
SuperBlade Network Modules User's Manual - Supermicro
404
SuperBlade ® Network Modules User’s Manual Revison 1.2 SBM-XEM-X10SM 10-Gbps Ethernet Switch SBM-IBP-D14 4x DDR InfiniBand Pass-Through Module SBM-XEM-002/M 10-Gbps Ethernet Pass-Through Module SBM-GEM-X2C+ 1/10-Gbps Ethernet Switch Module SBM-GEM-001 1-Gbps Ethernet Switch Module SBM-GEM-002 1-Gbps Ethernet Pass-Through Module SBM-IBS-Q3616/Q3616M/Q3618/F3616M 4x QDR InfiniBand Switch Module SBM-GEP-T20 1-Gbps Ethernet Pass-Through Module for TwinBlade™ SBM-GEM-X3S+ 1/10-Gbps Ethernet Switch Module SBM-IBS-001 4x DDR InfiniBand Switch Module SBM-XEM-F8X4SM 10-Gbps Ethernet Switch
-
Upload
khangminh22 -
Category
Documents
-
view
1 -
download
0
Transcript of SuperBlade Network Modules User's Manual - Supermicro

SuperBlade®
Network Modules
User’s ManualRevison 1.2
SBM-XEM-X10SM 10-Gbps Ethernet Switch
SBM-IBP-D14 4x DDR InfiniBand Pass-Through Module
SBM-XEM-002/M 10-Gbps Ethernet Pass-Through Module
SBM-GEM-X2C+ 1/10-Gbps Ethernet Switch Module
SBM-GEM-001 1-Gbps Ethernet Switch Module
SBM-GEM-002 1-Gbps Ethernet Pass-Through Module
SBM-IBS-Q3616/Q3616M/Q3618/F3616M 4x QDR InfiniBand Switch Module
SBM-GEP-T20 1-Gbps Ethernet Pass-Through Module for TwinBlade™
SBM-GEM-X3S+ 1/10-Gbps Ethernet Switch Module
SBM-IBS-001 4x DDR InfiniBand Switch Module
SBM-XEM-F8X4SM 10-Gbps Ethernet Switch

Superblade Network Modules User’s Manual
ii
The information in this User’s Manual has been carefully reviewed and is believed to be accurate. The vendor assumes no responsibility for any inaccuracies that may be contained in this document, makes no commitment to update or to keep current the information in this manual, or to notify any person or organization of the updates. Please Note: For the most up-to-date version of this manual, please see our web site at www.supermicro.com.
Super Micro Computer, Inc. ("Supermicro") reserves the right to make changes to the product described in this manual at any time and without notice. This product, including software and documentation, is the property of Supermicro and/or its licensors, and is supplied only under a license. Any use or reproduction of this product is not allowed, except as expressly permitted by the terms of said license.
IN NO EVENT WILL SUPERMICRO BE LIABLE FOR DIRECT, INDIRECT, SPECIAL, INCIDENTAL, SPECULATIVE OR CONSEQUENTIAL DAMAGES ARISING FROM THE USE OR INABILITY TO USE THIS PRODUCT OR DOCUMENTATION, EVEN IF ADVISED OF THE POSSIBILITY OF SUCH DAMAGES. IN PARTICULAR, SUPERMICRO SHALL NOT HAVE LIABILITY FOR ANY HARDWARE, SOFTWARE, OR DATA STORED OR USED WITH THE PRODUCT, INCLUDING THE COSTS OF REPAIRING, REPLACING, INTEGRATING, INSTALLING OR RECOVERING SUCH HARDWARE, SOFTWARE, OR DATA.
Any disputes arising between manufacturer and customer shall be governed by the laws of Santa Clara County in the State of California, USA.. The State of California, County of Santa Clara shall be the exclusive venue for the resolution of any such disputes. Super Micro's total liability for all claims will not exceed the price paid for the hardware product.
FCC Statement: This equipment has been tested and found to comply with the limits for a Class A digital device pursuant to Part 15 of the FCC Rules. These limits are designed to provide reasonable protection against harmful interference when the equipment is operated in a commercial environment. This equipment generates, uses, and can radiate radio frequency energy and, if not installed and used in accordance with the manufacturer’s instruction manual, may cause harmful interference with radio communications. Operation of this equipment in a residential area is likely to cause harmful interference, in which case you will be required to correct the interference at your own expense.
California Best Management Practices Regulations for Perchlorate Materials: This Perchlorate warning applies only to products containing CR (Manganese Dioxide) Lithium coin cells. Perchlorate Material-special handling may apply. See www.dtsc.ca.gov/hazardouswaste/perchlorate for further details.
Manual Revison 1.2
Release Date: February 17, 2015
Unless you request and receive written permission from Super Micro Computer, Inc., you may not copy any part of this document.
Information in this document is subject to change without notice. Other products and companies referred to herein are trademarks or registered trademarks of their respective companies or mark holders.
Copyright © 2014 by Super Micro Computer, Inc.All rights reserved.Printed in the United States of America
WARNING: HANDLING OF LEAD SOLDER MATERIALS USED IN THIS PRODUCT MAY EXPOSE YOU TO LEAD, A CHEMICAL KNOWN TO THE STATE OF CALIFORNIA TO CAUSE BIRTH DEFECTS AND OTHER REPRODUCTIVE HARM.

Preface
About this Manual
This manual is written for professional system integrators, Information Technology professionals, service personnel and technicians. It provides information for the installation and use of Supermicro's network modules. Installation and maintenance should be performed by experienced professionals only.
Manual Organization
Chapter 1: Introduction
The first chapter provides an overview of this manual.
Chapter 2: System Safety
You should familiarize yourself with this chapter for a general overview of safety precautions that should be followed when installing and servicing Superblade Network Modules.
Chapter 3: Setup and Installation
Refer here for details on installing the modules into a SuperBlade enclosure and for their
setup and configuration.
Chapter 4: InfiniBand Modules
This chapter details the InfiniBand modules and their features.
Chapter 5: Ethernet Modules
This chapter details all Ethernet switches and pass-through modules for the SuperBlade system.
Chapter 6: 1-Gb Ethernet Switch Firmware
This chapter details 1-Gb switch firmware menus and screens and how to use them.
Chapter 7: Layer 2/3 Ethernet Switch Firmware
This chapter details 1/10-Gb switch firmware menus and screens and how to use them.
Appendix A: HCA Mezzanine Cards
This appendix details the HCA mezzanine cards that can be installed in blade modules for use with the InfiniBand or 1/10-Gb switch modules.
Appendix B: LED Descriptions
LED descriptions are summarized here in this appendix for quick reference.
Appendix C: Installing Triple Wide Bays
This appendix describes and details how to use and set up triple-wide bays.
iii

Superblade Network Modules User’s Manual
Notes
iv

Table of Contents
Table of Contents
Chapter 1 Introduction....................................................................... 1-1
1-1 Overview............................................................................................. 1-1
1-2 Product Checklist of Typical Components..................................... 1-1
1-3 Features..............................................................................................1-1
1-4 Contacting Supermicro..................................................................... 1-2
Chapter 2 Standardized Warning Statements.....................2-1
2-1 About Standardized Warning Statements......................................2-1
Warning Definition...................................................................................2-1Installation Instructions ........................................................................... 2-3Circuit Breaker ........................................................................................ 2-4Power Disconnection Warning ................................................................ 2-5Equipment Installation............................................................................. 2-6Restricted Area ....................................................................................... 2-7Battery Handling ..................................................................................... 2-9Redundant Power Supplies ..................................................................2-10Backplane Voltage ................................................................................2-11Comply with Local and National Electrical Codes.................................2-12Product Disposal...................................................................................2-13Hot Swap Fan Warning .........................................................................2-14Power Cable and AC Adapter ..............................................................2-15
Chapter 3 Setup and Installation................................................. 3-1
3-1 Installing/Removing a Switch Module ............................................ 3-1
Installing a Switch Module ...................................................................... 3-1Removing a Switch Module .................................................................... 3-3
3-2 Configuring the Switch Module ....................................................... 3-4
Web-based Management Utility/IPMI ..................................................... 3-5Network Connection............................................................................. 3-5Address Defaults.................................................................................. 3-7
Command Line........................................................................................ 3-8
3-3 Locating and Identifying Switches and Switch Ports on a Blade Enclosure .............................................................................. 3-9
Locating and Identifying a Switch on a Blade Enclosure ........................3-9Locating and Identifying a Switch Port on a Blade Enclosure................. 3-9
v

Superblade Network Modules User’s Manual
3-4 Firmware for the 1/10 Gigabit and 10-Gigabit Ethernet Switch Modules ......................................................................................3-13
Firmware Upgrading Procedures ..........................................................3-13Firmware Failure Recovery Steps.........................................................3-16
Chapter 4 InfiniBand Modules ...................................................... 4-1
4-1 Overview............................................................................................. 4-1
4-2 SBM-IBS-001 4X DDR InfiniBand Switch Module ....................... 4-2
4-3 SBM-IBS-Q3618/Q3616 4X QDR InfiniBand Switch Modules ..................................................................................................... 4-3
4-4 SBM-IBS-Q3618M/SBM-IBS-Q3616M 4X QDR InfiniBand Switch Modules ........................................................................................ 4-4
4-5 SBM-IBS-F3616M 4X FDR InfiniBand Switch Module................ 4-6
4-6 SBM-IBP-D14 InfiniBand Pass-Through Module ......................... 4-8
4-7 Installation and Configuration of InfiniBand Switch Modules ..... 4-8
Installing/Removing the InfiniBand Switch Module ................................. 4-8Installing/Removing the InfiniBand Pass-Through Module .....................4-9InfiniBand Switch LEDs.........................................................................4-10Blade Software for Access to InfiniBand Switch Module ......................4-10
Chapter 5 Ethernet Modules .......................................................... 5-1
5-1 SBM-GEM-001 Gigabit Ethernet Switch Module ......................... 5-1
LED Indicators ........................................................................................ 5-2Ports........................................................................................................ 5-2
5-2 SBM-GEM-X2C(+) 1/10-Gb Ethernet Switch Module ................. 5-3
LED Indicators ........................................................................................ 5-4Ports........................................................................................................ 5-4
5-3 SBM-GEM-X3S+ 1/10-Gb Ethernet Switch Module .................... 5-5
LED Indicators ........................................................................................ 5-6Ports........................................................................................................ 5-6
5-4 SBM-GEM-002 1-Gb Ethernet Pass-through Module ................. 5-7
5-5 SBM-XEM-002/M 10-Gb Ethernet Pass-through Module........... 5-8
5-6 SBM-GEP-T20 1-Gb Ethernet Pass-through Module for Twin-Blade Modules ..............................................................................5-10
5-7 SBM-XEM-X10SM 10-Gb Ethernet Switch Module...................5-12
LED Indicators ......................................................................................5-13Ports......................................................................................................5-13
vi
:
5-8 SBM-XEM-F8X4SM Converged Networking Switch Module ........................................................................................5-14
LED Indicators ......................................................................................5-16Ports......................................................................................................5-16
Chapter 6 1-Gb Ethernet Switch Firmware ........................... 6-1
6-1 SBM-GEM-001 Firmware Features and Functions .....................6-1
6-1 Port Status.......................................................................................... 6-4
Port VLAN ID (PVID)............................................................................... 6-5Jumbo Frames Support .......................................................................... 6-5Port Configuration ...................................................................................6-5
6-2 Statistics..............................................................................................6-7
Port Statistics .......................................................................................... 6-7
6-3 VLAN.................................................................................................6-10
6-4 Configuring a Static VLAN .............................................................6-12
6-5 Trunking ............................................................................................6-13
6-6 Mirroring............................................................................................6-15
6-7 Quality of Service ............................................................................6-16
Priority Queues .....................................................................................6-16
6-8 Rate Control .....................................................................................6-18
6-9 L2 Management...............................................................................6-19
6-10 Spanning Tree ...............................................................................6-21
Bridge Protocol Data Unit (BPDU) ........................................................6-21Port Transition State..............................................................................6-22
RSTP Port Roles................................................................................6-22Root Status.........................................................................................6-24Bridge Setting.....................................................................................6-24RSTP Port Settings ............................................................................6-25
6-11 IEEE 802.1x ...................................................................................6-26
Wiring for 802.1x...................................................................................6-26802.1x Configuration.............................................................................6-27
6-12 IGMP Snooping.............................................................................6-28
6-13 SNMP..............................................................................................6-30
6-14 UpLink Failure Tracking (ULFT) .................................................6-31
Chapter 7 Layer 2/3 Ethernet Switch Firmware.................. 7-1
7-1 Overview............................................................................................. 7-1
Nomenclature.......................................................................................... 7-2
vii

Superblade Network Modules User’s Manual
7-2 Login.................................................................................................... 7-3
7-3 Home Page ........................................................................................ 7-3
Top Page Links ....................................................................................... 7-7Top LED Display ..................................................................................... 7-7Left Side Tree.......................................................................................... 7-7Middle Configuration Link Table.............................................................. 7-8
7-4 System Management Page ............................................................. 7-8
System Settings ....................................................................................7-10System Settings .................................................................................7-10System Version ..................................................................................7-12
File Management ..................................................................................7-13Save Configuration.............................................................................7-13File Copy ............................................................................................7-14File Management ...............................................................................7-14
Firmware Upgrade ................................................................................7-15Management Security ...........................................................................7-16
Management Security Basic Settings ................................................7-16Management User Account................................................................7-17Radius ................................................................................................7-18TACACS+ Global Settings .................................................................7-19TACACS+ Server Configuration.........................................................7-20IP Authorized Manager ......................................................................7-21SSH Configuration .............................................................................7-22SSL Configuration ..............................................................................7-23
Syslog ...................................................................................................7-25Syslog Configuration ..........................................................................7-25Syslog Mail Configuration ..................................................................7-26
ACL .......................................................................................................7-27MAC Based ACL................................................................................7-27IP Standard ACL ................................................................................7-28IP Extended ACL................................................................................7-29
WEBGUI Settings .................................................................................7-31SNMP....................................................................................................7-32
SNMP Community Settings................................................................7-33SNMP Group Settings........................................................................7-34SNMP Group Access Settings ...........................................................7-35SNMP View Tree Settings..................................................................7-36SNMP Target Address Settings..........................................................7-37SNMP Target Parameter Settings ......................................................7-38SNMP User Settings ..........................................................................7-39
viii

:
SNMP Trap Settings ..........................................................................7-40SNMP AgentX....................................................................................7-41
RMON ...................................................................................................7-43RMON Basic Settings ........................................................................7-43Event Configuration............................................................................7-44RMON Alarm Configuration ...............................................................7-45Ethernet Statistics Configuration ........................................................7-46History Control Configuration .............................................................7-47
QoS.......................................................................................................7-48QOS Basic Settings ...........................................................................7-48QOS Classmap Settings ....................................................................7-49QOS Policymap Settings....................................................................7-50COSQ Scheduling Algorithm..............................................................7-51COSQ Weight and Bandwidth Configuration .....................................7-52
NTP Settings.........................................................................................7-53Stack .....................................................................................................7-54CX4 Cable Length.................................................................................7-55Enabling Stacking .................................................................................7-56
Stack Configuration ............................................................................7-59Stack Details ......................................................................................7-60Stack Link Status................................................................................7-61Stack Counters...................................................................................7-62
Reload...................................................................................................7-63
7-5 Layer 2 Management......................................................................7-64
Layer 2 Basic Settings ..........................................................................7-65Port Manager ........................................................................................7-66
Port Basic Settings.............................................................................7-66Port Monitoring...................................................................................7-68VLAN Traffic Class .............................................................................7-69Port Control ........................................................................................7-70Rate Limiting ......................................................................................7-71
VLAN.....................................................................................................7-72VLAN Basic Settings ..........................................................................7-72Port Settings.......................................................................................7-73Static VLAN........................................................................................7-74Protocol Group...................................................................................7-75Port Protocol ......................................................................................7-75Vlan Port MAC Map ...........................................................................7-76Unicast MAC ......................................................................................7-77Wildcard .............................................................................................7-78
ix

Superblade Network Modules User’s Manual
Switch Port VLAN...............................................................................7-79Dynamic Vlan........................................................................................7-80
Dynamic VLAN Global Configuration .................................................7-80Port Configuration ..............................................................................7-81GARP Timers .....................................................................................7-82
RSTP ....................................................................................................7-83RSTP Global Settings ........................................................................7-83RSTP Basic Settings..........................................................................7-84Port Settings.......................................................................................7-85Port Status..........................................................................................7-86
MSTP ....................................................................................................7-87MSTP Basic Settings .........................................................................7-87MSTP Timers .....................................................................................7-89Port Configuration ..............................................................................7-90VLAN Mapping...................................................................................7-91Port Settings.......................................................................................7-92CIST Port Status ................................................................................7-93
LA (Link Aggregation) ...........................................................................7-95LA Basic Settings ...............................................................................7-95Interface Settings ...............................................................................7-96Port Channel ......................................................................................7-97Port Settings.......................................................................................7-98Port State Info ....................................................................................7-99Load Balancing ................................................................................7-100
802.1x .................................................................................................7-101Basic Settings ..................................................................................7-101Port Settings.....................................................................................7-102Timers ..............................................................................................7-104Local AS...........................................................................................7-105MAC Session Info ............................................................................7-106
Filters ..................................................................................................7-107Unicast Filters ..................................................................................7-107Multicast Filters ................................................................................7-108
7-6 Layer 3 Management....................................................................7-109
IP.........................................................................................................7-110Vlan Interface...................................................................................7-110IP V4 Interface Settings ...................................................................7-111IP Route ...........................................................................................7-112LoopBack Basic Settings .................................................................7-113
IP V6 ...................................................................................................7-114
x
:
IPv6 Route Configuration .................................................................7-114IPv6 Interface...................................................................................7-115ND Cache.........................................................................................7-116Address Settings ..............................................................................7-117Address Profile.................................................................................7-118Prefix Settings ..................................................................................7-119
DHCP Server ......................................................................................7-120DHCP Basic Settings .......................................................................7-120Pool Settings ....................................................................................7-121
DHCP Relay........................................................................................7-122DHCP Relay Basic Settings .............................................................7-122Interface Settings .............................................................................7-123
RIP ......................................................................................................7-124RIP Basic Settings ...........................................................................7-124Interfaces .........................................................................................7-125Neighbors List ..................................................................................7-126Security Settings ..............................................................................7-127Address Summarization ...................................................................7-128
RIPng ..................................................................................................7-129RIP6 Interface ..................................................................................7-129Filters ...............................................................................................7-130
OSPF ..................................................................................................7-132OSPF Basic Settings........................................................................7-132Area..................................................................................................7-133Interface ...........................................................................................7-134Virtual Interface ................................................................................7-135OSPF Neighbor................................................................................7-136OSPF RRD Route Configuration......................................................7-137OSPF Area Aggregation ..................................................................7-138External Aggregation........................................................................7-139
OSPF V3.............................................................................................7-141OSPFv3 Basic Settings....................................................................7-141Interface ...........................................................................................7-142Area..................................................................................................7-144OSPF V3 External Aggregation .......................................................7-145
BGP ....................................................................................................7-147BGP Basic Settings..........................................................................7-147BGP Peer Configuration...................................................................7-148BGP MED Configuration ..................................................................7-149Local Preference..............................................................................7-150
xi

Superblade Network Modules User’s Manual
BGP Filter.........................................................................................7-152Route Aggregations .........................................................................7-153Advanced BGP Configuration ..........................................................7-154BGP Community Management ........................................................7-155
RRD ....................................................................................................7-156RRD Basic Settings..........................................................................7-157BGP..................................................................................................7-158RIP ...................................................................................................7-159OSPF ...............................................................................................7-160
RRD6 ..................................................................................................7-161RRD6 Basic Settings........................................................................7-161Filters ...............................................................................................7-162RRD V6 OSPF .................................................................................7-163RRD RIP ..........................................................................................7-164
VRRP ..................................................................................................7-165VRRP Basic Settings .......................................................................7-165VRRP Settings .................................................................................7-166
7-7 Multicast..........................................................................................7-167
GMP Snooping....................................................................................7-167IGMP Snooping Configuration .........................................................7-168IGMP Snooping Timer......................................................................7-169IGMP Snooping Interface.................................................................7-170IGMP Snooping VLAN Router..........................................................7-171IGMP MAC Forwarding ....................................................................7-172
Dynamic Multicast...............................................................................7-173Global Configuration ........................................................................7-173Dynamic Multicast Port Configuration ..............................................7-174
IGMP...................................................................................................7-175Basic Settings ..................................................................................7-175Interface Configuration.....................................................................7-176Group Information ............................................................................7-177Source Information...........................................................................7-178
PIM......................................................................................................7-179Basic Settings ..................................................................................7-179Component.......................................................................................7-180Interfaces .........................................................................................7-181Candidate RPs.................................................................................7-182Threshold .........................................................................................7-183Static RP ..........................................................................................7-184
DVMRP ...............................................................................................7-185
xii

:
DVMRP Basic Settings ....................................................................7-185Interfaces .........................................................................................7-186
7-8 Statistics..........................................................................................7-187
Interface ..............................................................................................7-188Interface Statistics ............................................................................7-188Ethernet Statistics ............................................................................7-189
Radius.................................................................................................7-191TACACS+ Statistics ............................................................................7-193RMON Ethernet Statistics ...................................................................7-195SNMP Statistics ..................................................................................7-197
Agent................................................................................................7-197SNMP AgentX..................................................................................7-198
VLAN...................................................................................................7-199Current DB .......................................................................................7-200VLAN Port Statistics .........................................................................7-201VLAN Multicast Table .......................................................................7-202VLAN Counter Statistics...................................................................7-203VLAN Capabilities ............................................................................7-204VLAN FDB Entries ...........................................................................7-205
RSTP Statistics ...................................................................................7-206RSTP Information.............................................................................7-206RSTP Port Statistics.........................................................................7-207
MSTP Statistics...................................................................................7-209MSTP Information ............................................................................7-209MSTP CIST Statistics.......................................................................7-210MSTP MSTI Port Statistics...............................................................7-211
Link Aggregation (LA) .........................................................................7-212LA Port Statistics ..............................................................................7-213LA Neighbor Statistics ......................................................................7-214
802.1X.................................................................................................7-215802.1X Session Statistics.................................................................7-215802.1X Supplicant Statistics.............................................................7-216Mac Session Statistics .....................................................................7-217
IP.........................................................................................................7-219ARP Cache ......................................................................................7-219ICMP Statistics .................................................................................7-220
IPv6.....................................................................................................7-222IP V6 Interface Statistics ..................................................................7-222ICMP V6 Statistics............................................................................7-224
RIP Statistics.......................................................................................7-226
xiii

Superblade Network Modules User’s Manual
RIP6 ....................................................................................................7-227RIP6 Interface Statistics ...................................................................7-227RIP6 Route Information....................................................................7-228
OSPF ..................................................................................................7-230OSPF Route Information..................................................................7-230OSPF Link State DB.........................................................................7-231
OSPFv3 ..............................................................................................7-233OSPFV3 Route Information .............................................................7-233OSPFV3 Link State DB ....................................................................7-234
VRRP Statistics...................................................................................7-235IGMP Snooping...................................................................................7-237
IGMP Snooping Clear Statistics .......................................................7-237IGMP Snooping V1/V2 Statistics......................................................7-238IGMP Snooping V3 Statistics ...........................................................7-239
IGMP Statistics....................................................................................7-240PIM......................................................................................................7-242
PIM Interface Statistics.....................................................................7-242PIM Neighbor Statistics ....................................................................7-243PIM BSR Info ...................................................................................7-244PIM RP Set Information ...................................................................7-245PIM Route Information .....................................................................7-246
DVMRP ...............................................................................................7-247DVMRP Routers...............................................................................7-247DVMRP Multicast Routers ...............................................................7-248DVMRP Prune Statistics ..................................................................7-249
Appendix A HCA Mezzanine Cards ...........................................A-1
A-1 Safety Guidelines..............................................................................A-1
ESD Safety Guidelines ...........................................................................A-1General Safety Guidelines ......................................................................A-1
A-2 Mezzanine HCA Cards ....................................................................A-2
AOC-IBH-001 Mezzanine HCA Card ......................................................A-2AOC-IBH-002 Mezzanine HCA Card ......................................................A-3AOC-IBH-003 Mezzanine HCA Card ......................................................A-4AOC-IBH-XDS Mezzanine HCA Card.....................................................A-5AOC-IBH-XDD Mezzanine HCA Card ....................................................A-6AOC-IBH-XQS Mezzanine HCA Card ....................................................A-7AOC-IBH-XQD Mezzanine HCA Card ....................................................A-8AOC-XEH-iN2 Mezzanine HCA Card .....................................................A-9
A-3 Installation........................................................................................A-10
xiv

:
Installation Location ...........................................................................A-11Card Installation ....................................................................................A-11
Appendix B LED Descriptions ..................................................................................B-1
B-1 Gigabit Ethernet Module LED Descriptions..................................B-1
B-2 1/10 Gigabit Ethernet Module LED Descriptions.........................B-2
B-3 SBM-XEM-X10SM 10G and SBM-XEM-F8X4SM Ethernet Switch LED Descriptions.........................................................................B-3
B-4 SBM-IBS-001 InfiniBand Switch LED Descriptions.....................B-4
B-5 SBM-IBS-Q3616M and SBM-IBS-Q3618M InfiniBand Switch LED Descriptions .....................................................................................B-5
Appendix C Installing Triple Wide Bays ............................................................ C-1
C-1 Installing a Triple Wide Module Bay ............................................. C-1
xv

Superblade Network Modules User’s Manual
Notes
xvi

:
List of Figures
Figure 3-1. Blade Enclosure with 1-Gbps Switch Modules Installed................. 3-2Figure 3-2. Blade Enclosure with 1/10-Gbps Switch Modules Installed............ 3-3Figure 3-3. Configuring the Switch Module ....................................................... 3-4Figure 3-4. IPMI Login Screen .......................................................................... 3-5Figure 3-5. IPMI Blade System Screen............................................................. 3-6Figure 3-6. Gigabit Switch Panel....................................................................... 3-7Figure 3-7. Displayed Text for Rebooting .......................................................3-14Figure 3-8. Setting Hardware Information.......................................................3-15Figure 4-1. SBM-IBS-001 InfiniBand Switch Module ........................................ 4-2Figure 4-2. SBM-IBS-Q3618/Q3616 InfiniBand Switch Module........................4-3Figure 4-3. SBM-IBS-Q3616M InfiniBand Switch Module................................. 4-4Figure 4-4. SBM-IBS-F3616M InfiniBand Switch Module ................................. 4-6Figure 4-5. SBM-IBP-D14 InfiniBand Pass-Through Triple-Wide Module ........ 4-8Figure 5-1. SBM-GEM-001 Gigabit Ethernet Switch Module ............................ 5-1Figure 5-2. SBM-GEM-X2C(+) 1/10-Gigabit Ethernet Switch Module Ports & Indicators..............................................................................................5-3Figure 5-3. SBM-GEM-X3S+ 1/10-Gigabit Ethernet Switch Module Ports & Indicators..............................................................................................5-5Figure 5-4. SBM-GEM-002 Gigabit Pass-through Module................................ 5-7Figure 5-5. SBM-XEM-002/M 10-Gigabit Pass-through Module ....................... 5-9Figure 5-6. SBM-GEP-T20 Gigabit Pass-through Module ..............................5-10Figure 5-7. SBM-GEP-T20 Installed in Enclosure...........................................5-11Figure 5-8. SBM-XEM-X10SM 10 Gigabit Ethernet Switch Module Ports & Indicators............................................................................................5-12Figure 5-9. SBM-XEM-F8X4SM 10 Gigabit Ethernet Switch Module Ports & Indicators............................................................................................5-14Figure 6-1. Switch Status Screen...................................................................... 6-2Figure 6-2. Switch System Management Screen.............................................. 6-2Figure 6-3. Port Status Screen.......................................................................... 6-4Figure 6-4. Jumbo Frame Setting Screen......................................................... 6-5Figure 6-5. Port Configuration Screen .............................................................. 6-6Figure 6-6. Statistics Screen............................................................................. 6-7Figure 6-7. Port Statistics Screen ..................................................................... 6-8Figure 6-8. VLAN Screen................................................................................6-10Figure 6-9. Creating a New VLAN...................................................................6-12Figure 6-10. New VLAN Screen......................................................................6-13Figure 6-11. Trunking Screen .........................................................................6-14Figure 6-12. Port Mirroring Screen..................................................................6-15
xvii

Superblade Network Modules User’s Manual
Figure 6-13. QoS Setting Screen....................................................................6-17Figure 6-14. Rate Limit and Storm Control Screen.........................................6-18Figure 6-15. Storm Control Screen .................................................................6-19Figure 6-16. L2 Management Screen .............................................................6-20Figure 6-17. L2 Management: Current Entries Screen ...................................6-20Figure 6-18. Rapid Spanning Tree Screen .....................................................6-23Figure 6-19. Rapid Spanning Tree Port Settings ............................................6-25Figure 6-20. 802.1x Configuration Screen ......................................................6-27Figure 6-21. IGMP Snooping Screen..............................................................6-29Figure 6-22. Uplink Failure Tracking Configuration Screen ............................6-32Figure 7-1. Login Page...................................................................................... 7-3Figure 7-2. Home Page..................................................................................... 7-4Figure 7-3. SBM-GEM-X2C(+) Home Page...................................................... 7-5Figure 7-4. SBM-XEM-X10SM Home Page...................................................... 7-5Figure 7-5. SSE-G24-TG4 Home Page ............................................................ 7-6Figure 7-6. SSE-G48-TG4 Home Page ............................................................ 7-6Figure 7-7. System Management Page ............................................................ 7-8Figure 7-8. System Settings Page ..................................................................7-10Figure 7-9. System Version Page ...................................................................7-12Figure 7-10. File Management Page...............................................................7-13Figure 7-11. Firmware Upgrade Page.............................................................7-15Figure 7-12. Management Security Basic Settings Page................................7-16Figure 7-13. Management User Account Page...............................................7-17Figure 7-14. Radius Server Configuration Page .............................................7-18Figure 7-15. TACACS+ Global Settings Page ................................................7-19Figure 7-16. TACACS+ Server Configuration Page........................................7-20Figure 7-17. IP Authorized Manager Page......................................................7-21Figure 7-18. SSH Configuration ......................................................................7-22Figure 7-19. SSL Configuration Page .............................................................7-23Figure 7-20. Syslog Configuration Page .........................................................7-25Figure 7-21. Syslog Mail Configuration Page..................................................7-26Figure 7-22. MAC ACL Configuration Page....................................................7-27Figure 7-23. IP Standard ACL Configuration Page.........................................7-28Figure 7-24. IP Extended ACL Page...............................................................7-29Figure 7-25. Web GUI Settings Page..............................................................7-31Figure 7-26. SNMP Agent Control Settings Page...........................................7-32Figure 7-27. SNMP Community Settings Page...............................................7-33Figure 7-28. SNMP Group Settings Page.......................................................7-34Figure 7-29. SNMP Group Access Settings Page ..........................................7-35Figure 7-30. SNMP View Tree Settings Page.................................................7-36
xviii

:
Figure 7-31. SNMP Target Address Settings Page ........................................7-37Figure 7-32. SNMP Target Parameter Settings Page.....................................7-38Figure 7-33. SNMP Security Settings Page....................................................7-39Figure 7-34. SNMP Trap Settings Page..........................................................7-40Figure 7-35. SNMP AgentX Subagent Settings Page.....................................7-41Figure 7-36. RMON Basic Settings Page........................................................7-43Figure 7-37. Event Configuration Settings Page.............................................7-44Figure 7-38. RMON Alarm Configuration Page...............................................7-45Figure 7-39. Ethernet Statistics Configuration Page.......................................7-46Figure 7-40. History Control Configuration Page ............................................7-47Figure 7-41. QOS Basic Settings Page...........................................................7-48Figure 7-42. QOS Classmap Settings Page ...................................................7-49Figure 7-43. QOS Policymap Settings Page...................................................7-50Figure 7-44. COSQ Scheduling Algorithm Settings Page...............................7-51Figure 7-45. COSQ Weight and Bandwidth Configurations Page...................7-52Figure 7-46. NTP Settings Page .....................................................................7-53Figure 7-47. Configuring CX4 Cable Length ...................................................7-55Figure 7-48. Switch Diagram...........................................................................7-57Figure 7-49. Stack Configuration Page...........................................................7-59Figure 7-50. Stack Details Page .....................................................................7-60Figure 7-51. Stack Link Status Page...............................................................7-61Figure 7-52. Stack Counter Details Page........................................................7-62Figure 7-53. System Settings Page – Reload.................................................7-63Figure 7-54. Layer2 Management Page .........................................................7-64Figure 7-55. MAC Address Table Settings Page ............................................7-65Figure 7-56. Port Basic Settings Page............................................................7-66Figure 7-57. Port Monitoring Page..................................................................7-68Figure 7-58. VLAN Traffic Class Mapping Page .............................................7-69Figure 7-59. Port Control Page .......................................................................7-70Figure 7-60. Rate Limiting Page .....................................................................7-71Figure 7-61. VLAN Basic Settings Page .........................................................7-72Figure 7-62. VLAN Port Settings Page ...........................................................7-73Figure 7-63. Static VLAN Configuration Page.................................................7-74Figure 7-64. VLAN Protocol Group Settings Page..........................................7-75Figure 7-65. VLAN Port MAC Map Settings Page ..........................................7-76Figure 7-66. VLAN Unicast MAC Settings Page.............................................7-77Figure 7-67. Wildcard Settings Page ..............................................................7-78Figure 7-68. Switch Port Vlan Filtering Page ..................................................7-79Figure 7-69. Dynamic VLAN Global Configuration Page ................................7-80Figure 7-70. Dynamic VLAN Port Configuration Page....................................7-81
xix

Superblade Network Modules User’s Manual
Figure 7-71. Garp Timers Configuration Page................................................7-82Figure 7-72. Global Configuration Page..........................................................7-83Figure 7-73. RSTP Configuration Page ..........................................................7-84Figure 7-74. Port Status Configuration Page ..................................................7-85Figure 7-75. RSTP Port Status Page..............................................................7-86Figure 7-76. Global Configuration Page..........................................................7-87Figure 7-77. Timers Configuration Page.........................................................7-89Figure 7-78. CIST Settings Page ....................................................................7-90Figure 7-79. VLAN Mapping Page ..................................................................7-91Figure 7-80. Port Settings Page......................................................................7-92Figure 7-81. MSTP CIST Port Status Page ....................................................7-93Figure 7-82. LA Basic Settings Page ..............................................................7-95Figure 7-83. Port Channel Interface Basic Settings Page...............................7-96Figure 7-84. LA Port Channel Settings Page..................................................7-97Figure 7-85. LA Port Settings Page ................................................................7-98Figure 7-86. LA Port State Machine Information Page ...................................7-99Figure 7-87. LA Load Balancing Policy Page................................................7-100Figure 7-88. 802.1x Basic Settings Page......................................................7-101Figure 7-89. 802.1x Port Settings Page........................................................7-102Figure 7-90. 802.1x Timer Configuration Page.............................................7-104Figure 7-91. Local Authentication Server Configuration Page......................7-105Figure 7-92. MAC Session Info Page............................................................7-106Figure 7-93. L2 Unicast Filter Configuration Page........................................7-107Figure 7-94. L2 Multicast Filter Configuration Page......................................7-108Figure 7-95. Layer3 Management Page .......................................................7-109Figure 7-96. VLAN Interface Basic Settings Page ........................................7-110Figure 7-97. IPv4 Interface Settings Page ....................................................7-111Figure 7-98. IP Route Configuration Page....................................................7-112Figure 7-99. LoopBack Basic Settings Page.................................................7-113Figure 7-100. IP6 Route Configuration Page................................................7-114Figure 7-101. IPv6 Interface Settings Page ..................................................7-115Figure 7-102. ND Cache Configuration Page ...............................................7-116Figure 7-103. Address Settings Page ...........................................................7-117Figure 7-104. Address Profile Settings Page................................................7-118Figure 7-105. Prefix Configuration Page.......................................................7-119Figure 7-106. DHCP Basic Settings Page ....................................................7-120Figure 7-107. DHCP Pool Settings Page......................................................7-121Figure 7-108. DHCP Relay Configuration Page............................................7-122Figure 7-109. DHCP Relay Interface Configuration Page.............................7-123Figure 7-110. RIP Basic Settings Page.........................................................7-124
xx

:
Figure 7-111. RIP Interface Page .................................................................7-125Figure 7-112. RIP Neighbor List Page ..........................................................7-126Figure 7-113. RIP Security Settings Page ....................................................7-127Figure 7-114. RIP Interface Specific Address Summarization Page.............7-128Figure 7-115. RIP6 Interface Configuration Page.........................................7-129Figure 7-116. RIP6 Filter Configuration Page...............................................7-130Figure 7-117. OSPF Basic Settings Page.....................................................7-132Figure 7-118. OSPF Area Configuration Page..............................................7-133Figure 7-119. OSPF Interface Configuration Page .......................................7-134Figure 7-120. OSPF Virtual Interface Configuration Page............................7-135Figure 7-121. OSPF Neighbor Configuration Page.......................................7-136Figure 7-122. OSPF RRD Route Configuration Page...................................7-137Figure 7-123. OSPF Area Aggregation Page................................................7-138Figure 7-124. OSPF As External Aggregation Configuration Page ..............7-139Figure 7-125. OSPFv3 Basic Settings Page.................................................7-141Figure 7-126. Interface Settings Page ..........................................................7-142Figure 7-127. OSPFv3 Area Settings Page ..................................................7-144Figure 7-128. OSPF AS External Aggregation Configuration Page..............7-145Figure 7-129. BGP Basic Settings Page.......................................................7-147Figure 7-130. BGP Peer Configuration Page................................................7-148Figure 7-131. BGP MED Configuration Page ...............................................7-149Figure 7-132. BGP Local Preference Configuration Page ............................7-150Figure 7-133. BGP Filter Configuration Page ...............................................7-152Figure 7-134. BGP Route Aggregation Configuration Page .........................7-153Figure 7-135. Advanced BGP Configuration Page .......................................7-154Figure 7-136. BGP Community Management Page......................................7-155Figure 7-137. RRD Basic Settings Page.......................................................7-157Figure 7-138. RRD BGP Configuration Page................................................7-158Figure 7-139. RRD RIP Configuration Page .................................................7-159Figure 7-140. RRD OSPF Configuration Page .............................................7-160Figure 7-141. RRD6 Basic Settings Page.....................................................7-161Figure 7-142. RRD6 Filter Configuration Page .............................................7-162Figure 7-143. RRD6 OSPFv3 Configuration Page........................................7-163Figure 7-144. RRD RIPv6 Configuration Page .............................................7-164Figure 7-145. VRRP Basic Settings Page.....................................................7-165Figure 7-146. VRRP Settings Page ..............................................................7-166Figure 7-147. Multicast Home Page..............................................................7-167Figure 7-148. IGMP Snooping Configuration Page.......................................7-168Figure 7-149. IGMP Snooping Timer Configuration Page ............................7-169Figure 7-150. IGMP Snooping Interface Configuration Page........................7-170
xxi

Superblade Network Modules User’s Manual
Figure 7-151. IGMP Snooping VLAN Router Ports Page .............................7-171Figure 7-152. MAC Based Multicast Forwarding Table Page.......................7-172Figure 7-153. Dynamic Multicast Global Configuration Page .......................7-173Figure 7-154. Dynamic Multicast Port Configuration Page ...........................7-174Figure 7-155. IGMP Configuration Page.......................................................7-175Figure 7-156. IGMP Interface Configuration Page........................................7-176Figure 7-157. IGMP Group Configuration Page............................................7-177Figure 7-158. IGMP Source Information Page..............................................7-178Figure 7-159. PIM Basic Settings Page ........................................................7-179Figure 7-160. PIM Component Configuration Page......................................7-180Figure 7-161. PIM Interface Configuration Page...........................................7-181Figure 7-162. Candidate RP Configuration Page..........................................7-182Figure 7-163. PIM Threshold Configuration Page.........................................7-183Figure 7-164. Static RP Configuration Page.................................................7-184Figure 7-165. DVMRP Basic Settings Page..................................................7-185Figure 7-166. DVMRP Interface Settings Page ............................................7-186Figure 7-167. Statistics Home Page .............................................................7-187Figure 7-168. Interface Statistics Page.........................................................7-188Figure 7-169. Ethernet Statistics Page .........................................................7-189Figure 7-170. Radius Server Statistics Page ................................................7-191Figure 7-171. TACACS+ Statistics Page ......................................................7-193Figure 7-172. RMON Ethernet Statistics Page .............................................7-195Figure 7-173. SNMP Statistics Page.............................................................7-197Figure 7-174. VLAN Current Database Page................................................7-200Figure 7-175. VLAN Port Statistics Page......................................................7-201Figure 7-176. VLAN Multicast Table Page....................................................7-202Figure 7-177. VLAN Counter Statistics Page................................................7-203Figure 7-178. VLAN Capabilities Page .........................................................7-204Figure 7-179. VLAN FDB Entries Page.........................................................7-205Figure 7-180. RSTP Information Page..........................................................7-206Figure 7-181. RSTP Port Statistics Page......................................................7-207Figure 7-182. MSTP Information Page .........................................................7-209Figure 7-183. MSTP CIST Port Statistics Page ............................................7-210Figure 7-184. MSTP MSTI Port Statistics Page............................................7-211Figure 7-185. LA Port Statistics Page...........................................................7-213Figure 7-186. LA Neighbor Statistics Information Page................................7-214Figure 7-187. 802.1x Session Statistics Page ..............................................7-215Figure 7-188. 802.1x Supplicant Session Statistics Page.............................7-216Figure 7-189. MAC Session Statistics Page .................................................7-217Figure 7-190. ARP Cache Page....................................................................7-219
xxii

:
Figure 7-191. ICMP Statistics Page..............................................................7-220Figure 7-192. IPV6 Interface Statistics Page ................................................7-222Figure 7-193. ICMPv6 Statistics Page ..........................................................7-224Figure 7-194. RIP Interface Statistics Page..................................................7-226Figure 7-195. RIP6 Interface Statistics Page................................................7-227Figure 7-196. RIP6 Route Information Page.................................................7-228Figure 7-197. OSPF Route Information Page...............................................7-230Figure 7-198. OSPF Link State Database Page ...........................................7-231Figure 7-199. OSPFV3 Route Information Page...........................................7-233Figure 7-200. OSPFV3 Link State Database Page.......................................7-234Figure 7-201. VRRP Statistics Page.............................................................7-235Figure 7-202. IGMP Snooping Clear Statistics Page....................................7-237Figure 7-203. IGMP Snooping V1/V2 Statistics Page...................................7-238Figure 7-204. IGMP Snooping V3 Statistics Page ........................................7-239Figure 7-205. IGMP Route Statistics Page ...................................................7-240Figure 7-206. PIM Interface Statistics Page..................................................7-242Figure 7-207. PIM Neighbor Statistics Page.................................................7-243Figure 7-208. PIM BSR Info Page.................................................................7-244Figure 7-209. PIM RP Information Page.......................................................7-245Figure 7-210. PIM Route Information Page ..................................................7-246Figure 7-211. DVMRP Routes Page.............................................................7-247Figure 7-212. DVMRP Multicast Routes Page..............................................7-248Figure 7-213. DVMRP Prune Statistics Page ...............................................7-249Figure A-1. AOC-IBH-001 Mezzanine HCA Card .............................................A-2Figure A-2. AOC-IBH-002 Mezzanine HCA Card .............................................A-3Figure A-3. AOC-IBH-003 Mezzanine HCA Card .............................................A-4Figure A-4. AOC-IBH-XDS Mezzanine HCA Card ............................................A-5Figure A-5. AOC-IBH-XDD Mezzanine HCA Card............................................A-6Figure A-6. AOC-IBH-XQS Mezzanine HCA Card............................................A-7Figure A-7. AOC-IBH-XQD Mezzanine HCA Card............................................A-8Figure A-8. AOC-XEH-iN2 Mezzanine HCA Card.............................................A-9Figure A-9. Installation Location......................................................................A-10Figure A-10. Card Installation .........................................................................A-12Figure A-11. Installation Complete..................................................................A-12Figure C-1. Step 1 & 2 ..................................................................................... C-1Figure C-2. Step 3 & 4 ..................................................................................... C-2Figure C-3. Step 5............................................................................................ C-3Figure C-4. Step 6............................................................................................ C-4
xxiii

Superblade Network Modules User’s Manual
Notes
xxiv

:
List of Tables
Table 3-1. SBM-GEM-001 Switch Module Address Default Settings................ 3-7Table 3-2. Locating and Identifying a Switch ....................................................3-9Table 3-3. SBE-710 Enclosures with SBM-GEM-001/002 or SBM-GEM-X2C+/X3S+...............................................................................3-10Table 3-4. SBE-710 Enclosures with SBM-XEM-X10SM................................3-10Table 3-5. SBE-720 Enclosures with SBM-GEM-X2C+/X3S+........................3-10Table 3-6. SBE-720 Enclosures with SBM-XEM-X10SM................................3-11Table 3-7. SBE-714 Enclosures with SBM-GEM-001/002 or SBM-GEM-X2C+/X3S+...............................................................................3-12Table 4-1. SBM-IBS-001 InfiniBand Module Interface ......................................4-2Table 4-2. SBM-IBS-001 InfiniBand Module Features ......................................4-2Table 4-3. SBM-IBS-Q3618/Q3616 InfiniBand Module Interface...................... 4-3Table 4-4. SBM-IBS-Q3618/Q3616 InfiniBand Module Features .....................4-3Table 4-5. SBM-IBS-Q3618M/SBM-IBS-Q3616M InfiniBand Module Interface ............................................................................................................4-4Table 4-6. SBM-IBS-Q3618M/SBM-IBS-Q3616M InfiniBand Module Features............................................................................................................4-5Table 4-7. SBM-IBS-F3616M InfiniBand Module Interface............................... 4-6Table 4-8. SBM-IBS-F3616M InfiniBand Module Features............................... 4-7Table 5-1. SBM-GEM-001 Gigabit Ethernet Switch Module Interface .............. 5-1Table 5-2. GEM-001 Gigabit Ethernet Switch Module Features ....................... 5-2Table 5-3. SBM-GEM-001 Gigabit Ethernet Switch Module Ports.................... 5-2Table 5-4. SBM-GEM-X2C(+) 1/10-Gigabit Ethernet Switch Module Interface ............................................................................................................5-3Table 5-5. SBM-GEM-X2C(+) 1/10-Gigabit Ethernet Switch Module Features............................................................................................................5-4Table 5-6. SBM-GEM-X2C(+) Ports..................................................................5-4Table 5-7. SBM-GEM-X3S+ 1/10-Gigabit Ethernet Switch Module Interface ............................................................................................................5-5Table 5-8. SBM-GEM-X3S+ 1/10-Gigabit Ethernet Switch Module Features............................................................................................................5-6Table 5-9. SBM-GEM-X3S+ Ports .................................................................... 5-6Table 5-10. SBM-GEM-002 Gigabit Pass-through Module Interface ................ 5-7Table 5-11. SBM-GEM-002 Gigabit Ethernet Pass-through Module Features............................................................................................................5-8Table 5-12. SBM-XEM-002/M 10-Gigabit Pass-through Module Interface .......5-9Table 5-13. SBM-XEM-002/M 10-Gigabit Pass-through Module Features .......5-9Table 5-14. SBM-GEP-T20 Gigabit Pass-through Module Interface ..............5-10
xxv

Superblade Network Modules User’s Manual
Table 5-15. SBM-GEP-T20 Gigabit Ethernet Pass-through Module Features..........................................................................................................5-11Table 5-16. SBM-XEM-X10SM 10 Gigabit Ethernet Switch Module Interface ..........................................................................................................5-12Table 5-17. SBM-XEM-X10SM 10 Gigabit Ethernet Switch Module Features..........................................................................................................5-13Table 5-18. SBM-XEM-X10SM Ports..............................................................5-13Table 5-19. SBM-XEM-F8X4SM 10 Gigabit Ethernet Switch Module Interface ..........................................................................................................5-15Table 5-20. SBM-XEM-F8X4SM 10 Gigabit Ethernet Switch Module Features..........................................................................................................5-15Table 5-21. SBM-XEM-F8X4SM Ports............................................................5-16Table 6-1. SBM-GEM-001 Software Features and Functions........................... 6-1Table 6-2. Port Configuration Screen Controls ................................................. 6-6Table 6-3. Port Statistics Screen Controls ........................................................ 6-8Table 6-4. Port Mirroring Screen Controls ......................................................6-15Table 6-5. QoS Setting Screen Controls.........................................................6-17Table 6-6. Storm Control Screen Controls ......................................................6-19Table 6-7. Comparison of Port States.............................................................6-22Table 6-8. IGMP Snooping Screen Controls...................................................6-30Table 6-9. Uplink Failure Tracking Configuration Screen Controls .................6-32Table 7-1. Home Page Controls and Components ........................................... 7-4Table 7-2. System Information Page Parameters ...........................................7-10Table 7-3. Management Security Basic Settings Page Parameters ...............7-17Table 7-4. Radius Server Configuration Page Parameters.............................7-18Table 7-5. TACACS+ Global Settings Page Parameters................................7-19Table 7-6. TACACS+ Server Configuration Page Parameters .......................7-20Table 7-7. IP Authorized Manager Page Parameters .....................................7-21Table 7-8. SSH Configuration Page Parameters ............................................7-22Table 7-9. Syslog Configuration Page Parameters.........................................7-25Table 7-10. Syslog Mail Configuration Page Parameters ...............................7-26Table 7-11. MAC ACL Configuration Page Parameters..................................7-27Table 7-12. IP Standard ACL Configuration Page Parameters.......................7-29Table 7-13. IP Extended ACL Configuration Page Parameters ......................7-30Table 7-14. Web GUI Settings Page Parameters ...........................................7-31Table 7-15. SNMP Agent Configuration Pages...............................................7-32Table 7-16. SNMP Community Settings Page Parameters ............................7-33Table 7-17. SNMP Group Settings Page Parameters.....................................7-34Table 7-18. SNMP Group Access Settings Page Parameters ........................7-35Table 7-19. SNMP View Tree Settings Page Parameters ..............................7-37Table 7-20. SNMP Target Address Settings Page Parameters ......................7-37
xxvi

:
Table 7-21. SNMP Target Parameter Settings Page Parameters ..................7-39Table 7-22. SNMP Security Settings Page Parameters..................................7-40Table 7-23. SNMP Trap Settings Page Parameters .......................................7-41Table 7-24. SNMP AgentX Subagent Settings Page Parameters ..................7-41Table 7-25. Event Configuration Page Parameters ........................................7-44Table 7-26. RMON Alarm Configuration Page Parameters ............................7-45Table 7-27. Ethernet Statistics Configuration Page Parameters.....................7-46Table 7-28. History Control Configuration Page Parameters..........................7-47Table 7-29. QOS Basic Settings Page Parameters ........................................7-49Table 7-30. QOS Classmap Settings Page Parameters .................................7-49Table 7-31. QOS Policymap Settings Page Parameters ................................7-50Table 7-32. COSQ Scheduling Algorithm Settings Page Parameters ............7-51Table 7-33. COSQ Weight and Bandwidth Configurations Page Parameters......................................................................................................7-52Table 7-34. NTP Settings Page Parameters...................................................7-53Table 7-35. Stack Configuration Page Parameters.........................................7-59Table 7-36. Stack Details Page Parameters ...................................................7-60Table 7-37. Stack Counter Details Page Parameters .....................................7-62Table 7-38. Port Basic Settings Page Parameters..........................................7-67Table 7-39. Port Monitoring Page Parameters................................................7-68Table 7-40. VLAN Traffic Class Mapping Page Parameters...........................7-69Table 7-41. Port Control Page Parameters.....................................................7-70Table 7-42. Rate Limiting Page Parameters ...................................................7-71Table 7-43. VLAN Basic Settings Page Parameters.......................................7-73Table 7-44. VLAN Port MAC Map Page Parameters ......................................7-76Table 7-45. VLAN Unicast Mac Settings Page Parameters............................7-77Table 7-46. Wildcard Settings Page Parameters ............................................7-78Table 7-47. SwitchPort Vlan Filtering Page Parameters.................................7-79Table 7-48. Dynamic VLAN Port Configuration Page Parameters..................7-81Table 7-49. Garp Timers Configuration Page Parameters..............................7-82Table 7-50. Global Configuration Page Parameters .......................................7-83Table 7-51. RSTP Configuration Page Parameters ........................................7-84Table 7-52. Port Status Configuration Page Parameters................................7-85Table 7-53. RSTP Port Status Page Parameters............................................7-86Table 7-54. Global Configuration Page Parameters .......................................7-88Table 7-55. CIST Settings Page Parameters..................................................7-90Table 7-56. VLAN Mapping Page Parameters................................................7-91Table 7-57. Port Settings Page Parameters ...................................................7-92Table 7-58. MSTP CIST Port Status Page Parameters ..................................7-93Table 7-59. LA Basic Settings Page Parameters............................................7-95
xxvii

Superblade Network Modules User’s Manual
Table 7-60. Port Channel Interface Basic Settings Page Parameters ............7-96Table 7-61. LA Port Channel Settings Page Parameters................................7-97Table 7-62. LA Port Settings Page Parameters ..............................................7-98Table 7-63. 802.1x Basic Settings Page Parameters ...................................7-101Table 7-64. 802.1x Port Settings Page Parameters......................................7-103Table 7-65. 802.1x Timer Configuration Page Parameters...........................7-104Table 7-66. Local Authentication Server Configuration Page Parameters....................................................................................................7-105Table 7-67. MAC Session Info Page Parameters .........................................7-106Table 7-68. L2 Unicast Filter Configuration Page Parameters......................7-107Table 7-69. L2 Multicast Filter Configuration Page Parameters ...................7-109Table 7-70. VLAN Interface Basic Settings Page Parameters......................7-110Table 7-71. IPv4 Interface Settings Page Parameters..................................7-111Table 7-72. IP Route Configuration Page Parameters..................................7-112Table 7-73. LoopBack Basic Settings Page Parameters ..............................7-113Table 7-74. IP6 Route Configuration Page Parameters................................7-114Table 7-75. IPv6 Interface Settings Page Parameters..................................7-115Table 7-76. ND Cache Configuration Page Parameters ...............................7-117Table 7-77. Address Settings Page Parameters...........................................7-117Table 7-78. Address Profile Settings Page Parameters................................7-118Table 7-79. Prefix Configuration Page Parameters ......................................7-119Table 7-80. DHCP Basic Settings Page Parameters ....................................7-120Table 7-81. DHCP Pool Settings Page Parameters......................................7-121Table 7-82. DHCP Relay Configuration Page Parameters ...........................7-122Table 7-83. DHCP Relay Interface Configuration Page Parameters ............7-123Table 7-84. RIP Basic Settings Page Parameters ........................................7-124Table 7-85. RIP Interface Page Parameters .................................................7-125Table 7-86. RIP Security Setting Page Parameters......................................7-127Table 7-87. RIP Interface Specific Address Summarization Page Parameters....................................................................................................7-128Table 7-88. RIP6 Interface Configuration Page Parameters.........................7-129Table 7-89. RIP6 Filter Configuration Page Parameters...............................7-131Table 7-90. OSPF Basic Settings Page Parameters ....................................7-132Table 7-91. OSPF Area Configuration Page Parameters .............................7-133Table 7-92. OSPF Interface Configuration Page Parameters.......................7-134Table 7-93. OSPF Virtual Interface Configuration Page Parameters............7-135Table 7-94. OSPF Neighbor Configuration Page Parameters ......................7-136Table 7-95. OSPF RRD Route Configuration Page Parameters .................7-137Table 7-96. OSPF Area Aggregation Page Parameters ...............................7-138Table 7-97. OSPF As External Aggregation Configuration Page Parameters....................................................................................................7-139
xxviii

:
Table 7-98. OSPFv3 Basic Settings Page Parameters.................................7-141Table 7-99. Interface Settings Page Parameters ..........................................7-143Table 7-100. OSPFv3 Area Settings Page Parameters................................7-144Table 7-101. OSPF AS External Aggregation Configuration Page Parameters....................................................................................................7-145Table 7-102. BGP Basic Settings Page Parameters.....................................7-148Table 7-103. BGP Peer Configuration Page Parameters .............................7-149Table 7-104. BGP MED Configuration Page Parameters .............................7-150Table 7-105. BGP Local Preference Configuration Page Parameters..........7-151Table 7-106. BGP Filter Configuration Page Parameters .............................7-152Table 7-107. BGP Route Aggregation Configuration Page Parameters .......7-153Table 7-108. Advanced BGP Configuration Page Parameters .....................7-154Table 7-109. BGP Community Management Page Parameters ...................7-156Table 7-110. RRD Basic Settings Page Parameters ....................................7-157Table 7-111. RRD BGP Configuration Page Parameters .............................7-158Table 7-112. RRD RIP Configuration Page Parameters...............................7-159Table 7-113. RRD OSPF Configuration Page Parameters ...........................7-160Table 7-114. RRD6 Filter Configuration Page Parameters...........................7-162Table 7-115. RRD6 OSPFv3 Configuration Page Parameters .....................7-163Table 7-116. RRD RIPv6 Configuration Page Parameters ...........................7-164Table 7-117. VRRP Settings Page Parameters ............................................7-166Table 7-118. IGMP Snooping Configuration Page Parameters ....................7-168Table 7-119. IGMP Snooping Timer Configuration Page Parameters ..........7-169Table 7-120. IGMP Snooping Interface Configuration Page Parameters....................................................................................................7-170Table 7-121. IGMP Snooping VLAN Router Ports Page Parameters ...........7-172Table 7-122. MAC Based Multicast Forwarding Table Page Parameters....................................................................................................7-172Table 7-123. Dynamic Multicast Port Configuration Page Parameters.........7-174Table 7-124. IGMP Interface Configuration Page Parameters .....................7-176Table 7-125. IGMP Group Configuration Page Parameters .........................7-177Table 7-126. IGMP Source Information Page Parameters ...........................7-178Table 7-127. PIM Basic Settings Page Parameters......................................7-179Table 7-128. PIM Component Configuration Page Parameters....................7-180Table 7-129. PIM Interface Configuration Page Parameters ........................7-181Table 7-130. Candidate RP Configuration Page Parameters .......................7-182Table 7-131. PIM Threshold Configuration Page Parameters ......................7-183Table 7-132. Static RP Configuration Page Parameters...............................7-184Table 7-133. DVMRP Basic Settings Page Parameters ...............................7-185Table 7-134. DVMRP Interface Settings Page Parameters ..........................7-186Table 7-135. Interface Statistics Page Parameters.......................................7-188
xxix

Superblade Network Modules User’s Manual
Table 7-136. Ethernet Statistics Page Parameters .......................................7-190Table 7-137. Radius Server Statistics Page Parameters..............................7-191Table 7-138. TACACS+ Statistics Page Parameters....................................7-193Table 7-139. RMON Ethernet Statistics Page Parameters ...........................7-195Table 7-140. SNMP Statistics Page Parameters ..........................................7-197Table 7-141. Agentx Subagent Statistics Page Parameters .........................7-198Table 7-142. VLAN Current Database Page Parameters .............................7-200Table 7-143. VLAN Port Statistics Page Parameters....................................7-201Table 7-144. VLAN Multicast Table Page Parameters .................................7-202Table 7-145. VLAN Counter Statistics Page Parameters .............................7-203Table 7-146. VLAN Capabilities Page Parameters .......................................7-204Table 7-147. VLAN FDB Entries Page Parameters ......................................7-205Table 7-148. RSTP Information Page Parameters .......................................7-206Table 7-149. RSTP Port Statistics Page Parameters ...................................7-207Table 7-150. MSTP Information Page Parameters .......................................7-209Table 7-151. MSTP CIST Port Statistics Page Parameters..........................7-210Table 7-152. MSTP MSTI Port Statistics Page Parameters .........................7-212Table 7-153. LA Port Statistics Page Parameters.........................................7-213Table 7-154. LA Neighbor Statistics Information Page Parameters..............7-214Table 7-155. 802.1x Session Statistics Page Parameters ............................7-215Table 7-156. 802.1x Supplicant Session Statistics Page Parameters ..........7-216Table 7-157. MAC Session Statistics Page Parameters...............................7-218Table 7-158. ARP Cache Page Parameters .................................................7-219Table 7-159. ICMP Statistics Page Parameters............................................7-220Table 7-160. IPV6 Interface Statistics Page Parameters..............................7-222Table 7-161. ICMPv6 Statistics Page Parameters........................................7-224Table 7-162. RIP Interface Statistics Page Parameters................................7-226Table 7-163. RIP6 Interface Statistics Page Parameters..............................7-227Table 7-164. RIP6 Route Information Page Parameters ..............................7-228Table 7-165. OSPF Route Information Page Parameters.............................7-230Table 7-166. OSPF Link State Database Page Parameters.........................7-231Table 7-167. OSPFV3 Route Information Page Parameters ........................7-233Table 7-168. OSPFV3 Link State Database Page Parameters ....................7-234Table 7-169. VRRP Statistics Page Parameters...........................................7-235Table 7-170. IGMP Snooping Clear Statistics Page Parameters..................7-237Table 7-171. IGMP Snooping V1/V2 Statistics Page Parameters ................7-238Table 7-172. IGMP Snooping V3 Statistics Page Parameters......................7-239Table 7-173. IGMP Route Statistics Page Parameters.................................7-240Table 7-174. PIM Interface Statistics Page Parameters ...............................7-242Table 7-175. PIM Neighbor Statistics Page Parameters...............................7-243
xxx

:
Table 7-176. PIM BSR Info Page Parameters ..............................................7-244Table 7-177. PIM RP Information Page Parameters.....................................7-245Table 7-178. PIM Route Information Page Parameters ................................7-246Table 7-179. DVMRP Routes Page Parameters...........................................7-247Table 7-180. DVMRP Multicast Routes Page Parameters ...........................7-248Table 7-181. DVMRP Prune Statistics Page Parameters .............................7-249Table B-1. Gigabit Ethernet Switch LED Indicators ..........................................B-1Table B-2. 1/10 Gigabit Ethernet Switch LED Indicators ..................................B-2Table B-3. Stacking LED Activity (SBM-GEM-X2C/+ Only) ..............................B-2Table B-4. SBM-XEM-X10SM Ethernet Switch LEDs.......................................B-3Table B-5. SBM-IBS-001 InfiniBand Switch LEDs ............................................B-4Table B-6. SBM-IBS-Q3616M and SBM-IBS-Q3618M InfiniBand Switch LEDs......................................................................................................B-5
xxxi

Superblade Network Modules User’s Manual
Notes
xxxii

Chapter 1 Introduction
1-1 OverviewThe Superblade Network Modules User’s Manual contains information on all network modules used for the Supermicro SuperBlade system. This incorporates information on the InfiniBand switch module, all Ethernet switch modules and all pass-through modules for both InfiniBand and Ethernet.
1-2 Product Checklist of Typical ComponentsAll modules are shipped alone or with a SuperBlade enclosure when ordered. Aside from packaging, no cables or cords are included.
Please refer to our web site for information on operating systems that have been certified for use with the SuperBlade (www.supermicro.com/products/superblade/).
Note: For your system to work properly, please follow the links below to download all necessary drivers/utilities and the user’s manual for your server.
• Supermicro product manuals: http://www.supermicro.com/support/manuals/
• Product drivers and utilities: ftp://ftp.supermicro.com
• Product safety information: http://super-dev/about/policies/safety_information.cfm
• If you have any questions, please contact our support team at: [email protected]
Note: A complete list of safety warnings is provided on the Supermicro web site at http://www.supermicro.com/about/policies/safety_information.cfm.
1-3 FeaturesSee Chapter 4: "InfiniBand Modules" on page 4-1 for information and features of the InfiniBand modules. See Chapter 5: "Ethernet Modules" on page 5-1 for information on all Ethernet switches and pass-through modules.
1-1
Superblade Network Modules User’s Manual
1-4 Contacting Supermicro
Headquarters
Address: Super Micro Computer, Inc.
980 Rock Ave.
San Jose, CA 95131 U.S.A.
Tel: +1 (408) 503-8000
Fax: +1 (408) 503-8008
Email:[email protected] (General Information)
[email protected] (Technical Support)
Web Site: www.supermicro.com
Europe
Address: Super Micro Computer B.V.
Het Sterrenbeeld 28, 5215 ML
‘s-Hertogenbosch, The Netherlands
Tel: +31 (0) 73-6400390
Fax: +31 (0) 73-6416525
Web Site: www.supermicro.nl
Email:
[email protected] (General Information)
[email protected] (Technical Support)
[email protected] (Customer Support)
Asia-Pacific
Address: Super Micro Computer, Inc.
3F, No. 150, Jian 1st Rd.
Zhonghe Dist., New Taipei City 23511
Taiwan (R.O.C)
Tel: +886-(2) 8226-3990
Fax: +886-(2) 8226-3992
Web Site: www.supermicro.com.tw
Technical Support:
Email: [email protected]
1-2

Chapter 2Standardized Warning Statements
2-1 About Standardized Warning StatementsThe following statements are industry standard warnings, provided to warn the user of situations which have the potential for bodily injury. Should you have questions or experience difficulty, contact Supermicro's Technical Support department for assistance. Only certified technicians should attempt to install or configure components.
Read this appendix in its entirety before installing or configuring components in the Supermicro chassis
These warnings may also be found on our web site at http://www.supermicro.com/about/policies/safety_information.cfm.
Warning Definition
Warning!
This warning symbol means danger. You are in a situation that could cause bodily injury. Before you work on any equipment, be aware of the hazards
involved with electrical circuitry and be familiar with standard practices for preventing accidents.
警告の定義
この警告サインは危険を意味します。
人身事故につながる可能性がありますので、いずれの機器でも動作させる前に、
電気回路に含まれる危険性に注意して、標準的な事故防止策に精通して下さい。
此警告符号代表危险。
您正处于可能受到严重伤害的工作环境中。在您使用设备开始工作之前,必须充分意识到
触电的危险,并熟练掌握防止事故发生的标准工作程序。请根据每项警告结尾的声明号码
找到此设备的安全性警告说明的翻译文本。
此警告符號代表危險。
您正處於可能身體可能會受損傷的工作環境中。在您使用任何設備之前,請注意觸電的危
險,並且要熟悉預防事故發生的標準工作程序。請依照每一注意事項後的號碼找到相關的
翻譯說明內容。
2-1

SBI-7127R-SH Blade Module User’s Manual
Warnung
WICHTIGE SICHERHEITSHINWEISE
Dieses Warnsymbol bedeutet Gefahr. Sie befinden sich in einer Situation, die zu Verletzungen führen kann. Machen Sie sich vor der Arbeit mit Geräten mit den Gefahren elektrischer Schaltungen und den üblichen Verfahren zur Vorbeugung vor Unfällen vertraut. Suchen Sie mit der am Ende jeder Warnung angegebenen Anweisungsnummer nach der jeweiligen Übersetzung in den übersetzten Sicherheitshinweisen, die zusammen mit diesem Gerät ausgeliefert wurden.
BEWAHREN SIE DIESE HINWEISE GUT AUF.
INSTRUCCIONES IMPORTANTES DE SEGURIDAD
Este símbolo de aviso indica peligro. Existe riesgo para su integridad física. Antes de manipular cualquier equipo, considere los riesgos de la corriente eléctrica y familiarícese con los procedimientos estándar de prevención de accidentes. Al final de cada advertencia encontrará el número que le ayudará a encontrar el texto traducido en el apartado de traducciones que acompaña a este dispositivo.
GUARDE ESTAS INSTRUCCIONES.
IMPORTANTES INFORMATIONS DE SÉCURITÉ
Ce symbole d'avertissement indique un danger. Vous vous trouvez dans une situation pouvant entraîner des blessures ou des dommages corporels. Avant de travailler sur un équipement, soyez conscient des dangers liés aux circuits électriques et familiarisez-vous avec les procédures couramment utilisées pour éviter les accidents. Pour prendre connaissance des traductions des avertissements figurant dans les consignes de sécurité traduites qui accompagnent cet appareil, référez-vous au numéro de l'instruction situé à la fin de chaque avertissement.
CONSERVEZ CES INFORMATIONS.
안전을 위한 주의사항
זהרהאהצהרות תקנוןן
חבלה זהרות על פי תקני התעשייה, על מנת להזהיר את המשתמש מפני אהצהרות הבאות הן קשר עם מחלקת תמיכה יש ליצורתקלות בבעיה כלשהי, יפיזית אפשרית. במידה ויש שאלות או ה
רכיבים. האת טכנית של סופרמיקרו. טכנאים מוסמכים בלבד רשאים להתקין או להגדיר
את הנספח במלואו לפני התקנת או הגדרת הרכיבים במארזי סופרמיקרו. יש לקרוא
جسدیة اصابة تتسبب في حالة یمكن أن انك في . خطر یعني ھذا الرمز تحذیر! الدوائر بالمخاطر الناجمة عن ن على علمك،معدات تعمل على أي قبل أن
الكھربائیةحوادثأي وقوعمنع ل الوقائیة ساتبالممار ن على درایةوك
ترجمتھا للعثور كل تحذیر في نھایة المنصوص البیان استخدم رقم
2-2

Chapter 2: Standardized Warning Statements
경고 !
이 경고 기호는 위험이 있음을 알려 줍니다 . 작업자의 신체에 부상을 야기 할 수 있는
상태에 있게 됩니다 . 모든 장비에 대한 작업을 수행하기 전에 전기회로와 관련된 위험
요소들을 확인하시고 사전에 사고를 방지할 수 있도록 표준 작업절차를 준수해 주시기
바랍니다 .
해당 번역문을 찾기 위해 각 경고의 마지막 부분에 제공된 경고문 번호를 참조하십시오
BELANGRIJKE VEILIGHEIDSINSTRUCTIES
Dit waarschuwings symbool betekent gevaar. U verkeert in een situatie die lichamelijk letsel kan veroorzaken. Voordat u aan enige apparatuur gaat werken, dient u zich bewust te zijn van de bij een elektrische installatie betrokken risico's en dient u op de hoogte te zijn van de standaard procedures om ongelukken te voorkomen. Gebruik de nummers aan het eind van elke waarschuwing om deze te herleiden naar de desbetreffende locatie.
BEWAAR DEZE INSTRUCTIES
Installation Instructions
Warning!
Read the installation instructions before connecting the system to the power source.
設置手順書
システムを電源に接続する前に、設置手順書をお読み下さい。
警告
将此系统连接电源前 , 请先阅读安装说明。
警告
將系統與電源連接前,請先閱讀安裝說明。
Warnung
Vor dem Anschließen des Systems an die Stromquelle die Installationsanweisungen lesen.
¡Advertencia!
Lea las instrucciones de instalación antes de conectar el sistema a la red de alimentación.
Attention
Avant de brancher le système sur la source d'alimentation, consulter les directives d'installation.
2-3

SBI-7127R-SH Blade Module User’s Manual
시스템을 전원에 연결하기 전에 설치 안내를 읽어주십시오 .
Waarschuwing
Raadpleeg de installatie-instructies voordat u het systeem op de voedingsbron aansluit.
Circuit Breaker
Warning!
This product relies on the building's installation for short-circuit (overcurrent) protection. Ensure that the protective device is rated not greater than: 250 V,
20 A.
サーキット・ブレーカー
この製品は、短絡(過電流)保護装置がある建物での設置を前提としています。
保護装置の定格が 250 V、20 A を超えないことを確認下さい。
警告
此产品的短路(过载电流)保护由建筑物的供电系统提供,确保短路保护设备的额定电流
不大于 250V,20A。
警告
此產品的短路 ( 過載電流 ) 保護由建築物的供電系統提供 ,確保短路保護設備的額定電流不大於 250V,20A。
Warnung
Dieses Produkt ist darauf angewiesen, dass im Gebäude ein Kurzschluss- bzw. Überstromschutz installiert ist. Stellen Sie sicher, dass der Nennwert der Schutzvorrichtung nicht mehr als: 250 V, 20 A beträgt.
¡Advertencia!
Este equipo utiliza el sistema de protección contra cortocircuitos (o sobrecorrientes) del edificio. Asegúrese de que el dispositivo de protección no sea superior a: 250 V, 20 A.
Attention
Pour ce qui est de la protection contre les courts-circuits (surtension), ce produit dépend de l'installation électrique du local. Vérifiez que le courant nominal du dispositif de protection n'est pas supérieur à :250 V, 20 A.
.מתחאת הוראות התקנה לפני חיבור המערכת למקור יש לקרוא
مصدر للطاقة النظام إلى قبل توصیل تركیباقر إرشادات ال
קצר חשמלי. יש לוודא כי המותקנת במבנים למניעת ההגנמוצר זה מסתמך על V, 20 A 250-הוא לא יותר מהחשמלי המכשיר המגן מפני הקצר
2-4

Chapter 2: Standardized Warning Statements
경고 !
이 제품은 전원의 단락 (과전류 )방지에 대해서 전적으로 건물의 관련 설비에 의존합니
다 . 보호장치의 정격이 반드시 250V( 볼트 ), 20A( 암페어 )를 초과하지 않도록 해야
합니다 .
Waarschuwing
Dit product is afhankelijk van de kortsluitbeveiliging (overspanning) van uw electrische installatie. Controleer of het beveiligde aparaat niet groter gedimensioneerd is dan 220V, 20A.
Power Disconnection Warning
Warning!
The system must be disconnected from all sources of power and the power cord removed from the power supply module(s) before accessing the chassis
interior to install or remove system components.
電源切断の警告
システムコンポーネントの取り付けまたは取り外しのために、シャーシー内部にアクセ
スするには、
システムの電源はすべてのソースから切断され、電源コードは電源モジュールから取り
外す必要があります。
警告
在你打开机箱并安装或移除内部器件前 , 必须将系统完全断电 , 并移除电源线。
警告
在您打開機殼安裝或移除內部元件前,必須將系統完全斷電,並移除電源線。
Warnung
Das System muss von allen Quellen der Energie und vom Netzanschlusskabel getrennt sein, das von den Spg.Versorgungsteilmodulen entfernt wird, bevor es auf den Chassisinnenraum zurückgreift, um Systemsbestandteile anzubringen oder zu entfernen.
في التي تم تثبیتھا من الدوائرالقصیرة الحمایة معدات یعتمد على ھذا المنتج المبنى
20A, 250V : أكثر من لیس وقائيال الجھاز تقییم أن تأكد من
2-5

SBI-7127R-SH Blade Module User’s Manual
¡Advertencia!
El sistema debe ser disconnected de todas las fuentes de energía y del cable eléctrico quitado de los módulos de fuente de alimentación antes de tener acceso el interior del chasis para instalar o para quitar componentes de sistema.
Attention
Le système doit être débranché de toutes les sources de puissance ainsi que de son cordon d'alimentation secteur avant d'accéder à l'intérieur du chassis pour installer ou enlever des composants de systéme.
경고 !
시스템에 부품들을 장착하거나 제거하기 위해서는 섀시 내부에 접근하기 전에 반드시
전원 공급장치로부터 연결되어있는 모든 전원과 전기코드를 분리해주어야 합니다 .
Waarschuwing
Voordat u toegang neemt tot het binnenwerk van de behuizing voor het installeren of verwijderen van systeem onderdelen, dient u alle spanningsbronnen en alle stroomkabels aangesloten op de voeding(en) van de behuizing te verwijderen.
Equipment Installation
Warning!
Only trained and qualified personnel should be allowed to install, replace, or service this equipment.
機器の設置
トレーニングを受け認定された人だけがこの装置の設置、交換、またはサービスを許可されています。
警告
只有经过培训且具有资格的人员才能进行此设备的安装、更换和维修。
警告
只有經過受訓且具資格人員才可安裝、更換與維修此設備。
אזהרה מפני ניתוק חשמליי
אזהרה!את כבל החשמלי מהספק ויש להסיר יש לנתק את המערכת מכל מקורות החשמל
רכיבים. תאו הסר תלפני גישה לחלק הפנימי של המארז לצורך התקנ
امداد وحدة من سلك الكھرباء وإزالة الطاقة مصادرمن جمیع النظام یجب فصل قبل الطاقة
الجھاز مكونات لتثبیت أو إزالة لھیكلل المناطق الداخلیة الوصول إلى
2-6

Chapter 2: Standardized Warning Statements
Warnung
Das Installieren, Ersetzen oder Bedienen dieser Ausrüstung sollte nur geschultem, qualifiziertem Personal gestattet werden.
¡Advertencia!
Solamente el personal calificado debe instalar, reemplazar o utilizar este equipo.
Attention
Il est vivement recommandé de confier l'installation, le remplacement et la maintenance de ces équipements à des personnels qualifiés et expérimentés.
경고 !
훈련을 받고 공인된 기술자만이 이 장비의 설치 , 교체 또는 서비스를 수행할 수 있습니
다 .
Waarschuwing
Deze apparatuur mag alleen worden geïnstalleerd, vervangen of hersteld door geschoold en gekwalificeerd personeel.
Restricted Area
Warning!
This unit is intended for installation in restricted access areas. A restricted access area can be accessed only through the use of a special tool, lock and
key, or other means of security. (This warning does not apply to workstations).
アクセス制限区域
このユニットは、アクセス制限区域に設置されることを想定しています。
アクセス制限区域は、特別なツール、鍵と錠前、その他のセキュリティの手段を用いてのみ出入りが可能です。
警告
此部件应安装在限制进出的场所,限制进出的场所指只能通过使用特殊工具、锁和钥匙或
其它安全手段进出的场所。
警告
此裝置僅限安裝於進出管制區域,進出管制區域係指僅能以特殊工具、鎖頭及鑰匙或其
他安全方式才能進入的區域。
אזהרה! הציוד או לתת שירות עבור הציוד. אי להתקין, להחליף אתצוות מוסמך בלבד רש
ھذا الجھاز خدمة أو استبداللتركیب و والمدربین للموظفین المؤھلین فقط یجب أن یسمح
2-7

SBI-7127R-SH Blade Module User’s Manual
Warnung
Diese Einheit ist zur Installation in Bereichen mit beschränktem Zutritt vorgesehen. Der Zutritt zu derartigen Bereichen ist nur mit einem Spezialwerkzeug, Schloss und Schlüssel oder einer sonstigen Sicherheitsvorkehrung möglich.
¡Advertencia!
Esta unidad ha sido diseñada para instalación en áreas de acceso restringido. Sólo puede obtenerse acceso a una de estas áreas mediante la utilización de una herramienta especial, cerradura con llave u otro medio de seguridad.
Attention
Cet appareil doit être installée dans des zones d'accès réservés. L'accès à une zone d'accès réservé n'est possible qu'en utilisant un outil spécial, un mécanisme de verrouillage et une clé, ou tout autre moyen de sécurité.
경고 !
이 장치는 접근이 제한된 구역에 설치하도록 되어있습니다 . 특수도구 , 잠금 장치 및 키
, 또는 기타 보안 수단을 통해서만 접근 제한 구역에 들어갈 수 있습니다 .
Waarschuwing
Dit apparaat is bedoeld voor installatie in gebieden met een beperkte toegang. Toegang tot dergelijke gebieden kunnen alleen verkregen worden door gebruik te maken van speciaal gereedschap, slot en sleutel of andere veiligheidsmaatregelen.
אזור עם גישה מוגבלתת
אזהרה!יש להתקין את היחידה באזורים שיש בהם הגבלת גישה. הגישה ניתנת בעזרת
כלי אבטחה בלבד (מפתח, מנעול וכד').
. تم محظورة مناطق لتركیبھا في ھذه الوحدة تخصیصأداة خاصة، من خالل استخدام فقط محظورة منطقة ول إلىیمكن الوص
ألمانوسیلة أخرى لال أي أو قفل ومفتاح
2-8

Chapter 2: Standardized Warning Statements
Battery Handling
Warning!
There is the danger of explosion if the battery is replaced incorrectly. Replace the battery only with the same or equivalent type recommended by the
manufacturer. Dispose of used batteries according to the manufacturer's instructions.
電池の取り扱い
電池交換が正しく行われなかった場合、破裂の危険性があります。 交換する電池はメーカーが推奨する型、または同等のものを使用下さい。 使用済電池は製造元の指示に従って処分して下さい。
警告
电池更换不当会有爆炸危险。请只使用同类电池或制造商推荐的功能相当的电池更换原有
电池。请按制造商的说明处理废旧电池。
警告
電池更換不當會有爆炸危險。請使用製造商建議之相同或功能相當的電池更換原有電
池。請按照製造商的說明指示處理廢棄舊電池。
Warnung
Bei Einsetzen einer falschen Batterie besteht Explosionsgefahr. Ersetzen Sie die Batterie nur durch den gleichen oder vom Hersteller empfohlenen Batterietyp. Entsorgen Sie die benutzten Batterien nach den Anweisungen des Herstellers.
Attention
Danger d'explosion si la pile n'est pas remplacée correctement. Ne la remplacer que par une pile de type semblable ou équivalent, recommandée par le fabricant. Jeter les piles usagées conformément aux instructions du fabricant.
¡Advertencia!
Existe peligro de explosión si la batería se reemplaza de manera incorrecta. Reemplazar la batería exclusivamente con el mismo tipo o el equivalente recomendado por el fabricante. Desechar las baterías gastadas según las instrucciones del fabricante.
경고 !
אזהרה!יש להחליף של הסוללה במידה והוחלפה בדרך לא תקינה. פיצוץקיימת סכנת
.צתיצרן מומלחברת התואם מ את הסוללה בסוג
לפי הוראות היצרן. יש לבצע המשומשות סילוק הסוללות
فعلیك بطریقة غیر صحیحة البطاریة انفجار في حالة استبدال من ھناك خطر استبدال البطاریة
بھ الشركة المصنعة أوصتكما أو ما یعادلھا بنفس النوع فقط تعلیمات الشركة الصانعةالمستعملة وفقا ل تخلص من البطاریات
2-9

SBI-7127R-SH Blade Module User’s Manual
배터리가 올바르게 교체되지 않으면 폭발의 위험이 있습니다 . 기존 배터리와 동일하거
나 제조사에서 권장하는 동등한 종류의 배터리로만 교체해야 합니다 . 제조사의 안내에
따라 사용된 배터리를 처리하여 주십시오 .
Waarschuwing
Er is ontploffingsgevaar indien de batterij verkeerd vervangen wordt. Vervang de batterij slechts met hetzelfde of een equivalent type die door de fabrikant aanbevolen wordt. Gebruikte batterijen dienen overeenkomstig fabrieksvoorschriften afgevoerd te worden.
Redundant Power Supplies
Warning!
This unit might have more than one power supply connection. All connections must be removed to de-energize the unit.
冗長電源装置
このユニットは複数の電源装置が接続されている場合があります。
ユニットの電源を切るためには、すべての接続を取り外さなければなりません。
警告
此部件连接的电源可能不止一个,必须将所有电源断开才能停止给该部件供电。
警告
此裝置連接的電源可能不只一個,必須切斷所有電源才能停止對該裝置的供電。
Warnung
Dieses Gerät kann mehr als eine Stromzufuhr haben. Um sicherzustellen, dass der Einheit kein trom zugeführt wird, müssen alle Verbindungen entfernt werden.
¡Advertencia!
Puede que esta unidad tenga más de una conexión para fuentes de alimentación. Para cortar por completo el suministro de energía, deben desconectarse todas las conexiones.
Attention
Cette unité peut avoir plus d'une connexion d'alimentation. Pour supprimer toute tension et tout courant électrique de l'unité, toutes les connexions d'alimentation doivent être débranchées.
אם קיים יותר מספק אחדד
אזהרה!כל החיבורים על מנת לרוקן יש להסיר את ליחדה יש יותר מחיבור אחד של ספק.
דה.יאת היח
2-10

Chapter 2: Standardized Warning Statements
경고 !
이 장치에는 한 개 이상의 전원 공급 단자가 연결되어 있을 수 있습니다 . 이 장치에 전
원을 차단하기 위해서는 모든 연결 단자를 제거해야만 합니다 .
Waarschuwing
Deze eenheid kan meer dan één stroomtoevoeraansluiting bevatten. Alle aansluitingen dienen verwijderd te worden om het apparaat stroomloos te maken
Backplane Voltage
Warning!
Hazardous voltage or energy is present on the backplane when the system is operating. Use caution when servicing.
バックプレーンの電圧
システムの稼働中は危険な電圧または電力が、バックプレーン上にかかっています。
修理する際には注意ください。
警告
当系统正在进行时,背板上有很危险的电压或能量,进行维修时务必小心。
警告
當系統正在進行時,背板上有危險的電壓或能量,進行維修時務必小心。
Warnung
Wenn das System in Betrieb ist, treten auf der Rückwandplatine gefährliche Spannungen oder Energien auf. Vorsicht bei der Wartung.
¡Advertencia!
Cuando el sistema está en funcionamiento, el voltaje del plano trasero es peligroso. Tenga cuidado cuando lo revise.
Attention
Lorsque le système est en fonctionnement, des tensions électriques circulent sur le fond de panier. Prendre des précautions lors de la maintenance.
. امداد الطاقة بوحدات عدة اتصاالت جھازال یكون لھذا قد الكھرباء عن وحدةال لعزل كافة االتصاالت یجب إزالة
מתח בפנל האחוריי
הרה!אזקיימת סכנת מתח בפנל האחורי בזמן תפעול המערכת. יש להיזהר במהלך
העבודה.
2-11

SBI-7127R-SH Blade Module User’s Manual
경고 !
시스템이 동작 중일 때 후면판 (Backplane) 에는 위험한 전압이나 에너지가 발생 합니
다 . 서비스 작업 시 주의하십시오 .
Waarschuwing
Een gevaarlijke spanning of energie is aanwezig op de backplane wanneer het systeem in gebruik is. Voorzichtigheid is geboden tijdens het onderhoud.
Comply with Local and National Electrical Codes
Warning!
Installation of the equipment must comply with local and national electrical codes.
地方および国の電気規格に準拠
機器の取り付けはその地方および国の電気規格に準拠する必要があります。
警告
设备安装必须符合本地与本国电气法规。
警告
設備安裝必須符合本地與本國電氣法規。
Warnung
Die Installation der Geräte muss den Sicherheitsstandards entsprechen.
¡Advertencia!
La instalacion del equipo debe cumplir con las normas de electricidad locales y nacionales.
Attention
L'équipement doit être installé conformément aux normes électriques nationales et locales.
اللوحة أوالطاقة الموجودة على التیار الكھربائي من خطر ھناك ھذا الجھاز خدمة كن حذرا عند یعمل النظامعندما یكون
תיאום חוקי החשמל הארצי
אזהרה!.הציוד חייבת להיות תואמת לחוקי החשמל המקומיים והארציים התקנת
المتعلقة المحلیة والوطنیةقوانین یجب أن یمتثل لل الكھربائیة تركیب المعدات بالكھرباء
2-12

Chapter 2: Standardized Warning Statements
경고 !
현 지역 및 국가의 전기 규정에 따라 장비를 설치해야 합니다 .
Waarschuwing
Bij installatie van de apparatuur moet worden voldaan aan de lokale en nationale elektriciteitsvoorschriften.
Product Disposal
Warning!
Ultimate disposal of this product should be handled according to all national laws and regulations.
製品の廃棄
この製品を廃棄処分する場合、国の関係する全ての法律・条例に従い処理する必要があります。
警告
本产品的废弃处理应根据所有国家的法律和规章进行。
警告
本產品的廢棄處理應根據所有國家的法律和規章進行。
Warnung
Die Entsorgung dieses Produkts sollte gemäß allen Bestimmungen und Gesetzen des Landes erfolgen.
¡Advertencia!
Al deshacerse por completo de este producto debe seguir todas las leyes y reglamentos nacionales.
Attention
La mise au rebut ou le recyclage de ce produit sont généralement soumis à des lois et/ou directives de respect de l'environnement. Renseignez-vous auprès de l'organisme compétent.
סילוק המוצרר
אזהרה!חוקי המדינה.סילוק סופי של מוצר זה חייב להיות בהתאם להנחיות ו
القوانین واللوائح الوطنیةجمیع وفقا ل ینبغي التعامل معھ ھذا المنتج من التخلص النھائي عند
2-13

SBI-7127R-SH Blade Module User’s Manual
경고 !
이 제품은 해당 국가의 관련 법규 및 규정에 따라 폐기되어야 합니다 .
Waarschuwing
De uiteindelijke verwijdering van dit product dient te geschieden in overeenstemming met alle nationale wetten en reglementen.
Hot Swap Fan Warning
Warning!
The fans might still be turning when you remove the fan assembly from the chassis. Keep fingers, screwdrivers, and other objects away from the
openings in the fan assembly's housing.
ファン・ホットスワップの警告
シャーシから冷却ファン装置を取り外した際、ファンがまだ回転している可能性があります。 ファンの開口部に、指、ドライバー、およびその他のものを近づけないで下さい。
警告
当您从机架移除风扇装置,风扇可能仍在转动。小心不要将手指、螺丝起子和其他物品太
靠近风扇
警告
當您從機架移除風扇裝置,風扇可能仍在轉動。小心不要將手指、螺絲起子和其他物品
太靠近風扇。
Warnung
Die Lüfter drehen sich u. U. noch, wenn die Lüfterbaugruppe aus dem Chassis genommen wird. Halten Sie Finger, Schraubendreher und andere Gegenstände von den Öffnungen des Lüftergehäuses entfernt.
¡Advertencia!
Los ventiladores podran dar vuelta cuando usted quite ell montaje del ventilador del chasis. Mandtenga los dedos, los destornilladores y todos los objetos lejos de las aberturas del ventilador
Attention
Il est possible que les ventilateurs soient toujours en rotation lorsque vous retirerez le bloc ventilateur du châssis. Prenez garde à ce que doigts, tournevis et autres objets soient éloignés du logement du bloc ventilateur.
אזהרה!המאוורר מהמארז, יתכן והמאווררים עדיין עובדים. יש כאשר מסירים את חלקי
מרחק בטוח את האצבעות וכלי עבודה שונים מהפתחים בתוך המאווררללהרחיק
2-14

Chapter 2: Standardized Warning Statements
경고 !
섀시로부터 팬 조립품을 제거할 때 팬은 여전히 회전하고 있을 수 있습니다 . 팬 조림품
외관의 열려있는 부분들로부터 손가락 및 스크류드라이버 , 다른 물체들이 가까이 하지
않도록 배치해 주십시오 .
Waarschuwing
Het is mogelijk dat de ventilator nog draait tijdens het verwijderen van het ventilatorsamenstel uit het chassis. Houd uw vingers, schroevendraaiers en eventuele andere voorwerpen uit de buurt van de openingen in de ventilatorbehuizing.
Power Cable and AC Adapter
Warning!
When installing the product, use the provided or designated connection cables, power cables and AC adaptors. Using any other cables and adaptors
could cause a malfunction or a fire. Electrical Appliance and Material Safety Law prohibits the use of UL or CSA -certified cables (that have UL/CSA shown on the code) for any other electrical devices than products designated by Supermicro only.
電源コードと ACアダプター
製品を設置する場合、提供または指定された接続ケーブル、電源コードと ACアダプターを使用下さい。 他のケーブルやアダプタを使用すると故障や火災の原因になることがあります。 電気用品安全法は、ULまたは CSA 認定のケーブル (UL/CSE マークがコードに表記 ) を Supermicro が指定する製品以外に使用することを禁止しています。
警告
安装此产品时,请使用本身提供的或指定的连接线,电源线和电源适配器.使用其它线材或
适配器可能会引起故障或火灾。除了 Supermicro 所指定的产品 , 电气用品和材料安全法
律规定禁止使用未经 UL 或 CSA 认证的线材。( 线材上会显示 UL/CSA 符号 )。
警告
安裝此產品時 , 請使用本身提供的或指定的連接線 , 電源線和電源適配器 . 使用其它線
材或適配器可能會引起故障或火災。除了 Supermicro 所指定的產品 , 電氣用品和材料安全法律規定禁止使用未經 UL 或 CSA 認證的線材。( 線材上會顯示 UL/CSA 符號 )。
إبقاء یجب من الھیكل المروحة كتلة تدورعند إزالة ال تزال أن المراوح من الممكنمفكات البراغيو األصابع
. المروحة كتلة في الفتحات عن بعیدا وغیرھا من األشیاء
2-15

SBI-7127R-SH Blade Module User’s Manual
Warnung
Bei der Installation des Produkts, die zur Verfügung gestellten oder benannt Anschlusskabel, Stromkabel und Netzteile. Verwendung anderer Kabel und Adapter kann zu einer Fehlfunktion oder ein Brand entstehen. Elektrische Geräte und Material Safety Law verbietet die Verwendung von UL-oder CSA-zertifizierte Kabel, UL oder CSA auf der Code für alle anderen elektrischen Geräte als Produkte von Supermicro nur bezeichnet gezeigt haben.
¡Advertencia!
Al instalar el producto, utilice los cables de conexión previstos o designados, los cables y adaptadores de CA. La utilización de otros cables y adaptadores podría ocasionar un mal funcionamiento o un incendio. Aparatos Eléctricos y la Ley de Seguridad del Material prohíbe el uso de UL o CSA cables certificados que tienen UL o CSA se muestra en el código de otros dispositivos eléctricos que los productos designados por Supermicro solamente.
Attention
Lors de l'installation du produit, utilisez les bables de connection fournis ou désigné. L'utilisation d'autres cables et adaptateurs peut provoquer un dysfonctionnement ou un incendie. Appareils électroménagers et de loi sur la sécurité Matériel interdit l'utilisation de UL ou CSA câbles certifiés qui ont UL ou CSA indiqué sur le code pour tous les autres appareils électriques que les produits désignés par Supermicro seulement.
ACי מחשמליים ומתאא
אזהרה!אשר ACכאשר מתקינים את המוצר, יש להשתמש בכבלים, ספקים ומתאמים
נועדו וסופקו לשם כך. שימוש בכל כבל או מתאם אחר יכול לגרום לתקלה או יחות, קיים איסור קצר חשמלי. על פי חוקי שימוש במכשירי חשמל וחוקי בט
(כשאר מופיע עליהם קוד של CSA -או ב UL -להשתמש בכבלים המוסמכים בUL/CSA( שלא צוין על ידי סופרקמיקרו בלבד.עבור כל מוצר חשמלי אחר
الكابالت الكھربائیة كابالت التوصیل،و الجھاز یجب استخدام عند تركیبالتیار المتردد ومحوالت
. أو حریق حدوث عطل في یتسبب أخرى ومحوالت كابالت استخدام أي أن . التيمع المنتج تم توفیرھا لك
UL أو CSA الكابالت یحظر استخدام السالمة قانون ومواد األجھزة الكھربائیة معتمدة من قبل
Supermicro ألي من قبل المعینة المنتجات غیر كھربائیة أخرى أجھزة (UL/CSA عالمةالتي تحمل )
2-16

Chapter 2: Standardized Warning Statements
경고 !
제품을 설치할 때에는 제공되거나 지정된 연결케이블과 전원케이블 , AC 어댑터를 사용
해야 합니다 . 그 밖의 다른 케이블들이나 어댑터들은 고장 또는 화재의 원인이 될 수 있
습니다 . 전기용품안전법 (Electrical Appliance and Material Safety Law) 은 슈퍼마
이크로에서 지정한 제품들 외에는 그 밖의 다른 전기 장치들을 위한 UL또는 CSA에서
인증한 케이블 (전선 위에 UL/CSA가 표시 )들의 사용을 금지합니다 .
Waarschuwing
Bij het installeren van het product, gebruik de meegeleverde of aangewezen kabels, stroomkabels en adapters. Het gebruik van andere kabels en adapters kan leiden tot een storing of een brand. Elektrisch apparaat en veiligheidsinformatiebladen wet verbiedt het gebruik van UL of CSA gecertificeerde kabels die UL of CSA die op de code voor andere elektrische apparaten dan de producten die door Supermicro alleen.
2-17

SBI-7127R-SH Blade Module User’s Manual
Notes
2-18

Chapter 3 Setup and Installation
This chapter covers the setup and installation of the SuperBladeSuperBlade Ethernet switch modules.
SuperMicro has three different Gigabit Ethernet switch modules for its SuperBlade system. The first is the SBM-GEM-001 Gigabit Ethernet switch module with ten external 1-Gbps Ethernet uplinks. The second SBM-GEM-X2C(+) and third SBM-GEM-X3S+ 1/10-Gigabit Ethernet switch modules are a 1-Gbps Ethernet switches with three external 10-Gbps uplink and two/four external 1-Gbps Ethernet uplink ports. Supermicro also offers a 10-Gbps Ethernet switch – the SBM-XEM-X10SM. The following pages contain some installation instructions that are common to both switches.
3-1 Installing/Removing a Switch ModuleFollow the procedures below for installing or uninstalling any of the Gigabit Ethernet switch modules into a SuperBlade system.
Installing a Switch Module
1. Make sure the cover to the module has been installed before proceeding. Follow the anti-static precautions described in Chapter 2.
2. Remove the dummy cover from the bay you want to place the module in.
3. Place the module's release handle in the open position.
4. Slide the module into the module bay until it stops (see Figure 3-1 and Figure 3-2).
NOTE: The pass-through modules do not require any special setup or configuration, just installation in their bays.
The SBM-GEM-002 Gigabit pass-through module uses the same single bays as the Gigabit Ethernet switch modules, while the SBM-XEM-002/MM 10-Gigabit pass-through and the SBM-XEM-X10SM 10-Gigabit switch modules require a double-wide bay for installation into the SuperBlade enclosure. See the SuperBlade User’s Manual for details on double-wide bay setup.
3-1

Superblade Network Modules User’s Manual
Figure 3-1. Blade Enclosure with 1-Gbps Switch Modules Installed
SBM-GEM-001Switch
SBM-IBS-001 4x DDR InfiniBand Switch Module
3-2

Chapter 3: Setup and Installation
5. Push the release handle to the closed position.
Removing a Switch Module
1. Pull out the release handle to the open position.
2. Pull the module out of the bay.
3. Replace immediately with another module or with a dummy module cover to maintain airflow integrity.
Figure 3-2. Blade Enclosure with 1/10-Gbps Switch Modules Installed
NOTE: After the module has been installed and the handle locked, it will turn on and a POST test will run to verify it is working properly. If there are no problems the blue Init. OK LED on the module will illuminate and you will see an OK under INITIATED in the GBE SWITCH screen of the management software utility.
NOTE: If the module is installed in a top bay it must be positioned upside-down.
SBM-GEM-X2C(+)Switch
SBM-XEM-002M Pass-Through Module
3-3

Superblade Network Modules User’s Manual
3-2 Configuring the Switch Module
Figure 3-3. Configuring the Switch Module
A Gigabit Ethernet switch module can be configured using two methods (as shown in Figure 3-3). You may configure it:
• Through the web-based management utility or IPMI (via the CMM module)
• Directly through a command line (using a telnet interface or a serial console)
The management utility and IPMI access the switch module through the CMM module. To access it directly, use the command line.
Note that any port may be configured as up (active) or down (inactive). All ports are active by default.
For more detailed information on configuration of the switches, see either Chapter 6: "1-Gb Ethernet Switch Firmware" on page 6-1 or Chapter 7: "Layer 2/3 Ethernet Switch Firmware" on page 7-1.
3-4

Chapter 3: Setup and Installation
Web-based Management Utility/IPMI
Using the Web-based Management Utility or IPMI is the most user-friendly method of configuring the switch module. You can access the configuration menu either through the management utility or by a network connection.
See either Chapter 6 or Chapter 7 for more details on the Web-based Management Utility.
Network Connection
Use the procedure below to connect and login to the IPMI system.
Logging In to the IPMI:
1. Connect a PC to a network that is accessible to the switch.
For example, connect a PC to any of the front panel ports of the switch and make sure the PC has an IP address on the same subnet as the switch management IP.
2. Type the IP address of the switch that you want to connect to in the address bar of your browser, and hit <ENTER>. Once the connection is made, the LOGIN screen displays (Figure 3-4).
Figure 3-4. IPMI Login Screen
3-5

Superblade Network Modules User’s Manual
a. Type in your Username in the USERNAME box.
b. Type in your Password in the PASSWORD box and click on LOGIN.
The IPMI Blade System screen shown in Figure 3-5 is then displayed.
Figure 3-5. IPMI Blade System Screen
3. Clicking on a gigabit switch module will display the gigabit switch in the Gigabit Switch panel on the screen (Figure 3-6). You may make changes in the configuration of the switch module in this panel to your needs.
NOTE: The default username and the default password are both ADMIN. The Default IP address is https://192.168.100.102.
3-6

Chapter 3: Setup and Installation
Figure 3-6. Gigabit Switch Panel
Address Defaults
The following defaults in Table 3-1 are the default addresses that are initially set. Afterwards, you can change these values within the program.
Table 3-1. SBM-GEM-001 Switch Module Address Default Settings
Address Default Setting
Default IP Address https://192.168.100.102
Default Gateway Address 192.168.100.1
Default Subnet Mask 255.255.255.0
NOTE: If two switches are installed in a SuperBlade system, you will have to change the IP address of one from the default so that both switches have unique addresses.
3-7

Superblade Network Modules User’s Manual
Command Line
Configuring the 1/10-G Ethernet switch (SBM-GEM-X2C/SBM-GEM-X3S+) or the 10-G Ethernet switch (SBM-XEM-X10SM) can be done using a command line via telnet or by using the serial console interface.
Accessing CLI through Telnet:
To access command line via telnet, follow the below steps.
1. Connect a PC to a network that is accessible to the switch.
For example, connect a PC to any of the front panel ports of the switch and make sure the PC has an IP address on the same subnet as the switch management IP.
2. In the PC, start a telnet client session with the switch management IP (default IP is 192.168.100.102).
This brings up the switch’s command line interface for user login.
3. Enter username and password to login to the switch.
4. To view the switch configurations use show commands and to configure the switch type config term to get access to the configuration commands. For help type ? or help.
Accessing CLI through a Serial Console
To access command line via a serial console, follow the below steps.
1. Connect a PC serial port to the switch console port.
2. In the PC, open any seral port access applications, such as Hyperterminal or Term Term.
3. Choose the serial port connected with the switch and configure with the following parameters:
Baudrate = 9600
Data bits = 8
Parity = None
Stop bit = 1
4. This brings up the switch’s command line interface for user login.
5. Enter username and password to login to the switch.
6. To view the switch configurations use show commands and to configure the switch type config term to get access to the configuration commands. For help type ? or help.
3-8

Chapter 3: Setup and Installation
3-3 Locating and Identifying Switches and Switch Ports on a Blade Enclosure
Use this section to help you in locating and identifying the switch ports and switches on a blad enclosure.
Locating and Identifying a Switch on a Blade Enclosure
When you are looking at the rear of the blade enclosure, you can identify the switch associating with a CMM designation by using the information in Table 3-2.
Locating and Identifying a Switch Port on a Blade Enclosure
In general, a switch that is designated on the CMM as "Switch 1", has its ports electrically routed to the first network interfaces of the blade servers, while the switch designed as "Switch 2" has its ports electrically routed to the second network interfaces of the blade servers. However, pass-through Ethernet modules have a one-to-one relationship between their internal and external ports.
Managed switches have internal ports that are associated with the blade server slots and network interfaces (NIC) as shown in Table 3-3 through Table 3-7.
Table 3-2. Locating and Identifying a Switch
Switch Namea
a. As shown on the CMM.
SBM-GEM-001/003
SBM-GEM-X2C+/X3S+
SBM-GEP-T20
SBM-XEM-X10SM
SBM-XEM-002M
SBM-IBSAll models
Upper SlotGigabit Switch1
L3 Gigabit Switch1
Gigabit Switch 1
10G Switch 2
10G Switch 2
Infiniband (QDR) Switch 2
Lower SlotGigabit Switch 2
L3 Gigabit Switch 2
Gigabit Switch 2
10G Switch 1
10G Switch 1
Infiniband (QDR) Switch 1
NOTE: Not all switches shown are supported on all blade enclosures. Please check the Superblade matrix for the supported models.
3-9

Superblade Network Modules User’s Manual
Table 3-3. SBE-710 Enclosures with SBM-GEM-001/002 or SBM-GEM-X2C+/X3S+
Blade Upper Switch Lower Switch Switch Port #
Blade1 NIC1 NIC2 Gi 0/1
Blade 2 NIC1 NIC2 Gi 0/2
Blade 3 NIC1 NIC2 Gi 0/3
Blade 4 NIC1 NIC2 Gi 0/4
Blade 5 NIC1 NIC2 Gi 0/5
Blade 6 NIC1 NIC2 Gi 0/6
Blade 7 NIC1 NIC2 Gi 0/7
Blade 8 NIC1 NIC2 Gi 0/8
Blade 9 NIC1 NIC2 Gi 0/9
Blade 10 NIC1 NIC2 Gi 0/10
Table 3-4. SBE-710 Enclosures with SBM-XEM-X10SM
Blade Upper Switch Lower Switch Switch Port #
Blade1 NIC2 NIC1 Ex 0/1
Blade 2 NIC2 NIC1 Ex 0/2
Blade 3 NIC2 NIC1 Ex 0/3
Blade 4 NIC2 NIC1 Ex 0/4
Blade 5 NIC2 NIC1 Ex 0/5
Blade 6 NIC2 NIC1 Ex 0/6
Blade 7 NIC2 NIC1 Ex 0/7
Blade 8 NIC2 NIC1 Ex 0/8
Blade 9 NIC2 NIC1 Ex 0/9
Blade 10 NIC2 NIC1 Ex 0/10
Table 3-5. SBE-720 Enclosures with SBM-GEM-X2C+/X3S+
Blade Upper Switch Lower Switch Switch Port #
Blade1 NIC1 NIC2 Gi 0/1
Blade 2 NIC1 NIC2 Gi 0/2
Blade 3 NIC1 NIC2 Gi 0/3
Blade 4 NIC1 NIC2 Gi 0/4
Blade 5 NIC1 NIC2 Gi 0/5
Blade 6 NIC1 NIC2 Gi 0/6
Blade 7 NIC1 NIC2 Gi 0/7
3-10

Chapter 3: Setup and Installation
Blade 8 NIC1 NIC2 Gi 0/8
Blade 9 NIC1 NIC2 Gi 0/9
Blade 10 NIC1 NIC2 Gi 0/10
Blade 11 NIC1 NIC2 Gi 0/11
Blade 12 NIC1 NIC2 Gi 0/12
Blade 13 NIC1 NIC2 Gi 0/13
Blade 14 NIC1 NIC2 Gi 0/14
Blade 15 NIC1 NIC2 Gi 0/15
Blade 16 NIC1 NIC2 Gi 0/16
Blade 17 NIC1 NIC2 Gi 0/17
Blade 18 NIC1 NIC2 Gi 0/18
Blade 19 NIC1 NIC2 Gi 0/19
Blade 20 NIC1 NIC2 Gi 0/20
Table 3-6. SBE-720 Enclosures with SBM-XEM-X10SM
Blade Upper Switch Lower Switch Switch Port #
Blade1 NIC2 NIC1 Ex 0/1
Blade 2 NIC2 NIC1 Ex 0/2
Blade 3 NIC2 NIC1 Ex 0/3
Blade 4 NIC2 NIC1 Ex 0/4
Blade 5 NIC2 NIC1 Ex 0/5
Blade 6 NIC2 NIC1 Ex 0/6
Blade 7 NIC2 NIC1 Ex 0/7
Blade 8 NIC2 NIC1 Ex 0/8
Blade 9 NIC2 NIC1 Ex 0/9
Blade 10 NIC2 NIC1 Ex 0/10
Blade 11 NIC2 NIC1 Ex 0/11
Blade 12 NIC2 NIC1 Ex 0/12
Blade 13 NIC2 NIC1 Ex 0/13
Blade 14 NIC2 NIC1 Ex 0/14
Blade 15 NIC2 NIC1 Ex 0/15
Blade 16 NIC2 NIC1 Ex 0/16
Blade 17 NIC2 NIC1 Ex 0/17
Table 3-5. SBE-720 Enclosures with SBM-GEM-X2C+/X3S+
Blade Upper Switch Lower Switch Switch Port #
3-11

Superblade Network Modules User’s Manual
Blade 18 NIC2 NIC1 Ex 0/18
Blade 19 NIC2 NIC1 Ex 0/19
Blade 20 NIC2 NIC1 Ex 0/20
Table 3-7. SBE-714 Enclosures with SBM-GEM-001/002 or SBM-GEM-X2C+/X3S+
Blade Upper Switch Lower Switch Switch Port #
Blade1 NIC1 NIC2 Gi 0/1
Blade 2 NIC1 NIC2 Gi 0/2
Blade 3 NIC1 NIC2 Gi 0/3
Blade 4 NIC1 NIC2 Gi 0/4
Blade 5 NIC1 NIC2 Gi 0/5
Blade 6 NIC1 NIC2 Gi 0/6
Blade 7 NIC1 NIC2 Gi 0/7
Blade 8 NIC1 NIC2 Gi 0/8
Blade 9 NIC1 NIC2 Gi 0/9
Blade 10 NIC1 NIC2 Gi 0/10
Blade 11 NIC1 NIC2 Gi 0/11
Blade 12 NIC1 NIC2 Gi 0/12
Blade 13 NIC1 NIC2 Gi 0/13
Blade 14 NIC1 NIC2 Gi 0/14
Table 3-6. SBE-720 Enclosures with SBM-XEM-X10SM (Continued)
Blade Upper Switch Lower Switch Switch Port #
3-12

Chapter 3: Setup and Installation
3-4 Firmware for the 1/10 Gigabit and 10-Gigabit Ethernet Switch Modules
The firmware for the 1/10-Gigabit and 10-Gigabit Ethernet switch modules resides on a chip on the PCB.
The switch modules have internal flash memory in two areas to hold two firmware images. The flash area used for the normal firmware image is referred to as the normal area. The other flash area, referred to as the fallback area, is used to store the firmware image for fallback purpose in case of a failure to boot from the normal area.
Firmware Upgrading Procedures
The procedures for firmware upgrading and using a fallback firmware image are listed below.
Upgrading Firmware on the Switch using TFTP:
To upgrade the switch’s firmware, use the procedure below.
1. Copy the latest firmware to the TFTP root directory on the TFTP server machine.
2. Make sure the upgraded TFTP server and switch both have network reach ability.
3. Login to the Switch CLI, either through Telnet or a serial console port.
4. Type the below command to upgrade the firmware in the normal area:
firmware upgrade tftp://<ip-address>/<filename> flash:normal
Here <ip-address> is the IP address of the TFTP server and <filename> is the name of the firmware image file.
5. On successful download CLI displays the below string:
Firmware download completed successfully.
6. After a successful download, reboot the switch to use this latest firmware.
7. If the download fails, check the IP address, file name, network connections and configurations to reach the TFTP server.
8. If the switch does not come up after the firmware upgrade due to any incorrect firmware images, boot the switch using a fallback firmware image. Refer the steps in the procedure "Booting using a Fallback Firmware Image:" below to boot the switch using a fallback firmware image.
9. Once the switch is booted with a fallback firmware, repeat the above steps to upgrade with the correct firmware image.
10. On successful upgrade of the latest firmware, it is advised that you upgrade the fallback firmware image also. Follow the steps listed in the procedure "Upgrading Fallback Firmware using TFTP:" below to upgrade the fallback firmware image.
3-13

Superblade Network Modules User’s Manual
Booting using a Fallback Firmware Image:
Use the procedure below to boot using a fallback firmware image.
1. Reboot the switch by power cycling the switch power.
2. During reboot, press any key when it displays the below text (as shown in Figure 3-7).
Hit any key to stop autoboot: 5
Figure 3-7. Displayed Text for Rebooting
3-14

Chapter 3: Setup and Installation
3. Once the boot sequence is interrupted, it will display menu options as shown in Figure 3-7.
Use the "H" option to set hardware information by typing the character H. This will display the hardware information that can be changed as shown in Figure 3-8.
4. To choose the boot from a fallback image, type the command: rflag=1
5. Type Save to save the hardware information.
6. Type Exit to exit the hardware information menu.
7. Type J to boot the image. In this case it will boot from a fallback image.
NOTE: The numbers in the Product Type entry change depending upon the switch you are using.
Figure 3-8. Setting Hardware Information
3-15

Superblade Network Modules User’s Manual
8. In case you wish to later move back to a normal image, repeat the above the steps with one difference for step 4, where you should use the command rflag=0 instead of rflag=1 to boot with a normal firmware image.
Upgrading Fallback Firmware using TFTP:
To upgrade fallback firmware using TFTP, use the procedure below.
1. Copy the latest firmware to the TFTP root directory on the TFTP server machine.
2. Make sure the upgraded TFTP server and switch both have network reach ability.
3. Login to the Switch CLI either through Telnet or a serial console port.
4. Type the below command to upgrade the firmware in the normal area:
firmware upgrade tftp://<ip-address>/<filename> flash:fallbackl
Here <ip-address> is the IP address of the TFTP server and <filename> is the name of the firmware image file.
5. On a successful download, the CLI displays the below string:
Firmware download completed successfully.
6. After a successful download, reboot the switch using the fallback image to verify the fallback image. Refer the steps listed above in the procedure "Booting using a Fallback Firmware Image:" above to boot the switch in the fallback image.
7. Once both the normal and fallback image both have latest firmware, continue to use the normal image as directed in step 8 of the procedure "Booting using a Fallback Firmware Image:".
Firmware Failure Recovery Steps
In case you have any issues in booting the switch with either a normal or fallback image, use the procedure below to recover the switch functionality with a correctly working firmware image.
Recovering Switch Functionality with a Firmware Image:
1. Copy the latest firmware to the TFTP root directory on a TFTP server machine.
2. Make sure the upgraded TFTP server and switch both have network reach ability.
1. Reboot the switch by power cycling the switch power.
2. During reboot, press any key when it displays the below text (as shown in Figure 3-7).
Hit any key to stop autoboot: 5
3. Once the boot sequence is interrupted, it will display menu options as shown in Figure 3-7.Use the "H" option to set hardware information by typing the character H.
This will display the hardware information that can be changed as shown in Figure 3-8.
3-16

Chapter 3: Setup and Installation
4. Configure the IP address for this switch (only for booting purposes) using the command: ip=<IP address>
For example ip=https://192.168.2.3
5. Configure the subnet mask for this switch IP address using the below command:
mask=<subnet mask>
For example mask=255.255.255.0
6. Configure the TFTP server IP address using the below command:
tftpaddr=<TFTP server IP>
For example tftpaddr=192.168.2.100
7. Configure the gateway address to reach the TFTP server using the below command if the TFTP server is in different network:
gateway=<gateway IP>
For example gateway=192.168.2.100
8. Configure the firmware image file name using the below command:
ramdiskname=<filename>
For example ramdiskname= SBM-GEM-X2C-v5.2.10.bin
9. Type Save to save the hardware information.
10. Type Exit to exit the hardware information menu.
11. Type F to download the firmware image. In this case it will download to the normal image area.
12. On a successful download, the switch displays the below string.
Updating the ramdisk image ...This may take awhileOK
13. After a successful download, boot the switch to use this latest firmware by typing J.
14. If the download fails, check the IP address, file name, network connections and configurations to reach the TFTP server.
3-17

Superblade Network Modules User’s Manual
Notes
3-18

Chapter 4 InfiniBand Modules
4-1 OverviewInfiniBand is a switch-based, point-to-point bidirectional serial link network communications architecture. Supermicro offers three different Infiniband modules:
• 4X DDR (20-Gb/s) switch with 14 internal ports and 10 external CX4 ports
• 4X DDR (20-Gb/s) pass-through with 14 internal ports and 14 external CX4 ports
• 4X QDR (40-Gb/s) switch with up to 20 internal ports and up to 18 external QSFP ports (4 models).
The main function of the SuperBlade InifiniBand switch modules is to provide high-speed interconnectivity among the blade modules and with external peripherals. These are hot-pluggable modules that must be installed in a double-wide or triple-wide bay at the lower right of the enclosure. Because they occupy one of the bays alternatively used for the CMM, only one InfiniBand module may normally be installed in the system. However, the SBM-IBS-Q3616M and SBM-IBS-Q3618M are exceptions to this since they allow installation of an optional integrated CMM. See Section 4-4: SBM-IBS-Q3618M/SBM-IBS-Q3616M 4X QDR InfiniBand Switch Modules on page 4-4 for details.
NOTE: For any blade to access the InfiniBand module, it must first have an InfiniBand card installed on its mainboard. See Appendix A for details on the Mezzanine HCA cards that are available for use with the InfiniBand module.
4-1

Superblade Network Modules User’s Manual
4-2 SBM-IBS-001 4X DDR InfiniBand Switch Module
Figure 4-1. SBM-IBS-001 InfiniBand Switch Module
Table 4-1. SBM-IBS-001 InfiniBand Module Interface
Item Description
1 Module Power LED
2 Module Status LED
3 External InfiniBand Port (10 total)
4 Port Physical Link LED (Green)
5 Port Activity LED (Yellow)
6 Module Release Handle
Table 4-2. SBM-IBS-001 InfiniBand Module Features
Feature Description
Internal/External Ports Internal: 14 4X DDR copper ports/ External: 10 4X DDR copper ports
Bandwidth4X DDR (20-Gbps) non-blocking architecture for 960-Gbps total bandwidth (24-port)
Latency 160 ns port-to-port switch latency
Power Consumption 34 - 40W
Operating System Firmware (upgradable)
1 4 5
62 3 6
4-2

Chapter 4: InfiniBand Modules
4-3 SBM-IBS-Q3618/Q3616 4X QDR InfiniBand Switch Modules
Figure 4-2. SBM-IBS-Q3618/Q3616 InfiniBand Switch Module
Table 4-3. SBM-IBS-Q3618/Q3616 InfiniBand Module Interface
Item Description
1 System error. Fault LED (Red)a
a. If the fault LED goes on, the QDR switch operation is stopped. It then needs a hardware reset or a power off cycle to bring it back into normal operation.
2 System status. Ready LED (Green)b
b. If the Green LED is blinking, the QDR switch is overheated. Please check the air fan and vent condition. If the fault LED goes on at the same time, a hard reset or a power off cycle needs to be initiated.
3 External InfiniBand Port (16 QSFP ports for Q3616 and 18 QSFP ports for Q3618)
4 Per Port Dual-color LED, PHY link(Green)/Logic link(Amber)/ACT blinking(Green+Amber)
5 Module Release Handle
6 Port Numbers (First port number is top port, second port number is bottom port)
7 QDR Switch Reset Button
Table 4-4. SBM-IBS-Q3618/Q3616 InfiniBand Module Features
Feature Description
Internal/External PortsInternal: 18/20 4X QDR copper ports/ External: 18/16 4X QDR copper ports
Bandwidth4X QDR (40-Gbps) non-blocking architecture for 2.88-Tbps total bandwidth (36-port)
Latency 120-ns port-to-port switch latency
Power Consumption 100W
Operating System Firmware (upgradable)
4
62 53
1 67
4-3
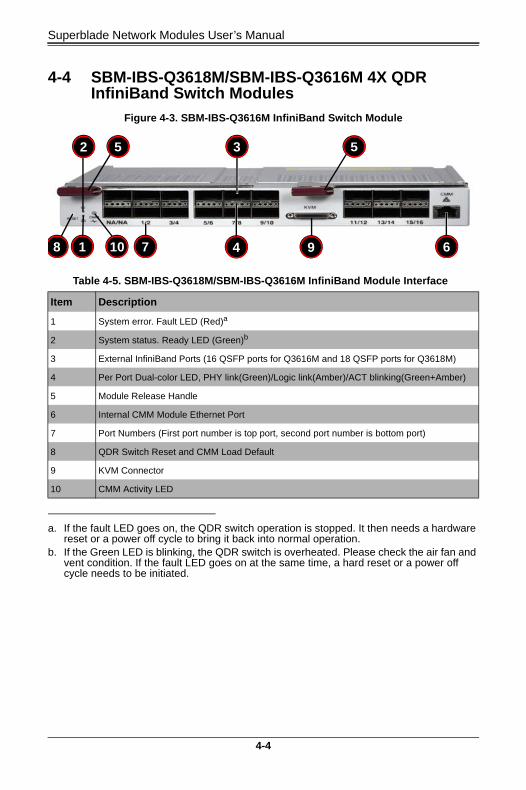
Superblade Network Modules User’s Manual
4-4 SBM-IBS-Q3618M/SBM-IBS-Q3616M 4X QDR InfiniBand Switch Modules
Figure 4-3. SBM-IBS-Q3616M InfiniBand Switch Module
Table 4-5. SBM-IBS-Q3618M/SBM-IBS-Q3616M InfiniBand Module Interface
Item Description
1 System error. Fault LED (Red)a
a. If the fault LED goes on, the QDR switch operation is stopped. It then needs a hardware reset or a power off cycle to bring it back into normal operation.
2 System status. Ready LED (Green)b
b. If the Green LED is blinking, the QDR switch is overheated. Please check the air fan and vent condition. If the fault LED goes on at the same time, a hard reset or a power off cycle needs to be initiated.
3 External InfiniBand Ports (16 QSFP ports for Q3616M and 18 QSFP ports for Q3618M)
4 Per Port Dual-color LED, PHY link(Green)/Logic link(Amber)/ACT blinking(Green+Amber)
5 Module Release Handle
6 Internal CMM Module Ethernet Port
7 Port Numbers (First port number is top port, second port number is bottom port)
8 QDR Switch Reset and CMM Load Default
9 KVM Connector
10 CMM Activity LED
52 5
6
3
71 108 4 9
4-4

Chapter 4: InfiniBand Modules
In addition to the InfiniBand switching capability it shares with other Supermicro Blade InfiniBand switches, the SBM-IBS-Q3618M/SBM-IBS-Q3616M modules include provision for the installation of an optional integrated Chassis Management Module (CMM). This “mini-CMM” (BMB-CMM-002) is installed as an add-on-module inside the switch chassis. This allows installation of two (redundant) switches in the SuperBlade enclosure without the loss of system management capability. Note that a dual-port InfiniBand add-on card is required if redundant switches are installed.
Either the RJ45 connector or the KVM connector on the front of the SBM-IBS-Q3618M/SBM-IBS-Q3616M modules can be used to connect to the integrated CMM module (see Figure 4-3). There is also an activity indicator LED for the CMM on the left-hand side of the front of the SBM-IBS-Q3618M/SBM-IBS-Q3616M modules.
The reset button (lower left), pushed once, will reset the SBM-IBS-Q3618M/SBM-IBS-Q3616M modules. If held down for approximately 5 seconds it will send a signal to the CMM, which cause the CMM to return to default settings.
See Chapter 4, Section 4.1 of the SuperBlade User’s Manual for more information on the operation of the CMM itself, including instructions on how to use both the KVM and RJ45 connections.
Table 4-6. SBM-IBS-Q3618M/SBM-IBS-Q3616M InfiniBand Module Features
Feature Description
Internal/External PortsInternal: 18/20 4X QDR copper ports/ External: 18/16 4X QDR copper ports
Bandwidth4X QDR (40-Gbps) non-blocking architecture for 2.88-Tbps total bandwidth (36-port)
Latency 120-ns port-to-port switch latency
Power Consumption 120W (with CMM Module Loaded)
Operating System Firmware (upgradable)
4-5

Superblade Network Modules User’s Manual
4-5 SBM-IBS-F3616M 4X FDR InfiniBand Switch Module
Figure 4-4. SBM-IBS-F3616M InfiniBand Switch Module
Table 4-7. SBM-IBS-F3616M InfiniBand Module Interface
Item Description
1 System error. Fault LED (Red)a
a. If the fault LED goes on, the FDR switch operation is stopped. It then needs a hardware reset or a power off cycle to bring it back into normal operation.
2 System status. Ready LED (Green)b
b. If the Green LED is blinking, the FDR switch is overheated. Please check the air fan and vent condition. If the fault LED goes on at the same time, a hard reset or a power off cycle needs to be initiated.
3 External InfiniBand FDR Ports
4 Per Port Dual-color LED, PHY link(Green)/Logic link(Amber)/ACT blinking(Green+Amber)
5 Module Release Handle
6 Internal CMM Module Ethernet Port
7 Port Numbers (First port number is top port, second port number is bottom port)
8 QDR Switch Reset and CMM Load Default
9 KVM Connector
10 CMM Activity LED
52 5
6
3
71 108 4 9
4-6

Chapter 4: InfiniBand Modules
In addition to the InfiniBand switching capability it shares with other Supermicro Blade InfiniBand switches, the SBM-IBS-F3616M modules include provision for the installation of an optional integrated Chassis Management Module (CMM). This “mini-CMM” (BMB-CMM-002) is installed as an add-on-module inside the switch chassis. This allows installation of two (redundant) switches in the SuperBlade enclosure without the loss of system management capability. Note that a dual-port InfiniBand add-on card is required if redundant switches are installed.
Either the RJ45 connector or the KVM connector on the front of the SBM-IBS-F3616M modules can be used to connect to the integrated CMM module (see Figure 4-3). There is also an activity indicator LED for the CMM on the left-hand side of the front of the SBM-IBS-F3616M modules.
The reset button (lower left), pushed once, will reset the SBM-IBS-QF3616M modules. If held down for approximately 5 seconds it will send a signal to the CMM, which cause the CMM to return to default settings.
See Chapter 4, Section 4.1 of the SuperBlade User’s Manual for more information on the operation of the CMM itself, including instructions on how to use both the KVM and RJ45 connections.
Table 4-8. SBM-IBS-F3616M InfiniBand Module Features
Feature Description
Internal/External Ports Internal: 20 FDR10 ports/ External: 16 4X FDR with QSFP connectors
Bandwidth4X FDR (56-Gbps) non-blocking architecture with 56Gbps through external ports for 3.392Tbps total switch bandwidth (36-port)
Latency 120-ns port-to-port switch latency
Power Consumption 120W (with CMM Module Loaded)
Operating System Firmware (upgradable)
4-7

Superblade Network Modules User’s Manual
4-6 SBM-IBP-D14 InfiniBand Pass-Through Module
The SBM-IBP-D14 InfniBand Pass-through Module is a triple-wide non-configurable pass-through module that includes fourteen (14) 4X DDR copper ports with CX-4 connectors. The pass-through module is used to provide a connection between the Infiniband controller (Add-on Card) mounted on the blade’s mainboard and an external InfiniBand device.
Unlike the SBM-IBS-001 4x DDR InfiniBand switch module, this is a pass-through module. With this module Blade 1 would be connected directly to port 1, Blade 2 to port 2 and so on. If you are only connected to 10 blades then ports 11 through 14 are not connected.
Temperature and voltage of the pass-through module are read through the CMM module. Like other SuperBlade network modules, this pass-through module is hot-pluggable.
4-7 Installation and Configuration of InfiniBand Switch Modules
This section covers the installation, removal and configuration of InfiniBand switch modules and InfiniBand pass-through modules.
Installing/Removing the InfiniBand Switch Module
Before installing the InfiniBand switch module make sure the cover to the module has been installed before proceeding. Refer to the anti-static precautions described in Chapter 2.
The InifiniBand switch module must be installed into a double-wide bay. Assuming that you have already created a double-wide bay out of two single-wide bays, continue with the steps below. See the SuperBlade User’s Manual for details on setting up double-wide bays in the SuperBlade enclosure.
Figure 4-5. SBM-IBP-D14 InfiniBand Pass-Through Triple-Wide Module
NOTE: The SBM-IBP-D14 InfniBand Pass-through Module must be connected to another InfiniBand module in order to operate.
4-8

Chapter 4: InfiniBand Modules
Installing the Module
1. Remove the dummy cover from the bay you want to place the module in.
2. Place the module's release handle in the open position.
3. Slide the module into the module bay until it stops.
4. Push the release handle to the closed position.
After the module has been installed and the handle locked, it will power on after a short delay and a POST test will run to verify it is working properly.
Removing the Module
1. Pull out the release handle to the open position.
2. Pull the module out of the bay.
3. Replace immediately with another module or with a dummy module cover to maintain airflow integrity.
Installing/Removing the InfiniBand Pass-Through Module
Before installing the InfiniBand pass-through module make sure the cover to the module has been installed before proceeding. Refer to the anti-static precautions described in Chapter 2.
The InifiniBand pass-through module must be installed into a triple-wide bay. For instructions on how to create a triple-wide bay, see Appendix C.
Assuming that you have already created a triple-wide bay out of three single-wide bays, continue with the steps below.
Installing the Module
1. Remove the dummy cover from the bay you want to place the module in.
2. Place the module's release handle in the open position.
3. Slide the module into the module bay until it stops.
4. Push the release handle to the closed position.
Removing the Module
1. Pull out the release handle to the open position.
2. Pull the module out of the bay.
3. Replace immediately with another module or with a dummy module cover to maintain airflow integrity.
NOTE: The 10GbE Pass-through module (SBM-XEM-002/M) also requires the same double-wide bay as the InfiniBand switch module and may be installed instead of the InfiniBand switch module in your blade enclosure system. Use the same instructions below for installing either the pass-through module or the InfiniBand switch module.
4-9

Superblade Network Modules User’s Manual
InfiniBand Switch LEDs
InfiniBand switch LEDs are listed and described in Table B-5 in Appendix B.
Blade Software for Access to InfiniBand Switch Module
The InfiniBand Switch Module is an unmanaged switch and requires no configuration. Blades which are to be connected to it will require an appropriate driver software package to be installed.
The Windows software package (WinOF) can be downloaded from: http://www.mellanox.com/content/pages.php?pg=products_dyn&product_family=32&menu_section=34
The Windows ReadMe is available at:
http://www.mellanox.com/related-docs/prod_software/Mellanox_WinOF_VPI_Readme.pdf
Linux OFED software package is available from the following link:
http://www.mellanox.com/content/pages.php?pg=products_dyn&product_family=26&menu_section=34
Linux release notes:
http://www.mellanox.com/related-docs/prod_software/MLNX_OFED_1_5_1_release_notes.txt
4-10

Chapter 5 Ethernet Modules
Your SuperBlade enclosure can include either of several models of Ethernet switch modules or of Ethernet pass-through modules installed in it.
The Ethernet switch modules and pass-through modules can only be installed in the upper and/or lower left module bays, whereas the SBM-XEM-002/M 10-Gigabit pass-through module must be installed in a double-wide slot in the enclosure in a location alternately used for the InfiniBand switch module. The InfiniBand module is discussed in Chapter 4.
5-1 SBM-GEM-001 Gigabit Ethernet Switch ModuleThe SBM-GEM-001 Gigabit Ethernet switch module is a layer 2 Ethernet switch. It includes ten 1-Gb/s uplink (RJ45) ports and fourteen 1-Gb/s downlink ports for the SuperBlade's LAN interfaces. The Gigabit Ethernet switch module has two internal Ethernet paths to the CMM(s). The switch is used to provide a connection between the Ethernet controller integrated on the mainboard and an external Ethernet device. This is a hot-pluggable module. See Figure 5-1, Table 5-1 and Table 5-2 for switch details.
Figure 5-1. SBM-GEM-001 Gigabit Ethernet Switch Module
Table 5-1. SBM-GEM-001 Gigabit Ethernet Switch Module Interface
Item Description
1 RS232 (COM) Serial Port
2 “Initiation OK” LED
3 Module Fault LED
4 RJ45 Ethernet Ports
4
5
1
6
3
2
5-1

Superblade Network Modules User’s Manual
LED Indicators
LED indicators for the SBM-GEM-001 Gigabit Ethernet switch module are listed and described in Table B-1 of Appendix B.
Ports
The SBM-GEM-001 Gigabit Ethernet switch module contains several front-mounted ports as described below in Table 5-3.
5 Ethernet Port Status LEDs
6 Module Release Handle
Table 5-2. GEM-001 Gigabit Ethernet Switch Module Features
Feature Description
Chipset Broadcom BCM5345M
Internal/External PortsInternal: Fourteen 1-Gbps downlink ports / External: Ten 1-Gbps RJ45 uplink ports
Bandwidth 24-Gbps non-blocking
Trunking Link aggregation support
Jumbo Frame Support Up to 9kb
Remote Management Browser-based management
Protocols Spanning Tree, Rapid Spanning Tree, Multiple Spanning Tree (802.1d.1w)
Power Consumption ~30.6W
Operating SystemFirmware (see Section 3-4: Firmware for the 1/10 Gigabit and 10-Gigabit Ethernet Switch Modules on page 3-13 for details)
Table 5-3. SBM-GEM-001 Gigabit Ethernet Switch Module Ports
Port Description
RS-232 Compatible Serial PortThis port accepts an connector cable for uplink using RS-232 connection to a console.
RJ45 Ethernet PortsThese two ports accept a RJ45 connector for 1-Gbps uplink communications.
Table 5-1. SBM-GEM-001 Gigabit Ethernet Switch Module Interface (Continued)
Item Description
5-2

Chapter 5: Ethernet Modules
5-2 SBM-GEM-X2C(+) 1/10-Gb Ethernet Switch ModuleThe SBM-GEM-X2C(+) 1/10-Gigabit Ethernet switch module is a layer 2/3 Ethernet switch. It includes three 10-Gb/s uplink ports (two CX4 and one SPF+), two 1-Gb/s uplink RJ45 uplink ports and fourteen (X2C) or twenty (X2C+) 1-Gb/s downlink ports for the SuperBlade's LAN interfaces. The Ethernet switch module has two internal Ethernet paths to the CMM(s). The switch is used to provide a connection between the Ethernet controller integrated on the mainboard and an external Ethernet device. This is a hot-pluggable module. See Figure 5-2, Table 5-4 and Table 5-5 for switch details.
Figure 5-2. SBM-GEM-X2C(+) 1/10-Gigabit Ethernet Switch Module Ports & Indicators
Table 5-4. SBM-GEM-X2C(+) 1/10-Gigabit Ethernet Switch Module Interface
Item Description
1 RS-232 (COM) Serial Port
2 Module Fault LED
3 “Initiation OK” LED
4 Stack ID LEDs (4)
5 10-Gbps Uplink Port Status LEDs (3)
6 1-Gbps RJ45 Uplink Port Status LEDs (Link/Activity and Speed)
7 1-Gbps RJ45 Uplink Ports (2)
8 CX4 10-Gbps Uplink Ports (2)
9 SFP+ 10-Gbps Uplink Port
10 Module Release Handle
6
8
23 1
9
7 45
10
5-3

Superblade Network Modules User’s Manual
LED Indicators
LED indicators for the SBM-GEM-X2C(+) 1/10-Gigabit Ethernet switch module are listed and described in Table B-2 of Appendix B.
Ports
The SBM-GEM-X2C(+) 1/10-Gigabit Ethernet switch module contains several front-mounted ports as described below in Table 5-6.
Table 5-5. SBM-GEM-X2C(+) 1/10-Gigabit Ethernet Switch Module Features
Feature Description
Chipset Broadcom BCM56314
Internal/External PortsInternal: Twenty (X2C+) 1-Gbps downlink portsExternal: Two 1-Gbps RJ45 uplink ports and Three 10-Gbps uplink ports (1 SPF+, 2 CX4)
Bandwidth 112-Gbps non-blocking
Trunking Link aggregation support (Full 802.3 ad)
Jumbo Frame Support Up to 9KB
Remote Management Browser-based management or Command Line Interface (CLI)
ProtocolsSpanning Tree, Rapid Spanning Tree, Multiple Spanning Tree, IGMP snooping and 802.1x
Power Consumption ~30.6W
Operating SystemFirmware (see Section 3-4: Firmware for the 1/10 Gigabit and 10-Gigabit Ethernet Switch Modules on page 3-13 for details)
Table 5-6. SBM-GEM-X2C(+) Ports
Port Description
RS-232 Compatible Serial PortThis port accepts an connector cable for uplink using RS-232 connection to a console.
RJ45 Ethernet PortsThese two ports accept a RJ45 connector for 1-Gbps uplink communications.
CX4 10-Gbps PortsThese two ports accept a CX4 10GBase-CX4 connectors for 10-Gbps uplink communications or for stacking.
SFP+ 10-Gbps PortThis port accepts a SFP+ Direct Attach connector or fiber with SFP+ transceiver for 10-Gbps uplink communications.
5-4

Chapter 5: Ethernet Modules
5-3 SBM-GEM-X3S+ 1/10-Gb Ethernet Switch ModuleThe SBM-GEM-X3S+ 1/10-Gigabit Ethernet switch module is a layer 2/3 Ethernet switch. It includes three 10-Gb/s uplink ports (SFP+), four 1-Gb/s uplink RJ45 uplink ports and twenty 1-Gb/s downlink ports for the SuperBlade's LAN interfaces. The Ethernet switch module has two internal Ethernet paths to the CMM(s). The switch is used to provide a connection between the Ethernet controller integrated on the mainboard and an external Ethernet device. This is a hot-pluggable module. See Figure 5-3, Table 5-7 and Table 5-8 for switch details.
Figure 5-3. SBM-GEM-X3S+ 1/10-Gigabit Ethernet Switch Module Ports & Indicators
Table 5-7. SBM-GEM-X3S+ 1/10-Gigabit Ethernet Switch Module Interface
Item Description
1 RS-232 (COM) Serial Port
2 Module Fault LED
3 “Initiation OK” LED
4 SFP+ 10-Gbps Uplink Ports
5 10-Gbps Uplink Port Status LEDs (3)
6 1-Gbps RJ45 Uplink Ports (4)
7 1-Gbps RJ45 Uplink Port Status LEDs (Link/Activity and Speed)
8 Module Release Handle
23 17
4
5
6 8
5-5

Superblade Network Modules User’s Manual
LED Indicators
LED indicators for the SBM-GEM-X3S+ 1/10-Gigabit Ethernet switch module are listed and described in Table B-2 of Appendix B.
Ports
The SBM-GEM-X3S+ 1/10-Gigabit Ethernet switch module contains several front-mounted ports as described below in Table 5-9.
Table 5-8. SBM-GEM-X3S+ 1/10-Gigabit Ethernet Switch Module Features
Feature Description
Chipset Broadcom BCM56314
Internal/External PortsTwenty 1-Gbps downlink portsExternal: Four 1-Gbps RJ45 uplink ports and Three 10-Gbps uplink ports (SFP+)
Bandwidth 104-Gbps non-blocking
Trunking Link aggregation support (Full 802.3 ad)
Jumbo Frame Support Up to 9KB
Remote Management Browser-based management or Command Line Interface (CLI)
ProtocolsSpanning Tree, Rapid Spanning Tree, Multiple Spanning Tree, IGMP snooping and 802.1x
Power Consumption ~30.6W
Operating SystemFirmware (see Section 3-4: Firmware for the 1/10 Gigabit and 10-Gigabit Ethernet Switch Modules on page 3-13 for details)
Table 5-9. SBM-GEM-X3S+ Ports
Port Description
RS-232 Compatible Serial PortThis port accepts an connector cable for uplink using RS-232 connection to a console.
RJ45 Ethernet PortsThese four ports accept a RJ45 connector for 1-Gbps uplink communications.
SFP+ 10-Gbps PortThese three ports accept a SFP+ Direct Attach connector or fiber with transceiver for 10-Gbps uplink communications.
5-6

Chapter 5: Ethernet Modules
5-4 SBM-GEM-002 1-Gb Ethernet Pass-through ModuleThe SBM-GEM-002 Gigabit pass-through module is a non-configurable pass through module that includes fourteen (14) 1-Gb/s uplink (RJ45) ports and fourteen 1-Gb/s downlink ports for the SuperBlade's LAN interfaces. This Ethernet module has two internal Ethernet paths to the CMM(s). The switch is used to provide a connection between the Ethernet controller integrated on the mainboard and an external Ethernet device.
Unlike the SBM-GEM-001 Gigabit Ethernet switch module, this is a pass-through module and is not configurable. With this module Blade 1 would be connected directly to port 1, Blade 2 to port 2 and so on. If you are only connected to 10 blades then ports 11 through 14 are not connected.
Temperature and voltage of the pass-through module are read through the CMM module. The LED’s of the pass-through for a blade are only lit when the blade is on. Like the SBM-GEM-001 Gigabit Ethernet switch module, this pass-through module is a hot-pluggable module. See Figure 5-4, Table 5-10 and Table 5-11 for switch details.
Figure 5-4. SBM-GEM-002 Gigabit Pass-through Module
NOTE: The SBM-GEM-002 Gigabit pass-through module must be connected to another Gigabit Ethernet switch module in order to operate. If you connect it to a 10/100 switch, it will not work.
Table 5-10. SBM-GEM-002 Gigabit Pass-through Module Interface
Item Description
1 Module Release Handle
2 RJ45 Ethernet Ports
3 Ethernet Port Status LEDs
2
3
1
2
5-7

Superblade Network Modules User’s Manual
5-5 SBM-XEM-002/M 10-Gb Ethernet Pass-through Module
The SBM-XEM-002/M, and the newer SBM-XEM0-002M 10-Gigabit pass-through modules are non-configurable pass through modules that includes 14 (fourteen) 10-Gb/s uplink (SFP+) ports and 14 10-Gb/s internal downlink (XAUI) ports for the SuperBlade's LAN interfaces.
The SBM-XEM-002/M 10-Gigabit pass-through module includes connectors and circuitry that allow the installation of an optional mini-CMM module (BMB-CMM-002). See the SuperBlade User’s Manual for information on the installation and operation of the mini-CMM module. The RJ45 connector is used for console connection to the mini-CMM module.
The SBM-XEM-002/M 10-Gigabit pass-through module must be installed in a double-wide slot in the enclosure. It is installed in a location that is alternately used for the InfiniBand switch module. See the SuperBlade User’s Manual for details.
Unlike the SBM-GEM-001 or SBM-GEM-X2C(+) Ethernet switch modules, this is a pass-through module, and just like the SBM-GEM-002 1-Gb Ethernet Pass-through Module model described above, it is not configurable.
With this module Blade 1 would be connected directly to port 1, Blade 2 to port 2 and so on. If you are connected to 10 blades then ports 11 through 14 are not connected.
Temperature and voltage of the pass-through module are read through the CMM module. The LED’s of the pass-through for a blade are only lit when the blade is on. Like the other switches, this pass-through module is a hot-pluggable module. See Figure 5-5, Table 5-12 and Table 5-13 for switch details.
Table 5-11. SBM-GEM-002 Gigabit Ethernet Pass-through Module Features
Feature Description
Internal/External PortsInternal: Fourteen 1-Gbps downlink ports / External: fourteen 1-Gbps RJ45 uplink ports
Remote Management NA
Protocols NA
Power Consumption ~30.6W
NOTE: For any blade to access the 10-Gigabit pass-through module, it must first have one of the Connect-X based add-on InfiniBand cards installed on its mainboard (AOC-IBH-XDS or AOC-IBH-XDD, AOC-IBH-XDS, AOC-IBH-XDD or AOC-IBH-XDS or AOC-IBH-XDD cards). See Appendix A for details on the AOC cards.
5-8

Chapter 5: Ethernet Modules
Figure 5-5. SBM-XEM-002/M 10-Gigabit Pass-through Module
NOTE: The SBM-XEM-002/M 10-Gigabit pass-through module must be connected to another 10-Gigabit Ethernet switch module in order to operate. If you connect it to a 10/100/1000 switch, it will not work.
Table 5-12. SBM-XEM-002/M 10-Gigabit Pass-through Module Interface
Item Description
1 Module Release Handles
2 10-Gbp/s Uplink SFP+ Ports
3 RJ45 Ethernet Port for conncection to console for mini-CMM
4 “Initiation OK” LED for mini-CMM
5 Reset Button for mini-CMM
Table 5-13. SBM-XEM-002/M 10-Gigabit Pass-through Module Features
Feature Description
Internal/External PortsInternal: Fourteen 10-Gbps downlink ports to internal 10-Gbps Mezzanine Add-on Card / External: fourteen 10-Gbps SFP+ uplink ports
Remote Management NA
Protocols NA
Power Consumption ~30.6W
2 3 4
1 5
5-9

Superblade Network Modules User’s Manual
5-6 SBM-GEP-T20 1-Gb Ethernet Pass-through Module for Twin-Blade Modules
The SBM-GEP-T20 Gigabit pass-through module is a non-configurable pass through module that includes twenty (20) 1-Gb/s uplink (RJ45) ports and twenty (20) 1-Gb/s downlink ports for the SuperBlade's LAN interfaces. This Ethernet module has an internal I2C path to the CMM. The pass-through module is used to provide a connection between the Ethernet controller integrated on the mainboard and an external Ethernet device.
Unlike the SBM-GEM-001 Gigabit Ethernet switch module, this is a pass-through module and is not configurable. With this module Blade 1 would be connected directly to port 1, Blade 2 to port 2 and so on. If you are only connected to 10 blades then ports 11 through 20 are not connected.
Temperature and voltage of the pass-through module are read through the CMM module. The LED’s of the pass-through for a blade are only lit when the blade is on. Like the SBM-GEM-001 Gigabit Ethernet switch module, this pass-through module is a hot-pluggable module. See Figure 5-6, Table 5-14 and Table 5-15 for switch details.
Figure 5-6. SBM-GEP-T20 Gigabit Pass-through Module
NOTE: The SBM-GEP-T20 Gigabit pass-through module must be connected to another Gigabit Ethernet switch module in order to operate. If you connect it to a 10/100 switch, it will not work.
Table 5-14. SBM-GEP-T20 Gigabit Pass-through Module Interface
Item Description
1 Module Release Handles
2 RJ45 Ethernet Ports
3 Ethernet Port Status LEDs
12 2
3
1
5-10

Chapter 5: Ethernet Modules
The SBM-GEP-T20 is a double-wide module. It installs in the upper left-hand slot in the rear of the SuperBlade enclosure. Only one SBM-GEP-T20 is supported per enclosure (see Figure 5-7).
Table 5-15. SBM-GEP-T20 Gigabit Ethernet Pass-through Module Features
Feature Description
Internal/External PortsInternal: Twenty 1 Gbps downlink ports / External: twenty 1 Gbps RJ45 uplink ports (fixed speed at 1 Gbps)
Remote Management NA
Protocols NA
Power Consumption ~30.6W
Figure 5-7. SBM-GEP-T20 Installed in Enclosure
5-11

Superblade Network Modules User’s Manual
5-7 SBM-XEM-X10SM 10-Gb Ethernet Switch ModuleThe SBM-XEM-X10SM 10-Gigabit Ethernet switch module is a layer 2/3 Ethernet switch. It offers advanced switching features and connection to 10-Gigabit Ethernet networks. Internally it connects to the SuperBlade through a one or two-port mezzanine add-on-card. Externally there are up to ten 10-Gb/s uplink connections (four only that function in the TwinBlade™ system). It also has two internal Ethernet paths to the CMM(s) to allow configuration, management, and control of the switch and its ports through a browser-based management interface. In addition to the Web-based GUI, it offers a CLI for enhanced flexibility in switch management and control. See Figure 5-8, Table 5-16 and Table 5-17 for switch details.
Figure 5-8. SBM-XEM-X10SM 10 Gigabit Ethernet Switch Module Ports & Indicators
Table 5-16. SBM-XEM-X10SM 10 Gigabit Ethernet Switch Module Interface
Item Description
1 Switch Fault Indicator LED
2 Switch Available Indicator LED
3 CMM Available Indicator LED
4 Reset Button
5 SFP+ 10-Gbps Uplink Ports
6 Module Release Handle
7 10-Gbps Uplink Port Link Up/Available LED
8 10-Gbps Uplink Port Link Activity LED
9 Switch Console USB Port
10 KVM for CMM Port
11 CMM Console RJ45 Port
12 Switch Console RJ45 Port
4 105 12
6 2 31 97 8 11
5-12

Chapter 5: Ethernet Modules
LED Indicators
LED indicators for the SBM-XEM-X10SM 10-Gigabit Ethernet switch module are listed and described in Table B-4 of Appendix B.
Ports
The SBM-XEM-X10SM 10-Gigabit Ethernet switch module contains several front-mounted ports as described below in Table 5-6.
Table 5-17. SBM-XEM-X10SM 10 Gigabit Ethernet Switch Module Features
Feature Description
Chipset Broadcom BCM56820
Internal/External PortsInternal: Twenty 10-Gbps downlink portsExternal: Four (TwinBlade) or Ten (Ten Blade) 10-Gbps uplink ports (SPF+)
Bandwidth 480-Gbps
Trunking Link Aggregation Support (Full 802.3 ad)
Jumbo Frame Support Up to 9KB
Remote Management Browser-based management or Command Line Interface (CLI)
ProtocolsSpanning Tree, Rapid Spanning Tree, Multiple Spanning Tree, IGMP snooping and 802.1x
Power Consumption
Operating SystemFirmware (see Section 3-4: Firmware for the 1/10 Gigabit and 10-Gigabit Ethernet Switch Modules on page 3-13 for details)
Table 5-18. SBM-XEM-X10SM Ports
Port Description
RS-232 Compatible Serial PortThis port accepts a connector cable for uplink using RS-232 connection to a console.
RJ45 Ethernet PortsThese two ports accept a RJ45 connector for 1-Gbps uplink communications.
USB Port This port is for a USB connector for switch console communications.
SFP+ 10-Gbps PortThis port accepts a SFP+ Direct Attach connector or fiber with transceiver for 10-Gbps uplink communications.
5-13

Superblade Network Modules User’s Manual
5-8 SBM-XEM-F8X4SM Converged Networking Switch Module
The Supermicro SBM-XEM-F8X4SM converged networking switch module combines 10-Gigabit Ethernet (DCB), Fibre Channel over Ethernet (FCoE) and Fibre Channel (FC) in a single optimized switch. It features a compact design that integrates both 10-GbE Data Center Bridging (DCB) external ports and Fiber Channel external ports for connectivity to both LAN and Storage Area Networks (SANs). It allows you to select a combination of internal and external ports for connectivity to Data Center resources (LAN) and storage including 10GbE, FC and FCoE. This module provides visibility of the VMs in the storage fabric through vHBA capable Supermicro AOC-XEM-iN2 CNA cards, and it provides a high performance low latency architecture supporting a combined 482-Gbps switching bandwidth in full duplex operation. This module provides a rich standard-based features at Layer 2 (Data Link) and Layer 3. Data link layer features include link aggregation to uplink switches, VLANs, QoS, ACLs, IGMP and multicast forwarding. At layer 3, it supports both static and dynamic routing.
See Figure 5-8, Table 5-16 and Table 5-17 for switch details.
Figure 5-9. SBM-XEM-F8X4SM 10 Gigabit Ethernet Switch Module Ports & Indicators
4 105 12
2 31 97 8 11
6
13
5-14

Chapter 5: Ethernet Modules
Table 5-19. SBM-XEM-F8X4SM 10 Gigabit Ethernet Switch Module Interface
Item Description
1 Switch Fault Indicator LED
2 Switch Available Indicator LED
3 CMM Available Indicator LED
4 Reset Button
5 SFP+ 10-Gbps Uplink Ports
6 SFP+ Fibre Channel (FC) Uplink Ports
7 10-Gbps Uplink Port Link Up/Available LED
8 10-Gbps Uplink Port Link Activity LED
9 Switch Console USB Port
10 KVM for CMM Port
11 CMM Console RJ45 Port
12 Switch Console RJ45 Port
13 Module Release Handle
Table 5-20. SBM-XEM-F8X4SM 10 Gigabit Ethernet Switch Module Features
Feature Description
Chipset Broadcom BCM56820
Internal/External Ports
Internal: Ten (10-blade enclosure) or Twenty (TwinBlade enclosure) 10-Gbps downlink portsExternal: Four (10-blade enclosure) or none (TwinBlade Blade) 10-Gbps uplink ports (SPF+)
Bandwidth 480-Gbps
Trunking Link Aggregation Support (Full 802.3 ad)
Jumbo Frame Support Up to 9KB
Remote Management Browser-based management or Command Line Interface (CLI)
Protocols
Priority-based Flow Control (PFC), Enhanced Transmission Selection (ETS), Data Center Bridging Exchange (DCBX), Spanning Tree, Spanning Tree, Rapid Spanning Tree, Multiple Spanning Tree, LACP (802.3ad), LLDP (802.1AB), Flow Control (802.3x), ACL, Port-based Network Access Control (802.1x), QoS, QoSx, Egress Queuing, Strict priority, Weighted Round Robin (WRR), Weighted Fair Queuing, IGMP snooping (v1 and v2), Support Unicast, Multicast and Broadcast
Power Consumption 124 Watts
Operating SystemFirmware (see Section 3-4: Firmware for the 1/10 Gigabit and 10-Gigabit Ethernet Switch Modules on page 3-13 for details)
5-15

Superblade Network Modules User’s Manual
LED Indicators
LED indicators for the SBM-XEM-F8X4SM 10-Gigabit Ethernet switch module are listed and described in Table B-4 of Appendix B.
Ports
The SBM-XEM-F8X4SM 10-Gigabit Ethernet switch module contains several front-mounted ports as described below in Table 5-6.
Table 5-21. SBM-XEM-F8X4SM Ports
Port Description
RS-232 Compatible Serial PortThis port accepts a connector cable for uplink using RS-232 connection to a console.
RJ45 Ethernet PortsThese two ports accept a RJ45 connector for 1-Gbps uplink communications.
USB Port This port is for a USB connector for switch console communications.
SFP+ 10-Gbps PortThis port accepts a SFP+ Direct Attach connector or fiber with transceiver for 10-Gbps uplink communications.
5-16
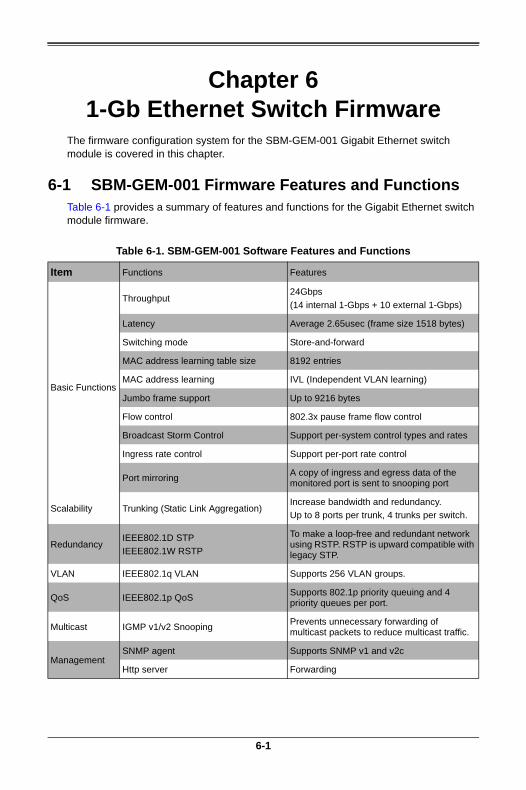
Chapter 6 1-Gb Ethernet Switch Firmware
The firmware configuration system for the SBM-GEM-001 Gigabit Ethernet switch module is covered in this chapter.
6-1 SBM-GEM-001 Firmware Features and FunctionsTable 6-1 provides a summary of features and functions for the Gigabit Ethernet switch module firmware.
Table 6-1. SBM-GEM-001 Software Features and Functions
Item Functions Features
Basic Functions
Throughput24Gbps
(14 internal 1-Gbps + 10 external 1-Gbps)
Latency Average 2.65usec (frame size 1518 bytes)
Switching mode Store-and-forward
MAC address learning table size 8192 entries
MAC address learning IVL (Independent VLAN learning)
Jumbo frame support Up to 9216 bytes
Flow control 802.3x pause frame flow control
Broadcast Storm Control Support per-system control types and rates
Ingress rate control Support per-port rate control
Port mirroringA copy of ingress and egress data of the monitored port is sent to snooping port
Scalability Trunking (Static Link Aggregation)Increase bandwidth and redundancy.
Up to 8 ports per trunk, 4 trunks per switch.
RedundancyIEEE802.1D STP
IEEE802.1W RSTP
To make a loop-free and redundant network using RSTP. RSTP is upward compatible with legacy STP.
VLAN IEEE802.1q VLAN Supports 256 VLAN groups.
QoS IEEE802.1p QoSSupports 802.1p priority queuing and 4 priority queues per port.
Multicast IGMP v1/v2 SnoopingPrevents unnecessary forwarding of multicast packets to reduce multicast traffic.
ManagementSNMP agent Supports SNMP v1 and v2c
Http server Forwarding
6-1

Superblade Network Modules User’s Manual
To configure the switch, select the switch you want in the SWITCH STATUS screen in the Web-based Management Utility. See the Web-based Management Utility User’s Manual for details.
A SWITCH STATUS screen will appear (Figure 6-1) in your browser.
Figure 6-1. Switch Status Screen
In this screen, either select WEB MANAGEMENT or type the IP address of the switch (usually 192.168.100.102) in the address field of your web browser. The SYSTEM MANAGEMENT screen shown in Figure 6-2 appears.
Figure 6-2. Switch System Management Screen
6-2

Chapter 6: 1-Gb Ethernet Switch Firmware
NOTE: You will see “BMB-GEM-003” on most of these screens. This the board model number for the SBM-GEM-001 switch and is sometimes used interchangeably with it in describing the product.
6-3

Superblade Network Modules User’s Manual
6-1 Port Status
The PORT STATUS screen provides a status overview of the switch’s 24 ports. As shown in Figure 6-3, it includes link, speed, duplex, flow control, jumbo frame and PVID. In this screen click on PORT on the left menu bar. The port status will show up. To retrieve and update to the latest status, click the REFRESH button.
The PORT column indicates the port number of the switch.
The LINK STATUS column shows the current link status (either up or down) for each port.
The SPEED DUPLEX column indicates the link speed and duplex status for each port when it is linked up. If the link is down, there is no status shown on SPEED DUPLEX.
The FLOW CONTROL column indicates that the state of flow control is either disabled or enabled for each port when it is linked up.
The JUMBO FRAMES column indicates that the state of jumbo frame support is either disabled or enabled for each port when it is linked up.
The PVID column shows the current default port VLAN ID for each switch port.
Figure 6-3. Port Status Screen
NOTE: In the figures BMB-GEM-003 is the number of the Gigabit switch board; it is not a separate model of switch.
6-4

Chapter 6: 1-Gb Ethernet Switch Firmware
Port VLAN ID (PVID)
The PVID is used in a port-based VLAN to allow assigning a port to belong to a VLAN. A VLAN can then be configured to be a group of member ports. This switch is an 802.1q tag-aware switch. If no VLANs are defined on the switch, every port will be assigned to a default VLAN which has VLAN ID 1. Each port will have PVID equal to 1.
If incoming frames are untagged, they will be tagged with the default PVID of the port on which they are received. The destination MAC address of the frame and the PVID will be used for forwarding decisions. An incoming tagged frame will be kept intact. The switch will use the VID in the frame and the destination MAC address for the forwarding decision. Look for a more detailed description in the VLAN section.
Jumbo Frames Support
To modify the jumbo frames support for all of ports, click on the EDIT OF JUMBO FRAME setting (as shown in Figure 6-3) to link to the JUMBO FRAME SETTING screen (Figure 6-4). Click the ENABLE JUMBO FRAME check box to enable/disable jumbo frame support.
Figure 6-4. Jumbo Frame Setting Screen
When a jumbo frame is enabled, the maximum length of a frame that can be forwarded by a switch is 9216. When the jumbo frame is disabled, the maximum length of a frame that can be forwarded by a switch is 1518.
Port Configuration
To modify the configuration of each port, click on the port number in the PORT STATUS screen (see Figure 6-3). The PORT CONFIGURATION screen appears (Figure 6-5). It is used to define speed and duplexing for a port when auto-negotiation is off. When auto-negotiation is on, this data is negotiated with the link partner.
6-5

Superblade Network Modules User’s Manual
Figure 6-5. Port Configuration Screen
Table 6-2. Port Configuration Screen Controls
Control Description
Port Specifies the port number to control.
Admin Enables or disables the port.
Auto Negotiation
Enables or disables auto-negotiation. When auto-negotiation is enabled, the port negotiates with the link partner and works out speed, duplex operation, and flow control. When auto-negotiation is disabled, port speed, duplex operation, and flow control is programmable by the user.
Duplex Speed Indicates duplex state and speed of the port.
Flow Control
Turns flow control on or off. When flow control of the port is on, it sends out a Pause frame or a Jam Packet if it is over-subscribed. When this port receives a Pause Frame or Jam Signal, it will postpone sending for a certain period to send out a frame by IEEE definition.
Default PriorityAssigns packet priority for packets arriving at the port without tagging. If the packet comes in with tag or priority-tag, the priority is retrieved from the priority field of the tag.
PVIDAssigns default port VLAN ID for the port. When the port receives a frame which is untagged or priority tagged (VLAN ID = 0), the PVID will be used for forwarding decision for these two kind of frame.
6-6
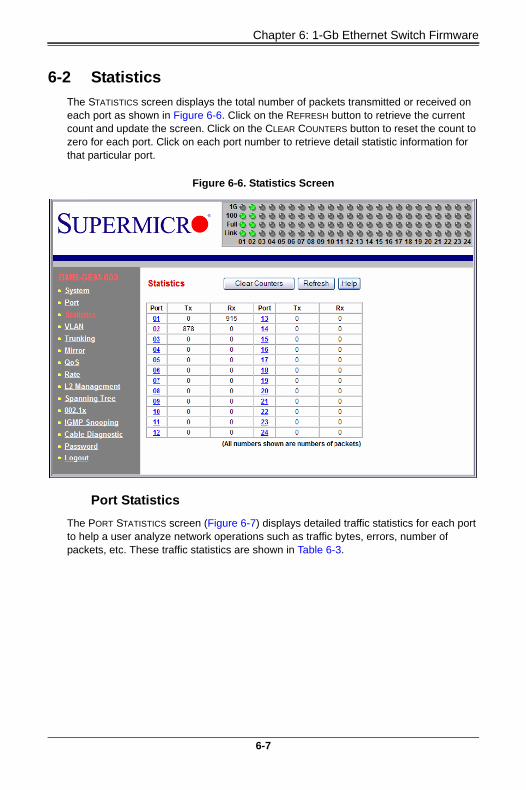
Chapter 6: 1-Gb Ethernet Switch Firmware
6-2 Statistics
The STATISTICS screen displays the total number of packets transmitted or received on each port as shown in Figure 6-6. Click on the REFRESH button to retrieve the current count and update the screen. Click on the CLEAR COUNTERS button to reset the count to zero for each port. Click on each port number to retrieve detail statistic information for that particular port.
Port Statistics
The PORT STATISTICS screen (Figure 6-7) displays detailed traffic statistics for each port to help a user analyze network operations such as traffic bytes, errors, number of packets, etc. These traffic statistics are shown in Table 6-3.
Figure 6-6. Statistics Screen
6-7

Superblade Network Modules User’s Manual
Figure 6-7. Port Statistics Screen
Table 6-3. Port Statistics Screen Controls
Control Description
TX Displays traffic information on outgoing frames.
Octets Indicates total octets transmitted.
UnicastPkts This indicates transmitted unicast packets.
NonUnicastPkts This indicates transmitted non-unicast packets.
Discards This indicates discarded packets.
Errors This indicates Excessive Collision packets.
QLength This indicates count of packets currently buffered.
RX Displays traffic information on incoming frames.
Octets Indicates total octets received.
UnicastPkts Indicates received unicast packets.
NonUnicastPkts Indicates received non-unicast packets.
Discards Indicates discarded packets.
6-8

Chapter 6: 1-Gb Ethernet Switch Firmware
ErrorsIndicates undersize/fragment/FCS error/oversized errors with good FCS packets.
SummaryDisplays traffic information by packet type, type of error and frame size range.
DropEventsIndicates events in which packets are dropped due to a lack of resources. This includes events where the receiving shared buffer is full, and events when a transmission failure is due to a late collision.
UnknownProtosIndicates received packets using unknown protocols, such as packets that are dropped due to reasons other than drop events and storm limits.
TotalRxMulticastPkts Indicates the total received multicast packets.
TotalRxBrodcastPkts Indicates the total received broadcast packets.
RxUndersizePktsIndicates received packets with a length that is less than the minimum packet size.
RxOversizePktsIndicates received packets with length more than the maximum packet size.
RxFragmentsIndicates received packets (length 10 ~ 63 bytes) with an invalid FCS or an alignment error.
RxJabbersIndicates received packets (invalid FCS or code error) that exceed the counter maximum size to the maximum received frame length.
TxCollisions Indicates the total transmitted collision packets.
RxCRCAlignErrIndicates received packets (invalid FCS) that have a length between 64 bytes and the counter maximum size.
Total Octets RxIndicates total number of octets of data received (excluding framing bits, but including FCS bytes).
Total Pkts RxIndicates total received packet count (including all bad packets, unicast, broadcast, multicast and MAC control packets).
64 Bytes Rx PktsIndicates received packets with a packet length that is less than or equal to 64 bytes.
65-127 Bytes Rx PktsIndicates received packets with a packet length that is between (includes) 65 ~ 127 bytes.
128-255 Bytes Rx PktsIndicates received packets with a packet length that is between (includes) 128 ~ 255 bytes.
256-511 Bytes Rx PktsIndicates received packets with a packet length that is between (includes) 256 ~ 511 bytes.
512-1023 Bytes Rx PktsIndicates received packets with a packet length that is between (includes) 512 ~ 1023 bytes.
1024-1518 Bytes Rx Pkts
indicates received packets with a packet length that is between (includes) 1024 ~ 1518 bytes.
Table 6-3. Port Statistics Screen Controls (Continued)
Control Description
6-9

Superblade Network Modules User’s Manual
6-3 VLAN
Virtual LAN (VLAN) is a technology used to create several independent logical networks in a physical network. Hence, it reduces the size of the broadcast domain in a network. Packets are forwarded within the same VLAN. It can also be used to combine several network segments into a same group of networks that appear as a single LAN to create a flexible and extensible LAN network system. The VLAN screen is shown in Figure 6-8.
The switch supports an 802.1Q tagging VLAN. All packets entering the port of a switch only can be forwarded to a port that is a member of same VLAN. The ingress untagged frames are tagged by a per-port default tag (PVID). The forwarding decision is based on this assigned default PVID. If the ingress frames are 802.1Q tagged, the port won’t alter the frames but will keep the frame’s VLAN information intact. Tagged frames are forwarded according to a VID contained within the tag.
The switch also supports ingress filtering. The switch will examine the VLAN information in the incoming packets header to determine whether to drop or forward the packets. If the incoming frame has tagged VLAN information, the ingress port will check itself to see if it is a member of the tagged VLAN. If it is not, the frame will be dropped. If it’s a member of the tagged VLAN, then it will check the destination port to see if it is a member of the tagged VLAN. If not, the frame is dropped. If the destination is a member
1519-9216 Bytes Rx Pkts
indicates received packets with a packet length that is between (includes) 1519 ~ 9216 bytes.
1519-9216 Bytes Tx Pkts
indicates transmitted packets with a packet length that is between (includes) 1519 ~ 9216 bytes.
Figure 6-8. VLAN Screen
Table 6-3. Port Statistics Screen Controls (Continued)
Control Description
6-10

Chapter 6: 1-Gb Ethernet Switch Firmware
of the VLAN, the frame is forwarded to the destination port. If the incoming frame is not tagged with VLAN information, the ingress port will use PVID as the VLAN ID. If the destination port is not in the same VLAN, the frame is dropped.
The switch is initially configured to have one VLAN and its VID is 1. This VLAN is called the default VLAN. By default, all ports are initially assigned to the default VLAN.
Frames can not be forwarded across VLANs. Frames, whether they are unicast, multicast or broadcast, cannot flow from one VLAN to another VLAN unless there is a VLAN routing device to bridge them.
The switch also allows a user to configure the egress packets to either tagging or untagging. The untagging feature of 802.1Q VLAN allows a user to hook up the port to a legacy switch that doesn’t recognize 802.1Q tagging header in the packet. Also, the tagging feature allows VLANs to span into multiple 802.1Q compliant switches through physical connections between switches.
6-11

Superblade Network Modules User’s Manual
6-4 Configuring a Static VLAN
The switch currently supports static VLANs only. To configure the VLAN, click on the VLAN folder at the left-hand side bar. The IEEE802.1Q VLAN screen should appear as shown in Figure 6-8. It lists the entire current VLAN configuration and also allows a user to create a new VLAN or modify port membership of a VLAN. The MEMBER PORTS indicates the number of member ports of the VLAN. There are two color symbols for each port to indicate tagging or untagging of packets egress from the port:
• Orange: Indicates a tagged egress packet
• Teal: Indicates an untagged egress packet
Creating a New VLAN
1. Click on the CREATE NEW VLAN button. The screen as shown in Figure 6-9 should appear.
2. Assign a new VLAN ID, then click on the icon under each port to change the member state. There are three states to choose from: untag egress packets, tag egress packets and not member of a VLAN.
Figure 6-9. Creating a New VLAN
6-12

Chapter 6: 1-Gb Ethernet Switch Firmware
3. Click on the CREATE button to create the new VLAN. A new VLAN is shown in Figure 6-10.
4. If you want to remove this VLAN, click on the REMOVE THIS VLAN button. Click on DISPLAY ALL VLAN to list all of current VLAN configuration.
5. To change the port member state or remove a VLAN, select the VLAN either from the VLAN ID drop down menu or by clicking on the VLAN ID in the table in Figure 6-8. This screen shows the current member state of the selected VLAN. Users can modify the port member state, apply a change or remove the VLAN.
6-5 Trunking
Trunking aggregates multiple physical ports link into a single trunk to provide a single logical high-speed pipeline link. This is useful for switch-to-switch, switch-to-server and switch-to-router applications. The SuperMicro Gigabit Ethernet switch supports static type link aggregations. It uses a distribution algorithm to balance traffic between trunk members. This aggregates the bandwidth of the trunk. The switch considers a trunk as a single port entity regardless of the trunk composition.
The switch supports up to four separate trunks. Each trunk consists of 2 to 8 ports. A port in one trunk cannot simultaneously be in another trunk. Link aggregation is supported only on point-to-point links with the MAC operating in full duplex mode. All links in a trunk must operate at the same data rate.
The links within a trunk should have an equal amount of traffic to achieve maximum efficiency in a multiple-link trunk. Thus, some sort of load balancing among the links in a trunk is employed. One requirement for load balancing is that the frames being
Figure 6-10. New VLAN Screen
6-13

Superblade Network Modules User’s Manual
transmitted must not be out of order. The switch performs load balancing based on a distribution algorithm that used the following information to assign conversation to ports:
• MAC source address
• MAC destination address
• MAC source address + destination address
The user can choose one of the distribution criteria from the configuration screen as shown in Figure 6-11.
Configuring the Trunk
1. Click on TRUNKING folder on left-hand side bar to bring up the TRUNK SETTING screen, as shown in Figure 6-11.
2. Click on the TRUNK ID drop down list to select the trunk group to which you want to add port member.
3. Click on the PORT drop down list to select the port number which you want to add to the selected trunk.
4. Click on the ADD button to add it in. The port number should show up under the TRUNK GROUP MEMBER in the table. Click the DEL button to delete a port member from the selected trunk.
5. Select one of the distribution criteria for the load balancing algorithm.
6. Then, click APPLY button to update and save to a new setting.
Figure 6-11. Trunking Screen
6-14

Chapter 6: 1-Gb Ethernet Switch Firmware
6-6 Mirroring
The switch supports port mirroring. A copy of the egress (transmit) data and the ingress (receive) data of the mirrored (monitored) port is sent to the mirroring (snooping) port. A user can attach a monitoring device to the mirroring port, such as a sniffer or an RMON probe to view the traffic at the mirrored port. This is useful for network monitoring and troubleshooting.
The switch allows for only one mirrored port at any given time. Port mirroring is independent from L2 switching. The receive mirrored port still forwards the frame to the mirroring port, even if the frame is eventually dropped.
To configuring port mirroring, click on the MIRROR folder in the left-hand side bar. The MIRROR SETTING screen should appear as in Figure 6-12.
Figure 6-12. Port Mirroring Screen
Table 6-4. Port Mirroring Screen Controls
Control Description
Mode This enables or disables mirroring. Select L2 to enable the mirroring.
Mirror This specifies a Mirror port to which ingress and egress traffic will be mirrored.
Mirror To This specifies the mirrored-to port.
Apply This applies the mirror setting to the system.
6-15

Superblade Network Modules User’s Manual
6-7 Quality of Service
Quality of Service (QoS) helps a network user to reserve a guaranteed bandwidth for some critical application functions that require a high bandwidth and high priority. Applications such as video, audio streaming, VoIP and video conferencing must have a certain amount of bandwidth to maintain their operation correctly. QoS allows user to prioritize network traffic, thereby providing better services for those applications with a higher priority.
The switch supports 802.1p priority queuing QoS based on the priority bit in a frame’s VLAN header. The 802.1p priority bit, if present in the frame, specifies the priority of the frame during forwarding. The 802.1p standard uses eight (0-7) priority levels for network traffic. Priority level 7 is the highest priority. Priority level 0 is the lowest level.
Priority Queues
Four priority queues are provided for each port. The priority queues are labeled from 3 to 0. Priority queue 3 has highest priority while queue 0 has lowest priority. The switch transmits the frames based on the priority of the queue, not the priority tag. Frames in a higher priority queue are served more often than frames in a lower priority queue.
User configurable mapping (priority queue assignment) between the eight 802.1p priority classes and the four priority queues is provided. If the incoming frame is untagged, the switch uses the priority field in the per-port default priority (configurable in the PORT folder) to assign a frame to a priority queue. If the incoming frame is tagged or priority-tagged, the switch uses the priority field in the incoming frame to assign the frame to a priority queue.
The scheduling for transmission among the four priority queues is accomplished by one of the two user-configurable schemes: strict (fixed) priority and weighted round-robin.
For strict priority based scheduling, the packets which were put in the higher priority queue are transmitted first. If there are multiple frames with different priority tags in the same priority queue, the frame with higher priority level is transmitted first. After all frames in the higher priority queue have been transmitted, the frames in the lower priority queue will start transmitting.
For the weighted round-robin based scheduling, the number of packets served in the priority queue is determined by the weight number. After those packets are transmitted, the service moves to transmit the packets in the next queue. Therefore, a higher priority queue should have a higher weight number than a lower priority queue. The weight number is from 1 to 15 for the switch. If each queue has same weight number, then each queue has an equal opportunity to transmit frames just like in round-robin queuing.
To configure the QoS, click the QOS folder on the left-hand side bar. It should display as shown in Figure 6-13.
The QOS SETTING sets the priority relationship between the four queues, selects the scheduling method for those queues, associates packets of specific priorities to specific queues, and specifies a “weight” for each queue.
6-16

Chapter 6: 1-Gb Ethernet Switch Firmware
Figure 6-13. QoS Setting Screen
Table 6-5. QoS Setting Screen Controls
Control Description
Scheduling MethodThis specifies one of the two scheduling methods (Strict and Weighted Round-Robin) for the queues.
Queue [0:3] Queue [0:3] prioritizes the four queues. Queue 0 is the lowest priority queue and queue 3 is the highest priority queue. Packets in queue 3 are served more often than packets in queue 0.
Priority
This indicates packet priority. This value is retrieved from the priority tag field, with values from 0 to 7. 0 indicates the lowest priority and 7 indicates the highest priority. Click on the radio button to send packets of a specific priority to a particular queue.
WeightThis indicates the weight (number of packets) to be served in the queue before moving to serve the next queue. A high priority queue should have a higher weight than a low-priority queue.
6-17

Superblade Network Modules User’s Manual
6-8 Rate Control
The switch supports per-port rate control. When the data rate of the incoming frame for a particular port exceeds a selected rate, the excess frame traffic is subject to packet drops or flow control, depending on the per-port flow control configuration in the PORT folder. If the flow control of a particular port is enabled, then the switch uses flow control to inhibit any excess traffic. If the flow control is disabled, the excess frames will be dropped.
To configure the ingress rate limit for a port, click on RATE in the left-hand side bar. The RATE LIMIT AND STORM CONTROL screen appears as Figure 6-14.
The screen shows the Ingress Rate (in kilobits per sec) for all ports. Click on the port number to control the ingress rates for the port. There are eight different levels to select: no limit (1Gbps), 256Kbps, 1Mbps, 4Mbps, 16Mbps, 64Mbps, 128Mbps or 512Mbps. The STORM CONTROL indicates the current status of storm control.
A traffic storm happens when broadcast, multicast or unknown unicast packets flood the network, which will degrade the network performance. The storm control monitors the traffic of an incoming particular type of frame (configured by the user) and limits traffic to a user configurable rate level (threshold). The storm rate threshold is counted in number of packets per second (pps). If the traffic of a particular frame type exceeds the threshold during one second, all the rest of that type of frame will be dropped before the end of that second.
The switch provides configuration to assign storm control type and rate limitations to the entire system.
Figure 6-14. Rate Limit and Storm Control Screen
6-18

Chapter 6: 1-Gb Ethernet Switch Firmware
To configure storm control, click STORM CONTROL link in the RATE LIMIT AND STORM CONTROL screen (Figure 6-14). The STORM CONTROL screen appears as shown in Figure 6-15.
6-9 L2 Management
L2 management provides a way to add, delete, and look up MAC addresses in the L2 address table. The switch supports 8192 L2 address table entries, each specifying a MAC address, VLAN ID, destination port number, trunk ID and Rtag. The switch supports store-and-forward mode switching.
After a frame is received, its source MAC address (MACSA) and destination MAC address (MACDA) are retrieved. Depending on the port state, the MACSA and port number may be used to dynamically update the L2 address table. The MACDA may be used to determine the frame’s destination port. User can also statically add a MAC address to the L2 address table.
To add a static entry into the L2 ADDRESS table, click on the ADD link on the L2 ADDRESS MANAGEMENT screen as shown in Figure 6-16.
Figure 6-15. Storm Control Screen
Table 6-6. Storm Control Screen Controls
Control Description
Storm Control TypeThis selects the type of the packet storm. The figure below shows all available options: Broadcast only, Broadcast and multicast, Broadcast unknown unicast and Broadcast, multicast, and unknown unicast.
Storm Control RateThis selects a rate (packets-per-second) for storm control. The figure below shows all available options: 10 pps 100 pps 1000 pps 5000 pps 10000 pps and 15000 pps.
6-19

Superblade Network Modules User’s Manual
To remove the specified static MAC address from the table, click the DELETE link for that MAC address as shown in Figure 6-17 when there are static entries in the table.
To search for a MAC address to see if it exists in the table or not, enter the MAC ADDRESS and VID, then click on LOOKUP button. If the MAC address is in L2 ADDRESS table, whether it is a static or a dynamic MAC address, the result will be displayed.
To show all of MAC address in the L2 table, click the SHOW link next to SHOW L2 ADDRESSES.
Figure 6-16. L2 Management Screen
Figure 6-17. L2 Management: Current Entries Screen
6-20

Chapter 6: 1-Gb Ethernet Switch Firmware
6-10 Spanning Tree
The Spanning Tree Protocol (STP) helps to detect and prevents loops from occurring on a switched or bridged network. When multiple paths exist on a network, STP will configure the network to use the most efficient path between network devices. All other paths are forced into a blocked standby state. If the active path fails, then STP will automatically select another path to become the active path on the network to sustain normal network operations. An active path is selected by comparing path costs defined on each path. The path with the lowest cost will be selected.
The switch supports IEEE802.1d Spanning Tree Protocol and IEEE802.1w Rapid Spanning Tree Protocol (RSTP). The Rapid Spanning Tree Protocol significantly reduces the convergence time by assigning port roles and by determining the active topology. A reconfiguration of the spanning tree can occur in less than one second. The RSTP is backward compatible with legacy devices running IEEE802.1d STP and serves as an STP device when an STP device is present in the network.
Bridge Protocol Data Unit (BPDU)
The spanning tree is built by obtaining switch information by exchanging Bridge Protocol Data Unit (BPDU) packets among the participating switches. When RSTP is enabled for a switch, it will generate a BPDU and periodically forward it out through each port on the switch. The interval is configurable through the Hello Time, which is set to a two second default. This enables the switch to keep track of network topology changes and enable or disable ports as required.
The BPDU contains the information about the transmitting switch and its ports including MAC address, bridge priority, port priority and port path cost. The BPDU packet is sent out by using the unique MAC address of the port itself as a source address, and the destination address of the STP multicast address 01:80:C2:00:00:00.
There are three types of BPDUs:
• Configuration BPDU – for spanning tree computation
• Topology Change Notification (TCN) BPDU – announces changes in network topology.
• Topology Change Notification Acknowledge (TCA) BPDU
The major operation of the spanning tree protocol includes a root bridge election, finding paths to a root bridge, determining the least cost path to root and disabling all other root paths. When a RSTP enabled switch is turned on, it automatically assumes that it is the root bridge in the spanning tree. The software in the switch will elect a switch as the root bridge based on the Bridge ID in the received BPDU. The Bridge ID is an 8-byte field which combines a high order two-byte bridge priority number and a lower order six-byte switch MAC address. The switch with the lowest Bridge ID will be elected as the root bridge.
All RSTP participating switches will use an algorithm to determine how close they are to the root bridge, which is known as Path Cost. The path with lowest cost will be selected as the active path. All others will be blocked (standby). TCN packets are injected into the network by a non-root switch and propagated to the root. Upon receipt of the TCN, the
6-21

Superblade Network Modules User’s Manual
root switch will set a Topology Change flag in its normal BPDUs. This flag is propagated to all other switches to instruct them to rapidly age out their forwarding table entries.
Port Transition State
When a device is connected to an RTSP or STP enabled switch port for the first time, it will not immediately start to forward data. Instead, it will go through a number of states while it processes BPDUs and determines the network topology.
There are five port states in the legacy 802.1d STP: disabled, blocking, listening, learning and forwarding. The RSTP combines the disabled, blocking and listening states used in 802.1d STP and creates a single state: Discarding. Table 6-7 lists the comparison of port states between 802.1d STP and 802.1w RSTP.
RSTP Port Roles
RSTP will assign port roles for each port during the process receiving the BPDUs. Based on its port role, a port can either send or receive BPDUs and forward or block data traffic.
• Root – the port that provides the lowest cost path when the switch forwards packets to the root switch.
• Designated – the port closest to the root switch and forwarding traffic toward the root switch and sending BPDUs in a link segment. Each designated port is in a forwarding state.
• Alternate – this port provides an alternate path to the root bridge. This path is different than using the root port. The alternate port is in a blocking state.
• Backup – the port provides a backup/redundant path to a link segment to which another switch port already connects. This is a special case when two or more ports of the same switch are connected together.
• Disabled - Not a strictly part of RSTP, a network administrator can manually disable a port.
To configure the RAPID SPANNING TREE, click the SPANNING TREE folder on the left-hand side bar. There are two portions to configure: RSTP SWITCH SETTINGS and RSTP PORT SETTINGS, as shown in the RAPID SPANNING TREE screen (Figure 6-18).
Table 6-7. Comparison of Port States
State Displayed 802.1d STP 802.1w RSTP
Discarding Disabled Discarding
Discarding Blocking Discarding
Discarding Listening Discarding
Learning Learning Learning
Forwarding Forwarding Forwarding
6-22

Chapter 6: 1-Gb Ethernet Switch Firmware
Figure 6-18. Rapid Spanning Tree Screen
The RSTP SWITCH SETTINGS allows the user to control RSTP parameters from the bridge point-of-view. ROOT STATUS shows status of the root bridge. BRIDGE SETTING shows the current bridge setup.
To turn on the Rapid Spanning Tree Protocol (RSTP), check on the ENABLE RSTP dialog box and click on the APPLY GLOBAL SETTINGS button.
6-23

Superblade Network Modules User’s Manual
Root Status
The settings for ROOT STATUS are shown below:
• Designated Root Bridge – The bridge identifier of the root of the spanning tree is determined by the RSTP protocol as executed by this node. The bridge identifier value is used as the Root Identifier parameter in all configuration Bridge PDUs originated by this node.
• Max Age – This indicates the maximum age of the root bridge. This is the maximum age of spanning tree protocol information learned from the network on any port before it is discarded, in units of hundredths of a second. This is the actual value that this bridge is currently using.
• Hello Time – This indicates the amount of hello time of the root bridge. Hello time is the amount of time between the transmission of configuration Bridge PDUs by this node on any port when it is the root of the spanning tree or trying to become so, in units of hundredths of a second.
• Forward Delay – This indicates the amount of forward delay of the root bridge. Forward delay is a time value, measured in units of hundredths of a second, which controls how fast a port changes its state. The value determines how long the port stays in each of the listening and learning states, which precede the forward state. This value is also used to age all dynamic entries in the forwarding databases when a topology change has been detected and is underway.
Bridge Setting
Settings for Bridge Setting are shown below:
• Priority – This configures the priority of the current bridge.
• Max Age – This configures the maximum age of the current bridge. This is the maximum age of spanning tree protocol information learned from the network on any port before it is discarded, in units of hundredths of a second. This is the actual value that this bridge is currently using.
• Hello Time – This indicates the amount of hello time of the current bridge. Hello time is the amount of time between the transmission of configuration Bridge PDUs by this node on any port when it is the root of the spanning tree or trying to become so, in units of hundredths of a second.
• Forward Delay – This indicates the amount of forward delay of the current bridge. Forward delay is a time value, measured in units of hundredths of a second, which controls how fast a port changes its state. This value determines how long the port stays in each of the listening and learning states, which precede the forward state. This value is also used to age all dynamic entries in the forwarding databases when a topology change has been detected and is underway.
6-24

Chapter 6: 1-Gb Ethernet Switch Firmware
RSTP Port Settings
These settings control and monitor the port-based spanning tree status.
• Participate – This specifies if the RSTP is enabled or not for the selected port.
• Cost – Displays the cost of this port. “Cost” means the contribution of this port to the path cost of paths towards the spanning tree root which include this port.
• Priority – Displays the priority of this port. This is the value of the priority field contained in the first octet of the Port ID.
• Edge – This indicates if this port is the edge port. Once configured as an edge port, the port immediately transitions to the forwarding state. It is available only when the port is directly connected to an end terminal (or a file server) that has no influence on the spanning tree configuration. Since ports 11 to 24 are connected to blade server NIC ports, all of those ports can be configured as an Edge port.
• P2P – This indicates if this port is a point-to-point link. If you connect a port to another port though a point-to-point link and the local port becomes a designated port, it negotiates a rapid transition with the other port to ensure a loop-free topology.
• Status – This displays the RSTP port status.
• Role – This displays the role of this port.
To modify the PORT SETTINGS for each port, click on the EDIT link next to PORT SETTING. The RAPID SPANNING TREE - PORT SETTINGS screen (Figure 6-19) will appear.
Select a group of port numbers that you want to configure. Setting the COST to zero or checking AUTO will automatically set the default value depending on the link speed. The default cost is 20000 for a Gigabit port and is 100000 for a 100Mbps port.
Figure 6-19. Rapid Spanning Tree Port Settings
6-25

Superblade Network Modules User’s Manual
6-11 IEEE 802.1x
IEEE 802.1x is a client-server based access control and authentication protocol that restricts unauthorized user devices from connecting to the LAN through publicly accessible ports. This port-based access control is accomplished by using a RADIUS server that is connected to a gigabit switch management port to authenticate client users trying to access a network through the switch. The gigabit switch will relay Extensible Authentication Protocol over LAN (EAPoL) packets between the user client and the RADIUS server. The 802.1x protocol consists of three components: client, authenticator and authentication server.
The Authentication Server is a remote device that runs the RADIUS server program (Windows 2000/2003 IAS™, freeRADIUS™ from open source). The role of the Authentication Server is to certify the identity of a client attempting to access the network. By exchanging secure information between the RADIUS server and the client through EAPoL packets, the Authentication Server will inform the switch whether or not the client is granted access to the LAN through the connected port.
The client is a workstation that wishes to access the network through a connected switch port. All workstations have to run a program (supplicant) that is compliant with the 802.1x protocol. Microsoft Windows XP™ and Vista™ should have this. A user can also install another third party package, such as Odyssey® from Funk Software®.
When the GLOBAL RADIUS SETTING and SET STATUS of an individual port are enabled, that port will initially be placed into an unauthorized state. The client will initiate negotiations by sending an EAPOL START packet.
There are several EAP authentication methods available in Microsoft Windows XP, such as EAP-MD5, EAP-TLS and EAP-PEAP. Currently, the gigabit switch only supports EAP-MD5 for 802.1x authentication.
• PEAP-MS-CHAP v2 uses password-based credentials and requires computer certificates on the RADIUS servers.
• EAP-TLS uses certificate-based credentials and requires user and computer certificates on the wire’s client computers and computer certificates on the RADIUS servers.
• EAP-MD5 (Message Digest 5) Challenge Handshake Authentication Protocol (MD5 CHAP), which uses passwords.
Wiring for 802.1x
The EAPOL packets are handled by a management processor in the switch. The processor communicates with the outside world through three ports. Two ports (eth0 and eth1) are connected to the CMM module's Ethernet port and the third port (eth2) is connected to all 24 switching ports. Only one port is enabled at any time. The regular configuration setup switch is managed through the CMM Ethernet port. Thus, for regular deployment, the RADIUS server should be located where it can be reached from the CMM Ethernet port.
6-26

Chapter 6: 1-Gb Ethernet Switch Firmware
802.1x Configuration
To configure 802.1x port based access control, click on the 802.1X folder in the left-hand side bar. The 802.1X configuration should display as shown in Figure 6-20. Check the GLOBAL RADIUS SETTING dialog box to enable 802.1x port based access control.
• Radius Server IP Address – This indicates the IP address of the RADIUS server.
• UDP Port Number – This specifies the UDP port number of the EAPOL control frame. 1812 is the default UDP port number. If the RADIUS server can’t recognize them, other numbers can be used.
• Shared Secret – This is a 16-character string used by the RADIUS server as a password to identify EAPOL control frames.
The PORT AUTHENTICATION SETTINGS allows you to enable or disable authentication for individual ports. It also displays the results when a port is enabled for authentication.
• Set Status – This enables or disables port authentication. ENABLE PORT AUTHENTICATION STATUS means a port should be authorized by a RADIUS server to forward traffic. No traffic is forwarded if it is unauthorized. No authentication process is required for those ports in disabled status; traffic can be forwarded normally.
• Show Client MAC – This displays the last client in the MAC address who sent out the EAPOL control frame of the port.
Figure 6-20. 802.1x Configuration Screen
6-27
Superblade Network Modules User’s Manual
• Authorization – This displays the authentication status of an enabled port. It includes the following status:
• In Progress – This indicates that the authentication is still in progress. Traffic is not forwarded before authentication is verified.
• Yes indicates the port access is authorized.
• No indicates the port access is not authorized.
• N/A means no authentication required.
6-12 IGMP Snooping
IP multicast is often used to distribute video/audio multimedia data over the network. The layer 2 switch will flood multicast frames to all of ports of switch, which wastes a lot of unnecessary network bandwidth. IGMP is a standard defined in RFC1112 for IGMPv1 and in RFC2236 for IGMPv2. IGMP specifies how a host can register a router in order to receive specific multicast traffic. A layer 3 switch usually supports Internet Group Management Protocol (IGMP) to manage multicast groups by sending and processing IGMP packets. To prevent the unnecessary flooding, the gigabit layer 2 switch can enable the IGMP snooping function to control how IP multicast packets are forwarded to required ports by monitoring IGMP queries and response packets generated by layer 3 switches or the IGMP querier.
Currently, the gigabit switch supports IGMP snooping for IGMP v1/v2 packets. In the real network setup, the switch is seated between the Multicast Router/Server and the host. The Multicast Router/Server will periodically send an IGMP v2 query packet and the host will respond with an IGMP v2 report packet if the host is in the same multicast group. When the host wants to go away, it can send an IGMP v2 Leave packet. The switch will remove the connected port number from the multicast group entry of a table. If the host is just silently removed, then the switch will clean it from table when the timer expires.
Figure 6-21 shows the IGMP SNOOPING configuration screen. Table 6-8 describes each configuration item.
6-28

Chapter 6: 1-Gb Ethernet Switch Firmware
Figure 6-21. IGMP Snooping Screen
6-29

Superblade Network Modules User’s Manual
6-13 SNMP
The SNMP agent in the gigabit switch supports SNMP v1 and v2c. It also supports the following MIB:
• RFC1213 MIBII with standard sets which include system, interfaces, IP, ICMP, TCP, UDP, Dot3, and SNMP.
• RFC2011 SNMPv2 MIB for IP using SMIv2
• RFC2665 EtherLike MIB
Table 6-8. IGMP Snooping Screen Controls
Control Description
Robustness Variable
This allows tuning for the expected packet loss on a subnet. If a subnet is expected to be lossy, the Robustness Variable may be increased. IGMP is robust to (Robustness Variable-1) packet losses. The Robustness Variable must not be 0, and should not be 1. The default value is 2.
Query Interval
This is the interval between general queries sent by the querier. The default interval is 125 seconds. By varying the [Query Interval], an administrator may tune the number of IGMP messages on the subnet; larger values cause IGMP queries to be sent less often.
Query Response Interval
This is the maximum response time inserted into the periodic general queries. The default value is 100 (10 seconds) By varying the query response interval, an administrator can tune the bursting of IGMP messages on the subnet; larger values make the traffic less bursty, as host responses are spread out over a larger interval. The number of seconds represented by the query response interval must be less than the query interval.
Last Member Query Interval
This is the maximum response time inserted into group-specific queries sent in response to Leave Group messages, and is also the amount of time between group-specific query messages. The default value is 10 (1 second). This value may be tuned to modify the “leave latency” of the network. A reduced value results in reduced time to detect the loss of the last member of a group.
Last Member Query Count
This is the number of Group-Specific Queries sent before the router assumes there are no local members.Default: the Robustness Variable.
Enable IGMP Snooping Feature
This is used to enable the IGMP snooping feature.
Router Ports This specifies ports to which IGMP routers were connected.
6-30

Chapter 6: 1-Gb Ethernet Switch Firmware
6-14 UpLink Failure Tracking (ULFT)
Uplink Failure Tracking (ULFT) feature is provided to support network adapter Teaming (Windows Systems) or Channel Bonding (Linux Systems) on SuperBlade servers.
Installing two GbE switch modules can have additional connectivity to allow increased network bandwidth, redundancy, and/or fault tolerance. The connection between internal ports of the switch and each LAN port of the server blades is hardwired through the middle plane. The link will not be dropped unless either switch's internal port or the server blade's LAN port fails.
By enabling the ULFT feature with proper pair configuration, a failover event can be triggered in the Teaming or Channel Bonding program when all of a switch's external uplink member ports fail. The switch automatically enables the internal downlink ports once one of the uplink ports in the configured pair returns to service.
To use ULFT, you must configure a Failure Tracking Pair and enable the ULFT feature. A Failure Tracking Pair consists of uplink and downlink ports. The uplink tracking member contains at least one of the external ports: port 1 to port 10. The downlink tracking member contains at least one of the internal ports: port 11 to port 24.
If Trunking is enabled on the external uplink ports, then all of the trunk member ports should be configured as uplink members of a tracking pair. The link to the configured internal downlink member ports is disabled when all of the trunking uplink member ports fail. Figure 6-22 shows the UPLINK FAILURE TRACKING CONFIGURATION screen. Table 6-9 describes each configuration item.
For example, if your SuperBlade has two blade servers installed on slot 1 and slot 3,then each blade has two LAN ports, one connected to the internal port of the upper GbE switch and the other one connected to the internal port of the bottom GbE switch. To implement switch redundancy, you need to have two GbE switches installed. Each of these GbE switches should enable the UpLink Failure Tracking feature and have the exact same proper configuration as shown in Figure 6-22.
The pair configuration in this example defines the ULFT for blade 1 and blade 3. The external port 5 of each switch is connected to an external third party switch through an Ethernet cable. This assumes that the Network Adapter Teaming or Channel Bonding has a proper configuration and is running on each of the blades.
If one of the external Ethernet cables is broken or the third party switch port to which the cable connects fails, then one of the SuperBlade GbE switches will detect a link drop on its external port 5 and turn down the link on its internal ports 11 and 13. The Teaming or Channel Bonding software running on both of these blades then detects a link drop on one of its LAN ports and switches to another LAN port automatically. This allows network traffic to go through another GbE switch.
NOTE: By dafault, the switch’s ULFT feature is disabled. The link status on the external uplink ports does not affect the link status of internal downlink ports.
6-31

Superblade Network Modules User’s Manual
Note that ULTF will only drop an internal link from the blade to the switch if all of the (external) uplinks defined for that blade have failed (or been disabled) on that switch. As long as one or more of uplinks on a particular switch (that have been defined for a particular downlink) is active, the blade and switch will keep the internal link active.
Figure 6-22. Uplink Failure Tracking Configuration Screen
Table 6-9. Uplink Failure Tracking Configuration Screen Controls
Control Description
Enable UpLink Failure Tracking
Enables/Disables the UPLINK FAILURE TRACKING feature.
Modify Uplink MemberSelect the pair ID and uplink port number to add/delete to/from uplink member of a pair.
Modify Downlink MemberSelect the pair ID and downlink port number to add/delete to/from downlink member of a pair.
Uplink Track Member This column defines member ports of an uplink in a ULFT pair.
Downlink Track Member This column defines member ports of a downlink in a ULFT pair.
6-32

Chapter 7 Layer 2/3 Ethernet Switch FirmwareThis chapter is provided to help you quickly get started in using the firmware for your SBM-GEM-X2C(+)/SBM-GEM-X3S+, 1/10-Gigabit Ethernet or SBM-XEM-X10SM 10-Gigabit Ethernet switch module, using the web-based management GUI tool.
7-1 OverviewThe Supermicro switch utility for the Layer 2/3 Gigabit Ethernet switch modules provides a web-based interface for managing layer2 and layer3 switching at wire speed for constructing a switched/routed network. This interface provides both a bridging functionality and advanced features such as link aggregation, Dynamic VLAN/Dynamic Multicast, IGMP Snooping and Network Access Control. This web-based interface also comes with several Layer3 features as well (such as wire speed routing, Differentiated services, multicast routing and so on).
The Supermicro Switch firmware is implemented using open sources from OpenSSL, OpenSSH and other open source communities and is configured using web browsers such as Internet Explorer.
NOTE: The 1/10-Gigabit Ethernet switch module is available in three versions:
• SBM-GEM-X2C which supports 10 or 14 blade enclosure systems
• SBM-GEM-X2C+ which also supports twin-blade (20 node) systems in addition to the 10 and 14 blade enclosures.
• SBM-GEM-X3S+ which supports all blade enclosures and provides three SFP+ 10GbE uplink ports
Except for the the maximum number of blades supported, both the SBM-GEM-X2C and SBM-GEM-X2C+ are identical. The “SBM-GEM-X2C(+)” part number is therefore used throughout the rest of this manual to refer to features and operational characteristics of both versions.
NOTE: The 10-Gigabit Ethernet switch module is available in only one version, the SBM-XEM-X10SM. This module supports either or the following configurations:
• Twin blade (20 node (SBE-720E enclosure)) systems with a configuration that has four external 10-Gbps Ethernet ports available
• 10-blade systems (SBE-710Q enclosure) whose configuration has ten external 10-Gbps Ethernet ports available
NOTE: See the SM-CLI Guide included on your SuperBlade Switch System CD-ROM for further information on the 1/10 Gigabit Ethernet switch firmware and its controls using the CLI.
7-1

Superblade Network Modules User’s Manual
The utility starts with a default IP address, which is also the management IP address. This IP address is essentially provided for remote management of this switch. For managing the switch through web browsers, type in the default IP address in your browser’s web address in order to start accessing the switch.
For example, if the management IP address of the switch is 192.168.1.1, the switch can be accessed through the Web browser by typing http://192.168.1.1 in the address space of the web browser.
The default management IP address for Supermicro Switch products is 192.168.100.102. This default IP address can be changed in the SYSTEM SETTINGS page in the System Management section.
The management interface for the SBM-GEM-X2C(+), SBM-GEM-X3S+ and the SBM-XEM-X10SM is the same as that for the Supermicro standalone SSE-G24-TG4 and SSE-G48-TG4 1/10-Gigabit Ethernet switch modules.
For the SSE-G48-TG4 and SSE-G24-TF4 switches, you can connect to any of the front panel 1G ports or back panel 10G ports to manage the switch with the default management IP. These switches will create VLAN 1 by default with this IP address, including all 1G and 10G ports.
The SBM-GEM-X2C(+), SBM-GEM-X3S+ and SBM-XEM-X10SM blade switches can be managed with the default IP through CMM Ethernet connections, since their internal management Ethernet ports are connected with CMM Ethernet ports internally. If you prefer to manage the SBM-GEM-X2C(+) or SBM-XEM-X10SM switch through front panel ports or through any other switching ports, then you can assign the desired management IP address to VLAN 1. Alternatively, you can create any VLAN and manage the switch through switching ports. Here the term switching ports refer to all internal and external 1G and 10G ports of the switch.
Nomenclature
The following nomenclature applies to screens found in this chapter:
• Port */* – This indicates the stacking ID number, port number
• Port Number GB */* – This is for an internal port
• Port Number Ext */* – This is for an external port.
7-2

Chapter 7: Layer 2/3 Ethernet Switch Firmware
7-2 Login
The initial login page (Figure 7-1) is used to login to the Supermicro Switch web-based management utility for 10-Gbps switches. To login, enter your User Name and Password in the fields provided and press the LOGIN button.
This User Name and Password are both used for accessing the switch through the web for switch configuration. The entered user name and password are validated at the switch end.
After logging in, you will be taken to the HOME page of the utility. See Section 7-3: Home Page on page 7-3 for further details.
7-3 Home PageThe HOME page (Figure 7-2) contains links and menus for going to all other control pages in the Supermicro Switch web-based interface utility. A list of controls for this page is shown in Table 7-1. The basic page structure of the HOME page is duplicated for all subsequent sub-pages of the Supermicro Switch web-based interface utility.
Figure 7-1. Login Page
7-3

Superblade Network Modules User’s Manual
The HOME page is displayed on successful validation of the user name and password. The information in this page presents a brief overview of the switch web-based management utility. See Figure 7-3, Figure 7-4, Figure 7-5 and Figure 7-6 for different views of the Home page for each of Supermico’s Layer 2/3 switches.
Figure 7-2. Home Page
Table 7-1. Home Page Controls and Components
Number Name Description
1 Top Page Links
The Top Page Links are present both on the Home page and all other pages accessed and contain links to support pages or additional controls for all pages viewed with the Web Management Utility. See "Top Page Links" below for further details.
2 Top LED DisplayThis section of the screen provides an overview port status for the switch. See "Top Page Links" for further details.
3 Left Side TreeThe Left Side Tree contains an expandable list of links for you to use to get to other management pages. All configuration pages contain this navigation tree.
4Middle Configuration Links Table
Each configuration page contains its own links and controls
2
3
1
4
7-4

Chapter 7: Layer 2/3 Ethernet Switch Firmware
Figure 7-3. SBM-GEM-X2C(+) Home Page
Figure 7-4. SBM-XEM-X10SM Home Page
7-5

Superblade Network Modules User’s Manual
Figure 7-5. SSE-G24-TG4 Home Page
Figure 7-6. SSE-G48-TG4 Home Page
7-6

Chapter 7: Layer 2/3 Ethernet Switch Firmware
Top Page Links
On the top of all pages of the web-based management utility you can find the following PAGE HEADER links:
• Refresh – Click this link to refresh the contents of the page. Unlike the browser refresh button, this link refreshes only the contents of the middle of the page which has the active data.
• Support – Click this link to get technical support for Supermicro Products.
• Help – Click on this link to open a context specific help page that covers all the items on the page being viewed.
• About – Click this link to get additional information about the web-based management utility, the switch and also the versions supported.
• Log Out – Click this link to log out of the web session and go back to the Login page.
Top LED Display
This part of the screen displays the Port Status, Speed and Link Status for every port of the switch.
Since the number of ports is different in SBM-GEM-X2C(+), SSE-G24-TG4 and SSE-G48-TG4 switches, this display displays a different number of ports for each when the Web Management Utility is run:
• For the SBM-GEM-X2C switch, it displays sixteen Gigabit Ethernet (Gi) ports and three 10-Gigabit Ethernet (Ex - Extreme Ethernet) ports.
• For the SBM-GEM-X2C+ and SBM-GEM-X3S+ switches, it displays twenty-two Gigabit Ethernet (Gi) ports and three 10-Gigabit Ethernet (Ex - Extreme Ethernet) ports.
• For the SSE-G24-TG4 switch, it displays twenty four Gi ports and four Ex ports.
• For the SSE-G48-TG4 switch, it displays forty eight Gi ports and four Ex ports.
Note that Ex ports configured as stacking ports will not be displayed.
In stacking, the Switch Identifier will be displayed on top of this LED display. This allows you to select a stack member switch of interest, and to view the LED display for the corresponding switch.
For Link, a green light corresponding to a number indicates that numbered port is up, whereas a red light corresponding to a number indicates that this port is down.
Left Side Tree
The tree display on the left side of the page provides quick access to the configuration pages. This tree is organized based on the features supported in the switch. The main features are categorized in the following groups.
• System Management - System based configurations
• Layer 2 Management - Layer 2 Protocols including VLAN, RSTP, MSTP, …
7-7

Superblade Network Modules User’s Manual
• Layer 3 Management - Layer 3 Protocols including - IP, RIP, OSPF, ….
• Multicast Management - Multicast Protocols including IGMP, PIM, …
• Statistics - Statistics and Counters for all the features.
This tree is displayed on the left navigation pane on all configuration pages. This makes it easier for you to choose any configuration page directly without going back to the home page every time. To go to one of a MANAGEMENT page’s sub-pages, click on the symbol to expand the list.
Middle Configuration Link Table
This section of the page displays a table of links to all major configurations. This table provides links similar to the Left Side Tree links. The configuration links are categorized based on features of the switch.
7-4 System Management Page
The SYSTEM MANAGEMENT page (Figure 7-7) contains the following links:
• "System Settings" on page 7-10
• "System Version" on page 7-12
• "File Management" on page 7-13
• "Firmware Upgrade" on page 7-15
• "Management Security" on page 7-16
• "Syslog" on page 7-25
Figure 7-7. System Management Page
7-8

Chapter 7: Layer 2/3 Ethernet Switch Firmware
• "ACL" on page 7-27
• "WEBGUI Settings" on page 7-31
• "SNMP" on page 7-32
• "RMON" on page 7-43
• "QoS" on page 7-48
• "NTP Settings" on page 7-53
• "Stack" on page 7-54
7-9

Superblade Network Modules User’s Manual
System Settings
The following pages can be accessed through the System Settings link:
• "System Settings" on page 7-10
• "System Version" on page 7-12
System Settings
Clicking the SYSTEM INFORMATION tab brings up the SYSTEM SETTINGS page (Figure 7-8). This page provides system related information and also helps you configure system specific parameters. Table 7-2 lists the parameters found on this page.
Figure 7-8. System Settings Page
Table 7-2. System Information Page Parameters
Parameter Description
Device Name A configurable name can be entered into this field for the switch.
IP address mode Either Manual or Automatic mode can be set for this parameter.
Subnet Mask Use this parameter to configure the subnet mask.
SNMP Engine ID This configures the SNMP Engine Identifier.
Device contact Use this parameter to change the device contact.
Device Location Use this parameter to change the device location.
PIM Mode Use this to configure the PIM status of the switch.
7-10

Chapter 7: Layer 2/3 Ethernet Switch Firmware
This page also has a control to Reset To Factory Defaults. This clears all switch configuration and local user accounts information. This reset requires reboot of the switch.
This page also provides a control to Reboot the switch. In stacking, the Switch Identifier is displayed on top of this reboot button. You can select the interested stack member switch to reboot the corresponding switch. You can also select the ALL option to reboot all stack members.
Snoop forwarding ModeYou can use this parameter to change the Snoop Fowarding Mode between MAC based and IP based.
Switch Start MAC address This is a display for the Switch Start MAC address.
Configuration Restore Status
This is a display for the Configuration Restore Status
Device Up Time This is a display for the Device Up Time.
HTTP Server Status This is a display for the HTTP Server Status.
HTTP Port Number This is a display for the HTTP Port Number.
WARNING: Make sure to have all necessary configurations backed up before doing "Reset To Factory Defaults.".
Table 7-2. System Information Page Parameters (Continued)
Parameter Description
7-11

Superblade Network Modules User’s Manual
System Version
Clicking the SYSTEM VERSION tab brings up the SYSTEM VERSION page (Figure 7-9). This page displays the hardware and firmware version of the switch.
Figure 7-9. System Version Page
7-12

Chapter 7: Layer 2/3 Ethernet Switch Firmware
File Management
Clicking the FILE MANAGEMENT link brings up the FILE MANAGEMENT page (Figure 7-10). The FILE MANAGEMENT page helps you to manage the configuration files in the switch. This page provides three main features.
• Save Configuration
• File Copy
• File Management
Save Configuration
You can save a currently running switch configuration in the following three ways:
• Save Startup Config - This option saves the currently running configuration in a local flash file with the file name configured as a "startup configuration" file.
• Save Flash File - This option saves the currently running configuration in local flash file with a user specified file name.
• Save Remotely - This option saves the currently running configuration into a remote TFTP server. You need to provide the IP address and file name of the TFTP server for this option.
The total configuration memory space and available free space are also displayed for your reference.
Figure 7-10. File Management Page
7-13

Superblade Network Modules User’s Manual
File Copy
You can copy a local file to or from a remote TFTP server. This feature is useful to create a backup of configuration files remotely, and also to download configuration files from remote computers to the switch. You need to provide a local file name and also the remote TFTP server’s IP address and file name for this feature.
File Management
This section displays information about the configuration files stored in the switch and allows you to do any of the following actions:
• You can select one or more files and delete them.
• You can choose a Startup Configuration file from this file list.
• You can choose the FILE option and enter a name for a Startup Configuration file.
• You can also choose the NO RESTORE option for not loading any configuration files on the next reboot of the switch.
7-14

Chapter 7: Layer 2/3 Ethernet Switch Firmware
Firmware Upgrade
Clicking the FIRMWARE UPGRADE link brings up the FIRMWARE UPGRADE page (Figure 7-11). This page allows you to upgrade the firmware in normal or fallback memory. In stacking, the firmware is upgraded in all stack members automatically.
Figure 7-11. Firmware Upgrade Page
7-15

Superblade Network Modules User’s Manual
Management Security
The MANAGEMENT SECURITY link provides configuration for the following features:
• "Management Security Basic Settings" on page 7-16
• "Management User Account" on page 7-17
• "Radius" on page 7-18
• "TACACS+ Global Settings" on page 7-19
• "TACACS+ Server Configuration" on page 7-20
• "IP Authorized Manager" on page 7-21
• "SSH Configuration" on page 7-22
• "SSL Configuration" on page 7-23
Management Security Basic Settings
Clicking the MANAGEMENT SECURITY tab brings up the MANAGEMENT SECURITY BASIC SETTINGS page (Figure 7-12). This page allows you to setup the below listed basic security parameters (Table 7-3).
Figure 7-12. Management Security Basic Settings Page
7-16

Chapter 7: Layer 2/3 Ethernet Switch Firmware
Administrative users can also create Enable Passwords in this page. Low privilege users can use these Enable Passwords in the WEB SETTINGS page to enable access to privilege configurations.
Administrative users can set an Enable Password for all privilege levels. By default, the Enable Password is set only for the highest level (Level_15). This default password is the same as the default password set for the ADMIN user login.
Management User Account
Clicking the LOCAL USERS tab brings up the MANAGEMENT USER ACCOUNT CONFIGURATION page (Figure 7-13). This page allows you to create or delete local user accounts. You need more than privilege Level_5 to view all pages and need more than privilege Level_10 for changing the configurations. The highest, Level_15, is for Administrator privilege.
Table 7-3. Management Security Basic Settings Page Parameters
Parameter Description
Authentication mode
Use this parameter to choose the mode of authentication for management access. By default the management access is authenticated with LOCAL user accounts information. However you can choose to authenticate using Radius or TACACS instead.
Authentication trapsYou can enable SNMP Traps for SNMP access authentication events using this parameter..
Figure 7-13. Management User Account Page
7-17

Superblade Network Modules User’s Manual
Radius
Clicking the RADIUS tab brings up the RADIUS SERVER CONFIGURATION page (Figure 7-14). This page allows you to configure the RADIUS server parameters as shown in Table 7-4.
Figure 7-14. Radius Server Configuration Page
Table 7-4. Radius Server Configuration Page Parameters
Parameter Description
Server ID This parameter specifies the unique identifier of the Radius Server Entry.
IP Address This parameter specifies the IP Address of the Radius Server.
Shared SecretUse this parameter to specify the secret string, which is to be shared between the Radius Server and the Radius Client.
Server Type
This parameter specifies the following RADIUS server type
• Authentication
• Accounting
• Both (Authentication and Accounting).
Response Time (secs) This parameter specifies the maximum time that the Radius Server has to respond for a request from the Radius Client.
Retry CountThis parameter specifies the maximum number of times a radius request is re-transmitted before getting a response from the Radius Server.
7-18

Chapter 7: Layer 2/3 Ethernet Switch Firmware
TACACS+ Global Settings
The TACACS+ GLOBAL SETTINGS page (Figure 7-15) allows you to configure TACACS retries and choose an active TACACS server. The parameters for this page are shown in Table 7-5.
Figure 7-15. TACACS+ Global Settings Page
Table 7-5. TACACS+ Global Settings Page Parameters
Parameter Description
Active Server IP AddressThis parameter specifies the IP address of the active TACACS server. This server should have been already configured in the following TACACS+ SERVER CONFIGURATION page (Figure 7-16).
RetriesThis parameter determines the number of times the switch searches the active TACACS server from the list of servers maintained. The allowed values are between 1 to 100.
7-19

Superblade Network Modules User’s Manual
TACACS+ Server Configuration
Clicking the TACACS+ SERVERS tab brings up the TACACS+ SERVER CONFIGURATION page (Figure 7-16), which allows you to configure TACACS servers. The parameters for this page are shown in Table 7-6.
Figure 7-16. TACACS+ Server Configuration Page
Table 7-6. TACACS+ Server Configuration Page Parameters
Parameter Description
IP Address This parameter specifies the IP address of the TACACS server.
Port Use this parameter to specify the TCP port for TACACS protocol.
Single ConnectionSpecify Yes or No for a single TCP connection. If Yes, it establishes only a single TCP connection with a given TACACS server.
TimeoutThe time for which the switch will wait for a response from the TACACS server before closing the connection is specified with this parameter. It is configurable in seconds, with the default as 5-seconds.
Secret Key This parameter specifies the encryption key for the given TACACS server.
7-20
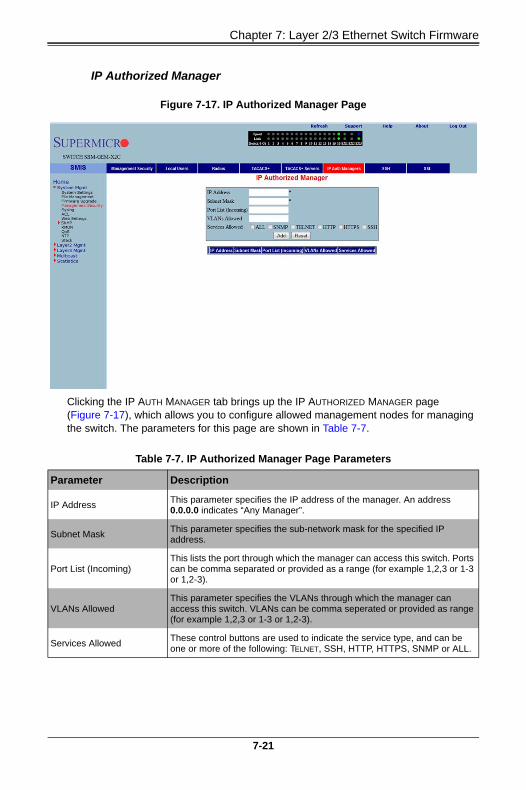
Chapter 7: Layer 2/3 Ethernet Switch Firmware
IP Authorized Manager
Clicking the IP AUTH MANAGER tab brings up the IP AUTHORIZED MANAGER page (Figure 7-17), which allows you to configure allowed management nodes for managing the switch. The parameters for this page are shown in Table 7-7.
Figure 7-17. IP Authorized Manager Page
Table 7-7. IP Authorized Manager Page Parameters
Parameter Description
IP AddressThis parameter specifies the IP address of the manager. An address 0.0.0.0 indicates “Any Manager”.
Subnet MaskThis parameter specifies the sub-network mask for the specified IP address.
Port List (Incoming)This lists the port through which the manager can access this switch. Ports can be comma separated or provided as a range (for example 1,2,3 or 1-3 or 1,2-3).
VLANs Allowed This parameter specifies the VLANs through which the manager can access this switch. VLANs can be comma seperated or provided as range (for example 1,2,3 or 1-3 or 1,2-3).
Services AllowedThese control buttons are used to indicate the service type, and can be one or more of the following: TELNET, SSH, HTTP, HTTPS, SNMP or ALL.
7-21

Superblade Network Modules User’s Manual
SSH Configuration
Clicking the SSH tab brings up the SSH CONFIGURATION page (Figure 7-18), which allows you to configure the SSH (Secure Shell) version and keys. The parameters for this page are shown in Table 7-8.
Figure 7-18. SSH Configuration
Table 7-8. SSH Configuration Page Parameters
Parameter Description
SSH VersionThe default for this parameter is v2. You can choose to configure this as compatible with v1 instead.
CipherThe default for this parameter is 3DES-CBC. You can instead choose to configure it as 3DES-CBC or DES-CBC or both
AuthenticationThis parameter’s default is HMAC-SHA1. You can instead choose to configure it as HMAC-SHA1 or HMAC-MD5 or both.
7-22

Chapter 7: Layer 2/3 Ethernet Switch Firmware
SSL Configuration
Clicking the SSL tab brings up the SSL CONFIGURATION page (Figure 7-19), which allows you to configure SSL (Secure Sockets Layer) parameters and generate SSL certificates for HTTPS. To configure SSL and enable HTTPS, follow the procedure below using this page.
Configuring SSL and Enabling HTTPS
1. Configure CIPHER SUITE and CRYPTO KEY RSA with your chosen parameters.
2. Create a certificate request by entering the subject name and clicking on the CREATE button.
3. When the page reloads, the text box below the CREATE button will display a certificate request. Copy and paste these contents to a text file that says a.csr.
4. To generate an SSL certificate, the openssl application can be used. The sub-steps below can be executed in any Linux machine to generate SSL certificates. For other openssl implementations, refer to the openssl documentation to find the equivalent steps for them.
a. Execute the below command in the Linux shell.
openssl req -x509 -newkey rsa:1024 -keyout cakey.pem -out cacert.pem
b. Execute the below command also in a Linux shell.
Figure 7-19. SSL Configuration Page
7-23

Superblade Network Modules User’s Manual
openssl x509 -req -in a.csr -out cert.pem -CA cacert.pem -CAkey cakey.pem -CAcreateserial
The above steps will generate the certificate file cert.pem.
5. Open the generated certificate file cert.pem and delete the first line (---BEGIN CERTIFICATE ---) and last line (----END CERTIFICATE--).
6. Join all the remaining lines as single lines to avoid line breaks being processed and copy/paste these joined texts in the ENTER CERTIFICATE text box back in the SSL CONFIGURATION page.
7. Click the CONFIGURE button.
This configures the certificate and saves it to flash memory.
7-24

Chapter 7: Layer 2/3 Ethernet Switch Firmware
Syslog
The Syslog link provides configuration controls for the following features:
• "Syslog Configuration" on page 7-25
• "Syslog Mail Configuration" on page 7-26
Syslog Configuration
Clicking the LOGGING tab brings up the SYSLOG CONFIGURATION page (Figure 7-20), which allows you to configure logging parameters. The parameters for this page are shown in Table 7-9.
Figure 7-20. Syslog Configuration Page
Table 7-9. Syslog Configuration Page Parameters
Parameter Description
Syslog This parameter enables or disables the Syslog feature.
Server IP AddressThis parameter specifies the Syslog server IP address. Make sure the Server IP is reachable.
Buffer Size The buffer size is specfied in log entries. Max entries buffered is 200.
TimestampThis parameter allows you to enable or disable the adding of a timestamp to the log messages.
Console Log This parameter allows you to enable or disable logging to the console.
7-25

Superblade Network Modules User’s Manual
Syslog Mail Configuration
Clicking the MAIL tab brings up the SYSLOG MAIL CONFIGURATION page (Figure 7-21), which allows you to configure the mail server and mail addresses for the syslog feature. The parameters for this page are shown in Table 7-10.
FacilityThis parameter allows you to select supported facilities. The switch supports syslog standard supported facilities LOCAL0, LOCAL1, LOCAL2, LOCAL3, LOCAL4, LOCAL5, LOCAL6, LOCAL7 and USER.
TrapsThis parameter helps you to select a particular trap type. The following types of traps are supported ALERTS, CRITICIAL, DEBUGGING, EMERGENCIES, ERROR, INFORMATIONAL, NOTIFICATION and WARNINGS.
Figure 7-21. Syslog Mail Configuration Page
Table 7-10. Syslog Mail Configuration Page Parameters
Parameter Description
Mail Server IP Address This parameter specifies the IP address of the mail server. Make sure the mail server is reachable.
Sender Email IDThis parameter specifies the Email ID to be shown as the From address on Syslog Emails.
Receiver Email ID This parameter specifies the receipent Email address for Syslog Emails.
Table 7-9. Syslog Configuration Page Parameters (Continued)
Parameter Description
7-26
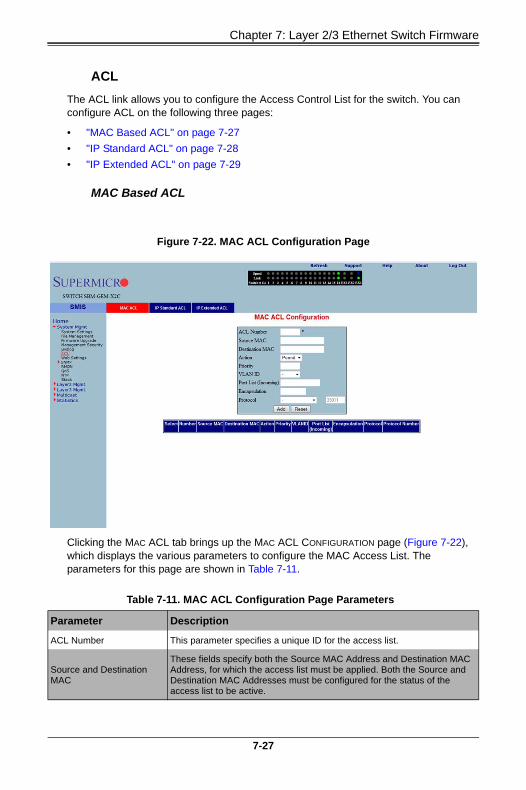
Chapter 7: Layer 2/3 Ethernet Switch Firmware
ACL
The ACL link allows you to configure the Access Control List for the switch. You can configure ACL on the following three pages:
• "MAC Based ACL" on page 7-27
• "IP Standard ACL" on page 7-28
• "IP Extended ACL" on page 7-29
MAC Based ACL
Clicking the MAC ACL tab brings up the MAC ACL CONFIGURATION page (Figure 7-22), which displays the various parameters to configure the MAC Access List. The parameters for this page are shown in Table 7-11.
Figure 7-22. MAC ACL Configuration Page
Table 7-11. MAC ACL Configuration Page Parameters
Parameter Description
ACL Number This parameter specifies a unique ID for the access list.
Source and Destination MAC
These fields specify both the Source MAC Address and Destination MAC Address, for which the access list must be applied. Both the Source and Destination MAC Addresses must be configured for the status of the access list to be active.
7-27

Superblade Network Modules User’s Manual
IP Standard ACL
Clicking the IP STANDARD ACL tab brings up the IP STANDARD ACL CONFIGURATION page (Figure 7-23), which displays the various ACL (Access Control List) parameters to configure the Standard IP access lists. The parameters for this page are shown in Table 7-12.
Action This parameter specifies the action to be taken for the access list.
Priority This parameter specifies the priority for the access list.
VLAN IDThis parameter specifies the VLAN ID for which the access list has to be applied.
Port List (Incoming)This parameter specifies the Port List for which the access list has to be applied.
EncapsulationThis parameter specifies the Encapsulation type of the packet for which the access list has to be applied.
ProtocolThis parameter specifies the non-IP protocol type of the packet for which the access list has to be applied.
Figure 7-23. IP Standard ACL Configuration Page
Table 7-11. MAC ACL Configuration Page Parameters (Continued)
Parameter Description
7-28

Chapter 7: Layer 2/3 Ethernet Switch Firmware
IP Extended ACL
Clicking the IP EXTENDED ACL tab brings up the IP EXTENDED ACL CONFIGURATION page (Figure 7-24), which displays the various parameters required to configure the Extended IP access lists. The parameters for this page are shown in Table 7-13.
Table 7-12. IP Standard ACL Configuration Page Parameters
Parameter Description
ACL NumberThis parameter specifies the unique ID for the access list. This value must be in the range from 1 to 1000.
ActionThis parameter specifies whether the packets must be allowed or dropped when a match has been found.
Source and Destination IP Address
This parameter specifies the IP Address of the Source and Destination for which the access list must be applied.
Subnet MaskThis parameter specifies the Source and Destination Address Mask corresponding to the IP Address.
Ports List (Incoming)This parameter specifies the Incoming Port List for which the access list has to be applied.
Ports List (Outgoing)This parameter specifies the Outgoing Port List for which the access list has to be applied.
Figure 7-24. IP Extended ACL Page
7-29

Superblade Network Modules User’s Manual
Table 7-13. IP Extended ACL Configuration Page Parameters
Parameter Description
ACL NumberThis parameter specifies the unique ID for the access list. This value must be in the range from 1001 to 65535.
ActionThis parameter specifies whether the packets must be allowed or dropped when a match has been found.
Source and Destination IP Address
This parameter specifies the IP Address for which the access list must be applied.
Subnet MaskThis parameter specifies the Address Mask corresponding to the IP Address.
Ports List (Incoming)This parameter specifies the Incoming Port List for which the filter has to be applied.
Ports List (Outgoing)This parameter specifies the Outgoing Port List for which the filter has to be applied.
Protocol This parameter specifies the type of protocol.
Message CodeThis parameter specifies the Message Code to be checked for ICMP Packets.
Message TypeThis parameter specifies the Message Type to be checked for ICMP Packets.
Priority This parameter specifies the Priority for the filter.
TOS This parameter specifies the Type of Service for the access list.
ACK BitThis parameter indicates the TCP Ack Bit to be checked against the incoming packet.
RST Bit This parameter indicates the TCP Reset Bit to be checked against the incoming packet.
Source Port (Min) These parameters specify the range of TCP/UDP sourceports from which the access list must be applied.Source Port (Max)
Destination Port (Min) These parameters specify the destination ports to which the access list must be appliedDestination Port (Max)
7-30

Chapter 7: Layer 2/3 Ethernet Switch Firmware
WEBGUI Settings
Clicking the WEB SETTINGS link brings up the WEB GUI SETTINGS page (Figure 7-25), which displays all basic Web GUI settings. The parameters for this page are shown in Table 7-14.
Figure 7-25. Web GUI Settings Page
Table 7-14. Web GUI Settings Page Parameters
Parameter Description
Session timeoutThis timeout value is used to automatically logout inactive user sessions. The default value is 5-minutes (600-seconds).
Statistics Refresh Timer The statistics pages (grouped under "Statistics" node in left side tree) can be set to auto refresh based on this Statistics Refresh Timer. The default value zero means no auto refresh by default.
Session Privilege
This displays the current privilege level of the logged in user. You can choose to enter another privilege level using this configuration if you have the Enable Password for the required privilege levels. The Enable Passwords for different levels are configurable in the Management Security web page.
7-31

Superblade Network Modules User’s Manual
SNMP
Clicking the SNMP link brings up the SNMP AGENT CONTROL SETTINGS page (Figure 7-26). SMIS supports the SNMP Agent or SNMP AgentX Sub-agent. The SNMP Agent or AgentX Sub-agent can be enabled or both can be disabled.
The SNMP Agent provides the following sub-page configurations shown in the table below.
Figure 7-26. SNMP Agent Control Settings Page
Table 7-15. SNMP Agent Configuration Pages
Configuration Page Description
"SNMP Community Settings" on page 7-33
This page allows you to configure the SNMP community including the COMMUNITY INDEX, NAME, SECURITY NAME, CONTEXT NAME, TRANSPORT TAG and STORAGE TYPE.
"SNMP Group Settings" on page 7-34
This page allows you to configure SNMP groups including GROUP NAME, SECURITY NAME, SECURITY MODEL and STORAGE TYPE.
"SNMP Group Access Settings" on page 7-35
This page allows you to configure access parameters for SNMP groups including GROUP NAME, SECURITY MODEL, SECURITY LEVEL, STORAGE TYPE, and READ, WRITE and NOTIFY VIEW.
"SNMP View Tree Settings" on page 7-36
This page allows you to configure an SNMP view tree including VIEW NAME, SUB TREE, MASK, TYPE OF THE VIEW and STORAGE TYPE.
"SNMP Target Address Settings" on page 7-37
This page allows you to configure SNMP target including TARGET NAME, TARGET IP, TRANSPORT TAG, PARAM and STORAGE TYPE.
7-32

Chapter 7: Layer 2/3 Ethernet Switch Firmware
SNMP Community Settings
Clicking the COMMUNITY tab brings up the SNMP COMMUNITY SETTINGS page (Figure 7-27), which allows you to add SNMP managers or remove existing managers.. The parameters for this page are shown in Table 7-16.
"SNMP Target Parameter Settings" on page 7-38
This setting allows you to configure SNMP target parameters including PARAMETER NAME, MP MODEL, SECURITY MODEL, NAME, LEVEL and STORAGE TYPE.
"SNMP User Settings" on page 7-39
This setting allows you to configure SNMP security including user name, AUTHENTICATION PROTOCOL, AUTHENTICATION KEY, PRIVACY PROTOCOL, PRIVACY KEY and STORAGE TYPE.
"SNMP Trap Settings" on page 7-40
This setting allows you to configure SNMP trap notifications including NOTIFY NAME, NOTIFY TAG, NOTIFY TYPE and STORAGE TYPE.
Figure 7-27. SNMP Community Settings Page
Table 7-16. SNMP Community Settings Page Parameters
Parameter Description
Community index This parameter sets the COMMUNITY INDEX identifer.
Community name This parameter sets the COMMUNITY NAME string.
Security Name This parameter sets the User Name String.
Table 7-15. SNMP Agent Configuration Pages (Continued)
Configuration Page Description
7-33

Superblade Network Modules User’s Manual
SNMP Group Settings
Clicking the GROUP tab brings up the SNMP GROUP SETTINGS page (Figure 7-28). This page helps you map a combination of the SECURITY MODEL and the SECURITY NAME into a GROUP NAME, which is used to define an access control policy. In addition, this page displays the STORAGE TYPE of the Group Table. The parameters for this page are shown in Table 7-17.
Context NameThis parameter sets the CONTEXT NAME that the management information is accessed from when using the community string, which is specified by the corresponding instance of the SNMP community name.
Transport Tag This parameter sets the TRANSPORT TAG Identifer.
Storage Type This parameter sets the Volatile Storage or Non-Volatile Storage setting.
Figure 7-28. SNMP Group Settings Page
Table 7-17. SNMP Group Settings Page Parameters
Parameter Description
Security ModelThis parameter allows you to select from version 1, version 2 or version 3 for the SECURITY MODEL used.
Security Name Use this parameter to specify the SECURITY NAME string.
Table 7-16. SNMP Community Settings Page Parameters (Continued)
Parameter Description
7-34

Chapter 7: Layer 2/3 Ethernet Switch Firmware
SNMP Group Access Settings
Clicking the GROUP ACCESS tab brings up the SNMP GROUP ACCESS SETTINGS page (Figure 7-29), which displays the access rights of groups. Each entry is indexed by a GROUP NAME, a Context Prefix, a SECURITY MODEL and a SECURITY LEVEL. A proper view name (READ, WRITE and MODIFY) must be used for access control checking. It also displays the STORAGE TYPE of the Group Access table. An SNMP Group must be created prior to the Group Access configuration.
The parameters for this page are shown in Table 7-18.
Group Name Use this parameter to specify the GROUP NAME string.
Storage TypeUse this parameter to specify whether the STORAGE TYPE is Volatile or Non-Volatile.
Figure 7-29. SNMP Group Access Settings Page
Table 7-18. SNMP Group Access Settings Page Parameters
Parameter Description
Group Name This parameter allows you to specify the GROUP NAME string.
Security Model This parameter allows you to specify whether SNMP version v1, v2 or v3 is used. Version 3 is the most secure model as it allows packet encryption with the private key word.
Table 7-17. SNMP Group Settings Page Parameters (Continued)
Parameter Description
7-35

Superblade Network Modules User’s Manual
SNMP View Tree Settings
Clicking the VIEW tab brings up the SNMP VIEW TREE SETTINGS page (Figure 7-30), which allows configuration of view trees. A SUBTREE when combined with the corresponding instance of a MASK defines a family of view subtrees. The VIEW NAME is the name for a family of view subtrees. This page also displays the STORAGE TYPE of the VIEWTREE table. SNMP Group and SNMP Access settings have to be created prior to the Group View configuration.
The parameters for this page are shown in Table 7-19.
Security Level
With this parameter the no-authentication option disables authentication. The AUTHENTICATION option enables Message digest (MD5) or Secure Hash Algorithm (SHA) packet authentication. The PRIVATE option selects both AUTHENTICATION and PRIVACY.
Read View This parameter allows you to specify the READ VIEW identifier.
Write View This parameter allows you to specify the WRITE VIEW identifier.
Notify View This parameter allows you to specify the NOTIFY VIEW identifier.
Storage TypeUse this parameter to specify whether the STORAGE TYPE is Volatile or Non-Volatile.
Figure 7-30. SNMP View Tree Settings Page
Table 7-18. SNMP Group Access Settings Page Parameters (Continued)
Parameter Description
7-36

Chapter 7: Layer 2/3 Ethernet Switch Firmware
SNMP Target Address Settings
Clicking the TARGET ADDRESS tab brings up the SNMP TARGET ADDRESS SETTINGS page (Figure 7-31), which configures SNMP target address parameters. The parameters for this page are shown in Table 7-20.
Table 7-19. SNMP View Tree Settings Page Parameters
Parameter Description
View Name This parameter specifies a VIEW NAME string.
SubTree This parameter specifies a tree OID.
Mask This parameter specifies an OID mask.
View Type This parameter specifies whether a VIEW TYPE is Included or Excluded.
Storage TypeUse this parameter to specify whether the STORAGE TYPE is volatile or non-volatile.
Figure 7-31. SNMP Target Address Settings Page
Table 7-20. SNMP Target Address Settings Page Parameters
Parameter Description
Target Name This parameter specifies a TARGET NAME as a unique identifier.
Target IP AddressThe TARGET IP ADDRESS specifies a target address to be used in the generation of SNMP operations.
7-37

Superblade Network Modules User’s Manual
SNMP Target Parameter Settings
Clicking the TARGET PARAMETER tab brings up the SNMP TARGET PARAMETER SETTINGS page (Figure 7-32), which configures SNMP Target Address parameters. The parameters for this page are shown in Table 7-21.
Target Timeout TARGET TIMEOUT specifies the maximum round trip for communicating with the TARGET IP ADDRESS.
Target RetriesTARGET RETRIES specifies the number of attempts to be made when no response is received
Transport Tag The TRANSPORT TAG value is used to select a target address for a particular operation.
ParamPARAM contains SNMP parameters to be used when generating messages to be sent to a transport address.
Storage TypeUse this parameter to specify whether the STORAGE TYPE is volatile or non-volatile.
Figure 7-32. SNMP Target Parameter Settings Page
Table 7-20. SNMP Target Address Settings Page Parameters (Continued)
Parameter Description
7-38
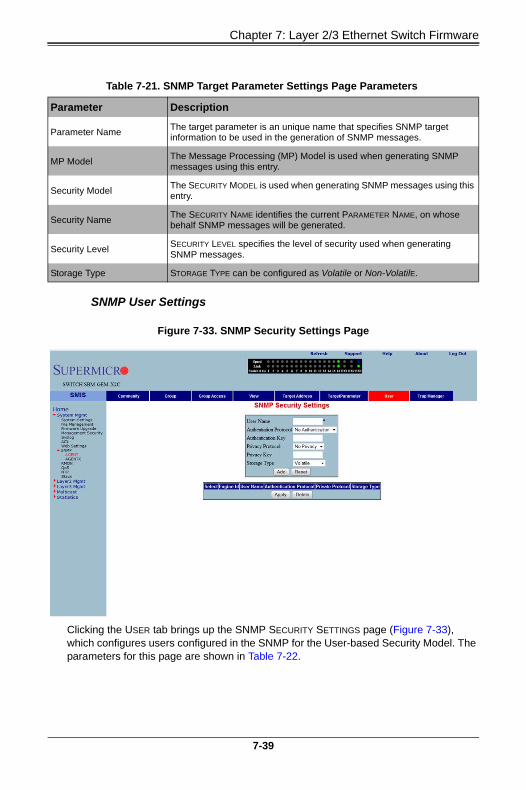
Chapter 7: Layer 2/3 Ethernet Switch Firmware
SNMP User Settings
Clicking the USER tab brings up the SNMP SECURITY SETTINGS page (Figure 7-33), which configures users configured in the SNMP for the User-based Security Model. The parameters for this page are shown in Table 7-22.
Table 7-21. SNMP Target Parameter Settings Page Parameters
Parameter Description
Parameter NameThe target parameter is an unique name that specifies SNMP target information to be used in the generation of SNMP messages.
MP Model The Message Processing (MP) Model is used when generating SNMP messages using this entry.
Security ModelThe SECURITY MODEL is used when generating SNMP messages using this entry.
Security NameThe SECURITY NAME identifies the current PARAMETER NAME, on whose behalf SNMP messages will be generated.
Security LevelSECURITY LEVEL specifies the level of security used when generating SNMP messages.
Storage Type STORAGE TYPE can be configured as Volatile or Non-VolatilE.
Figure 7-33. SNMP Security Settings Page
7-39

Superblade Network Modules User’s Manual
SNMP Trap Settings
Clicking the TRAP MANAGER tab brings up the SNMP TRAP SETTINGS page (Figure 7-34), which configures the set of management targets that must receive notifications. The parameters for this page are shown in Table 7-23.
Table 7-22. SNMP Security Settings Page Parameters
Parameter Description
User Name USER NAME is the (User-based Security) model dependent security ID.
Authentication Protocol The AUTHENTICATION PROTOCOL is used for authentication.
Authentication KeyThe AUTHENTICATION KEY is the secret authentication key used for messages sent on behalf of this user to/from the SNMP.
Privacy ProtocolPRIVACY PROTOCOL is an indication of whether or not messages sent on behalf of this user to/from the SNMP are protected from disclosure, and if so, the type of privacy protocol that is used.
Privacy KeyPRIVACY KEY is an indication of whether or not messages sent on behalf of this user to/from the SNMP are protected from disclosure.
Storage Type STORAGE TYPE can be configured as Volatile or Non-Volatile.
Figure 7-34. SNMP Trap Settings Page
7-40

Chapter 7: Layer 2/3 Ethernet Switch Firmware
SNMP AgentX
Clicking the AGENTX link brings up the SNMP AGENTX SUBAGENT SETTINGS page (Figure 7-35), which allows you to configure SNMP Agentx sub-agent parameters. The parameters for this page are shown in Table 7-24.
Table 7-23. SNMP Trap Settings Page Parameters
Parameter Description
Notify Name NOTIFY NAME is a unique identifier associated with the entry.
Notify Tag
NOTIFY TAG contains a single tag value, which is used to select entries in the Target Address table. Any entry in the Target Address table that contains a tag value equal to the value of an instance of this Trap Manager, is selected.
Notify TypeThe type of notification of the SNMP Trap Settings can be configured as Trap or Inform.
Storage Type STORAGE TYPE can be configured as Volatile or Non-Volatile.
Figure 7-35. SNMP AgentX Subagent Settings Page
Table 7-24. SNMP AgentX Subagent Settings Page Parameters
Parameter Description
Transport Domain This parameter allows you to specify the TCP.
IP Address Type This parameter specifies IPv4 or IPv6 for the IP ADDRESS TYPE.
7-41

Superblade Network Modules User’s Manual
Master IP Address This parameter specifies the Master Agent IP address.
Master Port No This parameter specifies the Master Port number.
Table 7-24. SNMP AgentX Subagent Settings Page Parameters (Continued)
Parameter Description
7-42

Chapter 7: Layer 2/3 Ethernet Switch Firmware
RMON
The following pages can be used to set RMON (Remote Monitoring) features and settings:
• "RMON Basic Settings" on page 7-43
• "Event Configuration" on page 7-44
• "RMON Alarm Configuration" on page 7-45
• "Ethernet Statistics Configuration" on page 7-46
• "History Control Configuration" on page 7-47
RMON Basic Settings
Clicking the BASIC SETTINGS tab brings up the RMON BASIC SETTINGS page (Figure 7-36), which enables/disables the RMON feature using the RMON Status parameter.
Figure 7-36. RMON Basic Settings Page
7-43

Superblade Network Modules User’s Manual
Event Configuration
Clicking the EVENTS tab brings up the EVENT CONFIGURATIONS page (Figure 7-37), which configures RMON events. The parameters for this page are shown in Table 7-25.
Figure 7-37. Event Configuration Settings Page
Table 7-25. Event Configuration Page Parameters
Parameter Description
Index This parameter specifies the index to the Events table.
Description This parameter specifies a brief description of the event.
TypeThis parameter specifies the event configured. This can be a Log, an SNMP Trap, Both, or None. For the event type to display, TRAP and Log and TRAP Community must be configured.
Community
This parameter specifies the SNMP community string used for this trap. This is relevant when an SNMP trap is requested for an event. For event type to display, TRAP and Log and TRAP Community must be configured. Also make sure the configured community is active before adding an event on that community.
Owner This parameter indicates the owner of this event.
Last Time Sent This parameter denotes the time this event entry last generated an event.
7-44
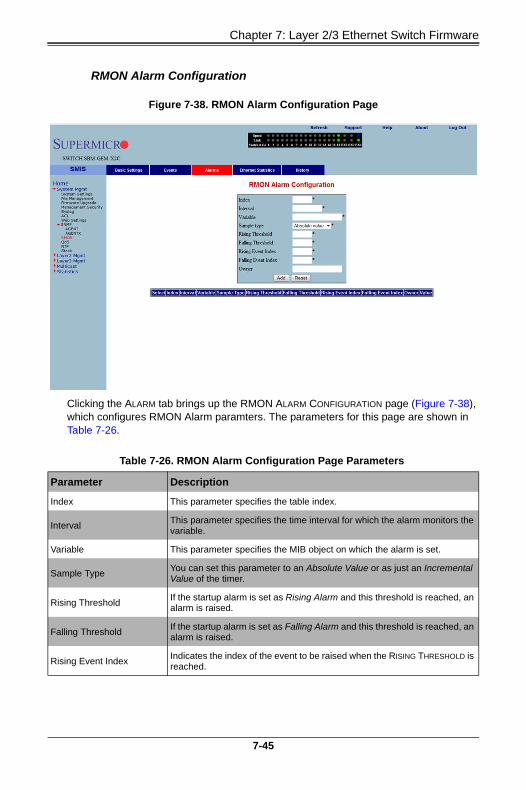
Chapter 7: Layer 2/3 Ethernet Switch Firmware
RMON Alarm Configuration
Clicking the ALARM tab brings up the RMON ALARM CONFIGURATION page (Figure 7-38), which configures RMON Alarm paramters. The parameters for this page are shown in Table 7-26.
Figure 7-38. RMON Alarm Configuration Page
Table 7-26. RMON Alarm Configuration Page Parameters
Parameter Description
Index This parameter specifies the table index.
IntervalThis parameter specifies the time interval for which the alarm monitors the variable.
Variable This parameter specifies the MIB object on which the alarm is set.
Sample TypeYou can set this parameter to an Absolute Value or as just an Incremental Value of the timer.
Rising ThresholdIf the startup alarm is set as Rising Alarm and this threshold is reached, an alarm is raised.
Falling ThresholdIf the startup alarm is set as Falling Alarm and this threshold is reached, an alarm is raised.
Rising Event IndexIndicates the index of the event to be raised when the RISING THRESHOLD is reached.
7-45

Superblade Network Modules User’s Manual
Ethernet Statistics Configuration
Clicking the ETHERNET STATISTICS tab brings up the ETHERNET STATISTICS CONFIGURATION page (Figure 7-39), which configures RMON Ethernet statistics parameters. The parameters for this page are shown in Table 7-27.
Falling Event IndexIndicates the index of the event to be raised when the FALLING THRESHOLD is reached.
Owner Specifies the owner of the alarm.
Figure 7-39. Ethernet Statistics Configuration Page
Table 7-27. Ethernet Statistics Configuration Page Parameters
Parameter Description
Index This parameter specifies the index to the table.
Port This parameter specifies the Ethernet Port.
OctetsThis parameter specifies the total number of octets received from the network.
PacketsThis parameter specifies the total number of packets received from the network.
Broadcast PacketsThis parameter specifies the total number of broadcast packets received from the network.
Table 7-26. RMON Alarm Configuration Page Parameters (Continued)
Parameter Description
7-46

Chapter 7: Layer 2/3 Ethernet Switch Firmware
History Control Configuration
Clicking the HISTORY tab brings up the HISTORY CONTROL CONFIGURATION page (Figure 7-40), which configures RMON history parameters. The parameters for this page are shown in Table 7-28.
Multicast PacketsThis parameter specifies the total number of multicast packets received from the network.
Owner This parameter specifies the owner string.
Figure 7-40. History Control Configuration Page
Table 7-28. History Control Configuration Page Parameters
Parameter Description
Index This parameter specifies the index to the table.
Data SourceThis parameter specifies the SNMP object ID of the variable for which the history is being collected.
Buckets RequestedIndicates the number of buckets to be configured for collecting the RMON statistics.
IntervalThis parameter specifies the time interval between two successive polls to collect the statistics.
Owner Denotes the owner of the RMON group of statistics.
Table 7-27. Ethernet Statistics Configuration Page Parameters (Continued)
Parameter Description
7-47

Superblade Network Modules User’s Manual
QoS
The QoS link of the System page opens the QoS Basic Settings page. This page allows you to configure QoS through following pages:
• "QOS Basic Settings" on page 7-48
• "QOS Classmap Settings" on page 7-49
• "QOS Policymap Settings" on page 7-50
• "COSQ Scheduling Algorithm" on page 7-51
• "COSQ Weight and Bandwidth Configuration" on page 7-52
QOS Basic Settings
Clicking the BASIC SETTINGS tab brings up the QOS BASIC SETTINGS page (Figure 7-41), which allows you to configure QOS basic settings parameters. The parameters for this page are shown in Table 7-29.
Buckets Granted Denotes the number of buckets granted for collecting the RMON statistics.
StatusThis parameter specifies the status of the History Control entry as either Valid or Invalid.
Figure 7-41. QOS Basic Settings Page
Table 7-28. History Control Configuration Page Parameters (Continued)
Parameter Description
7-48

Chapter 7: Layer 2/3 Ethernet Switch Firmware
QOS Classmap Settings
Clicking the CLASSMAP tab brings up the QOS CLASSMAP SETTINGS page (Figure 7-42), which is used to classify the stream of traffic. The parameters for this page are shown in Table 7-30.
Table 7-29. QOS Basic Settings Page Parameters
Parameter Description
System Control With this parameter SYSTEM CONTROL can Start or Shutdown QoS.
Status This parameter allows enabling/disabling of the QoS status.
Figure 7-42. QOS Classmap Settings Page
Table 7-30. QOS Classmap Settings Page Parameters
Parameter Description
Classmap IDThis parameter specifies a unique ID for the Classmap. It must be in the range from 1 to 65535.
Filter IDThis parameter specifies the unique filter ID associated with this Classmap.
Filter TypeThis parameter specifies the filter type associated with the Classmap. It can be set as either MAC filter (1) or IP filter (2).
7-49

Superblade Network Modules User’s Manual
QOS Policymap Settings
Clicking the POLICYMAP tab brings up the QOS POLICYMAP SETTINGS page (Figure 7-43), which is used to specify action for a specified classmap. The parameters for this page are shown in Table 7-31.
Figure 7-43. QOS Policymap Settings Page
Table 7-31. QOS Policymap Settings Page Parameters
Parameter Description
Policy Map IDThis parameter specifies the unique ID for Policymap. The value ranges between 1 and 65535.
Class Map ID This parameter specifies the CLASS MAP ID to associate with Policymap.
Traffic Rate This parameter specifies the TRAFFIC RATE of data that has to be applied.
In-Profile ActionThis parameter specifies the action to be applied on matched data, and can be specified as either Policy DSCP or Policy Precedence.
Out-Profile ActionThis parameter specifies the action to be applied on out-of-profile data, and can be specified as either Policy DSCP or Drop.
In-Profile Action ValueThe IN-PROFILE ACTION VALUE can be specified from 0 to 7 for DSCP, or from 0 to 63 for IP Precedence.
Out-Profile Action ValueThe OUT-PROFILE ACTION VALUE can be specified as Drop or from 0 to 63 for DSCP.
7-50

Chapter 7: Layer 2/3 Ethernet Switch Firmware
COSQ Scheduling Algorithm
Clicking the COSQ ALGORITHM tab brings up the COSQ SCHEDULING ALGORITHM SETTINGS page (Figure 7-44), which allows you to choose the COSQ (Class of Service Queue) scheduling algorithm for every port. The parameters for this page are shown in Table 7-32.
Figure 7-44. COSQ Scheduling Algorithm Settings Page
Table 7-32. COSQ Scheduling Algorithm Settings Page Parameters
Parameter Description
Port NumberThis list of ports allows you to select from the port index for your selected algorithm.
Scheduling Algorithm
The SCHEDULING ALGORITHM can be selected as one of the following:
• Strict Priority
• Round Robin
• Weighted Round Robin
• Weighted Fair Queuein
• Strict Round Robin
• Strict Weighted Round Robin
• Strict Weighted Fair Queueing
• Deficit Round Robin
7-51

Superblade Network Modules User’s Manual
COSQ Weight and Bandwidth Configuration
Clicking the COSQ TRAFFIC CLASS tab brings up the COSQ WEIGHT AND BANDWIDTH CONFIGURATIONS page (Figure 7-45), which allows you to configure the weight and bandwidth for CoS Queues. The parameters for this page are shown in Table 7-33.
Figure 7-45. COSQ Weight and Bandwidth Configurations Page
Table 7-33. COSQ Weight and Bandwidth Configurations Page Parameters
Parameter Description
COSQ QueueThis parameter allows you to select between 0 to 7 for your COSQ QUEUE value.
COSQ WeightThis parameter allows you to select between 0 to 15 for your COSQ WEIGHT value.
COSQ Min Bandwidth This parameter configures minimum bandwidth between 1 and 262143.
COSQ Max Bandwidth This parameter configures maximum bandwidth between 1 and 262143.
COSQ Flag Use this parameter to set a flag for this queue.
7-52

Chapter 7: Layer 2/3 Ethernet Switch Firmware
NTP Settings
Clicking the NTP link brings up the NTP SETTINGS page (Figure 7-46), which configures the Network Time Protocol (NTP). The parameters for this page are shown in Table 7-34.
Figure 7-46. NTP Settings Page
Table 7-34. NTP Settings Page Parameters
Parameter Description
NTP Client Settings
NTP StatusThis field enables or disables NTP in the switch. Configure the NTP SERVERS section to enable NTP.
Receive Server UpdateThe value for this parameter could be Broadcast or Unicast. To process the broadcast NTP updates from the server, choose the Broadcast option.
Timezone Settings
Hour Offset This parameter allows you to enter an hour offset from GMT for local time.
Minutes OffsetThis parameter allows you to enter a minutes offset (after hour offset) from GMT for local time.
NTP Servers
Server IP Address Use this parameter to enter the NTP server IP address.
KeyChoose the key from the configured list. These keys are configurable in this page in the NTP SERVER KEYS section’s fields.
7-53

Superblade Network Modules User’s Manual
Stack
The Supermicro Intelligent switch supports stacking of Supermicro switch units. Switch stacking is created by connecting switches in a daisy chain. One of the stacked switches is selected as a Master based on its configurations. The Master switch provides management support for the whole stack. Other switches in the stack are referred to as slave switches.
The Master switch manages the control plane traffic for all stacked switches. When the current master switch fails, the backup master is then selected as the current master. The Master selection algorithm is based on a priority configuration. If two switches have the same priority, the switch with the lowest MAC address is selected as the Master switch.
Interval This parameter allows you to choose the interval from the given list.
PreferredThis parameter allows you to choose the preferred server. Choose Yes if this server needs to be preferred over other configured NTP servers. You can add multiple NTP servers.
NTP Servers Keys
Key IDUse this parameter to select a number to identify the configured key strings.
Key StringUse this paramter to specify any string to be used as a key to handshake with NTP servers.
NOTE: Make sure all stacked switches are running the same version of firmware.
Table 7-34. NTP Settings Page Parameters (Continued)
Parameter Description
7-54

Chapter 7: Layer 2/3 Ethernet Switch Firmware
CX4 Cable Length
Stacking is supported with CX-4 cables only. The CX-4 cable used for stacking should be no more than 3-meters in length, because stacking internally runs at 12-Gbps and therefore requires a more robust signal than longer cable lengths might provide reliably. The industry standard stacking cable length is 3-meters.
When used for 10G Ethernet uplinks, the CX-4 ports can be from 1-meter to 12-meters in length; the maximum CX-4 cable length supported on Supermicro switches is 12-meters.
It is acceptable to use a 1-meter stacking cable for port 1 and a 12-meter uplink cable for port 2. You will only need to configure the long cable preference for port 2. Do this by selecting the Port Number in the CX4 CABLE LENGTH screen (Figure 7-47) and then selecting the "long" option.
This configuration is done on an individual port basis. Thus, you can use "short" for one port and "long" for the other port. Alternatively you might use both "short" or, if neither are for stacking, both can be "long" cables.
NOTE: For stacking ports, you do not need to configure CX4 cable length. It is fixed as "short" for stacking ports.
Figure 7-47. Configuring CX4 Cable Length
7-55

Superblade Network Modules User’s Manual
Enabling Stacking
By default, Supermicro switches act as stand-alone switches. This stand-alone default facilitates using 10G Ethernet ports as Extreme Ethernet ports for uplinks.
When stacking is enabled the stacking ports are dedicated for stacking purposes. Stacking can be enabled using the command stack with the switch identifier and priority. The detailed command syntax is explained below.
In the stacking mode, any firmware upgrade in the Master Switch will automatically initiate a firmware upgrade to all attached stack member switches. Firmware upgrade confirmation from stack member switches will be displayed in the Master Switch management interface.
Also in the stacking mode, the user can reload all stacked switches or any selected stack member switch from the master management interface.
The interface numbers change between stacking and non-stacking cases due to the switch ID. So configurations saved for stacking are not valid for non-stacking cases and vice versa.
Adding Stacking Members
Connect the stacked switches using stacking cables. For better redundancy, connect the switches daisy-chained as shown in Figure 7-48. This chain connectivity helps to maintain stacking in case a single link or switch fails.
Before connecting switches in stacking, make sure stacking is enabled in all switches and that the switch identifier and priorities are all configured properly.
NOTE: When stacking is enabled, the switch needs to be rebooted to make it effective.
NOTE: When a switch is acting as a stand-alone switch with stacking disabled, all physical interfaces are numbered as 0/1 to 0/n.
When the switch is in stacking mode, the interfaces are numbered as <switch id>/1 to <switch id> / n.
In non-stacking mode, the switch ID is considered to be 0.
NOTE: If you choose stacking using the stack command from a non-stacking case, and the configurations are already saved for restoring the switch, it will rename the configuration file by adding a suffix _nonstack and will not restore this file when the switch reboots with stacking enabled.
Similarly, if you choose non-stacking using the no stack command from the stacking case, and the configurations are already saved for restoring the switch, it will rename the configuration file by adding a suffix _stack and will not restore this file when the switch reboots with stacking disabled.
7-56

Chapter 7: Layer 2/3 Ethernet Switch Firmware
There is no other specifical configuration required to add stacked switches. If two stacking-enabled switches connect through stacking cables, they form a stack.
NOTE: Do not use the same switch ID for multiple switches on the stack.
Figure 7-48. Switch Diagram
7-57

Superblade Network Modules User’s Manual
The SBM-GEM-X2C+ has four LEDs to display the stacking identifier. Due to the limited space available for LEDs, the stacking identifier is displayed in binary form using these four stacking LEDs.
Removing a stacked switch
To remove a switch from stacking follow the below recommended procedure.
1. Disconnect stacking cables.
2. Reboot the removed switch as a standalone switch.
3. Disable stacking. Execute the “no stack” command.
4. Reboot the switch again to operate as regular stand-alone switch.
Stacking Identifier
Stacking ID LED 4
Stacking ID LED 3
Stacking ID LED 2
Stacking ID LED 1
1 OFF OFF OFF ON
2 OFF OFF ON OFF
3 OFF OFF ON ON
4 OFF ON OFF OFF
5 OFF ON OFF ON
6 OFF ON ON OFF
7 OFF ON ON ON
8 ON OFF OFF OFF
9 ON OFF OFF ON
10 ON OFF ON OFF
11 ON OFF ON ON
12 ON ON OFF OFF
13 ON ON OFF ON
14 ON ON ON OFF
15 ON ON ON ON
16 OFF OFF OFF OFF
NOTE: In a stack only one switch can be configured as master. The slave switches will not allow you to configure anything except stacking disabled. To login to slave switches, use a login name as "stackuser" and password as "stack123".
NOTE: When a switch is moved from stacking to stand-alone mode, the saved stacking configurations can not be loaded in stand-alone mode. When stacking is disabled, the switch software renames the existing configuration file to avoid automatic restoration of stacking configurations on a stand-alone switch.
7-58

Chapter 7: Layer 2/3 Ethernet Switch Firmware
The following pages are available for configuring Stack settings;
• "Stack Configuration" on page 7-59
• "Stack Details" on page 7-60
• "Stack Counters" on page 7-62
Stack Configuration
Clicking the STACK SETTINGS tab brings up the STACK CONFIGURATION page (Figure 7-49), which configures the stacking feature. The parameters for this page are shown in Table 7-35.
Figure 7-49. Stack Configuration Page
Table 7-35. Stack Configuration Page Parameters
Parameter Description
Switch ID
This parameter defines a switch identifier number for this switch. This identifier should be unique in the stack, since the number is used in referring all physical interfaces available in this switch.
So for example, if this parameter is choosen as 2, the physical interfaces will be referred as Gi2/1, Gi2/1 and so on.
For non-stacking, stand-alone cases this switch ID is considered as zero.
Ports
This parameter represents the number of stacking ports. You can choose the number based upon your preferred stacking configuration and available CX4 ports. It is recommended that you use two CX4 ports as stacking ports to get redundancy.
7-59

Superblade Network Modules User’s Manual
Stack Details
Clicking the STACK DETAILS tab brings up the STACK DETAILS page (Figure 7-50), which displays stacking details. The parameters for this page are shown in Table 7-36.
PriorityThis parameter chooses the priority for this switch in the Stacking Master selection. It could be configured as Preferred Master, Backup Master or Preferred Slave.
StackingThis parameter enables or disables stacking.
NOTE: Any change in stacking status requires a reboot of the switch.
Figure 7-50. Stack Details Page
Table 7-36. Stack Details Page Parameters
Parameter Description
Self Status
Stack Ports This is the number of stacking ports configured in this switch.
Switch ID This parameter is used to specify the switch identifier of this switch.
Stack IPThis parameter is used to specify the IP address of this switch. This IP address is used to communicate between stack member switches.
Stack MACThis parameter is used to specify the MAC address of this switch. This MAC address is used to communicate between stack member switches.
Table 7-35. Stack Configuration Page Parameters (Continued)
Parameter Description
7-60

Chapter 7: Layer 2/3 Ethernet Switch Firmware
Stack Link Status
The STACK LINK STATUS page (Figure 7-51) displays the stack interface link status as “up” or “down”.
Configured State This parameter is used to specify the priority of this switch.
Current StateThis parameter is used to specify the current status of this switch as Master or Slave.
Peer Status – The following parameters display information about all connected stack Slave switches.
Switch ID This parameter is used to specify the switch identifier of the Slave switch.
Stack IPThis parameter is used to specify the IP address of the Slave switch. This IP address is used to communicate between stack member switches.
Stack MACThis parameter is used to specify the MAC address of the Slave switch. This MAC address is used to communicate between stack member switches.
Switch State This parameter is used to specify the current status of the Slave switch.
Card Name This parameter is used to specify the type of Slave switch.
Figure 7-51. Stack Link Status Page
Table 7-36. Stack Details Page Parameters (Continued)
Parameter Description
7-61

Superblade Network Modules User’s Manual
Stack Counters
Clicking the STACK COUNTERS tab brings up the STACK COUNTERS DETAILS page (Figure 7-52), which displays statistics for stacking ports. The parameters for this page are shown in Table 7-37.
Figure 7-52. Stack Counter Details Page
Table 7-37. Stack Counter Details Page Parameters
Parameter Description
Port This parameter displays the stacking port identifier.
Received Statistics
InOctet This parameter displays the number of bytes received.
InUcast This parameter displays the number of unicast packets received.
InDiscardThis parameter displays the number of received packets which were discarded.
InErrors This parameter displays the number of packets received with errors.
InHCOctet This parameter displays the number of bytes received with HC.
Transmit Statistics
OutOctet This parameter displays the number of bytes transmitted.
OutUcast This parameter displays the number of unicast packets transmitted.
OutDiscard This parameter displays the number of packets discarded in transmission.
7-62

Chapter 7: Layer 2/3 Ethernet Switch Firmware
Reload
A “Switch Reload” function (Figure 7-53) is available in the SYSTEM SETTINGS page in the SYSTEM MANAGEMENT section.
You can use the SWITCH select option to choose the switch to reload, or you can select the ALL SWITCHES option to reload all stack member switches.
The FORCE check box provides an option to force a reload of the switch when the Master Switch is waiting for confirmation messages from slave switches for stacking configurations.
Click the RELOAD SWITCH button to reload the selected switch
OutErrors This parameter displays the number of packets transmitted got errors.
OutHCOctet This parameter displays the number of bytes transmitted with HC.
NOTE: HC refers to the High Capacity value of the counter used. The regular counter is 32-bit. The HC counter is 64-bit.
Figure 7-53. System Settings Page – Reload
Table 7-37. Stack Counter Details Page Parameters (Continued)
Parameter Description
7-63

Superblade Network Modules User’s Manual
7-5 Layer 2 Management The LAYER2 MANAGEMENT page (Figure 7-54) has links to all pages with Layer2 controls.
Figure 7-54. Layer2 Management Page
7-64

Chapter 7: Layer 2/3 Ethernet Switch Firmware
Layer 2 Basic Settings
Clicking the LAYER2 BASIC STTINGS link brings up the MAC ADDRESS TABLE SETTINGS page (Figure 7-55), which gives you the option to change MAC aging time. MAC address confirmation can be done with this time interval.
Figure 7-55. MAC Address Table Settings Page
7-65

Superblade Network Modules User’s Manual
Port Manager
The PORT MANAGER link has links to the following web pages:
• "Port Basic Settings" on page 7-66
• "Port Monitoring" on page 7-68
• "VLAN Traffic Class" on page 7-69
• "Port Control" on page 7-70
• "Rate Limiting" on page 7-71
Port Basic Settings
NOTE: In all port based configuration pages, the port number group links are provided on the top.
In the normal standalone operation of the switch, there is only one link and the corresponding port configuration is displayed below it.
In case of stacking, multiple groups of port links are displayed. These links provide the configuration of ports from different stack member switches. To view the configuration of ports from a particular stack member switch, select the corresponding port links. For example, if three switches having switch identifier as 1, 2, and 3 are stacked together, the links will be as follows.
Gi1/1-Ex1/2 | Gi2/1-Ex2/2 | Gi3/1-Ex3/2
So to view the ports of switch 2, you need to select the Gi2/1-Ex2/2 link.
Figure 7-56. Port Basic Settings Page
7-66

Chapter 7: Layer 2/3 Ethernet Switch Firmware
Clicking the BASIC SETTINGS tab brings up the PORT BASIC SETTINGS page (Figure 7-56), which allows you to configure port status and mode information. This page also helps configuring priority and MTU. The parameters for this page are shown in Table 7-38.
Table 7-38. Port Basic Settings Page Parameters
Parameter Description
Port This displays the port number.
Link statusThis column shows the physical link status as an UP or Down arrow. A green up arrow indicates that the status of the port is up, while the red down arrow indicates that the status of the port is down.
Admin StateThis parameter allows you to administratively configure the admin state as Up or Down.
Default User Priority This parameter allows you to set the priority from 0 to 7.
Switch PortBy default all ports are switch ports for layer 2 switching. To configure a port as a layer 3 routed port, choose No.
Switch Port Mode Use this control allows to set the access mode as either Trunk or Hybrid.
MTU
This sets the MTU value. The Minimum is 90 and Maximum is 16338. A port must be administrativly down in order to change the MTU. Jumbo frames of up to 9216 bytes are supported on 1G links. Jumbo frames of up to 16338 bytes are supported on 10G links.
Link Up/Down TrapThis parameter enables or disables SNMP trap generation for port up and down events.
7-67

Superblade Network Modules User’s Manual
Port Monitoring
Clicking the PORT MONITORING tab brings up the PORT MONITORING page (Figure 7-57), which allows you to enable or disbale monitoring on port interface. The parameters for this page are shown in Table 7-39.
Figure 7-57. Port Monitoring Page
Table 7-39. Port Monitoring Page Parameters
Parameter Description
Status This parameter enables or disables the port monitoring.
Port This displays the port number.
Receive Monitoring This parameter enables or disables the receive monitoring.
Trasmit Monitoring This parameter enables or disables the transmit monitoring.
7-68

Chapter 7: Layer 2/3 Ethernet Switch Firmware
VLAN Traffic Class
Clicking the TRAFFIC CLASS tab brings up the VLAN TRAFFIC CLASS MAPPING page (Figure 7-58), which allows you to map a priority to a traffic class. The parameters for this page are shown in Table 7-40.
Figure 7-58. VLAN Traffic Class Mapping Page
Table 7-40. VLAN Traffic Class Mapping Page Parameters
Parameter Description
Port This displays the port number.
Priority 0 This parameter chooses any traffic class 0 to 7 to map with priority 0.
Priority 1 This parameter chooses any traffic class 0 to 7 to map with priority 1.
Priority 2 This parameter chooses any traffic class 0 to 7 to map with priority 2.
Priority 3 This parameter chooses any traffic class 0 to 7 to map with priority 3.
Priority 4 This parameter chooses any traffic class 0 to 7 to map with priority 4.
Priority 5 This parameter chooses any traffic class 0 to 7 to map with priority 5.
Priority 6 This parameter chooses any traffic class 0 to 7 to map with priority 6.
Priority 7 This parameter chooses any traffic class 0 to 7 to map with priority 7.
7-69

Superblade Network Modules User’s Manual
Port Control
Clicking the PORT CONTROL tab brings up the PORT CONTROL page (Figure 7-59), which allows you to configure specific parameters of the port. You can choose between Auto-negotiation and No-negotiation for a port. If No-negotiation is chosen, then the speed of the link, FlowControl and duplex modes can be configured. The parameters for this page are shown in Table 7-41.
Figure 7-59. Port Control Page
Table 7-41. Port Control Page Parameters
Parameter Description
Port This displays the port number.
ModeThis parameter allows you to select either Auto Negotiation or No-negotiation.
Duplex This parameter allows you to select either Full Duplex or Half Duplex.
SpeedThis parameter allows you to select the speed as 10 Mbps, 100 Mbps or 1 Gbps.
Flow Control Admin StatusThis parmeter allows you to specify the Flow Control Admin Status as either Disabled, Trasmit Flow Control Enabled, Receive Flow Control Enabled or both Transmit and Receive Flow Control Enabled.
Flow Control Operation Status
This parameter displays the status of the flow control.
HOL Block PreventionThis parameter allows you to enable or disable Head of Line block prevention.
7-70

Chapter 7: Layer 2/3 Ethernet Switch Firmware
Rate Limiting
Clicking the RATE LIMITING tab brings up the RATE LIMITING page (Figure 7-60), which allows you to configure rate limiting for the port interface. The parameters for this page are shown in Table 7-42.
Figure 7-60. Rate Limiting Page
Table 7-42. Rate Limiting Page Parameters
Parameter Description
Port This displays the port number.
The following parameters are configurable for Ingress Rate Limiting.
DLF LevelThis parameter allows you to specify the destination lookup failure packets per second.
Broadcast Level This parameter allows you to specify the broadcast packets per second.
Multicast Level This parameter allows you to specify the multicast packets per second.
The following parameters are configurable for Egress Rate Limiting.
Egress Port Rate LimitThis parameter allows you to specify the egress limit of packets per second.
Egress Port Burst Size This parameter allows you to specify the egress limit of packet burst size.
7-71

Superblade Network Modules User’s Manual
VLAN
The VLAN link allows to configure the VLAN information. VLAN configuration information has been provided in the following pages:
• "VLAN Basic Settings" on page 7-72
• "Port Settings" on page 7-73
• "Static VLAN" on page 7-74
• "Protocol Group" on page 7-75
• "Port Protocol" on page 7-75
• "Vlan Port MAC Map" on page 7-76
• "Unicast MAC" on page 7-77
• "Wildcard" on page 7-78
• "Switch Port VLAN" on page 7-79
VLAN Basic Settings
Clicking the BASIC SETTINGS tab brings up the VLAN BASIC SETTINGS page (Figure 7-61), which displays VLAN global configuration information. The parameters for this page are shown in Table 7-43.
Figure 7-61. VLAN Basic Settings Page
7-72

Chapter 7: Layer 2/3 Ethernet Switch Firmware
In addition, the BASIC SETTINGS page provides the configuration3 of Bridge Mode (Customer /Provider) and the priority for tunneled STP BPDUs. When you configure BRIDGE MODE TO PROVIDER, the Port Protocol based classification and MAC-based classification on all ports must be disabled.
Port Settings
Table 7-43. VLAN Basic Settings Page Parameters
Parameter Description
Garp System Control This parameter starts or shuts down GARP in the switch.
Learning ModeThis parameter specifies the Learning Mode (Independent, Shared, Hybrid or VLAN Learning).
VLAN Version This parameter specifies the VLAN version supported.
Maximum VLAN IDThis parameter specifies the largest (4094) valid VLAN ID, which this switch can accept, above which all will be discarded.
Maximum Supported VLANs
This parameter specifies the maximum number of VLANs that this device can scale.
Number of VLANs in the System
This parameter specifies the active number of VLANs configured in the device.
MAC Based on All Ports This parameter enables or disables the per Port MAC based classification.
Port and Protocol Based on all Ports
This parameter enables or disables the per Port Protocol based classification.
Figure 7-62. VLAN Port Settings Page
7-73

Superblade Network Modules User’s Manual
Clicking the PORT SETTINGS tab brings up the VLAN PORT SETTINGS page (Figure 7-62), which is used to associate the VLAN ID to the port for Port based VLAN classification.
While associating different ports to VLANs, you can also configure INGRESS FILTERING (at the port level) and ACCEPTABLE FRAME TYPES (accept Tagged Frame Alone or All frames).
The other configurations provided in this page are, enabling/disabling per Port MAC based classification and Port Protocol based classification, enabling/disabling of tunneling and enabling/disabling of STP BPDU Tunneling. To enable STP BPDU Tunneling on an interface, you must first enable tunneling on that interface.
Static VLAN
Clicking the STATIC VLANS tab brings up the STATIC VLAN CONFIGURATION page (Figure 7-63), which allows you to configure the VLAN related information statically.
Using the first table you can create new entries for uncreated VLANs. VLAN ID is the mandatory field in configuring a VLAN. You can also enter a VLAN NAME, MEMBER PORT LIST, UNTAGGED PORT and the FORBIDDEN PORTS for a VLAN.
The second table displays the VLAN configurations saved in the switch.
Figure 7-63. Static VLAN Configuration Page
7-74

Chapter 7: Layer 2/3 Ethernet Switch Firmware
Protocol Group
Clicking the PROTOCOL GROUP tab brings up the VLAN PROTOCOL GROUP SETTINGS page (Figure 7-64), which is used to map Protocol Templates to Protocol Group Identifiers.
The FRAME TYPE gives you the data-link encapsulation format. The PROTOCOL VALUE is the value of the protocol in a protocol template. The GROUP ID represents a group of protocols that are associated together.
Port Protocol
Clicking the Port PROTOCOL tab brings up the PORT VLAN PROTOCOL SETTINGS page (not shown), which displays a table used for Port and Protocol based VLAN classification. The GROUP ID designates a group of protocols in the Protocol Group Database. The VLAN ID is the ID associated with a group of protocols for each port.
Figure 7-64. VLAN Protocol Group Settings Page
7-75

Superblade Network Modules User’s Manual
Vlan Port MAC Map
Clicking the PORT MAC MAP tab brings up the VLAN PORT MAC MAP page (Figure 7-65), which allows you to configure MAC based VLANs. The parameters for this page are shown in Table 7-44.
Figure 7-65. VLAN Port MAC Map Settings Page
Table 7-44. VLAN Port MAC Map Page Parameters
Parameter Description
Port No This displays the port number.
Port Mac-Map Addr This parameter specifies the Port MAC-Map address.
Port Mac-Map Vid This parameter specifies the VLAN identifier for this MAC based VLAN
Bcast OptionThis parameter specifies the Broadcast option, which can be allowed or discarded.
7-76

Chapter 7: Layer 2/3 Ethernet Switch Firmware
Unicast MAC
Clicking the UNICAST MAC tab brings up the VLAN UNICAST MAC SETTINGS page (Figure 7-66), which allows you to configure the various parameters for VLAN Unicast MAC settings. The parameters for this page are shown in Table 7-45.
Figure 7-66. VLAN Unicast MAC Settings Page
Table 7-45. VLAN Unicast Mac Settings Page Parameters
Parameter Description
VLAN ID This parameter specifies the VLAN Identifier.
MAC Admin StatusThis parameter specifies the MAC administration status, which can be enabled or disabled.
MAC Limit This parameter indicates the MAC limit.
MAC Operational StatusThis parameter specifies the MAC operational Status, which can be enabled or disabled.
7-77

Superblade Network Modules User’s Manual
Wildcard
Clicking the WILDCARD tab brings up the WILDCARD SETTINGS page (Figure 7-67), which configures wildcard MAC addresses and ports for VLANs. The parameters for this page are shown in Table 7-46.
Figure 7-67. Wildcard Settings Page
Table 7-46. Wildcard Settings Page Parameters
Parameter Description
Content ID This parameter allows you to select the CONTENT ID.
Address Selection Use this parameter to select the address type.
Ports This parameter allows you to enter a port.
7-78
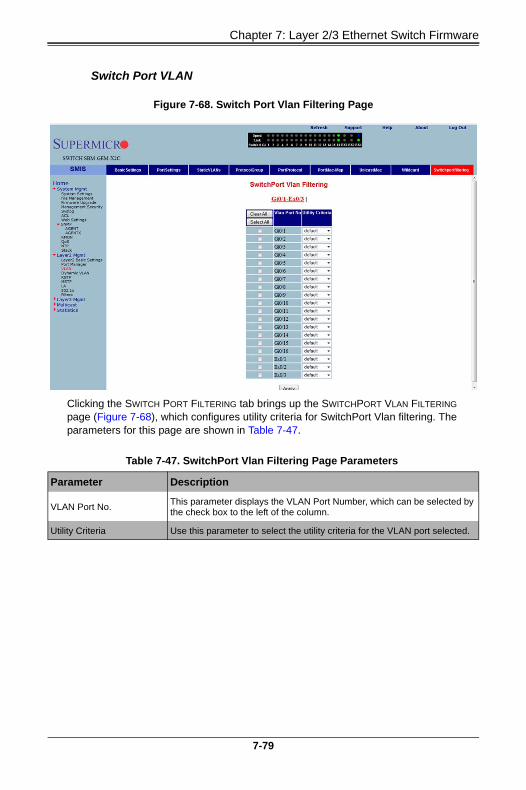
Chapter 7: Layer 2/3 Ethernet Switch Firmware
Switch Port VLAN
Clicking the SWITCH PORT FILTERING tab brings up the SWITCHPORT VLAN FILTERING page (Figure 7-68), which configures utility criteria for SwitchPort Vlan filtering. The parameters for this page are shown in Table 7-47.
Figure 7-68. Switch Port Vlan Filtering Page
Table 7-47. SwitchPort Vlan Filtering Page Parameters
Parameter Description
VLAN Port No.This parameter displays the VLAN Port Number, which can be selected by the check box to the left of the column.
Utility Criteria Use this parameter to select the utility criteria for the VLAN port selected.
7-79

Superblade Network Modules User’s Manual
Dynamic Vlan
The Dynamic VLAN link allows you to configure the Dynamic VLAN information. Dynamic VLAN configuration information has been provided in the following pages
• "Dynamic VLAN Global Configuration" on page 7-80
• "Port Configuration" on page 7-81
• "GARP Timers" on page 7-82
Dynamic VLAN Global Configuration
Clicking the DYNAMIC VLAN tab brings up the DYNAMIC VLAN GLOBAL CONFIGURATION page (Figure 7-69), which allows you to enable or disable Dynamic VLAN.
Figure 7-69. Dynamic VLAN Global Configuration Page
7-80

Chapter 7: Layer 2/3 Ethernet Switch Firmware
Port Configuration
Clicking the PORT SETTINGS link brings up the DYNAMIC VLAN PORT CONFIGURATION page (Figure 7-70), which allows you to configure parameters for Dynamic VLAN ports. The parameters for this page are shown in Table 7-48.
Figure 7-70. Dynamic VLAN Port Configuration Page
Table 7-48. Dynamic VLAN Port Configuration Page Parameters
Parameter Description
PortThis parameter displays the Port Number, which can be selected by the check box to the left of the column.
Dynamic VLAN Status Use this parameter to enable/disable the DYNAMIC VLAN STATUS.
Restricted VLAN Registration
This parameter allows you to enable/disable RESTRICTED VLAN REGISTRATION.
7-81

Superblade Network Modules User’s Manual
GARP Timers
Clicking the GARP TIMERS tab brings up the GARP TIMERS CONFIGURATION page (Figure 7-71), which displays the various parameters for changing Garp times. The parameters for this page are shown in Table 7-49.
Figure 7-71. Garp Timers Configuration Page
Table 7-49. Garp Timers Configuration Page Parameters
Parameter Description
Port No This parameter displays the Port Number.
Garp Join Time (msecs) This parameter allows you to change the Garp Join Time.
Garp Leave Time (msecs) This parameter allows you to change the Garp Leave Time.
Garp Leave All Time (msecs)
This parameter allows you to change the Garp Leave All Time.
7-82

Chapter 7: Layer 2/3 Ethernet Switch Firmware
RSTP
The RSTP link provides links to the following configuration pages:
• "RSTP Global Settings" on page 7-83
• "RSTP Basic Settings" on page 7-84
• "Port Settings" on page 7-85
• "Port Status" on page 7-86
RSTP Global Settings
Clicking the GLOBAL SETTINGS tab brings up the GLOBAL CONFIGURATION page (Figure 7-72), which allows you to configure RSTP global parameters. The parameters for this page are shown in Table 7-50.
Figure 7-72. Global Configuration Page
Table 7-50. Global Configuration Page Parameters
Parameter Description
System Control This parameter starts or Shutsdown RSTP in the switch.
StatusThis parameter allows you to enable/disable the protocol at a global level on the switch.
Dynamic Path Cost Calculation
This parameter allows you to enable or disable the DYNAMIC PATH COST CALCULATION.
7-83

Superblade Network Modules User’s Manual
RSTP Basic Settings
Clicking the BASIC SETTINGS tab brings up the RSTP CONFIGURATION page (Figure 7-73), which displays the various parameters for RSTP configuration. The parameters for this page are shown in Table 7-51.
Figure 7-73. RSTP Configuration Page
Table 7-51. RSTP Configuration Page Parameters
Parameter Description
System Control This parameter allows you to start or shutsdown RSTP in the switch.
RSTP StatusThis parameter allows you to enable/disable the protocol at a global level on the switch.
CompatibilityThis parameter allows you to choose to run the protocol as an RSTP or STP compatible version.
Bridge PriorityThis parameter specifies the BRIDGE PRIORITY, which can be used to select the root bridge.
Transmit Hold Count This parameter specifies the maximum number of packets that can be sent in a given interval. This is configured to avoid flooding.
Default Path Cost VersionThis parameter allows you to configure the path cost either as a 16-bit value or a 32-bit value. This is provided mainly for backward compatibility with STAP.
7-84

Chapter 7: Layer 2/3 Ethernet Switch Firmware
Port Settings
Clicking the PORT SETTINGS tab brings up the PORT STATUS CONFIGURATION page (Figure 7-74), which allows you to set the configuration per port related to RSTP. The parameters for this page are shown in Table 7-52.
Figure 7-74. Port Status Configuration Page
Table 7-52. Port Status Configuration Page Parameters
Parameter Description
Port This parameter specifies the port identifier.
StatusThis parameter enables or disables the RSTP protocol status on a particular port.
Priority This parameter specifies the port priority used in role selection.
Path Cost This parameter specifies the path cost associated with this port.
Protocol Migration This parameter controls the migration from RSTP to STP, if the other side of the switch runs STP. The migration takes place only if this is Enabled.
PortFastThis parameter must be configured, if the corresponding port is an edge port.
Point-to-PointThis parameter allows you to configure ports explicitly as Point-to-point (Force true), Non-point-to-point or leave the decision to be made Dynamically (from the AL or MAC layer).
Auto Edge StatusIf this parameter is set to true, the edge port status is dynamically calculated.
7-85

Superblade Network Modules User’s Manual
Port Status
Clicking the PORT STATUS tab brings up the RSTP PORT STATUS page (Figure 7-75), which displays RSTP port specific information. The parameters for this page are shown in Table 7-53.
Restricted Role This parameter specifies the RESTRICTED ROLE status of the port.
Restricted TCN This parameter indicates the RESTRICTED TCN status of the port.
Figure 7-75. RSTP Port Status Page
Table 7-53. RSTP Port Status Page Parameters
Parameter Description
Designated RootThis parameter specifies the unique Bridge Identifier of the bridge that is recorded as the root for the segment to which the port is attached.
Designated CostThis parameter specifies the path cost of the Designated Port of the segment connected to this port.
Designated BridgeThis parameter specifies the Bridge Identifier of the bridge, which this port considers to be the Designated Bridge for this port's segment.
Designated PortThis parameter specifies the Port Identifier of the port on the Designated Bridge for this port's segment.
Table 7-52. Port Status Configuration Page Parameters (Continued)
Parameter Description
7-86

Chapter 7: Layer 2/3 Ethernet Switch Firmware
MSTP
The MSTP link leads you to the following configuration pages:
• "MSTP Basic Settings" on page 7-87
• "MSTP Timers" on page 7-89
• "Port Configuration" on page 7-90
• "VLAN Mapping" on page 7-91
• "Port Settings" on page 7-92
• "CIST Port Status" on page 7-93
MSTP Basic Settings
TypeThis parameter specifies the operational point-to-point status of the LAN segment attached to this port. It indicates whether a port is considered to have a Point-to-point connection or Shared Media.
RoleThis parameter specifies the port's current role as defined by the Spanning Tree Protocol.
Port StateThis parameter specifies the port's current state as defined by application of the Spanning Tree Protocol.
Figure 7-76. Global Configuration Page
Table 7-53. RSTP Port Status Page Parameters (Continued)
Parameter Description
7-87

Superblade Network Modules User’s Manual
Clicking the BASIC SETTINGS tab brings up the GLOBAL CONFIGURATION page (Figure 7-76), which can access the MSTP global configuration. The parameters for this page are shown in Table 7-54.
Table 7-54. Global Configuration Page Parameters
Parameter Description
System Control This parameter Starts or Shutsdown MSTP in the switch.
MSTP StatusThis parameter specifies the protocol that can be enabled/disabled at a global level on the switch using this field.
CompatibilityThis parameter allows you to choose to run the protocol in MSTP, RSTP or an STP compatible version.
Bridge PriorityThis parameter specifies the Priority value assigned to the bridge that is used to select the root bridge.
Transmit Hold CountThis parameter specifies the maximum number of packets that can be sent in a given interval. This is configured to avoid flooding.
Default Path Cost VersionThis parameter allows you to configure the path cost either as a 16-bit value or a 32-bit value. This is provided mainly for backward compatibility with STAP.
Maximum Age (Seconds) This parameter specifies the time period for which the information received in the RSTP BDPU is valid.
Forward Delay (Seconds)This parameter specifies how fast a port changes its Spanning state when moving towards the Forwarding state.
Hop Counts (Seconds)This parameter specifies the maximum number of bridges that a packet can cross before it will be dropped, to avoid infinite looping of the packets.
Region NameThis parameter specifies the name for the Region's configuration. By default, the region name will be equal to the Bridge MAC Address.
Region VersionThis parameter specifies the version number of the configuration to be used.
7-88

Chapter 7: Layer 2/3 Ethernet Switch Firmware
MSTP Timers
Clicking the TIMERS tab brings up the TIMERS CONFIGURATION page (Figure 7-77), which configures the time for MAXIMUM HOP COUNT, FORWARD DELAY, MAXIMUM AGE, TRANSMIT HOLD AGE and HELLO TIME.
Figure 7-77. Timers Configuration Page
7-89

Superblade Network Modules User’s Manual
Port Configuration
Clicking the PORT CONFIGURATION tab brings up the CIST SETTINGS page (Figure 7-78), which sets the configuration per Port related to MSTP. The parameters for this page are shown in Table 7-55.
Figure 7-78. CIST Settings Page
Table 7-55. CIST Settings Page Parameters
Parameter Description
Port This parameter specifies the port identifier.
Admin StatusThis parameter specifies the MSTP protocol status that can be enabled/disabled on the particular port.
Priority This parameter specifies the port priority used in role selection.
Path Cost This parameter specifies the path cost associated with this port.
Protocol MigrationThis parameter controls the migration among MSTP, RSTP and STP protocols, if the other side of the switch runs a different mode. Migration takes place only if this is enabled.
Edge StatusThis parameter must be configured if the corresponding port is an edge port.
Point-to-Point StatusThis parameter allows you to configure the ports explicitly as point-to-point (Force true), as a non-point-to-point port, or leave the decision to be made dynamically (from the AL or MAC layer).
Hello Time (Seconds) This parameter specifies the administrative value of Hello Time for the port.
7-90

Chapter 7: Layer 2/3 Ethernet Switch Firmware
VLAN Mapping
Clicking the VLAN MAPPING tab brings up the VLAN MAPPING page (Figure 7-79), whose table contains one entry for each instance of MSTP. The parameters for this page are shown in Table 7-56.
Auto Edge Status If set to True, the edge port status will be dynamically calculated.
Restricted Role This parameter specifies the Restricted role status of the port.
Restricted TCN This parameter indicates the Restricted TCN status of the port.
Figure 7-79. VLAN Mapping Page
Table 7-56. VLAN Mapping Page Parameters
Parameter Description
MSTP Instance ID This parameter specifies the Instance ID, which is the index of the table.
Map VLANThis parameter specifies the list of VLANs to be mapped to this instance of the spanning tree.
Unmap VLANThis parameter specifies the list of VLANs to be unmapped from this instance of the spanning tree.
Table 7-55. CIST Settings Page Parameters (Continued)
Parameter Description
7-91

Superblade Network Modules User’s Manual
Port Settings
Clicking the PORT SETTINGS tab brings up the PORT SETTINGS page (Figure 7-80), which displays the various parameters for port settings. The parameters for this page are shown in Table 7-57.
Figure 7-80. Port Settings Page
Table 7-57. Port Settings Page Parameters
Parameter Description
PortThis parameter specifies the interface index of the port on which MSTP is being run.
MSTP Instance IDThis parameter specifies the instance ID of the STP that is associated with this instance.
Port State This parameter specifies the current state of the port.
Priority This parameter specifies the priority related to this port.
CostThis parameter specifies the cost associated with this port, which will be added to the cost of any path that includes this port.
7-92

Chapter 7: Layer 2/3 Ethernet Switch Firmware
CIST Port Status
Clicking the CIST PORT STATUS tab brings up the MSTP CIST PORT STATUS page (Figure 7-81), which displays MSTP CIST port specific information. The parameters for this page are shown in Table 7-58.
Figure 7-81. MSTP CIST Port Status Page
Table 7-58. MSTP CIST Port Status Page Parameters
Parameter Description
Designated Root This parameter specifies the unique Bridge Identifier of the Bridge recorded as the Root for the segment to which the port is attached.
Designated BridgeThis parameter specifies the Bridge Identifier of the bridge, which this port considers to be the Designated Bridge for this port's segment.
Designated PortThis parameter specifies the Port Identifier of the port on the Designated Bridge for this port's segment.
Designated CostThis parameter specifies the path cost of the Designated Port of the segment connected to this port.
Regional Root This parameter specifies the unique Bridge Identifier of the bridge recorded as the CIST Regional Root Identifier in the configuration BPDUs transmitted.
Regional Path CostThis parameter specifies the contribution of this port to the path cost of paths towards the CIST Regional Root, which includes this port.
TypeThis parameter specifies the operational point-to-point status of the LAN segment attached to this port. It indicates whether a port is considered to have a point-to-point connection or shared media.
7-93

Superblade Network Modules User’s Manual
RoleThis parameter specifies the ports current role as defined by the Spanning Tree Protocol.
Port StateThis parameter specifies the port's current state as defined by the application of the Spanning Tree Protocol.
Table 7-58. MSTP CIST Port Status Page Parameters (Continued)
Parameter Description
7-94

Chapter 7: Layer 2/3 Ethernet Switch Firmware
LA (Link Aggregation)
The LA link provides links to the following configuration pages:
• "LA Basic Settings" on page 7-95
• "Interface Settings" on page 7-96
• "Port Channel" on page 7-97
• "Port Settings" on page 7-98
• "Port State Info" on page 7-99
• "Load Balancing" on page 7-100
LA Basic Settings
Clicking the BASIC SETTINGS tab brings up the LA BASIC SETTINGS page (Figure 7-82), which displays the various parameters for LA basic settings. The parameters for this page are shown in Table 7-59.
Figure 7-82. LA Basic Settings Page
Table 7-59. LA Basic Settings Page Parameters
Parameter Description
System Control This parameter Starts or Shutsdown LA in the switch.
LA Status This is used to enable or disable LA in the switch.
7-95

Superblade Network Modules User’s Manual
Interface Settings
Clicking the INTERFACE SETTINGS tab brings up the PORT CHANNEL INTERFACE BASIC SETTINGS page (Figure 7-83), which allows you to configure port channels. The parameters for this page are shown in Table 7-60.
System PriorityThis parameter specifies the priority value associated with the Actor's system ID.
System IDThis parameter specifies the Bridge MAC Address that is displayed. This is a read-only parameter.
Figure 7-83. Port Channel Interface Basic Settings Page
Table 7-60. Port Channel Interface Basic Settings Page Parameters
Parameter Description
Port Channel IDThis parameter specifies the identifier of the port channel interface. The valids values are between 1 to 65535.
Admin Status This parameter administratively makes the port channel Up or Down.
MTU This parameter specifies the MTU value for this port channel.
Table 7-59. LA Basic Settings Page Parameters (Continued)
Parameter Description
7-96

Chapter 7: Layer 2/3 Ethernet Switch Firmware
Port Channel
Clicking the PORT CHANNEL SETTINGS tab brings up the LA PORT CHANNEL SETTINGS page (Figure 7-84), which is used to edit the Port Channel configuration. The first table is for creating Port Channel interfaces while the second table is for editing the Port Channel configuration. The third table is used to display the Port Channels and to delete the existing Port Channels.
The parameters for this page are shown in Table 7-61.
Figure 7-84. LA Port Channel Settings Page
Table 7-61. LA Port Channel Settings Page Parameters
Parameter Description
Port Channel ID This parameter specifies the identifier of the port channel interface.
Action TypeThis parameter specifies whether the port channel must be created or deleted.
PortsThis parameter specifies the interface indices that must be configured to be members of the Port Channel.
MAC Selection This parameter specifies the mode by which the MAC address for the port channel is assigned. It can be dynamic or the user can Force the selection of a specific MAC address.
Force MACThis parameter specifies the MAC Address that is assigned to the port channel. For this, the MAC selection mode must be Force.
7-97

Superblade Network Modules User’s Manual
Port Settings
Clicking the PORT SETTINGS tab brings up the LA PORT SETTINGS page (Figure 7-85), which configures LA properties at a per-port level. The parameters for this page are shown in Table 7-62.
Figure 7-85. LA Port Settings Page
Table 7-62. LA Port Settings Page Parameters
Parameter Description
Port This parameter specifies the Interface Index.
Port Priority This parameter specifies the priority value of the Port.
ModeThis parameter specifies the various port modes, such as LACP, Manual or Disable.
ActivityThis parameter specifies whether the Port LACP activity is Active or Passive.
Timeout
This parameter sets the time within which LACP PDUs must be received on a port to avoid timing out of the Aggregated Link. If a Long timeout is chosen then the ports will time out of the Port Channel in 90-seconds. If a Short timeout is chosen then the ports will time out of the Port Channel in 3-seconds.
7-98

Chapter 7: Layer 2/3 Ethernet Switch Firmware
Port State Info
Clicking the PORT STATE INFO tab brings up the LA PORT STATE MACHINE INFORMATION page (Figure 7-86), which displays Link Aggregation state machine information. It displays the aggregation state information for every port channel.
Wait TimeThis parameter configures the waiting time for a port after receiving Partner information and before entering aggregation.
Bundle State
This parameter indicates the current state of the port with respect to Link Aggregation. The possible states are:
• Up in Bundle - The port is an active member of the port channel.
• Up Individual - The port is not a member of any port channel but its Oper-Status is Up.
• Standby - The port is a member of the port channel but is currently in a standby state.
• Down - The port’s Oper-Status is Down.
Figure 7-86. LA Port State Machine Information Page
Table 7-62. LA Port Settings Page Parameters (Continued)
Parameter Description
7-99
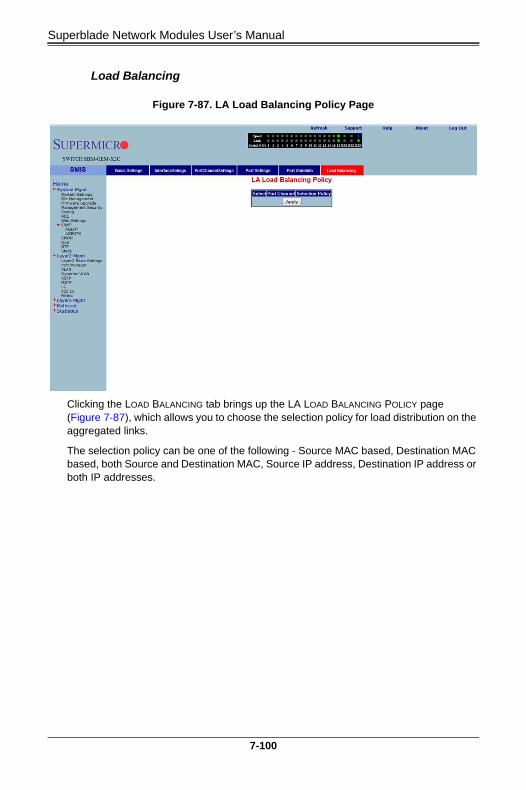
Superblade Network Modules User’s Manual
Load Balancing
Clicking the LOAD BALANCING tab brings up the LA LOAD BALANCING POLICY page (Figure 7-87), which allows you to choose the selection policy for load distribution on the aggregated links.
The selection policy can be one of the following - Source MAC based, Destination MAC based, both Source and Destination MAC, Source IP address, Destination IP address or both IP addresses.
Figure 7-87. LA Load Balancing Policy Page
7-100

Chapter 7: Layer 2/3 Ethernet Switch Firmware
802.1x
The 802.1x link provides link to the following configuration pages:
• "Basic Settings" on page 7-101
• "Port Settings" on page 7-102
• "Timers" on page 7-104
• "Local AS" on page 7-105
• "MAC Session Info" on page 7-106
Basic Settings
Clicking the BASIC SETTINGS tab brings up the 802.1X BASIC SETTINGS page (Figure 7-88), which displays the various 802.1x Basic Settings parameters. The parameters for this page are shown in Table 7-63.
Figure 7-88. 802.1x Basic Settings Page
Table 7-63. 802.1x Basic Settings Page Parameters
Parameter Description
System Control This parameter starts or shutsdown 802.1x in the switch.
802.1x Authentication This parameter allows enabling or disabling of the 802.1x based port security feature in the switch.
7-101

Superblade Network Modules User’s Manual
Port Settings
Clicking the PORT SETTINGS tab brings up the 802.1X PORT SETTINGS page (Figure 7-89), which configures security information at the individual port levels. The parameters for this page are shown in Table 7-64.
Authentication ServerThis parameter specifies the Authentication Server Location as Remote or Local.
Network Access Server IDThis parameter specifies the Authenticator ID, which originates the Access-Request Packets.
Figure 7-89. 802.1x Port Settings Page
Table 7-63. 802.1x Basic Settings Page Parameters (Continued)
Parameter Description
7-102

Chapter 7: Layer 2/3 Ethernet Switch Firmware
Table 7-64. 802.1x Port Settings Page Parameters
Parameter Description
PortThis parameter specifies the Index of the port for which its fields (such as PORT CONTROL, PORT AUTHORIZATION STATUS, and so on) are configured.
Port Control
This parameter specifies the control values of the Authenticator Port. The control values can be:
• Force Authorize - All the traffic through this port will be allowed always.
• Force Unauthorize - All the traffic through this port will be blocked always.
• Auto - The 802.1x authentication process will be imposed over this port.
Port Authorization StatusThis parameter specifies current status of the port either as Authorized or Un-Authorized.
Authentication ModeThis parameter specifies the configuration for selecting the AUTHENTICATION MODE to be Port Based.
Admin Control Direction
This parameter specifies whether security is to be imposed for
• In - the incoming traffic
• Both - both incoming and outgoing traffic
Operational Control Direction
This parameter specifies the current security status.
Port InitializeThis parameter specifies the initialization control for the port. Setting this value to True causes the port to be initialized. The value reverts to False once initialization is complete.
Maximum Authentication Request
This parameter specifies the maximum number of authentication requests that can be sent from the authenticator before getting a response from the supplicant.
ReauthenticationThis parameter provides configuration to enable or disable the reauthentication mechanism on the port.
7-103

Superblade Network Modules User’s Manual
Timers
Clicking the TIMERS tab brings up the 802.1X TIMER CONFIGURATION page (Figure 7-90), which configures Timer parameters at the individual port level. The parameters for this page are shown in Table 7-13.
Figure 7-90. 802.1x Timer Configuration Page
Table 7-65. 802.1x Timer Configuration Page Parameters
Parameter Description
PortThis parameter is the index of the port for which fields such as QUIET PERIOD, TRANSMIT PERIOD, and such are configured.
Quiet Period (Seconds)This parameter specifies the duration for which the authenticator will be silent and will not attempt to acquire a supplicant. It can be configured to any value in the range from 1 to 65535 seconds.
Transmit Period (Seconds)This parameter specifies the time period used by the Authenticator State machine to define when the EAPOL PDU is to be transmitted. It can be configured to any value in the range from 1 to 65535 seconds.
Re-authentication Period (Seconds)
This parameter specifies the time between periodic re-authentication of the supplicant.
7-104

Chapter 7: Layer 2/3 Ethernet Switch Firmware
Local AS
Clicking the LOCAL AS tab brings up the LOCAL AUTHENTICATION SERVER CONFIGURATION page (Figure 7-22), which configures Local Authentication Server information. The parameters for this page are shown in Table 7-13.
Figure 7-91. Local Authentication Server Configuration Page
Table 7-66. Local Authentication Server Configuration Page Parameters
Parameter Description
User NameThis parameter specifies the identity of the user who is seeking authentication, and is set by a string of not more than 20 printable characters.
PasswordThis parameter specifies the password specific to the user name, and is set by a string of not more than 20 printable characters.
Permission
This parameter represents the allowance and denial of access. The values that can be configured are:
• Allow - When set to Allow, the authentication request is allowed over the set of ports in the PORT LIST.
• Deny - When set to Deny, the authentication request is NOT allowed over the set of ports in the PORT LIST.
Port ListThis parameter represents the complete set of ports of the authenticator to which the user is allowed or denied access. It is based on permission.
7-105

Superblade Network Modules User’s Manual
MAC Session Info
Clicking the MAC SESSION INFO tab brings up the MAC SESSION INFO page (Figure 7-22), which configures the supplicant MAC address. The parameters for this page are shown in Table 7-13.
Figure 7-92. MAC Session Info Page
Table 7-67. MAC Session Info Page Parameters
Parameter Description
Session Intialize
This parameter is the initialization control for this Supplicant MAC address. Setting this attribute to True causes the Supplicant session with this MAC address, to be initialized. The attribute value reverts to False once initialization has completed.
Session ReAuthenticate
This parameter is the reauthentication control for this Supplicant MAC address. Setting this attribute to True causes the Authenticator PAE state machine for this MAC address to reauthenticate the Supplicant. Setting this attribute to False has no effect. This attribute always returns to False when it is read.
7-106
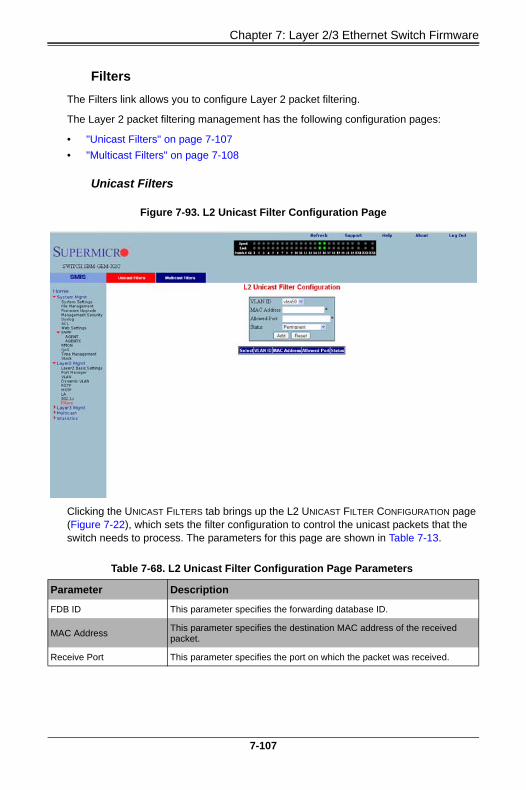
Chapter 7: Layer 2/3 Ethernet Switch Firmware
Filters
The Filters link allows you to configure Layer 2 packet filtering.
The Layer 2 packet filtering management has the following configuration pages:
• "Unicast Filters" on page 7-107
• "Multicast Filters" on page 7-108
Unicast Filters
Clicking the UNICAST FILTERS tab brings up the L2 UNICAST FILTER CONFIGURATION page (Figure 7-22), which sets the filter configuration to control the unicast packets that the switch needs to process. The parameters for this page are shown in Table 7-13.
Figure 7-93. L2 Unicast Filter Configuration Page
Table 7-68. L2 Unicast Filter Configuration Page Parameters
Parameter Description
FDB ID This parameter specifies the forwarding database ID.
MAC AddressThis parameter specifies the destination MAC address of the received packet.
Receive Port This parameter specifies the port on which the packet was received.
7-107

Superblade Network Modules User’s Manual
Multicast Filters
Clicking the MULTICAST FILTERS tab brings up the L2 MULTICAST FILTER CONFIGURATION page (Figure 7-22), which allows you to set the filter configuration to control the multicast packets that the switch needs to process. The parameters for this page are shown in Table 7-13.
Allowed PortsThis parameter specifies the list of ports on which the received packet, with the above set MAC address (if received from the configured port) can be forwarded.
Status
You can choose to set this configuration to any one of the following types:
• Other – For entries currently in use, but whose conditions remain different from the following values.
• Permanent – Entries that reside even after the restart of the switch.
• DeleteOnReset – This deletes the entry on restart.
• DeleteOnTimeout – This deletes the entry on expiration of the ageing timer.
Figure 7-94. L2 Multicast Filter Configuration Page
Table 7-68. L2 Unicast Filter Configuration Page Parameters (Continued)
Parameter Description
7-108

Chapter 7: Layer 2/3 Ethernet Switch Firmware
7-6 Layer 3 Management
The LAYER 3 MANAGEMENT home page (Figure 7-95) has links to all Layer 3 features.
Table 7-69. L2 Multicast Filter Configuration Page Parameters
Parameter Description
VLAN ID This parameter specifies the VLAN ID.
MAC AddressThis parameter specifies the destination MAC address of the received packet.
Receive Port This parameter specifies the port on which the packet was received.
Allowed Ports This parameter specifies the list of ports on which the received packet, with the above set MAC address (if received from the configured port) can be forwarded.
Forbidden PortsThis parameter specifies the list of ports on which the received packet, with the above set MAC address (if received from the configured port) must NOT be forwarded.
Status
You can choose to set this configuration to any one of the following types:
• Permanent – This configuration resides even after restart of the switch.
• DeleteOnReset – This configuration deletes the entry on restart.
• DeleteOnTimeout – This configuration deletes the entry on expiration of the ageing timer.
Figure 7-95. Layer3 Management Page
7-109

Superblade Network Modules User’s Manual
IP
The IP link enables you to perform IP related configuration. This can be done through the following pages.
• "Vlan Interface" on page 7-110
• "IP V4 Interface Settings" on page 7-111
• "IP Route" on page 7-112
• "LoopBack Basic Settings" on page 7-113
Vlan Interface
Clicking the VLAN INTERFACE tab brings up the VLAN INTERFACE BASIC SETTINGS page (Figure 7-96), which allows configuring of L3 VLAN interfaces. The parameters for this page are shown in Table 7-70.
Figure 7-96. VLAN Interface Basic Settings Page
Table 7-70. VLAN Interface Basic Settings Page Parameters
Parameter Description
VLAN Interface This parameter specifies the VLAN identifier.
Admin State This parameter specifies the admin state as either Up or Down.
MTU This parameter specifies the maximum transfer unit size in bytes.
7-110

Chapter 7: Layer 2/3 Ethernet Switch Firmware
IP V4 Interface Settings
Clicking the IPV4 ADDR CONF tab brings up the IPV4 INTERFACE SETTINGS page (Figure 7-97), which allowsyou to configure the IP address for L3 VLANs. The parameters for this page are shown in Table 7-71.
Figure 7-97. IPv4 Interface Settings Page
Table 7-71. IPv4 Interface Settings Page Parameters
Parameter Description
Interface VLAN ID This parameter specifies the VLAN interface.
IP Address This parameter specifies the IP Address of the specified interface.
Subnet Mask This parameter indicates the mask for the specified IP Address.
Address TypeThis parameter specifies the type of address, which can be Primary or Secondary.
7-111

Superblade Network Modules User’s Manual
IP Route
Clicking the IP ROUTE tab brings up the IP ROUTE CONFIGURATION page (Figure 7-98), which allows you to configure the static IP routes. The parameters for this page are shown in Table 7-72.
Figure 7-98. IP Route Configuration Page
Table 7-72. IP Route Configuration Page Parameters
Parameter Description
Destination NetworkThis parameter specifies the network address for which the route is being added.
Subnet MaskThis parameter indicates the subnet mask for the Destination Network address.
Gateway This parameter denotes the Next Hop Gateway to reach the IP address.
Interface This parameter specifies the outgoing interface.
Distance (Metric) This parameter specifies the metric value of the destination.
7-112

Chapter 7: Layer 2/3 Ethernet Switch Firmware
LoopBack Basic Settings
Clicking the LOOPBACK SETTINGS tab brings up the LOOPBACK BASIC SETTINGS page (Figure 7-99), which allows you to configure loopback IP interfaces. The parameters for this page are shown in Table 7-73.
Figure 7-99. LoopBack Basic Settings Page
Table 7-73. LoopBack Basic Settings Page Parameters
Parameter Description
LoopBack Interface This parameter is the name of the loopback interface getting created.
Interface Type This parameter is always the loopback for this configuration.
Interface Status This parameter for the INTERFACE STATUS can be set to Up or Down.
IP Address This parameter specifies the IP address for this loopback interface.
Subnet Mask This parameter specifies the subnet mask for this loopback interface.
7-113

Superblade Network Modules User’s Manual
IP V6
The IPV6 link allows you to perform IPv6 related configurations. This can be accomplished through the following six pages.
• "IPv6 Route Configuration" on page 7-114
• "IPv6 Interface" on page 7-115
• "ND Cache" on page 7-116
• "Address Settings" on page 7-117
• "Address Profile" on page 7-118
• "Prefix Settings" on page 7-119
IPv6 Route Configuration
Clicking the IPV6 ROUTE tab brings up the IP6 ROUTE CONFIGURATION page (Figure 7-100), which configures various IP6 Route parameters. The parameters for this page are shown in Table 7-74.
Figure 7-100. IP6 Route Configuration Page
Table 7-74. IP6 Route Configuration Page Parameters
Parameter Description
Destination NetworkThis parameter specifies the network address for which the IPv6 route is being added.
Prefix Length This parameter specifies the subnet mask for the above said address.
7-114
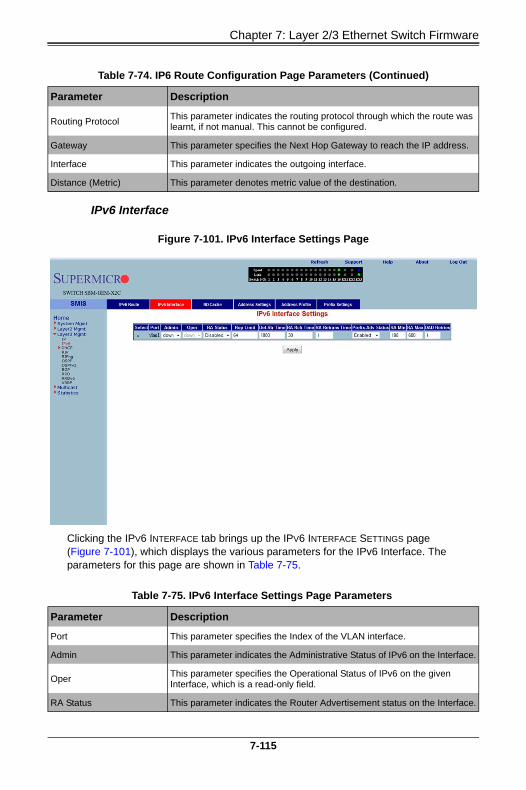
Chapter 7: Layer 2/3 Ethernet Switch Firmware
IPv6 Interface
Clicking the IPV6 INTERFACE tab brings up the IPV6 INTERFACE SETTINGS page (Figure 7-101), which displays the various parameters for the IPv6 Interface. The parameters for this page are shown in Table 7-75.
Routing Protocol This parameter indicates the routing protocol through which the route was learnt, if not manual. This cannot be configured.
Gateway This parameter specifies the Next Hop Gateway to reach the IP address.
Interface This parameter indicates the outgoing interface.
Distance (Metric) This parameter denotes metric value of the destination.
Figure 7-101. IPv6 Interface Settings Page
Table 7-75. IPv6 Interface Settings Page Parameters
Parameter Description
Port This parameter specifies the Index of the VLAN interface.
Admin This parameter indicates the Administrative Status of IPv6 on the Interface.
OperThis parameter specifies the Operational Status of IPv6 on the given Interface, which is a read-only field.
RA Status This parameter indicates the Router Advertisement status on the Interface.
Table 7-74. IP6 Route Configuration Page Parameters (Continued)
Parameter Description
7-115

Superblade Network Modules User’s Manual
ND Cache
Clicking the ND CACHE tab brings up the ND CACHE CONFIGURATION page (Figure 7-102). The parameters for this page are shown in Table 7-76.
Hop Limit This parameter denotes the Hop Limit value to be placed in the Router Advertisements sent on the Interface.
Def-Rtr TimeThis parameter specifies the Default router lifetime to be placed in the Router Advertisements sent on the interface.
RA Rch TimeThis parameter indicates the Reachable time to be placed in the Router Advertisements sent on the interface.
RA Retrans TimeThis parameter specifies the RA Retransmit time to be placed in the Router Advertisement sent on the interface.
Prefix-Adv Status This parameter specifies the Prefix Advertisement status on the Interface.
RA MinThis parameter specifies the minimum time in seconds allowed between sending unsolicited router advertisements.
RA MaxThis parameter indicates the maximum time in seconds allowed between sending unsolicited router advertisements.
DAD RetriesThis parameter specifies the maximum number of Duplicate Address Detection retries.
Figure 7-102. ND Cache Configuration Page
Table 7-75. IPv6 Interface Settings Page Parameters (Continued)
Parameter Description
7-116

Chapter 7: Layer 2/3 Ethernet Switch Firmware
Address Settings
Clicking the ADDRESS SETTINGS tab brings up the ADDRESS SETTINGS page (Figure 7-103), which allows you to configure address settings for IPv6. The parameters for this page are shown in Table 7-77.
Table 7-76. ND Cache Configuration Page Parameters
Parameter Description
Interface VLAN ID This parameter indicates index of the VLAN interface.
Destination This parameter specifies Destination IPv6 address.
MAC Address This parameter denotes the physical address of the Destination address.
StateThis parameter indicates the Reachability state of the entry, which is a read-only field.
Age This parameter specifies the Age Time.
Figure 7-103. Address Settings Page
Table 7-77. Address Settings Page Parameters
Parameter Description
Interface VLAN ID This parameter specifies the index of the VLAN Interface.
Address This parameter specifies the IPv6 address.
7-117

Superblade Network Modules User’s Manual
Address Profile
Clicking the ADDRESS PROFILE tab brings up the ADDRESS PROFILE SETTINGS page (Figure 7-104). The parameters for this page are shown in Table 7-78.
Prefix LengthThis parameter indicates the length of the prefix (in bits) associated with this entry's IPv6 address.
Address TypeThis parameter specifies that the type of address can be Link-Local, Global-Unicast or Anycast.
Address Profile ID This parameter indicates the index to the IPv6 address Profile table.
Figure 7-104. Address Profile Settings Page
Table 7-78. Address Profile Settings Page Parameters
Parameter Description
Profile ID This parameter specifies the index of the Address Profile entry.
Adv Status This parameter specifies the Prefix Advertise status.
On Link Adv Status This parameter indicates the On-Link Advertise Flag status.
Auto Conf Adv Status This parameter denotes the Autonomous Configuration Advertise Flag status.
Table 7-77. Address Settings Page Parameters (Continued)
Parameter Description
7-118

Chapter 7: Layer 2/3 Ethernet Switch Firmware
Prefix Settings
Clicking the PREFIX SETTINGS tab brings up the PREFIX CONFIGURATION page (Figure 7-105). The parameters for this page are shown in Table 7-79.
Preferred TimeThis parameter specifies the Preferred Lifetime of the prefix address that uses this profile.
Valid TimeThis parameter indicates the Valid Lifetime of the prefix address that uses this profile.
Valid Flag This parameter specifies if the Valid Lifetime Flag is Variable or Fixed.
Preferred Flag This parameter specifies if the Preferred Lifetime Flag is Variable or Fixed.
Figure 7-105. Prefix Configuration Page
Table 7-79. Prefix Configuration Page Parameters
Parameter Description
Interface VLAN ID This parameter specifies the index of the VLAN Interface.
Prefix This parameter indicates the IPv6 address prefix to be advertised in RA.
Prefix Length This parameter indicates the PREFIX LENGTH (in bits).
Prefix Profile ID This parameter specifies index to the IPv6 address profile table.
Table 7-78. Address Profile Settings Page Parameters (Continued)
Parameter Description
7-119
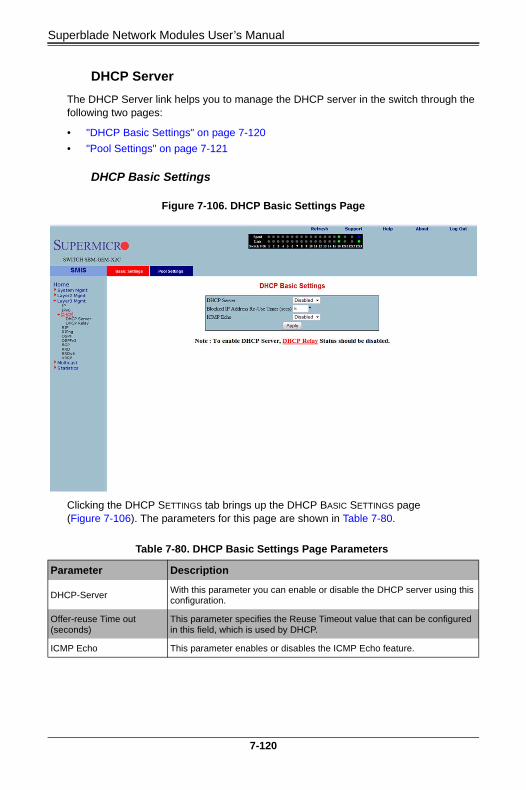
Superblade Network Modules User’s Manual
DHCP Server
The DHCP Server link helps you to manage the DHCP server in the switch through the following two pages:
• "DHCP Basic Settings" on page 7-120
• "Pool Settings" on page 7-121
DHCP Basic Settings
Clicking the DHCP SETTINGS tab brings up the DHCP BASIC SETTINGS page (Figure 7-106). The parameters for this page are shown in Table 7-80.
Figure 7-106. DHCP Basic Settings Page
Table 7-80. DHCP Basic Settings Page Parameters
Parameter Description
DHCP-ServerWith this parameter you can enable or disable the DHCP server using this configuration.
Offer-reuse Time out (seconds)
This parameter specifies the Reuse Timeout value that can be configured in this field, which is used by DHCP.
ICMP Echo This parameter enables or disables the ICMP Echo feature.
7-120

Chapter 7: Layer 2/3 Ethernet Switch Firmware
Pool Settings
Clicking the POOL SETTINS link brings up the DHCP POOL SETTINGS page (Figure 7-107), which allows you to configure the IP address pool that can be used by the DHCP server to allocate IP addresses. The parameters for this page are shown in Table 7-81.
Figure 7-107. DHCP Pool Settings Page
Table 7-81. DHCP Pool Settings Page Parameters
Parameter Description
Pool IDThis parameter specifies the pool ID to index among the different subnet pools configured.
Network This parameter specifies the subnet of the IP address in the pool.
Subnet Mask This parameter specifies the subnet mask of the IP address in the pool.
Start IPThis parameter specifies the first IP address in the address pool that is used for dynamic allocation by the DHCP server.
End IPThis parameter specifies the last IP address in the address pool that is used for dynamic allocation by the DHCP server.
Lease Time This parameter specifies the time interval for which the IP address is valid.
Utilization Threshold This parameter specifies the DHCP Pool Utilization Threshold value.
Status This parameter specifies the status of the entry.
7-121

Superblade Network Modules User’s Manual
DHCP Relay
The DHCP Relay link helps you to manage the DHCP relay in the switch through the following two pages:
• "DHCP Relay Basic Settings" on page 7-122
• "Interface Settings" on page 7-123
DHCP Relay Basic Settings
Clicking the BASIC SETTINGS tab brings up the DHCP RELAY CONFIGURATION page (Figure 7-108), which displays the various parameters for configuring the DHCP relay. The parameters for this page are shown in Table 7-82.
Figure 7-108. DHCP Relay Configuration Page
Table 7-82. DHCP Relay Configuration Page Parameters
Parameter Description
Service DHCP-RelayThis parameter specifies the DHCP relay status that can be enabled or disabled in the switch using this field.
IP DHCP Relay Information Option
You can enable/disable this field to control the processing related to the Relay Agent Information options.
DHCP Server AddressThis parameter indicates the IP address of the DHCP Server to which the Relay Agent needs to forward the packets from the client.
7-122

Chapter 7: Layer 2/3 Ethernet Switch Firmware
Interface Settings
Clicking the INTERFACE CONF tab brings up the DHCP RELAY INTERFACE CONFIGURATION page (Figure 7-109), which allows you to configure the DHCP relay for VLANs. The parameters for this page are shown in Table 7-83.
Figure 7-109. DHCP Relay Interface Configuration Page
Table 7-83. DHCP Relay Interface Configuration Page Parameters
Parameter Description
VLAN Interface This parameter specifies the VLAN Interface name.
Circuit ID This parameter specifies the DHCP Relay Circuit identifer.
Remote ID This parameter specifies the Remote identifer.
7-123

Superblade Network Modules User’s Manual
RIP
The RIP link opens the following links for configuration of RIP protocol:
• "RIP Basic Settings" on page 7-124
• "Interfaces" on page 7-125
• "Neighbors List" on page 7-126
• "Security Settings" on page 7-127
• "Address Summarization" on page 7-128
RIP Basic Settings
Clicking the BASIC SETTINGS tab brings up the RIP BASIC SETTINGS page (Figure 7-110). The parameters for this page are shown in Table 7-84.
Figure 7-110. RIP Basic Settings Page
Table 7-84. RIP Basic Settings Page Parameters
Parameter Description
Output-delayThis parameter specifies the delay that needs to be enabled for RIP to split the periodic update packets before they are sent out.
Neighbor FilterThis parameter enables or disables neighbor filtering. Neighbor filtering helps you to filter routes from specific neighbors.
Auto-summary status This parameter enables or disables the Auto-summary feature.
7-124

Chapter 7: Layer 2/3 Ethernet Switch Firmware
Interfaces
Clicking the INTERFACE tab brings up the RIP INTERFACE page (Figure 7-111). The parameters for this page are shown in Table 7-85.
Figure 7-111. RIP Interface Page
Table 7-85. RIP Interface Page Parameters
Parameter Description
InterfaceThis parameter specifies the Interface ID for which RIP needs to be configured.
IP Address This parameter specifies the IP address of the RIP interface.
Status This parameter specifies the admin status of the interface.
Split HorizonThis parameter specifies the operational status of Split Horizon in the system.
Default Route InstallationThis parameter specifies whether Default Route Installation can be done or not.
Send VersionThis parameter allows selecting the RIP packets sent to be compatible to either RIPV1, RIP1 Compatible or RIPv2.
Receive VersionThis parameter is similar to SEND VERSION, but it allows you to choose the RIP packets to be received as either RIPV1, RIPV2, both RIPv1 and RIPv2 or None.
Route Age TimerThis parameter specifies the time interval after which the routes will be flushed.
7-125

Superblade Network Modules User’s Manual
Neighbors List
Clicking the NEIGHBORS tab brings up the RIP NEIGHBOR LIST page (Figure 7-112), which is used to configure the RIP neighbors, by configuring their IP address.
The single parameter for this page is IP ADDRESS, which specifies the IP Address of the neighbor router to which the unicast update has to be sent.
Update Timer This parameter specifies the time interval between successive RIP updates.
Garbage TimerThis parameter specifies the time interval after which the invalid routes will be removed from the routing table.
Figure 7-112. RIP Neighbor List Page
Table 7-85. RIP Interface Page Parameters (Continued)
Parameter Description
7-126

Chapter 7: Layer 2/3 Ethernet Switch Firmware
Security Settings
Clicking the SECURITY tab brings up the RIP SECURITY SETTING page (Figure 7-113). The parameters for this page are shown in Table 7-13.
Figure 7-113. RIP Security Settings Page
Table 7-86. RIP Security Setting Page Parameters
Parameter Description
IP AddressThis parameter displays the active RIP interfaces. You can select the interface for which you want to configure authentication.
Authentication TypeThis parameter specifies the authentication type. You can choose No Authentication, or Simple Password, or the md5 authentication type.
Authentication KeyThis parameter specifies the key used for authentication if the authentication type is other than No Authentication.
7-127

Superblade Network Modules User’s Manual
Address Summarization
Clicking the SUMMARIZATION tab brings up the RIP INTERFACE SPECIFIC ADDRESS SUMMARIZATION page (Figure 7-114). The parameters for this page are shown in Table 7-87.
Figure 7-114. RIP Interface Specific Address Summarization Page
Table 7-87. RIP Interface Specific Address Summarization Page Parameters
Parameter Description
InterfaceThis parameter specifies the Interface ID for which the RIP aggregate address needs to be configured.
Aggregate Address This parameter specifies the aggregate address.
Subnet Mask This parameter specifies the mask of the aggregate address.
7-128

Chapter 7: Layer 2/3 Ethernet Switch Firmware
RIPng
The RIP6 link allows you perform RIPv6 related configuration for the switch. This can be accomplished through the following two pages:
• "RIP6 Interface" on page 7-129
• "Filters" on page 7-130
RIP6 Interface
Clicking the RIP6 INTERFACE tab brings up the RIP6 INTERFACE CONFIGURATION page (Figure 7-115). The parameters for this page are shown in Table 7-88.
Figure 7-115. RIP6 Interface Configuration Page
Table 7-88. RIP6 Interface Configuration Page Parameters
Parameter Description
Interface ID Specifies the Interface Id for which RIPv6 needs to be configured.
Status This parameter specifies the administration status of the interface.
Prof ID This parameter indicates the Index of the Address Profile entry.
Metric OffsetThis parameter specifies the metric for the routes that are being re-distributed.
Def Rt AdvThis parameter indicates the default router lifetime to be placed in the Router Advertisements sent on the interface.
7-129

Superblade Network Modules User’s Manual
Filters
Clicking the FILTERS tab brings up the RIP6 FILTER CONFIGURATION page (Figure 7-116). The parameters for this page are shown in Table 7-89.
Prof HorizonThis parameter specifies the operational status of Profile Horizon in the system.
Per-Updt TimerThis parameter specifies the time interval between successive RIP6 updates.
Trig-Dly TimeThis parameter indicates the time interval in seconds by which further triggered updates are delayed, after one triggered update is sent.
Route Age TimeThis parameter specifies the time interval after which, the routes are flushed.
Garbage TimerThis parameter specifies the time interval after which, the invalid routes are removed from the routing table.
Figure 7-116. RIP6 Filter Configuration Page
Table 7-88. RIP6 Interface Configuration Page Parameters (Continued)
Parameter Description
7-130

Chapter 7: Layer 2/3 Ethernet Switch Firmware
Table 7-89. RIP6 Filter Configuration Page Parameters
Parameter Description
Filter Address This parameter specifies the FILTER ADDRESS for the RIP6 interface.
Filter TypeThis parameter specifies the FILTER TYPE for which RIP6 needs to be configured.
7-131
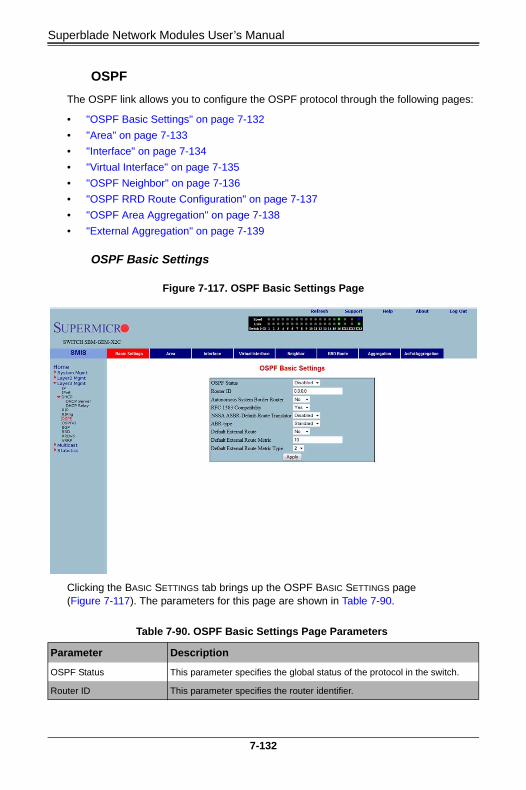
Superblade Network Modules User’s Manual
OSPF
The OSPF link allows you to configure the OSPF protocol through the following pages:
• "OSPF Basic Settings" on page 7-132
• "Area" on page 7-133
• "Interface" on page 7-134
• "Virtual Interface" on page 7-135
• "OSPF Neighbor" on page 7-136
• "OSPF RRD Route Configuration" on page 7-137
• "OSPF Area Aggregation" on page 7-138
• "External Aggregation" on page 7-139
OSPF Basic Settings
Clicking the BASIC SETTINGS tab brings up the OSPF BASIC SETTINGS page (Figure 7-117). The parameters for this page are shown in Table 7-90.
Figure 7-117. OSPF Basic Settings Page
Table 7-90. OSPF Basic Settings Page Parameters
Parameter Description
OSPF Status This parameter specifies the global status of the protocol in the switch.
Router ID This parameter specifies the router identifier.
7-132

Chapter 7: Layer 2/3 Ethernet Switch Firmware
Area
Clicking the AREA tab brings up the OSPF AREA CONFIGURATION page (Figure 7-118). The parameters for this page are shown in Table 7-91.
Autonomous System Border Router
This parameter indicates the flag to denote whether or not the router is to be configured as an Autonomous System Border Router.
RFC 1583 CompatibilityThis parameter specifies the compatibility to RFC 1583 for choosing the route among multiple AS for the same destination.
External Link State Database Limit
This parameter specifies the maximum number of non-default AS-external-LSA entries that can be stored in the link state database.
Figure 7-118. OSPF Area Configuration Page
Table 7-91. OSPF Area Configuration Page Parameters
Parameter Description
Area ID This parameter specifies the identifier for the area.
TypeThis parameter allows you to configure the area type, as a Stub area, a Normal area or NSSA.
Send Summary Router This field is used to control the import of summary LSAs to stub areas. This does not have any impact for other areas.
Default Cost This parameter specifies the metric/cost associated with the routes.
Table 7-90. OSPF Basic Settings Page Parameters (Continued)
Parameter Description
7-133

Superblade Network Modules User’s Manual
Interface
Clicking the INTERFACE tab brings up the OSPF INTERFACE CONFIGURATION page (Figure 7-119). The parameters for this page are shown in Table 7-92.
Figure 7-119. OSPF Interface Configuration Page
Table 7-92. OSPF Interface Configuration Page Parameters
Parameter Description
Interface This parameter specifies the interface index of the port.
Area ID This parameter indicates the 32-bit integer uniquely identifying the area to which the interface connects.
PriorityThis parameter specifies the priority of this interface, which is used in the DR election algorithm.
Authentication TypeThis parameter allows you to choose MD5, Simple Password or None as the authentication type.
MD5 Key IDThis parameter specifies the secret key used to create the message digest appended to the OSPF packet, if the authentication type is MD5.
Authentication KeyThis parameter specifies the key required for authentication, if authentication is enabled on this interface.
IP Address This parameter specifies the IP Address of the OSPF interface.
7-134

Chapter 7: Layer 2/3 Ethernet Switch Firmware
Virtual Interface
Clicking the VIRTUAL INTERFACE tab brings up the OSPF VIRTUAL INTERFACE CONFIGURATION page (Figure 7-120). The parameters for this page are shown in Table 7-93.
Designated Router This read-only field specifies the IP Address of the Designated Router.
StatusWhen this parameter is enabled, the interface is advertised as an internal route to some area. When disabled it denotes that the interface is external to OSPF.
Figure 7-120. OSPF Virtual Interface Configuration Page
Table 7-93. OSPF Virtual Interface Configuration Page Parameters
Parameter Description
Transit Area ID This parameter specifies the transit area that the virtual link traverses.
Neighbor Router ID This parameter specifies the router ID of the virtual neighbor.
Authentication TypeThis parameter allows you to choose MD5, Simple Password or None as the authentication type.
Table 7-92. OSPF Interface Configuration Page Parameters (Continued)
Parameter Description
7-135

Superblade Network Modules User’s Manual
OSPF Neighbor
Clicking the NEIGHBOR tab brings up the OSPF NEIGHBOR CONFIGURATION page (Figure 7-121), which allows you to configure OSPF neighbors. The parameters for this page are shown in Table 7-94.
MD5 Key IDThis parameter specifies the secret key used to create the message digest appended to the OSPF packet if the authentication type is MD5.
Authentication Key This parameter specifies the key required for authentication, if authentication is enabled on this interface.
Figure 7-121. OSPF Neighbor Configuration Page
Table 7-94. OSPF Neighbor Configuration Page Parameters
Parameter Description
Neighbor IP Address This parameter specifies the neighbor router ID.
Priority This parameter specifies a number value for the router priority.
Table 7-93. OSPF Virtual Interface Configuration Page Parameters (Continued)
Parameter Description
7-136

Chapter 7: Layer 2/3 Ethernet Switch Firmware
OSPF RRD Route Configuration
Clicking the RRD ROUTE tab brings up the OSPF RRD ROUTE CONFIGURATION page (Figure 7-122), which displays the various parameters for RRD Route configuration. The parameters for this page are shown in Table 7-95.
Figure 7-122. OSPF RRD Route Configuration Page
Table 7-95. OSPF RRD Route Configuration Page Parameters
Parameter Description
Destination Network This parameter specifies the DESTINATION NETWORK.
Network Mask This parameter specifies the NETWORK MASK.
Route Metric This parameter specifies the ROUTE METRIC.
Route Metric Type This parameter specifies the ROUTE METRIC TYPE.
Route Tag This parameter specifies the ROUTE TAG.
7-137
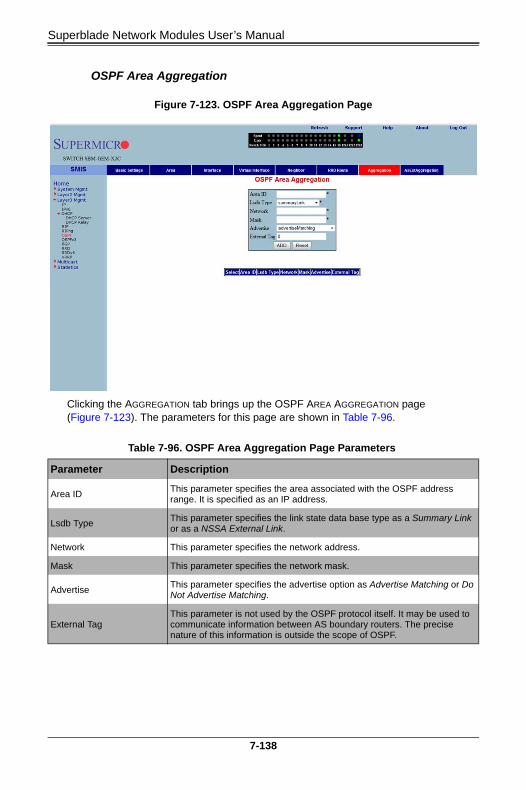
Superblade Network Modules User’s Manual
OSPF Area Aggregation
Clicking the AGGREGATION tab brings up the OSPF AREA AGGREGATION page (Figure 7-123). The parameters for this page are shown in Table 7-96.
Figure 7-123. OSPF Area Aggregation Page
Table 7-96. OSPF Area Aggregation Page Parameters
Parameter Description
Area IDThis parameter specifies the area associated with the OSPF address range. It is specified as an IP address.
Lsdb TypeThis parameter specifies the link state data base type as a Summary Link or as a NSSA External Link.
Network This parameter specifies the network address.
Mask This parameter specifies the network mask.
AdvertiseThis parameter specifies the advertise option as Advertise Matching or Do Not Advertise Matching.
External TagThis parameter is not used by the OSPF protocol itself. It may be used to communicate information between AS boundary routers. The precise nature of this information is outside the scope of OSPF.
7-138

Chapter 7: Layer 2/3 Ethernet Switch Firmware
External Aggregation
Clicking the EXT AGGREGATION tab brings up the OSPF AS EXTERNAL AGGREGATION CONFIGURATION page (Figure 7-124), which allows you to configure OSPF external aggregation parameters. The parameters for this page are shown in Table 7-97.
Figure 7-124. OSPF As External Aggregation Configuration Page
Table 7-97. OSPF As External Aggregation Configuration Page Parameters
Parameter Description
Network This parameter specifies the external network address.
Mask This parameter specifies the network mask.
Area ID This parameter specifies the Area identifier.
7-139

Superblade Network Modules User’s Manual
Aggregation Effect
This parameter specifies the Aggreation option as one of the following:
• Advertise – When set to advertise and associated Area ID is 0.0.0.0, then the aggregated Type-5 are generated. Otherwise if the associated Area ID is x.x.x.x (other than 0.0.0.0), then the aggregated Type-7 is generated in NSSA x.x.x.x for the specified range.
• Do Not Advertise – When set to doNotAdvertise (2) and associated Area ID is 0.0.0.0, then the Type-5 is not generated for the specified range, while aggregated Type-7 are generated in all attached NSSA. While if the associated Area ID is x.x.x.x (other than 0.0.0.0), then the Type-7 are not generated in NSSA x.x.x.x for the specified range.
• Allow All – When set to allowAll and associated Area ID is 0.0.0.0, then the aggregated Type-5 are generated for the specified range. In addition aggregated Type-7 are generated in all attached NSSA for the specified range.
• Deny All – When set to denyAll neither Type-5 nor Type-7 will be generated for the specified range.
Translation This parameter enables or disables the translation.
Table 7-97. OSPF As External Aggregation Configuration Page Parameters
Parameter Description
7-140

Chapter 7: Layer 2/3 Ethernet Switch Firmware
OSPF V3
The OSPFv3 link allows you to configure the OSPFv3 protocol through the following pages:
• "OSPFv3 Basic Settings" on page 7-141
• "Interface" on page 7-142
• "Area" on page 7-144
• "OSPF V3 External Aggregation" on page 7-145
OSPFv3 Basic Settings
Clicking the BASIC SETTINGS tab brings up the OSPFV3 BASIC SETTINGS page (Figure 7-125). The parameters for this page are shown in Table 7-98.
Figure 7-125. OSPFv3 Basic Settings Page
Table 7-98. OSPFv3 Basic Settings Page Parameters
Parameter Description
OSPFv3 Status This parameter enables or disables OSPFv3 administratively.
Router ID This parameter uniquely identifies the router in the Autonomous System.
Autonomous System Border Router Status
This parameter specifies the router as Autonomous System border router.
Area Border Router This parameter specifies the router as an area border router.
7-141

Superblade Network Modules User’s Manual
Interface
Clicking the INTERFACE tab brings up the INTERFACE SETTINGS page (Figure 7-126). The parameters for this page are shown in Table 7-99.
External LSDB Limit This parameter specifies maximum number of non-default AS-external-LSAs entries that can be stored in the link-state database.
Exit Overflow IntervalThis parameter specifies the time interval in seconds a router will attempt to leave OverflowState.
Demand Extension This parameter indicates the router's support for demand routing.
Reference BandwidthThis parameter specifies Reference bandwidth in kilobits/seconds, for calculating default interface metrics.
SPF DelayThis parameter indicates the delay in routing calculation after a topology change.
SPF Hold TimeThis parameter specifies the minimum time between two consecutive SPF calculations.
Default Passive InterfaceThis parameter specifies whether all the OSPFv3 interfaces created after this setting are passive or not.
Trace Level This parameter defines the level of trace required for OSPFv3.
Figure 7-126. Interface Settings Page
Table 7-98. OSPFv3 Basic Settings Page Parameters (Continued)
Parameter Description
7-142

Chapter 7: Layer 2/3 Ethernet Switch Firmware
Table 7-99. Interface Settings Page Parameters
Parameter Description
VLAN/Tunnel Identifier This parameter specifies the IPv6 interface over which OSPFv3 is enabled.
Area ID This parameter specifies the area ID associated with the IPv6 interface.
Interface TypeThis parameter specifies the type of OSPFv3 interface (broadcast, nbma, pointToPoint and pointToMultipoint).
Priority This parameter specifies the priority of the interface.
Transit Delay This parameter indicates the estimated number of seconds to transmit a link state update packet over the interface.
Retransmission IntervalThis parameter indicates the number of seconds between the link-state advertisement retransmissions, for adjacencies belonging to the interface.
Hello Interval This parameter indicates the length of time, in seconds, between the Hello packets that the router sends on the interface.
Dead IntervalThis parameter specifies the number of seconds for which the router waits for hello packet from the neighbor before declaring this neighbor down.
Poll Interval This parameter denotes the larger time interval, in seconds, between the Hello packets sent to an inactive non-broadcast multi- access neighbor.
Demand ProceduresThis parameter indicates whether Demand OSPFv3 procedures must be performed on this interface.
Metric Value This parameter specifies the metric assigned to this interface.
Neighbour ProbingThis parameter enables or disables neighbor probing to determine whether the neighbor is active or inactive.
Neighbour Probe Retransmit Limit
This parameter indicates the number of consecutive LSA retransmissions before the neighbor is deemed inactive and the neighbor adjacency is brought down.
Demand Probe Interval This parameter defines how often the neighbor is probed.
7-143

Superblade Network Modules User’s Manual
Area
Clicking the AREA tab brings up the OSPFV3 AREA SETTINGS page (Figure 7-127). The parameters for this page are shown in Table 7-100.
Figure 7-127. OSPFv3 Area Settings Page
Table 7-100. OSPFv3 Area Settings Page Parameters
Parameter Description
Area ID This parameter uniquely identifies an area.
TypeThis parameter indicates whether an area is a Stub area, NSSA, or Standard (normal) area.
Area Summary This parameter controls the import of Inter-Area LSAs into stub areas. This can be noAreaSummary or sendAreaSummary.
Stub MetricThis parameter indicates the metric value advertised for the default route into Stub area and NSSA.
NSSA Translator RoleThis parameter specifies the NSSA Border router's ability to perform NSSA translation of type-7 LSAs into type-5 LSAs.
NSSA Stability IntervalThis parameter specifies the number of seconds after an elected translator determines its services are no longer required, in which it must continue to perform its translation duties.
Stub Metric TypeThis parameter specifies the type of metric (OSPFv3 Metric, External Type 1, External Type 2) advertised as a default route.
7-144

Chapter 7: Layer 2/3 Ethernet Switch Firmware
OSPF V3 External Aggregation
Clicking the EXT AGGREGATION tab brings up the OSPF AS EXTERNAL AGGREGATION CONFIGURATION page (Figure 7-128), which allows you to configure OSPF external aggregation parameters. The parameters for this page are shown in Table 7-101.
Figure 7-128. OSPF AS External Aggregation Configuration Page
Table 7-101. OSPF AS External Aggregation Configuration Page Parameters
Parameter Description
Network This parameter specifies the external network address.
Mask This parameter specifies the network mask.
Area ID This parameter specifies the Area identifier.
7-145

Superblade Network Modules User’s Manual
Aggregation Effect
This parameter specifies the Aggreation option as one of the following:
• Advertise – When set to advertise and the associated Area ID is 0.0.0.0, then aggregated Type-5 are generated. Otherwise if associated Area ID is x.x.x.x (other than 0.0.0.0), then aggregated Type-7 is generated in NSSA x.x.x.x for the specified range.
• Do Not Advertise – When set to doNotAdvertise (2) and the associated Area ID is 0.0.0.0, then Type-5 is not generated for the specified range, while aggregated Type-7 are generated in all attached NSSA. While associated Area ID is x.x.x.x (other than 0.0.0.0), then Type-7 are not generated in NSSA x.x.x.x for the specified range.
• Allow All – When set to allowAll and associated Area ID is 0.0.0.0, then aggregated Type-5 are generated for the specified range. In addition aggregated Type-7 are generated in all attached NSSA, for the specified range.
• Deny All – When set to denyAll neither Type-5 nor Type-7 will be generated for the specified range.
Translation This parameter enables or disables the translation.
Table 7-101. OSPF AS External Aggregation Configuration Page Parameters
Parameter Description
7-146

Chapter 7: Layer 2/3 Ethernet Switch Firmware
BGP
The BGP link allows you to configure the BGP protocol. Following are the configuration parameters available to manage BGP through this interface:
• "BGP Basic Settings" on page 7-147
• "BGP Peer Configuration" on page 7-148
• "BGP MED Configuration" on page 7-149
• "Local Preference" on page 7-150
• "BGP Filter" on page 7-152
• "Route Aggregations" on page 7-153
• "Advanced BGP Configuration" on page 7-154
• "BGP Community Management" on page 7-155
BGP Basic Settings
Clicking the BASICS tab brings up the BGP BASIC SETTINGS page (Figure 7-129). The parameters for this page are shown in Table 7-102.
Figure 7-129. BGP Basic Settings Page
7-147
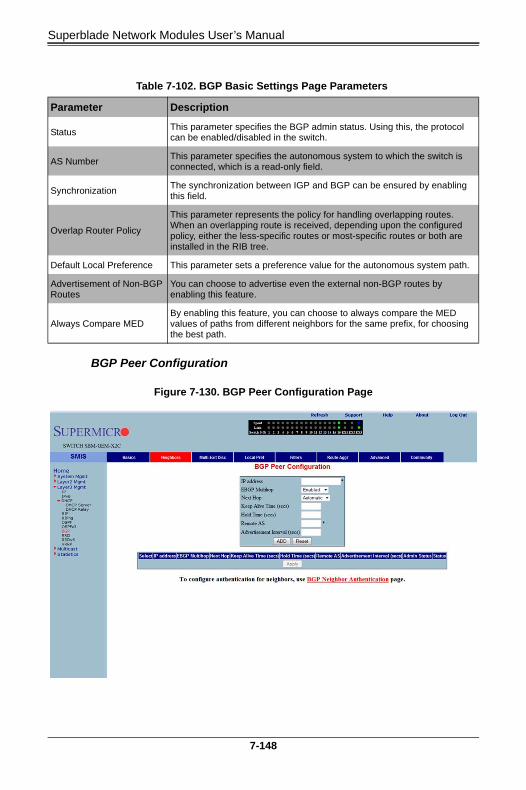
Superblade Network Modules User’s Manual
BGP Peer Configuration
Table 7-102. BGP Basic Settings Page Parameters
Parameter Description
StatusThis parameter specifies the BGP admin status. Using this, the protocol can be enabled/disabled in the switch.
AS Number This parameter specifies the autonomous system to which the switch is connected, which is a read-only field.
SynchronizationThe synchronization between IGP and BGP can be ensured by enabling this field.
Overlap Router Policy
This parameter represents the policy for handling overlapping routes. When an overlapping route is received, depending upon the configured policy, either the less-specific routes or most-specific routes or both are installed in the RIB tree.
Default Local Preference This parameter sets a preference value for the autonomous system path.
Advertisement of Non-BGP Routes
You can choose to advertise even the external non-BGP routes by enabling this feature.
Always Compare MEDBy enabling this feature, you can choose to always compare the MED values of paths from different neighbors for the same prefix, for choosing the best path.
Figure 7-130. BGP Peer Configuration Page
7-148

Chapter 7: Layer 2/3 Ethernet Switch Firmware
Clicking the NEIGHBORS tab brings up the BGP PEER CONFIGURATION page (Figure 7-130), which allows you to configre BGP Neighbors. The parameters for this page are shown in Table 7-103.
BGP MED Configuration
Table 7-103. BGP Peer Configuration Page Parameters
Parameter Description
IP Address This parameter specifies the IP address of the BGP neighbor.
EBGP MultiHopBy enabling this feature, BGP connections can be established between peers, which are not directly connected.
Next HopUsing this parameter, next Hop can be set as Self or Automatic. By setting this field to Self, you can make the switch the next hop for all the routes that it distributes to its peers.
Keep Alive Time (Seconds)This parameter specifies the maximum time interval between successive updates between any two BGP peers.
Hold Time (Seconds)This parameter specifies the Hold time. This is the timer interval that a BGP will wait, before it decides that a connection to the peer is torn down.
Remote AS This parameter represents the remote autonomous system number.
Advertisement Interval (seconds)
This parameter specifies the interval in seconds for the Minimum Route advertisement interval timer.
Status This parameter specifies the status of the entry.
Figure 7-131. BGP MED Configuration Page
7-149

Superblade Network Modules User’s Manual
Clicking the MULTI-EXIT DISC tab brings up the BGP MED CONFIGURATION page (Figure 7-131), which allows you to configure the MED value for routes learnt from BGP peers. The parameters for this page are shown in Table 7-104.
Local Preference
Table 7-104. BGP MED Configuration Page Parameters
Parameter Description
MED ID This parameter specifies the index for this table.
Remote ASThis parameter specifies the AS number from which the route update is received.
IP Address PrefixThis parameter specifies the IP address prefix for which the update is received.
IP Address Prefix Length This parameter is used to calculate the subnet.
Intermediate AS This parameter represents the intermediate AS between the BGP peers.
DirectionThis parameter can be set for the incoming or the outgoing packets using In and Out values.
ValueThis parameter specifies the MED value to be associated with this path learnt.
Preference This parameter is used to enable/disable filtering.
Status This parameter indicates the status of the entry.
Figure 7-132. BGP Local Preference Configuration Page
7-150

Chapter 7: Layer 2/3 Ethernet Switch Firmware
Clicking the LOCAL PREF tab brings up the BGP LOCAL PREFERENCE CONFIGURATION page (Figure 7-132), which allows you to configure the Local Preference value for routes. The parameters for this page are shown in Table 7-105.
Table 7-105. BGP Local Preference Configuration Page Parameters
Parameter Description
Local Preference IDThis parameter specifies the Local Preference ID, which is the index for this table.
Remote ASThis parameter specifies the AS number from which the route update is received.
IP Address PrefixThis parameter specifies the IP Address prefix for which the update is received.
IP Address Prefix Length This parameter is used to calculate the subnet.
Intermediate AS This parameter represents the intermediate AS between the BGP peers.
DirectionThis parameter can be set for the incoming or the outgoing packets using In and Out values.
ValueThis parameter specifies the Local preference value to be associated with this learnt path.
Preference This parameter is used to enable/disable filtering.
Status This parameter specifies the status of the entry.
7-151

Superblade Network Modules User’s Manual
BGP Filter
Clicking the FILTERS tab brings up the BGP FILTER CONFIGURATION page (Figure 7-133), which is used to set the filters on the routes being learnt. The parameters for this page are shown in Table 7-106.
Figure 7-133. BGP Filter Configuration Page
Table 7-106. BGP Filter Configuration Page Parameters
Parameter Description
Filter ID This parameter specifies the filter index.
Remote ASThis parameter specifies the remote AS associated with the BGP peer from which the router is being distributed.
IP Address This parameter specifies the IP address for which the route is being learnt.
IP Address Prefix Length This parameter specifies the prefix length to calculate the Subnet.
Intermediate AS This parameter represents the intermediate AS between the BGP peers.
Direction This parameter indicates the direction of the packet.
ActionWith this parameter you can choose either to Allow (not to filter) or Deny (Filter) for the above configuration set.
Status This parameter specifies the status of the entry.
7-152

Chapter 7: Layer 2/3 Ethernet Switch Firmware
Route Aggregations
Clicking the ROUTE AGGR tab brings up the BGP ROUTE AGGREGATION CONFIGURATION page (Figure 7-134), which is used to aggregate and configure the routes advertised by BGP. The parameters for this page are shown in Table 7-107.
Figure 7-134. BGP Route Aggregation Configuration Page
Table 7-107. BGP Route Aggregation Configuration Page Parameters
Parameter Description
ID This parameter specifies the index to this table.
IP Address PrefixThis parameter specifies the IP address prefix that needs to be aggregated.
IP Address Prefix LengthThis parameter, in combination with the IP Prefix, decides the aggregated route to be distributed by this switch.
Route AdvertiseWith this parameter you can either choose to advertise only the aggregated routes by setting Summary only, or choose to advertise all routes by setting All.
Status This parameter specifies the status of the entry.
7-153
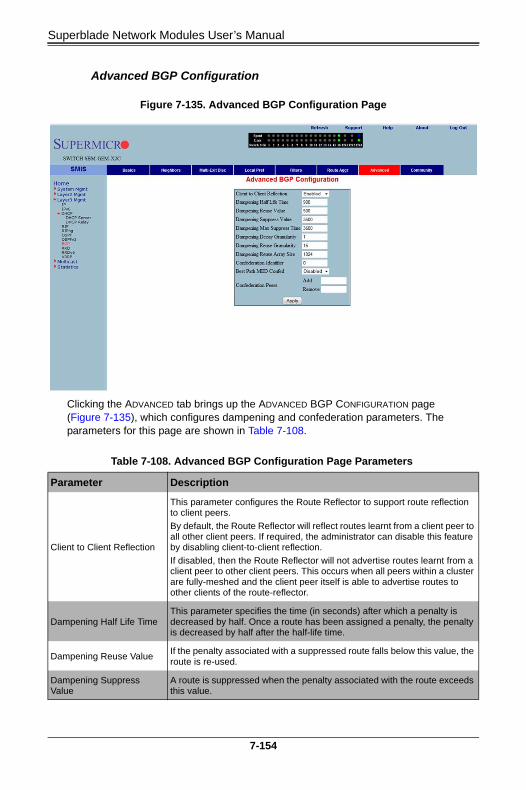
Superblade Network Modules User’s Manual
Advanced BGP Configuration
Clicking the ADVANCED tab brings up the ADVANCED BGP CONFIGURATION page (Figure 7-135), which configures dampening and confederation parameters. The parameters for this page are shown in Table 7-108.
Figure 7-135. Advanced BGP Configuration Page
Table 7-108. Advanced BGP Configuration Page Parameters
Parameter Description
Client to Client Reflection
This parameter configures the Route Reflector to support route reflection to client peers.
By default, the Route Reflector will reflect routes learnt from a client peer to all other client peers. If required, the administrator can disable this feature by disabling client-to-client reflection.
If disabled, then the Route Reflector will not advertise routes learnt from a client peer to other client peers. This occurs when all peers within a cluster are fully-meshed and the client peer itself is able to advertise routes to other clients of the route-reflector.
Dampening Half Life TimeThis parameter specifies the time (in seconds) after which a penalty is decreased by half. Once a route has been assigned a penalty, the penalty is decreased by half after the half-life time.
Dampening Reuse ValueIf the penalty associated with a suppressed route falls below this value, the route is re-used.
Dampening Suppress Value
A route is suppressed when the penalty associated with the route exceeds this value.
7-154

Chapter 7: Layer 2/3 Ethernet Switch Firmware
BGP Community Management
Clicking the COMMUNITY tab brings up the BGP COMMUNITY MANAGEMENT page (Figure 7-136), which configures BGP community and extended community parameters. The parameters for this page are shown in Table 7-109.
Dampening Max Suppress Time
This parameter specifies the maximum time (in seconds) a route can be suppressed.
Dampening Decay Granularity
This parameter specifies the time granularity in seconds used to perform all decay computations.
Dampening Reuse Granularity
This parameter specifies the time interval between evaluations of the reuse-lists. Each reuse lists corresponds to an additional time increment.
Dampening Reuse Array Size
This parameter specifies the size of the reuse index arrays. This size determines the accuracy with which suppressed routes can be placed within the set of reuse lists, when suppressed for a long time.
Confederation IdentifierThis parameter specifies the BGP confederation identifier. The possible values are between 1 to 65535. Configuring 0 removes the existing configuration.
Best Path MED ConfedThis parameter enables or disables MED comparison among paths learnt from confed peers.
Confederation Peers This parameter configures the ASs that belongs to the confederation.
Figure 7-136. BGP Community Management Page
Table 7-108. Advanced BGP Configuration Page Parameters (Continued)
Parameter Description
7-155

Superblade Network Modules User’s Manual
RRD
The RRD link allows you to manage the Route Redistribution with the help of the following pages:
• "RRD Basic Settings" on page 7-157
• "BGP" on page 7-158
• "RIP" on page 7-159
• "OSPF" on page 7-160
Table 7-109. BGP Community Management Page Parameters
Parameter Description
Community Route Configurations
This parameter configures an entry in the Additive or Delete Community table.
Community Filter Configurations
This parameter configures the permit or deny function for the community attribute while receiving or advertising.
Community Peer Configurations
This parameter enables or disables advertisement of community attributes to the peer.
Community Policy Configurations
This parameter configures the community attribute advertisement policy for a specific destination.
Extended Community Route Configurations
This parameter configures an entry in the Additive or Delete Extended Community table.
Extended Community Filter Configurations
This parameter configures the permit or deny function for the Extended Community attribute while receiving or advertising.
Extended Community Peer Configurations
This parameter enables or disables advertisement of the Extended Community attributes to the peer.
Extended Community Policy Configurations
This parameter configures the Extended Community attribute advertisement policy for the specific destination.
7-156

Chapter 7: Layer 2/3 Ethernet Switch Firmware
RRD Basic Settings
Clicking the BASIC SETTINGS tab brings up the RRD BASIC SETTINGS page (Figure 7-137). The parameters for this page are shown in Table 7-110.
Figure 7-137. RRD Basic Settings Page
Table 7-110. RRD Basic Settings Page Parameters
Parameter Description
RRD StatusBy enabling this parameter, Route Re-distribution can be enabled in the switch.
AS NumberThis parameter is used to configure the Router AS number to which this switch belongs.
Router ID This parameter represents the Router ID of the switch.
7-157

Superblade Network Modules User’s Manual
BGP
Clicking the BGP tab brings up the RRD BGP CONFIGURATION page (Figure 7-138), which allows you to re-distribute the routes that are learnt through other routing protocols to BGP. The parameters for this page are shown in Table 7-111.
Figure 7-138. RRD BGP Configuration Page
Table 7-111. RRD BGP Configuration Page Parameters
Parameter Description
BGP Status This parameter enables or disables redistribution for BGP.
Default MetricThis parameter specifies the metric for the routes that are being re-distributed.
ImportWith this parameter you can choose to import Direct routes, Static routes, RIP routes and/or OSPF routes to BGP.
7-158

Chapter 7: Layer 2/3 Ethernet Switch Firmware
RIP
Clicking the RIP tab brings up the RRD RIP CONFIGURATION page (Figure 7-139), which allows you to re-distribute the routes that are learnt through other routing protocols to RIP. The parameters for this page are shown in Table 7-112.
Figure 7-139. RRD RIP Configuration Page
Table 7-112. RRD RIP Configuration Page Parameters
Parameter Description
RIP Status This parameter enables or disables redistribution for RIP.
Default MetricThis parameter specifies the metric for the routes that are being re-distributed.
ImportYou can use this parameter to choose to import Direct routes, Static routes, OSPF routes and BGP routes to RIP.
Route Tag TypeThis parameter describes whether a tag is manually configured or automatically generated.
Route TagThis parameter indicates the route tag in case you configure a manual option for the tag type.
7-159

Superblade Network Modules User’s Manual
OSPF
Clicking the OSPF tab brings up the RRD OSPF CONFIGURATION page (Figure 7-140), which allows you to e-distribute the routes that are learnt through other routing protocols to OSPF. The parameters for this page are shown in Table 7-113.
Figure 7-140. RRD OSPF Configuration Page
Table 7-113. RRD OSPF Configuration Page Parameters
Parameter Description
OSPF Status This parameter enables or disables redistribution for OSPF.
ImportWith this parameter you can choose to import Direct routes, Static routes, RIP routes and BGP routes to OSPF.
7-160

Chapter 7: Layer 2/3 Ethernet Switch Firmware
RRD6
The RRD6 link allows you to perform RRD6 related configuration through the following pages.
• "RRD6 Basic Settings" on page 7-161
• "Filters" on page 7-162
• "RRD V6 OSPF" on page 7-163
• "RRD RIP" on page 7-164
RRD6 Basic Settings
Clicking the BASIC SETTINGS tab brings up the RRD6 BASIC SETTINGS page (Figure 7-141), which has the single parameter option of changing the throat limit for RRD6.
Figure 7-141. RRD6 Basic Settings Page
7-161

Superblade Network Modules User’s Manual
Filters
Clicking the FILTERS tab brings up the RRD6 FILTER CONFIGURATION page (Figure 7-142). The parameters for this page are shown in Table 7-114.
Figure 7-142. RRD6 Filter Configuration Page
Table 7-114. RRD6 Filter Configuration Page Parameters
Parameter Description
IPv6 address This parameter specifies the IPv6 Address.
Prefix LengthThis parameter indicates the length of the prefix (in bits) associated with this entry's IPv6 address.
Source This parameter denotes the address of the Source.
Destination This parameter specifies the address of the Destination.
ActionWith this parameter you can either choose to Permit (not to filter) or Deny (Filter) for the above configuration set.
7-162
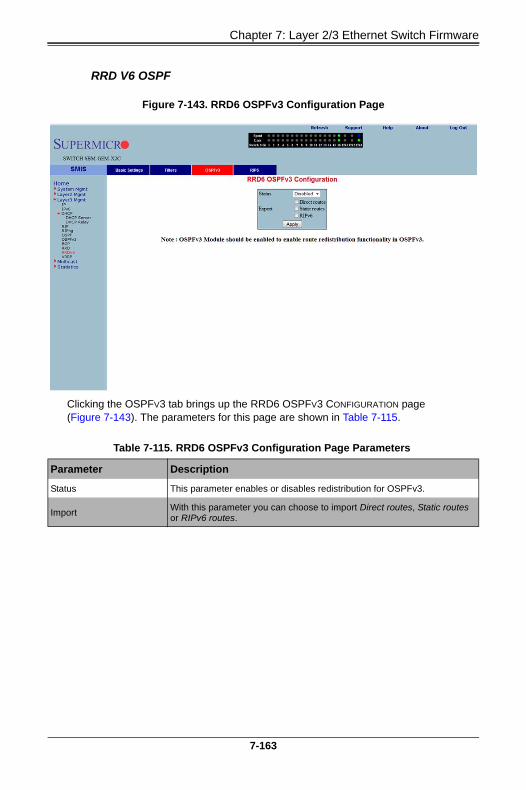
Chapter 7: Layer 2/3 Ethernet Switch Firmware
RRD V6 OSPF
Clicking the OSPFV3 tab brings up the RRD6 OSPFV3 CONFIGURATION page (Figure 7-143). The parameters for this page are shown in Table 7-115.
Figure 7-143. RRD6 OSPFv3 Configuration Page
Table 7-115. RRD6 OSPFv3 Configuration Page Parameters
Parameter Description
Status This parameter enables or disables redistribution for OSPFv3.
ImportWith this parameter you can choose to import Direct routes, Static routes or RIPv6 routes.
7-163

Superblade Network Modules User’s Manual
RRD RIP
Clicking the RP6 tab brings up the RRD RIPV6 CONFIGURATION page (Figure 7-144). The parameters for this page are shown in Table 7-116.
Figure 7-144. RRD RIPv6 Configuration Page
Table 7-116. RRD RIPv6 Configuration Page Parameters
Parameter Description
Status This parameter enables or disables redistribution for RIP6.
Default MetricThis parameter specifies the metric for the routes that are being re-distributed.
ImportWith this parameter you can choose to import Direct routes, Static routes or OSPFv3 routes.
7-164

Chapter 7: Layer 2/3 Ethernet Switch Firmware
VRRP
The VRRP link allows you to configure VRRP through the following two pages:
• "VRRP Basic Settings" on page 7-165
• "VRRP Settings" on page 7-166
VRRP Basic Settings
Clicking the BASIC SETTINGS tab brings up the VRRP BASIC SETTINGS page (Figure 7-145), whose single parameter allows you to specify the status of VRRP in the switch.
Figure 7-145. VRRP Basic Settings Page
7-165

Superblade Network Modules User’s Manual
VRRP Settings
Clicking the VRRP SETTINGS link brings up the VRRP SETTINGS page (Figure 7-146). The parameters for this page are shown in Table 7-117.
Figure 7-146. VRRP Settings Page
Table 7-117. VRRP Settings Page Parameters
Parameter Description
Virtual Router ID This parameter indicates the Virtual ID associated with each Virtual Router.
InterfaceThis parameter represents the interface on which the Virtual Router must be configured.
Primary IP Address This parameter specifies the PRIMARY IP ADDRESS for the Virtual Router.
PriorityThis parameter indicates the PRIORITY for the Virtual Router. The configurable priority value ranges from 1 to 254.
Authentication Type This parameter indicates the AUTHENTICATION TYPE for the Virtual Router.
Authentication Key This parameter indicates the AUTHENTICATION KEY for the Virtual Router.
Advertisement Interval (Seconds)
This parameter specifies the time Interval in seconds for sending the advertisement packets.
Preempt Mode This parameter enablesor disables the PREEMPT MODE.
State This parameter indicates the current state of the Virtual Router.
Status This parameter specifies the Admin Status of the Virtual Router.
7-166

Chapter 7: Layer 2/3 Ethernet Switch Firmware
7-7 Multicast
MULTICAST HOME page (Figure 7-147) has links to multicast features in the switch.
GMP Snooping
The GMP Snooping link allows you to configure GMP Snooping through the following pages:
• "IGMP Snooping Configuration" on page 7-168
• "IGMP Snooping Timer" on page 7-169
• "IGMP Snooping Interface" on page 7-170
• "IGMP Snooping VLAN Router" on page 7-171
• "IGMP MAC Forwarding" on page 7-172
Figure 7-147. Multicast Home Page
7-167

Superblade Network Modules User’s Manual
IGMP Snooping Configuration
Clicking the BASIC SETTINGS tab brings up the IGMP SNOOPING CONFIGURATION page (Figure 7-148), which allows you to configure IGMP snooping parameters. The parameters for this page are shown in Table 7-118.
Figure 7-148. IGMP Snooping Configuration Page
Table 7-118. IGMP Snooping Configuration Page Parameters
Parameter Description
System Control This parameter Starts or Shutsdown IGS in the switch.
IGMP Snooping StatusThis parameter enables or disables IGMP snooping globally in the switch. To enable IGS, GMRP status must be Disabled.
Operational StatusThis parameter enables or disables IGMP snooping operationally in the switch. To enable IGS, GMRP status must be Disabled.
Proxy ReportingThis parameter indicates whether the proxy reporting in the IGMP snooping switch is to be enabled or disabled.
Snooping ModeThis parameter specifies the IGMP snooping multicast forwarding mode, which can be configured using the Destination IP Address or the Destination MAC Address.
Report ForwardingThis parameter specifies whether the IGMP reports are forwarded on all ports or only on router ports.
7-168

Chapter 7: Layer 2/3 Ethernet Switch Firmware
IGMP Snooping Timer
Clicking the TIMER tab brings up the IGMP SNOOPING TIMER CONFIGURATION page (Figure 7-149), which configures IGMP snooping timers. The parameters for this page are shown in Table 7-119.
Retry CountThis parameter specifies the maximum number of group specific queries sent on a port on the reception of an IGMPv2 leave message.
Query Transmit On TCThis parameter allows you to enable or disable query transmit when topology changes.
Figure 7-149. IGMP Snooping Timer Configuration Page
Table 7-119. IGMP Snooping Timer Configuration Page Parameters
Parameter Description
Router Port PurgeInterval (Secs)
This parameter specifies the interval for which the learnt router port will be purged. The default value is 125-seconds.
Group-Member Port Purge Interval (Secs)
This parameter specifies the interval after which a port gets deleted, if IGMP reports are not received on a port. The default value is 260-seconds.
Table 7-118. IGMP Snooping Configuration Page Parameters (Continued)
Parameter Description
7-169

Superblade Network Modules User’s Manual
IGMP Snooping Interface
Clicking the INTERFACE CONFIGURATION tab brings up the IGMP SNOOPING INTERFACE CONFIGURATION page (Figure 7-150), which configures IGMP snooping interface specific parameters. The parameters for this page are shown in Table 7-120.
Report Forward Interval (Secs)
This parameter specifies the interval within which the next report messages for the same multicast group will not be forwarded. The default value is 5-seconds.
Group Query Interval (Secs)
This parameter specifies the interval within which the switch sends a group specific query on a port when an IGMPv2 leave message is received. The default value is 2-seconds.
Figure 7-150. IGMP Snooping Interface Configuration Page
Table 7-120. IGMP Snooping Interface Configuration Page Parameters
Parameter Description
VLAN IDThis parameter specifies the VLAN ID for which the configuration is to be performed.
IGMP Snooping Status This parameter specifies the status of IGMP snooping in the Switch, which can be enabled or disabled for a specific VLAN.
Operating VersionThis parameter specifies the operating version of the IGMP snooping switch for a specific VLAN.
Table 7-119. IGMP Snooping Timer Configuration Page Parameters (Continued)
Parameter Description
7-170

Chapter 7: Layer 2/3 Ethernet Switch Firmware
IGMP Snooping VLAN Router
Clicking the ROUTE PORTS tab brings up the IGMP SNOOPING VLAN ROUTER PORTS page (Figure 7-151). The parameters for this page are shown in Table 7-121.
Fast LeaveThis parameter indicates whether the fast leave processing for a specific VLAN, is to be enabled or disabled.
Querier StatusThis parameter specifies whether the IGMP snooping switch is enabled or disabled as a querier for a specific VLAN.
Querier Interval(secs)This parameter specifies the time period for which general queries are sent by the IGMP snooping switch, when configured as querier on a VLAN.
Router Port List This parameter specifies the router port list for a specific VLAN.
Current Version This parameter specifies the working IGMP Version on the given VLAN.
Current Querier Status This parameter specifies the current status of the Querier.
Figure 7-151. IGMP Snooping VLAN Router Ports Page
Table 7-120. IGMP Snooping Interface Configuration Page Parameters (Continued)
Parameter Description
7-171

Superblade Network Modules User’s Manual
IGMP MAC Forwarding
Clicking the GROUP INFORMATION tab brings up the MAC BASED MULTICAST FORWARDING TABLE page (Figure 7-152), which displays either the IP Based or the MAC Based Multicast Forwarding Table depending upon the configuration of the forwarding mode. The parameters for this page are shown in Table 7-122.
Table 7-121. IGMP Snooping VLAN Router Ports Page Parameters
Parameter Description
VLAN ID This parameter specifies the VLAN ID.
Port List This parameter specifies the ports on which routers are connected for a specific VLAN.
Figure 7-152. MAC Based Multicast Forwarding Table Page
Table 7-122. MAC Based Multicast Forwarding Table Page Parameters
Parameter Description
VLAN IDThis parameter specifies the VLAN ID pertaining to the MAC based multicast forwarding entry.
Group MAC Address This parameter specifies the Group MAC Multicast address that is learnt.
Port List This parameter specifies the learnt ports.
7-172

Chapter 7: Layer 2/3 Ethernet Switch Firmware
Dynamic Multicast
The Dynamic Multicast link allows you to configure Dynamic Multicast through the following pages:
• "Global Configuration" on page 7-173
• "Dynamic Multicast Port Configuration" on page 7-174
Global Configuration
Clicking the DYNAMIC MULTICAST tab brings up the DYNAMIC MULTICAST GLOBAL CONFIGURATION page (Figure 7-153), which allows you to enable or disable the dynamic multicast feature.
Figure 7-153. Dynamic Multicast Global Configuration Page
7-173

Superblade Network Modules User’s Manual
Dynamic Multicast Port Configuration
Clicking the PORT SETTINGS tab brings up the DYNAMIC MULTICAST PORT CONFIGURATION page (Figure 7-154), which configures dynamic multicast at the port level. The parameters for this page are shown in Table 7-123.
Figure 7-154. Dynamic Multicast Port Configuration Page
Table 7-123. Dynamic Multicast Port Configuration Page Parameters
Parameter Description
Port This parameter specifies the Port index.
Dynamic Multicast Status This parameter enables or disables dynamic multicast on this port.
Restricted Group Registration
This parameter enables or disables RESTRICTED GROUP REGISTRATION on this port.
7-174

Chapter 7: Layer 2/3 Ethernet Switch Firmware
IGMP
The IGMP page allows you to configure the IGMP protocol. The IGMP protocol in the switch can be configured through the following pages:
• "Basic Settings" on page 7-175
• "Interface Configuration" on page 7-176
• "Group Information" on page 7-177
• "Source Information" on page 7-178
Basic Settings
Clicking the IGMP CONFIGURATION tab brings up the IGMP CONFIGURATION page (Figure 7-155), whose single parameter allows you to enable or disable IGMP in the switch.
Figure 7-155. IGMP Configuration Page
7-175

Superblade Network Modules User’s Manual
Interface Configuration
Clicking the INTERFACE CONFIGURATION tab brings up the IGMP INTERFACE CONFIGURATION page (Figure 7-156). The parameters for this page are shown in Table 7-124.
Figure 7-156. IGMP Interface Configuration Page
Table 7-124. IGMP Interface Configuration Page Parameters
Parameter Description
Interface This parameter specifies the interface index.
IGMP Status This parameter specifies the IGMP Status.
Operating VersionWith this parameter you can choose to run either in IGMP Version 1, IGMP Version 2 or IGMP Version 3. This can be configured for every interface.
Fast LeaveThis parameter indicates whether the fast leave processing for a specific interface, is to be enabled or disabled.
Query IntervalThis parameter indicates the interval between two successive IGMP queries.
Query Response Time This parameter specifies the response time for IGMP queries.
Robustness Value This parameter specifies the ROBUSTNESS VALUE on this interface.
7-176

Chapter 7: Layer 2/3 Ethernet Switch Firmware
Group Information
Clicking the GROUP INFORMATION tab brings up the IGMP GROUP CONFIGURATION page (Figure 7-157). The parameters for this page are shown in Table 7-125.
Figure 7-157. IGMP Group Configuration Page
Table 7-125. IGMP Group Configuration Page Parameters
Parameter Description
Interface This parameter specifies the interface index.
Group Address This parameter specifies the IP multicast group address.
Source AddressThis parameter represents the IP Source address.NOTE: Source configuration is allowed only when the operating version is v3 on this interface.
Filter Mode This parameter specifies the FILTER MODE.
7-177

Superblade Network Modules User’s Manual
Source Information
Clicking the SOURCE INFORMATION tab brings up the IGMP SOURCE INFORMATION page (Figure 7-158). The parameters for this page are shown in Table 7-126.
Figure 7-158. IGMP Source Information Page
Table 7-126. IGMP Source Information Page Parameters
Parameter Description
Group Address This parameter specifies the IP multicast group address.
Interface This parameter specifies the interface index.
Source Address This parameter represents the IP Source address.
7-178

Chapter 7: Layer 2/3 Ethernet Switch Firmware
PIM
The PIM link allows you to perform PIM related configuration through the following pages:
• "Basic Settings" on page 7-179
• "Component" on page 7-180
• "Interfaces" on page 7-181
• "Candidate RPs" on page 7-182
• "Threshold" on page 7-183
• "Static RP" on page 7-184
Basic Settings
Clicking the BASIC SETTINGS tab brings up the PIM BASIC SETTINGS page (Figure 7-159), which specifies the PIM status in the switch. The parameters for this page are shown in Table 7-127.
Figure 7-159. PIM Basic Settings Page
Table 7-127. PIM Basic Settings Page Parameters
Parameter Description
PIM StatusThis parameter allows you to enable or disable the PIM status in the switch.
PIM V6 Status This parameter allows you to enable or disable the PIM V6 status in the switch.
7-179

Superblade Network Modules User’s Manual
Component
Clicking the COMPONENT tab brings up the PIM COMPONENT CONFIGURATION page (Figure 7-160). The parameters for this page are shown in Table 7-128.
Registration Stop Rate Limiting Period
This parameter specifies the registration stop rate limiting period in seconds.
PMBR StatusThis parameter allows you to enable or disable the PMBR status in the switch.
Static RP This parameter allows you to enable or disable the Static RP in the switch.
Figure 7-160. PIM Component Configuration Page
Table 7-128. PIM Component Configuration Page Parameters
Parameter Description
Component ID This parameter specifies a number uniquely identifying the component.
Candidate CRP Hold TimeThis parameter specifies the hold time of the component when it is a candidate RP in the local domain.
ModeThis parameter specifies the mode of the component. It can be Sparse or Dense.
Table 7-127. PIM Basic Settings Page Parameters (Continued)
Parameter Description
7-180

Chapter 7: Layer 2/3 Ethernet Switch Firmware
Interfaces
Clicking the INTERFACES tab brings up the PIM INTERFACE CONFIGURATION page (Figure 7-161). The parameters for this page are shown in Table 7-129.
BSR AddressThis parameter specifies the IP address of the bootstrap router for the local PIM region, which is a read-only field.
BSR Expiry TimeThis parameter indicates the minimum time remaining before the bootstrap router in the local domain is declared down, which is a read-only field.
Figure 7-161. PIM Interface Configuration Page
Table 7-129. PIM Interface Configuration Page Parameters
Parameter Description
Interface This parameter specifies the interface index.
Component ID This parameter specifies a number uniquely identifying the component.
Hello Interval (Seconds)This parameter specifies the time interval between two successive Hello messages being sent by PIM on this interface.
Join Prune Interval (Seconds)
This parameter specifies the time interval between two successive Join/Prune messages being sent by PIM on this interface.
Table 7-128. PIM Component Configuration Page Parameters (Continued)
Parameter Description
7-181

Superblade Network Modules User’s Manual
Candidate RPs
Clicking the CANDIDATE RPS tab brings up the CANDIDATE RP CONFIGURATION page (Figure 7-162). The parameters for this page are shown in Table 7-130.
CBSR PreferenceThis parameter indicates the preference value for the local interface as a candidate bootstrap router.
Row Status This parameter indicates the operational status of the entry.
Figure 7-162. Candidate RP Configuration Page
Table 7-130. Candidate RP Configuration Page Parameters
Parameter Description
Component ID This parameter specifies a number uniquely identifying the component.
Group AddressThis parameter represents the multicast group, for which the switch advertises itself as the candidate RP.
Group MaskThis parameter specifies the subnet mask, which when combined with the group address gives the group prefix.
RP Address This parameter represents the IP address of the Candidate-RP.
Table 7-129. PIM Interface Configuration Page Parameters (Continued)
Parameter Description
7-182

Chapter 7: Layer 2/3 Ethernet Switch Firmware
Threshold
Clicking the THRESHOLD tab brings up the PIM THRESHOLD CONFIGURATION page (Figure 7-163). The parameters for this page are shown in Table 7-131.
Figure 7-163. PIM Threshold Configuration Page
Table 7-131. PIM Threshold Configuration Page Parameters
Parameter Description
Group ThresholdThis parameter is a bits-per-second (BPS) value that when it exceeds a certain value, initiates source specific counters for a particular group.
Source Threshold This parameter is a bits-per-second (BPS) value that when exceeds a certain value, initiates switching to shortest path tree.
Switching Period This parameter specifies the time interval that the data rate is monitored for, initiating the counters or for switching to SPT.
RP ThresholdWhen the number of registered packets received exceeds this threshold value, RP initiates switching to SPT.
RP Switching PeriodThis parameter specifies the time interval for which the registered packets are monitored to initiate switching to SPT.
7-183

Superblade Network Modules User’s Manual
Static RP
Clicking the STATIC RP tab brings up the STATIC RP CONFIGURATION page (Figure 7-164), which configure static PIM RPs (Rendezvous Points). The parameters for this page are shown in Table 7-132.
Figure 7-164. Static RP Configuration Page
Table 7-132. Static RP Configuration Page Parameters
Parameter Description
Component ID This parameter specifies a number uniquely identifying the component.
Address Type This parameter chooses the IPv4 or IPv6 address type.
Static Group AddressThis parameter represents the multicast group, for which the switch advertises itself as the candidate RP.
Static Group MaskThis parameter specifies the subnet mask, which when combined with the group address gives the group prefix.
Static RP Address This parameter represents the IP address of the candidate RP.
7-184

Chapter 7: Layer 2/3 Ethernet Switch Firmware
DVMRP
The DVMRP page allows you to configure the DVMRP protocol using the following pages:
• "DVMRP Basic Settings" on page 7-185
• "Interfaces" on page 7-186
DVMRP Basic Settings
Clicking the BASIC SETTINGS tab brings up the DVMRP BASIC SETTINGS page (Figure 7-165). The parameters for this page are shown in Table 7-133.
Figure 7-165. DVMRP Basic Settings Page
Table 7-133. DVMRP Basic Settings Page Parameters
Parameter Description
DVMRP Status DVMRP can be enabled or disabled in the switch using this field.
Prune Lifetime (Seconds) This parameter represents the Prune Life Time Configuration value.
7-185

Superblade Network Modules User’s Manual
Interfaces
Clicking the INTERFACES tab brings up the DVMRP INTERFACE SETTINGS page (Figure 7-166), which displays the various parameters XXXXXX. The parameters for this page are shown in Table 7-134.
Figure 7-166. DVMRP Interface Settings Page
Table 7-134. DVMRP Interface Settings Page Parameters
Parameter Description
Interface This parameter specifies the Interface Index.
IP Address This parameter specifies the IP Address of the interface, which is a read-only field.
MetricThis parameter specifies the distance metric for this interface, which is used to calculate distance vectors.
7-186

Chapter 7: Layer 2/3 Ethernet Switch Firmware
7-8 Statistics
The STATISTICS HOME page (Figure 7-167) contains links to all statistical information for all switch features.
Figure 7-167. Statistics Home Page
7-187

Superblade Network Modules User’s Manual
Interface
The Interface link allows you to configure the following pages:
• "Interface Statistics" on page 7-188
• "Ethernet Statistics" on page 7-189
Interface Statistics
Clicking the INTERFACE tab brings up the INTERFACE STATISTICS page (Figure 7-168). The parameters for this page are shown in Table 7-135.
Figure 7-168. Interface Statistics Page
Table 7-135. Interface Statistics Page Parameters
Parameter Description
Index This parameter specifies the Port index.
MTU This parameter specifies the Max Transfer Unit bytes.
Speed (Bits Per Second) This parameter specifies the port speed in bits per second.
Received Octets This parameter specifies the number of bytes received.
Received Unicast Packets This parameter specifies the number of unicast packets received.
Received Nunicast Packets This parameter specifies the number of non-unicast packets received.
Received Discards This parameter specifies the number of packets discared due to errors.
Received Errors This parameter specifies the number of packets received with errors.
7-188

Chapter 7: Layer 2/3 Ethernet Switch Firmware
Ethernet Statistics
Clicking the ETHERNET tab brings up the ETHERNET STATISTICS page (Figure 7-169). The parameters for this page are shown in Table 7-136.
Received Unknown Protocols
This parameter specifies the number of packets received with an unknown protocol.
Transmitted Octets This parameter specifies the number of bytes transmitted.
Transmitted Unicast Packets
This parameter specifies the number of unicast packets transmitted.
Transmitted Nunicast Packets
This parameter specifies the number of non-unicast packets transmitted.
Transmitted DiscardsThis parameter specifies the number of packets discarded due to transmit errors.
Transmitted Errors This parameter specifies the number of transmit errors.
Figure 7-169. Ethernet Statistics Page
Table 7-135. Interface Statistics Page Parameters (Continued)
Parameter Description
7-189
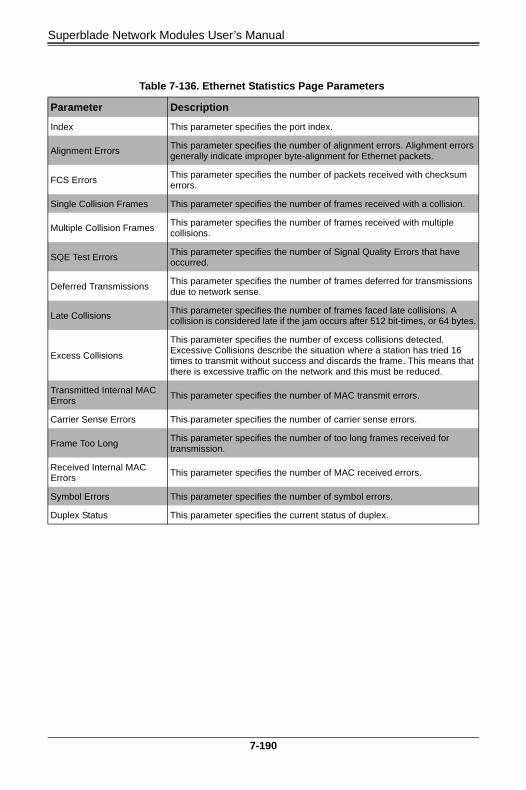
Superblade Network Modules User’s Manual
Table 7-136. Ethernet Statistics Page Parameters
Parameter Description
Index This parameter specifies the port index.
Alignment ErrorsThis parameter specifies the number of alignment errors. Alighment errors generally indicate improper byte-alignment for Ethernet packets.
FCS ErrorsThis parameter specifies the number of packets received with checksum errors.
Single Collision Frames This parameter specifies the number of frames received with a collision.
Multiple Collision FramesThis parameter specifies the number of frames received with multiple collisions.
SQE Test ErrorsThis parameter specifies the number of Signal Quality Errors that have occurred.
Deferred TransmissionsThis parameter specifies the number of frames deferred for transmissions due to network sense.
Late CollisionsThis parameter specifies the number of frames faced late collisions. A collision is considered late if the jam occurs after 512 bit-times, or 64 bytes.
Excess Collisions
This parameter specifies the number of excess collisions detected. Excessive Collisions describe the situation where a station has tried 16 times to transmit without success and discards the frame. This means that there is excessive traffic on the network and this must be reduced.
Transmitted Internal MAC Errors
This parameter specifies the number of MAC transmit errors.
Carrier Sense Errors This parameter specifies the number of carrier sense errors.
Frame Too LongThis parameter specifies the number of too long frames received for transmission.
Received Internal MAC Errors
This parameter specifies the number of MAC received errors.
Symbol Errors This parameter specifies the number of symbol errors.
Duplex Status This parameter specifies the current status of duplex.
7-190

Chapter 7: Layer 2/3 Ethernet Switch Firmware
Radius
Clicking the RADIUS link brings up the RADIUS SERVER STATISTICS page (Figure 7-170). The parameters for this page are shown in Table 7-137.
Figure 7-170. Radius Server Statistics Page
Table 7-137. Radius Server Statistics Page Parameters
Parameter Description
Index This parameter specifies the port index.
Radius Server Address This parameter specifies the RADIUS SERVER ADDRESS.
UDP Port Number This parameter specifies the UDP PORT NUMBER.
Round Trip Time This parameter displays the ROUND TRIP TIME in seconds.
No of Request Packets This parameter specifies the number of request packets transmitted.
No of Retransmitted Packets
This parameter specifies the number of packets retransmitted.
No of Access-Accept Packets
This parameter specifies the number of accept packets.
No of Access-Reject Packets
This parameter specifies the number of reject packets.
No of Access-Challenge Packets
This parameter specifies the number of challenge packets.
7-191

Superblade Network Modules User’s Manual
No of Malformed Access Responses
This parameter specifies the number of invalid access responses received.
No of Bad Authenticators This parameter specifies the number of failed authentications.
No of Pending Requests This parameter specifies the number of currently pending requests.
No of Time Outs This parameter specifies the number of time outs that have happened.
No of Unknown TypesThis parameter specifies the number of unknown types that have been received.
Table 7-137. Radius Server Statistics Page Parameters (Continued)
Parameter Description
7-192

Chapter 7: Layer 2/3 Ethernet Switch Firmware
TACACS+ Statistics
Clicking the TACACS+ link brings up the TACACS+ STATISTICS page (Figure 7-171). The parameters for this page are shown in Table 7-138.
Figure 7-171. TACACS+ Statistics Page
Table 7-138. TACACS+ Statistics Page Parameters
Parameter Description
Authentication Starts Request
This parameter specifies the number of authentication starts requested.
Authentication Continues Request
This parameter specifies the number of authentication continues requested.
Authentication Enables Request
This parameter specifies the number of authentication enables requested.
Authentication Aborts Request
This parameter specifies the number of authentication aborts requested.
Authentication Pass Received
This parameter specifies the number of authentication passes received.
Authentication Fails Received
This parameter specifies the number of authentication fails received.
Authentication Get User Received
This parameter specifies the number of authentication get users received.
Authentication Get Pass Received
This parameter specifies the number of authentication get passes received.
7-193

Superblade Network Modules User’s Manual
Authentication Get Data Received
This parameter specifies the number of authentication get datas received.
Authentication Errors Received
This parameter specifies the number of authentication errors received.
Authentication Follows Received
This parameter specifies the number of authentication follows received.
Authentication Restart Received
This parameter specifies the number of authentication restarts received.
Authentication Session Timeouts
This parameter specifies the number of authentication session timeouts received.
Authorization Requests This parameter specifies the number of authentication requests received.
Authorization Pass Add Received
This parameter specifies the number of authentication pass adds received.
Authorization Pass Reply Received
This parameter specifies the number of authentication pass replies received.
Authorization Fails Received
This parameter specifies the number of authentication fails received.
Authorization Errors Received
This parameter specifies the number of authentication errors received.
Authorization Follows Received
This parameter specifies the number of authentication follows received.
Authorization Session Timeouts
This parameter specifies the number of authentication session timeouts.
Accounting Start Requests This parameter specifies the number of accounting start requests.
Accounting WD Requests This parameter specifies the number of accounting WD requests.
Accounting Stop Requests This parameter specifies the number of accounting stop requests.
Accounting Success Received
This parameter specifies the number of accounting successes received.
Accounting Errors Received
This parameter specifies the number of accounting errors received.
Accounting Follows Received
This parameter specifies the number of accounting follows received.
Accounting Session Timeouts
This parameter specifies the number of accounting sessions received.
Malformed Packets Received
This parameter specifies the number of malformed packets received.
Socket Failures This parameter specifies the number of socket failures.
Connection Failures This parameter specifies the number of connection failures.
Table 7-138. TACACS+ Statistics Page Parameters (Continued)
Parameter Description
7-194

Chapter 7: Layer 2/3 Ethernet Switch Firmware
RMON Ethernet Statistics
Clicking the RMON link brings up the RMON ETHERNET STATISTICS page (Figure 7-172), which displays RMON Ethernet statistics information. The parameters for this page are shown in Table 7-139.
Figure 7-172. RMON Ethernet Statistics Page
Table 7-139. RMON Ethernet Statistics Page Parameters
Parameter Description
Index This parameter specifies the index.
Port This parameter specifies the port.
Octets This parameter specifies the number of octets received.
Packets This parameter specifies the number of packets received.
Broadcast Packets This parameter specifies the number of broadcast packets received.
Multicast Packets This parameter specifies the number of multicast packets received.
CRC Errors This parameter specifies the number of packets received with crc errors.
Under Size Packets This parameter specifies the number of under size packets received.
Over Size Packtes This parameter specifies the number of over size packets received.
Fragments This parameter specifies the number of fragments received.
Jabbers This parameter specifies the number of jabbers.
Collisions This parameter specifies the number of collisions.
7-195

Superblade Network Modules User’s Manual
64 OctetsThis parameter specifies the number of Ethernet packets received with a size less than 64 bytes.
65-127 OctetsThis parameter specifies the number of Ethernet packets received with a size between 65 and 127 bytes.
128-255 OctetsThis parameter specifies the number of Ethernet packets received with a size between 128 and 255 bytes.
256-511 OctetsThis parameter specifies the number of Ethernet packets received with a size between 256 and 511 bytes.
512-1023 OctetsThis parameter specifies the number of Ethernet packets received with a size between 512 and 1023 bytes.
1024-1518 OctetsThis parameter specifies the number of Ethernet packets received with a size between 1024 and 1518 bytes.
Table 7-139. RMON Ethernet Statistics Page Parameters (Continued)
Parameter Description
7-196

Chapter 7: Layer 2/3 Ethernet Switch Firmware
SNMP Statistics
The SNMP Statistics link allows you to configure SNMP Statistics through the following pages:
• "Agent" on page 7-197
• "SNMP AgentX" on page 7-198
Agent
Clicking the SNMP AGENT link brings up the SNMP STATISTICS page (Figure 7-173), which displays SNMP statistics. The parameters for this page are shown in Table 7-140.
Figure 7-173. SNMP Statistics Page
Table 7-140. SNMP Statistics Page Parameters
Parameter Description
SNMP Packets Input This parameter specifies the number of SNMP packets input.
BAD SNMP Version Errors This parameter specifies the number of BAD SNMP version errors.
SNMP Unknown Community Name
This parameter specifies the number of SNMP unknown community names.
SNMP Get Request PDU's This parameter specifies the number of SNMP Get Request PDU's.
SNMP Get Next PDU's This parameter specifies the number of SNMP Get Next PDU's.
SNMP Set Request PDU's This parameter specifies the number of SNMP Set Request PDU's.
7-197

Superblade Network Modules User’s Manual
SNMP AgentX
Clicking the AGENTX link brings up the AGENTX SUBAGENT STATISTICS page (not shown), which displays Agentx Subagent information. The parameters for this page are shown in Table 7-141.
SNMP Packet Output This parameter specifies the number of SNMP packets output.
SNMP Too Big Errors This parameter specifies the number of SNMP Too Big errors,
SNMP No Such Name Errors
This parameter specifies the number of SNMP No Such Name errors,
SNMP Bad Value Errors This parameter specifies the number of SNMP Bad Value errors.
SNMP General Errors This parameter specifies the number of SNMP General errors.
SNMP Trap PDU's This parameter specifies the number of SNMP Trap PDU's.
SNMP Manager-Role Output Packets
This parameter specifies the number of SNMP Manager-Role Output packets.
SNMP Inform Responses Received
This parameter specifies the number of SNMP Inform responses received.
SNMP Inform Request Generated
This parameter specifies the number of SNMP Inform requests generated.
SNMP Inform Messages Dropped
This parameter specifies the number of SNMP Inform messages dropped.
SNMP Inform Requests awaiting Acknowledgement
This parameter specifies the number of SNMP Inform requests awaiting acknowledgement.
Table 7-141. Agentx Subagent Statistics Page Parameters
Parameter Description
Transmit Statistics
Transmitted Packets This parameter specifies the number of packets transmitted.
Open PDU This parameter specifies the number of open PDUs transmitted.
IndexAlloc PDU This parameter specifies the number of IndexAlloc PDUs transmitted.
Register PDU This parameter specifies the number of register PDUs transmitted.
Add Agent Caps PDU This parameter specifies the number of add agent caps PDUs transmitted.
Notify PDU This parameter specifies the number of notify PDUs transmitted.
Ping PDU This parameter specifies the number of ping PDUs transmitted.
Remove Agent Caps PDUThis parameter specifies the number of remove agent caps PDUs transmitted.
IndexDeAlloc PDU This parameter specifies the number of IndexDeAlloc PDUs transmitted.
Table 7-140. SNMP Statistics Page Parameters (Continued)
Parameter Description
7-198

Chapter 7: Layer 2/3 Ethernet Switch Firmware
VLAN
The VLAN link allows you to view VLAN statistics through the following pages:
• "Current DB" on page 7-200
• "VLAN Port Statistics" on page 7-201
• "VLAN Multicast Table" on page 7-202
• "VLAN Counter Statistics" on page 7-203
• "VLAN Capabilities" on page 7-204
• "VLAN FDB Entries" on page 7-205
UnRegister PDU This parameter specifies the number of unregister PDUs transmitted.
Close PDU This parameter specifies the number of close PDUs transmitted.
Response PDU This parameter specifies the number of response PDUs transmitted.
Receive Statistics
Received Packets This parameter specifies the number of packets received.
Get Request PDU This parameter specifies the number of get request PDUs received.
Get Next PDU This parameter specifies the number of get next PDUs received.
Get Bulk PDU This parameter specifies the number of get bulk PDUs received.
TestSet PDU This parameter specifies the number of test set PDUs received.
Commit PDU This parameter specifies the number of commit PDUs received.
Cleanup PDU This parameter specifies the number of cleanup PDUs received.
Undo PDU This parameter specifies the number of undo PDUs received.
Dropped Packets This parameter specifies the number of dropped packets.
Parse Drop ErrorsThis parameter specifies the number of received PDUs dropped due to parse errors.
Open Fail Errors This parameter specifies the number of open fail PDUs received.
Close PDU This parameter specifies the number of close PDUs received.
Response PDU This parameter specifies the number of response PDUs received.
Table 7-141. Agentx Subagent Statistics Page Parameters (Continued)
Parameter Description
7-199

Superblade Network Modules User’s Manual
Current DB
Clicking the CURRENT DB tab brings up the VLAN CURRENT DATABASE page (Figure 7-174), which displays VLAN database entries. The parameters for this page are shown in Table 7-142.
Figure 7-174. VLAN Current Database Page
Table 7-142. VLAN Current Database Page Parameters
Parameter Description
VLAN ID This parameter specifies the VLAN identifer.
VLAN FDB ID This parameter specifies the VLAN filter database identifer.
Member Ports This parameter specifies the index of member ports.
Untagged Ports This parameter specifies the index of untagged member ports.
Status This parameter specifies the VALN status.
7-200

Chapter 7: Layer 2/3 Ethernet Switch Firmware
VLAN Port Statistics
Clicking the PORT STATISTICS tab brings up the VLAN PORT STATISTICS page (Figure 7-175), which displays the various parameters XXXXXX. The parameters for this page are shown in Table 7-143.
Figure 7-175. VLAN Port Statistics Page
Table 7-143. VLAN Port Statistics Page Parameters
Parameter Description
Port This parameter specifies the port index.
VLAN ID This parameter specifies the VLAN identifer.
Received Frames This parameter specifies the number of packets received in this VLAN.
Transmitted Frames This parameter specifies the number of packets transmitted in this VLAN.
Received Discards This parameter specifies the number of received packets discarded.
Received Overflow This parameter specifies the number of received overflow packets.
Transmitted Overflow This parameter specifies the number of transmit overflows.
Transmitted Overflow Discards
This parameter specifies the number of transmit overflow discards.
7-201

Superblade Network Modules User’s Manual
VLAN Multicast Table
Clicking the MULTICAST TABLE tab brings up the VLAN MULTICAST TABLE page (Figure 7-176), which displays multicast VLAN information. The parameters for this page are shown in Table 7-144.
Figure 7-176. VLAN Multicast Table Page
Table 7-144. VLAN Multicast Table Page Parameters
Parameter Description
VLAN ID This parameter specifies the VLAN identifer.
Address This parameter specifies the VLAN address.
Egress Ports This parameter specifies the indexes of egress ports.
Ports LearntThis parameter specifies the indexes of ports on this VLAN that are learned.
7-202

Chapter 7: Layer 2/3 Ethernet Switch Firmware
VLAN Counter Statistics
Clicking the COUNTER STATISTICS link brings up the VLAN COUNTER STATISTICS page (Figure 7-177), which displays VLAN counters. The parameters for this page are shown in Table 7-145.
Figure 7-177. VLAN Counter Statistics Page
Table 7-145. VLAN Counter Statistics Page Parameters
Parameter Description
VLAN ID This parameter specifies the VLAN identifier.
Unicast Frames Rx This parameter specifies the number of unicast packets received.
Mcast/Bcast Frames Rx This parameter specifies the number of non-unicast packets received.
Unknown Unicast FloodedThis parameter specifies the number of packets flooded due to unknown unicast.
Unicast frames Tx This parameter specifies the number of unicast packets transmitted.
Broadcast frames Tx This parameter specifies the number of broadcast packets transmitted.
7-203

Superblade Network Modules User’s Manual
VLAN Capabilities
Clicking the CAPABILITIES tab brings up the VLAN CAPABILITIES page (Figure 7-178), which displays the VLAN capabilities of the switch. The parameters for this page are shown in Table 7-146.
Figure 7-178. VLAN Capabilities Page
Table 7-146. VLAN Capabilities Page Parameters
Parameter Description
Extended Filtering Services This parameter specifies the number of extended filtering services.
Traffic Classes This parameter specifies the number of traffic classes
Static Entry Individual port This parameter specifies the number of Static Entry Individual ports.
IVL capable This parameter specifies the number of IVL capables.
SVL capable This parameter specifies the number of SVL capables.
Hybrid capable This parameter specifies the number of Hybrid capables.
Configurable PVID Tagging This parameter specifies the number of Configurable PVID taggings.
7-204

Chapter 7: Layer 2/3 Ethernet Switch Firmware
VLAN FDB Entries
Clicking the FDB ENTRIES tab brings up the VLAN FDB ENTRIES page (Figure 7-179), which displays VLAN filter database entries. The parameters for this page are shown in Table 7-147.
Figure 7-179. VLAN FDB Entries Page
Table 7-147. VLAN FDB Entries Page Parameters
Parameter Description
VLAN ID This parameter specifies the VLAN identifier.
MAC Address This parameter specifies the MAC address learned.
Port This parameter specifies the Index of port where this entry is learned.
Status This parameter specifies the Status of this entry.
7-205

Superblade Network Modules User’s Manual
RSTP Statistics
The RSTP STATISTICS link allows you to view RSTP statistics through the following pages:
• "RSTP Information" on page 7-206
• "RSTP Port Statistics" on page 7-207
RSTP Information
Clicking the INFORMATION tab brings up the RSTP INFORMATION page (Figure 7-180), which displays RSTP statistics. The parameters for this page are shown in Table 7-148.
Figure 7-180. RSTP Information Page
Table 7-148. RSTP Information Page Parameters
Parameter Description
Protocol Specification This parameter specifies the Protocol Specification.
Time Since Topology Change
This parameter specifies the number of seconds since topology changed.
Designated Root This parameter specifies the designated root bridge address.
Root Brg Priority This parameter specifies the priority of root bridge.
Root Cost This parameter specifies the cost to root.
Root Port This parameter specifies the index of the root port.
7-206

Chapter 7: Layer 2/3 Ethernet Switch Firmware
RSTP Port Statistics
Clicking the PORT STATISTICS tab brings up the RSTP PORT STATISTICS page (Figure 7-181), which displays RSTP port level statistics. The parameters for this page are shown in Table 7-149.
Max Age This parameter specifies the max age in seconds.
Hello Time This parameter specifies the Hello time in seconds.
Hold Time This parameter specifies the hold time in seconds.
Forward Delay This parameter specifies the forward delay in seconds.
Figure 7-181. RSTP Port Statistics Page
Table 7-149. RSTP Port Statistics Page Parameters
Parameter Description
Port This parameter specifies the port index.
Received RST BPDUs This parameter specifies the number of RSTP BPDUs received.
Received Configuration BPDUs
This parameter specifies the number of config BPDUs received.
Received TCNThis parameter specifies the number of topology changed notifications received.
Table 7-148. RSTP Information Page Parameters (Continued)
Parameter Description
7-207

Superblade Network Modules User’s Manual
Transmitted RST BPDUs This parameter specifies the number of RSTP BPDUs transmitted.
Transmitted Configuration BPDUs
This parameter specifies the number of config BPDUs transmitted.
Transmitted TCNThis parameter specifies the number of topology change notifications transmitted.
Received Invalid RST BPDUs
This parameter specifies the number of invalid RSTP BPDUs received.
Received Invalid Configuration BPDUs
This parameter specifies the number of invalid configuration BPDUs received.
Received Invalid TCN BPDUs
This parameter specifies the number of invalid topology change BPDUs received.
Protocol Migration Count This parameter specifies the number of times protocol migration happened.
Effective Port State This parameter specifies the effective port state.
EdgePort Oper Status This parameter specifies the operational status of edge port.
Link Type This parameter specifies the broadcast or point-to-point.
Table 7-149. RSTP Port Statistics Page Parameters (Continued)
Parameter Description
7-208

Chapter 7: Layer 2/3 Ethernet Switch Firmware
MSTP Statistics
The MSTP Statistics link allows you to view MSTP statistics through the following pages:
• "MSTP Information" on page 7-209
• "MSTP CIST Statistics" on page 7-210
• "MSTP MSTI Port Statistics" on page 7-211
MSTP Information
Clicking the INFORMATION tab brings up the MSTP INFORMATION page (Figure 7-138), which displays MSTP statistics. The parameters for this page are shown in Table 7-13.
Figure 7-182. MSTP Information Page
Table 7-150. MSTP Information Page Parameters
Parameter Description
Bridge Address This parameter specifies the Bridge Address.
CIST Root This parameter specifies the CIST root.
Regional Root This parameter specifies the Regional root.
CIST Root Cost This parameter specifies the CIST root cost.
Regional Root Cost This parameter specifies the Regional root cost.
Root Port This parameter specifies the index of the root port.
Hold Time This parameter specifies the hold time in seconds.
7-209

Superblade Network Modules User’s Manual
MSTP CIST Statistics
Clicking the CIST PORT STATISTICS tab brings up the MSTP CIST PORT STATISTICS page (Figure 7-183), which displays STP CIST port level statistics. The parameters for this page are shown in Table 7-151.
Max Age This parameter specifies the maximum age in seconds.
Forward Delay This parameter specifies the forward delay in seconds.
CIST Time Since Topology Change
This parameter specifies the number of seconds since topology last changed.
Topology Changes This parameter specifies the number of topology changes.
Figure 7-183. MSTP CIST Port Statistics Page
Table 7-151. MSTP CIST Port Statistics Page Parameters
Parameter Description
Received MST BPDUs This parameter specifies the number of MSTP BPDUs received.
Received RST BPDUs This parameter specifies the number of RSTP BPDUs received.
Received Config BPDUs This parameter specifies the number of config BPDUs received.
Received TCN BPDUsThis parameter specifies the number of topology change notification BPDUs received.
Table 7-150. MSTP Information Page Parameters (Continued)
Parameter Description
7-210

Chapter 7: Layer 2/3 Ethernet Switch Firmware
MSTP MSTI Port Statistics
Clicking the MSTI PORT STATISTICS tab brings up the MSTP MSTI PORT STATISTICS page (Figure 7-184), which displays MSTP MSTI port level statistics. The parameters for this page are shown in Table 7-152.
Transmitted MST BPDUs This parameter specifies the number of MSTP BPDUs transmitted.
Transmitted RST BPDUs This parameter specifies the number of RSTP BPDUs transmitted.
Transmitted Config BPDUs This parameter specifies the number of config BPDUs transmitted.
Transmitted TCN BPDUsThis parameter specifies the number of topology change notification BPDUs transmitted.
Received Invalid MST BPDUs
This parameter specifies the number of invalid MSTP BPDUs received.
Received Invalid RST BPDUs
This parameter specifies the number of invalid RSTP BPDUs received.
Received Invalid Config BPDUs
This parameter specifies the number of invalid config BPDUs received.
Received Invalid TCN BPDUs
This parameter specifies the number of invalid TCN BPDUs received.
Protocol Migration CountThis parameter specifies the number of times protocol migration happened.
Figure 7-184. MSTP MSTI Port Statistics Page
Table 7-151. MSTP CIST Port Statistics Page Parameters (Continued)
Parameter Description
7-211

Superblade Network Modules User’s Manual
Link Aggregation (LA)
The Link Aggregation link allows you to view Link Aggregation (LA) statistics through the following pages:
• "LA Port Statistics" on page 7-213
• "LA Neighbor Statistics" on page 7-214
Table 7-152. MSTP MSTI Port Statistics Page Parameters
Parameter Description
Instance This parameter specifies the MSTP instance Identifer.
Port This parameter specifies the port index.
Designated Root This parameter specifies the designated root bridge address.
Designated Bridge This parameter specifies the designated Bridge address.
Designated PortThis parameter specifies the index of designated port for this MSTP instance.
State This parameter specifies the current state.
Forward Transitions This parameter specifies the number of Forward Transitions.
Received BPDUs This parameter specifies the number of BPDUs received.
Transmitted BPDUs This parameter specifies the number of BPDUs transmitted.
Invalid Received BPDUs This parameter specifies the number of invalid BPDUs received.
Designated Cost This parameter specifies the designated cost.
Role This parameter specifies the current role.
7-212
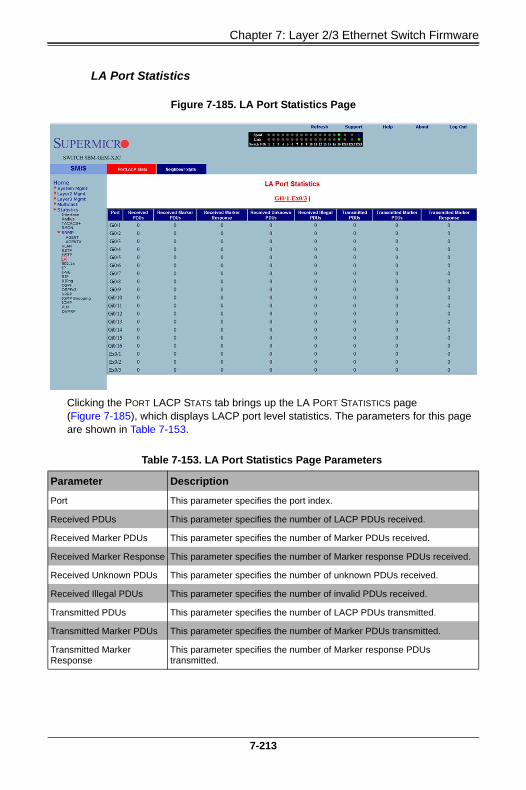
Chapter 7: Layer 2/3 Ethernet Switch Firmware
LA Port Statistics
Clicking the PORT LACP STATS tab brings up the LA PORT STATISTICS page (Figure 7-185), which displays LACP port level statistics. The parameters for this page are shown in Table 7-153.
Figure 7-185. LA Port Statistics Page
Table 7-153. LA Port Statistics Page Parameters
Parameter Description
Port This parameter specifies the port index.
Received PDUs This parameter specifies the number of LACP PDUs received.
Received Marker PDUs This parameter specifies the number of Marker PDUs received.
Received Marker Response This parameter specifies the number of Marker response PDUs received.
Received Unknown PDUs This parameter specifies the number of unknown PDUs received.
Received Illegal PDUs This parameter specifies the number of invalid PDUs received.
Transmitted PDUs This parameter specifies the number of LACP PDUs transmitted.
Transmitted Marker PDUs This parameter specifies the number of Marker PDUs transmitted.
Transmitted Marker Response
This parameter specifies the number of Marker response PDUs transmitted.
7-213

Superblade Network Modules User’s Manual
LA Neighbor Statistics
Clicking the NEIGHBOR STATS tab brings up the LA NEIGHBOR STATISTICS INFORMATION page (Figure 7-186), which displays LACP neighbor statistics. The parameters for this page are shown in Table 7-154.
Figure 7-186. LA Neighbor Statistics Information Page
Table 7-154. LA Neighbor Statistics Information Page Parameters
Parameter Description
Port Index This parameter specifies the port index.
Partner SystemID This parameter specifies the Partner SystemID.
Oper Key This parameter specifies the Oper Key.
Partner Port Priority This parameter specifies the Partner Port Priority.
7-214

Chapter 7: Layer 2/3 Ethernet Switch Firmware
802.1X
The 802.1x link allows you to view 802.1x statistics through the following pages:
• "802.1X Session Statistics" on page 7-215
• "802.1X Supplicant Statistics" on page 7-216
• "Mac Session Statistics" on page 7-217
802.1X Session Statistics
Clicking the SESSION STATS tab brings up the 802.1X SESSION STATISTICS page (Figure 7-187), which displays 802.1x statistics information. The parameters for this page are shown in Table 7-155.
Figure 7-187. 802.1x Session Statistics Page
Table 7-155. 802.1x Session Statistics Page Parameters
Parameter Description
Port This parameter specifies the port index.
Session ID This parameter specifies the session identifier.
Received Frames This parameter specifies the number of packets received.
Transmitted Frames This parameter specifies the number of packets transmitted.
Session Time (secs) This parameter specifies the session time in seconds.
7-215

Superblade Network Modules User’s Manual
802.1X Supplicant Statistics
Clicking the SUPP SESSION STATS tab brings up the 802.1X SUPPLICANT SESSION STATISTICS page (Figure 7-188), which displays information about the 802.1x supplicant session. The parameters for this page are shown in Table 7-156.
Session Terminate Cause This parameter specifies the reason for session termination.
User Name This parameter specifies the name of the user authenticated.
Figure 7-188. 802.1x Supplicant Session Statistics Page
Table 7-156. 802.1x Supplicant Session Statistics Page Parameters
Parameter Description
Port This parameter specifies the port index.
Eapol FrRx This parameter specifies the number of the EAPOL packets received.
Eapol FrTx This parameter specifies the number of the EAPOL packets transmitted.
Eapol Start FrTxThis parameter specifies the number of the EAPOL start packet transmitted.
Eapol Logoff FrTx This parameter specifies the number of the EAPOL logoff packet transmitted.
Table 7-155. 802.1x Session Statistics Page Parameters (Continued)
Parameter Description
7-216

Chapter 7: Layer 2/3 Ethernet Switch Firmware
Mac Session Statistics
Clicking the MAC SESSION STATS tab brings up the MAC SESSION STATISTICS page (Figure 7-189), which displays statistics information about 802.1x MAC sessions. The parameters for this page are shown in Table 7-157.
Eapol RespId FrTxThis parameter specifies the number of the EAPOL response identifier packet transmitted.
Eapol Resp FrTxThis parameter specifies the number of the EAPOL response packet frame transmitted.
Eapol ReqId FrRxThis parameter specifies the number of the EAPOL request identifier packet received.
Eapol Req FrRxThis parameter specifies the number of the EAPOL request frame receieved.
Invalid Eapol FrRx This parameter specifies the number of the invalid EAPOL frame received.
Eap LenErr FrRxThis parameter specifies the number of EAPOL packets received with an invalid length.
Last Eapol FrVersion This parameter specifies the version on the last EAPOL packet.
Last Eapol FrSource This parameter specifies the source of the last EAPOL packet.
Figure 7-189. MAC Session Statistics Page
Table 7-156. 802.1x Supplicant Session Statistics Page Parameters (Continued)
Parameter Description
7-217

Superblade Network Modules User’s Manual
Table 7-157. MAC Session Statistics Page Parameters
Parameter Description
Supplicant MacAddr This parameter specifies the supplicant MAC address.
Frames Rx This parameter specifies the number of packets received.
Frames Tx This parameter specifies the number of packets transmitted.
Session ID This parameter specifies the session identifier.
Session Terminte Cause This parameter specifies the reason for session termination.
User Name This parameter specifies the name of user authenticated.
7-218

Chapter 7: Layer 2/3 Ethernet Switch Firmware
IP
The IP link allows you to view IP statistics through the following pages:
• "ARP Cache" on page 7-219
• "ICMP Statistics" on page 7-220
ARP Cache
Clicking the ARP CACHE tab brings up the ARP CACHE page (Figure 7-190), which displays ARP entries. The parameters for this page are shown in Table 7-158.
Figure 7-190. ARP Cache Page
Table 7-158. ARP Cache Page Parameters
Parameter Description
InterfaceThis parameter specifies the interface from which this ARP entry is learned.
MAC Address This parameter specifies the MAC address.
IP Address This parameter specifies the IP address.
Media Type This parameter specifies the static ARP or dynamic ARP.
7-219

Superblade Network Modules User’s Manual
ICMP Statistics
Clicking the ICMP STATISTICS tab brings up the ICMP STATISTICS page (Figure 7-191), which displays ICMP statistics information. The parameters for this page are shown in Table 7-159.
Figure 7-191. ICMP Statistics Page
Table 7-159. ICMP Statistics Page Parameters
Parameter Description
Received Message This parameter specifies the number of received messages.
Received Error This parameter specifies the number of received errors.
Receive Destination Unreachable
This parameter specifies the number of received destination unreachables.
Received Redirect This parameter specifies the number of received redirects.
Received Echo Requests This parameter specifies the number of echo requests..
Received Echo Replies This parameter specifies the number of echo replies.
Receive Source Quenches This parameter specifies the number of source quenches.
Transmitted Message This parameter specifies the number of transmited messages.
Transmitted Error This parameter specifies the number of transmitted errors.
Transmitted Destination Unreachable
This parameter specifies the number of transmitted destination unreachables.
Transmitted Redirect This parameter specifies the number of transmitted redirects.
7-220

Chapter 7: Layer 2/3 Ethernet Switch Firmware
Transmitted Echo Requests This parameter specifies the number of transmitted echo requests.
Transmitted Echo Replies This parameter specifies the number of transmitted echo replies.
Transmited Source Quenches
This parameter specifies the number of transmitted source quenches.
Table 7-159. ICMP Statistics Page Parameters (Continued)
Parameter Description
7-221

Superblade Network Modules User’s Manual
IPv6
The IPv6 link allows you to view IPv6 statistics through the following pages:
• "IP V6 Interface Statistics" on page 7-222
• "ICMP V6 Statistics" on page 7-224
IP V6 Interface Statistics
Clicking the IPV6 INTERFACE tab brings up the IPV6 INTERFACE STATISTICS page (Figure 7-192), which displays IPv6 port statistics. The parameters for this page are shown in Table 7-160.
Figure 7-192. IPV6 Interface Statistics Page
Table 7-160. IPV6 Interface Statistics Page Parameters
Parameter Description
Interface This parameter specifies the Port index.
Rcvd This parameter specifies the number of IPv6 packets received.
Hdr ErrThis parameter specifies the number of IPv6 packets received with header error.
Too Big Errs This parameter specifies the number of too big IPv6 packets received.
Addr ErrsThis parameter specifies the number of IPv6 packets received with address errors.
7-222

Chapter 7: Layer 2/3 Ethernet Switch Firmware
Fwd DgramsThis parameter specifies the number of IPv6 datagrams forwarded in this port.
Unknown protos This parameter specifies the number of packets received with unknown protocol.
DiscdrsThis parameter specifies the number of received packets discarded due to errors.
Delivers This parameter specifies the number of packets delivered.
Out Rqst This parameter specifies the number of transmit requests.
Out Discards This parameter specifies the number of transmit discards due to errors.
Out No RoutesThis parameter specifies the number of packets to be transmitted but no routes.
Reasm Reqds This parameter specifies the number of reassembly requests.
Reasm OKs This parameter specifies the number or successful reassemblies.
Reasm Fails This parameter specifies the number of reassemblies failed.
Frag OKs This parameter specifies the number of good fragments received.
Frag Fails This parameter specifies the number of fragments incompletely received.
Frag Creates This parameter specifies the number of fragments created.
Rcvd Mcast Pkts This parameter specifies the number of received IPv6 multicast packets.
Send Mcast Pkts This parameter specifies the number of IPv6 multicast packets transmitted.
Trunctd Pkts This parameter specifies the number of packets truncated.
Table 7-160. IPV6 Interface Statistics Page Parameters (Continued)
Parameter Description
7-223

Superblade Network Modules User’s Manual
ICMP V6 Statistics
Clicking the ICMPV6 tab brings up the ICMPV6 STATISTICS page (Figure 7-193), which displays ICMPv6 statistics. The parameters for this page are shown in Table 7-161.
Figure 7-193. ICMPv6 Statistics Page
Table 7-161. ICMPv6 Statistics Page Parameters
Parameter Description
In Message This parameter specifies the number of messages received.
In Errors This parameter specifies the number of messages received with errors.
In Dest UnreachesThis parameter specifies the number of destination unreachable messages received.
In Time Excds This parameter specifies the number of receive timeouts.
In Param Probs This parameter specifies the number of parameters probed.
In PktTooBigs This parameter specifies the number of too big packets received.
In Echos This parameter specifies the number of echo requests received.
In EchoReps This parameter specifies the number of echo responses received.
In Router Solicits This parameter specifies the number of received router solicits.
In Router Advertisements This parameter specifies the number of routers advertisement received.
In Neighbor Solicits This parameter specifies the number of received neighbor solicits.
In Neighbor Advertisements This parameter specifies the number of received neighbor solicits.
7-224

Chapter 7: Layer 2/3 Ethernet Switch Firmware
In Redirects This parameter specifies the number of redirect packets received.
In Admin Prohib This parameter specifies the number of receive admin prohibted.
Out Messages This parameter specifies the number of messages transmitted.
Out Errors This parameter specifies the number of messages transmitted with errors.
Out Dest UnreachesThis parameter specifies the number of destination unreachable messages transmitted.
Out Time Excds This parameter specifies the number of transmit timeouts.
Out Param Probs This parameter specifies the number of parameters probed.
Out Pkts Too Big This parameter specifies the number of too big packets transmitted.
Out Echos This parameter specifies the number of echo requests transmitted.
Out Echo Reps This parameter specifies the number of echo responses transmitted.
Out Route Solicits This parameter specifies the number of transmitted router solicits.
Out Router Advertisements This parameter specifies the number of transmitted neighbor solicits.
Out Neighbour Solicts This parameter specifies the number of transmitted neighbor solicits.
Out Neighbour Advertisements
This parameter specifies the number of transmitted neighbor solicits.
Out Redirects This parameter specifies the number of redirect packets transmitted.
Out Admin Prohib This parameter specifies the number of transmit admin prohibted.
In Bad Code This parameter specifies the number of bad code packets.
Table 7-161. ICMPv6 Statistics Page Parameters (Continued)
Parameter Description
7-225

Superblade Network Modules User’s Manual
RIP Statistics
Clicking the RIP link brings up the RIP INTERFACE STATISTICS page (Figure 7-194), which displays RIP statistics. The parameters for this page are shown in Table 7-162.
Figure 7-194. RIP Interface Statistics Page
Table 7-162. RIP Interface Statistics Page Parameters
Parameter Description
IP Address This parameter specifies the IP address.
Received Bad Packets This parameter specifies the number of received bad packets.
Received Bad Routes This parameter specifies the number of received bad routes.
Transmitted Updates This parameter specifies the the number of transmitted updates.
7-226

Chapter 7: Layer 2/3 Ethernet Switch Firmware
RIP6
The RIP6 link allows you to view RIP6 statistics through the following pages:
• "RIP6 Interface Statistics" on page 7-227
• "RIP6 Route Information" on page 7-228
RIP6 Interface Statistics
Clicking the INTERFACE STATISTICS tab brings up the RIP6 INTERFACE STATISTICS page (Figure 7-195), which displays RIPng statistics. The parameters for this page are shown in Table 7-163.
Figure 7-195. RIP6 Interface Statistics Page
Table 7-163. RIP6 Interface Statistics Page Parameters
Parameter Description
Interface ID This parameter specifies the interface identifier.
In Msg This parameter specifies the number of RIPng packets received.
In Req This parameter specifies the number of RIPng request packets received.
In Resp This parameter specifies the number of RIPng resonse packets received.
In Unk-Cmd This parameter specifies the number of RIPng unknown command packets received.
In Other-VerThis parameter specifies the number of RIPng other version packets received.
7-227

Superblade Network Modules User’s Manual
RIP6 Route Information
Clicking the ROUTE INFORMATION tab brings up the RIP6 ROUTE INFORMATION page (Figure 7-196), which displays information about RIPng routes. The parameters for this page are shown in Table 7-164.
In Discards This parameter specifies the number of received packets discarded.
Out Msg This parameter specifies the number of RIPng packets transmitted.
Out ReqThis parameter specifies the number of RIPng request packets transmitted.
Out Resp This parameter specifies the number of RIPng response packets transmitted.
Out TrigUpd This parameter specifies the number of RIPng triggered updates transmitted.
Figure 7-196. RIP6 Route Information Page
Table 7-164. RIP6 Route Information Page Parameters
Parameter Description
Destination This parameter specifies the route destination.
Prefix-len This parameter specifies the length of the route prefix.
Table 7-163. RIP6 Interface Statistics Page Parameters (Continued)
Parameter Description
7-228

Chapter 7: Layer 2/3 Ethernet Switch Firmware
Protocol This parameter specifies the routing protocol
Route-IfIndex This parameter specifies the interface index.
Next-Hop This parameter specifies the next hop for this route.
Route-Metric This parameter specifies the metric of this route.
Route-Tag This parameter specifies the route tag identifier.
Age This parameter specifies the route age in seconds.
Table 7-164. RIP6 Route Information Page Parameters (Continued)
Parameter Description
7-229

Superblade Network Modules User’s Manual
OSPF
The OSPF link allows you to view OSPF statistics through the following pages:
• "OSPF Route Information" on page 7-230
• "OSPF Link State DB" on page 7-231
OSPF Route Information
Clicking the ROUTE INFORMATION tab brings up the OSPF ROUTE INFORMATION page (Figure 7-197), which displays information about OSPF routes. The parameters for this page are shown in Table 7-165.
Figure 7-197. OSPF Route Information Page
Table 7-165. OSPF Route Information Page Parameters
Parameter Description
IP Address This parameter specifies the IP address.
Subnet Mask This parameter specifies the Subnet Mask.
TOS This parameter specifies the TOS.
Gateway This parameter specifies the gateway.
Type This parameter specifies the type.
Area ID This parameter specifies the Area ID.
Cost This parameter specifies the cost.
7-230

Chapter 7: Layer 2/3 Ethernet Switch Firmware
OSPF Link State DB
Clicking the LINK STATE DATABASE tab brings up the OSPF LINK STATE DATABASE page (Figure 7-198), which displays information about OSPF link state database. The parameters for this page are shown in Table 7-166.
Type 2 Cost This parameter specifies the Type 2 cost.
Interface This parameter specifies the interface.
Figure 7-198. OSPF Link State Database Page
Table 7-166. OSPF Link State Database Page Parameters
Parameter Description
Area ID This parameter specifies the area identifier.
Type This parameter specifies the link state type.
Link State ID This parameter specifies the link state identifier.
Router ID This parameter specifies the router identifer.
SequenceThis parameter specifies the sequence number of this link state information.
Table 7-165. OSPF Route Information Page Parameters (Continued)
Parameter Description
7-231

Superblade Network Modules User’s Manual
Checksum This parameter specifies the checksum.
Age This parameter specifies the link state information age in seconds.
Table 7-166. OSPF Link State Database Page Parameters (Continued)
Parameter Description
7-232
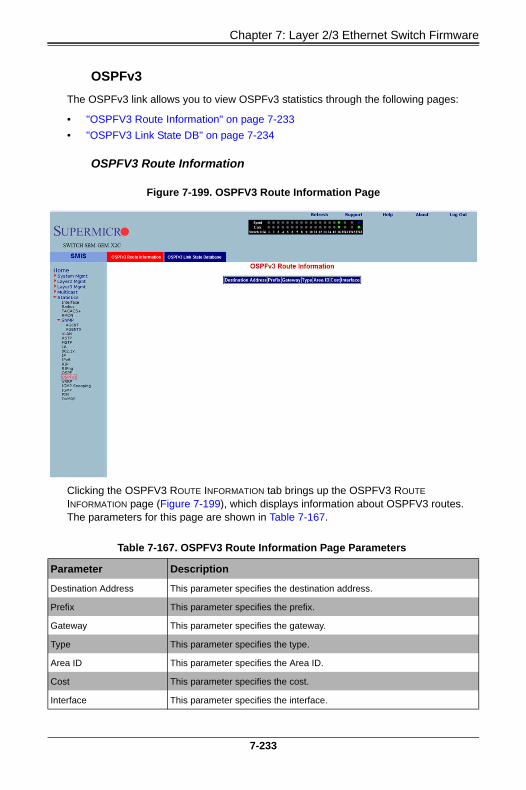
Chapter 7: Layer 2/3 Ethernet Switch Firmware
OSPFv3
The OSPFv3 link allows you to view OSPFv3 statistics through the following pages:
• "OSPFV3 Route Information" on page 7-233
• "OSPFV3 Link State DB" on page 7-234
OSPFV3 Route Information
Clicking the OSPFV3 ROUTE INFORMATION tab brings up the OSPFV3 ROUTE INFORMATION page (Figure 7-199), which displays information about OSPFV3 routes. The parameters for this page are shown in Table 7-167.
Figure 7-199. OSPFV3 Route Information Page
Table 7-167. OSPFV3 Route Information Page Parameters
Parameter Description
Destination Address This parameter specifies the destination address.
Prefix This parameter specifies the prefix.
Gateway This parameter specifies the gateway.
Type This parameter specifies the type.
Area ID This parameter specifies the Area ID.
Cost This parameter specifies the cost.
Interface This parameter specifies the interface.
7-233

Superblade Network Modules User’s Manual
OSPFV3 Link State DB
Clicking the OSPFV3 LINK STATE DATABASE tab brings up the OSPFV3 LINK STATE DATABASE page (Figure 7-200), which displays information about OSPF link state database. The parameters for this page are shown in Table 7-168.
Figure 7-200. OSPFV3 Link State Database Page
Table 7-168. OSPFV3 Link State Database Page Parameters
Parameter Description
Area ID This parameter specifies the area identifier.
Type This parameter specifies the link state type.
Link State ID This parameter specifies the link state identifier.
Router ID This parameter specifies the router identifier.
SequenceThis parameter specifies the sequence number of this link state information.
Checksum This parameter specifies the checksum.
Age This parameter specifies the link state information age in seconds.
7-234

Chapter 7: Layer 2/3 Ethernet Switch Firmware
VRRP Statistics
Clicking the VRRP link brings up the VRRP STATISTICS page (Figure 7-201), which displays VRRP global statistics and VRRP router specific statistics. The parameters for this page are shown in Table 7-169.
Figure 7-201. VRRP Statistics Page
Table 7-169. VRRP Statistics Page Parameters
Parameter Description
VRRP Global Statistics
Checksum Errors This parameter specifies the number of checksum errors.
Version Errors This parameter specifies the number of version errors.
Virtual Router ID Errors This parameter specifies the number of Virtual Router ID errors.
VRRP Router Specific Statistics
Virtual Router ID This parameter specifies the Virtual Router identifier.
Transitions to Master This parameter specifies the number of transitions as Master.
Advertisment Receive This parameter specifies the number of advertisement packets received.
Advertisment Internal Error This parameter specifies the number of advertisement errors happened.
Authentication Failures This parameter specifies the number of authentication failures.
IP TTL Errors This parameter specifies the number of IP TTL errors happened.
7-235

Superblade Network Modules User’s Manual
Priority Zero Packet Received
This parameter specifies the number of priority zero packets received.
Priority Zero Packet Transmited
This parameter specifies the number of priority zero packets transmitted.
Invalid Packet Type Received
This parameter specifies the number of invalid packets received.
Address List Errors This parameter specifies the number of address list errors.
Invalid Authentication TypeThis parameter specifies the number of invalid authentication types received.
Authentication Type Mismatch
This parameter specifies the number of authentication type mismatch received.
Packet Length ErrorsThis parameter specifies the number of VRRP packets received with invalid length.
Table 7-169. VRRP Statistics Page Parameters (Continued)
Parameter Description
7-236

Chapter 7: Layer 2/3 Ethernet Switch Firmware
IGMP Snooping
The IGMP link allows you to view IGMP statistics through the following pages:
• "IGMP Snooping Clear Statistics" on page 7-237
• "IGMP Snooping V1/V2 Statistics" on page 7-238
• "IGMP Snooping V3 Statistics" on page 7-239
IGMP Snooping Clear Statistics
Clicking the IGS CLEAR STATS tab brings up the IGMP SNOOPING CLEAR STATISTICS page (Figure 7-202), which displays clearing IGMP snooping statistics. The parameters for this page are shown in Table 7-170.
Figure 7-202. IGMP Snooping Clear Statistics Page
Table 7-170. IGMP Snooping Clear Statistics Page Parameters
Parameter Description
All This parameter gives you the option to clear all the IGMP statistics.
Vlan IDThis parameter give you the option to clear IGMP statistics for a particular VLAN.
7-237

Superblade Network Modules User’s Manual
IGMP Snooping V1/V2 Statistics
Clicking the IGS STATISTICS tab brings up the IGMP SNOOPING V1/V2 STATISTICS page (Figure 7-203), which displays IGMP snooping statistics. The parameters for this page are shown in Table 7-171.
Figure 7-203. IGMP Snooping V1/V2 Statistics Page
Table 7-171. IGMP Snooping V1/V2 Statistics Page Parameters
Parameter Description
VLAN ID This parameter specifies the VLAN identifier.
General Queries Received This parameter specifies the number of general guery packets received.
Group Queries Received This parameter specifies the number of group query packets received.
Group and Source Queries Received
This parameter specifies the number of group and source query packets received.
IGMP Reports Received This parameter specifies the number of IGMP report packets received.
IGMP Leaves Received This parameter specifies the number of IGMP leave packets received.
IGMP Packets Dropped This parameter specifies the number of IGMP dackets dropped.
General Queries Transmitted
This parameter specifies the number of general query packets transmitted.
Group Queries Transmitted This parameter specifies the number of group query packets transmitted.
IGMP Reports Transmitted This parameter specifies the number of IGMP report packets transmitted.
IGMP Leaves Transmitted This parameter specifies the number of IGMP leave packets transmitted.
7-238

Chapter 7: Layer 2/3 Ethernet Switch Firmware
IGMP Snooping V3 Statistics
Clicking the IGS V3 STATISTICS tab brings up the IGMP SNOOPING V3 STATISTICS page (Figure 7-204), which displays IGMP snooping V3 statistics information. The parameters for this page are shown in Table 7-172.
Figure 7-204. IGMP Snooping V3 Statistics Page
Table 7-172. IGMP Snooping V3 Statistics Page Parameters
Parameter Description
VLAN ID This parameter specifies the VLAN identifier.
V3 Reports Received This parameter specifies the number of Reports messages received.
IS_INCL Messages Received
This parameter specifies the number of messages received with is include field.
IS_EXCL Messages Received
This parameter specifies the number of messages received with is exclude field.
TO_INCL Messages Received
This parameter specifies the number of messages received with to include field.
TO_EXCL Messages Received
This parameter specifies the number of messages received with to exclude field.
ALLOW Messages Received
This parameter specifies the number of allow messages received.
7-239

Superblade Network Modules User’s Manual
IGMP Statistics
Clicking the IGMP link brings up the IGMP ROUTE STATISTICS page (Figure 7-205), which displays IGMP route information. The parameters for this page are shown in Table 7-173.
BLOCK Messages Received
This parameter specifies the number of block messages received.
V3 Reports Sent This parameter specifies the number of V3 reports transmitted.
Figure 7-205. IGMP Route Statistics Page
Table 7-173. IGMP Route Statistics Page Parameters
Parameter Description
Interface This parameter specifies the interface identifier.
General Queries Received This parameter specifies the number of general guery packets received.
Group Queries Received This parameter specifies the number of group query packets received.
Group and Source Queries Received
This parameter specifies the number of group and source query packets received.
IGMP V1/V2 Reports Received
This parameter specifies the number of IGMP V1/V2 report packets received.
Table 7-172. IGMP Snooping V3 Statistics Page Parameters (Continued)
Parameter Description
7-240

Chapter 7: Layer 2/3 Ethernet Switch Firmware
IGMP V3 Reports Received This parameter specifies the number of IGMP V3 report packets received.
General Queries Transmitted
This parameter specifies the number of general query packets transmitted.
Group Queries Transmitted This parameter specifies the number of group query packets transmitted.
Group and Source Queries Transmitted
This parameter specifies the number of group and source query packets transmitted.
Table 7-173. IGMP Route Statistics Page Parameters (Continued)
Parameter Description
7-241

Superblade Network Modules User’s Manual
PIM
The PIM link allows you to view PIM statistics through the following pages:
• "PIM Interface Statistics" on page 7-242
• "PIM Neighbor Statistics" on page 7-243
• "PIM BSR Info" on page 7-244
• "PIM RP Set Information" on page 7-245
• "PIM Route Information" on page 7-246
PIM Interface Statistics
Clicking the INTERFACE STATS tab brings up the PIM INTERFACE STATISTICS page (Figure 7-206), which displays PIM interface statistics. The parameters for this page are shown in Table 7-174.
Figure 7-206. PIM Interface Statistics Page
Table 7-174. PIM Interface Statistics Page Parameters
Parameter Description
Address This parameter specifies the address.
Interface This parameter specifies the interface.
Version This parameter specifies the version.
Mode This parameter specifies the mode.
7-242

Chapter 7: Layer 2/3 Ethernet Switch Firmware
PIM Neighbor Statistics
Clicking the NEIGHBOR STATS tab brings up the PIM NEIGHBOR STATISTICS page (Figure 7-207), which displays PIM neighbor statistics. The parameters for this page are shown in Table 7-175.
Neighbor Count This parameter specifies the neighbor count.
Query Interval This parameter specifies the query interval.
DR address This parameter specifies the DR address.
DR Priority This parameter specifies the DR priority.
Figure 7-207. PIM Neighbor Statistics Page
Table 7-175. PIM Neighbor Statistics Page Parameters
Parameter Description
Neighbor This parameter specifies the neighbor.
Interface This parameter specifies the interface.
Uptime This parameter specifies the uptime.
Expiry This parameter specifies the expiry.
Version This parameter specifies the version.
Table 7-174. PIM Interface Statistics Page Parameters (Continued)
Parameter Description
7-243

Superblade Network Modules User’s Manual
PIM BSR Info
Clicking the BSR INFO tab brings up the PIM BSR INFO page (Figure 7-208). The parameters for this page are shown in Table 7-176.
Priority This parameter specifies the priority.
Mode This parameter specifies the mode.
Component This parameter specifies the component.
Override Interval This parameter specifies the override interval.
LAN Delay This parameter specifies the LAN delay.
Figure 7-208. PIM BSR Info Page
Table 7-176. PIM BSR Info Page Parameters
Parameter Description
Component This parameter specifies the component.
BSR This parameter specifies the BSR.
BSR Address This parameter specifies the BSR address.
Priority This parameter specifies the priority.
Hash Mask Length This parameter specifies the Hash Mask Length.
Table 7-175. PIM Neighbor Statistics Page Parameters (Continued)
Parameter Description
7-244

Chapter 7: Layer 2/3 Ethernet Switch Firmware
PIM RP Set Information
Clicking the RP SET INFO tab brings up the PIM RP INFORMATION page (Figure 7-209), which displays PIM RP information. The parameters for this page are shown in Table 7-177.
Figure 7-209. PIM RP Information Page
Table 7-177. PIM RP Information Page Parameters
Parameter Description
Group This parameter specifies the group address.
Mask This parameter specifies the mask.
Candidate RP This parameter specifies the candidate RP.
Hold Time This parameter specifies the Hold time in seconds.
Expiry Time This parameter specifies the expiry time in seconds.
Component This parameter specifies the component identifier.
7-245

Superblade Network Modules User’s Manual
PIM Route Information
Clicking the MROUTE INFO tab brings up the PIM ROUTE INFORMATION page (Figure 7-210), which displays PIM route information. The parameters for this page are shown in Table 7-178.
Figure 7-210. PIM Route Information Page
Table 7-178. PIM Route Information Page Parameters
Parameter Description
Group This parameter specifies the group address.
Source This parameter specifies the source address.
Mask This parameter specifies the PIM route mask.
Upstream Neighbor This parameter specifies the upstream neighbor address.
Interface This parameter specifies the
Up Time This parameter specifies the up time in seconds.
Expiry Time This parameter specifies the expiry time in seconds.
Receive Packets This parameter specifies the number of packets received.
7-246

Chapter 7: Layer 2/3 Ethernet Switch Firmware
DVMRP
The DVMRP link allows you to view DVMRP statistics through the following pages:
• "DVMRP Routers" on page 7-247
• "DVMRP Multicast Routers" on page 7-248
• "DVMRP Prune Statistics" on page 7-249
DVMRP Routers
Clicking the ROUTES tab brings up the DVMRP ROUTES page (Figure 7-211), which displays DVMRP routes information. The parameters for this page are shown in Table 7-179.
Figure 7-211. DVMRP Routes Page
Table 7-179. DVMRP Routes Page Parameters
Parameter Description
Network This parameter specifies the network address for this route.
Subnet Mask This parameter specifies the network mask for this route.
Metric This parameter specifies the metric value for this route.
Status This parameter specifies the status of this route.
Neighbor This parameter specifies the neighbor address for this route.
Interface This parameter specifies the interface identifier.
7-247

Superblade Network Modules User’s Manual
DVMRP Multicast Routers
Clicking the MULTICAST ROUTES tab brings up the DVMRP MULTICAST ROUTES page (Figure 7-212), which displays DVMRP multicast routes information. The parameters for this page are shown in Table 7-180.
Figure 7-212. DVMRP Multicast Routes Page
Table 7-180. DVMRP Multicast Routes Page Parameters
Parameter Description
Source Network This parameter specifies the source network.
Group Address This parameter specifies the group address.
RPF Neighbor This parameter specifies the RPF neighbor.
RPF Interface This parameter specifies the RPF interface.
Expiry Time This parameter specifies the expiry time in seconds.
7-248

Chapter 7: Layer 2/3 Ethernet Switch Firmware
DVMRP Prune Statistics
Clicking the PRUNE FORWARD tab brings up the DVMRP PRUNE STATISTICS page (Figure 7-213), which DVMRP prune statistics information. The parameters for this page are shown in Table 7-181.
Figure 7-213. DVMRP Prune Statistics Page
Table 7-181. DVMRP Prune Statistics Page Parameters
Parameter Description
Source Network Address This parameter specifies the source network address.
Group Address This parameter specifies the group address.
Interface Identifier. This parameter specifies the interface identifier.
Neighbor Address This parameter specifies the neighbor address.
Time This parameter specifies the time in seconds.
7-249

Superblade Network Modules User’s Manual
Notes
7-250

Appendix AHCA Mezzanine Cards
This appendix describes safety guidelines, features and installation of HCA Mezzanine cards used with the InfiniBand and 10-Gb switch module. See Chapter 4 for further details on the InfiniBand module. See Chapter 5 for further details on the 10-Gb switch module.
A-1 Safety Guidelines
To avoid personal injury and property damage, carefully follow all the safety steps listed below when accessing your system or handling the components.
ESD Safety Guidelines
Electric Static Discharge (ESD) can damage electronic components. To prevent damage to your system, it is important to handle it very carefully. The following measures are generally sufficient to protect your equipment from ESD.
• Use a grounded wrist strap designed to prevent static discharge.
• Touch a grounded metal object before removing a component from the antistatic bag.
• Handle the add-on card by its edges only; do not touch its components, peripheral chips, memory modules or gold contacts.
• When handling chips or modules, avoid touching their pins.
• Put the card and peripherals back into their antistatic bags when not in use.
General Safety Guidelines
• Always disconnect power cables before installing or removing any components from the computer.
• Disconnect the power cable before installing or removing any cables from the system.
• Make sure that the add-on card is securely and properly installed on the motherboard to prevent damage to the system due to power shortage.
A-1

Superblade Network Modules User’s Manual
A-2 Mezzanine HCA Cards
Available Mezzanine HCA cards for use with the SuperBlade InfiniBand switch are shown in the following sections.
AOC-IBH-001 Mezzanine HCA Card
The AOC-IBH-001 card has dual 4x DDR IB ports and uses a Mellanox Infinihost III Ex DDR chip. This card is no longer in production (EOL), but users of this card can consider replacement with the AOC-IBH-XDD Mezzanine HCA card as an alternative.
NOTE: All images and layouts shown in this user's guide are based upon the latest PCB Revision available at the time of publishing. The card you have received may or may not look exactly the same as the graphics shown in this manual.
Figure A-1. AOC-IBH-001 Mezzanine HCA Card
A-2

Appendix A: HCA Mezzanine Cards
AOC-IBH-002 Mezzanine HCA Card
The AOC-IBH-002 card has a single 4x DDR 20-Gbps IB port and uses a Mellanox InfiniHost III Lx DDR chip.
Figure A-2. AOC-IBH-002 Mezzanine HCA Card
A-3

Superblade Network Modules User’s Manual
AOC-IBH-003 Mezzanine HCA Card
The AOC-IBH-003 card has dual ports that can be either 4xDDR IB or 10-Gbps Ethernet and uses a Mellanox ConnectX chip. This card is no longer in production (EOL), but users of this card can consider replacement with the AOC-IBH-XDD Mezzanine HCA card as an alternative.
Figure A-3. AOC-IBH-003 Mezzanine HCA Card
A-4

Appendix A: HCA Mezzanine Cards
AOC-IBH-XDS Mezzanine HCA Card
The AOC-IBH-XDS card has a single 4x DDR 20-Gbps port that can be either 4x DDR IB or 10-Gbps Ethernet and uses a Mellanox ConnectX chip. This card comes with a removable extender flange, like the one shown in Figure A-6: "AOC-IBH-XQS Mezzanine HCA Card" on page A-7, that allows it to be installed in all compatible SuperBlade servers.
Figure A-4. AOC-IBH-XDS Mezzanine HCA Card
A-5

Superblade Network Modules User’s Manual
AOC-IBH-XDD Mezzanine HCA Card
The AOC-IBH-XDD card has dual 4x DDR 20-Gbps ports that can be either 4x DDR IB or 10-Gbps Ethernet and uses a Mellanox ConnectX chip. This card comes with a removable extender flange, like the one shown in Figure A-6: "AOC-IBH-XQS Mezzanine HCA Card" on page A-7, that allows it to be installed in all compatible SuperBlade servers.
Figure A-5. AOC-IBH-XDD Mezzanine HCA Card
A-6

:
AOC-IBH-XQS Mezzanine HCA Card
The AOC-IBH-XQS card has a single 4x QDR 40-Gbps port, and uses a Mellanox ConnectX chip. This card comes with a removable extender flange (shown in Figure A-6), that allows it to be installed in all compatible SuperBlade servers.
Figure A-6. AOC-IBH-XQS Mezzanine HCA Card
A-7

Superblade Network Modules User’s Manual
AOC-IBH-XQD Mezzanine HCA Card
The AOC-IBH-XQS card has dual 4x QDR 40-Gbps ports, and uses a Mellanox ConnectX chip. This card comes with a removable extender flange (like the one shown in Figure A-6: "AOC-IBH-XQS Mezzanine HCA Card" on page A-7), that allows it to be installed in all compatible SuperBlade servers.
Figure A-7. AOC-IBH-XQD Mezzanine HCA Card
A-8

:
AOC-XEH-iN2 Mezzanine HCA Card
The AOC-XEH-iN2 card has dual 10-Gbps Ethernet ports, and uses an Intel® 82599 (Niantic™) chip. This card comes with a removable extender flange (like the one shown in Figure A-6: "AOC-IBH-XQS Mezzanine HCA Card" on page A-7), that allows it to be installed in all compatible SuperBlade servers.
This mezzanine card can be used as a 10-Gbps Ethernet NIC with either the SBM-XEM-002/M 10-Gbps Ethernet pass-through or the SBM-XEM-X10SM 10-Gbps Ethernet switch.
Figure A-8. AOC-XEH-iN2 Mezzanine HCA Card
A-9

Superblade Network Modules User’s Manual
A-3 Installation
Figure A-9. Installation Location
Card Connector
Place Screws
Here
A-10

:
Installation Location
All models of the Mezzanine HCA card are compatible with both SBI and SBA blade modules. The AOC-IBH-XQS and AOC-IBH-XQD cards are only compatible with the latest SBI and SBA models. For the latest compatibility information, see our web site:
http://www.supermicro.com/products/superblade/
Card Installation
To Install an HCA Card:
1. Confirm that you have the correct card and three (3) screws.
2. Following the instructions from the SuperBlade Manual, remove the blade module and open the cover to access the mainboard.
3. In a standard, electro-magnetically protected workstation, secure the card to the serverboard by gently but firmly attaching the card to the two connectors.
4. Using a Phillips screw driver, secure and tighten each screw one at a time. Do not overtighten the screws.
NOTE: The latest models of the Supermicro InfiniBand HCA card have a smaller form factor to make them compatible with newer blade modules. The newer HCAs come from the factory with an extender bracket attached to allow installation in older blade modules.
For installation in newer blade modules, first remove the extender bracket by removing the two screws with a Phillips screwdriver. Then follow the above instructions for installation on the blade module itself.
A-11

Superblade Network Modules User’s Manual
Figure A-10. Card Installation
Figure A-11. Installation Complete
A-12

Appendix BLED Descriptions
This appendix covers LED descriptions for the blade enclosure and other module components. The LED descriptions for the InfiniBand switch, Gigabit Ethernet modules and Blade modules are included here for your reference.
B-1 Gigabit Ethernet Module LED Descriptions
SBM-GEM-001 Gigabit Ethernet module and SBM-GEM-002 Pass-through module LEDs are described below in Table B-1.
Table B-1. Gigabit Ethernet Switch LED Indicators
LED State Description
Module Initiation OK LED
(GEM-001 Module Only)
Steady OnThe GEM-001 GbE switch module is operational and has passed the POST (Power-On Self-Test) with no critical faults.
Module Fault LED (Red)
(GEM-001 Module Only)
Steady On
When lit, this LED indicates that the GEM-001 GbE switch module has either failed the POST or has detected an operational fault within the module. When this LED is lit, the fault LED on the blade enclosure will also turn on.
Link/Activity Ethernet Port Status LED
Solid Green This indicates that the link is established, no activity
Blinking GreenThis indicates that data is being transmitted (Tx) or received (Rx)
Off This indicates that no link is established
Speed Ethernet Port Status LED (GEM-001 Module Only)
Amber Connection speed of the port is 1 Gb/sec
Green Connection speed of the port is 100 Mb/sec
Off Connection speed of the port is 10 Mb/sec
B-1

Superblade Network Modules User’s Manual
B-2 1/10 Gigabit Ethernet Module LED Descriptions
The SBM-GEM-X2C/+ 1/10 Gbps Ethernet module and XEM-002 10GbE Pass-through Module LEDs are described below in Table B-2.
Table B-2. 1/10 Gigabit Ethernet Switch LED Indicators
LED State Description
RJ45 Link/Activity
(GEM-X2C Module Only)Green
Solid denotes link established, no activity. Blinking denotes activity. Off indicates that no link is established.
RJ45 Speed
(GEM-X2C Module Only)Amber/Green/Off
Amber denotes 1 Gbps speed.
Green denotes 100 Mbps speed.
Off denotes 10 Mbps speed.
“Initiation OK” LED Blue Denotes successful initiation/OK status when solidly lit.
Module Fault LED Red Denotes SBM-GEM-X2C module failure when solidly lit.
10G Port LEDs GreenDenotes activity for 10Gbps port when solidly lit. Blinking green denotes data transmited (Tx) or received (Rx).
Stack ID LEDs
(GEM-X2C Module Only)Green Denotes Stack ID activity as shown in Table B-3 below.
Table B-3. Stacking LED Activity (SBM-GEM-X2C/+ Only)
Stack LED 4 Stack LED 3 Stack LED 2 Stack LED 1 Stacking Switch Identifier
OFF OFF OFF ON 1
OFF OFF ON OFF 2
OFF OFF ON ON 3
OFF ON OFF OFF 4
OFF ON OFF ON 5
OFF ON ON OFF 6
OFF ON ON ON 7
ON OFF OFF OFF 8
ON OFF OFF ON 9
ON OFF ON OFF 10
ON OFF ON ON 11
ON ON OFF OFF 12
ON ON OFF ON 13
ON ON ON OFF 14
ON ON ON ON 15
OFF OFF OFF OFF 16 / Stacking Disabled.
B-2

Appendix B: LED Descriptions
B-3 SBM-XEM-X10SM 10G and SBM-XEM-F8X4SM Ethernet Switch LED Descriptions
SBM-XEM-X10SM and SBM-XEM-F8X4SM10-Gigabit Ethernet switch module LEDs are found below in Table B-6.
Table B-4. SBM-XEM-X10SM Ethernet Switch LEDs
LED State Indication Description
10G Port LED (left) Link Up/Available
Off Port is not available
Amber Port is available and link down
Green Link up
10G Port LED (right) Link speed/Activity
Off No activity
Amber Blink Speed 1G activity
Green Blink Speed 10G activity
Switch Fault IndicatorOff Switch is in normal operation
Red Switch is failed
Switch Available Indicator
Off Switch firmware is in initialization state.
Green Switch firmware INIT OK and ready.
CMM Available Indicator
Off CMM is not active
Blue blink CMM is active
RJ45 1G Switch Port (left)
OFF Link down, no activity
Solid Green Link up
Green blink Activity
RJ45 1G Switch Port (right)
Off Speed 10Mbps
Green Speed 100Mbps
Amber Speed 1000Mbps
RJ45 CMM Port (left)Off No activity
Green blink Activity
RJ45 CMM Port (right)
Off Link down
Green Speed 100/10Mbps
Amber Speed 1000Mbps
B-3

Superblade Network Modules User’s Manual
B-4 SBM-IBS-001 InfiniBand Switch LED Descriptions
SBM-IBS-001 InfiniBand switch module LEDs are found below in Table B-5.
Table B-5. SBM-IBS-001 InfiniBand Switch LEDs
LED State Indication Description
Module Status LED
Blink Switch is booting its firmware
Steady On Boot process failed
Off Switch is properly booted and operational
Module Power LED (Green)
Steady On Switch has power and is operational
Off There is a problem with the power being supplied to the switch.
Port Physical Link LED (Green)
Steady On Physical link established
Blink Physical link error, poor connection quality
Off Port is off or has no physical connection
Port Activity LED (Yellow)
Steady On Logic link established, no activity
Blinking Data transferring to/from the port
Off Logical link is down
B-4

:
B-5 SBM-IBS-Q3616M and SBM-IBS-Q3618M InfiniBand Switch LED Descriptions
SBM-IBS-Q3616M and SBM-IBS-Q3618M InfiniBand switch module LEDs are found below in Table B-6.
Table B-6. SBM-IBS-Q3616M and SBM-IBS-Q3618M InfiniBand Switch LEDs
LED State Indication Description
Module Status LED (Red)
On Failure
Off Error
Module Power LED (Green)
Steady On Switch has power and is operational
Off There is a problem with the power being supplied to the switch
Port Physical Link LED (Green)
Steady On Physical link established
Blink Physical link error, poor connection quality
Off Port is off or has no physical connection
Port Activity LED (Yellow)
Steady On Logic link established, no activity
Blinking Data transferring to/from the port
Off Logical link is down
CMM (Blue)
M Models Only
Blinking CMM has power is operational
Off No CMM or CMM is not available
B-5

Superblade Network Modules User’s Manual
Notes
B-6

Appendix CInstalling Triple Wide Bays
This appendix describes the setup for triple-wide module bays used by the InfiniBand pass-through module. See Chapter 4 for further details on InfiniBand modules.
C-1 Installing a Triple Wide Module Bay
Use the procedure below for installing a triple-wide module bay in a Superblade chassis.
Installing a Triple-Wide Module Bay
1. Remove the four screws that secure the inner enclosure to the main enclosure. Slide the inner enclosure outward, depressing the locking tabs on both sides to pull it completely out.
2. Remove any single-wide modules that are occupying the bays you wish to modify to a triple-wide bay. See Figure C-1, Step 1 & 2 for details.
Figure C-1. Step 1 & 2
Screws 4pcsScrews 4pcs
C-1

Superblade Network Modules User’s Manual
3. In the module bay you wish to expand to triple wide, remove the two screws that secure the center support to the inner enclosure then take out the center support.
4. Remove the two screws from the underside of each of the two horizontal spacers. See Figure C-2, Step 3 & 4 for details.
Figure C-2. Step 3 & 4
Screws 4Pcs
C-2

Appendix C: Installing Triple Wide Bays
5. Using four screws, install the long horizontal spacer to the same space where the two short spacers were removed. See Figure C-3, Step 5 for details.
Figure C-3. Step 5
Screws 4pcs
C-3

Superblade Network Modules User’s Manual
6. You can now install a double-wide module into the bay. See Figure C-4, Step 6 for details.
Figure C-4. Step 6
NOTE: This procedure describes modifying three right most single-wide bays located at the bottom of the inner enclosure. The same procedure applies to the three right most single bays located at the top of the enclosure, but note that the horizontal spacers in the bottom bays use a guide pin and are not interchangeable with the upper bay spacers.
Modules in the upper bays will have their release handles on the bottom, while modules in the lower bays will have their release handles on the top.
Placing modules in an “upside-down” orientation in an upper-bay (only) does not affect their operation.
C-4

Appendix C: Installing Triple Wide Bays
NOTE: Only one triple-wide module can be installed in an enclosure since each enclosure requires at least one CMM module. The bottom location is recommended.
If using the AOC-IBH-002 single-port InfiniBand mezzanine card, the InfiniBand pass-through module MUST be installed in the bottom location.
C-5

Superblade Network Modules User’s Manual
Notes
C-6

Disclaimer
The products sold by Supermicro are not intended for and will not be used in life support systems, medical equipment, nuclear facilities or systems, aircraft, aircraft devices, aircraft/emergency communication devices or other critical systems whose failure to perform be reasonably expected to result in significant injury or loss of life or catastrophic property damage. Accordingly, Supermicro disclaims any and all liability, and should buyer use or sell such products for use in such ultra-hazardous applications, it does so entirely at its own risk. Furthermore, buyer agrees to fully indemnify, defend and hold Supermicro harmless for and against any and all claims, demands, actions, litigation, and proceedings of any kind arising out of or related to such ultra-hazardous use or sale.

Superblade Network Modules User’s Manual