Steelhead Mobile Controller User's Guide - Riverbed Support
242
SteelCentral™ Controller for SteelHead™ Mobile User’s Guide Version 4.8 April 2016
-
Upload
khangminh22 -
Category
Documents
-
view
0 -
download
0
Transcript of Steelhead Mobile Controller User's Guide - Riverbed Support

SteelCentral™ Controller for SteelHead™ Mobile User’s Guide
Version 4.8
April 2016

© 2016 Riverbed Technology, Inc. All rights reserved.
Riverbed and any Riverbed product or service name or logo used herein are trademarks of Riverbed. All other trademarks used herein belong to their respective owners. The trademarks and logos displayed herein cannot be used without the prior written consent of Riverbed or their respective owners.
Akamai® and the Akamai wave logo are registered trademarks of Akamai Technologies, Inc. SureRoute is a service mark of Akamai. Apple and Mac are registered trademarks of Apple, Incorporated in the United States and in other countries. Cisco is a registered trademark of Cisco Systems, Inc. and its affiliates in the United States and in other countries. EMC, Symmetrix, and SRDF are registered trademarks of EMC Corporation and its affiliates in the United States and in other countries. IBM, iSeries, and AS/400 are registered trademarks of IBM Corporation and its affiliates in the United States and in other countries. Juniper Networks and Junos are registered trademarks of Juniper Networks, Incorporated in the United States and other countries. Linux is a trademark of Linus Torvalds in the United States and in other countries. Microsoft, Windows, Vista, Outlook, and Internet Explorer are trademarks or registered trademarks of Microsoft Corporation in the United States and in other countries. Oracle and JInitiator are trademarks or registered trademarks of Oracle Corporation in the United States and in other countries. UNIX is a registered trademark in the United States and in other countries, exclusively licensed through X/Open Company, Ltd. VMware, ESX, ESXi are trademarks or registered trademarks of VMware, Inc. in the United States and in other countries.
This product includes Windows Azure Linux Agent developed by the Microsoft Corporation (http://www.microsoft.com/). Copyright 2012 Microsoft Corporation.
This product includes software developed by the University of California, Berkeley (and its contributors), EMC, and Comtech AHA Corporation. This product is derived from the RSA Data Security, Inc. MD5 Message-Digest Algorithm.
The SteelHead Mobile Controller (virtual edition) includes VMware Tools. Portions Copyright © 1998-2013 VMware, Inc. All Rights Reserved.
NetApp Manageability Software Development Kit (NM SDK), including any third-party software available for review with such SDK which can be found at http://communities.netapp.com/docs/DOC-1152, and are included in a NOTICES file included within the downloaded files.
For a list of open source software (including libraries) used in the development of this software along with associated copyright and license agreements, see the Riverbed Support site at https//support.riverbed.com.
This documentation is furnished “AS IS” and is subject to change without notice and should not be construed as a commitment by Riverbed. This documentation may not be copied, modified or distributed without the express authorization of Riverbed and may be used only in connection with Riverbed products and services. Use, duplication, reproduction, release, modification, disclosure or transfer of this documentation is restricted in accordance with the Federal Acquisition Regulations as applied to civilian agencies and the Defense Federal Acquisition Regulation Supplement as applied to military agencies. This documentation qualifies as “commercial computer software documentation” and any use by the government shall be governed solely by these terms. All other use is prohibited. Riverbed assumes no responsibility or liability for any errors or inaccuracies that may appear in this documentation.
Riverbed Technology
680 Folsom Street
San Francisco, CA 94107
Fax: 415-247-8801
Web: http://www.riverbed.com
Phone: 415-247-8800
Part Number
712-00103-15

Beta Draft
Contents
Preface.........................................................................................................................................................7
About This Guide ..........................................................................................................................................7Audience ..................................................................................................................................................7Document Conventions .........................................................................................................................8
Documentation and Release Notes .............................................................................................................8
Contacting Riverbed......................................................................................................................................9
Chapter 1 - Overview of the Mobile Controller ......................................................................................11
Hardware and Software Dependencies....................................................................................................11
Overview of the Mobile Controller Solution ...........................................................................................12Definition of Terms ..............................................................................................................................13Mobile Controller Administration Tasks ..........................................................................................13What Are Policies?................................................................................................................................14What Are Packages?.............................................................................................................................14What Are Group Assignments? .........................................................................................................14What Are Clusters? ..............................................................................................................................15
Using the Management Console................................................................................................................15Connecting to the Management Console ..........................................................................................15Home Page and Menu Bar ..................................................................................................................16Navigating in the Management Console ..........................................................................................17Getting Help ..........................................................................................................................................20
Next Steps .....................................................................................................................................................21Basic Steps for Deploying the SteelHead Mobile Package .............................................................21
Chapter 2 - Modifying Host and Network Interface Settings ................................................................23
Modifying General Host Settings ..............................................................................................................23
Modifying Network Interfaces ..................................................................................................................26IPv6 Support..........................................................................................................................................26
Configuring Port Labels..............................................................................................................................33Modifying Ports in a Port Label .........................................................................................................34
SteelCentral Controller for SteelHead Mobile User’s Guide 3
Beta Draft
Contents
Chapter 3 - Configuring System Administrator Settings ......................................................................37
Setting Announcements..............................................................................................................................37
Configuring Alarm Settings .......................................................................................................................38
Configuring Date and Time .......................................................................................................................43
Configuring Monitored Ports ....................................................................................................................46
Configuring SNMP Settings.......................................................................................................................47Configuring SNMPv3 .........................................................................................................................50SNMP Authentication and Access Control ......................................................................................52
Configuring Email Settings ........................................................................................................................56
Configuring Log Settings............................................................................................................................59Filtering Logs by Application or Process ..........................................................................................61
Configuring Advanced Settings ................................................................................................................63
Chapter 4 - Configuring Security Settings .............................................................................................65
Configuring General Security Settings .....................................................................................................65
Viewing Permissions...................................................................................................................................66
Managing User Permissions.......................................................................................................................67User Accounts .......................................................................................................................................67
Setting RADIUS Servers .............................................................................................................................70
Configuring TACACS+ Access..................................................................................................................73
Unlocking the Secure Vault........................................................................................................................74
Configuring Web Settings .........................................................................................................................76Managing Web SSL Certificates .........................................................................................................77
Chapter 5 - Managing Mobile Controllers ..............................................................................................81
Configuring Scheduled Jobs.......................................................................................................................81
Managing Licenses ......................................................................................................................................82Installing a License ...............................................................................................................................83
Upgrading Your Software ..........................................................................................................................84
Rebooting and Shutting Down the Mobile Controller ...........................................................................87
Configuring Mobile Controller Clusters ..................................................................................................87Prerequisites ..........................................................................................................................................88Configuration Settings in Your Clusters ...........................................................................................89Troubleshooting Cluster Connections...............................................................................................90Troubleshooting Mobile Controller Connectivity ...........................................................................90License Pooling .....................................................................................................................................91
Managing Configurations ..........................................................................................................................91
Chapter 6 - Configuring SSL for Mobile Controllers .............................................................................93
Configuring SSL for Mobile Controllers ..................................................................................................93
4 SteelCentral Controller for SteelHead Mobile User’s Guide

Beta Draft
Contents
Basic Steps for Configuring SSL .........................................................................................................94Basic Steps for Configuring SSL Proxy Support ..............................................................................95
Configuring Mobile Controller Peering ...................................................................................................96
Modifying SSL Server Certificate Settings ...............................................................................................98
Configuring SSL Certificate Authorities ................................................................................................105
Configuring SSL Bulk Import and Export .............................................................................................106
Chapter 7 - Managing SteelHead Mobile Clients .................................................................................109
Managing SteelHead Mobile Policies .....................................................................................................109Creating New Policies........................................................................................................................110Configuring In-Path Optimization Rules for Policies ...................................................................112Configuring Protocol Settings ..........................................................................................................119Configuring SSL for Policies .............................................................................................................137Configuring Location Awareness for Policies................................................................................140Configuring Endpoint Settings for Policies ....................................................................................143
Managing SteelHead Mobile Packages ..................................................................................................146Creating Packages ..............................................................................................................................146Viewing Package Details ...................................................................................................................148Deploying SteelHead Mobile Packages...........................................................................................150
Managing SteelHead Mobile Assignments............................................................................................153Changing Default Policy Assignments ...........................................................................................154Working with Group Assignments..................................................................................................154Changing an Endpoint Group for Clients Using a GPO ..............................................................156Enabling or Disabling Optimization Using a GPO Template......................................................157
Chapter 8 - Viewing Reports and Logs.................................................................................................159
Viewing Reports for Endpoints ...............................................................................................................159Viewing Endpoint Reports................................................................................................................160Viewing Endpoint User Information...............................................................................................164Viewing Desktop Bandwidth Reports.............................................................................................166Viewing Branch Warming Reports ..................................................................................................168Viewing SSL Reports..........................................................................................................................170Viewing Endpoint History Reports .................................................................................................172Viewing Desktop Traffic Reports.....................................................................................................174
Viewing Diagnostics Reports...................................................................................................................176Viewing Alarm Status Reports .........................................................................................................176Viewing CPU Utilization Reports ....................................................................................................181Viewing Memory Paging Reports....................................................................................................183Viewing Interface Counters ..............................................................................................................185
Viewing and Downloading Logs ............................................................................................................187Viewing Logs ......................................................................................................................................187Downloading Log Files......................................................................................................................190
Viewing Diagnostic Reports for Endpoints ...........................................................................................191Viewing the Memory Dumps List....................................................................................................191
SteelCentral Controller for SteelHead Mobile User’s Guide 5

Beta Draft
Contents
Viewing the System Dumps List ......................................................................................................192Downloading Endpoint TCP Dumps ..............................................................................................193
Viewing Controller Reports .....................................................................................................................194Viewing the System Dumps List ......................................................................................................194Viewing Process Dump Files ............................................................................................................195Capturing and Uploading TCP Dumps ..........................................................................................196Stopping a TCP Dump After an Event Occurs...............................................................................201
Exporting Logs ...........................................................................................................................................203
Chapter 9 - Troubleshooting the SteelHead Mobile Configuration ....................................................205
Common SteelHead Mobile Configuration Problems .........................................................................206
Appendix A - Default Policy Settings....................................................................................................209
Default Policy Settings Summary............................................................................................................209
Appendix B - Windows and Mac SteelHead Mobile Client Properties...............................................215
Windows SteelHead Mobile Client Properties......................................................................................215Status Tab.............................................................................................................................................216Settings Tab .........................................................................................................................................217Support Tab .........................................................................................................................................218System Tray Options..........................................................................................................................220
Mac SteelHead Mobile Client Properties ...............................................................................................221Viewing Preferences and System Status .........................................................................................221Accessing the Support Menu ............................................................................................................223Managing Optimization Controls ....................................................................................................224Using the Controllers Tab .................................................................................................................226Using the SSL Tab...............................................................................................................................228
Appendix C - Windows Installer Properties .........................................................................................231
Windows Installer Properties Overview................................................................................................231Command-line Properties .................................................................................................................231Precedence Rules ................................................................................................................................231
Appendix D - Mobile Controller MIB .....................................................................................................235
Accessing the Mobile Controller Enterprise MIB .................................................................................235
SNMP Traps................................................................................................................................................236
Index ........................................................................................................................................................239
6 SteelCentral Controller for SteelHead Mobile User’s Guide
Beta Draft
Preface
Read this preface for an overview of the information provided in this guide. This preface includes the following sections:
“About This Guide” on page 7
“Documentation and Release Notes” on page 8
“Contacting Riverbed” on page 9
About This Guide
The SteelCentral Controller for SteelHead Mobile User’s Guide describes how to configure and manage the Mobile Controller. It describes how to create policies, packages, and assignments for the SteelHead Mobile clients using the Riverbed Management Console.
The information in this guide applies to the Mobile Controller as well as the Virtual SteelHead Mobile Controller (Mobile Controller-v) products, except where explicit references are made to hardware or virtual features.
This guide is written for storage and network administrators who are familiar with administering and managing WANs using common network protocols such as TCP, CIFS, HTTP, FTP, and NFS.
You must also be familiar with administering and managing a network of deployed SteelHeads.
This guide includes information pertinent to the following products:
Riverbed SteelCentral Controller for SteelHead Mobile (Mobile Controller, SMC)
Riverbed Mobile Controller (virtual edition) (Mobile Controller-v, VSMC)
Riverbed Management Console (Management Console)
Riverbed SteelHead (SteelHead)
Audience
This guide is written for storage and network administrators who are familiar with administering and managing WANs using common network protocols such as TCP, CIFS, HTTP, FTP, and NFS.
You must also be familiar with administering and managing a network of deployed SteelHeads.
SteelCentral Controller for SteelHead Mobile User’s Guide 7

Beta Draft
Preface Documentation and Release Notes
Document Conventions
This guide uses the following standard set of typographical conventions.
Documentation and Release Notes
To obtain the most current version of all Riverbed documentation, go to the Riverbed Support site athttps://support.riverbed.com.
If you need more information, see the Riverbed Knowledge Base for any known issues, how-to documents, system requirements, and common error messages. You can browse titles or search for keywords and strings. To access the Riverbed Knowledge Base, log in to the Riverbed Support site at https://support.riverbed.com.
Each software release includes release notes. The release notes identify new features in the software as well as known and fixed problems. To obtain the most current version of the release notes, go to the Software and Documentation section of the Riverbed Support site athttps://support.riverbed.com.
Examine the release notes before you begin the installation and configuration process.
Convention Meaning
italics Within text, new terms and emphasized words appear in italic typeface.
boldface Within text, CLI commands, CLI parameters, and REST API properties appear in bold typeface.
Courier Code examples appear in Courier font:
amnesiac > enableamnesiac # configure terminal
< > Values that you specify appear in angle brackets: interface <ip-address>
[ ] Optional keywords or variables appear in brackets: ntp peer <ip-address> [version <number>]
{ } Elements that are part of a required choice appear in braces: {<interface-name> | ascii <string> | hex <string>}
| The pipe symbol separates alternative, mutually exclusive elements of a choice. The pipe symbol is used in conjunction with braces or brackets; the braces or brackets group the choices and identify them as required or optional: {delete <filename> | upload <filename>}
8 SteelCentral Controller for SteelHead Mobile User’s Guide

Beta Draft
Contacting Riverbed Preface
Contacting Riverbed
This section describes how to contact departments within Riverbed.
Technical support - If you have problems installing, using, or replacing Riverbed products, contact Riverbed Support or your channel partner who provides support. To contact Riverbed Support, open a trouble ticket by calling 1-888-RVBD-TAC (1-888-782-3822) in the United States and Canada or +1 415-247-7381 outside the United States. You can also go to https://support.riverbed.com.
Professional services - Riverbed has a staff of professionals who can help you with installation, provisioning, network redesign, project management, custom designs, consolidation project design, and custom coded solutions. To contact Riverbed Professional Services, email [email protected] or go to http://www.riverbed.com/services-training/Services-Training.html.
Documentation - The Riverbed Technical Publications team continually strives to improve the quality and usability of Riverbed documentation. Riverbed appreciates any suggestions you might have about its online documentation or printed materials. Send documentation comments to [email protected].
SteelCentral Controller for SteelHead Mobile User’s Guide 9

Beta Draft
Preface Contacting Riverbed
10 SteelCentral Controller for SteelHead Mobile User’s Guide

Beta Draft
CHAPTER 1 Overview of the Mobile Controller
This chapter introduces the Mobile Controller, the Management Console, and the basic steps for deploying SteelHead Mobile packages. This overview contains the following sections:
“Hardware and Software Dependencies” on page 11
“Overview of the Mobile Controller Solution” on page 12
“Using the Management Console” on page 15
“Next Steps” on page 21
Before reading this guide, you should know how to install and connect the Mobile Controller to your network. For details, see the SteelCentral Controller for SteelHead Mobile Installation Guide.
To use this chapter, you must know how to install, configure, and manage WAN optimization using the SteelHead. For details about the SteelHead, see the SteelHead Installation and Configuration Guide, the SteelHead Management Console User’s Guide, and the SteelHead Deployment Guide.
Hardware and Software Dependencies
The following table summarizes the hardware and software requirements for the Mobile Controller.
Mobile Controller Component Hardware and Software Requirements
Mobile Controller 19-inch (483-mm) two-post or four-post rack.
Management Console Any computer that supports a web browser with a color image display.
The Management Console has been tested with Mozilla Firefox Extended Support Release 10.0 and Microsoft Internet Explorer 7.0 and 8.0.
Note: JavaScript and cookies must be enabled in your web browser.
SteelHead Mobile RiOS 4.0.x or later on the SteelHead.
SteelCentral Controller for SteelHead Mobile User’s Guide 11

Beta Draft
Overview of the Mobile Controller Overview of the Mobile Controller Solution
Overview of the Mobile Controller Solution
The Mobile Controller solution lets you optimize TCP traffic to remote users who are accessing your computer network using any type of remote access. Remote users employ client software to exchange optimized data with a SteelHead. In most cases, the Mobile Controller requires only a hostname and IP address to be operational, and client software can be deployed using default settings.
Depending on your organization, your Mobile Controller solution can include:
SteelHead Mobile Controller - A dedicated, rackable unit designed to manage the Mobile Controller licenses and to control the deployment, management, and reporting of Mobile Controller client software for large deployments and rapidly growing organizations.
Virtual SteelHead Mobile Controller - Provides virtualized enterprise-grade acceleration for small- sized and medium-sized businesses or smaller strategic mobile deployments.
SteelHead Mobile Client - The client software that enables LAN-like performance for Windows PCs or Mac computers, no matter where users are located. SteelHead Mobile clients are managed by the Mobile Controller and connect to a SteelHead.
The Mobile Controller solution enables you to perform optimization for the following types of users:
Mobile Users - Employees who connect to the WAN from various locations and also connect to the LAN locally.
Home Users - Employees who use computers that connect to the corporate network.
Small Branch Office Users - Users located at offices with fewer than ten employees who connect to the WAN but do not have a standard SteelHead on site.
The SteelHead Mobile software is deployed to PC or Mac laptops or desktops. A Mobile Controller, typically located in the data center, is required for Mobile Controller deployment, management, and licensing control. After the Mobile Controller is deployed, packages that contain client software can be distributed.
SteelHead Mobile policies are assigned to a group or a particular user on the Mobile Controller. Policies define optimization rules and connection information for the SteelHead Mobile clients. The Mobile Controller can update SteelHead Mobile policies, if desired. Figure 1-1 outlines the optimization process flow.
Figure 1-1. Optimization Process Flow
The Mobile Controller is designed to be deployed to your SteelHead Mobile clients without additional configuration. It ships with default policies that provide default values for the client software that is deployed to your endpoints. You can create your own packages and your own polices as needed.
You can find information about custom deployments in this guide and in the SteelHead Deployment Guide.
12 SteelCentral Controller for SteelHead Mobile User’s Guide

Beta Draft
Overview of the Mobile Controller Solution Overview of the Mobile Controller
Definition of Terms
The following terms are used to describe Mobile Controller features, attributes, and processes.
Mobile Controller Administration Tasks
The Mobile Controller facilitates the following administration tasks for your SteelHead Mobile clients:
Configuration - The Mobile Controller enables you to install, configure, and update SteelHead Mobile clients in groups. The Mobile Controller uses policies, packages, and deployment groups to facilitate centralized configuration and reporting.
Monitoring - The Mobile Controller provides both high-level status and detailed statistics about SteelHead Mobile performance, and enables you to configure alerts for managed SteelHead Mobile clients.
Term Definition
endpoint/SteelHead Mobile
An endpoint client or SteelHead Mobile is a client computer: for example, a Windows or Mac laptop, or a tablet.
SteelHead Mobile package
A SteelHead Mobile install package is used to install SteelHead Mobile software onto each of your endpoint clients.
A package created on a Mobile Controller contains the fully qualified domain name (FQDN) of the Mobile Controller and a certificate that secures communication between the client and the controller.
The default SteelHead Mobile package that ships with the Mobile Controller contains default package settings. Typically, you can install and deploy the Mobile Controller without modifying the default policy or package that ship with the product.
For details, see “Creating Packages” on page 146.
policies A policy contains optimization rules for accelerating the WAN traffic between SteelHead Mobile clients and SteelHeads in your network. A policy is required for optimization to occur. A policy also contains information about the size of the SteelHead Mobile RiOS data store.
For details, see “Managing SteelHead Mobile Policies” on page 109.
Prior to Mobile Controller 4.0, policies were separated into endpoint and acceleration policies.
group assignments
A group assignment is an association between a number of SteelHead Mobile clients or users and a package and policy. A group assignment governs which policies and packages the Mobile Controller provides to the SteelHead Mobile clients. When you create a package, you can assign a group assignment to it. The group assignment is associated with the SteelHead Mobile clients upon installation of the SteelHead Mobile software. The Mobile Controller subsequently uses the group assignment to identify the SteelHead Mobile client and provides the assigned policies and software updates.
For details, see “Managing SteelHead Mobile Assignments” on page 153.
Group assignment was called Deployment ID in Mobile Controller 2.x and earlier releases.
clusters Clusters are groups of two or more Mobile Controllers used to pool available SteelHead Mobile licenses and configuration settings. The entire pool of available licenses remains available to the SteelHead Mobile clients even if one Mobile Controller has used all of its licenses or one Mobile Controller fails. SteelHead Mobile clients can connect to Mobile Controllers in a cluster and receive a consistent configuration from any Mobile Controller in the cluster. Configuration changes made to any Mobile Controller propagate to all Mobile Controllers in the cluster.
Demilitarized Zone (DMZ)
A demilitarized zone (DMZ) is a computer or small subnetwork that sits between a trusted internal network, such as a corporate private LAN, and an untrusted external network, such as the public Internet. Typically, the DMZ contains devices accessible to Internet traffic, such as web (HTTP) servers, FTP servers, SMTP (email) servers, and DNS servers.
SteelCentral Controller for SteelHead Mobile User’s Guide 13

Beta Draft
Overview of the Mobile Controller Overview of the Mobile Controller Solution
Management - The Mobile Controller enables you to schedule software upgrades and configuration changes to groups of SteelHead Mobile clients or to collect logs from SteelHead Mobile clients.
License Pooling - You can join two or more Mobile Controllers into a cluster, allowing pooling of available licenses. With license pooling, the entire pool of licenses remains available to the SteelHead Mobile client, even if one Mobile Controller has used all of its installed licenses or a Mobile Controller in the cluster fails. SteelHead Mobile clients can connect to any Mobile Controller in a cluster and receive shared configuration settings from any Mobile Controller in the cluster. For details, see “Configuring Mobile Controller Clusters” on page 87.
What Are Policies?
Policies are sets of optimization, security, endpoint storage, and other configuration settings for groups of SteelHead Mobile clients that have the same performance requirements. Policies can also be shared by Mobile Controllers that are members of a cluster. A policy can be for a specific SteelHead Mobile client, or it can represent settings for groups of SteelHead Mobile clients and SteelHeads in your enterprise environment.
The Mobile Controller ships with a default policy, Initial, which the Mobile Controller automatically provides to endpoint clients. For basic settings, you can install and deploy Mobile Controller without modifying the default policy.
For details, see “Managing SteelHead Mobile Packages” on page 146.
What Are Packages?
You use packages to install and update the SteelHead Mobile client software on each of your endpoint clients. A package is an installation bundle for the client’s operating system that contains the SteelHead Mobile client software and the information necessary for SteelHead Mobile clients to communicate with the Mobile Controller.
In most cases, you can deploy the default package included with the Mobile Controller.
For details, see “Creating Packages” on page 146.
Note: If the package is to be downloaded by more than 50 clients, Riverbed recommends that you put the package on a file server so that the Mobile Controller is not overloaded with requests.
What Are Group Assignments?
Group assignments govern which policies and packages your SteelHead Mobile clients receive. Group assignments enable you to deploy different policies to groups of SteelHead Mobile clients, based on their individual performance needs. When you deploy a package to a group, the Mobile Controller uses the group assignment to identify the proper subset of SteelHead Mobile clients and automatically provides policy and software updates to them. For details, see “Managing SteelHead Mobile Assignments” on page 153.
14 SteelCentral Controller for SteelHead Mobile User’s Guide

Beta Draft
Using the Management Console Overview of the Mobile Controller
What Are Clusters?
Clusters are groups of two or more Mobile Controllers used to pool available endpoint licenses and share configurations when multiple Mobile Controllers are needed to support large deployments. SteelHead Mobile clients associated with clusters have access to the licenses on all Mobile Controllers in the cluster, even if one or more Mobile Controllers are unavailable. Any member of a cluster can modify settings used by the cluster, and the settings are then automatically updated to the entire cluster. For detailed information about clusters, see “Configuring Mobile Controller Clusters” on page 87.
Using the Management Console
The following section describes how to connect to and navigate in the Management Console. It includes the following sections:
“Connecting to the Management Console” on page 15
“Home Page and Menu Bar” on page 16
“Navigating in the Management Console” on page 17
“Getting Help” on page 20
You manage the Mobile Controller using either the web-based Management Console or the Riverbed command-line interface. Riverbed recommends that you use the Management Console to configure and manage your system. The Mobile Controller command-line features are described in the Riverbed Command-Line Interface Reference Manual.
Connecting to the Management Console
To connect to the Management Console, you must know the URL or IP address and administrator password that you assigned when you set up your Mobile Controller using the configuration wizard of the Mobile Controller. For details, see the SteelCentral Controller for SteelHead Mobile Installation Guide.
Note: JavaScript and cookies must be enabled in your web browser.
To connect to the Management Console
1. Enter the URL for the Mobile Controller in the location box of your web browser:
protocol://host.domain
protocol is HTTP or HTTPS. HTTPS uses the SSL protocol to ensure a secure channel. If you use HTTPS to connect, you might be prompted to inspect and verify the SSL certificate. By default, the Mobile Controller uses a self-signed certificate, which provides encrypted web connections to the Management Console. It is re-created when the appliance hostname changes and when the certificate has expired.
host is the hostname you assigned to the Mobile Controller primary interface in the configuration wizard. If your DNS server maps that IP address to a name, you can specify the DNS name.
domain is the full domain name for the Mobile Controller appliance.
SteelCentral Controller for SteelHead Mobile User’s Guide 15

Beta Draft
Overview of the Mobile Controller Using the Management Console
The Management Console appears, displaying the Login page.
Figure 1-2. Login Page
2. In the Username text box, specify the user login: admin, monitor, a login from a RADIUS or TACACS+ database, or any local accounts created using the role-based accounts feature. The default login is admin. For details on role-based accounts, see “Managing User Permissions” on page 67.
Users with administrator (admin) privileges can configure and administer the Mobile Controller. Users with monitor (monitor) privileges can view the Mobile Controller reports and user logs, and change their own password. A monitor user cannot make configuration changes.
3. In the Password text box, specify the password you assigned in the configuration wizard of the Mobile Controller. (The Mobile Controller is shipped with the default password: password.)
4. Click Log In to display the Home page.
Home Page and Menu Bar
The top of every page displays the menu bar. The current state of the system appears to the right of the menus—Healthy, Admission Control, Degraded, or Critical—and is always visible. A status of Healthy (Needs Attention) indicates that the management tasks that do not affect optimization are needed. For details, select the current system status to display the Alarm Status page.
Figure 1-3. Mobile Controller Menu Bar
The system saves settings on a per-user basis. A message appears at the top of each page when more than one user is logged in, explaining that user preferences might be overwritten.
The Home page displays the controller up time, temperature (if the Mobile Controller is not virtual), CMC hostname (if you have one in your network), connected clients, licenses in use, and the status of the clients (healthy, degraded, critical, and disabled).
In Mobile Controller 4.8 and later, the Home page also displays cluster information, if a cluster is configured. The Cluster Wide Connection Information lists the number of controllers in the cluster, installed and free licenses, connections and licensed connections, and the status of the clients in the cluster (healthy, degraded, critical, and disabled).
The Home page also displays the following reports:
Bandwidth Optimization - Summarizes the throughput or total data transmitted by all clients over the WAN and the LAN in the last week. In Mobile Controller 4.8 and later, this graph also shows the number of desktop licenses installed and in use.
16 SteelCentral Controller for SteelHead Mobile User’s Guide

Beta Draft
Using the Management Console Overview of the Mobile Controller
Endpoint History - Displays the endpoints that are connected to the controller and the licensed endpoints. By default, endpoint data for the past week is shown. In Mobile Controller 4.8 and later, this graph also shows the history of desktop endpoints.
Figure 1-4. The Home Page (Bandwidth Optimization Report)
In Mobile Controller 4.8 and later, there are panes for the Bandwidth Optimization and Endpoint History reports at the bottom of the Home page. Click a pane to display the report you want to see.
Navigating in the Management Console
You can navigate to the tools and reports available to you in the Management Console using hyperlinked tabs and menus.
To display cascading menus
1. Select the Configure, Manage, and Reports menus to display the submenus. For example, select Reports to display the submenus Endpoints, Diagnostics, and Export. The menu item that is currently active is highlighted.
2. To go to a page, slide your cursor down to the submenu item you want to display and select the menu name. For example, under Reports > Optimization, select Bandwidth Optimization to display the page.
SteelCentral Controller for SteelHead Mobile User’s Guide 17

Beta Draft
Overview of the Mobile Controller Using the Management Console
The following table summarizes the cascading menus.
Displaying Report Details
You can zoom in to display report details.
Tab Purpose
Home Displays the current status of your system and verifies bandwidth optimization.
Configure Networking - Configure host settings, network interfaces, and port labels.
SSL - Configure peering, signing CA, and certificate authorities.
System Settings - Configure announcements, alarms, monitored ports, SNMP basic, SNMP v.3, SNMP ACIs, email, and logging.
Security - Configure general security settings, user permissions, RADIUS, TACACS+, secure vault, and web settings.
Maintenance - Configure scheduled jobs, licenses, software upgrade, reboot/shutdown.
Cluster - Configure cluster settings.
My Account - Change your password and configure user roles.
Configurations - Apply a saved configuration.
Manage Configure policies, packages, and assignments.
Reports Create and display endpoint reports and diagnostic reports and export reports to files and email.
Support Displays contact information for Riverbed Support, software and hardware information, MIB files, and the online help.
Save Save current settings on all pages.
Healthy/Degraded/Critical/Unlicensed
Click the status display to navigate to the Reports > Diagnostics > Alarm Status page.
18 SteelCentral Controller for SteelHead Mobile User’s Guide

Beta Draft
Using the Management Console Overview of the Mobile Controller
To display chart details
1. Click and drag your cursor across an area of interest to you.
Figure 1-5. Highlight Area of Interest
2. Release the cursor to magnify the highlighted area.
Figure 1-6. Magnified Area
3. To return to the original report view, click Reset Zoom or refresh your browser.
SteelCentral Controller for SteelHead Mobile User’s Guide 19

Beta Draft
Overview of the Mobile Controller Using the Management Console
Saving Your Configuration
Most Management Console configuration pages include an Apply button for you to commit your changes. When you click Apply, the Management Console updates the running configuration, but your changes are written to disk only when you save your configuration.
The Save icon on the menu bar alerts you if the changes you have made require saving to disk.
To permanently save the changes, click Save.
Logging Out
Click Logout in the upper-right corner of the screen to log out of the current session.
Printing Pages and Reports
You can print Management Console pages and reports using the print option on your web browser.
To print pages and reports
Choose File > Print in your web browser to open the Print dialog box.
Getting Help
The Support page provides the following options:
Online Help - View browser-based online help.
Support - View links and contact information for Riverbed Support.
Appliance Details - View appliance information such as model number, hardware revision type, serial number, and software version number currently installed on the appliance.
MIB Files - View Riverbed and appliance MIB files in text format.
Displaying Online Help
The Management Console provides page-level help for the appliance.
To display online help in the Management Console
Click the question mark icon next to the page title. The help for the page appears in a new browser window.
Downloading Documentation
The Riverbed Support Site contains PDF versions of the documentation for all Riverbed products:
https://support.riverbed.com/
20 SteelCentral Controller for SteelHead Mobile User’s Guide

Beta Draft
Next Steps Overview of the Mobile Controller
Next Steps
This section contains the steps required to deploy SteelHead Mobile clients software to SteelHead Mobile clients. If you use the default package, all you have to do is distribute the package and make sure the endpoints connect successfully. If you create a custom package, additional steps are required to configure your custom policies.
Basic Steps for Deploying the SteelHead Mobile Package
The following section describes the basic steps for deploying the default SteelHead Mobile package to the endpoint clients in your network.
You have a number of options with regard to the default package and policy that is shipped with the Mobile Controller. You can create custom packages to be used in the future with customized policies, or you can customize the default policy, Initial. In addition, you can use the default package and customize the policy that is assigned to the Default group on the assignments page.
To deploy a custom SteelHead Mobile package
1. Log in to the Management Console. For details, see “Connecting to the Management Console” on page 15.
2. Apply your policies. For details, see “Managing SteelHead Mobile Packages” on page 146.
3. Create your packages to deploy the SteelHead Mobile software to your endpoint clients. For details, see “Managing SteelHead Mobile Packages” on page 146.
Note: If the package will be downloaded by more than 50 clients simultaneously, Riverbed recommends that you put the package on a file server so that the Mobile Controller is not overloaded with requests.
4. Define your group. For details about groups, see “Managing SteelHead Mobile Assignments” on page 153.
5. Assign your policies and packages to groups. For details, see “Managing SteelHead Mobile Packages” on page 146 and “Managing SteelHead Mobile Policies” on page 109.
6. Using the deployment tool of your choice (for example, email or an internal website), deploy the packages to your endpoint clients. For details, see “Deploying SteelHead Mobile Packages” on page 150.
7. Verify your connection and optimization in the Endpoint Report page. For details, see “Viewing Endpoint Reports” on page 160.
SteelCentral Controller for SteelHead Mobile User’s Guide 21

Beta Draft
Overview of the Mobile Controller Next Steps
22 SteelCentral Controller for SteelHead Mobile User’s Guide

Beta Draft
CHAPTER 2 Modifying Host and Network
Interface Settings
This chapter describes how to configure host and network interface settings. You initially set these properties when you ran the installation wizard. This section describes how you can view and modify these settings, if needed. It includes the following sections:
“Modifying General Host Settings” on page 23
“Modifying Network Interfaces” on page 26
“Configuring Port Labels” on page 33
Modifying General Host Settings
You can view and modify general host settings in the Configure > Networking > Host Settings page.
When you initially ran the installation wizard, you set required network host settings for the Mobile Controller. Use the following controls only if modification or additional configuration is required:
Name - Modify the hostname only if your deployment requires it.
DNS Settings - Riverbed recommends that you use DNS resolution.
Hosts - If you do not use DNS resolution, or if the host does not have a DNS entry, you can create a host-IP address resolution map.
Web/FTP Proxy - Configure proxy addresses for web or FTP proxy access to the Mobile Controller.
SteelCentral Controller for SteelHead Mobile User’s Guide 23

Beta Draft
Modifying Host and Network Interface Settings Modifying General Host Settings
To modify general host settings
Choose Configure > Networking > Host Settings to display the Host Settings page.
Figure 2-1. Host Settings Page
To change the hostname
1. Choose Configure > Networking > Host Settings to display the Host Settings page.
2. Under Name, modify the value in the Hostname field.
3. Click Apply to apply your changes to the running configuration.
4. Click Save to save your settings permanently.
To specify DNS settings
1. Choose Configure > Networking > Host Settings to display the Host Settings page.
Under DNS Settings, complete the configuration as described in this table.
Control Description
Primary DNS Server Specify the IP address for the primary name server.
Secondary DNS Server Optionally, specify the IP address for the secondary name server.
24 SteelCentral Controller for SteelHead Mobile User’s Guide

Beta Draft
Modifying General Host Settings Modifying Host and Network Interface Settings
2. Click Apply to apply your changes to the running configuration.
3. Click Save to save your settings permanently.
To add a new host
1. Choose Configure > Networking > Host Settings to display the Host Settings page.
Under Hosts, complete the configuration as described in this table.
2. Click Apply to apply your changes to the running configuration.
3. Click Save to save your settings permanently.
To set a Web/FTP proxy
1. Choose Configure > Networking > Host Settings to display the Host Settings page.
2. Under Web/FTP Proxy, complete the configuration as described in this table.
Tertiary DNS Server Optionally, specify the IP address for the tertiary name server.
DNS Domain List Specify an ordered list of domain names.
If you specify domains, the system automatically finds the appropriate domain for each of the hosts that you specify in the system.
Control Description
IP Address Specify the IP address for the host.
Hostname Specify a hostname.
Add Adds the host.
Remove Selected Select the check box next to the name and click Remove Selected.
Control Description
Enable Web Proxy Provides web proxy access to the Mobile Controller. Enables the Mobile Controller to use a web proxy to contact the Riverbed licensing portal and fetch licenses in a secure environment. You can optionally require user credentials to communicate with the proxy, and you can specify the method used to authenticate and negotiate user credentials.
Web proxy access is disabled by default.
RiOS supports the following proxies: Squid, Blue Coat Proxy SG, Microsoft WebSense, and McAfee Web Gateway.
Web/FTP Proxy Specify the IP address for the web or FTP proxy.
Control Description
SteelCentral Controller for SteelHead Mobile User’s Guide 25

Beta Draft
Modifying Host and Network Interface Settings Modifying Network Interfaces
3. Click Apply to apply your changes to the running configuration.
4. Click Save to save your settings permanently.
Modifying Network Interfaces
You can view and modify settings for the appliance primary and auxiliary interfaces in the Configure > Networking > Network Interfaces page.
When you initially ran the Configuration wizard, you set required values for the base interfaces for the Mobile Controller. Use the following controls if modification or additional configuration is required:
Primary Interface - On the appliance, the primary interface is the port you connect to the LAN switch. The primary interface is the appliance management interface. The primary interface is also used by SteelHead Mobile clients to connect to the Mobile Controller.
Auxiliary Interface - On the appliance, the auxiliary interface provides a second subnet, if needed, to separate administration from client access. The IP address for the auxiliary interface must be on a subnet different from the primary interface subnet.
Main Routing Table - Displays a summary of the main routing table for the appliance. If necessary, you can add static routes that might be required for out-of-path deployments or particular device management subnets.
IPv6 Support
RiOS 7.0 extended support for IPv6 traffic with packet-mode optimization, and RiOS 8.5 and later further enhances its IPv6 capabilities by supporting autodiscovery and fixed-target rules. By using autodiscovery or fixed-target in-path rules, RiOS can apply transport and application streamlining techniques (similarly as it does for TCP connections over IPv4) to improve the user experience as the transition to IPv6 continues.
Port Optionally, specify the port for the web or FTP proxy. The default port is 1080.
Enable Authentication Optionally, select to require user credentials for use with web or FTP proxy traffic. Specify the following to authenticate the users:
• Username - Specify a username.
• Password - Specify a password.
• Authentication Type - Select an authentication method from the drop-down list:
– Basic - Authenticates user credentials by requesting a valid username and password. This is the default setting.
– NTLM - Authenticates user credentials based on an authentication challenge and response.
– Digest - Provides the same functionality as Basic authentication; however, Digest authentication improves security because the system sends the user credentials across the network as a Message Digest 5 (MD5) hash.
Control Description
26 SteelCentral Controller for SteelHead Mobile User’s Guide

Beta Draft
Modifying Network Interfaces Modifying Host and Network Interface Settings
IPv6 is enabled by default in RiOS 8.5 and later. The SteelHead support for IPv6 is twofold:
Managing SteelHeads - Support for management access using IPv6 IP addresses on primary and auxiliary interfaces.
Optimizing IPv6 traffic using SteelHead appliances - SteelHeads can optimize IPv6 traffic.
For details on IPv6 deployments, see the SteelHead Deployment Guide.
This table lists IPv6 support by feature and notes any limits and special considerations.
RiOS IPv6 Support Includes RiOS
Version
Notes
Conformance with Request for Comments (RFCs) 1981, 2460, 2464, 2710, 3590, 4007, 4291, 4443, 4861, 4862, 4943, 5095, and 5156.
8.5 and later
TCP IPv6 traffic interception between source and destination, bandwidth optimization.
8.5 and later
Autodiscovery of SteelHeads. 8.5 and later
TCP inner connections between the peer SteelHeads is strictly IPv4.
Ability to automatically discover fixed-target and pass-through in-path rules, along with ability to deny and reject IPv6 TCP traffic as configured in the in-path rules.
8.5 and later
RiOS does not support the Outlook Anywhere and Citrix latency optimization policies for autodiscovery and fixed-target rules.
RiOS does not support the neural framing modes Always, TCP Hints, and Dynamic.
RiOS does not support the Oracle forms and Oracle forms over SSL preoptimization policies.
HTTP and HTTPS latency optimization for IPv6 TCP traffic. 8.5 and later
Ability to configure serial clusters. 8.5 and later
Interception of IPv6 traffic for in-path, virtual in-path, and server-side out-of-path configurations.
8.5 and later
WCCPv6 support is not available. Virtual in-path support is PBR only.
Interceptor is not supported.
Intercepting and passing through IPv4 and/or IPv6 traffic, depending on the in-path rules.
8.5 and later
Ability to detect asymmetric routes for IPv6 TCP traffic; enables connection forwarding of IPv6 TCP traffic in asymmetric conditions.
8.5 and later
The connection-forwarding control channel between the neighbors is strictly IPv4. You must configure IPv4 addresses on the SteelHeads when using a connection-forwarding control channel.
Ability to configure IPv4 and IPv6 addresses on every in-path interface and intercepting and optimizing IPv4 and IPv6 traffic.
8.5 and later
Ability to configure one IPv6 address configuration for every in-path interface.
RiOS intercepts and optimizes traffic matching the scope of the IPv6 address configured on the in-path interface. Not applicable for a link-local address configured on the in-path interface.
8.5 and later
RiOS passes through IPv6 TCP traffic not matching the scope of the IPv6 address configured on the in-path interface.
SteelCentral Controller for SteelHead Mobile User’s Guide 27

Beta Draft
Modifying Host and Network Interface Settings Modifying Network Interfaces
Features Not Supported with IPv6
The following features are not IPv6 compatible:
Management In-Path (MIP) Interface
Transparency
NetFlow
RSP
Path selection
QoS
Host labels
IPSec
Ability to configure IPv6 addresses on any in-path interface.
IPv6 TCP inner connections only in fixed-target cases.
8.5 and later
This IPv6-only mode requires configuring only fixed-target in-path rules.
Enhanced autodiscovery of SteelHeads for IPv6 TCP traffic. 8.5 and later
TCP inner connections between the peer SteelHeads is IPv4 only.
Simplified routing for IPv6 TCP traffic. 8.5 and later
Connection forwarding for IPv6 traffic in multi-interface mode. 8.5 and later
The control connection between neighbors is still IPv4 only.
When multiple interface support in the Networking > Network Integration: Connection Forwarding page is not enabled, IPv6 traffic is passed through.
Ability to configure peering rules for IPv6 traffic. 8.5 The peer client-side SteelHead IP address is IPv4 only.
Ability to configure IPv6 addresses in Single Ended Interception (SEI) rules under Optimization > Network Services: Transport Settings.
8.5 and later
Global and automatic kickoff for pass-through TCP IPv6 traffic. 8.5 and later
Ability to configure asymmetric VLANs for IPv6 TCP traffic. 8.5 and later
Latency optimization of signed-SMB, CIFS/SMB1, SMB2, and SMB3 using IPv6 endpoint addressing.
8.5.2 and later
The authentication stack continues to require IPv4 endpoint addressing.
Encrypted Outlook Anywhere latency optimization. 8.6 and later
MAPI, eMAPI latency optimization 8.6 and later
Authentication is over IPv4.
Authentication over IPv6. 8.6 and later
RiOS IPv6 Support Includes RiOS
Version
Notes
28 SteelCentral Controller for SteelHead Mobile User’s Guide

Beta Draft
Modifying Network Interfaces Modifying Host and Network Interface Settings
Automatic address assignment through DHCPv6
Multicast listener discovery
IPv6 stateless address autoconfiguration
WCCP using anything other than IPv4 outer connections
To display and modify the configuration for network interfaces
1. Choose Configure > Networking > Network Interfaces to display the Network Interfaces page.
The Network Interfaces page is divided into four areas: Primary Interface, Auxiliary Interface, Main IPv4 Routing Table, and Main IPv6 Routing Table.
Figure 2-2. Network Interfaces Page
2. Under Primary Interface, complete the configuration as described in this table.
Control Description
Enable Primary Interface Enables the appliance management interface, which can be used for both managing the SteelHead and serving data for a server-side out-of-path (OOP) configuration.
Obtain IPv4 Address Automatically
Select this option to automatically obtain the IP address from a DHCP server. A DHCP server must be available so that the system can request the IP address from it.
Note: The primary and in-path interfaces can share the same network subnet. The primary and auxiliary interfaces cannot share the same network subnet.
Enable IPv4 Dynamic DNS Select this option to send the hostname with the DHCP request for registration with Dynamic DNS. The hostname is specified in the Configure > Networking > Host Settings page.
SteelCentral Controller for SteelHead Mobile User’s Guide 29

Beta Draft
Modifying Host and Network Interface Settings Modifying Network Interfaces
Specify IPv4 Address Manually Select this option if you do not use a DHCP server to set the IPv4 address. Specify these settings:
• IPv4 Address - Specify an IP address.
• IPv4 Subnet Mask - Specify a subnet mask.
• Default IPv4 Gateway - Specify the default gateway IPv4 address. The default gateway must be in the same network as the primary interface. You must set the default gateway for in-path configurations.
Specify IPv6 Address Manually Select this option and specify these settings to set an IPv6 address.
• IPv6 Auto-Assigned - Displays the link-local address that is automatically generated when IPv6 is enabled on the base interfaces.
• IPv6 Address - Specify an IP address using this format: eight 16-bit hex strings separated by colons, 128-bits. For example
2001:38dc:0052:0000:0000:e9a4:00c5:6282
You do not need to include leading zeros; for example
2001:38dc:52:0:0:e9a4:c5:6282
You can replace consecutive zero strings with double colons (::). For example
2001:38dc:52::e9a4:c5:6282
• IPv6 Prefix - Specify a prefix. The prefix length is 0 to 128, separated from the address by a forward slash (/). In the following example, 60 is the prefix:
2001:38dc:52::e9a4:c5:6282/60
• IPv6 Gateway - Specify the gateway IP address. The gateway must be in the same network as the primary interface.
Note: You cannot set an IPv6 address dynamically using a DHCP server.
MTU Specify the MTU value. The MTU is the largest physical packet size, measured in bytes, that a network can send. The default value is 1500.
Control Description
30 SteelCentral Controller for SteelHead Mobile User’s Guide

Beta Draft
Modifying Network Interfaces Modifying Host and Network Interface Settings
3. Under Auxiliary Interface, complete the configuration as described in this table.
4. Click Apply to apply your changes to the running configuration.
Control Description
Enable Aux Interface Enables an auxiliary interface, which can be used only for managing the SteelHead. This interface cannot be used for an out-of-path (OOP) SteelHead data service. Typically, this interface is used for device-management networks.
Obtain IPv4 Address Automatically
Select this option to automatically obtain the IP address from a DHCP server. A DHCP server must be available so that the system can request the IP address from it.
Note: The primary and in-path interfaces can share the same subnet. The primary and auxiliary interfaces cannot share the same network subnet.
Enable IPv4 Dynamic DNS Select this option to send the hostname with the DHCP request for registration with Dynamic DNS. The hostname is specified in the Configure > Networking > Host Settings page.
Specify IPv4 Address Manually Select this option if you do not use a DHCP server to set the IPv4 address. Specify these settings:
• IPv4 Address - Specify an IP address.
• IPv4 Subnet Mask - Specify a subnet mask.
Specify IPv6 Address Manually Select this option and specify these settings to set an IPv6 address.
• IPv6 Auto-Assigned - Displays the link-local address that is automatically generated when IPv6 is enabled on the base interfaces.
• IPv6 Address - Specify an IP address, using this format: eight 16-bit hex strings separated by colons, 128-bits. For example
2001:38dc:0052:0000:0000:e9a4:00c5:6282
You do not need to include leading zeros. For example:
2001:38dc:52:0:0:e9a4:c5:6282
You can replace consecutive zero strings with double colons (::). For example:
2001:38dc:52::e9a4:c5:6282
• IPv6 Prefix - Specify a prefix. The prefix length is 0 to 128, separated from the address by a forward slash (/). In the following example, 60 is the prefix:
2001:38dc:52::e9a4:c5:6282/60
Note: You cannot set an IPv6 address dynamically using a DHCP server.
MTU Specify the MTU value. The MTU is the largest physical packet size, measured in bytes, that a network can send. The default value is 1500.
SteelCentral Controller for SteelHead Mobile User’s Guide 31

Beta Draft
Modifying Host and Network Interface Settings Modifying Network Interfaces
5. Click Save to save your changes permanently.
Note: After you apply your settings, you can verify whether changes have had the desired effect by reviewing related reports. After this verification, you can write the active configuration that is stored in memory to the active configuration file (or you can save it as any filename you choose). For details on saving configurations, see “Managing Configurations” on page 91.
To configure routes for IPv4
Under the Main IPv4 Routing Table you can configure a static routing in the main routing table for out-of-path deployments or if your device management network requires static routes.
You can add or remove routes from the table list as described in this table.
The Management Console writes your configuration changes to memory.
To configure routes for IPv6
Under Main IPv6 Routing Table, you can configure static routing in the main routing table if your device-management network requires static routes.
You can add or remove routes from the table list as described in this table. .
Control Description
Add a New Route Displays the controls for adding a new route.
Destination IPv4 Address Specify the destination IP address for the out-of-path appliance or network management device.
IPv4 Subnet Mask Specify the subnet mask.
Gateway IPv4 Address Specify the IP address for the gateway. The gateway must be in the same network as the primary or auxiliary interface you are configuring.
Interface Select an interface for the IPv4 route from the drop-down menu.
Add Adds the route to the table list.
Remove Selected Select the check box next to the name and click Remove Selected.
Control Description
Add a New Route Displays the controls for adding a new route.
Destination IPv6 Address Specify the destination IP address.
IPv6 Prefix Specify a prefix. The prefix length is from 0 to 128 bits, separated from the address by a forward slash (/).
Gateway IPv6 Address Specify the IP address for the gateway. The gateway must be in the same network as the primary or auxiliary interface you are configuring.
Interface Select an interface for the IPv6 route from the drop-down menu.
Add Adds the route to the table list.
Remove Selected Select the check box next to the name and click Remove Selected.
32 SteelCentral Controller for SteelHead Mobile User’s Guide

Beta Draft
Configuring Port Labels Modifying Host and Network Interface Settings
Configuring Port Labels
You create port labels in the Port Labels page. Port labels are names given to sets of port numbers. You use port labels when configuring in-path rules. For example, you can use port labels to define a set of ports for which the same in-path or load balancing rules apply.
The following table summarizes the port labels that are provided by default.
If you do not want to automatically forward traffic on interactive, RBT-Proto, or secure ports, you must delete the Interactive, RBT-Proto, and Secure in-path rules. For details, see “Configuring In-Path Optimization Rules for Policies” on page 112.
This feature is optional.
To create a port label
1. Choose Configure > Networking > Port Labels to display the Port Labels page.
Figure 2-3. Port Labels Page
Port Type Description and Ports
Interactive Use this port label to automatically pass-through traffic on interactive ports (for example, Telnet, TCP ECHO, remote logging, and shell).
RBT-Proto Use this port label to automatically pass-through traffic on ports used by the system: 7744 (RiOS data store synchronization), 7800 (in-path), 7810 (out-of-path), 7820 (failover), 7850 (connection forwarding), 7860 (SteelHead Interceptor), and 7870 (Mobile Controller).
Secure Use this port label to automatically pass-through traffic on commonly secure ports (for example, SSH, HTTPS, and SMTPS).
SteelCentral Controller for SteelHead Mobile User’s Guide 33

Beta Draft
Modifying Host and Network Interface Settings Configuring Port Labels
2. To add a port label, complete the configuration as described in this table.
3. Click Save to save your settings permanently.
Modifying Ports in a Port Label
You can add or delete ports associated with a port label in the Port Label page.
To modify ports in a port label
1. Choose Configure > Networking > Port Labels to display the Port Labels page.
2. Select the port label name in the Port Labels list to display the Editing Port Label group.
Figure 2-4. Editing Port Labels Page
Control Description
Add a New Port Label Displays the controls to add a new port label.
Name Specify the label name. These rules apply:
• Port labels are not case sensitive and can be any string consisting of letters, the underscore ( _ ), or the hyphen ( - ). There cannot be spaces in port labels.
• The fields in the various rule pages of the Management Console that take a physical port number also take a port label.
• To avoid confusion, do not use a number for a port label.
• Port labels that are used in in-path and other rules, such as QoS and peering rules, cannot be deleted.
• Port label changes (that is, adding and removing ports inside a label) are applied immediately by the rules that use the port labels that you have modified.
Ports Specify a comma-separated list of ports.
Remove Selected Select the check box next to the name and click Remove Selected.
Add Adds the port label.
34 SteelCentral Controller for SteelHead Mobile User’s Guide

Beta Draft
Configuring Port Labels Modifying Host and Network Interface Settings
3. Under Editing Port Label <port label name>, add or delete ports in the Ports text box.
4. Click Apply to save your settings to the running configuration; click Cancel to cancel your changes.
5. Click Save to save your settings permanently.
SteelCentral Controller for SteelHead Mobile User’s Guide 35

Beta Draft
Modifying Host and Network Interface Settings Configuring Port Labels
36 SteelCentral Controller for SteelHead Mobile User’s Guide

CHAPTER 3 Configuring System Administrator
Settings
This chapter describes how to configure system administration settings. It includes the following sections:
“Setting Announcements” on page 37
“Configuring Alarm Settings” on page 38
“Configuring Date and Time” on page 43
“Configuring Monitored Ports” on page 46
“Configuring SNMP Settings” on page 47
“Configuring Email Settings” on page 56
“Configuring Log Settings” on page 59
“Configuring Advanced Settings” on page 63
Setting Announcements
You can create or modify a login message or a message of the day. The login message appears in the Mobile Controller Login page. The message of the day appears in the Home page and when you first log in to the CLI.
SteelCentral Controller for SteelHead Mobile User’s Guide 37
Configuring System Administrator Settings Configuring Alarm Settings
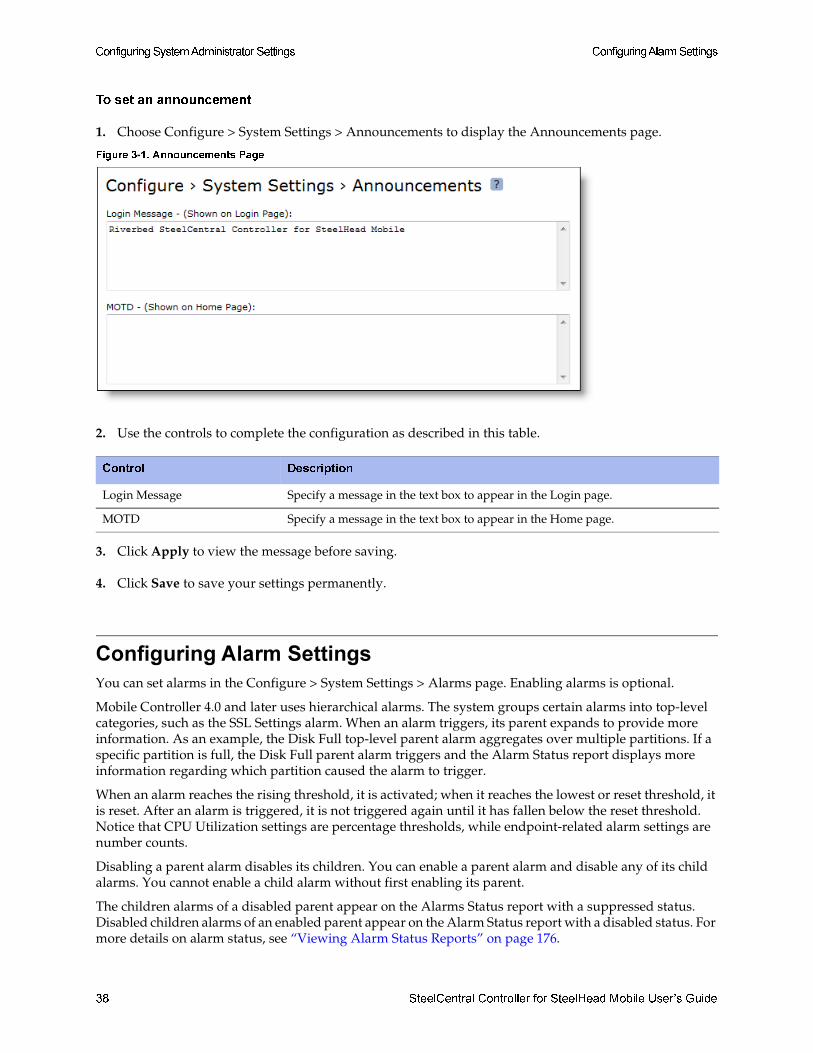
To set an announcement
1. Choose Configure > System Settings > Announcements to display the Announcements page.
Figure 3-1. Announcements Page
2. Use the controls to complete the configuration as described in this table.
3. Click Apply to view the message before saving.
4. Click Save to save your settings permanently.
Configuring Alarm Settings
You can set alarms in the Configure > System Settings > Alarms page. Enabling alarms is optional.
Mobile Controller 4.0 and later uses hierarchical alarms. The system groups certain alarms into top-level categories, such as the SSL Settings alarm. When an alarm triggers, its parent expands to provide more information. As an example, the Disk Full top-level parent alarm aggregates over multiple partitions. If a specific partition is full, the Disk Full parent alarm triggers and the Alarm Status report displays more information regarding which partition caused the alarm to trigger.
When an alarm reaches the rising threshold, it is activated; when it reaches the lowest or reset threshold, it is reset. After an alarm is triggered, it is not triggered again until it has fallen below the reset threshold. Notice that CPU Utilization settings are percentage thresholds, while endpoint-related alarm settings are number counts.
Disabling a parent alarm disables its children. You can enable a parent alarm and disable any of its child alarms. You cannot enable a child alarm without first enabling its parent.
The children alarms of a disabled parent appear on the Alarms Status report with a suppressed status. Disabled children alarms of an enabled parent appear on the Alarm Status report with a disabled status. For more details on alarm status, see “Viewing Alarm Status Reports” on page 176.
Control Description
Login Message Specify a message in the text box to appear in the Login page.
MOTD Specify a message in the text box to appear in the Home page.
38 SteelCentral Controller for SteelHead Mobile User’s Guide

Configuring Alarm Settings Configuring System Administrator Settings
To set alarm parameters
1. Choose Configure > System Settings > Alarms to display the Alarms page.
Figure 3-2. Alarms Page
2. Under Enable Alarms, complete the configuration as described in this table.
Control Description
Configuration Indicates whether a configuration error was detected.
CPU Utilization Enables an alarm and sends an email notification if the average and peak threshold for the CPU utilization is exceeded. By default, this alarm is enabled with a rising threshold of 90 percent and a reset threshold of 70 percent.
• Rising Threshold - Specify the rising threshold. When an alarm reaches the rising threshold, it is activated.
• Reset Threshold - Specify the reset threshold. When an alarm reaches the lowest or reset threshold, it is reset. After an alarm is triggered, it is not triggered again until it has fallen below the reset threshold.
SteelCentral Controller for SteelHead Mobile User’s Guide 39

Configuring System Administrator Settings Configuring Alarm Settings
Disk Full Enables an alarm if the system partitions (not the SteelHead Mobile data store) are full or almost full. For example, Mobile Controller monitors the available space on /var, which is used to hold logs, statistics, system dumps, TCP dumps, and so on.
By default, this alarm is enabled.
This alarm monitors the following system partitions:
• /boot Full
• /bootmgr Full
• /config Full
• /data Full
• /var Full
Endpoint Datastore Indicates whether the number of endpoint clients with data store errors has reached the rising threshold. By default, this alarm is enabled with a rising threshold of 50 and a reset threshold of 40.
Endpoint Filesystem Full
Indicates whether the number of endpoint clients with File System Full errors has reached the rising threshold. By default, this alarm is enabled with a rising threshold of 50 and a reset threshold of 40.
Endpoint Firewall Indicates whether the number of endpoint clients with firewall status errors has reached the rising threshold. By default, this alarm is enabled with a rising threshold of 50 and a reset threshold of 40.
Endpoint Gen ID Error Indicates whether the number of endpoint clients with Endpoint genID errors has reached the rising threshold. By default, this alarm is enabled with a rising threshold of 50 and a reset threshold of 40.
Endpoint NFS Indicates whether the number of endpoint clients with NFS errors has reached the rising threshold. By default, this alarm is enabled with a rising threshold of 50 and a reset threshold of 40.
Endpoint Service Indicates whether the number of endpoint clients with service errors has reached the rising threshold. By default, this alarm is enabled with a rising threshold of 50 and a reset threshold of 40.
Endpoint SSL Error Indicates whether the number of endpoint clients with SSL errors has reached the rising threshold. By default, this alarm is enabled with a rising threshold of 50 and a reset count of 40.
Endpoint Version Indicates whether the number of endpoint clients in your network with mismatches between software versions has reached the rising threshold. If a software mismatch is detected, resolve the mismatch by upgrading or reverting to a previous version of the software. By default, this alarm is enabled with a rising threshold of 50 and a reset threshold of 40.
Endpoint License Indicates whether to send an alarm when all the licenses have been used.
• Desktop License to enable alarms only for desktop licenses.
Control Description
40 SteelCentral Controller for SteelHead Mobile User’s Guide

Configuring Alarm Settings Configuring System Administrator Settings
Hardware • Fan Error - Enables an alarm and sends an email notification if a fan is failing or has failed and needs to be replaced. By default, this alarm is enabled.
• Flash Error - Enables an alarm when the system detects an error with the flash drive hardware. By default, this alarm is enabled.
• IPMI - Enables an alarm and sends an email notification if an Intelligent Platform Management Interface (IPMI) event is detected. (Not supported on all appliance models.)
This alarm triggers when there has been a physical security intrusion. The following events trigger this alarm:
– Chassis intrusion (physical opening and closing of the appliance case)
– Memory errors (correctable or uncorrectable ECC memory errors)
– Hard drive faults or predictive failures
– Power cycle, such as turning the power switch on or off, physically unplugging and replugging the cable, or issuing a power cycle from the power switch controller.
By default, this alarm is enabled.
• Memory Error - Enables an alarm and sends an email notification if a memory error is detected: for example, when a system memory stick fails. By default, this alarm is enabled.
• Power Supply - Enables an alarm and sends an email notification if an inserted power supply cord does not have power, as opposed to a power supply slot with no power supply cord inserted. By default, this alarm is enabled.
• RAID - Indicates that the system has encountered RAID errors (for example, missing drives, pulled drives, drive failures, and drive rebuilds).
Licensing Enables an alarm and sends an email notification if a license on the Mobile Controller is removed, is about to expire, has expired, or is invalid. This alarm triggers if the Mobile Controller has no license installed for its currently configured model.
• Autolicense Critical Event - This alarm triggers when the Riverbed Licensing Portal cannot respond to a license request with valid licenses.
• Autolicense Informational Event - This alarm triggers if the Riverbed Licensing Portal has information regarding the licenses for a Mobile Controller appliance. For example, this alarm displays when the portal provides a license that is associated with a token previously used on a different Mobile Controller appliance.
• Licenses Expired - This alarm triggers if one or more features have at least one license installed, but all of them are expired.
• Licenses Expiring - This alarm triggers if the license for one or more features is going to expire within two weeks.
• Licensing - This alarm triggers if the Mobile Controller has no license installed for its currently configured model.
Note: The licenses expiring and licenses expired alarms are triggered per feature. For example, if you install two license keys for a feature, LK1-FOO-xxx (expired) and LK1-FOO-yyy (not expired), the alarms do not trigger, because the feature has one valid license.
By default, this alarm is enabled.
Control Description
SteelCentral Controller for SteelHead Mobile User’s Guide 41

Configuring System Administrator Settings Configuring Alarm Settings
Link Duplex Enables an alarm and sends an email notification when an interface was not configured for half-duplex negotiation but has negotiated half-duplex mode.
The alarm displays which interface is triggering the duplex alarm.
• Interface aux Half-Duplex - Select to enable an alarm on this interface.
• Interface primary Half-Duplex - Select to enable an alarm on this interface.
By default, this alarm is enabled.
Link I/O Errors Enables an alarm and sends an email notification when the error rate on an interface exceeds 0.1 percent while either sending or receiving packets. This threshold is based on the observation that even a small link error rate reduces TCP throughput significantly. A properly configured LAN connection experiences very few errors.
The alarm clears when the rate drops below 0.05 percent.
• Interface aux Link Error - This alarm triggers if an Ethernet link is lost with the aux interface.
• Interface primary Link Error - This alarm triggers if an Ethernet link is lost with the primary interface.
This error condition is often caused by surrounding devices, like routers or switches that are transitioning between interfaces. This alarm also accompanies system restarts on the Mobile Controller.
By default, this alarm is disabled.
Link State Enables an alarm and sends an email notification if an Ethernet link is inoperable due to a network event. Depending on which link is inoperable, the system might no longer be optimizing and a network outage could occur.
• Interface aux Down - This alarm triggers if an Ethernet link is inoperable on the aux interface.
• Interface primary Down - This alarm triggers if an Ethernet link is inoperable on the primary interface.
By default, this alarm is disabled.
Memory Paging Enables an alarm and sends an email notification if memory paging is detected. If 100 pages are swapped every couple of hours, the system is functioning properly. If thousands of pages are swapped every few minutes, contact the Riverbed Support site at:
https://support.riverbed.com.
By default, this alarm is disabled.
Process Dump Creation Error
Enables an alarm and sends an email notification if the system detects an error while trying to create a process dump. This alarm indicates an abnormal condition in which the Mobile Controller cannot collect the core file after three retries. It can be caused when the /var directory is reaching capacity or other conditions. When the alarm is raised, the directory is blacklisted.
By default, this alarm is enabled.
Secure Vault Enables an alarm and sends an email notification if the system encounters a problem with the secure vault:
• Secure Vault Locked - Indicates that the secure vault is locked. To optimize SSL connections or to use Mobile Controller data store encryption, the secure vault must be unlocked. Go to Configure > Security > Secure Vault and unlock the secure vault.
By default, this alarm is enabled.
Control Description
42 SteelCentral Controller for SteelHead Mobile User’s Guide

Configuring Date and Time Configuring System Administrator Settings
3. Click Apply to apply your changes to the running configuration.
4. Click Save to save your settings permanently.
Configuring Date and Time
Riverbed recommends that you use NTP time synchronization for configuring the date and time.
SSL Enables an alarm if an error is detected in your SSL configuration.
• SSL Certificates - Indicates that an SSL peering certificate has failed to reenroll automatically within the Simple Certificate Enrollment Protocol (SCEP) polling interval.
• SSL Signing Certificate Validity - Indicates that an SSL peering certificate has failed to reenroll automatically within the Simple Certificate Enrollment Protocol (SCEP) polling interval.
By default, this alarm is enabled.
Temperature Enables an alarm if the temperature of your system exceeds the rising threshold.
• Critical Temperature - Enables an alarm and sends an email notification if the CPU temperature exceeds the rising threshold. When the CPU returns to the reset threshold, the critical alarm is cleared. The default value for the rising threshold temperature is 70ºC; the default reset threshold temperature is 67ºC.
• Warning Temperature - Enables an alarm and sends an email notification if the CPU temperature approaches the rising threshold. When the CPU returns to the reset threshold, the warning alarm is cleared.
– Rising Threshold - Specify the rising threshold (ºC). When an alarm reaches the rising threshold, it is activated. The default value is 70º.
– Reset Threshold - Specify the reset threshold (ºC). When an alarm reaches the lowest or reset threshold, it is reset. After an alarm is triggered, it is not triggered again until it has fallen below the reset threshold. The default value is 67º.
Underprovisioned VM Memory, data storage, or CPU resources are insufficient for the maximum number of endpoints. For VSMC only (VSMC-VSP and VSMC-ESX).
Valid Platform Enables an alarm to be triggered if the hardware platform does not support Mobile Controller-v (VSMC-VSP). SteelHead EX is required for VSMC-VSP.
By default, this alarm is enabled.
Valid VM Enables an alarm to be triggered if the virtual machine is unavailable. For VSMC and VSMC-VSP only.
By default, this alarm is enabled.
Control Description
SteelCentral Controller for SteelHead Mobile User’s Guide 43

Configuring System Administrator Settings Configuring Date and Time
To use Network Time Protocol (NTP) time synchronization
1. Choose Configure > System Settings > Date and Time to display the Date and Time page.
Figure 3-3. Date and Time Page
2. Under Date and Time, click Use NTP Time Synchronization.
3. As a best practice, you should configure your own internal NTP servers; however, if you want to use the Mobile Controller-provided NTP server, the hard-coded IP address that is preconfigured into every Mobile Controller is 208.70.196.25. This IP address appears in the NTP server list.
4. To add a new NTP server, complete the configuration as described in this table.
Control Description
Add a New NTP Server Displays the controls to add a server.
Hostname or IP Address Specify the hostname or IP address for the NTP server. You can connect to an NTP public server pool; for example, 0.riverbed.pool.ntp.org.
When you add an NTP server pool, the server is selected from a pool of time servers.
Version Select the NTP server version from the drop-down list: 3 or 4.
44 SteelCentral Controller for SteelHead Mobile User’s Guide

Configuring Date and Time Configuring System Administrator Settings
5. Click Save to save your settings permanently.
Note: To modify server properties, select the server name in the server table row.
To set the time and date manually
1. Choose Configure > System Settings > Date and Time to display the Date and Time page.
2. Under Date and Time, click Set Time Manually.
3. Complete the configuration as described in this table.
4. Click Apply to apply your changes to the running configuration.
5. Click Save to save your settings permanently.
Note: After you apply your settings, you can verify whether changes have had the desired effect by reviewing related reports. After this verification, you can write the active configuration that is stored in memory to the active configuration file (or save it with any filename you choose). For details on saving configurations, see “Managing Configurations” on page 91.
Enabled/Disabled Select Enabled from the drop-down list to connect to the NTP server. Select Disabled from the drop-down list to disconnect from the NTP server.
Key ID Specify the MD5 or SH1 key identifier to use to authenticate the NTP server. The valid range is from 1 to 65534. The key ID must appear on the trusted keys list.
Add Adds the NTP server to the server list.
Remove Selected Select the check box next to the name and click Remove Selected.
Control Description
Time Zone Select a time zone from the drop-down list. The default value is US/Pacific.
Note: Changes to the Time Zone will end your current browser session and require you to log in again.
Change Date Specify the date in this format: yyyy/mm/dd.
Change Time Specify military time in this format: hh:mm:ss.
Control Description
SteelCentral Controller for SteelHead Mobile User’s Guide 45

Configuring System Administrator Settings Configuring Monitored Ports
Configuring Monitored Ports
You specify the TCP ports that you want to monitor in the Configure > System Settings > Monitored Ports page. The ports you specify appear in the Desktop Traffic report. Make sure that the description you provide helps you identify the type of traffic on the port.
The SteelHead Mobile reports all ports that have traffic to the Mobile Controller. Discovered ports, with a label (if one exists), are added to the Desktop Traffic report. If a label does not exist, then an unknown label is added to the discovered port. To change the unknown label to a name representing the port, you must add the port with a new label. All statistics for this new port label are preserved from the time the port was discovered.
By default, traffic is monitored on ports 21 (FTP), 80 (HTTP), 139 (CIFS:NetBIOS), 443 (SSL), 445 (CIFS:TCP), 1352 (Lotus Notes), 1433 (SQL:TDS), 7830 (MAPI), 8777 (RCU), and 10566 (SnapMirror).
To set monitored ports
1. Choose Configure > System Settings > Monitored Ports to display the Monitored Ports page.
Figure 3-4. Monitored Ports Page
2. Complete the configuration as described in this table.
Control Description
Add Port Displays the controls to add a new port.
Port Number Specify the port to be monitored.
Port Description Specify a description of the type of traffic on the port.
Add Displays the controls for adding a port.
Remove Selected Select the check box next to the name and click Remove Selected.
46 SteelCentral Controller for SteelHead Mobile User’s Guide

Configuring SNMP Settings Configuring System Administrator Settings
3. To modify a monitored port, click the magnifying glass icon next to the port and complete the configuration as described in this table.
Configuring SNMP Settings
You configure SNMP contact and trap receiver settings to allow events to be reported to an SNMP entity in the Configure > System Settings > SNMP Basic page.
Traps are messages sent by an SNMP entity that indicate the occurrence of an event. The default system configuration does not include SNMP traps.
Mobile Controller 4.8 provides support for the following:
SNMP Version 1
SNMP Version 2c
SNMP Version 3, which provides authentication through the User-based Security Model (USM)
View-Based Access Control Mechanism (VACM), which provides richer access control
SNMP Version 3 authentication using AES 128 and DES encryption privacy
For a summary of the SNMP traps sent to configured trap receivers, see Appendix D, “SNMP Traps.”
For details on MIBs, see Appendix D, “Mobile Controller MIB.”
Control Description
Port Description Specify a description of the type of traffic on the port.
Apply Applies your settings to the running configuration.
SteelCentral Controller for SteelHead Mobile User’s Guide 47

Configuring System Administrator Settings Configuring SNMP Settings
To set general SNMP parameters
1. Choose Configure > System Settings > SNMP Basic to display the SNMP Basic page.
Figure 3-5. SNMP Basic Page
2. Under SNMP Server Settings, complete the configuration as described in this table.
3. Click Apply to apply your changes to the running configuration.
4. Click Save to save your settings permanently.
Control Description
Enable SNMP Traps Enables event reporting to an SNMP entity.
System Contact Specify the username for the SNMP contact.
System Location Specify the physical location of the SNMP system.
Read-Only Community String
Specify a password-like string to identify the read-only community: for example, public. This community string overrides any VACM settings.
Community strings cannot contain the # (hash) value.
48 SteelCentral Controller for SteelHead Mobile User’s Guide

Configuring SNMP Settings Configuring System Administrator Settings
To add or remove a trap receiver
1. Under Trap Receivers, complete the configuration as described in this table.
Control Description
Add a New Trap Receiver Displays the controls to add a new trap receiver.
Receiver Specify the destination IPv4 or IPv6 address or hostname for the SNMP trap.
Destination Port Specify the destination port.
Receiver Type Select SNMP version v1, v2c, or v3 (user-based security model).
Remote User (Appears only when you select v3.) Specify a remote username.
Authentication (Appears only when you select v3). Optionally, select either Supply a Password or Supply a Key to use while authenticating users.
Authentication Protocol (Appears only when you select v3.) Select an authentication method from the drop-down list:
• MD5 - Specifies the Message-Digest 5 algorithm, a widely used cryptographic hash function with a 128-bit hash value. This is the default value.
• SHA - Specifies the Secure Hash Algorithm, a set of related cryptographic hash functions. SHA is considered to be the successor to MD5.
Password/Password Confirm (Appears only when you select v3 and Supply a Password.) Specify a password. The password must have a minimum of eight characters. Confirm the password in the Password Confirm text box.
Security Level (Appears only when you select v3.) Determines whether a single atomic message exchange is authenticated. Select one of these levels from the drop-down list:
• No Auth - Does not authenticate packets and does not use privacy. This is the default setting.
• Auth - Authenticates packets but does not use privacy.
• AuthPriv - Authenticates packets using AES 128 and DES to encrypt messages for privacy.
Note: A security level applies to a group, not to an individual user.
Privacy Protocol (Appears only when you select v3 and AuthPriv.) Select either the AES or DES protocol from the drop-down list. AES uses the AES128 algorithm.
Privacy (Appears only when you select v3 and AuthPriv.) Select Same as Authentication Key, Supply a Password, or Supply a Key to use while authenticating users. The default setting is Same as Authentication Key.
Privacy Password (Appears only when you select v3 and Supply a Password.) Specify a password. The password must have a minimum of eight characters. Confirm the password in the Privacy Password Confirm text box.
MD5/SHA Key (Appears only when you select v3 and Authentication as Supply a Key.) Specify a unique authentication key. The key is either a 32-hexadecimal digit MD5 or a 40-hexadecimal digit SHA digest created using md5sum or sha1sum.
Privacy MD5/SHA Key (Appears only when you select v3 and Privacy as Supply a Key.) Specify the privacy authentication key. The key is either a 32-hexadecimal digit MD5 or a 40-hexadecimal digit SHA digest created using md5sum or sha1sum.
SteelCentral Controller for SteelHead Mobile User’s Guide 49

Configuring System Administrator Settings Configuring SNMP Settings
2. Click Save to save your settings permanently.
To test an SNMP trap
1. Choose Configure > System Settings > SNMP Basic to display the SNMP Basic page.
2. Under SNMP Trap Test, click Run.
Configuring SNMPv3
SNMPv3 provides additional authentication and access control for message security. For example, you can verify the identity of the SNMP entity (manager or agent) sending the message.
The Mobile Controller supports SNMPv3 message encryption for increased security.
Using SNMPv3 is more secure than SNMPv1 or SNMPv2; however, it requires more configuration steps to provide the additional security features.
Basic Steps
1. Create the SNMP-server users. Users can be authenticated using either a password or a key.
2. Configure SNMP-server views to define which part of the SNMP MIB tree is visible.
3. Configure SNMP-server groups, which map users to views, enabling you to control who can view what SNMP information.
4. Configure the SNMP-server access policies that contain a set of rules defining access rights. Based on these rules, the entity decides how to process a given request.
Community For v1 or v2 trap receivers, specify the SNMP community name. For example, public or private v3 trap receivers need a remote user with an authentication protocol, a password, and a security level.
Enable Receiver Select this option to enable the new trap receiver. Clear to disable the receiver.
Add Adds a new trap receiver to the list.
Remove Selected Select the check box next to the name and click Remove Selected.
Control Description
50 SteelCentral Controller for SteelHead Mobile User’s Guide

Configuring SNMP Settings Configuring System Administrator Settings
To create users for SNMP v3
1. Choose Configure > System Settings > SNMP v3 to display the SNMP v3 page.
Figure 3-6. SNMP v3 Page
2. Under Users, complete the configuration as described in this table..
3. Click Save to save your settings permanently.
Control Description
Add a New User Displays the controls to add a new user.
User Name Specify the username.
Authentication Protocol
Select an authentication method from the drop-down list:
• MD5 - Specifies the Message-Digest 5 algorithm, a widely used cryptographic hash function with a 128-bit hash value. This is the default value.
• SHA - Specifies the Secure Hash Algorithm, a set of related cryptographic hash functions. SHA is considered to be the successor to MD5.
Authentication Optionally, select either Supply a Password or Supply a Key to use while authenticating users.
Password/Password Confirm
Specify a password. The password must have a minimum of eight characters. Confirm the password in the Password Confirm text box.
Use Privacy Option Select to use SNMPv3 encryption.
Privacy Protocol Select either the AES or DES protocol from the drop-down list. AES uses the AES128 algorithm.
Privacy Select Same as Authentication, Supply a Password, or Supply a Key to use while authenticating users. The default setting is Same as Authentication.
Add Adds the user.
Remove Selected Select the check box next to the name and click Remove Selected.
SteelCentral Controller for SteelHead Mobile User’s Guide 51

Configuring System Administrator Settings Configuring SNMP Settings
SNMP Authentication and Access Control
The following features apply to SNMPv1, SNMPv2c, and SNMPv3 unless noted otherwise:
Security Names - Identify an individual user (v1 or v2c only).
Secure Groups - Identify a security name or security model by a group.
Secure Views - Create a custom view using the VACM that controls who can access which MIB objects under agent management by including or excluding specific OIDs. For example, some users have access to critical read-write control data, while other users have access to just read-only data. For a list of OIDs, see “Configuring SNMP Settings” on page 47.
Security Models - A security model identifies the SNMP version associated with a user for the group in which the user resides.
Secure Access Policies - Defines who gets access to which type of information. An access policy is composed of <group-name, security-model, security-level, read-view-name>.
read-view-name is a preconfigured view that applies to read requests by this security name.
write-view-name is a preconfigured view that applies to write requests by this security name.
notify-view-name is a preconfigured view that applies to write requests to this security name.
An access policy is the configurable set of rules, based on which the entity decides how to process a given request.
To set secure usernames
1. Choose Configure > System Settings > SNMP ACLs to display the SNMP ACLs page.
Figure 3-7. SNMP ACLs Page - Security Names
52 SteelCentral Controller for SteelHead Mobile User’s Guide

Configuring SNMP Settings Configuring System Administrator Settings
2. Under Security Names, complete the configuration as described in this table.
3. Click Apply to apply your changes to the running configuration.
4. Click Save to save your settings permanently.
Control Description
Add a New Security Name
Displays the controls to add a security name.
Security Name Specify a name to identify a requester allowed to issue gets and sets (v1 and v2c only). The specified requester can make changes to the view-based access-control model (VACM) security name configuration.
This control does not apply to SNMPv3 queries. To restrict v3 USM users from polling a particular subnet, use the RiOS Management ACL feature, located in the Configure > Security > Management ACL page.
Traps for v1 and v2c are independent of the security name.
Community String Specify the password-like community string to control access. Use a combination of uppercase, lowercase, and numerical characters to reduce the chance of unauthorized access to the SteelHead.
Community strings do not allow printable 7-bit ASCII characters, except for white spaces. Also, the community strings cannot begin with a pound sign (#) or a hyphen (-).
If you specify a read-only community string (located in the SNMP Basic page under SNMP Server Settings), it takes precedence over this community name and allows users to access the entire MIB tree from any source host. If you do not want to allows users this level of access, delete the read-only community string.
To create multiple SNMP community strings on a SteelHead, leave the default public community string and then create a second read-only community string with a different security name. Or, you can delete the default public string and create two new SNMP ACLs with unique names.
Source IP Address and Mask Bits
Specify the host IPv4 or IPv6 address and mask bits to which you permit access using the security name and community string.
Add Adds the security name.
Remove Selected Select the check box next to the name and click Remove Selected.
SteelCentral Controller for SteelHead Mobile User’s Guide 53

Configuring System Administrator Settings Configuring SNMP Settings
To set secure groups
1. Choose Configure > System Settings > SNMP ACLs to display the SNMP ACLs page.
Figure 3-8. SNMP ACLs Page - Groups
2. Under Groups, complete the configuration as described in this table..
3. Click Apply to apply your changes to the running configuration.
4. Click Save to save your settings permanently.
Control Description
Add a New Group Displays the controls to add a new group
Group Name Specify a group name.
Security Models and Name Pairs
Click the + button and select a security model from the drop-down list:
• v1 or v2c - Displays another drop-down menu. Select a security name.
• v3 (usm) - Displays another drop-down menu. Select a user.
To add another Security Model and Name pair, click the plus sign (+).
Add Adds the group name and security model and name pairs.
Remove Selected Select the check box next to the name and click Remove Selected.
54 SteelCentral Controller for SteelHead Mobile User’s Guide

Configuring SNMP Settings Configuring System Administrator Settings
To set secure views
1. Choose Configure > System Settings > SNMP ACLs to display the SNMP ACLs page.
Figure 3-9. SNMP ACLs Page - Views
2. Under Views, complete the configuration as described in this table..
3. Click Apply to apply your changes to the running configuration.
4. Click Save to save your settings permanently.
Control Description
Add a New View Displays the controls to add a new view.
View Name Specify a descriptive view name to facilitate administration.
Includes Specify the object identifiers (OIDs) to include in the view, separated by commas. One example is .1.3.6.1.4.1. By default, the view excludes all OIDs.
You can specify .iso or any subtree or subtree branch.
You can specify an OID number or use its string form: for example: .iso.org.dod.internet.private.enterprises.rbt.products.steelhead.system.model
Excludes Specify the OIDs to exclude in the view, separated by commas. By default, the view excludes all OIDs.
Add Adds the view.
Remove Selected Select the check box next to the name and click Remove Selected.
SteelCentral Controller for SteelHead Mobile User’s Guide 55

Configuring System Administrator Settings Configuring Email Settings
To add an access policy
1. Choose Configure > System Settings > SNMP ACLs to display the SNMP ACLs page.
Figure 3-10. SNMP ACLs Page
2. Under Access Policies, complete the configuration as described in this table.
3. Click Apply to apply your changes to the running configuration.
4. Click Save to save your settings permanently.
Configuring Email Settings
You can set email notification parameters for events and failures in the Configure > System Settings > Email page.
By default, email addresses are not specified for event and failure notification.
Control Description
Add a New Access Policy
Displays the controls to add a new access policy. A group and a view must be created before an access policy can be added.
Group Name Select a group name from the drop-down list.
Security Level Determines whether a single atomic message exchange is authenticated. Select one of the following from the drop-down list:
• No Auth - Does not authenticate packets and does not use privacy. This is the default setting.
• Auth - Authenticates packets but does not use privacy.
• AuthPriv - Authenticates packets using AES or DES to encrypt messages for privacy.
Note: A security level applies to a group, not to an individual user.
Read View Select a view from the drop-down list.
Add Adds the policy to the policy list.
Remove Selected Select the check box next to the name and click Remove Selected.
56 SteelCentral Controller for SteelHead Mobile User’s Guide

Configuring Email Settings Configuring System Administrator Settings
To set event and failure email notification
1. Choose Configure > System Settings > Email to display the Email page.
Figure 3-11. Email Page
2. Under Email Notification, complete the configuration as described in this table.
Control Description
SMTP Server Specify the SMTP server. You must have external DNS and external access for SMTP traffic for this feature to function.
Note: Make sure that you provide a valid SMTP server to ensure that the users you specify receive email notifications for events and failures.
SMTP Port Specify the port number for the SMTP server.
SteelCentral Controller for SteelHead Mobile User’s Guide 57
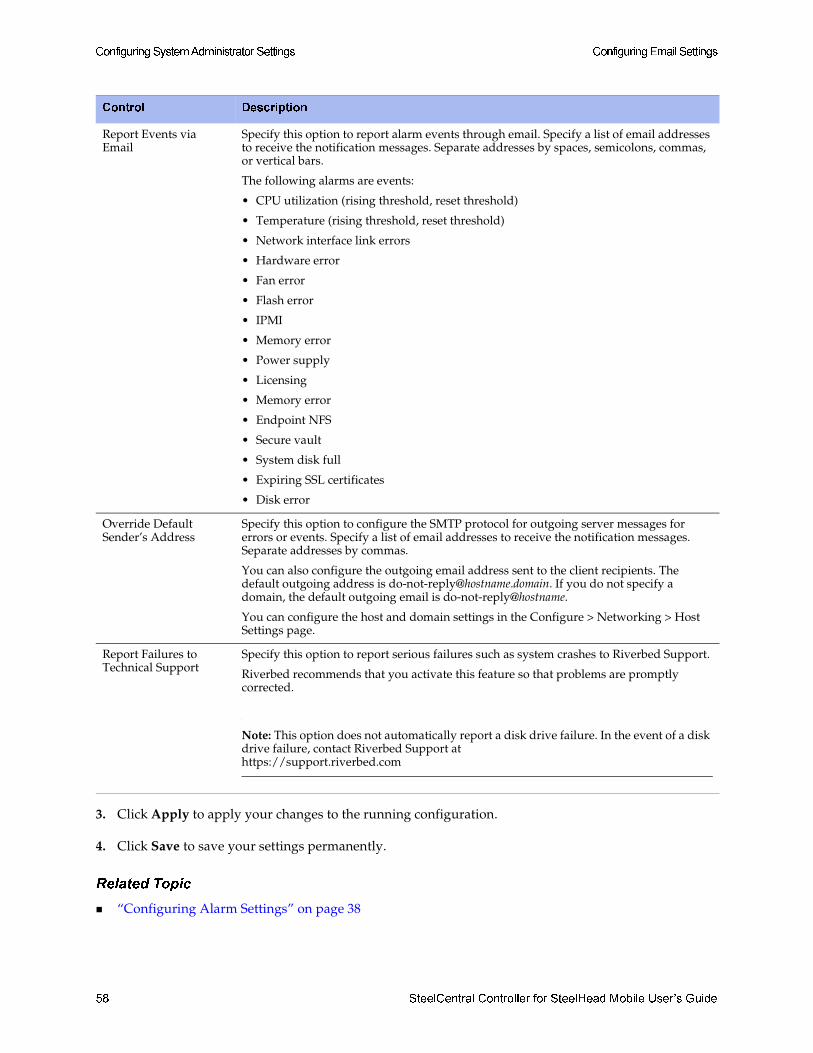
Configuring System Administrator Settings Configuring Email Settings
3. Click Apply to apply your changes to the running configuration.
4. Click Save to save your settings permanently.
Related Topic
“Configuring Alarm Settings” on page 38
Report Events via Email
Specify this option to report alarm events through email. Specify a list of email addresses to receive the notification messages. Separate addresses by spaces, semicolons, commas, or vertical bars.
The following alarms are events:
• CPU utilization (rising threshold, reset threshold)
• Temperature (rising threshold, reset threshold)
• Network interface link errors
• Hardware error
• Fan error
• Flash error
• IPMI
• Memory error
• Power supply
• Licensing
• Memory error
• Endpoint NFS
• Secure vault
• System disk full
• Expiring SSL certificates
• Disk error
Override Default Sender’s Address
Specify this option to configure the SMTP protocol for outgoing server messages for errors or events. Specify a list of email addresses to receive the notification messages. Separate addresses by commas.
You can also configure the outgoing email address sent to the client recipients. The default outgoing address is [email protected]. If you do not specify a domain, the default outgoing email is do-not-reply@hostname.
You can configure the host and domain settings in the Configure > Networking > Host Settings page.
Report Failures to Technical Support
Specify this option to report serious failures such as system crashes to Riverbed Support.
Riverbed recommends that you activate this feature so that problems are promptly corrected.
Note: This option does not automatically report a disk drive failure. In the event of a disk drive failure, contact Riverbed Support athttps://support.riverbed.com
Control Description
58 SteelCentral Controller for SteelHead Mobile User’s Guide

Configuring Log Settings Configuring System Administrator Settings
Configuring Log Settings
You set up local and remote logging in the Configure > System Settings > Logging page.
By default, the system rotates each log file every 24 hours or if the file size reaches one Gigabyte uncompressed. You can change this default setting to have the files rotated very week or month and you can have the files rotated based on file size.
The automatic rotation of system logs deletes your oldest log file, labeled as Archived log #10, pushes the current log to Archived log # 1, and starts a new current-day log file.
To set up logging
1. Choose Configure > System Settings > Logging to display the Logging page.
Figure 3-12. Log Settings Page
SteelCentral Controller for SteelHead Mobile User’s Guide 59

Configuring System Administrator Settings Configuring Log Settings
2. Under Logging Configuration, complete the configuration as described in this table.
3. To rotate the logs manually, under Log Actions, click Rotate Logs. After the logs are rotated, this message appears:
logs have been successfully rotated
When you click Rotate Logs, your archived file #1 contains data for a partial day because you are writing a new log before the current 24-hour period is complete.
4. Click Apply to apply your changes to the running configuration.
5. Click Save to save your settings permanently.
Control Description
Minimum Severity Select the minimum severity level for the system log messages. The log contains all messages with this severity level or higher. Select one of these levels from the drop-down list:
• Emergency - Emergency, the system is unusable.
• Alert - Action must be taken immediately.
• Critical - Conditions that affect the functionality of the SteelHead.
• Error - Conditions that probably affect the functionality of the SteelHead.
• Warning - Conditions that could affect the functionality of the SteelHead, such as authentication failures.
• Notice - Normal but significant conditions, such as a configuration change. This is the default setting.
• Info - Informational messages that provide general information about system operations.
Note: This control applies to the system log only. It does not apply to the user log.
Maximum Number of Log Files
Specify the maximum number of logs to store. The default value is 10.
Lines Per Log Page Specify the number of lines per log page. The default value is 100.
Rotate Based On Specifies the rotation option:
• Time - Select Day, Week, or Month from the drop-down list. The default setting is Day.
• Disk Space - Specify how much disk space, in megabytes, the log uses before it rotates. The default value is 16 MB.
Note: The log file size is checked at 10-minute intervals. If there is an unusually large amount of logging activity, it is possible for a log file to grow larger than the set disk space limit in that period of time.
60 SteelCentral Controller for SteelHead Mobile User’s Guide

Configuring Log Settings Configuring System Administrator Settings
To add or remove a log server
1. To add or remove a log server, complete the configuration as described in this table.
2. Click Apply to apply your changes to the running configuration.
3. Click Save to save your settings permanently.
Filtering Logs by Application or Process
You can filter a log by one or more applications or one or more processes. This filtering ability is particularly useful when capturing data at a lower severity level, at which a Mobile Controller appliance might not be able to sustain the flow of logging data the service is committing to disk.
To filter a log
1. Choose Configure > System Settings > Logging to display the Logging page.
Figure 3-13. Filtering a Log
Control Description
Add a New Log Server Displays the controls for configuring new log servers.
Server IP Specify the server IP address.
Minimum Severity Select the minimum severity level for the log messages. The log contains all messages with this severity level or higher. Select one of these levels from the drop-down list:
• Emergency - Emergency, the system is unusable.
• Alert - Action must be taken immediately.
• Critical - Conditions that affect the functionality of the SteelHead appliance.
• Error - Conditions that probably affect the functionality of the SteelHead appliance.
• Warning - Conditions that could affect the functionality of the SteelHead appliance, such as authentication failures.
• Notice - Normal but significant conditions, such as a configuration change. This is the default setting.
• Info - Informational messages that provide general information about system operations.
Add Adds the server to the list.
Remove Selected Select the check box next to the name and click Remove Selected.
SteelCentral Controller for SteelHead Mobile User’s Guide 61

Configuring System Administrator Settings Configuring Log Settings
2. Under Per-Process Logging, complete the configuration as described in this table.
3. Click Apply to apply your changes to the running configuration.
4. Click Save to save your settings permanently.
Control Description
Add a New Process Logging Filter
Displays the controls for adding a process level logging filter.
Process Select a process to include in the log from the drop-down list:
• alarmd - Alarm manager, which processes all alarms, including their thresholds and severity.
• cmcfc - CMC automatic registration utility.
• rgp - SCC connector, which handles SCC appliance communication.
• rgpd - SCC client daemon, the connection manager.
• cli - Command-line interface.
• mgmtd - Device control and management, which directs the entire device management system. It handles message passing between various management daemons, managing system configuration and general application of system configuration on the hardware underneath through the hald.
• hald - Hardware abstraction daemon, which handles access to the hardware.
• pm - Process manager, which handles launching of internal system daemons and keeps them running.
• sched - Process scheduler, which handles one-time scheduled events.
• statsd - Statistics collector, which handles queries, storage, and trending of system statistics.
• wdt - Watchdog timer, the motherboard watchdog daemon.
• webasd - Web application process, which handles the web user interface.
Minimum Severity Select the minimum severity level for the log messages. The log contains all messages with this severity level or higher. Select one of the following levels from the drop-down list:
• Emergency - Emergency; the system is unusable.
• Alert - Action must be taken immediately.
• Critical - Conditions that affect the functionality of the Mobile Controller.
• Error - Conditions that probably affect the functionality of the Mobile Controller.
• Warning - Conditions that could affect the functionality of the Mobile Controller, such authentication failures.
• Notice - Normal but significant conditions, such as a configuration change. This is the default setting.
• Info - Informational messages that provide general information about system operations.
Add Adds the filter to the list. The process now logs at the selected severity and higher level.
Remove Selected Select the check box next to the name and click Remove Selected to remove the filter.
62 SteelCentral Controller for SteelHead Mobile User’s Guide

Configuring Advanced Settings Configuring System Administrator Settings
Configuring Advanced Settings
You configure the Mobile Controller service port and Endpoint Report settings in the Configure > System Settings > Advanced Settings page. You can also view and manage network adapters on this page.
To configure the service port and Endpoint Report settings, and to manage adapters
1. Choose Configure > System Settings > Advanced Settings to display the Advanced Settings page.
Figure 3-14. Advanced Settings Page
SteelCentral Controller for SteelHead Mobile User’s Guide 63

Configuring System Administrator Settings Configuring Advanced Settings
2. Complete the configuration as described in this table.
3. Click Apply to apply your changes to the running configuration.
4. Click Save to save your settings permanently.
Control Description
Mobile Controller Service Port
Specify a port number for the Mobile Controller service port, or leave the default value of 7870.
Caution: Do not modify the service port setting until after you deploy the SteelHead Mobile Client that connects to this Mobile Controller. This modification changes the port on which the Mobile Controller listens for incoming SteelHead Mobile connections. If you change this setting, SteelHead Mobile clients trying to connect to the Mobile Controller on the old port are disconnected.
Remove Inactive Endpoints After
From the drop-down list, select a period of time after which the SteelHead Mobile information for the Endpoint report is removed from the Management Console:
• 1 Day
• 1 Week
• 1 Month
• 3 Months
Adapter List Settings This area displays the existing network adapters in the current configuration. Use the controls to work with adapters. You can modify existing adapters or add a new one.
• Select one or more adapters and:
– Click Enable/Disable to toggle on or off the selected adapters.
– Click Remove Selected Adapters to delete.
• Click Add New Adapter to specify a new one.
64 SteelCentral Controller for SteelHead Mobile User’s Guide

CHAPTER 4 Configuring Security Settings
This chapter describes how to configure Mobile Controller security features. It includes the following sections:
“Configuring General Security Settings” on page 65
“Viewing Permissions” on page 66
“Managing User Permissions” on page 67
“Setting RADIUS Servers” on page 70
“Configuring TACACS+ Access” on page 73
“Unlocking the Secure Vault” on page 74
“Configuring Web Settings” on page 76
To use this chapter, you must know how to install, configure, and manage WAN optimization using the SteelHead. For details about the SteelHead, see the SteelHead Installation and Configuration Guide, the SteelHead Management Console User’s Guide, and the SteelHead Deployment Guide.
Configuring General Security Settings
You can prioritize local, RADIUS, and TACACS+ authentication methods for the system and set the authorization policy and default user for RADIUS and TACACS+ authorization systems in the Configure > Security > General Security Settings page.
Note: Make sure to put the authentication methods in the order in which you want authentication to occur. If authorization fails on the first method, the next method is attempted, and so on, until all of the methods have been attempted.
Note: To set TACACS+ authorization levels (admin or read-only) to allow certain members of a group to log in, add the following attribute to users on the TACACS+ server: service = rbt-exec { local-user-name = “monitor” }where you replace “monitor” with “admin” for write access.
SteelCentral Controller for SteelHead Mobile User’s Guide 65

Configuring Security Settings Viewing Permissions
For details on setting up RADIUS and TACACS+ servers, see the SteelHead Deployment Guide.
To set general security settings
1. Choose Configure > Security > General Security Settings to display the General Security Settings page.
Figure 4-1. General Security Settings Page
2. Under Authentication Methods, complete the configuration as described in this table.
3. Click Apply to apply your changes to the running configuration.
4. Click Save to save your settings permanently.
Viewing Permissions
You can display your system permissions and add or change your login password in the Configure > My Account page.
Control Description
Authentication Methods Specifies the authentication method. Select an authentication method from the drop-down list. The methods are listed in the order in which they occur. If authorization fails on the first method, the next method is attempted, and so on, until all of the methods have been attempted.
For RADIUS/TACACS+, fallback only when servers are unavailable.
Specifies that the SteelHead falls back to a RADIUS or TACACS+server only when all other servers do not respond. This is the default setting.
When this feature is disabled, the SteelHead does not fall back to the RADIUS or TACACS+ servers. If it exhausts the other servers and does not get a response, it returns a server failure.
Authorization Policy Appears only for some Authentication Methods. Optionally, select one of these policies from the drop-down list:
• Remote First - Check the remote server first for an authentication policy, and only check locally if the remote server does not have one set. This is the default behavior.
• Remote Only - Only checks the remote server.
• Local Only - Only checks the local server. All remote users are mapped to the user specified. Any vendor attributes received by an authentication server are ignored.
66 SteelCentral Controller for SteelHead Mobile User’s Guide

Managing User Permissions Configuring Security Settings
To display system permissions
1. Choose Configure > My Account to display the My Account page.
Figure 4-2. My Account Page
2. Under Password, complete the configuration as described in this table.
3. Click Apply to apply your changes to the running configuration.
The permissions list displays the roles and permissions assigned to your username.
Note: For details on setting user permissions, see “Managing User Permissions” on page 67.
Managing User Permissions
You can change the administrator or monitor passwords and define role-based users in the Configure > Security > User Permissions page.
User Accounts
The system provides two user account options, based on what actions the user can take:
Admin - The administrator user has full privileges. For example, as an administrator you can set and modify configuration settings, add and delete users, restart the Mobile Controller service, reboot the Mobile Controller, and create and view performance and system reports.
Control Description
Change Password Allows you to add or change your log in password.
New Password/Confirm New Password
Specify a password in the text box. Retype the password in the Confirm New Password text box.
Old Password (Appears when password policy is enabled and the Minimum Character Difference Between Passwords value is greater than 0). Nonadministrators must specify the old password.
Administrators are never required to enter an old password when changing an account password.
SteelCentral Controller for SteelHead Mobile User’s Guide 67

Configuring Security Settings Managing User Permissions
Monitor - A monitor user can view reports and user logs, and change his or her password. A monitor user cannot make configuration changes, modify private keys, view system logs, or manage cryptographic modules in the system.
Roles and Permissions
You can also create users, assign passwords to the user, and assign varying configuration roles to the user. A user role determines whether the user has permission to:
Read-only - With read-only privileges, you can view current configuration settings but you cannot change them.
Read/Write - With read and write privileges, you can view settings and make configuration changes for a feature.
Deny - With deny privileges, you cannot view settings or save configuration changes for a feature.
Available menu items reflect the privileges of the user. For example, any menu items that a user does not have permission to use are unavailable. When a user selects an unavailable link, the User Permissions page appears.
To set or modify user account permissions
1. Choose Configure > Security > User Permissions to display the User Permissions page.
Figure 4-3. User Permissions Page
68 SteelCentral Controller for SteelHead Mobile User’s Guide

Managing User Permissions Configuring Security Settings
2. Under Accounts, complete the configuration as described in this table.
3. Click Apply to apply your changes.
To add a new user account
1. Choose Configure > Security > User Permissions to display the User Permissions page.
2. Under Accounts, complete the configuration as described in this table.
Control Description
admin/monitor Click the magnifying glass icon for the user account you want to set or modify. Login failure details are displayed.
Clear - Clears the detailed information about login failures.
Change Password - Enables password protection.
Mobile Controller 4.8 and later includes an account control feature that allows you to select a password policy for more security. When you enable account control on the Configure > Security > Password Policy page, a user must use a password.
When a user has a null password to start with, the administrator can still set the user password with account control enabled. However, once the user or administrator changes the password, it cannot be reset to null as long as account control is enabled.
New Password - Specify a password in the text box.
New Password Confirm - Retype the new administrator password.
Enable Account - Select the option to enable or clear to disable the administrator or monitor account. If the account is enabled, the following option is available:
• Make this the AAA Default User (for RADIUS/TACACS+ logins)
Control Description
Add a New Account Click to display the controls for creating a new account.
Account Name Specify a name for the account.
Password Specify a password in the text box.
New Password Confirm
Retype the password to confirm.
Enable Account Select the check box to enable the new account. If the account is enabled, the following option is available:
• Make this the AAA Default User (for RADIUS/TACACS+ logins)
SteelCentral Controller for SteelHead Mobile User’s Guide 69

Configuring Security Settings Setting RADIUS Servers
3. Click Save to save your settings permanently.
Setting RADIUS Servers
You set up RADIUS server authentication in the Configure > Security > RADIUS page.
RADIUS is an access control protocol that uses a challenge and response method for authenticating users. Setting up RADIUS server authentication is optional.
You can prioritize local, RADIUS, and TACACS+ authentication methods for the system and set the authorization policy and default user for RADIUS and TACACS+ authorization systems in the Configure > Security > General Security Settings page.
For details on setting up RADIUS and TACACS+ servers, see the SteelHead Deployment Guide.
Roles and Permissions Select one of these roles:
• Administrator - Specifies an administration account with full access to configuration and reports.
• Role-based management (RBM) User - Select deny, read-only, or read/write access for the following settings:
– General Settings - Configures the per-source IP connection limit and the maximum connection pooling size.
– Network Settings - Configures host and network interface settings, including DNS cache settings and hardware assist rules.
– Security Settings - Configures security settings, including RADIUS and TACACS authentication settings and the secure vault password.
– Policy/Package/Assignment Settings - Configures policy, package, and assignment settings.
– Diagnostic Reports Settings - Customizes system diagnostic reports, including system and user log settings. It does not include TCP dumps.
– Endpoint Reports Settings - Configures endpoint client report settings.
– SSL Settings - Configures SSL support and the secure inner channel.
– Cluster Settings - Configures Mobile Controller cluster settings.
Add Adds your settings to the system.
Remove Selected Accounts
Click to remove the selected accounts.
Control Description
70 SteelCentral Controller for SteelHead Mobile User’s Guide

Setting RADIUS Servers Configuring Security Settings
To set RADIUS server authentication
1. Choose Configure > Security > RADIUS to display the RADIUS page.
Figure 4-4. RADIUS Page
2. Under Default RADIUS Settings, complete the configuration as described in this table.
3. Click Apply to apply your changes to the running configuration.
Control Description
Set a Global Default Key
Enables a global server key for the RADIUS server.
Global Key Specify the global server key.
Confirm Global Key Confirm the global server key.
Timeout Specify the time-out period in seconds (1 to 60). The default value is 3.
Retries Specify the number of times you want to allow the user to retry authentication. The default value is 1.
SteelCentral Controller for SteelHead Mobile User’s Guide 71

Configuring Security Settings Setting RADIUS Servers
4. To add a new RADIUS server, complete the configuration as described in this table.
Note: If you add a new server to your network and you do not specify the values described in this table, the global settings are applied automatically.
5. Click Save to save your settings permanently.
Note: To modify RADIUS server settings, click the server IP address in the list of Radius Servers. Use the Status drop-down list to enable or disable a server in the list.
Related Topic
“Configuring General Security Settings” on page 65
Control Description
Add a RADIUS Server Displays the controls for defining a new RADIUS server.
Hostname or IP Address
Specify the hostname or server IP address. RiOS does not support IPv6 server IP addresses.
Authentication Port Specify the port for the server.
Authentication Type Select one of these authentication types:
• PAP - Password Authentication Protocol (PAP), which validates users before allowing them access to the RADIUS server resources. PAP is the most flexible protocol but is less secure than CHAP.
• CHAP - Challenge-Handshake Authentication Protocol (CHAP), which provides better security than PAP. CHAP validates the identity of remote clients by periodically verifying the identity of the client using a three-way handshake. This validation happens at the time of establishing the initial link and might happen again at any time. CHAP bases verification on a user password and transmits an MD5 sum of the password from the client to the server.
Override the Global Default Key
Overrides the global server key for the server.
Server Key - Specify the override server key.
Confirm Server Key - Confirm the override server key.
Timeout Specify the time-out period in seconds (1 to 60). The default value is 3.
Retries Specify the number of times you want to allow the user to retry authentication. Valid values are from 0 to 5. The default value is 1.
Enabled Enables the new server.
Add Adds the RADIUS server to the list.
Remove Selected Select the check box next to the name and click Remove Selected.
72 SteelCentral Controller for SteelHead Mobile User’s Guide

Configuring TACACS+ Access Configuring Security Settings
Configuring TACACS+ Access
You set up TACACS+ server authentication in the Configure > Security > TACACS+ page.
TACACS+ is an authentication protocol that allows a remote access server to forward a login password for a user to an authentication server to determine whether access is allowed to a given system.
Enabling this feature is optional.
You can prioritize local, RADIUS, and TACACS+ authentication methods for the system and set the authorization policy and default user for RADIUS and TACACS+ authorization systems in the Configure > Security > General Security Settings page.
For details on configuring RADIUS and TACACS+ servers to accept login requests from the Mobile Controller, see the SteelHead Deployment Guide.
To set a TACACS+ server
1. Choose Configure > Security > TACACS+ to display the TACACS+ page.
Figure 4-5. TACACS+F Page
2. Under Default TACACS+ Settings, complete the configuration as described in this table.
Control Description
Set a Global Default Key
Enables a global server key for the server.
Global Key Specify the global server key.
Confirm Global Key Confirms the global server key.
Timeout Specify the time-out period in seconds (1 to 60). The default value is 3.
Retries Specify the number of times you want to allow the user to retry authentication. Valid values are from 0 to 5. The default is 1.
SteelCentral Controller for SteelHead Mobile User’s Guide 73

Configuring Security Settings Unlocking the Secure Vault
3. Click Apply to apply your changes to the running configuration.
4. To add or remove a TACACS+ server, complete the configuration as described in this table.
Note: If you add a new server to your network and you do not specify the values described in this table, the global settings are applied automatically.
.
5. Click Save to save your settings permanently.
Related Topic
“Configuring General Security Settings” on page 65
Unlocking the Secure Vault
You can unlock and change the password for the secure vault in the Configure > Security > Secure Vault page.
The secure vault contains sensitive information from your Mobile Controller configuration, including SSL private keys. These configuration settings are encrypted on the disk at all times, using AES 256-bit encryption.
Initially the secure vault is keyed with a default password known only to the Mobile Controller software, which allows the Mobile Controller to automatically unlock the vault during system startup. You can change the password, but when you do, the secure vault does not automatically unlock on startup. To optimize SSL connections, the secure vault must be unlocked.
Control Description
Add a TACACS+ Server Displays the controls for defining a new TACACS+ server.
Hostname or IP Address Specify the hostname or server IP address.
Authentication Port Specify the port for the server. The default value is 49.
Authentication Type Select either PAP or ASCII as the authentication type. The default value is PAP.
Override the Global Default Key
Specify this option to override the global server key for the server.
Server Key Specify the override server key.
Confirm Server Key Confirm the override server key.
Timeout Specify the time-out period in seconds (1 to 60). The default is 3.
Retries Specify the number of times you want to allow the user to retry authentication. Valid values are from 0 to 5. The default is 1.
Enabled Enables the new server.
Add Adds the TACACS+ server to the list.
Remove Selected Select the check box next to the name and click Remove Selected.
74 SteelCentral Controller for SteelHead Mobile User’s Guide

Unlocking the Secure Vault Configuring Security Settings
To unlock or change the password of the secure vault
1. Choose Configure > Security > Secure Vault to display the Secure Vault page.
Figure 4-6. Secure Vault Page
2. Under Unlock Secure Vault, complete the configuration as described in this table.
3. Under Change Secure Vault Password, complete the configuration as described in this table.
4. Click Save to save your settings permanently.
Related Topic
“Configuring General Security Settings” on page 65
Control Description
Password Specify a password and click Unlock Secure Vault.
Initially the secure vault is keyed with a default password known only to the Mobile Controller software, which allows the Mobile Controller to automatically unlock the vault during system startup. You can change the password, but the secure vault does not automatically unlock on startup. To optimize SSL connections, you must unlock the secure vault.
Unlock Secure Vault Unlocks the vault.
Control Description
Current Password Specify the current password. If you are changing the default password that ships with the product, leave the text box blank.
New Password Specify a new password for the secure vault.
New Password Confirm Confirm the new password for the secure vault.
Change Password Changes the password for the secure vault.
SteelCentral Controller for SteelHead Mobile User’s Guide 75

Configuring Security Settings Configuring Web Settings
Configuring Web Settings
You can modify Management Console web user interface and certificate settings in the Configure > Security > Web Settings page.
To modify web settings
1. Choose Configure > Security > Web Settings to display the Web Settings page.
Figure 4-7. Web Settings Page
2. Under Web Settings, complete the configuration as described in this table.
3. Click Apply to apply your changes to the running configuration.
4. Click Save to save your settings permanently.
Control Description
Default Web Login ID Specify the username that appears in the authentication page. The default value is admin.
Web Inactivity Timeout Specify the number of idle minutes before time-out. The default value is 15. A value of 0 disables time-out.
Allow Session Timeouts When Viewing Auto-Refreshing Pages
By default, session time-out is enabled, which stops the automatic updating of the report pages when the session times out. Clear the Allow box to disable the session time-out, remain logged-in indefinitely, and automatically refresh the report pages.
Caution: Disabling this feature poses a security risk.
76 SteelCentral Controller for SteelHead Mobile User’s Guide

Configuring Web Settings Configuring Security Settings
Managing Web SSL Certificates
The Mobile Controller provides the following additional security features to manage SSL certificates used by the Management Console web user interface using HTTPS:
Generate the certificate and key pairs on the Mobile Controller. Generating the certificate and key pairs overwrites the existing certificate and key pair, regardless of whether the previous certificate and key pair was self-signed or user added. The new self-signed certificate lasts for one year (365 days).
Create certificate signing requests from the certificate and key pairs.
Replace a signed certificate with one created by an administrator or generated by a third-party certificate authority.
Note: The web certificate applies only to connections made to the HTTP and HTTPS services of the Mobile Controller and is not used for connections between the SteelHead Mobile clients and the Mobile Controller.
To modify web certificates
1. Choose Configure > Security > Web Settings to display the Web Settings page.
2. Under Web Certificate, select the Details tab. The Mobile Controller identity certificate details appear, as described in this table.
3. To view the certificate in PEM format, under Web Certificate, select the PEM tab.
Control Description
Issued To/Issued By Common Name - Specifies the common name of the certificate authority.
Organization - Specifies the organization name (for example, the company).
Organization Unit - Specifies the organization unit name (for example, section or department).
Locality - Specifies the city.
State - Specifies the state.
Country - Specifies the country.
Serial Number - Specifies the serial number (Issued To, only).
Validity Issued On - Specifies the date the certificate was issued.
Expires On - Specifies the date the certificate expires.
Fingerprint Specifies the SSL fingerprint.
Key Type - Specifies the key type.
Size - Specifies the size in bytes.
SteelCentral Controller for SteelHead Mobile User’s Guide 77

Configuring Security Settings Configuring Web Settings
4. To replace an existing certificate, under Web Certificate, select the Replace tab and complete the configuration as described in this table.
5. Click Import Key and Certificate to import the key and certificate (for imported keys), or click Generate Key and Certificate to generate the key and certificate (for new keys).
Control Description
Import Existing Private Key and CA-Signed Public Certificate
(One File in PEM or PKCS12 Formats)
Imports the existing private key and CA-signed public certificate as a single file.
The page displays controls for importing a single file either by browsing to and uploading the certificate and keys or by using the text box to copy and paste a PEM file.
Then enter the decryption password in the Decryption Password field, if necessary.
Note: Decryption passwords are required for PKCS-12 files, and they are optional for PEM files.
Import Existing Private Key and CA-Signed Public Certificate
(Two Files in PEM or DER Formats)
Imports the existing private key and CA-signed public certificate as two separate files.
Import the private key either by browsing to and uploading the file or by copying and pasting a PEM file into the key text box. Then enter the decryption password in the Decryption Password field, if necessary.
Note: Decryption passwords are optional for PEM files, and they are never needed for DER files.
Import the public certificate either by browsing to and uploading the file or by copying and pasting a PEM file into the certificate text box.
Generate New Private Key and Self-Signed Public Certificate
Select this option to generate a new private key and self-signed public certificate.
Cipher Bits - Select the key length from the drop-down list. The default value is 1024.
Organization Name - Specify the organization name (for example, the company).
Organization Unit Name - Specify the organization unit name (for example, the section or department).
Locality - Specify the city.
State - Specify the state.
Country - Specify the country (two-letter code only).
Email Address - Specify the email address of the contact person.
Validity Period - Specify how many days the certificate is valid. The default value is 730.
78 SteelCentral Controller for SteelHead Mobile User’s Guide

Configuring Web Settings Configuring Security Settings
6. To generate a Certificate Signing Request (CSR), under Web Certificate, select the Generate CSR tab and complete the configuration as described in this table.
7. Click Generate CSR to generate the CSR.
8. Click Save to save the settings permanently.
Control Description
Common Name Specify the common name (hostname).
Organization Name Specify the organization name (for example, the company).
Organization Unit Name Specify the organization unit name (for example, the section or department).
Locality Specify the city.
State Specify the state. Do not abbreviate.
Country Specify the country (2-letter code only).
Email Address Specify the email address of the contact person.
SteelCentral Controller for SteelHead Mobile User’s Guide 79

Configuring Security Settings Configuring Web Settings
80 SteelCentral Controller for SteelHead Mobile User’s Guide

Beta Draft
CHAPTER 5 Managing Mobile Controllers
This chapter describes the tasks you perform for routine management of the Mobile Controller. It includes the following sections:
“Configuring Scheduled Jobs” on page 81
“Managing Licenses” on page 82
“Upgrading Your Software” on page 84
“Rebooting and Shutting Down the Mobile Controller” on page 87
“Configuring Mobile Controller Clusters” on page 87
“Managing Configurations” on page 91
To use this chapter, you must know how to install, configure, and manage WAN optimization using the SteelHead. For details about the SteelHead, see the SteelHead Installation and Configuration Guide, the SteelHead Management Console User’s Guide, and the SteelHead Deployment Guide.
Configuring Scheduled Jobs
You can view completed, pending, and inactive jobs as well as jobs that were not completed because of an error in the Configure > Maintenance > Scheduled Jobs page. You can also delete a job, change its status, or modify its properties.
Jobs are commands that are scheduled to run at a time you specify.
You can use the Management Console to:
schedule a software upgrade.
generate multiple TCP dumps on a specific date and time.
To schedule all other jobs, you must use the Riverbed CLI.
For details on scheduling jobs using the CLI, see the Riverbed Command-Line Interface Reference Manual.
SteelCentral Controller for SteelHead Mobile User’s Guide 81

Beta Draft
Managing Mobile Controllers Managing Licenses
To configure scheduled jobs
1. Choose Configure > Maintenance > Scheduled Jobs to display the Scheduled Jobs page.
Figure 5-1. Scheduled Jobs Page
2. Select the Job ID number to display details about the job.
3. Select Enabled or Disabled from the drop-down list to enable or disable the job.
4. Under Details for Job <#>, complete the configuration as described in this table.
5. Click Save to save your settings permanently.
Managing Licenses
After you purchase the Mobile Controller, Riverbed Support emails to you the license keys, required on the Licenses page. A single license key can contain more than 2000 licenses. Licensing can affect how you configure your Mobile Controller deployment.
The Mobile Controller comes with concurrent licenses. Concurrent licenses are not limited to specific users. Any of your users can utilize the licenses, provided that the number of connected users does not exceed the number of licenses that you purchased. The Mobile Controller does not support the use of more than 4000 endpoint licenses at any one time.
You add or remove license keys in the Licenses page. The page always displays a list of active licenses.
Control Description
Name Specify a name for the job.
Comment Specify a comment.
Interval (seconds) Specify the number of seconds between job recurrences. Specify 0 to run the job one-time only.
Executes on Specify the start time and end time using the format YYYY/MM/DD HH:MM:SS.
Enable/Disable Job Select the check box to enable the job, clear the check box to disable the job.
Apply Changes Applies the changes to the current configuration.
Cancel/Remove This Job Cancels and removes the job.
Execute Now Runs the job.
Remove Selected Jobs Select the check box next to the name and click Remove Selected Jobs.
82 SteelCentral Controller for SteelHead Mobile User’s Guide

Beta Draft
Managing Licenses Managing Mobile Controllers
Installing a License
This section describes how to request and fetch a license manually from the Riverbed license portal or install a license manually after receiving it from Riverbed Support or Sales.
Mobile Controller 4.0 and later simplifies license management by providing an automated way to fetch and activate licenses for Riverbed products. You no longer have to manually activate individual appliances and install the licenses.
Fetching a license is restricted for read-only users such as monitor and RBM users with read-only access for General Settings (permissions are granted on the Configure > Security > User Permissions page).
To install a license on a new Mobile Controller
Connect a new Mobile Controller to the network.
The Mobile Controller automatically contacts the Riverbed license portal and downloads the licenses. The Licensing page displays a success message, or the Alarm Status page reports an actionable error message.
To replace expired licenses
Purchase new downloadable licenses to replace the expired license.
At the time of the next scheduled automatic license fetch, the Mobile Controller automatically contacts the Riverbed license portal and downloads the new licenses. The Licensing page displays a success message, or the Alarm Status page reports an actionable error message.
To fetch a license on demand
1. Choose Configure > Maintenance > Licenses to display the Licenses page.
2. Click Fetch Updates Now.
The Licensing page displays a success message, or the Alarm Status page reports an actionable error message.
To install a license
1. Choose Configure > Maintenance > Licenses to display the Licenses page.
Figure 5-2. Licenses Page
The Licenses page includes a table of licenses with a column showing the date and time the license was installed.
2. Click Fetch Updates Now (below the license table) to update the status of the existing licenses.
After you click the Fetch Updates Now button, a note displays the date and time of the last update. Normal update results appear in black, and any errors appear in red.
SteelCentral Controller for SteelHead Mobile User’s Guide 83

Beta Draft
Managing Mobile Controllers Upgrading Your Software
3. Complete the configuration as described in this table..
4. Click Save to save your settings permanently.
Upgrading Your Software
You can upgrade or revert to a backup version of the software in the Configure > Maintenance > Software Upgrade page.
The bottom of the page displays the software version history of the SteelHead Mobile, which includes the version number and the software installation date.
Control Description
Add a New License Displays the controls to add a new license.
Licenses Text Box Copy and paste the license key provided by Riverbed Support or Sales into the text box.
Note: Separate multiple license keys with a space, Tab, or Enter.
Add Adds the license.
Fetch Updates Now Contacts the Riverbed license portal and downloads all applicable licenses for the SteelHead.
84 SteelCentral Controller for SteelHead Mobile User’s Guide

Beta Draft
Upgrading Your Software Managing Mobile Controllers
To revert software version
1. Choose Configure > Maintenance > Software Upgrade to display the Software Upgrade page.
Figure 5-3. Software Upgrade Page
2. Under Software Upgrade, complete the configuration as described in this table.
To upgrade software version
1. Choose Configure > Maintenance > Software Upgrade to display the Software Upgrade page.
Control Description
Switch to Backup Version Switches to the backup version on the next reboot.
Cancel Version Switch Cancels the software version switch on the next reboot.
SteelCentral Controller for SteelHead Mobile User’s Guide 85

Beta Draft
Managing Mobile Controllers Upgrading Your Software
2. Under Install Upgrade, complete the configuration as described in this table.
3. Reboot the Mobile Controller. For details, see “Rebooting and Shutting Down the Mobile Controller” on page 87.
Related Topic
“Configuring Scheduled Jobs” on page 81
Control Description
From URL Select this option and specify the URL.
Use one of the following formats:
http://host/path/to/file
https://host/path/to/file
ftp://user:password@host/path/to/file
scp://user:password@host/path/to/file
From Riverbed Support Site Select this option and then select the target release number from the drop-down list. The system uploads and installs the new image immediately after you click Install. To upload and install the image later, schedule another date or time before you click Install.
Optionally, in SteelCentral 4.8 and later, you can download a delta image directly from the Riverbed Support site to the SteelHead appliance. The downloaded image includes only the incremental changes. The smaller file size means a faster download and less load on the network.
From Local File Select this option and specify the path, or click Browse to go to the local file directory.
If you specify a file to upload in the Local File text box, the image is uploaded immediately; however the image is installed and the system is rebooted at the time you specify.
Schedule Upgrade for Later Schedules the upgrade process. Specify the date and time to run the upgrade: yyyy/mm/dd, hh:mm:ss.
Install Click to install the software upgrade on your system, unless you schedule it for later.
The software image can be quite large; uploading the image to the appliance and installing it can take a few minutes. Downloading a delta image directly from the Riverbed Support site is faster because the downloaded image includes only the incremental changes.
As the upgrade progresses, status messages appear.
After the installation is complete, the system reminds you to reboot the appliance to switch to the new version of the software.
Cancel Cancels your changes.
86 SteelCentral Controller for SteelHead Mobile User’s Guide

Beta Draft
Rebooting and Shutting Down the Mobile Controller Managing Mobile Controllers
Rebooting and Shutting Down the Mobile Controller
You can reboot or shut down the system in the Configure > Maintenance > Reboot/Shutdown page.
To restart the system, you must manually turn on the Mobile Controller appliance.
To reboot or shut down the system
1. Choose Configure > Maintenance > Reboot/Shutdown to display the Reboot/Shutdown page.
Figure 5-4. Reboot/Shutdown Page
2. Click Reboot. After you click Reboot, you are logged out of the system and it is rebooted.
3. Click Shutdown to shut down the system. After you click Shutdown, the system turns off. To restart the system, you must manually turn on the Mobile Controller.
Configuring Mobile Controller Clusters
You can create a cluster, or join an existing cluster of two or more Mobile Controllers, on the Cluster page. Mobile Controller clusters simplify the process of configuring Mobile Controllers for large deployments or high availability deployments with multiple Mobile Controllers. You can join two or more Mobile Controllers to provide a pool for available licenses. The entire pool of available licenses remains available to the SteelHead Mobile clients, even if one Mobile Controller uses all of its installed licenses or one Mobile Controller fails. The SteelHead Mobile clients can connect to any Mobile Controller in a cluster and have the same configuration and administrative experience.
Clusters provide the SteelHead Mobile clients with the same experience regardless of the Mobile Controller to which they connect by synchronizing the policies and other configuration settings across a set of member Mobile Controllers. You can configure cluster-wide settings on any member of the cluster, and these settings propagate across the cluster. However, node-specific settings must be configured locally on each Mobile Controller in the cluster.
Note: Peering certificates can be clustered, but the Signing CA and other settings under SSL are node-specific. Other node-specific settings include the Mobile Controller hostname and IP address.
Clustered Mobile Controllers pool their licenses, making the set of all base licenses available even if one or more Mobile Controllers in the cluster are not available. Although licenses are pooled between all members in a cluster, you must install base licenses on each Mobile Controller.
SteelCentral Controller for SteelHead Mobile User’s Guide 87

Beta Draft
Managing Mobile Controllers Configuring Mobile Controller Clusters
The Mobile Controller connects to a cluster in steps. First it sends a request to join the cluster to any existing cluster member. If accepted, it begins the process of joining a cluster. Settings of the Mobile Controller joining the cluster are deleted during the joining process, and the joining Mobile Controller synchronizes its configurations with that of the cluster. When the connection process finishes and synchronization is complete, the Mobile Controller is a member of the cluster.
Note: For clusters with more than three nodes, Riverbed recommends that you do not use extra-small Virtual Mobile Controllers (with 2 GB in the /data partition size).
You work with clusters on the Manage > Clusters page. This page shows the number of desktop licenses installed and in use.
Figure 5-5. Cluster Settings Page
Prerequisites
Before you can add a Mobile Controller to a cluster, you must complete the following prerequisites:
Have a valid IP address for the Mobile Controller.
Know the fully qualified domain name (FQDN) of the Mobile Controller.
Be able to connect to the other members in the cluster.
Have the same set of base licenses installed on all the members of the cluster: for example CIFS, MAPI, SSL, and so forth. For details on managing Mobile Controller licenses, see “Managing Licenses” on page 82.
Ensure that SSL trust can be established between all Mobile Controllers in the cluster. Generally, this trust is done by sharing the Signing CA certificate of members of the cluster. Prior to joining the cluster, you can export the existing signing CA, including the private key for the Mobile Controller. For details on exporting signing CAs, see “To export an existing certificate” on page 103.
Import the signing CA and private key of the other members of the cluster to the Mobile Controller. Prior to joining the cluster, you must replace (import) the existing signing CA, including the private key, for the Mobile Controllers in the cluster (One File in PEM or PKCS12 formats). For details on replacing (importing) existing signing CAs, see “To replace a Mobile Controller signing CA” on page 100.
88 SteelCentral Controller for SteelHead Mobile User’s Guide

Beta Draft
Configuring Mobile Controller Clusters Managing Mobile Controllers
Configuration Settings in Your Clusters
After you join a cluster, the configuration settings on your Mobile Controller are replaced by those shared in the cluster. When you change those settings on your Mobile Controller, those changes are made to the configuration of each Mobile Controller in the cluster. The following table lists the features that are shared by each Mobile Controller in the cluster.
To join a cluster
1. Choose Configure > Cluster to display the Cluster page.
2. Specify, in the Host name text box, the IP address or hostname of any Mobile Controller that is a member of the cluster.
3. Optionally, specify a port number.
4. Click Attach to join the cluster.
After your Mobile Controller has joined the cluster, the Attach button becomes the Detach button. To leave a cluster, click Detach. You can remove any Mobile Controller in the cluster from any cluster member.
To remove a Mobile Controller from the cluster
1. Click the box next to any cluster member listed under Controllers in the cluster.
Figure 5-6. Remove from Cluster
2. Click Remove from cluster.
Feature Description
Policies All policy settings propagate throughout the cluster.
Packages Packages created on any member Mobile Controller are available to all clients and Mobile Controllers in the cluster.
Assignments and Group Settings All group assignments and settings propagate throughout the cluster.
Adapter List List of available interfaces.
Endpoint Report The Endpoint report for any cluster member shows all endpoints connected to the cluster. For detailed information about Endpoint reports, see “Viewing Reports for Endpoints” on page 159.
License Pooling Base licenses must be installed on each Mobile Controller in the cluster. Cluster members share licenses.
Peering Certificates Establishes a trust relationship for the SSL peering certificates of all Mobile Controllers in the cluster.
Port Labels Port labels created on any member Mobile Controller are available to all clients and Mobile Controllers in the cluster.
Monitored Ports Monitored port configuration settings made on any member Mobile Controller are applied to all clients and Mobile Controllers in the cluster.
SteelCentral Controller for SteelHead Mobile User’s Guide 89

Beta Draft
Managing Mobile Controllers Configuring Mobile Controller Clusters
You can check the status of any cluster member in the Status column. The possible values for the Status column are defined in this table.
Troubleshooting Cluster Connections
The following situations can cause your Mobile Controller to become disconnected from the cluster:
The Mobile Controller that your Mobile Controller is connected to has become unreachable for some reason.
The trust settings on your Mobile Controller or the peer to which you are connected have changed and no longer match. Check your SSL settings; see “Basic Steps for Configuring SSL Proxy Support” on page 95.
If your Mobile Controller is disconnected from the cluster, and attempts to reconnect are denied, detach and rejoin the cluster. For details, see “Configuring Mobile Controller Clusters” on page 87.
Make sure that you have your logs configured at Error level. Cluster error messages appear at this level. For details on filtering log messages, see “Viewing and Downloading Logs” on page 187.
Troubleshooting Mobile Controller Connectivity
The following topologies can cause problems with Mobile Controller connectivity:
Firewalls between the endpoint and the Mobile Controller - To more easily manage the Mobile Controller, be sure to open the firewall to allow access to ports 22, 80, 443, and 7870. For more information about firewalls and firewall requirements, see the SteelCentral Controller for SteelHead Mobile Installation Guide.
Mixed mode clustering - In this topology, the Mobile Controllers use different versions of the software. Mix mode clustering can occur when not all the Mobile Controllers are updated to the latest software release.
Making policy, configuration, and cluster changes in mixed mode can be challenging. Therefore, Riverbed recommends that all the Mobile Controllers be updated to the same version of the software.
For more information, see the Riverbed Knowledge Base for any known issues, how-to documents, system requirements, and common error messages. You can browse titles or search for keywords and strings. To access the Riverbed Knowledge Base, log in to the Riverbed Support site athttps://support.riverbed.com.
Status Description
Joining The Mobile Controller is joining a cluster member.
Connecting The Mobile Controller is connecting to a cluster member.
Connected, Syncing The Mobile Controller is connected to a cluster member and is configuring its settings to match the cluster’s settings.
Connected, Synced The Mobile Controller is connected to a cluster member and has finished changing its settings to match the cluster’s settings.
Disconnected The Mobile Controller cannot connect with the specified cluster member.
Disconnected, Denied The cluster member is actively denying connections to the local Mobile Controller.
90 SteelCentral Controller for SteelHead Mobile User’s Guide

Beta Draft
Managing Configurations Managing Mobile Controllers
License Pooling
In Mobile Controller clusters, licenses for all members are shared and available to each member of the cluster.
Members of the cluster can check out licenses from the license pool in small batches and return them when no longer needed, such as when the SteelHead Mobile clients disconnect from the Mobile Controller or no longer require a license.
When the Mobile Controller fails, other members detect the failure and all licenses are returned to the free pool. The Mobile Controller checks out a new batch of licenses when it comes back up. Initially, by default, the Mobile Controller collects up to 100 licenses (if they are available), and then acquires more if needed. If no licenses are available when the Mobile Controller comes back online, it is not able to check out licenses until they are released from other Mobile Controllers.
Managing Configurations
You can save, activate, and import configurations in the Configure > Configurations page.
Each Mobile Controller has an active, running configuration and written, saved configurations.
When you apply your settings in the Mobile Controller, the values are applied to the active running configuration, but the values are not written to disk and saved permanently.
When you save your configuration settings, the values are written to disk and saved permanently.
Each time you save your configuration settings, they are written to the current running configuration, and a backup is created. For example, if the running configuration is myconfig and you save it, myconfig is backed up to myconfig.bak and myconfig is overwritten with the current configuration settings.
The Configuration Manager is a utility that enables you to save configurations as backups or active configuration backups.
SteelCentral Controller for SteelHead Mobile User’s Guide 91

Beta Draft
Managing Mobile Controllers Managing Configurations
To manage configurations
1. Choose Configure > Configurations to display the Configurations page.
Figure 5-7. Configurations Page
2. Use the controls to manage configurations as described in this table.
Note: Click the configuration name to display the configuration settings in a new browser window.
Control Description
Current Configuration Save Configuration - To save settings that have been applied to the running configuration, click Save Configuration.
Revert - To revert your settings to the running configuration, click Revert.
Save Current Configuration New Configuration Name - To save settings that have been applied to the running configuration as a new filename, type a name in the Name text box.
Save - To save the current configuration name, click Save.
Configurations Remove Selected Configuration - To remove an entry from the list, select the check box next to the entry and click Remove Selected Configuration.
Change Active Configuration To activate an alternative configuration, select a configuration in the list and click Activate.
92 SteelCentral Controller for SteelHead Mobile User’s Guide

CHAPTER 6 Configuring SSL for Mobile
Controllers
This chapter describes how to configure SSL support for the Mobile Controller. It includes the following sections:
“Configuring SSL for Mobile Controllers” on page 93
“Configuring Mobile Controller Peering” on page 96
“Modifying SSL Server Certificate Settings” on page 98
“Configuring SSL Certificate Authorities” on page 105
“Configuring SSL Bulk Import and Export” on page 106
Configuring SSL for Mobile Controllers
Each Mobile Controller is manufactured with its own self-signed certificate and private key that uniquely identifies that Mobile Controller.
For detailed information about SSL, see the SteelHead Management Console User’s Guide.
The Mobile Controller provides you with the following SSL options.
SSL Task Reference
Enable SSL in Mobile Controller policies You can enable SSL in your SteelHead Mobile polices. For details, see “Configuring SSL for Policies” on page 137.
Create SSL peering relationships You can create peering relationships between the Mobile Controller and the SteelHeads in your network. You must have a trusted peer relationship to create Mobile Controller clusters. For details about Mobile Controller clusters, see “To configure SSL Peering” on page 97.
View Mobile Controller certificate details You can view the current Mobile Controller certificate details. For details, see “To view signing CA details” on page 98.
Add chain certificates If your organization uses internal CAs to sign its SSL server certificates, you must import each of the certificates (in the chain) onto the Mobile Controller. For details, see “To add a chain certificate” on page 99.
View certificates in Privacy Enhanced Mail (PEM) format
You can view the certificate in Privacy Enhanced Mail (PEM) format. For details, see “To view a CA in PEM format” on page 100.
SteelCentral Controller for SteelHead Mobile User’s Guide 93

Configuring SSL for Mobile Controllers Configuring SSL for Mobile Controllers
Basic Steps for Configuring SSL
The following tables describe the basic steps for configuring SSL in the Mobile Controller and the SteelHead.
This table lists the tasks to be completed at the Mobile Controller, along with the section where you can find details about the task..
This table lists the tasks to be completed at the the SteelHead, along with the section where you can find details about the task.
Replace (import) certificates By default, the Mobile Controller ships with a default peer certificate. Riverbed recommends that you replace the default peer certificate with a certificate with a matching common name and security parameters (key length). For details, see “To replace a Mobile Controller signing CA” on page 100.
Export certificates You can export the signing CA of the Mobile Controller to the peer SteelHead and then import it to establish the peer relationship. For details, see “To export an existing certificate” on page 103.
Generate certificate signing requests (CSR) You can generate a CSR for the current private key. For details, see “To generate a CSR” on page 104.
Mobile Controller Task Reference
1. Add the root CA to the CAs. Choose Configure > SSL > Certificate Authorities. For details, see “To add SSL certificate authorities” on page 105.
2. Add the signing CA. Choose Configure > SSL > Signing CA. For details, see “To view signing CA details” on page 98.
3. Add the root CA as a chain certificate. Choose Configure > SSL > Signing CA. For details, see “To add a chain certificate” on page 99.
SteelHead Task Reference
1. Add the root CA to the CA list. Choose Configure > Optimization > Certificate Authorities. For details, see the SteelHead Management Console User’s Guide.
2. Create a trust relationship with the root CA. Choose Configure > Optimization > Secure Peering. Make sure that you select Trust Existing CA and select the root CA from the drop-down list. For details, see the SteelHead Management Console User’s Guide.
3. Add the signing CA to the Mobile Controller trust list. Choose Configure > Optimization > Secure Peering. Make sure that you select Add a New Mobile Entity and navigate to the local file. For details, see the SteelHead Management Console User’s Guide.
4. Add the server certificate. Choose Configure > Optimization > SSL Main Settings. Make sure that you select Import Existing Private Key and CA-Signed Public Certificate. For details, see the SteelHead Management Console User’s Guide.
SSL Task Reference
94 SteelCentral Controller for SteelHead Mobile User’s Guide

Configuring SSL for Mobile Controllers Configuring SSL for Mobile Controllers
Basic Steps for Configuring SSL Proxy Support
The following tables describe the basic steps for configuring SSL proxy support in the Mobile Controller and the SteelHead.
This table lists the tasks to be completed at the Mobile Controller, along with the section where you can find details about the task..
Mobile Controller Task Reference
1. Enable the SSL proxy support feature. Choose Manage > Policies > SSL. Select the policy. Then select the Enable SSL Optimization check box and the Enable SSL Proxy Support check box. For details, see “Configuring SSL for Policies” on page 137.
2. Add the in-path rules for the SSL proxy. Choose Manage > Policies > In-Path Rules. Add an in-path rule that applies SSL preoptimization to all connections going through the SSL proxy. For details, see “Configuring In-Path Optimization Rules for Policies” on page 112.
Caution: When non-SSL connections go through the SSL proxy, the in-path rule is applied and the connections are included in the SSL connection totals.
However, since the connection is a non-SSL connection, it is considered an unsuccessful SSL connection and is reflected as such on the Status display for the SteelHead as shown in the example below:
SSL Connections (Successful/Total): 25675/50624
The unsuccessful connections (that is, the non-SSL connections) will also be reflected in the SSL endpoint reports on the Mobile Controller (Reports > Endpoints > SSL).
3. Export the Mobile Controller certificate to the SteelHead.
Note: Complete this step at the SteelHead.
At the SteelHead, choose Optimization > SSL: Secure Peering. For details, see the SteelHead Management Console User’s Guide.
4. Import the SteelHead certificate to the Mobile Controller. Choose Configure > SSL > Peering > Add a New Trusted Entity. For details, see “Configuring Mobile Controller Peering” on page 96.
SteelCentral Controller for SteelHead Mobile User’s Guide 95

Configuring SSL for Mobile Controllers Configuring Mobile Controller Peering
This table lists the tasks to be completed at the SteelHead, along with the section where you can find details about the task.
Configuring Mobile Controller Peering
You configure secure peers between the Mobile Controller and the SteelHead in the Configure > SSL > Peering page.
For basic steps for configuring SSL in the Mobile Controller and the SteelHead, see “Basic Steps for Configuring SSL” on page 94.
For basic steps for configuring the SSL Proxy Support feature in the Mobile Controller and the SteelHead, see “Basic Steps for Configuring SSL Proxy Support” on page 95.
For details about SSL peering, see the SteelHead Management Console User’s Guide.
SteelHead Task Reference
1. Enable the SSL proxy support feature. Choose Optimization > SSL: Advanced Settings. Be sure to select the Enable SSL Proxy Support check box. For details, see the SteelHead Management Console User’s Guide.
2. Create the server certificate on the SteelHead. Choose Optimization > SSL: SSL Main Settings > SSL Server Certificates. For details, see the SteelHead Management Console User’s Guide.
3. Import the Mobile Controller certificate to the SteelHead.
Note: This step consists of two parts, one completed at the Mobile Controller and one completed at the SteelHead.
• At the Mobile Controller, choose Configure > SSL > Signing CA. For details, see, “To configure SSL Peering” on page 97.
• At the SteelHead, choose Optimization > SSL: Secure Peering (SSL) > Mobile Trust. For details, see the SteelHead Management Console User’s Guide.
96 SteelCentral Controller for SteelHead Mobile User’s Guide

Configuring Mobile Controller Peering Configuring SSL for Mobile Controllers
To configure SSL Peering
1. Choose Configure > SSL > Peering to display the Peering page.
Figure 6-1. Peering Page
2. To add or remove a trusted entity, under Peering Trust, complete the configuration as described in this table.
Control Description
Add a New Trusted Entity Displays the controls for adding trusted entities.
Trust Existing CA Select an existing CA from the drop-down list.
Trust New Certificate Adds a new CA or peer certificate. The SteelHead supports RSA and DSA for peering trust entities.
Optional Local Name Optionally, specify a local name for the entity (for example, the fully qualified domain name).
Local File Browse to the local file.
Cert Text Paste the content of the certificate text file into the text box.
Add Adds the trusted entity (or peer) to the trusted peers list.
Remove Selected Select the check box next to the name and click Remove Selected.
SteelCentral Controller for SteelHead Mobile User’s Guide 97

Configuring SSL for Mobile Controllers Modifying SSL Server Certificate Settings
Modifying SSL Server Certificate Settings
You can modify Mobile Controller certificate authority (CA) settings in the Configure > SSL > Signing CA page. You can perform the following tasks on the Signing CA page:
“To view signing CA details” on page 98
“To add a chain certificate” on page 99
“To view a CA in PEM format” on page 100
“To replace a Mobile Controller signing CA” on page 100
“To export an existing certificate” on page 103
“To generate a CSR” on page 104
For basic steps for configuring SSL in the Mobile Controller and the SteelHead, see “Basic Steps for Configuring SSL” on page 94.
To view signing CA details
1. Choose Configure > SSL > Signing CA to display the Signing CA page.
Figure 6-2. Signing CA - Details Page
98 SteelCentral Controller for SteelHead Mobile User’s Guide

Modifying SSL Server Certificate Settings Configuring SSL for Mobile Controllers
2. Select the Details tab to display the Signing CA - Details page.
The Signing CA - Details page displays the following information for the Mobile Controller CA.
To add a chain certificate
1. Choose Configure > SSL > Signing CA to display the Signing CA page.
Figure 6-3. Signing CA - Details Page
Field Description
Issued To/Issued By Common Name - Specifies the common name of the certificate authority.
Organization - Specifies the organization name (for example, the company).
Organization Unit - Specifies the organization unit (optional).
Locality - Specifies the city.
State - Specifies the state.
Country - Specifies the country.
Serial Number - Specifies the serial number (Issued To, only).
Validity Issued On - Specifies the date the certificate was issued.
Expires On - Specifies the date the certificate expires.
Fingerprint SHA1 - Specifies the SSL fingerprint.
SteelCentral Controller for SteelHead Mobile User’s Guide 99

Configuring SSL for Mobile Controllers Modifying SSL Server Certificate Settings
2. Complete the configuration as described in this table.
3. Click Save to save the settings permanently.
To view a CA in PEM format
1. Choose Configure > SSL > Signing CA to display the Signing CA page.
2. Under SMC Signing CA Key/Certificate, select PEM to display the CA in the PEM format.
Figure 6-4. Signing CA Page
To replace a Mobile Controller signing CA
1. Choose Configure > SSL > Signing CA to display the Signing CA page.
Control Description
Add a New Chain Certificate Displays the controls to add a chain certificate.
Use Existing CA Select to use an existing certificate authority, and then select the certificate authority from the drop-down list.
Use New Certificate(s) PEM or DER formats
Select to use a new certificate.
Optional Local Name Optionally, specify a local name for the certificate.
Local File Browse to the local file.
Cert Text Paste the contents of the certificate text file into the text box.
Add Adds the chain certificate to the chain certificate list.
Remove Selected Select the check box next to the name and click Remove Selected.
100 SteelCentral Controller for SteelHead Mobile User’s Guide

Modifying SSL Server Certificate Settings Configuring SSL for Mobile Controllers
2. Under SCCM Signing CA Key/Certificate, select Replace to display the import CA options.
Figure 6-5. Signing CA - Replace CA Page
3. Complete the configuration as described in this table.
Control Description
Import Existing Private Key and CA-Signed Public Certificate
(One File in PEM or PKCS12 Formats)
Imports the existing private key and CA-signed public certificate as a single file.
The page displays controls for importing a single file either by browsing to and uploading the certificate and keys or by using the text box to copy and paste a PEM file.
Then enter the decryption password in the Decryption Password field, if necessary.
Note: Decryption passwords are required for PKCS-12 files, and they are optional for PEM files.
SteelCentral Controller for SteelHead Mobile User’s Guide 101

Configuring SSL for Mobile Controllers Modifying SSL Server Certificate Settings
4. Click Import Key and Certificate to import the key and certificate (for imported keys), or click Generate Key and Certificate to generate the key and certificate (for new keys).
5. Click Save to save the settings permanently.
Import Existing Private Key and CA-Signed Public Certificate
(Two Files in PEM or DER Formats)
Imports the existing private key and CA-signed public certificate as two separate files.
Import the private key either by browsing to and uploading the file or by copying and pasting a PEM file into the key text box. Then enter the decryption password in the Decryption Password field, if necessary.
Note: Decryption passwords are optional for PEM files, and they are never needed for DER files.
Import the public certificate either by browsing to and uploading the file or by copying and pasting a PEM file into the certificate text box.
Generate New Private Key and Self-Signed Public Certificate
Select this option to generate a new private key and self-signed public certificate.
Cipher Bits - Select the key length from the drop-down list. The default value is 1024.
Common Name (required) - Specify the hostname of the peer.
Organization Name - Specify the organization name (for example, the company).
Organization Unit Name - Specify the organization unit name (for example, the section or department).
Locality - Specify the city.
State (no abbreviations) - Specify the state.
Country (2-letter code) - Specify the country (two-letter code only).
Email Address - Specify the email address of the contact person.
Validity Period (Days) - Specify how many days the certificate is valid. The default value is 730.
Control Description
102 SteelCentral Controller for SteelHead Mobile User’s Guide

Modifying SSL Server Certificate Settings Configuring SSL for Mobile Controllers
To export an existing certificate
1. Choose Configure > SSL > Signing CA to display the Signing CA page.
Figure 6-6. Signing CA - Export Page
2. Under SMC Signing CA Key/Certificate, select Export to display the export CA options.
3. Complete the configuration as described in this table.
4. Click Save to save the settings permanently.
Control Description
Password/Password Confirm Specify and confirm the encrypted password if you are including the private key (required if including key). The password must be at least four characters long.
Include Private Key Includes the private key in the export.
Export Exports the SteelHead appliance peering certificate and key.
SteelCentral Controller for SteelHead Mobile User’s Guide 103

Configuring SSL for Mobile Controllers Modifying SSL Server Certificate Settings
To generate a CSR
1. Choose Configure > SSL > Signing CA to display the Signing CA page.
Figure 6-7. Signing CA - Generate CSR Page
2. Select the Generate CSR tab to display the CSR options.
3. Complete the configuration as described in this table.
4. Click Save to save the settings permanently.
Control Description
Common Name (required) Specify the common name (hostname) of the peer.
Organization Name Specify the organization name (for example, the company).
Organization Unit Name Specify the organization unit name (for example, the section or department).
Locality Specify the city.
State Specify the state. Do not abbreviate.
Country (2-letter code) Specify the country (2-letter code only).
Email Address Specify the email address of the contact person.
Generate CSR Generates the Certificate Signing Request.
104 SteelCentral Controller for SteelHead Mobile User’s Guide

Configuring SSL Certificate Authorities Configuring SSL for Mobile Controllers
Configuring SSL Certificate Authorities
You add SSL certificate authorities (CA) in the Configure > SSL > Certificate Authorities page.
A CA is a third-party entity in a network that issues digital certificates and manages security credentials and public keys for message encryption. A CA issues a public key certificate that states the CA attests that the public key contained in the certificate belongs to the person, organization, server, or other entity noted in the certificate. The CA verifies applicant credentials, so that relying parties can trust the information in the CA certificates. If you trust the CA and can verify the CA signature, you can also verify that a certain public key does indeed belong to whomever is identified in the certificate.
Note: With the Client Authorization Certification (CAC) feature (Release 4.6 and later), clients can be certified using a variety of authentication certificates, depending on the browser or application they are using to connect to the SSL server.
Each certificate can serve a specific function, such as Key Exchange or Signature. For the Mobile Controller to successfully optimize traffic, the recommended certificate function is Key Exchange.
However, based on the inherent Windows-based cryptography settings (the Cryptographic Service Provider [CSP] installed on the Windows client) the certificate with the Signature function can also be used for authentication. Thus, the Mobile Controller can successfully optimize traffic with the Signature authorization certificate. This optimization is controlled by the host machine and the host machine settings.
Note: Before adding a CA, it is critical to verify that it is genuine; a malicious CA can compromise network security by signing fake certificates.
To add SSL certificate authorities
1. Choose Configure > SSL > Certificate Authorities to display the Certificate Authorities page.
Figure 6-8. Certificate Authorities Page
2. Under Certificate Authorities, complete the configuration as described in this table.
Control Description
Add a New Certificate Authority Optional Local Name (ignored if importing multiple certificates) - Specify the local name.
Local File - Browse to the local certificate authority file.
Cert Text - Paste the certificate authority into the text box and click Add.
SteelCentral Controller for SteelHead Mobile User’s Guide 105

Configuring SSL for Mobile Controllers Configuring SSL Bulk Import and Export
3. Click Save to save the settings permanently.
Note: Select the Certificate Authority name to display details.
Configuring SSL Bulk Import and Export
You configure SSL bulk import and export settings in the Configure > SSL > Advanced Settings page.
If you use self-signed peering certificates and have multiple Mobile Controllers (including multiple server-side appliances), you can use the bulk import feature to avoid configuring each peering trust relationship between the pairs of Mobile Controllers.
The bulk data that you import contains the serial number of the exporting Mobile Controller. The Mobile Controller importing the data compares its own serial number with the serial number contained in the bulk data.
The following rules apply to bulk data when importing and exporting the data:
Peering Certificate and Key Data - If the serial numbers match, the Mobile Controller importing the bulk data overwrites its existing peering certificates and keys with that bulk data. If the serial numbers do not match, the Mobile Controller importing the bulk data does not overwrite its peering certificate and key.
Certificate Authority, Peering Trust, and SSL Server Configuration Data - For all other configuration data, such as certificate authorities, peering trusts, and server configurations (if included), if there is a conflict, the imported configuration data takes precedence (that is, the imported configuration data overwrites any existing configurations).
Note: Bulk data importing operations do not delete configurations; they can only add or overwrite them.
Bulk importing does not require a service restart.
Add Adds the certificate authority.
Remove Selected Select the check box next to the name and click Remove Selected.
Control Description
106 SteelCentral Controller for SteelHead Mobile User’s Guide

Configuring SSL Bulk Import and Export Configuring SSL for Mobile Controllers
To perform bulk import operations
1. Choose Configure > SSL > Advanced Settings to display the Advanced Settings page.
Figure 6-9. Advanced Settings Page
2. Under Bulk Import, complete the configuration as described in this table.
3. Click Save to save your settings permanently.
To perform bulk export operations
1. Select one Mobile Controller (A) and trust all the Mobile Controllers peering certificates. Make sure that you include the peering certificate for Mobile Controller A. For details on configuring trusted peers, see “Basic Steps for Configuring SSL Proxy Support” on page 95.
2. Choose Configure > SSL > Advanced Settings to display the Advanced Settings page.
Control Description
Upload File Browse to the previously exported bulk file that contains the certificates and keys.
Password to Decrypt Specify the password used to decrypt the file.
Import Signing Certificate and Key
Import the signing certificate and private key.
Allow import of Signing Certificate and Key from a different Mobile Controller
Import the signing certificate and key from a different Mobile Controller.
Import Imports your SSL configuration, keys, and certificates, so that all the Mobile Controllers trust one another as peers.
SteelCentral Controller for SteelHead Mobile User’s Guide 107

Configuring SSL for Mobile Controllers Configuring SSL Bulk Import and Export
3. Under Bulk Export, complete the configuration as described in this table.
4. Click Save to save your settings permanently.
Control Description
Password Specify and confirm the password used for the export file.
Export Exports your SSL configuration and optionally your server private keys and certificates.
108 SteelCentral Controller for SteelHead Mobile User’s Guide

Beta Draft
CHAPTER 7 Managing SteelHead Mobile Clients
This chapter describes how to manage SteelHead Mobile clients using policies, packages, and group assignments. It includes the following sections:
“Managing SteelHead Mobile Policies” on page 109
“Managing SteelHead Mobile Packages” on page 146
“Managing SteelHead Mobile Assignments” on page 153
Managing SteelHead Mobile Policies
A policy is a set of optimization, security, location awareness, storage, and other configuration settings that determine the optimization rules for the SteelHead Mobile clients. SteelHead Mobile clients must have a policy and other endpoint-specific settings for optimization. Packages deployed to the SteelHead Mobile clients must contain a policy.
The Mobile Controller ships with a default policy, Initial, that is suitable for standard in-path deployments. You can install and deploy the Mobile Controller without modifying this default policy. For details on default-policy Initial settings, see Appendix A, “Default Policy Settings.”
Note: You have the option to set a customized policy as the default policy in the Mobile Controller. If a policy is unassigned to a group, by default it uses the default policy that you specify.
You can create policies as configuration templates to configure groups of SteelHead Mobile clients that have the same performance requirements. For example, you might use the default policy for the majority of your SteelHead Mobile clients and create another policy for a group of SteelHead Mobile clients that need to pass through a specific type of traffic. When you modify a policy, the SteelHead Mobile client is updated automatically by the Mobile Controller when the policy is saved and the SteelHead Mobile is connected, or when the SteelHead Mobile next connects.
If you install the SteelHead Mobile software so that your users have access to the Mobile Controller, your users are able to modify some administrator-defined policy settings. If a new policy is sent to the Mobile Controller whose settings have been overridden by the user, the user’s settings remain in effect until the user clicks Reset under Settings > Reset to Administrator Policy in the client, or until the user returns the modified client setting to Auto (if applicable).
SteelCentral Controller for SteelHead Mobile User’s Guide 109

Beta Draft
Managing SteelHead Mobile Clients Managing SteelHead Mobile Policies
To deploy the SteelHead Mobile software with the default settings, you simply make the default package available to your SteelHead Mobile clients. For details about packages, see “Basic Steps for Deploying the SteelHead Mobile Package” on page 21.
Policies affect the optimization experience for SteelHead Mobile clients. Policies include settings for the following optimization features.
For details about default policy settings, see Appendix A, “Default Policy Settings.”
For details about features in policies, see the SteelHead Management Console User’s Guide.
Creating New Policies
You create new policies on the Manage > Policies page.
To create a new policy
1. Choose Manage > Policies to display the Policies page.
Figure 7-1. Policies Page
2. To create a new policy, click Create New Policy and complete the configuration as described in this table.
Feature Task
In-path rules For details, see “Configuring In-Path Optimization Rules for Policies” on page 112.
Protocol settings For details, see “Configuring Protocol Settings” on page 119.
SSL optimization For details, see “Configuring SSL for Policies” on page 137.
Location awareness For details, see “Configuring Location Awareness for Policies” on page 140.
Endpoint settings For details, see “Configuring Endpoint Settings for Policies” on page 143.
Control Description
Create New Policy Displays the controls to create a new policy.
Policy Name Specify the policy name.
110 SteelCentral Controller for SteelHead Mobile User’s Guide

Beta Draft
Managing SteelHead Mobile Policies Managing SteelHead Mobile Clients
To modify policy name and description
1. Choose Manage > Policies to display the Policies page.
2. Click the policy name to display the General Settings tab.
Figure 7-2. Policies - General Settings Page
3. Complete the configuration as described in this table.
Set Default Set the default policy for the Mobile Controller. If a policy is unassigned to a group, by default the Mobile Controller will use the default policy assigned here.
Description Specify a description of the policy.
Copy Contents From Policy Optionally, select a policy from the drop-down list to copy settings from an existing policy.
Add Adds the policy to the policy list.
Control Description
Policy Name Specify the policy name.
Description Specify a description of the policy.
Update Policy Updates the policy general settings.
Control Description
SteelCentral Controller for SteelHead Mobile User’s Guide 111

Beta Draft
Managing SteelHead Mobile Clients Managing SteelHead Mobile Policies
Configuring In-Path Optimization Rules for Policies
You configure in-path optimization rules for your SteelHead Mobile client in the In-Path Rules tab of the Manage > Policies page.
In-path rules determine the SteelHead Mobile client behavior with SYN packets. In-path rules are an ordered list of fields a SteelHead Mobile uses to match with Viewing Endpoint SYN packet fields (for example, source or destination subnet, IP address, VLAN, or TCP port). Each in-path rule has an action field. When a SteelHead Mobile finds a matching in-path rule for a SYN packet, the SteelHead Mobile treats the packet according to the action specified in the in-path rule.
In-path rule configurations differ depending on the action. For example, both the fixed-target and the autodiscovery actions allow you to choose what type of optimization is applied, what type of data reduction is used, what type of latency optimization is applied, and so on.
For details about in-path rules, see the SteelHead Management Console User’s Guide.
To configure in-path rule policies
1. Choose Manage > Policies to display the Policies page.
2. Click the policy name to display the policy tabs and select In-Path Rules
Figure 7-3. Policies - In-Path Rules Page
112 SteelCentral Controller for SteelHead Mobile User’s Guide

Beta Draft
Managing SteelHead Mobile Policies Managing SteelHead Mobile Clients
3. Complete the configuration as described in this table..
Control Description
Add a New In-Path Rule Displays the controls for adding a new rule.
Type Select one of the following rule types from the drop-down list:
• Auto-Discover - Autodiscover is the process by which the SteelHead Mobile automatically intercepts and optimizes traffic on all IP addresses and ports. By default, autodiscover is applied to all IP addresses and ports that are not secure, interactive, or default Riverbed ports. Defining in-path rules modifies this default setting. For details, see the SteelHead Management Console User’s Guide.
• Fixed-Target - Fixed-target rules specify that a SteelHead Mobile always goes to a specific SteelHead first. Fixed-target rules can be used if the SteelHead is located out-of-path, or for troubleshooting purposes. In addition to the settings available for autodiscovery rules, you also must set a target SteelHead. You can also specify a backup SteelHead.
– Target Appliance IP Address - Enter the IP address and port number for your target SteelHead.
– Backup Appliance IP Address - Enter the IP address and port number for your backup SteelHead.
• Pass-Through - Pass-through rules identify traffic that is passed through the network unoptimized. You define pass-through rules to exclude subnets from optimization. Traffic is also passed through when the SteelHead is in bypass mode. Traffic may be passed through by the SteelHead Mobile because of pass through rule, because the connection was established before the Mobile Controller was put in place or before the service was enabled.
• Discard - Drops the SYN packets silently. The SteelHead Mobile filters out traffic that matches the discard rules. This process is similar to how routers and firewalls drop disallowed packets: the connection-initiating application has no knowledge of the fact that its packets were dropped until the connection times out.
• Deny - Drops the SYN packets, sends a message back to its source, and resets the TCP connection being attempted. Using an active reset process rather than a silent discard allows the connection initiator to know that its connection is disallowed.
Position Select Start, End, or a rule number from the drop-down list. The SteelHead Mobile evaluates rules in numerical order starting with rule 1. If the conditions set in the rule match, the rule is applied and the system moves on to the next packet. If the conditions set in the rule do not match, the system consults the next rule. For example, if the conditions of rule 1 do not match, rule 2 is consulted. If rule 2 matches the conditions, it is applied, and no further rules are consulted.
In general, list rules in the following order:
1. Deny 2. Discard 3. Pass-through 4. Fixed-target 5. Auto-Discover
Note: The default rule, Auto-Discover, which optimizes all remaining traffic that has not been selected by another rule, cannot be removed and is always listed last.
SteelCentral Controller for SteelHead Mobile User’s Guide 113

Beta Draft
Managing SteelHead Mobile Clients Managing SteelHead Mobile Policies
Source Subnet Specify the subnet IP address and netmask for the source network.
Use the following format for an individual subnet IP address and netmask:
XXX.XXX.XXX.XXX/XX (IPv4)
You can also specify 0.0.0.0/0 as the wildcard for all traffic.
Destination Subnet Specify the subnet IP address and netmask for the destination network.
Use the following format for an individual subnet IP address and netmask:
XXX.XXX.XXX.XXX/XX (IPv4)
You can also specify 0.0.0.0/0 as the wildcard for all traffic.
Port or Port Label - Specify the destination port number, port label, or All. Click Port Label to go to the Configure > Networking > Port Labels page for reference.
Target Appliance IP Address Specify the target appliance address for a fixed-target rule.
Port - Specify the target port number for a fixed-target rule.
Backup Appliance IP Address Specify the backup appliance address for a fixed-target rule.
Port - Specify the backup destination port number for a fixed-target rule.
Preoptimization Policy Select a traffic type from the drop-down list:
• None - If the Oracle Forms, SSL, or Oracle Forms-over-SSL preoptimization policy is turned on and you want to turn it off for a port, select None. This is the default setting.
• Oracle Forms - Enables preoptimization processing for Oracle Forms.
• Oracle Forms over SSL - Enables preoptimization processing for both the Oracle Forms and SSL encrypted traffic through SSL secure ports on the client-side SteelHead. You must also set the Latency Optimization Policy to HTTP.
Note: If the server is running over a standard secure port—for example, port 443—the Oracle Forms over SSL in-path rule needs to be before the default secure port pass-through rule in the in-path rule list.
• SSL - Enables preoptimization processing for SSL encrypted traffic through SSL secure ports on the SteelHead Mobile.
Optimization Policy Optionally, if you have selected Auto-Discover or Fixed Target, you can configure the following types of optimization policies:
• SDR-Only - Performs SDR; do not perform LZ compression.
• Compression-Only - Performs LZ compression; do not perform SDR.
• None - Does not perform SDR or LZ compression.
Control Description
114 SteelCentral Controller for SteelHead Mobile User’s Guide

Beta Draft
Managing SteelHead Mobile Policies Managing SteelHead Mobile Clients
Latency Optimization Policy Select one of the following policies from the drop-down list:
• Normal - Performs all latency optimizations (HTTP is activated for ports 80 and 8080). This is the default setting.
• HTTP - Activates HTTP optimization on connections matching this rule.
• Outlook Anywhere - Enables Outlook Anywhere latency optimization. Outlook Anywhere is a feature of Microsoft Exchange Server 2003, 2007, and 2010 that allows Microsoft Office Outlook 2003, 2007, and 2010 clients to connect to their Exchange servers over the Internet using the Microsoft RPC tunneling protocol. For details about Outlook Anywhere, see the SteelHead Management Console User’s Guide.
• Citrix - Activates Citrix-over-SSL optimization on connections matching this rule. This policy is not compatible with IPv6. Add an in-path rule to the SteelCentral Controller for SteelHead Mobile (SCCM) that specifies the Citrix Access Gateway IP address, select this latency optimization policy on both the client-side and server-side SteelHeads, and set the preoptimization policy to SSL. The SteelHead Mobile clients must be running RiOS 4.8.2 or later and the server-side SteelHead must be running RiOS 7.0 or later. The preoptimization policy must be set to SSL.
SSL must be enabled on the Citrix Access Gateway. On the server-side SteelHead, enable SSL and install the SSL server certificate for the Citrix Access Gateway.
The client-side and server-side SteelHeads establish an SSL channel between themselves to secure the optimized ICA traffic. End users log in to the Access Gateway through a browser (HTTPS) and access applications through the web Interface site. Clicking an application icon starts the Online Plug-in, which establishes an SSL connection to the Access Gateway. The ICA connection is tunneled through the SSL connection.
The SteelHead decrypts the SSL connection from the user device, applies ICA latency optimization, and reencrypts the traffic over the Internet. The server-side SteelHead decrypts the optimized ICA traffic and reencrypts the ICA traffic into the original SSL connection destined to the Access Gateway.
• None - Do not activate latency optimization on connections matching this rule. For Oracle Forms-over-SSL encrypted traffic, you must set the Latency Optimization Policy to HTTP.
Note: Setting the Latency Optimization Policy to None excludes all latency optimizations, such as HTTP, MAPI, and SMB.
Control Description
SteelCentral Controller for SteelHead Mobile User’s Guide 115

Beta Draft
Managing SteelHead Mobile Clients Managing SteelHead Mobile Policies
Neural Framing Mode Optionally, if you have selected Auto-Discover or Fixed Target, you can select a neural framing mode for the in-path rule. Neural framing enables the system to select the optimal packet framing boundaries for Scalable Data Referencing (SDR). Neural framing creates a set of heuristics to intelligently determine the optimal moment to flush TCP buffers. The system continuously evaluates these heuristics and uses the optimal heuristic to maximize the amount of buffered data transmitted in each flush, while minimizing the amount of idle time that the data sits in the buffer.
You can specify the following neural framing settings:
• Never - Do not use the Nagle algorithm. The Nagle algorithm is a means of improving the efficiency of TCP/IP networks by reducing the number of packets that need to be sent over the network. It works by combining a number of small outgoing messages and sending them all at once. All the data is immediately encoded without waiting for timers to fire or application buffers to fill past a specified threshold. Neural heuristics are computed in this mode but are not used. In general, this setting works well with time-sensitive and chatty or real-time traffic.
• Always - Use the Nagle algorithm. This is the default setting. All data is passed to the codec which attempts to coalesce consume calls (if needed) to achieve better fingerprinting. A timer (6 ms) backs up the codec and causes leftover data to be consumed. Neural heuristics are computed in this mode but are not used.
For different types of traffic, one algorithm might be better than others. The considerations include: latency added to the connection, compression, and SDR performance.
To configure neural framing for an FTP data channel, define an in-path rule with the destination port 20 and set its data reduction policy. To configure neural framing for a MAPI data channel, define an in-path rule with the destination port 7830 and set its data reduction policy.
Control Description
116 SteelCentral Controller for SteelHead Mobile User’s Guide

Beta Draft
Managing SteelHead Mobile Policies Managing SteelHead Mobile Clients
WAN Visibility Mode Enables WAN visibility, which pertains to how packets traversing the WAN are addressed.
WAN visibility mode is configurable for Auto-Discover and Fixed-Target rules. To configure WAN Visibility for Fixed-Target rules, you must use CLI commands. For details on WAN Visibility CLI commands, see the Riverbed Command-Line Interface Reference Manual.
You configure WAN visibility on the client-side SteelHead Mobile (where the connection is initiated). The server-side SteelHead must also support WAN visibility.
Select one of the following modes from the drop-down list:
• Correct Addressing - Turns WAN visibility off. Correct addressing uses SteelHead IP addresses and port numbers in the TCP/IP packet header fields for optimized traffic in both directions across the WAN. This is the default setting.
• Port Transparency - Port address transparency preserves your server port numbers in the TCP/IP header fields for optimized traffic in both directions across the WAN. Traffic is optimized while the server port number in the TCP/IP header field appears to be unchanged. Routers and network monitoring devices deployed in the WAN segment between the communicating SteelHeads can view these preserved fields.
Use port transparency if you want to manage and enforce QoS policies that are based on destination ports. If your WAN router is following traffic classification rules written in terms of client and network addresses, port transparency enables your routers to use existing rules to classify the traffic without any changes.
Port transparency enables network analyzers deployed within the WAN (between the SteelHeads) to monitor network activity and to capture statistics for reporting by inspecting traffic according to its original TCP port number.
Port transparency does not require dedicated port configurations on your Mobile Controllers.
Note: Port transparency only provides server port visibility. It does not provide server IP address visibility. For the Mobile Controller, the client IP address and port numbers are preserved.
• Full Transparency - Full address transparency preserves your client and server IP addresses and port numbers in the TCP/IP header fields for optimized traffic in both directions across the WAN. It also preserves VLAN tags. Traffic is optimized while these TCP/IP header fields appear to be unchanged. Routers and network monitoring devices deployed in the WAN segment between the communicating SteelHeads can view these preserved fields.
If both port transparency and full address transparency are acceptable solutions, port transparency is preferable. Port transparency avoids potential networking risks that are inherent to enabling full address transparency. For details, see the SteelHead Deployment Guide.
However, if you must see your client or server IP addresses across the WAN, full transparency is your only configuration option.
Control Description
SteelCentral Controller for SteelHead Mobile User’s Guide 117

Beta Draft
Managing SteelHead Mobile Clients Managing SteelHead Mobile Policies
4. Click Update Policy to save your settings.
Note: The Mobile Controller will cache the changes you make to a policy across multiple tabs, until you click Update Policy or go to a different page.
5. Click Save to save your settings permanently.
WAN Visibility Mode (continued)Note: Enabling full address transparency requires symmetrical traffic flows between the client and server. If any asymmetry exists on the network, enabling full address transparency might yield unexpected results, up to and including loss of connectivity. For details, see the SteelHead Deployment Guide.
RiOS includes an option for using Full Transparency with a stateful firewall. A stateful firewall examines packet headers, stores information, and then validates subsequent packets against this information. If your system uses a stateful firewall, the following option is available:
• Full Transparency with Reset - Enables full address and port transparency and also sends a forward reset between receiving the probe response and sending the transparent inner channel SYN. This option ensures the firewall does not block inner transparent connections because of information stored in the probe connection. The forward reset is necessary because the probe connection and inner connection use the same IP addresses and ports and both map to the same firewall connection. The reset clears the probe connection created by the SteelHead and allows for the full transparent inner connection to traverse the firewall.
Notes:
• For details on configuring WAN visibility and its implications, see the SteelHead Deployment Guide.
• To turn full transparency on globally by default, create an in-path auto-discover rule, select Full, and place it above the default in-path rule and after the Secure, Interactive, and RBT-Proto rules.
• You can configure a SteelHead for WAN visibility even if the server-side SteelHead does not support it, but the connection is not transparent.
• You can enable full transparency for servers in a specific IP address range and you can enable port transparency on a specific server. For details, see the SteelHead Deployment Guide.
• The Top Talkers report displays statistics on the most active, heaviest users of WAN bandwidth, providing some WAN visibility without enabling a WAN Visibility Mode.
Description Describe the rule to facilitate administration.
Add Adds the rule to the list. The Management Console redisplays the In-Path Rules table and applies your modifications to the running configuration, which is stored in memory.
Remove Selected Rules Select the check box next to the name and click Remove Selected Rules.
Move Selected Rules Moves the selected rules. Click the arrow next to the desired rule position; the rule moves to the new position.
Edit Rule Select an existing rule number from the table and expand it. Make required changes and click Edit Rule to update an existing rule.
Control Description
118 SteelCentral Controller for SteelHead Mobile User’s Guide

Beta Draft
Managing SteelHead Mobile Policies Managing SteelHead Mobile Clients
Configuring Protocol Settings
You configure the following protocol settings in the Protocol Settings tab of the Manage > Policies page:
CIFS (SMB1) - CIFS SMB1 optimization performs latency and SDR optimizations on SMB1 traffic. Without this feature, the SteelHead Mobile performs only SDR optimization without improving CIFS latency. Typically, you disable CIFS optimization only to troubleshoot the system.
SMB2/3 - Performs SMB2 or SMB3 latency optimization in addition to the existing bandwidth optimization features. These optimizations include cross-connection caching, read-ahead, write-behind, and batch prediction among several other techniques to ensure low latency transfers. The Mobile Controller maintains the data integrity and the client always receives data directly from the servers.
MAPI - MAPI does not require a separate license and is enabled by default. When encrypted MAPI support is enabled on the Mobile Controller, it uses a secure inner channel to ensure that all MAPI traffic sent between SteelHead Mobile clients and the server-side SteelHeads is secure. Only disable MAPI if you are experiencing an issue with Outlook traffic.
HTTP - Enable HTTP optimization to prefetch and store objects embedded in web pages to improve HTTP traffic performance. By default, HTTP optimization is disabled. You can choose the extensions to store, such as css, gif, jpg, js, and png, or configure the SteelHead Mobile client to store all allowable objects.
NFS - Provides latency optimization improvements for NFS operations by prefetching data, storing it on the client for a short amount of time, and using it to respond to client requests.
Oracle Forms - A platform for developing user interface applications to interact with an Oracle database. It uses a Java applet to interact with the database in either native, HTTP, or HTTPS mode. The SteelHead and the Mobile Controller decrypt, optimize, and then reencrypt the Oracle Forms traffic.
Lotus Notes - A client-server collaborative application that provides email, instant messaging, calendar, resource, and file sharing. The Mobile Controller provides latency and bandwidth optimization for Lotus Notes 6.5 and later traffic across the WAN, accelerating email attachment transfers. Lotus Notes is only supported on Windows SteelHead Mobile clients.
Citrix - To consolidate operations, some organizations install thin clients in their branch offices and install a Citrix Presentation Server in the data center to front-end the applications. The proprietary protocol that Citrix uses to move updates between the client and the server is called ICA (Independent Computing Architecture). The thin clients at the branch offices have a Citrix ICA client accessing the services at the data center, which are front-ended by a Citrix Presentation Server (also called Citrix Metaframe Server in earlier versions).
SteelCentral Controller for SteelHead Mobile User’s Guide 119

Beta Draft
Managing SteelHead Mobile Clients Managing SteelHead Mobile Policies
To configure protocol settings
1. Choose Manage > Policies to display the Policies page.
2. Click the policy name to display the policy tabs and select Protocol Settings to display another set of tabs for the various protocol settings.
Figure 7-4. Policies - Protocol Settings Page
3. Complete the configuration for each protocol as described in the following sections.
“To configure CIFS (SMB1) settings” on page 121
“To configure SMB2/3 settings” on page 124
“To configure MAPI settings” on page 126
“To configure HTTP settings” on page 128
“To configure NFS settings” on page 133
“To configure Oracle Forms settings” on page 134
“To configure Lotus Notes settings” on page 135
“To configure Citrix settings” on page 136
“To configure Connection settings” on page 137
120 SteelCentral Controller for SteelHead Mobile User’s Guide

Beta Draft
Managing SteelHead Mobile Policies Managing SteelHead Mobile Clients
To configure CIFS (SMB1) settings
1. With the Protocol Settings tab open, select the CIFS (SMB1) tab to display the settings.
Figure 7-5. CIFS (SMB1) Settings
2. Complete the configuration as described in this table.
Control Description
Enable Latency Optimization CIFS SMB1 optimization performs latency and SDR optimizations on SMB1 traffic. Without this feature, the SteelHead Mobile performs only SDR optimization without improving CIFS latency. Latency optimization is enabled by default. Typically, you disable latency optimization to troubleshoot problems with the system.
Note: To disable CIFS optimization, it must also be disabled on the server-side SteelHead.
Disable Write Optimization Select this option to disable write optimization.
Disable write optimization only if you have applications that assume and require write-through in the network. If you disable write optimization, the SteelHead Mobile still provides optimization for CIFS reads and for other protocols, but you might experience a slight decrease in overall optimization.
Most applications operate safely with write optimization because CIFS allows you to explicitly specify write-through on each write operation. However, if you have an application that does not support explicit write-through operations, you must disable it on the SteelHead Mobile.
If you do not disable write-through, the SteelHead Mobile acknowledges writes before they are fully committed to disk, to speed up write operation. The SteelHead Mobile does not acknowledge the file close until the file is safely written.
SteelCentral Controller for SteelHead Mobile User’s Guide 121

Beta Draft
Managing SteelHead Mobile Clients Managing SteelHead Mobile Policies
Optimize Connections with Security Signatures (that do not require signing)
Prevents Windows SMB signing. This is the default setting.
The Secure-CIFS feature enables you to automatically disable Windows SMB signing. SMB signing prevents the appliance from applying full optimization on CIFS connections and significantly reduces the performance gain from a Mobile Controller deployment. Because many enterprises already take additional security precautions (such as firewalls, internal-only reachable servers, and so forth), SMB signing adds little additional security, at a significant performance cost (even without Riverbed optimization).
Before you enable Secure-CIFS, consider the following factors:
• If the client machine has Required signing, enabling Secure-CIFS prevents the client from connecting to the server.
• If the server-side machine has Required signing, the client and server connect but you cannot perform full latency optimization with the appliance. Domain controllers default to Required.
For details about SMB signing and the performance cost associated with it, see the SteelHead Management Console User’s Guide.
Enable Server Side Dynamic Write Throttling
Enables the CIFS dynamic throttling mechanism, which replaces the current static buffer scheme. If you enable CIFS dynamic throttling, it is activated only when there are suboptimal conditions on the server side causing a backlog of writes messages; it does not have a negative effect under normal network conditions.
Enable Applock Optimization Enables CIFS latency optimizations to improve read and write performance for Microsoft Word (.doc) and Excel (.xls) documents when multiple users have the file open. This setting is enabled by default in RiOS 6.0 and later.
This feature enhances the Enable Overlapping Open Optimization feature by identifying and obtaining locks on read write access at the application level. The overlapping open optimization feature handles locks at the file level.
Note: Applock Optimization is a client-side setting only. To enable this feature on Mobile Controller clients, select Applock Optimization on the Mobile Controller policy assigned to the clients.
Control Description
122 SteelCentral Controller for SteelHead Mobile User’s Guide

Beta Draft
Managing SteelHead Mobile Policies Managing SteelHead Mobile Clients
3. Click Update Policy to save your settings.
4. Click Save to save your settings permanently.
Enable Overlapping Open Optimization Overlapping Open Optimization is disabled by default. To prevent any compromise to data integrity, the appliance optimizes only data to which exclusive access is available (in other words, when locks are granted). When an oplock is not available, the SteelHead Mobile does not perform application-level latency optimizations but still performs SDR and compression on the data, as well as TCP optimizations.
Enabling this feature on applications that perform multiple opens of the same file to complete an operation results in a performance improvement (for example, CAD applications).
Note: If a remote user opens a file that is optimized using the overlapping open feature and a second user opens the same file, the second user might receive an error if the file fails to go through a SteelHead Mobile, or if it does not go through a SteelHead (for example, certain applications that are sent over the LAN). If this error occurs, disable overlapping opens for those applications.
Optimize only the following extensions Specify a list of extensions you want to optimize using overlapping opens.
Optimize all except the following extensions Specify a list of extensions you do not want to optimize using overlapping opens.
Control Description
SteelCentral Controller for SteelHead Mobile User’s Guide 123

Beta Draft
Managing SteelHead Mobile Clients Managing SteelHead Mobile Policies
To configure SMB2/3 settings
1. With the Protocol Settings tab open, select the SMB2/3 tab to display the settings.
Figure 7-6. SMB2/3 Settings
124 SteelCentral Controller for SteelHead Mobile User’s Guide

Beta Draft
Managing SteelHead Mobile Policies Managing SteelHead Mobile Clients
2. Complete the configuration as described in this table.
3. Click Update Policy to save your settings.
4. Click Save to save your settings permanently.
Control Description
Enable SMB2 Optimization Performs SMB2 optimization in addition to the existing bandwidth optimization features. These optimizations include cross-connection caching, read-ahead, write-behind, and batch prediction among several other techniques to ensure low latency transfers. The Mobile Controller maintains the data integrity, and the client always receives data directly from the servers.
By default, SMB2 optimization is enabled.
• Enable SMB3 Optimization - Select this option to enable SMB3 optimization.
Note: You must enable (or disable) SMB2 or SMB3 (if applicable) optimization on both the SteelHead Mobile and server-side SteelHead. After enabling SMB2 or SMB3 optimization, you must restart the optimization service.
Down-Negotiation Select this option so that connections that can be successfully down-negotiated will be optimized according to the settings in the CIFS (SMB1) section. If down-negotiation is enabled, select one of the following options:
• None - Do not down-negotiate connections. No connections can be down negotiated.
• SMB2 and SMB3 to SMB1 - Down-negotiate SMB2 and SMB3 connections to SMB1.
SteelCentral Controller for SteelHead Mobile User’s Guide 125

Beta Draft
Managing SteelHead Mobile Clients Managing SteelHead Mobile Policies
To configure MAPI settings
1. With the Protocol Settings tab open, select the MAPI tab to display the settings.
Figure 7-7. MAPI Settings
2. Complete the configuration as described in this table.
Control Description
Enable MAPI Optimization MAPI optimization is enabled by default. Only clear this check box if you want to disable MAPI optimization. Only disable MAPI if you are experiencing an issue with Outlook traffic.
Exchange Port Specify the MAPI Exchange port. The default value is 7830.
Enable Encrypted Optimization Select this option to enable encrypted optimization.
126 SteelCentral Controller for SteelHead Mobile User’s Guide

Beta Draft
Managing SteelHead Mobile Policies Managing SteelHead Mobile Clients
3. Click Update Policy to save your settings.
4. Click Save to save your settings permanently.
Enable Outlook Anywhere Optimization
Enables Outlook Anywhere latency optimization. Outlook Anywhere is a feature of Microsoft Exchange Server 2003, 2007, and 2010 that allows Microsoft Office Outlook 2003, 2007, and 2010 clients to connect to their Exchange servers over the Internet using the Microsoft RPC tunneling protocol. Outlook Anywhere allows for a VPN-less connection as the MAPI RPC protocol is tunneled over HTTP or HTTPS. RPC over HTTP can transport regular or encrypted MAPI. If you use encrypted MAPI, the server-side SteelHead must be a member of the Windows domain. By default, this feature is disabled.
To use this feature, you must also enable HTTP Optimization on the SteelHead Mobile and server-side SteelHeads (HTTP optimization is enabled by default).
If you are using Outlook Anywhere over HTTPS, you must enable SSL and the IIS certificate must be installed on the server-side SteelHead:
• When using HTTP, Outlook can only use NTLM proxy authentication.
• When using HTTPS, Outlook can use NTLM or Basic proxy authentication.
• When using encrypted MAPI with HTTP or HTTPS, you must enable and configure encrypted MAPI in addition to this feature.
Note: Outlook Anywhere optimized connections cannot start MAPI prepopulation.
After you apply your settings, you can verify that the connections appear in the Endpoint report as a MAPI-OA or an eMAPI-OA (encrypted MAPI) application. The Outlook Anywhere connection entries appear in the system log with an RPCH prefix.
Note: Outlook Anywhere can create twice as many connections on the SteelHead as regular MAPI (depending on the versions of the Outlook client and Exchange server). This effect results in the SteelHead entering admission control twice as fast with Outlook Anywhere as with regular MAPI.
For details and troubleshooting information, see the SteelHead Deployment Guide.
For details about enabling Outlook Anywhere, seehttp://technet.microsoft.com/en-us/library/bb123513(EXCHG.80).aspx
Auto-Detect Outlook Anywhere Connections
Automatically detects the RPC over HTTPS protocol used by Outlook Anywhere. This feature is dimmed and unavailable until you enable Outlook Anywhere optimization. By default, these options are enabled.
You can enable automatic detection of RPC over HTTPS using this option or you can set in-path rules. Autodetect is best for simple Mobile Controller configurations and when the IIS server is also handling websites.
If the IIS server is only used as RPC Proxy, and for configurations with asymmetric routing, connection forwarding or Interceptor installations, add in-path rules that identify the RPC Proxy server IP addresses and select the Outlook Anywhere latency optimization policy. After adding the in-path rule, disable the auto-detect option.
Control Description
SteelCentral Controller for SteelHead Mobile User’s Guide 127

Beta Draft
Managing SteelHead Mobile Clients Managing SteelHead Mobile Policies
To configure HTTP settings
1. With the Protocol Settings tab open, select the HTTP tab to display the settings.
Figure 7-8. HTTP Settings (with “HTML Tags to Prefetch” and “Server Subnet Settings” Sections Expanded)
128 SteelCentral Controller for SteelHead Mobile User’s Guide

Beta Draft
Managing SteelHead Mobile Policies Managing SteelHead Mobile Clients
2. Complete the configuration as described in this table.
Control Description
Enable HTTP Optimization Enable this feature to prefetch and store objects embedded in web pages to improve HTTP traffic performance. By default, HTTP optimization is disabled.
Store All Allowable Objects Examines the control header to determine which objects to store. When enabled, the Mobile Controller does not limit the objects to those listed in Extensions to prefetch but rather prefetches all objects that the control header indicates are storable. This option is useful to store web objects encoded into names without an object extension: for example, SharePoint objects.
By default, Store All Allowable Objects is enabled.
Store Objects With The Following Extensions: Object Prefetch Table Extensions
Specify object extensions to prefetch and store in the local object prefetch table. Separate extensions with a comma. By default, the SteelHead prefetches .jpg, .gif, .js, .png, and .css object extensions.
Disable the Object Prefetch Table Stores nothing.
Minimum Object Prefetch Table Time Sets the minimum number of seconds the objects are stored in the local object prefetch table. The default is 60 seconds.
This setting specifies the minimum lifetime of the stored object. During this lifetime, any qualified If-Modified-Since (IMS) request from the client receives an HTTP 304 response, indicating that the resource for the requested object has not changed since stored.
Maximum Object Prefetch Table Time Sets the maximum number of seconds the objects are stored in the local object prefetch table. The default is 86,400 seconds (24 hours).
This setting specifies the maximum lifetime of the stored object. During this lifetime, any qualified If-Modified-Since (IMS) request from the client receives an HTTP 304 response, indicating that the resource for the requested object has not changed since stored.
Extensions to Prefetch Specifies object extensions to prefetch, separated by commas. By default the SteelHead prefetches .jpg, .gif, .js, .png, and .css object extensions.
HTML Tags to Prefetch Selects which HTML tags to prefetch. By default, the following tags are prefetched: base/href, body/background, img/src, link/href, and script/src.
Add a Prefetch Tag Configures a new prefetch tag with the following controls:
• Tag Name - Specifies the tag name.
• Attribute - Specifies the tag attribute.
Note: These tags are for the Parse and Prefetch feature only and do not affect other prefetch types, such as object extensions.
SteelCentral Controller for SteelHead Mobile User’s Guide 129

Beta Draft
Managing SteelHead Mobile Clients Managing SteelHead Mobile Policies
Server Subnet and Host Settings Under Server Subnet and Host Settings, you can enable URL Learning, Parse and Prefetch, and Object Prefetch Table in any combination for any server subnet. You can also enable authorization optimization to tune a particular subnet dynamically with no service restart required.
The default settings are URL Learning for all traffic with automatic configuration disabled. The default setting applies when HTTP optimization is enabled, regardless of whether there is an entry in the Subnet list. In the case of overlapping subnets, specific list entries override any default settings.
Suppose the majority of your web servers have dynamic content applications but you also have several static content application servers. You could configure your entire server subnet to disable URL Learning and enable Parse and Prefetch and Object Prefetch Table, optimizing HTTP for the majority of your web servers. Next, you could configure your static content servers to use URL Learning only, disabling Parse and Prefetch and Object Prefetch Table.
Add a Subnet or Host Displays the controls for adding a server subnet or host. The server must support keepalive.
Server Subnet Specify an IP address and mask pattern for the server subnet on which to set up the HTTP optimization scheme. Use the format:
XXX.XXX.XXX.XXX/XX.
Basic Tuning • Strip Compression - Removes the accept-encoding lines from the HTTP compression header. An accept-encoding directive compresses content rather than using raw HTML. Enabling this option improves the performance of the Mobile Controller data reduction algorithms. By default, strip compression is enabled.
• Insert Cookie - Adds a cookie to HTTP applications that do not already have one. HTTP applications frequently use cookies to keep track of sessions. The Mobile Controller uses cookies to distinguish one user session from another. If an HTTP application does not use cookies, the SteelHead Mobile inserts one so that it can track requests from the same client. By default, this setting is disabled.
• Insert Keep Alive - Uses the same TCP connection to send and receive multiple HTTP requests and responses, as opposed to opening a new one for every single request and response. Select this option when using the URL Learning or Parse and Prefetch features with HTTP 1.0 or HTTP 1.1 applications using the Connection Close method. By default, this setting is disabled.
Control Description
130 SteelCentral Controller for SteelHead Mobile User’s Guide

Beta Draft
Managing SteelHead Mobile Policies Managing SteelHead Mobile Clients
Prefetch Schemes • URL Learning - Enables URL Learning, which learns associations between a base URL request and a follow-on request. Stores information about which URLs have been requested and which URLs have generated a 200 OK response from the server. This option fetches the URLs embedded in style sheets or any JavaScript associated with the base page and located on the same host as the base URL.
URL Learning works best with nondynamic content that does not contain session-specific information. URL Learning is enabled by default.
Your system must support cookies and persistent connections to benefit from URL Learning. If your system has cookies turned off and depends on URL rewriting for HTTP state management, or is using HTTP 1.0 (with no keepalives), you can force the use of cookies using the Add Cookie option and force the use of persistent connections using the Insert Keep Alive option.
• Parse and Prefetch - Enables Parse and Prefetch, which parses the base HTML page received from the server and prefetches any embedded objects to the SteelHead Mobile. This option complements URL Learning by handling dynamically generated pages and URLs that include state information. When the browser requests an embedded object, the Mobile Controller serves the request from the prefetched results, eliminating the round-trip delay to the server.
The prefetched objects contained in the base HTML page can be images, style sheets, or any Java scripts associated with the base page and located on the same host as the base URL.
Parse and Prefetch requires cookies. If the application does not use cookies, you can insert one using the Insert Cookie option.
• Object Prefetch Table - Enables the Object Prefetch Table, which stores HTTP object prefetches from HTTP GET requests for cascading style sheets, static images, and Java scripts in the Object Prefetch Table. When the browser performs If-Modified-Since (IMS) checks for stored content or sends regular HTTP requests, the SteelHead Mobile responds to these IMS checks and HTTP requests, cutting back on round trips across the WAN.
Control Description
SteelCentral Controller for SteelHead Mobile User’s Guide 131

Beta Draft
Managing SteelHead Mobile Clients Managing SteelHead Mobile Policies
3. Click Update Policy to save your settings.
4. Click Save to save your settings permanently.
Authentication Tuning • Reuse Auth - Allows an unauthenticated connection to serve prefetched objects, as long as the connection belongs to a session whose base connection is already authenticated.
This option is most effective when the web server is configured to use per-connection NTLM or Kerberos authentication.
• Force NTLM - In the case of negotiated Kerberos and NTLM authentication, forces NTLM. Kerberos is less efficient over the WAN because the client must contact the Domain Controller to answer the server authentication challenge and tends to be employed on a per-request basis.
Riverbed recommends enabling Strip Auth Header along with this option.
• Strip Auth Header - Removes all credentials from the request on an already authenticated connection. This option works around Internet Explorer behavior that reauthorizes connections that have previously been authorized.
This option is most effective when the web server is configured to use per-connection NTLM authentication.
Note: If the web server is configured to use per-request NTLM authentication, enabling this option might cause authentication failure.
• Gratuitous 401 - Prevents a WAN round trip by issuing the first 401 containing the realm choices from the SteelHead Mobile.
Riverbed recommends enabling Strip Auth Header along with this option.
This option is most effective when the web server is configured to use per-connection NTLM authentication or per-request Kerberos authentication.
Note: If the web server is configured to use per-connection Kerberos authentication, enabling this option might cause additional delay.
SharePoint • FPSE (FrontPage Server Extensions) - FPSE is an application-level protocol used by SharePoint. FPSE allows a website to be presented as a file share. FPSE initiates its communication with the server by requesting well-defined URLs for further communication and determining the version of the server.
• WebDAV (Web-based Distributed Authoring and Versioning) - WebDAV is a set of extensions to the HTTP/1.1 protocol that allows users to collaboratively edit and manage files on remote web servers. WebDAV is an IETF Proposed Standard (RFC 4918) that provides the ability to access the document management system as a network file system.
Add Adds the server subnet or host.
Control Description
132 SteelCentral Controller for SteelHead Mobile User’s Guide

Beta Draft
Managing SteelHead Mobile Policies Managing SteelHead Mobile Clients
To configure NFS settings
1. With the Protocol Settings tab open, select the NFS tab to display the settings.
Figure 7-9. NFS Settings
2. Complete the configuration as described in this table.
3. Click Update Policy to save your settings.
4. Click Save to save your settings permanently.
Control Description
Enable NFS Optimization Enables NFS optimization.
SteelCentral Controller for SteelHead Mobile User’s Guide 133

Beta Draft
Managing SteelHead Mobile Clients Managing SteelHead Mobile Policies
To configure Oracle Forms settings
1. With the Protocol Settings tab open, select the Oracle Forms tab to display the settings.
Figure 7-10. Oracle Forms Settings
2. Complete the configuration as described in this table.
3. Click Update Policy to save your settings.
4. Click Save to save your settings permanently.
Control Description
Enable Oracle Forms Optimization Enables Oracle Forms optimization in native mode, also known as socket mode. Oracle Forms native mode optimization is enabled by default. Disable this option only to turn off Oracle Forms optimization; for example, if your network users do not use Oracle applications.
134 SteelCentral Controller for SteelHead Mobile User’s Guide

Beta Draft
Managing SteelHead Mobile Policies Managing SteelHead Mobile Clients
To configure Lotus Notes settings
1. With the Protocol Settings tab open, select the Lotus Notes tab to display the settings.
Figure 7-11. Lotus Notes Settings
2. Complete the configuration as described in this table.
3. Click Update Policy to save your settings.
4. Click Save to save your settings permanently.
Control Description
Enable Lotus Notes Optimization Enables latency and bandwidth optimization for Lotus Notes 6.0 and later traffic across the WAN. This feature accelerates email attachment transfers and server-to-server or client-to-server replications. Lotus Notes is only supported on SteelHead Mobile clients running on Windows PCs.
Lotus Notes Port Specify the Lotus Notes port for optimization. Typically, you do not need to modify the default value of 1352.
SteelCentral Controller for SteelHead Mobile User’s Guide 135

Beta Draft
Managing SteelHead Mobile Clients Managing SteelHead Mobile Policies
To configure Citrix settings
1. With the Protocol Settings tab open, select the Citrix tab to display the settings.
Figure 7-12. Citrix Settings
2. Complete the configuration as described in this table.
3. Click Update Policy to save your settings.
4. Click Save to save your settings permanently.
Control Description
Citrix Optimizes the native Citrix traffic bandwidth.
ICA Port Specify the port on the Presentation Server for inbound traffic. The default port is 1494.
Session Reliability (CGP) Port Specify the port number for Common Gateway Protocol (CGP) connections. CGP uses the session reliability port to keep the session window open even if there is an interruption on the network connection to the server. By default, this setting is 2598.
Enable SecureICA Encryption Uses the RC5 algorithm to encrypt the ICA protocol, securing communication sent between a MetaFrame Presentation Server and a client.
136 SteelCentral Controller for SteelHead Mobile User’s Guide

Beta Draft
Managing SteelHead Mobile Policies Managing SteelHead Mobile Clients
To configure Connection settings
1. With the Protocol Settings tab open, select the Connection Settings tab to display the settings.
Figure 7-13. Connection Settings
2. Complete the configuration as described in this table.
3. Click Update Policy to save your settings.
4. Click Save to save your settings permanently.
Configuring SSL for Policies
You configure SSL for your SteelHead Mobile in the SSL tab of the Manage > Policies page. SSL is a cryptographic protocol that provides secure communications between two parties over the Internet.
Control Description
Maximum Connection Pool Size Specify the maximum number of TCP connections in a connection pool.
Connection pooling enhances network performance by reusing active connections instead of creating a new connection for every request. Connection pooling is useful for protocols which create a large number of short-lived TCP connections, such as HTTP.
To optimize such protocols, a connection pool manager maintains a pool of idle TCP connections, up to the maximum pool size. When a client requests a new connection to a previously visited server, the pool manager checks the pool for unused connections and returns one if available. Thus, the SteelHead Mobile and the SteelHead do not have to wait for a three-way TCP handshake to finish across the WAN. If all connections currently in the pool are busy and the maximum pool size has not been reached, the new connection is created and added to the pool. When the pool reaches its maximum size, all new connection requests are queued until a connection in the pool becomes available or the connection attempt times out.
The default value is 5. A value of 0 specifies no connection pool.
SteelCentral Controller for SteelHead Mobile User’s Guide 137

Beta Draft
Managing SteelHead Mobile Clients Managing SteelHead Mobile Policies
For detailed information about configuring SSL for the Mobile Controller, see Chapter 6, “Configuring SSL for Mobile Controllers.”
For detailed information about configuring SSL in the SteelHead, see the SteelHead Management Console User’s Guide.
To configure SSL for policies
1. Choose Manage > Policies to display the Policies page.
2. Click the policy name to display the policy tabs and select SSL.
Figure 7-14. Policies - SSL Page
3. Complete the configuration as described in this table.
Control Description
General SSL Settings Enable SSL Optimization - Enables SSL optimization, which accelerates applications that use SSL to encrypt traffic. This option is disabled by default. You can choose to enable SSL optimization only on certain sessions (based on source and destination addresses, subnets, and ports), or on all SSL sessions, or on no SSL sessions at all. An SSL session that is not optimized simply passes through the SteelHead Mobile unmodified.
Client Authentication Enable Client Certificate Support - Enables use of client-side SSL certificates to authenticate clients.
Proxies Enable SSL Proxy Support - Enables support for SSL proxy.
138 SteelCentral Controller for SteelHead Mobile User’s Guide

Beta Draft
Managing SteelHead Mobile Policies Managing SteelHead Mobile Clients
4. Click Update Policy to save your changes.
5. Click Save to save your changes permanently.
SSL Secure Peering Settings Traffic Type
Traffic Type - Select one of the following traffic types from the drop-down list:
• SSL Only - The peer Mobile Controller and the server-side SteelHead authenticate each other and then encrypt and optimize all SSL traffic: for example, HTTPS traffic on port 443. This is the default setting.
• SSL and Secure Protocols - The peer Mobile Controller and the server-side SteelHead authenticate each other and then encrypt and optimize all traffic traveling over the following secure protocols: Citrix, SSL, SMB-signed, and encrypted MAPI.
SMB-signing, MAPI encryption, or Secure ICA encryption must be enabled on both the Mobile Controller and server-side SteelHeads when securing SMB-signed traffic, encrypted MAPI traffic, or encrypted Citrix ICA traffic.
Enabling this option requires an optimization service restart.
• All - The peer Mobile Controller and the server-side SteelHead authenticate each other and then encrypt and optimize all traffic. Only the optimized traffic is secure; pass-through traffic is not. Enabling this option requires an optimization service restart.
• Fallback to No Encryption - Specifies that the Mobile Controller optimizes but does not encrypt the connection when it is unable to negotiate a secure, encrypted inner channel connection with the peer. This is the default setting. Enabling this option requires an optimization service restart.
Note: Riverbed strongly recommends enabling this setting on both the Mobile Controller and the server-side SteelHeads, especially in mixed deployments.
This option applies only to non-SSL traffic and is unavailable when you select SSL Only as the traffic type.
Clear the check box to pass through connections that do not have a secure encrypted inner channel connection with the peer. Use caution when disabling this setting, as doing so specifies that you strictly do not want traffic optimized between nonsecure appliances. When this setting is disabled on the server-side SteelHead and All is selected as the traffic type, it will not optimize the connection when a secure channel is unavailable, and might drop it.
SSL Peering Trust All Pre-configured Peering Certificates - Enables a trust relationship for all preconfigured Mobile Controller certificates listed in Effective List of all the Peering Certificates.
Trust Selected Peering Certificates - Enables a trust relationship only with selected peering certificates in the Selected Peering Certificates list.
Add Peering Certificate - Click to add a peering certificate from the drop-down list.
Add - Adds the selected peering certificate to the Selected Peerings Certificates list.
Remove Peering Certificate - Select the check box next to the name and click Remove Peering Certificate to remove the peering certificate.
Control Description
SteelCentral Controller for SteelHead Mobile User’s Guide 139

Beta Draft
Managing SteelHead Mobile Clients Managing SteelHead Mobile Policies
Configuring Location Awareness for Policies
Location Awareness enables SteelHead Mobile clients to detect that they are in a branch office with a SteelHead and to allow the branch office SteelHead to optimize their traffic. You configure location awareness for your SteelHead Mobile client on the Location Awareness tab of the Manage > Policies page.
When a SteelHead Mobile client is in a branch office that has a SteelHead, the location awareness settings determine whether optimization is performed by the SteelHead Mobile client or by the SteelHead. SteelHead Mobile client can be configured to operate in any one of three modes when in the branch office:
1. If latency-based location awareness is disabled (which also means that branch warming is unavailable), the SteelHead Mobile client performs optimization. The SteelHead Mobile client does not experience improved performance when accessing data segments that have been previously accessed by other users at the branch office, and the client warms only its own SteelHead Mobile RiOS data store. The branch office SteelHead does not warm its RiOS data store with data segments accessed by the SteelHead Mobile client, so when another user at the branch office transfers the same data, the second user experiences cold performance.
2. If latency-based location awareness is enabled but branch warming is not, then the branch office SteelHead performs optimization. In this case, the SteelHead Mobile client experiences warm performance while in the branch office. The branch office SteelHead warms its RiOS data store with segments previously accessed by the SteelHead Mobile client and by other users at the branch office. This is the default setting.
3. If latency-based location awareness and branch warming are both enabled, the SteelHead Mobile client will perform optimization with the server-side SteelHead, and it will also pull data segments from the branch-side SteelHead if another user in the branch has already accessed the same data. The SteelHead Mobile client will also push all of its newly acquired data segments to the branch SteelHead so other users may experience warm performance when they access that same data, whether the optimization is performed directly by the branch-side SteelHead or by another SteelHead Mobile client that is in Branch Warming mode. When the user leaves the branch office, the SteelHead Mobile client provides warm performance.
Branch warming co-operates with and optimizes transfers for a server-side SteelHead. New data transfers between the client and server are populated in the Mobile Controller RiOS data store, the branch SteelHead RiOS data store, and the server-side SteelHead RiOS data store.
When data is downloaded from the server, the server-side SteelHead checks if either the SteelHead Mobile client or the branch SteelHead has the data in its RiOS data store. If either device already has the data segments, the server-side SteelHead sends only references to the data. The SteelHead Mobile client and the branch SteelHead communicate with each other to resolve the references.
The following requirements must be met for location awareness and branch warming to function properly:
The SteelHeads must be running RiOS 6.0 or later.
The SteelHead Mobile client and the Mobile Controller must be running Mobile Controller 3.0 or later.
Enable latency-based location awareness and branch warming on the Mobile Controller.
Enable branch warming on both the client-side and server-side SteelHeads.
Both the client-side and server-side SteelHeads must be deployed in-path or virtual in-path (that is, no fixed-target rules).
Enable enhanced autodiscovery on both the client-side and server-side SteelHeads.
140 SteelCentral Controller for SteelHead Mobile User’s Guide

Beta Draft
Managing SteelHead Mobile Policies Managing SteelHead Mobile Clients
Branch warming might not improve performance for configurations using SteelHead Mobile clients that communicate with multiple server-side appliances in different scenarios. For example, if a SteelHead Mobile home user peers with one server-side SteelHead after logging in through a VPN network and peers with a different server-side SteelHead after logging in from the branch office, branch warming does not improve performance.
To configure location awareness
1. Choose Manage > Policies to display the Policies page.
2. Click the policy name to display the policy tabs and select Location Awareness.
Figure 7-15. Policies - Location Awareness Page
3. Complete the configuration as described in this table.
Control Description
Enable Latency-based location awareness
Click the check box only if you want to enable latency-based location awareness. Latency-based location awareness is disabled by default.
Optimize over adapters specified above if latency to SteelHead is more than: ( ) ms
Specify the value of latency to the SteelHead (in milliseconds) above which optimization over the specified adapters occurs.
Enable Branch Warming Select the check box only if you want to enable branch warming. Branch warming is disabled by default.
SteelCentral Controller for SteelHead Mobile User’s Guide 141

Beta Draft
Managing SteelHead Mobile Clients Managing SteelHead Mobile Policies
4. Click Update Policy to save your changes.
5. Click Save to save your settings permanently.
Enabling Branch Warming on SteelHead Appliances
For branch warming to work on the SteelHead Mobile client, branch warming must be enabled on both the client-side and server-side SteelHeads. For your convenience, instructions are provided here for configuring the SteelHeads.
To configure branch warming on the client-side and server-side SteelHead appliances
1. Connect to the client-side and server-side SteelHead appliances.
2. On both the client-side and the server-side SteelHeads, choose Configure > Optimization > Data Store to display the Data Store page.
3. Under General Settings, select Enable Branch Warming for SteelHead Mobiles.
4. Click Apply to apply your settings.
5. Click Save to save your settings permanently.
6. Restart the optimization service.
Note: To enable branch warming, ensure that the client-side and server-side SteelHeads are deployed as in-path or virtual in-path devices.
Adapters to Optimize: Add New Rule
Position - Select start, end, or a rule number from the drop-down list.
The Mobile Controllers evaluate rules in numerical order, starting with rule 1. If the conditions set in the rule match, then the rule is applied, and the system moves on to the next packet. If the conditions set in the rule do not match, the system consults the next rule. For example, if the conditions of rule 1 do not match, rule 2 is consulted. If rule 2 matches the conditions, it is applied, and no further rules are consulted.
Adapter - Determines the adapter. Select the adapter from the drop-down list. You can also add a new adapter when you add a new rule. Select Other Adapter(s) from the drop-down list and enter the adapter name in the Other - Please specify field.
Optimize - Determines the optimization. Select one of the following options from the drop-down list:
• Yes - Enables optimization.
• No - Disables optimization.
Add - Click Add to add the rule to the rules list.
Control Description
142 SteelCentral Controller for SteelHead Mobile User’s Guide

Beta Draft
Managing SteelHead Mobile Policies Managing SteelHead Mobile Clients
Configuring Endpoint Settings for Policies
You configure endpoint settings for SteelHead Mobile clients on the Endpoint Settings tab of the Manage > Policies page. Endpoint settings include the SteelHead Mobile RiOS data store size, log size, adding additional Mobile Controllers, Windows-only settings, and enabling visibility of the SteelHead Mobile in the system tray.
When you configure endpoint settings, you must remove the Mobile Controller labeled with the (localhost) suffix. This special Mobile Controller is the localhost, and when the policy is created, it is replaced by the Mobile Controller sending the policy, leading to an incorrect IP address. Instead of using the Mobile Controller labeled (localhost), use only the fully qualified domain name or the IP address for that Mobile Controller.
Note: Carefully consider the RiOS data store size of your SteelHead Mobile client. You can modify the SteelHead Mobile RiOS data store size at any time in a policy in the Manage > Policies > Endpoint Settings page. However, changing the RiOS data store size requires clearing the data store, which can temporarily slow performance.
To configure endpoint settings
1. Choose Manage > Policies to display the Policies page.
2. Click the policy name to display the policy tabs and select Endpoint Settings.
The Endpoint Settings page appears with the Controller Settings tab displayed.
Figure 7-16. Policies - Endpoint Settings - Controller Settings
SteelCentral Controller for SteelHead Mobile User’s Guide 143

Beta Draft
Managing SteelHead Mobile Clients Managing SteelHead Mobile Policies
3. Configure the controller settings as described in this table.
4. Select the Desktop Settings tab to configure endpoint settings for desktop licenses.
Control Description
Controller Options Add a New Controller - Displays the controls for adding a new Mobile Controller to the list.
Insert At - Select start, end, or a Mobile Controller number from the drop-down list. The default value is end.
Specify the order in which endpoint clients connect with Mobile Controllers.
Mobile Controllers connect according to the number you specify, starting with 1. If the system is unable to connect to 1 in the list, the system moves on to the next Mobile Controller in the list. For example, if the system is unable to connect to Mobile Controller 1, then Mobile Controller 2 is attempted. If Mobile Controller 2 is successful, no further Mobile Controllers in the list are attempted.
Hostname/Port - Specify a fully qualified hostname or IP address and port for a Mobile Controller that the client connects to. You can specify more than one Mobile Controller. The default port value is 7870.
Use Random Ordering of Controllers when Connecting - Select the check box to disregard the Mobile Controller priority list and randomly connect to Mobile Controllers in the group. The default setting is disabled.
Add - Adds a new Mobile Controller.
Remove Selected Controllers - To remove an entry, select the check box next to the entry and click Remove Selected Controllers.
By default, a value for the local Mobile Controller is already in the list. In a clustered deployment, the entry should be removed and replaced with an explicit entry for the local Mobile Controller.
144 SteelCentral Controller for SteelHead Mobile User’s Guide

Beta Draft
Managing SteelHead Mobile Policies Managing SteelHead Mobile Clients
5. Configure the desktop license settings as described in this table.
6. Click Update Policy to save your changes.
Control Description
General Settings Show Client in the System Tray - Select the check box to display the SteelHead Mobile in your client machine system tray. The default setting is enabled.
Note: When you enable Show Client in the System Tray, the endpoint user can override policy settings made by the system administrator. Even if a new policy is sent to the client, the settings in the client remain in effect until the endpoint user clicks Reset under Settings > Reset to Administrator policy.
Allow User to Modify Optimization Settings - Select the check box to enable the SteelHead Mobile user to modify optimization settings. The default setting is enabled.
Data Store Settings Data Store Size - Select one of the following options from the drop-down list. The minimum value is 256 MB. The default value is 10 GB.
• 256 MB = 81 MB RAM
• 512 MB = 81 MB RAM
• 1 GB = 81 MB RAM
• 2 GB = 100 MB RAM
• 5 GB = 112 MB RAM
• 10 GB = 161 MB RAM
• 15 GB = 171 MB RAM
• 20 GB = 228 MB RAM
The amount of RAM used by the optimization service on the SteelHead Mobile is related to the SteelHead Mobile RiOS data store size that you select. If the SteelHead Mobile is visible on the client computer, the Data Store Size Auto setting for RiOS data store size means the client is using the size specified in the policy.
Note: Carefully consider the RiOS data store size for your SteelHead Mobile clients. Changing the size later requires emptying the RiOS data store, which temporarily slows performance.
Log Settings Maximum Log Size - Specify the maximum size for your log files to be stored on your client machine. The default value is 5000 KB.
Windows-Only Settings Disable TCP/IP Checksum Offloading (Requires client reboot) - For Windows only. Select the check box to disable TCP/IP checksum offloading.
SteelCentral Controller for SteelHead Mobile User’s Guide 145

Beta Draft
Managing SteelHead Mobile Clients Managing SteelHead Mobile Packages
7. Click Save to save your settings permanently.
Note: After you apply your settings, you can verify whether changes have had the desired effect by reviewing related reports. After this verification, you can write the active configuration that is stored in memory to the active configuration file (or you can save it as any filename you choose). For details on saving configurations, see “Managing Configurations” on page 91.
Managing SteelHead Mobile Packages
The following section describes how to deploy Mobile Controller optimization settings to your SteelHead Mobile clients using packages. It includes the following sections:
“Creating Packages” on page 146
“Viewing Package Details” on page 148
“Deploying SteelHead Mobile Packages” on page 150
Creating Packages
You create packages in the Manage > Packages page to deploy Mobile Controller optimization settings to your SteelHead Mobile clients.
The Mobile Controller is shipped with a default package, called Default, which contains endpoint settings from the default Initial policy. The default package is designed to be suitable for basic deployments.
After you create a package it cannot be edited. However, you can create and deploy new packages for software and configuration updates.
To move a user from one group to another, you must uninstall the SteelHead Mobile software on the endpoint and then install the package with the new group. A simple approach is to move users to new groups when you upgrade their SteelHead Mobile software to a higher version.
146 SteelCentral Controller for SteelHead Mobile User’s Guide

Beta Draft
Managing SteelHead Mobile Packages Managing SteelHead Mobile Clients
To create a package
1. Choose Manage > Packages to display the Packages page.
Figure 7-17. Packages Page
2. Complete the configuration as described in this table.
Control Description
Create New Package Package Name - Specify a unique name for the package. The package name can be three or more characters, and it can contain alphanumeric characters (0-9, a-z, A-Z), spaces, hyphens ( - ), and underscores ( _ ).
Group - Specify the name of an existing group or specify a unique group name. Note the following points:
• If you specify an existing group name, a new package with the specified name will be created under the existing group.
• If you specify a unique group name, the name can be three or more characters, and it can contain alphanumeric characters (0-9, a-z, A-Z), spaces, hyphens ( - ), and underscores ( _ ).
For details on groups, see “Managing SteelHead Mobile Assignments” on page 153.
Comments - Specify a short comment to help you identify the package. This comment is displayed with the name of the package and the version number of the software contained in the package, on the Manage Packages page.
Install Directory - Specify the installation directory for the package. The default directory in Windows is %PROGRAMFILES%\Riverbed\Steelhead Mobile.
Datastore Directory - Specify the SteelHead Mobile RiOS data store directory. The default directory in Windows is %ALLUSERSAPPDATA%\Riverbed\Steelhead_mobile\Datastore.
Use Endpoint Settings from Policy - Select a policy from the drop-down list.
SteelCentral Controller for SteelHead Mobile User’s Guide 147

Beta Draft
Managing SteelHead Mobile Clients Managing SteelHead Mobile Packages
3. Click Add to save your package.
4. Click Save to permanently save your settings.
Viewing Package Details
You can view package details in the Manage > Packages page.
To view package details
1. Choose Manage > Packages to display the Packages page. A list of packages residing on the Mobile Controller displays according to the assigned group. Each group has a list of packages belonging to it.
Options (Windows only)
Show Installer UI - Select this option to display the Microsoft Windows Installer UI upon initial installation. The default value is enabled. To install the package silently (without the Microsoft Windows Installer UI), disable the Show Installer UI option.
Note: The Microsoft Windows Installer is visible to the endpoint client if the Show Installer UI option is enabled. If so, the system prompts you to specify your SteelHead Mobile RiOS data store size and Mobile Controller configurations.
Place Icon on Desktop - Select this option to display the Microsoft Windows Installer icon on the desktop of the client machine. The default value is enabled.
Place Entry in Start Menu - Select this option to list the Microsoft Windows Installer in the Start menu of the client machine. The default value is enabled.
Restart if Reboot is Needed - Select this option to prompt the user to reboot the machine after installing the SteelHead Mobile. The default value is disabled.
Increment MaxNumFilters if Needed - Select this option to increment automatically to the maximum number of filter drivers in the Windows Vista or Windows 7 registry, if the maximum number of filters is already installed on the system.
Add - Adds a new package to the package list. Packages are displayed according to their assigned group. Each group has a list of associated packages belonging to that group.
Remove Selected Packages - To remove an entry, select the check box next to the name and click Remove Selected Packages.
Control Description
148 SteelCentral Controller for SteelHead Mobile User’s Guide

Beta Draft
Managing SteelHead Mobile Packages Managing SteelHead Mobile Clients
2. Click the group name to display a list of packages, the version, and any comments associated with the package.
Figure 7-18. Packages Page
3. Click the package name to display package details.
Figure 7-19. Package Details Page
The following information is displayed for the package.
Control Description
Name The unique name for the package.
Group The unique group for the package.
Comments A short comment to help you identify the package.
Created The Mobile Controller software version and package code.
Build Details The date and time the package was created.
SteelCentral Controller for SteelHead Mobile User’s Guide 149

Beta Draft
Managing SteelHead Mobile Clients Managing SteelHead Mobile Packages
Deploying SteelHead Mobile Packages
The following section describes how to deploy SteelHead Mobile packages using the Microsoft Windows Installer for Windows clients and the Apple PackageMaker for Mac OS X clients.
You can use any of the following methods to deploy packages to the endpoint clients in your network:
Deployment Tools - Typically, in larger organizations, you might use deployment tools to install the SteelHead Mobile client software (for example, Microsoft SMS and GPO, Altiris, Tivoli, Radia, and Zenworks). Deployment of SteelHead Mobile software has been tested with Microsoft SMS, Active Directory, and GPO (Group Policy Object). Consult your vendor’s documentation for information about its products.
Software Version The Mobile Controller software version.
Install Directory The installation directory for the package. The default directory in Windows is %PROGRAMFILES%\Riverbed\Steelhead Mobile.
Datastore Directory The SteelHead Mobile RiOS data store directory. The default directory in Windows is %ALLUSERSAPPDATA%\Riverbed\Steelhead_Mobile\Datastore.
Endpoint Settings The following endpoint settings are displayed:
• Data Store Size - Displays the size allotted of the SteelHead Mobile RiOS data store.
• Log File Size - Displays the size allotted for log files.
• Number of Log Files - Displays the maximum number of log files allowed.
• Driver Order - Displays the current driver order.
• Disable Checksum Offload - Displays the current setting for Checksum Offload: true or false
• Driver Order Enabled - Displays the current setting for driver order: true or false
Installer UI The Microsoft Windows Installer UI option: true or false
Desktop Icon The Microsoft Windows Installer icon option on the desktop of the SteelHead Mobile: true or false
Start Menu The Microsoft Windows Installer option appears in the Start menu of the of the SteelHead Mobile: true or false
Restart if Reboot is Needed
Reboot the machine after installing the SteelHead Mobile: true or false
Increase MaxNumFilters if Needed
Increment automatically to the maximum number of filter drivers in the Windows Vista or Windows 7 registry, if the maximum number of filters is already installed on the system: true or false
32-bit Package Download URL
Download URL for the 32-bit Windows package.
64-bit Package Download URL
Download URL for the 64-bit Windows package.
Mac Package Download URL
Download URL for the Mac package.
Control Description
150 SteelCentral Controller for SteelHead Mobile User’s Guide

Beta Draft
Managing SteelHead Mobile Packages Managing SteelHead Mobile Clients
Email - You can use email to send the link provided on the Mobile Controller.
Manual Installation - If your deployment is small, you might want to install each package manually on the client machines.
Scripts - You can use login scripts or batch files to trigger an installation when users log in to their systems.
After you save the SteelHead Mobile package to your computer, double-click the package to install the package on your computer.
Note: If the package is to be downloaded by more than 50 SteelHead Mobile clients, Riverbed recommends that you put the package on a file server so the Mobile Controller is not overloaded with requests.
Basic Steps for Deploying Packages
Perform the following basic steps to deploy packages to your SteelHead Mobile clients.
1. Choose Manage > Packages to display the Packages page.
2. Click the group name to display a list of packages.
3. Click the package name to view package details, including the download URL for Windows and Mac packages.
4. Click the URL for the Windows or Mac package and save it to your local machine.
5. Distribute your package using a deployment tool of your choice:
You use a deployment tool, for example, you can use Microsoft GPO or SMS.
You can deploy your package from an internal website, by email, or manually. If you use one of these methods, you must install the SteelHead Mobile clients manually by double-clicking on the SteelHead Mobile package to install the package on your computer.
6. Verify the SteelHead Mobile connections and optimization in the Reports > Endpoints > Endpoints report on the Mobile Controller.
Installing the SteelHead Mobile Packages on Windows and Mac Clients
Perform the following steps to install the SteelHead Mobile package on a Windows Client. For details on Microsoft Windows Installer Properties (MSI) properties, see Appendix C, “Windows Installer Properties.”
The SteelHead Mobile installer for the Mac OS X is a standard Apple PackageMaker installer. Perform the following steps to install the SteelHead Mobile package on Mac clients.
To install the SteelHead Mobile package on a Windows client
1. After you have saved the SteelHead Mobile package to your computer, double-click the msi file to execute the package.
2. Accept the license agreement.
3. Choose the installation destination folder.
SteelCentral Controller for SteelHead Mobile User’s Guide 151
Beta Draft
Managing SteelHead Mobile Clients Managing SteelHead Mobile Packages
4. Specify whether to have a Desktop icon or a Start menu icon.
5. Choose a Typical or Advanced installation. If you select Advanced, set your SteelHead Mobile RiOS data store size and configure your Mobile Controller.
6. Click the desktop icon to launch the SteelHead Mobile.
7. Reboot your machine, if prompted.
To install the SteelHead Mobile package on a Mac client
1. After you have saved the SteelHead Mobile package to your computer, double-click the tgz file to run it.
2. Accept the license agreement.
3. Select the installation Destination disk.
4. Specify an administrator name and password, and click OK.
5. Click Close to complete the installation.
If the Show Client in the System Tray option is enabled in the policy, the SteelHead Mobile software icon is now shown in the system tray.
The SteelHead Mobile runs in the background and optimizes traffic transparently. After approximately thirty seconds, the client is visible on the Mobile Controller.
To verify your client connections and optimization, navigate to the Reports > Endpoints > Endpoint Report page on the Mobile Controller. For details, see “Viewing Endpoint Reports” on page 160.
Updating SteelHead Mobile Software
You use packages to provide automatic software updates to your SteelHead Mobile clients. After a package is created, it cannot be edited.
Note: HTTP access must be enabled on the Mobile Controller for automatic updates to be downloaded to your SteelHead Mobile clients.
When the SteelHead Mobile software is installed a client is assigned a group ID based on the package that was installed. If you used the Default package, then the client will be in the Default group. Using groups allows you to assign upgrades and policies to several SteelHead Mobile clients at a time. For details on groups, see “Managing SteelHead Mobile Assignments” on page 153.
Note: If you want to change a SteelHead Mobile’s group while still having the client using the same version, you must manually uninstall the SteelHead Mobile software to install the package with the new group. The SteelHead Mobile’s group can also be changed using the Group Policy Object (GPO) template. For details, see “Changing an Endpoint Group for Clients Using a GPO” on page 156.
152 SteelCentral Controller for SteelHead Mobile User’s Guide

Beta Draft
Managing SteelHead Mobile Assignments Managing SteelHead Mobile Clients
Basic Steps for Creating a Package for SteelHead Mobile Software Updates
The following list describes the basic steps for creating a package for SteelHead Mobile software updates.
Note: Upgrading can terminate existing connections on the client. Client connections are terminated each time the policies are updated.
Managing SteelHead Mobile Assignments
On the Manage > Assignments page, you configure two types of assignments:
Default policy assignments for desktop devices.
Group assignments for SteelHead Mobile clients.
Task Reference
1. Create new packages for each group. “Creating Packages” on page 146.
2. Modify the package assigned to the current group or assign your policies to group.
“Managing SteelHead Mobile Assignments” on page 153.
3. Deploy the package to the endpoint clients in your network using the deployment tool of your choice. When using the upgrade method built into the Mobile Controller, the endpoint user will be prompted to install the update.
“Deploying SteelHead Mobile Packages” on page 150 and “Installing the SteelHead Mobile Packages on Windows and Mac Clients” on page 151.
4. Verify your connection and optimization in the Reports > Endpoints > Endpoint Report page.
“Viewing Endpoint Reports” on page 160.
5. You can also make individual assignments to Active Directory users based on their username identified by the Mobile Controller without using a group.
“Working with Group Assignments” on page 154.
SteelCentral Controller for SteelHead Mobile User’s Guide 153

Beta Draft
Managing SteelHead Mobile Clients Managing SteelHead Mobile Assignments
Figure 7-20. Assignments Page
Changing Default Policy Assignments
You can configure default policy assignments for the desktop. The default policy is Initial.
To change a default policy assignment
1. Choose Manage > Assignments to display the Assignments page.
2. Click the device type that you want to edit. (You can also click the search icon next to the device type.)
Clicking the device type displays its details, and the search icon changes to an “x.” Click the “x” to collapse the details.
3. Under Edit Assignment, select a policy from the drop-down list.
4. Click Update SMC Default Assignment to make the change effective.
Working with Group Assignments
Typically, you use Group assignments to link policies and packages to your SteelHead Mobile clients. Group assignments enable you to create different packages that are associated with different policies and assign them to groups of SteelHead Mobile clients. When you deploy a package, the SteelHead Mobile reports its group to be that of the package that was installed. The Mobile Controller uses the group to identify the SteelHead Mobile clients associated with that group and automatically provides policy and software updates to them.
Your group assignments can be based on your endpoint client computers, such as applications used, computer memory, or disk space. Your group assignments can also be based on department, job function, geographic location, and so forth. Finally, they can be based on the type of Mobile Controller deployment you want, such as whether to optimize SteelHead Mobile clients when they are in the office.
154 SteelCentral Controller for SteelHead Mobile User’s Guide

Beta Draft
Managing SteelHead Mobile Assignments Managing SteelHead Mobile Clients
For example, suppose your SteelHead Mobile clients have two types of computers: one with a minimal amount of disk space and another that has substantially larger amounts of disk space. You can deploy two packages:
You can deploy the default package (which has a group assignment, Default and default policy, Initial) to your SteelHead Mobile clients with minimal disk space. Deploying the default package requires no additional configuration. After these SteelHead Mobile clients install the package, they are associated with the Default group and automatically receive policy and software updates assigned to the Default group.
You can create a policy called, for example, high_end. The high_end policy would allot more disk space for data optimization. You would create a package and give it a unique group called, for example, graphics_department. You would assign the high_end policy to the graphics_department group, and you would deploy the associated package to those users with the larger disk space. After your users install the package, their computers become associated with the graphics_department group and, subsequently, receive policy and software updates assigned to the graphics_department group. You could also use the high_end policy for clients associated with a different group.
You can also make individual assignments to Active Directory users without using a group. Riverbed recommends that you use a group to assign policies to packages.
If your network environment requires the deployment of multiple packages, create the packages you need before deploying the default package. For details, see the SteelCentral Controller for SteelHead Mobile Installation Guide.
To manage group assignments
1. Choose Manage > Assignments to display the Assignments page.
2. Complete the configuration as described in this table.
Controls Description
Add Group Assignments Specify the group assignments.
• Group - Specify a new, unique group. If you are updating endpoint clients, specify an existing group.
• Package - Specify a name for the package from the drop-down list.
• Policy - Specify the policy from the drop-down list. The default is Initial.
Note: In Mobile Controller 4.8, you can select Inherit from Default as an option.
Add Adds the group assignment.
Remove Selected Assignments
Removes the selected assignment.
Add AD Path Assignments
Specify the Active Directory path assignment.
Active Directory Path Assignment - Specify a new, unique active directory path assignment.
Package - Specify a name for the package from the drop-down list.
Policy - Specify the policy from the drop-down list.
SteelCentral Controller for SteelHead Mobile User’s Guide 155

Beta Draft
Managing SteelHead Mobile Clients Managing SteelHead Mobile Assignments
3. Click Save to save your settings permanently.
Changing an Endpoint Group for Clients Using a GPO
You can also use the Group Policy Object (GPO) custom administrative template to configure Mobile Controller deployment settings in the Manage > Assignments page.
The GPO custom administrative template adds Mobile Controller-specific policy settings to existing GPOs. After the template is added, you can configure these policy settings for use on the SteelHead Mobile clients. The GPO template can be added to the computer-specific or to the user-specific section of a GPO, depending on whether you want to apply settings based on computer name or username.
To change a client endpoint group with GPO
1. Double-click Group.
2. Select the option to enable the policy setting.
3. Type the group name.
When the policy is applied, the affected client begins using the specified group when communicating with the Mobile Controller, downloading policies, and so on.
Add Adds the active directory path assignment.
GPO Custom Administrative Template
Complete the following tasks:
• Click the link to download the GPO template (SteelheadMobile.adm) to your local machine.
• On the Active Directory Server, in the Group Policy Editor, under Computer Configuration or User Configuration, right-click Administrative Templates and select Add/Remove Templates.
• Click Add.
• Navigate to the location of the SteelheadMobile.adm file downloaded above, select it, and click Open.
• The SteelheadMobile.adm file is listed under Current Policy Templates. The GPO now contains a Mobile Controller section with a list of the available Mobile Controller policy settings.
Note: On Windows Server 2008 R2 or later, the new template appears under a subsection of Current Policy Templates labeled Classic Administrative Templates.
For details about changing a group, and disabling and enabling optimization using a GPO, see “Changing an Endpoint Group for Clients Using a GPO” on page 156 and “Enabling or Disabling Optimization Using a GPO Template” on page 157.
Controls Description
156 SteelCentral Controller for SteelHead Mobile User’s Guide

Beta Draft
Managing SteelHead Mobile Assignments Managing SteelHead Mobile Clients
Enabling or Disabling Optimization Using a GPO Template
In Windows Server you can enable or disable optimization using a GPO template.
To enable or disable optimization using a GPO Template
1. Double-click Enable Optimization.
2. Select the policy that you want to enable.
3. To disable optimization, uncheck Enable Optimization.
When the policy is applied, optimization on the client is disabled.
SteelCentral Controller for SteelHead Mobile User’s Guide 157

Beta Draft
Managing SteelHead Mobile Clients Managing SteelHead Mobile Assignments
158 SteelCentral Controller for SteelHead Mobile User’s Guide

CHAPTER 8 Viewing Reports and Logs
This chapter describes how to view reports and logs on the Mobile Controller and the SteelHead Mobile. Reports provide you with detailed information about network, health, and diagnostics. The chapter includes the following sections:
“Viewing Reports for Endpoints” on page 159
“Viewing Diagnostics Reports” on page 176
“Viewing and Downloading Logs” on page 187
“Viewing Diagnostic Reports for Endpoints” on page 191
“Viewing Controller Reports” on page 194
“Exporting Logs” on page 203
To use this chapter, you must know how to install, configure, and manage WAN optimization using the SteelHead. For details about the SteelHead, see the SteelHead Installation and Configuration Guide, the SteelHead Management Console User’s Guide, and the SteelHead Deployment Guide.
Note: To print any report or log, choose File > Print in your web browser to open the Print dialog box.
Viewing Reports for Endpoints
The following section describes how to view and customize endpoint client reports. It includes the following sections:
“Viewing Endpoint Reports” on page 160
“Viewing Endpoint User Information” on page 164
“Viewing Desktop Bandwidth Reports” on page 166
“Viewing Branch Warming Reports” on page 168
“Viewing SSL Reports” on page 170
“Viewing Endpoint History Reports” on page 172
“Viewing Desktop Traffic Reports” on page 174
SteelCentral Controller for SteelHead Mobile User’s Guide 159

Viewing Reports and Logs Viewing Reports for Endpoints
For all reports, data collection is the same. The Mobile Controller receives bandwidth and connection metrics from currently connected SteelHead Mobile clients every five minutes, and aggregates statistical data by hour and day.
If the Mobile Controller is part of a cluster, the report only shows data from the current Mobile Controller. The Mobile Controller stores the SteelHead Mobile data for three months or longer, depending on your network environment.
The Desktop Bandwidth reports, Branch Warming reports, and SSL reports for endpoints show graphs. In bar-graph and line-graph reports, the x-axis (or tick mark) plots time, according to the interval you select. The y-axis plots the metric of interest, such as gigabytes (GBs) of bandwidth, percent (%) of data reduction, and connection counts.
The Desktop Traffic reports show pie charts. Pie chart graphs do not indicate peaks or averages, but represent the aggregate for the time period selected.
The LAN and WAN statistics reported on an Endpoint report might differ from those shown in the Desktop Bandwidth or Desktop Traffic graphs. For example, an endpoint client might switch Mobile Controllers if the controllers are in a cluster, or a user might manually change the Mobile Controller. The statistics shown on the Endpoint report are an aggregate of the LAN or WAN data across all the Mobile Controllers that the endpoint client connected to during the selected time frame. However, the statistics shown on the Desktop Bandwidth and Desktop Traffic graphs are only for the Mobile Controller currently in use.
Viewing Endpoint Reports
The Reports > Endpoints > Endpoint Report page provides information about the Mobile Controller’s endpoints.
An Endpoint report lists every endpoint client that has connected to the Mobile Controller and any other controllers in the same cluster. The report summarizes the overall status of your SteelHead Mobile clients: username, connection status, controller, IP address, software version, group, policy, percent of data reduction, amount of data sent over the LAN and WAN, warmed data, and time connected. The Endpoint report provides statistics that describe endpoint client activity for the time period you specify, as shown in the bottom right of the report.
The Endpoint report displays icons for both types of clients: Windows or Mac. The icons are dimmed if the client is unlicensed, and bright orange if the client is licensed.
The Endpoint report for Mobile Controller 4.8 and later also has a Settings tab that lets you choose the columns that appear in the report. In addition, on the Endpoints tab, three sub-tabs let you filter the report contents, perform system operations on endpoints, and remove one or more selected endpoints, as shown here:
Figure 8-1. Endpoint Report Page
160 SteelCentral Controller for SteelHead Mobile User’s Guide

Viewing Reports for Endpoints Viewing Reports and Logs
What This Report Tells You
The Endpoint report answers the following questions:
What is the current connection status of my SteelHead Mobile?
What is the health and Mobile Controller connection status?
How much data was transmitted for each SteelHead Mobile?
To view an endpoint report or change the report display
1. Choose Reports > Endpoints > Endpoint Report to display the Endpoint Report page.
2. To change the columns displayed in the report, click the Settings tab.
3. Select or clear the check boxes for the report columns, based on this table.
4. Click Apply to make your changes.
Filtering Endpoint Reports
Select the Filters tab on the Endpoint report page to set or change the list of endpoint clients displayed, based on a variety of factors.
Figure 8-2. Endpoint Report Page - Filters Tab
Control Description
Group Displays the SteelHead Mobile group.
Policy Displays the policy assigned to the SteelHead Mobile.
Total Reduction Displays the amount of data reduction for the SteelHead Mobile.
LAN Data Displays the amount of data transmitted over the LAN during the selected time period.
WAN Data Displays the amount of data transmitted over the WAN during the selected time period.
Warmed Data Displays the total warmed data from the local Mobile Controller for the period specified when branch warming is turned on.
Connected At Displays the connection time for the SteelHead Mobile.
SteelCentral Controller for SteelHead Mobile User’s Guide 161

Viewing Reports and Logs Viewing Reports for Endpoints
To filter endpoint reports
1. On the Endpoint Reports page, click Filters (if it is not already highlighted).
2. Use the controls to customize the report as described in this table.
3. Select or clear one or more endpoints on the endpoint list below the Filters pane.
4. Click Apply Filter to make your changes.
Control Description
User Specify one or more usernames. Separate multiple usernames with commas.
Type Select All or Desktop.
License Select All, Licensed, or Unlicensed.
Connection duration Select All Connections Intervals, or an interval ranging from five minutes to one month
Statistics posted Select an interval ranging from the last hour to last month
Endpoints per page Select All Endpoints, or 20, 50, or 100 endpoints
Status Specify the current state of the SteelHead Mobile from the drop-down list:
• All - Indicates that all data is requested.
• Connected - Indicates the Mobile Controller is connected to the SteelHead Mobile.
– Healthy - Indicates that all systems are functioning properly.
– Degraded - Indicates that system has detected an error when communicating with an endpoint.
– Critical - Indicates that the optimization service is not running. Contact your system administrator.
– Disabled - Indicates that the optimization service is turned off.
• Disconnected - Indicates that the connection to the endpoint is down.
Version Select All to filter on all software versions, or select one or more particular software versions. This filter only appears when more than one value is present among the currently connected the SteelHead Mobile clients.
Group Specifies one or more groups of SteelHead Mobile clients to display. This filter only appears when more than one value is present among the currently connected the SteelHead Mobile clients.
Controller Select or clear All, or one or more Mobile Controllers. This filter only appears when more than one value is present among the currently connected SteelHead Mobile clients.
Policy Select or clear All, or specific policies assigned to the SteelHead Mobile. This filter only appears when more than one value is present among the currently connected SteelHead Mobile clients.
Add Adds filters.
162 SteelCentral Controller for SteelHead Mobile User’s Guide

Viewing Reports for Endpoints Viewing Reports and Logs
Removing Endpoint Information
Select the Remove Selected Endpoints tab to remove the current information stored in the Endpoint report for one or more endpoints. Under normal circumstances, this information is replaced periodically with new information from the SteelHead Mobile.
Note: Clicking Remove Endpoint does not disable or remove the SteelHead Mobile on the end user’s machine.
To remove information for endpoints
1. Select the Remove Selected Endpoints tab.
2. Select the check box next to one or more endpoint usernames.
3. Click Remove Endpoint to make your changes.
Performing Endpoint Operations
Select the Endpoint Operation tab to perform system tasks such as resetting connections and requesting dump files, on selected endpoint clients.
To perform system tasks on endpoint clients
1. On the Endpoint Reports page, select the Endpoint Operations tab.
2. Use the controls on this tab to perform any of the tasks described in this table. .
Control Description
Reset Client-SMC Connection
Select the check box next to one or more endpoint usernames, and click Reset Client-SMC Connection to reset the connection between the Mobile Controller and the endpoint client.
Request System Dump Select the check box next to one or more endpoint usernames, and click Request System Dump to upload the files.
A system dump contains endpoint logs, configuration information, process information, and other diagnostic information to use for troubleshooting.
Note: HTTP must be enabled on the Mobile Controller to upload files from your SteelHead Mobile.
To view system dump files, see “Viewing Diagnostic Reports for Endpoints” on page 191.
SteelCentral Controller for SteelHead Mobile User’s Guide 163

Viewing Reports and Logs Viewing Reports for Endpoints
3. Select or clear one or more endpoints on the endpoint list below the Operations pane.
4. Click Apply Action to produce the desired results.
Viewing Endpoint User Information
On the Endpoint Reports page, you can display additional detailed information about an individual endpoint. The information is organized across several tabs.
Request Memory Dump Uploads the memory dump files.
Note: A memory dump can be very large and can take time to upload.
Note: HTTP must be enabled on the Mobile Controller to upload files from your SteelHead Mobile.
To view memory dump files, see “Viewing the Memory Dumps List” on page 191.
TCP Dump Duration Select the check box next to one or more endpoint usernames, specify a time interval, and click Request TCP Dump to upload the TCP dump files.
Note: HTTP must be enabled on the Mobile Controller to upload TCP dump files from your SteelHead Mobile.
To view TCP dump files, see “Capturing and Uploading TCP Dumps” on page 196.
Request TCP Dump Select the check box next to one or more endpoint usernames and click Request TCP Dump to upload the files.
Control Description
164 SteelCentral Controller for SteelHead Mobile User’s Guide

Viewing Reports for Endpoints Viewing Reports and Logs
Figure 8-3. Endpoint User Page
To view endpoint user details
1. Click an entry in the User column to expand details for that user.
2. Click the tabs at the top of the expanded user detail information to view detailed information about the endpoint user. The following tabs are available:
General Information - Includes general information about the endpoint user, the user’s computer, and the user’s SteelHead Mobile, including client health, health description, computer name, IP address, policy, package, SteelHead Mobile software version, license status, memory, free disk space, and data store size.
Bandwidth Summary - Includes the amount of WAN data, warmed data, LAN data, total data reduction, number of SSL requests, and how many SSL requests were optimized.
Current Connections - Lists the endpoint’s current connections by the running process with the source and destination port and information about the percent of data reduction.
Adapters - Lists the Ethernet and other network adapters currently in use on the endpoint.
Assignments - Lists the package and policy currently assigned to the endpoint, and provides drop-down lists for selecting a different policy or package.
Diagnostics - Provides links to any memory dumps, system dumps, and TCP dumps that have been run for the endpoint with a time stamp, file size, and MD5 sum for the dump file. Admin privileges are required to view the Diagnostics tab.
SteelCentral Controller for SteelHead Mobile User’s Guide 165

Viewing Reports and Logs Viewing Reports for Endpoints
Viewing Desktop Bandwidth Reports
These reports summarize the overall inbound and outbound bandwidth improvements for the SteelHead Mobile clients of each type connected to the Mobile Controller. You can create reports according to the time period of your choice, application, and type of traffic.
For details about adding ports to be monitored, see “Configuring Monitored Ports” on page 46.
The Desktop Bandwidth report includes the following table of statistics that describe bandwidth utilization for the time period you specify.
What This Report Tells You
The Desktop Bandwidth report answers the following questions:
How much bandwidth optimization has occurred on the SteelHead Mobile clients as a result of data optimization?
What was the average and peak reduction of data sent by SteelHead Mobile clients?
What was the overall increase in the amount of data that can be transmitted as a result of data optimization?
Field Description
WAN Data Specifies the bytes transmitted over the WAN.
LAN Data Specifies the bytes transmitted over the LAN.
Total Data Reduction Specifies the percent decrease of data transmitted over the WAN as a result of optimization, according to the following calculation:
(Data In – Data Out)/(Data In)
Peak Data Reduction Occurred At Specifies the time that the peak data reduction occurred.
Optimized Bandwidth Capacity Increase
Specifies the increase in the amount of data transmitted over the WAN as a result of optimization, according to the following calculation:
1/(1-Reduction Rate)
166 SteelCentral Controller for SteelHead Mobile User’s Guide

Viewing Reports for Endpoints Viewing Reports and Logs
To view a Desktop Bandwidth report
1. Choose Reports > Endpoints > Desktop Bandwidth to display the desktop bandwidth page.
Figure 8-4. Desktop Bandwidth Page
2. Manipulate the report as you like:
– Mouse over the data points.
– To hide or show a data type (WAN or LAN), click that type in the graph legend.
3. Use the controls to customize the report as described in this table.
Control Description
Period Select Last Hour, Last Day, Last Week, Last Month, or Custom from the drop-down list.
If you select Custom, specify a Start Time and End Time to configure a customized time interval report. Use the following format for specifying a start and end time: yyyy/mm/dd hh:mm:ss.
Endpoints Select All from the drop-down list for a report on all endpoints connected to the Mobile Controller, or select a specific endpoint from the list.
Network Select All from the drop-down list for a report on all networks or select WiFi, 3G/4G, or Roaming.
SteelCentral Controller for SteelHead Mobile User’s Guide 167
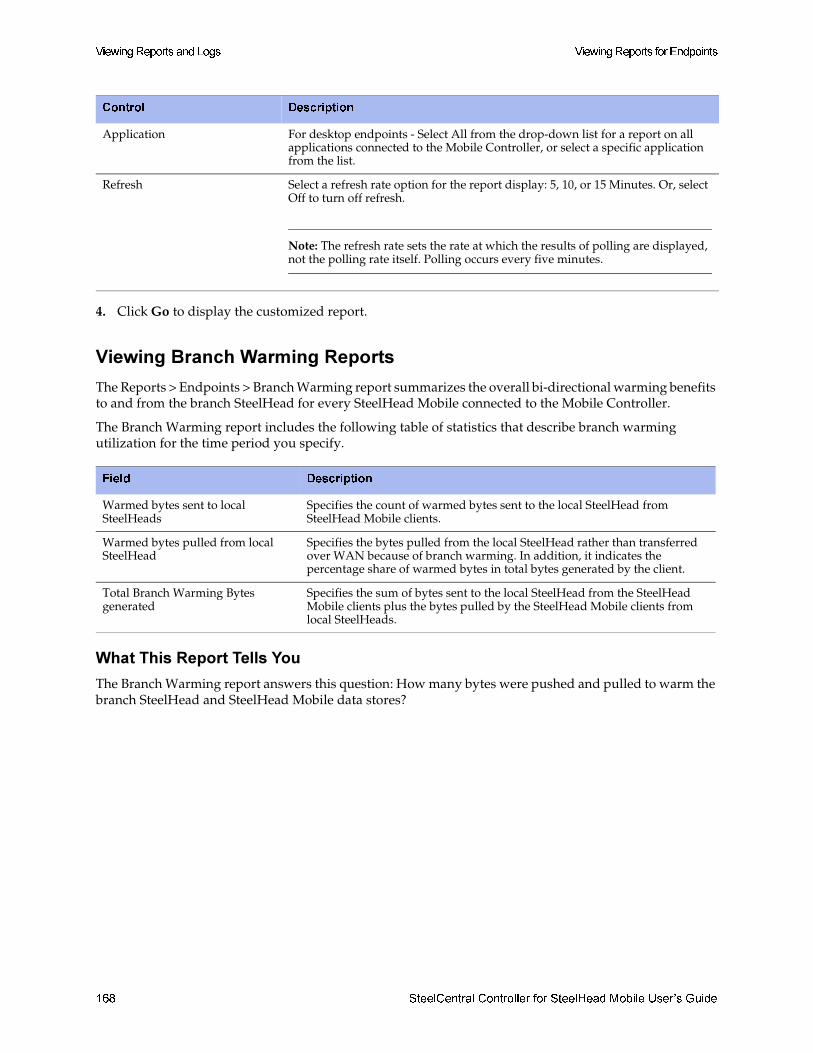
Viewing Reports and Logs Viewing Reports for Endpoints
4. Click Go to display the customized report.
Viewing Branch Warming Reports
The Reports > Endpoints > Branch Warming report summarizes the overall bi-directional warming benefits to and from the branch SteelHead for every SteelHead Mobile connected to the Mobile Controller.
The Branch Warming report includes the following table of statistics that describe branch warming utilization for the time period you specify.
What This Report Tells You
The Branch Warming report answers this question: How many bytes were pushed and pulled to warm the branch SteelHead and SteelHead Mobile data stores?
Application For desktop endpoints - Select All from the drop-down list for a report on all applications connected to the Mobile Controller, or select a specific application from the list.
Refresh Select a refresh rate option for the report display: 5, 10, or 15 Minutes. Or, select Off to turn off refresh.
Note: The refresh rate sets the rate at which the results of polling are displayed, not the polling rate itself. Polling occurs every five minutes.
Field Description
Warmed bytes sent to local SteelHeads
Specifies the count of warmed bytes sent to the local SteelHead from SteelHead Mobile clients.
Warmed bytes pulled from local SteelHead
Specifies the bytes pulled from the local SteelHead rather than transferred over WAN because of branch warming. In addition, it indicates the percentage share of warmed bytes in total bytes generated by the client.
Total Branch Warming Bytes generated
Specifies the sum of bytes sent to the local SteelHead from the SteelHead Mobile clients plus the bytes pulled by the SteelHead Mobile clients from local SteelHeads.
Control Description
168 SteelCentral Controller for SteelHead Mobile User’s Guide

Viewing Reports for Endpoints Viewing Reports and Logs
To view a Branch Warming report
1. Choose Reports > Endpoints > Branch Warming to display the Branch Warming page.
Figure 8-5. Branch Warming Page
2. Manipulate the report as you like:
– Drag your cursor over an area of interest to zoom.
– After dragging, click the Reset Zoom link that appears to return to normal view.
– To hide or show a data type (Branch In or Branch Out), click that type in the graph legend.
3. Use the controls to customize the report as described in this table.
Control Description
Period Select Last Hour, Last Day, Last Week, Last Month, or Custom from the drop-down list.
If you select Custom, specify a Start Time and End Time, and to configure a customized time interval report. Use the following format for specifying a start and end time: yyyy/mm/dd hh:mm:ss.
SteelCentral Controller for SteelHead Mobile User’s Guide 169

Viewing Reports and Logs Viewing Reports for Endpoints
4. Click Go to display the customized report.
Viewing SSL Reports
The Reports > Endpoints > SSL report summarizes the SSL connection requests and connection rate for the time period specified. You can create reports according to the time period of your choice, application, and type of traffic.
The SSL report includes the following statistics for the time period you specify.
What This Report Tells You
The SSL report answers the following questions:
What was the peak number of optimized connections?
How many SSL connections were not optimized?
Endpoints Select All from the drop-down list for a report based on all endpoints connected to the Mobile Controller, or select a specific endpoint from the list. You can also perform a search on a substring, such as the IP address subnet.
Refresh Select a refresh rate option for the report display: 5, 10, or 15 Minutes. Or, select Off to turn off refresh.
Note: The refresh rate sets the rate at which the results of polling are displayed, not the polling rate itself. Polling occurs every five minutes.
Control Description
SSL Connections Optimized Specifies the number of SSL connections that were optimized.
SSL Connections Not Optimized Specifies the number of SSL connections that were not optimized.
Total Optimized Connections Requested Specifies the number of SSL requests.
Overall connections optimized Specifies the overall number optimized connections, including SSL connections.
Peak # connections optimization Specifies the number of peak connections for SSL.
Peak connection optimization at Specifies the peak connection-optimization time.
Control Description
170 SteelCentral Controller for SteelHead Mobile User’s Guide

Viewing Reports for Endpoints Viewing Reports and Logs
To view an SSL report
1. Choose Reports > Endpoints > SSL to display the SSL page.
Figure 8-6. SSL Page
2. Manipulate the report as you like:
– Drag your cursor over an area of interest to zoom.
– After dragging, click the Reset Zoom link that appears to return to normal view.
– To hide or show a data type (Optimized or Unoptimized SSL Connections), click that type in the graph legend.
3. Use the controls to customize the report as described in this table.
Control Description
Period Select Last Hour, Last Day, Last Week, Last Month, or Custom from the drop-down list.
If you select Custom, specify a Start Time and End Time, and to configure a customized time interval report. Use the following format for specifying a start and end time: yyyy/mm/dd hh:mm:ss.
SteelCentral Controller for SteelHead Mobile User’s Guide 171

Viewing Reports and Logs Viewing Reports for Endpoints
4. Click Go to display the customized report.
Viewing Endpoint History Reports
The Reports > Endpoints > Endpoint History report displays the following statistics, which describe connected endpoint activity for the time period you specify.
What This Report Tells You
The Endpoint History report answers the following questions:
How many endpoints connected, over time?
When were the most endpoints connected?
How many licenses were added in a given period?
Endpoints Select All from the drop-down list for a report based on all endpoints connected to the Mobile Controller, or select a specific endpoint from the list. You can also perform a search on a substring, such as the IP address subnet.
Refresh Select a refresh rate option for the report display: 5, 10, or 15 Minutes. Or, select Off to turn off refresh.
Note: The refresh rate sets the rate at which the results of polling are displayed, not the polling rate itself. Polling occurs every five minutes.
Field Description
Average Connected Endpoints Specifies the average number of endpoint clients connected to the Mobile Controller for the time period specified.
Maximum Connected Endpoints Specifies the maximum number of endpoint clients connected to the Mobile Controller for the time period specified.
Average Licensed Endpoints Specifies the average number of endpoint clients licensed.
Maximum Licensed Endpoint Specifies the maximum number of endpoint clients licensed.
Peak Connection Time Specifies the time at which point the greatest number of endpoint clients were connected to the Mobile Controller for the time period specified.
Control Description
172 SteelCentral Controller for SteelHead Mobile User’s Guide

Viewing Reports for Endpoints Viewing Reports and Logs
To view the Endpoint History report
1. Choose Reports > Endpoints > Endpoint History to display the Endpoint History page.
Figure 8-7. Endpoint History Page
2. Manipulate the report as you like:
– Drag your cursor over an area of interest to zoom.
– After dragging, click the Reset Zoom link that appears to return to normal view.
– To hide or show an endpoint type, click that type in the graph legend.
3. Use the controls to customize the report as described in this table.
4. Click Go to display the customized report.
Control Description
Period Select Last Hour, Last Day, Last Week, Last Month, or Custom from the drop-down list.
If you select Custom, specify a Start Time and End Time to configure a customized time interval report. Use the following format for specifying a start and end time: yyyy/mm/dd hh:mm:ss.
Refresh Select a refresh rate option for the report display: 5, 10, or 15 Minutes. Or, select Off to turn off refresh.
Note: The refresh rate sets the rate at which the results of polling are displayed, not the polling rate itself. Polling occurs every five minutes.
SteelCentral Controller for SteelHead Mobile User’s Guide 173

Viewing Reports and Logs Viewing Reports for Endpoints
Viewing Desktop Traffic Reports
The Reports > Endpoints > Desktop Traffic report provides a percentage breakdown, by port and by application, of the amount of SteelHead Mobile traffic being transmitted.
The Mobile Controller automatically discovers all the ports in the system that have desktop traffic. The discovered port, along with a label (if one exists), is added to the report. If a label does not exist, an Unknown label is added to the discovered port.
If you want to change the Unknown label to a name representing the port, you must add the port with a new label. All statistics for this new port label are preserved from the time the port was discovered.
For details about adding ports to be monitored, see “Configuring Monitored Ports” on page 46.
Note: The Endpoints > Desktop Traffic report displays a maximum of 16 colors for ports. If you have more than 16 ports, the colors in the report wrap from the beginning.
The Desktop Traffic report provides the following statistics that describe data transmission by port and by application (for example, MAPI, HTTP, or CIFS), for the time period you specify.
What This Report Tells You
The Desktop Traffic report answers the following questions:
How much benefit from data reduction is a specific endpoint client enjoying?
How much network traffic is each endpoint transferring?
Field Description
Port Specifies the TCP/IP port number and type of traffic for each row of statistics.
Reduction Specifies the amount of data reduction as a result of data optimization.
LAN Specifies the amount of traffic on the LAN.
WAN Specifies the amount of traffic on the WAN.
Traffic % Specifies the percentage of the total traffic each port represents.
174 SteelCentral Controller for SteelHead Mobile User’s Guide

Viewing Reports for Endpoints Viewing Reports and Logs
To view the Desktop Traffic report
1. Choose Reports > Endpoints > Desktop Traffic to display the Desktop Traffic page.
Figure 8-8. Desktop Traffic Page
2. Use the controls to customize the report as described in this table.
3. Click Go to display the customized report.
Control Description
Period Select Last Hour, Last Day, Last Week, Last Month, or Custom from the drop-down list.
If you select Custom, specify a Start Time and End Time to configure a customized time interval report. Use the following format for specifying a start and end time: yyyy/mm/dd hh:mm:ss.
Endpoints Select All from the drop-down list for a report based on all endpoints connected to the Mobile Controller, or select a specific endpoint from the list. You can also perform a search on a substring, such as the IP address subnet.
Refresh Select a refresh rate option for the report display: 5, 10, or 15 Minutes. Or, select Off to turn off refresh.
Note: The refresh rate sets the rate at which the results of polling are displayed, not the polling rate itself. Polling occurs every five minutes.
SteelCentral Controller for SteelHead Mobile User’s Guide 175

Viewing Reports and Logs Viewing Diagnostics Reports
Viewing Diagnostics Reports
The following section describes how to create and view diagnostics reports for the Mobile Controller. It includes the following sections:
“Viewing Alarm Status Reports” on page 176
“Viewing CPU Utilization Reports” on page 181
“Viewing Memory Paging Reports” on page 183
“Viewing Interface Counters” on page 185
Viewing Alarm Status Reports
The Reports > Diagnostics > Alarm Status report provides status for the Mobile Controller alarms.
The Mobile Controller tracks key hardware and software metrics and alerts you to any potential problems so that you can quickly discover and diagnose issues.
Mobile Controller 4.0 and later features alarm reporting using hierarchical alarms. The system groups certain alarms into top-level categories, such as the SSL Settings alarm. When an alarm triggers, its parent expands to provide more information: for example, the System Disk Full top-level alarm aggregates over multiple partitions. If a specific partition is full, the System Disk Full alarm triggers and the Alarm Status report displays more information regarding which partition caused the alarm to trigger.
The alarm status falls into one of the following states:
OK - Signifies that no problems have been found.
Needs Attention - Accompanies a healthy state to indicate management-related issues not affecting the ability of the Mobile Controller to optimize traffic.
Degraded - Indicates that the Mobile Controller is optimizing traffic, but the system has detected an issue.
Admission Control - Indicates that the Mobile Controller is optimizing traffic but has reached its connection limit.
Critical - Indicates that the Mobile Controller might or might not be optimizing traffic; you must address a critical issue.
Suppressed - Appears after a child alarm when its parent alarm is disabled on the Configure > System Settings > Alarms page.
Disabled - Appears when a child alarm is disabled even though its parent alarm is enabled.
176 SteelCentral Controller for SteelHead Mobile User’s Guide

Viewing Diagnostics Reports Viewing Reports and Logs
The Alarm Status report includes the following alarm information..
Alarm Mobile
Controller
State
Reason
Configuration Indicates whether a configuration error was detected.
CPU Utilization Degraded Indicates that the system has reached the CPU threshold for any of the CPUs in the Mobile Controller. If the system has reached the CPU threshold, check your settings. For details, see “Configuring Alarm Settings” on page 38.
If your alarm thresholds are correct, reboot the Mobile Controller. For details, see “Rebooting and Shutting Down the Mobile Controller” on page 87.
Note: If more than 100 MB of data is moved through a Mobile Controller while performing PFS synchronization, the CPU utilization might become high and result in a CPU alarm. This CPU alarm is not cause for concern.
Disk Full Indicates that the system partitions (not the SteelHead Mobile RiOS data store) are full or almost full.
Endpoint Datastore Indicates whether the number of endpoint clients with data store errors has reached the rising threshold. By default, this alarm is enabled.
Endpoint Filesystem Full
Indicates whether the number of endpoint clients with File System Full errors has reached the rising threshold. By default, this alarm is enabled.
Endpoint Firewall Indicates whether the number of endpoints with firewall status has reached the rising threshold. By default, this alarm is enabled.
Endpoint Gen Id Error
Indicates whether an Endpoint Gen Id error was detected. By default, this alarm is enabled.
Endpoint NFS Indicates whether there has been an NFS error. By default, this alarm is enabled.
Endpoint Service Indicates whether the number of endpoint clients with service errors has reached the rising threshold. By default, this alarm is enabled.
Endpoint SSL Error Indicates whether there has been an SSL error. By default, this alarm is enabled.
Endpoint Version Indicates whether there is a mismatch between software versions in your network. If a software mismatch is detected, resolve the mismatch by upgrading or reverting to a previous version of the software. By default, this alarm is enabled.
Endpoint License Indicates whether the number of connected endpoint licenses (including desktop licenses) has exceeded the licensed limit. For details about updating licenses, see “Managing Licenses” on page 82.
SteelCentral Controller for SteelHead Mobile User’s Guide 177

Viewing Reports and Logs Viewing Diagnostics Reports
Hardware Either Critical or Degraded, depending on the state
• Fan Error - Indicates that a fan is failing or has failed and must be replaced.
• Flash Error - Flash Error - Indicates an error with the flash drive hardware. At times, the USB flash drive that holds the system images might become unresponsive; the Mobile Controller continues to function normally. When this error occurs, you cannot perform a software upgrade, as the Mobile Controller is unable to write a new upgrade image to the flash drive without first power-cycling the system.
To reboot the appliance, go to the Configure > Maintenance > Reboot/Shut Down page or enter the CLI reload command to automatically power-cycle the Mobile Controller and restore the flash drive to its proper state.
• IPMI - Indicates an Intelligent Platform Management Interface (IPMI) event. (Not supported on all appliance models.)
This alarm triggers when there has been a physical security intrusion. The following events trigger this alarm:
– chassis intrusion (physical opening and closing of the appliance case)
– memory errors (correctable or uncorrectable ECC memory errors)
– hard drive faults or predictive failures
– power cycle, such as turning the power switch on or off, physically unplugging and replugging the cable, or issuing a power cycle from the power switch controller
By default, this alarm is enabled.
• Memory Error - Indicates a memory error: for example, when a system memory stick fails.
• Power Supply - Indicates that an inserted power supply cord does not have power, as opposed to a power supply slot with no power supply cord inserted.
• RAID - Indicates that the system has encountered RAID errors (for example, missing drives, pulled drives, drive failures, and drive rebuilds). Provides status information for individual drives on the system.
– RAID Disk 0 Status
– RAID Disk 1 Status
For drive rebuilds, if a drive is removed and then reinserted, the alarm continues to be triggered until the rebuild is complete.
Alarm Mobile
Controller
State
Reason
178 SteelCentral Controller for SteelHead Mobile User’s Guide

Viewing Diagnostics Reports Viewing Reports and Logs
Licensing Critical Indicates whether a license on the Mobile Controller is removed, is about to expire, has expired, or is invalid. This alarm triggers if the Mobile Controller has no license installed for its currently configured model.
• Autolicense Critical Event - This alarm triggers when the Riverbed Licensing Portal cannot respond to a license request with valid licenses.
• Autolicense Informational Event - This alarm triggers if the Riverbed Licensing Portal has information regarding the licenses for a Mobile Controller appliance. For example, this alarm displays when the portal provides a license that is associated with a token previously used on a different Mobile Controller appliance.
• Licenses Expired - This alarm triggers if one or more features have at least one license installed, but all of them are expired.
• Licenses Expiring - This alarm triggers if the license for one or more features is going to expire within two weeks.
• Licensing - This alarm triggers if the Mobile Controller has no BASE or MSPEC license installed for its currently configured model.
Note: The licenses expiring and licenses expired alarms are triggered per feature. For example, if you install two license keys for a feature, LK1-FOO-xxx (expired) and LK1-FOO-yyy (not expired), the alarms do not trigger, because the feature has one valid license.
Link Duplex Enables an alarm and sends an email notification when an interface was not configured for half-duplex negotiation but has negotiated half-duplex mode.
The alarm displays which interface is triggering the duplex alarm.
• Interface aux Half-Duplex
• Interface primary Half-Duplex
Link I/O Errors Enables an alarm and sends an email notification when the error rate on an interface exceeds 0.1 percent while either sending or receiving packets. This threshold is based on the observation that even a small link error rate reduces TCP throughput significantly. A properly configured LAN connection experiences very few errors. The alarm clears when the rate drops below 0.05 percent.
The alarm displays the interface with the link error.
• Interface aux Link Error
• Interface primary Link Error
Link State Degraded Indicates that the system has detected a link that is inoperable. You are notified through SNMP traps, email, and alarm status.
• Interface aux Down - This alarm triggers if an Ethernet link is inoperable on the aux interface.
• Interface primary Down - This alarm triggers if an Ethernet link is inoperable on the primary interface.
By default, this alarm is disabled.
Alarm Mobile
Controller
State
Reason
SteelCentral Controller for SteelHead Mobile User’s Guide 179

Viewing Reports and Logs Viewing Diagnostics Reports
What This Report Tells You
The Alarm Status report answers the following question: What is the current status of the Mobile Controller?
Memory Paging Degraded Indicates that the system has reached the memory paging threshold. If 100 pages are swapped approximately every two hours, the SteelHead is functioning properly. If thousands of pages are swapped every few minutes, then reboot the Mobile Controller. For details, see “Rebooting and Shutting Down the Mobile Controller” on page 87.
If rebooting does not solve the problem, contact the Riverbed Support site at:
https://support.riverbed.com.
Process Dump Creation Error
Degraded Indicates that the system has detected an error while trying to create a process dump. This alarm indicates an abnormal condition in which RiOS cannot collect the core file after three retries. It can be caused when the /var directory, which is used to hold system dumps, is reaching capacity or other conditions. When this alarm is raised, the directory is blacklisted.
Contact Riverbed Support to correct the issue.
Secure Vault Degraded Indicates a problem with the secure vault.
• Secure Vault Locked - Needs Attention - Indicates that the secure vault is locked. To optimize SSL connections or to use RiOS data store encryption, the secure vault must be unlocked. Go to Configure > Security > Secure Vault and unlock the secure vault. For details, see “Unlocking the Secure Vault” on page 74.
SSL Indicates that an error has been detected in your SSL configuration.
• SSL Certificates - Indicates that an SSL peering certificate has failed to reenroll automatically within the Simple Certificate Enrollment Protocol (SCEP) polling interval.
• SSL Signing Certificate Validity - Indicates that an SSL peering certificate has failed to reenroll automatically within the Simple Certificate Enrollment Protocol (SCEP) polling interval.
Temperature Critical or Warning
Indicates that the CPU temperature has exceeded or is approaching the critical threshold:
• Critical Temperature - Indicates that the CPU temperature has exceeded the critical threshold. The default value for the rising threshold temperature is 70ºC; the default reset threshold temperature is 67ºC.
• Warning Temperature - Indicates that the CPU temperature is about to exceed the critical threshold.
Underprovisioned VM
Memory, data storage, or CPU resources are insufficient for the maximum number of endpoints.
Does not apply to the Mobile Controller.
Valid Platform Indicates that the hardware platform does not support the Mobile Controller-v.By default, this alarm is enabled.
Valid VM Indicates that the virtual machine is unavailable.
Alarm Mobile
Controller
State
Reason
180 SteelCentral Controller for SteelHead Mobile User’s Guide

Viewing Diagnostics Reports Viewing Reports and Logs
To view the Alarm Status report
Choose Reports > Diagnostics > Alarm Status to display the Alarm Status page. Alternately, you can select the current system status that appears in the status box in the upper-right corner of each screen (Healthy, Admission Control, Degraded, or Critical) to display the Alarm Status page.
Figure 8-9. Alarm Status Page
Viewing CPU Utilization Reports
The Reports > Diagnostics > CPU Utilization report summarizes the percentage of the CPU used within the time period specified.
Typically, a Mobile Controller operates on approximately 5 to 10 percent CPU capacity during nonpeak hours and approximately 25 to 30 percent capacity during peak hours. No single Mobile Controller CPU usage should exceed 90 percent.
What This Report Tells You
The CPU Utilization report answers the following questions:
How much of the CPU is being used?
What is the average and peak percentage of the CPU being used?
SteelCentral Controller for SteelHead Mobile User’s Guide 181

Viewing Reports and Logs Viewing Diagnostics Reports
About Report Graphs
In bar-graph and line-graph reports, the x-axis (or tick mark) plots time, according to the interval you select. The y-axis plots the metric of interest, such as GBs of bandwidth, percent (%) of data reduction, connection counts, and the like.
Drag your cursor over an area of interest to zoom. Click Reset Zoom to return to normal view. To display only one data type (for example, WAN, LAN) click the name of the data in the graph legend.
Pie chart graphs do not indicate peaks or averages. Pie chart graphs represent the aggregate for the time period selected.
To view the CPU Utilization report
1. Choose Reports > Diagnostics > CPU Utilization to display the CPU Utilization page.
Figure 8-10. CPU Utilization Page
182 SteelCentral Controller for SteelHead Mobile User’s Guide

Viewing Diagnostics Reports Viewing Reports and Logs
2. Use the controls to customize the report as described in this table.
3. Click Go to display your report.
Viewing Memory Paging Reports
The Reports > Diagnostics > Memory Paging report provides the total number of memory pages, per second, utilized in the time period specified. It includes the following table of statistics that describe memory paging activity for the time period you specify.
Note: If the Memory Paging report shows that thousands of pages are swapped every few minutes, contact Riverbed Support at https://support.riverbed.com.
What This Report Tells You
The Memory Paging report answers the following questions:
How much memory is being used?
What is the average and maximum amount of memory pages swapped?
Control Description
Period Select Last Hour, Last Day, Last Week, Last Month, or Custom from the drop-down list.
If you select Custom, specify a Start Time and End Time to configure a customized time interval report. Use the following format for specifying a start and end time: yyyy/mm/dd hh:mm:ss.
Refresh Select one of the following options to set a rate to refresh the report display:
• To refresh your report every 5 minutes, select 5 Minute.
• To refresh your report every 10 minutes, select 10 Minutes.
• To refresh your report every 15 minutes, select 15 Minutes.
• To turn off refresh, select Off.
Note: The refresh rate sets the rate at which the results of polling are displayed, not the polling rate itself. Polling occurs every five minutes.
Field Description
Total Pages Swapped Out Specifies the total number of pages swapped. If 100 pages are swapped approximately every two hours the Mobile Controller is functioning properly.
Average Pages Swapped Out Specifies the average number of pages swapped. If 100 pages are swapped every couple of hours the Mobile Controller is functioning properly.
Maximum Pages Swapped Out At <time> on <date>
Specifies the date and time that the maximum number of pages were swapped.
SteelCentral Controller for SteelHead Mobile User’s Guide 183

Viewing Reports and Logs Viewing Diagnostics Reports
About Report Graphs
In bar-graph and line-graph reports, the x-axis (or tick mark) plots time, according to the interval you select. The y-axis plots the metric of interest, such as gigabytes (GBs) of bandwidth, percent (%) of data reduction, connection counts, and the like.
Drag your cursor over an area of interest to zoom. Click Reset Zoom to return to normal view. To display only one data type (for example, WAN, LAN) click the name of the data in the graph legend.
Pie chart graphs do not indicate peaks or averages. Pie chart graphs represent the aggregate for the time period selected.
To view the Memory Paging report
1. Choose Reports > Diagnostics > Memory Paging to display the Memory Paging page.
Figure 8-11. Memory Paging Page
184 SteelCentral Controller for SteelHead Mobile User’s Guide

Viewing Diagnostics Reports Viewing Reports and Logs
2. Use the controls to customize the report as described in this table.
3. Click Go to display your report.
Viewing Interface Counters
The Reports > Diagnostics > Interface Counters report summarizes the statistics for the primary and auxiliary interfaces. It also displays the IP address, speed, duplex, MAC address, and current status of each interface.
For automatically negotiated speed and duplex settings, the Interface Counters report displays the speed at which they are negotiated.
The Interface Counters report displays the statistics described in this table.
Control Description
Period Select Last Hour, Last Day, Last Week, Last Month, or Custom from the drop-down list.
If you select Custom, specify a Start Time and End Time to configure a customized time interval report. Use the following format for specifying a start and end time: yyyy/mm/dd hh:mm:ss.
Refresh Select one of the following options to set a rate to refresh the report display:
• To refresh your report every 5 minutes, select 5 Minutes.
• To refresh your report every 10 minutes, select 10 Minutes.
• To refresh your report every 15 minutes, select 15 Minutes.
• To turn off refresh, select Off.
Note: The refresh rate sets the rate at which the results of polling are displayed, not the polling rate itself. Polling occurs every five minutes.
Counter Description
Interface Identifies the interface for which statistics are displayed for each row of the report.
• Primary - Displays statistics for the primary interface.
• Auxiliary Interface - Displays statistics for the auxiliary interface.
IP Specifies the IP address for the interface.
Ethernet Specifies the MAC address, speed, and duplex setting for the interface. Use this information to troubleshoot speed and duplex problems. Make sure the speed for the SteelHead matches the WAN or LAN interfaces. Riverbed recommends setting the speed to 100 and duplex to full.
Link Specifies true or false to indicate whether the link is up or down.
Receive Packets Specifies the total number of packets, packets discarded, errors encountered, packets overrun, frames sent, and multicast packets sent.
Transmit Packets Specifies the total number packets, packets discarded, errors encountered, packets overrun, carriers used, and collisions encountered.
SteelCentral Controller for SteelHead Mobile User’s Guide 185

Viewing Reports and Logs Viewing Diagnostics Reports
What This Report Tells You
The Interface Counters report answers the following questions:
How many packets are being transmitted?
Are there any errors occurring during the packet transmissions?
What is the current status of the interface?
To view interface counters
1. Choose Reports > Diagnostics > Interface Counters to display the Interface Counters page.
Figure 8-12. Interface Counters Page
2. To clear all statistics, click Clear All Interface Statistics.
186 SteelCentral Controller for SteelHead Mobile User’s Guide

Viewing and Downloading Logs Viewing Reports and Logs
Viewing and Downloading Logs
Mobile Controller log reports provide a high-level view of network activity. Logs can be viewed within Mobile Controller or downloaded, as described in the sections below.
“Viewing Logs” on page 187
“Downloading Log Files” on page 190
Viewing Logs
You can view both user and system logs.
“Viewing User Logs” on page 187
“Viewing System Logs” on page 188
Viewing User Logs
You can view user logs in the Reports > Diagnostics > View User Logs page. The user log filters messages from the system log to display messages that are of immediate use to the system administrator.
View user logs to monitor system activity and to troubleshoot problems. For example, you can monitor who logged in, who logged out, and who entered particular CLI commands, alarms and errors. The most recent log events are listed first.
To view and customize user logs
1. Choose Reports > Diagnostics > View User Logs to display the View User Logs page.
Figure 8-13. View User Logs Page
SteelCentral Controller for SteelHead Mobile User’s Guide 187

Viewing Reports and Logs Viewing and Downloading Logs
2. Use the controls to customize the log as described in this table.
You can continuously display new lines as the log grows and appends new data.
To view a continuous log
1. Choose Reports > Diagnostics > View User Logs to display the View User Logs page.
2. Customize the log as described in “To view and customize user logs” on page 187.
3. Click Launch Continuous Log in the upper-right corner of the page.
Viewing System Logs
You can view system logs in the Reports > Diagnostics > View System Logs page. Use System logs to monitor system activity and to troubleshoot problems. The most recent log events are listed first.
Control Description
Show Select one of the archived logs or Current Log from the drop-down list.
Lines per Page Specify the number of lines you want to display in the page.
Jump to Select one of the following options from the drop-down list:
• Page - Specify the number of pages you want to display.
• Time - Specify the time for the log you want to display.
Filter Select one of the following filtering options from the drop-down list:
• Regular expression - Specify a regular expression on which to filter the log.
• Error or higher - Displays Error level logs or higher.
• Warning or higher - Displays Warning level logs or higher.
• Notice or higher - Displays Notice level logs or higher.
• Info or higher - Displays Info level logs or higher.
Go Displays the report.
188 SteelCentral Controller for SteelHead Mobile User’s Guide

Viewing and Downloading Logs Viewing Reports and Logs
To customize system logs
1. Choose Reports > Diagnostics > View System Logs to display the View System Logs page.
Figure 8-14. View System Logs Page
2. Use the controls to customize the report as described in this table.
Note: To print the log, choose File > Print in your web browser to open the Print dialog box.
Control Description
Show Select one of the archived logs or Current Log from the drop-down list.
Lines per page Specify the number of lines you want to display in the page.
Jump to Select one of these options from the drop-down list:
• Page - Specify the number of pages you want to display.
• Time - Specify the time for the log you want to display.
Regular Expression Filter
Select one of these filtering options from the drop-down list:
• Regular expression - Specify a regular expression on which to filter the log.
• Error or higher - Displays Error level logs or higher.
• Warning or higher - Displays Warning level logs or higher.
• Notice or higher - Displays Notice level logs or higher.
• Info or higher - Displays Info level logs or higher.
Go Displays the report.
SteelCentral Controller for SteelHead Mobile User’s Guide 189

Viewing Reports and Logs Viewing and Downloading Logs
To view a continuous log
1. Choose Reports > Diagnostics > View System Logs to display the View System Logs page.
2. Customize the log as described in “To customize system logs” on page 189.
3. Click Launch Continuous Log in the upper-right corner of the page.
Downloading Log Files
You can download both user and system logs.
“Downloading User Log Files” on page 190
“Downloading System Log Files” on page 190
Downloading User Log Files
You can download user logs in the Reports > Diagnostics > Download User Logs page. Download user logs to monitor system activity and to troubleshoot problems.
To download user logs
1. Choose Reports > Diagnostics > Download User Logs to display the Download User Logs page.
Figure 8-15. Download User Logs Page
2. Click the name of the log to display the dialog box to display or save the log to disk.
3. Click Rotate Logs to archive the current log to a numbered archived log file and then clear the log so that it is empty again.
Downloading System Log Files
You can download system logs in the Reports > Diagnostics > Download System Logs page. Download system logs to monitor system activity and to troubleshoot problems.
190 SteelCentral Controller for SteelHead Mobile User’s Guide

Viewing Diagnostic Reports for Endpoints Viewing Reports and Logs
To download system logs
1. Choose Reports > Diagnostics > Download System Logs to display the Download System Logs page.
Figure 8-16. Download System Logs Page
2. Click the name of the log to display the dialog box to display or save the log to disk.
3. Click Rotate Logs to archive the current log to a numbered archived log file and then clear the log so that it is empty again.
Viewing Diagnostic Reports for Endpoints
Display the diagnostic reports for endpoint clients from the Reports > Diagnostics > Endpoint page. This section describes the following reports:
“Viewing the Memory Dumps List” on page 191
“Viewing the System Dumps List” on page 192
“Downloading Endpoint TCP Dumps” on page 193
Viewing the Memory Dumps List
You can display and download endpoint memory dumps in the Reports > Diagnostics > Endpoint > Memory Dumps page. A memory dump contains a copy of the memory data on the system. Memory dump files can help you diagnose problems in the system.
SteelCentral Controller for SteelHead Mobile User’s Guide 191

Viewing Reports and Logs Viewing Diagnostic Reports for Endpoints
To view memory dump files
1. Choose Reports > Diagnostics > Endpoint > Memory Dumps to display the Memory Dumps page.
Figure 8-17. Memory Dumps Page
2. Click the filename to open a file or save the file to disk.
3. Click Include Statistics. (This option is enabled by default).
4. Optionally, click the box next to Download Link to select all previously saved system dumps and enable Remove Selected.
5. Click Generate System Dump to generate a new system dump.
Note: To remove an entry, select the box next to the name and click Remove Selected.
Viewing the System Dumps List
You can display and download endpoint system dumps in the Reports > Diagnostics > Endpoint > System Dumps page. A system dump contains a copy of the kernel data on the system. System dump files can help you diagnose problems in the system.
192 SteelCentral Controller for SteelHead Mobile User’s Guide

Viewing Diagnostic Reports for Endpoints Viewing Reports and Logs
To view system dump files
1. Choose Reports > Diagnostics > Endpoint > System Dumps to display the System Dumps page.
Figure 8-18. System Dumps Page
2. Select Download Link to save all system dump files to disk, or select particular filenames to save only those files to disk.
3. Click Include Statistics. (This option is enabled by default).
4. Optionally, click Include All Logs.
5. Click Generate System Dump to generate a new system dump.
Note: To remove an entry, select the check box next to the name and click Remove Selected.
Downloading Endpoint TCP Dumps
You can download endpoint TCP dumps in the Reports > Diagnostics > Endpoint > TCP Dumps page. TCP dump files contain summary information for every Internet packet received or transmitted on the interface. TCP dump files can help diagnose problems in the system.
To download TCP dumps
1. Choose Reports > Diagnostics > Endpoint > TCP Dumps to display the TCP Dumps page.
Figure 8-19. TCP Dumps Page
2. Click the TCP dump name to open a file save dialog box and download the file.
Note: To remove an entry, select the check box next to the name and click Remove Selected Files.
SteelCentral Controller for SteelHead Mobile User’s Guide 193

Viewing Reports and Logs Viewing Controller Reports
Viewing Controller Reports
The following section describes how to view Mobile Controller system files to help diagnose problems. It includes the following sections:
“Viewing the System Dumps List” on page 194
“Viewing Process Dump Files” on page 195
“Capturing and Uploading TCP Dumps” on page 196
“Stopping a TCP Dump After an Event Occurs” on page 201
Viewing the System Dumps List
You can display and download Mobile Controller system dumps in the Reports > Diagnostics > Controller > System Dumps page. A system dump contains a copy of the kernel data on the system. System dump files can help you diagnose problems in the system.
To view system dump files
1. Choose Reports > Diagnostics > Controller > System Dumps to display the System Dumps page.
Figure 8-20. System Dumps Page
2. Click Include Statistics (this option is enabled by default).
3. Optionally, click Include All Logs to create logs regardless of size. Typically, system dumps are limited to 50 MB of compressed logs.
194 SteelCentral Controller for SteelHead Mobile User’s Guide

Viewing Controller Reports Viewing Reports and Logs
4. Under Generate System Dump, click Generate System Dump to generate a new system dump.
Note: To remove an entry, select the check box next to the name and click Remove Selected.
Note: To print the report, choose File > Print in your web browser to open the Print dialog box.
To upload a system dump file to Riverbed support
1. Choose Reports > Diagnostics > Controller> System Dumps to display the System Dumps page.
2. Select the filename.
3. Optionally, specify a case number that corresponds to the system dump. Riverbed Support recommends using a case number: for example, 194170.
You can also enter the CLI command file debug dump upload URL to specify a URL instead of a case number. When you specify a URL, the dump file goes directly to the URL.
If the URL points to a directory on the upload server, it must have a trailing backslash (/).
For example:
ftp://ftp.riverbed.com/incoming/
(not ftp://ftp.riverbed.com/incoming)
The filename as it exists on the appliance will then match the filename on the upload server.
For details, see the Riverbed Command-Line Interface Reference Manual.
4. Click Upload.
Because uploading a system dump can take a while (especially when including ESXi information on a SteelHead EX), the status appears during the upload. When the system dump finishes uploading, the date, time, and a status of either uploaded (appears in green) or failed (appears in red). An explanation appears for uploads that fail.
Viewing Process Dump Files
The Reports > Diagnostics > Controller > Process Dumps report displays a list of process files and size.
To view process dump files
1. Choose Reports > Diagnostics > Controller > Process Dumps to display the Process Dumps page.
SteelCentral Controller for SteelHead Mobile User’s Guide 195

Viewing Reports and Logs Viewing Controller Reports
2. Under Controller Diagnostic in the left menu, click Process Dumps to display the Controller Diagnostic > Process Dumps page.
Figure 8-21. Controller Diagnostic > Process Dumps Page
To upload a process dump file to Riverbed support
1. Choose Reports > Diagnostics > Controller> Process Dumps to display the Process Dumps page.
2. Select the filename.
3. Optionally, specify a case number that corresponds to the system dump. Riverbed Support recommends using a case number: for example, 194170.
You can also enter the CLI command file debug dump upload URL to specify a URL instead of a case number. When you specify a URL, the dump file goes directly to the URL.
If the URL points to a directory on the upload server, it must have a trailing backslash (/).
For example:
ftp://ftp.riverbed.com/incoming/
(not ftp://ftp.riverbed.com/incoming)
The filename as it exists on the appliance will then match the filename on the upload server.
For details, see the Riverbed Command-Line Interface Reference Manual.
4. Click Upload.
Because uploading a system dump can take a while, the status appears during the upload. When the system dump finishes uploading, the date, time, and a status of either uploaded (appears in green) or failed (appears in red). An explanation appears for uploads that fail.
Capturing and Uploading TCP Dumps
You can capture, download, and upload TCP dumps in the Reports > Diagnostics > Controller > TCP Dumps page. TCP dump files contain summary information for every Internet packet received or transmitted on the interface. TCP dump files can help diagnose problems in the system.
Mobile Controller provides an easy way to capture and retrieve multiple TCP dumps from the Management Console. You can generate TCP dumps from multiple interfaces at the same time, limit the size of the TCP dump, and schedule a specific date and time to generate a TCP dump. Scheduling and limiting a TCP dump by time or size allows unattended captures.
The top of the TCP Dumps page displays a list of existing TCP dumps and the bottom of the page displays controls to create a new TCP dump. It also includes the TCP dumps that are currently running. The Running Capture Name list includes TCP dumps running at a particular time. It includes TCP dumps started manually and also any dumps that were scheduled previously and are now running.
196 SteelCentral Controller for SteelHead Mobile User’s Guide

Viewing Controller Reports Viewing Reports and Logs
To capture TCP dumps
1. Choose Reports > Diagnostics > Controller > TCP Dumps to display the TCP Dumps page.
Figure 8-22. TCP Dumps Page
SteelCentral Controller for SteelHead Mobile User’s Guide 197

Viewing Reports and Logs Viewing Controller Reports
2. Complete the configuration as described in this table.
Control Description
Add a New TCP Dump Displays the controls for creating a capture file.
Capture Name Specify the name of the capture file. Use a unique filename to prevent overwriting an existing capture file. The default filename uses this format:
<hostname>_<interface>_<timestamp>.cap
<hostname> is the hostname of the SteelHead,<interface> is the name of the interface selected for the trace (for example, lan0_0, wan0_0), and <timestamp> is in the yyyy/mm/dd hh:mm:ss format.
If this capture file relates to an open Riverbed Support case, specify the capture filename case_<number> where <number >is your Riverbed Support case number: for example, case_12345.
Note: The .cap file extension is not included with the filename when it appears in the capture queue.
Endpoints Specify IP addresses and port numbers to capture packets between them:
IPs - Specify IP addresses of endpoints on one side. Separate multiple IP addresses using commas. You can enter IPv6 addresses separated by commas. The default setting is all IP addresses.
Ports - Specify ports on one side. Separate multiple ports using commas. The default setting is all ports.
—and—
IPs - Specify IP addresses of endpoints on the other side. Separate multiple IP addresses using commas. You can enter IPv6 addresses separated by commas. The default setting is all IP addresses.
Ports - Specify ports on the other side. Separate multiple ports using commas. The default setting is all ports.
To capture traffic flowing in only one direction or to enter a custom command, use the CLI tcpdump command. For details, see the Riverbed Command-Line Interface Reference Manual.
Capture Interfaces Captures packet traces on the selected interfaces. You can select all interfaces or a base, in-path, or RSP interface. The default setting is none. You must specify a capture interface.
If you select several interfaces at a time, the data is automatically placed into separate capture files.
When path selection is enabled, Riverbed recommends that you collect packet traces on all LAN and WAN interfaces.
198 SteelCentral Controller for SteelHead Mobile User’s Guide

Viewing Controller Reports Viewing Reports and Logs
Capture Parameters These parameters let you capture information about dot1q VLAN traffic. You can match traffic based on VLAN-tagged or untagged packets, or both. You can also filter by port number or host IP address and include or exclude ARP packets. Select one of these parameters for capturing VLAN packets:
• Capture Untagged Traffic Only - Select this option for the following captures:
– All untagged VLAN traffic.
– Untagged 7850 traffic and ARP packets. You must also specify or arp in the custom flags field on this page.
– Only untagged ARP packets. You must also specify and arp in the custom flags field on this page.
• Capture VLAN-Tagged Traffic Only - Select this option for the following captures:
– Only VLAN-tagged traffic.
• VLAN-tagged packets with host 10.11.0.6 traffic and ARP packets. You must also specify 10.11.0.6 in the IPs field, and specify or arp in the custom flags field on this page.
– VLAN-tagged ARP packets only. You must also specify and arp in the custom flags field on this page.
• Capture both VLAN and Untagged Traffic - Select this option for the following captures:
– All VLAN traffic.
– Both tagged and untagged 7850 traffic and ARP packets. You must also specify the following in the custom flags field on this page:
(port 7850 or arp) or (vlan and (port 7850 or arp))
– Both tagged and untagged 7850 traffic only. You must also specify 7850 in one of the port fields on this page. No custom flags are required.
– Both tagged and untagged ARP packets. You must also specify the following in the custom flags field on this page:
(arp) or (vlan and arp)
Capture Duration (Seconds)
Specify a positive integer to set how long the capture runs, in seconds. The default value is 30. Specify 0 or continuous to initiate a continuous trace.
For continuous capture, Riverbed recommends specifying a maximum capture size and a nonzero rotate file number to limit the size of the TCP dump.
Maximum Capture Size Specify the maximum capture file size, in MB. The default value is 100. After the file reaches the maximum capture size, TCP dump starts writing capture data into the next file, limited by the Number of Files to Rotate field.
Riverbed recommends a maximum capture file size of 1024 MB (1 GB).
Buffer Size Optionally, specify the maximum amount of data, in KB, allowed to queue while awaiting processing by the capture file. The default value is 154 KB.
Snap Length Optionally, specify the snap length value for the capture file, which equals the number of bytes captured for each packet. Having a snap length smaller than the maximum packet size on the network enables you to store more packets, but you might not be able to inspect the full packet content. Specify 0 for a full packet capture (recommended for CIFS, MAPI, and SSL captures). The default value is 1518 bytes.
Control Description
SteelCentral Controller for SteelHead Mobile User’s Guide 199

Viewing Reports and Logs Viewing Controller Reports
Note: If a problem occurs with an immediate or scheduled TCP dump, a warning message appears. Check the system log for details about the error and check the TCP dump for syntax errors.
Custom Flag Use Examples
The examples in this table focus on the custom flag entry but rely on other fields to create a complete filter.
Number of Files to Rotate
Specify how many capture files to keep for each interface before overwriting the oldest file. To stop file rotation, you can specify 0; however, Riverbed recommends rotating files, because stopping the rotation can fill the disk partition.
This limits the number of files created to the specified number, and begins overwriting files from the beginning, thus creating a rotating buffer.
The default value is five files per interface. The maximum value is a 32-bit integer.
Custom Flags Specify custom flags as additional statements within the filter expression. Custom flags are added to the end of the expression created from the Endpoints fields and the Capture Parameters radio buttons (pertaining to VLANs).
If you require an “and” statement between the expression created from other fields and the expression that you are entering in the custom flags field, you must include the “and” statement at the start of the custom flags field.
Do not use host, src, or dst statements in the custom flags field. Although it is possible in trivial cases to get these statements to start without a syntax error, they do not capture GRE-encapsulated packets that some modes of SteelHead communications use, such as WCCP deployments or Interceptor connection-setup traffic. Riverbed recommends using bidirectional filters by specifying endpoints.
For complete control of your filter expression, use the CLI tcpdump command. For details, see the Riverbed Command-Line Interface Reference Manual.
For examples, see “Custom Flag Use Examples” on page 200.
Schedule Dump Schedules the capture to run at a later date and time.
Start Date Specify a date to initiate the capture, in this format: yyyy/mm/dd.
Start Time Specify a time to initiate the capture, in this format: hh:mm:ss.
Add Adds the capture request to the capture queue.
Filter Purpose Custom Flag
To capture all traffic on VLAN 10 between two specified endpoints: 1.1.1.1 and 2.2.2.2
and vlan 10
To capture any packet with a SYN or an ACK tcp[tcpflags] & (tcp-syn|tcp-ack) != 0
To capture any packet with a SYN tcp[tcpflags] & (tcp-syn) != 0
—or—
tcp[13] & 2 == 2
To capture any SYN to or from host 1.1.1.1 and (tcp[tcpflags] & (tcp-syn) != 0)
—or—
and (tcp[13] & 2 == 2)
Control Description
200 SteelCentral Controller for SteelHead Mobile User’s Guide

Viewing Controller Reports Viewing Reports and Logs
IPv6 Custom Flag Use Examples
The examples in this table focus on the custom flag entry, but rely on other fields to create a complete filter.
To build expressions for TCP dumps, IPv6 filtering does not currently support the TCP, UDP, and other upper-layer protocol types that IPv4 supports. Also, these IPv6 examples are based on the assumption that only a single IPv6 header is present.
To upload a TCP dump file to Riverbed support
1. Choose Reports > Diagnostics > Controller > TCP Dumps to display the TCP Dumps page.
2. Select the filename.
3. Optionally, specify a case number that corresponds to the system dump. Riverbed Support recommends using a case number: for example, 194170.
You can also enter the CLI command file debug dump upload URL to specify a URL instead of a case number. When you specify a URL, the dump file goes directly to the URL.
If the URL points to a directory on the upload server, it must have a trailing backslash (/).
For example:
ftp://ftp.riverbed.com/incoming/
(not ftp://ftp.riverbed.com/incoming)
The filename as it exists on the appliance will then match the filename on the upload server.
For details, see the Riverbed Command-Line Interface Reference Manual.
4. Click Upload.
Because uploading a system dump can take a while, the status appears during the upload. When the system dump finishes uploading, the date, time, and a status of either uploaded (appears in green) or failed (appears in red). An explanation appears for uploads that fail.
Stopping a TCP Dump After an Event Occurs
Capture files offer visibility into intermittent network issues, but the amount of traffic they capture can be overwhelming. Also, because rotating logs is common, after a capture logs an event, the SteelHead appliance log rotation can overwrite debugging information specific to the event.
Mobile Controller 4.8 and later makes troubleshooting easier because it provides a trigger that can stop a continuous capture after a specific log event occurs. The result is a smaller file to help pinpoint what makes the event happen.
The stop trigger continuously scans the system logs for a search pattern. When it finds a match, it stops all running captures.
Filter Purpose Custom Flag
To capture all FIN packets to or from host 2001::2002 and (ip6[53] & 1!=0)
To capture all IPv6 SYN packets ip6 or proto ipv6 and (ip6[53] & 2 == 2)
SteelCentral Controller for SteelHead Mobile User’s Guide 201

Viewing Reports and Logs Viewing Controller Reports
To stop a capture after a specific log event
1. Choose Reports > Diagnostics > Controller > TCP Dumps to display the TCP Dumps page.
2. Schedule a capture.
Figure 8-23. TCP Dump Stop Trigger
3. In the Pattern text box, enter a Perl regular expression (regex) to find in a log. RiOS compares the Perl regex against each new line in the system logs and the trigger stops if it finds a match.
The simplest regex is a word or a string of characters. For example, if you set the pattern to “Limit,” the trigger matches the line “Connection Limit Reached.”
Notes:
Perl regular expressions are case sensitive.
Perl treats the space character like any other character in a regex.
Perl reserves some characters, called metacharacters, for use in regex notation. The metacharacters are:
{ } [ ] ( ) ^ $ . | * + ? \
You can match a metacharacter by putting a backslash before it. For example, to search for a backslash in the logs, you must enter two backslashes (\\) as the pattern.
The pattern follows Perl regular expression syntax. For details, go to:
http://perldoc.perl.org/perlre.html
You cannot change the pattern while a scan is running. You must stop the scan before changing a pattern.
You do not need to wrap the pattern with the metacharacters to match the beginning or end of a line (^ $) or with the wildcard character (*).
4. Specify the amount of time to pause before stopping all running captures when the Mobile Controller finds a match. This setting gives the system some time to log more data without abruptly cutting off the capture. The default is 30 seconds. Specify 0 for no delay; the capture stops immediately.
After a trigger has fired, the capture can stop by itself before the delay expires: for example, the capture duration can expire.
5. Click Start Scan.
202 SteelCentral Controller for SteelHead Mobile User’s Guide

Exporting Logs Viewing Reports and Logs
When the scan stops, the Mobile Controller sends an email to all email addresses on the Configure > System Settings > Email page appearing under Report Events via Email. The email notifies users that the trigger has fired.
The page indicates “Last Triggered: Never” if a TCP Dump stop trigger has never triggered on the Mobile Controller. After the delay duration of the stop trigger, the Mobile Controller displays the last triggered time.
Before changing the Perl regular expression or amount of delay, you must first stop the process.
To stop a running scan
Click Stop Scan to halt the background process that monitors the system logs. The Mobile Controller dims this button when the stop trigger is idling.
Stop Trigger Limitations
These limitations apply to the trigger:
You cannot create a trigger to stop a specific capture; the trigger affects all running captures.
If the search pattern contains a typo, the trigger might never find a match.
Only one instance of a trigger can run at one time.
To view controller TCP dump files
1. Choose Reports > Diagnostics > Controller > TCP Dumps to display the TCP Dumps page.
2. Under Download Link, select the TCP dump name to open the file.
Note: To print the TCP dump, select the TCP dump filename under Download Link. When the file opens, choose File > Print in your web browser to open the Print dialog box.
Note: To remove an entry, select the check box next to the name in the TCP dump list and click Remove Selected.
To stop a running TCP dump
1. Choose Reports > Diagnostics > Controller > TCP Dumps to display the TCP Dumps page.
2. Select the TCP dump filename in the Running Capture Name list.
3. Click Stop Selected Captures.
In continuous mode, after you complete the capture, perform the following steps to upload a TCP dump to Riverbed Support. (For timed TCP dumps, start with Step 2.)
Exporting Logs
You can specify logs, choose a time range, and optionally receive your log data by email on the Reports > Export page. Reports are text files in CSV (comma-separated values) format.
SteelCentral Controller for SteelHead Mobile User’s Guide 203

Viewing Reports and Logs Exporting Logs
To export logs
1. Choose Report > Export to display the Export page.
Figure 8-24. The Export Page
2. Use the controls to customize the report as described in this table.
Note: If you choose to export a report without an email address, your report is downloaded by your browser.
Control Description
Export Report Data Select a report type from the drop-down list:
• CPU Utilization
• Memory Utilization
• Paging I/O
Begin Date and Time - Choose a start time and date for your report in the format yyyy/mm/dd hh:mm:ss.
End Date and Time - Choose an end time and date for your report in the format yyyy/mm/dd hh:mm:ss.
Email Delivery - Optionally, choose to have the report sent by email.
• Email Address - Specify an email address.
204 SteelCentral Controller for SteelHead Mobile User’s Guide

CHAPTER 9 Troubleshooting the SteelHead
Mobile Configuration
This chapter describes how to troubleshoot common SteelHead Mobile configuration problems. It includes the following section:
“Common SteelHead Mobile Configuration Problems” on page 206
SteelCentral Controller for SteelHead Mobile User’s Guide 205

Troubleshooting the SteelHead Mobile Configuration Common SteelHead Mobile Configuration Problems
Common SteelHead Mobile Configuration Problems
The following table summarizes how to troubleshoot common SteelHead Mobile configuration problems.
Problem Verification Solution
Optimization is failing.
Restart the SteelHead Mobile.
To restart the Windows SteelHead Mobile
1. In the client system tray, click the SteelHead Mobile software icon to open the SteelHead Mobile GUI.
2. In the SteelHead Mobile, click Support.
3. Under Restart SteelHead Mobile, click Restart.
4. In the SteelHead Mobile, click Status.
5. Check whether the monitor process is running. If the monitor process is running, the following message is displayed:
Healthy
To restart the Mac SteelHead Mobile
1. In the Finder, click the SteelHead Mobile icon to display the menu.
2. In the SteelHead Mobile menu, select Support > Restart SteelHead Mobile.
3. In the SteelHead Mobile menu, select Status.
4. Check whether the monitor process is running. If the monitor process is running, the following message is displayed:
Healthy
Optimization is failing (continued)
Verify that the monitor process is running.
The monitor is a service that communicates with the Mobile Controller and starts the optimization process.
To verify that the monitor process is running
1. In the client system tray, click the SteelHead Mobile software icon to open the SteelHead Mobile GUI.
2. In the SteelHead Mobile, click Status.
3. Under Current Controller, check whether the monitor is running. If the monitor is not running, the following message is displayed:
Unable to connect to monitor
4. In the SteelHead Mobile, click Support.
5. Under Restart SteelHead Mobile, click Restart.
6. In the SteelHead Mobile, click Status.
7. Check whether the monitor process is running. If the monitor process is running, the following message is displayed:
Healthy
206 SteelCentral Controller for SteelHead Mobile User’s Guide

Common SteelHead Mobile Configuration Problems Troubleshooting the SteelHead Mobile Configuration
Optimization is failing (continued)
Verify that the client is connected to the Mobile Controller.
In the SteelHead Mobile GUI, under Settings, verify that the client is connected to the Mobile Controller.
To verify that the SteelHead Mobile is connected to the Mobile Controller
1. In the client system tray, click the SteelHead Mobile software icon to open the SteelHead Mobile GUI.
2. Click Status. If the SteelHead Mobile is connected to the Mobile Controller, the following message is displayed:
Connected
Optimization is failing (continued)
Verify that the client is connecting to the Mobile Controller.
In the SteelHead Mobile, test whether the client is connecting to the Mobile Controller.
To verify that the SteelHead Mobile is connecting to the Mobile Controller
1. In the client system tray, click the SteelHead Mobile software icon to open the SteelHead Mobile GUI.
2. In the SteelHead Mobile, click Settings.
3. Under Configure Mobile Controllers, click Configure to display the Configure Mobile Controllers dialog box.
4. Select the Mobile Controller that you want to verify and click Test to test the connection.
It takes approximately 30 seconds for the client to connect with the Mobile Controller (after you have VPN connectivity). If after 30 seconds, the client GUI still indicates that SteelHead Mobile client is not connected to the Mobile Controller, perform Step 5.
5. Under Restart SteelHead Mobile Client, click Restart, and then click Yes.
Problem Verification Solution
SteelCentral Controller for SteelHead Mobile User’s Guide 207

Troubleshooting the SteelHead Mobile Configuration Common SteelHead Mobile Configuration Problems
Optimization is failing (continued)
Verify that there is enough free disk space for the data store.
To verify whether there is enough free disk space for the data store
1. In the client system tray, click the SteelHead Mobile software icon to open the SteelHead Mobile GUI.
2. In the SteelHead Mobile, click Status.
3. If the SteelHead Mobile displays the following message, the optimization process is not running:
Critical
4. On the client system tray, right-click and select Task Manager to open the Windows Task Manager dialog box.
5. Click Processes and look for the rbtsport.exe process.
6. If the process is not running, in the SteelHead Mobile, click Support.
7. Under Logs, click View Log to view the current log file.
8. Look for the following message:
Insufficient disk space for seg store
If you do not have enough disk space, reduce the data store size value.
9. In the SteelHead Mobile, click Settings.
10. Under Resource Allocation, select a smaller data store size from the drop-down list.
Optimization is failing (continued)
Verify that the connections are optimized.
To verify that connections are optimized, your system administrator must
1. Log in to the Management Console.
2. Click Reports > Endpoints > Endpoint Report to display the Endpoint Report page.
3. Click the username in the endpoints list to display the Endpoint Details page.
4. Under General Information, check the connection status.
Problem Verification Solution
208 SteelCentral Controller for SteelHead Mobile User’s Guide

Beta Draft
APPENDIX A Default Policy Settings
This appendix describes the default policy settings.
“Default Policy Settings Summary” on page 209
Default Policy Settings Summary
The following table summarizes the default settings for the initial default policy. For basic steps for deploying the Mobile Controller with the default policy and package, see “Basic Steps for Deploying the SteelHead Mobile Package” on page 21.
In most cases, the default policy does not need to be modified. However, if a Mobile Controller is on the public Internet, an unlicensed user can add the IP address of the Mobile Controller to his or her client controller list. The user will then receive the default acceleration policy associated with the Mobile Controller, and will consume a license when a connection is optimized.
Using a nondefault policy requires the user to know the policy name to specify in his or her endpoint policy— information that requires admin/monitor access. Therefore, if you have a Mobile Controller on the public Internet, Riverbed recommends that the default policy disable optimization.
The easiest way to disable optimization is to add an in-path rule that passes through all traffic. Although users can still connect to the Mobile Controller with a default policy that disables optimization, the user will not consume a license.
Parameter Field or option Default value
General Settings: Policy Name Initial
Description None
SteelCentral Controller for SteelHead Mobile User’s Guide 209

Beta Draft
Default Policy Settings Default Policy Settings Summary
Optimization Rules: In-Path Rule
Type Auto Discover
Position Start
Source Subnet 0.0.0.0/0
Destination Subnet 0.0.0.0/0
Port or Port Label All
Preoptimization Policy None
Optimization Policy Normal
Latency Optimization Policy Normal
Neural Framing Mode Always
WAN Visibility Mode Correct Addressing
Description None
Protocol Settings: CIFS Enable Latency Optimization Enabled
Optimize Connections with Security Signatures (that do not require signing)
Enabled
Disable Write Optimization Disabled
Enable Server Side Dynamic Write Throttling
Enabled
Buffer Size 2048 KB
Enable Overlapping Open Optimization
Disabled
Optimize Only the Following Extensions: sldasm, slddrw, slddwg, sldprt
Disabled
Optimize All Except the Following Extensions: ldb, mdb
Disabled
Protocol Settings: SMB2 Enable SMB2 Latency Optimization Enabled
Do Not Optimize Connections that cannot be Down-Negotiated
Enabled
Enable SMB2 Latency Optimization on Connections that cannot be Down-Negotiated
Disabled
Parameter Field or option Default value
210 SteelCentral Controller for SteelHead Mobile User’s Guide

Beta Draft
Default Policy Settings Summary Default Policy Settings
Protocol Settings: MAPI Enable MAPI Optimization - Exchange Port
Enabled
Port 7830
Enable MAPI NSPI - NSPI Port Disabled
Port 7840
Enable Encrypted Optimization Disabled
Enable Outlook Anywhere Optimization
Disabled
Auto-Detect Outlook Anywhere Connections
Disabled
Protocol Settings: NFS (Mac clients only)
Enable NFS Optimization Disabled
Protocol Settings: Oracle Forms
Enable Oracle Forms Optimization Disabled
Protocol Settings: Lotus Notes
Enable Lotus Notes Optimization - Lotus Notes Port
Disabled
Port 1352
Protocol Settings: Citrix Enable Citrix ICA Optimization Disabled
ICA Port Port 1494
Session Reliability (CGP) Port Port 2598
Enable Secure ICA Encryption Disabled
General Protocol Settings: Connection Settings
Maximum Connection Pooling Size 5
HTTP: Settings Enable HTTP Optimization Disabled
HTTP: Add New Prefetch Tag
Tag Name None
Tag Attribute None
Parameter Field or option Default value
SteelCentral Controller for SteelHead Mobile User’s Guide 211

Beta Draft
Default Policy Settings Default Policy Settings Summary
HTTP: Add a Subnet Server Subnet None
Strip Compression3.1.0 clients and newer
Enabled
Insert Cookie3.1.0 clients and newer
Disabled
Insert Keep Alive3.1.0 clients and newer
Disabled
URL Learning Disabled
Parse and Prefetch Disabled
Object Prefetch Table Disabled
Reuse Auth3.1.0 clients and newer
Disabled
Force NTLM3.1.0 clients and newer
Disabled
Strip Auth Header3.1.0 clients and newer
Disabled
Gratuitous 4013.1.0 clients and newer
Disabled
SSL: General SSL Settings Enable SSL Optimization Disabled
SSL: Client Authentication
Enable Client Certificate Support Disabled
SSL: SSL Secure Peering Settings
Traffic Type SSL Only
Fallback to No Encryption Enabled
SSL: SSL Peering Trust All Pre-Configured Peering Certificates
Enabled
Trust Selected Peering Certificates Disabled
Location Awareness Enable Latency-based location awareness
Disabled
Latency Awareness Enable Branch warming Disabled
Adapters to Optimize: Add New Rule
Position Start
Adapter All Adapters
Optimize Yes
Endpoint Settings: General Settings
Show Client in the System Tray Enabled
Endpoint Settings: Data Store Settings
Data Store Size 10 GB
Endpoint Settings: Log Settings
Maximum Log Size 5000 KB
Maximum Number of Log Files 2
Parameter Field or option Default value
212 SteelCentral Controller for SteelHead Mobile User’s Guide

Beta Draft
Default Policy Settings Summary Default Policy Settings
The Initial policy contains the following pass-through rules to automatically pass through traffic that cannot be optimized. The three rules are:
Secure - For traffic on secure ports (for example, SSH, HTTPS, and SMTPS).
Interactive - For traffic on interactive ports (for example, Telnet, TCP ECHO, remote logging, and shell).
RBT-Proto - Specifies well-known ports used by the system: 7744 (data store synchronization), 7800-7801 (in-path), 7810 (out-of-path), 7820 (failover), 7850 (connection forwarding), 7860 (SteelHead Interceptor), 7870 (Mobile Controller).
Endpoint Settings: Add a new Controller
Insert At End
Hostname Name of the current Mobile Controller.
Port 7870
Controller Options Add a New Controller Insert At - Select start, end, or a Mobile Controller number from the drop-down list. The default value is end.
Specify the order in which controllers connect with Mobile Controllers.
SteelHead Mobile clients connect according to the number you specify, starting with 1. If the system is unable to connect to 1 in the list, the system moves on to the next Mobile Controller in the list. For example, if the system is unable to connect to Mobile Controller 1, then Mobile Controller 2 is attempted. If Mobile Controller 2 is successful, no further Mobile Controllers in the list are attempted.
Hostname Name of the current Mobile Controller.
Port 7870
Use Random Ordering of Controllers when Connecting
Disabled
Endpoint Settings: Windows-only Settings
Reorder Intermediate Drivers (Required for Check Point and Nortel VPN compatibility)
Disabled
Disable TCP/IP Checksum Offloading (Requires client reboot)
Disabled
Parameter Field or option Default value
SteelCentral Controller for SteelHead Mobile User’s Guide 213

Beta Draft
Default Policy Settings Default Policy Settings Summary
214 SteelCentral Controller for SteelHead Mobile User’s Guide

APPENDIX B Windows and Mac SteelHead Mobile
Client Properties
This appendix describes the Windows and Mac SteelHead Mobile software properties. It includes the following sections:
“Windows SteelHead Mobile Client Properties” on page 215
“Mac SteelHead Mobile Client Properties” on page 221
Windows SteelHead Mobile Client Properties
The Windows SteelHead Mobile software icon is displayed in the system tray if the Show Client in the System Tray option is enabled in the policy.
To display the SteelHead Mobile software on the Windows client machine
Double-click the Mobile Controller icon in the system tray to display the SteelHead Mobile software.
Figure B-1. Windows Status
SteelCentral Controller for SteelHead Mobile User’s Guide 215

Windows and Mac SteelHead Mobile Client Properties Windows SteelHead Mobile Client Properties
Status Tab
The Status tab displays the SteelHead Mobile system status, performance statistics, and connection list.
The following table describes the controls under the Status tab of the Windows SteelHead Mobile.
Connection Icons
The following icons are displayed in the Connection List of the Status tab to indicate the state of the connection:
Function Control Description
System Status Optimization Status Displays the current state of the SteelHead Mobile. The SteelHead Mobile can be in one of the following states:
• Initializing - Indicates that the optimization service is starting.
• Healthy - Indicates that all systems are functioning properly.
• Critical - Indicates that the optimization service is not running. Contact your system administrator.
• Disabled - Indicates that the optimization service is turned off.
• Warning - Indicates that the optimization status is running, but there are some issues. Contact your system administrator.
Current Controller Displays the Mobile Controller hostname or IP address and the port to which the client connects.
Controller Connection Status
Displays the Mobile Controller’s connection status. Possible values are Connected, Connected: Licensed, Connected: Not Licensed, or Not Connected.
Policy Displays the policy currently running on the client.
Performance Statistics
Total Data Reduction
Displays the percent data reduction on the SteelHead Mobile since the optimization service has been running.
Optimization Statistics (LAN/WAN)
Displays the total amount of optimized data exchanged with peer SteelHead (for LAN/WAN).
Branch Warming Statistics (In/Out)
Displays the branch warming statistics.
SSL Connections (Successful/Total)
Displays the number of successful SSL connections.
Connection List
Displays the different connections. Right-click a connection and select Detect SteelHeads to find and display SteelHeads along the network path to a specified destination server.
Yellow arrows Displays Established (Optimized) connection.
Green arrow Displays Established (Branch Mode) connection.
Blue arrow Displays Established (Branch Warming) connection.
Gray arrow Displays Established (Pass-through) connection.
Red arrow Displays Established (Optimized) connection with optimization error.
Lock icon Indicates secure inner channel connections.
216 SteelCentral Controller for SteelHead Mobile User’s Guide

Windows SteelHead Mobile Client Properties Windows and Mac SteelHead Mobile Client Properties
Settings Tab
The Settings tab displays current SteelHead Mobile settings such as data store size, optimization settings, reset connections, and adapter list.
Note: The SteelHead Mobile allows users to override policy settings made by the system administrator. Even if a new policy is sent to the client, the settings in the client remain in effect unless the client clicks Reset to Administrator Policy under Settings.
The following table describes the controls under the Settings tab of the Windows SteelHead Mobile.
Function Control Description
Resource Allocation
Current Data Store Size on Disk
Specifies the current data store size on disk.
Data Store Size Specify the amount of disk space allocated to the data store from the drop-down list.
Auto (x GB) is the size set by the administrator in the policy. Setting this option to a non-Auto value overrides the current Endpoint Settings in your policy.
Optimization Settings
RiOS Bandwidth and Latency Optimization
Select this option to enable RiOS bandwidth optimization on the client. When enabled, all dependent check boxes are grayed-out.
You can also enable and disable client optimization from the SteelHead Mobile icon in the system tray.
MAPI Optimization (for Exchange)
Select this option to optimize MAPI for Exchange.
HTTP Optimization Select this option to optimize HTTP.
SSL Optimization Select this option to optimize SSL.
SMB2 Optimization Select this option to optimize CIFS SMB2.
SMB3 Optimization Select this option to optimize CIFS SMB3.
Citrix Optimization Select this option to optimize Citrix.
Lotus Notes Select this option to optimize Lotus Notes.
Oracle Forms Select this option to optimize Oracle Forms.
Reset Connections
Reset connections when the Mobile Controller is initialized
Resets existing nonoptimized connections when the optimization service restarts.
Reset to Administrator Policy
Reset Click Reset to return values on the Settings tab back to the values defined by your system administrator.
SteelCentral Controller for SteelHead Mobile User’s Guide 217

Windows and Mac SteelHead Mobile Client Properties Windows SteelHead Mobile Client Properties
Support Tab
The Support tab displays tools for assisting you in diagnosing problems with your system.
For more information about troubleshooting your system, see “Common SteelHead Mobile Configuration Problems” on page 206.
Configure SteelHead Mobile Controllers
Configure Click Configure to open the Configure Mobile Controllers dialog box. A list of Mobile Controllers is displayed and the following controls:
• Use controller list defined by Administrator - Connect to a Mobile Controller listed by the system administrator in the policy.
• Override controller list - Does not restrict the Mobile Controller list to the system administrator-set specifications in the policy.
– New - Add a Mobile Controller to the list. This option is available when Override controller list is selected.
– Edit - Modify a Mobile Controller on the list. This option is available when Override controller list is selected and a Mobile Controller is selected in the list.
– Delete - Delete a Mobile Controller from the list. This option is available when Override controller list is selected and a Mobile Controller is selected in the list.
– Test - Verifies that the user can connect to the Mobile Controller. This option is available when Override controller list is selected and a Mobile Controller is selected in the list.
– Apply - Click Apply to save your configurations.
– Arrow keys - Use the arrows on the right side of the list to change the priority order of the Mobile Controllers the client connects to. The priority list is used only if Select Controller at Random is disabled and Override controller list is selected.
• Select Controller at Random - If there is more than one Mobile Controller in the list, the SteelHead Mobile randomly connects to one of them. Use this option if you want to distribute SteelHead Mobile connections. This control has the following options:
– Enabled - Specifies random selection of Mobile Controllers.
– Auto - Enables or disables random selection of Mobile Controllers as defined by the administrator in the policy.
– Disabled - Specifies the first Mobile Controller on the list. If this connection fails, the next Mobile Controller on the list is selected, and so on.
Adapter List Displays the adapters that the Mobile Controller has identified on the client system, along with IP address and the optimization status for each adapter.
Function Control Description
218 SteelCentral Controller for SteelHead Mobile User’s Guide

Windows SteelHead Mobile Client Properties Windows and Mac SteelHead Mobile Client Properties
The following table describes the controls under the Support tab.
Function Control Description
Logs
View your current log file.
Click View Log to view your current log file. These are the log files for the SteelHead Mobile.
For assistance, contact your system administrator.
Upload system dump to your Administrator.
Click Upload System Dump to upload your system dump file to the Mobile Controller. Your system administrator uses the dump file to troubleshoot your system.
For assistance, contact your system administrator.
Generate a TCP dump and send it to your administrator.
Click Generate to generate a TCP dump for the specified amount of time (seconds or minutes). The TCP dump is automatically sent to Mobile Controller where a system administrator can view it in the Reports tab. Use this option to troubleshoot the client system.
For assistance, contact your system administrator.
Diagnostics Check
Run a diagnostics check to ensure your SteelHead Mobile is running properly.
Click Run Check to run a diagnostics check on the SteelHead Mobile. If the status is anything other than Healthy, there might be a problem with the system.
For assistance, contact your system administrator.
Restart SteelHead Mobile
Restart your SteelHead Mobile.
Click Restart to restart the SteelHead Mobile. This option restarts the optimization service and is a first step for troubleshooting the optimization service.
SteelCentral Controller for SteelHead Mobile User’s Guide 219

Windows and Mac SteelHead Mobile Client Properties Windows SteelHead Mobile Client Properties
System Tray Options
This section describes the functionality of the Windows SteelHead Mobile system tray properties.
View SSL Certificates
View the certificates that are used for SSL optimization and authorization with the SteelHead Mobile.
Click View Certificates to view the certificates that are used for SSL optimization.
Certificates The following list of certificates is displayed:
• SteelHead Mobile Controller CA Certificate
• SteelHead Mobile Controller Server Certificate
• SteelHead Peering Certificate - Click to regenerate a certificate while the optimization is enabled. This option is disabled when optimization on the client is disabled or when a controller is not connected.
• Advanced SSL CA Certificate
Certificate Details Displays the following information:
• Serial Number - Specifies the serial number (Issued To, only).
• Issued To/Issued By - Specifies the following information:
– Common Name - Specifies the common name of the certificate authority.
– Organization Unit - Specifies the organization name (for example, the company).
– Locality - Specifies the city.
– State - Specifies the state.
– Country - Specifies the country (2-letter code only).
• Validity - Specifies the following information:
– Issued On - Specifies the date the certificate was issued.
– Expires On - Specifies the date the certificate expires.
• Fingerprint - Specifies the fingerprint.
– SHA1 - Specifies the SSL fingerprint.
PEM Format Displays the certificate in PEM format.
Detect SteelHeads
Find and display SteelHeads along the network path to a specified destination server.
Click Detect SteelHeads to find and display SteelHeads along the network path to a specified destination server.
Reset Statistics Reset the cumulative historical statistics.
Click Reset Stats to reset the cumulative historical statistics.
Upgrade Check to see if you have the latest version of the Mobile Controller installed.
Click Check for Updates to check if you have the latest version of the Mobile Controller installed.
Function Control Description
220 SteelCentral Controller for SteelHead Mobile User’s Guide

Mac SteelHead Mobile Client Properties Windows and Mac SteelHead Mobile Client Properties
To display the SteelHead Mobile system tray properties
Right-click the SteelHead Mobile icon in the system tray to display the different options.
The following table describes the options in the system tray.
Mac SteelHead Mobile Client Properties
This section describes the Mac SteelHead Mobile client properties.
Viewing Preferences and System Status
1. To see the SteelHead Mobile preferences, open the Mac System Preferences and select SteelHead Mobile.
Figure B-2. Mac System Preferences
Option Description
Show Select this option to show the SteelHead Mobile on the screen.
Hide Select this option to minimize the SteelHead Mobile to the system tray.
Enable/Disable Optimization Select this option to enable or disable client optimization.
About Select this option to show the SteelHead Mobile software version.
Exit Select this option to remove the SteelHead Mobile icon from the system tray and disable client optimization. Always use this option to stop SteelHead Mobile optimization.
SteelCentral Controller for SteelHead Mobile User’s Guide 221

Windows and Mac SteelHead Mobile Client Properties Mac SteelHead Mobile Client Properties
2. Click the SteelHead Mobile logo on the menu bar and select Status to display the current system status.
Figure B-3. Status Window
The following table describes the information displayed in the Status window of the Mac SteelHead Mobile.
Function Control Description
System Status Optimization Status Displays the current state of the SteelHead Mobile. The SteelHead Mobile can be in one of the following states:
• Initializing - Indicates that the optimization service is starting.
• Healthy - Indicates that all systems are functioning properly.
• Critical - Indicates that the optimization service is not running. Contact your system administrator.
• Disabled - Indicates that the optimization service is turned off.
Current Controller Displays the Mobile Controller hostname or IP address and the port that the client connects to.
• Warning - Indicates that the optimization status is running, but there are some issues. Contact your system administrator.
Controller Status Displays whether the Mobile Controller is currently Connected, Not Connected, Licensed, or Not Licensed.
Policy Displays the policy currently running on the client.
222 SteelCentral Controller for SteelHead Mobile User’s Guide

Mac SteelHead Mobile Client Properties Windows and Mac SteelHead Mobile Client Properties
Connection Icons
The following icons are displayed in the Connection List of the Status window to indicate the state of the connection:
Accessing the Support Menu
The Support menu provides tools for diagnosing problems with your system.
To access the Support menu
Click the SteelHead Mobile logo on the menu bar to display tools for assisting you in diagnosing problems with your system. For details about troubleshooting your system, see “Common SteelHead Mobile Configuration Problems” on page 206.
Performance Statistics
Total Data Reduction
Displays the percent data reduction on the SteelHead Mobile since the optimization service has been running.
Optimization Statistics (LAN/WAN)
Displays the total amount of optimized data exchanged with peer SteelHead (for LAN/WAN).
Your Capacity Increase
Specifies the performance improvement as a result of data optimization.
Branch Warming Statistics (In/Out)
Displays the branch warming statistics.
SSL Connections (Successful/Total)
Displays the number of successful SSL connections.
Connection List
Displays the different connections. Control-click a connection and select Detect SteelHeads to find and display SteelHeads along the network path to a specified destination server.
Yellow arrows Displays Established (Optimized) connection.
Green arrow Displays Established (Branch Mode) connection.
Blue arrow Displays Established (Branch Warming) connection.
Gray arrow Displays Established (Pass-through) connection.
Red arrow Displays Established (Optimized) connection with optimization error
Lock icon Indicates secure inner channel connections.
Function Control Description
SteelCentral Controller for SteelHead Mobile User’s Guide 223

Windows and Mac SteelHead Mobile Client Properties Mac SteelHead Mobile Client Properties
The following table describes the controls on the Support menu.
Managing Optimization Controls
The SteelHead Mobile client preferences pane appears with three tabs: Optimization, Controllers, and SSL.
Function Control Description
View Log
View your current log file.
Click View Log to view your current log file. These are the log files for the SteelHead Mobile.
For assistance, contact your system administrator.
Generate Sysdump
Upload system dump to your Administrator.
Click Upload System Dump to upload your system dump file to the Mobile Controller. Your system administrator uses the dump file to troubleshoot your system.
For assistance, contact your system administrator.
Generate TCP Trace
Generate a TCP trace and send it to your administrator.
Click Generate to generate a TCP dump for the specified amount of time (seconds or minutes). The TCP dump is automatically sent to Mobile Controller where a system administrator can view it in the Reports tab. Use this option to troubleshoot the client system.
For assistance, contact your system administrator.
Detect SteelHeads
Find and display SteelHeads along the network path to a specified destination server.
Click Detect SteelHeads to find and display SteelHeads along the network path to a specified destination server.
Restart SteelHead Mobile
Restart your SteelHead Mobile.
Click Restart to restart the SteelHead Mobile. This option restarts the optimization service and is a first step for troubleshooting the optimization service.
Reset Statistics Reset the cumulative historical statistics.
Click Reset Stats to reset the cumulative historical statistics.
224 SteelCentral Controller for SteelHead Mobile User’s Guide

Mac SteelHead Mobile Client Properties Windows and Mac SteelHead Mobile Client Properties
The Optimization tab displays current optimization status and enables users to enable optimization, configure connection reset, and set the data store size.
Figure B-4. Optimization Tab
The following table describes the controls under the Optimization tab of the Mac SteelHead Mobile.
Function Control Description
SteelHead Mobile Monitor Service
Indicates if the service is running or not running.
Restart Click to restart the SteelHead Mobile Monitor Service.
Optimization Status Displays the current state of the SteelHead Mobile. The SteelHead Mobile can be in one of the following states:
• Initializing - Indicates that the optimization service is starting.
• Healthy - Indicates that all systems are functioning properly.
• Critical - Indicates that the optimization service is not running. Contact your system administrator.
• Disabled - Indicates that the optimization service is turned off.
Optimization Settings
RiOS Bandwidth and Latency Optimization
Select this option to enable RiOS bandwidth optimization on the client. When enabled, all dependent check boxes are dimmed.
You can also enable and disable client optimization from the SteelHead Mobile icon in the system tray.
NFS Optimization Select this option to optimize NFS.
HTTP Optimization Select this option to optimize HTTP.
Reset connections when the SteelHead Mobile is initialized
Resets existing nonoptimized connections when the optimization service is restarted.
SteelCentral Controller for SteelHead Mobile User’s Guide 225

Windows and Mac SteelHead Mobile Client Properties Mac SteelHead Mobile Client Properties
Using the Controllers Tab
The Controllers tab displays the current controller and connection status, and enables users to specify controller options and to add and modify controllers.
Figure B-5. Controllers Tab
Data Store Current data store size on disk
Specifies the current data store size on disk.
Data store size Specifies the amount of disk space allocated to the data store.
Function Control Description
226 SteelCentral Controller for SteelHead Mobile User’s Guide

Mac SteelHead Mobile Client Properties Windows and Mac SteelHead Mobile Client Properties
The following table describes the controls under the Controllers tab of the Mac SteelHead Mobile.
Function Control Description
Configure Mobile Controllers
Current Controller Specifies the Mobile Controller hostname or IP address, and the port that the SteelHead Mobile connects to.
Connection Status Displays the current connection status of the SteelHead Mobile. The SteelHead Mobile can be in one of the following states:
• Connected - Indicates that the SteelHead Mobile is connected to a Mobile Controller but is not consuming a license from the Mobile Controller. This condition may indicate, for instance, that the SteelHead Mobile is in branch mode or is not currently optimizing any connections.
• Connected: Licensed - Indicates that the SteelHead Mobile is connected to a Mobile Controller and is consuming a license from the Mobile Controller.
• Connected: Denied License - Indicates that the SteelHead Mobile is connected to a Mobile Controller but is unable to obtain a license from the Mobile Controller.
• Not Connected- Indicates that the SteelHead Mobile is not connected to a Mobile Controller.
Select controller to use at random
If there is more than one Mobile Controller in the list, the SteelHead Mobile randomly connects to one of them. Use this option if you want to distribute SteelHead Mobile connections. This control has the following options:
– Auto - Enables or disables random selection of Mobile Controllers as defined by the administrator in the current policy.
– On - Specifies random selection of Mobile Controllers.
– Off - Specifies the first Mobile Controller on the list. If this connection fails, the next Mobile Controller on the list is selected, and so on.
Use controller list defined by administrator
Connect to a Mobile Controller listed by the system administrator in the current policy.
Override controller list
Does not restrict the Mobile Controller list to the system administrator-set specifications in the current policy.
When Override controller list is selected, the following additional controls are activated:
• + - Click + to add a Mobile Controller to the list; click - to remove one.
• Test - Verifies that the user can connect to the selected Mobile Controller.
• Arrow keys - Use the arrows on the right side of the list to change the priority order of the Mobile Controllers the client connects to. The priority list is used only if Select Controller at Random is disabled.
To modify a Mobile Controller on the list, double-click the controller in the list and edit directly. Directly editing the list is only possible when the Override controller list is selected.
Revert Click Revert to undo any changes made to the controller configuration in this tab.
Apply Click Apply to save your configurations.
SteelCentral Controller for SteelHead Mobile User’s Guide 227

Windows and Mac SteelHead Mobile Client Properties Mac SteelHead Mobile Client Properties
Using the SSL Tab
The SSL tab displays the CA certificates and enables users to enable or disable SSL optimization.
Figure B-6. SSL Tab
228 SteelCentral Controller for SteelHead Mobile User’s Guide

Mac SteelHead Mobile Client Properties Windows and Mac SteelHead Mobile Client Properties
The following table describes the controls under the SSL tab of the Mac SteelHead Mobile.
Function Control Description
SSL optimization Click On or Off to enable or disable SSL optimization.
Refresh Click to refresh the CA information.
Certificates The following list of certificates is displayed:
• SteelHead Mobile Controller CA Certificate
• SteelHead Mobile Controller Server Certificate
• SteelHead Peering Certificate - Regenerates when you click Regenerate while the optimization is enabled. This button is disabled when optimization on the client is disabled or when a controller is not connected.
• Advanced SSL CA Certificate
Certificate Details Displays the following information based on the certificate option selected above:
• Serial Number - Displays the serial number (Issued To, only).
• Issued To/Issued By - Displays the following information:
– Common Name - Displays the common name of the certificate authority.
– Organization - Displays the organization name (for example, the company).
– Org. Unit - Displays the organizational unit within the organization.
– Locality - Displays the city.
– State - Displays the state.
– Country - Displays the country (2-letter code only).
• Issued On - Displays the date the certificate was issued.
• Expires On - Displays the date the certificate expires.
• Fingerprint - Displays the fingerprint.
SteelCentral Controller for SteelHead Mobile User’s Guide 229

Windows and Mac SteelHead Mobile Client Properties Mac SteelHead Mobile Client Properties
230 SteelCentral Controller for SteelHead Mobile User’s Guide

Beta Draft
APPENDIX C Windows Installer Properties
This appendix describes the Windows installer properties.
“Windows Installer Properties Overview” on page 231
Windows Installer Properties Overview
The Mobile Controller Windows installer supports many Microsoft Windows Installer (MSI) properties that you can modify to control installation features. You can specify these properties from the Windows command-line by passing them to MSI executable file (msiexec.exe).
Command-line Properties
When you run the Mobile Controller installer from the command line, the properties can be passed to msiexec.exe using this syntax:
msiexec /i SteelheadMobile.msi <property-name>=<value> [/qn]
For example, you can specify the location of the installer and data store, the size of the data store, and disabled the desktop icon for the SteelHead Mobile using the following syntax:
msiexec /i SteelheadMobile.msi RVBD_INSTALLDIR="E:\Riverbed" RVBD_DATASTOREDIR="E:\Datastore" RVBD_DATASTORESIZEMB=512 RVBD_DESKTOPICON=0 /qn
Precedence Rules
Properties can be set by multiple sources. A single property can be set from the command line, the installer user interface, or the value set by the administrator on the Mobile Controller when creating the package.
The installer uses the following precedence rules (from highest to lowest) to choose the values it will use during installation:
1. Modified value from the installer UI. If a value is not modified in the installer dialog boxes, then the property's final value is set based on rest of the rules.
2. Value passed on the Windows command line. If both INSTALLDIR and RVBD_INSTALLDIR are set on the command line, the value of INSTALLDIR takes precedence.
SteelCentral Controller for SteelHead Mobile User’s Guide 231

Beta Draft
Windows Installer Properties Windows Installer Properties Overview
3. Value set by the administrator on the Mobile Controller when creating the package.
The following table describes the Windows installer properties and their values.
Property Supported Values Description
INSTALLDIR Absolute directory paths. Valid paths with embedded environment variables are also supported. For example:
INSTALLDIR="C:\Riverbed"
INSTALLDIR="%SYSTEMDRIVE%\Riverbed"
Determines the install directory path. Consider setting RVBD_INSTALLDIR instead of setting this property. If both INSTALLDIR and RVBD_INSTALLDIR are set, the value of INSTALLDIR takes precedence.
RVBD_CONTROLLERS A string containing one or more controllers delimited by a semicolon (;). Controller port, if specified, must be delimited by a colon (:). Ports default to 7870 if they are not specified.
For example: RVBD_CONTROLLERS="1.2.3.4:7870;mv-gw1;mv-gw2.nbttech.com:8080"
Determines the controllers to which the client connects.
RVBD_DATASTOREDIR Absolute directory paths. Valid paths with embedded environment variables are also supported. For example:
RVBD_DATASTOREDIR="C:\Datastore"
RVBD_DATASTOREDIR="%SYSTEMDRIVE%\Datastore"
Determines the location of the SteelHead Mobile data store.
RVBD_DATASTORESIZEMB 256, 512, 1024, 2048, 5120, 10240, 15360, and 20480.
For example: RVBD_DATASTORESIZEMB=512
Determines the size of SteelHead Mobile data store.
RVBD_DESKTOPICON 0 - Do not create a desktop shortcut.
1 - Create a SHM desktop shortcut.
For example: RVBD_DESKTOPICON=0
Determines whether or not to create a Windows desktop shortcut.
RVBD_INSTALLDIR Absolute directory paths. Valid paths with embedded environment variables are also supported. For example:
RVBD_INSTALLDIR="C:\Riverbed"
RVBD_INSTALLDIR="%SYSTEMDRIVE%\Riverbed"
Determines the install directory path. It is recommended that you use RVBD_INSTALLDIR over INSTALLDIR, as the installer performs additional error checks when RVBD_INSTALLDIR is set. If both INSTALLDIR and RVBD_INSTALLDIR are set, the value of INSTALLDIR takes precedence.
232 SteelCentral Controller for SteelHead Mobile User’s Guide

Beta Draft
Windows Installer Properties Overview Windows Installer Properties
RVBD_RANDOMIZECONTROLLERS 0 - Do not select controllers at random.
1 - Select a controller at random.
For example: RVBD_RANDOMIZECONTROLLERS=0
Determines whether the client should choose a controller at random from the specified list of controllers and connect to it.
RVBD_SHOWUI 0 - Suppress the installer UI.
1 - Display the installer UI.
For example: RVBD_SHOWUI=0
Determines whether to show the installer UI dialogs during the installation.
RVBD_STARTMENUICON 0 - Do not create a shortcut in the Start menu folder.
1 - Create a shortcut in the Start menu folder.
For example: RVBD_STARTMENUICON=0
Determines whether or not to create a start menu shortcut.
Property Supported Values Description
SteelCentral Controller for SteelHead Mobile User’s Guide 233

Beta Draft
Windows Installer Properties Windows Installer Properties Overview
234 SteelCentral Controller for SteelHead Mobile User’s Guide

Beta Draft
APPENDIX D Mobile Controller MIB
This appendix describes the Mobile Controller SNMP MIB. It includes the following sections:
“Accessing the Mobile Controller Enterprise MIB” on page 235
“SNMP Traps” on page 236
Accessing the Mobile Controller Enterprise MIB
The Mobile Controller MIB monitors device status and peers, and provides network statistics for seamless integration into network management systems such as Hewlett Packard OpenView Network Node Manager, PRTG, and other SNMP browser tools.
For details about configuring and using these network monitoring tools, consult the vendor documentation.
The following guidelines describe how to download and access the Mobile Controller MIB using common MIB browsing utilities:
You can download the Mobile Controller MIB (CONTROLLER-MIB.txt) from the Help: Online Help page of the Mobile Controller or from the Riverbed Support site at https://support.riverbed.com and load it into any MIB browser utility.
Some utilities might expect a file type other than a text file. If an unexpected file type is detected, change the file type to the one expected.
Some utilities assume that the root is mib-2 by default. If the utility sees a new node, such as enterprises, it might look under mib-2.enterprises. If the utility is looking for the root, use iso.org.dod.internet.private.enterprises.rbt as the root.
Some command-line browsers might not load all MIB files by default. If all the MIB files are not loaded by default, find the appropriate command option to load the CONTROLLER-MIB.txt file: for example, for NET-SNMP browsers, snmwalk -m all.
SteelCentral Controller for SteelHead Mobile User’s Guide 235

Beta Draft
Mobile Controller MIB SNMP Traps
SNMP Traps
The following table summarizes the SNMP traps sent out from the Mobile Controller to configured trap receivers.
Trap Description
procCrash (enterprises.17163.1.4.4.1.1)
A process has crashed and subsequently been restarted by the system. A system snapshot of this crash is accessible on the Mobile Controller. Riverbed Support might need information contained in the system snapshot to determine the cause of the crash.
procExit (enterprises.17163.1.4.4.1.2)
A process has unexpectedly exited and been restarted by the system. The process might have exited on its own or due to other process failures. Contact Riverbed Support to determine the cause of this event.
cpuUtil (enterprises.17163.1.4.4.1.3) Average CPU utilization has exceeded an acceptable threshold. Sustained CPU load might be symptomatic of a more serious issue. Contact Riverbed Support for more information.
pagingActivity (enterprises.17163.1.4.4.1.4)
The system is running low on memory and has begun swapping memory pages to disk. This event can be triggered during heavy computing loads. Contact Riverbed Support to determine the cause of this event.
scheduledJobError (enterprises.17163.1.4.4.1.5)
A scheduled job on the system has failed. Use the Mobile Controller to determine which job failed.
confModeEnter (enterprises.17163.1.4.4.1.6)
A user on the system has entered configuration mode.
confModeExit (enterprises.17163.1.4.4.1.7)
A user on the system has exited configuration mode.
linkError (enterprises.17163.1.4.4.1.8)
An interface has lost its link on the Mobile Controller.
powerSupplyError (enterprises.17163.1.4.4.1.9)
A power supply on the Mobile Controller has failed.
fanError (enterprises.17163.1.4.4.1.10)
A fan error has been detected on the Mobile Controller.
memoryError (enterprises.17163.1.4.4.1.11)
A memory error has been detected on the Mobile Controller.
ipmi (enterprises.17163.1.4.4.1.12) An IPMI event has been detected on the Mobile Controller.
warningTemp (enterprises.17163.1.4.4.1.13)
Mobile Controller temperature has reached the warning level.
criticalTemp (enterprises.17163.1.4.4.1.14)
Mobile Controller temperature has reached the critical level.
configurationError(enterprises.17163.1.4.4.1.16)
Error writing system configuration files.
configChange (enterprises.17163.1.4.4.1.15)
A change has been made to the system configuration.
epDatastoreError (enterprises.17163.1.4.4.1.100)
Endpoint data store error threshold has been exceeded.
epFsFullError (enterprises.17163.1.4.4.1.101)
Endpoint file system full threshold has been exceeded.
236 SteelCentral Controller for SteelHead Mobile User’s Guide

Beta Draft
SNMP Traps Mobile Controller MIB
epLicenseError (enterprises.17163.1.4.4.1.102)
Endpoint license limit has been exceeded.
epVersionError (enterprises.17163.1.4.4.1.103)
Endpoint version error threshold has been exceeded.
epServiceError (enterprises.17163.1.4.4.1.104)
Endpoint service error threshold has been exceeded.
Trap Description
SteelCentral Controller for SteelHead Mobile User’s Guide 237

Beta Draft
Mobile Controller MIB SNMP Traps
238 SteelCentral Controller for SteelHead Mobile User’s Guide

Beta Draft
Index
AAccounts
privileges 67role-based 68
Adapters, managing 64Adapters, viewing list 64Add a New TCP Dump 198Administrator password 67Advanced settings, configuring 63Alarm settings, configuring 38Alarm status
admission control 177fan error 41licensing 179link state 179memory paging 180software version mismatch 180temperature 180
Alarm Status report, viewing 176Alarm thresholds, setting 38Announcement, setting on home page 37Applock optimization 122Assignments
configuring 153definition of 13
Authentication methodssetting 65TACACS+ 66
Auto-discover, in-path rule 113
BBranch Warming report, viewing 168Bulk import and export, configuring 106
CCascading menus
displaying and using 17summary of 18
Certificate authoritiesadding 105configuring in SSL 105
CIFSoptimization 119, 125overlapping opens, enabling 123SMB signing, disabling 122
Citrix, enabling optimization 136Cluster information
on Home page 16Cluster, prerequisites for adding a Mobile
SteelCentral Controller for SteelHead Mobile User’s Guide
Controller 88Clusters
connections, troubleshooting 90definition 13overview of 87
Clusters, configuring 87Command-line interface, using 15Configurations, saving 20, 91Configuring
advanced settings 63alarm settings 38clusters 87email settings 56endpoint settings for policies 143general security settings 65in-path rules for policies 112location awareness for policies 140log settings 59monitored ports 46peering 95port labels 33preoptimization policy 114protocol settings 119scheduled jobs 81SNMP settings 47SNMP v3 50SSL bulk import and export 106SSL certificate authorities 105SSL for Mobile Controllers 93SSL for policies 137TACACS+ access 73web settings 76
Connection pool, setting size for 137Console, connecting to 15Continuous log, viewing a 188Correct addressing mode 117CPU utilization
alarm status 177report, viewing 181
Creatingnew policies 110packages 146
Critical state 162, 216, 222, 225
DDefault policy, settings for 209, 233Definition of terms 13Demilitarized zone (DMZ), definition
239

Beta Draft
Index
of 13Deny privileges in role-based accounts 68Desktop Bandwidth report, viewing 166Desktop Traffic report, viewing 174Diagnostics reports, viewing 176Disabled state 162DMZ (demilitarized zone), definition of 13Document conventions, overview of 8Downloading
endpoint TCP dumps 193log files 190
EEmail, configuring notification 56Endpoint client, definition of 13Endpoint Diagnostic reports, viewing 191Endpoint History report, viewing 172Endpoint reports
filter types 162viewing 160
Endpoint reports, viewing 160Endpoint settings for policies,
configuring 143Enterprise MIB, accessing 235Events, configuring email for 56Exporting logs 203
FFailures, configuring email for 56Fan Error alarm status 41FTP proxy access, configuring 23Full address transparency, description
of 117
GGPO (Group Policy Object)
changing an endpoint group 156enabling and disabling optimization
in 157Group assignments
configuring 153definition of 13
HHardware dependencies, overview of 11Healthy state, description of 162Home page
cluster information 16overview of 16
Home page announcementsetting 37
Host settings, modifying 23
IIn-path rules
autodiscover 113configuring for policies 112deny 113discard 113fixed target 113
Installingfrom the command line 231license 83
Interactive ports, description of 33Interface Counters report, viewing 185
240 St
IPMI error 41, 178IPMI, SNMP trap 236IPv6
support summary 26
JJobs
scheduling 81viewing 82
KKeepalive for HTTP optimization 130Known issues 8, 90
LLabeling, traffic in reports 46Licenses 82
fetching automatically 83pooling of 91
Licensing alarm status 179Link state alarm status 179Local logging, setting 59localhost Mobile Client 143Location awareness, configuring 140Log settings, configuring 59Logins, multiple 16Logs
customizing 190downloading 187exporting 203filtering 188viewing 187viewing continuous 190
MMac
client properties 221client settings 221Controllers tab 226deploying packages 152Optimization tab 225SSL tab 229Status window 222Support menu 223
Management Consoleconnecting 15navigating 17using 15
Managingconfigurations 91licenses 82Mobile Client group assignments 153Mobile Client packages 146Mobile Client policies 109optimization controls 224user permissions 67web SSL certificates 77
MAPI Exchange 2003enabling optimization 126
Memory dumps, viewing 191Memory error 41, 178Memory paging
alarm status 180reports 183
Message of the day
eelCentral Controller for SteelHead Mobile User’s Guide

Beta Draft
Index
See MOTDMIB file
SNMP traps sent 236Mobile Client
common problems 206installer GUI 232Mac GUI 221updating software 152
Mobile Client packagesdefinition of 13steps for deploying 21
Modifyinggeneral host settings 23network interfaces 26ports in a port label 34
Monitor password, configuring 67Monitored ports, configuring 46MOTD, setting 37MTU value, setting 30, 31Multiple logins 16
NNetwork adapters 64Network interfaces, modifying 26
OObject identifiers, viewing through
SNMP 55Object prefetches, configuring 129Online documentation 8, 90Optimization
disabling CIFS SMB signing for 122overlapping opens, enabling 123
Oracle Forms traffic, in-path rule 114Outlook Anywhere
automatic detection 127latency optimization 127over HTTPS 127
Overlapping opens, enabling 123
PPackages
creating 146creating software updates 153definition of 13, 14deploying 21, 150viewing details 148
Pass-throughenable for traffic on interactive ports 33rules, default settings for 213traffic on secure ports 33traffic on system ports 33
Peering, configuring 95Permissions
managing 67viewing 66
Policiesconfiguring endpoint settings for 143configuring location awareness for 140configuring protocol settings for 119configuring SSL for 137creating 110definition of 13, 14
Port labelsconfiguring 33
SteelCentral Controller for SteelHead Mobile User’s Guide
overview of 33Port transparency 117Ports, modifying, in a port label 34Power supply error 178Preferences and system status,
viewing 221Preoptimization policy, configuring 114Primary gateway IP address 30Primary interface
on the SteelHead appliance 26setting 29
Printing pages and reports 20Privileges, read, write, and deny 68Process dumps, viewing 195Protocol settings, configuring 119Proxy
addresses for web access 23setting an IP for Web/FTP 25
QQoS policies, port transparency 117Queue
capture file 198specifying the trace dump size 199
RRADIUS, configuring 70RBT-Proto, description of 33Read-only privileges for role-based
accounts, configuring 68Rebooting the system 87Related reading 8Reports
Alarm Status 176Branch Warming 168CPU Utilization 181Desktop Bandwidth 166Desktop Traffic 174Endpoint 160Endpoint History 172Endpoints 159Interface Counters 185Memory dumps for endpoints 191Memory Paging 183Process dumps for Mobile
Controllers 195SSL 170System dumps for endpoints 192System dumps for Mobile
Controllers 194TCP dumps for endpoints 193TCP dumps for Mobile Controllers 196
Reverting, to a backup version of the system 84
Riverbed, contacting 9Role-based
accounts 68user permissions 67
RPC over HTTP or HTTPS, using with Outlook Anywhere 127
SScheduled jobs, configuring 81Secure ports, description of 33Secure vault, unlocking 74
241

Beta Draft
Index
Securityconfiguring RADIUS 70configuring TACACS+ 73
Security settings, configuring 65Security signatures, disabling 122Setting
alarm thresholds 38local logging 59SNMP trap receivers 47
SMB signing, disabling 122SNMP
access control 52access policies 56access policy security 49, 56adding groups 54adding trap receivers 49adding views 55authentication 52creating users 50MIB, accessing 235supported versions 47testing a trap 50traps, summary of sent 236v3 configuring 50
Software dependencies, overview of 11Software version mismatch, alarm status
for 180Software, upgrading 84Speed and duplex
avoiding a mismatch 31SSL
configuring certificate authorities 105configuring for Mobile Controllers 93configuring for policies 137error state 162non-443 servers detected on
upgrade 180peering list 77trusted entities 97
Subnet for aux interface 26System dumps, viewing 192, 194System tray options 220System, logging out of 20
TTACACS+
configuring 73configuring access to 73setting authentication method 65
TCP dump 198TCP dumps
capturing and uploading 196viewing 193, 196
Temperature alarm status 180Time zone setting 44Traps, summary of SNMP traps sent 236Troubleshooting
cluster connections 90common problems, summary table 206
UUpgrading, software 84User logs
downloading 190viewing 187
242 St
User permissions, configuring 67
VVault, unlocking and changing the
password 74
WWAN visibility modes 117Web settings, configuring 76Windows
SMB signing, disabling 122Windows Mobile Client
installer properties 231properties 215Settings tab 217Status tab 216Support tab 218
Write optimization, disabling 121Write throttling, enabling 114
eelCentral Controller for SteelHead Mobile User’s Guide