SMP/E V3R2.0 User's Guide - IBM Documents List
244
IBM SMP/E for z/OS and OS/390 User’s Guide SA22-7773-04
-
Upload
khangminh22 -
Category
Documents
-
view
1 -
download
0
Transcript of SMP/E V3R2.0 User's Guide - IBM Documents List

IBM SMP/E for z/OS and OS/390
User’s Guide
SA22-7773-04
���

IBM SMP/E for z/OS and OS/390
User’s Guide
SA22-7773-04
���
Note!Before using this information and the product it supports, be sure to read the general information under “Notices” onpage 199.
Fifth Edition, August 2003
This book replaces the previous edition, SA22-7773-03, which is now obsolete. Changes or additions to text andillustrations are indicated by a vertical line to the left of the change.
This edition applies to IBM SMP/E for z/OS and OS/390, V3R2, program number 5655-G44, and to all subsequentreleases and modifications, unless otherwise indicated in new editions.
Changes or additions to text and illustrations are indicated by a vertical line to the left of the change.
Order IBM publications through your IBM representative or the IBM branch office serving your locality.Publications are not stocked at the address given below.
IBM welcomes your comments. A form for readers’ comments may be provided at the back of this publication, oryou may address your comments to the following address:
International Business Machines CorporationDepartment 55JA, Mail Station P3842455 South RoadPoughkeepsie, NY 12601-5400United States of America
FAX (United States & Canada): 1+845+432+9405FAX (Other Countries):
Your International Access Code +1+845+432-9405
IBMLink (United States customers only): IBMUSM10(MHVRCFS)Internet e-mail: [email protected] Wide Web: http://www.ibm.com/servers/eserver/zseries/zos/webqs.html
If you would like a reply, be sure to include your name, address, telephone number, or FAX number.
Make sure to include the following in your comment or note:v Title and order number of this bookv Page number or topic related to your comment
When you send information to IBM, you grant IBM a nonexclusive right to use or distribute the information in anyway it believes appropriate without incurring any obligation to you.
© Copyright International Business Machines Corporation 1986, 2003. All rights reserved.US Government Users Restricted Rights – Use, duplication or disclosure restricted by GSA ADP Schedule Contractwith IBM Corp.
Contents
Figures . . . . . . . . . . . . . . vii
Tables . . . . . . . . . . . . . . . ix
About This Book. . . . . . . . . . . xiWho Should Read This Publication . . . . . . xiBibliography . . . . . . . . . . . . . . xi
Using LookAt to look up message explanations . xi
Summary of Changes . . . . . . . . xiii
Chapter 1. SMP/E Primer . . . . . . . 1What Is SMP/E, and Why Should I Use It? . . . . 1
Understanding Your System . . . . . . . . 1Changing the Elements of the System . . . . . 2Keeping Track of the Elements of the System . . 7
How Does SMP/E Work? . . . . . . . . . . 9The Distribution and Target Libraries . . . . . 10The Consolidated Software Inventory (CSI) . . . 11
What Are the Basic SMP/E Commands I Need toKnow? . . . . . . . . . . . . . . . . 12
Setting the Zone You Want to Work On . . . . 13Receiving the SYSMOD into SMP/E’s Data Sets 13Applying the SYSMOD to the Target Libraries . . 13Restoring the Target Libraries to the PreviousLevel . . . . . . . . . . . . . . . 13Accepting the SYSMOD and Updating theDistribution Libraries . . . . . . . . . . 13Displaying SMP/E Data . . . . . . . . . 13Flow of SMP/E SYSMOD Processing . . . . . 14
Receiving the SYSMOD into SMP/E’s Data Sets . . 14What Happens During RECEIVE Processing . . 15How SMP/E Keeps Track of RECEIVE Processing 15Using the RECEIVE Command . . . . . . . 16Summary . . . . . . . . . . . . . . 17
Applying the SYSMOD to the Target Libraries . . . 18What Happens During APPLY Processing . . . 18How SMP/E Keeps Track of APPLY Processing 18Using the APPLY Command. . . . . . . . 19Summary . . . . . . . . . . . . . . 21
Restoring the Target Libraries to the Previous Level 22What Happens During RESTORE Processing . . 22How SMP/E Keeps Track of RESTOREProcessing . . . . . . . . . . . . . . 22Using the RESTORE Command. . . . . . . 23Summary . . . . . . . . . . . . . . 25
Accepting the SYSMOD into the DistributionLibraries . . . . . . . . . . . . . . . 25
What Happens During ACCEPT Processing . . 25How SMP/E Keeps Track of ACCEPT Processing 26Using the ACCEPT Command . . . . . . . 27Summary . . . . . . . . . . . . . . 29
Displaying SMP/E Data . . . . . . . . . . 29Using the Query Dialogs . . . . . . . . . 30
Using the LIST Command . . . . . . . . 32Using the REPORT Commands . . . . . . . 33SMP/E CSI Application Programming Interface 34Summary . . . . . . . . . . . . . . 34
Chapter 2. SMP/E Concepts. . . . . . 35What Is SMP/E?. . . . . . . . . . . . . 35What Are SYSMODs? . . . . . . . . . . . 35Data Sets Used by SMP/E . . . . . . . . . 37How SMP/E Can Help You Install and MaintainProducts . . . . . . . . . . . . . . . 39
Where to Begin . . . . . . . . . . . . 39Installing SYSMODs . . . . . . . . . . 40Monitoring Your System . . . . . . . . . 40Managing the SMP/E Database. . . . . . . 41Managing Zones. . . . . . . . . . . . 43Linking and Relinking Modules . . . . . . 43General SMP/E Processing . . . . . . . . 44
Chapter 3. Preparing to Use SMP/E . . 45Allocating and Initializing Data Sets in the SMP/EDatabase . . . . . . . . . . . . . . . 45
CSI Data Sets . . . . . . . . . . . . . 45PTS Data Sets . . . . . . . . . . . . 58SCDS Data Sets . . . . . . . . . . . . 58
How to Dynamically Allocate Data Sets to Be UsedDuring SMP/E Processing . . . . . . . . . 58
Sources of Information for Dynamic Allocation 59How Dynamic Allocation Works . . . . . . 60
Defining Utility Programs and AssociatedParameters to SMP/E . . . . . . . . . . . 60
Using Default Values for Utility Programs . . . 61Defining Values for Utility Programs . . . . . 61Example: How to Request the Desired UtilityProcessing . . . . . . . . . . . . . . 63
Recovering After Errors from Utility Processing . . 64Overview of Your Input to Retry Processing . . 64Example: How to Request the Desired RetryProcessing . . . . . . . . . . . . . . 65
Connecting SMP/E Dialogs to ISPF . . . . . . 66Check for Required Programs . . . . . . . 66Add Dialog Modules to the PCF Command Table 67Concatenate the Dialog Libraries . . . . . . 67Connect the Dialogs to ISPF . . . . . . . . 69Customize the SMP/E Dialogs . . . . . . . 70
Setting Up SMP/E for Easier Operation . . . . . 72Recommended Values for OPTIONS Entry . . . 72Recommended Link Edit Utility Output DDDEFEntries . . . . . . . . . . . . . . . 73Specifying Automatic Cross-Zone RequisiteChecking . . . . . . . . . . . . . . 73
Defining the Information Needed to Invoke SMP/E 76Required JCL Statements . . . . . . . . . 76Sample Cataloged Procedure for SMP/E. . . . 78
Defining Exit Routines. . . . . . . . . . . 82
© Copyright IBM Corp. 1986, 2003 iii
Chapter 4. Installing a New Function 83Introduction . . . . . . . . . . . . . . 83RECEIVE-APPLY-ACCEPT Method . . . . . . 83Using the Standard RECEIVE-APPLY-ACCEPTMethod. . . . . . . . . . . . . . . . 84
Preparing Your System . . . . . . . . . 84Staging the SYSMODs: The RECEIVE Process . . 85Updating the Target Libraries: The APPLYProcess . . . . . . . . . . . . . . . 86Testing the New Function . . . . . . . . 88Updating the Distribution Libraries: TheACCEPT Process . . . . . . . . . . . 89Checking Other Zones for Requisites: REPORTCROSSZONE . . . . . . . . . . . . . 90
Chapter 5. Installing Preventive Service 91Introduction . . . . . . . . . . . . . . 91
CBPDO Tapes . . . . . . . . . . . . 91ESO Tapes . . . . . . . . . . . . . . 92
Preventive Service Process: Summary. . . . . . 93Preparing Your System . . . . . . . . . . 93Staging the SYSMODs: The RECEIVE Process . . . 94Updating the Target Libraries: The APPLY Process 95
Checking the Update (APPLY CHECK) . . . . 96Updating the Target Library (APPLY). . . . . 99Installing PTFs That Need Special Processing 100
Testing the New Service Level . . . . . . . . 100Updating the Distribution Libraries: The ACCEPTProcess . . . . . . . . . . . . . . . 100
Checking the Update (ACCEPT CHECK) . . . 101Updating the Distribution Library (ACCEPT) 102Installing PTFs That Need Special Processing 102
Chapter 6. Installing CorrectiveService . . . . . . . . . . . . . . 103Introduction . . . . . . . . . . . . . . 103Building or Checking the Fix . . . . . . . . 104Preparing Your System . . . . . . . . . . 105Staging the SYSMODs: The RECEIVE Process . . 105Updating the Target Libraries: The APPLY Process 106
Checking the Update (APPLY CHECK) . . . . 106Updating the Target Library (APPLY) . . . . 107
Testing the Corrective Service . . . . . . . . 107Updating the Distribution Libraries: The ACCEPTProcess . . . . . . . . . . . . . . . 107
Checking the Update (ACCEPT CHECK) . . . 107Updating the Distribution Library (ACCEPT) 108
Chapter 7. Installing a UserModification . . . . . . . . . . . . 109Introduction . . . . . . . . . . . . . . 109Preparing Your System . . . . . . . . . . 109Staging the SYSMODs: The RECEIVE Process . . 109Updating the Target Libraries: The APPLY Process 110
Checking the Update (APPLY CHECK) . . . . 110Updating the Target Library (APPLY) . . . . 111
Testing the USERMOD . . . . . . . . . . 111Updating the Distribution Libraries: The ACCEPTProcess . . . . . . . . . . . . . . . 111
Chapter 8. Managing ExceptionSYSMODs . . . . . . . . . . . . . 113Introduction . . . . . . . . . . . . . . 113What SMP/E Does with the HOLDDATA . . . . 114
Initial Entry into Staging Data Sets: RECEIVE 114Updating Target Libraries: APPLY . . . . . 115Updating Distribution Libraries: ACCEPT . . . 116Removing HOLDDATA from SMP/E Data Sets 116
Sources of HOLDDATA . . . . . . . . . . 117CBPDO Tapes . . . . . . . . . . . . 117ESO Tapes . . . . . . . . . . . . . 117PSP Information . . . . . . . . . . . 118How to Process HOLDDATA . . . . . . . 118
Chapter 9. Creating Cross-Product,Cross-Zone Load Modules: The LINKMODULE Command . . . . . . . . 125When to Use LINK MODULE . . . . . . . . 125How to Use LINK MODULE . . . . . . . . 126
Chapter 10. Displaying the DataManaged by SMP/E: The LISTCommand . . . . . . . . . . . . . 127Introduction . . . . . . . . . . . . . . 127Listing All the SMP/E Data . . . . . . . . 127Listing by Specific Entry Type . . . . . . . . 128Listing Specific Entries . . . . . . . . . . 129Listing by FMID or FMIDSET . . . . . . . . 130Listing to Compare Two Zones . . . . . . . 131Summary. . . . . . . . . . . . . . . 132
Chapter 11. Changing the Data SMP/EManages: The UCLIN Command . . . 133Introduction . . . . . . . . . . . . . . 133When to Use UCLIN . . . . . . . . . . . 133How to Use UCLIN . . . . . . . . . . . 134
Chapter 12. Identifying Cross-ZoneRequisites: The REPORTCROSSZONE Command. . . . . . . 137Introduction . . . . . . . . . . . . . . 137Defining a ZONESET. . . . . . . . . . . 137Running the REPORT CROSSZONE Command . . 138Installing the SYSMODs . . . . . . . . . . 139
Chapter 13. Identifying InstalledSYSMODs Affected by Error Holds:The REPORT ERRSYSMODSCommand . . . . . . . . . . . . . 141Introduction . . . . . . . . . . . . . . 141Running the REPORT ERRSYSMODS Command 141Installing the SYSMODs . . . . . . . . . . 142
Chapter 14. Listing the Source IDs ina Zone: The REPORT SOURCEIDCommand . . . . . . . . . . . . . 143Introduction . . . . . . . . . . . . . . 143
iv SMP/E V3R2.0 User’s Guide
Running the REPORT SOURCEID Command. . . 143Listing the SYSMODs . . . . . . . . . . 143
Chapter 15. Comparing the SYSMODsInstalled in Two Zones: The REPORTSYSMODS Command . . . . . . . . 145Introduction . . . . . . . . . . . . . . 145Running the REPORT SYSMODS Command . . . 145Installing the SYSMODs . . . . . . . . . . 145
Chapter 16. Building a UserModification . . . . . . . . . . . . 147Choosing between a USERMOD and a FunctionSYSMOD . . . . . . . . . . . . . . . 147Creating the MCSs . . . . . . . . . . . 148
The ++USERMOD MCS . . . . . . . . . 148The ++VER MCS . . . . . . . . . . . 148The ++JCLIN MCS . . . . . . . . . . 149++MOD and ++ZAP MCSs . . . . . . . . 150++MAC and ++MACUPD MCSs . . . . . . 150++SRC and ++SRCUPD MCSs. . . . . . . 151The ++PROGRAM MCS . . . . . . . . . 151Data Element MCSs . . . . . . . . . . 151Hierarchical File System Element MCSs . . . 152
Examples of USERMODs . . . . . . . . . 152Example 1: Updating a Module . . . . . . 152Example 2: Replacing a Module . . . . . . 153Example 3: Adding New Modules . . . . . 153Example 4: Replacing a Macro or Source Code 154Example 5: Updating a Macro or Source Code 155Example 6: Adding New Source Code . . . . 155Example 7: Adding New Source Code that Usesan IBM-Supplied Macro . . . . . . . . . 157Example 8: Adding a New Module that Uses anIBM-Supplied Macro . . . . . . . . . . 158
Chapter 17. Determining WhichSYSMODs Led Others to Fail: TheCauser SYSMOD Summary Report . . 161Introduction . . . . . . . . . . . . . . 161Using Causer SYSMOD Information . . . . . . 161
Resolving Errors for All SYSMODs That Failed 161Resolving Errors for a Single SYSMOD ThatFailed . . . . . . . . . . . . . . . 162Example . . . . . . . . . . . . . . 162
Chapter 18. Java Archive UpdateExploiter’s Guide . . . . . . . . . . 165JAR Replacements in FMIDs . . . . . . . . 165JAR Updates in PTFs . . . . . . . . . . . 165JAR Replacements in PTFs . . . . . . . . . 166
Appendix A. Migration . . . . . . . 169Migration Overview . . . . . . . . . . . 169
Terms you need to know . . . . . . . . 169SMP/E Release Levels . . . . . . . . . 170Developing a migration strategy . . . . . . 170
Migration Roadmap . . . . . . . . . . . 171SMP/E V3R2 Summary . . . . . . . . . 171
SMP/E V3R2 Overview . . . . . . . . . . 172LINK LMODS Command . . . . . . . . 172REPORT CALLLIBS Command Removal . . . 172UPGRADE Command . . . . . . . . . 172GIMXSID Service Routine . . . . . . . . 173GIMZIP: Archive Segmentation . . . . . . 173GIMZIP: User Defined Subdirectories . . . . 173Java Archive Files . . . . . . . . . . . 174Smaller SMPLTS data set . . . . . . . . 174DUMMY data set for SYSDEFSD . . . . . . 175SMP/E Dialog Customization . . . . . . . 176GIMUTTBL Removal . . . . . . . . . . 176
SMP/E V3R1 Overview . . . . . . . . . . 176Defining Exit Routines using SMPPARMMember GIMEXITS . . . . . . . . . . 176Dynamic Allocation using SMPPARM MemberGIMDDALC. . . . . . . . . . . . . 177Enhanced Link Name Values . . . . . . . 177Removal of Function to Create BackupIEANUC01 Load Modules . . . . . . . . 177Conditional JCLIN Processing . . . . . . . 178Network Delivery of SMP/E Input . . . . . 178AMODE=64 and COMPAT=PM4 Link EditParameters . . . . . . . . . . . . . 179Selected SMP/E Data Sets May Now Reside inthe Hierarchical File System . . . . . . . 179HFS Data Set Identification . . . . . . . . 179SMPPTS Spill Data Sets . . . . . . . . . 179HOLDDATA Summary Reports . . . . . . 179SMP/E Load Modules and Service RoutinesMoved to SYS1.MIGLIB . . . . . . . . . 180GIMXTRX Service Routine . . . . . . . . 180
OS/390 Version 2 Release 7 SMP/E Overview . . 180SMP/E Planning and Migration Assistant . . . 180Data Element Reformatting . . . . . . . . 180Description for a SYSMOD . . . . . . . . 180Improved Protection for Hierarchical FileSystem Files . . . . . . . . . . . . . 181Pre-Built Load Module Support . . . . . . 181Product Data . . . . . . . . . . . . 181Sequential Data Set Support . . . . . . . 181Shell Script Support . . . . . . . . . . 181Symbolic Link Support . . . . . . . . . 181
OS/390 Version 2 Release 5 SMP/E Overview . . 181CBIPO dialogs . . . . . . . . . . . . 182Client Code Installation . . . . . . . . . 182Global Zone Merge . . . . . . . . . . 182Library Change Interface . . . . . . . . 182Improved Load Module Build Processing . . . 182Load module return code . . . . . . . . 183Performance Improvements . . . . . . . 183PTF Compaction in SMPPTS Data Set . . . . 183Enhanced RECEIVE Command Processing . . 183Reduced SMP/E Message Output . . . . . 183GIMAPI: All Entries and Subentries Support 184GIMAPI: Version Support . . . . . . . . 184
OS/390 Version 1 Release 3 SMP/E Overview . . 184API for User Access to the CSI . . . . . . 184Enhanced Cross-Zone Requisite Checking . . . 184Enhanced Exception SYSMOD Report . . . . 185Enhanced ++IF FMID Processing . . . . . . 185
Contents v
Enhanced Internal HOLD SYS Processing . . . 185Enhanced ZONEEDIT Command. . . . . . 186Enhancements to the Binder Utility inDFSMS/MVS . . . . . . . . . . . . 186System/390 Service Update Facility . . . . . 186
OS/390 Version 1 Release 2 SMP/E Overview . . 187BLOCKSIZE=8800 for SMP/E Data Sets . . . 187BUILDMCS Command . . . . . . . . . 187Bypassing System Holds for Specific SYSMODs 187FMIDSET Selection . . . . . . . . . . 187Receiving Relative File Data Sets Created fromPDSEs . . . . . . . . . . . . . . . 187SMP/E Dialogs: FIND Command . . . . . 188SMP/E GIMOPCDE Member Moved fromPARMLIB . . . . . . . . . . . . . 188
Summary of Interface Changes . . . . . . . 188Commands . . . . . . . . . . . . . 188Data Sets and Files . . . . . . . . . . 189Exits . . . . . . . . . . . . . . . 189Macros . . . . . . . . . . . . . . 189Messages . . . . . . . . . . . . . . 190
Panels . . . . . . . . . . . . . . . 190Programming Interfaces . . . . . . . . . 192Service Routines . . . . . . . . . . . 192SMPPARM Members . . . . . . . . . . 193SYS1.SAMPLIB Members . . . . . . . . 193195
Appendix B. Recommended ServiceUpgrade (RSU) . . . . . . . . . . . 195
Appendix C. Accessibility . . . . . . 197Using assistive technologies . . . . . . . . 197Keyboard navigation of the user interface . . . . 197
Notices . . . . . . . . . . . . . . 199Trademarks . . . . . . . . . . . . . . 200
Glossary . . . . . . . . . . . . . 203
Index . . . . . . . . . . . . . . . 217
vi SMP/E V3R2.0 User’s Guide
Figures
1. Load Module Creation . . . . . . . . . 22. Introducing an Element . . . . . . . . . 43. Preventing Problems with an Element . . . . 54. Fixing Problems with an Element . . . . . 65. Customizing an Element . . . . . . . . 76. PTF Replacement . . . . . . . . . . . 87. PTF Prerequisite . . . . . . . . . . . 88. Load Module Constructions . . . . . . . 99. The Public Library . . . . . . . . . . 10
10. The Distribution and Target Libraries . . . . 1111. z/OS System with SMP/E . . . . . . . 1212. Flow of SMP/E SYSMOD Processing . . . . 1413. Results of RECEIVE Processing . . . . . . 1614. Results of APPLY Processing . . . . . . . 1915. Results of RESTORE Processing . . . . . . 2316. Results of ACCEPT Processing . . . . . . 2717. Query Selection Menu . . . . . . . . . 3018. CSI Query Panel . . . . . . . . . . . 3119. CSI Query - Select Entry Panel . . . . . . 3120. CSI Query - SYSMOD Entry Panel . . . . . 3121. Example of a SYSMOD Hierarchy . . . . . 3722. Summary of Zone Relationships . . . . . 3823. Sample Single-CSI Structure . . . . . . . 46
24. Sample Multiple-CSI Structure . . . . . . 4725. Using a Separate Global Zone for Each
Subsystem . . . . . . . . . . . . . 4826. Using One CSI for the Whole System . . . . 4927. Using a Master CSI . . . . . . . . . . 5028. Using a Master CSI and a Separate CSI for
Each Zone . . . . . . . . . . . . . 5129. Using a Master CSI and One CSI per SREL 5230. Relationships between Zone Definition Entries 5531. Relationships of OPTIONS, UTILITY, Zone
Definition Entries and the SET Command . . 6232. Sample Logon Procedure That Concatenates
SMP/E and ISPF Libraries . . . . . . . 6933. Sample SMP/E Cataloged Procedure . . . . 8034. APPLY SYSLIB Concatenation: APPLY
Different from ACCEPT . . . . . . . . 8235. ACCEPT SYSLIB Concatenation: APPLY
Different from ACCEPT . . . . . . . . 8236. SYSMOD Status Report: Sample Report for
APPLY . . . . . . . . . . . . . . 16237. Causer SYSMOD Summary Report: Sample
Report for APPLY . . . . . . . . . . 163
© Copyright IBM Corp. 1986, 2003 vii

viii SMP/E V3R2.0 User’s Guide
Tables
1. Publications for IBM SMP/E for z/OS andOS/390, V3R2 . . . . . . . . . . . . xi
2. Entries Controlling SMP/E Processing . . . 553. Entries Describing the Status and Structure of
the Target and Distribution Libraries . . . . 564. Default Values for UTILITY Entries . . . . 615. How to Request the Desired Utility Processing 636. How to Request the Desired Retry Processing 657. ISPF Libraries and Related SMP/E Target
Libraries . . . . . . . . . . . . . 678. SMPTABL Data Set Allocations . . . . . . 689. Sources for Functions and Their Installation
Information . . . . . . . . . . . . 8310. Format of a CBPDO Tape . . . . . . . . 9211. Format of an ESO . . . . . . . . . . 9212. CBPDO/Service Level/PSP HOLDDATA
Example . . . . . . . . . . . . . 122
13. Alternatives to UCLIN . . . . . . . . 13414. Comparison of USERMODs and Function
SYSMODs . . . . . . . . . . . . 14715. Information Needed to Add New Source
Code . . . . . . . . . . . . . . 15516. Summary of SMP/E V3R2 Updates . . . . 17217. Summary of Changed Commands . . . . 18818. Summary of Changed Data Sets . . . . . 18919. Summary of Changed Macros . . . . . . 18920. Summary of New and Changed Panels 19021. Summary of SMP/E Programming Interfaces 19222. Summary of SMP/E Service Routines 19223. Summary of SMP/E Changes to
SYS1.SAMPLIB . . . . . . . . . . . 19324. Summary of SMP/E Changes to
SYS1.SAMPLIB . . . . . . . . . . . 193
© Copyright IBM Corp. 1986, 2003 ix

x SMP/E V3R2.0 User’s Guide
About This Book
This publication documents a new and enhanced version of SMP/E. New orchanged information is identified by revision bars (|) to the left of the addition orchange.
Who Should Read This PublicationAnyone who uses SMP/E, or who wants to understand SMP/E processes, shouldread this publication.
After reading this publication, you should be able to do most SMP/E processes.You may have to refer to SMP/E Commands for details on commands.
BibliographyThis section tells you more about the SMP/E library.v The IBM SMP/E for z/OS and OS/390, V3R2 publications are available as
printable PDF files and BookManager-viewable softcopy athttp://www.ibm.com/servers/eserver/zseries/zos/bkserv/
v Table 1 lists the IBM SMP/E for z/OS and OS/390, V3R2 publications andbriefly describes each one.
v For information on z/OS publications and more information on the IBM SMP/Efor z/OS and OS/390, V3R2 books, see z/OS Information Roadmap.
Table 1. Publications for IBM SMP/E for z/OS and OS/390, V3R2
Title Description
SMP/E Messages, Codes, and Diagnosis, GA22-7770 Explains SMP/E messages and return codes and theactions to take for each; and how to handle suspectedSMP/E problems.
SMP/E Commands, SA22-7771 Explains SMP/E commands and processing in detail.
SMP/E Reference, SA22-7772 Explains SMP/E modification control statements, datasets, exit routines, and programming interfaces in detailand provides additional SMP/E reference material.
SMP/E User’s Guide, SA22-7773 Describes how to use SMP/E to install programs andservice.
Using LookAt to look up message explanationsLookAt is an online facility that lets you look up explanations for most messagesyou encounter, as well as for some system abends and codes. Using LookAt to findinformation is faster than a conventional search because in most cases LookAt goesdirectly to the message explanation.
You can access LookAt from the Internet at:http://www.ibm.com/eserver/zseries/zos/bkserv/lookat/ or from anywhere inz/OS or z/OS.e where you can access a TSO/E command line (for example,TSO/E prompt, ISPF, z/OS UNIX System Services running OMVS).
© Copyright IBM Corp. 1986, 2003 xi

The LookAt Web site also features a mobile edition of LookAt for devices such asPocket PCs, Palm OS, or Linux-based handhelds. So, if you have a handhelddevice with wireless access and an Internet browser, you can now access LookAtmessage information from almost anywhere.
To use LookAt as a TSO/E command, you must have LookAt installed on yourhost system. You can obtain the LookAt code for TSO/E from a disk on your z/OSCollection (SK3T-4269) or from the LookAt Web site’s Download link.
Bibliography
xii SMP/E V3R2.0 User’s Guide
Summary of Changes
Summary of Changesfor SA22-7771-04as Updated, August 2003
This revision reflects the deletion, addition, or modification of information tosupport miscellaneous maintenance items. A vertical bar ( | ) in the left marginindicates changes to the text and illustrations.
Summary of Changesfor SA22-7773-03SMP/E Version 3 Release 2May 2003
New Information
v “SMP/E V3R2 Overview” on page 172 has been added to ″Appendix A.Migration″. It includes migration information on:– “LINK LMODS Command” on page 172– “REPORT CALLLIBS Command Removal” on page 172– “UPGRADE Command” on page 172– “GIMXSID Service Routine” on page 173– “GIMZIP: Archive Segmentation” on page 173– “Java Archive Files” on page 174– “Smaller SMPLTS data set” on page 174– “DUMMY data set for SYSDEFSD” on page 175– “GIMZIP: User Defined Subdirectories” on page 173– “SMP/E Dialog Customization” on page 176– “GIMUTTBL Removal” on page 176.
v Chapter 18, “Java Archive Update Exploiter’s Guide”, on page 165 has beenadded.
v “Relinking Load Modules That Use CALLLIBS: LINK LMODS” on page 44 hasbeen added.
Changed Information
v Member GIMSAMPU in SYS1.SAMPLIB has been updated to provide sample jobsteps to allocate SMPCSI data sets and SMP/E operational data sets (such asSMPPTS and SMPLOG) and UCLIN statements to initialize the newly allocatedSMPCSI data sets, as shown in “Allocating a CSI Data Set” on page 52 andTable 24 on page 193.
v “Handling Cross-Zone Link-Edits: LINK MODULE” on page 43 has beenupdated.
v “How Dynamic Allocation Works” on page 60 has been updated.v “Customize the SMP/E Dialogs” on page 70 has been updated.v “Updating Target Libraries: APPLY” on page 115 has been updated.v “How to Use LINK MODULE” on page 126 has been updated.v “SMP/E Load Modules and Service Routines Moved to SYS1.MIGLIB” on page
180 has been updated.
© Copyright IBM Corp. 1986, 2003 xiii
v “GIMXTRX Service Routine” on page 180 has been updated.v Appendix B, “Recommended Service Upgrade (RSU)”, on page 195 has been
updated.
Moved Information
v None.
Deleted Information
v The chapter on using the REPORT CALLLIBS command has been deleted,because that command is no longer supported.
Summary of Changesfor SA22-7773-02as Updated, March 2002
This revision reflects the deletion, addition, or modification of information tosupport miscellaneous maintenance items. A vertical bar ( ∨ ) in the left marginindicates changes to the text and illustrations.
New Information
v An appendix with z/OS product accessibility information has been added.
Changed Information
v Table 24 on page 193 has been updated to include GIMCRSAM, GIMPRSAM,and GIMSAMPU.
Moved Information
v None.
Deleted Information
v None.
Summary of Changesfor SA22-7773-01SMP/E Version 3October 2001
The book contains information previously presented in SA22-7773-00, whichapplied to z/OS Version 1 Release 1.
New Information
v Appendix A, “Migration”, on page 169 has been added.v SMPPARM member GIMDDALC in “How to Dynamically Allocate Data Sets to
Be Used During SMP/E Processing” on page 58 has been added.
Changed Information
v “Example 1: Updating a Module” on page 152 has been updated.
Moved Information
v None.
Deleted Information
v Information related to backup IEANUC01 load modules has been removed.
xiv SMP/E V3R2.0 User’s Guide
This book contains terminology, maintenance, and editorial changes. Technicalchanges or additions to the text and illustrations are indicated by a vertical line tothe left of the change. You may notice changes in the style and structure of somecontent in this book — for example, headings that use uppercase for the first letterof initial words only, and procedures that have a different look and format. Thechanges are ongoing improvements to the consistency and retrievability ofinformation in our books.
Summary of Changes xv

xvi SMP/E V3R2.0 User’s Guide
Chapter 1. SMP/E Primer
This chapter provides an introduction to SMP/E to new SMP/E users. If you arealready familiar with SMP/E, you can skip this chapter.
What Is SMP/E, and Why Should I Use It?SMP/E is a tool designed to manage the installation of software products on yourz/OS system and to track the modifications you make to those products. Usually,it is the system programmer’s responsibility to ensure that all software productsand their modifications are properly installed on the system. The systemprogrammer also has to ensure that all products are installed at the proper level soall elements of the system can work together. At first, that might not sound toodifficult, but as the complexity of the software configuration increases, so does thetask of monitoring all the elements of the system. To better understand this, let’stake a closer look at your z/OS system and see how SMP/E can help you maintainit.
Understanding Your SystemYour z/OS system may appear to be one big block of code that drives your CPU.Actually, z/OS is a complex system comprising many different smaller blocks ofcode. Each of those smaller blocks of code perform a specific function within thesystem.
For example, some of the functions that can appear in a Z/OS system include:v Base Control Program (BCP)v C/C++ IBM Open Class Libraryv Communications Server (CS z/OS)v Cryptographic Servicesv DCE Application Supportv DCE Base Servicesv DFSMSdfpv DFSORTv Distributed File Servicev Encina Toolkit Executivev Hardware Configuration Definition (HCD)v High Level Assembler (HLASM)v IBM HTTP Serverv Infoprint Serverv ISPFv JES2 or JES3v Language Environmentv Managed System Infrastructure (msys) for Setupv Network File Systemv Open Systems Adapter/Support Facility (OSA/SF)v Resource Measurement Facility (RMF)v System Display and Search Facility (SDSF)
© Copyright IBM Corp. 1986, 2003 1
|
v SMP/Ev Time Sharing Option/Extensions (TSO/E)v z/OS UNIX® System Services (z/OS UNIX)
Each system function is composed of one or more load modules. In a z/OSenvironment, a load module represents the basic unit of machine-readable,executable code. Load modules are created by combining one or more objectmodules and processing them with a link-edit utility. The link-editing of modulesis a process that resolves external references and addresses. The functions on yoursystem, therefore, are one or more object modules that have been combined andlink-edited.
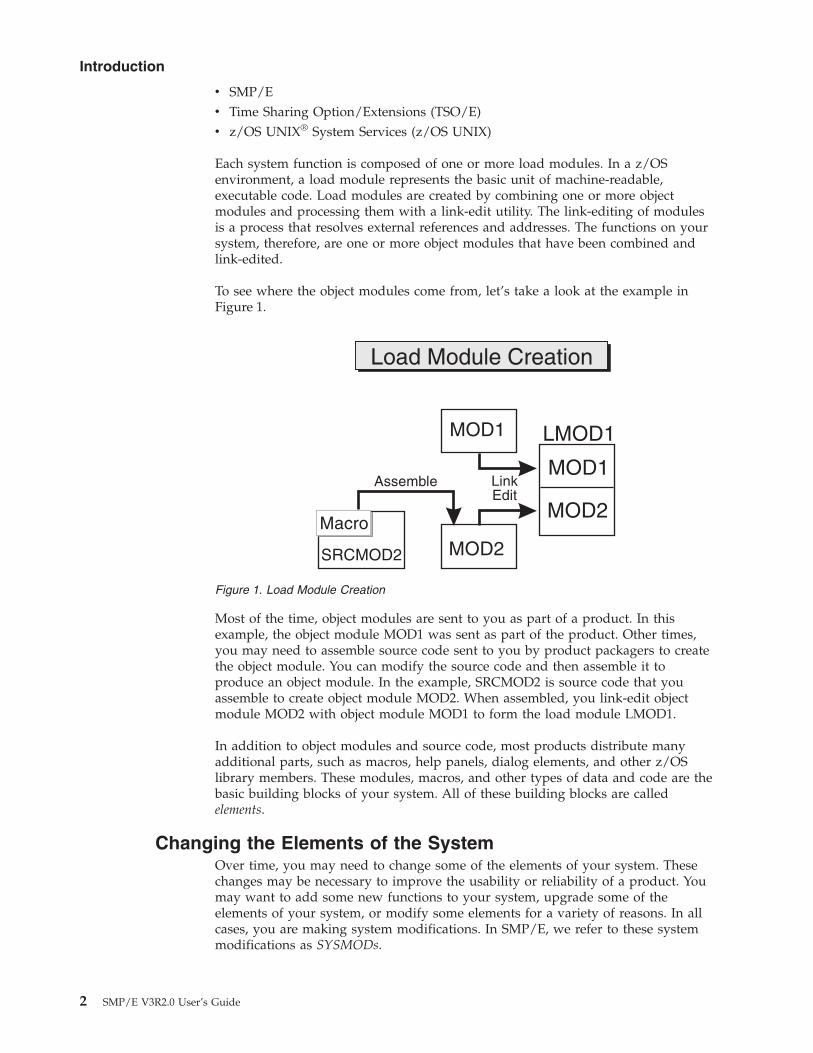
To see where the object modules come from, let’s take a look at the example inFigure 1.
Most of the time, object modules are sent to you as part of a product. In thisexample, the object module MOD1 was sent as part of the product. Other times,you may need to assemble source code sent to you by product packagers to createthe object module. You can modify the source code and then assemble it toproduce an object module. In the example, SRCMOD2 is source code that youassemble to create object module MOD2. When assembled, you link-edit objectmodule MOD2 with object module MOD1 to form the load module LMOD1.
In addition to object modules and source code, most products distribute manyadditional parts, such as macros, help panels, dialog elements, and other z/OSlibrary members. These modules, macros, and other types of data and code are thebasic building blocks of your system. All of these building blocks are calledelements.
Changing the Elements of the SystemOver time, you may need to change some of the elements of your system. Thesechanges may be necessary to improve the usability or reliability of a product. Youmay want to add some new functions to your system, upgrade some of theelements of your system, or modify some elements for a variety of reasons. In allcases, you are making system modifications. In SMP/E, we refer to these systemmodifications as SYSMODs.
Figure 1. Load Module Creation
Introduction
2 SMP/E V3R2.0 User’s Guide
A SYSMOD is the actual package containing information SMP/E needs to installand track system modifications. SYSMODs are composed of two parts:v Modification control statements (MCS), designated by ++ as the first two
characters, that tell SMP/E:– What elements are being updated or replaced– How the SYSMOD relates to product software and other SYSMODs– Other specific installation information
v Modification text, which is the object modules, macros, and other elementssupplied by the SYSMOD
There are four different categories of SYSMODs, each supporting a task you mightwant to perform:
Function SYSMODs Introduce the elements for a product.
PTF (program temporary fix) SYSMODsPrevent or fix problems with an element, orintroduce new element s.
APAR (authorized program analysis reports) SYSMODsFix problems with an element.
USERMOD (user modifications) SYSMODsCustomize an element.
Introducing an Element—The Function SYSMODOne way you can modify your system is to introduce new elements into thatsystem. To accomplish this with SMP/E, you can install a function SYSMOD. Thefunction SYSMOD introduces a new product, a new version or release of aproduct, or updated functions for an existing product into the system. All othertypes of SYSMODs are dependent upon the function SYSMOD, because they are allmodifications of the elements originally introduced by the function SYSMOD.
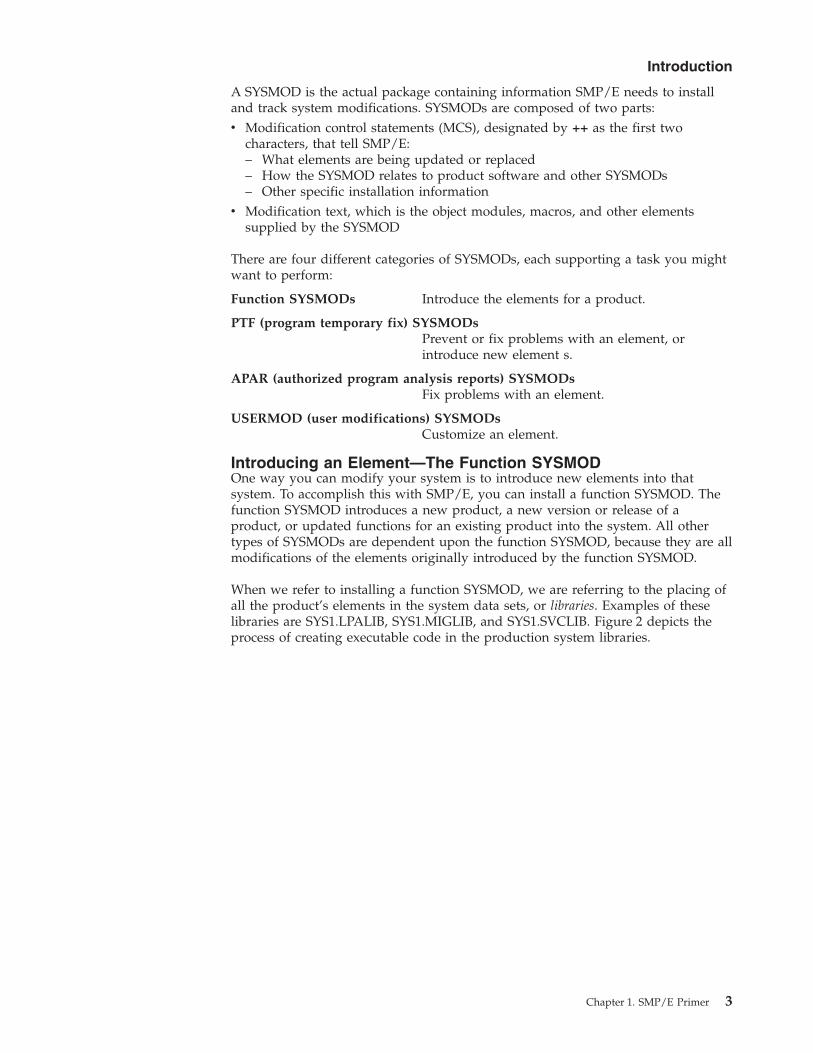
When we refer to installing a function SYSMOD, we are referring to the placing ofall the product’s elements in the system data sets, or libraries. Examples of theselibraries are SYS1.LPALIB, SYS1.MIGLIB, and SYS1.SVCLIB. Figure 2 depicts theprocess of creating executable code in the production system libraries.
Introduction
Chapter 1. SMP/E Primer 3
In this figure, the installation of a function SYSMOD link-edits object modulesMOD1, MOD2, MOD3, and MOD4 to create load module LMOD2. The executablecode created in load module LMOD2 is installed in the system libraries throughthe installation of the function SYSMOD.
There are two types of function SYSMODs:v A base function SYSMOD adds or replaces an entire system function. Examples
of base functions are SMP/E and JES2.v A dependent function SYSMOD provides an addition to an existing system
function. It is called dependent because its installation depends upon a basefunction already being installed. Examples of dependent functions are thelanguage features for SMP/E.
Both base function SYSMODs and dependent function SYSMODs are used tointroduce new elements into the system.
Here’s an example of a simple function SYSMOD that introduces four elements:++FUNCTION(FUN0001) /* SYSMOD type and identifier. */.++VER(Z038) /* For MVS SREL */.++MOD(MOD1) RELFILE(1) /* Introduce this module */
DISTLIB(AOSFB) /* in this distribution library. */.++MOD(MOD2) RELFILE(1) /* Introduce this module */
DISTLIB(AOSFB) /* in this distribution library. */.++MOD(MOD3) RELFILE(1) /* Introduce this module */
DISTLIB(AOSFB) /* in this distribution library. */.++MOD(MOD4) RELFILE(1) /* Introduce this module */
DISTLIB(AOSFB) /* in this distribution library. */.
Preventing or Fixing Problems with an Element—The PTFSYSMODWhen a problem with a software element is discovered, IBM supplies its customerswith a tested fix for that problem. This fix comes in the form of a programtemporary fix (PTF). Although you may not have experienced the problem the PTF
Figure 2. Introducing an Element
Introduction
4 SMP/E V3R2.0 User’s Guide
is intended to prevent, it is wise to install the PTF on your system. The PTFSYSMOD is used to install the PTF, thereby preventing the occurrence of thatproblem on your system.
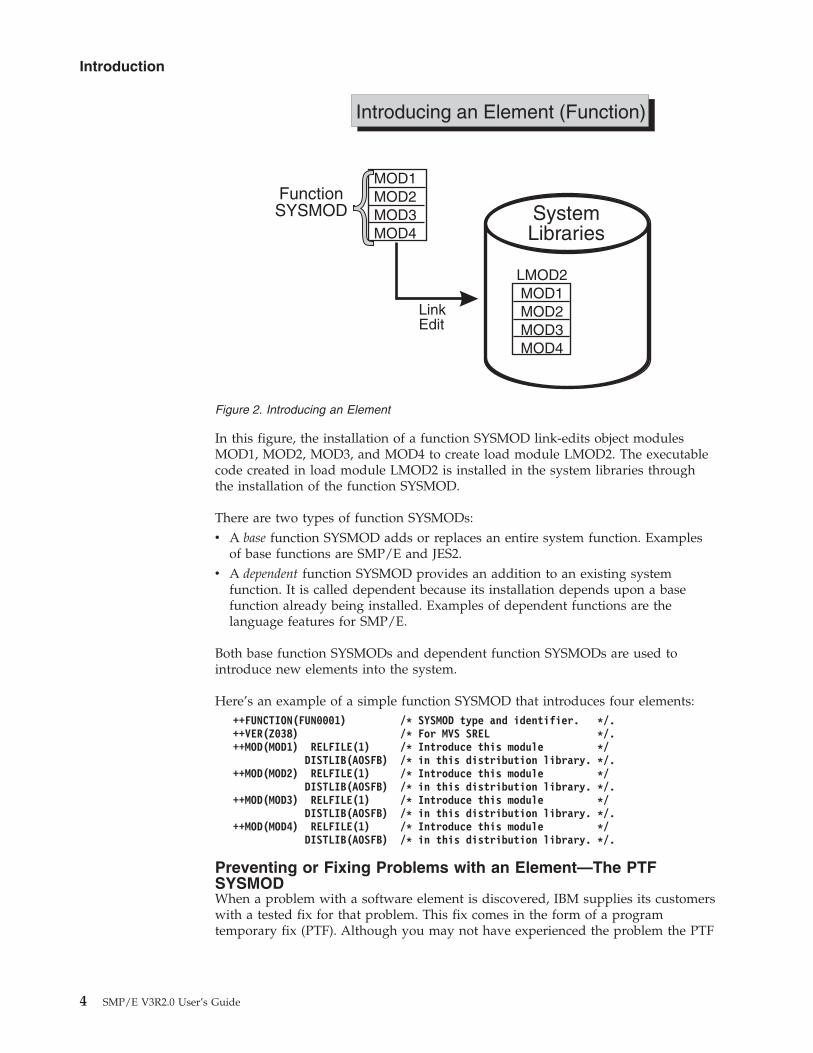
Usually, PTFs are designed to replace or update one or more complete elements ofa system function. Let’s look at Figure 3.
In Figure 3, we see a previously installed load module, LMOD2. If we want toreplace the element MOD1, we should install a PTF SYSMOD that contains themodule MOD1. That PTF SYSMOD replaces the element in error with the correctedelement. As part of the installation of the PTF SYSMOD, SMP/E relinks LMOD2 toinclude the new and corrected version of MOD1.
Here is an example of a simple PTF SYSMOD:++PTF(PTF0001) /* SYSMOD type and identifier. */.++VER(Z038) FMID(FUN0001) /* Apply to this product. */.++MOD(MOD1) /* Replace this module */
DISTLIB(AOSFB) /* in this distribution library. */....... object code for module...
PTF SYSMODs are always dependent upon the installation of a function SYSMOD.In some cases, some PTF SYSMODs may also be dependent upon the installationof other PTF SYSMODs. These dependencies are called prerequisites. We will look ata typical PTF prerequisite when we discuss the complexity of keeping track of theelements of the system.
Fixing Problems with an Element—The APAR SYSMODYou may sometimes find it is necessary to correct a serious problem that occurs onyour system before a PTF is ready for distribution. In this situation, IBM suppliesyou with an authorized program analysis report (APAR). An APAR is a fixdesigned to quickly correct a specific area of an element or replace an element inerror. You install an APAR SYSMOD to implement a fix, thereby updating theincorrect element.
In Figure 4, the shaded section shows an area of MOD2 containing an error.
Figure 3. Preventing Problems with an Element
Introduction
Chapter 1. SMP/E Primer 5
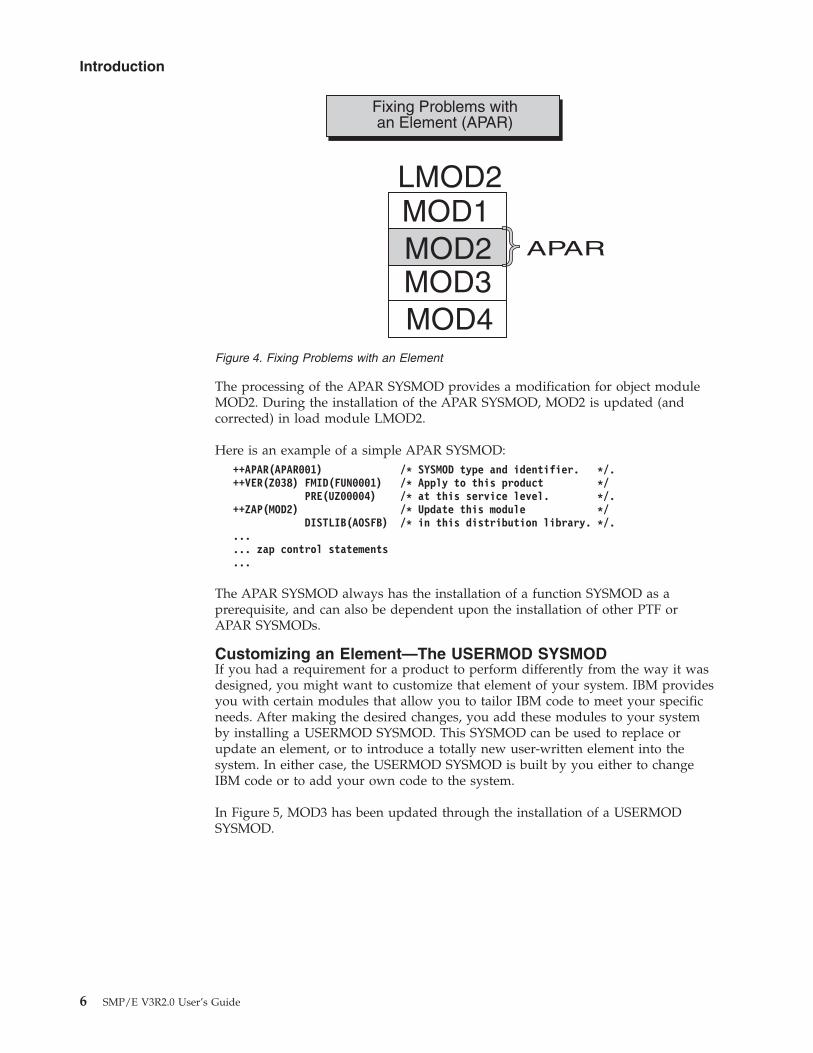
The processing of the APAR SYSMOD provides a modification for object moduleMOD2. During the installation of the APAR SYSMOD, MOD2 is updated (andcorrected) in load module LMOD2.
Here is an example of a simple APAR SYSMOD:++APAR(APAR001) /* SYSMOD type and identifier. */.++VER(Z038) FMID(FUN0001) /* Apply to this product */
PRE(UZ00004) /* at this service level. */.++ZAP(MOD2) /* Update this module */
DISTLIB(AOSFB) /* in this distribution library. */....... zap control statements...
The APAR SYSMOD always has the installation of a function SYSMOD as aprerequisite, and can also be dependent upon the installation of other PTF orAPAR SYSMODs.
Customizing an Element—The USERMOD SYSMODIf you had a requirement for a product to perform differently from the way it wasdesigned, you might want to customize that element of your system. IBM providesyou with certain modules that allow you to tailor IBM code to meet your specificneeds. After making the desired changes, you add these modules to your systemby installing a USERMOD SYSMOD. This SYSMOD can be used to replace orupdate an element, or to introduce a totally new user-written element into thesystem. In either case, the USERMOD SYSMOD is built by you either to changeIBM code or to add your own code to the system.
In Figure 5, MOD3 has been updated through the installation of a USERMODSYSMOD.
Figure 4. Fixing Problems with an Element
Introduction
6 SMP/E V3R2.0 User’s Guide
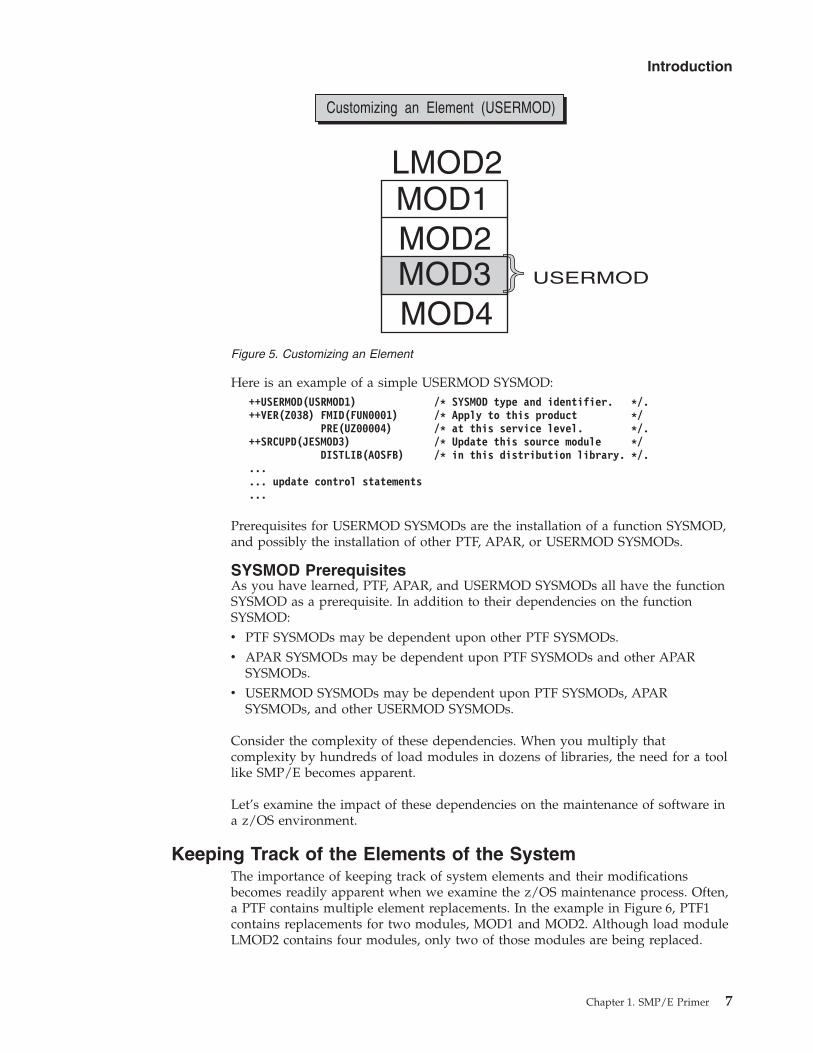
Here is an example of a simple USERMOD SYSMOD:++USERMOD(USRMOD1) /* SYSMOD type and identifier. */.++VER(Z038) FMID(FUN0001) /* Apply to this product */
PRE(UZ00004) /* at this service level. */.++SRCUPD(JESMOD3) /* Update this source module */
DISTLIB(AOSFB) /* in this distribution library. */....... update control statements...
Prerequisites for USERMOD SYSMODs are the installation of a function SYSMOD,and possibly the installation of other PTF, APAR, or USERMOD SYSMODs.
SYSMOD PrerequisitesAs you have learned, PTF, APAR, and USERMOD SYSMODs all have the functionSYSMOD as a prerequisite. In addition to their dependencies on the functionSYSMOD:v PTF SYSMODs may be dependent upon other PTF SYSMODs.v APAR SYSMODs may be dependent upon PTF SYSMODs and other APAR
SYSMODs.v USERMOD SYSMODs may be dependent upon PTF SYSMODs, APAR
SYSMODs, and other USERMOD SYSMODs.
Consider the complexity of these dependencies. When you multiply thatcomplexity by hundreds of load modules in dozens of libraries, the need for a toollike SMP/E becomes apparent.
Let’s examine the impact of these dependencies on the maintenance of software ina z/OS environment.
Keeping Track of the Elements of the SystemThe importance of keeping track of system elements and their modificationsbecomes readily apparent when we examine the z/OS maintenance process. Often,a PTF contains multiple element replacements. In the example in Figure 6, PTF1contains replacements for two modules, MOD1 and MOD2. Although load moduleLMOD2 contains four modules, only two of those modules are being replaced.
Figure 5. Customizing an Element
Introduction
Chapter 1. SMP/E Primer 7
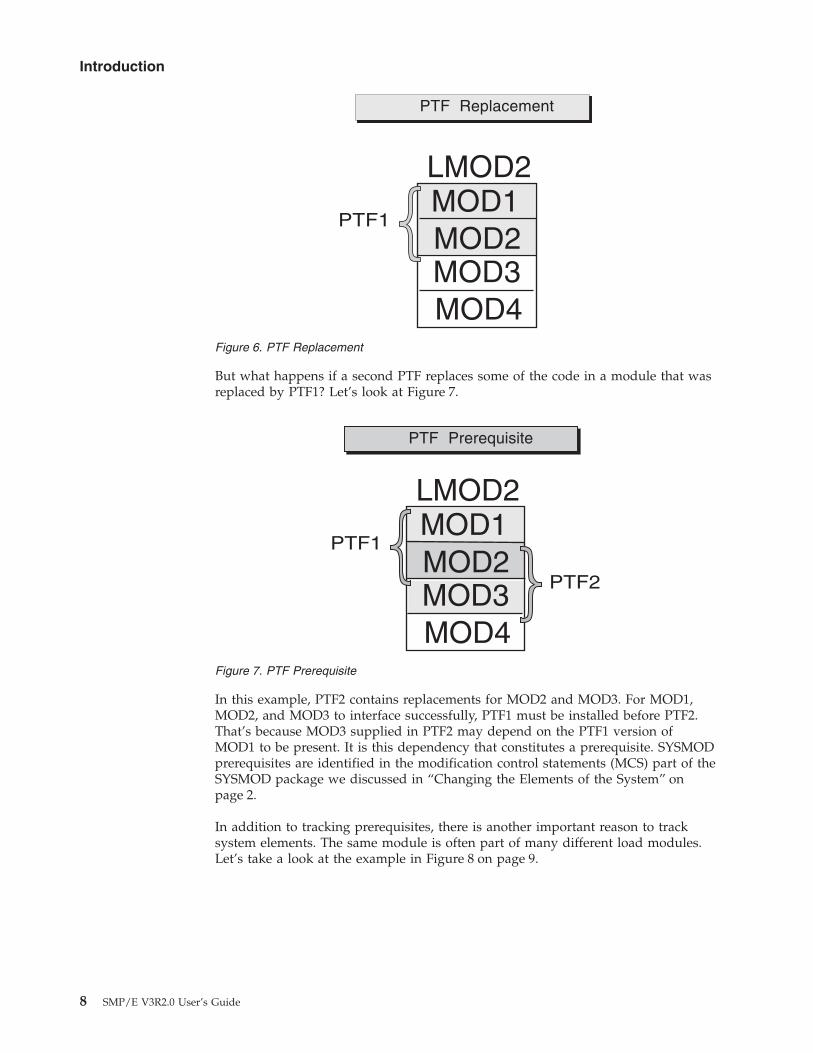
But what happens if a second PTF replaces some of the code in a module that wasreplaced by PTF1? Let’s look at Figure 7.
In this example, PTF2 contains replacements for MOD2 and MOD3. For MOD1,MOD2, and MOD3 to interface successfully, PTF1 must be installed before PTF2.That’s because MOD3 supplied in PTF2 may depend on the PTF1 version ofMOD1 to be present. It is this dependency that constitutes a prerequisite. SYSMODprerequisites are identified in the modification control statements (MCS) part of theSYSMOD package we discussed in “Changing the Elements of the System” onpage 2.
In addition to tracking prerequisites, there is another important reason to tracksystem elements. The same module is often part of many different load modules.Let’s take a look at the example in Figure 8 on page 9.
Figure 6. PTF Replacement
Figure 7. PTF Prerequisite
Introduction
8 SMP/E V3R2.0 User’s Guide
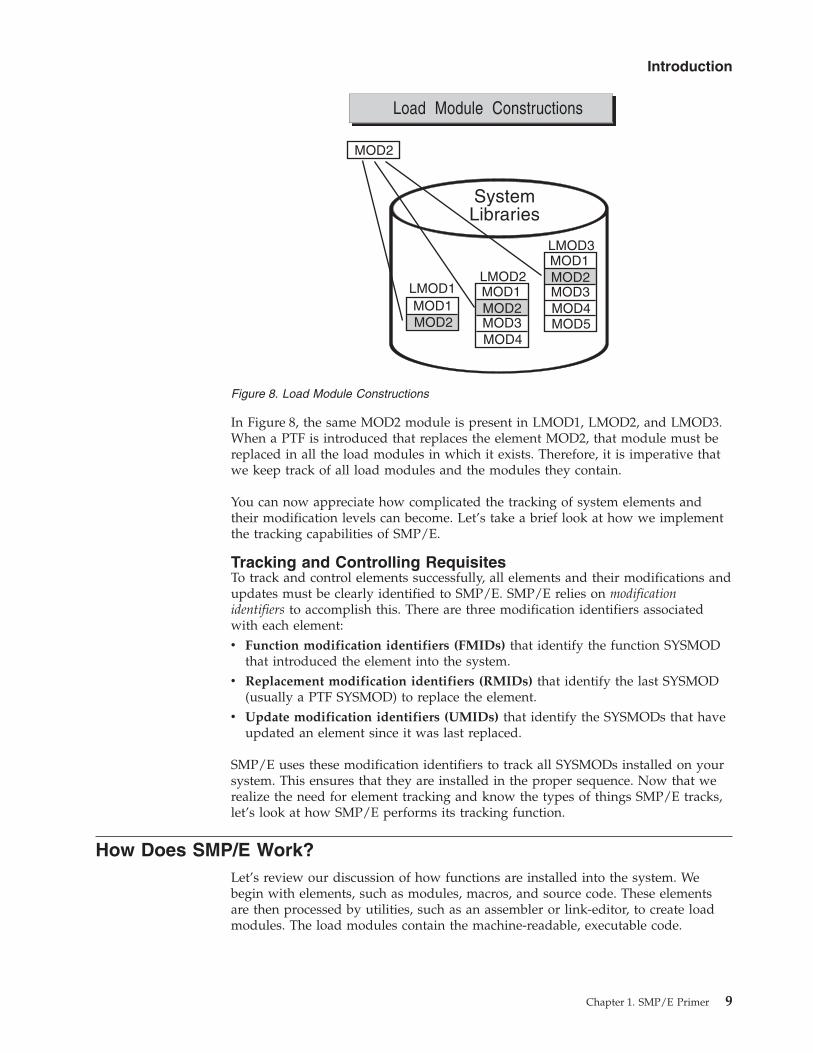
In Figure 8, the same MOD2 module is present in LMOD1, LMOD2, and LMOD3.When a PTF is introduced that replaces the element MOD2, that module must bereplaced in all the load modules in which it exists. Therefore, it is imperative thatwe keep track of all load modules and the modules they contain.
You can now appreciate how complicated the tracking of system elements andtheir modification levels can become. Let’s take a brief look at how we implementthe tracking capabilities of SMP/E.
Tracking and Controlling RequisitesTo track and control elements successfully, all elements and their modifications andupdates must be clearly identified to SMP/E. SMP/E relies on modificationidentifiers to accomplish this. There are three modification identifiers associatedwith each element:v Function modification identifiers (FMIDs) that identify the function SYSMOD
that introduced the element into the system.v Replacement modification identifiers (RMIDs) that identify the last SYSMOD
(usually a PTF SYSMOD) to replace the element.v Update modification identifiers (UMIDs) that identify the SYSMODs that have
updated an element since it was last replaced.
SMP/E uses these modification identifiers to track all SYSMODs installed on yoursystem. This ensures that they are installed in the proper sequence. Now that werealize the need for element tracking and know the types of things SMP/E tracks,let’s look at how SMP/E performs its tracking function.
How Does SMP/E Work?Let’s review our discussion of how functions are installed into the system. Webegin with elements, such as modules, macros, and source code. These elementsare then processed by utilities, such as an assembler or link-editor, to create loadmodules. The load modules contain the machine-readable, executable code.
Figure 8. Load Module Constructions
Introduction
Chapter 1. SMP/E Primer 9
Your production system in a z/OS environment consists of the z/OS operatingsystem and all the code needed to do your everyday work. That’s fine, but whereis all that stuff kept, and how is it organized? Let’s find out.
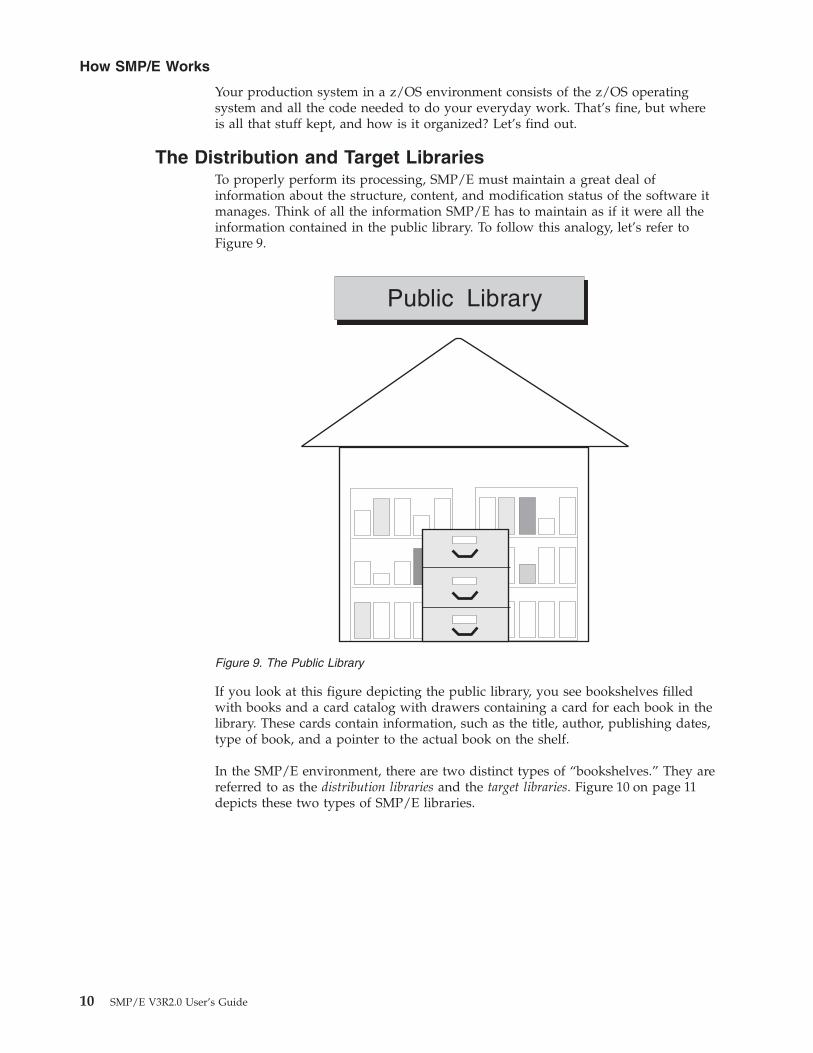
The Distribution and Target LibrariesTo properly perform its processing, SMP/E must maintain a great deal ofinformation about the structure, content, and modification status of the software itmanages. Think of all the information SMP/E has to maintain as if it were all theinformation contained in the public library. To follow this analogy, let’s refer toFigure 9.
If you look at this figure depicting the public library, you see bookshelves filledwith books and a card catalog with drawers containing a card for each book in thelibrary. These cards contain information, such as the title, author, publishing dates,type of book, and a pointer to the actual book on the shelf.
In the SMP/E environment, there are two distinct types of “bookshelves.” They arereferred to as the distribution libraries and the target libraries. Figure 10 on page 11depicts these two types of SMP/E libraries.
Figure 9. The Public Library
How SMP/E Works
10 SMP/E V3R2.0 User’s Guide
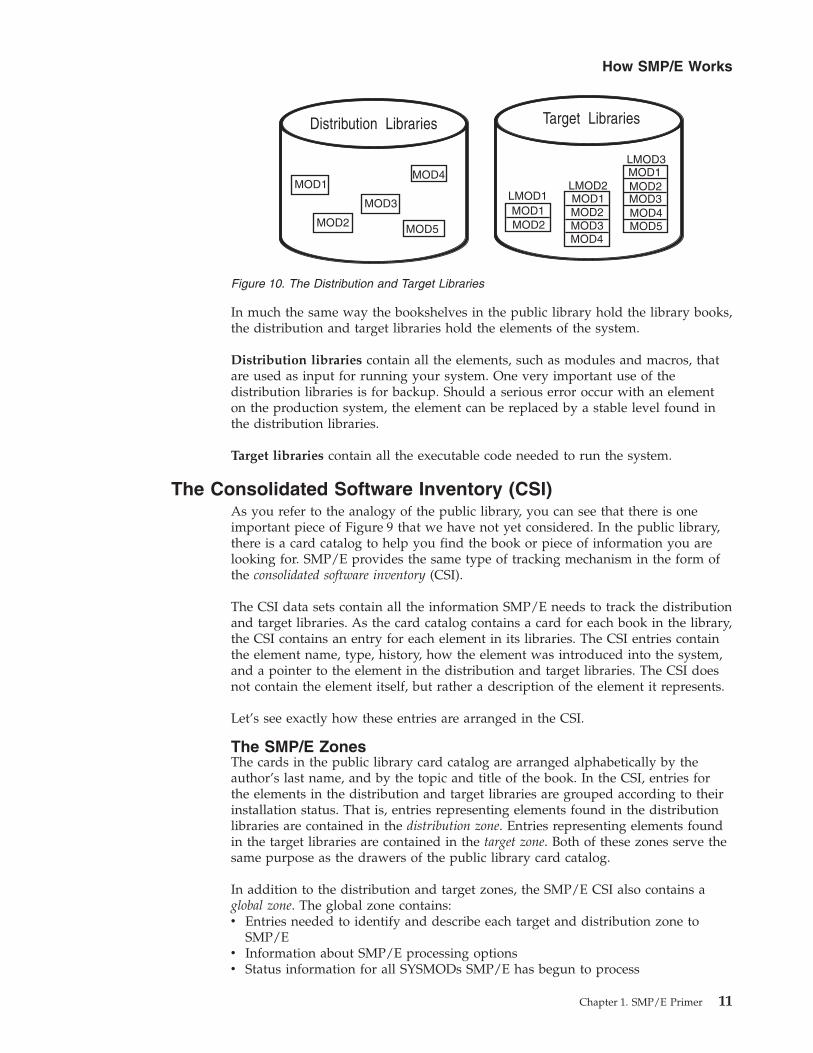
In much the same way the bookshelves in the public library hold the library books,the distribution and target libraries hold the elements of the system.
Distribution libraries contain all the elements, such as modules and macros, thatare used as input for running your system. One very important use of thedistribution libraries is for backup. Should a serious error occur with an elementon the production system, the element can be replaced by a stable level found inthe distribution libraries.
Target libraries contain all the executable code needed to run the system.
The Consolidated Software Inventory (CSI)As you refer to the analogy of the public library, you can see that there is oneimportant piece of Figure 9 that we have not yet considered. In the public library,there is a card catalog to help you find the book or piece of information you arelooking for. SMP/E provides the same type of tracking mechanism in the form ofthe consolidated software inventory (CSI).
The CSI data sets contain all the information SMP/E needs to track the distributionand target libraries. As the card catalog contains a card for each book in the library,the CSI contains an entry for each element in its libraries. The CSI entries containthe element name, type, history, how the element was introduced into the system,and a pointer to the element in the distribution and target libraries. The CSI doesnot contain the element itself, but rather a description of the element it represents.
Let’s see exactly how these entries are arranged in the CSI.
The SMP/E ZonesThe cards in the public library card catalog are arranged alphabetically by theauthor’s last name, and by the topic and title of the book. In the CSI, entries forthe elements in the distribution and target libraries are grouped according to theirinstallation status. That is, entries representing elements found in the distributionlibraries are contained in the distribution zone. Entries representing elements foundin the target libraries are contained in the target zone. Both of these zones serve thesame purpose as the drawers of the public library card catalog.
In addition to the distribution and target zones, the SMP/E CSI also contains aglobal zone. The global zone contains:v Entries needed to identify and describe each target and distribution zone to
SMP/Ev Information about SMP/E processing optionsv Status information for all SYSMODs SMP/E has begun to process
Figure 10. The Distribution and Target Libraries
How SMP/E Works
Chapter 1. SMP/E Primer 11
v Exception data for SYSMODs requiring special handling or that are in error
In SMP/E, when we speak of exception data, we are usually referring toHOLDDATA. HOLDDATA is often supplied for a product to indicate a specifiedSYSMOD should be held from installation. Reasons for holding a SYSMOD can be:v A PTF is in error and should not be installed until the error is corrected (ERROR
HOLD).v Certain system actions may be required before SYSMOD installation (SYSTEM
HOLD).v The user may want to perform some actions before installing the SYSMOD
(USER HOLD).
All the information found in the global zone, combined with the information foundin the distribution and target zones, represents the data SMP/E needs to installand track your system software.
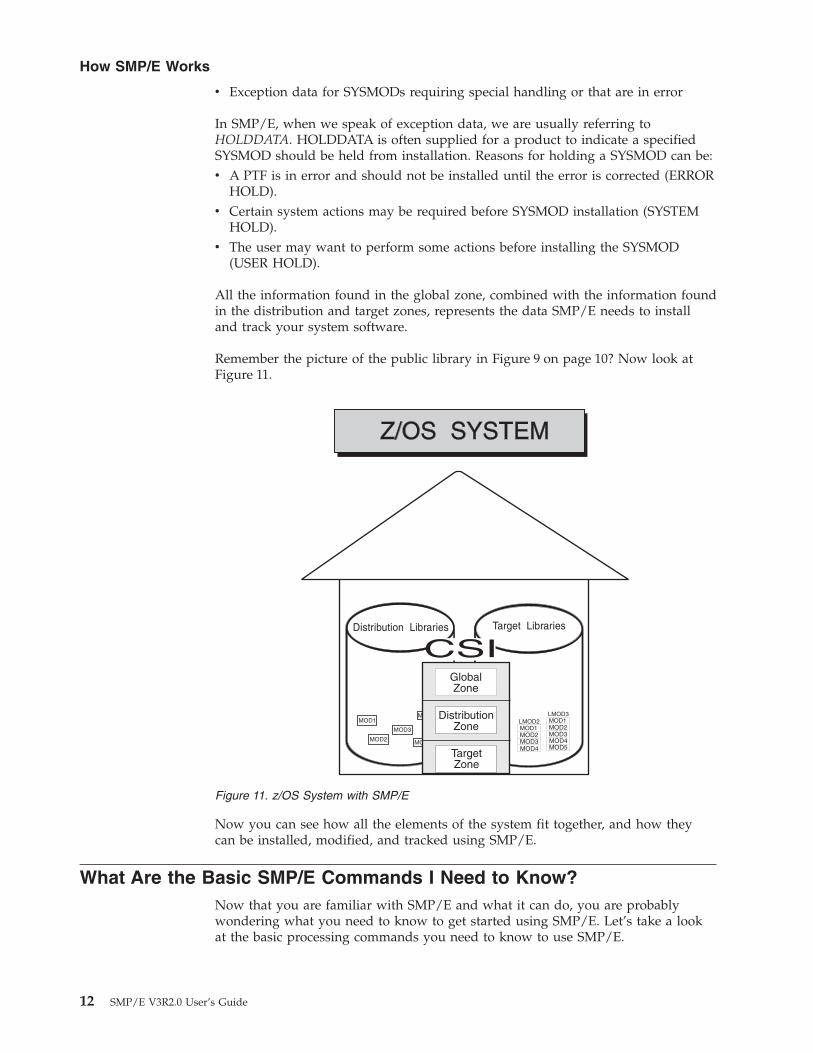
Remember the picture of the public library in Figure 9 on page 10? Now look atFigure 11.
Now you can see how all the elements of the system fit together, and how theycan be installed, modified, and tracked using SMP/E.
What Are the Basic SMP/E Commands I Need to Know?Now that you are familiar with SMP/E and what it can do, you are probablywondering what you need to know to get started using SMP/E. Let’s take a lookat the basic processing commands you need to know to use SMP/E.
Figure 11. z/OS System with SMP/E
How SMP/E Works
12 SMP/E V3R2.0 User’s Guide

Setting the Zone You Want to Work OnBefore processing SMP/E commands, you must first set the zone on which youwant SMP/E to work (global, target, or distribution). You do this by issuing theSET command. The SET command identifies the zone and, therefore, the libraries,upon which subsequent SMP/E commands are to act.
The SET command can also be used to request a particular set of predefinedprocessing options. For more information about the SET command, refer to SMP/ECommands.
Receiving the SYSMOD into SMP/E’s Data SetsFor SMP/E to install a SYSMOD, the SYSMOD must be “received” into data setsthat can be used by SMP/E. The SMP/E RECEIVE command performs the task ofcopying the SYSMOD from the distribution medium from which it was sent intothe data sets used by SMP/E.
For more information about the RECEIVE command, refer to “Receiving theSYSMOD into SMP/E’s Data Sets” on page 14.
Applying the SYSMOD to the Target LibrariesOnce a SYSMOD has been received, you want to “apply” the SYSMOD to theappropriate target libraries. The SMP/E APPLY command invokes various systemutilities to install the SYSMOD’s elements into the target libraries.
For more information about the APPLY command, refer to “Applying the SYSMODto the Target Libraries” on page 18.
Restoring the Target Libraries to the Previous LevelShould you experience problems after applying a SYSMOD, you may want to“restore” its elements in error to a previous and stable level. The SMP/E RESTOREcommand replaces a failing element with a copy from the distribution libraries.
For more information about the RESTORE command, refer to “Restoring the TargetLibraries to the Previous Level” on page 22.
Accepting the SYSMOD and Updating the DistributionLibraries
After you have performed a SYSMOD RECEIVE and APPLY, you want to “accept”the elements into the distribution libraries for backup. However, this should bedone only after you are satisfied with the performance and stability of theelements of the SYSMOD. Once you ACCEPT a SYSMOD, you cannot RESTOREits element to a previous level. The SMP/E ACCEPT command updates thedistribution libraries so they are available for backup of any future SYSMODs.
For more information about the ACCEPT command, refer to “Accepting theSYSMOD into the Distribution Libraries” on page 25.
Displaying SMP/E DataThe SMP/E CSI and other primary data sets contain a great deal of informationyou may find useful when installing new elements or functions, preparing usermodifications, or debugging problems. There are several ways SMP/E allows youto display that information, as well as information about modules, macros, andother elements:
Basic SMP/E Commands
Chapter 1. SMP/E Primer 13
v Query dialogs display specific information you request through interactivedialogs with SMP/E.
v The LIST command generates a hardcopy listing of information about yoursystem.
v REPORT commands check, compare, and generate hardcopy information aboutthe contents of zones on your system.
v The SMP/E CSI application programming interface can be used to writeapplication programs to query the contents of your system’s CSI data sets.
For more information about displaying SMP/E data, refer to “Displaying SMP/EData” on page 29.
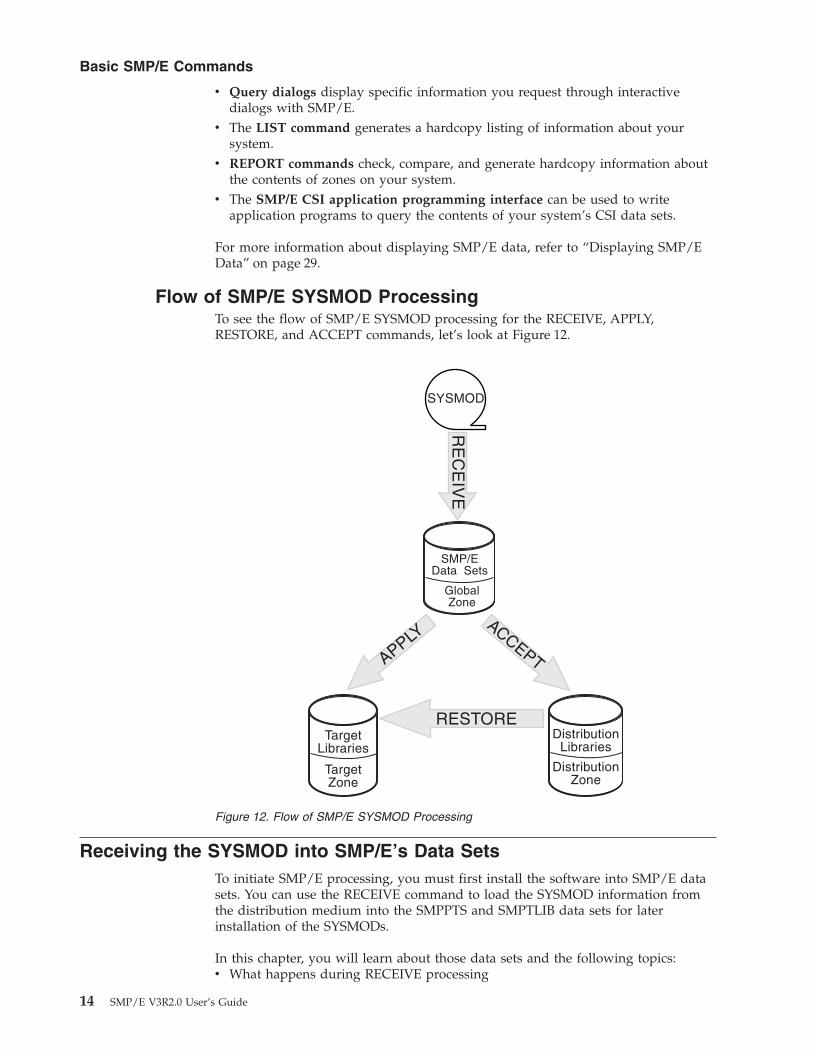
Flow of SMP/E SYSMOD ProcessingTo see the flow of SMP/E SYSMOD processing for the RECEIVE, APPLY,RESTORE, and ACCEPT commands, let’s look at Figure 12.
Receiving the SYSMOD into SMP/E’s Data SetsTo initiate SMP/E processing, you must first install the software into SMP/E datasets. You can use the RECEIVE command to load the SYSMOD information fromthe distribution medium into the SMPPTS and SMPTLIB data sets for laterinstallation of the SYSMODs.
In this chapter, you will learn about those data sets and the following topics:v What happens during RECEIVE processing
Figure 12. Flow of SMP/E SYSMOD Processing
Basic SMP/E Commands
14 SMP/E V3R2.0 User’s Guide
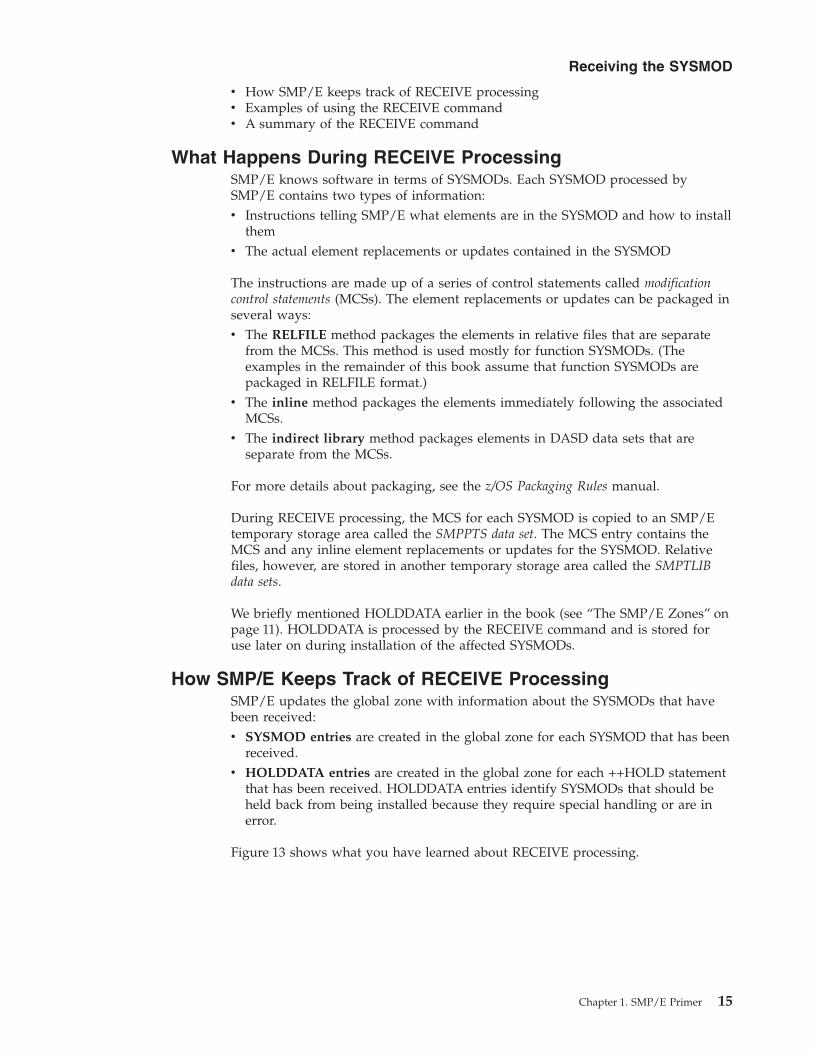
v How SMP/E keeps track of RECEIVE processingv Examples of using the RECEIVE commandv A summary of the RECEIVE command
What Happens During RECEIVE ProcessingSMP/E knows software in terms of SYSMODs. Each SYSMOD processed bySMP/E contains two types of information:v Instructions telling SMP/E what elements are in the SYSMOD and how to install
themv The actual element replacements or updates contained in the SYSMOD
The instructions are made up of a series of control statements called modificationcontrol statements (MCSs). The element replacements or updates can be packaged inseveral ways:v The RELFILE method packages the elements in relative files that are separate
from the MCSs. This method is used mostly for function SYSMODs. (Theexamples in the remainder of this book assume that function SYSMODs arepackaged in RELFILE format.)
v The inline method packages the elements immediately following the associatedMCSs.
v The indirect library method packages elements in DASD data sets that areseparate from the MCSs.
For more details about packaging, see the z/OS Packaging Rules manual.
During RECEIVE processing, the MCS for each SYSMOD is copied to an SMP/Etemporary storage area called the SMPPTS data set. The MCS entry contains theMCS and any inline element replacements or updates for the SYSMOD. Relativefiles, however, are stored in another temporary storage area called the SMPTLIBdata sets.
We briefly mentioned HOLDDATA earlier in the book (see “The SMP/E Zones” onpage 11). HOLDDATA is processed by the RECEIVE command and is stored foruse later on during installation of the affected SYSMODs.
How SMP/E Keeps Track of RECEIVE ProcessingSMP/E updates the global zone with information about the SYSMODs that havebeen received:v SYSMOD entries are created in the global zone for each SYSMOD that has been
received.v HOLDDATA entries are created in the global zone for each ++HOLD statement
that has been received. HOLDDATA entries identify SYSMODs that should beheld back from being installed because they require special handling or are inerror.
Figure 13 shows what you have learned about RECEIVE processing.
Receiving the SYSMOD
Chapter 1. SMP/E Primer 15

Using the RECEIVE CommandIn this section, you will see some basic examples of how you might use theRECEIVE command.
ExamplesLet’s look at a few of these examples.
Receiving SYSMODs and HOLDDATA: In the course of maintaining yoursystem, you need to install service and process the related HOLDDATA. AssumeIBM has supplied you with a service tape (such as a CBPDO tape or an ESO tape),and you want to install it on your system. The first step is to receive the SYSMODsand HOLDDATA that are contained on the tape. You can accomplish this byspecifying the following commands:
SET BDY(GLOBAL).RECEIVE.
When you issue these commands, SMP/E receives all the SYSMODs andHOLDDATA on the service tape into the global zone.
Receiving Only HOLDDATA: There may be times when you do not want toreceive the SYSMODs from a service tape, but you do want to receive theHOLDDATA. Because the HOLDDATA provides information about SYSMODsrequiring special handling or that are in error, it is important for you to receive theHOLDDATA into SMP/E’s storage repository as soon as possible. The followingcommands process only the HOLDDATA:
SET BDY(GLOBAL).RECEIVE HOLDDATA.
By issuing these commands, you direct SMP/E to receive only the HOLDDATAfrom the service tape into the global zone.
Figure 13. Results of RECEIVE Processing
Receiving the SYSMOD
16 SMP/E V3R2.0 User’s Guide
Receiving Only SYSMODs: Assume you have previously received only theHOLDDATA from a service tape and are now ready to install the SYSMODs. Toinstall these SYSMODs (using the APPLY and ACCEPT commands), you must firstreceive them. This can be done by specifying the following commands:
SET BDY(GLOBAL).RECEIVE SYSMODS.
When you issue these commands, you direct SMP/E to receive only the SYSMODsfrom the service tape into the global zone.
Receiving SYSMODs and HOLDDATA for a Specific Product: You may want toreceive SYSMODs and HOLDDATA for a particular product from the service tape.You can accomplish this task by specifying the following commands:
SET BDY(GLOBAL).RECEIVE FORFMID(HOP0001).
By issuing these commands, you direct SMP/E to receive SYSMODs andHOLDDATA for the product whose FMID is HOP0001 from the service tape intothe global zone.
For a more complete description of all the RECEIVE command operands and otherexamples, see The RECEIVE Command in SMP/E Commands.
Reporting OutputWhen RECEIVE processing is complete, these reports will help you analyze theresults:v The RECEIVE Summary report provides you with an at-a-glance look at all the
SYSMODs that were processed during the RECEIVE command run. It showsyou which SYSMODs were received, which were not received, and why.
Note: The SYSMODs listed in this report depend on the operands you specifyon the RECEIVE command.
v The RECEIVE Exception SYSMOD Data report provides you with a quicksummary of the HOLDDATA information processed during the RECEIVEcommand run. It lists the SYSMODs requiring special handling or that are inerror, and those SYSMODs no longer requiring special handling or that have hadan error fixed.
v The File Allocation report provides you with a list of the data sets used forRECEIVE processing and supplies information about these data sets.
For more information about these reports (and samples of actual reports), seeSMP/E Reports in SMP/E Commands.
SummaryLet’s summarize what you have learned about using the RECEIVE command toload a SYSMOD into SMP/E’s storage area. The RECEIVE command:v Copies the MCS for each SYSMOD to the SMPPTS data setv Loads elements into SMPTLIB data sets for SYSMODs using the relative file
packaging methodv Records what is received in the global zone
– SYSMOD entries– HOLDDATA entries
v Reports the results of processing
Receiving the SYSMOD
Chapter 1. SMP/E Primer 17

Applying the SYSMOD to the Target LibrariesAfter the SYSMODs have been received, you can use the APPLY command toinstall them into the appropriate target system libraries. The APPLY command callssystem utilities, which are responsible for the actual updating of those libraries.
In this chapter, you will learn about the following topics:v What happens during APPLY processingv How SMP/E keeps track of APPLY processingv Examples of using the APPLY commandv A summary of the APPLY command
What Happens During APPLY ProcessingThroughout the APPLY process, SMP/E helps you manage the complexities ofyour system when installing SYSMODs.
Selecting the SYSMODsYou can specify operands on the APPLY command that tell SMP/E which of thereceived SYSMODs are to be selected for installation in the target libraries. SMP/Echecks to make sure all other required SYSMODs (prerequisites) have beeninstalled or are being installed concurrently and in the proper sequence. For moreinformation about prerequisites, see “Keeping Track of the Elements of the System”on page 7.
Selecting the ElementsDuring APPLY processing, SMP/E uses the information provided in the selectedSYSMODs to determine which elements should be installed in the target libraries.The selection of elements is monitored by SMP/E to make sure that the correctfunctional level of each element is selected.
Checking the APPLY ProcessSMP/E provides you with an option to stop APPLY processing just before anyupdating takes place so you can ensure all prerequisites are satisfied before theinstallation of the SYSMODs. This helps you see what will happen (and helps youdetect problem SYSMODs) without actually updating the target libraries.
Updating the Target LibrariesAfter the proper SYSMODs have been selected and the proper functional andservice level of each element has been determined, the APPLY command directsSMP/E to call the system utilities. It is the system utilities that actually place theelements into the target libraries described in the target zone. The source of theelements is the SMPTLIB data sets, the SMPPTS data set, or the indirect libraries,depending on how the SYSMOD was packaged.
Note: Because the APPLY command updates the system libraries, you shouldnever use it on a live production system. When you process the APPLYcommand, you should always use a copy of the target libraries and targetzone. By using a copy, you minimize the risk of new code causing an outageof your system. This process of copying is called cloning and is explained indetail in the OS/390 Software Management Cookbook, SG24-4775.
How SMP/E Keeps Track of APPLY ProcessingSMP/E updates the information about the SYSMODs that have been applied.Remember, the target zone reflects the contents of the target libraries. Therefore,after the utility work is complete, and the target libraries have been updated, thetarget zone is updated to accurately reflect the status of those libraries.
Applying the SYSMOD
18 SMP/E V3R2.0 User’s Guide
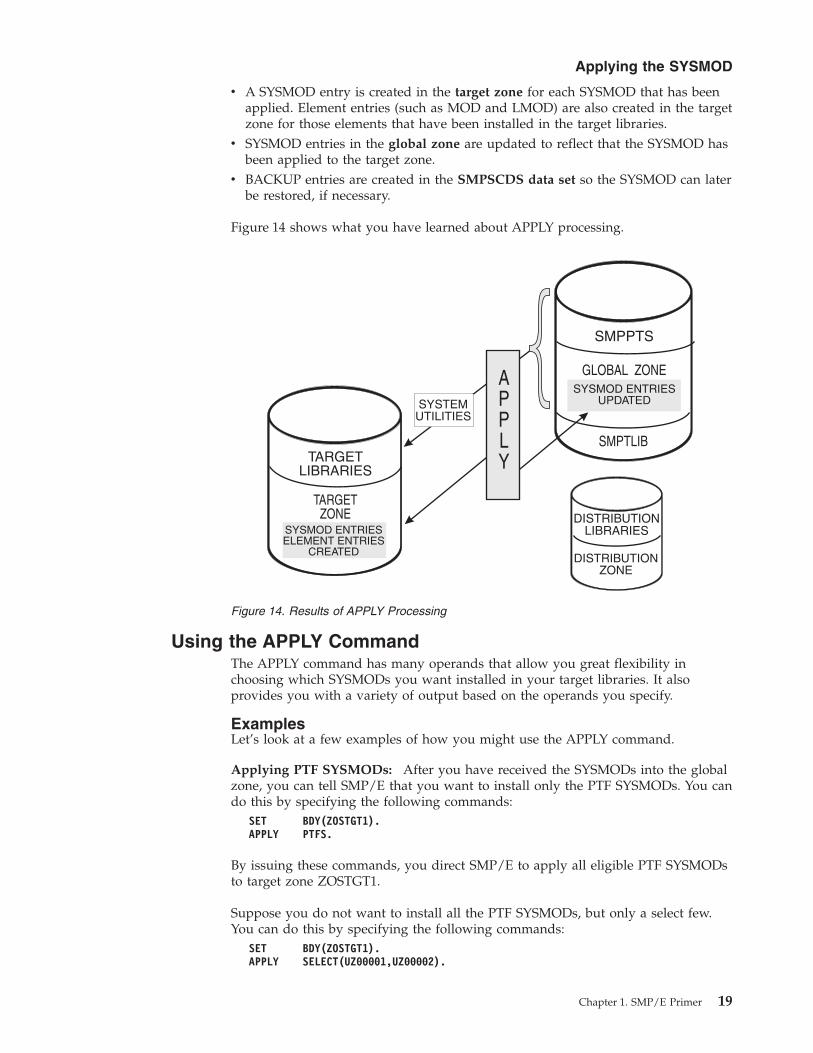
v A SYSMOD entry is created in the target zone for each SYSMOD that has beenapplied. Element entries (such as MOD and LMOD) are also created in the targetzone for those elements that have been installed in the target libraries.
v SYSMOD entries in the global zone are updated to reflect that the SYSMOD hasbeen applied to the target zone.
v BACKUP entries are created in the SMPSCDS data set so the SYSMOD can laterbe restored, if necessary.
Figure 14 shows what you have learned about APPLY processing.
Using the APPLY CommandThe APPLY command has many operands that allow you great flexibility inchoosing which SYSMODs you want installed in your target libraries. It alsoprovides you with a variety of output based on the operands you specify.
ExamplesLet’s look at a few examples of how you might use the APPLY command.
Applying PTF SYSMODs: After you have received the SYSMODs into the globalzone, you can tell SMP/E that you want to install only the PTF SYSMODs. You cando this by specifying the following commands:
SET BDY(ZOSTGT1).APPLY PTFS.
By issuing these commands, you direct SMP/E to apply all eligible PTF SYSMODsto target zone ZOSTGT1.
Suppose you do not want to install all the PTF SYSMODs, but only a select few.You can do this by specifying the following commands:
SET BDY(ZOSTGT1).APPLY SELECT(UZ00001,UZ00002).
Figure 14. Results of APPLY Processing
Applying the SYSMOD
Chapter 1. SMP/E Primer 19
Issuing these commands results in the selection of only PTFs UZ00001 andUZ00002 for installation in target zone ZOSTGT1.
Applying APAR and USERMOD SYSMODs: You may want to install justcorrective fixes (APARs) or user modifications (USERMODs) into the targetlibraries. You can accomplish this with the following commands:
SET BDY(ZOSTGT1).APPLY APARS
USERMODS.
When you issue these commands, SMP/E installs all eligible APARs andUSERMODs into target zone ZOSTGT1.
Applying SYSMODs for Selected Products: There may be times when you wantto update only certain products on your system with the SYSMODs contained on aservice tape. Assume you want to install all PTFs for a particular product to yoursystem. This can be accomplished by specifying the following commands:
SET BDY(ZOSTGT1).APPLY PTFS
FORFMID(HOP0001).
orSET BDY(ZOSTGT1).APPLY FORFMID(HOP0001).
In both cases, SMP/E applies all applicable PTFs for the product with FMIDHOP0001 to target zone ZOSTGT1. Unless you specify otherwise, PTFS is thedefault SYSMOD type.
Applying SYSMODs Having Prerequisites: When installing a SYSMOD, youmight not always know if it has prerequisites, or if the prerequisites are available.(Sometimes a prerequisite SYSMOD might not be received, or it might be heldbecause it is in error.) In cases such as this, you can direct SMP/E to checkwhether an equivalent (or superseding) SYSMOD is available, by specifying theGROUPEXTEND operand.
Assume you want to update a product with all the eligible PTFs and APARs. Youcan do this by specifying the following commands:
SET BDY(ZOSTGT1).APPLY PTFS
APARSFORFMID(HOP0001)GROUPEXTEND.
By issuing these commands, you direct SMP/E to apply all PTFs and APARs,along with any other required SYSMODs to the product whose FMID is HOP0001and is located in the ZOSTGT1 target zone. If SMP/E cannot find a requiredSYSMOD, it looks for and uses a SYSMOD that supersedes the required one.
Applying SYSMODs Using the CHECK Operand: In the previous example, youdirected SMP/E to automatically include all SYSMODs needed for the specifiedproduct. There may be times when you want to see which SYSMODs are includedbefore you actually install them. You can do this with the CHECK operand byissuing the following commands:
Applying the SYSMOD
20 SMP/E V3R2.0 User’s Guide
SET BDY(ZOSTGT1).APPLY PTFS
APARSFORFMID(HOP0001)GROUPEXTENDCHECK.
After these commands are processed, you can check the SYSMOD Status report tosee which SYSMODs would have been installed if you had not specified theCHECK operand. If you are satisfied with the results of this trial run, you canissue the commands again, without the CHECK operand, to actually install theSYSMODs.
For a more complete description of all the APPLY command operands, and foradditional examples, see APPLY Command in SMP/E Commands.
Reporting OutputWhen APPLY processing is complete, these reports will help you analyze theresults:v The SYSMOD Status report provides you with a summary of the processing
that took place for each eligible SYSMOD, based on the operands you specifiedon the APPLY command. It shows you which SYSMODs were applied, whichwere not applied, and why.
v The Element Summary report provides you with a detailed look at each elementaffected by APPLY processing. It tells you in which libraries the elements wereinstalled.
v The Causer SYSMOD Summary report provides you with a list of SYSMODsthat caused other SYSMODs to fail, and describes the errors that must be fixedto successfully process the SYSMODs. This report can reduce the amount ofwork involved in figuring out which errors caused SYSMODs to fail.
v The File Allocation report provides you with a list of the data sets used forAPPLY processing and supplies information about these data sets.
Additional reports may be produced depending on the work being done and thecontent of the SYSMODs. For more information about all the reports produced bythe APPLY command (and samples of actual reports), see The APPLY Command inSMP/E Commands.
SummaryLet’s summarize what you have learned about using the APPLY command toinstall a SYSMOD in the target libraries. The APPLY command:v Selects SYSMODs to installv Checks that all other required SYSMODs have been (or are being) installedv Based on SYSMODs, selects elements to installv Directs SMP/E to call the system utilities to update the target librariesv Records what is applied:
– Target zone: Creates SYSMOD entries and element entries– Global zone: Updates SYSMOD entries– SMPSCDS data set: Creates BACKUP entries
v Reports the results of processing
Remember, you should never perform APPLY processing on a live productionsystem!
Applying the SYSMOD
Chapter 1. SMP/E Primer 21
Restoring the Target Libraries to the Previous LevelIf you discover that a particular SYSMOD is causing a problem in your targetlibraries, you can remove it and replace the elements affected by it with theprevious level of those elements, which is obtained from the backup (ordistribution) libraries. If you are wondering how a backup version came to exist inthe distribution libraries, this topic is covered in “Accepting the SYSMOD into theDistribution Libraries” on page 25.
You can use the RESTORE command to remove SYSMODs from the target librariesand restore them to a previous level. The RESTORE command reverses APPLYprocessing, but has no effect on ACCEPT processing.
In this chapter, you will learn about the following topics:v What happens during RESTORE processingv How SMP/E keeps track of RESTORE processingv Examples of using the RESTORE commandv A summary of the RESTORE command
What Happens During RESTORE ProcessingSMP/E provides you with a method for removing an applied SYSMOD when itsinstallation results in unexpected problems.
Removing the SYSMODsSMP/E ensures the eligibility of the selected SYSMODs and checks whether otherSYSMODs are affected before continuing with RESTORE processing. Because of thevarious relationships and dependencies among the many SYSMODs, this checkingis very important to the integrity of your system. In fact, to ensure that therequisites for a SYSMOD being restored are processed appropriately, SMP/E mayrequire the whole chain of prerequisites to be restored.
Selecting the ElementsDuring RESTORE processing, SMP/E uses the information provided in the selectedSYSMODs to determine which elements in the target zone should be replaced byelements in the related distribution libraries. The selection of elements is monitoredby SMP/E to make sure that the correct functional level of each element isselected.
Checking the RESTORE ProcessSMP/E provides you with an option to stop RESTORE processing just before anyupdating takes place so you can ensure all prerequisites are satisfied beforerestoring any SYSMODs. This helps you see what will happen without actuallymaking any changes to the elements in the target libraries.
Replacing the Elements in the Target LibrariesWhen SMP/E is satisfied that the proper SYSMODs have been selected, it usesinformation from the target zone to determine which distribution zone describesthe elements necessary to replace the SYSMOD’s elements in the target libraries.The RESTORE command directs SMP/E to call system utilities that replace theelements in the target libraries with the previous level of the elements from therelated distribution libraries.
How SMP/E Keeps Track of RESTORE ProcessingSMP/E updates the information about the SYSMODs that have been restored.Remember, the target zone reflects the contents of the target libraries. Therefore,
Restoring Target Libraries
22 SMP/E V3R2.0 User’s Guide
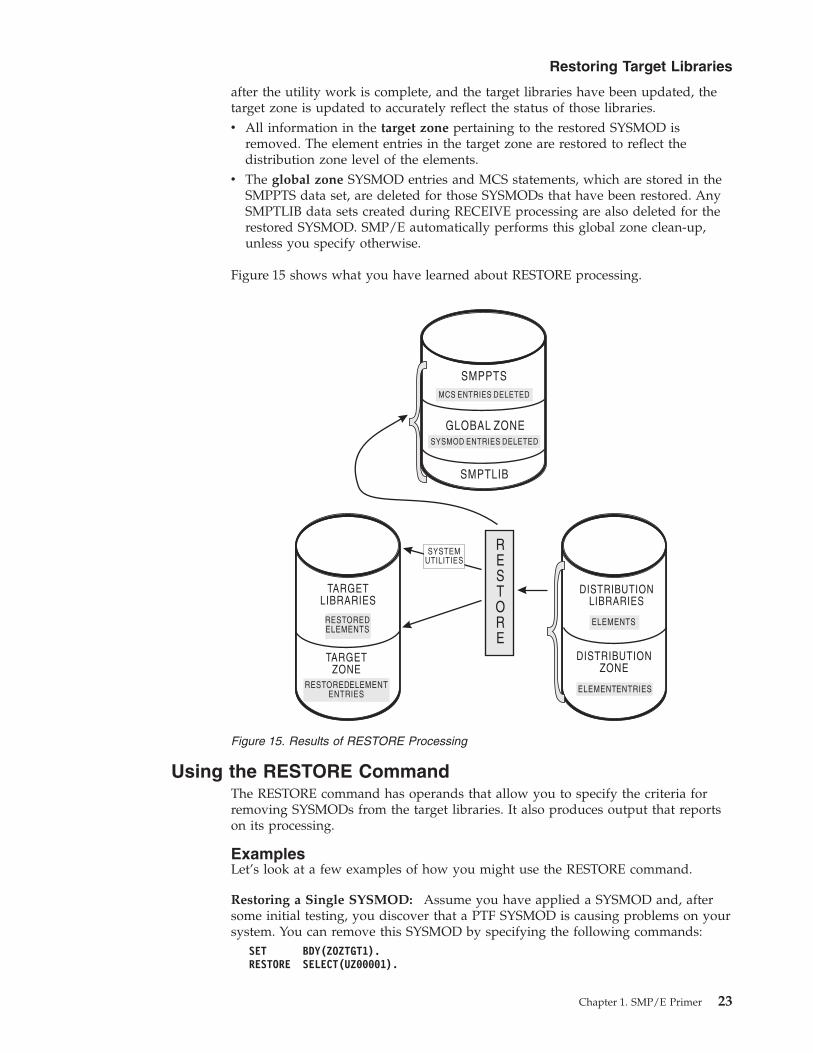
after the utility work is complete, and the target libraries have been updated, thetarget zone is updated to accurately reflect the status of those libraries.v All information in the target zone pertaining to the restored SYSMOD is
removed. The element entries in the target zone are restored to reflect thedistribution zone level of the elements.
v The global zone SYSMOD entries and MCS statements, which are stored in theSMPPTS data set, are deleted for those SYSMODs that have been restored. AnySMPTLIB data sets created during RECEIVE processing are also deleted for therestored SYSMOD. SMP/E automatically performs this global zone clean-up,unless you specify otherwise.
Figure 15 shows what you have learned about RESTORE processing.
Using the RESTORE CommandThe RESTORE command has operands that allow you to specify the criteria forremoving SYSMODs from the target libraries. It also produces output that reportson its processing.
ExamplesLet’s look at a few examples of how you might use the RESTORE command.
Restoring a Single SYSMOD: Assume you have applied a SYSMOD and, aftersome initial testing, you discover that a PTF SYSMOD is causing problems on yoursystem. You can remove this SYSMOD by specifying the following commands:
SET BDY(ZOZTGT1).RESTORE SELECT(UZ00001).
Figure 15. Results of RESTORE Processing
Restoring Target Libraries
Chapter 1. SMP/E Primer 23
By issuing these commands, you instruct SMP/E to remove PTF UZ00001 fromtarget zone ZOZTGT1 and replace its elements in the target libraries with theprevious level of elements from the distribution libraries.
Restoring SYSMODs Using the GROUP Operand: When you want to remove aparticular SYSMOD, it is not always easy to determine other SYSMODs that needto be restored in order to remove the bad one. Assume a particular PTF SYSMODis causing a problem, and you want to know if it is dependent on any otherSYSMODs so you can also restore those SYSMODs. This can be accomplished byspecifying the following commands:
SET BDY(ZOZTGT1).RESTORE SELECT(UZ00003)
GROUP.
By issuing these commands, you instruct SMP/E to restore PTF UZ00003 and anyother related PTFs from target zone ZOZTGT1, and replace their elements with theprevious level from the distribution zone.
Restoring SYSMODs Using the CHECK Operand: In the previous example, youdirected SMP/E to restore any dependent SYSMODs in order to remove the badone. There may be times when you want to see which SYSMODs are restoredwithout actually restoring them. You can do this with the CHECK operand byissuing the following commands:
SET BDY(ZOZTGT1).RESTORE SELECT(UZ00003)
GROUPCHECK.
After these commands are processed, you can check the SYSMOD Status report tosee which SYSMODs would have been restored if you had not specified theCHECK operand. If you are satisfied with the results of this trial run, you canissue the commands again, without the CHECK operand, to actually restore theSYSMODs.
For a more complete description of all the RESTORE command operands, and foradditional examples, see The RESTORE Command in SMP/E Commands.
Reporting OutputWhen RESTORE processing is complete, these reports will help you analyze theresults:v The SYSMOD Status report provides you with a summary of the processing
that took place for each eligible SYSMOD, based on the operands you specifiedon the RESTORE command. It shows you which SYSMODs were restored, whichwere not restored, and why.
v The Element Summary report provides you with a detailed look at each elementreplaced or modified by RESTORE processing. It tells you in which libraries theelements were restored.
v The Causer SYSMOD Summary report provides you with a list of SYSMODsthat caused other SYSMODs to fail, and describes the errors that must be fixedto successfully process the SYSMODs. This report can reduce the amount ofwork involved in figuring out which errors caused SYSMODs to fail.
v The File Allocation report provides you with a list of the data sets used forRESTORE processing and supplies information about these data sets.
Restoring Target Libraries
24 SMP/E V3R2.0 User’s Guide

Additional reports may be produced depending on the work being done and thecontent of the SYSMODs. For more information about all the reports produced bythe RESTORE command (and samples of actual reports), see The RESTORECommand in SMP/E Commands.
SummaryLet’s summarize what you have learned about using the RESTORE command toremove a SYSMOD from the target libraries. The RESTORE command:v Removes the SYSMOD from the indicated target zonev Calls system utilities to replace the SYSMOD’s elements in the target libraries
with elements from the related distribution librariesv Records what is restored:
– Target zone: Restores element entries to reflect their distribution zone leveland deletes all information about restored SYSMOD.
– Global zone: Deletes SYSMOD entries and MCS statements in SMPPTS forrestored SYSMOD. Any SMPTLIB data sets created during RECEIVEprocessing are also deleted for the restored SYSMOD. (This global zoneprocessing is optional.)
– SMPSCDS data set: Deletes BACKUP entries for restored SYSMOD.v Reports the results of processing
Note: Not all SYSMODs can be restored. For example, SMP/E cannot restore aSYSMOD that deletes another SYSMOD or that deletes a load moduleduring APPLY processing.
Accepting the SYSMOD into the Distribution LibrariesYou can use the ACCEPT command to install software in backup (or distribution)libraries. ACCEPT processing is very similar to APPLY processing with oneimportant exception: ACCEPT processing is irreversible.
In this chapter, you will learn about the following topics:v What happens during ACCEPT processingv How SMP/E keeps track of ACCEPT processingv Examples of using the ACCEPT commandv A summary of the ACCEPT command
What Happens During ACCEPT ProcessingAfter you are satisfied that an applied SYSMOD has performed reliably in yourtarget system, you can install it in your backup system (distribution) libraries.
Selecting the SYSMODsYou can specify operands on the ACCEPT command that tell SMP/E which of thereceived SYSMODs are to be selected for installation in the distribution libraries.SMP/E ensures that all other required SYSMODs have been installed or are beinginstalled concurrently and in the proper sequence.
Selecting the ElementsDuring ACCEPT processing, SMP/E uses the information provided in the selectedSYSMODs to determine which elements should be installed in the distributionlibraries. The selection of elements is monitored by SMP/E to make sure that thecorrect functional level of each element is selected.
Restoring Target Libraries
Chapter 1. SMP/E Primer 25
Checking the ACCEPT ProcessSMP/E provides you with an option to stop ACCEPT processing before anyupdating takes place so you can ensure all prerequisites are satisfied before theinstallation of the SYSMODs. This helps you see what will happen (and helps youdetect problem SYSMODs) without actually updating the distribution libraries.
Updating the Distribution LibrariesAfter the proper SYSMODs have been selected and the proper functional andservice level of each element has been checked, SMP/E calls the system utilities (inthe same manner as APPLY and RESTORE) to place the elements into thedistribution libraries described in the distribution zone. The source of the elementsis the SMPTLIB data sets, the SMPPTS data set, or the indirect libraries, dependingon how the SYSMOD was packaged.
Note: When ACCEPT processing has been completed, there is no way it can beundone.
How SMP/E Keeps Track of ACCEPT ProcessingSMP/E updates the information about the SYSMODs that have been accepted.Remember, the distribution zone reflects the contents of the distribution libraries.Therefore, after the utility work is complete, and the distribution libraries havebeen updated, the distribution zone is updated to accurately reflect the status ofthose libraries.v A SYSMOD entry is created in the distribution zone for each SYSMOD that has
been accepted. Element entries (such as MOD and LMOD) are also created inthe distribution zone for the elements that have been installed in the distributionlibraries.
v Global zone SYSMOD entries and MCS statements in the SMPPTS data set aredeleted for those SYSMODs that have been accepted into the distribution zone.Any SMPTLIB data sets created during RECEIVE processing are also deleted. Ifyou do not want SMP/E to do this global zone clean-up, you have the option toindicate this to SMP/E, and the information is saved.
Figure 16 on page 27 shows what you have learned about ACCEPT processing.
Accepting the SYSMOD
26 SMP/E V3R2.0 User’s Guide
Using the ACCEPT CommandThe ACCEPT command has many operands that allow you great flexibility forfurther defining which SYSMODs you want installed in your distribution libraries.It also provides you with a variety of output based on the operands you specify.
ExamplesLet’s look at a few examples of how you might use the ACCEPT command.
Accepting PTF SYSMODs: After you have applied the SYSMODs into the targetzone, you can define to SMP/E that you want to install only the PTF SYSMODsinto the distribution zone. You can do this by specifying the following commands:
SET BDY(ZOSDLB1).ACCEPT PTFS.
By issuing these commands, you direct SMP/E to accept all eligible PTF SYSMODsinto distribution zone ZOSDLB1.
Suppose you do not want to install all the PTF SYSMODs, but only a select few.You can do this by specifying the following commands:
SET BDY(ZOSDLB1).ACCEPT SELECT(UZ00001,UZ00002).
When you issue these commands, only PTFs UZ00001 and UZ00002 are installed indistribution zone ZOSDLB1.
Accepting SYSMODs for Selected Products: There may be times when you wantto update only certain products on your system with the SYSMODs contained on aservice tape. Assume you want to install all PTFs for a particular product. This canbe accomplished by specifying the following commands:
Figure 16. Results of ACCEPT Processing
Accepting the SYSMOD
Chapter 1. SMP/E Primer 27
SET BDY(ZOSDLB1).ACCEPT PTFS
FORFMID(HOP0001).
orSET BDY(ZOSDLB1).ACCEPT FORFMID(HOP0001).
In both cases, SMP/E accepts all applicable PTFs for the product whose FMID isHOP0001 and that is located in distribution zone ZOSDLB1. Unless you specifyotherwise, PTFS is the default SYSMOD type.
Accepting SYSMODs Having Prerequisites: When installing a SYSMOD, youmight not always know if it has prerequisites, or if the prerequisites are available.(Sometimes a prerequisite SYSMOD might not be received, or it might be heldbecause it is in error.) In cases such as this, you can direct SMP/E to checkwhether an equivalent (or superseding) SYSMOD is available, by specifying theGROUPEXTEND operand.
Assume you want to process all PTFs for a product on your system, and you wantto ensure that all other required SYSMODs are also processed. You can do this byspecifying the following commands:
SET BDY(ZOSDLB1).ACCEPT PTFS
FORFMID(HOP0001)GROUPEXTEND.
By issuing these commands, you direct SMP/E to accept all PTFs, along with anyother required SYSMODs, to the product whose FMID is HOP0001 and is locatedin the ZOSDLB1 target zone. If SMP/E cannot find a required SYSMOD, it looksfor and uses a SYSMOD that supersedes the required one.
Accepting SYSMODs Using the CHECK Operand: In the previous example,SMP/E was directed to automatically include all SYSMODs needed for thespecified product. There may be times when you want to see which SYSMODs areincluded before you actually install them. You can do this with the CHECKoperand by issuing the following commands:
SET BDY(ZOSTGT1).ACCEPT PTFS
FORFMID(HOP0001)GROUPEXTENDCHECK.
After these commands are processed, you can check the SYSMOD Status report tosee which SYSMODs would have been installed if you had not specified theCHECK operand. If you are satisfied with the results of this trial run, you canissue the commands again, without the CHECK operand, to actually install theSYSMODs.
For a more complete description of all the ACCEPT command operands and otherexamples, see The ACCEPT Command in SMP/E Commands.
Reporting OutputWhen ACCEPT processing is complete, these reports will help you analyze theresults:
Accepting the SYSMOD
28 SMP/E V3R2.0 User’s Guide
v The SYSMOD Status report provides you with a summary of the processingthat took place for each eligible SYSMOD, based on the operands you specifiedon the ACCEPT command. It shows you which SYSMODs were accepted, whichwere not accepted, and why.
v The Element Summary report provides you with a detailed look at each elementaffected by ACCEPT processing. It tells you in which libraries the elements wereinstalled.
v The Causer SYSMOD Summary report provides you with a list of SYSMODsthat caused other SYSMODs to fail, and describes the errors that must be fixedto successfully process the SYSMODs. This report can reduce the amount ofwork involved in figuring out which errors caused SYSMODs to fail.
v The File Allocation report provides you with a list of the data sets used forACCEPT processing and supplies information about these data sets.
Additional reports may be produced depending on the work being done and thecontent of the SYSMODs. For more information about all the reports produced bythe ACCEPT command (and samples of actual reports), see The ACCEPTCommand in SMP/E Commands.
SummaryLet’s summarize what we have learned about using the ACCEPT command toinstall a SYSMOD in the distribution (or backup) libraries. The ACCEPT command:v Selects SYSMODs to installv Checks that all other required SYSMODs have been (or are being) installedv Based on SYSMODs, selects elements to installv Directs SMP/E to call the system utilities to update the distribution librariesv Records what is accepted:
– Distribution zone: Creates SYSMOD entries and element entries.– Global zone: Deletes SYSMOD entries and MCS statements in SMPPTS. Any
SMPTLIB data sets created during RECEIVE processing are also deleted. (Thisglobal zone processing is optional.)
v Reports the results of processing
Remember, once you have accepted a SYSMOD, it cannot be restored!
Displaying SMP/E DataYou can use SMP/E to provide helpful information for planning new installations,debugging problems, and other instances when you want to know the functionand service level of your product software. There are several ways you can displaydata in the SMP/E database.
In this chapter, you will learn about the kinds of information that help you manageyour system and the best method by which the information can be obtained.v Query dialogs: The easiest and fastest way to obtain just the information you
wantv LIST command: When you need an all-inclusive hardcopy listing of information
about your systemv REPORT commands: To check and compare the zone contents and generate
command output that can be used to update your systemv SMP/E CSI application programming interface: To write an application
program to query the contents of your system’s CSI data sets.
Accepting the SYSMOD
Chapter 1. SMP/E Primer 29

Using the Query DialogsThe SMP/E dialogs provide you with an online method of system management,software inventory, data base inquiries, and guidance. For example, with the Querydialogs, you can look up information in the CSI data set. The Query dialogs areone of the easiest and most direct methods you can use to obtain the content andstatus of any SYSMOD that has been processed by SMP/E. You can use the Querydialogs to display an entry in either a specific zone (CSI query) or in all zones(cross-zone query).
You can use the SMP/E dialogs to view a SYSMOD, even if it has been compacted.Use the Query dialog (zone is GLOBAL, entry type MCS, entry name is theSYSMOD name) and you will be shown the complete SYSMOD in an edit session.You may save the SYSMOD in a different location from this session. If you areusing SMPPTS spill data sets, there is another benefit of viewing the SYSMODfrom the Query dialog, in that you do not have to know in which SMPPTS data setthe SYSMOD is stored; SMP/E will find it for you.
To get to the Query dialogs, you select SMP/E (option 1) on the initial SMP/Edialog panel (CIDPGV2). Then, on the main menu for SMP/E options(GIM@PRIM), select Query (option 3). This takes you to the initial Query panel,shown in Figure 17. If you need assistance with using the Query dialogs, (or any ofthe SMP/E dialogs), help panels are available.
Let’s assume you want to find out which SYSMODs have been applied to aparticular target zone on your system. You can accomplish this task using theQUERY SELECTION MENU and selecting the CSI QUERY option (1), as shown inFigure 17.
When the CSI QUERY panel is displayed (see Figure 18 on page 31), you canindicate that you want SMP/E to check target zone ZOSTGT1 for all SYSMODentries.
GIMQUPO QUERY SELECTION MENU===> 1
1 CSI QUERY - Display SMPCSI entries2 CROSS-ZONE QUERY - Display status of an entry in
all zones3 SOURCEID QUERY - Display SOURCEIDs for specified zone
D DESCRIBE - Overview of using QUERY
T TUTORIAL - Information on using QUERY
To return to the SMP/E primary option menu, enter END .
5694-A01 5655-G44(C) COPYRIGHT IBM CORP 1982, 2003
Figure 17. Query Selection Menu
Displaying SMP/E Data
30 SMP/E V3R2.0 User’s Guide

Because the ENTRY NAME was left blank on the CSI QUERY panel, SMP/Edisplays another panel (see Figure 19) that lists all the SYSMOD entries in targetzone ZOSTGT1.
The CSI QUERY - SELECT ENTRY panel shows that SYSMODs AZ00005, UZ00001,and UZ00002 have been applied to target zone ZOSTGT1. If you want moreinformation about the contents of SYSMOD UZ00001, you can select that entry byentering an S next to it, and another panel is displayed (see Figure 20).
GIMQU1PO CSI QUERY===>
Specify the zone, entry type, and name to be queried:
ZONE NAME ===> ZOSTGT1 Name of the zone to be queried.To display a list of all zones,leave blank
ENTRY TYPE ===> SYSMOD Entry type to be queried.To display a list of all validentry types, leave ENTRY TYPEand ENTRY NAME blank
ENTRY NAME ===> Entry name to be queried.To display a list of all entriesfor the selected zone and entrytype, leave blank
To return to the Query selection menu, enter END .
Figure 18. CSI Query Panel
GIMQUSEA CSI QUERY - SELECT ENTRY===> SCROLL ===> PAGE
Select one entry to query from target zone ZOSTGT1 :
S NAME ACTIONAZ00005
s UZ00001UZ00002
Figure 19. CSI Query - Select Entry Panel
GIMQIT26 CSI QUERY - SYSMOD ENTRY===> SCROLL ===> PAGE
To return to the previous panel, enter END .
Entry Type: SYSMOD Zone Name: ZOSTGT1Entry Name: UZ00001 Zone Type: TARGET
Type: PTF Status: APPLIEDFMID: HOP0001Date/Time: 02.341 13.57:31 APPLIED
-------- -------- -------- -------- -------- -------- --------MODS MOD01 MOD02
Figure 20. CSI Query - SYSMOD Entry Panel
Displaying SMP/E Data
Chapter 1. SMP/E Primer 31
The CSI QUERY - SYSMOD ENTRY panel displays all the relevant informationpertaining to SYSMOD UZ00001.
As you can see, the QUERY dialog panels provide a quick and easy way for you toobtain information about your system.
Using the LIST CommandIn the course of managing your system, there may be times when you need ahardcopy listing of some type of information. You can use the LIST command toaccomplish this task. For example, it might be necessary for you to have a recordof the following:v All entries of a specific typev Selected entries of a specific typev All entries that meet certain criteria
The LIST command can provide you with a listing of this information.
ExamplesLet’s look at a few basic examples of how you might use the LIST command.
Listing Entries in a Particular Zone: In the course of managing your system, youmight need to know which SYSMOD entries exist in the global zone. You can findthis out by specifying the following commands:
SET BDY(GLOBAL).LIST SYSMODS.
By issuing these commands, you direct SMP/E to list all the SYSMOD entries inthe global zone.
Listing Specific Entries: Suppose you discover a problem on your system andneed to determine whether a particular SYSMOD has been installed in the targetzone. You can accomplish this by specifying the following commands:
SET BDY(ZOSTGT1).LIST SYSMOD(UZ00001).
By issuing these commands, you direct SMP/E to provide you with informationabout SYSMOD UZ00001 in target zone ZOSTGT1.
Listing SYSMODs That Are Received but Not Installed: You might havereceived service into the global zone and are in the process of installing the serviceon your system. You want to see which of the SYSMODs you have received havenot yet been installed in a target zone. This can be accomplished by specifying thefollowing commands:
SET BDY(GLOBAL).LIST SYSMODS
NOAPPLY(ZOSTGT1).
By issuing these commands, you direct SMP/E to list the SYSMODs that have beenreceived, but have not yet been applied to target zone ZOSTGT1.
Reporting OutputWhen LIST processing is complete, these reports will provide you with theinformation that was requested:v The LIST Summary report provides you with information about the type of
entry, name of entry, and status of entry for zones and data sets you havespecified.
Displaying SMP/E Data
32 SMP/E V3R2.0 User’s Guide
v The File Allocation report provides you with a list of the data sets used forLIST processing, and supplies information about these data sets.
For a more complete description of the LIST command, additional examples, andsamples of actual reports, see The LIST Command in SMP/E Commands.
Using the REPORT CommandsYou can use the REPORT commands to check and compare the SYSMODs installedin the different zones that exist on your system. In addition to this checking, youcan tell SMP/E to generate the necessary commands to synchronize the specifiedzones. You can later modify these commands, if necessary, and use them to installthe indicated SYSMODs.
One of the REPORT commands (REPORT SYSMODS) is very useful if you want tocompare the SYSMODs installed in two zones. This command allows you tocompare the following:v One distribution zone to another distribution zonev One target zone to another target zonev A distribution zone to a target zonev A target zone to a distribution zone
ExampleLet’s look at a basic example of how you might use the REPORT SYSMODScommand. Assume you have two systems using the same global zone, and youwant to check which SYSMODs are installed in a target zone on one system, butare not installed in a target zone on the other system. You can accomplish this byspecifying the following commands:
SET BDY(GLOBAL).REPORT SYSMODS
INZONE(ZOSTGT1)COMPARED(ZOSTGT2).
By issuing these commands, you direct SMP/E to compare the SYSMOD content ofzone ZOSTGT1 to that of zone ZOSTGT2. Any SYSMODs that are in zoneZOSTGT1 and are not in zone ZOSTGT2 appear in the resulting report.
SMP/E also provides output you can use to install those SYSMODs you deemappropriate.
Reporting OutputWhen REPORT SYSMODs processing is complete, these reports will provide youwith the information that was requested:v The SYSMOD Comparison report provides you with a summary of the
SYSMODs found in the input zone, but not found in the comparison zone. It canhelp you determine which SYSMODs might need to be installed in thecomparison zone so its content reflects that of the input zone.
v The File Allocation report provides you with a list of the data sets used forREPORT processing, and supplies information about these data sets.
For a more complete description of the REPORT commands, additional examples,and samples of actual reports, see SMP/E Reports in SMP/E Commands.
Displaying SMP/E Data
Chapter 1. SMP/E Primer 33
SMP/E CSI Application Programming InterfaceThe SMP/E CSI application program interface (GIMAPI) allows you to writeapplication programs that have read-only access to data stored in SMP/E’s CSI(Consolidated Software Inventory) data sets. GIMAPI is described in detail inSMP/E Reference.
SummaryLet’s summarize what you have learned about using the Query dialogs, the LISTcommand, the REPORT command, and the CSI API to check SMP/E’s records foryour system:v Query dialogs: Easy and fast way to obtain informationv LIST command: Best for hardcopy listingv REPORT commands: Best for checking and comparing zone contentsv SMP/E CSI application programming interface: Best for writing an application
program to query the contents of your system’s CSI data sets.
Displaying SMP/E Data
34 SMP/E V3R2.0 User’s Guide
Chapter 2. SMP/E Concepts
This chapter summarizes some basic concepts that you will need to understandbefore you can use SMP/E. It briefly describes:v What SMP/E isv What system modifications arev The data sets used by SMP/Ev How SMP/E can help you install and maintain products, and monitor changes
to products
What Is SMP/E?SMP/E is the basic tool for installing and maintaining software in OS/390 or z/OSsystems and subsystems. It controls these changes at the element level by:v Selecting the proper levels of elements to be installed from a large number of
potential changesv Calling system utility programs to install the changesv Keeping records of the installed changes
SMP/E is an integral part of the installation, service, and maintenance processesfor CBPDOs, ProductPacs, RefreshPacs, and selective follow-on service forCustomPacs. In addition, SMP/E can be used to install and service any softwarethat is packaged in SMP/E system modification (SYSMOD) format.
SMP/E can be run either using batch jobs or using dialogs under InteractiveSystem Productivity Facility/Program Development Facility (ISPF/PDF). SMP/Edialogs help you interactively query the SMP/E database, as well as create andsubmit jobs to process SMP/E commands.
These are some of the types of software that can be installed by SMP/E:v Products and service provided in CBPDOs and CustomPac offeringsv Products and service from IBM Software Distribution Centers not provided in
CBPDOs or CustomPac offeringsv Service provided in Expanded Service Options (ESOs)v Other products and service
SMP/E can install software from any of these sources, provided it is packaged as asystem modification, or SYSMOD.
What Are SYSMODs?Software, whether it is a product or service, consists of elements such as macros,modules, source, and other types of data (such as CLISTs or sample procedures).For software to be installed by SMP/E, it must include control information for theelements. This information describes the elements and any relationships thesoftware has with other products or service that may also be installed on the samesystem. The combination of elements and control information is called a systemmodification, or SYSMOD.
There are four types of SYSMODs:
© Copyright IBM Corp. 1986, 2003 35
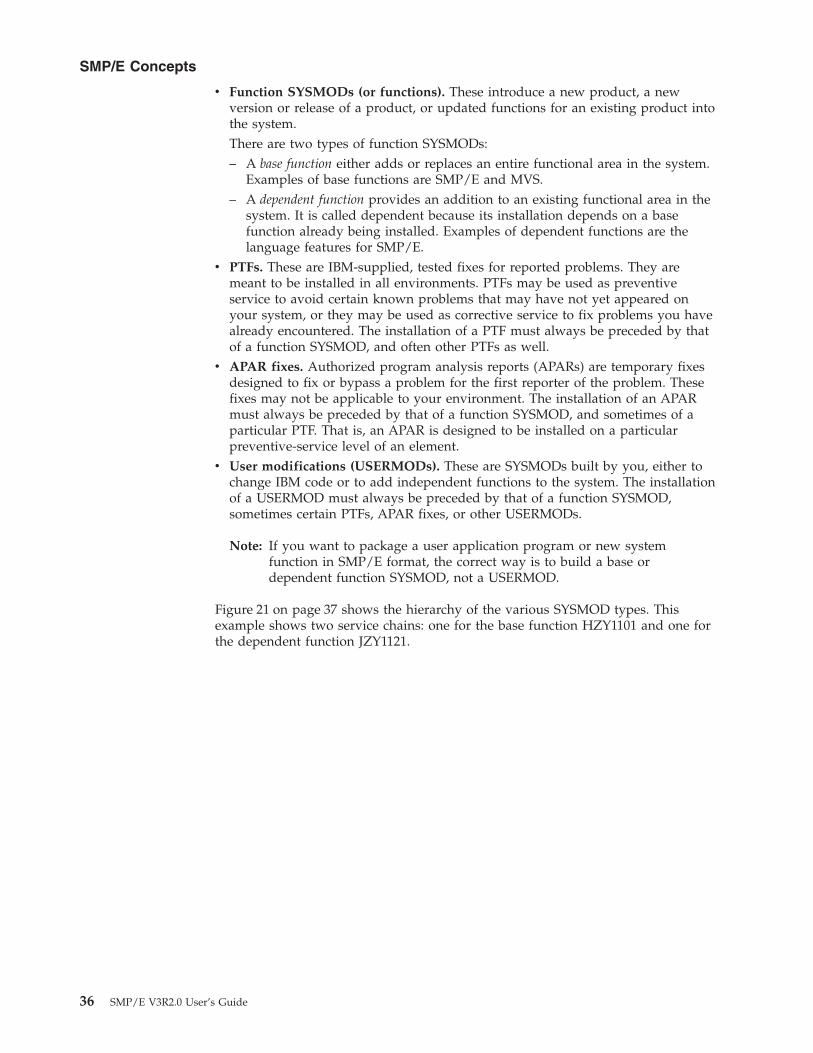
v Function SYSMODs (or functions). These introduce a new product, a newversion or release of a product, or updated functions for an existing product intothe system.There are two types of function SYSMODs:– A base function either adds or replaces an entire functional area in the system.
Examples of base functions are SMP/E and MVS.– A dependent function provides an addition to an existing functional area in the
system. It is called dependent because its installation depends on a basefunction already being installed. Examples of dependent functions are thelanguage features for SMP/E.
v PTFs. These are IBM-supplied, tested fixes for reported problems. They aremeant to be installed in all environments. PTFs may be used as preventiveservice to avoid certain known problems that may have not yet appeared onyour system, or they may be used as corrective service to fix problems you havealready encountered. The installation of a PTF must always be preceded by thatof a function SYSMOD, and often other PTFs as well.
v APAR fixes. Authorized program analysis reports (APARs) are temporary fixesdesigned to fix or bypass a problem for the first reporter of the problem. Thesefixes may not be applicable to your environment. The installation of an APARmust always be preceded by that of a function SYSMOD, and sometimes of aparticular PTF. That is, an APAR is designed to be installed on a particularpreventive-service level of an element.
v User modifications (USERMODs). These are SYSMODs built by you, either tochange IBM code or to add independent functions to the system. The installationof a USERMOD must always be preceded by that of a function SYSMOD,sometimes certain PTFs, APAR fixes, or other USERMODs.
Note: If you want to package a user application program or new systemfunction in SMP/E format, the correct way is to build a base ordependent function SYSMOD, not a USERMOD.
Figure 21 on page 37 shows the hierarchy of the various SYSMOD types. Thisexample shows two service chains: one for the base function HZY1101 and one forthe dependent function JZY1121.
SMP/E Concepts
36 SMP/E V3R2.0 User’s Guide
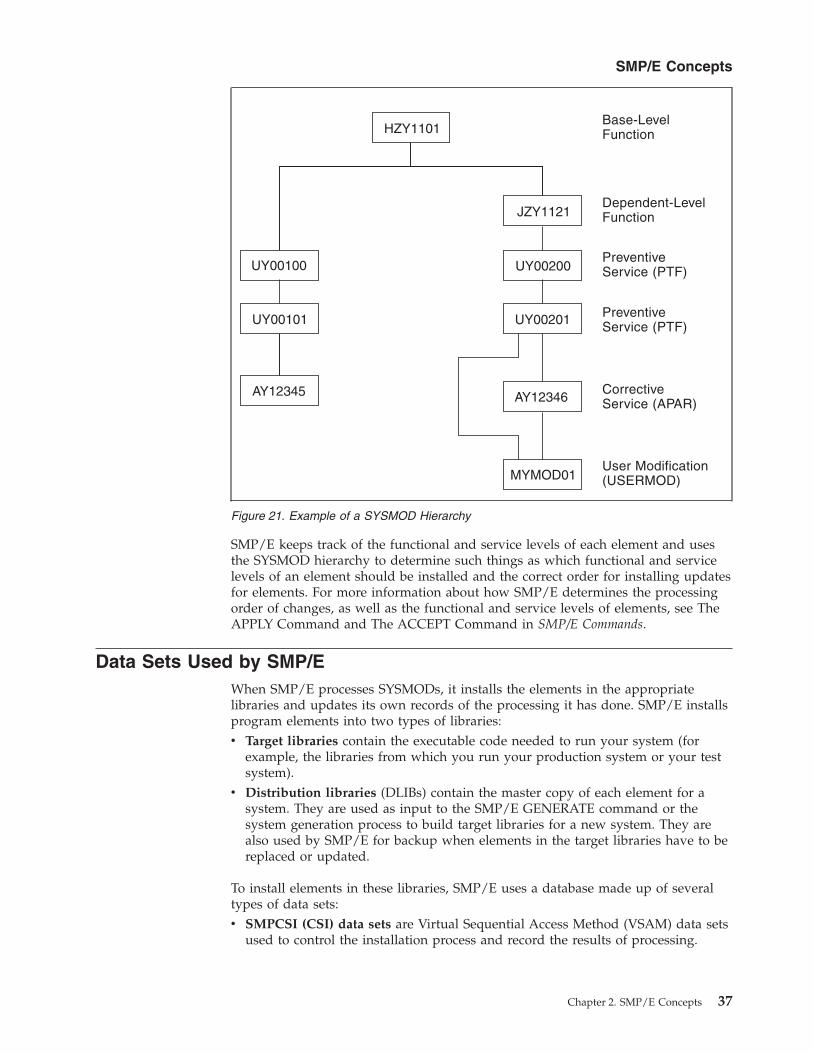
SMP/E keeps track of the functional and service levels of each element and usesthe SYSMOD hierarchy to determine such things as which functional and servicelevels of an element should be installed and the correct order for installing updatesfor elements. For more information about how SMP/E determines the processingorder of changes, as well as the functional and service levels of elements, see TheAPPLY Command and The ACCEPT Command in SMP/E Commands.
Data Sets Used by SMP/EWhen SMP/E processes SYSMODs, it installs the elements in the appropriatelibraries and updates its own records of the processing it has done. SMP/E installsprogram elements into two types of libraries:v Target libraries contain the executable code needed to run your system (for
example, the libraries from which you run your production system or your testsystem).
v Distribution libraries (DLIBs) contain the master copy of each element for asystem. They are used as input to the SMP/E GENERATE command or thesystem generation process to build target libraries for a new system. They arealso used by SMP/E for backup when elements in the target libraries have to bereplaced or updated.
To install elements in these libraries, SMP/E uses a database made up of severaltypes of data sets:v SMPCSI (CSI) data sets are Virtual Sequential Access Method (VSAM) data sets
used to control the installation process and record the results of processing.
Figure 21. Example of a SYSMOD Hierarchy
SMP/E Concepts
Chapter 2. SMP/E Concepts 37
The CSI data set is a VSAM data set in which SMP/E maintains informationabout the system. A CSI can be divided into multiple partitions through theVSAM key structure. Each partition is referred to as a zone.There are three types of zones:– A single global zone is used to record information about SYSMODs that have
been received into the SMPPTS data set. The global zone also containsinformation enabling SMP/E to access the other two types of zones,information about system utilities that SMP/E calls to install elements fromSYSMODs, and information allowing you to tailor SMP/E processing.
– One or more target zones are used to record information about the status andstructure of the operating system (or target) libraries. Each target zone alsopoints to the related distribution zone, which can be used during APPLY,RESTORE, and LINK when SMP/E is processing a SYSMOD and needs tocheck the level of the elements in the distribution libraries.
– One or more distribution zones are used to record information about thestatus and structure of the distribution libraries (DLIBs). Each DLIB zone alsopoints to the related target zone, which is used when SMP/E is accepting aSYSMOD and needs to check if the SYSMOD has already been applied.
Figure 22 shows the relationships between SMP/E zones and libraries.
There can be more than one zone in an SMPCSI data set (in fact, there can be upto 32766 zones per data set). For example, an SMPCSI data set can contain aglobal zone, several target zones, and several distribution zones. The zones canalso be in separate SMPCSI data sets. One SMPCSI data set can contain just theglobal zone, a second SMPCSI data set the target zones, and a third SMPCSIdata set the distribution zones. For more information on ways to structureSMPCSI data sets, see the SMP/E Reference manual.
v An SMPPTS (PTS) data set is a data set for temporary storage of SYSMODswaiting to be installed.
Figure 22. Summary of Zone Relationships
SMP/E Concepts
38 SMP/E V3R2.0 User’s Guide
The PTS is used strictly as a storage data set for SYSMODs. The RECEIVEcommand stores SYSMODs directly on the PTS without any modifications ofSMP/E information. The PTS is related to the global zone in that both data setscontain information about the received SYSMODs. Only one PTS can be used fora given global zone. Therefore, you can look at the global zone and the PTS as apair of data sets that must be processed (for example, deleted, saved, ormodified) concurrently.
v The SMPSCDS (SCDS) data set contains backup copies of target zone entriesmodified during APPLY processing. Therefore, each SCDS is directly related to aspecific target zone, and each target zone must have its own SCDS.SCDS data sets are used by SMP/E to store backup copies of target zone entriesmodified during APPLY processing. Therefore, each SCDS is directly related to aspecific target zone, and each target zone must have its own SCDS.
SMP/E also uses the following data sets:v The SMPMTS (MTS) data set is a library in which SMP/E stores copies of
macros during installation when no other target macro library is identified.Therefore, the MTS is related to a specific target zone, and each target zone musthave its own MTS data set.
v The SMPSTS (STS) data set is a library in which SMP/E stores copies of sourceduring installation when no other target source library is identified. Therefore,the STS is related to a specific target zone, and each target zone must have itsown STS data set.
v The SMPLTS (LTS) data set is a library that maintains the base version of a loadmodule. The load module in this library specifies a SYSLIB allocation in order toimplicitly include modules. Therefore, the LTS is related to a specific target zone,and each target zone must have its own LTS data set.
v Other utility and work data sets.
SMP/E uses information in the CSI data sets to select proper element levels forinstallation, to determine which libraries should contain which elements, and toidentify which system utilities should be called for the installation.
System programmers can also use the CSI data sets to obtain the latest informationon the structure, content, and status of the system. SMP/E provides thisinformation in reports, listings, and dialogs to help you:v Investigate function and service levelsv Understand intersections and relationships of SYSMODs (either installed or
waiting to be installed)v Build job streams for SMP/E processing
How SMP/E Can Help You Install and Maintain ProductsThis section briefly describes the tasks involved in general SMP/E processing,installing SYSMODs, and monitoring and maintaining your system, as well as thecommands used to accomplish these tasks. Following is a guide to the commandsthat help you with these tasks. (You can use SMP/E dialogs for all the tasks in thislist.) For more information about these commands, see the SMP/E Commandsmanual.
Where to BeginYou must specify a SET command before SMP/E can process any other commands.
SMP/E Concepts
Chapter 2. SMP/E Concepts 39
Specifying the Zone to Be Processed: SETThe main SMP/E database is a set of CSIs. When you establish the SMP/Edatabase, you use the UCLIN command or the administration dialogs to divide theCSI into one or more partitions called zones. A zone contains control informationfor the following:v A set of target libraries. (These zones are called target zones.)v A set of distribution libraries. (These zones are called distribution zones.)v The data present in the PTS and for general SMP/E processing. (This zone is
called the global zone.)
You must tell SMP/E which zone you are working with before it can execute anyother commands. You direct SMP/E processing to a specific zone by coding thezone name on the SET command.
Installing SYSMODsThe primary purpose of SMP/E is to install SYSMODs. This section describes thetasks and commands you can use.
Loading SYSMODs into the SMPPTS: RECEIVEThe RECEIVE command performs the following functions:v Reads in SYSMODs from a sequential input file, defined by the SMPPTFIN DD
statementv Reads in HOLDDATA for exception SYSMODs from another sequential input
file, defined by the SMPHOLD DD statementv Determines which SYSMODs and HOLDDATA are applicable to your systemv Stores the SYSMODs and HOLDDATA in a storage data set (the PTS data set)
and in the global zone
Note: The RECEIVE command can also be used to transfer software packages froma TCP/IP network connected server directly into an SMP/E directory ordata sets.
Installing SYSMODs in the Target Libraries: APPLYAfter the SYSMODs have been received, you can use the APPLY command todirect SMP/E to install them in the appropriate target libraries.
Installing SYSMODs in the Distribution Libraries: ACCEPTAfter installing a SYSMOD in the target libraries and testing it to your satisfaction,you can use the ACCEPT command to have SMP/E install that SYSMOD in thedistribution libraries and delete it from the PTS and the global zone.
Note: Though the usual order of processing a SYSMOD is RECEIVE, APPLY, andthen ACCEPT, you skip the APPLY step and go directly from RECEIVE toACCEPT. For further information, see Chapter 4, “Installing a NewFunction”, on page 83.
Building a System from a Set of Distribution Libraries:GENERATEUse the GENERATE command to create a job stream that builds a system (a set oftarget libraries) from a set of distribution libraries.
Monitoring Your SystemThis section describes the tasks and commands you can use to monitor yoursystem.
SMP/E Concepts
40 SMP/E V3R2.0 User’s Guide
Displaying Information from the SMP/E Database: LISTUse the Query dialogs or the LIST command to display the data SMP/E retains.There are several operands you can use to list subsets of the data.
Checking and Comparing Zone Contents: REPORTThe REPORT command helps you obtain information about SYSMODs installed onyour system. There are several types of REPORT commands that you can use to dothe following:v REPORT CROSSZONE to list conditional requisites that must be installed in
certain zones because of SYSMODs installed in other zones. This information canhelp you synchronize service for related products that are in different zones.
v REPORT ERRSYSMODS to list SYSMODs that have already been installed butare affected by error holds subsequently received.
v REPORT SOURCEID to list source IDs assigned to SYSMODs in a given zoneor ZONESET.
v REPORT SYSMODS to list SYSMODs installed in one zone and applicable to asecond zone, but not yet installed in it.
Managing the SMP/E DatabaseThis section describes the tasks and commands you can use to remove SYSMODsand process the SMP/E database as a part of your system maintenance.
Notes:
1. There is no SMP/E command to remove a SYSMOD from the distributionlibraries once you have accepted it.
2. Because all SMP/E processing is controlled by information in the CSI data set,you must provide the required information in the CSI before you process anySYSMODs.
Removing SYSMODs From the Target Libraries: RESTOREAfter you have installed a SYSMOD in the target libraries, you should test it tomake sure the change works correctly. If during testing you find an error in one ofthe SYSMODs you applied, you can use the RESTORE command to remove thatSYSMOD from the system.
The RESTORE command causes the elements in the distribution libraries to bereinstalled on the target libraries. Therefore, when restoring a SYSMOD, you mayhave to restore more than the one SYSMOD in error. All SYSMODs that have notbeen accepted and that affect some of the same elements or need the same servicelevel requisites as the one you are restoring must also be restored.
Removing SYSMODs From the PTS: REJECTAfter receiving a SYSMOD, you can use the REJECT command to remove thatSYSMOD from the PTS and the global zone. This can be done to rework aSYSMOD.
You can also use REJECT after you use NOPURGE to accept a SYSMOD into thedistribution libraries. Using NOPURGE in the OPTIONS entry prevents SMP/Efrom deleting the global zone SYSMOD entry and the PTS MCS entry duringACCEPT processing. Later, you can delete the SYSMOD and MCS entries by usingREJECT.
SMP/E Concepts
Chapter 2. SMP/E Concepts 41
Processing the SMP/E Database to Create, Update, or Delete aSingle Entry: UCLINYou can use the Administration dialogs or the UCLIN command to create orchange entries in CSI data sets. UCLIN can be used to create entries requiredduring SMP/E processing, such as entries for:v Identifying the utilities SMP/E is to usev Providing information for dynamic allocation support
You can also use UCLIN to correct errors in entries or to alter processinginformation.
Note: This command should be used with extreme caution; an incorrect changecan cause a SYSMOD to be installed incorrectly later.
UCLIN updates only entries in SMP/E data sets. It does nothing to any elementsor load modules in any product libraries. You must ensure that the appropriatechanges are made to the libraries.
Processing the SMP/E Database to Update Several Entries of theSame Type: ZONEEDITUse the ZONEEDIT command to quickly change the values for a field in differentDDDEF or UTILITY entries in the same zone. You can also use ZONEEDIT tochange the cross-zone subentries of MOD, LMOD, and TARGETZONE entries.
Processing the SMP/E Database to Define the Structure of theTarget Libraries: JCLINTo install a SYSMOD successfully, SMP/E must have information about thestructure of your target libraries, such as:v The library in which an element residesv How modules are link-edited together to form load modulesv Where the load modules exist and their characteristics
The JCLIN command enables you to define the target library structure. In someinstances, such as defining the target library structure for data elements, it is notnecessary to use JCLIN, because the definition in the MCS statement is sufficient.
When processing the JCLIN command, you provide SMP/E with a job streamcontaining all the job steps (such as copies, link-edits, and assemblies) needed tocreate a set of target libraries from a set of distribution libraries. SMP/E then scansthat input and builds all required entries to define the target system structure.
Processing the SMP/E Database to Write Information to theSMPLOG Data Set: LOGUse the LOG command to write to the SMPLOG and SMPLOGA data sets. This isuseful for maintaining documentation about your system, such as who installed acertain SYSMOD, and why.
Processing the SMP/E Database to Clean Up the SMPLTS,SMPMTS, SMPSTS, and SMPSCDS Data Sets: CLEANUPUse the CLEANUP command to delete entries from the SMPMTS, SMPSTS, andSMPSCDS data sets for a particular target zone, if any entries still exist after theassociated SYSMOD has been accepted into the related distribution zone.TheCLEANUP command can also be used to remove the base version of load modulesthat are no longer needed from the SMPLTS data set.
SMP/E Concepts
42 SMP/E V3R2.0 User’s Guide
Managing ZonesThis section describes the tasks and commands you can use to manage zones.
Copying a Zone from One CSI to Another: ZONECOPYUse the ZONECOPY command to copy an entire target or distribution zone fromone CSI data set to another. When you use the ZONECOPY command, SMP/Echecks that the zone you copy into is empty except for a ZPOOL record.
Copying a Zone to a Sequential Data Set: ZONEEXPORTThe ZONEEXPORT command creates a copy of a specified distribution, target, orglobal zone and places it into another data set (a variable-block sequential dataset). Having this copy of a specified zone gives you two advantages:v You can use it as a backup copy to recreate a zone that has been accidentally
erased or destroyed.v You can use it as a “transportable” copy to create the same zone on another
system or in another CSI data set on the same system.
Copying a Zone from a Sequential Data Set to a CSI Data Set:ZONEIMPORTUse the ZONEIMPORT command to reload an exported zone into a distribution,target, or global zone. ZONEIMPORT can be used only with output fromZONEEXPORT.
Deleting a Zone: ZONEDELETESometimes you need to delete the SMP/E data related to one of the systems youare supporting. These are some examples of when you need to delete a zone:v After a full system generation, you have to delete the information describing the
previous target system libraries. Then you rebuild that information to describethe new set of target system libraries built from the distribution libraries.
v After installing a new level of a product that existed in its own target zone anddistribution zone, you want to delete the information about the old level of theproduct and continue processing only the new level.
Merging Zones: ZONEMERGEUse the ZONEMERGE command to merge one zone into another zone after youuse the GENERATE command or do a full system generation. When you use theZONEMERGE command, SMP/E looks through the zones that ZONEMERGEworks on and merges the data from them.
Renaming a Zone: ZONERENAMEUse the ZONERENAME command to rename a zone. This command can help youkeep meaningful names for your zones. You can also use ZONERENAME after aGENERATE command or a full system generation to help you change the name ofthe distribution zone that GENERATE or the system generation uses to build anew target zone.
Linking and Relinking ModulesThis section describes the tasks and commands you can use to link or relinkmodules into load modules.
Handling Cross-Zone Link-Edits: LINK MODULEUse the LINK MODULE command to link modules in one zone with load modulesin another zone and to track this inclusion so that subsequent APPLY andRESTORE processing can automatically maintain the affected load modules.
SMP/E Concepts
Chapter 2. SMP/E Concepts 43

Relinking Load Modules That Use CALLLIBS: LINK LMODSUse the LINK LMODS command to relink load modules that have a CALLLIBSsubentry list in their LMOD entry (and therefore use the automatic library calloption to implicitly include modules from a specified library). The LINK LMODScommand may also be used to relink specific load modules that do not containCALLLIBS, rebuilding them from scratch if necessary.
General SMP/E ProcessingThis section describes general SMP/E processing tasks and the commands you canuse to do them.
Requesting Diagnostic Processing: DEBUGUse the DEBUG command to display the name of the issuing routine in eachSMP/E message, to dump SMP/E control blocks, to dump VSAM requestparameter list (RPL) control blocks, and to get a SNAP dump of SMP/E and itswork areas whenever a specified message is issued.
Resetting Return Codes: RESETRCNormally, the execution of an SMP/E command depends on the successfulexecution of all preceding commands. However, you can use the RESETRCcommand to reset the return code to zero. This allows SMP/E to run the nextcommand, even if a preceding command failed.
SMP/E Concepts
44 SMP/E V3R2.0 User’s Guide
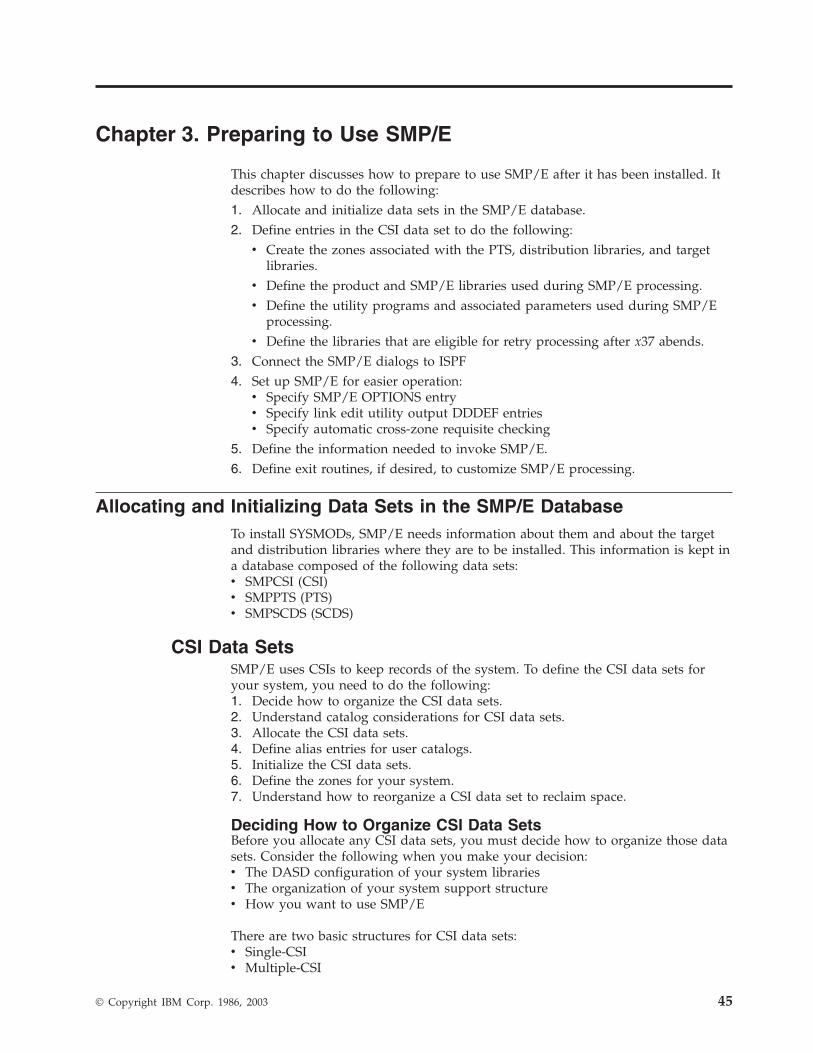
Chapter 3. Preparing to Use SMP/E
This chapter discusses how to prepare to use SMP/E after it has been installed. Itdescribes how to do the following:1. Allocate and initialize data sets in the SMP/E database.2. Define entries in the CSI data set to do the following:
v Create the zones associated with the PTS, distribution libraries, and targetlibraries.
v Define the product and SMP/E libraries used during SMP/E processing.v Define the utility programs and associated parameters used during SMP/E
processing.v Define the libraries that are eligible for retry processing after x37 abends.
3. Connect the SMP/E dialogs to ISPF4. Set up SMP/E for easier operation:
v Specify SMP/E OPTIONS entryv Specify link edit utility output DDDEF entriesv Specify automatic cross-zone requisite checking
5. Define the information needed to invoke SMP/E.6. Define exit routines, if desired, to customize SMP/E processing.
Allocating and Initializing Data Sets in the SMP/E DatabaseTo install SYSMODs, SMP/E needs information about them and about the targetand distribution libraries where they are to be installed. This information is kept ina database composed of the following data sets:v SMPCSI (CSI)v SMPPTS (PTS)v SMPSCDS (SCDS)
CSI Data SetsSMP/E uses CSIs to keep records of the system. To define the CSI data sets foryour system, you need to do the following:1. Decide how to organize the CSI data sets.2. Understand catalog considerations for CSI data sets.3. Allocate the CSI data sets.4. Define alias entries for user catalogs.5. Initialize the CSI data sets.6. Define the zones for your system.7. Understand how to reorganize a CSI data set to reclaim space.
Deciding How to Organize CSI Data SetsBefore you allocate any CSI data sets, you must decide how to organize those datasets. Consider the following when you make your decision:v The DASD configuration of your system librariesv The organization of your system support structurev How you want to use SMP/E
There are two basic structures for CSI data sets:v Single-CSIv Multiple-CSI
© Copyright IBM Corp. 1986, 2003 45
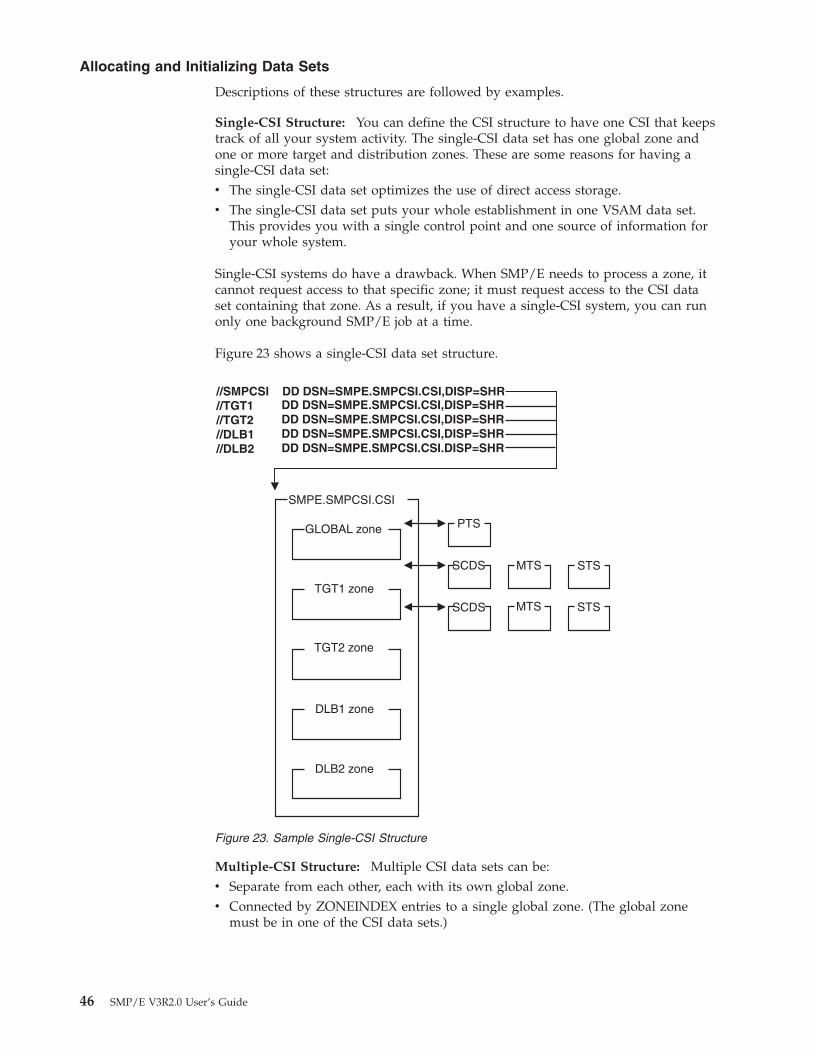
Descriptions of these structures are followed by examples.
Single-CSI Structure: You can define the CSI structure to have one CSI that keepstrack of all your system activity. The single-CSI data set has one global zone andone or more target and distribution zones. These are some reasons for having asingle-CSI data set:v The single-CSI data set optimizes the use of direct access storage.v The single-CSI data set puts your whole establishment in one VSAM data set.
This provides you with a single control point and one source of information foryour whole system.
Single-CSI systems do have a drawback. When SMP/E needs to process a zone, itcannot request access to that specific zone; it must request access to the CSI dataset containing that zone. As a result, if you have a single-CSI system, you can runonly one background SMP/E job at a time.
Figure 23 shows a single-CSI data set structure.
Multiple-CSI Structure: Multiple CSI data sets can be:v Separate from each other, each with its own global zone.v Connected by ZONEINDEX entries to a single global zone. (The global zone
must be in one of the CSI data sets.)
Figure 23. Sample Single-CSI Structure
Allocating and Initializing Data Sets
46 SMP/E V3R2.0 User’s Guide
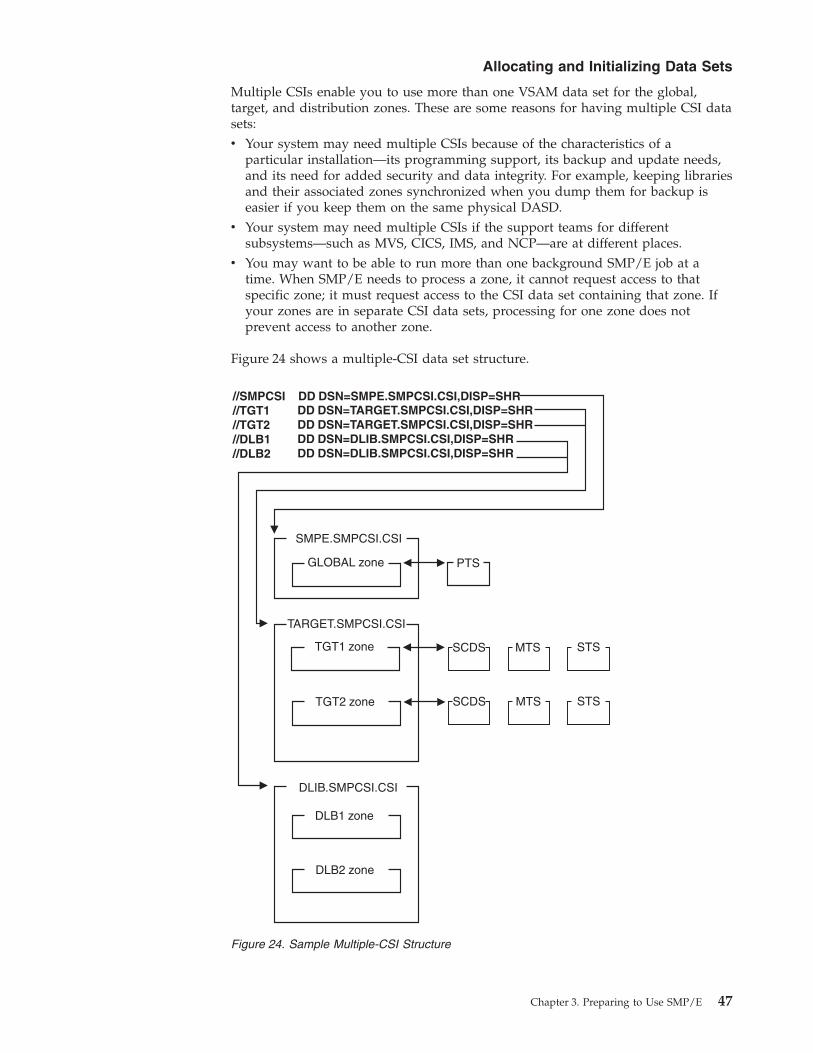
Multiple CSIs enable you to use more than one VSAM data set for the global,target, and distribution zones. These are some reasons for having multiple CSI datasets:v Your system may need multiple CSIs because of the characteristics of a
particular installation—its programming support, its backup and update needs,and its need for added security and data integrity. For example, keeping librariesand their associated zones synchronized when you dump them for backup iseasier if you keep them on the same physical DASD.
v Your system may need multiple CSIs if the support teams for differentsubsystems—such as MVS, CICS, IMS, and NCP—are at different places.
v You may want to be able to run more than one background SMP/E job at atime. When SMP/E needs to process a zone, it cannot request access to thatspecific zone; it must request access to the CSI data set containing that zone. Ifyour zones are in separate CSI data sets, processing for one zone does notprevent access to another zone.
Figure 24 shows a multiple-CSI data set structure.
Figure 24. Sample Multiple-CSI Structure
Allocating and Initializing Data Sets
Chapter 3. Preparing to Use SMP/E 47
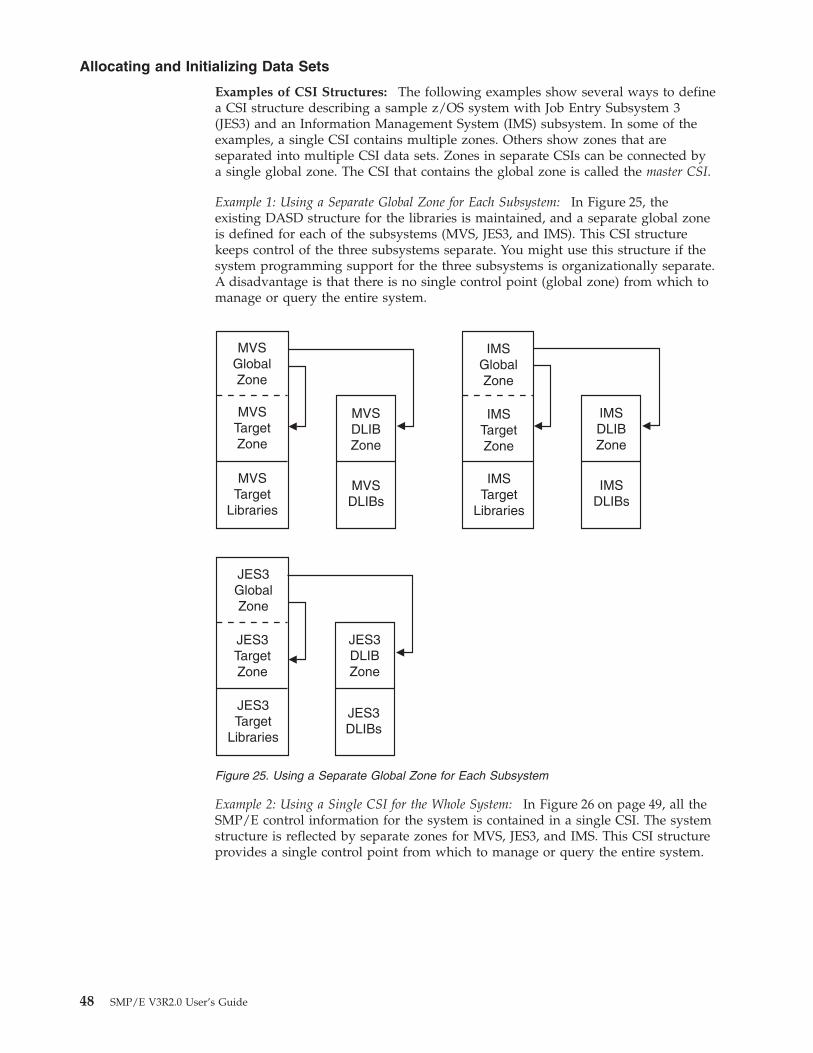
Examples of CSI Structures: The following examples show several ways to definea CSI structure describing a sample z/OS system with Job Entry Subsystem 3(JES3) and an Information Management System (IMS) subsystem. In some of theexamples, a single CSI contains multiple zones. Others show zones that areseparated into multiple CSI data sets. Zones in separate CSIs can be connected bya single global zone. The CSI that contains the global zone is called the master CSI.
Example 1: Using a Separate Global Zone for Each Subsystem: In Figure 25, theexisting DASD structure for the libraries is maintained, and a separate global zoneis defined for each of the subsystems (MVS, JES3, and IMS). This CSI structurekeeps control of the three subsystems separate. You might use this structure if thesystem programming support for the three subsystems is organizationally separate.A disadvantage is that there is no single control point (global zone) from which tomanage or query the entire system.
Example 2: Using a Single CSI for the Whole System: In Figure 26 on page 49, all theSMP/E control information for the system is contained in a single CSI. The systemstructure is reflected by separate zones for MVS, JES3, and IMS. This CSI structureprovides a single control point from which to manage or query the entire system.
Figure 25. Using a Separate Global Zone for Each Subsystem
Allocating and Initializing Data Sets
48 SMP/E V3R2.0 User’s Guide
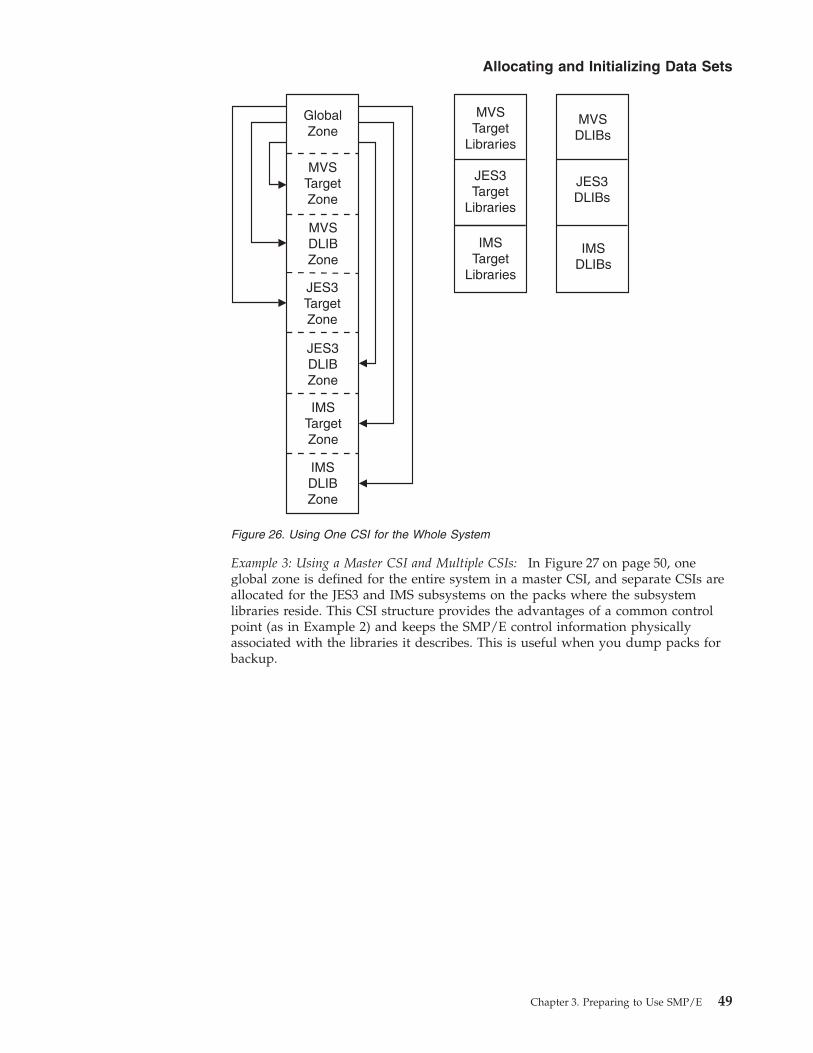
Example 3: Using a Master CSI and Multiple CSIs: In Figure 27 on page 50, oneglobal zone is defined for the entire system in a master CSI, and separate CSIs areallocated for the JES3 and IMS subsystems on the packs where the subsystemlibraries reside. This CSI structure provides the advantages of a common controlpoint (as in Example 2) and keeps the SMP/E control information physicallyassociated with the libraries it describes. This is useful when you dump packs forbackup.
Figure 26. Using One CSI for the Whole System
Allocating and Initializing Data Sets
Chapter 3. Preparing to Use SMP/E 49
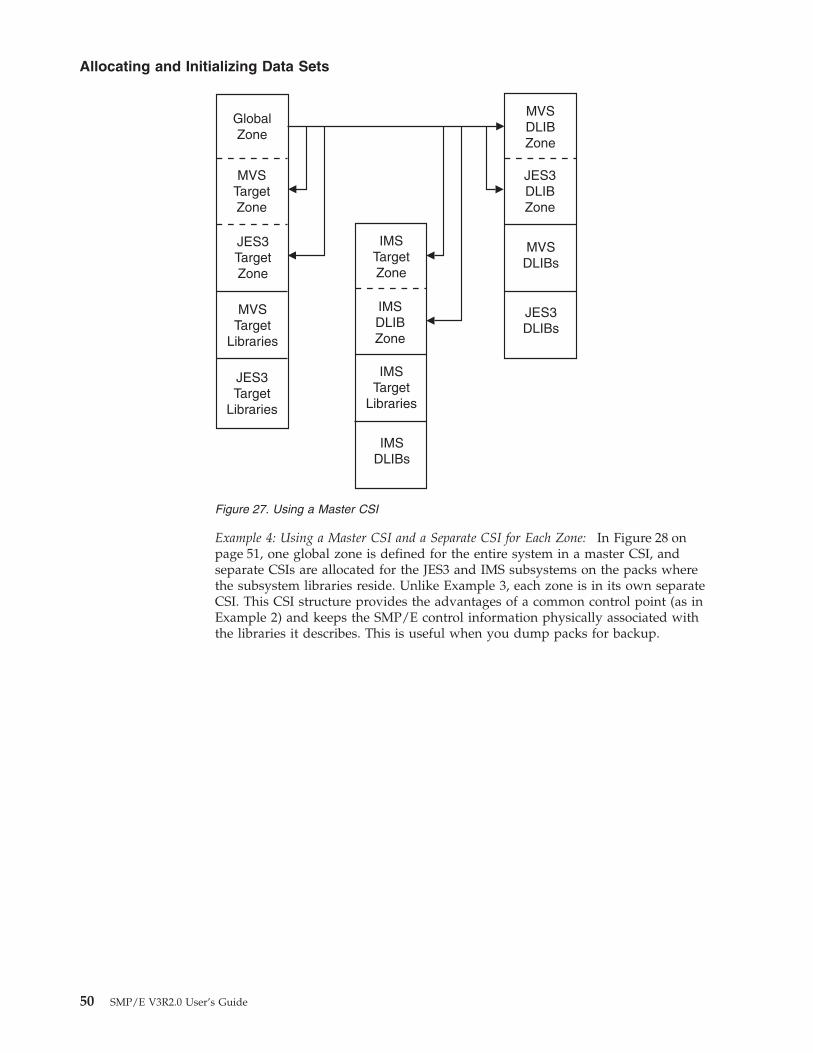
Example 4: Using a Master CSI and a Separate CSI for Each Zone: In Figure 28 onpage 51, one global zone is defined for the entire system in a master CSI, andseparate CSIs are allocated for the JES3 and IMS subsystems on the packs wherethe subsystem libraries reside. Unlike Example 3, each zone is in its own separateCSI. This CSI structure provides the advantages of a common control point (as inExample 2) and keeps the SMP/E control information physically associated withthe libraries it describes. This is useful when you dump packs for backup.
Figure 27. Using a Master CSI
Allocating and Initializing Data Sets
50 SMP/E V3R2.0 User’s Guide
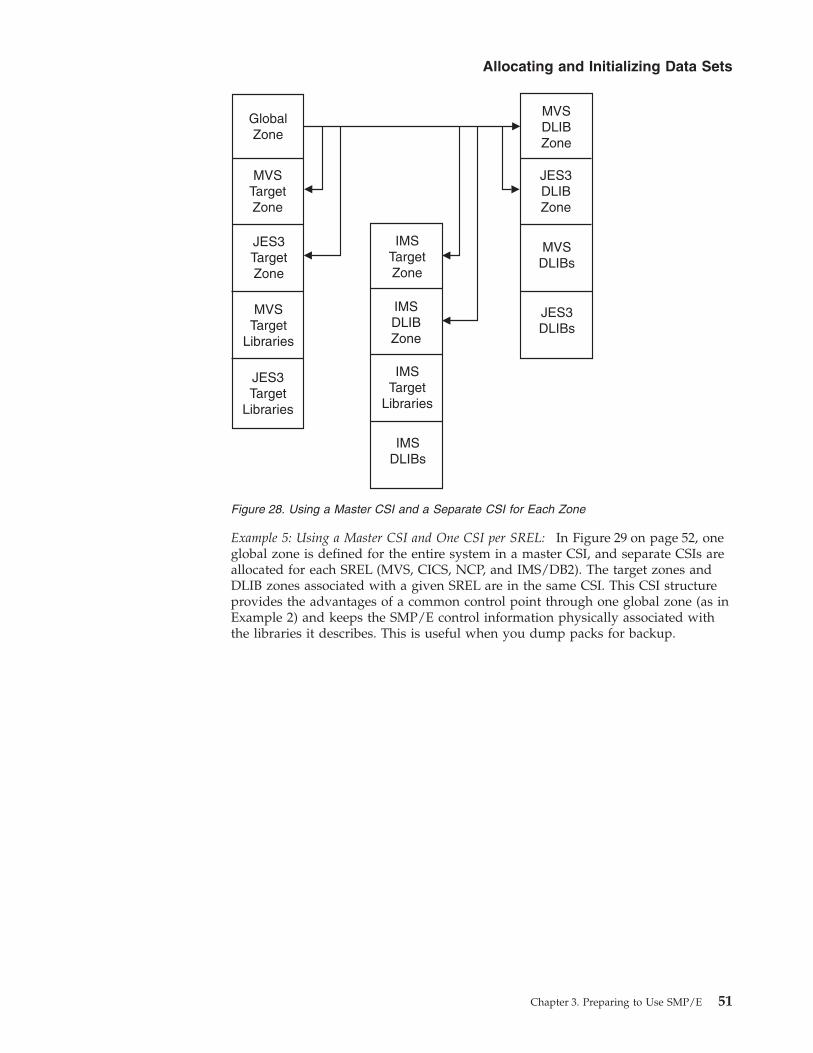
Example 5: Using a Master CSI and One CSI per SREL: In Figure 29 on page 52, oneglobal zone is defined for the entire system in a master CSI, and separate CSIs areallocated for each SREL (MVS, CICS, NCP, and IMS/DB2). The target zones andDLIB zones associated with a given SREL are in the same CSI. This CSI structureprovides the advantages of a common control point through one global zone (as inExample 2) and keeps the SMP/E control information physically associated withthe libraries it describes. This is useful when you dump packs for backup.
Figure 28. Using a Master CSI and a Separate CSI for Each Zone
Allocating and Initializing Data Sets
Chapter 3. Preparing to Use SMP/E 51
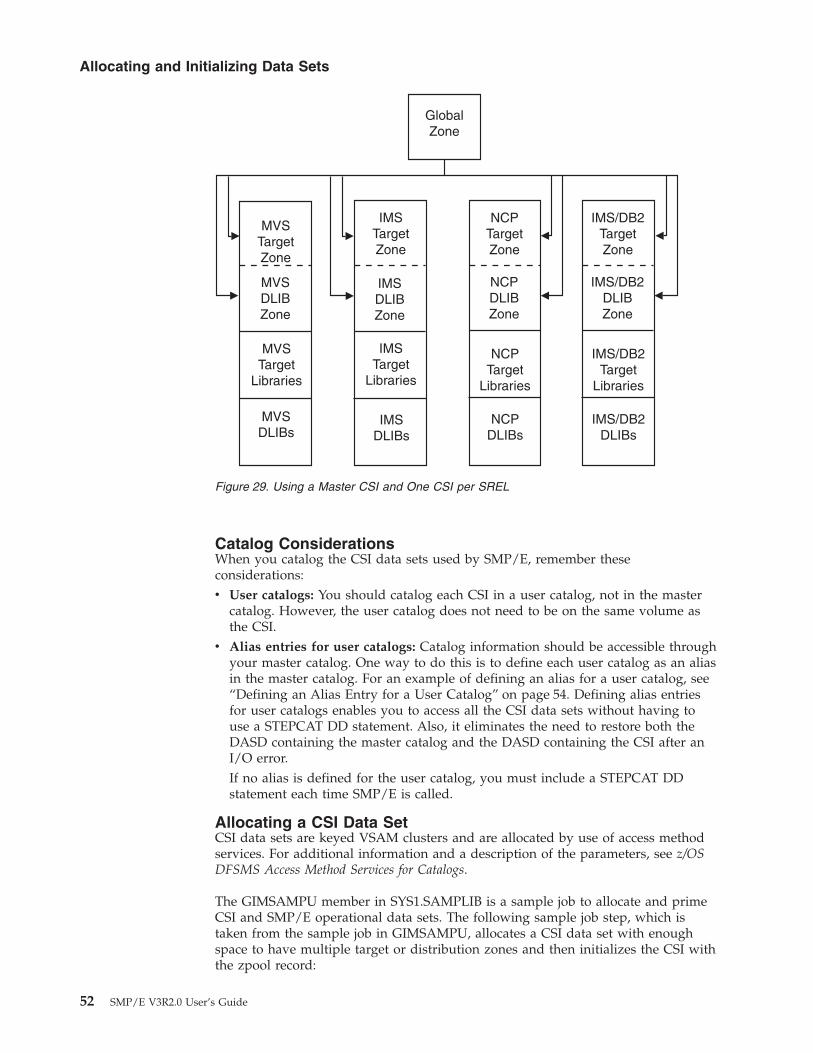
Catalog ConsiderationsWhen you catalog the CSI data sets used by SMP/E, remember theseconsiderations:v User catalogs: You should catalog each CSI in a user catalog, not in the master
catalog. However, the user catalog does not need to be on the same volume asthe CSI.
v Alias entries for user catalogs: Catalog information should be accessible throughyour master catalog. One way to do this is to define each user catalog as an aliasin the master catalog. For an example of defining an alias for a user catalog, see“Defining an Alias Entry for a User Catalog” on page 54. Defining alias entriesfor user catalogs enables you to access all the CSI data sets without having touse a STEPCAT DD statement. Also, it eliminates the need to restore both theDASD containing the master catalog and the DASD containing the CSI after anI/O error.If no alias is defined for the user catalog, you must include a STEPCAT DDstatement each time SMP/E is called.
Allocating a CSI Data SetCSI data sets are keyed VSAM clusters and are allocated by use of access methodservices. For additional information and a description of the parameters, see z/OSDFSMS Access Method Services for Catalogs.
The GIMSAMPU member in SYS1.SAMPLIB is a sample job to allocate and primeCSI and SMP/E operational data sets. The following sample job step, which istaken from the sample job in GIMSAMPU, allocates a CSI data set with enoughspace to have multiple target or distribution zones and then initializes the CSI withthe zpool record:
Figure 29. Using a Master CSI and One CSI per SREL
Allocating and Initializing Data Sets
52 SMP/E V3R2.0 User’s Guide
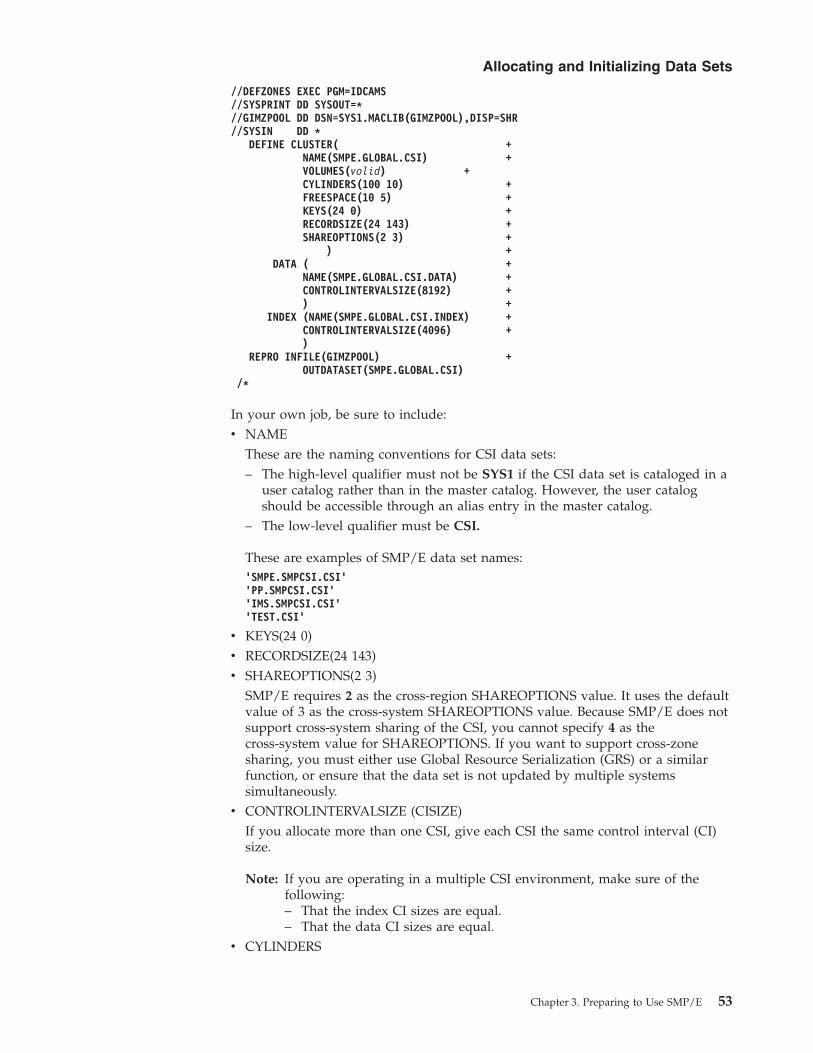
//DEFZONES EXEC PGM=IDCAMS//SYSPRINT DD SYSOUT=*//GIMZPOOL DD DSN=SYS1.MACLIB(GIMZPOOL),DISP=SHR//SYSIN DD *
DEFINE CLUSTER( +NAME(SMPE.GLOBAL.CSI) +VOLUMES(volid) +CYLINDERS(100 10) +FREESPACE(10 5) +KEYS(24 0) +RECORDSIZE(24 143) +SHAREOPTIONS(2 3) +
) +DATA ( +
NAME(SMPE.GLOBAL.CSI.DATA) +CONTROLINTERVALSIZE(8192) +) +
INDEX (NAME(SMPE.GLOBAL.CSI.INDEX) +CONTROLINTERVALSIZE(4096) +)
REPRO INFILE(GIMZPOOL) +OUTDATASET(SMPE.GLOBAL.CSI)
/*
In your own job, be sure to include:v NAME
These are the naming conventions for CSI data sets:– The high-level qualifier must not be SYS1 if the CSI data set is cataloged in a
user catalog rather than in the master catalog. However, the user catalogshould be accessible through an alias entry in the master catalog.
– The low-level qualifier must be CSI.
These are examples of SMP/E data set names:’SMPE.SMPCSI.CSI’’PP.SMPCSI.CSI’’IMS.SMPCSI.CSI’’TEST.CSI’
v KEYS(24 0)v RECORDSIZE(24 143)v SHAREOPTIONS(2 3)
SMP/E requires 2 as the cross-region SHAREOPTIONS value. It uses the defaultvalue of 3 as the cross-system SHAREOPTIONS value. Because SMP/E does notsupport cross-system sharing of the CSI, you cannot specify 4 as thecross-system value for SHAREOPTIONS. If you want to support cross-zonesharing, you must either use Global Resource Serialization (GRS) or a similarfunction, or ensure that the data set is not updated by multiple systemssimultaneously.
v CONTROLINTERVALSIZE (CISIZE)If you allocate more than one CSI, give each CSI the same control interval (CI)size.
Note: If you are operating in a multiple CSI environment, make sure of thefollowing:– That the index CI sizes are equal.– That the data CI sizes are equal.
v CYLINDERS
Allocating and Initializing Data Sets
Chapter 3. Preparing to Use SMP/E 53
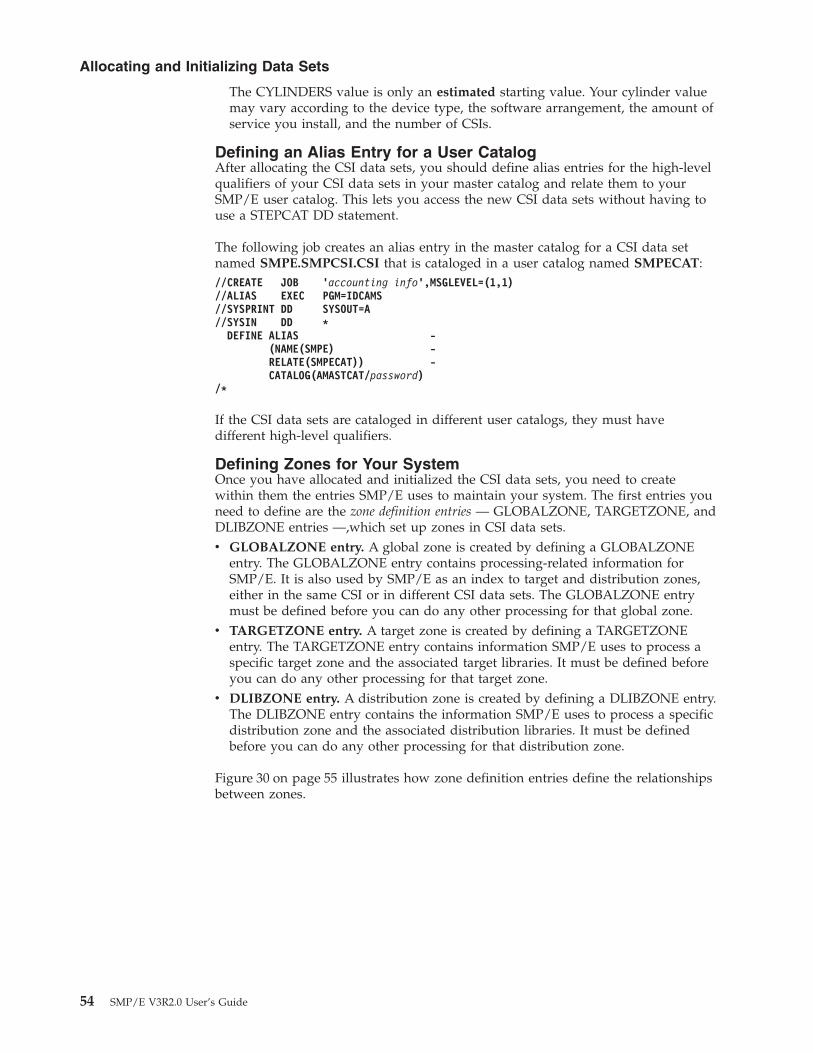
The CYLINDERS value is only an estimated starting value. Your cylinder valuemay vary according to the device type, the software arrangement, the amount ofservice you install, and the number of CSIs.
Defining an Alias Entry for a User CatalogAfter allocating the CSI data sets, you should define alias entries for the high-levelqualifiers of your CSI data sets in your master catalog and relate them to yourSMP/E user catalog. This lets you access the new CSI data sets without having touse a STEPCAT DD statement.
The following job creates an alias entry in the master catalog for a CSI data setnamed SMPE.SMPCSI.CSI that is cataloged in a user catalog named SMPECAT://CREATE JOB ’accounting info’,MSGLEVEL=(1,1)//ALIAS EXEC PGM=IDCAMS//SYSPRINT DD SYSOUT=A//SYSIN DD *
DEFINE ALIAS -(NAME(SMPE) -RELATE(SMPECAT)) -CATALOG(AMASTCAT/password)
/*
If the CSI data sets are cataloged in different user catalogs, they must havedifferent high-level qualifiers.
Defining Zones for Your SystemOnce you have allocated and initialized the CSI data sets, you need to createwithin them the entries SMP/E uses to maintain your system. The first entries youneed to define are the zone definition entries — GLOBALZONE, TARGETZONE, andDLIBZONE entries —,which set up zones in CSI data sets.v GLOBALZONE entry. A global zone is created by defining a GLOBALZONE
entry. The GLOBALZONE entry contains processing-related information forSMP/E. It is also used by SMP/E as an index to target and distribution zones,either in the same CSI or in different CSI data sets. The GLOBALZONE entrymust be defined before you can do any other processing for that global zone.
v TARGETZONE entry. A target zone is created by defining a TARGETZONEentry. The TARGETZONE entry contains information SMP/E uses to process aspecific target zone and the associated target libraries. It must be defined beforeyou can do any other processing for that target zone.
v DLIBZONE entry. A distribution zone is created by defining a DLIBZONE entry.The DLIBZONE entry contains the information SMP/E uses to process a specificdistribution zone and the associated distribution libraries. It must be definedbefore you can do any other processing for that distribution zone.
Figure 30 on page 55 illustrates how zone definition entries define the relationshipsbetween zones.
Allocating and Initializing Data Sets
54 SMP/E V3R2.0 User’s Guide

After you have defined the zones for your system, you can create other entries.SMP/E zones contain two basic types of entries:v Entries controlling SMP/E processing.
You generally define processing control entries through the SMP/EAdministration dialogs or with the UCLIN command. Table 2 summarizes theinformation specified in these entries.
v Entries describing the structure and status of the target and distribution libraries.Status and structure entries are generally created by SMP/E when you installSYSMODs, run the JCLIN command, or copy entries from one zone to another.Table 3 on page 56 summarizes the information specified in these entries.
SMP/E provides a member in SYS1.SAMPLIB (GIMSAMPU) containing sampleUCLIN statements to define entries for a basic z/OS system. You can access thismember by use of standard system utilities. The sample definitions aresyntactically correct and can be used as the basis for your CSI entries. This sampleis not complete for all systems, but it is an example of the types of informationvarious entries need. For examples of UCLIN to define entries, see The UCLINCommand in SMP/E Commands, which shows the UCLIN syntax for each entrytype, and SMP/E Data Set Entries in SMP/E Reference, which contains a descriptionof the syntax plus examples and notes on its use.
Table 2. Entries Controlling SMP/E Processing
Type of Information Entry Type
Zone Where Defined
Global Target DLIB
Data set definitions for dynamic allocation1 DDDEF X X X
DLIB zone processing information DLIBZONE X
Exception (held) SYSMODs2 HOLDDATA2 X
FMIDs to limit the SYSMODs processed by anSMP/E command
FMIDSET X
Figure 30. Relationships between Zone Definition Entries
Allocating and Initializing Data Sets
Chapter 3. Preparing to Use SMP/E 55
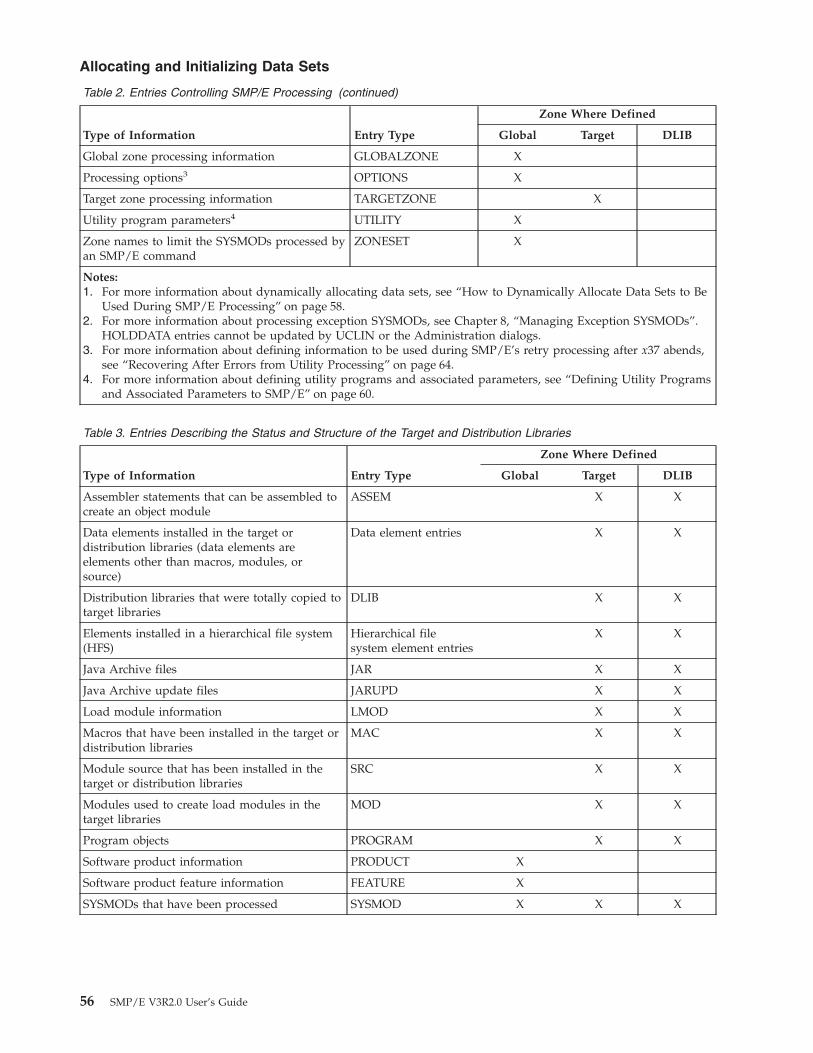
Table 2. Entries Controlling SMP/E Processing (continued)
Type of Information Entry Type
Zone Where Defined
Global Target DLIB
Global zone processing information GLOBALZONE X
Processing options3 OPTIONS X
Target zone processing information TARGETZONE X
Utility program parameters4 UTILITY X
Zone names to limit the SYSMODs processed byan SMP/E command
ZONESET X
Notes:1. For more information about dynamically allocating data sets, see “How to Dynamically Allocate Data Sets to Be
Used During SMP/E Processing” on page 58.2. For more information about processing exception SYSMODs, see Chapter 8, “Managing Exception SYSMODs”.
HOLDDATA entries cannot be updated by UCLIN or the Administration dialogs.3. For more information about defining information to be used during SMP/E’s retry processing after x37 abends,
see “Recovering After Errors from Utility Processing” on page 64.4. For more information about defining utility programs and associated parameters, see “Defining Utility Programs
and Associated Parameters to SMP/E” on page 60.
Table 3. Entries Describing the Status and Structure of the Target and Distribution Libraries
Type of Information Entry Type
Zone Where Defined
Global Target DLIB
Assembler statements that can be assembled tocreate an object module
ASSEM X X
Data elements installed in the target ordistribution libraries (data elements areelements other than macros, modules, orsource)
Data element entries X X
Distribution libraries that were totally copied totarget libraries
DLIB X X
Elements installed in a hierarchical file system(HFS)
Hierarchical filesystem element entries
X X
Java Archive files JAR X X
Java Archive update files JARUPD X X
Load module information LMOD X X
Macros that have been installed in the target ordistribution libraries
MAC X X
Module source that has been installed in thetarget or distribution libraries
SRC X X
Modules used to create load modules in thetarget libraries
MOD X X
Program objects PROGRAM X X
Software product information PRODUCT X
Software product feature information FEATURE X
SYSMODs that have been processed SYSMOD X X X
Allocating and Initializing Data Sets
56 SMP/E V3R2.0 User’s Guide

Reorganizing a CSI Data Set to Reclaim SpaceDuring normal SMP/E processing, VSAM control interval splits and control areasplits can occur. These splits use up some of the free space in each control intervalor control area, and this can degrade SMP/E performance and DASD spaceutilization. You should monitor your VSAM data sets regularly to determine howmany splits have occurred and how much free space remains. The following joblists the catalog entry for data set SMPE.SMPCSI.CSI://LISTCAT JOB ’accounting info’,MSGLEVEL=(1,1)//STEP01 EXEC PGM=IDCAMS//SYSPRINT DD SYSOUT=A//SYSIN DD *
LISTCAT -ENTRIES(SMPE.SMPCSI.CSI) -ALL
/*
After examining the LISTCAT output, you may determine that the CSI should bereorganized to eliminate splits in the control intervals or control areas and to resetthe amount of free space available. This can be done through the access methodservices EXPORT and IMPORT commands. Once a CSI has been exported, a newCSI can be allocated, and the exported CSI can be imported so that normal SMP/Eprocessing can continue.
Note: These examples are not the only way of compressing the CSI. You mayprefer to use another method, drawing on your experience and knowledgeof VSAM.
The following is a sample job for exporting the CSI://EXPORT JOB ’accounting info’,MSGLEVEL=(1,1)//STEP01 EXEC PGM=IDCAMS//SMPCSI DD DSN=SMPE.SMPCSI.CSI,DISP=OLD//TEMPCSI DD DSN=SMPCSI.DATA,DISP=OLD//SYSPRINT DD SYSOUT=A//SYSIN DD *
EXPORT SMPE.SMPCSI.CSI -INFILE(SMPCSI) -OUTFILE(TEMPCSI)
/*
The following is an sample job for importing the CSI://IMPORT JOB ’accounting info’,MSGLEVEL=(1,1)//STEP01 EXEC PGM=IDCAMS//SMPCSI DD DSN=SMPE.SMPCSI.CSI,DISP=OLD//TEMPCSI DD DSN=SMPCSI.DATA,DISP=OLD//SYSPRINT DD SYSOUT=A//SYSIN DD *
IMPORT INFILE(TEMPCSI) -OUTFILE(SMPCSI) -INTOEMPTY
/*
Notes:
1. If you want to delete the original CSI (SMPE.SMPCSI.CSI) when the exportedcopy (SMPCSI.DATA) is created, do not use the IDCAMS TEMPORARYkeyword on the EXPORT command.If you want to make a backup copy of the CSI, you can use the TEMPORARYkeyword on the EXPORT command to keep the original CSI intact.
2. Use a sequential data set to receive the exported CSI.
Allocating and Initializing Data Sets
Chapter 3. Preparing to Use SMP/E 57
3. After allocating a new CSI to be imported into, do not prime it with theGIMZPOOL record provided in SYS1.MACLIB; if you do, the import operationwill fail.
PTS Data SetsThe PTS data set is used as temporary storage for SYSMODs. It contains onemember for each SYSMOD received. Each member is called a modification controlstatement (MCS) entry and is an exact copy of the SYSMOD as it was receivedfrom the SMPPTFIN data set. The name of an MCS entry matches the ID of theSYSMOD it contains. Generally, the MCS entries are kept on the PTS until theSYSMOD is accepted; then, under normal processing, they are deleted.
Each PTS data set must be associated with only one global zone. The allocation ofspace and directory blocks for the SMPPTS depends on your plans for installingand maintaining the functions managed by the global zone. For more informationabout allocating the SMPPTS data set, see SMP/E Reference.
SCDS Data SetsThe SCDS data set contains backup copies of target-zone entries that are modifiedduring APPLY processing. These backup copies are made before the entries are (1)changed by inline JCLIN, a ++MOVE MCS, or a ++RENAME MCS or (2) deletedby an element MCS with the DELETE operand. The backup copies are used duringRESTORE processing to return the entries to the way they were before APPLYprocessing.
Each backup copy of an entry is associated with the SYSMOD that caused theentry to be backed up. Together, the collection of entries associated with aSYSMOD is called the BACKUP entry for that SYSMOD. When you process theSCDS (for example, to list entries), you can specify only BACKUP entries; youcannot process individual entries within a BACKUP entry.
Each target zone within a CSI must have its own SCDS. The correct SCDS to beused during processing is determined either by the SMPSCDS DDDEF entry ineach specific target zone or by a DD statement in the JCL. An SCDS can beallocated the same way as any normal partitioned data set. The allocation of spaceand directory blocks for this data set depends on your plans for installing andmaintaining functions. For more information about allocating the SMPSCDS dataset, see SMP/E Reference.
How to Dynamically Allocate Data Sets to Be Used During SMP/EProcessing
The processing of SMP/E commands requires a variety of data sets. You can eitherprovide the DD statements for these data sets (such as in a cataloged procedure) orhave SMP/E allocate the data sets dynamically. Dynamic allocation has theadvantage that data sets are allocated only as they are needed; DD statementsmust successfully allocate all data sets, regardless of whether they are needed forthe command being processed.
There are some drawbacks to using DD statements. For example, all the data setsdefined by DD statements must be successfully allocated, regardless of whetherthey are needed for the command being processed. In addition, if you are runningseveral SMP/E commands, you must be careful to use the correct DD statements
Allocating and Initializing Data Sets
58 SMP/E V3R2.0 User’s Guide
for each command. If you are processing zones that are in different CSI data sets,you must make sure to provide a DD statement that points to each of those zonesand their associated CSIs.
With dynamic allocation, you do not have these problems. Subsequent sectionsdescribe the sources from which SMP/E can get the information it needs toallocate data sets dynamically and how it chooses which of these sources to use.
Sources of Information for Dynamic AllocationSMP/E can use several sources of information to allocate data sets dynamically:v DDDEF entriesv SMPPARM member GIMDDALCv Standard defaults
DDDEF EntriesYou can use DDDEF entries to provide SMP/E with information it needs toallocate any of the following:v Permanent data sets, such as target libraries, distribution libraries, and SMP/E
data setsv Temporary data setsv SYSOUT data setsv Work data setsv Pathnames for elements and load modules residing in a hierarchical file system
(HFS)
The name of the DDDEF entry must match the ddname of the data set it describesand the entry must exist in the zone that uses the data set. DDDEF entries providemore flexibility than DD statements; they enable different zones to use differentdata sets for the same ddname and they use resources more efficiently becausethey allow SMP/E to allocate only the data sets it needs.
DDDEF entries can include the following information:v Data set namev Unit typev Volume serial numberv Initial data set status: NEW, OLD, MOD, or SHRv Final data set status: KEEP, DELETE, or CATALOGv How the data set is to be allocated: blocks, cylinders, or tracksv Primary and secondary values for space allocationv Whether the data set should be RACF-protectedv Whether the data set is SMS-managedv Directory information used to allocate the pathname for an element or load
module residing in a hierarchical file system (HFS).
For more information about DDDEF entries, see the SMP/E Reference manual.
SMPPARM member GIMDDALCAnother way to provide SMP/E with information about data sets is throughGIMDDALC control statements in SMPPARM member GIMDDALC. For moreinformation about GIMDDALC, see the chapter on SMPPARM members in theSMP/E Reference manual.
Standard Defaults: SMPOUT and SYSPRINT are critical for SMP/E to operateproperly. Therefore, in case they are not defined, SMP/E has built-in defaults forthem.
Allocating and Initializing Data Sets
Chapter 3. Preparing to Use SMP/E 59
v SMPOUT is allocated either as SYSOUT (for background processing) or to theterminal (for foreground processing).
v SYSPRINT is allocated as SYSOUT.
How Dynamic Allocation WorksOnce SMP/E has determined which data sets are needed for the command it isprocessing, SMP/E checks whether DD statements have been provided for any ofthose data sets. SMP/E uses information from those DD statements in allocatingthe data sets to which they apply. If any data sets lack DD statements, SMP/Emust allocate them dynamically. To get the information it needs to do this, SMP/Echecks the following sources in the order shown.1. DDDEF entries. If the zone specified on the SET command contains a DDDEF
entry for the required data set, SMP/E uses that entry to allocate the data set.Otherwise, it checks the next source.
2. SMPPARM member GIMDDALC. If a GIMDDALC control statement has beendefined in SMPPARM member GIMDDALC, SMP/E uses that information toallocate the data set. Otherwise, it checks the next source.
3. Standard defaults. If the data set is for SMPOUT or SYSPRINT, SMP/E usesthe standard default to allocate the data set. Otherwise, data set allocation fails.
Notes:
1. When a data set is part of a concatenation (such as the SYSLIB concatenation),SMP/E does not do the previously described checking. All data sets in aconcatenation must be defined the same way. For example, if a DDDEF entryspecifies a concatenation, all the specified entries must also be defined byDDDEF entries.
2. For the cross-zone phase of APPLY and RESTORE processing, a DD statementcannot be used to allocate the SYSLIB for a cross-zone load module. Thislibrary can be allocated only through a DDDEF entry in the cross-zonecontaining the LMOD entry for the cross-zone load module.
3. The DD name SMPDUMMY is always allocated as a DUMMY data set. SMP/Eignores any allocation information specified for SMPDUMMY by a DDDEFentry or GIMDDALC member. If SMPDUMMY was previously allocatedoutside of SMP/E, SMP/E frees the SMPDUMMY DD and then reallocates it asa DUMMY data set.
Defining Utility Programs and Associated Parameters to SMP/ESMP/E calls utility programs to install SYSMODs in the target and distributionlibraries. These utilities must reside in either the LNKLST concatenation or the linkpack area (LPA), as defined in SYS1.PARMLIB. SMP/E uses default utilityprograms unless you define OPTIONS entries and UTILITY entries specifyingother utilities and parameters.v OPTIONS entries point to the specific UTILITY entry to be used for each type of
utility. These are the types of utilities you can point to:– Access methods services– Assembler– Compress– Copy– Link-edit– Retry after x37 abends– Update– Superzap
Allocating and Initializing Data Sets
60 SMP/E V3R2.0 User’s Guide

v Each UTILITY entry defines the information to be used when invoking a specifictype of utility:– The name of the utility program– The maximum utility return code that SMP/E should consider to be
successful– The ddname to be used for utility output– Parameters to be passed to the utility
Using Default Values for Utility ProgramsIf you do not define UTILITY entries and OPTIONS entries to specify which utilityprograms to use, SMP/E uses default utility programs, as well as its own defaultvalues, for return codes, print values, and the parameters to be passed. Table 4 liststhe default values for the various types of utility programs.
Table 4. Default Values for UTILITY Entries
Utility NAME RC PRINT PARM
Access methodservices
IDCAMS 0 SYSPRINT
Assembler ASMA90 4 SYSPRINT XREF,NOOBJECT,DECK
Compress IEBCOPY 0 SYSPRINT
Copy IEBCOPY 0 SYSPRINT
Hierarchical filesystem copy
BPXCOPY 0 SYSPRINT (seenote 3)
Link-edit utility IEWBLINK orIEWL (see note1)
8 SYSPRINT LET, LIST,NCAL, XREF(see note 2)
Retry after x37abends
IEBCOPY 0 SYSPRINT
Update IEBUPDTE 0 SYSPRINT Determined bySMP/E duringprocessing
Superzap IMASPZAP 4 SYSPRINT
Notes:
1. When the DFP level supports the binder, IEWBLINK is the default link-edit utility.When the DFP level does not support the binder, IEWL is the default.
2. When the load module being link-edited contains a CALLLIBS subentry list, SMP/Edoes not always use NCAL by default. In this case, SMP/E uses CALL for the link tothe actual target library or NCAL for the link to the SMPLTS library. SMP/E alwaysuses NCAL for ACCEPT processing.
3. If SYSTSPRT is specified as the PRINT value, it is ignored and the default of SYSPRINTis used instead.
Defining Values for Utility ProgramsIf you want to use utility programs other than the defaults, or if you want tospecify different parameters for the default utility programs, you need to identifythe programs to SMP/E by defining UTILITY entries and OPTIONS entries. Forexample, the installation information for a particular product you are about to
Defining Utility Programs
Chapter 3. Preparing to Use SMP/E 61

install may direct you to use a specific link-edit utility and may indicate that themaximum successful return code from the utility is 4, not 8.
Figure 31 shows how OPTIONS entries, UTILITY entries, zone definition entries,and the SET command are related.
These are the basic steps you follow:
�1� Define the desired utility name and parameters in a UTILITY entry.
�2� Define an OPTIONS entry that points to that UTILITY entry.
�3� Put the OPTIONS entry into effect by doing one of the following:
�A� If the information should be the default for processing a particularzone, update the associated zone definition entry to point to the desiredOPTIONS entry. The default OPTIONS ENTRY is always used forprocessing that zone, unless you override the OPTIONS entry with theSET command.
�B� Otherwise, use the SET command to indicate which OPTIONS entry touse when processing the zone specified on the SET command. Theinformation in the specified OPTIONS entry overrides the defaultOPTIONS entry defined for the zone.
For examples of these steps, see “Example: How to Request the Desired UtilityProcessing” on page 63. For more detailed information, see OPTIONS Entry,UTILITY Entry, GLOBALZONE Entry, DLIBZONE Entry, and TARGETZONE Entryin SMP/E Reference, and the SET command in SMP/E Commands.
Figure 31. Relationships of OPTIONS, UTILITY, Zone Definition Entries and the SETCommand
Defining Utility Programs
62 SMP/E V3R2.0 User’s Guide
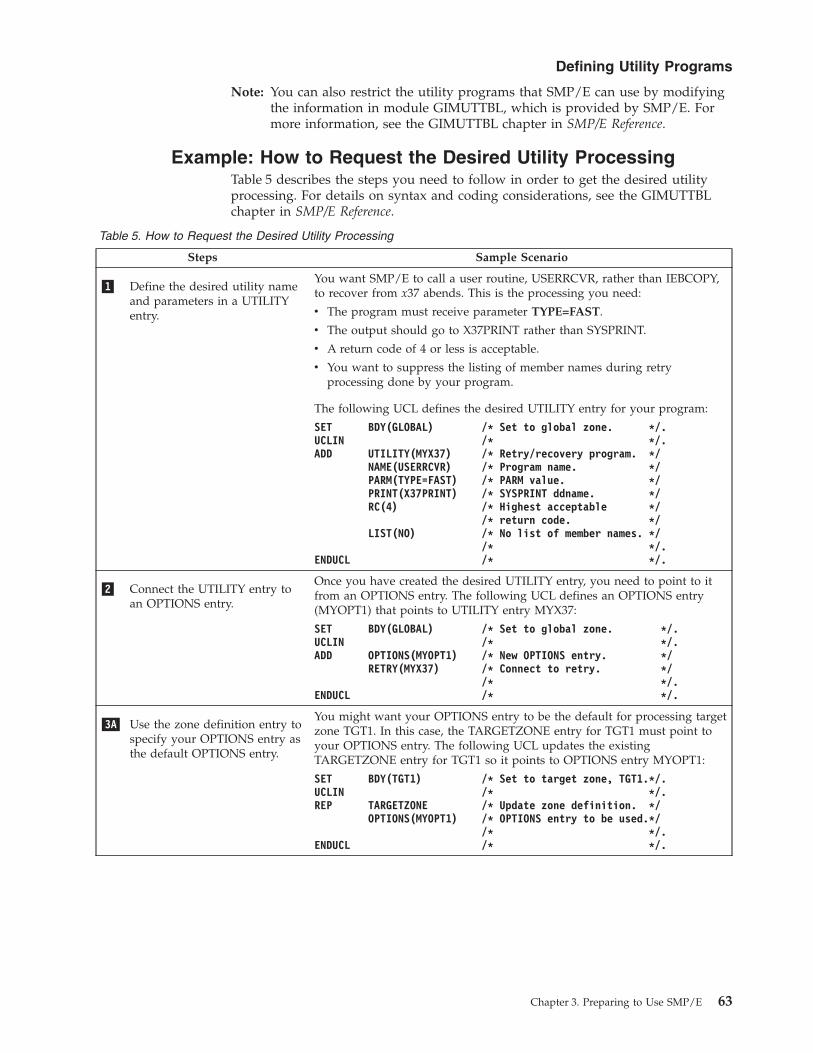
Note: You can also restrict the utility programs that SMP/E can use by modifyingthe information in module GIMUTTBL, which is provided by SMP/E. Formore information, see the GIMUTTBL chapter in SMP/E Reference.
Example: How to Request the Desired Utility ProcessingTable 5 describes the steps you need to follow in order to get the desired utilityprocessing. For details on syntax and coding considerations, see the GIMUTTBLchapter in SMP/E Reference.
Table 5. How to Request the Desired Utility Processing
Steps Sample Scenario
�1� Define the desired utility nameand parameters in a UTILITYentry.
You want SMP/E to call a user routine, USERRCVR, rather than IEBCOPY,to recover from x37 abends. This is the processing you need:
v The program must receive parameter TYPE=FAST.
v The output should go to X37PRINT rather than SYSPRINT.
v A return code of 4 or less is acceptable.
v You want to suppress the listing of member names during retryprocessing done by your program.
The following UCL defines the desired UTILITY entry for your program:
SET BDY(GLOBAL) /* Set to global zone. */.UCLIN /* */.ADD UTILITY(MYX37) /* Retry/recovery program. */
NAME(USERRCVR) /* Program name. */PARM(TYPE=FAST) /* PARM value. */PRINT(X37PRINT) /* SYSPRINT ddname. */RC(4) /* Highest acceptable */
/* return code. */LIST(NO) /* No list of member names. */
/* */.ENDUCL /* */.
�2� Connect the UTILITY entry toan OPTIONS entry.
Once you have created the desired UTILITY entry, you need to point to itfrom an OPTIONS entry. The following UCL defines an OPTIONS entry(MYOPT1) that points to UTILITY entry MYX37:
SET BDY(GLOBAL) /* Set to global zone. */.UCLIN /* */.ADD OPTIONS(MYOPT1) /* New OPTIONS entry. */
RETRY(MYX37) /* Connect to retry. *//* */.
ENDUCL /* */.
�3A� Use the zone definition entry tospecify your OPTIONS entry asthe default OPTIONS entry.
You might want your OPTIONS entry to be the default for processing targetzone TGT1. In this case, the TARGETZONE entry for TGT1 must point toyour OPTIONS entry. The following UCL updates the existingTARGETZONE entry for TGT1 so it points to OPTIONS entry MYOPT1:
SET BDY(TGT1) /* Set to target zone, TGT1.*/.UCLIN /* */.REP TARGETZONE /* Update zone definition. */
OPTIONS(MYOPT1) /* OPTIONS entry to be used.*//* */.
ENDUCL /* */.
Defining Utility Programs
Chapter 3. Preparing to Use SMP/E 63
Table 5. How to Request the Desired Utility Processing (continued)
Steps Sample Scenario
�3B� Use the SET command to haveyour OPTIONS entry overridethe default OPTIONS entry forthe zone.
Instead of changing the default OPTIONS entry, you might want to overridewhatever the default might be and use OPTIONS entry (MYOPT1) forprocessing particular commands or SYSMODs. In this case, the SETcommand preceding the commands you want to process must point to yourOPTIONS entry. The following UCL points the SET command to OPTIONSentry MYOPT1:
SET BDY(TGT1) /* Set to target zone, TGT1.*/OPTIONS(MYOPT1) /* OPTIONS entry used. */....
Recovering After Errors from Utility ProcessingTo complete as many updates as possible to your product libraries, SMP/E tries torecover from errors that occur during processing by the utilities it invokes. Thetype of recovery SMP/E attempts for such errors depends on the type of error thatoccurred and the type of utility that was called.v Batched updates, no out-of-space problems. Items to be processed by the
link-edit utility or the copy utility are often batched. If an error other than anx37 abend occurs during such a utility call, SMP/E debatches the items andreinvokes the utility to attempt updates for individual members. This recovery isattempted automatically by SMP/E; no user intervention is required.
v Out-of-space errors (x37 abends). If a list of data sets is specified by the user,SMP/E attempts “retry” processing for data sets that have run out of space.During retry processing, the data set that ran out of space is compressed, andthe utility is called again to retry the updates.If retry processing does not reclaim sufficient space and input to the utility wasbatched (copy or link-edit utility only), SMP/E debatches the input and retriesthe utility for each member separately. If this final attempt fails, the resulting x37abend is treated as an unacceptable utility return code, and processing continuesfor other eligible updates.
This section explains what you need to define in order to have SMP/E attemptretry processing for x37 abends.
Overview of Your Input to Retry ProcessingYour input to retry processing is through subentries in the OPTIONS entry, anoptional retry exit routine, and the RETRY command operand.v OPTIONS entry. The RETRYDDN and EXRTYDD subentries in the OPTIONS
entry indicate which libraries are eligible for retry processing.The RETRYDDN subentry specifies which libraries should be included in retryprocessing. Without this list of libraries, SMP/E does not attempt retryprocessing.The EXRTYDD subentry specifies which libraries should be excluded from retryprocessing. This makes it easier for you to include all but a few specific librariesin retry processing.
v Exit routine. The retry exit routine enables you to control retry processing whenan x37 abend occurs, instead of having SMP/E compress the out-of-space dataset and reinvoke the failing utility.
Defining Utility Programs
64 SMP/E V3R2.0 User’s Guide

If SMP/E determines that a retry can be attempted, it cancels the abend dumpand calls the retry exit routine. The routine can then either cancel retryprocessing or perform some other method of recovery.
v RETRY operand. The RETRY operand tells SMP/E whether to attempt retryprocessing for the specific SMP/E command that is being processed. RETRY canbe specified on the ACCEPT, APPLY, LINK LMODS, LINK MODULE, andRESTORE commands.You do not need to specify this operand in order to request retry processing,because the default is RETRY(YES). However, you can explicitly specifyRETRY(YES) if you want to.To prevent retry processing for a specific command, specify RETRY(NO) insteadof using RETRY(YES).
Example: How to Request the Desired Retry ProcessingTable 6 describes the steps you need to follow in order to get the desired retryprocessing. For details on syntax and coding considerations, see SMP/E Reference.
Table 6. How to Request the Desired Retry Processing
Steps Sample Scenario
�1� Decide which data sets should be included in orexcluded from retry processing.
You want retry processing for all libraries exceptLINKLIB, MIGLIB, and NUCLEUS.
�2� Define the necessary subentries in the OPTIONSentries that you plan to use.
You already have been using OPTIONS entry OPT1 forall your ACCEPT, APPLY, LINK LMODS, LINKMODULE, and RESTORE commands. You need to addRETRYDDN and EXRTYDD values to specify thelibraries that are eligible for retry processing.
SET BDY(GLOBAL).UCLIN .ADD OPTIONS(OPT1)
RETRYDDN(ALL)EXRTYDD(LINKLIB,MIGLIB,
NUCLEUS).
ENDUCL .
�3� Decide whether to use the default RETRY UTILITYentry, or to point to and define a RETRY UTILITYentry that specifies the desired information.
You will use the defaults for the retry utility as shown inTable 4 on page 61.
�4� If desired, define an exit routine for retryprocessing.
The Retry Exit Routine section in SMP/E Referenceprovides all the information you need about theinterface for this routine and what SMP/E expectsthe routine to do.
You will use SMP/E’s retry processing instead of writinga retry exit routine.
Defining Utility Programs
Chapter 3. Preparing to Use SMP/E 65
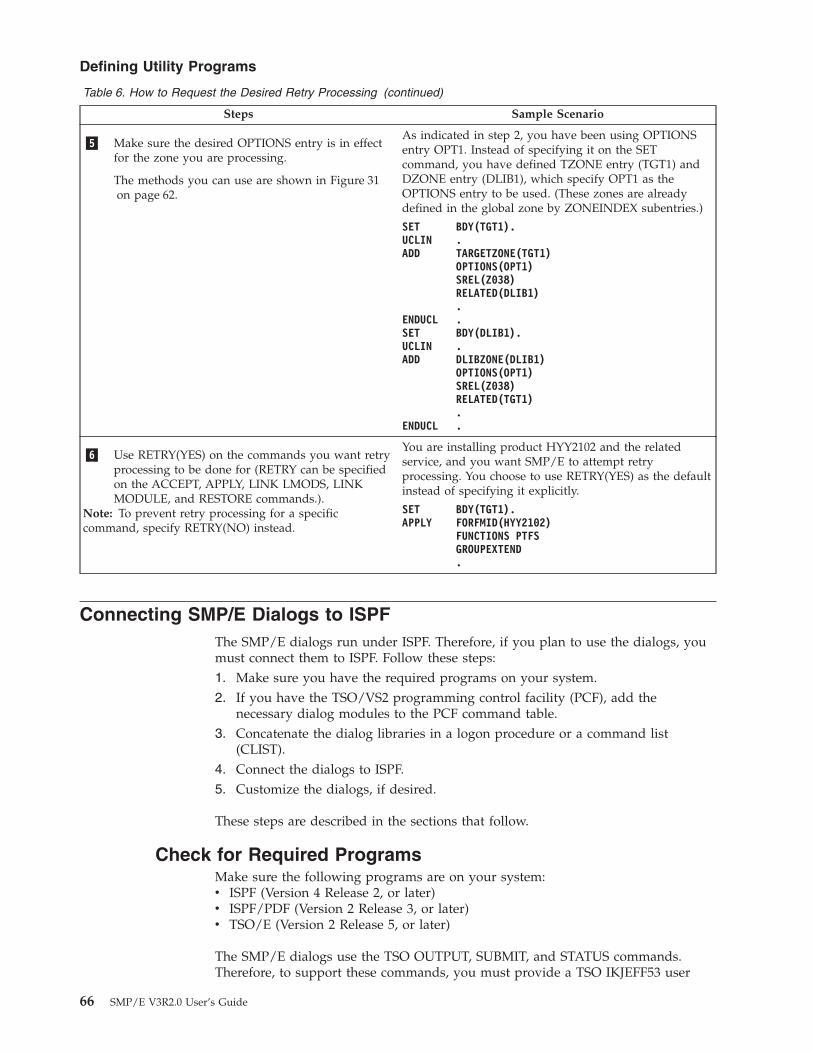
Table 6. How to Request the Desired Retry Processing (continued)
Steps Sample Scenario
�5� Make sure the desired OPTIONS entry is in effectfor the zone you are processing.
The methods you can use are shown in Figure 31on page 62.
As indicated in step 2, you have been using OPTIONSentry OPT1. Instead of specifying it on the SETcommand, you have defined TZONE entry (TGT1) andDZONE entry (DLIB1), which specify OPT1 as theOPTIONS entry to be used. (These zones are alreadydefined in the global zone by ZONEINDEX subentries.)
SET BDY(TGT1).UCLIN .ADD TARGETZONE(TGT1)
OPTIONS(OPT1)SREL(Z038)RELATED(DLIB1).
ENDUCL .SET BDY(DLIB1).UCLIN .ADD DLIBZONE(DLIB1)
OPTIONS(OPT1)SREL(Z038)RELATED(TGT1).
ENDUCL .
�6� Use RETRY(YES) on the commands you want retryprocessing to be done for (RETRY can be specifiedon the ACCEPT, APPLY, LINK LMODS, LINKMODULE, and RESTORE commands.).
Note: To prevent retry processing for a specificcommand, specify RETRY(NO) instead.
You are installing product HYY2102 and the relatedservice, and you want SMP/E to attempt retryprocessing. You choose to use RETRY(YES) as the defaultinstead of specifying it explicitly.
SET BDY(TGT1).APPLY FORFMID(HYY2102)
FUNCTIONS PTFSGROUPEXTEND.
Connecting SMP/E Dialogs to ISPFThe SMP/E dialogs run under ISPF. Therefore, if you plan to use the dialogs, youmust connect them to ISPF. Follow these steps:1. Make sure you have the required programs on your system.2. If you have the TSO/VS2 programming control facility (PCF), add the
necessary dialog modules to the PCF command table.3. Concatenate the dialog libraries in a logon procedure or a command list
(CLIST).4. Connect the dialogs to ISPF.5. Customize the dialogs, if desired.
These steps are described in the sections that follow.
Check for Required ProgramsMake sure the following programs are on your system:v ISPF (Version 4 Release 2, or later)v ISPF/PDF (Version 2 Release 3, or later)v TSO/E (Version 2 Release 5, or later)
The SMP/E dialogs use the TSO OUTPUT, SUBMIT, and STATUS commands.Therefore, to support these commands, you must provide a TSO IKJEFF53 user
Defining Utility Programs
66 SMP/E V3R2.0 User’s Guide
installation exit routine that does not restrict the TSO OUTPUT and STATUScommands to job names beginning with the user’s user ID. For details, see z/OSTSO/E Customization.
Add Dialog Modules to the PCF Command TableIf you have the TSO/VS2 programming control facility (PCF), add the followingmodules to the PCF command table:
GIMPSBTPGIMISID1GIMISID2GIMISID3GIMISID4GIMISID5
Concatenate the Dialog LibrariesTable 7 lists the SMP/E dialog libraries needed to concatenate with ISPF librariesTo use the dialogs, concatenate these libraries in a TSO logon procedure or in aCLIST. Here are some recommendations for concatenating the libraries:v There are two sets of dialog libraries for SMP/E: one for English and one for
Japanese. You can include the libraries for only one of these features in a givenlogon procedure or CLIST. If you want to be able to use both features on thesame system, you need a logon procedure or CLIST for each feature. To switchfrom one feature to the other, you have to exit ISPF, run the procedure or CLISTfor the other feature, and get back into ISPF.
v Do not use the ISPF LIBDEF service to concatenate the following libraries.Instead, use either the TSO ALLOCATE command or DD statements and JCL.– Dialog CLISTs (GIM.SGIMCLS0): If you use LIBDEF, the CLISTs and EXECs
in the data set cannot be executed.– Dialog load module library (GIM.SGIMLMD0): If LIBDEF is used to
concatenate the load module libraries, the SMP/E dialogs cannot findrequired load modules.
Table 7. ISPF Libraries and Related SMP/E Target Libraries
DDNAME SMP/E Library Contents
SYSPROC GIM.SGIMCLS0 Dialog CLISTs
ISPLLIB GIM.SGIMLMD0 Dialog load modules
ISPMLIB GIM.SGIMMENU Dialog messages
ISPPLIB GIM.SGIMPENU Dialog panels
ISPSLIB GIM.SGIMSENU Skeleton JCL procedures
ISPTLIB GIM.SGIMTENU (see Note1)
Table input library
ISPCTL1 (see Note 2) Generated JCL
ISPCTL2 (see Note 2) Generated JCL
SMPTABL A user-defined name (seeNote 3)
SMP/E table library
Notes:
1. Include GIM.SGIMTENU and the SMPTABL data set in the ISPTLIBconcatenation.
Connecting SMP/E Dialogs to ISPF
Chapter 3. Preparing to Use SMP/E 67
2. Use the ISPCTL1 and ISPCTL2 files to generate JCL for submitted SMP/E jobs.The SMP/E job submit facility lets you browse and edit this JCL. You can omitthese files from your logon procedure and let ISPF automatically allocate themas needed.To save the input JCL generated by the dialogs, either:v Use EDIT CREATE while in the generated JCL to save it in another
(permanent) data set, orv Allocate a permanent sequential data set to ISPCTL1 (LRECL=80,
RECFM=FB) before you enter the SMP/E dialogs.3. Allocate a single, installation-wide table data set to the ISPTLIB and SMPTABL
DD statements.v SMP/E uses this table data set to save process status information for the
SYSMOD management dialogs.v The data set must be a partitioned data set (LRECL=80, RECFM=FB).
Because the data set is also in the concatenation of ISPTLIB, make the blocksize compatible with the block size of the corresponding ISPF data sets.
v For more information about the SMPTABL data set, see “SMPTABL SpaceAllocation”.
SMPTABL Space AllocationThe amount of space required for SMPTABL depends on the number of concurrentprocesses you want to support for the SMP/E SYSMOD management dialog andon the amount of data that is saved for each process. Use Table 8 as a guide.
Table 8. SMPTABL Data Set Allocations
Number of Processes BLKSIZE Number of Blocks Directory Blocks
16 8800 60 4
32 8800 120 8
Sample Logon ProcedureFigure 32 is an example of a logon procedure that concatenates the libraries for theSMP/E dialogs.
Note: Depending on the system you are connecting the dialogs to, you may needto change your logon procedure, a CLIST, or both. It is common practice tohave a logon procedure call a CLIST every time a user logs on. This isnormally done so that minor changes to concatenations do not requirechanges to the logon procedure, or so users with the same logon procedurecan have the CLIST perform different allocations from the ones performedfor other users.
If you make changes only to your logon procedure and the procedure calls aCLIST that changes a concatenation, you may end up missing changes youmade in your logon procedure. In this case, instead of (or in addition to)updating the concatenations in your logon procedure, you should updatethe concatenations in the CLIST that is called.
Connecting SMP/E Dialogs to ISPF
68 SMP/E V3R2.0 User’s Guide

Connect the Dialogs to ISPFYou can get to the SMP/E dialogs from the SMP/E primary option menu. Toprovide access to that menu, you must connect the dialogs to ISPF. Sample ISPFpanels are provided with z/OS to enable panels for most z/OS elements, includingSMP/E. These panels are in the SISPPENU data set after APPLY processing. Thepanels supplied are:
ISR@390 This is an ISPF Primary Options Menu. It is identical to theISR@PRIM Primary Options Menu, except that it includes theadditional options 12 and 13, which point to the next two panels.
ISR@390S This is a secondary panel, with options used by systemprogrammers and administrators, including SMP/E.
ISR@390U This is a secondary menu panel, including the options used bymost ISPF users.
//SMPE EXEC PGM=IKJEFT01,ROLL=(NO,NO),DYNAMNBR=99//SYSPROC DD DSN=GIM.SGIMCLS0,DISP=SHR /* SMP/E CLISTs. */// DD DSN=ISR.V2R3M0.ISRCLIB,DISP=SHR//SYSHELP DD DSN=SYS1.HELP,DISP=SHR//SYSPRINT DD TERM=TS//SYSIN DD TERM=TS//************************************************************//*//* ISPF temporary data sets (no ISPCTL1 or ISPCTL2)//*//************************************************************//ISPLST1 DD DISP=NEW,UNIT=SYSALLDA,SPACE=(CYL,(1,1)),// DCB=(LRECL=121,BLKSIZE=0,RECFM=FBA)//ISPLST2 DD DISP=NEW,UNIT=SYSALLDA,SPACE=(CYL,(1,1)),// DCB=(LRECL=121,BLKSIZE=0,RECFM=FBA)//************************************************************//*//* ISPF/SMPE load modules, panels, skeletons, messages,//* tables//* NOTE: SMPTABL is a single installation-wide//* ISPF table data set shared by all SMP/E//* users. It is initially allocated as an empty PDS//* LRECL=80, RECFM=FB, BLKSIZE= (compatible with//* ISP.V2R3M0.ISRTLIB).//*//************************************************************//ISPLLIB DD DSN=GIM.SGIMLMD0,DISP=SHR /* SMP/E LMODs. *///ISPPLIB DD DSN=GIM.SGIMPENU,DISP=SHR /* SMP/E panels. */// DD DSN=ISR.V2R3M0.ISRPLIB,DISP=SHR// DD DSN=ISP.V2R3M0.ISPPLIB,DISP=SHR//ISPSLIB DD DSN=GIM.SGIMSENU,DISP=SHR /* SMP/E skeletons.*/// DD DSN=ISR.V2R3M0.ISRSLIB,DISP=SHR// DD DSN=ISP.V2R3M0.ISPSLIB,DISP=SHR//ISPMLIB DD DSN=GIM.SGIMMENU,DISP=SHR /* SMP/E messages. */// DD DSN=ISR.V2R3M0.ISRMLIB,DISP=SHR// DD DSN=ISP.V2R3M0.ISPMLIB,DISP=SHR//ISPTLIB DD DSN=GIM.SGIMTENU,DISP=SHR /* SMP/E tables. */// DD DSN=ISR.V2R3M0.ISRTLIB,DISP=SHR// DD DSN=ISP.V2R3M0.ISPTLIB,DISP=SHR// DD DSN=user-defined name,DISP=SHR /* SMP/E tables.*///SMPTABL DD DSN=user-defined name,DISP=SHR /* SMP/E tables.*/
Figure 32. Sample Logon Procedure That Concatenates SMP/E and ISPF Libraries
Connecting SMP/E Dialogs to ISPF
Chapter 3. Preparing to Use SMP/E 69
Use one of the methods documented in the Program Directory for this level ofSMP/E to use ISR@390 instead of ISR@PRIM. The SMP/E dialogs will then beaccessible through panel ISR@390S.
Customize the SMP/E DialogsAfter you install the SMP/E dialogs, you can change the default values they use.
When you select option 0 (SETTINGS) on the SMP/E Primary Option Menu,SMP/E displays panel GIM@PARM, which allows you tov Modify the values for allocating temporary SMP/E utility (SYSUTn) and SMP/E
work (SMPWRKn) data sets . The options you specify are saved permanently inthe ISPF profile pool for use later by other SMP/E dialog processes.
v Specify a data set name to be used by SMP/E for the SMPPARM data set duringbackground execution. The SMPPARM data set is used to define exit routinesand specify allocation information used by SMP/E processing. If a data set nameis specified on panel GIM@PARM, SMP/E generates an SMPPARM DDstatement in all JCL jobs created by the SMP/E dialogs that invoke SMP/E.
Connecting SMP/E Dialogs to ISPF
70 SMP/E V3R2.0 User’s Guide
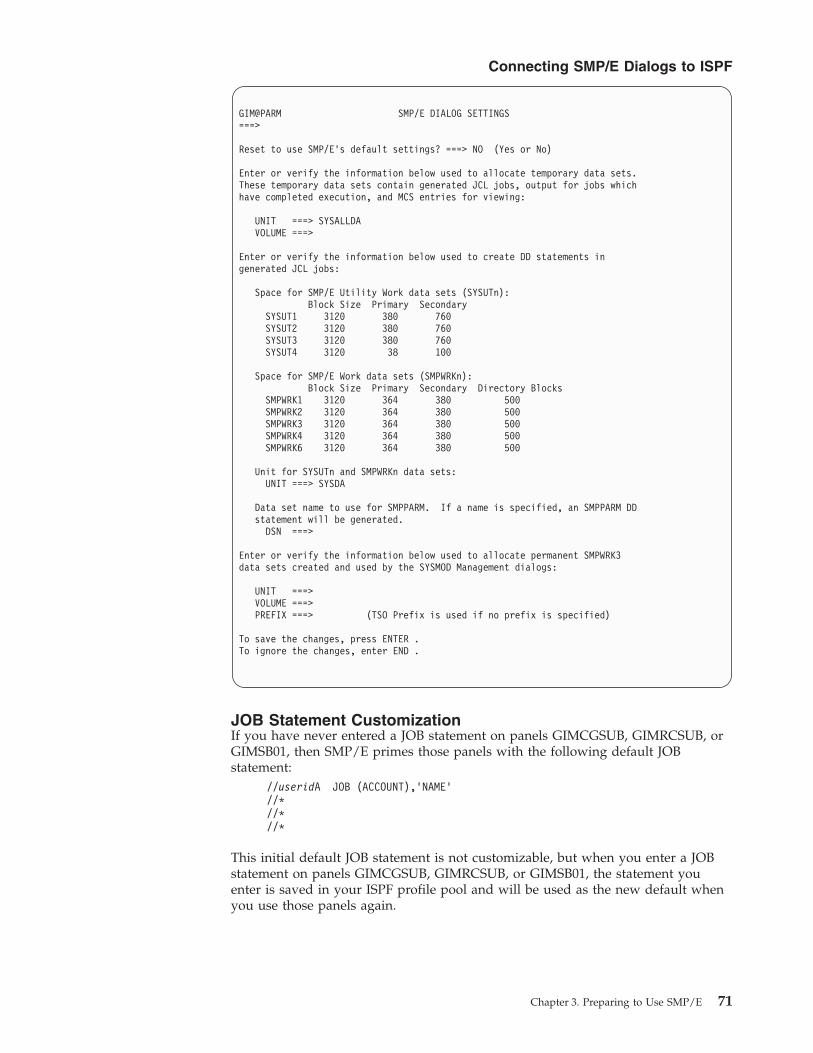
GIM@PARM SMP/E DIALOG SETTINGS===>
Reset to use SMP/E’s default settings? ===> NO (Yes or No)
Enter or verify the information below used to allocate temporary data sets.These temporary data sets contain generated JCL jobs, output for jobs whichhave completed execution, and MCS entries for viewing:
UNIT ===> SYSALLDAVOLUME ===>
Enter or verify the information below used to create DD statements ingenerated JCL jobs:
Space for SMP/E Utility Work data sets (SYSUTn):Block Size Primary Secondary
SYSUT1 3120 380 760SYSUT2 3120 380 760SYSUT3 3120 380 760SYSUT4 3120 38 100
Space for SMP/E Work data sets (SMPWRKn):Block Size Primary Secondary Directory Blocks
SMPWRK1 3120 364 380 500SMPWRK2 3120 364 380 500SMPWRK3 3120 364 380 500SMPWRK4 3120 364 380 500SMPWRK6 3120 364 380 500
Unit for SYSUTn and SMPWRKn data sets:UNIT ===> SYSDA
Data set name to use for SMPPARM. If a name is specified, an SMPPARM DDstatement will be generated.
DSN ===>
Enter or verify the information below used to allocate permanent SMPWRK3data sets created and used by the SYSMOD Management dialogs:
UNIT ===>VOLUME ===>PREFIX ===> (TSO Prefix is used if no prefix is specified)
To save the changes, press ENTER .To ignore the changes, enter END .
JOB Statement CustomizationIf you have never entered a JOB statement on panels GIMCGSUB, GIMRCSUB, orGIMSB01, then SMP/E primes those panels with the following default JOBstatement:
//useridA JOB (ACCOUNT),’NAME’//*//*//*
This initial default JOB statement is not customizable, but when you enter a JOBstatement on panels GIMCGSUB, GIMRCSUB, or GIMSB01, the statement youenter is saved in your ISPF profile pool and will be used as the new default whenyou use those panels again.
Connecting SMP/E Dialogs to ISPF
Chapter 3. Preparing to Use SMP/E 71
Setting Up SMP/E for Easier OperationSMP/E provides several optional facilities that you can use to make SMP/Eoperations easier and more efficient. To take advantage of these facilities, you mustset up a few SMP/E options. Normally, these set up procedures need only be doneonce.
The major tasks are:v Specifying SMP/E OPTIONS entryv Specifying link edit utility output DDDEF entriesv Specifying automatic cross-zone requisite checking
Recommended Values for OPTIONS EntryIBM recommends the following OPTIONS entry values:
Recommended Value Purpose
MSGFILTER(YES) MSGFILTER(YES) causes SMP/E to filter themessages it writes to SMPOUT during APPLY,ACCEPT, and RESTORE command processing.When SMP/E filters messages, most non-criticalinformational messages are not written toSMPOUT. The result is less output to read throughwhen it is necessary to investigate an SMP/Eoperation. MSGFILTER(NO) is the default.
MSGWIDTH(80) MSGWIDTH(80) causes SMP/E to format itsmessages to an 80 character width. This makesonline viewing simpler by eliminating the need toscroll right to view the entire message text.MSGWIDTH(120) is the default.
RECZGRP Often the RECEIVE command will receive a PTFthat has already been accepted and purged fromthe global zone and SMPPTS data set. There is noneed to receive such PTFs and they only add to thespace used by the SMPPTS. To prevent RECEIVEfrom receiving such PTFs, you need to tell SMP/Ewhat dlib zones to check when determining if aPTF has already been accepted. You can specify thelist of dlib zones using the RECEIVE Zone Group(RECZGRP) subentry in an OPTIONS entry.
The RECZGRP subentry allows you to set a policyand specify the list of zones once. This list is thenused for all future RECEIVE operations wheneverthe OPTIONS entry is active. With the list of dlibzones set, during RECEIVE processing, SMP/E willcheck each of the zones specified first beforereceiving a PTF. If that PTF is accepted in any ofthe specified zones, the PTF will not be receivedagain.
RETRYDDN(ALL) RETRYDDN(ALL) causes SMP/E to compressout-of-space libraries and retry processing after anx37 abend. When you use this option, make sureyou are not updating production data sets.
Setting Up SMP/E for Easier Operation
72 SMP/E V3R2.0 User’s Guide
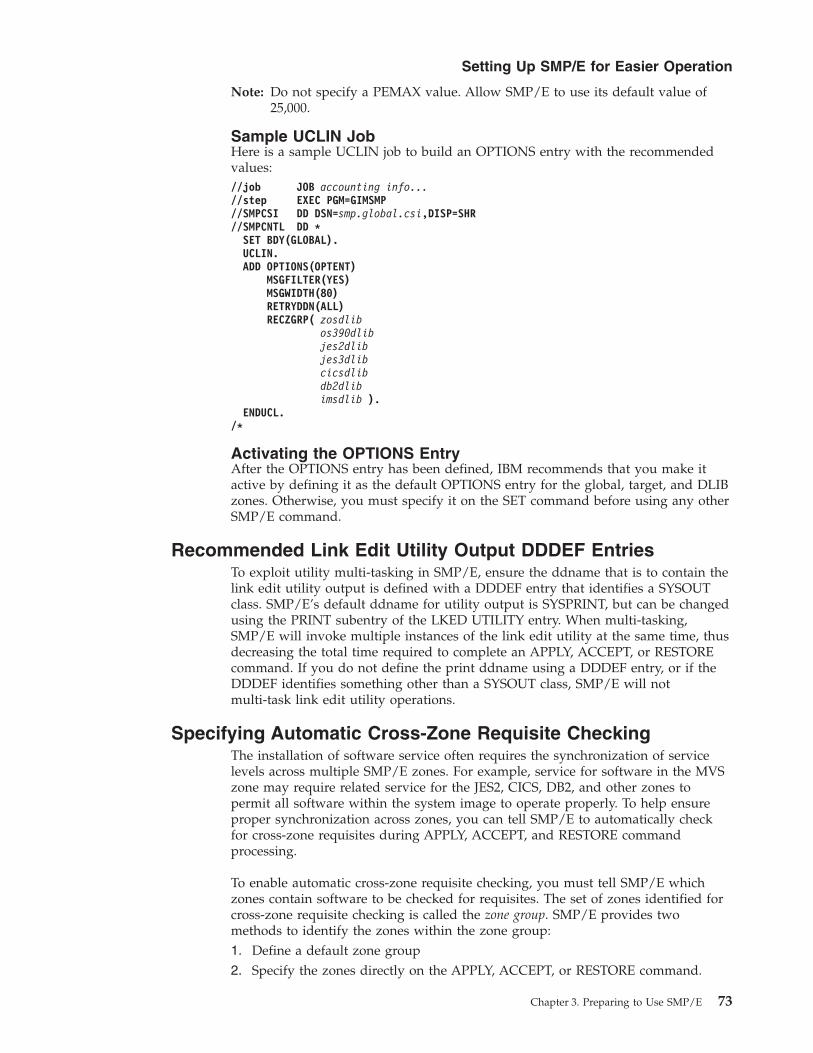
Note: Do not specify a PEMAX value. Allow SMP/E to use its default value of25,000.
Sample UCLIN JobHere is a sample UCLIN job to build an OPTIONS entry with the recommendedvalues://job JOB accounting info...//step EXEC PGM=GIMSMP//SMPCSI DD DSN=smp.global.csi,DISP=SHR//SMPCNTL DD *
SET BDY(GLOBAL).UCLIN.ADD OPTIONS(OPTENT)
MSGFILTER(YES)MSGWIDTH(80)RETRYDDN(ALL)RECZGRP( zosdlib
os390dlibjes2dlibjes3dlibcicsdlibdb2dlibimsdlib ).
ENDUCL./*
Activating the OPTIONS EntryAfter the OPTIONS entry has been defined, IBM recommends that you make itactive by defining it as the default OPTIONS entry for the global, target, and DLIBzones. Otherwise, you must specify it on the SET command before using any otherSMP/E command.
Recommended Link Edit Utility Output DDDEF EntriesTo exploit utility multi-tasking in SMP/E, ensure the ddname that is to contain thelink edit utility output is defined with a DDDEF entry that identifies a SYSOUTclass. SMP/E’s default ddname for utility output is SYSPRINT, but can be changedusing the PRINT subentry of the LKED UTILITY entry. When multi-tasking,SMP/E will invoke multiple instances of the link edit utility at the same time, thusdecreasing the total time required to complete an APPLY, ACCEPT, or RESTOREcommand. If you do not define the print ddname using a DDDEF entry, or if theDDDEF identifies something other than a SYSOUT class, SMP/E will notmulti-task link edit utility operations.
Specifying Automatic Cross-Zone Requisite CheckingThe installation of software service often requires the synchronization of servicelevels across multiple SMP/E zones. For example, service for software in the MVSzone may require related service for the JES2, CICS, DB2, and other zones topermit all software within the system image to operate properly. To help ensureproper synchronization across zones, you can tell SMP/E to automatically checkfor cross-zone requisites during APPLY, ACCEPT, and RESTORE commandprocessing.
To enable automatic cross-zone requisite checking, you must tell SMP/E whichzones contain software to be checked for requisites. The set of zones identified forcross-zone requisite checking is called the zone group. SMP/E provides twomethods to identify the zones within the zone group:1. Define a default zone group2. Specify the zones directly on the APPLY, ACCEPT, or RESTORE command.
Setting Up SMP/E for Easier Operation
Chapter 3. Preparing to Use SMP/E 73
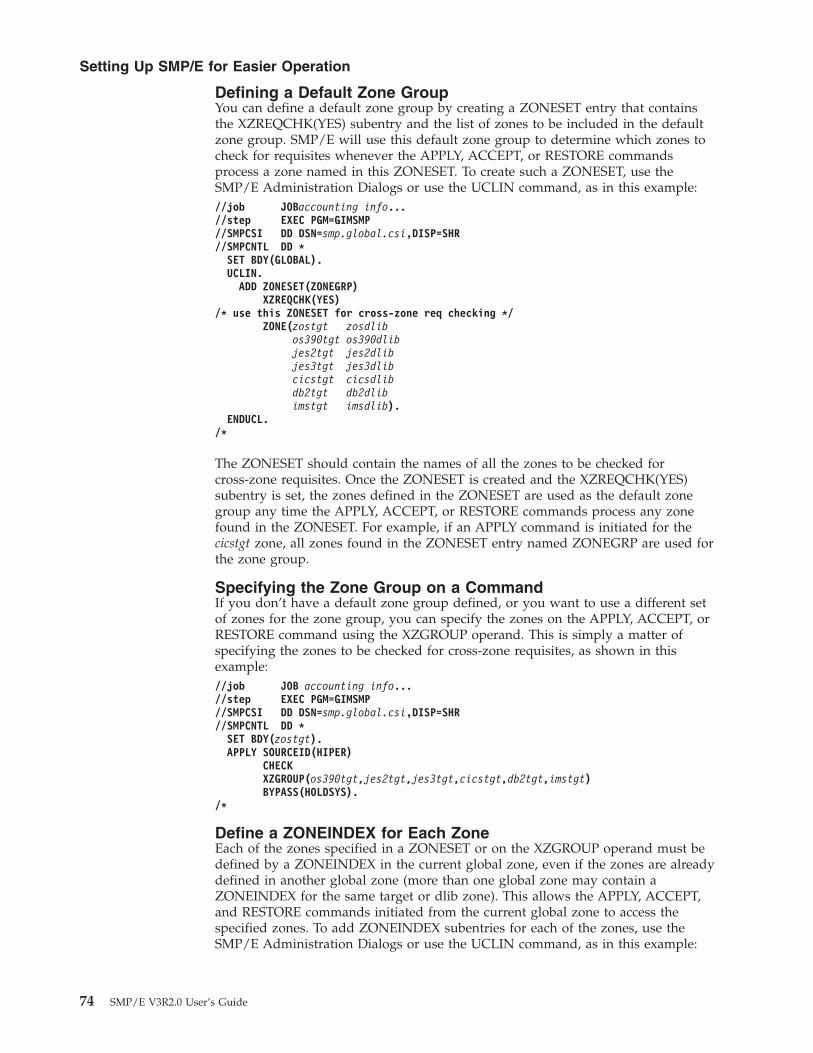
Defining a Default Zone GroupYou can define a default zone group by creating a ZONESET entry that containsthe XZREQCHK(YES) subentry and the list of zones to be included in the defaultzone group. SMP/E will use this default zone group to determine which zones tocheck for requisites whenever the APPLY, ACCEPT, or RESTORE commandsprocess a zone named in this ZONESET. To create such a ZONESET, use theSMP/E Administration Dialogs or use the UCLIN command, as in this example://job JOBaccounting info...//step EXEC PGM=GIMSMP//SMPCSI DD DSN=smp.global.csi,DISP=SHR//SMPCNTL DD *
SET BDY(GLOBAL).UCLIN.
ADD ZONESET(ZONEGRP)XZREQCHK(YES)
/* use this ZONESET for cross-zone req checking */ZONE(zostgt zosdlib
os390tgt os390dlibjes2tgt jes2dlibjes3tgt jes3dlibcicstgt cicsdlibdb2tgt db2dlibimstgt imsdlib).
ENDUCL./*
The ZONESET should contain the names of all the zones to be checked forcross-zone requisites. Once the ZONESET is created and the XZREQCHK(YES)subentry is set, the zones defined in the ZONESET are used as the default zonegroup any time the APPLY, ACCEPT, or RESTORE commands process any zonefound in the ZONESET. For example, if an APPLY command is initiated for thecicstgt zone, all zones found in the ZONESET entry named ZONEGRP are used forthe zone group.
Specifying the Zone Group on a CommandIf you don’t have a default zone group defined, or you want to use a different setof zones for the zone group, you can specify the zones on the APPLY, ACCEPT, orRESTORE command using the XZGROUP operand. This is simply a matter ofspecifying the zones to be checked for cross-zone requisites, as shown in thisexample://job JOB accounting info...//step EXEC PGM=GIMSMP//SMPCSI DD DSN=smp.global.csi,DISP=SHR//SMPCNTL DD *
SET BDY(zostgt).APPLY SOURCEID(HIPER)
CHECKXZGROUP(os390tgt,jes2tgt,jes3tgt,cicstgt,db2tgt,imstgt)BYPASS(HOLDSYS).
/*
Define a ZONEINDEX for Each ZoneEach of the zones specified in a ZONESET or on the XZGROUP operand must bedefined by a ZONEINDEX in the current global zone, even if the zones are alreadydefined in another global zone (more than one global zone may contain aZONEINDEX for the same target or dlib zone). This allows the APPLY, ACCEPT,and RESTORE commands initiated from the current global zone to access thespecified zones. To add ZONEINDEX subentries for each of the zones, use theSMP/E Administration Dialogs or use the UCLIN command, as in this example:
Setting Up SMP/E for Easier Operation
74 SMP/E V3R2.0 User’s Guide

//job JOB accounting info...//step EXEC PGM=GIMSMP//SMPCSI DD DSN=smp.global.csi,DISP=SHR//SMPCNTL DD *
SET BDY(GLOBAL).UCLIN.
ADD GLOBALZONE ZONEINDEX((zostgt,zos.target.csi,TARGET)(zosdlib,zos.dlib.csi,DLIB)(os390tgt,os390.target.csi,TARGET)(os390dlib,os390.dlib.csi,DLIB)(jes2tgt,jes2.target.csi,TARGET)(jes2dlib,jes2.dlib.csi,DLIB)(jes3tgt,jes3.target.csi,TARGET)(jes3dlib,jes3.dlib.csi,DLIB)(cicstgt,cics.target.csi,TARGET)(cicsdlib,cics.dlib.csi,DLIB)(db2tgt,db2.target.csi,TARGET)(db2dlib,db2.dlib.csi,DLIB)(imstgt,ims.target.csi,TARGET)(imsdlib,ims.dlib.csi,DLIB)).
ENDUCL./*
Cross-Zone Requisite CheckingWhether you define a default zone group or specify a zone group on the APPLY,ACCEPT, and RESTORE command, SMP/E will determine during commandprocessing whether any cross-zone requisites are unsatisfied. Cross-zone requisitesare caused by ++IF statements, where a SYSMOD containing a ++IF statementresides in one zone and the function identified on the ++IF resides in another zone.If the requisite identified on the ++IF statement does not reside in the same zoneas the identified function, then the condition is not satisfied.
Unsatisfied cross-zone requisite conditions will cause APPLY, ACCEPT, andRESTORE command processing to fail for the SYSMOD containing the ++IFstatement. Processing will continue to fail until the requisite is satisfied in the otherzone, unless the BYPASS(XZIFREQ) operand is specified on the command.
Bypassing Unsatisfied Cross-Zone RequisitesThe BYPASS(XZIFREQ) operand on the APPLY, ACCEPT, and RESTOREcommands tells SMP/E to continue processing the command even if missingcross-zone requisites are detected. SMP/E warning messages will be issued toidentify the missing cross-zone requisites.//job JOB accounting info...//step EXEC PGM=GIMSMP//SMPCSI DD DSN=smp.global.csi,DISP=SHR//SMPCNTL DD *
SET BDY(zostgt).APPLY SOURCEID(HIPER)
CHECKBYPASS(HOLDSYS
XZIFREQ)./*
Note: This example assumes a default zone group has been defined and willtherefore be used during APPLY command processing.
You can be broad or very granular in the specification of what cross-zone requisitesto bypass. You can indicate all cross-zone requisites are to be bypassed (as in theprevious example), you can indicate that specific cross-zone requisite SYSMODsare to be bypassed, or you can indicate that only specific cross-zone requisite
Setting Up SMP/E for Easier Operation
Chapter 3. Preparing to Use SMP/E 75
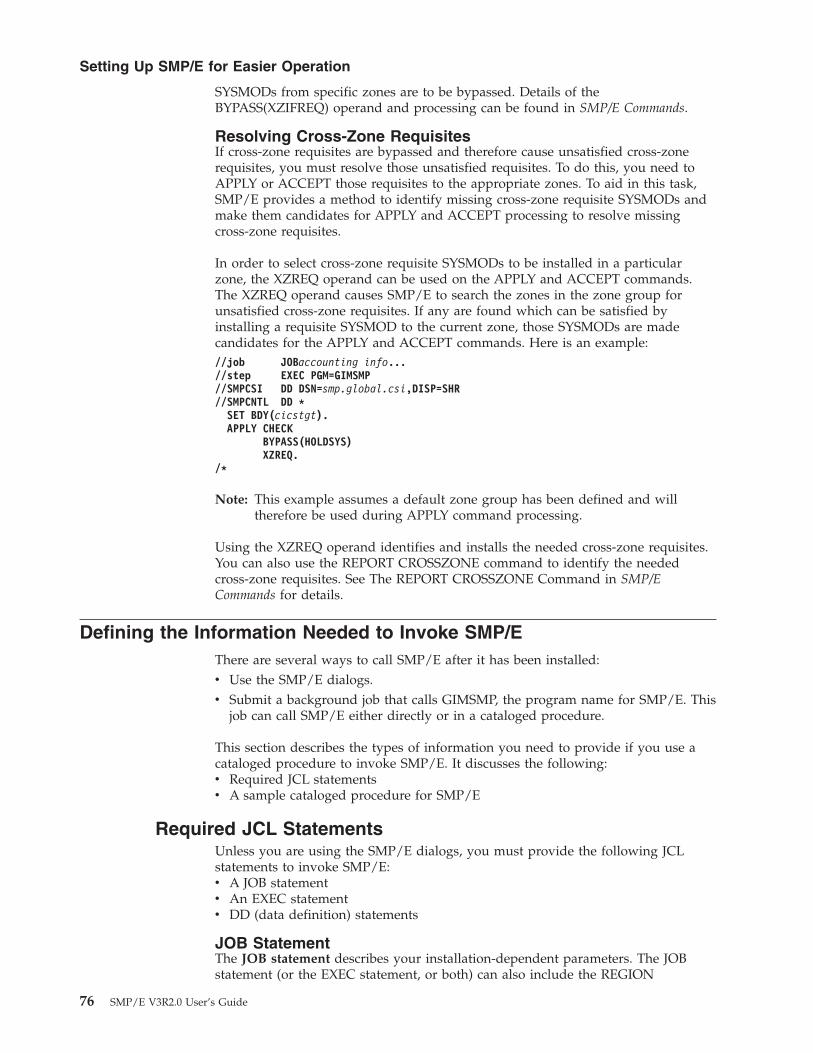
SYSMODs from specific zones are to be bypassed. Details of theBYPASS(XZIFREQ) operand and processing can be found in SMP/E Commands.
Resolving Cross-Zone RequisitesIf cross-zone requisites are bypassed and therefore cause unsatisfied cross-zonerequisites, you must resolve those unsatisfied requisites. To do this, you need toAPPLY or ACCEPT those requisites to the appropriate zones. To aid in this task,SMP/E provides a method to identify missing cross-zone requisite SYSMODs andmake them candidates for APPLY and ACCEPT processing to resolve missingcross-zone requisites.
In order to select cross-zone requisite SYSMODs to be installed in a particularzone, the XZREQ operand can be used on the APPLY and ACCEPT commands.The XZREQ operand causes SMP/E to search the zones in the zone group forunsatisfied cross-zone requisites. If any are found which can be satisfied byinstalling a requisite SYSMOD to the current zone, those SYSMODs are madecandidates for the APPLY and ACCEPT commands. Here is an example://job JOBaccounting info...//step EXEC PGM=GIMSMP//SMPCSI DD DSN=smp.global.csi,DISP=SHR//SMPCNTL DD *
SET BDY(cicstgt).APPLY CHECK
BYPASS(HOLDSYS)XZREQ.
/*
Note: This example assumes a default zone group has been defined and willtherefore be used during APPLY command processing.
Using the XZREQ operand identifies and installs the needed cross-zone requisites.You can also use the REPORT CROSSZONE command to identify the neededcross-zone requisites. See The REPORT CROSSZONE Command in SMP/ECommands for details.
Defining the Information Needed to Invoke SMP/EThere are several ways to call SMP/E after it has been installed:v Use the SMP/E dialogs.v Submit a background job that calls GIMSMP, the program name for SMP/E. This
job can call SMP/E either directly or in a cataloged procedure.
This section describes the types of information you need to provide if you use acataloged procedure to invoke SMP/E. It discusses the following:v Required JCL statementsv A sample cataloged procedure for SMP/E
Required JCL StatementsUnless you are using the SMP/E dialogs, you must provide the following JCLstatements to invoke SMP/E:v A JOB statementv An EXEC statementv DD (data definition) statements
JOB StatementThe JOB statement describes your installation-dependent parameters. The JOBstatement (or the EXEC statement, or both) can also include the REGION
Setting Up SMP/E for Easier Operation
76 SMP/E V3R2.0 User’s Guide
parameter to set the size of the region in which SMP/E runs. For details, see z/OSMVS JCL User’s Guide, SA22-7598 or z/OS MVS JCL Reference, SA22-7597.
Note: To enable the SMP/E job step to get the maximum space above 16megabytes. you can specify REGION=0M. Or, if you prefer, you can specifya more specific region size.
EXEC StatementThe EXEC statement must specify PGM=GIMSMP or the name of your catalogedprocedure for calling SMP/E. (For an example of a cataloged procedure, see“Sample Cataloged Procedure for SMP/E” on page 78.) The following can bespecified in the EXEC statement PARM parameter:
CSI= dsnamewhere dsname is the name of the CSI data set containing the global zone. (Thisdata set is also known as the master CSI.) This parameter is used to enableSMP/E to allocate the master CSI data set dynamically.
Note: If there is an SMPCSI DD statement, the CSI=dsname operand is notallowed. If both are specified, SMP/E does not run.
DATE= datewhere date can be one of the following:
U or IPL To use the IPL date of the system.
REPLY To request the date from the operator. As a result, SMP/Eissues message GIM399I.
yyddd To specify a specific date, where yy is the year and ddd is theday of the year (the Julian date).
If DATE is not specified, the IPL date of the system is used.
PROCESS=WAIT orPROCESS=END
The PROCESS parameter is used to control how long a job should wait if a CSIor PTS data set is not immediately available because it is currently being usedeither by another job or by a dialog.v WAIT causes the job to wait until the data set is available. A message is
issued to the system operator every 30 minutes while the job is waiting.v END causes the job to wait for 10 minutes. If the data set is still not
available after the 10-minute wait, the command requiring the data set isstopped.
If PROCESS is not specified, the default is PROCESS=WAIT.
For more information on obtaining and sharing CSI data sets, see “SharingSMP/E Data Sets” in SMP/E Commands.
Processing of the PTS data set is also affected by the WAITFORDSN valuespecified in its DDDEF entry. WAITFORDSN determines whether SMP/Eshould wait to allocate a data set that is not immediately available. If theDDDEF entry specifies WAITFORDSN=NO (or lets this value default to NO)and the data set is not available, allocation of the data set fails, regardless ofthe PROCESS value specified on the EXEC statement. If WAITFORDSN=NO,SMP/E does not wait to retry allocation of the data set.
Required JCL Statements
Chapter 3. Preparing to Use SMP/E 77
For example, suppose a PTS with a disposition of OLD is already being usedby a job, and a second job tries to access the same PTS data set by allocating itthrough a DDDEF entry. The DDDEF entry used by the second job for the PTSspecifies WAITFORDSN=NO. As a result, allocation of the PTS fails for thesecond job.
DD StatementsDD statements define the data sets that can be used in SMP/E processing. Forinformation on the data sets required for each command, see the chapters onindividual SMP/E commands in SMP/E Commands.
Note: You can use DDDEF entries, rather than DD statements, to allocate many ofthe necessary data sets. For more information, see “How to DynamicallyAllocate Data Sets to Be Used During SMP/E Processing” on page 58.
Sample Cataloged Procedure for SMP/EFigure 33 on page 80 is a sample cataloged procedure, SMPPROC, that can be usedto run SMP/E. The numbers to the left of the statements correspond to the notesthat follow the example. When you write a cataloged procedure for SMP/E,remember the following:v Tailor your own cataloged procedure to fit your system and processing
requirements.v You may want to use a single procedure for all SMP/E processing, or you may
want to define multiple procedures for specific SMP/E commands and includein each one just those DD statements required for that command. For example, aspecial procedure for RECEIVE might include the SMPPTFIN DD statement butno DD statements for the target and distribution libraries.
Note: The SYSLIB concatenations for APPLY and ACCEPT should point todifferent libraries.
v Most of the data sets in the cataloged procedure can be allocated without DDstatements. If you use the methods described for the data sets listed below, youmay not need a cataloged procedure.– Master CSI data set. The master CSI data set can be specified on the CSI=
parameter of the EXEC statement for GIMSMP, rather than on the SMPCSIDD statement. For more information about parameters you can specify on theEXEC statement, see “Required JCL Statements” on page 76.
– Target and distribution zones. CSI data sets for target and distribution zonesare normally dynamically allocated with zone indexes in the global zone. Ifyou want to use the batch local shared resources (BLSR) subsystem, you mustsupply your own JCL statements. For examples of defining zone indexes andof specifying JCL for BLSR, see the SMPCSI section in SMP/E Reference.
– Other data sets. Other data sets in the cataloged procedure can be definedwith DDDEF entries. When you use DDDEF entries, only the data setsSMP/E needs for a particular run are allocated.When you use DD statements, all the data sets defined must be online andallocated. Therefore, you might want to use a combination of DDDEF entriesand a cataloged procedure shorter than the one in Figure 33 on page 80. Formore information about DDDEF entries, see SMP/E Reference.
v Although they are not shown in the sample cataloged procedure, the followingDD statements may also be required:– An SMPCNTL DD statement, pointing to the commands that SMP/E
processes, is required by all commands.
Required JCL Statements
78 SMP/E V3R2.0 User’s Guide
– An SMPPTFIN DD statement, pointing to the source of the SYSMODs that areprocessed, is required by the RECEIVE command.
– An SMPHOLD DD statement, pointing to the source of the HOLDDATA thatis processed, is required by the RECEIVE command.
– An SMPPTS DD statement should be coded with DISP=SHR. This allowsconcurrent jobs to share the PTS as much as possible. For more informationon how SMP/E shares data sets, see Sharing SMP/E Data Sets in SMP/ECommands.
– The SMPLTS data set is required when processing load modules withCALLLIBS.
– An SMPMTS DD statement is required for changes to macros that do notreside in a target library.
– An SMPSTS DD statement is required for changes to source code that doesnot reside in a target library.
– If any of the SYSMODs being installed contain elements packaged with theLKLIB operand, a DD statement for the ddname specified on that operand isrequired by the APPLY and ACCEPT commands.
– If any of the SYSMODs being installed contain elements or JCLIN packagedwith the TXLIB operand, a DD statement for the ddname specified on thatoperand is required by the APPLY and ACCEPT commands.
v If any of the required data sets (such as the SMPPTFIN) are not defined in thecataloged procedure or by DDDEF entries, they must be specified in the JCLused to call SMP/E.
v For more information about the data sets required by each SMP/E command,see SMP/E Commands.
Sample Cataloged Procedure
Chapter 3. Preparing to Use SMP/E 79

�1� SMPPUNCH is required for the GENERATE, REPORT, and UNLOADcommands. Because it may have a high level of output, SMPPUNCH shouldbe directed to disk or tape.
�2� SMPCSI DD statements should be coded with DISP=SHR. This allowsSMP/E to share the CSI data sets as much as possible. If DISP=OLD isspecified, no data-set sharing is attempted. For more information on howSMP/E shares data sets, see Sharing SMP/E Data Sets in SMP/E Commands.
�3� SMPWRK1–SMPWRK6 show only sample sizes for the data sets. The actualsize required depends on the number of SYSMODs being processed and thenumber of elements within those SYSMODs.
�4� SMPWRK3 can be permanently allocated in order to reuse assemblies. Formore information, see the description of the REUSE operand in The APPLYCommand in SMP/E Commands.
�5� SYSLIB concatenation depends on how you intend to use the distribution
//SMPPROC PROC//SMP EXEC PGM=GIMSMP//* ----- SYSOUT data sets --------------------------------//SMPOUT DD SYSOUT=A//SMPRPT DD SYSOUT=A//SMPLIST DD SYSOUT=A//SMPSNAP DD SYSOUT=A//SMPDEBUG DD SYSOUT=A//SYSPRINT DD SYSOUT=A
�1� //SMPPUNCH DD SYSOUT=B//*------ SMP/E data sets ---------------------------------//SMPLOG DD DSN=SYS1.SMPLOG,DISP=MOD//SMPLOGA DD DSN=SYS1.SMPLOGA,DISP=MOD
�2� //* ----- Master CSI -------------------------------------//SMPCSI DD DSN=SMPE.SMPCSI.CSI,DISP=SHR//SMPDATA1 DD DSN=MVSTGT1.SMPDATA1,DISP=MOD//SMPDATA2 DD DSN=MVSTGT1.SMPDATA2,DISP=MOD
�3� //* ----- SMP/E temporary data sets------------------------//SMPWRK1 DD UNIT=SYSDA,SPACE=(CYL,(2,1,5)),DISP=(,DELETE),// DCB=BLKSIZE=6160//SMPWRK2 DD UNIT=SYSDA,SPACE=(CYL,(2,1,5)),DISP=(,DELETE),// DCB=BLKSIZE=6160
�4� //SMPWRK3 DD DSN=data set name,UNIT=SYSDA,SPACE=(CYL,(2,1,5)),DISP=(,CATALOG),
// DCB=BLKSIZE=3120//SMPWRK4 DD UNIT=SYSDA,SPACE=(CYL,(2,1,5)),DISP=(,DELETE),// DCB=BLKSIZE=3120//SMPWRK6 DD UNIT=SYSDA,SPACE=(CYL,(2,1,5)),DISP=(,DELETE),// DCB=BLKSIZE=6160//* ----- Utility data sets -------------------------------//SYSUT1 DD UNIT=SYSDA,SPACE=(CYL,(2,1)),DISP=(,DELETE)//SYSUT2 DD UNIT=SYSDA,SPACE=(CYL,(2,1)),DISP=(,DELETE)//SYSUT3 DD UNIT=SYSDA,SPACE=(CYL,(2,1)),DISP=(,DELETE)//SYSUT4 DD UNIT=SYSDA,SPACE=(TRK,(2,1)),DISP=(,DELETE)//* ----- Assembler SYSLIB data set -----------------------
�5� //SYSLIB DD DSN=data set name,DISP=SHR• • •
//* ----- Target libraries --------------------------------//LINKLIB DD DSN=SYS1.LINKLIB,DISP=OLD
• • •//* ----- Distribution libraries --------------------------//AOSC5 DD DSN=SYS1.AOSC5,DISP=OLD
• • •// PEND
Figure 33. Sample SMP/E Cataloged Procedure
Sample Cataloged Procedure
80 SMP/E V3R2.0 User’s Guide
libraries. For details on which data sets to include and in what order, see“How to Determine the Appropriate SYSLIB Concatenation”.
If you use a different SYSLIB concatenation for APPLY and ACCEPT andprefer to use a SYSLIB DD statement, you should have at least twoprocedures. If you use DDDEFs to point to the different libraryconcatenations, you can use one procedure. You can modify the examples touse the appropriate procedure.
The following job uses the cataloged procedure in Figure 33 on page 80 to callSMP/E.//SMPJOB JOB ’accounting info’,MSGLEVEL=(1,1)//SMPSTEP EXEC SMPPROC//SMPPTFIN DD ... points to the file or data set that contains//* the SYSMODs to be received//SMPHOLD DD ... points to the file or data set that contains//* the HOLDDATA to be received//SMPTLIB DD UNIT=SYSALLDA,VOL=SER=SMPVOL//SMPCNTL DD *
SET BDY(GLOBAL) /* Set to global zone */.RECEIVE SYSMOD /* receive SYSMODS and */
HOLDDATA /* HOLDDATA */SOURCEID(MYPTFS) /* Assign a source ID */
/* */.LIST MCS /* List the cover letters */
SOURCEID(MYPTFS) /* for the SYSMODs *//* */.
SET BDY(TARGET1) /* Set to target zone */.APPLY SOURCEID(MYPTFS) /* Apply the SYSMODs */
/* */.LIST LOG /* List the target zone log */.
/*
How to Determine the Appropriate SYSLIB ConcatenationThe recommended method for determining the appropriate SYSLIB concatenationtreats the distribution libraries as totally separate from the target libraries.
Note: The example shown is for processing a zone for SREL Z038 containing thez/OS base control program (BCP). For other zones, follow therecommendations for the products residing in those zones.
Treating the distribution libraries as totally separate from the target librariesensures that only the latest tested version of a macro is used during an assembly.Thus, the SYSLIB concatenation at ACCEPT is different from that at APPLY.
The SMPMTS data set contains macros from SYSMODs that are applied. Therefore,the proper SYSLIB concatenation for APPLY processing includes the SMPMTS dataset, as is shown in Figure 34 on page 82.
Sample Cataloged Procedure
Chapter 3. Preparing to Use SMP/E 81
|||||||||||||||||||||

During ACCEPT processing, the macros in the SMPMTS and in the target macrolibraries are not considered to have been tested. The SMPMTS is, therefore, notconcatenated. Figure 35 shows the proper SYSLIB concatenation for ACCEPT.
Defining Exit RoutinesThere are two types of exit routines you can define to tailor SMP/E processing:v The RECEIVE exit routine enables you to scan statements in the SMPPTFIN
data set during RECEIVE processing.v The retry exit routine enables you to control retry processing when a data set
runs out of space during RETRY can be specified on the ACCEPT, APPLY, LINKLMODS, LINK MODULE, and RESTORE commands. processing. (In retryprocessing, the data set is compressed and the utility that failed is called again.)
For more details, see the “SMP/E Exit Routines” chapter, in SMP/E Reference.
//* ------ Include SMPMTS first//* ------ followed by all macro target libraries//* ------ followed by all distribution//* libraries//SYSLIB DD DSN=SYS1.SMPMTS,DISP=OLD// DD DSN=SYS1.MACLIB,DISP=OLD// DD DSN=SYS1.MODGEN,DISP=OLD//* ------ IF YOU NEED TO ASSEMBLE JES SOURCE MODULES://* ------ either HASPSRC (JES2) or JES3MAC (JES3)// DD DSN=SYS1.HASPSRC,DISP=OLD// DD DSN=SYS1.SISTMAC1,DISP=OLD// DD DSN=SYS1.ATSOMAC,DISP=OLD// DD •// DD • other macro target libraries// DD •// DD •// DD • any macro distribution libraries needed// DD •
Figure 34. APPLY SYSLIB Concatenation: APPLY Different from ACCEPT
//* ------ Include only macro distribution//* libraries// DD DSN=SYS1.AMACLIB,DISP=OLD//SYSLIB DD DSN=SYS1.AMODGEN,DISP=OLD//* ------ IF YOU NEED TO ASSEMBLE JES SOURCE MODULES://* ------ either HASPSRC (JES2) or JES3MAC (JES3)// DD DSN=SYS1.HASPSRC,DISP=OLD// DD DSN=SYS1.AISTMAC1,DISP=OLD// DD DSN=SYS1.ATSOMAC,DISP=OLD// DD •// DD • other macro distribution libraries// DD •
Figure 35. ACCEPT SYSLIB Concatenation: APPLY Different from ACCEPT
Sample Cataloged Procedure
82 SMP/E V3R2.0 User’s Guide
Chapter 4. Installing a New Function
This chapter discusses the method you use to install a new function. It describes:v Sources of new functions and sources of installation informationv An example of installing a function
IntroductionThe primary purpose of SMP/E is to help you install SYSMODs in your target anddistribution libraries. To do this, SMP/E provides three basic commands:RECEIVE, APPLY, and ACCEPT.
This chapter summarizes the general steps you follow to install a function. Youshould look at the installation materials that arrive with a function to find outabout special requirements and procedures for installing the function. Table 9 listssources of new functions and places where you can find information for installingthe new functions.
Table 9. Sources for Functions and Their Installation Information
Product Delivery Vehicle Products and Service You Get Installation Materials You Can Use
CBPDO Products and service (not integrated)on a single logical tape
Sample jobs to receive products andservice
Program directories for the productsyou ordered
Installation manuals for the productsyou ordered
Independent product Product tape Program directory for the product
Installation manual for the product (ifone is provided)
RECEIVE-APPLY-ACCEPT MethodRECEIVE-APPLY-ACCEPT is the standard installation method. It uses SMP/ERECEIVE, APPLY, and ACCEPT commands to install functions onto a subsystem.Usually, you do not have to do any special processing outside SMP/E to installyour functions. The JCLIN needed to set up the load modules for the function issent along with the function.
In this method of installation, you:1. Use the RECEIVE command to get the SYSMODs from the input data set and
put them in the SMP/E data sets (the PTS and global zone within the CSI).2. Use the APPLY command to install the SYSMODs in the target system libraries;
then test them as required.3. Use the ACCEPT command to install the SYSMODs into the distribution
libraries.
© Copyright IBM Corp. 1986, 2003 83
Using the Standard RECEIVE-APPLY-ACCEPT MethodThis section describes the standard process for using the RECEIVE, APPLY, andACCEPT commands to install a function.
Note: You can use either the SMP/E dialogs or JCL jobs to receive, apply, andaccept functions. The basic steps to follow are the same. If you have accessto the SMP/E dialogs, you should use them. Otherwise, you can use thesteps described in this chapter as examples.
Preparing Your SystemBefore you start doing any operations on the product function or service tape youhave received, there is work you should do to your system to make sure it is readyand to be certain you can recover in case of a serious failure during installation.
Following are some of these steps:1. Read the documentation for your new product. This includes the program
directory and, if provided, an installation guide. Also check the IBM PreventiveService Planning (PSP) files for the latest information about the product. This isimportant because there may be a PTF for the product that is not included inan ESO, or one of the PTFs may contain an error you should know about.
2. When you order a product, you should update the FMID list in the globalzone with the FMIDs of the products you will be receiving. (Check the programdirectory for this information.) This enables you to receive any preventiveservice shipped between the time you order the product and the time youinstall it.
3. Read the program directory. It tells you which libraries are affected, whetherany existing libraries must be expanded and by how much, and whether anynew libraries are required.
4. Prepare the target and distribution libraries. If these libraries are properlyprepared before you apply or accept a SYSMOD, very little time is lost if anerror occurs.List the VTOC of the target and distribution packs. This shows you which datasets are into their secondary extents, or are too full to contain additionalelements that may be applied or accepted. If you are unsure how large a dataset will grow, you may want to check full data sets against the SYSMODs youwill be processing.Partitioned data sets with a high percentage of their space used can becompressed by use of IEBCOPY. If it looks as if more space may be neededeven after the compression, allocate a larger data set and copy the nearly fulldata set into it; then delete the old data set. Rename the new one properly and,if it has had to be allocated on a different pack, update any procedurenecessary with the new VOLUME data.This preparation is time-consuming but takes less time and work thanrecovering from an out-of-space abend (E37, B37, and so on).SMP/E command operands can also help you handle out-of-space abends.v The COMPRESS operand tells SMP/E to compress the data sets before they
are updated; this can help you avoid an x37 ABEND. For more informationabout the COMPRESS operand, see the SMP/E Commands manual.
v The RETRY(YES) operand tells SMP/E to attempt recovery after an x37ABEND occurs by compressing the affected data sets and retrying the failingutility. If you still need space after SMP/E’s initial retry attempt and input tothe utility was batched (copy or link-edit utility only), SMP/E debatches the
Installing Functions
84 SMP/E V3R2.0 User’s Guide
input and retries the utility separately for each member. For informationabout this retry processing, see “Recovering After Errors from UtilityProcessing” on page 64.
5. Allocate any new libraries required. Determine where they are to be allocatedand then allocate them. Remember that the program directory ordinarily showshow much space will be used—not how much space to allocate for thelibraries. Libraries should be allocated with more space than required to allowfor later modifications. Usually, twice the required space is recommended toallow for the replacement of every element in the library without running outof space.Remember to add the appropriate DDDEF entries to the target zones and DLIBzones into which you will be installing this function.
6. Check the SMP/E data sets to make sure they have enough space. Ifnecessary, compress or expand the partitioned data sets. A data set that is easilyoverlooked in this process is the SMPSTS, which fills very rapidly when youare receiving source updates (JES2 and JES3, for example). Reorganize orexpand (if necessary) the CSI data set (using access method services EXPORTand IMPORT).
7. Create a backup for the volumes affected. This is a very important step thatshould not be overlooked. Without a current backup copy, a serious systemfailure during installation means not only redoing the installation in processbut also means going to the last backup level and redoing all the work donesince then.
8. Estimate the time required for APPLY and ACCEPT processing. Make sureenough time is available to allow these jobs to run to completion.The program directory or installation guide may contain information to helpyou estimate the time required.
Staging the SYSMODs: The RECEIVE ProcessWhen you get a new function as part of a CBPDO, you get one logical tape thatcontains the function and the unintegrated service. If there is no preventive servicefor the function, it is not included in your order.
The first step in installing the new function is the RECEIVE process, which readsin the SYSMODs so they can be installed later:v If you have access to the SMP/E dialogs, you can use the RECEIVE dialog to
receive the function and any related service and HOLDDATA.v You can use the RIMLIB job included on the CBPDO tape to receive the
function, service, and HOLDDATA shipped on the CBPDO. For moreinformation, see z/OS and z/OS.e Planning for Installation and the documentationthat was included with the CBPDO.
Receiving the Function SYSMODFunction SYSMODs obtained from IBM are packaged in RELFILE format. Beforeany actual processing takes place, SMP/E must first determine if the SYSMODspackaged in RELFILE format are to be received from tape or DASD. If theSMPPTFIN data set is located on tape, SMP/E assumes that the RELFILEs are ontape. If the SMPPTFIN data set is located on DASD, SMP/E assumes the RELFILEsare on DASD and are cataloged.
During RECEIVE processing, the contents of the RELFILEs are placed into theSMPTLIBs, which are used as temporary storage. SMPTLIBs that are uncataloged
Installing Functions
Chapter 4. Installing a New Function 85
are automatically cataloged by SMP/E. When the RELFILEs are on DASD, SMP/Echecks to ensure that the RELFILE and SMPTLIB names are not the same. If theyare, RECEIVE processing stops.
Note: Do not delete the SMPTLIBs after the RECEIVE step; they must be retaineduntil after the function is applied and accepted.
Updating the Target Libraries: The APPLY ProcessAfter preparing your target and distribution libraries and receiving the functionand any related service and HOLDDATA, the next step is to update your targetlibraries. Review the program directory for the products you are installing.
When installing a new function, you are concerned with three groups ofSYSMODs:v The function itselfv All PTFs applicable to the functionv All PTFs applicable to other functions that are specified as requisites of the
function or service applicable to the function
You may be able to apply all the required SYSMODs with one APPLY command.This method has several advantages:v It eliminates the need to run the APPLY command several times in order to
install the complete set of SYSMODs required.v You replace elements in the target libraries less often; therefore, there is less risk
of running out of space.v Because the SMP/E overhead and the number of invocations of the system
utilities are reduced, overall processing time is decreased.
Therefore, although SMP/E supports the separate installation of a new functionand its service, the common installation method is preferred unless the productprogram directory for other unique installation requirements directs otherwise.This is the method illustrated in subsequent examples. For more information aboutthe APPLY command operands, see The APPLY Command in SMP/E Commands.
When you are updating the target libraries, there are actually three distinct SMP/Ejobs to be run:v Receive additional HOLDDATA. Before starting the APPLY, you should contact
the IBM Support Center to get additional HOLDDATA from the product PSP fileor the CORPE PSP file. Obtaining and receiving additional HOLDDATA iscovered under “Processing HOLDDATA from PSP Files” on page 121. The othertwo steps are covered in more detail in the following sections.
v Run the APPLY CHECK job. This is a nonupdating mode of APPLY. Its purposeis to help resolve any problems that may prevent the APPLY from completingprocessing successfully.
v Apply the SYSMOD updates. This installs the new function and service into thetarget libraries.
Checking the Update: The APPLY CHECK ProcessThe purpose of this step is to determine:v Whether any errors will occur while the new function is being applied (except
for errors that occur as a direct result of an update, such as a target libraryrunning out of space). This includes missing DDDEF entries.
v Whether any requisite SYSMODs are missing.
Installing Functions
86 SMP/E V3R2.0 User’s Guide
v The target libraries that will be updated.v The SYSMODs, if any, that will be regressed.
Use the SMP/E dialogs or the following sample job to do an APPLY CHECK forthe function and related SYSMODs://APPLY JOB ’accounting info’,MSGLEVEL=(1,1)//APPLYCHK EXEC SMPPROC//SMPCNTL DD *SET BDY(ZOSTGT1) /* Set to target zone. */.APPLY FORFMID(HXX1200) /* Apply for this FMID */
FUNCTIONS /* the function itself */PTFS /* and all its PTFs. */GROUPEXTEND /* Also all requisite PTFS. */CHECK /* But do not update libs. */BYPASS(HOLDSYSTEM /* Bypass options */
HOLDCLASS(UCLREL,ERREL))
./*
Researching the APPLY CHECK Reports: As a result of running the APPLYCHECK job, SMP/E produces various messages and reports that you should nowuse to do further research. Here are some of the errors that may have beendetected:v Some DD statements may be missing. Check the program directory or the
SMP/E Reference manual to determine why they are required and how theyshould be specified.
v Some APAR fixes or USERMODs may be regressed. If so, you must determinewhy. For APAR fixes, you have to get the version of the APAR fix applicable tothe new product. For USERMODs, you have to rework the modification to makeit applicable to the new function, or eliminate the modification if the productbeing installed provides the same function. When doing the actual APPLYoperation, you may need to specify the BYPASS operand to inform SMP/E thatyou have resolved these problems.
v Some prerequisite or requisite PTFs may be missing. If so, you should determinewhether they can be obtained. Some may already be on an ESO tape you havein-house but have not received; others may not have been shipped, in whichcase you have to get an early copy of them by contacting the IBM SupportCenter. Although you can also avoid these conditions by using the BYPASSoperand, you are advised not to do this because the regressions have not beenresolved.
Note: Obtaining a product in a CBPDO greatly reduces the amount of workneeded to find requisite PTFs, because CBPDOs include all the service forproducts applicable to the selected SREL.
v Some elements may not have been selected for installation. For each suchelement, if the current functional owner (that is, FMID) is an IBM product, theremay not be a problem; this condition is common and occurs because there aremultiple functions with common elements. Check the program directory orinstallation guide for the product you are installing to determine whether thiscondition is normal or if it indicates a problem.If the FMID is not one for an IBM product, further research is necessary. Contactthe current owner of the element to determine how that product is related to theone you are installing.
v Some of the PTFs may not have been selected for installation because ofexception SYSMOD conditions identified by the ++HOLD MCSs. When
Installing Functions
Chapter 4. Installing a New Function 87
installing a new function, you may want to research these PTFs further. You canuse the reason ID and the comments specified in the ++HOLD MCS todetermine which of the following actions is most appropriate:– Bypass the condition using the BYPASS(HOLDERR) operand– Do not install the PTF– Obtain a fix for the APAR
Getting Additional SYSMODs: After doing the research step, you may decidethat additional SYSMODs are needed. If so:1. Obtain the additional SYSMODs by using CBPDO, ESO, IBMLINK, or the IBM
Support Center.2. Receive the additional SYSMODs, using the same source ID value as used
when processing the CBPDO tape.3. Rerun the APPLY CHECK job.
Repeat this process until no new errors are reported.
Updating the Target Library: The APPLY ProcessAfter you have done the APPLY CHECK and the associated research and the othernecessary preparation, the APPLY job itself should be fairly simple. The APPLY jobdoes the same checking as the APPLY CHECK and then continues by calling theappropriate system utilities to get all the elements installed.
Note: If a product deletes another product, you cannot use the RESTOREcommand to back off the applied product and bring back the deleted one.
Use the SMP/E dialogs or the following sample job to apply the function and anyrelated SYSMODs://APPLY JOB ’accounting info’,MSGLEVEL=(1,1)//APPLY EXEC SMPPROC//SMPCNTL DD *SET BDY(ZOSTGT1) /* Set to target zone. */.APPLY FORFMID(HXX1200) /* Apply for this FMID */
FUNCTIONS /* the function itself */PTFS /* and all its PTFs. */GROUPEXTEND /* Also all requisite PTFs. */
/* No check this time. */BYPASS(HOLDCLASS(UCLREL,ERREL)/*Bypass options.*/
HOLDSYS(reason-id,...) ./*
If you have obtained additional APAR fixes or USERMODs, you should eitherspecify each of these SYSMODs in the SELECT operand, or if all applicable APARsand USERMODs are to be applied, specify the APARS and USERMODS operands.
Note: For most products, you do not have to do any additional processing to getthe elements into executable format. However, some products may requireyou to run additional utilities or to perform extra steps after applying theSYSMODs. See your product documentation for more information.
Testing the New FunctionAfter installing the new function, you should perform two operations:1. Create a backup of the updated data sets, including any SMP/E data sets
affected, in case something happens to the data sets during the next phase.
Note: If you are doing the installation on a clone of your original system, youalready have a backup—your original system.
Installing Functions
88 SMP/E V3R2.0 User’s Guide
2. Do some testing before putting the new function into production. This testingshould include some of the following:v If the product has supplied installation verification procedures (IVPs), they
should be run.v If your installation has a test job stream, the tests should be run.v If the new function could at all affect your ability to IPL the system, try an
IPL at this time.
Only after verifying the new function on a noncritical test system should you putit into production. You should not consider the test phase completed until youhave run the new function in production mode for some period (as determined byyour installation requirements). Only then, if no errors are found, are you ready togo to the next step, updating your distribution libraries.
Updating the Distribution Libraries: The ACCEPT ProcessThe last major phase of installing a new function is to update the distributionlibraries, using the SMP/E ACCEPT command. This is a very critical step: Oncethe function and its service have been accepted, there is no SMP/E method forremoving it from either the target or distribution libraries.
When you are ready to update your distribution libraries, you have the same set ofconsiderations and SMP/E support as described under “Updating the TargetLibraries: The APPLY Process” on page 86, and the same three-phase operation:1. Receive additional data. Before starting the ACCEPT process, you should
obtain any additional HOLDDATA for the function you are installing by usingCBPDO, ESO, IBMLINK, or the IBM Support Center. See “ProcessingHOLDDATA from PSP Files” on page 121 for additional information.
Note: If there is a significant time between the APPLY process and ACCEPTprocess, additional problems may have been reported for which++HOLD statements have been created. If this new data is not obtained,SMP/E may install PE PTFs into the distribution libraries.
2. Run the ACCEPT CHECK job. This is a nonupdating mode of ACCEPT. Itspurpose is to help resolve any problems that may prevent the ACCEPT fromcompleting processing successfully.
3. Accept the SYSMOD update. This installs the new function and service intothe distribution library.
Checking the Update: The ACCEPT CHECK ProcessThe ACCEPT CHECK job provides the same function for the distribution librariesthat the APPLY CHECK job provides for the target libraries. See “Checking theUpdate: The APPLY CHECK Process” on page 86.
Use the SMP/E dialogs or the following sample job to do an ACCEPT CHECK forthe function and related SYSMODs://ACCEPT JOB ’accounting info’,MSGLEVEL=(1,1)//ACCEPTCK EXEC SMPPROC//SMPCNTL DD *SET BDY(DLIB1) /* Set to DLIB zone. */.ACCEPT FORFMID(HXX1200) /* Accept for this FMID */
FUNCTIONS /* the function itself */PTFS /* and all its PTFs. */GROUPEXTEND /* Also all requisite PTFs. */CHECK /* But do not update libs. */BYPASS(HOLDSYSTEM /* Bypass options */
Installing Functions
Chapter 4. Installing a New Function 89
HOLDCLASS(UCLREL,ERREL))
./*
Researching the ACCEPT CHECK Reports: The ACCEPT CHECK reports shouldbe researched in the same manner as the APPLY CHECK reports (see “Researchingthe APPLY CHECK Reports” on page 87).
Getting Additional SYSMODs: The process of getting additional SYSMODs orAPAR fixes for those PTFs being accepted is the same as during the APPLY process(see “Getting Additional SYSMODs” on page 88).
Updating the Distribution Library: The ACCEPT ProcessThe ACCEPT process updates the distribution libraries. Use the SMP/E dialogs orthe following sample job to accept the function and any related SYSMODs://ACCEPT JOB ’accounting info’,MSGLEVEL=(1,1)//ACCEPT EXEC SMPPROC//SMPCNTL DD *SET BDY(DLIB1) /* Set to DLIB zone. */.ACCEPT FORFMID(HXX1200) /* Accept for this FMID */
FUNCTIONS /* the function itself */PTFS /* and all its PTFs. */GROUPEXTEND /* Also all requisite PTFs. */
/* No check this time. */BYPASS(HOLDCLASS(UCLREL,ERREL)/*Bypass options */
HOLDSYS(reason-id,...) ./*
Note: If you have obtained additional APAR fixes or USERMODs, you shouldeither specify each of these SYSMODs in the SELECT operand or, if allapplicable APARs and USERMODs are to be installed, specify the APARSand USERMODS operands.
Checking Other Zones for Requisites: REPORT CROSSZONEAfter installing a function, you may need to check other zones for conditionalrequisites. A conditional requisite is software (such as service) that must beinstalled for a given function if another function is also installed. To help automatethe research for conditional requisites, the installation logic (SMP/E modificationcontrol statements) for a function uses ++IF statements to identify the requisites.
Conditional requisites may be for functions that are installed in different zones. Ifyou have set up automatic cross-zone requisite checking, as described in“Specifying Automatic Cross-Zone Requisite Checking” on page 73, SMP/E willenforce cross-zone requisites during APPLY or ACCEPT processing. Otherwise, youmust use the SMP/E REPORT CROSSZONE command after a function and therelated service has been installed to manually identify cross-zone requisites definedin the installation logic. To help you install the identified requisites, REPORTCROSSZONE can also write APPLY and ACCEPT commands to the SMPPUNCHdata set. So, if you have not specified automatic cross-zone requisite checking, andthe function you have installed (or any related service) specifies conditionalrequisites, you should run the REPORT CROSSZONE command against the targetand DLIB zones containing that product, as well as against the zones containingthe functions identified on the ++IF statements. For more information about theREPORT CROSSZONE command, see Chapter 12, “Identifying Cross-ZoneRequisites: The REPORT CROSSZONE Command”, on page 137.
Installing Functions
90 SMP/E V3R2.0 User’s Guide

Chapter 5. Installing Preventive Service
This chapter describes the steps for installing preventive service. After anintroduction to preventive service and a summary of the preventive serviceprocess, it discusses the following topics:v Preparing your systemv Staging the SYSMODs with the RECEIVE commandv Updating the target libraries with the APPLY commandv Testing the new service levelv Updating the distribution libraries with the ACCEPT command
IntroductionYou install preventive service through the use of the SMP/E preventive serviceprocess. The process uses:v A tape that contains the preventive service (either a CBPDO tape or an
expanded service options (ESO) tape).v A well-defined set of steps that you should follow to install each service level in
order to bring your system up to the current service level.
ESOs are used as input to the software manufacturing database for the service tobe included in CBPDOs. As a result, there are many similarities between these twoofferings.
If you receive service and HOLDDATA from both CBPDO and ESO tapes, makesure you install them in service level order (for example, service level 0201,followed by service level 0202, and so on). Each PTF that is currently available ona service level has a corresponding source ID. After you have received PTFs fromone of these service offerings (ESO or CBPDO), do not try to receive them againfrom the other.
CBPDO TapesCBPDO tapes can be ordered periodically, as you decide to update your system. ACBPDO tape contains the PTFs, HOLDDATA, and PSP upgrade files to bring yoursystem up to a service level that you select. A CBPDO is ordered for a particularfeature (CICS, database system, MVS, or NCP). These features correspond to theSRELs to which products are applicable.
You have two options when ordering a CBPDO: you can get products plus service,or service only. (If you are interested just in installing preventive service, order aservice-only CBPDO.) With both of these options, you automatically receive servicefor products for which you are already licensed under a single customer numberfor a single feature.
The amount of service you receive in your CBPDO depends on your selection of aservice level and whether this is your first CBPDO order.v If you select a service level, you get all service from that level to the current
level.v If you do not select a service level and this is your first CBPDO order, you get
all the service shown on the order checklist.
© Copyright IBM Corp. 1986, 2003 91
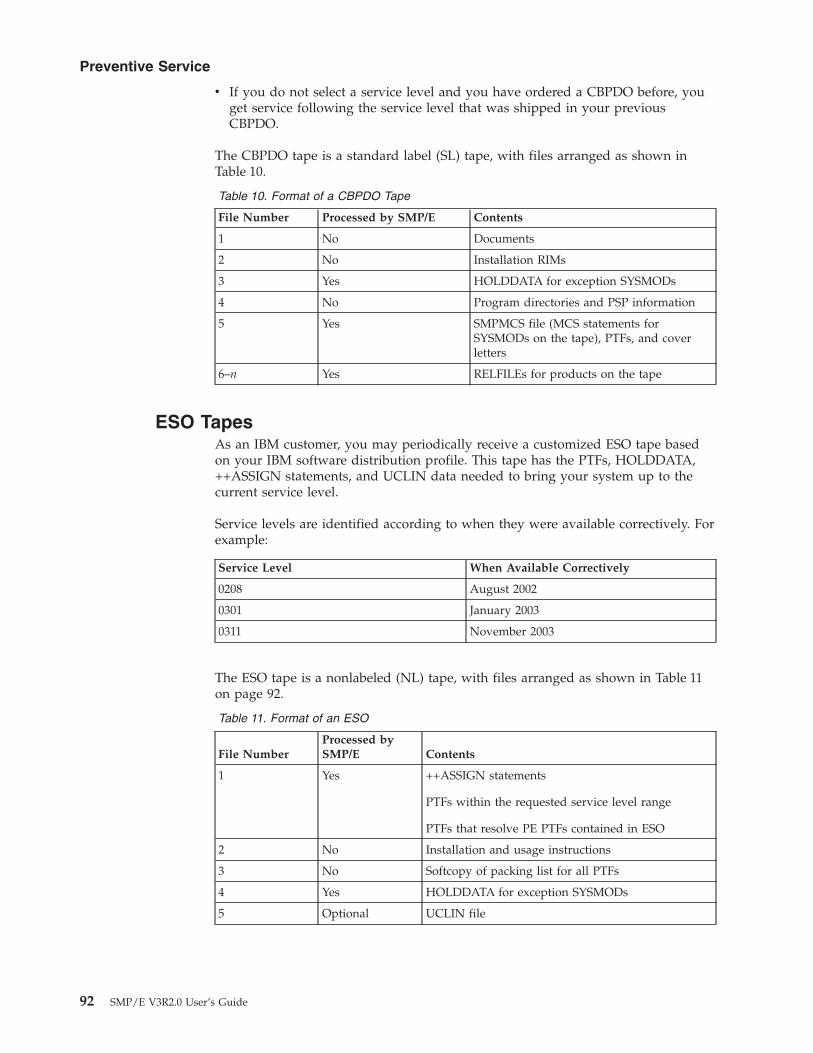
v If you do not select a service level and you have ordered a CBPDO before, youget service following the service level that was shipped in your previousCBPDO.
The CBPDO tape is a standard label (SL) tape, with files arranged as shown inTable 10.
Table 10. Format of a CBPDO Tape
File Number Processed by SMP/E Contents
1 No Documents
2 No Installation RIMs
3 Yes HOLDDATA for exception SYSMODs
4 No Program directories and PSP information
5 Yes SMPMCS file (MCS statements forSYSMODs on the tape), PTFs, and coverletters
6–n Yes RELFILEs for products on the tape
ESO TapesAs an IBM customer, you may periodically receive a customized ESO tape basedon your IBM software distribution profile. This tape has the PTFs, HOLDDATA,++ASSIGN statements, and UCLIN data needed to bring your system up to thecurrent service level.
Service levels are identified according to when they were available correctively. Forexample:
Service Level When Available Correctively
0208 August 2002
0301 January 2003
0311 November 2003
The ESO tape is a nonlabeled (NL) tape, with files arranged as shown in Table 11on page 92.
Table 11. Format of an ESO
File NumberProcessed bySMP/E Contents
1 Yes ++ASSIGN statements
PTFs within the requested service level range
PTFs that resolve PE PTFs contained in ESO
2 No Installation and usage instructions
3 No Softcopy of packing list for all PTFs
4 Yes HOLDDATA for exception SYSMODs
5 Optional UCLIN file
Preventive Service
92 SMP/E V3R2.0 User’s Guide

Preventive Service Process: SummaryThe preventive service process has five phases:1. Prepare your system.2. Stage the preventive service.3. Update the target libraries.4. Test the system.5. Update the distribution libraries.
The preventive service phases are the same as those defined in Chapter 6,“Installing Corrective Service”, on page 103, although the steps within each phasediffer. These phases are the basic SMP/E operations to install any SYSMOD.
Each of these phases consists of a series of steps (SMP/E jobs, research, orinvocations of system utilities) that must be done to make sure the preventiveservice is installed correctly and to ensure the integrity of your system libraries.
The steps defined are the normal steps for the installation of most PTFs. Any PTFthat requires special processing will contain instructions for installing it.
Generally, you should first attempt to install all the normal PTFs that you havereceived and then to install those having special requirements. The intention is toinstall the maximum number of preventive fixes on your system as soon aspossible.
Note: You should let SMP/E manage PE PTFs (PTFs discovered to be in error),rather than researching and resolving them yourself.
The following sections describe, in detail, the steps necessary for each of thepreventive service phases.
Note: You can use either the SMP/E dialogs or JCL jobs to receive, apply, andaccept preventive service. The basic steps are the same. If you have access tothe SMP/E dialogs, you should use them. Otherwise, you can use the stepsdescribed in this chapter as examples.
Preparing Your SystemBefore you start installing preventive service, you should do the following to makesure that your system is ready and that you can recover in case of a serious failureduring installation:v Get the latest HOLDDATA from IBMLINK or the IBM Support Center. You
process this HOLDDATA during the next phase.As described in Chapter 8, “Managing Exception SYSMODs”, on page 113, anESO may contain PTFs that were discovered to be in error (called PE PTFs) afterthey were shipped to an IBM software distribution center. You can find outabout PE PTFs from IBMLINK or the IBM Support Center and build thecorresponding ++HOLD/++RELEASE statements necessary to preventintroducing problems by processing PTFs with known errors.
v Make sure you have the publications you need.v Estimate the time you need for APPLY and ACCEPT processing. Make sure there
is time for these jobs to run to completion.v Back up your disk packs.
Preventive Service
Chapter 5. Installing Preventive Service 93
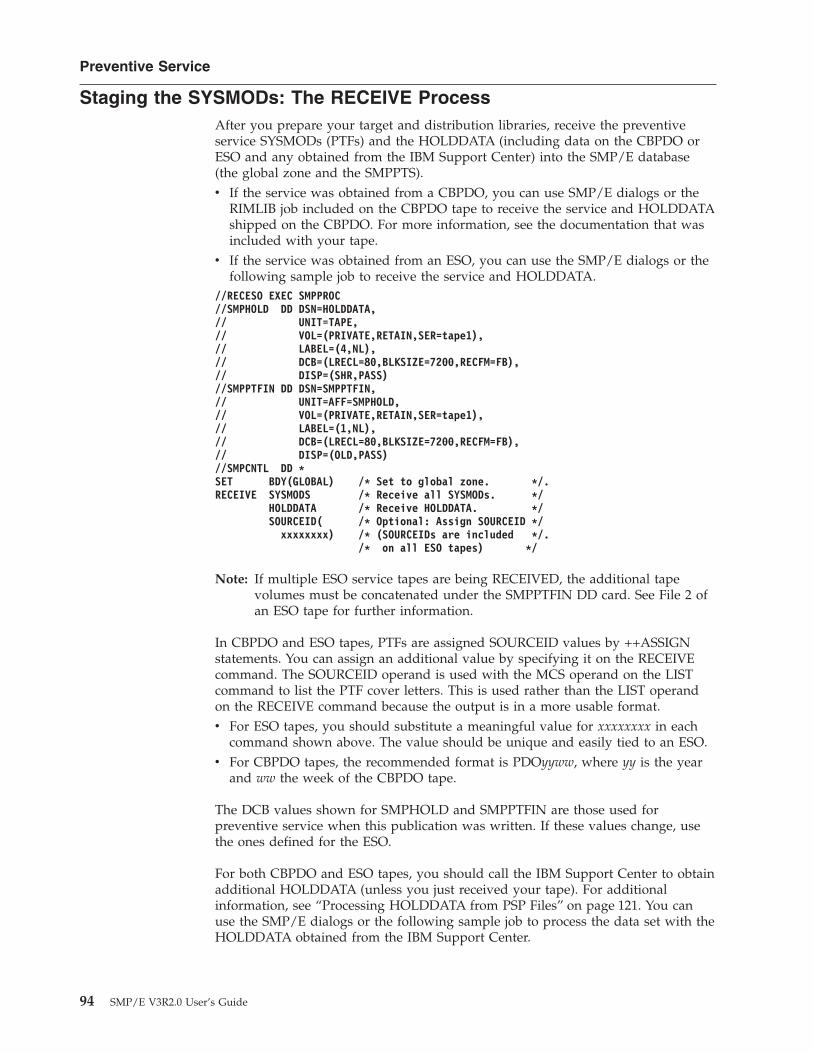
Staging the SYSMODs: The RECEIVE ProcessAfter you prepare your target and distribution libraries, receive the preventiveservice SYSMODs (PTFs) and the HOLDDATA (including data on the CBPDO orESO and any obtained from the IBM Support Center) into the SMP/E database(the global zone and the SMPPTS).v If the service was obtained from a CBPDO, you can use SMP/E dialogs or the
RIMLIB job included on the CBPDO tape to receive the service and HOLDDATAshipped on the CBPDO. For more information, see the documentation that wasincluded with your tape.
v If the service was obtained from an ESO, you can use the SMP/E dialogs or thefollowing sample job to receive the service and HOLDDATA.
//RECESO EXEC SMPPROC//SMPHOLD DD DSN=HOLDDATA,// UNIT=TAPE,// VOL=(PRIVATE,RETAIN,SER=tape1),// LABEL=(4,NL),// DCB=(LRECL=80,BLKSIZE=7200,RECFM=FB),// DISP=(SHR,PASS)//SMPPTFIN DD DSN=SMPPTFIN,// UNIT=AFF=SMPHOLD,// VOL=(PRIVATE,RETAIN,SER=tape1),// LABEL=(1,NL),// DCB=(LRECL=80,BLKSIZE=7200,RECFM=FB),// DISP=(OLD,PASS)//SMPCNTL DD *SET BDY(GLOBAL) /* Set to global zone. */.RECEIVE SYSMODS /* Receive all SYSMODs. */
HOLDDATA /* Receive HOLDDATA. */SOURCEID( /* Optional: Assign SOURCEID */
xxxxxxxx) /* (SOURCEIDs are included */./* on all ESO tapes) */
Note: If multiple ESO service tapes are being RECEIVED, the additional tapevolumes must be concatenated under the SMPPTFIN DD card. See File 2 ofan ESO tape for further information.
In CBPDO and ESO tapes, PTFs are assigned SOURCEID values by ++ASSIGNstatements. You can assign an additional value by specifying it on the RECEIVEcommand. The SOURCEID operand is used with the MCS operand on the LISTcommand to list the PTF cover letters. This is used rather than the LIST operandon the RECEIVE command because the output is in a more usable format.v For ESO tapes, you should substitute a meaningful value for xxxxxxxx in each
command shown above. The value should be unique and easily tied to an ESO.v For CBPDO tapes, the recommended format is PDOyyww, where yy is the year
and ww the week of the CBPDO tape.
The DCB values shown for SMPHOLD and SMPPTFIN are those used forpreventive service when this publication was written. If these values change, usethe ones defined for the ESO.
For both CBPDO and ESO tapes, you should call the IBM Support Center to obtainadditional HOLDDATA (unless you just received your tape). For additionalinformation, see “Processing HOLDDATA from PSP Files” on page 121. You canuse the SMP/E dialogs or the following sample job to process the data set with theHOLDDATA obtained from the IBM Support Center.
Preventive Service
94 SMP/E V3R2.0 User’s Guide
//RECEIVE JOB ’accounting info’,MSGLEVEL=(1,1)//RECESM EXEC SMPPROC//SMPHOLD DD ...data describing your data set//* ...must be RECFM=FB, LRECL=80//SMPCNTL DD *SET BDY(GLOBAL) /* Set to global zone. */.RECEIVE HOLDDATA /* Receive HOLDDATA. */./*
The HOLDDATA you obtain from the IBM Support Center should be in SMP/Eformat. If not, or if you are creating your own HOLDDATA, see the SMP/EReference manual to review the syntax for the ++HOLD statements.
Updating the Target Libraries: The APPLY ProcessAfter you prepare your target and distribution libraries and receive all thenecessary PTFs and HOLDDATA, update the target libraries. Though most PTFscan be installed directly into the target libraries, some require special processing,such as a fix that must be concurrently installed on all processors in a network.
These PTFs contain a ++HOLD statement that automatically places them intoHOLD for SYSTEM action status; that is, SMP/E does not allow them to beinstalled unless you take some direct action, such as specifyingBYPASS(HOLDSYS) on the APPLY command. These PTFs should not be processedimmediately; you should attempt to install all PTFs not requiring such actions andthen return to process these. For additional information about these PTFs, see“Installing PTFs That Need Special Processing” on page 100.
When installing preventive service, you are concerned with two groups of PTFs:v All PTFs from the CBPDO or ESO you are installingv Any other PTFs that are required to install these PTFs
SMP/E provides operands (SOURCEID and GROUP or GROUPEXTEND) on theAPPLY command that facilitate the installation of all required PTFs by use of oneAPPLY command. Installing all PTFs with one APPLY command provides severaladvantages:v It eliminates the need to run the APPLY command several times in order to
install the complete set of PTFs required.v It reduces the risk of running out of space, because you are replacing elements
in the target libraries less often.v It decreases overall processing time, because there is less SMP/E overhead and
the system utilities are invoked less often.
When you update the target libraries, there are three distinct SMP/E jobs to berun:1. Receive additional HOLDDATA. Before starting the APPLY, you should
contact the IBM Support Center to obtain any additional HOLDDATA for theCBPDO or ESO you are installing. This step is required if:a. You did not obtain the additional HOLDDATA from the IBM Support
Center during the staging phase.b. There has been a delay between the RECEIVE and APPLY staging phase
and the target update phase.
We will not discuss this first step further here. If you need to perform this step,see “Staging the SYSMODs: The RECEIVE Process” on page 94.
Preventive Service
Chapter 5. Installing Preventive Service 95
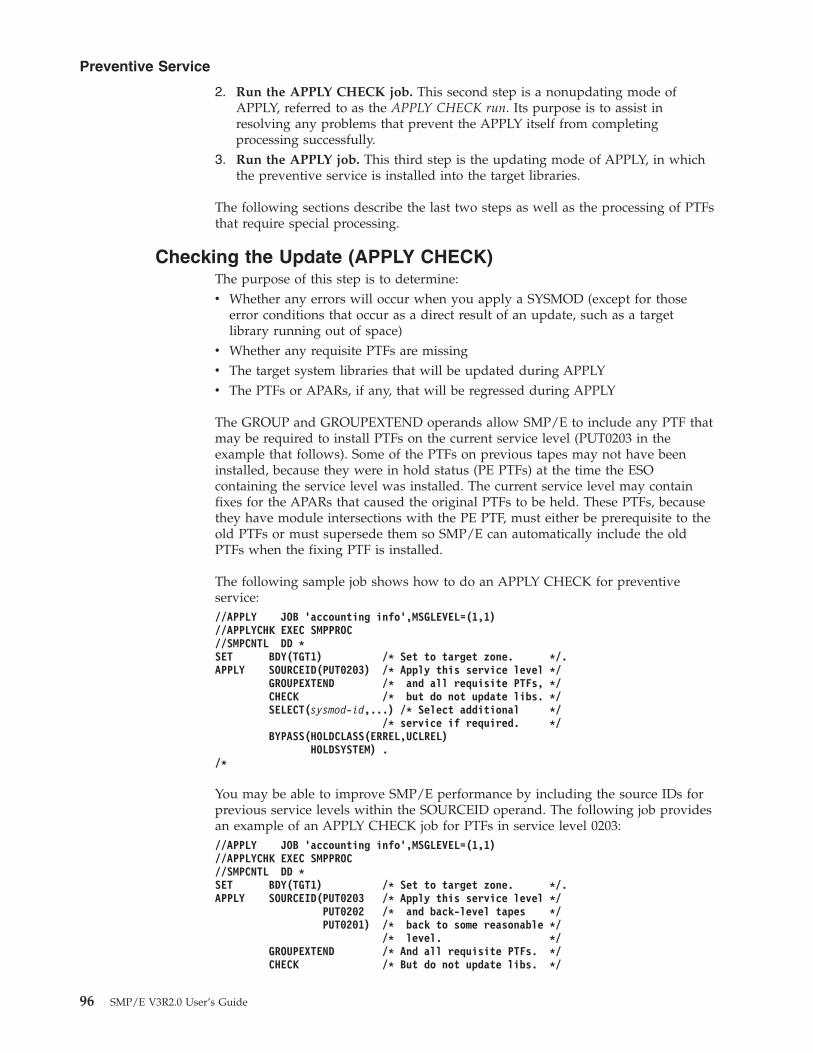
2. Run the APPLY CHECK job. This second step is a nonupdating mode ofAPPLY, referred to as the APPLY CHECK run. Its purpose is to assist inresolving any problems that prevent the APPLY itself from completingprocessing successfully.
3. Run the APPLY job. This third step is the updating mode of APPLY, in whichthe preventive service is installed into the target libraries.
The following sections describe the last two steps as well as the processing of PTFsthat require special processing.
Checking the Update (APPLY CHECK)The purpose of this step is to determine:v Whether any errors will occur when you apply a SYSMOD (except for those
error conditions that occur as a direct result of an update, such as a targetlibrary running out of space)
v Whether any requisite PTFs are missingv The target system libraries that will be updated during APPLYv The PTFs or APARs, if any, that will be regressed during APPLY
The GROUP and GROUPEXTEND operands allow SMP/E to include any PTF thatmay be required to install PTFs on the current service level (PUT0203 in theexample that follows). Some of the PTFs on previous tapes may not have beeninstalled, because they were in hold status (PE PTFs) at the time the ESOcontaining the service level was installed. The current service level may containfixes for the APARs that caused the original PTFs to be held. These PTFs, becausethey have module intersections with the PE PTF, must either be prerequisite to theold PTFs or must supersede them so SMP/E can automatically include the oldPTFs when the fixing PTF is installed.
The following sample job shows how to do an APPLY CHECK for preventiveservice://APPLY JOB ’accounting info’,MSGLEVEL=(1,1)//APPLYCHK EXEC SMPPROC//SMPCNTL DD *SET BDY(TGT1) /* Set to target zone. */.APPLY SOURCEID(PUT0203) /* Apply this service level */
GROUPEXTEND /* and all requisite PTFs, */CHECK /* but do not update libs. */SELECT(sysmod-id,...) /* Select additional */
/* service if required. */BYPASS(HOLDCLASS(ERREL,UCLREL)
HOLDSYSTEM) ./*
You may be able to improve SMP/E performance by including the source IDs forprevious service levels within the SOURCEID operand. The following job providesan example of an APPLY CHECK job for PTFs in service level 0203://APPLY JOB ’accounting info’,MSGLEVEL=(1,1)//APPLYCHK EXEC SMPPROC//SMPCNTL DD *SET BDY(TGT1) /* Set to target zone. */.APPLY SOURCEID(PUT0203 /* Apply this service level */
PUT0202 /* and back-level tapes */PUT0201) /* back to some reasonable */
/* level. */GROUPEXTEND /* And all requisite PTFs. */CHECK /* But do not update libs. */
Preventive Service
96 SMP/E V3R2.0 User’s Guide
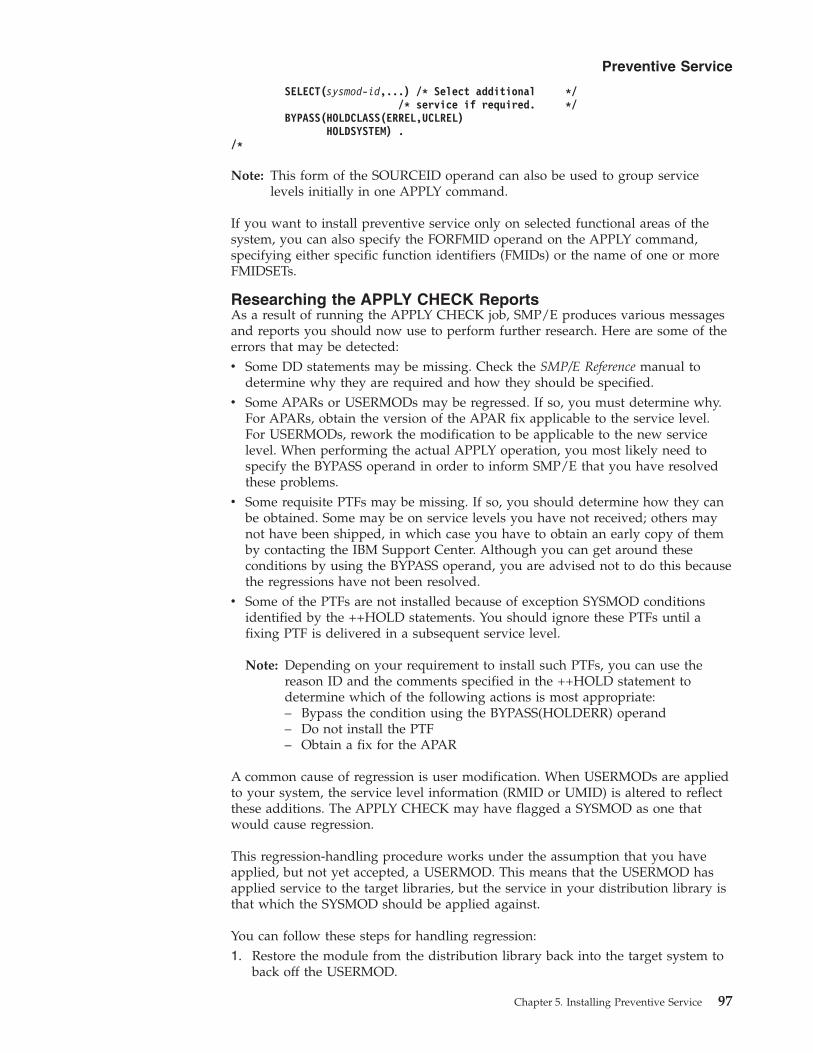
SELECT(sysmod-id,...) /* Select additional *//* service if required. */
BYPASS(HOLDCLASS(ERREL,UCLREL)HOLDSYSTEM) .
/*
Note: This form of the SOURCEID operand can also be used to group servicelevels initially in one APPLY command.
If you want to install preventive service only on selected functional areas of thesystem, you can also specify the FORFMID operand on the APPLY command,specifying either specific function identifiers (FMIDs) or the name of one or moreFMIDSETs.
Researching the APPLY CHECK ReportsAs a result of running the APPLY CHECK job, SMP/E produces various messagesand reports you should now use to perform further research. Here are some of theerrors that may be detected:v Some DD statements may be missing. Check the SMP/E Reference manual to
determine why they are required and how they should be specified.v Some APARs or USERMODs may be regressed. If so, you must determine why.
For APARs, obtain the version of the APAR fix applicable to the service level.For USERMODs, rework the modification to be applicable to the new servicelevel. When performing the actual APPLY operation, you most likely need tospecify the BYPASS operand in order to inform SMP/E that you have resolvedthese problems.
v Some requisite PTFs may be missing. If so, you should determine how they canbe obtained. Some may be on service levels you have not received; others maynot have been shipped, in which case you have to obtain an early copy of themby contacting the IBM Support Center. Although you can get around theseconditions by using the BYPASS operand, you are advised not to do this becausethe regressions have not been resolved.
v Some of the PTFs are not installed because of exception SYSMOD conditionsidentified by the ++HOLD statements. You should ignore these PTFs until afixing PTF is delivered in a subsequent service level.
Note: Depending on your requirement to install such PTFs, you can use thereason ID and the comments specified in the ++HOLD statement todetermine which of the following actions is most appropriate:– Bypass the condition using the BYPASS(HOLDERR) operand– Do not install the PTF– Obtain a fix for the APAR
A common cause of regression is user modification. When USERMODs are appliedto your system, the service level information (RMID or UMID) is altered to reflectthese additions. The APPLY CHECK may have flagged a SYSMOD as one thatwould cause regression.
This regression-handling procedure works under the assumption that you haveapplied, but not yet accepted, a USERMOD. This means that the USERMOD hasapplied service to the target libraries, but the service in your distribution library isthat which the SYSMOD should be applied against.
You can follow these steps for handling regression:1. Restore the module from the distribution library back into the target system to
back off the USERMOD.
Preventive Service
Chapter 5. Installing Preventive Service 97
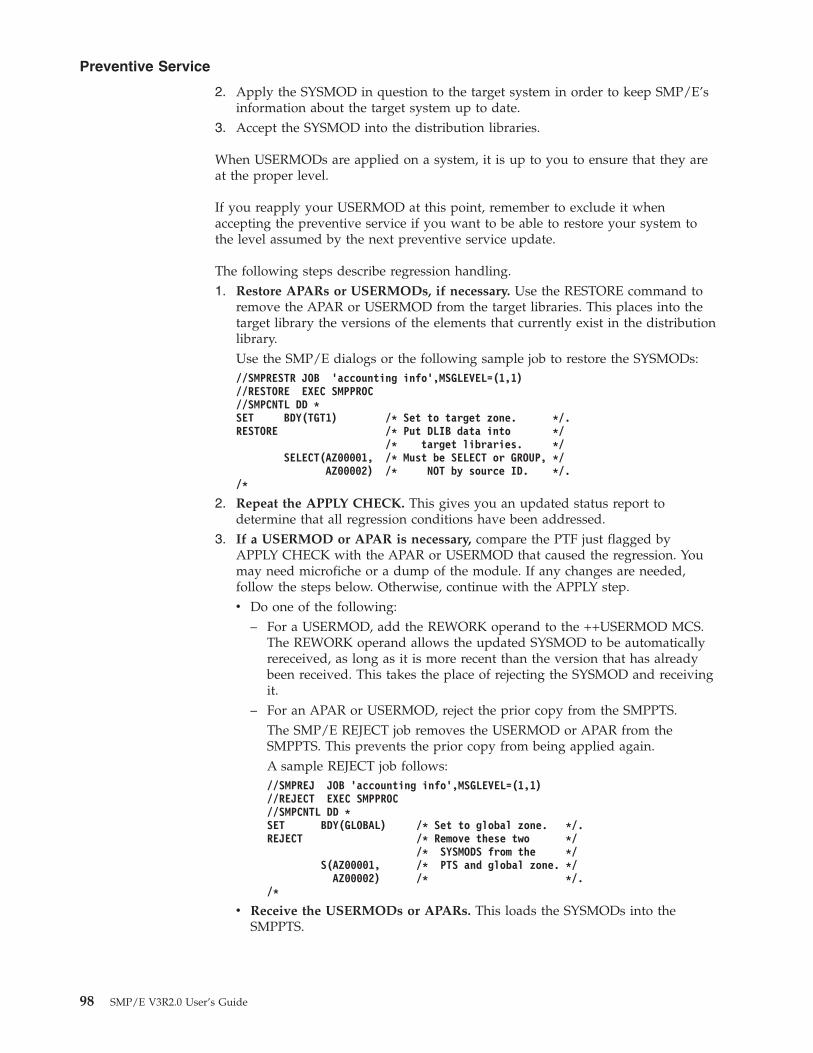
2. Apply the SYSMOD in question to the target system in order to keep SMP/E’sinformation about the target system up to date.
3. Accept the SYSMOD into the distribution libraries.
When USERMODs are applied on a system, it is up to you to ensure that they areat the proper level.
If you reapply your USERMOD at this point, remember to exclude it whenaccepting the preventive service if you want to be able to restore your system tothe level assumed by the next preventive service update.
The following steps describe regression handling.1. Restore APARs or USERMODs, if necessary. Use the RESTORE command to
remove the APAR or USERMOD from the target libraries. This places into thetarget library the versions of the elements that currently exist in the distributionlibrary.Use the SMP/E dialogs or the following sample job to restore the SYSMODs://SMPRESTR JOB ’accounting info’,MSGLEVEL=(1,1)//RESTORE EXEC SMPPROC//SMPCNTL DD *SET BDY(TGT1) /* Set to target zone. */.RESTORE /* Put DLIB data into */
/* target libraries. */SELECT(AZ00001, /* Must be SELECT or GROUP, */
AZ00002) /* NOT by source ID. */./*
2. Repeat the APPLY CHECK. This gives you an updated status report todetermine that all regression conditions have been addressed.
3. If a USERMOD or APAR is necessary, compare the PTF just flagged byAPPLY CHECK with the APAR or USERMOD that caused the regression. Youmay need microfiche or a dump of the module. If any changes are needed,follow the steps below. Otherwise, continue with the APPLY step.v Do one of the following:
– For a USERMOD, add the REWORK operand to the ++USERMOD MCS.The REWORK operand allows the updated SYSMOD to be automaticallyrereceived, as long as it is more recent than the version that has alreadybeen received. This takes the place of rejecting the SYSMOD and receivingit.
– For an APAR or USERMOD, reject the prior copy from the SMPPTS.The SMP/E REJECT job removes the USERMOD or APAR from theSMPPTS. This prevents the prior copy from being applied again.A sample REJECT job follows://SMPREJ JOB ’accounting info’,MSGLEVEL=(1,1)//REJECT EXEC SMPPROC//SMPCNTL DD *SET BDY(GLOBAL) /* Set to global zone. */.REJECT /* Remove these two */
/* SYSMODS from the */S(AZ00001, /* PTS and global zone. */
AZ00002) /* */./*
v Receive the USERMODs or APARs. This loads the SYSMODs into theSMPPTS.
Preventive Service
98 SMP/E V3R2.0 User’s Guide
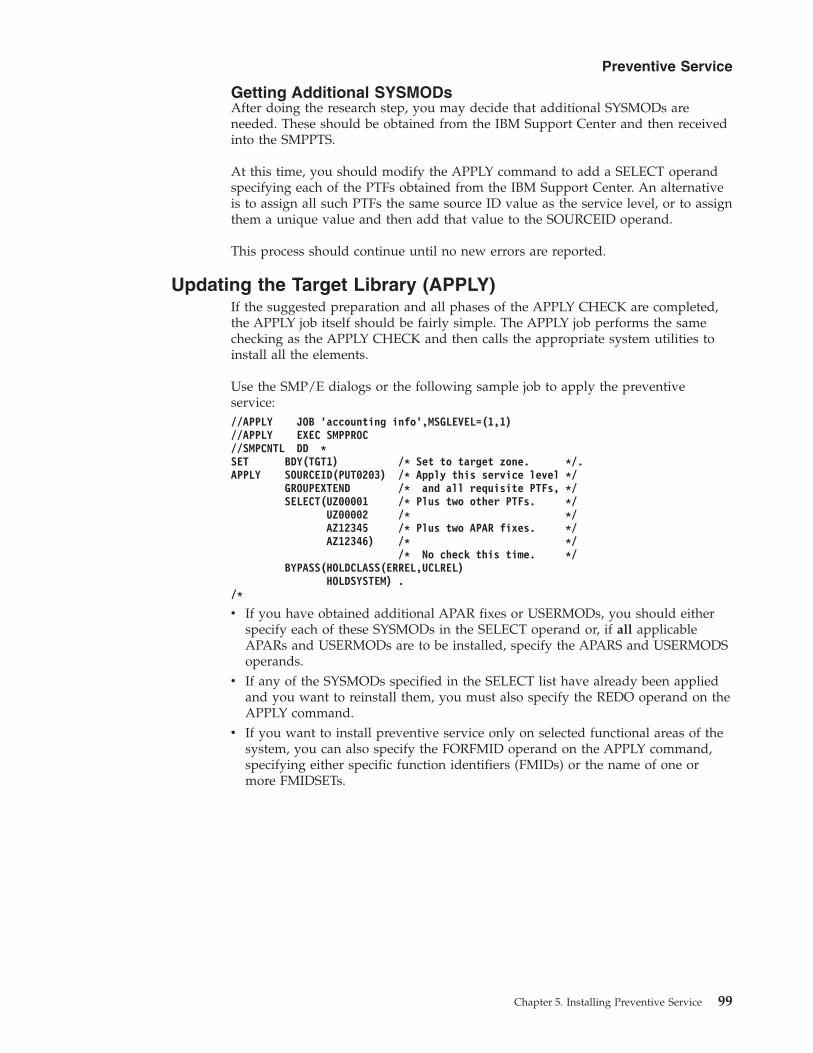
Getting Additional SYSMODsAfter doing the research step, you may decide that additional SYSMODs areneeded. These should be obtained from the IBM Support Center and then receivedinto the SMPPTS.
At this time, you should modify the APPLY command to add a SELECT operandspecifying each of the PTFs obtained from the IBM Support Center. An alternativeis to assign all such PTFs the same source ID value as the service level, or to assignthem a unique value and then add that value to the SOURCEID operand.
This process should continue until no new errors are reported.
Updating the Target Library (APPLY)If the suggested preparation and all phases of the APPLY CHECK are completed,the APPLY job itself should be fairly simple. The APPLY job performs the samechecking as the APPLY CHECK and then calls the appropriate system utilities toinstall all the elements.
Use the SMP/E dialogs or the following sample job to apply the preventiveservice://APPLY JOB ’accounting info’,MSGLEVEL=(1,1)//APPLY EXEC SMPPROC//SMPCNTL DD *SET BDY(TGT1) /* Set to target zone. */.APPLY SOURCEID(PUT0203) /* Apply this service level */
GROUPEXTEND /* and all requisite PTFs, */SELECT(UZ00001 /* Plus two other PTFs. */
UZ00002 /* */AZ12345 /* Plus two APAR fixes. */AZ12346) /* */
/* No check this time. */BYPASS(HOLDCLASS(ERREL,UCLREL)
HOLDSYSTEM) ./*
v If you have obtained additional APAR fixes or USERMODs, you should eitherspecify each of these SYSMODs in the SELECT operand or, if all applicableAPARs and USERMODs are to be installed, specify the APARS and USERMODSoperands.
v If any of the SYSMODs specified in the SELECT list have already been appliedand you want to reinstall them, you must also specify the REDO operand on theAPPLY command.
v If you want to install preventive service only on selected functional areas of thesystem, you can also specify the FORFMID operand on the APPLY command,specifying either specific function identifiers (FMIDs) or the name of one ormore FMIDSETs.
Preventive Service
Chapter 5. Installing Preventive Service 99
Installing PTFs That Need Special ProcessingThere are so many reasons a PTF may require special processing that it isimpossible to document how you should handle each case. Any PTF requiringspecial processing should contain a ++HOLD statement (after all the ++VERstatements and before the first element MCS). That ++HOLD statement should beas follows:
++HOLD(sysmod-id) /* Originating SYSMOD ID. */SYSTEM /* Special processing info. */FMID(sysmod-id) /* Functional owner. */REASON(reason-id)COMMENT(....
....any amount of comment text
....)
.
See SMP/E Reference for a detailed description of the ++HOLD statement syntax.The comment text within the ++HOLD statement, or in the PTF cover letter,contains a description of all the special processing necessary to install this PTF.
Testing the New Service LevelAfter having installed the new service, you should perform two operations:1. Create a backup of the updated data sets, including the SMP/E data sets
affected. This ensures that if something happens to the data sets during thenext phase, you do not have to repeat all the processing done in previous steps.
2. Perform some testing before putting the service into production. This testingshould include some of the following:v Run selected product IVP jobs.v Run test job streams, if your installation has them.v Attempt an IPL.
Only after verifying the service on a noncritical test system should you put thatservice into production. The test phase should not be considered complete untilyou have run the service in production mode for some period (as determined bythe requirements for your installation). If no errors are found, you are ready toproceed to the next step: updating your distribution libraries.
Updating the Distribution Libraries: The ACCEPT ProcessThe last major phase of installing preventive service is updating the distributionlibraries with the SMP/E ACCEPT command. This is a very critical step. Once theservice is accepted, there is no SMP/E method to remove it from either the targetor distribution libraries.
When you are ready to update your distribution libraries, you have the same set ofconsiderations and SMP/E support as described under “Updating the TargetLibraries: The APPLY Process” on page 95, and the same three-phase operation:1. Receive additional HOLDDATA. Before starting the ACCEPT, you should
obtain any additional HOLDDATA for the service level you are installing. Thisstep is required if:v You did not obtain the additional HOLDDATA from the IBM Support Center
during the staging phase.
Preventive Service
100 SMP/E V3R2.0 User’s Guide
v There has been a delay between the RECEIVE staging phase and theACCEPT DLIB update phase.
2.
Notes:
a. If there is a significant time between the APPLY and ACCEPT, additionalproblems may have been reported for which ++HOLD statements havebeen created. If this new data is not obtained, SMP/E may install PE PTFsinto the distribution libraries.
b. You may want to run the REPORT ERRSYSMODS command to see whetherany SYSMODs that are applied are now in error. For more information, seeChapter 13, “Identifying Installed SYSMODs Affected by Error Holds: TheREPORT ERRSYSMODS Command”, on page 141.
3. Run the ACCEPT CHECK job. The second job is a nonupdating mode ofACCEPT, referred to as the ACCEPT CHECK run. Its purpose is to help resolveany problems that prevent the ACCEPT itself from successfully completingprocessing.
4. Run the ACCEPT update. The third job is the updating mode of ACCEPT, inwhich the preventive service is installed into the distribution libraries.
Note: Special processing may be required during the ACCEPT process. PTFsrequiring this processing should be handled in the same manner as duringthe APPLY process.
Checking the Update (ACCEPT CHECK)The ACCEPT CHECK job provides the same function for the distribution librariesthat the APPLY CHECK job provided for the target libraries. See “Checking theUpdate (APPLY CHECK)” on page 96.
Use the SMP/E dialogs or the following sample job to do an ACCEPT CHECK forpreventive service. This example is an ACCEPT CHECK job for PTFs in servicelevel 0203://ACCEPT JOB ’accounting info’,MSGLEVEL=(1,1)//ACCEPTCK EXEC SMPPROC//SMPCNTL DD *SET BDY(DLIB1) /* Set to DLIB zone. */.ACCEPT SOURCEID(PUT0203) /* Accept this service level*/
GROUPEXTEND( /* Include requisite PTFs */NOAPARS /* Don’t include APARs or */NOUSERMODS) /* USERMODs */
CHECK /* but do not update libs. */SELECT(sysmod-id,...) /* Select additional */
/* service if required. */BYPASS(HOLDCLASS(ERREL,UCLREL)
HOLDSYSTEM) ./*
Note: This example can be used for PTFs from either a CBPDO or an ESO.
If you want to install preventive service only on selected functional areas of thesystem, you can also specify the FORFMID operand on the ACCEPT command,specifying either specific function identifiers (FMIDs) or the name of one or moreFMIDSETs.
Preventive Service
Chapter 5. Installing Preventive Service 101
Researching the ACCEPT CHECK ReportsThe ACCEPT CHECK reports should be researched in the same manner as theAPPLY CHECK reports (see “Researching the APPLY CHECK Reports” onpage 97).
Getting Additional SYSMODsThe procedure for getting additional SYSMODs or APAR fixes from those PTFsbeing accepted is the same as that followed during the APPLY process (see“Getting Additional SYSMODs” on page 99).
If you obtain additional SYSMODs during the ACCEPT phase, you should processthese through the APPLY phase before accepting them.
Updating the Distribution Library (ACCEPT)The ACCEPT command causes SMP/E to update the distribution libraries. You canuse the SMP/E dialogs or the following sample job to accept the preventiveservice://ACCEPT JOB ’accounting info’,MSGLEVEL=(1,1)//ACCEPT EXEC SMPPROC//SMPCNTL DD *SET BDY(DLIB1) /* Set to DLIB zone. */.ACCEPT SOURCEID(PUT0203) /* Accept this service level*/
GROUPEXTEND( /* Include requisite PTFs */NOAPARS /* Don’t include APARs or */NOUSERMODS) /* USERMODs */
/* No check this time. */SELECT(sysmod-id,...) /* Select additional */
/* service if required. */BYPASS(HOLDCLASS(ERREL,UCLREL)
HOLDSYSTEM) ./*
Notes:
1. If you have obtained additional APAR fixes or USERMODs, you should eitherspecify each of these SYSMODs in the SELECT operand or, if all applicableAPARs and USERMODs are to be installed, specify the APARS andUSERMODS operands.
2. If you want to install preventive service only on selected functional areas of thesystem, you can also specify the FORFMID operand on the ACCEPT command,specifying either specific function identifiers (FMIDs) or the name of one ormore FMIDSETs.
Installing PTFs That Need Special ProcessingDuring the ACCEPT process, the considerations for special processing are the sameas for the APPLY process (see “Installing PTFs That Need Special Processing” onpage 100).
Preventive Service
102 SMP/E V3R2.0 User’s Guide
Chapter 6. Installing Corrective Service
This chapter describes the steps for installing corrective service. It discusses thesetopics:v An introduction to corrective servicev Building and checking a corrective service fixv Preparing your systemv Staging the SYSMODs with the RECEIVE commandv Updating the target libraries with the APPLY commandv Testing the corrective servicev Updating the distribution libraries with the ACCEPT command
IntroductionCorrective service is the process of installing a SYSMOD to resolve a specificproblem in your system. The problem has usually been brought to your attentionbecause the system has not functioned as expected (for example, an abend hasoccurred, or jobs are not running as expected).
The first task is to investigate the problem, so that the failing component andmodule can be identified. SMP/E Messages, Codes, and Diagnosis provides helpfulinformation on diagnosing and handling SMP/E problems. This can be done inconjunction with the IBM Support Center. SMP/E can help you work with the IBMSupport Center to isolate and obtain a fix for the problem. Useful informationincludes:v The function and service level of the module involvedv The service level of your system—that is, the specific SYSMODs that have been
installedv Any USERMODs involvedv The affected load modules
After determining the cause of the error, you want a fix for the problem. There areseveral possibilities:1. The problem has already been reported, and a PTF has been created to fix the
module. That PTF may not have been shipped on an ESO. If it has beenshipped, you should have it in your shop (already received). If not, the IBMSupport Center can help you get a copy of it.
2. The PTF identified by the Support Center may have been received but not yetapplied. Use the LIST command or the SMP/E Query dialog to check the statusof the PTF.
3. The problem has been previously reported. No PTF has been created, but anAPAR fix is available either to fix or to bypass the problem.
4. The problem is a new one, and no fix is available. In this case, you have towork with the IBM Support Center to construct a fix for your system.
No matter where you obtain the fix, the installation of that fix is said to be incorrective mode.
Note: You can use either the SMP/E dialogs or JCL jobs to build, receive, apply,and accept corrective service. The basic steps to follow are the same. If you
© Copyright IBM Corp. 1986, 2003 103
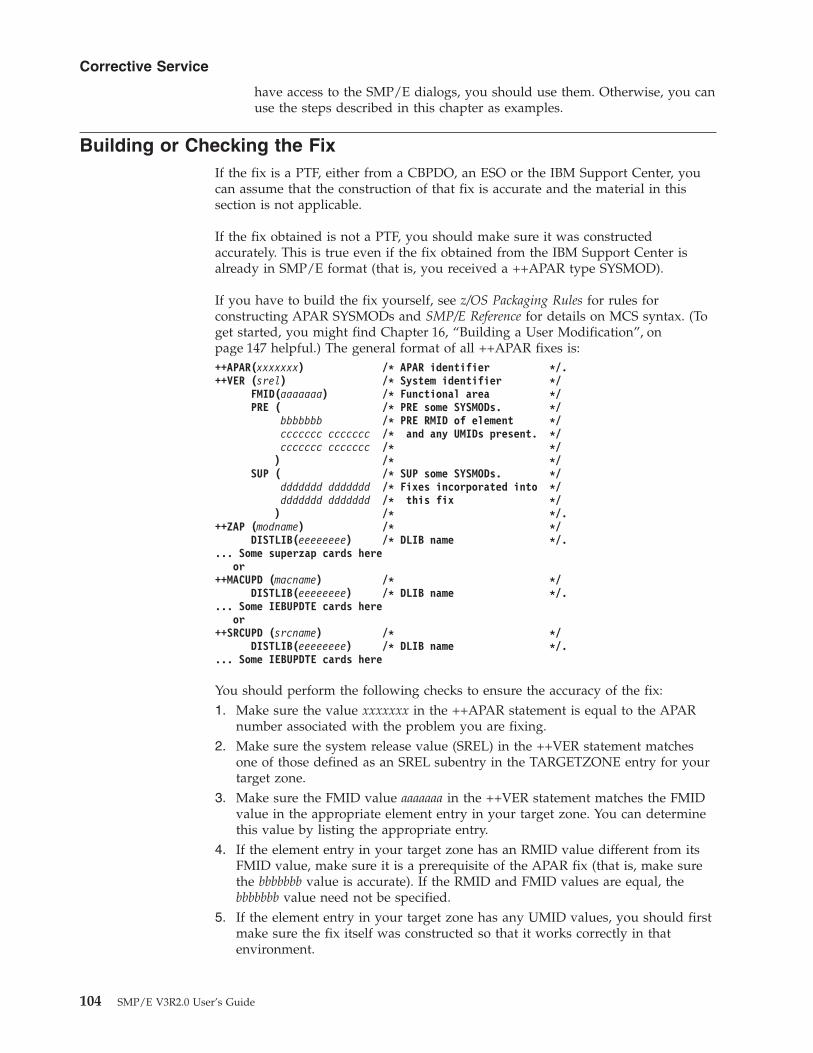
have access to the SMP/E dialogs, you should use them. Otherwise, you canuse the steps described in this chapter as examples.
Building or Checking the FixIf the fix is a PTF, either from a CBPDO, an ESO or the IBM Support Center, youcan assume that the construction of that fix is accurate and the material in thissection is not applicable.
If the fix obtained is not a PTF, you should make sure it was constructedaccurately. This is true even if the fix obtained from the IBM Support Center isalready in SMP/E format (that is, you received a ++APAR type SYSMOD).
If you have to build the fix yourself, see z/OS Packaging Rules for rules forconstructing APAR SYSMODs and SMP/E Reference for details on MCS syntax. (Toget started, you might find Chapter 16, “Building a User Modification”, onpage 147 helpful.) The general format of all ++APAR fixes is:++APAR(xxxxxxx) /* APAR identifier */.++VER (srel) /* System identifier */
FMID(aaaaaaa) /* Functional area */PRE ( /* PRE some SYSMODs. */
bbbbbbb /* PRE RMID of element */ccccccc ccccccc /* and any UMIDs present. */ccccccc ccccccc /* */) /* */
SUP ( /* SUP some SYSMODs. */ddddddd ddddddd /* Fixes incorporated into */ddddddd ddddddd /* this fix */) /* */.
++ZAP (modname) /* */DISTLIB(eeeeeeee) /* DLIB name */.
... Some superzap cards hereor
++MACUPD (macname) /* */DISTLIB(eeeeeeee) /* DLIB name */.
... Some IEBUPDTE cards hereor
++SRCUPD (srcname) /* */DISTLIB(eeeeeeee) /* DLIB name */.
... Some IEBUPDTE cards here
You should perform the following checks to ensure the accuracy of the fix:1. Make sure the value xxxxxxx in the ++APAR statement is equal to the APAR
number associated with the problem you are fixing.2. Make sure the system release value (SREL) in the ++VER statement matches
one of those defined as an SREL subentry in the TARGETZONE entry for yourtarget zone.
3. Make sure the FMID value aaaaaaa in the ++VER statement matches the FMIDvalue in the appropriate element entry in your target zone. You can determinethis value by listing the appropriate entry.
4. If the element entry in your target zone has an RMID value different from itsFMID value, make sure it is a prerequisite of the APAR fix (that is, make surethe bbbbbbb value is accurate). If the RMID and FMID values are equal, thebbbbbbb value need not be specified.
5. If the element entry in your target zone has any UMID values, you should firstmake sure the fix itself was constructed so that it works correctly in thatenvironment.
Corrective Service
104 SMP/E V3R2.0 User’s Guide
You should then make sure each of the UMID values is specified in the PREoperand in place of the ccccccc values shown in the example. This is notabsolutely required, but if it is not done, SMP/E issues warning messagesduring installation indicating that these SYSMODs may have an intersectionwith the one you are installing, and therefore may be regressed. Putting theUMID values in the PRE list suppresses these messages.
6. If this SYSMOD is to fix multiple problems, each of the additional APARs thatare being fixed should be specified in the SUP operand (ddddddd values in theexample).
7. Make sure the name in the ++ZAP, ++MACUPD, or ++SRCUPD statement iscorrect.
8. Make sure the value eeeeeeee specified in the DISTLIB operand matches theDISTLIB value in the target zone entry.
Note: The DISTLIB value is optional, but it is a good idea to specify it to makesure there is no mistake about which element you are dealing with.
Once you have made sure the SYSMOD is accurate, you are ready to start theactual installation process.
Preparing Your SystemCorrective service is very different from the installation of a new function orpreventive service.v It usually affects a very limited area of the system.v It is usually done because a severe problem is affecting the system.v There is a need for an immediate fix.v The fix usually takes little time to install.
Thus, there is usually no need or time to prepare the system by backing up packs,compressing libraries, and so on. If possible, it is a good idea to have a backupsystem available in case a problem does occur.
Staging the SYSMODs: The RECEIVE ProcessAfter verifying that the corrective SYSMOD is syntactically correct and specifiesthe proper set of functions and PTFs, receive that SYSMOD (APAR or PTF) into theSMP/E database so you can install it into the target libraries.
Because corrective service requires a very small number of SYSMODs—often onlyone—the job of receiving it is very simple. You can use the SMP/E dialogs or thefollowing sample job://RECEIVE JOB ’accounting info’,MSGLEVEL=(1,1)//RECEIVE EXEC SMPPROC//SMPPTFIN DD ...points to input with SYSMOD//* If you put the SYSMOD in a data set//* refer to that data set.//* If the SYSMOD is in card format//* use "DD *" followed by the cards.//SMPCNTL DD *SET BDY(GLOBAL) /* Set to global zone. */.RECEIVE SELECT( /* Receive selected SYSMODs.*/
xxxxxxx /* Specify SYSMOD number. */) /* */
SYSMODS /* Only process SMPPTFIN -do not look at SMPHOLD. */.
/*
Corrective Service
Chapter 6. Installing Corrective Service 105
Note: No source ID was assigned. This is because the SYSMOD is installedselectively in the APPLY step. If you want to assign a common value or tagthe SYSMOD with some sort of identifier (such as programmer initials), youcan use the SOURCEID operand.
If the input data set contains only the SYSMODs you are installing for thiscorrective service problem, you can omit the SELECT operand. SMP/E thenattempts to process all the SYSMODs in the SMPPTFIN input data set.
Updating the Target Libraries: The APPLY ProcessAfter receiving the corrective service, you are ready to install it into the targetlibraries. You should not attempt to install the SYSMODs without first verifyingthem. If you have done all the proper checking before this time, the SYSMODsshould be installed correctly. However, if you have overlooked something, thedirect installation may cause unexpected results.
Checking the Update (APPLY CHECK)The purpose of this job is to verify that the SYSMOD(s) can be installed correctlyand that you understand what libraries and load modules in the system areaffected. You can use the SMP/E dialogs or the following sample job to do anAPPLY CHECK for corrective service://APPLY JOB ’accounting info’,MSGLEVEL=(1,1)//APPLYCHK EXEC SMPPROC//SMPCNTL DD *SET BDY(TGT1) /* Set to target zone. */.APPLY SELECT( /* Install selected SYSMOD. */
xxxxxxx /* Specify SYSMOD name here.*/) /* */
CHECK /* In check mode only. */.
Researching the APPLY CHECK ReportsReview the reports from the check, looking for the following types of information:v Were any error messages produced? If so, determine the cause and fix the
problem.v Will any SYSMODs be regressed? If so, determine how to resolve the problems.v Are any other areas of the system affected?
Using HOLDDATA to Assist in Identifying Fixes: If the SYSMOD you areinstalling is a PTF (obtained from a CBPDO, an ESO, or directly from the IBMSupport Center), SMP/E may have some HOLDDATA stored applying to that PTF.If so, the reports will indicate all the reason IDs preventing PTF installation. Youshould use these reason IDs to determine what the errors are. This can be done by:1. Listing the SYSMOD and MCS entries for the PTF.2. Looking at the ++HOLD statements that are listed.3. Using the COMMENT field in the ++HOLD statement to determine the cause
of the error. If the COMMENT field is not present or does not describe theproblem adequately, ask the IBM Support Center for further information.
4. Determining whether the error in the PTF is critical enough to stop it frombeing installed. Remember that you are trying to fix an existing problem; youmay decide to install the PTF to fix that problem because the exposure isminimal.
Corrective Service
106 SMP/E V3R2.0 User’s Guide

5. If necessary, contact the IBM Support Center to obtain a corrective fix for thePTF. If, in the preceding step, you decided that the PTF should be installedimmediately to fix your problem, you should perform this step at some laterdate.
Getting Additional SYSMODsIf the research of the APPLY CHECK reports discloses that additional SYSMODsare required, these should be obtained in the same manner as the originalcorrective SYSMOD.
Updating the Target Library (APPLY)Once the APPLY CHECK has run to your satisfaction, you are ready to install thefix using the SMP/E dialogs or the following sample job to apply the correctiveservice://APPLY JOB ’accounting info’,MSGLEVEL=(1,1)//APPLY EXEC SMPPROC//SMPCNTL DD *SET BDY(TGT1) /* Set to target zone. */.APPLY SELECT( /* Install selected SYSMOD. */
xxxxxxx /* Specify SYSMOD name here.*/) /* */
/* Note no check operand. */.
Testing the Corrective ServiceThe testing needed after you install a corrective fix depends on the type ofproblem you encountered. It may range from no testing to running the job inwhich the error was detected.
Updating the Distribution Libraries: The ACCEPT ProcessOnce you have installed the corrective service into the target libraries, you mustdecide whether you want to update the distribution libraries. You should base thisdecision on the products involved and on your processing requirements.
The following is a consideration for not accepting corrective service:Corrective service has not been tested and, therefore, may be found to be inerror at some later date. Once you have accepted the SYSMODs, there is noRESTORE capability.
The following are some of the considerations for accepting corrective service:v If you do not accept the SYSMOD and you perform a system generation, all that
service is lost and must be reinstalled.v If you must restore a SYSMOD, the work required increases with the number of
SYSMODs that have been applied but not accepted. All intersecting SYSMODsmust be restored, and then all but the desired SYSMOD must be reapplied. Thisis especially true for source-modified products.
The following sections describe the steps you should use, assuming you havedecided to accept some corrective service.
Checking the Update (ACCEPT CHECK)The ACCEPT CHECK job provides the same function for the distribution librariesthat the APPLY CHECK job provided for the target libraries. It is importantbecause the function and service level of the modules in the distribution libraries
Corrective Service
Chapter 6. Installing Corrective Service 107

may be different from that in the target libraries. You can use the SMP/E dialogsor the following sample job to do an ACCEPT CHECK for corrective service://ACCEPT JOB ’accounting info’,MSGLEVEL=(1,1)//ACCEPTCK EXEC SMPPROC//SMPCNTL DD *SET BDY(DLIB1) /* Set to DLIB zone. */.ACCEPT SELECT( /* Install selected SYSMOD. */
xxxxxxx /* Specify SYSMOD name here.*/) /* */
CHECK /* In check mode only. */.
Researching the ACCEPT CHECK ReportsYou should research the ACCEPT CHECK reports in the same way as for theAPPLY process (see “Researching the APPLY CHECK Reports” on page 106).
Using HOLDDATA to Assist in Identifying Fixes: If SMP/E reported anyexception SYSMOD data during the APPLY CHECK process, you should expect tosee the same information during the ACCEPT CHECK process. If you haveprocessed any HOLDDATA between the APPLY and ACCEPT, additionalinformation may be reported. This information should be handled in the samemanner as the APPLY information.
Getting Additional SYSMODsIf additional SYSMODs are required to ACCEPT the corrective service, you shouldobtain them in the same manner as the original corrective service SYSMOD.
Note: If you obtain additional SYSMODs, make sure you process them through theAPPLY and test phases before accepting them.
Updating the Distribution Library (ACCEPT)Once the ACCEPT CHECK runs to your satisfaction, you are ready to accept thefix. Use the SMP/E dialogs or the following sample job to accept the correctiveservice://ACCEPT JOB ’accounting info’,MSGLEVEL=(1,1)//ACCEPT EXEC SMPPROC//SMPCNTL DD *SET BDY(DLIB1) /* Set to DLIB zone. */.ACCEPT SELECT( /* Install selected SYSMOD. */
xxxxxxx /* Specify SYSMOD name here.*/) /* */
/* Note no check operand. */.
Corrective Service
108 SMP/E V3R2.0 User’s Guide
Chapter 7. Installing a User Modification
This chapter describes the steps for installing a user modification (USERMOD).After an introduction to USERMODs, it describes the following processes:v Preparing your systemv Staging the USERMOD with the RECEIVE commandv Updating the target libraries with the APPLY commandv Testing the USERMODv Updating the distribution libraries with the ACCEPT command
IntroductionA USERMOD is a SYSMOD used to make a modification to some IBM-suppliedsoftware element (module, macro, source, or data element) to implement a newfunction or to provide a hook into a user program that provides that function.
A USERMOD should not be confused with an APAR SYSMOD (corrective fix),even if you built the initial version of that fix to fix a problem immediately. For adescription of how to construct USERMODs, see Chapter 16, “Building a UserModification”, on page 147. For details on the syntax of the MCS statements usedin constructing USERMODs, see the SMP/E Reference manual. The z/OS PackagingRules contains additional information on when a USERMOD should be used. Therest of this chapter assumes that you have properly constructed the USERMODand are now ready to install it.
Note: You can use either the SMP/E dialogs or JCL jobs to receive, apply, andaccept USERMODs. The basic steps to follow are the same. If you haveaccess to the SMP/E dialogs, you should use them. Otherwise, you can usethe steps described in this chapter as examples.
Preparing Your SystemYou must determine the amount of system preparation necessary for yourUSERMOD. If it is extensive and affects critical components of the system, youshould perform the same tasks as defined under “Preparing Your System” onpage 84 or “Preparing Your System” on page 93. If it is a minor change, affectingvery few modules and not critical to the operation of the system, no preparation isneeded.
Staging the SYSMODs: The RECEIVE ProcessBecause a USERMOD is generally processed as a single SYSMOD, processing isvery similar to that for corrective service; that is, it is received by use of theSELECT option. Use the SMP/E dialogs or the following sample job to receive theUSERMOD://RECEIVE JOB ’accounting info’,MSGLEVEL=(1,1)//RECEIVE EXEC SMPPROC//SMPPTFIN DD ...points to input with your USERMOD//* If you put the USERMOD in a data set//* refer to that data set.//* If the USERMOD is in card format//* use "DD *" followed by the cards.//* Create your data set in LRECL=80,//* FB format.
© Copyright IBM Corp. 1986, 2003 109
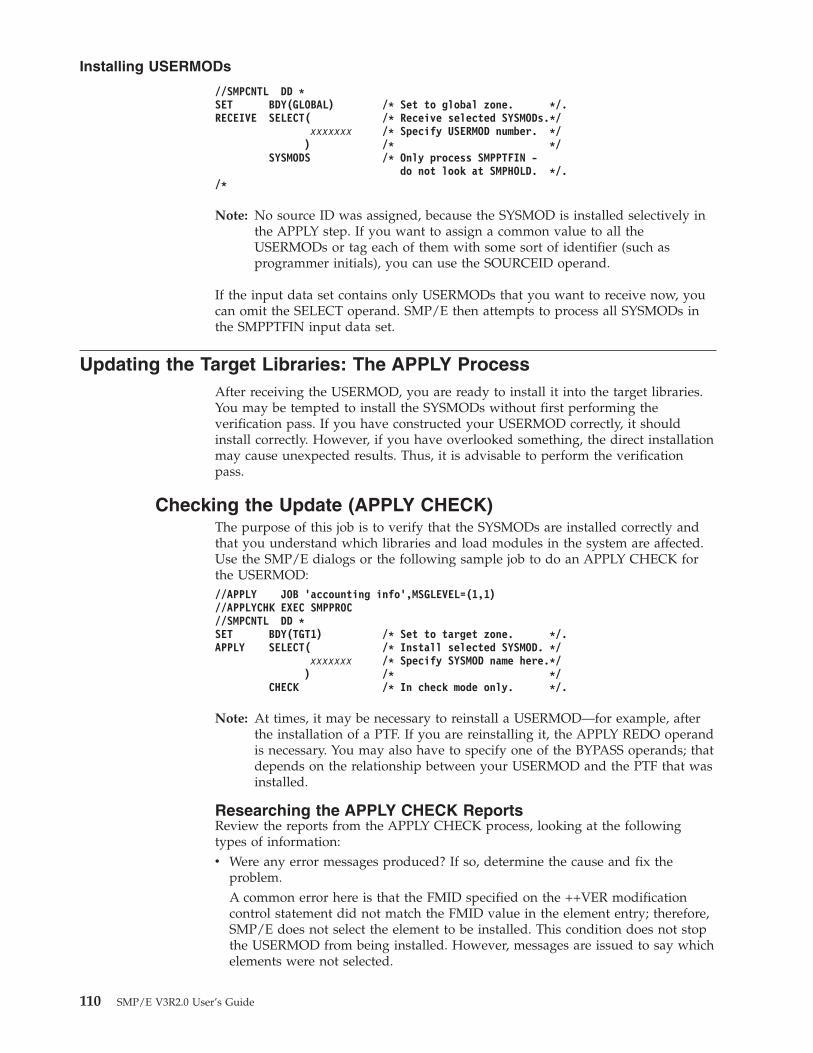
//SMPCNTL DD *SET BDY(GLOBAL) /* Set to global zone. */.RECEIVE SELECT( /* Receive selected SYSMODs.*/
xxxxxxx /* Specify USERMOD number. */) /* */
SYSMODS /* Only process SMPPTFIN -do not look at SMPHOLD. */.
/*
Note: No source ID was assigned, because the SYSMOD is installed selectively inthe APPLY step. If you want to assign a common value to all theUSERMODs or tag each of them with some sort of identifier (such asprogrammer initials), you can use the SOURCEID operand.
If the input data set contains only USERMODs that you want to receive now, youcan omit the SELECT operand. SMP/E then attempts to process all SYSMODs inthe SMPPTFIN input data set.
Updating the Target Libraries: The APPLY ProcessAfter receiving the USERMOD, you are ready to install it into the target libraries.You may be tempted to install the SYSMODs without first performing theverification pass. If you have constructed your USERMOD correctly, it shouldinstall correctly. However, if you have overlooked something, the direct installationmay cause unexpected results. Thus, it is advisable to perform the verificationpass.
Checking the Update (APPLY CHECK)The purpose of this job is to verify that the SYSMODs are installed correctly andthat you understand which libraries and load modules in the system are affected.Use the SMP/E dialogs or the following sample job to do an APPLY CHECK forthe USERMOD://APPLY JOB ’accounting info’,MSGLEVEL=(1,1)//APPLYCHK EXEC SMPPROC//SMPCNTL DD *SET BDY(TGT1) /* Set to target zone. */.APPLY SELECT( /* Install selected SYSMOD. */
xxxxxxx /* Specify SYSMOD name here.*/) /* */
CHECK /* In check mode only. */.
Note: At times, it may be necessary to reinstall a USERMOD—for example, afterthe installation of a PTF. If you are reinstalling it, the APPLY REDO operandis necessary. You may also have to specify one of the BYPASS operands; thatdepends on the relationship between your USERMOD and the PTF that wasinstalled.
Researching the APPLY CHECK ReportsReview the reports from the APPLY CHECK process, looking at the followingtypes of information:v Were any error messages produced? If so, determine the cause and fix the
problem.A common error here is that the FMID specified on the ++VER modificationcontrol statement did not match the FMID value in the element entry; therefore,SMP/E does not select the element to be installed. This condition does not stopthe USERMOD from being installed. However, messages are issued to say whichelements were not selected.
Installing USERMODs
110 SMP/E V3R2.0 User’s Guide
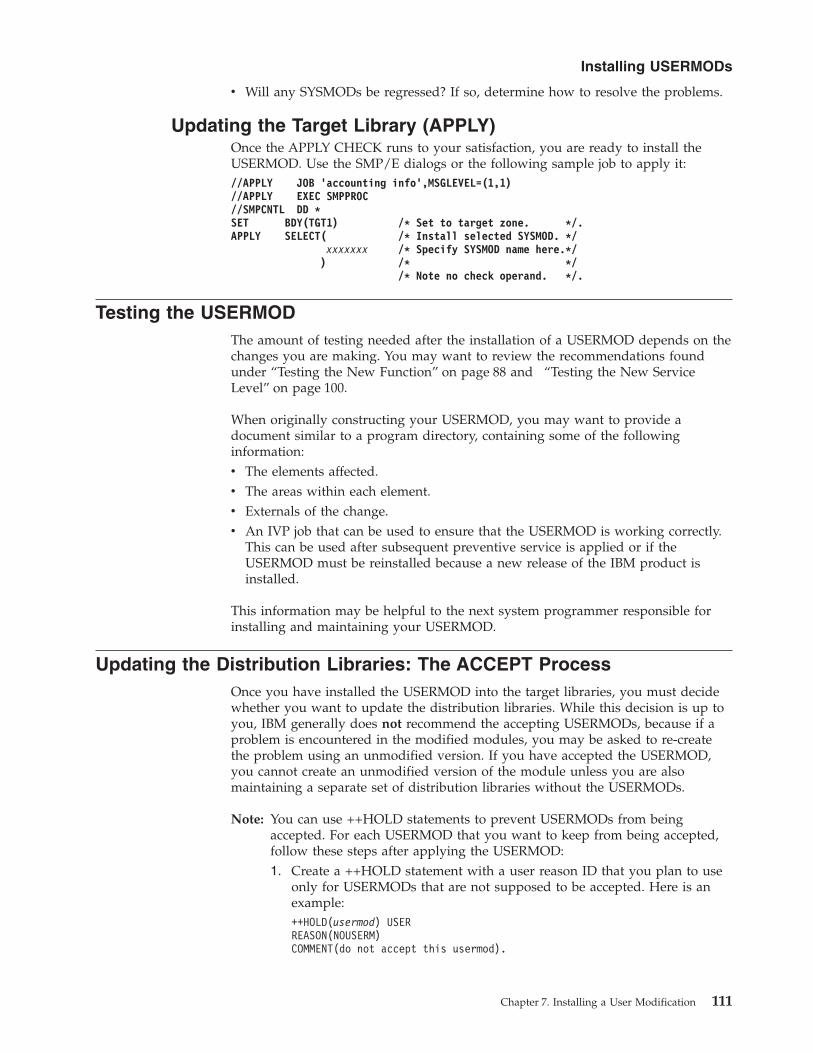
v Will any SYSMODs be regressed? If so, determine how to resolve the problems.
Updating the Target Library (APPLY)Once the APPLY CHECK runs to your satisfaction, you are ready to install theUSERMOD. Use the SMP/E dialogs or the following sample job to apply it://APPLY JOB ’accounting info’,MSGLEVEL=(1,1)//APPLY EXEC SMPPROC//SMPCNTL DD *SET BDY(TGT1) /* Set to target zone. */.APPLY SELECT( /* Install selected SYSMOD. */
xxxxxxx /* Specify SYSMOD name here.*/) /* */
/* Note no check operand. */.
Testing the USERMODThe amount of testing needed after the installation of a USERMOD depends on thechanges you are making. You may want to review the recommendations foundunder “Testing the New Function” on page 88 and “Testing the New ServiceLevel” on page 100.
When originally constructing your USERMOD, you may want to provide adocument similar to a program directory, containing some of the followinginformation:v The elements affected.v The areas within each element.v Externals of the change.v An IVP job that can be used to ensure that the USERMOD is working correctly.
This can be used after subsequent preventive service is applied or if theUSERMOD must be reinstalled because a new release of the IBM product isinstalled.
This information may be helpful to the next system programmer responsible forinstalling and maintaining your USERMOD.
Updating the Distribution Libraries: The ACCEPT ProcessOnce you have installed the USERMOD into the target libraries, you must decidewhether you want to update the distribution libraries. While this decision is up toyou, IBM generally does not recommend the accepting USERMODs, because if aproblem is encountered in the modified modules, you may be asked to re-createthe problem using an unmodified version. If you have accepted the USERMOD,you cannot create an unmodified version of the module unless you are alsomaintaining a separate set of distribution libraries without the USERMODs.
Note: You can use ++HOLD statements to prevent USERMODs from beingaccepted. For each USERMOD that you want to keep from being accepted,follow these steps after applying the USERMOD:1. Create a ++HOLD statement with a user reason ID that you plan to use
only for USERMODs that are not supposed to be accepted. Here is anexample:++HOLD(usermod) USERREASON(NOUSERM)COMMENT(do not accept this usermod).
Installing USERMODs
Chapter 7. Installing a User Modification 111
2. Run the SMP/E RECEIVE command to read in the ++HOLD statement.Use the SMPHOLD DD statement to point to the file or data setcontaining the ++HOLD statement.
Because of the user hold, this USERMOD can be accepted only if you bypass thespecific user reason ID. The SYSMOD will not be automatically accepted if youspecify USERMOD or the specific SYSMOD ID on the ACCEPT command withoutbypassing the user reason ID.
Be aware that if you receive the ++HOLD statement before applying theUSERMOD, you must bypass the user hold reason ID in order to apply theUSERMOD.
Installing USERMODs
112 SMP/E V3R2.0 User’s Guide
Chapter 8. Managing Exception SYSMODs
This chapter explains how SMP/E manages SYSMODs that require specialprocessing. It discusses these topics:v An introduction to exception SYSMODsv What SMP/E does with HOLDDATAv Sources of HOLDDATAv Steps for processing the data
IntroductionMost SYSMODs you receive from IBM can be installed without additionalconsiderations; you can simply receive, apply, and then accept them. For someSYSMODs, however, this is not possible. Examples of such SYSMODs are:v SYSMODs that were sent out to correct a problem but that either have not fixed
the problem or have introduced a new problem. These are called PTFs in error,or PE PTFs.
v SYSMODs that require special installation processing, such as a fix that must beconcurrently installed on all processors in a network.
v SYSMODs that introduce changes into the system that you should be madeaware of, such as changes to operator messages or critical documentationchanges.
In SMP/E terms, these SYSMODs are called exception SYSMODs. SMP/E supplies afunction to automate the management of exception SYSMODs. SMP/E supportsthree categories of exception SYSMODs:v Error. PTFs in error (PE PTFs).v System. SYSMODs identified by IBM as requiring special processing or
notification.v User. Any SYSMODs that you identify as requiring special processing.
Two MCSs are used to manage exception SYSMODs:v ++HOLD puts a SYSMOD into exception status.v ++RELEASE removes a PE PTF from exception status when it has been
determined that the PTF was held erroneously.
++HOLD statements for system holds are usually built as part of the held PTF.++RELEASE statements and ++HOLD statements for error or user holds must bein SMPHOLD. ++HOLD and ++RELEASE statements provided by SMPHOLD(external holds) identify the following:v The SYSMOD ID of the exception SYSMOD (that is, the SYSMOD being held).v The exception SYSMOD category.v The FMID to which that ++HOLD applies.v The reason the SYSMOD is being put into or was in exception status. This is a 1-
to 7-character alphanumeric string called the reason ID.– For error-category exception SYSMODs, SMP/E expects the reason ID to be
the SYSMOD ID of the APAR reporting the problem.– For system-category exception SYSMODs, SMP/E expects the reason ID to be
a short description of the action required.
© Copyright IBM Corp. 1986, 2003 113
– For user-category exception SYSMODs, SMP/E makes no assumption aboutwhat the reason ID represents.
For more information about reason IDs, see the SMP/E Reference manual.v Text describing why the SYSMOD is being put into exception status. This field is
only for ++HOLD statements.v An alternative way to release the exception SYSMOD. This field is only for
++HOLD statements.Every ++HOLD statement specifies a HOLD category of ERROR, SYSTEM, orUSER. In addition to one of these categories, a ++HOLD statement may includea HOLD CLASS, which is an alternative way to release a held SYSMOD. Forexample, an exception SYSMOD may fix a problem more severe than theproblem it introduces. The ++HOLD statement for that SYSMOD would have anERROR reason ID that matches an APAR ID and a CLASS of ERREL.
++HOLD statements provided within a SYSMOD identify the same information.However, even though these internal holds are effective against the containingSYSMOD, the SYSMOD ID specified on the hold may be different from that of thecontaining SYSMOD, as long as the SYSMOD ID specified on the hold issuperseded by the containing SYSMOD.
SMP/E then manages exception SYSMODs by actually managing the resolution ofthe problems described by the reason ID specified on the ++HOLD statement.
Subsequent sections of this chapter describe how SMP/E uses HOLDDATA duringthe installation of a SYSMOD, where the exception SYSMOD statements comefrom, and how to process them. The chapters on the RECEIVE command, theAPPLY command, and the ACCEPT command in SMP/E Commands contain a muchmore detailed explanation of the material covered here.
What SMP/E Does with the HOLDDATAThis section describes what SMP/E does with the HOLDDATA when processingthe various commands associated with installing and removing SYSMODs.
Note: You must provide SMP/E with the most current HOLDDATA possible to getthe most benefit from this support.
Initial Entry into Staging Data Sets: RECEIVEThe RECEIVE command tells SMP/E to take the HOLDDATA from the input dataset on which it was delivered and store it in the SMP/E database.
The two operands that control input processes are:v SYSMOD, which tells SMP/E to process the SYSMODs from the data set
specified by the SMPPTFIN DD statementv HOLDDATA, which tells SMP/E to process the HOLDDATA (++HOLD and
++RELEASE statements) from the data set or file in the hierarchical file systemspecified by the SMPHOLD DD statement
You can specify one or both operands on the RECEIVE command. If neitheroperand is specified, SMP/E attempts to receive the SYSMODs from SMPPTFIN,and HOLDDATA from SMPHOLD.
When receiving a SYSMOD, SMP/E creates two entries:
Exception SYSMODs
114 SMP/E V3R2.0 User’s Guide

1. An MCS entry is created on the SMPPTS. This entry is a copy (possiblycompacted) of the SYSMOD as it appeared in the SMPPTFIN data set.
2. A SYSMOD entry is created in the global zone. This entry contains informationthat describes the installation requirements and element content of theSYSMOD.
When receiving the HOLDDATA, SMP/E also creates (or modifies) two entries:1. A HOLDDATA entry is created (or modified) in the global zone. This entry is
an exact copy of the ++HOLD statements as they appeared in SMPHOLD. Thename of the entry is the ID of the SYSMOD affected by this ++HOLDstatement. The HOLDDATA entry for a single SYSMOD can contain multiple++HOLD statements.
Note: When a ++RELEASE statement is processed, SMP/E removes thecorresponding ++HOLD statement from the HOLDDATA entry. When all++HOLD statements are removed, the HOLDDATA entry isautomatically deleted.
2. A SYSMOD entry is created (or modified) in the global zone. This entrycontains information that describes the exception SYSMOD conditions.For each ++HOLD statement processed, SMP/E updates the global zoneSYSMOD entry to add a HOLD reason ID subentry. There are three types ofHOLD reason ID subentries, HOLDERROR, HOLDSYSTEM, and HOLDUSER,corresponding to the three categories of exception SYSMODs.
Note: When a ++RELEASE statement is processed, SMP/E removes thecorresponding reason ID from the global zone SYSMOD entry. Do notuse the ++RELEASE statement to install a SYSMOD with an unresolvedreason ID. Use the appropriate BYPASS operand instead.
Updating Target Libraries: APPLYWhen SMP/E applies a SYSMOD, SMP/E checks to see if that SYSMOD iscurrently in exception SYSMOD status by seeing if there are any HOLD reason IDsubentries in the global zone SYSMOD entry. If so, SMP/E makes sure each reasonID is resolved before allowing the SYSMOD to be installed.
For an error reason ID to be resolved, at least one of the following conditions mustbe met:v The reason ID must be superseded by another SYSMOD being installed.v The reason ID must already exist as a SYSMOD entry in the target zone.v You must specify BYPASS(HOLDERROR) on the APPLY command to show that
you are aware that an unresolved exception SYSMOD is being installed.v If there is a HOLD CLASS associated with the reason ID, you can specify
BYPASS(HOLDCLASS) on APPLY to indicate that you are using an alternativeway to resolve the reason ID.See the BYPASS operand in The APPLY Command in SMP/E Commands foradditional information.
Internal holds are considered resolved if any of the following conditions are met:v The SYSMOD ID specified on the ++HOLD defining the exception is found as a
SYSMOD entry in the target zonev The SYSMOD ID specified on the ++HOLD defining the exception is being
superseded by a SYSMOD being applied concurrently
Exception SYSMODs
Chapter 8. Managing Exception SYSMODs 115
v The applicable BYPASS operand is specified.
You can resolve external system and user reason IDs by specifyingBYPASS(HOLDSYSTEM) or BYPASS(HOLDUSER) on the APPLY command. Ifthere is a HOLD CLASS associated with the reason ID, you can specifyBYPASS(HOLDCLASS) on APPLY to indicate that you are using an alternative wayto resolve the reason ID.
If you choose to resolve a reason ID by using the BYPASS operand, you must doany required processing at the appropriate time. Otherwise, errors related to theundone processing may occur, even though the reason ID was considered resolved.
Note: You may use the ++RELEASE statement for user category reason IDs if youwant to unconditionally release the SYSMOD for all systems. Rememberthat, unlike BYPASS, ++RELEASE actually deletes the ++HOLD statement. Ifyou plan to use the user category ++HOLD statement, see the SMP/EReference manual for more information on the naming conventions for reasonIDs.
If all reason IDs are resolved, SMP/E allows the SYSMOD to be applied. If anyremain unresolved, SMP/E prevents the SYSMOD, and any other SYSMODsdependent on this one, from being installed.
SMP/E leaves the reason IDs in the global zone SYSMOD entry when theSYSMOD is applied, so if the SYSMOD is applied on another system later, thesame checking is done on that system. If the information had been deleted duringthe first APPLY, SMP/E would not recognize the problem when the SYSMOD isapplied to subsequent systems. Therefore, the ++RELEASE statement should notbe used to install an exception SYSMOD with an unresolved reason ID. Theappropriate BYPASS operand should be used instead.
In summary, SMP/E ensures that no known problems are introduced into yoursystem by managing those problems at the level of the individual problem, ratherthan the SYSMOD level. It is, therefore, very important that SMP/E have the mostcurrent information on exception SYSMODs. For more information on theimportance of having current HOLDDATA and what you must do to provide thatinformation to SMP/E, see “How to Process HOLDDATA” on page 118.
Updating Distribution Libraries: ACCEPTException SYSMOD processing is the same when accepting a SYSMOD as whenapplying one, except that the appropriate distribution zone is used to determinewhether the fixes for the reason IDs have been installed.
Removing HOLDDATA from SMP/E Data SetsThere are various ways to remove HOLDDATA from SMP/E data sets.
After a Successful ACCEPTWhen accepting a SYSMOD, if SMP/E determines that the global zone SYSMODentry and the SMPPTS MCS entry are to be deleted, SMP/E deletes anyHOLDDATA associated with those SYSMODs. Once the SYSMOD and MCS entriesfor a SYSMOD have been deleted, you will probably not install that SYSMOD onany other systems, so you would not need the HOLDDATA again.
Exception SYSMODs
116 SMP/E V3R2.0 User’s Guide
During RESTORE ProcessingHOLDDATA is never deleted during RESTORE processing. The assumption is thatyou may later want to reapply the SYSMODs you are restoring.
With the REJECT CommandIf you are using the SMPPTS as a history file of all SYSMODs, you may eventuallywant to purge some of those SYSMODs. To do this, use the REJECT command. Youcan use the HOLDDATA operand to have SMP/E delete not only the global zoneSYSMOD and SMPPTS MCS entries, but also any associated HOLDDATA.
Sources of HOLDDATABesides the data you create, these are the main sources of HOLDDATA providedby IBM:v CBPDO tapesv Expanded service options (ESO) tapesv Preventive service planning (PSP) informationv IBM service web pages
This section describes these sources.
CBPDO TapesOne of the primary means of obtaining HOLDDATA is CBPDO tapes. IBMcustom-builds these tapes to provide the products and service you request, takinginto consideration whether this is your first CBPDO order.v If you select a particular service level, you get HOLDDATA for all service from
that level to the current level.v If you do not select a service level and this is your first CBPDO order, you get
HOLDDATA for all the service shown on the order checklist.v If you do not select a service level and you have ordered a CBPDO before, you
get HOLDDATA for service following the last service level that was shipped inyour previous CBPDO.
The HOLDDATA on a CBPDO tape has been customized to your product set. Thatis, it contains only data applicable to PTFs for those products within a givenfeature for which you are licensed under a single customer number. However, itdoes not reflect the contents of any specific system within the establishmentdefined by that customer number.
The HOLDDATA on the CBPDO tape should be processed immediately on receiptof the tape. You can use either the SMP/E dialogs or the RIMLIB jobs providedwith the CBPDO tape to receive the HOLDDATA. For more information, see thedocumentation that came with the CBPDO tape.
ESO TapesAnother way to obtain HOLDDATA is through ESO tapes. IBM regularly createsthe service levels shipped on these tapes, then custom-builds ESOs for users andmakes the tapes available through either subscription orders or special requestorders.
The HOLDDATA on an ESO tape has been customized to your product set. That is,it contains only data applicable to PTFs for those products within a given feature
Exception SYSMODs
Chapter 8. Managing Exception SYSMODs 117
for which you are licensed under a single customer number. However, it does notreflect the contents of any specific system within the establishment defined by thatcustomer number.
The HOLDDATA on the ESO should be processed immediately on receipt of thetape. For more information on processing the ESO, see “Processing HOLDDATAfrom an ESO” on page 120 and “Example of Processing HOLDDATA” on page 121.
PSP InformationOnce a service level has been created, there is no further opportunity to change theHOLDDATA on that tape, even though new errors are reported. It is, however,important that you have this error information when you are about to install aCBPDO or an ESO. Otherwise, you may direct SMP/E to install a PE PTF, thusintroducing a problem while fixing one. To solve this problem, PSP files have beenset up to hold this additional HOLDDATA. Within each SREL, there is one PSP filefor each service level.
When a service level is created, a PSP file is also created. As problems (APARs) arereported, appropriate ++HOLD statements are added to the applicable PSP files.IBM determines the applicable PSP files as follows:1. Determine the PTF that introduced the APAR.2. If the PTF is not yet assigned a monthly service level, add a ++HOLD
statement to the CORPE PSP file as well as the most current monthly bucket.
Note: The CORPE PSP file is for PE PTFs available correctively, but not yetassigned to a monthly service level. The current monthly bucket willcontain ++HOLD statements for corrective service PTFs as well as thoseassigned to a monthly service level.
3. If the PTF is available on a service level, determine the service level on whichthat PTF was first shipped.
4. Add a ++HOLD statement to the PSP file corresponding to that service level.5. Add a ++HOLD statement to each PSP file corresponding to any service levels
shipped after the one determined in the previous step, up to the current servicelevel.
6. Add a ++HOLD statement for the next service level.7. No further PSP files are updated.
Before installing a CBPDO tape, an ESO tape, or PTFs in corrective mode, useIBMLINK or contact the IBM Support Center to get the information in theapplicable PSP file. For more information on how to use the PSP information, see“Processing HOLDDATA from PSP Files” on page 121 and “Example of ProcessingHOLDDATA” on page 121.
How to Process HOLDDATAThe management of exception SYSMODs is a very important part of SMP/E.SMP/E’s ability to manage exception SYSMODs, however, is limited by the qualityand timeliness of the HOLDDATA made available to it. To gain the full advantageof this function, you must understand how SMP/E expects the three HOLDDATAinput sources to be used and the times during which SMP/E expects them to beused.
The following steps summarize the process for managing exception SYSMOD data:
Exception SYSMODs
118 SMP/E V3R2.0 User’s Guide
1. Receive all new products as you get them, or use UCLIN to add the FMIDs ofthe new products to the global zone. This allows you to process exceptionSYSMODs for them. Then receive any associated HOLDDATA shipped with theproduct.
2. Receive HOLDDATA from subsequent CBPDO or ESO tapes in service levelorder. Remember to do the following:v Receive all new products as you get them so you can process exception
SYSMODs for them.v Receive HOLDDATA as soon as you get your CBPDO or ESO tapes.
3. Before doing preventive service, do the following:a. Get the PSP file associated with the last service level for which you
processed HOLDDATA, and receive this additional HOLDDATA for yourproducts.
b. Get the CORPE PSP file. This contains PE PTFs that are availablecorrectively, but are not yet available in a service level.
c. List and review HOLDDATA for SYSTEM HOLDs and, if possible, handlethe required special conditions. Then apply and accept these processedSYSMODs by specifying BYPASS(HOLDSYS) and listing the individualSYSMOD IDs on the SELECT operand. This helps makes sure all availableservice is installed when you do preventive service.
Be sure to review “Example of Processing HOLDDATA” on page 121. This exampleshows why you should follow the procedures defined.
Processing HOLDDATA from a CBPDO TapeWhen you receive a CBPDO tape, the HOLDDATA it contains is based on theservice level you selected and on whether this is your first CBPDO. ThisHOLDDATA pertains both to the PTFs actually on that tape and to PTFs shippedon previous tapes. Follow these steps to process the HOLDDATA:1. Receive the HOLDDATA from the CBPDO tape as soon as you get the tape.
Use the SMP/E dialogs or the RIMLIB job provided with the CBPDO tape.By receiving the HOLDDATA as soon as possible, you make sure SMP/E hasthe most current information available. Therefore, if you try to install any PTFin response to a problem on your system and that PTF is in error, SMP/Eknows this and warns you so you can weigh the effect of installing the knownproblem against the effect of fixing the problem you have encountered.
2. Receive the SYSMODs from the CBPDO tape as soon as you get the tape. Usethe SMP/E dialogs or the RIMLIB job provided with the CBPDO tape.This makes sure that all available PTFs are ready to be installed. If you find aproblem in your system and determine that a PTF must be installed incorrective mode, you have a better chance of having that PTF and all itsrequisites readily available on the SMPPTS.
Note: You can receive the SYSMODs and HOLDDATA separately or in the samejob.
By following these procedures, you are essentially making a trade-off: systemresources as increased DASD space for the SMPPTS against the time the systemprogrammer would spend on searching for the service level with the required PTFand on fixing problems caused by installing PE PTFs.
One important part of this procedure is that the HOLDDATA on each CBPDO andESO must be received in chronological order. SMP/E processes the ++HOLD and
Exception SYSMODs
Chapter 8. Managing Exception SYSMODs 119
++RELEASE statements in the order in which they are encountered. Therefore,there can be an exposure if you receive the data out of sequence. For instance, thetapes may be set up so that one contains a ++HOLD for a PTF and a subsequentone contains a ++RELEASE for the same PTF. If the tapes are processed in thewrong order, the RELEASE statement is processed first, and then the HOLDstatement. As a result, the PTF remains held.
Processing HOLDDATA from an ESOWhen you receive your expanded service options (ESO) tape, the HOLDDATA itcontains pertains both to the PTFs actually on that tape and to PTFs shipped inprevious service levels. SMP/E and exception SYSMOD support have beendesigned to work most efficiently and effectively if you adhere to the followingprocessing guides:1. Receive the HOLDDATA file of the ESO as soon as you get the tape using the
SMP/E dialogs or the following sample job://RECHOLD JOB ’accounting info’,MSGLEVEL=(1,1)//RECEIVE EXEC SMPPROC//SMPHOLD DD ...data describing exception file//SMPCNTL DD *SET BDY(GLOBAL) /* Set to global zone. */.RECEIVE HOLDDATA /* Receive only exception
SYSMOD data. */./*
By receiving the HOLDDATA as soon as possible, you make sure SMP/E hasthe most current information available. Therefore, if you try to install any PTFin response to a problem on your system and that PTF is in error, SMP/Eknows this and warns you so you can balance the effect of installing the knownproblem against the effect of fixing the problem you have encountered.
2. Receive the SYSMOD file of the ESO as soon as you get the tape using theSMP/E dialogs or the following sample job://RECPTFS JOB ’accounting info’,MSGLEVEL=(1,1)//RECEIVE EXEC SMPPROC//SMPPTFIN DD ...data describing sysmods file//SMPCNTL DD *SET BDY(GLOBAL) /* Set to global zone. */.RECEIVE SYSMODS /* Receive only SYSMODs. */
SOURCEID(MYESO) /* Specify user-definedsource ID value. */.
LIST SYSMODS /* Now list the SYSMODs */MCS /* including SMP MCS */SOURCEID(MYESO) /* for those SYSMODs just
received. */./*
This makes sure that all available PTFs are ready to be installed. If you find aproblem in your system and determine that a PTF must be installed incorrective mode, you have a better chance of having that PTF and all itsrequisites readily available on the SMPPTS.
Note: The SOURCEID operand is optional. All PTFs in an ESO are assignedSOURCEID values by ++ASSIGN statements.
Although the procedures for receiving the SYSMOD and the HOLDDATA file areshown as separate jobs, they can be done in one RECEIVE command by specifyingboth the SYSMODS and HOLDDATA operands. In fact, this is the preferredmethod and is the default if neither operand is specified.
Exception SYSMODs
120 SMP/E V3R2.0 User’s Guide
By following these procedures, you are essentially making a trade-off: systemresources as increased DASD space for the SMPPTS against the time the systemprogrammer would spend on searching for the service level with the required PTFand on fixing problems caused by installing PE PTFs.
One important part of this procedure is that the HOLDDATA on each ESO andCBPDO must be received in chronological order. SMP/E processes the ++HOLDand ++RELEASE statements in the order in which they are encountered. Therefore,there can be an exposure if you receive the data out of sequence. For instance, thetapes may be set up so that one contains a ++HOLD for a PTF and a subsequentone contains a ++RELEASE for the same PTF. If the tapes are processed in thewrong order, the RELEASE statement is processed first, and then the HOLDstatement. As a result, the PTF remains held.
Processing HOLDDATA from PSP FilesAnother source of exception SYSMOD data is the PSP file, available throughIBMLINK or from the IBM Support Center. For each service level that is applicableto a specific environment, there is a PSP file containing additional HOLDDATA.This file contains all the ++HOLD and ++RELEASE statements applicable to PTFson either that service level or earlier ones. You should process this PSP file beforeyou install an ESO or before you install a CBPDO tape that includes PTFs fromthat service level.
When you are ready to install a CBPDO or ESO, you must do the following:1. Make sure you have received the HOLDDATA from, at minimum, all the
CBPDOs and ESOs up to the service level of the tape you are installing. Youshould receive the HOLDDATA from all the available tapes to reduce theamount of data that you have to get from PSP.
2. Use IBMLINK or contact the IBM Support Center to get the latest CORPE PSPfile, as well as the PSP file associated with the latest service level for whichyou have received HOLDDATA (not the PSP file for the service level that youare installing).
3. Create a data set containing the ++HOLD statements obtained from IBMLINKor the IBM Support Center.
4. Receive that data set using the SMP/E dialogs or the following sample job.//RECHOLD JOB ’accounting info’,MSGLEVEL=(1,1)//RECEIVE EXEC SMPPROC//SMPHOLD DD ...data describing your data set//SMPCNTL DD *SET BDY(GLOBAL) /* Set to global zone. */.RECEIVE HOLDDATA /* Receive only exception
SYSMOD data. */./*
You should also use IBMLINK or contact the IBM Support Center to get PSPinformation whenever you are installing corrective service. Before installing a PTFin corrective mode, determine the service level on which it was initially shipped.Then contact the IBM Support Center to get the PSP data associated with thatservice level to determine whether there are any ++HOLD statements for that PTF.If so, process them and install the PTF.
Example of Processing HOLDDATAAssume you are ready to actually install a CBPDO or ESO. The following examplemay help you understand the reasons behind the recommendations made in thischapter. In this example:
Exception SYSMODs
Chapter 8. Managing Exception SYSMODs 121

1. Table 12 on page 122 shows information on exception SYSMODs. The PTFs andPSP files are as follows:a. Column 1 lists the three service levels involved in this example.b. Column 2 lists the five SYSMODs in each service level.c. Column 3 lists the ++HOLD statements contained on the CBPDO or ESO.
For simplicity, there are no PE PTFs before the first service level in theexample (PUT0201). The exact syntax and APAR numbers for the ++HOLDare not significant for this example.
d. Column 4 lists the ++HOLD statements contained in the PSP file associatedwith each of the service levels. The exact syntax and APAR numbers for the++HOLD are not significant for this example.
2. The SYSMODs have been marked PE as follows:v As of the 0201 service level, there were no PTFs in error.v Between the 0201 and the 0202 service levels, PTFs UR00002 and UR00003
were marked as PE.v Between the 0202 and the 0203 service levels, PTF UR00005 was marked PE.v At the 0203 service level, PTF UR00001 was marked as PE.
3. Table 12 shows the contents of each of the files at some time after the creationof the 0203 service level.
Table 12. CBPDO/Service Level/PSP HOLDDATA Example
Service LevelPTFs PerService Level
PTFs withHOLDDATA
HOLDDATA in PSPFile for the Source IDService Level
PUT0201 UR00001UR00002UR00003UR00004UR00005
UR00001UR00002UR00003UR00005
PUT0202 UR00006UR00007UR00008UR00009UR00010
UR00002UR00003
UR00001UR00005
PUT0203 UR00011UR00012UR00013UR00014UR00015
UR00005 UR00001
4. You are now trying to install PTFs at service level 0201. The amount ofprocessing you have to do before installing 0201 service level PTFs depends onwhat you did with PTFs in 0202 and 0203 service levels.v If you have received the HOLDDATA for service levels 0201, 0202, and 0203,
you have to process only the one ++HOLD statement for PTF UR00001 fromthe PSP file for service level 0203.
v If you have received only the HOLDDATA for service level 0202, you have toprocess the two ++HOLD statements for PTFs UR00001 and UR00005 fromthe PSP file for service level 0202.
v If you decided not to process any data for particular service levels until youare actually ready to install them (that is, if you did nothing with service
Exception SYSMODs
122 SMP/E V3R2.0 User’s Guide
level 0202 or 0203), you have to process the four ++HOLD statements forPTFs UR00001, UR00002, UR00003, and UR00005 from the PSP file for servicelevel 0201.
Note: In each case, you used the PSP file associated with the last service levelfor which you received the HOLDDATA, but if you had kept current inprocessing the exception SYSMOD files from the service levels, youwould have had less information to obtain from the IBM Support Center.
In this example, the number of PTFs and HOLDDATA was small and, thus, thedata seems manageable. However, with a real service level with hundreds ofPTFs, the amount of manual work involved in getting the ++HOLD statementsfrom IBMLINK or the IBM Support Center, and then keying them into a dataset and receiving them could be very time-consuming. So, the cost of theincreased DASD space necessary to store the HOLDDATA each month iscommonly paid back in increased programmer productivity when the servicelevel is to be installed.
Exception SYSMODs
Chapter 8. Managing Exception SYSMODs 123
Exception SYSMODs
124 SMP/E V3R2.0 User’s Guide

Chapter 9. Creating Cross-Product, Cross-Zone LoadModules: The LINK MODULE Command
This chapter discusses the LINK MODULE command, with an emphasis on whenand how to use it.
When to Use LINK MODULEProducts sometimes contain modules from other products. For example, a productmay need to:v Include another product’s modules in its load modules. In this case, as long as
the two products are in the same zone, SMP/E can automatically include therequired modules in the load modules that need them (if the modules reside inthe target library as single-CSECT load modules). SMP/E also tracks theinclusion of these cross-product modules in the load modules.
v Update another product’s load module with one of its modules. In this case, aslong as the two products are in the same zone, SMP/E can automatically relinkthe load module and include the supplied module. SMP/E also tracks theinclusion of the modules in the cross-product load module.
However, when such products reside in different zones, SMP/E cannotautomatically perform the cross-zone link-edits. The LINK MODULE commandcan be used to perform these cross-zone link-edits as postinstallation steps withinSMP/E control. The LINK MODULE command causes the required load modulesin one zone to be linked with modules residing in another zone, and tracks thisinclusion so that subsequent APPLY and RESTORE processing can automaticallymaintain the affected load modules.
Notes:
1. When SMP/E processes the LINK MODULE command, it assumes that addingthe desired modules to the load modules does not require any changes to theload module definition (that is, the linkage editor control statements or linkageeditor attributes). If any such changes are needed, make them through JCLINbefore using the LINK MODULE command.
2. For the LINK MODULE command, the SET BOUNDARY command mustspecify the target zone that contains the LMOD entries for the load modules tobe link-edited.
3. There are times when the LINK MODULE command is not appropriate touse—generally, for products that are written in a high-level language and, as aresult, include modules from libraries (such as compiler libraries) owned by adifferent product. Your options for installing such a product depend on howthe product was packaged.v SYSLIB DD statements are used in link-edit steps in order to implicitly
include the necessary modules.In this case, when you install the product, the implicitly-included modulesare automatically linked into the load modules. If the libraries containingthose modules are updated, you can use the LINK LMODS command torebuild the affected load modules. For more information, see the LINKLMODS chapter in SMP/E Commands.
© Copyright IBM Corp. 1986, 2003 125

v No SYSLIB DD statements are used in link-edit steps in order to implicitlyinclude the necessary modules. In this case, you must use postinstallationlink-edit steps outside of SMP/E.
How to Use LINK MODULEAssume you have installed GDDM and CICS, and some of the GDDM modulesmust be linked into CICS load modules. GDDM resides in zone GDDTZN, and thezone controlling CICS is CICTZN. Because GDDM and CICS are controlled bydifferent zones, SMP/E does not automatically link the GDDM modules into theCICS load modules when GDDM is installed. The LINK MODULE command canbe used instead.
In this example, GDDM module ADMABCD needs to be linked into CICS loadmodule DFHWXYZ. Module ADMABCD is installed in a target library as asingle-CSECT load module when GDDM is installed. Therefore, SMP/E can usethe target library version of ADMABCD to update CICS load module DFHWXYZ.(If a module does not reside in a target library as a single-CSECT load module,SMP/E uses the related distribution zone copy of the module to update the loadmodule.)
The following commands can be used to have SMP/E install and track theinstallation of GDDM module ADMABCD in the CICS load module:SET BDY(CICTZN) /* Target zone for CICS. */.LINK MODULE(ADMABCD) /* Link module ADMABCD */
FROMZONE(GDDTZN) /* residing in zone GDDTZN */INTOLMOD(DFHWXYZ) /* into load module DFHWXYZ. */.
These commands cause GDDM module ADMABCD to be linked into CICS loadmodule DFHWXYZ. SMP/E also adds cross-zone subentries to the affected entries:v An XZLMOD subentry is added to the ADMABCD MOD entry in target zone
GDDTZN so that if ADMABCD is updated, it can be automatically replaced inthe CICS load module.
Note: The CICS load module is automatically updated only if the XZLINKsubentry was previously set to AUTOMATIC in the TZONE entry forzone CICTZN. Here is an example of the commands that can be used todo this:SET BDY(CICTZN) /* Target zone for CICS. */.UCLIN.ADD TZONE(CICTZN) /* Update TZONE entry */
XZLINK(AUTOMATIC). /* to do automatic links. */.ENDUCL.
v An XZMOD subentry is added to the CICS DFHWXYZ LMOD entry in targetzone CICTZN to indicate that:– DFHWXYZ now contains ADMABCD.– Any updates for ADMABCD should be accepted only from zone GDDTZN.
v TIEDTO subentries are added to the TZONE entries for CICTZN and GDDTZNto indicate that there is a relationship between modules and load modules inthese zones.
For more information on the LINK MODULE command and cross-zone updatingduring APPLY and RESTORE processing, see the LINK MODULE chapter inSMP/E Commands.
LINK MODULE Command
126 SMP/E V3R2.0 User’s Guide
Chapter 10. Displaying the Data Managed by SMP/E: The LISTCommand
This chapter discusses the LIST command. After an introduction, it discusses thesetopics:v Listing all the SMP/E datav Listing by specific entry typev Listing specific entriesv Listing by FMID or FMIDSETv Listing to compare two zones
IntroductionThe SMP/E database contains much information that is useful to you at certaintimes. For instance, when a problem is encountered in your system:v You need to know the functional and service level of the module with the error.v You may also want to know when that module was last changed: a recent
change may have caused the problem.v After reporting the problem, you can start working with the IBM Support Center
to debug the problem. They may want to know the status of other specific PTFs:have you installed them; are they available on your system; is anything stoppingthem from being installed?
v After identifying the problem in the module, you may want to know whetherany other parts of the system are affected by that module.
All of this information is available in the SMP/E database. You can obtain theinformation by using the SMP/E dialogs as you debug the problem. You can alsouse the SMP/E LIST command to create hardcopy listings of the information.
With the LIST command, you can display all entries of a specified type or specificentries. The following sections demonstrate the flexibility of the LIST command.For a complete description of all the LIST command operands, see The LISTCommand in SMP/E Commands.
Listing All the SMP/E DataIf you encounter a problem with your system, the SMP/E data describing thatsystem can be very important in diagnosing the problem. This information can beobtained by using the SMP/E dialogs during the debugging process. However, ifthe system is not running, the information is not available unless you haveperiodically listed the SMP/E data for the system.
Therefore, it is advisable to list all the data for each of your systems and save thehardcopy listing. The data can be listed by individual zone. The following is anexample of a job for listing all the entries in zone TGT01.//LIST JOB ’accounting info’,MSGLEVEL=(1,1)//LIST EXEC SMPPROC//SMPCNTL DD *SET BDY(TGT01) /* Set to desired zone. */.LIST /* List all entries */
© Copyright IBM Corp. 1986, 2003 127
XREF /* with XREF option to showadditional relationshipsbetween entries. */.
/*
Because the global zone contains data used to process each of the target zones anddistribution zones, you may want to list that data more often. The following joblists all the data in the global zone, including the SYSMOD entries and the MCSentries://LIST JOB ’accounting info’,MSGLEVEL=(1,1)//LIST EXEC SMPPROC//SMPCNTL DD *SET BDY(GLOBAL) /* Set to global zone. */.LIST /* List all entries. */./*
If you do not require a listing of the SYSMOD and MCS entries, you can use theLIST operands that enable you to list only specific entry types. For additionalinformation, see “Listing by Specific Entry Type”.
SMP/E also provides support to list all the entries for all the zones defined in theGLOBALZONE entry. This enables you to display all data for all systems with oneSMP/E command. Here is an example of this option://LIST JOB ’accounting info’,MSGLEVEL=(1,1)//LIST EXEC SMPPROC//SMPCNTL DD *SET BDY(GLOBAL) /* Set to global zone. */.LIST /* List all entries */
ALLZONES /* for all zones. */./*
Notes:
1. The ALLZONES operand should be used with caution; it may produce a largeamount of output.
2. This function can also be qualified by other LIST operands to limit the entrieslisted from each zone. For example, the following job will list only theSYSMOD entries from all zones://LIST JOB ’accounting info’,MSGLEVEL=(1,1)//LIST EXEC SMPPROC//SMPCNTL DD *SET BDY(GLOBAL) /* Set to global zone. */.LIST SYSMOD /* List the SYSMOD entries */
ALLZONES /* for all zones. */./*
Listing by Specific Entry TypeAt times, you may need to have a listing of all entries of a certain type. Forexample:v You may want to display all the DDDEF entries for a particular target zone or
distribution zone.v You may want to list all the OPTIONS and UTILITY entries in the global zone
so you do not duplicate an existing entry.
SMP/E supports various operands on the LIST command that you can use to listall the entries for one or more entry types. The following job shows how to use theDDDEF, OPTIONS, and UTILITY operands on the LIST command to do this:
LIST Command
128 SMP/E V3R2.0 User’s Guide
//LIST JOB ’accounting info’,MSGLEVEL=(1,1)//LIST EXEC SMPPROC//SMPCNTL DD *SET BDY(TGT1) /* Set to target zone */.LIST DDDEF /* List all DDDEF entries. */
/* */.SET BDY(DLIB1) /* Set to DLIB zone */.LIST DDDEF /* List all DDDEF entries. */
/* */.SET BDY(GLOBAL) /* Set to global zone. */.LIST OPTIONS /* List all options */
UTILITY /* and utility entries. *//* */.
/*
For a complete list of all the operands corresponding to the various entry types,see The LIST Command in SMP/E Commands.
Note: Not all entry types are valid for each zone type. For example, requesting alisting of the OPTIONS entries in a target zone results in an error, becauseOPTIONS entries exist only in the global zone. For a summary of the typesof entries contained in each type of zone, see Table 2 on page 55 and Table 3on page 56.
Sometimes, the various entry-type operands can be further qualified to processonly a subset of all existing entries. The most common type for which this can bedone is the SYSMOD entries. There are numerous operands to qualify SYSMODentries. The LIST Command in SMP/E Commands describes all of them in detail.
One of the most common uses of this function is to determine the functions (orFMIDs) that have been installed. The following job can be used to list:v The function SYSMODs installed on TGT1v Those PTFs that have been applied to TGT1 but not yet accepted to DLIB1//LIST JOB ’accounting info’,MSGLEVEL=(1,1)//LIST EXEC SMPPROC//SMPCNTL DD *SET BDY(TGT1) /* Set to target zone. */.LIST SYSMOD /* List the SYSMOD entries */
FUNCTIONS /* for function SYSMODs. *//* */.
LIST SYSMOD /* List the SYSMOD entries */PTFS /* for PTF type SYSMODs */NOACCEPT(DLIB1) /* not yet accepted. */
/* */./*
Listing Specific EntriesWhen you encounter a problem in your system and contact the IBM SupportCenter to resolve the problem, you may be asked to provide very specificinformation. For example:v What is the service level of the module in which the problem was reported?v Are there any USERMODs for the module?v Do you have a specific PTF installed?
If you have a complete, current listing of all the entries in your system, you canget this information from that listing. You can also get it through the SMP/Edialogs while you are talking to the IBM Support Center.
LIST Command
Chapter 10. Displaying the Data Managed by SMP/E: The LIST Command 129
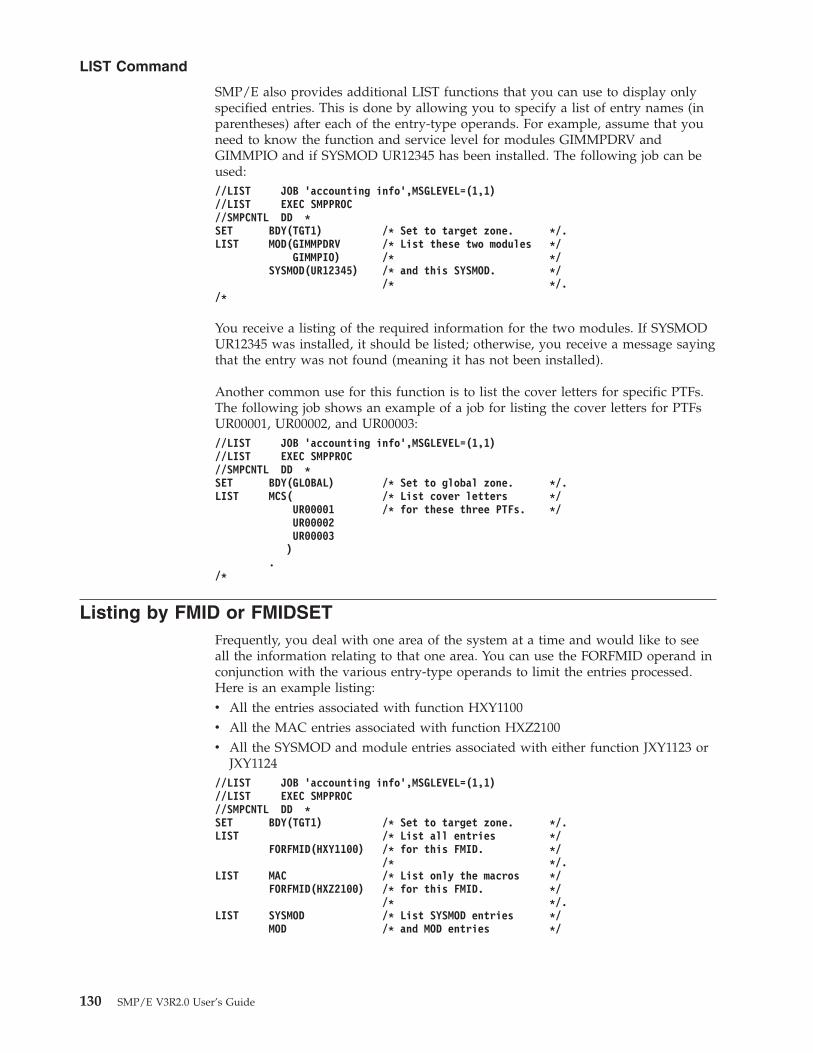
SMP/E also provides additional LIST functions that you can use to display onlyspecified entries. This is done by allowing you to specify a list of entry names (inparentheses) after each of the entry-type operands. For example, assume that youneed to know the function and service level for modules GIMMPDRV andGIMMPIO and if SYSMOD UR12345 has been installed. The following job can beused://LIST JOB ’accounting info’,MSGLEVEL=(1,1)//LIST EXEC SMPPROC//SMPCNTL DD *SET BDY(TGT1) /* Set to target zone. */.LIST MOD(GIMMPDRV /* List these two modules */
GIMMPIO) /* */SYSMOD(UR12345) /* and this SYSMOD. */
/* */./*
You receive a listing of the required information for the two modules. If SYSMODUR12345 was installed, it should be listed; otherwise, you receive a message sayingthat the entry was not found (meaning it has not been installed).
Another common use for this function is to list the cover letters for specific PTFs.The following job shows an example of a job for listing the cover letters for PTFsUR00001, UR00002, and UR00003://LIST JOB ’accounting info’,MSGLEVEL=(1,1)//LIST EXEC SMPPROC//SMPCNTL DD *SET BDY(GLOBAL) /* Set to global zone. */.LIST MCS( /* List cover letters */
UR00001 /* for these three PTFs. */UR00002UR00003)
./*
Listing by FMID or FMIDSETFrequently, you deal with one area of the system at a time and would like to seeall the information relating to that one area. You can use the FORFMID operand inconjunction with the various entry-type operands to limit the entries processed.Here is an example listing:v All the entries associated with function HXY1100v All the MAC entries associated with function HXZ2100v All the SYSMOD and module entries associated with either function JXY1123 or
JXY1124//LIST JOB ’accounting info’,MSGLEVEL=(1,1)//LIST EXEC SMPPROC//SMPCNTL DD *SET BDY(TGT1) /* Set to target zone. */.LIST /* List all entries */
FORFMID(HXY1100) /* for this FMID. *//* */.
LIST MAC /* List only the macros */FORFMID(HXZ2100) /* for this FMID. */
/* */.LIST SYSMOD /* List SYSMOD entries */
MOD /* and MOD entries */
LIST Command
130 SMP/E V3R2.0 User’s Guide

FORFMID(JXY1123 /* for this FMID */JXY1124) /* or this FMID. */
/* */./*
Note: The names within the FORFMID operand can be names of FMIDSET entries.In this case, SMP/E lists all the entries associated with any of the FMIDsdefined in the FMIDSET entry.
Listing to Compare Two ZonesIf you have multiple zones, you may sometimes want to determine the functionaland service differences between them. The LIST command provides you with thiscapability.
Note: You can also use the REPORT SYSMODS command to compare theSYSMOD content of two zones. Besides telling you which SYSMODs areinstalled in one zone but not in a second, REPORT SYSMODS also indicateswhich of the uninstalled SYSMODs are applicable to the second zone andgenerates commands you can run to install the SYSMODs in the secondzone. For more information, see Chapter 15, “Comparing the SYSMODsInstalled in Two Zones: The REPORT SYSMODS Command”, on page 145.
One possibility might be that you have two products at different service levels. Theproduct at the lower service level works, and the product at the higher servicelevel does not work. You might use LIST to compare the zones for the two systemsand to determine what is causing the problem.
This example compares two target zones, TGT1 and TGT2. The commands in thefollowing example perform the comparison for you://LIST JOB ’accounting info’,MSGLEVEL=(1,1)//LIST EXEC SMPPROC//SMPCNTL DD *SET BDY(TGT1) /* Set to target zone TGT1. */.LIST SYSMODS /* List the SYSMODs */
/* in zone TGT1 */NOAPPLY(TGT2) /* that have not been */
/* applied to TGT2. *//* */.
SET BDY(TGT2) /* Set to target zone TGT2. */.LIST SYSMODS /* List the SYSMODs */
/* in zone TGT2 */NOAPPLY(TGT1) /* that have not been */
/* applied to TGT1. *//* */.
/*
By comparing the two resulting listings, you can see the differences between thetwo zones.
In this second example, the same product is installed in different zones. You wantto compare the service to make sure both copies of the product are at the samelevel. For example, assume that product PVT1102 is installed in two target zonesand two distribution zones:
LIST Command
Chapter 10. Displaying the Data Managed by SMP/E: The LIST Command 131
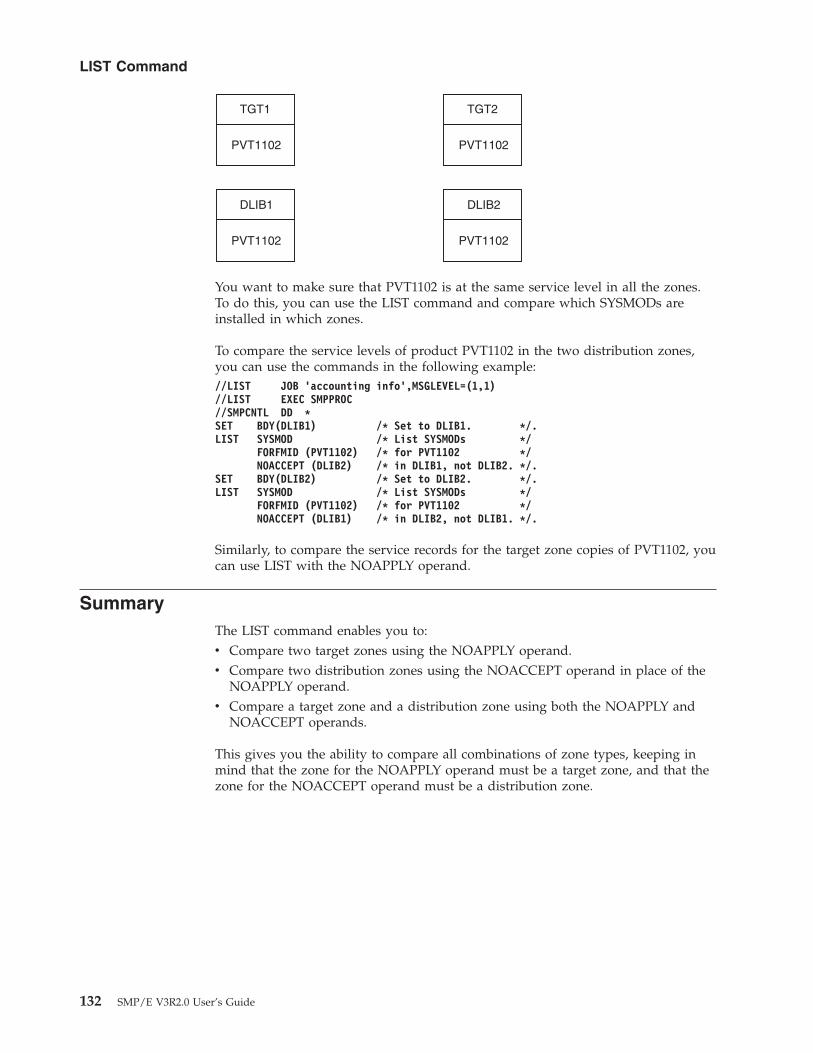
You want to make sure that PVT1102 is at the same service level in all the zones.To do this, you can use the LIST command and compare which SYSMODs areinstalled in which zones.
To compare the service levels of product PVT1102 in the two distribution zones,you can use the commands in the following example://LIST JOB ’accounting info’,MSGLEVEL=(1,1)//LIST EXEC SMPPROC//SMPCNTL DD *SET BDY(DLIB1) /* Set to DLIB1. */.LIST SYSMOD /* List SYSMODs */
FORFMID (PVT1102) /* for PVT1102 */NOACCEPT (DLIB2) /* in DLIB1, not DLIB2. */.
SET BDY(DLIB2) /* Set to DLIB2. */.LIST SYSMOD /* List SYSMODs */
FORFMID (PVT1102) /* for PVT1102 */NOACCEPT (DLIB1) /* in DLIB2, not DLIB1. */.
Similarly, to compare the service records for the target zone copies of PVT1102, youcan use LIST with the NOAPPLY operand.
SummaryThe LIST command enables you to:v Compare two target zones using the NOAPPLY operand.v Compare two distribution zones using the NOACCEPT operand in place of the
NOAPPLY operand.v Compare a target zone and a distribution zone using both the NOAPPLY and
NOACCEPT operands.
This gives you the ability to compare all combinations of zone types, keeping inmind that the zone for the NOAPPLY operand must be a target zone, and that thezone for the NOACCEPT operand must be a distribution zone.
LIST Command
132 SMP/E V3R2.0 User’s Guide
Chapter 11. Changing the Data SMP/E Manages: The UCLINCommand
This chapter discusses the UCLIN command, with an emphasis on how and whento use it.
IntroductionThe SMPCSI and associated data sets contain basically two types of information:v Information added as a result of installing SYSMODs. Generally, this type is
managed completely by SMP/E; that is, appropriate entries are added, changed,or deleted as SYSMODs are installed. You need not make any modification tothe database to record this information. You may, however, need to makechanges to do the following:– Record changes made outside SMP/E– Delete information no longer required– Recover from an SMP/E or system error
v Information added by you to control the installation of SYSMODs. You mustmanually add this information to the database before processing any SYSMODs.You may later need to modify the information to reflect new processinginformation.
The UCLIN command helps you to make these changes.
To use UCLIN effectively, you should have a detailed understanding of how itworks and what it can do. The UCLIN Command in SMP/E Commands and SMP/Edata-set entries in the SMP/E Reference manual provide that level of detail. Readthose chapters before trying to run any UCLIN commands. The following sectionsdescribe, at a very high level, what UCLIN is.
When to Use UCLINUCLIN is a very powerful function that must be used with extreme caution. Youcan use UCLIN to modify almost all the data in the SMP/E database. When youare modifying an entry, SMP/E makes sure the data within that one entry isconsistent—that is, that the result could have occurred during normal SMP/Eprocessing. However, no checking is done to make sure the resulting entry isconsistent with other related entries in the database.
For example, you can use UCLIN to delete a UTILITY entry in the global zonewithout SMP/E detecting any error condition. However, if there is an OPTIONSentry within the global zone that refers to the deleted UTILITY entry, an erroroccurs when you attempt to use that OPTIONS entry. This is a very simpleexample of inconsistent data across entries that does not result in a serious error.UCLIN modifications to other entries, such as element, LMOD, or SYSMOD, maynot be detected as error conditions during processing, but may cause incorrectprocessing, such as failing to link a module, updating the wrong library, orinstalling a SYSMOD that should not be installed.
In general, consider the following before making the UCLIN update:1. Determine whether there is a better method of obtaining the same result.
Table 13 on page 134 shows where to find more information about alternatives
© Copyright IBM Corp. 1986, 2003 133
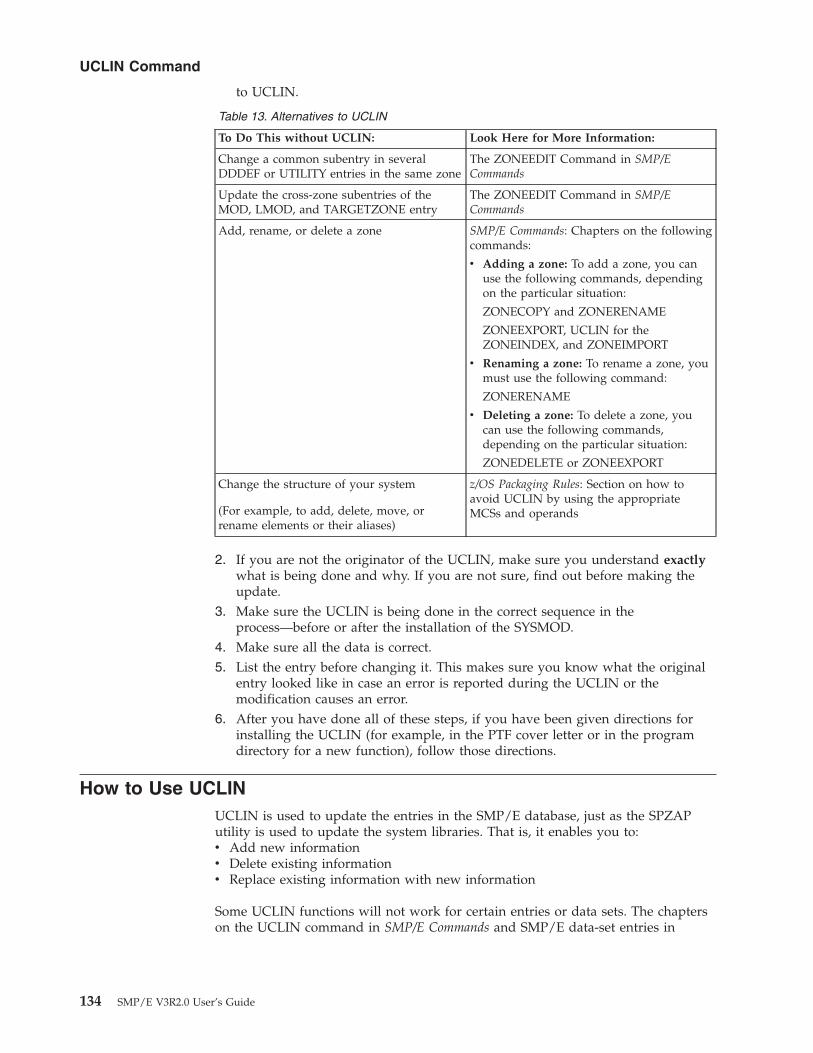
to UCLIN.
Table 13. Alternatives to UCLIN
To Do This without UCLIN: Look Here for More Information:
Change a common subentry in severalDDDEF or UTILITY entries in the same zone
The ZONEEDIT Command in SMP/ECommands
Update the cross-zone subentries of theMOD, LMOD, and TARGETZONE entry
The ZONEEDIT Command in SMP/ECommands
Add, rename, or delete a zone SMP/E Commands: Chapters on the followingcommands:
v Adding a zone: To add a zone, you canuse the following commands, dependingon the particular situation:
ZONECOPY and ZONERENAME
ZONEEXPORT, UCLIN for theZONEINDEX, and ZONEIMPORT
v Renaming a zone: To rename a zone, youmust use the following command:
ZONERENAME
v Deleting a zone: To delete a zone, youcan use the following commands,depending on the particular situation:
ZONEDELETE or ZONEEXPORT
Change the structure of your system
(For example, to add, delete, move, orrename elements or their aliases)
z/OS Packaging Rules: Section on how toavoid UCLIN by using the appropriateMCSs and operands
2. If you are not the originator of the UCLIN, make sure you understand exactlywhat is being done and why. If you are not sure, find out before making theupdate.
3. Make sure the UCLIN is being done in the correct sequence in theprocess—before or after the installation of the SYSMOD.
4. Make sure all the data is correct.5. List the entry before changing it. This makes sure you know what the original
entry looked like in case an error is reported during the UCLIN or themodification causes an error.
6. After you have done all of these steps, if you have been given directions forinstalling the UCLIN (for example, in the PTF cover letter or in the programdirectory for a new function), follow those directions.
How to Use UCLINUCLIN is used to update the entries in the SMP/E database, just as the SPZAPutility is used to update the system libraries. That is, it enables you to:v Add new informationv Delete existing informationv Replace existing information with new information
Some UCLIN functions will not work for certain entries or data sets. The chapterson the UCLIN command in SMP/E Commands and SMP/E data-set entries in
UCLIN Command
134 SMP/E V3R2.0 User’s Guide
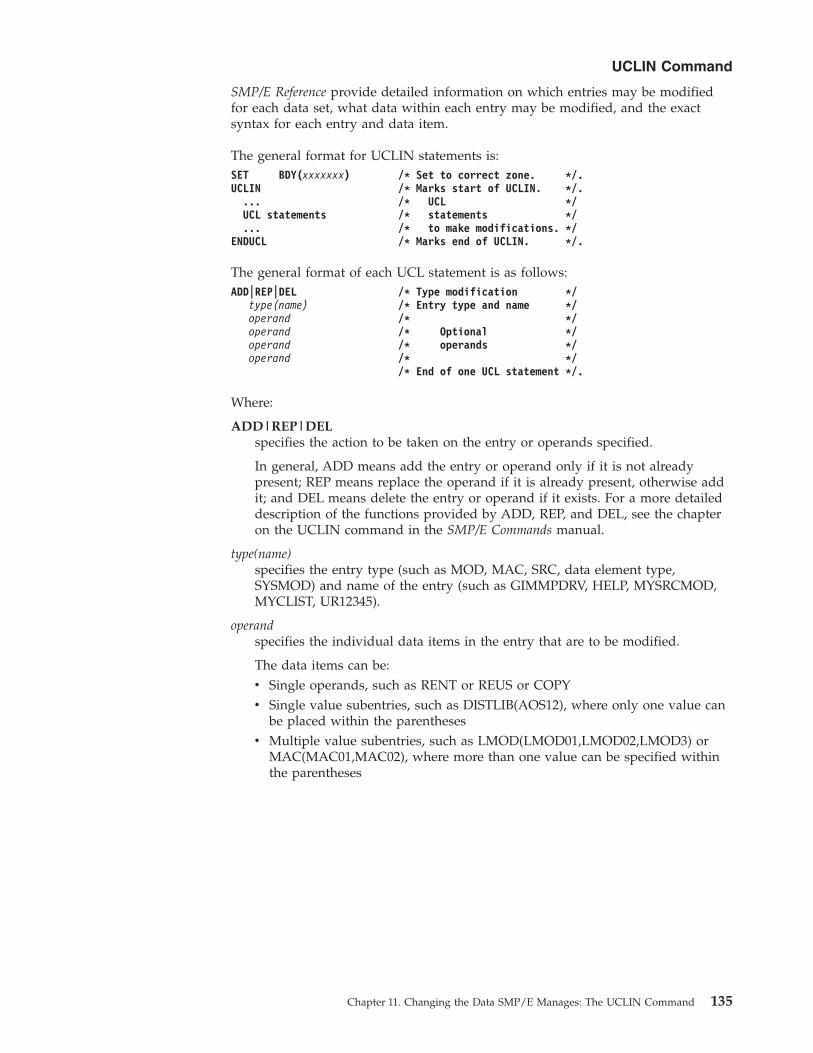
SMP/E Reference provide detailed information on which entries may be modifiedfor each data set, what data within each entry may be modified, and the exactsyntax for each entry and data item.
The general format for UCLIN statements is:SET BDY(xxxxxxx) /* Set to correct zone. */.UCLIN /* Marks start of UCLIN. */.
... /* UCL */UCL statements /* statements */... /* to make modifications. */
ENDUCL /* Marks end of UCLIN. */.
The general format of each UCL statement is as follows:ADD|REP|DEL /* Type modification */
type(name) /* Entry type and name */operand /* */operand /* Optional */operand /* operands */operand /* */
/* End of one UCL statement */.
Where:
ADD|REP|DELspecifies the action to be taken on the entry or operands specified.
In general, ADD means add the entry or operand only if it is not alreadypresent; REP means replace the operand if it is already present, otherwise addit; and DEL means delete the entry or operand if it exists. For a more detaileddescription of the functions provided by ADD, REP, and DEL, see the chapteron the UCLIN command in the SMP/E Commands manual.
type(name)specifies the entry type (such as MOD, MAC, SRC, data element type,SYSMOD) and name of the entry (such as GIMMPDRV, HELP, MYSRCMOD,MYCLIST, UR12345).
operandspecifies the individual data items in the entry that are to be modified.
The data items can be:v Single operands, such as RENT or REUS or COPYv Single value subentries, such as DISTLIB(AOS12), where only one value can
be placed within the parenthesesv Multiple value subentries, such as LMOD(LMOD01,LMOD02,LMOD3) or
MAC(MAC01,MAC02), where more than one value can be specified withinthe parentheses
UCLIN Command
Chapter 11. Changing the Data SMP/E Manages: The UCLIN Command 135

UCLIN Command
136 SMP/E V3R2.0 User’s Guide
Chapter 12. Identifying Cross-Zone Requisites: The REPORTCROSSZONE Command
This chapter contains information about using the REPORT CROSSZONEcommand to check for requisites between zones. It discusses these topics:v How to define a ZONESETv How to run the REPORT CROSSZONE commandv How to install the SYSMODs, using the output from the REPORT CROSSZONE
command
IntroductionYour system may contain products that are packaged and installed separately, butwhich have service level or interface dependencies. For example, an interface errorin one product may require a change to another product that used the interface.When this happens, a unique PTF is generated for each product. The relationshipbetween the PTFs can be specified in a conditional requisite (++IF) modificationcontrol statement in the PTFs. If you have completed the steps listed in “SpecifyingAutomatic Cross-Zone Requisite Checking” on page 73, SMP/E automaticallychecks the requisites during APPLY, ACCEPT, and RESTORE processing, whetherthe products are in the same zone or in separate zones. However, if you have notcompleted these steps and the products are in separate zones, the requisites are notautomatically checked in any other zones. In this case, to make sure theserequisites are installed where they are needed, you must:1. Define a set of zones to be checked for conditional requisites. This is done with
the ZONESET entry in the global zone.
Note: All the zones in the ZONESET must be defined by ZONEINDEXsubentries in the same global zone as the ZONESET entry.
2. Run the REPORT CROSSZONE command to get a list of the SYSMODs thatmust be installed and the zones where they are needed.
3. Install the SYSMODs in the indicated zones.
Note: If you just want to check service levels for products, you should use theREPORT SYSMODS command or the LIST command. See Chapter 15,“Comparing the SYSMODs Installed in Two Zones: The REPORT SYSMODSCommand”, on page 145 and “Listing to Compare Two Zones” on page 131for more information.
Defining a ZONESETTo tell SMP/E which zones it should check for missing requisites, you must definea global zone ZONESET entry. You may have one or more ZONESETs to describegroups of products that might have dependencies on each other.
For example, assume you have a system that supports two products, ABC andAYZ, that have dependencies on one another. You might have one zone, BASEABC,for the base ABC function, and another zone, PRODABC, for a dependent function.Likewise, you might have a zone BASEXYZ for the base XYZ function, andanother zone, PRODXYZ, for a dependent function. The dependent functions are
© Copyright IBM Corp. 1986, 2003 137
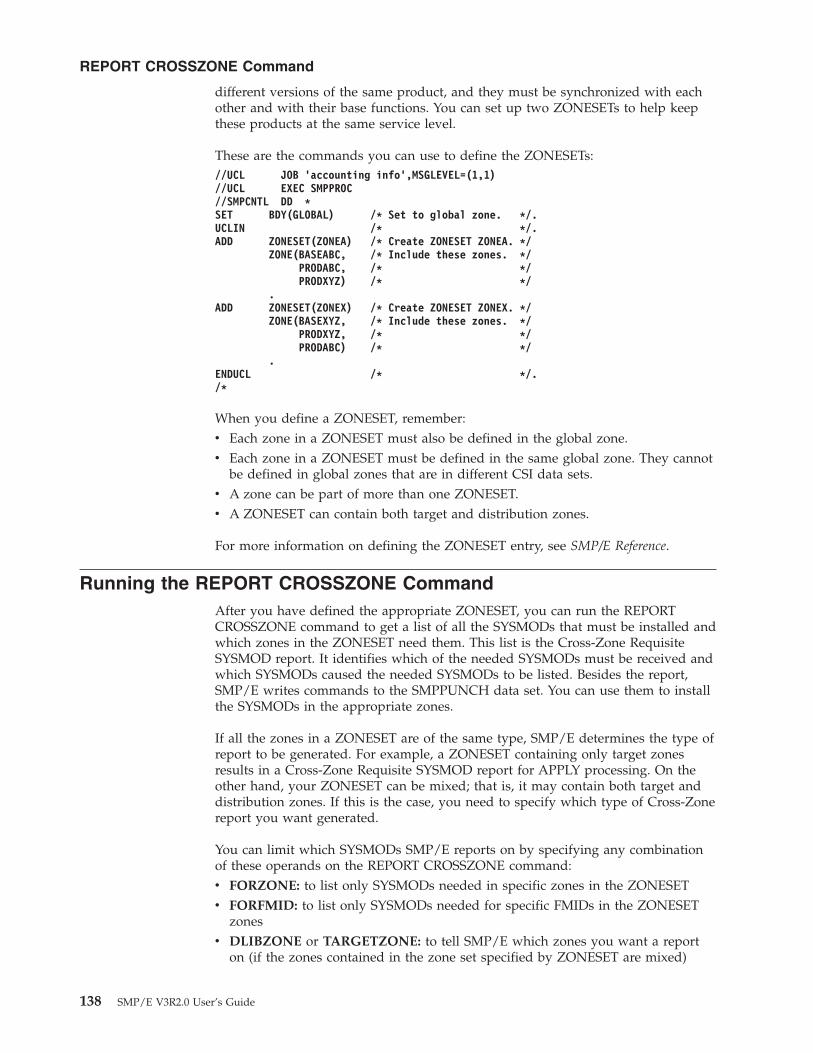
different versions of the same product, and they must be synchronized with eachother and with their base functions. You can set up two ZONESETs to help keepthese products at the same service level.
These are the commands you can use to define the ZONESETs://UCL JOB ’accounting info’,MSGLEVEL=(1,1)//UCL EXEC SMPPROC//SMPCNTL DD *SET BDY(GLOBAL) /* Set to global zone. */.UCLIN /* */.ADD ZONESET(ZONEA) /* Create ZONESET ZONEA. */
ZONE(BASEABC, /* Include these zones. */PRODABC, /* */PRODXYZ) /* */
.ADD ZONESET(ZONEX) /* Create ZONESET ZONEX. */
ZONE(BASEXYZ, /* Include these zones. */PRODXYZ, /* */PRODABC) /* */
.ENDUCL /* */./*
When you define a ZONESET, remember:v Each zone in a ZONESET must also be defined in the global zone.v Each zone in a ZONESET must be defined in the same global zone. They cannot
be defined in global zones that are in different CSI data sets.v A zone can be part of more than one ZONESET.v A ZONESET can contain both target and distribution zones.
For more information on defining the ZONESET entry, see SMP/E Reference.
Running the REPORT CROSSZONE CommandAfter you have defined the appropriate ZONESET, you can run the REPORTCROSSZONE command to get a list of all the SYSMODs that must be installed andwhich zones in the ZONESET need them. This list is the Cross-Zone RequisiteSYSMOD report. It identifies which of the needed SYSMODs must be received andwhich SYSMODs caused the needed SYSMODs to be listed. Besides the report,SMP/E writes commands to the SMPPUNCH data set. You can use them to installthe SYSMODs in the appropriate zones.
If all the zones in a ZONESET are of the same type, SMP/E determines the type ofreport to be generated. For example, a ZONESET containing only target zonesresults in a Cross-Zone Requisite SYSMOD report for APPLY processing. On theother hand, your ZONESET can be mixed; that is, it may contain both target anddistribution zones. If this is the case, you need to specify which type of Cross-Zonereport you want generated.
You can limit which SYSMODs SMP/E reports on by specifying any combinationof these operands on the REPORT CROSSZONE command:v FORZONE: to list only SYSMODs needed in specific zones in the ZONESETv FORFMID: to list only SYSMODs needed for specific FMIDs in the ZONESET
zonesv DLIBZONE or TARGETZONE: to tell SMP/E which zones you want a report
on (if the zones contained in the zone set specified by ZONESET are mixed)
REPORT CROSSZONE Command
138 SMP/E V3R2.0 User’s Guide
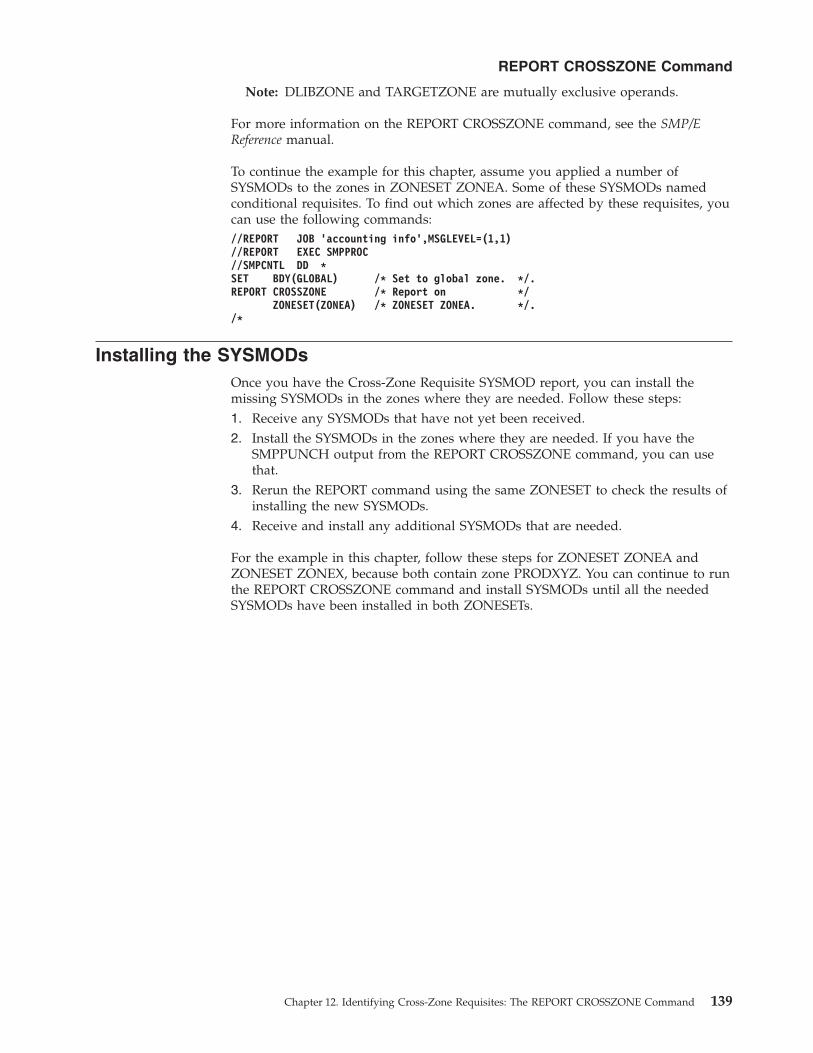
Note: DLIBZONE and TARGETZONE are mutually exclusive operands.
For more information on the REPORT CROSSZONE command, see the SMP/EReference manual.
To continue the example for this chapter, assume you applied a number ofSYSMODs to the zones in ZONESET ZONEA. Some of these SYSMODs namedconditional requisites. To find out which zones are affected by these requisites, youcan use the following commands://REPORT JOB ’accounting info’,MSGLEVEL=(1,1)//REPORT EXEC SMPPROC//SMPCNTL DD *SET BDY(GLOBAL) /* Set to global zone. */.REPORT CROSSZONE /* Report on */
ZONESET(ZONEA) /* ZONESET ZONEA. */./*
Installing the SYSMODsOnce you have the Cross-Zone Requisite SYSMOD report, you can install themissing SYSMODs in the zones where they are needed. Follow these steps:1. Receive any SYSMODs that have not yet been received.2. Install the SYSMODs in the zones where they are needed. If you have the
SMPPUNCH output from the REPORT CROSSZONE command, you can usethat.
3. Rerun the REPORT command using the same ZONESET to check the results ofinstalling the new SYSMODs.
4. Receive and install any additional SYSMODs that are needed.
For the example in this chapter, follow these steps for ZONESET ZONEA andZONESET ZONEX, because both contain zone PRODXYZ. You can continue to runthe REPORT CROSSZONE command and install SYSMODs until all the neededSYSMODs have been installed in both ZONESETs.
REPORT CROSSZONE Command
Chapter 12. Identifying Cross-Zone Requisites: The REPORT CROSSZONE Command 139

140 SMP/E V3R2.0 User’s Guide
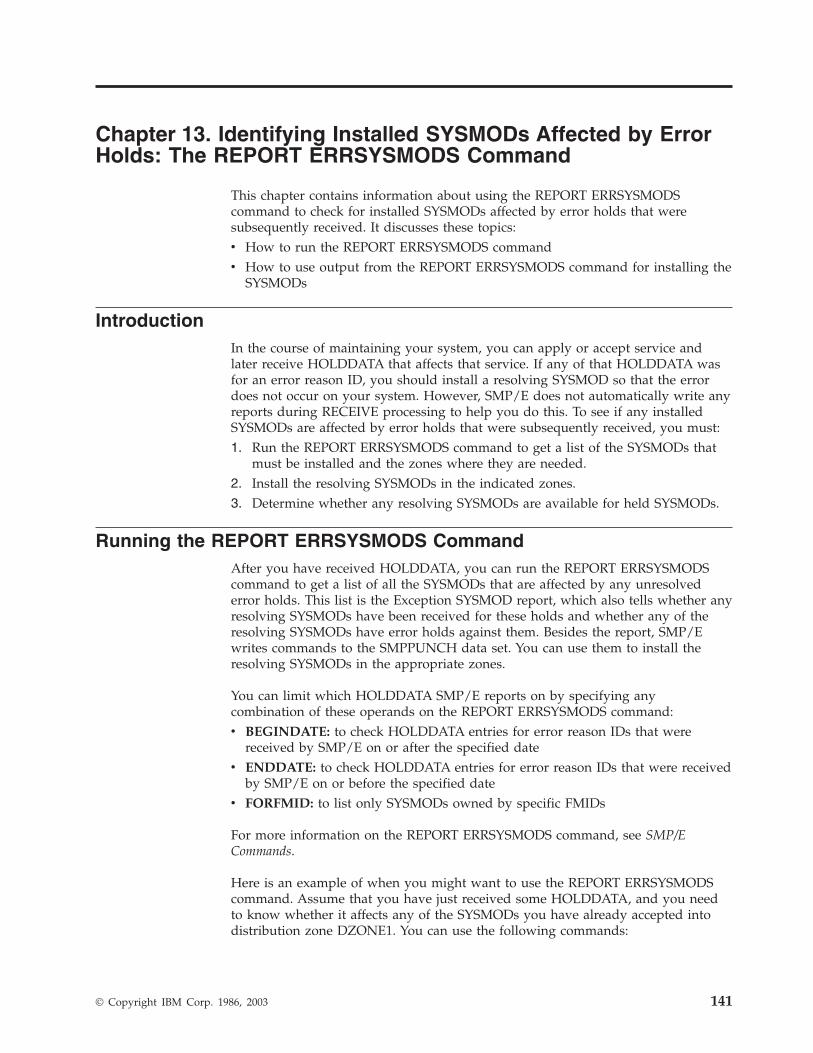
Chapter 13. Identifying Installed SYSMODs Affected by ErrorHolds: The REPORT ERRSYSMODS Command
This chapter contains information about using the REPORT ERRSYSMODScommand to check for installed SYSMODs affected by error holds that weresubsequently received. It discusses these topics:v How to run the REPORT ERRSYSMODS commandv How to use output from the REPORT ERRSYSMODS command for installing the
SYSMODs
IntroductionIn the course of maintaining your system, you can apply or accept service andlater receive HOLDDATA that affects that service. If any of that HOLDDATA wasfor an error reason ID, you should install a resolving SYSMOD so that the errordoes not occur on your system. However, SMP/E does not automatically write anyreports during RECEIVE processing to help you do this. To see if any installedSYSMODs are affected by error holds that were subsequently received, you must:1. Run the REPORT ERRSYSMODS command to get a list of the SYSMODs that
must be installed and the zones where they are needed.2. Install the resolving SYSMODs in the indicated zones.3. Determine whether any resolving SYSMODs are available for held SYSMODs.
Running the REPORT ERRSYSMODS CommandAfter you have received HOLDDATA, you can run the REPORT ERRSYSMODScommand to get a list of all the SYSMODs that are affected by any unresolvederror holds. This list is the Exception SYSMOD report, which also tells whether anyresolving SYSMODs have been received for these holds and whether any of theresolving SYSMODs have error holds against them. Besides the report, SMP/Ewrites commands to the SMPPUNCH data set. You can use them to install theresolving SYSMODs in the appropriate zones.
You can limit which HOLDDATA SMP/E reports on by specifying anycombination of these operands on the REPORT ERRSYSMODS command:v BEGINDATE: to check HOLDDATA entries for error reason IDs that were
received by SMP/E on or after the specified datev ENDDATE: to check HOLDDATA entries for error reason IDs that were received
by SMP/E on or before the specified datev FORFMID: to list only SYSMODs owned by specific FMIDs
For more information on the REPORT ERRSYSMODS command, see SMP/ECommands.
Here is an example of when you might want to use the REPORT ERRSYSMODScommand. Assume that you have just received some HOLDDATA, and you needto know whether it affects any of the SYSMODs you have already accepted intodistribution zone DZONE1. You can use the following commands:
© Copyright IBM Corp. 1986, 2003 141
//REPORT JOB ’accounting info’,MSGLEVEL=(1,1)//REPORT EXEC SMPPROC//SMPCNTL DD *SET BDY(GLOBAL) /* process global zone */.REPORT ERRSYSMODS /* report on exception */
ZONES(DZONE1) /* SYSMODs in this zone */BEGINDATE(01 01 02) /* for HOLDDATA received */ENDDATE(02 01 02) /* between these dates */.
Installing the SYSMODsOnce you have the Exception SYSMOD report, you can install the resolvingSYSMODs in the zones where they are needed. Follow these steps:1. If any resolving SYSMODs are held, run REPORT ERRSYSMODS, specifying
the global zone, to see if any SYSMODs have been received that resolve theadditional holds for the resolving SYSMODs.
2. If the Exception SYSMOD report for the global zone shows resolving SYSMODsfor the additional holds, edit the SMPPUNCH output to add the new resolvingSYSMODs and to update the selection list so the held resolving SYSMODs willbe processed.
3. Use the SMPPUNCH output to install the resolving SYSMODs in DZONE1.
REPORT ERRSYSMODS Command
142 SMP/E V3R2.0 User’s Guide
Chapter 14. Listing the Source IDs in a Zone: The REPORTSOURCEID Command
This chapter contains information about using the REPORT SOURCEID commandto list the source IDs assigned to SYSMODs in a given zone or ZONESET. Itdiscusses these topics:v How to run the REPORT SOURCEID commandv How to list SYSMODs using the output from the REPORT SOURCEID command
IntroductionIn the course of maintaining your system, you may need to find out which sourceIDs are assigned to SYSMODs in a given zone. For example, assume you installservice using CBPDOs, which assign source IDs to the service SYSMODs theycontain. You can use the REPORT SOURCEID command to determine the latestservice level you have installed in a particular zone. To determine the service levelbased on source IDs, follow these steps:1. Run the REPORT SOURCEID command to get a list of which source IDs are
assigned to SYSMODs in a given zone.2. If desired, list the SYSMOD entries for the SYSMODs with those source IDs.
Running the REPORT SOURCEID CommandYou can use the REPORT SOURCEID command to get a list of all the source IDsassigned to SYSMODs in a given zone. This list is the SOURCEID report, whichmay also indicate which SYSMODs these source IDs are assigned to. Besides thereport, SMP/E writes commands to the SMPPUNCH data set, which you can useto list the SYSMODs. For details on the REPORT SOURCEID command, see SMP/ECommands.
Here is an example of when you might want to use the REPORT SOURCEIDcommand. Assume you want to find out which source IDs are associated withSYSMODs in target zone TGT1, and you want to know which SYSMODs eachsource ID is assigned to. You can use the following commands:SET BDY(GLOBAL).REPORT SOURCEID
ZONES(TGT1)SYSMODIDS.
Listing the SYSMODsIf you want more information about the SYSMODs that are assigned the sourceIDs shown in the SOURCEID report, you can list the related SYSMOD entries. TheSMPPUNCH output produced by the REPORT SOURCEID command contains theLIST SYSMOD SOURCEID(...) commands needed to list the SYSMODs for thesource IDs in the SOURCEID report. You can tailor the SMPPUNCH output to listthe SYSMODs in which you are interested, and run the commands to list thedesired SYSMODs.
© Copyright IBM Corp. 1986, 2003 143

144 SMP/E V3R2.0 User’s Guide
Chapter 15. Comparing the SYSMODs Installed in Two Zones:The REPORT SYSMODS Command
This chapter contains information about using the REPORT SYSMODS commandto check if SYSMODs installed in one zone are applicable to and installed in asecond zone. It discusses these topics:v How to run the REPORT SYSMODS commandv How to install SYSMODs using the output from the REPORT SYSMODS
command
IntroductionIn the course of maintaining your system, you may need to compare the functionand service level of two zones. For example, if you have installed the sameproducts in different zones, you may want to make sure that both copies of theseproducts are at the same level. SMP/E does not do this kind of checkingautomatically. To compare the SYSMODs installed in two zones, you must:1. Run the REPORT SYSMODS command to get a list of the SYSMODs that are
installed in the first zone and that are applicable to the second zone but are notyet installed there.
2. Install the applicable SYSMODs in the second zone.
Running the REPORT SYSMODS CommandYou can run the REPORT SYSMODS command to get a list of all the SYSMODsthat are installed in one zone and not in a second. This list is the SYSMODComparison report, which also tells which of these SYSMODs are applicable to thesecond zone, shows if the SYSMODs have been received, and lists any source IDsassociated with the SYSMODs. Besides the report, SMP/E writes commands to theSMPPUNCH data set, which you can use to install the SYSMODs. For details onthe REPORT SYSMODS command, see SMP/E Commands.
Here is an example of when you might want to use the REPORT SYSMODScommand. Assume you have two z/OS systems. The target zones that controlthese systems are TGZONE1 and TGZONE2, and they are serviced from the sameglobal zone. You want to determine which SYSMODs are installed in TGZONE1and are not installed in, but are applicable to, TGZONE2. You can use thefollowing commands:SET BDY(GLOBAL) /* process global zone */.REPORT SYSMODS /* report on SYSMODs */
INZONE(TGZONE1) /* input zone TGZONE1 */COMPAREDTO(TGZONE2) /* comparison zone TGZONE2 */.
Installing the SYSMODsOnce you have the SYSMOD Comparison report, you can install the applicableSYSMODs in the zone where they are needed. Follow these steps:1. Research the report to determine which of the identified SYSMODs you want to
install into the comparison zone.
© Copyright IBM Corp. 1986, 2003 145
2. Find and receive any applicable SYSMODs that were not available and that youwant to install. The source ID in the report identifies some possible sources forobtaining the SYSMODs.
3. Tailor the SMPPUNCH output to install the set of SYSMODs that you deemappropriate; then run the commands to install the desired SYSMODs.
REPORT SYSMODS Command
146 SMP/E V3R2.0 User’s Guide
Chapter 16. Building a User Modification
This chapter discusses steps and considerations for building a user modification(USERMOD). It provides the following information:v How to choose between building a SYSMOD as a USERMOD and building it as
a functionv How to create modification control statementsv Examples of USERMODs
Choosing between a USERMOD and a Function SYSMODSoftware products available from IBM provide you with many functions. However,these functions may not always exactly meet your processing requirements. Manyof these products provide interfaces, such as user exit routines or dummy modules,that you can use to customize the functions to your needs. Sometimes, however,you may need to change a function substantially. You can do this by either:v Constructing a user modification as USERMODs to an existing functionv Constructing an additional function SYSMOD
Although you might be able to make these changes without SMP/E, there areadvantages to creating them either as USERMODs or as function SYSMODs so thatSMP/E can install them.
When SMP/E installs the changes, it does the following:v Keeps a record of the changesv Reports any intersections with SYSMODs provided by IBMv Ensures that the changes are not regressedv Ensures that the changes are installed properly in the correct librariesv Lets you remove the changes if there are problems
Before creating your changes, you must decide whether to build a USERMOD typeSYSMOD or a function SYSMOD. Table 14 lists considerations that will help youmake this decision.
Table 14. Comparison of USERMODs and Function SYSMODs
USERMOD Function SYSMOD
Provides changes for elements owned by anexisting function.
May provide new elements for an existingfunction.
Provides new elements or new elementversions for a new function.
SMP/E reports on changes attempted byPTFs, APARs, or USERMODs.
SMP/E does not report on changesattempted by PTFs, APARs, or USERMODs.
Other SYSMODs for the same function canupdate the elements.
Because the SYSMOD owns the element,SYSMODs for other functions cannot updatethe element without also changing theowner of the element.
Better for small changes that affect only afew elements.
Better for major additions to the system.
© Copyright IBM Corp. 1986, 2003 147

Creating the MCSsThis section describes some of the considerations for building the MCSs for aUSERMOD SYSMOD. See z/OS Packaging Rules for guidelines on when to useUSERMODs and SMP/E Modification Control Statements in SMP/E Reference formore information on MCS syntax.
The ++USERMOD MCSThe ++USERMOD statement identifies this SYSMOD as a USERMOD and assignsa 7-character identifier to the SYSMOD.
The format of the ++USERMOD statement is:++USERMOD(sysmod_id) /* */.
The ++VER MCSThe ++VER statement is necessary in all SYSMODs. It describes the environmentnecessary for installing the SYSMOD.
The general format of the ++VER statement follows:++VER /* Environment MCS */
(srel) /* System and release ID */FMID(aaaaaaa) /* Functional area */PRE ( /* */
bbbbbbb bbbbbbb /* Prerequisite PTFs */bbbbbbb bbbbbbb /* */) /* */
REQ ( /* */ccccccc ccccccc /* Other related USERMODs */ccccccc ccccccc /* */) /* */
SUP ( /* */ddddddd ddddddd /* Other USERMODs incorp- */ddddddd ddddddd /* orated into this one */
) /* */.
Specifying the Proper System ReleaseThe SREL value (srel) must be one of those defined as an SREL subentry in theTARGETZONE entry. If the USERMOD is a change to an IBM product, the SRELshould correspond to the SREL value specified in the IBM product that currentlyowns the elements within this SYSMOD.
Specifying the FMID ValueIf any element is owned by an FMID different from that specified in the ++VERstatement, that element is not selected for installation during APPLY or ACCEPTprocessing, and message GIM45401W is issued. This condition is a SYSMODconstruction error. SMP/E supports a SYSMOD construction that assumes that thiscondition occurs regularly and that the SYSMOD contains an ++IF statementspecifying another SYSMOD that supplies the proper functional version of theelement.
Note: As was explained earlier, it is a good idea to construct a USERMOD so thateach SYSMOD contains only one element. This construction methodeliminates this problem.
Specifying the Proper RequisitesWhen you specify requisite SYSMODs, you are defining two kinds of relationships:v The relationship of your SYSMOD to previous versions of the elementv The relationship of your SYSMOD to other SYSMODs currently on the system
Building a USERMOD
148 SMP/E V3R2.0 User’s Guide

The following text describes how you can define these relationships.
Relationships to Earlier Versions of the Elements:
1. If the element entry in your target zone has an RMID value different from itsFMID value, ensure it is a prerequisite of the USERMOD fix; that is, make surethe bbbbbbb value shown in the example is accurate. If the RMID and FMIDvalues are equal, the bbbbbbb value need not be specified.
2. If the element entry in your target zone has any UMID values, you should firstcheck to make sure the USERMOD itself was constructed so it works correctlyin that environment. You should then make sure each of the UMID values isspecified in the PRE operand in place of the ccccccc values shown in theexample. This is not an absolute requirement, but if it is omitted, SMP/E issueswarning messages during installation identifying that these SYSMODs mayhave an intersection with the one you are installing and, therefore, may beregressed. Putting the UMID values in the PRE list suppresses these messages.
3. If you do not specify the requisites that previously replaced an element, SMP/Edoes not allow your USERMODs to be installed unless you specify BYPASS(ID)on the APPLY or ACCEPT commands.
4. If you want this SYSMOD installed without any warning or error messages,you must specify all the current UMID values of each element in the SYSMODin the PRE operand. This indicates to SMP/E that the SYSMOD was designedto be installed on the current function and service level of the element,including update level.If you do not specify the requisites that previously updated an element, thefollowing occurs:v If your SYSMOD contains an element replacement, SMP/E does not allow
the SYSMOD to be installed unless BYPASS(ID) is specified on the APPLYand ACCEPT command.
v If your SYSMOD contained an element update, SMP/E allows the SYSMODto be installed, but issues a warning message for each requisite not specifiedin the PRE list.
This means SMP/E is unable to determine if there is an intersection betweenyour update and those already on the element. It assumes that there is none,and you should investigate both updates to verify this.
Relationships to Other SYSMODs: Your SYSMOD may depend on anotherUSERMOD or IBM PTF being installed, because you depend on the functionprovided by that SYSMOD. You may want to indicate that this SYSMOD is part ofa set of USERMODs designed to provide some user function. Because eachSYSMOD contains only one element, you want to tell SMP/E that they should allbe installed together. This is done with the REQ operand (the ccccccc values in theexample).
Specifying Superseded SYSMODsIf this SYSMOD is to fix multiple problems, each of the additional APARs that arebeing fixed should be specified in the SUP operand (ddddddd values in theexample). This notifies SMP/E that it is not necessary to install those SYSMODsafter the current SYSMOD is installed.
The ++JCLIN MCSThe ++JCLIN statement is necessary in all SYSMODs that add new modules orchange the link-edit characteristics or link-edit control cards for existing loadmodules. The data following the ++JCLIN statement consists of the jobs necessary
Building a USERMOD
Chapter 16. Building a User Modification 149
for installing the new module or link-editing the affected load modules, as if thatJCL were actually going to build the load modules from scratch from members oflibraries.
The general format of the ++JCLIN statement is:
++JCLIN /* Installation data */.
++MOD and ++ZAP MCSsThe ++MOD and ++ZAP statements are used to identify a replacement and updateto a module in the distribution library and associated load modules.
The data following the ++MOD statement is an object deck. The general format ofthe ++MOD statement is:++MOD(modname) /* Distribution name */
DISTLIB(dlibname) /* DLIB ddname */...... Object deck for module...
The data following the ++ZAP statement is a set of superzap control statements.The general format of the ++ZAP statement is:++ZAP(modname) /* Distribution name */
DISTLIB(dlibname) /* DLIB ddname */....... Superzap control statement...
The superzap control statements are the same as you would use if you were callingthe superzap utility. The only exception is that on the NAME statement, youshould specify only the CSECT name within the distribution library module, ratherthan the load module name and the CSECT name. When SMP/E installs theSYSMOD, it determines all the load modules into which this distribution modulewas link-edited and then calls the superzap utility for each of these load modules,modifying the NAME statement as appropriate.
++MAC and ++MACUPD MCSsThe ++MAC and ++MACUPD statements are used to identify a replacement andupdate to a macro in the distribution library and associated target libraries.
The data following the ++MAC statement is the macro replacement. The generalformat of the ++MAC statement is:++MAC(macname) /* Macro name */
DISTLIB(dlibname) /* DLIB ddname */....... Macro replacement...
The data following the ++MACUPD statement is the control statements that wouldhave been used if you called the IEBUPDTE utility. The general format of the++MACUPD statement is:++MACUPD(macname) /* Macro name */
DISTLIB(dlibname) /* DLIB ddname */....... Update control statements...
Building a USERMOD
150 SMP/E V3R2.0 User’s Guide
The following restrictions are enforced by SMP/E:1. The first statement must be the “./ change name=macname” control statement.2. The name specified on the change statement must be the same as on the
++MACUPD statement.3. No insert or delete statement can be used. Inserting must be done by manually
assigning each line a number. Deleting must be done by commenting out theline. This restriction enables SMP/E to merge the update control statementwhen multiple SYSMODs modify the same macro.
++SRC and ++SRCUPD MCSsThe ++SRC and ++SRCUPD statements are used to identify a replacement andupdate to source in the distribution library and associated target libraries. Theformat of the MCSs and the data format and restrictions are similar to those formacros.
The ++PROGRAM MCSThe ++PROGRAM statement is used to define replacements for program elements,which are pre-built load modules or program objects. (For a complete descriptionof program elements, see the chapter on MCSs in SMP/E Reference.) You can add aprogram element by packaging it in a USERMOD.
The ++PROGRAM MCS is immediately followed by the load module or programobject. The general format of the ++PROGRAM MCS is:++PROGRAM(name) /* Data element type, name */
DISTLIB(dlibname) /* DLIB ddname */....... Program element replacement...
To be packaged inline, a program element must be unloaded along with its aliasesinto a sequential data set and then transformed with GIMDTS into the requiredfixed-block-80 record format before it is packaged. Later, when SMP/E installs theelement, it is changed back to its original format. For more information aboutusing GIMDTS, see SMP/E Reference.
Data Element MCSsData element MCSs are used to define replacements for data elements, which areelements other than macros, modules, program elements, and source code. Theseinclude TSO CLISTs, help panels, ISPF dialog panels, and online publicationslibraries. (For a complete description of data elements, see SMP/E ModificationControl Statements in SMP/E Reference.) You can add a data element by packagingit in a USERMOD.
The data element MCS is immediately followed by the data element itself. Thegeneral format of the data element MCS is:++element(name) /* Data element type, name */
DISTLIB(dlibname) /* DLIB ddname */....... Data element replacement...
To be packaged inline, a data element must contain fixed-block 80 records. If theoriginal format of the element is not fixed-block 80 records, you can use GIMDTS,a service routine provided with SMP/E, to transform the element into the required
Building a USERMOD
Chapter 16. Building a User Modification 151
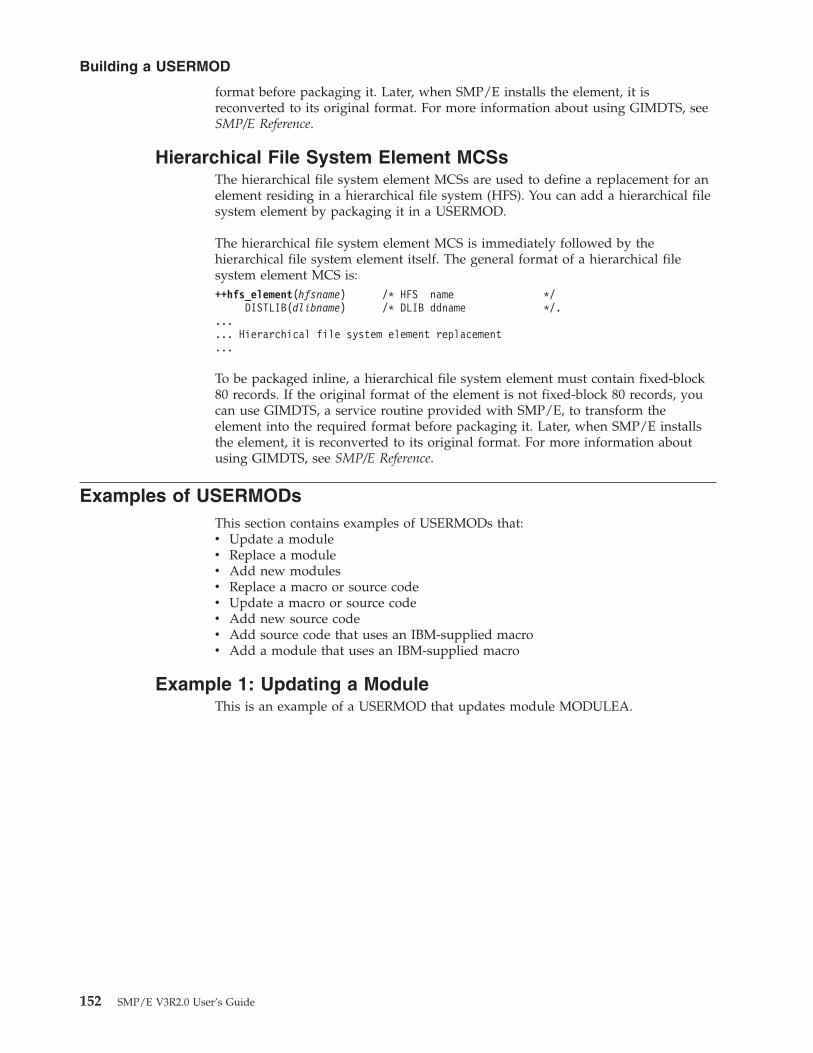
format before packaging it. Later, when SMP/E installs the element, it isreconverted to its original format. For more information about using GIMDTS, seeSMP/E Reference.
Hierarchical File System Element MCSsThe hierarchical file system element MCSs are used to define a replacement for anelement residing in a hierarchical file system (HFS). You can add a hierarchical filesystem element by packaging it in a USERMOD.
The hierarchical file system element MCS is immediately followed by thehierarchical file system element itself. The general format of a hierarchical filesystem element MCS is:++hfs_element(hfsname) /* HFS name */
DISTLIB(dlibname) /* DLIB ddname */....... Hierarchical file system element replacement...
To be packaged inline, a hierarchical file system element must contain fixed-block80 records. If the original format of the element is not fixed-block 80 records, youcan use GIMDTS, a service routine provided with SMP/E, to transform theelement into the required format before packaging it. Later, when SMP/E installsthe element, it is reconverted to its original format. For more information aboutusing GIMDTS, see SMP/E Reference.
Examples of USERMODsThis section contains examples of USERMODs that:v Update a modulev Replace a modulev Add new modulesv Replace a macro or source codev Update a macro or source codev Add new source codev Add source code that uses an IBM-supplied macrov Add a module that uses an IBM-supplied macro
Example 1: Updating a ModuleThis is an example of a USERMOD that updates module MODULEA.
Building a USERMOD
152 SMP/E V3R2.0 User’s Guide
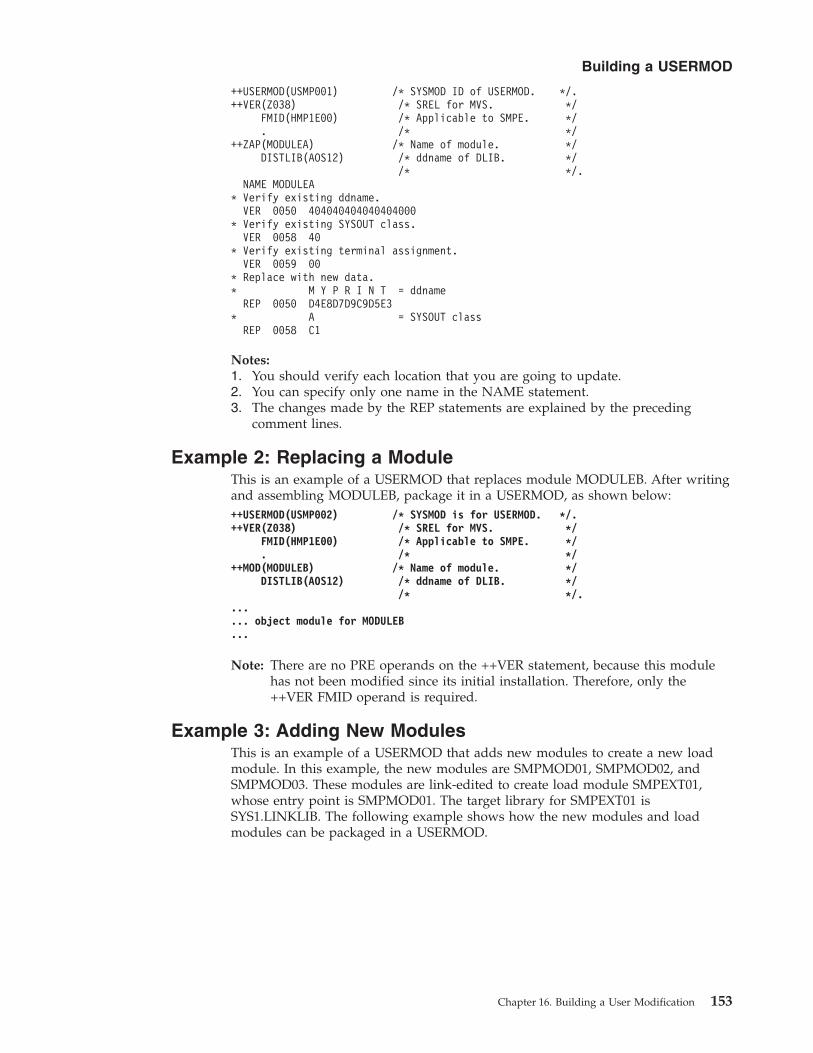
Notes:1. You should verify each location that you are going to update.2. You can specify only one name in the NAME statement.3. The changes made by the REP statements are explained by the preceding
comment lines.
Example 2: Replacing a ModuleThis is an example of a USERMOD that replaces module MODULEB. After writingand assembling MODULEB, package it in a USERMOD, as shown below:++USERMOD(USMP002) /* SYSMOD is for USERMOD. */.++VER(Z038) /* SREL for MVS. */
FMID(HMP1E00) /* Applicable to SMPE. */. /* */
++MOD(MODULEB) /* Name of module. */DISTLIB(AOS12) /* ddname of DLIB. */
/* */....... object module for MODULEB...
Note: There are no PRE operands on the ++VER statement, because this modulehas not been modified since its initial installation. Therefore, only the++VER FMID operand is required.
Example 3: Adding New ModulesThis is an example of a USERMOD that adds new modules to create a new loadmodule. In this example, the new modules are SMPMOD01, SMPMOD02, andSMPMOD03. These modules are link-edited to create load module SMPEXT01,whose entry point is SMPMOD01. The target library for SMPEXT01 isSYS1.LINKLIB. The following example shows how the new modules and loadmodules can be packaged in a USERMOD.
++USERMOD(USMP001) /* SYSMOD ID of USERMOD. */.++VER(Z038) /* SREL for MVS. */
FMID(HMP1E00) /* Applicable to SMPE. */. /* */
++ZAP(MODULEA) /* Name of module. */DISTLIB(AOS12) /* ddname of DLIB. */
/* */.NAME MODULEA
* Verify existing ddname.VER 0050 404040404040404000
* Verify existing SYSOUT class.VER 0058 40
* Verify existing terminal assignment.VER 0059 00
* Replace with new data.* M Y P R I N T = ddname
REP 0050 D4E8D7D9C9D5E3* A = SYSOUT class
REP 0058 C1
Building a USERMOD
Chapter 16. Building a User Modification 153
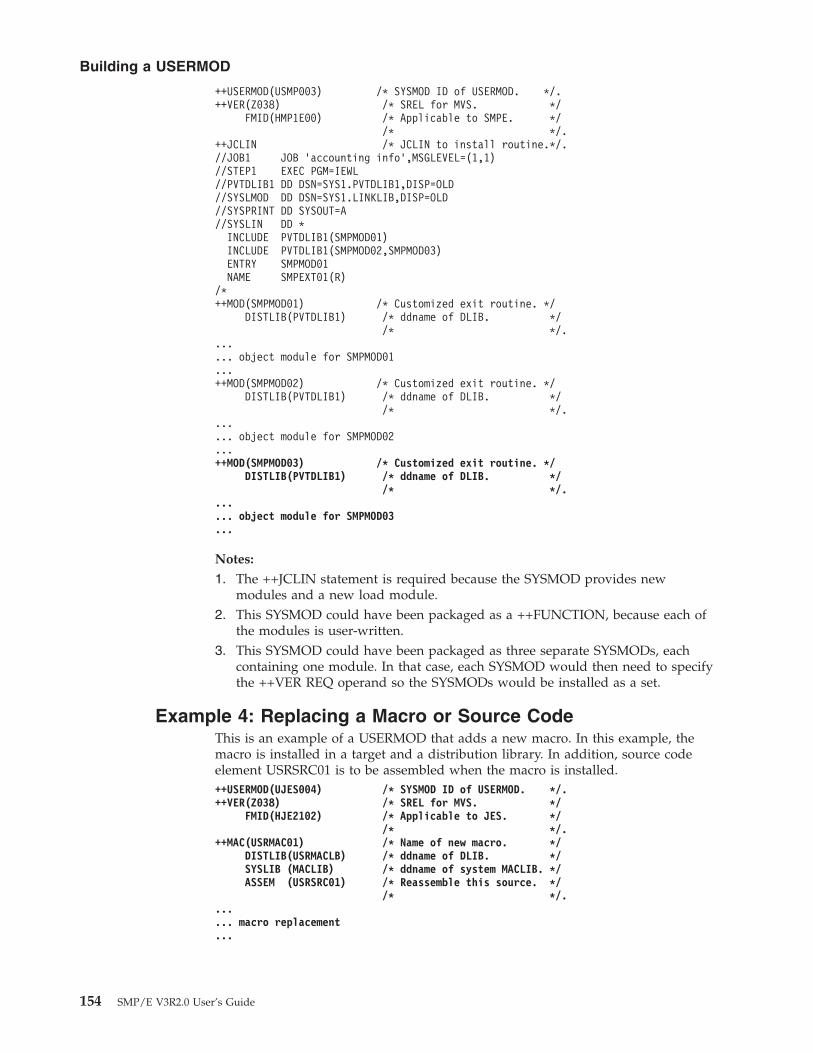
Notes:
1. The ++JCLIN statement is required because the SYSMOD provides newmodules and a new load module.
2. This SYSMOD could have been packaged as a ++FUNCTION, because each ofthe modules is user-written.
3. This SYSMOD could have been packaged as three separate SYSMODs, eachcontaining one module. In that case, each SYSMOD would then need to specifythe ++VER REQ operand so the SYSMODs would be installed as a set.
Example 4: Replacing a Macro or Source CodeThis is an example of a USERMOD that adds a new macro. In this example, themacro is installed in a target and a distribution library. In addition, source codeelement USRSRC01 is to be assembled when the macro is installed.++USERMOD(UJES004) /* SYSMOD ID of USERMOD. */.++VER(Z038) /* SREL for MVS. */
FMID(HJE2102) /* Applicable to JES. *//* */.
++MAC(USRMAC01) /* Name of new macro. */DISTLIB(USRMACLB) /* ddname of DLIB. */SYSLIB (MACLIB) /* ddname of system MACLIB. */ASSEM (USRSRC01) /* Reassemble this source. */
/* */....... macro replacement...
++USERMOD(USMP003) /* SYSMOD ID of USERMOD. */.++VER(Z038) /* SREL for MVS. */
FMID(HMP1E00) /* Applicable to SMPE. *//* */.
++JCLIN /* JCLIN to install routine.*/.//JOB1 JOB ’accounting info’,MSGLEVEL=(1,1)//STEP1 EXEC PGM=IEWL//PVTDLIB1 DD DSN=SYS1.PVTDLIB1,DISP=OLD//SYSLMOD DD DSN=SYS1.LINKLIB,DISP=OLD//SYSPRINT DD SYSOUT=A//SYSLIN DD *
INCLUDE PVTDLIB1(SMPMOD01)INCLUDE PVTDLIB1(SMPMOD02,SMPMOD03)ENTRY SMPMOD01NAME SMPEXT01(R)
/*++MOD(SMPMOD01) /* Customized exit routine. */
DISTLIB(PVTDLIB1) /* ddname of DLIB. *//* */.
...
... object module for SMPMOD01
...++MOD(SMPMOD02) /* Customized exit routine. */
DISTLIB(PVTDLIB1) /* ddname of DLIB. *//* */.
...
... object module for SMPMOD02
...++MOD(SMPMOD03) /* Customized exit routine. */
DISTLIB(PVTDLIB1) /* ddname of DLIB. *//* */.
...
... object module for SMPMOD03
...
Building a USERMOD
154 SMP/E V3R2.0 User’s Guide
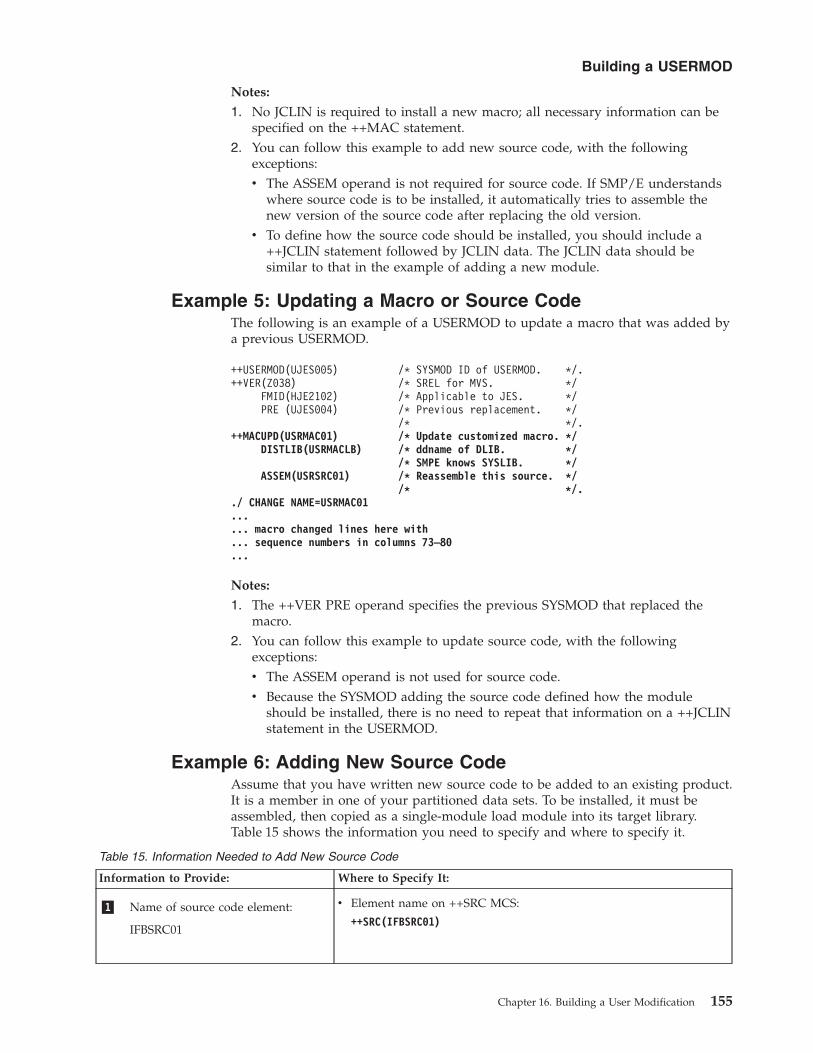
Notes:
1. No JCLIN is required to install a new macro; all necessary information can bespecified on the ++MAC statement.
2. You can follow this example to add new source code, with the followingexceptions:v The ASSEM operand is not required for source code. If SMP/E understands
where source code is to be installed, it automatically tries to assemble thenew version of the source code after replacing the old version.
v To define how the source code should be installed, you should include a++JCLIN statement followed by JCLIN data. The JCLIN data should besimilar to that in the example of adding a new module.
Example 5: Updating a Macro or Source CodeThe following is an example of a USERMOD to update a macro that was added bya previous USERMOD.
Notes:
1. The ++VER PRE operand specifies the previous SYSMOD that replaced themacro.
2. You can follow this example to update source code, with the followingexceptions:v The ASSEM operand is not used for source code.v Because the SYSMOD adding the source code defined how the module
should be installed, there is no need to repeat that information on a ++JCLINstatement in the USERMOD.
Example 6: Adding New Source CodeAssume that you have written new source code to be added to an existing product.It is a member in one of your partitioned data sets. To be installed, it must beassembled, then copied as a single-module load module into its target library.Table 15 shows the information you need to specify and where to specify it.
Table 15. Information Needed to Add New Source Code
Information to Provide: Where to Specify It:
�1� Name of source code element:
IFBSRC01
v Element name on ++SRC MCS:
++SRC(IFBSRC01)
++USERMOD(UJES005) /* SYSMOD ID of USERMOD. */.++VER(Z038) /* SREL for MVS. */
FMID(HJE2102) /* Applicable to JES. */PRE (UJES004) /* Previous replacement. */
/* */.++MACUPD(USRMAC01) /* Update customized macro. */
DISTLIB(USRMACLB) /* ddname of DLIB. *//* SMPE knows SYSLIB. */
ASSEM(USRSRC01) /* Reassemble this source. *//* */.
./ CHANGE NAME=USRMAC01
...
... macro changed lines here with
... sequence numbers in columns 73–80
...
Building a USERMOD
Chapter 16. Building a User Modification 155
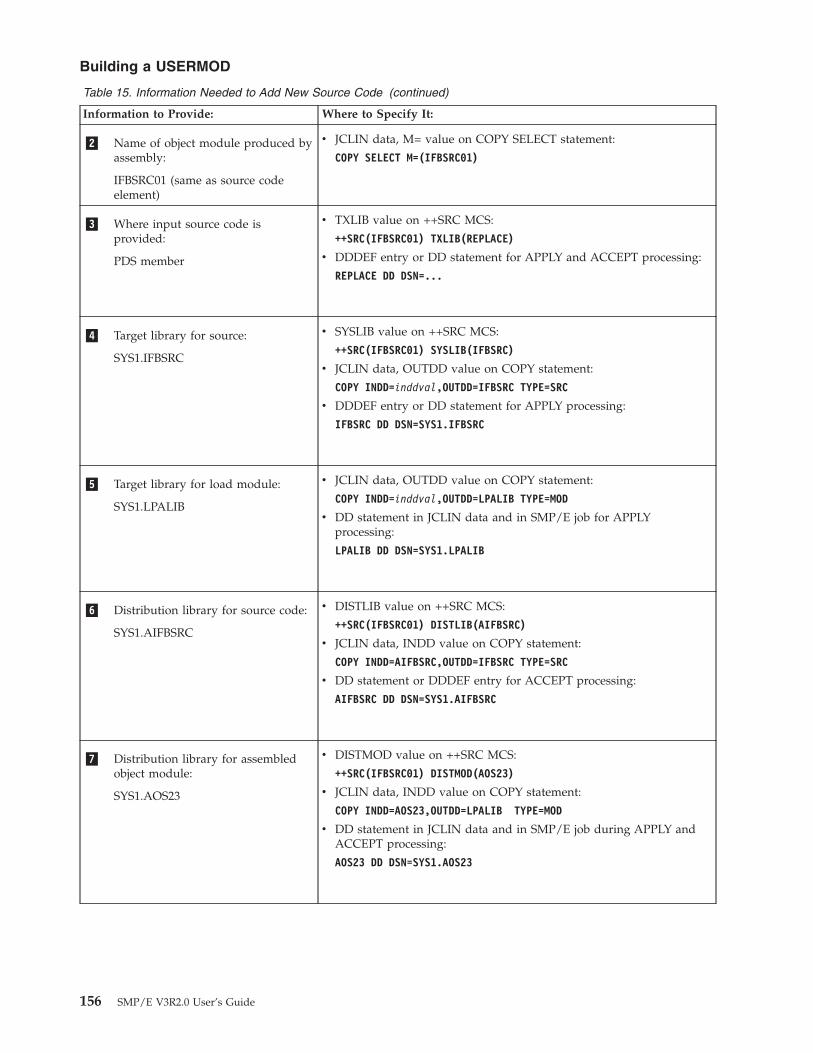
Table 15. Information Needed to Add New Source Code (continued)
Information to Provide: Where to Specify It:
�2� Name of object module produced byassembly:
IFBSRC01 (same as source codeelement)
v JCLIN data, M= value on COPY SELECT statement:
COPY SELECT M=(IFBSRC01)
�3� Where input source code isprovided:
PDS member
v TXLIB value on ++SRC MCS:
++SRC(IFBSRC01) TXLIB(REPLACE)
v DDDEF entry or DD statement for APPLY and ACCEPT processing:
REPLACE DD DSN=...
�4� Target library for source:
SYS1.IFBSRC
v SYSLIB value on ++SRC MCS:
++SRC(IFBSRC01) SYSLIB(IFBSRC)
v JCLIN data, OUTDD value on COPY statement:
COPY INDD=inddval,OUTDD=IFBSRC TYPE=SRC
v DDDEF entry or DD statement for APPLY processing:
IFBSRC DD DSN=SYS1.IFBSRC
�5� Target library for load module:
SYS1.LPALIB
v JCLIN data, OUTDD value on COPY statement:
COPY INDD=inddval,OUTDD=LPALIB TYPE=MOD
v DD statement in JCLIN data and in SMP/E job for APPLYprocessing:
LPALIB DD DSN=SYS1.LPALIB
�6� Distribution library for source code:
SYS1.AIFBSRC
v DISTLIB value on ++SRC MCS:
++SRC(IFBSRC01) DISTLIB(AIFBSRC)
v JCLIN data, INDD value on COPY statement:
COPY INDD=AIFBSRC,OUTDD=IFBSRC TYPE=SRC
v DD statement or DDDEF entry for ACCEPT processing:
AIFBSRC DD DSN=SYS1.AIFBSRC
�7� Distribution library for assembledobject module:
SYS1.AOS23
v DISTMOD value on ++SRC MCS:
++SRC(IFBSRC01) DISTMOD(AOS23)
v JCLIN data, INDD value on COPY statement:
COPY INDD=AOS23,OUTDD=LPALIB TYPE=MOD
v DD statement in JCLIN data and in SMP/E job during APPLY andACCEPT processing:
AOS23 DD DSN=SYS1.AOS23
Building a USERMOD
156 SMP/E V3R2.0 User’s Guide

Table 15. Information Needed to Add New Source Code (continued)
Information to Provide: Where to Specify It:
�8� How to install the source code:
Assemble, then copy
v ++SRC MCS automatically notifies SMP/E to assemble the module.
v JCLIN data, COPY steps:
//JOB1 JOB ...//STEP1 EXEC PGM=IEBCOPY//AIFBSRC DD DSN=SYS1.AIFBSRC,...//IFBSRC DD DSN=SYS1.IFBSRC,...//AOS23 DD DSN=SYS1.AOS23,...//LPALIB DD DSN=SYS1.LPALIB,...//SYSIN DD *
COPY INDD=AIFBSRC,OUTDD=IFBSRC TYPE=SRCSELECT M=(IFBSRC01)COPY INDD=AOS23,OUTDD=LPALIB TYPE=MODSELECT M=(IFBSRC01)
/*
v The OPTIONS and UTILITY entries in effect for the APPLY orACCEPT command being processed specify the names of theassembler and copy utilities to use and parameters to be passed tothem.
The following is a sample USERMOD that can be used to package the source code.The numbers associate items in the SYSMOD with the information listed inTable 15 on page 155.
Example 7: Adding New Source Code that Uses anIBM-Supplied Macro
Assume you are packaging one of your user-written routines as a USERMOD(UMOD001). Your USERMOD includes assembler source (SRCPART), which is tobe included in load module LOADMOD1 and is packaged as a SRC element witha ++SRC statement, as described in previous USERMOD examples. SRCPARTrefers to an IBM-supplied macro (IBMMAC), which was packaged in its owningproduct with a ++MAC statement. You want SRCPART to be automaticallyreassembled every time IBMMAC is updated or replaced with service. Toaccomplish this, your USERMOD must contain a JCLIN assembly step in additionto the necessary SMP/E MCS statements. (This means you need to supply the
++USERMOD(USR0001) /* My USERMOD. */.++VER(Z038) FMID(MYFMID1). /* For my function. */.
�8� ++JCLIN. /* Link object module. */.//JOB1 JOB ...//STEP1 EXEC PGM=IEBCOPY
�6� //AIFBSRC DD DSN=SYS1.AIFBSRC,DISP=SHR�4� //IFBSRC DD DSN=SYS1.IFBSRC,DISP=SHR�7� //AOS23 DD DSN=SYS1.AOS23,DISP=SHR�5� //LPALIB DD DSN=SYS1.LPALIB,DISP=SHR
//SYSIN DD *�4�,�6� COPY INDD=AIFBSRC,OUTDD=IFBSRC TYPE=SRC�2� SELECT M=(IFBSRC01)�5�,�7� COPY INDD=AOS23,OUTDD=LPALIB TYPE=MOD�2� SELECT M=(IFBSRC01)
/*�1�,�2�,�8� ++SRC(IFBSRC01) /* My source module. */
�3� TXLIB(REPLACE) /* Where source is. */�6� DISTLIB(AIFBSRC) /* DISTLIB for source. */�7� DISTMOD(AOS23) /* DISTLIB for object. */�4� SYSLIB(IFBSRC) /* SYSLIB for source. */.
Building a USERMOD
Chapter 16. Building a User Modification 157
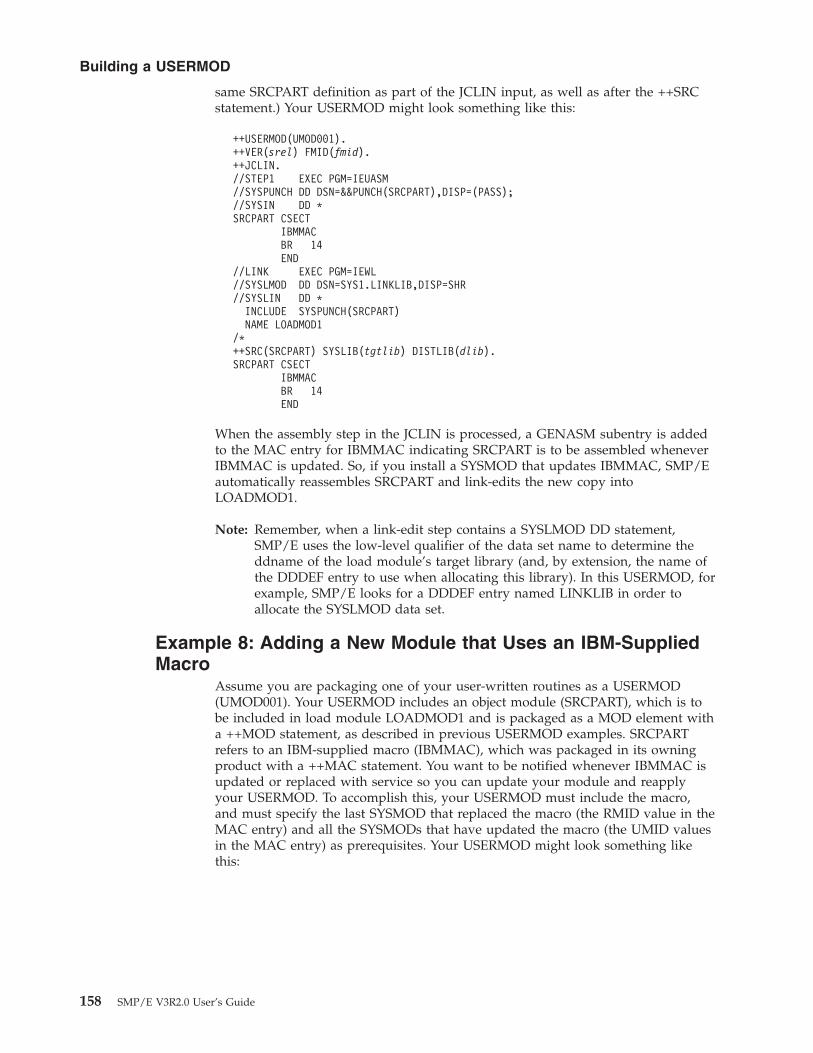
same SRCPART definition as part of the JCLIN input, as well as after the ++SRCstatement.) Your USERMOD might look something like this:
When the assembly step in the JCLIN is processed, a GENASM subentry is addedto the MAC entry for IBMMAC indicating SRCPART is to be assembled wheneverIBMMAC is updated. So, if you install a SYSMOD that updates IBMMAC, SMP/Eautomatically reassembles SRCPART and link-edits the new copy intoLOADMOD1.
Note: Remember, when a link-edit step contains a SYSLMOD DD statement,SMP/E uses the low-level qualifier of the data set name to determine theddname of the load module’s target library (and, by extension, the name ofthe DDDEF entry to use when allocating this library). In this USERMOD, forexample, SMP/E looks for a DDDEF entry named LINKLIB in order toallocate the SYSLMOD data set.
Example 8: Adding a New Module that Uses an IBM-SuppliedMacro
Assume you are packaging one of your user-written routines as a USERMOD(UMOD001). Your USERMOD includes an object module (SRCPART), which is tobe included in load module LOADMOD1 and is packaged as a MOD element witha ++MOD statement, as described in previous USERMOD examples. SRCPARTrefers to an IBM-supplied macro (IBMMAC), which was packaged in its owningproduct with a ++MAC statement. You want to be notified whenever IBMMAC isupdated or replaced with service so you can update your module and reapplyyour USERMOD. To accomplish this, your USERMOD must include the macro,and must specify the last SYSMOD that replaced the macro (the RMID value in theMAC entry) and all the SYSMODs that have updated the macro (the UMID valuesin the MAC entry) as prerequisites. Your USERMOD might look something likethis:
++USERMOD(UMOD001).++VER(srel) FMID(fmid).++JCLIN.//STEP1 EXEC PGM=IEUASM//SYSPUNCH DD DSN=&&PUNCH(SRCPART),DISP=(PASS);//SYSIN DD *SRCPART CSECT
IBMMACBR 14END
//LINK EXEC PGM=IEWL//SYSLMOD DD DSN=SYS1.LINKLIB,DISP=SHR//SYSLIN DD *
INCLUDE SYSPUNCH(SRCPART)NAME LOADMOD1
/*++SRC(SRCPART) SYSLIB(tgtlib) DISTLIB(dlib).SRCPART CSECT
IBMMACBR 14END
Building a USERMOD
158 SMP/E V3R2.0 User’s Guide
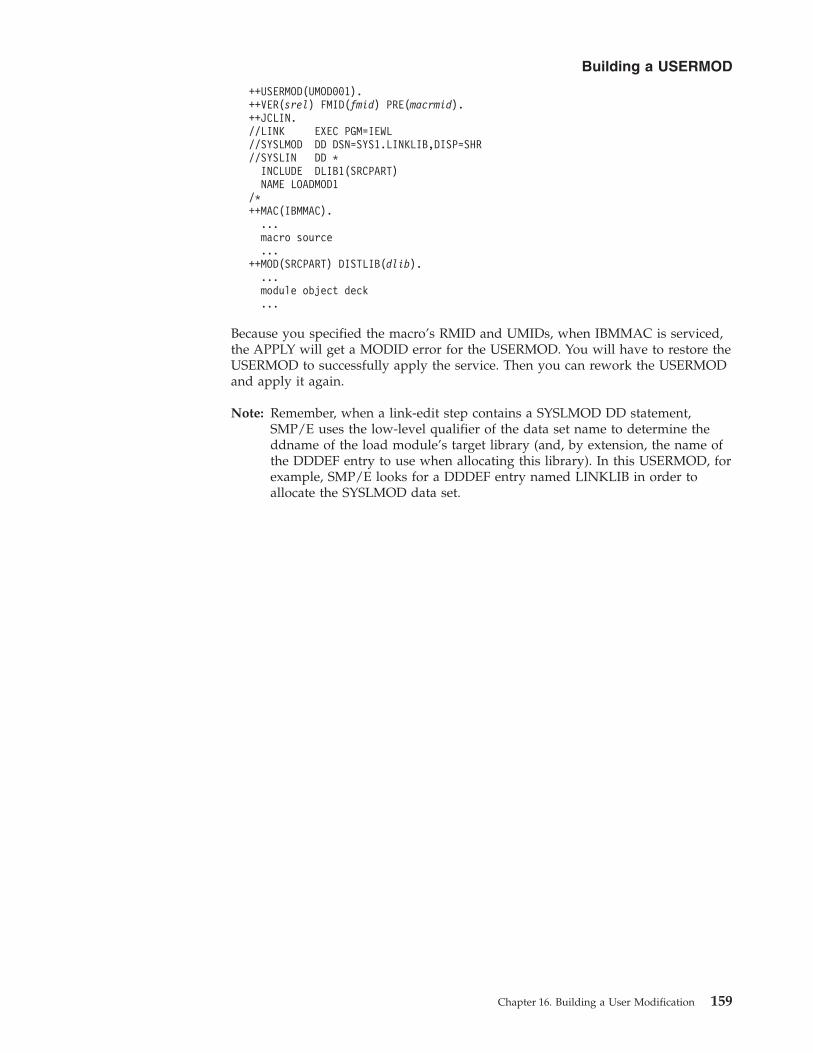
Because you specified the macro’s RMID and UMIDs, when IBMMAC is serviced,the APPLY will get a MODID error for the USERMOD. You will have to restore theUSERMOD to successfully apply the service. Then you can rework the USERMODand apply it again.
Note: Remember, when a link-edit step contains a SYSLMOD DD statement,SMP/E uses the low-level qualifier of the data set name to determine theddname of the load module’s target library (and, by extension, the name ofthe DDDEF entry to use when allocating this library). In this USERMOD, forexample, SMP/E looks for a DDDEF entry named LINKLIB in order toallocate the SYSLMOD data set.
++USERMOD(UMOD001).++VER(srel) FMID(fmid) PRE(macrmid).++JCLIN.//LINK EXEC PGM=IEWL//SYSLMOD DD DSN=SYS1.LINKLIB,DISP=SHR//SYSLIN DD *
INCLUDE DLIB1(SRCPART)NAME LOADMOD1
/*++MAC(IBMMAC).
...macro source...
++MOD(SRCPART) DISTLIB(dlib)....module object deck...
Building a USERMOD
Chapter 16. Building a User Modification 159

Building a USERMOD
160 SMP/E V3R2.0 User’s Guide
Chapter 17. Determining Which SYSMODs Led Others to Fail:The Causer SYSMOD Summary Report
This chapter describes root cause analysis and provides examples of how to usethe causer SYSMOD information in the Causer SYSMOD Summary report and theSYSMOD Status report to determine the cause of SYSMOD failure.
IntroductionA causer SYSMOD is a SYSMOD whose failure led to the failure of otherSYSMODs. To identify causer SYSMODs, SMP/E performs root cause analysis forthe ACCEPT, APPLY, and RESTORE commands. The types of errors SMP/Eanalyzes to determine causer SYSMODs include the following:v Held SYSMODsv Missing requisite SYSMODsv Utility program failures: copy, update, assembler, link, zapv Out-of-space conditions: x37 ABENDsv Missing DD statements and other allocation errorsv ID errors (a SYSMOD does not supersede or specify as a prerequisite an RMID
or a UMID of an element)v JCLIN errors (syntax errors)
The results of SMP/E’s root cause analysis are presented in two reports:v SYSMOD Status report
This report summarizes the processing done for each eligible SYSMOD. ForSYSMODs that failed, the report lists the causer SYSMODs.After you check the SYSMOD Status report to determine the results ofprocessing, use the Causer SYSMOD Summary report to determine which errorsneed to be corrected.
v Causer SYSMOD Summary reportThis report lists the causer SYSMODs along with a brief summary of the relatedmessages, descriptions of the errors that caused the SYSMODs to fail, and, whenfeasible, some causes for those errors.
Using Causer SYSMOD InformationHow you use the causer SYSMOD information provided by the Causer SYSMODSummary report and the SYSMOD Status report depends on what you need toinstall—all the SYSMODs specified on the command you are processing, or onlyspecific ones. This section describes some general scenarios and includes anexample of using these reports.
Resolving Errors for All SYSMODs That FailedSuppose you are installing a CBPDO, but the reports show that several of theSYSMODs failed. You want to resolve all the reported errors and install all theSYSMODs in the CBPDO.1. Go to the Causer SYSMOD Summary report to identify the causer SYSMODs
and determine how to resolve the errors.
© Copyright IBM Corp. 1986, 2003 161
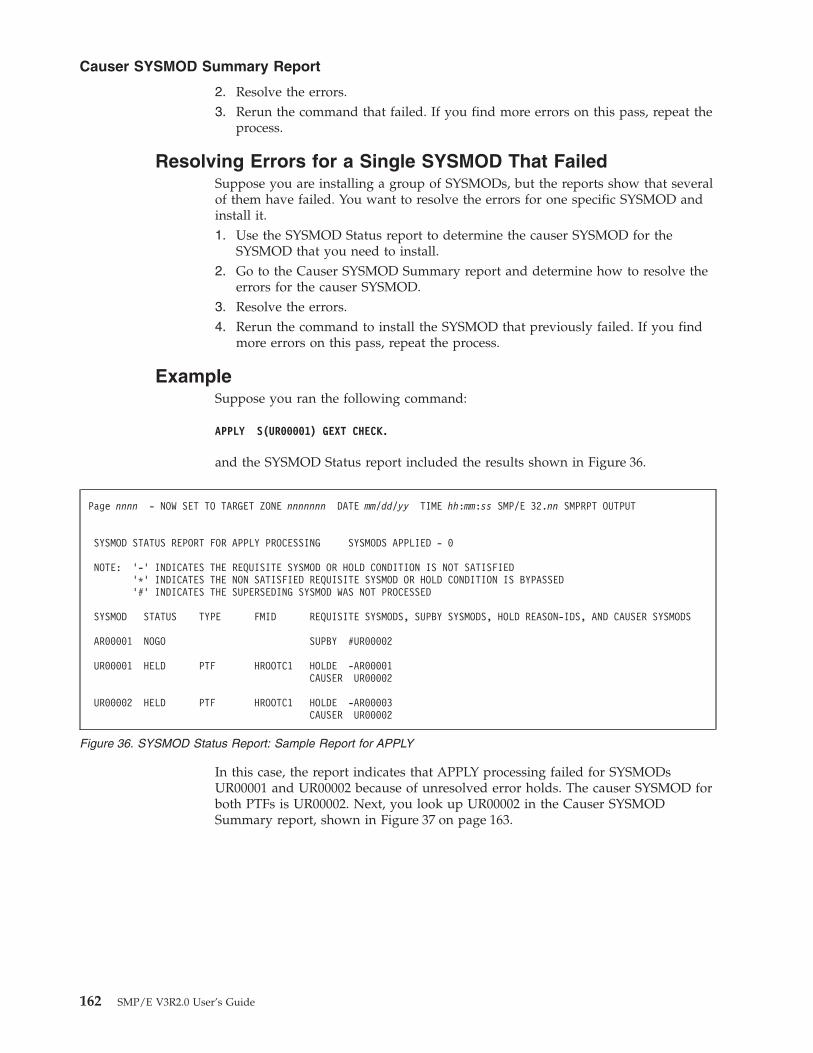
2. Resolve the errors.3. Rerun the command that failed. If you find more errors on this pass, repeat the
process.
Resolving Errors for a Single SYSMOD That FailedSuppose you are installing a group of SYSMODs, but the reports show that severalof them have failed. You want to resolve the errors for one specific SYSMOD andinstall it.1. Use the SYSMOD Status report to determine the causer SYSMOD for the
SYSMOD that you need to install.2. Go to the Causer SYSMOD Summary report and determine how to resolve the
errors for the causer SYSMOD.3. Resolve the errors.4. Rerun the command to install the SYSMOD that previously failed. If you find
more errors on this pass, repeat the process.
ExampleSuppose you ran the following command:
APPLY S(UR00001) GEXT CHECK.
and the SYSMOD Status report included the results shown in Figure 36.
In this case, the report indicates that APPLY processing failed for SYSMODsUR00001 and UR00002 because of unresolved error holds. The causer SYSMOD forboth PTFs is UR00002. Next, you look up UR00002 in the Causer SYSMODSummary report, shown in Figure 37 on page 163.
Page nnnn - NOW SET TO TARGET ZONE nnnnnnn DATE mm/dd/yy TIME hh:mm:ss SMP/E 32.nn SMPRPT OUTPUT
SYSMOD STATUS REPORT FOR APPLY PROCESSING SYSMODS APPLIED - 0
NOTE: ’-’ INDICATES THE REQUISITE SYSMOD OR HOLD CONDITION IS NOT SATISFIED’*’ INDICATES THE NON SATISFIED REQUISITE SYSMOD OR HOLD CONDITION IS BYPASSED’#’ INDICATES THE SUPERSEDING SYSMOD WAS NOT PROCESSED
SYSMOD STATUS TYPE FMID REQUISITE SYSMODS, SUPBY SYSMODS, HOLD REASON-IDS, AND CAUSER SYSMODS
AR00001 NOGO SUPBY #UR00002
UR00001 HELD PTF HROOTC1 HOLDE -AR00001CAUSER UR00002
UR00002 HELD PTF HROOTC1 HOLDE -AR00003CAUSER UR00002
Figure 36. SYSMOD Status Report: Sample Report for APPLY
Causer SYSMOD Summary Report
162 SMP/E V3R2.0 User’s Guide

That report shows that APPLY processing failed because error hold AR00003 wasnot resolved for SYSMOD UR00002. By resolving this hold, you will fix the errorslisted in the SYSMOD Status report.
Page nnnn - NOW SET TO TARGET ZONE nnnnnnnn DATE mm/dd/yy TIME hh:mm:ss SMP/E 32.nn SMPRPT OUTPUT
CAUSER SYSMOD SUMMARY REPORT FOR APPLY PROCESSING
CAUSER FMID MESSAGE ID PAGE ERROR DESCRIPTION AND POSSIBLE CAUSES
UR00002 HROOTC1 GIM35901I 2 ERROR HOLD AR00003 WAS NOT RESOLVED.
Figure 37. Causer SYSMOD Summary Report: Sample Report for APPLY
Causer SYSMOD Summary Report
Chapter 17. Determining Which SYSMODs Led Others to Fail: The Causer SYSMOD Summary Report 163

164 SMP/E V3R2.0 User’s Guide
Chapter 18. Java Archive Update Exploiter’s Guide
This chapter is a guide to packaging Java Archive files (JAR files) and updates forJAR files in SMP/E. The intended audience for this section is anyone who will beexploiting this function, including product packagers and service teams. This guideprovides information and examples about packaging a product release using the++JAR MCS and building subsequent PTFs to service that release using the++JARUPD MCS.
JAR Replacements in FMIDsSuppose your product has a simple TicTacToe applet. The complete TicTacToeapplet (or Java application) is composed of a class file and audio and image files,and is stored in a directory structure as follows:/u/pezk/TicTacToe/TicTacToe.class
/audio/beep.au/ding.au/yahoo.au
/images/cross.gif/not.gif
To build a JAR file element for the complete TicTacToe applet, you would firstmake your working directory the TicTacToe directory where the applet files reside,and then run the following jar command:cd /u/pezk/TicTacToe/jar cvf ABCTTT.jar *
Specified in this way, the jar command takes all files in the working directory(/u/pezk/TicTacToe), and all files within subdirectories of the working directory,and creates a JAR file named ABCTTT.jar.
Your product release, or FMID, can then contain this single JAR file, which is thecomplete TicTacToe applet. You can do this using the ++JAR MCS as seen in thefollowing example:++JAR(ABCTTT) DISTLIB(AABCBIN) SYSLIB(SABCBIN) RELFILE(2)
PARM(PATHMODE(0,6,4,4))LINK(’../TicTacToe.jar’)SYMLINK(’../../../../../usr/lib/TicTacToe.jar’)SYMPATH(’../../usr/lpp/abc/bin/TicTacToe.jar’).
JAR Updates in PTFsSuppose some time after your FMID has been made available and is being used, adefect is discovered (an APAR). The TicTacToe applet requires a change because ofthe APAR. Specifically, you need to add another image file (images/new.gif), andreplace the class file (TicTacToe.class) with an updated copy of the class file.Further, suppose the change team has placed the new image file and updated classfile in directories, as follows:/u/apars/ow12345/TicTacToe/TicTacToe.class/images/new.gif
You can instruct SMP/E to add new files to a JAR file, and replace files in anexisting JAR file by using the ++JARUPD MCS. If files TicTacToe.class and new.gifwere to be packaged and archived together in a JAR file of their own, then that
© Copyright IBM Corp. 1986, 2003 165
file, in SMP/E terms, would be considered a JAR update file. For example, giventhe directory structure above for the new and updated files, the jar commandcould be used to create the JAR update file as follows:cd /u/apars/ow12345/TicTacToe/jar cvf ABCTTT.jarupd *
The resultant JAR file ABCTTT.jarupd would be packaged as a ++JARUPD in aPTF as in the following example:++PTF(UW12345).++VER(Z038) FMID(fmid).++JARUPD(ABCTTT)
PARM(PATHMODE(0,6,4,4)) JARPARM(0M)LINK(’../TicTacToe.jar’)SYMLINK(’../../../../../usr/lib/TicTacToe.jar’)SYMPATH(’../../usr/lpp/abc/bin/TicTacToe.jar’).
Suppose now another defect (APAR) is discovered against the TicTacToe applet,and you must update the /audio/beep.au file within the archive. Again, you canuse the ++JARUPD MCS to describe an update to the archive. Assuming thereplacement audio file resides in a directory as follows:/u/apars/ow54321/TicTacToe/audio/beep.au
The following jar command could create the necessary JAR update:cd /u/apars/ow54321/TicTacToe/jar cvf ABCTTT.jarupd *
The resulting JAR file ABCTTT.jarupd would be packaged as a ++JARUPD in aPTF as in the following example:++PTF(UW54321).++VER(Z038) FMID(fmid) PRE(UW12345).++JARUPD(ABCTTT)
PARM(PATHMODE(0,6,4,4)) JARPARM(0M)LINK(’../TicTacToe.jar’)SYMLINK(’../../../../../usr/lib/TicTacToe.jar’)SYMPATH(’../../usr/lpp/abc/bin/TicTacToe.jar’).
Notice the second PTF has a prerequisite for the first PTF. Such a relationship isrequired by SMP/E because both PTFs update the same JAR file.
JAR Replacements in PTFsJust as replacements for JAR files can be delivered in an FMID, so can JAR filereplacements be delivered in PTFs. Suppose you decide to create a ″level-set″ PTF,which incorporates the updates from several previous APARs and PTFs. In thiscase, you want to replace the entire TicTacToe applet JAR file, rather then add orreplace files within the archive.
You create the JAR file for the applet using the jar command as discussed earlierand then package it as a ++JAR element in a PTF, as in the following example:++PTF(UW87654).++VER(Z038) FMID(fmid) SUP(UW12345 UW54321).++JAR(ABCTTT) DISTLIB(AABCBIN) SYSLIB(SABCBIN)
PARM(PATHMODE(0,6,4,4)) JARPARM(0M)LINK(’../TicTacToe.jar’)SYMLINK(’../../../../../usr/lib/TicTacToe.jar’)SYMPATH(’../../usr/lpp/abc/bin/TicTacToe.jar’).
JAR Updates
166 SMP/E V3R2.0 User’s Guide

Notice this PTF supersedes both PTFs that supplied updates for the JAR file.Again, such relationships (either supersede or prerequisite) are required by SMP/E,because both PTFs provided updates for the JAR file contained in the current PTF.
JAR Updates
Chapter 18. Java Archive Update Exploiter’s Guide 167

168 SMP/E V3R2.0 User’s Guide
Appendix A. Migration
Migration OverviewYour plan for migrating to the new level of SMP/E should include informationfrom a variety of sources. These sources of information describe topics such ascoexistence, service, migration procedures, and interface changes.
The following documentation, which is supplied with your product order, providesinformation about installing your z/OS system. In addition to specific informationabout SMP/E, this documentation contains information about all of the z/OSelements.v z/OS and z/OS.e Planning for Installation
This book describes the installation requirements for z/OS at a system andelement level. It includes hardware, software, and service requirements for boththe driving and target systems. It also describes any coexistence considerationsand actions.
v SMP/E Program Directory
This document, which is provided with your SMP/E product order, leads youthrough the specific installation steps for SMP/E.
v ServerPac Installing Your Order
This is the order-customized installation book for using the ServerPacinstallation method. Be sure to review “Appendix A. Product Information”,which describes data sets supplied, jobs or procedures that have been completedfor you, and product status. IBM may have run jobs or made updates toPARMLIB or other system control data sets. These updates could affect yourmigration.
Within this book, you can find information about the specific updates andconsiderations that apply to this release of SMP/E.v “Migration Roadmap” on page 171
This section identifies the migration paths that are supported with the currentlevel of SMP/E. It also describes the additional publications that can assist youwith your migration to the current level.
v “SMP/E V3R2 Overview” on page 172This section describes the specific updates that were made to SMP/E for thecurrent release. For each item, this section provides an overview of the change, adescription of any migration and coexistence tasks that may be considered, andwhere you can find more detailed information in the SMP/E library or otherelement libraries.
v “Summary of Interface Changes” on page 188This section provides a summary of the changes that are made to z/OS user andprogramming interfaces.
Terms you need to knowThis section describes some terms you may need to know as you use this section.
Migration Activities that relate to the installation of a new version or releaseof a program to replace an earlier level. Completion of these
© Copyright IBM Corp. 1986, 2003 169
activities ensures that the applications and resources on yoursystem will function correctly at the new level.
Coexistence Two or more systems at different levels (for example, software,service, or operational levels) that share resources. Coexistenceincludes the ability of a system to respond in the following ways toa new function that was introduced on another system with whichit shares resources: ignore a new function, terminate gracefully,support a new function.
New releases of SMP/E generally add to or enhance theinformation stored in SMP/E data sets. This new or enhanced datais not always compatible with previous releases of SMP/E. Resultsare unpredictable when a prior release of SMP/E encounters dataintroduced by a later release. Therefore, IBM provides tolerationPTFs that allow selected prior releases to ignore changesintroduced by a later release. In some cases, a compatibility PTF orsmall programming enhancement (SPE) is available to add a newfunction to selected prior releases. z/OS and z/OS.e Planning forInstallation, GA22-7504, provides a list of the required tolerationand compatibility PTFs for each prior release of SMP/E.
SMP/E Release LevelsThe SMP/E element of z/OS is usually not updated with every release of z/OS.For example, the level of SMP/E that was shipped with z/OS Release 1 is identicalto that shipped with OS/390 V2R7.
Developing a migration strategyThe recommended steps for migrating to a new release of SMP/E are:1. Become familiar with the supporting migration and installation documentation
for the release.You should determine what updates are needed for products that are suppliedby IBM, system libraries, and non-IBM products. Review z/OS and z/OS.ePlanning for Installation and z/OS Introduction and Release Guide for informationabout SMP/E and other z/OS elements.
2. Develop a migration plan for your installation.When planning to migrate to a new release of SMP/E, you must considerhigh-level support requirements, such as machine and programmingrestrictions, migration paths, and program compatibility.
3. Obtain and install any required program temporary fixes (PTFs) or updatedversions of the operating system.Call the IBM Software Support Center to obtain the preventive service planning(PSP) upgrade for SMP/E, which provides the most current information aboutPTFs for SMP/E. Check RETAIN again just before testing SMP/E. Forinformation about how to request the PSP upgrade, refer to the SMP/E ProgramDirectory. Although the SMP/E Program Directory contains a list of the requiredPTFs, the most current information is available from the IBM Software SupportCenter.
4. Install the product using the SMP/E Program Directory or the ServerPac InstallingYour Order documentation.
5. Verify that any application programs that use the SMP/E API will continue torun and, if necessary, make changes to ensure compatibility with the newrelease.
6. Use the new release before initializing major new function.
170 SMP/E V3R2.0 User’s Guide

7. If necessary, customize the new function for your installation.8. Exercise the new functions.
Reviewing changes to SMP/E processingAs you define your installation’s migration plan, consider how the new andchanged SMP/E functions might affect the following areas of SMP/E processing.for each item described in “SMP/E V3R2 Overview” on page 172, you shouldreview the “Migration procedures” section to determine how, or if, the changeaffects the tasks that are performed at your installation.
Customization You can customize some SMP/E functions to takeadvantage of new support after the product isinstalled. For example, you can tailor SMP/Ethrough the use of installation exit routines orSMPPARM options. This section lists changes toSMP/E that might require you to tailor SMP/E toensure that it runs as before.
Operations The new SMP/E release might introduce changesto its operating characteristics, such as changedcommands, new or changed messages, or in themethods of implementing new functions. This bookidentifies those changes for which you shouldprovide user education before using this release ofSMP/E.
Programming To ensure that existing programs run as before,programmers who develop programs that use theGIMAPI, library change file records, or UNIX shellscripts must be aware of any changes to thoseinterfaces introduced in a new release of SMP/E.
Reviewing changes to SMP/E interfacesWhen defining your installation’s migration plan, also consider that SMP/Einterfaces may also be affected by the new or changed functions that areintroduced in this release. These interfaces include:v Commandsv Exitsv Macrosv Messagesv Panelsv SYS1.SAMPLIB members
“Summary of Interface Changes” on page 188 provides a summary of the changesthat affect these interfaces for the release. This information is also listed in the“What this change affects” section that is provided for each release enhancement in“SMP/E V3R2 Overview” on page 172.
Migration Roadmap
SMP/E V3R2 SummaryTable 16 on page 172 summarizes the updates that have been introduced to SMP/EV3R2. If you are migrating from z/OS V1R1 or OS/390, you should review theinformation in the detailed section for each item.
Appendix A. Migration 171
Table 16. Summary of SMP/E V3R2 Updates
For Information About: Refer to:
“SMP/E Dialog Customization” on page 176 176
“Java Archive Files” on page 174 174
“Smaller SMPLTS data set” on page 174 174
“DUMMY data set for SYSDEFSD” on page 175 175
“GIMZIP: Archive Segmentation” on page 173 173
“GIMZIP: User Defined Subdirectories” on page 173 173
“LINK LMODS Command” 172
“UPGRADE Command” 172
“REPORT CALLLIBS Command Removal” 172
“GIMXSID Service Routine” on page 173 173
“GIMUTTBL Removal” on page 176 176
SMP/E V3R2 OverviewThe following sections describe the new and changed SMP/E functions that areintroduced for SMP/E V3R2. The information about each item includes:v Descriptionv Summary of the SMP/E tasks or interfaces that might be affectedv Coexistence considerations, if any, that are associated with the itemv Migration procedures, if any, that are associated with the itemv References to other publications that contain additional detailed information
LINK LMODS CommandThe new LINK LMODS command can be used to refresh the callable services forall load modules within a particular target zone. The LINK LMODS command canalso be used to refresh the callable services only for those load modules that havea dependency on a particular set of CALLLIBS. The LINK LMODS commandreplaces the REPORT CALLLIBS command, which has been removed from SMP/EV3R2. For more information about the LINK LMODS command, refer to SMP/ECommands.
REPORT CALLLIBS Command RemovalThe REPORT CALLLIBS command has been removed from SMP/E V3R2. It hasbeen replaced by the LINK LMODS command.
UPGRADE CommandNew releases of SMP/E must sometimes make changes to SMP/E data sets thatcannot be properly processed by prior SMP/E releases. SMP/E usually makesincompatible changes only when necessary to provide new and improvedcapabilities. For example, a new type of element requires a new entry type inSMPCSI data sets and these new entry types are typically not understood orprocessed correctly by SMP/E levels that have not been specifically updated to doso.
The UPGRADE command allows you to specify when SMP/E is permitted tomake incompatible changes to SMP/E data sets. This, in turn, allows you to make
172 SMP/E V3R2.0 User’s Guide
the trade-off between exploiting new SMP/E functions and preservingcompatibility with prior SMP/E releases. For more information about theUPGRADE command, refer to SMP/E Commands.
Coexistence considerationsA toleration PTF will enable OS/390 V2R7 SMP/E, z/OS V1R2 SMP/E, andSMP/E V3R1 to automatically check for incompatible changes made by a higherlevel of SMP/E. A toleration PTF will also provide a warning message should auser try to issue an UPGRADE command on a release of SMP/E prior to V3R2.
GIMXSID Service RoutineThe GIMXSID service routine is used as part of the ShopzSeries offering. GIMXSIDcreates a single data source required by ShopzSeries to place customized softwareproduct and service orders. The data source created by GIMXSID, the softwareinventory data, is a composite of three kinds of information as follows:1. A list of FEATUREs found in the SMPCSI data sets. The Feature List is used by
ShopzSeries to perform product requisite checking and also to prime the orderchecklist when ordering a ServerPac.
2. A list of the FMIDs found in the SMPCSI data sets. The FMID List is used byShopzSeries to scope service orders to the PTFs applicable solely to the user’sdesired configuration of target and global zones.
3. A bitmap representation of the PTFs found in the specified target zones andglobal zones. The PTF Bitmap is used by ShopzSeries (CCSS) to produce servicepackages that do not contain PTFs that are already present in the user’sconfiguration.
GIMZIP: Archive SegmentationThe GIMZIP service routine has been enhanced with a new SEGMENT option toallow you to specify the maximum size for the network transportable objectsproduced by GIMZIP. Very large objects will be divided into archive segments thatare within the specified size. The GIMUNZIP service routine and the RECEIVEFROMNETWORK and RECEIVE FROMNTS commands will now accept networkpackages that contain archive segments as input. For more information about theGIMZIP and GIMUNZIP service routines, refer to SMP/E Reference. For moreinformation about the RECEIVE commands, refer to SMP/E Commands.
Also, you can now use the SMPWKDIR DD statement to specify a location fortemporary files produced during GIMZIP processing.
Coexistence considerationsSMP/E releases prior to SMP/E V3R2 cannot process GIMZIP output that containssegmented archive files. A toleration PTF will issue an error message should a usertry to process GIMZIP output that contains segmented archive files on a release ofSMP/E prior to V3R2.
GIMZIP: User Defined SubdirectoriesUsers of GIMZIP may now specify subdirectories in which to store documentation,samples, readme files, and other files. This is done with the new subdir attributeof the <FILEDEF> tag of the GIMZIP package control statement. The subdirectoryis created in the hierarchical file system, within the parent directory pointed to bythe SMPDIR DD statement in the JCL used to invoke GIMZIP.
Appendix A. Migration 173
Coexistence considerationsUnless the required PTF is installed, SMP/E releases prior to SMP/E V3R2 cannotprocess GIMZIP packages that exploit user-defined subdirectories.
Java Archive FilesMany z/OS software products developed with Java use Java Archive (JAR) files asthe packaging format for Java application files. To better accommodate suchproducts, SMP/E V3R2 is introducing JAR file update support. For SMP/E, therewill be two forms of JAR files; JAR replacement files and JAR update files. JARreplacement files are complete replacements for a JAR file and are treated simplyas files in the hierarchical file system. SMP/E will copy replacement JAR files intothe hierarchical file system, just as is done for all other hierarchical file systemelements. JAR update files are archive files themselves, but do not contain all ofthe component files that make up the complete JAR file. A JAR update file containsonly the new and changed component files. These new and changed componentfiles are archived into a JAR file. SMP/E uses the JAR command and the contentsof a JAR update file to update an existing JAR file.
For information about the JAR command and JAR files, refer to the “JavaDeveloper Connection, Using JAR Files: The Basics”, athttp://developer.java.sun.com/developer/Books/JAR/basics/index.html
Coexistence considerationsSMP/E releases prior to SMP/E V3R2 cannot process JAR replacement files or JARupdate files, nor can they process the data entries for these elements. A tolerationPTF will cause SMP/E to issue an error message if it encounters an unsupportedJAR element or data entry.
Smaller SMPLTS data setThe SMPLTS data set is used by SMP/E to save the base version of a product’sload modules that use callable services. To reduce SMPLTS space requirements,SMP/E now saves a base version of a load module in the SMPLTS data set only ifit contains both CALLLIBS and XZMOD subentries. If a load module containsCALLLIBS subentries, but no XZMOD subentries, this load module is not saved inthe SMPLTS.
For more detailed information about these command changes, refer to SMP/ECommands.
Coexistence considerationsThe SMPLTS data set used by SMP/E V3R2 may not contain the base version ofload modules with CALLLIBS subentries. Because of this, once the SMPLTS hasbeen modified by SMP/E V3R2, you cannot use certain commands from olderlevels of SMP/E that depend on the base version of a load module being in theSMPLTS data set. Specifically, if any of the following updates were made to a zonewith load modules containing CALLLIBS but no XZMOD subentries, the targetzone is marked:v CLEANUP command is run against the zonev GENERATE command is run against the zonev APPLY or RESTORE command is run and the base version of the load module is
deleted from the SMPLTS
174 SMP/E V3R2.0 User’s Guide
A toleration PTF against older releases of SMP/E allows certain commands to beprocessed against a target zone that has been marked to indicate that the SMPLTSdata set can not be used. These commands do not depend on the base version ofload modules existing in the SMPLTS:v APPLYv BUILDMCSv CLEANUPv DEBUGv GENERATEv JCLINv LISTv LOGv RESETRCv SETv UCLINv UNLOADv ZONECOPYv ZONEDELETEv ZONEEDITv ZONEEXPORTv ZONEIMPORTv ZONEMERGE
The toleration PTF also prohibits the RESTORE or LINK MODULE command frombeing run against a target zone that has been marked.
DUMMY data set for SYSDEFSDThe SYSDEFSD DD statement defines the location for the binder to write IMPORTstatements for all exported entries of a DLL load module. Whenever entries are tobe exported, the binder expects the SYSDEFSD data set and, if it is not present,will issue a warning message to indicate the missing data set. Product developerswho supply DLLs do not always want or need the IMPORT statements associatedwith a DLL retained. In these instances, the SYSDEFSD would be better defined aseither a temporary or DUMMY data set.
SMP/E is defining a new ddname called SMPDUMMY, which will always beallocated as ’DD DUMMY’. Product packagers may now specify the SYSDEFSDDD statement in the JCLIN input stream as any of the following:v //SYSDEFSD DD DSN=SMPDUMMY,DISP=xxxv //SYSDEFSD DD DSN=NULLFILEv //SYSDEFSD DD DUMMY
In each case, the SIDE DECK LIBRARY subentry of the LMOD entry will be set toSMPDUMMY. When needed for processing, SMPDUMMY will be dynamicallyallocated by SMP/E as a DUMMY data set.
Coexistence considerationsUnless the required PTF is installed, SMP/E releases prior to SMP/E V3R2 cannotprocess SYSMOD input that uses the SYSDEFSD DUMMY enhancement, nor canthey process the data entries for these elements.
For more information about SYSDEFSD DUMMY, refer to SMP/E Reference.
Appendix A. Migration 175

SMP/E Dialog CustomizationA new option, Option 0, has been added to the SMP/E Primary Option MenuGIM@PRIM to implement the current SMP/E customization options. This newoption allows you to enter or change the values for the customization options thatwere previously found in panel GIM@UPRM. When you select option 0 from theGIM@PRIM panel, the panel GIM@PARM will appear. The options you thenspecify are saved permanently in the ISPF profile pool for later use by otherSMP/E dialog processes.
Migration tasksAll dialog customization formerly specified on panel GIM@UPRM must now bespecified using Option 0 on the SMP/E Primary Option Menu. When you move toa new release of SMP/E and continue to use the same ISPF profile data set, nomigration actions are required to use the options previously entered and saved.
For more information about SMP/E dialog customization, refer to the tutorialpanels that accompany the SMP/E dialogs.
GIMUTTBL RemovalModule GIMUTTBL and load module GIMUTTBL are no longer supplied as partof SMP/E. Macro GIMDFUT, which was used to replace the IBM-supplied copy ofGIMUTTBL, is also no longer supplied. GIMUTTBL was formerly used to specifywhich utility programs SMP/E can call.
Migration tasksYou can specify which utility programs SMP/E can call by using the PROGRAMclass of the z/OS Security Server (RACF). Refer to z/OS Security Server RACFSecurity Administrator’s Guide, for more information about how to use this function.
SMP/E V3R1 OverviewThe following sections describe the new and changed SMP/E functions that areintroduced for SMP/E V3R1. The information about each item includes:v Descriptionv Summary of the SMP/E tasks or interfaces that might be affectedv Coexistence considerations, if any, that are associated with the itemv Migration procedures, if any, that are associated with the itemv References to other publications that contain additional detailed information
Defining Exit Routines using SMPPARM Member GIMEXITSSMP/E V3R1 allows you to define exit routines that are to be given control duringSMP/E processing by specifying new GIMEXITS control statements in SMPPARMmember GIMEXITS. This replaces the previous method of updating moduleGIMMPUXD. Putting the exit routine information in an SMPPARM member meansthat the information is persistent and that you do not need to update moduleGIMMPUXD every time a new release of SMP/E is installed.
Migration tasksIf you have existing exit routines defined in GIMMPUXD or wish to create newexit routines, you must define them in a GIMEXITS member. Any exit routinesdefined in GIMMPUXD will be ignored by SMP/E
For more detailed information about this change, refer to SMP/E Reference.
176 SMP/E V3R2.0 User’s Guide
Dynamic Allocation using SMPPARM Member GIMDDALCSMP/E V3R1 allows you to define data sets to be dynamically allocated by SMP/Eby specifying new GIMDDALC control statements in SMPPARM memberGIMDDALC, as well as by using DDDEF entries. This replaces the previousmethod of updating module GIMMPDFT. Putting the dynamic allocationinformation in an SMPPARM member means that the information is persistent andthat you do not need to update module GIMMPDFT every time a new release ofSMP/E is installed.
Migration tasksIf you have used GIMMPDFT to define data sets for dynamic allocation, you mustcreate new definitions in GIMDDALC. SMP/E will ignore any definitions inGIMMPDFT.
For more information about this change, refer to SMP/E Reference.
Enhanced Link Name ValuesSMP/E V3R1 has increased the maximum length allowed for a hierarchical filesystem element LINK value from 64 characters to 1023 characters. SMP/E has alsoincreased the maximum length allowed for the alias values on ALIAS link-editcontrol statements from 64 characters to 1023 characters.
Coexistence considerationsUnless the required PTF is installed, SMP/E releases prior to SMP/E V3R1 cannotprocess a SYSMOD containing a hierarchical file system element MCS that specifiesa LINK value longer than 64 characters, nor can they process a hierarchical filesystem element entry containing a LINK subentry, or an LMOD entry containingan LMODALIAS subentry, created by SMP/E V3R1, or higher. If installed, the PTFwill update the SMP/E Query dialogs and the GIMAPI to retrieve and displayinformation about LINK or LMODALIAS subentries created by SMP/E V3R1, orhigher. For all other SMP/E processing, the PTF will cause SMP/E to issue anerror message if it encounters an unsupported LINK value or LINK orLMODALIAS subentry.
Migration tasksAn application program that uses the SMP/E Alias Record Type 0 (A0) librarychange record may need to be updated to handle alias and link values of up to1023 characters to avoid truncating data. For more information about this change,refer to the chapter on Library Change File Records in SMP/E Reference.
An application program that uses the GIMAPI to query the LINK subentry of anhierarchical file system element entry or the LMODALIAS subentry of an LMODentry may need to be updated to allow for the longer length of these subentries.For more information about this change, refer to the description of these subentriesin the GIMAPI chapter of SMP/E Reference.
Removal of Function to Create Backup IEANUC01 LoadModules
The ability to save the target system’s nucleus load module (IEANUC01) duringAPPLY, LINK, and RESTORE command processing has been removed from z/OSV1R2 SMP/E. The NUCID operand of the APPLY command and the NUCIDsubentry are no longer supported and will be ignored by SMP/E if specified.
Appendix A. Migration 177
Migration tasksAn application program that uses the GIMAPI to query the NUCID subentry of anOPTIONS entry must be updated because this subentry no longer exists. For moreinformation about the GIMAPI, refer to the GIMAPI chapter of SMP/E Reference.
Conditional JCLIN ProcessingSMP/E V3R1 allows a packager to use special JCL comments in the JCLIN input tocause SMP/E to skip over parts of the JCLIN input based on the installationenvironment. The parts of the JCLIN input that are skipped are not processed bythe JCLIN command and do not contribute to the structure information derivedfrom JCLIN processing.
For more information about this change, refer to the section on ″Conditional JCLINComment Statements″ in SMP/E Commands, SA22-7771.
Coexistence considerationsUnless the required PTF is installed, SMP/E releases prior to SMP/E V3R1 cannotprocess JCLIN input that contains the special JCL comments used to skip overparts of the JCLIN input. If installed, the PTF will cause SMP/E to issue an errormessage if the unsupported JCL comments are encountered.
Network Delivery of SMP/E InputSMP/E V3R1 can receive input from a network server, in addition to tape andDASD. This enables the delivery of SMP/E-installable products and service overthe internet or an intranet. By installing software directly from a network source,SMP/E enables a more seamless integration of electronic software delivery andinstallation. This reduces the tasks and time required to install software deliveredelectronically.
SMP/E also provides the GIMZIP and GIMUNZIP service routines to construct,and then later unwrap, network transportable packages of software. This allowsyou to create your own packages of SMP/E installable software, and thendistribute them within your own enterprise, or to other enterprises. Specifically, theGIMZIP service routine will accept partitioned or sequential data sets as input andwill create a network transportable package as output. For more information onthe GIMZIP and GIMUNZIP service routines, see SMP/E Reference, SA22-7772.
Once a package is made accessible on an FTP server, you can use the SMP/ERECEIVE command to transfer the package through a TCP/IP network directlyinto an SMP/E environment. The RECEIVE command has been extended with newDELETEPKG, FROMNETWORK, and FROMNTS operands to process thesenetwork transportable packages. For more information on the RECEIVE commandchanges, see SMP/E Commands, SA22-7771.
New CLIENT and SERVER data sets and SMPDIR and SMPNTS directories havebeen created to support this new processing. For more information on CLIENT,SERVER, SMPDIR, and SMPNTS, see SMP/E Reference, SA22-7772.
Coexistence considerationsNetwork delivery of SMP/E input requires a new packaging format for that inputand new operands on the RECEIVE command. SMP/E releases prior to z/OSSMP/E cannot process this new packaging format and do not recognize the newRECEIVE command operands.
178 SMP/E V3R2.0 User’s Guide

AMODE=64 and COMPAT=PM4 Link Edit ParametersSMP/E V3R1 recognizes and saves the AMODE=64 and COMPAT=PM4 link editparameters.
The AMODE option assigns the addressing mode for all of the entry points into aprogram module (the main entry point, its true aliases, and all of the alternateentry points). AMODE=64 instructs the binder to create AMODE 31/64 executableswith 8-byte adcons.
The COMPAT option identifies the compatibility level of the binder.COMPAT=PM4 allows the user to specify a compatibility level appropriate forAMODE=64 executables.
Selected SMP/E Data Sets May Now Reside in the HierarchicalFile System
SMP/E V3R1 allows the following data sets to reside in the hierarchical filesystem:v SMPCNTLv SMPDEBUGv SMPHOLDv SMPJCLINv SMPLISTv SMPOUTv SMPPTFINv SMPPUNCHv SMPRPT
For more information about this change, refer to the description of each of thesedata sets in SMP/E Reference.
HFS Data Set IdentificationSMP/E V3R1 has enhanced the SMP/E File Allocation Report and SMP/E librarychange file records to identify the physical HFS data sets where files in thehierarchical file system reside.
SMPPTS Spill Data SetsSMP/E RECEIVE processing can use SMPPTS spill data sets, if defined, to storeSYSMODs when the primary SMPPTS data set is full. Up to 99 spill data sets,named SMPPTS1 through SMPPTS99, can be defined with DD statements orDDDEFs. By eliminating the tasks involved when recovering from an overflowingSMPPTS data set, the use of SMPPTS spill data sets can reduce the amount ofmanual intervention and data set management required to install software service.
HOLDDATA Summary ReportsSMP/E V3R1 now provides additional HOLDDATA reports for APPLY andACCEPT processing. The new reports provide you with ++HOLD information inthe context of the APPLY or ACCEPT processing output. This frees you fromhaving to manually collect this information, thus saving you significant researchtime.
Appendix A. Migration 179
SMP/E Load Modules and Service Routines Moved toSYS1.MIGLIB
The SMP/E load modules, service routines, and other SMP/E components thatformerly resided in the SYS1.LINKLIB library have been moved to SYS1.MIGLIB.Putting SMP/E into SYS1.MIGLIB enables a driving system to STEPLIB to SMP/Ewhile ensuring that the STEPLIB does not expose the driving system to otherexecutables that are not at the correct level for the driving system.
GIMXTRX Service RoutineGIMXTRX is intended for use as part of an offering called ShopzSeries. It providestwo basic functions:1. Generate a list of target zone names associated with a given GLOBAL zone
SMPCSI data set name.2. Generate a BITMAP representation of FUNCTION and PTF SYSMODs found in
a given list of target zone names associated with a given GLOBAL zoneSMPCSI data set name.
OS/390 Version 2 Release 7 SMP/E OverviewThe following sections describe the new and changed SMP/E functions that areintroduced for OS/390 Version 2 Release 7 (V2R7). (This level of SMP/E was alsosupplied with OS/390 Version 2, Releases 8, 9, and 10.) The information about eachitem includes:v Descriptionv Summary of the SMP/E tasks or interfaces that might be affectedv Coexistence considerations, if any, that are associated with the itemv Migration procedures, if any, that are associated with the itemv References to other publications that contain additional detailed information
SMP/E Planning and Migration AssistantOS/390 V2R7 (or later) SMP/E provided a Planning and Migration Assistant toassist users in managing their existing system and planning to migrate to a newOS/390 system.
Data Element ReformattingSMP/E can install data elements during APPLY, ACCEPT, RESTORE, andGENERATE into the output data sets based on their physical attributes.
Coexistence considerationsReleases of SMP/E prior to OS/390 Version 2 Release 7 cannot process theDEIINST and HFSINST jobs created by the GENERATE command of SMP/E V3R1or z/OS SMP/E. Also, an HFSINST job created by the GENERATE command froma release of SMP/E prior to OS/390 Release 7 cannot be processed by z/OSSMP/E or by OS/390 V2R7 (or later) SMP/E.
Rerun the GENERATE job using the SMP/E release that will be used to processthe resulting JCL.
Description for a SYSMODOS/390 V2R7 (or later) SMP/E enabled product developers and packagers toinclude additional descriptive information in a SYSMOD header MCS (that is, in a++APAR, ++FUNCTION, ++PTF, or ++USERMOD statement).
180 SMP/E V3R2.0 User’s Guide
Improved Protection for Hierarchical File System FilesBefore manipulating files in the hierarchical file system, SMP/E temporarilyswitches the SMP/E user to superuser authority (UID=0) when manipulating filesin the hierarchical file system and restores the user to the previous level ofauthority when the SMP/E updates are done. This means that SMP/E users do notneed to have UID=0 (superuser) authority all the time, which reduces the chance ofsuch users accidentally erasing or damaging files in the hierarchical file systemwhile performing non-SMP/E work.
Coexistence considerationsThe SMP/E user must be defined to the security class BPX.SUPERUSER for thisprocess to work properly.
Pre-Built Load Module SupportThe ++PROGRAM MCS can be used to add, replace, or delete pre-built loadmodules and program objects in PDS and PDSE data sets as complete entities infunctions and PTFs.
Product DataThe ++PRODUCT and ++FEATURE MCS can be used to add, replace, or deleteadditional product and feature data.
Sequential Data Set SupportSMP/E can now install a data element into a sequential data set.
Coexistence considerationsReleases of SMP/E prior to OS/390 Version 2 Release 7 cannot process theDEIINST and HFSINST jobs created by the GENERATE command of SMP/E V3R1or z/OS SMP/E. Also, an HFSINST job created by the GENERATE command froma release of SMP/E prior to OS/390 Version 2 Release 7 cannot be processed byz/OS SMP/E or by OS/390 V2R7 (or later) SMP/E.
Rerun the GENERATE job using the SMP/E release that will be used to processthe resulting JCL.
Shell Script SupportOS/390 V2R7 (or later) SMP/E enabled the execution of UNIX shell scripts duringSMP/E installation of code into the OS/390 UNIX Services environment. SMP/Eprovides a generic interface to enable a packager to deliver a shell script that canbe executed during SMP/E installation, thus reducing the pre-install andpost-install requirements of OS/390 UNIX Services application programs.
Symbolic Link SupportSymbolic links can be specified on hierarchical file system MCS.
OS/390 Version 2 Release 5 SMP/E OverviewThe following sections describe the new and changed SMP/E functions that areintroduced for OS/390 Version 2 Release 5 (V2R5). (This level of SMP/E was alsosupplied with OS/390 Version 2 Release 6.) The information about each itemincludes:v Descriptionv Summary of the SMP/E tasks or interfaces that might be affected
Appendix A. Migration 181
v Coexistence considerations, if any, that are associated with the itemv Migration procedures, if any, that are associated with the itemv References to other publications that contain additional detailed information
CBIPO dialogsThe CBIPO installation dialogs formerly included with SMP/E were removed fromSMP/E in OS/390 V2R5 SMP/E. Customers wishing to install a CBIPO on anOS/390 system may still do so using bootstrap dialogs provided with the CBIPO.
Client Code InstallationOS/390 V2R5 (or later) SMP/E provides facilities to simplify the installation ofcooperative or client/server products (such as OS/2). This is done with a commonSMP/E packaging structure, a common S/390 server repository for clientcomponents, and a server repository accessible from any client platform. Thesefacilities allow, for example, storing the client parts in a hierarchical file system(HFS) and thereby allowing them to be packaged and installed along with the hostparts, rather than separately.
Coexistence considerationsEnhanced hierarchical file system element MCS cannot be used by SMP/E releasesprior to OS/390 V2R5 SMP/E, unless the required PTF is installed.
Global Zone MergeOS/390 V2R5 (or later) SMP/E provides a method to merge information from oneglobal zone into another global zone, which customers can use to reduce thenumber of global zones that they must manage. The merged information includes:v SYSMOD and HOLDDATA entries,v SYSMOD members in the SMPPTS data set,v OPTIONS, UTILITY, DDDEF, ZONESET, and FMIDSET entriesv Global zone entry information, such as zone indexes, FMID list, and SRELs.
This facility is useful to customers who use ServerPac.
Library Change InterfaceOS/390 V2R5 (or later) SMP/E provides a programming interface that can be usedto obtain a synopsis of SMP/E APPLY and RESTORE processing at the library ormember level. Customers can use this interface to propagate the libraries andmembers modified by SMP/E APPLY and RESTORE processing to other systemsrequiring the changes, thereby facilitating the integration of SMP/E-managedinformation in multisystem environments.
Coexistence considerationsOPTIONS entries that contain the CHANGEFILE subentry cannot be used bySMP/E releases prior to OS/390 V2R5 SMP/E, unless the required PTF is installed.
Improved Load Module Build ProcessingOS/390 V2R5 (or later) SMP/E will not build a load module if SMP/E cannotinclude all of the load module’s component modules that have been installed orare being installed. If such a load module can not be completely built, SMP/Eterminates APPLY processing for all affected SYSMODs. In addition, OS/390 V2R5(or later) SMP/E reduces the likelihood of termination owing to incomplete load
182 SMP/E V3R2.0 User’s Guide
modules by expanding its search for the component modules to include copies ofmodules from within previously installed SYSMODs in the SMPPTS data set.
Load module return codeOS/390 V2R5 (or later) SMP/E allows product packagers to provide information inthe JCLIN to identify the highest return code allowable for each load module. IBMwill provide toleration PTFs for this function for prior releases of OS/390 andcurrently supported releases of SMP/E.
Coexistence considerationsLMOD entries that contain the RETURN CODE subentry cannot be used bySMP/E releases prior to OS/390 V2R5 SMP/E, unless the required PTF is installed.
Performance ImprovementsOS/390 V2R5 (or later) SMP/E provides for multitasking of link-edit operationsduring APPLY, ACCEPT, and RESTORE processing.
PTF Compaction in SMPPTS Data SetOS/390 V2R5 (or later) SMP/E compacts the SYSMOD (PTF) data within theSMPPTS data set to reduce its size. This ability to compact PTF data prior torelease by IBM also allows IBM to shrink the size of the OS/390 service stream,thus reducing the amount of physical media (tapes) required to distribute service,as well as shrink the size of service distributed through various electronicmediums.
Coexistence considerationsv Compacted SMPPTS data created by OS/390 V2R5 (or later) SMP/E cannot be
used by releases prior to OS/390 V2R5 SMP/E, unless the required PTF isinstalled.
v OPTIONS entries that contain the COMPACT subentry cannot be used bySMP/E releases prior to OS/390 V2R5 SMP/E, unless the required PTF isinstalled.
Enhanced RECEIVE Command ProcessingOS/390 V2R5 (or later) SMP/E enables users to prevent the RECEIVE commandfrom processing SYSMODs that are already applied or accepted. Users can specifythis with the OPTIONS entry, on the RECEIVE command, or both. Thisenhancement reduces the need for the user to manually manage the SMPPTS withREJECT commands.
Coexistence considerationsOPTIONS entries that contain the RECZGRP and RECEXZGRP subentries cannotbe used by SMP/E releases prior to OS/390 V2R5 SMP/E.
Reduced SMP/E Message OutputOS/390 V2R5 (or later) SMP/E reduced the number of messages issued duringAPPLY, ACCEPT, and RESTORE processing for easier identification of potentialproblems. Also, users may specify that messages issued to SMPOUT be formattedto an 80 character width, instead of the previous 120 character width, to make themessages easier to view when displayed on a terminal screen.
Coexistence considerationsOPTIONS entries that contain the MSGWIDTH and MSGFILTER subentries cannotbe used by SMP/E releases prior to OS/390 V2R5 SMP/E.
Appendix A. Migration 183
GIMAPI: All Entries and Subentries SupportFor OS/390 V2R5 (or later) SMP/E, an application program using the GIMAPIQUERY command may specify an asterisk (*) on entry and subentry parameters toretrieve the Consolidated Software Inventory (CSI) data for all entry types, allsubentries, or both.
GIMAPI: Version SupportOS/390 V2R5 (or later) SMP/E can supply to an application program the versionof GIMAPI being executed to retrieve information from the CSI. This allows theapplication program to determine whether information stored in the CSI issupported with the level of the QUERY program that is being executed.
Coexistence considerationsApplication programs cannot use the VERSION command of the GIMAPIprogramming interface on releases of SMP/E prior to OS/390 V2R5 (or later)SMP/E, unless the required PTF is installed.
OS/390 Version 1 Release 3 SMP/E OverviewThe following sections describe the new and changed SMP/E functions that areintroduced for OS/390 Version 1 Release 3 (V1R3). (This level of SMP/E was alsosupplied with OS/390 Version 2 Release 4.) The information about each itemincludes:v Descriptionv Summary of the SMP/E tasks or interfaces that might be affectedv Coexistence considerations, if any, that are associated with the itemv Migration procedures, if any, that are associated with the itemv References to other publications that contain additional detailed information
API for User Access to the CSIA programming interface is provided for read only access to SMP/E’s consolidatedsoftware inventory (CSI) data. The data in CSI can be used to further automatesystems management tasks.
A program called GIMAPI is used to invoke the API. The function can be calledfrom different languages. Examples are provided for C/370 and PL/I.
The following commands are used with the GIMAPI call:
QUERY Request data from the SMP/E CSI and return it to the callingprogram.
FREE Free storage allocated by invocations of the QUERY command.
Enhanced Cross-Zone Requisite CheckingCross-zone requisite checking is enhanced. Immediate feedback from the APPLY,ACCEPT, and RESTORE commands assists you in verifying that cross-zonerequisites are installed and satisfied.
Optional parameters with these commands provide you the flexibility to:v Override SMP/E’s default method for determining which zones are checked for
cross-zone requisitesv Install unsatisfied cross-zone requisites into the set-to zone
184 SMP/E V3R2.0 User’s Guide
v Lessen the severity of a missing cross-zone requisite to a warning versus aterminating error
Coexistence considerationsReleases of SMP/E prior to OS/390 V1R3 SMP/E cannot perform the cross-zonerequisite checking requested by the XZREQCHK(YES) subentry of a ZONESETentry and will ignore the request.
Enhanced Exception SYSMOD ReportThe enhanced Exception SYSMOD Report, available as a small programmingenhancement (SPE) for OS/390 V1R3 SMP/E, includes IBM OS/390 EnhancedHOLDDATA that is provided in ++HOLD statements. The report is reformatted sothat it is ordered by FMID within each requested zone. (Previously, the report wasordered by SYSMOD within each zone.) A summary section is placed at the end ofthe report. The enhanced REPORT ERRSYSMODS command continues to workwith legacy HOLDDATA.
The REPORT ERRSYSMODS command has also been enhanced by this SPE tohandle held SYSMODs. Previously, a held, resolving SYSMOD was placed in theSMPPUNCH output, but was commented out. The customer had to rerun REPORTERRSYSMODS command against the GLOBAL zone to determine if the held,resolving SYSMOD had an available resolving SYSMOD. REPORT ERRSYSMODSdoes this research for the customer and produces one SMPPUNCH output.
Coexistence considerationsv The REPORT ERRSYSMODS command in SMP/E releases prior to OS/390 V1R3
cannot display IBM z/OS Enhanced HOLDDATA as intended. OS/390 V1R3 andV2R4 require the installation of the appropriate SPE.
v The format of the HOLDDATA provided by the SMARTMVS service in Europeor the Electronic HOLDDATA service in the U.S. is not compatible with z/OSEnhanced HOLDDATA and does not take advantage of the enhanced REPORTERRSYSMODS command. Customers who currently use these services, and whowish to make full use of the REPORT ERRSYSMODS command, must refreshtheir CSI’s HOLDDATA with z/OS Enhanced HOLDDATA.
Enhanced ++IF FMID Processingz/OS SMP/E allows the ++IF MCS FMID operand to specify the same value as thevalue of the FMID operand of the previous ++VER MCS (if the SYSMOD is not abase function) or the name of the SYSMOD (if the SYSMOD is a base function).
Enhanced Internal HOLD SYS ProcessingAnalysis of internal HOLD information when one SYSMOD supersedes another issimplified. When a SYSMOD has ++HOLD information and it is superseded byanother SYSMOD, the ++HOLD can be brought forward unchanged. The SYSMODID on the ++HOLD need not change to that of the superseding SYSMOD. Even ifthe SYSMOD ID on the ++HOLD is not the same as the containing SYSMOD, the++HOLD is effective only against the SYSMOD that contains it. If the SYSMOD IDon the ++HOLD is not the same as the containing SYSMOD, SMP/E can determineif internal HOLDs are satisfied during APPLY and ACCEPT processing and therebyeliminate manual analysis.
Appendix A. Migration 185
Coexistence considerationsSYSMODs that contain a ++HOLD MCS that specifies a SYSMOD ID that issuperseded on a preceding ++VER MCS cannot be processed by previous releasesof SMP/E during RECEIVE processing, unless the appropriate PTF is installed forthe prior release.
Enhanced ZONEEDIT CommandThe ZONEEDIT command is enhanced to provide a simplified method of changingpath names. A PATH subentry is included on the unconditional CHANGEstatement of the ZONEEDIT DDDEF command.
An example of when you might want to use the PATH subentry on the CHANGEstatement is to modify path names of DDDEFs during the z/OS OpenEditionservice process.
Enhancements to the Binder Utility in DFSMS/MVSSMP/E can use enhancements to the binder utility in DFSMS/MVS. Theenhancements to the binder include elimination of the LE/370 prelinker utility, andbuilding dynamic load library (DLL) program objects. SMP/E’s support includes:v New link-edit parameters are recognized on the LEPARM operand of the
++MOD MCS and in JCLIN used to define a load module. The new parametersare ALIASES, DYNAM, FILL, HOBSET, REUS(NONE|REFR|RENT|SERIAL),RMODE=SPLIT, and UPCASE(YES|NO). All of these new parameters can bespecified in JCLIN and all except ALIASES and DYNAM can be specified on theLEPARM operand.
v SMP/E supports the binder in dynamically building a definition side deck filefor DLL program objects when those program objects are installed. The library tocontain the definition side deck file is identified by a new side deck library(SIDEDECKLIB) subentry in the LMOD entry.
v Load modules that use DLLs can reference the definition side deck filesassociated with the DLLs. This is done by including the definition side deck filesduring a link-edit operation. The LMOD entry will contain a new utility input(UTIN) subentry list to record definition side deck files to be included during alink-edit operation.
Coexistence considerationsReleases of SMP/E prior to OS/390 V1R3 SMP/E cannot:v Correctly install products and service that were developed for installation using
the INCLUDE statements in JCLIN that identify UTILITY INPUT for a loadmodule, the SYSDEFSD DD statements in JCLIN that identify the definition sidedeck library for a load module, and the FILL, HOBSET, RMODE=SPLIT, andEXITS link edit attributes on the LEPARM operand on the ++MOD MCS and inJCLIN.
v Use target and distribution zones containing LMOD or MOD entries updated byOS/390 V1R3 (or later) with FILL, HOBSET, RMODE=SPLIT, EXITS, ALIASES,or DYNAM link edit parameters in the MOD and LMOD entries, the UTILITYINPUT subentry list, or the SIDE DECK LIBRARY subentry in the LMODentries.
System/390 Service Update FacilityThe System/390 Service Update Facility (SUF) available as a small programmingenhancement (SPE) for OS/390 V1R3 SMP/E, provides, along with other
186 SMP/E V3R2.0 User’s Guide
System/390 products, provides a common tool across multiple platforms to helpcustomers to maintain their systems with System/390 service facilities.
OS/390 Version 1 Release 2 SMP/E OverviewThe following sections describe the new and changed SMP/E functions that areintroduced for OS/390 Version 1 Release 2 (V1R2). The information about eachitem includes:v Descriptionv Summary of the SMP/E tasks or interfaces that might be affectedv Coexistence considerations, if any, that are associated with the itemv Migration procedures, if any, that are associated with the itemv References to other publications that contain additional detailed information
BLOCKSIZE=8800 for SMP/E Data SetsFor the RELFILE data sets, target libraries, and distribution libraries containingz/OS SMP/E, data sets that are allocated with RECFM=FB and LRECL=80 areallocated with BLKSIZE=8800.
BUILDMCS CommandThe BUILDMCS command provides a process for copying products from one pairof target and distribution zones and libraries, to another pair of target anddistribution zones and libraries. This command generates the MCS and JCLINrequired to reinstall the specified FMIDs.
Coexistence considerationsSYSMOD input (modification control statements) created by the BUILDMCScommand cannot be processed by SMP/E releases prior to OS/390 V1R2 SMP/E,unless the required PTF is installed.
Bypassing System Holds for Specific SYSMODsFor APPLY and ACCEPT processing, you can bypass a particular system hold forspecific SYSMODs, instead of for all SYSMODs held for that reason ID. Forexample, a number of SYSMODs might be held because they require you to takesome required action before installing them. If you have completed the requiredaction for some (but not all) of the held SYSMODs, you can request SMP/E tobypass that hold reason ID only for the SYSMODs you specify. All other SYSMODsaffected by that reason ID remain held.
FMIDSET SelectionSMP/E provides additional granularity of FMIDSET specification on the SELECToperand of the APPLY, ACCEPT, RESTORE, and RECEIVE commands to allow youto install sets of FMIDs.
Receiving Relative File Data Sets Created from PDSEsWhen allocating a new SMPTLIB data set during RECEIVE processing, SMP/Echecks the format of the associated relative file (RELFILE) data set, then uses theappropriate data set type (LIBRARY or PDS) for the SMPTLIB data set. Here aresome benefits of this change:v When packaging SYSMODs, you can ship program objects in RELFILEs, because
SMP/E can load RELFILEs that were created from PDSEs into SMPTLIB datasets that are PDSEs.
Appendix A. Migration 187
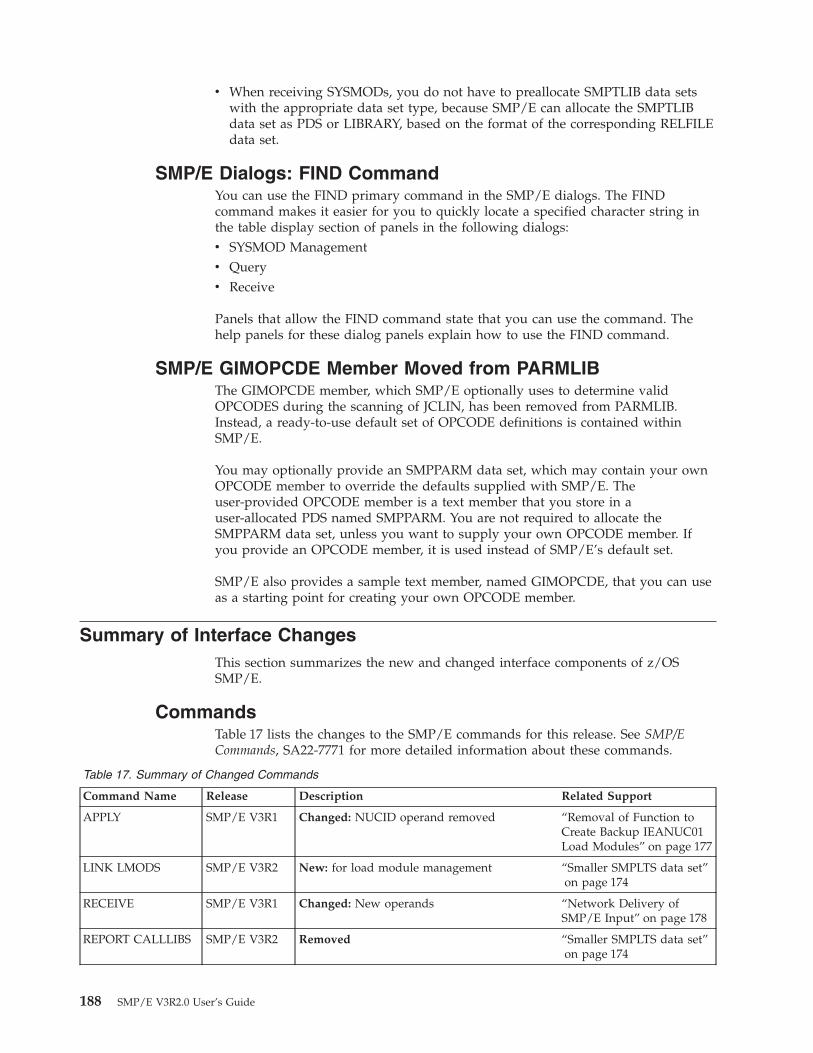
v When receiving SYSMODs, you do not have to preallocate SMPTLIB data setswith the appropriate data set type, because SMP/E can allocate the SMPTLIBdata set as PDS or LIBRARY, based on the format of the corresponding RELFILEdata set.
SMP/E Dialogs: FIND CommandYou can use the FIND primary command in the SMP/E dialogs. The FINDcommand makes it easier for you to quickly locate a specified character string inthe table display section of panels in the following dialogs:v SYSMOD Managementv Queryv Receive
Panels that allow the FIND command state that you can use the command. Thehelp panels for these dialog panels explain how to use the FIND command.
SMP/E GIMOPCDE Member Moved from PARMLIBThe GIMOPCDE member, which SMP/E optionally uses to determine validOPCODES during the scanning of JCLIN, has been removed from PARMLIB.Instead, a ready-to-use default set of OPCODE definitions is contained withinSMP/E.
You may optionally provide an SMPPARM data set, which may contain your ownOPCODE member to override the defaults supplied with SMP/E. Theuser-provided OPCODE member is a text member that you store in auser-allocated PDS named SMPPARM. You are not required to allocate theSMPPARM data set, unless you want to supply your own OPCODE member. Ifyou provide an OPCODE member, it is used instead of SMP/E’s default set.
SMP/E also provides a sample text member, named GIMOPCDE, that you can useas a starting point for creating your own OPCODE member.
Summary of Interface ChangesThis section summarizes the new and changed interface components of z/OSSMP/E.
CommandsTable 17 lists the changes to the SMP/E commands for this release. See SMP/ECommands, SA22-7771 for more detailed information about these commands.
Table 17. Summary of Changed Commands
Command Name Release Description Related Support
APPLY SMP/E V3R1 Changed: NUCID operand removed “Removal of Function toCreate Backup IEANUC01Load Modules” on page 177
LINK LMODS SMP/E V3R2 New: for load module management “Smaller SMPLTS data set”on page 174
RECEIVE SMP/E V3R1 Changed: New operands “Network Delivery ofSMP/E Input” on page 178
REPORT CALLLIBS SMP/E V3R2 Removed “Smaller SMPLTS data set”on page 174
188 SMP/E V3R2.0 User’s Guide
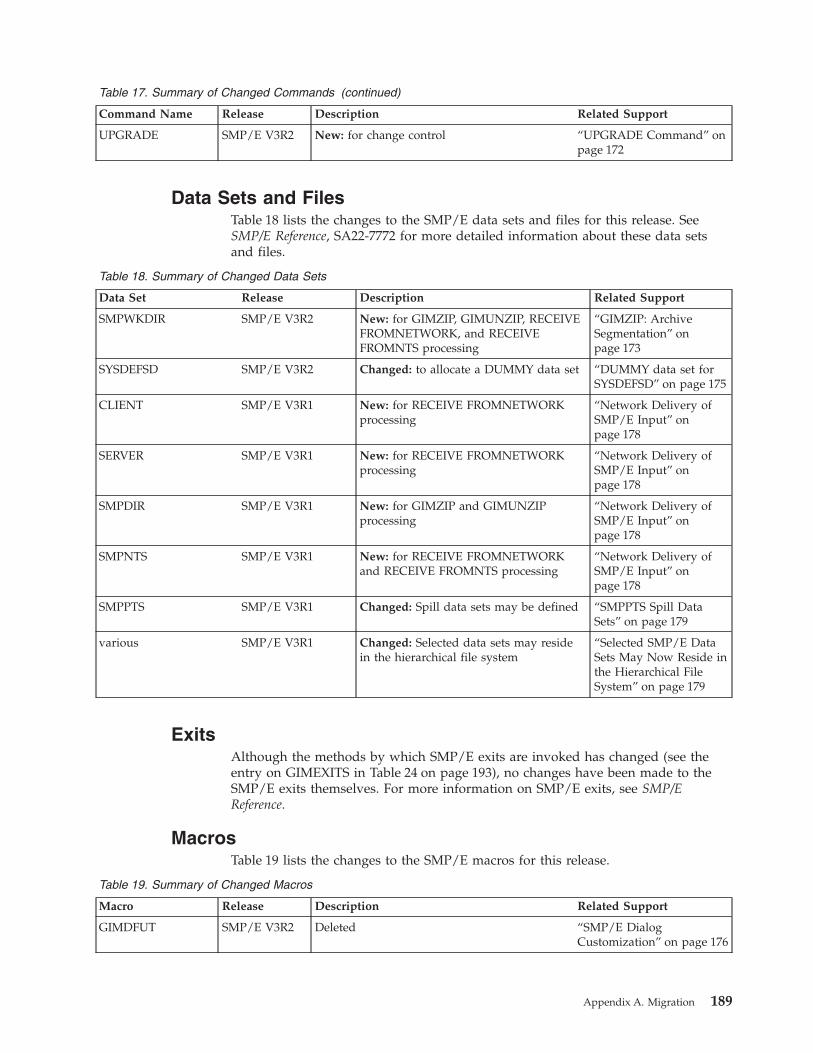
Table 17. Summary of Changed Commands (continued)
Command Name Release Description Related Support
UPGRADE SMP/E V3R2 New: for change control “UPGRADE Command” onpage 172
Data Sets and FilesTable 18 lists the changes to the SMP/E data sets and files for this release. SeeSMP/E Reference, SA22-7772 for more detailed information about these data setsand files.
Table 18. Summary of Changed Data Sets
Data Set Release Description Related Support
SMPWKDIR SMP/E V3R2 New: for GIMZIP, GIMUNZIP, RECEIVEFROMNETWORK, and RECEIVEFROMNTS processing
“GIMZIP: ArchiveSegmentation” onpage 173
SYSDEFSD SMP/E V3R2 Changed: to allocate a DUMMY data set “DUMMY data set forSYSDEFSD” on page 175
CLIENT SMP/E V3R1 New: for RECEIVE FROMNETWORKprocessing
“Network Delivery ofSMP/E Input” onpage 178
SERVER SMP/E V3R1 New: for RECEIVE FROMNETWORKprocessing
“Network Delivery ofSMP/E Input” onpage 178
SMPDIR SMP/E V3R1 New: for GIMZIP and GIMUNZIPprocessing
“Network Delivery ofSMP/E Input” onpage 178
SMPNTS SMP/E V3R1 New: for RECEIVE FROMNETWORKand RECEIVE FROMNTS processing
“Network Delivery ofSMP/E Input” onpage 178
SMPPTS SMP/E V3R1 Changed: Spill data sets may be defined “SMPPTS Spill DataSets” on page 179
various SMP/E V3R1 Changed: Selected data sets may residein the hierarchical file system
“Selected SMP/E DataSets May Now Reside inthe Hierarchical FileSystem” on page 179
ExitsAlthough the methods by which SMP/E exits are invoked has changed (see theentry on GIMEXITS in Table 24 on page 193), no changes have been made to theSMP/E exits themselves. For more information on SMP/E exits, see SMP/EReference.
MacrosTable 19 lists the changes to the SMP/E macros for this release.
Table 19. Summary of Changed Macros
Macro Release Description Related Support
GIMDFUT SMP/E V3R2 Deleted “SMP/E DialogCustomization” on page 176
Appendix A. Migration 189
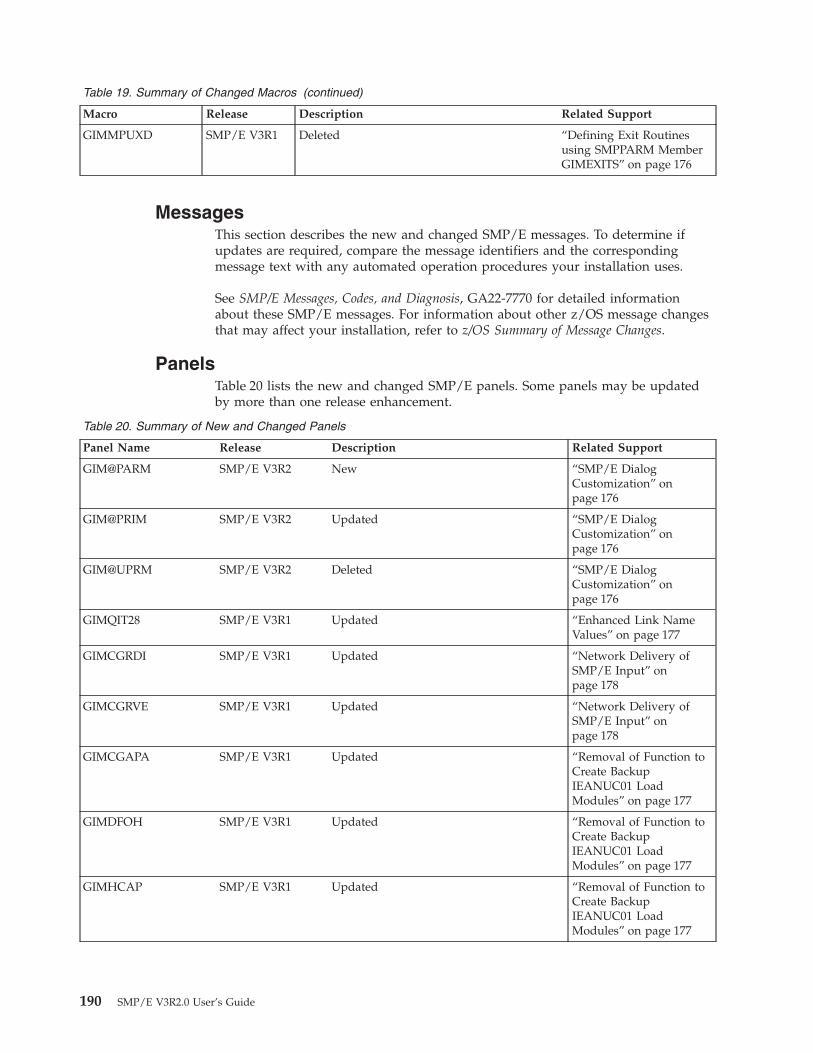
Table 19. Summary of Changed Macros (continued)
Macro Release Description Related Support
GIMMPUXD SMP/E V3R1 Deleted “Defining Exit Routinesusing SMPPARM MemberGIMEXITS” on page 176
MessagesThis section describes the new and changed SMP/E messages. To determine ifupdates are required, compare the message identifiers and the correspondingmessage text with any automated operation procedures your installation uses.
See SMP/E Messages, Codes, and Diagnosis, GA22-7770 for detailed informationabout these SMP/E messages. For information about other z/OS message changesthat may affect your installation, refer to z/OS Summary of Message Changes.
PanelsTable 20 lists the new and changed SMP/E panels. Some panels may be updatedby more than one release enhancement.
Table 20. Summary of New and Changed Panels
Panel Name Release Description Related Support
GIM@PARM SMP/E V3R2 New “SMP/E DialogCustomization” onpage 176
GIM@PRIM SMP/E V3R2 Updated “SMP/E DialogCustomization” onpage 176
GIM@UPRM SMP/E V3R2 Deleted “SMP/E DialogCustomization” onpage 176
GIMQIT28 SMP/E V3R1 Updated “Enhanced Link NameValues” on page 177
GIMCGRDI SMP/E V3R1 Updated “Network Delivery ofSMP/E Input” onpage 178
GIMCGRVE SMP/E V3R1 Updated “Network Delivery ofSMP/E Input” onpage 178
GIMCGAPA SMP/E V3R1 Updated “Removal of Function toCreate BackupIEANUC01 LoadModules” on page 177
GIMDFOH SMP/E V3R1 Updated “Removal of Function toCreate BackupIEANUC01 LoadModules” on page 177
GIMHCAP SMP/E V3R1 Updated “Removal of Function toCreate BackupIEANUC01 LoadModules” on page 177
190 SMP/E V3R2.0 User’s Guide
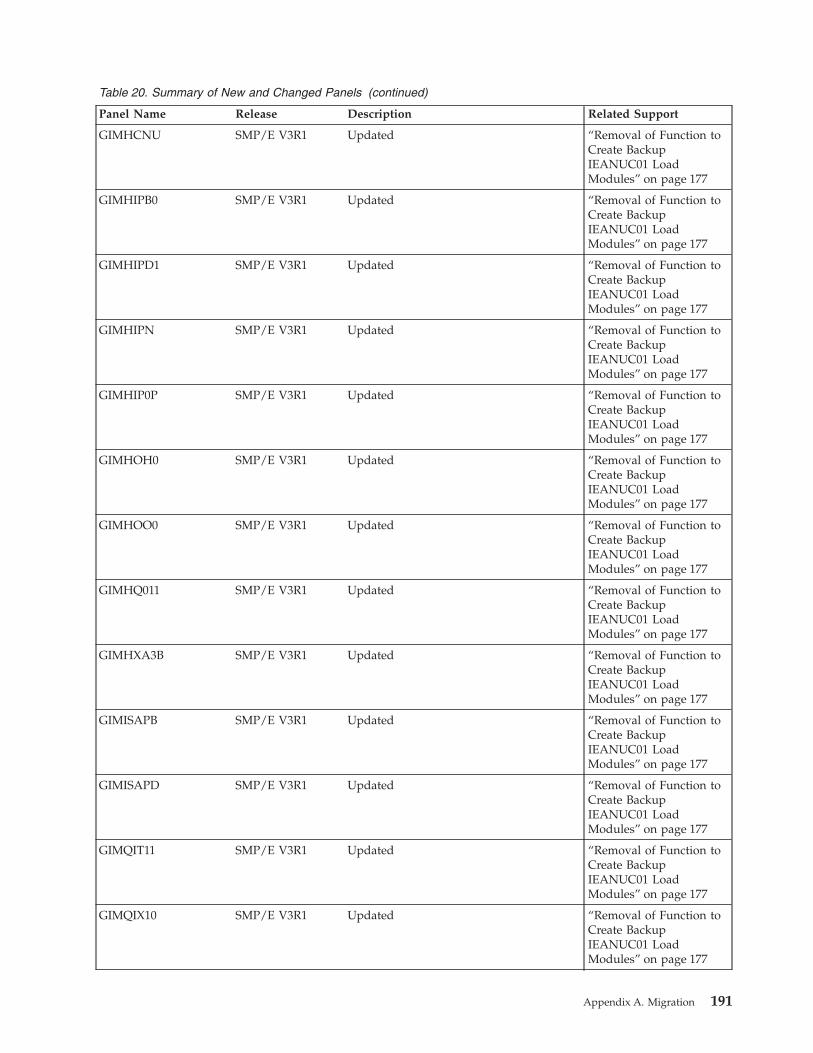
Table 20. Summary of New and Changed Panels (continued)
Panel Name Release Description Related Support
GIMHCNU SMP/E V3R1 Updated “Removal of Function toCreate BackupIEANUC01 LoadModules” on page 177
GIMHIPB0 SMP/E V3R1 Updated “Removal of Function toCreate BackupIEANUC01 LoadModules” on page 177
GIMHIPD1 SMP/E V3R1 Updated “Removal of Function toCreate BackupIEANUC01 LoadModules” on page 177
GIMHIPN SMP/E V3R1 Updated “Removal of Function toCreate BackupIEANUC01 LoadModules” on page 177
GIMHIP0P SMP/E V3R1 Updated “Removal of Function toCreate BackupIEANUC01 LoadModules” on page 177
GIMHOH0 SMP/E V3R1 Updated “Removal of Function toCreate BackupIEANUC01 LoadModules” on page 177
GIMHOO0 SMP/E V3R1 Updated “Removal of Function toCreate BackupIEANUC01 LoadModules” on page 177
GIMHQ011 SMP/E V3R1 Updated “Removal of Function toCreate BackupIEANUC01 LoadModules” on page 177
GIMHXA3B SMP/E V3R1 Updated “Removal of Function toCreate BackupIEANUC01 LoadModules” on page 177
GIMISAPB SMP/E V3R1 Updated “Removal of Function toCreate BackupIEANUC01 LoadModules” on page 177
GIMISAPD SMP/E V3R1 Updated “Removal of Function toCreate BackupIEANUC01 LoadModules” on page 177
GIMQIT11 SMP/E V3R1 Updated “Removal of Function toCreate BackupIEANUC01 LoadModules” on page 177
GIMQIX10 SMP/E V3R1 Updated “Removal of Function toCreate BackupIEANUC01 LoadModules” on page 177
Appendix A. Migration 191
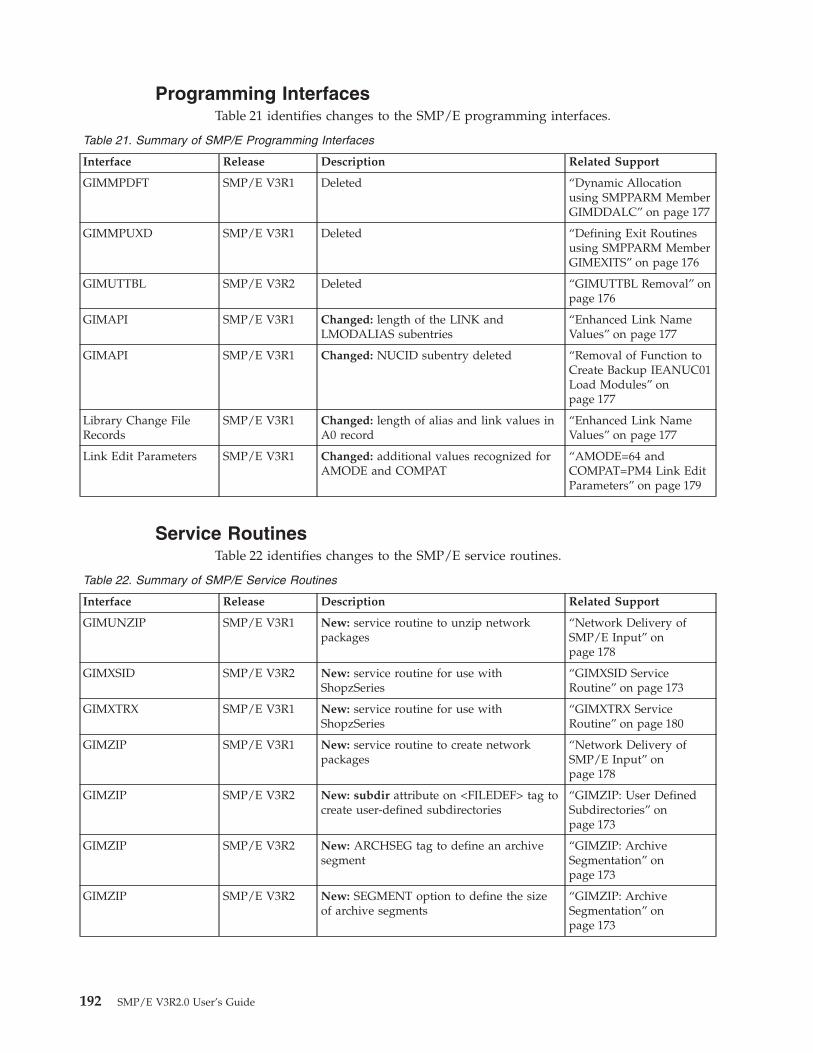
Programming InterfacesTable 21 identifies changes to the SMP/E programming interfaces.
Table 21. Summary of SMP/E Programming Interfaces
Interface Release Description Related Support
GIMMPDFT SMP/E V3R1 Deleted “Dynamic Allocationusing SMPPARM MemberGIMDDALC” on page 177
GIMMPUXD SMP/E V3R1 Deleted “Defining Exit Routinesusing SMPPARM MemberGIMEXITS” on page 176
GIMUTTBL SMP/E V3R2 Deleted “GIMUTTBL Removal” onpage 176
GIMAPI SMP/E V3R1 Changed: length of the LINK andLMODALIAS subentries
“Enhanced Link NameValues” on page 177
GIMAPI SMP/E V3R1 Changed: NUCID subentry deleted “Removal of Function toCreate Backup IEANUC01Load Modules” onpage 177
Library Change FileRecords
SMP/E V3R1 Changed: length of alias and link values inA0 record
“Enhanced Link NameValues” on page 177
Link Edit Parameters SMP/E V3R1 Changed: additional values recognized forAMODE and COMPAT
“AMODE=64 andCOMPAT=PM4 Link EditParameters” on page 179
Service RoutinesTable 22 identifies changes to the SMP/E service routines.
Table 22. Summary of SMP/E Service Routines
Interface Release Description Related Support
GIMUNZIP SMP/E V3R1 New: service routine to unzip networkpackages
“Network Delivery ofSMP/E Input” onpage 178
GIMXSID SMP/E V3R2 New: service routine for use withShopzSeries
“GIMXSID ServiceRoutine” on page 173
GIMXTRX SMP/E V3R1 New: service routine for use withShopzSeries
“GIMXTRX ServiceRoutine” on page 180
GIMZIP SMP/E V3R1 New: service routine to create networkpackages
“Network Delivery ofSMP/E Input” onpage 178
GIMZIP SMP/E V3R2 New: subdir attribute on <FILEDEF> tag tocreate user-defined subdirectories
“GIMZIP: User DefinedSubdirectories” onpage 173
GIMZIP SMP/E V3R2 New: ARCHSEG tag to define an archivesegment
“GIMZIP: ArchiveSegmentation” onpage 173
GIMZIP SMP/E V3R2 New: SEGMENT option to define the sizeof archive segments
“GIMZIP: ArchiveSegmentation” onpage 173
192 SMP/E V3R2.0 User’s Guide
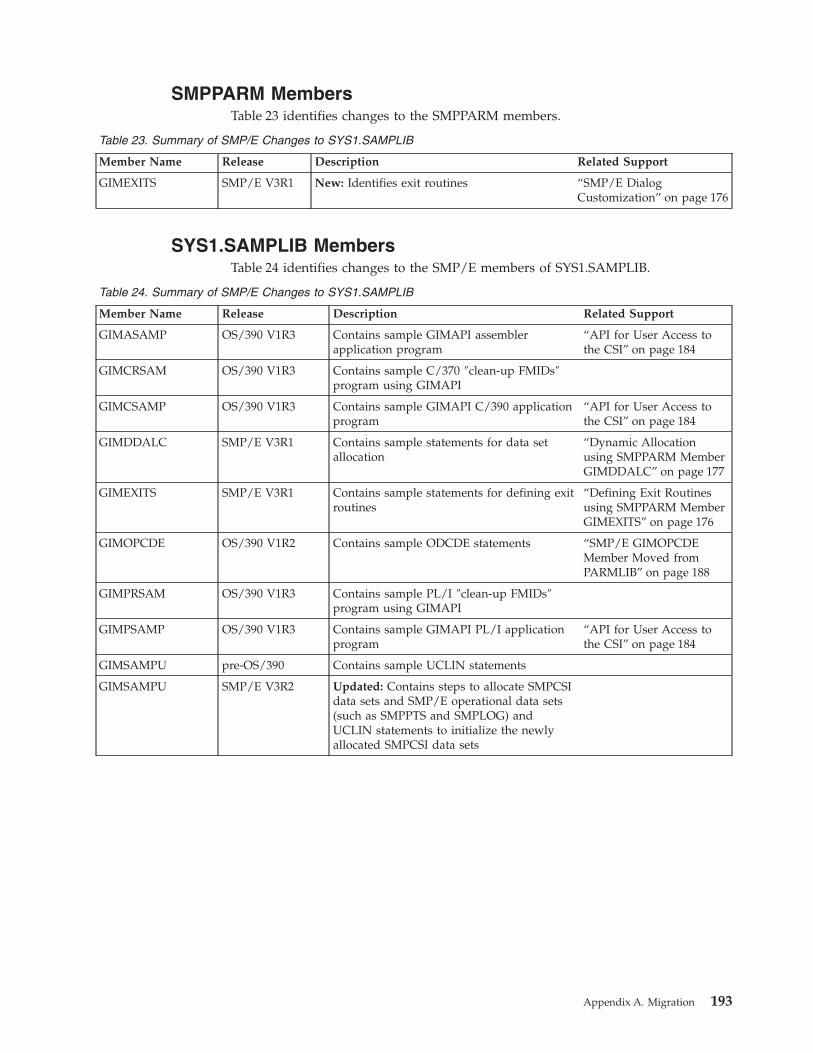
SMPPARM MembersTable 23 identifies changes to the SMPPARM members.
Table 23. Summary of SMP/E Changes to SYS1.SAMPLIB
Member Name Release Description Related Support
GIMEXITS SMP/E V3R1 New: Identifies exit routines “SMP/E DialogCustomization” on page 176
SYS1.SAMPLIB MembersTable 24 identifies changes to the SMP/E members of SYS1.SAMPLIB.
Table 24. Summary of SMP/E Changes to SYS1.SAMPLIB
Member Name Release Description Related Support
GIMASAMP OS/390 V1R3 Contains sample GIMAPI assemblerapplication program
“API for User Access tothe CSI” on page 184
GIMCRSAM OS/390 V1R3 Contains sample C/370 ″clean-up FMIDs″program using GIMAPI
GIMCSAMP OS/390 V1R3 Contains sample GIMAPI C/390 applicationprogram
“API for User Access tothe CSI” on page 184
GIMDDALC SMP/E V3R1 Contains sample statements for data setallocation
“Dynamic Allocationusing SMPPARM MemberGIMDDALC” on page 177
GIMEXITS SMP/E V3R1 Contains sample statements for defining exitroutines
“Defining Exit Routinesusing SMPPARM MemberGIMEXITS” on page 176
GIMOPCDE OS/390 V1R2 Contains sample ODCDE statements “SMP/E GIMOPCDEMember Moved fromPARMLIB” on page 188
GIMPRSAM OS/390 V1R3 Contains sample PL/I ″clean-up FMIDs″program using GIMAPI
GIMPSAMP OS/390 V1R3 Contains sample GIMAPI PL/I applicationprogram
“API for User Access tothe CSI” on page 184
GIMSAMPU pre-OS/390 Contains sample UCLIN statements
GIMSAMPU SMP/E V3R2 Updated: Contains steps to allocate SMPCSIdata sets and SMP/E operational data sets(such as SMPPTS and SMPLOG) andUCLIN statements to initialize the newlyallocated SMPCSI data sets
Appendix A. Migration 193

194 SMP/E V3R2.0 User’s Guide
Appendix B. Recommended Service Upgrade (RSU)
Recommended Service Upgrade (RSU) is a preventive service philosophy thatapplies to z/OS. RSU is intended to reduce the volume of PTFs customers mustapply for preventive maintenance and to reduce the chance of encountering a PTFin error (PE), resulting in a more stable system.
IBM recommends that customers APPLY all RSU PTFs as preventive maintenanceon their z/OS systems. However, customers must make the final decision as towhat maintenance they will install.
The recommended service for the following products is tested in the ConsolidatedService Test (CST) cycle:v z/OS and OS/390v CICS Transaction Server for OS/390v DB2 UDB for OS/390v IMSv MQSeries for OS/390
Recommended Service Upgrades, with an SMP/E SOURCEID of RSUyymm, areavailable:v Quarterly, with all PTFs that completed Consolidated Service Test (CST) testing
during the prior quarter, including severity 1 through severity 4 APARs.v Monthly, with high impact or pervasive (HIPER) PTFs, PTF-in-error (PE) PTFs,
and other recommended PTFs (recommended because of new function,serviceability, installability, security, or integrity) that have been CST tested.
For information about the latest recommended level of service, see the CST andRSU web site:http://www.ibm.com/servers/eserver/zseries/zos/servicetst/
Note that while all CST-tested PTFs become RSU PTFs, not all RSU PTFs are testedin CST. Only the following are included in CST testing: z/OS, z/OS.e, OS/390,CICS, DB2, IMS, and MQSeries.
RSU is provided for z/OS through ESO, CBPDO, and ServerPac.
© Copyright IBM Corp. 1986, 2003 195

196 SMP/E V3R2.0 User’s Guide
Appendix C. Accessibility
Accessibility features help a user who has a physical disability, such as restrictedmobility or limited vision, to use software products successfully. The majoraccessibility features in z/OS™ enable users to:v Use assistive technologies such as screen-readers and screen magnifier softwarev Operate specific or equivalent features using only the keyboardv Customize display attributes such as color, contrast, and font size
Using assistive technologiesAssistive technology products, such as screen-readers, function with the userinterfaces found in z/OS. Consult the assistive technology documentation forspecific information when using it to access z/OS interfaces.
Keyboard navigation of the user interfaceUsers can access z/OS user interfaces using TSO/E or ISPF. Refer to z/OS TSO/EPrimer, z/OS TSO/E User’s Guide, and z/OS ISPF User’s Guide Volume I forinformation about accessing TSO/E and ISPF interfaces. These guides describehow to use TSO/E and ISPF, including the use of keyboard shortcuts or functionkeys (PF keys). Each guide includes the default settings for the PF keys andexplains how to modify their functions.
© Copyright IBM Corp. 1986, 2003 197

198 SMP/E V3R2.0 User’s Guide

Notices
This information was developed for products and services offered in the USA.
IBM may not offer the products, services, or features discussed in this document inother countries. Consult your local IBM representative for information on theproducts and services currently available in your area. Any reference to an IBMproduct, program, or service is not intended to state or imply that only that IBMproduct, program, or service may be used. Any functionally equivalent product,program, or service that does not infringe any IBM intellectual property right maybe used instead. However, it is the user’s responsibility to evaluate and verify theoperation of any non-IBM product, program, or service.
IBM may have patents or pending patent applications covering subject matterdescribed in this document. The furnishing of this document does not give youany license to these patents. You can send license inquiries, in writing, to:
IBM Director of LicensingIBM CorporationNorth Castle DriveArmonk, NY 10504-1785USA
For license inquiries regarding double-byte (DBCS) information, contact the IBMIntellectual Property Department in your country or send inquiries, in writing, to:
IBM World Trade Asia CorporationLicensing2-31 Roppongi 3-chome, Minato-kuTokyo 106, Japan
The following paragraph does not apply to the United Kingdom or any othercountry where such provisions are inconsistent with local law:INTERNATIONAL BUSINESS MACHINES CORPORATION PROVIDES THISPUBLICATION “AS IS” WITHOUT WARRANTY OF ANY KIND, EITHEREXPRESS OR IMPLIED, INCLUDING, BUT NOT LIMITED TO, THE IMPLIEDWARRANTIES OF NON-INFRINGEMENT, MERCHANTABILITY OR FITNESSFOR A PARTICULAR PURPOSE. Some states do not allow disclaimer of express orimplied warranties in certain transactions, therefore, this statement may not applyto you.
This information could include technical inaccuracies or typographical errors.Changes are periodically made to the information herein; these changes will beincorporated in new editions of the publication. IBM may make improvementsand/or changes in the product(s) and/or the program(s) described in thispublication at any time without notice.
Any references in this information to non-IBM Web sites are provided forconvenience only and do not in any manner serve as an endorsement of those Websites. The materials at those Web sites are not part of the materials for this IBMproduct and use of those Web sites is at your own risk.
IBM may use or distribute any of the information you supply in any way itbelieves appropriate without incurring any obligation to you.
© Copyright IBM Corp. 1986, 2003 199
Licensees of this program who wish to have information about it for the purposeof enabling: (i) the exchange of information between independently createdprograms and other programs (including this one) and (ii) the mutual use of theinformation which has been exchanged, should contact:
IBM CorporationMail Station P3002455 South RoadPoughkeepsie, NY 12601-5400USA
Such information may be available, subject to appropriate terms and conditions,including in some cases, payment of a fee.
The licensed program described in this information and all licensed materialavailable for it are provided by IBM under terms of the IBM Customer Agreement,IBM International Program License Agreement, or any equivalent agreementbetween us.
If you are viewing this information softcopy, the photographs and colorillustrations may not appear.
TrademarksThe following terms are trademarks of the IBM Corporation in the United States,other countries, or both:
BookManagerCICSDATABASE 2DB2DFSMSDFSMS/MVSDFSMSdfpDFSMSdssIBMIBMLinkIMSOS/2OS/390RACFRETAINSPSystem/390SystemPacVTAMz/OS
UNIX is a registered trademark of The Open Group in the United States and othercountries.
Java and all Java-based trademarks are trademarks of Sun Microsystems, Inc. in theUnited States, other countries, or both.
Microsoft, Windows, Windows NT, and the Windows logo are trademarks ofMicrosoft Corporation in the United States, other countries, or both.
200 SMP/E V3R2.0 User’s Guide

Other company, product, and service names may be trademarks or service marksof others.
Notices 201

202 SMP/E V3R2.0 User’s Guide

Glossary
This glossary defines technical terms andabbreviations used in SMP/E documentation. Ifyou do not find the term you are looking for,refer to the index of the appropriate SMP/Emanual or view IBM Glossary of Computing Terms,located at:http://www.ibm.com/networking/nsg/nsgmain.htm
Sequence of Entries: For clarity and consistencyof style, this glossary arranges the entriesalphabetically on a letter-by-letter basis. In otherwords, only the letters of the alphabet are used todetermine sequence; special characters and spacesbetween words are ignored.
Organization of Entries: Each entry consists of asingle-word or multiple-word term or theabbreviation or acronym for a term, followed by acommentary. A commentary includes one or moreitems (definitions or references) and is organizedas follows:1. An item number, if the commentary contains
two or more items.2. A usage label, indicating the area of
application of the term, for example, “Inprogramming,” or “In SMP/E.” Absence of ausage label implies that the term is generallyapplicable to SMP/E, to IBM, or to dataprocessing.
3. A descriptive phrase, stating the basicmeaning of the term. The descriptive phrase isassumed to be preceded by “the term isdefined as ...” The part of speech beingdefined is indicated by the opening words ofthe descriptive phrase: “To ...” indicates averb, and “Pertaining to ...” indicates amodifier. Any other wording indicates a nounor noun phrase.
4. Annotative sentences, providing additional orexplanatory information.
5. References, directing the reader to otherentries or items in the dictionary.
References: The following cross-references areused in this glossary:
Contrast with. This refers to a term that hasan opposed or substantively differentmeaning.
Synonym for. This indicates that the term hasthe same meaning as a preferred term, whichis defined in its proper place in the glossary.Synonymous with. This is a backwardreference from a defined term to all otherterms that have the same meaning.See. This refers you to multiple-word termsthat have the same last word.See also. This refers the reader to relatedterms that have a related, but notsynonymous, meaning.Deprecated term for or Deprecatedabbreviation for. This indicates that the termor abbreviation should not be used. It refers toa preferred term, which is defined in itsproper place in the glossary.
Selection of Terms: A term is a word or group ofwords to be defined. In this glossary, the singularform of the noun and the infinitive form of theverb are the terms most often selected to bedefined. If the term may be abbreviated, theabbreviation is given in parentheses immediatelyfollowing the term. The abbreviation is alsodefined in its proper place in the glossary.
AACCEPT. The SMP/E command used to installSYSMODs in the distribution libraries.
accept. In SMP/E, to install SYSMODs in thedistribution libraries. This is done with the ACCEPTcommand.
accepted SYSMOD. A SYSMOD that has beensuccessfully installed by the SMP/E ACCEPTcommand. Accepted SYSMODs do not have the ERRORflag set and are found as SYSMOD entries in thedistribution zone.
Access method services (AMS). The system utilityprogram used to support VSAM data sets.
AMS. Access method services.
APAR. Authorized program analysis report.
APAR fix. A temporary correction of a defect in anIBM system control program or licensed program thataffects a specific user. An APAR fix is usually replacedlater by a permanent correction called a PTF. APARfixes are identified to SMP/E by the ++APARstatement.
© Copyright IBM Corp. 1986, 2003 203

applied SYSMOD. A SYSMOD that has beensuccessfully processed by the SMP/E APPLY command.Applied SYSMODs do not have the ERROR flag setand are found as SYSMOD entries in the target zone.
APPLY. The SMP/E command used to installSYSMODs in the target libraries.
apply. In SMP/E, to install SYSMODs in the targetlibraries. This is done with the APPLY command.
archive. An archive is a network transportable filecontaining two files; a file attribute file (FAF) and thedata file that the FAF describes.
ASSEM entry. An SMP/E entry containing assemblerstatements that can be assembled to create an objectmodule.
authorized program analysis report (APAR). A reportof a problem caused by a suspected defect in a currentunaltered release of a program. The correction is calledan APAR fix.
BBACKUP entries. A collection of SMP/E target zoneentries that are copied into the SMPSCDS data setduring APPLY processing before they are updated byinline JCLIN, a ++MOVE MCS, or a ++RENAME MCS,or before they are deleted by an element MCS with theDELETE operand.
BACKUP entries consist of:
v A SYSMOD entry indicating what entries have beenadded, deleted, or updated
v ASSEM entries for updated target zone ASSEMentries
v LMOD entries for updated target zone LMOD entries
v MAC entries for updated or deleted target zoneMAC entries
v MOD entries for updated or deleted target zoneMOD entries
v SRC entries for updated or deleted target zone SRCentries
v Data element entries for deleted target zone dataelement entries
v DLIB entries for updated target zone DLIB entries
BALR. Branch and link register commands.
base function. A SYSMOD defining elements of thebase system or other products that were not previouslypresent in the target libraries. Base functions areidentified to SMP/E by the ++FUNCTION statement.SMP/E is an example of a base function.
base level system. The level of the target systemmodules, macros, source, and DLIBs created by systemgeneration, to which function and service modificationsare applicable.
base version of a load module. Some load modulesinclude modules both explicitly (through INCLUDEstatements) and implicitly (through a SYSLIBallocation). The base version of such a load moduleincludes only the explicitly-defined modules for theload module. It is maintained by SMP/E in theSMPLTS data set. The base version of a load module isused with the SYSLIB allocation as input to thelink-edit utility in order to build the load module in itstarget libraries.
binder. A program that processes the output oflanguage translators and compilers into an executableprogram (load module). It is part of the DFSMS/MVSelement of z/OS.
bypass. In SMP/E, to circumvent errors that wouldotherwise cause SYSMOD processing to fail. This isdone by using the BYPASS operand on an SMP/Ecommand.
Ccauser SYSMOD. A SYSMOD identified by root causeanalysis to be at the base of errors that caused otherSYSMODs to fail. See root cause analysis.
CBPDO. MVS Custom-Built Product DeliveryOffering.
CICS. Customer Information Control System.
CLEANUP. The SMP/E command used to deleteentries from the SMPMTS, SMPSTS, and SMPSCDSdata sets after a SYSMOD has been accepted into therelated distribution zone.
CNTL. See SMPCNTL.
coexisting functions. Functions that meet theserequirements: (1) they are for the same system orsubsystem and have the same SREL value, (2) they donot delete or supersede each other and are not negativeprerequisites, and (3) if they are base functions, theyare for different products. See also conditionallycoexisting functions and unconditionally coexistingfunctions.
comment statements. Special control statements thatare coded as JCL comments and which are used toconvey information to SMP/E during JCLINprocessing.
conditional requisites. Requisites defined by an ++IFstatement. These are requisites that must be installed ifthe functions specified on the ++IF statements areinstalled.
applied SYSMOD • conditional requisites
204 SMP/E V3R2.0 User’s Guide
conditionally coexisting functions. Functions thatcoexist but do not have to be in the same zone.
consolidated software inventory. See SMPCSI.
corequisite SYSMODs. SYSMODs each of which canbe installed properly only if the other is present.Corequisites are defined by the REQ operand on the++VER statement.
corrective service. Any SYSMOD used to selectivelyfix a system problem. Generally, corrective servicerefers to APAR fixes.
cross-zone. (1) A target zone other than the set-to zonethat defines a load module containing modules fromset-to zone. Also called a TIEDTO zone. The moduleswere added to the load module through the SMP/ELINK command. The relationship between thecross-zone and the set-to zone is established throughthe TIEDTO subentry in their zone definition entries.See also set-to zone and TIEDTO relationship. (2)Pertaining to relationships between zones, especially asa result of conditional requisites (++IF statements) orLINK processing. See also cross-zone requisite, cross-zoneload module, and cross-zone module.
cross-zone load module. A load module containingmodules from a different zone as a result of LINKprocessing.
cross-zone module. A module included in a loadmodule from a different zone as a result of LINKprocessing.
cross-zone requisite. A conditional requisite that mustbe installed in one zone because of another SYSMODthat is installed in a different zone. The REPORTcommand can be used to check information saved from++IF statements and determine where any cross-zonerequisites should be installed.
CSI. Consolidated software inventory data set. SeeSMPCSI.
Ddata element. An element that is not a macro, module,or source—for example, a dialog panel or sample code.
DDDEF entry. An SMP/E entry containing theinformation SMP/E needs in order to dynamicallyallocate a particular data set.
DEBUG. The SMP/E command used to obtainadditional information for problem determination—forexample, to trace messages or take dumps.
debug. In SMP/E, to obtain additional information forproblem determination—for example, to trace messagesor take dumps. This is done with the DEBUGcommand.
definition side deck. A file in the hierarchical filesystem, a member of a partitioned data set, or asequential data set that contains binder IMPORTcontrol statements.
deleted function. In SMP/E, a function that wasremoved from the system when another function wasinstalled. This is indicated by the DELBY subentry inthe SYSMOD entry for the deleted function. See alsoexplicitly deleted function and implicitly deleted function.
deleting function. A function that removes otherfunctions from the system. This is done by specifyingthem on the DELETE operand of the ++VER statement.
dependent function. A function that introduces newelements or redefines elements of the base level systemor other products. A dependent function cannot existwithout a base function. Dependent functions areidentified to SMP/E by the ++FUNCTION statement.
dialog. The interactive support provided by SMP/Ethrough ISPF. Instead of entering specific commandsand operands, you can use panels to specify thedesired processing.
distribution library (DLIB). A library that containsthe master copy of all the elements in a system. Adistribution library can be used to create or back up atarget library.
distribution zone. In SMP/E, a group of records in aCSI data set that describes the SYSMODs and elementsin a distribution library.
DLIB. Distribution library.
DLIB entry. An SMP/E entry describing a distributionlibrary that has been totally copied into a target library.
DLIBZONE entry. An SMP/E entry containinginformation used by SMP/E to process a specificdistribution zone and the associated distributionlibraries.
DLL. Dynamic link library
EEC. Engineering change.
element. In SMP/E, part of a product, such as amacro, module, dialog panel, or sample code.
element MCS. An MCS used to replace or update anelement.
element selection. The process by which SMP/Echooses the appropriate changes for an element affectedby several SYSMODs being installed at the same time.
conditionally coexisting functions • element selection
Glossary 205
entry. In SMP/E, a collection of records in a CSI dataset. An entry can be created, updated, or deleted by useof UCL statements.
environment. The functions (FMIDs) installed on aparticular system or subsystem (SREL).
ERROR indicator. In SMP/E, an indicator in a targetor distribution zone SYSMOD entry that shows thatSYSMOD processing failed. The ERROR indicator is setbefore SMP/E updates any libraries and is reset ifprocessing is successful. If processing fails, it remainsset to show that an error occurred.
ESO. Expanded service options.
exception SYSMOD. A SYSMOD that is in error orthat requires special processing before it can beinstalled. ++HOLD and ++RELEASE statementsidentify exception SYSMODs.
EXCP. Execute channel programs.
expanded service options (ESO). A tape that includespreventive service PTFs. Where available, it replacesPUTs as the vehicle for delivering preventive service.An ESO contains PTFs and ++ASSIGN statementsassigning source IDs for the PTFs. In the United States,this tape is available from the IBM Support Center andcan be ordered either by subscription or as needed.
explicitly deleted function. A function deletedbecause it was specified on the DELETE operand of a++VER statement in another SYSMOD.
exported zone. A zone copied into a sequential dataset by use of the SMP/E ZONEEXPORT command.
external HOLDDATA. ++HOLD statements containedin SMPHOLD. Contrast with internal HOLDDATA.
FFAF. file attribute file.
FE. Field engineering.
feature. See dependent function.
file attribute file. A file attribute file (FAF) is a filecontaining control statements that describe theattributes of the file contained in an SMP/E networktransportable archive. The FAF is contained within thearchive information about how the file was created.
File Transfer Protocol. File Transfer Protocol (FTP) is aprotocol that defines the interactions necessary betweena client and server to facilitate the exchange of binaryand textual data files.
firewall. A firewall is an intermediate server thatfunctions to isolate a secure network from an insecurenetwork.
FTP. File Transfer Protocol.
FMID. Function modification identifier.
FMIDSET. A group of FMIDs to be used inprocessing an SMP/E command—for example, toindicate that SYSMODs applicable to certain functionsshould be installed.
FMIDSET entry. An SMP/E entry defining anFMIDSET.
function. In SMP/E, a product (such as a systemcomponent or licensed program) that can be installedin a user’s system if desired. Functions are identified toSMP/E by the ++FUNCTION statement. Each functionmust have a unique FMID.
function modification identifier (FMID). TheSYSMOD ID of a function SYSMOD. It identifies thefunction that currently owns a given element.
functionally higher SYSMOD. A SYSMOD that usesthe function contained in an earlier SYSMOD (calledthe functionally lower SYSMOD) and contains additionalfunctions as well.
functionally lower SYSMOD. A SYSMOD whosefunction is also contained in a later SYSMOD (calledthe functionally higher SYSMOD).
GGENASM. A subentry in the MAC entry that lists theASSEM or SRC entries that must be assembled if themacro is replaced or updated.
GENERATE. The SMP/E command used to create ajob stream that builds a set of target libraries from a setof distribution libraries.
generate. In SMP/E, to create a job stream that buildsa set of target libraries from a set of distributionlibraries. This is done with the GENERATE command.
GIMUNZIP. An SMP/E service routine used toextract files contained in network transportablepackages that were built using GIMZIP.
GIMZIP. An SMP/E service routine used to producenetwork transportable packages.
global zone. A group of records in a CSI data set usedto record information about SYSMODs received for aparticular system. The global zone also containsinformation that (1) enables SMP/E to access target anddistribution zones in that system, and (2) enables youto tailor aspects of SMP/E processing.
GLOBALZONE entry. An SMP/E entry containinginformation that SMP/E uses to process the globalzone, the associated target and distribution zones, andSMPPTS.
entry • GLOBALZONE entry
206 SMP/E V3R2.0 User’s Guide
GTF. Generalized trace facility.
Hhashing. An operation that uses a one-way(irreversible) function on data, usually to reduce thelength of the data and to provide a verifiableauthentication value (checksum) for the hashed data.
header MCS. An ++APAR, ++FUNCTION, ++PTF, or++USERMOD statement. The header MCS indicates thetype of SYSMOD.
HFS. Hierarchical file system.
hierarchical file system element. An element that hasa hierarchical file system as its “target library”.
hierarchy. In SMP/E, the top-down structure offunction and service SYSMODs, in which eachSYSMOD is dependent on the one above it.
higher functional level. An element version thatcontains all the functions of all other relevant versionsof that element.
HOLDDATA. In SMP/E, MCSs used to indicate thatcertain SYSMODs contain errors or require specialprocessing before they can be installed. ++HOLD and++RELEASE statements are used to defineHOLDDATA. SYSMODs affected by HOLDDATA arecalled exception SYSMODs.
HOLDDATA entry. An SMP/E entry containing++HOLD statements that either were received fromSMPHOLD (external HOLDDATA) or were within aSYSMOD that was received (internal HOLDDATA).
IICSF. Integrated Cryptographic Service Facility.
IFREQ. A conditional requisite. Conditional requisitesare specified on the REQ operand of the ++IFstatement.
IMASPZAP. The system utility program used toinstall superzaps, which are changes for modules, loadmodules, or CSECTs within modules.
implicitly deleted function. A function deletedbecause of its dependency on an explicitly deletedfunction that is specified on the DELETE operand ofthe ++VER statement.
imported zone. A zone copied from a sequential dataset into another zone by use of the SMP/EZONEIMPORT command.
IMS. Information Management System.
IMSGEN. IMS generation.
indicator. See subentry indicator.
in effect. Having control over SMP/E processing. Forexample, an OPTIONS entry is in effect if (1) it isspecified on the SET command or (2) it is defined asthe default OPTIONS entry for the set-to zone.
inline data. Information (such as utility controlstatements or code for an element) that is packageddirectly after the associated MCS, rather than in aseparate file or data set.
inline JCLIN. The JCL statements associated with a++JCLIN statement. Inline JCLIN may immediatelyfollow the ++JCLIN statement, or it may be in theRELFILE or TXLIB data set pointed to by the ++JCLINstatement. Inline JCLIN is used to update the targetzone when a SYSMOD is applied, or the distributionzone when a SYSMOD is accepted. Contrast with JCLINinput.
inner macro. A macro invoked by another macro. Inparticular, inner macros are those that SMP/E does notdetect during JCLIN processing of assembler job steps.
install. In SMP/E, to apply a SYSMOD to the targetlibraries or to accept a SYSMOD into the distributionlibraries.
internal HOLDDATA. ++HOLD statements containedwithin a SYSMOD. Contrast with external HOLDDATA.
I/O. Input or output.
IOGEN. Input/output device generation.
IPL. Initial program load.
ISMD. IBM Software Manufacturing and Delivery(formerly called PID).
ISPF. Interactive System Productivity Facility.
ISPF/PDF. Interactive System ProductivityFacility/Program Development Facility.
IVP. Installation verification procedure.
JJAR. The SMP/E entry or MCS that describes a JavaARchive (JAR) file. Also, the abbreviation for JavaARchive (see Java ARchive(JAR)).
JARUPD. The SMP/E MCS used to describe anupdate to a JAR element.
JCL. Job control language.
JCLIN. (1) The SMP/E command used to process datafrom SMPJCLIN. (2) The ++JCLIN statement, which isassociated with JCLIN data that is included in aSYSMOD. (3) SMPJCLIN. See SMPJCLIN.
GTF • JCLIN
Glossary 207
See also inline JCLIN and JCLIN data.
JCLIN data. The JCL statements associated with the++JCLIN statement or saved in the SMPJCLIN data set.They are used by SMP/E to update the target zonewhen the SYSMOD is applied. Optionally, SMP/E canuse JCLIN data to update the distribution zone whenthe SYSMOD is accepted.
JCLIN input. The JCL statements contained inSMPJCLIN and used as input for the JCLIN command.Contrast with inline JCLIN.
jar. The Java command used to invoke the JavaArchive Tool. The Java Archive Tool is used to performoperations on Java ARchive (JAR) files.
Java ARchive (JAR). An archive file format based onthe ZIP file format. Used for aggregating many Javaapplet component files into one.
job control language (JCL). A problem-orientedlanguage designed to express statements in a job thatare used to identify the job or describe its requirementsto an operating system.
Llicensed program. A program that performs a functionfor the user, and usually interacts with and relies uponthe system control program or some otherIBM-provided control program. Generally, a licensedprogram is a software package that can be orderedfrom the program libraries, such as IBM SoftwareDistribution (ISMD). IMS and CICS are examples oflicensed programs.
LINK LMODS. The SMP/E command used to relinkload modules that use CALLLIBS.
LINK MODULE. The SMP/E command used to linkmodules in one zone with load modules in anotherzone.
link library (LKLIB). A data set containing link-editedobject modules.
LIST. The SMP/E command used to display entries inSMP/E data sets.
list. In SMP/E, to display entries in SMP/E data sets.This is done with the LIST command.
LKLIB. Link library.
LMOD. In SMP/E, an abbreviation for load module.
LMOD entry. An SMP/E entry containing all theinformation needed to replace or update a given loadmodule.
load module. A computer program in a form suitablefor loading into main storage for execution. It is usuallythe output of a link-edit utility.
LOG. (1) The SMP/E command used to writeuser-supplied information to the SMPLOG data set. (2)The SMPLOG data set. See SMPLOG.
lower functional level. An element version that iscontained in a later element version.
MMAC. The SMP/E entry or MCS that describes amacro.
macro. An instruction in a source language that is tobe replaced by a defined sequence of instructions in thesame source language.
MACUPD. The SMP/E MCS used to update a macro.
mass-mode processing. In SMP/E, processing thatincludes all eligible SYSMODs, regardless of whetherthey were individually selected.
master CSI. The CSI data set that contains the globalzone.
MCS. Modification control statement.
MCS entry. An SMP/E entry containing a copy of aSYSMOD exactly as it was received from SMPPTFIN.MCS entries are in SMPPTS, which is used to storeSYSMODs.
MOD. The SMP/E entry or MCS that describes anobject module or a single-module load module.
MODID. Modification identifier.
modification. In SMP/E, an alteration or correction toa system control program, licensed program, or userprogram. Synonymous with system modification(SYSMOD).
modification control statement (MCS). An SMP/Econtrol statement used to package a SYSMOD. MCSsdescribe the elements of a program and therelationships that program has with other programsthat may be installed on the same system.
modification identifier (MODID). A list of SYSMODIDs, including the last SYSMOD that totally replacedthe element (RMID), any subsequent partial updates tothe element (UMIDs), and the function that owns theelement (FMID). MODIDs are contained in elemententries.
modification level. A distribution of all temporaryfixes that have been issued since the previousmodification level. A change in modification level doesnot add new functions or change the programming
JCLIN data • modification level
208 SMP/E V3R2.0 User’s Guide
support category of the release to which it applies.Contrast with release and version.
Note: Whenever a new release of a program isshipped, the modification level is set to 0. Whenthe release is reshipped with the accumulatedservices changes incorporated, the modificationlevel is incremented by 1.
module. Synonym for object module or single-moduleload module.
MTS. Macro temporary storage data set. SeeSMPMTS.
MTSMAC entry. An SMP/E entry that is a copy of amacro that resides only in a distribution library but isneeded temporarily during APPLY processing.MTSMAC entries are in the SMPMTS data set.
MVS. Multiple Virtual Storage.
MVS Custom-Built Product Delivery Offering(CBPDO). A software delivery offering used to addproducts or service to an existing MVS, NCP, CICS, orIMS system.
NNCP. Network Control Program.
negative prerequisite (NPRE). In SMP/E, a functionthat is mutually exclusive with another function. It isdefined by the NPRE operand on the ++VER statement.
NPRE. Negative prerequisite.
Oobject deck. Object module input to the link-editutility that is placed in the input stream, in card format.
object module. A module that is the output from alanguage translator (such as a compiler or anassembler). An object module is in relocatable formatwith machine code that is not executable. Before anobject module can be executed, it must be processed bythe link-edit utility.
When an object module is link-edited, a load module iscreated. Several modules can be link-edited together tocreate one load module (for example, as part of SMP/EAPPLY processing), or an object module can belink-edited by itself to create a single-module loadmodule (for example, to prepare the module forshipment in RELFILE format or in an LKLIB data set oras part of SMP/E ACCEPT processing).
operating system. In SMP/E, the system updated byAPPLY and RESTORE processing. It consists of thetarget libraries. Also called the target system.
OPTIONS entry. An SMP/E entry definingprocessing options that are to be used by SMP/E.
Ppackage attribute file. A package attribute file (PAF)is a file that contains control statements describing thecontents of a network transportable package.
packaging. Adding the appropriate MCS statements toelements to create a SYSMOD, then putting theSYSMOD in the proper format on the distributionmedium, such as a tape or direct access data sets.
PAF. package attribute file.
partitioned data set extended (PDSE). Asystem-managed data set containing an indexeddirectory and members that are similar to the directoryand members of partitioned data sets. A PDSE can beused instead of a partitioned data set.
PE. See program error PTF.
PE-PTF. See program error PTF.
PID. The former name for ISD.
PRE. Prerequisite.
prerequisite (PRE). In SMP/E, a SYSMOD that mustbe installed before or along with another SYSMOD inorder for that other SYSMOD to be successfullyinstalled. It is defined by the PRE operand on the++VER statement.
preventive service. (1) The mass installation of PTFsto avoid rediscoveries of the APARs fixed by thosePTFs. (2) The SYSMODs delivered on the programupdate tape.
preventive service planning (PSP). Installationrecommendations and HOLDDATA for a product or aservice level. PSP information can be obtained throughthe IBM Support Center.
product. Generally, a software package, such as alicensed program or a user application. A product cancontain one or more functions and can consist of one ormore versions and releases.
product version. All the releases for a given version ofa product.
program error PTF (PE-PTF). A PTF that has beenfound to contain an error. A PE-PTF is identified on a++HOLD ERROR statement, along with the APAR thatfirst reported the error.
program object. An executable program stored in aPDSE program library. It is similar to a load module,but has fewer restrictions. For SMP/E purposes,program objects are referred to as load modules.
module • program object
Glossary 209
program packaging. See packaging.
program product. The former term for licensedprogram.
program temporary fix (PTF). A temporary solutionor bypass of a problem that may affect all users andthat was diagnosed as the result of a defect in a currentunaltered release of the program. In the absence of anew release of a system or component that incorporatesthe correction, the fix is not temporary but is thepermanent and official correction mechanism. Newelements can also be defined in a PTF. PTFs areidentified to SMP/E by the ++PTF statement.
program update tape (PUT). The former vehicle forpreventive service. See expanded service options.
PSP. Preventive service planning.
PSW. Program status word.
PTF. Program temporary fix.
PTS. PTF temporary store data set. See SMPPTS.
PTFIN. PTF input. See SMPPTFIN.
PUT. See expanded service options.
RRACF. Resource Access Control Facility.
RECEIVE. The SMP/E command used to read inSYSMODs and other data from SMPPTFIN andSMPHOLD.
receive. In SMP/E, to read SYSMODs and other datafrom SMPPTFIN and SMPHOLD and store them on theglobal zone for subsequent SMP/E processing. This isdone with the RECEIVE command.
regressed SYSMOD. A SYSMOD one or more ofwhose elements are modified by subsequent SYSMODsthat are not related to it.
regressing SYSMOD. A SYSMOD that causesregression of previous modifications when it isinstalled.
regression. In SMP/E, the condition that occurs whenan element is changed by a SYSMOD that is not relatedto SYSMODs that previously modified the element.
REJECT. The SMP/E command used to removeSYSMODs from the global zone and SMPPTS.
reject. In SMP/E, to remove SYSMODs from theglobal zone and SMPPTS and delete any relatedSMPTLIB data sets. This is done with the REJECTcommand.
related installation materials (RIMs). In IBMcustom-built offerings, task-oriented documentation,jobs, sample exit routines, procedures, parameters, andexamples developed by IBM.
related SYSMOD. A SYSMOD associated with otherSYSMODs by the FMID, PRE, REQ, or SUP operands.
related zone. The zone named in the RELATEDsubentry of a TARGETZONE or DLIBZONE entry. Fora target zone, the related zone is generally thedistribution zone for the libraries used to create thetarget libraries. For a distribution zone, the related zoneis generally the target zone for the libraries built fromthe distribution libraries.
relative file (RELFILE) format. A SYSMOD packagingmethod where elements and JCLIN data are in separaterelative files from the MCSs. When SYSMODs arepackaged in relative file format there is a file of MCSsfor one or more SYSMODs, and one or more relativefiles containing unloaded source-code data sets andunloaded link-edited data sets containing executablemodules. The relative files can be either unloaded filesin IEBCOPY format, or they can be partitioned datasets. Relative file format is the typical method used forpackaging function SYSMODs.
relative files (RELFILEs). Unloaded files containingmodification text and JCL input data associated with aSYSMOD. These files are used to package a SYSMODin relative file format.
release. A distribution of a new product or newfunction and APAR fixes for an existing product.Contrast with modification level and version.
replacement modification identifier (RMID). TheSYSMOD ID of the last SYSMOD that completelyreplaced a given element.
REPORT. The SMP/E command used to obtaininformation about SYSMODs that have been installed.These are the types of REPORT commands:
v REPORT CROSSZONE: Lists conditional requisitesthat must be installed in certain zones because ofSYSMODs installed in other zones.
v REPORT ERRSYSMODS: Determines whether anySYSMODs already installed are now exceptionSYSMODs.
v REPORT SOURCEID: Lists the source IDs associatedwith SYSMODs in the specified zones.
v REPORT SYSMODS: Compares the SYSMODsinstalled in two target or distribution zones.
requisite. A SYSMOD that must be installed before orat the same time as the SYSMOD being processed.There are several types of requisites:
v Prerequisites, which are specified by the PREoperand on the SYSMOD’s ++VER statement
program packaging • requisite
210 SMP/E V3R2.0 User’s Guide
v Corequisites, which are specified by the REQoperand on the SYSMOD’s ++VER statement
v Conditional requisites, which are specified by theREQ operand on the SYSMOD’s associated ++IFstatement
requisite chain. A sequence of SYSMODs that aredirectly or indirectly identified as requisites for a givenSYSMOD, (A SYSMOD may identify other SYSMODsas requisites, which in turn may have requisites of theirown. The requisite chain extends from the initialSYSMOD, through the hierarchy of requisites, until nomore SYSMODs are found that have requisites.) Seerequisite.
requisite set. The set of all SYSMODs on the requisitechain for a particular SYS
RESETRC. The SMP/E command used to set thereturn codes for the previous commands to zero, sothat SMP/E can process the current command.
RESTORE. The SMP/E command used to removeapplied SYSMODs from the target libraries.
restore. In SMP/E, to remove applied SYSMODs fromthe target libraries by use of the RESTORE command.
restore group. All the SYSMODs that have a direct orindirect relationship with a SYSMOD being restored byuse of the GROUP operand.
RIM. Related installation material.
RMID. Replacement modification identifier.
RMF. Resource measurement facility.
root cause analysis. Processing done by SMP/E forthe ACCEPT, APPLY, and RESTORE commands toidentify causer SYSMODs (SYSMODs whose failure hasled to the failure of other SYSMODs). The types oferrors SMP/E analyzes to determine causer SYSMODsinclude the following:
v Held SYSMODs
v Missing requisite SYSMODs
v Utility program failures: copy, update, assembler,link, zap
v Out-of-space conditions: x37 abends
v Missing DD statements and other allocation errors
v ID errors (a SYSMOD does not supersede or specifyas a prerequisite an RMID or a UMID)
v JCLIN failures (syntax errors)
RPL. Request parameter list.
RTM2WA. Recovery termination manager 2 workarea.
SSCDS. Save control data set. See SMPSCDS.
SCP. System control program.
select-mode processing. In SMP/E, processing thatincludes individually selected SYSMODs.
service. PTFs and APAR fixes.
service level. The FMID, RMID, and UMID values foran element. The service level identifies the owner of theelement, the last SYSMOD to replace the element, andall the SYSMODs that have updated the element sinceit was last replaced.
service order relationship. A relationship amongservice SYSMODs that is determined by the PRE andSUP operands, and the type of SYSMOD.
service SYSMOD. Any SYSMOD identified by an++APAR or ++PTF statement.
service update. The integration of available serviceinto the current release of a function. Since this is not anew release of the function, it does not change thefunction’s FMID.
SET. The SMP/E command used to indicate the zoneto be processed.
set. In SMP/E, to indicate which zone should beprocessed by the subsequent commands. This is donewith the SET command.
set-to zone. The zone that was specified on theprevious SET command and that is currently beingprocessed. Contrast with cross-zone.
SHA-1. Secure Hash Algorithm 1.
side deck. See definition side deck.
single-module load module. A load module createdby link-editing a single object module by itself—forexample, to prepare the module for shipment inRELFILE format or in an LKLIB data set or as part ofSMP/E ACCEPT processing.
SMPCNTL. The SMP/E data set or file in thehierarchical file system that contains the SMP/Ecommands to be processed.
SMPCSI. The SMP/E data set that containsinformation about the structure of a user’s system aswell as information needed to install the operatingsystem on a user’s system. The SMPCSI DD statementrefers specifically to the CSI that contains the globalzone. This is also called the master CSI.
SMPDEBUG. The SMP/E data set or file in thehierarchical file system that contains a dump requestedby the DEBUG command. Depending on the operands
requisite chain • SMPDEBUG
Glossary 211
specified, it may contain (1) a dump of SMP/E controlblocks and storage areas associated with the specifieddump points or (2) a dump of the VSAM RPL controlblock for the specified SMP/E function.
SMPDUMMY. The SMP/E data set used to define aload module’s definition side deck library as aDUMMY data set. SMPDUMMY is always allocated bySMP/E as a DUMMY data set.
SMP/E. A program product, or an element of OS/390or z/OS, used to install software and software changeson z/OS systems. SMP/E consolidates installation data,allows more flexibility in selecting changes to beinstalled, provides a dialog interface, and supportsdynamic allocation of data sets.
SMP/E commands. Commands defining theprocessing to be done by SMP/E, such as RECEIVE.
SMP/E entry. An entry in an SMP/E data set—forexample, a MOD entry in a CSI data set.
SMPHOLD. SMPHOLD is the source for HOLDDATA(++HOLD and ++RELEASE statements) to be processedby the RECEIVE command. SMPHOLD may be a tapefile, a data set, or one or more files in the hierarchicalfile system.
SMPJCLIN. The SMP/E data set or file in thehierarchical file system that contains a job stream ofassembly, link-edit, and copy job steps. This data istypically the stage 1 output from the most recent full orpartial system generation. However, it may also beother data in a similar format, such as the output of theGENERATE command. This job stream is used as inputto the JCLIN command to update or create entries in atarget zone.
SMPLIST. The SMP/E data set or file in thehierarchical file system that contains the output of allLIST commands.
SMPLOG. The SMP/E data set that containstime-stamped records of SMP/E processing. Therecords in this data set can be written automatically bySMP/E or added by the user through the LOGcommand.
SMPLOGA. A secondary log data set for SMP/Eprocessing. If SMPLOGA is defined, it is automaticallyused when the SMPLOG data set is full.
SMPLTS. The SMP/E data set used as a target loadmodule library to maintain the base version of a loadmodule that specifies a SYSLIB allocation in order toimplicitly include modules.
SMPMTS. The SMP/E data set used as a targetlibrary for macros that exist only in a distributionlibrary, such as macros in SYS1.AMODGEN. TheSMPMTS enables the current version of these macros tobe used for assemblies during APPLY processing.
SMPNTS. The SMPNTS is a directory structure andassociated files contained in the hierarchical file systemused for temporary storage of network transportedpackages that were received during SMP/E RECEIVEprocessing.
SMPOBJ. The SMP/E data set used forsource-maintained products. SMPOBJ containspreassembled modules that can be used to avoidreassembling those modules. These modules must be inload module format—that is, in the same format asmodules residing in the distribution library.
SMPOUT. The SMP/E data set or file in thehierarchical file system that contains messages issuedduring SMP/E processing. It may also contain a dumpof the VSAM RPL, if a dump was taken. In addition, itmay contain LIST output and reports if SMPLIST andSMPRPT are not defined.
SMPPARM. The data set that contains members todefine parameters, such as macros, assembler operationcodes, GIMDDALC control statements, and exitroutines.
SMPPTFIN. SMPPTFIN is the source of SYSMODsand ++ASSIGN statements to be processed by theRECEIVE command. SMPPTFIN may be a tape file, adata set, or one or more files in the hierarchical filesystem.
SMPPTS. The SMP/E data set that containsSYSMODs received from SMPPTFIN. SMPPTS is thesource of SYSMODs that are installed in the target anddistribution libraries.
SMPPTS spill data sets. Optional SMP/E data setsthat can be used to store SYSMODs when the SMPPTSdata set becomes full.
SMPPUNCH. The SMP/E data set or file in thehierarchical file system that contains output fromvarious SMP/E commands. This output generallyconsists of commands or control statements.
v GENERATE: A job stream for building target libraries
v REPORT: Commands for installing or listingSYSMODs
v UNLOAD: UCLIN statements for recreating theentries that were unloaded
SMPRPT. The SMP/E data set or file in thehierarchical file system that contains the reportsproduced during SMP/E processing.
SMPSCDS. The SMP/E data set that contains backupcopies of target zone entries that are created duringAPPLY processing. These backup copies are madebefore the entries are (1) changed by inline JCLIN, a++MOVE MCS, or a ++RENAME MCS, or (2) deletedby an element MCS with the DELETE operand. The
SMPDUMMY • SMPSCDS
212 SMP/E V3R2.0 User’s Guide
backup copies are used during RESTORE processing toreturn the entries to the way they were before APPLYprocessing.
SMPSNAP. The SMP/E data set that is used for snapdump output. When a severe error such as an abend orsevere VSAM return code occurs, SMP/E requests asnap dump of its storage before doing any errorrecovery. In addition, the DEBUG command canrequest a snap dump of SMP/E storage when specifiedmessages are issued, or can request a snap dump ofcontrol blocks and storage areas associated with aspecified dump point.
SMPSTS. The SMP/E data set used as a target libraryfor source that exists only in a distribution library. TheSMPSTS enables the current version of this source to beused for assemblies during APPLY processing.
SMPTLIB. The SMP/E data sets used as temporarystorage for relative files loaded from SMPPTFIN duringRECEIVE processing. The SMPTLIB data sets aredeleted when the associated SYSMOD is deleted byREJECT, RESTORE, or ACCEPT processing.
SMPWKDIR. An optional directory in the hierarchicalfile system used for temporary work files.
SMPWRK1. The SMP/E data set used as temporarystorage for macro updates and replacements that willbe processed by an update or copy utility program.SMP/E places the input in SMPWRK1 during APPLYand ACCEPT processing before calling the utility.
SMPWRK2. The SMP/E data set used as temporarystorage for source updates and source replacementsthat will be processed by an update or copy utilityprogram. SMP/E places the input in SMPWRK2 duringAPPLY and ACCEPT processing before calling theutility.
SMPWRK3. The SMP/E data set used as temporarystorage for object modules supplied by a SYSMOD,object modules created by assemblies, and zap utilityinput following ++ZAP statements.
SMPWRK4. The SMP/E data set used as temporarystorage for zap utility or link-edit utility input thatcontains EXPAND control statements.
SMPWRK6. The SMP/E data set used duringACCEPT and APPLY processing as temporary storagefor inline replacements for data elements. SMP/Eplaces the input in this data set so that it can bedirectly accessed and installed by the copy utility orSMP/E.
source. The source statements that constitute the inputto a language translator for a particular translation.
source ID. A 1- to 8-character identifier that indicateshow a SYSMOD was obtained—for example, from aparticular service level in an ESO. A source ID is
associated with a specific SYSMOD by the RECEIVEcommand or the ++ASSIGN statement.
SOURCEID. The operand used to refer to a source ID.
source module. The source statements that constitutethe input to a language translator, such as a compileror an assembler, for a particular translation.
SRC. The SMP/E entry or MCS statement thatdescribes a source.
SRCUPD. The MCS used to update a source.
SREL. System release identifier.
Storage Management Subsystem (SMS). ADFSMS/MVS facility used to automate and centralizethe management of storage. Using SMS, a storageadministrator describes data allocation characteristics,performance and availability goals, backup andretention requirements, and storage requirements to thesystem through data class, storage class, managementclass, storage group, and ACS routine definitions.
STS. Source temporary store data set. See SMPSTS.
STSSRC entry. An SMP/E entry that is a copy ofsource that resides only in a distribution library but isneeded temporarily during APPLY processing. STSSRCentries are in the SMPSTS data set.
stub entry. An element entry or LMOD entry thatdoes not contain the basic information SMP/E requiresin order to process the element or load module (such asFMID, RMID, or library names), but does contain otherinformation, such as subentries describing cross-zonerelationships.
stub load module. A load module that does notcontain the modules needed to perform its basicfunctions, but does contain other modules, such ascross-zone modules.
subentry. A field in an SMP/E entry. Each subentryhas associated with it a type and a value. The samesubentry type may occur several times in a single entry,each time with a different value. For example, themodules supplied by a PTF are saved as MODsubentries in the PTF’s SYSMOD entry. Some subentriesoccur only once within an entry, such as the FMIDsubentry in a target zone MOD entry.
subentry indicator. A subentry that does not have adata value associated with it. An example of anindicator is the ERROR indicator in the SYSMOD entry.An indicator is either on or off.
subentry list. Multiple occurrences of the samesubentry type in an entry, each with a different value.For example, the modules supplied by a PTF are savedas names in the MOD subentry list within the SYSMODentry for that PTF.
SMPSNAP • subentry list
Glossary 213
SUP. Supersede.
superseded-only SYSMOD. A SYSMOD that has notbeen installed, but that has been superseded by anotherSYSMOD that has been installed.
superseded SYSMOD. In SMP/E, a SYSMOD that iscontained in or replaced by the SYSMOD or requisiteset of SYSMODs currently being processed. This isindicated by the SUPBY subentry in the SYSMOD entryfor the superseded SYSMOD. A superseded SYSMOD isfunctionally lower than the SYSMOD that supersededit.
superseding SYSMOD. In SMP/E, a SYSMOD thatcontains all the functions in another SYSMOD and isrecognized as the equivalent of that other SYSMOD.The superseding SYSMOD uses SUP operand on its++VER statement to specify the superseded SYSMOD.
superzap. A generic term for the process performedby IMASPZAP. It can also refer to the module updatesprocessed by IMASPZAP.
SVC. Supervised call.
SVRB. Supervisor request block.
SYSGEN. System generation.
SYSLIB. (1) A subentry used to identify the targetlibrary in which an element is installed. (2) Aconcatenation of macro libraries to be used by theassembler. (3) A set of routines used by the link-editutility to resolve unresolved external references.
SYSMOD. System modification.
SYSMOD entry. An SMP/E entry containinginformation about a SYSMOD that has been receivedinto SMPPTS, accepted into the distribution libraries, orapplied to the target libraries.
SYSMOD ID. System modification identifier.
SYSMOD packaging. See packaging.
SYSMOD selection. The process of determiningwhich SYSMODs are eligible to be processed.
SYSPRINT. The data set that contains output from theutilities called by SMP/E.
SYSPUNCH. The temporary data set containing objectmodules assembled by running the job streamproduced by system generation or the GENERATEcommand. These modules are not installed in thedistribution libraries at ACCEPT time.
system control program (SCP). IBM-suppliedprogramming that is fundamental to the operation andmaintenance of the system. It serves as an interfacewith licensed programs and user programs and isavailable without additional charge.
system generation (SYSGEN). The process ofselecting optional parts of an operating system and ofcreating a particular operating system tailored to therequirements of a data processing installation.
system modification (SYSMOD). The input data toSMP/E that defines the introduction, replacement, orupdate of elements in the operating system andassociated distribution libraries to be installed underthe control of SMP/E. A system modification is definedby a set of MCS.
system modification identifier (SYSMOD ID). Thename that SMP/E associates with a systemmodification. It is specified on the ++APAR,++FUNCTION, ++PTF, or ++USERMOD statement.
system release identifier (SREL). A 4-byte valuerepresenting the system or subsystem, such as Z038 forMVS-based products.
SYSUT1, SYSUT2, SYSUT3. Scratch data sets forSMP/E and the utilities it calls.
SYSUT4. A data set that is used instead of the SYSINdata sets when certain utilities are called.
Ttarget library. A library containing the executablecode that makes up a system.
target system. The system updated during APPLY andRESTORE processing, also referred to as the operatingsystem. See also target libraries.
target zone. In SMP/E, a group of records in a CSIdata set that describes the SYSMODs, elements, andload modules in a target library.
TARGETZONE entry. An SMP/E entry containinginformation used by SMP/E to process a specific targetzone and the associated target libraries.
TCP/IP. Transmission Control Protocol/InternetProtocol (TCP/IP) is a hardware independentcommunication protocol used between physicallyseparated computers. It was designed to facilitatecommunication between computers located on differentphysical networks.
temporary data set. A work data set(SMPWRK1–SMPWRK6) or utility data set(SYSUT1–SYSUT4). Temporary data sets are allocatedwhen processing for an SMP/E command begins, anddeleted when processing is finished.
text library (TXLIB). A data set containing JCLINinput or replacements for macros, source, or objectmodules that have not been link-edited. It is used whenthe JCLIN or elements are provided in partitioned datasets rather than inline or in relative files.
SUP • text library (TXLIB)
214 SMP/E V3R2.0 User’s Guide
TGTLIB. Target library.
TIEDTO relationship. A cross-zone relationshipbetween two target zones created when the LINKcommand updates a load module in one of the zones toinclude modules from the other zone. This relationshipis established through the TIEDTO subentry in the zonedefinition entries for each of the zones.
TIEDTO zone. See cross-zone.
TLIB. Temporary library. See SMPTLIB.
transformed data. Data processed by the GIMDTSservice routine so that it can be packaged inline infixed-block 80 records.
TSO. Time-sharing option.
TXLIB. Text library.
UUCL. Update control language.
UCL statement. An SMP/E control statement used todefine or change information in an SMP/E data setentry. UCL statements are coded between the UCLINand ENDUCL commands. The UCL statement specifiesthe action to be taken (ADD, REP, or DEL), the entry tobe modified, and any indicators and subentries to bechanged.
UCLIN. The SMP/E command used to mark thebeginning of UCL statements, which are used to makechanges to entries in SMP/E data sets.
UMID. Update modification identifier.
unconditionally coexisting functions. Functions thatcoexist and must be in the same zone.
UNLOAD. The SMP/E command used to copy dataout of SMP/E data set entries in the form of UCLstatements.
unload. In SMP/E, to copy data out of SMP/E dataset entries in the form of UCL statements, by use of theUNLOAD command.
update. In SMP/E, to change an existing elementwithout replacing it.
update modification identifier (UMID). TheSYSMOD ID of a SYSMOD that updated the lastreplacement of a given element.
user modification (USERMOD). A change constructedby a user to modify an existing function, add to anexisting function, or add a user-defined function.USERMODs are identified to SMP/E by the++USERMOD statement.
USERMOD. User modification.
UTILITY entry. An SMP/E entry containinginformation used by SMP/E to invoke a particularsystem utility program.
VVERSION. An operand on the ++VER or elementstatement. VERSION specifies one or more SYSMODscontaining elements that are functionally lower thanelements in the SYSMOD that specifies the operand.The VERSION operand is also used to changeownership of elements.
version. A separate licensed program that is based onan existing licensed program and that usually hassignificant new code or new functions. Contrast withrelease and modification level.
versioned element. An element that is part of morethan one function—for example, one that is part of abase function and a dependent function.
VSAM. Virtual Storage Access Method.
VTOC. Volume table of contents.
ZZAP. (1) The SMP/E MCS used to package an updatefor an object module. (2) The superzap controlstatement used to update an object module. (3) Ashortened name for the superzap utility, which is usedto install these updates. See IMASPZAP.
zone. A partition in a CSI data set.
ZONECOPY. The SMP/E command used to copy azone from one CSI data set to another.
ZONEDELETE. The SMP/E command used to deletea zone from a CSI data set.
ZONEEDIT. The SMP/E command used to changethe values for a subentry in all the DDDEF or UTILITYentries in a given zone.
ZONEEXPORT. The SMP/E command used to copy azone into a sequential data set.
ZONEIMPORT. The SMP/E command used to loadan exported zone from a sequential data set intoanother zone.
ZONEMERGE. The SMP/E command used to copyone zone into another, or to merge two zones into one.
ZONERENAME. The SMP/E command used tochange the name of a zone.
ZONESET. A group of zones to be used whenprocessing an SMP/E command. For example, it may
TGTLIB • ZONESET
Glossary 215
define the zones that the REPORT command is to checkfor cross-zone requisites. A ZONESET may also definea group of zones to be checked or ignored by theREJECT command.
ZONESET entry. An SMP/E entry defining aZONESET.
z/OS UNIX System Services (z/OS UNIX). The set offunctions provided by the Shell and Utilities, kernel,debugger, file system, C/C++ Run-Time Library,Language Environment, and other elements of thez/OS operating system that allow users to write andrun application programs that conform to UNIXstandards.
ZONESET entry • z/OS UNIX System Services (z/OS UNIX)
216 SMP/E V3R2.0 User’s Guide
Index
Special characters++element MCS
USERMODs 151++HOLD MCS
coexistence considerations 186operands 113
++IF MCScross-zone requisite checking 137
++JAR MCSusing 165, 166
++JARUPD MCSusing 165
++JCLIN MCSUSERMODs 149
++MAC MCSUSERMODs 150
++MACUPD MCSUSERMODs 150
++MOD MCSUSERMODs 150
++PROGRAM MCSUSERMODs 151
++RELEASE MCSoperands 113
++SRC MCSUSERMODs 151
++SRCUPD MCSUSERMODs 151
++USERMOD MCSbuilding USERMODs 148examples 152
++VER MCScoexistence considerations 186USERMODs 148
++ZAP MCSUSERMODs 150
AACCEPT CHECK command
See also ACCEPT commandcorrective service 107functions 89preventive service 101
ACCEPT commandcorrective service 108description 13examples 27exception SYSMOD processing 116functions 90preventive service 102processing 25reports produced 28summary 40
Access Method Services (AMS)See AMS utility
accessibility 197alias defined for user catalog 52, 54allocating data sets
DDDEF entry 59
allocating data sets (continued)dynamic allocation 58PTS 58SCDS 58SMPCSI 52
ALLZONES 128AMODE=64 link edit parameter 179AMS utility
allocating the CSI 52default values 61reorganizing a CSI 57
APAR fixesdefining 36
APAR SYSMODs 5APPLY CHECK command
See also APPLY commandcorrective service 106functions 86preventive service 96USERMODs 110
APPLY commandcorrective service 107description 13examples 19exception SYSMOD processing 115functions 88preventive service 99processing 18reports produced 21summary 40USERMODs 111
ASMA90 utilitySee assembler utility
assembler utilitydefault values 61
automatic call libraries 125automatic cross-zone requisite checking
specifying 73
BBACKUP entry 19base functions 36binder
See link-edit utilityBPX.SUPERUSER security class
coexistence considerations 181
CCALL
effect of CALLLIBS subentry on 61calling SMP/E 76cataloged procedure for SMP/E 78catalogs
alias defined for user catalog 52, 54for CSI 52listing 57
causer SYSMODs 161
CBPDORecommended Service Upgrade 195
CBPDO tapeformat 92functions, source of 83HOLDDATA
processing 119source of 117
preventive service, source of 91CHANGEFILE
coexistence considerations 182CLEANUP command 42CLIST data set for SMP/E dialogs,
LIBDEF restrictions 67commands
ACCEPT 40APPLY 40CLEANUP 42DEBUG 44GENERATE 40JCLIN 42LINK LMODS 44LINK MODULE 43LIST 41LOG 42RECEIVE 40REJECT 41REPORT CROSSZONE 41REPORT ERRSYSMODS 41REPORT SOURCEID 41, 143REPORT SYSMODS 41, 145RESETRC 44RESTORE 41SET 40UCLIN 42ZONECOPY 43ZONEDELETE 43ZONEEDIT 42ZONEEXPORT 43ZONEIMPORT 43ZONEMERGE 43ZONERENAME 43
COMPACTcoexistence considerations 183
comparing two zonesLIST command 131REPORT CROSSZONE
command 137COMPAT=PM4 link edit parameter 179compress utility
default values 61compressing a CSI 57concatenating dialog libraries 67conditional JCLIN processing
coexistence considerations 178Consolidated Software Inventory
See SMPCSIconsolidated software inventory data set
(SMPCSI) 11copy utility
default values 61
© Copyright IBM Corp. 1986, 2003 217

corrective servicedescription of 36installation
ACCEPT CHECK processing 107ACCEPT processing 108APPLY CHECK process 106APPLY processing 107construct the fix 104deciding whether to accept 107prepare 105RECEIVE processing 105research the ACCEPT CHECK
reports 108research the APPLY CHECK
reports 106summary 103test 107
corrective service (APAR SYSMODs) 5cover letters, listing 130cross-product load modules
example 126cross-zone load modules
example 126cross-zone requisite checking 137Cross-Zone Requisite SYSMOD
report 138cross-zone requisites
bypassing unsatisfied 75checking for 75resolving 76unsatisfied 75
CSISee also SMPCSIAPI for 14cataloging considerations 52defining entries
sample UCL statements 55defining zones 54importing 57master CSI
definition of 48parameter
EXEC statement for GIMSMP 77reorganizing 57structures, examples of
multiple-CSI structure 49separate CSI for each SREL,
combining target and DLIBzones 51
separate CSI for each zone 50separate global zones 48single-CSI structure 48
summary 45CUM tape
See cumulative service tapecustomizing
an element (USERMOD SYSMODs) 6JOB statement 71SMP/E dialogs 70
Ddata element MCS
USERMODs 151data sets
dynamically allocating 58
DATE parameter, EXEC statement forGIMSMP 77
DDDEF entryinstead of DD statements in cataloged
procedure 78used for dynamic allocation 59
DEBUG command 44default utilities used by SMP/E 61default zone group
defining 74defaults
for SMP/E dialogs 70SMPOUT 59SYSPRINT 59
defining data setsDDDEF entry 59dynamic allocation 58PTS 58SCDS 58SMPCSI 45
DEIINST jobcoexistence considerations 180, 181
deleting SYSMODs from your system(RESTORE command) 13, 22
dependent functions 36dialogs
concatenating libraries 67connecting to ISPF master application
menu 69customizing 70
migration tasks 176overview 176
default valuespanel GIM@PARM 70SMP/E dialogs 70
distribution librariesin logon procedure for SMP/E 69
editing dialog JCL 68LIBDEF restrictions 67logon procedure for SMP/E 69required programs 66restrictions 67saving JCL generated by SMP/E
dialogs 68specifying defaults for 70table data sets 68target libraries
in logon procedure for SMP/E 69disability 197displaying SMP/E data
API for 34LIST command 32Query dialogs 30REPORT commands 33
distribution libraries (DLIBs)description of 37zones for 38, 54
distribution zonedefining 54description of 11, 38SYSMOD entries 26
DLIBZONE entry 54DYNAM
coexistence considerations 186dynamic allocation
CSI parameter on EXEC statement forGIMSMP 77
dynamic allocation (continued)DDDEF entries 60DDDEF entry 59GIMDDALC 59migration tasks 177SMPPARM 59sources of information
DDDEF entries 59standard defaults 59
summary 58
EEND
EXEC statement parameter forGIMSMP 77
enhanced link name valuescoexistence considerations 177migration tasks 177
entries in CSI data setsDLIBZONE entry 54GLOBALZONE entry 54TARGETZONE entry 54
ESOformat 92HOLDDATA
processing 120source of 117
exception data (HOLDDATA) 12exception SYSMOD data
CBPDO tapesource of 117
exception SYSMOD management++HOLD MCS 113
operands 113++RELEASE MCS 113
operands 113categories of HOLDDATA 113examples of 113HOLDDATA
CBPDO tape, processing 119ESO, processing 120obtaining 117processing example 121PSP files, processing 121
introduction 113processing
ACCEPT 116APPLY 115RECEIVE 114REJECT 117RESTORE 117
exception SYSMOD report 141EXEC statement
CSI=dsname 77DATE=date 77PARM 77PROCESS=END 77PROCESS=WAIT 77
exit routines 82migration tasks 176
Expanded Service Option (ESO)Recommended Service Upgrade 195
exporting a CSI data set 57
218 SMP/E V3R2.0 User’s Guide
FFILL
coexistence considerations 186fixing an element 5function SYSMODs 3
installationACCEPT CHECK processing 89ACCEPT processing 90APPLY CHECK processing 86APPLY processing 88choosing the update mode 86get additional SYSMODs 88preparation 84RECEIVE function 85RECEIVE processing 85research the ACCEPT CHECK
reports 90research the APPLY CHECK
reports 87summary 83test the new function 88
summary 35functions in a system 2
GGENERATE command
summary 40generated JCL, saving for SMP/E
dialogs 68GIM@PARM (SMP/E Dialog
Settings) 70, 176, 190GIM@PRIM (SMP/E Primary Option
Menu) 70, 190GIM@UPRM
removal of 176GIMDFUT
removal of 176GIMMPDFT
migration tasks 177GIMMPUXD
migration tasks 176GIMSAMPU 55GIMSMP 77, 78GIMUNZIP 178GIMUTTBL
migration tasks 176removal of 176
GIMXSID 173GIMXTRX 180GIMZIP
archive segmentationcoexistence considerations 173overview 173
network delivery of SMP/E inputcoexistence considerations 178overview 178
user defined subdirectoriescoexistence considerations 174overview 173
global zonedefining 54description of 11, 38HOLDDATA entries 15SYSMOD entries 15, 19, 23, 26
GLOBALZONE entry 54
HHEWLH096 utility
See link-edit utilityHFSINST job
coexistence considerations 180, 181hierarchical file system
copy utilitydefault values 61
identification of data sets 179SMP/E data sets residing in 179
hierarchical file system element MCScoexistence considerations 182USERMODs 152
HOBSETcoexistence considerations 186
HOLDDATA 117See also exception SYSMOD
managementCBPDO tape
processing 119checking effect on installed SYSMODs
(REPORT ERRSYSMODS) 141ESO
processing 94, 106, 120source of 117
from IBMLINK 118from the IBM Support Center 106provided for SYSMODs 12PSP files
processing 121source of 118
summary reports 179HOLDDATA entries
created during RECEIVE 115in the global zone 15
IIBMLINK, source of HOLDDATA 118IDCAMS utility
See AMS utilityIEANUC01 load module 177IEBCOPY utility
See copy utilityIEBUPDTE utility
See update utilityIEWBLINK utility
See link-edit utilityIEWL utility
See link-edit utilityIMASPZAP utility
See superzap utilityimplicitly including modules from
another product 125installation methods
RECEIVE-APPLY-ACCEPT 83installation procedures
corrective service 103functions 83preventive service 91USERMODs 109
installing SMP/Econnecting the dialogs 66
installing SYSMODsdistribution libraries (ACCEPT
command) 13, 25
installing SYSMODs (continued)target libraries (APPLY
command) 13, 18introducing an element 3invoking SMP/E 76ISPCTL1 68ISPCTL2 68ISPF (Interactive System Productivity
Facility)concatenating libraries 67connecting dialogs 66, 69
ISPF/PDF (Interactive SystemProductivity Facility/ProgramDevelopment Facility) 66
JJava Archive (JAR) files
building 165coexistence considerations 174in FMIDs 165in PTFs 165, 166URL for 174using 165
JCL generated by SMP/E dialogs,saving 68
JCLIN commandsummary 42
JOB statementcustomizing 71
Kkeyboard 197
LLIBDEF restrictions 67link edit utility output
recommended DDDEF entries 73LINK LMODS command
overview of 172summary 44
LINK MODULE commanddescription 125example 126summary 43when to use 125
link-edit utilitydefault values 61
link-editing object modules into loadmodules 2
LIST commandcomparing two zones 131cover letters 130description 14examples 32listing a specific entry type 128listing an FMID or FMIDSET 130listing specific entries 129reports produced 32summary 41, 127
LISTCAT job 57listing SMP/E data
API for 34LIST command 32
Index 219

listing SMP/E data (continued)Query dialogs 30REPORT commands 33
load module data set for SMP/E dialogs,LIBDEF restrictions 67
load module, created by link-editingobject modules 2
LOG command 42logon procedure (TSO) 69logon procedure, sample 68LookAt message retrieval tool xi
Mmaster application menu for ISPF 69master catalog, alias for user catalog 52,
54master CSI
definition of 48specified on DD statement 78specified on EXEC statement 77, 78
MCS entry, created during RECEIVE 114message retrieval tool, LookAt ximethods of installation 83migration
OS/390 V1R2 SMP/E summary 187OS/390 V1R3 SMP/E summary 184OS/390 V2R5 SMP/E summary 181OS/390 V2R7 SMP/E summary 180overview 169recommended steps for 170SMP/E V3R1 summary 176SMP/E V3R2 summary 171terminology 169
modification control statement (MCS) 3,15
modification identifiersfunction (FMID) 9replacement (RMID) 9update (UMID) 9
MSGFILTERcoexistence considerations 183
MSGWIDTHcoexistence considerations 183
multiple-CSI zone structure 46, 49
NNCAL
effect of CALLLIBS subentry on 61network delivery of SMP/E input
coexistence considerations 178notices 199NUCID
migration tasks 178operand of APPLY command 177subentry 177
Oobject module, link-editing into a load
module 2
PPCF (programming control facility) 67PE PTF
See exception SYSMODsprerequisites for SYSMODs 7preventive service 91
CBPDO tapes 91description of 36ESO tapes 92installation
ACCEPT CHECK processing 101ACCEPT processing 102APPLY CHECK processing 96APPLY processing 99get additional SYSMODs 99preparation 93RECEIVE processing 94research the ACCEPT CHECK
reports 102research the APPLY CHECK
reports 97test 100
PTF SYSMODs 4PROCESS parameter, EXEC statement for
GIMSMP 77product reinstall
See GENERATEproducts (function SYSMODs) 3program element MCS
USERMODs 151program temporary fix (PTF) 4programming control facility (PCF) 67PSP files
HOLDDATAprocessing 121source of 118
PTFSee also corrective serviceintroduction 91Recommended Service Upgrade 195summary 36
PTF cover letters, listing 130PTF SYSMODs 4PTS, summary 58PUT
See ESO
QQuery dialog
description 14example 30
RRACF (z/OS Security Server)
regulating SMP/E utility programswith 176
RCcoexistence considerations 183
reason IDs 113RECEIVE command
corrective service 105description 13entries created
HOLDDATA entry 115
RECEIVE command (continued)entries created (continued)
MCS entry 114SYSMOD entry 115
examples 16functions 85preventive service 94processing 15reports produced 17summary 40USERMODs 109
RECEXZGRPcoexistence considerations 183
Recommended Service Upgrade(RSU) 195
recovering from utility errors 64RECZGRP
coexistence considerations 183REJECT command
exception SYSMOD processing 117summary 41
removing SYSMODs from your system(RESTORE command) 13, 22
reorganizing a CSI 57REPORT CALLLIBS command
removal of 172REPORT command
description 14example 33reports produced 33
REPORT CROSSZONE command 76introduction 137summary 41
REPORT ERRSYSMODS commandHOLDDATA for installed
SYSMODs 141introduction 141summary 41
REPORT SOURCEID commandintroduction 143summary 41
REPORT SYSMODS commandintroduction 145summary 41
reportsACCEPT CHECK reports
corrective service 108functions 90preventive service 102
APPLY CHECK reportscorrective service 106functions 87preventive service 97USERMODs 110
Causer SYSMOD Summaryreport 161
SYSMOD Status report 161, 162RESETRC command 44RESTORE command
description 13examples 23exception SYSMOD processing 117processing 22reports produced 24summary 41
restrictionsCLIST data set for SMP/E dialogs 67
220 SMP/E V3R2.0 User’s Guide
restrictions (continued)dialogs 67LIBDEF 67load module data set for SMP/E
dialogs 67retry processing 64retry utility
default values 61RMODE=ALIASES
coexistence considerations 186RMODE=SPLIT
coexistence considerations 186root cause analysis 161RSU (Recommended Service
Upgrade) 195
Ssample logon procedure 68saving JCL generated by SMP/E
dialogs 68SCDS, summary 58separate CSI for each SREL, combining
target and DLIB zones 51separate CSI for each zone 50ServerPac
Recommended Service Upgrade 195servicing a product
corrective service (APARSYSMODs) 5
preventive service (PTF SYSMODs) 4SET command 13, 40shortcut keys 197SIDEDECKLIB
coexistence considerations 186single-CSI structure 46, 48SMP/E cataloged procedure 78SMP/E commands 12, 39SMP/E data
changing 133listing 127
SMP/E data setsresiding in hierarchical file
system 179SMPCSI 11SMPPTS 15SMPSCDS 19SMPTLIB 15
SMP/E dialog libraries,concatenating 67
SMP/E dialogscustomizing
migration tasks 176overview 176
SMP/E reportsACCEPT CHECK reports
corrective service 108functions 90preventive service 102
APPLY CHECK reportscorrective service 106functions 87preventive service 97USERMODs 110
SMP/E summary 35SMPCSI
allocating 52
SMPCSI (continued)master CSI 78multiple-CSI structure 46single-CSI structure 46summary 45zones, description of 38
SMPDUMMY ddnameallocation rules 60coexistence considerations 175overview 175
SMPHOLD 94, 95SMPLTS
coexistence considerations 174use of 39, 174
SMPMTSuse of 39
SMPOUTdefault 59
SMPPROC (cataloged procedure forSMP/E) 78
SMPPTScoexistence considerations 183spill data sets 179use of 38
SMPPUNCH outputREPORT CROSSZONE
command 138REPORT ERRSYSMODS
command 141SMPSCDS
use of 39SMPSTS
use of 39SMPTABL
description 67space allocation 68
source code, assembling to create anobject module 2
specifying the zone to be updated (SETcommand) 13
standard method of installation 83STEPCAT DD statements
alternative to 52, 54superzap utility
default values 61SYS1.LINKLIB 180SYS1.LPALIB 3SYS1.MACLIB 58SYS1.MIGLIB 3, 180SYS1.SAMPLIB 193SYS1.SVCLIB 3SYSDEFSD
DUMMY data set forcoexistence considerations 175overview 175
SYSLIBconcatenation 81
SYSMOD entriescreated during RECEIVE 115distribution zone 26global zone 15, 19, 23, 26target zone 19, 23
SYSMODsAPAR 5definition of 35description 2
SYSMODs (continued)function
base 4dependent 4
hierarchy 35listing
REPORT SOURCEID 143SMPPUNCH 143
prerequisites 7PTF 4summary 35USERMOD 6
SYSPRINTdefault 59
system modificationsSee SYSMODs
Ttable data sets for dialogs 68target libraries, description of 37target zone
defining 54description of 11, 38SYSMOD entries 19, 23
TARGETZONE entry 54temporary fix (APAR SYSMODs) 6
UUCLIN command
general syntax 134introduction 133samples in GIMSAMPU 55summary 42
update utilitydefault values 61
UPGRADE commandcoexistence considerations 173overview of 172
user catalogalias in master catalog 52, 54for CSI 52
user-defined subdirectoriescoexistence considerations 174
USERMOD 111See also user modificationcreating 147examples 152installation
APPLY CHECK process 110APPLY process 111prepare 109RECEIVE processing 109research APPLY CHECK
reports 110summary 109test 111
MCS statements++element (for data
elements) 151++JCLIN 149++MAC 150++MACUPD 150++MOD 150++PROGRAM 151
Index 221

USERMOD (continued)MCS statements (continued)
++SRC 151++SRCUPD 151++USERMOD 148++VER 148++ZAP 150hierarchical file system
element 152preventing ACCEPT processing 111summary 36
USERMOD SYSMODs 6utility errors, recovery from 64utility programs
default valuesaccess method services (AMS) 61assembler 61compress 61copy 61hierarchical file system copy 61link-edit utility 61retry 61superzap 61update 61
specifying which utility programsSMP/E can call 176
UTINcoexistence considerations 186
VVERSION command
coexistence considerations 184
WWAIT
EXEC statement parameter forGIMSMP 77
XXZREQCHK subentry
coexistence considerations 185use of 74
Zz/OS Security Server (RACF)
regulating SMP/E utility programswith 176
zone groupdefault 74defining 73specifying on command 74ZONEINDEX for 74
zone structuresexamples 48multiple CSIs 46single CSI 46
ZONECOPY commandalternative to UCLIN 134summary 43
ZONEDELETE commandalternative to UCLIN 134
ZONEDELETE command (continued)summary 43
ZONEEDIT commandalternative to UCLIN 134summary 42
ZONEEXPORT commandalternative to UCLIN 134summary 43
ZONEIMPORT commandalternative to UCLIN 134summary 43
ZONEINDEXfor zone group 74
ZONEMERGE commandsummary 43
ZONERENAME commandalternative to UCLIN 134summary 43
zonescomparing
LIST command 131REPORT CROSSZONE
command 137REPORT SYSMODS
command 145description of 38
zones in the SMPCSI data setSee also distribution zoneSee also global zoneSee target zone
ZONESET entrycross-zone processing 137defining 74
222 SMP/E V3R2.0 User’s Guide
Readers’ Comments — We’d Like to Hear from You
IBM SMP/E for z/OS and OS/390User’s Guide
Publication No. SA22-7773-04
Overall, how satisfied are you with the information in this book?
Very Satisfied Satisfied Neutral Dissatisfied VeryDissatisfied
Overall satisfaction h h h h h
How satisfied are you that the information in this book is:
Very Satisfied Satisfied Neutral Dissatisfied VeryDissatisfied
Accurate h h h h h
Complete h h h h h
Easy to find h h h h h
Easy to understand h h h h h
Well organized h h h h h
Applicable to your tasks h h h h h
Please tell us how we can improve this book:
Thank you for your responses. May we contact you? h Yes h No
When you send comments to IBM, you grant IBM a nonexclusive right to use or distribute your comments in anyway it believes appropriate without incurring any obligation to you.
Name Address
Company or Organization
Phone No.

Readers’ Comments — We’d Like to Hear from YouSA22-7773-04
SA22-7773-04
����Cut or FoldAlong Line
Cut or FoldAlong Line
Fold and Tape Please do not staple Fold and Tape
Fold and Tape Please do not staple Fold and Tape
NO POSTAGENECESSARYIF MAILED IN THEUNITED STATES
BUSINESS REPLY MAILFIRST-CLASS MAIL PERMIT NO. 40 ARMONK, NEW YORK
POSTAGE WILL BE PAID BY ADDRESSEE
IBM CorporationDepartment 55JA, Mail Station P3842455 South RoadPoughkeepsie, NY12601-5400
_ _ _ _ _ _ _ _ _ _ _ _ _ _ _ _ _ _ _ _ _ _ _ _ _ _ _ _ _ _ _ _ _ _ _ _ _ _ _ _ _ _ _ _ _ _ _ _ _ _ _ _ _ _ _ _ _ _ _ _ _ _ _ _ _ _ _ _ _ _ _ _ _ _ _ _ _ _ _ _ _ _ _ _ _ _ _ _ _
_ _ _ _ _ _ _ _ _ _ _ _ _ _ _ _ _ _ _ _ _ _ _ _ _ _ _ _ _ _ _ _ _ _ _ _ _ _ _ _ _ _ _ _ _ _ _ _ _ _ _ _ _ _ _ _ _ _ _ _ _ _ _ _ _ _ _ _ _ _ _ _ _ _ _ _ _ _ _ _ _ _ _ _ _ _ _ _ _
__
__
__
__
__
__
__
__
__
__
__
__
__
__
__
__
__
__
__
__
__
__
__
__
__
__
__
__
__
__
__
__
__
__
__
__
__
__
__
__
__
__
__
__
__
__
__
__
__
_

����
Program Number: 5655-G44
Printed in U.S.A.
SA22-7773-04