Why Businesses Run Better With NetSuite - Trimtab Consultants
Upload
khangminh22Category
view
2download
0
SmartView2 Admin Guide
www.smartwitness.com

pg. 2
Contents 1. Introduction……………………………………………………………………………………………………………3
a. Portal Login……………………………………………………………………………………………....…….. 3
2. Portal Gateway……………………………………………………………………………………………………...4
3. Accessible Features……………………………………………………………………………………………..…6
a. Dashboard……………………………………………………………………………………………………..…6
b. Events………………………………………………………………………………………………………………13
c. Media Manager……………………………………………………………………………………….………16
d. Maps……………………………………………………………………………………………………………..…17
e. Reports……………………………………………………………………………………………………….……20
i. Events History……………………………………………………………………………………………….20
ii. Summary…………………………………………………………………………………………………...….21
iii. Detailed………………………………………………………………………………………………………...22
iv. Current Idle…………………………………………………………………………………………..……….22
v. Graphs…………………………………………………………………………………………………………..22
vi. Overdue Maintenance……………………………………………………………………………….…23
vii. Location History………………………………………………………………………….………………..24
viii. Driver Report……………………………………………………………………………….……………….24
f. Settings………………………………………………………………………………………….………………..25
i. Devices…………………………………………………………………………………….………..………….25
ii. Fleets………………………………………………………………………………………….…………………27
iii. GEO Fencing…………………………………………………………………………….……………..……28
iv. Drivers……………………………………………………………………………………….…………………29
v. Alerts…………………………………………………………………………………………….….…………..29
g. Admin Privileges…………………………………………………………………………………..…………30
i. Users…………………………………………………………………………………………….………………30
ii. Fleet Users…………………………………………………………………………………….……………..30
iii. Support – Tickets …………………………………………………………………………….………….31

pg. 3
1. Introduction
Telematics software solution is a GPS tracking mechanism that will allow telematics
providers to monitor and manage their vehicles remotely. The main approach is to
connect a 3rd party system that involves data translation among different formats,
and often aggregating separate sets of data together to satisfy the data exchange.
The platform will securely enable the assigned vehicles to exchange data and live
streaming with remote servers via a cellular bearer.
These remote servers will to store all the data that’s accumulated from the active
devices and process remote service requests, which provide the users with summary
about their vehicle’s status and all the driving data.
The Platform delivers this expanding web of connectivity by creating Middleware
which connects proprietary, and open interfaces together.
a. Portal Login
To launch the TSP portal:
Use the provided credintails to access the portal.

pg. 4
2. Portal Gateway
Upon launching the TSP portal, a summary of all existing clients and their current
status will be provided that includes all the assigned clients under the TSP tenant,
the related manager’s names and their associated accounts. A list of total number of
devices associated with each client, date of boarding, and the current status.
The portal allows TSP Administrator to navigate and generate detailed reports for all
the existed clients.
The following gateways provide at the glance statics of the device’s current
status. TSP Administrator can access the following executable gateways:
Active Device Gateway: provides a list of all the existed devices that have
been activated under the TSP tenant, and their current status.
Not Assigned Devices Gateway: provides the TSP Administrator with a list
of all of the existed devices on the platform that are not being assigned
to a specific client.
Open Tickets Gateway: provides the TSP Administrator a facility to
manage technical issues that the clients might face with their devices.
No Coverage Gateway: generates a report for all the devices that have
been assigned to clients and being connected to the platform but their
current status is Offline.
Administrator can view the triggered events for all the registered clients by
clicking on Events tab or adjust and manage devices via Settings tab, which
will be discussed in the following sections.
TSP Administrator can view all the assigned clients under his tenant as follows:
Click on Admin tab.
Select Clients, a summary of all the clients will be listed.

pg. 5
The Administrator can login as one of the listed clients to view and
manage their portal.
The Administrator can view and add the account users as follows:
Click on Admin tab.
Select Users features. To add a new user, click on New User tab, the following
window will pop out.
The user’s permissions can be set either to an Administrator, or an Insurer.
Administrator can initiate and view tickets as follows:
Click on Admin tab.
Select Tickets feature. To create a new ticket, click on Create Ticket tab.
pg. 6
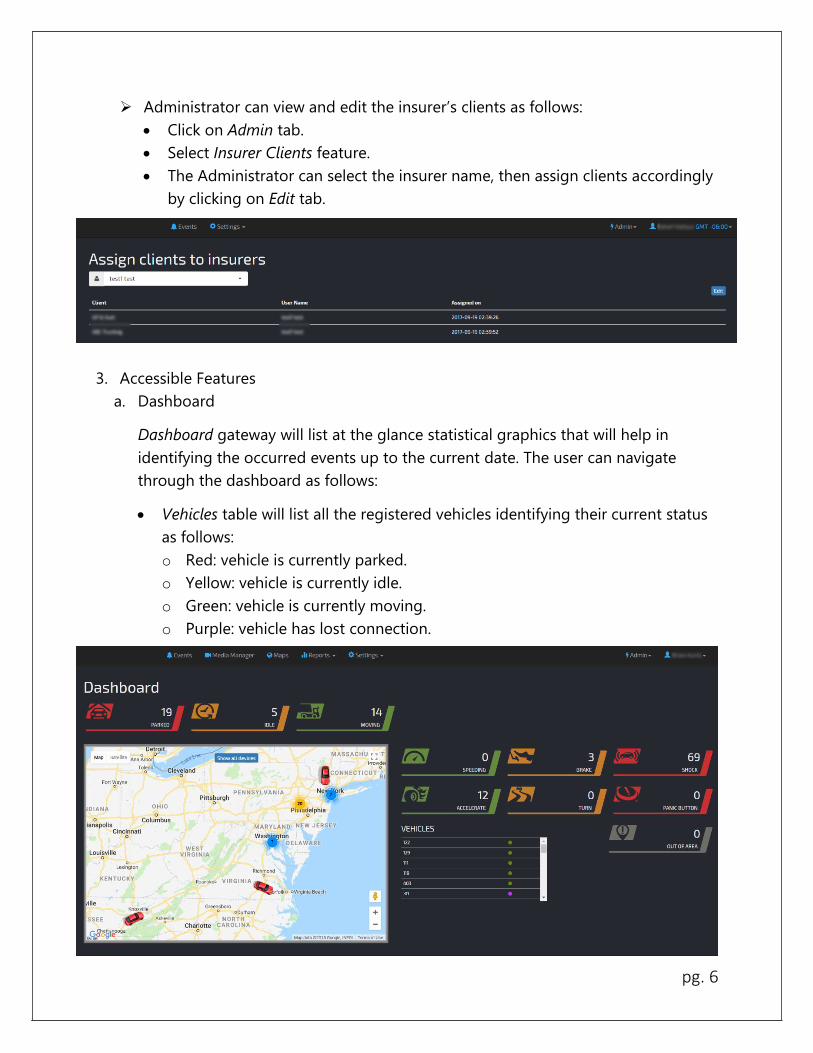
Administrator can view and edit the insurer’s clients as follows:
Click on Admin tab.
Select Insurer Clients feature.
The Administrator can select the insurer name, then assign clients accordingly
by clicking on Edit tab.
3. Accessible Features
a. Dashboard
Dashboard gateway will list at the glance statistical graphics that will help in
identifying the occurred events up to the current date. The user can navigate
through the dashboard as follows:
Vehicles table will list all the registered vehicles identifying their current status
as follows:
o Red: vehicle is currently parked.
o Yellow: vehicle is currently idle.
o Green: vehicle is currently moving.
o Purple: vehicle has lost connection.

pg. 7
Click on the desired vehicle to allocate it on the map.
o A summary tab will open up which includes vehicle name, device DRID,
current status, location and multiple executable tabs.
Executable functional tabs:
o Live Streaming: a live video streaming will be based upon a certain period of time
dedicated in seconds.

pg. 8
o Get Snapshot: uploads live images from the vehicle’s current location.
o Latest Video: an auto-upload of 20 seconds video of the vehicle’s current location
that can be found under Media History tab.
o Request Video: will retrieve a 20 seconds video upon the specified date and time.

pg. 9
All the requested videos will be listed under Media Manage tab, labeled as
Requester Name.
If the device is offline, all the user requests will be queued and processed
once the device is online.

pg. 10
o Event History: a list of all the triggered events upon the current date that can be
exported in Excel or PDF.
o Log History: a list of all the camera events upon the current date that can be
exported in Excel or PDF format.

pg. 11
o Media History: a list of all the manual requested & auto-uploaded media for the
past 7 days.

pg. 12
Note:
The device should be online in order to respond to Get Snapshot & Get Video
request.
The user can download MP4 file footage by clicking on Download tab.
For data analysis, and drive behavior report, click on MDT File tab. This
file extension will require the Software Analysis tool provided from SmartWitness
(http://support.smartwitness.com).

pg. 13
o View Routes: provides a detailed geographical summary of vehicle’s trip (can be
accessible via Maps tab).
The dashboard will present all the triggered events using graphical statistics, where
the only executable tabs will be (Speeding, Brake, Shock, Acceleration, Turn, Panic
and Out of area).
o Upon clicking on any of those tabs, a summary list will pop out including the
device name, position, speed and date-time stamp.
o The summary can be exported in Excel or PDF format.
o Out of area icon will list all the vehicles that were triggered out the predefined
GEO fence.
b. Events
Events tab will generate a summary list of all the triggered events. The listed
events can be filtered as of the current date, 7-days & 30 days.

pg. 14
A color code adjustment can be used to trigger certain events as follows:
o Red: lists Shock, Severe Shock and Panic events.
o Amber: lists Brake, Acceleration and Turn events.
o Gray: list Speed events.
The user can review any of the listed events by selecting one. A 10 seconds low
resolution footage will be presented, that includes the device name and DRID,
vehicle’s information, registered speed, time stamp and event’s location.
Incase of an accedient occurrence the user can have a street view of the
event by clicking on Street View tab.
The user can retrieve MP4 footage of the event by clicking on Video tab.
This tab will be colored green to indicate that the video was requested
previously, and will playback within the same window. Otherwise, a message stating
Request has been submitted will show up.
The user can dismiss the unnecessary events by clicking on Dismiss tab. However, the
events will be listed in a sperate tab called Dismissed.
The user can review and arrange the triggered events by clicking on Review tab. This
tab will provide the user with the ability to write comments one each event in order
to manage them.

pg. 15
Event route will be listed under View Route tab for the selected vehicle.
o
o Click on View Route tab.
o A new window will pop out listing all the routes
corresponding to the triggered event.

pg. 16
o These routes are being registered as a live track every 15 seconds increments,
which includes the actual event that is being colored differently in order to
allocate the exact event’s location.
o The user can click on any of the routes to request a snapshot/video as follows.
Events gateway will include executable graphical icons that generate summary
reports of the following:
o Active Today: lists the devices that are currently active.
o Check Connection: indicates devices that stopped reporting without having a
proper “Ignition Off” event for more than 1 hour.
o Check Settings: lists the devices that stopped reporting for the past 7 days.
o Check Media: shows devices that reported SD card errors and requires SD card
formatting.
o Idle: lists devices that are active but not moving for certain period of time
(Usually when vehicle is parked for 30 minutes, without dedicating Ignition Off
event).
o Emergency: lists devices that triggered Panic &/ Severe Shock events.
c. Media Manager
Media Manager gateway allows users to allocate media by selecting device/(s)
upon a certain period of time.
A 20 seconds footage for each triggered event with date & time stamp
including the requester name.
Videos will be labeled according to the recorded camera.

pg. 17
User can download the footage as of MP4/ MDT version.
d. Maps
Maps gateway allows users to allocate and view their vehicles.
Events are being presented as graphical executable icons which can be used
as a searching mechanism (Search by: Panic, Shock, Acceleration, Brake,
Speed, Turn or Idle).
The map will cluster the nearly located vehicles, or indicate them via colored
arrow according to its current status (Idle, Parked, Moving or Lost
Connection).

pg. 18
A quick search mechanism that allocates the current location of any vehicle by
typing vehicle’s ID.
In order to have a detailed GPS tracking, users can click on the pulled vehicle’s
icon. The following window will open up.

pg. 19
o Click on View Routes tab.
o Specify the desired date.
o Click on Show tab.
o A list of all the driven routes will show up with the corresponding time and
period duration.
o User can customize duration period to facilitate navigation process.
All the listed routes are executable. Users can retrieve an image &/ video by
clicking on the desired point on the map.

pg. 20
o Click on the flag in order to request video/image.
e. Reports
This feature allows the user to generate summary reports by clicking on Reports
tab.
i. Event History
Click on Reports tab.
Select Event History feature.
User must select a vehicle, driver name (if registered) and time range.
pg. 21
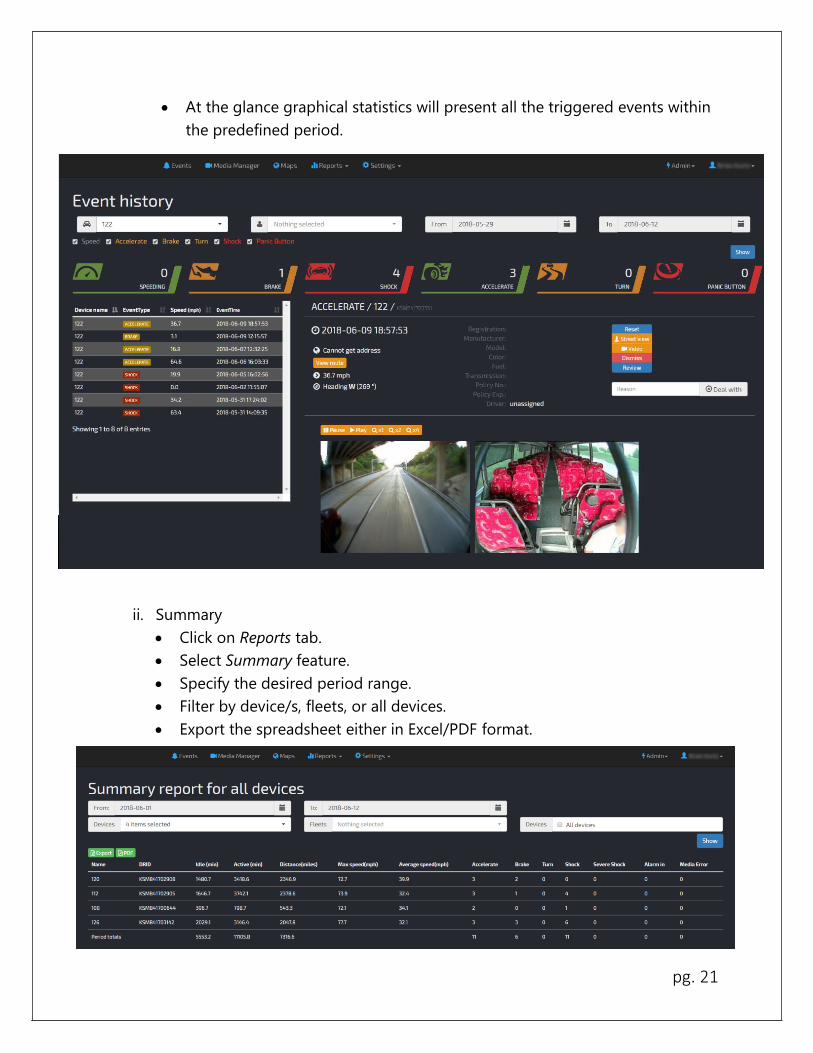
At the glance graphical statistics will present all the triggered events within
the predefined period.
ii. Summary
Click on Reports tab.
Select Summary feature.
Specify the desired period range.
Filter by device/s, fleets, or all devices.
Export the spreadsheet either in Excel/PDF format.

pg. 22
iii. Detailed
Click on Reports tab.
Select Detailed feature.
Specify the period range.
Select certain device to view and the status type (Idle/Active time, Distance,
Speed, Events, Log history).
Export the spreadsheet either in Excel/PDF format.
iv. Current Idle
Click on Reports tab.
Select Current Idle feature.
A summary of all the currently idle devices will be listed.
Export the spreadsheet either in Excel/PDF format.
v. Graphs
Click on Reports tab.
Select Graphs feature.
A graphical presentation of vehicle’s statuses will be presented that can be
filtered up to 3 months.

pg. 23
vi. Overdue Maintenance
Click on Reports tab.
Select Overdue Maintenance feature.
A summary report will be listing all the vehicles that require certain
maintenance care.
Export the spreadsheet either in Excel/PDF format.
User can modify the required maintenance by clicking on PM tab.

pg. 24
vii. Location History
Click on Reports tab.
Select Location History feature.
Choose certain vehicle to view.
Specify the time period.
User can generate a report based on triggered events (Panic, Shock, Turn,
Brake, Acceleration and Speed) by clicking on Events Only tab otherwise, all
the camera events will be listed (Live track, Device online/offline, Ignition
on/off, etc.).
Export the spreadsheet either in Excel/PDF format.
viii. Driver Report
Click on Reports tab.
Select Driver Report feature.
User can view either Summary or Detailed report.
For a Summary report: specify the deriver/s name, and time period.

pg. 25
For a Detailed report: specify the deriver name, event/telematics status,
time period.
Export the spreadsheet either in Excel/PDF format.
f. Settings
User can manage the fleet’s settings as follows.
i. Devices
Click on Settings tab.
Select Devices feature.
User can edit each device separately or multiple devices at once.
User can view charts per device, and adjust its maintenance.

pg. 26
The user can view view graphical charts as follows:
Click on Graphs tab.
The following window will open up, the user has to
specify the desired date to view vehicle’s telematics
charts accordingly
User can modiy device information as follows:
o Click on Edit tab.

pg. 27
o The following window will open up, the user can add/modify the device
information accordingly.
User can adjust PM maintenance settings as follows:
o Click on Device PM tab.
o The following window will pop out.
ii. Fleets
Click on Settings tab.
Select Fleets feature.
A summary of all the created fleets will be listed.
User can add a new fleet by clicking on New Fleet tab, or edit an existed one.

pg. 28
iii. Fencing
Click on Settings tab.
Select Fencing feature.
A list of all the created GEO fences will be listed on the left side of the
screen.
User can create a new GEO fencing, and receive alerts accordingly.
o Click on New Fence tab.
o An adjustable arrow icon can be used to specify the GEO fencing location.
o Click on Save Fence tab.

pg. 29
o Specify the fence name, select desired devices, adjust date& time stamp
with required days.
iv. Drivers
Click on Reports tab.
Select Drivers feature.
A summary of all the registered drivers and the corresponding vehicle/s will
be listed.
User can edit an existed driver or add new one.
v. Alerts
Click on Settings tab.
Select Alerts feature.
User can edit an existed alert or add new one.

pg. 30
g. Admin Privileges
Admin role allows the user to manage the account users, fleet users and tickets as
follows.
i. Users
Click on Admin tab.
Select Users feature.
Administrator can add/edit users.
ii. Fleet Users
Click on Admin tab.
Select Fleet Users feature.
Administrator can assign new user to certain fleet or delete an existed one.

pg. 31
iii. Support – Tickets
Click on Admin tab.
Select Tickets feature.
User can view or create a new ticket by clicking on Create Ticket tab.
Copyright © 2022 FDOKUMEN