
Account Management Users' Guide - Secure Login
1044
-
Upload
khangminh22 -
Category
Documents
-
view
5 -
download
0
Transcript of Account Management Users' Guide - Secure Login


Account Management Users' Guide
January 2019
© 2019 Interactive Brokers LLC. All Rights Reserved
Any symbols displayed within these pages are for illustrative purposes only, and are not intended to portray
any recommendation.
ContentsContents i
Classic Account Management Users' Guide 31
Overview 31
About Account Management 31
Account Management Access and Account Structures 32
Customer Types 33
Account Structures 33
Logging In 37
Failed Login Attempts 40
HomePage 40
Real-Time Summary 42
Balances 42
Margin Requirements 43
Available for Trading 43
Positions 44
Pending Items 44
Messages 45
Corporate Actions 46
Menus 46
Navigating the Account Management Menus 47
Account Management Users' Guide i
Contents
Getting Help 50
Dynamic Help 51
Account Management Users' Guide 51
Navigating Account Management Pages 51
Changing the Active Account 52
Account Selector 54
Using the Account Selector 54
Account Selector for Three-Level Accounts 58
Changing the Display Language 60
Printing 61
LoggingOut 61
Trade 63
QuickTrade 63
WebTrader 64
Post Trade Allocations 64
Open the Post Trade AllocationsWindow 65
Allocate Trades 65
Average Price Trades 70
Unallocate Trades 71
Create Allocation Templates 72
Odd Lot Designations 74
Allocate in Round Lots 74
Account Management Users' Guide ii
Contents
Allow Odd Lots Allocation 74
View the Allocation Summary 75
Import Allocations 76
Configure Post Trade Allocation Settings 77
Configuration Settings 78
Allocation Settings 78
Display Preferences 79
IPO Subscriptions 81
Reports 85
Activity 85
About Activity Statements 85
Statement Cutoff Times 86
Activity by Account Type 86
Activity Statement Archive Policy 87
Viewing Activity Statements 87
Default Statements 88
Creating Customized Statements 92
Customized Statements Profit and Loss Selection 95
Third-Party Downloads 96
If You are Downloading a Zip File Using Internet Explorer 7 or 8 100
Activity FlexQueries 100
Batch Reports 106
Account Management Users' Guide iii

Contents
Models 108
Quarterly Summaries 109
Trade Confirmations 111
Trade Confirmation Reports 112
Trade Allocations 114
Trade Confirmation FlexQueries 116
PortfolioAnalyst 122
Snapshot PDF Reports 125
Detailed PDF Reports 130
Available Reports in Detailed PDF Reports 136
Running a Performance Attribution Report 143
Understanding the Performance Attribution Report Table 143
Weighting by Sector 144
Returns and Attribution Effects by Sector 144
Understanding the Performance Attribution Charts 145
Understanding the Performance Attribution Scatter Plot 145
Creating CustomBenchmarks 146
About CustomBenchmarks 146
Synopses 149
Creating and Saving a Synopsis 149
Assigning a Synopsis to a Report 150
Editing and Deleting Saved PortfolioAnalyst Reports 151
Account Management Users' Guide iv
Contents
Viewing External Accounts 152
Account Summaries 153
External Accounts 157
Adding an External Account 157
Vewing and Editing External Accounts 161
Deleting External Accounts 162
Transaction Cost Analysis 163
Understanding the Transaction Cost Analysis 168
Risk 173
Margin Reports 173
Stress Test Report 176
Using the Stress Test SummaryReport 178
Value At Risk Report 179
Supplemental Reports 182
Compliance Reports 183
Advisor Fee Cap 183
Client SummaryReport 184
P/LMarkup Summary 186
Advisor Fee Invoices 187
Broker Client Revenue and Expense Summary 188
Tax 189
TaxOptimizer 189
Account Management Users' Guide v
Contents
Tax Forms 191
Position Transfer Basis 194
ForexCost Basis 196
Settings 198
Delivery 199
Delivery Settings for Activity Statements and Trade Reports 199
SMS Alerts 203
FlexQueries 204
Portfolio Analyst Delivery Settings 205
Broker Client Activity Statements 208
Using the FlexWeb Service 209
FlexWeb Service Version 2 210
FlexWeb Service Version 3 213
Version 3 Error Codes 217
Third-Party Services 218
Trader ID 221
Trader ID Rules 221
Client OATS Settings 223
Funding 227
Viewing Transaction History 227
Request a stop payment of a checkwithdrawal 233
Cash Deposit Details 234
Account Management Users' Guide vi

Contents
CashWithdrawal Details 240
Position Transfers Details 244
Internal Transfer Details 249
Fund Transfers 251
Checking the Status of Your Funds 252
Funds Status 252
Depositing Funds 254
Withdrawing Funds 258
ACH Initiated at IB and Canadian EFT Transactions 264
Transferring Funds Internally 264
Saving Bank Information 266
About Recurring Transactions 268
Canceling a Recurring Transaction 269
Withdrawing Funds to a Third Party 269
Position Transfers 274
ACATS Transfers 275
Requesting a Full ACATS Transfer 276
Requesting a Partial ACATS Transfer without a Position Instruction 279
Requesting a Partial ACATS Transfer Using an Existing Position Instruction 281
Creating a Position Instruction for a Partial ACATS Transfer 283
ATON Transfers 285
Requesting a Full ATON Transfer 285
Account Management Users' Guide vii

Contents
Partial ATON Transfers without Instructions 288
Partial ATON Transfers with Existing Instruction 291
Creating an ATON Position Instruction 293
Checking Position Eligibility for a Full ACATS or ATON Transfer 295
DRS Transfers 299
DWAC Transfers 302
Transferring Positions to an Advisor-Managed Account 305
Transfer International Assets 306
FOP Transfers 310
FOP Transfer without Instruction 310
FOP Transfer Using Existing Instruction 313
Creating Position Instruction for an FOP Transfer 315
US Futures Transfers 317
Transferring Positions BetweenMaster and Sub Accounts 318
Transferring Positions Internally 319
Using CSV Files for Position Transfers 321
Uploading Positions in a CSV File for Partial Position Transfers 321
Rules for Uploading Positions in a CSV File 324
Instructions 325
Bank Information 325
Bank Information Fields 327
Recurring Transactions 333
Account Management Users' Guide viii

Contents
Position Instructions 335
Settlement Instructions 337
Soft Dollars Disbursement 338
Manage Account 343
Account Information 343
Details 344
Account Details 344
Profile 347
Financial Information 352
Regulatory Information 354
Dividend Reinvestment 355
Trading Sub Accounts 357
Broker Declaration 358
Advisor Qualifications 359
Transfer on Death 361
Removing or Modifying a TOD Beneficiary 364
Investor Category 365
Large Trader Identification 367
EMIR and LEI Information 371
About EMIR and LEI 371
Who is Subject to the EMIR Regulation? 371
Original EMIR Elections 372
Account Management Users' Guide ix

Contents
The EMIR and LEI Information Page in Account Management 373
Changing Your Initial EMIR Election If You Previously Chose To DoNothing 373
Changing Your Delegated Reporting Choice 380
Tax Information 381
Tax FormCollection 382
Withholding Statement 384
Adding anOwner to anOrganization 385
Jurisdiction 386
Settings 390
Configure Account 390
Base Currency 391
Institutional Services 392
Account Type 394
Excess Funds Sweep 395
Fees 397
Pricing Structure 398
Request Soft Dollars 399
Request Soft Dollars 399
Soft Dollars Page 400
Soft Payments in Activity Statements 402
Compliance for Advisors 402
WhoCan Subscribe to this Service? 403
Account Management Users' Guide x
Contents
Using the Service for the First Time 403
Section 13 Subscription Election 404
Section 13Monitoring Groups 405
Rules for Monitoring Groups 405
Section 13 Handshake Requests 410
Section 13OnDemandReport Request 411
Rules for OnDemandReport Generation 411
Section 13 Designate Aggregated Report Recipients 413
Rules for Designating Aggregated Report Recipients 414
Trading PlatformsRead-Only Access 414
Paper Trading 415
About Paper Trading Accounts 417
Paper Trading Account Limitations 418
Account Management for a Paper Trading Account 419
Paper Trading Account Reset 420
WebTrader 420
Paper Trading Activity Statements 420
Activity FlexQuery 421
Trade Confirmations FlexQuery 422
Change Password 423
Account Alias 423
White Branding 424
Account Management Users' Guide xi

Contents
White Branding Trader Workstation 427
White BrandingWebTrader 430
White Branding Emails 431
White Branding Account Management, the Registration System and Statements 432
White Branding Reference Table 434
White Brand the IB TWS Users' Guide 436
White Branding the Contract Database 438
How to Close Your Account 439
Close Account 442
Account Closure Status 444
Reopening a Closed Account 445
IRA 446
IRA Conversion to a Roth Account 447
Partial IRA Conversions 449
IRA Recharacterization 449
Partial IRA Recharacterizations 449
IRA Reference 449
IRA Account Types 450
IRA Margin Accounts 450
IRA Account Types 450
IRA Transfer Methods 451
Conversions and Recharacterizations 454
Account Management Users' Guide xii

Contents
IRA Conversion 454
Eligibility Requirements 454
2010 Changes 454
IRA Recharacterization 455
Timing 455
Reconversion 455
Additional Information 456
Trade Configuration 456
Permissions 457
Trading UK CFDs andMetals 460
Trading Cash Forex 465
Cash Forex Eligibility Requirements 465
Market Data 466
Research 469
Subscriber Status 470
Market Data Assistant 472
Trading Limits 473
Restrictions 476
IB FYI 476
Alerts 478
Futures Arbitration Agreement 480
Asia GatewayAccess 481
Account Management Users' Guide xiii

Contents
Security 481
IP Restrictions 482
Change Password 484
Reset Paper Trading Account Password 485
Change Email Address 486
Change Security Questions 488
Secure Login System 489
Security Device 490
If You Choose Not to Participate in the Secure Login System 495
WhenWill I ReceiveMyDevice 496
Security Device Sharing 496
About Security Devices 498
Security Code Cards 498
Digital Security Card+ 499
Withdrawal Limits 500
SLS Opt Out 501
Rules for Opting Out 502
Client Security 503
Voting Subscriptions 504
Audit Trail 506
AccessRights 507
User AccessRightsGuide 508
Account Management Users' Guide xiv
Contents
AccessRightsOverview 508
AccessRights and AccessGroups 509
Security Officers 510
Security Officer Approvals 510
Account-Level AccessRights 510
User Roles 510
Primary and Secondary Authorizers 510
User AccessRights Summary 511
About Security Officers 512
Creating Security Officers During the Account Application Process 512
Adding and Deleting Security Officers 512
Security Officers and Account Management 512
Configure AccessRights 513
Users 515
Adding a User 516
Viewing Pending User AccessRights 521
Viewing Eligible Security Officers on Pending Items 521
Modifying User AccessRights 521
Adding Usernames to a User 524
Deleting a User 525
Add a Security Officer 526
User Roles 526
Account Management Users' Guide xv
Contents
Adding a User Role 526
Modifying a User Role 528
Deleting a User Role 528
View User Role Details 528
Contents i
Add or Link Accounts xxix
Create Linked Account xxix
Create Linked Account Scenarios xxxi
If You DoNot Finish the New Account Application xxxv
Account Management for Linked Accounts xxxv
Link Existing Account xxxvi
Guidelines for Linking Existing Accounts xxxvi
Link Existing Account Scenarios xxxviii
Account Management for Linked Accounts xlvii
Move, Link or Partition an Account xlvii
Important Notes about Linking and DeLinking xlviii
About Partitions xlix
Authorized Trader liii
Rules for Linking to and Delinking from an Advisor or Multiple Hedge Fund lv
Research Services lv
ResearchWebsite Login lvi
MoneyManager lvi
Account Management Users' Guide xvi

Contents
MoneyManager Marketplace lvi
Adding aMoneyManager lvii
MoneyManager Assignment lvii
Add aMoneyManager lix
Create a Client Fees Template lxi
Modify Client Fees for aMoneyManager lxi
Modify Trading Permissions lxiv
ChangeMoneyManager Client Account Assignments lxviii
Remove aMoneyManager lxxv
Wealth Manager Assignment lxxvi
Trader Referral Program lxxix
Trader Referral Payout Rules lxxix
Manage Clients/Funds/Traders 81
Dashboard 83
View Information About All Clients 87
View Client Account Details 92
Changing Account Representatives 104
Additional Advisor Authorizations 106
Additional Broker Authorizations 108
Invest in a Hedge Fund for a Client 110
Duplicate Client Accounts 115
Duplicated Account Settings 117
Account Management Users' Guide xvii

Contents
Upload Documents for Pending Non-Disclosed Broker Clients 118
Create and Link Accounts (for Advisors and Brokers) 119
Create 120
AddClient Account 120
Methods of Completing an Account Application 121
Steps in the Application Process 122
Inviting a Client to Start an Electronic Application 123
Starting a Semi-Electronic Application 125
Downloading Client Disclosures 127
Adding a Fully Disclosed Broker Client Account 128
Adding Advisors, STL andMultiple Hedge Fund Accounts to a Fully Disclosed Broker
Account 130
Adding an Advisor Account 130
Adding an STL Account 131
Adding aMultiple Hedge Fund Account 132
Rules for Three-Level Fully Disclosed Broker Accounts 133
Adding a Non-Disclosed Broker Client Account 136
Client Account Templates 137
Advisor/Fund Investment Manager Client Templates 138
Broker Client Templates 142
Set Up a Client Template with a Custom ID 147
Households 148
Account Management Users' Guide xviii
Contents
Rules for Creating Households 149
Link Client Accounts/Users 156
Close Account 158
Close a Non-Disclosed Broker Client Account 160
Account Closure Status 163
Opening Interactive Brokers Asset Management Accounts for Advisor Clients 163
Create (for Multiple Fund Investment Managers) 165
Add Client Account 165
Methods of Completing an Account Application 166
Steps in the Application Process 167
Inviting a Client to Start an Electronic Application 168
Starting a Semi-Electronic Application 170
Downloading Client Disclosures 172
Adding a Fully Disclosed Broker Client Account 173
Adding Advisors, STL andMultiple Hedge Fund Accounts to a Fully Disclosed Broker
Account 175
Adding an Advisor Account 175
Adding an STL Account 176
Adding aMultiple Hedge Fund Account 177
Rules for Three-Level Fully Disclosed Broker Accounts 178
Adding Advisor and STL Accounts to an Advisor or Multiple Hedge Fund Account 181
Adding an Advisor Account 182
Account Management Users' Guide xix

Contents
Adding an STL Account 182
Rules for Three-Level Advisor or Multiple Hedge Fund Accounts 183
Adding a Non-Disclosed Broker Client Account 186
Add a Fund Account or an SMA Account 187
Duplicate Client Accounts 191
Duplicated Account Settings 193
Client Account Templates 194
Advisor/Fund Investment Manager Client Templates 195
Broker Client Templates 199
Set Up a Client Template with a Custom ID 204
Traders 205
Traders 205
Authorized Trader 206
Close Account 209
Close a Non-Disclosed Broker Client Account 210
Account Closure Status 214
Client Fees 214
Advisor Client Fees 214
Broker Client Fees 215
Advisor Client Fees 215
Fee Reimbursement 217
Charge Commissions and/or Client Fees to the Advisor Master Account 217
Account Management Users' Guide xx

Contents
Client Fee Templates 217
Overview of Advisor Client Fees 217
Caps and Limitations 222
Examples 222
Percent of Net Liquidation Value 222
Flat Fee 222
Percent of Annual P&L 223
Percent of Market-to-Market P&L 223
Configure Advisor Client Fees 223
HighWater Mark 231
HighWater Mark Example 232
`Setting UpHighWater Marking 233
Advisor Fee Cap Formulas 237
Client Authorization 238
Advisor Client Invoicing 239
Uploading Invoices 245
Configure Invoice Notifications 248
Advisor Fee Reimbursements 250
Broker Client Fees 255
Rules for Broker Client Fees 255
Client Fee Templates 256
Choice of Pricing Structures for Client Accounts 256
Account Management Users' Guide xxi

Contents
Markup Summary 257
Types of Broker Client Markups 257
MinimumAmount 257
MaximumAmount 258
Ticket Charge 259
AbsoluteMarkup 260
Tiered Absolute Amount 261
%Markup 262
Exchange and Regulatory Fees 263
Interest Markups andMarkdowns 264
Markups on Borrow Fees 265
Take Up Fees for Prime Trades 266
Configure Broker Client Fees 266
Client Invoicing 272
Uploading Invoices 278
Markup Summary 279
Client Fee Templates 280
Overview of Client Fee Templates 280
Default Client Fee Templates 281
Fees for SMAs inMultiple Hedge Fund Accounts 285
HFCIP Fees 286
Settings 289
Account Management Users' Guide xxii
Contents
Account Alias 290
Broker Client Approvals 291
Excess Funds Sweep 294
Debit Card For Advisor Clients 296
Trade Configuration 297
Base Currency 297
Account Type 299
Client Trading 300
Permissions 301
Restrictions 303
Trading Limits 304
Security 306
Audit Trail 306
Users 308
Adding a User 310
Viewing Pending User AccessRights 314
Viewing Eligible Security Officers on Pending Items 314
Modifying User AccessRights 314
Adding Usernames to a User 317
Deleting a User 317
CRM 318
CRM HomePage 319
Account Management Users' Guide xxiii
Contents
Individual CRM Contacts 320
Sharing CRM with Another User 321
View, Sort and Search Records 322
View Current Tasks and Events 323
Entering a New Contact, Prospect or Client 325
Edit an Existing Contact, Prospect or Client 328
Additional Functions for Individual Records 330
Set and Reset Your Notes/Tasks Password 341
Set Up and Use a CRMMailbox 343
Requirements for a RackspaceMailbox 343
Additional Information 343
Additional Services Available fromRackspace 344
Disclaimer 344
Events 345
CRMAdvanced Search 349
CRMGroups 354
Import Contacts 361
Excel File Information 361
CRM Icon Reference 363
Investors' Marketplace 365
Search Services 365
Investing 366
Account Management Users' Guide xxiv

Contents
Advisor Marketplace 366
Broker Marketplace 369
Hedge FundMarketplace 372
Who is Eligible to Invest in Participating Hedge Funds? 373
RequiredMinimums 373
Risks of Hedge Fund Investing 373
Advisor Client Investments in Hedge Funds 374
MoneyManager Marketplace 376
Research 378
ResearchMarketplace 379
Education & Coaches 381
News Feeds 384
Trading Publications 387
Technology 388
Software Vendors 388
Programming Consultants 391
Administration 394
Accountant Marketplace 396
Auditor Marketplace 396
ComplianceMarketplace 397
Legal ServicesMarketplace 398
Tax FirmMarketplace 399
Account Management Users' Guide xxv
Contents
Administrator Marketplace 400
Manage Administrators 403
Add an Administrator 404
View Administrators 405
Delink an Administrator 406
Assign Client Accounts to Administrators 407
Remove Client Accounts fromAdministrators 410
BusinessDevelopment 412
Advertising 413
Business Analyst Marketplace 415
Financing Firms 418
CareersMarketplace 421
Corporate Access ProvidersMarketplace 422
Advertise Services 424
Guidelines for Advertising Software Tools, Programming Consulting, Analyst Research and
Educator Services 425
Investing 426
Advisor Marketplace 426
Joining the Advisor Marketplace 427
Broker Marketplace 434
Joining the Broker Marketplace 435
Hedge FundMarketplace 441
Account Management Users' Guide xxvi
Contents
Advisor Client Investments in Hedge Funds 441
Applying for Participation in the Hedge FundMarketplace - Single Fund Accounts 442
Applying for Participation in the Hedge FundMarketplace - Multiple Fund Accounts 443
Hedge FundMarketplace - Account Management for Participating Hedge Funds 446
Rules for Updating Your Fund Information 446
Hedge FundMarketplace - Third Party Administrator 449
MoneyManager Marketplace 451
Research 454
Research Application 454
Education & Coaches Application 455
Technology 455
Software Vendors Application 455
Programming Consultant Application 455
Administration 456
Administrator Marketplace for Administrators 456
Account Management for Administrators 458
HomePage 458
ReportsMenu 458
Manage Account Menu 459
Investors' MarketplaceMenu 459
Manage Clients 459
BusinessDevelopment 460
Account Management Users' Guide xxvii

Contents
Advertising Application 461
Business Analyst Application 461
Financing FirmsApplication 462
Careers Application 462
Corporate Access ProvidersMarketplace 462
Support 465
Client ServicesMessage Center 465
Message Center Window 466
Viewing Tickets and UnreadMessages 467
Changing the Display Language 468
Viewing the Legend 468
Creating a New Ticket 469
Modifying a Ticket 472
Setting Ticket Notification Preferences 473
Closing a Ticket 474
Viewing Corporate Actions 475
Submitting a TaxReporting Correction Form 477
Requesting a Trade Cancellation 478
Live Chat 480
Client ServicesContact Information 481
Service Tips 482
Knowledge Base 482
Account Management Users' Guide xxviii
Contents
Client Services Tools 483
SystemStatus 484
Paper Forms 485
Using Account Management Forms 486
Index 487
Account Management Users' Guide xxix

Account Management Users' Guide xxx
Classic Account Management Users'GuideOverview
This chapter introduces you to Account Management and provides an overview of common functions. The
following topics are included:
About Account Management
Account Management Access and Account Structures
Logging In
HomePage
Menus
Getting Help
Navigating Account Management Pages
Changing the Active Account
Account Selector
Changing the Display Language
Printing
LoggingOut
About Account Management
Our Account Management system lets you configure andmanage your account from a single window, and
gives you convenient access to these account and website functions:
Trade - All accounts can launch Trader Workstation andWebTrader, trade within Account Man-
agement using QuickTrade, and somemultiple account structures can access Post-Trade Allocations.
1
Account Management Users' Guide 31
Reports - Customize and generate reports such as activity statements, margin reports, trade con-
firmations, and tax forms.
Funding - Set up fund and position transfers to and from your account, check the status of your depos-
its, transfers and withdrawals; specify client fees for broker or advisor client accounts; submit advisor-
calculated fee invoices for client accounts; authenticate pending bank instruction requests; andmore.
Manage Account - Configure your account, including account- and user-level settings. These include
personal, financial and regulatory information; IP restrictions; pricing structures; base currency; master
account functions; adding users and defining their access rights; viewing, adding and closing broker or
advisor client accounts; andmuchmore.
Manage Clients/Funds/Traders - Advisors, Brokers (Fully Disclosed and Non-Disclosed) and SIPP
account administrators access thismenu to configure their client accounts. Hedge Fund Investment
Managers whomanagemultiple funds access thismenu asManage Funds. Proprietary Trading Group
STL Account Master Users access this as theManage Tradersmenu. Functions include viewing and
adding client accounts and fund accounts; configuring client account trading permissions; specifying cli-
ent fees for broker or advisor client accounts and SMA accounts; submitting fee invoices for client
accounts; andmuchmore.
Investors' Marketplace - Eligible account holders can access our Hedge Fund Investor Site, eligible
hedge funds can participate in Hedge Fund Capital Introduction program, and other accounts can
access theMoneyManager, Administrator marketplaces and Third Party Custodian pages.
Support - Point of access for submitting and tracking Client Services issues; initiating live chat; and
accessing Client Services tools.
Reference - Access important information from our website, including our product and exchange list-
ings and detailed information onmargin and order types.
When navigating through the different pages in Account Management, do NOT use your browser’s Back
button. If you do, youmay be logged out of the system. Instead, use theBack button provided on theAccount Management pages.
Account Management Access and Account Structures
Access to themany features in Account Management is based on your customer type and account
structure.
Account Management Users' Guide 32
Chapter 1 Account Management Access and Account Structures

Chapter 1 Customer Types
Customer Types
There are twomain customer, or legal, types:
Single - An individual is classified as individual, joint (two individuals), trust, or IRA.
Organization - An organization is classified as a corporation, partnership, limited liability corporation
(LLC), or unincorporated business.
Account Structures
Access to themany functions in Account Management depends on your account structure. For example,
youmight be an advisor or broker master user, an advisor or broker client user, proprietary trading group
master user or an institution sub user, or an individual trader or investor.
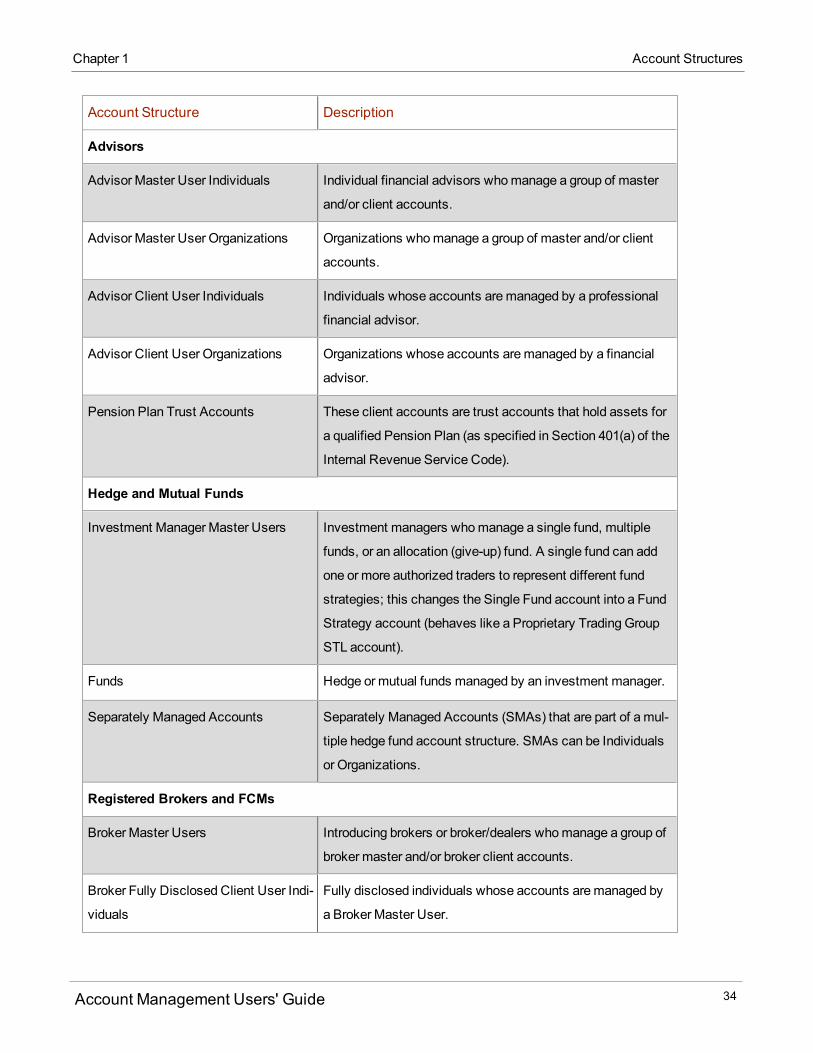
We offer the following account structures, which reflect your business:
Account Structure Description
Traders and Investors
Individual, Joint, Trust, and IRA and
Custodial (UGMA/UTMA)
Individual, Joint, Trust and IRA users whomanage their own
accounts, and UGMA/UTMA account custodians whoman-
age accounts for minors.
Small Business Single Corporations, Partnerships, Limited Liability Cor-
porations and Unincorporated legal structures that manage
their own accounts.
Friends and Family GroupGroup Multiple accounts (15 or fewer) managed under a single login.
Managed accounts can be single and/or organization cus-
tomer types, including family office and small business
accounts.
RSP and TFSA (IB Canada only) IB Canada offers Regular RSP, Spousal RSP and TSFA
accounts for individuals only. RSP accounts require amin-
imum equity size of 10K USD equivalent. A Spousal RSP
account allows spouse or common law partner to contribute
to your RSP and receive the benefit of the tax deductions for
such contributions.
Account Management Users' Guide 33
Account Structure Description
Advisors
Advisor Master User Individuals Individual financial advisors whomanage a group of master
and/or client accounts.
Advisor Master User Organizations Organizations whomanage a group of master and/or client
accounts.
Advisor Client User Individuals Individuals whose accounts aremanaged by a professional
financial advisor.
Advisor Client User Organizations Organizations whose accounts aremanaged by a financial
advisor.
Pension Plan Trust Accounts These client accounts are trust accounts that hold assets for
a qualified Pension Plan (as specified in Section 401(a) of the
Internal Revenue Service Code).
Hedge and Mutual Funds
Investment Manager Master Users Investment managers whomanage a single fund, multiple
funds, or an allocation (give-up) fund. A single fund can add
one or more authorized traders to represent different fund
strategies; this changes the Single Fund account into a Fund
Strategy account (behaves like a Proprietary Trading Group
STL account).
Funds Hedge or mutual funds managed by an investment manager.
Separately Managed Accounts Separately Managed Accounts (SMAs) that are part of a mul-
tiple hedge fund account structure. SMAs can be Individuals
or Organizations.
Registered Brokers and FCMs
Broker Master Users Introducing brokers or broker/dealers whomanage a group of
broker master and/or broker client accounts.
Broker Fully Disclosed Client User Indi-
viduals
Fully disclosed individuals whose accounts aremanaged by
a Broker Master User.
Account Management Users' Guide 34
Chapter 1 Account Structures
Chapter 1 Account Structures
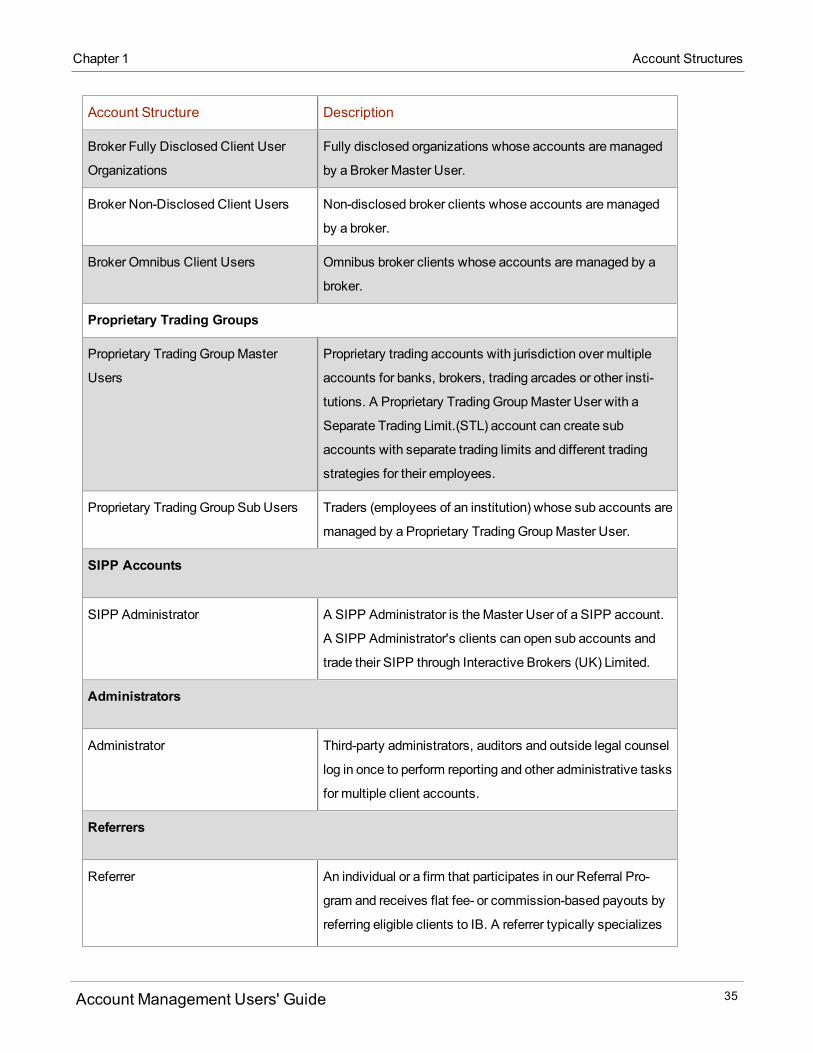
Account Structure Description
Broker Fully Disclosed Client User
Organizations
Fully disclosed organizations whose accounts aremanaged
by a Broker Master User.
Broker Non-Disclosed Client Users Non-disclosed broker clients whose accounts aremanaged
by a broker.
Broker Omnibus Client Users Omnibus broker clients whose accounts aremanaged by a
broker.
Proprietary Trading Groups
Proprietary Trading GroupMaster
Users
Proprietary trading accounts with jurisdiction over multiple
accounts for banks, brokers, trading arcades or other insti-
tutions. A Proprietary Trading GroupMaster User with a
Separate Trading Limit.(STL) account can create sub
accounts with separate trading limits and different trading
strategies for their employees.
Proprietary Trading Group Sub Users Traders (employees of an institution) whose sub accounts are
managed by a Proprietary Trading GroupMaster User.
SIPP Accounts
SIPP Administrator A SIPP Administrator is theMaster User of a SIPP account.
A SIPP Administrator's clients can open sub accounts and
trade their SIPP through Interactive Brokers (UK) Limited.
Administrators
Administrator Third-party administrators, auditors and outside legal counsel
log in once to perform reporting and other administrative tasks
for multiple client accounts.
Referrers
Referrer An individual or a firm that participates in our Referral Pro-
gram and receives flat fee- or commission-based payouts by
referring eligible clients to IB. A referrer typically specializes
Account Management Users' Guide 35
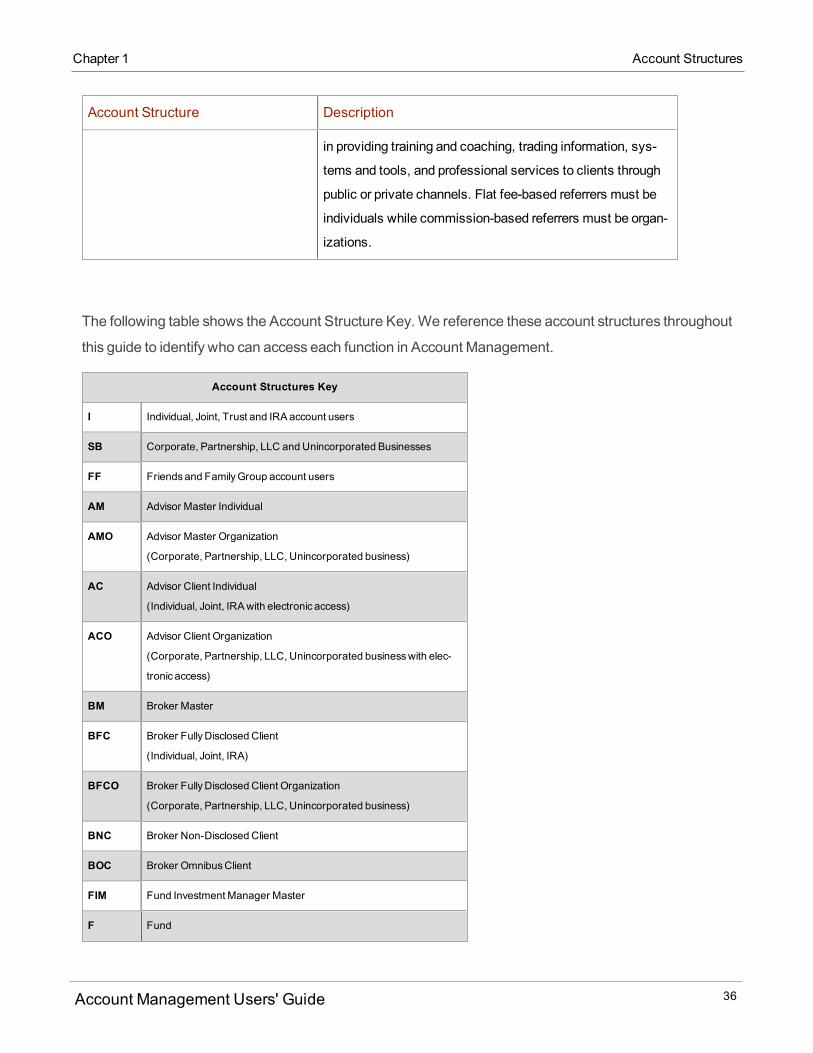
Account Structure Description
in providing training and coaching, trading information, sys-
tems and tools, and professional services to clients through
public or private channels. Flat fee-based referrers must be
individuals while commission-based referrers must be organ-
izations.
The following table shows the Account Structure Key.We reference these account structures throughout
this guide to identify who can access each function in Account Management.
Account Structures Key
I Individual, Joint, Trust and IRA account users
SB Corporate, Partnership, LLC and Unincorporated Businesses
FF Friendsand FamilyGroup account users
AM Advisor Master Individual
AMO Advisor Master Organization
(Corporate, Partnership, LLC, Unincorporated business)
AC Advisor Client Individual
(Individual, Joint, IRAwith electronic access)
ACO Advisor Client Organization
(Corporate, Partnership, LLC, Unincorporated businesswith elec-
tronic access)
BM Broker Master
BFC Broker FullyDisclosed Client
(Individual, Joint, IRA)
BFCO Broker FullyDisclosed Client Organization
(Corporate, Partnership, LLC, Unincorporated business)
BNC Broker Non-Disclosed Client
BOC Broker OmnibusClient
FIM Fund Investment Manager Master
F Fund
Account Management Users' Guide 36
Chapter 1 Account Structures
Chapter 1 Logging In
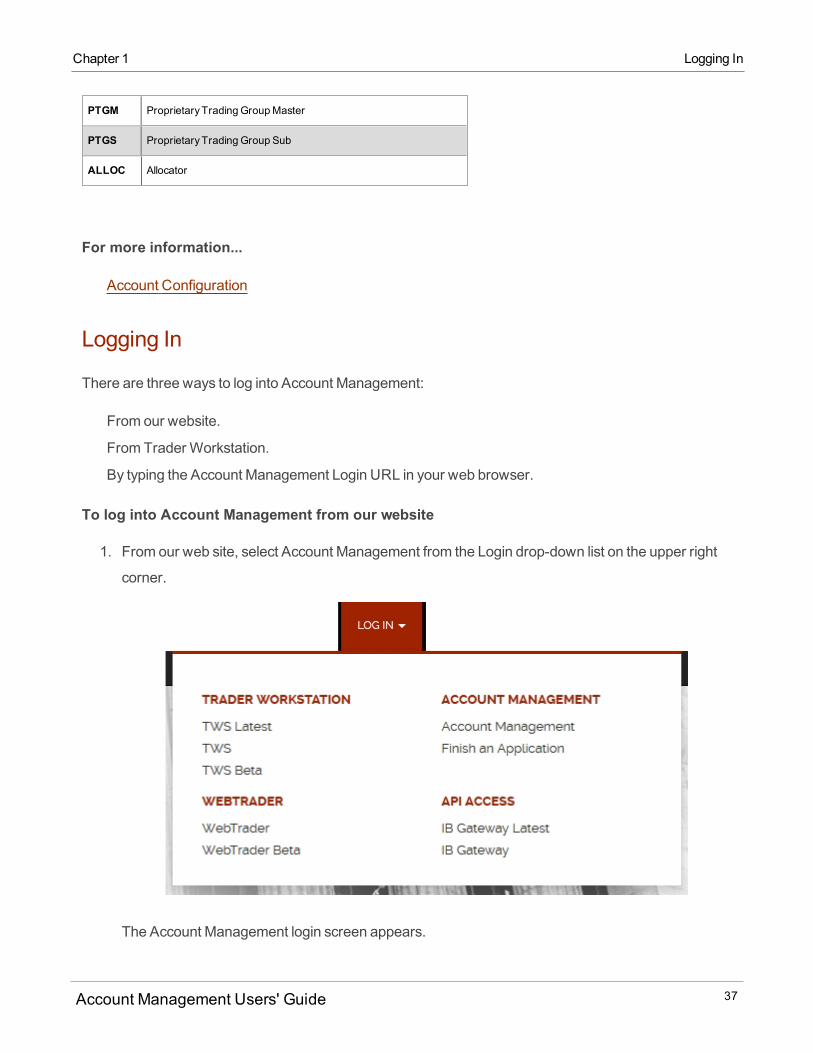
PTGM ProprietaryTradingGroupMaster
PTGS ProprietaryTradingGroup Sub
ALLOC Allocator
For more information...
Account Configuration
Logging In
There are three ways to log into Account Management:
From our website.
FromTrader Workstation.
By typing the Account Management Login URL in your web browser.
To log into Account Management from our website
1. From our web site, select Account Management from the Login drop-down list on the upper right
corner.
The Account Management login screen appears.
Account Management Users' Guide 37
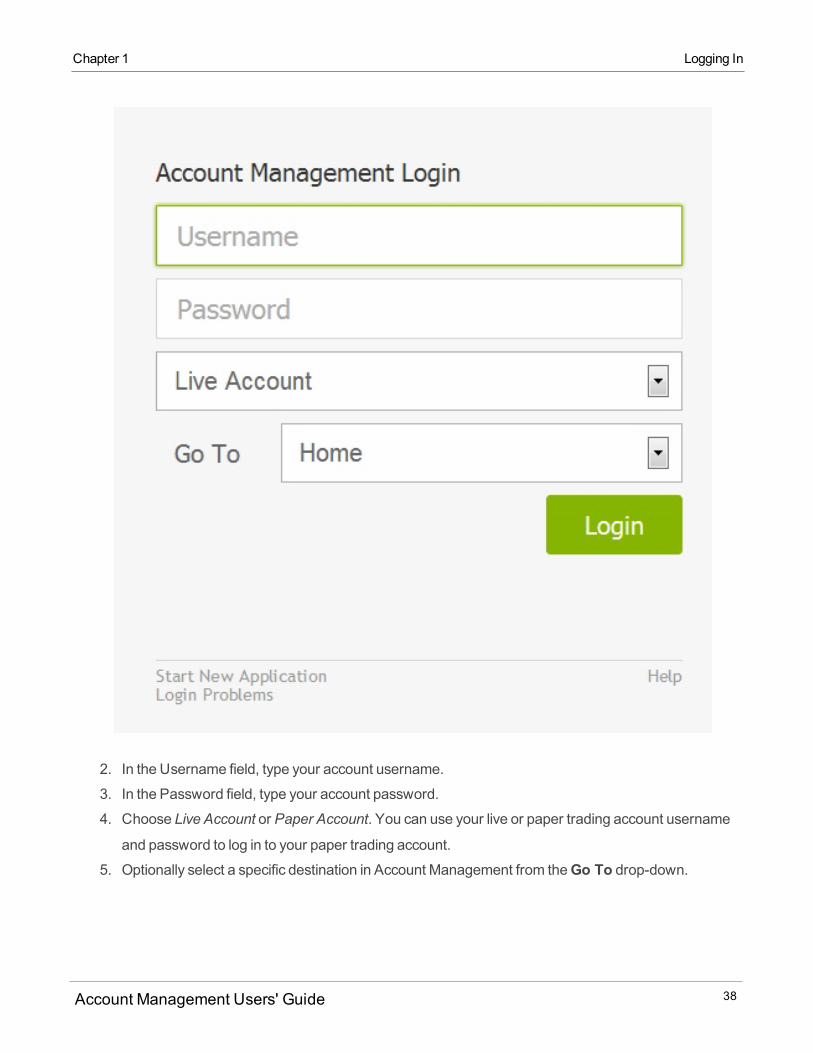
2. In the Username field, type your account username.
3. In the Password field, type your account password.
4. Choose Live Account or Paper Account. You can use your live or paper trading account username
and password to log in to your paper trading account.
5. Optionally select a specific destination in Account Management from theGo To drop-down.
Account Management Users' Guide 38
Chapter 1 Logging In
Chapter 1 Logging In
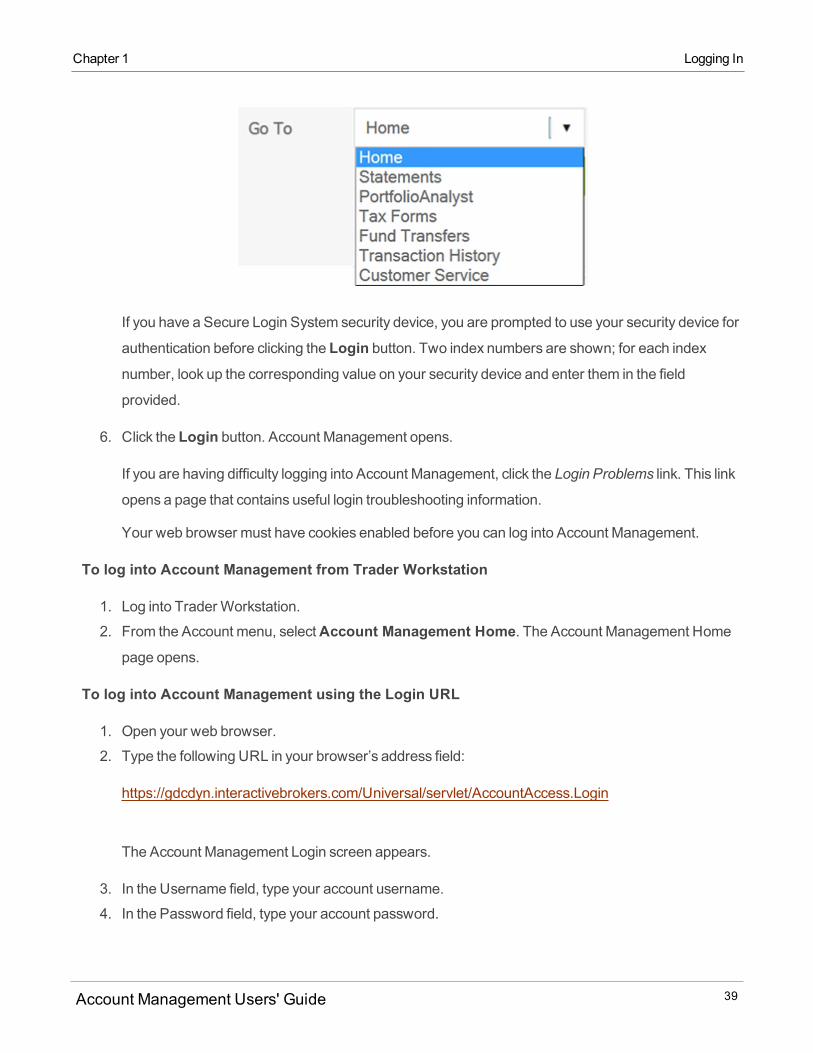
If you have a Secure Login System security device, you are prompted to use your security device for
authentication before clicking the Login button. Two index numbers are shown; for each indexnumber, look up the corresponding value on your security device and enter them in the field
provided.
6. Click the Login button. Account Management opens.
If you are having difficulty logging into Account Management, click the Login Problems link. This link
opens a page that contains useful login troubleshooting information.
Your web browser must have cookies enabled before you can log into Account Management.
To log into Account Management from Trader Workstation
1. Log into Trader Workstation.
2. From the Account menu, selectAccount Management Home. The Account Management Homepage opens.
To log into Account Management using the Login URL
1. Open your web browser.
2. Type the following URL in your browser’s address field:
https://gdcdyn.interactivebrokers.com/Universal/servlet/AccountAccess.Login
The Account Management Login screen appears.
3. In the Username field, type your account username.
4. In the Password field, type your account password.
Account Management Users' Guide 39
5. Choose Live Account or Paper Account. You can use your live account username and password to
log in to your paper trading account.
6. Optionally select a specific destination in Account Management from theGo To drop-down.7. Click the Login button. Account Management opens.
Failed Login Attempts
After ten failed login attempts in 24 hours, your Account Management login will be disabled. If this happens,
contact Client Services.
Home Page
The Account Management Home page includes the following tabbed pages:
Summary - The Real-time Summary appears by default on the Home page and includes current bal-
ances, margin requirements and available funds for your account, or in the case of amultiple account
structure, for the selected account.
Positions - The Positions tab displays all of the positions in your account, or in the case of amultiple
account structure, in the selected account.
Pending Items - The Pending Items tab displays all pending items, including outstanding document sub-
missions or funding requests for your account, or in the case of amultiple account structure, for the
selected account. The current number of pending items appears on the Pending Items tab.
Messages - TheMessages tab displays all current Client Servicesmessages, such as responses to
inquiries, for your account, or in the case of amultiple account structure, for the selected account.. The
current number of messages appears on theMessage Center tab.
Corporate Actions - The Corporate Actions tab displays all current corporate actions for your account,
or in the case of amultiple account structure, for the selected account.. The current number of cor-
porate actions appears on the Corporate Actions tab.
To return to the Home page from any place in Account Management, simply click the red icon on the left
side of the Account Management menu.
The Home page also includes the following:
Account Management Users' Guide 40
Chapter 1 Failed Login Attempts
Chapter 1 Home Page
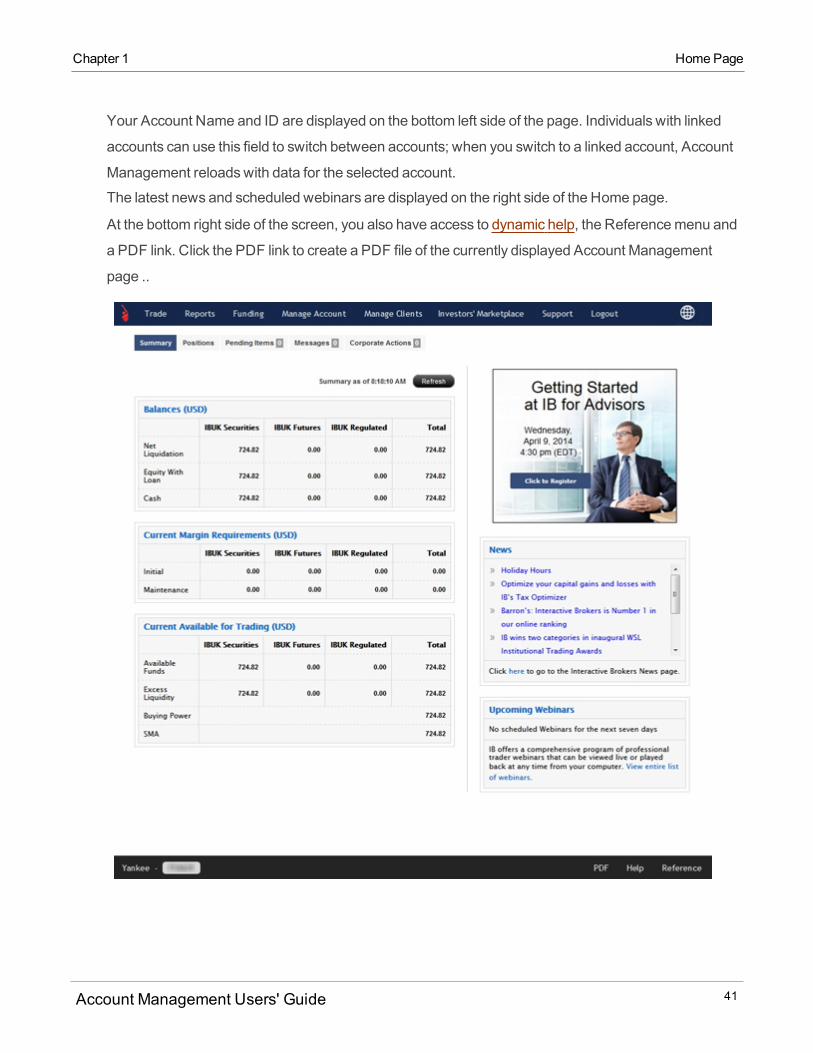
Your Account Name and ID are displayed on the bottom left side of the page. Individuals with linked
accounts can use this field to switch between accounts; when you switch to a linked account, Account
Management reloadswith data for the selected account.
The latest news and scheduled webinars are displayed on the right side of the Home page.
At the bottom right side of the screen, you also have access to dynamic help, the Referencemenu and
a PDF link. Click the PDF link to create a PDF file of the currently displayed Account Management
page ..
Account Management Users' Guide 41
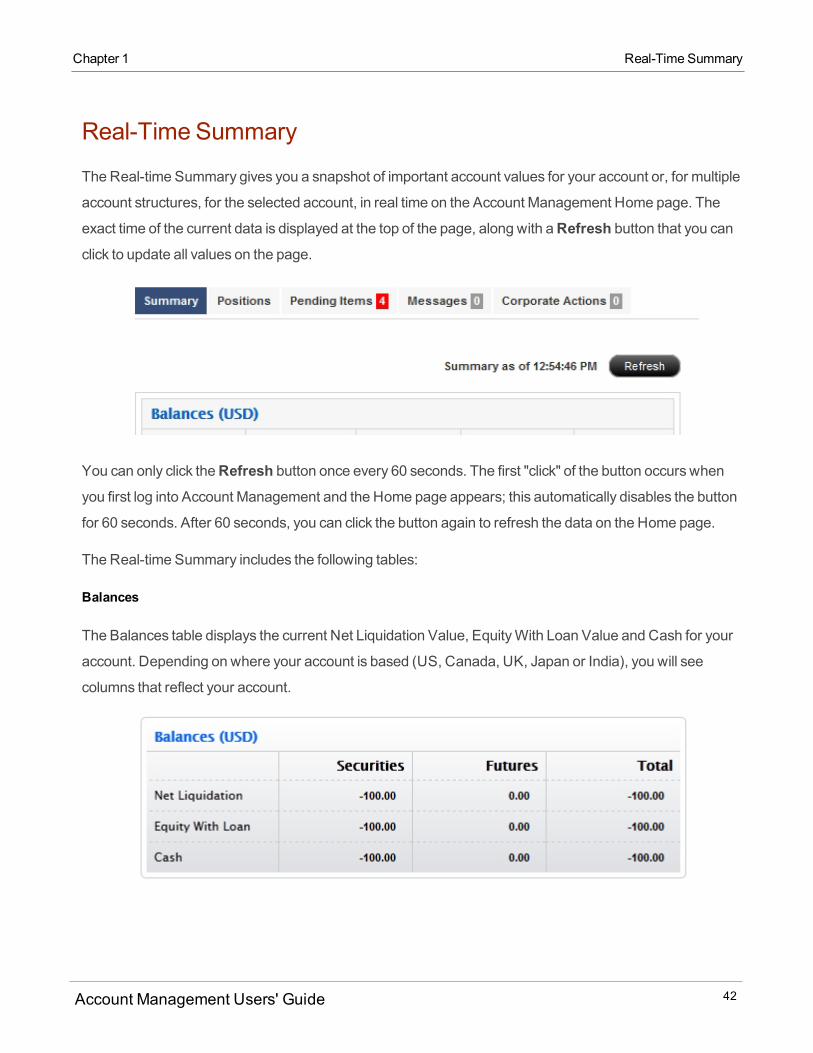
Real-Time Summary
TheReal-time Summary gives you a snapshot of important account values for your account or, for multiple
account structures, for the selected account, in real time on the Account Management Home page. The
exact time of the current data is displayed at the top of the page, along with aRefresh button that you canclick to update all values on the page.
You can only click theRefresh button once every 60 seconds. The first "click" of the button occurs whenyou first log into Account Management and the Home page appears; this automatically disables the button
for 60 seconds. After 60 seconds, you can click the button again to refresh the data on the Home page.
The Real-time Summary includes the following tables:
Balances
The Balances table displays the current Net Liquidation Value, EquityWith Loan Value and Cash for your
account. Depending on where your account is based (US, Canada, UK, Japan or India), you will see
columns that reflect your account.
Account Management Users' Guide 42
Chapter 1 Real-Time Summary
Chapter 1 Margin Requirements
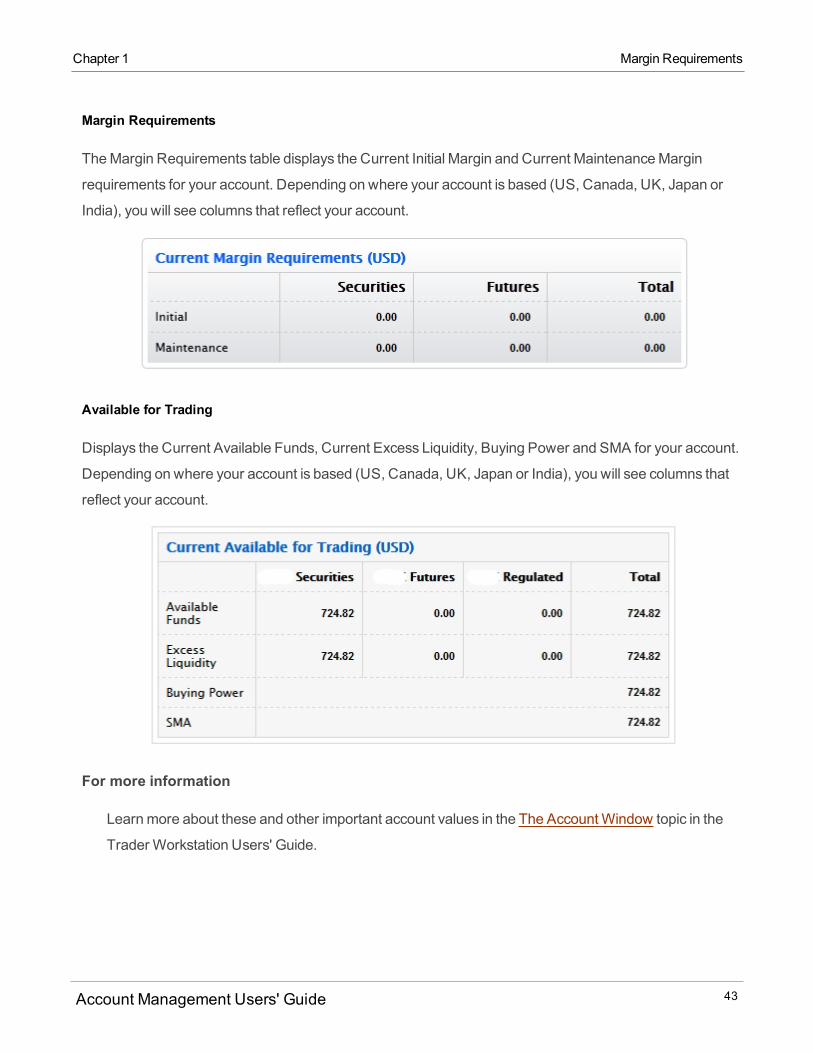
Margin Requirements
TheMargin Requirements table displays the Current Initial Margin and Current MaintenanceMargin
requirements for your account. Depending on where your account is based (US, Canada, UK, Japan or
India), you will see columns that reflect your account.
Available for Trading
Displays the Current Available Funds, Current Excess Liquidity, Buying Power and SMA for your account.
Depending on where your account is based (US, Canada, UK, Japan or India), you will see columns that
reflect your account.
For more information
Learnmore about these and other important account values in the The AccountWindow topic in the
Trader Workstation Users' Guide.
Account Management Users' Guide 43

Positions
The Positions tab displays all of the positions and cash in your account, or in the case of amultiple account
structure, in the selected account. You can hover your mouse cursor over a symbol to display the full name
of the position in a popup box. Positions are grouped by asset class.
Currently, the Positions tab is only visible to Individual, Joint, Trust, and IRA accounts that are NOT Advisor
or Fully Disclosed clients. If you are amaster user in an institution account (Advisor, Broker, Multiple
Hedge Fund, Proprietary Trading Group STL), you can view Positions for your clients, funds or sub
accounts in theManage Clients/Funds/Tradersmenu underAccounts > View > Summary.
For example, here is the Positions tab for an account with cash in several currencies.
Pending Items
The Pending Items page shows items such as outstanding document submissions or pending funding
requests for your account or, for multiple account structures, for the selected account.
Account Management Users' Guide 44
Chapter 1 Positions
Chapter 1 Messages
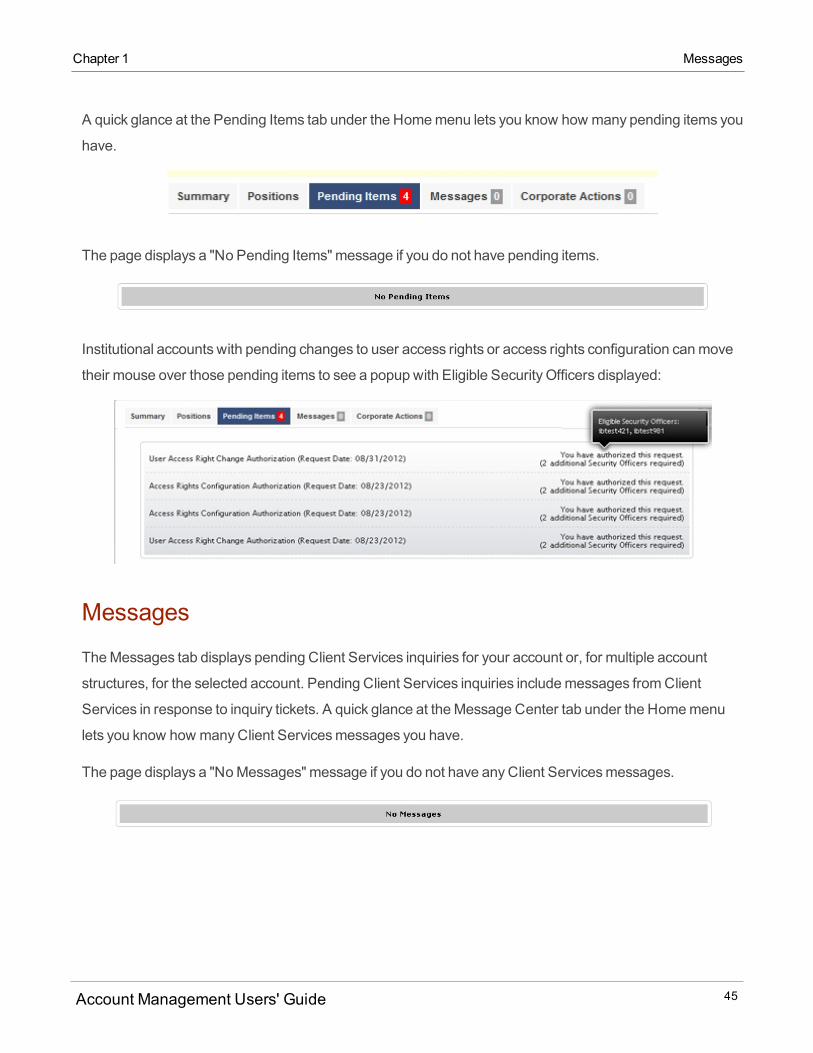
A quick glance at the Pending Items tab under the Homemenu lets you know how many pending items you
have.
The page displays a "No Pending Items"message if you do not have pending items.
Institutional accounts with pending changes to user access rights or access rights configuration canmove
their mouse over those pending items to see a popup with Eligible Security Officers displayed:
Messages
TheMessages tab displays pending Client Services inquiries for your account or, for multiple account
structures, for the selected account. Pending Client Services inquiries includemessages fromClient
Services in response to inquiry tickets. A quick glance at theMessage Center tab under the Homemenu
lets you know how manyClient Servicesmessages you have.
The page displays a "NoMessages"message if you do not have anyClient Servicesmessages.
Account Management Users' Guide 45
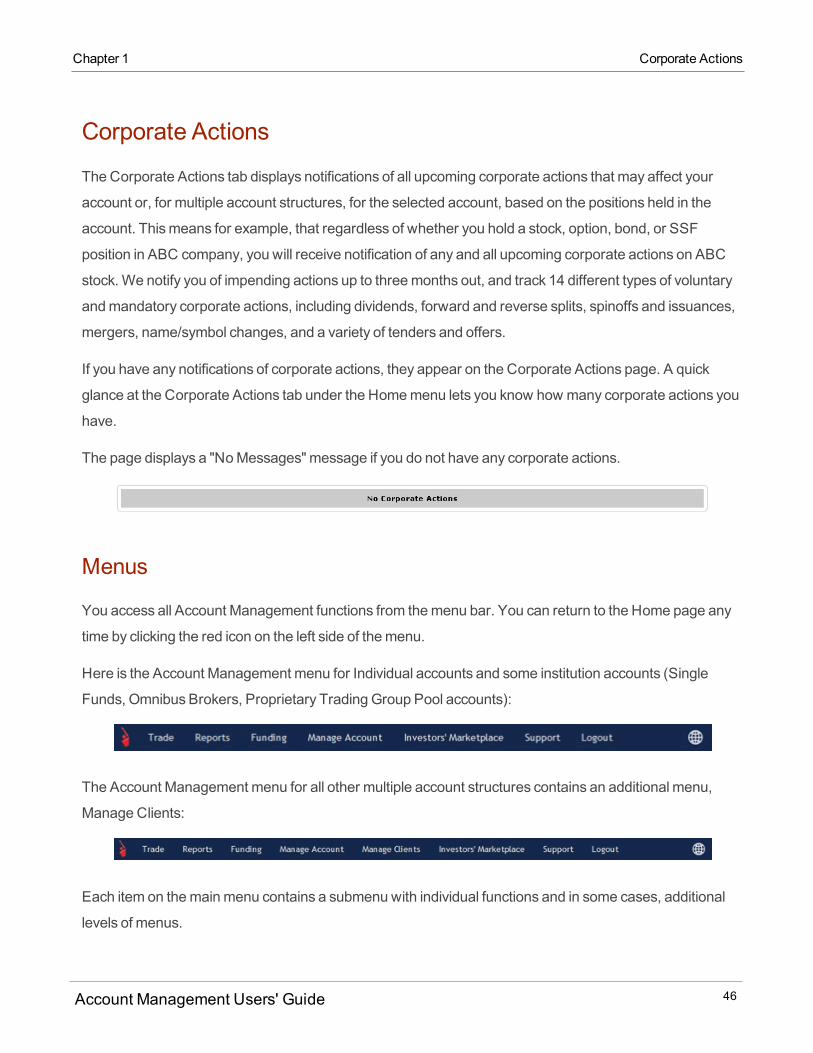
Corporate Actions
TheCorporate Actions tab displays notifications of all upcoming corporate actions that may affect your
account or, for multiple account structures, for the selected account, based on the positions held in the
account. Thismeans for example, that regardless of whether you hold a stock, option, bond, or SSF
position in ABC company, you will receive notification of any and all upcoming corporate actions on ABC
stock. We notify you of impending actions up to threemonths out, and track 14 different types of voluntary
andmandatory corporate actions, including dividends, forward and reverse splits, spinoffs and issuances,
mergers, name/symbol changes, and a variety of tenders and offers.
If you have any notifications of corporate actions, they appear on the Corporate Actions page. A quick
glance at the Corporate Actions tab under the Homemenu lets you know how many corporate actions you
have.
The page displays a "NoMessages"message if you do not have any corporate actions.
Menus
You access all Account Management functions from themenu bar. You can return to the Home page any
time by clicking the red icon on the left side of themenu.
Here is the Account Management menu for Individual accounts and some institution accounts (Single
Funds, Omnibus Brokers, Proprietary Trading Group Pool accounts):
The Account Management menu for all other multiple account structures contains an additional menu,
Manage Clients:
Each item on themainmenu contains a submenuwith individual functions and in some cases, additional
levels of menus.
Account Management Users' Guide 46
Chapter 1 Corporate Actions
Chapter 1 Navigating the Account Management Menus
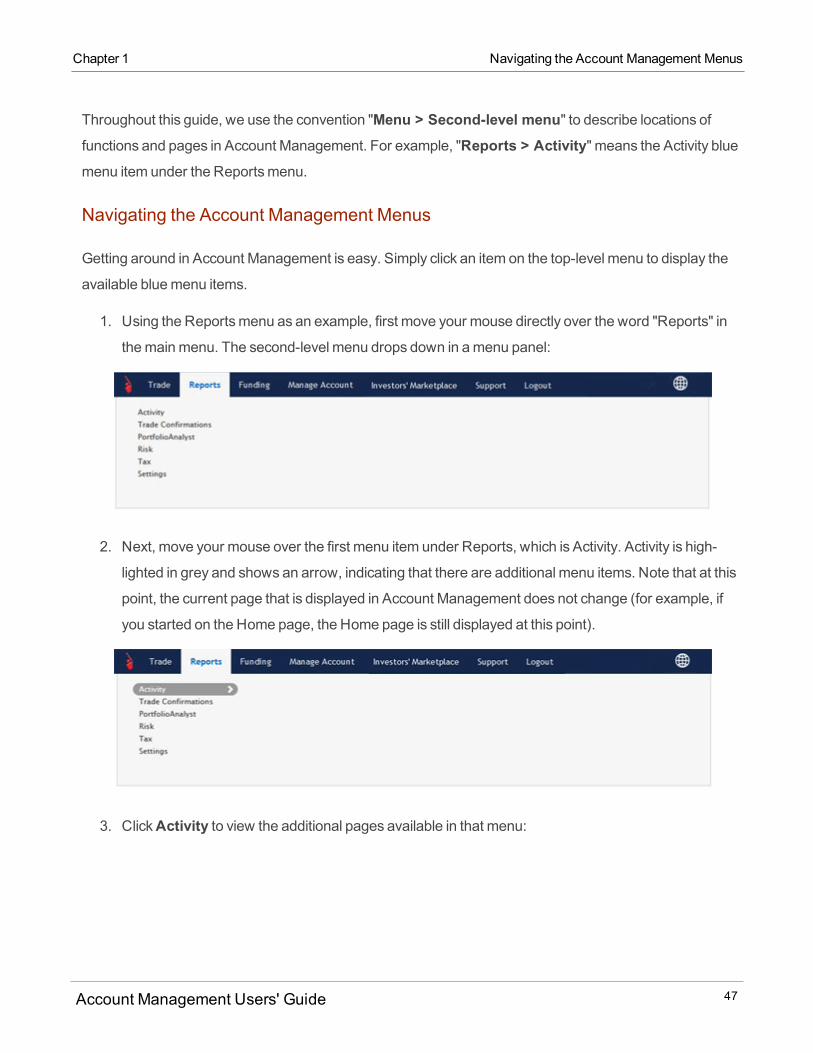
Throughout this guide, we use the convention "Menu > Second-level menu" to describe locations offunctions and pages in Account Management. For example, "Reports > Activity" means the Activity bluemenu item under the Reportsmenu.
Navigating the Account Management Menus
Getting around in Account Management is easy. Simply click an item on the top-level menu to display the
available bluemenu items.
1. Using the Reportsmenu as an example, first move your mouse directly over the word "Reports" in
themainmenu. The second-level menu drops down in amenu panel:
2. Next, move your mouse over the first menu item under Reports, which is Activity. Activity is high-
lighted in grey and shows an arrow, indicating that there are additional menu items. Note that at this
point, the current page that is displayed in Account Management does not change (for example, if
you started on the Home page, the Home page is still displayed at this point).
3. ClickActivity to view the additional pages available in that menu:
Account Management Users' Guide 47

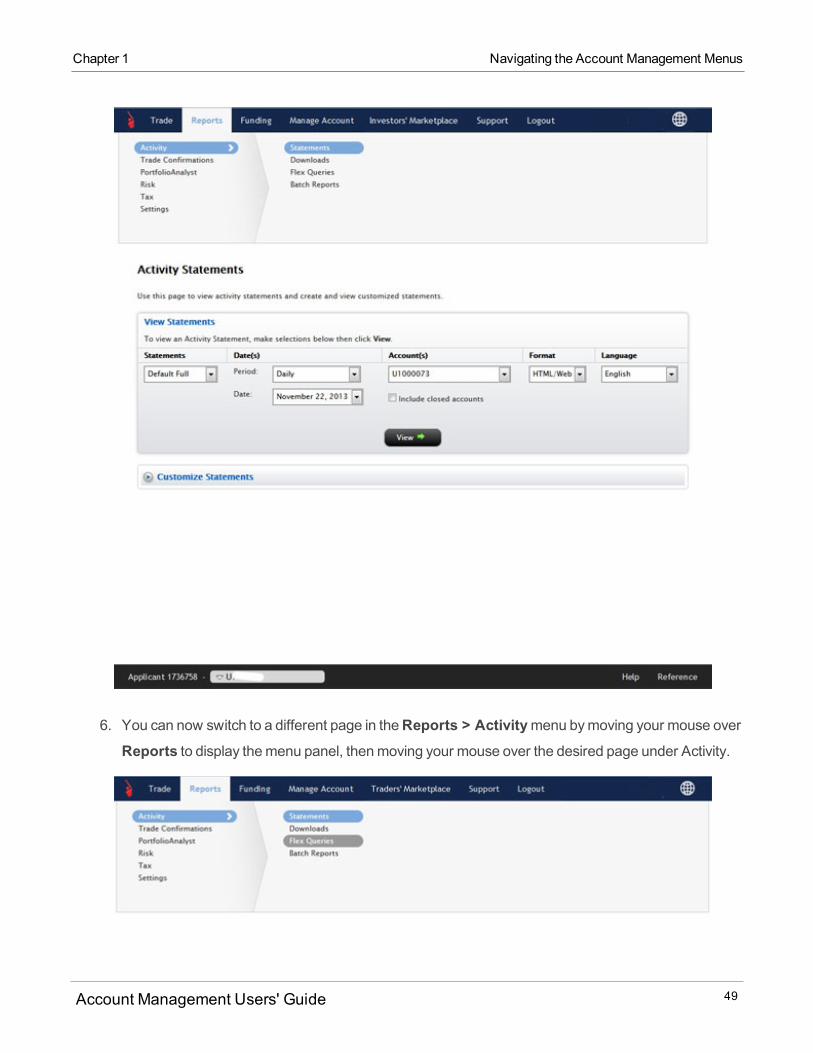
4. Activity is now highlighted in blue, and you canmove your mouse over all of the pages available
under Activity.
5. Click any page in the Activitymenu to display that page. In the image below, theReports > Activity> Statements page is displayed. As soon as the selected page opens, themenu panel hides fromview.
Account Management Users' Guide 48
Chapter 1 Navigating the Account Management Menus
Chapter 1 Navigating the Account Management Menus
6. You can now switch to a different page in theReports > Activitymenu bymoving your mouse overReports to display themenu panel, thenmoving your mouse over the desired page under Activity.
Account Management Users' Guide 49
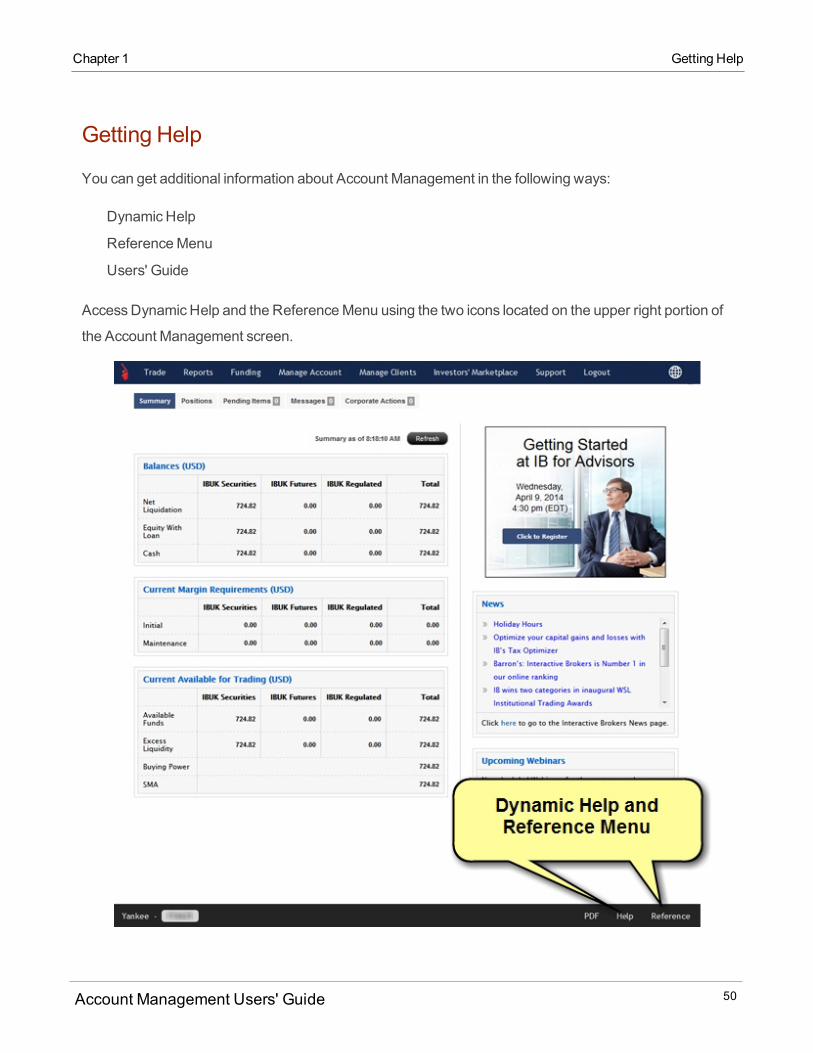
Getting Help
You can get additional information about Account Management in the following ways:
Dynamic Help
ReferenceMenu
Users' Guide
AccessDynamic Help and the ReferenceMenu using the two icons located on the upper right portion of
the Account Management screen.
Account Management Users' Guide 50
Chapter 1 Getting Help

Chapter 1 Dynamic Help
Dynamic Help
Onmost pages, you can display a help panel that contains simple step-by-step instructions. To display the
How To help panel, click the blue and white questionmark symbol on the upper right corner of the page.
The help panel slides in from the left side of the screen.
To close the help panel, click the red X.
Account Management Users' Guide
ThisGuide contains detailed instructions on how to use the different functions in Account Management.
Access this guide fromwithin most dynamic help topics, or from the ReferenceMenu, or from the
Documentation page in the Traders' University on our website.
Navigating Account Management Pages
ManyAccount Management functions contain a sequence of multiple pages, which are connected by
Continue and Back buttons. The presence of aContinue buttonmeans that there is another page that
Account Management Users' Guide 51

contains information that you need to view or a form that you need to complete. You can use theBackbutton to return to the previous page in the sequence.
When navigating through the different pages in Account Management, do NOT use your browser's Back
button. If you do, youmay be logged out of the system. Instead, use theBack button provided on theAccount Management pages.
You can also use themenus to navigate to any other page in Account Management, or click the red icon on
the left side of themenu to return to the Account Management Home page.
Changing the Active Account
If you havemultiple linked accounts or account partitions and you log in to Account Management, only one
account will be the active account. You can quickly change the active account to another linked account or
account partition from any page in Account Management using the account switching tool at the bottom of
the screen. You can switch between accounts and switch back at any time in Account Management.
This is not the same thing as using the Account Selector at the top of some Account Management pages.
Changing the active account affects all of Account Management while the Account Selector lets you
choose accounts on which to perform certain tasks on specific pages.
Change the Active Account
1. If you havemultiple linked accounts or account partitions, a down arrow displays next to the Account
ID. Click the down arrow to display a list of your available accounts by Account ID.
Account Management Users' Guide 52
Chapter 1 Changing the Active Account
Chapter 1 Changing the Active Account
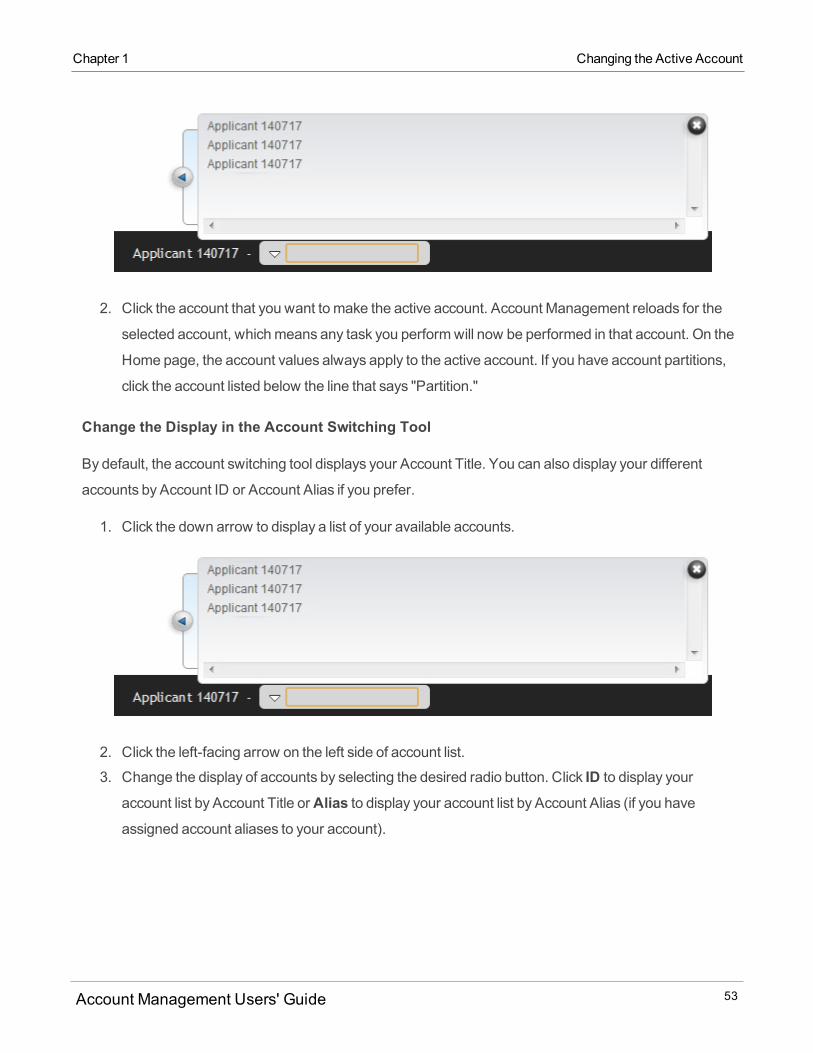
2. Click the account that you want to make the active account. Account Management reloads for the
selected account, whichmeans any task you performwill now be performed in that account. On the
Home page, the account values always apply to the active account. If you have account partitions,
click the account listed below the line that says "Partition."
Change the Display in the Account Switching Tool
By default, the account switching tool displays your Account Title. You can also display your different
accounts by Account ID or Account Alias if you prefer.
1. Click the down arrow to display a list of your available accounts.
2. Click the left-facing arrow on the left side of account list.
3. Change the display of accounts by selecting the desired radio button. Click ID to display your
account list by Account Title orAlias to display your account list by Account Alias (if you haveassigned account aliases to your account).
Account Management Users' Guide 53

4. You can now change the active account or close the account switching tool and change the active
account later.
Account Selector
If you have amaster account or any other multiple-account structure, including linked accounts, many of
the pages you access in Account Management, including the Home page, allow you to select or change the
account in which to perform a given task. On these pages, you will see the Account Selector appear at the
top of the page:
Using the Account Selector
Within the Account Selector, there are several ways to search for and select accounts:
Click the client or sub account ID to select it. Use the scroll bar to view more accounts.
Use the Search field to search for specific accounts. Enter an Account ID one character at a time to
view dynamic search results.
Use the Display By: radio buttons to search for accounts by Account ID, Account Title or Account Alias.
Matching accounts are displayed below the controls.
If you choose to search by Account Alias and there is no account alias associated with any client or sub
accounts, the Account ID + Account Title will be displayed instead.
Account Management Users' Guide 54
Chapter 1 Account Selector
Chapter 1 Using the Account Selector
On someAccount Management pages, you can also search for closed accounts. For example, if you are
an Advisor and you want to generate a statement for a closed client account, you can select the IncludeClosed Accounts check box to display closed accounts in the Account Selector.
There are different varieties of the Account Selector, depending on which Account Management page is
currently displayed and what kind of account you have:
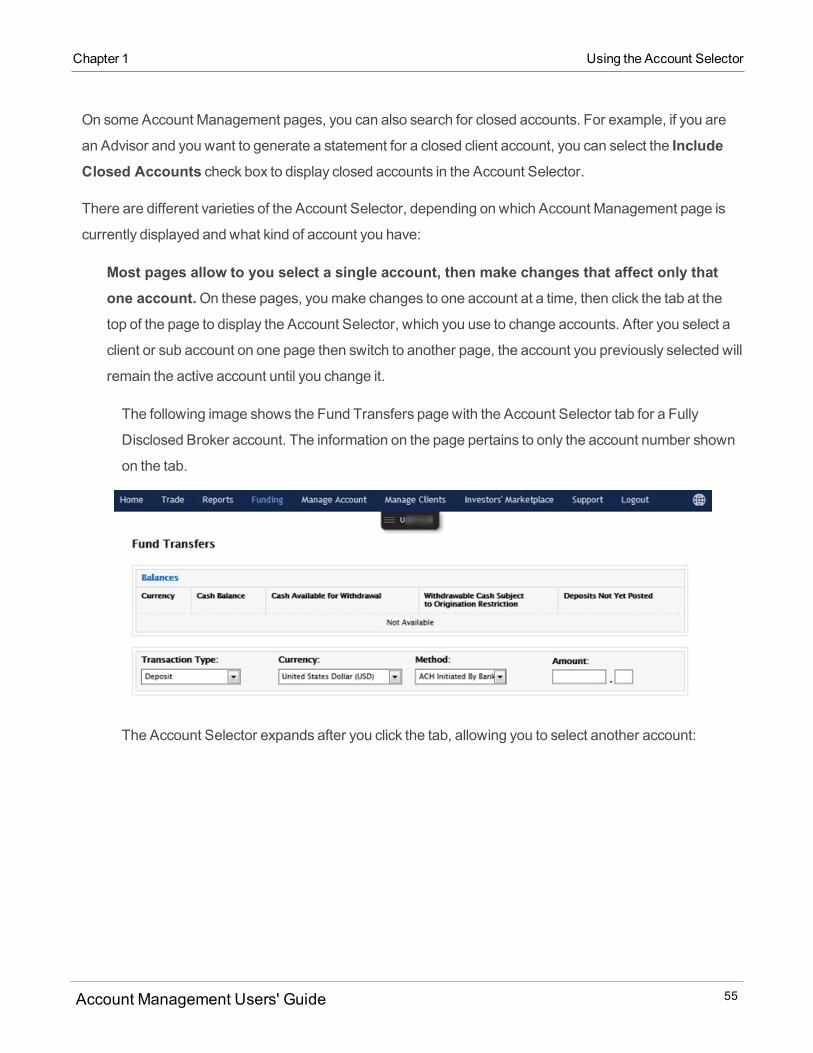
Most pages allow to you select a single account, then make changes that affect only thatone account.On these pages, youmake changes to one account at a time, then click the tab at thetop of the page to display the Account Selector, which you use to change accounts. After you select a
client or sub account on one page then switch to another page, the account you previously selected will
remain the active account until you change it.
The following image shows the Fund Transfers page with the Account Selector tab for a Fully
Disclosed Broker account. The information on the page pertains to only the account number shown
on the tab.
The Account Selector expands after you click the tab, allowing you to select another account:
Account Management Users' Guide 55
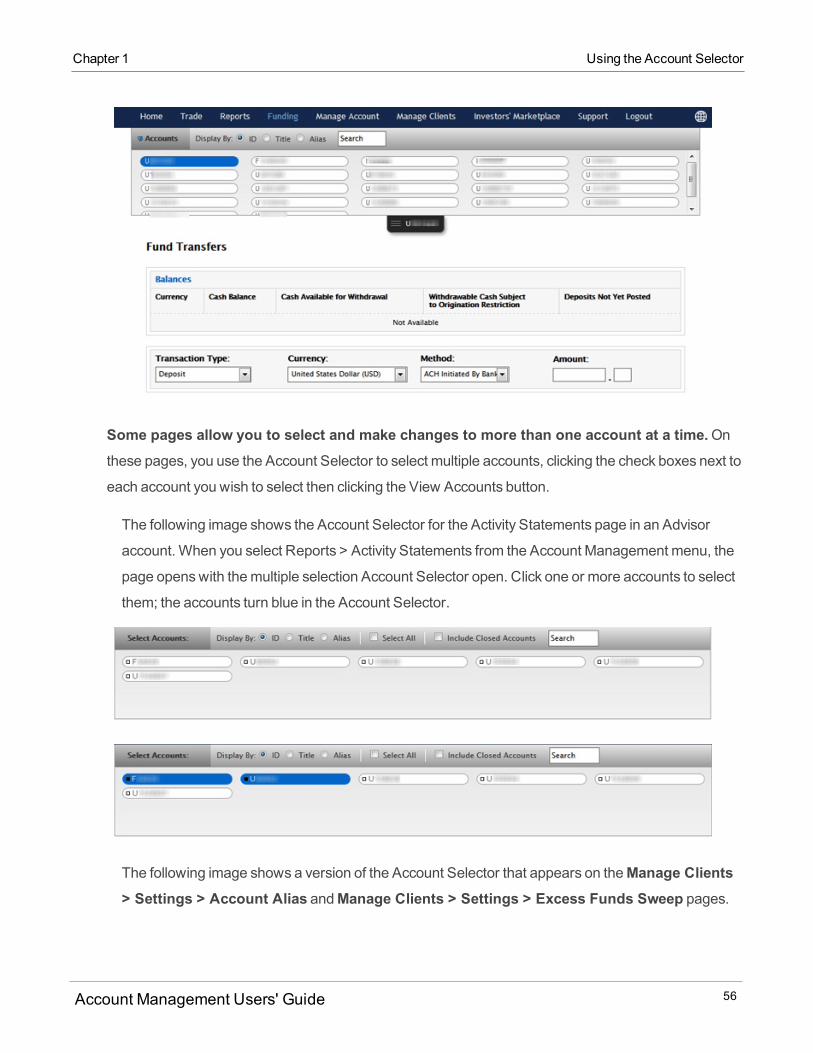
Some pages allow you to select and make changes to more than one account at a time.Onthese pages, you use the Account Selector to select multiple accounts, clicking the check boxes next to
each account you wish to select then clicking the View Accounts button.
The following image shows the Account Selector for the Activity Statements page in an Advisor
account. When you select Reports > Activity Statements from the Account Management menu, the
page openswith themultiple selection Account Selector open. Click one or more accounts to select
them; the accounts turn blue in the Account Selector.
The following image shows a version of the Account Selector that appears on theManage Clients> Settings > Account Alias andManage Clients > Settings > Excess Funds Sweep pages.
Account Management Users' Guide 56
Chapter 1 Using the Account Selector
Chapter 1 Using the Account Selector
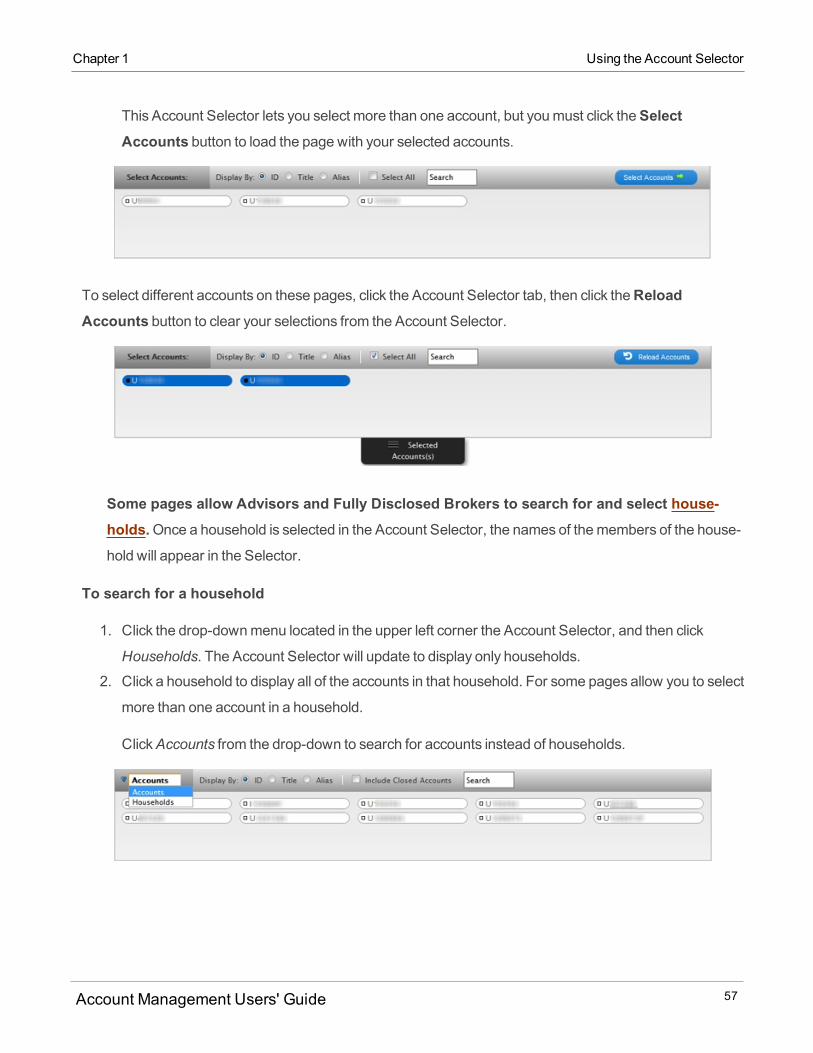
This Account Selector lets you select more than one account, but youmust click theSelectAccounts button to load the page with your selected accounts.
To select different accounts on these pages, click the Account Selector tab, then click theReloadAccounts button to clear your selections from the Account Selector.
Some pages allow Advisors and Fully Disclosed Brokers to search for and select house-holds.Once a household is selected in the Account Selector, the names of themembers of the house-hold will appear in the Selector.
To search for a household
1. Click the drop-downmenu located in the upper left corner the Account Selector, and then click
Households. The Account Selector will update to display only households.
2. Click a household to display all of the accounts in that household. For some pages allow you to select
more than one account in a household.
ClickAccounts from the drop-down to search for accounts instead of households.
Account Management Users' Guide 57
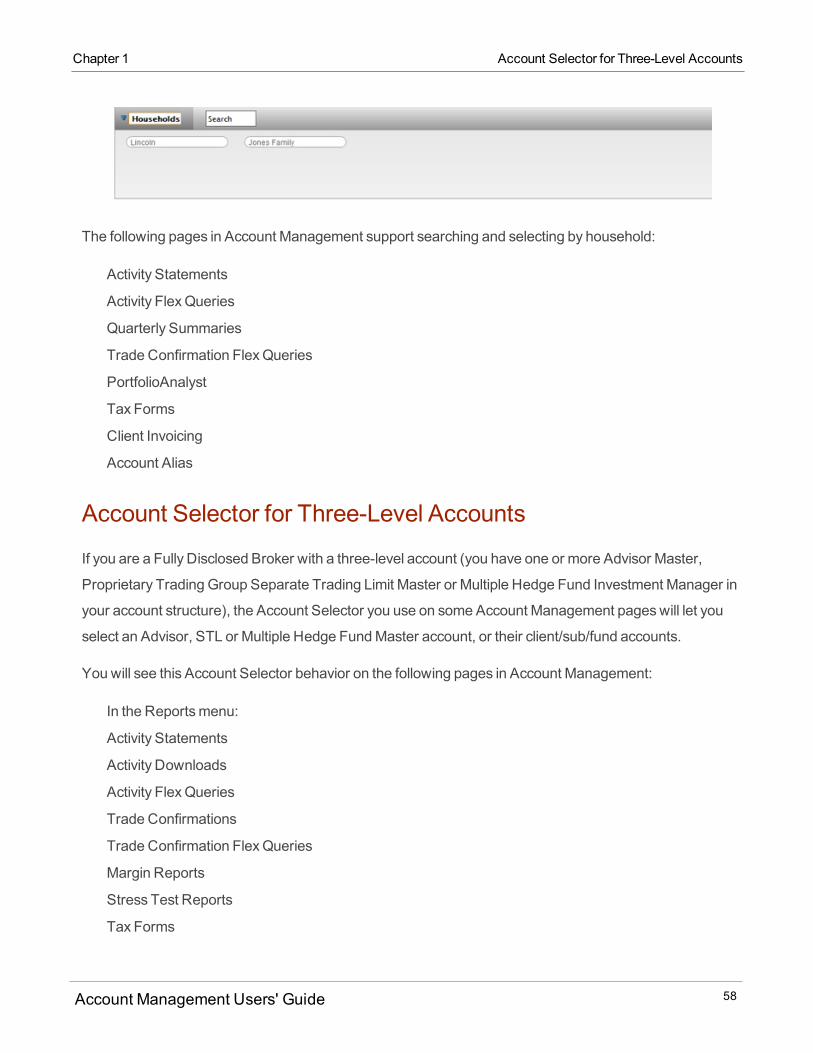
The following pages in Account Management support searching and selecting by household:
Activity Statements
Activity FlexQueries
Quarterly Summaries
Trade Confirmation FlexQueries
PortfolioAnalyst
Tax Forms
Client Invoicing
Account Alias
Account Selector for Three-Level Accounts
If you are a Fully Disclosed Broker with a three-level account (you have one or more Advisor Master,
Proprietary Trading Group Separate Trading Limit Master or Multiple Hedge Fund Investment Manager in
your account structure), the Account Selector you use on some Account Management pageswill let you
select an Advisor, STL or Multiple Hedge FundMaster account, or their client/sub/fund accounts.
You will see this Account Selector behavior on the following pages in Account Management:
In the Reportsmenu:
Activity Statements
Activity Downloads
Activity FlexQueries
Trade Confirmations
Trade Confirmation FlexQueries
Margin Reports
Stress Test Reports
Tax Forms
Account Management Users' Guide 58
Chapter 1 Account Selector for Three-Level Accounts
Chapter 1 Account Selector for Three-Level Accounts
In theManage Clientsmenu:
Accounts > View > Open/Pending/Closed/Rejected
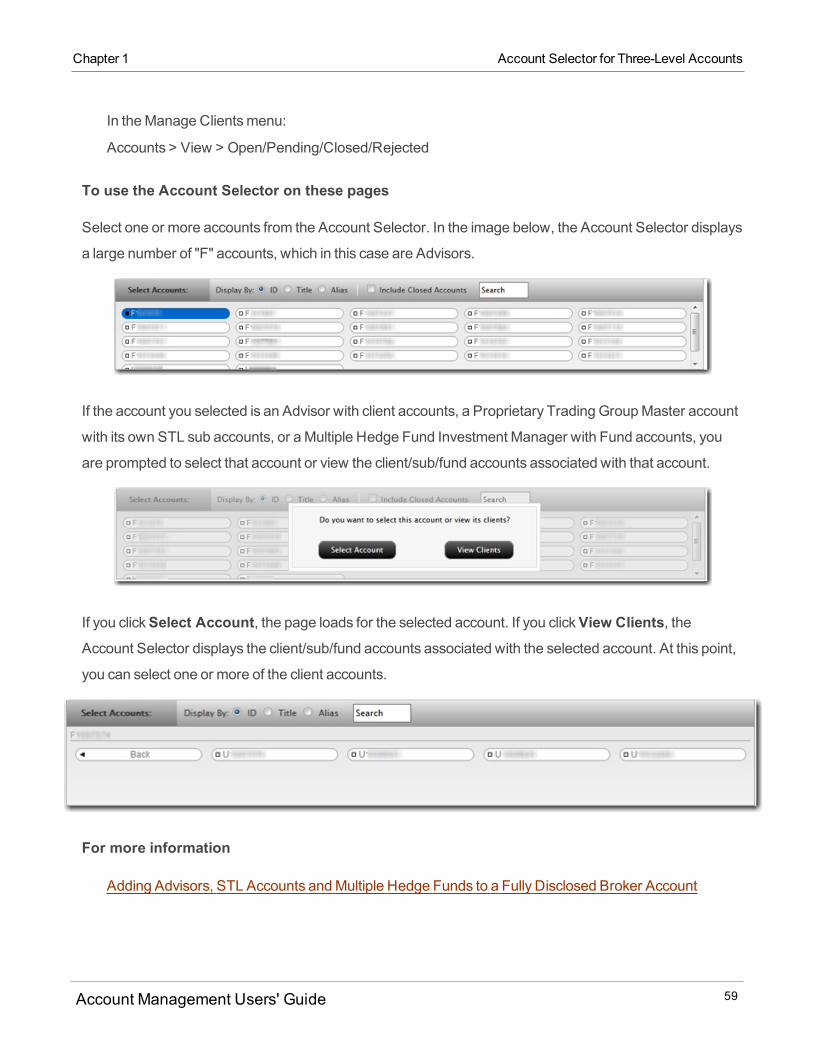
To use the Account Selector on these pages
Select one or more accounts from the Account Selector. In the image below, the Account Selector displays
a large number of "F" accounts, which in this case are Advisors.
If the account you selected is an Advisor with client accounts, a Proprietary Trading GroupMaster account
with its own STL sub accounts, or aMultiple Hedge Fund Investment Manager with Fund accounts, you
are prompted to select that account or view the client/sub/fund accounts associated with that account.
If you clickSelect Account, the page loads for the selected account. If you clickView Clients, theAccount Selector displays the client/sub/fund accounts associated with the selected account. At this point,
you can select one or more of the client accounts.
For more information
Adding Advisors, STL Accounts andMultiple Hedge Funds to a Fully Disclosed Broker Account
Account Management Users' Guide 59
Changing the Display Language
You can change the display language in Account Management and the Client ServicesMessage Center
using the LanguageMenu located at the top right of the screen.
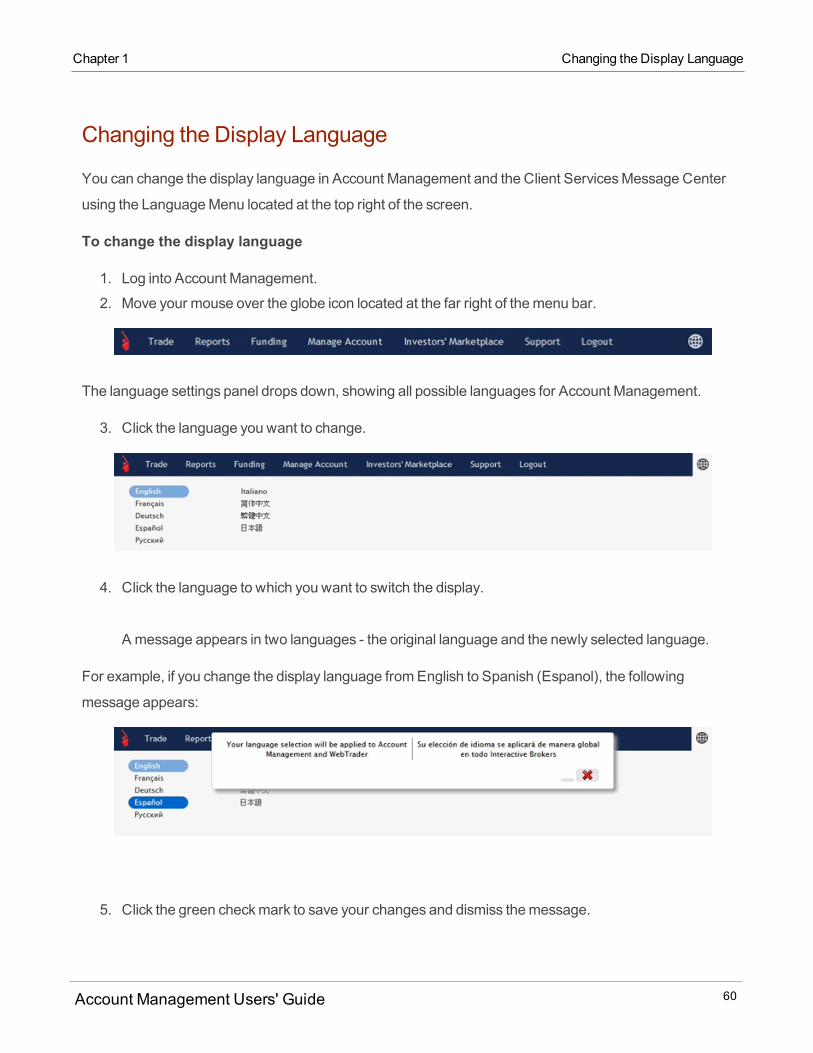
To change the display language
1. Log into Account Management.
2. Move your mouse over the globe icon located at the far right of themenu bar.
The language settings panel drops down, showing all possible languages for Account Management.
3. Click the language you want to change.
4. Click the language to which you want to switch the display.
A message appears in two languages - the original language and the newly selected language.
For example, if you change the display language fromEnglish to Spanish (Espanol), the following
message appears:
5. Click the green checkmark to save your changes and dismiss themessage.
Account Management Users' Guide 60
Chapter 1 Changing the Display Language

Chapter 1 Printing
If you change your mind, click the red X. Your changeswill NOT be saved and the display language
will remain unchanged.
Printing
You can print any Account Management page using your web browser's Print functions.
Logging Out
To log out of Account Management
1. Click the Logout button in the upper right corner of the screen.
Account Management Users' Guide 61

Account Management Users' Guide 62
TradeThe Trademenu gives you quick access to trading platforms and Post Trade Allocations.
This chapter includes the following topics:
QuickTrade
WebTrader
Post Trade Allocations
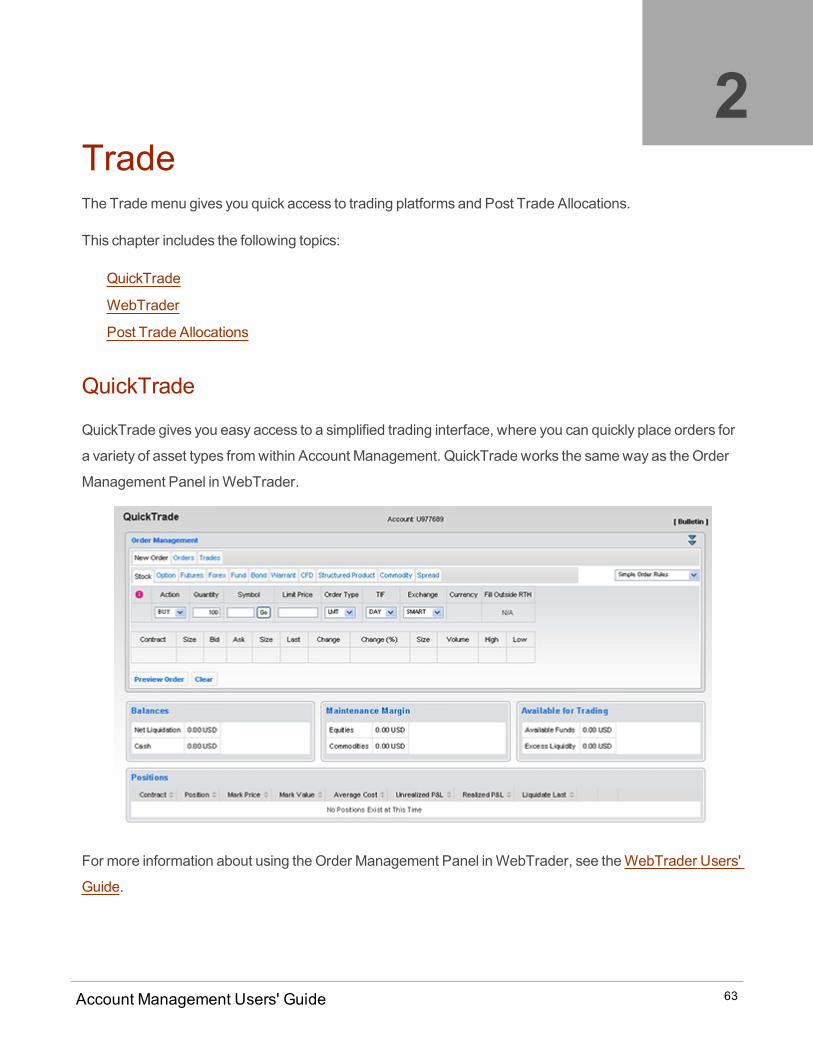
QuickTrade
QuickTrade gives you easy access to a simplified trading interface, where you can quickly place orders for
a variety of asset types fromwithin Account Management. QuickTrade works the sameway as theOrder
Management Panel inWebTrader.
For more information about using theOrder Management Panel inWebTrader, see theWebTrader Users'
Guide.
2
Account Management Users' Guide 63
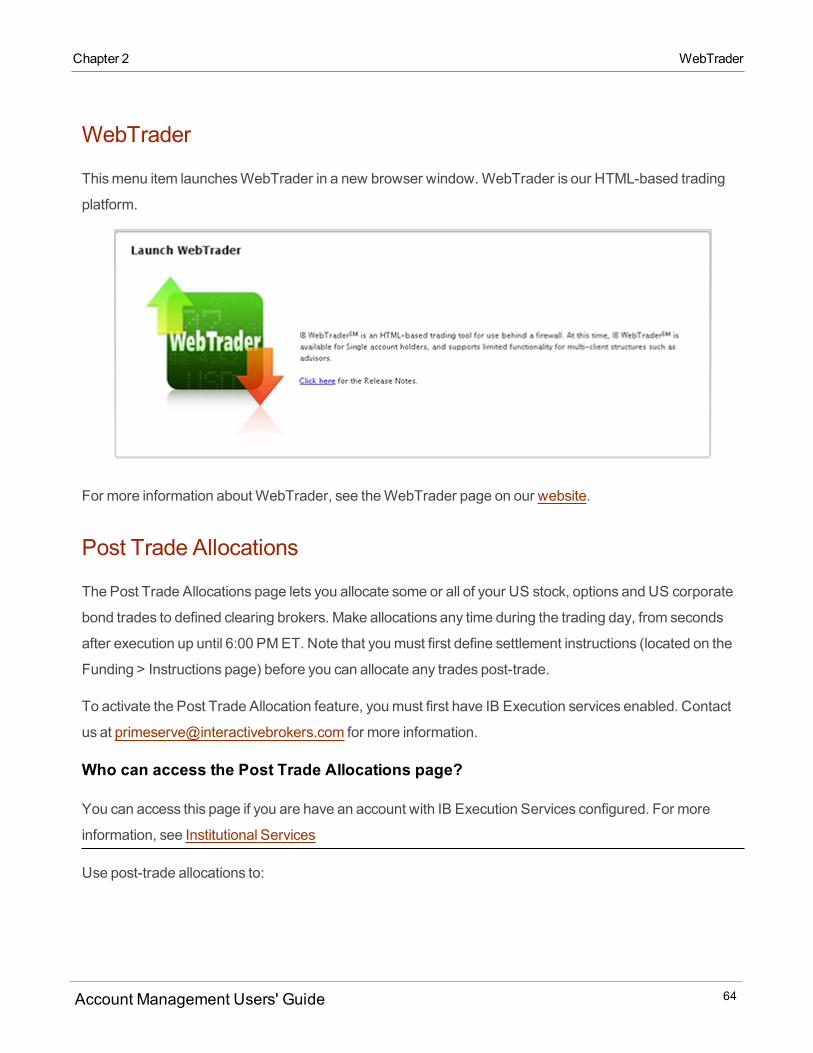
WebTrader
Thismenu item launchesWebTrader in a new browser window.WebTrader is our HTML-based trading
platform.
For more information aboutWebTrader, see theWebTrader page on our website.
Post Trade Allocations
The Post Trade Allocations page lets you allocate some or all of your US stock, options and US corporate
bond trades to defined clearing brokers. Make allocations any time during the trading day, from seconds
after execution up until 6:00 PMET. Note that youmust first define settlement instructions (located on the
Funding > Instructions page) before you can allocate any trades post-trade.
To activate the Post Trade Allocation feature, youmust first have IB Execution services enabled. Contact
us at [email protected] for more information.
Who can access the Post Trade Allocations page?
You can access this page if you are have an account with IB Execution Services configured. For more
information, see Institutional Services
Use post-trade allocations to:
Account Management Users' Guide 64
Chapter 2 WebTrader
Chapter 2 Open the Post Trade Allocations Window
Allocate any time during the day: up until 6:00 pmET for equities and up until 5:15 PMET for options;
After this time, your tradeswill automatically be allocated using the selected default clearing des-
tination.
Quickly unallocate any trades before the end of the day.
Configure re-usable allocation templates that allow you to quickly allocate one or multiple trades to a
pre-defined clearing broker or set of clearing brokers.
Import allocations from a properly-formatted .csv file.
Create a customAverage Price trade by selecting trades for the same symbol and side where only the
price differs. By default an average price display is expandable to show actual trades and trade prices.
Define configuration preferences including allocation settings, display preferences and symbol display.
Manage odd lots allocations. By default, the feature is set to allow round lots only.
Open the Post Trade AllocationsWindow
To access the Post Trade Allocations window
1. SelectAccount Management from the Loginmenu on our web site.
2. Enter your username and password and click Login.
3. ClickTrade > Post Trade Allocations.
The Post Trade Allocationswindow opens, displaying trades on the top and the allocations layout on the
bottom.
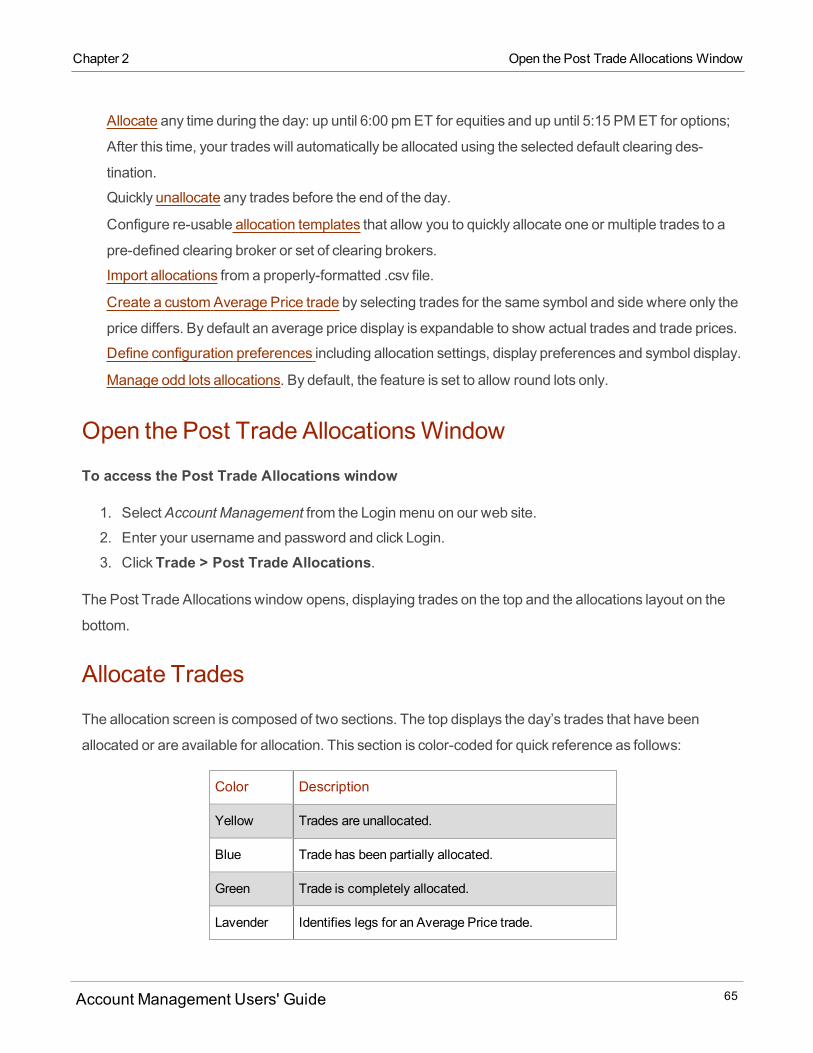
Allocate Trades
The allocation screen is composed of two sections. The top displays the day’s trades that have been
allocated or are available for allocation. This section is color-coded for quick reference as follows:
Color Description
Yellow Trades are unallocated.
Blue Trade has been partially allocated.
Green Trade is completely allocated.
Lavender Identifies legs for an Average Price trade.
Account Management Users' Guide 65
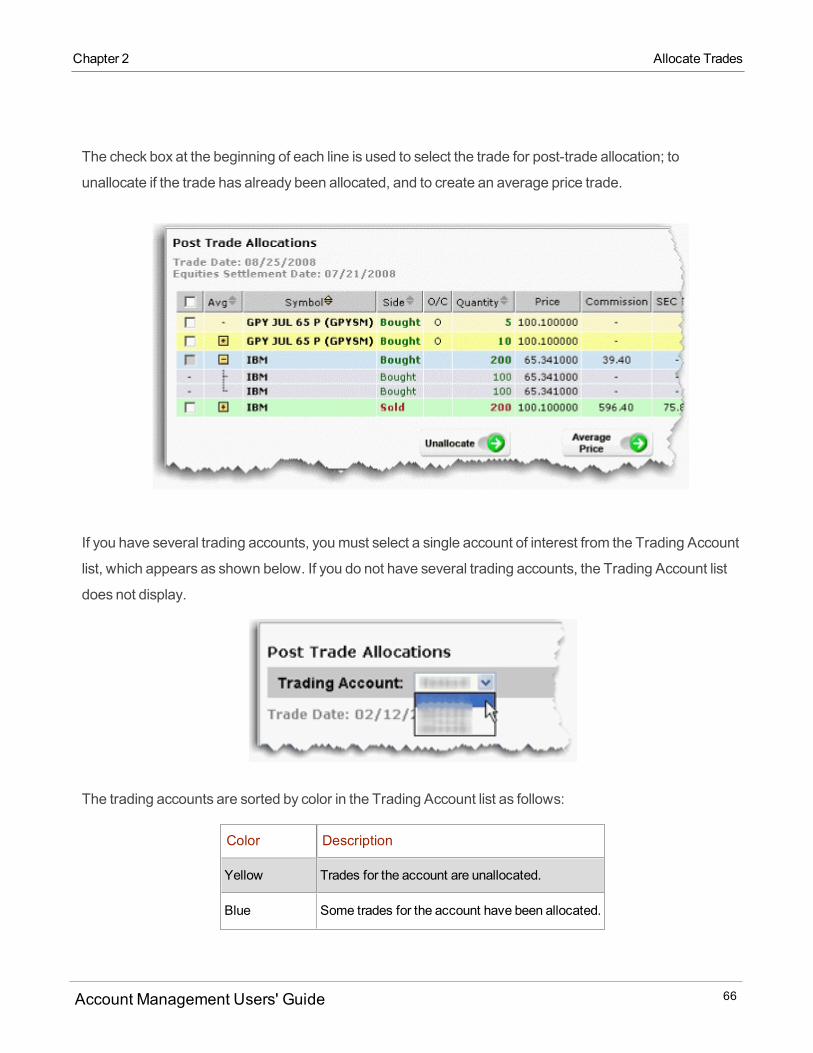
The check box at the beginning of each line is used to select the trade for post-trade allocation; to
unallocate if the trade has already been allocated, and to create an average price trade.
If you have several trading accounts, youmust select a single account of interest from the Trading Account
list, which appears as shown below. If you do not have several trading accounts, the Trading Account list
does not display.
The trading accounts are sorted by color in the Trading Account list as follows:
Color Description
Yellow Trades for the account are unallocated.
Blue Some trades for the account have been allocated.
Account Management Users' Guide 66
Chapter 2 Allocate Trades
Chapter 2 Allocate Trades
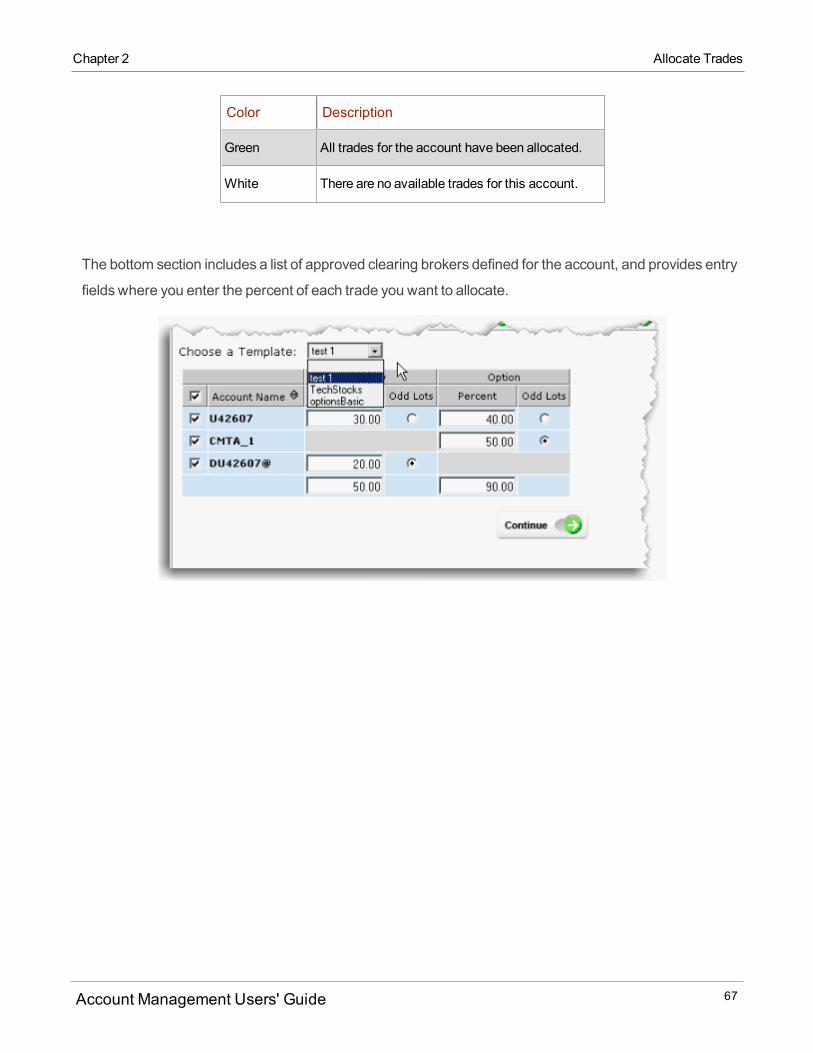
Color Description
Green All trades for the account have been allocated.
White There are no available trades for this account.
The bottom section includes a list of approved clearing brokers defined for the account, and provides entry
fields where you enter the percent of each trade you want to allocate.
Account Management Users' Guide 67
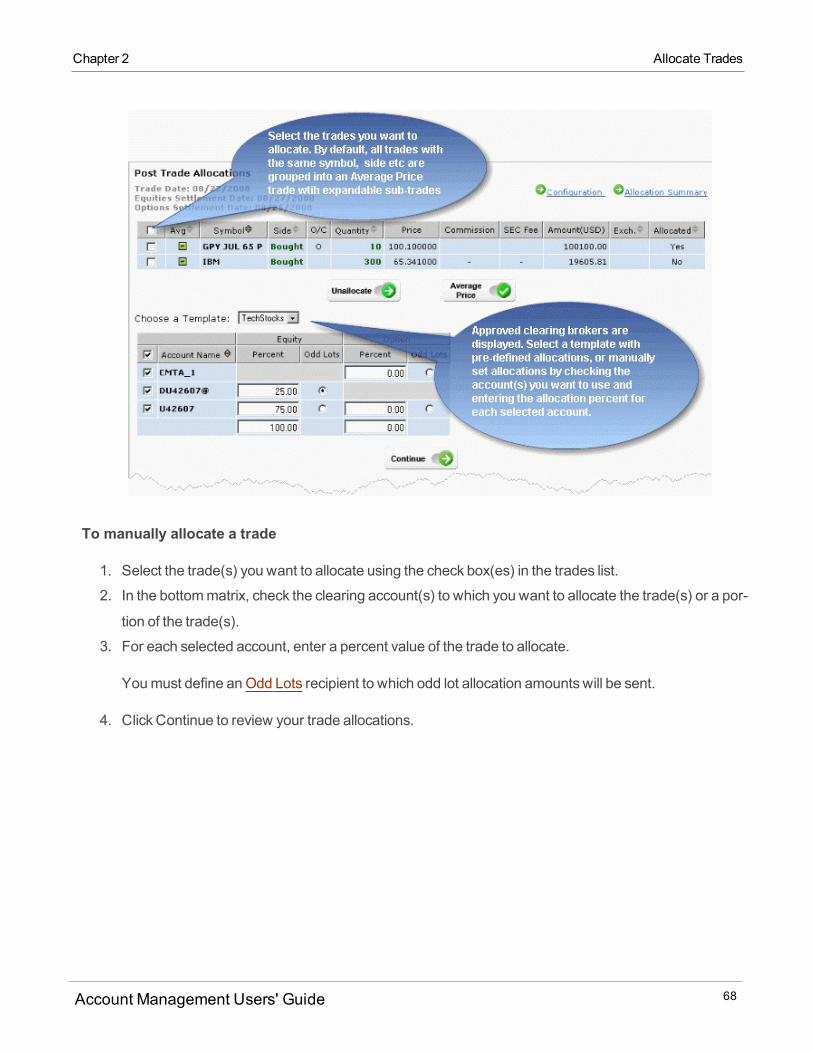
To manually allocate a trade
1. Select the trade(s) you want to allocate using the check box(es) in the trades list.
2. In the bottommatrix, check the clearing account(s) to which you want to allocate the trade(s) or a por-
tion of the trade(s).
3. For each selected account, enter a percent value of the trade to allocate.
Youmust define anOdd Lots recipient to which odd lot allocation amounts will be sent.
4. Click Continue to review your trade allocations.
Account Management Users' Guide 68
Chapter 2 Allocate Trades
Chapter 2 Allocate Trades
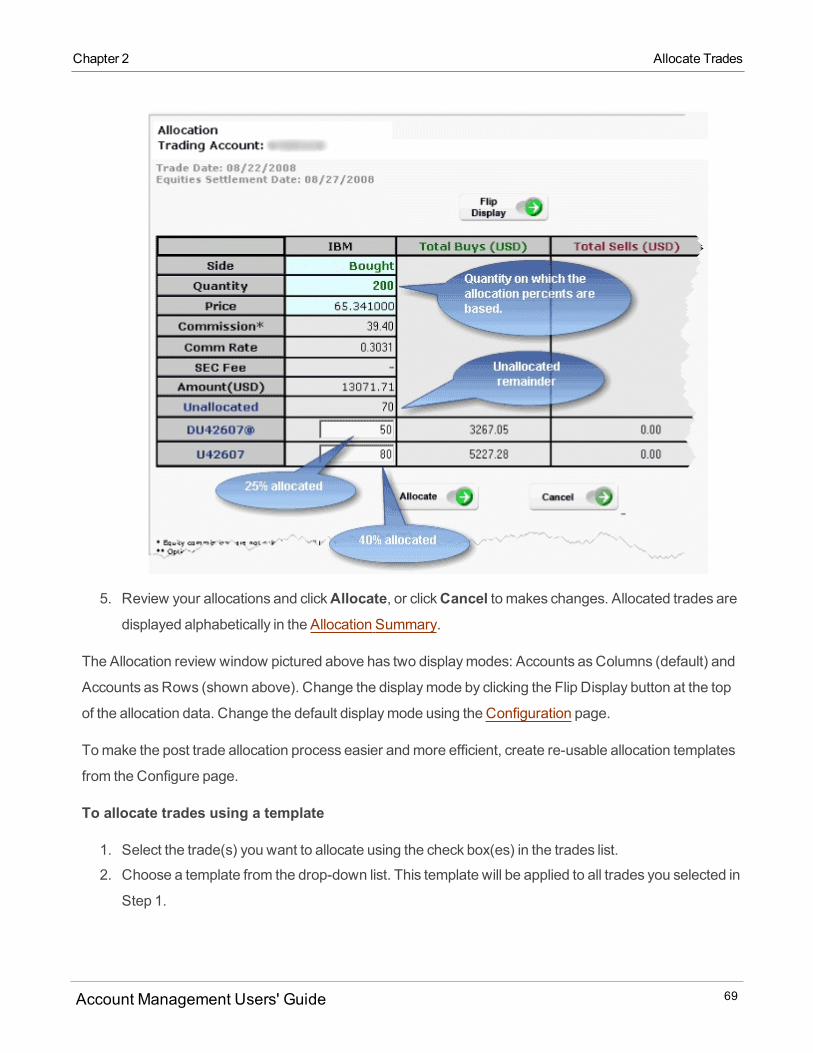
5. Review your allocations and clickAllocate, or clickCancel to makes changes. Allocated trades aredisplayed alphabetically in the Allocation Summary.
The Allocation review window pictured above has two displaymodes: Accounts asColumns (default) and
Accounts asRows (shown above). Change the displaymode by clicking the Flip Display button at the top
of the allocation data. Change the default displaymode using the Configuration page.
Tomake the post trade allocation process easier andmore efficient, create re-usable allocation templates
from the Configure page.
To allocate trades using a template
1. Select the trade(s) you want to allocate using the check box(es) in the trades list.
2. Choose a template from the drop-down list. This template will be applied to all trades you selected in
Step 1.
Account Management Users' Guide 69
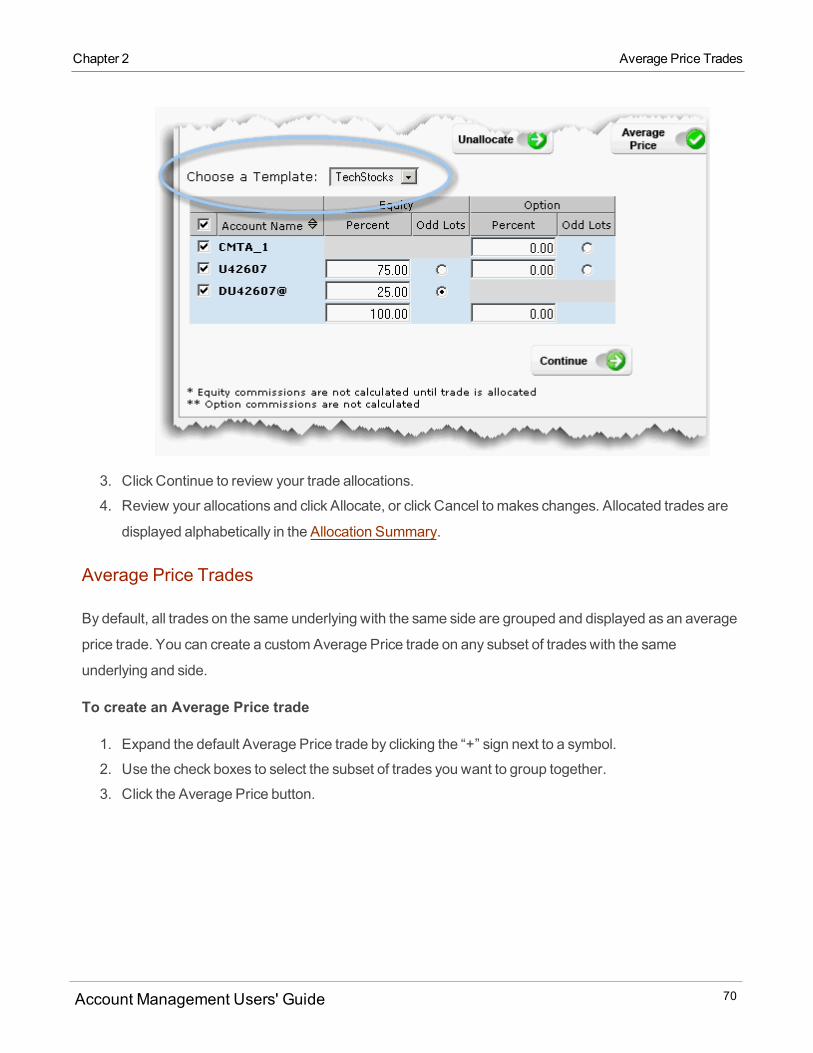
3. Click Continue to review your trade allocations.
4. Review your allocations and click Allocate, or click Cancel to makes changes. Allocated trades are
displayed alphabetically in the Allocation Summary.
Average Price Trades
By default, all trades on the same underlying with the same side are grouped and displayed as an average
price trade. You can create a customAverage Price trade on any subset of tradeswith the same
underlying and side.
To create an Average Price trade
1. Expand the default Average Price trade by clicking the “+” sign next to a symbol.
2. Use the check boxes to select the subset of trades you want to group together.
3. Click the Average Price button.
Account Management Users' Guide 70
Chapter 2 Average Price Trades
Chapter 2 Unallocate Trades
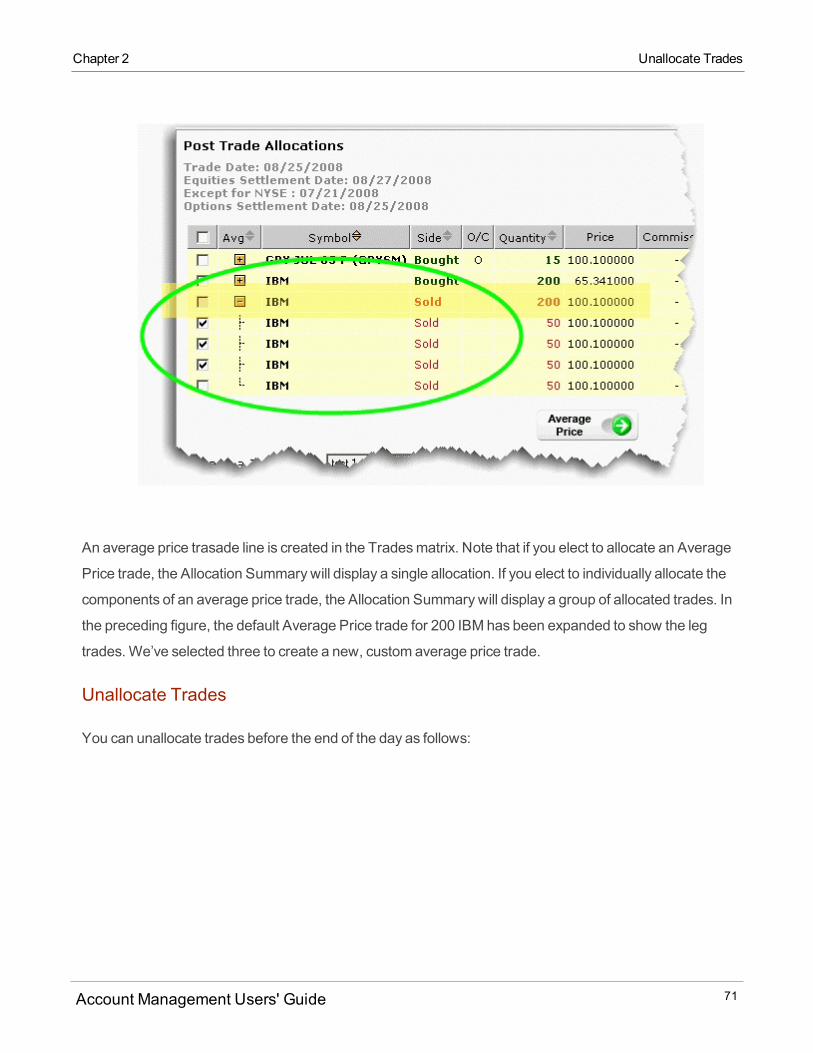
An average price trasade line is created in the Tradesmatrix. Note that if you elect to allocate an Average
Price trade, the Allocation Summarywill display a single allocation. If you elect to individually allocate the
components of an average price trade, the Allocation Summarywill display a group of allocated trades. In
the preceding figure, the default Average Price trade for 200 IBM has been expanded to show the leg
trades.We’ve selected three to create a new, custom average price trade.
Unallocate Trades
You can unallocate trades before the end of the day as follows:
Account Management Users' Guide 71
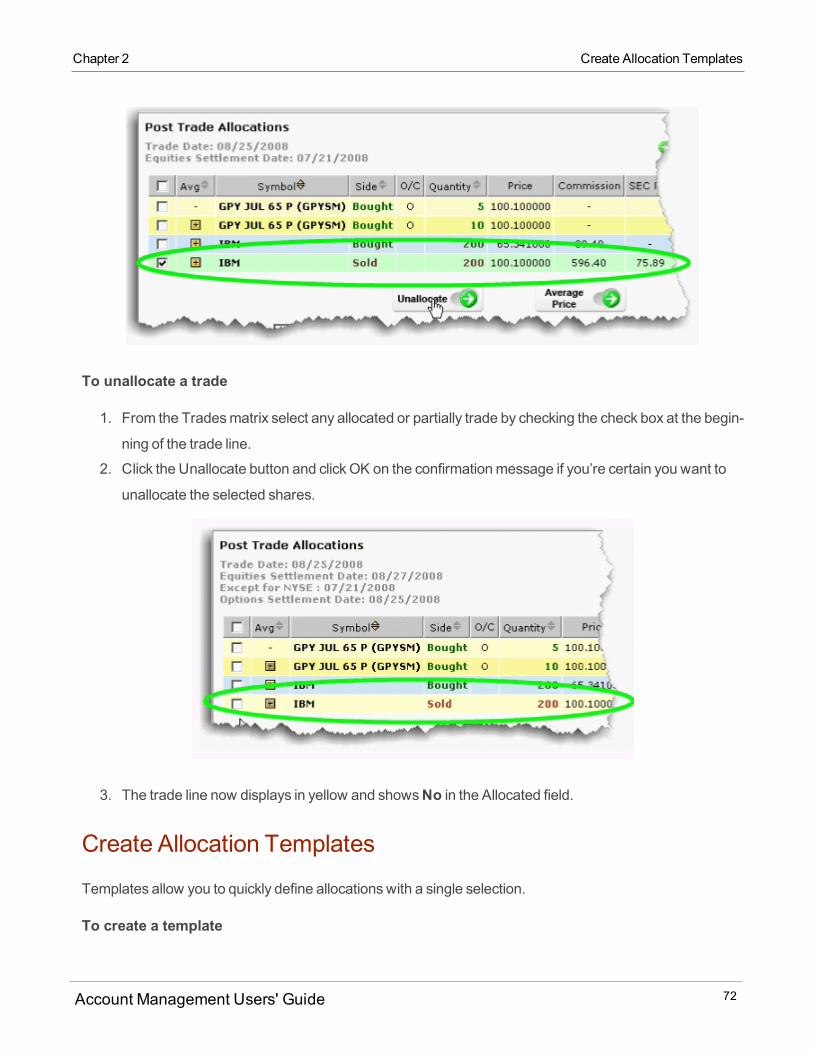
To unallocate a trade
1. From the Tradesmatrix select any allocated or partially trade by checking the check box at the begin-
ning of the trade line.
2. Click the Unallocate button and clickOK on the confirmationmessage if you’re certain you want to
unallocate the selected shares.
3. The trade line now displays in yellow and showsNo in the Allocated field.
Create Allocation Templates
Templates allow you to quickly define allocationswith a single selection.
To create a template
Account Management Users' Guide 72
Chapter 2 Create Allocation Templates
Chapter 2 Create Allocation Templates
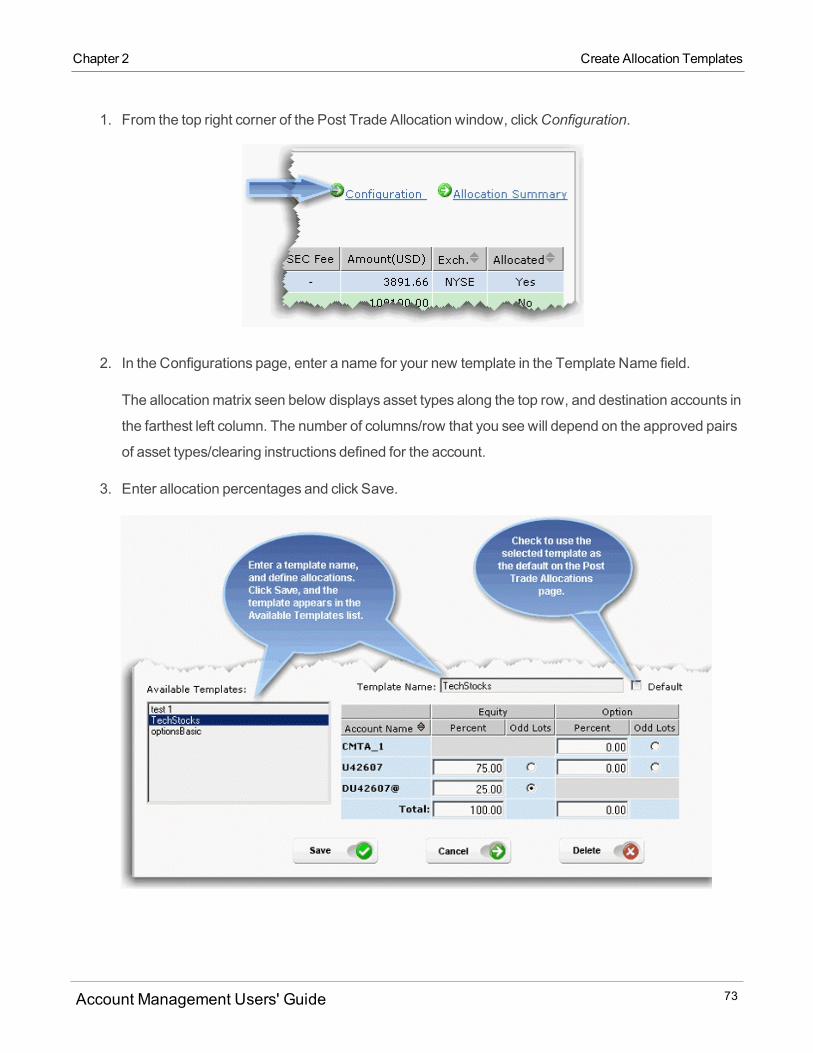
1. From the top right corner of the Post Trade Allocation window, clickConfiguration.
2. In the Configurations page, enter a name for your new template in the Template Name field.
The allocationmatrix seen below displays asset types along the top row, and destination accounts in
the farthest left column. The number of columns/row that you see will depend on the approved pairs
of asset types/clearing instructions defined for the account.
3. Enter allocation percentages and click Save.
Account Management Users' Guide 73
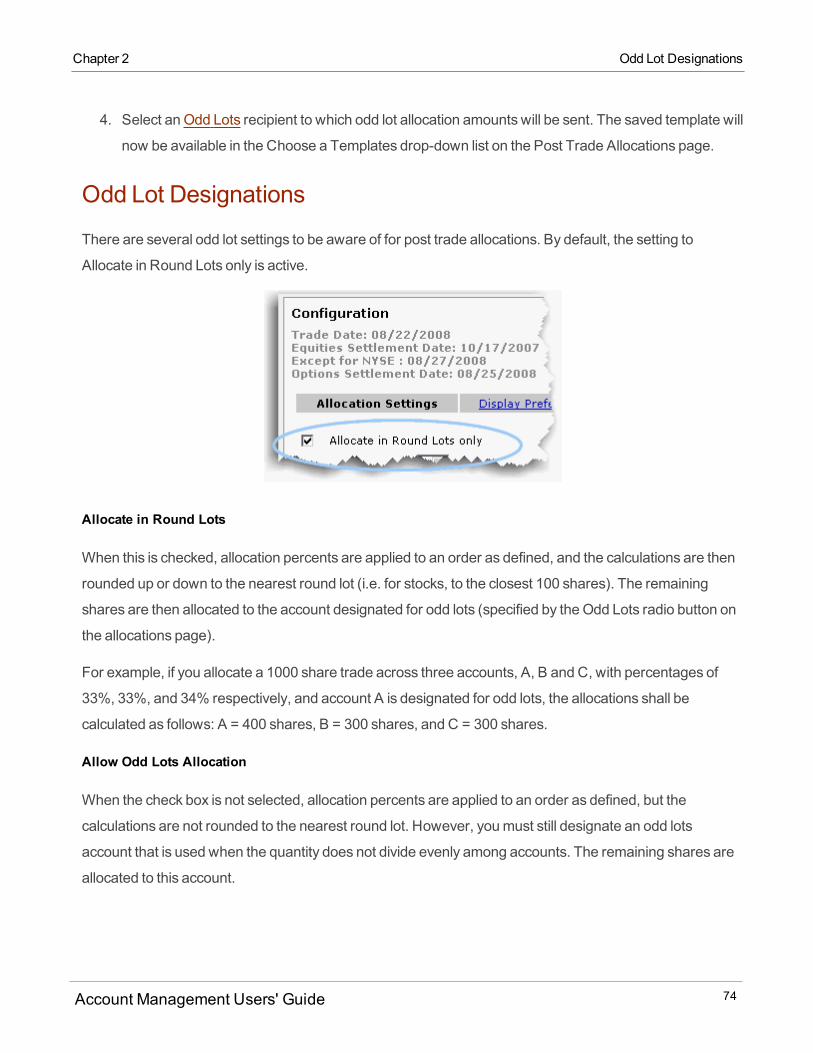
4. Select an Odd Lots recipient to which odd lot allocation amounts will be sent. The saved template will
now be available in the Choose a Templates drop-down list on the Post Trade Allocations page.
Odd Lot Designations
There are several odd lot settings to be aware of for post trade allocations. By default, the setting to
Allocate in Round Lots only is active.
Allocate in Round Lots
When this is checked, allocation percents are applied to an order as defined, and the calculations are then
rounded up or down to the nearest round lot (i.e. for stocks, to the closest 100 shares). The remaining
shares are then allocated to the account designated for odd lots (specified by theOdd Lots radio button on
the allocations page).
For example, if you allocate a 1000 share trade across three accounts, A, B and C, with percentages of
33%, 33%, and 34% respectively, and account A is designated for odd lots, the allocations shall be
calculated as follows: A = 400 shares, B = 300 shares, and C = 300 shares.
Allow Odd Lots Allocation
When the check box is not selected, allocation percents are applied to an order as defined, but the
calculations are not rounded to the nearest round lot. However, youmust still designate an odd lots
account that is used when the quantity does not divide evenly among accounts. The remaining shares are
allocated to this account.
Account Management Users' Guide 74
Chapter 2 Odd Lot Designations
Chapter 2 View the Allocation Summary
Using the same premise as the above example, in this case the allocationswould be calculated as: A = 330
shares, B = 330 shares, and C = 340 shares.
In another example, if you allocated 349 shares evenly across three accounts (116.33 shares each), the
calculations are each rounded down to 116, and 116 shares are allocated to two accounts and 117 shares
are allocated to the odd lots account.
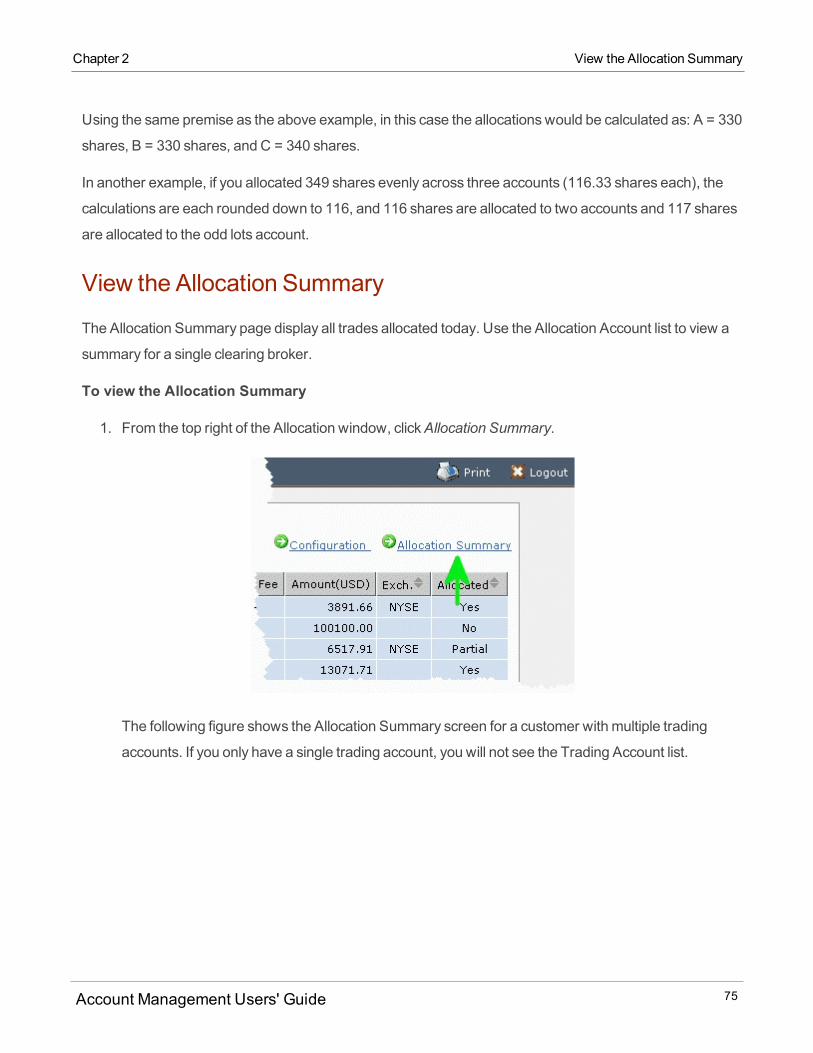
View the Allocation Summary
The Allocation Summary page display all trades allocated today. Use the Allocation Account list to view a
summary for a single clearing broker.
To view the Allocation Summary
1. From the top right of the Allocation window, clickAllocation Summary.
The following figure shows the Allocation Summary screen for a customer with multiple trading
accounts. If you only have a single trading account, you will not see the Trading Account list.
Account Management Users' Guide 75
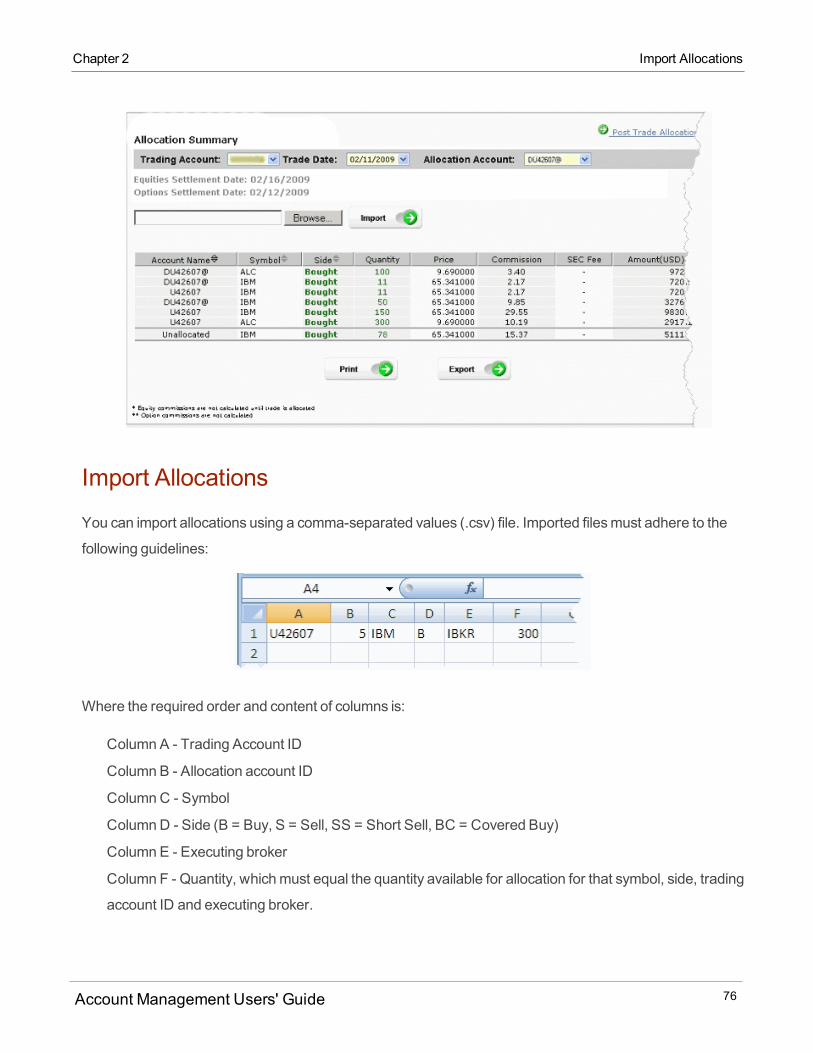
Import Allocations
You can import allocations using a comma-separated values (.csv) file. Imported filesmust adhere to the
following guidelines:
Where the required order and content of columns is:
Column A - Trading Account ID
Column B - Allocation account ID
ColumnC - Symbol
ColumnD - Side (B = Buy, S = Sell, SS = Short Sell, BC = Covered Buy)
Column E - Executing broker
Column F - Quantity, whichmust equal the quantity available for allocation for that symbol, side, trading
account ID and executing broker.
Account Management Users' Guide 76
Chapter 2 Import Allocations
Chapter 2 Configure Post Trade Allocation Settings
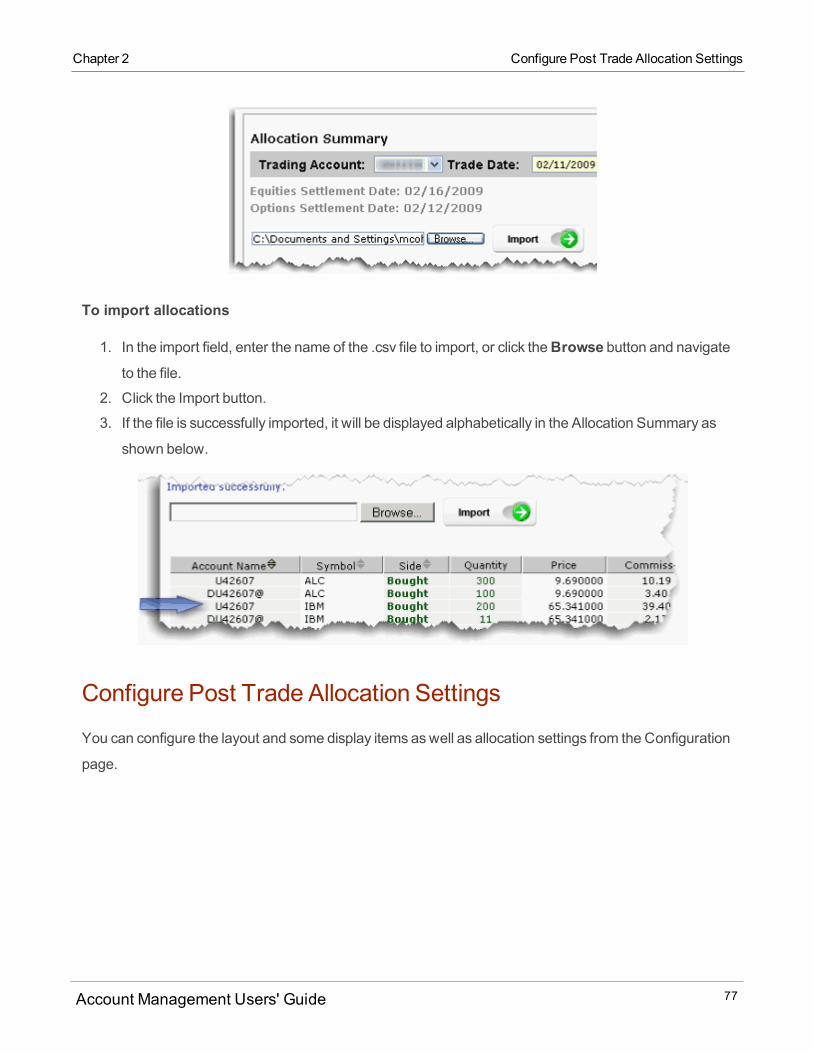
To import allocations
1. In the import field, enter the name of the .csv file to import, or click theBrowse button and navigateto the file.
2. Click the Import button.
3. If the file is successfully imported, it will be displayed alphabetically in the Allocation Summary as
shown below.
Configure Post Trade Allocation Settings
You can configure the layout and some display items aswell as allocation settings from the Configuration
page.
Account Management Users' Guide 77
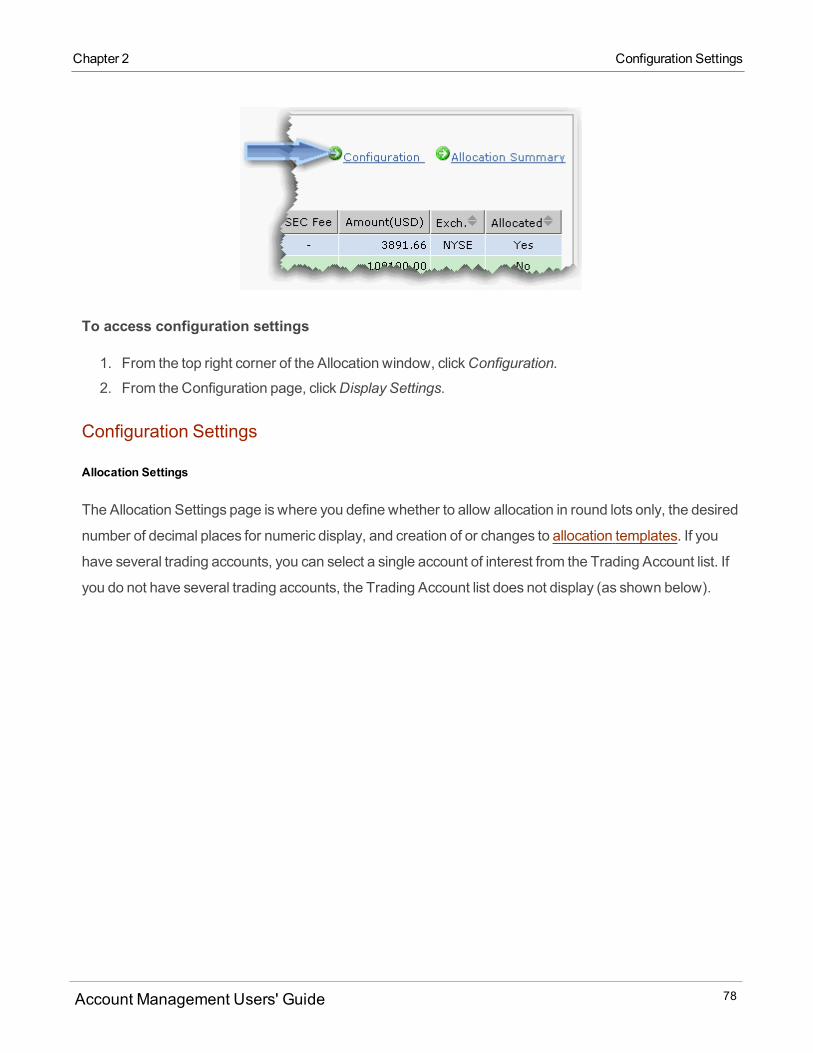
To access configuration settings
1. From the top right corner of the Allocation window, clickConfiguration.
2. From the Configuration page, clickDisplay Settings.
Configuration Settings
Allocation Settings
The Allocation Settings page is where you define whether to allow allocation in round lots only, the desired
number of decimal places for numeric display, and creation of or changes to allocation templates. If you
have several trading accounts, you can select a single account of interest from the Trading Account list. If
you do not have several trading accounts, the Trading Account list does not display (as shown below).
Account Management Users' Guide 78
Chapter 2 Configuration Settings

Chapter 2 Display Preferences
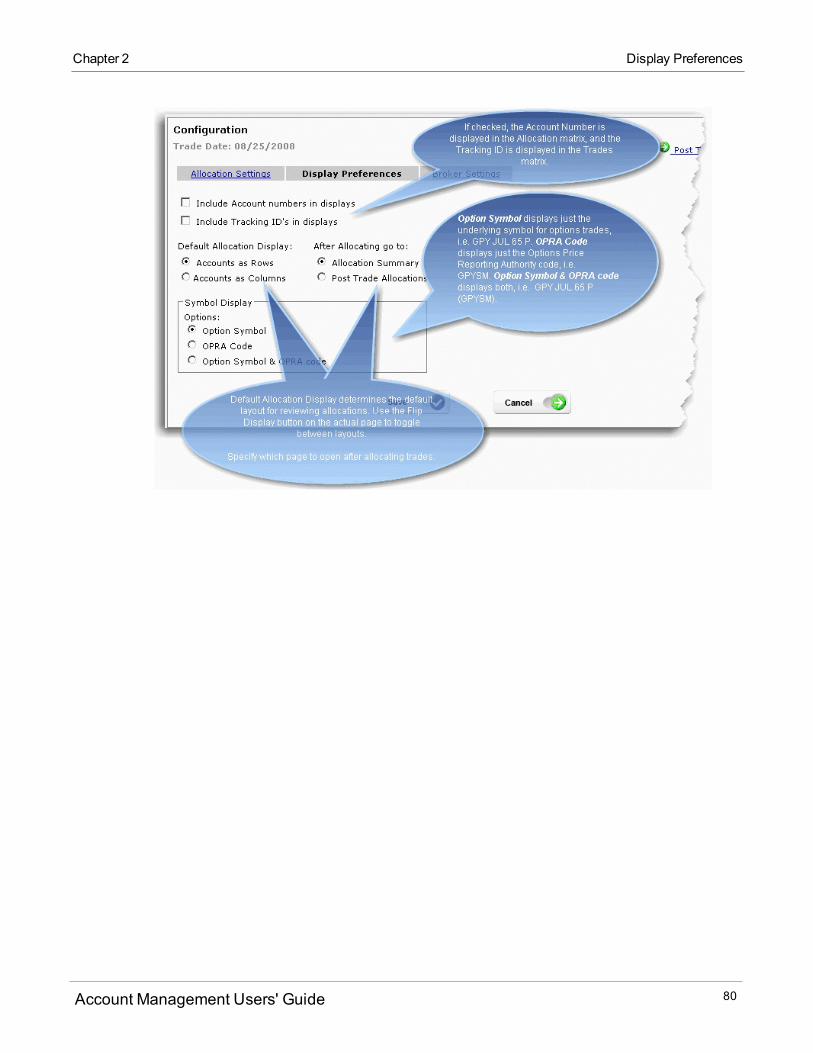
Display Preferences
The settings you specify in the Display Preferences page are for default settings; they can bemodified at
any time, and in some cases the layout can be changed on the page itself.
Account Management Users' Guide 79
Account Management Users' Guide 80
Chapter 2 Display Preferences
Chapter 2 IPO Subscriptions
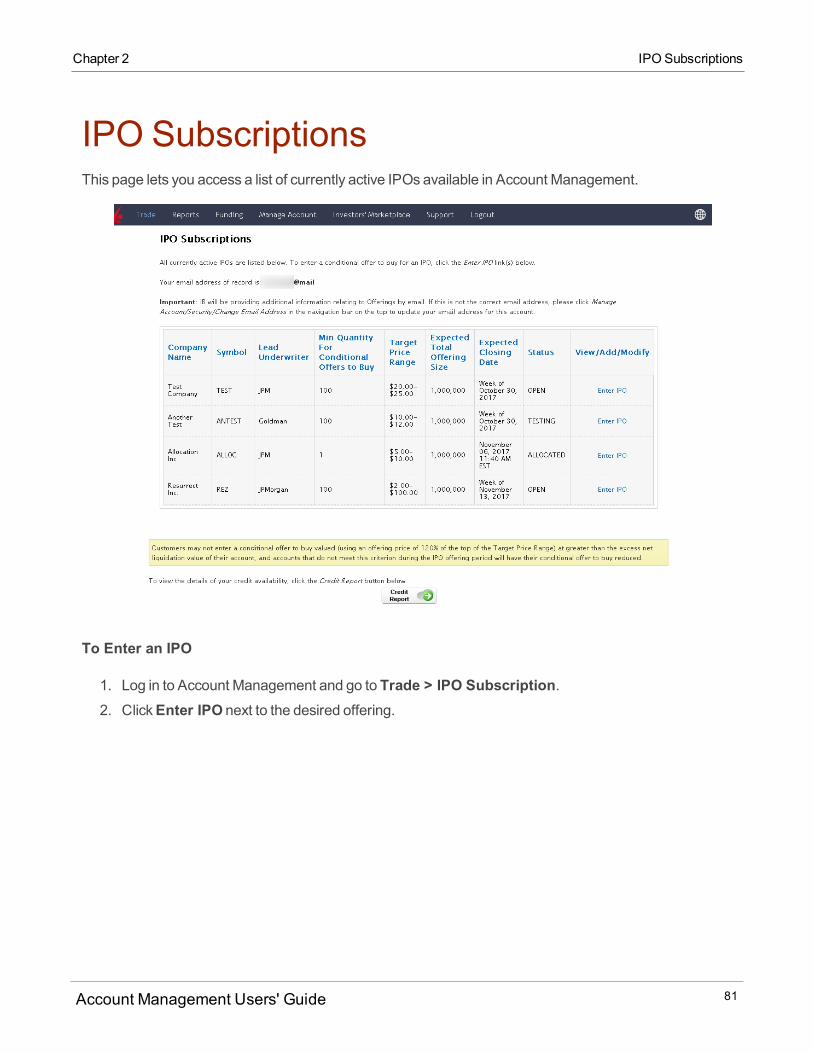
IPO SubscriptionsThis page lets you access a list of currently active IPOs available in Account Management.
To Enter an IPO
1. Log in to Account Management and go to Trade > IPO Subscription.2. ClickEnter IPO next to the desired offering.
Account Management Users' Guide 81
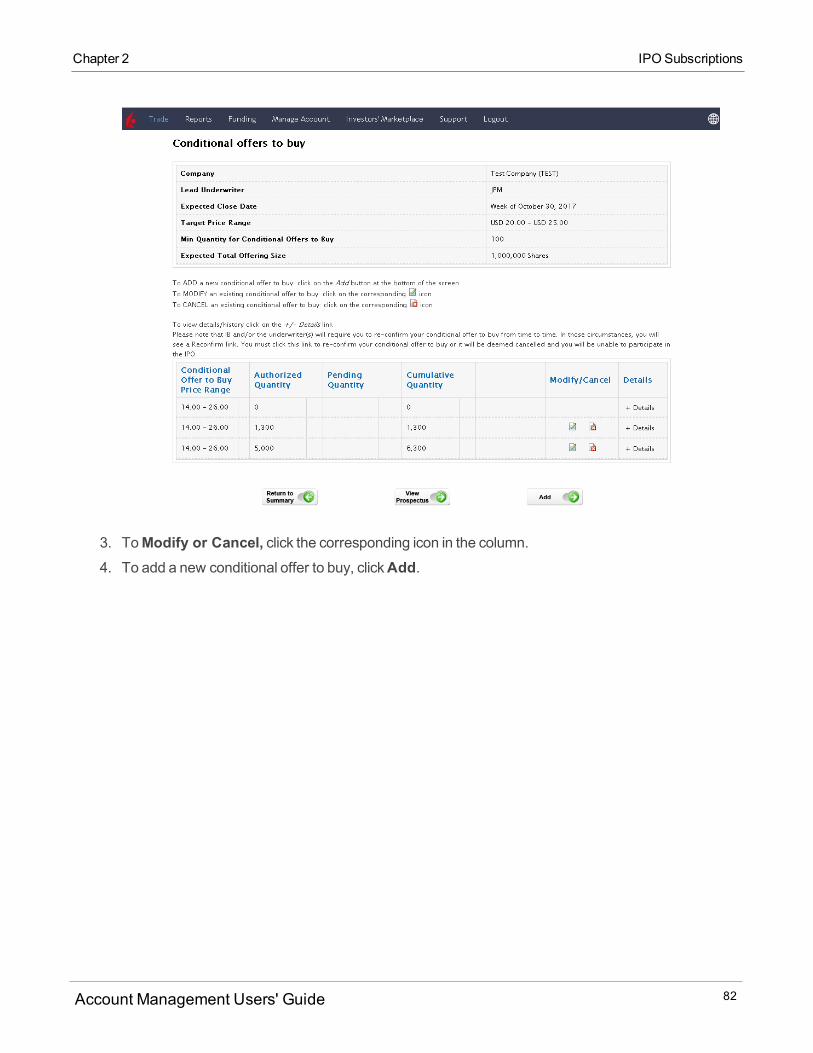
3. ToModify or Cancel, click the corresponding icon in the column.4. To add a new conditional offer to buy, clickAdd.
Account Management Users' Guide 82
Chapter 2 IPO Subscriptions
Chapter 2 IPO Subscriptions
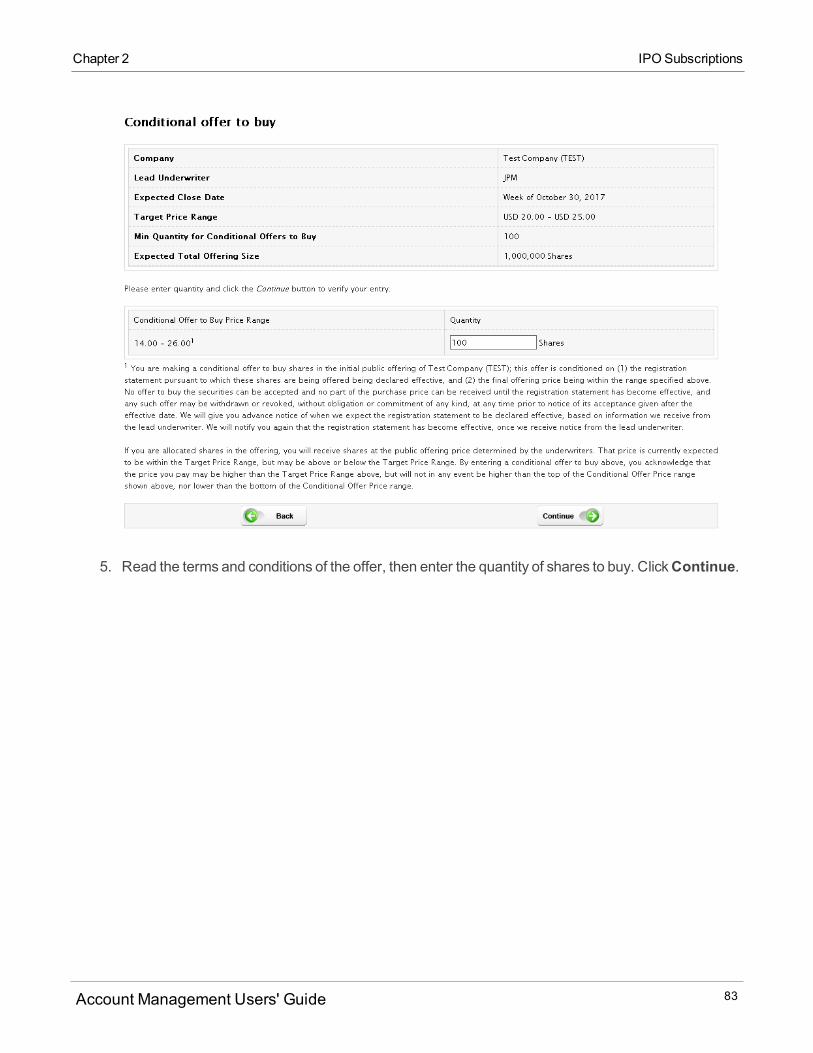
5. Read the terms and conditions of the offer, then enter the quantity of shares to buy. ClickContinue.
Account Management Users' Guide 83
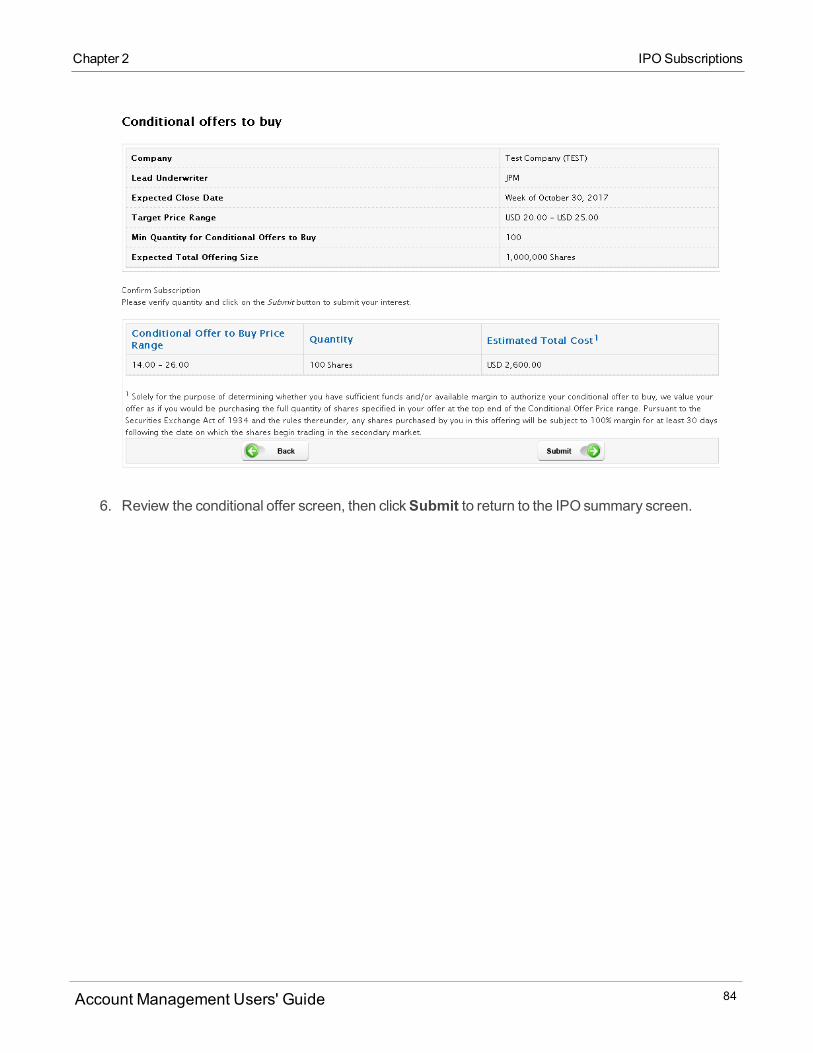
6. Review the conditional offer screen, then clickSubmit to return to the IPO summary screen.
Account Management Users' Guide 84
Chapter 2 IPO Subscriptions
ReportsThis chapter describes the reporting features of Account Management, including activity statements, trade
confirmation reports and supplemental reports such asmargin reports.
This chapter includes the following topics:
Activity Statements
Trade Confirmation Reports
PortfolioAnalyst
Transaction Cost Analysis
Risk
Supplemental Reports
Tax
Settings
Activity
TheReports > Activitymenu includes the following pages:
Statements - View and create activity statements. You can run default statements or create your own
customized statements.
Third-Party Downloads - Download activity statements in one of several formats, such asQuicken.
FlexQueries - Create highly customized activity statements in text or XML format.
Batch Reports - View the status of reports queued for batch processing, and run batch reports.
Models - Advisors and their clients view Model Statements.
About Activity Statements
Activity Statements include information about your account activity, which can be generated on a daily,
monthly, and yearly basis for all accounts.
3
Account Management Users' Guide 85
Information included in an Activity Statement is presented in expandable and collapsible sectionswith click-
down detail, and you can create customized statements to include or exclude individual sections. You can
also choose to include closed accounts in your statement. You are notified via email when there is account
activity.
Activity Statements in Mobile Account Management include information about your account activity, which
can be generated on a daily or monthly basis and for a custom date range for all accounts.
Prices in statements are displayed with aminimumof four decimal places to amaximumof seven decimal
places. Sections that display price include Trades andOpen Positions.
Statement Cutoff Times
Statement cutoff time is the time each day at which we stop including executed trades in your statement for
the day. Here are the current statement cutoff times:
Commodities - 5:15 PMEST
Securities - 8:20 PMEST
Forex - 5:00 PMEST
IB-JP clients - 6:00 AM ET.
Any trades executed before the cutoff times for the asset classes and clients listed above will be reflected in
the statement for that day.
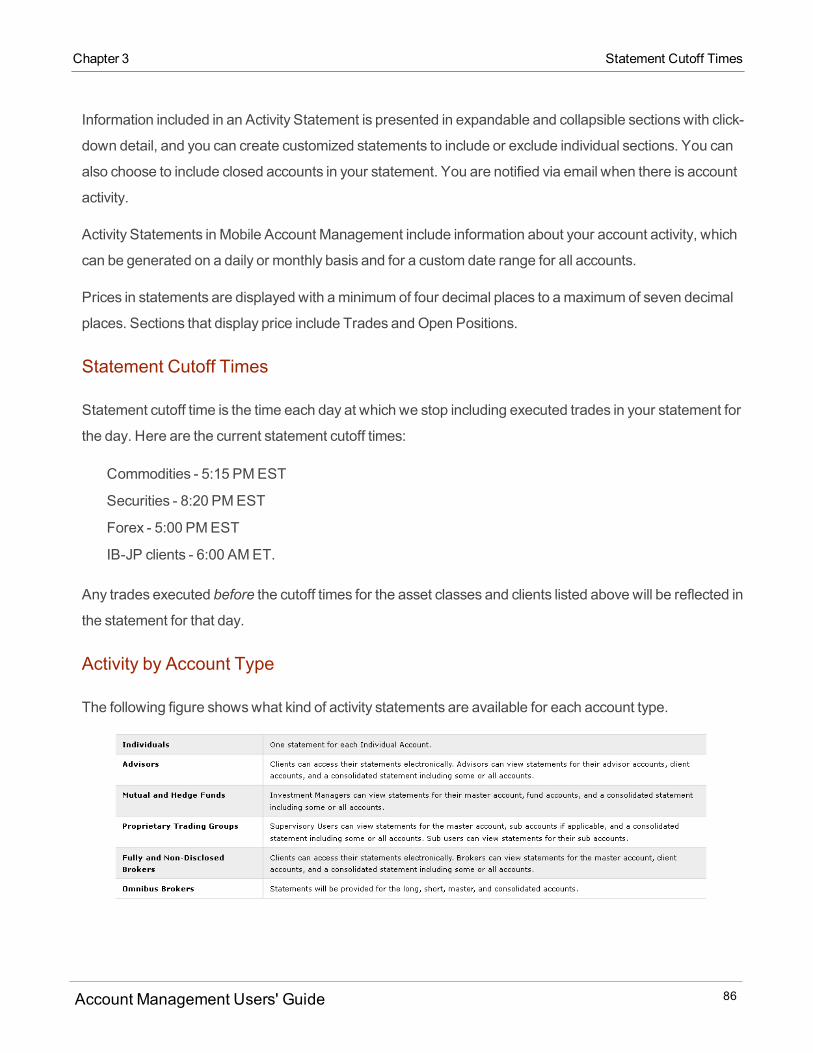
Activity by Account Type
The following figure showswhat kind of activity statements are available for each account type.
Account Management Users' Guide 86
Chapter 3 Statement Cutoff Times
Chapter 3 Activity Statement Archive Policy
Activity Statement Archive Policy
Weprovide access to activity statements as follows:
Daily account statements are available for the four previous calendar years and from the start of the cur-
rent calendar year.
Monthly account statements are available for the five previous years (60 prior months).
Annual account statements are available for the five previous years.
CustomDate Range account statements are available for the four previous calendar years and from
the start of the current calendar year.
You can obtain account statements older than this for a processing fee. See theOther Fees page on
our website for more information.
Viewing Activity Statements
Activity Statements include information about your account activity, and can be generated on a daily,
monthly, and yearly basis for all accounts.
You view activity statements fromAccount Management or from the View menu in Trader Workstation.
Make a note of the following guidelineswhen viewing activity statements:
Multi-account structures (Advisor, Broker, Institutions) can select one or more accounts from the
Account(s) list.
Monthly statements are generally available by five business days after the close of amonth.
Annual statements are available by January 31 under normal circumstances.
Who can access the Statements page?
You can access this page if you are a(n):
Individual, Joint, Trust or IRA Account User
Small Business Account User
Friends and Family GroupMaster or Client User
Advisor Master User Individual
Advisor Master User Organization
Account Management Users' Guide 87
Advisor Client User Individual
Advisor Client User Organization
Proprietary Trading GroupMaster User
Proprietary Trading Group SubUser
Broker Master User (master account only)
Broker Fully Disclosed Client User
Broker Fully Disclosed Client User Organization
Broker Non-Disclosed Client User
Investment Manager Master User
Fund
and you have been granted Reporting access rights.
Default Statements
There are several default statements available for viewing Activity Statements:
Partition Summary - This default statement is available for account holders who have divided their
accounts into partitions. It contains summary sections at the top for each partition, followed by con-
catenated statements for each partition.
Default -The primary default statement. It includesNet Asset Value (NAV), Realized and Unrealized
andMark-to-Market (MTM) performance summaries, deposit and withdrawals, dividends, interest,
fees, and other summary information related to changes in NAV. This default statement supports the
Calendar Year period. For accounts with models, the Default statement includes aModel Summary at
the top of the statement followed by the full Activity Statement for the account.
Realized Summary -A simpler statement that includesNAV, Positions and realized P&L summaries as
well as other summary information related to changes in NAV.
MTM Summary - A simpler statement that includesNAV and Position andMTM profit and loss sum-
maries aswell as other summary information related to changes in NAV.
Commodities Regulatory - The Commodities Regulatory statement breaks out domestic (US) and for-
eign cash/holdings for the Commodities segment of your account (required by the CMEGroup). This
type of statement is available for any accounts that trade futures or futures options.
You can also select one of our legacy default statements:
Account Management Users' Guide 88
Chapter 3 Default Statements
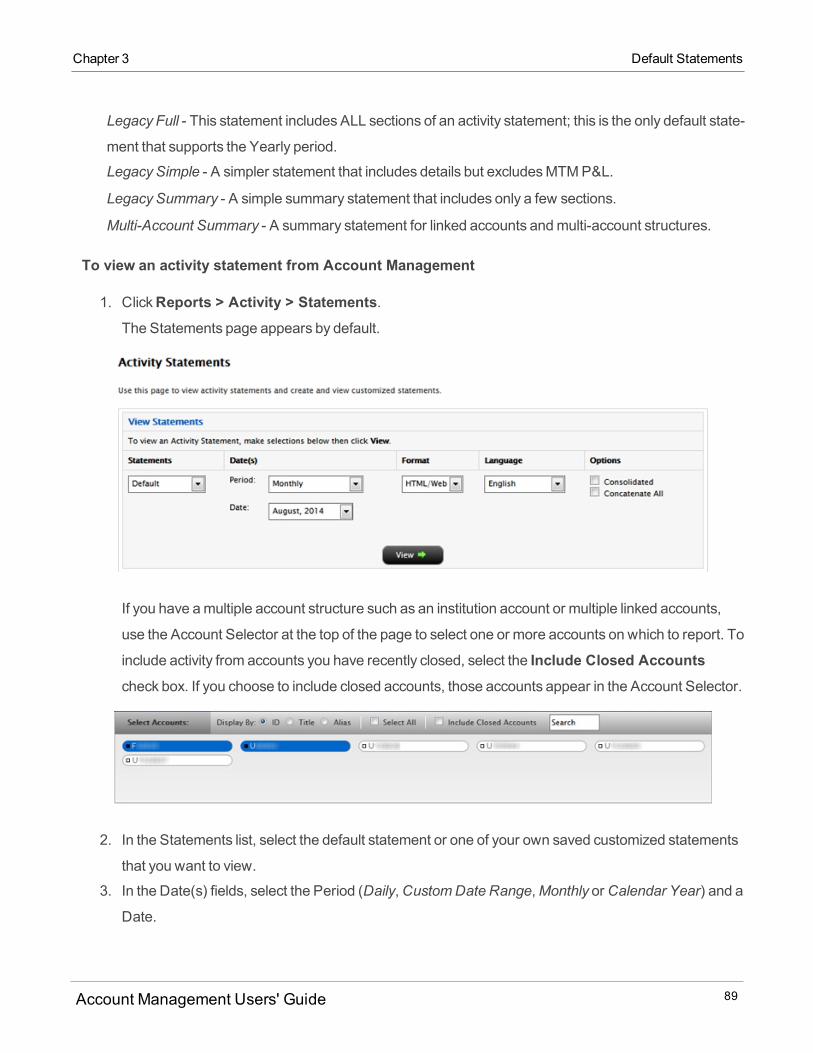
Chapter 3 Default Statements
Legacy Full - This statement includes ALL sections of an activity statement; this is the only default state-
ment that supports the Yearly period.
Legacy Simple - A simpler statement that includes details but excludesMTMP&L.
Legacy Summary - A simple summary statement that includes only a few sections.
Multi-Account Summary - A summary statement for linked accounts andmulti-account structures.
To view an activity statement from Account Management
1. ClickReports > Activity > Statements.The Statements page appears by default.
If you have amultiple account structure such as an institution account or multiple linked accounts,
use the Account Selector at the top of the page to select one or more accounts on which to report. To
include activity from accounts you have recently closed, select the Include Closed Accountscheck box. If you choose to include closed accounts, those accounts appear in the Account Selector.
2. In the Statements list, select the default statement or one of your own saved customized statements
that you want to view.
3. In the Date(s) fields, select the Period (Daily,CustomDate Range,Monthly orCalendar Year) and a
Date.
Account Management Users' Guide 89
o For CustomDate Range, select the From and To dates, which define the period covered by the
statement.o For Daily statements, you can select a specific date or the last business day.o For Monthly statements, you can select the last month or a specificmonth.o For Calendar Year (annual) statements, you can select a specific year.o For Commodity Regulatory Statements, you can selectDaily orCustomDate Range. Data is
available from 5/29/2015 forward.
4. If you have amultiple account structure, selectedmore than one account in the Account Selector,
and want to view a consolidated statement, select theConsolidate Selected check box. This checkboxONLY appears if you selectedmore than one account in the Account Selector (or if you selected
one or more accounts in a Household in the selector). You can also generate statements for all
accounts in a single statement (multiple statements are joined together in a single statement) if you
select your ownmaster account in the Account Selector and then select theConcatenate All checkbox.
Advisors, MoneyManagers and Brokers andmaster account users with reporting access rights who
select their ownmaster account in the Account Selector have access to client-only consolidated and
concatenated statements. SelectConsolidated (Clients-Only) to generate activity data for allclients combined into a single statement, orConcatenate All (Clients-Only) to generatestatements for all client accounts in a single statement (multiple client statements are joined together
in a single statement).
5. In the Format list, select either HTML/WEB, PDF, CSV or Excel (Legacy), depending on how you
want to view the statement. For our clients who want a format compatible with Microsoft Excel, we
recommend selecting CVS; however, we will continue tomake the Excel (Legacy) format available.
6. In the Language list, select your desired language.
7. ClickView to generate the activity statement.
If you selected PDF as the Format, you will be prompted to open the generated report or save it to
your computer.
8. You can expand and collapse each section of the statement individually. Click the slate blue section
heading bar to expand a section, and click it again to collapse it.
Account Management Users' Guide 90
Chapter 3 Default Statements
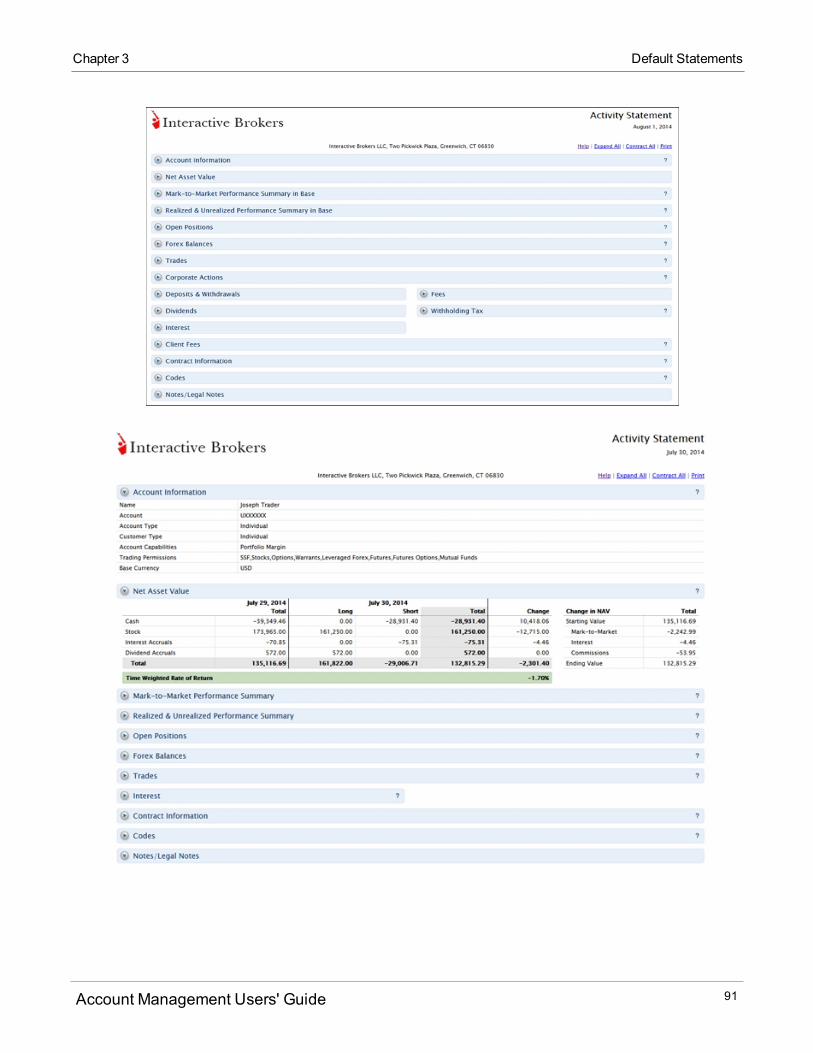
Chapter 3 Default Statements
Account Management Users' Guide 91
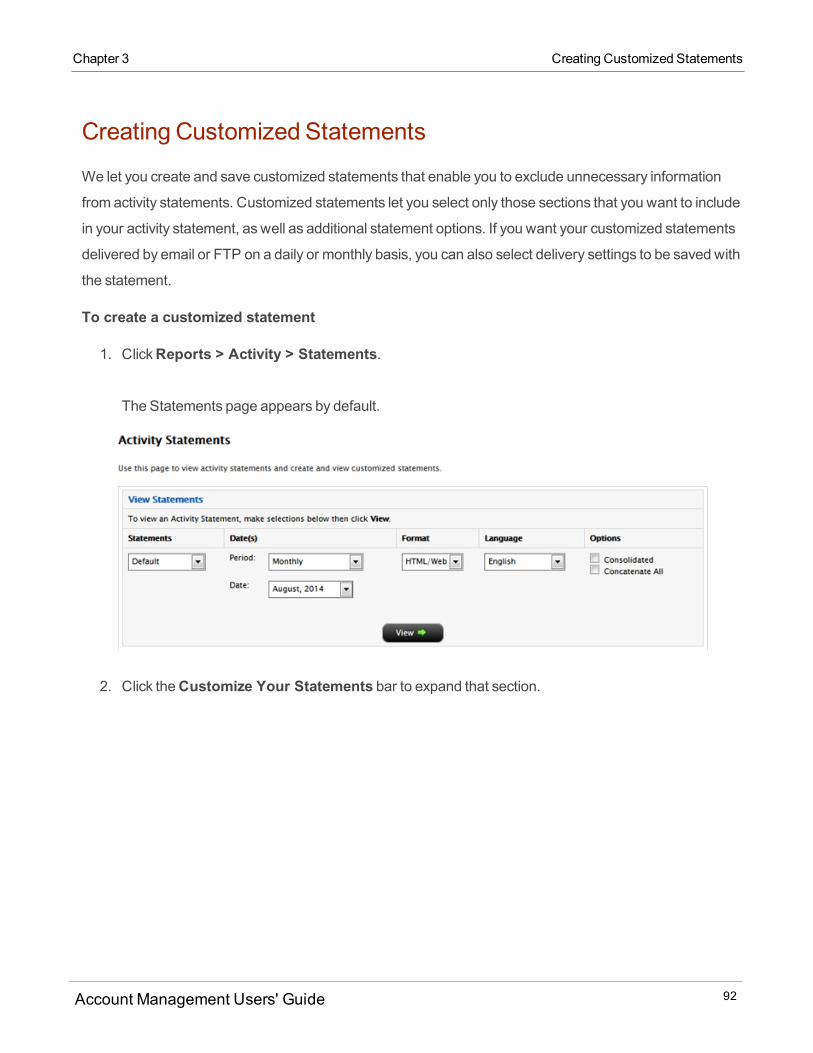
Creating Customized Statements
We let you create and save customized statements that enable you to exclude unnecessary information
from activity statements. Customized statements let you select only those sections that you want to include
in your activity statement, as well as additional statement options. If you want your customized statements
delivered by email or FTP on a daily or monthly basis, you can also select delivery settings to be saved with
the statement.
To create a customized statement
1. ClickReports > Activity > Statements.
The Statements page appears by default.
2. Click theCustomize Your Statements bar to expand that section.
Account Management Users' Guide 92
Chapter 3 Creating Customized Statements
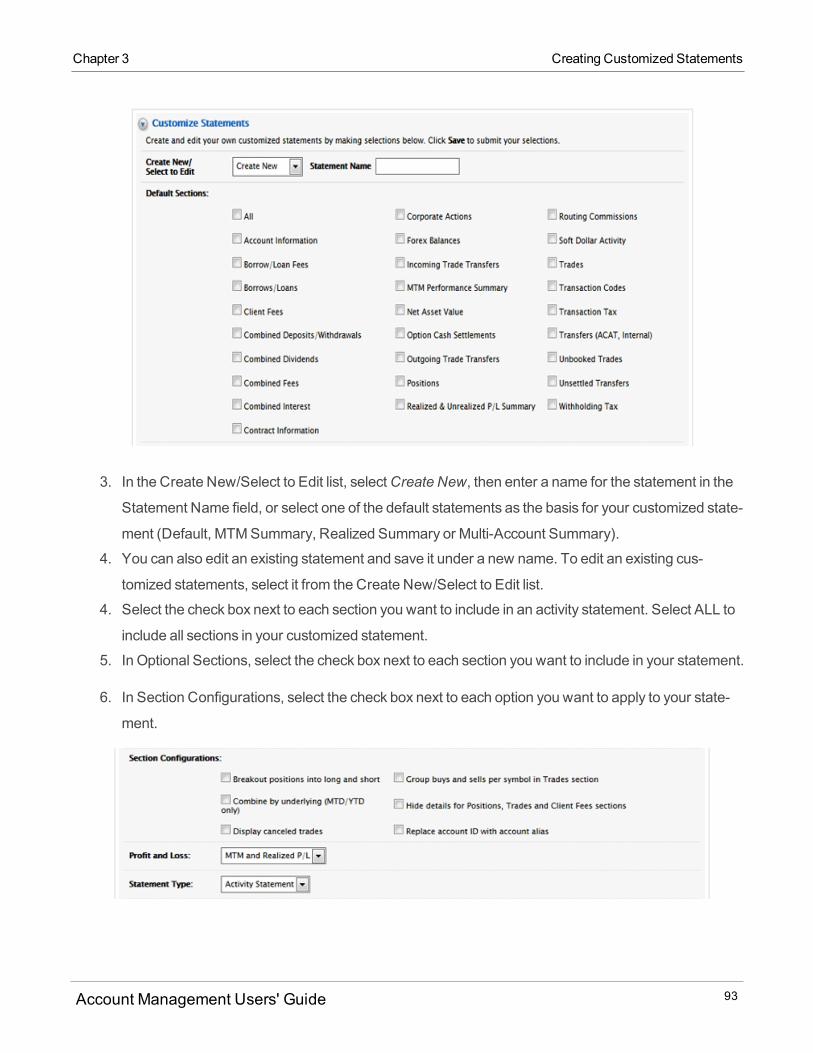
Chapter 3 Creating Customized Statements
3. In the Create New/Select to Edit list, selectCreate New, then enter a name for the statement in the
Statement Name field, or select one of the default statements as the basis for your customized state-
ment (Default, MTMSummary, Realized Summary or Multi-Account Summary).
4. You can also edit an existing statement and save it under a new name. To edit an existing cus-
tomized statements, select it from the Create New/Select to Edit list.
4. Select the check box next to each section you want to include in an activity statement. Select ALL to
include all sections in your customized statement.
5. In Optional Sections, select the check box next to each section you want to include in your statement.
6. In Section Configurations, select the check box next to each option you want to apply to your state-
ment.
Account Management Users' Guide 93
7. In the Profit and Loss list, select the profit and loss format for the statement. SelectMTMandReal-
ized P/L,Realized P/L Only,MTMOnly, orNone.
8. Select one of the following from the Statement Type list:
9. If you are an Executions Services customer, select either Activity Statement or Execution
Settlement.
Execution Settlements show activity by settlement date instead of trade date. If you select Execution
Settlement, filter the settlement by broker name or broker account using the fields provided.
10. If you are a Prime Services customer,selectActivity Statement, Settlement or Projected Settlement.
Prime Settlements show activity by settlement date; Projected Prime Settlements show activity by
projected settlement date.
11. If you want to view your statements on your mobile device, in the Statement Type list, selectMobile
Summary. TheMobile Summary is a scaled-down statement designed to be viewed on amobile
device.
12. In the Customize Statements Delivery Settings section, specify additional information for customized
activity statement that you want to be sent via email. Enter the following information for customized
statements that will be delivered via email:
o Account: Select account ID, ALL or CONSOLIDATED. Select ALL to apply the statement to themaster account and all sub accounts (or linked accounts). A separate email will be sent for each
account. (If you select FTP on the Delivery Settings page in Report Management, all files will be
delivered to the FTP site, but the directory will be appended with the report date for organizational
purposes.)
Although email and FTP deliverymethods are available, we recommend that Advisors and
Brokers choose FTP as their deliverymethod for customized statements with ALL accounts selec-
ted. Advisors and Brokers who select email as the deliverymethod for customized statements
with ALL accounts selected, you will get an emailed statements for each client or sub account.o Activity Period: Select Daily or Monthly.o Format: Select HTML/WEB, PDF or Excel.o Language: Select your language from the list.
Account Management Users' Guide 94
Chapter 3 Creating Customized Statements
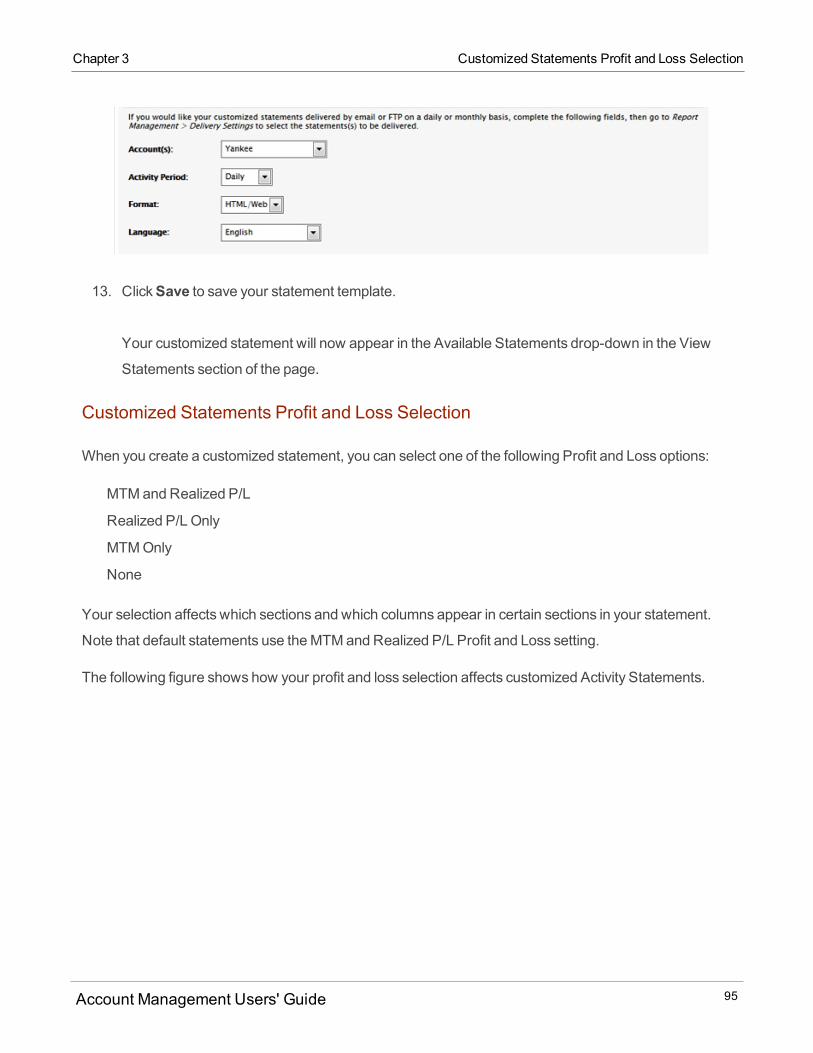
Chapter 3 Customized Statements Profit and Loss Selection
13. ClickSave to save your statement template.
Your customized statement will now appear in the Available Statements drop-down in the View
Statements section of the page.
Customized Statements Profit and Loss Selection
When you create a customized statement, you can select one of the following Profit and Loss options:
MTMandRealized P/L
Realized P/L Only
MTMOnly
None
Your selection affects which sections and which columns appear in certain sections in your statement.
Note that default statements use theMTMandRealized P/L Profit and Loss setting.
The following figure shows how your profit and loss selection affects customized Activity Statements.
Account Management Users' Guide 95
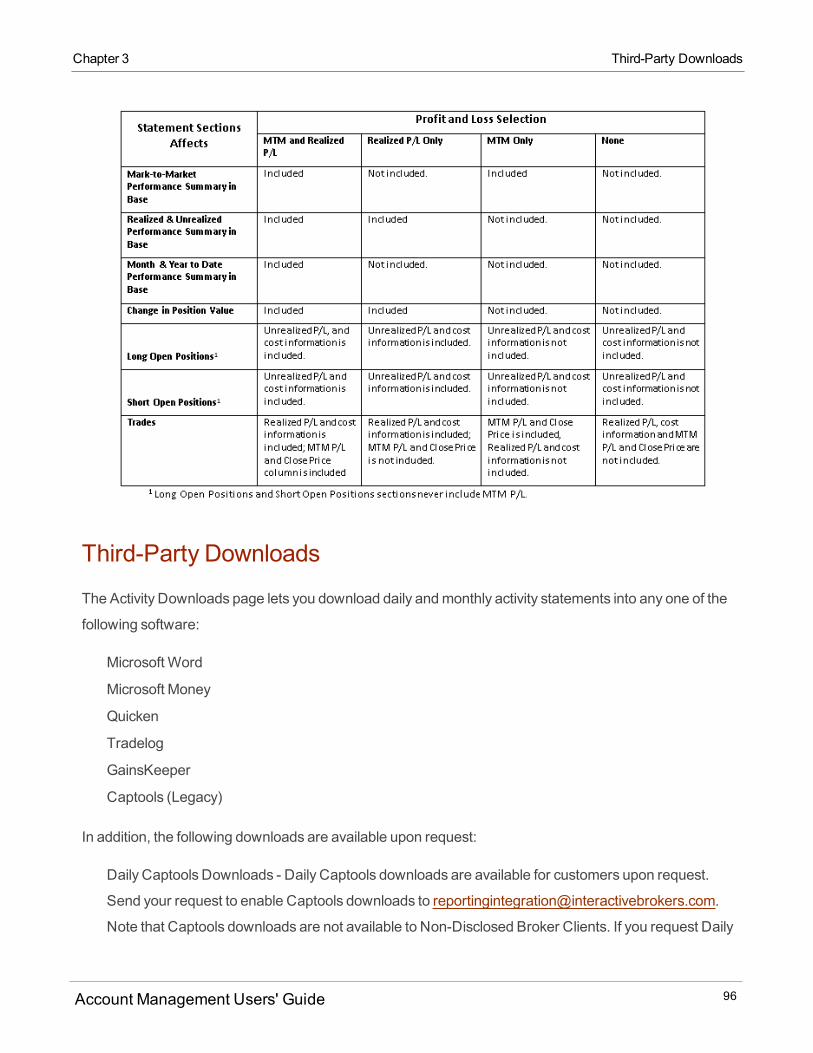
Third-Party Downloads
The Activity Downloads page lets you download daily andmonthly activity statements into any one of the
following software:
Microsoft Word
Microsoft Money
Quicken
Tradelog
GainsKeeper
Captools (Legacy)
In addition, the following downloads are available upon request:
Daily Captools Downloads - Daily Captools downloads are available for customers upon request.
Send your request to enable Captools downloads to [email protected].
Note that Captools downloads are not available to Non-Disclosed Broker Clients. If you request Daily
Account Management Users' Guide 96
Chapter 3 Third-Party Downloads
Chapter 3 Third-Party Downloads
Captools Downloads, the Activity Downloads page will contain an additional section for Daily Captools
Downloads.
Daily PortfolioCenter®/MorningstarDownloads for Advisors (for advisor accounts only).
PortfolioCenter is a product of Schwab Performance Technologies, a subsidiary of The CharlesSchwabCorporation.
If you are downloading your statements for use in a proprietary program that requires a set format, use
Activity FlexQueries instead of Activity Downloads.
Who can access the Activity Downloads page?
You can access this page if you are a(n):
Individual, Joint, Trust or IRA Account User
Small Business Account User
Friends and Family GroupMaster or Client User
Advisor Master User Individual
Advisor Master User Organization
Advisor Client User Individual
Advisor Client User Organization
Proprietary Trading GroupMaster User
Proprietary Trading Group SubUser
Broker Master User (master account only)
Broker Fully Disclosed Client User
Broker Fully Disclosed Client User Organization
Investment Manager Master User
Fund
Administrator who is subscribed (linked) to a client account.
To download activity statements
1. ClickReports > Activity > Downloads.
If you have amultiple account structure such as an institution account or multiple linked accounts,
use the Account Selector at the top of the page to select an account on which to report. To download
Account Management Users' Guide 97
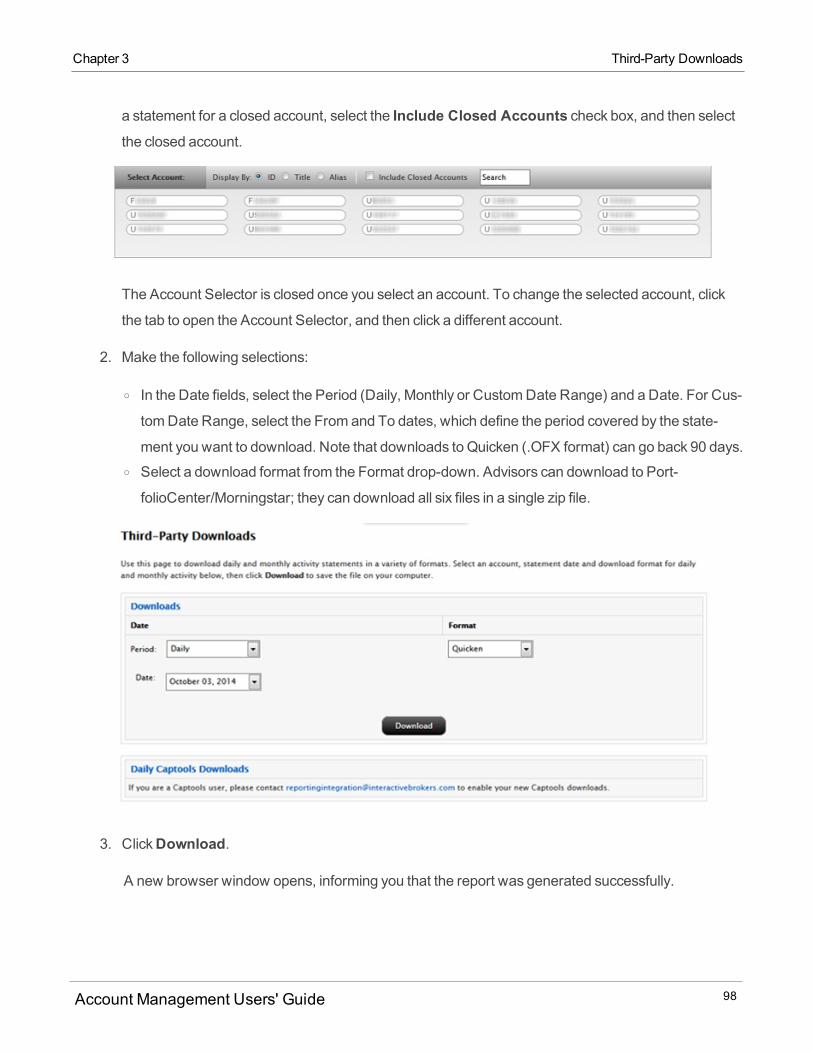
a statement for a closed account, select the Include Closed Accounts check box, and then selectthe closed account.
The Account Selector is closed once you select an account. To change the selected account, click
the tab to open the Account Selector, and then click a different account.
2. Make the following selections:
o In the Date fields, select the Period (Daily, Monthly or CustomDate Range) and a Date. For Cus-
tomDate Range, select the From and To dates, which define the period covered by the state-
ment you want to download. Note that downloads to Quicken (.OFX format) can go back 90 days.o Select a download format from the Format drop-down. Advisors can download to Port-
folioCenter/Morningstar; they can download all six files in a single zip file.
3. ClickDownload.
A new browser window opens, informing you that the report was generated successfully.
Account Management Users' Guide 98
Chapter 3 Third-Party Downloads
Chapter 3 Third-Party Downloads
4. Open the generated report with the appropriate application, or download the report to your com-
puter.
Account Management Users' Guide 99

If You are Downloading a Zip File Using Internet Explorer 7 or 8
If you are downloading a Zip file using Internet Explorer 7 or 8, verify that automatic prompting for file
downloads is enabled.
To verify that automatic prompting for file downloads is enabled
1. In Internet Explorer, select Internet Options from the Toolsmenu.2. In the Internet Options dialog box, select theSecurity tab.3. Click theCustom Level... button.4. Scroll down to the Downloads section.
5. Automatic prompting for file downloads should be enabled.
Activity Flex Queries
The Activity FlexQueries page lets you create highly customized report templates for activity statements.
Flex queries let you specify exactly which fields you want to view in your Activity Statement, the time period
you want the report to cover, the order in which you want the fields to display, and the display format, TEXT
or XML, in which you want to view your report.
You can createmultiple FlexQueries with different fields for each statement. All of your FlexQueries are
stored in Account Management, and can be easily run from the Activity FlexQueries page. An activity Flex
Query is different from a customized activity statement in that you can customize a FlexQuery at the field
level, allowing you to include and exclude detailed field information. Customized statements only let you
include and exclude sections.
The FlexQueries page lets you create a new FlexQuery or edit an existing FlexQuery. Existing Flex
Queries are displayed in the Saved FlexQueries section of the page. You can also edit default Flex
Queries for Trades and Positions, then use those queries as the basis for your own FlexQueries.
Saved FlexQueries are available for the four previous calendar years and from the start of the current
calendar year.
Who can access the Flex Queries page?
You can access this page if you are a(n):
Account Management Users' Guide 100
Chapter 3 If You are Downloading a Zip File Using Internet Explorer 7 or 8

Chapter 3 Activity Flex Queries
Individual, Joint, Trust or IRA Account User
Small Business Account User
Friends and Family GroupMaster or Client User
Advisor Master User Individual
Advisor Master User Organization
Advisor Client User Individual
Advisor Client User Organization
Proprietary Trading GroupMaster User
Proprietary Trading Group SubUser
Broker Master User (master account only)
Broker Fully Disclosed Client User
Broker Fully Disclosed Client User Organization
Investment Manager Master User
Fund
Account Management Users' Guide 101
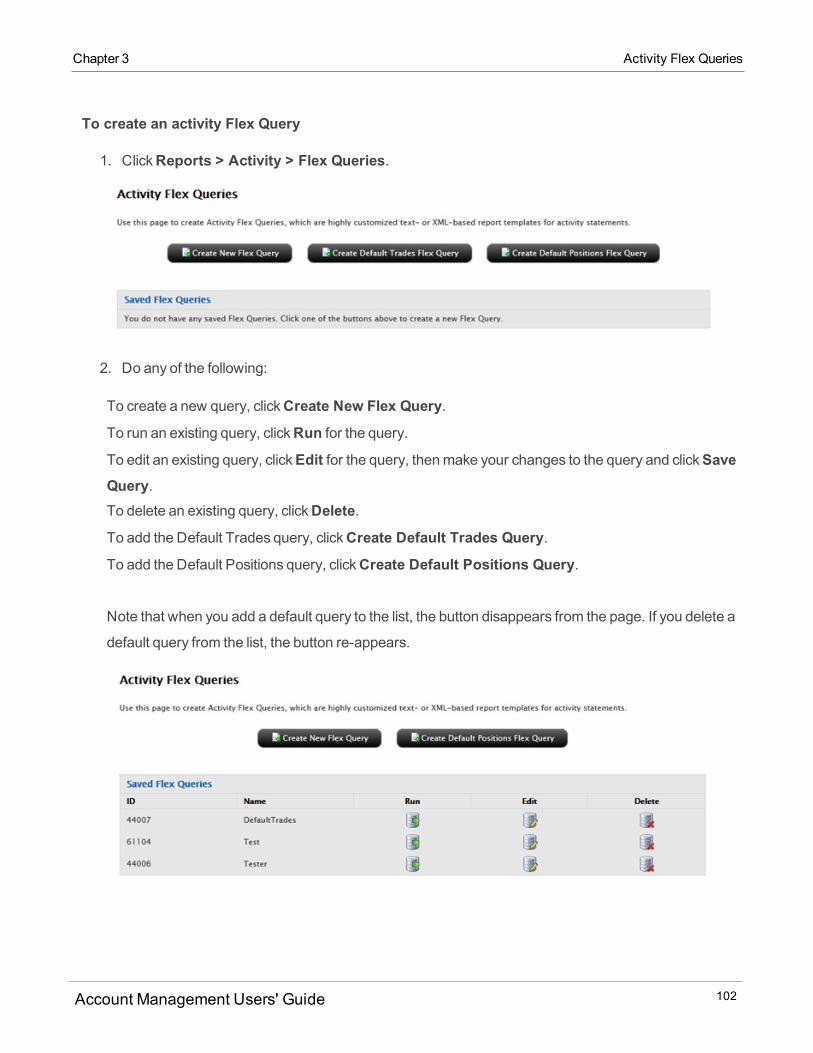
To create an activity Flex Query
1. ClickReports > Activity > Flex Queries.
2. Do any of the following:
To create a new query, clickCreate New Flex Query.
To run an existing query, clickRun for the query.
To edit an existing query, clickEdit for the query, thenmake your changes to the query and clickSaveQuery.To delete an existing query, clickDelete.
To add the Default Trades query, clickCreate Default Trades Query.
To add the Default Positions query, clickCreate Default Positions Query.
Note that when you add a default query to the list, the button disappears from the page. If you delete a
default query from the list, the button re-appears.
Account Management Users' Guide 102
Chapter 3 Activity Flex Queries
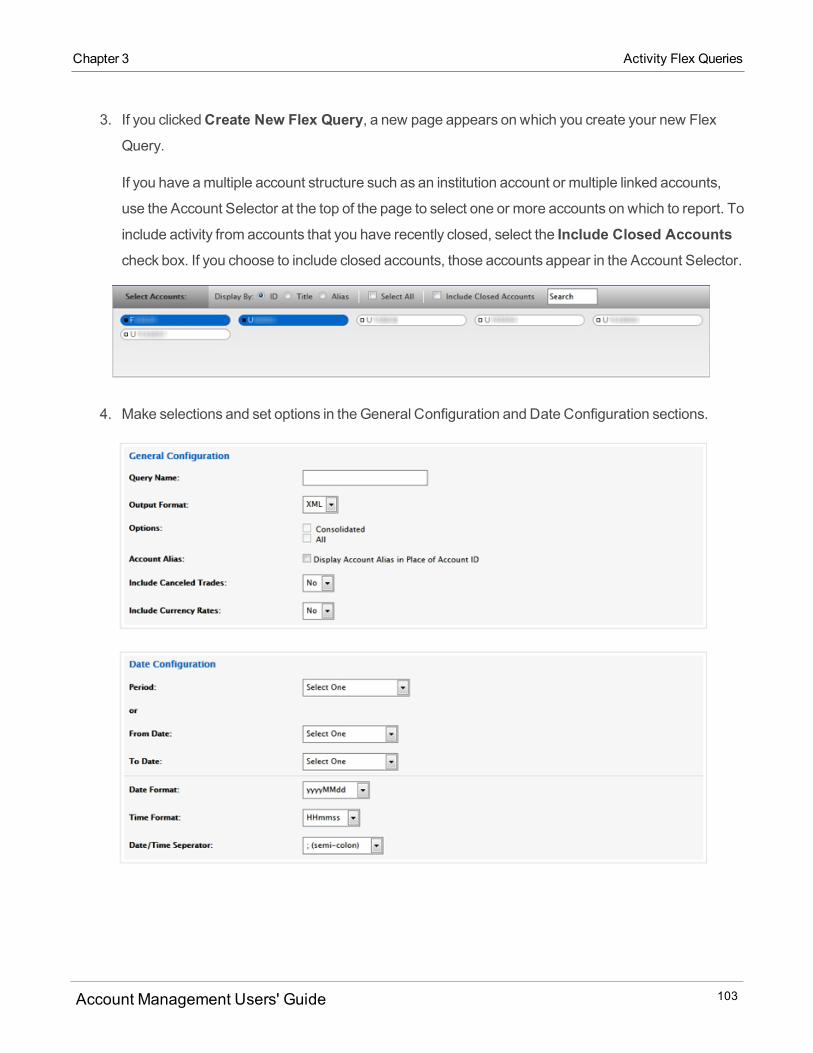
Chapter 3 Activity Flex Queries
3. If you clickedCreate New Flex Query, a new page appears on which you create your new Flex
Query.
If you have amultiple account structure such as an institution account or multiple linked accounts,
use the Account Selector at the top of the page to select one or more accounts on which to report. To
include activity from accounts that you have recently closed, select the Include Closed Accountscheck box. If you choose to include closed accounts, those accounts appear in the Account Selector.
4. Make selections and set options in the General Configuration and Date Configuration sections.
Account Management Users' Guide 103
In the Query Name field, enter the name of the FlexQuery.
In the Output Format list, select Text or XML. If you select Text, youmust also choose a delimiting char-
acter (comma, pipe or tab character), and optionally choose to include header and trailer records;
column headers; and section code and line descriptors.
Select other options as required. Note that theConsolidated andAll options are only available whenthemaster account has been selected in the Account Selector.
In the Date Configuration section, select the period for the FlexQuery, or enter a range of dates in the
FromDate and To Date fields. The following periods are available:
Last BusinessDay
Last Month
Last 30 Calendar Days
Last 365 Calendar Days
Month to Date
Year to Date
Last BusinessWeek (Mon-Fri)
Last N Calendar Days (when you select this option, youmust then select a number from 1 to 365 from
a drop-down)
In the Date Configuration section, select a Date Format, Time Format and Date/Time Separator:
Available date formats are:
yyyyMMdd (default)
yyyy-MM-dd
MM/dd/yyyy
MM/dd/yy
dd/MM/yyyy
dd/MM/yy
dd-MMM-yy
Available time formats are:
Account Management Users' Guide 104
Chapter 3 Activity Flex Queries
Chapter 3 Activity Flex Queries
HHmmss (default)
HH:mm:ss
Available date/time separators are:
; (semi-colon, the default)
, (comma)
'' (single-spaced)
No separator
Advisors, MoneyManagers and Brokers andmaster account users with reporting access rights who
select their ownmaster account in the Account Selector have access to client-only consolidated and
concatenated statements. SelectConsolidated (Clients-Only) to generate activity data for all clientscombined into a single statement, orConcatenate All (Clients-Only) to generate statements for allclient accounts in a single statement (multiple client statements are joined together in a single state-
ment).
5. Advisors who have createdmodels in Trader Workstation can includemodel information in their
Activity FlexQueries. In theModels section of the page, select one of these options:
o All - Include data for all models joined together. If you select this option, accounts that do not havemodels will also be included.
o Consolidated - Include consolidated data for all models and a single account.o Select a Model - Select this check box to view availablemodels in theModel drop-down list.
Select amodel from the drop-down to view a statement for a singlemodel. Onlymodels that have
been created in Trader Workstation for the selected account(s) will appear. If you select the
Independent model, accounts that do not havemodels will also be included.
6. To specify which fields in which sections to include, click each section to expand it, then select the
fields to include in the FlexQuery in each section by highlighting the fields in the Fields Available list,
then using the green right arrow tomove the fields to the Fields Included list. Use the green left
arrow tomove fields from the Fields Included list (and exclude the fields from the report).
Account Management Users' Guide 105
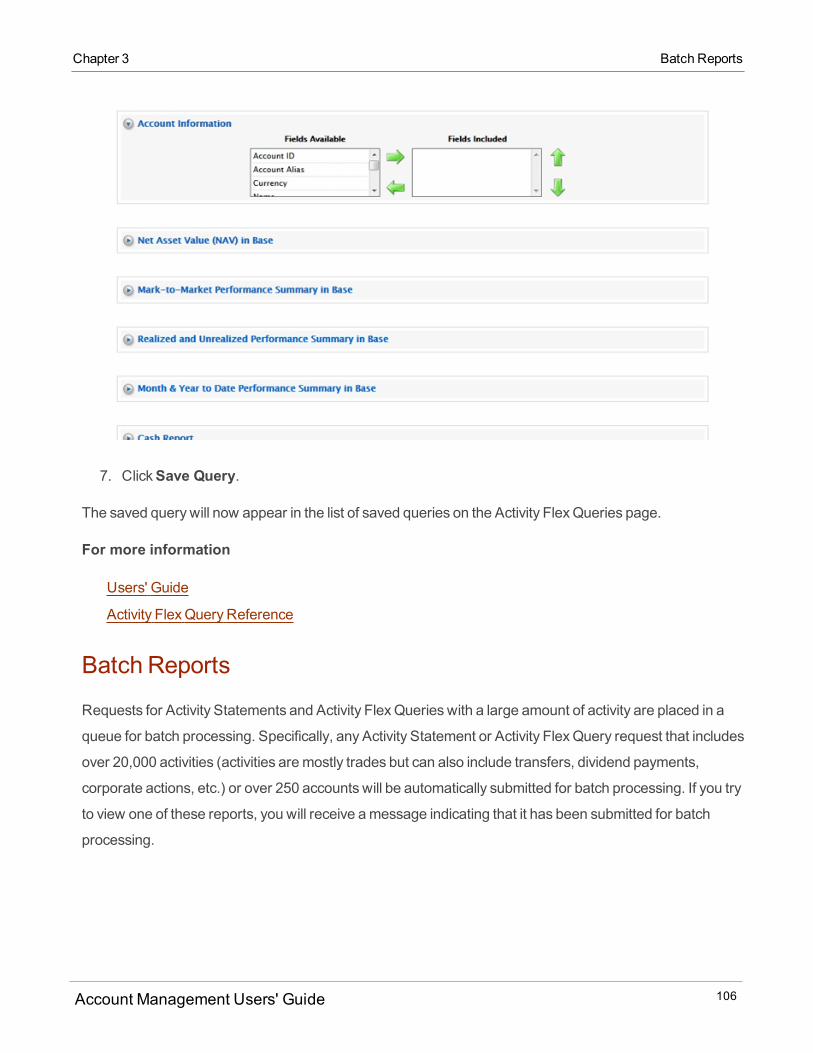
7. ClickSave Query.
The saved query will now appear in the list of saved queries on the Activity FlexQueries page.
For more information
Users' Guide
Activity FlexQuery Reference
Batch Reports
Requests for Activity Statements and Activity FlexQueries with a large amount of activity are placed in a
queue for batch processing. Specifically, any Activity Statement or Activity FlexQuery request that includes
over 20,000 activities (activities aremostly trades but can also include transfers, dividend payments,
corporate actions, etc.) or over 250 accounts will be automatically submitted for batch processing. If you try
to view one of these reports, you will receive amessage indicating that it has been submitted for batch
processing.
Account Management Users' Guide 106
Chapter 3 Batch Reports
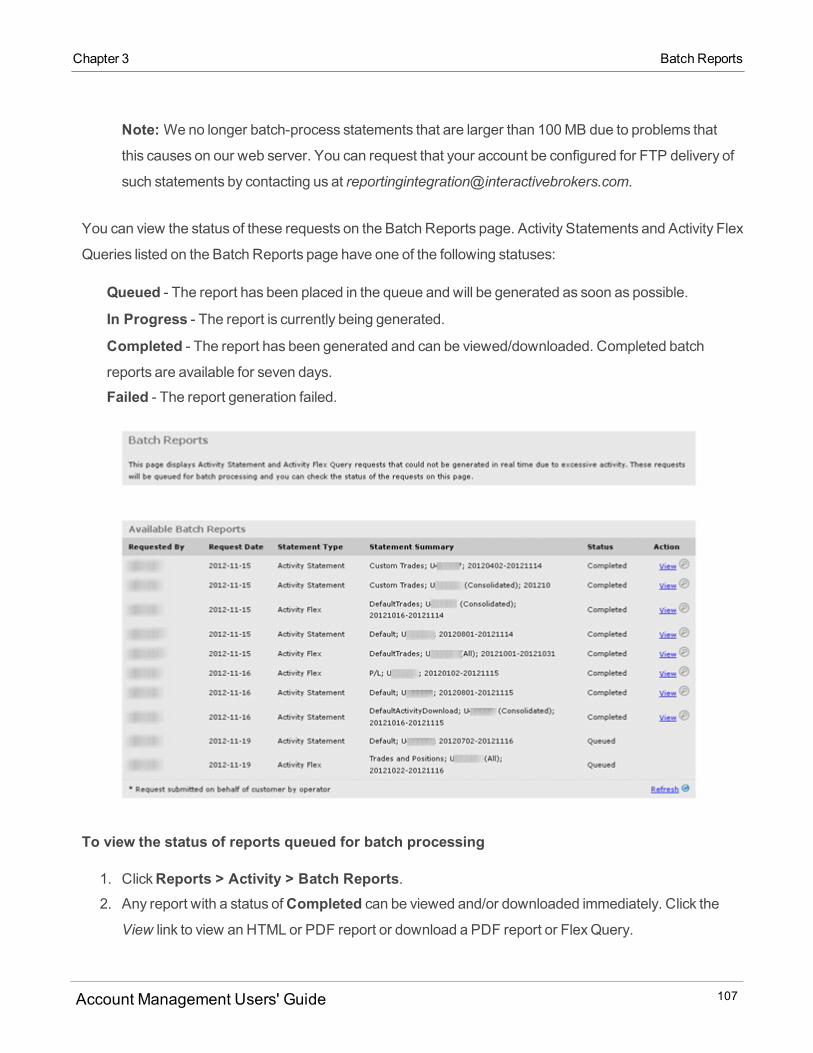
Chapter 3 Batch Reports
Note:Weno longer batch-process statements that are larger than 100MB due to problems that
this causes on our web server. You can request that your account be configured for FTP delivery of
such statements by contacting us at [email protected].
You can view the status of these requests on the Batch Reports page. Activity Statements and Activity Flex
Queries listed on the Batch Reports page have one of the following statuses:
Queued - The report has been placed in the queue and will be generated as soon as possible.
In Progress - The report is currently being generated.
Completed - The report has been generated and can be viewed/downloaded. Completed batchreports are available for seven days.
Failed - The report generation failed.
To view the status of reports queued for batch processing
1. ClickReports > Activity > Batch Reports.2. Any report with a status ofCompleted can be viewed and/or downloaded immediately. Click the
View link to view an HTML or PDF report or download a PDF report or FlexQuery.
Account Management Users' Guide 107
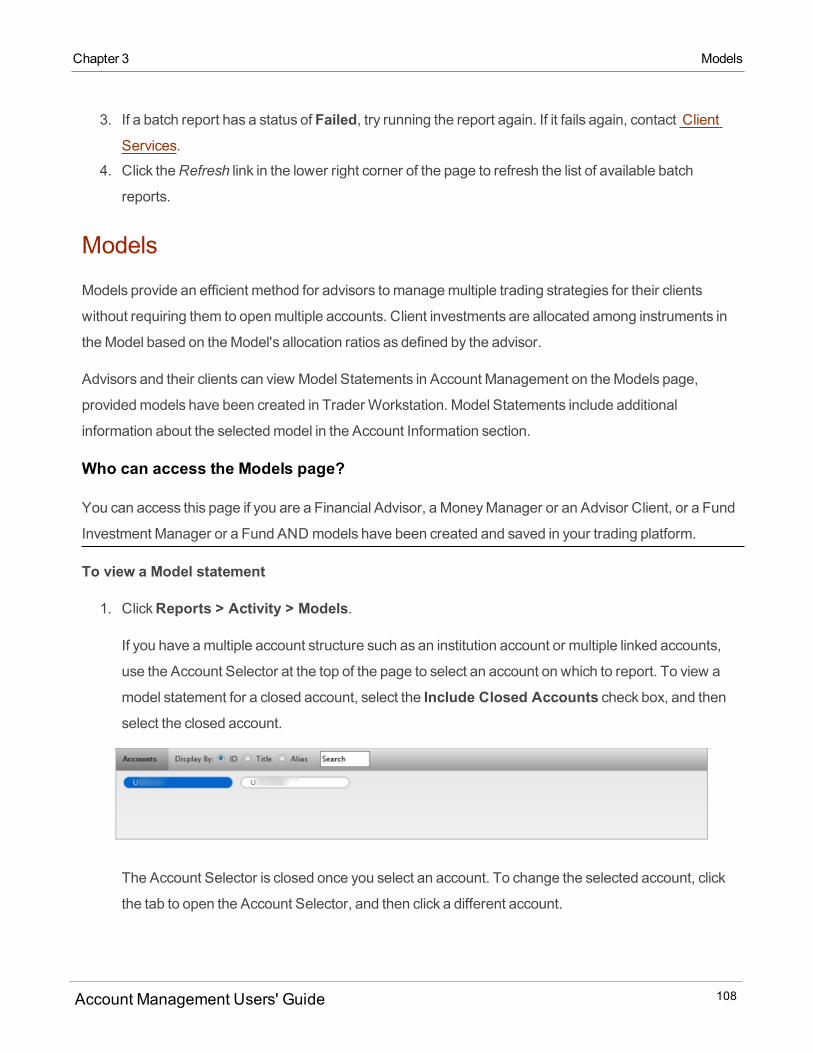
3. If a batch report has a status of Failed, try running the report again. If it fails again, contact ClientServices.
4. Click theRefresh link in the lower right corner of the page to refresh the list of available batch
reports.
Models
Models provide an efficient method for advisors tomanagemultiple trading strategies for their clients
without requiring them to openmultiple accounts. Client investments are allocated among instruments in
theModel based on theModel's allocation ratios as defined by the advisor.
Advisors and their clients can view Model Statements in Account Management on theModels page,
providedmodels have been created in Trader Workstation. Model Statements include additional
information about the selectedmodel in the Account Information section.
Who can access the Models page?
You can access this page if you are a Financial Advisor, a MoneyManager or an Advisor Client, or a Fund
Investment Manager or a Fund AND models have been created and saved in your trading platform.
To view a Model statement
1. ClickReports > Activity > Models.
If you have amultiple account structure such as an institution account or multiple linked accounts,
use the Account Selector at the top of the page to select an account on which to report. To view a
model statement for a closed account, select the Include Closed Accounts check box, and thenselect the closed account.
The Account Selector is closed once you select an account. To change the selected account, click
the tab to open the Account Selector, and then click a different account.
Account Management Users' Guide 108
Chapter 3 Models
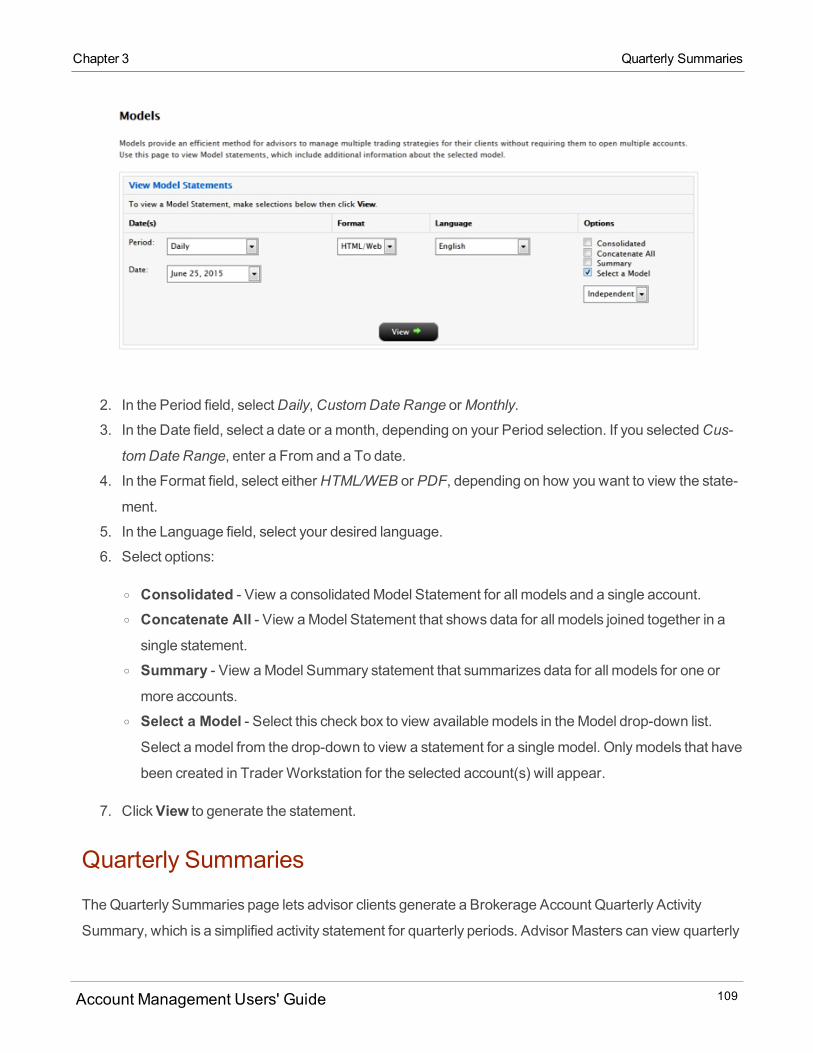
Chapter 3 Quarterly Summaries
2. In the Period field, selectDaily,CustomDate Range orMonthly.
3. In the Date field, select a date or amonth, depending on your Period selection. If you selectedCus-
tomDate Range, enter a From and a To date.
4. In the Format field, select eitherHTML/WEB or PDF, depending on how you want to view the state-
ment.
5. In the Language field, select your desired language.
6. Select options:
o Consolidated - View a consolidatedModel Statement for all models and a single account.o Concatenate All - View aModel Statement that shows data for all models joined together in a
single statement.o Summary - View aModel Summary statement that summarizes data for all models for one or
more accounts.o Select a Model - Select this check box to view availablemodels in theModel drop-down list.
Select amodel from the drop-down to view a statement for a singlemodel. Onlymodels that have
been created in Trader Workstation for the selected account(s) will appear.
7. ClickView to generate the statement.
Quarterly Summaries
TheQuarterly Summaries page lets advisor clients generate a Brokerage Account Quarterly Activity
Summary, which is a simplified activity statement for quarterly periods. Advisor Masters can view quarterly
Account Management Users' Guide 109
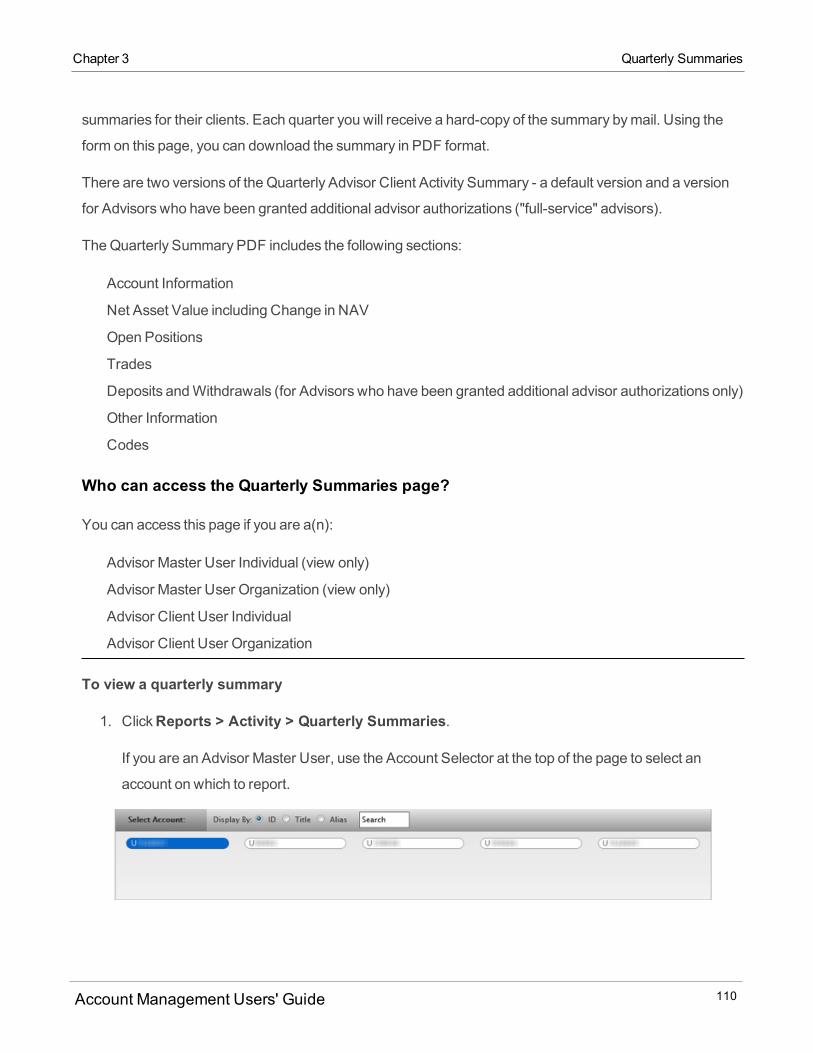
summaries for their clients. Each quarter you will receive a hard-copy of the summary bymail. Using the
form on this page, you can download the summary in PDF format.
There are two versions of the Quarterly Advisor Client Activity Summary - a default version and a version
for Advisors who have been granted additional advisor authorizations ("full-service" advisors).
TheQuarterly Summary PDF includes the following sections:
Account Information
Net Asset Value including Change in NAV
Open Positions
Trades
Deposits andWithdrawals (for Advisors who have been granted additional advisor authorizations only)
Other Information
Codes
Who can access the Quarterly Summaries page?
You can access this page if you are a(n):
Advisor Master User Individual (view only)
Advisor Master User Organization (view only)
Advisor Client User Individual
Advisor Client User Organization
To view a quarterly summary
1. ClickReports > Activity > Quarterly Summaries.
If you are an Advisor Master User, use the Account Selector at the top of the page to select an
account on which to report.
Account Management Users' Guide 110
Chapter 3 Quarterly Summaries

Chapter 3 Trade Confirmations
The Account Selector is closed once you select an account. To change the selected account, click
the tab to open the Account Selector, and then click a different account.
2. In the Date field, select the fiscal quarter.
3. ClickView to generate the summary.
The quarterly summary is generated and displayed as a PDF file in a new browser window.
Trade Confirmations
The Trade Confirmationsmenu includes the following tabbed pages:
Reports - View trade confirmation reports.
Trade Allocations - View pre-trade and post-trade allocation details.
FlexQueries - Create highly customized trade confirmation reports in text or XML format.
Real-time trade confirmations are generated for all executions. You can view a trade confirmations report,
which lists trade confirmations separately by asset class.
Trade confirmations are available for the four previous calendar years and from the start of the current
calendar year.
Who can access the Trade Confirmations page?
You can access this page if you are a(n):
Individual, Joint, Trust or IRA Account User
Small Business Account User
Friends and Family GroupMaster or Client User
Account Management Users' Guide 111
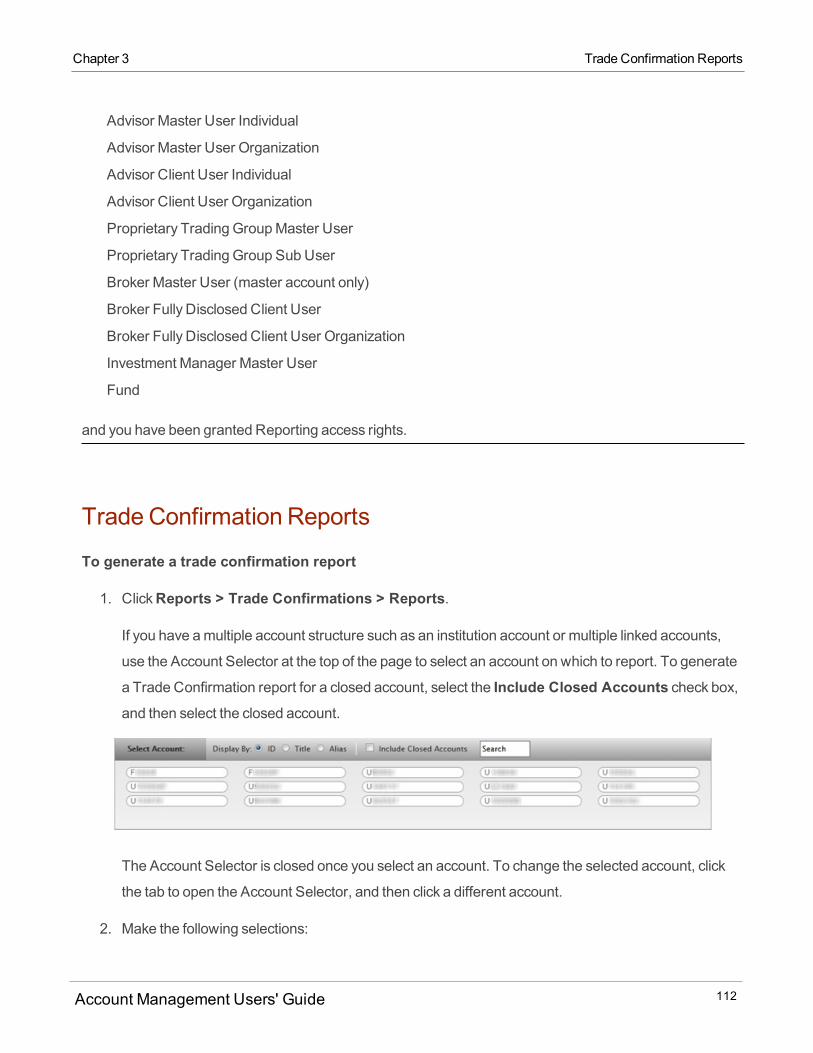
Advisor Master User Individual
Advisor Master User Organization
Advisor Client User Individual
Advisor Client User Organization
Proprietary Trading GroupMaster User
Proprietary Trading Group SubUser
Broker Master User (master account only)
Broker Fully Disclosed Client User
Broker Fully Disclosed Client User Organization
Investment Manager Master User
Fund
and you have been granted Reporting access rights.
Trade Confirmation Reports
To generate a trade confirmation report
1. ClickReports > Trade Confirmations > Reports.
If you have amultiple account structure such as an institution account or multiple linked accounts,
use the Account Selector at the top of the page to select an account on which to report. To generate
a Trade Confirmation report for a closed account, select the Include Closed Accounts check box,and then select the closed account.
The Account Selector is closed once you select an account. To change the selected account, click
the tab to open the Account Selector, and then click a different account.
2. Make the following selections:
Account Management Users' Guide 112
Chapter 3 Trade Confirmation Reports

Chapter 3 Trade Confirmation Reports
o In the Date fields, select the dates for the report.o In the Format field, selectHTML/WEB or PDF.o In the Language list, select your desired language.
Advisors, MoneyManagers and Brokers andmaster account users with reporting access rights who
select their ownmaster account in the Account Selector have access to client-only consolidated and
concatenated reports. SelectConsolidated (Clients-Only) to generate trade confirmations for allclients combined into a single report, orConcatenate All (Clients-Only) to generate statementsfor all client accounts in a single report (multiple client reports are joined together in a single report).
3. ClickView to generate the report.
If you selected PDF as the Format, you will be prompted to open the generated report or save it to
your computer.
Summary rows aremarked with a plus sign. Click a summary row to display detail rows; click the
summary row again to close the detail rows.
Account Management Users' Guide 113
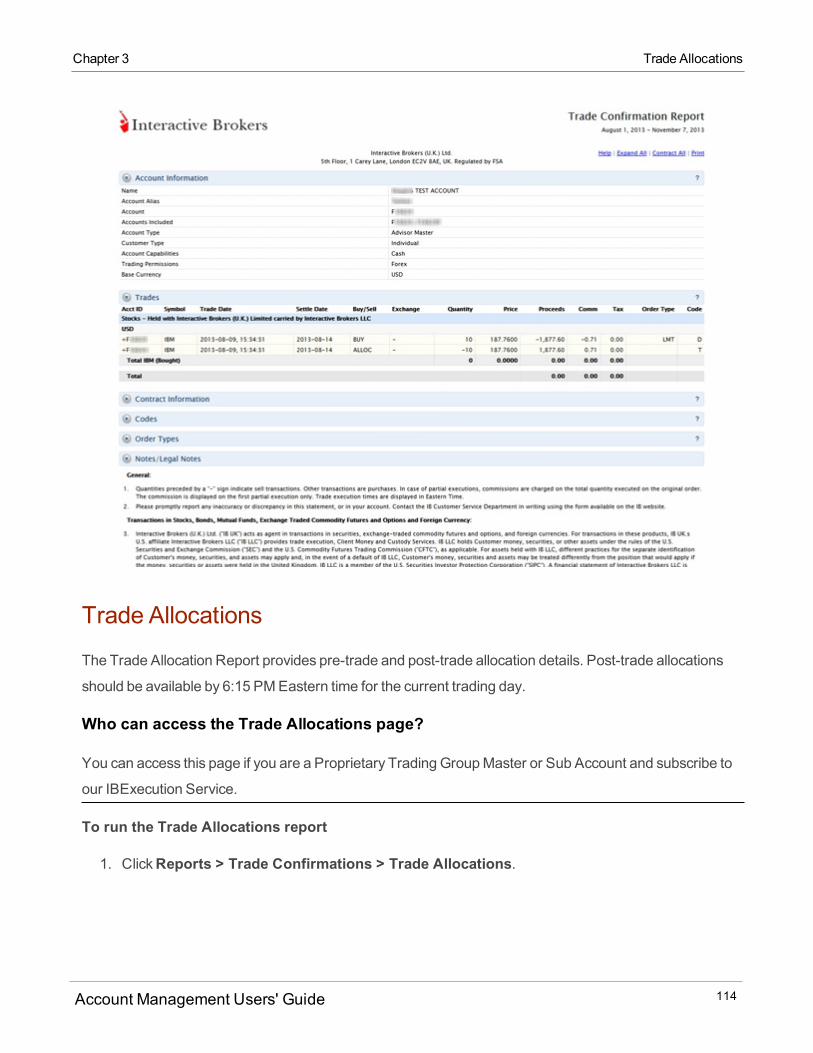
Trade Allocations
The Trade Allocation Report provides pre-trade and post-trade allocation details. Post-trade allocations
should be available by 6:15 PMEastern time for the current trading day.
Who can access the Trade Allocations page?
You can access this page if you are a Proprietary Trading GroupMaster or Sub Account and subscribe to
our IBExecution Service.
To run the Trade Allocations report
1. ClickReports > Trade Confirmations > Trade Allocations.
Account Management Users' Guide 114
Chapter 3 Trade Allocations
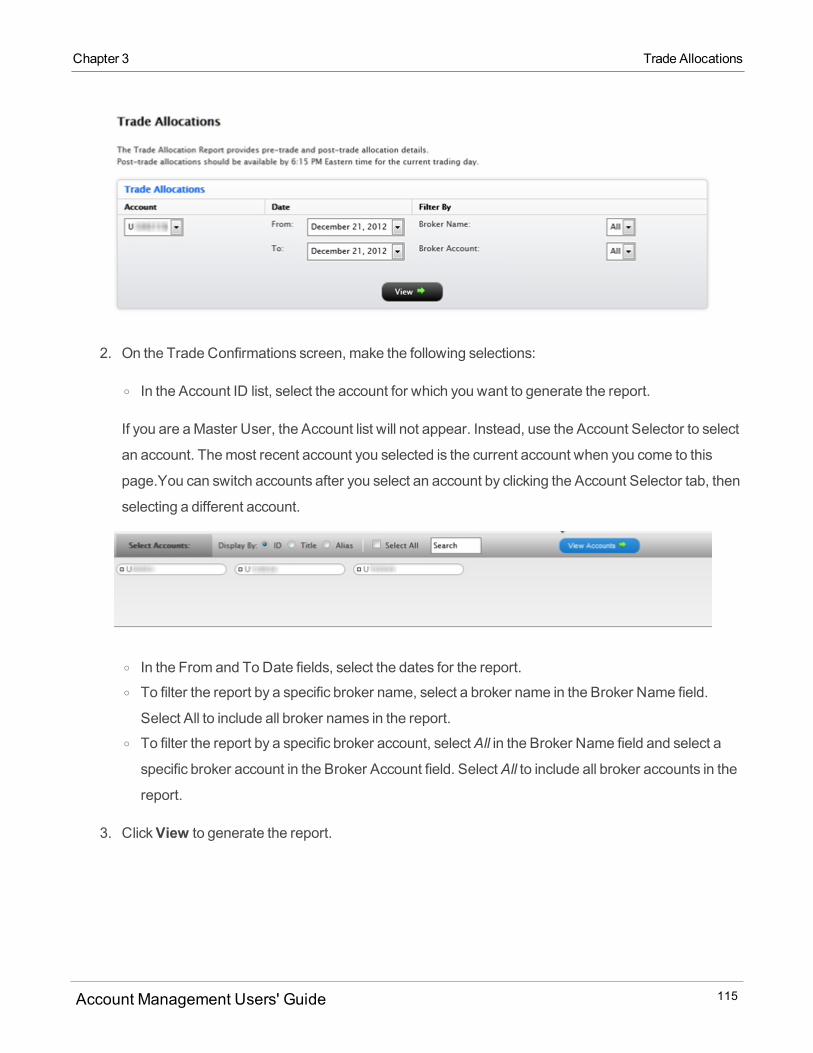
Chapter 3 Trade Allocations
2. On the Trade Confirmations screen, make the following selections:
o In the Account ID list, select the account for which you want to generate the report.
If you are aMaster User, the Account list will not appear. Instead, use the Account Selector to select
an account. Themost recent account you selected is the current account when you come to this
page.You can switch accounts after you select an account by clicking the Account Selector tab, then
selecting a different account.
o In the From and ToDate fields, select the dates for the report.o To filter the report by a specific broker name, select a broker name in the Broker Name field.
Select All to include all broker names in the report.o To filter the report by a specific broker account, selectAll in the Broker Name field and select a
specific broker account in the Broker Account field. SelectAll to include all broker accounts in the
report.
3. ClickView to generate the report.
Account Management Users' Guide 115
Trade Confirmation Flex Queries
The Trade Confirms Flex page lets you createmultiple, customized report templates for trade
confirmations. A trade confirmation FlexQuery lets you specify the exact fields you want to view in your
report, the time period you want the report to cover, the order in which you want the fields to appear in the
report, and the display format for the report.
You can createmultiple FlexQueries with different fields for each query. All of your Flex queries are stored
in Account Management. You can also add a default FlexQuery, then use it as the basis for your own by
editing it.
The FlexQueries page lets you create a new flex query or edit an existing FlexQuery. Existing Flex
Queries are displayed in the Saved FlexQueries section of the page. You can also edit the default Flex
Query to use it as the basis for your own FlexQuery.
Saved FlexQueries are available for the four previous calendar years and from the start of the current
calendar year.
Who can access the Trade Confirmation Flex Queries page?
You can access this page if you are a(n):
Individual, Joint, Trust or IRA Account User
Small Business Account User
Friends and Family GroupMaster or Client User
Advisor Master User Individual
Advisor Master User Organization
Advisor Client User Individual
Advisor Client User Organization
Proprietary Trading GroupMaster User
Proprietary Trading Group SubUser
Broker Master User (master account only)
Broker Fully Disclosed Client User
Broker Fully Disclosed Client User Organization
Account Management Users' Guide 116
Chapter 3 Trade Confirmation Flex Queries

Chapter 3 Trade Confirmation Flex Queries
Investment Manager Master User
Fund
and you have been granted Reporting access rights.
Account Management Users' Guide 117
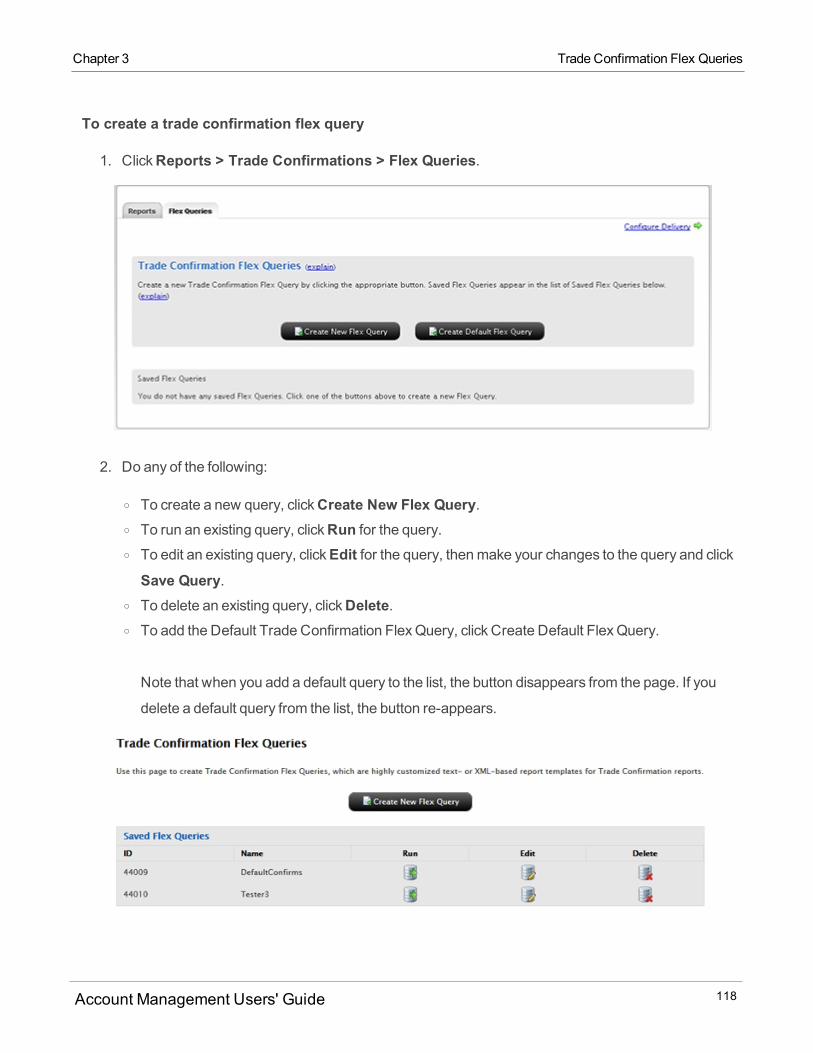
To create a trade confirmation flex query
1. ClickReports > Trade Confirmations > Flex Queries.
2. Do any of the following:
o To create a new query, clickCreate New Flex Query.o To run an existing query, clickRun for the query.o To edit an existing query, clickEdit for the query, thenmake your changes to the query and clickSave Query.
o To delete an existing query, clickDelete.o To add the Default Trade Confirmation FlexQuery, click Create Default FlexQuery.
Note that when you add a default query to the list, the button disappears from the page. If you
delete a default query from the list, the button re-appears.
Account Management Users' Guide 118
Chapter 3 Trade Confirmation Flex Queries

Chapter 3 Trade Confirmation Flex Queries
3. If you clickedCreate New Flex Query, a new page appears on which you create your new Flex
Query.
If you have amultiple account structure such as an institution account or multiple linked accounts,
use the Account Selector at the top of the page to select one or more accounts on which to report. To
include accounts that you have recently closed, select the Include Closed Accounts check box. Ifyou choose to include closed accounts, those accounts appear in the Account Selector.
4. Make selections and set options in the Configuration sections as follows:
Account Management Users' Guide 119

o In the Query Name field, enter the name of the flex query.o In the Output Format list, select Text or XML. If you select Text, youmust also choose a delimiting
character (comma, pipe or tab character), and optionally choose to include header and trailer
records; column headers; and section code and line descriptors.o Select other options as required. Note that theConsolidated andAll options are only availablewhen themaster account has been selected in the Account Selector.
Account Management Users' Guide 120
Chapter 3 Trade Confirmation Flex Queries

Chapter 3 Trade Confirmation Flex Queries
o In the Date Configuration section, select the period for the FlexQuery, or enter a range of dates in
the FromDate and To Date fields. The following periods are available:
Today
Last BusinessDay
Last Month
Last 30 Calendar Days
Last 365 Calendar Days
Month to Date
Year to Date
Last BusinessWeek (Mon-Fri)
Last N Calendar Days (when you select this option, youmust then select a number from 1 to 365
from a drop-down)o In the Date Configuration section, select a Date Format, Time Format and Date/Time Separator:
Available date formats are:
yyyyMMdd (default)
yyyy-MM-dd
MM/dd/yyyy
MM/dd/yy
dd/MM/yyyy
dd/MM/yy
dd-MMM-yy
Available time formats are:
HHmmss (default)
HH:mm:ss
Available date/time separators are:
; (semi-colon, the default)
, (comma)
'' (single-spaced)
No separatoro Advisors, MoneyManagers and Brokers andmaster account users with reporting access rights
who select their ownmaster account in the Account Selector have access to client-only con-
solidated and concatenated reports. SelectConsolidated (Clients-Only) to generate trade
Account Management Users' Guide 121
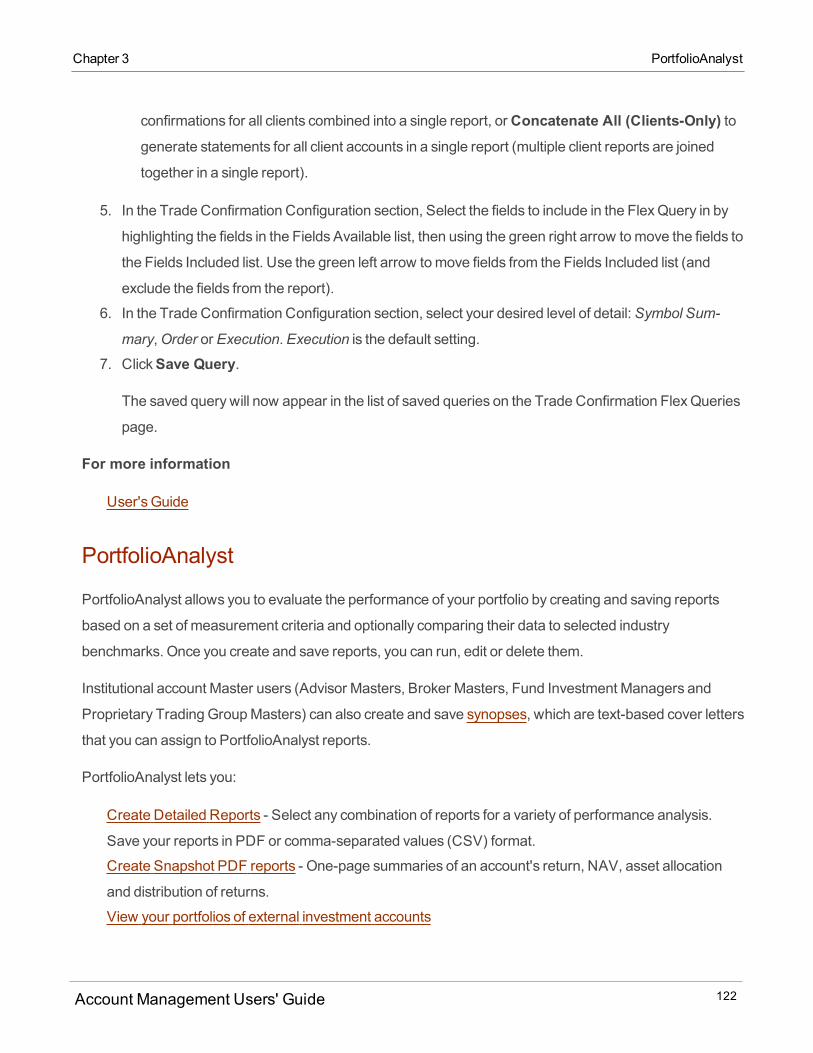
confirmations for all clients combined into a single report, orConcatenate All (Clients-Only) togenerate statements for all client accounts in a single report (multiple client reports are joined
together in a single report).
5. In the Trade Confirmation Configuration section, Select the fields to include in the FlexQuery in by
highlighting the fields in the Fields Available list, then using the green right arrow tomove the fields to
the Fields Included list. Use the green left arrow tomove fields from the Fields Included list (and
exclude the fields from the report).
6. In the Trade Confirmation Configuration section, select your desired level of detail:Symbol Sum-
mary,Order or Execution. Execution is the default setting.
7. ClickSave Query.
The saved query will now appear in the list of saved queries on the Trade Confirmation FlexQueries
page.
For more information
User's Guide
PortfolioAnalyst
PortfolioAnalyst allows you to evaluate the performance of your portfolio by creating and saving reports
based on a set of measurement criteria and optionally comparing their data to selected industry
benchmarks. Once you create and save reports, you can run, edit or delete them.
Institutional account Master users (Advisor Masters, Broker Masters, Fund Investment Managers and
Proprietary Trading GroupMasters) can also create and save synopses, which are text-based cover letters
that you can assign to PortfolioAnalyst reports.
PortfolioAnalyst lets you:
Create Detailed Reports - Select any combination of reports for a variety of performance analysis.
Save your reports in PDF or comma-separated values (CSV) format.
Create Snapshot PDF reports - One-page summaries of an account's return, NAV, asset allocation
and distribution of returns.
View your portfolios of external investment accounts
Account Management Users' Guide 122
Chapter 3 PortfolioAnalyst
Chapter 3 PortfolioAnalyst
You can also create your own custom benchmarks and select themwhen creating a Snapshot or Detailed
report.
Who can access the PortfolioAnalyst page?
You can access this page if you are a(n):
Individual, Joint, Trust or IRA Account User
Small Business Account User
Friends and Family GroupMaster or Client User
Advisor Master User Individual
Advisor Master User Organization
Advisor Client User Individual
Advisor Client User Organization
Proprietary Trading GroupMaster User
Proprietary Trading Group SubUser
Broker Master User (master account only)
Broker Fully Disclosed Client User
Broker Fully Disclosed Client User Organization
Broker Non-Disclosed Client User
Investment Manager Master User
Fund
and you have been granted Reporting access rights.
Here is the PortfolioAnalyst main page:
Account Management Users' Guide 123
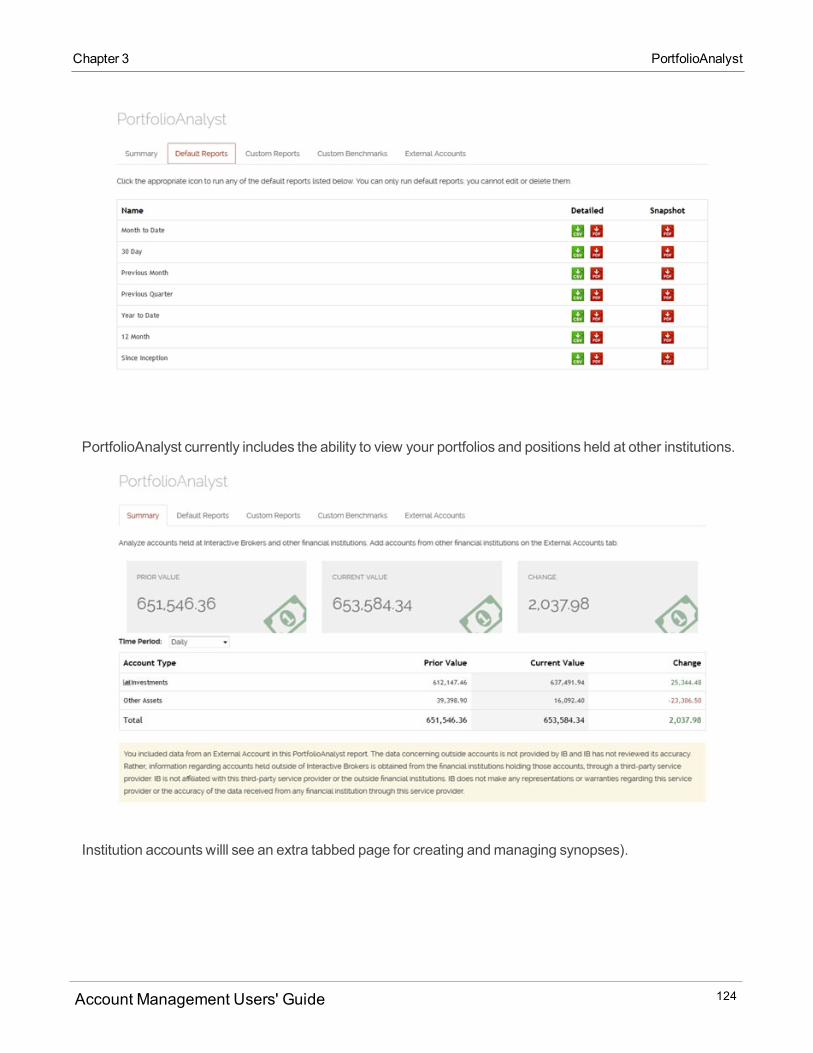
PortfolioAnalyst currently includes the ability to view your portfolios and positions held at other institutions.
Institution accounts willl see an extra tabbed page for creating andmanaging synopses).
Account Management Users' Guide 124
Chapter 3 PortfolioAnalyst
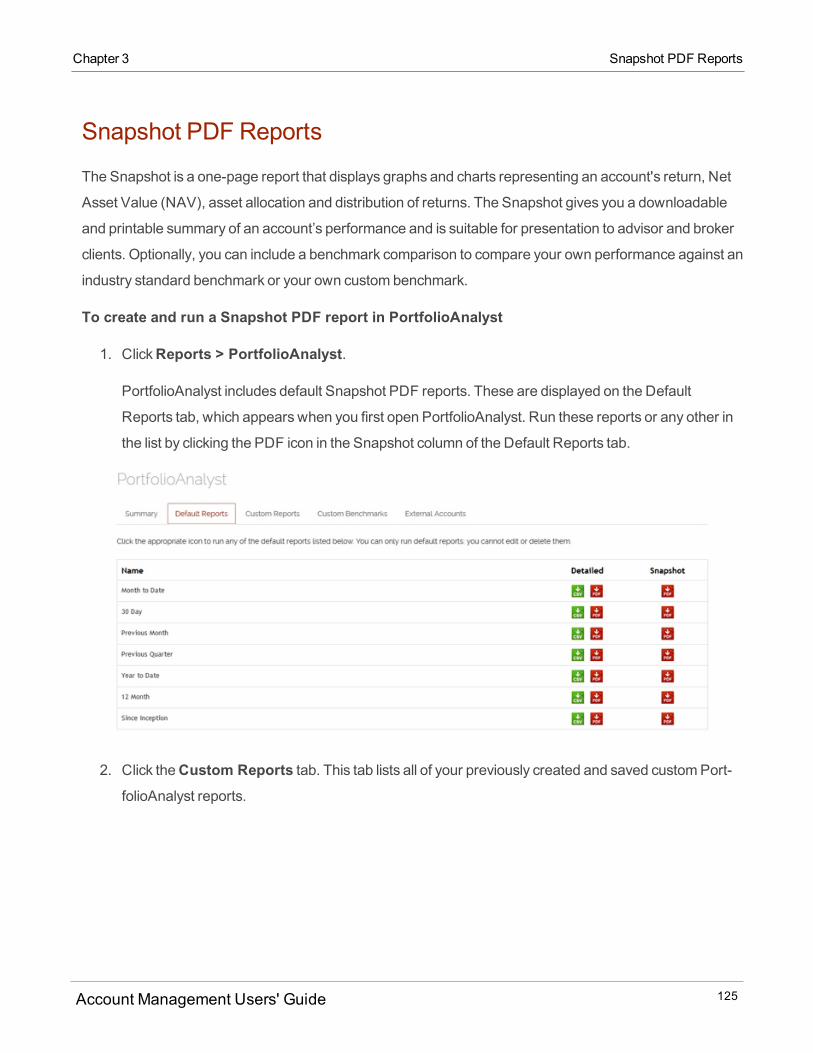
Chapter 3 Snapshot PDF Reports
Snapshot PDF Reports
The Snapshot is a one-page report that displays graphs and charts representing an account's return, Net
Asset Value (NAV), asset allocation and distribution of returns. The Snapshot gives you a downloadable
and printable summary of an account’s performance and is suitable for presentation to advisor and broker
clients. Optionally, you can include a benchmark comparison to compare your own performance against an
industry standard benchmark or your own custom benchmark.
To create and run a Snapshot PDF report in PortfolioAnalyst
1. ClickReports > PortfolioAnalyst.
PortfolioAnalyst includes default Snapshot PDF reports. These are displayed on the Default
Reports tab, which appears when you first open PortfolioAnalyst. Run these reports or any other in
the list by clicking the PDF icon in the Snapshot column of the Default Reports tab.
2. Click theCustom Reports tab. This tab lists all of your previously created and saved customPort-
folioAnalyst reports.
Account Management Users' Guide 125
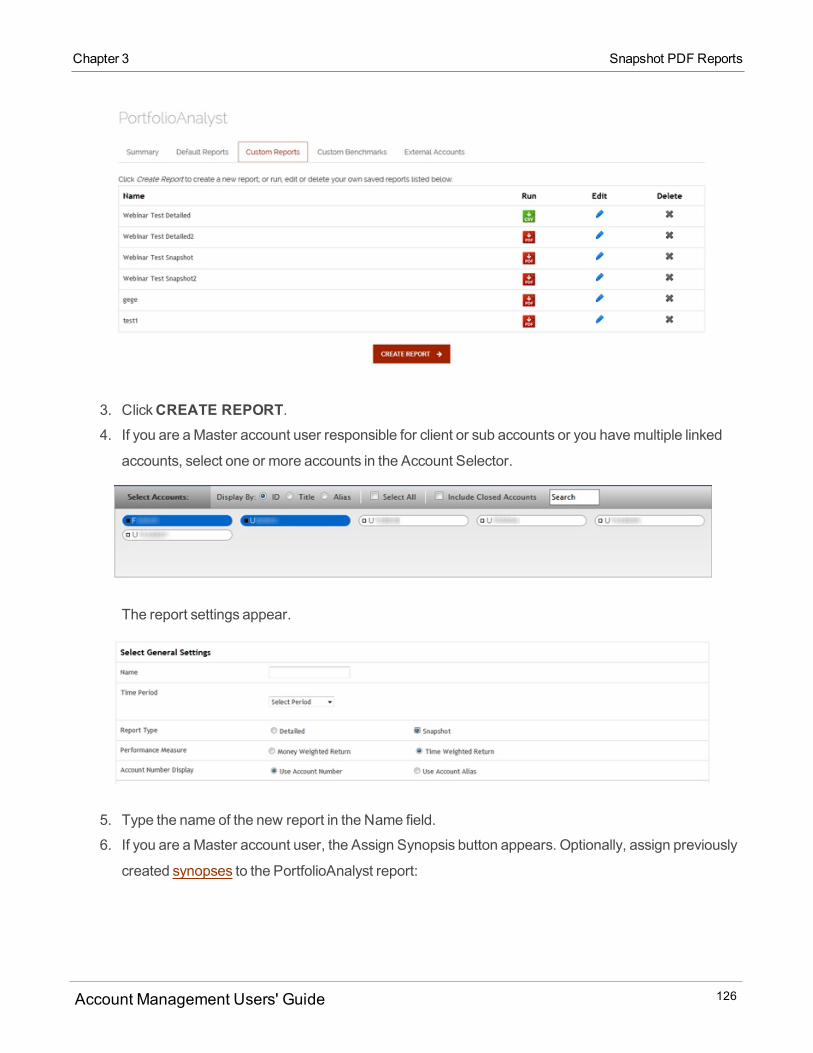
3. ClickCREATE REPORT.4. If you are aMaster account user responsible for client or sub accounts or you havemultiple linked
accounts, select one or more accounts in the Account Selector.
The report settings appear.
5. Type the name of the new report in the Name field.
6. If you are aMaster account user, the Assign Synopsis button appears. Optionally, assign previously
created synopses to the PortfolioAnalyst report:
Account Management Users' Guide 126
Chapter 3 Snapshot PDF Reports

Chapter 3 Snapshot PDF Reports
o ClickAssign Synopsis.o In the Assign Synopsis dialog, select a previously-saved synopsis, select the accounts whose
reports to which you want to attach the synopsis, then clickAssign. ClickApply to apply yourselections.
7. Select a time period:
o SelectDaily,Monthly,Quarterly, Previous Month, Previous Quarter,Month To Date, YearTo Date or Since Inception (since the inception of your account), depending on how you want
to view the data.o If you selected a daily time period, select a starting and ending date (up to amaximumof 60 days)
using the calendar popoup. If you selected amonthly time period, select a starting and ending
month. If you selected a quarterly time period, select a starting and ending quarter. Click the icons
next to the Starting Period and Ending Period fields to pick dates from a calendar.
Analysis results include data available from January 2008 to the present.
8. For PerformanceMeasure, select Time Weighted Return orMoney-Weighted Return.
o Time-Weighted Return (TWR):Select thismetric to view the percent return produced over time
independent of contributions or withdrawals. TWR eliminates the impact of the timing of fund
cash flows and isolates the portion of a portfolio's return that is attributable solely to theman-
ager's actions. TWR is typically used for public fundmanagers because they normally do not con-
trol cash flowing into or out of their funds.o Money-Weighted Return (MWR): Select thismetric to view the performance of your portfolio
during the specified report period. MWR is calculated using theModified Deitzmethod and is influ-
enced by the time of decisions to contribute or withdraw funds, aswell as the decisionsmade by
the portfolio manager of a fund.
9. SelectSnapshot as the Report Type.10. Choose how you want your account number to appear on your report in the Account Number Dis-
play section:
Account Management Users' Guide 127
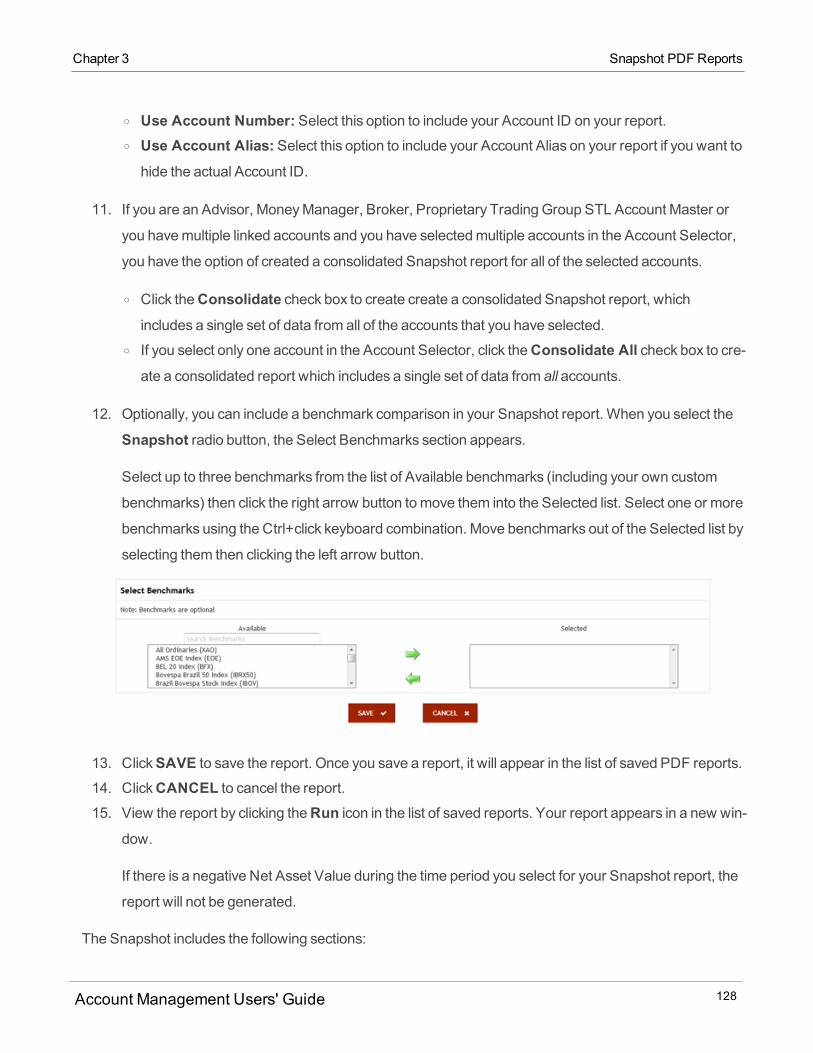
o Use Account Number: Select this option to include your Account ID on your report.o Use Account Alias: Select this option to include your Account Alias on your report if you want tohide the actual Account ID.
11. If you are an Advisor, MoneyManager, Broker, Proprietary Trading Group STL Account Master or
you havemultiple linked accounts and you have selectedmultiple accounts in the Account Selector,
you have the option of created a consolidated Snapshot report for all of the selected accounts.
o Click theConsolidate check box to create create a consolidated Snapshot report, whichincludes a single set of data from all of the accounts that you have selected.
o If you select only one account in the Account Selector, click theConsolidate All check box to cre-ate a consolidated report which includes a single set of data from all accounts.
12. Optionally, you can include a benchmark comparison in your Snapshot report. When you select the
Snapshot radio button, the Select Benchmarks section appears.
Select up to three benchmarks from the list of Available benchmarks (including your own custom
benchmarks) then click the right arrow button tomove them into the Selected list. Select one or more
benchmarks using the Ctrl+click keyboard combination. Move benchmarks out of the Selected list by
selecting them then clicking the left arrow button.
13. ClickSAVE to save the report. Once you save a report, it will appear in the list of saved PDF reports.
14. ClickCANCEL to cancel the report.15. View the report by clicking theRun icon in the list of saved reports. Your report appears in a new win-
dow.
If there is a negative Net Asset Value during the time period you select for your Snapshot report, the
report will not be generated.
The Snapshot includes the following sections:
Account Management Users' Guide 128
Chapter 3 Snapshot PDF Reports

Chapter 3 Snapshot PDF Reports
Account Information:Displays your account name and number, account alias if you have one, yourbase currency, account type and the specified time period.
Return Over Time:Displays a line chart showing the account's return percentage over the specifiedtime period.
Net Asset Value:Displays a bar chart showing the account's Net Asset Value over the specified timeperiod.
Distribution of Returns:Displays a bar chart showing the range of return percentage for each day,month or quarter in the specified time period and the number of times the return performance fell within
that range for the entire period.
Key Statistics:Displays several statistics for the specified time period, including beginning and end-ing NAV, return percentages (depending on your selected time period), the best return and the worst
return.
Asset Allocation:Displays two pie charts, one representing the account's asset allocation at thebeginning of the specified time period and one representing the account's asset allocation at the end of
the specified time period.
The following example shows a typical Snapshot report.
Account Management Users' Guide 129
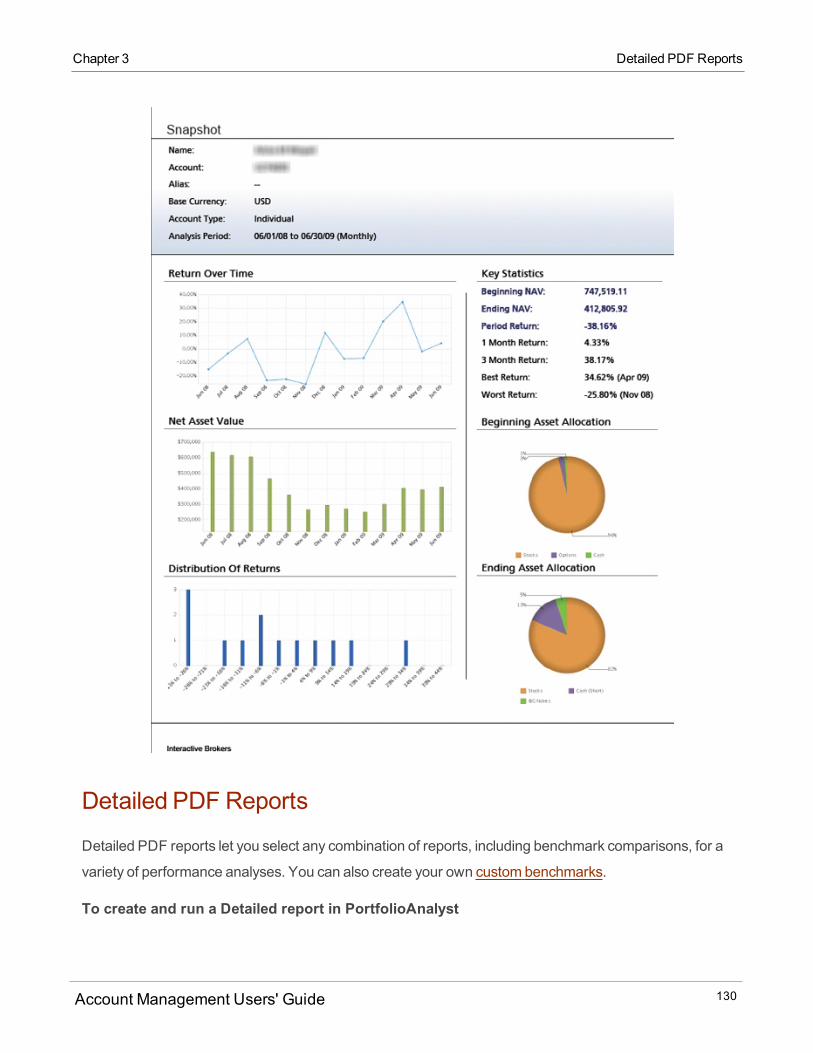
Detailed PDF Reports
Detailed PDF reports let you select any combination of reports, including benchmark comparisons, for a
variety of performance analyses. You can also create your own custom benchmarks.
To create and run a Detailed report in PortfolioAnalyst
Account Management Users' Guide 130
Chapter 3 Detailed PDF Reports
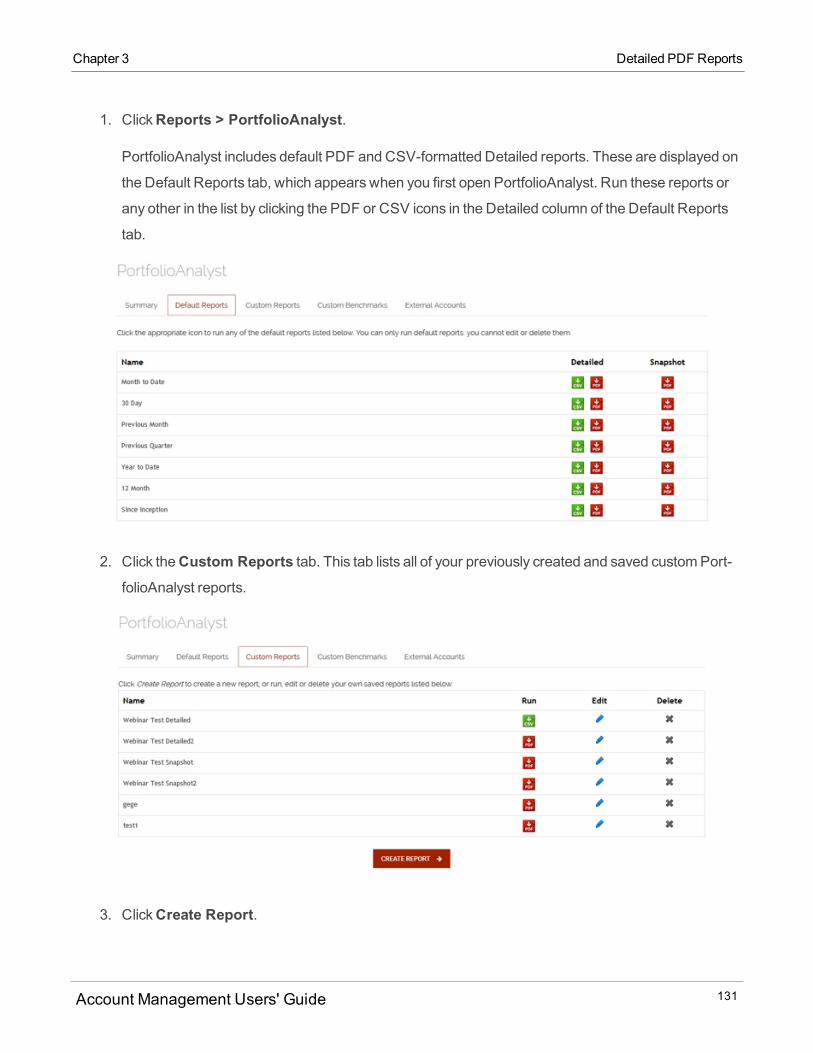
Chapter 3 Detailed PDF Reports
1. ClickReports > PortfolioAnalyst.
PortfolioAnalyst includes default PDF and CSV-formatted Detailed reports. These are displayed on
the Default Reports tab, which appears when you first open PortfolioAnalyst. Run these reports or
any other in the list by clicking the PDF or CSV icons in the Detailed column of the Default Reports
tab.
2. Click theCustom Reports tab. This tab lists all of your previously created and saved customPort-
folioAnalyst reports.
3. ClickCreate Report.
Account Management Users' Guide 131

4. If you are aMaster account user responsible for client or sub accounts or you havemultiple linked
accounts, select one or more accounts in the Account Selector.
The report settings appear.
5. Type the name of the new report in the Name field.
6. If you are aMaster account user, the Assign Synopsis button appears. Optionally, assign previously
created synopses to the PortfolioAnalyst report:
o ClickAssign Synopsis.o In the Assign Synopsis dialog, select a previously-saved synopsis, select the accounts whose
reports to which you want to attach the synopsis, then clickAssign. ClickApply to apply yourselections.
Account Management Users' Guide 132
Chapter 3 Detailed PDF Reports
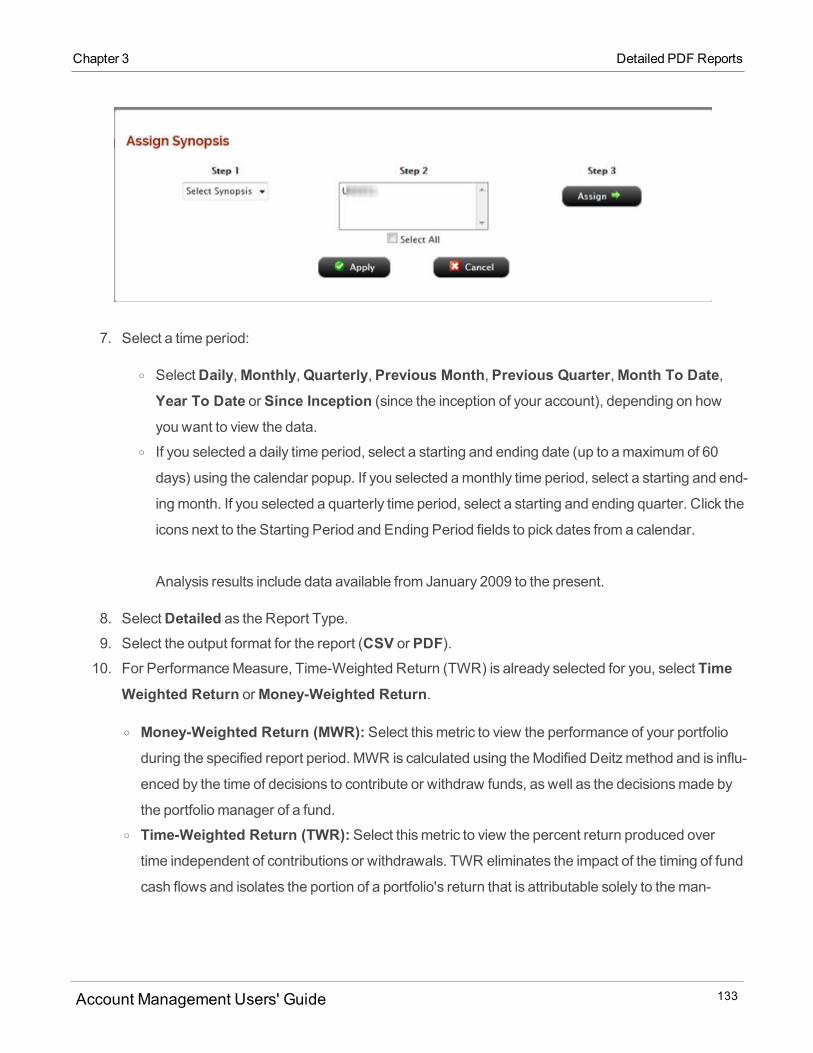
Chapter 3 Detailed PDF Reports
7. Select a time period:
o SelectDaily,Monthly,Quarterly, Previous Month, Previous Quarter,Month To Date,Year To Date or Since Inception (since the inception of your account), depending on howyou want to view the data.
o If you selected a daily time period, select a starting and ending date (up to amaximumof 60
days) using the calendar popup. If you selected amonthly time period, select a starting and end-
ingmonth. If you selected a quarterly time period, select a starting and ending quarter. Click the
icons next to the Starting Period and Ending Period fields to pick dates from a calendar.
Analysis results include data available from January 2009 to the present.
8. SelectDetailed as the Report Type.9. Select the output format for the report (CSV or PDF).10. For PerformanceMeasure, Time-Weighted Return (TWR) is already selected for you, select Time
Weighted Return orMoney-Weighted Return.
o Money-Weighted Return (MWR): Select thismetric to view the performance of your portfolio
during the specified report period. MWR is calculated using theModified Deitzmethod and is influ-
enced by the time of decisions to contribute or withdraw funds, aswell as the decisionsmade by
the portfolio manager of a fund.o Time-Weighted Return (TWR): Select thismetric to view the percent return produced over
time independent of contributions or withdrawals. TWR eliminates the impact of the timing of fund
cash flows and isolates the portion of a portfolio's return that is attributable solely to theman-
Account Management Users' Guide 133

ager's actions. TWR is typically used for public fundmanagers because they normally do not con-
trol cash flowing into or out of their funds.
11. Choose how you want your account number to appear on your report:
o Use Account Number: Select this option to include your Account ID on your report.o Use Account Alias: Select this option to include your Account Alias on your report if you want tohide the actual Account ID.
12. Optionally, you can include cover page and table of contents with your Detailed PDF report by check-
ing the appropriate Optional Pages check boxes.
13. If you are an Advisor, MoneyManager, Broker, Proprietary Trading Group STL Account Master or
you havemultiple linked accounts and you have selectedmultiple accounts in the Account Selector,
you have the option of created a consolidated Snapshot report for all of the selected accounts.
o Click theConsolidate check box to create create a consolidated Detailed report, which includesa single set of data from all of the accounts that you have selected.
o If you select only one account in the Account Selector, click theConsolidate All check box to cre-ate a consolidated report which includes a single set of data from all accounts.
If you have selected theConsolidate orConsolidate All check box, you can select the Breakdownof Accounts report, which provides key account values for the accounts that you have chosen to
consolidate.
14. Detailed PDF reports can contain the following distinct reports for each selected account. Click the
check box to include a report. Note that this section is not available in Snapshot reports.
Account Management Users' Guide 134
Chapter 3 Detailed PDF Reports
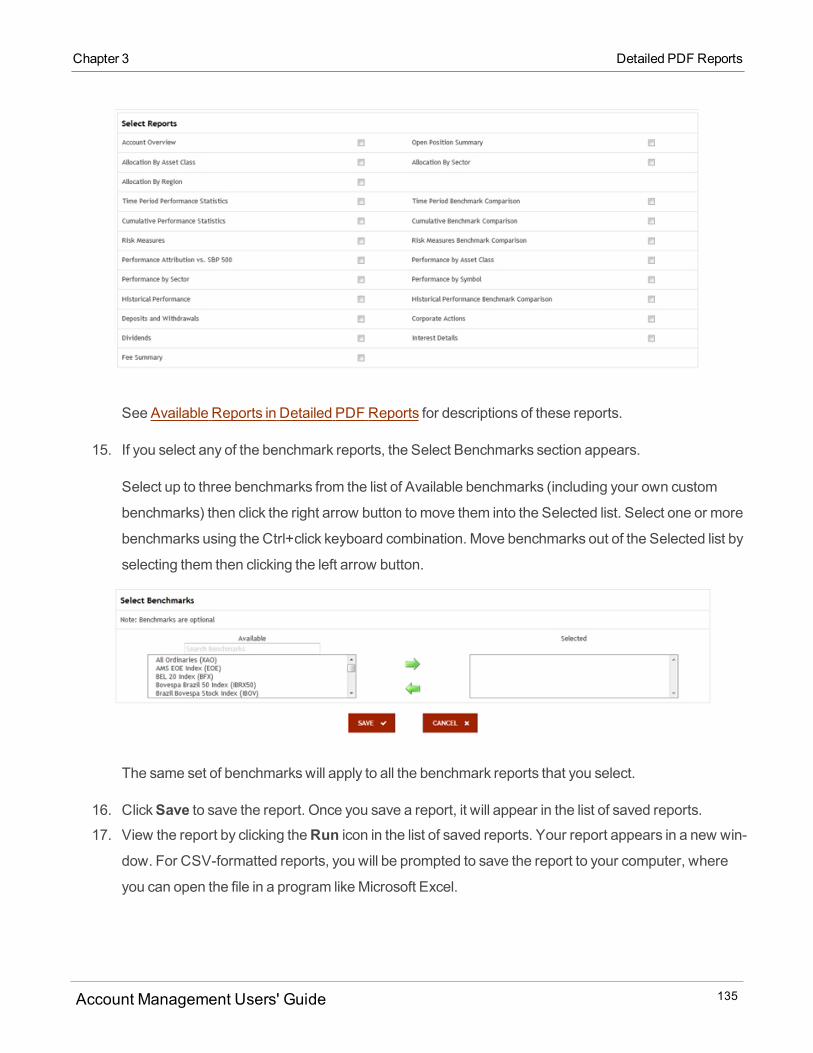
Chapter 3 Detailed PDF Reports
See Available Reports in Detailed PDF Reports for descriptions of these reports.
15. If you select any of the benchmark reports, the Select Benchmarks section appears.
Select up to three benchmarks from the list of Available benchmarks (including your own custom
benchmarks) then click the right arrow button tomove them into the Selected list. Select one or more
benchmarks using the Ctrl+click keyboard combination. Move benchmarks out of the Selected list by
selecting them then clicking the left arrow button.
The same set of benchmarkswill apply to all the benchmark reports that you select.
16. ClickSave to save the report. Once you save a report, it will appear in the list of saved reports.17. View the report by clicking theRun icon in the list of saved reports. Your report appears in a new win-
dow. For CSV-formatted reports, you will be prompted to save the report to your computer, where
you can open the file in a program likeMicrosoft Excel.
Account Management Users' Guide 135
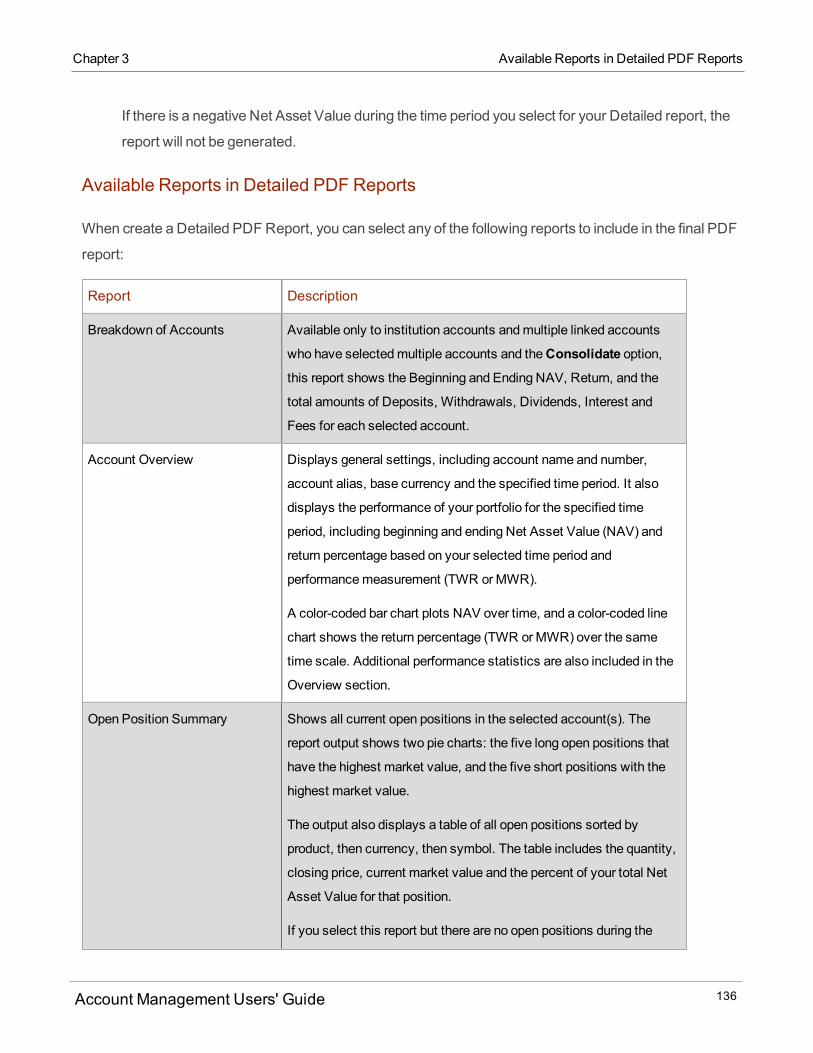
If there is a negative Net Asset Value during the time period you select for your Detailed report, the
report will not be generated.
Available Reports in Detailed PDF Reports
When create a Detailed PDF Report, you can select any of the following reports to include in the final PDF
report:
Report Description
Breakdown of Accounts Available only to institution accounts andmultiple linked accounts
who have selectedmultiple accounts and theConsolidate option,
this report shows the Beginning and Ending NAV, Return, and the
total amounts of Deposits, Withdrawals, Dividends, Interest and
Fees for each selected account.
Account Overview Displays general settings, including account name and number,
account alias, base currency and the specified time period. It also
displays the performance of your portfolio for the specified time
period, including beginning and ending Net Asset Value (NAV) and
return percentage based on your selected time period and
performancemeasurement (TWR orMWR).
A color-coded bar chart plots NAV over time, and a color-coded line
chart shows the return percentage (TWR orMWR) over the same
time scale. Additional performance statistics are also included in the
Overview section.
Open Position Summary Shows all current open positions in the selected account(s). The
report output shows two pie charts: the five long open positions that
have the highest market value, and the five short positions with the
highest market value.
The output also displays a table of all open positions sorted by
product, then currency, then symbol. The table includes the quantity,
closing price, current market value and the percent of your total Net
Asset Value for that position.
If you select this report but there are no open positions during the
Account Management Users' Guide 136
Chapter 3 Available Reports in Detailed PDF Reports
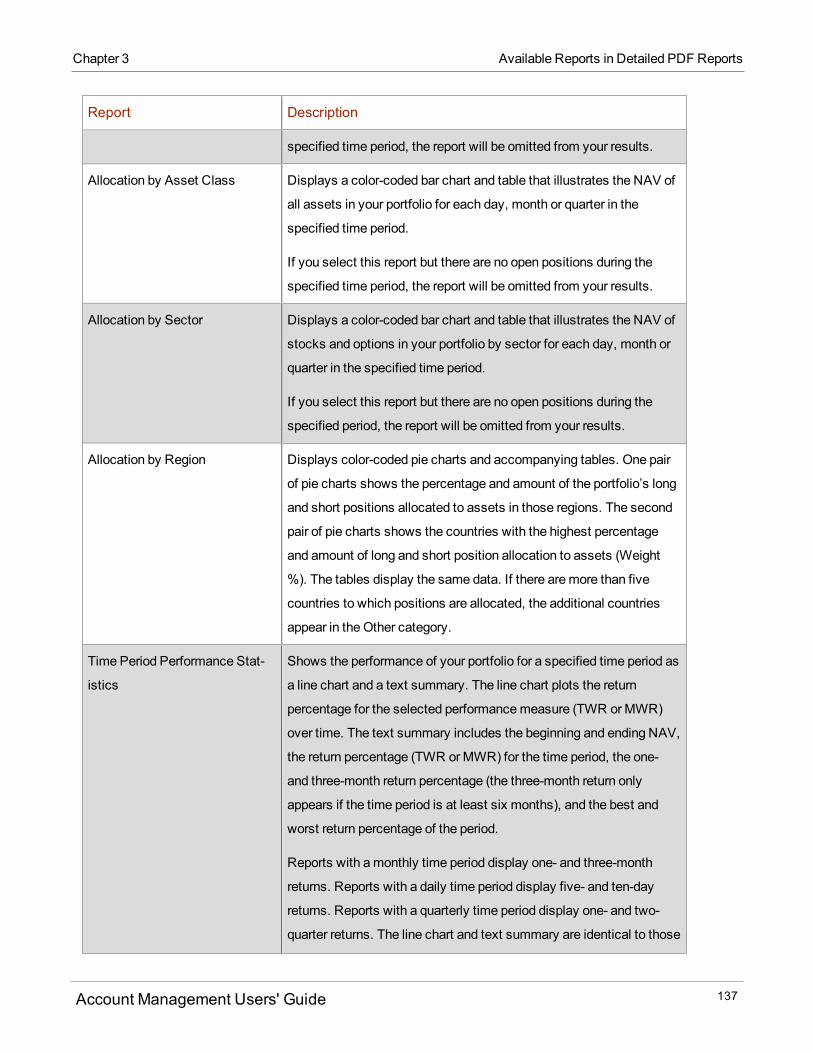
Chapter 3 Available Reports in Detailed PDF Reports
Report Description
specified time period, the report will be omitted from your results.
Allocation by Asset Class Displays a color-coded bar chart and table that illustrates the NAV of
all assets in your portfolio for each day, month or quarter in the
specified time period.
If you select this report but there are no open positions during the
specified time period, the report will be omitted from your results.
Allocation by Sector Displays a color-coded bar chart and table that illustrates the NAV of
stocks and options in your portfolio by sector for each day, month or
quarter in the specified time period.
If you select this report but there are no open positions during the
specified period, the report will be omitted from your results.
Allocation by Region Displays color-coded pie charts and accompanying tables. One pair
of pie charts shows the percentage and amount of the portfolio’s long
and short positions allocated to assets in those regions. The second
pair of pie charts shows the countries with the highest percentage
and amount of long and short position allocation to assets (Weight
%). The tables display the same data. If there aremore than five
countries to which positions are allocated, the additional countries
appear in the Other category.
Time Period Performance Stat-
istics
Shows the performance of your portfolio for a specified time period as
a line chart and a text summary. The line chart plots the return
percentage for the selected performancemeasure (TWR orMWR)
over time. The text summary includes the beginning and ending NAV,
the return percentage (TWR orMWR) for the time period, the one-
and three-month return percentage (the three-month return only
appears if the time period is at least six months), and the best and
worst return percentage of the period.
Reports with amonthly time period display one- and three-month
returns. Reports with a daily time period display five- and ten-day
returns. Reports with a quarterly time period display one- and two-
quarter returns. The line chart and text summary are identical to those
Account Management Users' Guide 137
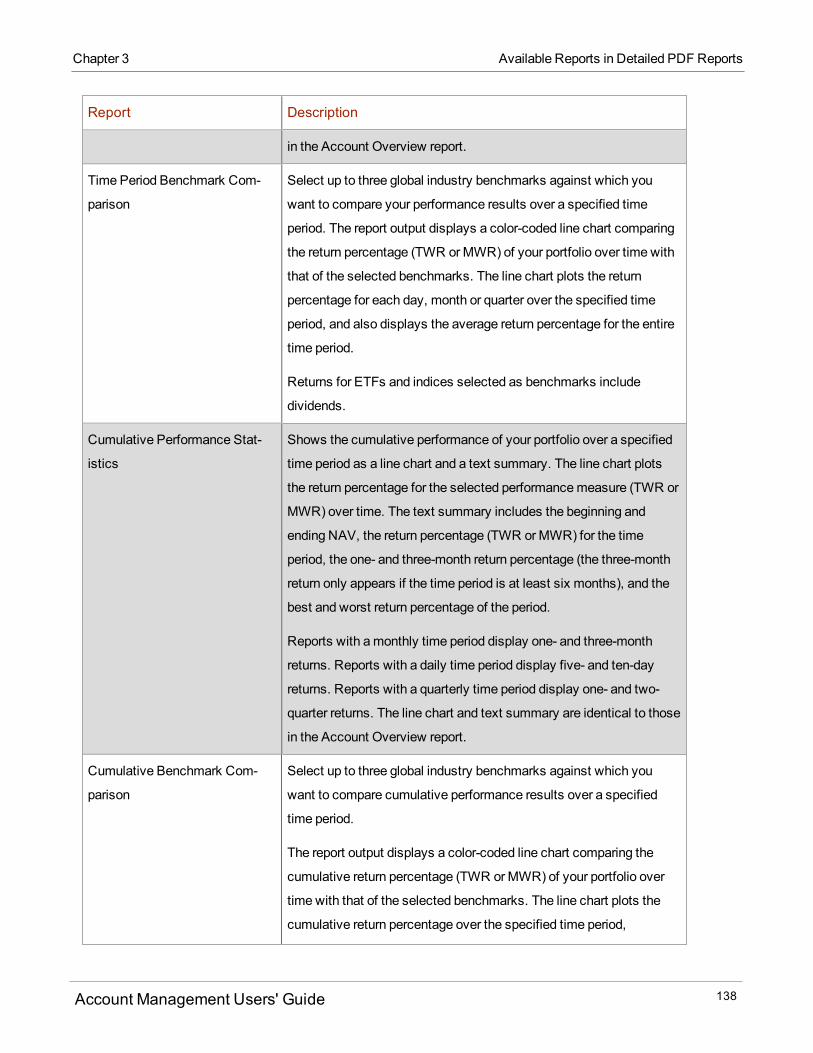
Report Description
in the Account Overview report.
Time Period Benchmark Com-
parison
Select up to three global industry benchmarks against which you
want to compare your performance results over a specified time
period. The report output displays a color-coded line chart comparing
the return percentage (TWR orMWR) of your portfolio over time with
that of the selected benchmarks. The line chart plots the return
percentage for each day, month or quarter over the specified time
period, and also displays the average return percentage for the entire
time period.
Returns for ETFs and indices selected as benchmarks include
dividends.
Cumulative Performance Stat-
istics
Shows the cumulative performance of your portfolio over a specified
time period as a line chart and a text summary. The line chart plots
the return percentage for the selected performancemeasure (TWR or
MWR) over time. The text summary includes the beginning and
ending NAV, the return percentage (TWR orMWR) for the time
period, the one- and three-month return percentage (the three-month
return only appears if the time period is at least six months), and the
best and worst return percentage of the period.
Reports with amonthly time period display one- and three-month
returns. Reports with a daily time period display five- and ten-day
returns. Reports with a quarterly time period display one- and two-
quarter returns. The line chart and text summary are identical to those
in the Account Overview report.
Cumulative Benchmark Com-
parison
Select up to three global industry benchmarks against which you
want to compare cumulative performance results over a specified
time period.
The report output displays a color-coded line chart comparing the
cumulative return percentage (TWR orMWR) of your portfolio over
time with that of the selected benchmarks. The line chart plots the
cumulative return percentage over the specified time period,
Account Management Users' Guide 138
Chapter 3 Available Reports in Detailed PDF Reports
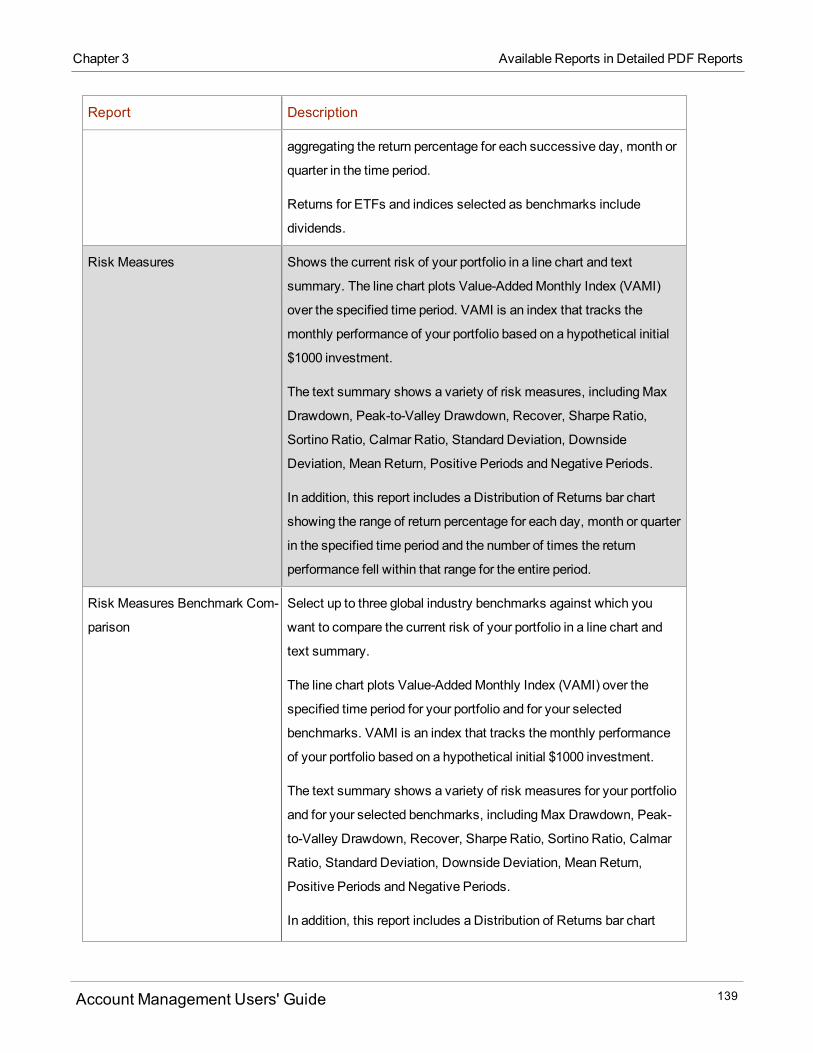
Chapter 3 Available Reports in Detailed PDF Reports
Report Description
aggregating the return percentage for each successive day, month or
quarter in the time period.
Returns for ETFs and indices selected as benchmarks include
dividends.
Risk Measures Shows the current risk of your portfolio in a line chart and text
summary. The line chart plots Value-AddedMonthly Index (VAMI)
over the specified time period. VAMI is an index that tracks the
monthly performance of your portfolio based on a hypothetical initial
$1000 investment.
The text summary shows a variety of risk measures, includingMax
Drawdown, Peak-to-Valley Drawdown, Recover, Sharpe Ratio,
Sortino Ratio, Calmar Ratio, Standard Deviation, Downside
Deviation, Mean Return, Positive Periods and Negative Periods.
In addition, this report includes a Distribution of Returns bar chart
showing the range of return percentage for each day, month or quarter
in the specified time period and the number of times the return
performance fell within that range for the entire period.
Risk Measures Benchmark Com-
parison
Select up to three global industry benchmarks against which you
want to compare the current risk of your portfolio in a line chart and
text summary.
The line chart plots Value-AddedMonthly Index (VAMI) over the
specified time period for your portfolio and for your selected
benchmarks. VAMI is an index that tracks themonthly performance
of your portfolio based on a hypothetical initial $1000 investment.
The text summary shows a variety of risk measures for your portfolio
and for your selected benchmarks, includingMax Drawdown, Peak-
to-Valley Drawdown, Recover, Sharpe Ratio, Sortino Ratio, Calmar
Ratio, Standard Deviation, Downside Deviation, Mean Return,
Positive Periods and Negative Periods.
In addition, this report includes a Distribution of Returns bar chart
Account Management Users' Guide 139

Report Description
showing the range of return percentage for each day, month or quarter
in the specified time period and the number of times the return
performance fell within that range for the entire period.
Returns for ETFs and indices selected as benchmarks include
dividends.
Performance Attribution Shows how your asset allocation and selection of securities affects
your portfolio’s performance when compared to the performance of
the S&P 500 Index over a specified time period.
This report includes a summary table that shows how you
outperformed or underperformed the S&P 500, as well as two charts
and a scatter plot. For more information about this report, see
Running a Performance Attribution Report.
Performance by Asset Class Displays a color-coded bar chart that illustrates the cumulative con-
tribution to your portfolio's return by asset class for each day, month
or quarter in the specified time period. Each color-coded bar in the
chart represents the contribution of all asset classes to each day/-
month/quarter in the specified time period .The table shows the return
for each asset class for each day/month/quarter in the specified time
period.
Performance by Sector Displays a color-coded bar chart and table that illustrate the con-
tribution to your portfolio's return by sector for each day, month or
quarter in the specified time period. The bars in the bar chart are color-
coded by sector. The table shows the values depicted in the chart.
Performance by Symbol Displays four charts, a table and two heat maps representing the
performance of the symbols in your portfolio:
Top Five Contributors - This chart displays the five symbols
with the highest contribution to your portfolio's return.
Bottom Five Contributors - This chart displays the five sym-
bols with the lowest contribution to your portfolio's return.
Contribution by Sector - This bar chart displays the con-
Account Management Users' Guide 140
Chapter 3 Available Reports in Detailed PDF Reports

Chapter 3 Available Reports in Detailed PDF Reports
Report Description
tribution of each sector to your portfolio's return.
Contribution by Asset Class - This bar chart displays each
the contribution of each asset class to your portfolio's return.
Table - Shows data for all open or closed symbols grouped
by asset class, including sector, AverageWeight, Return,
Contribution to Return, and Unrealized and Realized P&L in
dollar amounts.
Sector Composition Heat Map - This is a visual rep-
resentation of each sector's contribution to return. Each sec-
tor block shows the contribution to return of each symbol in
that sector. The larger the block, the larger the contribution
to return.
Portfolio Heat Map - This is a visual representation of the
contribution to return of each symbol in your portfolio. Green
indicates a positive return while red indicates a negative
return.
Historical Performance Shows the history of your portfolio's performance in a variety of
charts and tables on three pages:
The first page of the report includes two charts, a History
bar chart that shows the cumulative return percentage at dif-
ferent points in time in the history of your account (MTD,
QTD, YTD, 1 year, 3 year, 5 year and since inception), a
table that displays the same data as the History chart, and a
line chart that shows the cumulative return percentages
since the inception of your account.
The second page of the report includes two tables. One
table displays themonthly returns of your account for the
past five years (or since the inception of your account if it is
less than five years old). The second table shows the
quarterly returns of your account for the last five years (or
since the inception of your account if it is less than five years
Account Management Users' Guide 141
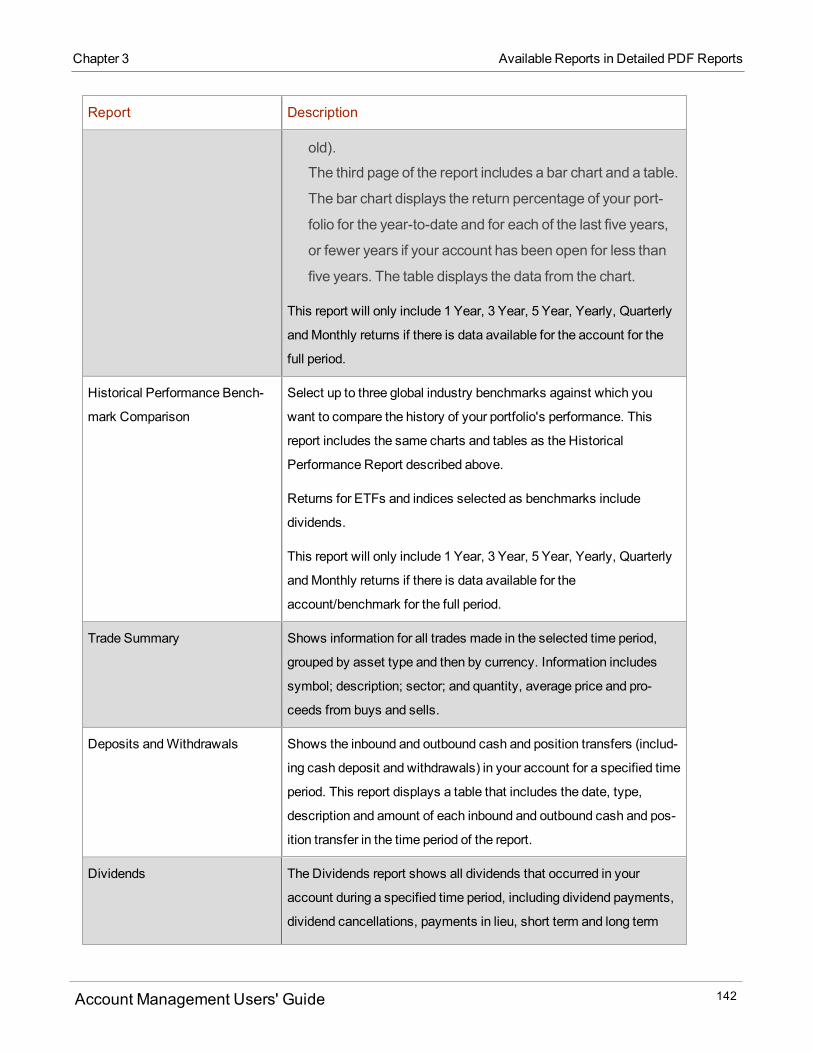
Report Description
old).
The third page of the report includes a bar chart and a table.
The bar chart displays the return percentage of your port-
folio for the year-to-date and for each of the last five years,
or fewer years if your account has been open for less than
five years. The table displays the data from the chart.
This report will only include 1 Year, 3 Year, 5 Year, Yearly, Quarterly
andMonthly returns if there is data available for the account for the
full period.
Historical Performance Bench-
mark Comparison
Select up to three global industry benchmarks against which you
want to compare the history of your portfolio's performance. This
report includes the same charts and tables as the Historical
Performance Report described above.
Returns for ETFs and indices selected as benchmarks include
dividends.
This report will only include 1 Year, 3 Year, 5 Year, Yearly, Quarterly
andMonthly returns if there is data available for the
account/benchmark for the full period.
Trade Summary Shows information for all trades made in the selected time period,
grouped by asset type and then by currency. Information includes
symbol; description; sector; and quantity, average price and pro-
ceeds from buys and sells.
Deposits andWithdrawals Shows the inbound and outbound cash and position transfers (includ-
ing cash deposit and withdrawals) in your account for a specified time
period. This report displays a table that includes the date, type,
description and amount of each inbound and outbound cash and pos-
ition transfer in the time period of the report.
Dividends The Dividends report shows all dividends that occurred in your
account during a specified time period, including dividend payments,
dividend cancellations, payments in lieu, short term and long term
Account Management Users' Guide 142
Chapter 3 Available Reports in Detailed PDF Reports
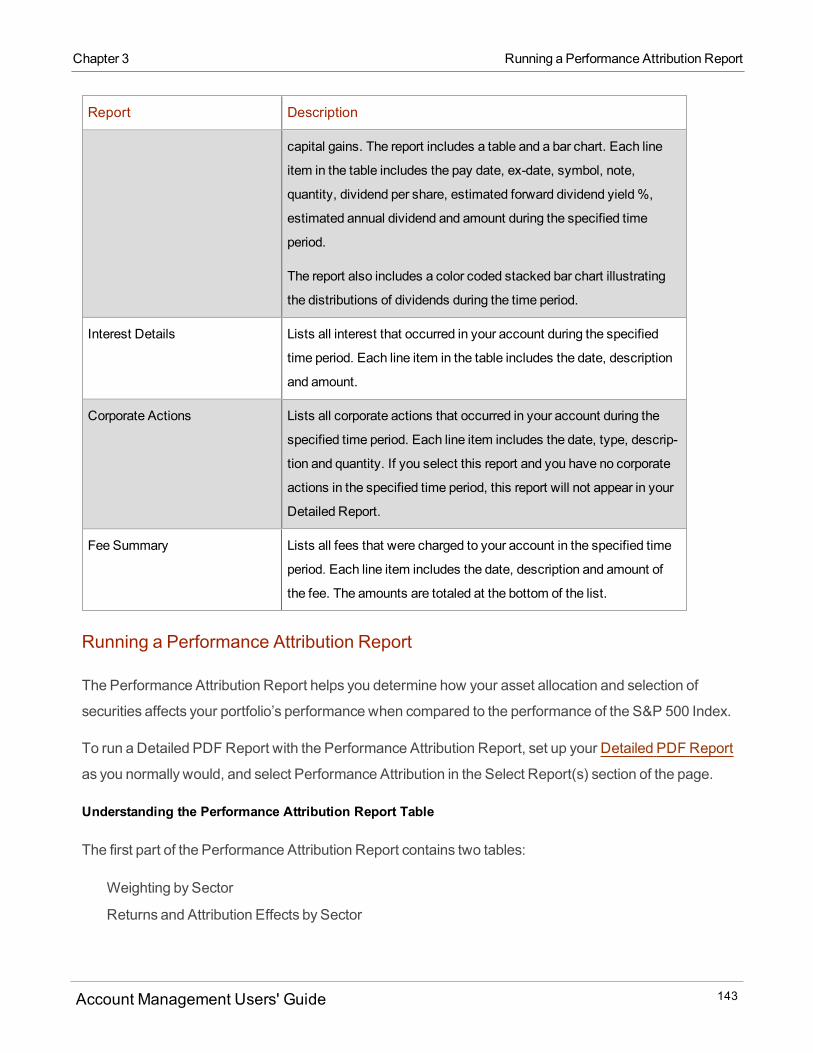
Chapter 3 Running a Performance Attribution Report
Report Description
capital gains. The report includes a table and a bar chart. Each line
item in the table includes the pay date, ex-date, symbol, note,
quantity, dividend per share, estimated forward dividend yield%,
estimated annual dividend and amount during the specified time
period.
The report also includes a color coded stacked bar chart illustrating
the distributions of dividends during the time period.
Interest Details Lists all interest that occurred in your account during the specified
time period. Each line item in the table includes the date, description
and amount.
Corporate Actions Lists all corporate actions that occurred in your account during the
specified time period. Each line item includes the date, type, descrip-
tion and quantity. If you select this report and you have no corporate
actions in the specified time period, this report will not appear in your
Detailed Report.
Fee Summary Lists all fees that were charged to your account in the specified time
period. Each line item includes the date, description and amount of
the fee. The amounts are totaled at the bottom of the list.
Running a Performance Attribution Report
The Performance Attribution Report helps you determine how your asset allocation and selection of
securities affects your portfolio’s performance when compared to the performance of the S&P 500 Index.
To run a Detailed PDF Report with the Performance Attribution Report, set up your Detailed PDF Report
as you normally would, and select Performance Attribution in the Select Report(s) section of the page.
Understanding the Performance Attribution Report Table
The first part of the Performance Attribution Report contains two tables:
Weighting by Sector
Returns and Attribution Effects by Sector
Account Management Users' Guide 143
Weighting by Sector
This table shows how your portfolio is allocated among ten different sectors, cash and unclassified
(anything not included in one of the other sectors), and how that allocation compares to the S&P 500 Index.
The table has three parts: BeginningWeight, EndingWeight and AverageWeight.
These tables show the beginning, ending and average weight for each sector in your portfolio and the S&P
500, and the difference (positive or negative) between the two, represented by a percentage. You can use
this table to see how under or overweighted your portfolio is in each sector compared to the S&P 500.
Returns and Attribution Effects by Sector
This table lets you compare your returns in each of the ten sectors, plus cash and unclassified, to those of
the S&P 500, and view the attribution effects of your sector allocation and stock selection within each
sector. Attribution effects let you see why your returns in a particular sector were better or worse than
those of the S&P 500.
The Period Return part of the table shows the absolute return percentage for each sector in your portfolio
and for the S&P 500, and the difference (positive or negative) between the two.
The Contribution to Return part of the tablemeasures the contribution of each sector to the overall return.
The table also illustrates the contribution of return for the account of each sector versus the S&P 500. The
standard calculation used to derive the Contribution to Return is:
Period Return x BeginningWeight = Contribution to Return
The attribution effect part of the table shows the attribution effects of sector allocation (Allocation column),
the attribution effects of security selection within each sector (Selection column), and the total attribution
effects for the period of the report. The attribution effect dissects the return and illustrates the reason for
your outperformance or underperformance.
The allocation effect determineswhether the overweighting or underweighting of sectors relative to a
benchmark contributes positively or negatively to the the account’s return. Positive allocation occurs when
the portfolio is overweighted in a sector that outperforms the benchmark, and underweighted in a sector
that underperforms the benchmark.
Account Management Users' Guide 144
Chapter 3 Weighting by Sector
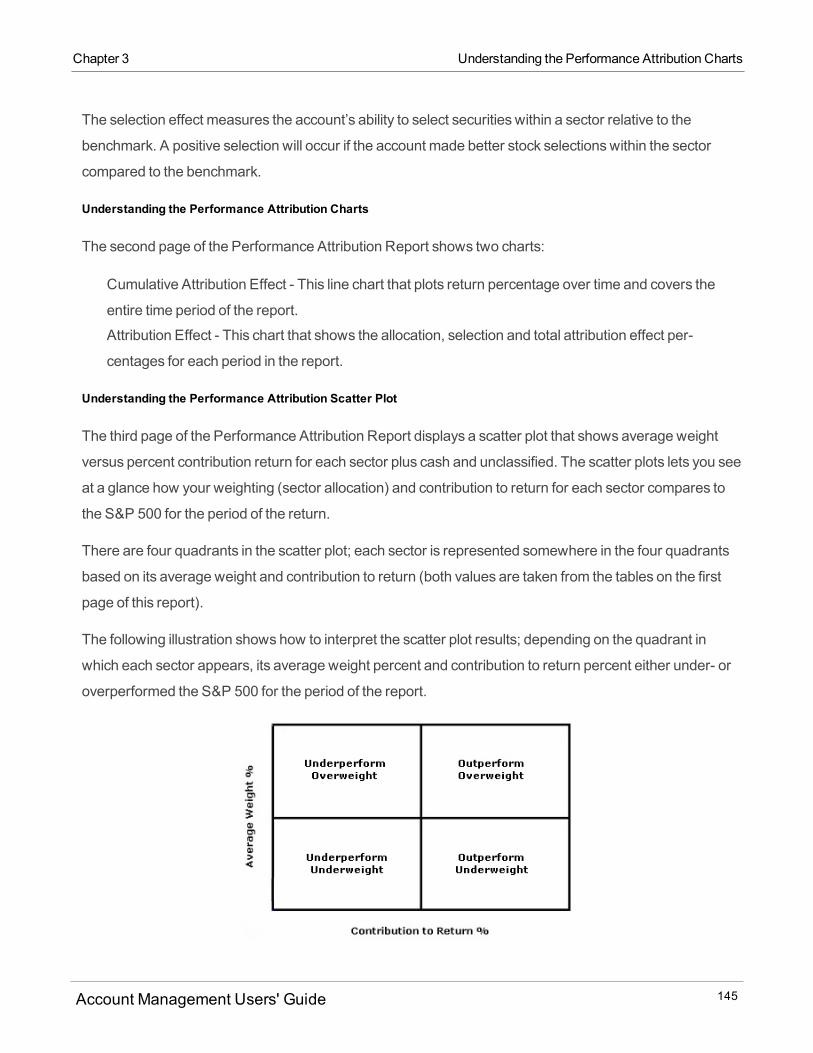
Chapter 3 Understanding the Performance Attribution Charts
The selection effect measures the account’s ability to select securities within a sector relative to the
benchmark. A positive selection will occur if the account made better stock selectionswithin the sector
compared to the benchmark.
Understanding the Performance Attribution Charts
The second page of the Performance Attribution Report shows two charts:
Cumulative Attribution Effect - This line chart that plots return percentage over time and covers the
entire time period of the report.
Attribution Effect - This chart that shows the allocation, selection and total attribution effect per-
centages for each period in the report.
Understanding the Performance Attribution Scatter Plot
The third page of the Performance Attribution Report displays a scatter plot that shows average weight
versus percent contribution return for each sector plus cash and unclassified. The scatter plots lets you see
at a glance how your weighting (sector allocation) and contribution to return for each sector compares to
the S&P 500 for the period of the return.
There are four quadrants in the scatter plot; each sector is represented somewhere in the four quadrants
based on its average weight and contribution to return (both values are taken from the tables on the first
page of this report).
The following illustration shows how to interpret the scatter plot results; depending on the quadrant in
which each sector appears, its average weight percent and contribution to return percent either under- or
overperformed the S&P 500 for the period of the report.
Account Management Users' Guide 145
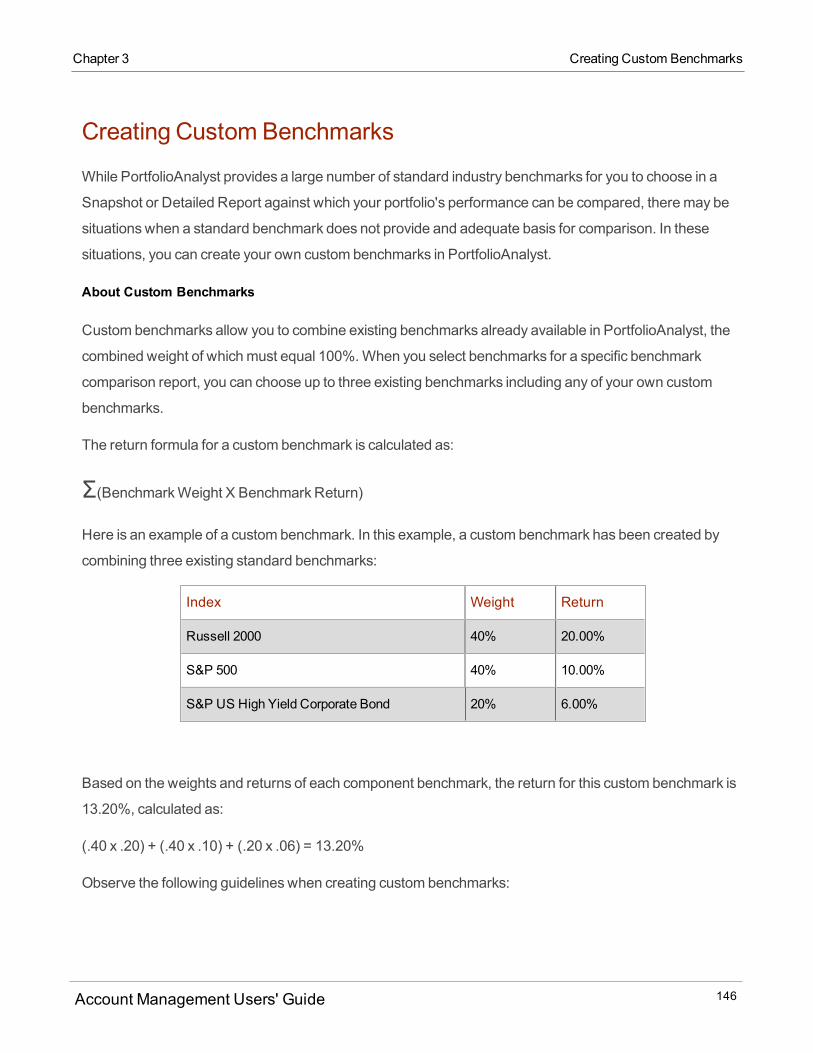
Creating Custom Benchmarks
While PortfolioAnalyst provides a large number of standard industry benchmarks for you to choose in a
Snapshot or Detailed Report against which your portfolio's performance can be compared, theremay be
situationswhen a standard benchmark does not provide and adequate basis for comparison. In these
situations, you can create your own custom benchmarks in PortfolioAnalyst.
About Custom Benchmarks
Custom benchmarks allow you to combine existing benchmarks already available in PortfolioAnalyst, the
combined weight of whichmust equal 100%.When you select benchmarks for a specific benchmark
comparison report, you can choose up to three existing benchmarks including any of your own custom
benchmarks.
The return formula for a custom benchmark is calculated as:
Σ(BenchmarkWeight X BenchmarkReturn)
Here is an example of a custom benchmark. In this example, a custom benchmark has been created by
combining three existing standard benchmarks:
Index Weight Return
Russell 2000 40% 20.00%
S&P 500 40% 10.00%
S&P US High Yield Corporate Bond 20% 6.00%
Based on the weights and returns of each component benchmark, the return for this custom benchmark is
13.20%, calculated as:
(.40 x .20) + (.40 x .10) + (.20 x .06) = 13.20%
Observe the following guidelineswhen creating custom benchmarks:
Account Management Users' Guide 146
Chapter 3 Creating Custom Benchmarks

Chapter 3 About Custom Benchmarks
You cannot use an existing custom benchmark as part of a new custom benchmark. Only the standard
benchmarks can be used when creating a custom benchmark.
Youmust include at least two standard benchmarkswhen creating a custom benchmark.
You can add any number of standard benchmarks to a custom benchmarks, as long as the total weight
equals 100%.
Each standard benchmark included in a custom benchmarkmust have a weight between 0 and 100.
No standard benchmark in a custom benchmark can have a weight of either 0 or 100.
You can addmultiple standard benchmarks at a time to a custom benchmark.
To create a custom benchmark
1. ClickReports > PortfolioAnalyst.2. Click theCustom Benchmarks tab. The CustomBenchmarks tab lists all of your saved custom
benchmarks. If you have not saved any custom benchmarks, the list will be empty. For example, the
abbreviation for the S&P 500 Index is SPX.
3. ClickCreate Custom Benchmark.
4. Type the name of the custom benchmark in the Name field, and type an abbreviation in the Abbre-
viation field.
5. In the list of available benchmarks, select the first benchmark you would like to include, and then click
Add Benchmark. You can type the first few characters of the desired benchmark in the entry box
Account Management Users' Guide 147
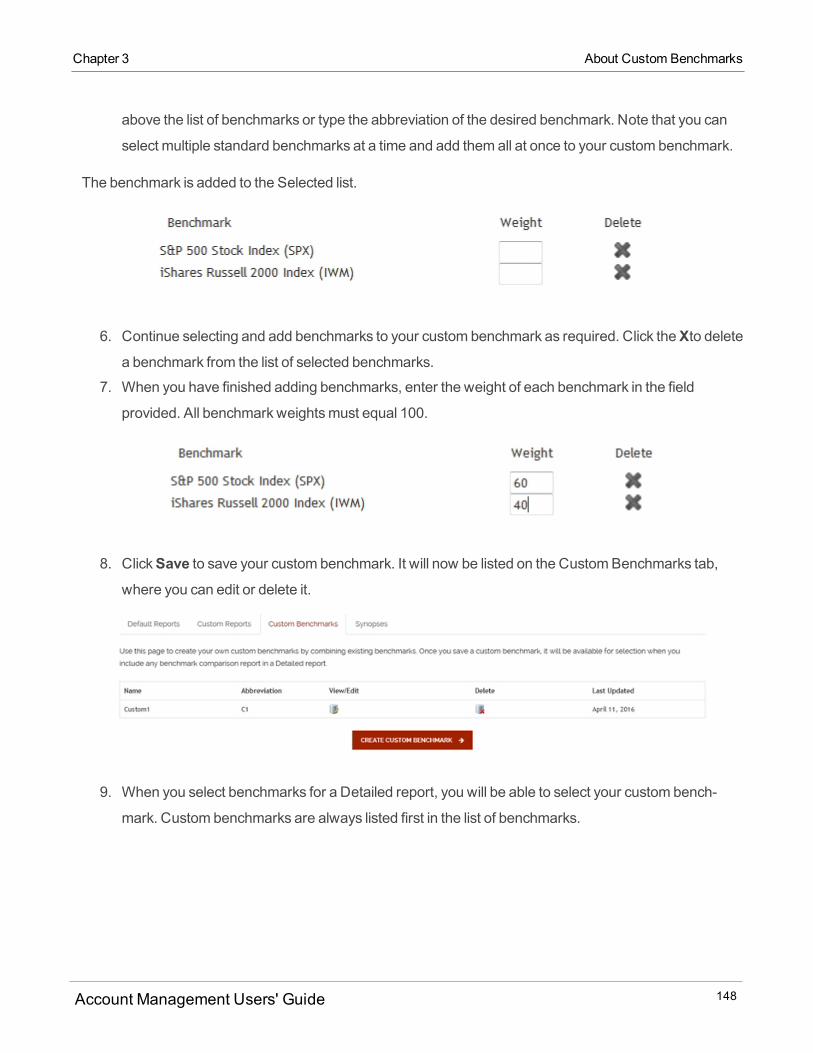
above the list of benchmarks or type the abbreviation of the desired benchmark. Note that you can
select multiple standard benchmarks at a time and add them all at once to your custom benchmark.
The benchmark is added to the Selected list.
6. Continue selecting and add benchmarks to your custom benchmark as required. Click theXto deletea benchmark from the list of selected benchmarks.
7. When you have finished adding benchmarks, enter the weight of each benchmark in the field
provided. All benchmarkweightsmust equal 100.
8. ClickSave to save your custom benchmark. It will now be listed on the CustomBenchmarks tab,
where you can edit or delete it.
9. When you select benchmarks for a Detailed report, you will be able to select your custom bench-
mark. Custom benchmarks are always listed first in the list of benchmarks.
Account Management Users' Guide 148
Chapter 3 About Custom Benchmarks
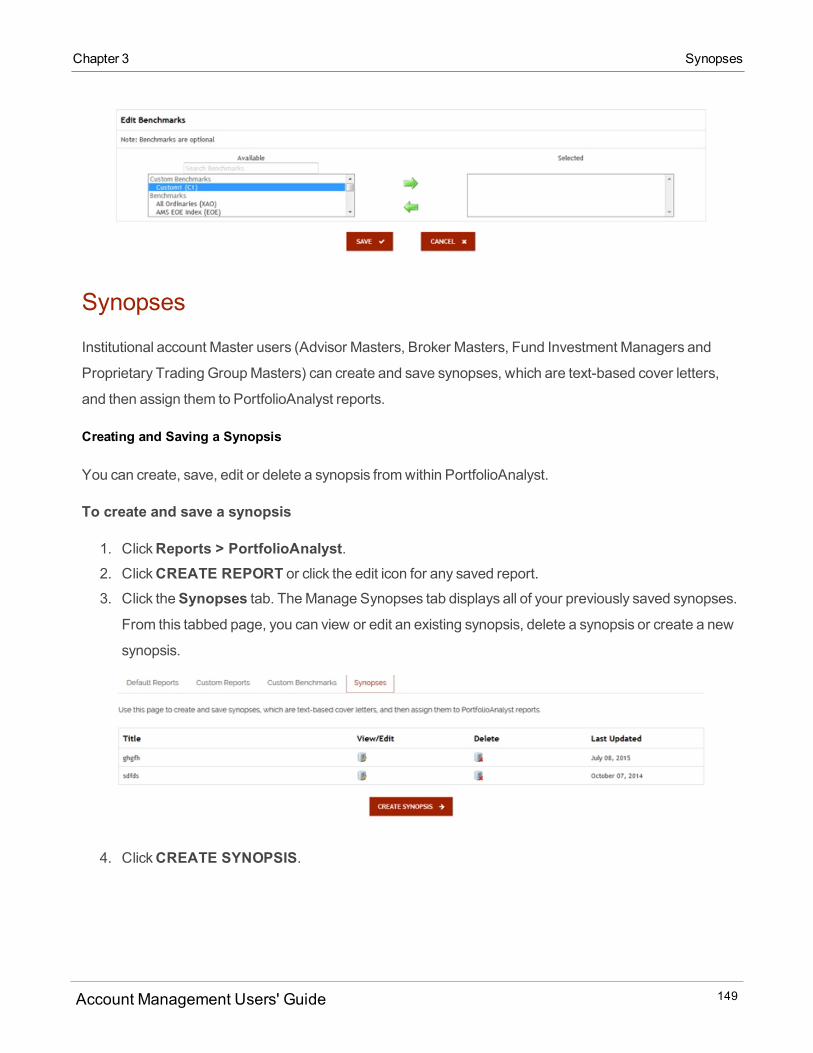
Chapter 3 Synopses
Synopses
Institutional account Master users (Advisor Masters, Broker Masters, Fund Investment Managers and
Proprietary Trading GroupMasters) can create and save synopses, which are text-based cover letters,
and then assign them to PortfolioAnalyst reports.
Creating and Saving a Synopsis
You can create, save, edit or delete a synopsis fromwithin PortfolioAnalyst.
To create and save a synopsis
1. ClickReports > PortfolioAnalyst.2. ClickCREATE REPORT or click the edit icon for any saved report.3. Click theSynopses tab. TheManage Synopses tab displays all of your previously saved synopses.
From this tabbed page, you can view or edit an existing synopsis, delete a synopsis or create a new
synopsis.
4. ClickCREATE SYNOPSIS.
Account Management Users' Guide 149
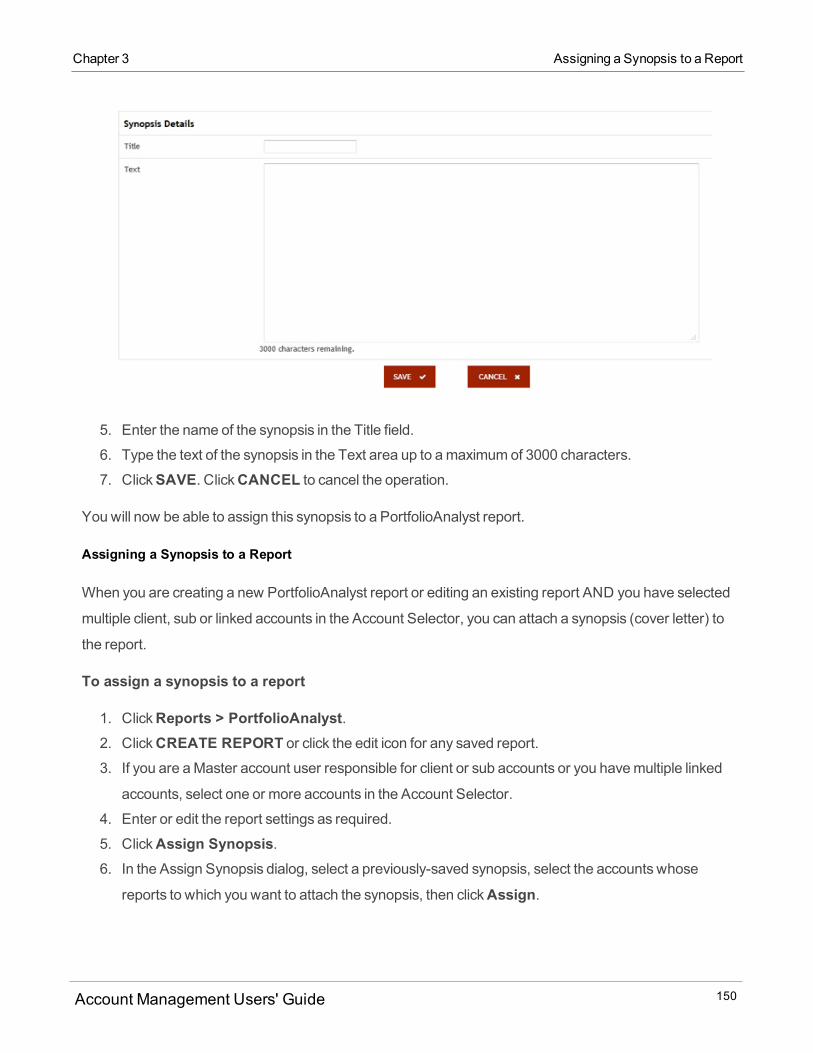
5. Enter the name of the synopsis in the Title field.
6. Type the text of the synopsis in the Text area up to amaximumof 3000 characters.
7. ClickSAVE. ClickCANCEL to cancel the operation.
You will now be able to assign this synopsis to a PortfolioAnalyst report.
Assigning a Synopsis to a Report
When you are creating a new PortfolioAnalyst report or editing an existing report AND you have selected
multiple client, sub or linked accounts in the Account Selector, you can attach a synopsis (cover letter) to
the report.
To assign a synopsis to a report
1. ClickReports > PortfolioAnalyst.2. ClickCREATE REPORT or click the edit icon for any saved report.3. If you are aMaster account user responsible for client or sub accounts or you havemultiple linked
accounts, select one or more accounts in the Account Selector.
4. Enter or edit the report settings as required.
5. ClickAssign Synopsis.6. In the Assign Synopsis dialog, select a previously-saved synopsis, select the accounts whose
reports to which you want to attach the synopsis, then clickAssign.
Account Management Users' Guide 150
Chapter 3 Assigning a Synopsis to a Report
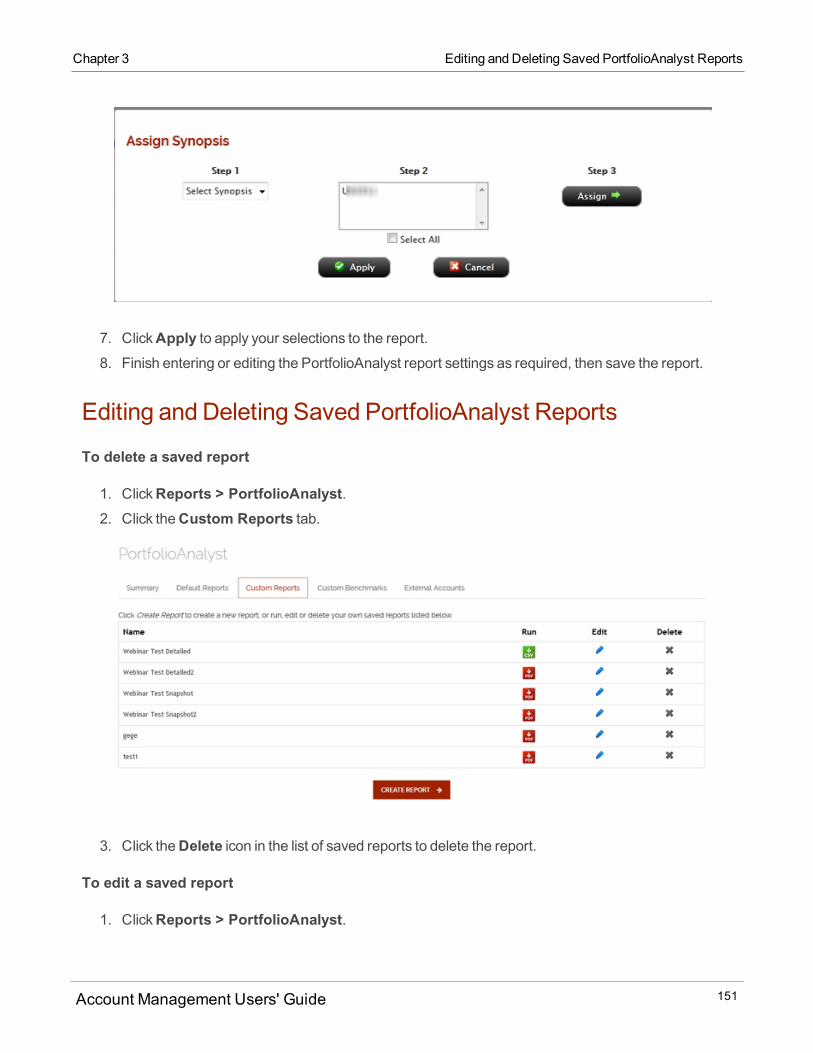
Chapter 3 Editing and Deleting Saved PortfolioAnalyst Reports
7. ClickApply to apply your selections to the report.8. Finish entering or editing the PortfolioAnalyst report settings as required, then save the report.
Editing and Deleting Saved PortfolioAnalyst Reports
To delete a saved report
1. ClickReports > PortfolioAnalyst.2. Click theCustom Reports tab.
3. Click theDelete icon in the list of saved reports to delete the report.
To edit a saved report
1. ClickReports > PortfolioAnalyst.
Account Management Users' Guide 151
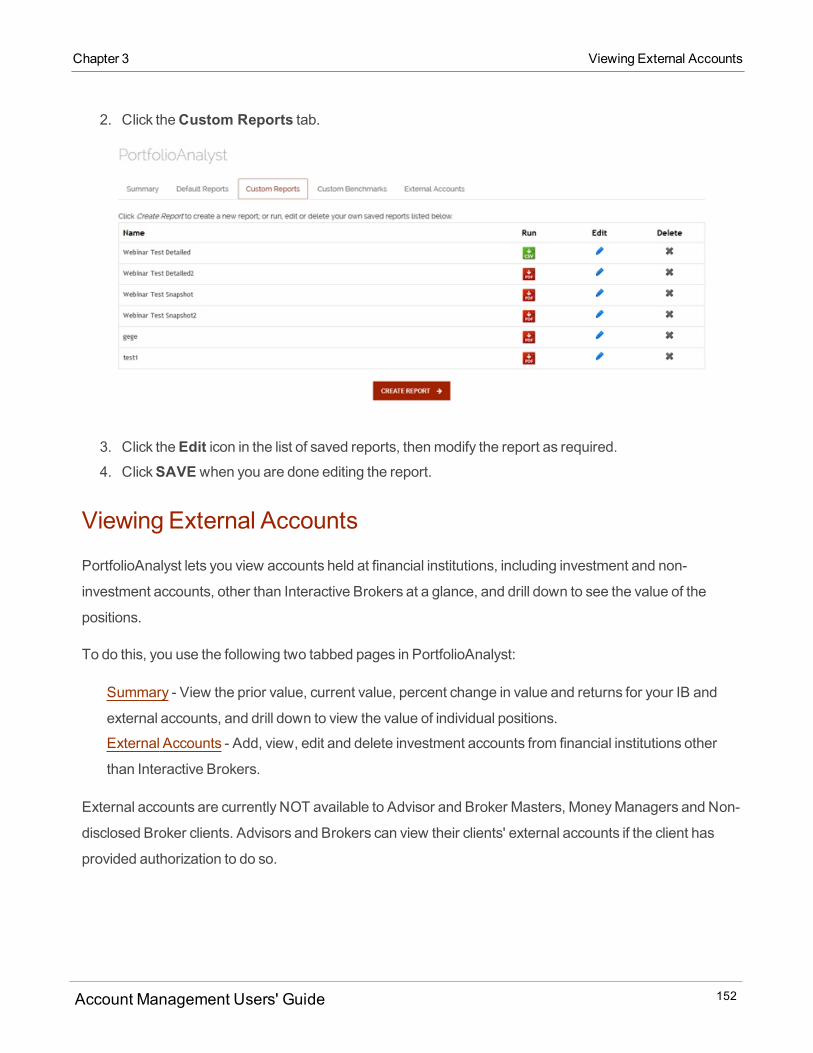
2. Click theCustom Reports tab.
3. Click theEdit icon in the list of saved reports, thenmodify the report as required.4. ClickSAVE when you are done editing the report.
Viewing External Accounts
PortfolioAnalyst lets you view accounts held at financial institutions, including investment and non-
investment accounts, other than Interactive Brokers at a glance, and drill down to see the value of the
positions.
To do this, you use the following two tabbed pages in PortfolioAnalyst:
Summary - View the prior value, current value, percent change in value and returns for your IB and
external accounts, and drill down to view the value of individual positions.
External Accounts - Add, view, edit and delete investment accounts from financial institutions other
than Interactive Brokers.
External accounts are currently NOT available to Advisor and Broker Masters, MoneyManagers and Non-
disclosed Broker clients. Advisors and Brokers can view their clients' external accounts if the client has
provided authorization to do so.
Account Management Users' Guide 152
Chapter 3 Viewing External Accounts
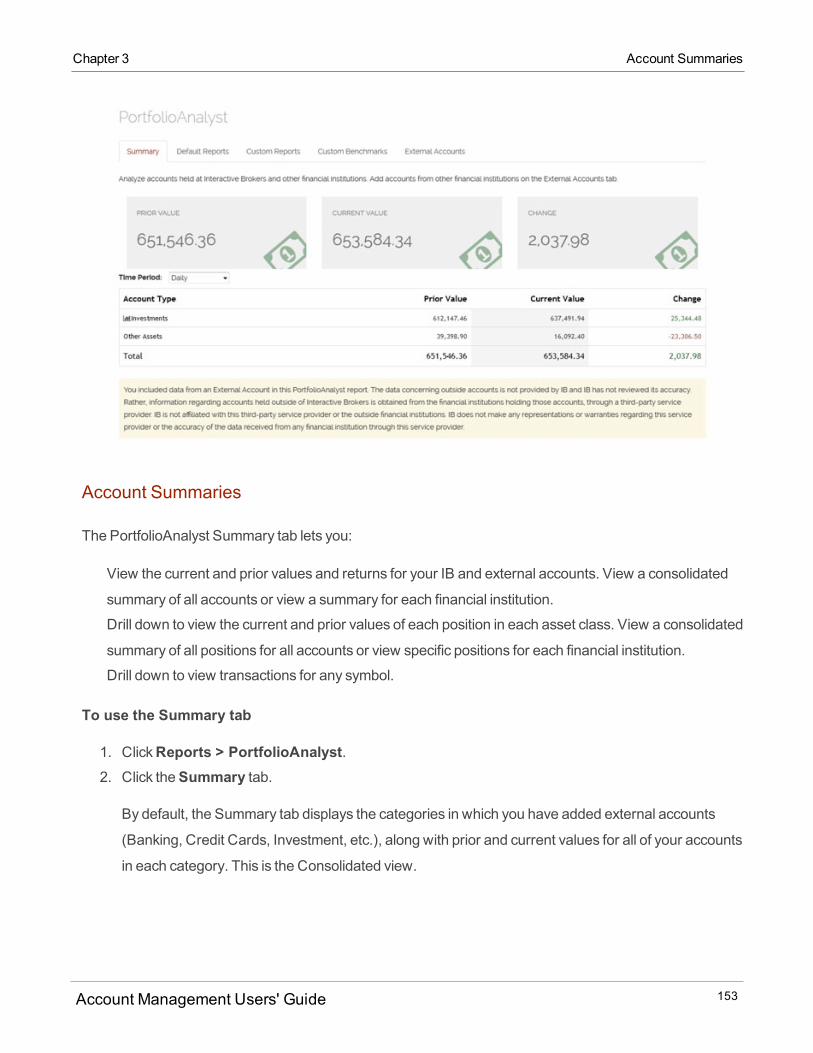
Chapter 3 Account Summaries
Account Summaries
The PortfolioAnalyst Summary tab lets you:
View the current and prior values and returns for your IB and external accounts. View a consolidated
summary of all accounts or view a summary for each financial institution.
Drill down to view the current and prior values of each position in each asset class. View a consolidated
summary of all positions for all accounts or view specific positions for each financial institution.
Drill down to view transactions for any symbol.
To use the Summary tab
1. ClickReports > PortfolioAnalyst.2. Click theSummary tab.
By default, the Summary tab displays the categories in which you have added external accounts
(Banking, Credit Cards, Investment, etc.), along with prior and current values for all of your accounts
in each category. This is the Consolidated view.
Account Management Users' Guide 153
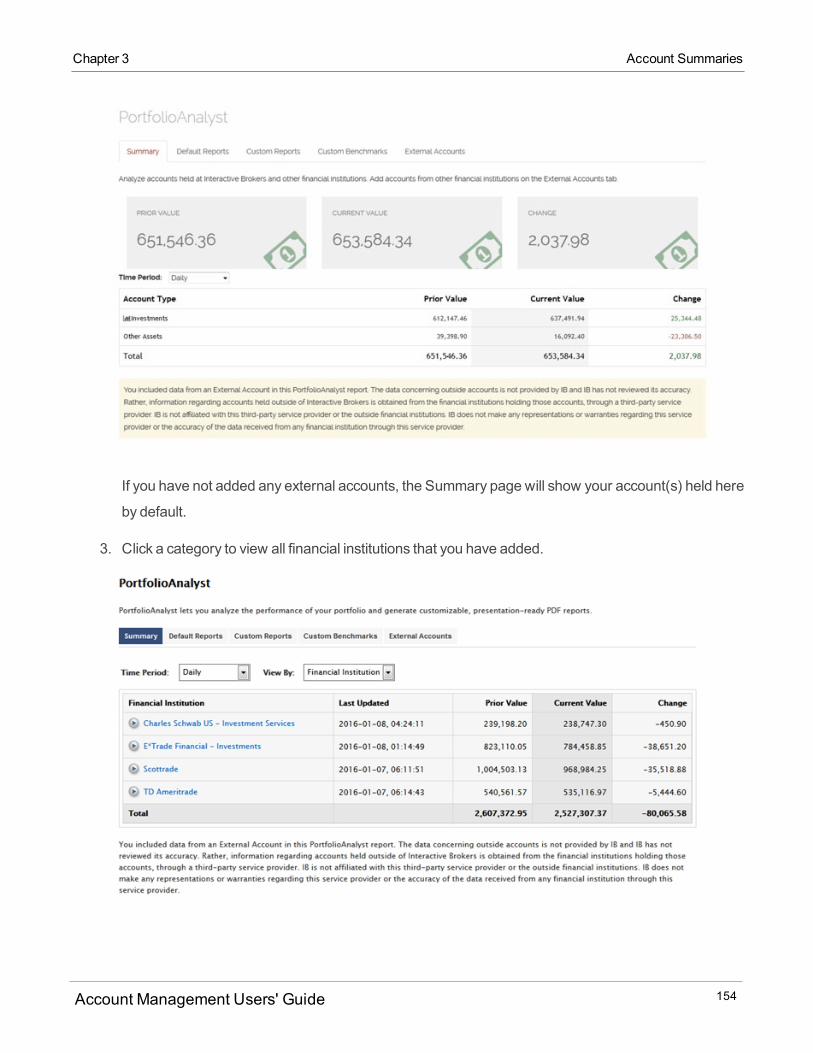
If you have not added any external accounts, the Summary page will show your account(s) held here
by default.
3. Click a category to view all financial institutions that you have added.
Account Management Users' Guide 154
Chapter 3 Account Summaries
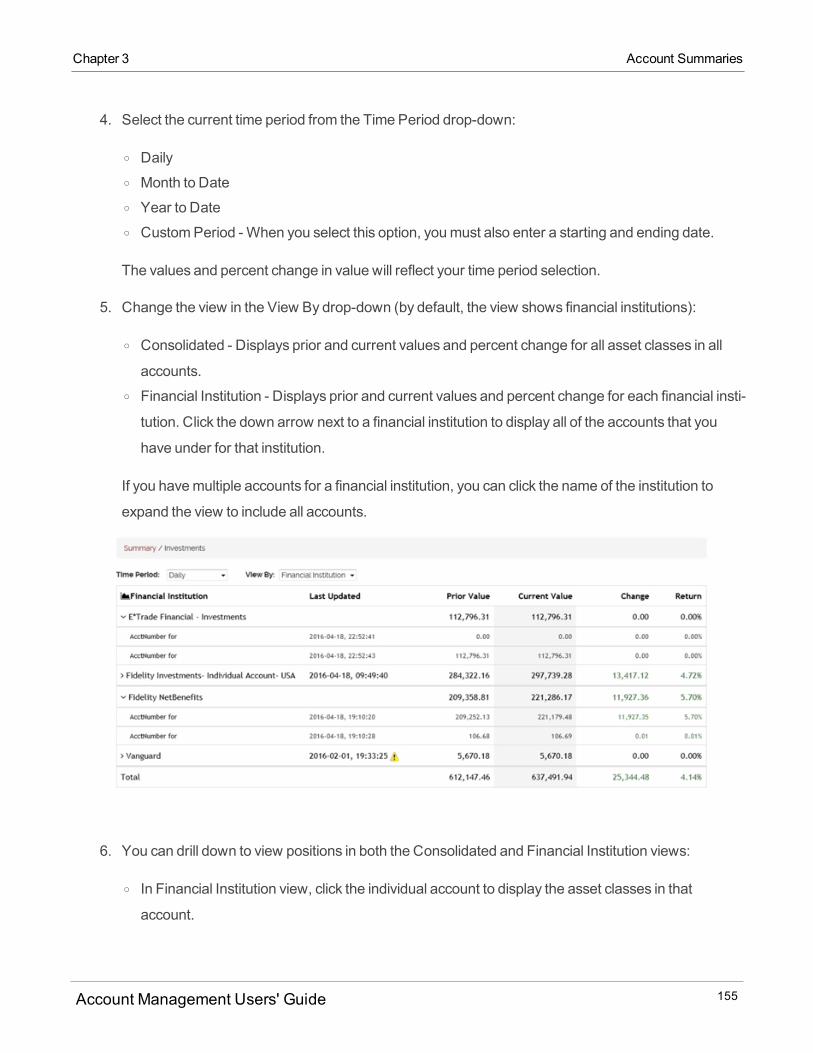
Chapter 3 Account Summaries
4. Select the current time period from the Time Period drop-down:
o Dailyo Month to Dateo Year to Dateo CustomPeriod - When you select this option, youmust also enter a starting and ending date.
The values and percent change in value will reflect your time period selection.
5. Change the view in the View By drop-down (by default, the view shows financial institutions):
o Consolidated - Displays prior and current values and percent change for all asset classes in all
accounts.o Financial Institution - Displays prior and current values and percent change for each financial insti-
tution. Click the down arrow next to a financial institution to display all of the accounts that you
have under for that institution.
If you havemultiple accounts for a financial institution, you can click the name of the institution to
expand the view to include all accounts.
6. You can drill down to view positions in both the Consolidated and Financial Institution views:
o In Financial Institution view, click the individual account to display the asset classes in that
account.
Account Management Users' Guide 155
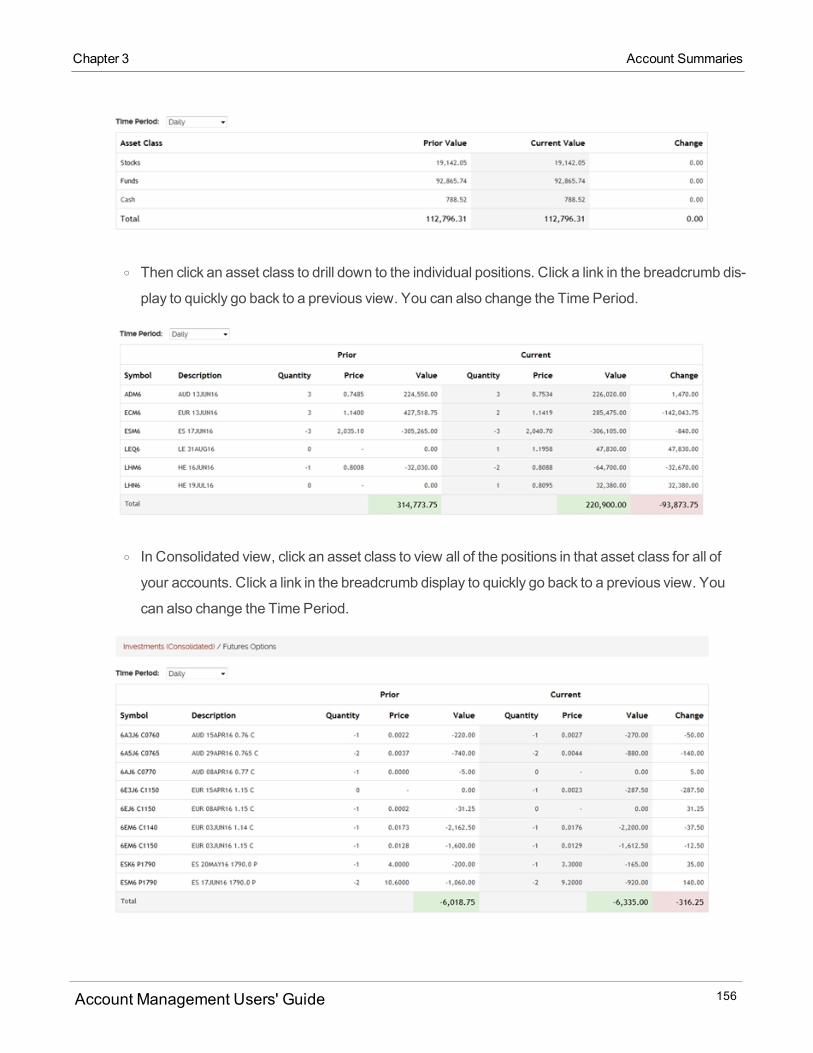
o Then click an asset class to drill down to the individual positions. Click a link in the breadcrumb dis-
play to quickly go back to a previous view. You can also change the Time Period.
o In Consolidated view, click an asset class to view all of the positions in that asset class for all of
your accounts. Click a link in the breadcrumb display to quickly go back to a previous view. You
can also change the Time Period.
Account Management Users' Guide 156
Chapter 3 Account Summaries
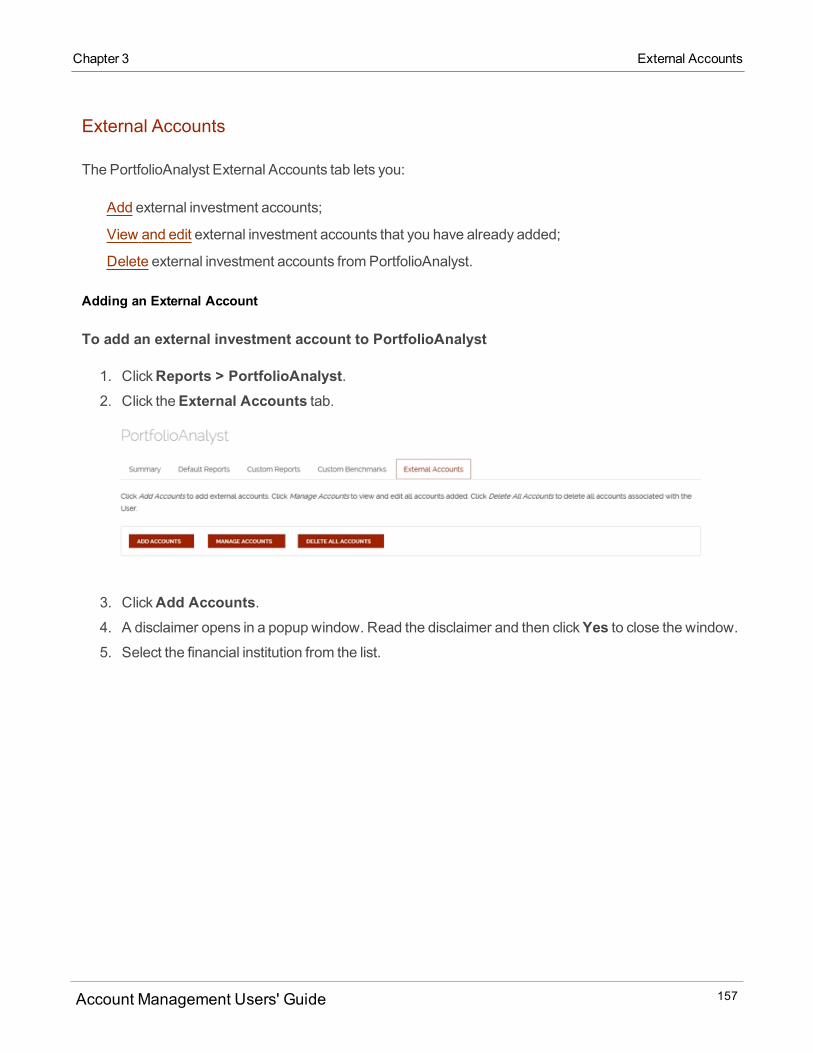
Chapter 3 External Accounts
External Accounts
The PortfolioAnalyst External Accounts tab lets you:
Add external investment accounts;
View and edit external investment accounts that you have already added;
Delete external investment accounts fromPortfolioAnalyst.
Adding an External Account
To add an external investment account to PortfolioAnalyst
1. ClickReports > PortfolioAnalyst.2. Click theExternal Accounts tab.
3. ClickAdd Accounts.4. A disclaimer opens in a popup window. Read the disclaimer and then clickYes to close the window.5. Select the financial institution from the list.
Account Management Users' Guide 157
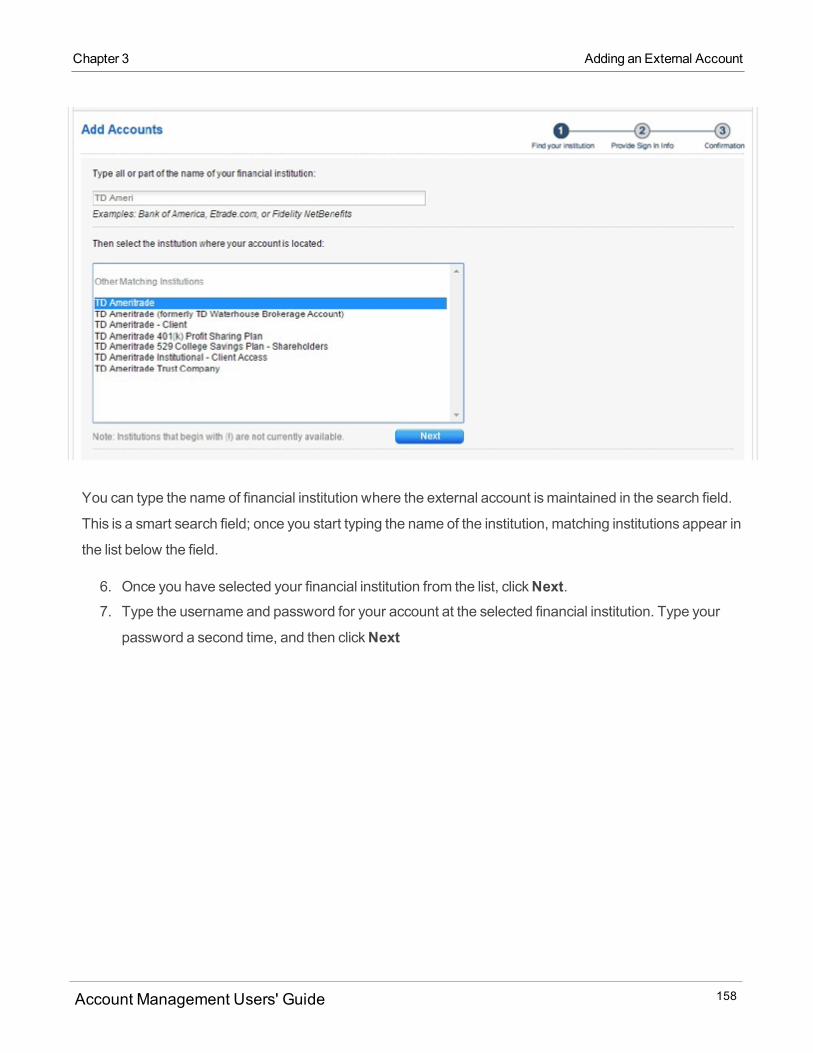
You can type the name of financial institution where the external account ismaintained in the search field.
This is a smart search field; once you start typing the name of the institution, matching institutions appear in
the list below the field.
6. Once you have selected your financial institution from the list, clickNext.7. Type the username and password for your account at the selected financial institution. Type your
password a second time, and then clickNext
Account Management Users' Guide 158
Chapter 3 Adding an External Account
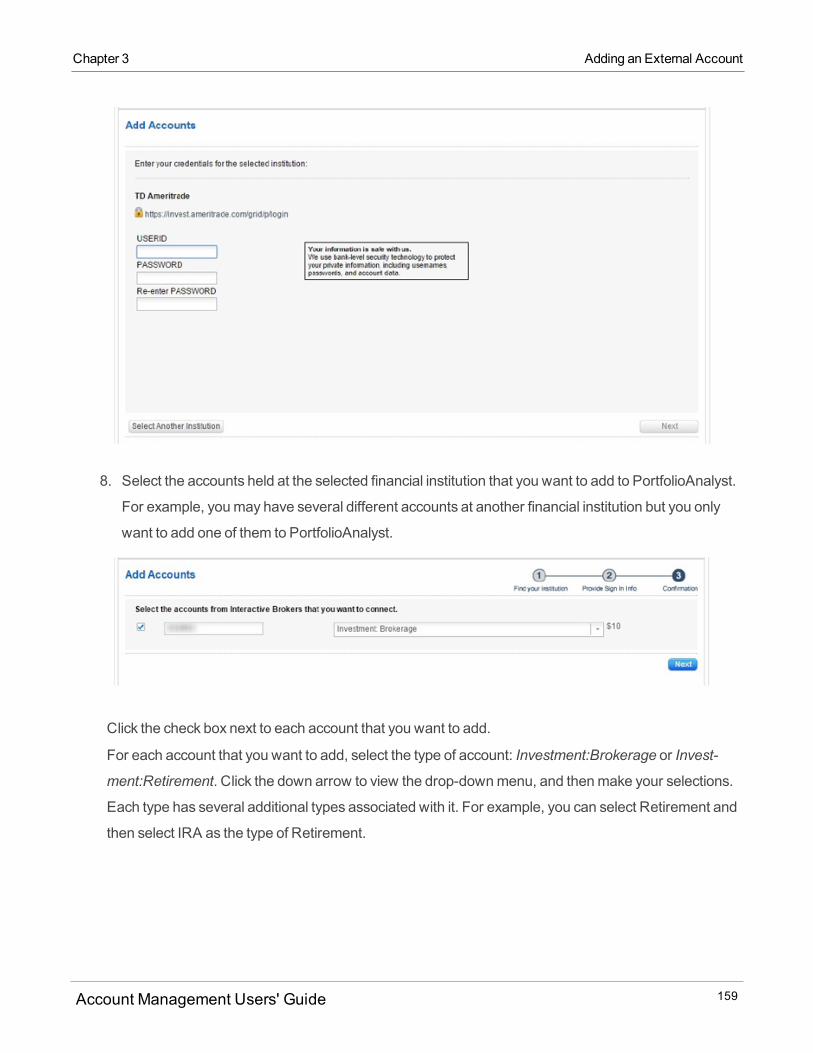
Chapter 3 Adding an External Account
8. Select the accounts held at the selected financial institution that you want to add to PortfolioAnalyst.
For example, youmay have several different accounts at another financial institution but you only
want to add one of them to PortfolioAnalyst.
Click the check box next to each account that you want to add.
For each account that you want to add, select the type of account: Investment:Brokerage or Invest-
ment:Retirement. Click the down arrow to view the drop-downmenu, and thenmake your selections.
Each type has several additional types associated with it. For example, you can select Retirement and
then select IRA as the type of Retirement.
Account Management Users' Guide 159
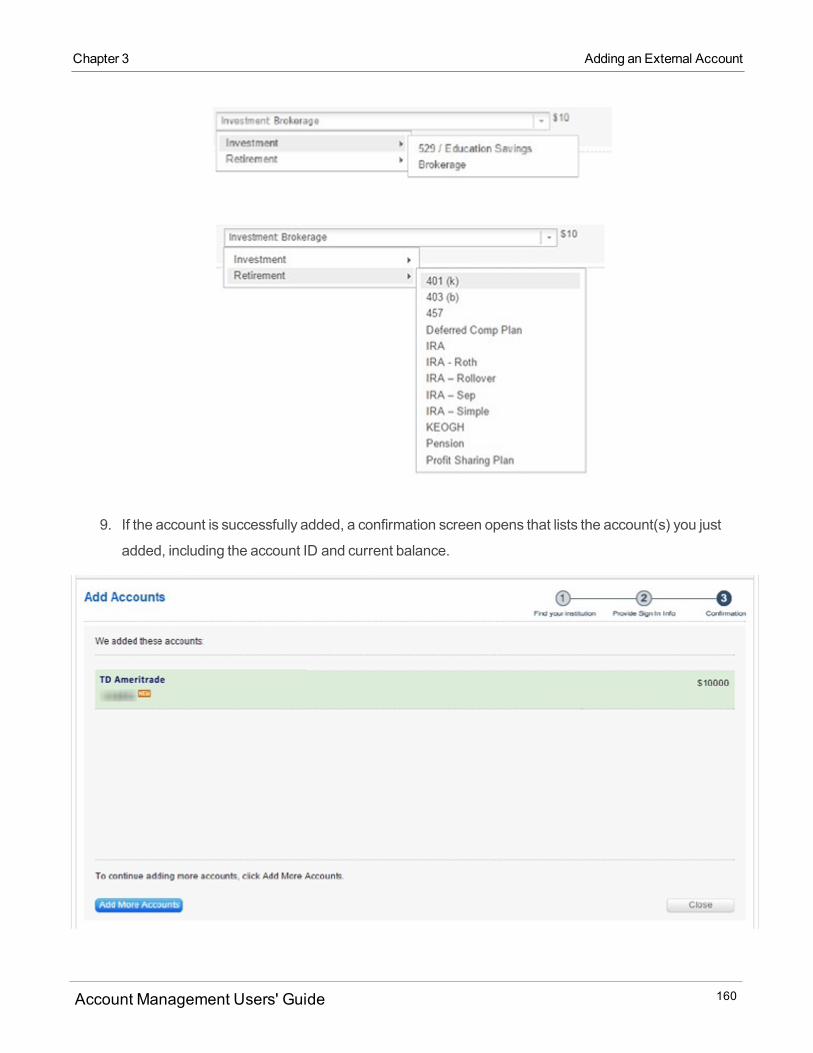
9. If the account is successfully added, a confirmation screen opens that lists the account(s) you just
added, including the account ID and current balance.
Account Management Users' Guide 160
Chapter 3 Adding an External Account
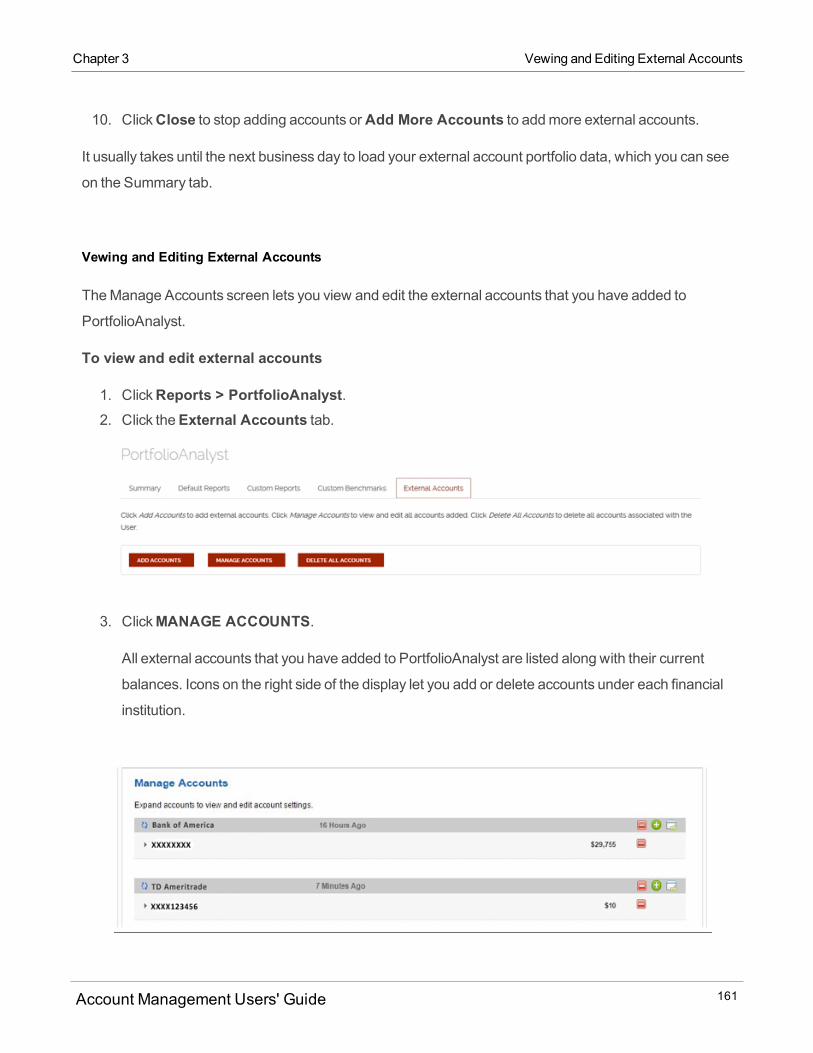
Chapter 3 Vewing and Editing External Accounts
10. ClickClose to stop adding accounts orAdd More Accounts to addmore external accounts.
It usually takes until the next business day to load your external account portfolio data, which you can see
on the Summary tab.
Vewing and Editing External Accounts
TheManage Accounts screen lets you view and edit the external accounts that you have added to
PortfolioAnalyst.
To view and edit external accounts
1. ClickReports > PortfolioAnalyst.2. Click theExternal Accounts tab.
3. ClickMANAGE ACCOUNTS.
All external accounts that you have added to PortfolioAnalyst are listed along with their current
balances. Icons on the right side of the display let you add or delete accounts under each financial
institution.
Account Management Users' Guide 161
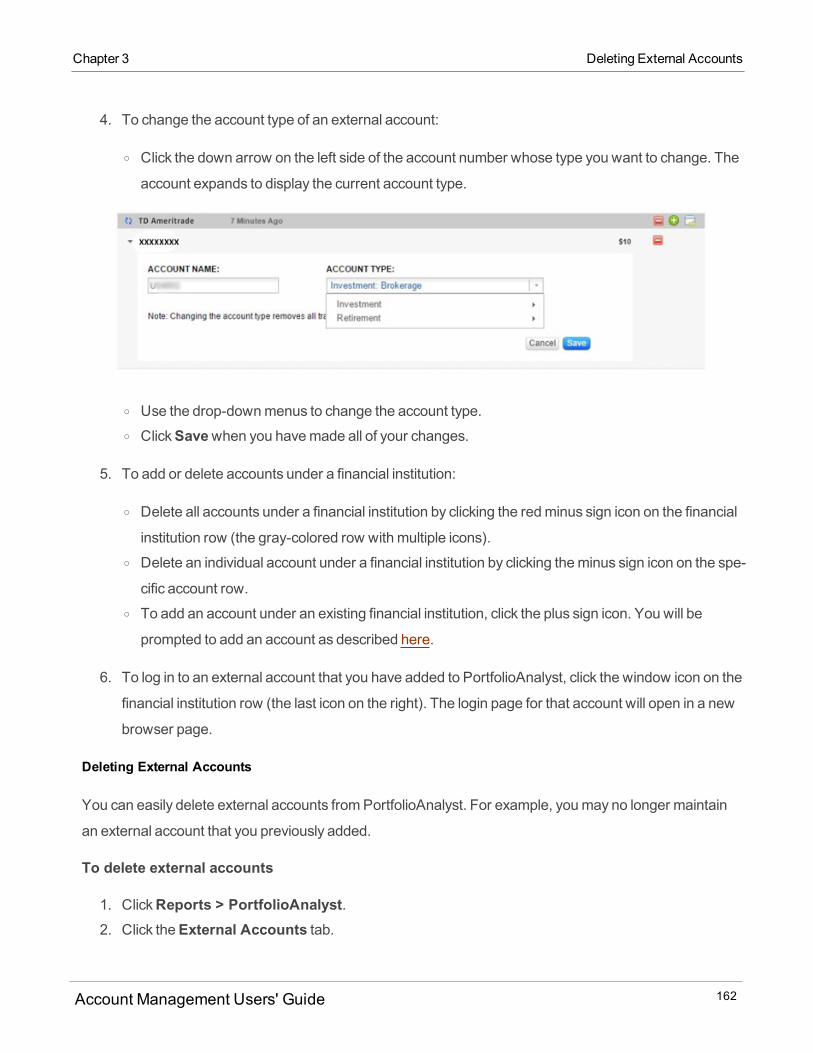
4. To change the account type of an external account:
o Click the down arrow on the left side of the account number whose type you want to change. The
account expands to display the current account type.
o Use the drop-downmenus to change the account type.o ClickSavewhen you havemade all of your changes.
5. To add or delete accounts under a financial institution:
o Delete all accounts under a financial institution by clicking the redminus sign icon on the financial
institution row (the gray-colored row withmultiple icons).o Delete an individual account under a financial institution by clicking theminus sign icon on the spe-
cific account row.o To add an account under an existing financial institution, click the plus sign icon. You will be
prompted to add an account as described here.
6. To log in to an external account that you have added to PortfolioAnalyst, click the window icon on the
financial institution row (the last icon on the right). The login page for that account will open in a new
browser page.
Deleting External Accounts
You can easily delete external accounts fromPortfolioAnalyst. For example, youmay no longer maintain
an external account that you previously added.
To delete external accounts
1. ClickReports > PortfolioAnalyst.2. Click theExternal Accounts tab.
Account Management Users' Guide 162
Chapter 3 Deleting External Accounts

Chapter 3 Transaction Cost Analysis
3. To delete ALL external accounts fromPortfolioAnalyst, clickDELETE ALL ACCOUNTS.
ClickYes in the confirmation popup that opens to complete the operation.4. To delete individual accounts (for example, youmay have addedmultiple accounts under a specific
financial institution but no longer maintain one of them):
o ClickManage Accounts.o Clicking the redminus sign icon on the specific account row.o In the confirmation popup, clickDelete Institution to complete the operation.
Transaction Cost Analysis
Transaction Cost Analysis is a dynamic and interactive analysis of your tradesmarked to various
benchmarks grouped in different categories or on a per-order basis. Transaction Cost Analysis applies to
trades of any instrument type and is typically available tenminutes after a trade is executed. Performance
metrics are expressed as basis points (bps) of value traded.
Each executed trade in the period of the analysis ismarked to a series of performance benchmarkswith
the results displayed inmultiple interactive tables. You can drill down in a variety of categories, including
trade date, order side, exchange, trade price and underlying, to see how each trade performedwhen
compared to the benchmark. The performance of a trade is calculated bymarking the trade price to each
benchmark. A positive number indicates that the trade worked in your favor; a negative number indicates
that the trade did not work in your favor.
You can also add or remove columns from tables using the Configure Columns feature.
Combinations are not supported in the Transaction Cost Analysis.
Account Management Users' Guide 163
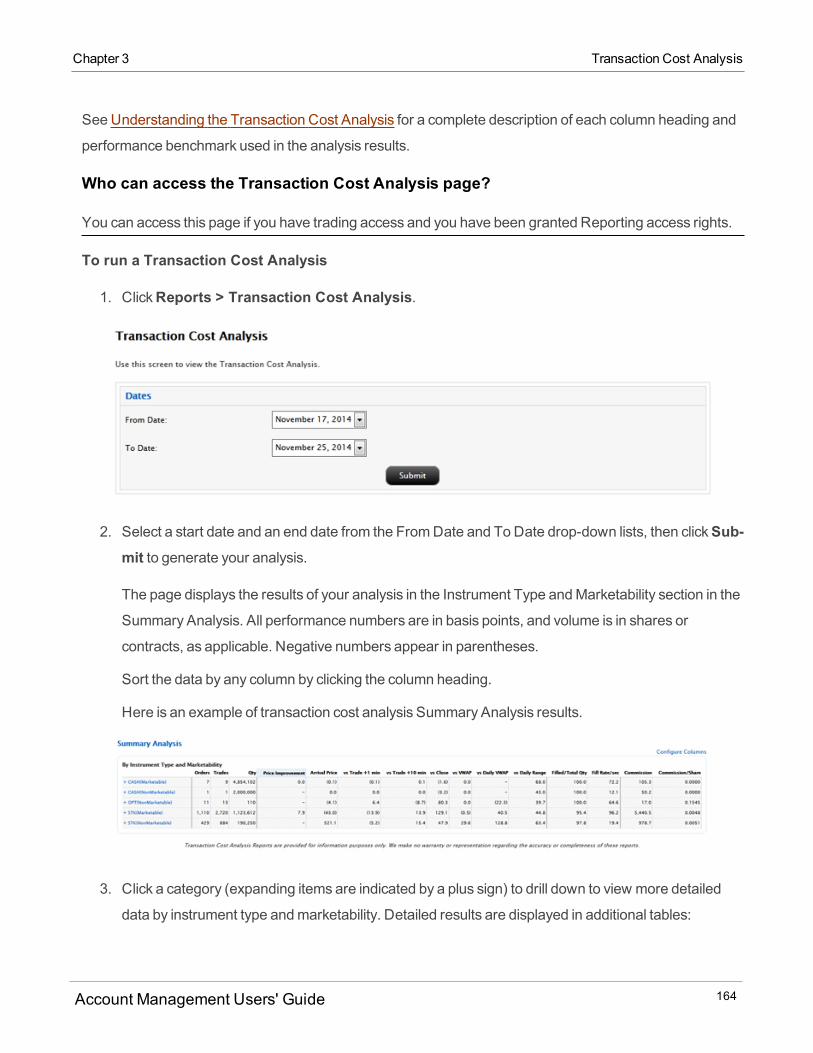
SeeUnderstanding the Transaction Cost Analysis for a complete description of each column heading and
performance benchmark used in the analysis results.
Who can access the Transaction Cost Analysis page?
You can access this page if you have trading access and you have been granted Reporting access rights.
To run a Transaction Cost Analysis
1. ClickReports > Transaction Cost Analysis.
2. Select a start date and an end date from the FromDate and To Date drop-down lists, then clickSub-mit to generate your analysis.
The page displays the results of your analysis in the Instrument Type andMarketability section in the
Summary Analysis. All performance numbers are in basis points, and volume is in shares or
contracts, as applicable. Negative numbers appear in parentheses.
Sort the data by any column by clicking the column heading.
Here is an example of transaction cost analysis Summary Analysis results.
3. Click a category (expanding items are indicated by a plus sign) to drill down to view more detailed
data by instrument type andmarketability. Detailed results are displayed in additional tables:
Account Management Users' Guide 164
Chapter 3 Transaction Cost Analysis
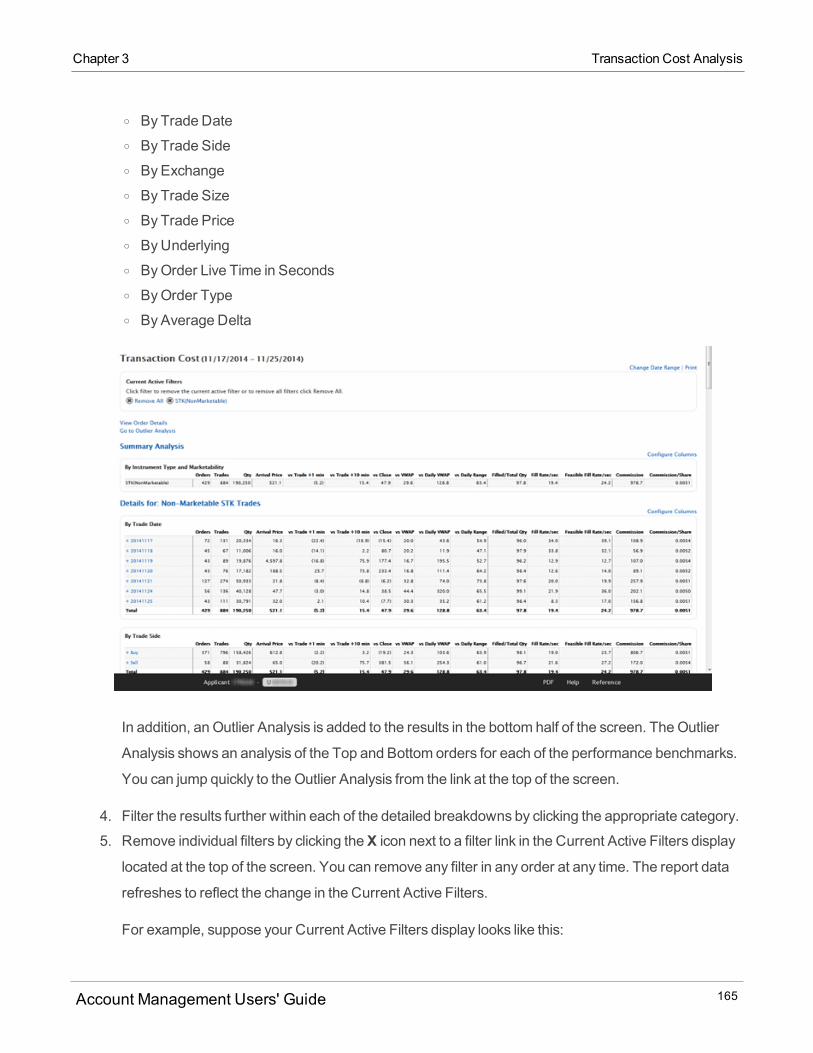
Chapter 3 Transaction Cost Analysis
o By Trade Dateo By Trade Sideo ByExchangeo By Trade Sizeo By Trade Priceo ByUnderlyingo ByOrder Live Time in Secondso ByOrder Typeo ByAverage Delta
In addition, an Outlier Analysis is added to the results in the bottom half of the screen. TheOutlier
Analysis shows an analysis of the Top and Bottom orders for each of the performance benchmarks.
You can jump quickly to the Outlier Analysis from the link at the top of the screen.
4. Filter the results further within each of the detailed breakdowns by clicking the appropriate category.
5. Remove individual filters by clicking theX icon next to a filter link in the Current Active Filters displaylocated at the top of the screen. You can remove any filter in any order at any time. The report data
refreshes to reflect the change in the Current Active Filters.
For example, suppose your Current Active Filters display looks like this:
Account Management Users' Guide 165
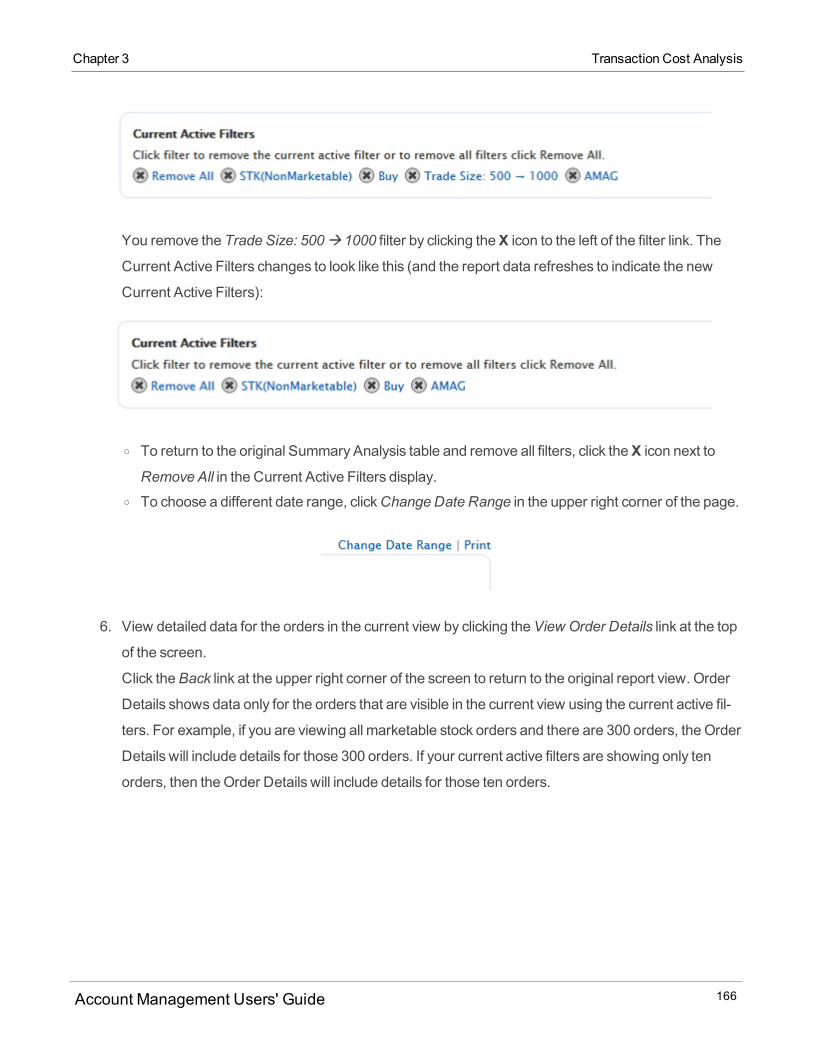
You remove the Trade Size: 500à 1000 filter by clicking theX icon to the left of the filter link. The
Current Active Filters changes to look like this (and the report data refreshes to indicate the new
Current Active Filters):
o To return to the original Summary Analysis table and remove all filters, click theX icon next to
Remove All in the Current Active Filters display.o To choose a different date range, clickChange Date Range in the upper right corner of the page.
6. View detailed data for the orders in the current view by clicking theView Order Details link at the top
of the screen.
Click theBack link at the upper right corner of the screen to return to the original report view. Order
Details shows data only for the orders that are visible in the current view using the current active fil-
ters. For example, if you are viewing all marketable stock orders and there are 300 orders, the Order
Details will include details for those 300 orders. If your current active filters are showing only ten
orders, then theOrder Details will include details for those ten orders.
Account Management Users' Guide 166
Chapter 3 Transaction Cost Analysis
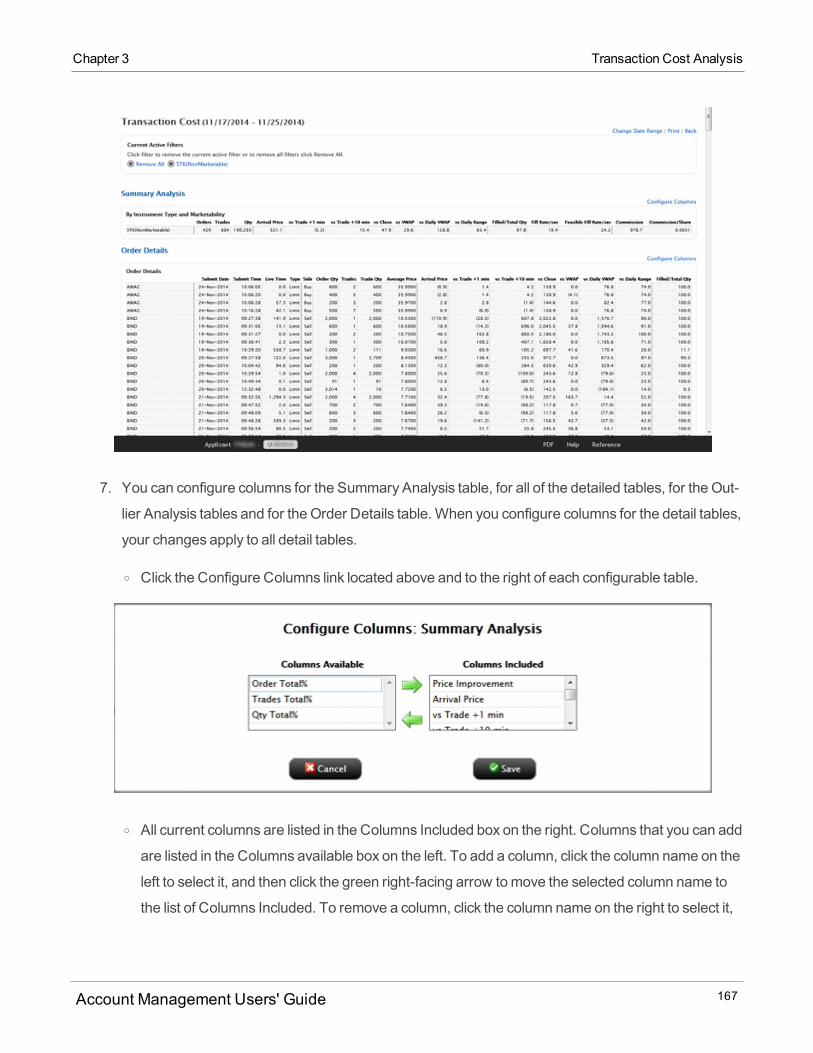
Chapter 3 Transaction Cost Analysis
7. You can configure columns for the Summary Analysis table, for all of the detailed tables, for the Out-
lier Analysis tables and for the Order Details table. When you configure columns for the detail tables,
your changes apply to all detail tables.
o Click the Configure Columns link located above and to the right of each configurable table.
o All current columns are listed in the Columns Included box on the right. Columns that you can add
are listed in the Columns available box on the left. To add a column, click the column name on the
left to select it, and then click the green right-facing arrow tomove the selected column name to
the list of Columns Included. To remove a column, click the column name on the right to select it,
Account Management Users' Guide 167
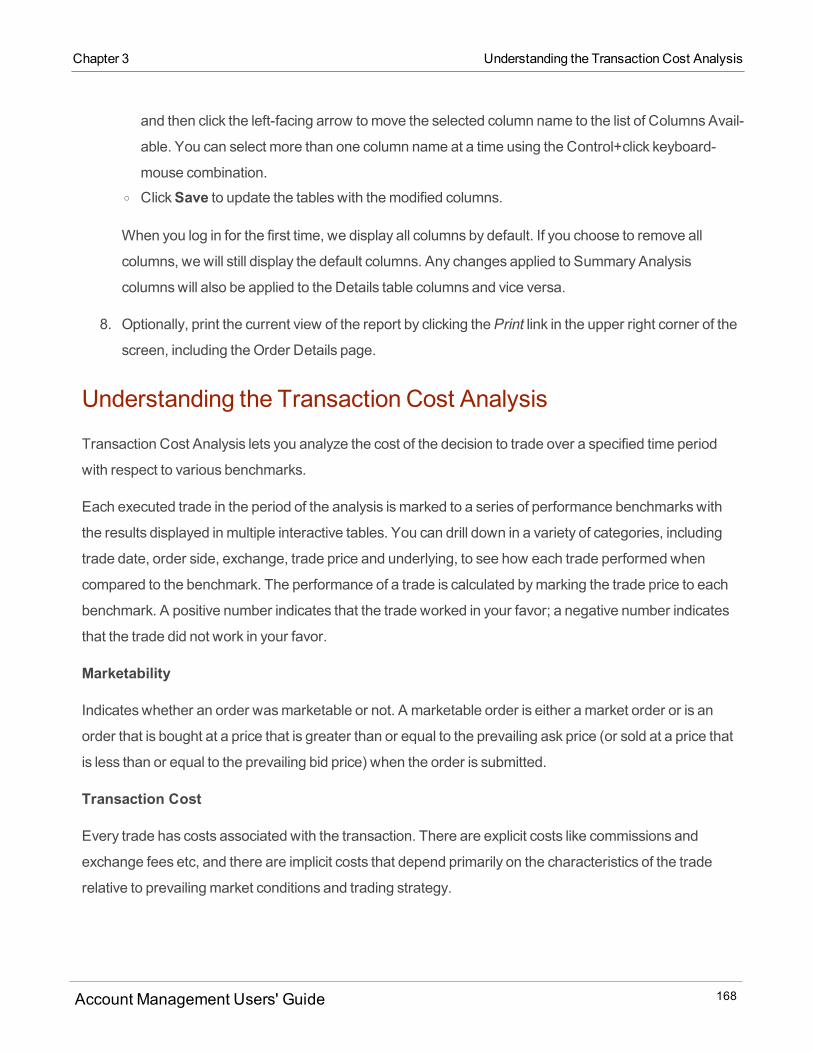
and then click the left-facing arrow tomove the selected column name to the list of ColumnsAvail-
able. You can select more than one column name at a time using the Control+click keyboard-
mouse combination.o ClickSave to update the tables with themodified columns.
When you log in for the first time, we display all columns by default. If you choose to remove all
columns, we will still display the default columns. Any changes applied to Summary Analysis
columnswill also be applied to the Details table columns and vice versa.
8. Optionally, print the current view of the report by clicking thePrint link in the upper right corner of the
screen, including theOrder Details page.
Understanding the Transaction Cost Analysis
Transaction Cost Analysis lets you analyze the cost of the decision to trade over a specified time period
with respect to various benchmarks.
Each executed trade in the period of the analysis ismarked to a series of performance benchmarkswith
the results displayed inmultiple interactive tables. You can drill down in a variety of categories, including
trade date, order side, exchange, trade price and underlying, to see how each trade performedwhen
compared to the benchmark. The performance of a trade is calculated bymarking the trade price to each
benchmark. A positive number indicates that the trade worked in your favor; a negative number indicates
that the trade did not work in your favor.
Marketability
Indicateswhether an order wasmarketable or not. A marketable order is either amarket order or is an
order that is bought at a price that is greater than or equal to the prevailing ask price (or sold at a price that
is less than or equal to the prevailing bid price) when the order is submitted.
Transaction Cost
Every trade has costs associated with the transaction. There are explicit costs like commissions and
exchange fees etc, and there are implicit costs that depend primarily on the characteristics of the trade
relative to prevailingmarket conditions and trading strategy.
Account Management Users' Guide 168
Chapter 3 Understanding the Transaction Cost Analysis
Chapter 3 Understanding the Transaction Cost Analysis
The Transaction Cost Analysis report compares trades to various industry standard benchmarks and some
uniquemeasures, allowing you to evaluate the quality of the executions.
Basis Points
Unit of measure that describes the percentage change in the value or rate of a financial instrument. One
basis point = 0.01%, or 0.0001 in decimal form. Performancemetrics are expressed as basis points (bps)
of value traded.
Currency
All commissions are in your account's base currency.Whenwe add notional value and total premium,
those will also be in account's base currency. The trade price will stay in traded currency.
Methodology
Wemark each trade to a series of benchmarks such as price improvement, arrival price andmore.We
aggregate tradesweighted by volume and present overall performance aswell as various tables that show
performance broken down by various criteria such as trade date, trade price, underlying, exchange and
more.
Negative numbers are indicated by parentheses.
You can drill down into reports by clicking categories, essentially filtering the results as required; the current
active filters are always displayed at the top of the page and you can remove any individual filter by clicking
theX icon next the filter. Detailed tables show data for the following:
By Trade Date
By Trade Side
ByExchange
By Trade Size
By Trade Price
ByUnderlying
ByOrder Live Time in Seconds
ByOrder Type
ByAverage Delta
You can also view the details of each order in the Order Details table, which opens on a new page.
Account Management Users' Guide 169
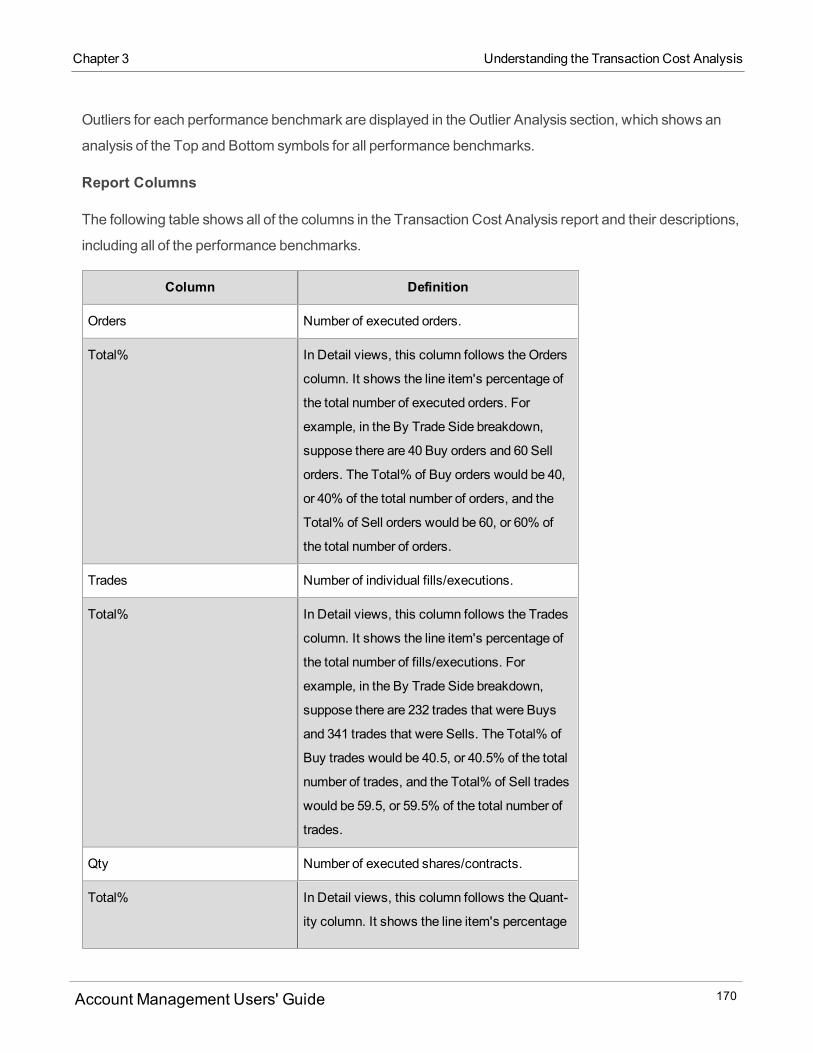
Outliers for each performance benchmark are displayed in the Outlier Analysis section, which shows an
analysis of the Top and Bottom symbols for all performance benchmarks.
Report Columns
The following table shows all of the columns in the Transaction Cost Analysis report and their descriptions,
including all of the performance benchmarks.
Column Definition
Orders Number of executed orders.
Total% In Detail views, this column follows the Orders
column. It shows the line item's percentage of
the total number of executed orders. For
example, in the By Trade Side breakdown,
suppose there are 40 Buy orders and 60 Sell
orders. The Total% of Buy orders would be 40,
or 40% of the total number of orders, and the
Total% of Sell orders would be 60, or 60% of
the total number of orders.
Trades Number of individual fills/executions.
Total% In Detail views, this column follows the Trades
column. It shows the line item's percentage of
the total number of fills/executions. For
example, in the By Trade Side breakdown,
suppose there are 232 trades that were Buys
and 341 trades that were Sells. The Total% of
Buy trades would be 40.5, or 40.5% of the total
number of trades, and the Total% of Sell trades
would be 59.5, or 59.5% of the total number of
trades.
Qty Number of executed shares/contracts.
Total% In Detail views, this column follows the Quant-
ity column. It shows the line item's percentage
Account Management Users' Guide 170
Chapter 3 Understanding the Transaction Cost Analysis
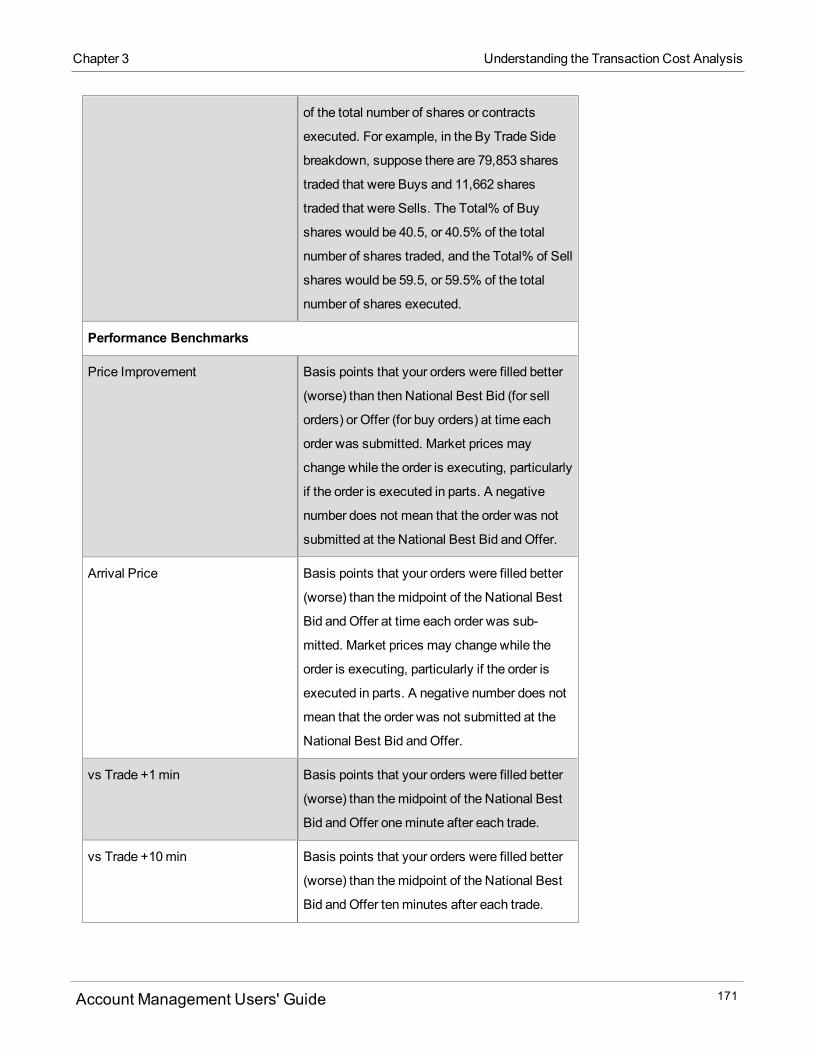
Chapter 3 Understanding the Transaction Cost Analysis
of the total number of shares or contracts
executed. For example, in the By Trade Side
breakdown, suppose there are 79,853 shares
traded that were Buys and 11,662 shares
traded that were Sells. The Total% of Buy
shares would be 40.5, or 40.5% of the total
number of shares traded, and the Total% of Sell
shares would be 59.5, or 59.5% of the total
number of shares executed.
Performance Benchmarks
Price Improvement Basis points that your orders were filled better
(worse) than then National Best Bid (for sell
orders) or Offer (for buy orders) at time each
order was submitted. Market prices may
change while the order is executing, particularly
if the order is executed in parts. A negative
number does not mean that the order was not
submitted at the National Best Bid andOffer.
Arrival Price Basis points that your orders were filled better
(worse) than themidpoint of the National Best
Bid andOffer at time each order was sub-
mitted. Market prices may change while the
order is executing, particularly if the order is
executed in parts. A negative number does not
mean that the order was not submitted at the
National Best Bid andOffer.
vs Trade +1min Basis points that your orders were filled better
(worse) than themidpoint of the National Best
Bid andOffer oneminute after each trade.
vs Trade +10min Basis points that your orders were filled better
(worse) than themidpoint of the National Best
Bid andOffer tenminutes after each trade.
Account Management Users' Guide 171
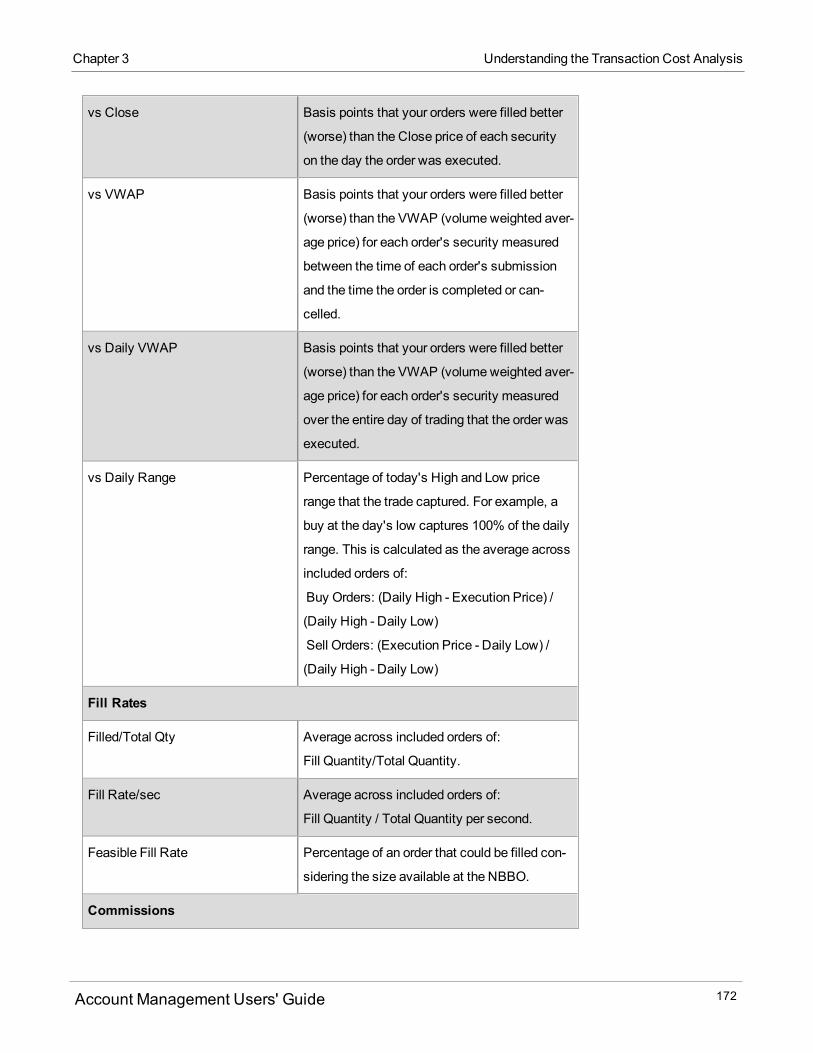
vs Close Basis points that your orders were filled better
(worse) than the Close price of each security
on the day the order was executed.
vs VWAP Basis points that your orders were filled better
(worse) than the VWAP (volumeweighted aver-
age price) for each order's security measured
between the time of each order's submission
and the time the order is completed or can-
celled.
vs Daily VWAP Basis points that your orders were filled better
(worse) than the VWAP (volumeweighted aver-
age price) for each order's security measured
over the entire day of trading that the order was
executed.
vs Daily Range Percentage of today's High and Low price
range that the trade captured. For example, a
buy at the day's low captures 100% of the daily
range. This is calculated as the average across
included orders of:
Buy Orders: (Daily High - Execution Price) /
(Daily High - Daily Low)
Sell Orders: (Execution Price - Daily Low) /
(Daily High - Daily Low)
Fill Rates
Filled/Total Qty Average across included orders of:
Fill Quantity/Total Quantity.
Fill Rate/sec Average across included orders of:
Fill Quantity / Total Quantity per second.
Feasible Fill Rate Percentage of an order that could be filled con-
sidering the size available at the NBBO.
Commissions
Account Management Users' Guide 172
Chapter 3 Understanding the Transaction Cost Analysis
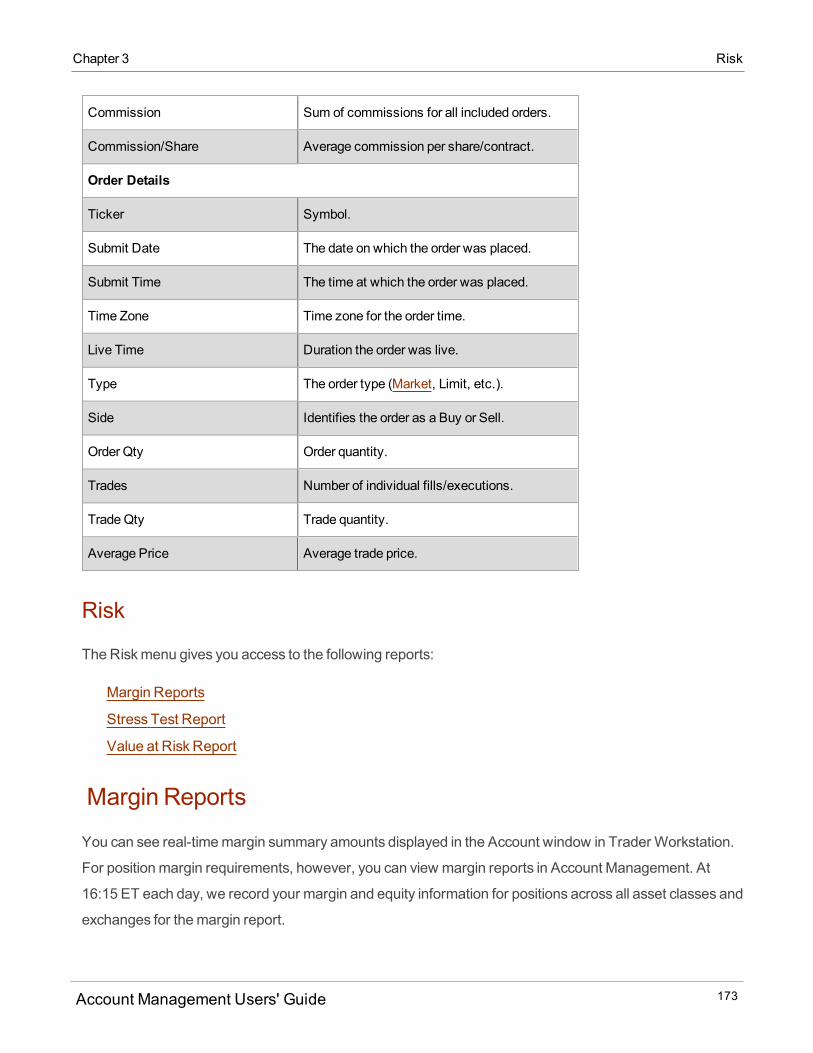
Chapter 3 Risk
Commission Sum of commissions for all included orders.
Commission/Share Average commission per share/contract.
Order Details
Ticker Symbol.
Submit Date The date on which the order was placed.
Submit Time The time at which the order was placed.
Time Zone Time zone for the order time.
Live Time Duration the order was live.
Type The order type (Market, Limit, etc.).
Side Identifies the order as a Buy or Sell.
Order Qty Order quantity.
Trades Number of individual fills/executions.
TradeQty Trade quantity.
Average Price Average trade price.
Risk
TheRiskmenu gives you access to the following reports:
Margin Reports
Stress Test Report
Value at Risk Report
Margin Reports
You can see real-timemargin summary amounts displayed in the Account window in Trader Workstation.
For positionmargin requirements, however, you can view margin reports in Account Management. At
16:15 ET each day, we record your margin and equity information for positions across all asset classes and
exchanges for themargin report.
Account Management Users' Guide 173
Margin reports show themargin requirements for all open single and combination positions. The report
displays Available Funds (to determine if you can put on a new trade) and Excess Liquidity (when excess is
depleted, you risk liquidation). Note that because information on your statements is displayed "as of" the
cut-off time for each individual exchange, the information in your margin report may be different from that
displayed on your statements.
Margin reports in Account Management are the only place where you can view themargin requirements
for combination/spread positions. Margin reports are available for the previous 180 days.
Who can access the Margin Reports page?
You can access this page if you are a(n):
Individual, Joint, Trust or IRA Account User
Small Business Account User
Friends and Family GroupMaster or Client User
Advisor Master User Individual
Advisor Master User Organization
Advisor Client User Individual
Advisor Client User Organization
Proprietary Trading GroupMaster User
Broker Master User (master account only)
Broker Fully Disclosed Client User
Broker Fully Disclosed Client User Organization
Investment Manager Master User
Fund
To generate a Margin report
1. ClickReports > Risk > Margin. TheMargin Reports page appears by default.
If you have amultiple account structure such as an institution account or multiple linked accounts,
use the Account Selector at the top of the page to select an account on which to report. To generate
aMargin report for a closed account, select the Include Closed Accounts check box, and thenselect the closed account.
Account Management Users' Guide 174
Chapter 3 Margin Reports

Chapter 3 Margin Reports
The Account Selector is closed once you select an account. To change the selected account, click
the tab to open the Account Selector, and then click a different account.
2. On theMargin Reports screen, make the following selections:
o In the Type field, selectDefault orCommodities Regulatory. The Commodities RegulatoryMar-
gin report breaks out domestic (US) and foreign cash/holdings for the Commodities segment of
your account (required by the CMEGroup). This type of margin report is available for any
accounts that trade futures or futures options.o In the Report Date field, select the date for the report.o In the Format field, select HTML/WEB, PDF or CSV (for a comma-separated values file).o In the Language field, select your language.
3. ClickView to generate the report.
If you selected PDF or CVS as the Format, you will be prompted to save the file to your computer.
You can expand and collapse each section of the report individually. Click the slate blue section
heading bar to expand a section, and click it again to collapse it.
The following figures show two views of a typical Margin report. The first figure shows the report with
all sections collapsed, while the second shows theMargin Detail section of the report expanded.
Account Management Users' Guide 175
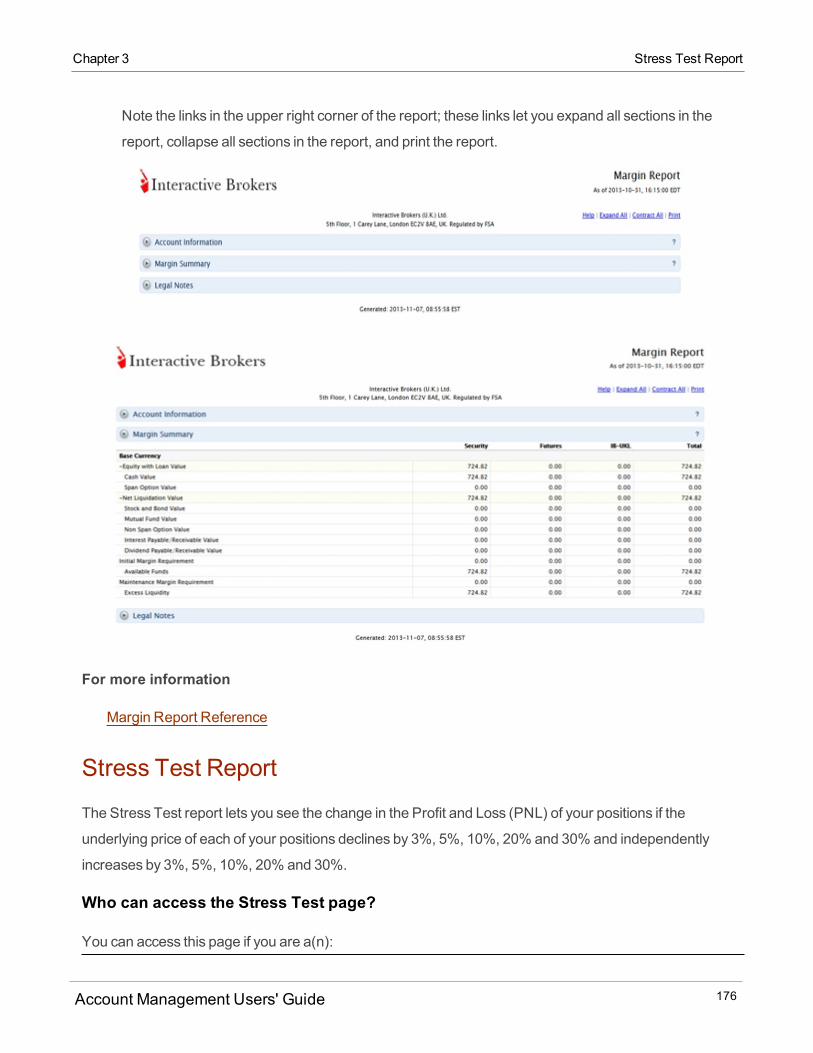
Note the links in the upper right corner of the report; these links let you expand all sections in the
report, collapse all sections in the report, and print the report.
For more information
Margin Report Reference
Stress Test Report
The Stress Test report lets you see the change in the Profit and Loss (PNL) of your positions if the
underlying price of each of your positions declines by 3%, 5%, 10%, 20% and 30% and independently
increases by 3%, 5%, 10%, 20% and 30%.
Who can access the Stress Test page?
You can access this page if you are a(n):
Account Management Users' Guide 176
Chapter 3 Stress Test Report
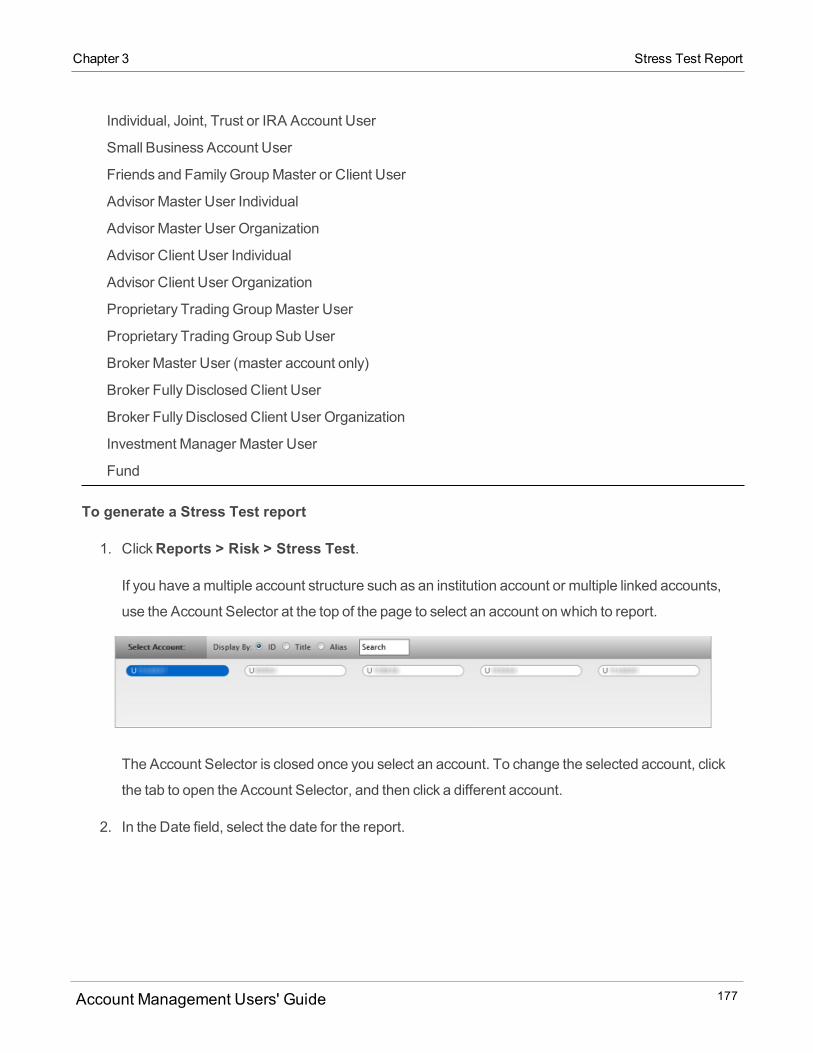
Chapter 3 Stress Test Report
Individual, Joint, Trust or IRA Account User
Small Business Account User
Friends and Family GroupMaster or Client User
Advisor Master User Individual
Advisor Master User Organization
Advisor Client User Individual
Advisor Client User Organization
Proprietary Trading GroupMaster User
Proprietary Trading Group SubUser
Broker Master User (master account only)
Broker Fully Disclosed Client User
Broker Fully Disclosed Client User Organization
Investment Manager Master User
Fund
To generate a Stress Test report
1. ClickReports > Risk > Stress Test.
If you have amultiple account structure such as an institution account or multiple linked accounts,
use the Account Selector at the top of the page to select an account on which to report.
The Account Selector is closed once you select an account. To change the selected account, click
the tab to open the Account Selector, and then click a different account.
2. In the Date field, select the date for the report.
Account Management Users' Guide 177
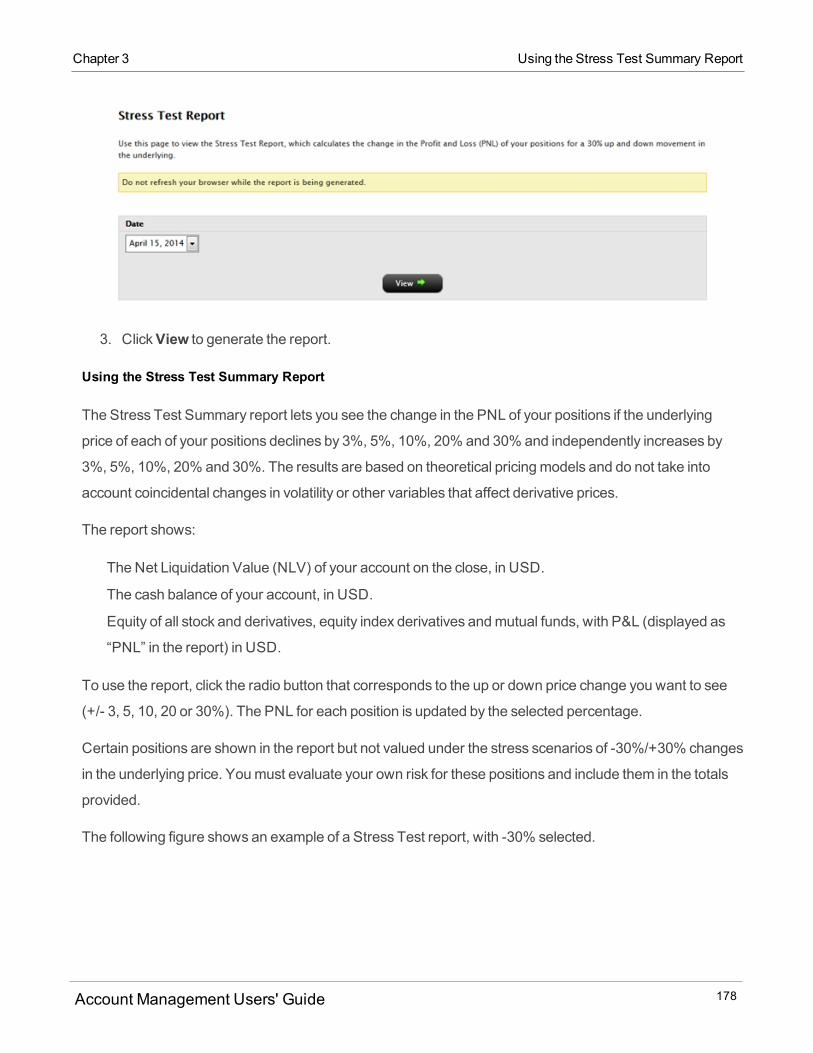
3. ClickView to generate the report.
Using the Stress Test Summary Report
The Stress Test Summary report lets you see the change in the PNL of your positions if the underlying
price of each of your positions declines by 3%, 5%, 10%, 20% and 30% and independently increases by
3%, 5%, 10%, 20% and 30%. The results are based on theoretical pricingmodels and do not take into
account coincidental changes in volatility or other variables that affect derivative prices.
The report shows:
The Net Liquidation Value (NLV) of your account on the close, in USD.
The cash balance of your account, in USD.
Equity of all stock and derivatives, equity index derivatives andmutual funds, with P&L (displayed as
“PNL” in the report) in USD.
To use the report, click the radio button that corresponds to the up or down price change you want to see
(+/- 3, 5, 10, 20 or 30%). The PNL for each position is updated by the selected percentage.
Certain positions are shown in the report but not valued under the stress scenarios of -30%/+30% changes
in the underlying price. Youmust evaluate your own risk for these positions and include them in the totals
provided.
The following figure shows an example of a Stress Test report, with -30% selected.
Account Management Users' Guide 178
Chapter 3 Using the Stress Test Summary Report
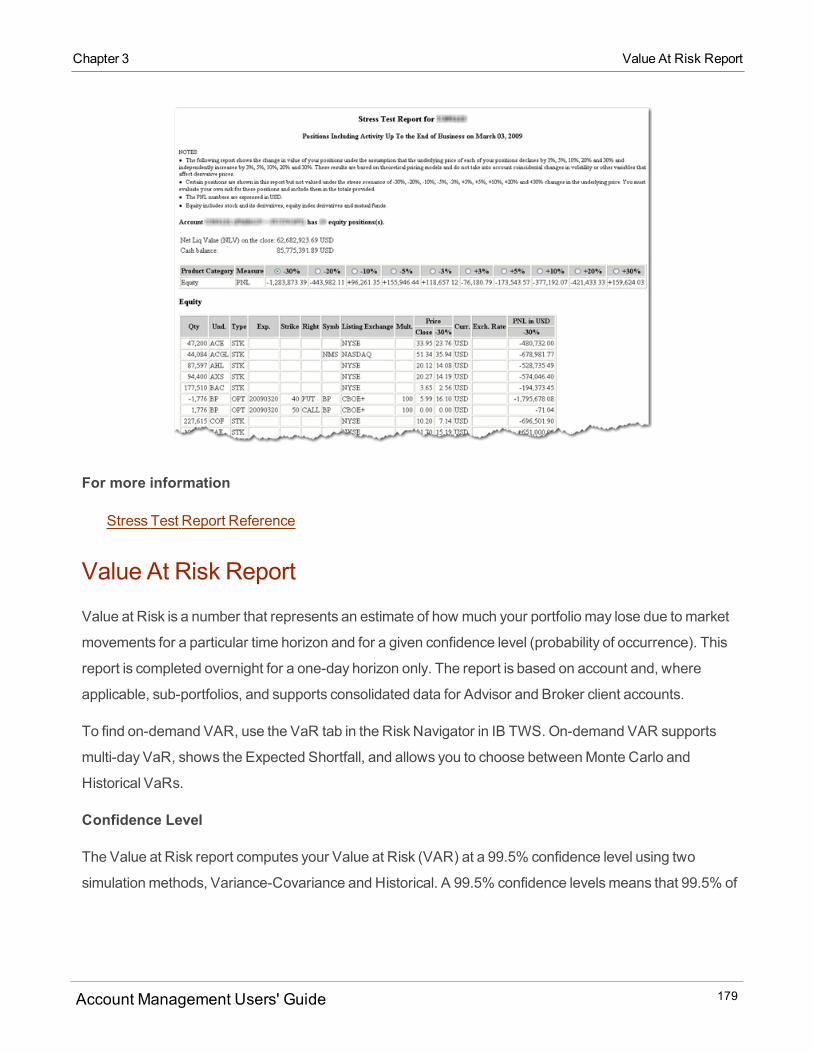
Chapter 3 Value At Risk Report
For more information
Stress Test Report Reference
Value At Risk Report
Value at Risk is a number that represents an estimate of how much your portfolio may lose due tomarket
movements for a particular time horizon and for a given confidence level (probability of occurrence). This
report is completed overnight for a one-day horizon only. The report is based on account and, where
applicable, sub-portfolios, and supports consolidated data for Advisor and Broker client accounts.
To find on-demand VAR, use the VaR tab in the Risk Navigator in IB TWS. On-demand VAR supports
multi-day VaR, shows the Expected Shortfall, and allows you to choose betweenMonte Carlo and
Historical VaRs.
Confidence Level
The Value at Risk report computes your Value at Risk (VAR) at a 99.5% confidence level using two
simulationmethods, Variance-Covariance and Historical. A 99.5% confidence levelsmeans that 99.5% of
Account Management Users' Guide 179
the time, your losseswill be lower than the VAR number (shown in this report as P/L), while 0.5% of the
time, your portfolio will experience greater losses.
Value At Risk Simulation
The Value at Risk report breaks your portfolio into sub-portfolios, each with exposure to a distinct set of risk
factors. These numbers are generated by simulating scenarios of risk factor movements (e.g. stock price,
FX rates, etc), using historical volatility and correlation experienced in the recent past.
For each symbol in a sub-portfolio and for each currency, we compute the simulated price, the percent
difference between the price and the simulated price, and themonetary difference between the simulated
value and the closing value. The simulations show themarket outcome that was found at the 99.5%
confidence level. Specifically, it shows the price of the underlying in that scenario, the percentage price
change versus the previous close and the P&L for the sub-portfolio (the underlying and its derivatives) that
results from that market outcome.
Who can access the Value At Risk Report page?
You can access this page if you are a(n):
Individual, Joint, Trust or IRA Account User
Small Business Account User
Friends and Family GroupMaster or Client User
Advisor Master User Individual
Advisor Master User Organization
Advisor Client User Individual
Advisor Client User Organization
Proprietary Trading GroupMaster User
Proprietary Trading Group SubUser
Broker Master User (master account only)
Broker Fully Disclosed Client User
Broker Fully Disclosed Client User Organization
Investment Manager Master User
Account Management Users' Guide 180
Chapter 3 Value At Risk Report
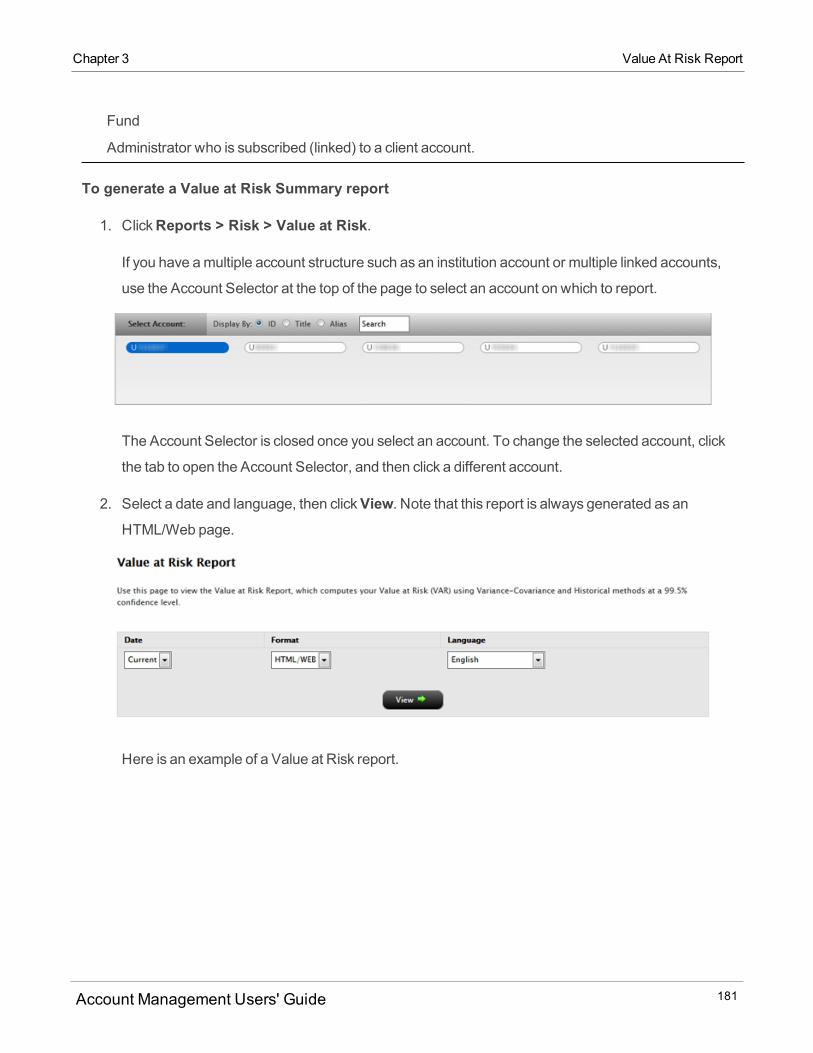
Chapter 3 Value At Risk Report
Fund
Administrator who is subscribed (linked) to a client account.
To generate a Value at Risk Summary report
1. ClickReports > Risk > Value at Risk.
If you have amultiple account structure such as an institution account or multiple linked accounts,
use the Account Selector at the top of the page to select an account on which to report.
The Account Selector is closed once you select an account. To change the selected account, click
the tab to open the Account Selector, and then click a different account.
2. Select a date and language, then clickView. Note that this report is always generated as anHTML/Web page.
Here is an example of a Value at Risk report.
Account Management Users' Guide 181
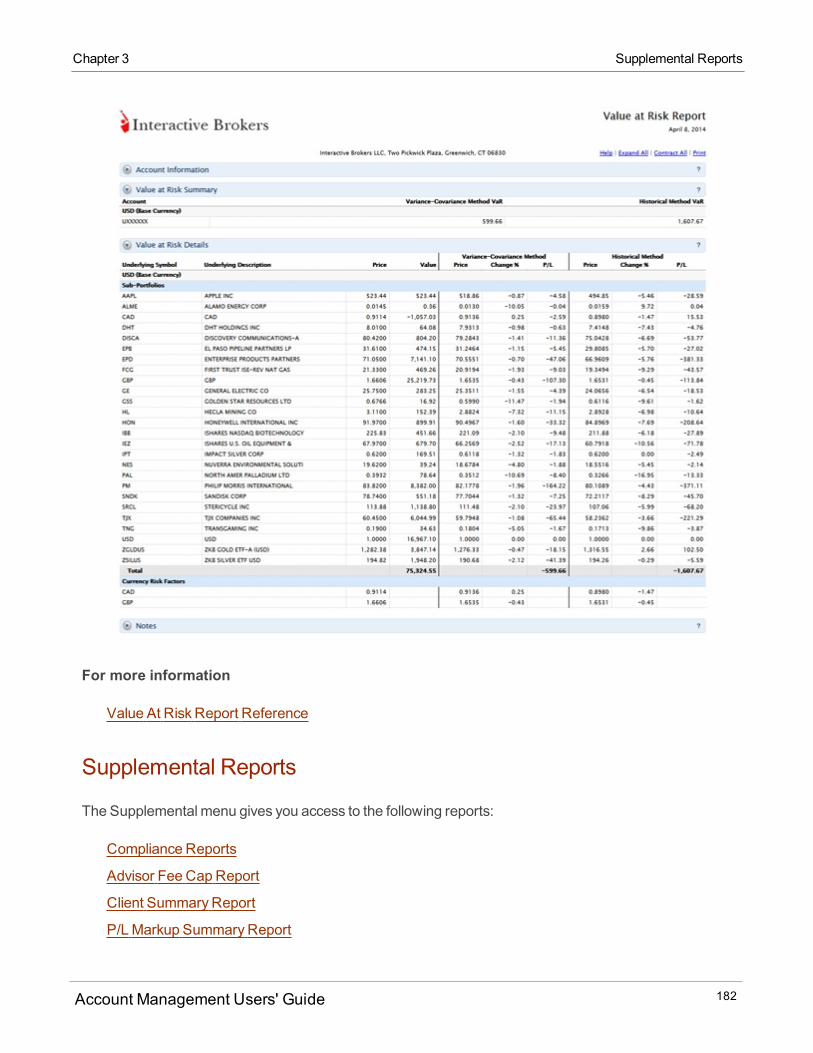
For more information
Value At Risk Report Reference
Supplemental Reports
The Supplemental menu gives you access to the following reports:
Compliance Reports
Advisor Fee CapReport
Client SummaryReport
P/LMarkup SummaryReport
Account Management Users' Guide 182
Chapter 3 Supplemental Reports
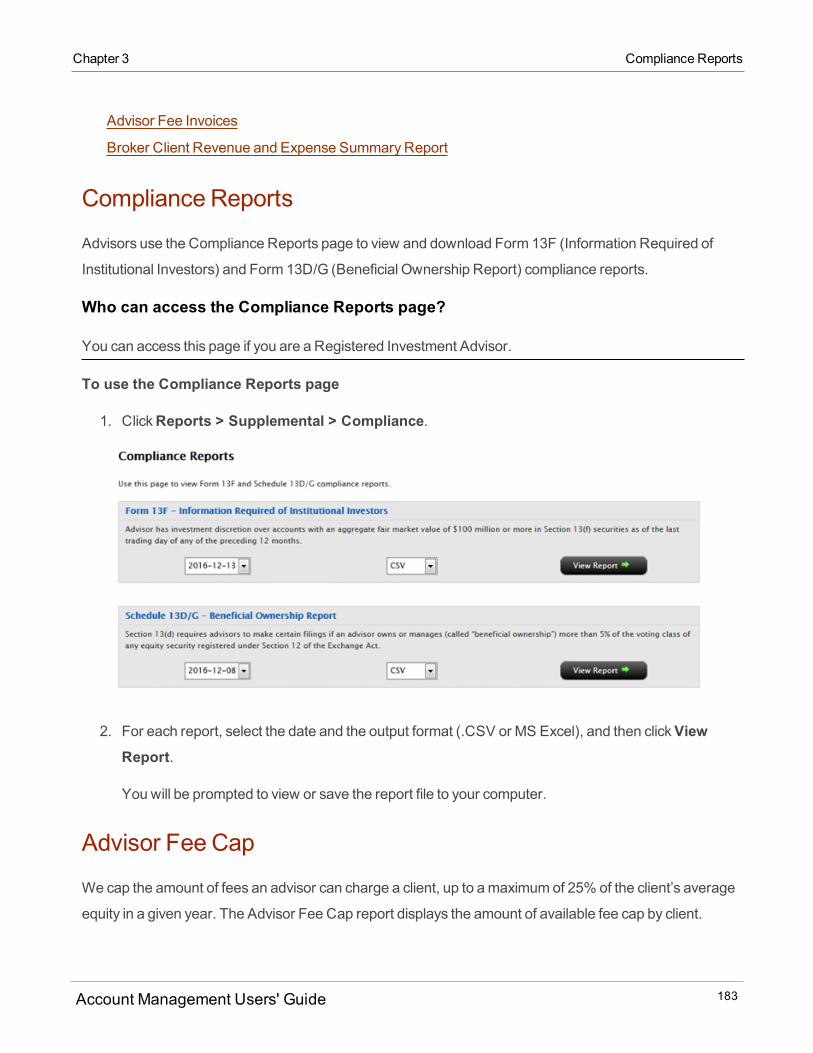
Chapter 3 Compliance Reports
Advisor Fee Invoices
Broker Client Revenue and Expense SummaryReport
Compliance Reports
Advisors use the Compliance Reports page to view and download Form 13F (Information Required of
Institutional Investors) and Form 13D/G (Beneficial Ownership Report) compliance reports.
Who can access the Compliance Reports page?
You can access this page if you are a Registered Investment Advisor.
To use the Compliance Reports page
1. ClickReports > Supplemental > Compliance.
2. For each report, select the date and the output format (.CSV or MS Excel), and then clickViewReport.
You will be prompted to view or save the report file to your computer.
Advisor Fee Cap
We cap the amount of fees an advisor can charge a client, up to amaximumof 25% of the client’s average
equity in a given year. The Advisor Fee Cap report displays the amount of available fee cap by client.
Account Management Users' Guide 183

Who can access the Advisor Fee Cap page?
You can access this page if you are a(n):
Advisor Master User Individual
Advisor Master User Organization
Advisor Client User Individual
Investment Manager Master User
To generate an advisor fee cap report
1. Click Reports > Supplemental > Fee Cap.
2. On the Advisor Fee Cap page, make the following selections:
In the Account(s) list, select the account for which you want to generate the report.
In the Date(s) field, select the date for the report.
In the Section(s) field, select ALL.
3. Click View to generate the report.
For more information
Advisor Client Markups
Advisor Fee CapReport Reference
Client Summary Report
Advisors, Brokers and Fund Investment Managers can run this snapshot of client balances and
performance over a one-day period. Because information on client’s statements is displayed “as of” the
Account Management Users' Guide 184
Chapter 3 Client Summary Report

Chapter 3 Client Summary Report
cut-off time for each individual exchange, it should be noted that information on your client summary report
may not equal information on your client’s statements.
Who can access the Client Summary page?
You can access this page if you are a(n):
Advisor Master Users
Advisor Client Users (Individuals) with Report Management access
Broker Master User
Fund Investment Manager
To generate a Client Summary report
1. ClickReports > Supplemental > Client Summary.
2. Make the following selections:
o In the Date field, select the date for the report.o In the Language field, select your language .
3. ClickView to generate the report.
For more information
Client SummaryReport Reference
Account Management Users' Guide 185
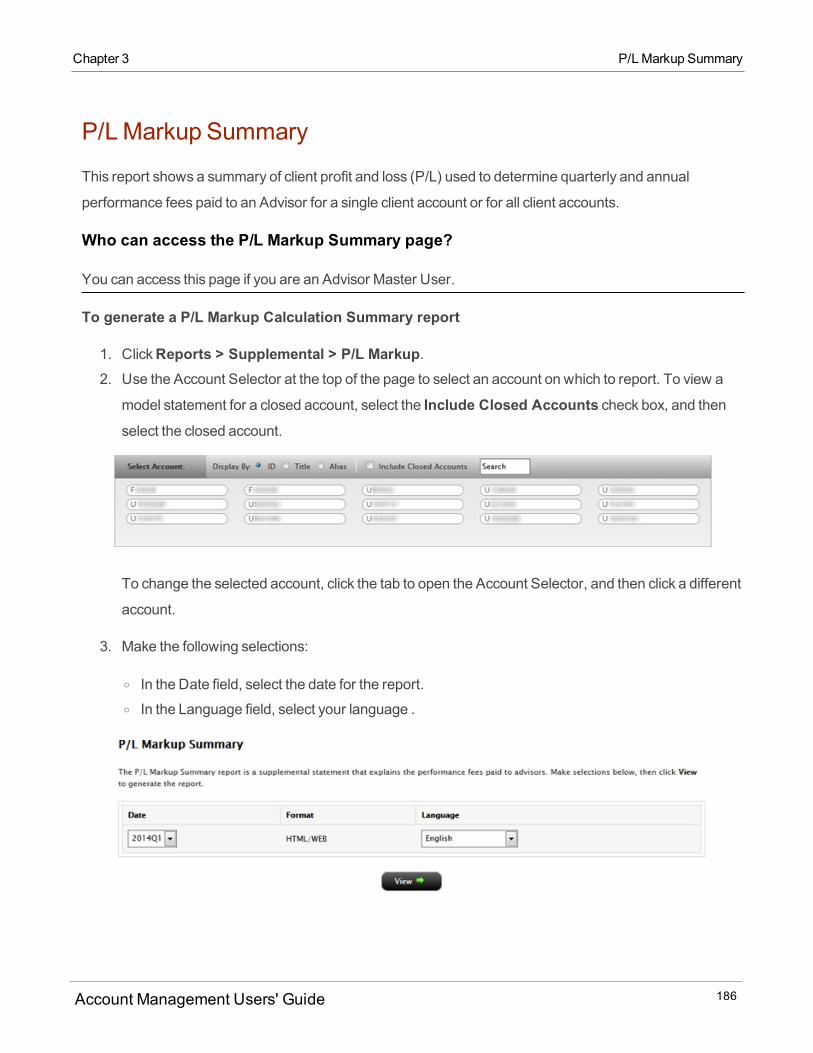
P/LMarkup Summary
This report shows a summary of client profit and loss (P/L) used to determine quarterly and annual
performance fees paid to an Advisor for a single client account or for all client accounts.
Who can access the P/L Markup Summary page?
You can access this page if you are an Advisor Master User.
To generate a P/L Markup Calculation Summary report
1. ClickReports > Supplemental > P/L Markup.2. Use the Account Selector at the top of the page to select an account on which to report. To view a
model statement for a closed account, select the Include Closed Accounts check box, and thenselect the closed account.
To change the selected account, click the tab to open the Account Selector, and then click a different
account.
3. Make the following selections:
o In the Date field, select the date for the report.o In the Language field, select your language .
Account Management Users' Guide 186
Chapter 3 P/LMarkup Summary

Chapter 3 Advisor Fee Invoices
4. ClickView to generate the report.
For more information
P/LMarkup SummaryReport Reference
Advisor Fee Invoices
Advisors use the Fee Invoices page to view fee invoices for specific clients and dates.
To view fee invoices:
1. ClickReports > Supplemental > Fee Invoice.2. Select an account from the Account Selector.
3. Select a date, and then clickView.The invoice for the selected account appears in a new browser tab or window.
Account Management Users' Guide 187

Broker Client Revenue and Expense Summary
Brokers run this report to view a snapshot of client daily, month-to-date and year-to-date expenses,
revenues, net revenue, grossmargin and aggregate client MTM.
Who can access the Broker Client Revenue and Expense Summary page?
You can access this page if you are a Broker Master.
To generate a Revenue and Expense Summary report
1. ClickReports > Supplemental > Client Revenue & Expense.
Account Management Users' Guide 188
Chapter 3 Broker Client Revenue and Expense Summary
Chapter 3 Tax
2. Make the following selections:
o In the Report Date field, select the date for the report.o In the Language field, select your language .
3. ClickView to generate the report
For more information
Broker Client Revenue and Expense SummaryReport Reference
Tax
The Taxmenu gives you access to the following pages:
TaxOptimizer
Tax Forms
Position Transfer Basis
ForexCost Basis
Tax Optimizer
Use the TaxOptimizer page to launch the TaxOptimizer Java-based application, which lets youmanage
your stock, option, bond, warrant and single-stock future gains and losses for tax purposes. Specifically,
the TaxOptimizer lets you select one of several tax lot-matching algorithms to:
Change the default tax lot-matchingmethod for your account.
Change the default tax lot-matchingmethod for the current or prior trading day.
Change the default tax lot-matchingmethod for a specific symbol for the current or prior trading day.
Run real-time "what if" scenarios that let you change the lot-matchingmethod on the fly to immediately
see the effect on your gains and losses.
Manuallymatch specific sales to open tax lots for the current or prior trading day.
Who can access the Tax Optimizer page?
All users can access the TaxOptimizer except Canadian customers, whose accounts are automatically
Account Management Users' Guide 189

assigned to our IB Canada (IB-CA) entity.
To run the Tax Optimizer
Youmust have the Java Runtime Environment minimum version 1.6 installed on your computer to be able
to run the TaxOptimizer.
1. ClickReports > Tax > Tax Optimizer.
2. Select either the current or prior trading day from the Trading Day drop-down.
3. ClickLaunch.4. You are prompted to open the file taxoptimizer.jnlp. Depending on your web browser, clickOpen or
OK to open the file.
The TaxOptimizer opens.
Account Management Users' Guide 190
Chapter 3 Tax Optimizer
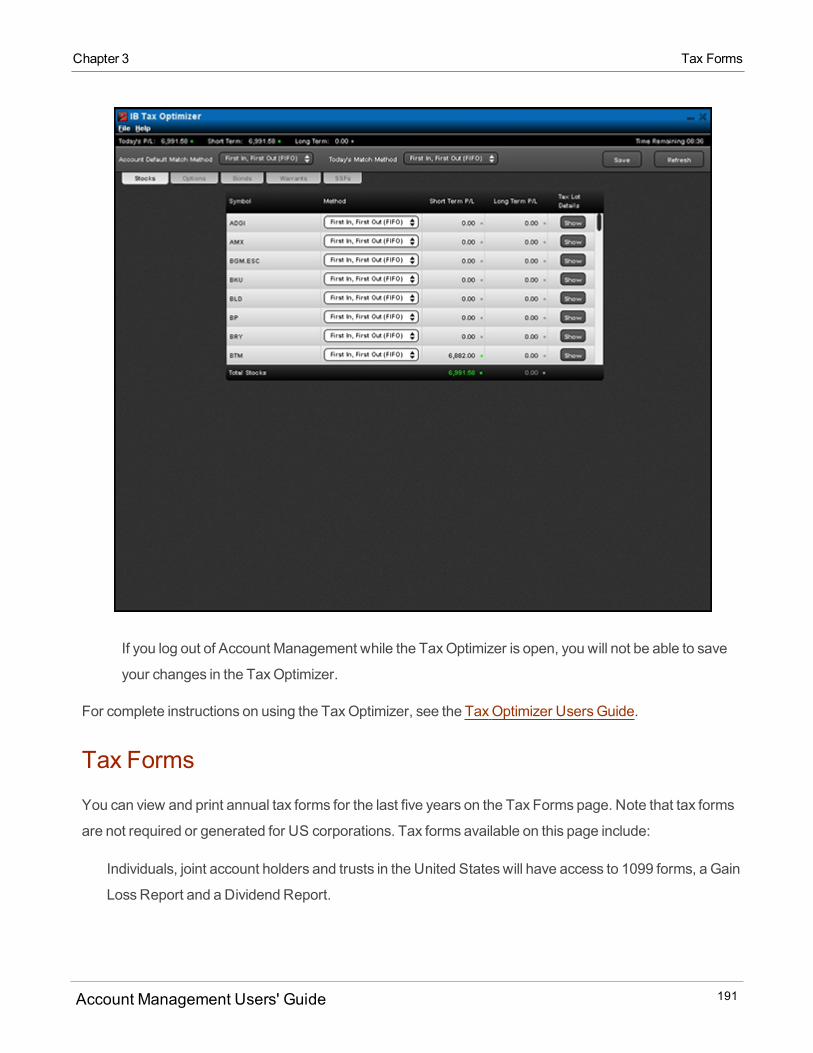
Chapter 3 Tax Forms
If you log out of Account Management while the TaxOptimizer is open, you will not be able to save
your changes in the TaxOptimizer.
For complete instructions on using the TaxOptimizer, see the TaxOptimizer UsersGuide.
Tax Forms
You can view and print annual tax forms for the last five years on the Tax Forms page. Note that tax forms
are not required or generated for US corporations. Tax forms available on this page include:
Individuals, joint account holders and trusts in the United States will have access to 1099 forms, a Gain
LossReport and a Dividend Report.
Account Management Users' Guide 191
Canadian individuals, primary joint account holders and trusts will have access to Forms T3, T5, and
T5008 aswell as a Dividend Report. Quebec residents will also receive a FormRL-3.
SomeCanadian accounts have two separate sets of 2013 tax forms that correspond to two separate
accounts, one open account and one closed account. We only display the set of tax forms for one of those
accounts on this page. To see the tax forms for your other account, use the Account Selector at the top of
this page as follows:
1. Click the tab to open the Account Selector.
2. Click the Include Closed Accounts check box to see your closed account.
3. Click the account in the Account Selector. The tax forms for that account will now appear on the page.
If you do not see the Account Selector, then you only have one set of tax forms.
Non-US and non-Canadian individuals, primary joint account holders and trusts will receive Forms
1042S aswell as a Dividend Report.
Who can access the Tax Forms page?
You can access this page if you are a(n):
Individual, Joint, Trust or IRA Account User
Small Business Account User
Friends and Family GroupMaster or Client User
Advisor Master User Individual
Advisor Master User Organization
Advisor Client User Individual
Advisor Client User Organization
Proprietary Trading GroupMaster User
Proprietary Trading Group SubUser
Broker Master User (master account only)
Broker Fully Disclosed Client User
Broker Fully Disclosed Client User Organization
Account Management Users' Guide 192
Chapter 3 Tax Forms
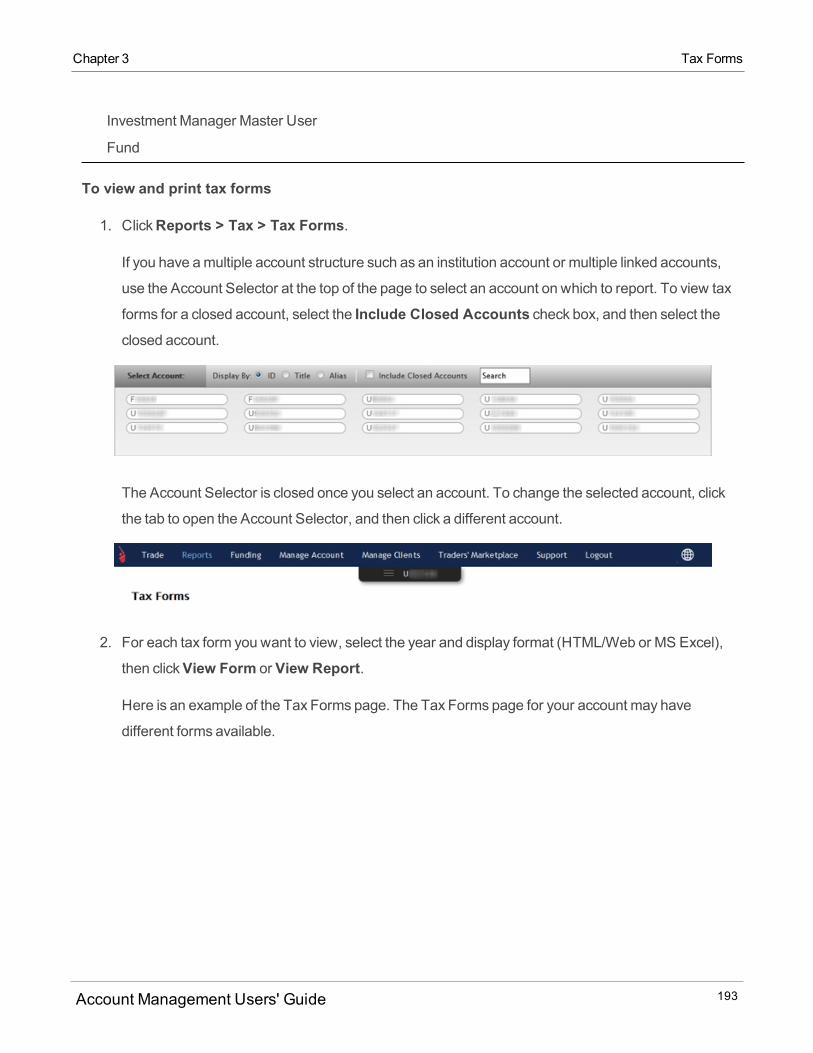
Chapter 3 Tax Forms
Investment Manager Master User
Fund
To view and print tax forms
1. ClickReports > Tax > Tax Forms.
If you have amultiple account structure such as an institution account or multiple linked accounts,
use the Account Selector at the top of the page to select an account on which to report. To view tax
forms for a closed account, select the Include Closed Accounts check box, and then select theclosed account.
The Account Selector is closed once you select an account. To change the selected account, click
the tab to open the Account Selector, and then click a different account.
2. For each tax form you want to view, select the year and display format (HTML/Web or MS Excel),
then clickView Form or View Report.
Here is an example of the Tax Forms page. The Tax Forms page for your account may have
different forms available.
Account Management Users' Guide 193
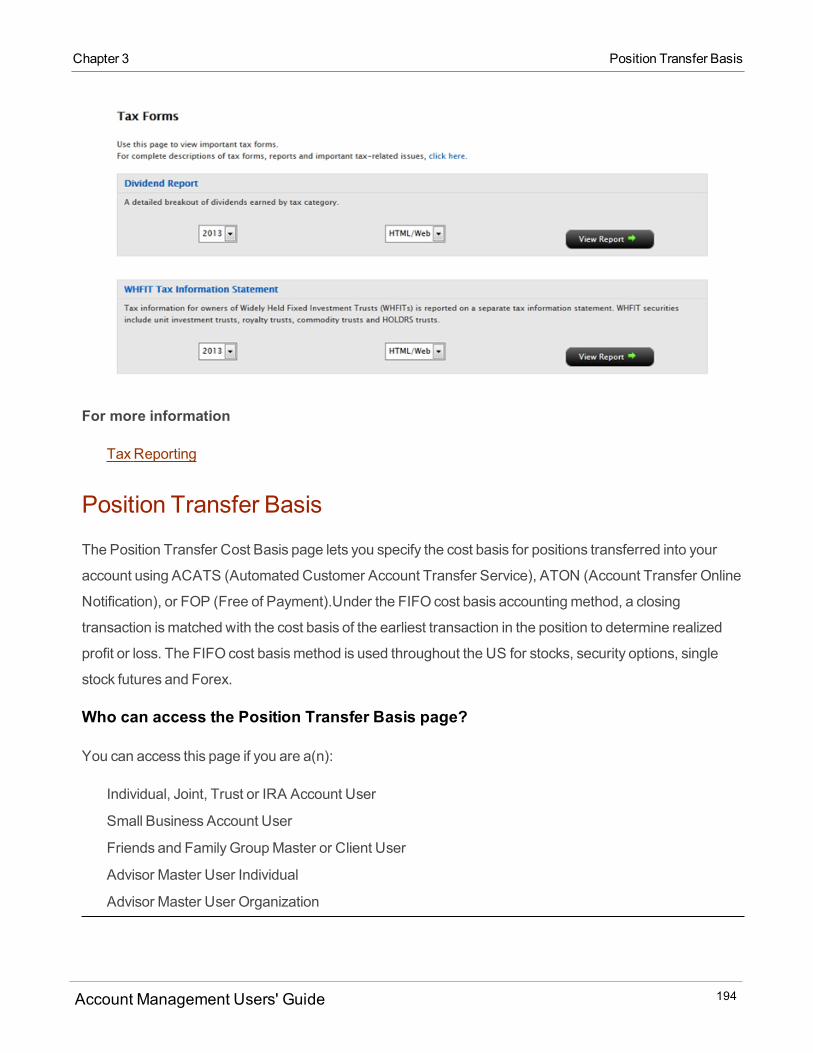
For more information
TaxReporting
Position Transfer Basis
The Position Transfer Cost Basis page lets you specify the cost basis for positions transferred into your
account using ACATS (Automated Customer Account Transfer Service), ATON (Account Transfer Online
Notification), or FOP (Free of Payment).Under the FIFO cost basis accountingmethod, a closing
transaction ismatched with the cost basis of the earliest transaction in the position to determine realized
profit or loss. The FIFO cost basismethod is used throughout the US for stocks, security options, single
stock futures and Forex.
Who can access the Position Transfer Basis page?
You can access this page if you are a(n):
Individual, Joint, Trust or IRA Account User
Small Business Account User
Friends and Family GroupMaster or Client User
Advisor Master User Individual
Advisor Master User Organization
Account Management Users' Guide 194
Chapter 3 Position Transfer Basis
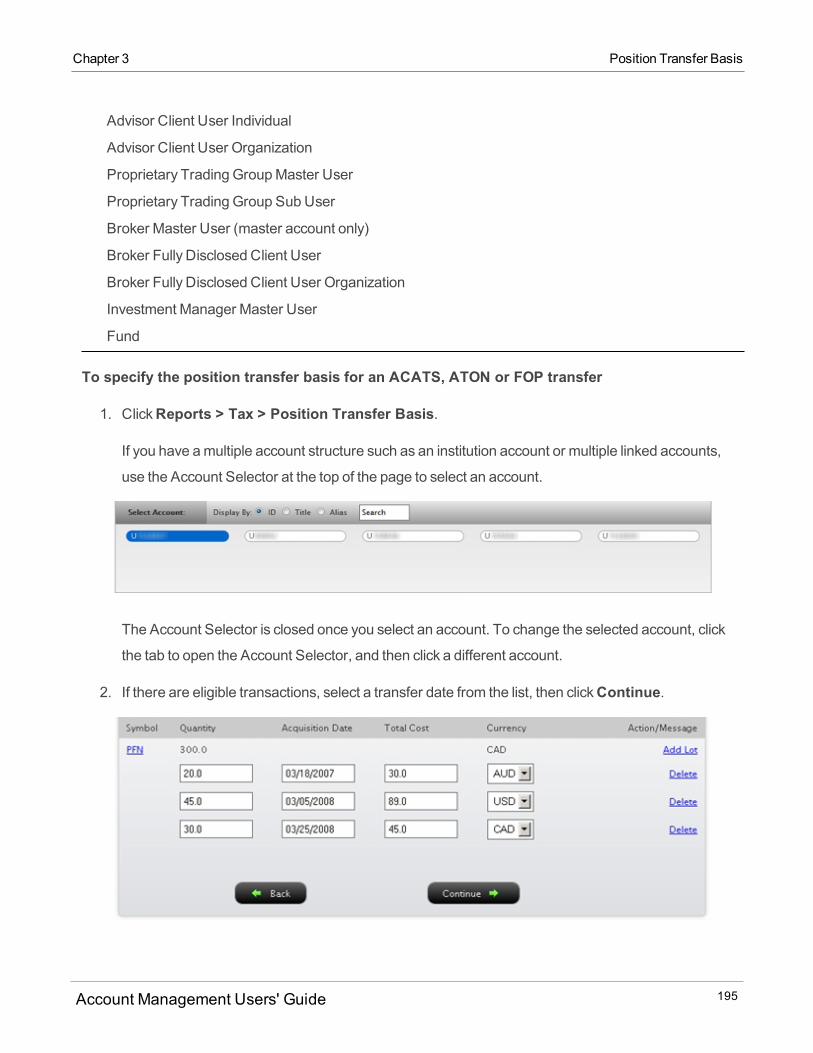
Chapter 3 Position Transfer Basis
Advisor Client User Individual
Advisor Client User Organization
Proprietary Trading GroupMaster User
Proprietary Trading Group SubUser
Broker Master User (master account only)
Broker Fully Disclosed Client User
Broker Fully Disclosed Client User Organization
Investment Manager Master User
Fund
To specify the position transfer basis for an ACATS, ATON or FOP transfer
1. ClickReports > Tax > Position Transfer Basis.
If you have amultiple account structure such as an institution account or multiple linked accounts,
use the Account Selector at the top of the page to select an account.
The Account Selector is closed once you select an account. To change the selected account, click
the tab to open the Account Selector, and then click a different account.
2. If there are eligible transactions, select a transfer date from the list, then clickContinue.
Account Management Users' Guide 195
3. Update the cost basis for your transfer:
o Enter the number of shares or contracts for the position in the Quantity field.o Enter the date of purchase for the position in the Date field.o Enter the total cost basis for the entire position in the Total Cost field.o Select a currency for the position. You can select the asset trading currency, your base currency
or USD. Available selectable currencies are the asset trading currency, your base currency and
USD. For new tax lots, the asset trading currency is the default currency. The asset trading cur-
rency is displayed on the symbol row. For old tax lots that may not have a currency, USD is the
default currency.o Optionally delete a tax lot by clicking the Delete link.
4. Click theEdit link to break the position intomultiple purchase dates and times.
5. ClickContinue to submit your cost basis update.
Forex Cost Basis
This page lets you update the cost basis for your Forex balances as of December 31, 2009.
Who Can Access the Forex Cost Basis Page?
You can access this page if you are a(n):
Individual, Joint, Trust or IRA Account User
Small Business Account User
Friends and FamilyMaster or Client User
Advisor Master User Individual
Advisor Master User Organization
Advisor Client User Individual
Advisor Client User Organization
Proprietary Trading GroupMaster User
Proprietary Trading Group SubUser
Broker Master User (master account only)
Broker Fully Disclosed Client User
Broker Fully Disclosed Client User Organization
Account Management Users' Guide 196
Chapter 3 Forex Cost Basis
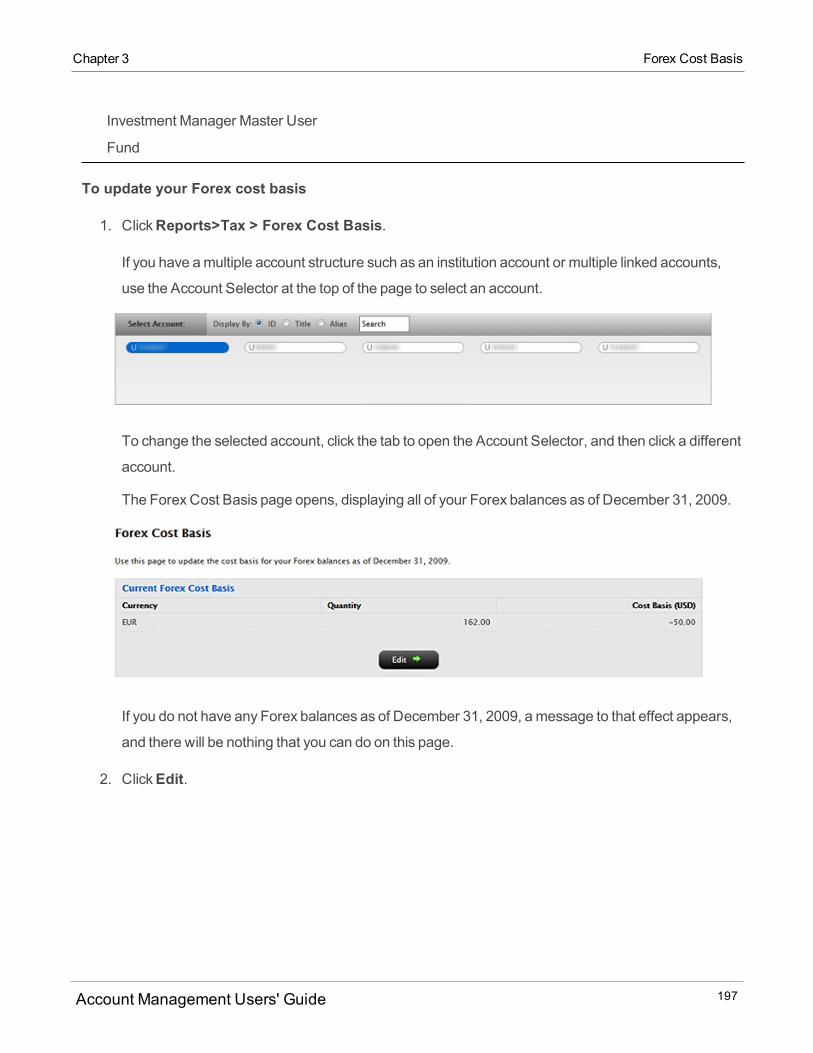
Chapter 3 Forex Cost Basis
Investment Manager Master User
Fund
To update your Forex cost basis
1. ClickReports>Tax > Forex Cost Basis.
If you have amultiple account structure such as an institution account or multiple linked accounts,
use the Account Selector at the top of the page to select an account.
To change the selected account, click the tab to open the Account Selector, and then click a different
account.
The ForexCost Basis page opens, displaying all of your Forex balances as of December 31, 2009.
If you do not have any Forex balances as of December 31, 2009, amessage to that effect appears,
and there will be nothing that you can do on this page.
2. ClickEdit.
Account Management Users' Guide 197
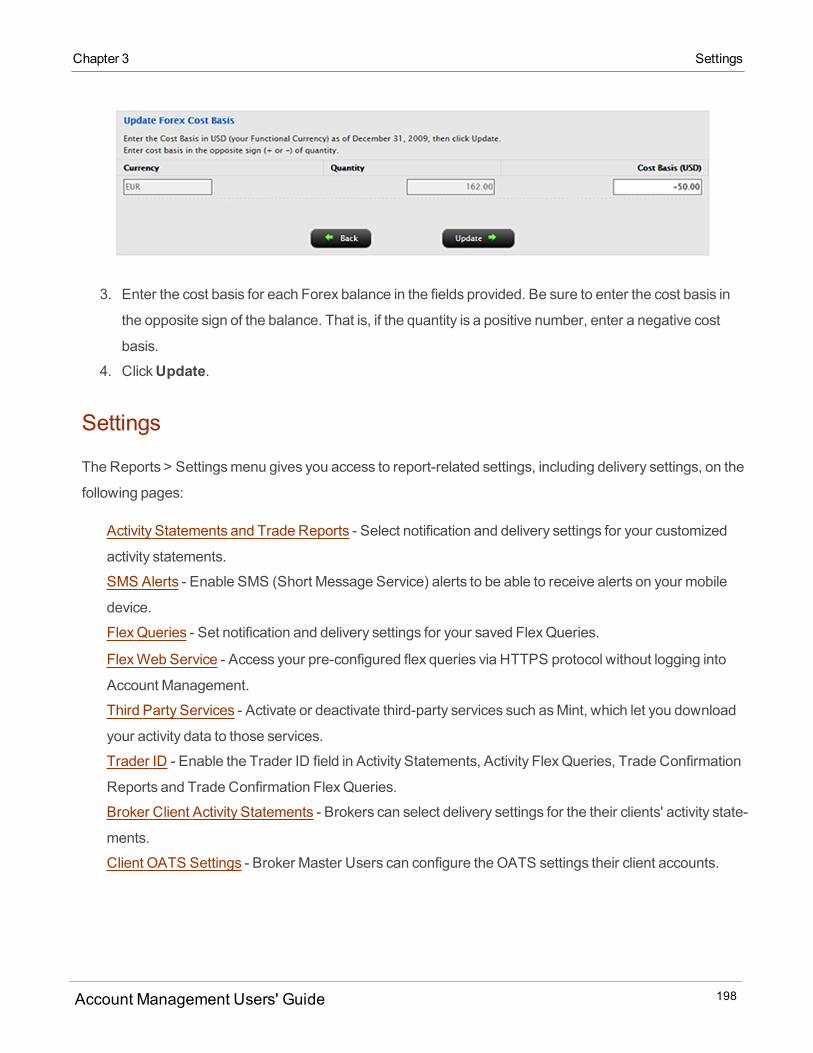
3. Enter the cost basis for each Forex balance in the fields provided. Be sure to enter the cost basis in
the opposite sign of the balance. That is, if the quantity is a positive number, enter a negative cost
basis.
4. ClickUpdate.
Settings
TheReports > Settingsmenu gives you access to report-related settings, including delivery settings, on the
following pages:
Activity Statements and Trade Reports - Select notification and delivery settings for your customized
activity statements.
SMS Alerts - Enable SMS (Short Message Service) alerts to be able to receive alerts on your mobile
device.
FlexQueries - Set notification and delivery settings for your saved FlexQueries.
FlexWeb Service - Access your pre-configured flex queries via HTTPS protocol without logging into
Account Management.
Third Party Services - Activate or deactivate third-party services such asMint, which let you download
your activity data to those services.
Trader ID - Enable the Trader ID field in Activity Statements, Activity FlexQueries, Trade Confirmation
Reports and Trade Confirmation FlexQueries.
Broker Client Activity Statements - Brokers can select delivery settings for the their clients' activity state-
ments.
Client OATS Settings - Broker Master Users can configure the OATS settings their client accounts.
Account Management Users' Guide 198
Chapter 3 Settings
Chapter 3 Delivery
Delivery
TheReport > Settings > Deliverymenu contains the following pages:
Activity Statements and Trade Reports - Select notification and delivery settings for your customized
activity statements.
SMS Alerts - Enable SMS (Short Message Service) alerts to be able to receive alerts on your mobile
device.
FlexQueries - Set notification and delivery settings for your saved FlexQueries.
PortfolioAnalyst - Configure delivery settings for your PortfolioAnalyst reports.
Broker Client Activity Statements - Brokers can select delivery settings for the their clients' activity state-
ments.
Delivery Settings for Activity Statements and Trade
Reports
The Activity Statements and Trade Reports page lets you set up notification preferences for daily and
monthly Activity Statements and for Daily Trade Reports, and specify your preferred deliverymethod for
your customized Activity Statements. Non-disclosed Broker Masters can also specify delivery settings for
client statements.
Additional Guidelines
Notifications are delivered only when there is trading activity.
In multi-account structures (for example, Registered Advisors, Fully Disclosed Brokers or Non-dis-
closed Brokers), these notifications are for themaster account only. They are not consolidated across
all client accounts.
Using a Registered Advisor as an example, the daily Activity Statement or Daily Trade Report would
only be delivered to themaster account user if there were trade allocations. The daily Activity State-
ment or Daily Trade Report would not be delivered to a Fully Disclosed or Non-disclosed Broker
Master.
Multi-account structures looking to receive daily or monthly statements on a consolidated basis should
set up a customized activity statement for themaster account user.
Account Management Users' Guide 199
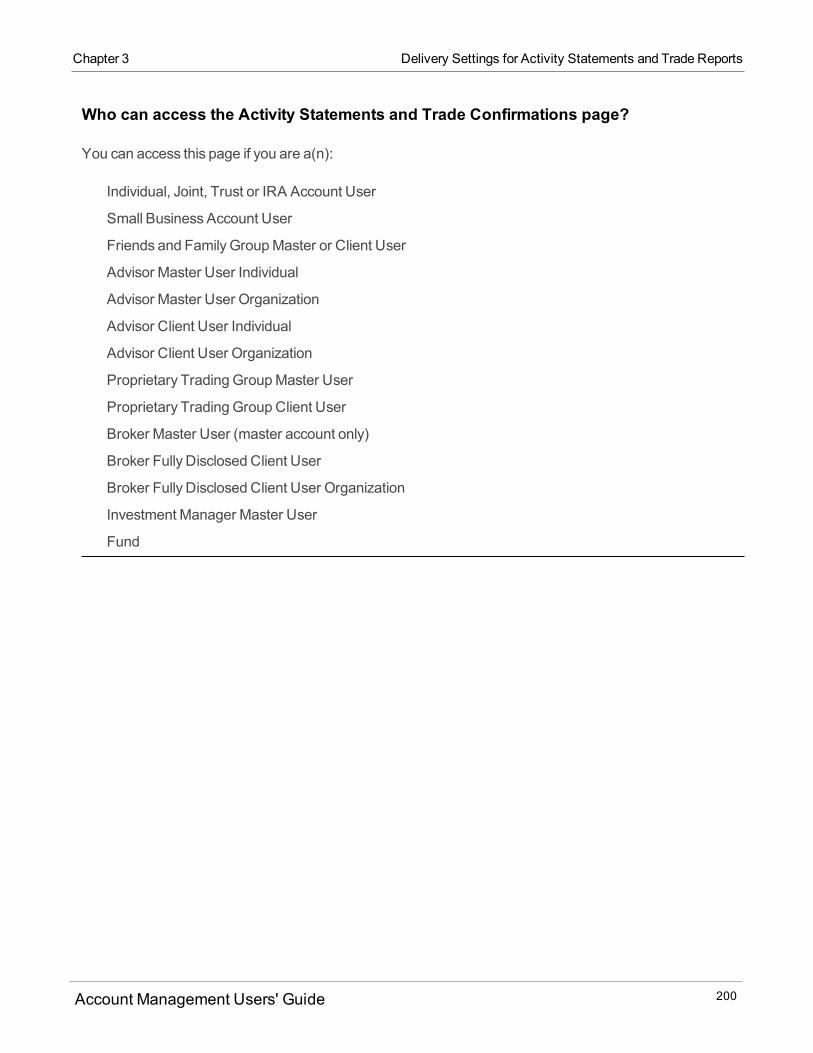
Who can access the Activity Statements and Trade Confirmations page?
You can access this page if you are a(n):
Individual, Joint, Trust or IRA Account User
Small Business Account User
Friends and Family GroupMaster or Client User
Advisor Master User Individual
Advisor Master User Organization
Advisor Client User Individual
Advisor Client User Organization
Proprietary Trading GroupMaster User
Proprietary Trading Group Client User
Broker Master User (master account only)
Broker Fully Disclosed Client User
Broker Fully Disclosed Client User Organization
Investment Manager Master User
Fund
Account Management Users' Guide 200
Chapter 3 Delivery Settings for Activity Statements and Trade Reports
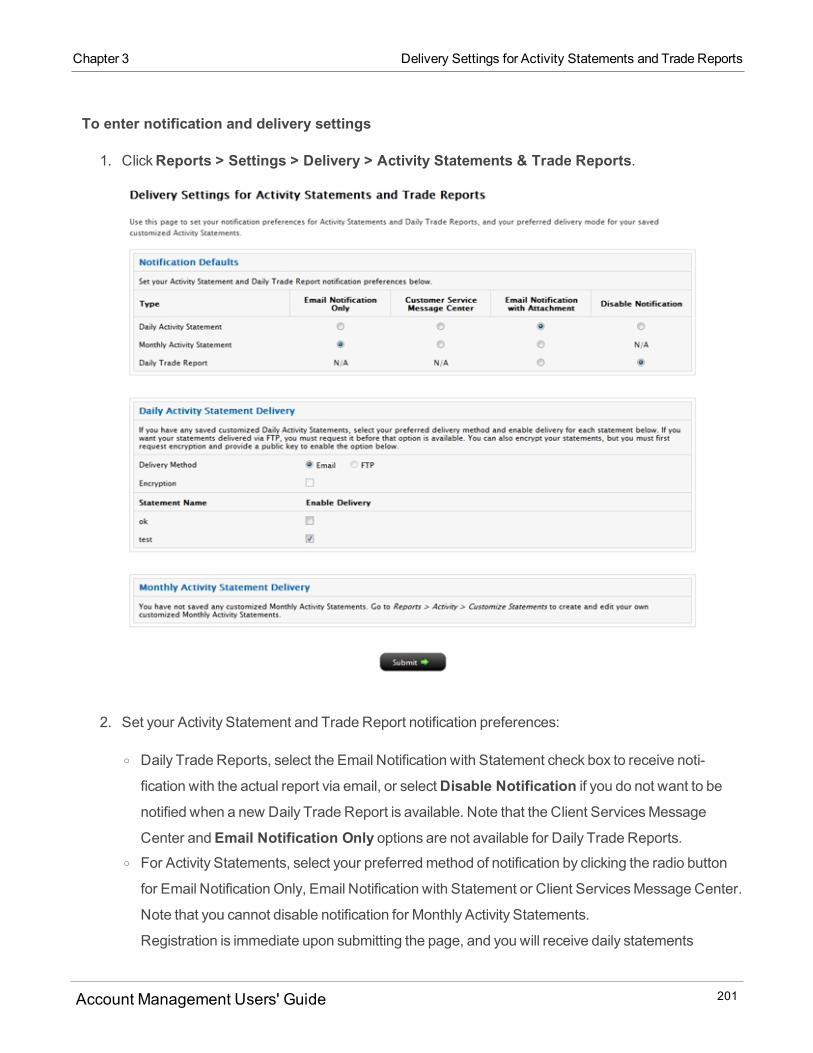
Chapter 3 Delivery Settings for Activity Statements and Trade Reports
To enter notification and delivery settings
1. ClickReports > Settings > Delivery > Activity Statements & Trade Reports.
2. Set your Activity Statement and Trade Report notification preferences:
o Daily Trade Reports, select the Email Notification with Statement check box to receive noti-
fication with the actual report via email, or selectDisable Notification if you do not want to benotified when a new Daily Trade Report is available. Note that the Client ServicesMessage
Center andEmail Notification Only options are not available for Daily Trade Reports.o For Activity Statements, select your preferredmethod of notification by clicking the radio button
for Email Notification Only, Email Notification with Statement or Client ServicesMessage Center.
Note that you cannot disable notification for Monthly Activity Statements.
Registration is immediate upon submitting the page, and you will receive daily statements
Account Management Users' Guide 201
beginning the next business day, andmonthly statements within the first week following the end
of themonth.
3. Select your preferred deliverymethod and enable delivery for each customized statement that you
have created.
o SelectEmail or FTP as the DeliveryMode.o Click theEncryption check box to encrypt your statements.
Youmust request FTP delivery and Encryption to enable those options. Contact your Sales
Representative tomake these requests.
o For each statement listed, click theEnable Delivery check box to enable delivery using the selec-ted deliverymode.
Although email and FTP deliverymethods are available, we recommend that Advisors and Brokers
choose FTP as their deliverymethod for customized statements with ALL accounts selected on the
Activity Statements page. Advisors and Brokers who select email as the deliverymethod for
customized statements with ALL accounts selected will get an emailed statement for each client or
sub account.
4. If you are a Broker Master with non-disclosed clients, specify delivery settings for your client
accounts in the Statement Delivery section:
o FTP is the default DeliveryMode. Youmust send a request to us to enable FTP delivery.
Files delivered to the FTP site are removed after 100 days.
o Select a language from the Language drop-down.
While we use English as the default language for Activity Statements for legal purposes, you
have the option of selecting a different language. If you select a different language, we will
provide statements in two languages, English, and your selected language.o Select theEnable Delivery check box to enable delivery of Daily andMonthly Client ActivityStatements to theMaster account. Daily statements are delivered only when there is activity in
the client account.
Account Management Users' Guide 202
Chapter 3 Delivery Settings for Activity Statements and Trade Reports

Chapter 3 SMS Alerts
5. ClickSubmit.
SMS Alerts
This page lets you enable delivery of alerts via SMS (Short Message Service) on your mobile device. This
option is only available if you have set up a valid SMS address on the Alert Notification page.
Who can access the SMS Alerts page?
You can access this page if you are a(n):
Individual, Joint, Trust or IRA Account User
Small Business Account User
Friends and Family GroupMaster or Client User
Advisor Master User Individual
Advisor Master User Organization
Advisor Client User Individual
Advisor Client User Organization
Proprietary Trading GroupMaster User
Proprietary Trading Group Client User
Broker Master User (master account only)
Broker Fully Disclosed Client User
Broker Fully Disclosed Client User Organization
Investment Manager Master User
Fund
To enable delivery of SMS alerts
1. ClickReports > Settings > Delivery > SMS Alerts.
Account Management Users' Guide 203
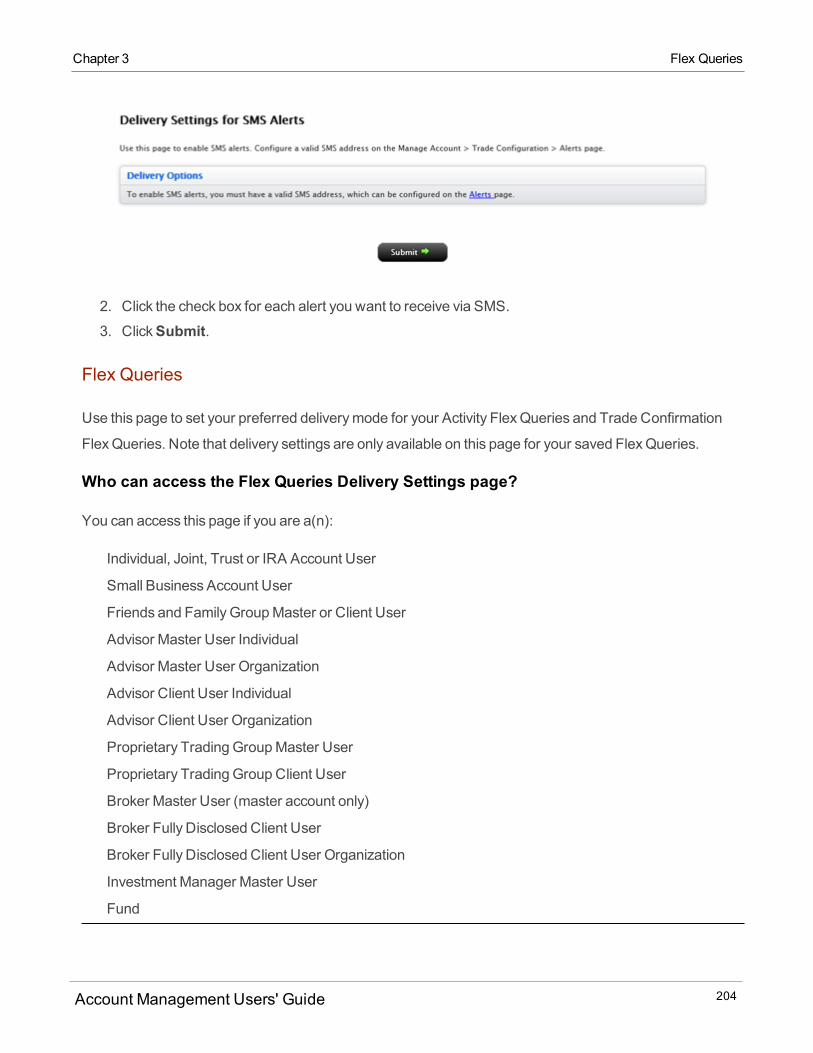
2. Click the check box for each alert you want to receive via SMS.
3. ClickSubmit.
Flex Queries
Use this page to set your preferred deliverymode for your Activity FlexQueries and Trade Confirmation
FlexQueries. Note that delivery settings are only available on this page for your saved FlexQueries.
Who can access the Flex Queries Delivery Settings page?
You can access this page if you are a(n):
Individual, Joint, Trust or IRA Account User
Small Business Account User
Friends and Family GroupMaster or Client User
Advisor Master User Individual
Advisor Master User Organization
Advisor Client User Individual
Advisor Client User Organization
Proprietary Trading GroupMaster User
Proprietary Trading Group Client User
Broker Master User (master account only)
Broker Fully Disclosed Client User
Broker Fully Disclosed Client User Organization
Investment Manager Master User
Fund
Account Management Users' Guide 204
Chapter 3 Flex Queries
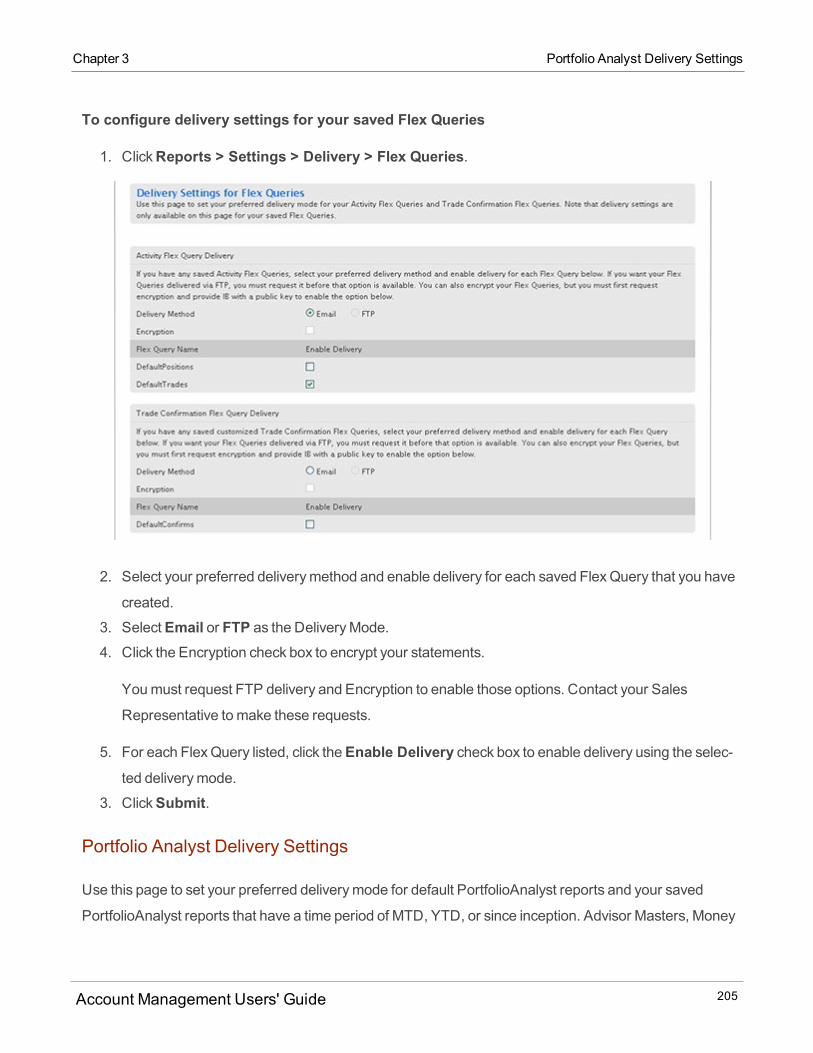
Chapter 3 Portfolio Analyst Delivery Settings
To configure delivery settings for your saved Flex Queries
1. ClickReports > Settings > Delivery > Flex Queries.
2. Select your preferred deliverymethod and enable delivery for each saved FlexQuery that you have
created.
3. SelectEmail or FTP as the DeliveryMode.4. Click the Encryption check box to encrypt your statements.
Youmust request FTP delivery and Encryption to enable those options. Contact your Sales
Representative tomake these requests.
5. For each FlexQuery listed, click theEnable Delivery check box to enable delivery using the selec-ted deliverymode.
3. ClickSubmit.
Portfolio Analyst Delivery Settings
Use this page to set your preferred deliverymode for default PortfolioAnalyst reports and your saved
PortfolioAnalyst reports that have a time period of MTD, YTD, or since inception. Advisor Masters, Money
Account Management Users' Guide 205

Managers and Broker Masters can set their preferred deliverymode for consolidated default reports and
their own saved consolidated reports with YTD andMTD time periods.
Selected reports are delivered as follows:
Time Period of ReportDelivery
Frequency
MTD Daily
YTD Daily
Since Inception Daily
Default Consolidated Reports
30 Day Consolidated Daily
1 Quarter Consolidated Quarterly
12Month Consolidated Monthly
Who can access the PortfolioAnalyst Delivery Settings page?
You can access this page if you are a(n):
Individual, Joint, Trust or IRA Account User
Small Business Account User
Friends and Family GroupMaster or Client User
Advisor Master User Individual
Advisor Master User Organization
Advisor Client User Individual
Advisor Client User Organization
Proprietary Trading GroupMaster User
Proprietary Trading Group SubUser
Broker Master User (master account only)
Broker Fully Disclosed Client User
Account Management Users' Guide 206
Chapter 3 Portfolio Analyst Delivery Settings

Chapter 3 Portfolio Analyst Delivery Settings
Broker Fully Disclosed Client User Organization
Broker Non-Disclosed Client User
Investment Manager Master User
Fund
and you have been granted Reporting access rights.
To configure delivery settings for PortfolioAnalyst
1. ClickReports > Settings > Delivery > PortfolioAnalyst.
The Delivery Settings for PortfolioAnalyst page opens.
2. Select your preferred deliverymethod and enable delivery for each PortfolioAnalyst report listed on
the page.
Account Management Users' Guide 207
o SelectEmail or FTP as the DeliveryMethod.o Click theEncryption check box to encrypt your statements.
Youmust request FTP delivery and Encryption to enable those options. Contact your Sales
Representative tomake these requests.
o For each report listed, click the check box to enable delivery using the selected deliverymode.
3. ClickSubmit.
Broker Client Activity Statements
If you are a Broker Master with non-disclosed clients, you can specify delivery settings for your clients'
statements on the Delivery Settings for Broker Client Activity Statements page.
You can specify these delivery settings:
Enable FTP delivery of daily andmonthly client activity statements. Daily statements are delivered only
when there is activity in the client account.
Select a language other than English.
Who can access the Delivery Settings for Broker Client Activity Statements page?
You can access this page if you are a Non-Disclosed Broker Master User.
To specify delivery settings
1. FTP is the default deliverymethod for broker client activity statements. Youmust send a request to
us to enable FTP delivery. To do this, clickSupport, then create a ticket in theMessage Center tosend your request to us.
2. When FTP delivery has been enabled, log into Account Management, then clickReports > Set-tings > Broker Client Activity Statements.
The Delivery Settings for Broker Client Activity Statements page opens.
Account Management Users' Guide 208
Chapter 3 Broker Client Activity Statements
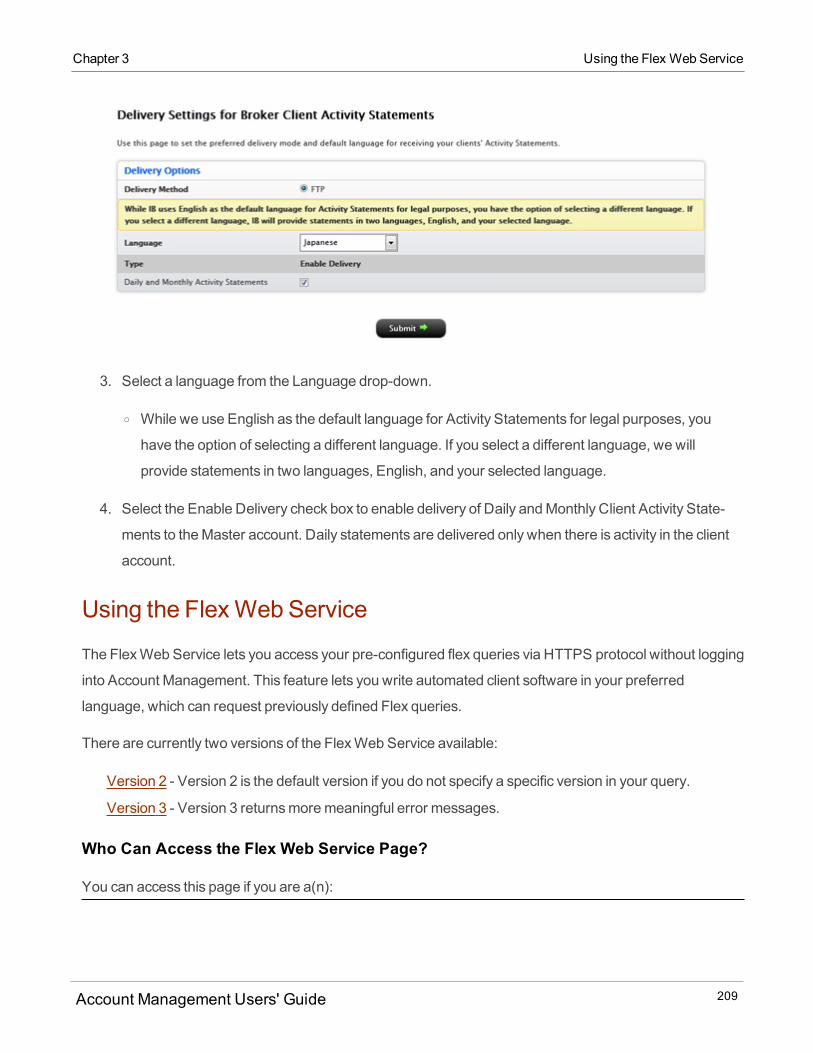
Chapter 3 Using the Flex Web Service
3. Select a language from the Language drop-down.
o While we use English as the default language for Activity Statements for legal purposes, you
have the option of selecting a different language. If you select a different language, we will
provide statements in two languages, English, and your selected language.
4. Select the Enable Delivery check box to enable delivery of Daily andMonthly Client Activity State-
ments to theMaster account. Daily statements are delivered only when there is activity in the client
account.
Using the FlexWeb Service
The FlexWeb Service lets you access your pre-configured flex queries via HTTPS protocol without logging
into Account Management. This feature lets you write automated client software in your preferred
language, which can request previously defined Flex queries.
There are currently two versions of the FlexWeb Service available:
Version 2 - Version 2 is the default version if you do not specify a specific version in your query.
Version 3 - Version 3 returnsmoremeaningful error messages.
Who Can Access the Flex Web Service Page?
You can access this page if you are a(n):
Account Management Users' Guide 209
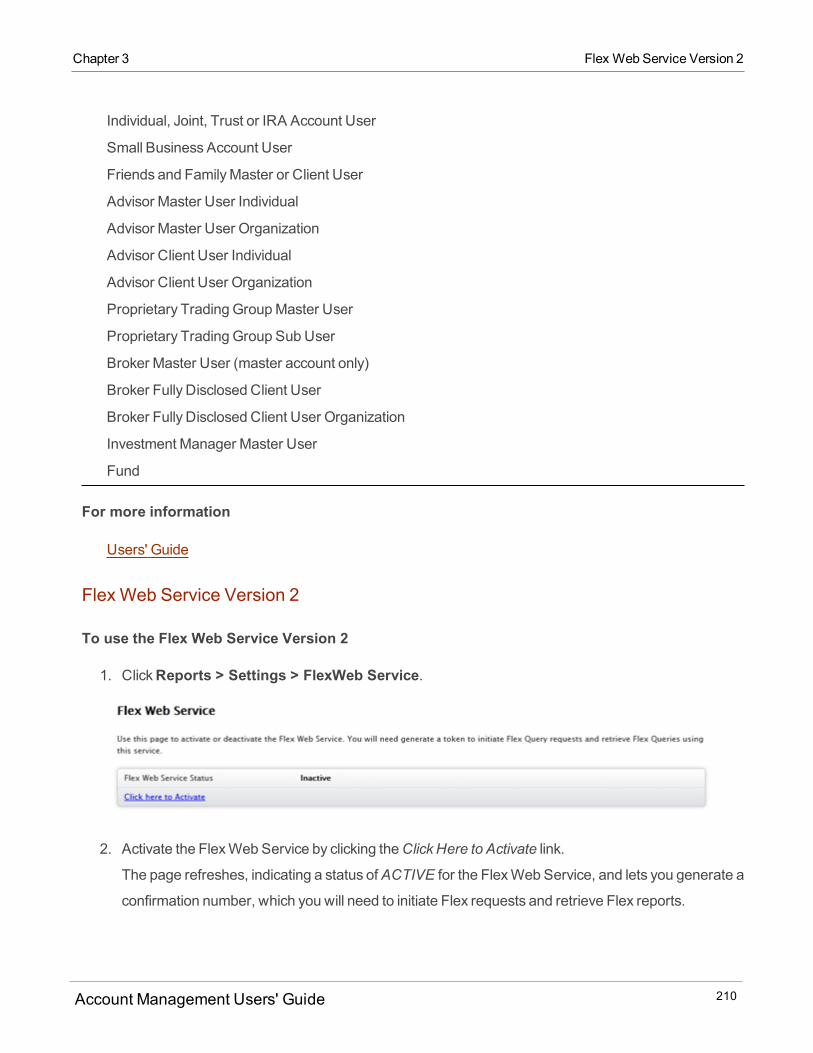
Individual, Joint, Trust or IRA Account User
Small Business Account User
Friends and FamilyMaster or Client User
Advisor Master User Individual
Advisor Master User Organization
Advisor Client User Individual
Advisor Client User Organization
Proprietary Trading GroupMaster User
Proprietary Trading Group SubUser
Broker Master User (master account only)
Broker Fully Disclosed Client User
Broker Fully Disclosed Client User Organization
Investment Manager Master User
Fund
For more information
Users' Guide
Flex Web Service Version 2
To use the Flex Web Service Version 2
1. ClickReports > Settings > FlexWeb Service.
2. Activate the FlexWeb Service by clicking theClick Here to Activate link.
The page refreshes, indicating a status of ACTIVE for the FlexWeb Service, and lets you generate a
confirmation number, which you will need to initiate Flex requests and retrieve Flex reports.
Account Management Users' Guide 210
Chapter 3 Flex Web Service Version 2
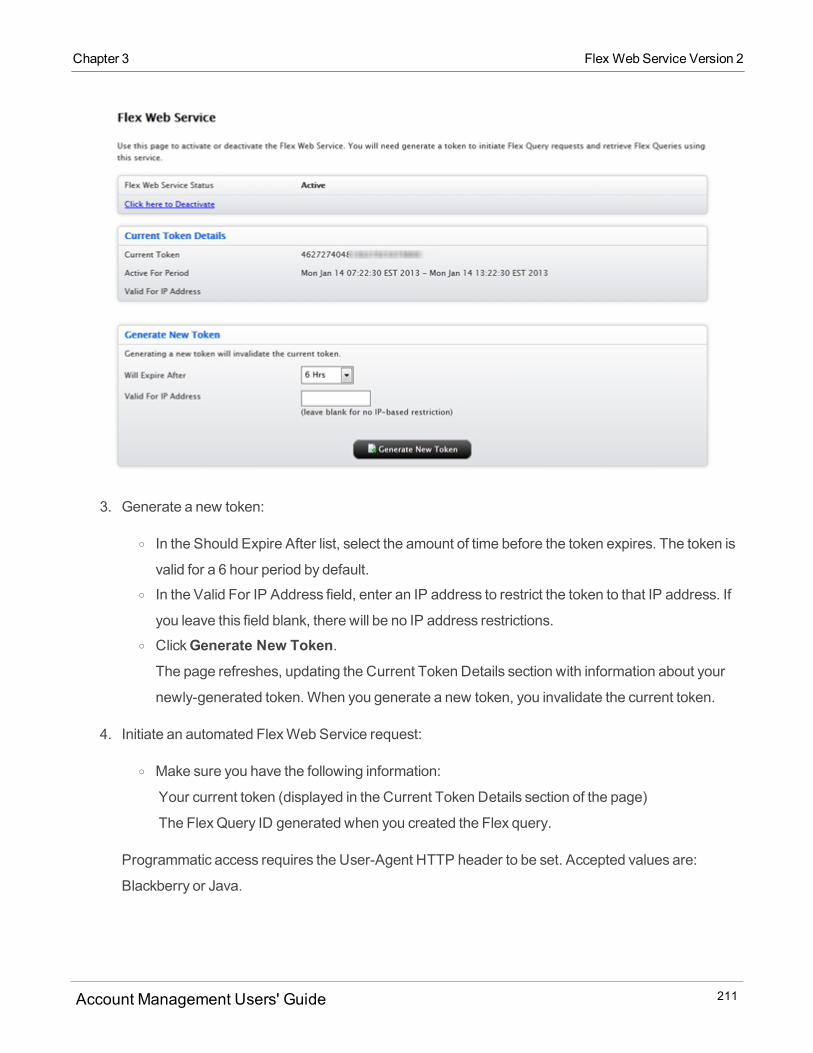
Chapter 3 Flex Web Service Version 2
3. Generate a new token:
o In the Should Expire After list, select the amount of time before the token expires. The token is
valid for a 6 hour period by default.o In the Valid For IP Address field, enter an IP address to restrict the token to that IP address. If
you leave this field blank, there will be no IP address restrictions.o ClickGenerate New Token.The page refreshes, updating the Current Token Details section with information about your
newly-generated token.When you generate a new token, you invalidate the current token.
4. Initiate an automated FlexWeb Service request:
o Make sure you have the following information:
Your current token (displayed in the Current Token Details section of the page)
The FlexQuery ID generated when you created the Flex query.
Programmatic access requires the User-Agent HTTP header to be set. Accepted values are:
Blackberry or Java.
Account Management Users' Guide 211
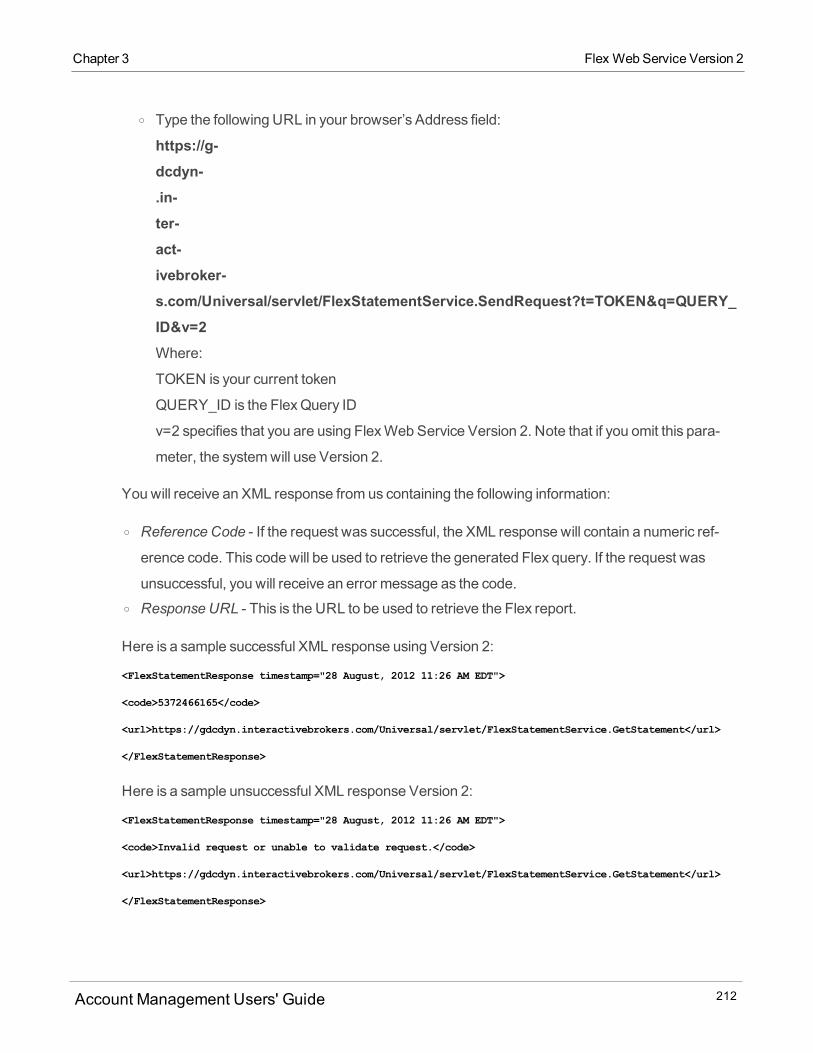
o Type the following URL in your browser’s Address field:
https://g-dcdyn-.in-ter-act-ivebroker-s.com/Universal/servlet/FlexStatementService.SendRequest?t=TOKEN&q=QUERY_ID&v=2Where:
TOKEN is your current token
QUERY_ID is the FlexQuery ID
v=2 specifies that you are using FlexWeb Service Version 2. Note that if you omit this para-
meter, the systemwill use Version 2.
You will receive an XML response from us containing the following information:
o Reference Code - If the request was successful, the XML response will contain a numeric ref-
erence code. This code will be used to retrieve the generated Flex query. If the request was
unsuccessful, you will receive an error message as the code.o Response URL - This is the URL to be used to retrieve the Flex report.
Here is a sample successful XML response using Version 2:
<FlexStatementResponse timestamp="28 August, 2012 11:26 AM EDT">
<code>5372466165</code>
<url>https://gdcdyn.interactivebrokers.com/Universal/servlet/FlexStatementService.GetStatement</url>
</FlexStatementResponse>
Here is a sample unsuccessful XML response Version 2:
<FlexStatementResponse timestamp="28 August, 2012 11:26 AM EDT">
<code>Invalid request or unable to validate request.</code>
<url>https://gdcdyn.interactivebrokers.com/Universal/servlet/FlexStatementService.GetStatement</url>
</FlexStatementResponse>
Account Management Users' Guide 212
Chapter 3 Flex Web Service Version 2
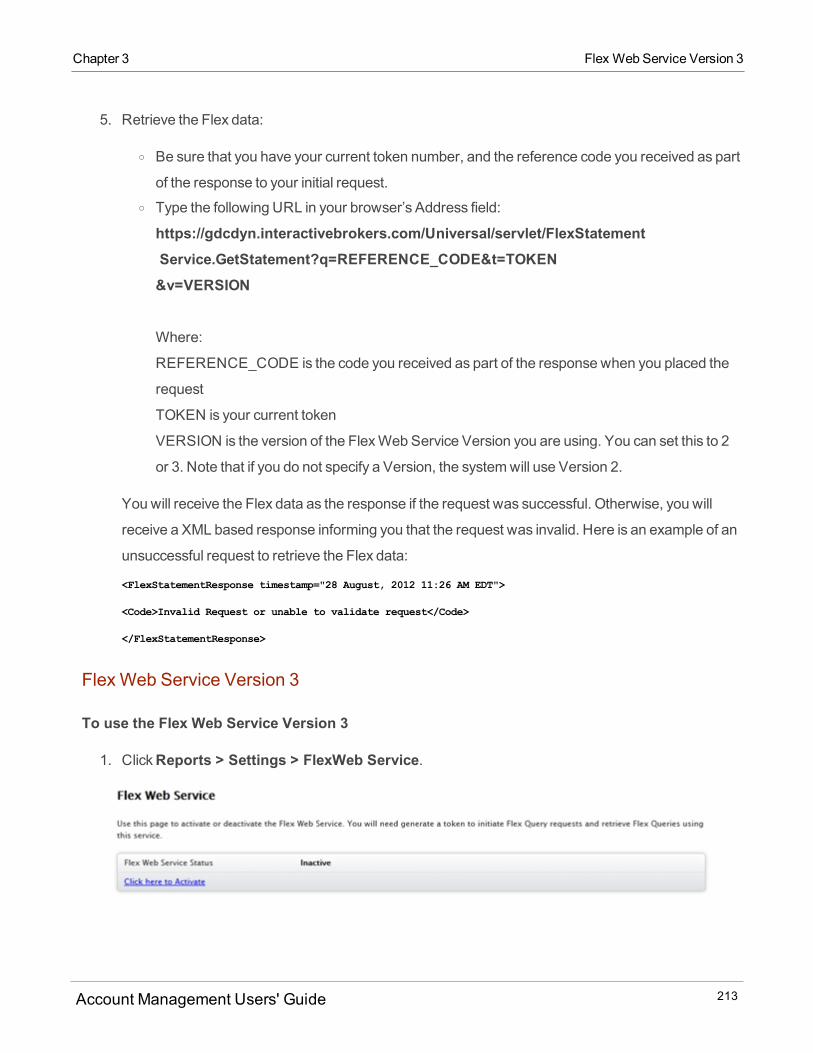
Chapter 3 Flex Web Service Version 3
5. Retrieve the Flex data:
o Be sure that you have your current token number, and the reference code you received as part
of the response to your initial request.o Type the following URL in your browser’s Address field:
https://gdcdyn.interactivebrokers.com/Universal/servlet/FlexStatementService.GetStatement?q=REFERENCE_CODE&t=TOKEN&v=VERSION
Where:
REFERENCE_CODE is the code you received as part of the response when you placed the
request
TOKEN is your current token
VERSION is the version of the FlexWeb Service Version you are using. You can set this to 2
or 3. Note that if you do not specify a Version, the systemwill use Version 2.
You will receive the Flex data as the response if the request was successful. Otherwise, you will
receive a XML based response informing you that the request was invalid. Here is an example of an
unsuccessful request to retrieve the Flex data:
<FlexStatementResponse timestamp="28 August, 2012 11:26 AM EDT">
<Code>Invalid Request or unable to validate request</Code>
</FlexStatementResponse>
Flex Web Service Version 3
To use the Flex Web Service Version 3
1. ClickReports > Settings > FlexWeb Service.
Account Management Users' Guide 213
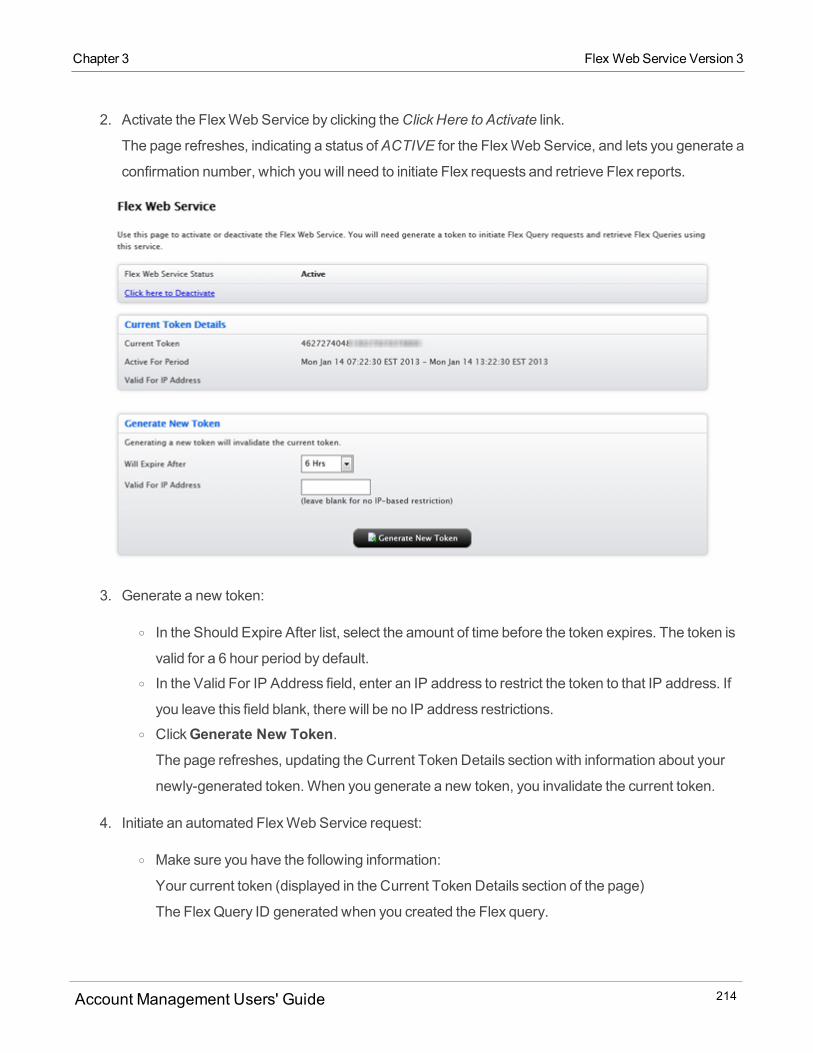
2. Activate the FlexWeb Service by clicking theClick Here to Activate link.
The page refreshes, indicating a status of ACTIVE for the FlexWeb Service, and lets you generate a
confirmation number, which you will need to initiate Flex requests and retrieve Flex reports.
3. Generate a new token:
o In the Should Expire After list, select the amount of time before the token expires. The token is
valid for a 6 hour period by default.o In the Valid For IP Address field, enter an IP address to restrict the token to that IP address. If
you leave this field blank, there will be no IP address restrictions.o ClickGenerate New Token.The page refreshes, updating the Current Token Details section with information about your
newly-generated token.When you generate a new token, you invalidate the current token.
4. Initiate an automated FlexWeb Service request:
o Make sure you have the following information:
Your current token (displayed in the Current Token Details section of the page)
The FlexQuery ID generated when you created the Flex query.
Account Management Users' Guide 214
Chapter 3 Flex Web Service Version 3
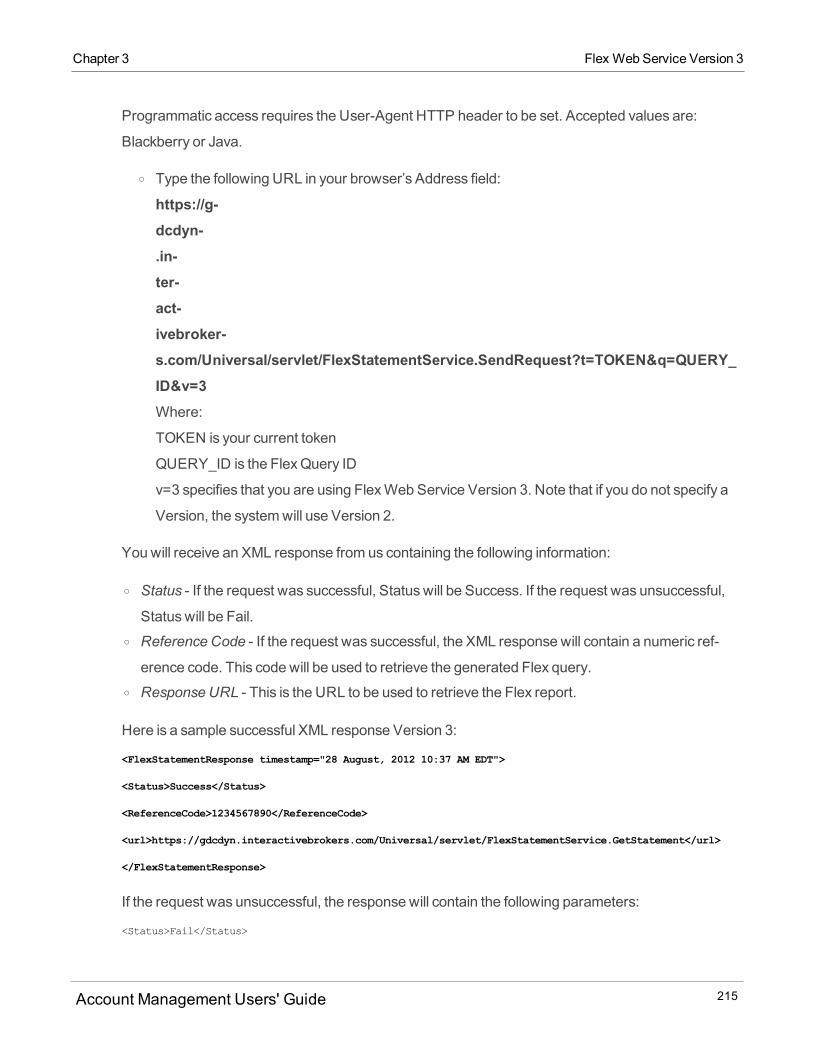
Chapter 3 Flex Web Service Version 3
Programmatic access requires the User-Agent HTTP header to be set. Accepted values are:
Blackberry or Java.
o Type the following URL in your browser’s Address field:
https://g-dcdyn-.in-ter-act-ivebroker-s.com/Universal/servlet/FlexStatementService.SendRequest?t=TOKEN&q=QUERY_ID&v=3Where:
TOKEN is your current token
QUERY_ID is the FlexQuery ID
v=3 specifies that you are using FlexWeb Service Version 3. Note that if you do not specify a
Version, the systemwill use Version 2.
You will receive an XML response from us containing the following information:
o Status - If the request was successful, Status will be Success. If the request was unsuccessful,
Status will be Fail.o Reference Code - If the request was successful, the XML response will contain a numeric ref-
erence code. This code will be used to retrieve the generated Flex query.o Response URL - This is the URL to be used to retrieve the Flex report.
Here is a sample successful XML response Version 3:
<FlexStatementResponse timestamp="28 August, 2012 10:37 AM EDT">
<Status>Success</Status>
<ReferenceCode>1234567890</ReferenceCode>
<url>https://gdcdyn.interactivebrokers.com/Universal/servlet/FlexStatementService.GetStatement</url>
</FlexStatementResponse>
If the request was unsuccessful, the response will contain the following parameters:
<Status>Fail</Status>
Account Management Users' Guide 215

<ErrorCode>XXXX</ErrorCode>
where XXXX = a numeric error code.
<ErrorMessage>TEXT</ErrorMessage>
Where TEXT is a text description of the specific error.
See Version 3 Error Codes for a list of all error codes and error messages.
Here is a sample unsuccessful XML response Version 3:
<FlexStatementResponse timestamp="28 August, 2012 10:37 AM EDT">
<Status>Fail</Status>
<ErrorCode>1012</ErrorCode>
<ErrorMessage>Token has expired.</ErrorMessage>
</FlexStatementResponse>
5. Retrieve the Flex data:
o Be sure that you have your current token number, and the reference code you received as part
of the response to your initial request.o Type the following URL in your browser’s Address field:
https://gdcdyn.interactivebrokers.com/Universal/servlet/FlexStatementService.GetStatement?q=REFERENCE_CODE&t=TOKEN&v=VERSION
Where:
REFERENCE_CODE is the code you received as part of the response when you placed the
request
TOKEN is your current token
VERSION is the version of the FlexWeb Service Version you are using. You can set this to 2
or 3. Note that if you do not specify a Version, the systemwill use Version 2.
You will receive the Flex data as the response if the request was successful. Otherwise, you will
receive a XML based response informing you that the request was invalid. Here is an example of an
unsuccessful request to retrieve the Flex data using Version 3:
<FlexStatementResponse timestamp="28 August, 2012 10:37 AM EDT">
<Status>Fail</Status>
<ErrorCode>1015</ErrorCode>
Account Management Users' Guide 216
Chapter 3 Flex Web Service Version 3
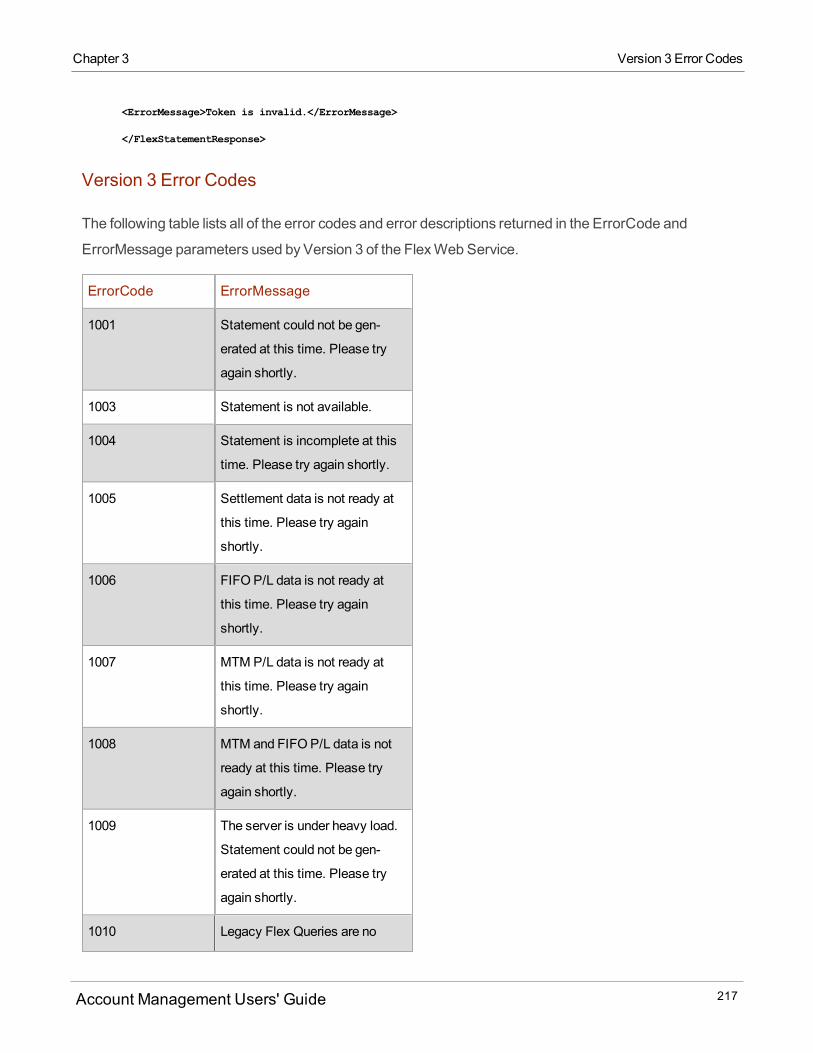
Chapter 3 Version 3 Error Codes
<ErrorMessage>Token is invalid.</ErrorMessage>
</FlexStatementResponse>
Version 3 Error Codes
The following table lists all of the error codes and error descriptions returned in the ErrorCode and
ErrorMessage parameters used by Version 3 of the FlexWeb Service.
ErrorCode ErrorMessage
1001 Statement could not be gen-
erated at this time. Please try
again shortly.
1003 Statement is not available.
1004 Statement is incomplete at this
time. Please try again shortly.
1005 Settlement data is not ready at
this time. Please try again
shortly.
1006 FIFO P/L data is not ready at
this time. Please try again
shortly.
1007 MTM P/L data is not ready at
this time. Please try again
shortly.
1008 MTM and FIFO P/L data is not
ready at this time. Please try
again shortly.
1009 The server is under heavy load.
Statement could not be gen-
erated at this time. Please try
again shortly.
1010 Legacy Flex Queries are no
Account Management Users' Guide 217
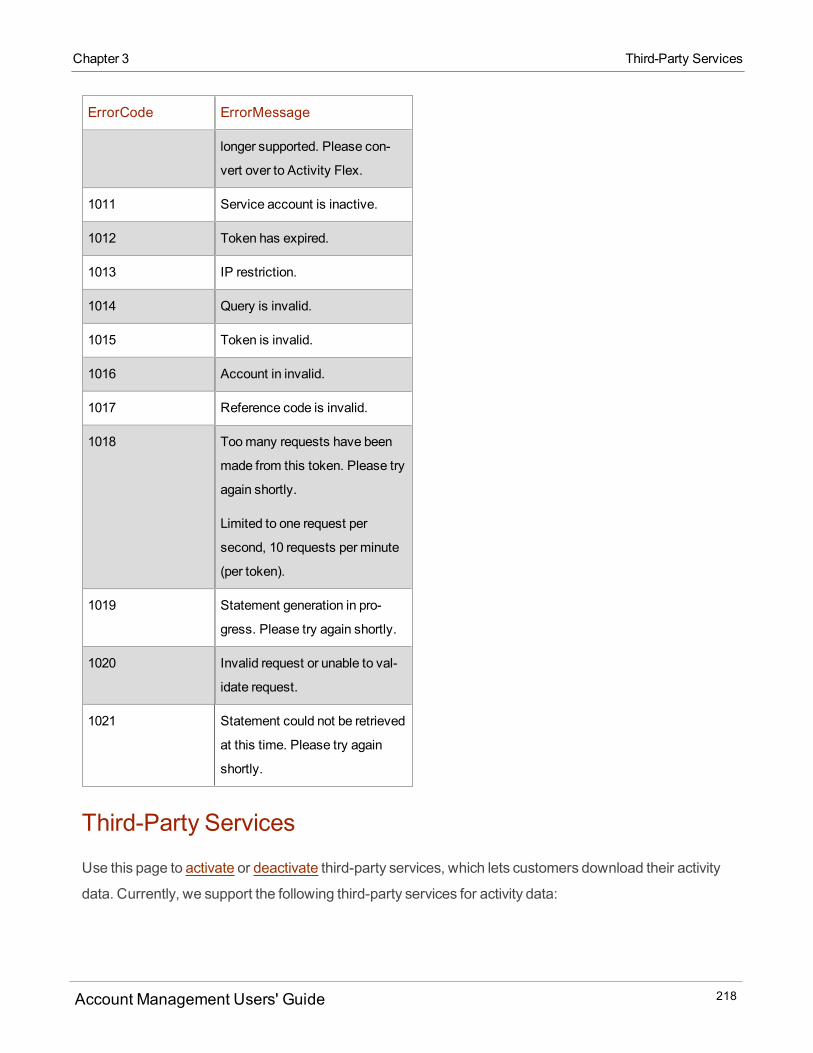
ErrorCode ErrorMessage
longer supported. Please con-
vert over to Activity Flex.
1011 Service account is inactive.
1012 Token has expired.
1013 IP restriction.
1014 Query is invalid.
1015 Token is invalid.
1016 Account in invalid.
1017 Reference code is invalid.
1018 Toomany requests have been
made from this token. Please try
again shortly.
Limited to one request per
second, 10 requests per minute
(per token).
1019 Statement generation in pro-
gress. Please try again shortly.
1020 Invalid request or unable to val-
idate request.
1021 Statement could not be retrieved
at this time. Please try again
shortly.
Third-Party Services
Use this page to activate or deactivate third-party services, which lets customers download their activity
data. Currently, we support the following third-party services for activity data:
Account Management Users' Guide 218
Chapter 3 Third-Party Services
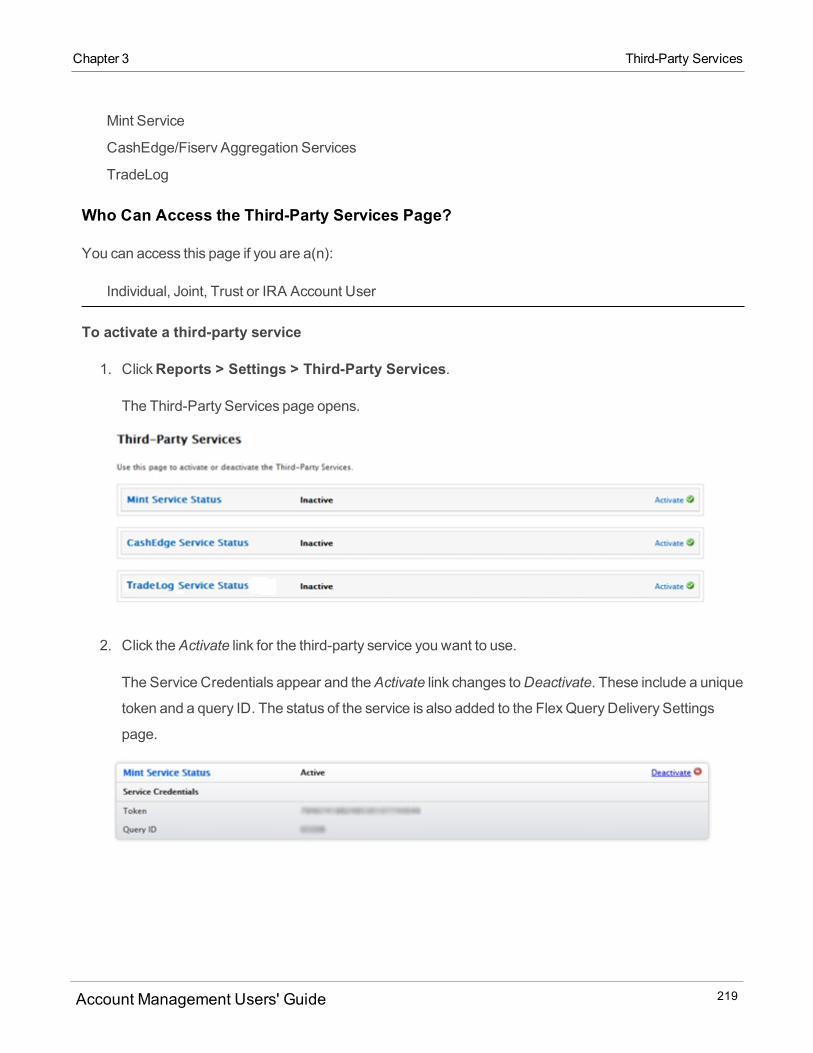
Chapter 3 Third-Party Services
Mint Service
CashEdge/Fiserv Aggregation Services
TradeLog
Who Can Access the Third-Party Services Page?
You can access this page if you are a(n):
Individual, Joint, Trust or IRA Account User
To activate a third-party service
1. ClickReports > Settings > Third-Party Services.
The Third-Party Services page opens.
2. Click theActivate link for the third-party service you want to use.
The Service Credentials appear and theActivate link changes toDeactivate. These include a unique
token and a query ID. The status of the service is also added to the FlexQuery Delivery Settings
page.
Account Management Users' Guide 219

Because third-party services use the FlexWeb Service, when you activate a third-party service, the
FlexWeb Service is also activated. For the purpose of using the third-party service, you do not have
to do anything with the FlexWeb Service. For more information about the FlexWeb Service, see
Using the FlexWeb Service.
3. Write down the Token andQuery ID.
4. Log into the third-party service that you are using and follow the instructions there to retrieve your
activity data.
To deactivate a third-party service
1. ClickReports > Settings > Third-Party Services.
The Third-Party Services page opens.
2. Click theDeactivate link for the third-party service.
The service is deactivated and theDeactivate link changes toActivate. Also, the third-party service
status is updated on the FlexQuery Delivery Settings page.
When you deactivate a third-party service, the FlexWeb Service is also deactivated. You can still
activate the FlexWeb Service without activating a third-party service if you need to use the FlexWeb
Service.
Account Management Users' Guide 220
Chapter 3 Third-Party Services
Chapter 3 Trader ID
Trader ID
Trader ID identifies the person who executed a trade without revealing his or her username. Institutional
account master users use this page to enable Trader ID and view a list of all Trader IDs and their
corresponding users, usernames and account IDs.
Once enabled, all users for themaster and client/sub accounts will be assigned a unique Trader ID; and the
Trader ID field will be displayed in the Activity and Trade Confirmation FlexQueries.
Trader ID Rules
Trader IDs consist of a letter prefix followed by a number in sequence for each username. The letter
prefixes are:
M - Indicates a username associated with theMaster account.
C - Indicates a username associated with a client or sub account.
Who can access the Trader ID page?
You can access this page if you are a(n):
Advisor Master User
Proprietary Trading GroupMaster User (STL accounts)
Broker Master User
Investment Manager Master User (multiple fund accounts)
To enable Trader ID
1. ClickReports > Settings > Trader ID.
Account Management Users' Guide 221
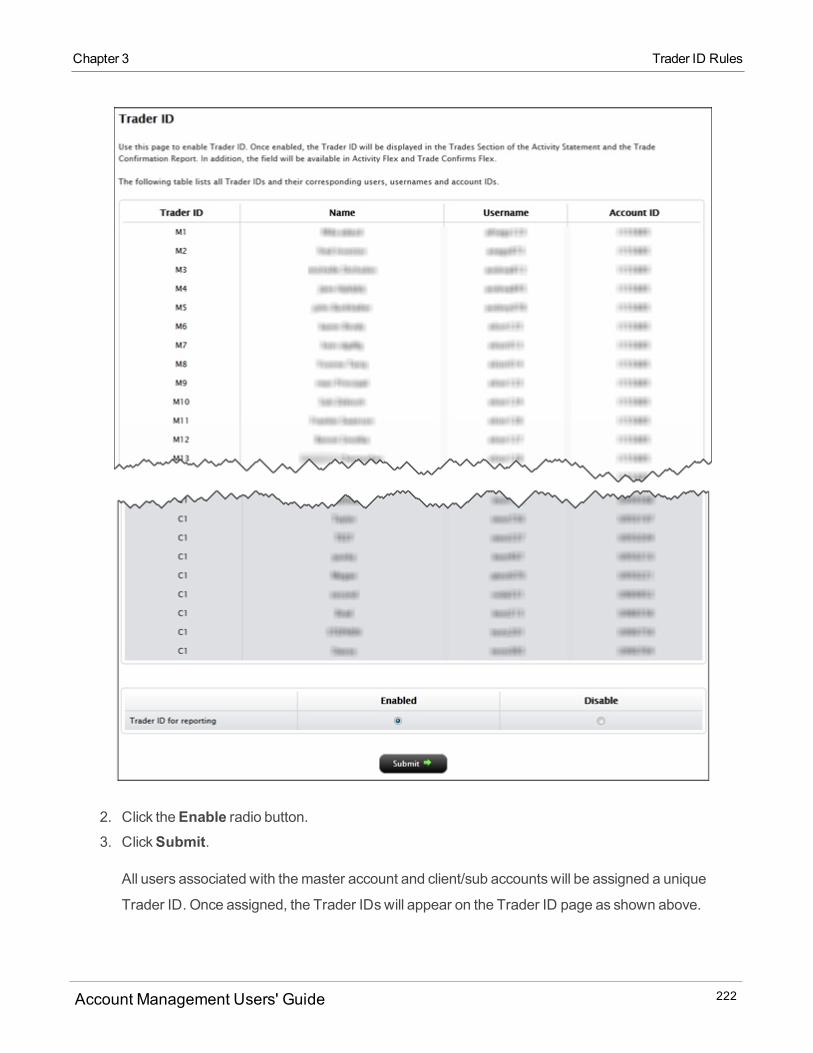
2. Click theEnable radio button.3. ClickSubmit.
All users associated with themaster account and client/sub accounts will be assigned a unique
Trader ID. Once assigned, the Trader IDswill appear on the Trader ID page as shown above.
Account Management Users' Guide 222
Chapter 3 Trader ID Rules
Chapter 3 Client OATS Settings
Trades reported on Activity Statements, Trade Confirmations and FlexQueries will show the Trader
ID associated with the username of the person who submitted the trade.
Client OATS Settings
The Financial Industry Regulatory Authority (FINRA) established theOrder Audit Trail System (OATS) as
an integrated audit trail of order, quote and trade information for Nasdaq securities. I-BROKERS are
required to supervise the OATS settings of their client accounts. The Client OATS Settings page displays
all open and pending client accounts and theOATSMaster Default Settings. You use this page to
configure the OATS settings for your client accounts:
Override theMaster Default Settings for institutional accounts.
Respond to flashing red alerts for pending client accounts.
Modify OATS permissions for a specific client account.
Who can access the Client OATS Settings page?
You can access this page if you are a Broker Master User
and you are amember of FINRA and/or have clients who aremembers of FINRA
and you want us to doOATS reporting to FINRA for you and/or your clients.
To override the OATS Master Default Settings for an institutional account
1. ClickReports > Client OATS Settings.
Account Management Users' Guide 223

2. In the list of Open Client Accounts, click the desired Client Account number.
3. In the Account Type list, selectRETAIL orWHOLESALE. If you selectWHOLESALE, the FINRA
Member list becomes available.
4. In the FINRAMember list, selectYES orNO. If you selectYES, the FINRAMember Type list
becomes available.
5. In the FINRAMember Type list, selectNO,OATS Reporting orOATS Non-Reporting. If you select
OATS Reporting orOATS Non-Reporting, theMPID field becomes available.
6. In theMPID field, type theMarket Participant Identifier code to be used for this client account.
7. In the Enable OATS at IB TWS Level list, selectYes orNo as required. ClickContinue to save yourchanges.
ClickBack to return to the Client OATS Settings page without saving your changes.
Account Management Users' Guide 224
Chapter 3 Client OATS Settings
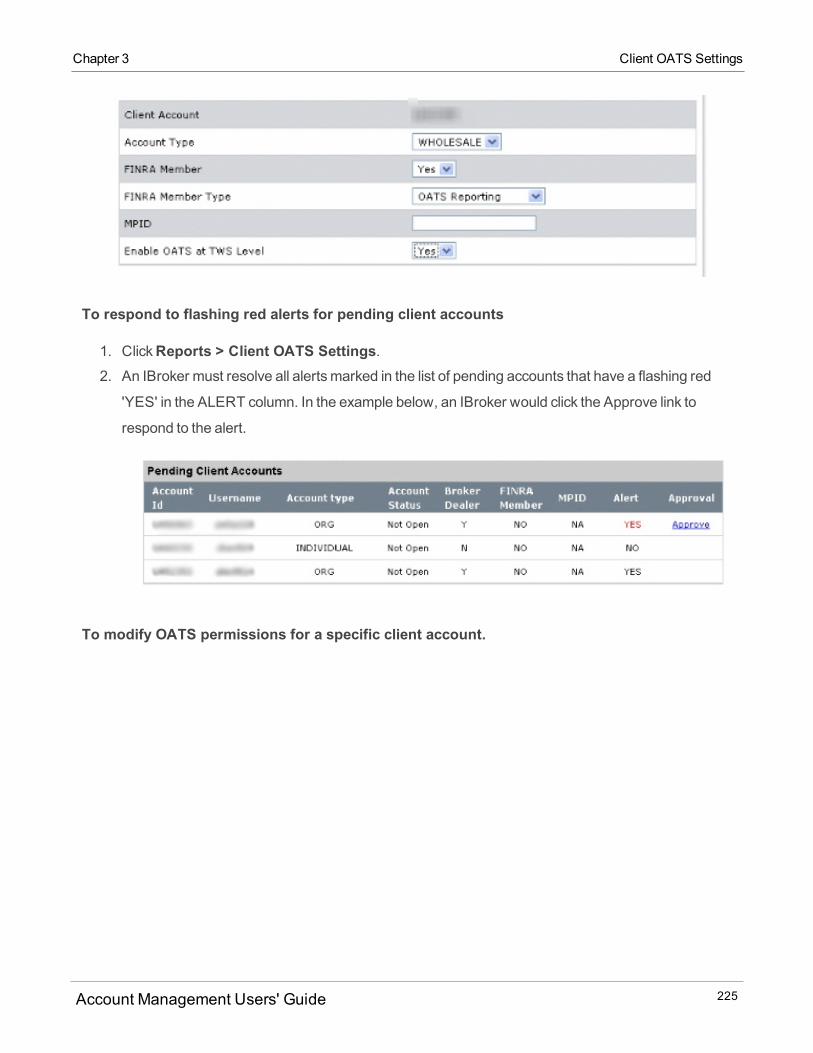
Chapter 3 Client OATS Settings
To respond to flashing red alerts for pending client accounts
1. ClickReports > Client OATS Settings.2. An IBroker must resolve all alertsmarked in the list of pending accounts that have a flashing red
'YES' in the ALERT column. In the example below, an IBroker would click the Approve link to
respond to the alert.
To modify OATS permissions for a specific client account.
Account Management Users' Guide 225
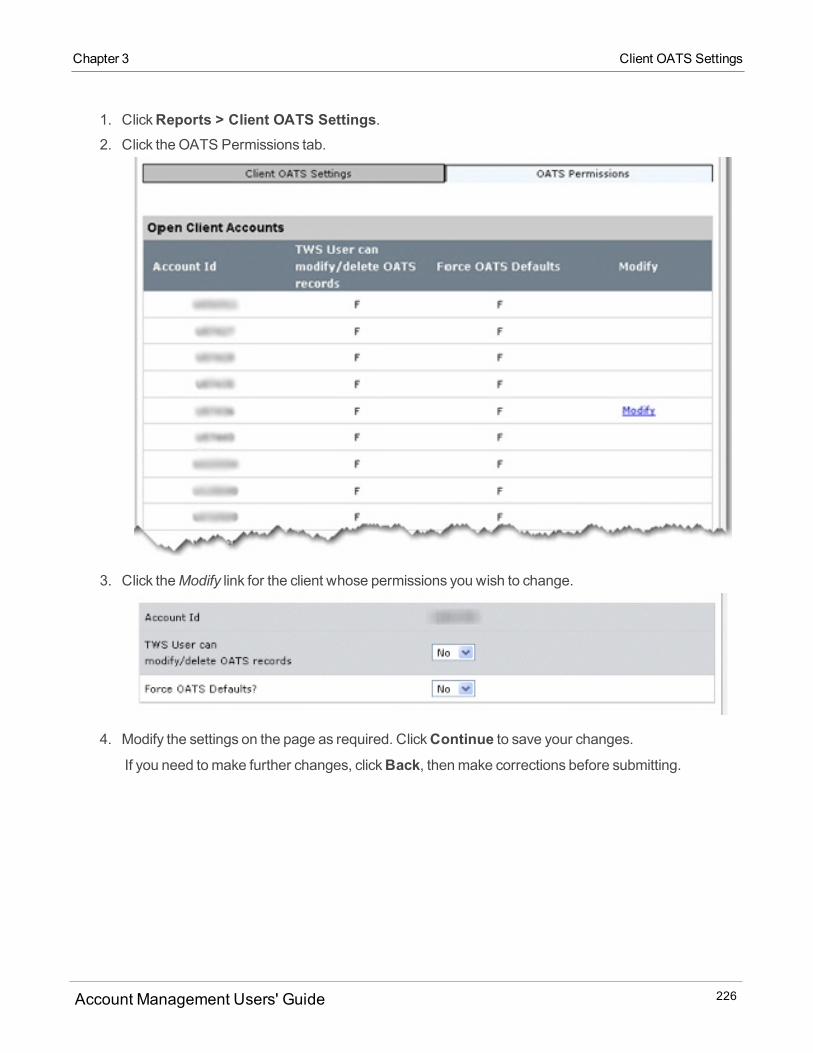
1. ClickReports > Client OATS Settings.2. Click the OATS Permissions tab.
3. Click theModify link for the client whose permissions you wish to change.
4. Modify the settings on the page as required. ClickContinue to save your changes.If you need tomake further changes, clickBack, thenmake corrections before submitting.
Account Management Users' Guide 226
Chapter 3 Client OATS Settings
FundingThis chapter describes how to use the FundsManagement functions in the Account Management system.
FundsManagement lets you check the status of your deposits, transfers and withdrawals; enter deposit
notifications and set up withdrawals; create bank instructions for fund and position transfers, settlement
instructions for cash and position transactions and recurring instructions for recurring transactions; and
authenticate pending fundmanagement requests.
This chapter includes the following topics:
Viewing Transaction History
Fund Transfers
Position Transfers
Instructions
Soft Dollars Disbursement
Viewing Transaction History
The Transaction History page lets you view information about cash deposits, cash withdrawals, inbound
and outbound position transfers and internal transfers for your account or for a client or sub account that
youmanage.
On the Transaction History page, you can:
View summary information about your transactions, and adjust the time period for which you want to
view transactions from the past 10 days to the past 90 days using a slider.
Search for any transaction by Account ID, transaction type or transactionmethod.
Sort the list of transactions by any column.
View additional details about each transaction in a popup window.
Cancel a transaction from the details popup window.
Modify a pending deposit notification.
Elect to stop payment on a checkwithdrawal.
4
Account Management Users' Guide 227
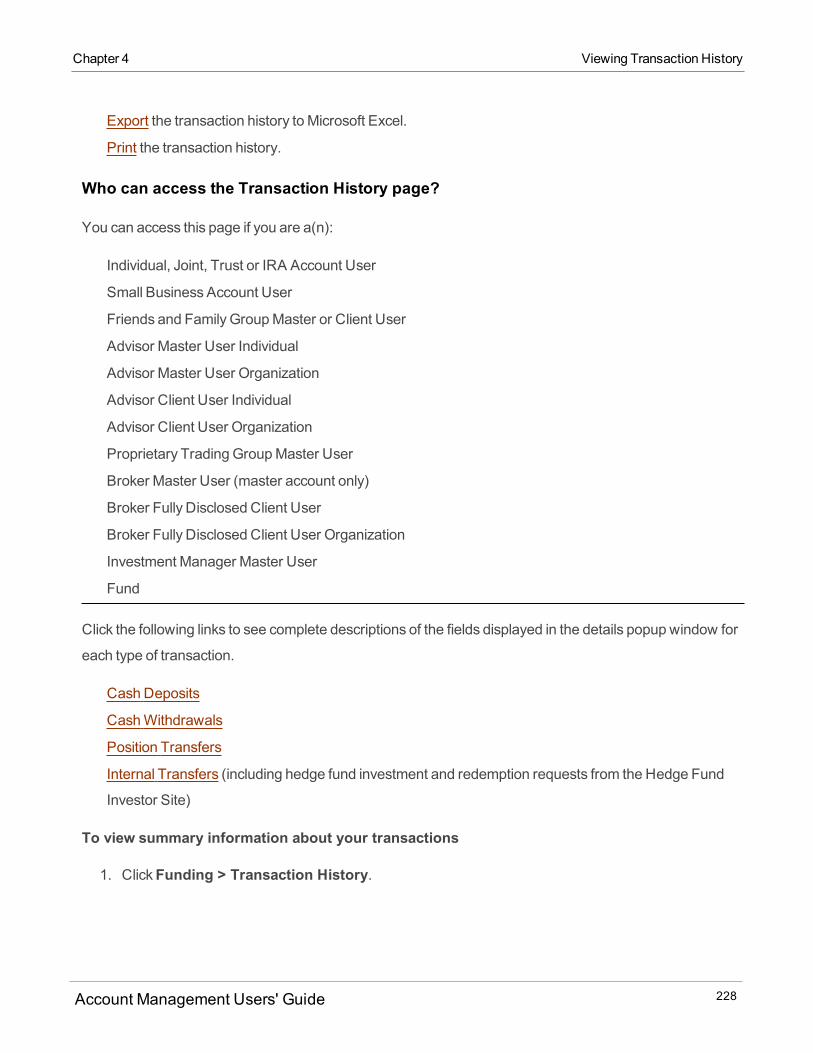
Export the transaction history toMicrosoft Excel.
Print the transaction history.
Who can access the Transaction History page?
You can access this page if you are a(n):
Individual, Joint, Trust or IRA Account User
Small Business Account User
Friends and Family GroupMaster or Client User
Advisor Master User Individual
Advisor Master User Organization
Advisor Client User Individual
Advisor Client User Organization
Proprietary Trading GroupMaster User
Broker Master User (master account only)
Broker Fully Disclosed Client User
Broker Fully Disclosed Client User Organization
Investment Manager Master User
Fund
Click the following links to see complete descriptions of the fields displayed in the details popup window for
each type of transaction.
Cash Deposits
CashWithdrawals
Position Transfers
Internal Transfers (including hedge fund investment and redemption requests from the Hedge Fund
Investor Site)
To view summary information about your transactions
1. ClickFunding > Transaction History.
Account Management Users' Guide 228
Chapter 4 Viewing Transaction History
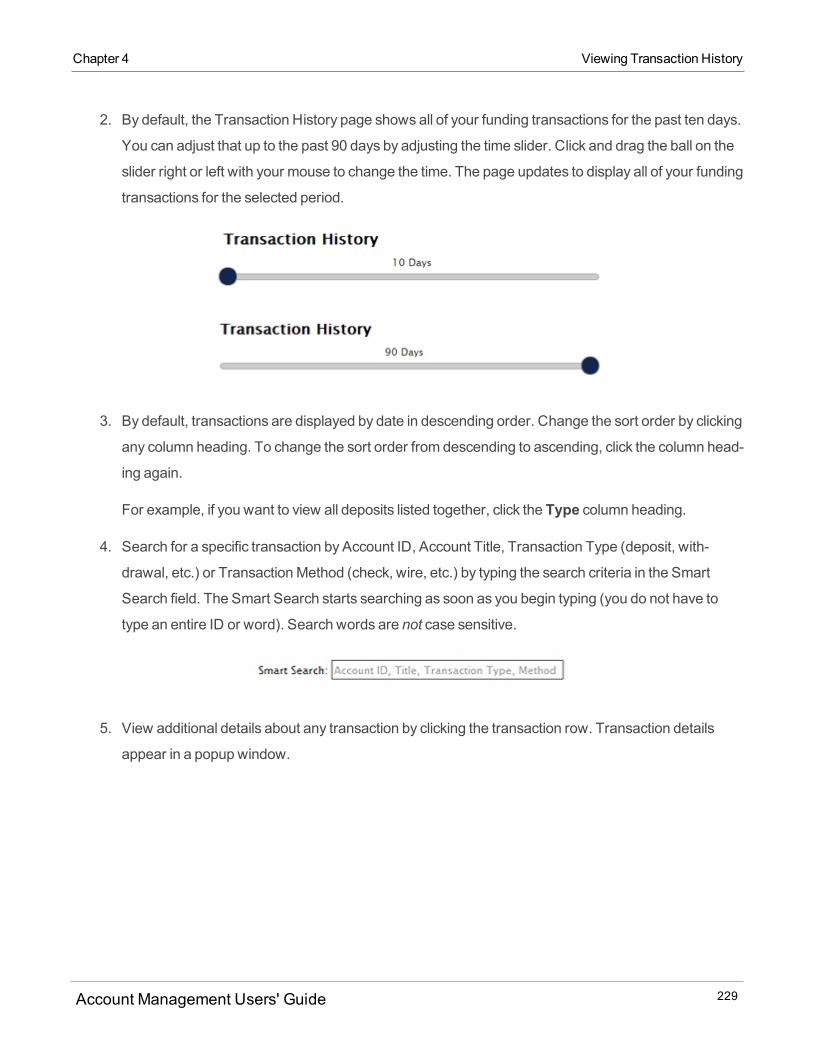
Chapter 4 Viewing Transaction History
2. By default, the Transaction History page shows all of your funding transactions for the past ten days.
You can adjust that up to the past 90 days by adjusting the time slider. Click and drag the ball on the
slider right or left with your mouse to change the time. The page updates to display all of your funding
transactions for the selected period.
3. By default, transactions are displayed by date in descending order. Change the sort order by clicking
any column heading. To change the sort order from descending to ascending, click the column head-
ing again.
For example, if you want to view all deposits listed together, click the Type column heading.
4. Search for a specific transaction by Account ID, Account Title, Transaction Type (deposit, with-
drawal, etc.) or Transaction Method (check, wire, etc.) by typing the search criteria in the Smart
Search field. The Smart Search starts searching as soon as you begin typing (you do not have to
type an entire ID or word). Search words are not case sensitive.
5. View additional details about any transaction by clicking the transaction row. Transaction details
appear in a popup window.
Account Management Users' Guide 229
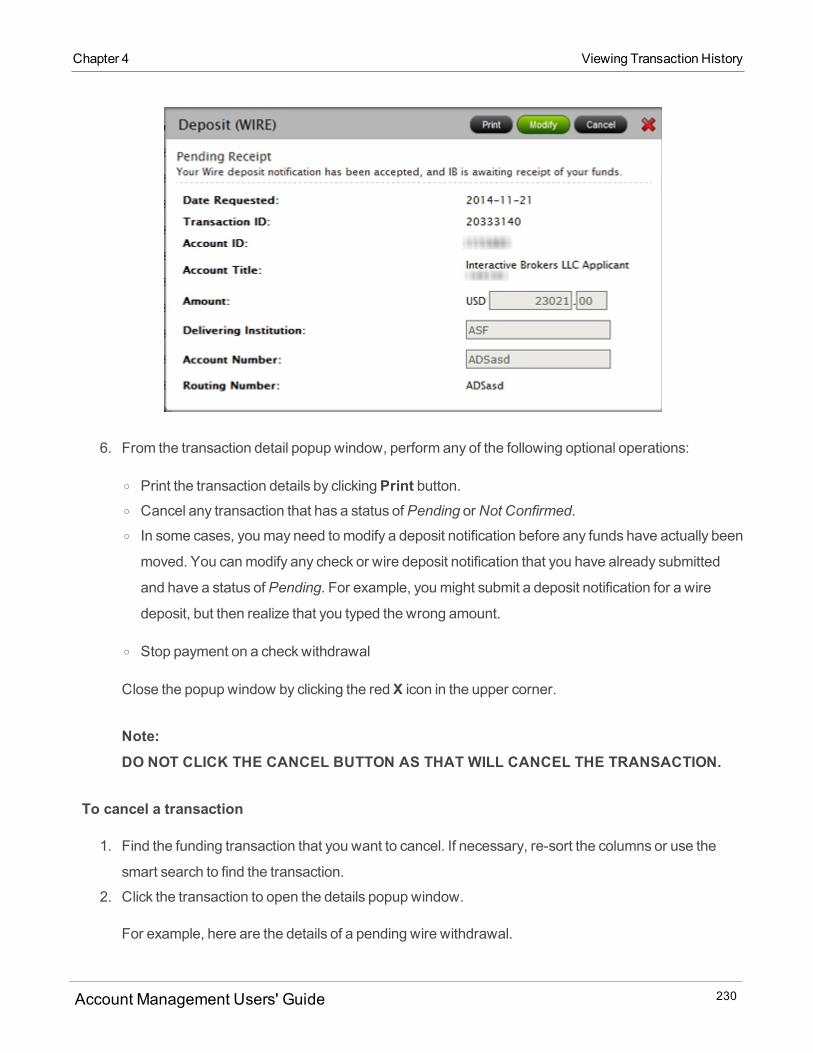
6. From the transaction detail popup window, perform any of the following optional operations:
o Print the transaction details by clickingPrint button.o Cancel any transaction that has a status of Pending orNot Confirmed.o In some cases, youmay need tomodify a deposit notification before any funds have actually been
moved. You canmodify any check or wire deposit notification that you have already submitted
and have a status of Pending. For example, youmight submit a deposit notification for a wire
deposit, but then realize that you typed the wrong amount.
o Stop payment on a checkwithdrawal
Close the popup window by clicking the redX icon in the upper corner.
Note:DO NOT CLICK THE CANCEL BUTTON AS THAT WILL CANCEL THE TRANSACTION.
To cancel a transaction
1. Find the funding transaction that you want to cancel. If necessary, re-sort the columns or use the
smart search to find the transaction.
2. Click the transaction to open the details popup window.
For example, here are the details of a pending wire withdrawal.
Account Management Users' Guide 230
Chapter 4 Viewing Transaction History

Chapter 4 Viewing Transaction History
3. Click theCancel button. Do not click the redX icon as that only closes the popup window.4. ClickOK when prompted to confirm your cancel request.
5. Click the redX icon to close the popup window. Note that the status of the transaction on the Trans-action History page has changed toCancelled.
To modify a deposit notification
Remember, deposit notifications do not actuallymove your funds. They only notify us of your intention to
deposit funds using the deposit method you selected.
1. Find the funding transaction that you want to mdify. If necessary, re-sort the columns or use the
smart search to find the transaction.
2. Click the transaction to open the details popup window.
Account Management Users' Guide 231
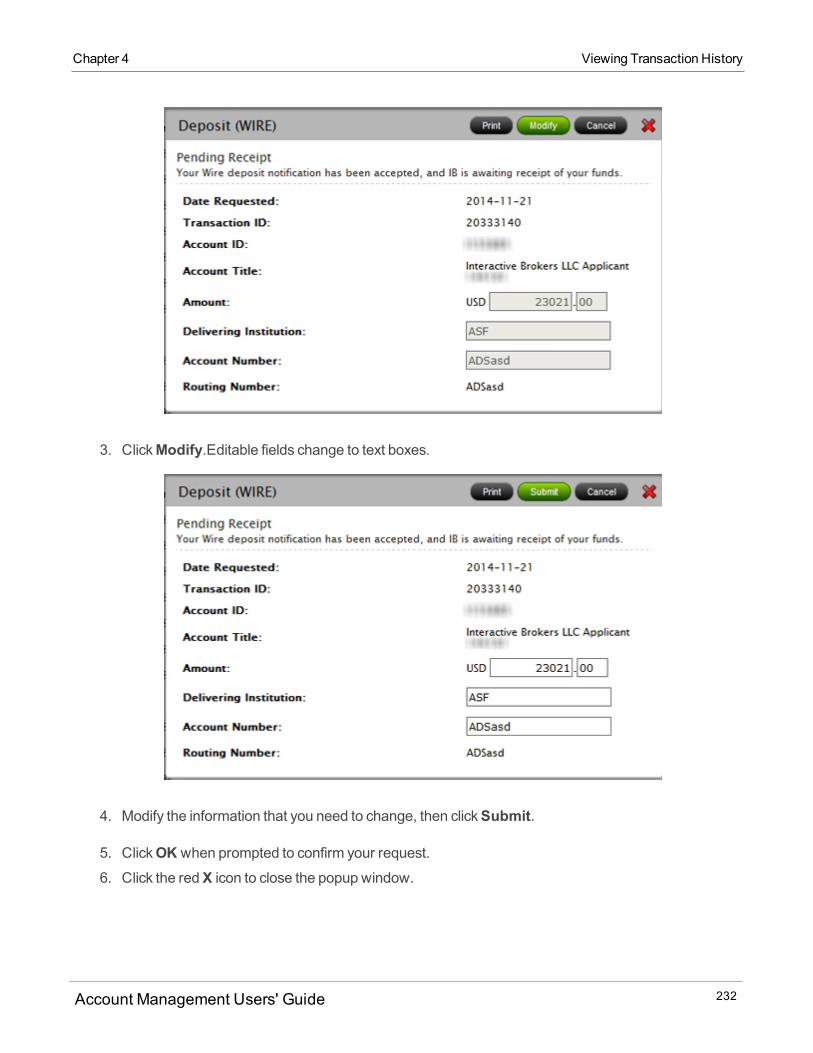
3. ClickModify.Editable fields change to text boxes.
4. Modify the information that you need to change, then clickSubmit.
5. ClickOK when prompted to confirm your request.
6. Click the redX icon to close the popup window.
Account Management Users' Guide 232
Chapter 4 Viewing Transaction History

Chapter 4 Request a stop payment of a check withdrawal
Request a stop payment of a check withdrawal
You can submit a request to stop payment of a checkwithdrawal on the Transaction History page. Stop
payment requests are subject to the following rules:
Stop payments can only be requested for checkwithdrawals.
You can request a stop payment for checkwithdrawals from the last 90 days only. On the Transaction
History page, all checkwithdrawals from the last 90 days are displayed.
You cannot request more than one stop payment for a single checkwithdrawal.
The option to stop payment only appears when a checkwithdrawal transaction’s status is Processing.
To request a stop payment of a check withdrawal
1. Click any checkwithdrawal to display the transaction details in a popup window.
2. Click theStop Payment button.3. A confirmationmessage appears. ClickOK to continue with your stop payment request.
4. Select a reason for the stop payment, then click Continue. Available reasons include:
o Non-receipto Incorrect addresso Lost/stolen/damageo I did not request
5. Read the Stop Payment Affidavit, then type your name in the field provided and click Continue. This
indicates that you are signing the affidavit.
Account Management Users' Guide 233
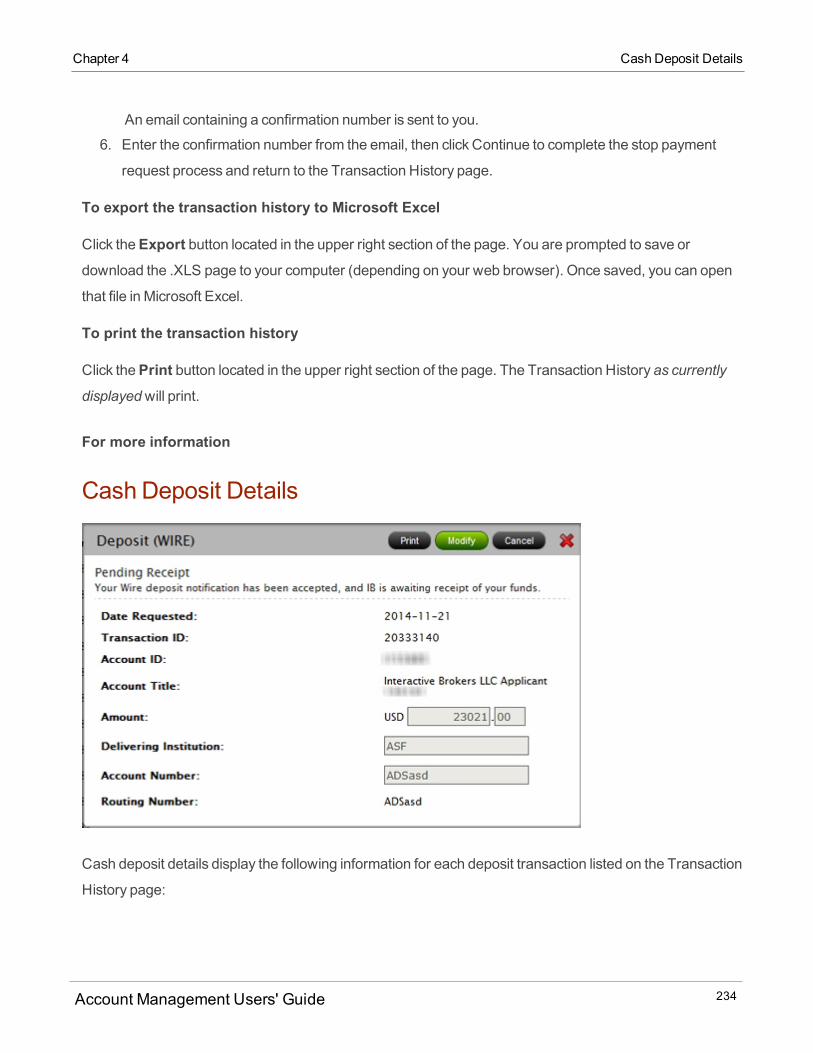
An email containing a confirmation number is sent to you.
6. Enter the confirmation number from the email, then click Continue to complete the stop payment
request process and return to the Transaction History page.
To export the transaction history to Microsoft Excel
Click theExport button located in the upper right section of the page. You are prompted to save ordownload the .XLS page to your computer (depending on your web browser). Once saved, you can open
that file in Microsoft Excel.
To print the transaction history
Click thePrint button located in the upper right section of the page. The Transaction History as currentlydisplayedwill print.
For more information
Cash Deposit Details
Cash deposit details display the following information for each deposit transaction listed on the Transaction
History page:
Account Management Users' Guide 234
Chapter 4 Cash Deposit Details
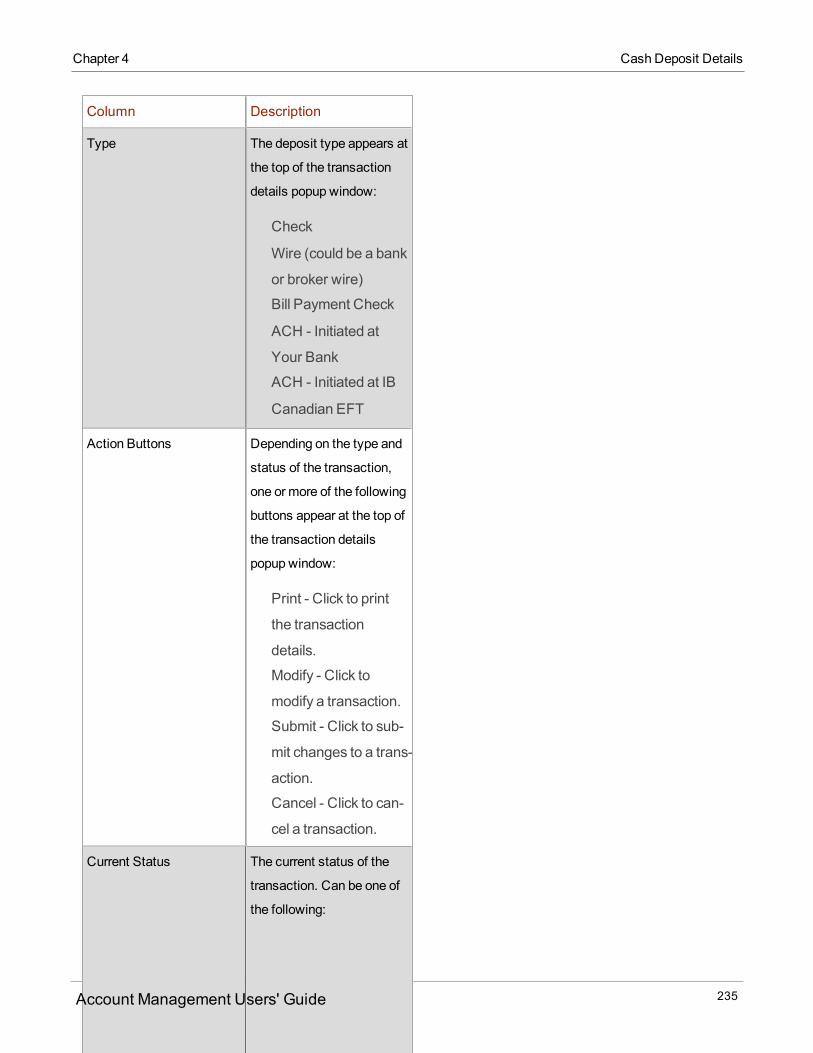
Chapter 4 Cash Deposit Details
Column Description
Type The deposit type appears at
the top of the transaction
details popup window:
Check
Wire (could be a bank
or broker wire)
Bill Payment Check
ACH - Initiated at
Your Bank
ACH - Initiated at IB
Canadian EFT
Action Buttons Depending on the type and
status of the transaction,
one or more of the following
buttons appear at the top of
the transaction details
popup window:
Print - Click to print
the transaction
details.
Modify - Click to
modify a transaction.
Submit - Click to sub-
mit changes to a trans-
action.
Cancel - Click to can-
cel a transaction.
Current Status The current status of the
transaction. Can be one of
the following:
Account Management Users' Guide 235
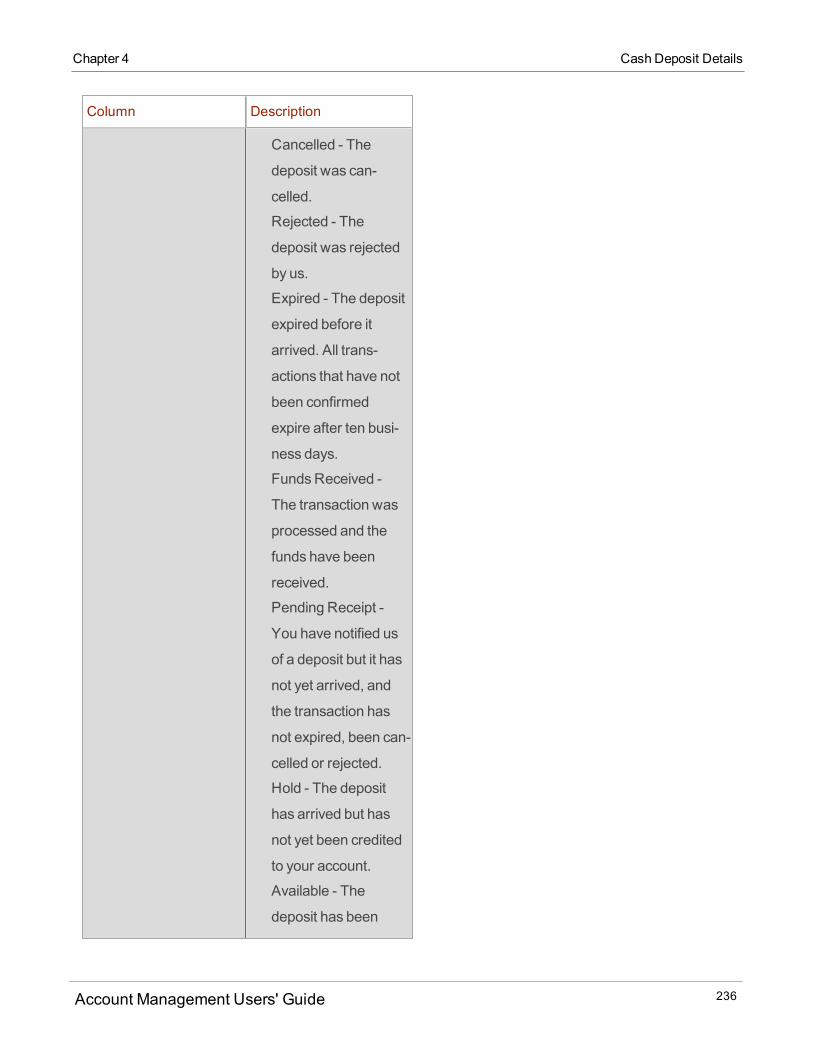
Column Description
Cancelled - The
deposit was can-
celled.
Rejected - The
deposit was rejected
by us.
Expired - The deposit
expired before it
arrived. All trans-
actions that have not
been confirmed
expire after ten busi-
ness days.
FundsReceived -
The transaction was
processed and the
funds have been
received.
Pending Receipt -
You have notified us
of a deposit but it has
not yet arrived, and
the transaction has
not expired, been can-
celled or rejected.
Hold - The deposit
has arrived but has
not yet been credited
to your account.
Available - The
deposit has been
Account Management Users' Guide 236
Chapter 4 Cash Deposit Details
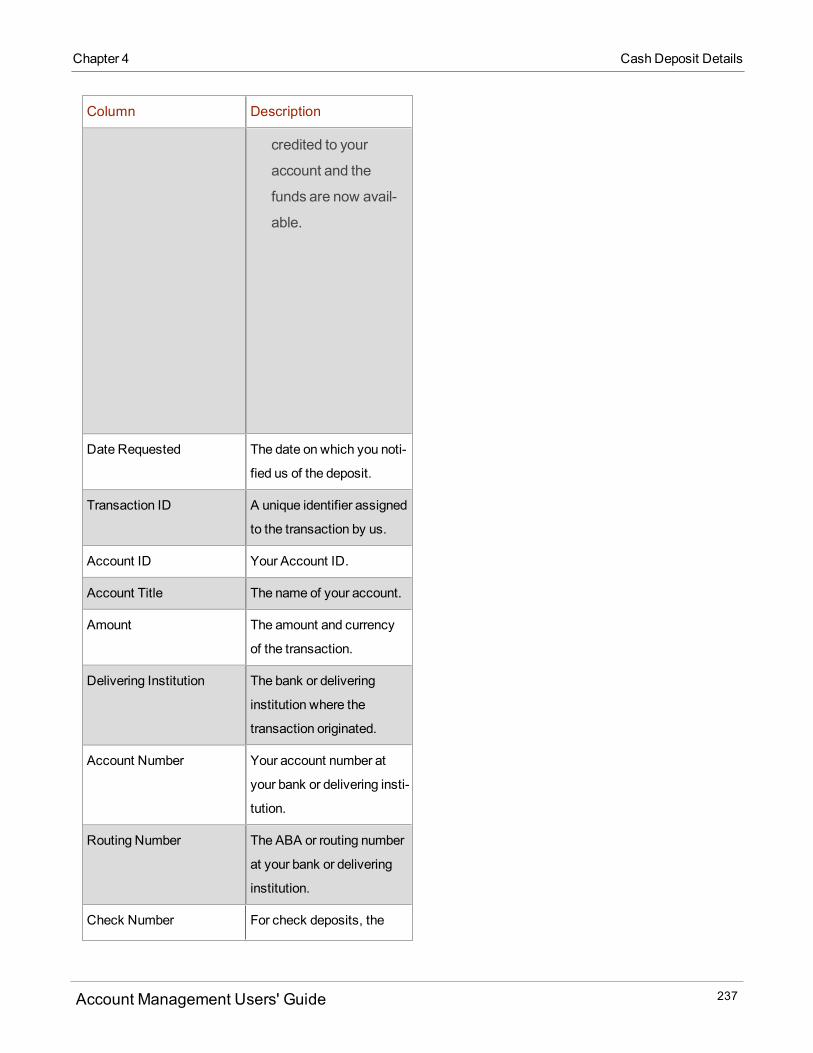
Chapter 4 Cash Deposit Details
Column Description
credited to your
account and the
funds are now avail-
able.
Date Requested The date on which you noti-
fied us of the deposit.
Transaction ID A unique identifier assigned
to the transaction by us.
Account ID Your Account ID.
Account Title The name of your account.
Amount The amount and currency
of the transaction.
Delivering Institution The bank or delivering
institution where the
transaction originated.
Account Number Your account number at
your bank or delivering insti-
tution.
Routing Number The ABA or routing number
at your bank or delivering
institution.
Check Number For check deposits, the
Account Management Users' Guide 237
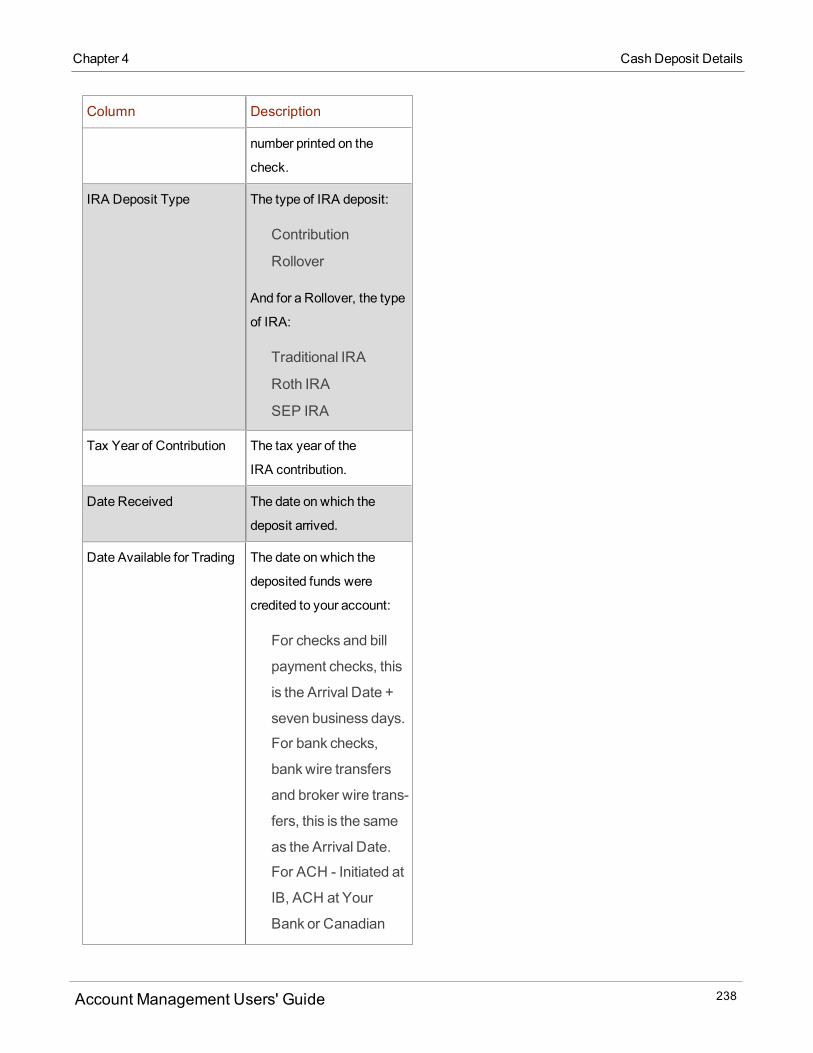
Column Description
number printed on the
check.
IRA Deposit Type The type of IRA deposit:
Contribution
Rollover
And for a Rollover, the type
of IRA:
Traditional IRA
Roth IRA
SEP IRA
Tax Year of Contribution The tax year of the
IRA contribution.
Date Received The date on which the
deposit arrived.
Date Available for Trading The date on which the
deposited funds were
credited to your account:
For checks and bill
payment checks, this
is the Arrival Date +
seven business days.
For bank checks,
bankwire transfers
and broker wire trans-
fers, this is the same
as the Arrival Date.
For ACH - Initiated at
IB, ACH at Your
Bank or Canadian
Account Management Users' Guide 238
Chapter 4 Cash Deposit Details
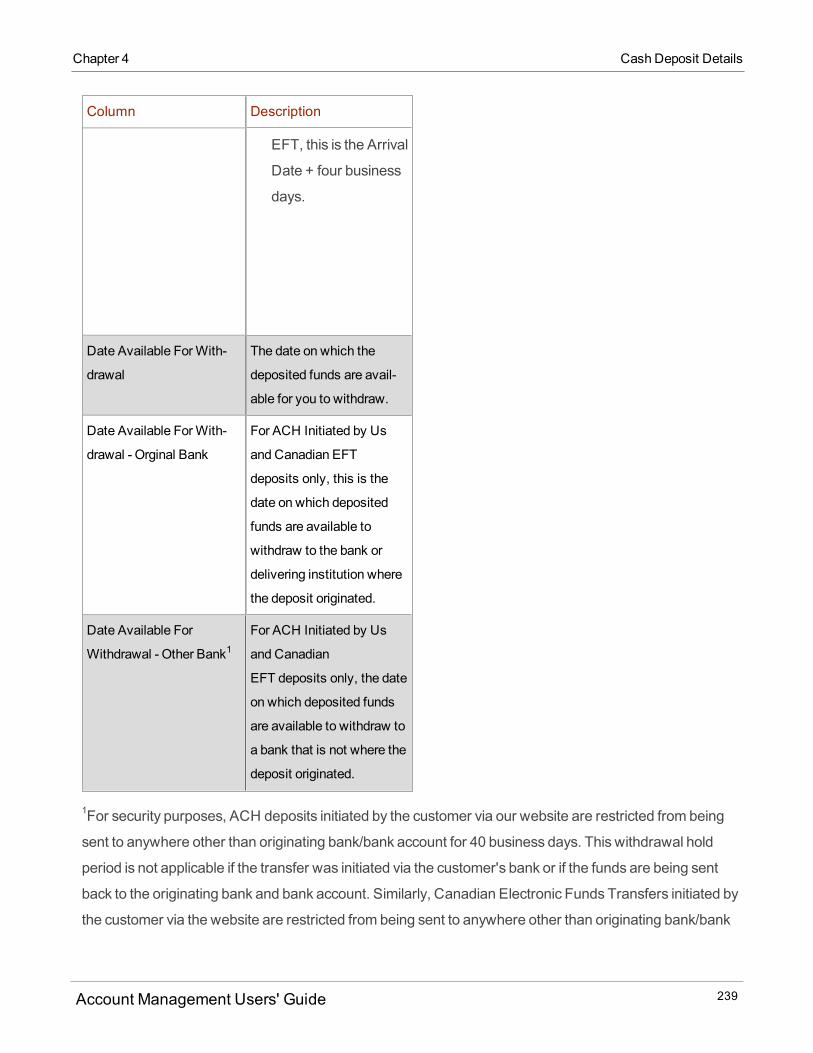
Chapter 4 Cash Deposit Details
Column Description
EFT, this is the Arrival
Date + four business
days.
Date Available ForWith-
drawal
The date on which the
deposited funds are avail-
able for you to withdraw.
Date Available ForWith-
drawal - Orginal Bank
For ACH Initiated by Us
and Canadian EFT
deposits only, this is the
date on which deposited
funds are available to
withdraw to the bank or
delivering institution where
the deposit originated.
Date Available For
Withdrawal - Other Bank1For ACH Initiated by Us
and Canadian
EFT deposits only, the date
on which deposited funds
are available to withdraw to
a bank that is not where the
deposit originated.
1For security purposes, ACH deposits initiated by the customer via our website are restricted from being
sent to anywhere other than originating bank/bank account for 40 business days. This withdrawal hold
period is not applicable if the transfer was initiated via the customer's bank or if the funds are being sent
back to the originating bank and bank account. Similarly, Canadian Electronic Funds Transfers initiated by
the customer via the website are restricted from being sent to anywhere other than originating bank/bank
Account Management Users' Guide 239

account for 60 business days. This withdrawal hold period is not applicable if the transfer was initiated via
the customer's bank or if the funds are being sent back to the originating account, bank and deposit
method.
CashWithdrawal Details
Cash withdrawal details display the following information for each deposit transaction listed on the
Transaction History page:
Column Description
Type The withdrawal type
appears at the top of the
transaction details popup
window:
Check
Wire Transfer – Bank
Wire Transfer –
Broker
ACH at IB
Canadian EFT
Action Buttons The following buttons
appear at the top of the
Account Management Users' Guide 240
Chapter 4 CashWithdrawal Details
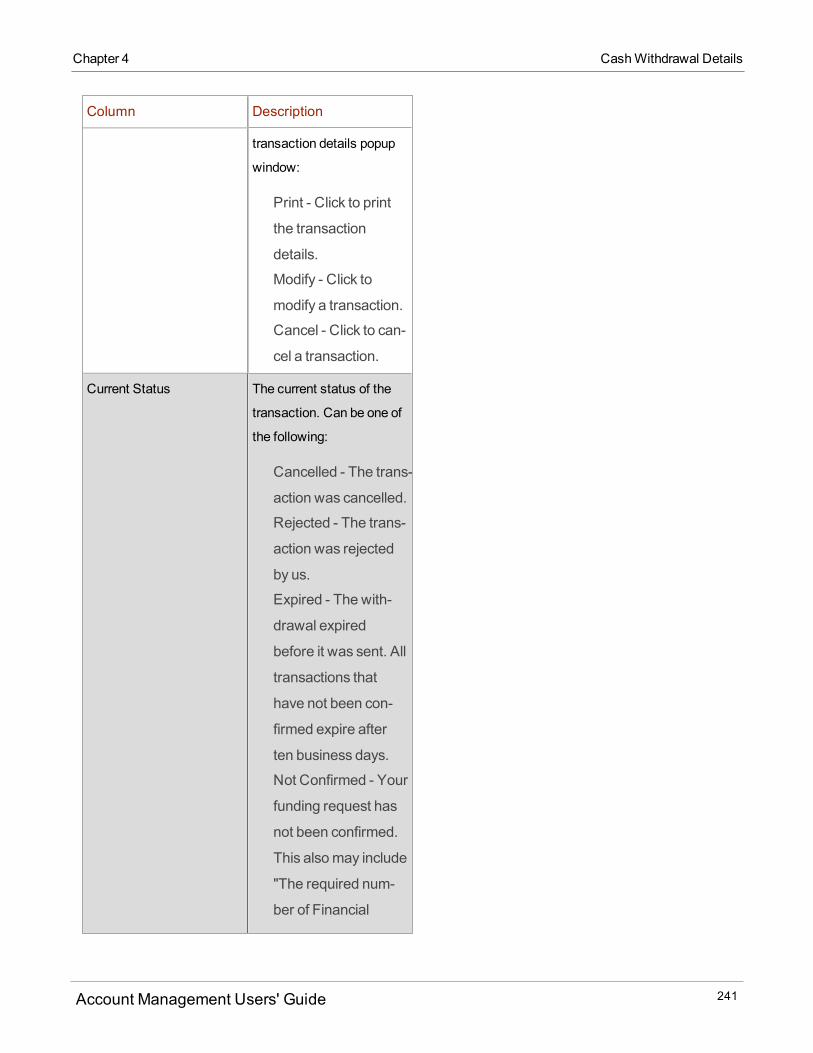
Chapter 4 CashWithdrawal Details
Column Description
transaction details popup
window:
Print - Click to print
the transaction
details.
Modify - Click to
modify a transaction.
Cancel - Click to can-
cel a transaction.
Current Status The current status of the
transaction. Can be one of
the following:
Cancelled - The trans-
action was cancelled.
Rejected - The trans-
action was rejected
by us.
Expired - The with-
drawal expired
before it was sent. All
transactions that
have not been con-
firmed expire after
ten business days.
Not Confirmed - Your
funding request has
not been confirmed.
This alsomay include
"The required num-
ber of Financial
Account Management Users' Guide 241

Column Description
Authorizers have not
authorized this
request." if your
account requires
deposit transactions
to be authorized.
Pending - Your with-
drawal request has
been received and is
being reviewed.
Pending Advisor -
Your withdrawal
request has been
received by us, but
has not been
approved by your
advisor. If your
advisor doesn't
approve within three
business days, the
fundswill auto-
matically be
released.
Sent - The funds
have been withdrawn
from your account.
Call Client Services -
There is an issue with
your transaction
request that youmust
resolve by calling Cli-
Account Management Users' Guide 242
Chapter 4 CashWithdrawal Details
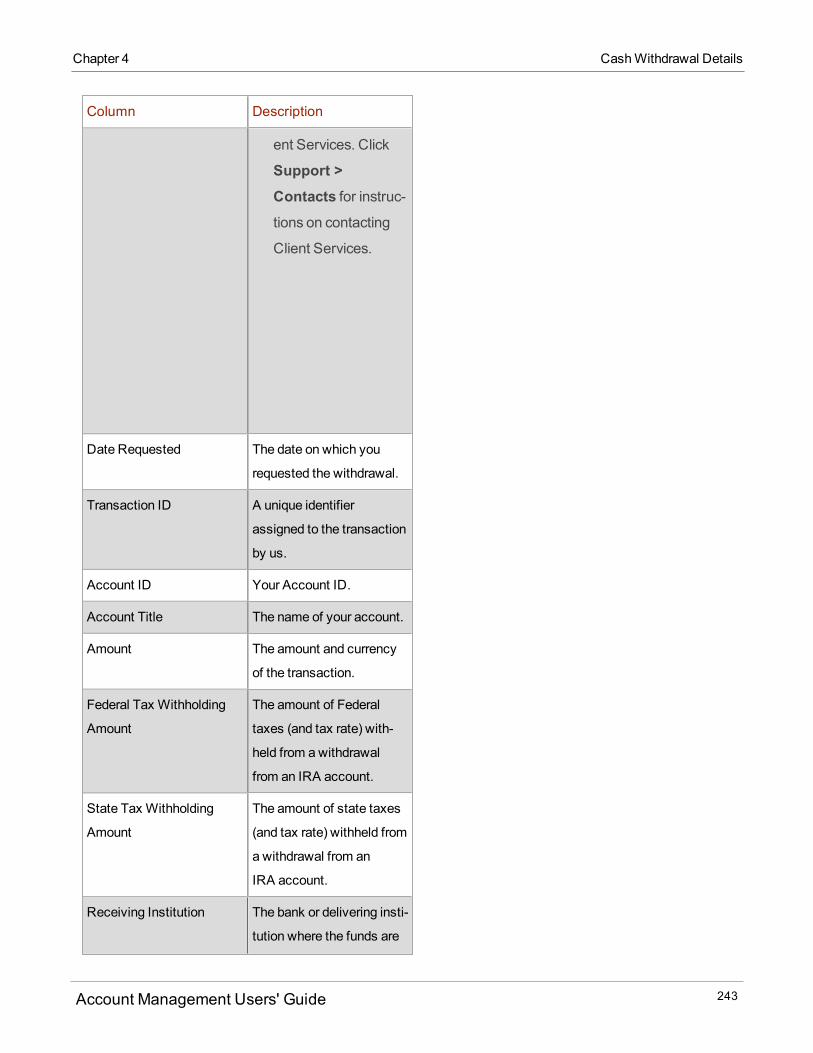
Chapter 4 CashWithdrawal Details
Column Description
ent Services. Click
Support >Contacts for instruc-tions on contacting
Client Services.
Date Requested The date on which you
requested the withdrawal.
Transaction ID A unique identifier
assigned to the transaction
by us.
Account ID Your Account ID.
Account Title The name of your account.
Amount The amount and currency
of the transaction.
Federal Tax Withholding
Amount
The amount of Federal
taxes (and tax rate) with-
held from awithdrawal
from an IRA account.
State Tax Withholding
Amount
The amount of state taxes
(and tax rate) withheld from
awithdrawal from an
IRA account.
Receiving Institution The bank or delivering insti-
tution where the funds are
Account Management Users' Guide 243
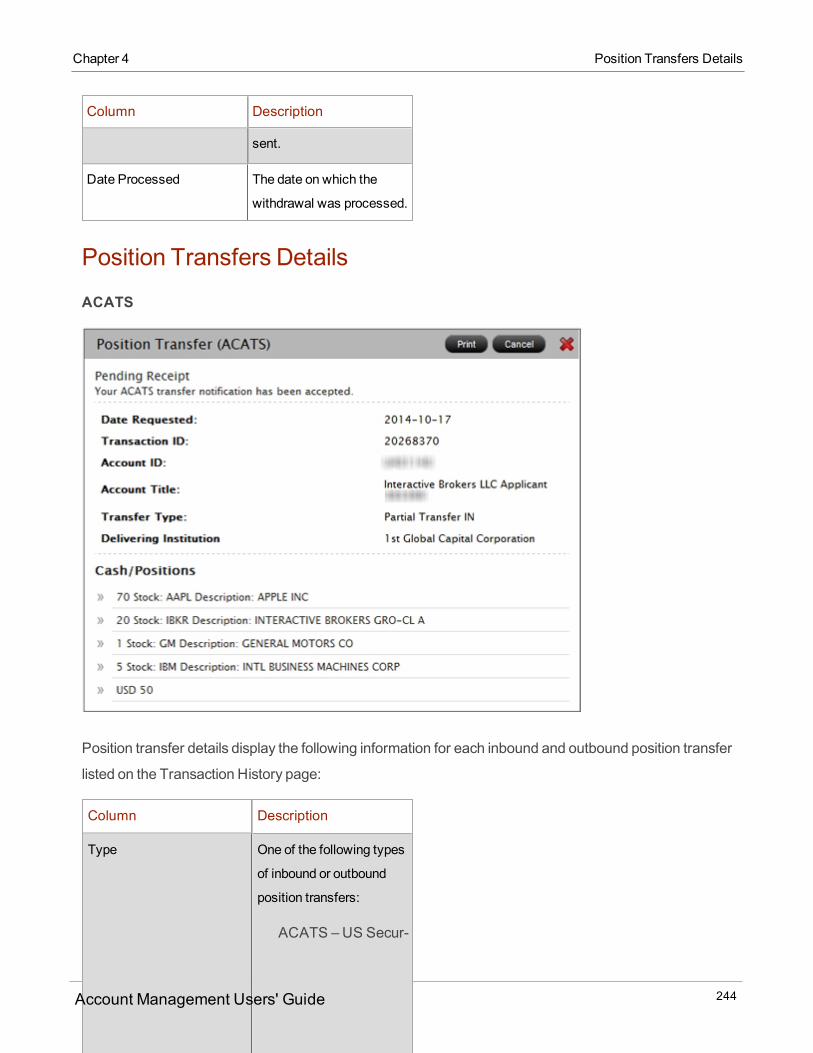
Column Description
sent.
Date Processed The date on which the
withdrawal was processed.
Position Transfers Details
ACATS
Position transfer details display the following information for each inbound and outbound position transfer
listed on the Transaction History page:
Column Description
Type One of the following types
of inbound or outbound
position transfers:
ACATS –US Secur-
Account Management Users' Guide 244
Chapter 4 Position Transfers Details
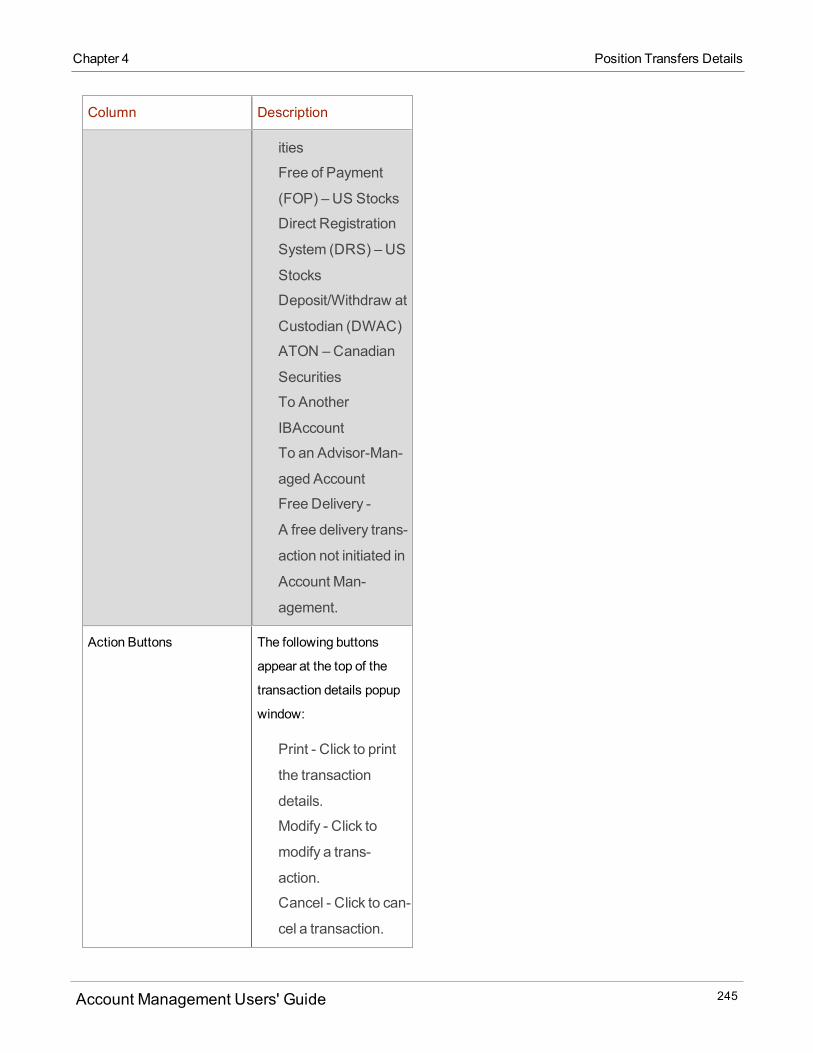
Chapter 4 Position Transfers Details
Column Description
ities
Free of Payment
(FOP) – US Stocks
Direct Registration
System (DRS) – US
Stocks
Deposit/Withdraw at
Custodian (DWAC)
ATON –Canadian
Securities
To Another
IBAccount
To an Advisor-Man-
aged Account
Free Delivery -
A free delivery trans-
action not initiated in
Account Man-
agement.
Action Buttons The following buttons
appear at the top of the
transaction details popup
window:
Print - Click to print
the transaction
details.
Modify - Click to
modify a trans-
action.
Cancel - Click to can-
cel a transaction.
Account Management Users' Guide 245
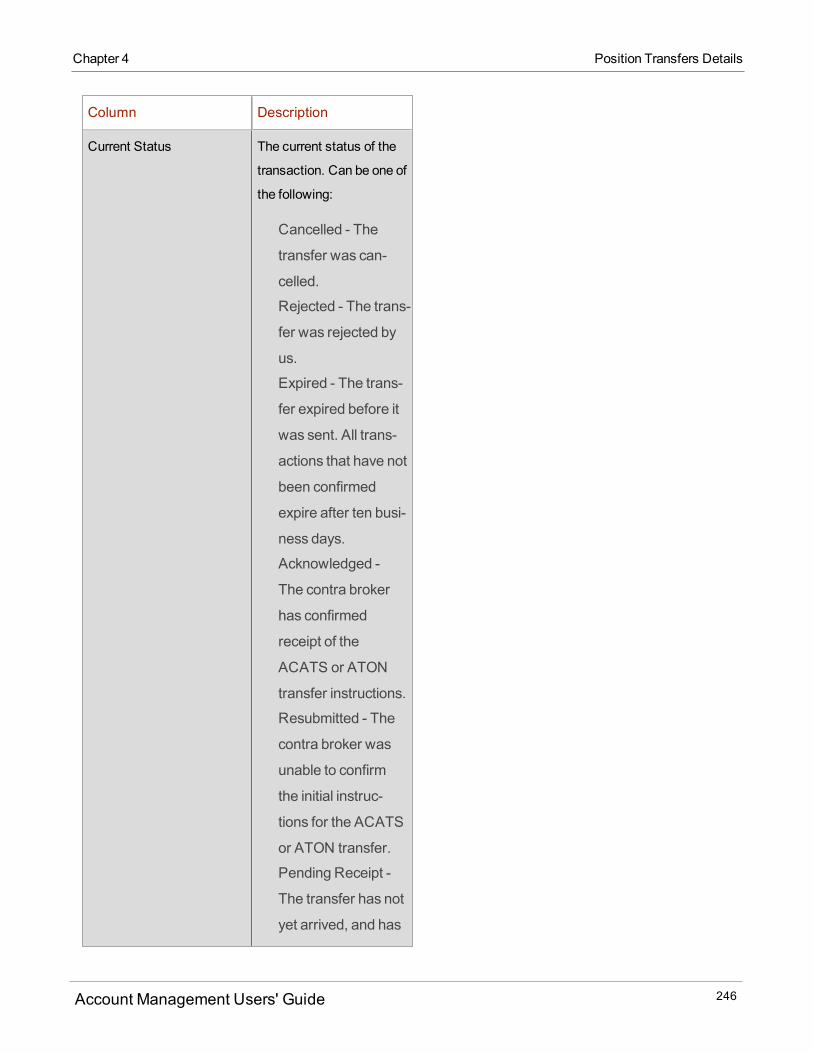
Column Description
Current Status The current status of the
transaction. Can be one of
the following:
Cancelled - The
transfer was can-
celled.
Rejected - The trans-
fer was rejected by
us.
Expired - The trans-
fer expired before it
was sent. All trans-
actions that have not
been confirmed
expire after ten busi-
ness days.
Acknowledged -
The contra broker
has confirmed
receipt of the
ACATS or ATON
transfer instructions.
Resubmitted - The
contra broker was
unable to confirm
the initial instruc-
tions for the ACATS
or ATON transfer.
Pending Receipt -
The transfer has not
yet arrived, and has
Account Management Users' Guide 246
Chapter 4 Position Transfers Details
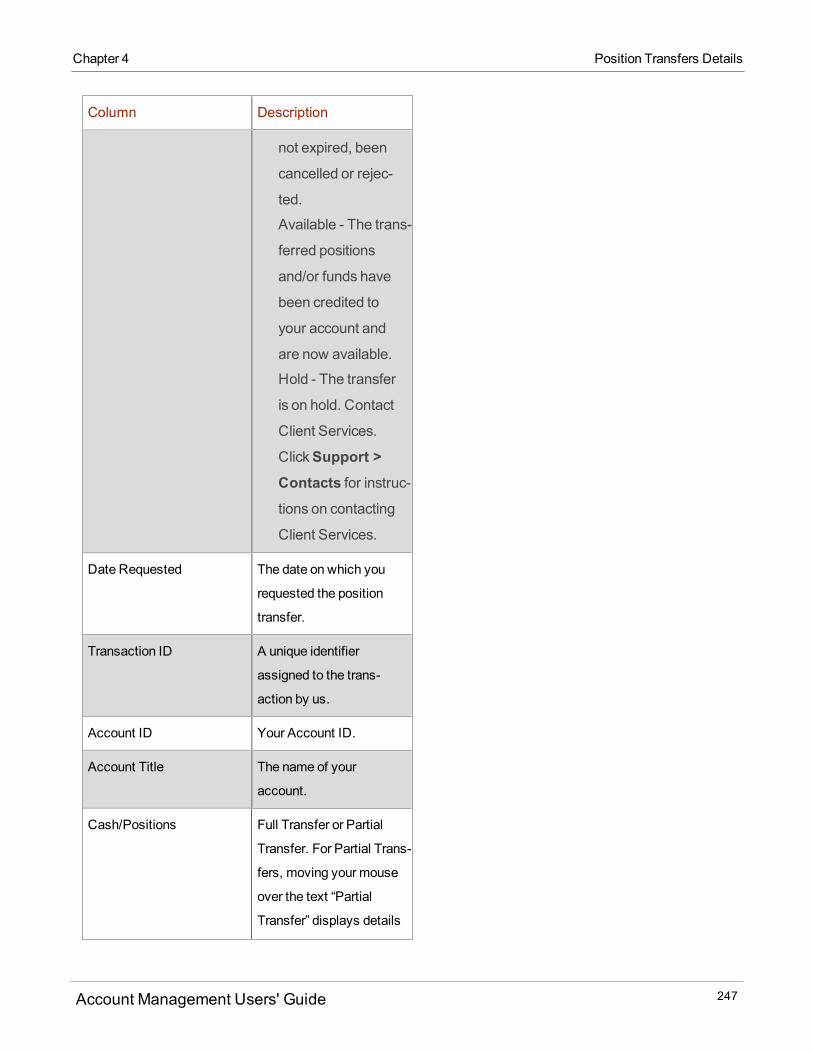
Chapter 4 Position Transfers Details
Column Description
not expired, been
cancelled or rejec-
ted.
Available - The trans-
ferred positions
and/or funds have
been credited to
your account and
are now available.
Hold - The transfer
is on hold. Contact
Client Services.
ClickSupport >Contacts for instruc-tions on contacting
Client Services.
Date Requested The date on which you
requested the position
transfer.
Transaction ID A unique identifier
assigned to the trans-
action by us.
Account ID Your Account ID.
Account Title The name of your
account.
Cash/Positions Full Transfer or Partial
Transfer. For Partial Trans-
fers, moving your mouse
over the text “Partial
Transfer” displays details
Account Management Users' Guide 247
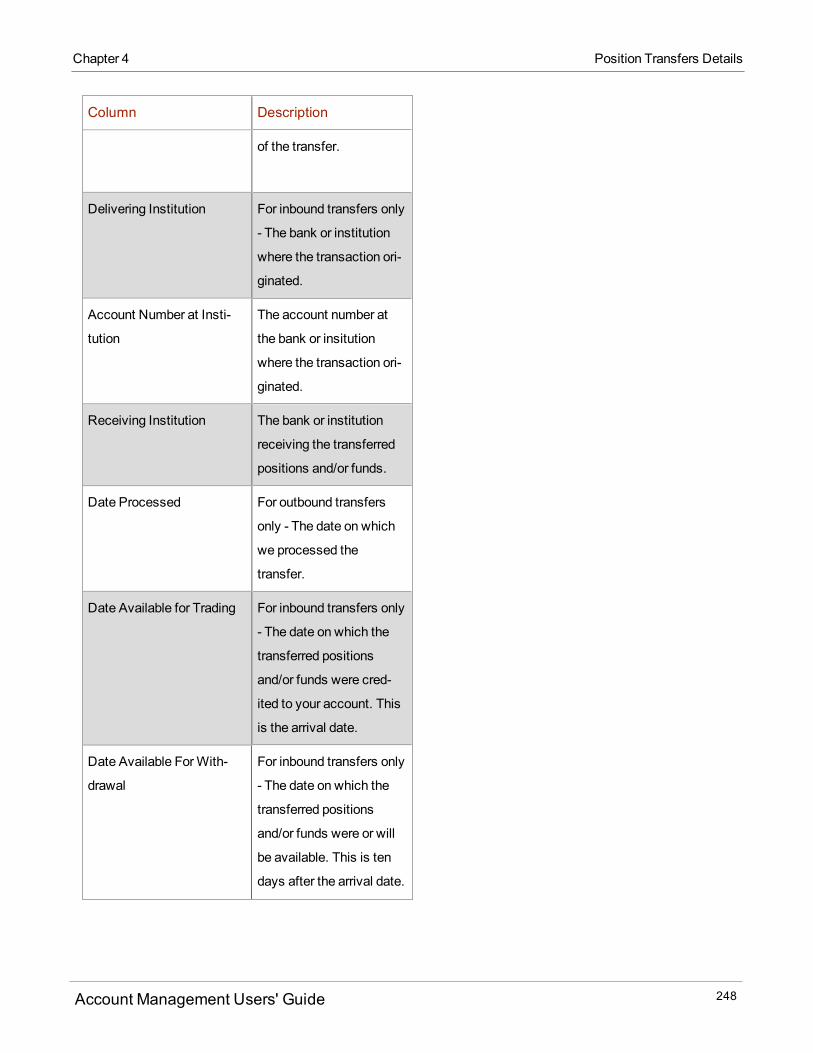
Column Description
of the transfer.
Delivering Institution For inbound transfers only
- The bank or institution
where the transaction ori-
ginated.
Account Number at Insti-
tution
The account number at
the bank or insitution
where the transaction ori-
ginated.
Receiving Institution The bank or institution
receiving the transferred
positions and/or funds.
Date Processed For outbound transfers
only - The date on which
we processed the
transfer.
Date Available for Trading For inbound transfers only
- The date on which the
transferred positions
and/or funds were cred-
ited to your account. This
is the arrival date.
Date Available ForWith-
drawal
For inbound transfers only
- The date on which the
transferred positions
and/or funds were or will
be available. This is ten
days after the arrival date.
Account Management Users' Guide 248
Chapter 4 Position Transfers Details
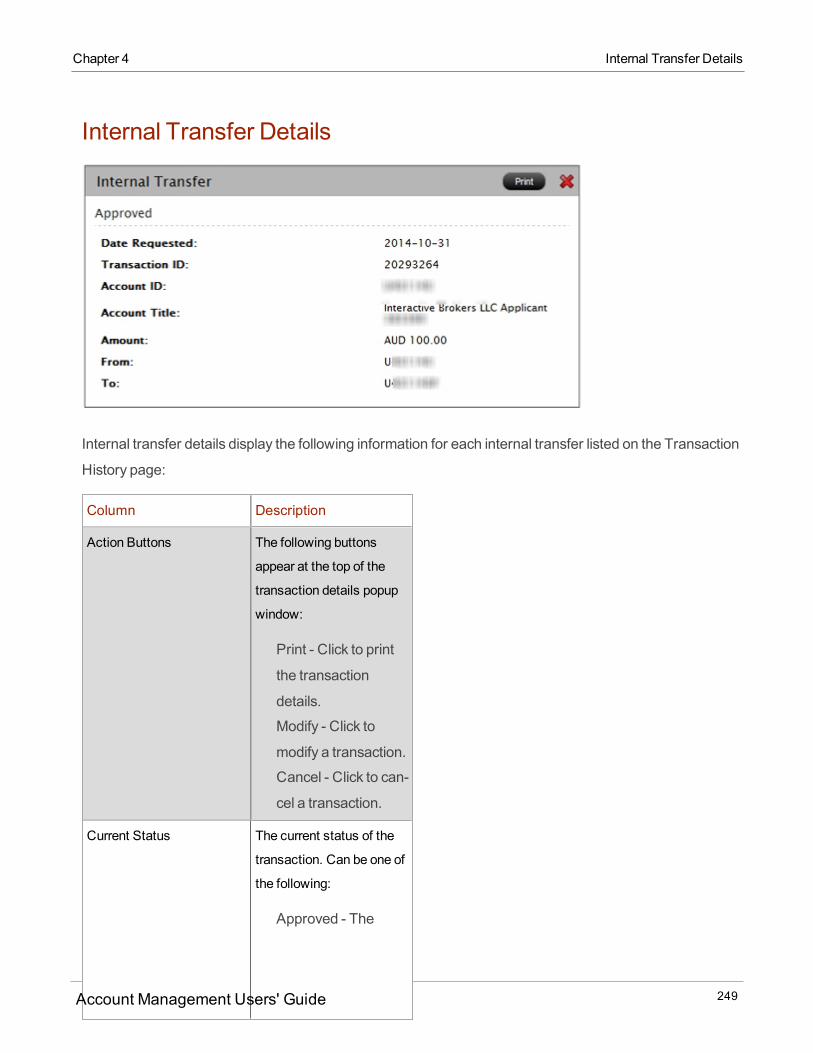
Chapter 4 Internal Transfer Details
Internal Transfer Details
Internal transfer details display the following information for each internal transfer listed on the Transaction
History page:
Column Description
Action Buttons The following buttons
appear at the top of the
transaction details popup
window:
Print - Click to print
the transaction
details.
Modify - Click to
modify a transaction.
Cancel - Click to can-
cel a transaction.
Current Status The current status of the
transaction. Can be one of
the following:
Approved - The
Account Management Users' Guide 249
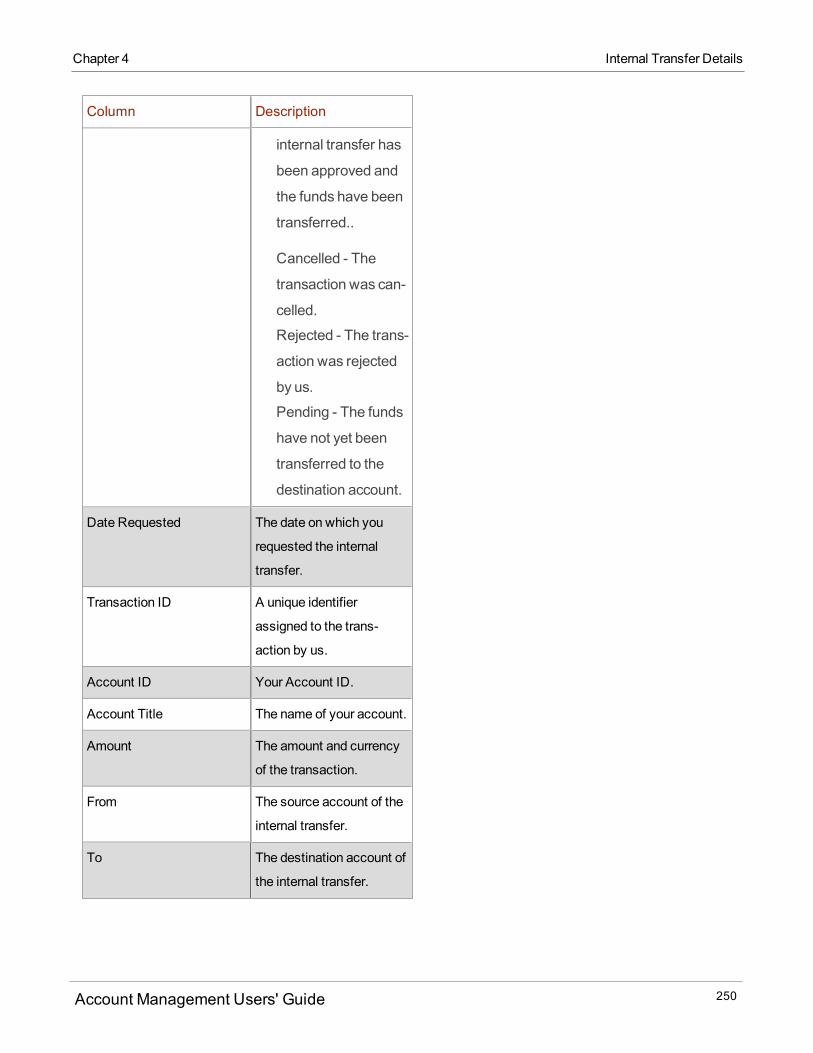
Column Description
internal transfer has
been approved and
the funds have been
transferred..
Cancelled - The
transaction was can-
celled.
Rejected - The trans-
action was rejected
by us.
Pending - The funds
have not yet been
transferred to the
destination account.
Date Requested The date on which you
requested the internal
transfer.
Transaction ID A unique identifier
assigned to the trans-
action by us.
Account ID Your Account ID.
Account Title The name of your account.
Amount The amount and currency
of the transaction.
From The source account of the
internal transfer.
To The destination account of
the internal transfer.
Account Management Users' Guide 250
Chapter 4 Internal Transfer Details

Chapter 4 Fund Transfers
Fund Transfers
The Fund Transfersmenu lets you view the funds status of your account, and initiate deposit notifications,
withdrawals and internal fund transfers. Specifically, you can:
Check the status of your funds, including cash balance and cash available for withdrawal.
Notify us of a deposit of funds
Request a withdrawal of funds
Transfer Funds Internally
In addition, you can:
Save bank information
Create recurring transactions
Request a wire withdrawal of funds from your account to a third party
Who can access the Fund Transfers page?
You can access this page if you are a(n):
Individual, Joint, Trust or IRA Account User
Small Business Account User
Friends and Family GroupMaster or Client User
Advisor Master User Organization (master and client account)
Advisor Client User Individual
Advisor Client User Organization
Proprietary Trading GroupMaster User
Broker Master User (master account only)
Broker Fully Disclosed Client User
Broker Fully Disclosed Client User Organization
Broker Non-Disclosed Client User
Investment Manager Master User
Fund
For more information
Account Management Users' Guide 251

Funding Reference
Checking the Status of Your Funds
To check the status of your funds
1. ClickFunding > Fund Transfers.2. If you have amaster account, use the Account Selector to search for client or sub accounts by
Account ID, Account Title or Account Alias, then click the client or sub account whose fund status
you want to view.
Funds status for the selected account appears at the top of the page.
Funds Status
The Fund Transfers page displays the following fund status information:
Field Description Notes
Cash Balance The current debit or credit
balance of cash posted to
your account. Shown in
your account’s base
currency.
All non-base currency balances are
converted into your base currency.
Cash Available for
Withdrawal
(assumingmargin
loan)
The total amount of cash
in your account that may
be withdrawn, assuming
you have amargin loan.
Shown in your account’s
base currency.
The balance available for
withdrawal may be less than your
total Cash Balance. For example,
for amargin account, cash
balances are being used to satisfy
your margin requirement, or for a
cash account, any portion of that
balance represents proceeds from
Account Management Users' Guide 252
Chapter 4 Checking the Status of Your Funds
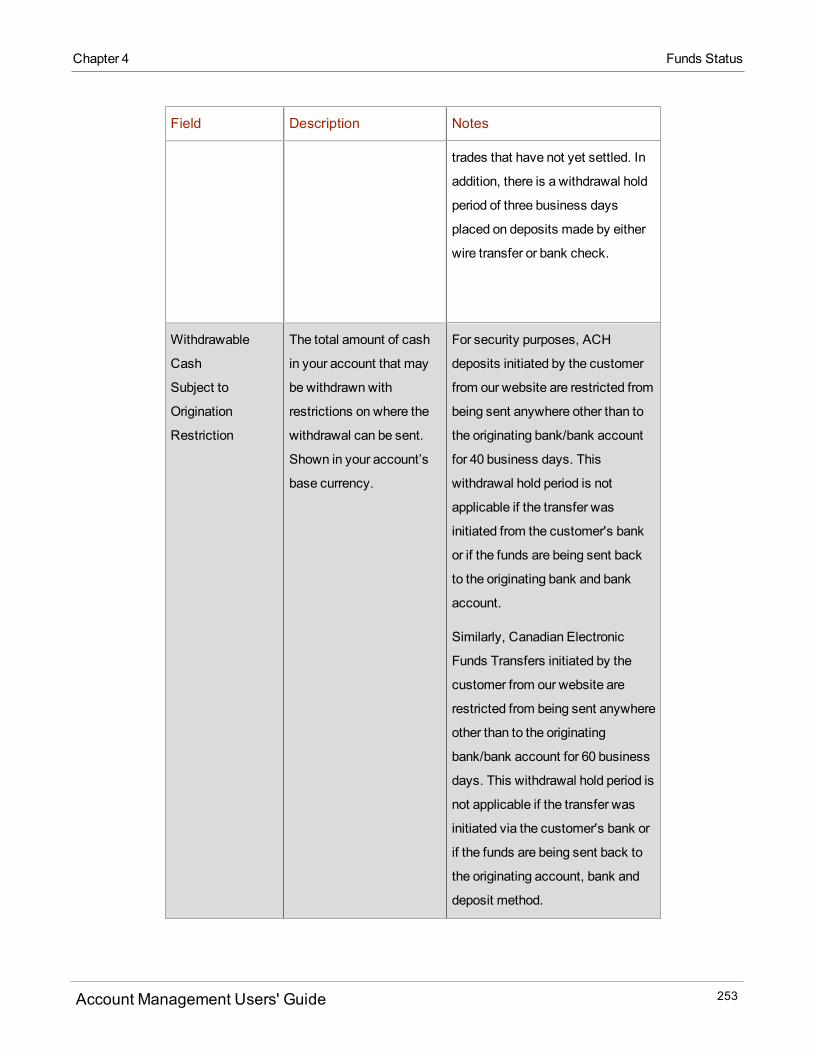
Chapter 4 Funds Status
Field Description Notes
trades that have not yet settled. In
addition, there is a withdrawal hold
period of three business days
placed on deposits made by either
wire transfer or bank check.
Withdrawable
Cash
Subject to
Origination
Restriction
The total amount of cash
in your account that may
be withdrawnwith
restrictions on where the
withdrawal can be sent.
Shown in your account’s
base currency.
For security purposes, ACH
deposits initiated by the customer
from our website are restricted from
being sent anywhere other than to
the originating bank/bank account
for 40 business days. This
withdrawal hold period is not
applicable if the transfer was
initiated from the customer's bank
or if the funds are being sent back
to the originating bank and bank
account.
Similarly, Canadian Electronic
Funds Transfers initiated by the
customer from our website are
restricted from being sent anywhere
other than to the originating
bank/bank account for 60 business
days. This withdrawal hold period is
not applicable if the transfer was
initiated via the customer's bank or
if the funds are being sent back to
the originating account, bank and
deposit method.
Account Management Users' Guide 253

Field Description Notes
Deposit Not Yet
Posted
The total balance of
deposits received but
subject to a credit hold.
These deposits are not
included in any other
account balance
displayed. Shown in your
account’s base currency.
Deposits made by ACH, Canadian
Electronic Funds Transfer and
check are subject to a credit hold
period prior to those funds being
posted to the customer's account.
Depositing Funds
The Fund Transfers page lets you notify us of a deposit of funds into your account. A deposit notification
does not actuallymove funds; youmust make arrangements with your bank or broker to deposit the funds.
We support the following types of deposits:
Wire
Check (all checks, including retirement checks)
Online bill payment check
Automated Clearing House (ACH) transfer initiated at IB
Canadian Electronic Funds Transfer (EFT) initiated by IB(Canada only)
AUD Bill payment (BPAY - for Australian Dollars only)
Direct Rollover (IRA accounts only)
Trustee-to-Trustee (IRA accounts only)
Deposit notifications are easy to complete. All required information appears as a form that you complete on
a single page - as you fill in a field or make a selection, the next part of the notification form appears.
Short Video
To notify us of a deposit
Account Management Users' Guide 254
Chapter 4 Depositing Funds
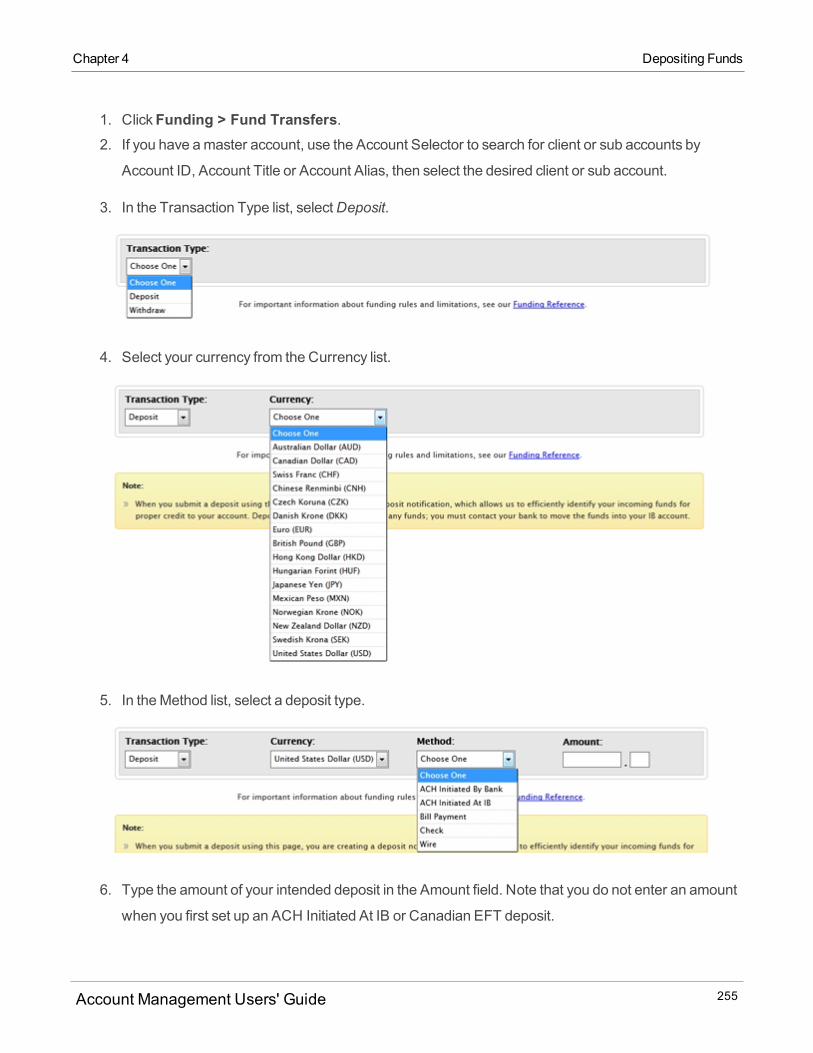
Chapter 4 Depositing Funds
1. ClickFunding > Fund Transfers.2. If you have amaster account, use the Account Selector to search for client or sub accounts by
Account ID, Account Title or Account Alias, then select the desired client or sub account.
3. In the Transaction Type list, selectDeposit.
4. Select your currency from the Currency list.
5. In theMethod list, select a deposit type.
6. Type the amount of your intended deposit in the Amount field. Note that you do not enter an amount
when you first set up an ACH Initiated At IB or Canadian EFT deposit.
Account Management Users' Guide 255

7. You are asked if you want to use previously saved bank information.
Select one of the following:
o Yes - Use saved bank information for new transfer requestSelect this option if you want to use previously saved bank information for this deposit request.
o No - Create new transfer request with new bank informationSelect this option if you want to save new bank information for this deposit request. This option is
automatically selected if you do not have any saved any bank information.
If you selectNo, complete all the fields that appear, which vary depending on the withdrawal methodyou selected.
Account Management Users' Guide 256
Chapter 4 Depositing Funds

Chapter 4 Depositing Funds
The fields vary depending on your previous selections.
8. Be sure to enter a Name for the bank instruction that will be saved with your bank information. You
will be able to use this bank instruction for future deposit notificationswithout having to re-enter your
bank information.
You can view all of your saved bank instructions on the Bank Information page.
9. Decide if you want to save the information as a recurring transaction.
If you would like to save this as a recurring transaction, clickYes, then complete all the fields andselections in that section.
You can view all of your saved recurring transactions on the Recurring Transactions page.
If you do not want to save this transaction as a recurring transaction, clickNo.
10. ClickContinue to submit your deposit notification.
Account Management Users' Guide 257

Or clickCancel to cancel the transaction.
Depending on the type of deposit notification you selected, a page appears with additional
instructions that describe what you need to provide to your bank to complete the actual deposit of
funds.
11. ClickFunding > View Transaction History at any time to view the status of your deposit noti-
fication.
For more information
Funding Reference - pages on our website that provide complete details on all funding transactions.
Withdrawing Funds
The Fund Transfers page lets you request a withdrawal of funds from your account or an internal fund
transfer to another IB account. We support the following kinds of withdrawal requests:
Wire
US ACH transfer initiated at IB (US accounts only)
Check (only available for US currency; your mailing addressmust be in the US)
Canadian EFT transfer (Canadian accounts only)
SEPA (Single Euro Payments Area) Initiated at IB
BACS (available for GBP withdrawals only)
GIRO/ACH (available for HKD, CNH, and SGD)
NZD ACH (available for NZD withdrawals only)
For important information about ACH Initiated at IB and Canadian EFT withdrawals, see ACH Initiated at
IB and Canadian EFT Transactions.
The following rules apply to withdrawals:
Accounts that do not participate in our Secure Login System are limited in the amount of money that
can be withdrawn. Account holders without a security device are limited to amaximumwithdrawal of
Account Management Users' Guide 258
Chapter 4 Withdrawing Funds
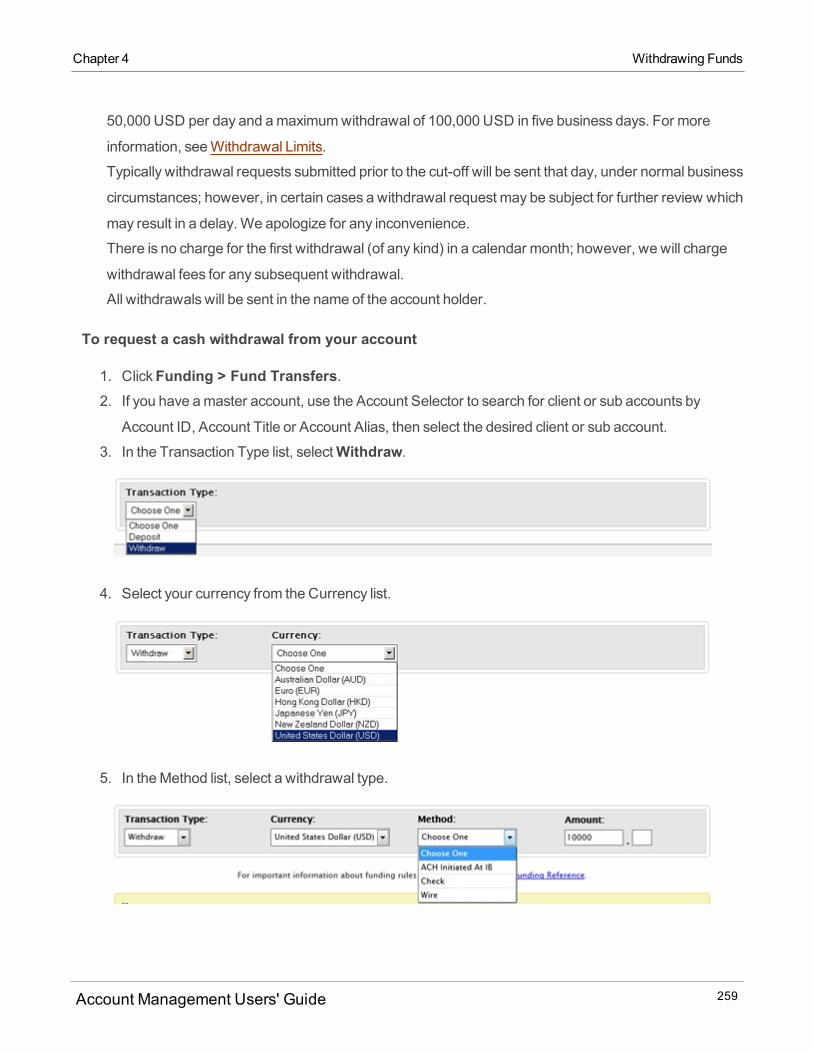
Chapter 4 Withdrawing Funds
50,000 USD per day and amaximumwithdrawal of 100,000 USD in five business days. For more
information, seeWithdrawal Limits.
Typically withdrawal requests submitted prior to the cut-off will be sent that day, under normal business
circumstances; however, in certain cases a withdrawal request may be subject for further review which
may result in a delay. We apologize for any inconvenience.
There is no charge for the first withdrawal (of any kind) in a calendar month; however, we will charge
withdrawal fees for any subsequent withdrawal.
All withdrawals will be sent in the name of the account holder.
To request a cash withdrawal from your account
1. ClickFunding > Fund Transfers.2. If you have amaster account, use the Account Selector to search for client or sub accounts by
Account ID, Account Title or Account Alias, then select the desired client or sub account.
3. In the Transaction Type list, selectWithdraw.
4. Select your currency from the Currency list.
5. In theMethod list, select a withdrawal type.
Account Management Users' Guide 259
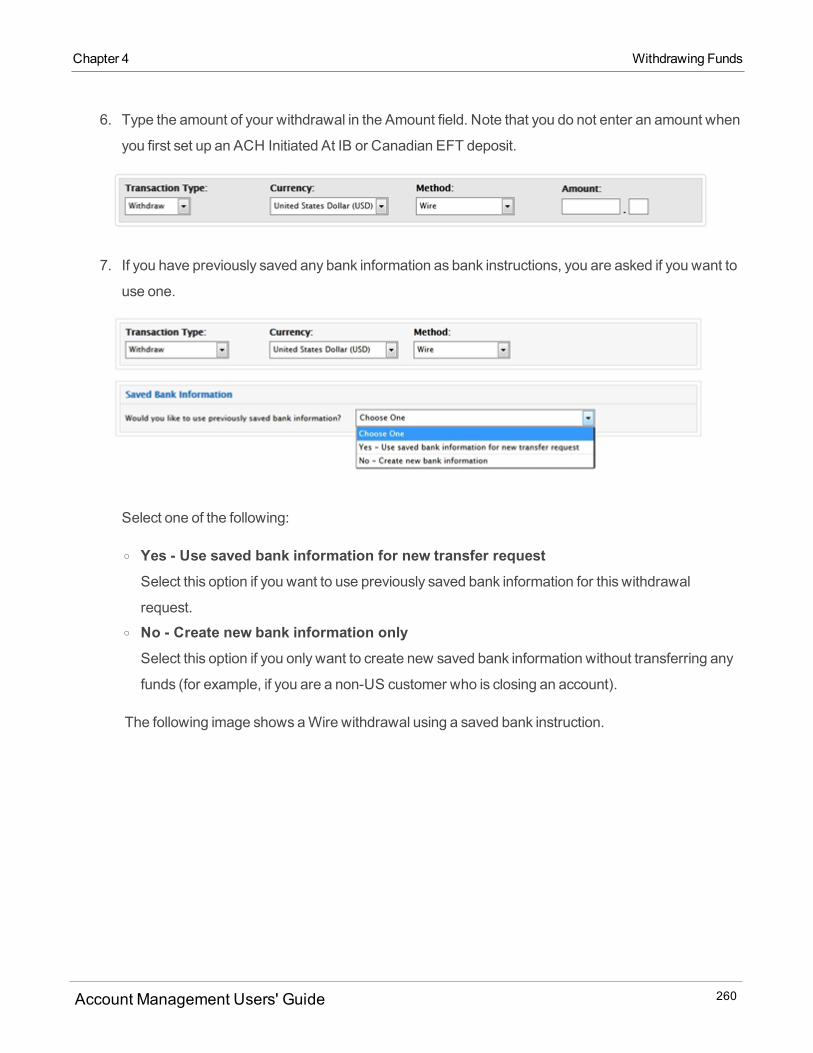
6. Type the amount of your withdrawal in the Amount field. Note that you do not enter an amount when
you first set up an ACH Initiated At IB or Canadian EFT deposit.
7. If you have previously saved any bank information as bank instructions, you are asked if you want to
use one.
Select one of the following:
o Yes - Use saved bank information for new transfer requestSelect this option if you want to use previously saved bank information for this withdrawal
request.o No - Create new bank information onlySelect this option if you only want to create new saved bank information without transferring any
funds (for example, if you are a non-US customer who is closing an account).
The following image shows aWire withdrawal using a saved bank instruction.
Account Management Users' Guide 260
Chapter 4 Withdrawing Funds
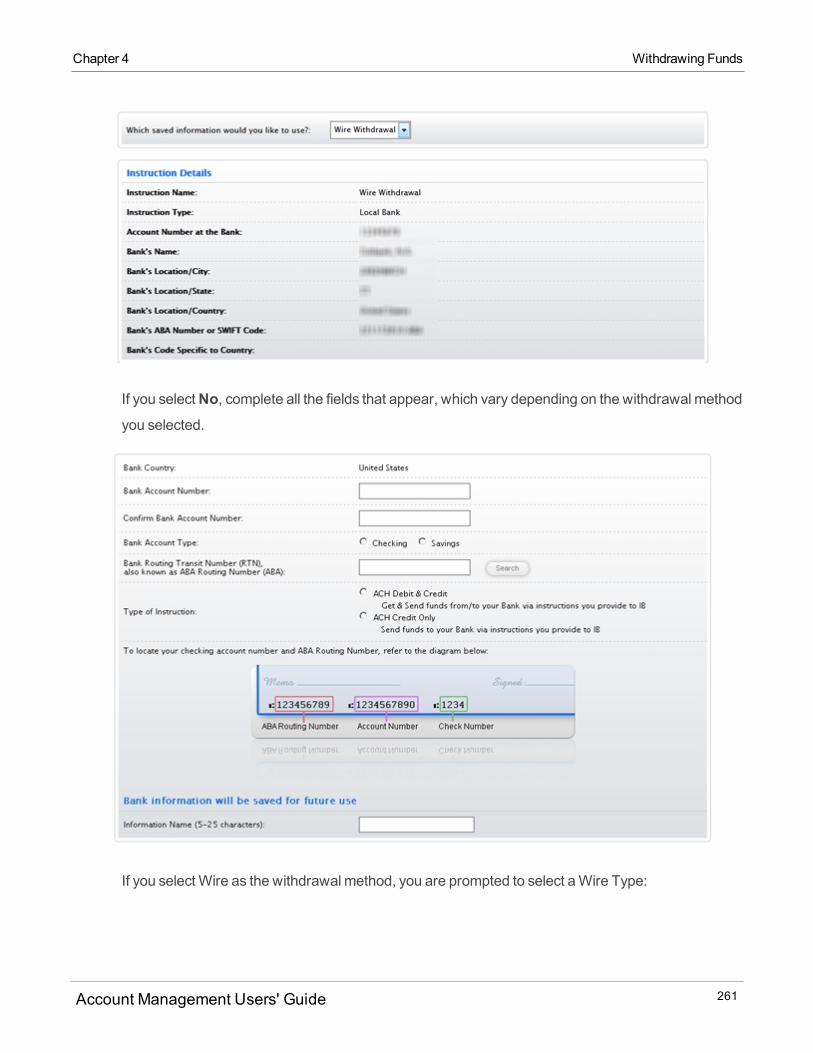
Chapter 4 Withdrawing Funds
If you selectNo, complete all the fields that appear, which vary depending on the withdrawal methodyou selected.
If you select Wire as the withdrawal method, you are prompted to select aWire Type:
Account Management Users' Guide 261

Then you are prompted to select your bank's country:
8. If you do not know your bank's routing number, click theSearch button next to the routing numberfield.
Then enter information about your bank in the popup window and clickContinue.
A list of all banks along with their routing numbers appears. Select your specific bank. The routing
number for the bank you select will be entered into the routing number field for you.
9. Be sure to enter a Name for the bank instruction that will be saved with your bank information. You
will be able to use this bank instruction for future withdrawals without having to re-enter your bank
information.
You can view all of your saved bank instructions on the Bank Information page.
10. Decide if you want to save the information as a recurring transaction.
Account Management Users' Guide 262
Chapter 4 Withdrawing Funds

Chapter 4 Withdrawing Funds
11. If you would like to save this as a recurring transaction, click Yes, then complete all the fields and
selections in that section.
If you do not want to save this transaction as a recurring transaction, clickNo.
12. ClickContinue to submit your withdrawal request. An email with a confirmation number is imme-diately sent to your email address.
Or clickCancel to cancel the transaction.
The Verify Your Identity page appears with additional information about your withdrawal request.
13. Enter your username, password and the confirmation number sent to your email address. ClickCon-firm.
If you did not receive a confirmation number, click theResend button to receive a new one.
14. ClickFunding > View Transaction History at any time to view the status of your deposit noti-
fication.
Account Management Users' Guide 263

For more information
Funding Reference - pages on our website that provide complete details on all funding transactions.
ACH Initiated at IB and Canadian EFT Transactions
The process of requesting ACH Initiated at IB and Canadian EFT deposit notifications and withdrawals is
somewhat different from other transactionmethods.
The process for these transactions is described below:
1. On the Funding > Fund Transfers page, after you select the transaction type, currency and thetransactionmethod, you enter and save your bank information just as you would for any other fund-
ing deposit or withdrawal method. Note that you do not enter an amount.
2. Once you submit this request, which authorizes us and your bank to electronically transfer funds
between the two accounts, we will issue test transactions in the form of small debit and credit
amounts to your bank account. Note that this request does not actuallymove your funds.
3. Youmust then verify these test transactions. This verification process ensures that the person enter-
ing bank information is the legitimate owner of the bank account to be used in the transaction.
4. Now that the verification process has been completed, you can submit an ACH Initiated at IB deposit
or Canadian EFT deposit notification or withdrawal request on the Fund Transfers page using the
bank information that you’ve already saved. This request will include the actual amount and will
move your funds.
Transferring Funds Internally
The Fund Transfers page lets you transfer funds internally from your account or an internal fund transfer to
another IB account. We support the following kinds of internal fund transfers:
Internal fund transfer to another IB account (all account structures) with matching Account Name,
Account Title, and Tax ID.
Linked accounts can use this type of transfer. However, multiple accounts that are eligible to be linked
but are not currently linked cannot use this type of transfer; these account holders will receive an error
message.
Account Management Users' Guide 264
Chapter 4 ACH Initiated at IB and Canadian EFT Transactions
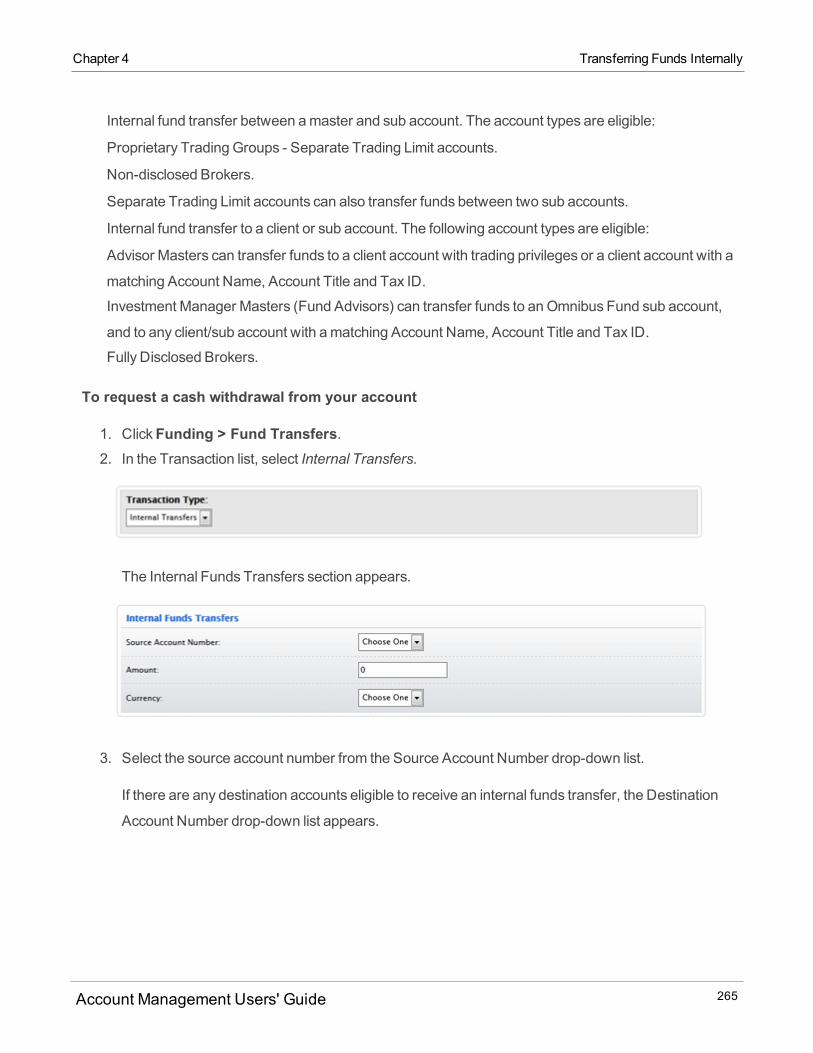
Chapter 4 Transferring Funds Internally
Internal fund transfer between amaster and sub account. The account types are eligible:
Proprietary Trading Groups - Separate Trading Limit accounts.
Non-disclosed Brokers.
Separate Trading Limit accounts can also transfer funds between two sub accounts.
Internal fund transfer to a client or sub account. The following account types are eligible:
Advisor Masters can transfer funds to a client account with trading privileges or a client account with a
matching Account Name, Account Title and Tax ID.
Investment Manager Masters (Fund Advisors) can transfer funds to anOmnibus Fund sub account,
and to any client/sub account with amatching Account Name, Account Title and Tax ID.
Fully Disclosed Brokers.
To request a cash withdrawal from your account
1. ClickFunding > Fund Transfers.2. In the Transaction list, select Internal Transfers.
The Internal Funds Transfers section appears.
3. Select the source account number from the Source Account Number drop-down list.
If there are any destination accounts eligible to receive an internal funds transfer, the Destination
Account Number drop-down list appears.
Account Management Users' Guide 265
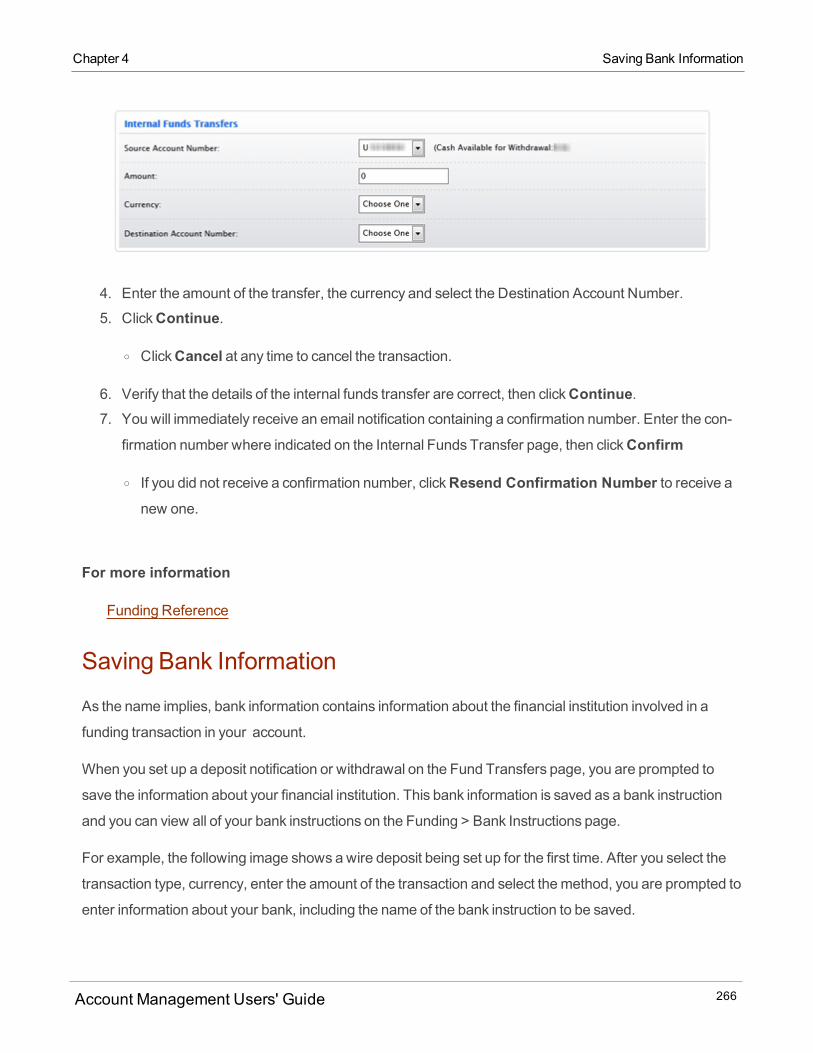
4. Enter the amount of the transfer, the currency and select the Destination Account Number.
5. ClickContinue.
o ClickCancel at any time to cancel the transaction.
6. Verify that the details of the internal funds transfer are correct, then clickContinue.7. You will immediately receive an email notification containing a confirmation number. Enter the con-
firmation number where indicated on the Internal Funds Transfer page, then clickConfirm
o If you did not receive a confirmation number, clickResend Confirmation Number to receive anew one.
For more information
Funding Reference
Saving Bank Information
As the name implies, bank information contains information about the financial institution involved in a
funding transaction in your account.
When you set up a deposit notification or withdrawal on the Fund Transfers page, you are prompted to
save the information about your financial institution. This bank information is saved as a bank instruction
and you can view all of your bank instructions on the Funding > Bank Instructions page.
For example, the following image shows a wire deposit being set up for the first time. After you select the
transaction type, currency, enter the amount of the transaction and select themethod, you are prompted to
enter information about your bank, including the name of the bank instruction to be saved.
Account Management Users' Guide 266
Chapter 4 Saving Bank Information
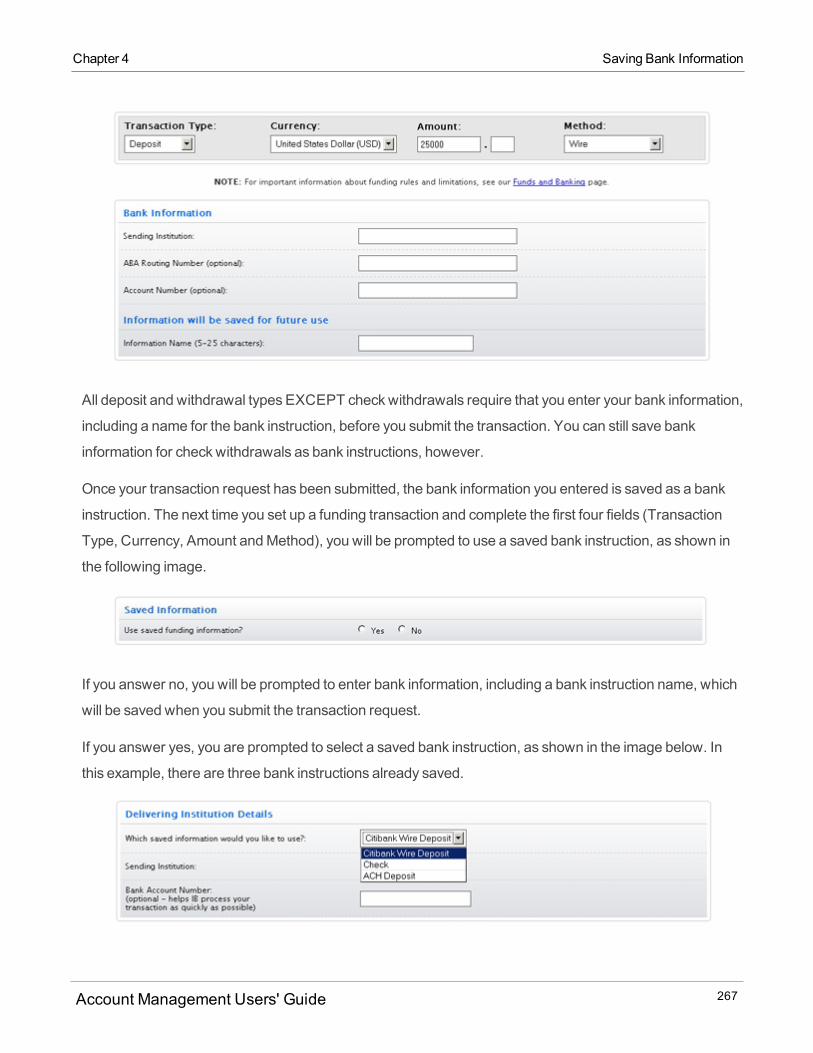
Chapter 4 Saving Bank Information
All deposit and withdrawal types EXCEPT checkwithdrawals require that you enter your bank information,
including a name for the bank instruction, before you submit the transaction. You can still save bank
information for checkwithdrawals as bank instructions, however.
Once your transaction request has been submitted, the bank information you entered is saved as a bank
instruction. The next time you set up a funding transaction and complete the first four fields (Transaction
Type, Currency, Amount andMethod), you will be prompted to use a saved bank instruction, as shown in
the following image.
If you answer no, you will be prompted to enter bank information, including a bank instruction name, which
will be saved when you submit the transaction request.
If you answer yes, you are prompted to select a saved bank instruction, as shown in the image below. In
this example, there are three bank instructions already saved.
Account Management Users' Guide 267
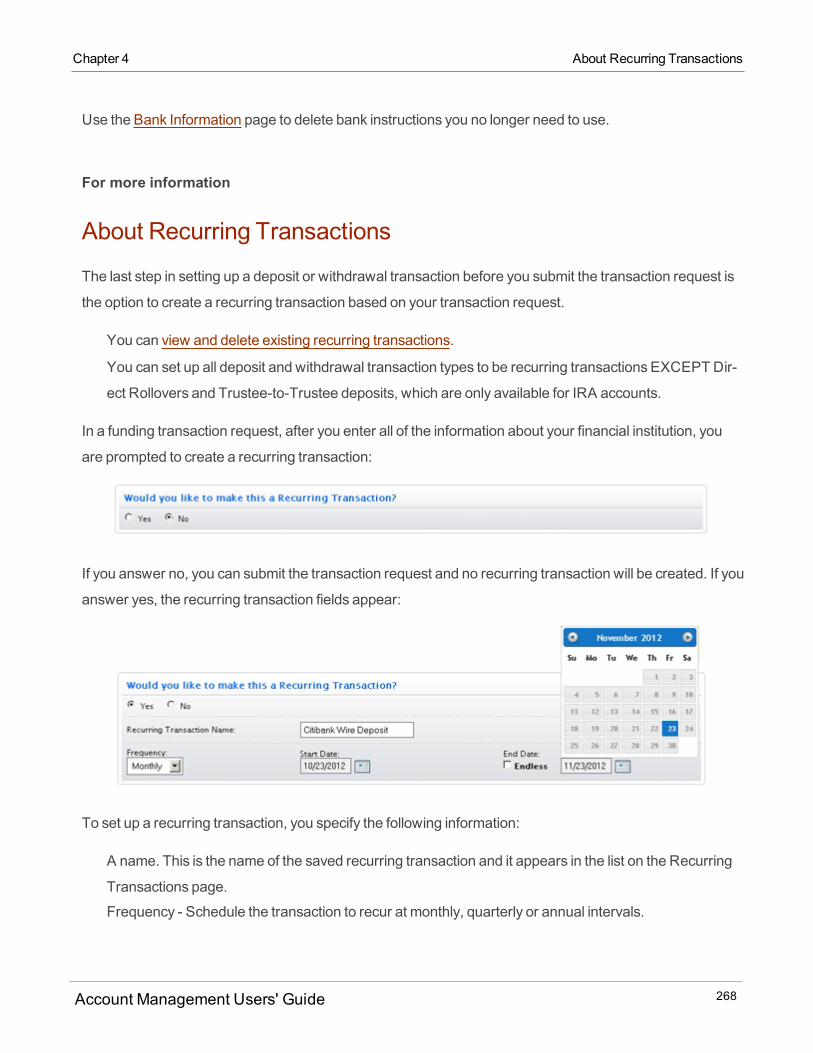
Use the Bank Information page to delete bank instructions you no longer need to use.
For more information
About Recurring Transactions
The last step in setting up a deposit or withdrawal transaction before you submit the transaction request is
the option to create a recurring transaction based on your transaction request.
You can view and delete existing recurring transactions.
You can set up all deposit and withdrawal transaction types to be recurring transactions EXCEPT Dir-
ect Rollovers and Trustee-to-Trustee deposits, which are only available for IRA accounts.
In a funding transaction request, after you enter all of the information about your financial institution, you
are prompted to create a recurring transaction:
If you answer no, you can submit the transaction request and no recurring transaction will be created. If you
answer yes, the recurring transaction fields appear:
To set up a recurring transaction, you specify the following information:
A name. This is the name of the saved recurring transaction and it appears in the list on the Recurring
Transactions page.
Frequency - Schedule the transaction to recur at monthly, quarterly or annual intervals.
Account Management Users' Guide 268
Chapter 4 About Recurring Transactions
Chapter 4 Canceling a Recurring Transaction
A start date, in the format mm/dd/yyyy, or use the calendar icon to select a date. This indicates the first
date that the recurring transaction should be processed.
An end date, in the format mm/dd/yyyy, or use the calendar icon to select a date. This indicates the last
date that the recurring transaction should be processed.
If you have an IRA account, youmust also specify:
For deposits, tax year (current only) and deposit type (Contribution only).
For withdrawals, the percentage of tax to be withheld the distribution type.
You can also specify that a recurring transaction has no end date and therefore will not expire until you
delete it. You do this by selecting the Endlesscheck box.
When you submit your transaction request, the recurring transaction information you entered will also be
saved and the transaction will recur at the frequency and on the start date that you entered.
In the event the transaction falls on a US non-business day under normal circumstances, we will process
the request on the business day prior to the recurring transaction date. In the even this processing leads to
multiple withdrawals during the samemonth, the account holder will be assessed withdrawal fees.
Canceling a Recurring Transaction
To cancel a recurring transaction, delete the recurring transaction from the Recurring Transaction page.
For more information
Funding Reference
Withdrawing Funds to a Third Party
The Fund Transfers page lets you request a wire withdrawal of funds from your account to an eligible third
party. Only wire withdrawals are allowed. A third-party withdrawal is a two-step process:
1. Enter third-party information and submit it to us for approval.
2. Upon approval of the payee information, create and submit a third-party withdrawal request using
the approved information as the bank information for the withdrawal. Note that the actual withdrawal
request is also subject to approval.
Who is eligible to withdraw funds to a third party?
Account Management Users' Guide 269

The following IB LLC, IB UK, IB HK and IB Canada accounts are eligible to withdraw funds to a third party:
Individual, Joint and Trust accounts - The primary account holder and any account user with funding
access rights in an Individual account, either account holder in a Joint account, and any trustee in a
Trust account with funding access rights can enter third- party withdrawal payee information and ini-
tiate third-party wire withdrawals.
Advisor accounts - Only the Registered Advisor is allowed to enter third-party withdrawal payee inform-
ation and initiate third-party withdrawal requests.
Proprietary Trading Group STL account master users and Pool accounts - Themaster user and any
account user with funding access rights can enter third-party withdrawal payee information and initiate
third-party wire withdrawals. Officers, traders or owners of the proprietary trading organization are not
eligible unless they have funding access rights.
Hedge Fund Accounts - The Fund Investment Manager and any account user with funding access
rights can enter third-party withdrawal payee information and initiate third-party wire withdrawals. The
Hedge Fund can request third-party withdrawals to vendors and administrators but not to individual
investors of the Fund or the Investment Manager.
Fully Disclosed Broker accounts - The individual users with funding access rights can enter third-party
withdrawal payee information and initiate third-party wire withdrawal requests.
The following accounts are NOT eligible to withdraw funds to a third party:
Master and client accounts under an unregistered Advisor account (Friends and Family account and
Family Office account with an unregistered Advisor)
IRA accounts
Non-disclosed andOmnibus Broker accounts
In a Proprietary Trading Group account, any user OTHER than themaster user and other than users
with funding access rights.
To enter third-party information and submit it to us
1. ClickFunding > Fund Transfers.2. If you have amaster account, use the Account Selector to search for client or sub accounts by
Account ID, Account Title or Account Alias, then select the desired client or sub account.
3. In the Transaction Type list, select Third PartyWithdrawal.
Account Management Users' Guide 270
Chapter 4 Withdrawing Funds to a Third Party
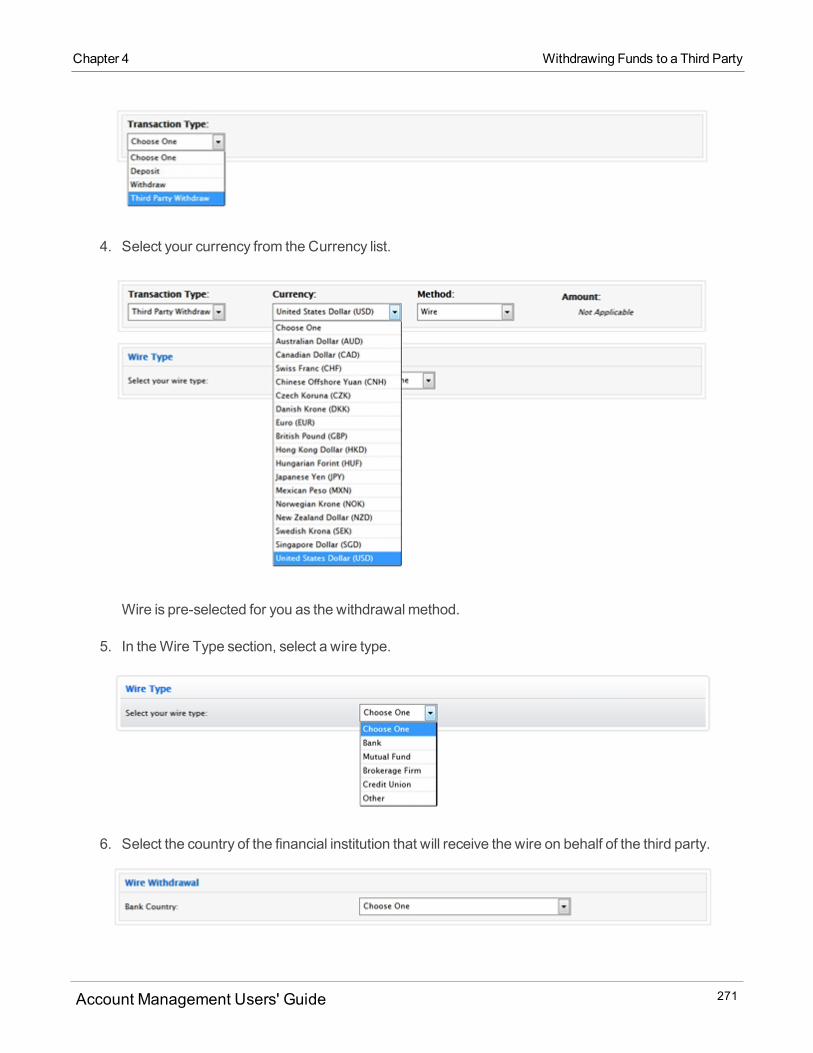
Chapter 4 Withdrawing Funds to a Third Party
4. Select your currency from the Currency list.
Wire is pre-selected for you as the withdrawal method.
5. In theWire Type section, select a wire type.
6. Select the country of the financial institution that will receive the wire on behalf of the third party.
Account Management Users' Guide 271

7. Fill in the rest of the information about the financial institution that will receive the wire on behalf of
the third party.
8. If you do not know your bank's routing number, click theSearch button next to the routing numberfield.
Then enter information about your bank in the popup window and clickContinue.
A list of all banks along with their routing numbers appears. Select your specific bank. The routing
number for the bank you select will be entered into the routing number field for you.
9. Fill in the information about the third-party payee.
Account Management Users' Guide 272
Chapter 4 Withdrawing Funds to a Third Party

Chapter 4 Withdrawing Funds to a Third Party
10. Enter a Name for the bank instruction that will be saved with your bank information.
11. ClickContinue to submit the third-party payee information to us for approval.
You will be notified when we approve the information.
To withdraw funds to a third party via a wire transfer
1. ClickFunding > Fund Transfers.2. If you have amaster account, use the Account Selector to search for client or sub accounts by
Account ID, Account Title or Account Alias, then select the desired client or sub account.
3. In the Transaction Type list, select Third PartyWithdrawal.
4. Select your currency from the Currency list.
Wire is preselected for you as the withdrawal method.
Account Management Users' Guide 273
5. You are asked if you want to use previously saved bank information. From the drop-down, select the
approved bank information that you previously submitted for your third-party withdrawal.
6. Type the amount of your withdrawal in the Amount field.
7. ClickContinue to submit your third-party withdrawal request.
Position Transfers
The Position Transfersmenu lets you transfer positions to and from your account. We support the following
types of position transfers in Account Management:
Automated Customer Account Transfer Service (ACATS)
Account Transfer on Notification (ATON) for Canadian securities
DRS - Direct Registration System
DWAC - Deposit/Withdraw at Custodian
Transfer Assets to an Advisor-Managed Account
Transfer International Assets
Free of Payment (FOP) for US stocks
US futures
Transfer Positions Internally
Position Transfer BetweenMaster and Sub
When you request an ACATS, ATON or FOP position transfer, you have the option of creating and/or
using a Position Instruction.
Who can access the Position Transfers page?
You can access this page if you are a(n):
Individual, Joint, Trust or IRA Account User
Small Business Account User
Friends and Family GroupMaster or Client User
Advisor Master User Organization (master and client account)
Advisor Client User Individual
Account Management Users' Guide 274
Chapter 4 Position Transfers
Chapter 4 ACATS Transfers
Advisor Client User Organization
Proprietary Trading GroupMaster User
Broker Master User (master account only)
Broker Fully Disclosed Client Users
Broker Fully Disclosed Client User Organization
Broker Non-Disclosed Client User
Investment Manager Master User
Fund
For more information
Funding Reference
ACATS Transfers
The Position Transfers page lets you transfer US stocks, warrants, optionsUS mutual funds, US bonds
and cash held at another brokerage firm to us through the National Securities Clearing Corporation's
(NSCC) Automated Customer Account Transfer Service (ACATS).
When you select ACATS as the transfer method on the Position Transfers page, you can:
Request a Full ACATS transfer, in which all of your assets are transferred from a third-party broker to
your account.
Request a Partial ACATS transfer without a Position Instruction, in which you transfer only some of
your assets and cash from a third-party broker to your account and you do not use an optional Position
Instruction.
Request a Partial ACATS transfer using a Position Instruction, in which you use a previously-created
Position Instruction to transfer only some of your assets and cash from a third-party broker to your
account.
Create a new Position Instruction, which lets you save and reuse third-party broker information for
future Partial ACATS transfers.
Your Account Name, Tax Identification Number and Customer Type (i.e. individual, joint, Roth IRA), must
exactlymatch the third-party broker account in order for the transfer to take place.
Account Management Users' Guide 275
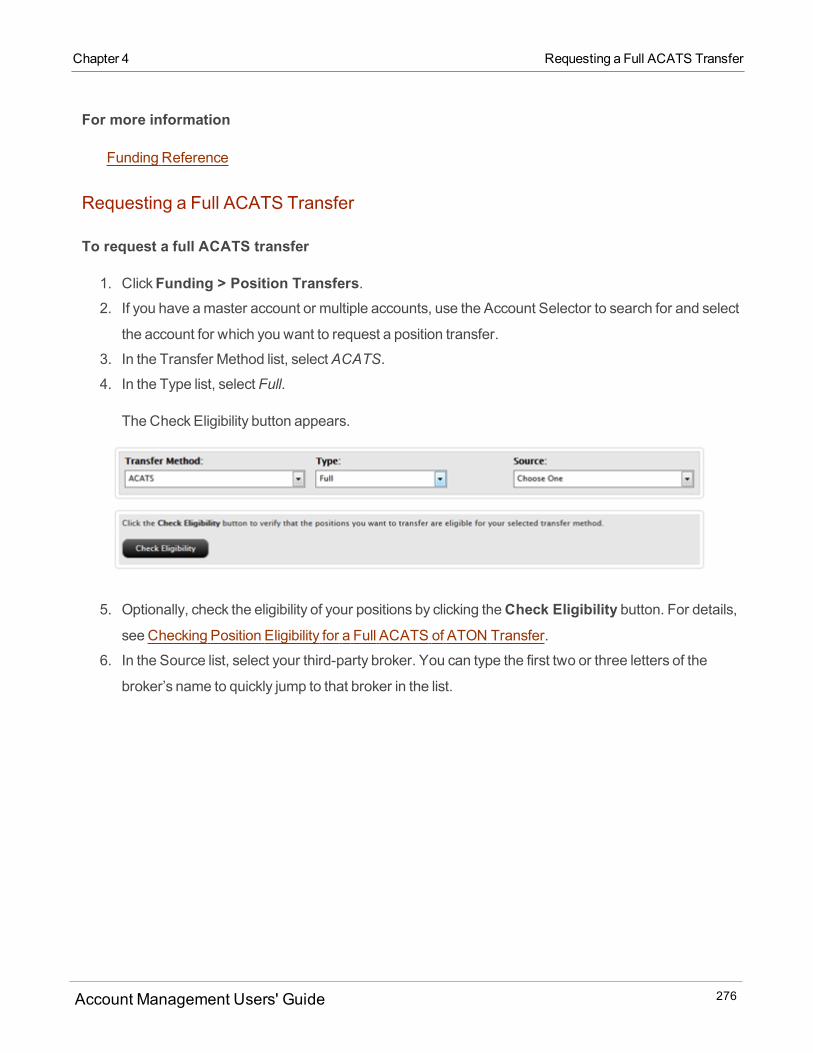
For more information
Funding Reference
Requesting a Full ACATS Transfer
To request a full ACATS transfer
1. ClickFunding > Position Transfers.2. If you have amaster account or multiple accounts, use the Account Selector to search for and select
the account for which you want to request a position transfer.
3. In the Transfer Method list, selectACATS.
4. In the Type list, select Full.
The Check Eligibility button appears.
5. Optionally, check the eligibility of your positions by clicking theCheck Eligibility button. For details,see Checking Position Eligibility for a Full ACATS of ATON Transfer.
6. In the Source list, select your third-party broker. You can type the first two or three letters of the
broker’s name to quickly jump to that broker in the list.
Account Management Users' Guide 276
Chapter 4 Requesting a Full ACATS Transfer
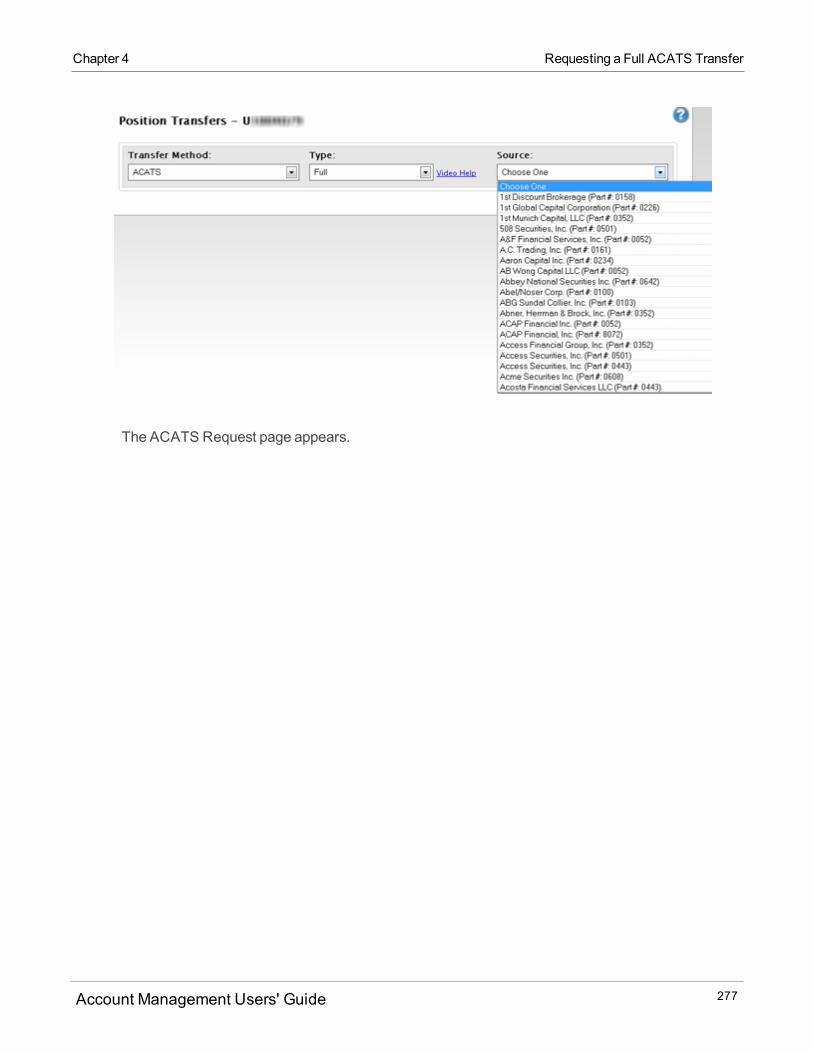
Chapter 4 Requesting a Full ACATS Transfer
The ACATS Request page appears.
Account Management Users' Guide 277
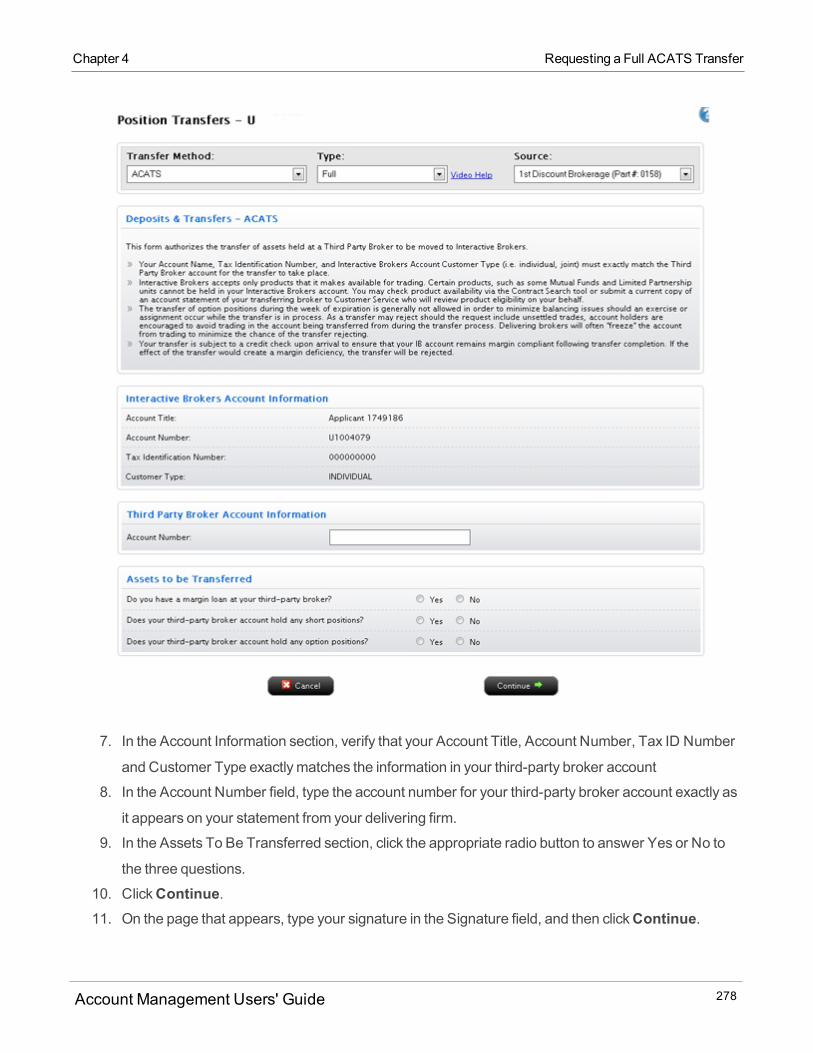
7. In the Account Information section, verify that your Account Title, Account Number, Tax ID Number
and Customer Type exactlymatches the information in your third-party broker account
8. In the Account Number field, type the account number for your third-party broker account exactly as
it appears on your statement from your delivering firm.
9. In the Assets To Be Transferred section, click the appropriate radio button to answer Yes or No to
the three questions.
10. ClickContinue.11. On the page that appears, type your signature in the Signature field, and then clickContinue.
Account Management Users' Guide 278
Chapter 4 Requesting a Full ACATS Transfer
Chapter 4 Requesting a Partial ACATS Transfer without a Position
Instruction
12. On the Confirmation page, enter the confirmation number that you received via email in the Con-
firmation Number field, then clickConfirm.
If you do not receive a Confirmation Number by email, please check your junk email folder as some-
times email filters blockmessages.
Or clickResend Confirmation Number to receive another confirmation email.Or clickCancel to cancel the transfer request.
For more information
Funding Reference
Requesting a Partial ACATS Transfer without a Position Instruction
See Position Instructions for information about viewing and deleting position instructions. ACATS Position
Instructions can only be used with Partial ACATS transfers.
To request a partial ACATS transfer without a Position Instruction
1. ClickFunding > Position Transfers.2. If you have amaster account or multiple accounts, use the Account Selector to search for and select
the account for which you want to request a position transfer.
3. In the Transfer Method list, selectACATS.
4. In the Type list, selectPartial.
5. In the Source list, select your third-party broker. You can type the first two or three letters of the
broker’s name to quickly jump to that broker in the list.
The ACATS Request page appears.
6. In the Account Number field, type the account number for your third-party broker account exactly as
it appears on your statement from your delivering firm.
7. In the Assets To Be Transferred section, click the appropriate radio button to answer Yes or No to
the three questions.
8. ClickContinue.The Partial ACATS Transfer page appears.
Account Management Users' Guide 279
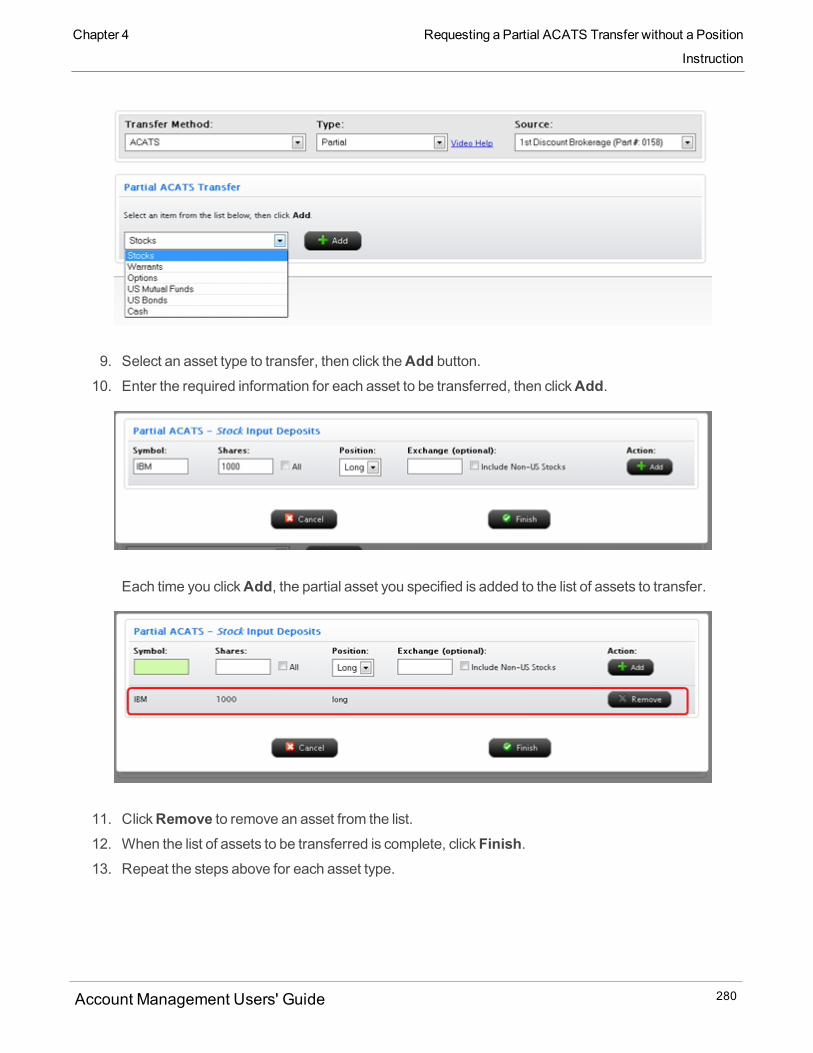
9. Select an asset type to transfer, then click theAdd button.10. Enter the required information for each asset to be transferred, then clickAdd.
Each time you clickAdd, the partial asset you specified is added to the list of assets to transfer.
11. ClickRemove to remove an asset from the list.
12. When the list of assets to be transferred is complete, clickFinish.13. Repeat the steps above for each asset type.
Account Management Users' Guide 280
Chapter 4 Requesting a Partial ACATS Transfer without a Position
Instruction
Chapter 4 Requesting a Partial ACATS Transfer Using an Existing Pos-
ition Instruction
14. On the ACATS Signature page, review the information on the page. Delete assets from the list or
addmore assets to transfer as required. Then type your name in the Signature field and click
Continue.
15. On the Confirmation page, enter the confirmation number that you received via email in the Con-
firmation Number field, then clickConfirm.
If you do not receive a Confirmation Number by email, please check your junk email folder as some-
times email filters blockmessages.
Or clickResend Confirmation Number to receive another confirmation email.Or clickCancel to cancel the transfer request.
For more information
Requesting a Partial ACATS Transfer Using an Existing Position Instruction
See Position Instructions for information about viewing and deleting position instructions. ACATS Position
Instructions can only be used with Partial ACATS transfers.
To request a partial ACATS transfer using an existing Position Instruction
1. ClickFunding > Position Transfers.2. If you have amaster account or multiple accounts, use the Account Selector to search for and select
the account for which you want to request a position transfer.
3. In the Transfer Method list, selectACATS.
4. In the Type list, selectUse/Create Instruction.This option allows you to use an existing Position
Instruction or create a new one.
5. In the Instruction list, select a previously-created Position Instruction from the list.
The instruction details appear on the screen and you can immediately begin adding assets to your
partial ACATS transfer.
Account Management Users' Guide 281

6. Select an asset type to transfer, then click theAdd button.7. Enter the required information for each asset to be transferred, then clickAdd.
Each time you clickAdd, the partial asset you specified is added to the list of assets to transfer.
Account Management Users' Guide 282
Chapter 4 Requesting a Partial ACATS Transfer Using an Existing Pos-
ition Instruction
Chapter 4 Creating a Position Instruction for a Partial ACATS Transfer
8. ClickRemove to remove an asset from the list.
9. When the list of assets to be transferred is complete, clickFinish.10. Repeat Steps 6-9 for each asset type.
11. On the ACATS Signature page, review the information on the page. Delete assets from the list or
addmore assets to transfer as required. Then type your name in the Signature field and click
Continue.12. On the Confirmation page, enter the confirmation number that you received via email in the Con-
firmation Number field, then clickConfirm.
If you do not receive a Confirmation Number by email, please check your junk email folder as some-
times email filters blockmessages.
Or clickResend Confirmation Number to receive another confirmation email.Or clickCancel to cancel the transfer request.
For more information
Creating a Position Instruction for a Partial ACATS Transfer
See Position Instructions for information about viewing and deleting position instructions. ACATS Position
Instructions can only be used with Partial ACATS transfers.
To create a new Position Instruction
1. ClickFunding > Position Transfers.2. If you have amaster account, in the Client/Sub Account Selection area, use the radio buttons to
search for client or sub accounts by Account ID, Account Title or Account Alias, then click the client
or sub account whose transaction history you want to view.
3. In the Transfer Method list, selectACATS.
4. In the Type list, selectUse/Create Instruction.This option allows you to use an existing Position
Instruction or create a new one.
5. In the Instruction list, selectAddNew Instruction.
If you select this option, you will be prompted to create and save the new instruction first, and then
you will have to start a new position transfer request and select the instruction you just created. Note
that you can only use Position Instructions for partial ACATS transfers.
Account Management Users' Guide 283
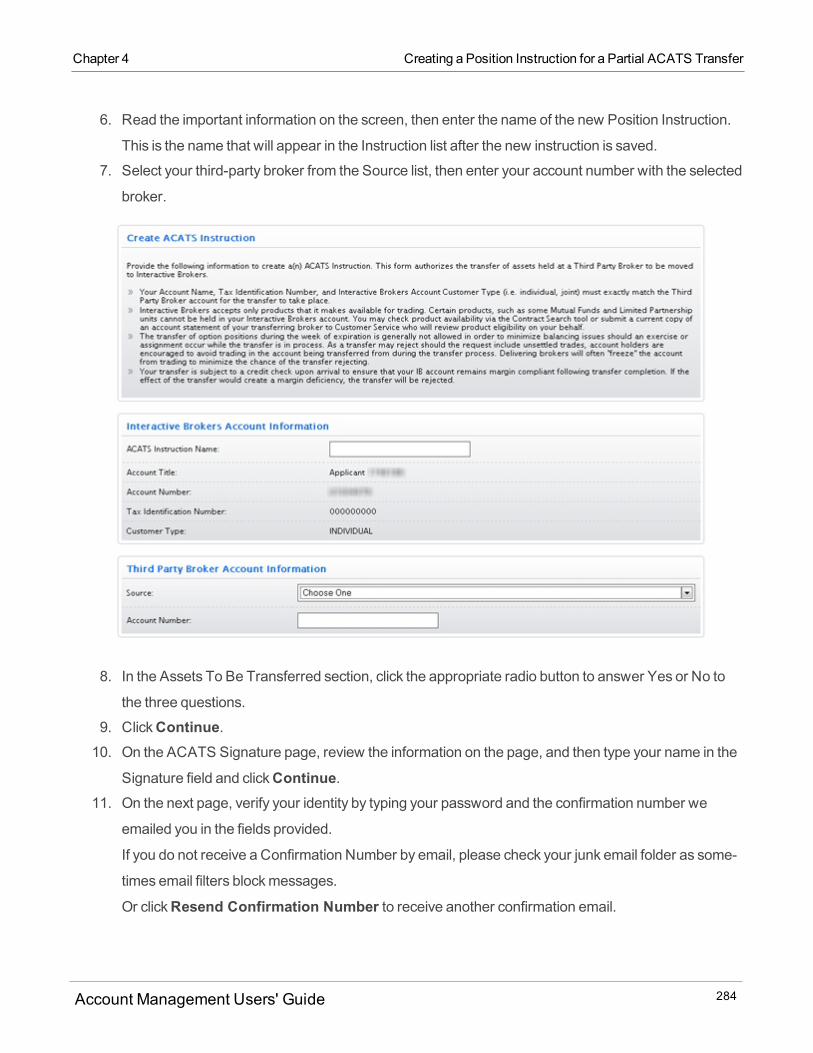
6. Read the important information on the screen, then enter the name of the new Position Instruction.
This is the name that will appear in the Instruction list after the new instruction is saved.
7. Select your third-party broker from the Source list, then enter your account number with the selected
broker.
8. In the Assets To Be Transferred section, click the appropriate radio button to answer Yes or No to
the three questions.
9. ClickContinue.10. On the ACATS Signature page, review the information on the page, and then type your name in the
Signature field and clickContinue.11. On the next page, verify your identity by typing your password and the confirmation number we
emailed you in the fields provided.
If you do not receive a Confirmation Number by email, please check your junk email folder as some-
times email filters blockmessages.
Or clickResend Confirmation Number to receive another confirmation email.
Account Management Users' Guide 284
Chapter 4 Creating a Position Instruction for a Partial ACATS Transfer
Chapter 4 ATON Transfers
12. Your new Position Instruction has been created. Now return to the Funding > Position Transfers
page and begin a new partial ACATS transfer using your newly-created Position Instruction.
For more information
ATONTransfers
The Position Transfers page lets you transfer US or Canadian stocks, options and cash held at another
brokerage firm to us through ATON, the Canadian equivalent of ACATS.
When you select ATON as the transfer method on the Position Transfers page, you can:
Request a Full ATON transfer, in which all of your assets are transferred from a third-party broker to
your account.
Request a Partial ATON transfer without a Position Instruction, in which you transfer only some of your
assets and cash from a third-party broker to your account and you do not use an optional Position
Instruction.
Request a Partial ATON transfer using a Position Instruction, in which you use a previously-created
Position Instruction to transfer only some of your assets and cash from a third-party broker to your
account.
Create a new Position Instruction, which lets you save and reuse third-party broker information for
future Partial ATON transfers.
Your Account Name, Tax Identification Number and Customer Type (i.e. individual, joint, Roth IRA), must
exactlymatch the third-party broker account in order for the transfer to take place.
For more information
Funding Reference
Requesting a Full ATON Transfer
To request a full ATON transfer
Account Management Users' Guide 285
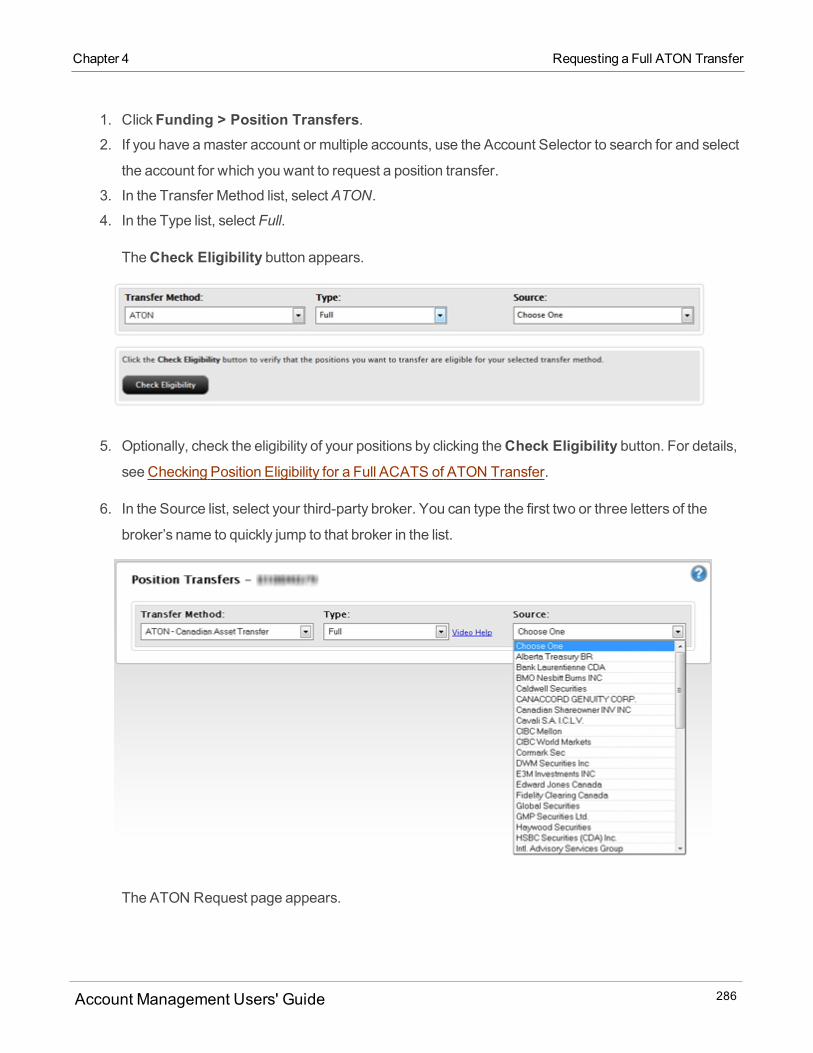
1. ClickFunding > Position Transfers.2. If you have amaster account or multiple accounts, use the Account Selector to search for and select
the account for which you want to request a position transfer.
3. In the Transfer Method list, selectATON.
4. In the Type list, select Full.
TheCheck Eligibility button appears.
5. Optionally, check the eligibility of your positions by clicking theCheck Eligibility button. For details,see Checking Position Eligibility for a Full ACATS of ATON Transfer.
6. In the Source list, select your third-party broker. You can type the first two or three letters of the
broker’s name to quickly jump to that broker in the list.
The ATON Request page appears.
Account Management Users' Guide 286
Chapter 4 Requesting a Full ATON Transfer
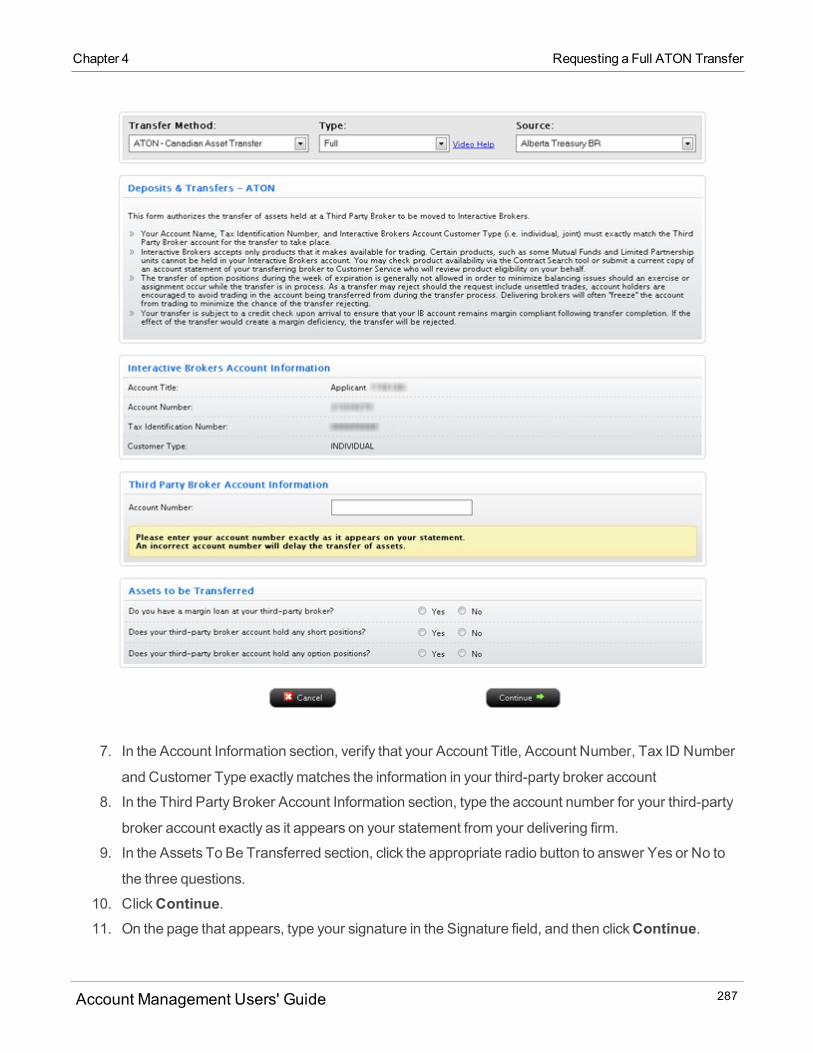
Chapter 4 Requesting a Full ATON Transfer
7. In the Account Information section, verify that your Account Title, Account Number, Tax ID Number
and Customer Type exactlymatches the information in your third-party broker account
8. In the Third Party Broker Account Information section, type the account number for your third-party
broker account exactly as it appears on your statement from your delivering firm.
9. In the Assets To Be Transferred section, click the appropriate radio button to answer Yes or No to
the three questions.
10. ClickContinue.11. On the page that appears, type your signature in the Signature field, and then clickContinue.
Account Management Users' Guide 287
12. On the Confirmation page, enter the confirmation number that you received via email in the Con-
firmation Number field, then clickConfirm.
If you do not receive a Confirmation Number by email, please check your junk email folder as some-
times email filters blockmessages.
Or clickResend Confirmation Number to receive another confirmation email.Or clickCancel to cancel the transfer request.
For more information
Funding Reference
Partial ATON Transfers without Instructions
See Position Instructions for information about viewing and deleting position instructions. ATON Position
Instructions can only be used with Partial ATON transfers.
To request a partial ATON transfer without a Position Instruction
1. ClickFunding > Position Transfers.2. If you have amaster account or multiple accounts, use the Account Selector to search for and select
the account for which you want to request a position transfer.
3. In the Transfer Method list, selectATON.
4. In the Type list, selectPartial.
5. In the Source list, select your third-party broker. You can type the first two or three letters of the
broker’s name to quickly jump to that broker in the list.
The ATON Request page appears.
Account Management Users' Guide 288
Chapter 4 Partial ATON Transfers without Instructions
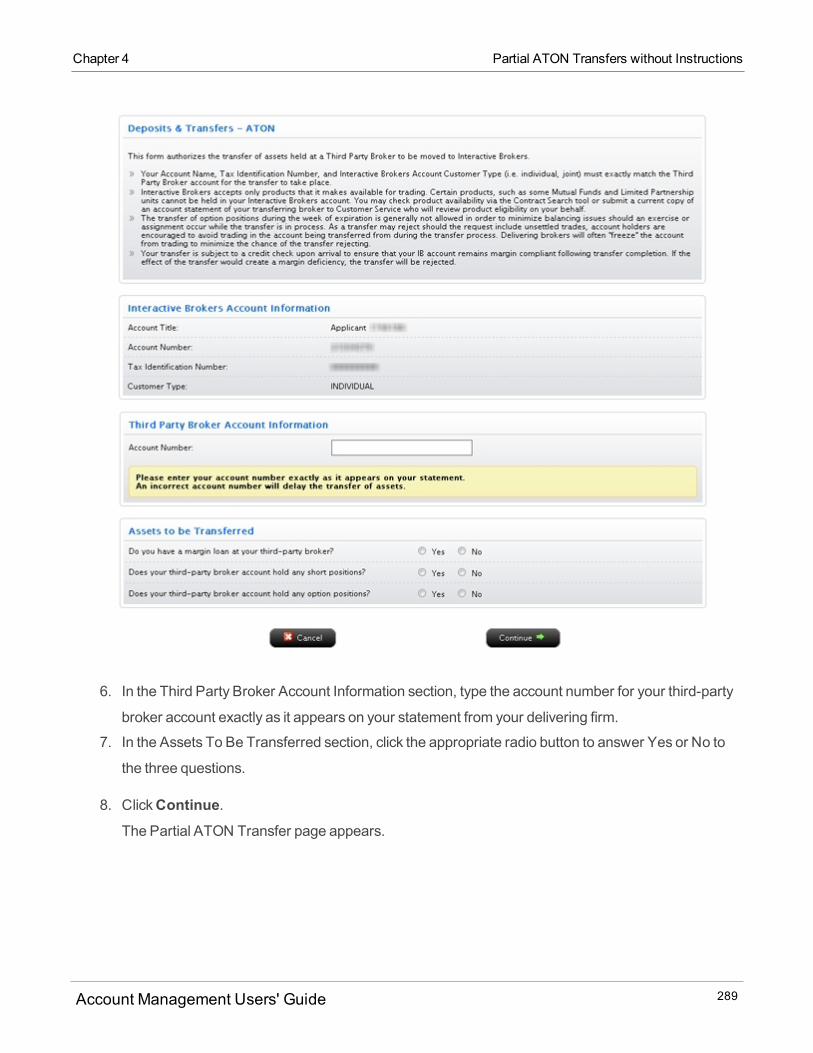
Chapter 4 Partial ATON Transfers without Instructions
6. In the Third Party Broker Account Information section, type the account number for your third-party
broker account exactly as it appears on your statement from your delivering firm.
7. In the Assets To Be Transferred section, click the appropriate radio button to answer Yes or No to
the three questions.
8. ClickContinue.The Partial ATON Transfer page appears.
Account Management Users' Guide 289
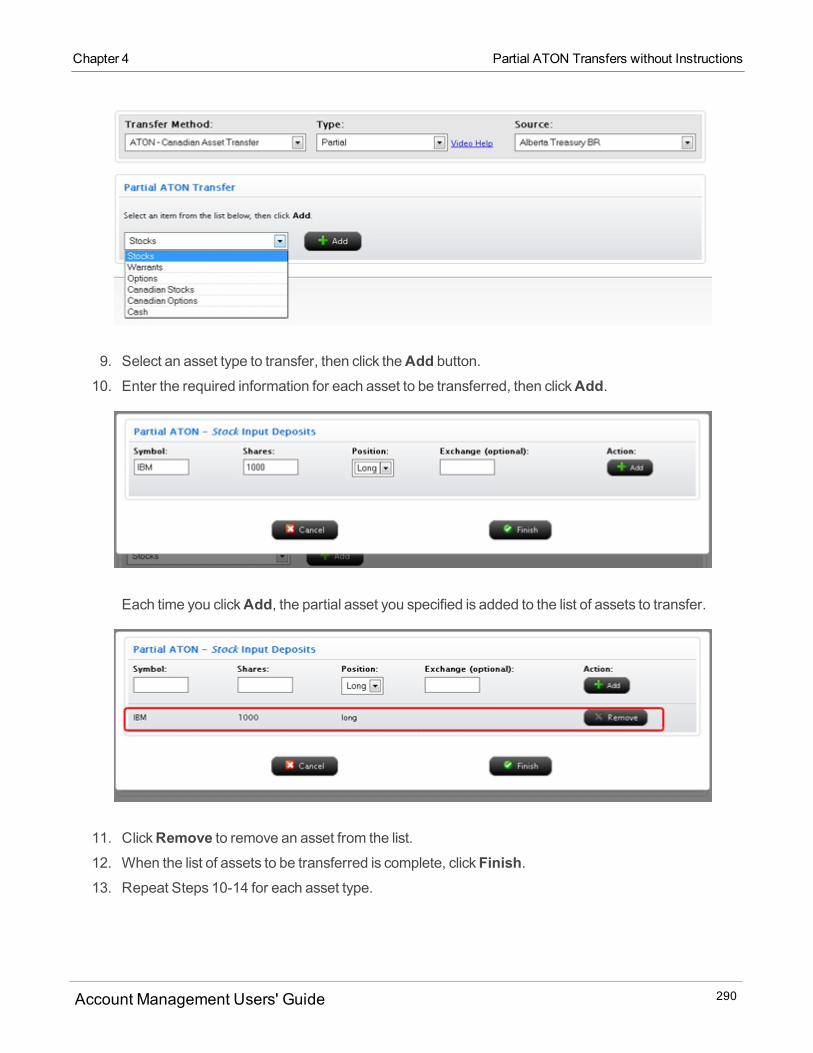
9. Select an asset type to transfer, then click theAdd button.10. Enter the required information for each asset to be transferred, then clickAdd.
Each time you clickAdd, the partial asset you specified is added to the list of assets to transfer.
11. ClickRemove to remove an asset from the list.
12. When the list of assets to be transferred is complete, clickFinish.13. Repeat Steps 10-14 for each asset type.
Account Management Users' Guide 290
Chapter 4 Partial ATON Transfers without Instructions
Chapter 4 Partial ATON Transfers with Existing Instruction
14. On the ATON Signature page, review the information on the page. Delete assets from the list or add
more assets to transfer as required. Then type your name in the Signature field and click Continue.
15. On the Confirmation page, enter the confirmation number that you received via email in the Con-
firmation Number field, then clickConfirm.
If you do not receive a Confirmation Number by email, please check your junk email folder as some-
times email filters blockmessages.
Or clickResend Confirmation Number to receive another confirmation email.Or clickCancel to cancel the transfer request.
For more information
Partial ATON Transfers with Existing Instruction
See Position Instructions for information about viewing and deleting position instructions. ATON Position
Instructions can only be used with Partial ATON transfers.
To request a partial ATON transfer using an existing Position Instruction
1. ClickFunding > Position Transfers.2. If you have amaster account or multiple accounts, use the Account Selector to search for and select
the account for which you want to request a position transfer.
3. In the Transfer Method list, selectATON.
4. In the Type list, selectUse/Create Instruction.This option allows you to use an existing Position
Instruction or create a new one.
5. In the Instruction list, select a previously-created Position Instruction from the list.
The instruction details appear on the screen and you can immediately begin adding assets to your
partial ATON transfer.
Account Management Users' Guide 291
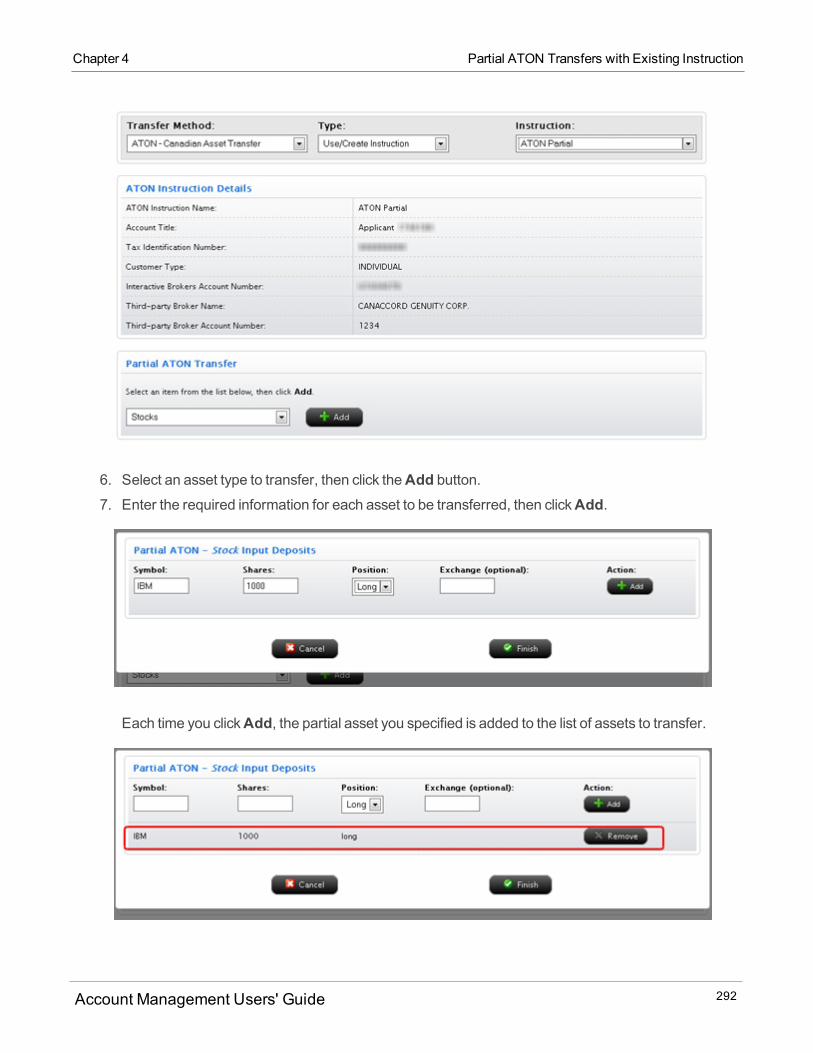
6. Select an asset type to transfer, then click theAdd button.7. Enter the required information for each asset to be transferred, then clickAdd.
Each time you clickAdd, the partial asset you specified is added to the list of assets to transfer.
Account Management Users' Guide 292
Chapter 4 Partial ATON Transfers with Existing Instruction
Chapter 4 Creating an ATON Position Instruction
8. ClickRemove to remove an asset from the list.
9. When the list of assets to be transferred is complete, clickFinish.10. Repeat Steps 6-9 for each asset type.
11. On the ATON Signature page, review the information on the page. Delete assets from the list or add
more assets to transfer as required. Then type your name in the Signature field and clickContinue.12. On the Confirmation page, enter the confirmation number that you received via email in the Con-
firmation Number field, then clickConfirm.
If you do not receive a Confirmation Number by email, please check your junk email folder as some-
times email filters blockmessages.
Or clickResend Confirmation Number to receive another confirmation email.Or clickCancel to cancel the transfer request.
For more information
Creating an ATON Position Instruction
See Position Instructions for information about viewing and deleting position instructions. ATON Position
Instructions can only be used with Partial ATON transfers.
To create a new ATON Position Instruction
1. ClickFunding > Position Transfers.2. If you have amaster account, in the Client/Sub Account Selection area, use the radio buttons to
search for client or sub accounts by Account ID, Account Title or Account Alias, then click the client
or sub account whose transaction history you want to view.
3. In the Transfer Method list, selectATON.
4. In the Type list, selectUse/Create Instruction.This option allows you to use an existing Position
Instruction or create a new one.
5. In the Instruction list, selectAddNew Instruction.
If you select this option, you will be prompted to create and save the new instruction first, and then
you will have to start a new position transfer request and select the instruction you just created. Note
that you can only use Position Instructions for partial ATON transfers.
6. Read the important information on the screen, then enter the name of the new Position Instruction.
This is the name that will appear in the Instruction list after the new instruction is saved.
Account Management Users' Guide 293
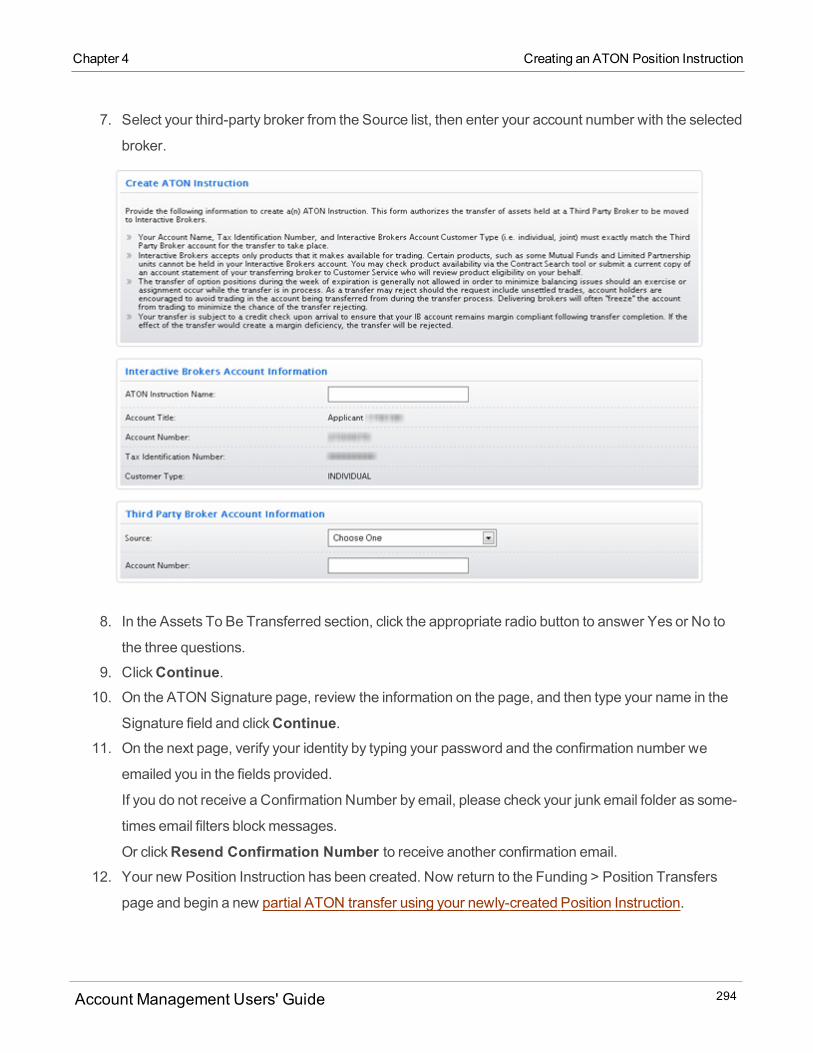
7. Select your third-party broker from the Source list, then enter your account number with the selected
broker.
8. In the Assets To Be Transferred section, click the appropriate radio button to answer Yes or No to
the three questions.
9. ClickContinue.10. On the ATON Signature page, review the information on the page, and then type your name in the
Signature field and clickContinue.11. On the next page, verify your identity by typing your password and the confirmation number we
emailed you in the fields provided.
If you do not receive a Confirmation Number by email, please check your junk email folder as some-
times email filters blockmessages.
Or clickResend Confirmation Number to receive another confirmation email.12. Your new Position Instruction has been created. Now return to the Funding > Position Transfers
page and begin a new partial ATON transfer using your newly-created Position Instruction.
Account Management Users' Guide 294
Chapter 4 Creating an ATON Position Instruction
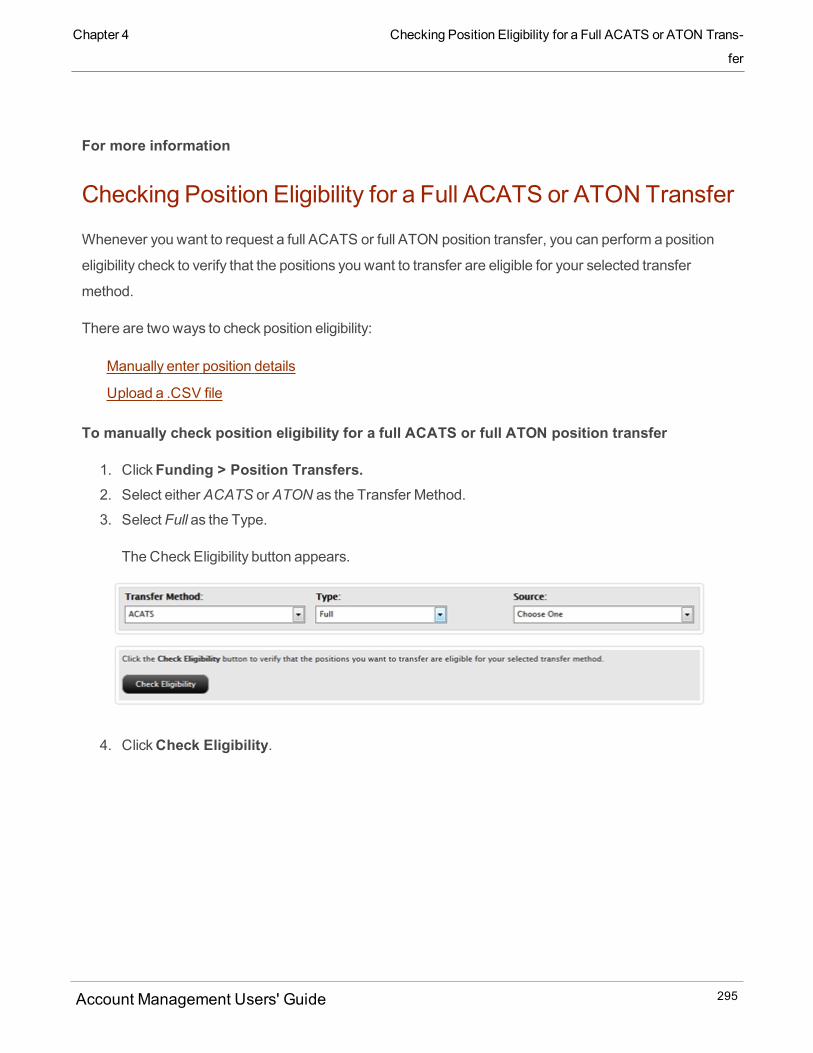
Chapter 4 Checking Position Eligibility for a Full ACATS or ATON Trans-
fer
For more information
Checking Position Eligibility for a Full ACATS or ATONTransfer
Whenever you want to request a full ACATS or full ATON position transfer, you can perform a position
eligibility check to verify that the positions you want to transfer are eligible for your selected transfer
method.
There are two ways to check position eligibility:
Manually enter position details
Upload a .CSV file
To manually check position eligibility for a full ACATS or full ATON position transfer
1. ClickFunding > Position Transfers.2. Select either ACATS or ATON as the Transfer Method.
3. Select Full as the Type.
The Check Eligibility button appears.
4. ClickCheck Eligibility.
Account Management Users' Guide 295
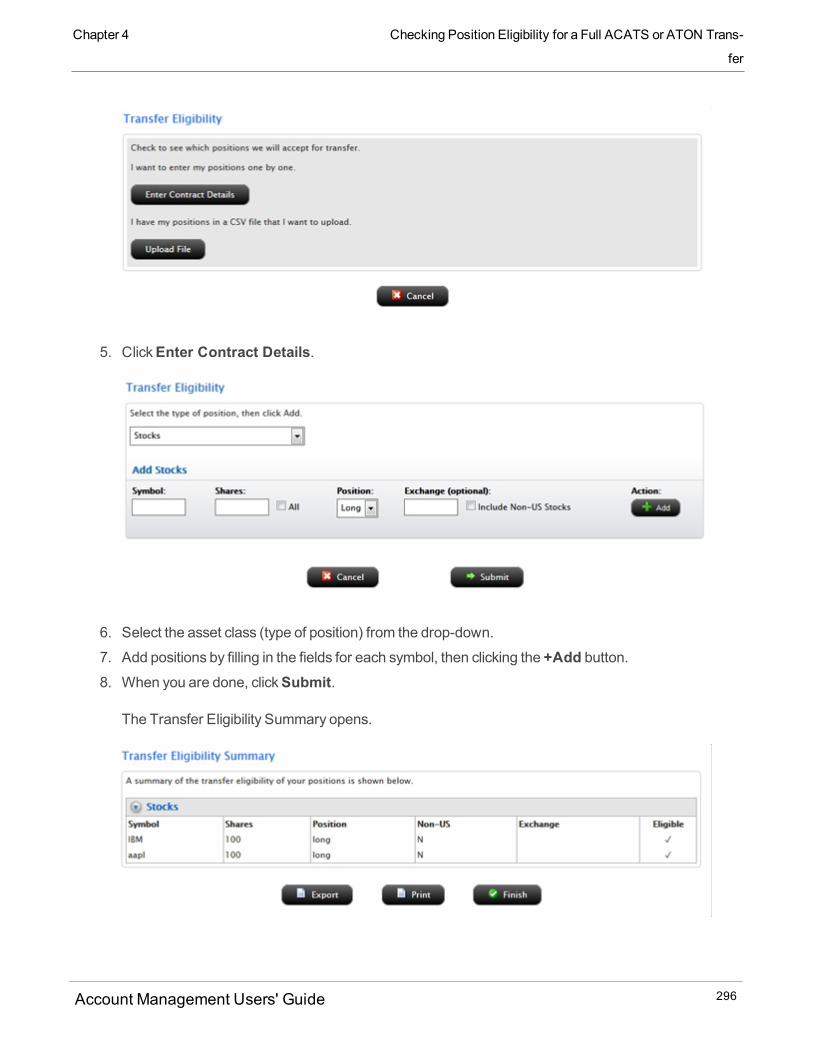
5. ClickEnter Contract Details.
6. Select the asset class (type of position) from the drop-down.
7. Add positions by filling in the fields for each symbol, then clicking the +Add button.8. When you are done, clickSubmit.
The Transfer Eligibility Summary opens.
Account Management Users' Guide 296
Chapter 4 Checking Position Eligibility for a Full ACATS or ATON Trans-
fer

Chapter 4 Checking Position Eligibility for a Full ACATS or ATON Trans-
fer
The Transfer Eligibility Summary lists all of the positions you entered andmarks eligible positions
with a checkmark in the Eligible column. The Eligible column is blank for ineligible positions .
9. Perform one of these optional steps:
o ClickExport to save the data to a .CSV file, which you can use to submit a partial ACATS or
ATON request.o ClickPrint to print the list.
10. ClickFinish to complete the eligibility check.11. If all of the positions you entered are eligible for the transfer, you can submit a new request for a full
ACATS or a full ATON transfer.
To upload positions in a .CSV file
1. ClickFunding > Position Transfers.2. Select either ACATS or ATON as the Transfer Method.
3. Select Full as the Type.
TheCheck Eligibility button appears.
4. ClickCheck Eligibility.
Account Management Users' Guide 297
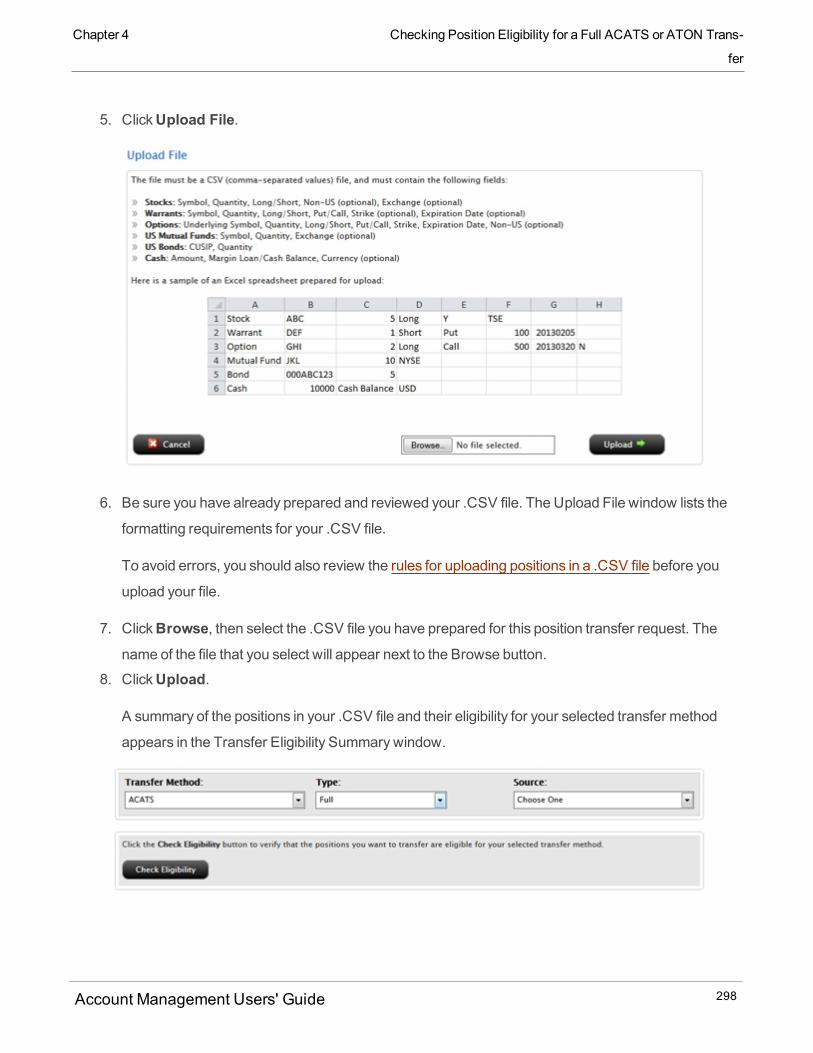
5. ClickUpload File.
6. Be sure you have already prepared and reviewed your .CSV file. The Upload File window lists the
formatting requirements for your .CSV file.
To avoid errors, you should also review the rules for uploading positions in a .CSV file before you
upload your file.
7. ClickBrowse, then select the .CSV file you have prepared for this position transfer request. The
name of the file that you select will appear next to the Browse button.
8. ClickUpload.
A summary of the positions in your .CSV file and their eligibility for your selected transfer method
appears in the Transfer Eligibility Summarywindow.
Account Management Users' Guide 298
Chapter 4 Checking Position Eligibility for a Full ACATS or ATON Trans-
fer
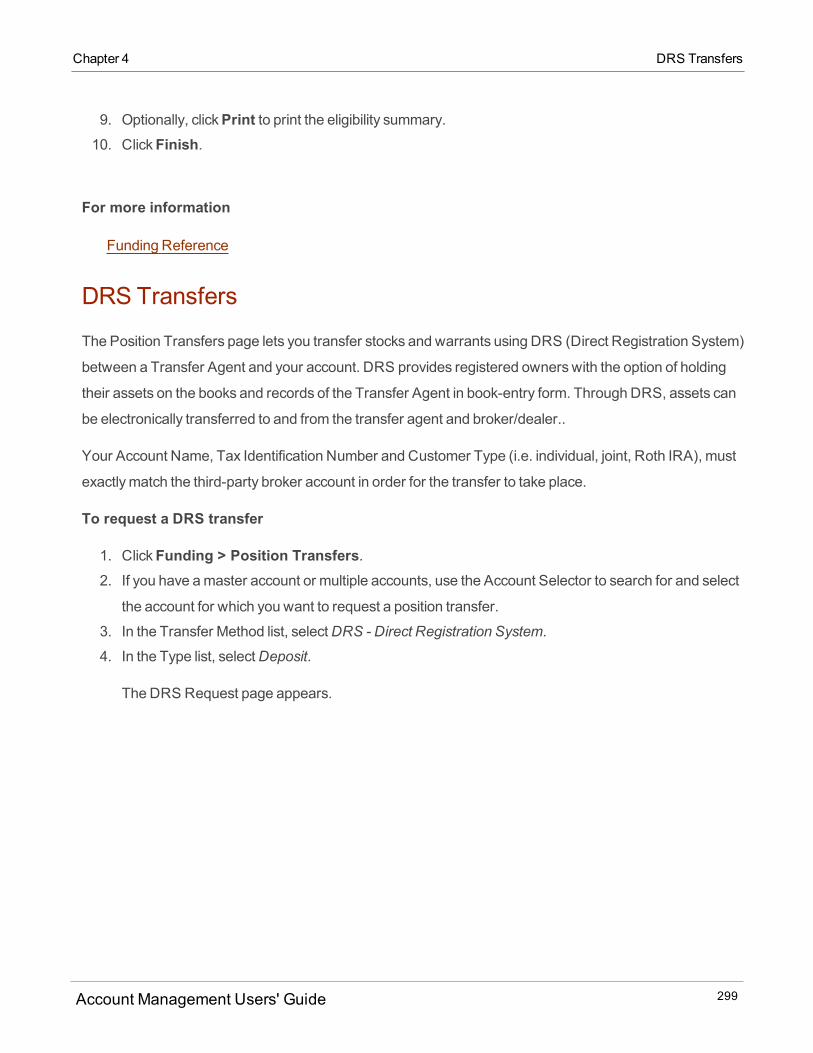
Chapter 4 DRS Transfers
9. Optionally, clickPrint to print the eligibility summary.10. ClickFinish.
For more information
Funding Reference
DRS Transfers
The Position Transfers page lets you transfer stocks and warrants using DRS (Direct Registration System)
between a Transfer Agent and your account. DRS provides registered owners with the option of holding
their assets on the books and records of the Transfer Agent in book-entry form. Through DRS, assets can
be electronically transferred to and from the transfer agent and broker/dealer..
Your Account Name, Tax Identification Number and Customer Type (i.e. individual, joint, Roth IRA), must
exactlymatch the third-party broker account in order for the transfer to take place.
To request a DRS transfer
1. ClickFunding > Position Transfers.2. If you have amaster account or multiple accounts, use the Account Selector to search for and select
the account for which you want to request a position transfer.
3. In the Transfer Method list, selectDRS - Direct Registration System.
4. In the Type list, selectDeposit.
The DRS Request page appears.
Account Management Users' Guide 299

5. In the Account Information section, verify that your Account Title, Account Number, Tax ID Number
and Customer Type exactlymatches the information in your third-party broker account.
6. In the Transfer Agent Account Information section enter the account number for your Transfer Agent
account, then clickContinue.The DRS Transfer page appears.
Account Management Users' Guide 300
Chapter 4 DRS Transfers
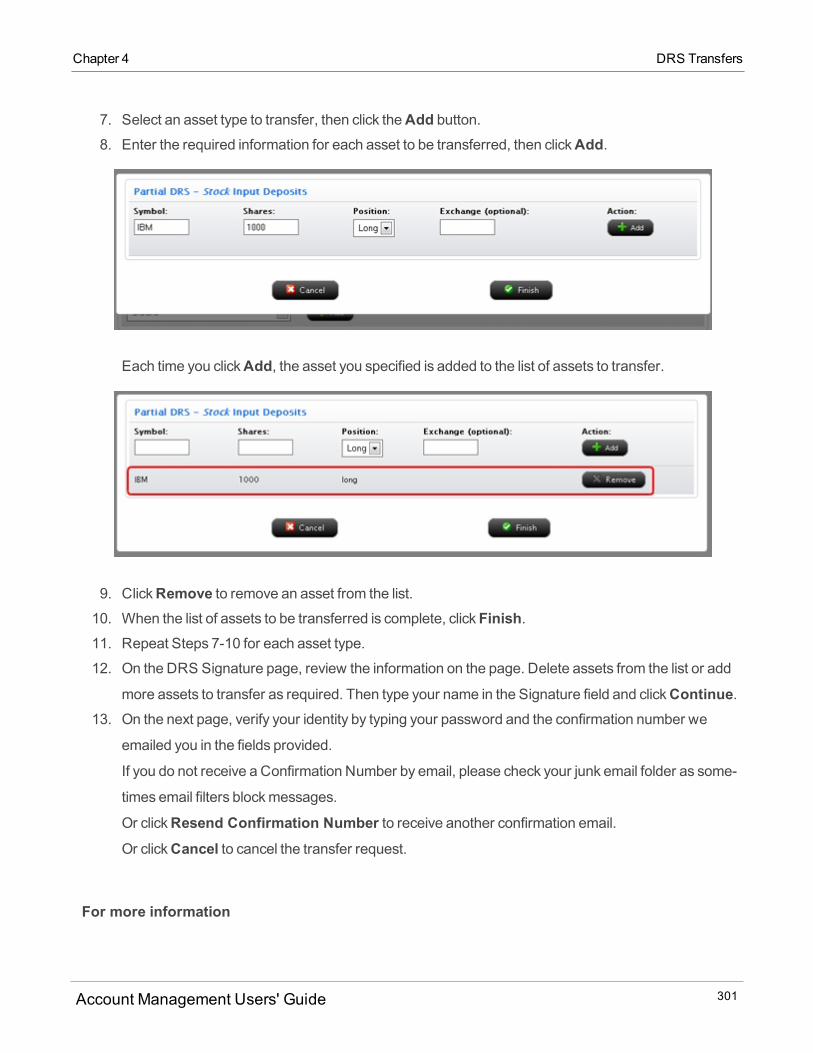
Chapter 4 DRS Transfers
7. Select an asset type to transfer, then click theAdd button.8. Enter the required information for each asset to be transferred, then clickAdd.
Each time you clickAdd, the asset you specified is added to the list of assets to transfer.
9. ClickRemove to remove an asset from the list.
10. When the list of assets to be transferred is complete, clickFinish.11. Repeat Steps 7-10 for each asset type.
12. On the DRS Signature page, review the information on the page. Delete assets from the list or add
more assets to transfer as required. Then type your name in the Signature field and clickContinue.13. On the next page, verify your identity by typing your password and the confirmation number we
emailed you in the fields provided.
If you do not receive a Confirmation Number by email, please check your junk email folder as some-
times email filters blockmessages.
Or clickResend Confirmation Number to receive another confirmation email.Or clickCancel to cancel the transfer request.
For more information
Account Management Users' Guide 301
Funding Reference
DWACTransfers
The Position Transfers page lets you transfer stocks and warrants using DWAC (Deposit/Withdrawal at
Custodian) between a Transfer Agent and your account. DWAC is an automated system for deposits and
withdrawals of securities at DTC.
Note: The cut-off time for submitting a DWAC transfer request is 3:45 PMEST. Any requests
submitted after that time will be processed on the next business day.
Your Account Name, Tax Identification Number and Customer Type (i.e. individual, joint, Roth IRA), must
exactlymatch the third-party broker account in order for the transfer to take place.
To request a DWAC transfer
1. ClickFunding > Position Transfers.2. If you have amaster account or multiple accounts, use the Account Selector to search for and select
the account for which you want to request a position transfer.
3. In the Transfer Method list, selectDWAC - Deposit/Withdrawal at Custodian.
4. In the Type list, select one of the following:
o Deposit - Select this option to transfer assets from a Transfer Agent to your account.o Withdraw - Select this option to transfer assets from your account to a Transfer Agent.
The DWAC Request page appears.
Account Management Users' Guide 302
Chapter 4 DWAC Transfers
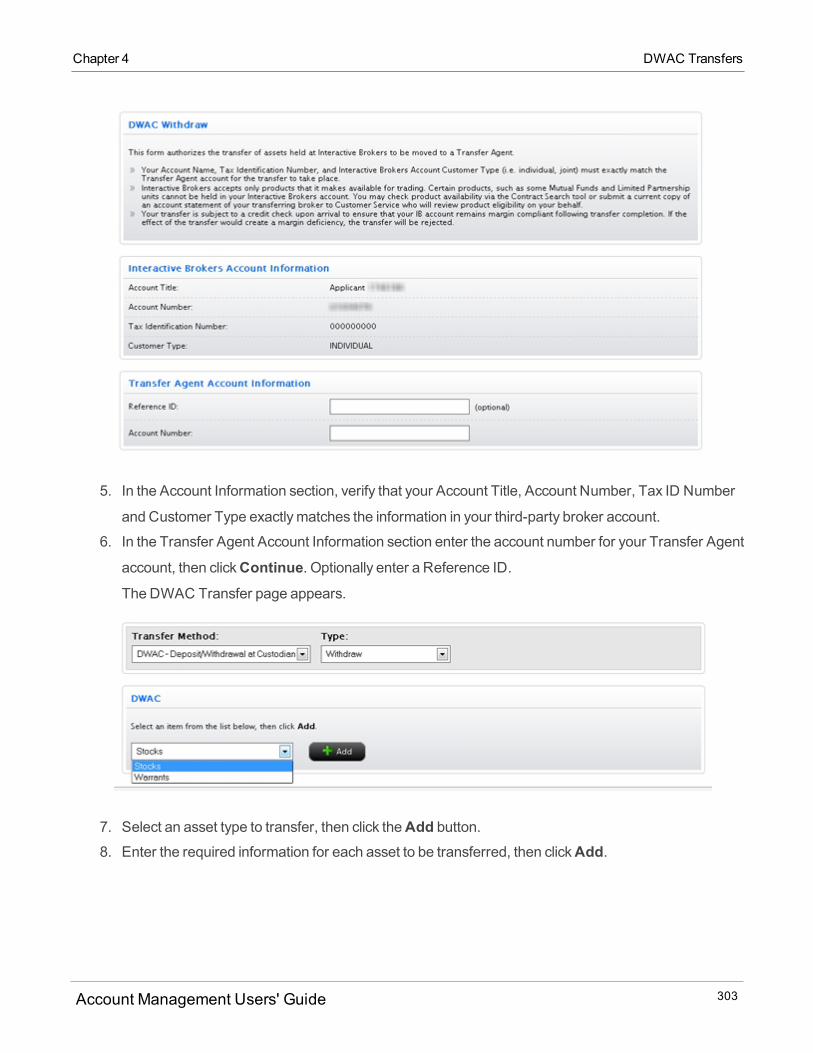
Chapter 4 DWAC Transfers
5. In the Account Information section, verify that your Account Title, Account Number, Tax ID Number
and Customer Type exactlymatches the information in your third-party broker account.
6. In the Transfer Agent Account Information section enter the account number for your Transfer Agent
account, then clickContinue. Optionally enter a Reference ID.The DWAC Transfer page appears.
7. Select an asset type to transfer, then click theAdd button.8. Enter the required information for each asset to be transferred, then clickAdd.
Account Management Users' Guide 303

Each time you clickAdd, the asset you specified is added to the list of assets to transfer.
9. ClickRemove to remove an asset from the list.
10. When the list of assets to be transferred is complete, clickFinish.11. Repeat Steps 7-10 for each asset type.
12. On the DWAC Signature page, review the information on the page. Delete assets from the list or
addmore assets to transfer as required. Then type your name in the Signature field and click
Continue.13. On the next page, verify your identity by typing your password and the confirmation number we
emailed you in the fields provided.
If you do not receive a Confirmation Number by email, please check your junk email folder as some-
times email filters blockmessages.
Or clickResend Confirmation Number to receive another confirmation email.Or clickCancel to cancel the transfer request.
For more information
Funding Reference
Account Management Users' Guide 304
Chapter 4 DWAC Transfers
Chapter 4 Transferring Positions to an Advisor-Managed Account
Transferring Positions to an Advisor-Managed Account
Individual account holders can transfer all or some of their assets from their existing account to an Advisor-
managed account or segment.
To transfer all of your assets into an Advisor-managed account
1. Identify an Advisor-managed account you want to join as a client, then request that Advisor to initiate
a client account invitation.
2. Complete or have the Advisor complete the Advisor Client Account Application.
The Account Titles and Tax IDs for your existing account and the new Advisor Client account must
match.
3. Once your Advisor Client Account is open, log into Account Management with the username and
password of your original account.
4. ClickFunding > Position Transfers.5. In the Transfer Method list, selectAdvisor-Managed Account Asset Transfer.
6. Enter the following information in the fields provided:
o The username of the destination account (the destination account is the Advisor-Managed
account).o The password of the destination account.o The account ID of the destination account.
7. ClickContinue.8. Confirm your identity by entering the confirmation number sent to you via email, then clickConfirm.
Your original account will be closed when your assets are transferred to an Advisor-managed
account.
You can also create a new Advisor- or Broker-managed account or account partition while retaining your
existing account. For more information see Linking to an Advisor- or Broker-Managed Account,
Account Management Users' Guide 305
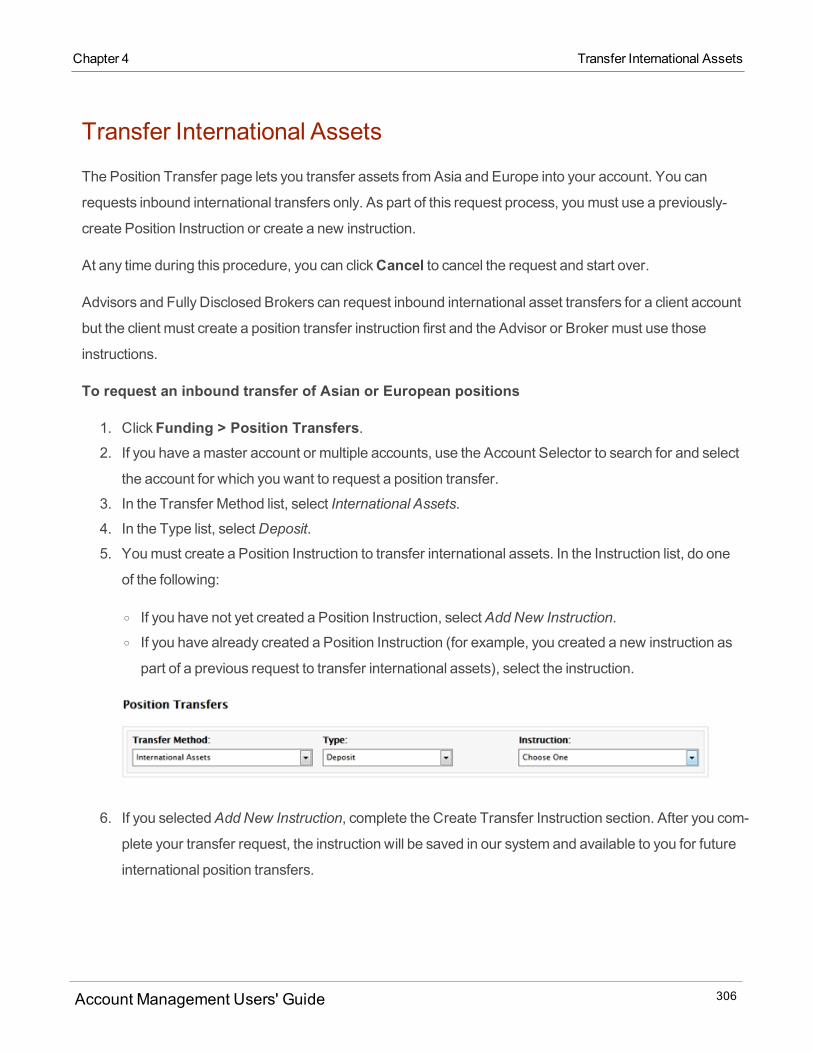
Transfer International Assets
The Position Transfer page lets you transfer assets fromAsia and Europe into your account. You can
requests inbound international transfers only. As part of this request process, youmust use a previously-
create Position Instruction or create a new instruction.
At any time during this procedure, you can clickCancel to cancel the request and start over.
Advisors and Fully Disclosed Brokers can request inbound international asset transfers for a client account
but the client must create a position transfer instruction first and the Advisor or Broker must use those
instructions.
To request an inbound transfer of Asian or European positions
1. ClickFunding > Position Transfers.2. If you have amaster account or multiple accounts, use the Account Selector to search for and select
the account for which you want to request a position transfer.
3. In the Transfer Method list, select International Assets.
4. In the Type list, selectDeposit.
5. Youmust create a Position Instruction to transfer international assets. In the Instruction list, do one
of the following:
o If you have not yet created a Position Instruction, selectAddNew Instruction.o If you have already created a Position Instruction (for example, you created a new instruction as
part of a previous request to transfer international assets), select the instruction.
6. If you selectedAddNew Instruction, complete the Create Transfer Instruction section. After you com-
plete your transfer request, the instruction will be saved in our system and available to you for future
international position transfers.
Account Management Users' Guide 306
Chapter 4 Transfer International Assets
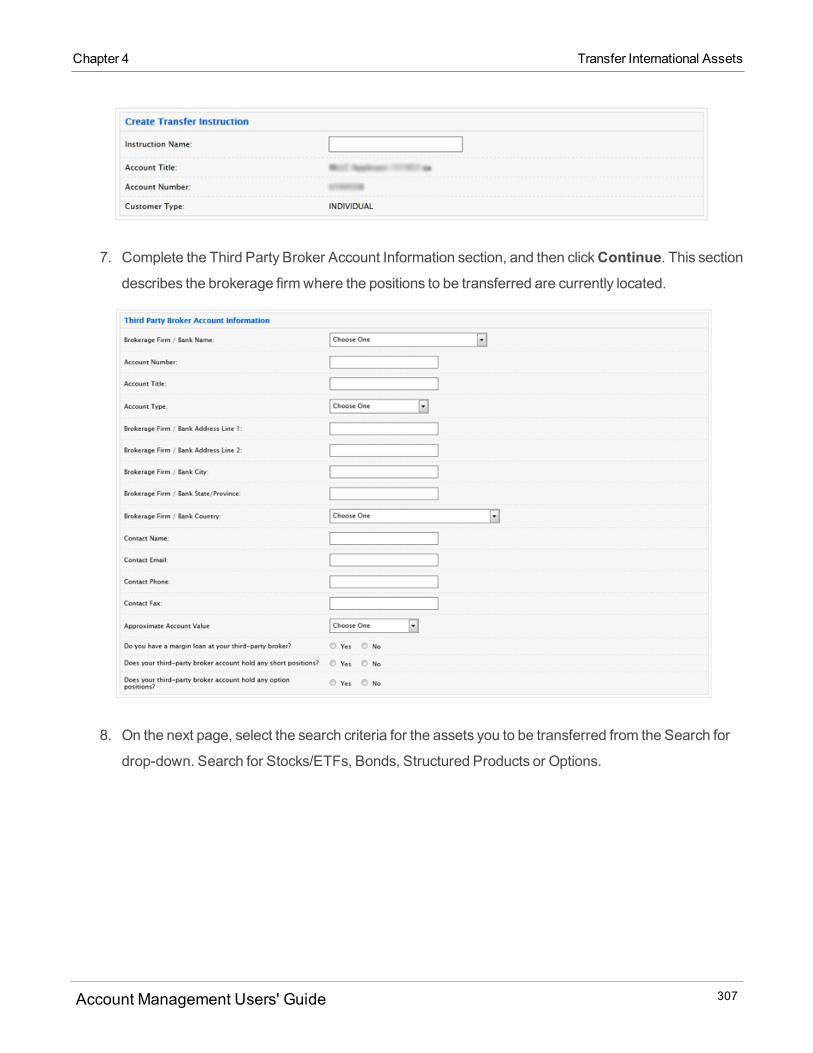
Chapter 4 Transfer International Assets
7. Complete the Third Party Broker Account Information section, and then clickContinue. This sectiondescribes the brokerage firmwhere the positions to be transferred are currently located.
8. On the next page, select the search criteria for the assets you to be transferred from the Search for
drop-down. Search for Stocks/ETFs, Bonds, Structured Products or Options.
Account Management Users' Guide 307

9. Complete all relevant fields for the assets to be transferred, and then clickSearch.
o For Stocks, you can choose to search by Symbol, ISIN or CUSIP.o For Bonds and Structured Products, you can search by ISIN.o For Options, you can search by underlying symbol.
For example, to search for stocks by symbol, select the Search by Symbol radio button and then
enter the symbol and quantity and optionally, the exchange and currency, and then clickSearch.
To search for options, enter the underlying symbol, quantity, select Put or Call, and enter the strike
and expiration date, and then clickSearch.
10. A popup appears with all possible asset matches. Click the radio button that corresponds to the cor-
rect asset.
Account Management Users' Guide 308
Chapter 4 Transfer International Assets
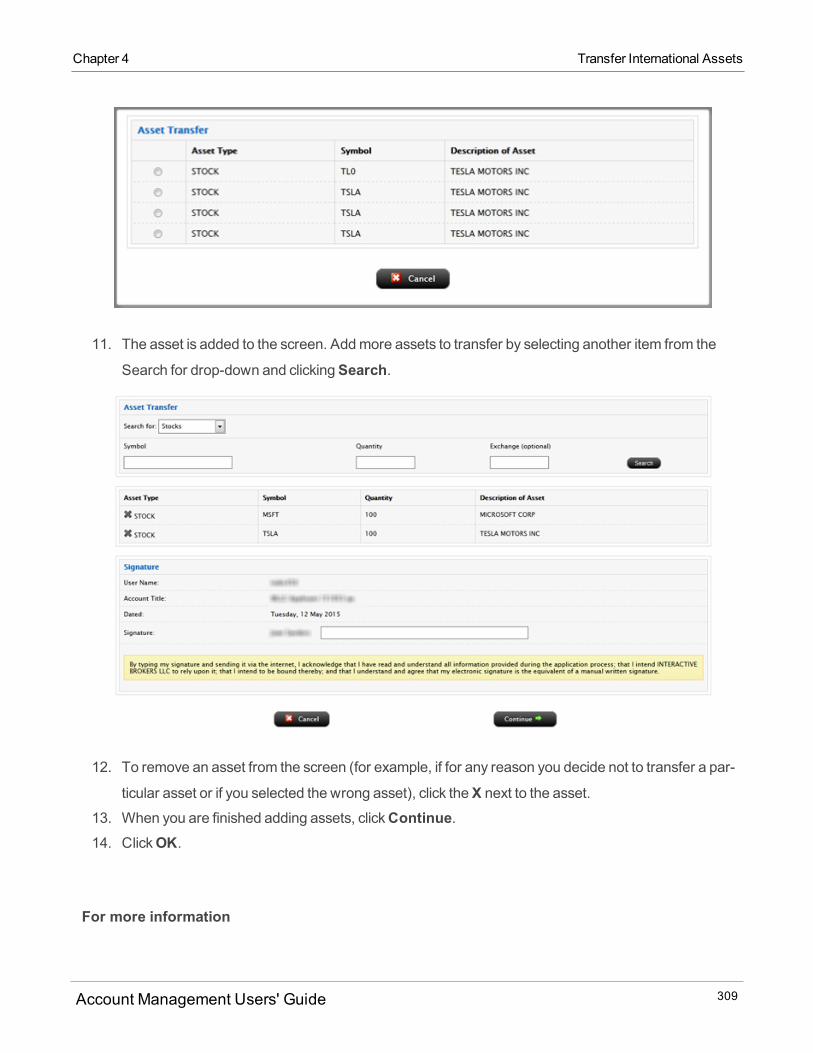
Chapter 4 Transfer International Assets
11. The asset is added to the screen. Addmore assets to transfer by selecting another item from the
Search for drop-down and clickingSearch.
12. To remove an asset from the screen (for example, if for any reason you decide not to transfer a par-
ticular asset or if you selected the wrong asset), click theX next to the asset.
13. When you are finished adding assets, clickContinue.14. ClickOK.
For more information
Account Management Users' Guide 309
Funding Reference
FOP Transfers
The Position Transfers page lets you use a Free of Payment (FOP) transfer to move long US stock,
warrant and US Bond positions from another US bank or broker that is amember of the DTC to your
account, (deposit) or from your account to another US bank or broker that is amember of the DTC
(withdraw).
When you select FOP as the transfer method on the Position Transfers page, you can:
Request an FOP transfer without a Position Instruction, in which you request an FOP transfer without
using an FOP Position Instruction.
Request a FOP transfer using a Position Instruction, in which request an FOP transfer using a pre-
viously-created Position Instruction.
Create a new Position Instruction, which lets you save and reuse third-party broker information for
future FOP transfers.
Your Account Name, Tax Identification Number and Customer Type (i.e. individual, joint, Roth IRA), must
exactlymatch the third-party broker account in order for the transfer to take place.
For more information
Funding Reference
FOP Transfer without Instruction
See Position Instructions for information about viewing and deleting position instructions.
To request an FOP transfer without using a Position Instruction
Account Management Users' Guide 310
Chapter 4 FOP Transfers
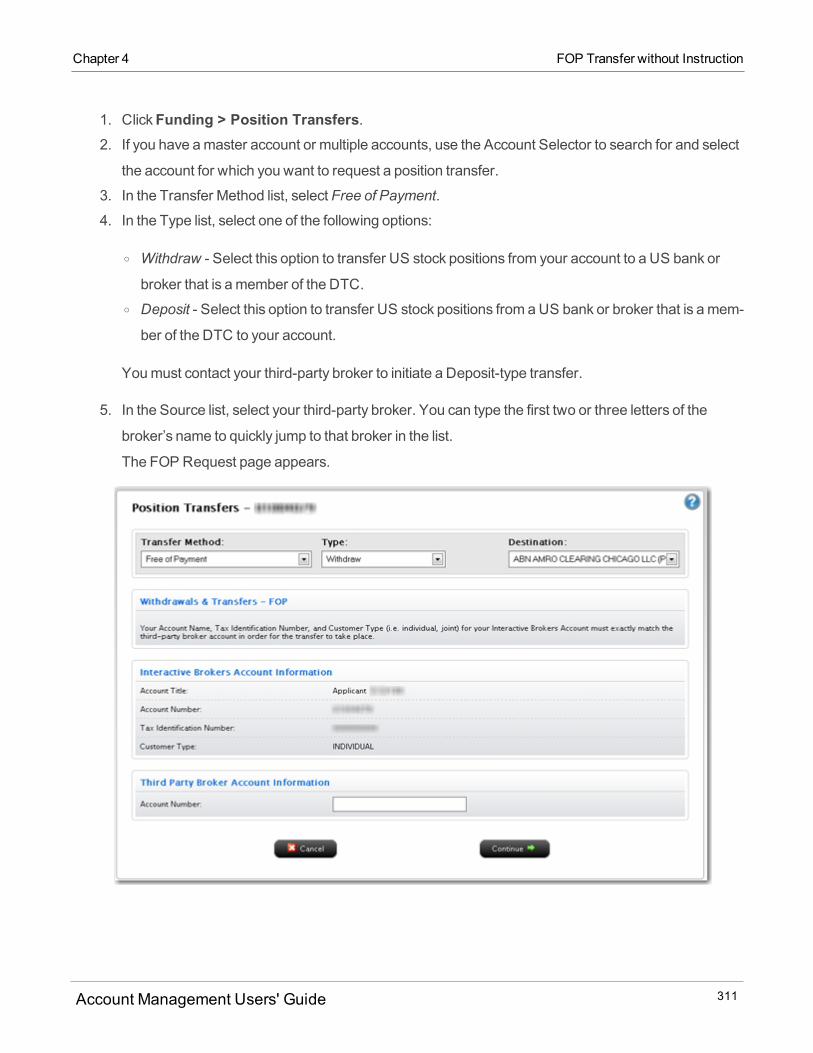
Chapter 4 FOP Transfer without Instruction
1. ClickFunding > Position Transfers.2. If you have amaster account or multiple accounts, use the Account Selector to search for and select
the account for which you want to request a position transfer.
3. In the Transfer Method list, select Free of Payment.
4. In the Type list, select one of the following options:
o Withdraw - Select this option to transfer US stock positions from your account to a US bank or
broker that is amember of the DTC.o Deposit - Select this option to transfer US stock positions from aUS bank or broker that is amem-
ber of the DTC to your account.
Youmust contact your third-party broker to initiate a Deposit-type transfer.
5. In the Source list, select your third-party broker. You can type the first two or three letters of the
broker’s name to quickly jump to that broker in the list.
The FOP Request page appears.
Account Management Users' Guide 311
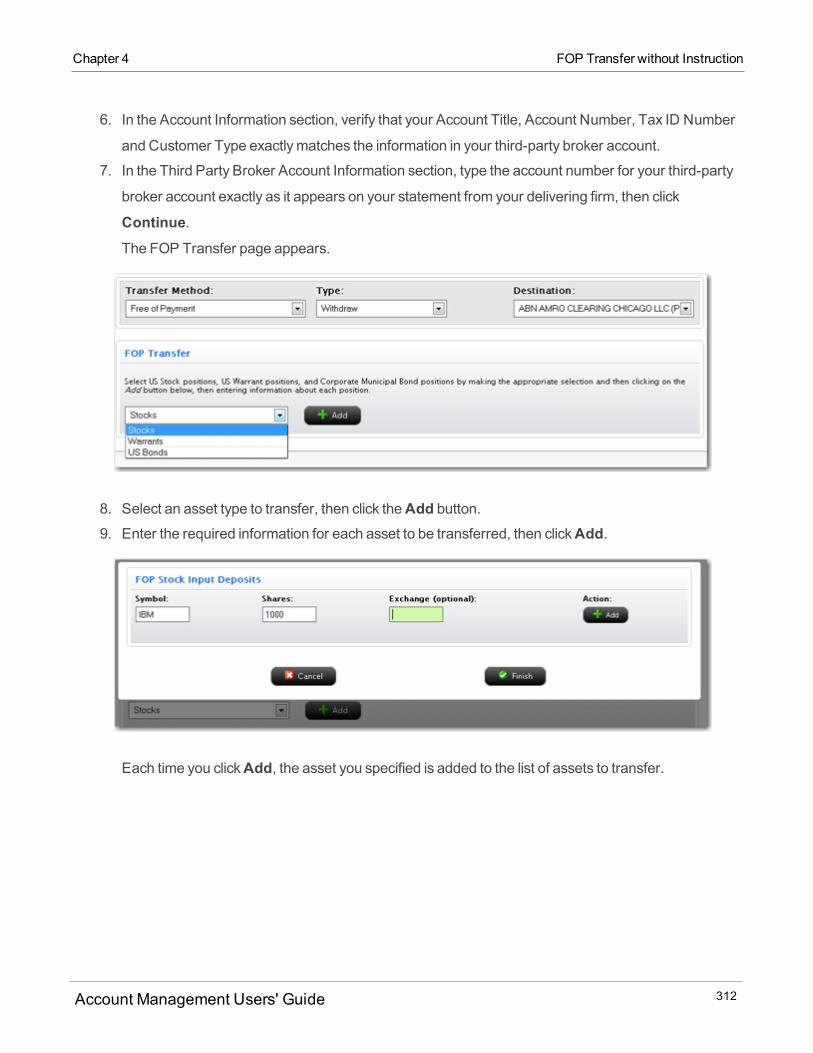
6. In the Account Information section, verify that your Account Title, Account Number, Tax ID Number
and Customer Type exactlymatches the information in your third-party broker account.
7. In the Third Party Broker Account Information section, type the account number for your third-party
broker account exactly as it appears on your statement from your delivering firm, then click
Continue.The FOP Transfer page appears.
8. Select an asset type to transfer, then click theAdd button.9. Enter the required information for each asset to be transferred, then clickAdd.
Each time you clickAdd, the asset you specified is added to the list of assets to transfer.
Account Management Users' Guide 312
Chapter 4 FOP Transfer without Instruction
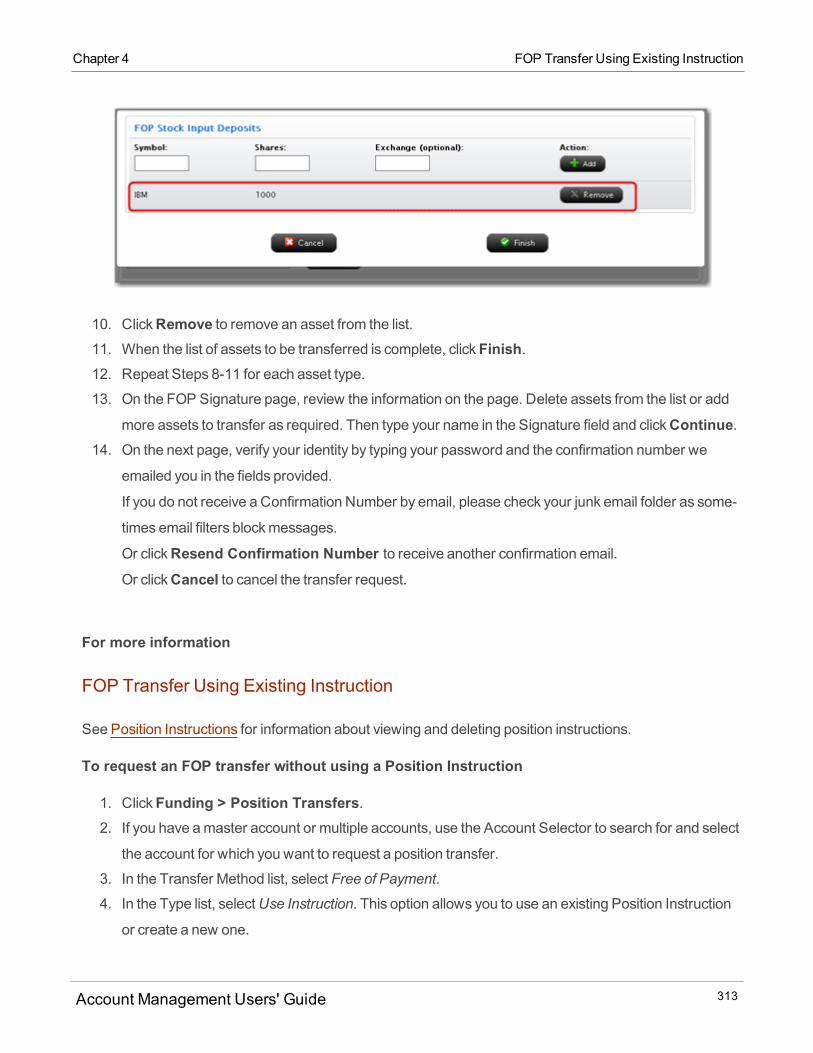
Chapter 4 FOP Transfer Using Existing Instruction
10. ClickRemove to remove an asset from the list.
11. When the list of assets to be transferred is complete, clickFinish.12. Repeat Steps 8-11 for each asset type.
13. On the FOP Signature page, review the information on the page. Delete assets from the list or add
more assets to transfer as required. Then type your name in the Signature field and clickContinue.14. On the next page, verify your identity by typing your password and the confirmation number we
emailed you in the fields provided.
If you do not receive a Confirmation Number by email, please check your junk email folder as some-
times email filters blockmessages.
Or clickResend Confirmation Number to receive another confirmation email.Or clickCancel to cancel the transfer request.
For more information
FOP Transfer Using Existing Instruction
See Position Instructions for information about viewing and deleting position instructions.
To request an FOP transfer without using a Position Instruction
1. ClickFunding > Position Transfers.2. If you have amaster account or multiple accounts, use the Account Selector to search for and select
the account for which you want to request a position transfer.
3. In the Transfer Method list, select Free of Payment.
4. In the Type list, selectUse Instruction. This option allows you to use an existing Position Instruction
or create a new one.
Account Management Users' Guide 313
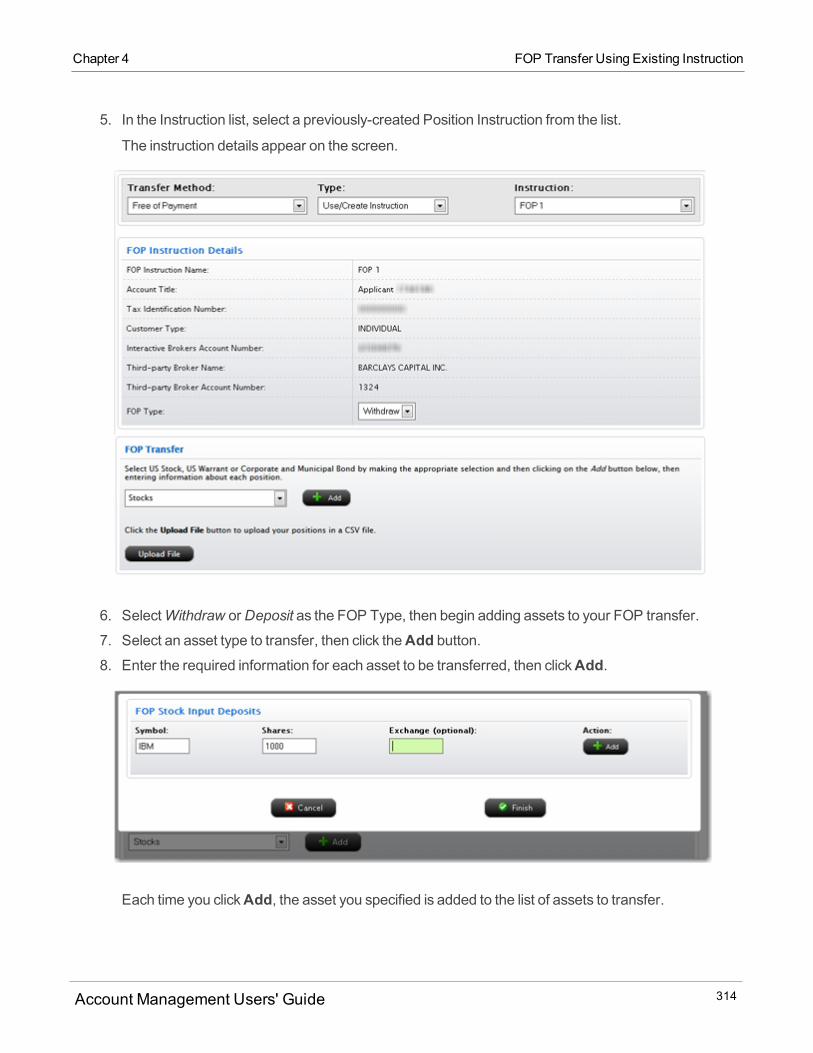
5. In the Instruction list, select a previously-created Position Instruction from the list.
The instruction details appear on the screen.
6. SelectWithdraw orDeposit as the FOP Type, then begin adding assets to your FOP transfer.
7. Select an asset type to transfer, then click theAdd button.8. Enter the required information for each asset to be transferred, then clickAdd.
Each time you clickAdd, the asset you specified is added to the list of assets to transfer.
Account Management Users' Guide 314
Chapter 4 FOP Transfer Using Existing Instruction
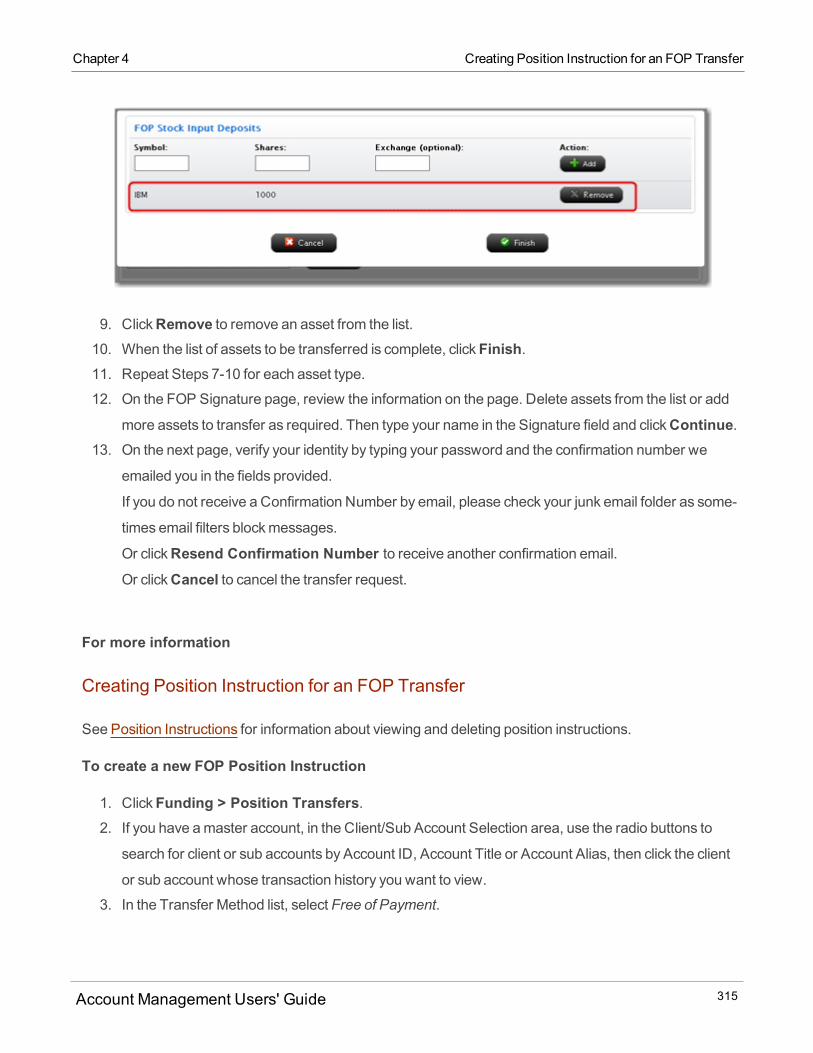
Chapter 4 Creating Position Instruction for an FOP Transfer
9. ClickRemove to remove an asset from the list.
10. When the list of assets to be transferred is complete, clickFinish.11. Repeat Steps 7-10 for each asset type.
12. On the FOP Signature page, review the information on the page. Delete assets from the list or add
more assets to transfer as required. Then type your name in the Signature field and clickContinue.13. On the next page, verify your identity by typing your password and the confirmation number we
emailed you in the fields provided.
If you do not receive a Confirmation Number by email, please check your junk email folder as some-
times email filters blockmessages.
Or clickResend Confirmation Number to receive another confirmation email.Or clickCancel to cancel the transfer request.
For more information
Creating Position Instruction for an FOP Transfer
See Position Instructions for information about viewing and deleting position instructions.
To create a new FOP Position Instruction
1. ClickFunding > Position Transfers.2. If you have amaster account, in the Client/Sub Account Selection area, use the radio buttons to
search for client or sub accounts by Account ID, Account Title or Account Alias, then click the client
or sub account whose transaction history you want to view.
3. In the Transfer Method list, select Free of Payment.
Account Management Users' Guide 315
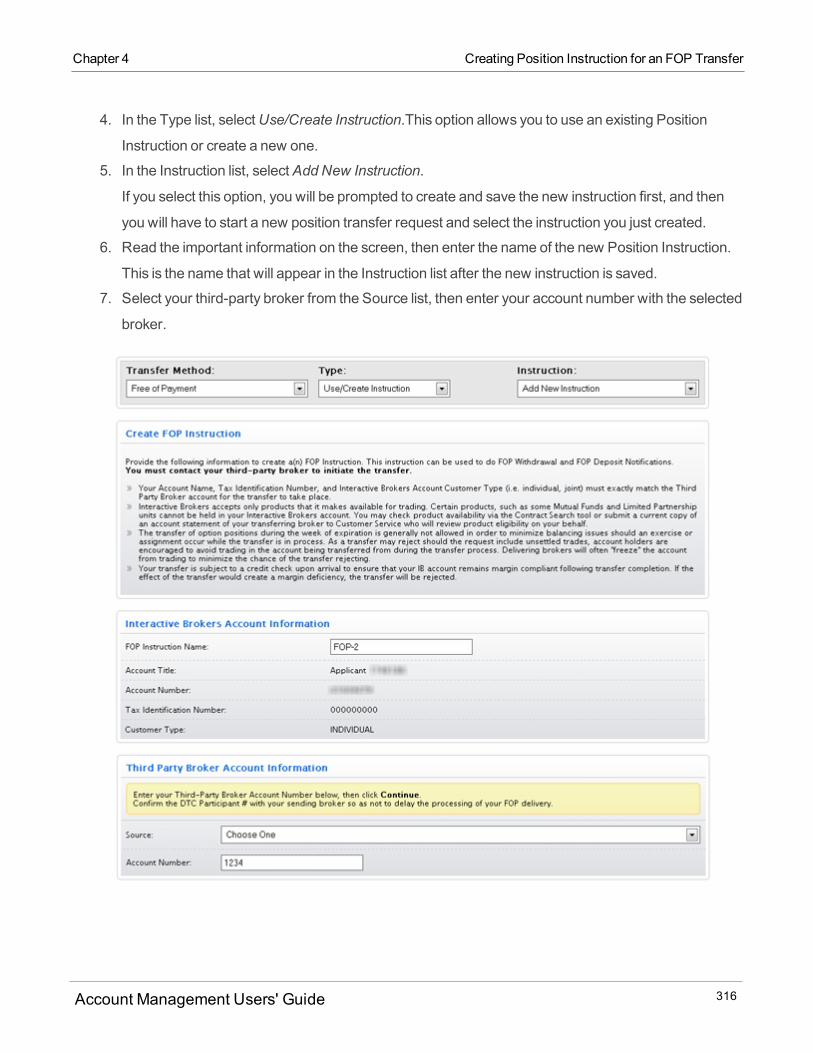
4. In the Type list, selectUse/Create Instruction.This option allows you to use an existing Position
Instruction or create a new one.
5. In the Instruction list, selectAddNew Instruction.
If you select this option, you will be prompted to create and save the new instruction first, and then
you will have to start a new position transfer request and select the instruction you just created.
6. Read the important information on the screen, then enter the name of the new Position Instruction.
This is the name that will appear in the Instruction list after the new instruction is saved.
7. Select your third-party broker from the Source list, then enter your account number with the selected
broker.
Account Management Users' Guide 316
Chapter 4 Creating Position Instruction for an FOP Transfer
Chapter 4 US Futures Transfers
8. ClickContinue.9. On the FOP Signature page, review the information on the page, and then type your name in the Sig-
nature field and clickContinue.10. On the next page, verify your identity by typing your password and the confirmation number we
emailed you in the fields provided.
If you do not receive a Confirmation Number by email, please check your junk email folder as some-
times email filters blockmessages.
Or clickResend Confirmation Number to receive another confirmation email.11. Your new Position Instruction has been created. Now return to the Funding > Position Transfers
page and begin a new FOP transfer using your newly-created Position Instruction.
For more information
US Futures Transfers
The Position Transfers page lets you transfer US futures positions and cash held from a third-party broker
to your account. This process requires you to print out and complete a form, then fax the completed form to
us.
If you are transferringmore than one account, please complete one form for each account that you are
transferring. The type of account at your current broker shouldmatch the account receiving the assets. If
the account types do not match, please visit our web site to complete a new account application.
To transfer US futures to your account
1. ClickFunding > Position Transfers.2. If you have amaster account or multiple accounts, use the Account Selector to search for and select
the account for which you want to request a position transfer.
3. In the Transfer Method list, selectUS Futures.
The Transfer of Assets Form appears.
Account Management Users' Guide 317

4. Print the form.
5. Complete the form, then fax it to us at the fax number indicated on the upper left corner of the form.
For more information
Transferring Positions BetweenMaster and Sub Accounts
Non-disclosed brokers and STL account users with fundmanagement access for theMaster Account can
transfer positions between themaster account and its sub accounts, and between two sub accounts.
Requests submitted during regular trading hours will transfer immediately. Requests submitted outside of
regular trading hours will be processed the next business day.
To transfer positions between master and sub accounts
1. ClickFunding > Position Transfers.2. If you have amaster account, in the Client/Sub Account Selection area, use the radio buttons to
search for client or sub accounts by Account ID, Account Title or Account Alias, then click the client
or sub account whose transaction history you want to view.
3. In the Transfer Method list, selectPosition Transfer BetweenMaster and Sub.
The screen displays all position transfers for your account.
Account Management Users' Guide 318
Chapter 4 Transferring Positions BetweenMaster and Sub Accounts

Chapter 4 Transferring Positions Internally
4. To request a new position transfer between your master account and a sub account, clickRequestNew Transfer.
5. Select the source account from the drop-down list, then clickContinue.6. Select the destination account from the drop-down list, then clickContinue.
The screen displays the symbol, asset class and available quantity of all positions held by the source
account.
7. Provide transfer details as follows:
o To transfer all positions to the selected sub account, select the Transfer all positionscheck box,
then click Continue.o To transfer some but not all positions to the selected sub account, enter the number to transfer in
the Transfer Quantity field for each symbol listed, then clickContinue.o For symbols whose positions you do not want to transfer, leave the Transfer Quantity field blank.
8. Verify that the transfer information is correct, then clickConfirm.
9. Confirm your identity by entering the confirmation number sent to you via email, then clickConfirm.
The positions are transferred.
For more information
Transferring Positions Internally
The Fund Transfers page lets you transfer positions internally from your IB account to another IB account.
The following rules apply to internal position transfers:
Account Titles of both accountsmust match.
The country of legal residence of both accountsmust match.
For US account holders, the US tax ID (Social Security number) of both accountsmust match.
For non-US Individual account holders, the ID number, ID type (passport, driver's license, national ID,
or alien ID) and ID-issuing countrymust match. For joint non-US account holders, the IDs of both first
and second holder must match.
For non-US Organization account holders, the government-issued ID and issuing country of both
accountsmust match.
Linked accounts can use this type of position transfer.
Account Management Users' Guide 319
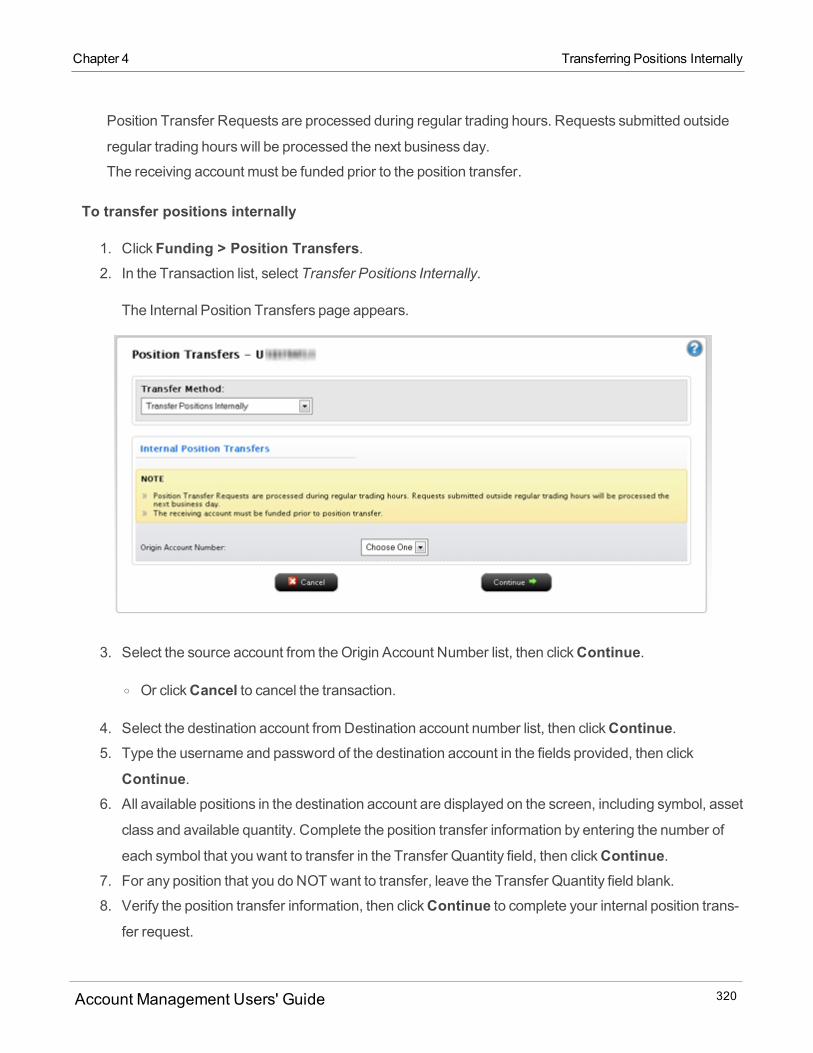
Position Transfer Requests are processed during regular trading hours. Requests submitted outside
regular trading hours will be processed the next business day.
The receiving account must be funded prior to the position transfer.
To transfer positions internally
1. ClickFunding > Position Transfers.2. In the Transaction list, select Transfer Positions Internally.
The Internal Position Transfers page appears.
3. Select the source account from theOrigin Account Number list, then clickContinue.
o Or clickCancel to cancel the transaction.
4. Select the destination account fromDestination account number list, then clickContinue.5. Type the username and password of the destination account in the fields provided, then click
Continue.6. All available positions in the destination account are displayed on the screen, including symbol, asset
class and available quantity. Complete the position transfer information by entering the number of
each symbol that you want to transfer in the Transfer Quantity field, then clickContinue.7. For any position that you do NOT want to transfer, leave the Transfer Quantity field blank.
8. Verify the position transfer information, then clickContinue to complete your internal position trans-fer request.
Account Management Users' Guide 320
Chapter 4 Transferring Positions Internally
Chapter 4 Using CSV Files for Position Transfers
Position transfer requests are processed during regular business hours. Requests submitted at
other timeswill be processed on the next business day.
For more information
Using CSV Files for Position Transfers
When you want to submit a position transfer request, you can prepare and upload a .CSV (comma-
separated values) file to:
Submit a partial ACATS, ATON, DRS, DWAC or FOP position transfer;
Check if the positions you want to transfer in a full ACATS or ATON position transfer are eligible to be
transferred (this does not actually transfer positions).
We recommend usingMicrosoft Excel to create your upload file, then saving the file as a *.csv file.
You do not have to upload a CSV file to do a partial position transfer or check the eligibility of your positions
for a full transfer. You can still manually enter positions in partial position transfer, and you canmanually
enter positions to check their eligibility for a full ACATS or ATON position transfer.
For more information
Uploading Positions in a CSV File for Partial Position Transfers
You can upload a *.CSV (comma-separated values) file to submit a partial position transfer request for any
of the following position transfer methods:
ACATS
ATON
DRS
DWAC
FOP
To upload positions in a .CSV file for a partial position transfer
Account Management Users' Guide 321

1. Follow the instructions for starting a partial position transfer request using ACATS or ATON, a pos-
ition transfer deposit or withdrawal using DWAC or FOP, or a position transfer deposit using DRS.
2. After you complete the required information for your position transfer request on the first page and
clickContinue, the Transfer page for your selected transfer method opens.
Here is an image of the Transfer page for an FOP position transfer:
3. ClickUpload File.
The Upload File window opens. This window is identical for all eligible position transfers.
4. Be sure you have already prepared and reviewed your .CSV file. The Upload File window lists the
formatting requirements for your .CSV file.
Account Management Users' Guide 322
Chapter 4 Uploading Positions in a CSV File for Partial Position Transfers
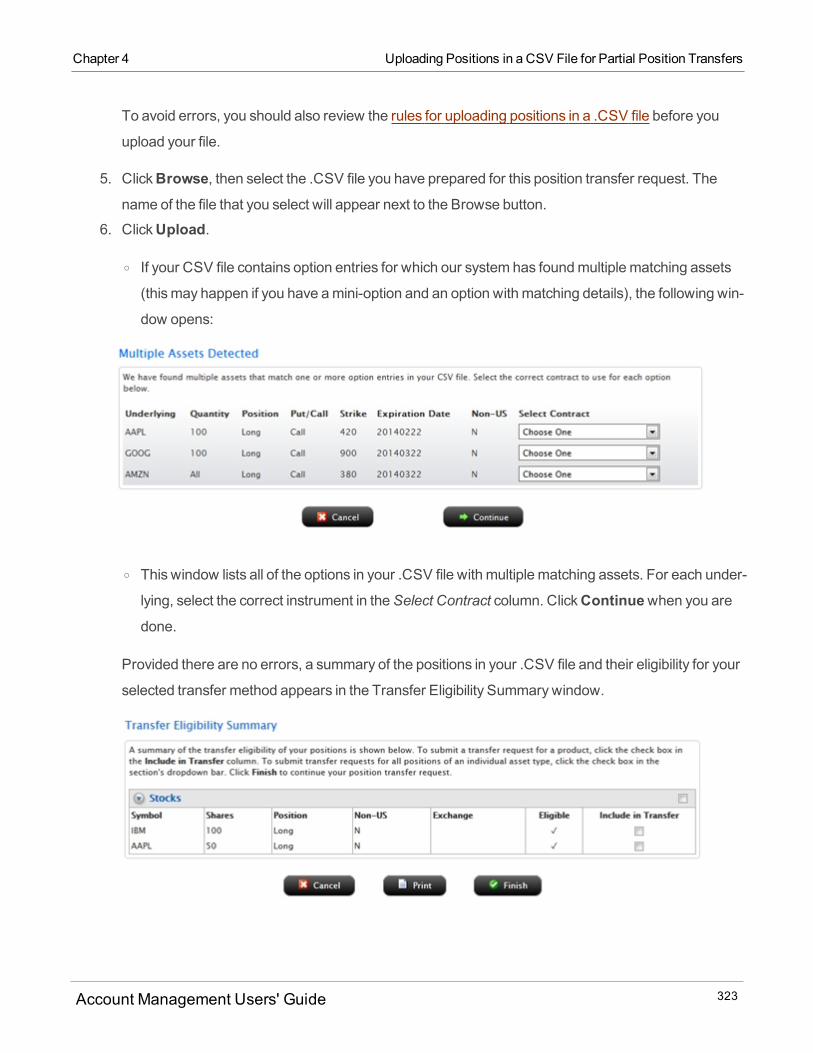
Chapter 4 Uploading Positions in a CSV File for Partial Position Transfers
To avoid errors, you should also review the rules for uploading positions in a .CSV file before you
upload your file.
5. ClickBrowse, then select the .CSV file you have prepared for this position transfer request. The
name of the file that you select will appear next to the Browse button.
6. ClickUpload.
o If your CSV file contains option entries for which our system has foundmultiple matching assets
(thismay happen if you have amini-option and an option with matching details), the following win-
dow opens:
o This window lists all of the options in your .CSV file with multiple matching assets. For each under-
lying, select the correct instrument in theSelect Contract column. ClickContinuewhen you aredone.
Provided there are no errors, a summary of the positions in your .CSV file and their eligibility for your
selected transfer method appears in the Transfer Eligibility Summarywindow.
Account Management Users' Guide 323
7. To include a position that ismarked as Eligible in your position transfer, click the check box under the
Include in Transfer column.
To include all positions, click the check box located at the far right of the asset class heading.
8. Optionally, clickPrint to print the eligibility summary.9. ClickFinish.
For more information
Rules for Uploading Positions in a CSV File
Observe the following rules when creating your *.CSV (comma separated values) file for either a position
eligibility check for a full transfer or for a partial ACATS, ATON, DRS, DWAC or FOP position transfer:
The file you uploadmust a CSV-formatted file. Although wewill process any uploaded file that is format-
ted as a CSV file, including files saved with a .txt extenstion, a .csv extension, or no extension, we
recommend that you create your upload file in Microsoft Excel and save it as a *.csv file.
Enter all dates using the yyyymmdd format.
All entries are case-insensitive (i.e. short = SHORT = ShOrT, etc).
All quantities and cash amounts can accept the word All to indicate to transfer everything.
When adding a stock, the Non-US indicator:
Defaults to N if not provided;
Will include US and Non-US exchanges if set to Y in an ACATS request;
Will only include Canadian exchanges if set to Y in an ATON request;
Is ignored in DRS, DWAC, and FOP transfers.
When adding an option, the Non-US indicator:
Defaults to N if not provided;
Will only include Canadian instruments if set to Y in an ATON request;
Is ignored in ACATS, DRS, DWAC, and FOP transfers.
When adding Cash, the currency field:
Defaults to USD;
Can be set to CAD or USD in ATON requests;
Is ignored in ACATS requests.
Account Management Users' Guide 324
Chapter 4 Rules for Uploading Positions in a CSV File
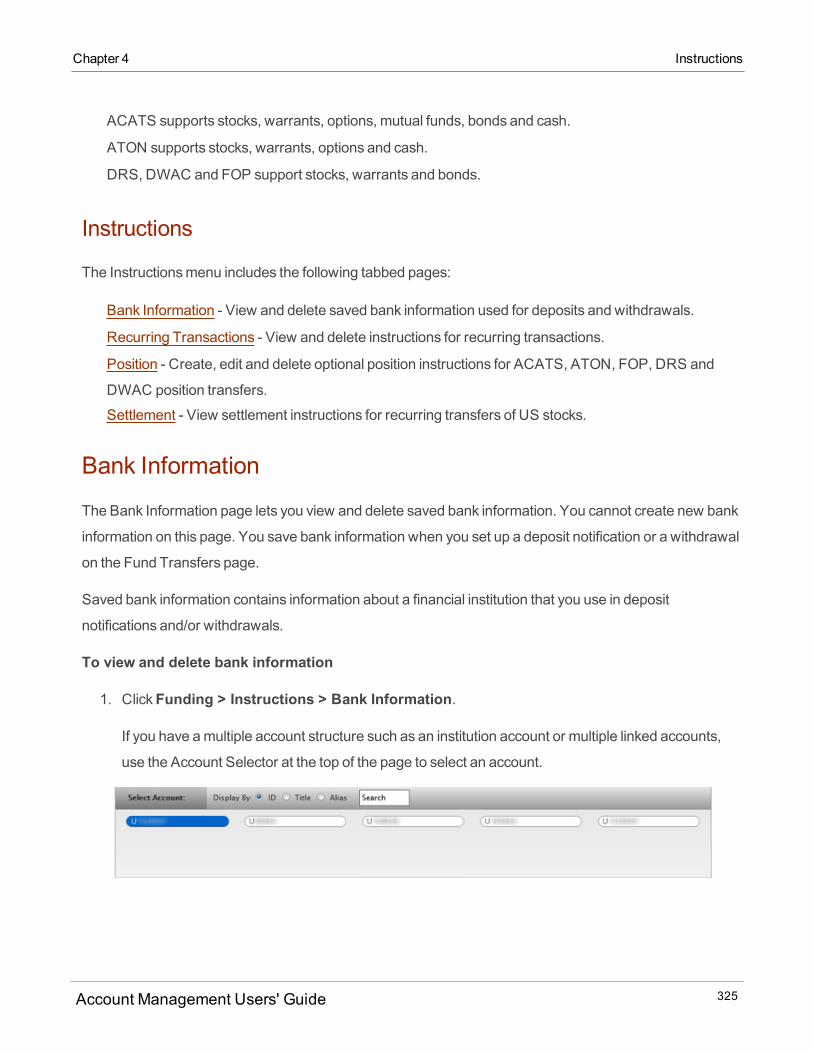
Chapter 4 Instructions
ACATS supports stocks, warrants, options, mutual funds, bonds and cash.
ATON supports stocks, warrants, options and cash.
DRS, DWAC and FOP support stocks, warrants and bonds.
Instructions
The Instructionsmenu includes the following tabbed pages:
Bank Information - View and delete saved bank information used for deposits and withdrawals.
Recurring Transactions - View and delete instructions for recurring transactions.
Position - Create, edit and delete optional position instructions for ACATS, ATON, FOP, DRS and
DWAC position transfers.
Settlement - View settlement instructions for recurring transfers of US stocks.
Bank Information
The Bank Information page lets you view and delete saved bank information. You cannot create new bank
information on this page. You save bank information when you set up a deposit notification or a withdrawal
on the Fund Transfers page.
Saved bank information contains information about a financial institution that you use in deposit
notifications and/or withdrawals.
To view and delete bank information
1. ClickFunding > Instructions > Bank Information.
If you have amultiple account structure such as an institution account or multiple linked accounts,
use the Account Selector at the top of the page to select an account.
Account Management Users' Guide 325
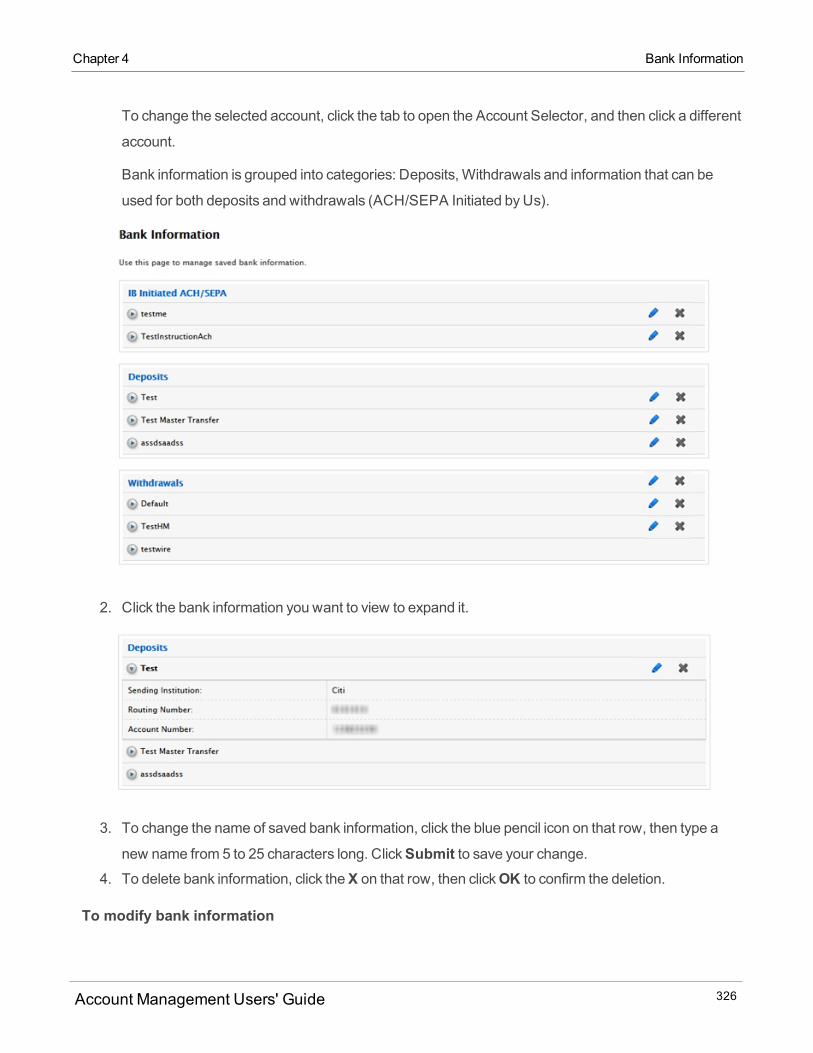
To change the selected account, click the tab to open the Account Selector, and then click a different
account.
Bank information is grouped into categories: Deposits, Withdrawals and information that can be
used for both deposits and withdrawals (ACH/SEPA Initiated byUs).
2. Click the bank information you want to view to expand it.
3. To change the name of saved bank information, click the blue pencil icon on that row, then type a
new name from 5 to 25 characters long. ClickSubmit to save your change.4. To delete bank information, click theX on that row, then clickOK to confirm the deletion.
To modify bank information
Account Management Users' Guide 326
Chapter 4 Bank Information

Chapter 4 Bank Information Fields
You cannot modify saved bank information. Youmust delete the bank information, then save bank
information when prompted on the Fund Transfers page during deposit or withdrawal transactions.
Bank Information Fields
The following table shows all the information that is saved in a bank instruction for each type of transaction.
Note that checkwithdrawals do not require that you enter and save bank information.
Transaction Type and
MethodField Notes
Deposits
ACH from US Bank Sending Institution The name of
the financial
institution
that will be
sending the
funds to your
Account.
Bank's ABA Number or
SWIFT/BIC Code
The routing
or transit
number for
your bank.
Bank Account Number or
IBAN
For coun-
tries outside
the US. This
field is
optional.
Name The name of
the instruc-
tion. This
appears on
the Bank
Instructions
Account Management Users' Guide 327
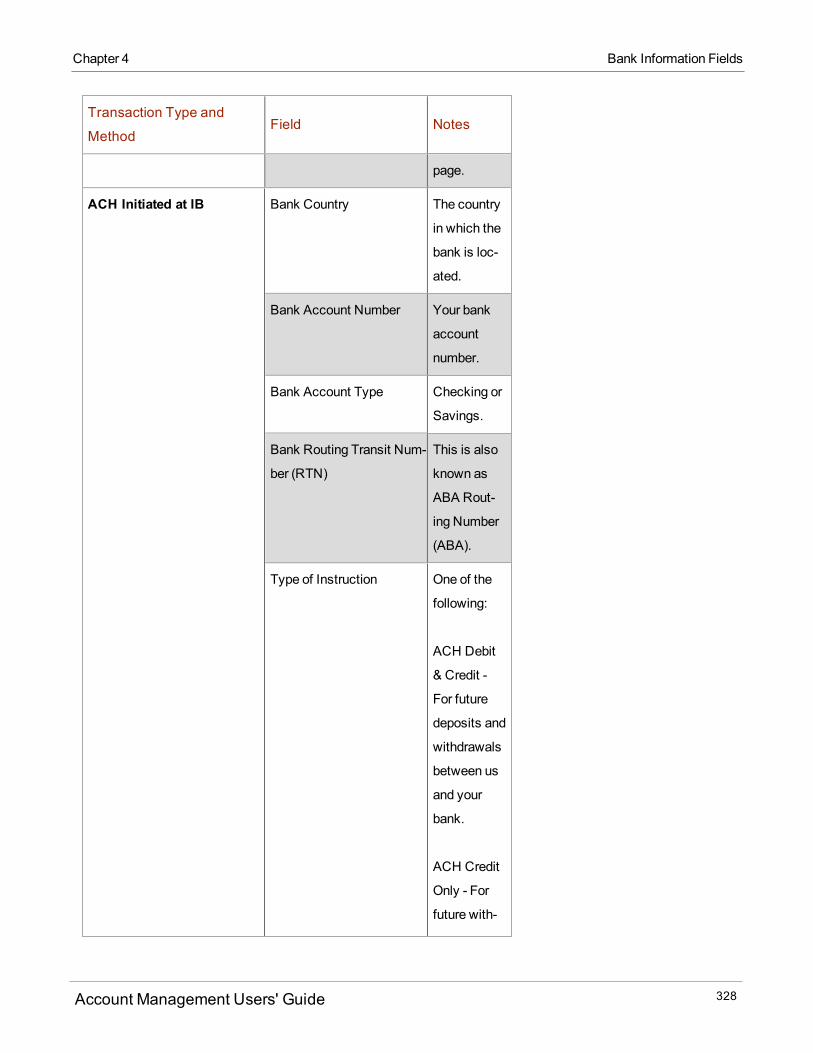
Transaction Type and
MethodField Notes
page.
ACH Initiated at IB Bank Country The country
in which the
bank is loc-
ated.
Bank Account Number Your bank
account
number.
Bank Account Type Checking or
Savings.
Bank Routing Transit Num-
ber (RTN)
This is also
known as
ABA Rout-
ing Number
(ABA).
Type of Instruction One of the
following:
ACH Debit
& Credit -
For future
deposits and
withdrawals
between us
and your
bank.
ACH Credit
Only - For
future with-
Account Management Users' Guide 328
Chapter 4 Bank Information Fields
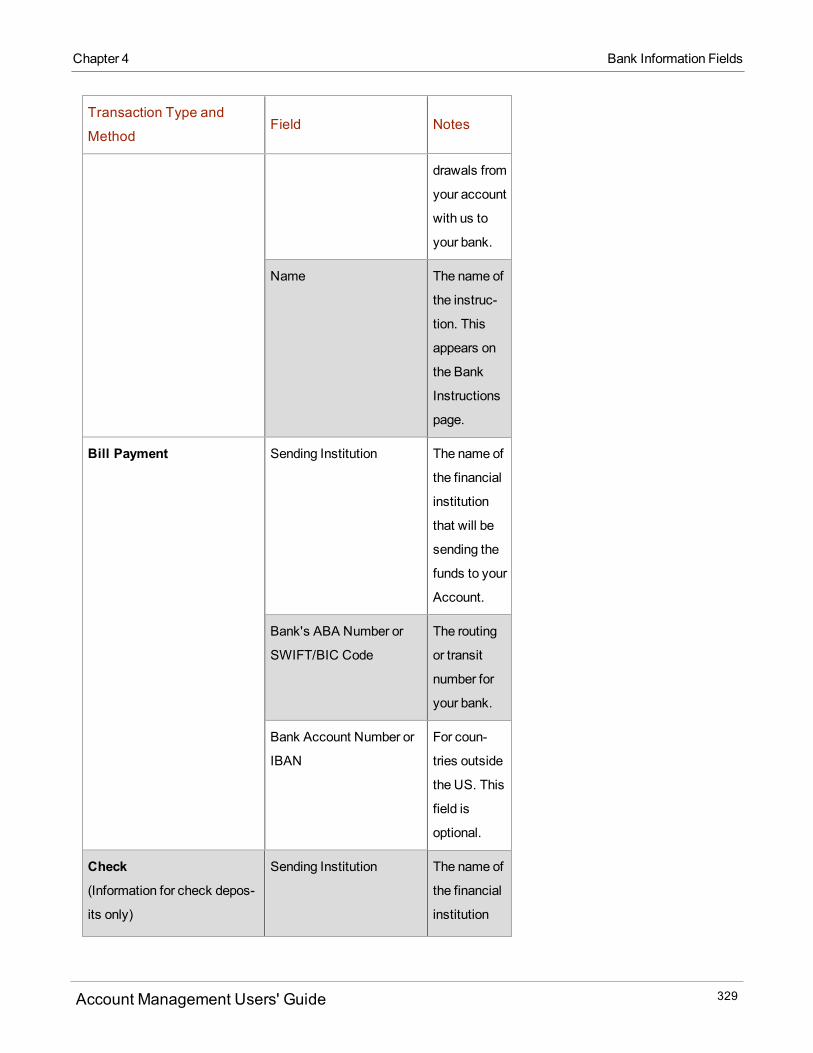
Chapter 4 Bank Information Fields
Transaction Type and
MethodField Notes
drawals from
your account
with us to
your bank.
Name The name of
the instruc-
tion. This
appears on
the Bank
Instructions
page.
Bill Payment Sending Institution The name of
the financial
institution
that will be
sending the
funds to your
Account.
Bank's ABA Number or
SWIFT/BIC Code
The routing
or transit
number for
your bank.
Bank Account Number or
IBAN
For coun-
tries outside
the US. This
field is
optional.
Check
(Information for check depos-
its only)
Sending Institution The name of
the financial
institution
Account Management Users' Guide 329
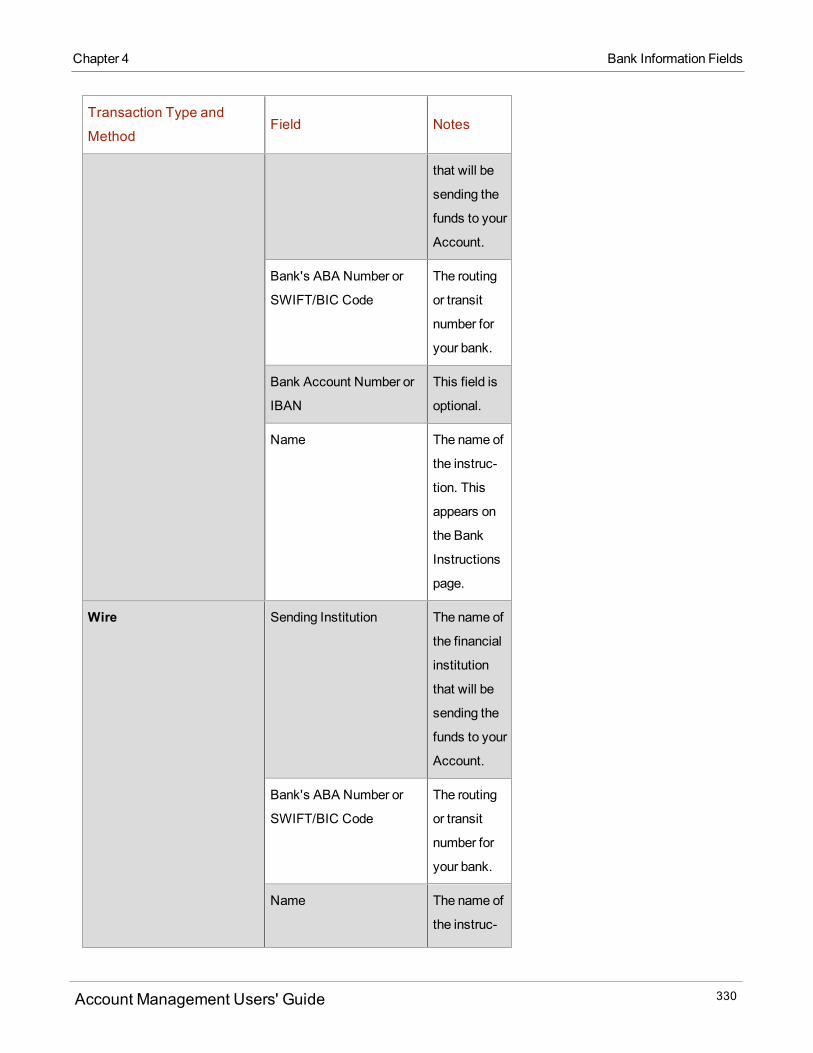
Transaction Type and
MethodField Notes
that will be
sending the
funds to your
Account.
Bank's ABA Number or
SWIFT/BIC Code
The routing
or transit
number for
your bank.
Bank Account Number or
IBAN
This field is
optional.
Name The name of
the instruc-
tion. This
appears on
the Bank
Instructions
page.
Wire Sending Institution The name of
the financial
institution
that will be
sending the
funds to your
Account.
Bank's ABA Number or
SWIFT/BIC Code
The routing
or transit
number for
your bank.
Name The name of
the instruc-
Account Management Users' Guide 330
Chapter 4 Bank Information Fields

Chapter 4 Bank Information Fields
Transaction Type and
MethodField Notes
tion. This
appears on
the Bank
Instructions
page.
Withdrawals
ACH Initiated at IB Bank Country The country
in which the
bank is loc-
ated.
Bank Account Number Your bank
account
number.
Bank Account Type Checking or
Savings.
Bank Routing Transit Num-
ber (RTN)
This is also
known as
ABA Rout-
ing Number
(ABA).
Type of Instruction One of the
following:
ACH Debit
& Credit -
For future
deposits and
withdrawals
between us
and your
Account Management Users' Guide 331

Transaction Type and
MethodField Notes
bank.
ACH Credit
Only - For
future with-
drawals from
your account
to your bank.
Name The name of
the instruc-
tion. This
appears on
the Bank
Instructions
page.
Wire Wire Type One of the
following:
Bank
Mutual Fund
Brokerage
Firm
Credit Union
Other
Bank Country The country
in which the
bank is loc-
ated.
Account Number Your
account
number.
Account Management Users' Guide 332
Chapter 4 Bank Information Fields

Chapter 4 Recurring Transactions
Transaction Type and
MethodField Notes
International Banking
Account Number (IBAN)
For coun-
tries outside
the US
where applic-
able.
SWIFT/BIC Code Where
applicable.
ABA Routing Number Where
applicable.
Name The name of
the instruc-
tion. This
appears on
the Bank
Instructions
page.
Recurring Transactions
TheRecurring Transactions page lets you view and delete instructions for saved recurring transactions.
You cannot create new recurring transactions on this page.When you delete an instruction for a
recurring transaction, you also cancel the recurring transaction. You are always given the opportunity to
create a recurring transaction when you finish setting up a deposit notification or a withdrawal on the Fund
Transfers page using saved bank information (also called a bank instruction).
A recurring transaction contains instructions to us about a transaction that you want to repeat on a regular
basis. It includes the frequency of recurrence, amount of the transaction, transaction type, start and end
dates and an instruction name.
For each saved recurring transaction, the Recurring Transactions page displays:
Account Management Users' Guide 333
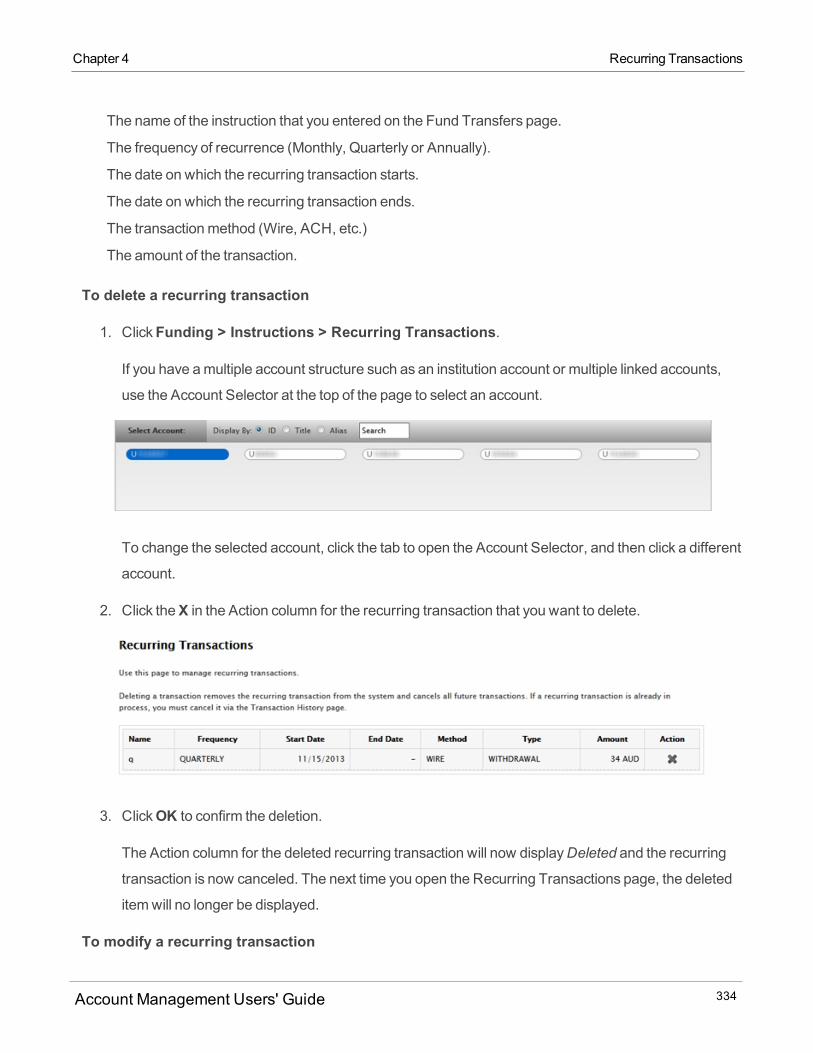
The name of the instruction that you entered on the Fund Transfers page.
The frequency of recurrence (Monthly, Quarterly or Annually).
The date on which the recurring transaction starts.
The date on which the recurring transaction ends.
The transactionmethod (Wire, ACH, etc.)
The amount of the transaction.
To delete a recurring transaction
1. ClickFunding > Instructions > Recurring Transactions.
If you have amultiple account structure such as an institution account or multiple linked accounts,
use the Account Selector at the top of the page to select an account.
To change the selected account, click the tab to open the Account Selector, and then click a different
account.
2. Click theX in the Action column for the recurring transaction that you want to delete.
3. ClickOK to confirm the deletion.
The Action column for the deleted recurring transaction will now displayDeleted and the recurring
transaction is now canceled. The next time you open the Recurring Transactions page, the deleted
itemwill no longer be displayed.
To modify a recurring transaction
Account Management Users' Guide 334
Chapter 4 Recurring Transactions

Chapter 4 Position Instructions
You cannot modify a recurring transaction. If you want to modify a recurring transaction, youmust delete
the recurring transaction, then create a new recurring transaction on the Fund Transfers page when you
finish setting up the deposit or withdrawal using saved bank information (also called a bank instruction).
Position Instructions
Position Instructions are optional instructions that you can create and use when you create certain types of
position transfers. The Position Instructions page lets you view and delete existing Position Instructions.
You cannot create a new instruction on Position Instruction page. You can only create a Position
Instruction on the Position Transfer page after you select either ACATS, FOP or ATON as the transfer
method.
A Position Instruction is a convenient way to re-use third-party broker information for the following types of
position transfers:
Automated Customer Account Transfer Service (ACATS) - Partial transfers only
Free of Payment (FOP) for US stocks
Account Transfer on Notification (ATON) for Canadian securities - Partial transfers only
When you request one of those types of position transfers on the Position Transfers page, you have the
option of creating a new Position Instruction or using an existing Position Instruction.
Who can access the Position Instructions page?
You can access this page if you are a(n):
Individual, Joint, Trust or IRA Account User
Small Business Account User
Friends and Family GroupMaster or Client User
Advisor Master User Organization (master and client account)
Advisor Client User Individual
Advisor Client User Organization
Proprietary Trading GroupMaster User
Broker Master User (master account only)
Account Management Users' Guide 335
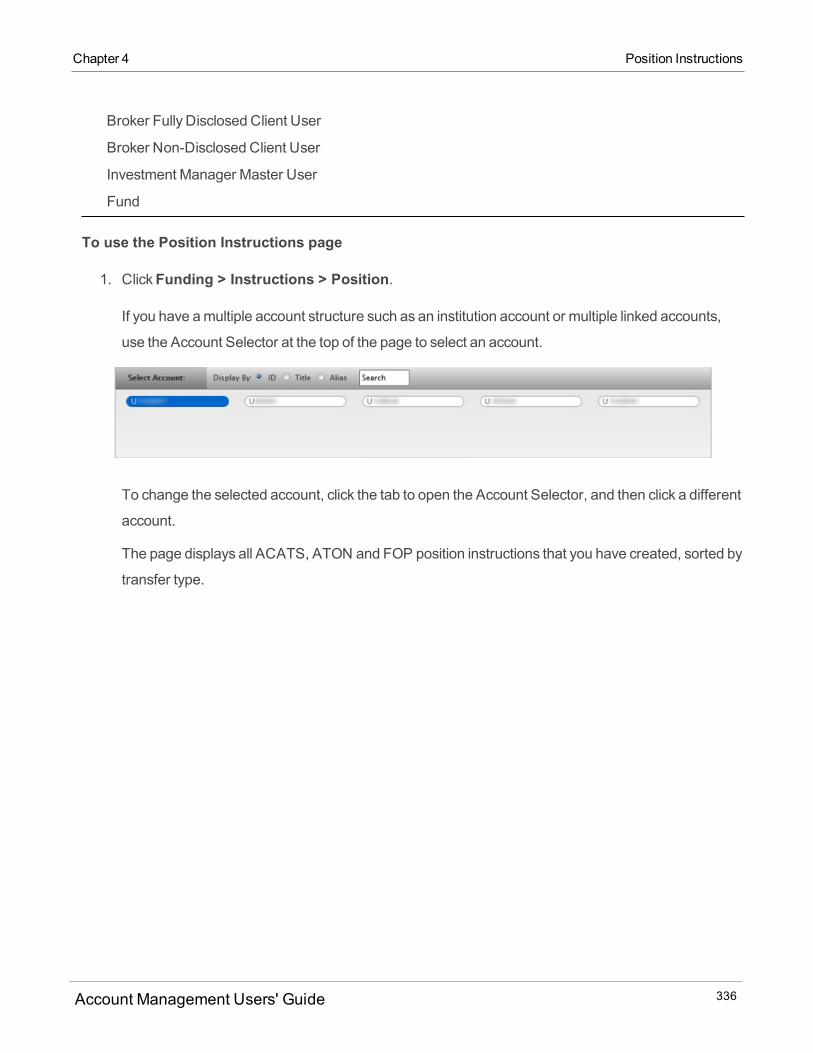
Broker Fully Disclosed Client User
Broker Non-Disclosed Client User
Investment Manager Master User
Fund
To use the Position Instructions page
1. ClickFunding > Instructions > Position.
If you have amultiple account structure such as an institution account or multiple linked accounts,
use the Account Selector at the top of the page to select an account.
To change the selected account, click the tab to open the Account Selector, and then click a different
account.
The page displays all ACATS, ATON and FOP position instructions that you have created, sorted by
transfer type.
Account Management Users' Guide 336
Chapter 4 Position Instructions
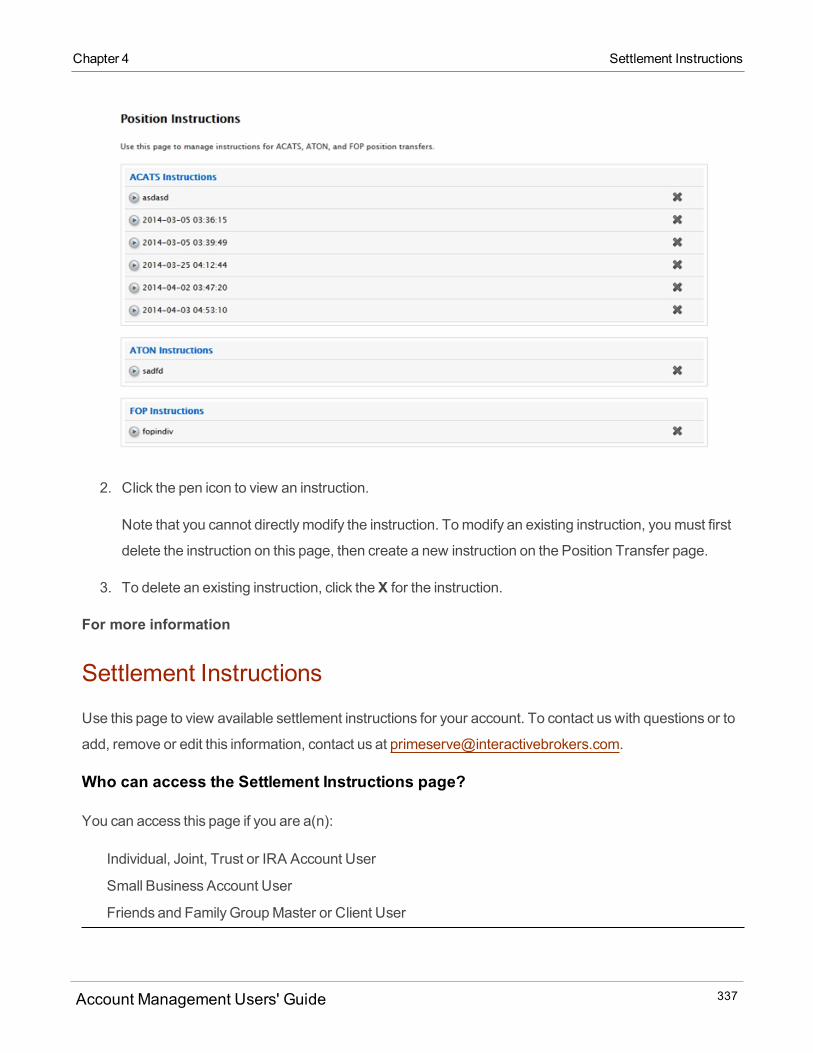
Chapter 4 Settlement Instructions
2. Click the pen icon to view an instruction.
Note that you cannot directlymodify the instruction. Tomodify an existing instruction, youmust first
delete the instruction on this page, then create a new instruction on the Position Transfer page.
3. To delete an existing instruction, click theX for the instruction.
For more information
Settlement Instructions
Use this page to view available settlement instructions for your account. To contact us with questions or to
add, remove or edit this information, contact us at [email protected].
Who can access the Settlement Instructions page?
You can access this page if you are a(n):
Individual, Joint, Trust or IRA Account User
Small Business Account User
Friends and Family GroupMaster or Client User
Account Management Users' Guide 337

Advisor Master User Organization (master and client account)
Advisor Client User Individual
Advisor Client User Organization
Proprietary Trading GroupMaster User
Broker Master User (master account only)
Broker Fully Disclosed Client User
Broker Non-Disclosed Client User
Investment Manager Master User
Fund
Soft Dollars Disbursement
Use the Soft Dollars Disbursement page to request disbursements to soft dollars vendors and view
existing disbursements and invoices and elect to paymarket data subscriptionswith accumulated soft
dollars. This page is only accessible after soft dollar vendor accounts have been set up here.
The Soft Dollars page only appears AFTER you have signed and submitted the Soft Dollars Agreement on
the Request Soft Dollars page.
Who can access the Soft Dollars Disbursement page?
You can access this page only if you are a Fund Investment Manager or a Registered Professional Advisor
and your soft dollar vendors have been set up and approved.
Account Management Users' Guide 338
Chapter 4 Soft Dollars Disbursement
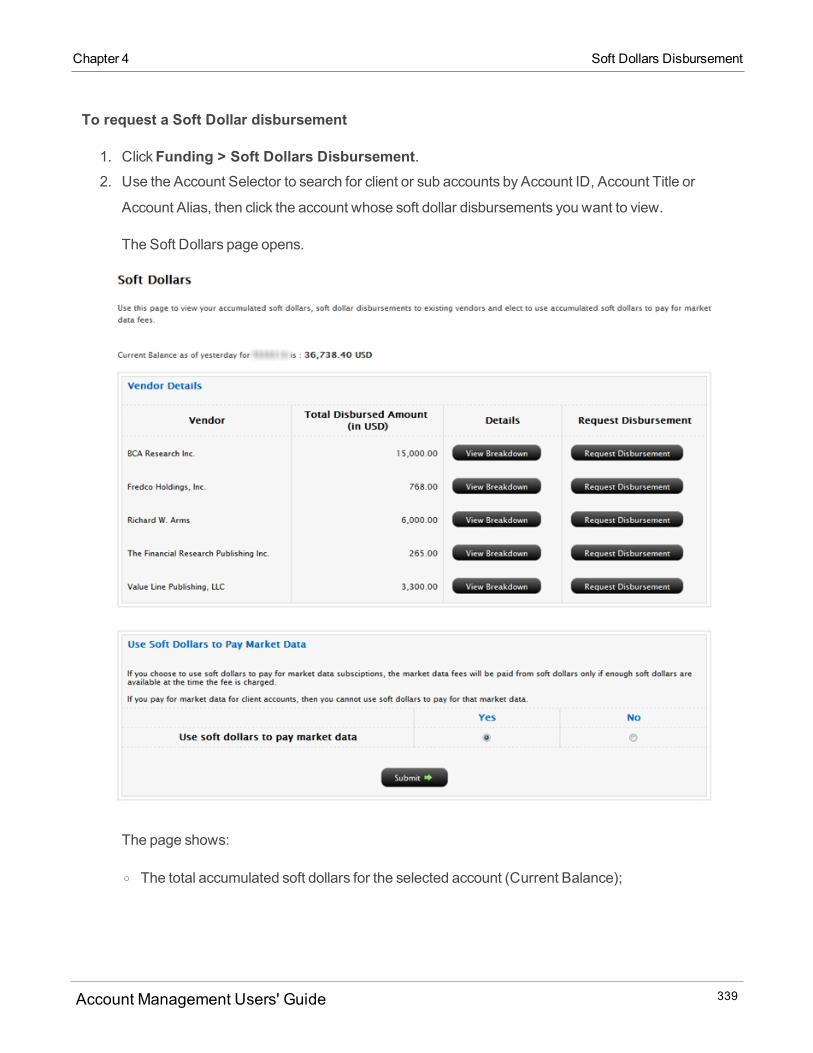
Chapter 4 Soft Dollars Disbursement
To request a Soft Dollar disbursement
1. ClickFunding > Soft Dollars Disbursement.2. Use the Account Selector to search for client or sub accounts by Account ID, Account Title or
Account Alias, then click the account whose soft dollar disbursements you want to view.
The Soft Dollars page opens.
The page shows:
o The total accumulated soft dollars for the selected account (Current Balance);
Account Management Users' Guide 339
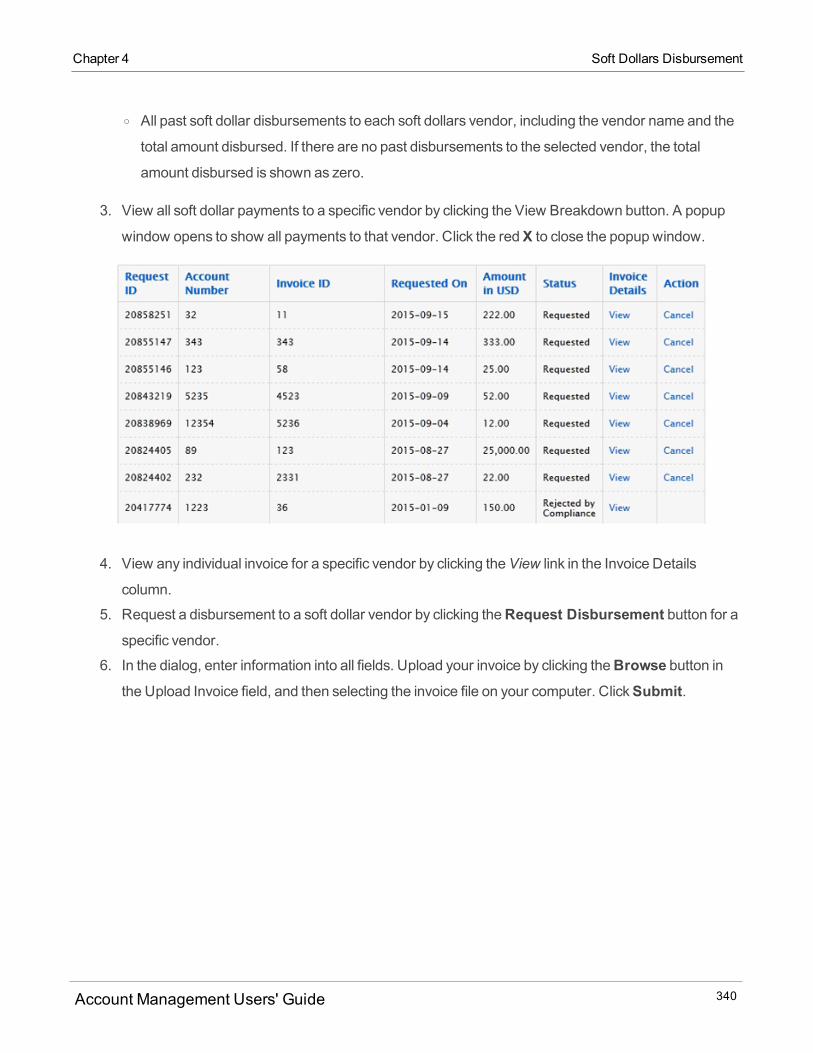
o All past soft dollar disbursements to each soft dollars vendor, including the vendor name and the
total amount disbursed. If there are no past disbursements to the selected vendor, the total
amount disbursed is shown as zero.
3. View all soft dollar payments to a specific vendor by clicking the View Breakdown button. A popup
window opens to show all payments to that vendor. Click the redX to close the popup window.
4. View any individual invoice for a specific vendor by clicking theView link in the Invoice Details
column.
5. Request a disbursement to a soft dollar vendor by clicking theRequest Disbursement button for aspecific vendor.
6. In the dialog, enter information into all fields. Upload your invoice by clicking theBrowse button inthe Upload Invoice field, and then selecting the invoice file on your computer. ClickSubmit.
Account Management Users' Guide 340
Chapter 4 Soft Dollars Disbursement
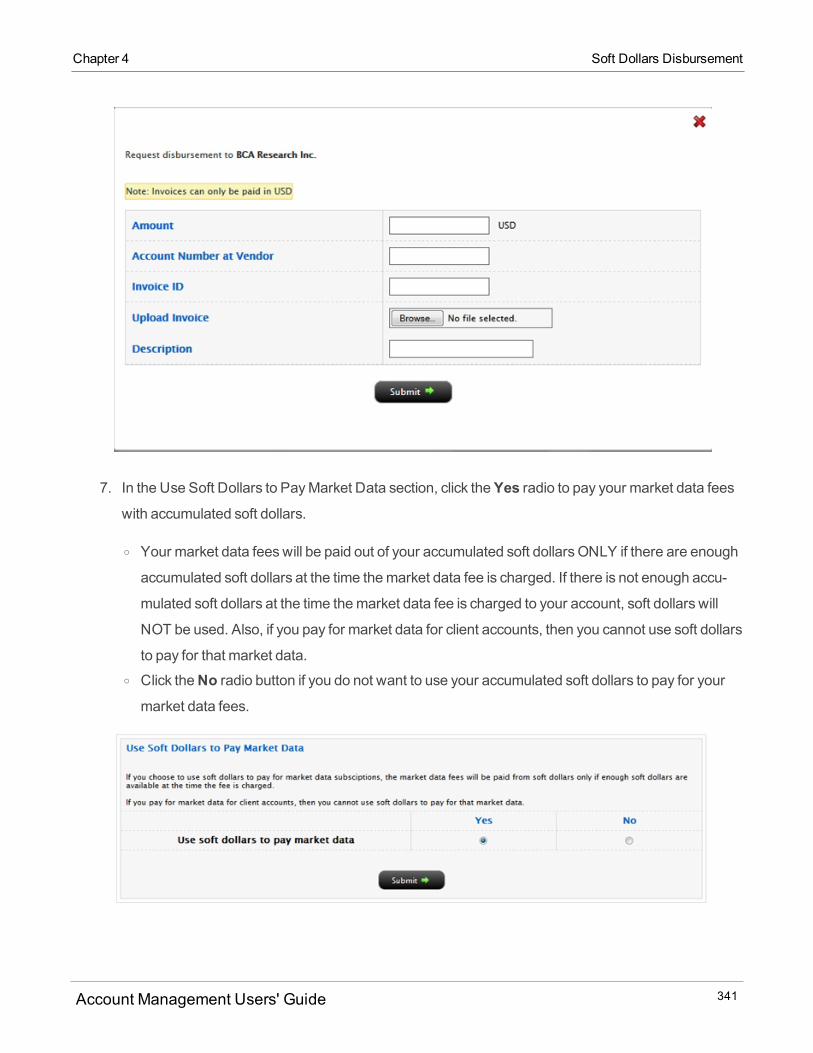
Chapter 4 Soft Dollars Disbursement
7. In the Use Soft Dollars to PayMarket Data section, click theYes radio to pay your market data feeswith accumulated soft dollars.
o Your market data feeswill be paid out of your accumulated soft dollarsONLY if there are enough
accumulated soft dollars at the time themarket data fee is charged. If there is not enough accu-
mulated soft dollars at the time themarket data fee is charged to your account, soft dollars will
NOT be used. Also, if you pay for market data for client accounts, then you cannot use soft dollars
to pay for that market data.o Click theNo radio button if you do not want to use your accumulated soft dollars to pay for yourmarket data fees.
Account Management Users' Guide 341
8. ClickSubmit to complete your request.
For more information
Request Soft Dollars
Account Management Users' Guide 342
Chapter 4 Soft Dollars Disbursement
Manage AccountThis chapter describes how to configure you account using the different account- and user-level settings in
theManage Account menu.
This chapter includes the following topics:
Account Information - Modify personal information for individuals or entities associated with your
account, modify your financial and regulatory information, update your W8 or W9 tax form, print a sum-
mary of your account details, view client accounts and invite clients to open accounts, andmore.
Settings - Configure all settings for your account, including base currency, pricing structure, margin
account upgrades, paper trading account, account aliases, white branding andmore.
Trade Configuration - Access all trade-related configuration functions, including trading permissions,
research andmarket data subscriptions.
Security - Configure security-related settings for your account, including your account password, IP
restrictions, sign up to vote in our online polls, request or share a Secure Login Device, andmore.
AccessRights - Add users and set their Account Management access rights, create user roles, and
Security Officers can view account-level access rights and configure the number of authorizers.
Add or Link Accounts - Create new accounts that are linked to you account, link existingmultiple IB
accounts under a single username and password, or link your account to an Advisor- or Broker-man-
aged account. Proprietary Trading GroupMaster Users (Pool account) and Single Hedge Funds can
also add sub accounts for authorized traders to their organizations.
Research Services - Access research provider websites with your IB account email address to get addi-
tional services.
MoneyManager - Advisors acting asWealth Managers can shop for MoneyManagers at theMoney
Manager Marketplace and assign them to trade client accounts, while MoneyManagers can sell their
trading expertise toWealth Managers.
Trader Referral - Lets our clients earn a cash bonus by referring new clients.
Account Information
The Account Informationmenu includes the following pages:
5
Account Management Users' Guide 343
Details - Modify personal, financial and regulatory information, and print a summary of your account set-
tings.
Trading Sub Accounts - Proprietary Trading GroupMaster Users can view and create sub accounts for
authorized traders.
Broker Declaration - Update your broker registration information.
Advisor Qualifications - Update your advisor registration information.
Transfer on Death - Register Transfer-On-Death beneficiaries.
Investor Category - Answer a series of questions to determine if you qualify to trade a wider range of
trading products.
Large Trader Identification - Add SEC Large Trader ID's to your account.
EMIR and LEI Information - Account holders who are subject to the EMIR regulation can change their
EMIR election.
Tax Information - Update your W-8/W-9 tax form.
Registration Information - Create accounts in multiple advisory jurisdictions.
Details
TheDetailsmenu includes the following pages:
Account Details - View and print a summary of your account settings.
Profile - Change personal information, such as name and address, and your regulatory information for
any individual or entity associated with your account.
Financial Information - Change financial information such as investment objectives and net worth.
Regulatory Information - Update the regulatory information for your account.
In addition, you can enable or disable dividend reinvestment for your own account from the Account Details
page.
Account Details
The Print Account Details page lets you view and print a summary of all of your account settings. The
following information is included in the account summary:
Account Management Users' Guide 344
Chapter 5 Details
Chapter 5 Account Details
Account configuration, including country, customer type and base currency
Individual and Single Hedge Fund accounts can enable and disable Dividend Reinvestment.
Customer type and, for Master account users, an account structure diagram.
Financial information, including investment objectives, net worth and annual income
Investment experience
Trading permissions, including the account type
Market data, including products, countries and bundles
Account holder details, including name, address and other personal information
Accredited investor qualifications
Regulatory information
Who can access the Print Account Details page?
You can access this page if you are a(n):
Individual, Joint, Trust or IRA Account User
Small Business Account User
Friends and Family GroupMaster or Client User
Advisor Master User Individual
Advisor Master User Organization
Advisor Client User Individual
Advisor Client User Organization
Proprietary Trading GroupMaster User
Broker Master User (master account only)
Broker Fully Disclosed Client User
Broker Fully Disclosed Client User Organization
Investment Manager Master User
Fund
To view account details
1. ClickManage Account > Account Information > Details > Account Details.2. Do one of the following:
Account Management Users' Guide 345
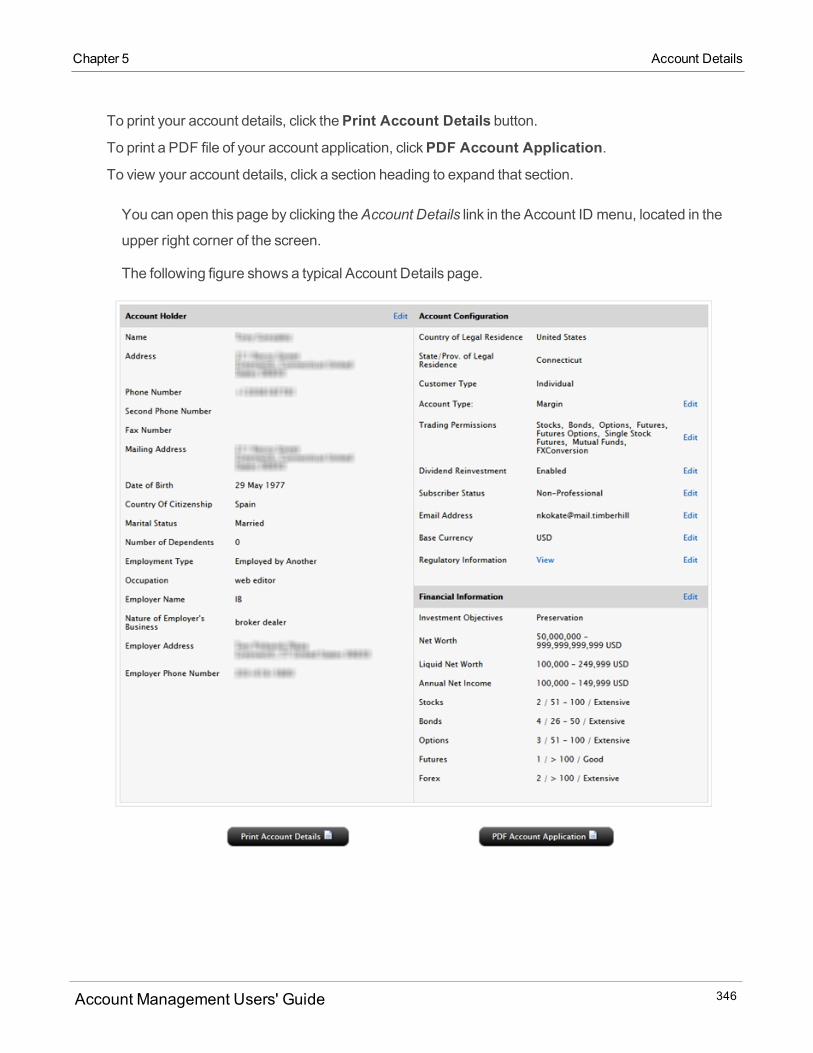
To print your account details, click thePrint Account Details button.
To print a PDF file of your account application, clickPDF Account Application.
To view your account details, click a section heading to expand that section.
You can open this page by clicking theAccount Details link in the Account ID menu, located in the
upper right corner of the screen.
The following figure shows a typical Account Details page.
Account Management Users' Guide 346
Chapter 5 Account Details
Chapter 5 Profile
Profile
The Profile page lets youmodify information for individuals or entities associated with your account. You
canmodify the following information:
Name and address
Personal information such as birthday andmarital status
Legal identification
Employment information
Regulatory information
Phone numbers
Tax Identification Number
Who can access the Profile page?
You can access this page if you are a(n):
Individual, Joint, Trust or IRA Account User
Small Business Account User
Friends and Family GroupMaster or Client User
Advisor Master User Individual
Advisor Master User Organization
Advisor Client User Individual
Advisor Client User Organization
Proprietary Trading GroupMaster User
Broker Master User (master account only)
Broker Fully Disclosed Client User
Broker Fully Disclosed Client User Organization
Investment Manager Master User
Fund
To update information on the Profile page
1. ClickManage Account > Account Information > Details > Profile.
Account Management Users' Guide 347
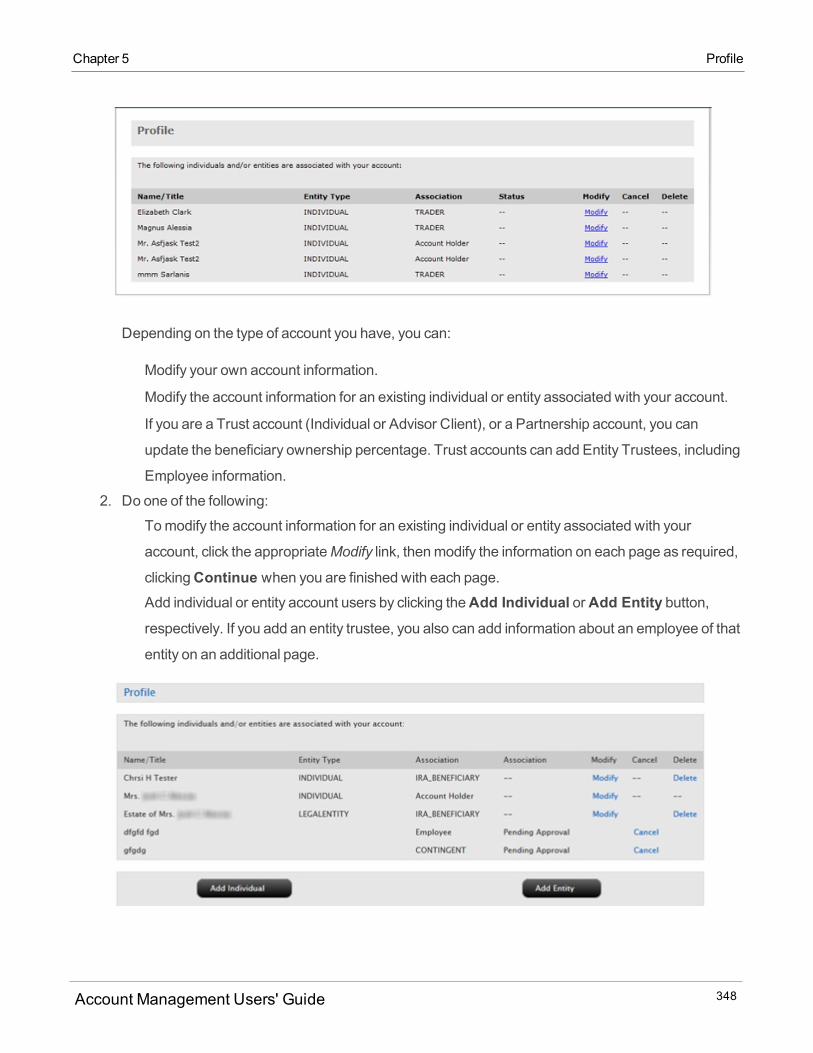
Depending on the type of account you have, you can:
Modify your own account information.
Modify the account information for an existing individual or entity associated with your account.
If you are a Trust account (Individual or Advisor Client), or a Partnership account, you can
update the beneficiary ownership percentage. Trust accounts can add Entity Trustees, including
Employee information.
2. Do one of the following:
Tomodify the account information for an existing individual or entity associated with your
account, click the appropriateModify link, thenmodify the information on each page as required,
clickingContinue when you are finished with each page.Add individual or entity account users by clicking theAdd Individual orAdd Entity button,respectively. If you add an entity trustee, you also can add information about an employee of that
entity on an additional page.
Account Management Users' Guide 348
Chapter 5 Profile
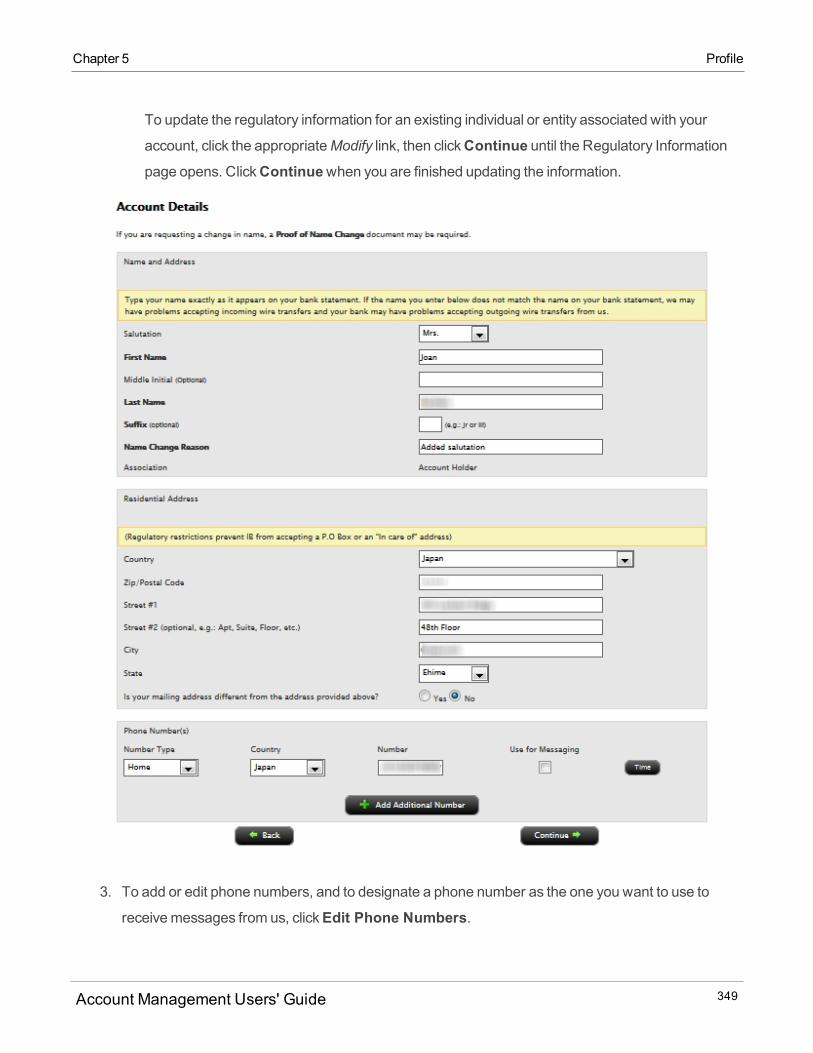
Chapter 5 Profile
To update the regulatory information for an existing individual or entity associated with your
account, click the appropriateModify link, then clickContinue until the Regulatory Informationpage opens. ClickContinuewhen you are finished updating the information.
3. To add or edit phone numbers, and to designate a phone number as the one you want to use to
receivemessages from us, clickEdit Phone Numbers.
Account Management Users' Guide 349
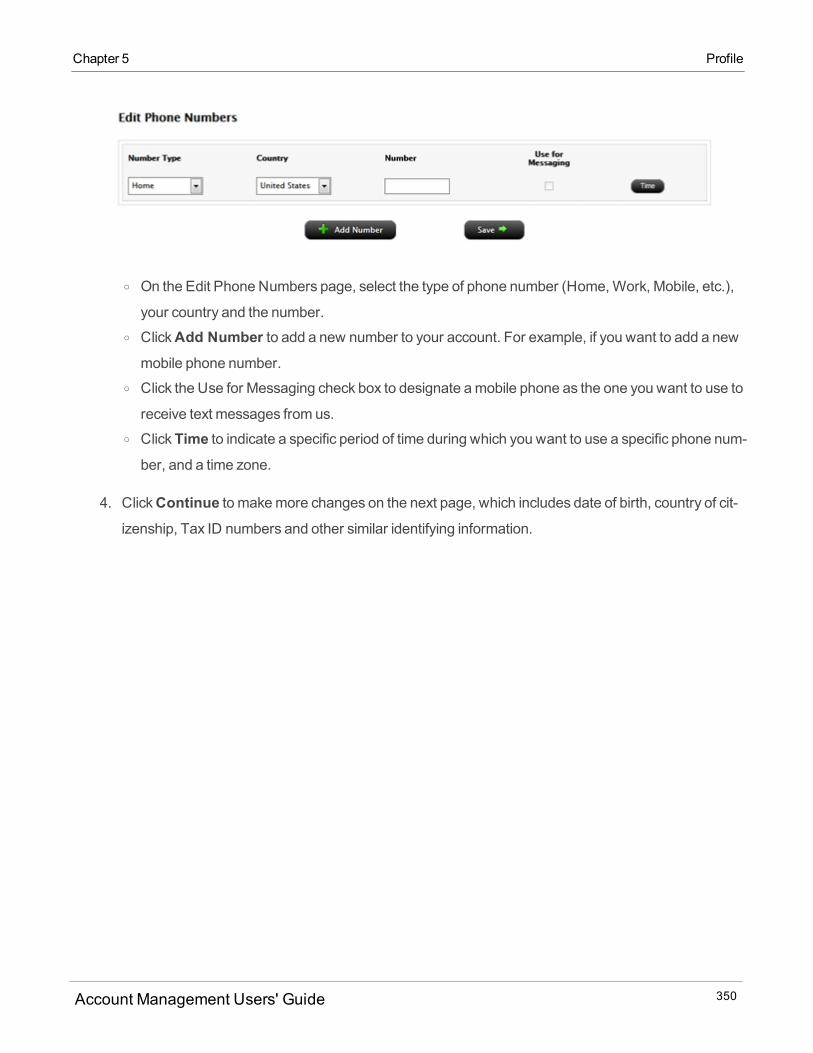
o On the Edit Phone Numbers page, select the type of phone number (Home,Work, Mobile, etc.),
your country and the number.o ClickAdd Number to add a new number to your account. For example, if you want to add a new
mobile phone number.o Click the Use for Messaging check box to designate amobile phone as the one you want to use to
receive text messages from us.o ClickTime to indicate a specific period of time during which you want to use a specific phone num-ber, and a time zone.
4. ClickContinue to makemore changes on the next page, which includes date of birth, country of cit-izenship, Tax ID numbers and other similar identifying information.
Account Management Users' Guide 350
Chapter 5 Profile
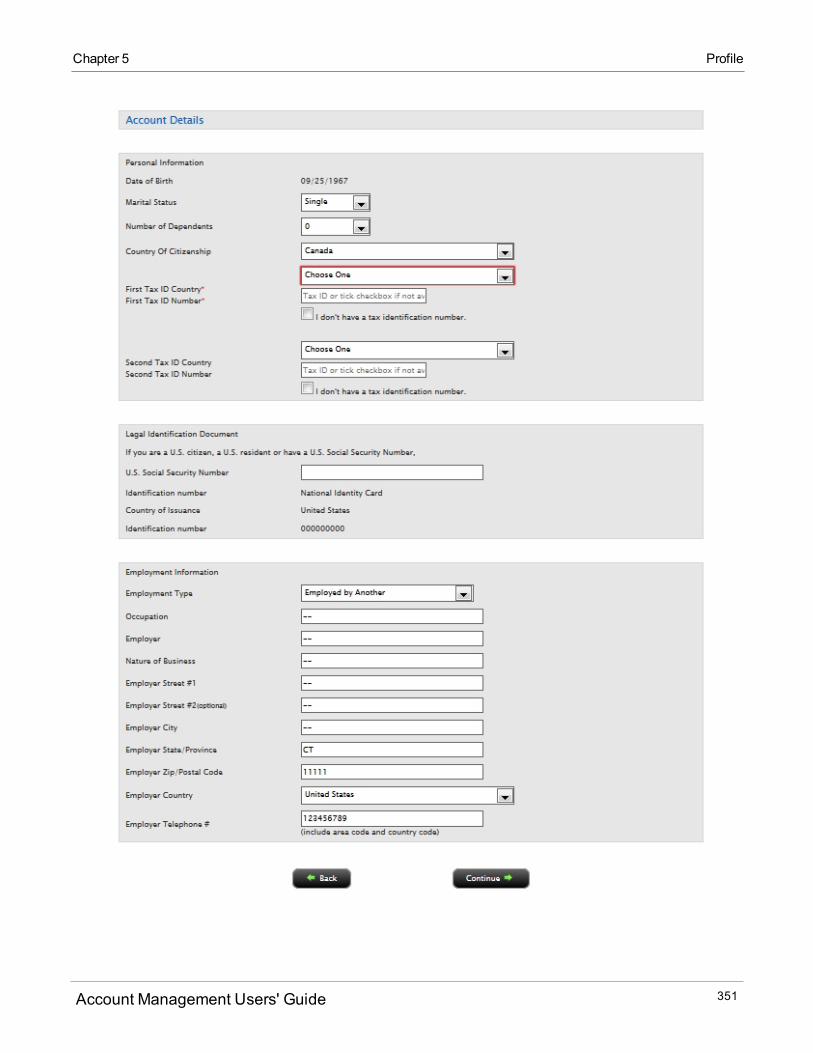
Chapter 5 Profile
Account Management Users' Guide 351
5. ClickContinuewhen you have finishedmaking changes.6. Verify your information on the next page, and then clickBack.
If you need tomake further changes, clickBack, thenmake corrections before submitting.
7. Enter the confirmation number sent to you via email, then clickContinue.If you have not received a confirmation number, click Request Confirmation Number to request that
a new confirmation number be sent to your email address on record.
Financial Information
The Financial Information page lets you change the following financial information for your account, which
you originally entered into your account application:
Investment objectives
Investment experience
Net worth and annual income
Who can access the Financial Information page?
You can access this page if you are a(n):
Individual, Joint, Trust or IRA Account User
Small Business Account User
Friends and Family GroupMaster or Client User
Advisor Master User Individual
Advisor Master User Organization
Advisor Client User Individual
Advisor Client User Organization
Proprietary Trading GroupMaster User
Broker Master User (master account only)
Broker Fully Disclosed Client User
Broker Fully Disclosed Client User Organization
Investment Manager Master User
Fund
Account Management Users' Guide 352
Chapter 5 Financial Information
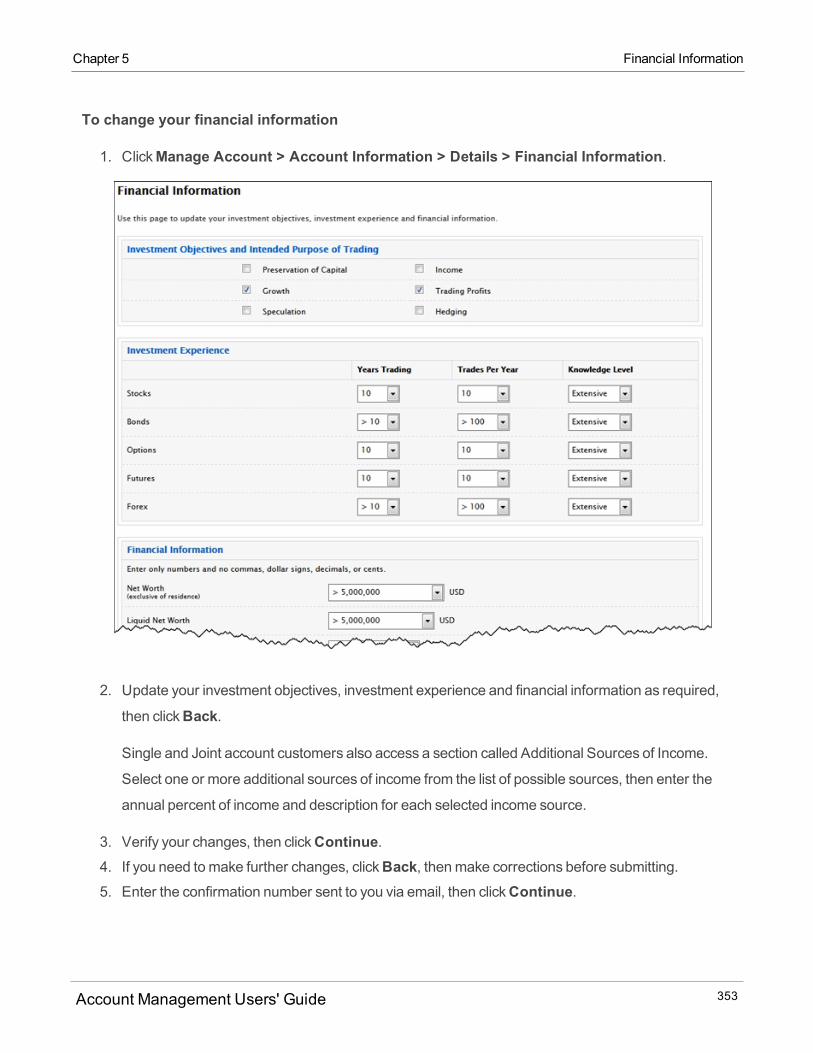
Chapter 5 Financial Information
To change your financial information
1. ClickManage Account > Account Information > Details > Financial Information.
2. Update your investment objectives, investment experience and financial information as required,
then clickBack.
Single and Joint account customers also access a section called Additional Sources of Income.
Select one or more additional sources of income from the list of possible sources, then enter the
annual percent of income and description for each selected income source.
3. Verify your changes, then clickContinue.4. If you need tomake further changes, clickBack, thenmake corrections before submitting.5. Enter the confirmation number sent to you via email, then clickContinue.
Account Management Users' Guide 353
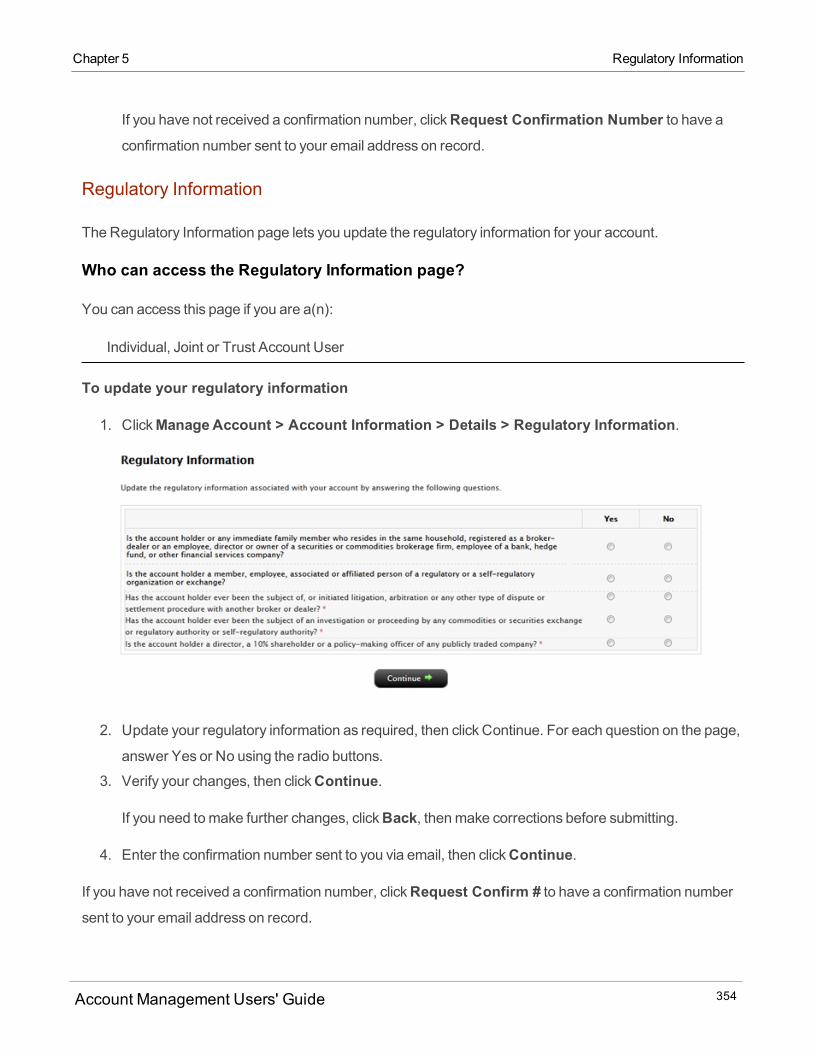
If you have not received a confirmation number, clickRequest Confirmation Number to have aconfirmation number sent to your email address on record.
Regulatory Information
TheRegulatory Information page lets you update the regulatory information for your account.
Who can access the Regulatory Information page?
You can access this page if you are a(n):
Individual, Joint or Trust Account User
To update your regulatory information
1. ClickManageAccount > Account Information > Details > Regulatory Information.
2. Update your regulatory information as required, then click Continue. For each question on the page,
answer Yes or No using the radio buttons.
3. Verify your changes, then clickContinue.
If you need tomake further changes, clickBack, thenmake corrections before submitting.
4. Enter the confirmation number sent to you via email, then clickContinue.
If you have not received a confirmation number, clickRequest Confirm # to have a confirmation numbersent to your email address on record.
Account Management Users' Guide 354
Chapter 5 Regulatory Information
Chapter 5 Dividend Reinvestment
Dividend Reinvestment
Dividend reinvestment is an option that lets you automatically invest cash dividends from common and
preferred stocks in the underlying stock. You can turn automatic dividend reinvestment on or off at the
account level only; that is, you cannot choose which dividends to reinvest. Dividend reinvestment is
disabled by default.
Rules
Dividend Reinvestment is available to IB LLC and IB UK clients only.
Only US and Canada listed common and preferred stocks are eligible for Dividend Reinvestment.
On themorning of the trading day following confirmation of the our receipt of a dividend payment on a
stock, we will use the dividend payment (or cash-in-lieu of dividend payment if you have amargin
account and your shares are on loan at the time of the dividend payment) to purchase additional shares
of that stock.
Wewill charge our customary commission for the purchase.
Purchased shareswill be allocated to clients on a pro rata basis (based on the dividend amount to
which each participating client is entitled). In the event that the purchase executes in multiple smaller
trades, you will receive the weighted-average price of such shares.
If your account is in amargin deficit and can’t initiate new positions, dividendswill not be reinvested,
even if you have dividend reinvestment enabled.
To enable and disable automatic dividend reinvestment
1. Depending on your account, access the dividend reinvestment option from the following pages in
Account Management:
o Individual, Joint, Trust, IRA, Small Business Accounts -Manage Account > Account Inform-ation > Details > Account Details. Enable dividend reinvestment by clicking theEdit link in theAccount Configuration section.
o Proprietary Trading Group STL Master User -Manage Traders > Traders > View. Enable auto-matic reinvestment for an individual trading sub account by clicking the blue pen icon in the
Dividend Reinvestment column.
Account Management Users' Guide 355
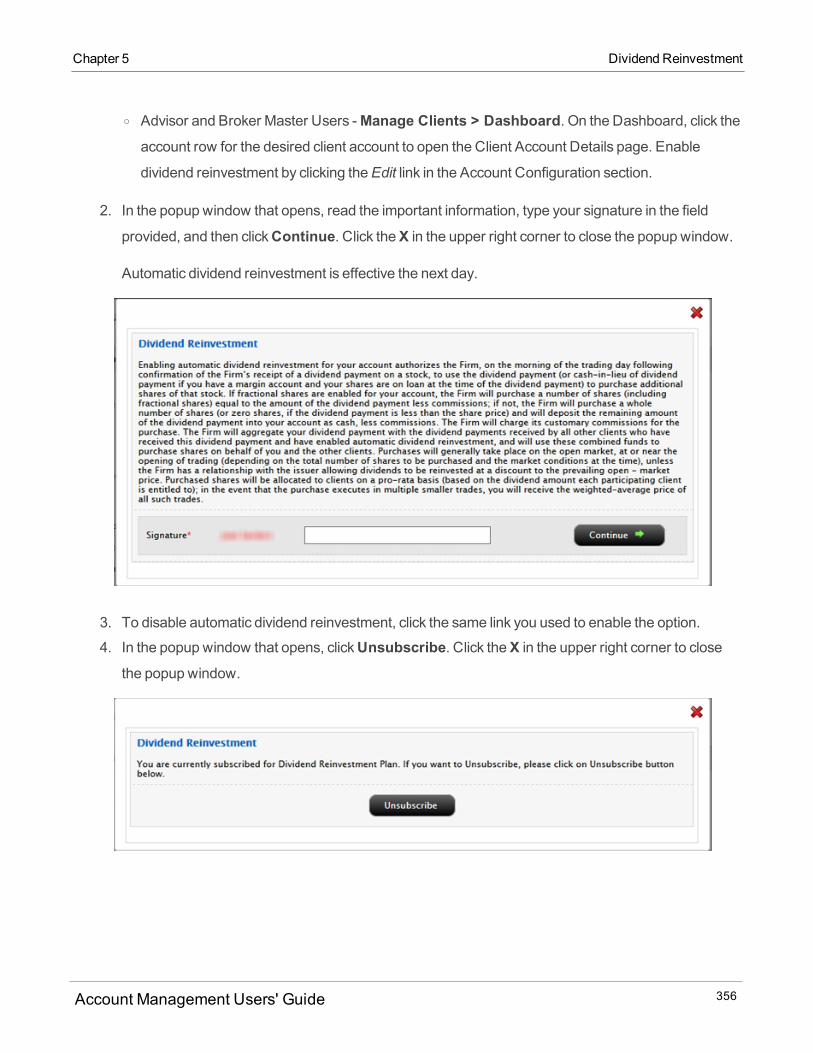
o Advisor and Broker Master Users -Manage Clients > Dashboard. On the Dashboard, click theaccount row for the desired client account to open the Client Account Details page. Enable
dividend reinvestment by clicking theEdit link in the Account Configuration section.
2. In the popup window that opens, read the important information, type your signature in the field
provided, and then clickContinue. Click theX in the upper right corner to close the popup window.
Automatic dividend reinvestment is effective the next day.
3. To disable automatic dividend reinvestment, click the same link you used to enable the option.
4. In the popup window that opens, clickUnsubscribe. Click theX in the upper right corner to close
the popup window.
Account Management Users' Guide 356
Chapter 5 Dividend Reinvestment
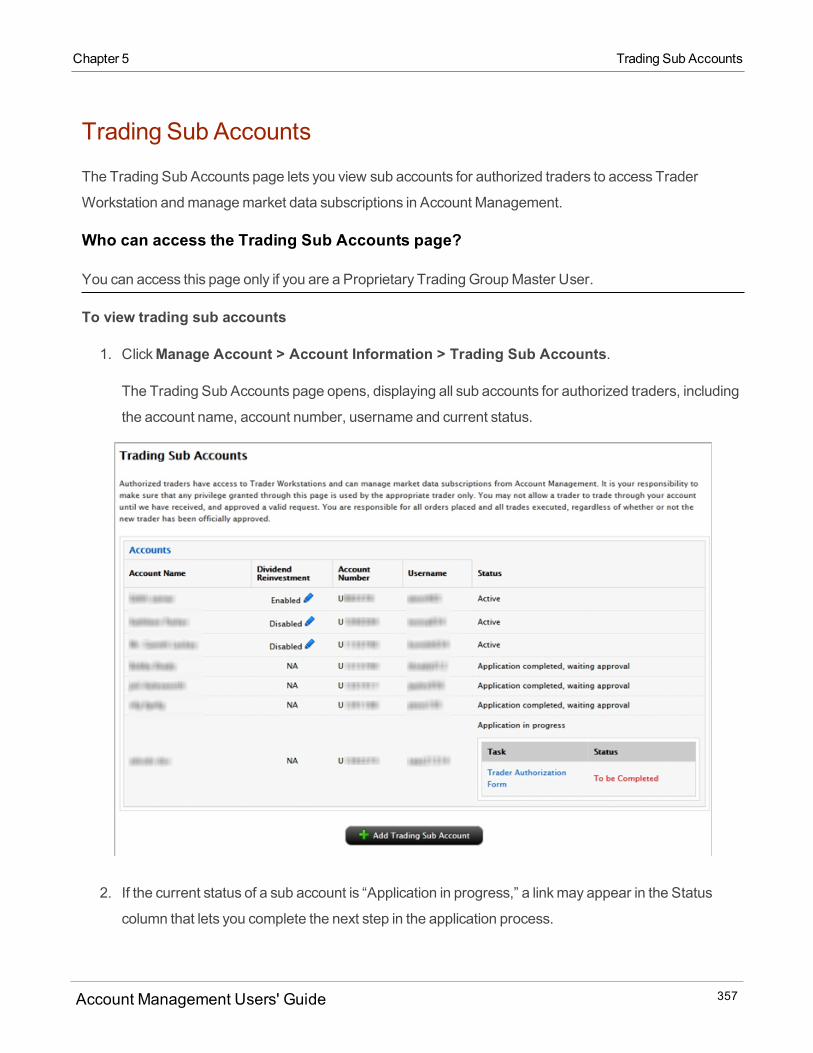
Chapter 5 Trading Sub Accounts
Trading Sub Accounts
The Trading Sub Accounts page lets you view sub accounts for authorized traders to access Trader
Workstation andmanagemarket data subscriptions in Account Management.
Who can access the Trading Sub Accounts page?
You can access this page only if you are a Proprietary Trading GroupMaster User.
To view trading sub accounts
1. ClickManage Account > Account Information > Trading Sub Accounts.
The Trading Sub Accounts page opens, displaying all sub accounts for authorized traders, including
the account name, account number, username and current status.
2. If the current status of a sub account is “Application in progress,” a linkmay appear in the Status
column that lets you complete the next step in the application process.
Account Management Users' Guide 357
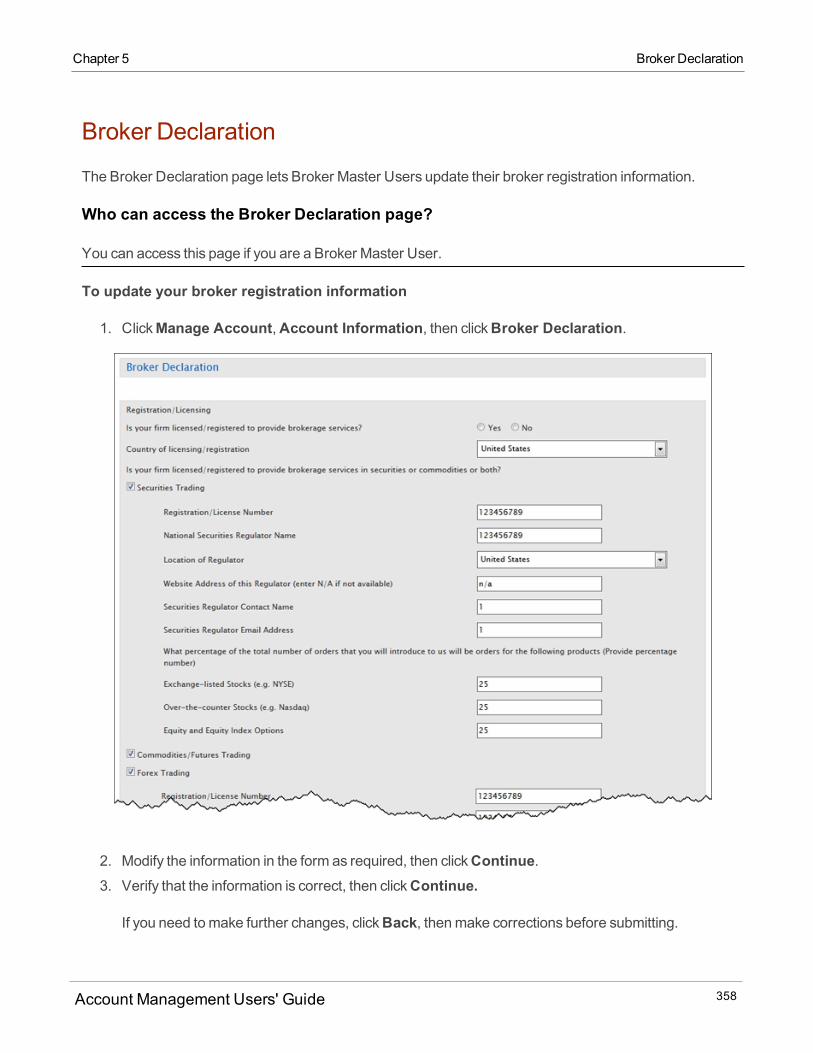
Broker Declaration
The Broker Declaration page lets Broker Master Users update their broker registration information.
Who can access the Broker Declaration page?
You can access this page if you are a Broker Master User.
To update your broker registration information
1. ClickManage Account,Account Information, then clickBroker Declaration.
2. Modify the information in the form as required, then clickContinue.3. Verify that the information is correct, then clickContinue.
If you need tomake further changes, clickBack, thenmake corrections before submitting.
Account Management Users' Guide 358
Chapter 5 Broker Declaration
Chapter 5 Advisor Qualifications
4. Enter the confirmation number that was sent to you via email, then clickContinue to submit yourchanges.
Advisor Qualifications
The Professional Advisor Qualifications page lets youmodify your advisor registration information. In order
to be a Professional Advisor, youmust qualify to trade Securities or Commodities Products. You do not
need to qualify for both.
Who can access the Advisor Qualifications page?
You can access this page if you are an Advisor Master User Individual or Organization.
To modify your advisor registration information
1. ClickManage Account > Account Information > Advisor Qualifications.
Account Management Users' Guide 359
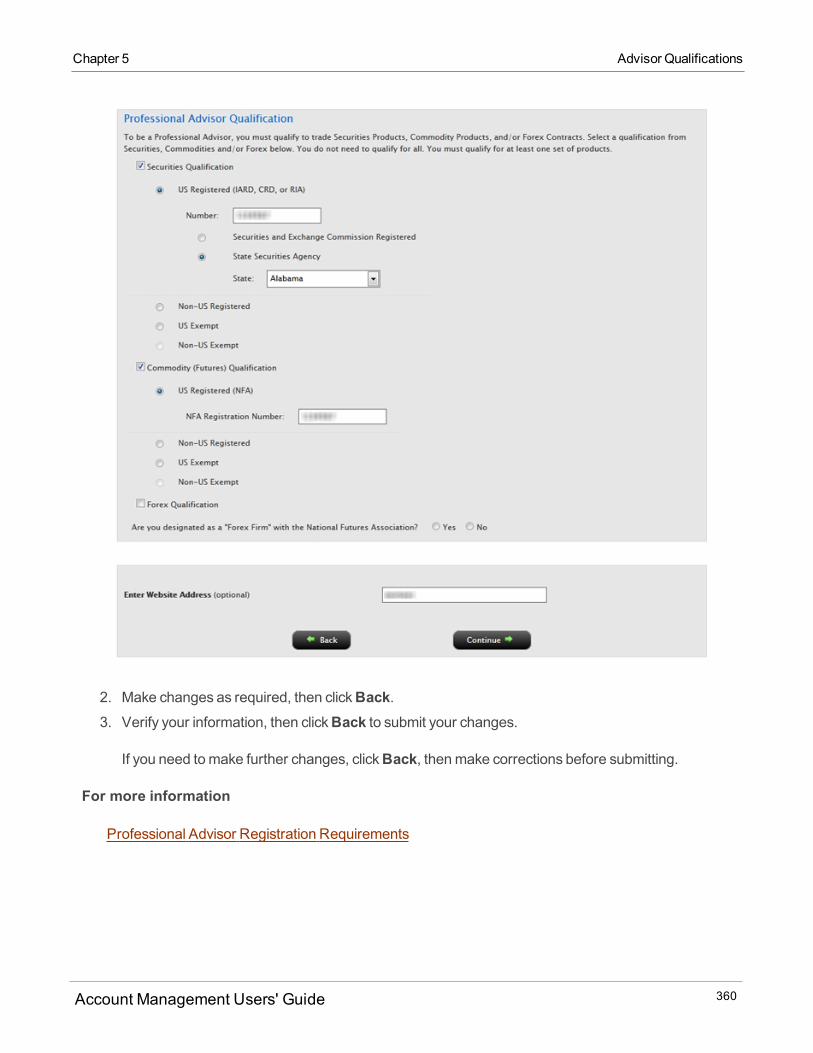
2. Make changes as required, then clickBack.3. Verify your information, then clickBack to submit your changes.
If you need tomake further changes, clickBack, thenmake corrections before submitting.
For more information
Professional Advisor Registration Requirements
Account Management Users' Guide 360
Chapter 5 Advisor Qualifications
Chapter 5 Transfer on Death
Transfer on Death
Use the Transfer on Death page to register one or more beneficiaries (called “TOD Beneficiaries”) to
whom you want to directly pass your account assets upon your death without having to go through probate.
When you register a Transfer on Death beneficiary, the executor or administrator of your estate will only
have to submit a Transfer on Death Beneficiary Distribution Formwith a certified copy of the death
certificate to ensure that your assets transfer to the beneficiary or beneficiaries that you have designated.
The following rules apply to Transfer on Death registration:
Only United States-based Single accounts are eligible for Transfer on Death registration. IRA
accounts are NOT eligible.
Your beneficiary (or beneficiaries) can be a natural person or other entity, such as a trust, corporation
or guardianship. Minors can be beneficiaries only if a custodian, trustee, or guardian is named for the
minor.
Youmust designate at least one and up to six Primary beneficiaries, and can designate one or more
optional contingent or Secondary beneficiaries. When you register a beneficiary, you select the percent
ownership of your assets to that beneficiary. The percent ownership among all Primary beneficiaries
must equal 100%. The percent ownership of all Secondary beneficiaries, if you choose to include them
in your Transfer of Death registration, must also equal 100%.
If you aremarried and reside in a community property state, youmust obtain your spouse’s consent if
you are not naming your spouse as the sole primary beneficiary. You and your spouse should consult a
legal and tax professional.
When you complete the Transfer on Death registration, the title of your account will be amended to
include your Transfer on Death Beneficiary (for example, “John Doe, TOD Mary Smith”).
At the completion of the online registration process, you will be prompted to complete a Transfer On
Death Agreement and send it to us. Be sure to send us a new signed Agreement anytime you change
or remove TOD beneficiaries.
SomeUS states do not allow Transfer on Death registration or may have specific restrictions. You and
your spouse should consult a legal and tax professional.
Who can access the Transfer on Death page?
You can access this page if you are a(n):
Account Management Users' Guide 361

US-based Individual Account User with a single account or multiple linked accounts. Joint, Trust and
IRA Accounts cannot access this page.
To register a Transfer on Death beneficiary
1. ClickManage Account > Account Information > Transfer On Death.
2. Select a beneficiary type to begin the registration process:
3. ClickAdd Individual Beneficiary to register an individual person as a beneficiary.4. ClickAdd Entity Beneficiary to register an entity such as a trust, corporation or guardianship as a
beneficiary.
3. Enter information about the beneficiary in the fields on the next page:
4. For an individual beneficiary, the Add Beneficiary page displays.
To update your marital status, clickManage Account > Account Information > Details.
Account Management Users' Guide 362
Chapter 5 Transfer on Death

Chapter 5 Transfer on Death
5. For an entity beneficiary, the Add Entity Beneficiary page displays.
6. If you are registering only one beneficiary, enter 100 in the Percent of Ownership field to assign all ofyour assets to that person or entity. If you plan on registering additional beneficiaries, enter the appro-
priate percent amount of ownership for this beneficiary. The percent of ownership for all bene-
ficiariesmust equal 100.
7. Youmust designate at least one and up to six Primary beneficiaries, and can designate one or more
optional contingent or Secondary beneficiaries.
In the Beneficiary Type field, selectPrimary to make this person or entity the primary beneficiary, orSecondary to make this person or entity a contingent beneficiary.
If you are a non-U.S resident, you will be required to provide a copy of the national identification
document that shows the identification number that you have provided. The document must include
person's photograph and date of birth.
8. ClickBack.
Account Management Users' Guide 363
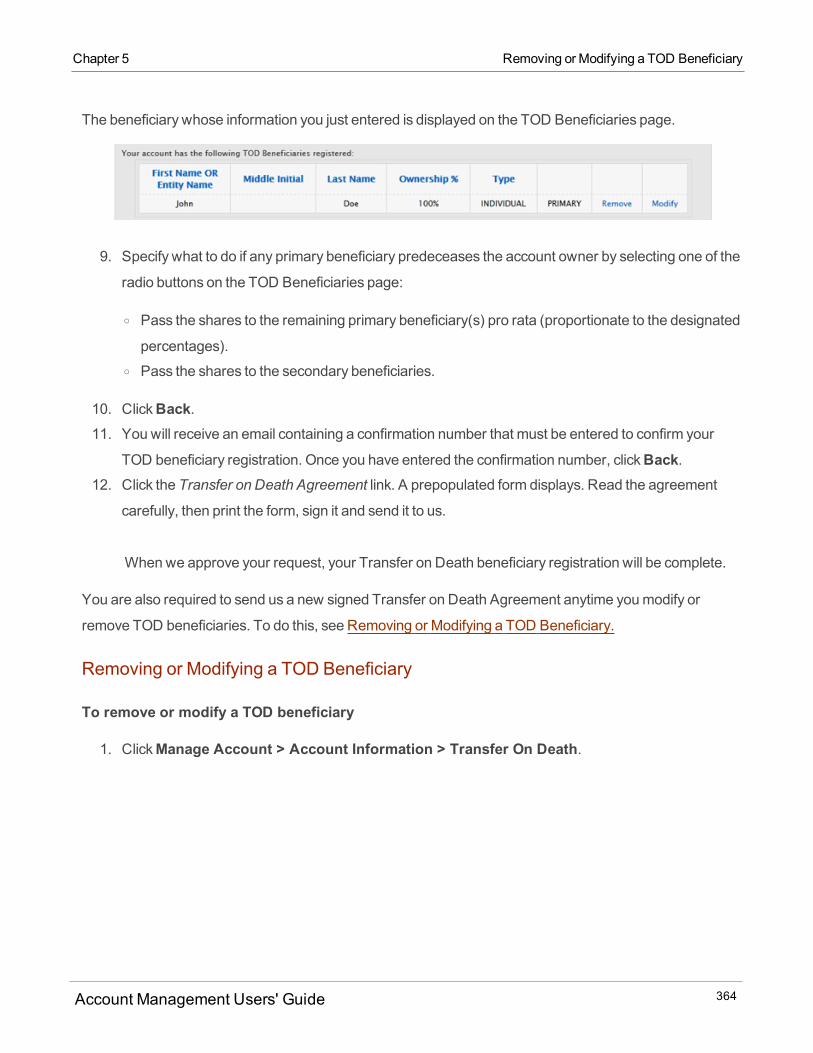
The beneficiary whose information you just entered is displayed on the TOD Beneficiaries page.
9. Specify what to do if any primary beneficiary predeceases the account owner by selecting one of the
radio buttons on the TOD Beneficiaries page:
o Pass the shares to the remaining primary beneficiary(s) pro rata (proportionate to the designated
percentages).o Pass the shares to the secondary beneficiaries.
10. ClickBack.11. You will receive an email containing a confirmation number that must be entered to confirm your
TOD beneficiary registration. Once you have entered the confirmation number, clickBack.12. Click the Transfer on Death Agreement link. A prepopulated form displays. Read the agreement
carefully, then print the form, sign it and send it to us.
Whenwe approve your request, your Transfer on Death beneficiary registration will be complete.
You are also required to send us a new signed Transfer on Death Agreement anytime youmodify or
remove TOD beneficiaries. To do this, see Removing or Modifying a TOD Beneficiary.
Removing or Modifying a TOD Beneficiary
To remove or modify a TOD beneficiary
1. ClickManage Account > Account Information > Transfer On Death.
Account Management Users' Guide 364
Chapter 5 Removing or Modifying a TOD Beneficiary
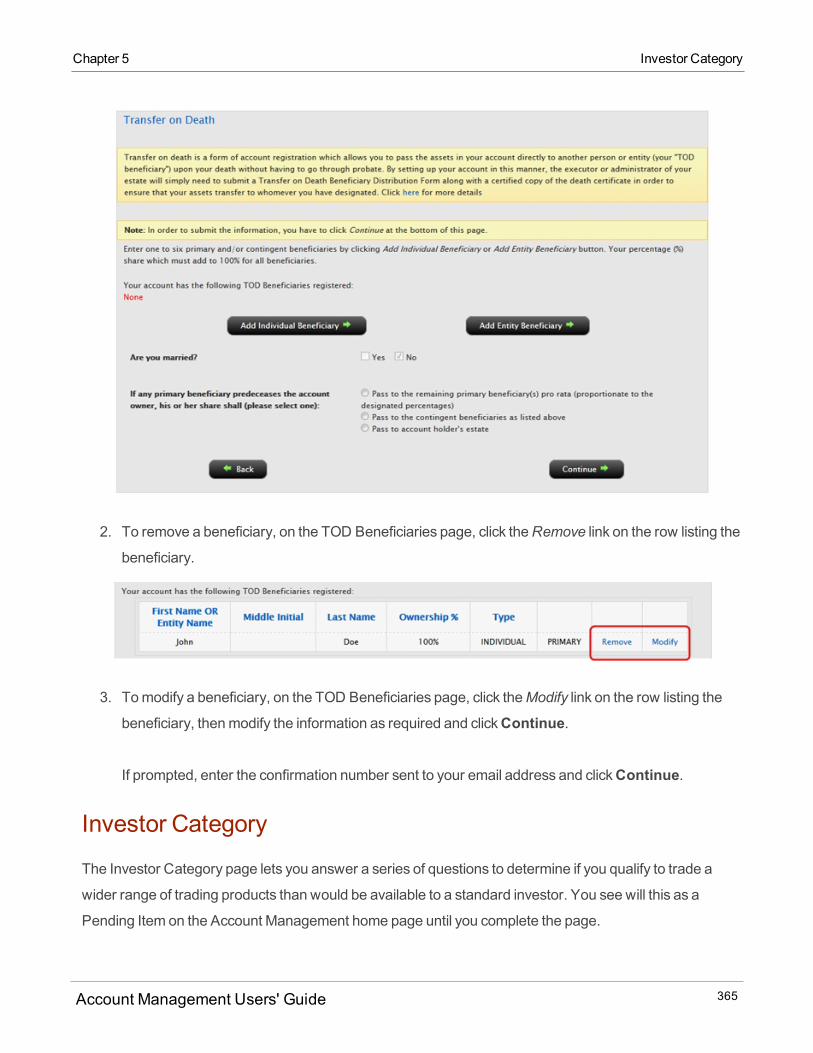
Chapter 5 Investor Category
2. To remove a beneficiary, on the TOD Beneficiaries page, click theRemove link on the row listing the
beneficiary.
3. Tomodify a beneficiary, on the TOD Beneficiaries page, click theModify link on the row listing the
beneficiary, thenmodify the information as required and clickContinue.
If prompted, enter the confirmation number sent to your email address and clickContinue.
Investor Category
The Investor Category page lets you answer a series of questions to determine if you qualify to trade a
wider range of trading products than would be available to a standard investor. You see will this as a
Pending Item on the Account Management home page until you complete the page.
Account Management Users' Guide 365
The Investor Category page presents four different investment categories:
Accredited Investor
Qualified Purchaser
Qualified Institutional Buyer
Eligible Contract Participant
Each section contains questions that helps us determine whether you qualify to trade additional products. If
you answer “Yes” in any section, the section expandswith additional questions, which youmust also
answer.
Who can access the Investor Category page?
ALL account structures can access this page EXCEPT:
IB Canada customers, IB India customers, IBSJ customers, and all Non-Disclosed andOmnibus Broker
Client accounts.
To use the Investor Category page
1. ClickManage Account > Account Information > Investor Category.
Account Management Users' Guide 366
Chapter 5 Investor Category
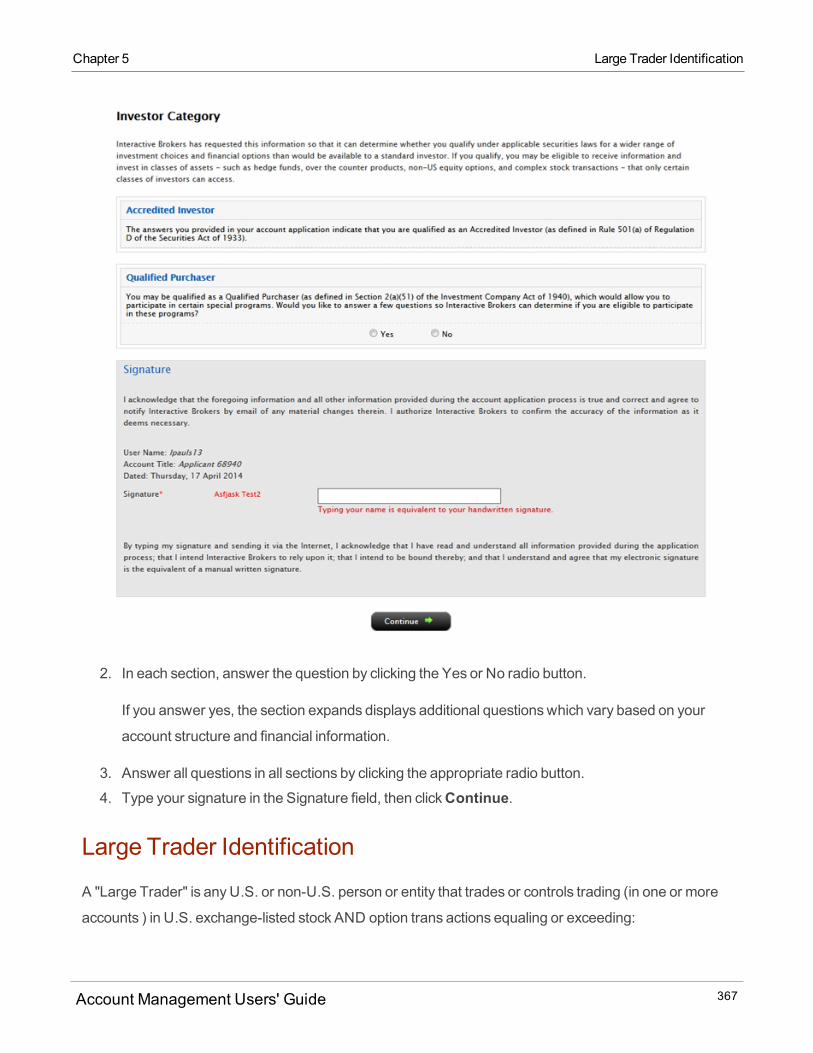
Chapter 5 Large Trader Identification
2. In each section, answer the question by clicking the Yes or No radio button.
If you answer yes, the section expands displays additional questionswhich vary based on your
account structure and financial information.
3. Answer all questions in all sections by clicking the appropriate radio button.
4. Type your signature in the Signature field, then clickContinue.
Large Trader Identification
A "Large Trader" is anyU.S. or non-U.S. person or entity that trades or controls trading (in one or more
accounts ) in U.S. exchange-listed stock AND option trans actions equaling or exceeding:
Account Management Users' Guide 367
2million shares or $20million during any calendar day;
20million shares or $200million during any calendar month.
Use this page to:
Add one or more SEC Large Trader ID Numbers to your account .
Add a Large Trader ID "Suffix" to a Large Trader ID Number (usually us ed to distinguish separate entit-
ies in a corporate structure).
Deactivate, reactivate or terminate an existing Large Trader ID Number.
For security purposes , you cannot change a Large Trader ID Number or Suffix online once you have
provided it to us. If a Large Trader ID Number or Suffix listed above for your account is incorrect contact
Client Services.
Who can access the Large Trader Identification page?
You can access this page if you are a(n):
Individual, Joint, Trust or IRA Account User
Small Business Account User
Friends and Family GroupMaster or Client User
Advisor Master User
Proprietary Trading GroupMaster User (STL accounts)
Broker Master User (Fully Disclosed and Non-Disclosed)
Broker Fully Disclosed Client User
Investment Manager Master User (Multiple Fund Account)
To add a Large Trader ID Number to your account
1. ClickManage Account > Account Information > Large Trader Identification.
If you have not yet added a Large Trader ID to your account, a page with general information about
Large Trader IDs appears.
Account Management Users' Guide 368
Chapter 5 Large Trader Identification
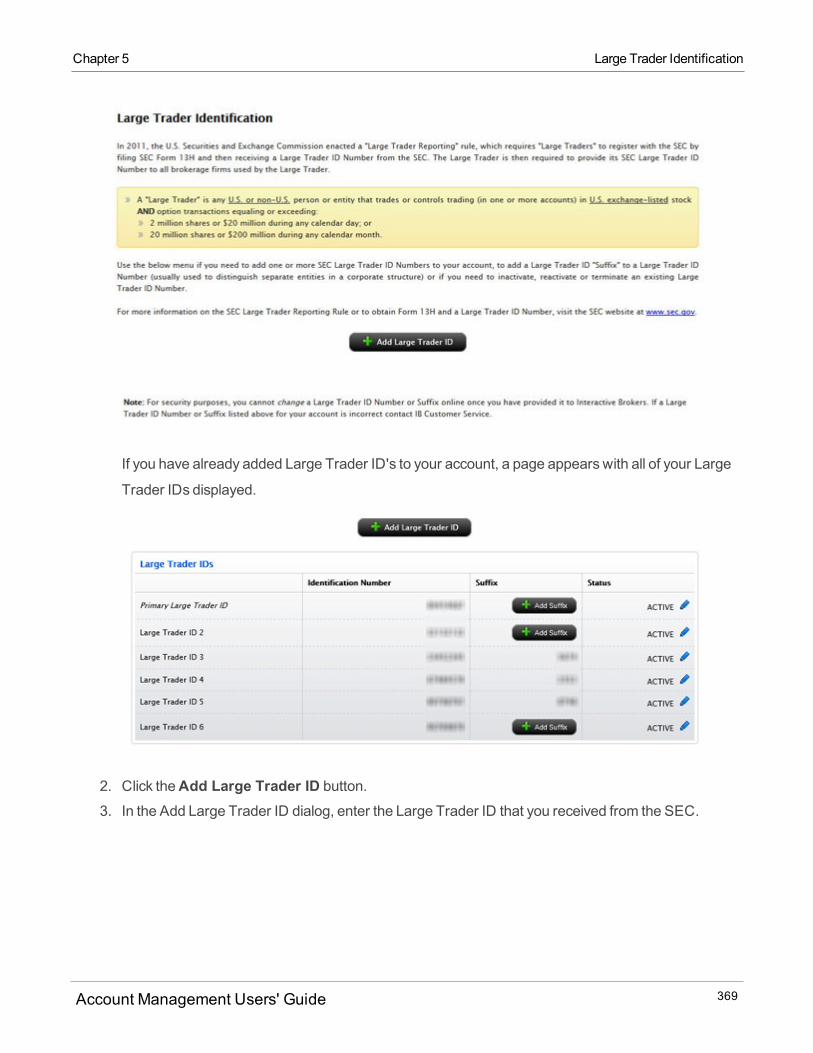
Chapter 5 Large Trader Identification
If you have already added Large Trader ID's to your account, a page appears with all of your Large
Trader IDs displayed.
2. Click theAdd Large Trader ID button.
3. In the Add Large Trader ID dialog, enter the Large Trader ID that you received from the SEC.
Account Management Users' Guide 369

4. Optionally, add a suffix to your Large Trader ID Number. For example, youmight want to add suf-
fixes to Large Trader ID's to distinguish separate entities in a corporate structure.
5. ClickOK. The newly-added Large Trader ID (and optional suffix) is added to the list of IDs on the
main page.
To add a suffix to Large Trader ID Number
You can add suffixes to Large Trader IDs only if you have not already done so.
1. ClickManage Account > Account Information > Large Trader Identification.2. Click theAdd Suffix button for each Large Trader ID to which you want to add a suffix.
3. In the Add Suffix dialog, type the suffix then clickOK.
The suffix is added to the Large Trader ID and appears on themain page.
To deactivate, reactivate or terminate a Large Trader ID Number
1. ClickManage Account > Account Information > Large Trader Identification.2. Click the blue pen icon in the Status column for the Large Trader ID that you want to deactivate,
reactivate or terminate.
3. Click the appropriate radio button, then clickOK.
Active IDs give you the choice of Deactivate or Terminate. Inactive IDs give you the choice of
Activate or Terminate.
Account Management Users' Guide 370
Chapter 5 Large Trader Identification

Chapter 5 EMIR and LEI Information
EMIR and LEI Information
The EMIR and LEI Information page in Account Management lets account holders who are subject to the
EMIR regulation change their EMIR election.
About EMIR and LEI
EuropeanMarkets and Infrastructure Regulations (EMIR) is a European Union regulation designed to
make the derivativesmarketsmore transparent by requiring counterparties to derivatives transactions to
report trades, positions, collateral and valuations to the European Securities andMarkets Authority
(ESMA), the European regulatory body. All counterparties with reporting obligations under EMIR must
have a Legal Entity Identifier (LEI) in order to report.
All of our clients who are subject to the EMIR regulation will see or will have already seen the
EMIR Election Form upon logging into Account Management. After you have completed the EMIR Election
process, you will be granted access to the full Account Management, AND will be able to access the
EMIR and LEI Information page to change your EMIR election, depending on your original EMIR election.
Note that you will only see the EMIR Election Form once upon logging into Account Management; once
youmake your election, you will not see the form again upon subsequent Account Management logins.
Who is Subject to the EMIR Regulation?
All of our entities’ clients established in the European Union operating non-individual accounts are required
to comply with EMIR. In this context, non-individual means any account which is owned by one or two
individuals as stated in the account title. Individual accounts in the name of a single person are not subject
to EMIR and so will not have access to this page.
The following account structures established in the European Union ARE subject to EMIR:
Account Management Users' Guide 371

Fully Disclosed, Non-Disclosed andOmnibus Broker master accounts
Non-Individual Fully Disclosed andOmnibus Broker sub accounts
Single andMultiple Hedge Fund accounts
Financial Advisor non-individual client accounts
Proprietary Trading Groups (all types on standalone non-individual accounts)
Original EMIR Elections
If you are subject to the EMIR regulations and have not alreadymade your EMIR election, when you log
into Account Management, you will be prompted to do so.
If you have an IBUK account; or an IBUK sub, client or linked account, you can elect to:
Instruct us to apply for an LEI on your behalf. You will be prompted to fill out a simple form and sign an
agreement.
Provide your LEI , which you have already obtained. You will be prompted to enter your LEI.
Do nothing (you do not have an LEI and you are not subject to the EMIR regulation).
If you do not have an IBUK account; or an IBUK sub, client or linked account, but are still subject to the
EMIR regulation, you can elect to:
Instruct us to apply for an LEI on your behalf and delegate your EMIR reporting to us. You will be
prompted to fill out a simple form and sign an agreement.
Provide your LEI , which you have already obtained. You will be prompted to enter your LEI.
Do nothing (you do not have an LEI and you are not subject to the EMIR regulation).
Account Management Users' Guide 372
Chapter 5 Original EMIR Elections

Chapter 5 The EMIR and LEI Information Page in Account Management
The EMIR and LEI Information Page in Account Management
This page allows account holders who have alreadymade an EMIR election to change their election.
If you have an IBUK account; or an IBUK sub, client or linked account and previously asked us to
provide an LEI, you will simply see your LEI displayed on the page. There is nothingmore to do.
If you do not have an IBUK account; or an IBUK sub, client or linked account and previously asked us
to provide an LEI and do your EMIR reporting for you, you will see your LEI displayed on the page and
be able to change your delegated reporting choice and/or change your Counterparty Type.
If you are subject to the EMIR regulation and previously chose to do nothing, you will see the original
election form in its entirety and you can change your EMIR election.
Changing Your Initial EMIR Election If You Previously Chose To Do Nothing
If you are subject to the EMIR regulation and previously chose the third option on the original EMIR and
LEI Information form (I do not have an LEI and do not want Interactive Brokers to apply for an LEI onmy
behalf as the account holder is not subject to EMIR), you will see the original election form in its entirety on
the EMIR and LEI Information page in Account Management.
To change your initial EMIR election if you previously chose the third EMIR election option:
1. ClickManage Account > Account Information > EMIR and LEI Information.2. Read the form completely and be sure that you understand all of the information contained therein.
3. Scroll all the way to the bottom of the page, and then review your EMIR election.
4. If you have an IBUK account; or an IBUK sub, client or linked account, you can elect to:
o Instruct us to apply for an LEI on your behalf. You will be prompted to fill out a simple form and
sign an agreement.o Provide your LEI , which you have already obtained. You will be prompted to enter your LEI.o Do nothing (you do not have an LEI and you are not subject to the EMIR regulation).
Account Management Users' Guide 373
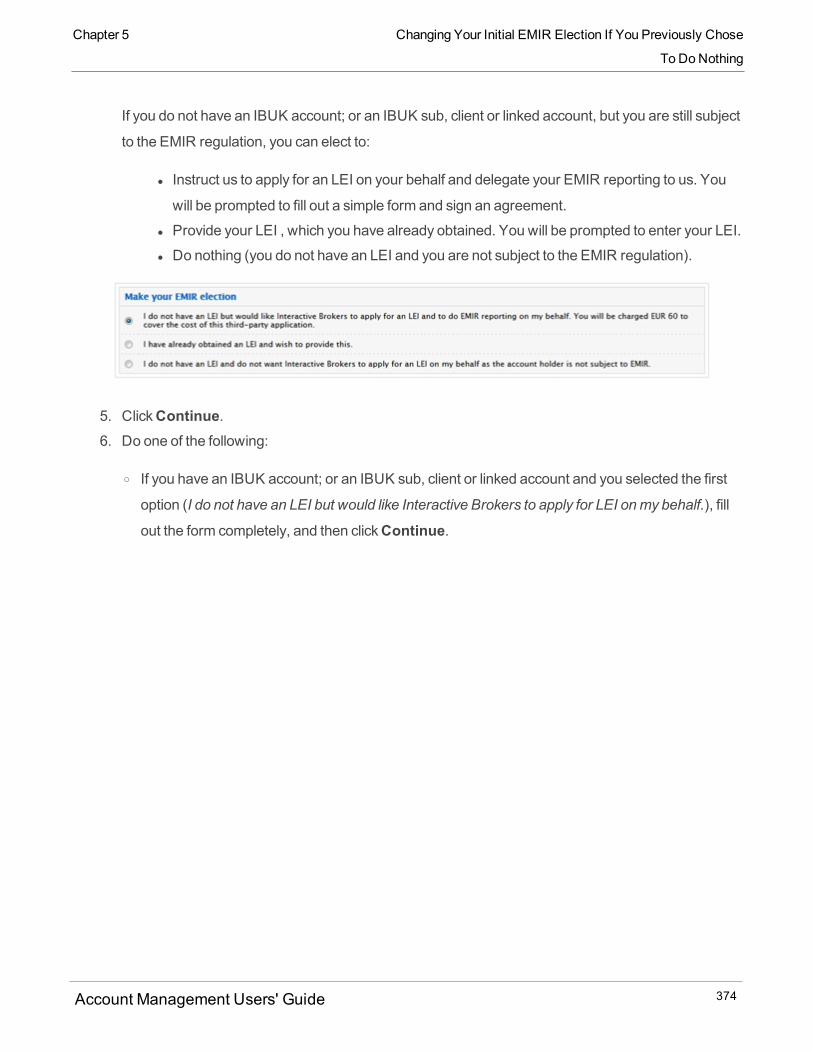
If you do not have an IBUK account; or an IBUK sub, client or linked account, but you are still subject
to the EMIR regulation, you can elect to:
l Instruct us to apply for an LEI on your behalf and delegate your EMIR reporting to us. You
will be prompted to fill out a simple form and sign an agreement.
l Provide your LEI , which you have already obtained. You will be prompted to enter your LEI.
l Do nothing (you do not have an LEI and you are not subject to the EMIR regulation).
5. ClickContinue.6. Do one of the following:
o If you have an IBUK account; or an IBUK sub, client or linked account and you selected the first
option (I do not have an LEI but would like Interactive Brokers to apply for LEI onmy behalf.), fill
out the form completely, and then clickContinue.
Account Management Users' Guide 374
Chapter 5 Changing Your Initial EMIR Election If You Previously Chose
To DoNothing
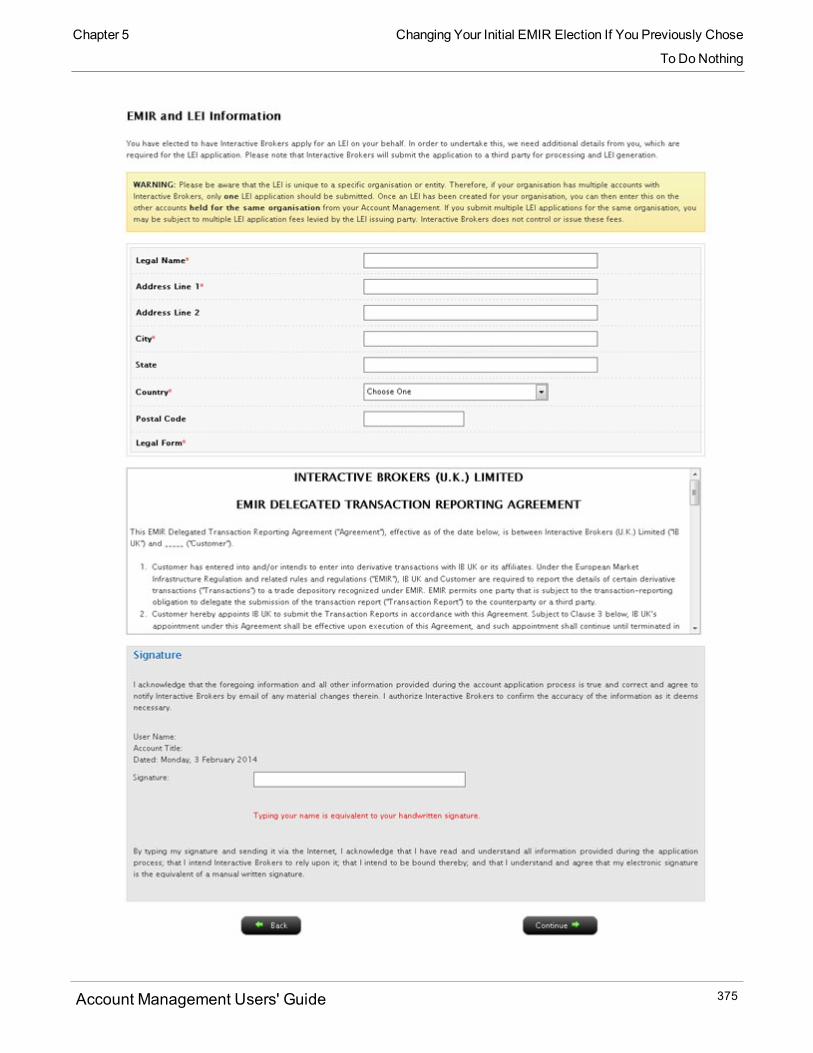
Chapter 5 Changing Your Initial EMIR Election If You Previously Chose
To DoNothing
Account Management Users' Guide 375
o If you do not have an IBUK account; or an IBUK sub, client or linked account, but you are still sub-
ject to the EMIR regulation, and you selected the first option (I do not have an LEI but would like
Interactive Brokers to apply for LEI and to do EMIR reporting onmy behalf.), fill out the form com-
pletely, type your name in the Signature field below the agreement, and then clickContinue.
Account Management Users' Guide 376
Chapter 5 Changing Your Initial EMIR Election If You Previously Chose
To DoNothing

Chapter 5 Changing Your Initial EMIR Election If You Previously Chose
To DoNothing
Account Management Users' Guide 377
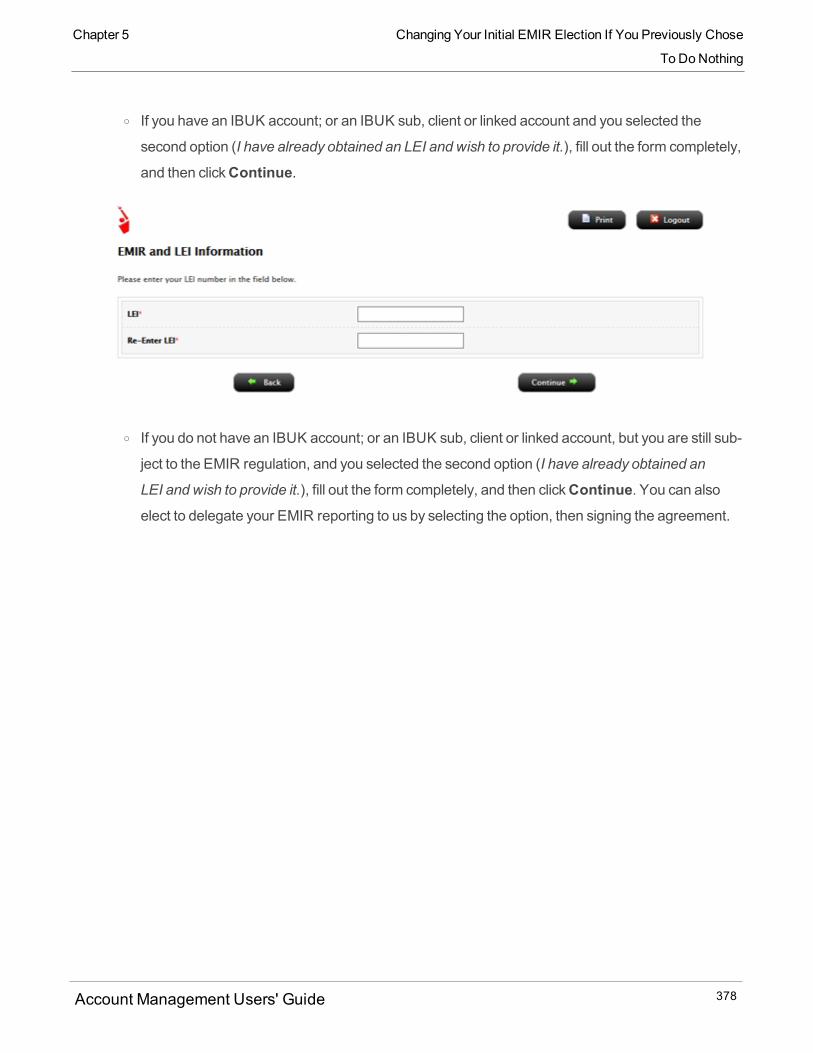
o If you have an IBUK account; or an IBUK sub, client or linked account and you selected the
second option (I have already obtained an LEI and wish to provide it.), fill out the form completely,
and then clickContinue.
o If you do not have an IBUK account; or an IBUK sub, client or linked account, but you are still sub-
ject to the EMIR regulation, and you selected the second option (I have already obtained an
LEI and wish to provide it.), fill out the form completely, and then clickContinue. You can alsoelect to delegate your EMIR reporting to us by selecting the option, then signing the agreement.
Account Management Users' Guide 378
Chapter 5 Changing Your Initial EMIR Election If You Previously Chose
To DoNothing
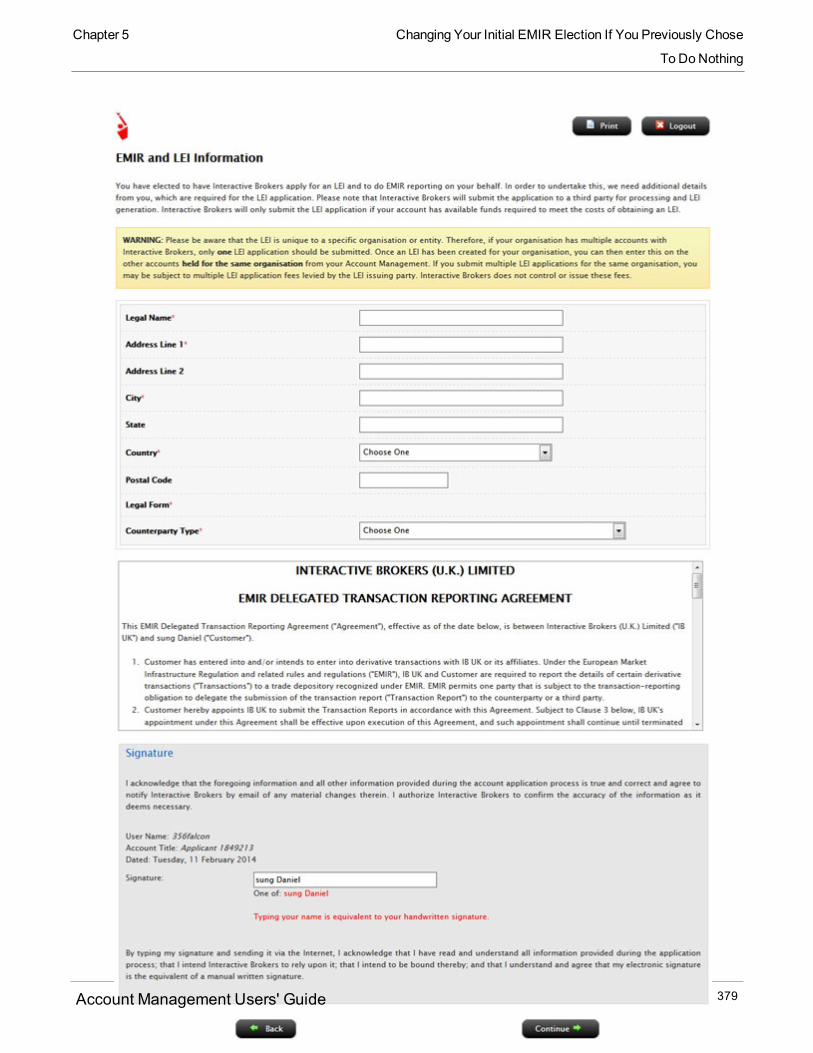
Chapter 5 Changing Your Initial EMIR Election If You Previously Chose
To DoNothing
Account Management Users' Guide 379
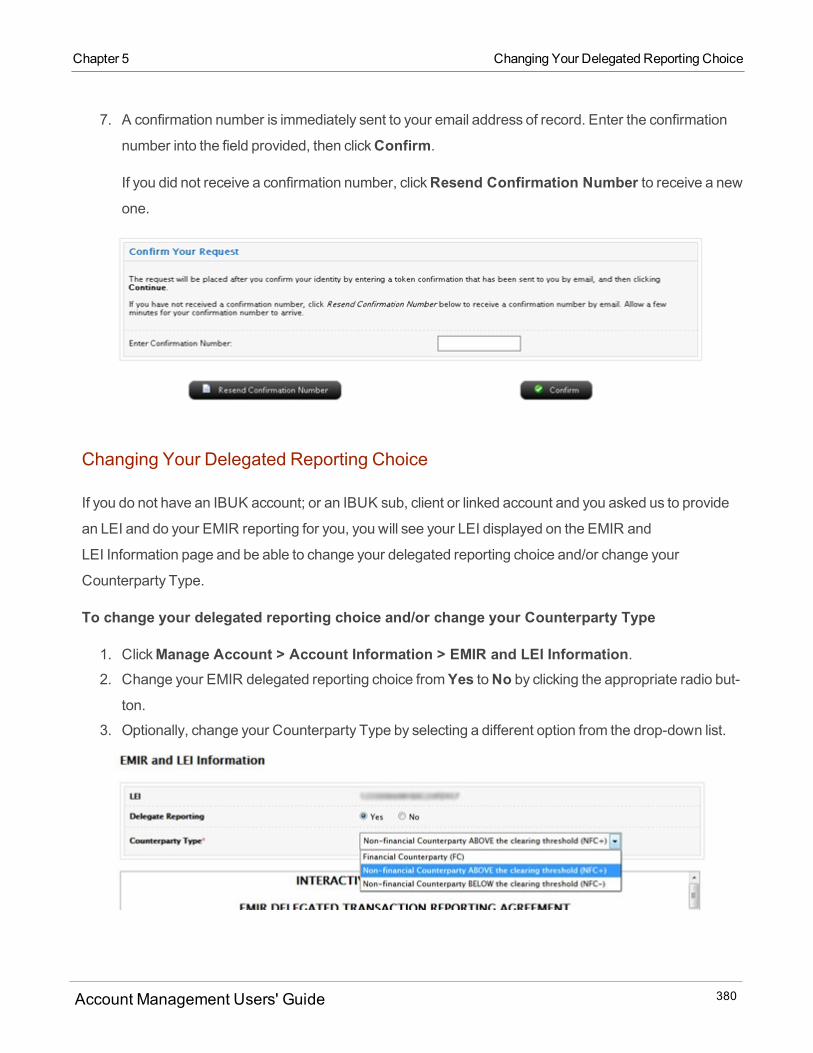
7. A confirmation number is immediately sent to your email address of record. Enter the confirmation
number into the field provided, then clickConfirm.
If you did not receive a confirmation number, clickResend Confirmation Number to receive a newone.
Changing Your Delegated Reporting Choice
If you do not have an IBUK account; or an IBUK sub, client or linked account and you asked us to provide
an LEI and do your EMIR reporting for you, you will see your LEI displayed on the EMIR and
LEI Information page and be able to change your delegated reporting choice and/or change your
Counterparty Type.
To change your delegated reporting choice and/or change your Counterparty Type
1. ClickManage Account > Account Information > EMIR and LEI Information.2. Change your EMIR delegated reporting choice fromYes toNo by clicking the appropriate radio but-
ton.
3. Optionally, change your Counterparty Type by selecting a different option from the drop-down list.
Account Management Users' Guide 380
Chapter 5 Changing Your Delegated Reporting Choice
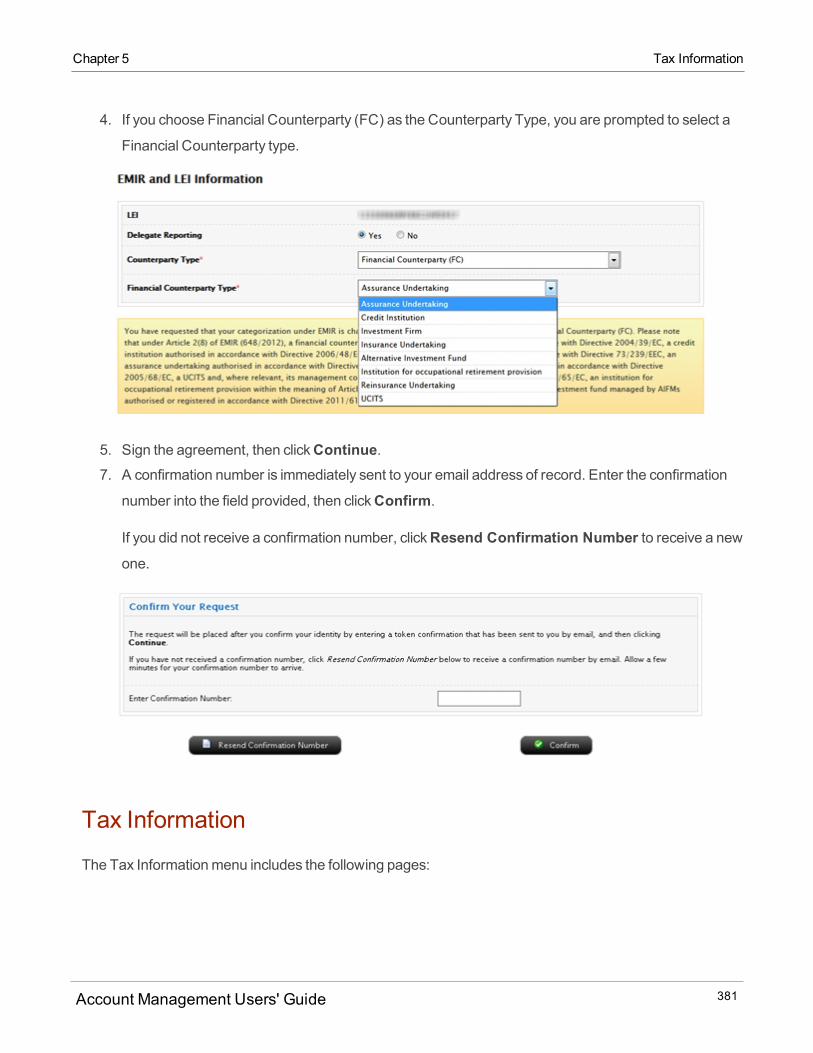
Chapter 5 Tax Information
4. If you choose Financial Counterparty (FC) as the Counterparty Type, you are prompted to select a
Financial Counterparty type.
5. Sign the agreement, then clickContinue.7. A confirmation number is immediately sent to your email address of record. Enter the confirmation
number into the field provided, then clickConfirm.
If you did not receive a confirmation number, clickResend Confirmation Number to receive a newone.
Tax Information
The Tax Informationmenu includes the following pages:
Account Management Users' Guide 381
Tax FormCollection - Review important tax-related information and update your W-8/W-9 tax form.
Withholding Statement - Proprietary Trading Group and Small Business accounts verify information
about andmodify the ownership percentages of all of the owners of their organization.
Tax Form Collection
The Tax FormCollection page lets account holders review and update important tax-related information
and lets account holders who are legal residents and citizens of the US (the US is your country of
organization formation and organization registration) fill out or update an IRS FormW-9, Request for
Taxpayer Identification Number and Certification or, if you are not a US legal resident and not a US citizen,
IRS FormW-8.
New owners who have been recently added to an organizationmust log in to Account Management and
complete this form.
Who can access the Tax Form Collection page?
You can access this page if you are a(n):
Individual, Joint, Trust or IRA Account User
Small Business Account User
Friends and Family GroupMaster or Client User
Advisor Master User Individual
Advisor Master User Organization
Advisor Client User Individual
Advisor Client User Organization
Proprietary Trading GroupMaster User
Broker Master User (master account only)
Broker Fully Disclosed Client User
Broker Fully Disclosed Client User Organization
Investment Manager Master User
Fund
To use the Tax Form Collection page
Account Management Users' Guide 382
Chapter 5 Tax Form Collection
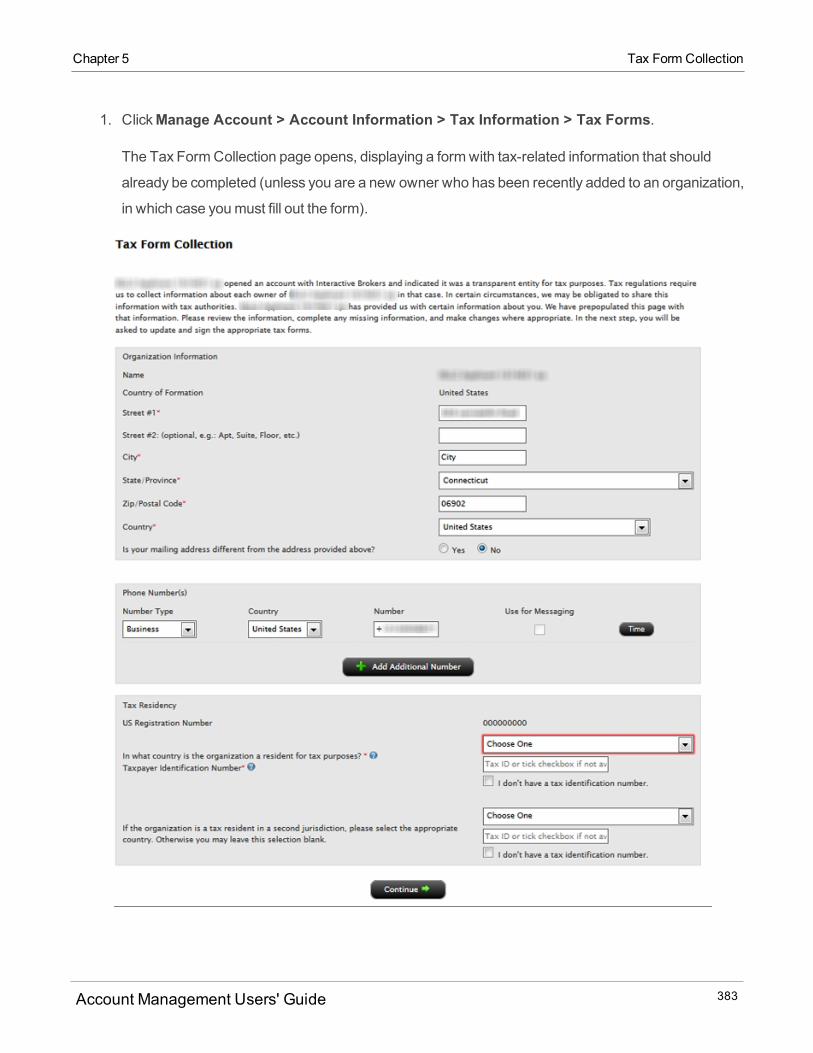
Chapter 5 Tax Form Collection
1. ClickManage Account > Account Information > Tax Information > Tax Forms.
The Tax FormCollection page opens, displaying a formwith tax-related information that should
already be completed (unless you are a new owner who has been recently added to an organization,
in which case youmust fill out the form).
Account Management Users' Guide 383
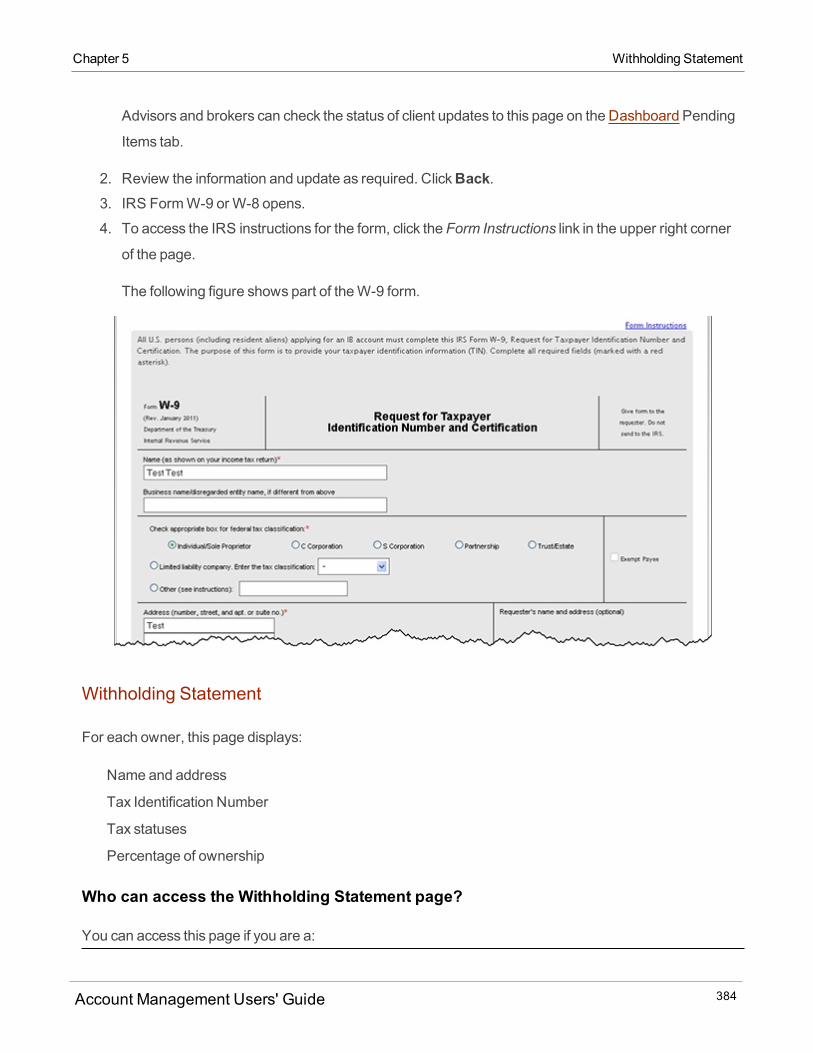
Advisors and brokers can check the status of client updates to this page on the Dashboard Pending
Items tab.
2. Review the information and update as required. ClickBack.3. IRS FormW-9 or W-8 opens.
4. To access the IRS instructions for the form, click the Form Instructions link in the upper right corner
of the page.
The following figure shows part of theW-9 form.
Withholding Statement
For each owner, this page displays:
Name and address
Tax Identification Number
Tax statuses
Percentage of ownership
Who can access the Withholding Statement page?
You can access this page if you are a:
Account Management Users' Guide 384
Chapter 5 Withholding Statement

Chapter 5 Adding anOwner to anOrganization
Proprietary Trading GroupMaster User
Small Business Account User
To use this page
1. ClickManage Account > Account Information > Tax Information > Withholding Statement.2. Verify all of the information.
3. Enter an effective date.
4. If necessary, modify the ownership percentages. Note that the total ownership percentage for all
ownersmust equal 100.
5. Type your signature and then clickContinue.
If the status of any owner is INCOMPLETE, that owner has not completed the form on the Tax Form
Collection page , a regulatory requirement for all owners of organizations. All owners of an
organization will be prompted to complete this form upon logging into Account Management. Once
the Tax FormCollection page has been completed and submitted, it will remain available in Account
Management for that owner.
For more information about adding owners to your organization in Account Management, see
Adding anOwner to anOrganization.
Adding an Owner to an Organization
Proprietary Trading GroupMaster account users and Small Business account users can add owners to
their organizations in Account Management.
Account Management Users' Guide 385
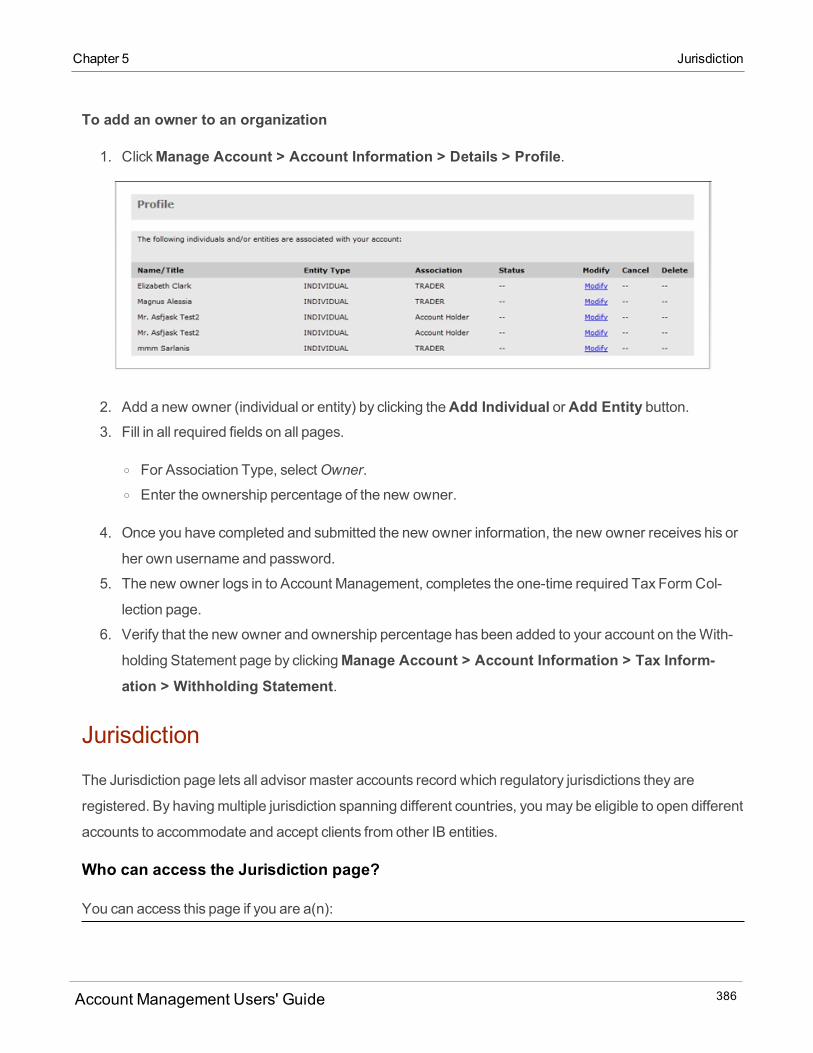
To add an owner to an organization
1. ClickManage Account > Account Information > Details > Profile.
2. Add a new owner (individual or entity) by clicking theAdd Individual orAdd Entity button.3. Fill in all required fields on all pages.
o For Association Type, selectOwner.o Enter the ownership percentage of the new owner.
4. Once you have completed and submitted the new owner information, the new owner receives his or
her own username and password.
5. The new owner logs in to Account Management, completes the one-time required Tax FormCol-
lection page.
6. Verify that the new owner and ownership percentage has been added to your account on theWith-
holding Statement page by clickingManage Account > Account Information > Tax Inform-ation > Withholding Statement.
Jurisdiction
The Jurisdiction page lets all advisor master accounts record which regulatory jurisdictions they are
registered. By havingmultiple jurisdiction spanning different countries, youmay be eligible to open different
accounts to accommodate and accept clients from other IB entities.
Who can access the Jurisdiction page?
You can access this page if you are a(n):
Account Management Users' Guide 386
Chapter 5 Jurisdiction
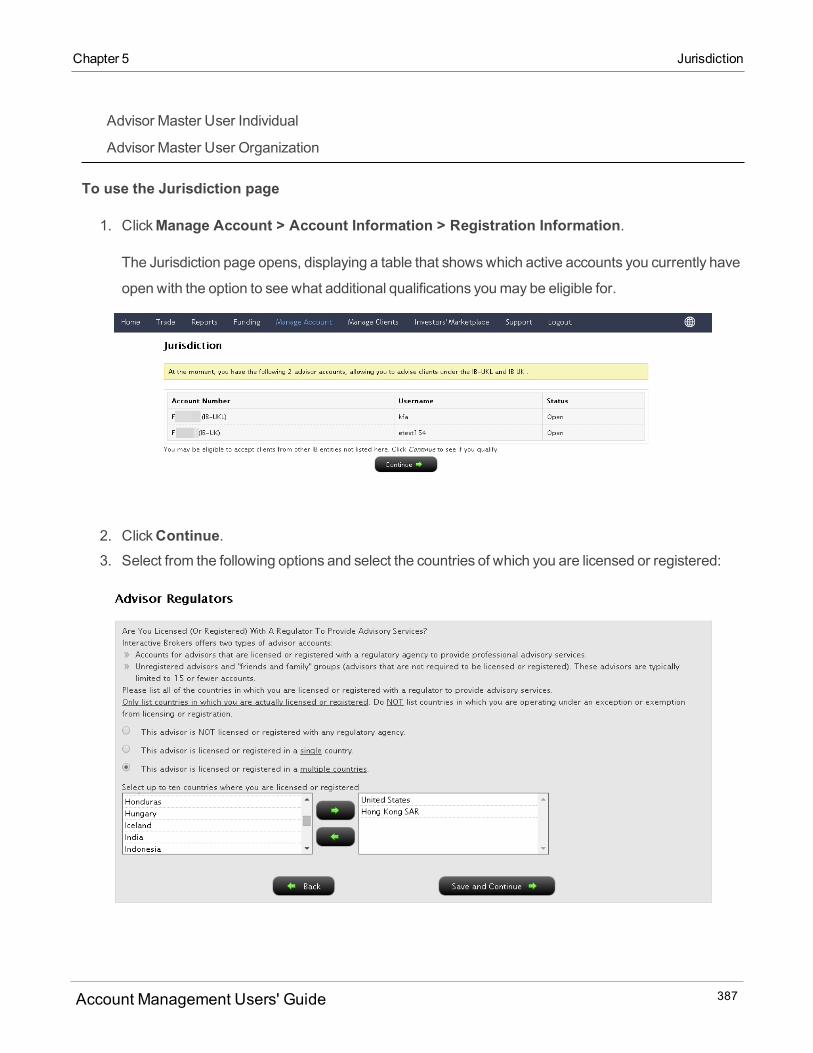
Chapter 5 Jurisdiction
Advisor Master User Individual
Advisor Master User Organization
To use the Jurisdiction page
1. ClickManage Account > Account Information > Registration Information.
The Jurisdiction page opens, displaying a table that showswhich active accounts you currently have
open with the option to see what additional qualifications youmay be eligible for.
2. ClickContinue.3. Select from the following options and select the countries of which you are licensed or registered:
Account Management Users' Guide 387
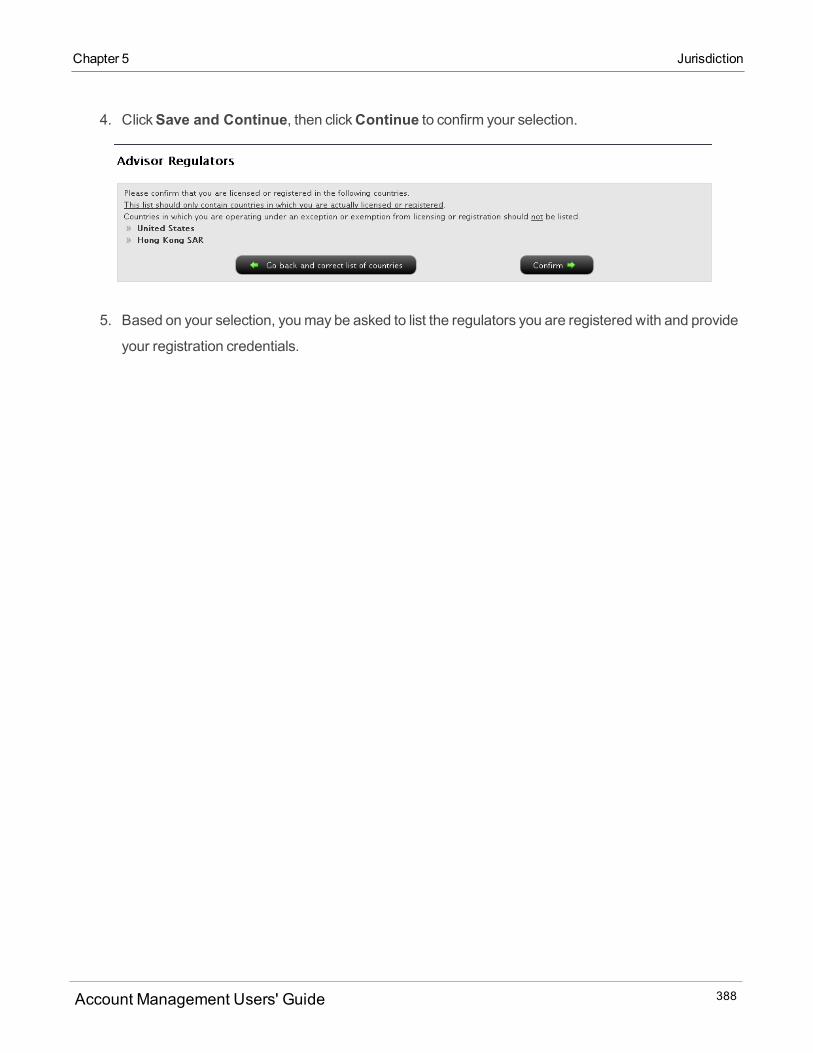
4. ClickSave and Continue, then clickContinue to confirm your selection.
5. Based on your selection, youmay be asked to list the regulators you are registered with and provide
your registration credentials.
Account Management Users' Guide 388
Chapter 5 Jurisdiction

Chapter 5 Jurisdiction
Account Management Users' Guide 389
6. ClickConfirm. You will be returned to the home screen and your pending information requested will
be processed for review.
Settings
The Account Settingsmenu includes account-level configuration functions on the following pages:
Configure Account - Opens a submenu that lets you configure your base currency, institutional ser-
vices and account type (upgrade to amargin account).
Fees - Opens a submenu that lets you select your pricing structure and configure soft dollars.
Compliance - Advisors can subscribe to RIA Compliance Initiative Section 13monitoring and report-
ing.
Mobile - Enable read-onlymode in trading platforms.
Paper Trading Account - Open a paper trading account.
Account Alias - Create an alias for your account.
White Branding - Configure advisor and broker white branding.
Close Account - Close your account, view the status of your account closure, or re-open a closed
account.
IRA - Opens a submenu that lets you perform full or partial conversions to a Roth IRA account, and per-
form full recharacterizations from a Roth IRA account.
Configure Account
TheConfigure Account tab includes the following pages:
Base Currency - Modify the base currency for your account.
Services - Institutional account holders can change their institutional services (IBClear, IBPrime or
IBExecution).
Account Type - Upgrade a cash account to aMargin account, or upgrade aMargin account to a Port-
folio Margin account.
Excess Funds Sweep - Configure the transfer of excessmargin funds between your securities and
commodities account segments.
Account Management Users' Guide 390
Chapter 5 Settings

Chapter 5 Base Currency
Base Currency
The Base Currency page lets youmodify the base currency for your account. Your base currency
determines the currency of translation for your statements, the currency used for determination of margin
requirement, and for a Cash Account, the currency of products you are allowed to trade. In addition,
charges related tomarket data and research, inactivity fees, and commissions on Forex trades are also
charged in your base currency.
Who can access the Base Currency page?
You can access this page if you are a(n):
Individual, Joint, Trust or IRA Account User
Small Business Account User
Friends and Family GroupMaster or Client User
Advisor Master User Individual
Advisor Master User Organization
Advisor Client User Individual
Advisor Client User Organization
Proprietary Trading GroupMaster User (canmodify the base currency for themaster and sub
accounts)
Broker Master User (canmodify the base currency for themaster and non-disclosed client accounts)
Broker Fully Disclosed Client User
Broker Fully Disclosed Client User Organization
Investment Manager Master User
Fund
To modify the base currency for an account
1. ClickManage Account > Settings > Configure Account > Base Currency. The Base Cur-rency appears by default.
Account Management Users' Guide 391
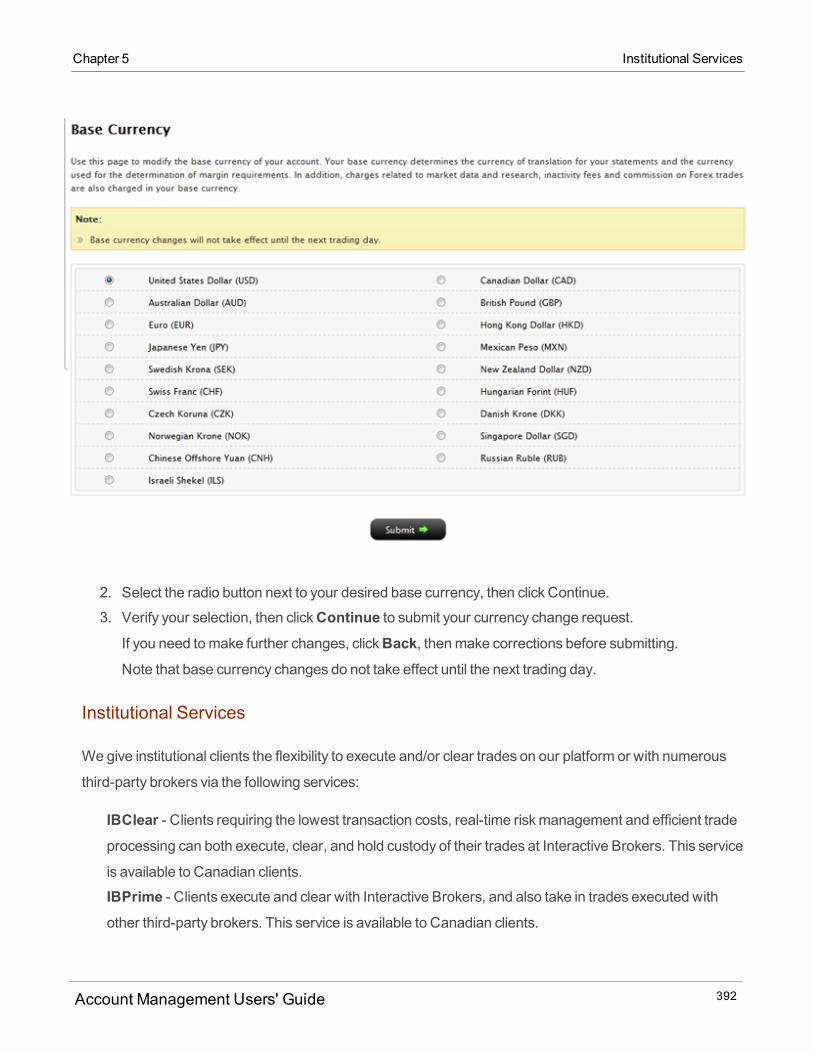
2. Select the radio button next to your desired base currency, then click Continue.
3. Verify your selection, then clickContinue to submit your currency change request.If you need tomake further changes, clickBack, thenmake corrections before submitting.Note that base currency changes do not take effect until the next trading day.
Institutional Services
Wegive institutional clients the flexibility to execute and/or clear trades on our platform or with numerous
third-party brokers via the following services:
IBClear - Clients requiring the lowest transaction costs, real-time riskmanagement and efficient tradeprocessing can both execute, clear, and hold custody of their trades at Interactive Brokers. This service
is available to Canadian clients.
IBPrime - Clients execute and clear with Interactive Brokers, and also take in trades executed withother third-party brokers. This service is available to Canadian clients.
Account Management Users' Guide 392
Chapter 5 Institutional Services

Chapter 5 Institutional Services
IBExecution - Trades are executed at Interactive Brokers using our superior price execution tech-nology, and then given up to a third-party broker. This service is not available to Canadian clients.
These services can bemixed andmatched, and added at any time to fit with our institutional customers’
changing needs. All services utilize our real-timemargin systemwhich prevents unauthorized trading by
continuously enforcing limits for each account, and automatically liquidating positions if any individual
account violates its limits at any time.
Who can access the Institutional Services page?
You can access this page if you are a(n):
Individual, Joint, Trust or IRA Account User
Small Business Account User
Friends and Family GroupMaster or Client User (master user cannot change the Account Type of the
master account)
Advisor Master User (can only view the Account Type of client accounts and cannot change it for the
master account)
Advisor Client User Individual
Advisor Client User Organization
Proprietary Trading GroupMaster User
Broker Fully Disclosed Client User
Investment Manager Master User (can only view the Account Type of client accounts and cannot
change it for themaster account)
Fund
To upgrade or change your institutional service
1. ClickManage Account > Settings > Configure Account > Institutional Services
The Institutional Services page opens for the selected account ID.
Account Management Users' Guide 393

2. Select the check box next to the Institutional Service to which you want to subscribe.
3. Make any other changes on the page as required tomodify your trading permissions, then click
Continue.4. Depending on the products that you have requested permission to trade, you are prompted to sign a
risk disclosure, as required by law. Complete the online Disclosure Form(s) by typing your name in
the Signature field, then clickContinue.5. Click the link(s) to read the complete agreements and/or disclosures, then click theAccept radio but-
ton to acknowledge your acceptance of the terms of the agreements and disclosures and click
Continue.
A Final Acknowledgments/Confirmation page opens, listing your current and requested trading
permissions and the current status of each. If approved, your trading permissionswill be listed with a
status of Approved.
Account Type
Use the Account Type page to upgrade your Cash account to aMargin account, or upgrade your Margin
account to a Portfolio Margin account. Before you can upgrade to amargin account, youmust meet the
eligibility requirements of those accounts.
Who can access the Account Type page?
You can change your account type on this page if you are a(n):
Account Management Users' Guide 394
Chapter 5 Account Type
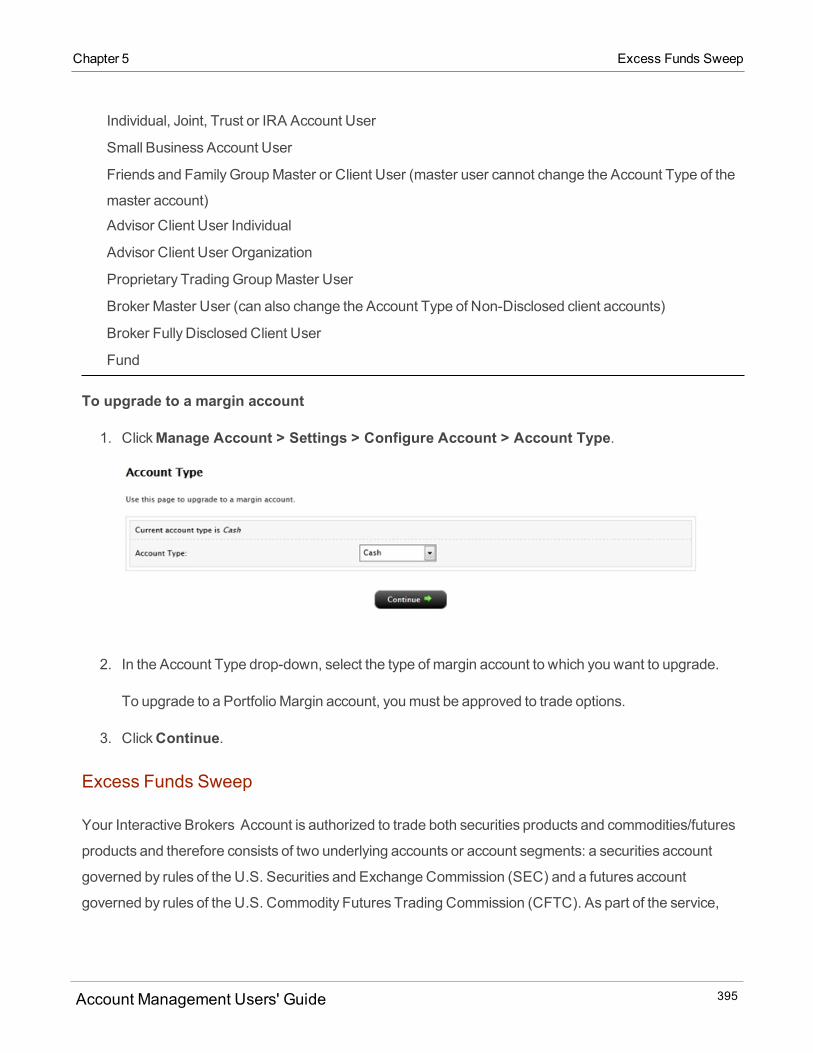
Chapter 5 Excess Funds Sweep
Individual, Joint, Trust or IRA Account User
Small Business Account User
Friends and Family GroupMaster or Client User (master user cannot change the Account Type of the
master account)
Advisor Client User Individual
Advisor Client User Organization
Proprietary Trading GroupMaster User
Broker Master User (can also change the Account Type of Non-Disclosed client accounts)
Broker Fully Disclosed Client User
Fund
To upgrade to a margin account
1. ClickManage Account > Settings > Configure Account > Account Type.
2. In the Account Type drop-down, select the type of margin account to which you want to upgrade.
To upgrade to a Portfolio Margin account, youmust be approved to trade options.
3. ClickContinue.
Excess Funds Sweep
Your Interactive Brokers Account is authorized to trade both securities products and commodities/futures
products and therefore consists of two underlying accounts or account segments: a securities account
governed by rules of the U.S. Securities and Exchange Commission (SEC) and a futures account
governed by rules of the U.S. Commodity Futures Trading Commission (CFTC). As part of the service,
Account Management Users' Guide 395
you have authorized us to automatically transfer funds as necessary between your securities account and
your futures account in order to satisfymargin requirements in either account.
Use the Excess Funds Sweep page to configure how you want us to handle the transfer of your excess
funds between the two segments of your account. You can choose to sweep the funds to either the
securities account or the commodities account, or choose not to sweep funds at all.
Note the following:
All customer deposits are initially received into your securities account and will remain in that account
unless you choose to sweep excess funds to your commodities account.
If you are identified as a securities pattern day trader, then we strongly recommend that you choose to
sweep excess funds into your securities account.
Regardless of your choice, we will generally keep a small buffer of excessmargin funds in each
account in order to prevent excessive transfers back and forth as your margined securities and futures
positions fluctuate in value.
This feature is not available in IB-India and IB-UKL accounts.
Who can access the Excess Funds Sweep page?
All accounts can access this page EXCEPT:
Advisor Master User
Investment Manager Master User
To set your excess funds sweep method
1. ClickManage Account > Settings > Configure Account > Excess Funds Sweep.
Account Management Users' Guide 396
Chapter 5 Excess Funds Sweep

Chapter 5 Fees
2. Read the important information on the page, then select a sweepmethod by clicking one of the radio
buttons.
o Do not sweep excess fundso Sweep excess funds intomy securities accounto Sweep excess funds intomy commodities account
3. ClickContinue. Your setting is saved immediately.
Fees
The Fees tab includes the following pages:
Pricing Structure - Select your pricing structure for stocks/ETFs/Warrants and for futures.
Soft Dollar Configuration - Configure your soft dollars, if you are participating in our Soft Dollars pro-
gram.
Account Management Users' Guide 397
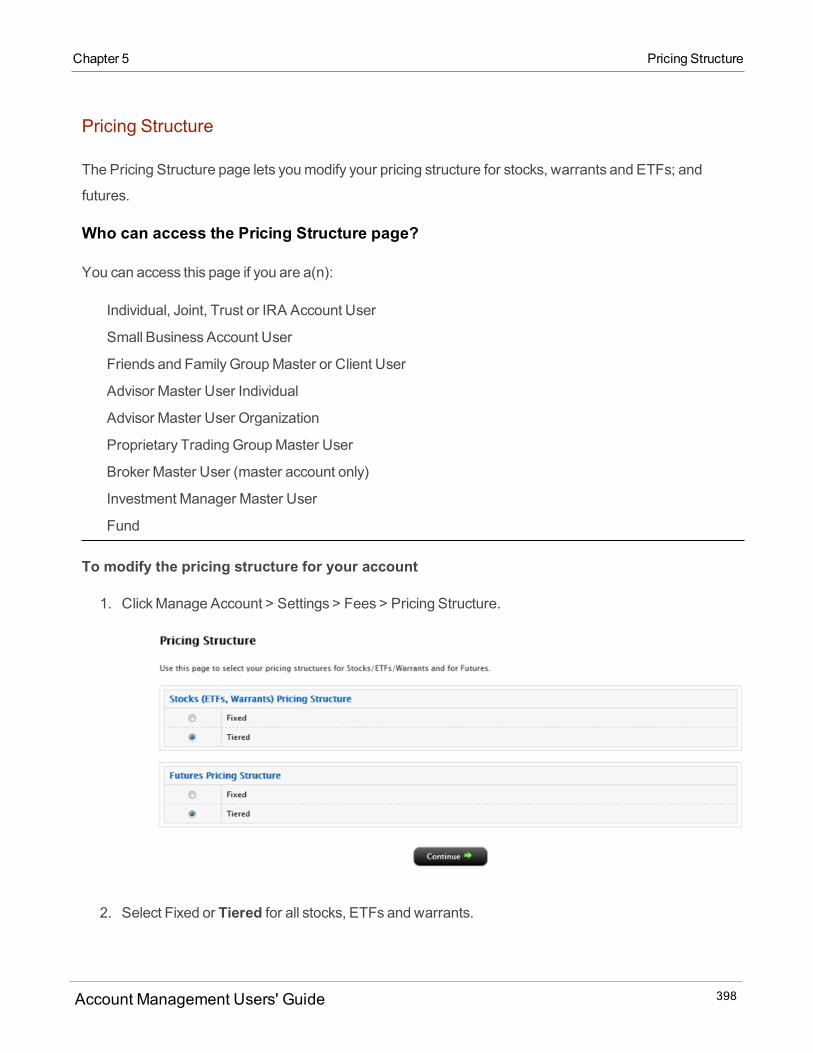
Pricing Structure
The Pricing Structure page lets youmodify your pricing structure for stocks, warrants and ETFs; and
futures.
Who can access the Pricing Structure page?
You can access this page if you are a(n):
Individual, Joint, Trust or IRA Account User
Small Business Account User
Friends and Family GroupMaster or Client User
Advisor Master User Individual
Advisor Master User Organization
Proprietary Trading GroupMaster User
Broker Master User (master account only)
Investment Manager Master User
Fund
To modify the pricing structure for your account
1. ClickManage Account > Settings > Fees > Pricing Structure.
2. Select Fixed or Tiered for all stocks, ETFs and warrants.
Account Management Users' Guide 398
Chapter 5 Pricing Structure
Chapter 5 Request Soft Dollars
3. Select Fixed or Tiered for futures, then click Continue.
4. Verify your information, then clickContinue to submit your changes.If you need tomake further changes, clickBack, thenmake corrections before submitting.
For more information
Commissions
Request Soft Dollars
Weoffer registered professional advisors and hedge andmutual funds the flexibility to offset the costs of
purchasing approved research products and services using soft dollars. Soft dollars are brokerage
commissions that are used to purchase research products and services from vendors. You can set up soft
dollar payments in five tiers for stocks and for options.
Contact us to set up soft dollar vendors and to disburse accumulated soft dollars to vendors by sending an
email to [email protected].
Who can access the Request Soft Dollars page?
You can access this page if you are a(n):
Registered Professional Advisor
Multiple Hedge Fund Investment Manager Master User or Single Hedge Fund
Request Soft Dollars
The first time you access the Soft Dollars feature in Account Management, only theRequest Soft Dollars
link appears in theManage Account > Settings > Feesmenu.
Account Management Users' Guide 399

Soft Dollars Page
The Soft Dollars page lets you set up a five-tiered schedule for soft dollars. Markupsmust be between 0
and 0.05 dollars per share for stocks. At the time of your trade, you specify which soft dollar tier to use; the
soft dollar amount will be based on the tier you select. Currently, only US stocks and options are eligible for
soft dollars.
The Soft Dollars page only appears AFTER you have signed and submitted the Soft Dollars Agreement on
the Request Soft Dollars page.
Account Management Users' Guide 400
Chapter 5 Soft Dollars Page
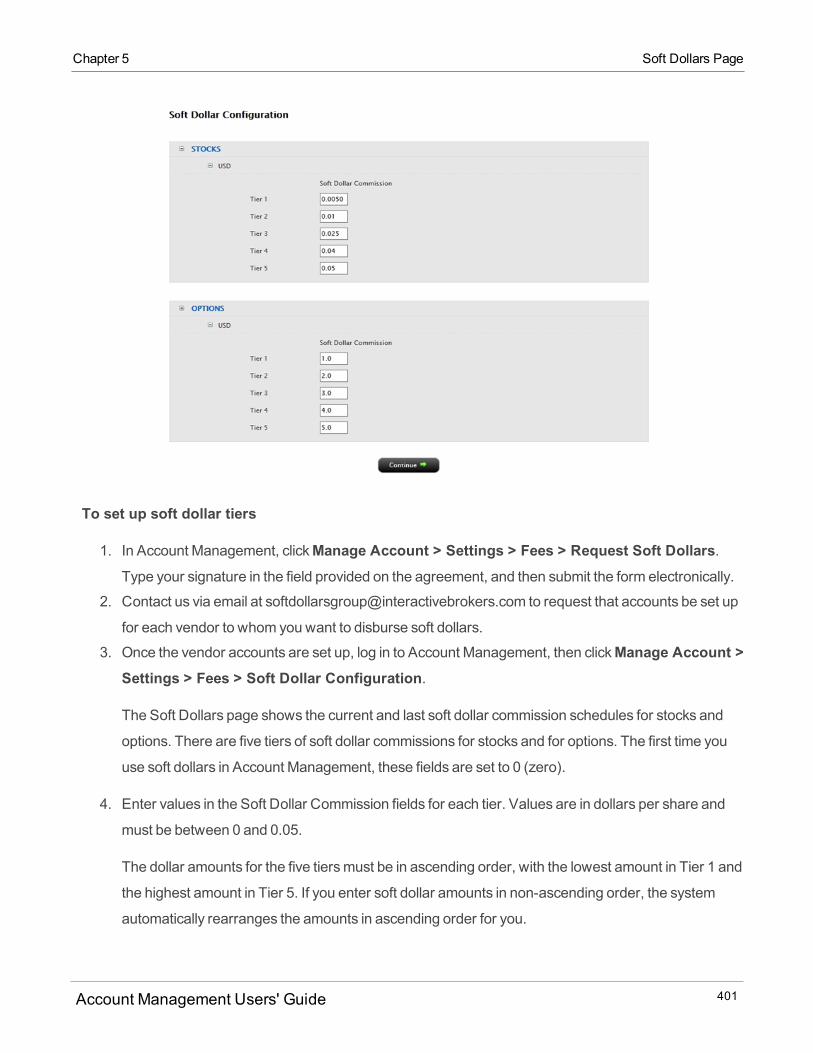
Chapter 5 Soft Dollars Page
To set up soft dollar tiers
1. In Account Management, clickManage Account > Settings > Fees > Request Soft Dollars.Type your signature in the field provided on the agreement, and then submit the form electronically.
2. Contact us via email at [email protected] to request that accounts be set up
for each vendor to whom you want to disburse soft dollars.
3. Once the vendor accounts are set up, log in to Account Management, then clickManage Account >Settings > Fees > Soft Dollar Configuration.
The Soft Dollars page shows the current and last soft dollar commission schedules for stocks and
options. There are five tiers of soft dollar commissions for stocks and for options. The first time you
use soft dollars in Account Management, these fields are set to 0 (zero).
4. Enter values in the Soft Dollar Commission fields for each tier. Values are in dollars per share and
must be between 0 and 0.05.
The dollar amounts for the five tiersmust be in ascending order, with the lowest amount in Tier 1 and
the highest amount in Tier 5. If you enter soft dollar amounts in non-ascending order, the system
automatically rearranges the amounts in ascending order for you.
Account Management Users' Guide 401
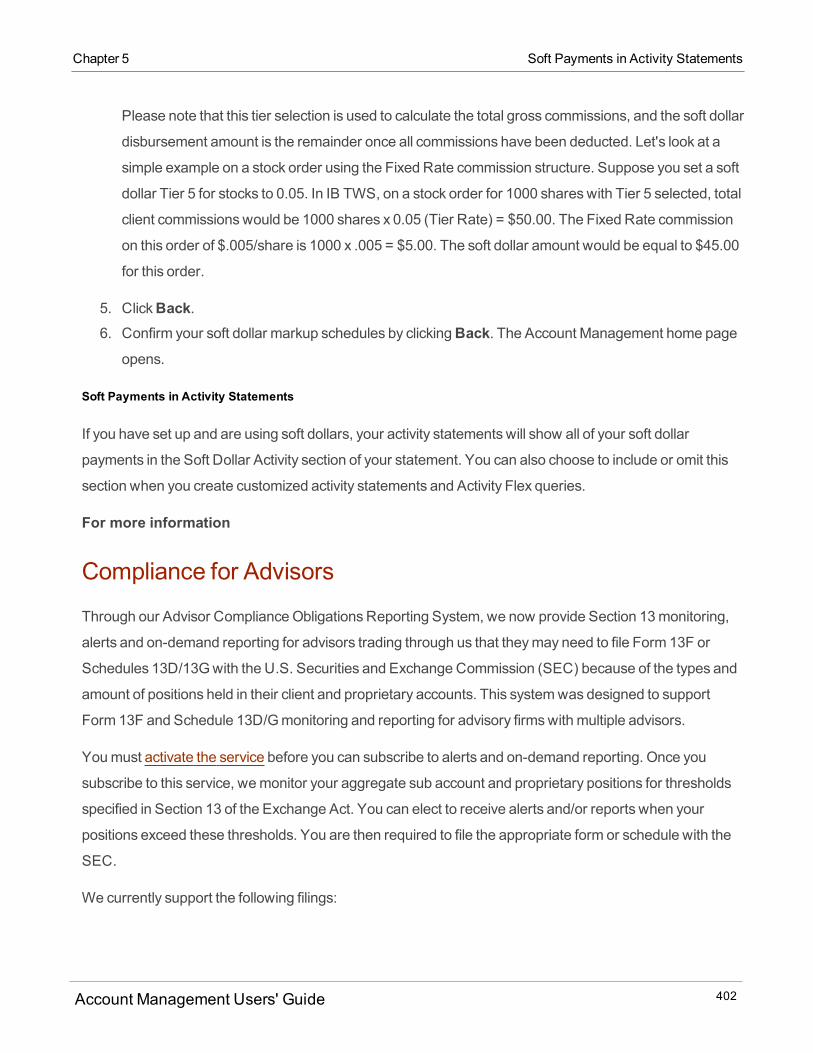
Please note that this tier selection is used to calculate the total gross commissions, and the soft dollar
disbursement amount is the remainder once all commissions have been deducted. Let's look at a
simple example on a stock order using the Fixed Rate commission structure. Suppose you set a soft
dollar Tier 5 for stocks to 0.05. In IB TWS, on a stock order for 1000 shareswith Tier 5 selected, total
client commissionswould be 1000 shares x 0.05 (Tier Rate) = $50.00. The Fixed Rate commission
on this order of $.005/share is 1000 x .005 = $5.00. The soft dollar amount would be equal to $45.00
for this order.
5. ClickBack.6. Confirm your soft dollar markup schedules by clickingBack. The Account Management home page
opens.
Soft Payments in Activity Statements
If you have set up and are using soft dollars, your activity statements will show all of your soft dollar
payments in the Soft Dollar Activity section of your statement. You can also choose to include or omit this
section when you create customized activity statements and Activity Flex queries.
For more information
Compliance for Advisors
Through our Advisor ComplianceObligationsReporting System, we now provide Section 13monitoring,
alerts and on-demand reporting for advisors trading through us that theymay need to file Form 13F or
Schedules 13D/13Gwith the U.S. Securities and Exchange Commission (SEC) because of the types and
amount of positions held in their client and proprietary accounts. This systemwas designed to support
Form 13F and Schedule 13D/Gmonitoring and reporting for advisory firmswith multiple advisors.
Youmust activate the service before you can subscribe to alerts and on-demand reporting. Once you
subscribe to this service, wemonitor your aggregate sub account and proprietary positions for thresholds
specified in Section 13 of the Exchange Act. You can elect to receive alerts and/or reports when your
positions exceed these thresholds. You are then required to file the appropriate form or schedule with the
SEC.
We currently support the following filings:
Account Management Users' Guide 402
Chapter 5 Soft Payments in Activity Statements
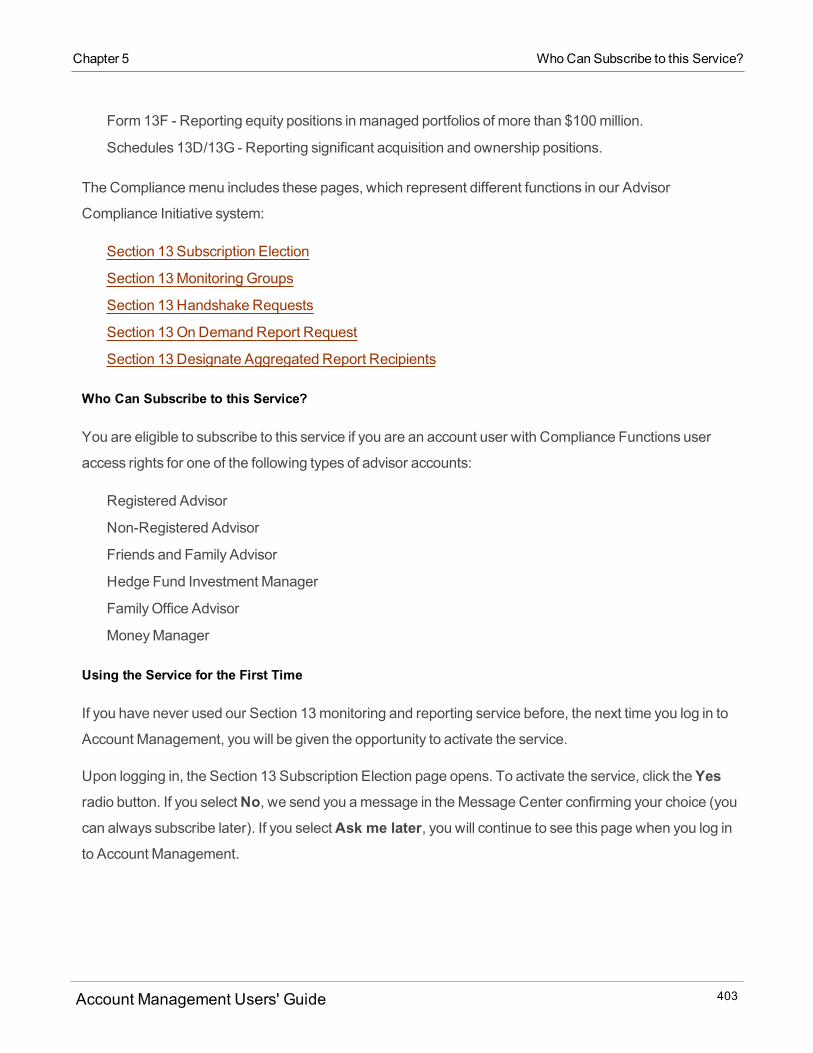
Chapter 5 WhoCan Subscribe to this Service?
Form 13F - Reporting equity positions in managed portfolios of more than $100million.
Schedules 13D/13G - Reporting significant acquisition and ownership positions.
The Compliancemenu includes these pages, which represent different functions in our Advisor
Compliance Initiative system:
Section 13 Subscription Election
Section 13Monitoring Groups
Section 13 Handshake Requests
Section 13OnDemandReport Request
Section 13 Designate Aggregated Report Recipients
Who Can Subscribe to this Service?
You are eligible to subscribe to this service if you are an account user with Compliance Functions user
access rights for one of the following types of advisor accounts:
Registered Advisor
Non-Registered Advisor
Friends and Family Advisor
Hedge Fund Investment Manager
Family Office Advisor
MoneyManager
Using the Service for the First Time
If you have never used our Section 13monitoring and reporting service before, the next time you log in to
Account Management, you will be given the opportunity to activate the service.
Upon logging in, the Section 13 Subscription Election page opens. To activate the service, click theYesradio button. If you selectNo, we send you amessage in theMessage Center confirming your choice (youcan always subscribe later). If you selectAsk me later, you will continue to see this page when you log into Account Management.
Account Management Users' Guide 403
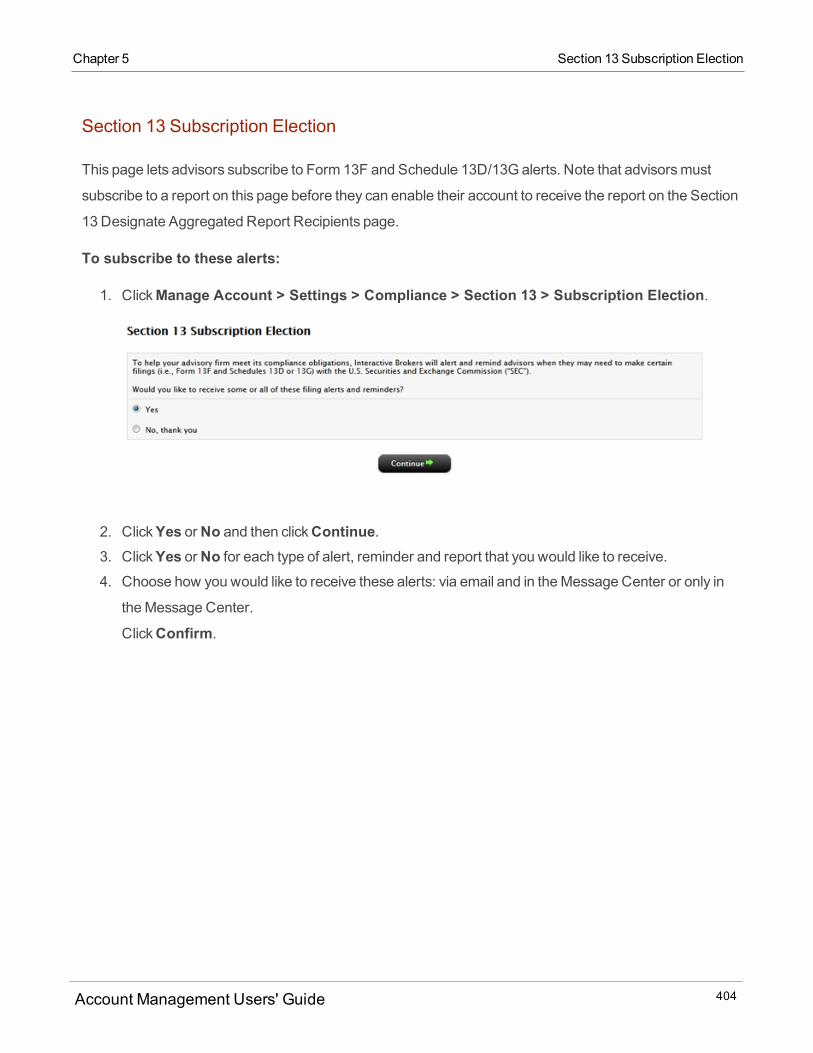
Section 13 Subscription Election
This page lets advisors subscribe to Form 13F and Schedule 13D/13Galerts. Note that advisorsmust
subscribe to a report on this page before they can enable their account to receive the report on the Section
13 Designate Aggregated Report Recipients page.
To subscribe to these alerts:
1. ClickManage Account > Settings > Compliance > Section 13 > Subscription Election.
2. ClickYes orNo and then clickContinue.3. ClickYes orNo for each type of alert, reminder and report that you would like to receive.4. Choose how you would like to receive these alerts: via email and in theMessage Center or only in
theMessage Center.
ClickConfirm.
Account Management Users' Guide 404
Chapter 5 Section 13 Subscription Election
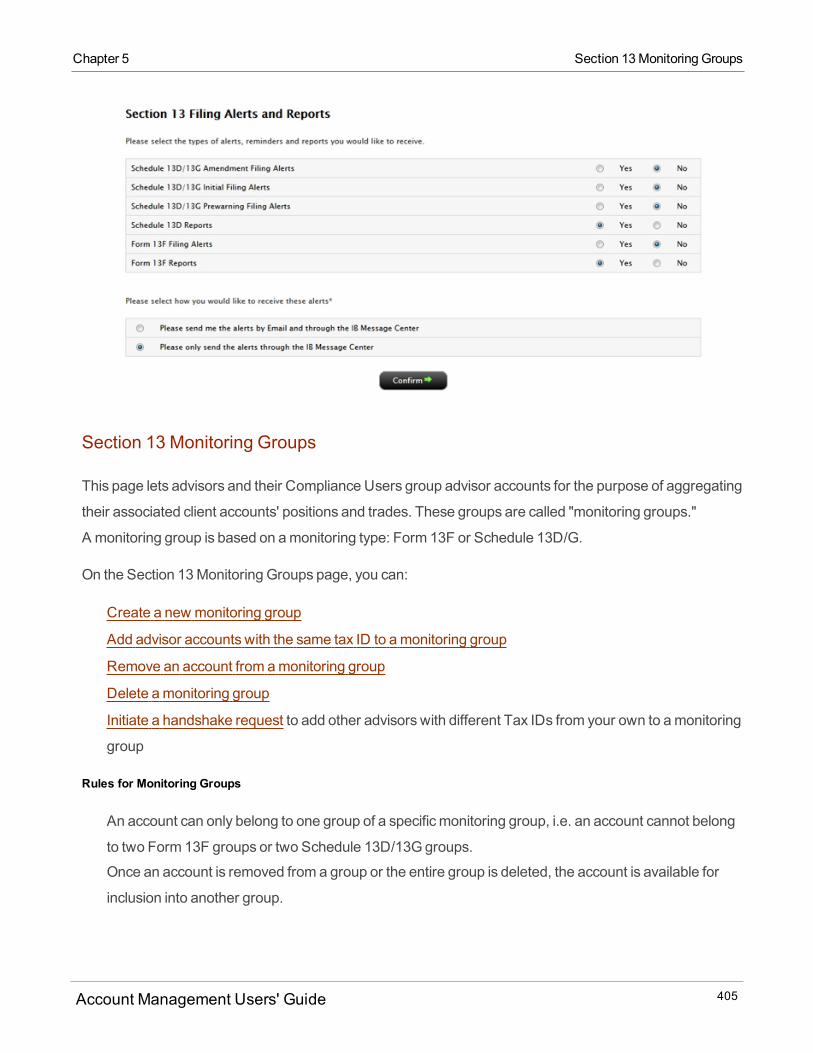
Chapter 5 Section 13Monitoring Groups
Section 13 Monitoring Groups
This page lets advisors and their Compliance Users group advisor accounts for the purpose of aggregating
their associated client accounts' positions and trades. These groups are called "monitoring groups."
A monitoring group is based on amonitoring type: Form 13F or Schedule 13D/G.
On the Section 13Monitoring Groups page, you can:
Create a new monitoring group
Add advisor accounts with the same tax ID to amonitoring group
Remove an account from amonitoring group
Delete amonitoring group
Initiate a handshake request to add other advisors with different Tax IDs from your own to amonitoring
group
Rules for Monitoring Groups
An account can only belong to one group of a specificmonitoring group, i.e. an account cannot belong
to two Form 13F groups or two Schedule 13D/13Ggroups.
Once an account is removed from a group or the entire group is deleted, the account is available for
inclusion into another group.
Account Management Users' Guide 405
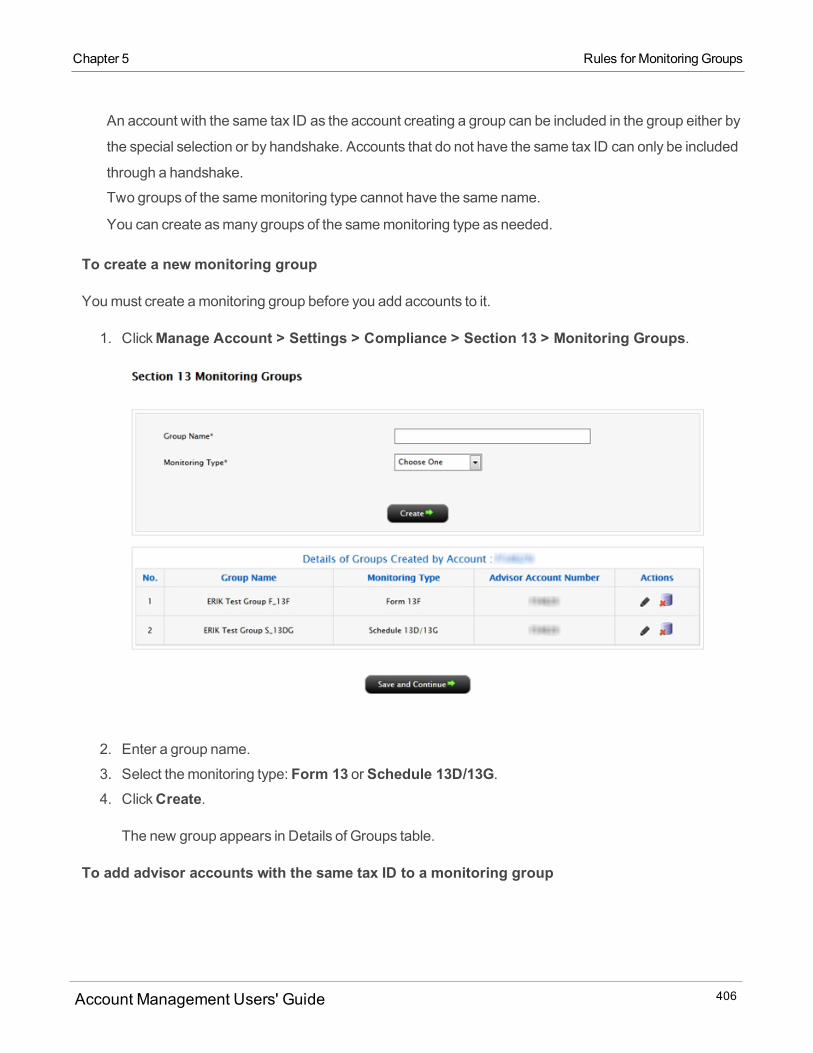
An account with the same tax ID as the account creating a group can be included in the group either by
the special selection or by handshake. Accounts that do not have the same tax ID can only be included
through a handshake.
Two groups of the samemonitoring type cannot have the same name.
You can create asmany groups of the samemonitoring type as needed.
To create a new monitoring group
Youmust create amonitoring group before you add accounts to it.
1. ClickManage Account > Settings > Compliance > Section 13 > Monitoring Groups.
2. Enter a group name.
3. Select themonitoring type: Form 13 or Schedule 13D/13G.4. ClickCreate.
The new group appears in Details of Groups table.
To add advisor accounts with the same tax ID to a monitoring group
Account Management Users' Guide 406
Chapter 5 Rules for Monitoring Groups
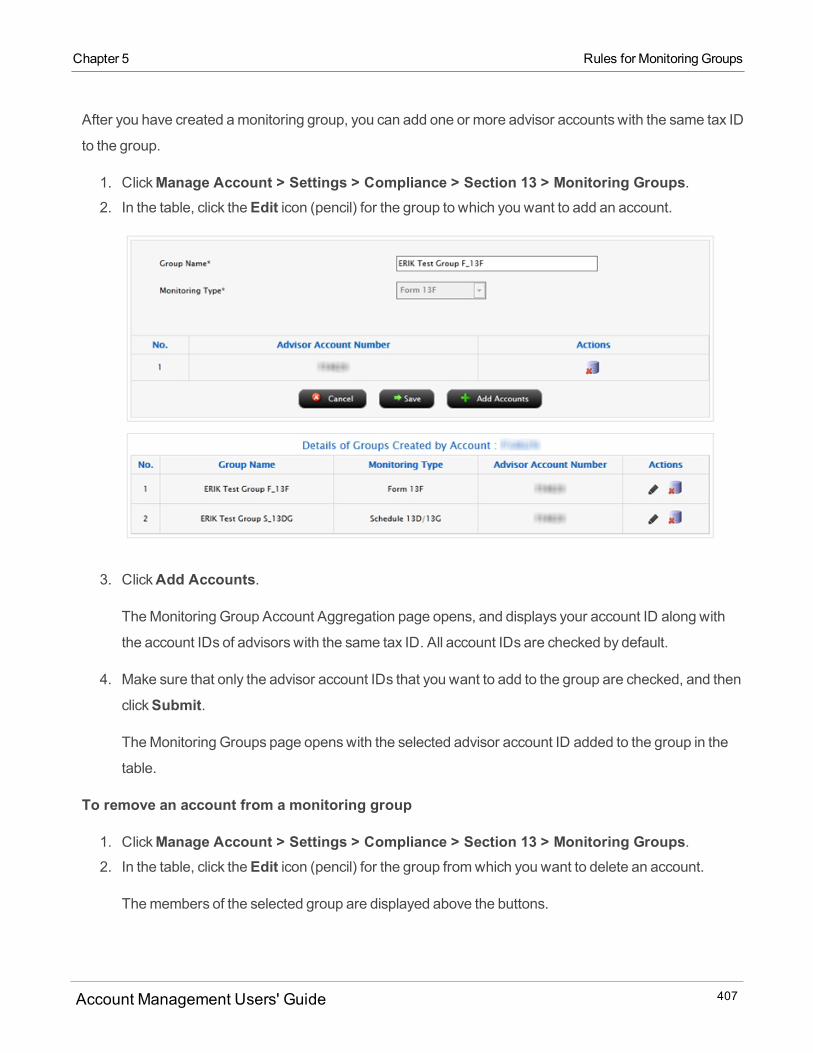
Chapter 5 Rules for Monitoring Groups
After you have created amonitoring group, you can add one or more advisor accounts with the same tax ID
to the group.
1. ClickManage Account > Settings > Compliance > Section 13 > Monitoring Groups.2. In the table, click theEdit icon (pencil) for the group to which you want to add an account.
3. ClickAdd Accounts.
TheMonitoring Group Account Aggregation page opens, and displays your account ID along with
the account IDs of advisors with the same tax ID. All account IDs are checked by default.
4. Make sure that only the advisor account IDs that you want to add to the group are checked, and then
clickSubmit.
TheMonitoring Groups page openswith the selected advisor account ID added to the group in the
table.
To remove an account from a monitoring group
1. ClickManage Account > Settings > Compliance > Section 13 > Monitoring Groups.2. In the table, click theEdit icon (pencil) for the group fromwhich you want to delete an account.
Themembers of the selected group are displayed above the buttons.
Account Management Users' Guide 407
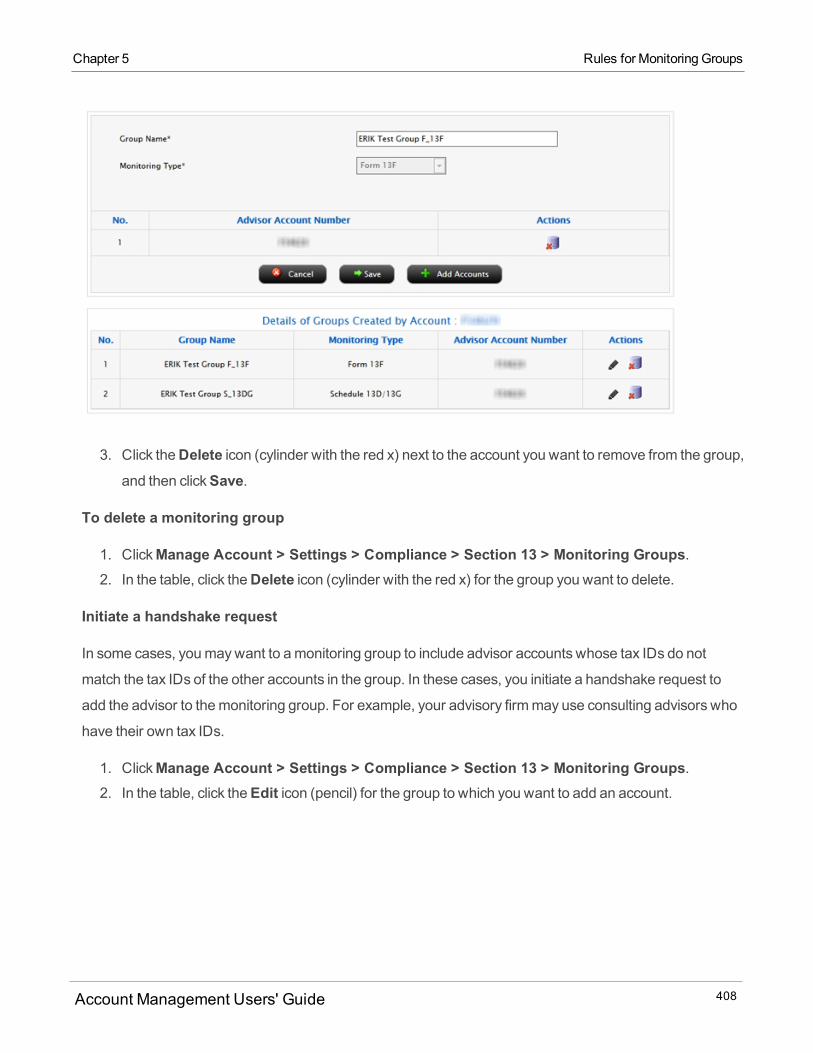
3. Click theDelete icon (cylinder with the red x) next to the account you want to remove from the group,
and then clickSave.
To delete a monitoring group
1. ClickManage Account > Settings > Compliance > Section 13 > Monitoring Groups.2. In the table, click theDelete icon (cylinder with the red x) for the group you want to delete.
Initiate a handshake request
In some cases, youmaywant to amonitoring group to include advisor accounts whose tax IDs do not
match the tax IDs of the other accounts in the group. In these cases, you initiate a handshake request to
add the advisor to themonitoring group. For example, your advisory firmmay use consulting advisors who
have their own tax IDs.
1. ClickManage Account > Settings > Compliance > Section 13 > Monitoring Groups.2. In the table, click theEdit icon (pencil) for the group to which you want to add an account.
Account Management Users' Guide 408
Chapter 5 Rules for Monitoring Groups

Chapter 5 Rules for Monitoring Groups
3. ClickAdd Accounts.
TheMonitoring Group Account Aggregation page opens, showing all advisor accounts with
matching tax IDs. They are checked by default.
4. ClickYes to indicate that you would like your firm's positions aggregated with the positionsmanagedby any other advisor account held at IB for Section 13 reporting purposes (i.e., those whose tax IDs
do not match the other accounts in themonitoring group).
Account Management Users' Guide 409

5. Enter the account ID of the other advisor and the name of the other advisor's firm.
6. ClickSearch to view thematching account.
7. Type a note to the other advisor in the text box that appears, and then clickSubmit.8. ClickManage Account > Settings > Compliance > Section 13 > Handshake Requests to con-
firm that your request was submitted.
9. The other advisor will receive your request as amessage in theMessage Center the next time he or
she logs in to Account Management. This other advisor will accept or decline the request on the Sec-
tion 13 Handshake Requests page. Once the other advisor accepts the request, his or her account
will be included in themonitoring group.
Section 13 Handshake Requests
Use this page to view all of your handshake requests, which you initiate from theMonitoring Groups page
to add other advisors whose tax IDs are not the same as your own to amonitoring group. Advisors who
receive handshake requests view them and accept or decline them on this page.
Account Management Users' Guide 410
Chapter 5 Section 13 Handshake Requests
Chapter 5 Section 13OnDemand Report Request
Section 13 On Demand Report Request
Use this page to submit requests for Form 13F and Schedules 13D/G reports and view the status of all
report requests. There are two ways to request a report:
Select amonitoring group from a drop-down list of available groups. This lets you request a report for a
group of which you are not amember but are the owner (creator).
Select amonitoring type (Form 13F or Schedules 13D/G) and enter report parameters. The system
will get the associated group for your account (you are the user that requested the report) and will run
the report on that group. If your account is not part of a group, the systemwill run the report for your
advisor account.
You can cancel a report request whose status isPending.
Rules for On Demand Report Generation
If you submit a report request bymonitoring group, only themembers of that group will be able to view
the report.
A group owner (the advisor who created themonitoring group) canmake an on demand report request
for that group.
If you submit a report request bymonitoring type, the system automatically selects themonitoring
group of that type of which you are amember. If you are not amember of a group and you request a
report monitoring type, the systemwill run the report for only you and your clients.
For Schedule 13D/G reporting, the starting datemust be one year or less from the current date.
For Schedule 13D/G reporting, the date rangemust not exceed 60 days.
You cannot submit duplicate report requests (report requests with identical parameters) for reports
that are pending generation. Once the report is generated, you can submit another report request with
the same parameters.
To submit an on demand report request by group
1. ClickManage Account > Settings > Compliance > Section 13 > On Demand Reporting.
The Section 13OnDemandReport Request page opens, showing all current report requests.
Account Management Users' Guide 411
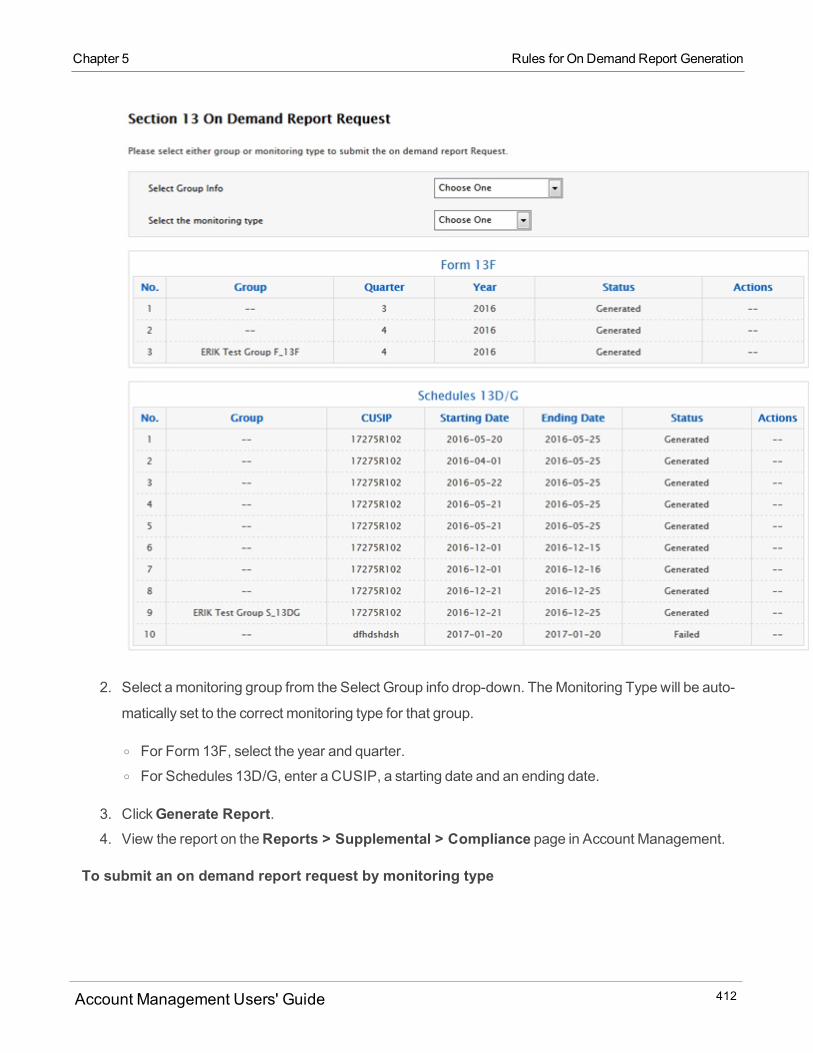
2. Select amonitoring group from the Select Group info drop-down. TheMonitoring Type will be auto-
matically set to the correct monitoring type for that group.
o For Form 13F, select the year and quarter.o For Schedules 13D/G, enter a CUSIP, a starting date and an ending date.
3. ClickGenerate Report.4. View the report on theReports > Supplemental > Compliance page in Account Management.
To submit an on demand report request by monitoring type
Account Management Users' Guide 412
Chapter 5 Rules for On Demand Report Generation
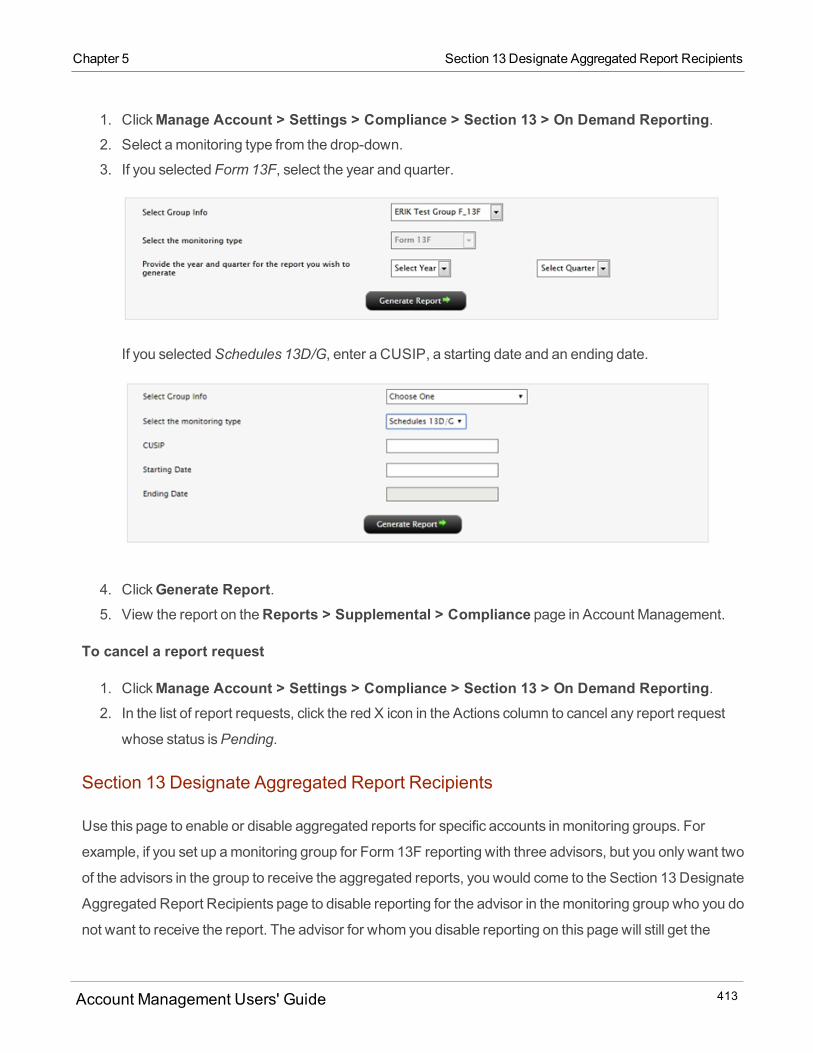
Chapter 5 Section 13 Designate Aggregated Report Recipients
1. ClickManage Account > Settings > Compliance > Section 13 > On Demand Reporting.2. Select amonitoring type from the drop-down.
3. If you selected Form 13F, select the year and quarter.
If you selectedSchedules 13D/G, enter a CUSIP, a starting date and an ending date.
4. ClickGenerate Report.5. View the report on theReports > Supplemental > Compliance page in Account Management.
To cancel a report request
1. ClickManage Account > Settings > Compliance > Section 13 > On Demand Reporting.2. In the list of report requests, click the red X icon in the Actions column to cancel any report request
whose status isPending.
Section 13 Designate Aggregated Report Recipients
Use this page to enable or disable aggregated reports for specific accounts in monitoring groups. For
example, if you set up amonitoring group for Form 13F reporting with three advisors, but you only want two
of the advisors in the group to receive the aggregated reports, you would come to the Section 13 Designate
Aggregated Report Recipients page to disable reporting for the advisor in themonitoring group who you do
not want to receive the report. The advisor for whom you disable reporting on this page will still get the
Account Management Users' Guide 413
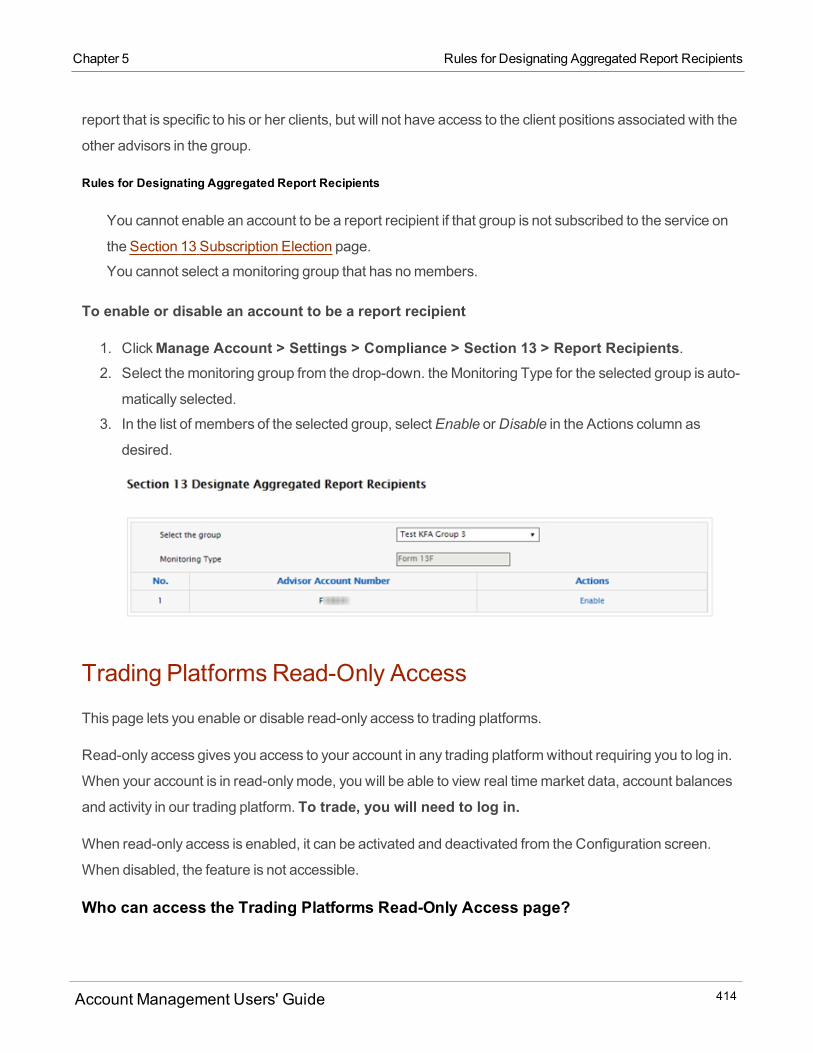
report that is specific to his or her clients, but will not have access to the client positions associated with the
other advisors in the group.
Rules for Designating Aggregated Report Recipients
You cannot enable an account to be a report recipient if that group is not subscribed to the service on
the Section 13 Subscription Election page.
You cannot select amonitoring group that has nomembers.
To enable or disable an account to be a report recipient
1. ClickManage Account > Settings > Compliance > Section 13 > Report Recipients.2. Select themonitoring group from the drop-down. theMonitoring Type for the selected group is auto-
matically selected.
3. In the list of members of the selected group, selectEnable orDisable in the Actions column as
desired.
Trading Platforms Read-Only Access
This page lets you enable or disable read-only access to trading platforms.
Read-only access gives you access to your account in any trading platformwithout requiring you to log in.
When your account is in read-onlymode, you will be able to view real timemarket data, account balances
and activity in our trading platform. To trade, you will need to log in.
When read-only access is enabled, it can be activated and deactivated from the Configuration screen.
When disabled, the feature is not accessible.
Who can access the Trading Platforms Read-Only Access page?
Account Management Users' Guide 414
Chapter 5 Rules for Designating Aggregated Report Recipients
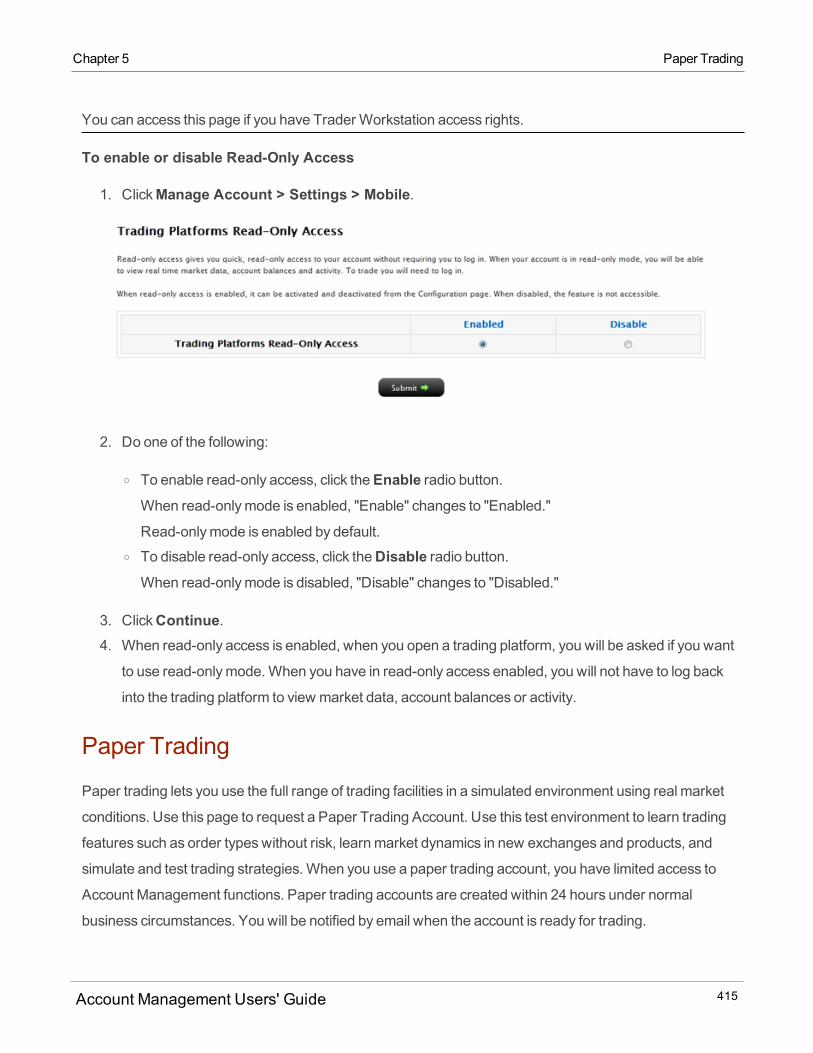
Chapter 5 Paper Trading
You can access this page if you have Trader Workstation access rights.
To enable or disable Read-Only Access
1. ClickManage Account > Settings > Mobile.
2. Do one of the following:
o To enable read-only access, click theEnable radio button.When read-onlymode is enabled, "Enable" changes to "Enabled."
Read-onlymode is enabled by default.o To disable read-only access, click theDisable radio button.When read-onlymode is disabled, "Disable" changes to "Disabled."
3. ClickContinue.4. When read-only access is enabled, when you open a trading platform, you will be asked if you want
to use read-onlymode.When you have in read-only access enabled, you will not have to log back
into the trading platform to view market data, account balances or activity.
Paper Trading
Paper trading lets you use the full range of trading facilities in a simulated environment using real market
conditions. Use this page to request a Paper Trading Account. Use this test environment to learn trading
features such as order typeswithout risk, learnmarket dynamics in new exchanges and products, and
simulate and test trading strategies. When you use a paper trading account, you have limited access to
Account Management functions. Paper trading accounts are created within 24 hours under normal
business circumstances. You will be notified by email when the account is ready for trading.
Account Management Users' Guide 415

Who can access the Paper Trading page?
You can access this page if you are a(n):
Individual, Joint, Trust or IRA Account User
Small Business Account User
Friends and Family GroupMaster or Client User
Advisor Master User Individual
Advisor Master User Organization
Advisor Client User Individual
Advisor Client User Organization
Proprietary Trading GroupMaster User
Proprietary Trading Group SubUser
Broker Master User (master account only)
Broker Fully Disclosed Client User
Broker Fully Disclosed Client User Organization
Broker Non-Disclosed Client User
Broker OmnibusClient User
Investment Manager Master User
Fund
To open a paper trading account
1. ClickManage Account > Settings > Paper Trading.
Account Management Users' Guide 416
Chapter 5 Paper Trading
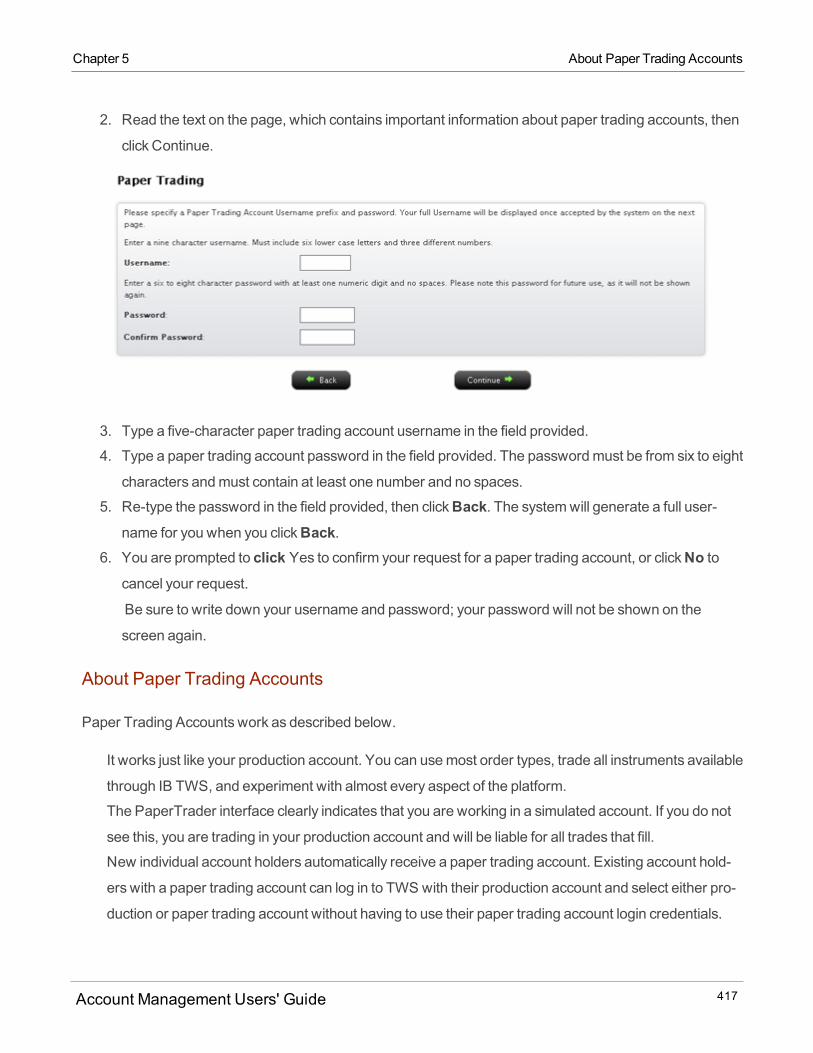
Chapter 5 About Paper Trading Accounts
2. Read the text on the page, which contains important information about paper trading accounts, then
click Continue.
3. Type a five-character paper trading account username in the field provided.
4. Type a paper trading account password in the field provided. The passwordmust be from six to eight
characters andmust contain at least one number and no spaces.
5. Re-type the password in the field provided, then clickBack. The systemwill generate a full user-
name for you when you clickBack.6. You are prompted to click Yes to confirm your request for a paper trading account, or clickNo to
cancel your request.
Be sure to write down your username and password; your password will not be shown on the
screen again.
About Paper Trading Accounts
Paper Trading Accounts work as described below.
It works just like your production account. You can usemost order types, trade all instruments available
through IB TWS, and experiment with almost every aspect of the platform.
The PaperTrader interface clearly indicates that you are working in a simulated account. If you do not
see this, you are trading in your production account and will be liable for all trades that fill.
New individual account holders automatically receive a paper trading account. Existing account hold-
ers with a paper trading account can log in to TWS with their production account and select either pro-
duction or paper trading account without having to use their paper trading account login credentials.
Account Management Users' Guide 417
Note that Advisors, Brokers, Advisor and Broker clients, Hedge Funds, Administrators, Referrers and
residents of India and Japan will still have to log in to their paper trading accounts with their paper trad-
ing account credentials.
Trades entered into this paper trading account will not actually execute on any exchange or settle at a
clearing house. However, the price of your executionswill be determined by real market prices and
sizes.
Trading permissions, market data subscriptions, base currency, and other account configurations are
the same as specified for your regular account.
A paper trading account statement will be provided each day and is available by logging into Account
Management with your Paper Trading Account login and accessing the Reportsmenu.
All paper trading accounts start with USD 1,000,000 of paper trading Equity with Loan Value, and this
equity will fluctuate as if the trades had executed in the real market.
Youmay reset your cash equity at any time in Account Management for your Paper Trading Account.
You can reset your paper trading cash equity to up to five times your production account value. Please
note that reset requests should be entered before 16:00 ET in order to take effect for the next business
day.
Paper Trading Account Limitations
Although a Paper Trading Account simulatesmost aspects of a production account, youmay encounter
some differences due to its construction as a simulator with no execution or clearing abilities. These
differences include but are not limited to:
No support for some order types including: VWAP, Auction, RFQ, and Pegged toMarket.
Fills are simulated from the top of the book; no deep book access.
Limited combo and EFP trading.
Stops and other complex order types are always simulated in paper trading; thismay result in slightly
different behavior from a production account.
Penny trading for US Options is not supported. You will be able to submit the order but it will not
receive a penny fill.
The trade simulator will reject the remainder of any exchange-directedmarket order that partially
executes. Thismay or may not match behavior of a real-world exchange. Market orders received while
Account Management Users' Guide 418
Chapter 5 Paper Trading Account Limitations
Chapter 5 Account Management for a Paper Trading Account
there is no quote on the opposite side will be held until themarket data arrives (i.e. until the first partial
fill).
Mutual Fund trading is not supported in a Paper Trader Account.
Account Management for a Paper Trading Account
When you use a paper trading account, you have limited access to Account Management functions.With a
paper trading account, you are limited to the following Account Management menus and functions:
Trade > Paper Trading Account Reset:Paper Trading Account Reset lets you reset the cash equity of
your paper trading account. All paper trading accounts start with 1,000,000 USD of paper trading
equity. Note that if you want to flatten the account positions, youmust trade out of them before request-
ing a paper trading account reset.
Trade > WebTrader:WebTrader lets you quickly launchWebTrader, our HTML-based trading platform
designed for traders who prefer a less complicated trading environment.
Reports > Activity > Statements:Statements lets you view and print daily statements for your paper
trading account, and download trade information toMicrosoft Word andMicrosoft Excel. Daily state-
ments cover the last 45 days.
Reports > Activity > FlexQueries: FlexQueries lets you create highly customized report templates for
Activity Statements called FlexQueries. FlexQueries let you specify exactly which fields you want to
view in your Activity Statement, the time period you want the report to cover, the order in which you
want the fields to display, and the format of the report.
Reports > Trade Confirmations > FlexQueries: Trade Confirms Flex lets you createmultiple, cus-
tomized report templates for trade confirmations. A trade confirmation flex query lets you specify the
exact fields you want to view in your report, the time period you want the report to cover, the order in
which you want the fields to appear in the report, and the format of the report.
Manage Account > Security > Reset Paper Trading Account Password: Lets you change your paper
trading account password by logging into Account Management with your production account (in the
event that you have forgotten your paper trading password).
Manage Account > Security > Individual > Password: Password lets you change your paper trading
account password by logging into Account Management with your paper trading account.
Account Management Users' Guide 419
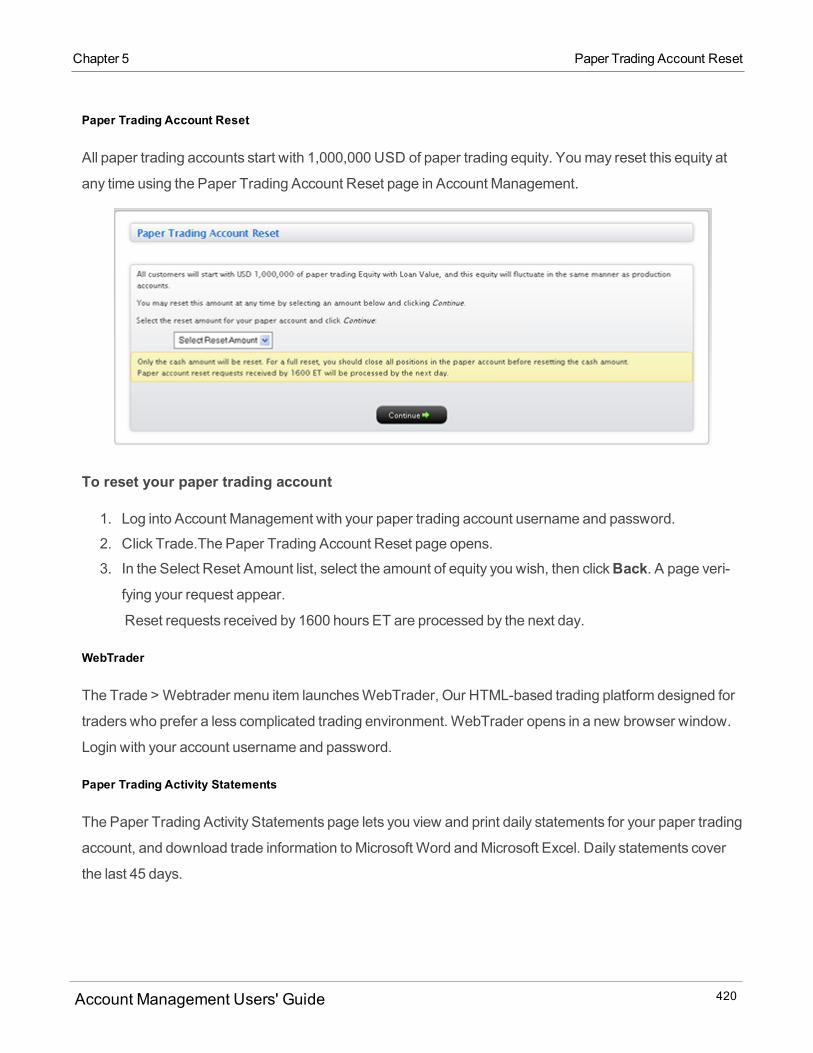
Paper Trading Account Reset
All paper trading accounts start with 1,000,000 USD of paper trading equity. Youmay reset this equity at
any time using the Paper Trading Account Reset page in Account Management.
To reset your paper trading account
1. Log into Account Management with your paper trading account username and password.
2. Click Trade.The Paper Trading Account Reset page opens.
3. In the Select Reset Amount list, select the amount of equity you wish, then clickBack. A page veri-
fying your request appear.
Reset requests received by 1600 hours ET are processed by the next day.
WebTrader
The Trade > Webtrader menu item launchesWebTrader, Our HTML-based trading platform designed for
traders who prefer a less complicated trading environment. WebTrader opens in a new browser window.
Login with your account username and password.
Paper Trading Activity Statements
The Paper Trading Activity Statements page lets you view and print daily statements for your paper trading
account, and download trade information toMicrosoft Word andMicrosoft Excel. Daily statements cover
the last 45 days.
Account Management Users' Guide 420
Chapter 5 Paper Trading Account Reset
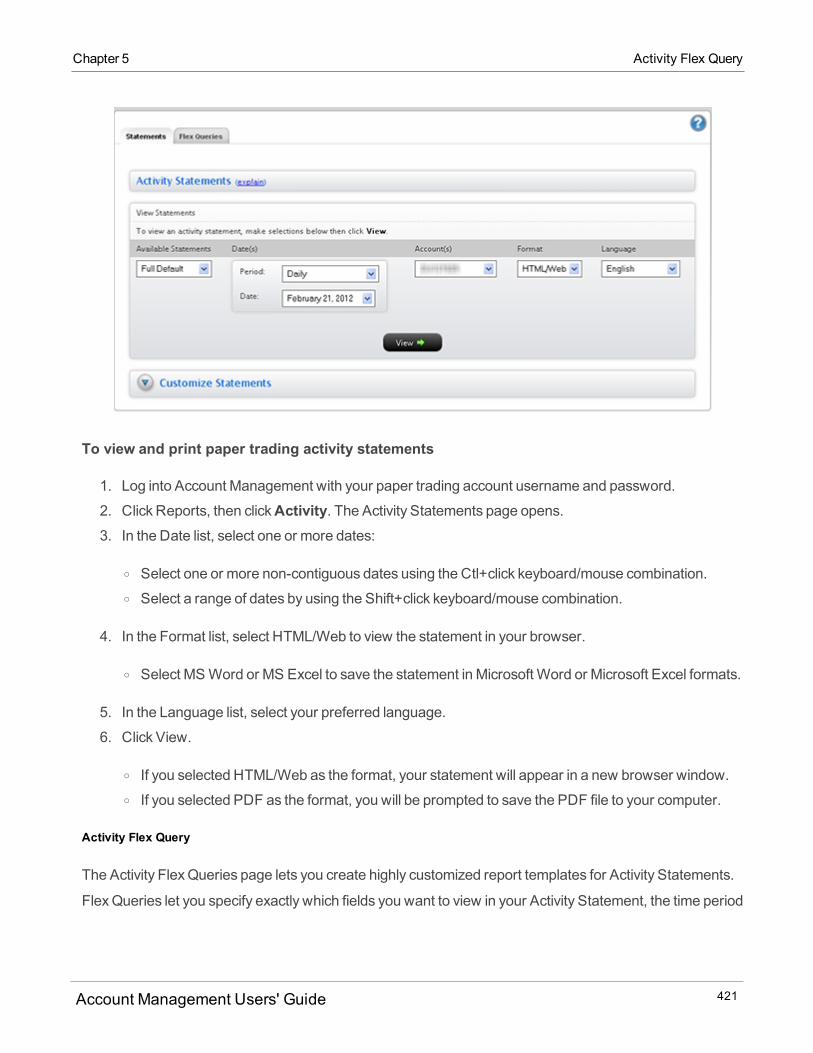
Chapter 5 Activity Flex Query
To view and print paper trading activity statements
1. Log into Account Management with your paper trading account username and password.
2. Click Reports, then clickActivity. The Activity Statements page opens.3. In the Date list, select one or more dates:
o Select one or more non-contiguous dates using the Ctl+click keyboard/mouse combination.o Select a range of dates by using the Shift+click keyboard/mouse combination.
4. In the Format list, select HTML/Web to view the statement in your browser.
o Select MSWord or MS Excel to save the statement in Microsoft Word or Microsoft Excel formats.
5. In the Language list, select your preferred language.
6. Click View.
o If you selected HTML/Web as the format, your statement will appear in a new browser window.o If you selected PDF as the format, you will be prompted to save the PDF file to your computer.
Activity Flex Query
The Activity FlexQueries page lets you create highly customized report templates for Activity Statements.
FlexQueries let you specify exactly which fields you want to view in your Activity Statement, the time period
Account Management Users' Guide 421
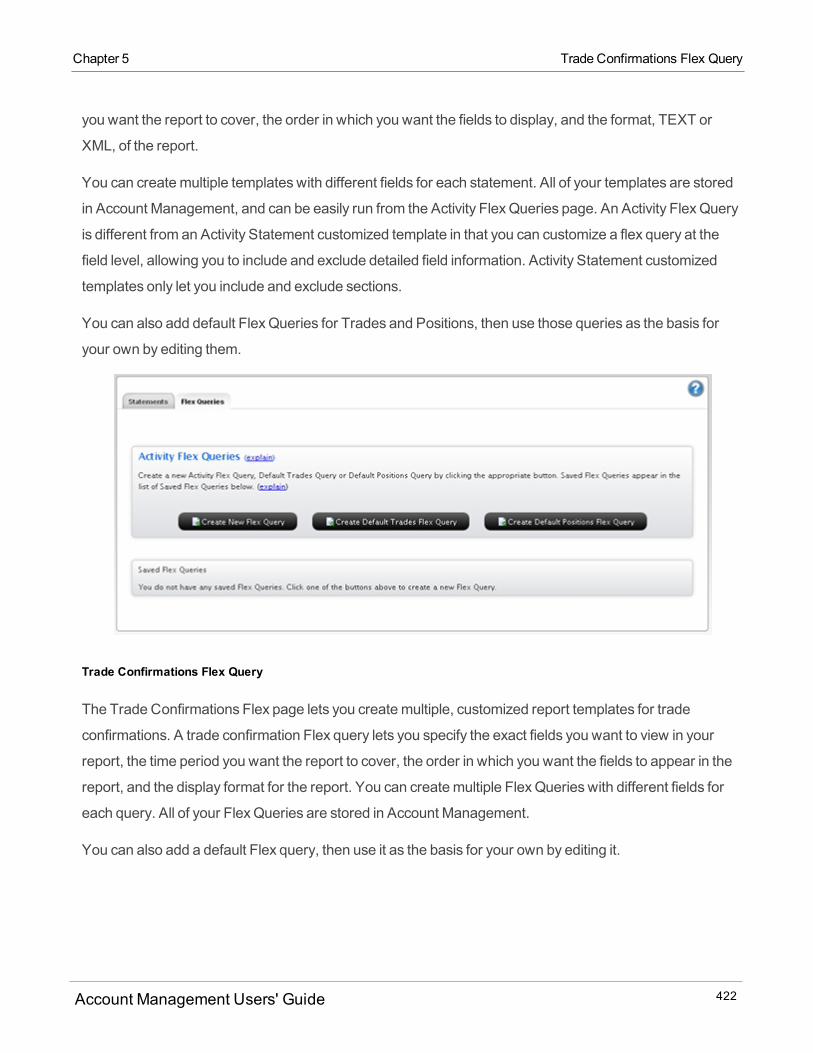
you want the report to cover, the order in which you want the fields to display, and the format, TEXT or
XML, of the report.
You can createmultiple templateswith different fields for each statement. All of your templates are stored
in Account Management, and can be easily run from the Activity FlexQueries page. An Activity FlexQuery
is different from an Activity Statement customized template in that you can customize a flex query at the
field level, allowing you to include and exclude detailed field information. Activity Statement customized
templates only let you include and exclude sections.
You can also add default FlexQueries for Trades and Positions, then use those queries as the basis for
your own by editing them.
Trade Confirmations Flex Query
The Trade Confirmations Flex page lets you createmultiple, customized report templates for trade
confirmations. A trade confirmation Flex query lets you specify the exact fields you want to view in your
report, the time period you want the report to cover, the order in which you want the fields to appear in the
report, and the display format for the report. You can createmultiple FlexQueries with different fields for
each query. All of your FlexQueries are stored in Account Management.
You can also add a default Flex query, then use it as the basis for your own by editing it.
Account Management Users' Guide 422
Chapter 5 Trade Confirmations Flex Query

Chapter 5 Change Password
Change Password
Use the Change Password page to change your paper trading account password.
To change your paper trading account password
1. Log into Account Management with your paper trading account username and password.
2. ClickManage Account> Security. The Change Password page opens.3. Type your current password, then type your new password. Choose a password that is from six to
eight characters long and contains at least one number and no spaces.
4. Retype the new password.
5. In the Confirmation Number field, type the confirmation number from the email you received.
6. ClickSubmit. The password change is effective immediately.
Account Alias
The Account Alias page lets you define an alias for your account. For example, youmight want to define an
account alias that is easier to remember than your account ID. If you are amaster user, you can define an
alias for any client or sub accounts that youmanage. If you create an account alias, it will appear on your
Account Management Users' Guide 423
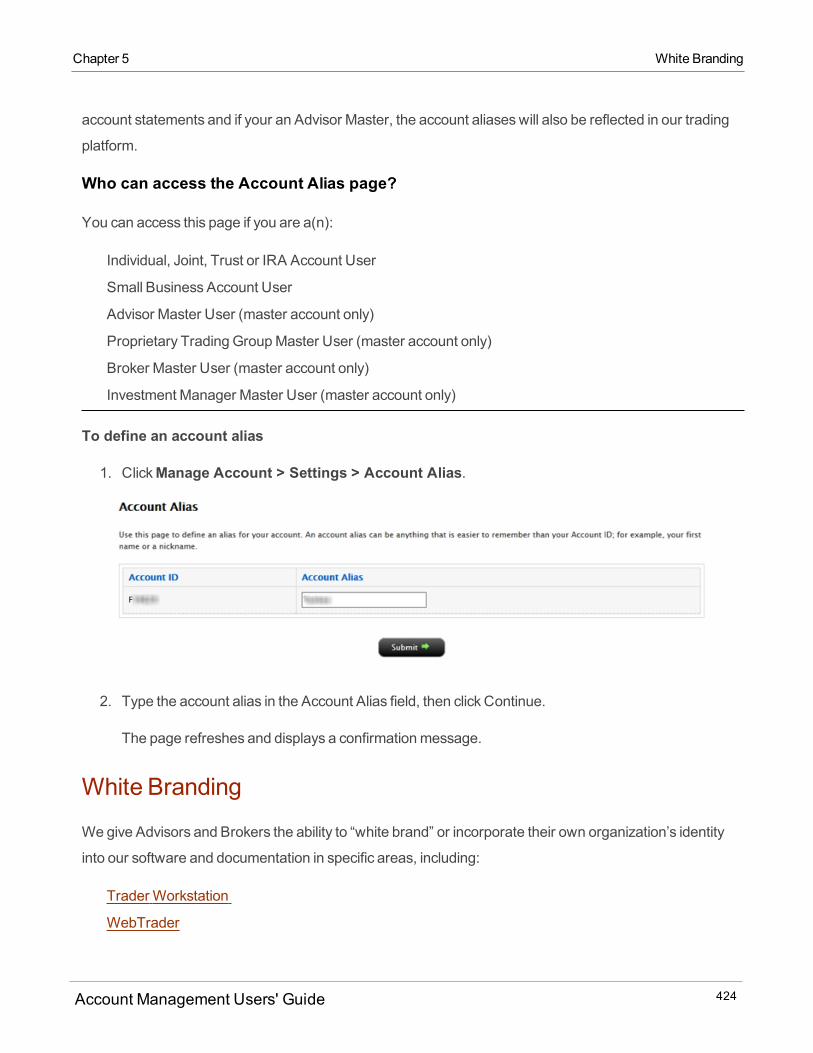
account statements and if your an Advisor Master, the account aliaseswill also be reflected in our trading
platform.
Who can access the Account Alias page?
You can access this page if you are a(n):
Individual, Joint, Trust or IRA Account User
Small Business Account User
Advisor Master User (master account only)
Proprietary Trading GroupMaster User (master account only)
Broker Master User (master account only)
Investment Manager Master User (master account only)
To define an account alias
1. ClickManage Account > Settings > Account Alias.
2. Type the account alias in the Account Alias field, then click Continue.
The page refreshes and displays a confirmationmessage.
White Branding
Wegive Advisors and Brokers the ability to “white brand” or incorporate their own organization’s identity
into our software and documentation in specific areas, including:
Trader Workstation
WebTrader
Account Management Users' Guide 424
Chapter 5 White Branding

Chapter 5 White Branding
Account Management, the Registration System, Statements and PortfolioAnalyst
Emails
Trader Workstation Online UsersGuide
IB Contract Database
Who can access the White Branding page?
You can access this page if you are a(n):
Advisor Master User Individual
Advisor Master User Organization
Broker Master User
Do not use the Interactive Brokers banner as a template for your White Branding Banner. IB cannot
endorse any Broker, and using a banner based on our corporate banner would give that impression.
Please note that white branding of statements can take up to 24 hours from the time you upload your
images.
To set up white branding
1. ClickManage Account > Settings > White Branding. TheWhite Branding Information page
opens. Brokers and Fund Investment Managers will seemore options than Advisors.
The following figure shows theWhite Branding page for Brokers and Fund Investment Managers.
Account Management Users' Guide 425
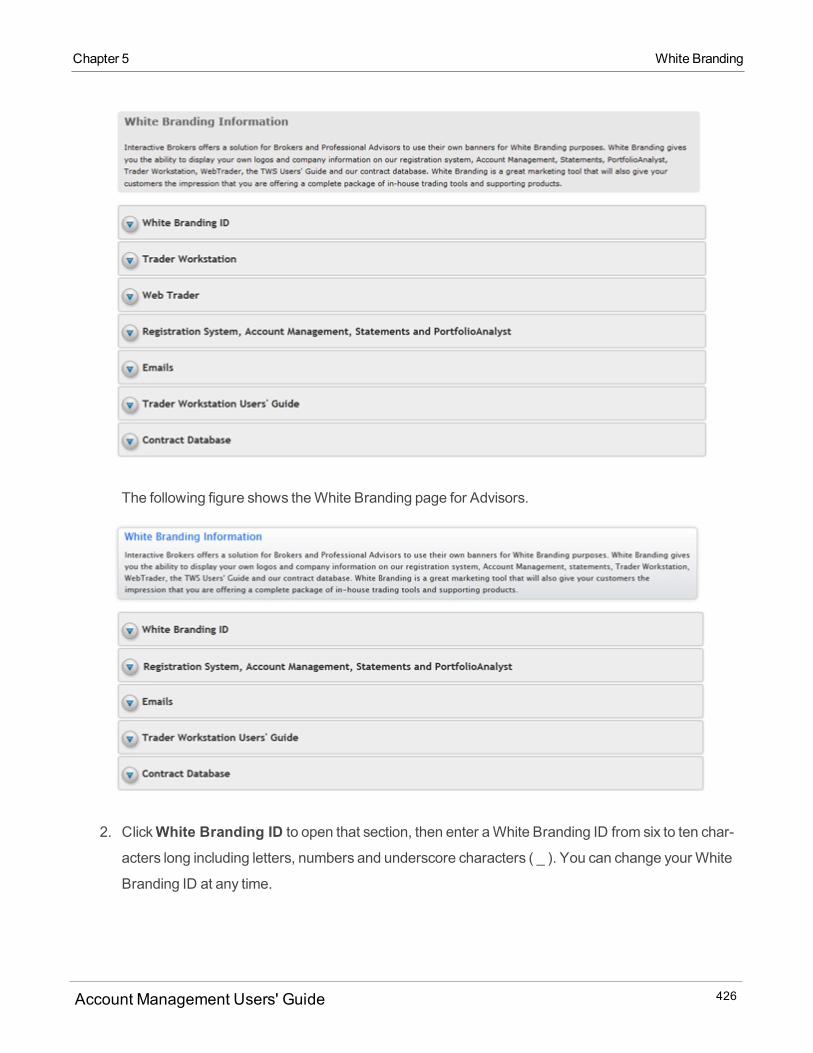
The following figure shows theWhite Branding page for Advisors.
2. ClickWhite Branding ID to open that section, then enter aWhite Branding ID from six to ten char-
acters long including letters, numbers and underscore characters ( _ ). You can change your White
Branding ID at any time.
Account Management Users' Guide 426
Chapter 5 White Branding

Chapter 5 White Branding TraderWorkstation
3. ClickSubmit.4. Click each section that represents the category you want to white brand, then follow the instructions
in the section to enter the required information. ClickSubmit in each section to enter the informationinto our system.
Changesmade before 5:00 PMEST go into effect 8:00 PMEST the same day. Changesmade after
5:00 PMEST will take effect the following day 8:00 PMEST.
White Branding Trader Workstation
Wegive Brokers the ability to customize the Trader Workstation (IB TWS) platform so it displays your logo
and useful company information to be presented on IB TWS, i.e. a link to your company's Homepage,
Client Services, Technical Support, and SalesRepresentative's contact information. Note that Advisors
cannot white brand Trader Workstation.
If Broker Masters configure Trader Workstation for white branding, thenmobile deviceswill also be white-
branded, including IBKR Mobile for Android and iOS.
To set up white branding for Trader Workstation, you perform the following steps:
1. Enter TWS white branding information in Account Management.
2. Provide a link on your website for your clients to download and install TWS.
To enter IB TWS white branding information in Account Management
1. Log into Account Management.
2. ClickManage Account > Settings > White Branding.3. ClickWhite Branding ID to open that section, then enter aWhite Branding ID from six to ten char-
acters long including letters, numbers and underscore characters ( _ ). You can change your White
Branding ID at any time.
Account Management Users' Guide 427
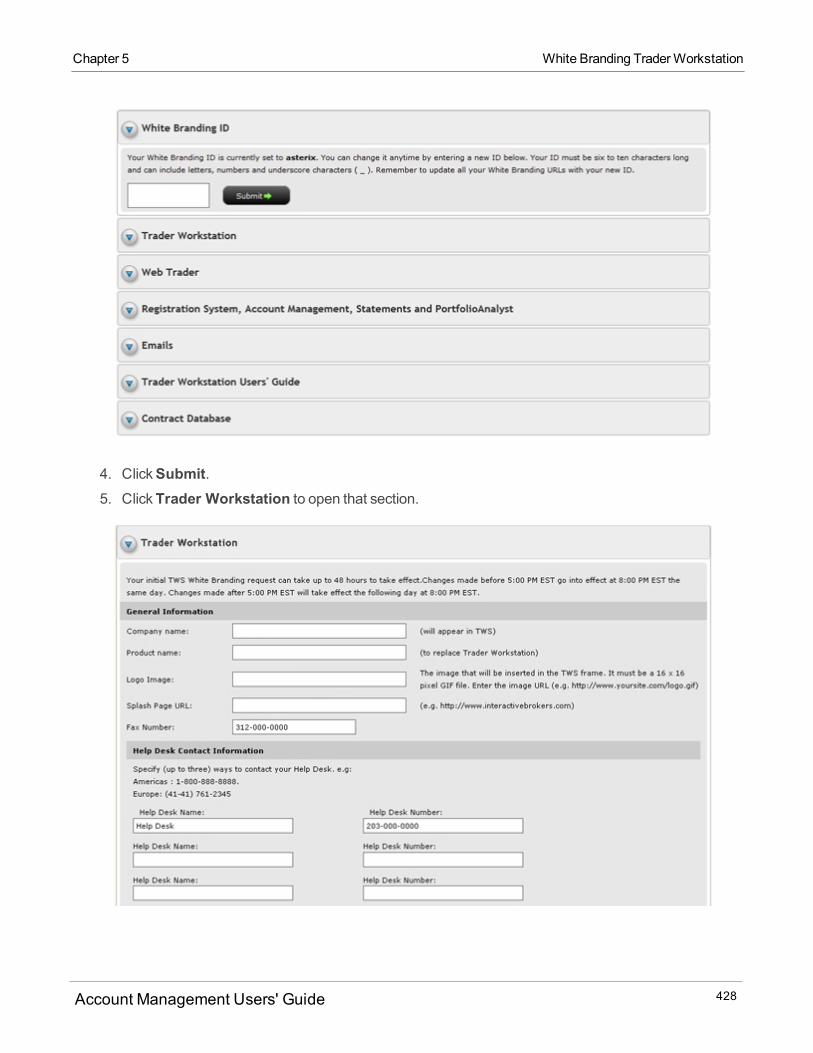
4. ClickSubmit.5. ClickTrader Workstation to open that section.
Account Management Users' Guide 428
Chapter 5 White Branding TraderWorkstation
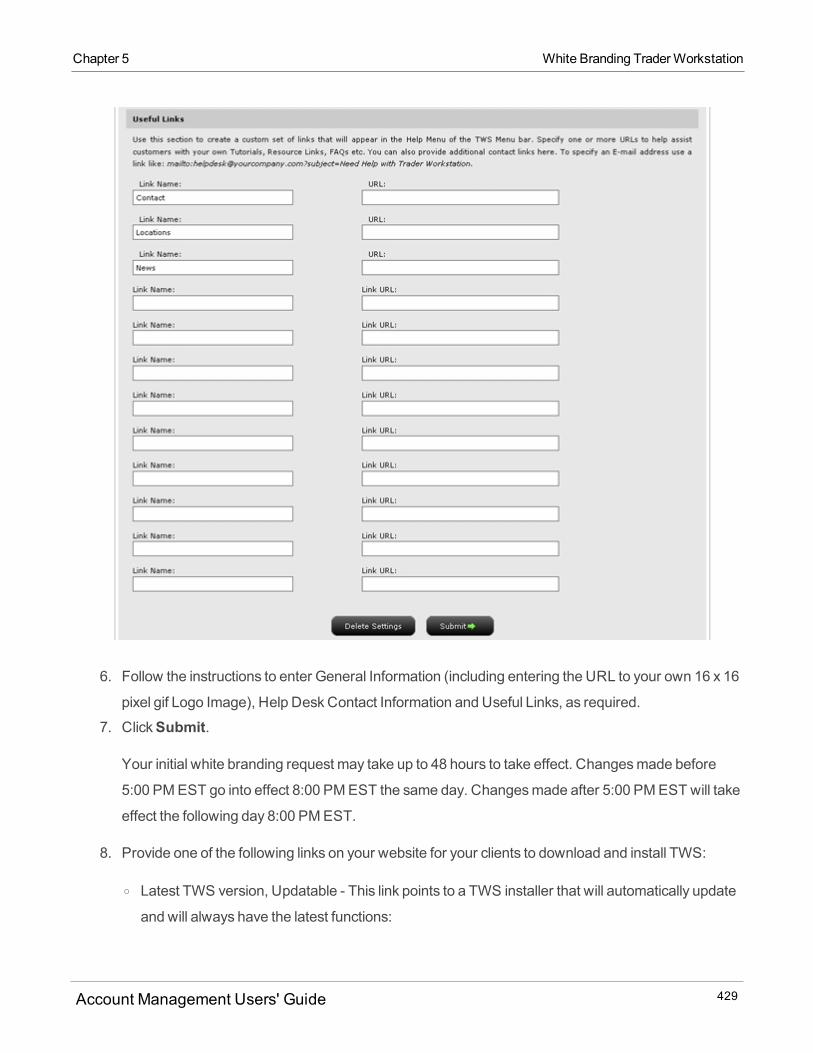
Chapter 5 White Branding TraderWorkstation
6. Follow the instructions to enter General Information (including entering the URL to your own 16 x 16
pixel gif Logo Image), Help DeskContact Information and Useful Links, as required.
7. ClickSubmit.
Your initial white branding request may take up to 48 hours to take effect. Changesmade before
5:00 PMEST go into effect 8:00 PMEST the same day. Changesmade after 5:00 PMEST will take
effect the following day 8:00 PMEST.
8. Provide one of the following links on your website for your clients to download and install TWS:
o Latest TWS version, Updatable - This link points to a TWS installer that will automatically update
and will always have the latest functions:
Account Management Users' Guide 429
https://www.cli-entam.com/en/index.php?f=16040&ns=T&conf=am&wbid=MYBROKERWBID
whereMYBROKERWBID is your actualWhite Branding ID
Latest "Offline" TWS. This URL links to the installer for a static TWS where the version does not
change unless the user manually downloads and installs TWS again:
https://www.clientam.com/en/index.php?f=16044&ns=T&conf=am&wbid=MYBROKERWBID
whereMYBROKERWBID is your actualWhite Branding ID
If you have previously configured your website with .jnlp files, replace the old JNLP link on your website
with one of the links above and verify that theWhite Branding logo is the correct size on the download page
and that you can download and install TWS successfully.
White Branding WebTrader
Wegive Brokers the ability to white brandWebTrader. WebTrader is our HTML-based trading interface,
which allows our customers to accessmarket data and transmit orders from behind a firewall where
access to IB TWSmay be impossible. TheWebTrader may also be easier to use for customerswho don't
need all of the capabilities of the Trader Workstation.
Brokers and their customersmay use theWebTrader if we are not the designatedOATS Reporting Party
under anOrder SendingOrganization (OSO) Agreement for that broker.
Note that advisors cannot white brandWebTrader.
To white brand WebTrader
1. Log into Account Management.
2. ClickManage Account > Settings > White Branding.3. ClickWhite Branding ID to open that section, then enter aWhite Branding ID from six to ten char-
acters long including letters, numbers and underscore characters ( _ ). You can change your White
Branding ID at any time.
4. ClickSubmit.5. ClickWebTrader to open that section.
Account Management Users' Guide 430
Chapter 5 White BrandingWebTrader
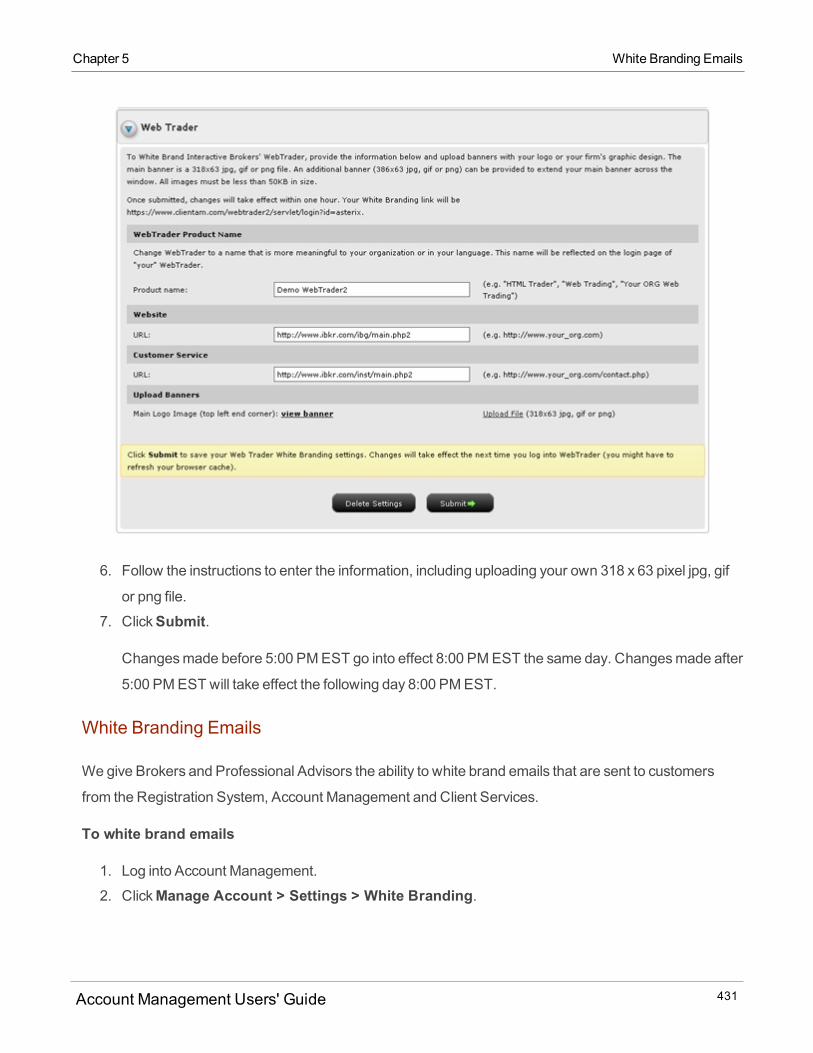
Chapter 5 White Branding Emails
6. Follow the instructions to enter the information, including uploading your own 318 x 63 pixel jpg, gif
or png file.
7. ClickSubmit.
Changesmade before 5:00 PMEST go into effect 8:00 PMEST the same day. Changesmade after
5:00 PMEST will take effect the following day 8:00 PMEST.
White Branding Emails
Wegive Brokers and Professional Advisors the ability to white brand emails that are sent to customers
from the Registration System, Account Management and Client Services.
To white brand emails
1. Log into Account Management.
2. ClickManage Account > Settings > White Branding.
Account Management Users' Guide 431
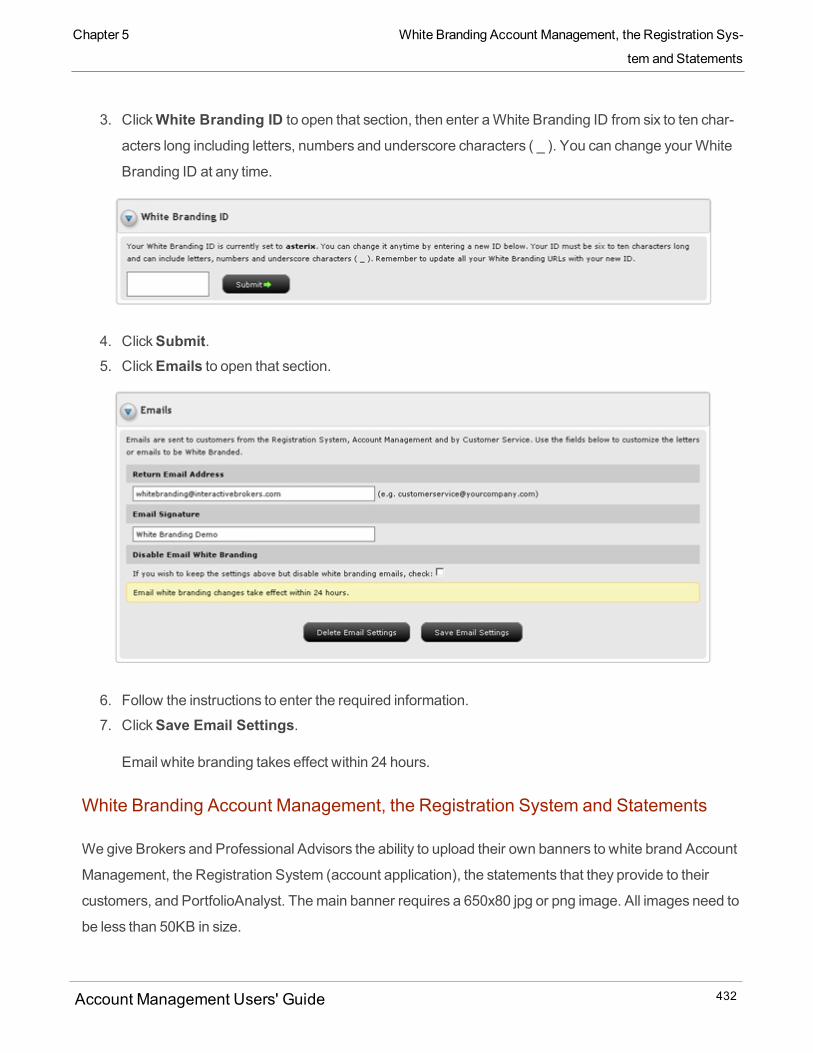
3. ClickWhite Branding ID to open that section, then enter aWhite Branding ID from six to ten char-
acters long including letters, numbers and underscore characters ( _ ). You can change your White
Branding ID at any time.
4. ClickSubmit.5. ClickEmails to open that section.
6. Follow the instructions to enter the required information.
7. ClickSave Email Settings.
Email white branding takes effect within 24 hours.
White Branding Account Management, the Registration System and Statements
Wegive Brokers and Professional Advisors the ability to upload their own banners to white brand Account
Management, the Registration System (account application), the statements that they provide to their
customers, and PortfolioAnalyst. Themain banner requires a 650x80 jpg or png image. All images need to
be less than 50KB in size.
Account Management Users' Guide 432
Chapter 5 White Branding Account Management, the Registration Sys-
tem and Statements

Chapter 5 White Branding Account Management, the Registration Sys-
tem and Statements
Upgrade existing banner images to png format to apply themost recent style to statements. For more
information, contact us at [email protected].
To white brand Account Management, the Registration System and Statements
1. Log into Account Management.
2. ClickManage Account > Settings > White Branding.3. ClickWhite Branding ID to open that section, then enter aWhite Branding ID from six to ten char-
acters long including letters, numbers and underscore characters ( _ ). You can change your White
Branding ID at any time.
4. ClickSubmit.5. ClickRegistration System, Account Management, Statements and PortfolioAnalyst to open
that section.
Account Management Users' Guide 433
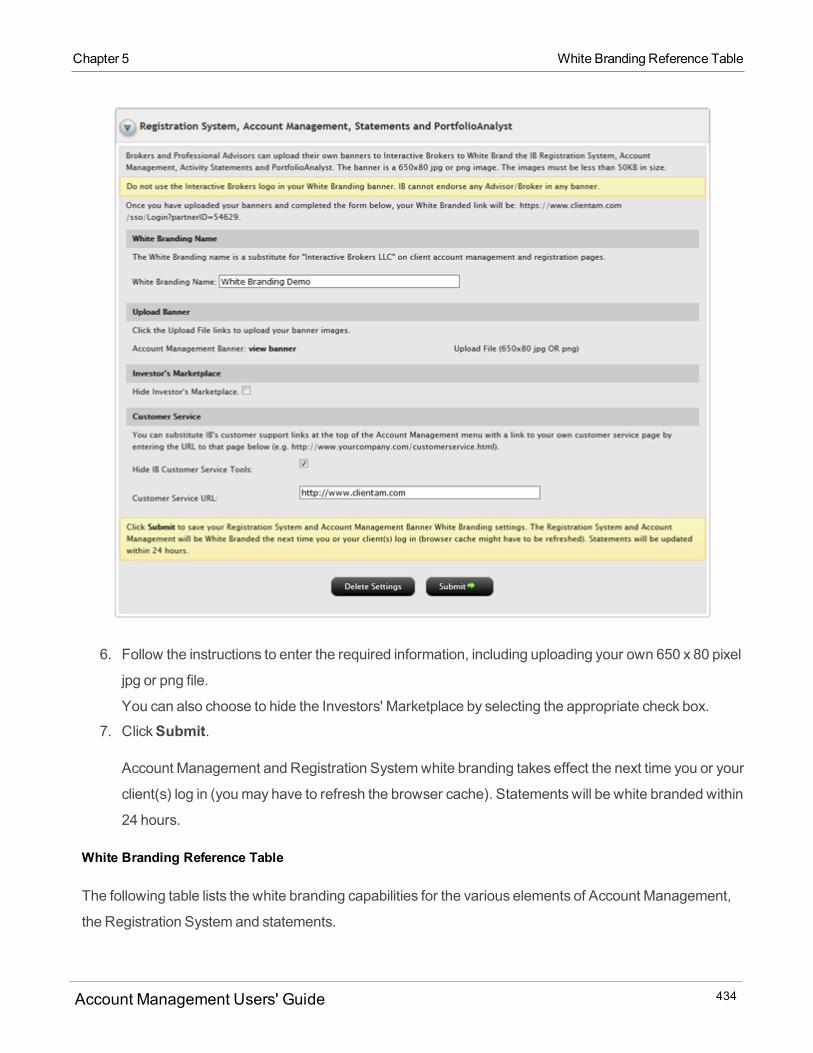
6. Follow the instructions to enter the required information, including uploading your own 650 x 80 pixel
jpg or png file.
You can also choose to hide the Investors' Marketplace by selecting the appropriate check box.
7. ClickSubmit.
Account Management and Registration Systemwhite branding takes effect the next time you or your
client(s) log in (youmay have to refresh the browser cache). Statements will be white branded within
24 hours.
White Branding Reference Table
The following table lists the white branding capabilities for the various elements of Account Management,
the Registration System and statements.
Account Management Users' Guide 434
Chapter 5 White Branding Reference Table
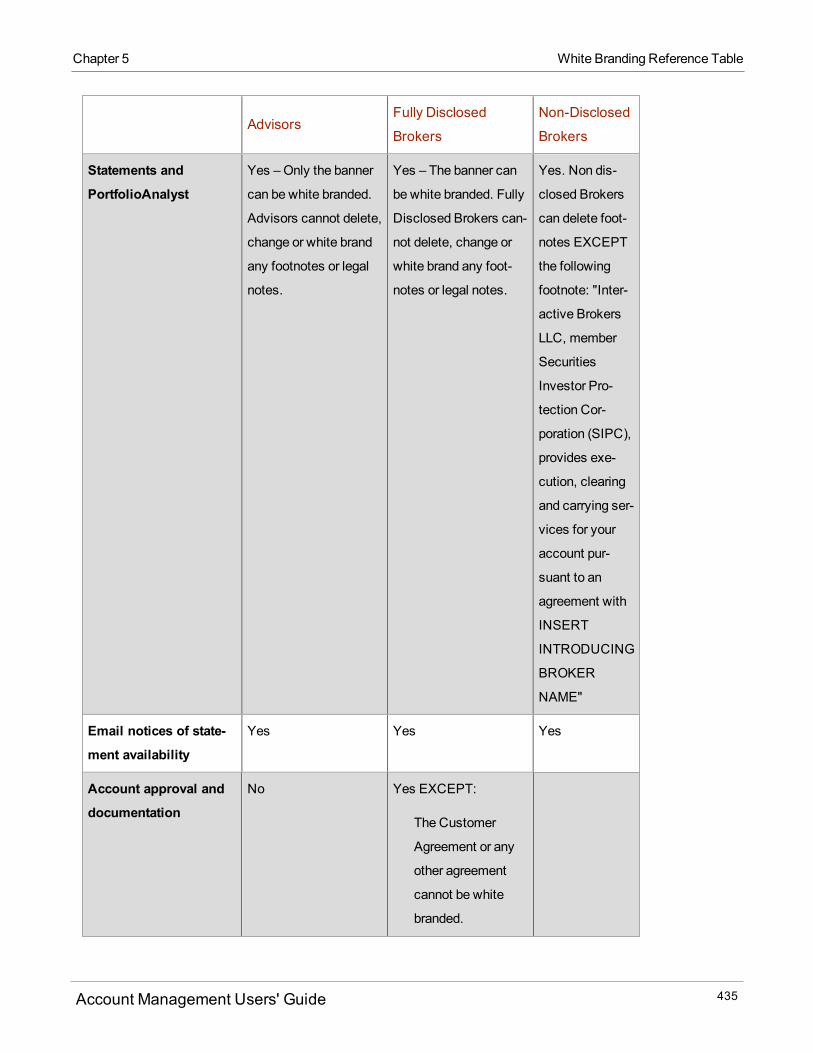
Chapter 5 White Branding Reference Table
AdvisorsFully Disclosed
Brokers
Non-Disclosed
Brokers
Statements and
PortfolioAnalyst
Yes –Only the banner
can be white branded.
Advisors cannot delete,
change or white brand
any footnotes or legal
notes.
Yes – The banner can
be white branded. Fully
Disclosed Brokers can-
not delete, change or
white brand any foot-
notes or legal notes.
Yes. Non dis-
closed Brokers
can delete foot-
notes EXCEPT
the following
footnote: "Inter-
active Brokers
LLC, member
Securities
Investor Pro-
tection Cor-
poration (SIPC),
provides exe-
cution, clearing
and carrying ser-
vices for your
account pur-
suant to an
agreement with
INSERT
INTRODUCING
BROKER
NAME"
Email notices of state-
ment availability
Yes Yes Yes
Account approval and
documentation
No Yes EXCEPT:
The Customer
Agreement or any
other agreement
cannot be white
branded.
Account Management Users' Guide 435
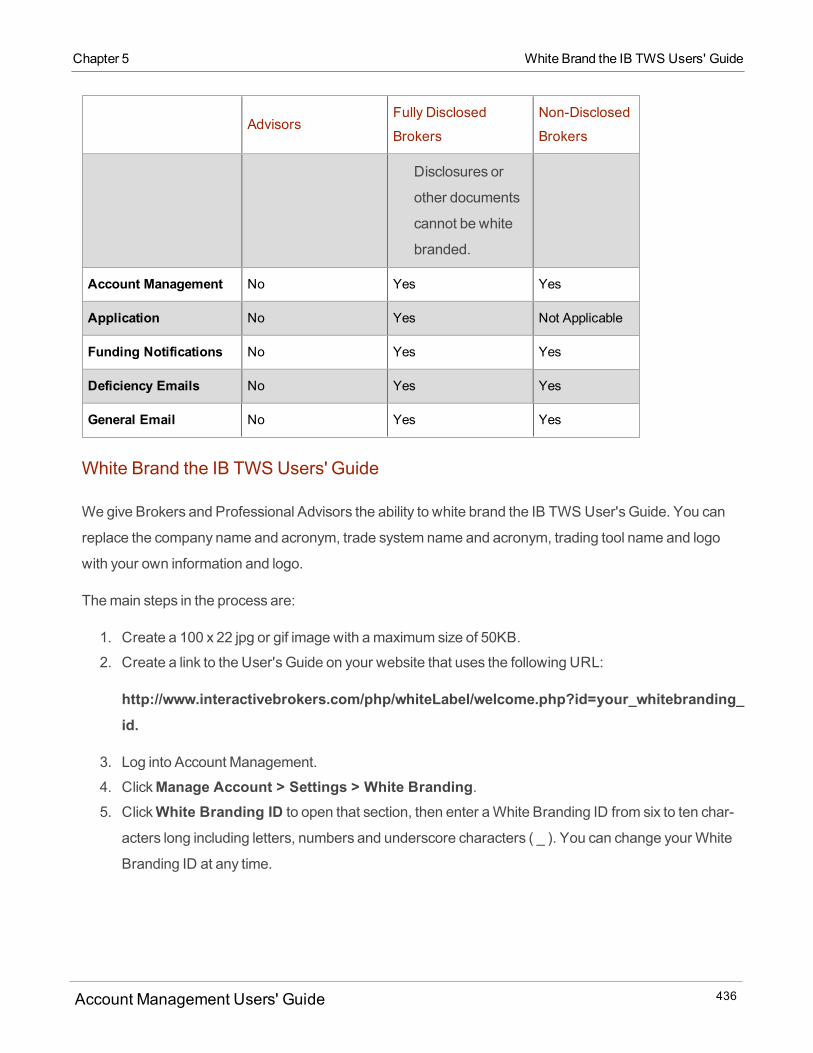
AdvisorsFully Disclosed
Brokers
Non-Disclosed
Brokers
Disclosures or
other documents
cannot be white
branded.
Account Management No Yes Yes
Application No Yes Not Applicable
Funding Notifications No Yes Yes
Deficiency Emails No Yes Yes
General Email No Yes Yes
White Brand the IB TWS Users' Guide
Wegive Brokers and Professional Advisors the ability to white brand the IB TWS User's Guide. You can
replace the company name and acronym, trade system name and acronym, trading tool name and logo
with your own information and logo.
Themain steps in the process are:
1. Create a 100 x 22 jpg or gif image with amaximum size of 50KB.
2. Create a link to the User's Guide on your website that uses the following URL:
http://www.interactivebrokers.com/php/whiteLabel/welcome.php?id=your_whitebranding_id.
3. Log into Account Management.
4. ClickManage Account > Settings > White Branding.5. ClickWhite Branding ID to open that section, then enter aWhite Branding ID from six to ten char-
acters long including letters, numbers and underscore characters ( _ ). You can change your White
Branding ID at any time.
Account Management Users' Guide 436
Chapter 5 White Brand the IB TWS Users' Guide
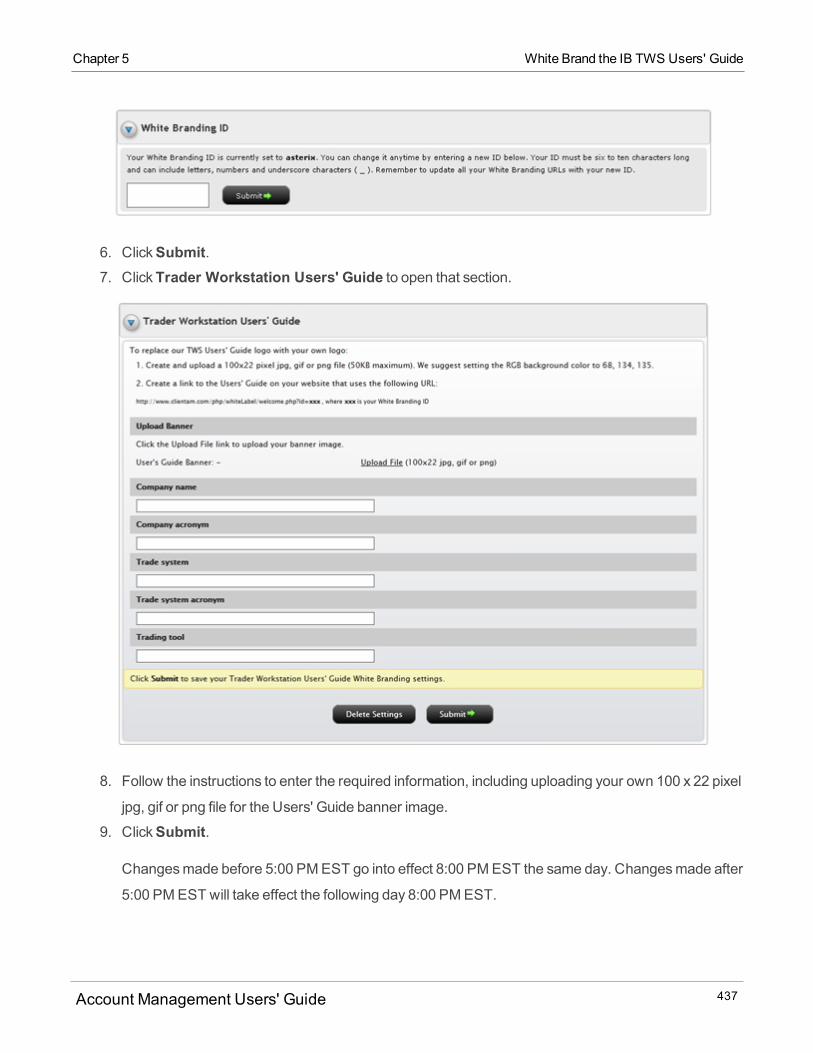
Chapter 5 White Brand the IB TWS Users' Guide
6. ClickSubmit.7. ClickTrader Workstation Users' Guide to open that section.
8. Follow the instructions to enter the required information, including uploading your own 100 x 22 pixel
jpg, gif or png file for the Users' Guide banner image.
9. ClickSubmit.
Changesmade before 5:00 PMEST go into effect 8:00 PMEST the same day. Changesmade after
5:00 PMEST will take effect the following day 8:00 PMEST.
Account Management Users' Guide 437
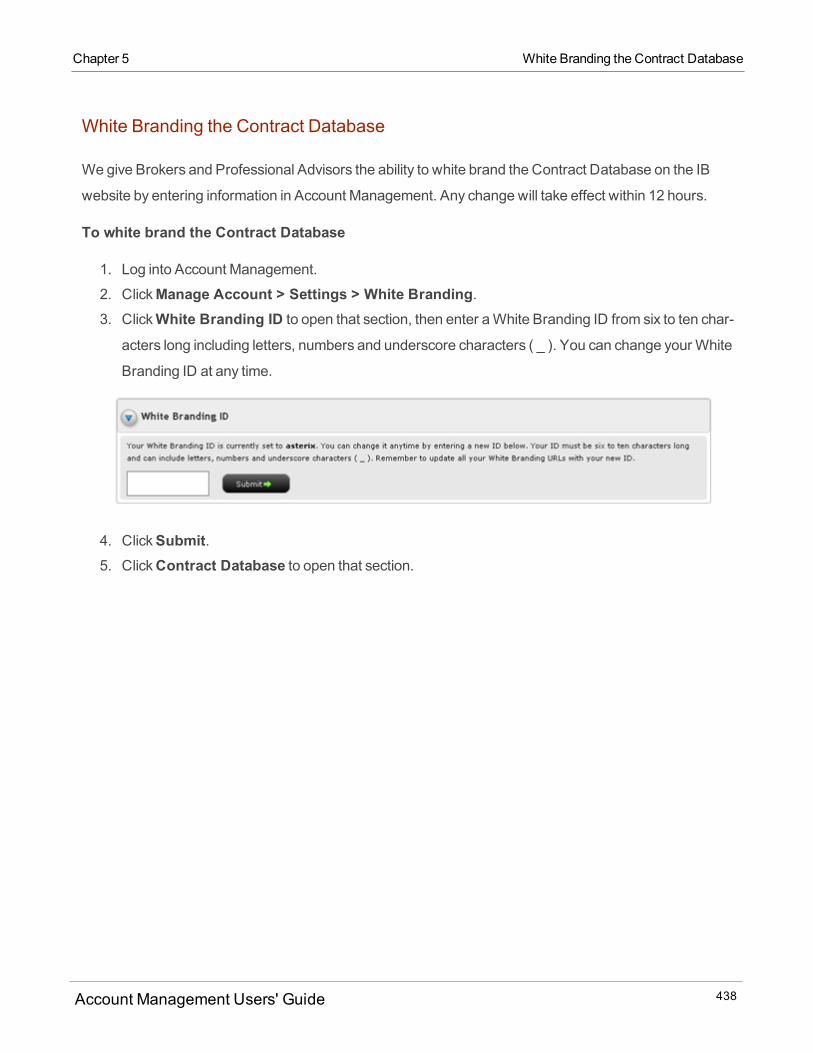
White Branding the Contract Database
Wegive Brokers and Professional Advisors the ability to white brand the Contract Database on the IB
website by entering information in Account Management. Any change will take effect within 12 hours.
To white brand the Contract Database
1. Log into Account Management.
2. ClickManage Account > Settings > White Branding.3. ClickWhite Branding ID to open that section, then enter aWhite Branding ID from six to ten char-
acters long including letters, numbers and underscore characters ( _ ). You can change your White
Branding ID at any time.
4. ClickSubmit.5. ClickContract Database to open that section.
Account Management Users' Guide 438
Chapter 5 White Branding the Contract Database
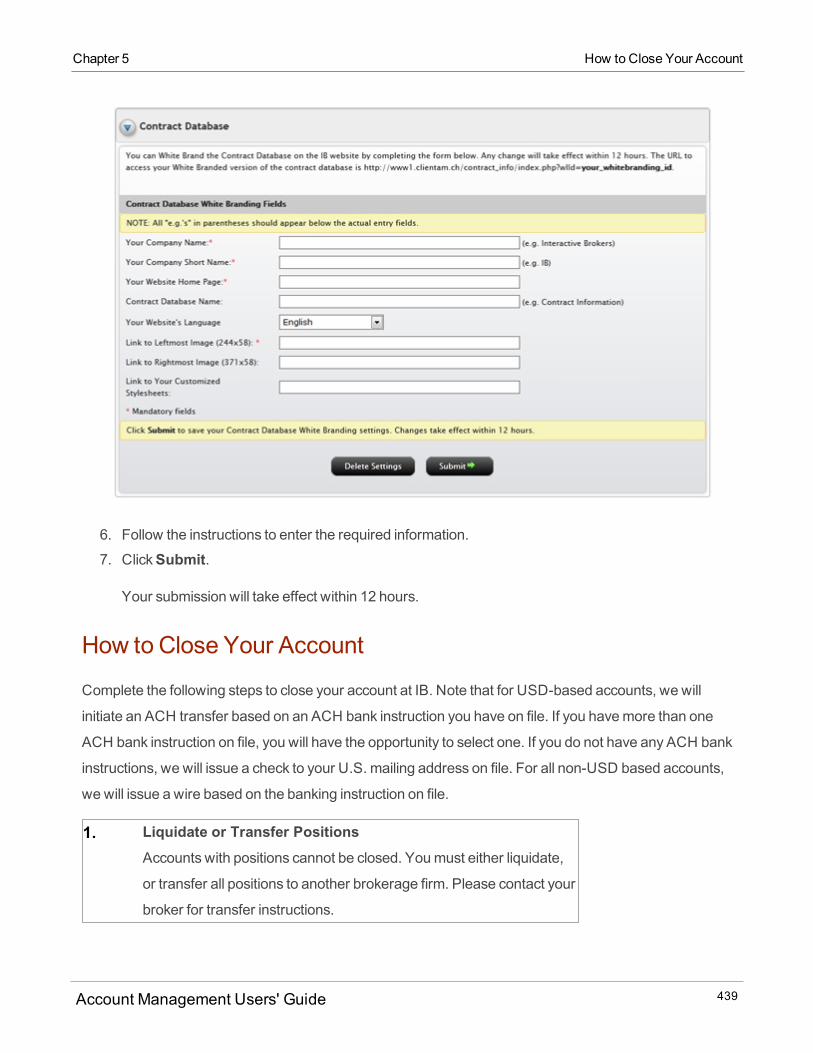
Chapter 5 How to Close Your Account
6. Follow the instructions to enter the required information.
7. ClickSubmit.
Your submission will take effect within 12 hours.
How to Close Your Account
Complete the following steps to close your account at IB. Note that for USD-based accounts, we will
initiate an ACH transfer based on an ACH bank instruction you have on file. If you havemore than one
ACH bank instruction on file, you will have the opportunity to select one. If you do not have any ACH bank
instructions, we will issue a check to your U.S. mailing address on file. For all non-USD based accounts,
we will issue a wire based on the banking instruction on file.
1. Liquidate or Transfer PositionsAccounts with positions cannot be closed. Youmust either liquidate,
or transfer all positions to another brokerage firm. Please contact your
broker for transfer instructions.
Account Management Users' Guide 439

To check your positions, log in to Account Management and select
Reports > Activity. View your latest statement to verify that all
positions have been liquidated or transferred.
2. Convert Foreign CurrenciesClosing withdrawals may only be made in your base cur-
rency. You must convert any foreign currency you may hold
back to your account's base currency. Be sure to check your
statement and consider any dividend or interest accruals. The
conversion can be processed using the Trader Workstation
FXTrader. IB will automatically convert non-Base currency
balances when you submit a close account request and the
balances are below USD 1,000 equivalent. If you need assist-
ance with the conversion process please contact our Trade
Desk.3. Verify Bank Wire Instructions
For all non-USD based accounts, we will issue a wire based on the
saved bank information (instruction) on file. If you do not have any
saved bank information (instruction) for aWireWithdrawal, create
one.
4. Return Secure Login DeviceIf you participate in the Secure Login System, youmust return your
secure login device. Cash balanceswill be reduced by the cost of the
device (between USD 20 and USD 150 depending on device) until
the secure login device is returned.
For more information regarding how to return the device please
contact our Technical Assistance Department or visit our web site:
http://ibkb.interactivebrokers.com/node/975
5. IRA Accounts WithdrawalsIRA account holders will need to complete an IRAWithdrawal on the
Funding > Fund Transfers page in Account Management andspecify the type of withdrawal for government tax reporting purposes.
Account Management Users' Guide 440
Chapter 5 How to Close Your Account
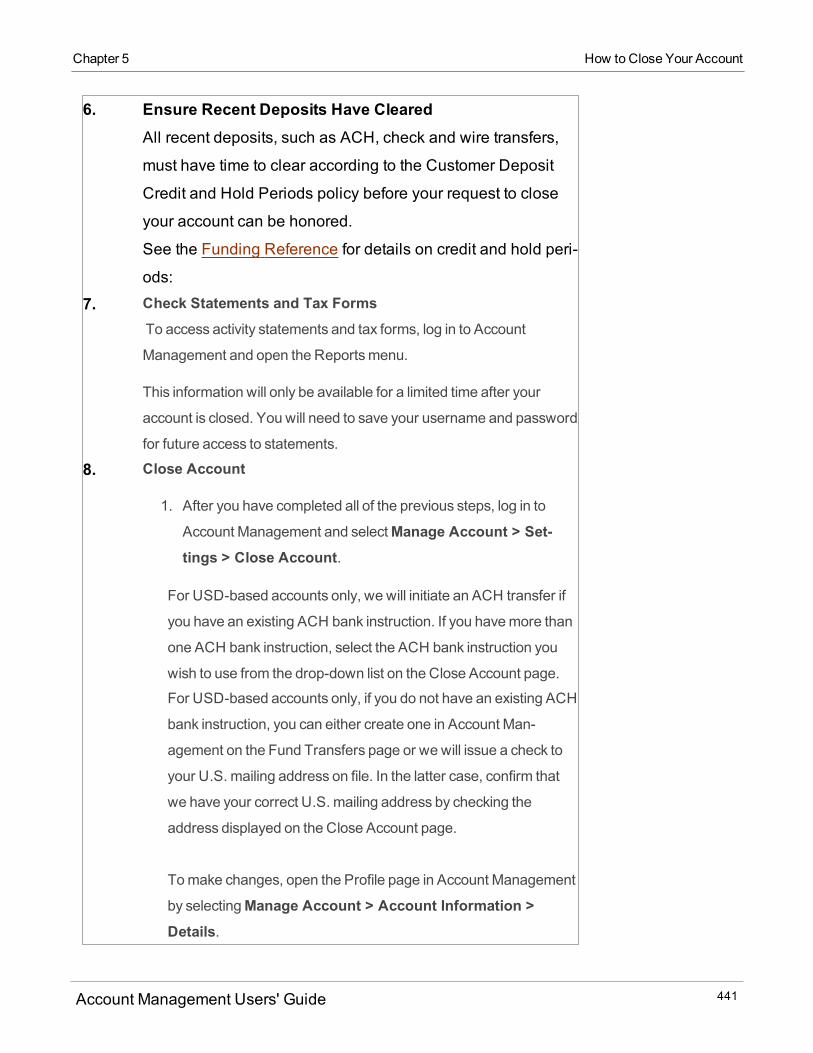
Chapter 5 How to Close Your Account
6. Ensure Recent Deposits Have ClearedAll recent deposits, such as ACH, check and wire transfers,
must have time to clear according to the Customer Deposit
Credit and Hold Periods policy before your request to close
your account can be honored.
See the Funding Reference for details on credit and hold peri-
ods:7. Check Statements and Tax Forms
To access activity statements and tax forms, log in to Account
Management and open the Reportsmenu.
This information will only be available for a limited time after your
account is closed. You will need to save your username and password
for future access to statements.
8. Close Account
1. After you have completed all of the previous steps, log in to
Account Management and selectManage Account > Set-tings > Close Account.
For USD-based accounts only, we will initiate an ACH transfer if
you have an existing ACH bank instruction. If you havemore than
one ACH bank instruction, select the ACH bank instruction you
wish to use from the drop-down list on the Close Account page.
For USD-based accounts only, if you do not have an existing ACH
bank instruction, you can either create one in Account Man-
agement on the Fund Transfers page or wewill issue a check to
your U.S. mailing address on file. In the latter case, confirm that
we have your correct U.S. mailing address by checking the
address displayed on the Close Account page.
Tomake changes, open the Profile page in Account Management
by selectingManage Account > Account Information >Details.
Account Management Users' Guide 441
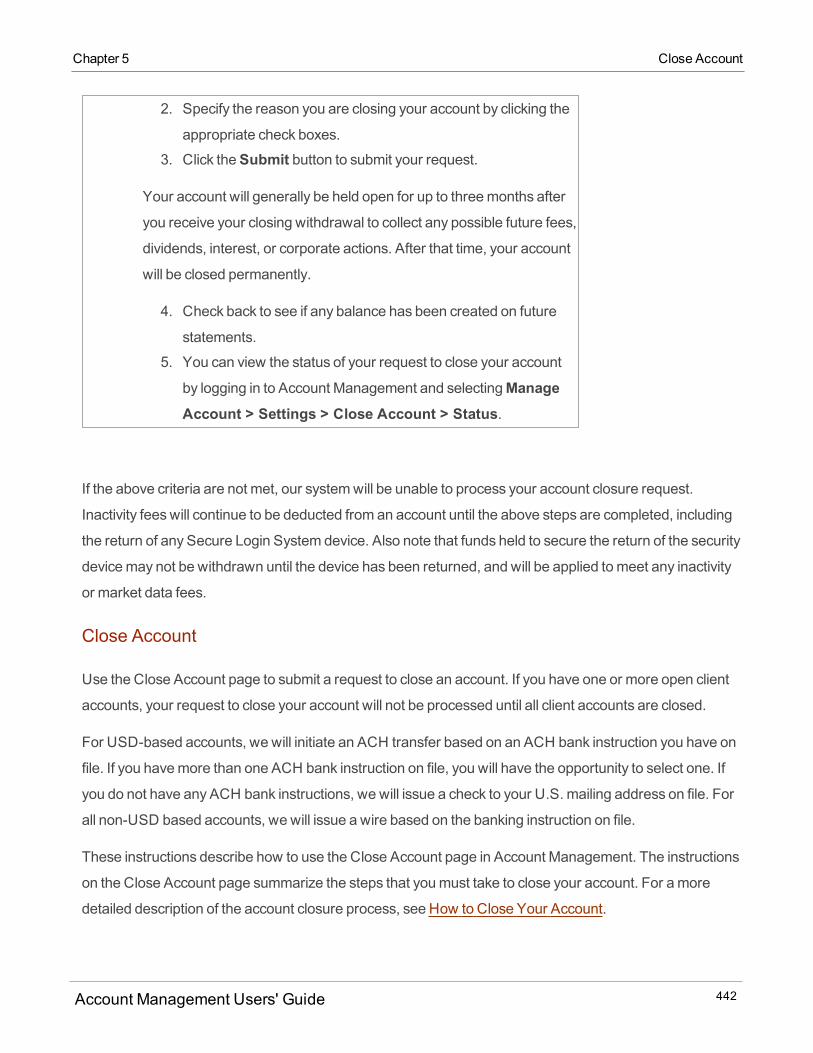
2. Specify the reason you are closing your account by clicking the
appropriate check boxes.
3. Click theSubmit button to submit your request.
Your account will generally be held open for up to threemonths after
you receive your closing withdrawal to collect any possible future fees,
dividends, interest, or corporate actions. After that time, your account
will be closed permanently.
4. Check back to see if any balance has been created on future
statements.
5. You can view the status of your request to close your account
by logging in to Account Management and selectingManageAccount > Settings > Close Account > Status.
If the above criteria are not met, our systemwill be unable to process your account closure request.
Inactivity feeswill continue to be deducted from an account until the above steps are completed, including
the return of any Secure Login System device. Also note that funds held to secure the return of the security
devicemay not be withdrawn until the device has been returned, and will be applied tomeet any inactivity
or market data fees.
Close Account
Use the Close Account page to submit a request to close an account. If you have one or more open client
accounts, your request to close your account will not be processed until all client accounts are closed.
For USD-based accounts, we will initiate an ACH transfer based on an ACH bank instruction you have on
file. If you havemore than one ACH bank instruction on file, you will have the opportunity to select one. If
you do not have any ACH bank instructions, we will issue a check to your U.S. mailing address on file. For
all non-USD based accounts, we will issue a wire based on the banking instruction on file.
These instructions describe how to use the Close Account page in Account Management. The instructions
on the Close Account page summarize the steps that youmust take to close your account. For amore
detailed description of the account closure process, see How to Close Your Account.
Account Management Users' Guide 442
Chapter 5 Close Account
Chapter 5 Close Account
Who can access the Close Account page?
You can access this page if you are a(n):
Individual, Joint, Trust or IRA Account User
Small Business Account User
Friends and Family GroupMaster or Client User
Advisor Master User
Advisor Client User Individual
Advisor Client User Organization
Proprietary Trading GroupMaster User (master account only)
Broker Master User (master and non-disclosed client accounts)
Broker Fully Disclosed Client User
Broker Fully Disclosed Client User Organization
Investment Manager Master User
Fund
To close an account from Account Management
1. ClickManage Account > Settings > Close Account. The Close Account Request page appearsby default.
Account Management Users' Guide 443
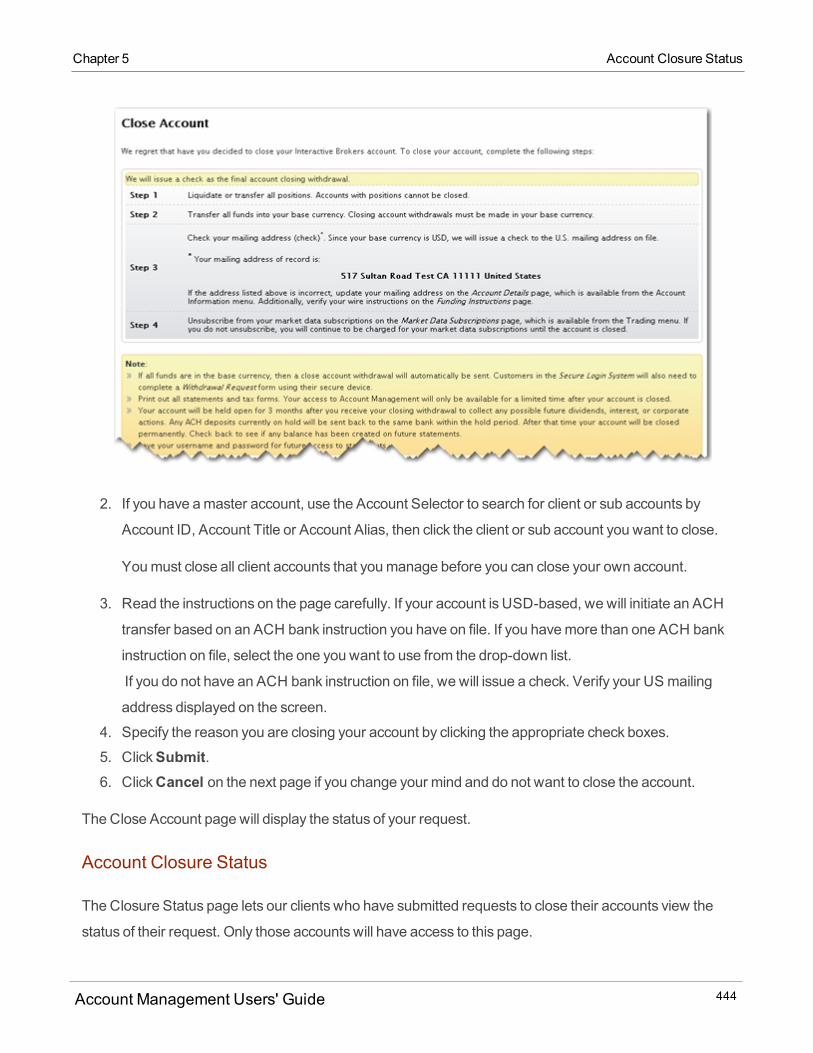
2. If you have amaster account, use the Account Selector to search for client or sub accounts by
Account ID, Account Title or Account Alias, then click the client or sub account you want to close.
Youmust close all client accounts that youmanage before you can close your own account.
3. Read the instructions on the page carefully. If your account is USD-based, we will initiate an ACH
transfer based on an ACH bank instruction you have on file. If you havemore than one ACH bank
instruction on file, select the one you want to use from the drop-down list.
If you do not have an ACH bank instruction on file, we will issue a check. Verify your US mailing
address displayed on the screen.
4. Specify the reason you are closing your account by clicking the appropriate check boxes.
5. ClickSubmit.6. ClickCancel on the next page if you change your mind and do not want to close the account.
The Close Account page will display the status of your request.
Account Closure Status
TheClosure Status page lets our clients who have submitted requests to close their accounts view the
status of their request. Only those accounts will have access to this page.
Account Management Users' Guide 444
Chapter 5 Account Closure Status
Chapter 5 Reopening a Closed Account
To check the status of account closure request
1. Log into Account Management. Note that Account Management for closed accounts displays an
abbreviatedmenu.
2. ClickManage Account > Settings > Closure Status.The Closure Status page displays.
Any pending or outstanding items required to close your account are displayed on the screen.
Reopening a Closed Account
TheReopen Account page lets you re-open an account that has been closed. If you close your account,
you can continue to access Account Management with your account username and password. For
example, youmaywant to access statements, check fund status or change your password after your
account has been closed. Only closed accounts have access to this page.
To submit a request to reopen your account, youmust meet the following requirements:
The date your account was originally openedmust be after January 1, 2002. If your account was
opened before that date, you cannot re-open it using the Reopen Account page in Account Man-
agement.
Your account must be AML-compliant. Thismeans that your account must meet our Anti-Money Laun-
dering requirements. (Most closed accountsmeet this requirement, but somemay not.)
If you are submitting a request to re-open a client or sub account, theMaster account must be open.
Who can access the Reopen Account page?
You can access this page if your account is closed or a request to close your account has been submitted,
and youmeet the requirements listed above.
To submit a request to re-open your account
1. Login into Account Management. Note that Account Management for closed accounts displays an
abbreviatedmenu.
2. ClickManage Account > Settings > Reopen Account.The Reopen Account page displays.
Account Management Users' Guide 445
Before you can submit your request to re-open your account, youmust update your trading
permissions (which products you want to trade in which countries), and your market data
subscriptions.
3. Click theUpdate Trading Permissions link.
4. Follow the instructions on the screen to select the products you wish to trade and the countries in
which to trade them.
If the account does not meet the trading experience, knowledge or financial criteria required to trade
the products you select, we provide a specific error message and a link to submit a request to update
this information.
5. ClickManage Account , Account Settings,Close Account, thenReopen to display the ReopenAccount page again.
6. Click theUpdateMarket Data Subscriptions link.
7. Follow the instructions on the screen to select market data subscriptions.
If your account has an expiredW-8 form (if it was completedmore than four years before the date of
your re-open request), an UpdateW-8 link appears. Click the link and submit an updatedW-8, then
return to the Reopen Account page and complete your request.
8. ClickManage Account , Account Settings,Close Account, thenReopen to display the ReopenAccount page again.
9. ClickBack.10. You will receive a confirmation number via email. Enter this confirmation number on the screen in
the field provided on the Reopen Account page.
The screen updates to inform you that your request has been submitted and is pending approval.
IRA
The IRA tab includes the following pages:
IRA Conversion to a Roth Account - Perform a full conversion from your Traditional, Rollover or SEP
IRA account to a Roth IRA account.
Partial IRA Conversion - Perform a partial IRA conversion.
Account Management Users' Guide 446
Chapter 5 IRA
Chapter 5 IRA Conversion to a Roth Account
IRA Recharacterization - Perform a recharacterization from your Roth account to an Traditional,
Rollover or SEP IRA account.
Partial IRA Recharacterization - Perform a partial IRA recharacterization.
For more information about our IRA accounts, see IRA Reference.
IRA Conversion to a Roth Account
Use this page to perform a full conversion from your Traditional, Rollover or SEP IRA account to an IB
Roth IRA account. In a full conversion, all assets in your Traditional or SEP IRA account are transferred to
your Roth IRA account.
The following rules and procedures apply to IRA conversions:
For IRA Conversions from another Custodian/Trustee, youmust open an Roth IRA account if you do
not already have one.
For IRA Conversions from a Traditional IRA or Rollover or SEP IRA account, youmust open a Roth
IRA if you do not already have one.
We only allow full conversions. For instructions on how to perform a partial conversion, see Partial IRA
Conversions
If you request a full conversion, your existing Traditional/SEP IRA account will be closed upon com-
pletion of the transfer.
A conversion to a Roth IRA is subject to federal and possibly state income taxwithholding, unless you
elect not to have withholding apply. Youmay either elect not to withhold federal income tax or youmay
elect to withhold at a rate not less than 10%.
If federal income tax is withheld, state income taxmay also be withheld. Where state income tax
applies, the rate will be no less than the state'sminimumwithholding requirement. Your state of res-
idence (the legal address for your IRA account), will determine your state income taxwithholding
requirement.
Consult your tax advisor about your tax withholding requirement.
To qualify for an IRA conversion, the total cash available in your Traditional or SEP IRA account must
be greater than the federal tax amount + the state tax amount + 2% of total assets being converted.
Stated as an equation, this requirement is:
Account Management Users' Guide 447
Total Cash Available > Federal Tax Amount + State Tax Amount + 2% of total assets being converted
Transfers of securities positions from a Traditional or SEP IRA to a Roth IRA will only be accepted
between accounts with matching names and taxpayer identification numbers.
Refer to IRS Publication 590, Individual Retirement Arrangements and consult your tax advisor regard-
ing your individual tax situation when deciding to convert.
If you are opening a new account for the purpose of doing an IRA conversion or recharacterization, you
should select the funding option IRA Conversion or Recharacterization in the Funding section of the
account application.
Who can access the IRA Conversion to a Roth Account page?
You can access this page if you are an IRA User with a Traditional, Rollover or SEP IRA account.
To perform an IRA conversion to an IB Roth IRA account
1. Log into Account Management for the Traditional or SEP IRA account you want to convert.
2. ClickManage Account > Settings > IRA > IRA Conversion to Roth Account.3. In the Transfer Method list, select IRA Conversion - Transfer Assets to Roth Account.
4. Enter the username, password and account ID of the Roth IRA account to which you want to con-
vert your Traditional, Rollover or SEP IRA account, then click Continue.
5. A confirmation number is sent to your email address of record. Enter the number on the next screen,
then click Confirm.
If you did not receive a confirmation number, click Request Confirmation Number to receive a new
confirmation number.
6. Be sure to read and understand the important rules governing IRA conversions before youmake
your Federal and State Income Taxwithholding elections.
Enter your Federal Income Taxwithholding rate or elect not to have Federal Income Taxwithheld.
The tax rate is a percentage of your total account equity. Click the appropriate radio button to
indicate your choice.
7. On the same screen, enter your State Income Taxwithholding rate or elect not to have Federal
Income Taxwithheld. The tax rate is a percentage of your total account equity. Click the appropriate
Account Management Users' Guide 448
Chapter 5 IRA Conversion to a Roth Account
Chapter 5 Partial IRA Conversions
radio button to indicate your choice.
8. ClickContinue. The status of your request appears on the screen.
Partial IRA Conversions
While we only allows full IRA Conversions, you can follow these steps to perform a partial IRA conversion:
1. Log into Account Management for your Traditional, Rollover or SEP IRA account.
2. ClickManage Account > Add Accounts > Add an Account.3. Use the Add an Account page to create a new Traditional, Rollover or SEP IRA account that is
linked to your IRA account.
4. Once the new Traditional, Rollover or SEP IRA Account is open, log into Account Management for
your original IRA account, then clickFunding > Position Transfers to transfer assets into the newIRA account.
5. Once the assets have been transferred into the new IRA account, use the IRA Conversion to a Roth
Account page to convert the newly-opened IRA account to a Roth account.
IRA Recharacterization
Effective January 1, 2018, pursuant to the TaxCuts and Jobs Act (Pub. L. No. 115-97), a conversion from
a traditional IRA, SEP or SIMPLE to a Roth IRA cannot be recharacterized. The new law also prohibits
recharacterizing amounts rolled over to a Roth IRA from other retirement plans, such as 401(k) or 403(b)
plans.
Partial IRA Recharacterizations
Effective January 1, 2018, pursuant to the TaxCuts and Jobs Act (Pub. L. No. 115-97), a conversion from
a traditional IRA, SEP or SIMPLE to a Roth IRA cannot be recharacterized. The new law also prohibits
recharacterizing amounts rolled over to a Roth IRA from other retirement plans, such as 401(k) or 403(b)
plans.
IRA Reference
This section includes general information on our Individual Retirement Accounts (IRAs) accounts. The
following topics are included:
Account Management Users' Guide 449
IRA Account Types
IRA Transfer Methods
Conversions and Recharacterizations
For more information, see our IRA FAQs.
IRA Account Types
This topic describes the different types of IRA accounts that are available.
IRA Margin Accounts
US resident customersmay open cash or margin Individual Retirement Accounts (IRAs). The fol-
lowing rules apply to IRA margin accounts:
IRA margin accounts are afforded all the benefits of amargin account, such as the ability to day trade
and the ability to trademultiple currencies andmultiple currency products, but are subject to the fol-
lowing limitations:
IRA accounts cannot borrow cash (i.e. have a debit balance or short stocks).
IRA accountsmay be opened in any base currency, but when trading in a non-base currency product a
currency trademust be executed first as you cannot borrow currencies.
IRA accounts can only cross-margin single stock futures, not stocks and options.
IRA accounts cannot borrow currencies.
Customers are advised to consult a tax specialist for further details on IRA rules and regulations.
IRA Account Types
When you open an IRA account with us, youmust select a type of IRA account. The following IRA types
are available:
Traditional
Traditional Rollover
Traditional Inherited
Roth
Account Management Users' Guide 450
Chapter 5 IRA Account Types
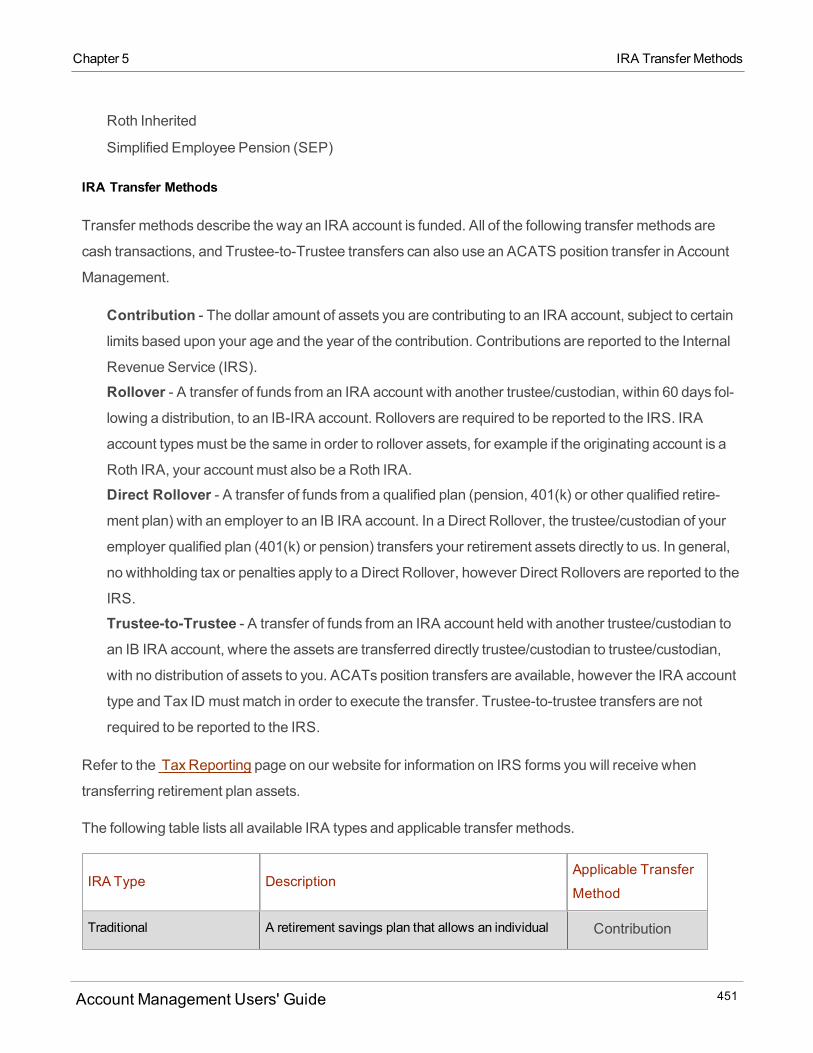
Chapter 5 IRA Transfer Methods
Roth Inherited
Simplified Employee Pension (SEP)
IRA Transfer Methods
Transfer methods describe the way an IRA account is funded. All of the following transfer methods are
cash transactions, and Trustee-to-Trustee transfers can also use an ACATS position transfer in Account
Management.
Contribution - The dollar amount of assets you are contributing to an IRA account, subject to certain
limits based upon your age and the year of the contribution. Contributions are reported to the Internal
Revenue Service (IRS).
Rollover - A transfer of funds from an IRA account with another trustee/custodian, within 60 days fol-
lowing a distribution, to an IB-IRA account. Rollovers are required to be reported to the IRS. IRA
account typesmust be the same in order to rollover assets, for example if the originating account is a
Roth IRA, your account must also be a Roth IRA.
Direct Rollover - A transfer of funds from a qualified plan (pension, 401(k) or other qualified retire-
ment plan) with an employer to an IB IRA account. In a Direct Rollover, the trustee/custodian of your
employer qualified plan (401(k) or pension) transfers your retirement assets directly to us. In general,
no withholding tax or penalties apply to a Direct Rollover, however Direct Rollovers are reported to the
IRS.
Trustee-to-Trustee - A transfer of funds from an IRA account held with another trustee/custodian to
an IB IRA account, where the assets are transferred directly trustee/custodian to trustee/custodian,
with no distribution of assets to you. ACATs position transfers are available, however the IRA account
type and Tax ID must match in order to execute the transfer. Trustee-to-trustee transfers are not
required to be reported to the IRS.
Refer to the TaxReporting page on our website for information on IRS forms you will receive when
transferring retirement plan assets.
The following table lists all available IRA types and applicable transfer methods.
IRA Type DescriptionApplicable Transfer
Method
Traditional A retirement savings plan that allows an individual Contribution
Account Management Users' Guide 451
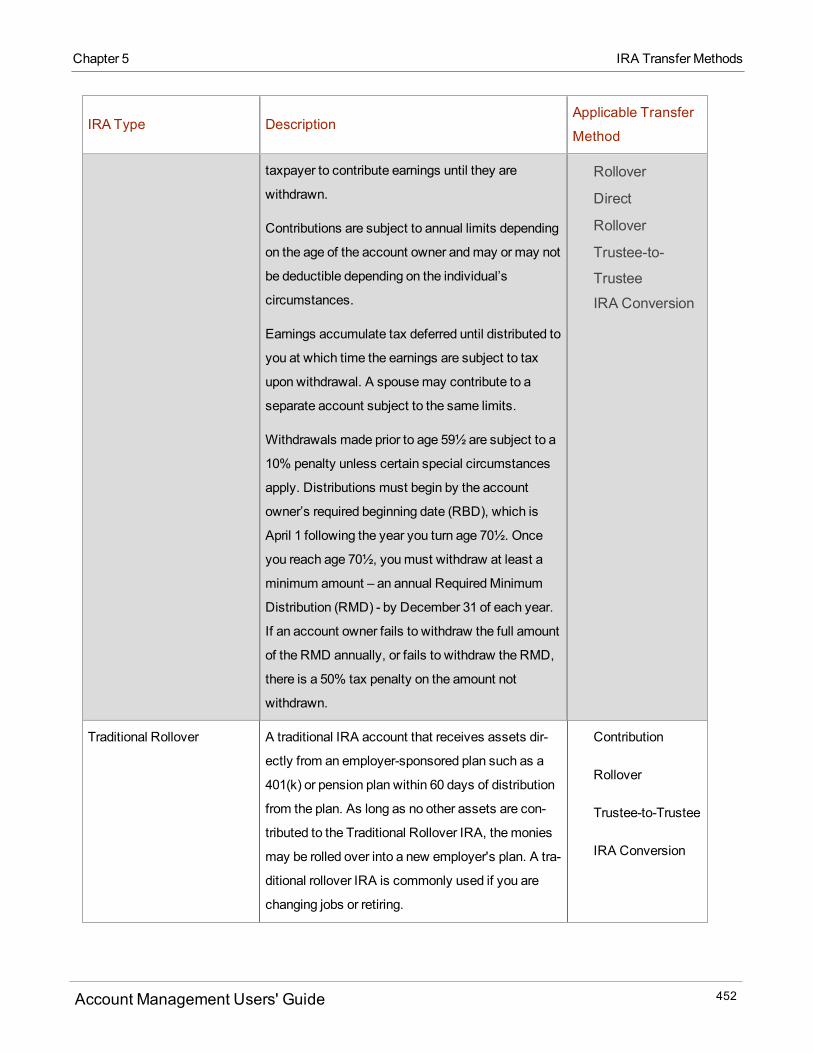
IRA Type DescriptionApplicable Transfer
Method
taxpayer to contribute earnings until they are
withdrawn.
Contributions are subject to annual limits depending
on the age of the account owner andmay or may not
be deductible depending on the individual’s
circumstances.
Earnings accumulate tax deferred until distributed to
you at which time the earnings are subject to tax
upon withdrawal. A spousemay contribute to a
separate account subject to the same limits.
Withdrawals made prior to age 59½ are subject to a
10% penalty unless certain special circumstances
apply. Distributions must begin by the account
owner’s required beginning date (RBD), which is
April 1 following the year you turn age 70½. Once
you reach age 70½, youmust withdraw at least a
minimum amount – an annual RequiredMinimum
Distribution (RMD) - by December 31 of each year.
If an account owner fails to withdraw the full amount
of the RMD annually, or fails to withdraw the RMD,
there is a 50% tax penalty on the amount not
withdrawn.
Rollover
Direct
Rollover
Trustee-to-
Trustee
IRA Conversion
Traditional Rollover A traditional IRA account that receives assets dir-
ectly from an employer-sponsored plan such as a
401(k) or pension plan within 60 days of distribution
from the plan. As long as no other assets are con-
tributed to the Traditional Rollover IRA, themonies
may be rolled over into a new employer's plan. A tra-
ditional rollover IRA is commonly used if you are
changing jobs or retiring.
Contribution
Rollover
Trustee-to-Trustee
IRA Conversion
Account Management Users' Guide 452
Chapter 5 IRA Transfer Methods

Chapter 5 IRA Transfer Methods
IRA Type DescriptionApplicable Transfer
Method
Traditional Inherited An IRA account youmay set up as the beneficiary
of a Traditional IRA you inherited from a spouse or
other IRA account owner who has died, to receive a
transfer of beneficiary IRA assets.
Trustee-to-Trustee
Roth A retirement savings plan that allows an individual
taxpayer to contribute earnings, subject to certain
income limits. Earnings accumulate tax-free and
contributions are nondeductible. Unlike Traditional
IRAs, a Roth IRA account owner may continue to
contribute after age 70½ if they have earned
income. Withdrawals prior to age 59½ are subject to
a 10% penalty unless special circumstances apply.
There are no age requirements when an account
owner must begin taking distributions. Contributions
are subject to annual limits depending on the age of
the account owner.
Contribution
Rollover
Trustee-to-Trustee
IRA
Recharacterization
Roth Inherited An IRA account youmay set up as the beneficiary
of a Roth IRA you inherited from a spouse or other
IRA account owner who has died, to receive a trans-
fer of beneficiary IRA assets.
Trustee-to-Trustee
Simplified Employee Pen-
sion (SEP)
A tax-deferred retirement plan for small businesses
and self-employed individuals where an employee
can set aside a percentage of pre-tax income into
the plan. Annual contributions an employer makes
to an employee's SEP-IRA cannot exceed the
lesser of 25% of compensation, or $52,000 for 2013
and $53,000 for 2014. The same limits apply to con-
tributions made to a self-employed individual's SEP-
IRA. There is 100% vesting of all plan contributions.
Distributions generally follow the same rules that
apply to IRAs.
Contribution
Rollover
Trustee-to-Trustee
IRA Conversion
Account Management Users' Guide 453

IRA Type DescriptionApplicable Transfer
Method
Simplified Employee Pen-
sion (SEP) Inherited
An IRA account youmay set up as the beneficiary
of a SEP IRA you inherited from a spouse or other
IRA account owner who has died, to receive a trans-
fer of beneficiary IRA assets.
Trustee-to-Trustee
Conversions and Recharacterizations
IRA Conversion
An IRA conversion is a transfer of Traditional, Traditional Rollover or SEP IRA assets to a Roth IRA with
the same custodian or as a trustee-to-trustee transfer or rollover. A conversion is subject to Form 1099-R
reporting for the distribution from the non-Roth and Form 5498 for the contribution to the Roth IRA.
Eligibility Requirements
You are eligible to convert to a Roth IRA if your modified adjusted gross income (MAGI) does not exceed
$100,000 (not including the IRA conversion amount) in the year you convert. This rule applies to both
single and joint tax filers. Married individuals filing separate tax returns are not eligible to convert to a Roth
IRA unless they have lived apart from their spouse for the entire tax year.
2010 Changes
If you convert in 2010, neither theMAGI limit nor the requirement that married filing separately spouses live
apart for the year will apply. Generally, when you convert to a Roth IRA, you are required to pay taxes on
any taxable converted amount including deductible contributions and any investment earnings. If you
convert in 2010, the income taxesmay be spread over 2011 and 2012, with 50% of the taxes due being
paid in each of those years. Furthermore, if you convert your Traditional IRA to a Roth IRA, the taxable
portion of your Traditional IRA will not be subject to a 10% penalty tax regardless of your age at the time of
the conversion unless the full amount of the distribution is not converted (for example, if you elect to
withhold taxes and the amount withheld is not replaced.)
The deadline to convert to a Roth IRA is December 31 of the year you choose to convert.
Account Management Users' Guide 454
Chapter 5 Conversions and Recharacterizations

Chapter 5 IRA Recharacterization
IRA Recharacterization
An IRA recharacterization is a transfer of converted Roth IRA assets back to a new or existing Traditional
IRA account. Roth IRA converted amounts from a SEP IRA may also be recharacterized back to a SEP
IRA account. IRS reporting is required for the distribution from the Roth IRA and the contribution to the
non-Roth IRA.
Timing
Election to recharacterizemust bemade by the tax return due date, plus themaximum six-month extension
period (whether or not the return is actually extended). The deadline to recharacterize a 2010 Roth
conversion is October 15, 2010. An IRA recharacterization is a transfer back to a new or existing
Traditional IRA of converted Roth assets. Roth IRA converted amounts from a SEP IRA may also be
recharacterized back to a SEP. IRS reporting is required for the distribution from the Roth and the
contribution to the non-Roth IRA. Timing Election to recharacterizemust bemade by the tax return due
date, plus themaximum six-month extension period (whether or not the return is actually extended).
The deadline to recharacterize a 2010 Roth conversion is October 15, 2010.
Reconversion
Reconversion is defined as a second conversion (following a Recharacterization) from a non-Roth IRA to a
Roth IRA. Taxpayer has alreadymade a first conversion from a non-Roth to a Roth IRA and then
recharacterized the conversion amount (including net earnings) back to a non-Roth IRA. Youmay not
convert, recharacterize and then reconvert in the same tax year. IRS reporting is required.
A taxpayer cannot reconvert back to a Roth IRA until the later of:
January 1 of the tax year following the year of the first conversion, or
30 days after the recharacterization to a non-Roth IRA
If the taxpayer makes a reconversion within the same tax year or before the 30 daywaiting period, the
reconversion is disregarded and the taxpayer must use the value of the non-Roth IRA at the time of the first
conversion to calculate the taxable income for the year.
Account Management Users' Guide 455
Additional Information
If you are age 70½ or older and you have not taken a RequiredMinimumDistribution (RMD) from your
IRA, youmust do so prior to converting to a Roth IRA.
For IRA Conversions from a traditional IRA (or IRA rollover) account, you first must open an IB Roth
IRA if you do not already have one.
Your existing traditional IRA account will be closed upon completion of a full conversion transfer.
Please note that transfers of securities positions from a Traditional IRA to a Roth IRA will only be accep-
ted between accounts with matching names and taxpayer identification numbers.
You cannot revoke or modify your election to Recharacterize after the election has beenmade.
An election to Recharacterizemust bemade by the federal tax return due date, plus themaximum six-
month extension period, for example, October 15, 2011.
Consult your tax advisor before you decide to convert to a Roth IRA.
Trade Configuration
The Trade Configurationmenu includes the following tabbed pages:
Permissions- Configure your trading permissions.
Research - Subscribe to news and information services.
Market Data - Subscribe tomarket data.
Subscriber Status - Set your market data subscriber status.
Alerts - Select the default method of receiving email alerts.
Trading Limits - Proprietary Trading GroupMaster users control the size and amounts that their author-
ized traders (sub accounts) can trade.
Restrictions - Master account users restrict their own accounts and their client/sub accounts from trad-
ing specific symbols.
IB FYI - Set notifications and automatic actions in your trading account based on portfolio and order his-
tory to help you stay on top of relevant dates and events.
Futures Arbitration Agreement - Sign and submit the Arbitration Agreement.
Asia GatewayAccess - Customers based in China select their delivery source for market data and
Account Management Users' Guide 456
Chapter 5 Additional Information
Chapter 5 Permissions
regional services
Securities ClaimsRecovery Service - Enroll for compensation on eligible securities.
Permissions
Trading permissions specify the products you can trade where you can trade them. You use the
Permissions page to view or modify existing trade permissions or subscribe to new permissions.When
specifying permissions, you will be asked to sign any risk disclosures required by local regulatory authority.
Who can access the Permissions page?
You can access this page if you are a(n):
Individual, Joint, Trust or IRA Account User
Small Business Account User
Friends and Family GroupMaster or Client User
Advisor Master User Individual/Organization (can only view)
Advisor Client User Individual
Advisor Client User Organization
Proprietary Trading GroupMaster User
Broker Master User
Broker Fully Disclosed Client User
Broker Fully Disclosed Client User Organization
Investment Manager Master User (can only view)
Fund
The Permissions page is available in PDF format for advisor clients.
To set trading permissions
1. ClickManage Account > Trade Configuration > Permissions. The Trading Permissions pageappears by default.
2. If you have amaster account, use the Account Selector to search for client or sub accounts by
Account ID, Account Title or Account Alias, then click the desired account to view the pending items
Account Management Users' Guide 457
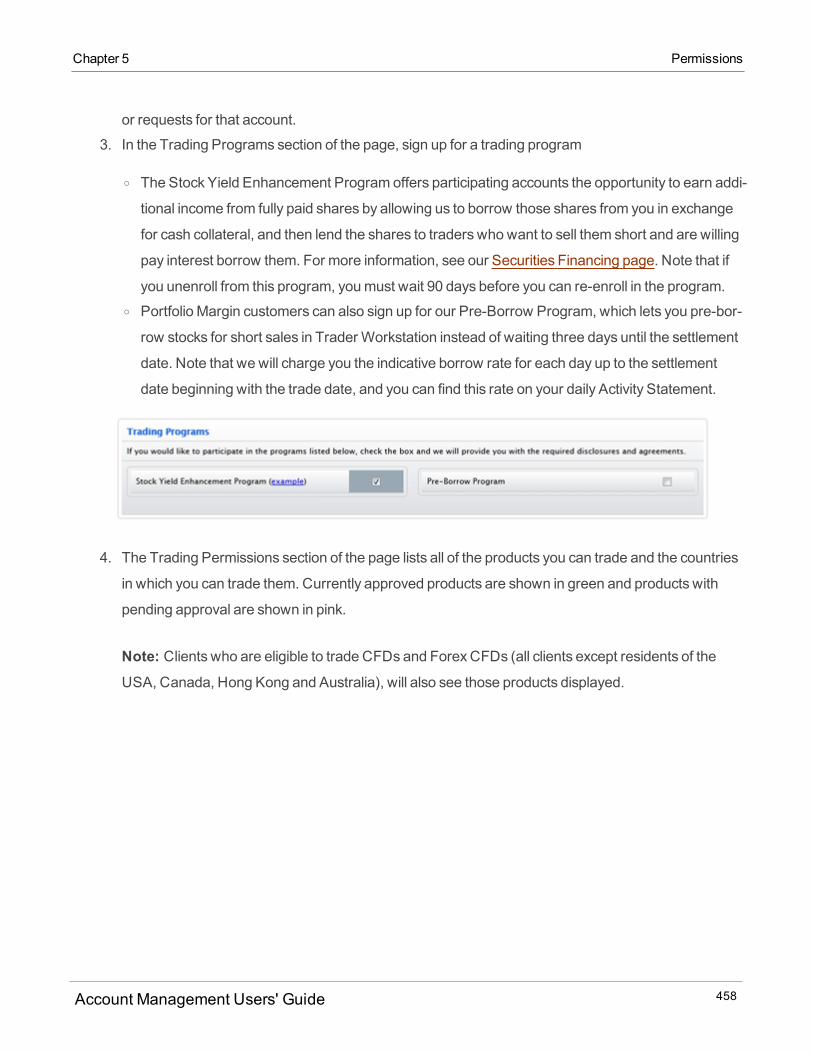
or requests for that account.
3. In the Trading Programs section of the page, sign up for a trading program
o The Stock Yield Enhancement Program offers participating accounts the opportunity to earn addi-
tional income from fully paid shares by allowing us to borrow those shares from you in exchange
for cash collateral, and then lend the shares to traders who want to sell them short and are willing
pay interest borrow them. For more information, see our Securities Financing page. Note that if
you unenroll from this program, youmust wait 90 days before you can re-enroll in the program.o Portfolio Margin customers can also sign up for our Pre-Borrow Program, which lets you pre-bor-
row stocks for short sales in Trader Workstation instead of waiting three days until the settlement
date. Note that we will charge you the indicative borrow rate for each day up to the settlement
date beginning with the trade date, and you can find this rate on your daily Activity Statement.
4. The Trading Permissions section of the page lists all of the products you can trade and the countries
in which you can trade them. Currently approved products are shown in green and products with
pending approval are shown in pink.
Note: Clients who are eligible to trade CFDs and ForexCFDs (all clients except residents of theUSA, Canada, Hong Kong and Australia), will also see those products displayed.
Account Management Users' Guide 458
Chapter 5 Permissions
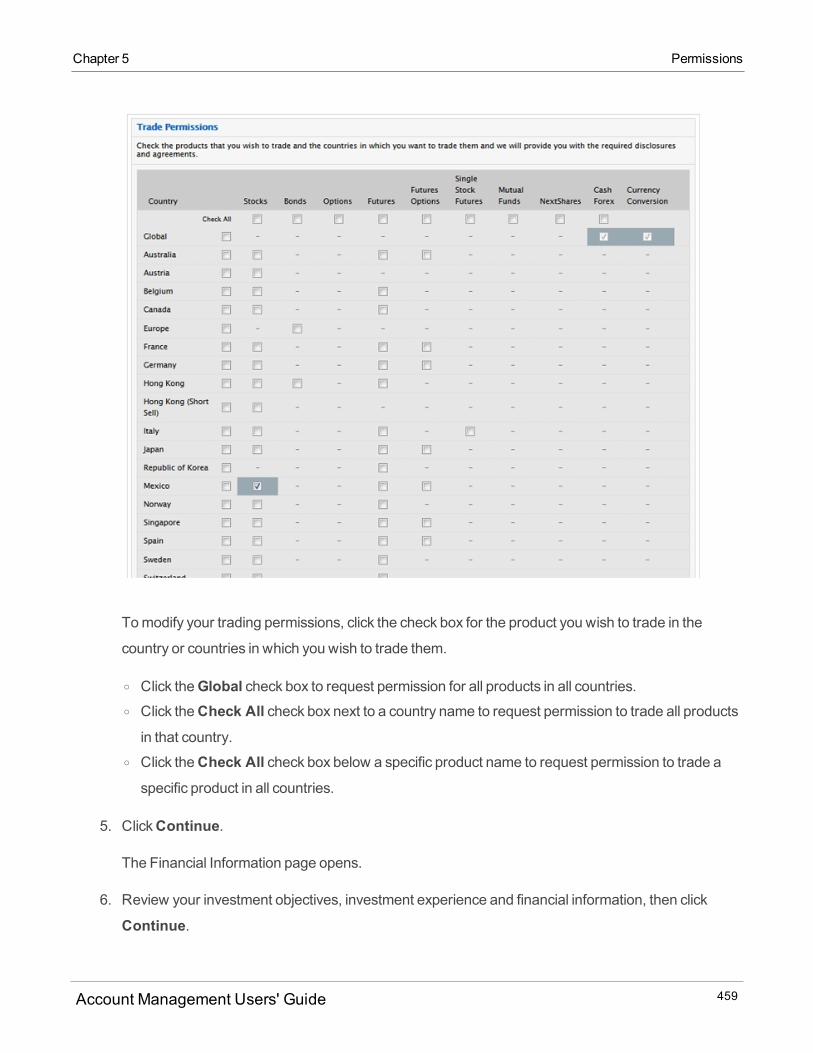
Chapter 5 Permissions
Tomodify your trading permissions, click the check box for the product you wish to trade in the
country or countries in which you wish to trade them.
o Click theGlobal check box to request permission for all products in all countries.o Click theCheck All check box next to a country name to request permission to trade all productsin that country.
o Click theCheck All check box below a specific product name to request permission to trade a
specific product in all countries.
5. ClickContinue.
The Financial Information page opens.
6. Review your investment objectives, investment experience and financial information, then click
Continue.
Account Management Users' Guide 459
Some products require specific investment experience, which you can alsomodify on this page.
7. Depending on the products that you have requested permission to trade, you are prompted to sign a
risk disclosure, as required by law. Complete the online Disclosure Form(s) by typing your name in
the Signature field, then clickContinue.8. Click the link(s) to read the complete agreements and/or disclosures, then click theAccept radio but-
ton to acknowledge your acceptance of the terms of the agreements and disclosures and click
Continue.
A Final Acknowledgments/Confirmation page opens, listing your current and requested trading
permissions and the current status of each. If approved, your trading permissionswill be listed with a
status of Approved.
Trading permission upgrade requests received by 11:00 AMET on a business daywill be reviewed
by the next business day under normal circumstances.
Trading UK CFDs and Metals
If youmeet the eligibility requirements, you can request permission to trade United KingdomCFDs, and/or
Metals. Currently, we offer Over-the-Counter Gold (OTC Gold) trading in theMetals product category.
When you elect to trade one or both of these products, we create a special IB-UKL account for you. You
must fund this account separately to trade these products.
This topic includes the following procedures:
Trading UK CFDs and/or Metals if You are an Advisor Master User
Trading UK CFDs and/or Metals if You are an Advisor Client User, Broker Client User or Single User
Trading UK CFDs and/or Metals if You are an Broker Master User
UK CFDs Eligibility Requirements
The following customers are eligible to trade UK CFDs:
CustomerEligible to trade
UK CFDs
All US customers No
Account Management Users' Guide 460
Chapter 5 Trading UK CFDs andMetals

Chapter 5 Trading UK CFDs andMetals
CustomerEligible to trade
UK CFDs
All Canadian customers No
Customers from countries other than:
o USo Canadao Hong Kongo Israelo New Zealand
Yes
Japanese and Indian customers who trade
through IB-UK
Yes
Japanese and Indian customers who do not
trade through IB-UK
No
Fully-disclosed Broker Clients of non-US
and non-Canadian Brokers. The clients must
meet the country eligibility requirements
Yes
Non-disclosed andOmnibus Broker clients
whoseMaster Account satisfies all other eli-
gibility rules
Yes
Fully-disclosed Broker Clients of US and
Canadian Brokers
No
Metals Eligibility Requirements
The following customers are eligible to tradeMetals:
Customer Eligible to trade Metals
US-based Eligible Contract Participants
(ECPs)
Yes
Account Management Users' Guide 461
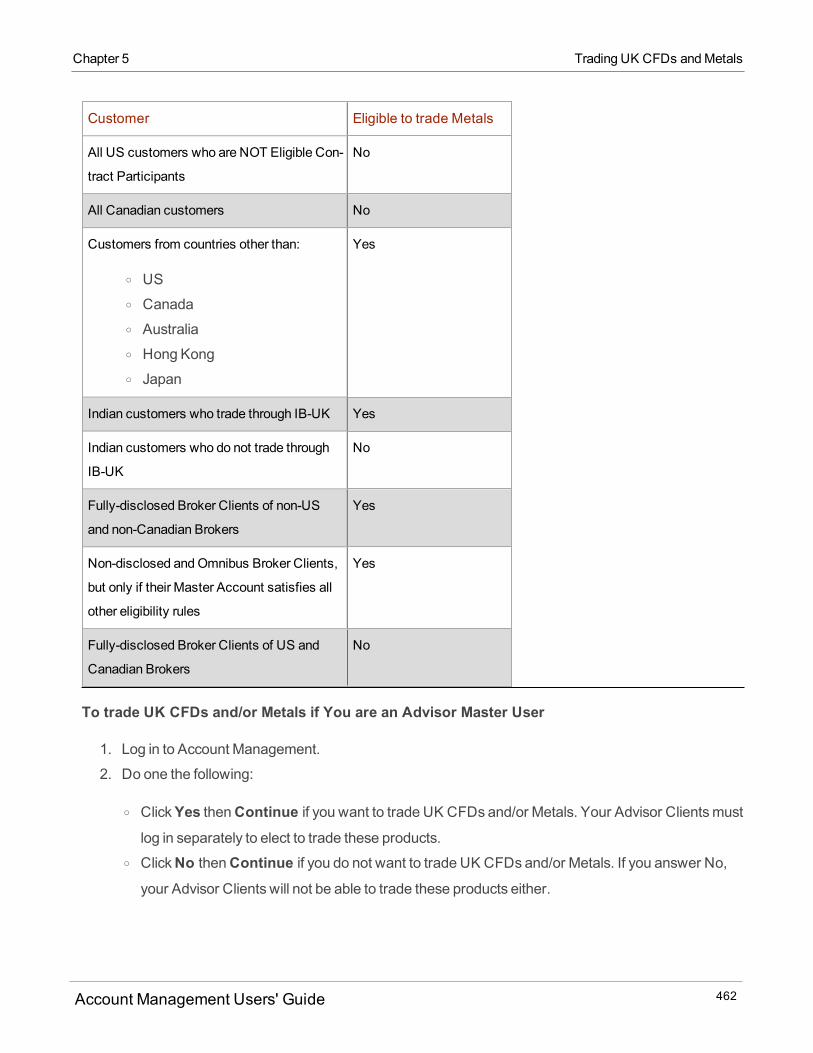
Customer Eligible to trade Metals
All US customers who are NOT Eligible Con-
tract Participants
No
All Canadian customers No
Customers from countries other than:
o USo Canadao Australiao Hong Kongo Japan
Yes
Indian customers who trade through IB-UK Yes
Indian customers who do not trade through
IB-UK
No
Fully-disclosed Broker Clients of non-US
and non-Canadian Brokers
Yes
Non-disclosed andOmnibus Broker Clients,
but only if their Master Account satisfies all
other eligibility rules
Yes
Fully-disclosed Broker Clients of US and
Canadian Brokers
No
To trade UK CFDs and/or Metals if You are an Advisor Master User
1. Log in to Account Management.
2. Do one the following:
o ClickYes thenContinue if you want to trade UK CFDs and/or Metals. Your Advisor Clientsmust
log in separately to elect to trade these products.o ClickNo thenContinue if you do not want to trade UK CFDs and/or Metals. If you answer No,
your Advisor Clients will not be able to trade these products either.
Account Management Users' Guide 462
Chapter 5 Trading UK CFDs andMetals
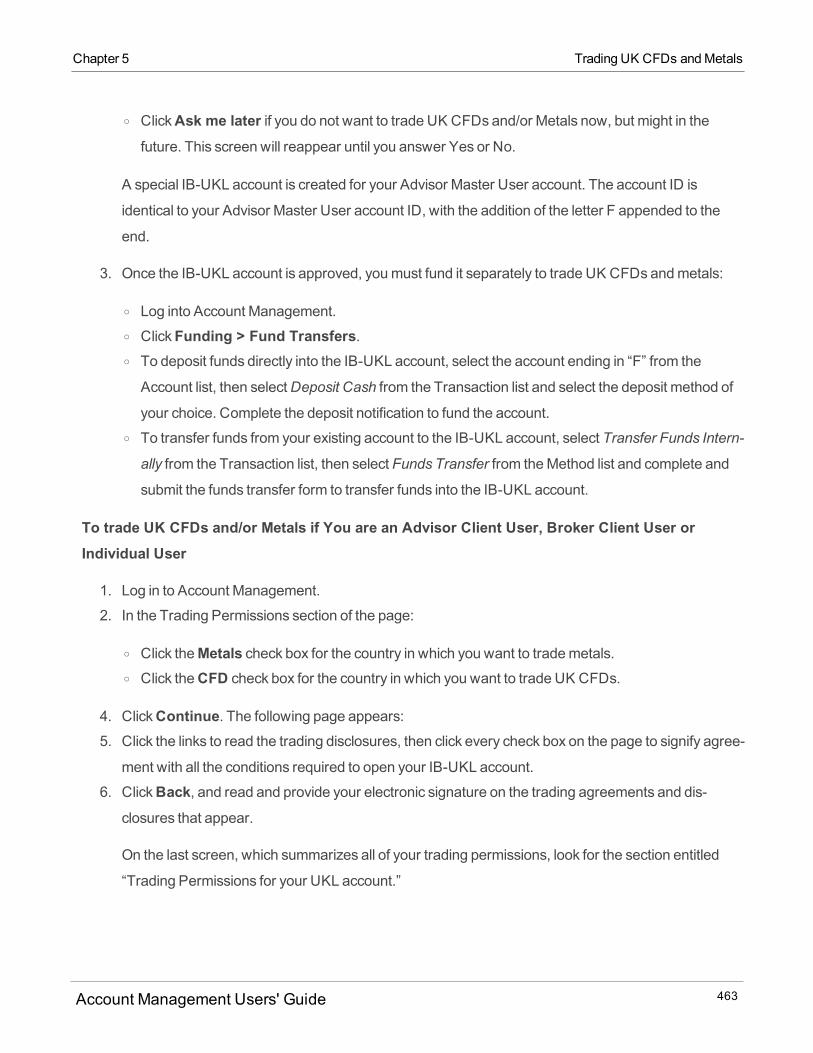
Chapter 5 Trading UK CFDs andMetals
o ClickAsk me later if you do not want to trade UK CFDs and/or Metals now, but might in the
future. This screen will reappear until you answer Yes or No.
A special IB-UKL account is created for your Advisor Master User account. The account ID is
identical to your Advisor Master User account ID, with the addition of the letter F appended to the
end.
3. Once the IB-UKL account is approved, youmust fund it separately to trade UK CFDs andmetals:
o Log into Account Management.o ClickFunding > Fund Transfers.o To deposit funds directly into the IB-UKL account, select the account ending in “F” from the
Account list, then selectDeposit Cash from the Transaction list and select the deposit method of
your choice. Complete the deposit notification to fund the account.o To transfer funds from your existing account to the IB-UKL account, select Transfer Funds Intern-
ally from the Transaction list, then select Funds Transfer from theMethod list and complete and
submit the funds transfer form to transfer funds into the IB-UKL account.
To trade UK CFDs and/or Metals if You are an Advisor Client User, Broker Client User orIndividual User
1. Log in to Account Management.
2. In the Trading Permissions section of the page:
o Click theMetals check box for the country in which you want to trademetals.o Click theCFD check box for the country in which you want to trade UK CFDs.
4. ClickContinue. The following page appears:5. Click the links to read the trading disclosures, then click every check box on the page to signify agree-
ment with all the conditions required to open your IB-UKL account.
6. ClickBack, and read and provide your electronic signature on the trading agreements and dis-closures that appear.
On the last screen, which summarizes all of your trading permissions, look for the section entitled
“Trading Permissions for your UKL account.”
Account Management Users' Guide 463

A special IB-UKL account is created for your account. The account ID is identical to your regular
account ID, with the addition of the letter F appended to the end.
7. Once the IB-UKL account is approved, youmust fund it separately to trade UK CFDs andmetals:
o Log into Account Management.o ClickFunding > Fund Transfers.o To deposit funds directly into the IB-UKL account, select the account ending in “F” from the
Account list, then selectDeposit Cash from the Transaction list and select the deposit method of
your choice. Complete the deposit notification to fund the account.o To transfer funds from your existing account to the IB-UKL account, select Transfer Funds Intern-
ally from the Transaction list, then select Funds Transfer from theMethod list and complete and
submit the funds transfer form to transfer funds into the IB-UKL account.
To trade UK CFDs and/or Metals if You are an Broker Master User
1. Log in to Account Management. If youmeet the eligibility requirements to trade these products, the
following page appears:
2. Read the information on the page, then click the check box at the bottom of the page to indicate
acknowledgment and clickContinue.
A special IB-UKL account is created for your account. The account ID is identical to your regular
account ID, with the addition of the letter F appended to the end.
3. Once the IB-UKL account is approved, youmust fund it separately to trade UK CFDs andmetals:
o Log into Account Management.o ClickFunding > Fund Transfers.o To deposit funds directly into the IB-UKL account, select the account ending in “F” from the
Account list, then selectDeposit Cash from the Transaction list and select the deposit method of
your choice. Complete the deposit notification to fund the account.o To transfer funds from your existing account to the IB-UKL account, select Transfer Funds Intern-
ally from the Transaction list, then select Funds Transfer from theMethod list and complete and
submit the funds transfer form to transfer funds into the IB-UKL account.
Account Management Users' Guide 464
Chapter 5 Trading UK CFDs andMetals
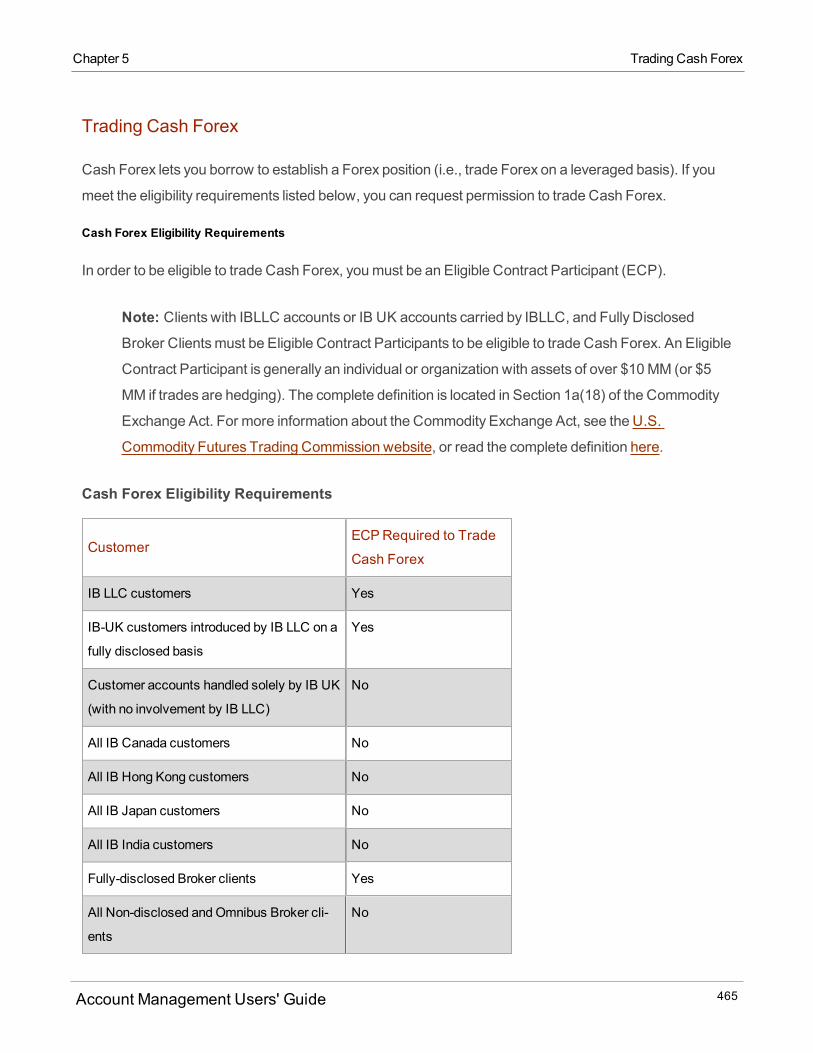
Chapter 5 Trading Cash Forex
Trading Cash Forex
Cash Forex lets you borrow to establish a Forex position (i.e., trade Forex on a leveraged basis). If you
meet the eligibility requirements listed below, you can request permission to trade Cash Forex.
Cash Forex Eligibility Requirements
In order to be eligible to trade Cash Forex, youmust be an Eligible Contract Participant (ECP).
Note: Clients with IBLLC accounts or IB UK accounts carried by IBLLC, and Fully Disclosed
Broker Clientsmust be Eligible Contract Participants to be eligible to trade Cash Forex. An Eligible
Contract Participant is generally an individual or organization with assets of over $10MM (or $5
MM if trades are hedging). The complete definition is located in Section 1a(18) of the Commodity
Exchange Act. For more information about the Commodity Exchange Act, see the U.S.
Commodity Futures Trading Commission website, or read the complete definition here.
Cash Forex Eligibility Requirements
CustomerECPRequired to Trade
Cash Forex
IB LLC customers Yes
IB-UK customers introduced by IB LLC on a
fully disclosed basis
Yes
Customer accounts handled solely by IB UK
(with no involvement by IB LLC)
No
All IB Canada customers No
All IB Hong Kong customers No
All IB Japan customers No
All IB India customers No
Fully-disclosed Broker clients Yes
All Non-disclosed andOmnibus Broker cli-
ents
No
Account Management Users' Guide 465
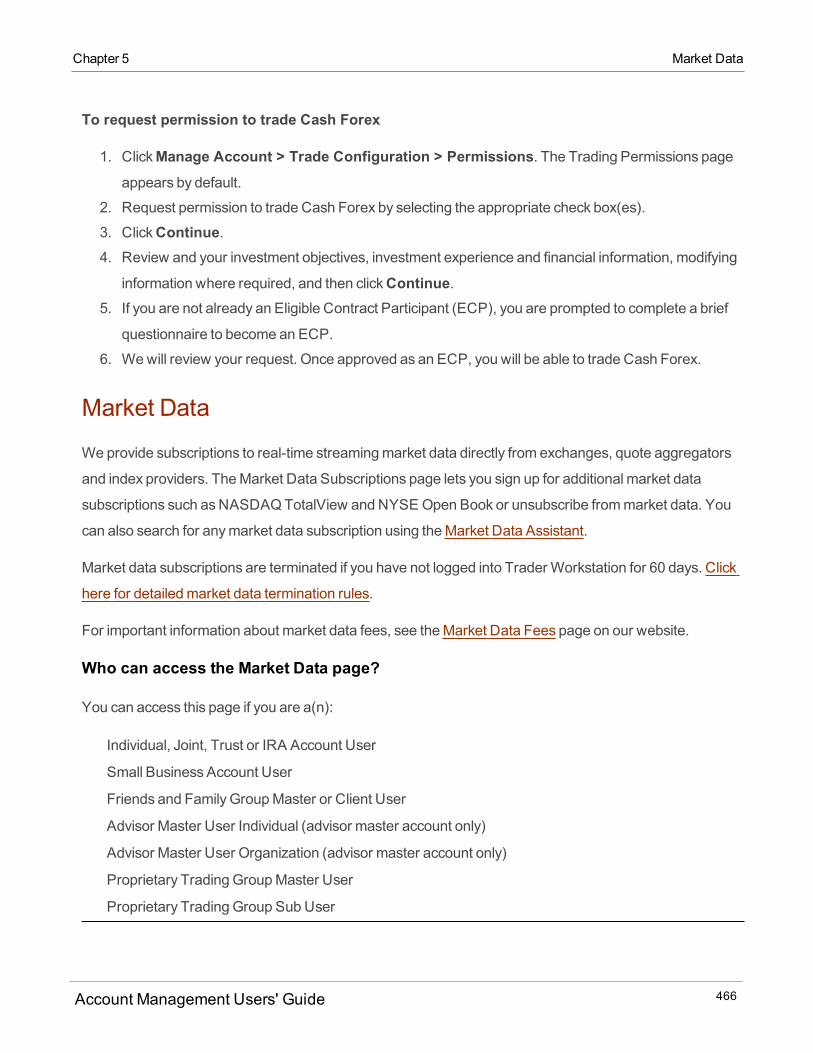
To request permission to trade Cash Forex
1. ClickManage Account > Trade Configuration > Permissions. The Trading Permissions pageappears by default.
2. Request permission to trade Cash Forex by selecting the appropriate check box(es).
3. ClickContinue.4. Review and your investment objectives, investment experience and financial information, modifying
information where required, and then clickContinue.5. If you are not already an Eligible Contract Participant (ECP), you are prompted to complete a brief
questionnaire to become an ECP.
6. Wewill review your request. Once approved as an ECP, you will be able to trade Cash Forex.
Market Data
Weprovide subscriptions to real-time streamingmarket data directly from exchanges, quote aggregators
and index providers. TheMarket Data Subscriptions page lets you sign up for additional market data
subscriptions such asNASDAQTotalView and NYSE Open Book or unsubscribe frommarket data. You
can also search for anymarket data subscription using theMarket Data Assistant.
Market data subscriptions are terminated if you have not logged into Trader Workstation for 60 days. Click
here for detailedmarket data termination rules.
For important information about market data fees, see theMarket Data Fees page on our website.
Who can access the Market Data page?
You can access this page if you are a(n):
Individual, Joint, Trust or IRA Account User
Small Business Account User
Friends and Family GroupMaster or Client User
Advisor Master User Individual (advisor master account only)
Advisor Master User Organization (advisor master account only)
Proprietary Trading GroupMaster User
Proprietary Trading Group SubUser
Account Management Users' Guide 466
Chapter 5 Market Data
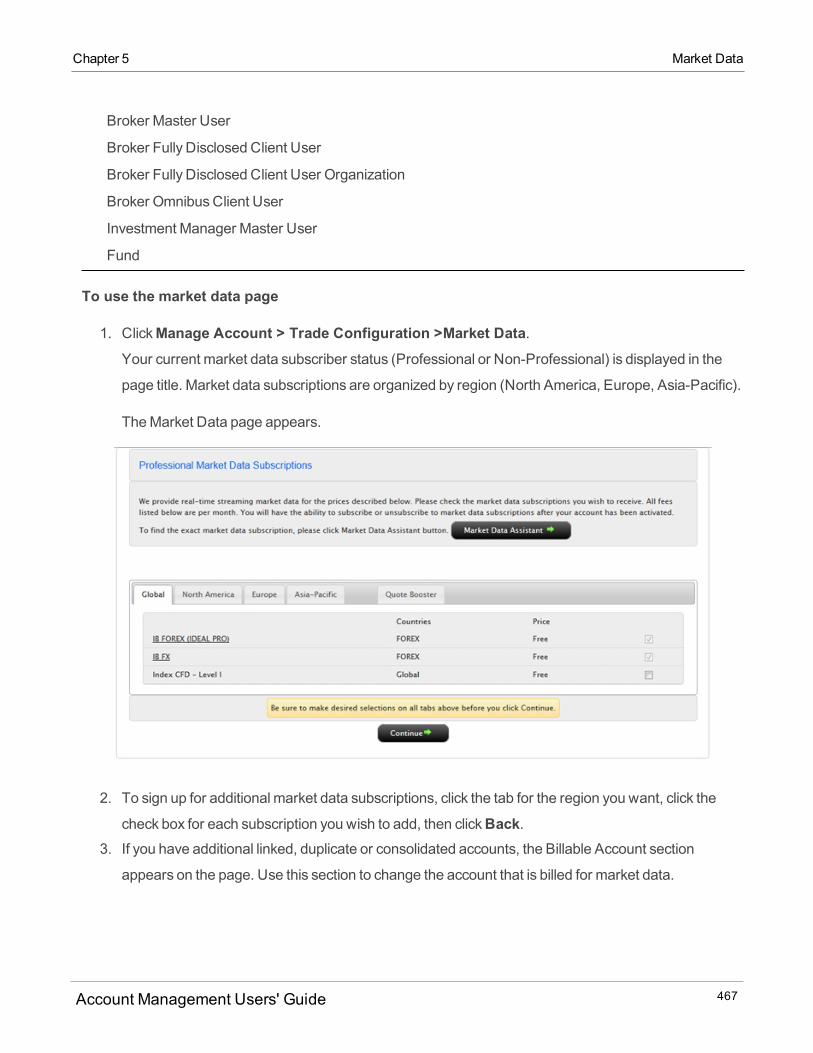
Chapter 5 Market Data
Broker Master User
Broker Fully Disclosed Client User
Broker Fully Disclosed Client User Organization
Broker OmnibusClient User
Investment Manager Master User
Fund
To use the market data page
1. ClickManage Account > Trade Configuration >Market Data.Your current market data subscriber status (Professional or Non-Professional) is displayed in the
page title. Market data subscriptions are organized by region (North America, Europe, Asia-Pacific).
TheMarket Data page appears.
2. To sign up for additional market data subscriptions, click the tab for the region you want, click the
check box for each subscription you wish to add, then clickBack.3. If you have additional linked, duplicate or consolidated accounts, the Billable Account section
appears on the page. Use this section to change the account that is billed for market data.
Account Management Users' Guide 467
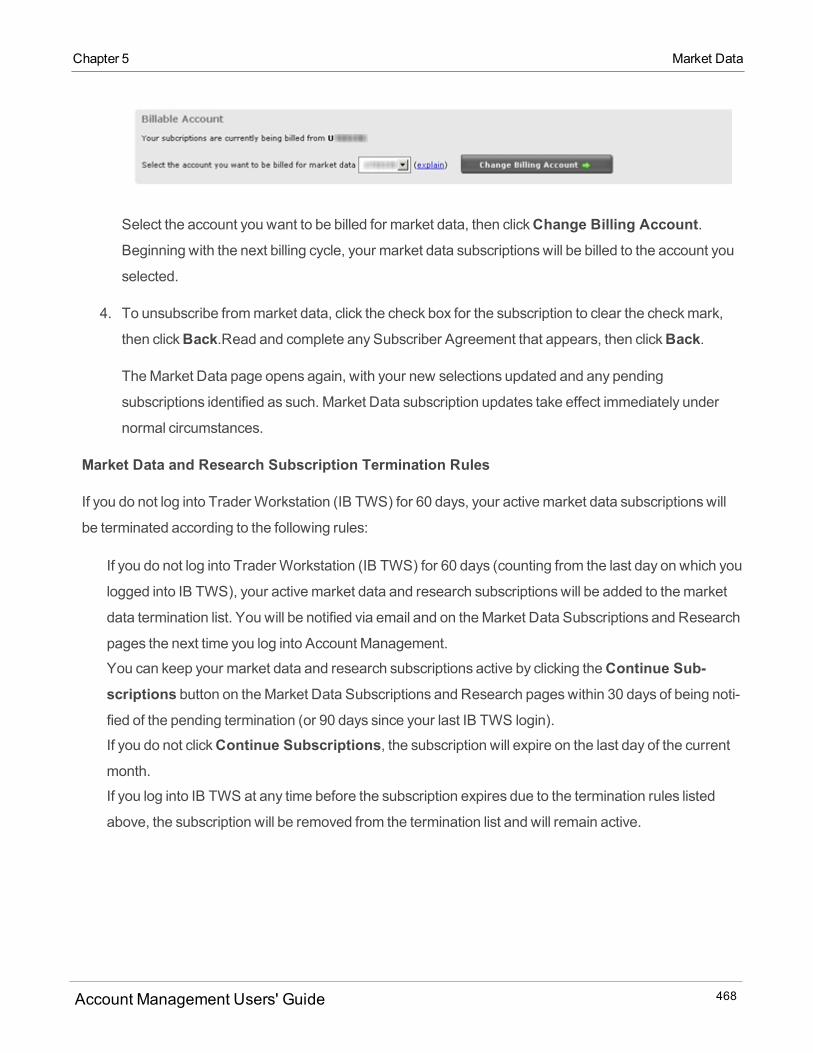
Select the account you want to be billed for market data, then clickChange Billing Account.Beginning with the next billing cycle, your market data subscriptionswill be billed to the account you
selected.
4. To unsubscribe frommarket data, click the check box for the subscription to clear the checkmark,
then clickBack.Read and complete any Subscriber Agreement that appears, then clickBack.
TheMarket Data page opens again, with your new selections updated and any pending
subscriptions identified as such. Market Data subscription updates take effect immediately under
normal circumstances.
Market Data and Research Subscription Termination Rules
If you do not log into Trader Workstation (IB TWS) for 60 days, your activemarket data subscriptionswill
be terminated according to the following rules:
If you do not log into Trader Workstation (IB TWS) for 60 days (counting from the last day on which you
logged into IB TWS), your activemarket data and research subscriptionswill be added to themarket
data termination list. You will be notified via email and on theMarket Data Subscriptions and Research
pages the next time you log into Account Management.
You can keep your market data and research subscriptions active by clicking theContinue Sub-scriptions button on theMarket Data Subscriptions and Research pageswithin 30 days of being noti-fied of the pending termination (or 90 days since your last IB TWS login).
If you do not clickContinue Subscriptions, the subscription will expire on the last day of the currentmonth.
If you log into IB TWS at any time before the subscription expires due to the termination rules listed
above, the subscription will be removed from the termination list and will remain active.
Account Management Users' Guide 468
Chapter 5 Market Data
Chapter 5 Research
Research
TheResearch page lets you sign up for IBIS - Interactive Brokers Information System and other news and
information services such asReutersWorldwide Fundamentals.
Research subscriptions are terminated if you have not logged into Trader Workstation for 60 days. Click
here for more information.
Who can access the Research page?
You can access this page if you are a(n):
Individual, Joint, Trust or IRA Account User
Small Business Account User
Friends and Family GroupMaster or Client User
Advisor Master User Individual (Master account only)
Advisor Master User Organization (Master account only)
Proprietary Trading GroupMaster User
Proprietary Trading Group SubUser
Broker Master User
Broker Fully Disclosed Client User
Broker Fully Disclosed Client User Organization
Broker OmnibusClient User
Investment Manager Master User
Fund
To subscribe to news and information services
1. ClickManage Account > Trade Configuration > Research.The Research page displays all available news and information services and their monthly prices,
including those to which you are currently subscribed.
Account Management Users' Guide 469
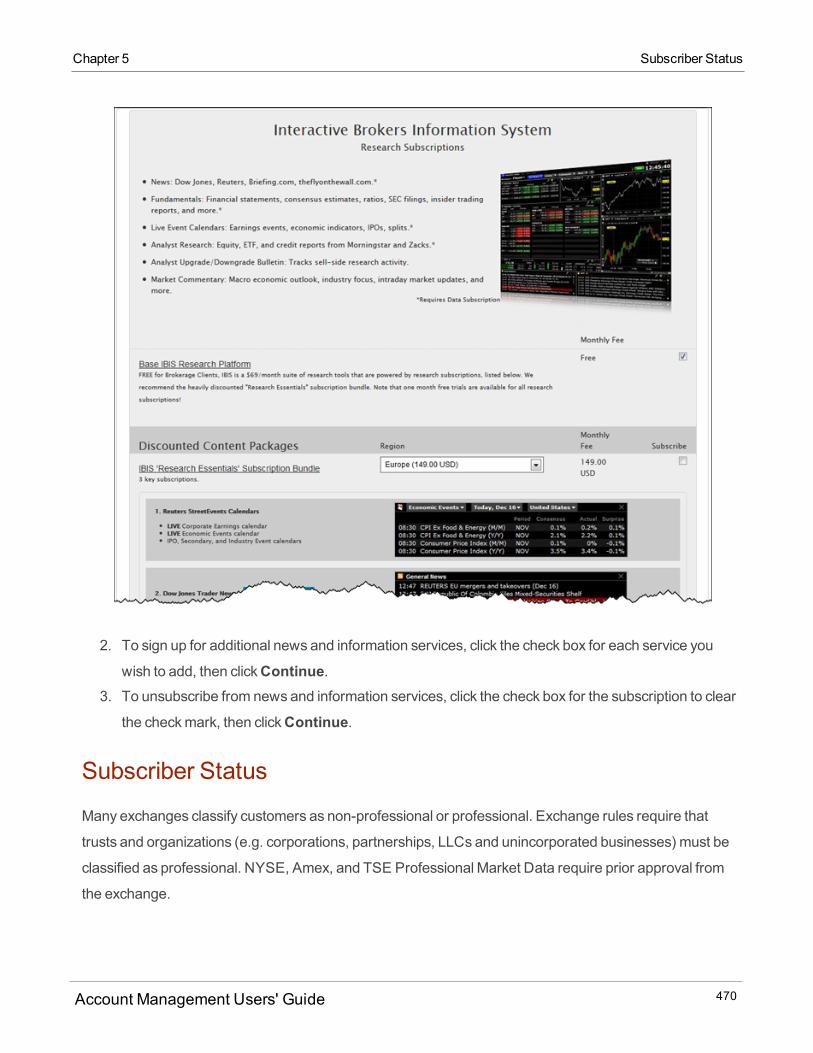
2. To sign up for additional news and information services, click the check box for each service you
wish to add, then clickContinue.3. To unsubscribe from news and information services, click the check box for the subscription to clear
the checkmark, then clickContinue.
Subscriber Status
Many exchanges classify customers as non-professional or professional. Exchange rules require that
trusts and organizations (e.g. corporations, partnerships, LLCs and unincorporated businesses) must be
classified as professional. NYSE, Amex, and TSE Professional Market Data require prior approval from
the exchange.
Account Management Users' Guide 470
Chapter 5 Subscriber Status
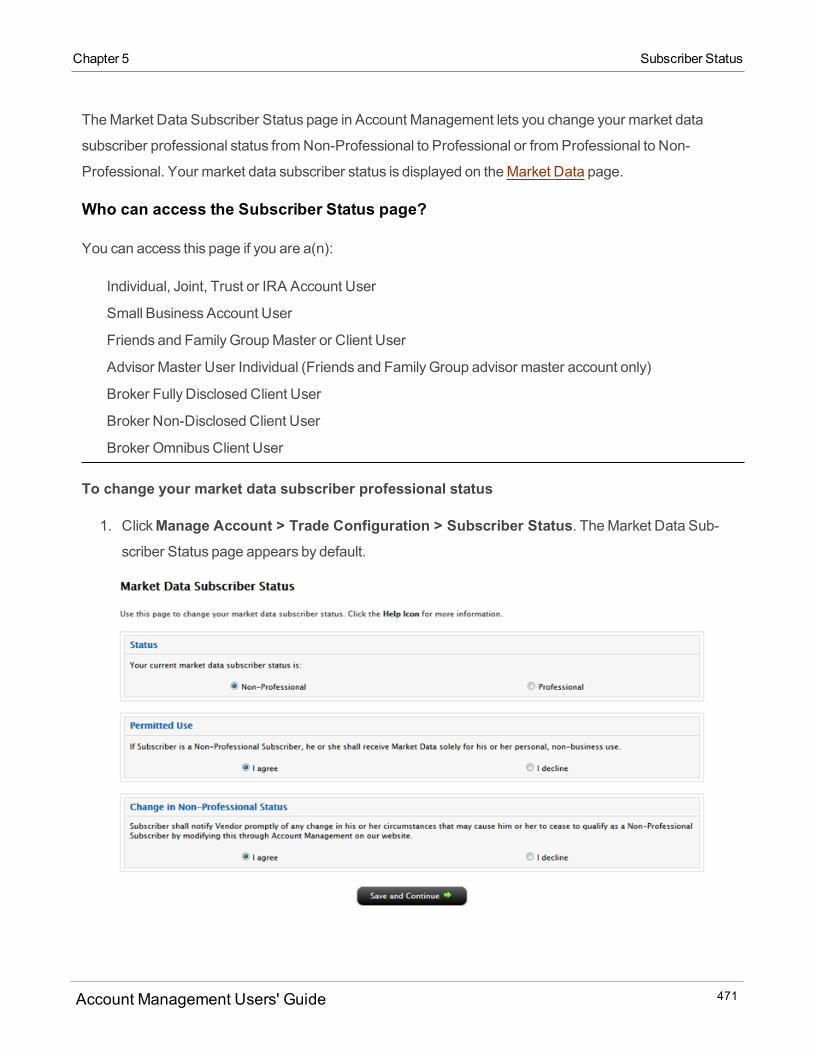
Chapter 5 Subscriber Status
TheMarket Data Subscriber Status page in Account Management lets you change your market data
subscriber professional status fromNon-Professional to Professional or fromProfessional to Non-
Professional. Your market data subscriber status is displayed on theMarket Data page.
Who can access the Subscriber Status page?
You can access this page if you are a(n):
Individual, Joint, Trust or IRA Account User
Small Business Account User
Friends and Family GroupMaster or Client User
Advisor Master User Individual (Friends and Family Group advisor master account only)
Broker Fully Disclosed Client User
Broker Non-Disclosed Client User
Broker OmnibusClient User
To change your market data subscriber professional status
1. ClickManage Account > Trade Configuration > Subscriber Status. TheMarket Data Sub-scriber Status page appears by default.
Account Management Users' Guide 471

o To change your status fromNon-Professional to Professional, click theProfessional radio but-ton, then read the Permitted Use and Change in Non-Professional Status statements and click
the I agree radio button in each section.o To downgrade your status fromProfessional to Non-Professional, youmust submit a ticket in the
Client ServicesMessage Center to request the status change:
ClickSupport > Message Center to display the Client ServicesMessage Center, then clickCreatein theMessage Center, and selectAccount Services andAccount Con-figuration/Permissions as the categories. Youmust include the reason for the change.
2. ClickContinue.
Market Data Assistant
Use theMarket Data Assistant to search for market data subscriptions.
To search for market data subscriptions
1. On theMarket Data Subscriptions page, clickMarket Data Assistant.2. Enter the desired stock symbol and exchange (or use an ISIN or CUSIP).
The search results will show whichmarket data subscription(s) provide the real-timemarket data for
all combinations of professional/non-professional, top-of-book, and deep-book data.
Account Management Users' Guide 472
Chapter 5 Market Data Assistant
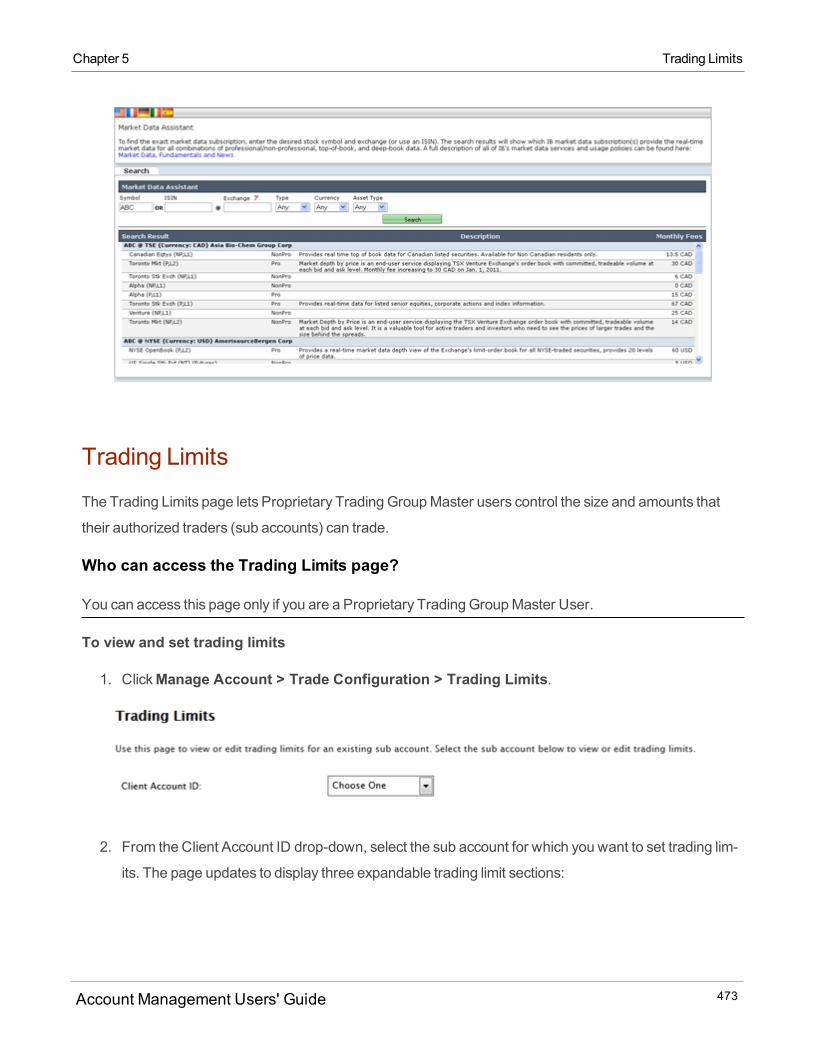
Chapter 5 Trading Limits
Trading Limits
The Trading Limits page lets Proprietary Trading GroupMaster users control the size and amounts that
their authorized traders (sub accounts) can trade.
Who can access the Trading Limits page?
You can access this page only if you are a Proprietary Trading GroupMaster User.
To view and set trading limits
1. ClickManage Account > Trade Configuration > Trading Limits.
2. From the Client Account ID drop-down, select the sub account for which you want to set trading lim-
its. The page updates to display three expandable trading limit sections:
Account Management Users' Guide 473

3. To set order value limits, click to expand that section, enter values and clickContinue.
o Dollar Value Per Order - The total value of any one order, in millions of dollars. For example, a
value of .5 = a limit of 500,000 USD.o Net Dollar Value Per Day - The net value of buys and sells for an entire trading day, in millions of
dollars. For example, if you bought 50million and sold 15million in a day, the net dollar value for
that daywould be 35million.o GrossDollar Value Per Day - The aggregate value of buys and sells for an entire trading day. For
example, if you bought 50million and sold 15million in a day, the gross dollar value for that day
would be 65million.
4. To set order quantity limits, click to expand that section, then enter order quantity limits. Click
Continuewhen you are done entering values.
Account Management Users' Guide 474
Chapter 5 Trading Limits

Chapter 5 Trading Limits
5. To set Exchange for Physical Limits, click to expand that section, then enter values for any of the fol-
lowing and clickContinue.
o MaximumNominal Exchange for Physical Per Order - The total value of any one Exchange for
Physical (EFP) order, in millions of dollars.o MaximumNet Exchange for Physical Per Trades - The net value of EFP buys and sells for an
entire trading day, in millions of dollars.o MaximumGross Exchange for Physical Trades - The aggregate value of EFP buys and sells for
an entire trading day. For example, if you bought 50million and sold 15million in a day, the gross
dollar value for that daywould be 65million.
6. Verify your changes on the Verify Trading Limits, then clickContinue.ClickBack if you need tomake further changes.
Account Management Users' Guide 475
7. A confirmation number is sent to your email address of record. Enter this number on the Con-
firmation page that appears, then clickContinue.
New trading limits and changes to existing trading limits go into effect on the next business day.
Restrictions
Set all trading restrictions in the Pre-Trade Compliance tool. Click the Launch Pre-Trade Compliancebutton to open the program.
For more information about the Pre-Trade Compliance tool, see the Pre-Trade Compliance Tool Users'
Guide.
IB FYI
FYIs are notifications and automatic actions in your trading account based on your portfolio, order history
and trading activity that are designed to help you stay on top of relevant dates and events. FYIs are
intended as a convenience; do not rely on them as a comprehensive or primary source of information.
The IB FYI page includes the following notifications and automatic actions:
Notifications
Borrow Availability - Notifies you when a borrow becomes available in shares that you were unable
to short last week.
Option Expiration Notification - Notifies you three days before US options expire.
Takeovers - Notifies you that a company in which you hold positions is the target of a takeover. Thisnotification is turned on by default.
Earnings - Notifies you of upcoming earnings announcements from any of your holdings.
Mutual Fund Advisory - Notifies you if there is an ETF comparable to your mutual fund holding.
Dividends - Notifies you if a US option position is projected to be economically beneficial for early exer-cise or assignment.
Automatic Actions
Account Management Users' Guide 476
Chapter 5 Restrictions

Chapter 5 IB FYI
Dividends - Automatically exercise US dividend-related stock and ETF options. If you select this Auto-
matic Action, IB's systemwill determine whether is likely to be beneficial to you to exercise call options
early, using predefinedmathematical criteria and based on well-established theories of option pricing
and efficient markets. The systemwill then send you a notification two days before the stock trades ex-
dividend and, if the determination remains favorable, automatically exercise the option early with no
action required from you.
All customerswho can trade US dividend-related options are eligible for this automatic action EXCEPT:
Japan accounts
India accounts
UK passport country residents
UKL standalone accounts
Hong Kong residents
Australian residents
Economic Event Order Suspension - Twenty seconds before amajor economic event, pauses allof your active orders for 40 seconds. Once you enable this automatic action in Account Management,
you will receive bulletins inside the trading platformwhich report the times and descriptions of the eco-
nomic events. Economic events includeGDP, non-farm payrolls, PPI, CPI and so on.
Who can access the IB FYI page?
All accounts except Advisor Clients.
To set FYI options
1. ClickManage Accounts > Trade Configuration > IB FYI.
Account Management Users' Guide 477

2. Click the check box next to the notification and/or automatic action you want to enable. Deselect a
check box to disable a notification and/or automatic action.
3. ClickSubmit.
Alerts
The Alerts page lets you select your default method of receiving email alerts. You can select your default
email address, or set an SMS (Short Message Service) address to receive SMS text message alerts on
your mobile telephone device.
Who can access the Alerts page?
You can access this page if you are a(n):
Account Management Users' Guide 478
Chapter 5 Alerts
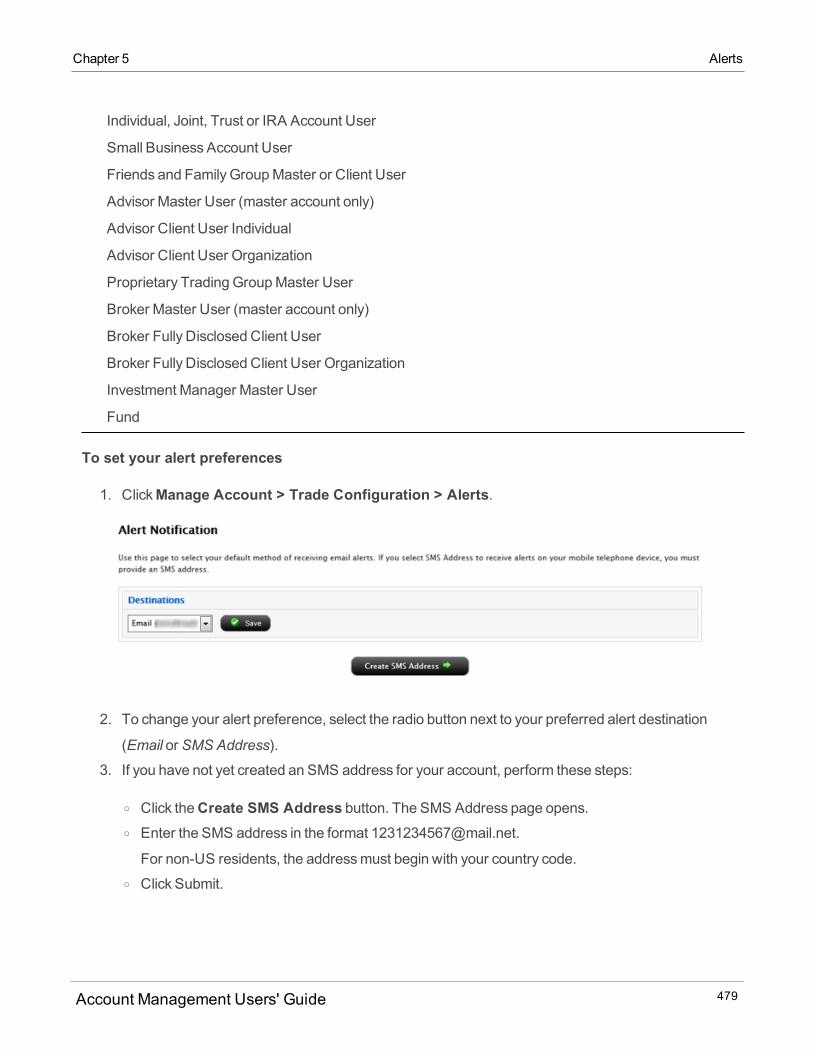
Chapter 5 Alerts
Individual, Joint, Trust or IRA Account User
Small Business Account User
Friends and Family GroupMaster or Client User
Advisor Master User (master account only)
Advisor Client User Individual
Advisor Client User Organization
Proprietary Trading GroupMaster User
Broker Master User (master account only)
Broker Fully Disclosed Client User
Broker Fully Disclosed Client User Organization
Investment Manager Master User
Fund
To set your alert preferences
1. ClickManage Account > Trade Configuration > Alerts.
2. To change your alert preference, select the radio button next to your preferred alert destination
(Email or SMS Address).
3. If you have not yet created an SMS address for your account, perform these steps:
o Click theCreate SMS Address button. The SMS Address page opens.o Enter the SMS address in the format [email protected].
For non-US residents, the addressmust begin with your country code.o Click Submit.
Account Management Users' Guide 479
o A verification code is immediately sent to the specified address. Type the code in the field
provided, then click Confirm.
Click Request Confirmation Number to request a new verification code to be sent to your SMS
address.
Click Cancel to cancel the creation of the SMS addresswith your account.
4. Tomodify an existing SMS address, click theModify SMS Address button, then enter the newSMS addresswhere indicated on the page that appears.
5. ClickSave to save your changes.
Futures Arbitration Agreement
The Arbitration Agreement page lets you sign and submit our Arbitration Agreement. You do not have to
sign this agreement to maintain an account with us. However, declining this agreement may result in
reduced trading limits.
Who can access the Futures Arbitration Agreement page?
You can access this page if you are a(n):
Individual, Joint, Trust or IRA Account User
Small Business Account User
Friends and Family GroupMaster or Client User
Advisor Client User Individual (available in PDF format)
Advisor Client User Organization (available in PDF format)
Proprietary Trading GroupMaster User
Broker Master User (master account only)
Broker Fully Disclosed Client User
Broker Fully Disclosed Client User Organization
Fund
To sign and submit the Arbitration Agreement
Account Management Users' Guide 480
Chapter 5 Futures Arbitration Agreement
Chapter 5 Asia Gateway Access
1. ClickManage Account > Trade Configuration > Futures Arb.2. Read the agreement carefully, then accept the agreement by clicking the appropriate radio button.
3. Sign the agreement by typing your name in the field provided, then clickSignature.
Asia Gateway Access
This page lets account holders based in China select their delivery source for market data and regional
services.
Who can access the Asia Gateway Access page?
You can access this page if your address is located in China (including Hong Kong).
To select your delivery source for market data and regional services in China
1. ClickManage Account > Trade Configuration > Asia Gateway Access.The Account Configuration/Asia GatewayAccess page appears. It displays your current delivery
source for market data and regional services.
2. Select one of the following options:
o (a) Market data and other regional services are delivered from the site closest to the exchange.
Select this option if you have a fast Internet connection to our US, Europe and Asia sites.o (b) Market data and other regional services are delivered via the Asia gateway.
Select this option if you have a slow Internet connection.
3. ClickContinue.
Security
The Securitymenu includes the following pages:
IP Restrictions - Restrict user access to IB TWS by IP address.
Change Password - Change your account password.
Reset Paper Trading Account Password - Change your paper trading account password.
Change Email Address - Change your email address or the email address of any user associated with
your account.
Account Management Users' Guide 481
Change Security Questions - Change the security questions in the account application.
Security Login System - Enroll in IB's Secure Login Program, and share your security device with a
second, matching user.
Voting Subscription - Sign up to vote in our online voting forums.
Client Security - Activate a security device for a client account.
Audit Trail - View requests generated in Account Management for your own account.
IP Restrictions
This page lets you restrict user access to IB TWS by IP address. Limiting user access from a specific list of
IP addresses adds a layer of security to your account. If no restrictions are specified for a trader, he or she
may log into IB TWS from any IP address.
Who can access the IP Restrictions page?
You can access this page if you are a(n):
Individual, Joint, Trust or IRA Account User
Small Business Account User
Friends and Family GroupMaster or Client User
Advisor Master User Individual
Advisor Master User Organization
Proprietary Trading GroupMaster User
Broker Master User
Broker Fully Disclosed Client User
Broker Fully Disclosed Client User Organization
Investment Manager Master User
Fund
To add IP restrictions
1. ClickManage Account > Security > Individual > IP Restrictions.
Account Management Users' Guide 482
Chapter 5 IP Restrictions
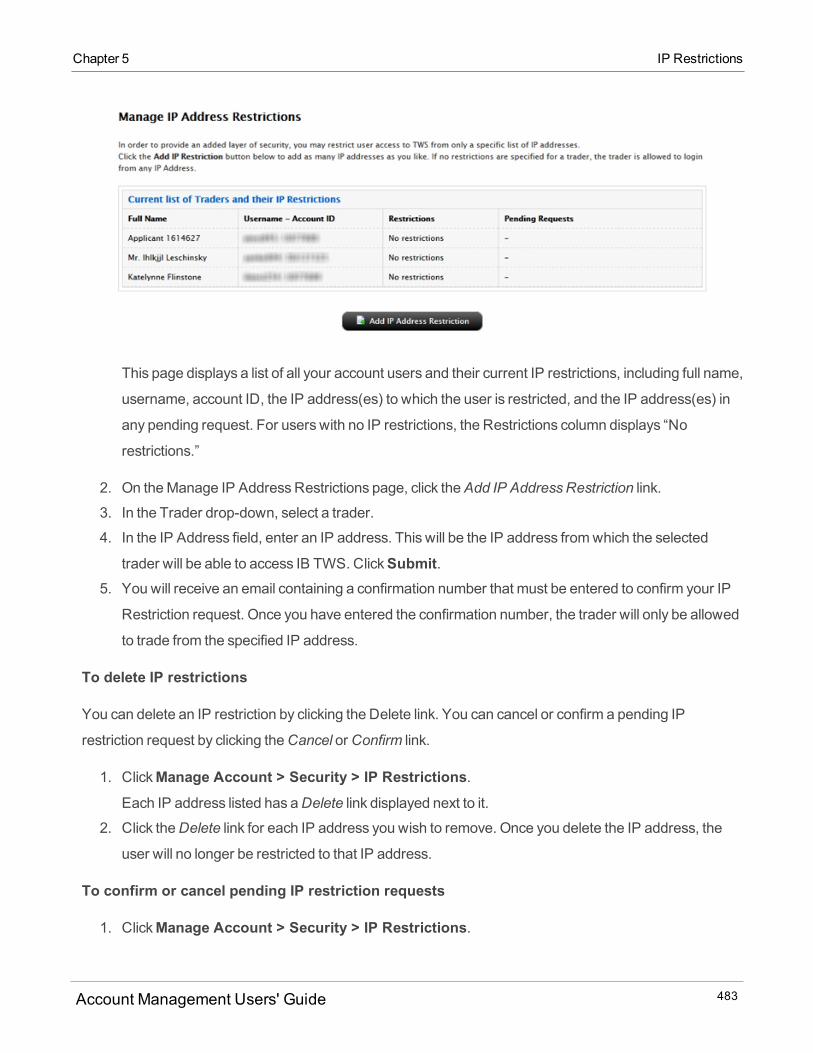
Chapter 5 IP Restrictions
This page displays a list of all your account users and their current IP restrictions, including full name,
username, account ID, the IP address(es) to which the user is restricted, and the IP address(es) in
any pending request. For users with no IP restrictions, the Restrictions column displays “No
restrictions.”
2. On theManage IP AddressRestrictions page, click theAdd IP AddressRestriction link.
3. In the Trader drop-down, select a trader.
4. In the IP Address field, enter an IP address. This will be the IP address fromwhich the selected
trader will be able to access IB TWS. ClickSubmit.5. You will receive an email containing a confirmation number that must be entered to confirm your IP
Restriction request. Once you have entered the confirmation number, the trader will only be allowed
to trade from the specified IP address.
To delete IP restrictions
You can delete an IP restriction by clicking the Delete link. You can cancel or confirm a pending IP
restriction request by clicking theCancel orConfirm link.
1. ClickManage Account > Security > IP Restrictions.Each IP address listed has aDelete link displayed next to it.
2. Click theDelete link for each IP address you wish to remove. Once you delete the IP address, the
user will no longer be restricted to that IP address.
To confirm or cancel pending IP restriction requests
1. ClickManage Account > Security > IP Restrictions.
Account Management Users' Guide 483

For each pending IP address restriction request, the Pending Requests column displays the IP
address andConfirm andCancel links.
o To confirm a pending request, clickConfirm.o To cancel a pending request, clickCancel.
Change Password
This page lets you change your account password.
Who can access the Change Password page?
All users.
To change your account password
1. ClickManage Account > Security > Change Password.
2. Type your current password in the field provided.
Account Management Users' Guide 484
Chapter 5 Change Password
Chapter 5 Reset Paper Trading Account Password
3. Type a new password in the field provided, then type it again in the Confirm Password field. The
passwordmust be six to 40 characters long, must contain at least one number and no spaces, and is
case-sensitive.
4. ClickSubmit.5. You will immediately receive a confirmation number at your email address of record. Type the con-
firmation number you received in the field provided, then clickSubmit.
The password change is effective immediately.
Reset Paper Trading Account Password
Use this page to change your paper trading account password from your production account. For example,
if you have forgotten your paper trading password, you can log into Account Management with your
production account credentials and change your paper trading account password using the procedure
described below.
Who can access the Reset Paper Trading Account Password page?
You can access this page if you are a(n):
Individual, Joint, Trust or IRA Account User
Small Business Account User
Friends and Family GroupMaster or Client User
Advisor Master User Individual
Advisor Master User Organization
Advisor Client User Individual
Advisor Client User Organization
Proprietary Trading GroupMaster User
Proprietary Trading Group SubUser
Broker Master User (master account only)
Broker Fully Disclosed Client User
Broker Fully Disclosed Client User Organization
Broker Non-Disclosed Client User
Broker OmnibusClient User
Account Management Users' Guide 485
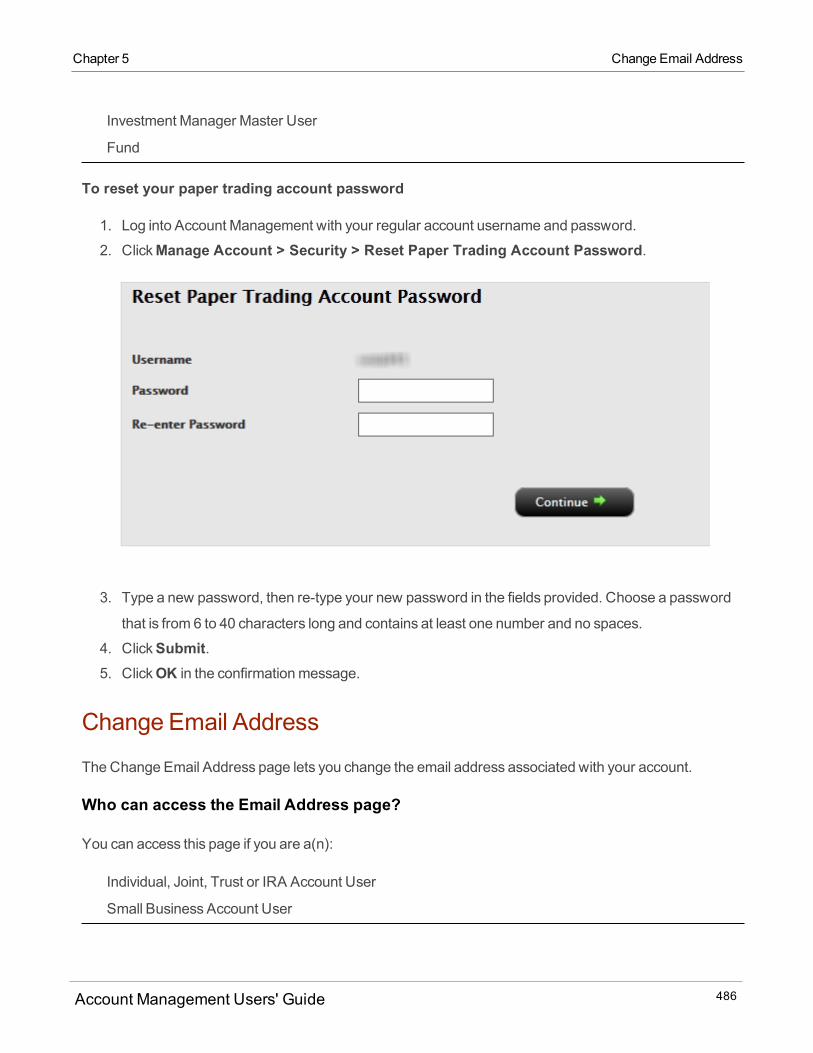
Investment Manager Master User
Fund
To reset your paper trading account password
1. Log into Account Management with your regular account username and password.
2. ClickManage Account > Security > Reset Paper Trading Account Password.
3. Type a new password, then re-type your new password in the fields provided. Choose a password
that is from 6 to 40 characters long and contains at least one number and no spaces.
4. ClickSubmit.5. ClickOK in the confirmationmessage.
Change Email Address
TheChange Email Address page lets you change the email address associated with your account.
Who can access the Email Address page?
You can access this page if you are a(n):
Individual, Joint, Trust or IRA Account User
Small Business Account User
Account Management Users' Guide 486
Chapter 5 Change Email Address
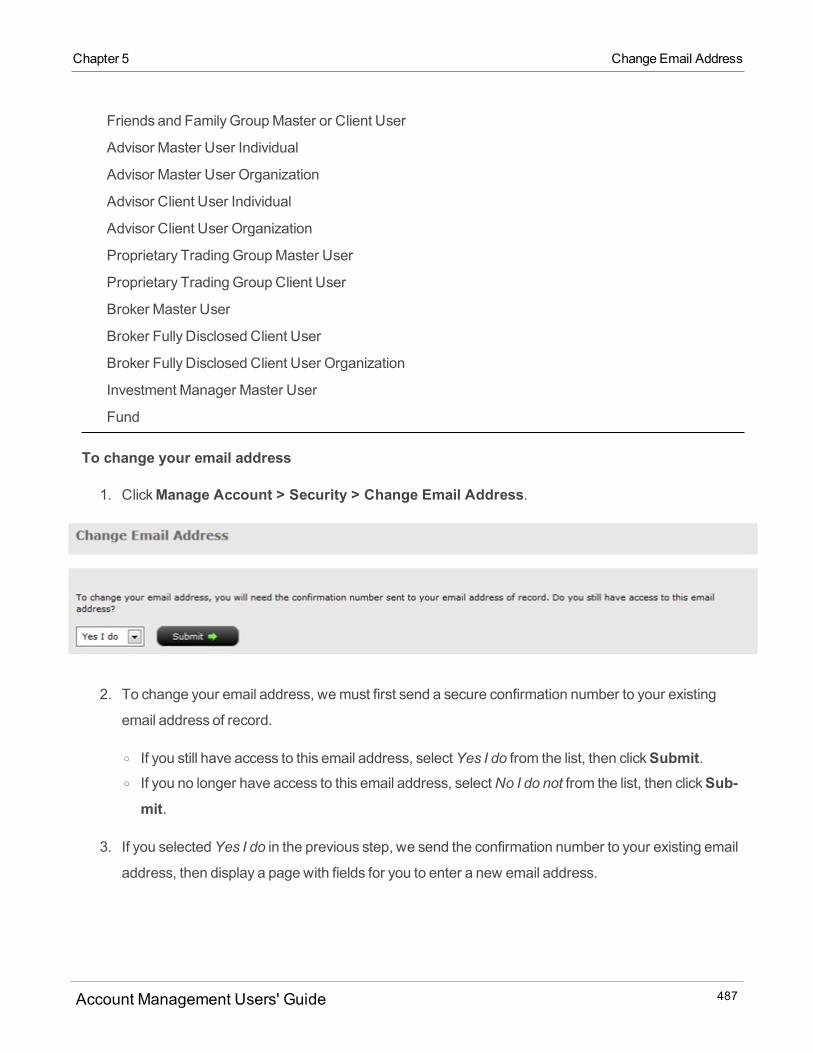
Chapter 5 Change Email Address
Friends and Family GroupMaster or Client User
Advisor Master User Individual
Advisor Master User Organization
Advisor Client User Individual
Advisor Client User Organization
Proprietary Trading GroupMaster User
Proprietary Trading Group Client User
Broker Master User
Broker Fully Disclosed Client User
Broker Fully Disclosed Client User Organization
Investment Manager Master User
Fund
To change your email address
1. ClickManage Account > Security > Change Email Address.
2. To change your email address, wemust first send a secure confirmation number to your existing
email address of record.
o If you still have access to this email address, selectYes I do from the list, then clickSubmit.o If you no longer have access to this email address, selectNo I do not from the list, then clickSub-mit.
3. If you selectedYes I do in the previous step, we send the confirmation number to your existing email
address, then display a page with fields for you to enter a new email address.
Account Management Users' Guide 487
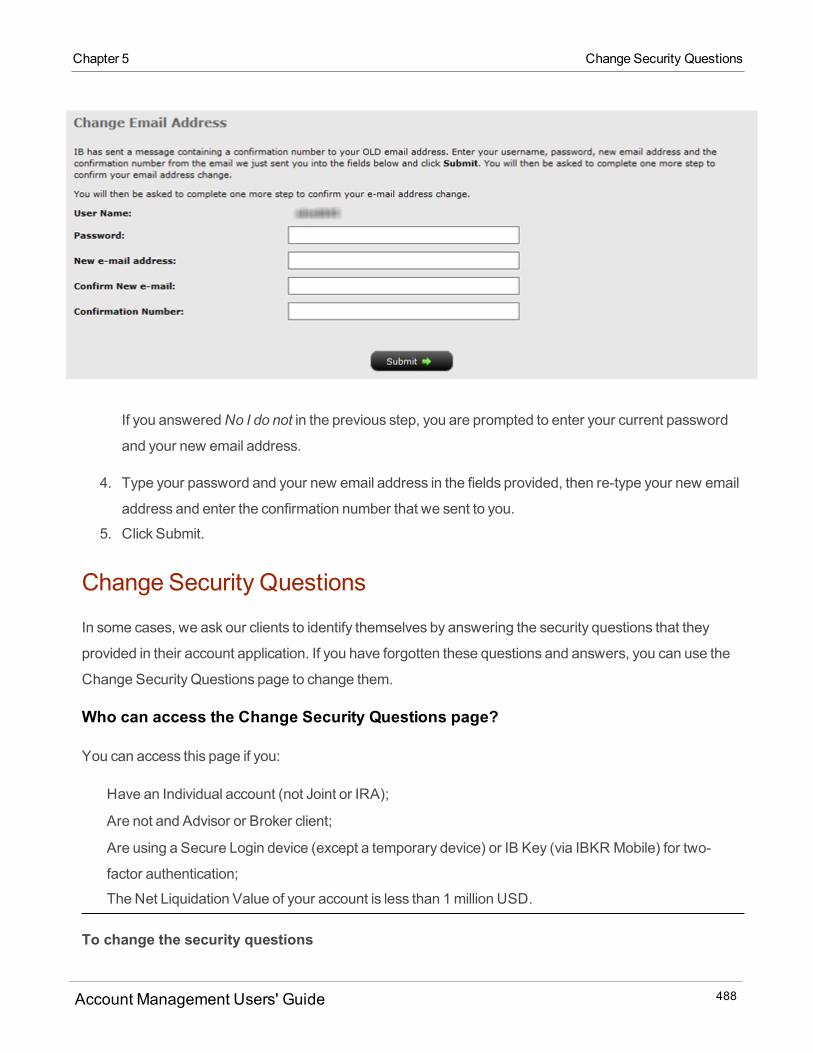
If you answeredNo I do not in the previous step, you are prompted to enter your current password
and your new email address.
4. Type your password and your new email address in the fields provided, then re-type your new email
address and enter the confirmation number that we sent to you.
5. Click Submit.
Change Security Questions
In some cases, we ask our clients to identify themselves by answering the security questions that they
provided in their account application. If you have forgotten these questions and answers, you can use the
Change Security Questions page to change them.
Who can access the Change Security Questions page?
You can access this page if you:
Have an Individual account (not Joint or IRA);
Are not and Advisor or Broker client;
Are using a Secure Login device (except a temporary device) or IB Key (via IBKR Mobile) for two-
factor authentication;
The Net Liquidation Value of your account is less than 1million USD.
To change the security questions
Account Management Users' Guide 488
Chapter 5 Change Security Questions
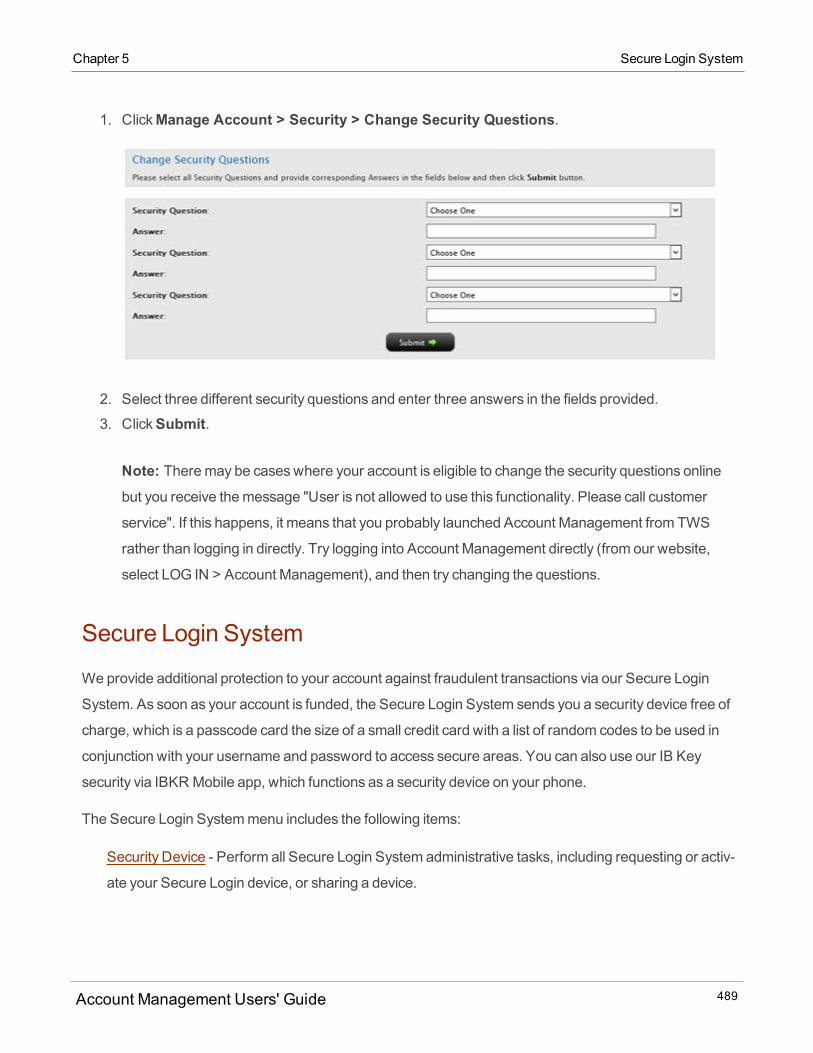
Chapter 5 Secure Login System
1. ClickManage Account > Security > Change Security Questions.
2. Select three different security questions and enter three answers in the fields provided.
3. ClickSubmit.
Note: Theremay be caseswhere your account is eligible to change the security questions onlinebut you receive themessage "User is not allowed to use this functionality. Please call customer
service". If this happens, it means that you probably launched Account Management from TWS
rather than logging in directly. Try logging into Account Management directly (from our website,
select LOG IN > Account Management), and then try changing the questions.
Secure Login System
Weprovide additional protection to your account against fraudulent transactions via our Secure Login
System. As soon as your account is funded, the Secure Login System sends you a security device free of
charge, which is a passcode card the size of a small credit card with a list of random codes to be used in
conjunction with your username and password to access secure areas. You can also use our IB Key
security via IBKR Mobile app, which functions as a security device on your phone.
The Secure Login Systemmenu includes the following items:
Security Device - Perform all Secure Login System administrative tasks, including requesting or activ-
ate your Secure Login device, or sharing a device.
Account Management Users' Guide 489
Security Device Sharing - Share your Secure Login device with another user.
SLS Opt Out - Opt out of the Secure Login System.
For detailed instructions on using IB Key instead of a physical security device, refer to Knowledge Base
Article 2260.
For more information
About Security Devices
Withdrawal Limits
WhenWill I ReceiveMyDevice?
Security Device
If you are an existing customer and are not enrolled in the Secure Login System, or have opted out of the
program in the past and now want to enroll, you can use the Secure Login System page to apply for an IB
security device.
Use the Activate/Request Security Device page in Account Management as follows:
New customers can activate their security device the first time they log into Account Management.
After 14 days, the device is automatically activated.
Existing customerswho have never had the opportunity to participate or opt out of the Secure Login
System can request a Security Device.
Share your security device with multiple accounts as long as the user identification of the accounts is
identical.
Existing customerswho have opted out of the program but who now want to participate can request a
Security Device.
Who can access the Security Device page?
You can access this page if you are a(n):
Individual, Joint, Trust or IRA Account User
Small Business Account User
Friends and Family GroupMaster or Client User
Account Management Users' Guide 490
Chapter 5 Security Device
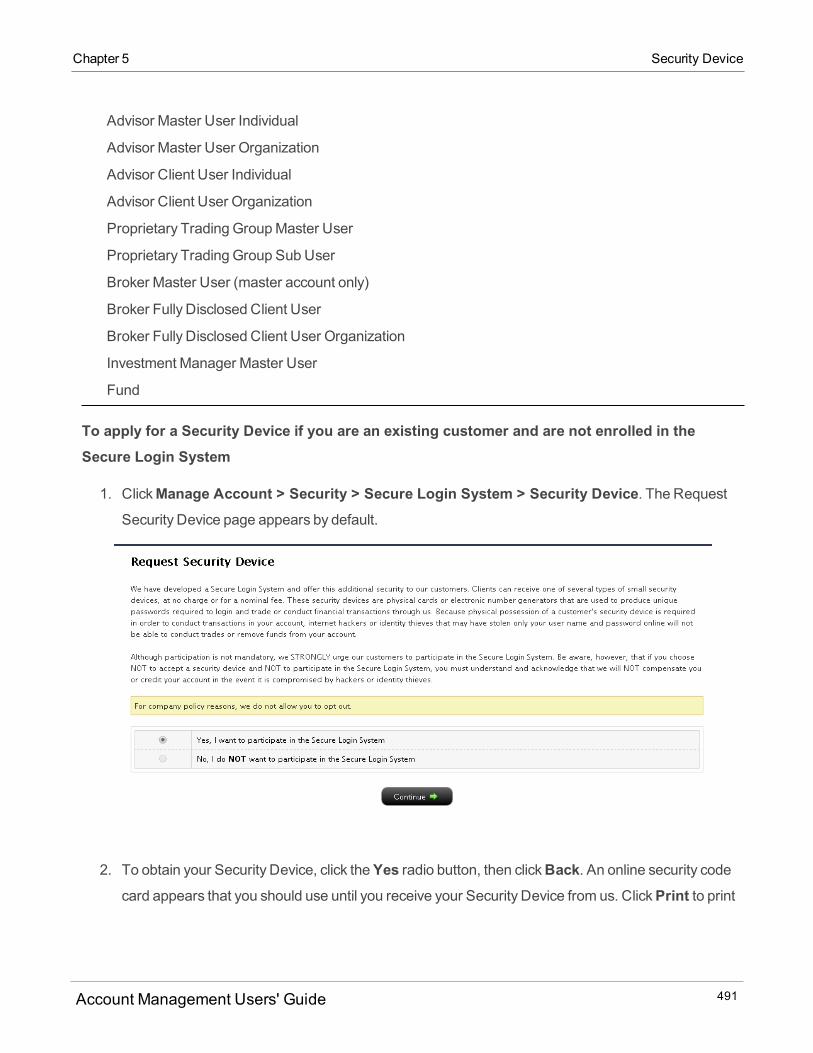
Chapter 5 Security Device
Advisor Master User Individual
Advisor Master User Organization
Advisor Client User Individual
Advisor Client User Organization
Proprietary Trading GroupMaster User
Proprietary Trading Group SubUser
Broker Master User (master account only)
Broker Fully Disclosed Client User
Broker Fully Disclosed Client User Organization
Investment Manager Master User
Fund
To apply for a Security Device if you are an existing customer and are not enrolled in theSecure Login System
1. ClickManage Account > Security > Secure Login System > Security Device. The RequestSecurity Device page appears by default.
2. To obtain your Security Device, click theYes radio button, then clickBack. An online security codecard appears that you should use until you receive your Security Device from us. ClickPrint to print
Account Management Users' Guide 491
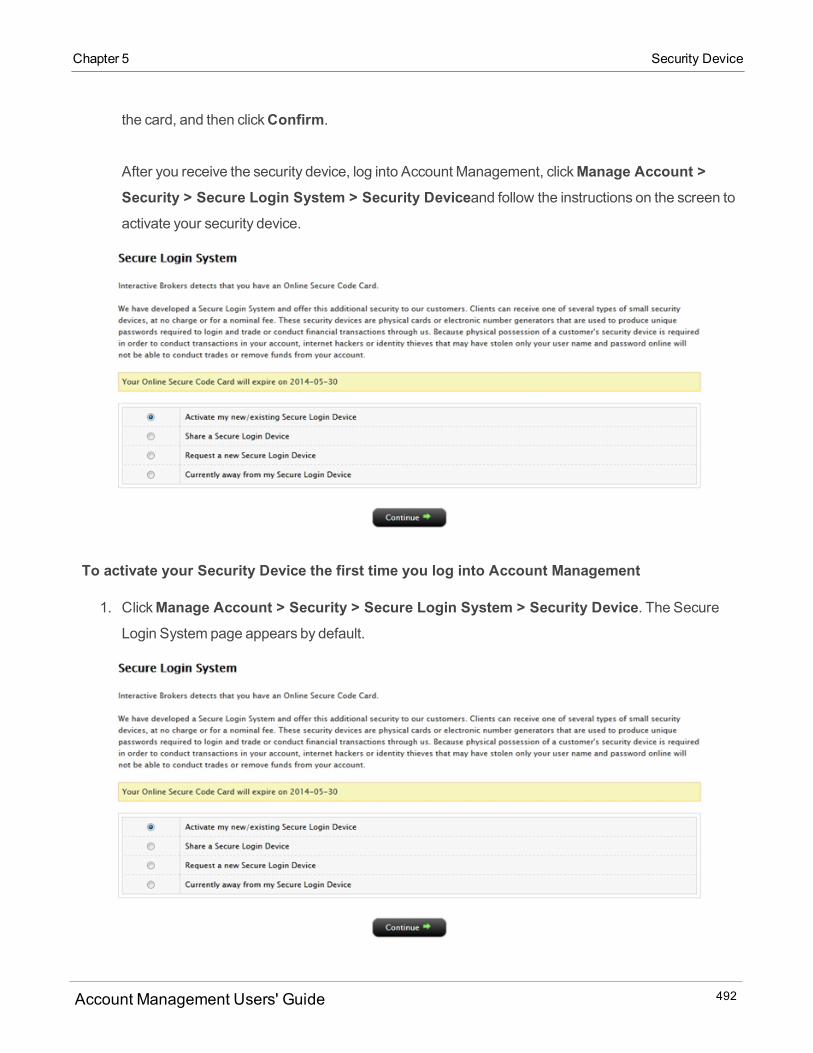
the card, and then clickConfirm.
After you receive the security device, log into Account Management, clickManage Account >Security > Secure Login System > Security Deviceand follow the instructions on the screen to
activate your security device.
To activate your Security Device the first time you log into Account Management
1. ClickManage Account > Security > Secure Login System > Security Device. The SecureLogin System page appears by default.
Account Management Users' Guide 492
Chapter 5 Security Device
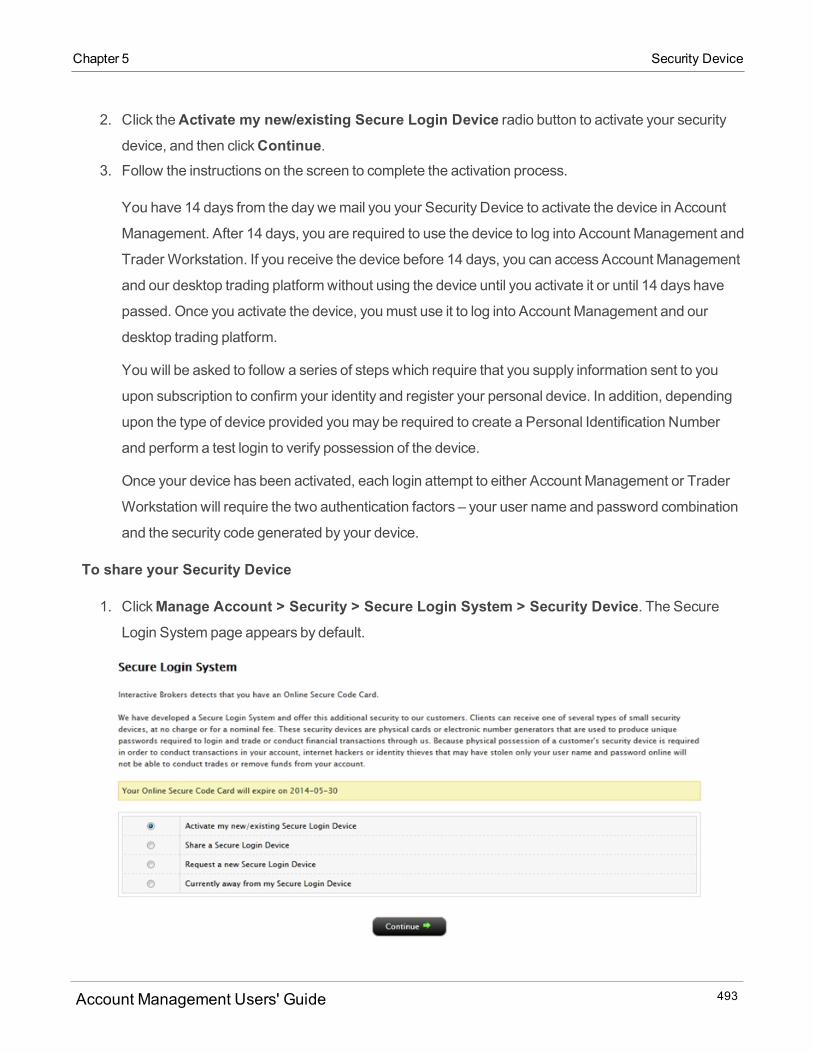
Chapter 5 Security Device
2. Click theActivate my new/existing Secure Login Device radio button to activate your securitydevice, and then clickContinue.
3. Follow the instructions on the screen to complete the activation process.
You have 14 days from the daywemail you your Security Device to activate the device in Account
Management. After 14 days, you are required to use the device to log into Account Management and
Trader Workstation. If you receive the device before 14 days, you can access Account Management
and our desktop trading platformwithout using the device until you activate it or until 14 days have
passed. Once you activate the device, youmust use it to log into Account Management and our
desktop trading platform.
You will be asked to follow a series of stepswhich require that you supply information sent to you
upon subscription to confirm your identity and register your personal device. In addition, depending
upon the type of device provided youmay be required to create a Personal Identification Number
and perform a test login to verify possession of the device.
Once your device has been activated, each login attempt to either Account Management or Trader
Workstation will require the two authentication factors – your user name and password combination
and the security code generated by your device.
To share your Security Device
1. ClickManage Account > Security > Secure Login System > Security Device. The SecureLogin System page appears by default.
Account Management Users' Guide 493

2. Click theShare a Secure Login Device radio button to share your security device, and then clickContinue.
3. Enter the username and password of the user with whom you want to share the security device in
the fields provided.
o As noted on the page, the security device that you want to sharemust be of equal or greater
security strength than the requesting user’s current security device.o Please note that for some customers, review and approval by our staff will be required prior to pro-
cessing your request.
3. ClickContinue to submit your request.
To apply for a Security Device if you have already opted out
1. ClickManage Account > Security > Secure Login System > Security Device. The SecureLogin System page appears by default.
2. The screen informs you that you have opted out of the program. ClickCancel.
The Request Security Device page opens.
3. To obtain your Security Device, click theYes radio button, then clickBack. An online security codecard appears that you should use until you receive your Security Device from us. ClickPrint to printthe card, and then clickConfirm.
After you receive the security device, log into Account Management, clickManage Account >
Account Management Users' Guide 494
Chapter 5 Security Device

Chapter 5 If You Choose Not to Participate in the Secure Login System
Security > Secure Login System > Security Deviceand follow the instructions on the screen to
activate your security device.
Your security device will be express shipped to you on the same day if your request has been
completed prior to 13:00 ET on a US business day. Otherwise, the device will be shipped on the
following business day. Depending on your location and the capabilities of the shipper, a delivery
tracking number will bemade available after 18:00 ET on the shipping date.
4. After you receive the security device, log into Account Management, clickManage Account >Security > Secure Login System > Security Device and follow the instructions on the screen to
activate your security device.
You will be asked to follow a series of stepswhich require that you supply information sent to you
upon subscription to confirm your identity and register your personal device. In addition, depending
upon the type of device provided youmay be required to create a Personal Identification Number
and perform a test login to verify possession of the device.
Once your device has been activated, each login attempt to either Account Management or Trader
Workstation will require the two authentication factors – your user name and password combination
and the security code generated by your device.
If You Choose Not to Participate in the Secure Login System
If you choose not to participate in the Secure Login System, be aware of the following:
Account Management Users' Guide 495

Wewill not compensate you or credit your account in the event it is compromised by hackers or identity
thieves
You can only withdraw amaximumof 50,000 USD in any one day.
Youmust wait 10 days to wire funds from your account after any change to the banking instructions for
your account, and youmust wait 10 days to withdraw funds by check after any change to your address
information.
Under the Customer Agreement, customers are responsible for all transactions initiated using their
user name and password.
When Will I Receive My Device
The delivery schedule depends on the type of security device you will be receiving.
Security Code Cards are shipped several times per week via regular mail.
Digital Security Cards are shipped several times per week via regular mail.
Gold/PlatinumDevices are shipped every day via Expressmail for requests that have been completed
prior to 13:00 ET on a US business day.
Depending upon your location and the capabilities of the shipper, a delivery tracking number will bemade
available after 18:00 ET on the shipping date. You can view this tracking number by clickingManageAccount > Security > Secure Login System in Account Management after that time or by calling
technical assistance at 1-877-442-2757, Option 2, then 6.
Security Device Sharing
A common security device obtained through our Secure Login System can be used to accessmultiple
accounts as long as the user identification of the accounts is identical. Use the Security Device Sharing
page to share a security device with a linked account.
This page is identical to selecting the Share a Secure Login Device option on themain Secure Login
Device page.
Who can access the Security Device Sharing page?
You can access this page if you are a(n):
Account Management Users' Guide 496
Chapter 5 WhenWill I ReceiveMy Device
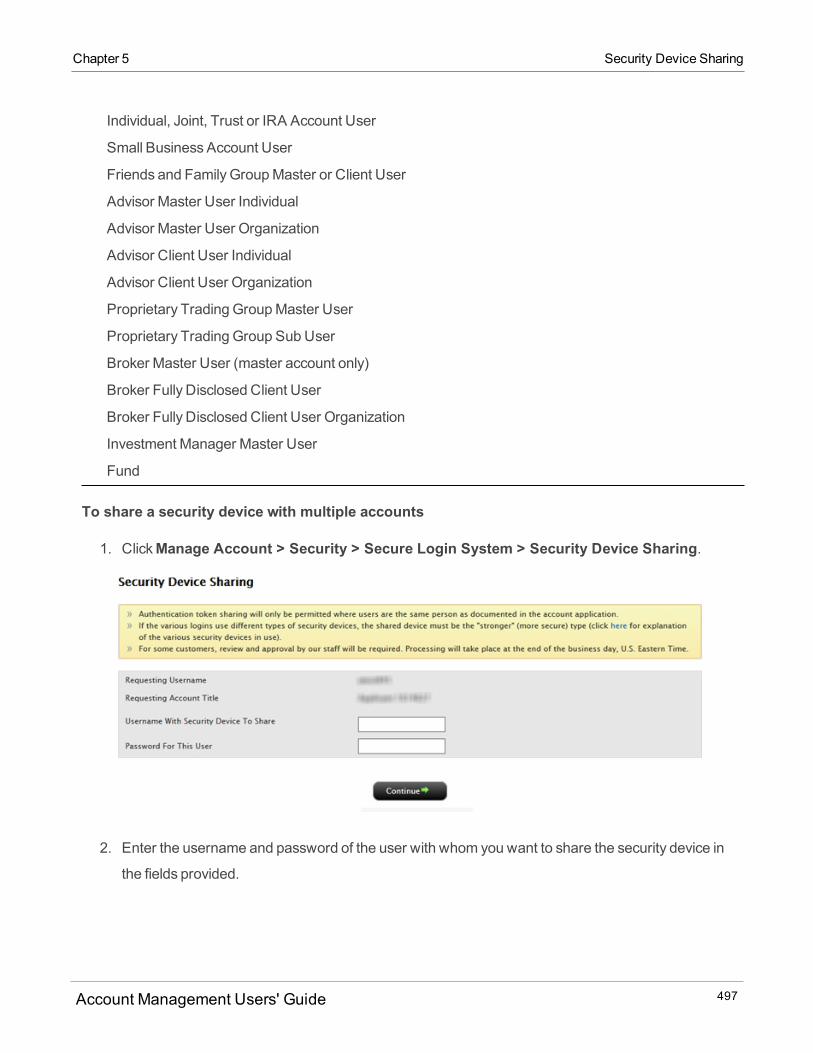
Chapter 5 Security Device Sharing
Individual, Joint, Trust or IRA Account User
Small Business Account User
Friends and Family GroupMaster or Client User
Advisor Master User Individual
Advisor Master User Organization
Advisor Client User Individual
Advisor Client User Organization
Proprietary Trading GroupMaster User
Proprietary Trading Group SubUser
Broker Master User (master account only)
Broker Fully Disclosed Client User
Broker Fully Disclosed Client User Organization
Investment Manager Master User
Fund
To share a security device with multiple accounts
1. ClickManage Account > Security > Secure Login System > Security Device Sharing.
2. Enter the username and password of the user with whom you want to share the security device in
the fields provided.
Account Management Users' Guide 497
o As noted on the page, the security device that you want to sharemust be of equal or greater
security strength than the requesting user’s current security device.o Please note that for some customers, review and approval by our staff will be required prior to pro-
cessing your request.
3. ClickContinue to submit your request.
About Security Devices
Click one of the following links to learnmore about our using your security device:
Security Code Cards - Recommended for accounts with a balance less than 500,000 USD. This is a
credit card-like device with 224 alpha-numeric codes.
Digital Security Card+ - Recommended for accounts with a balance greater than 500,000 USD. An
enhanced version of the Digital Security Card, thismodel adds an extra layer of security through the
use of a challenge code and a higher count of possible code permutations.
Security Code Cards
It's easy to securely log into any of our applications using your Security Code Card. Simply find and enter
the correct values from your card into the PassCode Authentication Box on the IB website.
To login with your Security Code Card
1. Start by logging into your application as always, using your username and password.
The PassCode Card Authentication box pops up.
2. Locate the first Index number in the authentication box.
In our image below, the first Index number is "100."
3. Using your Security Code Card, locate that Index number, and look immediately to the right to find its
corresponding card value.
In the image below, the Index number "100" has a corresponding card value ofA3D.
Account Management Users' Guide 498
Chapter 5 About Security Devices

Chapter 5 Digital Security Card+
4. Type that value in the entry field of the PassCode Card Authentication box on the website.
5. Follow steps 2 and 3 above for the next Index number, then type that value into the entry field of the
PassCode Card Authentication box on the website.
In the image below, the second Index number is "50" and its corresponding card value isZ3V.
6. Click theSubmit button.
Digital Security Card+
It's easy to securely log into any of our applications using your Digital Security Card. Simply enter your pin
into the device to generate a string of randomly-generated characters, and enter these characters into the
Security Code field in the login box.
To login with your Digital Security Card
Account Management Users' Guide 499
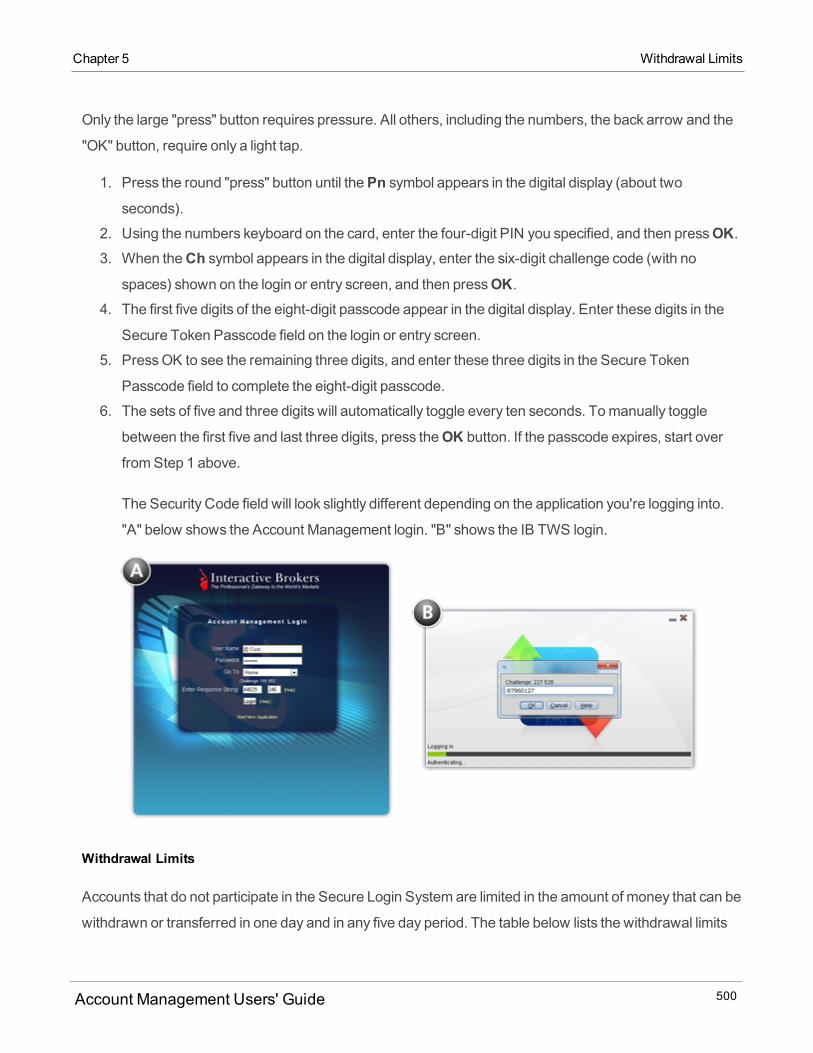
Only the large "press" button requires pressure. All others, including the numbers, the back arrow and the
"OK" button, require only a light tap.
1. Press the round "press" button until thePn symbol appears in the digital display (about twoseconds).
2. Using the numbers keyboard on the card, enter the four-digit PIN you specified, and then pressOK.3. When theCh symbol appears in the digital display, enter the six-digit challenge code (with no
spaces) shown on the login or entry screen, and then pressOK.4. The first five digits of the eight-digit passcode appear in the digital display. Enter these digits in the
Secure Token Passcode field on the login or entry screen.
5. PressOK to see the remaining three digits, and enter these three digits in the Secure Token
Passcode field to complete the eight-digit passcode.
6. The sets of five and three digits will automatically toggle every ten seconds. Tomanually toggle
between the first five and last three digits, press theOK button. If the passcode expires, start over
fromStep 1 above.
The Security Code field will look slightly different depending on the application you're logging into.
"A" below shows the Account Management login. "B" shows the IB TWS login.
Withdrawal Limits
Accounts that do not participate in the Secure Login System are limited in the amount of money that can be
withdrawn or transferred in one day and in any five day period. The table below lists the withdrawal limits
Account Management Users' Guide 500
Chapter 5 Withdrawal Limits
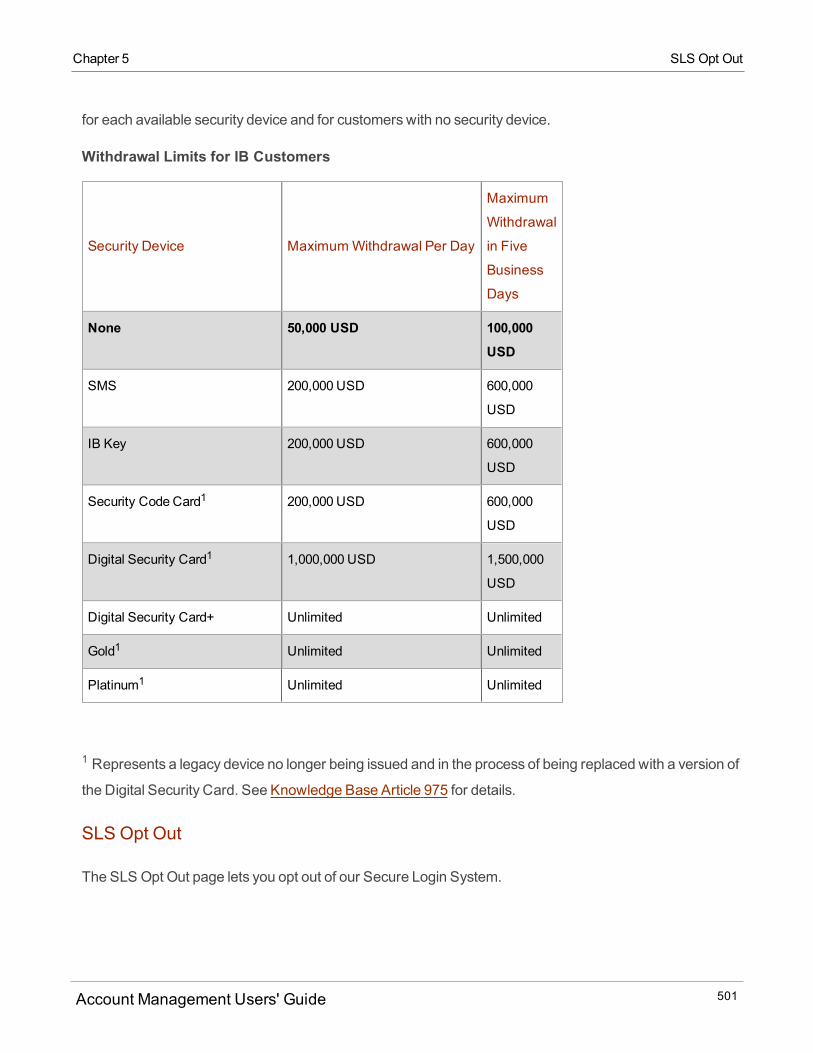
Chapter 5 SLS Opt Out
for each available security device and for customerswith no security device.
Withdrawal Limits for IB Customers
Security Device MaximumWithdrawal Per Day
Maximum
Withdrawal
in Five
Business
Days
None 50,000 USD 100,000
USD
SMS 200,000 USD 600,000
USD
IB Key 200,000 USD 600,000
USD
Security Code Card1 200,000 USD 600,000
USD
Digital Security Card1 1,000,000 USD 1,500,000
USD
Digital Security Card+ Unlimited Unlimited
Gold1 Unlimited Unlimited
Platinum1 Unlimited Unlimited
1 Represents a legacy device no longer being issued and in the process of being replaced with a version of
the Digital Security Card. See Knowledge Base Article 975 for details.
SLS Opt Out
The SLS Opt Out page lets you opt out of our Secure Login System.
Account Management Users' Guide 501
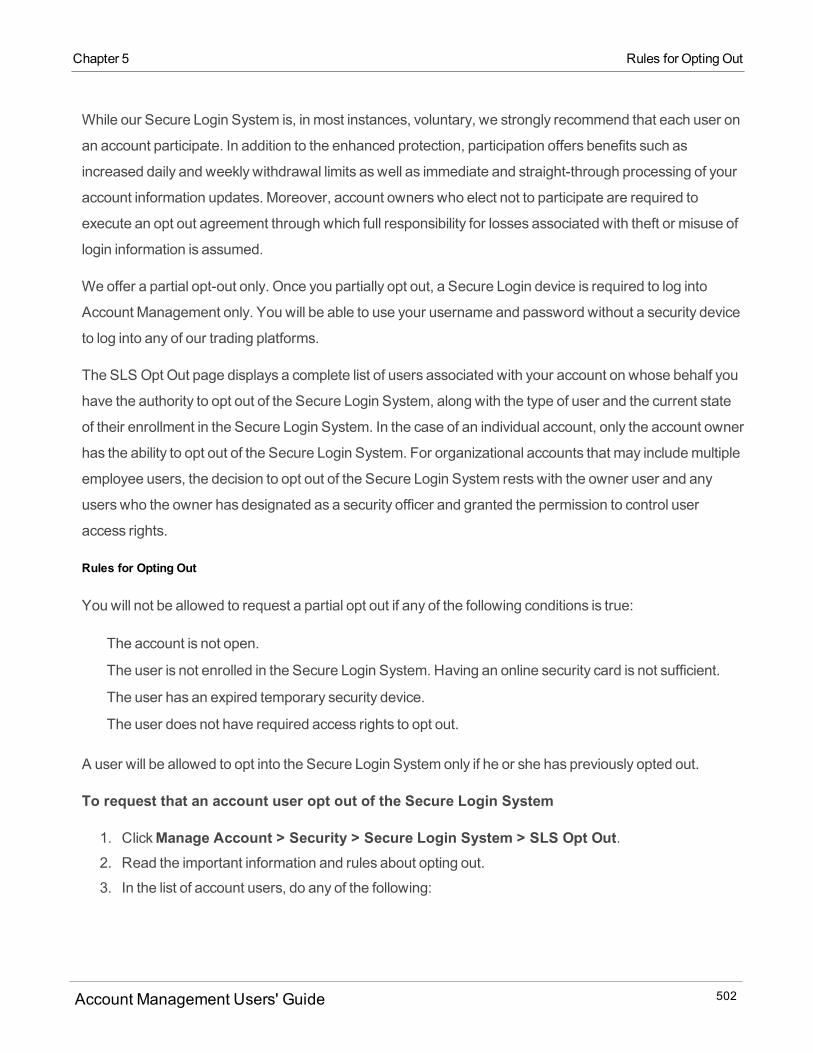
While our Secure Login System is, in most instances, voluntary, we strongly recommend that each user on
an account participate. In addition to the enhanced protection, participation offers benefits such as
increased daily and weekly withdrawal limits aswell as immediate and straight-through processing of your
account information updates. Moreover, account owners who elect not to participate are required to
execute an opt out agreement through which full responsibility for losses associated with theft or misuse of
login information is assumed.
We offer a partial opt-out only. Once you partially opt out, a Secure Login device is required to log into
Account Management only. You will be able to use your username and password without a security device
to log into any of our trading platforms.
The SLS Opt Out page displays a complete list of users associated with your account on whose behalf you
have the authority to opt out of the Secure Login System, along with the type of user and the current state
of their enrollment in the Secure Login System. In the case of an individual account, only the account owner
has the ability to opt out of the Secure Login System. For organizational accounts that may includemultiple
employee users, the decision to opt out of the Secure Login System rests with the owner user and any
users who the owner has designated as a security officer and granted the permission to control user
access rights.
Rules for Opting Out
Youwill not be allowed to request a partial opt out if any of the following conditions is true:
The account is not open.
The user is not enrolled in the Secure Login System. Having an online security card is not sufficient.
The user has an expired temporary security device.
The user does not have required access rights to opt out.
A user will be allowed to opt into the Secure Login System only if he or she has previously opted out.
To request that an account user opt out of the Secure Login System
1. ClickManage Account > Security > Secure Login System > SLS Opt Out.2. Read the important information and rules about opting out.
3. In the list of account users, do any of the following:
Account Management Users' Guide 502
Chapter 5 Rules for Opting Out
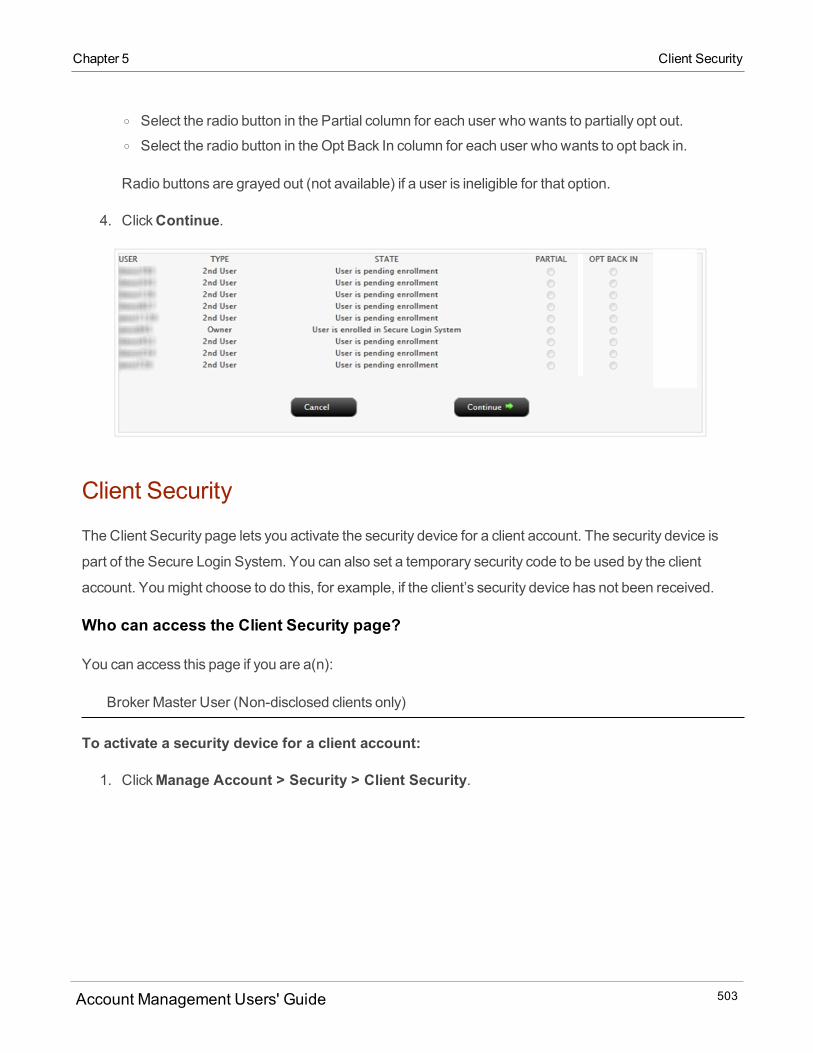
Chapter 5 Client Security
o Select the radio button in the Partial column for each user who wants to partially opt out.o Select the radio button in the Opt Back In column for each user who wants to opt back in.
Radio buttons are grayed out (not available) if a user is ineligible for that option.
4. ClickContinue.
Client Security
TheClient Security page lets you activate the security device for a client account. The security device is
part of the Secure Login System. You can also set a temporary security code to be used by the client
account. Youmight choose to do this, for example, if the client’s security device has not been received.
Who can access the Client Security page?
You can access this page if you are a(n):
Broker Master User (Non-disclosed clients only)
To activate a security device for a client account:
1. ClickManage Account > Security > Client Security.
Account Management Users' Guide 503
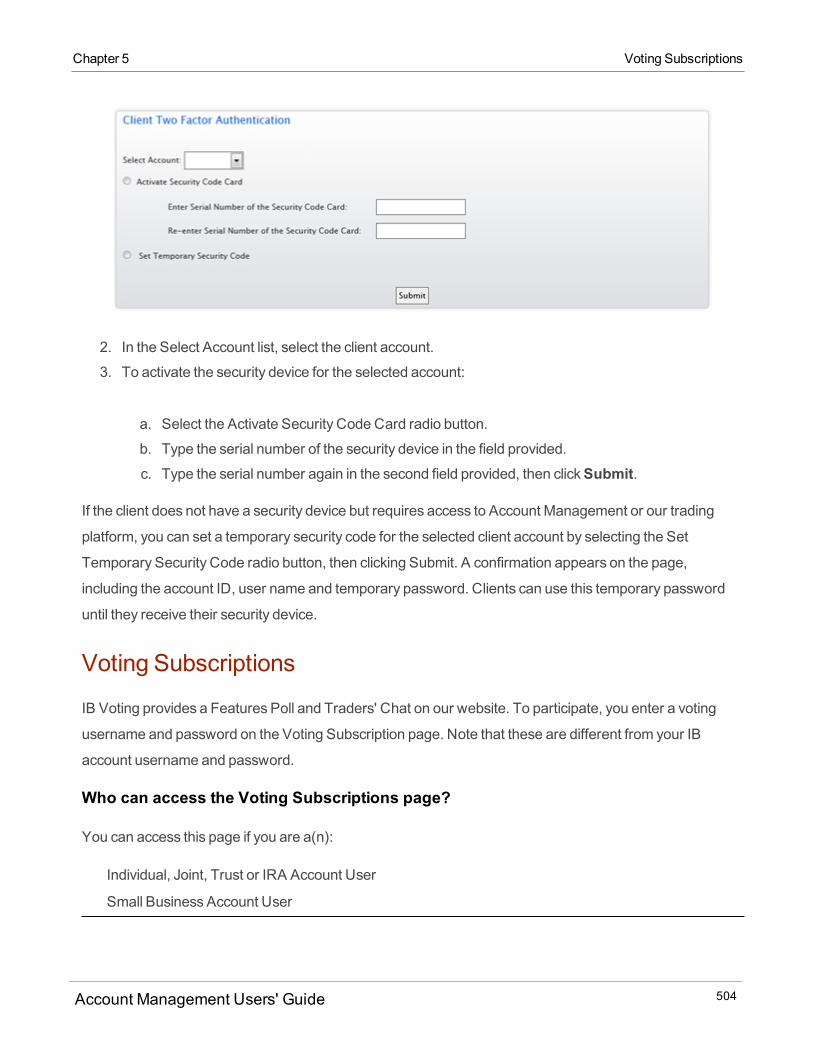
2. In the Select Account list, select the client account.
3. To activate the security device for the selected account:
a. Select the Activate Security Code Card radio button.
b. Type the serial number of the security device in the field provided.
c. Type the serial number again in the second field provided, then clickSubmit.
If the client does not have a security device but requires access to Account Management or our trading
platform, you can set a temporary security code for the selected client account by selecting the Set
Temporary Security Code radio button, then clicking Submit. A confirmation appears on the page,
including the account ID, user name and temporary password. Clients can use this temporary password
until they receive their security device.
Voting Subscriptions
IB Voting provides a Features Poll and Traders' Chat on our website. To participate, you enter a voting
username and password on the Voting Subscription page. Note that these are different from your IB
account username and password.
Who can access the Voting Subscriptions page?
You can access this page if you are a(n):
Individual, Joint, Trust or IRA Account User
Small Business Account User
Account Management Users' Guide 504
Chapter 5 Voting Subscriptions
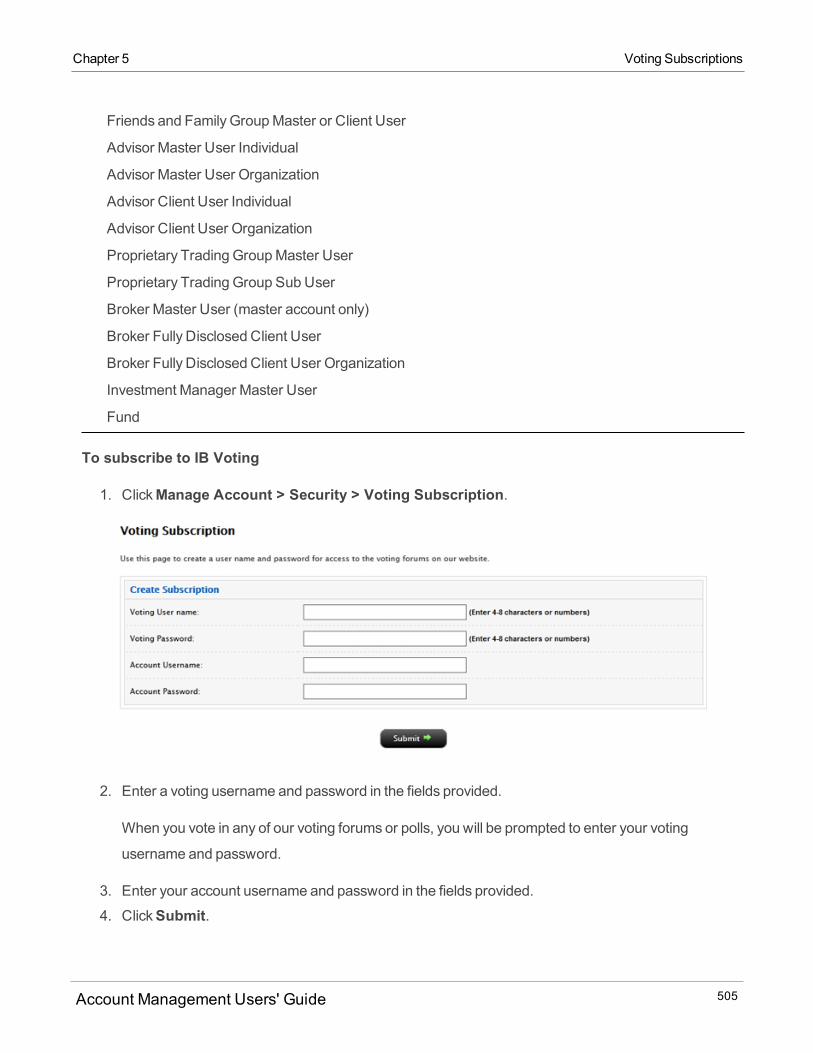
Chapter 5 Voting Subscriptions
Friends and Family GroupMaster or Client User
Advisor Master User Individual
Advisor Master User Organization
Advisor Client User Individual
Advisor Client User Organization
Proprietary Trading GroupMaster User
Proprietary Trading Group SubUser
Broker Master User (master account only)
Broker Fully Disclosed Client User
Broker Fully Disclosed Client User Organization
Investment Manager Master User
Fund
To subscribe to IB Voting
1. ClickManage Account > Security > Voting Subscription.
2. Enter a voting username and password in the fields provided.
When you vote in any of our voting forums or polls, you will be prompted to enter your voting
username and password.
3. Enter your account username and password in the fields provided.
4. ClickSubmit.
Account Management Users' Guide 505
Your voting subscription automatically expires after one year, at which time you can re-subscribe by
clicking theReactivate button, which only appears when your subscription has expired.
Audit Trail
The Audit Trail page letsMaster account users view Account Management requests for their own
accounts.
Who can access the Audit Trail page?
You can access this page if you are a(n):
Advisor Master User Individual
Advisor Master User Organization (can view Audit Trail for advisor master account only)
Proprietary Trading GroupMaster User (can view Audit Trail for master and sub accounts)
Broker Master User (can view Audit Trail for master and non-disclosed client accounts)
Investment Manager Master User
To view the audit trail
1. ClickManage Account > Security > Audit Trail.
Account Management Users' Guide 506
Chapter 5 Audit Trail

Chapter 5 Access Rights
2. Select the number of days back you wish the audit trail to include by selectingAll, Previous 90
Days or Previous 180 Days from the Show requests drop-down list, then clickSubmit.
The page refresheswith the updated information.
The audit trail displays type of request, the date and time of the request, the date and time the
request was updated (if applicable), and the state of the request (CONFIRMED,
ACKNOWLEDGED, PROCESSED, CANCELED).
Access Rights
The AccessRights tab includes the following pages:
Configure - Security Officers can view account-level access rights to Account Management functions
and set the number of Primary and Secondary authorizers
Account Management Users' Guide 507
Users - Add users to your account, modify existing users' information or access rights to Account Man-
agement and delete users from your account
User Roles - Create and delete user roles.
For more information
AccessRightsOverview
Security Officers
AccessRights Reference
User Access Rights Guide
Access Rights Overview
Wegive our clients the ability to create users through User AccessRights. The assignment of users and
their access rights is controlled by an organization's Security Officer(s). Individual accounts can also add
users and assign access rights to them, but these accounts do not have access to the full range of user
access rights functionality available to Security Officers for institutional accounts.
Institutional accounts can add up to 250 users, including employees and non-employees. Access rights to
the different functions in Account Management can be limited for each of those users. In addition, we also
offer an authorization feature to institutional accounts whereinmultiple usersmust approve certain Account
Management requests, such as funding transactions.
User Access Rights Availability
The complete User AccessRights system, including the ability to select Security Officers and use
authorizations, is available to the following account structures:
Professional Advisors
Brokers
Proprietary Trading Groups
Fund Investment Managers
Small Business Accounts (Corporation, Partnership, LLC or unincorporate legal structure)
Account Management Users' Guide 508
Chapter 5 User Access Rights Guide
Chapter 5 Access Rights and Access Groups
ALL account structures have the ability to add users to an account and assign them access rights to
Account Management functions EXCEPT:
Broker Non-Disclosed Clients
Broker OmnibusClients
Proprietary Trading Group Sub Accounts
Access Rights and Access Groups
User access rights are organized into access groups that correspond to these Account Management
menus:
Trade
Funding
Reports
Manage Account
Individual account holders cannot grant Funding rights to new users that they add. Security Officers for
institutional accounts CAN however grant Funding rights.
Each access group contains several functions, which themselves correspond to the individual functions in
Account Management. When assigning access rights to a user, you can assign access rights to an entire
access group and all of its individual functions, or you can assign access rights to the individual functions
themselves.
All account users automatically get rights to Security-related functions in Account Management
(Password, Secure Login System, Secure Login SystemDevice Sharing, and Voting Subscriptions), and
the functions in theManage Account > Settings access group (User Information and Change Email
Address).
Security Officers for account structureswith multiple users and client accounts can grant limited access to a
subset of user functions or accounts. For example, a Security Officer might want to give User A the ability
to only trade, while giving User B only the ability to look at account statements. User C might only be able to
trade client accounts 1-5, while User D can trade client accounts 6-10.
Assign user access rights to users when you add them to your account on theManage Account >Access Rights > Users page in Account Management.
Account Management Users' Guide 509
Security Officers
The assignment of access rights to users is controlled by an organization's Security Officer. Security
Officers are designated employeeswho can assign access rights and authorize functions. The Security
Officer can also add, modify and delete users.
Institutional account holders can add Security Officers to their account during the account application
process, if they require additional Security Officers for authorization purposes. To add Security Officers
after your account is open, youmust send a paper form request to us.
Security Officer Approvals
As an added layer of security, you can require that any changesmade by one Security Officer be approved
by one or two other Security Officers. To change the number of Security Officer approvals required, you
must complete and submit a request form.
Account-Level Access Rights
Security Officers can view account-level access rights on the AccessRights > Configure page in Account
Management but cannot change themwithout a special request to us.
User Roles
A user role is a set of user access rights saved with a unique name. User roles allow Security Officers (and
individual account holders) to save a set of user access rights and quickly apply them to users. This is
useful if you havemultiple users to add to an account. User roles work the sameway as user access rights:
functions are organized into access groups based on the Account Management menu structure, and you
expand each access group to view and assign rights to functions located in second-level menus. You can
select a user role only if you have created and saved at least one.
Create user roles on theManage Account > Access Rights > User Roles page in AccountManagement.
Primary and Secondary Authorizers
If your organization requires additional security for Account Management functions, you can appoint
authorizers to approve requests.Authorizers are users who provide additional layers of security for
different Account Management functions such as funding requests.
Account Management Users' Guide 510
Chapter 5 Security Officers
Chapter 5 User Access Rights Summary
There are two levels of authorizers: Primary and Secondary. These levels of authorization let youmatch
your organization's approval process to our Account Management system. A Primary Authorizer is the
highest level of approval while a Secondary Authorizer is the next level of approval. For example, your
CEOmight be the Primary Authorizer and the CIOmight be the Secondary Authorizer in your organization.
You set up authorizations on theManage Account > Access Rights > Configuration page in AccountManagement.
Primary and Secondary Authorizers authorize pending changes on theHome > Pending Items page.
User Access Rights Summary
Organizations can follow these steps to set up a user access rights implementation that includes Security
Officers and authorizations.
1. During your account application process, designate one or more persons to be Security Officers.
o As the account owner, you are automatically designated as a Security Officer.o If you forgot to do this, or you want to addmore Security Officers to your account, send a request
to us.o If you need an additional layer of security, you can require that changes submitted by one Secur-
ity Officer must be approved by other Security Officers. You set the number of these Security
Officer approvals during the application process.
2. After your account has been approved, your Security Officer logs into Account Management and cre-
ates and saves user roles to be able to apply reusable sets of access rights to more than one account
users.
3. Your Security Officer adds users to your account, granting them access rights to the different func-
tions in Account Management to correspond to the users and functions in your organization. At this
time, the Security Officer will also apply any saved user roles to the new users.
4. Your Security Officer sets the number of Primary and Secondary Authorizers for specific functions in
Account Management. On the same page in Account Management, the Security Officer can view
the current account-level access rights.
Account Management Users' Guide 511
About Security Officers
The assignment of users and their access rights is controlled by an organization's Security Officer(s).
Security Officers are designated employeeswho can assign access rights and authorize functions. The
Security Officer can also add, modify and delete users.
Creating Security Officers During the Account Application Process
During the account application process, the owner of the account (the account applicant; who is
automatically assigned the role of Security Officer) can select additional Security Officers, then assign each
Security Officer access rights to the various functions in Account Management. OnlyOrganization
customer type accounts can create security officers.
If you need an additional layer of security, you can require that any changesmade by one Security Officer
be approved by one or two other Security Officers. You can set the number these Security Officer
approvals during the application process. Any Security Officer can function as a Security Officer approver.
Adding and Deleting Security Officers
To add Security Officers after your account is open, you can add a new user to your account and designate
that user as a Security Officer, designate an existing user as a Security Officer (on theManage Account >Access Rights > Users page), or send a request to us. You can access the request form on theSupport> Paper Forms page of Account Management.
You can delete Security Officers from your account on theManage Account > Access Rights > Userspage of Account Management, but only if such removal does not change the number of required Security
Officer approvals set in your account application. For example, if your account currently has three security
Officers but requires only two, you can delete one of them fromwithin Account Management. If your
account currently has two Security Officers and requires two, you cannot delete one.
Security Officers and Account Management
Once you have designated a Security Officer for your account, that person will have access rights to the
Account Management functions that were assigned during the account application process. The Security
Officer is the only person who can view and access the following security-related functions in Account
Management:
Account Management Users' Guide 512
Chapter 5 About Security Officers
Chapter 5 Configure Access Rights
Manage Account > Access Rights > Configuration - View account-level access rights for an
account and set the number of Primary and Secondary Authorizers for Account Management, includ-
ing funding. This function is available only to institutional accounts.
Manage Account > Access Rights > Users - Add, delete andmodify users and assign accessrights to Account Management functions. Note that individual accounts (Individual, Joint, Trust, etc. cus-
tomer types) also have access to this page.
The Security and Access rightsmenus inManage Account, and the Change Email Address function
(these rights are preselected in the account application).
Configure Access Rights
When your account is first opened, it will have the ability to access all functions in Account Management.
Security Officers for your account use the AccessRights Configuration page to:
View account-level access rights for your account. Account-level access rights identify which functions
your account can access.
Set the number of Primary/Secondary authorizers required for Account Management functions.
Account access rights are organized into access rights groups that correspond to the Account
Management menus.
Access to each function in an access rights group is displayed as either granted or denied. Denied
functionswill not appear in the Account Management menus. Because the account applicant is
automatically a Security Officer, he or she has access to all functions in Account Management. When your
account is first opened, account-level access rights to ALL Account Management functions are granted by
default.
To change your account access rights, including granting or denying access to Account Management
functions, youmust send a request to us.
Who can access the Access Rights Configuration page?
You can access this page if you are a Security Officer for any institutional customer types.
To view account access rights and set the number of primary and secondary authorizers
Account Management Users' Guide 513
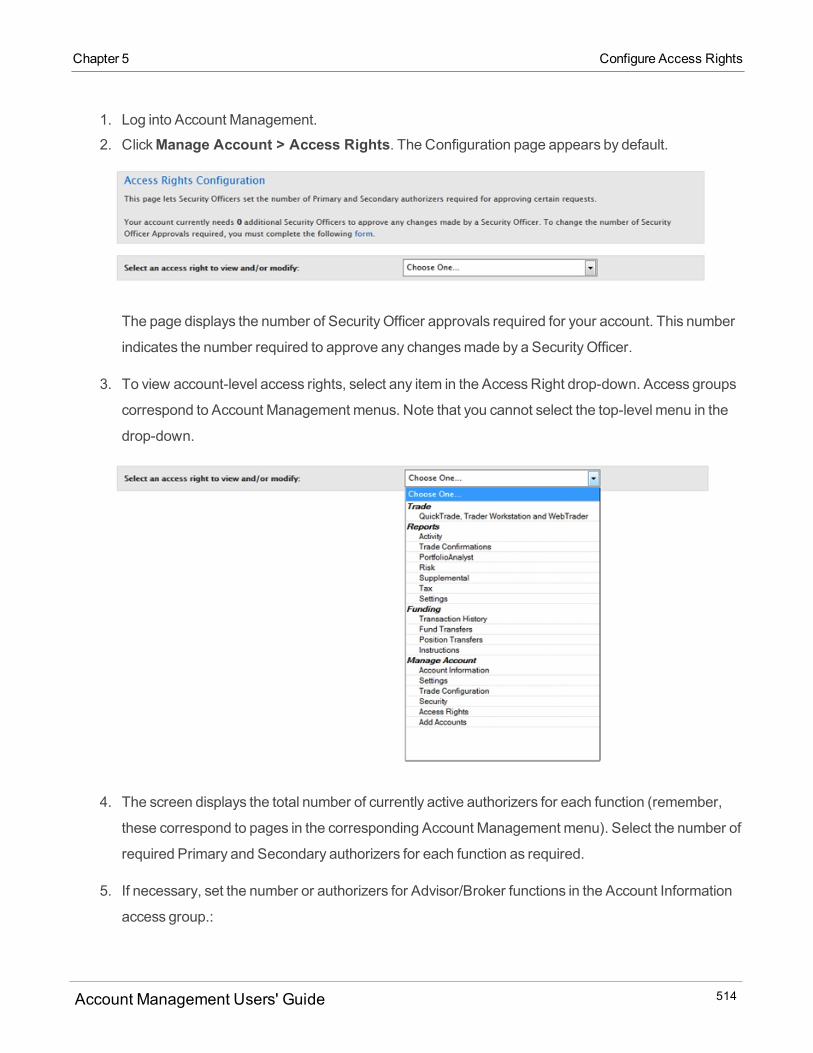
1. Log into Account Management.
2. ClickManage Account > Access Rights. The Configuration page appears by default.
The page displays the number of Security Officer approvals required for your account. This number
indicates the number required to approve any changesmade by a Security Officer.
3. To view account-level access rights, select any item in the AccessRight drop-down. Access groups
correspond to Account Management menus. Note that you cannot select the top-level menu in the
drop-down.
4. The screen displays the total number of currently active authorizers for each function (remember,
these correspond to pages in the corresponding Account Management menu). Select the number of
required Primary and Secondary authorizers for each function as required.
5. If necessary, set the number or authorizers for Advisor/Broker functions in the Account Information
access group.:
Account Management Users' Guide 514
Chapter 5 Configure Access Rights

Chapter 5 Users
o Select Account Information from the Select AccessGroup drop-down.o Select the number of required Primary and Secondary authorizers for Advisor Qualifications, Fin-
ancial Information and Broker Declaration functions as required.o ClickContinuewhen you are done.
6. Sub and client account holders (who function as their own Security Officers) can assign account-
level access rights to their Master Users.
7. If you are a sub or client account holder, select an access group from the drop-down, then select the
check box in theMaster User Access column for each function that you want your Master User to be
able to access.
8. ClickContinue to save your changes.
You can view your pending changes to access rights configuration on theHome > Pending Items page.Move your mouse over those pending items to see a popup with Eligible Security Officers displayed:
Users
TheUsers page lets you:
Add users to an account.
Modify Account Management access rights for existing users.
Add up to two usernames for a user.
Delete users from an account.
Add a Security Officer
Who can access the Users page?
All users and Security Officers can access this page except Broker Non-Disclosed Clients and Broker
Account Management Users' Guide 515
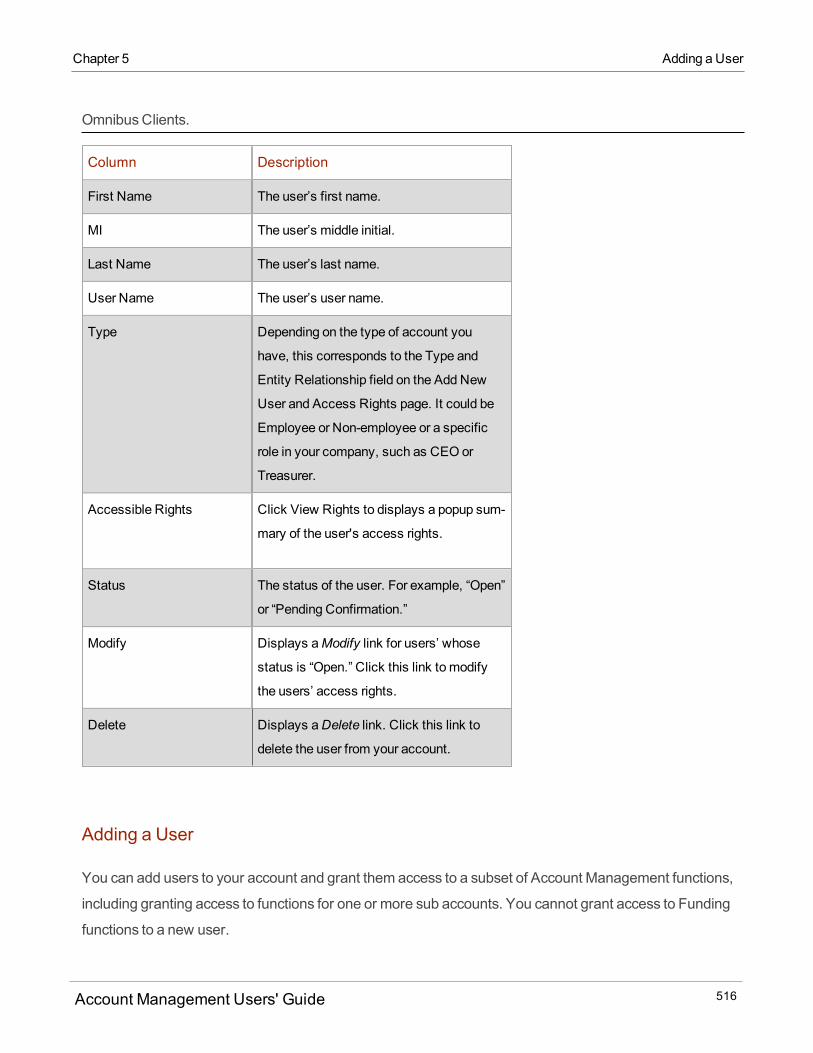
OmnibusClients.
Column Description
First Name The user’s first name.
MI The user’s middle initial.
Last Name The user’s last name.
User Name The user’s user name.
Type Depending on the type of account you
have, this corresponds to the Type and
Entity Relationship field on the Add New
User and Access Rights page. It could be
Employee or Non-employee or a specific
role in your company, such as CEO or
Treasurer.
Accessible Rights Click View Rights to displays a popup sum-
mary of the user's access rights.
Status The status of the user. For example, “Open”
or “Pending Confirmation.”
Modify Displays aModify link for users’ whose
status is “Open.” Click this link to modify
the users’ access rights.
Delete Displays aDelete link. Click this link to
delete the user from your account.
Adding a User
You can add users to your account and grant them access to a subset of Account Management functions,
including granting access to functions for one or more sub accounts. You cannot grant access to Funding
functions to a new user.
Account Management Users' Guide 516
Chapter 5 Adding a User
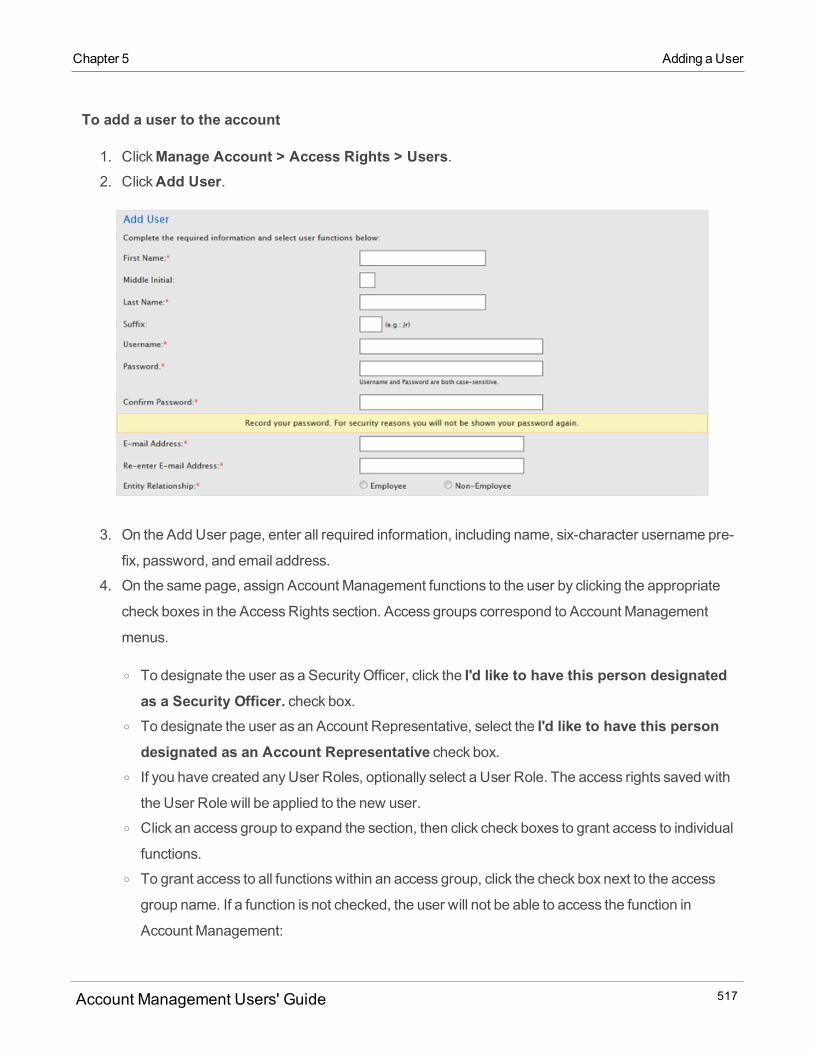
Chapter 5 Adding a User
To add a user to the account
1. ClickManage Account > Access Rights > Users.2. ClickAdd User.
3. On the Add User page, enter all required information, including name, six-character username pre-
fix, password, and email address.
4. On the same page, assign Account Management functions to the user by clicking the appropriate
check boxes in the AccessRights section. Access groups correspond to Account Management
menus.
o To designate the user as a Security Officer, click the I'd like to have this person designatedas a Security Officer. check box.
o To designate the user as an Account Representative, select the I'd like to have this persondesignated as an Account Representative check box.
o If you have created anyUser Roles, optionally select a User Role. The access rights saved with
the User Role will be applied to the new user.o Click an access group to expand the section, then click check boxes to grant access to individual
functions.o To grant access to all functionswithin an access group, click the check box next to the access
group name. If a function is not checked, the user will not be able to access the function in
Account Management:
Account Management Users' Guide 517
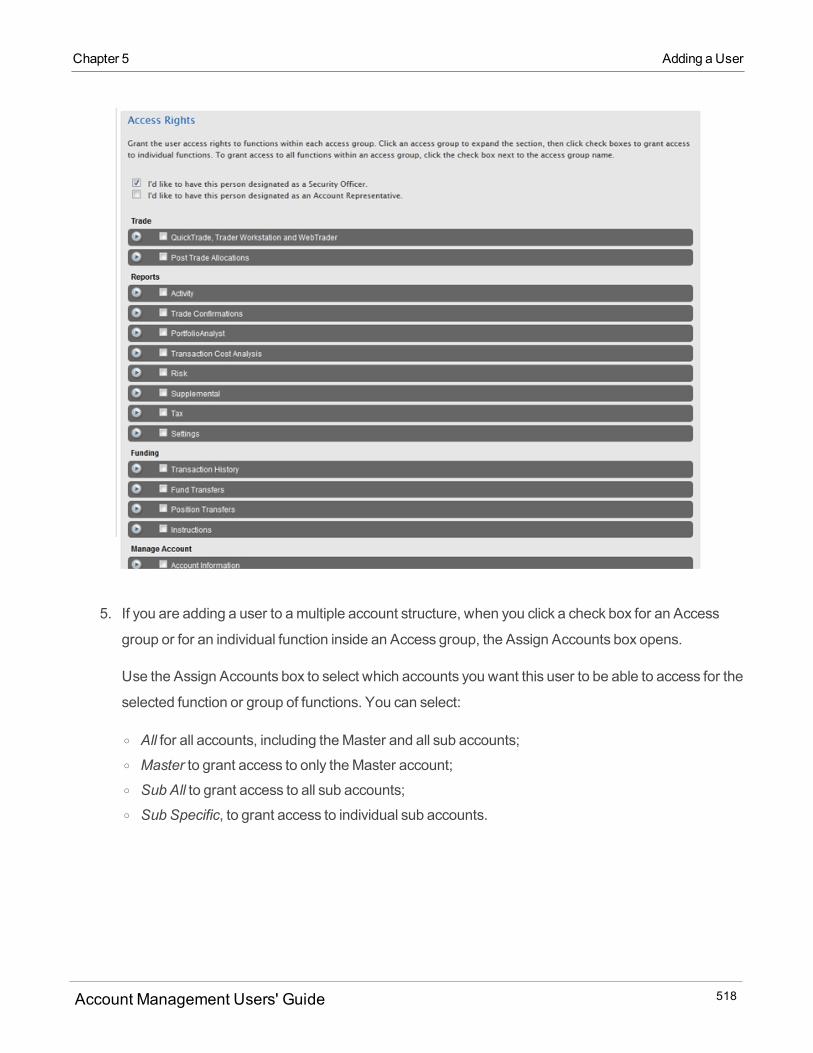
5. If you are adding a user to amultiple account structure, when you click a check box for an Access
group or for an individual function inside an Access group, the Assign Accounts box opens.
Use the Assign Accounts box to select which accounts you want this user to be able to access for the
selected function or group of functions. You can select:
o All for all accounts, including theMaster and all sub accounts;o Master to grant access to only theMaster account;o Sub All to grant access to all sub accounts;o Sub Specific, to grant access to individual sub accounts.
Account Management Users' Guide 518
Chapter 5 Adding a User
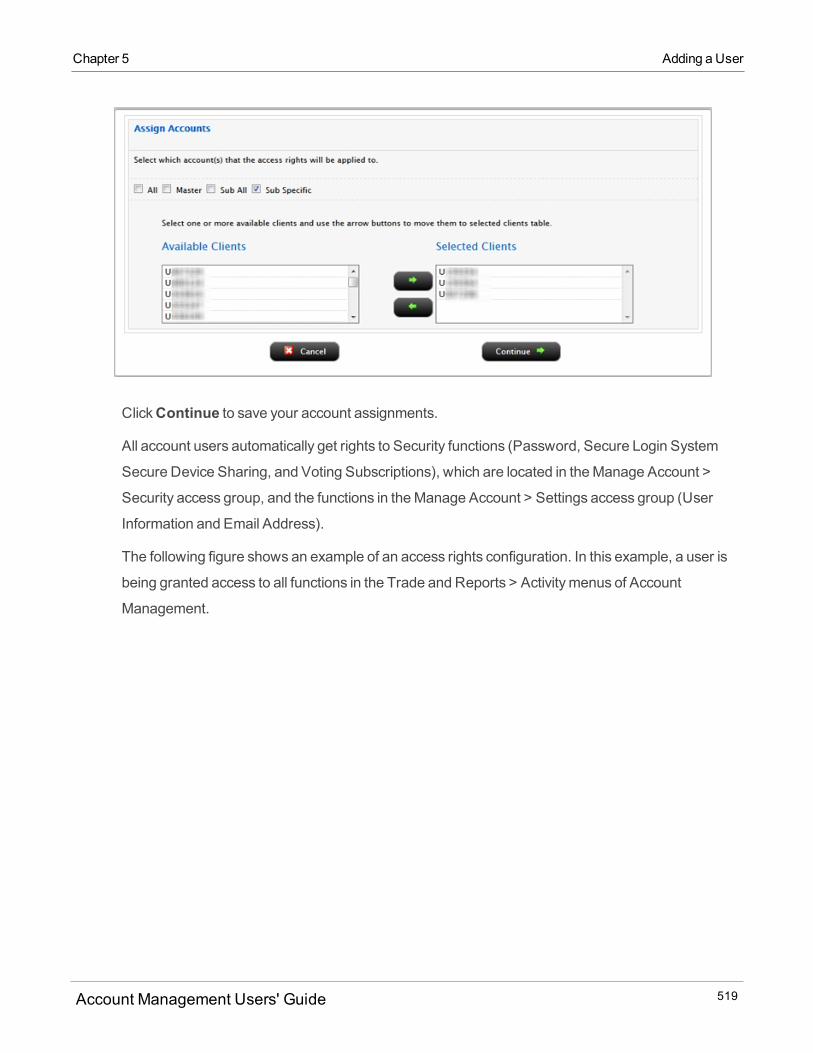
Chapter 5 Adding a User
ClickContinue to save your account assignments.
All account users automatically get rights to Security functions (Password, Secure Login System
Secure Device Sharing, and Voting Subscriptions), which are located in theManage Account >
Security access group, and the functions in theManage Account > Settings access group (User
Information and Email Address).
The following figure shows an example of an access rights configuration. In this example, a user is
being granted access to all functions in the Trade and Reports > Activitymenus of Account
Management.
Account Management Users' Guide 519

6. On the same page, you can select the accounts to which the access rights are assigned.
o Highlight one or more individual sub/client accounts in the list (Ctrl+ click to select multiple non-
adjacent accounts in the list; Shift+click to select multiple adjacent accounts in the list). Click the
All Sub/Client Accounts check box to select ALL accounts.
7. ClickContinue.8. Verify that all the information is correct, then clickContinue.
If you need tomake further changes, clickBack, thenmake corrections before submitting.9. Enter the confirmation number sent to you via email, then clickContinue.
If you have not received a confirmation number, clickRequest Confirmation Number to have aconfirmation number sent to your email address on record.
10. ClickCancel to cancel your changes.
Account Management Users' Guide 520
Chapter 5 Adding a User
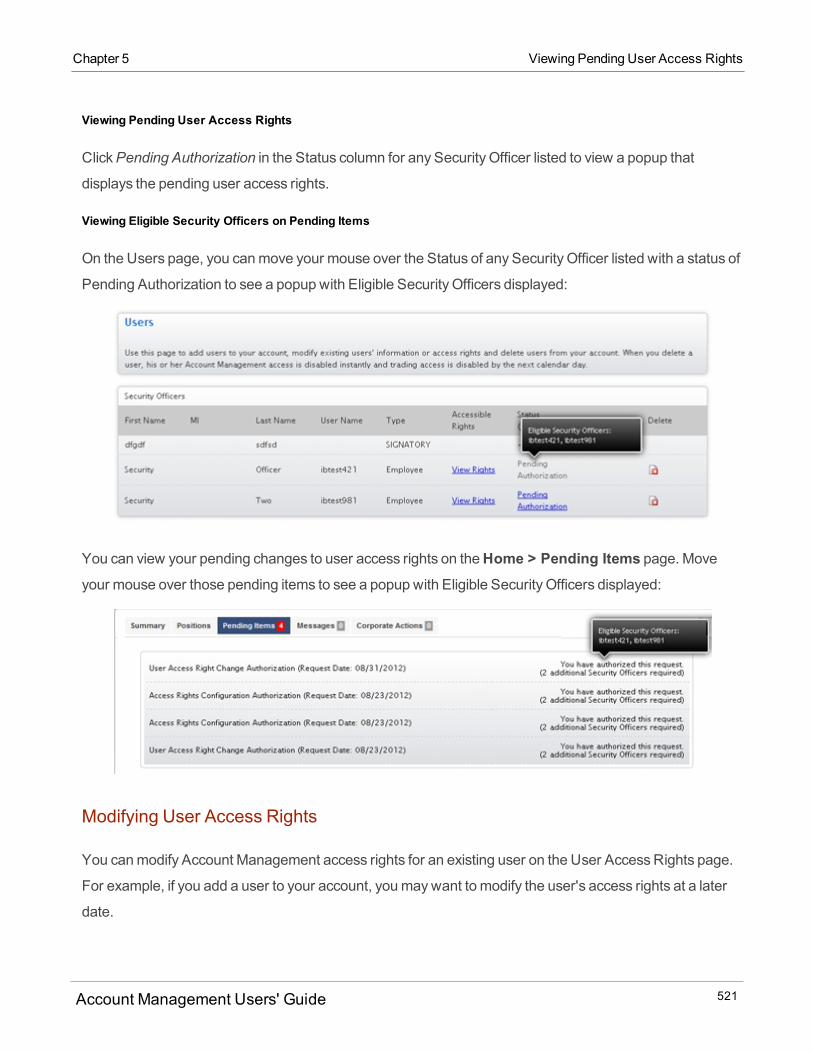
Chapter 5 Viewing Pending User Access Rights
Viewing Pending User Access Rights
ClickPending Authorization in the Status column for any Security Officer listed to view a popup that
displays the pending user access rights.
Viewing Eligible Security Officers on Pending Items
On the Users page, you canmove your mouse over the Status of any Security Officer listed with a status of
Pending Authorization to see a popup with Eligible Security Officers displayed:
You can view your pending changes to user access rights on theHome > Pending Items page. Moveyour mouse over those pending items to see a popup with Eligible Security Officers displayed:
Modifying User Access Rights
You canmodify Account Management access rights for an existing user on the User AccessRights page.
For example, if you add a user to your account, youmaywant to modify the user's access rights at a later
date.
Account Management Users' Guide 521
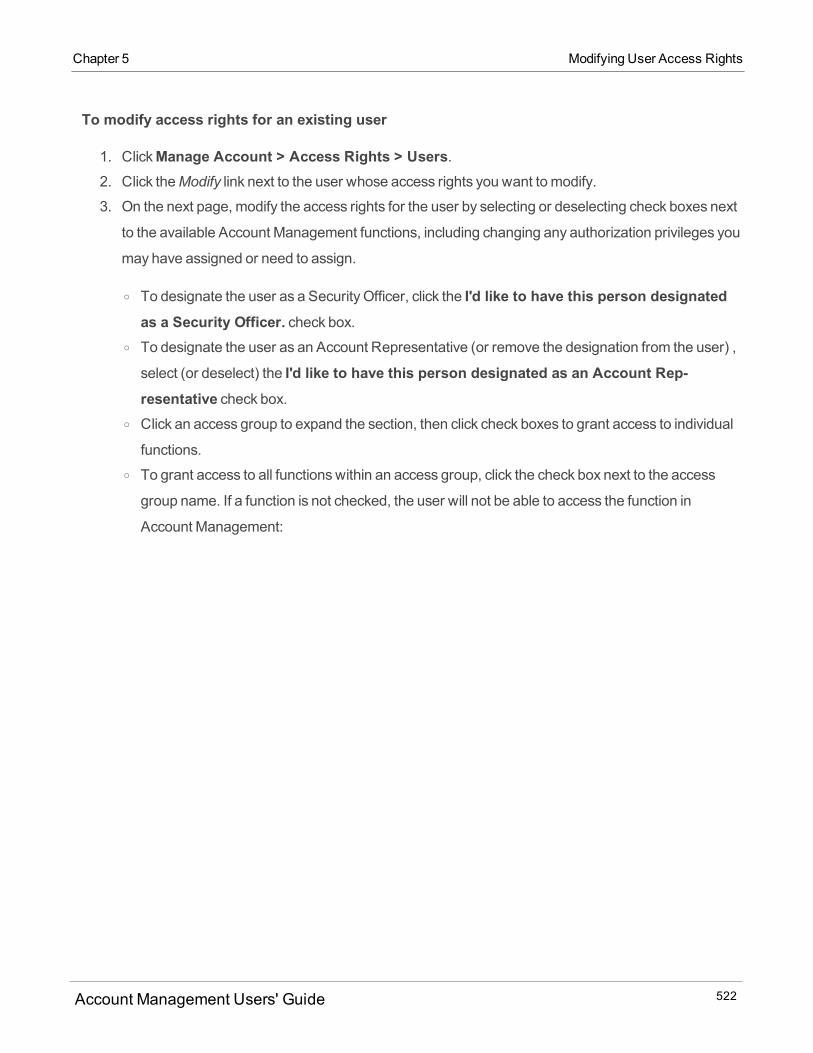
To modify access rights for an existing user
1. ClickManage Account > Access Rights > Users.2. Click theModify link next to the user whose access rights you want to modify.
3. On the next page, modify the access rights for the user by selecting or deselecting check boxes next
to the available Account Management functions, including changing any authorization privileges you
may have assigned or need to assign.
o To designate the user as a Security Officer, click the I'd like to have this person designatedas a Security Officer. check box.
o To designate the user as an Account Representative (or remove the designation from the user) ,
select (or deselect) the I'd like to have this person designated as an Account Rep-resentative check box.
o Click an access group to expand the section, then click check boxes to grant access to individual
functions.o To grant access to all functionswithin an access group, click the check box next to the access
group name. If a function is not checked, the user will not be able to access the function in
Account Management:
Account Management Users' Guide 522
Chapter 5 Modifying User Access Rights

Chapter 5 Modifying User Access Rights
4. If you aremodifying a user in amultiple account structure, clickModify Accounts for any individual
function inside an Access group. The Assign Accounts box opens.
Use the Assign Accounts box to change which accounts you want this user to be able to access for
the selected function or group of functions. You can select:
o All for all accounts, including theMaster and all sub accounts;o Master to grant access to only theMaster account;o Sub All to grant access to all sub accounts;o Sub Specific, to grant access to individual sub accounts.
Account Management Users' Guide 523
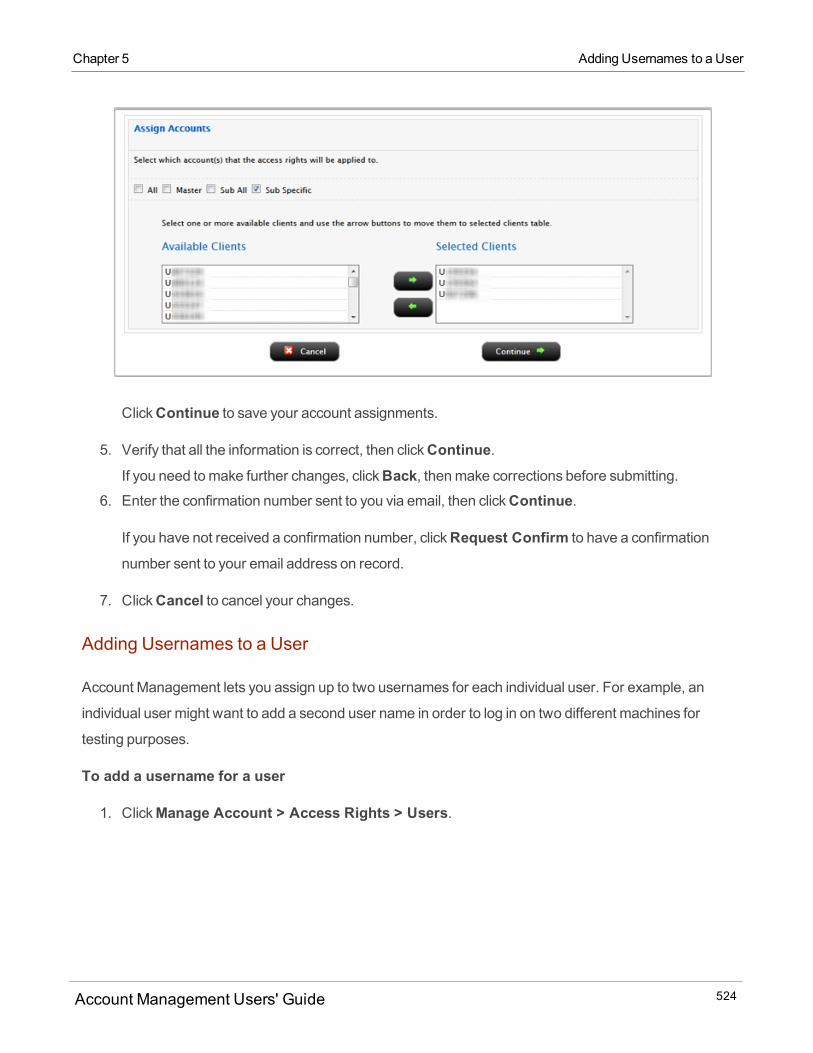
ClickContinue to save your account assignments.
5. Verify that all the information is correct, then clickContinue.If you need tomake further changes, clickBack, thenmake corrections before submitting.
6. Enter the confirmation number sent to you via email, then clickContinue.
If you have not received a confirmation number, clickRequest Confirm to have a confirmation
number sent to your email address on record.
7. ClickCancel to cancel your changes.
Adding Usernames to a User
Account Management lets you assign up to two usernames for each individual user. For example, an
individual user might want to add a second user name in order to log in on two different machines for
testing purposes.
To add a username for a user
1. ClickManage Account > Access Rights > Users.
Account Management Users' Guide 524
Chapter 5 Adding Usernames to a User
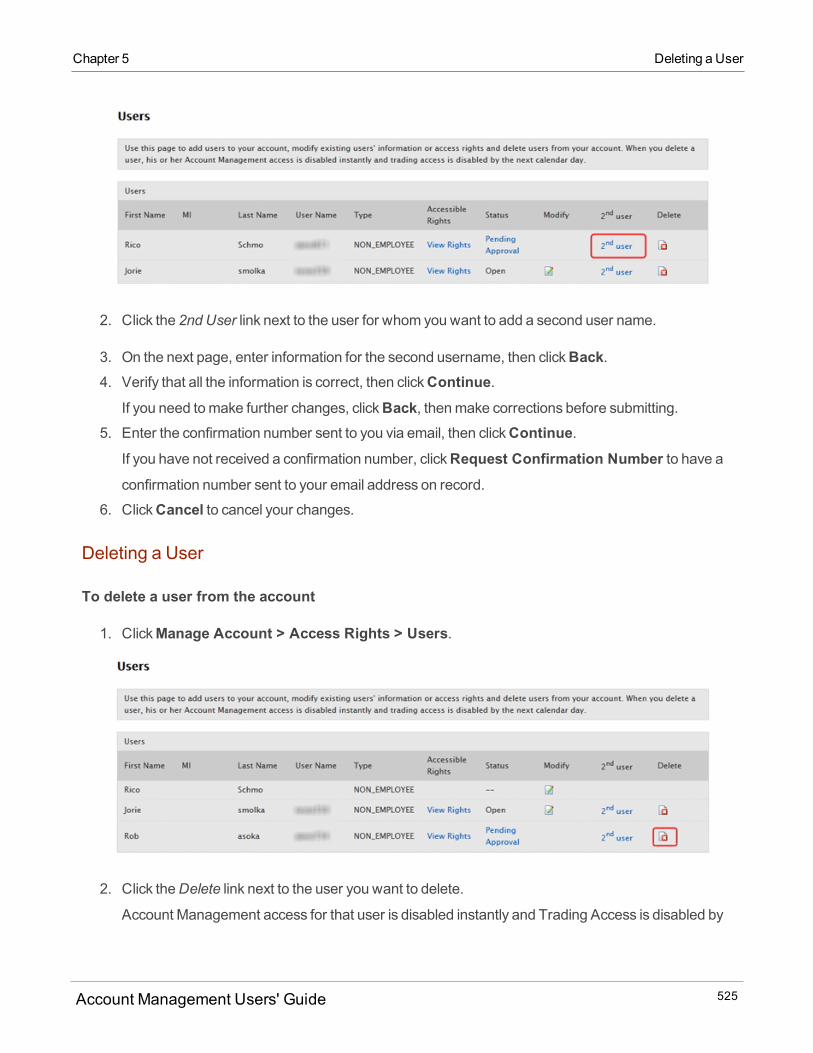
Chapter 5 Deleting a User
2. Click the 2nd User link next to the user for whom you want to add a second user name.
3. On the next page, enter information for the second username, then clickBack.4. Verify that all the information is correct, then clickContinue.
If you need tomake further changes, clickBack, thenmake corrections before submitting.5. Enter the confirmation number sent to you via email, then clickContinue.
If you have not received a confirmation number, clickRequest Confirmation Number to have aconfirmation number sent to your email address on record.
6. ClickCancel to cancel your changes.
Deleting a User
To delete a user from the account
1. ClickManage Account > Access Rights > Users.
2. Click theDelete link next to the user you want to delete.
Account Management access for that user is disabled instantly and Trading Access is disabled by
Account Management Users' Guide 525
the next calendar day.
Add a Security Officer
You can add Security Officers after your account is open by:
Adding a new user to your account and designating that user as a Security Officer.
Designating an existing user as a Security Officer bymodifying the user's access rights.
Sending a request to us. You can access the request form on theSupport > Paper Forms page ofAccount Management.
User Roles
A user role contains a set of access rights to Account Management functions. You can quickly assign
access rights to new users by selecting an existing user role when you add the new users to your account.
For example, you could create a user role that has access only to funding and reporting functions, then add
a user to your account and assign the funding/reporting role to that new user.
The User Roles page lets you:
Add a new user role
Delete a user role
View user role details
Who can access the User Roles page?
All users and Security Officers can access this page except Broker Non-Disclosed Clients and Broker
OmnibusClients.
Adding a User Role
To add a user role to the account
1. ClickManage Account > Access Rights > User Roles.
Account Management Users' Guide 526
Chapter 5 Add a Security Officer
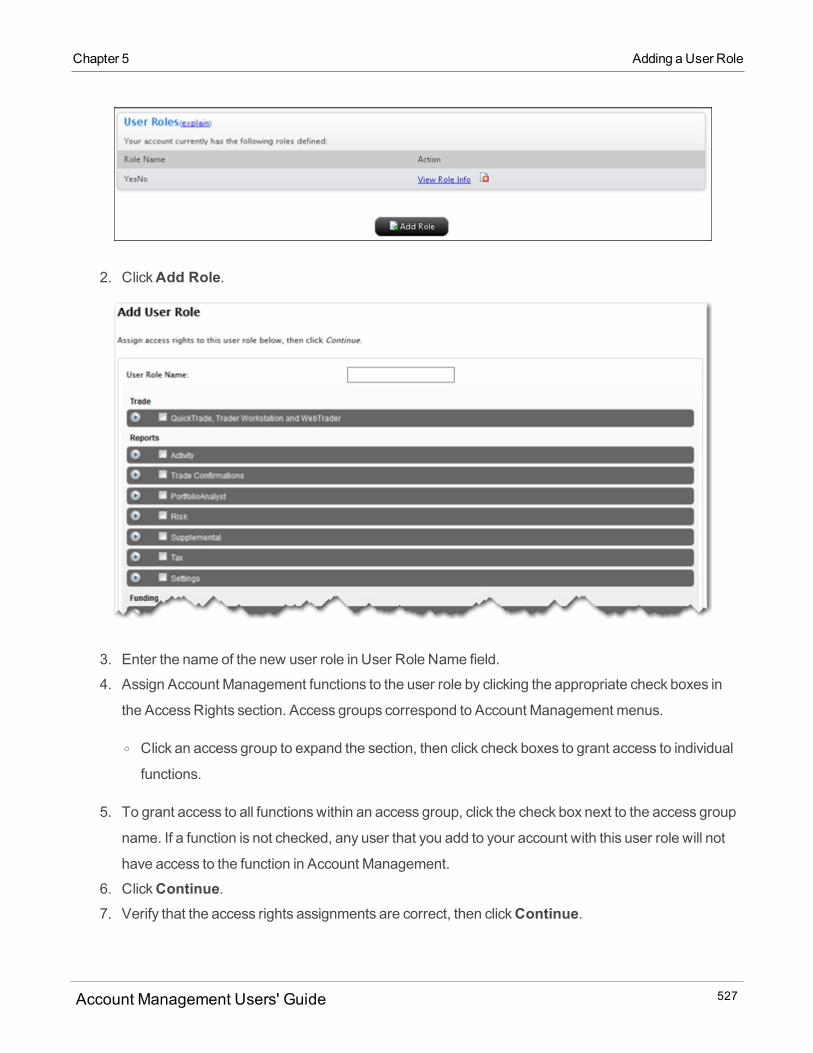
Chapter 5 Adding a User Role
2. ClickAdd Role.
3. Enter the name of the new user role in User Role Name field.
4. Assign Account Management functions to the user role by clicking the appropriate check boxes in
the AccessRights section. Access groups correspond to Account Management menus.
o Click an access group to expand the section, then click check boxes to grant access to individual
functions.
5. To grant access to all functionswithin an access group, click the check box next to the access group
name. If a function is not checked, any user that you add to your account with this user role will not
have access to the function in Account Management.
6. ClickContinue.7. Verify that the access rights assignments are correct, then clickContinue.
Account Management Users' Guide 527
8. Confirm your request for the creation of the new user role by entering the confirmation number that
we sent to your email address of record into the field provided.
9. ClickContinue.
Modifying a User Role
You canmodify a user role if you want
To add a user role to the account
1. ClickManage Account > Access Rights > User Roles.2. Click theModify link next to the user role you want to modify.
3. On the next page, modify the access rights for the user role by selecting or deselecting check boxes
next to the available Account Management functions, including changing any authorization privileges
youmay have assigned or need to assign. ClickContinue.4. Verify that all the information is correct, then clickContinue.
If you need tomake further changes, clickBack, thenmake corrections before submitting.5. Enter the confirmation number sent to you via email, then clickContinue.
If you have not received a confirmation number, clickRequest Confirm to have a confirmation num-
ber sent to your email address on record.
6. ClickCancel to cancel your changes.
Deleting a User Role
You can delete a user role when it is no longer needed.
To delete a user role
1. ClickManage Account > Access Rights > User Roles.2. Click theDelete link next to the user role you want to delete.
The user role is deleted from the system.
View User Role Details
To view user role details
1. ClickManage Account > Access Rights > User Roles.
Account Management Users' Guide 528
Chapter 5 Modifying a User Role

Chapter 5 View User Role Details
2. Click theView Role Info link in the Action column for a specific role.
The Role Details popup window opens, showing the details for the role.
3. To close the popup window, click theX in the upper right corner.
Account Management Users' Guide 529

Account Management Users' Guide 530
Contents
Contents i
Classic Account Management Users' Guide 31
Overview 31
About Account Management 31
Account Management Access and Account Structures 32
Customer Types 33
Account Structures 33
Logging In 37
Failed Login Attempts 40
HomePage 40
Real-Time Summary 42
Balances 42
Margin Requirements 43
Available for Trading 43
Positions 44
Pending Items 44
Messages 45
Corporate Actions 46
Menus 46
Navigating the Account Management Menus 47
Account Management Users' Guide i

Contents
Getting Help 50
Dynamic Help 51
Account Management Users' Guide 51
Navigating Account Management Pages 51
Changing the Active Account 52
Account Selector 54
Using the Account Selector 54
Account Selector for Three-Level Accounts 58
Changing the Display Language 60
Printing 61
LoggingOut 61
Trade 63
QuickTrade 63
WebTrader 64
Post Trade Allocations 64
Open the Post Trade AllocationsWindow 65
Allocate Trades 65
Average Price Trades 70
Unallocate Trades 71
Create Allocation Templates 72
Odd Lot Designations 74
Allocate in Round Lots 74
Account Management Users' Guide ii

Contents
Allow Odd Lots Allocation 74
View the Allocation Summary 75
Import Allocations 76
Configure Post Trade Allocation Settings 77
Configuration Settings 78
Allocation Settings 78
Display Preferences 79
IPO Subscriptions 81
Reports 85
Activity 85
About Activity Statements 85
Statement Cutoff Times 86
Activity by Account Type 86
Activity Statement Archive Policy 87
Viewing Activity Statements 87
Default Statements 88
Creating Customized Statements 92
Customized Statements Profit and Loss Selection 95
Third-Party Downloads 96
If You are Downloading a Zip File Using Internet Explorer 7 or 8 100
Activity FlexQueries 100
Batch Reports 106
Account Management Users' Guide iii
Contents
Models 108
Quarterly Summaries 109
Trade Confirmations 111
Trade Confirmation Reports 112
Trade Allocations 114
Trade Confirmation FlexQueries 116
PortfolioAnalyst 122
Snapshot PDF Reports 125
Detailed PDF Reports 130
Available Reports in Detailed PDF Reports 136
Running a Performance Attribution Report 143
Understanding the Performance Attribution Report Table 143
Weighting by Sector 144
Returns and Attribution Effects by Sector 144
Understanding the Performance Attribution Charts 145
Understanding the Performance Attribution Scatter Plot 145
Creating CustomBenchmarks 146
About CustomBenchmarks 146
Synopses 149
Creating and Saving a Synopsis 149
Assigning a Synopsis to a Report 150
Editing and Deleting Saved PortfolioAnalyst Reports 151
Account Management Users' Guide iv

Contents
Viewing External Accounts 152
Account Summaries 153
External Accounts 157
Adding an External Account 157
Vewing and Editing External Accounts 161
Deleting External Accounts 162
Transaction Cost Analysis 163
Understanding the Transaction Cost Analysis 168
Risk 173
Margin Reports 173
Stress Test Report 176
Using the Stress Test SummaryReport 178
Value At Risk Report 179
Supplemental Reports 182
Compliance Reports 183
Advisor Fee Cap 183
Client SummaryReport 184
P/LMarkup Summary 186
Advisor Fee Invoices 187
Broker Client Revenue and Expense Summary 188
Tax 189
TaxOptimizer 189
Account Management Users' Guide v

Contents
Tax Forms 191
Position Transfer Basis 194
ForexCost Basis 196
Settings 198
Delivery 199
Delivery Settings for Activity Statements and Trade Reports 199
SMS Alerts 203
FlexQueries 204
Portfolio Analyst Delivery Settings 205
Broker Client Activity Statements 208
Using the FlexWeb Service 209
FlexWeb Service Version 2 210
FlexWeb Service Version 3 213
Version 3 Error Codes 217
Third-Party Services 218
Trader ID 221
Trader ID Rules 221
Client OATS Settings 223
Funding 227
Viewing Transaction History 227
Request a stop payment of a checkwithdrawal 233
Cash Deposit Details 234
Account Management Users' Guide vi
Contents
CashWithdrawal Details 240
Position Transfers Details 244
Internal Transfer Details 249
Fund Transfers 251
Checking the Status of Your Funds 252
Funds Status 252
Depositing Funds 254
Withdrawing Funds 258
ACH Initiated at IB and Canadian EFT Transactions 264
Transferring Funds Internally 264
Saving Bank Information 266
About Recurring Transactions 268
Canceling a Recurring Transaction 269
Withdrawing Funds to a Third Party 269
Position Transfers 274
ACATS Transfers 275
Requesting a Full ACATS Transfer 276
Requesting a Partial ACATS Transfer without a Position Instruction 279
Requesting a Partial ACATS Transfer Using an Existing Position Instruction 281
Creating a Position Instruction for a Partial ACATS Transfer 283
ATON Transfers 285
Requesting a Full ATON Transfer 285
Account Management Users' Guide vii
Contents
Partial ATON Transfers without Instructions 288
Partial ATON Transfers with Existing Instruction 291
Creating an ATON Position Instruction 293
Checking Position Eligibility for a Full ACATS or ATON Transfer 295
DRS Transfers 299
DWAC Transfers 302
Transferring Positions to an Advisor-Managed Account 305
Transfer International Assets 306
FOP Transfers 310
FOP Transfer without Instruction 310
FOP Transfer Using Existing Instruction 313
Creating Position Instruction for an FOP Transfer 315
US Futures Transfers 317
Transferring Positions BetweenMaster and Sub Accounts 318
Transferring Positions Internally 319
Using CSV Files for Position Transfers 321
Uploading Positions in a CSV File for Partial Position Transfers 321
Rules for Uploading Positions in a CSV File 324
Instructions 325
Bank Information 325
Bank Information Fields 327
Recurring Transactions 333
Account Management Users' Guide viii
Contents
Position Instructions 335
Settlement Instructions 337
Soft Dollars Disbursement 338
Manage Account 343
Account Information 343
Details 344
Account Details 344
Profile 347
Financial Information 352
Regulatory Information 354
Dividend Reinvestment 355
Trading Sub Accounts 357
Broker Declaration 358
Advisor Qualifications 359
Transfer on Death 361
Removing or Modifying a TOD Beneficiary 364
Investor Category 365
Large Trader Identification 367
EMIR and LEI Information 371
About EMIR and LEI 371
Who is Subject to the EMIR Regulation? 371
Original EMIR Elections 372
Account Management Users' Guide ix
Contents
The EMIR and LEI Information Page in Account Management 373
Changing Your Initial EMIR Election If You Previously Chose To DoNothing 373
Changing Your Delegated Reporting Choice 380
Tax Information 381
Tax FormCollection 382
Withholding Statement 384
Adding anOwner to anOrganization 385
Jurisdiction 386
Settings 390
Configure Account 390
Base Currency 391
Institutional Services 392
Account Type 394
Excess Funds Sweep 395
Fees 397
Pricing Structure 398
Request Soft Dollars 399
Request Soft Dollars 399
Soft Dollars Page 400
Soft Payments in Activity Statements 402
Compliance for Advisors 402
WhoCan Subscribe to this Service? 403
Account Management Users' Guide x

Contents
Using the Service for the First Time 403
Section 13 Subscription Election 404
Section 13Monitoring Groups 405
Rules for Monitoring Groups 405
Section 13 Handshake Requests 410
Section 13OnDemandReport Request 411
Rules for OnDemandReport Generation 411
Section 13 Designate Aggregated Report Recipients 413
Rules for Designating Aggregated Report Recipients 414
Trading PlatformsRead-Only Access 414
Paper Trading 415
About Paper Trading Accounts 417
Paper Trading Account Limitations 418
Account Management for a Paper Trading Account 419
Paper Trading Account Reset 420
WebTrader 420
Paper Trading Activity Statements 420
Activity FlexQuery 421
Trade Confirmations FlexQuery 422
Change Password 423
Account Alias 423
White Branding 424
Account Management Users' Guide xi
Contents
White Branding Trader Workstation 427
White BrandingWebTrader 430
White Branding Emails 431
White Branding Account Management, the Registration System and Statements 432
White Branding Reference Table 434
White Brand the IB TWS Users' Guide 436
White Branding the Contract Database 438
How to Close Your Account 439
Close Account 442
Account Closure Status 444
Reopening a Closed Account 445
IRA 446
IRA Conversion to a Roth Account 447
Partial IRA Conversions 449
IRA Recharacterization 449
Partial IRA Recharacterizations 449
IRA Reference 449
IRA Account Types 450
IRA Margin Accounts 450
IRA Account Types 450
IRA Transfer Methods 451
Conversions and Recharacterizations 454
Account Management Users' Guide xii

Contents
IRA Conversion 454
Eligibility Requirements 454
2010 Changes 454
IRA Recharacterization 455
Timing 455
Reconversion 455
Additional Information 456
Trade Configuration 456
Permissions 457
Trading UK CFDs andMetals 460
Trading Cash Forex 465
Cash Forex Eligibility Requirements 465
Market Data 466
Research 469
Subscriber Status 470
Market Data Assistant 472
Trading Limits 473
Restrictions 476
IB FYI 476
Alerts 478
Futures Arbitration Agreement 480
Asia GatewayAccess 481
Account Management Users' Guide xiii
Contents
Security 481
IP Restrictions 482
Change Password 484
Reset Paper Trading Account Password 485
Change Email Address 486
Change Security Questions 488
Secure Login System 489
Security Device 490
If You Choose Not to Participate in the Secure Login System 495
WhenWill I ReceiveMyDevice 496
Security Device Sharing 496
About Security Devices 498
Security Code Cards 498
Digital Security Card+ 499
Withdrawal Limits 500
SLS Opt Out 501
Rules for Opting Out 502
Client Security 503
Voting Subscriptions 504
Audit Trail 506
AccessRights 507
User AccessRightsGuide 508
Account Management Users' Guide xiv

Contents
AccessRightsOverview 508
AccessRights and AccessGroups 509
Security Officers 510
Security Officer Approvals 510
Account-Level AccessRights 510
User Roles 510
Primary and Secondary Authorizers 510
User AccessRights Summary 511
About Security Officers 512
Creating Security Officers During the Account Application Process 512
Adding and Deleting Security Officers 512
Security Officers and Account Management 512
Configure AccessRights 513
Users 515
Adding a User 516
Viewing Pending User AccessRights 521
Viewing Eligible Security Officers on Pending Items 521
Modifying User AccessRights 521
Adding Usernames to a User 524
Deleting a User 525
Add a Security Officer 526
User Roles 526
Account Management Users' Guide xv

Contents
Adding a User Role 526
Modifying a User Role 528
Deleting a User Role 528
View User Role Details 528
Contents i
Add or Link Accounts xxix
Create Linked Account xxix
Create Linked Account Scenarios xxxi
If You DoNot Finish the New Account Application xxxv
Account Management for Linked Accounts xxxv
Link Existing Account xxxvi
Guidelines for Linking Existing Accounts xxxvi
Link Existing Account Scenarios xxxviii
Account Management for Linked Accounts xlvii
Move, Link or Partition an Account xlvii
Important Notes about Linking and DeLinking xlviii
About Partitions xlix
Authorized Trader liii
Rules for Linking to and Delinking from an Advisor or Multiple Hedge Fund lv
Research Services lv
ResearchWebsite Login lvi
MoneyManager lvi
Account Management Users' Guide xvi
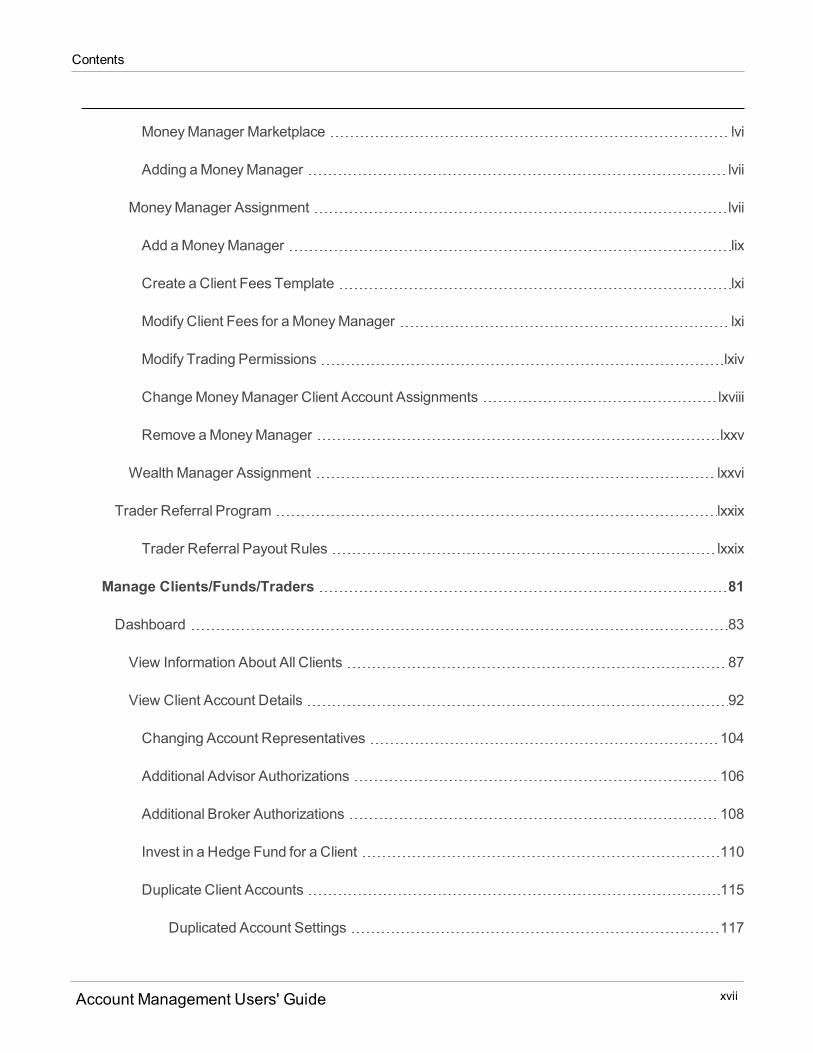
Contents
MoneyManager Marketplace lvi
Adding aMoneyManager lvii
MoneyManager Assignment lvii
Add aMoneyManager lix
Create a Client Fees Template lxi
Modify Client Fees for aMoneyManager lxi
Modify Trading Permissions lxiv
ChangeMoneyManager Client Account Assignments lxviii
Remove aMoneyManager lxxv
Wealth Manager Assignment lxxvi
Trader Referral Program lxxix
Trader Referral Payout Rules lxxix
Manage Clients/Funds/Traders 81
Dashboard 83
View Information About All Clients 87
View Client Account Details 92
Changing Account Representatives 104
Additional Advisor Authorizations 106
Additional Broker Authorizations 108
Invest in a Hedge Fund for a Client 110
Duplicate Client Accounts 115
Duplicated Account Settings 117
Account Management Users' Guide xvii
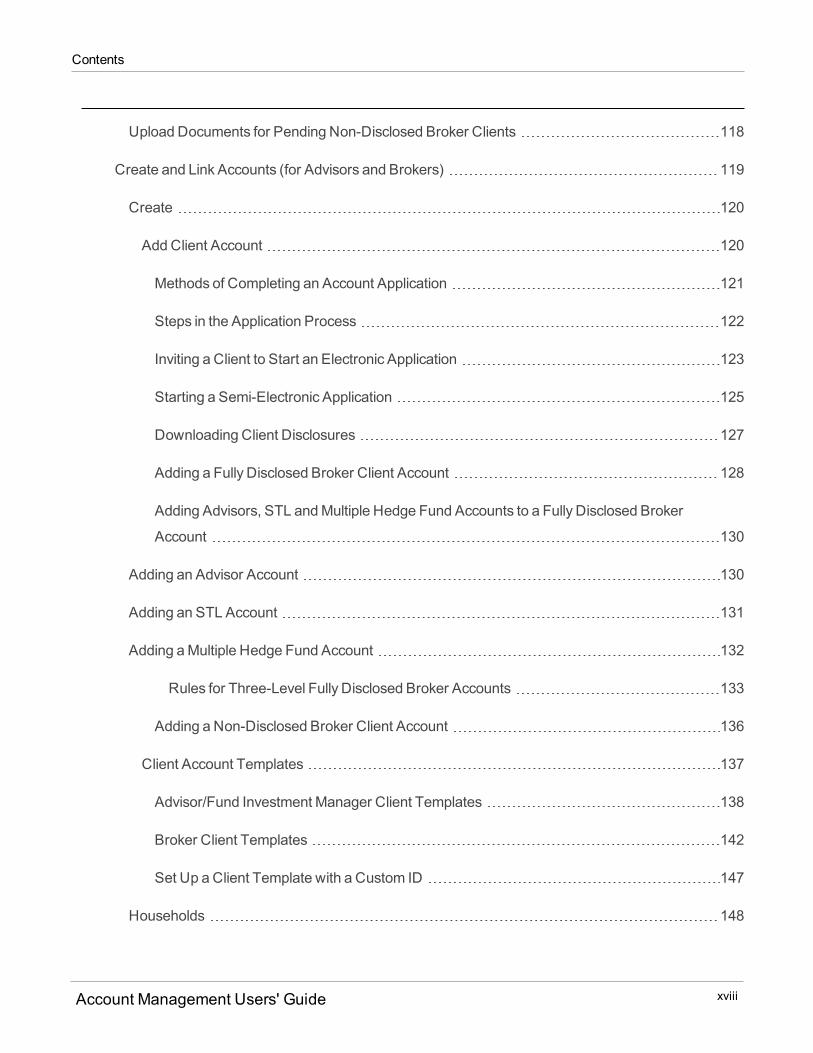
Contents
Upload Documents for Pending Non-Disclosed Broker Clients 118
Create and Link Accounts (for Advisors and Brokers) 119
Create 120
AddClient Account 120
Methods of Completing an Account Application 121
Steps in the Application Process 122
Inviting a Client to Start an Electronic Application 123
Starting a Semi-Electronic Application 125
Downloading Client Disclosures 127
Adding a Fully Disclosed Broker Client Account 128
Adding Advisors, STL andMultiple Hedge Fund Accounts to a Fully Disclosed Broker
Account 130
Adding an Advisor Account 130
Adding an STL Account 131
Adding aMultiple Hedge Fund Account 132
Rules for Three-Level Fully Disclosed Broker Accounts 133
Adding a Non-Disclosed Broker Client Account 136
Client Account Templates 137
Advisor/Fund Investment Manager Client Templates 138
Broker Client Templates 142
Set Up a Client Template with a Custom ID 147
Households 148
Account Management Users' Guide xviii

Contents
Rules for Creating Households 149
Link Client Accounts/Users 156
Close Account 158
Close a Non-Disclosed Broker Client Account 160
Account Closure Status 163
Opening Interactive Brokers Asset Management Accounts for Advisor Clients 163
Create (for Multiple Fund Investment Managers) 165
Add Client Account 165
Methods of Completing an Account Application 166
Steps in the Application Process 167
Inviting a Client to Start an Electronic Application 168
Starting a Semi-Electronic Application 170
Downloading Client Disclosures 172
Adding a Fully Disclosed Broker Client Account 173
Adding Advisors, STL andMultiple Hedge Fund Accounts to a Fully Disclosed Broker
Account 175
Adding an Advisor Account 175
Adding an STL Account 176
Adding aMultiple Hedge Fund Account 177
Rules for Three-Level Fully Disclosed Broker Accounts 178
Adding Advisor and STL Accounts to an Advisor or Multiple Hedge Fund Account 181
Adding an Advisor Account 182
Account Management Users' Guide xix
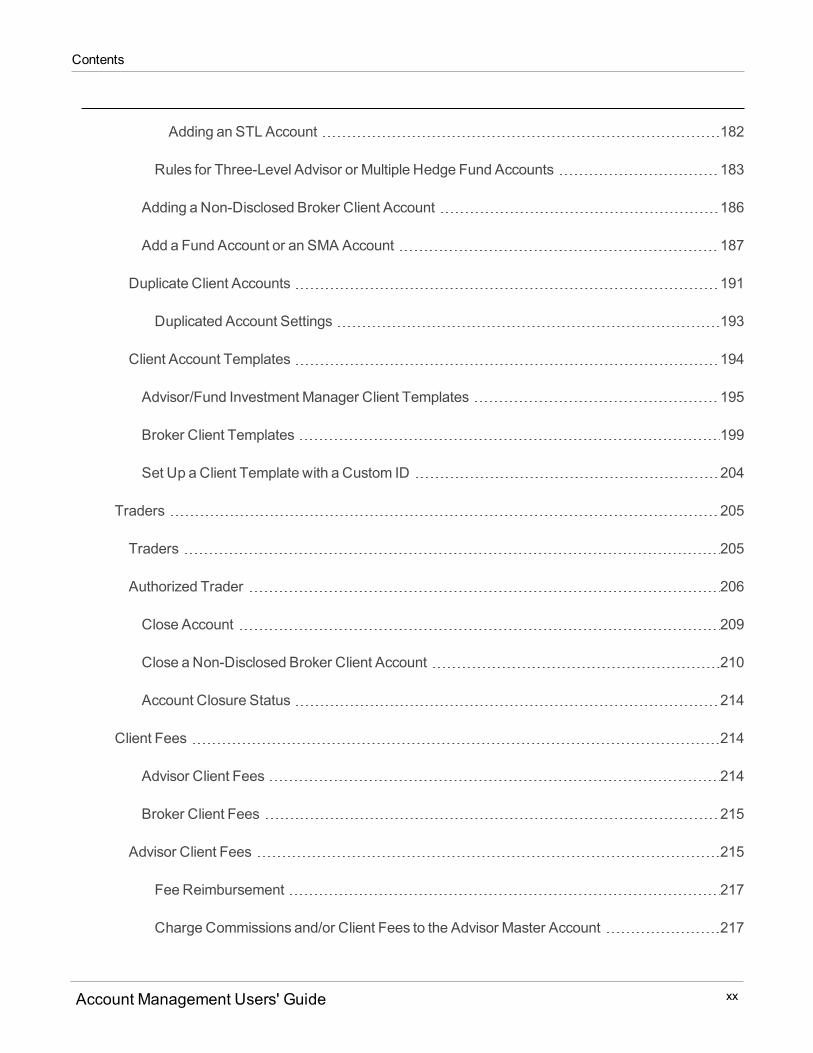
Contents
Adding an STL Account 182
Rules for Three-Level Advisor or Multiple Hedge Fund Accounts 183
Adding a Non-Disclosed Broker Client Account 186
Add a Fund Account or an SMA Account 187
Duplicate Client Accounts 191
Duplicated Account Settings 193
Client Account Templates 194
Advisor/Fund Investment Manager Client Templates 195
Broker Client Templates 199
Set Up a Client Template with a Custom ID 204
Traders 205
Traders 205
Authorized Trader 206
Close Account 209
Close a Non-Disclosed Broker Client Account 210
Account Closure Status 214
Client Fees 214
Advisor Client Fees 214
Broker Client Fees 215
Advisor Client Fees 215
Fee Reimbursement 217
Charge Commissions and/or Client Fees to the Advisor Master Account 217
Account Management Users' Guide xx

Contents
Client Fee Templates 217
Overview of Advisor Client Fees 217
Caps and Limitations 222
Examples 222
Percent of Net Liquidation Value 222
Flat Fee 222
Percent of Annual P&L 223
Percent of Market-to-Market P&L 223
Configure Advisor Client Fees 223
HighWater Mark 231
HighWater Mark Example 232
`Setting UpHighWater Marking 233
Advisor Fee Cap Formulas 237
Client Authorization 238
Advisor Client Invoicing 239
Uploading Invoices 245
Configure Invoice Notifications 248
Advisor Fee Reimbursements 250
Broker Client Fees 255
Rules for Broker Client Fees 255
Client Fee Templates 256
Choice of Pricing Structures for Client Accounts 256
Account Management Users' Guide xxi
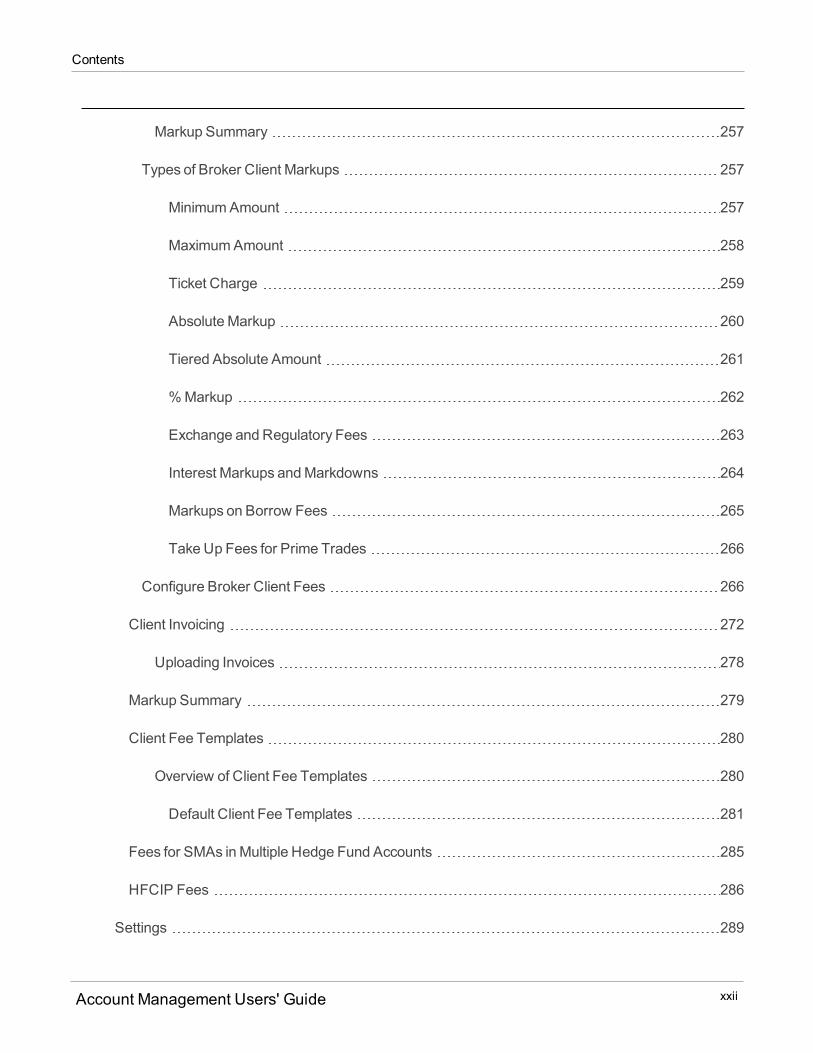
Contents
Markup Summary 257
Types of Broker Client Markups 257
MinimumAmount 257
MaximumAmount 258
Ticket Charge 259
AbsoluteMarkup 260
Tiered Absolute Amount 261
%Markup 262
Exchange and Regulatory Fees 263
Interest Markups andMarkdowns 264
Markups on Borrow Fees 265
Take Up Fees for Prime Trades 266
Configure Broker Client Fees 266
Client Invoicing 272
Uploading Invoices 278
Markup Summary 279
Client Fee Templates 280
Overview of Client Fee Templates 280
Default Client Fee Templates 281
Fees for SMAs inMultiple Hedge Fund Accounts 285
HFCIP Fees 286
Settings 289
Account Management Users' Guide xxii

Contents
Account Alias 290
Broker Client Approvals 291
Excess Funds Sweep 294
Debit Card For Advisor Clients 296
Trade Configuration 297
Base Currency 297
Account Type 299
Client Trading 300
Permissions 301
Restrictions 303
Trading Limits 304
Security 306
Audit Trail 306
Users 308
Adding a User 310
Viewing Pending User AccessRights 314
Viewing Eligible Security Officers on Pending Items 314
Modifying User AccessRights 314
Adding Usernames to a User 317
Deleting a User 317
CRM 318
CRM HomePage 319
Account Management Users' Guide xxiii

Contents
Individual CRM Contacts 320
Sharing CRM with Another User 321
View, Sort and Search Records 322
View Current Tasks and Events 323
Entering a New Contact, Prospect or Client 325
Edit an Existing Contact, Prospect or Client 328
Additional Functions for Individual Records 330
Set and Reset Your Notes/Tasks Password 341
Set Up and Use a CRMMailbox 343
Requirements for a RackspaceMailbox 343
Additional Information 343
Additional Services Available fromRackspace 344
Disclaimer 344
Events 345
CRMAdvanced Search 349
CRMGroups 354
Import Contacts 361
Excel File Information 361
CRM Icon Reference 363
Investors' Marketplace 365
Search Services 365
Investing 366
Account Management Users' Guide xxiv
Contents
Advisor Marketplace 366
Broker Marketplace 369
Hedge FundMarketplace 372
Who is Eligible to Invest in Participating Hedge Funds? 373
RequiredMinimums 373
Risks of Hedge Fund Investing 373
Advisor Client Investments in Hedge Funds 374
MoneyManager Marketplace 376
Research 378
ResearchMarketplace 379
Education & Coaches 381
News Feeds 384
Trading Publications 387
Technology 388
Software Vendors 388
Programming Consultants 391
Administration 394
Accountant Marketplace 396
Auditor Marketplace 396
ComplianceMarketplace 397
Legal ServicesMarketplace 398
Tax FirmMarketplace 399
Account Management Users' Guide xxv

Contents
Administrator Marketplace 400
Manage Administrators 403
Add an Administrator 404
View Administrators 405
Delink an Administrator 406
Assign Client Accounts to Administrators 407
Remove Client Accounts fromAdministrators 410
BusinessDevelopment 412
Advertising 413
Business Analyst Marketplace 415
Financing Firms 418
CareersMarketplace 421
Corporate Access ProvidersMarketplace 422
Advertise Services 424
Guidelines for Advertising Software Tools, Programming Consulting, Analyst Research and
Educator Services 425
Investing 426
Advisor Marketplace 426
Joining the Advisor Marketplace 427
Broker Marketplace 434
Joining the Broker Marketplace 435
Hedge FundMarketplace 441
Account Management Users' Guide xxvi

Contents
Advisor Client Investments in Hedge Funds 441
Applying for Participation in the Hedge FundMarketplace - Single Fund Accounts 442
Applying for Participation in the Hedge FundMarketplace - Multiple Fund Accounts 443
Hedge FundMarketplace - Account Management for Participating Hedge Funds 446
Rules for Updating Your Fund Information 446
Hedge FundMarketplace - Third Party Administrator 449
MoneyManager Marketplace 451
Research 454
Research Application 454
Education & Coaches Application 455
Technology 455
Software Vendors Application 455
Programming Consultant Application 455
Administration 456
Administrator Marketplace for Administrators 456
Account Management for Administrators 458
HomePage 458
ReportsMenu 458
Manage Account Menu 459
Investors' MarketplaceMenu 459
Manage Clients 459
BusinessDevelopment 460
Account Management Users' Guide xxvii

Contents
Advertising Application 461
Business Analyst Application 461
Financing FirmsApplication 462
Careers Application 462
Corporate Access ProvidersMarketplace 462
Support 465
Client ServicesMessage Center 465
Message Center Window 466
Viewing Tickets and UnreadMessages 467
Changing the Display Language 468
Viewing the Legend 468
Creating a New Ticket 469
Modifying a Ticket 472
Setting Ticket Notification Preferences 473
Closing a Ticket 474
Viewing Corporate Actions 475
Submitting a TaxReporting Correction Form 477
Requesting a Trade Cancellation 478
Live Chat 480
Client ServicesContact Information 481
Service Tips 482
Knowledge Base 482
Account Management Users' Guide xxviii
Contents
Client Services Tools 483
SystemStatus 484
Paper Forms 485
Using Account Management Forms 486
Index 487
Add or Link Accounts
The Add Accountsmenu gives you access to the following pages:
Create Linked Account - Create a new account that is linked to your account under the same user-
name and password.
Link Existing Account - Linkmultiple IB accounts under a single username and password.
Authorized Trader - Proprietary Trading GroupMaster Users (Pool account) and Single Hedge Funds
can add sub accounts for authorized traders in their organization.
In addition, you can link your account to an Advisor- or Broker-managed account or divide your account
into two partitions, one of which will bemanaged by an Advisor or a Broker on theMove, Link or Partition
an Account page. You access this page when you choose to link to an Advisor in the Advisor Marketplace
or a Broker in the Broker Marketplace.
Create Linked Account
This page lets you create new accounts that are linked to your account. New linked accounts have the
following characteristics:
You can access all of the linked accounts in Account Management using a single user name.
You can createmultiple linked accounts.
Once you create a linked account and log into Account Management, you can perform any action, such
asmodify trading permissions or transfer funds, for a specific linked account.
Linked accountsmust be separately funded.
Account Management Users' Guide xxix
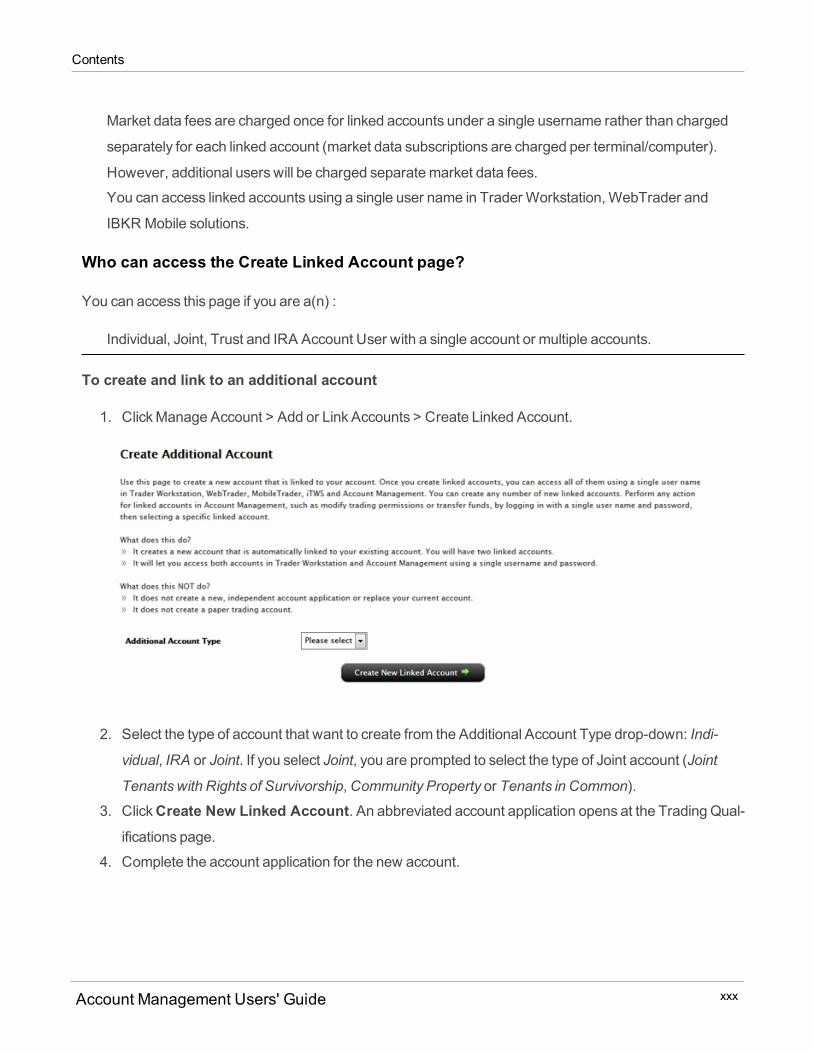
Contents
Market data fees are charged once for linked accounts under a single username rather than charged
separately for each linked account (market data subscriptions are charged per terminal/computer).
However, additional users will be charged separatemarket data fees.
You can access linked accounts using a single user name in Trader Workstation,WebTrader and
IBKR Mobile solutions.
Who can access the Create Linked Account page?
You can access this page if you are a(n) :
Individual, Joint, Trust and IRA Account User with a single account or multiple accounts.
To create and link to an additional account
1. ClickManage Account > Add or Link Accounts > Create Linked Account.
2. Select the type of account that want to create from the Additional Account Type drop-down: Indi-
vidual, IRA or Joint. If you select Joint, you are prompted to select the type of Joint account (Joint
Tenants with Rights of Survivorship,Community Property or Tenants in Common).
3. ClickCreate New Linked Account. An abbreviated account application opens at the Trading Qual-ifications page.
4. Complete the account application for the new account.
Account Management Users' Guide xxx
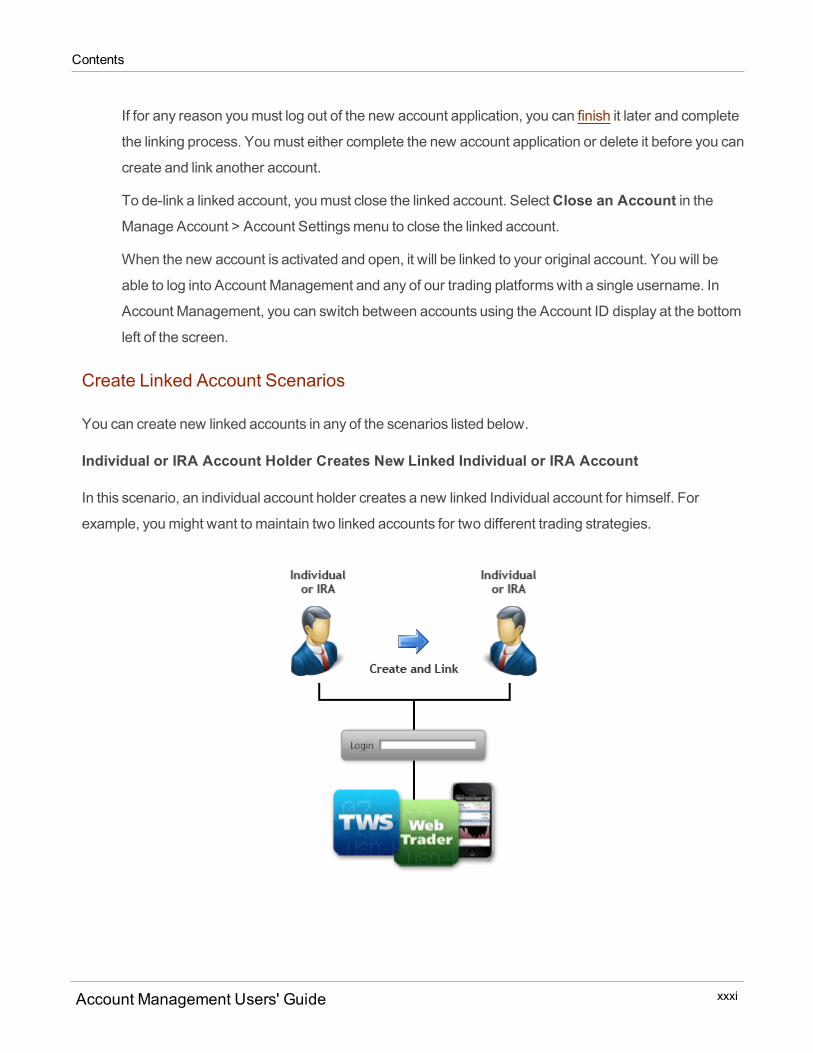
Contents
If for any reason youmust log out of the new account application, you can finish it later and complete
the linking process. Youmust either complete the new account application or delete it before you can
create and link another account.
To de-link a linked account, youmust close the linked account. SelectClose an Account in theManage Account > Account Settingsmenu to close the linked account.
When the new account is activated and open, it will be linked to your original account. You will be
able to log into Account Management and any of our trading platformswith a single username. In
Account Management, you can switch between accounts using the Account ID display at the bottom
left of the screen.
Create Linked Account Scenarios
You can create new linked accounts in any of the scenarios listed below.
Individual or IRA Account Holder Creates New Linked Individual or IRA Account
In this scenario, an individual account holder creates a new linked Individual account for himself. For
example, youmight want to maintain two linked accounts for two different trading strategies.
Account Management Users' Guide xxxi
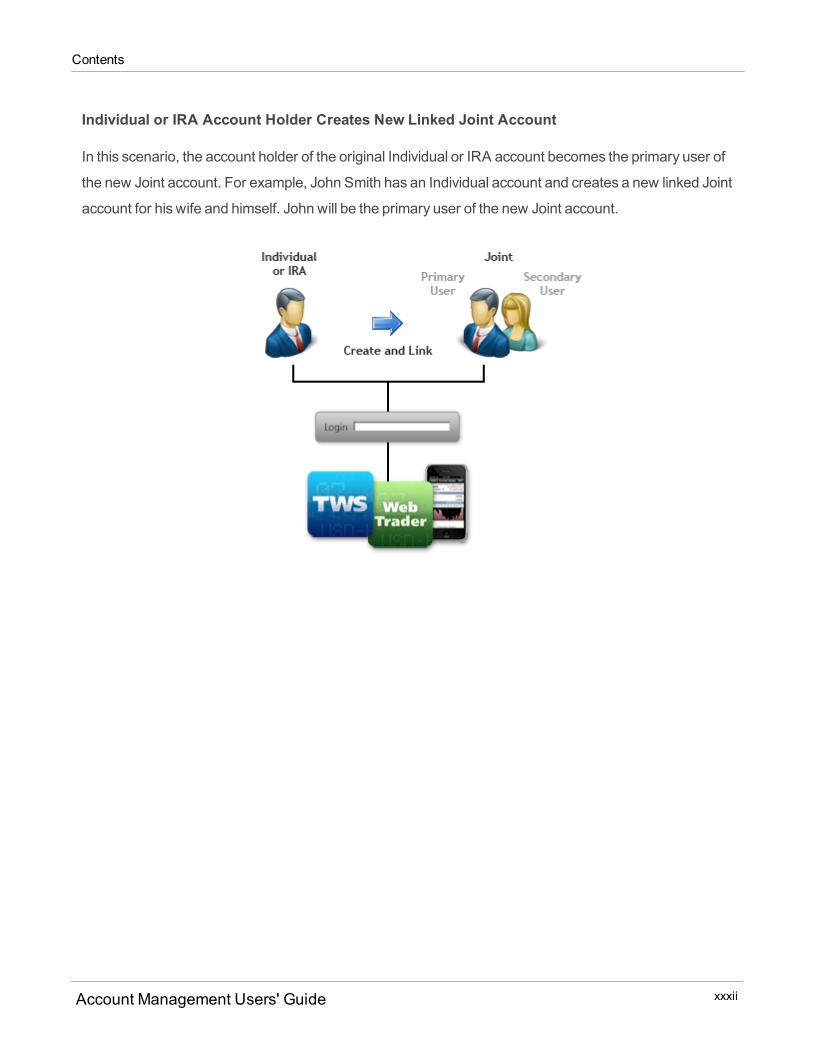
Contents
Individual or IRA Account Holder Creates New Linked Joint Account
In this scenario, the account holder of the original Individual or IRA account becomes the primary user of
the new Joint account. For example, John Smith has an Individual account and creates a new linked Joint
account for his wife and himself. John will be the primary user of the new Joint account.
Account Management Users' Guide xxxii

Contents
Joint Account Holder Creates New Linked Individual or IRA Account
In this scenario, either the primary or secondary user of the original Joint account becomes the account
holder of the new Joint account. For example, John andMary Smith have a Joint account. John creates a
new linked Individual account for himself.
Account Management Users' Guide xxxiii
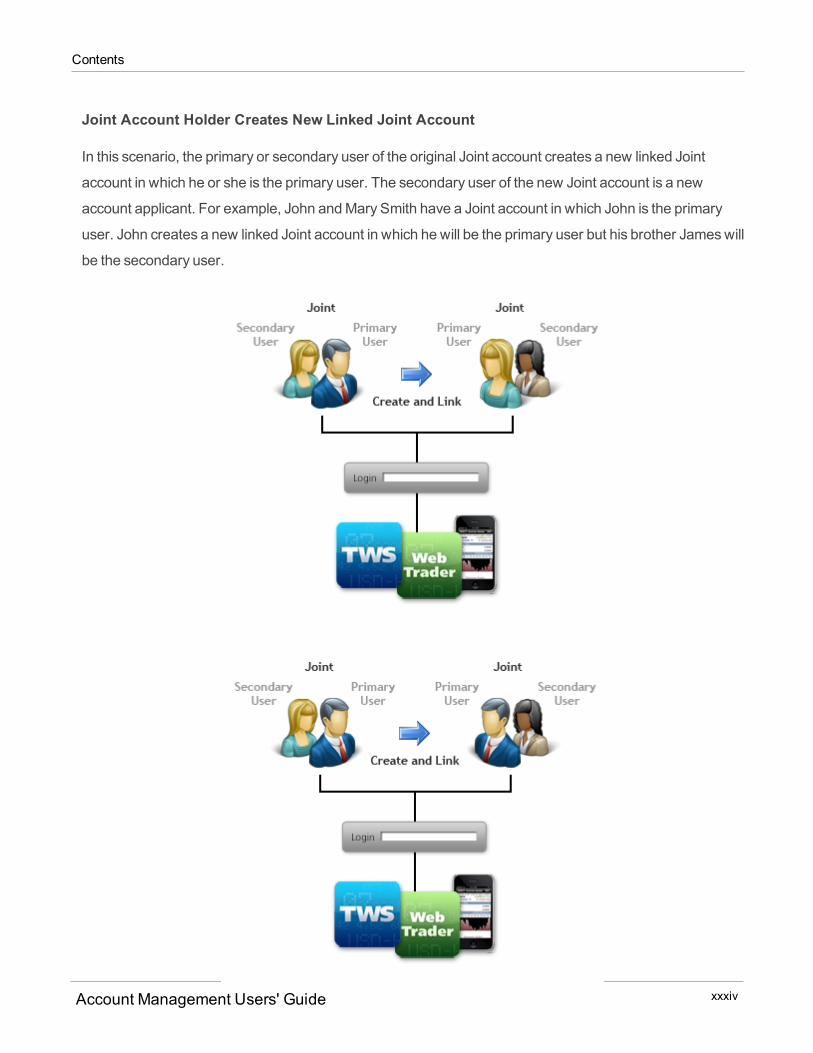
Contents
Joint Account Holder Creates New Linked Joint Account
In this scenario, the primary or secondary user of the original Joint account creates a new linked Joint
account in which he or she is the primary user. The secondary user of the new Joint account is a new
account applicant. For example, John andMary Smith have a Joint account in which John is the primary
user. John creates a new linked Joint account in which he will be the primary user but his brother Jameswill
be the secondary user.
Account Management Users' Guide xxxiv
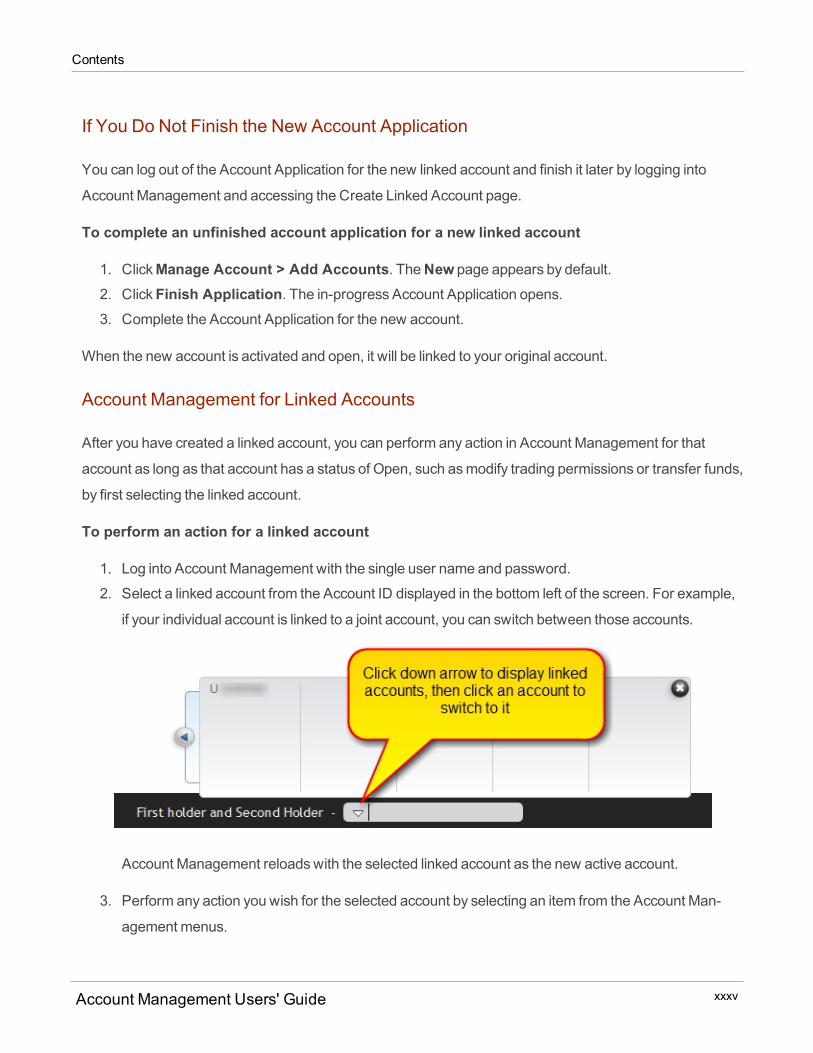
Contents
If You Do Not Finish the New Account Application
You can log out of the Account Application for the new linked account and finish it later by logging into
Account Management and accessing the Create Linked Account page.
To complete an unfinished account application for a new linked account
1. ClickManage Account > Add Accounts. TheNew page appears by default.
2. ClickFinish Application. The in-progress Account Application opens.3. Complete the Account Application for the new account.
When the new account is activated and open, it will be linked to your original account.
Account Management for Linked Accounts
After you have created a linked account, you can perform any action in Account Management for that
account as long as that account has a status of Open, such asmodify trading permissions or transfer funds,
by first selecting the linked account.
To perform an action for a linked account
1. Log into Account Management with the single user name and password.
2. Select a linked account from the Account ID displayed in the bottom left of the screen. For example,
if your individual account is linked to a joint account, you can switch between those accounts.
Account Management reloadswith the selected linked account as the new active account.
3. Perform any action you wish for the selected account by selecting an item from the Account Man-
agement menus.
Account Management Users' Guide xxxv

Contents
4. To de-link a linked account, youmust close the linked account. SelectClose an Account in theMan-age Account > Account Settingsmenu to close the linked account.
Link Existing Account
This page lets you link your multiple IB accounts under the single username and password associated with
your account, including accounts that aremanaged by an Advisor or a Broker. Once these accounts are
linked, you will be able to access Trader Workstation,WebTrader, IBKR Mobile solutions and Account
Management for any of the linked accounts using a single username and password. In addition, market
data subscriptions are charged once for linked accounts rather than charged separately for each linked
account (market data subscriptions are charged per terminal/computer).
Guidelines for Linking Existing Accounts
Observe these guidelineswhen linking accounts in this way:
To request a link to an existing account, youmust have an IB Secure Login System security device.
The email addresses, account titles, tax IDs, legal IDs and physical addresses associated with the
accounts you want to linkmust be the same.
Youmust link ALL accounts associated with you. You cannot link a subset of accounts.
Once the accounts have been linked, the unique usernames and passwords for the accounts to be
linked with this account will no longer function. The username and password associated with your
account will function for all inked accounts.
Once the accounts have been linked, the highest level security device among the linked accounts will
automatically become the active security device.
If you begin a new account application for an existingmatching account, you will be asked to link the
accounts.
Wewill link these accounts on Fridays.
Advisors and fully disclosed brokers can link existing individual and joint client accounts on theManage
Clients > Accounts > Link Existing Accounts page.
Three-level account linking is also supported as follows:
Account Management Users' Guide xxxvi
Contents
An existing individual account holder can link to an existing second-level Advisor or a second level Mul-
tiple Hedge Fund Investment Manager in a three-level Advisor or Fully Disclosed Broker account.
An existing Advisor or Multiple Hedge Fund Investment Manager with clients can link to a top-level
Advisor or a second level Multiple Hedge Fund Investment Manager in a three-level Advisor or Fully
Disclosed Broker account. In this scenario, the entire Advisor/Hedge Fund account structure, including
all of the existing client accounts, get moved to the three level account structure and all clients whose
accounts aremovingmust sign agreements before the linking can be completed.
Who can access the Link Existing Account page?
You can access this page if you are a(n) :
Individual, Joint, Trust or IRA Account User with multiple accounts
Individual, Joint, Trust or IRA Account User with a stand-alone account AND an Advisor- or Broker-
managed account.
Friends and Family Group Client User
Fully Disclosed Broker Client User
Advisor Client User Individual (not Organization)
To link your account to an existing account
1. Log into Account Management with your username and password, then enter the codes from your
Secure Login Device as instructed on the login screen.
2. ClickManage Account > Add or Link Accounts > Link Existing Account.
The page lists all of your current accounts that are eligible to link, along with their usernames and
current Secure Login Device . When you link these accounts, the unique username and password
associated with your other accounts will no longer function; you will access all accounts with a single
username and password.
Account Management Users' Guide xxxvii
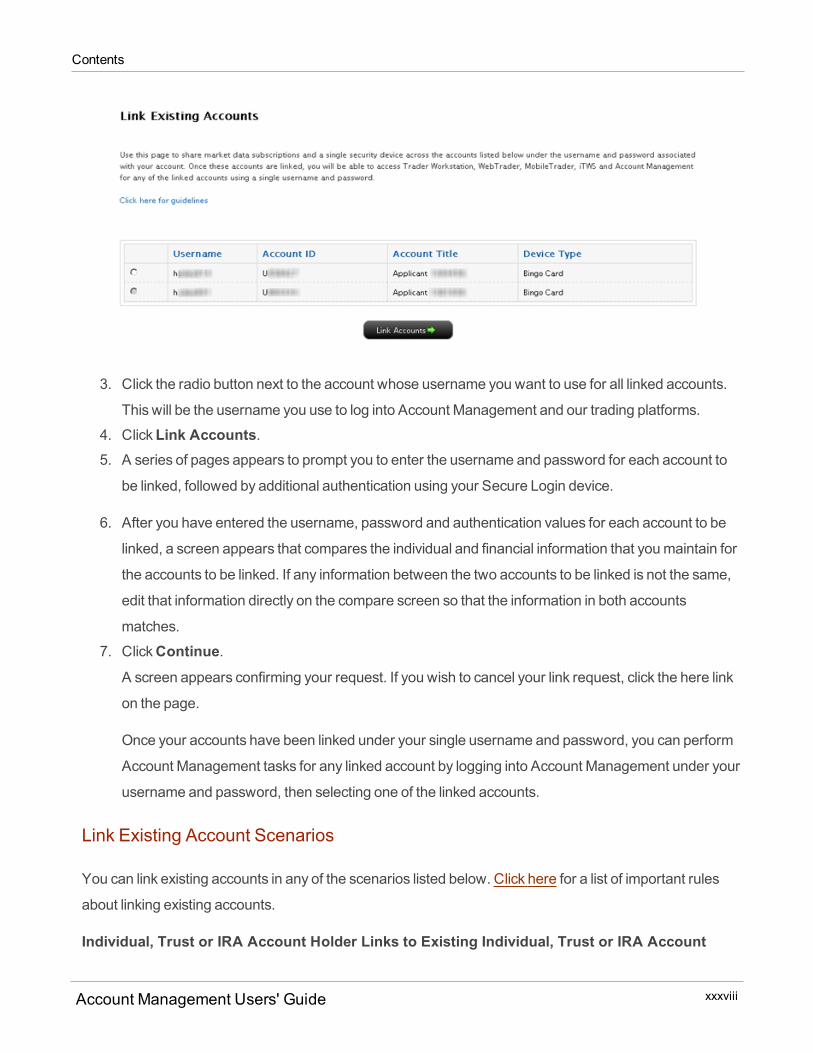
Contents
3. Click the radio button next to the account whose username you want to use for all linked accounts.
This will be the username you use to log into Account Management and our trading platforms.
4. ClickLink Accounts.5. A series of pages appears to prompt you to enter the username and password for each account to
be linked, followed by additional authentication using your Secure Login device.
6. After you have entered the username, password and authentication values for each account to be
linked, a screen appears that compares the individual and financial information that youmaintain for
the accounts to be linked. If any information between the two accounts to be linked is not the same,
edit that information directly on the compare screen so that the information in both accounts
matches.
7. ClickContinue.A screen appears confirming your request. If you wish to cancel your link request, click the here link
on the page.
Once your accounts have been linked under your single username and password, you can perform
Account Management tasks for any linked account by logging into Account Management under your
username and password, then selecting one of the linked accounts.
Link Existing Account Scenarios
You can link existing accounts in any of the scenarios listed below. Click here for a list of important rules
about linking existing accounts.
Individual, Trust or IRA Account Holder Links to Existing Individual, Trust or IRA Account
Account Management Users' Guide xxxviii

Contents
In this scenario, an individual, trust or IRA account holder has a second individual, trust or IRA account in
his name and links the two accounts under a single username.
Account Management Users' Guide xxxix
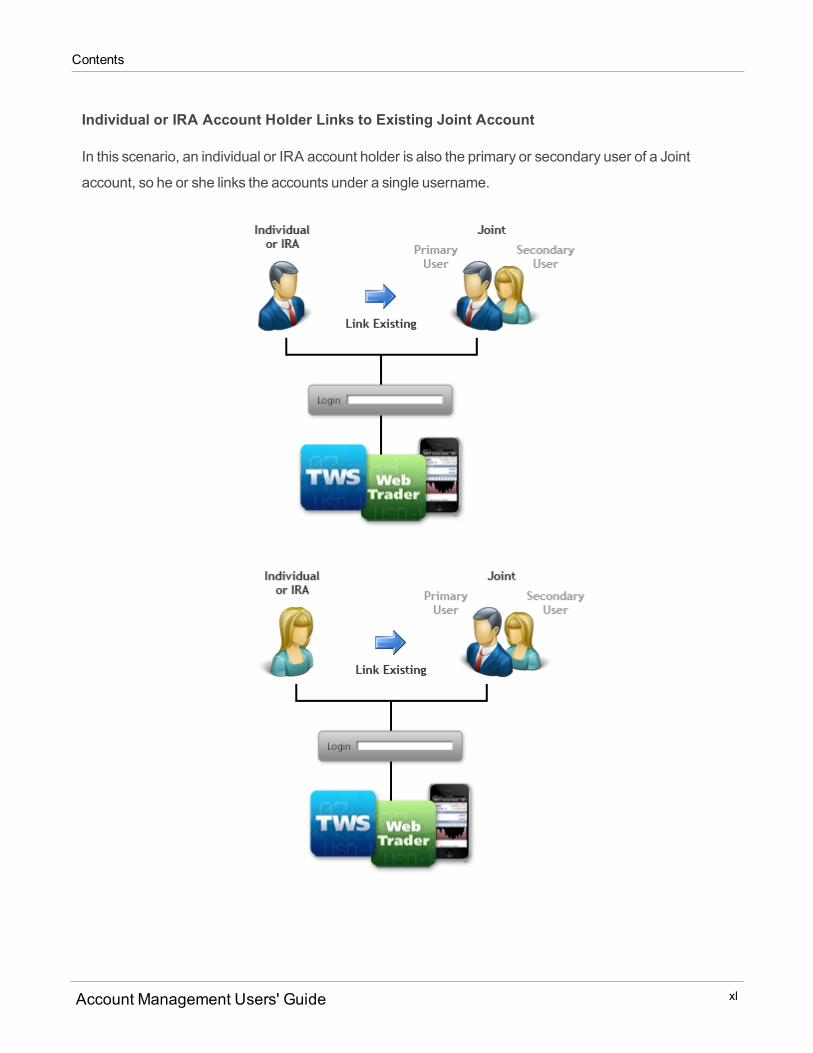
Contents
Individual or IRA Account Holder Links to Existing Joint Account
In this scenario, an individual or IRA account holder is also the primary or secondary user of a Joint
account, so he or she links the accounts under a single username.
Account Management Users' Guide xl

Contents
Joint Account Links to Existing Individual or IRA Account
In this scenario, the primary or secondary user of a Joint account also has an individual or IRA account, so
he or she links the accounts under a single username.
Account Management Users' Guide xli

Contents
Joint Account Links to Existing Joint Account with the same Primary and Secondary Users
In this scenario, the primary and secondary user of one Joint account are also the primary and secondary
user of another Joint account, so the primary user links the accounts under a single username. For
example, John andMary Smith have two Joint accounts for two different trading strategies, and theywant
to use a single username to access both accounts.
Account Management Users' Guide xlii
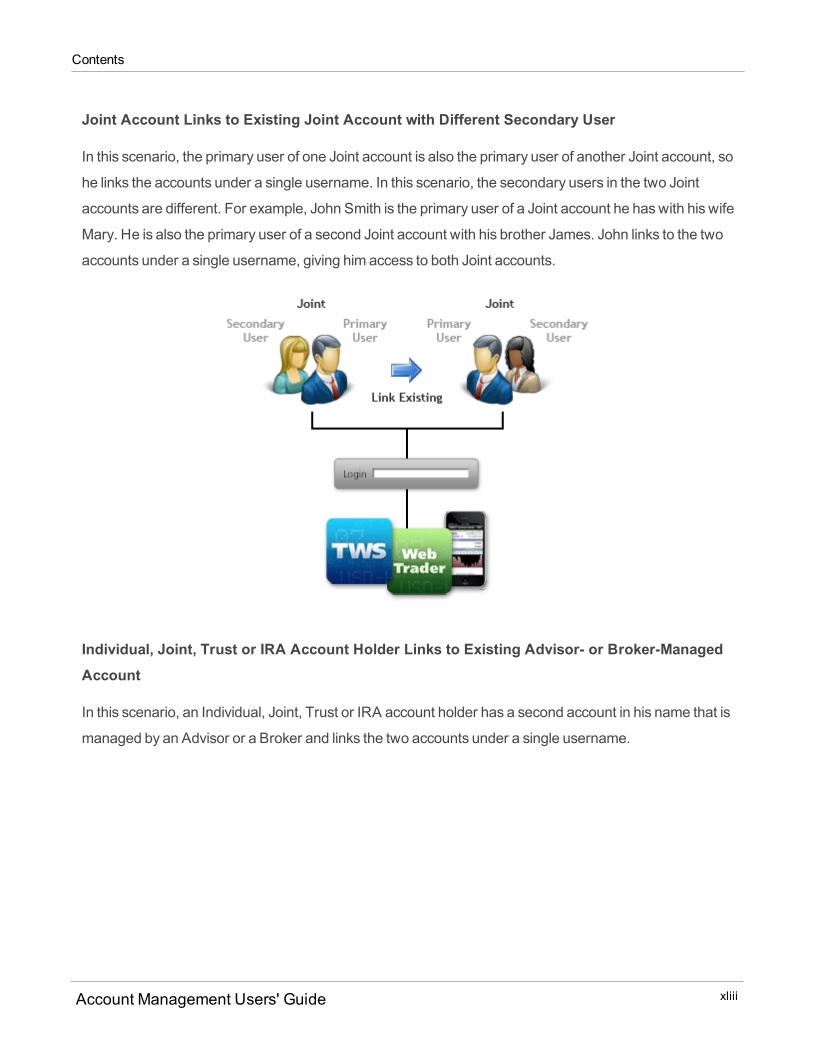
Contents
Joint Account Links to Existing Joint Account with Different Secondary User
In this scenario, the primary user of one Joint account is also the primary user of another Joint account, so
he links the accounts under a single username. In this scenario, the secondary users in the two Joint
accounts are different. For example, John Smith is the primary user of a Joint account he haswith his wife
Mary. He is also the primary user of a second Joint account with his brother James. John links to the two
accounts under a single username, giving him access to both Joint accounts.
Individual, Joint, Trust or IRA Account Holder Links to Existing Advisor- or Broker-ManagedAccount
In this scenario, an Individual, Joint, Trust or IRA account holder has a second account in his name that is
managed by an Advisor or a Broker and links the two accounts under a single username.
Account Management Users' Guide xliii
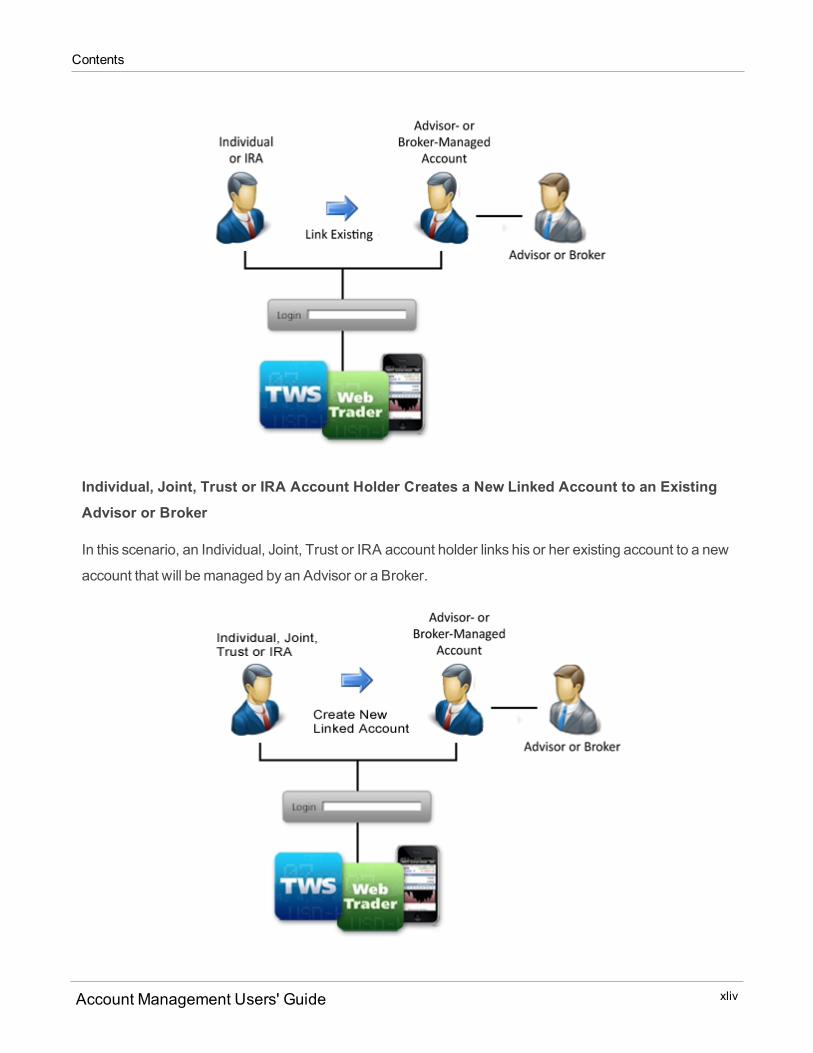
Contents
Individual, Joint, Trust or IRA Account Holder Creates a New Linked Account to an ExistingAdvisor or Broker
In this scenario, an Individual, Joint, Trust or IRA account holder links his or her existing account to a new
account that will bemanaged by an Advisor or a Broker.
Account Management Users' Guide xliv

Contents
Individual, Joint, Trust or IRA Account Holder Links to an Existing Advisor or Multiple HedgeFund Investment Manager in a three-level Advisor or three-level Fully Disclosed Brokeraccount.
In this scenario, an existing Individual, Joint, Trust or IRA account holder moves his or her account to an
existing Advisor or aMultiple Hedge Fund Investment Manager who is the second level of a three-level
Advisor or Fully Disclosed Broker account.
Account Management Users' Guide xlv
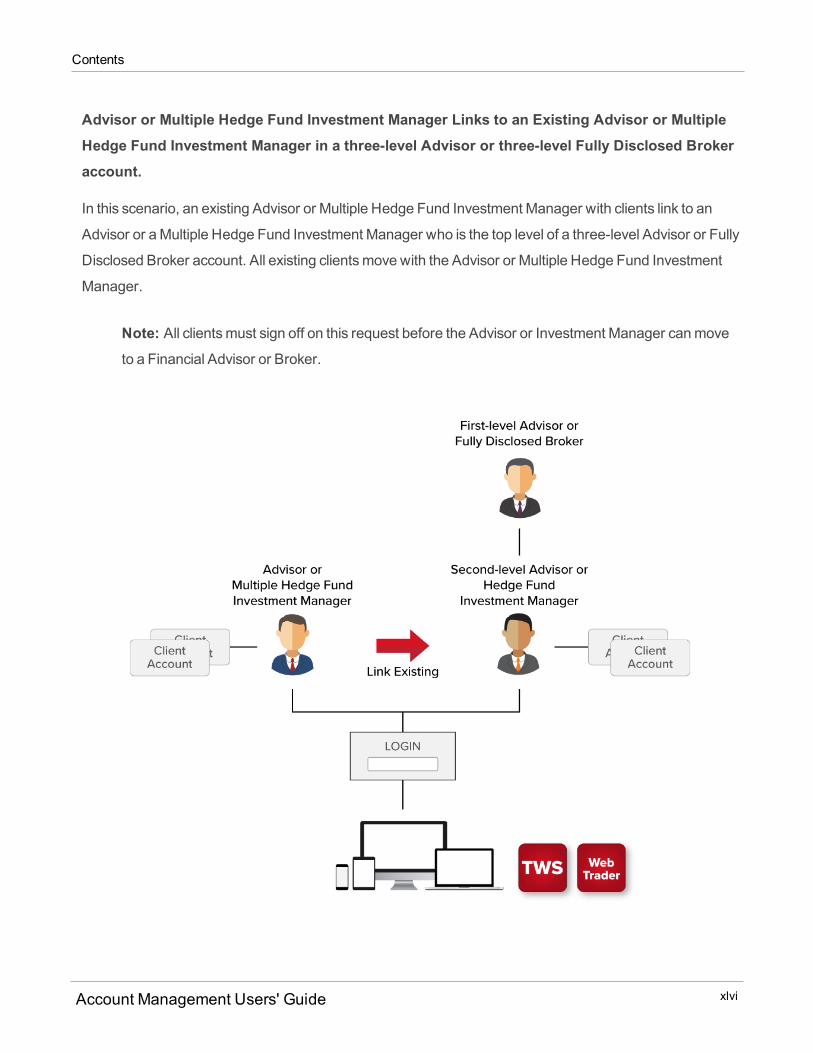
Contents
Advisor or Multiple Hedge Fund Investment Manager Links to an Existing Advisor or MultipleHedge Fund Investment Manager in a three-level Advisor or three-level Fully Disclosed Brokeraccount.
In this scenario, an existing Advisor or Multiple Hedge Fund Investment Manager with clients link to an
Advisor or aMultiple Hedge Fund Investment Manager who is the top level of a three-level Advisor or Fully
Disclosed Broker account. All existing clientsmove with the Advisor or Multiple Hedge Fund Investment
Manager.
Note: All clientsmust sign off on this request before the Advisor or Investment Manager canmoveto a Financial Advisor or Broker.
Account Management Users' Guide xlvi
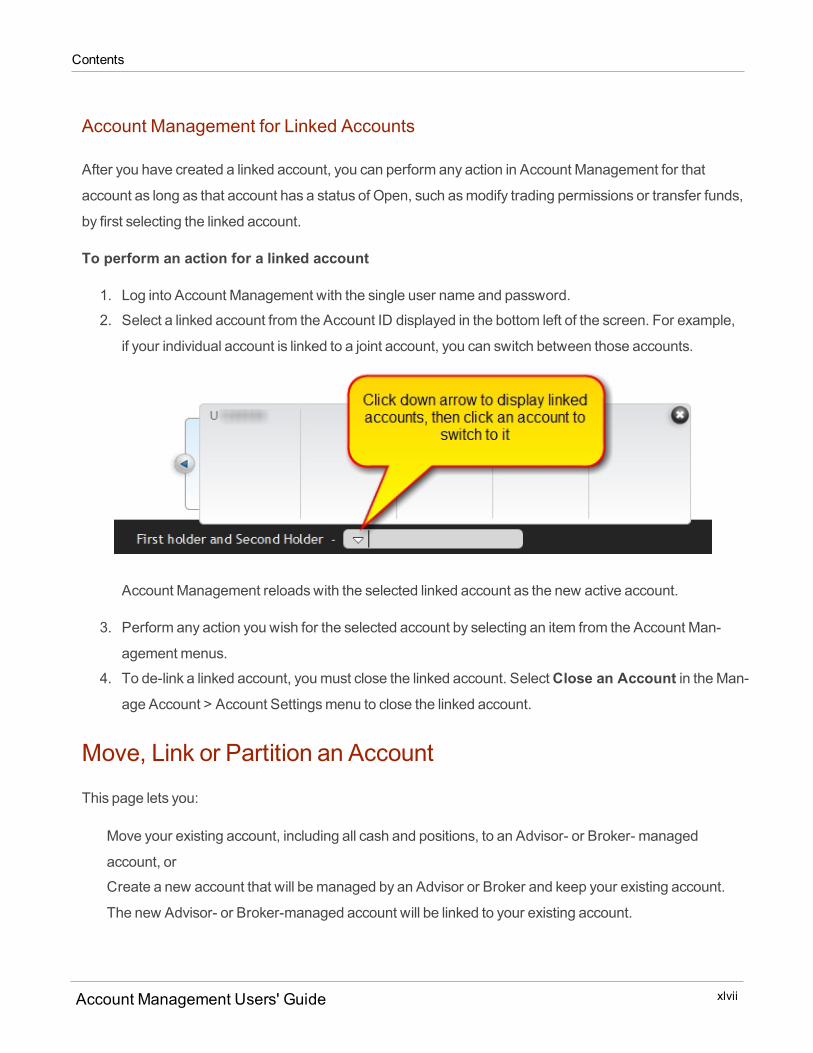
Contents
Account Management for Linked Accounts
After you have created a linked account, you can perform any action in Account Management for that
account as long as that account has a status of Open, such asmodify trading permissions or transfer funds,
by first selecting the linked account.
To perform an action for a linked account
1. Log into Account Management with the single user name and password.
2. Select a linked account from the Account ID displayed in the bottom left of the screen. For example,
if your individual account is linked to a joint account, you can switch between those accounts.
Account Management reloadswith the selected linked account as the new active account.
3. Perform any action you wish for the selected account by selecting an item from the Account Man-
agement menus.
4. To de-link a linked account, youmust close the linked account. SelectClose an Account in theMan-age Account > Account Settingsmenu to close the linked account.
Move, Link or Partition an Account
This page lets you:
Move your existing account, including all cash and positions, to an Advisor- or Broker- managed
account, or
Create a new account that will bemanaged by an Advisor or Broker and keep your existing account.
The new Advisor- or Broker-managed account will be linked to your existing account.
Account Management Users' Guide xlvii
Contents
Divide your account into two partitions: one that will bemanaged by you and one that will bemanaged
by an Advisor or Broker.
This page also appears when you link directly to an Advisor or Broker using the Investors' Marketplace.
Who can access the Move, Link or Partition an Account page?
You can access this page if you are a(n) :
Individual, Joint, Trust or IRA Account User with a single account or multiple accounts
Small Business Account User
Proprietary Trading GroupMaster User
Single Hedge Fund
Advisor Master User (can link to Broker only on this page)
Multiple Hedge Fund Investment Manager (can link to Broker only on this page)
Proprietary Trading Group STL Master User (can link to Broker only on this page)
and you are not an Advisor Client User or Broker Client User.
Important Notes about Linking and DeLinking
You cannot link your account to an advisor who has lesser trading permissions than you.
When youmove your entire account to an Advisor, you will no longer be able to log into Trader Work-
station and your current market data subscriptionswill be canceled.
When youmove your entire account to a Broker, you will keep the ability to log in to Trader Work-
station, and your current trading permissionswill remain in effect.
When you create a new linked Advisor- or Broker-managed account and keep your existing account,
the trading permissions for your existing account will also apply to the new Advisor- or Broker-man-
aged account, but any permission to which the Advisor or Broker is not entitled will be removed. Future
permissions changes for the new account must be done individually for each child account.
Client trading in a linked account managed by an Advisor or aMultiple Hedge Fund Investment Man-
ager cannot be enabled.
Market data subscriptions are charged once for linked accounts rather than separately for each linked
account (market data subscriptions are charged per terminal/computer).
Account Management Users' Guide xlviii
Contents
If you choose to create a new account partition under an Advisor/Broker, that partition will be created
overnight.
Complete account moves to an Advisor/Broker-managed account are completed every Friday at 2:00
PM.
When you choose to link your existing account to an Advisor/Broker-managed account, the Advisor or
Broker must confirm the link request. The new linked account will be open and ready to be funded by
6:00 PMon the same business day. If you submit your link request after 4:00 PM, the linked account
will be open and ready to be funded by 6:00 PMon the next business day.
About Partitions
When you choose to create a new account partition that will bemanaged by an Advisor or Broker, you are
essentially creating a parent-child account relationship. Your existing account becomes the "parent
partition" and your new Advisor- or Broker-managed partition becomes the "child partition." The following
guidelines apply to these partitions:
The trading permissions for your existing account partition will also apply to the new Advisor- or
Broker-managed partition, but any permission to which the Advisor or Broker is not entitled will be
removed. Future permissions changes for child partitions should be done individually for each partition.
Market data subscriptions are charged once for account partitions rather than charged separately for
each partition (market data subscriptions are charged per terminal/computer).
The child partition will be open and ready to be funded by 6:00 PMon the same business day. If you
submit your request after 4:00 PM, the child partition will be open and ready to be funded by 6:00 PM
on the next business day.
When you create a new Advisor- or Broker-managed child partition, the Advisor or Broker cannot
reject the request.
You fund the child partition by transferring cash and or positions from the parent partition to the child
partition once the child partition is open. Use internal fund transfers or internal position transfers to do
this.
The Advisor or Broker will determine and configure fees for the new child partition just as theywould
for any of their client accounts.
Commissions are charged separately for each partition.
Clients receive read only access to trading applications. The Advisor or Multiple Hedge Fund Invest-
ment Manager has the ability to enable client trading.
Account Management Users' Guide xlix
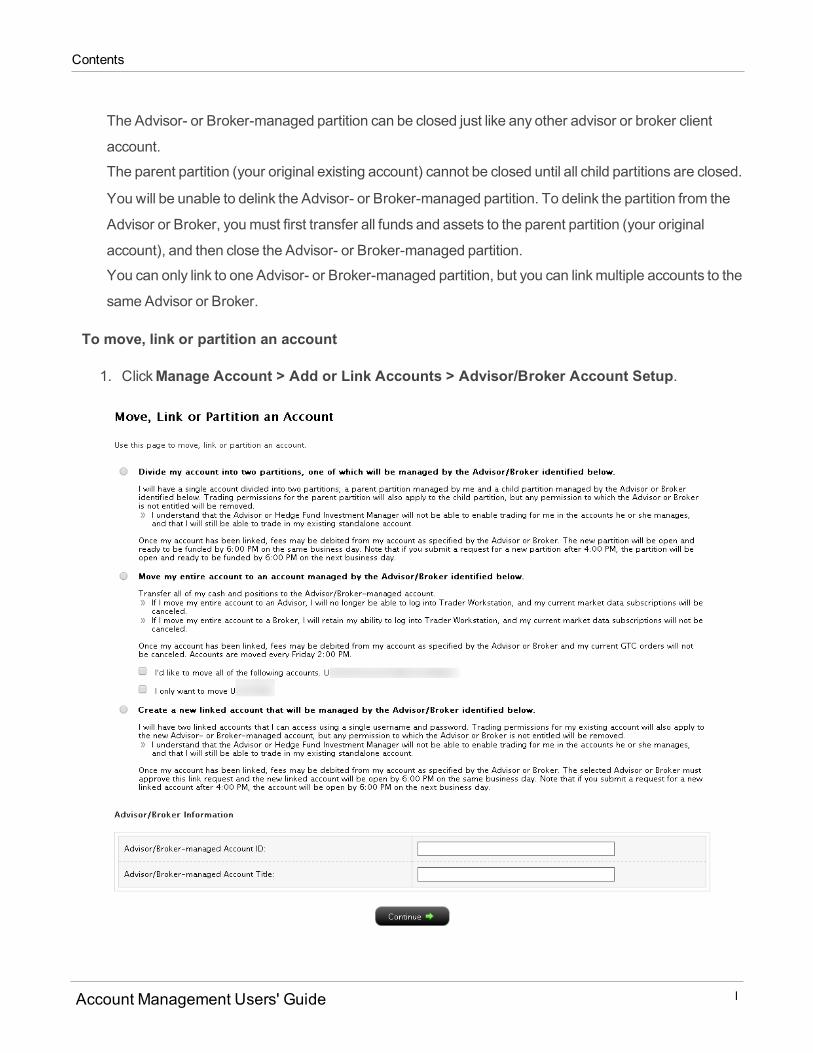
Contents
The Advisor- or Broker-managed partition can be closed just like any other advisor or broker client
account.
The parent partition (your original existing account) cannot be closed until all child partitions are closed.
You will be unable to delink the Advisor- or Broker-managed partition. To delink the partition from the
Advisor or Broker, youmust first transfer all funds and assets to the parent partition (your original
account), and then close the Advisor- or Broker-managed partition.
You can only link to one Advisor- or Broker-managed partition, but you can linkmultiple accounts to the
same Advisor or Broker.
To move, link or partition an account
1. ClickManage Account > Add or Link Accounts > Advisor/Broker Account Setup.
Account Management Users' Guide l

Contents
2. Select from the following options by clicking the appropriate radio button:
o Move my entire account to an account managed by the Advisor/Broker identifiedbelow.
o Create a new linked account that will be managed by the Advisor/Broker identifiedbelow.
o Divide my account into two partitions, one of which will be managed by theAdvisor/Broker identified below.
3. Type the Account ID and Account Title of the Advisor- or Broker-managed account in the fields
provided.
4. ClickContinue.5. Enter the account ID and title of the broker or advisor account to which you want to link in the fields
provided. For example, account ID I123456 and account title Applicant XYZ. If you already selected
the Advisor or Broker in the Investors' Marketplace, these fields will already be filled in.
6. ClickContinue.7. Sign each of the two required agreements and clickContinue after signing each one.
You will be emailed a confirmation number. Enter that number on the Confirmation Number page,
then clickContinue.
8. An email will be sent to the Advisor or Broker to inform him or her of your request.
To access this page from Investors' Marketplace
You can use Investors' Marketplace to identify the Advisor or Broker, and then can access theMove, Link
or Partition an Account page from theMarketplace.
Account Management Users' Guide li
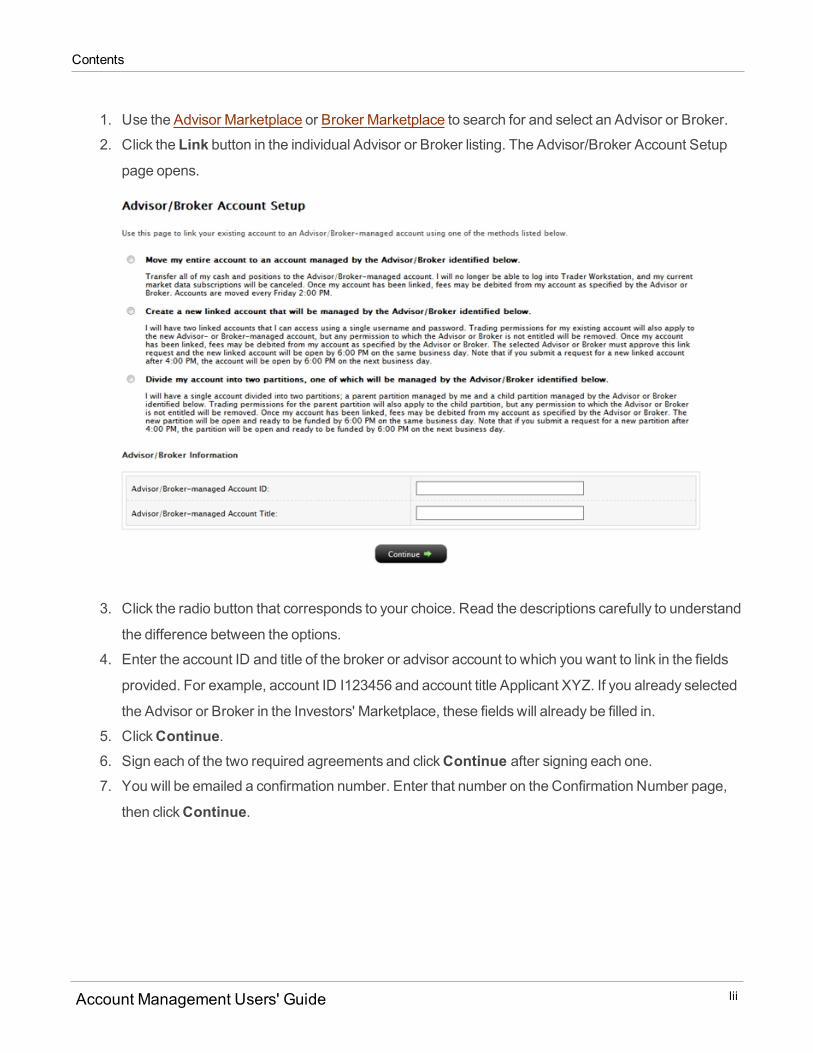
Contents
1. Use the Advisor Marketplace or Broker Marketplace to search for and select an Advisor or Broker.
2. Click the Link button in the individual Advisor or Broker listing. The Advisor/Broker Account Setuppage opens.
3. Click the radio button that corresponds to your choice. Read the descriptions carefully to understand
the difference between the options.
4. Enter the account ID and title of the broker or advisor account to which you want to link in the fields
provided. For example, account ID I123456 and account title Applicant XYZ. If you already selected
the Advisor or Broker in the Investors' Marketplace, these fields will already be filled in.
5. ClickContinue.6. Sign each of the two required agreements and clickContinue after signing each one.7. You will be emailed a confirmation number. Enter that number on the Confirmation Number page,
then clickContinue.
Account Management Users' Guide lii
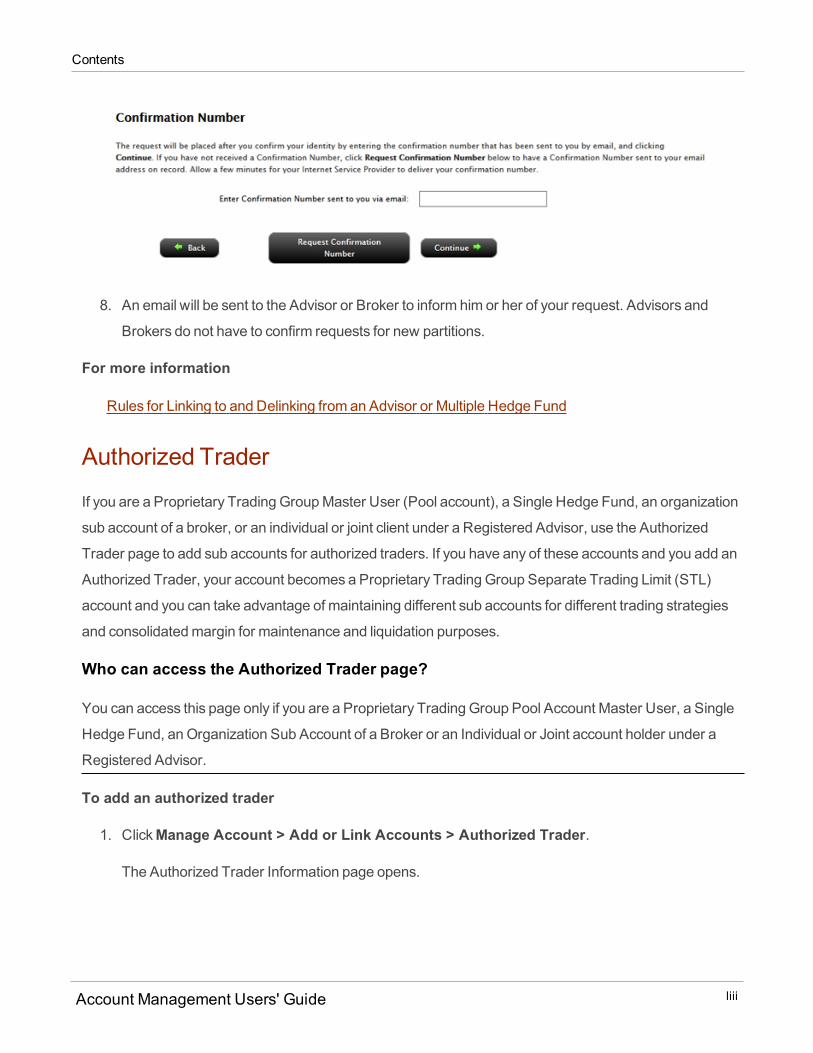
Contents
8. An email will be sent to the Advisor or Broker to inform him or her of your request. Advisors and
Brokers do not have to confirm requests for new partitions.
For more information
Rules for Linking to and Delinking from an Advisor or Multiple Hedge Fund
Authorized Trader
If you are a Proprietary Trading GroupMaster User (Pool account), a Single Hedge Fund, an organization
sub account of a broker, or an individual or joint client under a Registered Advisor, use the Authorized
Trader page to add sub accounts for authorized traders. If you have any of these accounts and you add an
Authorized Trader, your account becomes a Proprietary Trading Group Separate Trading Limit (STL)
account and you can take advantage of maintaining different sub accounts for different trading strategies
and consolidatedmargin for maintenance and liquidation purposes.
Who can access the Authorized Trader page?
You can access this page only if you are a Proprietary Trading Group Pool Account Master User, a Single
Hedge Fund, anOrganization Sub Account of a Broker or an Individual or Joint account holder under a
Registered Advisor.
To add an authorized trader
1. ClickManage Account > Add or Link Accounts > Authorized Trader.
The Authorized Trader Information page opens.
Account Management Users' Guide liii
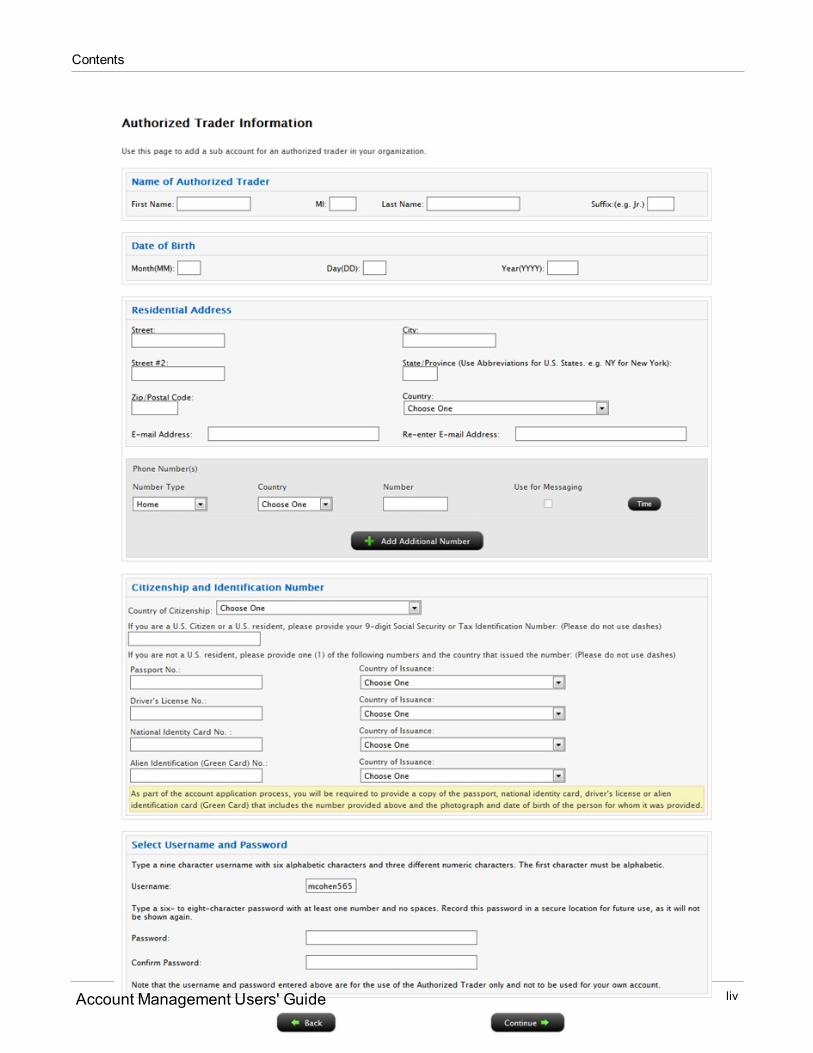
Contents
Account Management Users' Guide liv
Contents
2. Enter all required information, thenBack.
The Trader added page opens, which confirms your request and contains a link to the Trader
Authorization Form.
3. ClickTrader Authorization Form.
4. Read the form carefully, then sign the form by typing your name in the field provided.
5. ClickContinue.
Rules for Linking to and Delinking from an Advisor or Multiple
Hedge Fund
If your account is linked to an Advisor-managed or Multiple Hedge Fund Investment Manager-managed
account, youmay decide to delink that account and/or link to a different Advisor or Investment Manager
(relink). Before doing so, familiarize yourself with the following restrictions on linking and relinking.
Restrictions
Trading Sub accounts cannot be delinked or relinked.
Proprietary Accounts for Broker-Dealers cannot be delinked or relinked.
Client accounts with MoneyManager-attached accounts cannot be delinked or relinked.
Client accounts with a UKL segment cannot relink to a Financial Advisor without a UKL segment.
Client accounts cannot relink from a Financial Advisor or Friends and Family Advisor to a Hedge Fund.
Only Fund accounts can be relinked from aMultiple Fund Investment Manager to another Multiple
Fund Investment Manager.
When delinking accounts from or relinking accounts to a Financial Advisor, you can delink or relink all
accounts or one or more accounts.
Partitioned accounts cannot be delinked or relinked.
Hedge Fund clients of aMultiple Hedge Fund account cannot be delinked.
Research Services
TheResearch Servicesmenu includes the following items:
Account Management Users' Guide lv
Contents
ResearchWebsite Login
ResearchWebsite Login
This page lets you get access to research provider websites in order to get more services. You use your IB
account email address but a unique password to access provider websites.
To use this page
1. ClickManage Account > Research Services > Research Website Login.2. Select a research provider from the drop-down list.
3. Type a unique password in the field provided. You will use this password along with your IB account
email address to access the selected research provider's website.
o The passwordmust be unique; it cannot be the same as your IB account password.o The password should be between 6 and 20 characters.
4. ClickSubmit. It takes one business day to process your request.
Money Manager
Our MoneyManager program lets Professional Advisors acting asWealth Managers shop for Money
Managers at theMoneyManager Marketplace and assign them to trade client accounts, and letsMoney
Managers sell their trading expertise toWealth Managers.
TheMoneyManager menu includes the following tabbed pages:
MoneyManager Assignment - Once aWealth Manager and aMoneyManager agree to do business,
theWealth Manager uses this page to assign client accounts, set trading permissions and client fees
for theMoneyManager.
Wealth Manager Assignment - MoneyManagers use this page to accept trading assignments from
Wealth Managers.
Money Manager Marketplace
MoneyManagers canmarket their services by registering at theMoneyManager Marketplace. Once this is
done,Wealth Managers can shop for and connect with theMoneyManager at theMoneyManager
Account Management Users' Guide lvi
Contents
Marketplace, located in the Investors' Marketplace > Search Services > Investingmenu.
Adding a Money Manager
There are two ways for Wealth Manager to add aMoneyManager in Account Management:
On theManage Account > Money Manager > Administration page.
From theMoneyManager Marketplace (Investors' Marketplace > Search Services > Investing >Money Manager).
Money Manager Assignment
All Professional Financial Advisors are considered to beWealth Managers. As aWealth Manager, you can
optionally addMoneyManagers to trade for your client accounts. MoneyManagers direct trading and
investment activity in client accounts. They cannot add client accounts, fund client accounts, set client fees
or set client trading permissions.
Advisors who are part of a three-level broker account structure cannot link toMoneyManagers.
Who Can Access the Money Manager Assignment Page?
You can access this page if you are an Advisor who is a Registered Investment Advisor (RIA), including
second-tier Advisors (under a Fully Disclosed Broker), unregistered Advisors and Friends and Family
account Advisors.
A MoneyManager must first complete a separateMoneyManager account application. Once aMoney
Manager’s account is activated, you can add him or her to your account, then assign client accounts to
them for trading purposes, set trading permissions and set client fees. BothMoneyManagers andWealth
Managers can trade for client accounts. After theMoneyManager’s account has been activated, you as a
Wealth Manager perform the following steps:
1. Access theMoneyManager Marketplace and shop for availableMoneyManagers. Either contact a
MoneyManager directly or request that aMoneyManager contact you.
2. Once you and theMoneyManager have agreed to do business together, add theMoneyManager to
your account by using the Add button in theMoneyManager Marketplace, or use theMoneyMan-
Account Management Users' Guide lvii
Contents
ager Assignment page.
3. Add aMoneyManager
o MoneyManagersmust log into Account Management with their username and password to
accept assignments fromWealth Manager. SeeWealth Manager Assignment for more inform-
ation.o The first time aWealth Manager adds aMoneyManager, theWealth Manager must enter a code
up to four letters long called aMnemonic that will be used as part of a Virtual Account Number in
place of theWealth Manager Account ID on all reports, and when setting up client fees and client
trading permissions. This is a security feature to protect theWM account ID.
TheMoneyManager must also enter a code up to four letters long when he or she accepts the
Wealth Manager Assignment. ThisMnemonic will be used in place of theMoneyManager
Account ID in the Virtual Account Number on all reports.
4. Set Up a Client Fee Schedule - This fee schedule represents the fees that will be paid to you, the
Wealth Manager, when you trade for client accounts. Typically, you will have already done this for
your client accounts and this is the same procedure described in the Client Fees topic.
You set up a separate fee schedule for aMoneyManager when you set up the client accounts for
theMoneyManager.
5. Set Up Client Accounts - This step includes assigning client accounts to aMoneyManager, setting
trading permissions andMoneyManager client fees (fees that will be paid when theMoneyManager
trades for client accounts).
MoneyManagers can start trading the next business day (client assignments and trading
permissions require one business day to take effect). But MoneyManager client feeswill be
collected from client accounts and transferred to theMoneyManager only after the client signs the
MoneyManager client agreement.
6. Create a Client Fees Template - Optionally, create a common client fee schedule to for MoneyMan-
agers without having to set client fees separately for eachMoneyManager. Client feeswill be
enabled for a client account only after the client has submitted a signed fee agreement, if applicable.
7. Fund Client Accounts - See Fund Transfers or Position Transfers for detailed instructions.
Account Management Users' Guide lviii
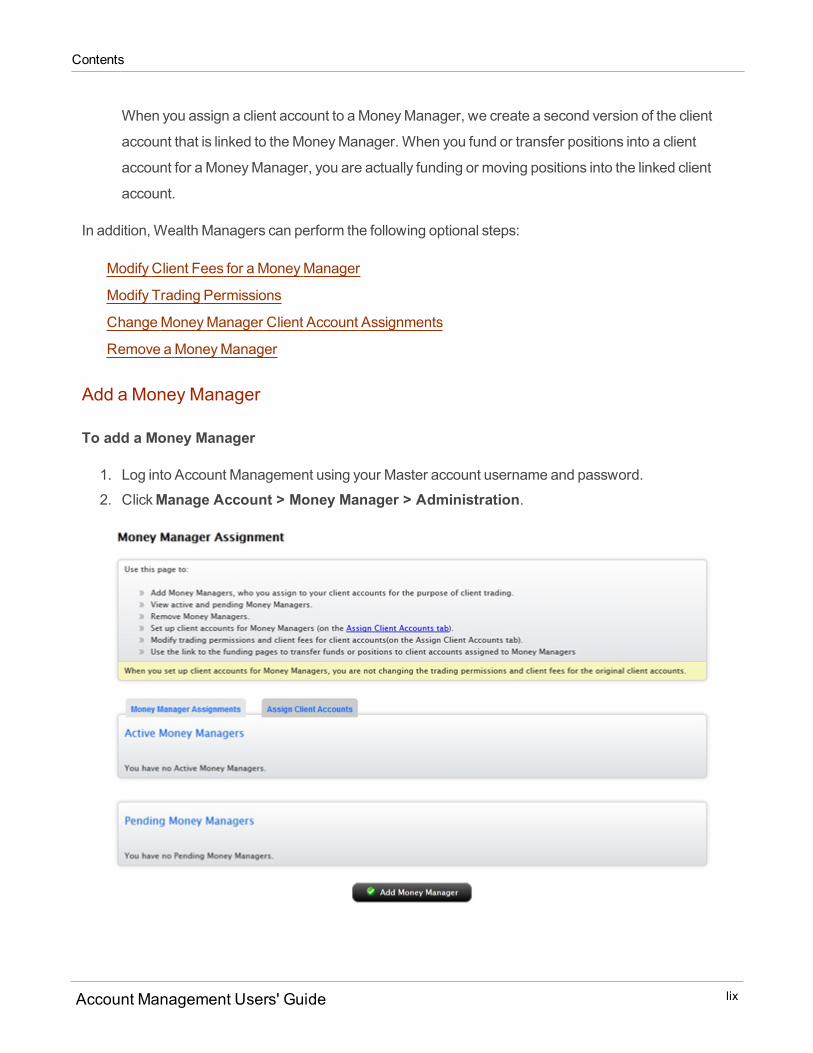
Contents
When you assign a client account to aMoneyManager, we create a second version of the client
account that is linked to theMoneyManager. When you fund or transfer positions into a client
account for aMoneyManager, you are actually funding or moving positions into the linked client
account.
In addition, Wealth Managers can perform the following optional steps:
Modify Client Fees for aMoneyManager
Modify Trading Permissions
ChangeMoneyManager Client Account Assignments
Remove aMoneyManager
Add a Money Manager
To add a Money Manager
1. Log into Account Management using your Master account username and password.
2. ClickManage Account > Money Manager > Administration.
Account Management Users' Guide lix
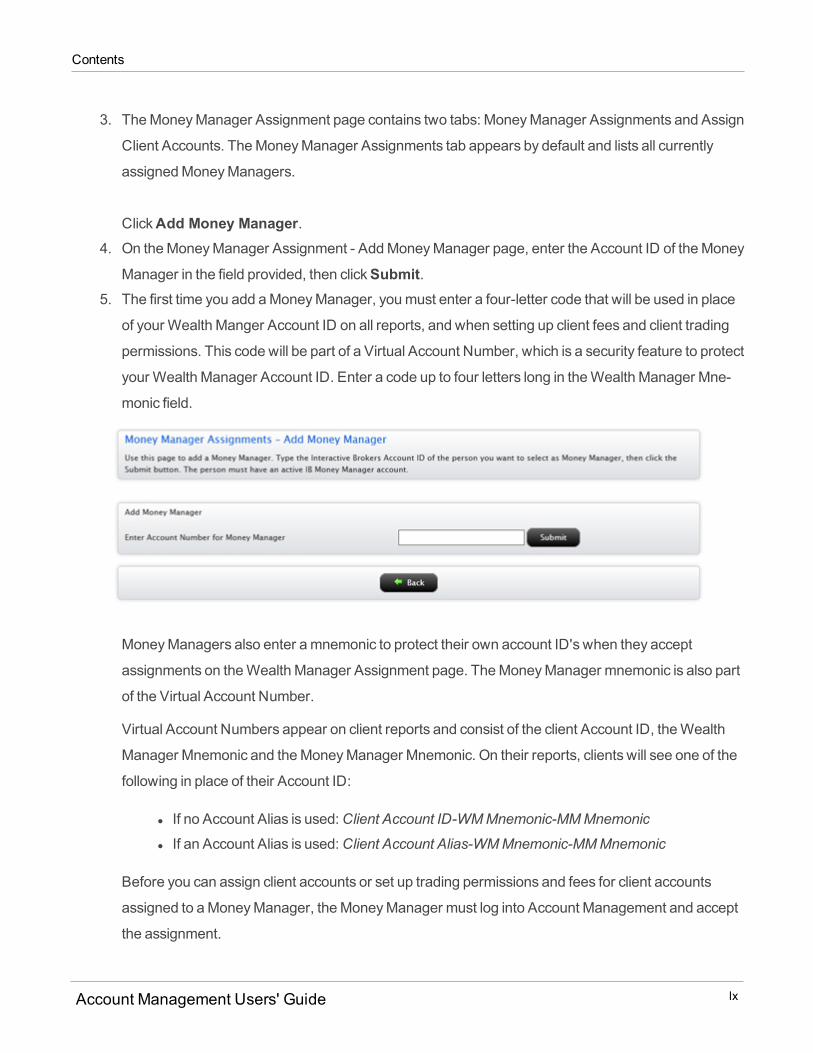
Contents
3. TheMoneyManager Assignment page contains two tabs: MoneyManager Assignments and Assign
Client Accounts. TheMoneyManager Assignments tab appears by default and lists all currently
assignedMoneyManagers.
ClickAdd Money Manager.4. On theMoneyManager Assignment - AddMoneyManager page, enter the Account ID of theMoney
Manager in the field provided, then clickSubmit.5. The first time you add aMoneyManager, youmust enter a four-letter code that will be used in place
of your Wealth Manger Account ID on all reports, and when setting up client fees and client trading
permissions. This code will be part of a Virtual Account Number, which is a security feature to protect
your Wealth Manager Account ID. Enter a code up to four letters long in theWealth Manager Mne-
monic field.
MoneyManagers also enter amnemonic to protect their own account ID's when they accept
assignments on theWealth Manager Assignment page. TheMoneyManager mnemonic is also part
of the Virtual Account Number.
Virtual Account Numbers appear on client reports and consist of the client Account ID, theWealth
Manager Mnemonic and theMoneyManager Mnemonic. On their reports, clients will see one of the
following in place of their Account ID:
l If no Account Alias is used:Client Account ID-WM Mnemonic-MMMnemonic
l If an Account Alias is used:Client Account Alias-WM Mnemonic-MMMnemonic
Before you can assign client accounts or set up trading permissions and fees for client accounts
assigned to aMoneyManager, theMoneyManager must log into Account Management and accept
the assignment.
Account Management Users' Guide lx
Contents
Create a Client Fees Template
A Client Fees Template lets you create and save a common client fee schedule, then apply it to multiple
client accounts assigned to aMoneyManager without having to set the client fees separately for each client
account. You create a Client Fees Template from theMoneyManager Assignment page.
To create a Client Fees Template
1. Log into Account Management using your Master account username and password.
2. ClickManage Account > Money Manager > Administration.3. In the list of ActiveMoneyManagers, click theAdd/Edit Client Fees Template link in the action
column for aMoneyManager.
4. Set client fees the way you normally would, selecting one of the options on the screen, then entering
values as required.
5. ClickContinue.
The Client Fees Template will now be available to assign tomultiple client accounts when you set
MoneyManager fees as described in Set Up Client Accounts.
6. Repeat this procedure to edit an existing Client Fees Template.
Modify Client Fees for a Money Manager
You can edit the client fees for one or more client accounts assigned to aMoneyManager. Note that any
changes toMoneyManager fees require approval from the client.
To modify Client Fees for a Money Manager
1. Log into Account Management using your Master account username and password.
2. ClickManage Account > Money Manager > Administration.
Account Management Users' Guide lxi
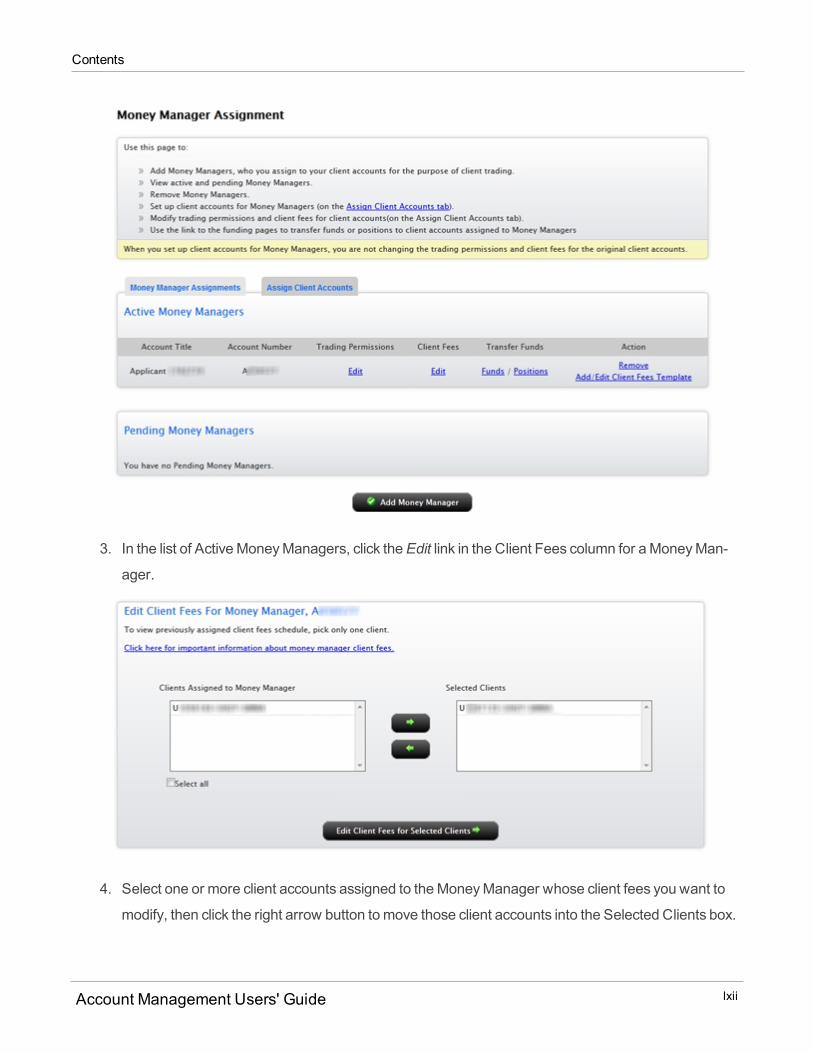
Contents
3. In the list of ActiveMoneyManagers, click theEdit link in the Client Fees column for aMoneyMan-
ager.
4. Select one or more client accounts assigned to theMoneyManager whose client fees you want to
modify, then click the right arrow button tomove those client accounts into the Selected Clients box.
Account Management Users' Guide lxii
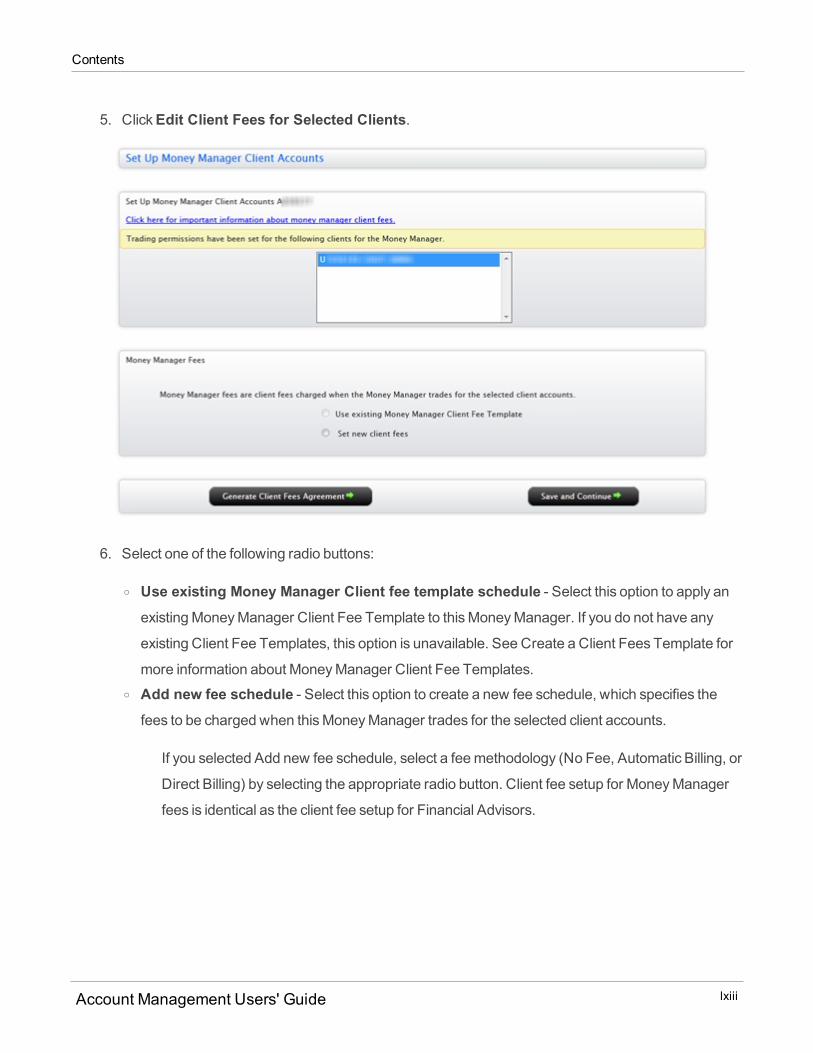
Contents
5. ClickEdit Client Fees for Selected Clients.
6. Select one of the following radio buttons:
o Use existing Money Manager Client fee template schedule - Select this option to apply anexistingMoneyManager Client Fee Template to thisMoneyManager. If you do not have any
existing Client Fee Templates, this option is unavailable. See Create a Client Fees Template for
more information about MoneyManager Client Fee Templates.o Add new fee schedule - Select this option to create a new fee schedule, which specifies the
fees to be charged when thisMoneyManager trades for the selected client accounts.
If you selected Add new fee schedule, select a feemethodology (No Fee, Automatic Billing, or
Direct Billing) by selecting the appropriate radio button. Client fee setup for MoneyManager
fees is identical as the client fee setup for Financial Advisors.
Account Management Users' Guide lxiii

Contents
7. ClickSave and Continue. A confirmation page appears.
Modify Trading Permissions
You can edit theMoneyManager trading permissions for one or more client accounts assigned to aMoney
Manager.
To modify trading permissions for a Money Manager
1. Log into Account Management using your Master account username and password.
2. ClickManage Account > Money Manager > Administration.
Account Management Users' Guide lxiv

Contents
3. In the list of ActiveMoneyManagers, click theEdit link in the Trading Permissions column for a
MoneyManager.
Account Management Users' Guide lxv
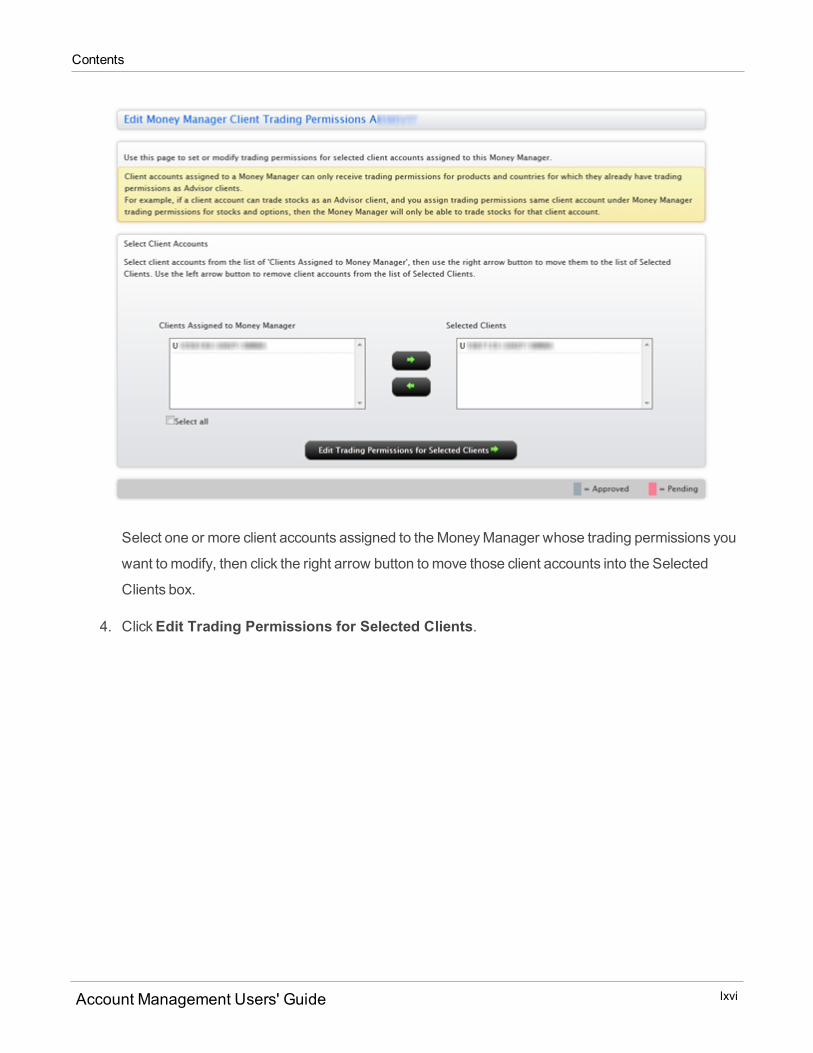
Contents
Select one or more client accounts assigned to theMoneyManager whose trading permissions you
want to modify, then click the right arrow button tomove those client accounts into the Selected
Clients box.
4. ClickEdit Trading Permissions for Selected Clients.
Account Management Users' Guide lxvi
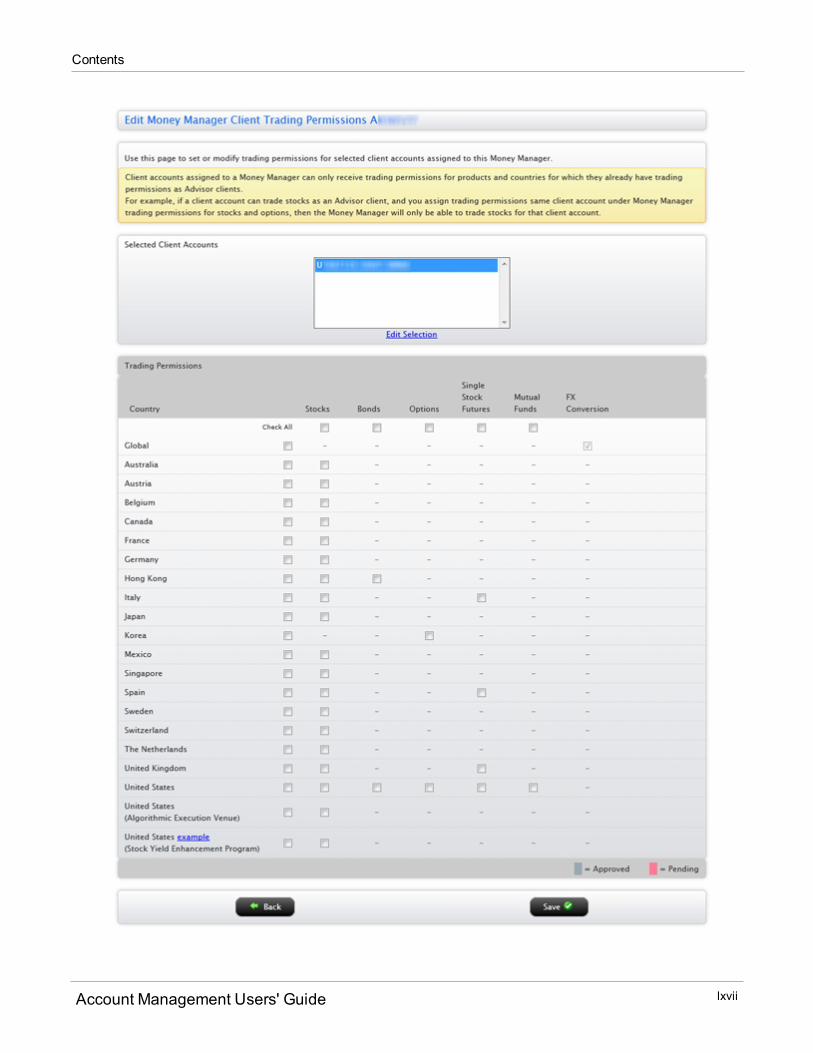
Contents
Account Management Users' Guide lxvii
Contents
5. The client accounts for whom you are adding trading permissions are displayed in the Selected Cli-
ent Accounts box. These are the client accounts that you assigned to theMoneyManager on the pre-
vious page.
Modify products and countries for those client accounts as required, then clickSave and Continue.
To change the client account assignments, click theEdit Selection link, then clickOKin themessagebox. You will be returned to the Assign Client Accounts page and you will lose any client
assignments you alreadymade.
Client account assigned to aMoneyManager can only receive trading permissions for products and
countries that they already have permission to trade as Advisor clients. For example, if a client
account can trade stocks as an Advisor client, and you assign trading permissions for aMoney
Manager that gives the same client account trading permissions for stocks and options, then the
MoneyManager will only be able to trade stocks for that client account.
Change Money Manager Client Account Assignments
You changeMoneyManager client account assignments at any time by adding or removing client accounts
from theMoneyManager.
To change Money Manager client assignments
1. Log into Account Management using your Master account username and password.
2. ClickManage Account > Money Manager > Administration.
Account Management Users' Guide lxviii
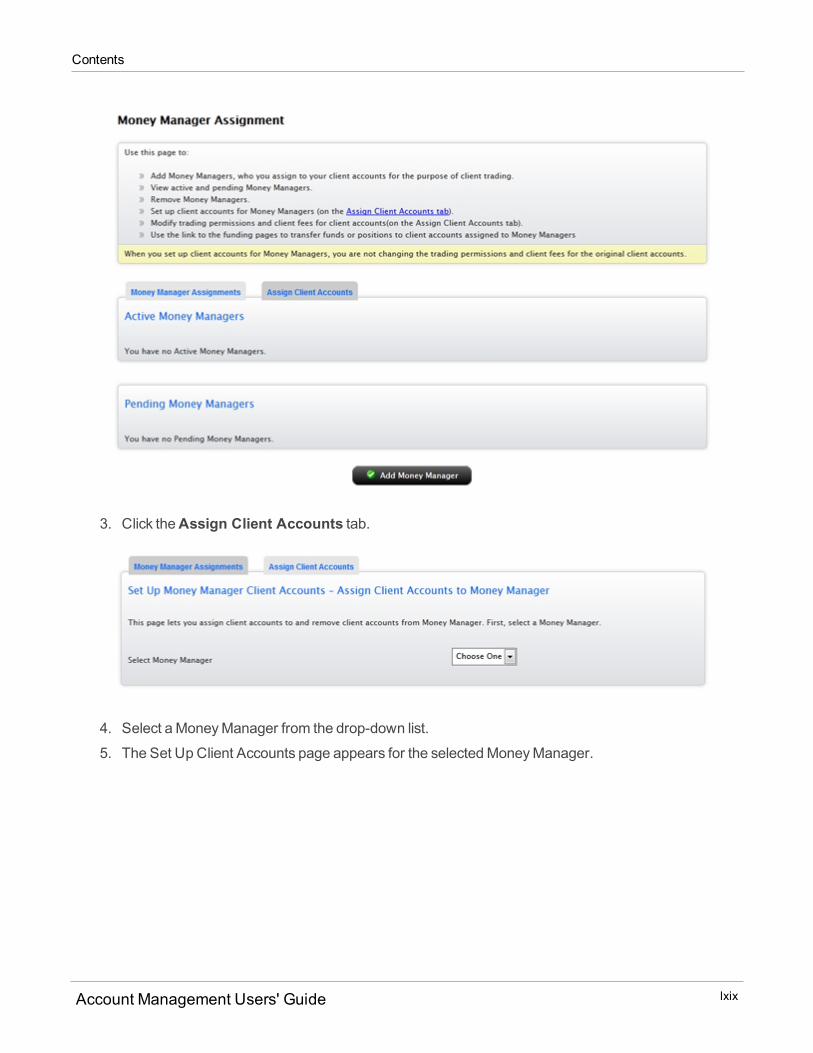
Contents
3. Click theAssign Client Accounts tab.
4. Select aMoneyManager from the drop-down list.
5. The Set Up Client Accounts page appears for the selectedMoneyManager.
Account Management Users' Guide lxix
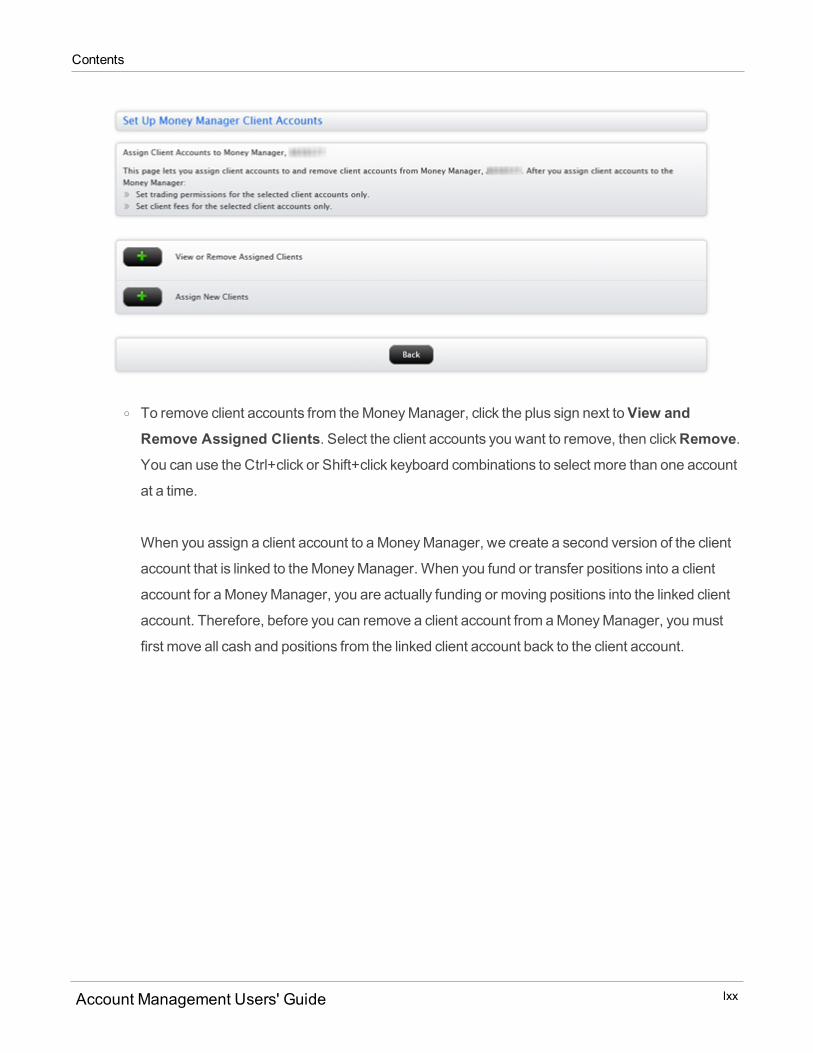
Contents
o To remove client accounts from theMoneyManager, click the plus sign next toView andRemove Assigned Clients. Select the client accounts you want to remove, then clickRemove.You can use the Ctrl+click or Shift+click keyboard combinations to select more than one account
at a time.
When you assign a client account to aMoneyManager, we create a second version of the client
account that is linked to theMoneyManager. When you fund or transfer positions into a client
account for aMoneyManager, you are actually funding or moving positions into the linked client
account. Therefore, before you can remove a client account from aMoneyManager, youmust
first move all cash and positions from the linked client account back to the client account.
Account Management Users' Guide lxx
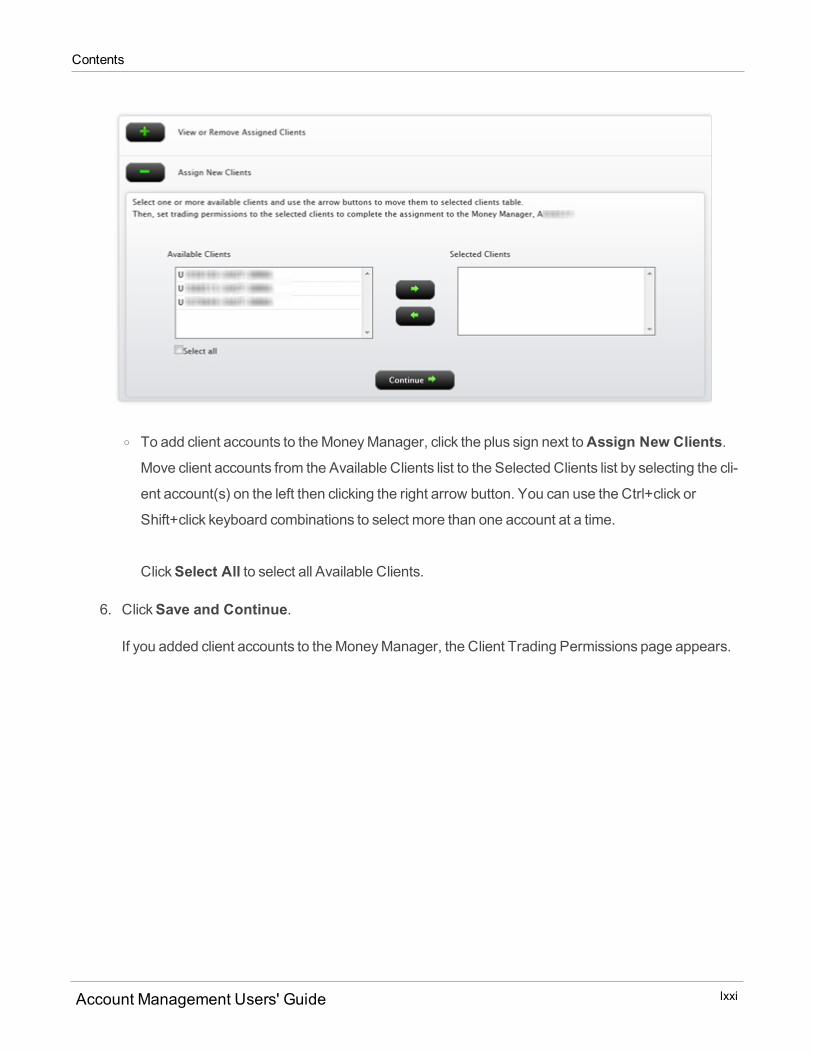
Contents
o To add client accounts to theMoneyManager, click the plus sign next toAssign New Clients.Move client accounts from the Available Clients list to the Selected Clients list by selecting the cli-
ent account(s) on the left then clicking the right arrow button. You can use the Ctrl+click or
Shift+click keyboard combinations to select more than one account at a time.
ClickSelect All to select all Available Clients.
6. ClickSave and Continue.
If you added client accounts to theMoneyManager, the Client Trading Permissions page appears.
Account Management Users' Guide lxxi

Contents
7. The client accounts for whom you are adding trading permissions are displayed in the Selected Cli-
ent Accounts box. These are the client accounts that you assigned to theMoneyManager on the pre-
Account Management Users' Guide lxxii

Contents
vious page.
Add products and countries to those client accounts as required, then clickSave and Continue.
Client account assigned to aMoneyManager can only receive trading permissions for products and
countries that they already have permission to trade as Advisor clients. For example, if a client
account can trade stocks as an Advisor client, and you assign trading permissions for aMoney
Manager that gives the same client account trading permissions for stocks and options, then the
MoneyManager will only be able to trade stocks for that client account.
TheMoneyManager Fees page appears. This page lets you set client fees for the client accounts
assigned to thisMoneyManager, which are displayed in the box at the top of the page.
8. Select one of the following radio buttons:
o Use existing Money Manager Client fee template schedule - Select this option to apply anexistingMoneyManager Client Fee Template to thisMoneyManager. If you do not have any
existing Client Fee Templates, this option is unavailable. See Create a Client Fees Template for
more information about MoneyManager Client Fee Templates.
Account Management Users' Guide lxxiii
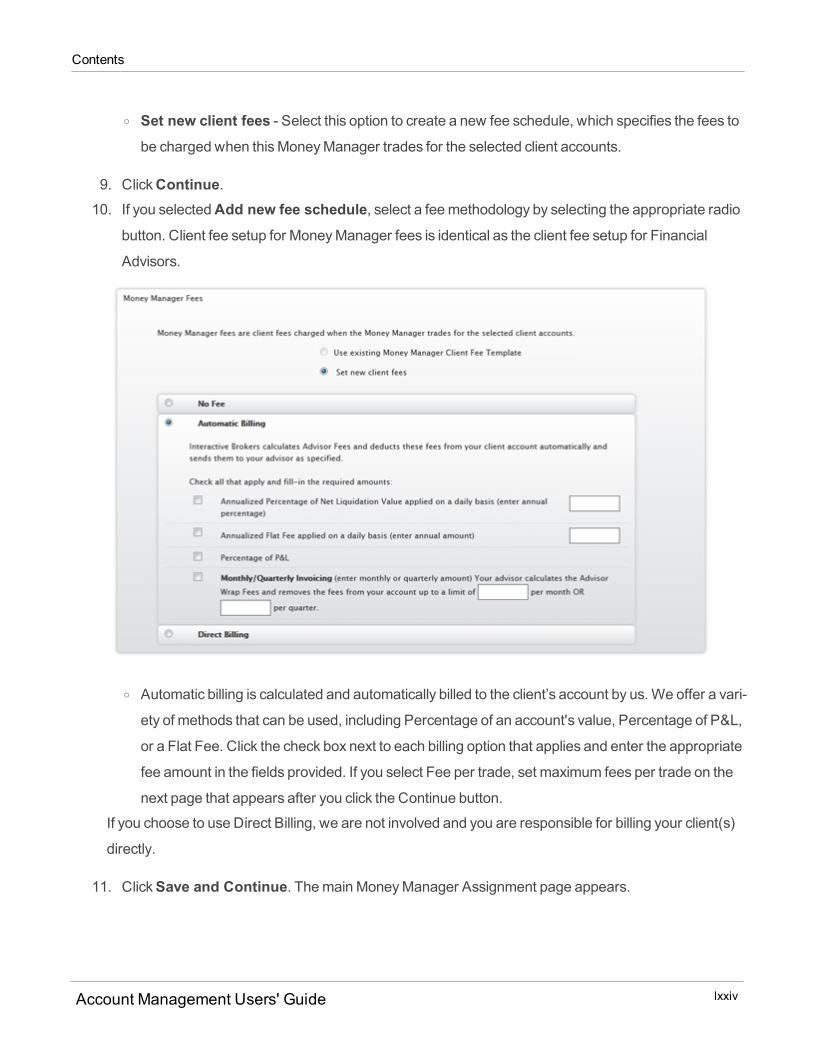
Contents
o Set new client fees - Select this option to create a new fee schedule, which specifies the fees to
be charged when thisMoneyManager trades for the selected client accounts.
9. ClickContinue.10. If you selectedAdd new fee schedule, select a feemethodology by selecting the appropriate radio
button. Client fee setup for MoneyManager fees is identical as the client fee setup for Financial
Advisors.
o Automatic billing is calculated and automatically billed to the client’s account by us.We offer a vari-
ety of methods that can be used, including Percentage of an account's value, Percentage of P&L,
or a Flat Fee. Click the check box next to each billing option that applies and enter the appropriate
fee amount in the fields provided. If you select Fee per trade, set maximum fees per trade on the
next page that appears after you click the Continue button.
If you choose to use Direct Billing, we are not involved and you are responsible for billing your client(s)
directly.
11. ClickSave and Continue. ThemainMoneyManager Assignment page appears.
Account Management Users' Guide lxxiv
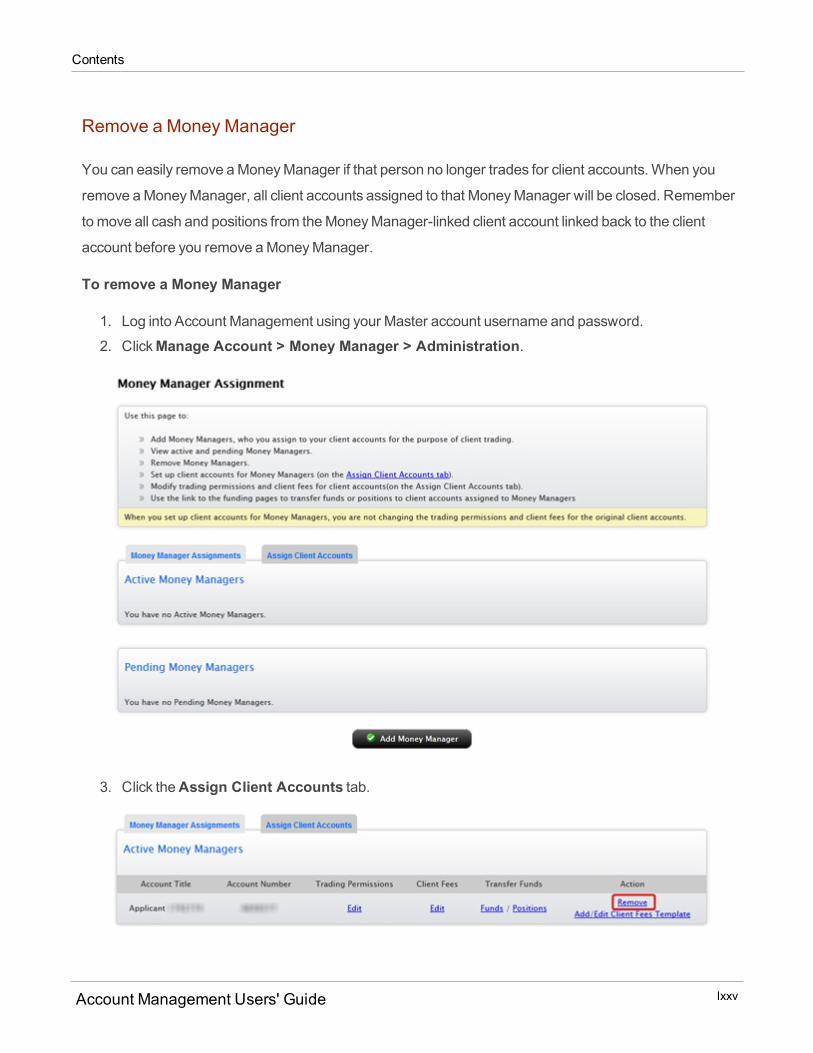
Contents
Remove a Money Manager
You can easily remove aMoneyManager if that person no longer trades for client accounts. When you
remove aMoneyManager, all client accounts assigned to that MoneyManager will be closed. Remember
tomove all cash and positions from theMoneyManager-linked client account linked back to the client
account before you remove aMoneyManager.
To remove a Money Manager
1. Log into Account Management using your Master account username and password.
2. ClickManage Account > Money Manager > Administration.
3. Click theAssign Client Accounts tab.
Account Management Users' Guide lxxv
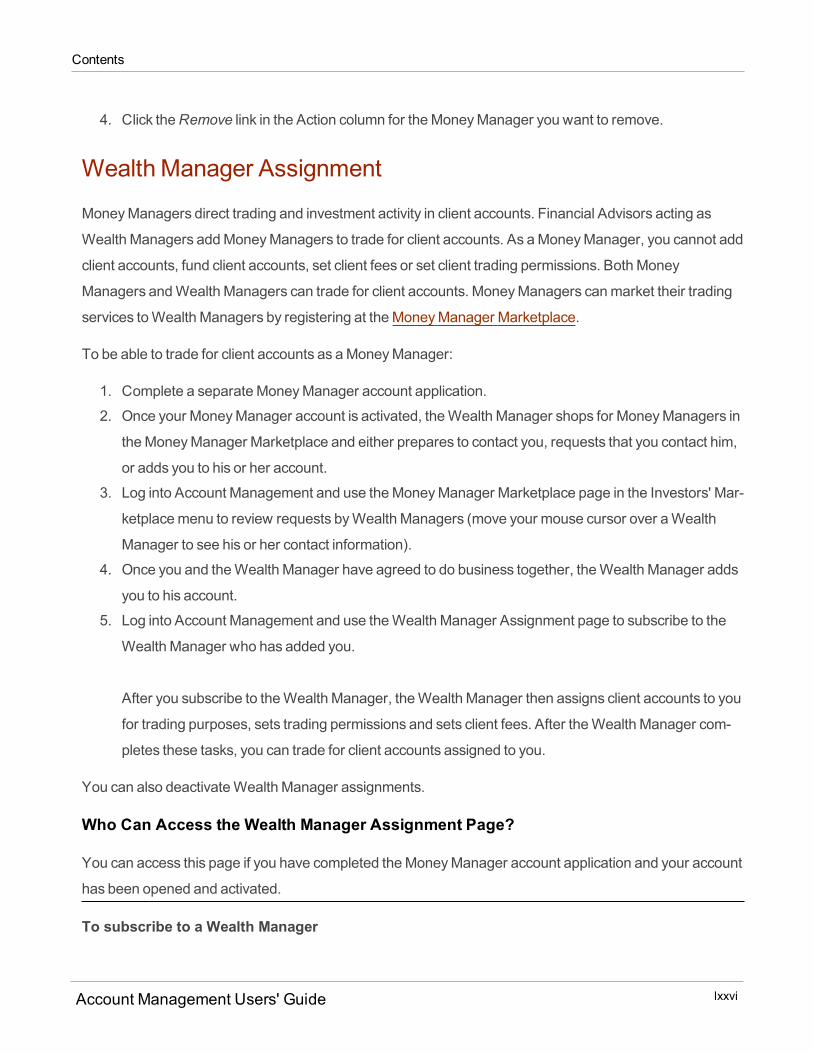
Contents
4. Click theRemove link in the Action column for theMoneyManager you want to remove.
Wealth Manager Assignment
MoneyManagers direct trading and investment activity in client accounts. Financial Advisors acting as
Wealth Managers addMoneyManagers to trade for client accounts. As aMoneyManager, you cannot add
client accounts, fund client accounts, set client fees or set client trading permissions. BothMoney
Managers andWealth Managers can trade for client accounts. MoneyManagers canmarket their trading
services toWealth Managers by registering at theMoneyManager Marketplace.
To be able to trade for client accounts as aMoneyManager:
1. Complete a separateMoneyManager account application.
2. Once your MoneyManager account is activated, theWealth Manager shops for MoneyManagers in
theMoneyManager Marketplace and either prepares to contact you, requests that you contact him,
or adds you to his or her account.
3. Log into Account Management and use theMoneyManager Marketplace page in the Investors' Mar-
ketplacemenu to review requests byWealth Managers (move your mouse cursor over aWealth
Manager to see his or her contact information).
4. Once you and theWealth Manager have agreed to do business together, theWealth Manager adds
you to his account.
5. Log into Account Management and use theWealth Manager Assignment page to subscribe to the
Wealth Manager who has added you.
After you subscribe to theWealth Manager, theWealth Manager then assigns client accounts to you
for trading purposes, sets trading permissions and sets client fees. After theWealth Manager com-
pletes these tasks, you can trade for client accounts assigned to you.
You can also deactivateWealth Manager assignments.
Who Can Access the Wealth Manager Assignment Page?
You can access this page if you have completed theMoneyManager account application and your account
has been opened and activated.
To subscribe to a Wealth Manager
Account Management Users' Guide lxxvi
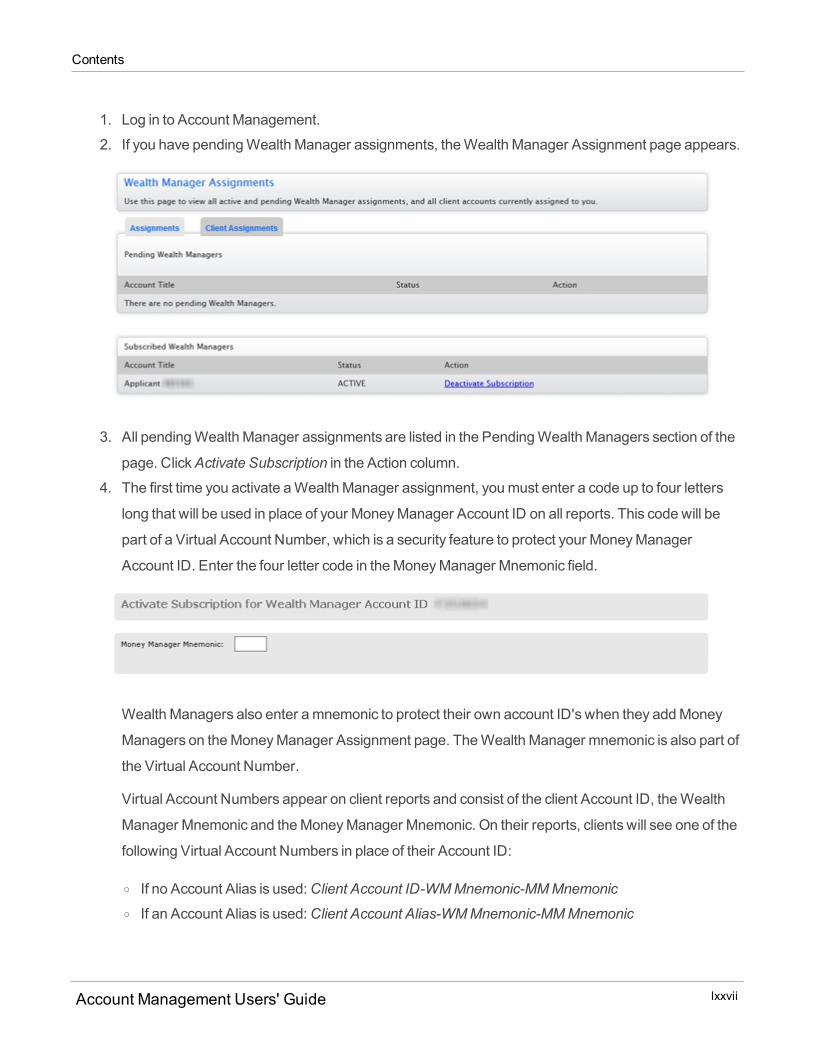
Contents
1. Log in to Account Management.
2. If you have pendingWealth Manager assignments, theWealth Manager Assignment page appears.
3. All pendingWealth Manager assignments are listed in the PendingWealth Managers section of the
page. ClickActivate Subscription in the Action column.
4. The first time you activate aWealth Manager assignment, youmust enter a code up to four letters
long that will be used in place of your MoneyManager Account ID on all reports. This code will be
part of a Virtual Account Number, which is a security feature to protect your MoneyManager
Account ID. Enter the four letter code in theMoneyManager Mnemonic field.
Wealth Managers also enter amnemonic to protect their own account ID's when they addMoney
Managers on theMoneyManager Assignment page. TheWealth Manager mnemonic is also part of
the Virtual Account Number.
Virtual Account Numbers appear on client reports and consist of the client Account ID, theWealth
Manager Mnemonic and theMoneyManager Mnemonic. On their reports, clients will see one of the
following Virtual Account Numbers in place of their Account ID:
o If no Account Alias is used:Client Account ID-WM Mnemonic-MMMnemonico If an Account Alias is used:Client Account Alias-WM Mnemonic-MMMnemonic
Account Management Users' Guide lxxvii
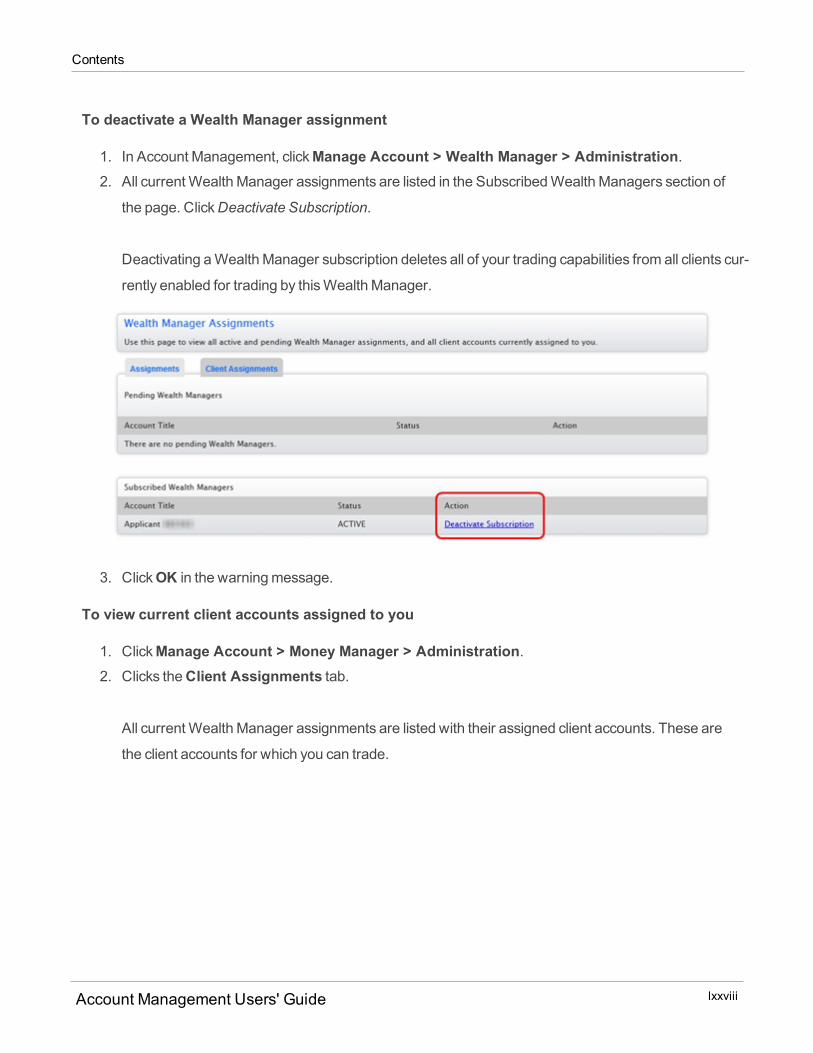
Contents
To deactivate a Wealth Manager assignment
1. In Account Management, clickManage Account > Wealth Manager > Administration.2. All currentWealth Manager assignments are listed in the SubscribedWealth Managers section of
the page. ClickDeactivate Subscription.
Deactivating aWealth Manager subscription deletes all of your trading capabilities from all clients cur-
rently enabled for trading by thisWealth Manager.
3. ClickOK in the warningmessage.
To view current client accounts assigned to you
1. ClickManage Account > Money Manager > Administration.2. Clicks theClient Assignments tab.
All currentWealth Manager assignments are listed with their assigned client accounts. These are
the client accounts for which you can trade.
Account Management Users' Guide lxxviii
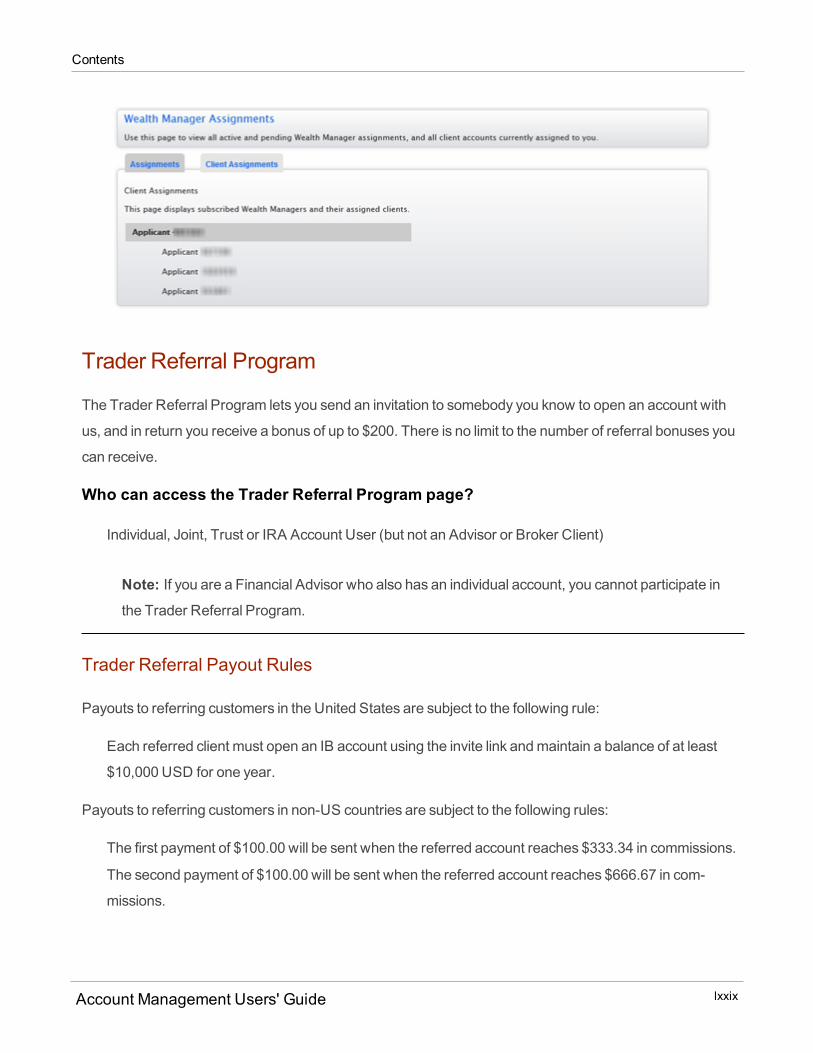
Contents
Trader Referral Program
The Trader Referral Program lets you send an invitation to somebody you know to open an account with
us, and in return you receive a bonus of up to $200. There is no limit to the number of referral bonuses you
can receive.
Who can access the Trader Referral Program page?
Individual, Joint, Trust or IRA Account User (but not an Advisor or Broker Client)
Note: If you are a Financial Advisor who also has an individual account, you cannot participate inthe Trader Referral Program.
Trader Referral Payout Rules
Payouts to referring customers in the United States are subject to the following rule:
Each referred client must open an IB account using the invite link andmaintain a balance of at least
$10,000 USD for one year.
Payouts to referring customers in non-US countries are subject to the following rules:
The first payment of $100.00 will be sent when the referred account reaches $333.34 in commissions.
The second payment of $100.00 will be sent when the referred account reaches $666.67 in com-
missions.
Account Management Users' Guide lxxix
Contents
You are eligible to receive the referral bonus up to one year from the opening of the referred account
only if the commissionminimums listed above aremet.
Note: You cannot refer members of your own household.We cannot pay referral fees for referred customerswho live in Spain.
To participate in the Trader Referral Program
1. ClickManage Account > Trader Referral.
2. Enter the first name, last name and email address of the person to whom you want to send an invit-
ation to open an account with us.
3. ClickSubmit.4. Repeat these steps for each person you want to refer.
You will receive a bonus based on the payout rules listed above.
Account Management Users' Guide lxxx
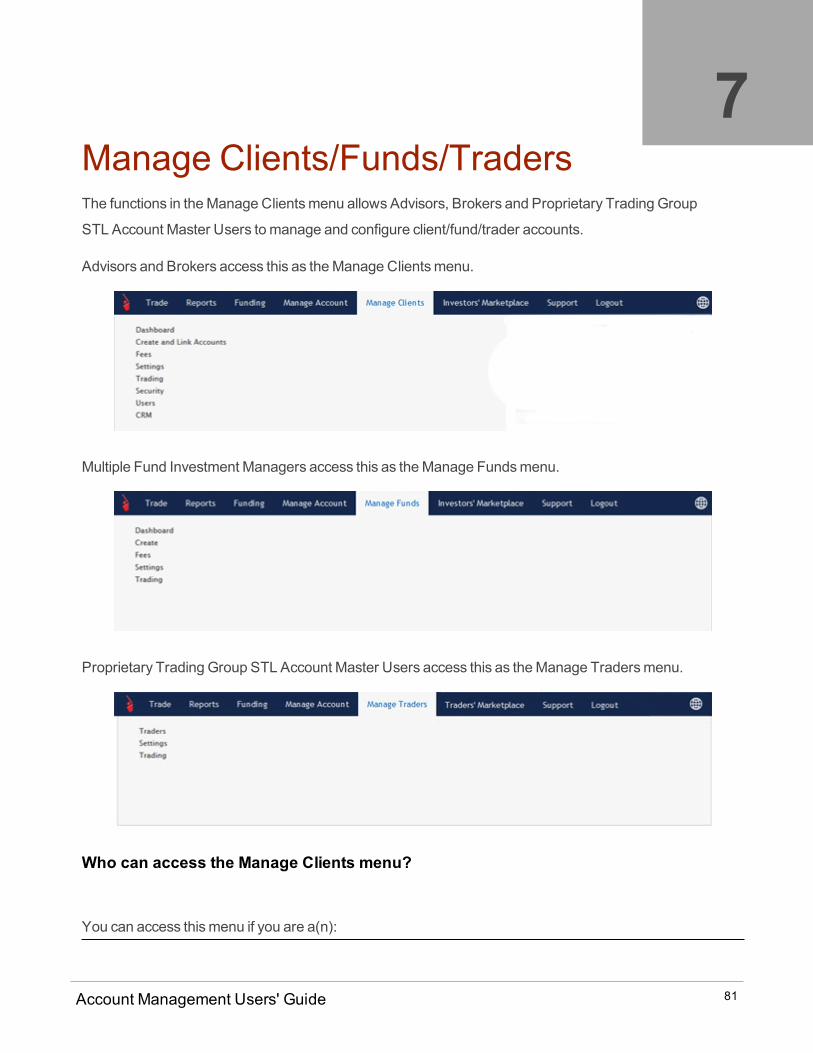
Manage Clients/Funds/TradersThe functions in theManage Clientsmenu allows Advisors, Brokers and Proprietary Trading Group
STL Account Master Users tomanage and configure client/fund/trader accounts.
Advisors and Brokers access this as theManage Clientsmenu.
Multiple Fund Investment Managers access this as theManage Fundsmenu.
Proprietary Trading Group STL Account Master Users access this as theManage Tradersmenu.
Who can access the Manage Clients menu?
You can access thismenu if you are a(n):
7
Account Management Users' Guide 81
Advisor Master User
Fully Disclosed and Non-Disclosed Broker Master User
SIPP Administrator
Who can access the Manage Funds menu?
You can access thismenu if you are a(n):
Investment Manager Master User (Multiple Funds only)
Who can access the Manage Traders menu?
You can access thismenu if you are a(n):
Proprietary Trading Group STL Account Master User
Your account structure determineswhich second-level (bluemenu) and third-level menu items you will
see.
Somemenu items are also available in theManage Account menu if you can apply those functions to your
master account only. The functions in theManage Clients/Manage Funds/Manage Tradersmenus are
ONLY for Master Users tomanage and configure client, fund and authorized trader sub accounts.
This chapter includes the following topics:
Dashboard - Advisors, Brokers andMultiple Fund Investment Managers can access information for all
their client or fund accounts from a single point of access, as well asmanagemany aspects of each cli-
ent account.
Create and Link Accounts (Advisors and Brokers) - Add client accounts, request up to five duplicate
accounts for an existing client account and can create templates to save and re-use application inform-
ation for new client/fund accounts, linkmultiple individual and/or joint accounts for a client under a
single username and password, and Non-Disclosed Brokers fill out or update an IRS FormW-8 or W-9
for their clients or close client accounts.
Note:We reserve the right to limit duplicate accounts to less than five.
Account Management Users' Guide 82
Chapter 7 Manage Clients/Funds/Traders
Chapter 7 Dashboard
Create (Multiple Fund Investment Managers) - Add client accounts, request up to five duplicate
accounts for an existing client account and can create templates to save and re-use application inform-
ation for new client/fund accounts.
Note:We reserve the right to limit duplicate accounts to less than five.
Traders (Proprietary Trading Group STL Account Masters) - View, add and close Authorized Trader
accounts.
Fees - Set advisor and broker client fees.
Settings - Create aliases for client accounts and configure the transfer of excessmargin funds between
your securities and commodities account segments.
Trading - Enable or disable client trading, set trading permissions for client accounts and restrict your
master account and your client/sub accounts from trading specific symbols.
Security- Master users can view Account Management requests from client accounts.
Users - Add users to your account, modify existing users' information or access rights to Account Man-
agement and delete users from your account.
CRM - Advisors can easily store and view information about their clients, prospects and contacts
Dashboard
TheDashboard lets Advisors, Brokers andMultiple Hedge Fund Investment Managers quickly and easily
access information about their clients from a single point of access, as well asmanagemany aspects of
each client account.
The following image shows the Dashboard for an Advisor.
Account Management Users' Guide 83

The following image shows the Dashboard for a Fully Disclosed Broker.
Account Management Users' Guide 84
Chapter 7 Dashboard

Chapter 7 Dashboard
Short Video
Advisors, Fully Disclosed and Non-Disclosed Brokers, andMultiple Fund Investment Managers can view
information about all of their clients:
View a list of all client accounts.
View recent activity for the past five days for all client accounts.
Search for and sort client accounts by account title, account type, account number, username or
account alias.
Filter all client accounts by account status.
If you havemultiple pages of accounts, you can quickly jump to any page.
Advisors can view pending items for all client accounts on a separate tabbed page.
Account Management Users' Guide 85
Fully Disclosed Brokers can also view application and options trading approvals for all accounts in the
Approvals column if they have enabled Client Approvals.
All brokers can view the user responsible for deleted applications in the Approvals column.
Download a list of outstanding registration tasks for all pending client accounts toMicrosoft Excel.
Download information about all client accounts toMicrosoft Excel.
Non-Disclosed Brokers can upload documents for pending client applications.
and can view andmanage individual client account details:
Drill down to account details, balances, positions and transaction history for any client.
View pending items.
View Client Servicesmessages and corporate actions.
Perform account management tasks, including:
Edit account alias, advisor or broker fees, and other settings;
Running activity statements and PortfolioAnalyst reports
Print account details;
Generate a PDF version of the account application;
View all registration tasks.
Fully Disclosed Brokers can also approve or reject pending client applications and pending client
options trading permissions if they have enabled Client Approvals.
Brokers can edit Registered Representatives.
Advisors can get special authorizations from clients to modify additional account settings for that client.
Who can access the Dashboard?
You can access this page if you are a(n):
Advisor Master User
Fully Disclosed and Non-Disclosed Broker Master User
Multiple Hedge Fund Investment Manager
Account Management Users' Guide 86
Chapter 7 Dashboard
Chapter 7 View Information About All Clients
View Information About All Clients
Advisors, Brokers andMultiple Hedge Fund Investment Managers use the Dashboard to view information
about all of their clients from a single point of access:
View and search for client accounts.
Filter all client accounts by account status.
View recent activity for the past five days for all client accounts.
Download a list of outstanding registration tasks for all pending client accounts toMicrosoft Excel.
Download information about all client accounts toMicrosoft Excel.
In addition, Advisors can view pending items for all accounts on the Pending Items tab.
To view and search for client accounts
When you first open the Dashboard, it displays a lists of all client or fund accounts. The number of accounts
on each tab appears next to the tab name.
1. ClickManage Clients > Dashboard. Multiple Hedge Fund investment Managers clickManageFunds > Dashboard.
All client or fund accounts are listed by Account Title, and each account shows the account type,
account number, username, account alias, account status (Open, Pending, Closed and Rejected),
and approval status.
For example, here is a dashboard for a fully disclosed broker.
Account Management Users' Guide 87
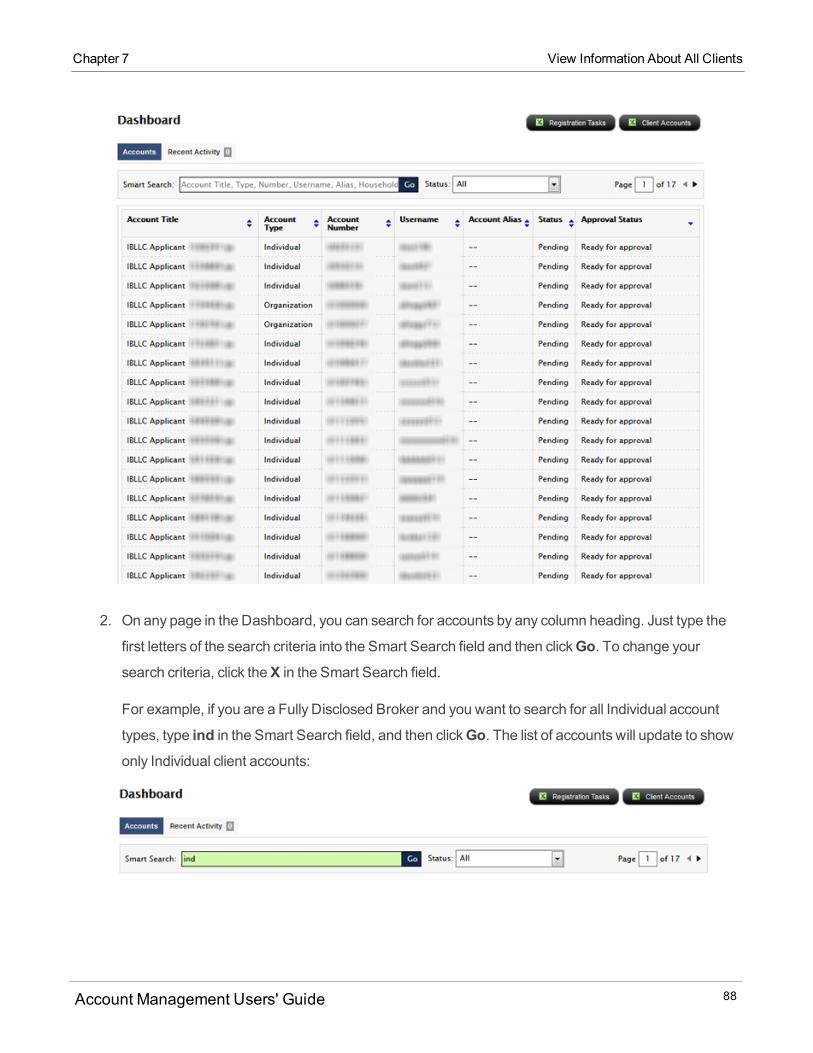
2. On any page in the Dashboard, you can search for accounts by any column heading. Just type the
first letters of the search criteria into the Smart Search field and then clickGo. To change yoursearch criteria, click theX in the Smart Search field.
For example, if you are a Fully Disclosed Broker and you want to search for all Individual account
types, type ind in the Smart Search field, and then clickGo. The list of accounts will update to showonly Individual client accounts:
Account Management Users' Guide 88
Chapter 7 View Information About All Clients
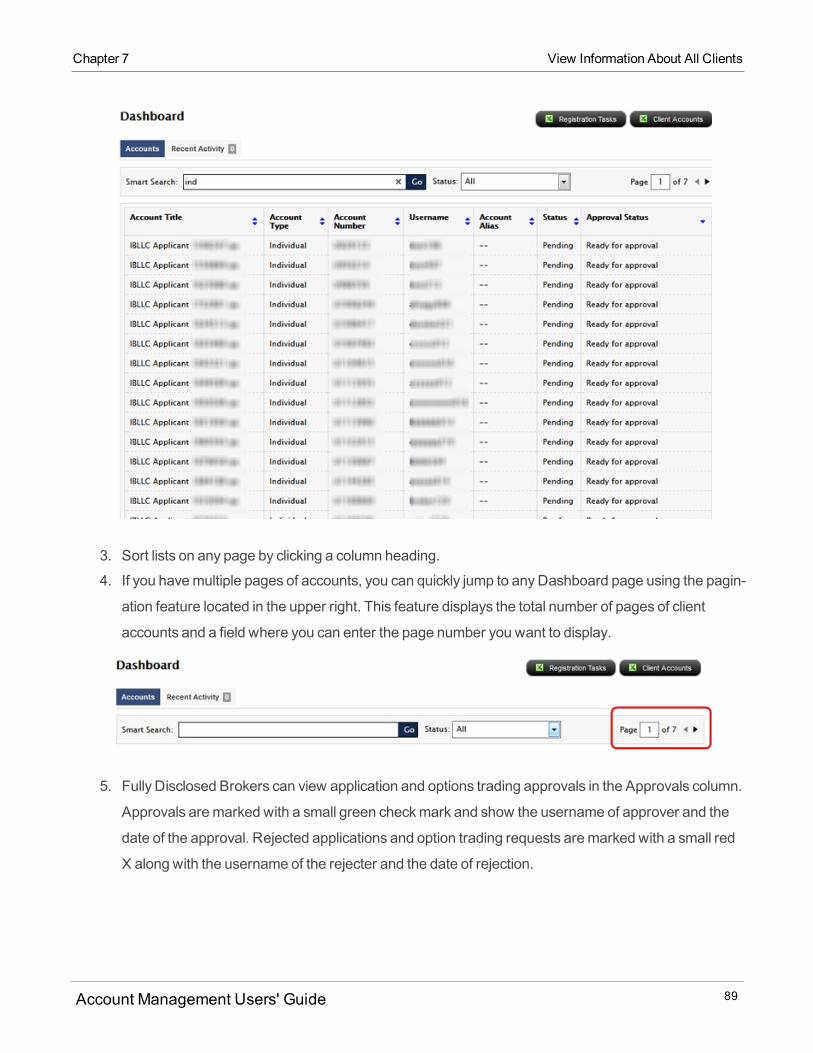
Chapter 7 View Information About All Clients
3. Sort lists on any page by clicking a column heading.
4. If you havemultiple pages of accounts, you can quickly jump to anyDashboard page using the pagin-
ation feature located in the upper right. This feature displays the total number of pages of client
accounts and a field where you can enter the page number you want to display.
5. Fully Disclosed Brokers can view application and options trading approvals in the Approvals column.
Approvals aremarked with a small green checkmark and show the username of approver and the
date of the approval. Rejected applications and option trading requests aremarked with a small red
X along with the username of the rejecter and the date of rejection.
Account Management Users' Guide 89
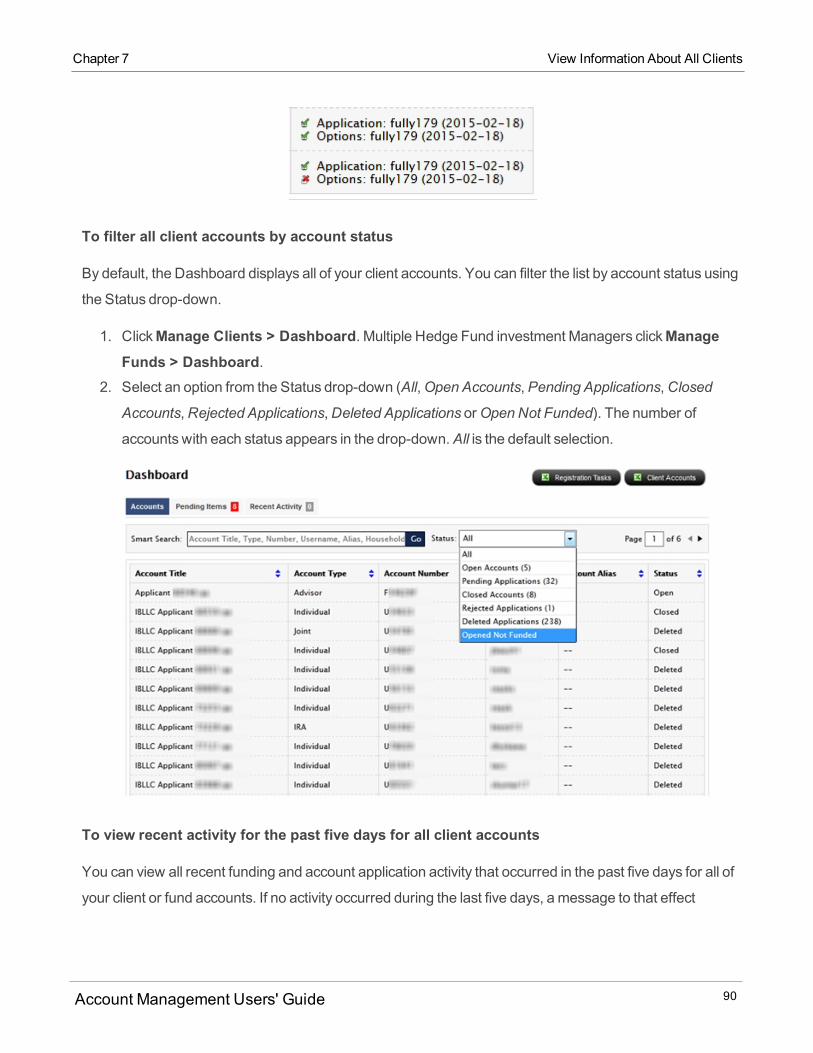
To filter all client accounts by account status
By default, the Dashboard displays all of your client accounts. You can filter the list by account status using
the Status drop-down.
1. ClickManage Clients > Dashboard. Multiple Hedge Fund investment Managers clickManageFunds > Dashboard.
2. Select an option from the Status drop-down (All,Open Accounts, Pending Applications,Closed
Accounts,Rejected Applications,Deleted Applications orOpenNot Funded). The number of
accounts with each status appears in the drop-down.All is the default selection.
To view recent activity for the past five days for all client accounts
You can view all recent funding and account application activity that occurred in the past five days for all of
your client or fund accounts. If no activity occurred during the last five days, amessage to that effect
Account Management Users' Guide 90
Chapter 7 View Information About All Clients
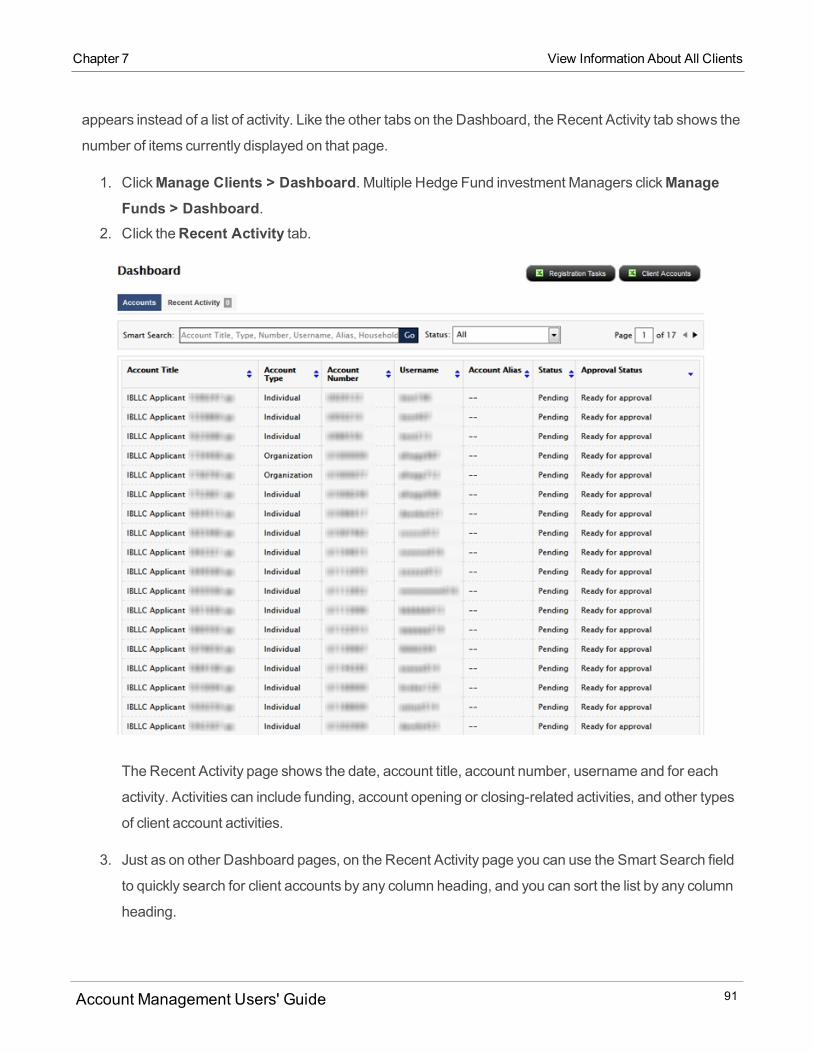
Chapter 7 View Information About All Clients
appears instead of a list of activity. Like the other tabs on the Dashboard, the Recent Activity tab shows the
number of items currently displayed on that page.
1. ClickManage Clients > Dashboard. Multiple Hedge Fund investment Managers clickManageFunds > Dashboard.
2. Click theRecent Activity tab.
The Recent Activity page shows the date, account title, account number, username and for each
activity. Activities can include funding, account opening or closing-related activities, and other types
of client account activities.
3. Just as on other Dashboard pages, on the Recent Activity page you can use the Smart Search field
to quickly search for client accounts by any column heading, and you can sort the list by any column
heading.
Account Management Users' Guide 91
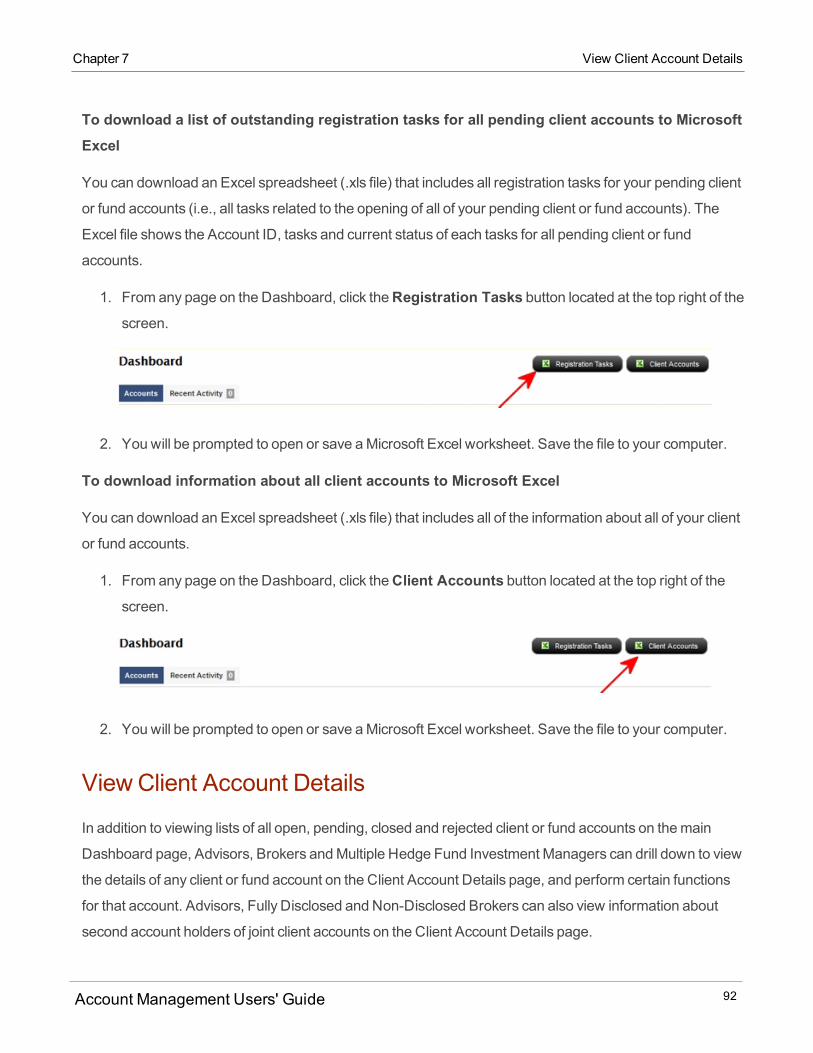
To download a list of outstanding registration tasks for all pending client accounts to MicrosoftExcel
You can download an Excel spreadsheet (.xls file) that includes all registration tasks for your pending client
or fund accounts (i.e., all tasks related to the opening of all of your pending client or fund accounts). The
Excel file shows the Account ID, tasks and current status of each tasks for all pending client or fund
accounts.
1. From any page on the Dashboard, click theRegistration Tasks button located at the top right of thescreen.
2. You will be prompted to open or save aMicrosoft Excel worksheet. Save the file to your computer.
To download information about all client accounts to Microsoft Excel
You can download an Excel spreadsheet (.xls file) that includes all of the information about all of your client
or fund accounts.
1. From any page on the Dashboard, click theClient Accounts button located at the top right of thescreen.
2. You will be prompted to open or save aMicrosoft Excel worksheet. Save the file to your computer.
ViewClient Account Details
In addition to viewing lists of all open, pending, closed and rejected client or fund accounts on themain
Dashboard page, Advisors, Brokers andMultiple Hedge Fund Investment Managers can drill down to view
the details of any client or fund account on the Client Account Details page, and perform certain functions
for that account. Advisors, Fully Disclosed and Non-Disclosed Brokers can also view information about
second account holders of joint client accounts on the Client Account Details page.
Account Management Users' Guide 92
Chapter 7 View Client Account Details
Chapter 7 View Client Account Details
On the Client Account Details page, you can:
Drill down to account details for any client or fund account, including client balances, positions or trans-
action history.
Advisors and Brokers can enable or disable dividend reinvestment for a client account.
View pending items for a client or fund account.
Edit account alias, advisor or broker fees, and other settings for a client or fund account.
Run activity statements and PortfolioAnalyst reports for a client or fund account.
Print client or fund account details.
Delete an application for a pending client account.
Generate a PDF version of the client or fund account application.
View all registration tasks for a client or fund account.
Jump to a client's CRM record.
In addition:
Brokers can edit Registered Representatives.
Fully Disclosed Brokers can approve or reject pending client applications and pending client options
trading permissions if they have enabled Client Approvals.
Fully Disclosed Brokers can opt into the Full Service Program tomodify additional account settings for
that client.
Advisors can get special authorizations from clients to modify additional account settings for that client.
View a client's Social Security Number, Passport Number and Driver's License IF you use two-factor
authentication (Secure Login Device or the IB Key Security via IBKR Mobile app) to log into your
account. If you do not use two-factor authentication to log into your account, you will not be able to see
this information.
Advisors can invest in a hedge fund on behalf of an eligible client via the Dashboard.
Advisors and Brokers can change a client's access to our trading platform.
Advisors, Brokers and FundManagers can duplicate client accounts.
Advisors and Brokers can enroll their clients into the Debit Card program.
To view account details for any client or fund account
Account Management Users' Guide 93
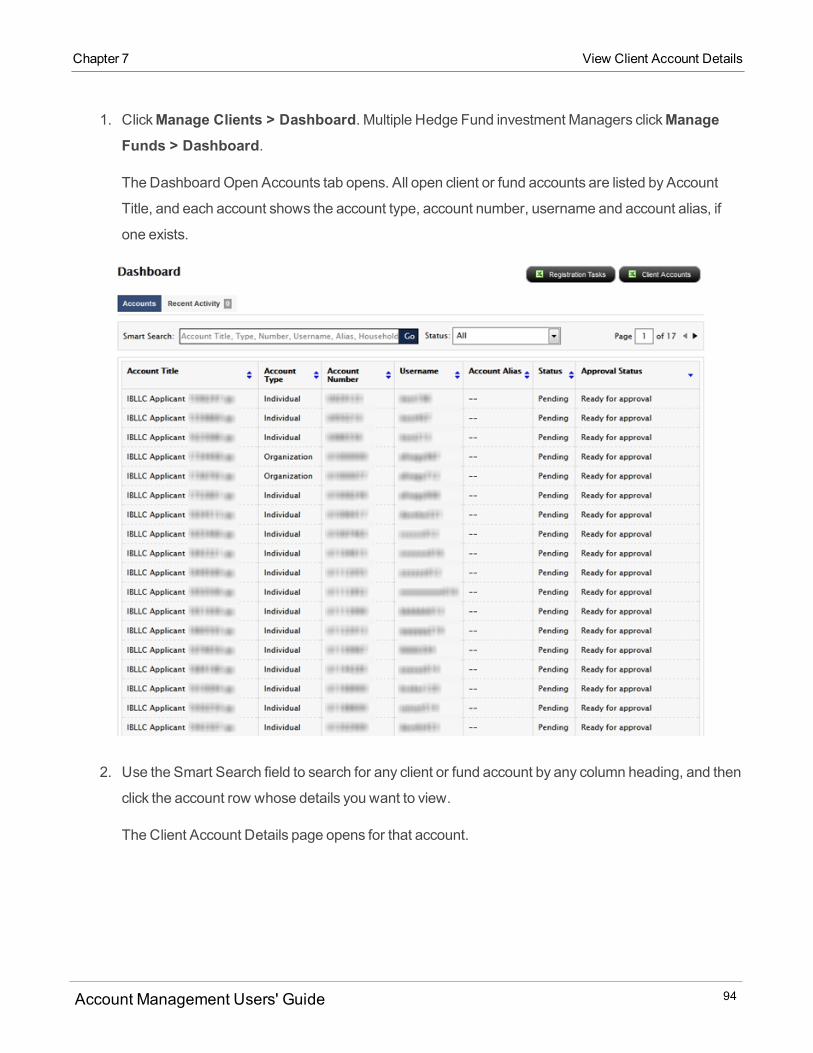
1. ClickManage Clients > Dashboard. Multiple Hedge Fund investment Managers clickManageFunds > Dashboard.
The Dashboard Open Accounts tab opens. All open client or fund accounts are listed by Account
Title, and each account shows the account type, account number, username and account alias, if
one exists.
2. Use the Smart Search field to search for any client or fund account by any column heading, and then
click the account row whose details you want to view.
The Client Account Details page opens for that account.
Account Management Users' Guide 94
Chapter 7 View Client Account Details
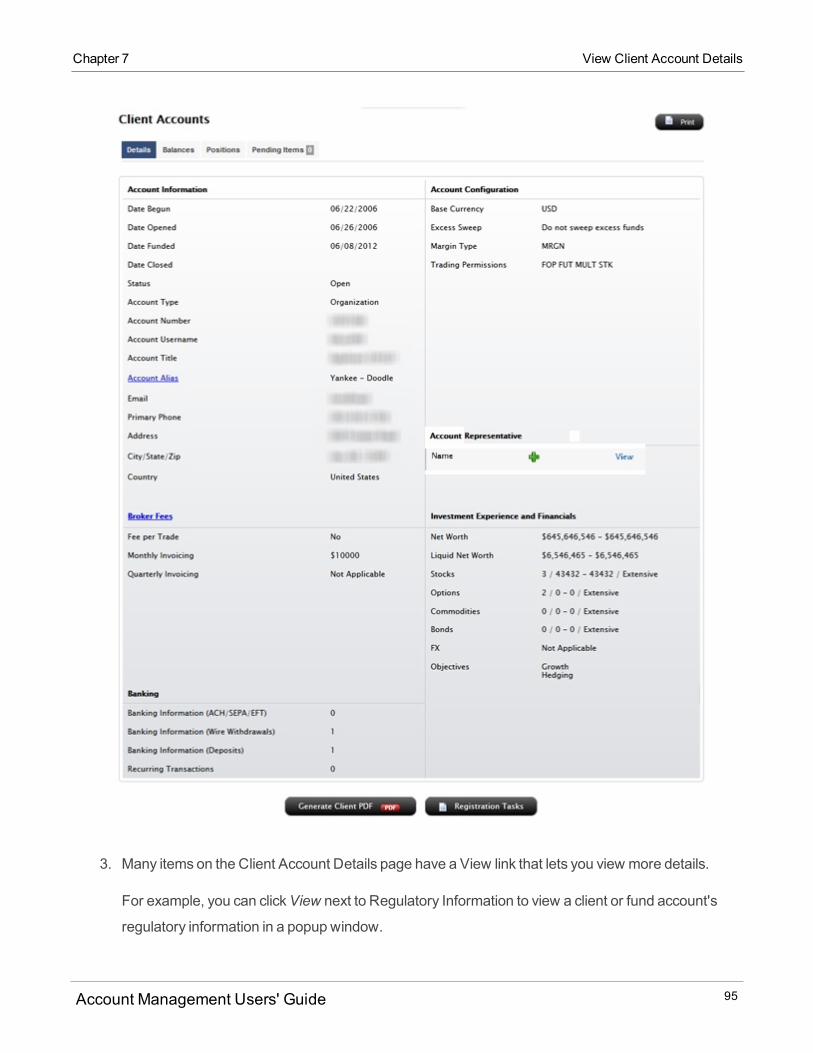
Chapter 7 View Client Account Details
3. Many items on the Client Account Details page have a View link that lets you view more details.
For example, you can clickView next to Regulatory Information to view a client or fund account's
regulatory information in a popup window.
Account Management Users' Guide 95

4. Click theBalances tab to view account balances, current margin requirements and current available
for trading for the client or fund account you are viewing.
5. Click thePositions tab to view all of the positions currently held by the client or fund account you are
viewing.
6. Click the Transaction History tab to view the transaction history for the client or fund account you
are viewing. The Transaction History tab functions in the sameway as the Funding
> Transaction History page.
7. Click theMessages tab to view all Client Servicesmessages for the account you are viewing.
8. Click theCorporate Actions tab to view all corporate actions for the account you are viewing.
9. To navigate back to themain Dashboard page, click themaster Account ID link in the breadcrumb
display in themiddle of the top of the page.
In the following image, like all of the images in this guide, the Account ID's have been obscured to
protect the account holder's identity .
To view pending items for any client or fund account
1. ClickManage Clients > Dashboard. Multiple Hedge Fund investment Managers clickManageFunds > Dashboard.
2. Search or sort the account list to find the account of interest, and then click the account row to display
Account Management Users' Guide 96
Chapter 7 View Client Account Details
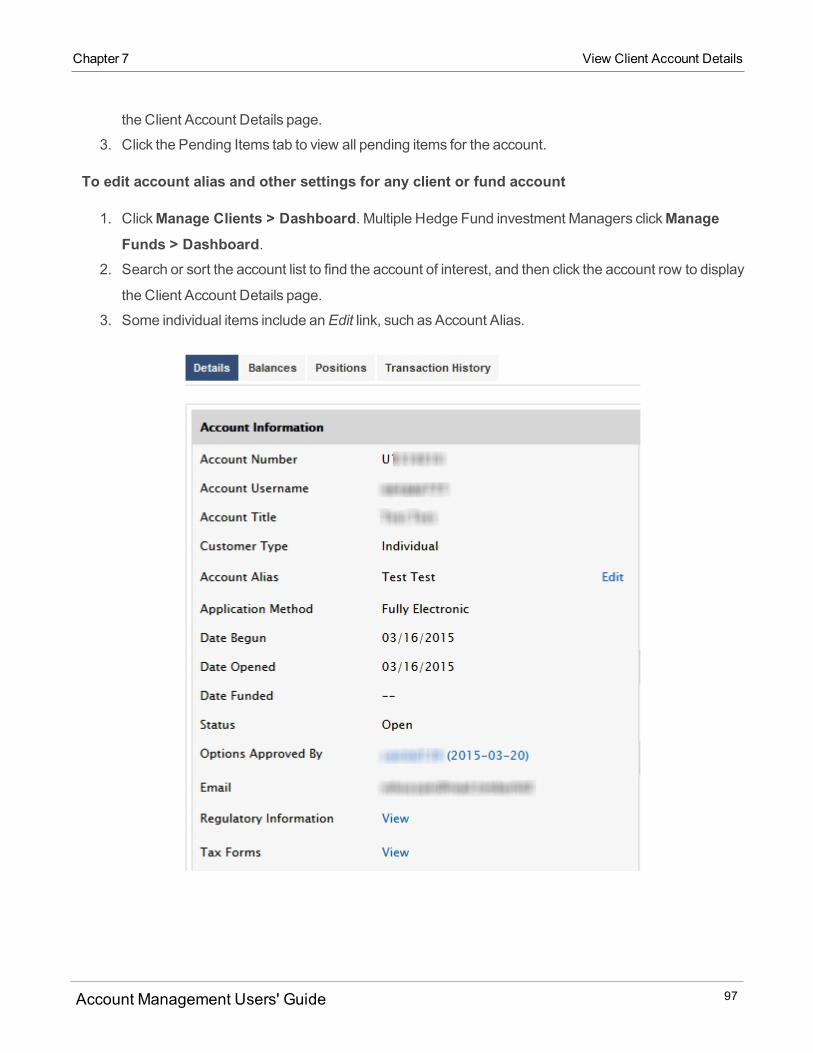
Chapter 7 View Client Account Details
the Client Account Details page.
3. Click the Pending Items tab to view all pending items for the account.
To edit account alias and other settings for any client or fund account
1. ClickManage Clients > Dashboard. Multiple Hedge Fund investment Managers clickManageFunds > Dashboard.
2. Search or sort the account list to find the account of interest, and then click the account row to display
the Client Account Details page.
3. Some individual items include anEdit link, such as Account Alias.
Account Management Users' Guide 97
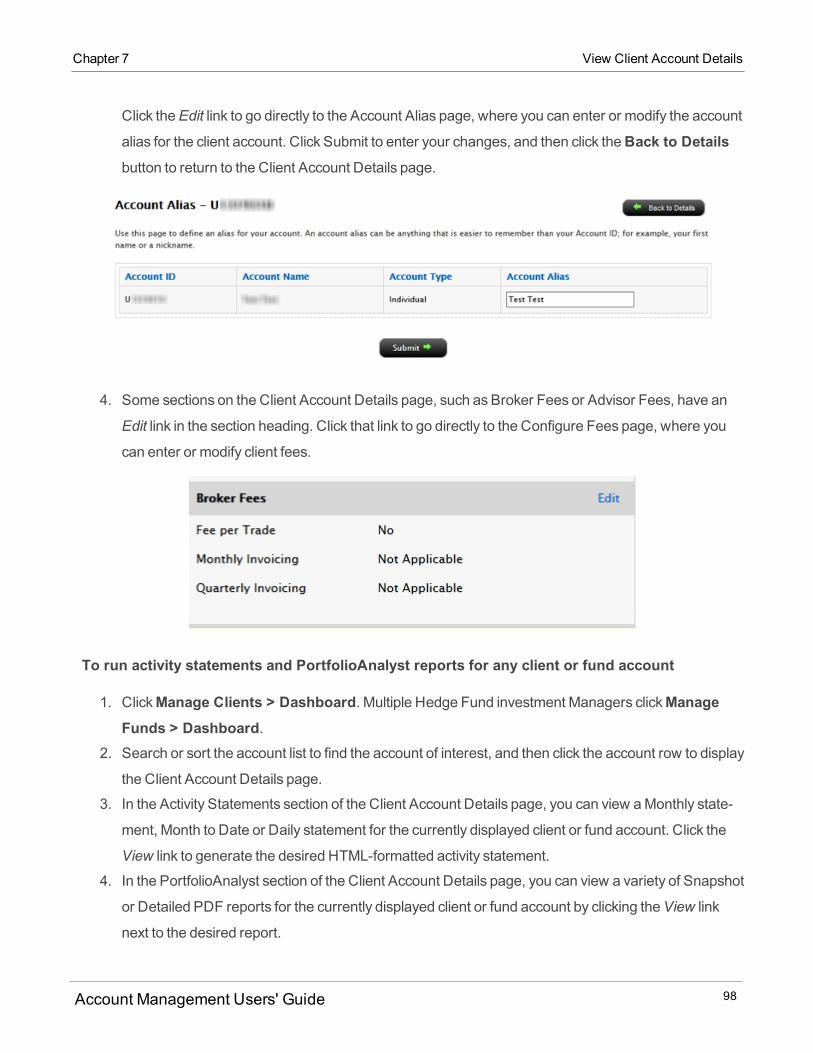
Click theEdit link to go directly to the Account Alias page, where you can enter or modify the account
alias for the client account. Click Submit to enter your changes, and then click theBack to Detailsbutton to return to the Client Account Details page.
4. Some sections on the Client Account Details page, such as Broker Fees or Advisor Fees, have an
Edit link in the section heading. Click that link to go directly to the Configure Fees page, where you
can enter or modify client fees.
To run activity statements and PortfolioAnalyst reports for any client or fund account
1. ClickManage Clients > Dashboard. Multiple Hedge Fund investment Managers clickManageFunds > Dashboard.
2. Search or sort the account list to find the account of interest, and then click the account row to display
the Client Account Details page.
3. In the Activity Statements section of the Client Account Details page, you can view aMonthly state-
ment, Month to Date or Daily statement for the currently displayed client or fund account. Click the
View link to generate the desired HTML-formatted activity statement.
4. In the PortfolioAnalyst section of the Client Account Details page, you can view a variety of Snapshot
or Detailed PDF reports for the currently displayed client or fund account by clicking theView link
next to the desired report.
Account Management Users' Guide 98
Chapter 7 View Client Account Details
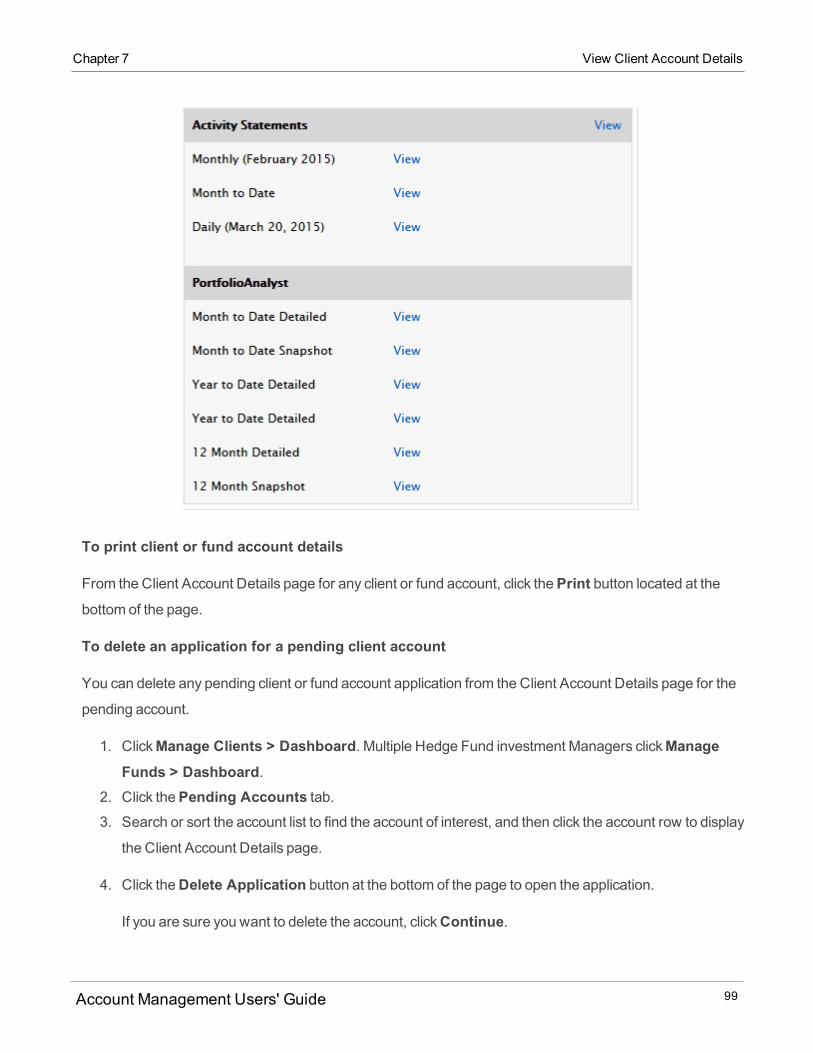
Chapter 7 View Client Account Details
To print client or fund account details
From the Client Account Details page for any client or fund account, click thePrint button located at thebottom of the page.
To delete an application for a pending client account
You can delete any pending client or fund account application from the Client Account Details page for the
pending account.
1. ClickManage Clients > Dashboard. Multiple Hedge Fund investment Managers clickManageFunds > Dashboard.
2. Click thePending Accounts tab.3. Search or sort the account list to find the account of interest, and then click the account row to display
the Client Account Details page.
4. Click theDelete Application button at the bottom of the page to open the application.
If you are sure you want to delete the account, clickContinue.
Account Management Users' Guide 99
If you change your mind and do not want to delete the application, clickBack.
Generate a PDF version of the client or fund account application
From the Client Account Details page, you can also generate a PDF of the client or fund account
application and view a list of all registration tasks by clicking theGenerate Client PDF button at the bottomof the page. Once the PDF application opens, you can print it.
View all registration tasks for the account.
1. ClickManage Clients > Dashboard. Multiple Hedge Fund investment Managers clickManageFunds > Dashboard.
2. Search or sort the account list to find the account of interest, and then click the account row to display
the Client Account Details page.
3. At the bottom of the Client Account Details page, click theRegistration Tasks button.
A popup showing all registration tasks for the client or fund account opens. Click the redX in theupper right corner to close the popup.
When viewing registration tasks, Fully Disclosed Brokers can also view supporting documents sent
by a client and received by us.
Account Management Users' Guide 100
Chapter 7 View Client Account Details
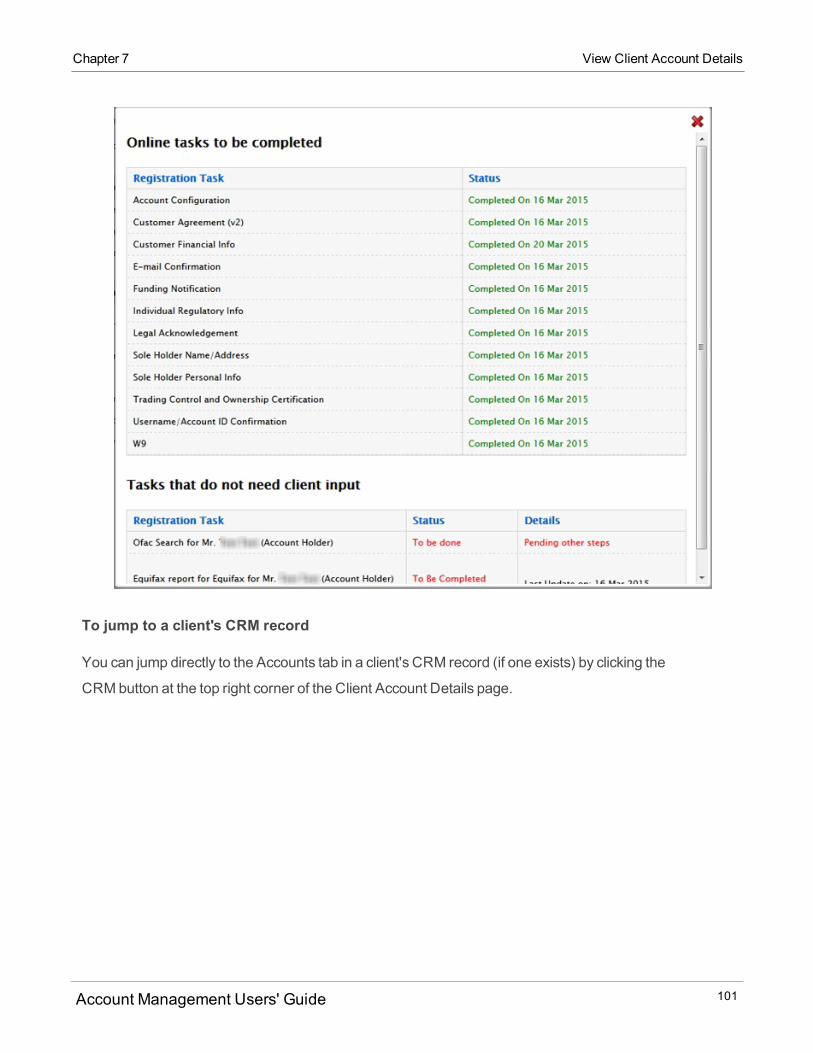
Chapter 7 View Client Account Details
To jump to a client's CRM record
You can jump directly to the Accounts tab in a client's CRM record (if one exists) by clicking the
CRM button at the top right corner of the Client Account Details page.
Account Management Users' Guide 101
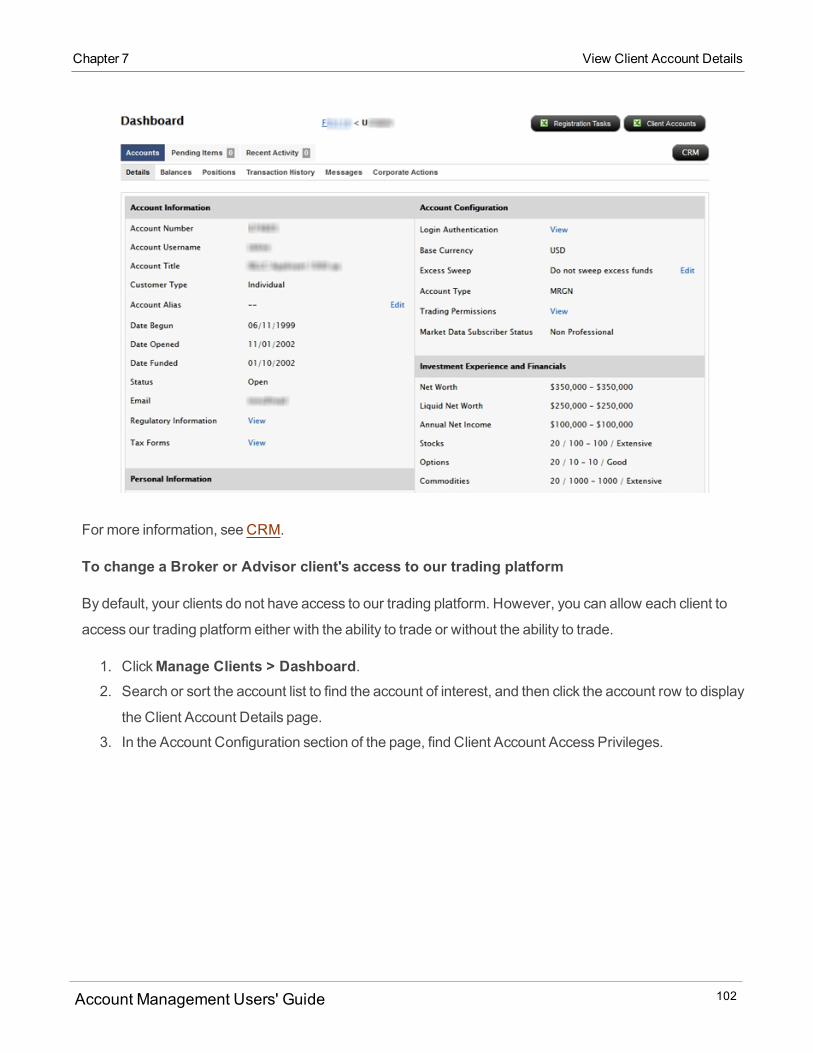
For more information, see CRM.
To change a Broker or Advisor client's access to our trading platform
By default, your clients do not have access to our trading platform. However, you can allow each client to
access our trading platform either with the ability to trade or without the ability to trade.
1. ClickManage Clients > Dashboard.2. Search or sort the account list to find the account of interest, and then click the account row to display
the Client Account Details page.
3. In the Account Configuration section of the page, find Client Account Access Privileges.
Account Management Users' Guide 102
Chapter 7 View Client Account Details
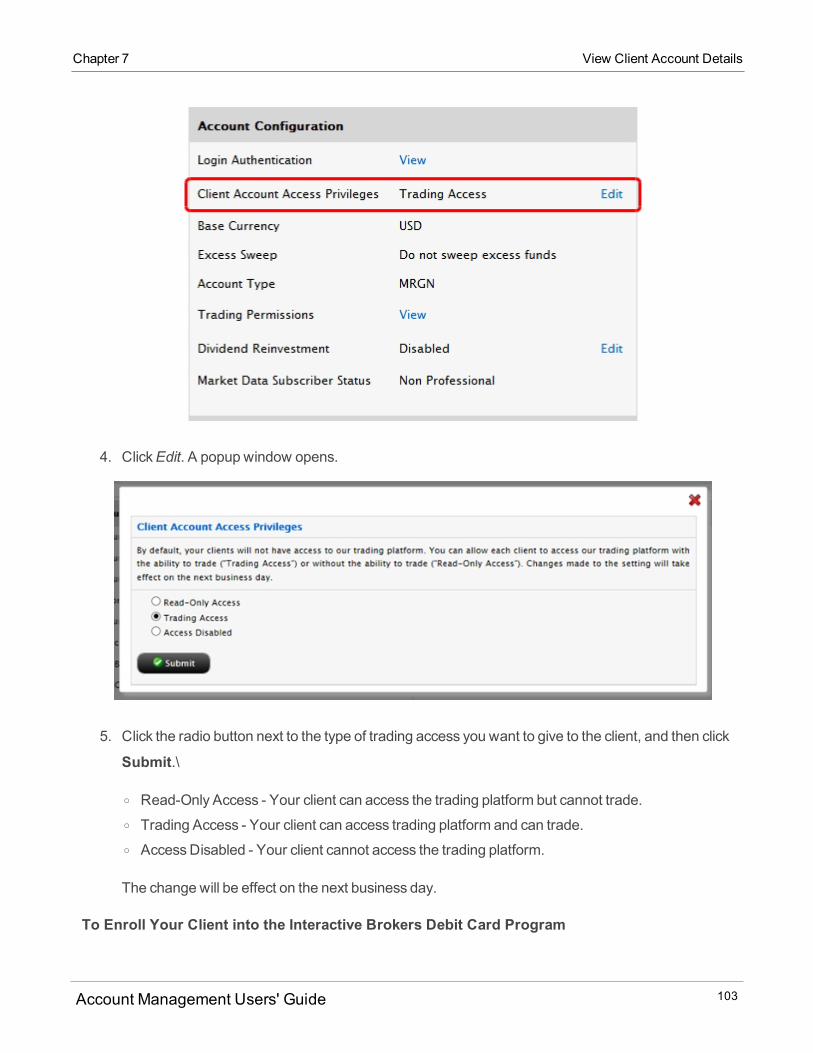
Chapter 7 View Client Account Details
4. ClickEdit. A popup window opens.
5. Click the radio button next to the type of trading access you want to give to the client, and then click
Submit.\
o Read-Only Access - Your client can access the trading platform but cannot trade.o Trading Access - Your client can access trading platform and can trade.o AccessDisabled - Your client cannot access the trading platform.
The change will be effect on the next business day.
To Enroll Your Client into the Interactive Brokers Debit Card Program
Account Management Users' Guide 103

Advisors and Brokers can enroll clients with the following qualifications:
o US Social Security Numbero US Mailing Addresso Verified Phone Number
1. ClickManage Clients > Dashboard > Special Programs.
2. ClickEnroll.3. A confirmation popup window opens confirming the debit card will be sent to your client.
Changing Account Representatives
Fully Disclosed Broker Master Users can view and change the Account Representatives for their clients
from the client account details page. An Account Representative is a person whomanages the relationship
between a broker and his or her client(s). Fully Disclosed Brokers can assign one or more Account
Representatives to a single client.
To change the Account Representative for an open or pending client account
1. ClickManage Clients > Accounts > View > Summary, then click an individual client account onany tabbed page.
or
ClickManage Clients > Accounts > View > Open orManage Clients > Accounts > View >Pending, then use the Account Selector to select an individual account.
The client account details page opens.
Account Management Users' Guide 104
Chapter 7 Changing Account Representatives
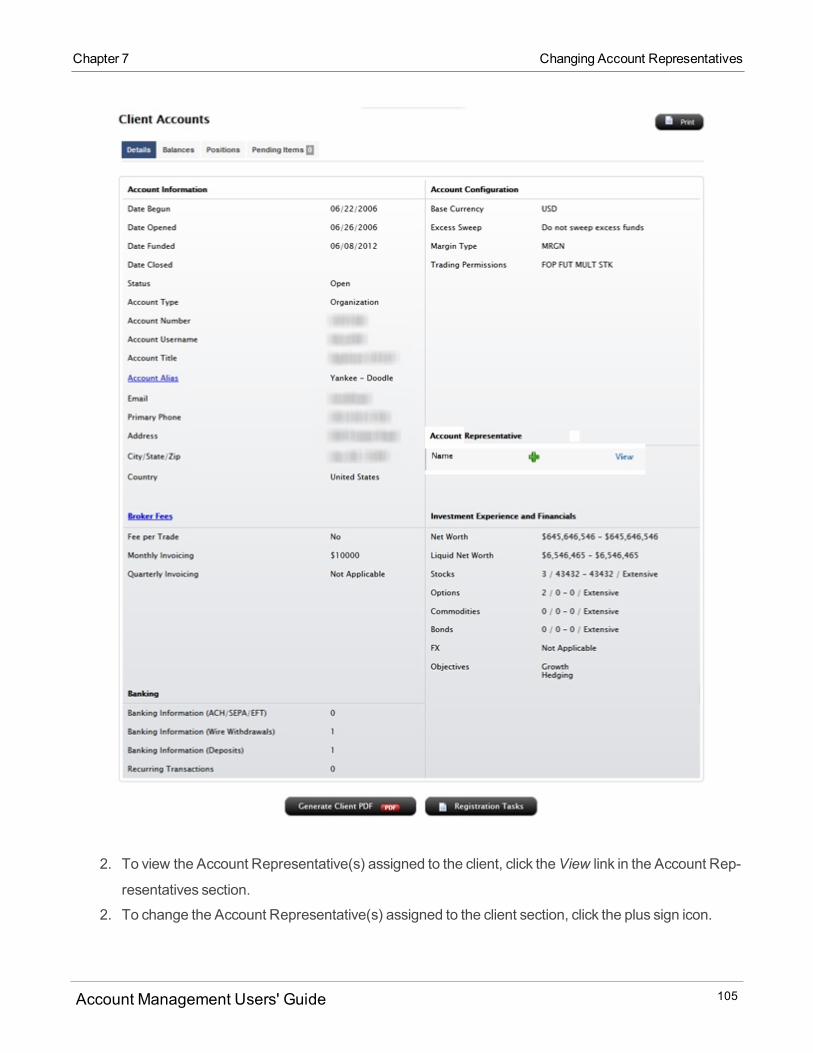
Chapter 7 Changing Account Representatives
2. To view the Account Representative(s) assigned to the client, click theView link in the Account Rep-
resentatives section.
2. To change the Account Representative(s) assigned to the client section, click the plus sign icon.
Account Management Users' Guide 105

The Edit Account Representative window opens.
3. If you have users who are designated as Account Representatives, theywill be listed in the Account
Representatives box.
4. ClickAdd to assign the Account Representative to the new client.
5. Enter an allocation percentage, whichmust total 100%. If you assign one Account Representative,
then the allocation will be 100. If you assignmore than one Account Representative to the new cli-
ent, the total allocationmust add up to 100%.If you change your mind, click theX to remove the
Account Representative from the new client.
6. If you want the Account Representative(s) to appear on the client's statements, click the check box.
o If a specific Account Representative is not listed in the drop-down, click theX to close the window,
then add one by designating an account user as an Account Representative using theManage
Account > AccessRights > Users page.
5. ClickSubmit.
For more information
Additional Advisor Authorizations
Advisors can get specific authorization from a client to modify additional settings in the client account.
These authorizations are listed on the Client Account Details page for open and pending client accounts.
Authorization Categories and Specific Tasks
Here is a list of all of the tasks that an advisor can be authorized to perform in a client's account. The list is
organized by category just as on the actual authorization form.
Authorization to Update or Change Account Information, Account Settings, Trading Permissions and Tax
Forms:
Change Account Info (Name& Address, Email, Phone Number, Legal Residence, Mailing address,
Personal Info, Employment Info, Financial Information, Regulatory Information, Trading objectives,
Change trading permissions and products
Change account settings (Base Currency, Account Type)
View and change account forms and tax forms.
Account Management Users' Guide 106
Chapter 7 Additional Advisor Authorizations
Chapter 7 Additional Advisor Authorizations
W8/W9 functions
Change Investor Category (QIB, Accredited Investor, etc)
Statement/ConfirmDelivery Settings
Trading Configuration
Market Data
Market Data Subscriber Status
Alert Notification
Paper Trading Account
Authorization to Provide or Change Banking and Transfer Instructions
ACH deposit information
ACH andwire withdrawal bank information
Position instructions for ACATS and FOP inbound transfers
Settlement instructions
Authorization to Send Third Party Payments andWires
Transmit payments or assets from the client account to third parties including wire transfers, ACH trans-
fers and other transfers of funds or assets.
Place limits on this authority by specifying amaximumamount and time period in months. For example,
nomore than $5,000 per 3month period.
Authorization to Vote Shares andMake ElectionsRegarding Positions (does not affect Account
Management)
Corporate Actions should be sent to the advisor not the client.
Proxy delivery and voting will be done by the advisor not the client.
Authorization for Special Programs and Alternative Investments
Hedge Fund Capital Introduction ProgramAgreement
Enroll or un-enroll in the Stock Yield Enhancement Program
Request to Send Electronic Notices, Confirmations and Account Statements only to Advisor
Account Management Users' Guide 107
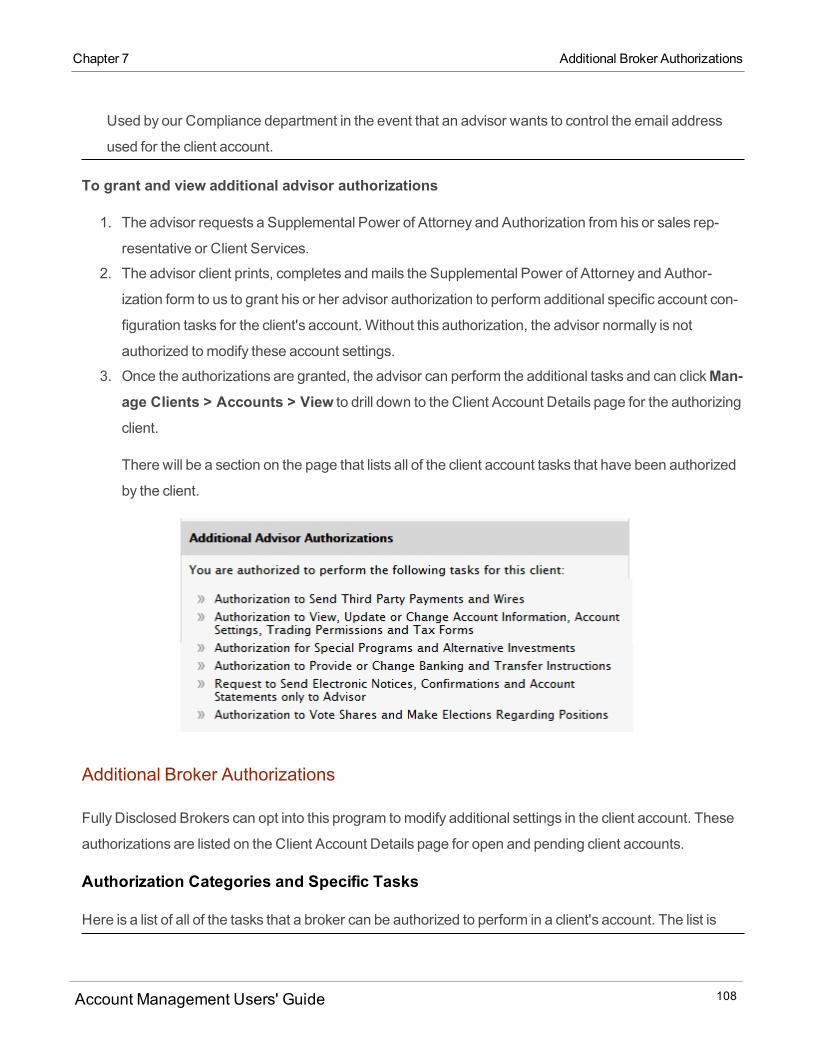
Used by our Compliance department in the event that an advisor wants to control the email address
used for the client account.
To grant and view additional advisor authorizations
1. The advisor requests a Supplemental Power of Attorney and Authorization from his or sales rep-
resentative or Client Services.
2. The advisor client prints, completes andmails the Supplemental Power of Attorney and Author-
ization form to us to grant his or her advisor authorization to perform additional specific account con-
figuration tasks for the client's account. Without this authorization, the advisor normally is not
authorized tomodify these account settings.
3. Once the authorizations are granted, the advisor can perform the additional tasks and can clickMan-age Clients > Accounts > View to drill down to the Client Account Details page for the authorizing
client.
There will be a section on the page that lists all of the client account tasks that have been authorized
by the client.
Additional Broker Authorizations
Fully Disclosed Brokers can opt into this program tomodify additional settings in the client account. These
authorizations are listed on the Client Account Details page for open and pending client accounts.
Authorization Categories and Specific Tasks
Here is a list of all of the tasks that a broker can be authorized to perform in a client's account. The list is
Account Management Users' Guide 108
Chapter 7 Additional Broker Authorizations
Chapter 7 Additional Broker Authorizations
organized by category just as on the actual authorization form.
Authorization to Update or Change Account Information, Account Settings, Trading Permissions and Tax
Forms:
Change Account Info (Name& Address, Email, Phone Number, Legal Residence, Mailing address,
Personal Info, Employment Info, Financial Information, Regulatory Information, Trading objectives,
Change trading permissions and products
Change account settings (Base Currency, Account Type)
View and change account forms and tax forms.
W8/W9 functions
Change Investor Category (QIB, Accredited Investor, etc)
Statement/ConfirmDelivery Settings
Trading Configuration
Market Data
Market Data Subscriber Status
Alert Notification
Paper Trading Account
Authorization to Provide Banking and Transfer Instructions
Create Deposit Notification
Submit Position Transfers
Make Internal Transfers
Provide Settlement Instructions
Authorization to Send Third Party Payments andWires
Transmit payments or assets from the client account to third parties including wire transfers, ACH trans-
fers and other transfers of funds or assets.
Place limits on this authority by specifying amaximumamount and time period in months. For example,
nomore than $5,000 per 3month period.
Authorization to Vote Shares andMake ElectionsRegarding Positions (does not affect Account
Management)
Account Management Users' Guide 109
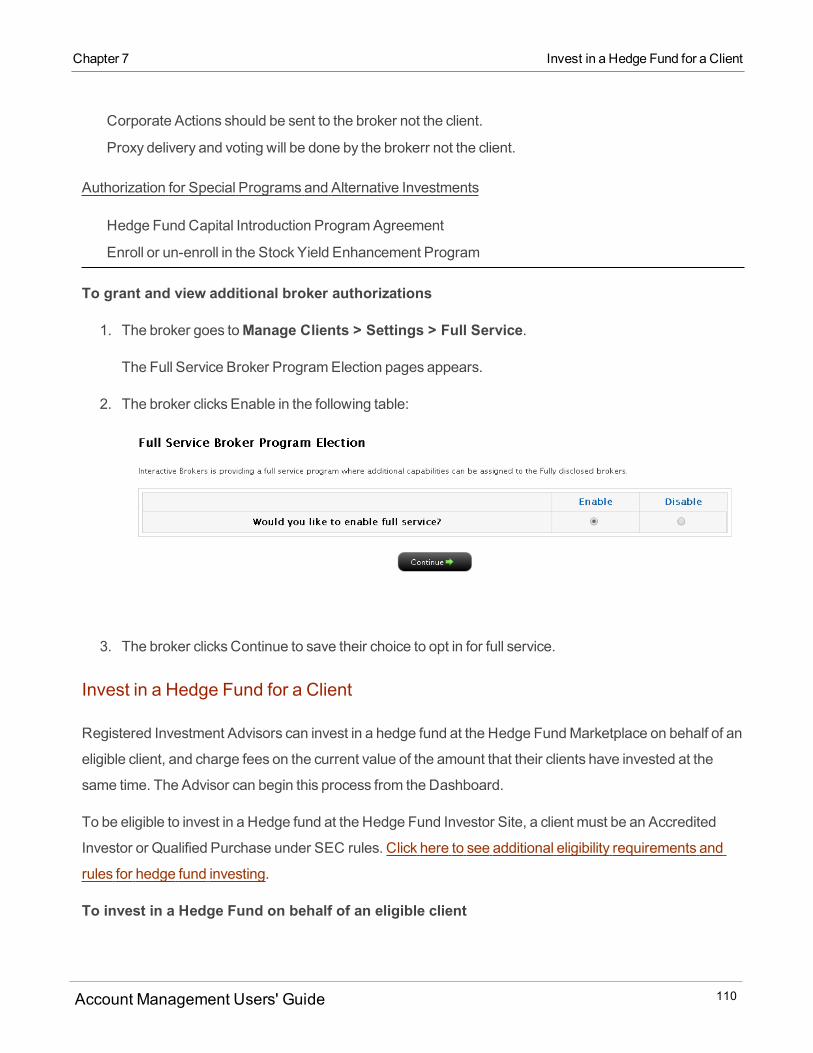
Corporate Actions should be sent to the broker not the client.
Proxy delivery and voting will be done by the brokerr not the client.
Authorization for Special Programs and Alternative Investments
Hedge Fund Capital Introduction ProgramAgreement
Enroll or un-enroll in the Stock Yield Enhancement Program
To grant and view additional broker authorizations
1. The broker goes toManage Clients > Settings > Full Service.
The Full Service Broker ProgramElection pages appears.
2. The broker clicks Enable in the following table:
3. The broker clicks Continue to save their choice to opt in for full service.
Invest in a Hedge Fund for a Client
Registered Investment Advisors can invest in a hedge fund at the Hedge FundMarketplace on behalf of an
eligible client, and charge fees on the current value of the amount that their clients have invested at the
same time. The Advisor can begin this process from the Dashboard.
To be eligible to invest in a Hedge fund at the Hedge Fund Investor Site, a client must be an Accredited
Investor or Qualified Purchase under SEC rules. Click here to see additional eligibility requirements and
rules for hedge fund investing.
To invest in a Hedge Fund on behalf of an eligible client
Account Management Users' Guide 110
Chapter 7 Invest in a Hedge Fund for a Client
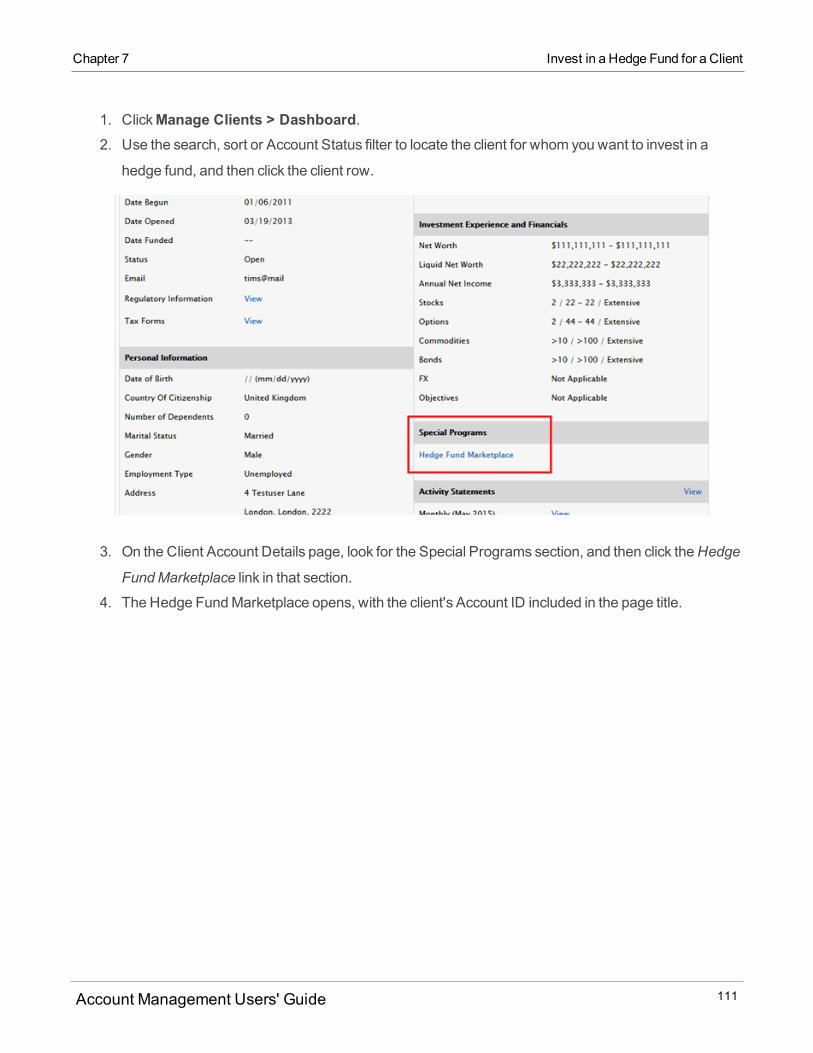
Chapter 7 Invest in a Hedge Fund for a Client
1. ClickManage Clients > Dashboard.2. Use the search, sort or Account Status filter to locate the client for whom you want to invest in a
hedge fund, and then click the client row.
3. On the Client Account Details page, look for the Special Programs section, and then click theHedge
FundMarketplace link in that section.
4. The Hedge FundMarketplace opens, with the client's Account ID included in the page title.
Account Management Users' Guide 111
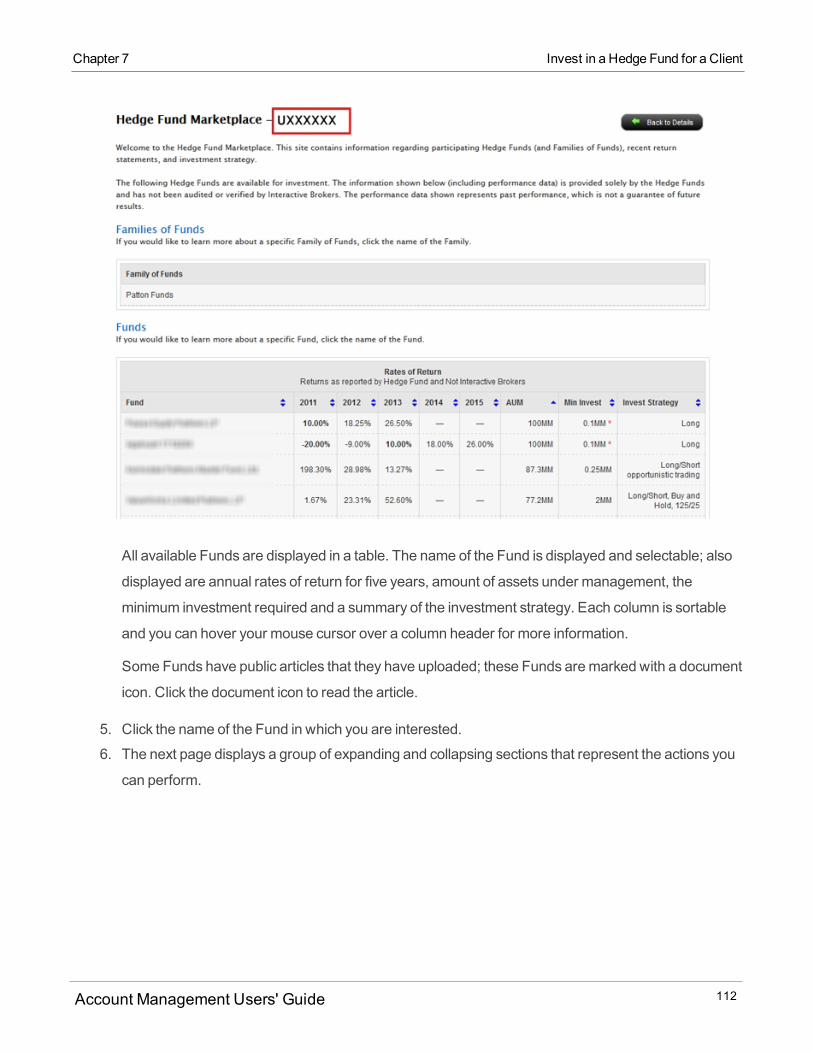
All available Funds are displayed in a table. The name of the Fund is displayed and selectable; also
displayed are annual rates of return for five years, amount of assets under management, the
minimum investment required and a summary of the investment strategy. Each column is sortable
and you can hover your mouse cursor over a column header for more information.
Some Funds have public articles that they have uploaded; these Funds aremarked with a document
icon. Click the document icon to read the article.
5. Click the name of the Fund in which you are interested.
6. The next page displays a group of expanding and collapsing sections that represent the actions you
can perform.
Account Management Users' Guide 112
Chapter 7 Invest in a Hedge Fund for a Client
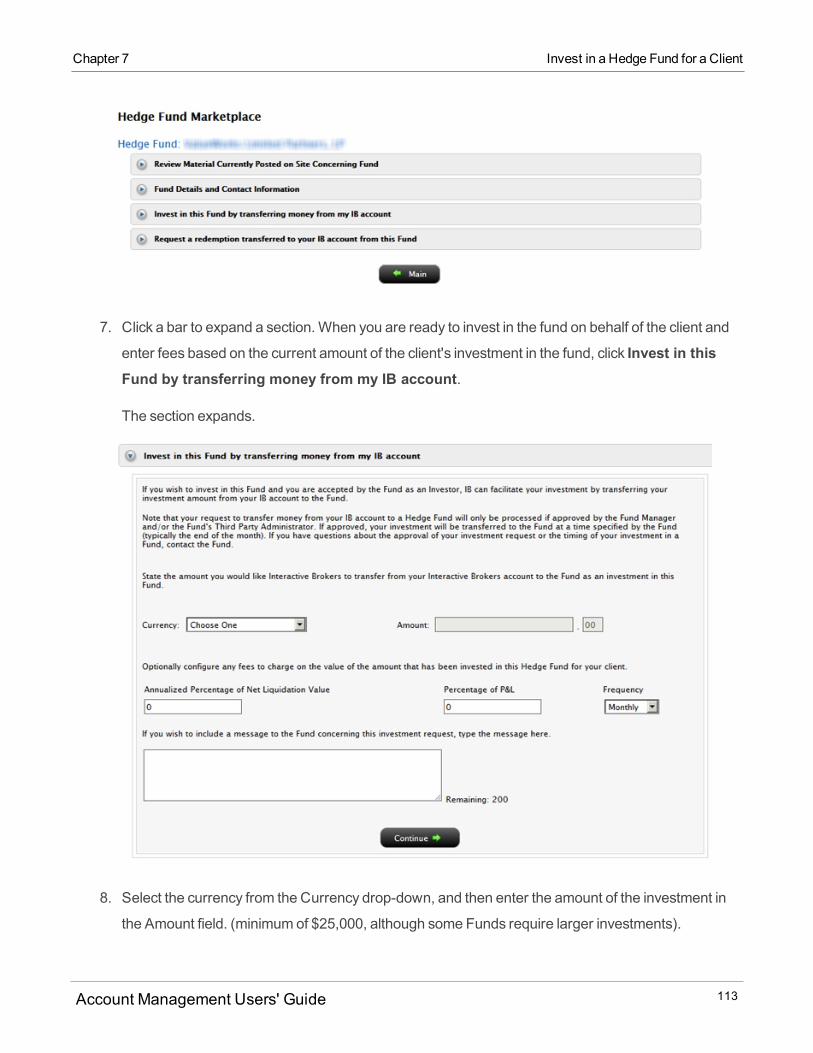
Chapter 7 Invest in a Hedge Fund for a Client
7. Click a bar to expand a section. When you are ready to invest in the fund on behalf of the client and
enter fees based on the current amount of the client's investment in the fund, click Invest in thisFund by transferring money from my IB account.
The section expands.
8. Select the currency from the Currency drop-down, and then enter the amount of the investment in
the Amount field. (minimumof $25,000, although some Funds require larger investments).
Account Management Users' Guide 113
9. Optionally, enter fees to charge on the amount of the client's investment in the fund:
If you have already set the fees (for example, you can set these fees on the HFCIP Fees page), the
fee fields are already filled in.
o In the Annualized Percentage of Net Liquidation Value field, enter a fee based on the Annualized
Percentage of Net Liquidation Value (NLV) of the current value of the client's investment in the
Fund. The percentage of equity feemust be between 0 and 1.o In the Percentage of P&L field, enter a fee based on the percentage of profit and loss of the cli-
ent's investment in the Fund.o Select Monthly or Quarterly from the Frequency drop-down.
10. ClickContinue.11. When your request has been successfully submitted, a confirmation box opens. ClickOK to close
the box, or clickGenerate PDF to print a PDF of your investment/fee changes for your client's sig-
nature .
12. Clientsmust approve hedge fund investments that youmake for them if they have never invested in
this fund before. If you included fee changeswith the investment, the client can approve both the
investment and the fee changes at the same time on the Pending Items page, available from the
Account Management Home page. Once the client confirms the investment on the Pending Items
page, he or she will be asked to enter a signature on a confirmation page.
As the advisor, you can view any pending hedge fund investments for a client by clicking the Pending
Items tab from the Dashboard. You can also cancel any requests with a status of Pending Client
Approval or Pending Hedge Fund Approval, as long as you are the user that created the
request.You can also click the pending transaction to view the transaction details. You can print a
PDF of your investment/fee changes for your client's signature from the transaction details popup
box.
Account Management Users' Guide 114
Chapter 7 Invest in a Hedge Fund for a Client
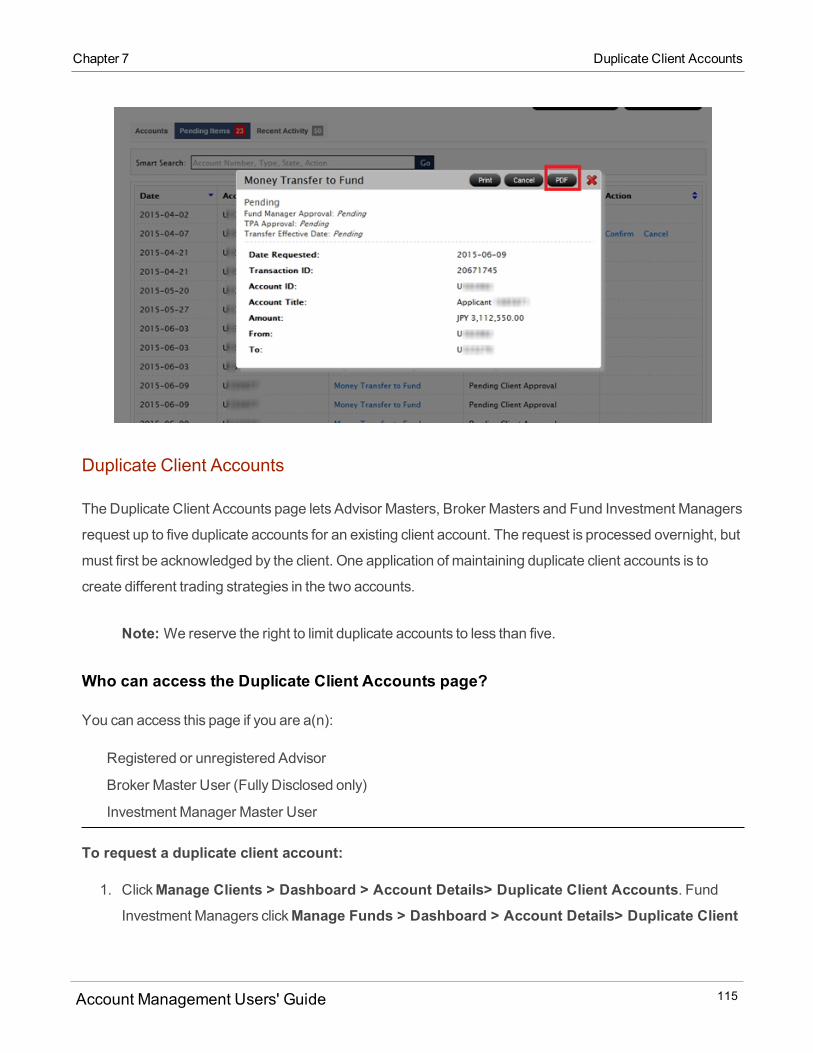
Chapter 7 Duplicate Client Accounts
Duplicate Client Accounts
TheDuplicate Client Accounts page lets Advisor Masters, Broker Masters and Fund Investment Managers
request up to five duplicate accounts for an existing client account. The request is processed overnight, but
must first be acknowledged by the client. One application of maintaining duplicate client accounts is to
create different trading strategies in the two accounts.
Note:We reserve the right to limit duplicate accounts to less than five.
Who can access the Duplicate Client Accounts page?
You can access this page if you are a(n):
Registered or unregistered Advisor
Broker Master User (Fully Disclosed only)
Investment Manager Master User
To request a duplicate client account:
1. ClickManage Clients > Dashboard > Account Details> Duplicate Client Accounts. FundInvestment Managers clickManage Funds > Dashboard > Account Details> Duplicate Client
Account Management Users' Guide 115
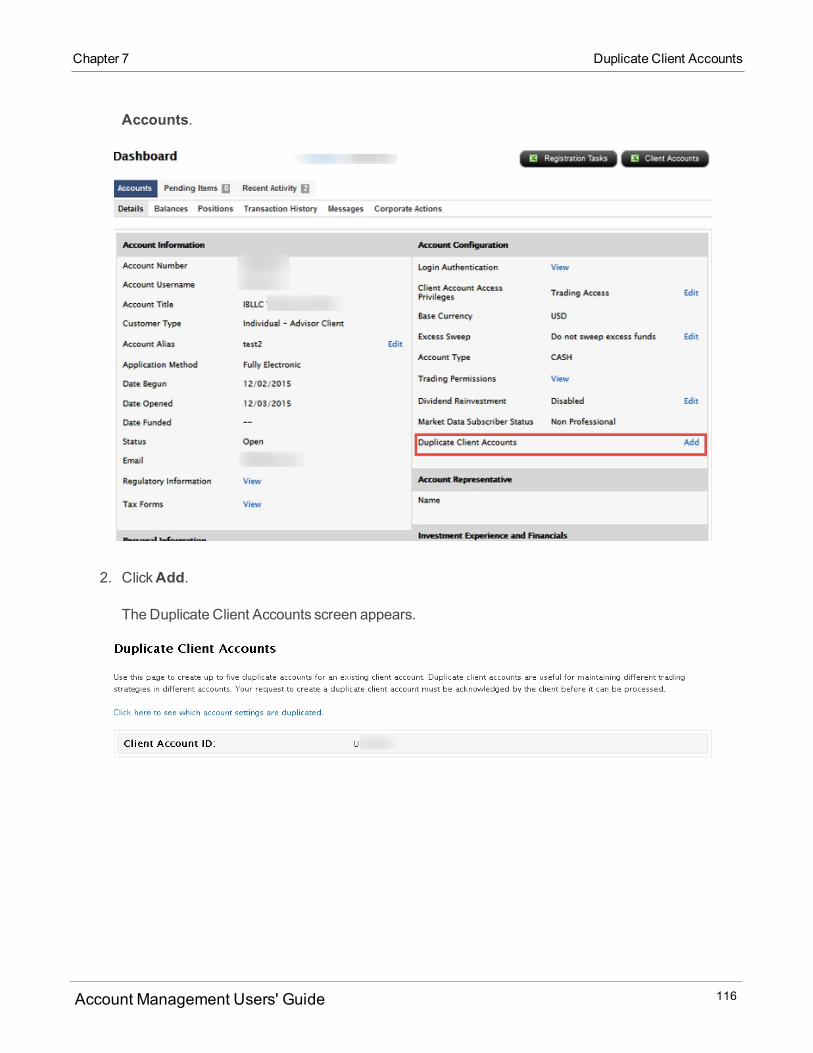
Accounts.
2. ClickAdd.
The Duplicate Client Accounts screen appears.
Account Management Users' Guide 116
Chapter 7 Duplicate Client Accounts
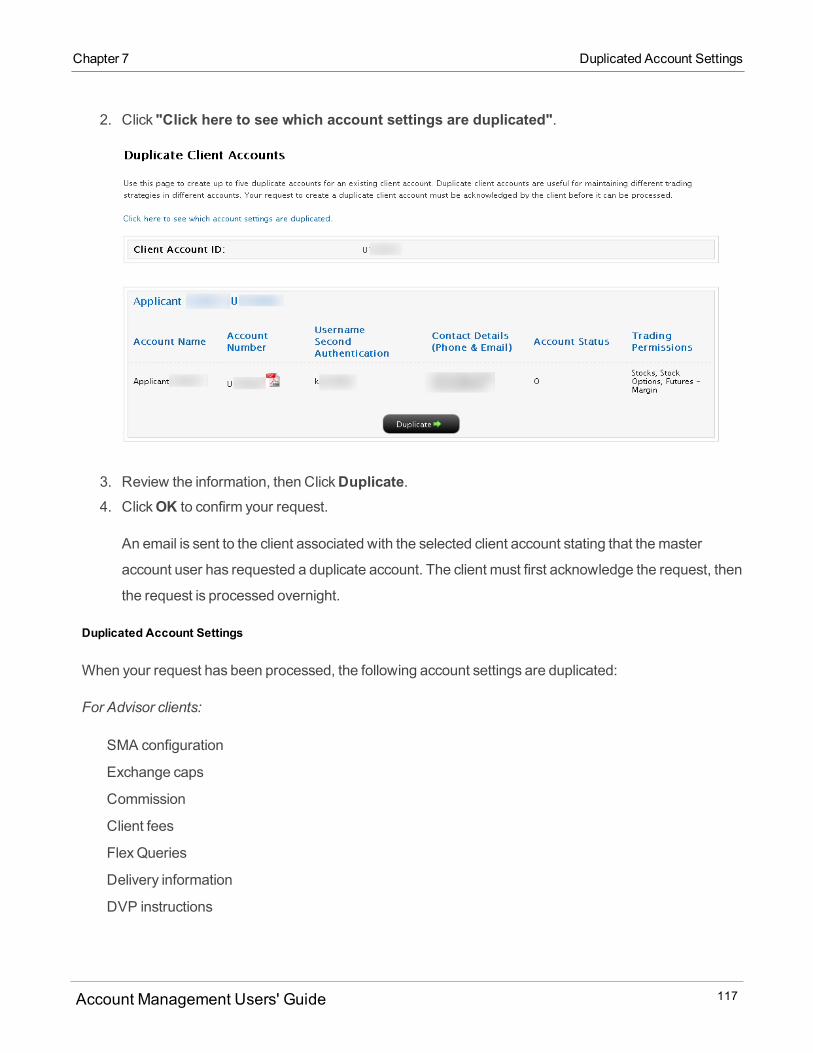
Chapter 7 Duplicated Account Settings
2. Click "Click here to see which account settings are duplicated".
3. Review the information, then ClickDuplicate.4. ClickOK to confirm your request.
An email is sent to the client associated with the selected client account stating that themaster
account user has requested a duplicate account. The client must first acknowledge the request, then
the request is processed overnight.
Duplicated Account Settings
When your request has been processed, the following account settings are duplicated:
For Advisor clients:
SMA configuration
Exchange caps
Commission
Client fees
FlexQueries
Delivery information
DVP instructions
Account Management Users' Guide 117
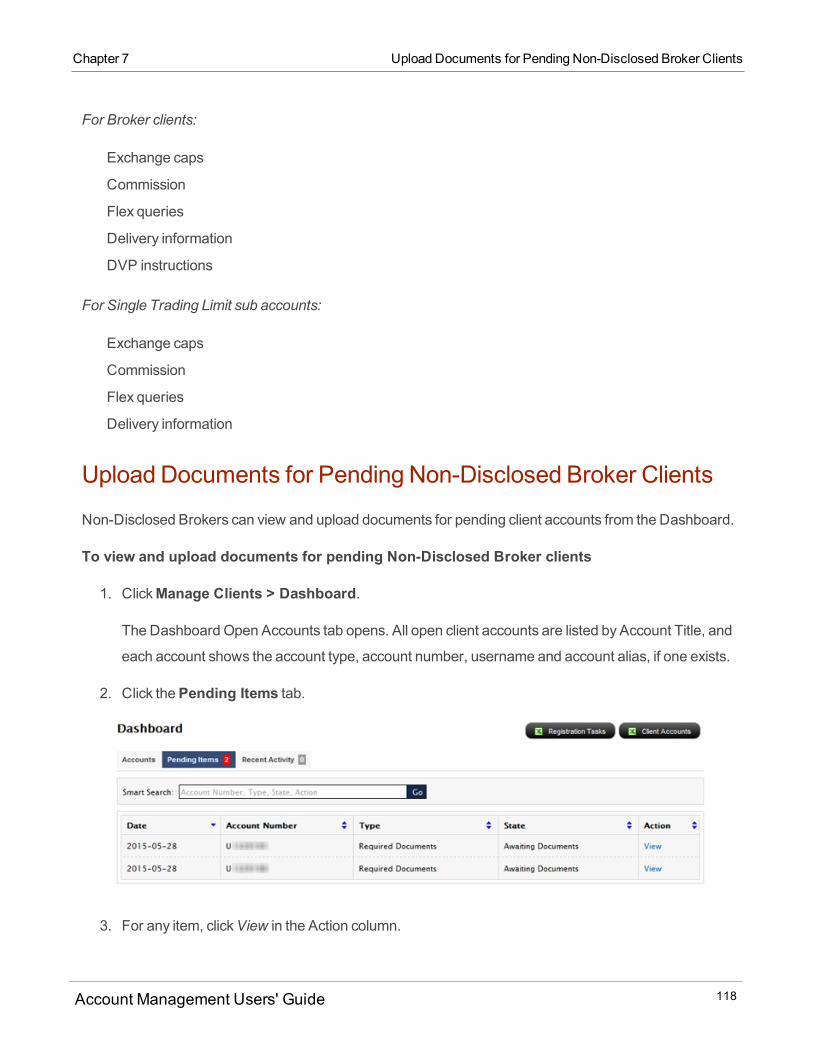
For Broker clients:
Exchange caps
Commission
Flex queries
Delivery information
DVP instructions
For Single Trading Limit sub accounts:
Exchange caps
Commission
Flex queries
Delivery information
Upload Documents for Pending Non-Disclosed Broker Clients
Non-Disclosed Brokers can view and upload documents for pending client accounts from the Dashboard.
To view and upload documents for pending Non-Disclosed Broker clients
1. ClickManage Clients > Dashboard.
The Dashboard Open Accounts tab opens. All open client accounts are listed by Account Title, and
each account shows the account type, account number, username and account alias, if one exists.
2. Click thePending Items tab.
3. For any item, clickView in the Action column.
Account Management Users' Guide 118
Chapter 7 Upload Documents for Pending Non-Disclosed Broker Clients
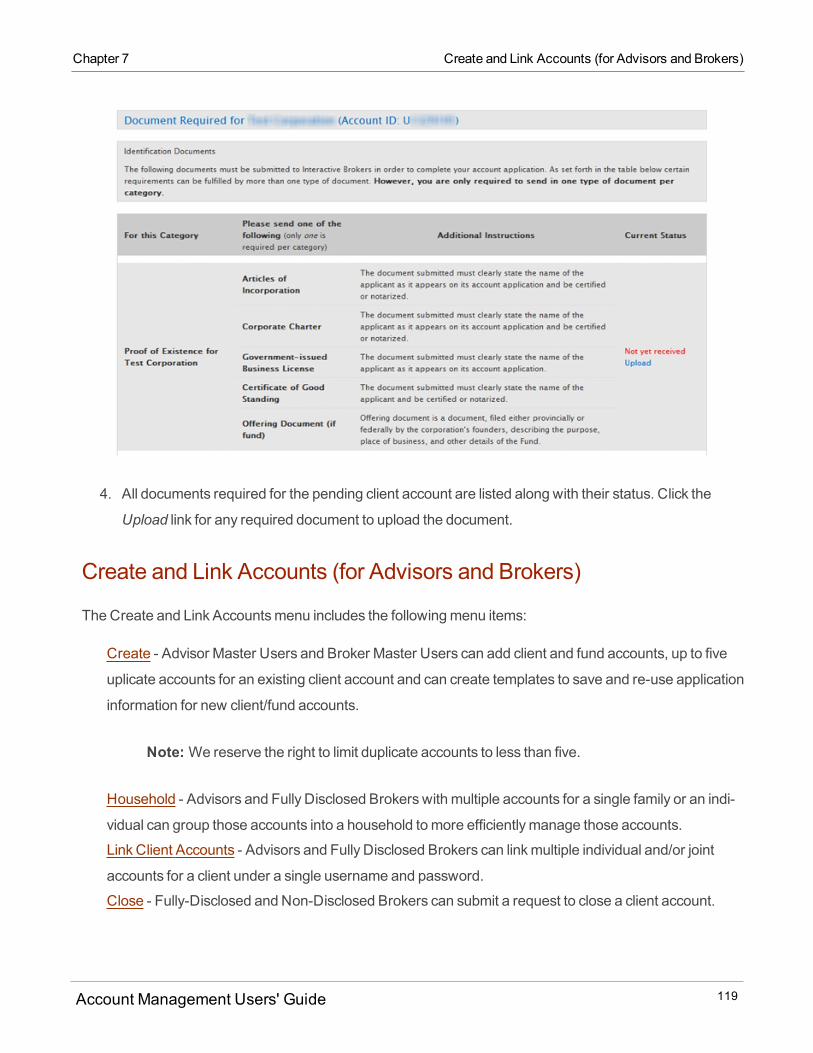
Chapter 7 Create and Link Accounts (for Advisors and Brokers)
4. All documents required for the pending client account are listed along with their status. Click the
Upload link for any required document to upload the document.
Create and Link Accounts (for Advisors and Brokers)
TheCreate and Link Accountsmenu includes the followingmenu items:
Create - Advisor Master Users and Broker Master Users can add client and fund accounts, up to five
uplicate accounts for an existing client account and can create templates to save and re-use application
information for new client/fund accounts.
Note:We reserve the right to limit duplicate accounts to less than five.
Household - Advisors and Fully Disclosed Brokers with multiple accounts for a single family or an indi-
vidual can group those accounts into a household tomore efficientlymanage those accounts.
Link Client Accounts - Advisors and Fully Disclosed Brokers can linkmultiple individual and/or joint
accounts for a client under a single username and password.
Close - Fully-Disclosed and Non-Disclosed Brokers can submit a request to close a client account.
Account Management Users' Guide 119
Create
TheCreatemenu includes the following pages:
New (Add Client Account) - Advisor Master Users, Broker Master Users and Investment Manager
Master Users can add client, sub and fund accounts.
Duplicate - Advisor Master Users, Broker Master Users and Investment Manager Master Users can
request up to five duplicate accounts for an existing client account.
Note:We reserve the right to limit duplicate accounts to less than five.
Client Account Templates - Advisor Master Users, Broker Master Users and Investment Manager
Master Users can create templates to save and re-use application information for new client/fund
accounts.
Open IB Asset Management accounts for Advisor clients - Advisors can connect their clients to Inter-
active AdvisorsMoneyManagers for the purpose of investing in Interactive Advisors Smart Beta Port-
folios.
Add Client Account
The AddClient Account page lets you add a client or sub account. Depending on the type of account you
have, from this page you can:
Methods of completing an account application
Steps in the application process
Send an invitation to a client to start an electronic application
Start a semi-electronic application
Download a copy of the client disclosures
Add a Fully Disclosed Broker client account
Add Advisor, STL andMultiple Hedge Fund accounts to a Fully Disclosed Broker account
Add an Advisor or STL account to an Advisor account
Add a Non-disclosed Broker client account
Account Management Users' Guide 120
Chapter 7 Create
Chapter 7 Methods of Completing an Account Application
Add a Fund account or a SeparatelyManaged Account (SMA) to aMultiple Hedge Fund account
Add an Advisor or STL account to aMultiple Hedge Fund account
Advisors and Fully Disclosed Brokers whose clients begin their application at the Advisor's or Broker's own
website can add a unique client ID to the Client Invitation sent to the client. For more information, see Using
a Custom ID for Advisor and Fully Disclosed Broker Client Applications.
Who can access the Add an Account page?
You can access this page if you are a(n):
Advisor Master User Individual
Advisor Master User Organization
Broker Master User (non-disclosed only)
Investment Manager Master User
Methods of Completing an Account Application
When you add an account, you start and complete the account application process. There are two
methods of completing an account application:
Fully electronic
Semi-electronic
The following table lists themethods of completing an application for all account structures.
Account StructureAvailable Methods of Com-
pleting an Account Application
Singles Fully electronic
Advisor Master
Users
Fully electronic
Semi-electronic
Advisor Client
Users
Fully electronic
Semi-electronic
Broker Master
Users
Fully electronic
Account Management Users' Guide 121
Account StructureAvailable Methods of Com-
pleting an Account Application
Semi-electronic
Broker Fully Dis-
closed Client Users
Fully electronic
Broker Non-Dis-
closed Client Users
Abbreviated electronic applic-
ation
Broker Omnibus Cli-
ent Users
None (client accounts are not
required)
Investment Manager
Master User
Fully electronic
Semi-electronic
Fund Fully electronic
Semi-electronic
Separately Managed
Account (SMA)
Semi-electronic
Proprietary Trading
GroupMaster User
Fully electronic
Semi-electronic
Proprietary Trading
Group Sub User
Abbreviated electronic applic-
ation
Steps in the Application Process
When you complete a fully electronic account application, the steps include:
1. Specify the customer type and base currency
2. Enter financial information, including date of birth, investment objectives and experience, net worth
and annual net income.
Account Management Users' Guide 122
Chapter 7 Steps in the Application Process
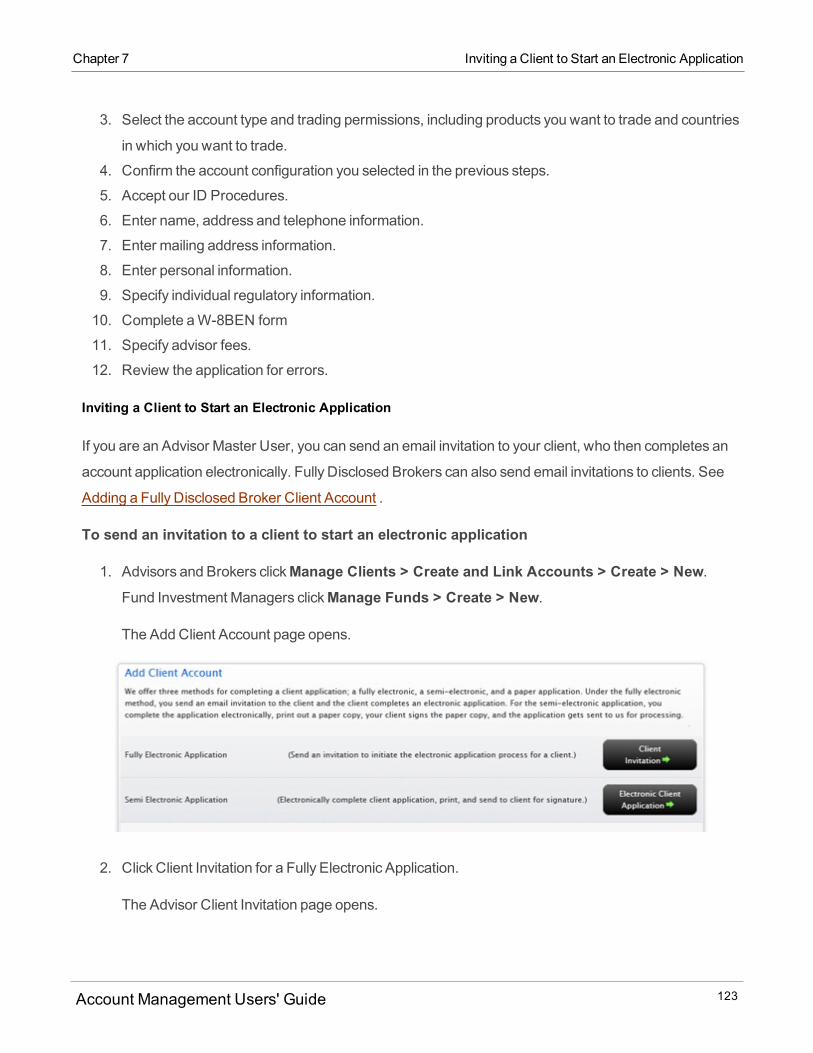
Chapter 7 Inviting a Client to Start an Electronic Application
3. Select the account type and trading permissions, including products you want to trade and countries
in which you want to trade.
4. Confirm the account configuration you selected in the previous steps.
5. Accept our ID Procedures.
6. Enter name, address and telephone information.
7. Enter mailing address information.
8. Enter personal information.
9. Specify individual regulatory information.
10. Complete aW-8BEN form
11. Specify advisor fees.
12. Review the application for errors.
Inviting a Client to Start an Electronic Application
If you are an Advisor Master User, you can send an email invitation to your client, who then completes an
account application electronically. Fully Disclosed Brokers can also send email invitations to clients. See
Adding a Fully Disclosed Broker Client Account .
To send an invitation to a client to start an electronic application
1. Advisors and Brokers clickManage Clients > Create and Link Accounts > Create > New.Fund Investment Managers clickManage Funds > Create > New.
The Add Client Account page opens.
2. Click Client Invitation for a Fully Electronic Application.
The Advisor Client Invitation page opens.
Account Management Users' Guide 123

3. Select the type of application for your client:
o ProTrack - This is a full account application for Individual, Joint, IRA, Trust and Small Businessclients who want to trade stocks, options, futures, forex, bonds, mutual funds, and CFDs.
o Client Account Templates - Select this option if you want to use a Client Account Template thatyou have created, and then select the desired template from the drop-downmenu.
If you select ProTrack, you will be asked to set client fees.o IB FastTrack US NonPro template - This is a short application for Individual, Joint and IRA cli-
ents who want to trade only stocks in their country of legal residence.
4. ClickSubmit.
The Client Fee Setup page opens.
5. Select the type of fees for the client:
o No Fee - An advisor chooses not to charge his or clients a fee for services rendered.o Automatic billing - A calculated fee is automatically billed to the client's account with blanket cli-
ent authorization. Be aware that Automatic Billing is subject to certain caps and limitations.
Advisors can choose one of several client feemethods:
o Annualized Percentage of Net Liquidation Valueo Annualized Flat feeo Percent of Profit and Loss (P&L)o Fee per trade unit
Account Management Users' Guide 124
Chapter 7 Inviting a Client to Start an Electronic Application
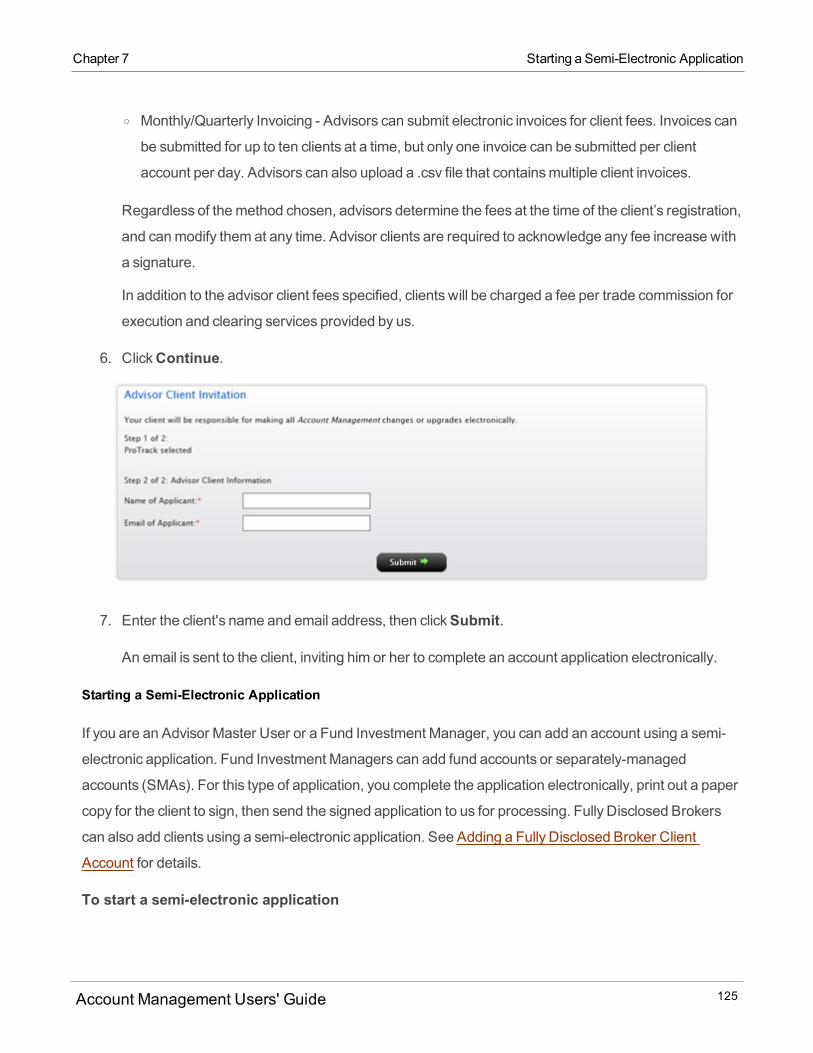
Chapter 7 Starting a Semi-Electronic Application
o Monthly/Quarterly Invoicing - Advisors can submit electronic invoices for client fees. Invoices can
be submitted for up to ten clients at a time, but only one invoice can be submitted per client
account per day. Advisors can also upload a .csv file that containsmultiple client invoices.
Regardless of themethod chosen, advisors determine the fees at the time of the client’s registration,
and canmodify them at any time. Advisor clients are required to acknowledge any fee increase with
a signature.
In addition to the advisor client fees specified, clients will be charged a fee per trade commission for
execution and clearing services provided by us.
6. ClickContinue.
7. Enter the client's name and email address, then clickSubmit.
An email is sent to the client, inviting him or her to complete an account application electronically.
Starting a Semi-Electronic Application
If you are an Advisor Master User or a Fund Investment Manager, you can add an account using a semi-
electronic application. Fund Investment Managers can add fund accounts or separately-managed
accounts (SMAs). For this type of application, you complete the application electronically, print out a paper
copy for the client to sign, then send the signed application to us for processing. Fully Disclosed Brokers
can also add clients using a semi-electronic application. See Adding a Fully Disclosed Broker Client
Account for details.
To start a semi-electronic application
Account Management Users' Guide 125
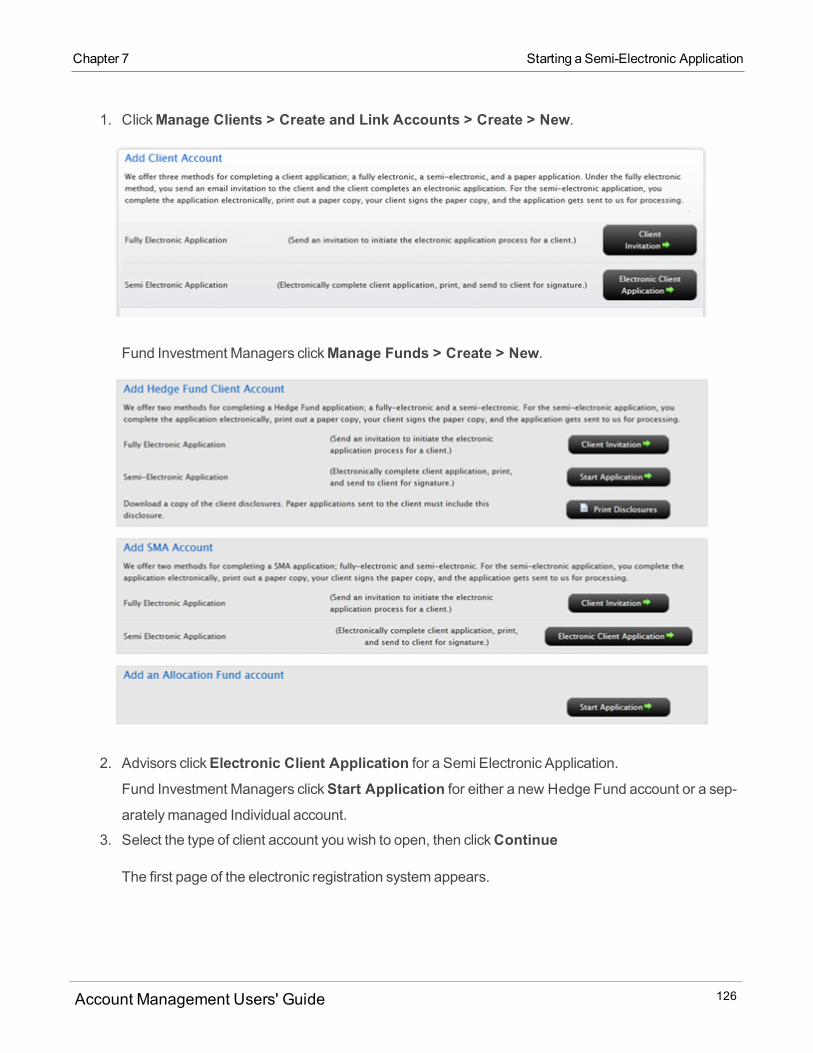
1. ClickManage Clients > Create and Link Accounts > Create > New.
Fund Investment Managers clickManage Funds > Create > New.
2. Advisors clickElectronic Client Application for a Semi Electronic Application.Fund Investment Managers clickStart Application for either a new Hedge Fund account or a sep-
aratelymanaged Individual account.
3. Select the type of client account you wish to open, then clickContinue
The first page of the electronic registration system appears.
Account Management Users' Guide 126
Chapter 7 Starting a Semi-Electronic Application
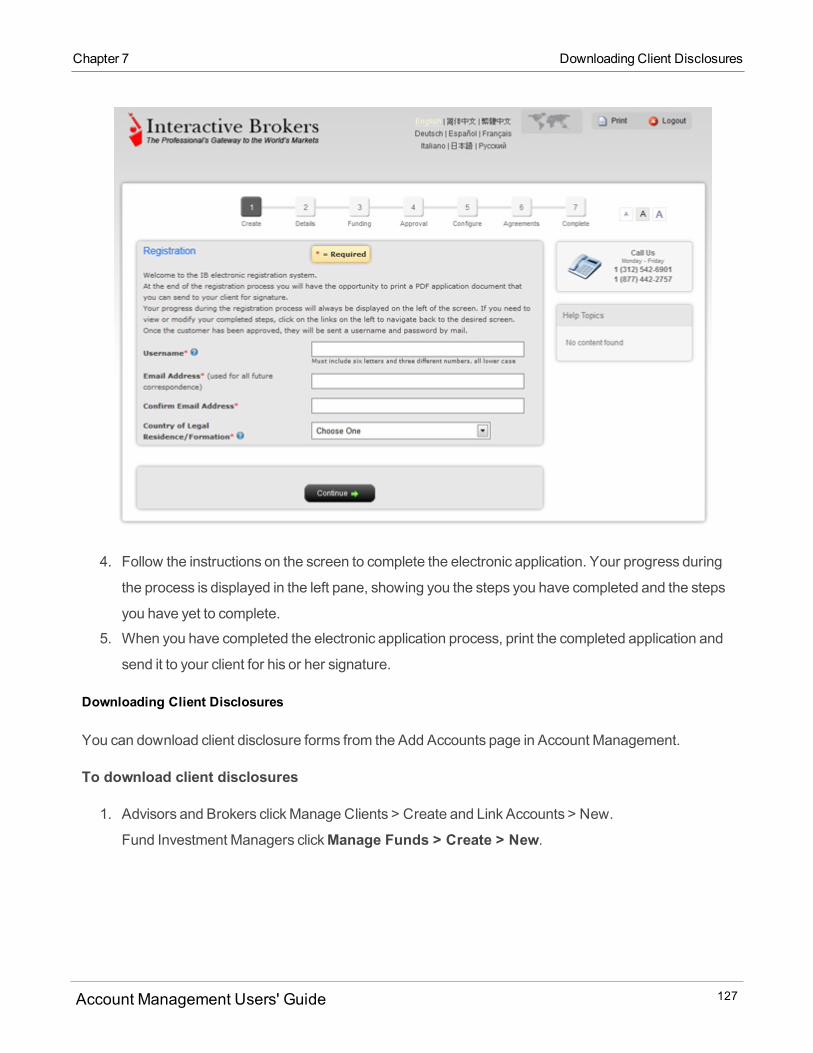
Chapter 7 Downloading Client Disclosures
4. Follow the instructions on the screen to complete the electronic application. Your progress during
the process is displayed in the left pane, showing you the steps you have completed and the steps
you have yet to complete.
5. When you have completed the electronic application process, print the completed application and
send it to your client for his or her signature.
Downloading Client Disclosures
You can download client disclosure forms from the Add Accounts page in Account Management.
To download client disclosures
1. Advisors and Brokers clickManage Clients > Create and Link Accounts > New.
Fund Investment Managers clickManage Funds > Create > New.
Account Management Users' Guide 127

2. In the Paper Application section of the Add Accounts page, click Client Disclosures. The Client Dis-
closures page opens.
3. Download zipped or unzipped client disclosure forms by clicking the appropriate button.
If you choose Zipped, you are prompted to save a zip file to your computer. The zip file is a large
group of files compressed into a smaller file that must by unzipped before you read any files. If you
choose unzipped forms, the forms appear in a PDF document that you can save to your computer
and print.
Adding a Fully Disclosed Broker Client Account
Fully Disclosed Brokers can add client accounts from their Broker master account.
To add a fully disclosed broker client account
1. ClickManage Clients > Create and Link Accounts > Create > New.
The Broker Client Invitation page opens.
Account Management Users' Guide 128
Chapter 7 Adding a Fully Disclosed Broker Client Account

Chapter 7 Adding a Fully Disclosed Broker Client Account
2. ClickClient Invitation to send an invitation to initiate a fully electronic application process for a cli-ent. The broker client will be able to select the type of account at the very beginning of his or her
application.
You can also selectElectronic Client Application to initiate a semi-electronic application. For thistype of application, you complete the application electronically, print out a paper copy for the client to
sign, then send the signed application to us for processing.
3. Enter the name and email address of the applicant, then clickContinue.4. If you have created and saved a client account template, select it from the Client Account Templates
list. Client account templates include a selected feemethodology, so you don’t have to specify fees if
you use a client account template. This field does not appear if you do not have any saved client
account templates.
5. Broker Master Users can assign one or more Account Representatives to a new client. An Account
Representative is a person whomanages the relationship between a broker and his or her client(s).
Broker Master Usersmust first designate an account user as an Account Representative on theMan-
age Account > AccessRights > Users page.
Account Management Users' Guide 129
o If you have users who are designated as Account Representatives, theywill be listed in the
Account Representatives box. ClickAdd to assign the Account Representative to the new client.o Enter an allocation percentage, whichmust total 100%. If you assign one Account Rep-
resentative, then the allocation will be 100. If you assignmore than one Account Representative
to the new client, the total allocationmust add up to 100%.o If you change your mind, click theX to remove the Account Representative from the new client.o If you want the Account Representative(s) to appear on the client's statements, click the check
box.
5. ClickContinue. The Pending Items page opens.
Adding Advisors, STL and Multiple Hedge Fund Accounts to a Fully Disclosed Broker Account
If you are a Fully Disclosed Broker, you can add the following types of institution accounts to your account
structure from your master account:
Advisor (including Friends and Family Advisor)
Proprietary Trading Group Separate Trading Limit (STL)
Multiple Hedge Fund
These institution accounts can have their own client, sub or fund accounts, making your account structure a
three-level account.
For detailed rules governing three-level Fully Disclosed Broker accounts, see Rules for Three-Level Fully
Disclosed Broker Accounts.
Adding an Advisor Account
To add an Advisor to your Fully Disclosed Broker account
1. ClickManage Clients > Create and Link Accounts > Create > New. 2. ClickClient Invitation to send an invitation to initiate a fully electronic application process. Cur-
rently, only fully electronic applications are available for adding an advisor to a Fully Disclosed
Broker account.
Account Management Users' Guide 130
Chapter 7 Adding Advisors, STL andMultiple Hedge Fund Accounts to a
Fully Disclosed Broker Account
Chapter 7 Adding an STL Account
3. The client begins his or her application by selecting Financial Advisor as the account type, andthen completes an Advisor Account application. Financial and trading criteria are applied separately
at the advisor and advisor client levels.
4. After the advisor application has been approved, the advisor can log into Account Management with
his own username and password, and then add one or more client accounts on theManage Clients> Create and Link Accounts > Create > New page. Fully Disclosed Brokers cannot add client
accounts to the Advisor account; thesemust be added by the advisor.
As a Fully Disclosed Broker, your trading qualifications (products you are qualified to trade) determine the
trading qualifications that are available to the new advisor and the advisor's clients.
Adding an STL Account
To add an STL account to your Fully Disclosed Broker account
1. ClickManage Clients > Create and Link Accounts > Create > New. 2. Do one of the following:
o ClickClient Invitation to send an invitation to initiate a fully electronic application process.o ClickElectronic Client Application to start the semi-electronic application process.o ClickStart Application to print a paper application.
3. If you selected the fully electronic application, the Broker Client Invitation page opens. Complete this
page, including entering the name and email of the applicant, and then clickContinue. The invitationwill be sent to the email address you enter and the client completes the application.
If you selected the semi electronic application, you will be prompted to selected the account type for
the new client. Select Institution as the account type, and then clickContinue. The accountapplication opens. This client will be the Proprietary Trading Group STL Master user.
If you selected the paper application, you will be prompted to selected the account type for the new
client. Select Institution as the account type, and then clickContinue. Complete the steps asdescribed on the screen to print the paper application.
4. After the application has been completed and approved, the new client can log into Account Man-
agement with his own username and password, and then add sub accounts from theManage
Account Management Users' Guide 131

Traders > Traders > Create > Authorized Trader page. Fully Disclosed Brokers cannot add subaccounts to the STL account.
The STL and its sub accounts belong to the same beneficiary.
Adding aMultiple Hedge Fund Account
To add a Multiple Hedge Fund account to your Fully Disclosed Broker account
1. ClickManage Clients > Create and Link Accounts > Create > New. 2. Do one of the following:
o ClickClient Invitation to send an invitation to initiate a fully electronic application process.o ClickElectronic Client Application to start the semi-electronic application process.o ClickStart Application to print a paper application.
3. If you selected the fully electronic application, the Broker Client Invitation page opens. Complete this
page, including entering the name and email of the applicant, and then clickContinue. The invitationwill be sent to the email address you enter and the client completes the application.
If you selected the semi electronic application, you will be prompted to selected the account type for
the new client. SelectMultiple Funds as the account type, and then clickContinue. The accountapplication opens. This client will be theMultiple Hedge Fund Investment Manager user.
If you selected the paper application, you will be prompted to selected the account type for the new
client. SelectMultiple Funds as the account type, and then clickContinue. Complete the steps asdescribed on the screen to print the paper application.
o Financial and trading criteria are applied separately at the Fund Investment Manager and fund
levels.
4. After themultiple hedge fund application has been approved, the Fund Investment Manager can log
into Account Management with his own username and password, and then add one or more fund or
SMA accounts on theManage Funds > Funds > Create > New page. Fully Disclosed Brokers
cannot add fund or SMA accounts to theMultiple Funds account; thesemust be added by the Fund
Investment Manager.
For more information
Account Management Users' Guide 132
Chapter 7 Adding aMultiple Hedge Fund Account

Chapter 7 Rules for Three-Level Fully Disclosed Broker Accounts
Linking to an Advisor- or Broker-Managed Account
Rules for Three-Level Fully Disclosed Broker Accounts
Fully Disclosed Broker accounts with Advisor, Proprietary Trading Group Separate Trading Limit (STL)
andMultiple Hedge Fund accounts (three-level accounts) are subject to the following rules.
Function Advisor AccountProprietary Trading
Group STL Account
Multiple Hedge Fund
Account
Trading The Fully Disclosed
Broker can trade for
advisor client accounts.
The Fully Disclosed
Broker cannot allocate
trades for advisor client
accounts.
The advisor can trade
for and allocate trades
to Advisor client
accounts.
The Fully Disclosed
Broker can apply trading
restrictions to the
Advisor Master account
but not to the Advisor
clients accounts.
The products that the
Fully Disclosed Broker
is approved to trade
determine the products
that the advisor can
trade. In other words,
the advisor cannot trade
The Fully Disclosed
Broker can trade for the
STL Master account but
not for any of the
STL sub accounts.
The Fully Disclosed
Broker can apply trading
restrictions to the STL
Master account but not
to the STL sub
accounts.
The products that the
Fully Disclosed Broker
is approved to trade
determine the products
that the STL Master can
trade. In other words,
the STL Master cannot
trade products that the
broker has not been
approved to trade.
The Fully Disclosed
Broker can trade for
Fund accounts.
The Fully Disclosed
Broker cannot allocate
trades to Fund
accounts.
The Fund Investment
Manager can trade for
multiple Funds in an
Allocation Account and
assign trades before the
end of the day to
specific cleared Fund
Accounts.
The Fund Investment
Manager can pre-trade
allocate for fund
accounts.
The Fully Disclosed
Broker can apply trading
restrictions to the Fund
Investment Manager
account but not to Fund
or SMA accounts.
Account Management Users' Guide 133

products that the broker
has not been approved
to trade.
The advisor cannot link
to money managers in a
three-level broker
account structure.
The products that the
Fully Disclosed Broker
is approved to trade
determine the products
that the Investment
Manager can trade. In
other words, the
Investment Manager
cannot trade products
that the broker has not
been approved to trade.
Margin Each advisor client
account is individually
margined.
The Broker Master
account and client
accounts aremargined
separately.
Each Fund account is
individually margined.
Markups and Fees The broker can enter a
markup schedule for the
advisor just as they can
for their fully disclosed
broker clients.
The advisor can enter
fee andmarkup
schedules for their
clients.
The advisor client will
be charged bothmarkup
schedules. If there are
twomarkups for Non-
US Advisor clients, the
markups will be
combined into one
markup. If there is a
markup and an advisor
The broker will enter a
markup schedule for the
STLMaster account
just as they can for
organization client
accounts. Markups for
STL sub accounts are
never placed in the
STL Master account.
Broker fees will be
placed in the Broker
Master account and
swept to the broker's
trading account at the
end of each day.
The broker can enter a
markup schedule for the
Fund Investment Man-
ager just as they can for
their fully disclosed
broker clients.
Account Management Users' Guide 134
Chapter 7 Rules for Three-Level Fully Disclosed Broker Accounts

Chapter 7 Rules for Three-Level Fully Disclosed Broker Accounts
client fee configured as
a Percent of Net
Liquidation Value, the
fees will appear
separately.
Broker markups will be
placed in the Broker
Master account and
swept to the broker's
trading account at the
end of the day.
Advisor client fees will
be placed in the Advisor
Master account.
Funding Brokers can perform
funding functions on
behalf of an advisor but
not the advisor's clients.
Advisor clients may
complete a deposit
notification in Account
Management if they
have a username and
password. If they don't,
the advisor can also
complete a deposit
notification for his
clients.
Brokers cannot perform
any funding functions on
behalf of an STL
account.
All existing standalone
STL funding functions
will be available to the
STL under the broker.
Deposits and
withdrawals must be
made from the STL
Master account and
transferred to/from the
sub accounts.
Brokers can perform
funding functions on
behalf of a Multiple
Hedge Fund Investment
Manager (theMaster
account) but not the
individual Fund
accounts.
The Fund Investment
Manager can deposit
funds for individual fund
accounts, and individual
funds can deposit funds
into their own accounts.
Reporting An advisor in a Fully
Disclosed Broker
account has access to
all of the reports that are
The STL account under
a broker has access to
the same reports
available as a
The Fund Investment
Manager has access to
all of the reports that are
available to any Multiple
Account Management Users' Guide 135
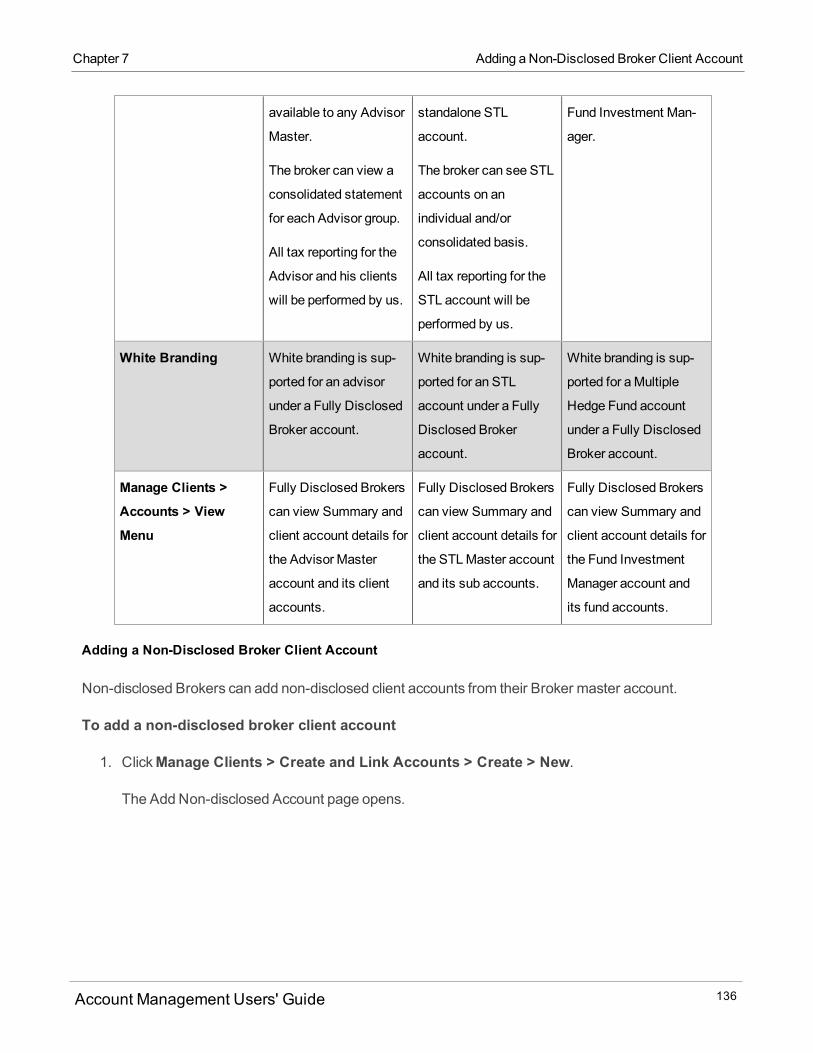
available to any Advisor
Master.
The broker can view a
consolidated statement
for each Advisor group.
All tax reporting for the
Advisor and his clients
will be performed by us.
standalone STL
account.
The broker can see STL
accounts on an
individual and/or
consolidated basis.
All tax reporting for the
STL account will be
performed by us.
Fund Investment Man-
ager.
White Branding White branding is sup-
ported for an advisor
under a Fully Disclosed
Broker account.
White branding is sup-
ported for an STL
account under a Fully
Disclosed Broker
account.
White branding is sup-
ported for aMultiple
Hedge Fund account
under a Fully Disclosed
Broker account.
Manage Clients >
Accounts > View
Menu
Fully Disclosed Brokers
can view Summary and
client account details for
the Advisor Master
account and its client
accounts.
Fully Disclosed Brokers
can view Summary and
client account details for
the STLMaster account
and its sub accounts.
Fully Disclosed Brokers
can view Summary and
client account details for
the Fund Investment
Manager account and
its fund accounts.
Adding a Non-Disclosed Broker Client Account
Non-disclosed Brokers can add non-disclosed client accounts from their Broker master account.
To add a non-disclosed broker client account
1. ClickManage Clients > Create and Link Accounts > Create > New.
The Add Non-disclosed Account page opens.
Account Management Users' Guide 136
Chapter 7 Adding a Non-Disclosed Broker Client Account
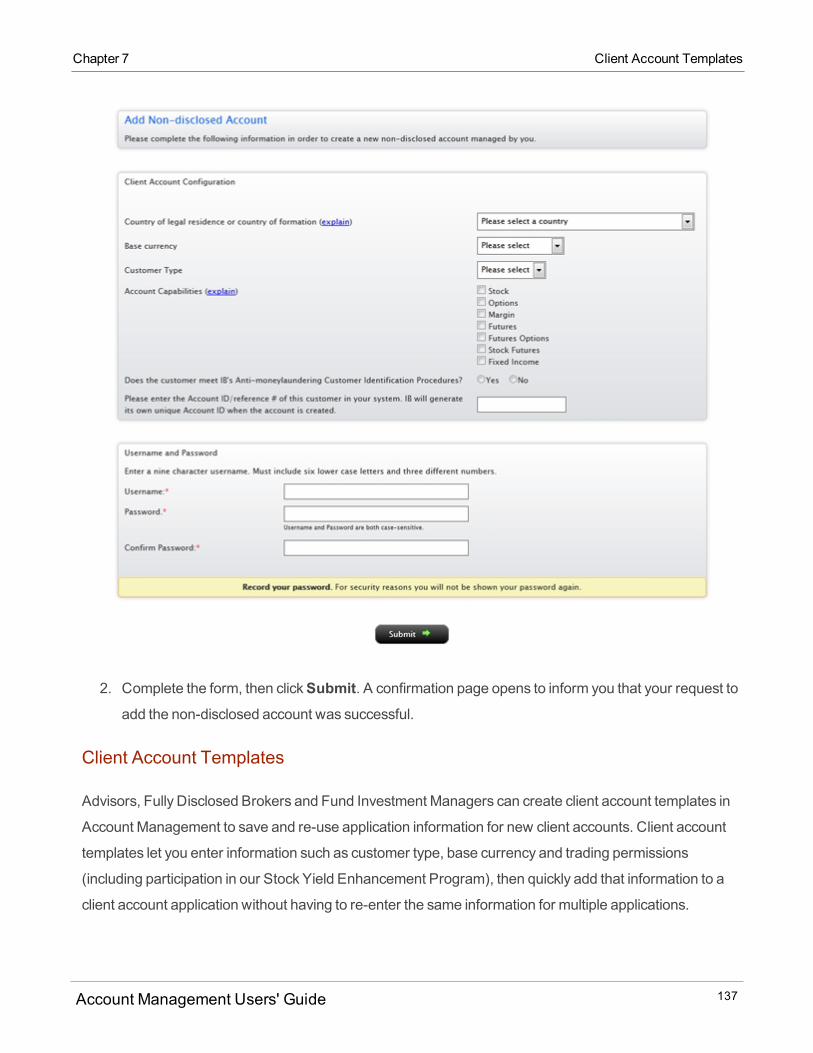
Chapter 7 Client Account Templates
2. Complete the form, then clickSubmit. A confirmation page opens to inform you that your request to
add the non-disclosed account was successful.
Client Account Templates
Advisors, Fully Disclosed Brokers and Fund Investment Managers can create client account templates in
Account Management to save and re-use application information for new client accounts. Client account
templates let you enter information such as customer type, base currency and trading permissions
(including participation in our Stock Yield Enhancement Program), then quickly add that information to a
client account application without having to re-enter the same information for multiple applications.
Account Management Users' Guide 137
TheClient Account Templates page lets Advisors, Fully Disclosed Brokers and Fund Investment
Managers create, modify and delete client account templates. When you add client accounts fromwithin
Account Management, you will have the option of selecting a saved client account template, which will
prepopulate a portion of the client account application.
Advisors and Fully Disclosed Brokers whose clients begin their application at the Advisor's or Broker's own
website can add a unique client ID to the Client Invitation sent to the client. For more information, see Using
a Custom ID for Advisor and Fully Disclosed Broker Client Applications.
Who can access the Client Account Templates page?
You can access this page if you are a(n):
Advisor Master User Individual
Advisor Master User Organization
Broker Master User (Fully Disclosed only)
Click for more information:
Advisor Client Templates
Broker Client Templates
Advisor/Fund Investment Manager Client Templates
If you are an Advisor Master or Fund Investment Manager, you can create, modify and delete re-usable
client account templates.
To create a client account template for advisor clients
1. ClickManage Clients > Create and Link Accounts > Create > Client Account Templates.Fund Investment Managers clickManage Funds > Create > Client Account Templates.
2. In the Pick template list, clickCreate.
Account Management Users' Guide 138
Chapter 7 Advisor/Fund Investment Manager Client Templates
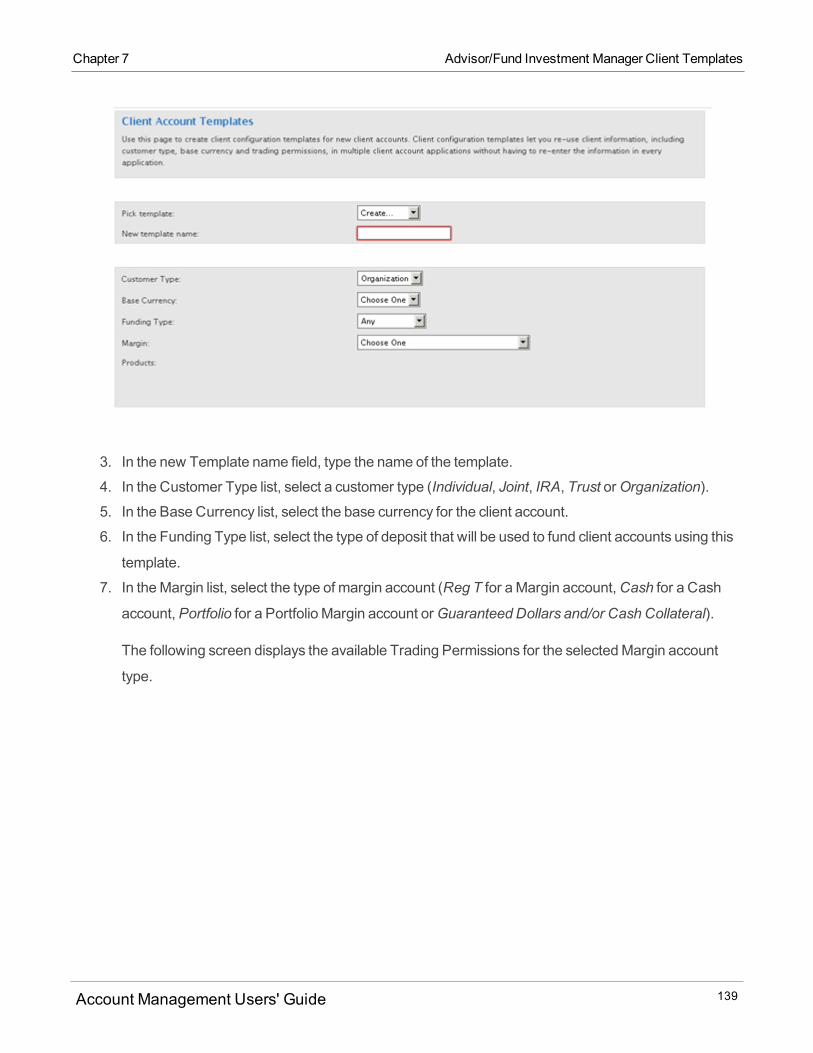
Chapter 7 Advisor/Fund Investment Manager Client Templates
3. In the new Template name field, type the name of the template.
4. In the Customer Type list, select a customer type (Individual, Joint, IRA, Trust orOrganization).
5. In the Base Currency list, select the base currency for the client account.
6. In the Funding Type list, select the type of deposit that will be used to fund client accounts using this
template.
7. In theMargin list, select the type of margin account (Reg T for aMargin account,Cash for a Cash
account,Portfolio for a Portfolio Margin account orGuaranteed Dollars and/or Cash Collateral).
The following screen displays the available Trading Permissions for the selectedMargin account
type.
Account Management Users' Guide 139
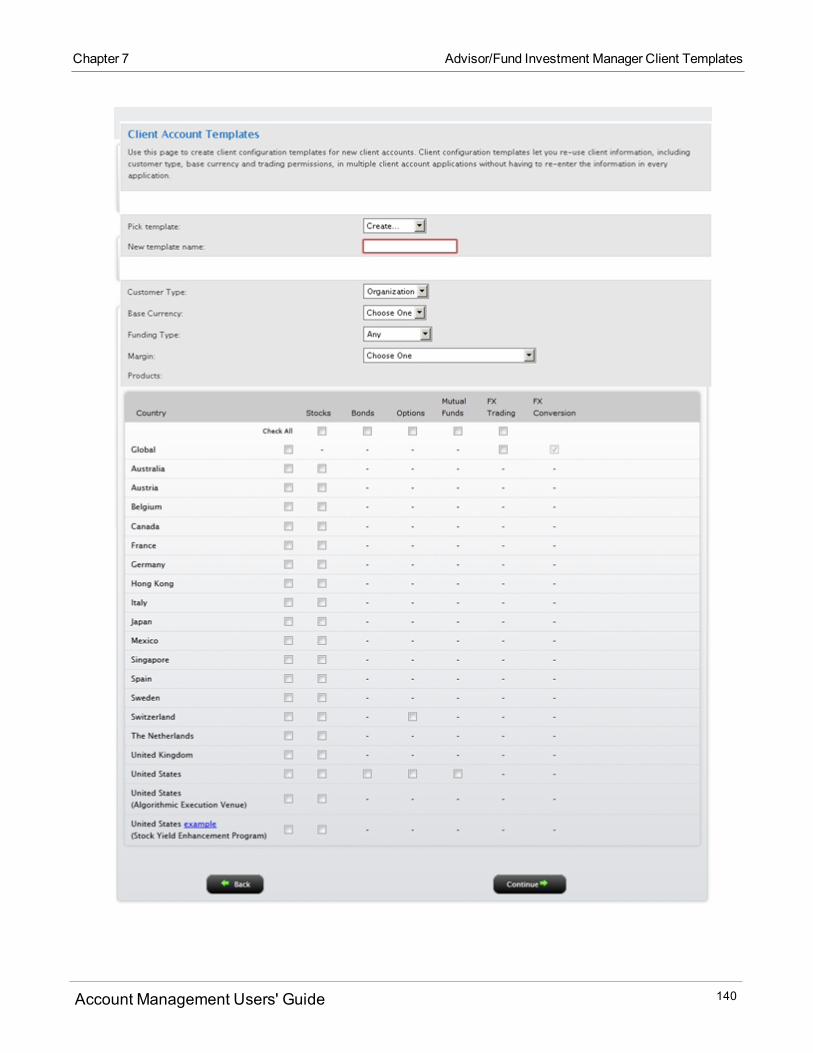
Account Management Users' Guide 140
Chapter 7 Advisor/Fund Investment Manager Client Templates

Chapter 7 Advisor/Fund Investment Manager Client Templates
8. Select the trading permissions by clicking the appropriate check boxes, then click Continue.
Note that you use this screen the sameway you use the Trading Permissions page in theManage
Account > Trade Configuration > Permissionsmenu.
9. Complete the Investment Objectives and Intended Purpose of Trading, Investment Experience and
Financial Information sections on the next page. You can skip any individual section on this page by
clicking the Skip button, or you can omit all of this information from the client account template by
clickingSkip All at the bottom of the page. ClickContinue to go to the next page,Back to go backto the previous page orDelete to delete the current template.
Account Management Users' Guide 141
10. Select the advisor feemethodology by clicking the appropriate radio button, then clickContinue.
Note that this page is identical to the Client Fees page for advisors in theManage Clients > Fees >
Configuremenu.
11. Verify that all the information in the client template is correct, then clickSave.
If any information is incorrect, clickBack, thenmodify the information as required and click Continueuntil you return to the verification page.
When you begin the process of adding a new client account, you will be able to select your saved
client account template.
To modify an existing client account template
1. ClickManage Clients > Create and Link Accounts > Create > Client Account Templates.2. In the Pick template list, click the existing template you want to modify.
3. Make changes as required, clickingContinue to advance through the pages.4. Verify that all the information in the client template is correct, then clickSave.
To delete an existing client account template
1. ClickManage Clients > Create and Link Accounts > Create > Client Account Templates.2. In the Pick template list, click the existing template you want to delete.
3. ClickDelete, then clickOK.
The template is deleted.
Broker Client Templates
If you are a Broker Master, you can create, modify and delete re-usable client account templates
To create a client account template for broker clients
1. ClickManage Clients > Create and Link Accounts > Create > Client Account Templates.2. In the Pick template list, clickCreate.
Account Management Users' Guide 142
Chapter 7 Broker Client Templates

Chapter 7 Broker Client Templates
3. In the new Template name field, type the name of the template.
4. In the Customer Type list, select a customer type (Individual, Joint, IRA, Trust orOrganization).
5. In the Base Currency list, select the base currency for the client account.
6. In the Funding Type list, select the type of deposit that will be used to fund client accounts using this
template.
7. In theMargin list, select the type of margin account (Reg T for aMargin account,Cash for a Cash
account,Portfolio for a Portfolio Margin account orGuaranteed Dollars and/or Cash Collateral).
The following screen displays an example of available Trading Permissions for a new broker client
template.
Account Management Users' Guide 143

Account Management Users' Guide 144
Chapter 7 Broker Client Templates
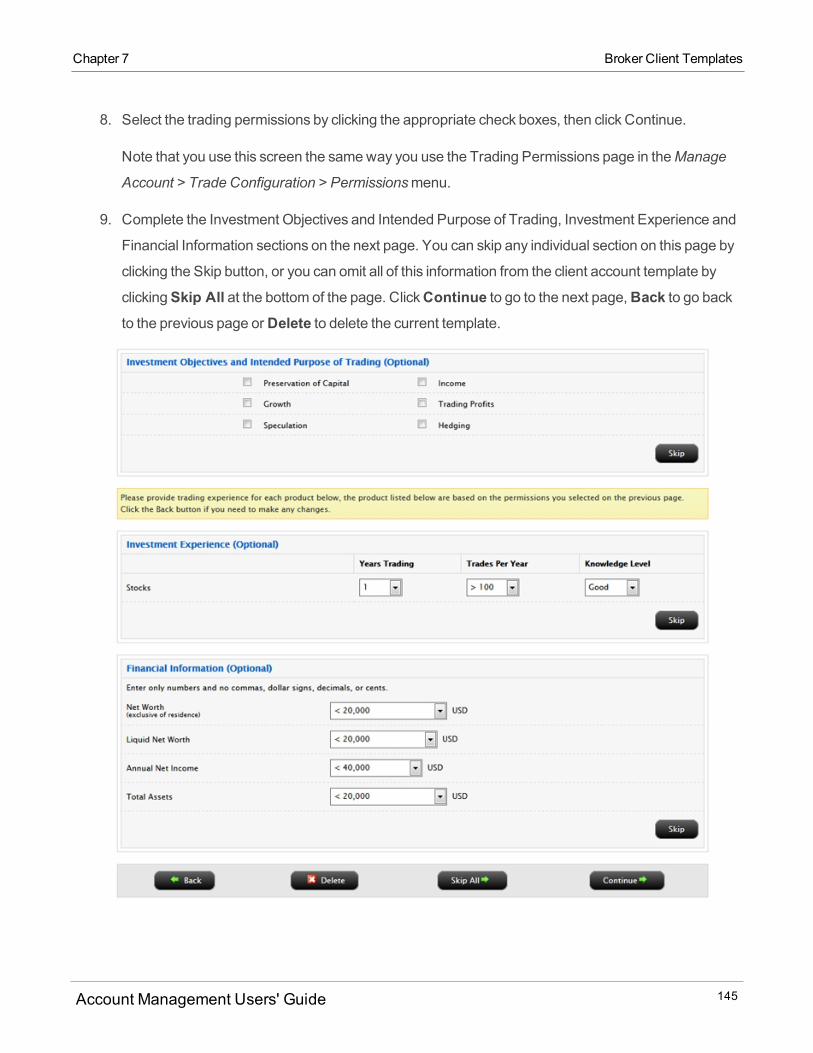
Chapter 7 Broker Client Templates
8. Select the trading permissions by clicking the appropriate check boxes, then click Continue.
Note that you use this screen the sameway you use the Trading Permissions page in theManage
Account > Trade Configuration > Permissionsmenu.
9. Complete the Investment Objectives and Intended Purpose of Trading, Investment Experience and
Financial Information sections on the next page. You can skip any individual section on this page by
clicking the Skip button, or you can omit all of this information from the client account template by
clickingSkip All at the bottom of the page. ClickContinue to go to the next page,Back to go backto the previous page orDelete to delete the current template.
Account Management Users' Guide 145
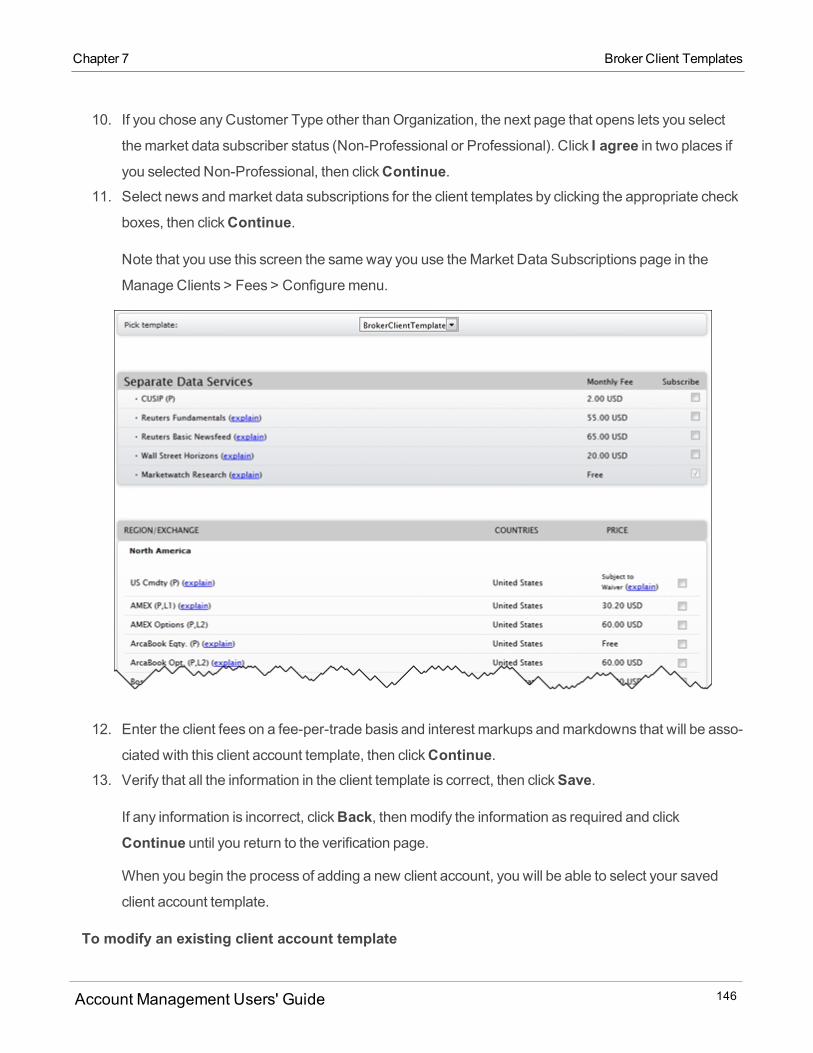
10. If you chose anyCustomer Type other thanOrganization, the next page that opens lets you select
themarket data subscriber status (Non-Professional or Professional). Click I agree in two places ifyou selected Non-Professional, then clickContinue.
11. Select news andmarket data subscriptions for the client templates by clicking the appropriate check
boxes, then clickContinue.
Note that you use this screen the sameway you use theMarket Data Subscriptions page in the
Manage Clients > Fees > Configuremenu.
12. Enter the client fees on a fee-per-trade basis and interest markups andmarkdowns that will be asso-
ciated with this client account template, then clickContinue.13. Verify that all the information in the client template is correct, then clickSave.
If any information is incorrect, clickBack, thenmodify the information as required and clickContinue until you return to the verification page.
When you begin the process of adding a new client account, you will be able to select your saved
client account template.
To modify an existing client account template
Account Management Users' Guide 146
Chapter 7 Broker Client Templates
Chapter 7 Set Up a Client Template with a Custom ID
1. ClickManage Clients > Create and Link Accounts > Create > Client Account Templates..2. In the Pick template list, click the existing template you want to modify.
3. Make changes as required, clickingContinue to advance through the pages.4. Verify that all the information in the client template is correct, then clickSave.
To delete an existing client account template
1. ClickManage Clients > Create and Link Accounts > Create > Client Account Templates.2. In the Pick template list, click the existing template you want to delete.
3. ClickDelete, then clickOK.
The template is deleted.
Set Up a Client Template with a Custom ID
ManyAdvisors and Fully Disclosed Brokers collect information from prospective clients on their own
websites, and then send a client invitation to complete an electronic application from Account
Management. You can create a Client Account Template and add the template application link to your own
website and include a custom ID that allows you tomatch the information in the client's application to the
information that you've already collected on your website.
To set up a client template using a custom ID for client applications started on your ownwebsite
1. Create a Client Account Template on theManage Clients > Create and Link Accounts >Create > Client Account Templates page.
2. Send yourself a fully electronic client application invitation:
o ClickManage Clients > Createa and Link Accounts > Create > New, then click theClientInvitation button.
o Select theClient Account Templates radio button and then select the client account templateyou created in Step 1. ClickContinue.
o Enter your name and email address, then clickSubmit. An email containing the link to the clientapplication is sent to you . You can add this link to your website as is for the client to complete the
application using the selected Client Account Template.
Account Management Users' Guide 147
3. To use a custom ID, add the custom ID to the link to the client application by adding&ex-ternalID=XXXXXXX (where XXXXXXX is the custom ID) to the end of the link as shown below:
https://www.clientam.com/Universal/servlet/formWelcome?partnerID=abctest12&invitation_id=7380044&token=66104&invitedBy=cHN2ZmE0ODA%3D&externalId=1234567
We will store the custom ID that you provide.
4. We will return the custom ID field along with all the other client data collected in the client application
to you as an XML schema via FTP delivery. The data is encrypted and you will have to provide a
PGP key to access it.
Households
Advisors and Fully Disclosed Brokers with multiple accounts for a single family or an individual can group
those accounts into a household tomore efficientlymanage those accounts. Individuals and Advisor and
Broker clients can request that their accounts be grouped into a household to reduce the amount of paper
mail they receive and to view consolidated reporting and account details in Account Management. The
primary user of the household, called the Head of Household, is allowed to view reporting and account
information of the other accounts in the household.
The Household page in Account Management lets Advisors and Fully Disclosed Brokers:
Create a household
Add an account to a household
Edit the name of a household
Delete a household
Change the Head of Household
Remove an account from a household
Who can access the Household page?
You can access this page if you are a(n):
Advisor Master User
Fully Disclosed Broker Master User
Account Management Users' Guide 148
Chapter 7 Households
Chapter 7 Rules for Creating Households
Additional account users who have been given access rights to the Household page.
Rules for Creating Households
Household groups are subject to the following rules:
Once the Advisor or Broker creates a household, a paper formwill be generated that can be submitted
to the Advisor or Broker client if they choose to be included in the household. If the paper form is not
submitted, the household will exist for the benefit of the Advisor or Broker only.
Individuals who want to group their multiple accounts into a household can accessCreate Household
PDF form by clicking a button at the bottom of the Household page. Use this form to submit a request
to create a household. Advisor and Broker clients who want their accounts grouped into a household
must ask their Advisor or Broker to initiate the household process.
Accounts linked within a household remain separate, segregated customer accounts. Customers
retain control over and are responsible for their individual accounts whether or not they are grouped in
a household.
Any account in a household is free to decide that he or she no longer wants to be linked to the other
accounts in this household. If you remove an account from a household, the Head of the Household will
no longer have any access to information about the account(s) removed.
Accounts with the same last namewith the same home address can be grouped in a household.
The Advisor or Broker can designate a primary user as the Head of Household. This user will have the
ability to access certain information about the other accounts in the household.
Account holders in the same family but with different last namewho are living at the same home
address and who are in a dependent relationship can be grouped in a household.
Organization accounts can be grouped in a household if the underlying organization is solely owned by
or established for the benefit of the familymembers.
Trust accounts can be grouped in a household if the current trust beneficiary’s is the family.
To create a household
1. ClickManage Clients > Create and Link Accounts > Household.
Account Management Users' Guide 149
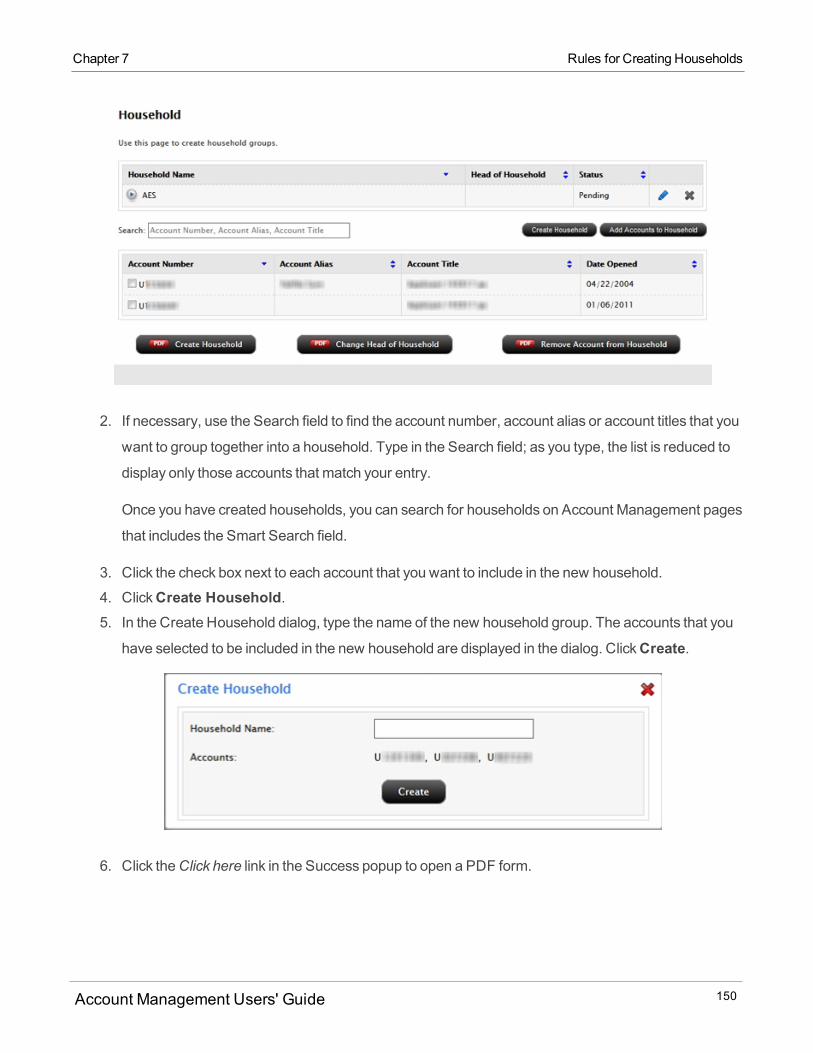
2. If necessary, use the Search field to find the account number, account alias or account titles that you
want to group together into a household. Type in the Search field; as you type, the list is reduced to
display only those accounts that match your entry.
Once you have created households, you can search for households on Account Management pages
that includes the Smart Search field.
3. Click the check box next to each account that you want to include in the new household.
4. ClickCreate Household.5. In the Create Household dialog, type the name of the new household group. The accounts that you
have selected to be included in the new household are displayed in the dialog. ClickCreate.
6. Click theClick here link in the Success popup to open a PDF form.
Account Management Users' Guide 150
Chapter 7 Rules for Creating Households
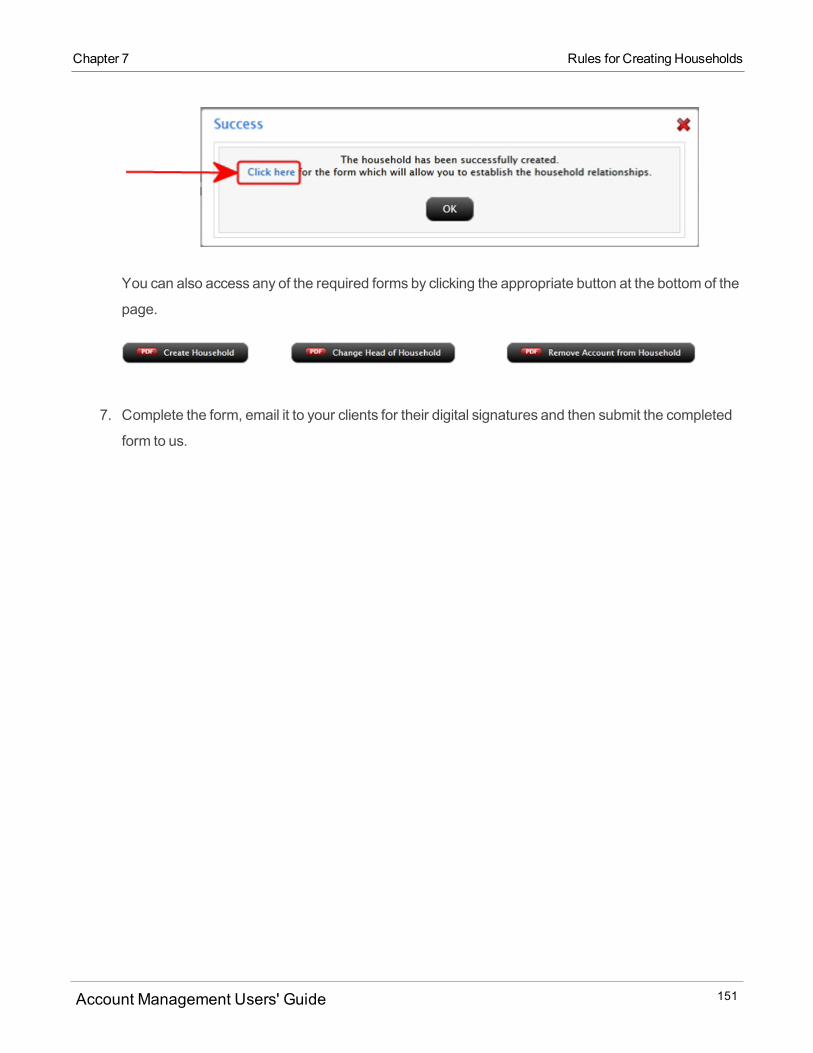
Chapter 7 Rules for Creating Households
You can also access any of the required forms by clicking the appropriate button at the bottom of the
page.
7. Complete the form, email it to your clients for their digital signatures and then submit the completed
form to us.
Account Management Users' Guide 151
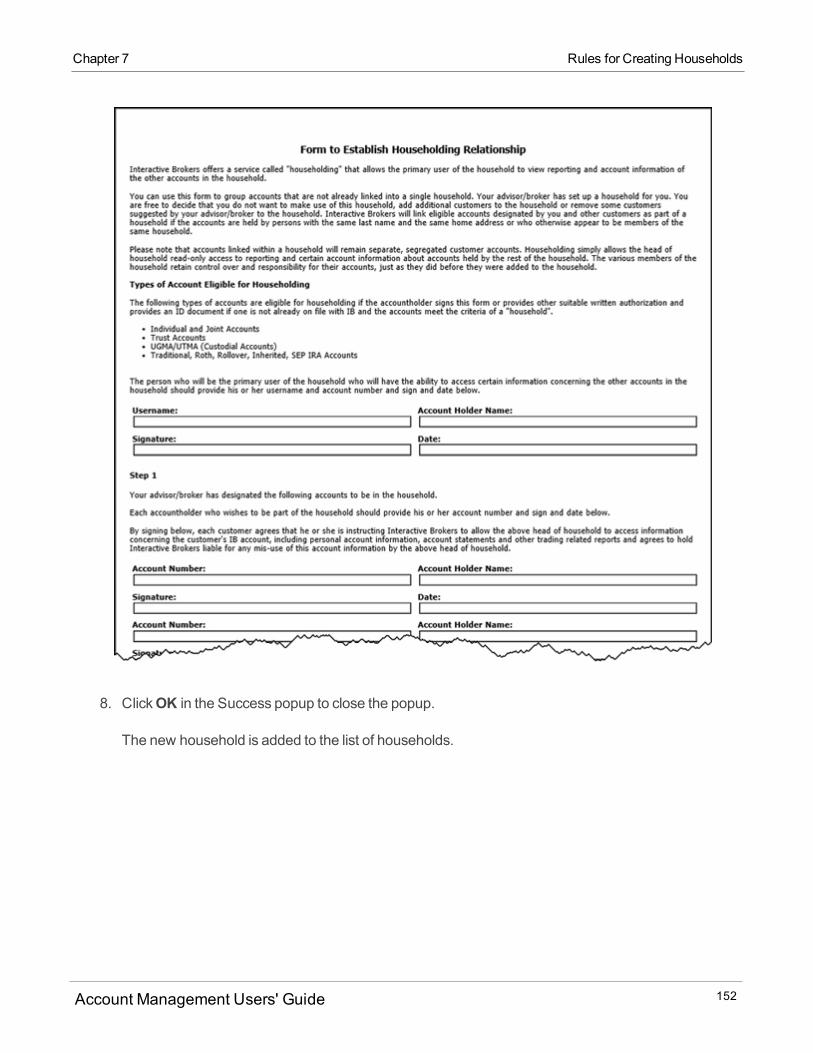
8. ClickOK in the Success popup to close the popup.
The new household is added to the list of households.
Account Management Users' Guide 152
Chapter 7 Rules for Creating Households
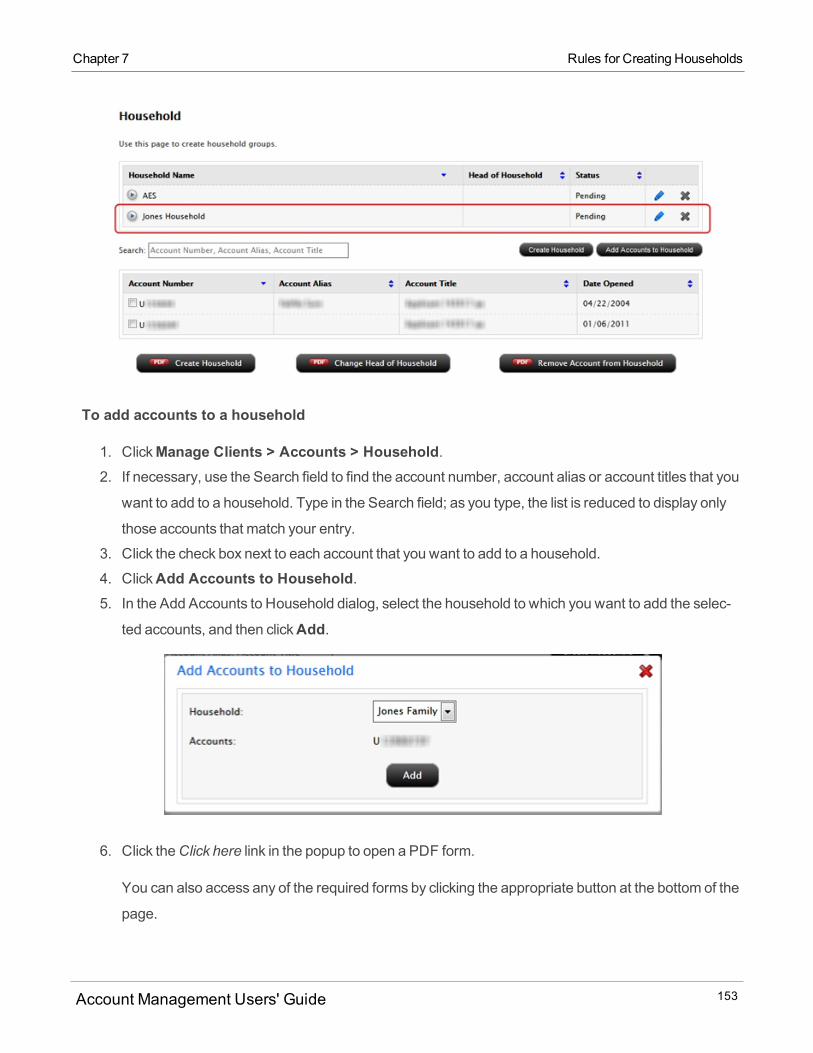
Chapter 7 Rules for Creating Households
To add accounts to a household
1. ClickManage Clients > Accounts > Household.2. If necessary, use the Search field to find the account number, account alias or account titles that you
want to add to a household. Type in the Search field; as you type, the list is reduced to display only
those accounts that match your entry.
3. Click the check box next to each account that you want to add to a household.
4. ClickAdd Accounts to Household.5. In the Add Accounts to Household dialog, select the household to which you want to add the selec-
ted accounts, and then clickAdd.
6. Click theClick here link in the popup to open a PDF form.
You can also access any of the required forms by clicking the appropriate button at the bottom of the
page.
Account Management Users' Guide 153

7. Complete the form, email it to your clients for their digital signatures and then submit the completed
form to us.
8. ClickOK in the Success popup to close the popup.
To edit the name of a household
1. ClickManage Clients > Accounts > Household.
2. In the in the list of households, click the blue pencil icon for the household whose name you want to
edit.
3. In the Edit Household dialog, type the new name of the household, then clickEdit.
The household name is changed immediately.
To delete a household
1. ClickManage Clients > Accounts > Household.2. In the list of households, click theX icon for the household you want to delete.
3. In the Edit Household dialog, type the new name of the household, then clickEdit.
Account Management Users' Guide 154
Chapter 7 Rules for Creating Households
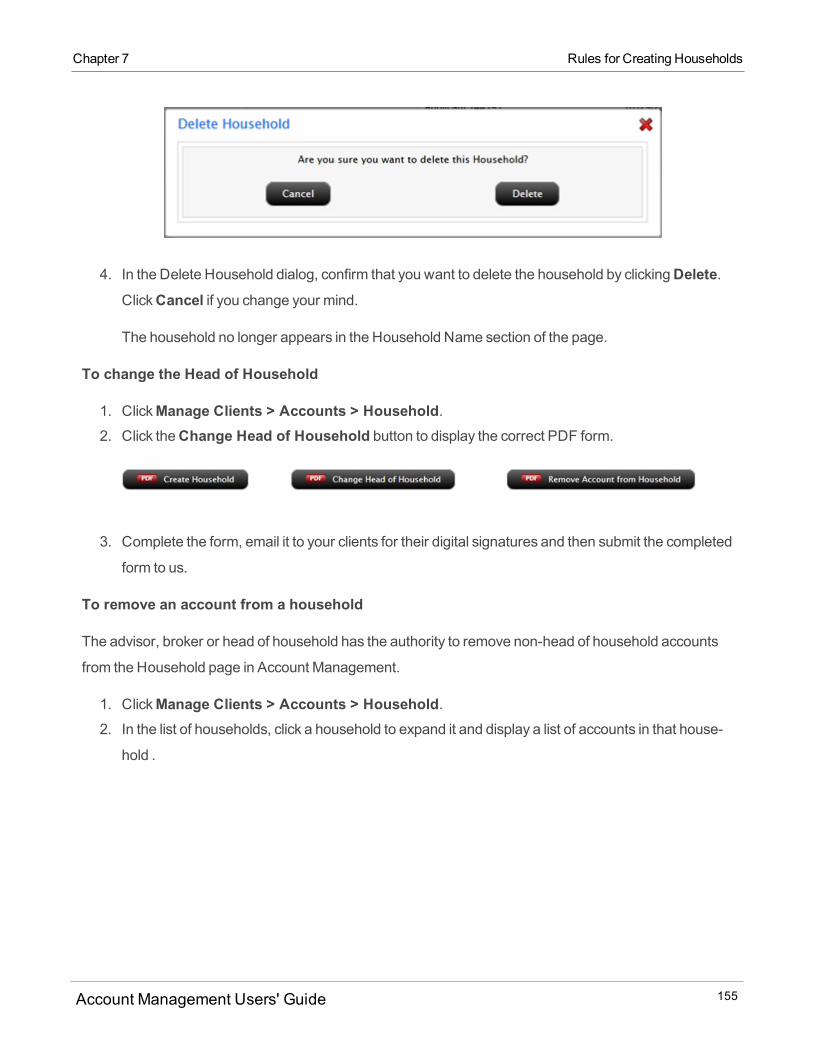
Chapter 7 Rules for Creating Households
4. In the Delete Household dialog, confirm that you want to delete the household by clickingDelete.ClickCancel if you change your mind.
The household no longer appears in the Household Name section of the page.
To change the Head of Household
1. ClickManage Clients > Accounts > Household.2. Click theChange Head of Household button to display the correct PDF form.
3. Complete the form, email it to your clients for their digital signatures and then submit the completed
form to us.
To remove an account from a household
The advisor, broker or head of household has the authority to remove non-head of household accounts
from the Household page in Account Management.
1. ClickManage Clients > Accounts > Household.2. In the list of households, click a household to expand it and display a list of accounts in that house-
hold .
Account Management Users' Guide 155
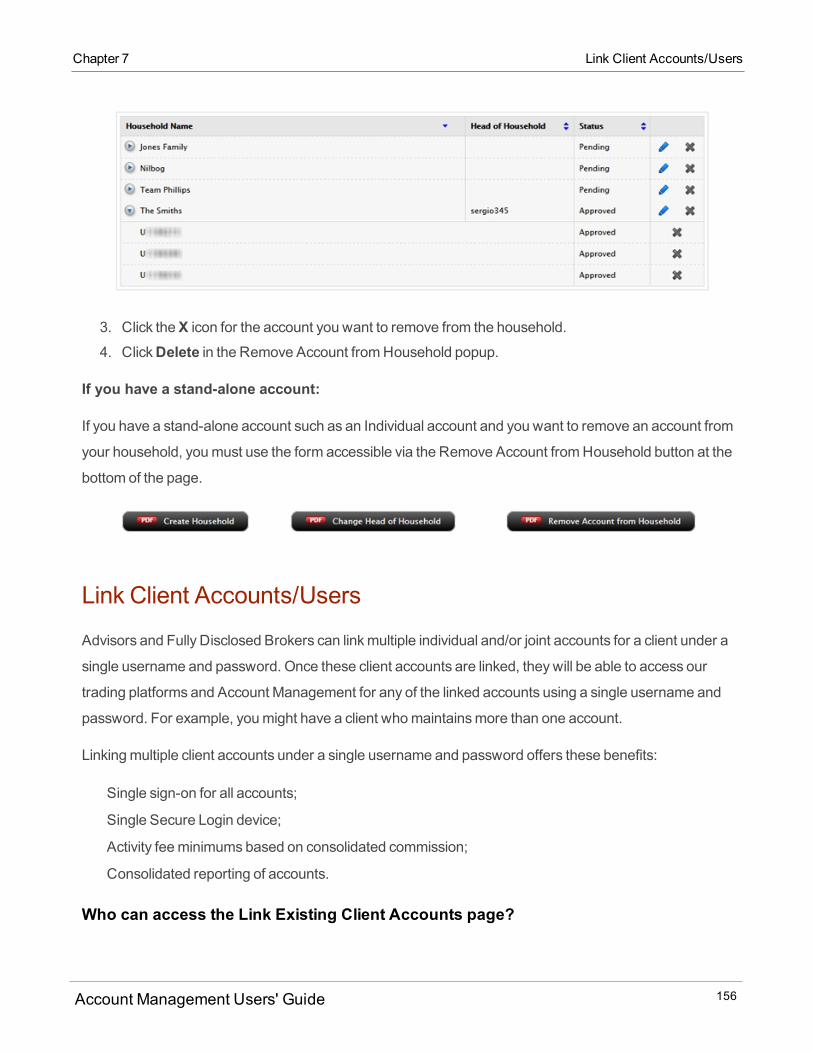
3. Click theX icon for the account you want to remove from the household.
4. ClickDelete in the Remove Account fromHousehold popup.
If you have a stand-alone account:
If you have a stand-alone account such as an Individual account and you want to remove an account from
your household, youmust use the form accessible via the Remove Account fromHousehold button at the
bottom of the page.
Link Client Accounts/Users
Advisors and Fully Disclosed Brokers can linkmultiple individual and/or joint accounts for a client under a
single username and password. Once these client accounts are linked, theywill be able to access our
trading platforms and Account Management for any of the linked accounts using a single username and
password. For example, youmight have a client whomaintainsmore than one account.
Linkingmultiple client accounts under a single username and password offers these benefits:
Single sign-on for all accounts;
Single Secure Login device;
Activity feeminimums based on consolidated commission;
Consolidated reporting of accounts.
Who can access the Link Existing Client Accounts page?
Account Management Users' Guide 156
Chapter 7 Link Client Accounts/Users
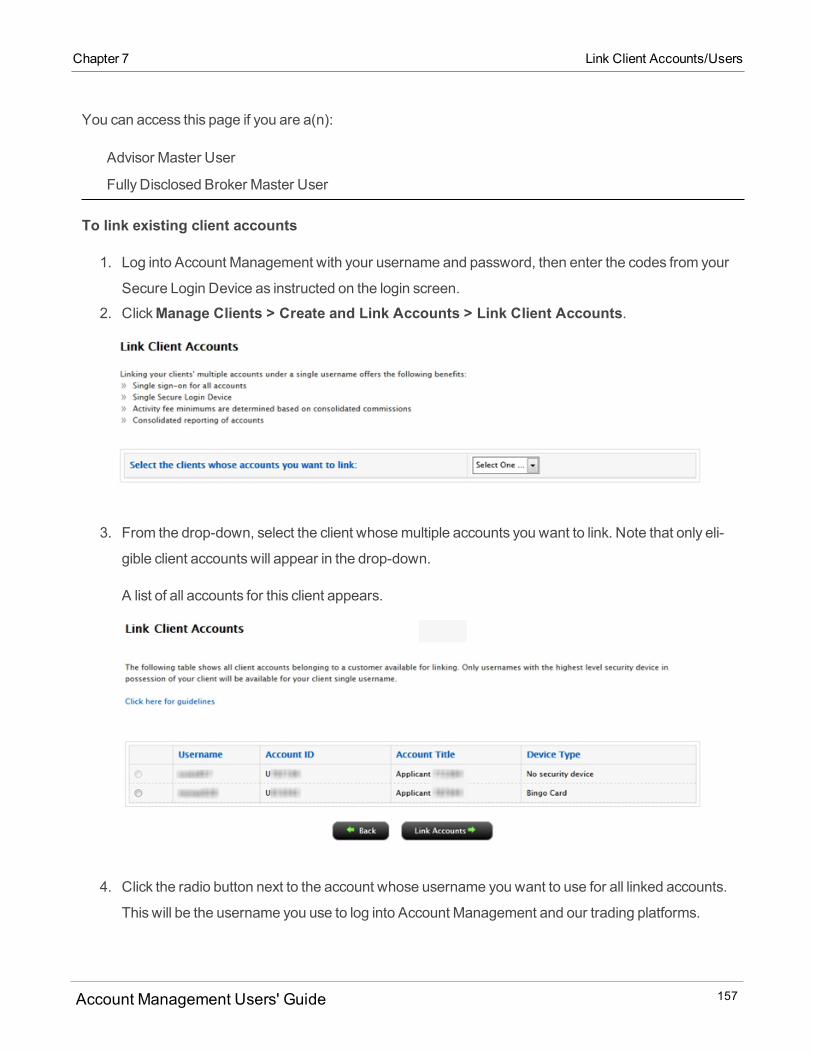
Chapter 7 Link Client Accounts/Users
You can access this page if you are a(n):
Advisor Master User
Fully Disclosed Broker Master User
To link existing client accounts
1. Log into Account Management with your username and password, then enter the codes from your
Secure Login Device as instructed on the login screen.
2. ClickManage Clients > Create and Link Accounts > Link Client Accounts.
3. From the drop-down, select the client whosemultiple accounts you want to link. Note that only eli-
gible client accounts will appear in the drop-down.
A list of all accounts for this client appears.
4. Click the radio button next to the account whose username you want to use for all linked accounts.
This will be the username you use to log into Account Management and our trading platforms.
Account Management Users' Guide 157
5. ClickLink Accounts.
A page opens that displays the individual and financial information for the client accounts to be linked
.
6. Review each of the line items below and, where differences exist, select the radio button next to the
entry which is correct. Note that this informationmust be identical across all accounts in or the
account will not be linked.
If none of the entries provided are correct, your client can correct the information on theManageAccount > Account Information > Details > Profile page and theManage Account >Account Information > Details > Financial Information page.
7. If there is saved bank information for both accounts being linked, you are prompted to select which
bank information to save.
8. After you have entered the username, password and authentication values for each account to be
linked, a screen appears that displays the individual and financial information that youmaintain for
the accounts to be linked. Click Continue.
A screen appears confirming your request. If you wish to cancel your link request, click the here link
on the page.
Close Account
Broker Master Users and Proprietary Trading Group STL Master Users use this Close Account page to
submit a request to close a non-disclosed client account or sub account. If you have one or more open
client/sub accounts, your request to close your account will not be processed until all client/sub accounts
are closed.
For USD-based accounts, we will initiate an ACH transfer based on an ACH bank instruction you have on
file. If you havemore than one ACH bank instruction on file, you will have the opportunity to select one. If
you do not have any ACH bank instructions, we will issue a check to your U.S. mailing address on file. For
all non-USD based accounts, we will issue a wire based on the banking instruction on file.
These instructions describe how to use the Close Account page in Account Management. The instructions
on the Close Account page summarize the steps that youmust take to close your account. For amore
detailed description of the account closure process, see How to Close Your Account.
Account Management Users' Guide 158
Chapter 7 Close Account
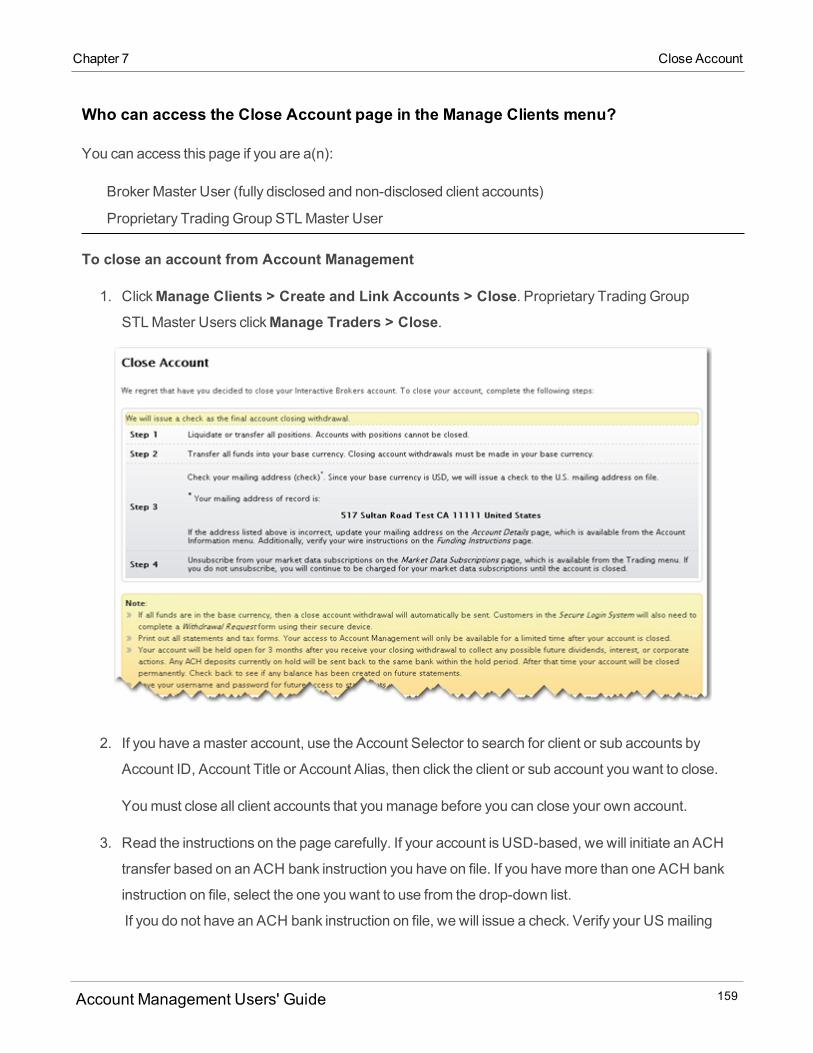
Chapter 7 Close Account
Who can access the Close Account page in the Manage Clients menu?
You can access this page if you are a(n):
Broker Master User (fully disclosed and non-disclosed client accounts)
Proprietary Trading Group STL Master User
To close an account from Account Management
1. ClickManage Clients > Create and Link Accounts > Close. Proprietary Trading GroupSTL Master Users clickManage Traders > Close.
2. If you have amaster account, use the Account Selector to search for client or sub accounts by
Account ID, Account Title or Account Alias, then click the client or sub account you want to close.
Youmust close all client accounts that youmanage before you can close your own account.
3. Read the instructions on the page carefully. If your account is USD-based, we will initiate an ACH
transfer based on an ACH bank instruction you have on file. If you havemore than one ACH bank
instruction on file, select the one you want to use from the drop-down list.
If you do not have an ACH bank instruction on file, we will issue a check. Verify your US mailing
Account Management Users' Guide 159
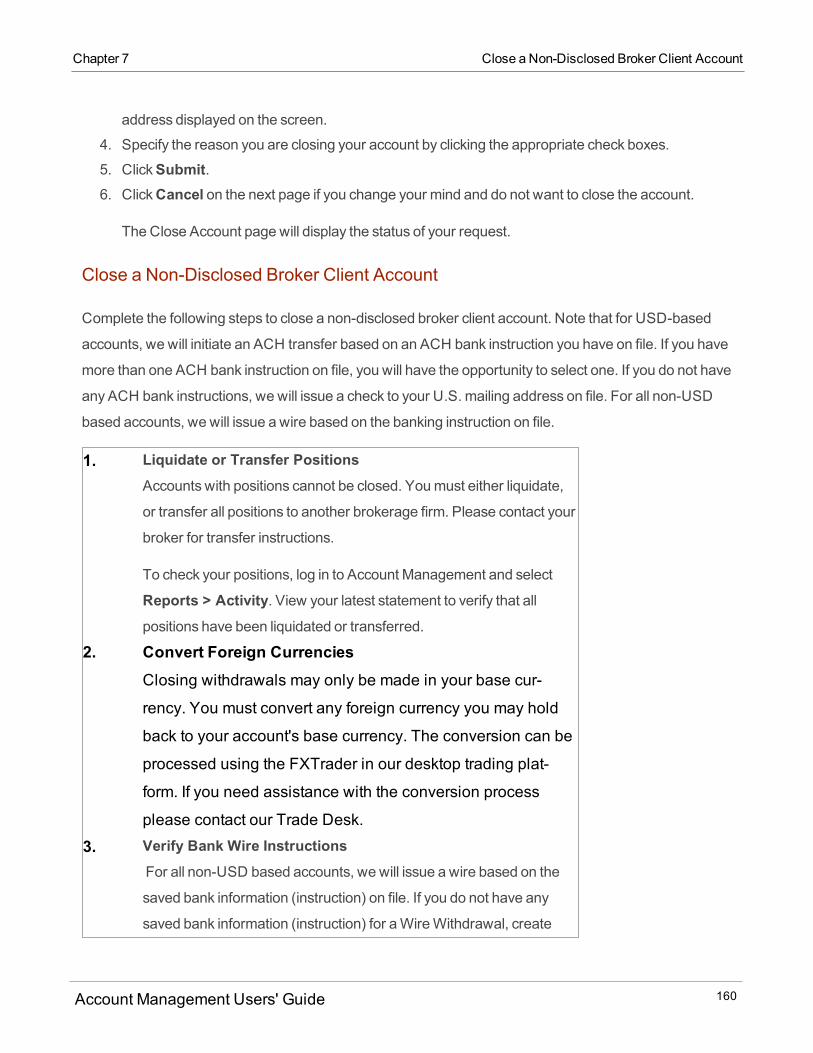
address displayed on the screen.
4. Specify the reason you are closing your account by clicking the appropriate check boxes.
5. ClickSubmit.6. ClickCancel on the next page if you change your mind and do not want to close the account.
The Close Account page will display the status of your request.
Close a Non-Disclosed Broker Client Account
Complete the following steps to close a non-disclosed broker client account. Note that for USD-based
accounts, we will initiate an ACH transfer based on an ACH bank instruction you have on file. If you have
more than one ACH bank instruction on file, you will have the opportunity to select one. If you do not have
any ACH bank instructions, we will issue a check to your U.S. mailing address on file. For all non-USD
based accounts, we will issue a wire based on the banking instruction on file.
1. Liquidate or Transfer PositionsAccounts with positions cannot be closed. Youmust either liquidate,
or transfer all positions to another brokerage firm. Please contact your
broker for transfer instructions.
To check your positions, log in to Account Management and select
Reports > Activity. View your latest statement to verify that all
positions have been liquidated or transferred.
2. Convert Foreign CurrenciesClosing withdrawals may only be made in your base cur-
rency. You must convert any foreign currency you may hold
back to your account's base currency. The conversion can be
processed using the FXTrader in our desktop trading plat-
form. If you need assistance with the conversion process
please contact our Trade Desk.3. Verify Bank Wire Instructions
For all non-USD based accounts, we will issue a wire based on the
saved bank information (instruction) on file. If you do not have any
saved bank information (instruction) for aWireWithdrawal, create
Account Management Users' Guide 160
Chapter 7 Close a Non-Disclosed Broker Client Account
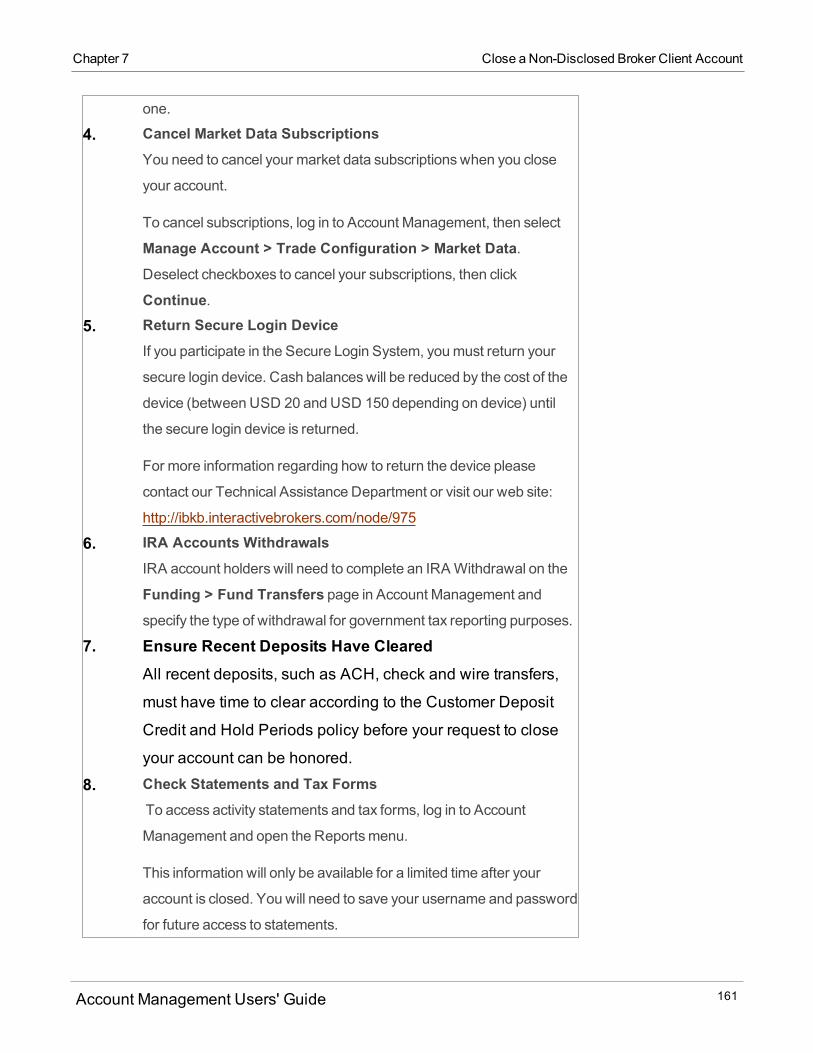
Chapter 7 Close a Non-Disclosed Broker Client Account
one.
4. Cancel Market Data SubscriptionsYou need to cancel your market data subscriptionswhen you close
your account.
To cancel subscriptions, log in to Account Management, then select
Manage Account > Trade Configuration > Market Data.Deselect checkboxes to cancel your subscriptions, then click
Continue.5. Return Secure Login Device
If you participate in the Secure Login System, youmust return your
secure login device. Cash balanceswill be reduced by the cost of the
device (between USD 20 and USD 150 depending on device) until
the secure login device is returned.
For more information regarding how to return the device please
contact our Technical Assistance Department or visit our web site:
http://ibkb.interactivebrokers.com/node/975
6. IRA Accounts WithdrawalsIRA account holders will need to complete an IRAWithdrawal on the
Funding > Fund Transfers page in Account Management andspecify the type of withdrawal for government tax reporting purposes.
7. Ensure Recent Deposits Have ClearedAll recent deposits, such as ACH, check and wire transfers,
must have time to clear according to the Customer Deposit
Credit and Hold Periods policy before your request to close
your account can be honored.8. Check Statements and Tax Forms
To access activity statements and tax forms, log in to Account
Management and open the Reportsmenu.
This information will only be available for a limited time after your
account is closed. You will need to save your username and password
for future access to statements.
Account Management Users' Guide 161
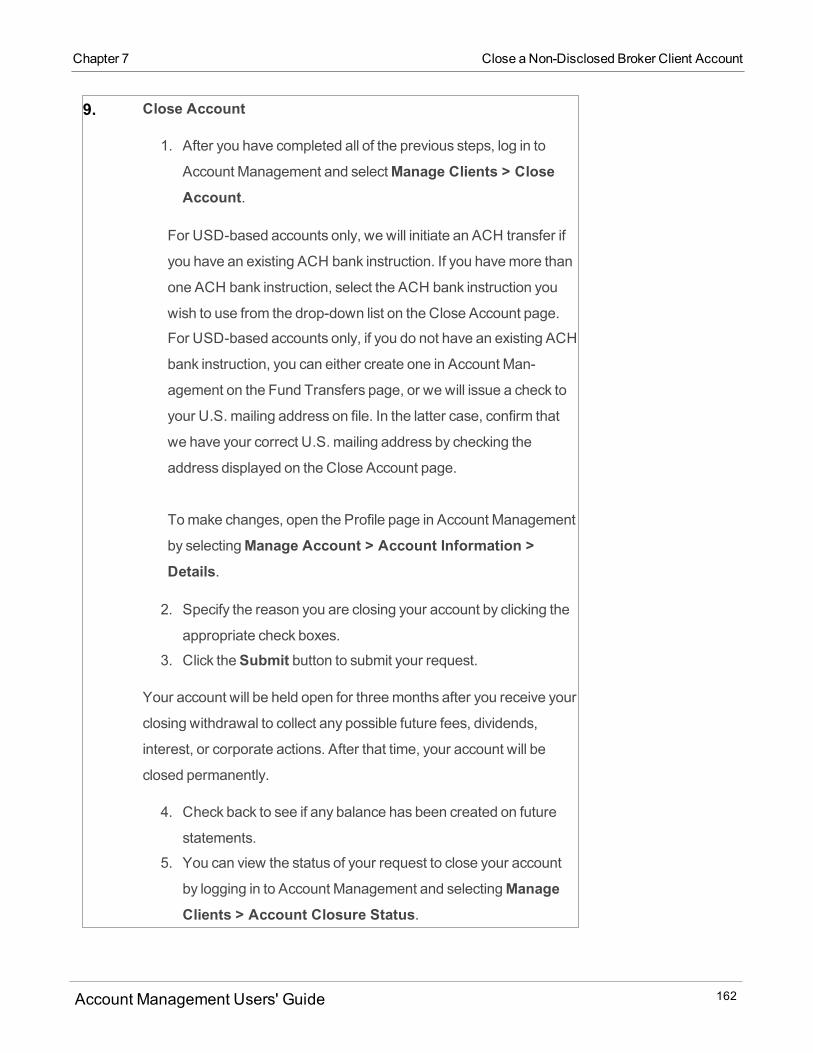
9. Close Account
1. After you have completed all of the previous steps, log in to
Account Management and selectManage Clients > CloseAccount.
For USD-based accounts only, we will initiate an ACH transfer if
you have an existing ACH bank instruction. If you havemore than
one ACH bank instruction, select the ACH bank instruction you
wish to use from the drop-down list on the Close Account page.
For USD-based accounts only, if you do not have an existing ACH
bank instruction, you can either create one in Account Man-
agement on the Fund Transfers page, or we will issue a check to
your U.S. mailing address on file. In the latter case, confirm that
we have your correct U.S. mailing address by checking the
address displayed on the Close Account page.
Tomake changes, open the Profile page in Account Management
by selectingManage Account > Account Information >Details.
2. Specify the reason you are closing your account by clicking the
appropriate check boxes.
3. Click theSubmit button to submit your request.
Your account will be held open for threemonths after you receive your
closing withdrawal to collect any possible future fees, dividends,
interest, or corporate actions. After that time, your account will be
closed permanently.
4. Check back to see if any balance has been created on future
statements.
5. You can view the status of your request to close your account
by logging in to Account Management and selectingManageClients > Account Closure Status.
Account Management Users' Guide 162
Chapter 7 Close a Non-Disclosed Broker Client Account
Chapter 7 Account Closure Status
If the above criteria are not met, our systemwill be unable to process your account closure request.
Inactivity feeswill continue to be deducted from an account until the above steps are completed, including
the return of any Secure Login System device. Also note that funds held to secure the return of the security
devicemay not be withdrawn until the device has been returned, and will be applied tomeet any inactivity
or market data fees.
Account Closure Status
TheClosure Status page lets Non-Disclosed Brokers who have submitted requests to close a client's
account view the status of their request.
To check the status of account closure request
1. Login into Account Management. Note that Account Management for closed accounts displays an
abbreviatedmenu.
2. ClickManage Clients > Accounts > Close Account.The Closure Status page displays.
Any pending or outstanding items required to close your account are displayed on the screen.
Opening Interactive Brokers Asset Management Accounts for
Advisor Clients
Advisors acting asWealth Managers can select IB Asset Management MoneyManagers and assign
clients to them for the purpose of investing in IB Asset Management portfolios.
To add a IB Asset Management Money Manager and assign clients to the IB Asset ManagementMoney Manager:
1. Access theMoneyManager Marketplace in Account Management by clicking Investors' Mar-ketplace > Search Services > Investing > Money Manager.
Account Management Users' Guide 163
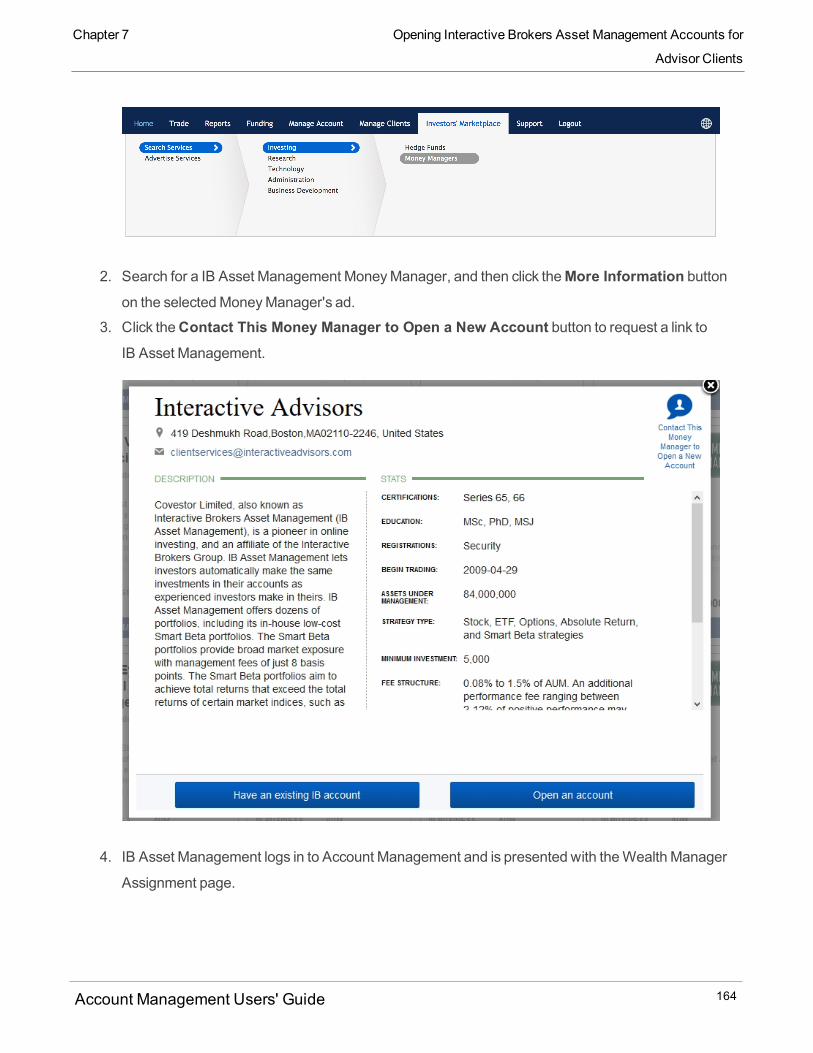
2. Search for a IB Asset Management MoneyManager, and then click theMore Information buttonon the selectedMoneyManager's ad.
3. Click theContact This Money Manager to Open a New Account button to request a link toIB Asset Management.
4. IB Asset Management logs in to Account Management and is presented with theWealth Manager
Assignment page.
Account Management Users' Guide 164
Chapter 7 Opening Interactive Brokers Asset Management Accounts for
Advisor Clients
Chapter 7 Create (for Multiple Fund Investment Managers)
5. IB Asset Management accepts the link from theWealth Manager by clickingActivate Subscription
next to the requestingWealth Manager.
6. Assign additional clients to the IB Asset Management MoneyManager as required, repeating the
steps above for each client to be assigned.
Note: You cannot continue with this process until IB Asset Management accepts the link.
Create (for Multiple Fund Investment Managers)
TheCreatemenu includes the following pages:
New (Add Client Account) - Advisor Master Users, Broker Master Users and Investment Manager
Master Users can add client, sub and fund accounts.
Duplicate - Advisor Master Users, Broker Master Users and Investment Manager Master Users can
request duplicate accounts for an existing client account.
Client Account Templates - Advisor Master Users, Broker Master Users and Investment Manager
Master Users can create templates to save and re-use application information for new client/fund
accounts.
AddClient Account
The AddClient Account page lets you add a client or sub account. Depending on the type of account you
have, from this page you can:
Methods of completing an account application
Steps in the application process
Send an invitation to a client to start an electronic application
Start a semi-electronic application
Download a copy of the client disclosures
Add a Fully Disclosed Broker client account
Add Advisor, STL andMultiple Hedge Fund accounts to a Fully Disclosed Broker account
Add an Advisor or STL account to an Advisor account
Add a Non-disclosed Broker client account
Account Management Users' Guide 165
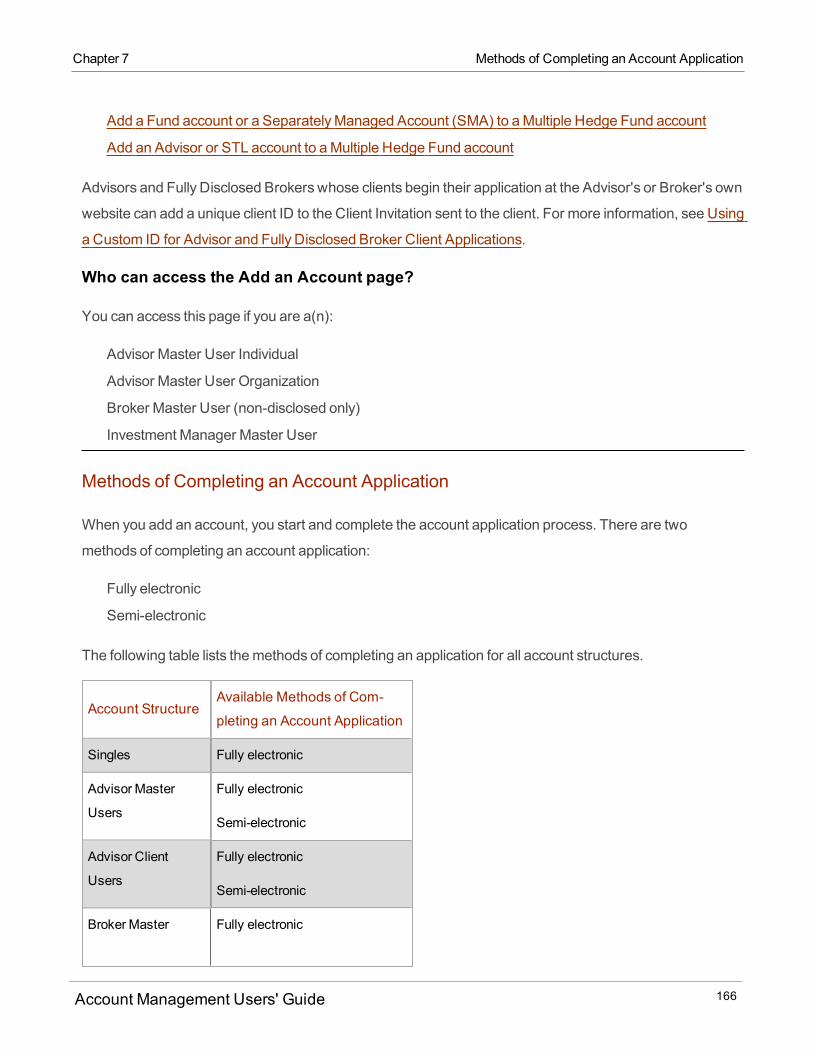
Add a Fund account or a SeparatelyManaged Account (SMA) to aMultiple Hedge Fund account
Add an Advisor or STL account to aMultiple Hedge Fund account
Advisors and Fully Disclosed Brokers whose clients begin their application at the Advisor's or Broker's own
website can add a unique client ID to the Client Invitation sent to the client. For more information, see Using
a Custom ID for Advisor and Fully Disclosed Broker Client Applications.
Who can access the Add an Account page?
You can access this page if you are a(n):
Advisor Master User Individual
Advisor Master User Organization
Broker Master User (non-disclosed only)
Investment Manager Master User
Methods of Completing an Account Application
When you add an account, you start and complete the account application process. There are two
methods of completing an account application:
Fully electronic
Semi-electronic
The following table lists themethods of completing an application for all account structures.
Account StructureAvailable Methods of Com-
pleting an Account Application
Singles Fully electronic
Advisor Master
Users
Fully electronic
Semi-electronic
Advisor Client
Users
Fully electronic
Semi-electronic
Broker Master Fully electronic
Account Management Users' Guide 166
Chapter 7 Methods of Completing an Account Application
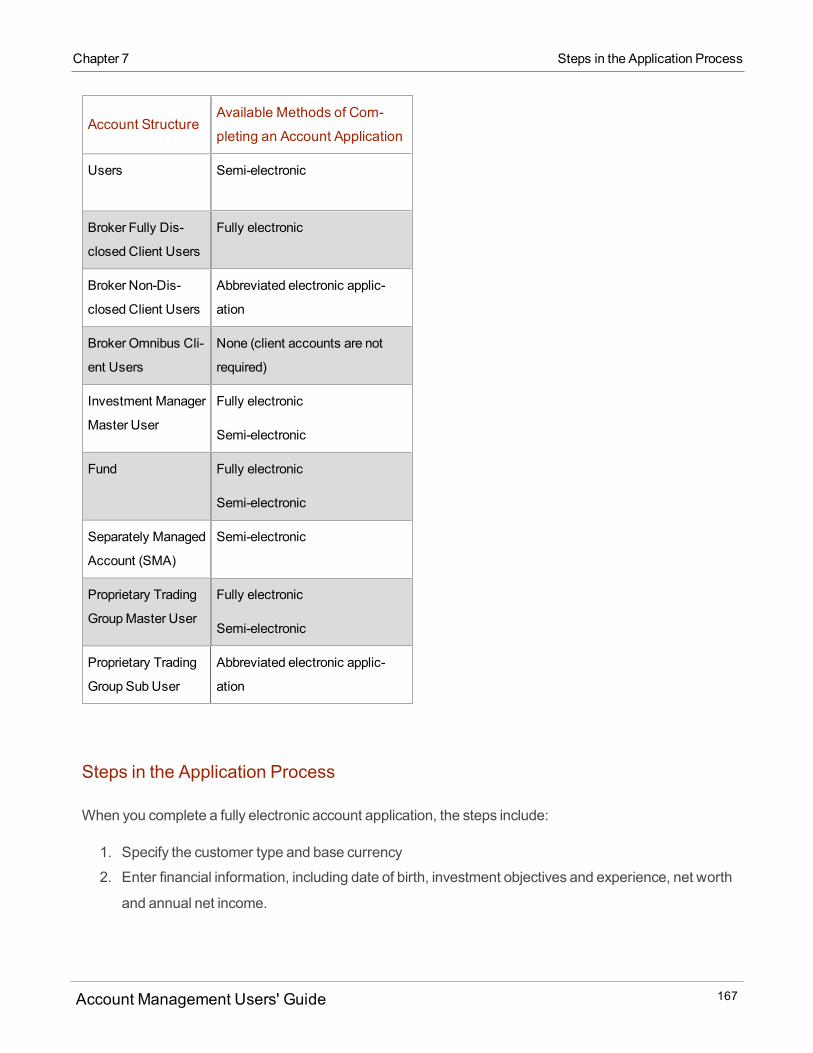
Chapter 7 Steps in the Application Process
Account StructureAvailable Methods of Com-
pleting an Account Application
Users Semi-electronic
Broker Fully Dis-
closed Client Users
Fully electronic
Broker Non-Dis-
closed Client Users
Abbreviated electronic applic-
ation
Broker Omnibus Cli-
ent Users
None (client accounts are not
required)
Investment Manager
Master User
Fully electronic
Semi-electronic
Fund Fully electronic
Semi-electronic
Separately Managed
Account (SMA)
Semi-electronic
Proprietary Trading
GroupMaster User
Fully electronic
Semi-electronic
Proprietary Trading
Group Sub User
Abbreviated electronic applic-
ation
Steps in the Application Process
When you complete a fully electronic account application, the steps include:
1. Specify the customer type and base currency
2. Enter financial information, including date of birth, investment objectives and experience, net worth
and annual net income.
Account Management Users' Guide 167
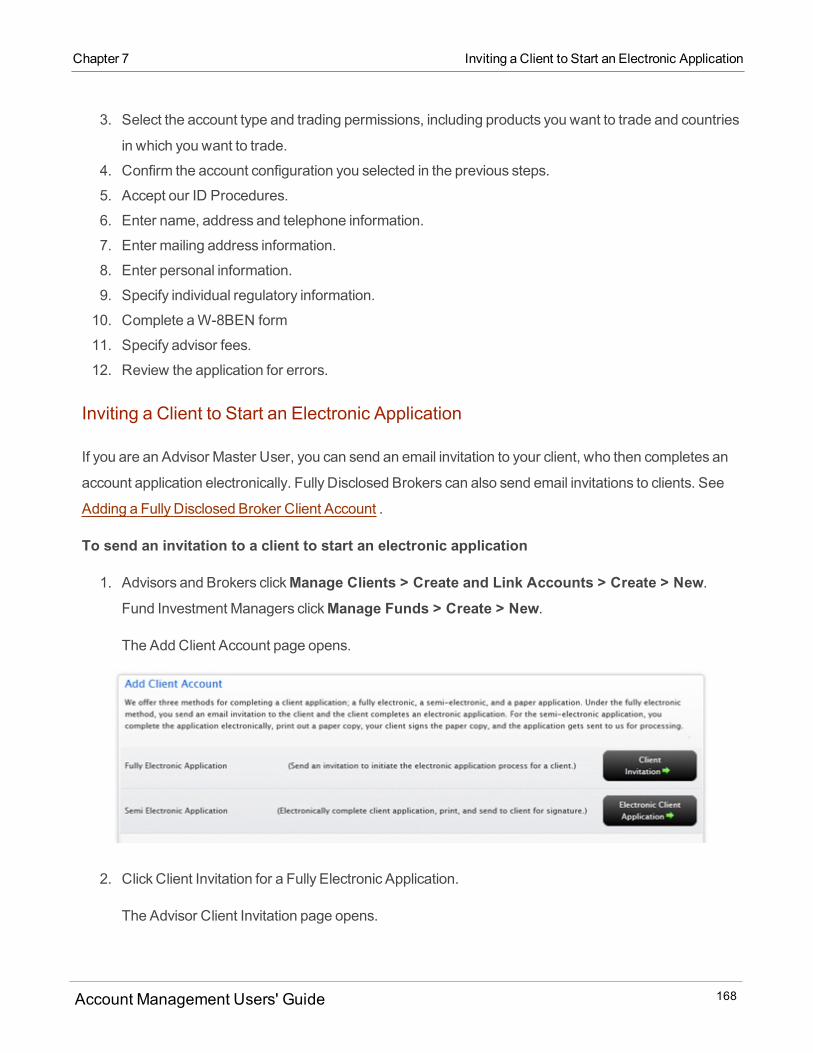
3. Select the account type and trading permissions, including products you want to trade and countries
in which you want to trade.
4. Confirm the account configuration you selected in the previous steps.
5. Accept our ID Procedures.
6. Enter name, address and telephone information.
7. Enter mailing address information.
8. Enter personal information.
9. Specify individual regulatory information.
10. Complete aW-8BEN form
11. Specify advisor fees.
12. Review the application for errors.
Inviting a Client to Start an Electronic Application
If you are an Advisor Master User, you can send an email invitation to your client, who then completes an
account application electronically. Fully Disclosed Brokers can also send email invitations to clients. See
Adding a Fully Disclosed Broker Client Account .
To send an invitation to a client to start an electronic application
1. Advisors and Brokers clickManage Clients > Create and Link Accounts > Create > New.Fund Investment Managers clickManage Funds > Create > New.
The Add Client Account page opens.
2. Click Client Invitation for a Fully Electronic Application.
The Advisor Client Invitation page opens.
Account Management Users' Guide 168
Chapter 7 Inviting a Client to Start an Electronic Application
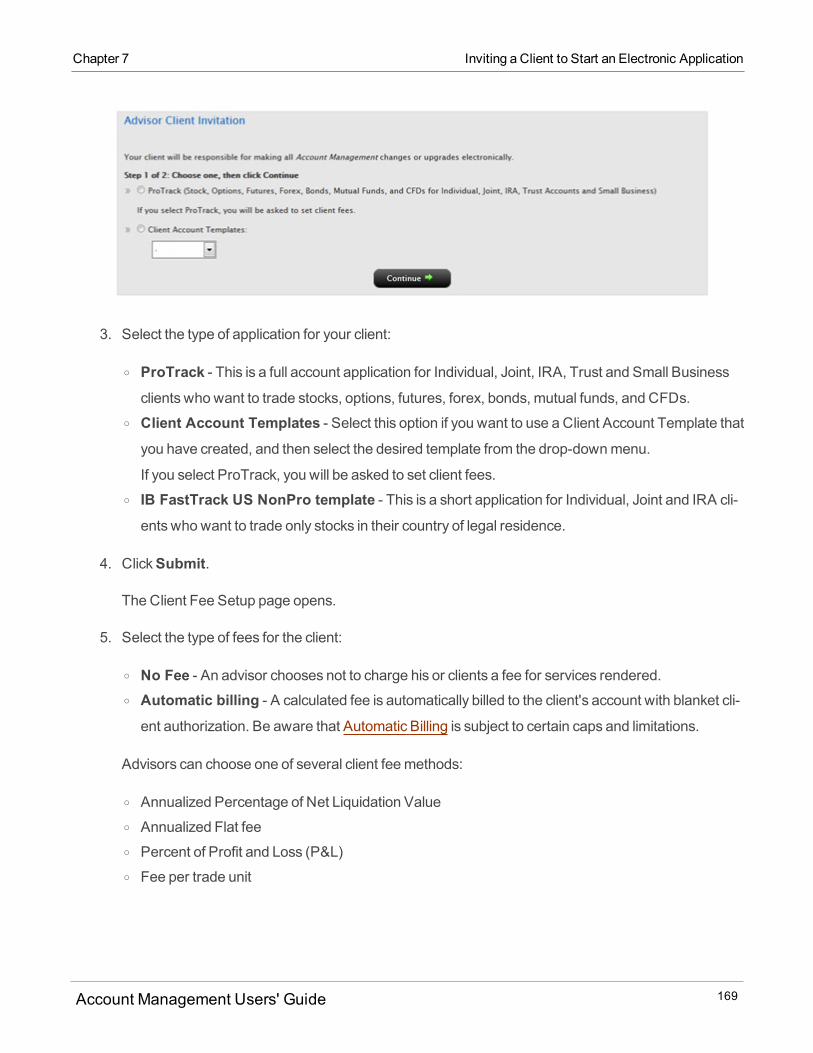
Chapter 7 Inviting a Client to Start an Electronic Application
3. Select the type of application for your client:
o ProTrack - This is a full account application for Individual, Joint, IRA, Trust and Small Businessclients who want to trade stocks, options, futures, forex, bonds, mutual funds, and CFDs.
o Client Account Templates - Select this option if you want to use a Client Account Template thatyou have created, and then select the desired template from the drop-downmenu.
If you select ProTrack, you will be asked to set client fees.o IB FastTrack US NonPro template - This is a short application for Individual, Joint and IRA cli-
ents who want to trade only stocks in their country of legal residence.
4. ClickSubmit.
The Client Fee Setup page opens.
5. Select the type of fees for the client:
o No Fee - An advisor chooses not to charge his or clients a fee for services rendered.o Automatic billing - A calculated fee is automatically billed to the client's account with blanket cli-
ent authorization. Be aware that Automatic Billing is subject to certain caps and limitations.
Advisors can choose one of several client feemethods:
o Annualized Percentage of Net Liquidation Valueo Annualized Flat feeo Percent of Profit and Loss (P&L)o Fee per trade unit
Account Management Users' Guide 169
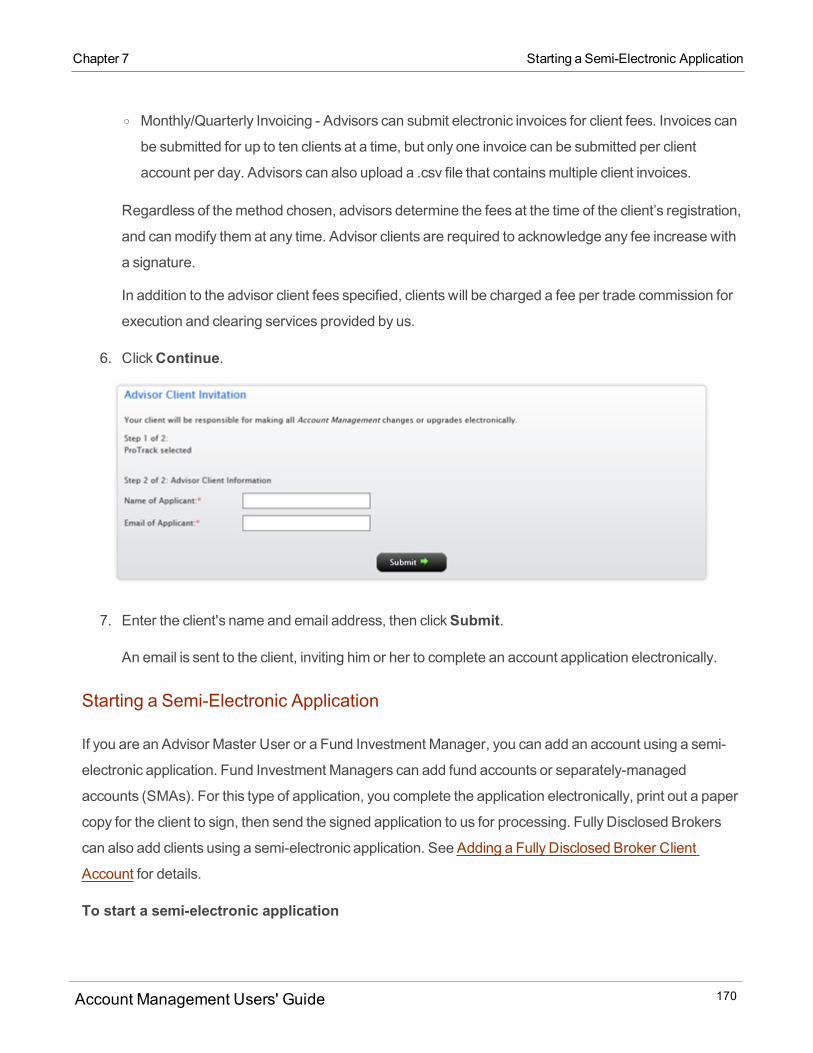
o Monthly/Quarterly Invoicing - Advisors can submit electronic invoices for client fees. Invoices can
be submitted for up to ten clients at a time, but only one invoice can be submitted per client
account per day. Advisors can also upload a .csv file that containsmultiple client invoices.
Regardless of themethod chosen, advisors determine the fees at the time of the client’s registration,
and canmodify them at any time. Advisor clients are required to acknowledge any fee increase with
a signature.
In addition to the advisor client fees specified, clients will be charged a fee per trade commission for
execution and clearing services provided by us.
6. ClickContinue.
7. Enter the client's name and email address, then clickSubmit.
An email is sent to the client, inviting him or her to complete an account application electronically.
Starting a Semi-Electronic Application
If you are an Advisor Master User or a Fund Investment Manager, you can add an account using a semi-
electronic application. Fund Investment Managers can add fund accounts or separately-managed
accounts (SMAs). For this type of application, you complete the application electronically, print out a paper
copy for the client to sign, then send the signed application to us for processing. Fully Disclosed Brokers
can also add clients using a semi-electronic application. See Adding a Fully Disclosed Broker Client
Account for details.
To start a semi-electronic application
Account Management Users' Guide 170
Chapter 7 Starting a Semi-Electronic Application
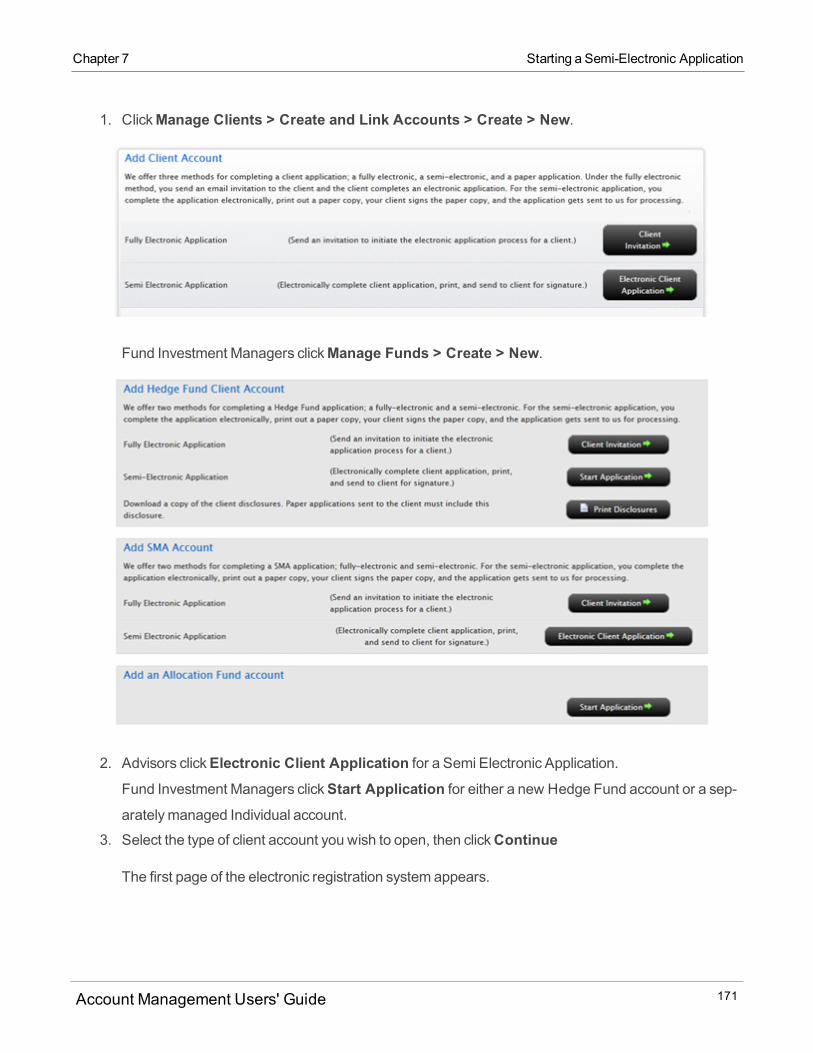
Chapter 7 Starting a Semi-Electronic Application
1. ClickManage Clients > Create and Link Accounts > Create > New.
Fund Investment Managers clickManage Funds > Create > New.
2. Advisors clickElectronic Client Application for a Semi Electronic Application.Fund Investment Managers clickStart Application for either a new Hedge Fund account or a sep-
aratelymanaged Individual account.
3. Select the type of client account you wish to open, then clickContinue
The first page of the electronic registration system appears.
Account Management Users' Guide 171
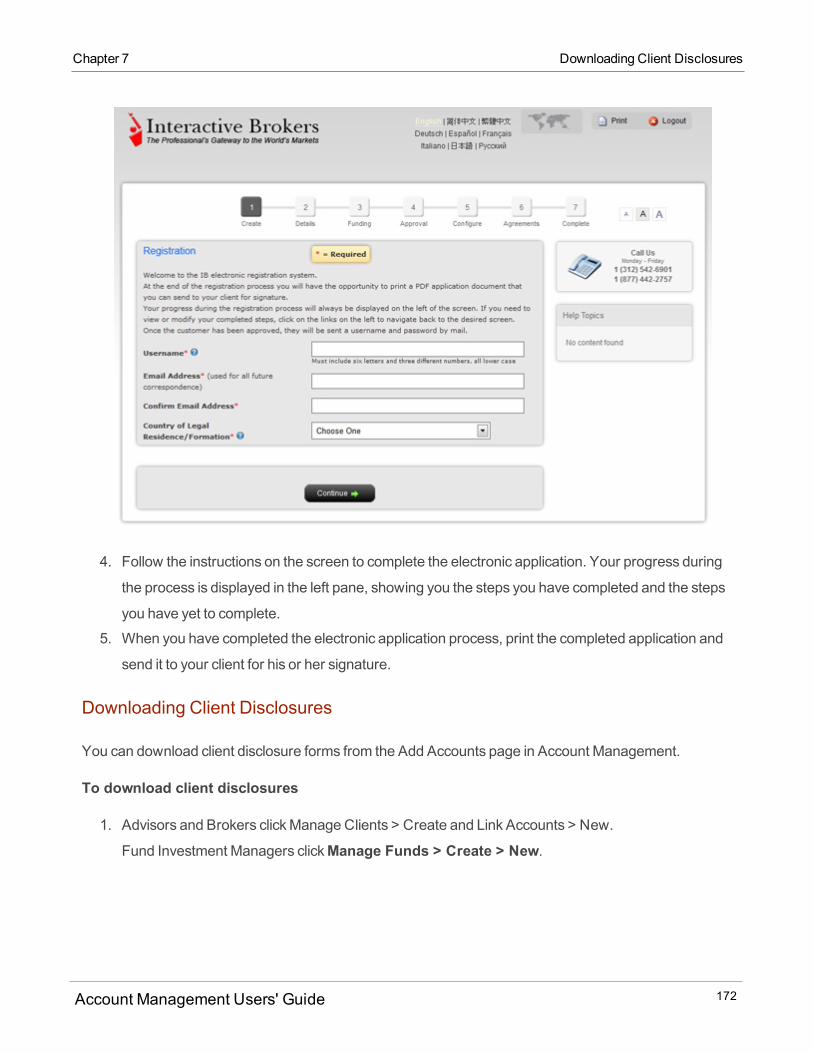
4. Follow the instructions on the screen to complete the electronic application. Your progress during
the process is displayed in the left pane, showing you the steps you have completed and the steps
you have yet to complete.
5. When you have completed the electronic application process, print the completed application and
send it to your client for his or her signature.
Downloading Client Disclosures
You can download client disclosure forms from the Add Accounts page in Account Management.
To download client disclosures
1. Advisors and Brokers clickManage Clients > Create and Link Accounts > New.
Fund Investment Managers clickManage Funds > Create > New.
Account Management Users' Guide 172
Chapter 7 Downloading Client Disclosures
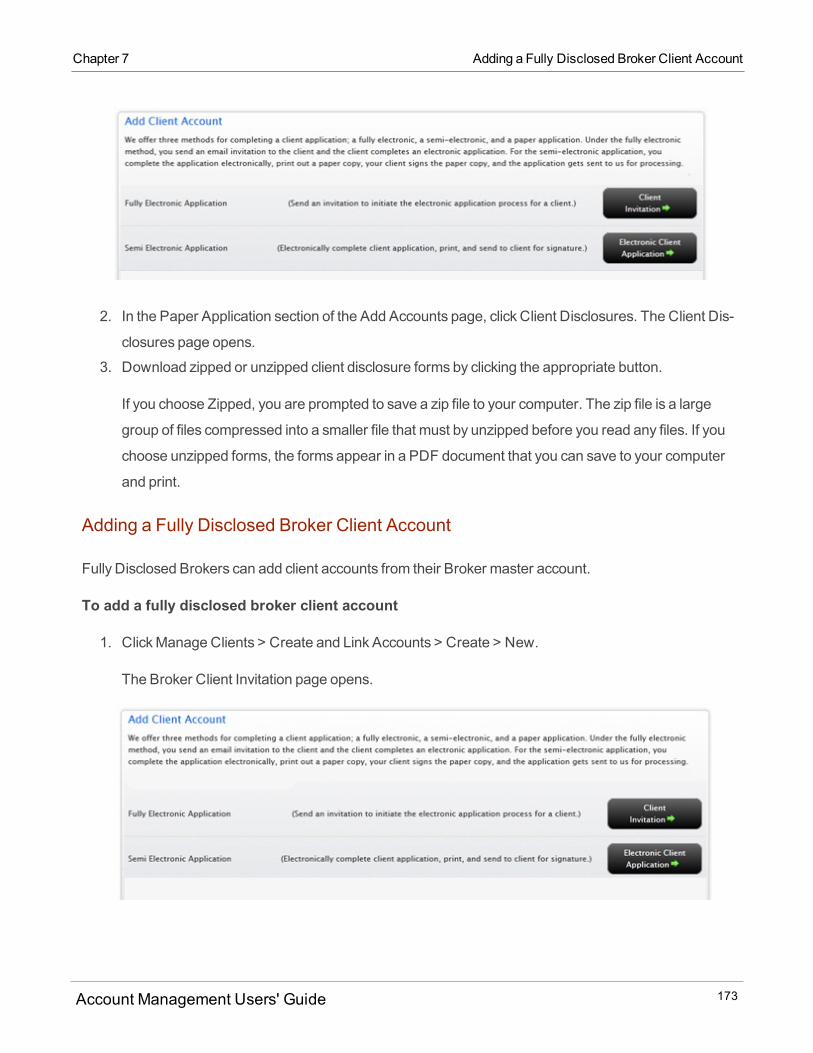
Chapter 7 Adding a Fully Disclosed Broker Client Account
2. In the Paper Application section of the Add Accounts page, click Client Disclosures. The Client Dis-
closures page opens.
3. Download zipped or unzipped client disclosure forms by clicking the appropriate button.
If you choose Zipped, you are prompted to save a zip file to your computer. The zip file is a large
group of files compressed into a smaller file that must by unzipped before you read any files. If you
choose unzipped forms, the forms appear in a PDF document that you can save to your computer
and print.
Adding a Fully Disclosed Broker Client Account
Fully Disclosed Brokers can add client accounts from their Broker master account.
To add a fully disclosed broker client account
1. ClickManage Clients > Create and Link Accounts > Create > New.
The Broker Client Invitation page opens.
Account Management Users' Guide 173
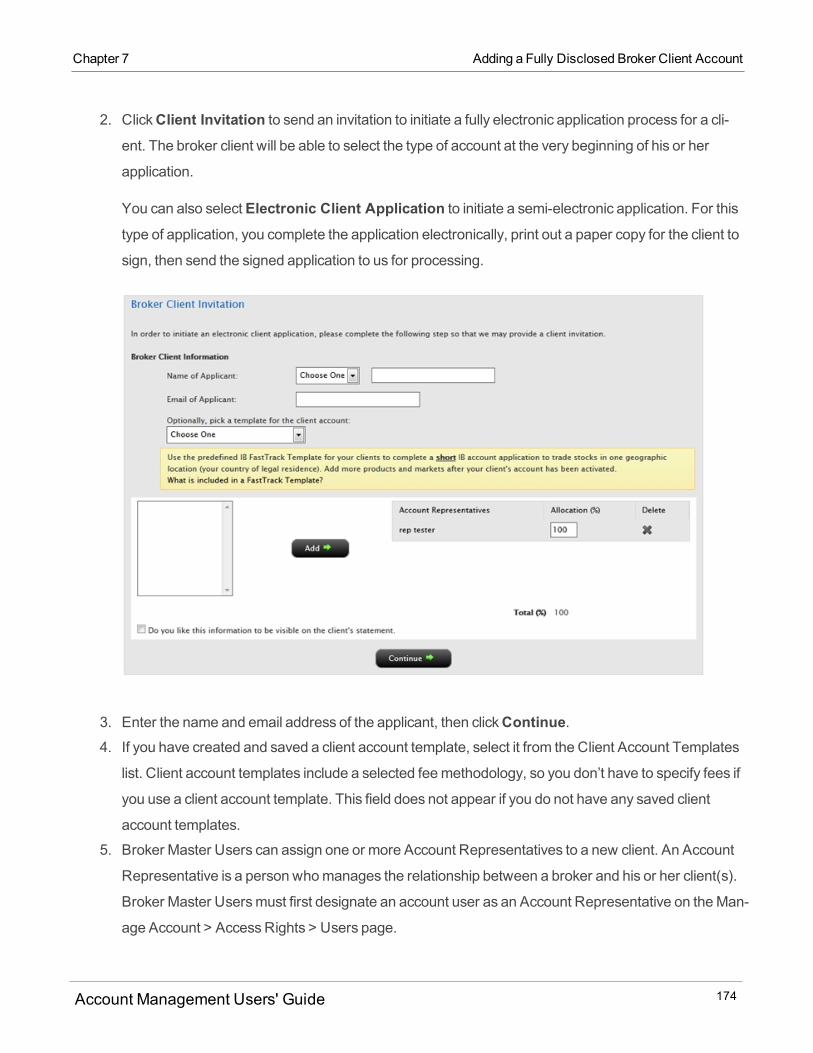
2. ClickClient Invitation to send an invitation to initiate a fully electronic application process for a cli-ent. The broker client will be able to select the type of account at the very beginning of his or her
application.
You can also selectElectronic Client Application to initiate a semi-electronic application. For thistype of application, you complete the application electronically, print out a paper copy for the client to
sign, then send the signed application to us for processing.
3. Enter the name and email address of the applicant, then clickContinue.4. If you have created and saved a client account template, select it from the Client Account Templates
list. Client account templates include a selected feemethodology, so you don’t have to specify fees if
you use a client account template. This field does not appear if you do not have any saved client
account templates.
5. Broker Master Users can assign one or more Account Representatives to a new client. An Account
Representative is a person whomanages the relationship between a broker and his or her client(s).
Broker Master Usersmust first designate an account user as an Account Representative on theMan-
age Account > AccessRights > Users page.
Account Management Users' Guide 174
Chapter 7 Adding a Fully Disclosed Broker Client Account

Chapter 7 Adding Advisors, STL andMultiple Hedge Fund Accounts to a
Fully Disclosed Broker Account
o If you have users who are designated as Account Representatives, theywill be listed in the
Account Representatives box. ClickAdd to assign the Account Representative to the new client.o Enter an allocation percentage, whichmust total 100%. If you assign one Account Rep-
resentative, then the allocation will be 100. If you assignmore than one Account Representative
to the new client, the total allocationmust add up to 100%.o If you change your mind, click theX to remove the Account Representative from the new client.o If you want the Account Representative(s) to appear on the client's statements, click the check
box.
5. ClickContinue. The Pending Items page opens.
Adding Advisors, STL and Multiple Hedge Fund Accounts to a Fully Disclosed
Broker Account
If you are a Fully Disclosed Broker, you can add the following types of institution accounts to your account
structure from your master account:
Advisor (including Friends and Family Advisor)
Proprietary Trading Group Separate Trading Limit (STL)
Multiple Hedge Fund
These institution accounts can have their own client, sub or fund accounts, making your account structure a
three-level account.
For detailed rules governing three-level Fully Disclosed Broker accounts, see Rules for Three-Level Fully
Disclosed Broker Accounts.
Adding an Advisor Account
To add an Advisor to your Fully Disclosed Broker account
1. ClickManage Clients > Create and Link Accounts > Create > New. 2. ClickClient Invitation to send an invitation to initiate a fully electronic application process. Cur-
rently, only fully electronic applications are available for adding an advisor to a Fully Disclosed
Broker account.
Account Management Users' Guide 175
3. The client begins his or her application by selecting Financial Advisor as the account type, andthen completes an Advisor Account application. Financial and trading criteria are applied separately
at the advisor and advisor client levels.
4. After the advisor application has been approved, the advisor can log into Account Management with
his own username and password, and then add one or more client accounts on theManage Clients> Create and Link Accounts > Create > New page. Fully Disclosed Brokers cannot add client
accounts to the Advisor account; thesemust be added by the advisor.
As a Fully Disclosed Broker, your trading qualifications (products you are qualified to trade) determine the
trading qualifications that are available to the new advisor and the advisor's clients.
Adding an STL Account
To add an STL account to your Fully Disclosed Broker account
1. ClickManage Clients > Create and Link Accounts > Create > New. 2. Do one of the following:
o ClickClient Invitation to send an invitation to initiate a fully electronic application process.o ClickElectronic Client Application to start the semi-electronic application process.o ClickStart Application to print a paper application.
3. If you selected the fully electronic application, the Broker Client Invitation page opens. Complete this
page, including entering the name and email of the applicant, and then clickContinue. The invitationwill be sent to the email address you enter and the client completes the application.
If you selected the semi electronic application, you will be prompted to selected the account type for
the new client. Select Institution as the account type, and then clickContinue. The accountapplication opens. This client will be the Proprietary Trading Group STL Master user.
If you selected the paper application, you will be prompted to selected the account type for the new
client. Select Institution as the account type, and then clickContinue. Complete the steps asdescribed on the screen to print the paper application.
4. After the application has been completed and approved, the new client can log into Account Man-
agement with his own username and password, and then add sub accounts from theManage
Account Management Users' Guide 176
Chapter 7 Adding an STL Account
Chapter 7 Adding aMultiple Hedge Fund Account
Traders > Traders > Create > Authorized Trader page. Fully Disclosed Brokers cannot add subaccounts to the STL account.
The STL and its sub accounts belong to the same beneficiary.
Adding a Multiple Hedge Fund Account
To add a Multiple Hedge Fund account to your Fully Disclosed Broker account
1. ClickManage Clients > Create and Link Accounts > Create > New. 2. Do one of the following:
o ClickClient Invitation to send an invitation to initiate a fully electronic application process.o ClickElectronic Client Application to start the semi-electronic application process.o ClickStart Application to print a paper application.
3. If you selected the fully electronic application, the Broker Client Invitation page opens. Complete this
page, including entering the name and email of the applicant, and then clickContinue. The invitationwill be sent to the email address you enter and the client completes the application.
If you selected the semi electronic application, you will be prompted to selected the account type for
the new client. SelectMultiple Funds as the account type, and then clickContinue. The accountapplication opens. This client will be theMultiple Hedge Fund Investment Manager user.
If you selected the paper application, you will be prompted to selected the account type for the new
client. SelectMultiple Funds as the account type, and then clickContinue. Complete the steps asdescribed on the screen to print the paper application.
o Financial and trading criteria are applied separately at the Fund Investment Manager and fund
levels.
4. After themultiple hedge fund application has been approved, the Fund Investment Manager can log
into Account Management with his own username and password, and then add one or more fund or
SMA accounts on theManage Funds > Funds > Create > New page. Fully Disclosed Brokers
cannot add fund or SMA accounts to theMultiple Funds account; thesemust be added by the Fund
Investment Manager.
For more information
Account Management Users' Guide 177
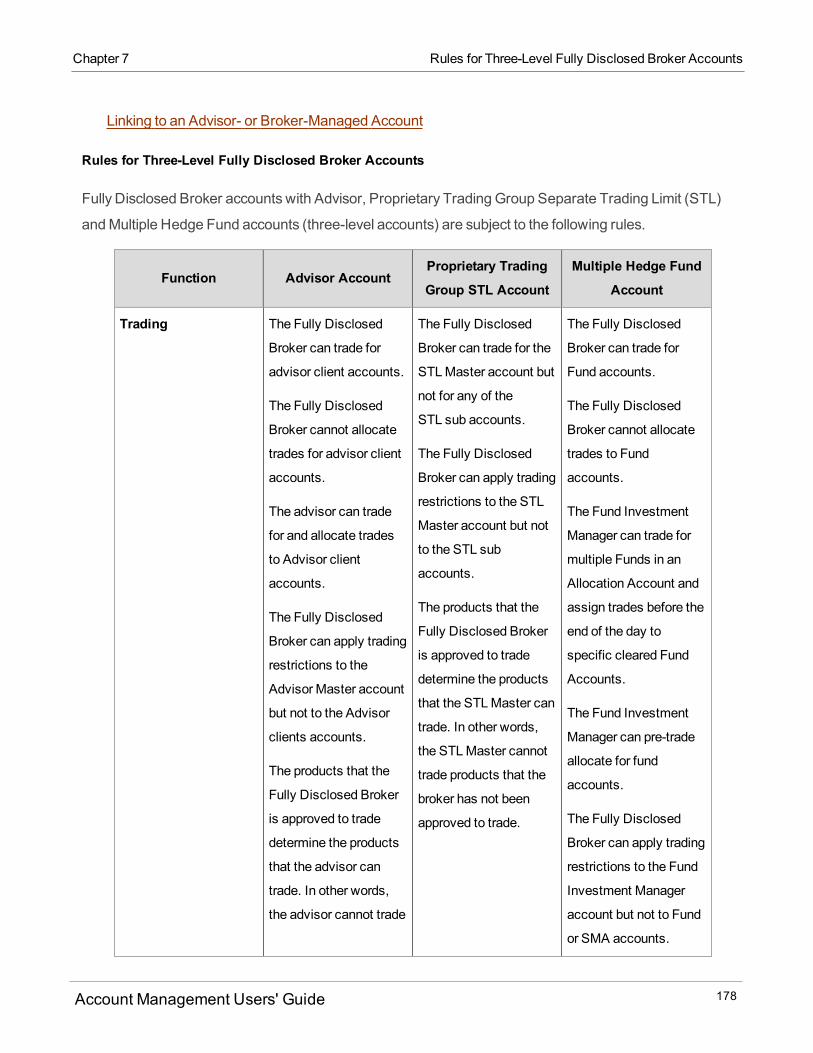
Linking to an Advisor- or Broker-Managed Account
Rules for Three-Level Fully Disclosed Broker Accounts
Fully Disclosed Broker accounts with Advisor, Proprietary Trading Group Separate Trading Limit (STL)
andMultiple Hedge Fund accounts (three-level accounts) are subject to the following rules.
Function Advisor AccountProprietary Trading
Group STL Account
Multiple Hedge Fund
Account
Trading The Fully Disclosed
Broker can trade for
advisor client accounts.
The Fully Disclosed
Broker cannot allocate
trades for advisor client
accounts.
The advisor can trade
for and allocate trades
to Advisor client
accounts.
The Fully Disclosed
Broker can apply trading
restrictions to the
Advisor Master account
but not to the Advisor
clients accounts.
The products that the
Fully Disclosed Broker
is approved to trade
determine the products
that the advisor can
trade. In other words,
the advisor cannot trade
The Fully Disclosed
Broker can trade for the
STL Master account but
not for any of the
STL sub accounts.
The Fully Disclosed
Broker can apply trading
restrictions to the STL
Master account but not
to the STL sub
accounts.
The products that the
Fully Disclosed Broker
is approved to trade
determine the products
that the STL Master can
trade. In other words,
the STL Master cannot
trade products that the
broker has not been
approved to trade.
The Fully Disclosed
Broker can trade for
Fund accounts.
The Fully Disclosed
Broker cannot allocate
trades to Fund
accounts.
The Fund Investment
Manager can trade for
multiple Funds in an
Allocation Account and
assign trades before the
end of the day to
specific cleared Fund
Accounts.
The Fund Investment
Manager can pre-trade
allocate for fund
accounts.
The Fully Disclosed
Broker can apply trading
restrictions to the Fund
Investment Manager
account but not to Fund
or SMA accounts.
Account Management Users' Guide 178
Chapter 7 Rules for Three-Level Fully Disclosed Broker Accounts
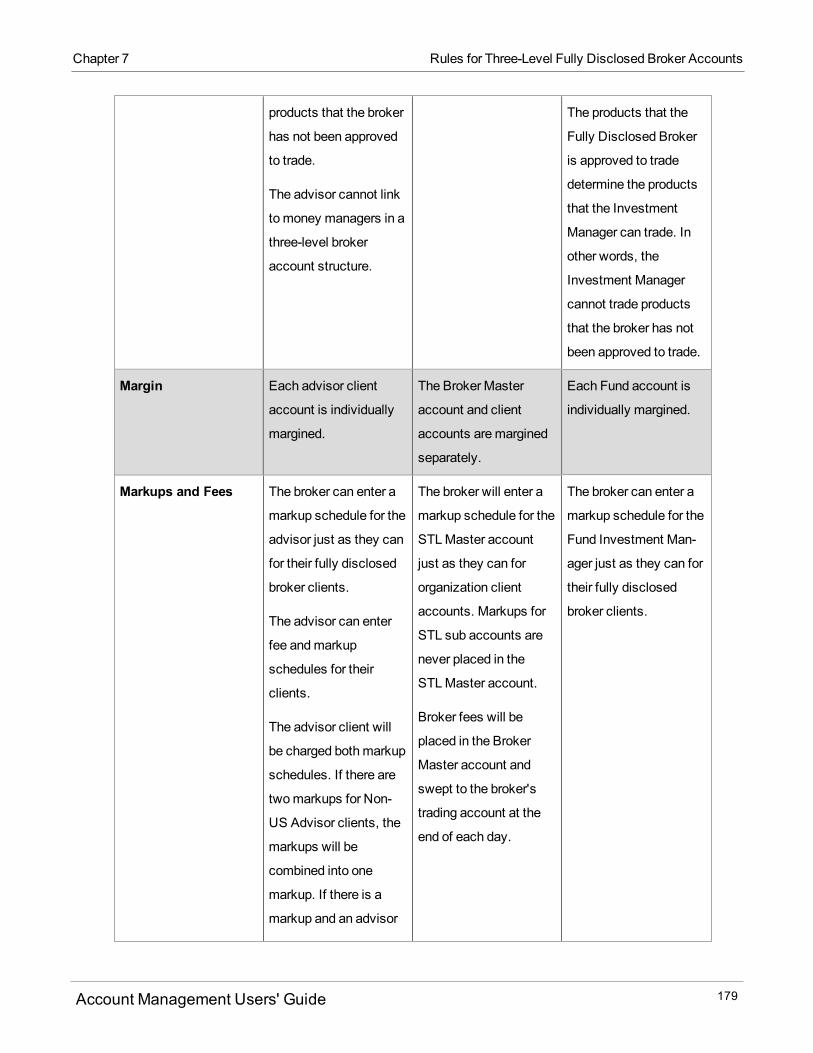
Chapter 7 Rules for Three-Level Fully Disclosed Broker Accounts
products that the broker
has not been approved
to trade.
The advisor cannot link
to money managers in a
three-level broker
account structure.
The products that the
Fully Disclosed Broker
is approved to trade
determine the products
that the Investment
Manager can trade. In
other words, the
Investment Manager
cannot trade products
that the broker has not
been approved to trade.
Margin Each advisor client
account is individually
margined.
The Broker Master
account and client
accounts aremargined
separately.
Each Fund account is
individually margined.
Markups and Fees The broker can enter a
markup schedule for the
advisor just as they can
for their fully disclosed
broker clients.
The advisor can enter
fee andmarkup
schedules for their
clients.
The advisor client will
be charged bothmarkup
schedules. If there are
twomarkups for Non-
US Advisor clients, the
markups will be
combined into one
markup. If there is a
markup and an advisor
The broker will enter a
markup schedule for the
STLMaster account
just as they can for
organization client
accounts. Markups for
STL sub accounts are
never placed in the
STL Master account.
Broker fees will be
placed in the Broker
Master account and
swept to the broker's
trading account at the
end of each day.
The broker can enter a
markup schedule for the
Fund Investment Man-
ager just as they can for
their fully disclosed
broker clients.
Account Management Users' Guide 179
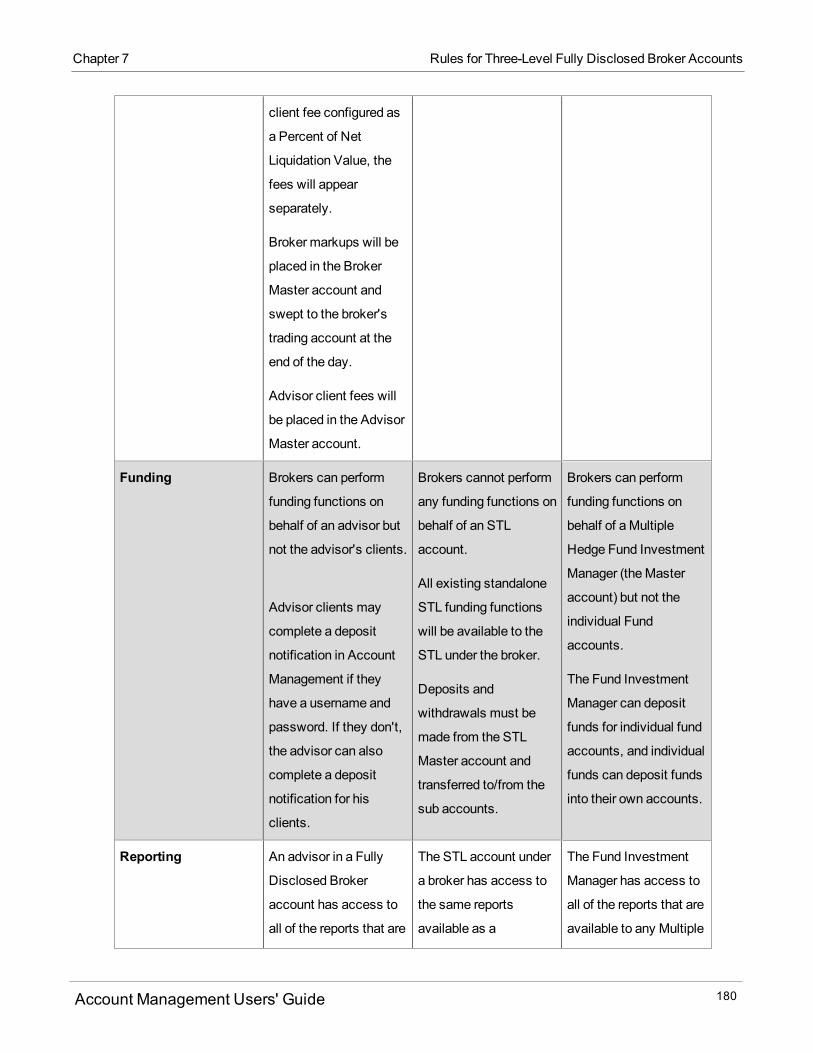
client fee configured as
a Percent of Net
Liquidation Value, the
fees will appear
separately.
Broker markups will be
placed in the Broker
Master account and
swept to the broker's
trading account at the
end of the day.
Advisor client fees will
be placed in the Advisor
Master account.
Funding Brokers can perform
funding functions on
behalf of an advisor but
not the advisor's clients.
Advisor clients may
complete a deposit
notification in Account
Management if they
have a username and
password. If they don't,
the advisor can also
complete a deposit
notification for his
clients.
Brokers cannot perform
any funding functions on
behalf of an STL
account.
All existing standalone
STL funding functions
will be available to the
STL under the broker.
Deposits and
withdrawals must be
made from the STL
Master account and
transferred to/from the
sub accounts.
Brokers can perform
funding functions on
behalf of a Multiple
Hedge Fund Investment
Manager (theMaster
account) but not the
individual Fund
accounts.
The Fund Investment
Manager can deposit
funds for individual fund
accounts, and individual
funds can deposit funds
into their own accounts.
Reporting An advisor in a Fully
Disclosed Broker
account has access to
all of the reports that are
The STL account under
a broker has access to
the same reports
available as a
The Fund Investment
Manager has access to
all of the reports that are
available to any Multiple
Account Management Users' Guide 180
Chapter 7 Rules for Three-Level Fully Disclosed Broker Accounts

Chapter 7 Adding Advisor and STL Accounts to an Advisor or
Multiple Hedge Fund Account
available to any Advisor
Master.
The broker can view a
consolidated statement
for each Advisor group.
All tax reporting for the
Advisor and his clients
will be performed by us.
standalone STL
account.
The broker can see STL
accounts on an
individual and/or
consolidated basis.
All tax reporting for the
STL account will be
performed by us.
Fund Investment Man-
ager.
White Branding White branding is sup-
ported for an advisor
under a Fully Disclosed
Broker account.
White branding is sup-
ported for an STL
account under a Fully
Disclosed Broker
account.
White branding is sup-
ported for aMultiple
Hedge Fund account
under a Fully Disclosed
Broker account.
Manage Clients >
Accounts > View
Menu
Fully Disclosed Brokers
can view Summary and
client account details for
the Advisor Master
account and its client
accounts.
Fully Disclosed Brokers
can view Summary and
client account details for
the STLMaster account
and its sub accounts.
Fully Disclosed Brokers
can view Summary and
client account details for
the Fund Investment
Manager account and
its fund accounts.
Adding Advisor and STL Accounts to an Advisor or Multiple Hedge Fund Account
If you are a Registered Investment Advisor or aMultiple Hedge Fund Investment Manager, you can add
the following types of institution accounts to your account structure from your master account.
Advisor - For Registered Investment Advisors that gather andmanage other Advisors. For example,
the second-level Advisor is amember of the same firm as the top-level Advisor, and has complete
access to the client accounts that he or shemanages. Another example is the second-level Advisor
who is independent but workswith the top-level Advisor.
Proprietary Trading Group Separate Trading Limit (STL) - For Advisors that want to runmultiple trad-
ing strategies for the same customer.
Multiple Hedge Fund
Account Management Users' Guide 181
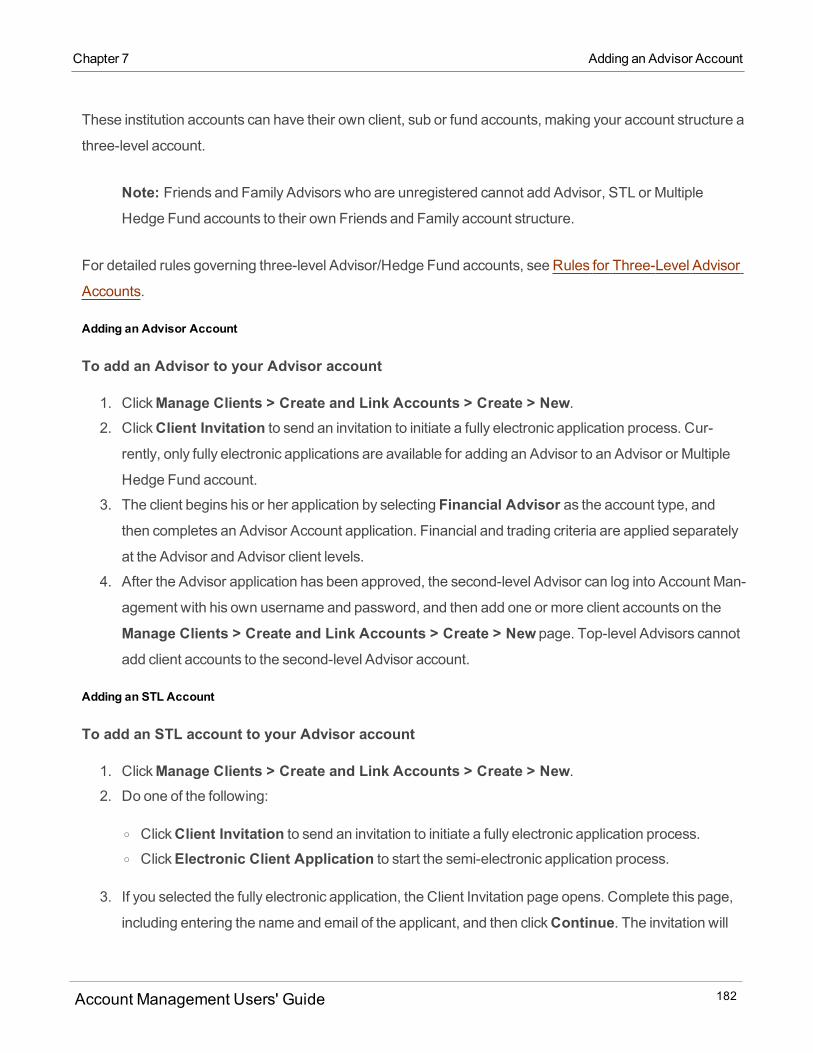
These institution accounts can have their own client, sub or fund accounts, making your account structure a
three-level account.
Note: Friends and Family Advisors who are unregistered cannot add Advisor, STL or MultipleHedge Fund accounts to their own Friends and Family account structure.
For detailed rules governing three-level Advisor/Hedge Fund accounts, see Rules for Three-Level Advisor
Accounts.
Adding an Advisor Account
To add an Advisor to your Advisor account
1. ClickManage Clients > Create and Link Accounts > Create > New. 2. ClickClient Invitation to send an invitation to initiate a fully electronic application process. Cur-
rently, only fully electronic applications are available for adding an Advisor to an Advisor or Multiple
Hedge Fund account.
3. The client begins his or her application by selecting Financial Advisor as the account type, andthen completes an Advisor Account application. Financial and trading criteria are applied separately
at the Advisor and Advisor client levels.
4. After the Advisor application has been approved, the second-level Advisor can log into Account Man-
agement with his own username and password, and then add one or more client accounts on the
Manage Clients > Create and Link Accounts > Create > New page. Top-level Advisors cannot
add client accounts to the second-level Advisor account.
Adding an STL Account
To add an STL account to your Advisor account
1. ClickManage Clients > Create and Link Accounts > Create > New. 2. Do one of the following:
o ClickClient Invitation to send an invitation to initiate a fully electronic application process.o ClickElectronic Client Application to start the semi-electronic application process.
3. If you selected the fully electronic application, the Client Invitation page opens. Complete this page,
including entering the name and email of the applicant, and then clickContinue. The invitation will
Account Management Users' Guide 182
Chapter 7 Adding an Advisor Account
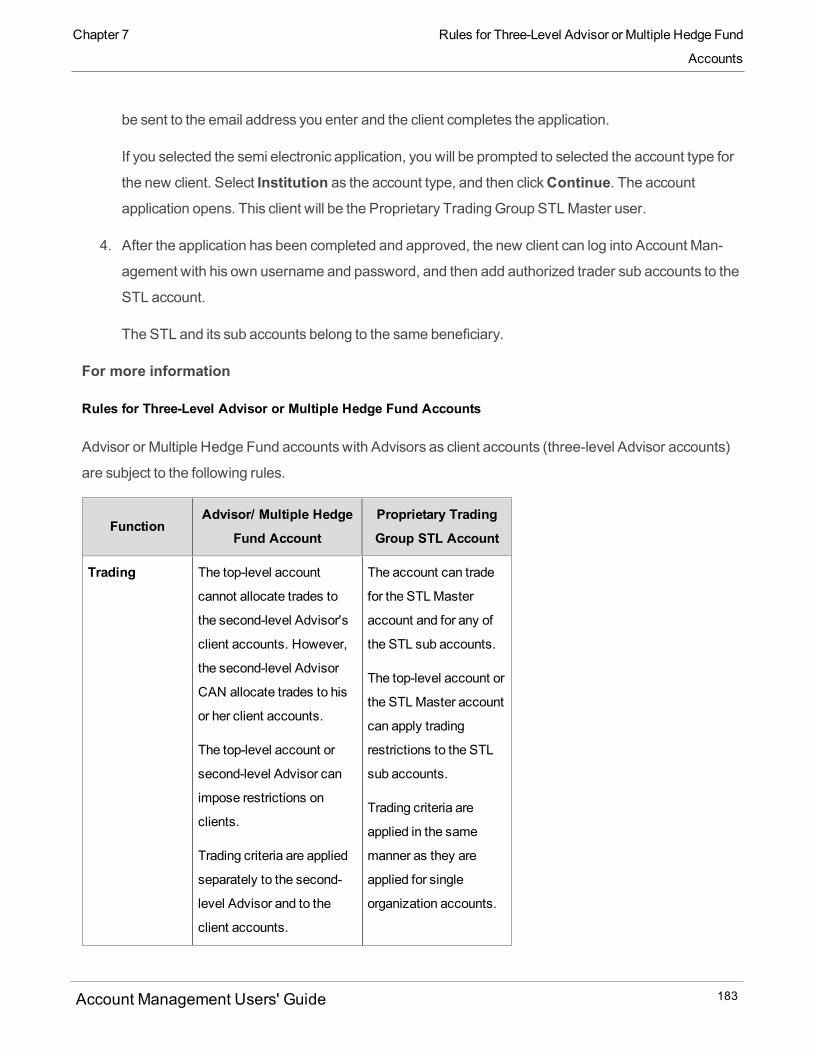
Chapter 7 Rules for Three-Level Advisor or Multiple Hedge Fund
Accounts
be sent to the email address you enter and the client completes the application.
If you selected the semi electronic application, you will be prompted to selected the account type for
the new client. Select Institution as the account type, and then clickContinue. The accountapplication opens. This client will be the Proprietary Trading Group STL Master user.
4. After the application has been completed and approved, the new client can log into Account Man-
agement with his own username and password, and then add authorized trader sub accounts to the
STL account.
The STL and its sub accounts belong to the same beneficiary.
For more information
Rules for Three-Level Advisor or Multiple Hedge Fund Accounts
Advisor or Multiple Hedge Fund accounts with Advisors as client accounts (three-level Advisor accounts)
are subject to the following rules.
FunctionAdvisor/ Multiple Hedge
Fund Account
Proprietary Trading
Group STL Account
Trading The top-level account
cannot allocate trades to
the second-level Advisor's
client accounts. However,
the second-level Advisor
CAN allocate trades to his
or her client accounts.
The top-level account or
second-level Advisor can
impose restrictions on
clients.
Trading criteria are applied
separately to the second-
level Advisor and to the
client accounts.
The account can trade
for the STL Master
account and for any of
the STL sub accounts.
The top-level account or
the STLMaster account
can apply trading
restrictions to the STL
sub accounts.
Trading criteria are
applied in the same
manner as they are
applied for single
organization accounts.
Account Management Users' Guide 183
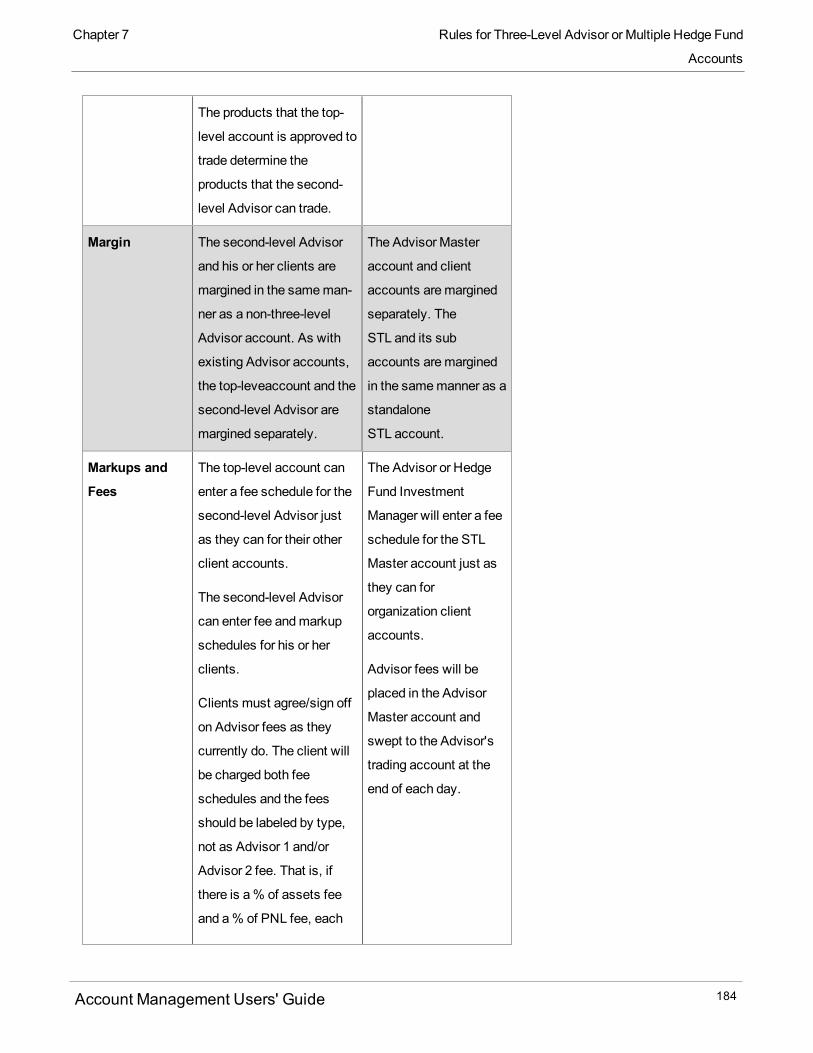
The products that the top-
level account is approved to
trade determine the
products that the second-
level Advisor can trade.
Margin The second-level Advisor
and his or her clients are
margined in the sameman-
ner as a non-three-level
Advisor account. As with
existing Advisor accounts,
the top-leveaccount and the
second-level Advisor are
margined separately.
The Advisor Master
account and client
accounts aremargined
separately. The
STL and its sub
accounts aremargined
in the samemanner as a
standalone
STL account.
Markups and
Fees
The top-level account can
enter a fee schedule for the
second-level Advisor just
as they can for their other
client accounts.
The second-level Advisor
can enter fee andmarkup
schedules for his or her
clients.
Clients must agree/sign off
on Advisor fees as they
currently do. The client will
be charged both fee
schedules and the fees
should be labeled by type,
not as Advisor 1 and/or
Advisor 2 fee. That is, if
there is a% of assets fee
and a% of PNL fee, each
The Advisor or Hedge
Fund Investment
Manager will enter a fee
schedule for the STL
Master account just as
they can for
organization client
accounts.
Advisor fees will be
placed in the Advisor
Master account and
swept to the Advisor's
trading account at the
end of each day.
Account Management Users' Guide 184
Chapter 7 Rules for Three-Level Advisor or Multiple Hedge Fund
Accounts
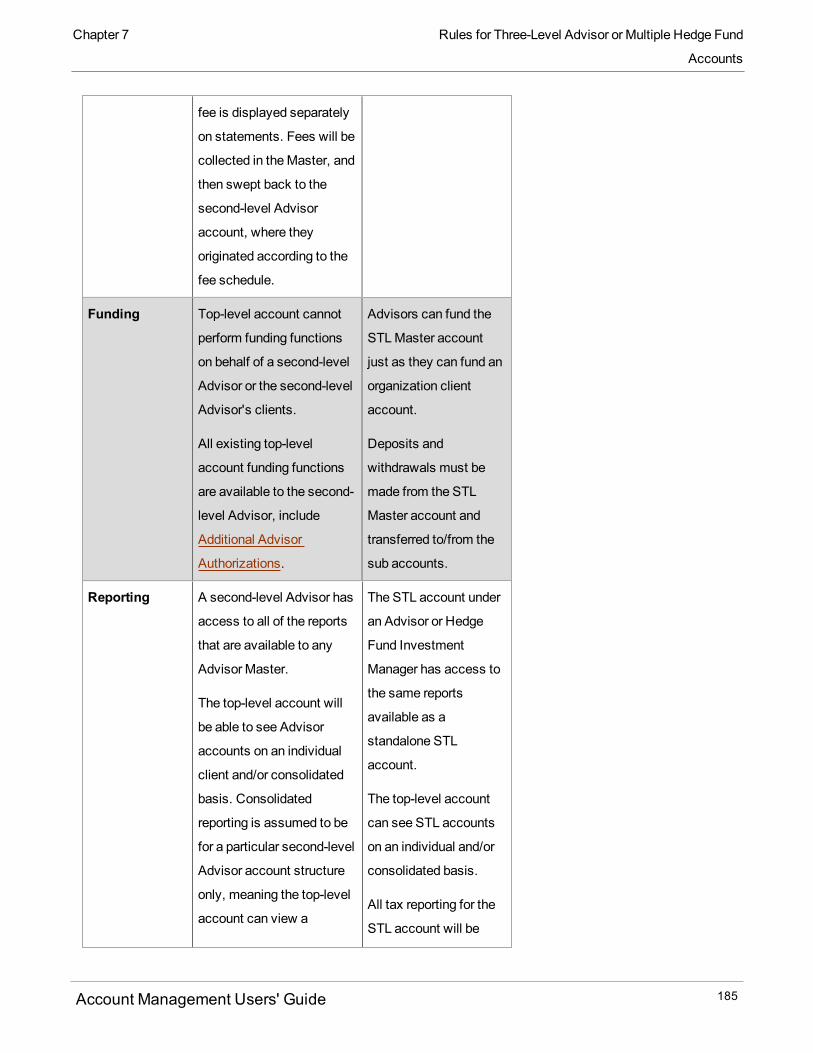
Chapter 7 Rules for Three-Level Advisor or Multiple Hedge Fund
Accounts
fee is displayed separately
on statements. Fees will be
collected in theMaster, and
then swept back to the
second-level Advisor
account, where they
originated according to the
fee schedule.
Funding Top-level account cannot
perform funding functions
on behalf of a second-level
Advisor or the second-level
Advisor's clients.
All existing top-level
account funding functions
are available to the second-
level Advisor, include
Additional Advisor
Authorizations.
Advisors can fund the
STLMaster account
just as they can fund an
organization client
account.
Deposits and
withdrawals must be
made from the STL
Master account and
transferred to/from the
sub accounts.
Reporting A second-level Advisor has
access to all of the reports
that are available to any
Advisor Master.
The top-level account will
be able to see Advisor
accounts on an individual
client and/or consolidated
basis. Consolidated
reporting is assumed to be
for a particular second-level
Advisor account structure
only, meaning the top-level
account can view a
The STL account under
an Advisor or Hedge
Fund Investment
Manager has access to
the same reports
available as a
standalone STL
account.
The top-level account
can see STL accounts
on an individual and/or
consolidated basis.
All tax reporting for the
STL account will be
Account Management Users' Guide 185
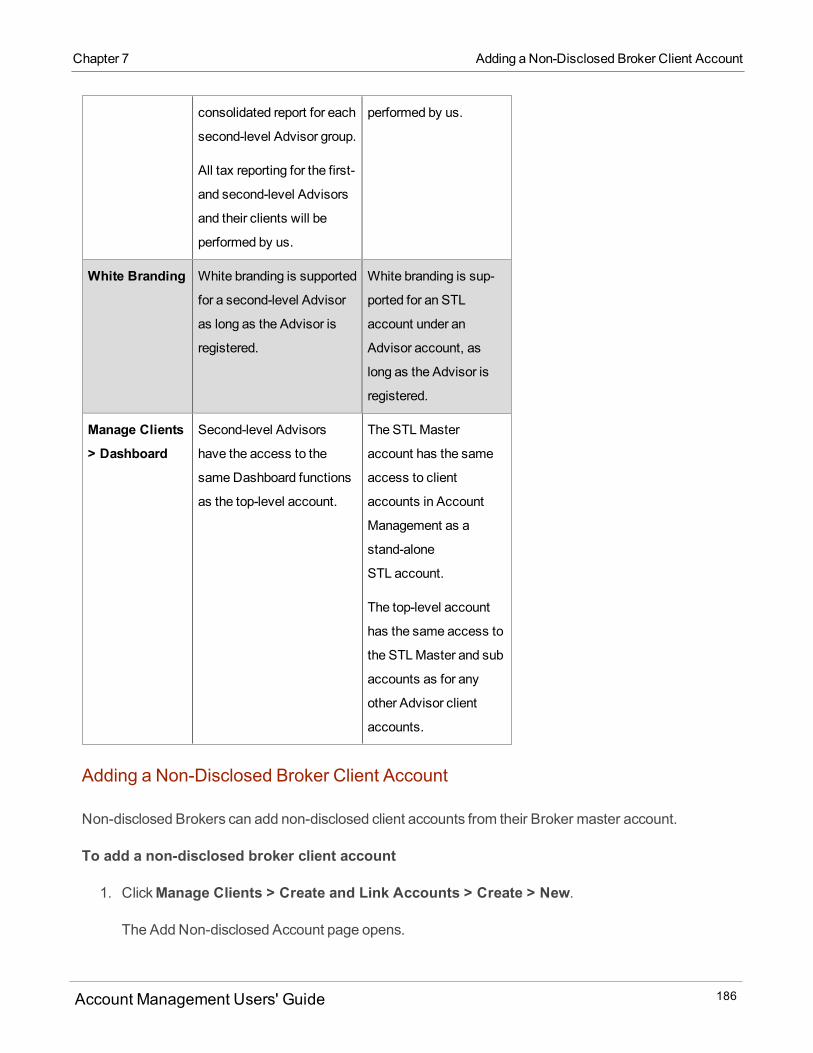
consolidated report for each
second-level Advisor group.
All tax reporting for the first-
and second-level Advisors
and their clients will be
performed by us.
performed by us.
White Branding White branding is supported
for a second-level Advisor
as long as the Advisor is
registered.
White branding is sup-
ported for an STL
account under an
Advisor account, as
long as the Advisor is
registered.
Manage Clients
> Dashboard
Second-level Advisors
have the access to the
sameDashboard functions
as the top-level account.
The STLMaster
account has the same
access to client
accounts in Account
Management as a
stand-alone
STL account.
The top-level account
has the same access to
the STLMaster and sub
accounts as for any
other Advisor client
accounts.
Adding a Non-Disclosed Broker Client Account
Non-disclosed Brokers can add non-disclosed client accounts from their Broker master account.
To add a non-disclosed broker client account
1. ClickManage Clients > Create and Link Accounts > Create > New.
The Add Non-disclosed Account page opens.
Account Management Users' Guide 186
Chapter 7 Adding a Non-Disclosed Broker Client Account
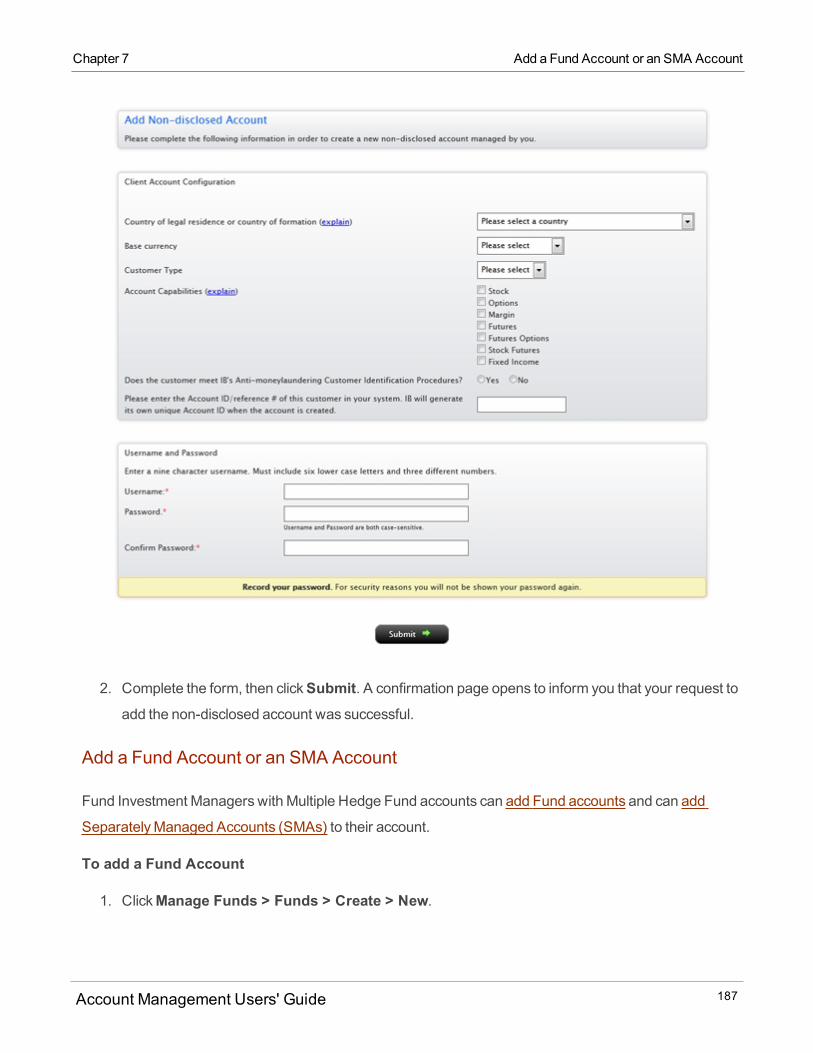
Chapter 7 Add a Fund Account or an SMA Account
2. Complete the form, then clickSubmit. A confirmation page opens to inform you that your request to
add the non-disclosed account was successful.
Add a Fund Account or an SMA Account
Fund Investment Managers with Multiple Hedge Fund accounts can add Fund accounts and can add
SeparatelyManaged Accounts (SMAs) to their account.
To add a Fund Account
1. ClickManage Funds > Funds > Create > New.
Account Management Users' Guide 187

2. In the Add Hedge Fund Account section, click the button that corresponds to the type of application
you wish to begin:
o Fully Electronic Application - ClickClient Invitation to initiate the electronic application processfor a fund account.
o Semi-Electronic Application - ClickStart Application to begin the semi-electronic applicationprocess.
3. Complete the application process as required.
To add a Separately Managed Account
Before you can add a client SMA account, youmust qualify to trade Securities Products, Commodities
Products, and/or ForexContracts. Youmust qualify for at least one set of products.
1. ClickManage Funds > Funds > Create > New.
Account Management Users' Guide 188
Chapter 7 Add a Fund Account or an SMA Account
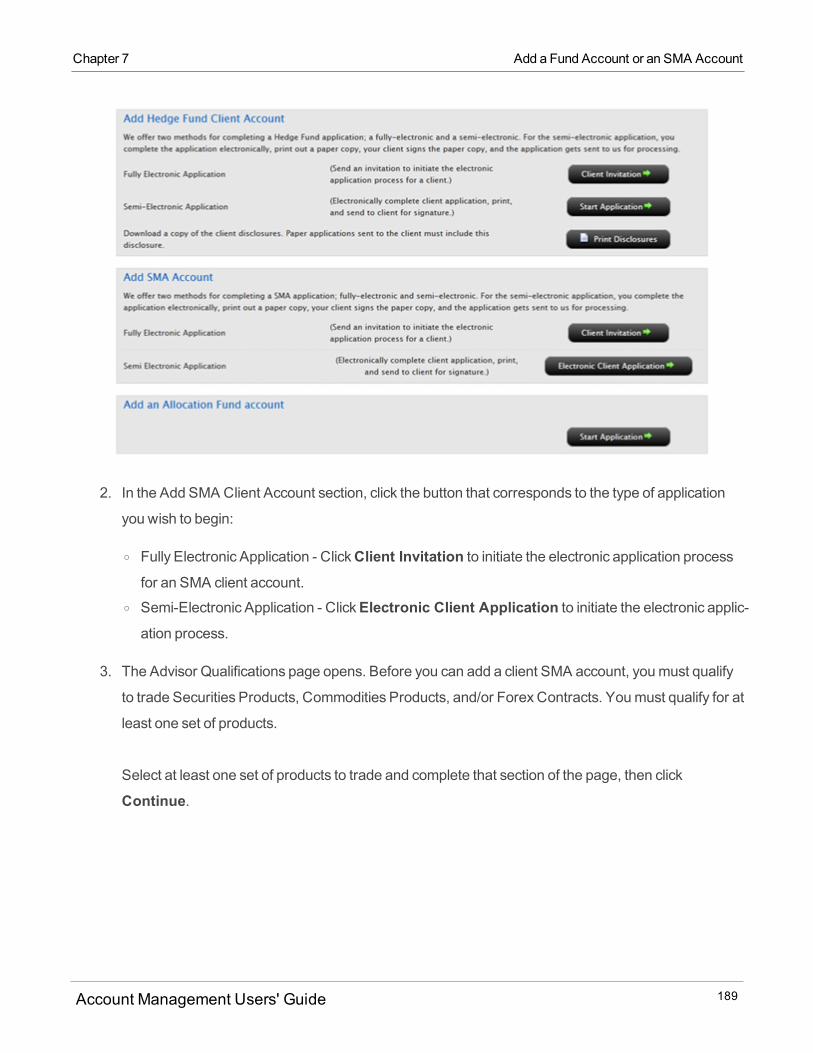
Chapter 7 Add a Fund Account or an SMA Account
2. In the Add SMA Client Account section, click the button that corresponds to the type of application
you wish to begin:
o Fully Electronic Application - ClickClient Invitation to initiate the electronic application processfor an SMA client account.
o Semi-Electronic Application - ClickElectronic Client Application to initiate the electronic applic-ation process.
3. The Advisor Qualifications page opens. Before you can add a client SMA account, youmust qualify
to trade Securities Products, Commodities Products, and/or ForexContracts. Youmust qualify for at
least one set of products.
Select at least one set of products to trade and complete that section of the page, then click
Continue.
Account Management Users' Guide 189
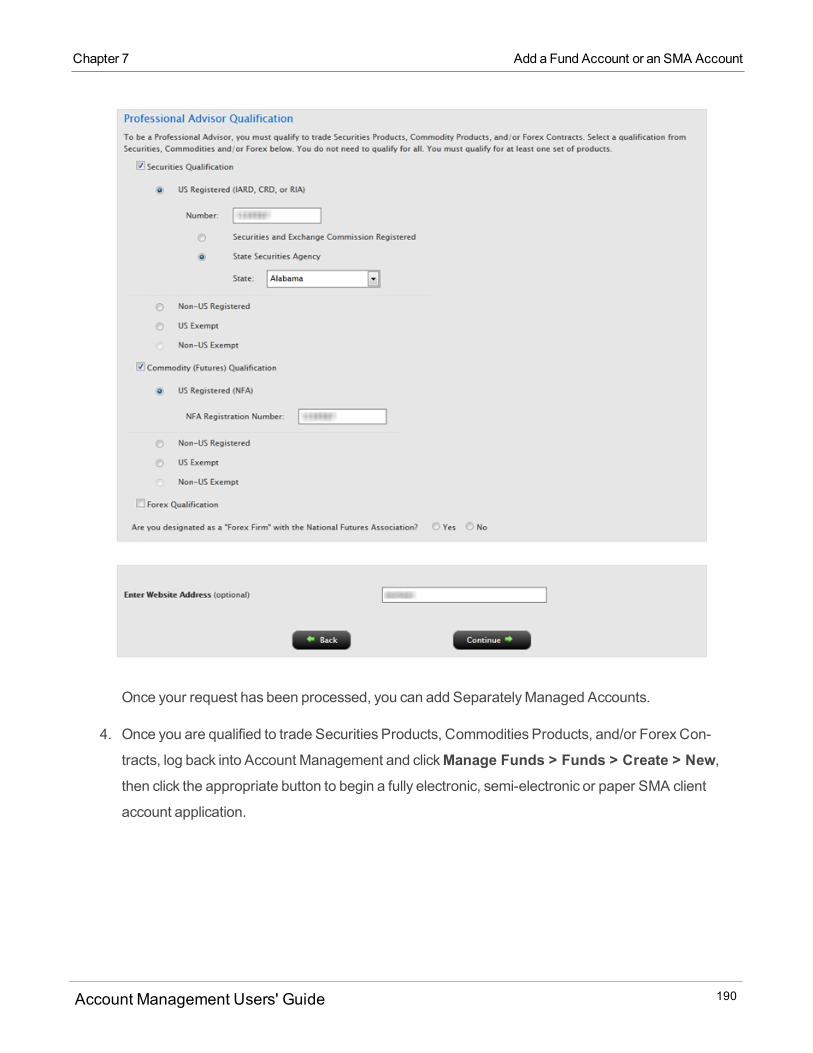
Once your request has been processed, you can add SeparatelyManaged Accounts.
4. Once you are qualified to trade Securities Products, Commodities Products, and/or ForexCon-
tracts, log back into Account Management and clickManage Funds > Funds > Create > New,then click the appropriate button to begin a fully electronic, semi-electronic or paper SMA client
account application.
Account Management Users' Guide 190
Chapter 7 Add a Fund Account or an SMA Account
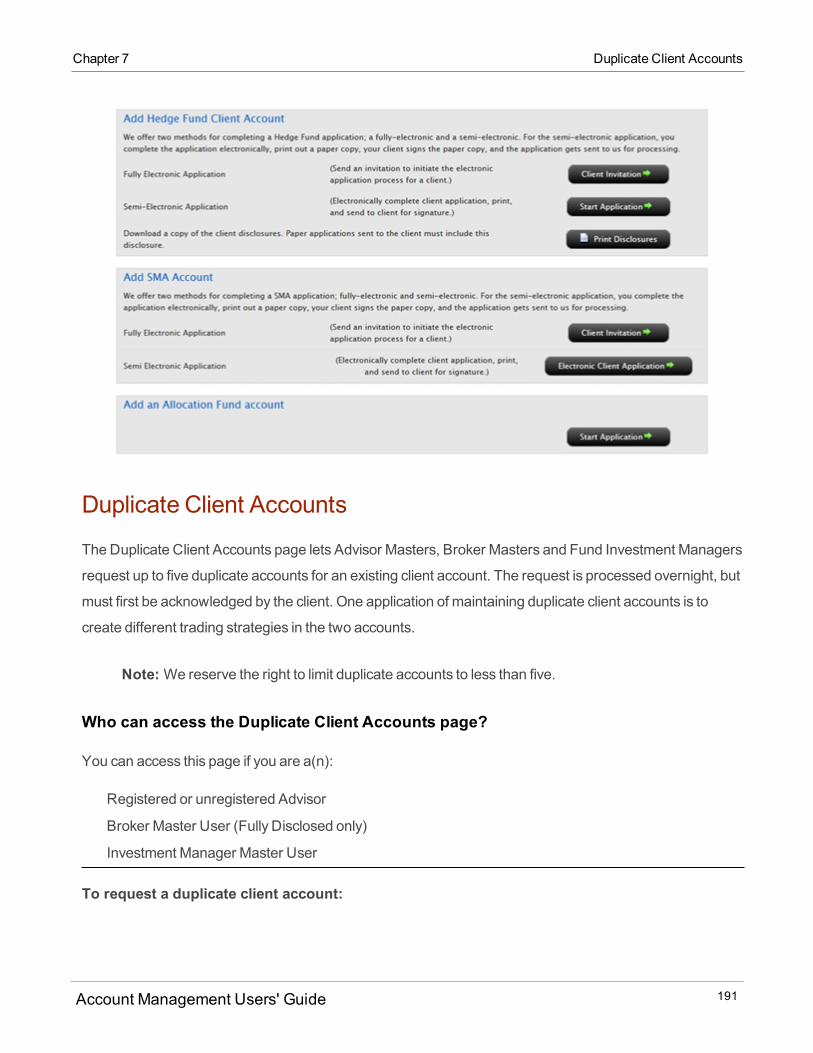
Chapter 7 Duplicate Client Accounts
Duplicate Client Accounts
TheDuplicate Client Accounts page lets Advisor Masters, Broker Masters and Fund Investment Managers
request up to five duplicate accounts for an existing client account. The request is processed overnight, but
must first be acknowledged by the client. One application of maintaining duplicate client accounts is to
create different trading strategies in the two accounts.
Note:We reserve the right to limit duplicate accounts to less than five.
Who can access the Duplicate Client Accounts page?
You can access this page if you are a(n):
Registered or unregistered Advisor
Broker Master User (Fully Disclosed only)
Investment Manager Master User
To request a duplicate client account:
Account Management Users' Guide 191
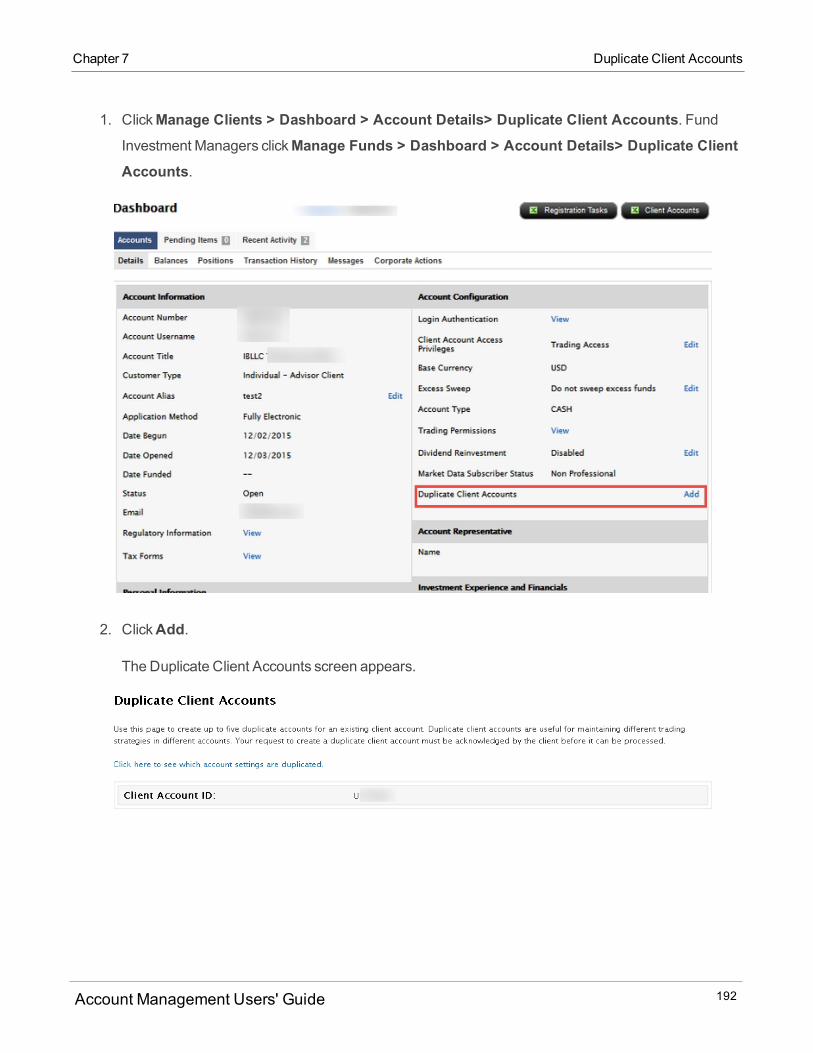
1. ClickManage Clients > Dashboard > Account Details> Duplicate Client Accounts. FundInvestment Managers clickManage Funds > Dashboard > Account Details> Duplicate ClientAccounts.
2. ClickAdd.
The Duplicate Client Accounts screen appears.
Account Management Users' Guide 192
Chapter 7 Duplicate Client Accounts

Chapter 7 Duplicated Account Settings
2. Click "Click here to see which account settings are duplicated".
3. Review the information, then ClickDuplicate.4. ClickOK to confirm your request.
An email is sent to the client associated with the selected client account stating that themaster
account user has requested a duplicate account. The client must first acknowledge the request, then
the request is processed overnight.
Duplicated Account Settings
When your request has been processed, the following account settings are duplicated:
For Advisor clients:
SMA configuration
Exchange caps
Commission
Client fees
FlexQueries
Delivery information
DVP instructions
Account Management Users' Guide 193
For Broker clients:
Exchange caps
Commission
Flex queries
Delivery information
DVP instructions
For Single Trading Limit sub accounts:
Exchange caps
Commission
Flex queries
Delivery information
Client Account Templates
Advisors, Fully Disclosed Brokers and Fund Investment Managers can create client account templates in
Account Management to save and re-use application information for new client accounts. Client account
templates let you enter information such as customer type, base currency and trading permissions
(including participation in our Stock Yield Enhancement Program), then quickly add that information to a
client account application without having to re-enter the same information for multiple applications.
The Client Account Templates page lets Advisors, Fully Disclosed Brokers and Fund Investment
Managers create, modify and delete client account templates. When you add client accounts fromwithin
Account Management, you will have the option of selecting a saved client account template, which will
prepopulate a portion of the client account application.
Advisors and Fully Disclosed Brokers whose clients begin their application at the Advisor's or Broker's own
website can add a unique client ID to the Client Invitation sent to the client. For more information, see Using
a Custom ID for Advisor and Fully Disclosed Broker Client Applications.
Who can access the Client Account Templates page?
You can access this page if you are a(n):
Account Management Users' Guide 194
Chapter 7 Client Account Templates
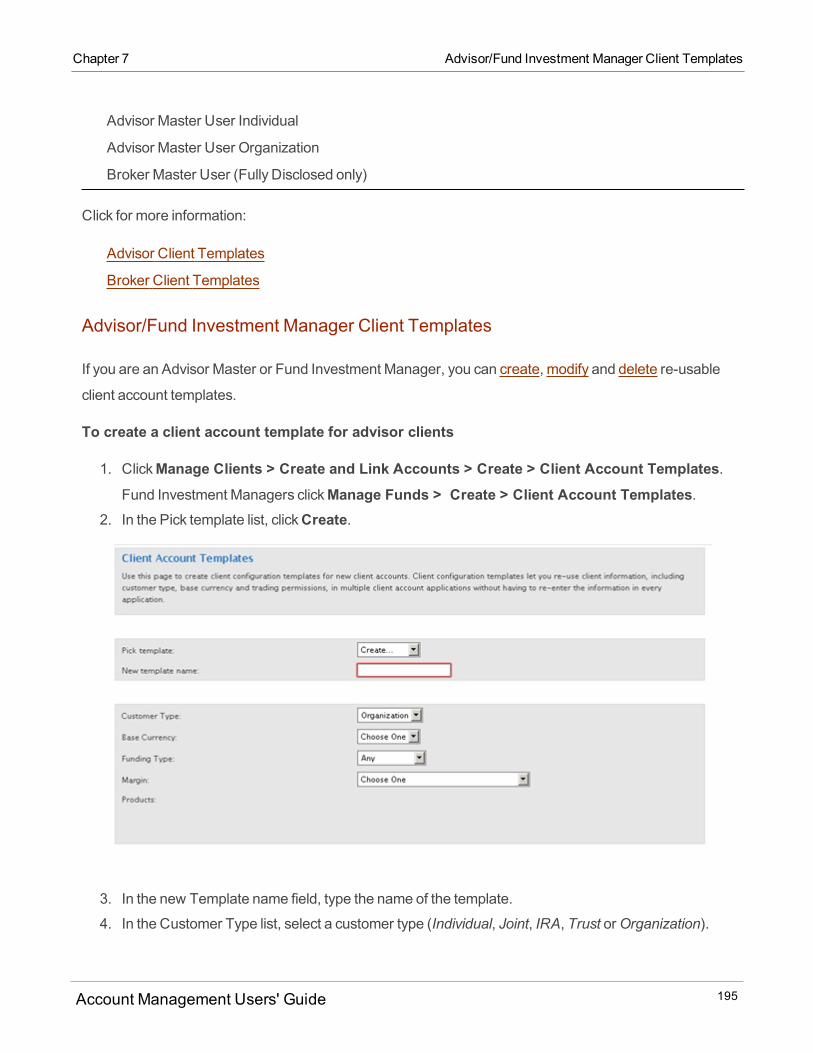
Chapter 7 Advisor/Fund Investment Manager Client Templates
Advisor Master User Individual
Advisor Master User Organization
Broker Master User (Fully Disclosed only)
Click for more information:
Advisor Client Templates
Broker Client Templates
Advisor/Fund Investment Manager Client Templates
If you are an Advisor Master or Fund Investment Manager, you can create, modify and delete re-usable
client account templates.
To create a client account template for advisor clients
1. ClickManage Clients > Create and Link Accounts > Create > Client Account Templates.Fund Investment Managers clickManage Funds > Create > Client Account Templates.
2. In the Pick template list, clickCreate.
3. In the new Template name field, type the name of the template.
4. In the Customer Type list, select a customer type (Individual, Joint, IRA, Trust orOrganization).
Account Management Users' Guide 195
5. In the Base Currency list, select the base currency for the client account.
6. In the Funding Type list, select the type of deposit that will be used to fund client accounts using this
template.
7. In theMargin list, select the type of margin account (Reg T for aMargin account,Cash for a Cash
account,Portfolio for a Portfolio Margin account orGuaranteed Dollars and/or Cash Collateral).
The following screen displays the available Trading Permissions for the selectedMargin account
type.
Account Management Users' Guide 196
Chapter 7 Advisor/Fund Investment Manager Client Templates

Chapter 7 Advisor/Fund Investment Manager Client Templates
Account Management Users' Guide 197
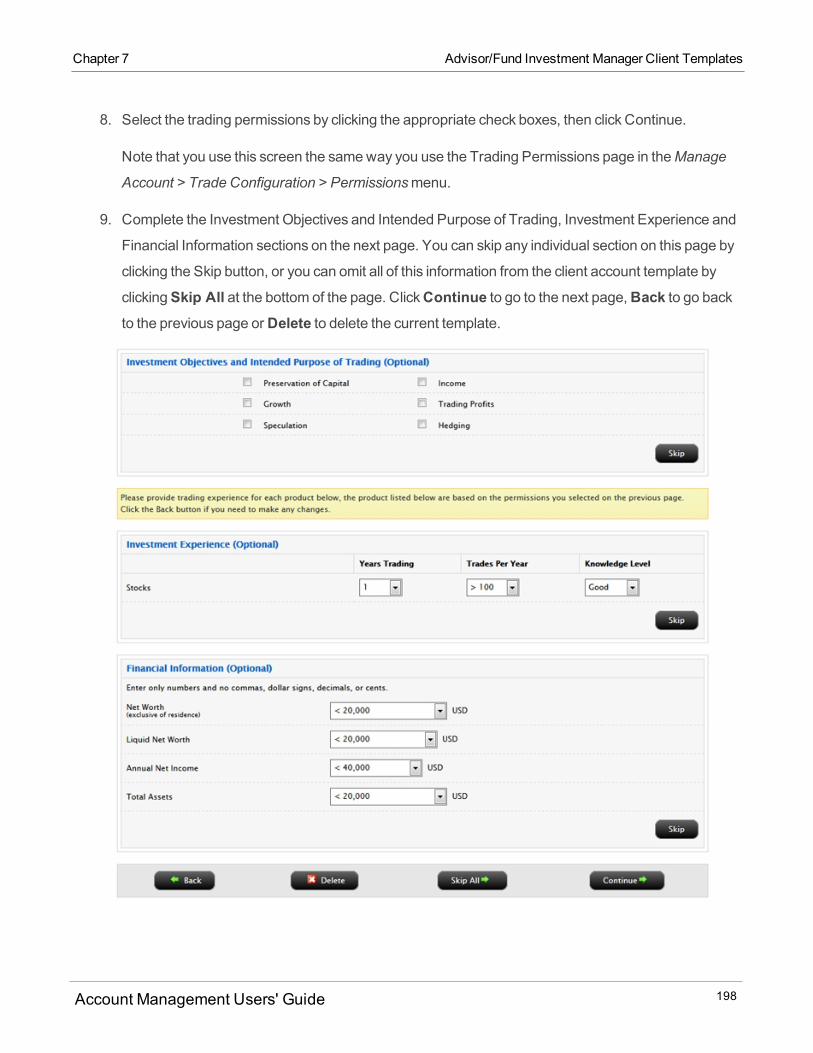
8. Select the trading permissions by clicking the appropriate check boxes, then click Continue.
Note that you use this screen the sameway you use the Trading Permissions page in theManage
Account > Trade Configuration > Permissionsmenu.
9. Complete the Investment Objectives and Intended Purpose of Trading, Investment Experience and
Financial Information sections on the next page. You can skip any individual section on this page by
clicking the Skip button, or you can omit all of this information from the client account template by
clickingSkip All at the bottom of the page. ClickContinue to go to the next page,Back to go backto the previous page orDelete to delete the current template.
Account Management Users' Guide 198
Chapter 7 Advisor/Fund Investment Manager Client Templates
Chapter 7 Broker Client Templates
10. Select the advisor feemethodology by clicking the appropriate radio button, then clickContinue.
Note that this page is identical to the Client Fees page for advisors in theManage Clients > Fees >
Configuremenu.
11. Verify that all the information in the client template is correct, then clickSave.
If any information is incorrect, clickBack, thenmodify the information as required and click Continueuntil you return to the verification page.
When you begin the process of adding a new client account, you will be able to select your saved
client account template.
To modify an existing client account template
1. ClickManage Clients > Create and Link Accounts > Create > Client Account Templates.2. In the Pick template list, click the existing template you want to modify.
3. Make changes as required, clickingContinue to advance through the pages.4. Verify that all the information in the client template is correct, then clickSave.
To delete an existing client account template
1. ClickManage Clients > Create and Link Accounts > Create > Client Account Templates.2. In the Pick template list, click the existing template you want to delete.
3. ClickDelete, then clickOK.
The template is deleted.
Broker Client Templates
If you are a Broker Master, you can create, modify and delete re-usable client account templates
To create a client account template for broker clients
1. ClickManage Clients > Create and Link Accounts > Create > Client Account Templates.2. In the Pick template list, clickCreate.
Account Management Users' Guide 199
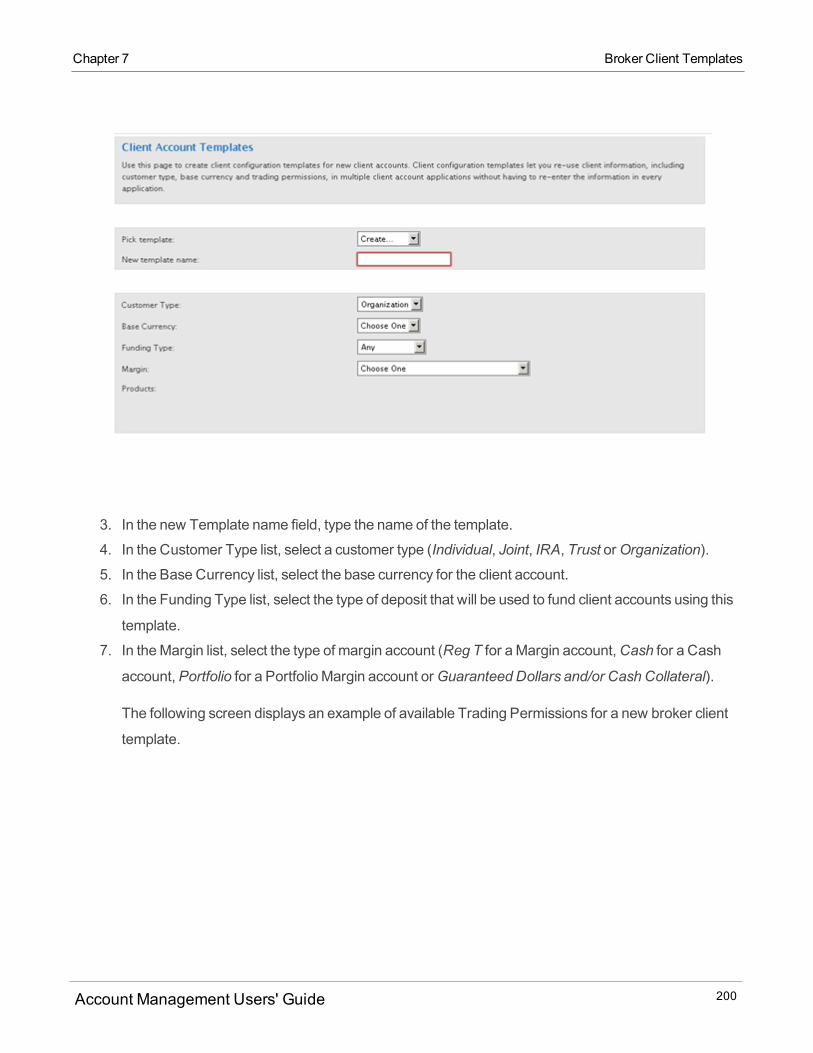
3. In the new Template name field, type the name of the template.
4. In the Customer Type list, select a customer type (Individual, Joint, IRA, Trust orOrganization).
5. In the Base Currency list, select the base currency for the client account.
6. In the Funding Type list, select the type of deposit that will be used to fund client accounts using this
template.
7. In theMargin list, select the type of margin account (Reg T for aMargin account,Cash for a Cash
account,Portfolio for a Portfolio Margin account orGuaranteed Dollars and/or Cash Collateral).
The following screen displays an example of available Trading Permissions for a new broker client
template.
Account Management Users' Guide 200
Chapter 7 Broker Client Templates
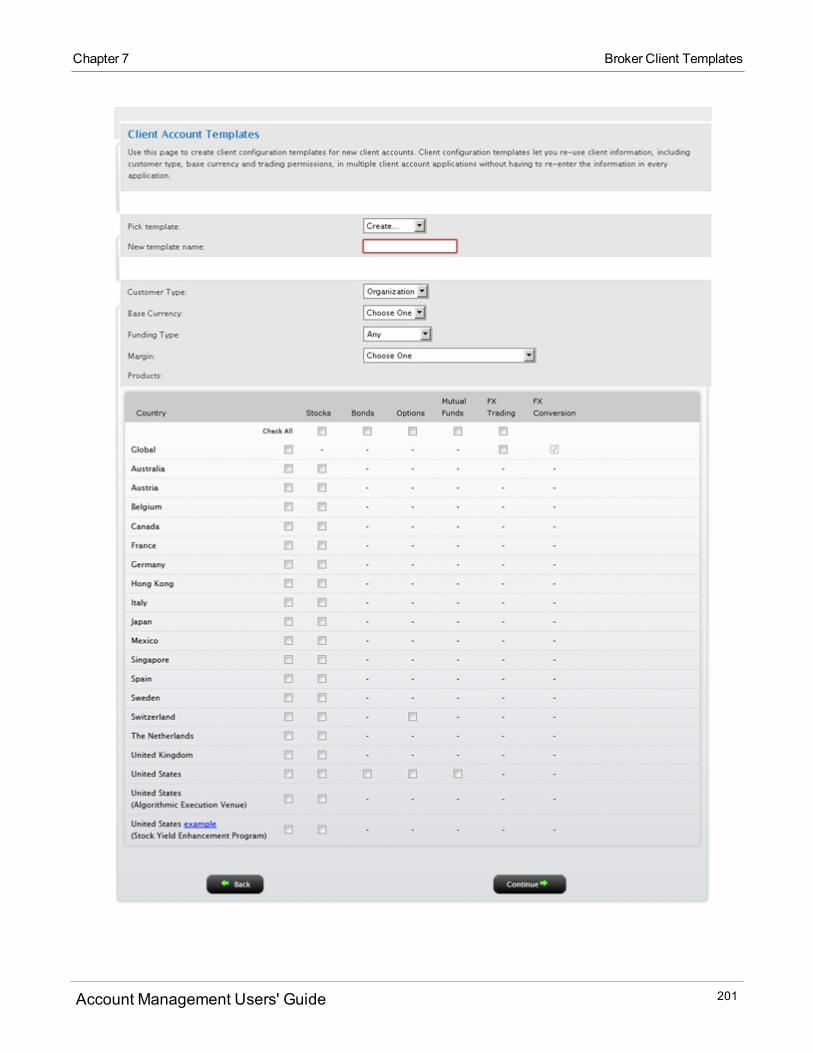
Chapter 7 Broker Client Templates
Account Management Users' Guide 201

8. Select the trading permissions by clicking the appropriate check boxes, then click Continue.
Note that you use this screen the sameway you use the Trading Permissions page in theManage
Account > Trade Configuration > Permissionsmenu.
9. Complete the Investment Objectives and Intended Purpose of Trading, Investment Experience and
Financial Information sections on the next page. You can skip any individual section on this page by
clicking the Skip button, or you can omit all of this information from the client account template by
clickingSkip All at the bottom of the page. ClickContinue to go to the next page,Back to go backto the previous page orDelete to delete the current template.
Account Management Users' Guide 202
Chapter 7 Broker Client Templates

Chapter 7 Broker Client Templates
10. If you chose anyCustomer Type other thanOrganization, the next page that opens lets you select
themarket data subscriber status (Non-Professional or Professional). Click I agree in two places ifyou selected Non-Professional, then clickContinue.
11. Select news andmarket data subscriptions for the client templates by clicking the appropriate check
boxes, then clickContinue.
Note that you use this screen the sameway you use theMarket Data Subscriptions page in the
Manage Clients > Fees > Configuremenu.
12. Enter the client fees on a fee-per-trade basis and interest markups andmarkdowns that will be asso-
ciated with this client account template, then clickContinue.13. Verify that all the information in the client template is correct, then clickSave.
If any information is incorrect, clickBack, thenmodify the information as required and clickContinue until you return to the verification page.
When you begin the process of adding a new client account, you will be able to select your saved
client account template.
To modify an existing client account template
Account Management Users' Guide 203
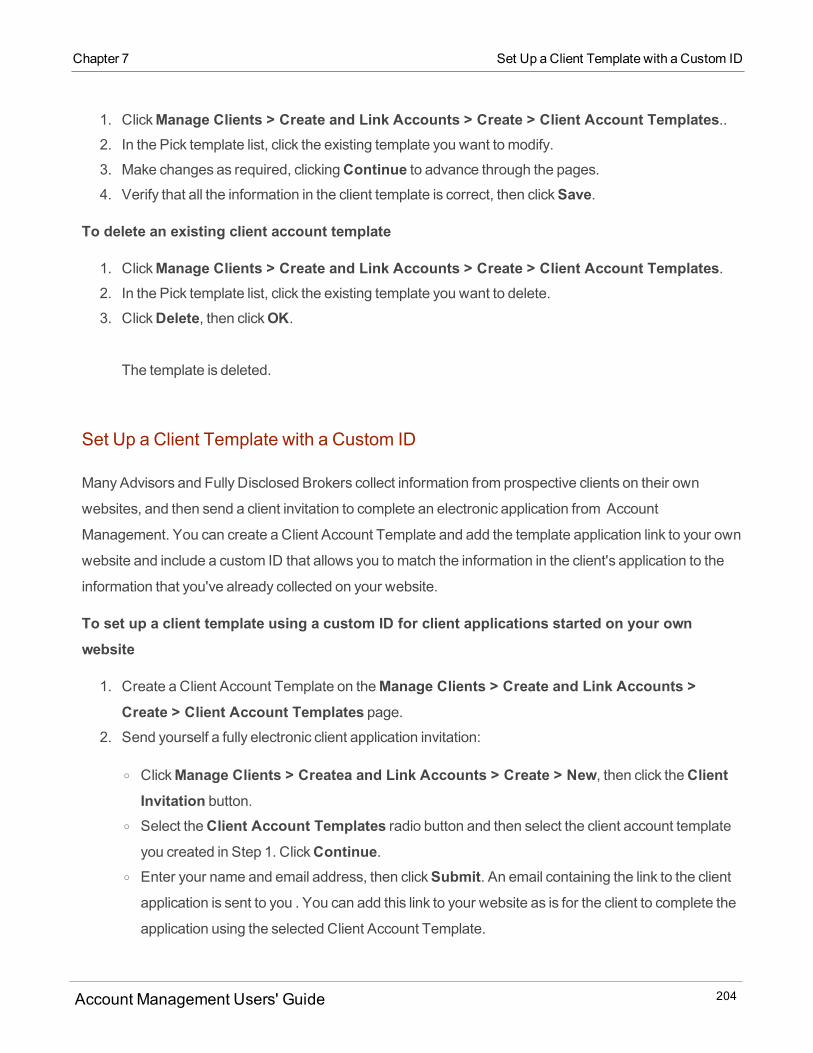
1. ClickManage Clients > Create and Link Accounts > Create > Client Account Templates..2. In the Pick template list, click the existing template you want to modify.
3. Make changes as required, clickingContinue to advance through the pages.4. Verify that all the information in the client template is correct, then clickSave.
To delete an existing client account template
1. ClickManage Clients > Create and Link Accounts > Create > Client Account Templates.2. In the Pick template list, click the existing template you want to delete.
3. ClickDelete, then clickOK.
The template is deleted.
Set Up a Client Template with a Custom ID
ManyAdvisors and Fully Disclosed Brokers collect information from prospective clients on their own
websites, and then send a client invitation to complete an electronic application from Account
Management. You can create a Client Account Template and add the template application link to your own
website and include a custom ID that allows you tomatch the information in the client's application to the
information that you've already collected on your website.
To set up a client template using a custom ID for client applications started on your ownwebsite
1. Create a Client Account Template on theManage Clients > Create and Link Accounts >Create > Client Account Templates page.
2. Send yourself a fully electronic client application invitation:
o ClickManage Clients > Createa and Link Accounts > Create > New, then click theClientInvitation button.
o Select theClient Account Templates radio button and then select the client account templateyou created in Step 1. ClickContinue.
o Enter your name and email address, then clickSubmit. An email containing the link to the clientapplication is sent to you . You can add this link to your website as is for the client to complete the
application using the selected Client Account Template.
Account Management Users' Guide 204
Chapter 7 Set Up a Client Template with a Custom ID
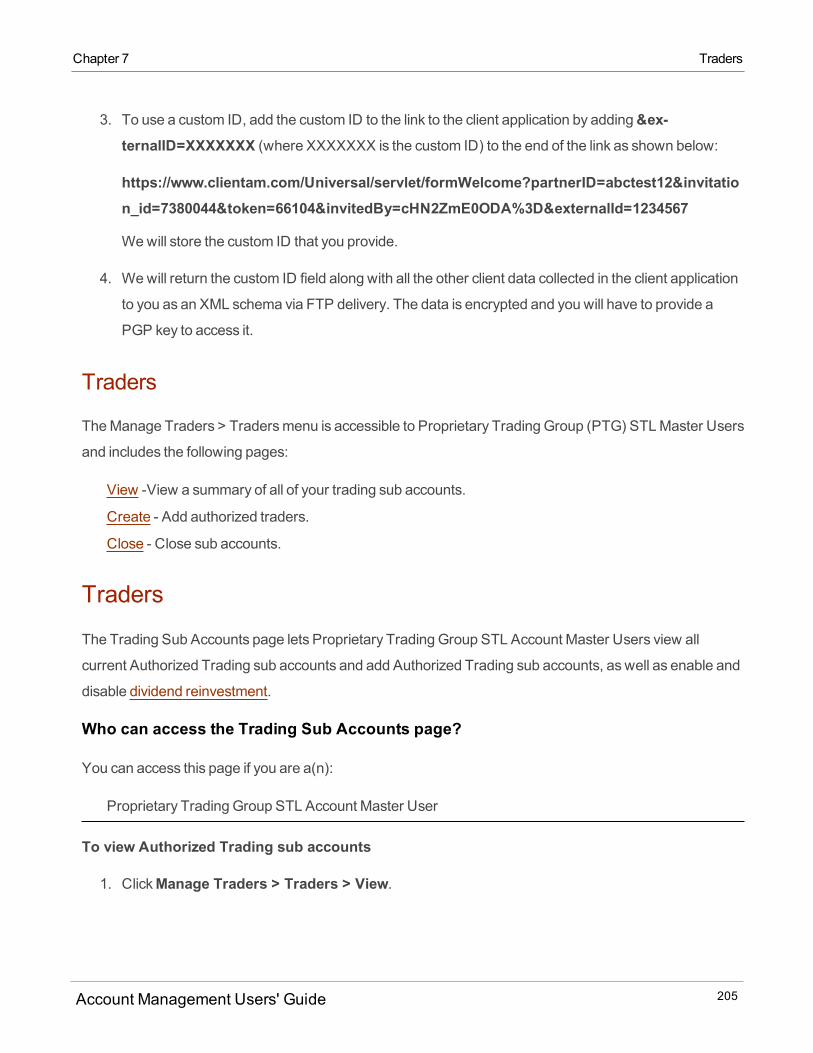
Chapter 7 Traders
3. To use a custom ID, add the custom ID to the link to the client application by adding&ex-ternalID=XXXXXXX (where XXXXXXX is the custom ID) to the end of the link as shown below:
https://www.clientam.com/Universal/servlet/formWelcome?partnerID=abctest12&invitation_id=7380044&token=66104&invitedBy=cHN2ZmE0ODA%3D&externalId=1234567
We will store the custom ID that you provide.
4. We will return the custom ID field along with all the other client data collected in the client application
to you as an XML schema via FTP delivery. The data is encrypted and you will have to provide a
PGP key to access it.
Traders
TheManage Traders > Tradersmenu is accessible to Proprietary Trading Group (PTG) STL Master Users
and includes the following pages:
View -View a summary of all of your trading sub accounts.
Create - Add authorized traders.
Close - Close sub accounts.
Traders
The Trading Sub Accounts page lets Proprietary Trading Group STL Account Master Users view all
current Authorized Trading sub accounts and add Authorized Trading sub accounts, as well as enable and
disable dividend reinvestment.
Who can access the Trading Sub Accounts page?
You can access this page if you are a(n):
Proprietary Trading Group STL Account Master User
To view Authorized Trading sub accounts
1. ClickManage Traders > Traders > View.
Account Management Users' Guide 205
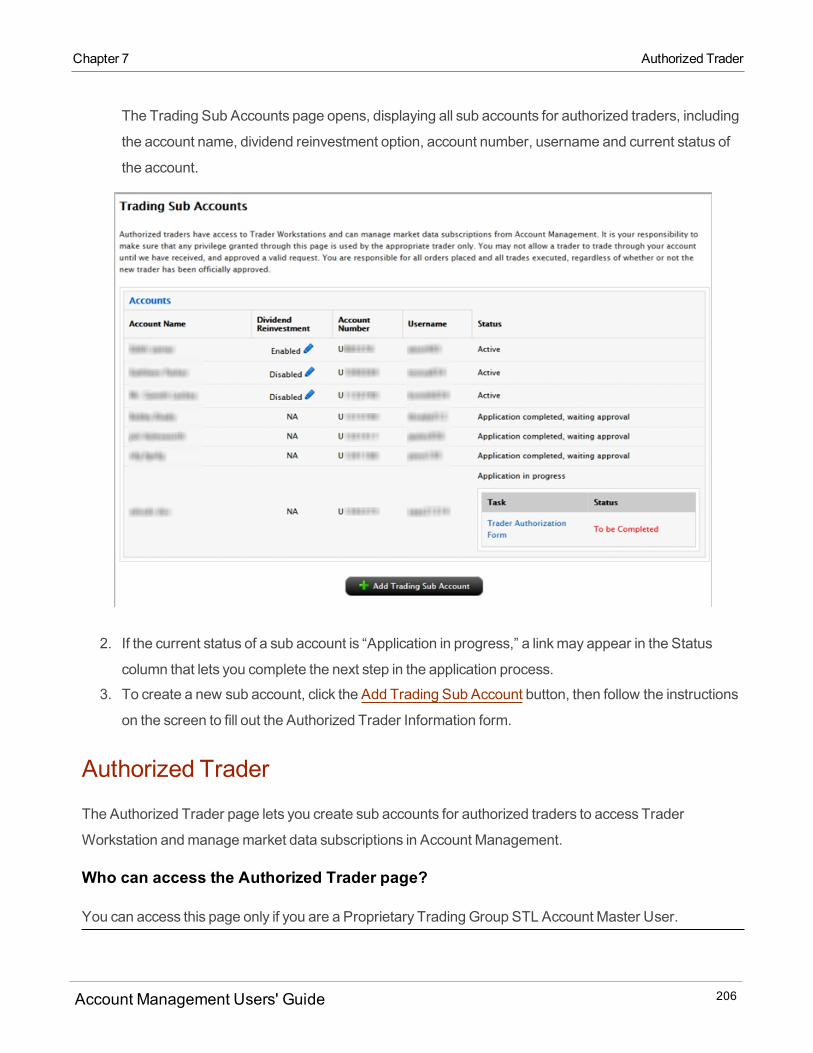
The Trading Sub Accounts page opens, displaying all sub accounts for authorized traders, including
the account name, dividend reinvestment option, account number, username and current status of
the account.
2. If the current status of a sub account is “Application in progress,” a linkmay appear in the Status
column that lets you complete the next step in the application process.
3. To create a new sub account, click the Add Trading Sub Account button, then follow the instructions
on the screen to fill out the Authorized Trader Information form.
Authorized Trader
The Authorized Trader page lets you create sub accounts for authorized traders to access Trader
Workstation andmanagemarket data subscriptions in Account Management.
Who can access the Authorized Trader page?
You can access this page only if you are a Proprietary Trading Group STL Account Master User.
Account Management Users' Guide 206
Chapter 7 Authorized Trader
Chapter 7 Authorized Trader
To add an authorized trader
1. ClickManage Traders > Traders > Create > Authorized Trader.
The Authorized Trader Information page opens.
Account Management Users' Guide 207
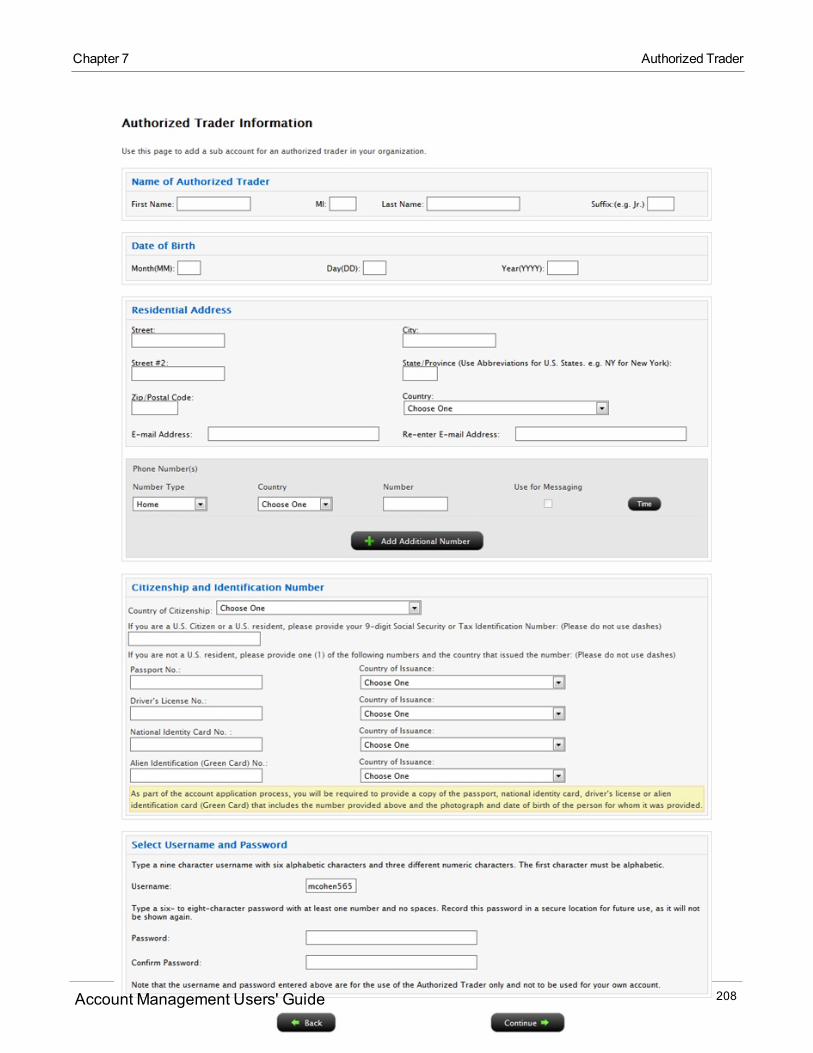
Account Management Users' Guide 208
Chapter 7 Authorized Trader
Chapter 7 Close Account
2. Enter all required information, then Continue.
The Trader added page opens, which confirms your request and contains a link to the Trader
Authorization Form.
3. ClickTrader Authorization Form.
4. Read the form carefully, then sign the form by typing your name in the field provided.
5. ClickContinue.
Close Account
Broker Master Users and Proprietary Trading Group STL Master Users use this Close Account page to
submit a request to close a non-disclosed client account or sub account. If you have one or more open
client/sub accounts, your request to close your account will not be processed until all client/sub accounts
are closed.
For USD-based accounts, we will initiate an ACH transfer based on an ACH bank instruction you have on
file. If you havemore than one ACH bank instruction on file, you will have the opportunity to select one. If
you do not have any ACH bank instructions, we will issue a check to your U.S. mailing address on file. For
all non-USD based accounts, we will issue a wire based on the banking instruction on file.
These instructions describe how to use the Close Account page in Account Management. The instructions
on the Close Account page summarize the steps that youmust take to close your account. For amore
detailed description of the account closure process, see How to Close Your Account.
Who can access the Close Account page in the Manage Clients menu?
You can access this page if you are a(n):
Broker Master User (fully disclosed and non-disclosed client accounts)
Proprietary Trading Group STL Master User
To close an account from Account Management
1. ClickManage Clients > Create and Link Accounts > Close. Proprietary Trading GroupSTL Master Users clickManage Traders > Close.
Account Management Users' Guide 209
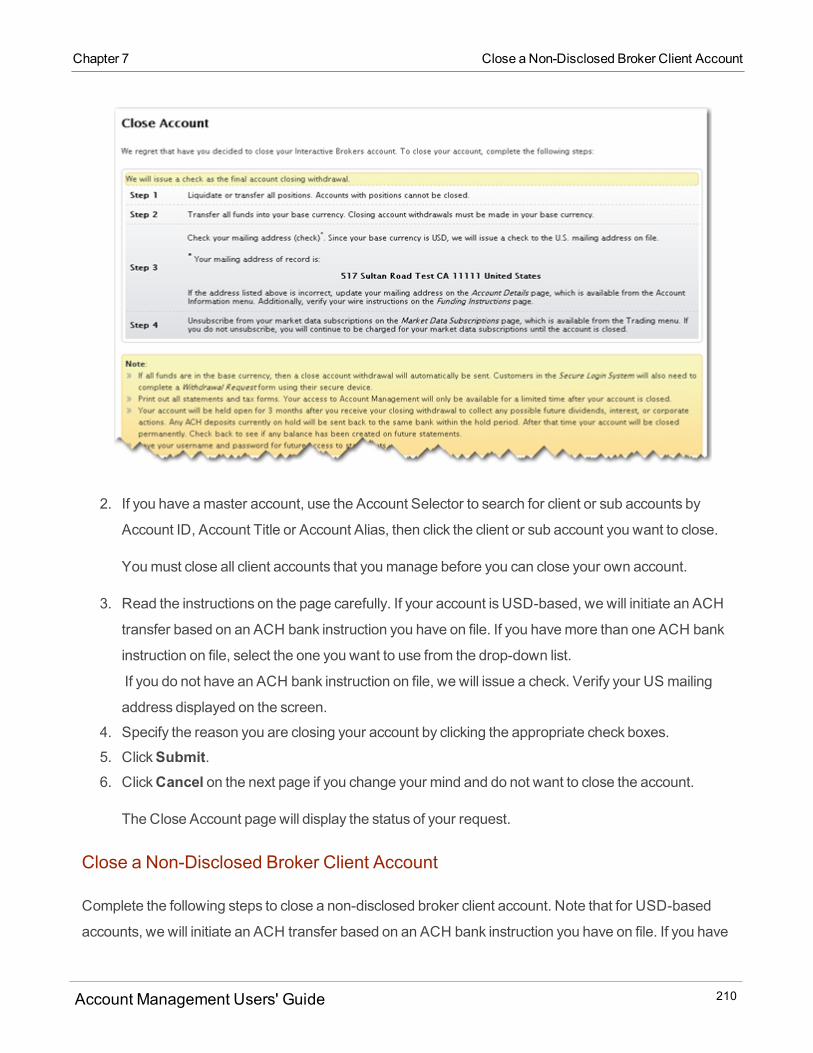
2. If you have amaster account, use the Account Selector to search for client or sub accounts by
Account ID, Account Title or Account Alias, then click the client or sub account you want to close.
Youmust close all client accounts that youmanage before you can close your own account.
3. Read the instructions on the page carefully. If your account is USD-based, we will initiate an ACH
transfer based on an ACH bank instruction you have on file. If you havemore than one ACH bank
instruction on file, select the one you want to use from the drop-down list.
If you do not have an ACH bank instruction on file, we will issue a check. Verify your US mailing
address displayed on the screen.
4. Specify the reason you are closing your account by clicking the appropriate check boxes.
5. ClickSubmit.6. ClickCancel on the next page if you change your mind and do not want to close the account.
The Close Account page will display the status of your request.
Close a Non-Disclosed Broker Client Account
Complete the following steps to close a non-disclosed broker client account. Note that for USD-based
accounts, we will initiate an ACH transfer based on an ACH bank instruction you have on file. If you have
Account Management Users' Guide 210
Chapter 7 Close a Non-Disclosed Broker Client Account
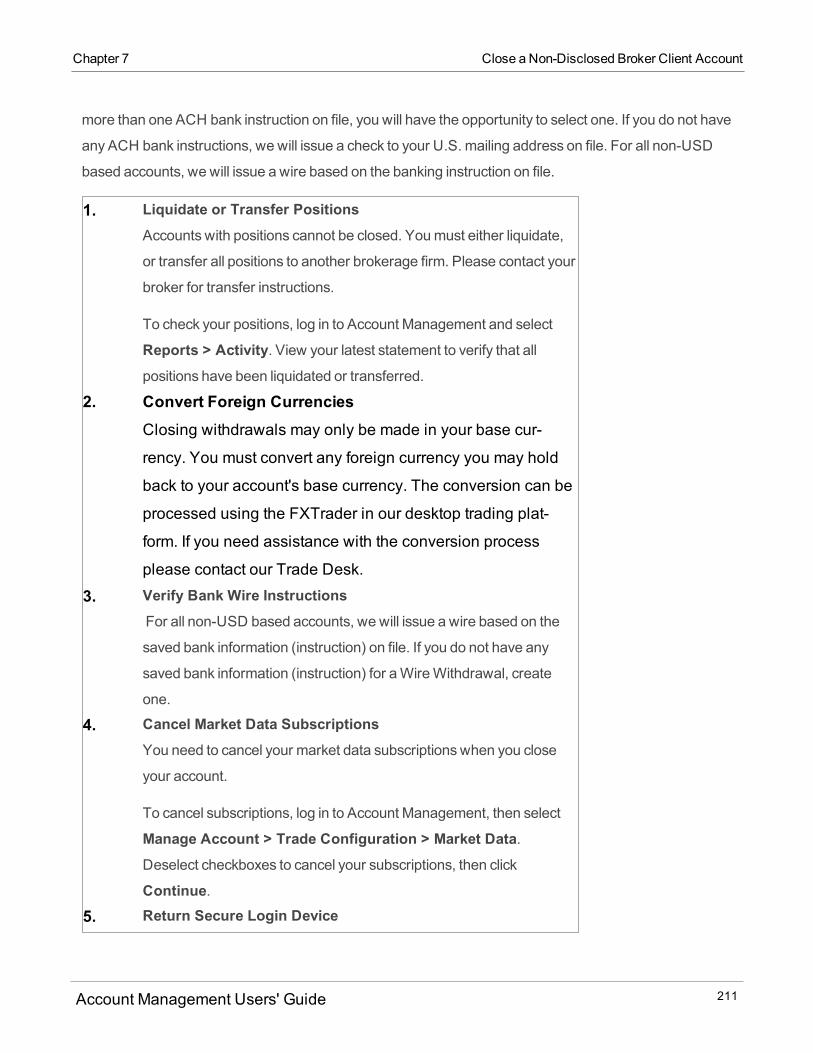
Chapter 7 Close a Non-Disclosed Broker Client Account
more than one ACH bank instruction on file, you will have the opportunity to select one. If you do not have
any ACH bank instructions, we will issue a check to your U.S. mailing address on file. For all non-USD
based accounts, we will issue a wire based on the banking instruction on file.
1. Liquidate or Transfer PositionsAccounts with positions cannot be closed. Youmust either liquidate,
or transfer all positions to another brokerage firm. Please contact your
broker for transfer instructions.
To check your positions, log in to Account Management and select
Reports > Activity. View your latest statement to verify that all
positions have been liquidated or transferred.
2. Convert Foreign CurrenciesClosing withdrawals may only be made in your base cur-
rency. You must convert any foreign currency you may hold
back to your account's base currency. The conversion can be
processed using the FXTrader in our desktop trading plat-
form. If you need assistance with the conversion process
please contact our Trade Desk.3. Verify Bank Wire Instructions
For all non-USD based accounts, we will issue a wire based on the
saved bank information (instruction) on file. If you do not have any
saved bank information (instruction) for aWireWithdrawal, create
one.
4. Cancel Market Data SubscriptionsYou need to cancel your market data subscriptionswhen you close
your account.
To cancel subscriptions, log in to Account Management, then select
Manage Account > Trade Configuration > Market Data.Deselect checkboxes to cancel your subscriptions, then click
Continue.5. Return Secure Login Device
Account Management Users' Guide 211
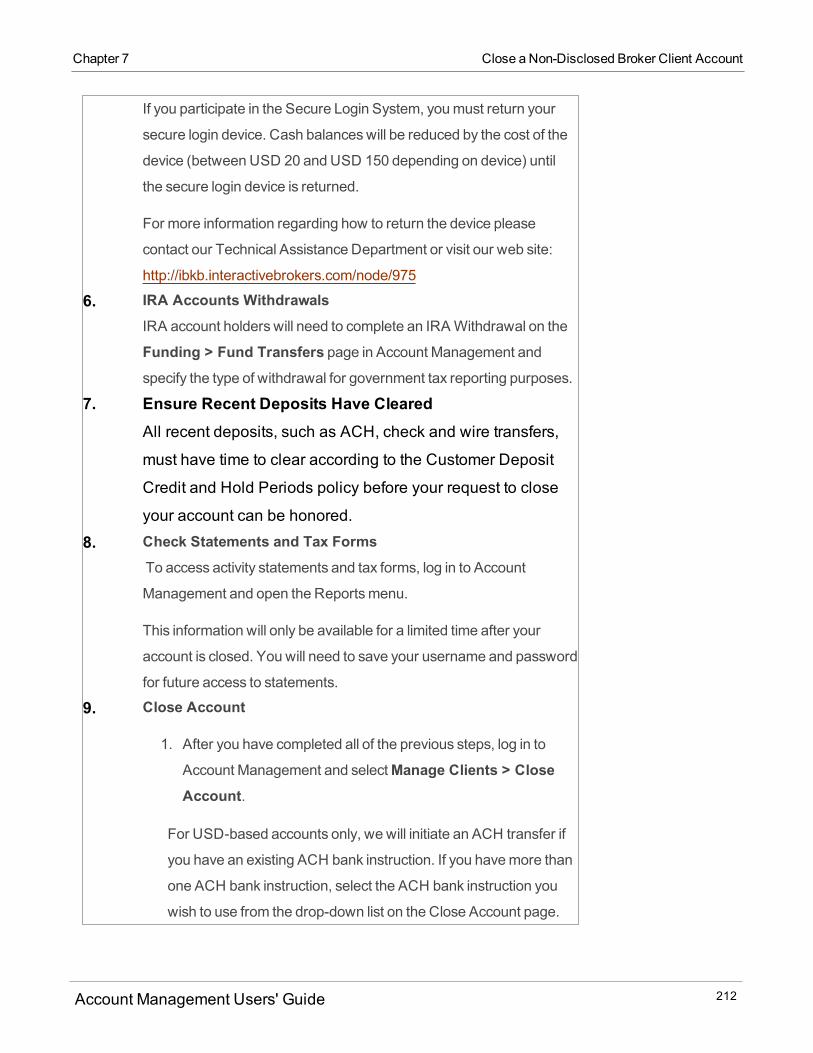
If you participate in the Secure Login System, youmust return your
secure login device. Cash balanceswill be reduced by the cost of the
device (between USD 20 and USD 150 depending on device) until
the secure login device is returned.
For more information regarding how to return the device please
contact our Technical Assistance Department or visit our web site:
http://ibkb.interactivebrokers.com/node/975
6. IRA Accounts WithdrawalsIRA account holders will need to complete an IRAWithdrawal on the
Funding > Fund Transfers page in Account Management andspecify the type of withdrawal for government tax reporting purposes.
7. Ensure Recent Deposits Have ClearedAll recent deposits, such as ACH, check and wire transfers,
must have time to clear according to the Customer Deposit
Credit and Hold Periods policy before your request to close
your account can be honored.8. Check Statements and Tax Forms
To access activity statements and tax forms, log in to Account
Management and open the Reportsmenu.
This information will only be available for a limited time after your
account is closed. You will need to save your username and password
for future access to statements.
9. Close Account
1. After you have completed all of the previous steps, log in to
Account Management and selectManage Clients > CloseAccount.
For USD-based accounts only, we will initiate an ACH transfer if
you have an existing ACH bank instruction. If you havemore than
one ACH bank instruction, select the ACH bank instruction you
wish to use from the drop-down list on the Close Account page.
Account Management Users' Guide 212
Chapter 7 Close a Non-Disclosed Broker Client Account
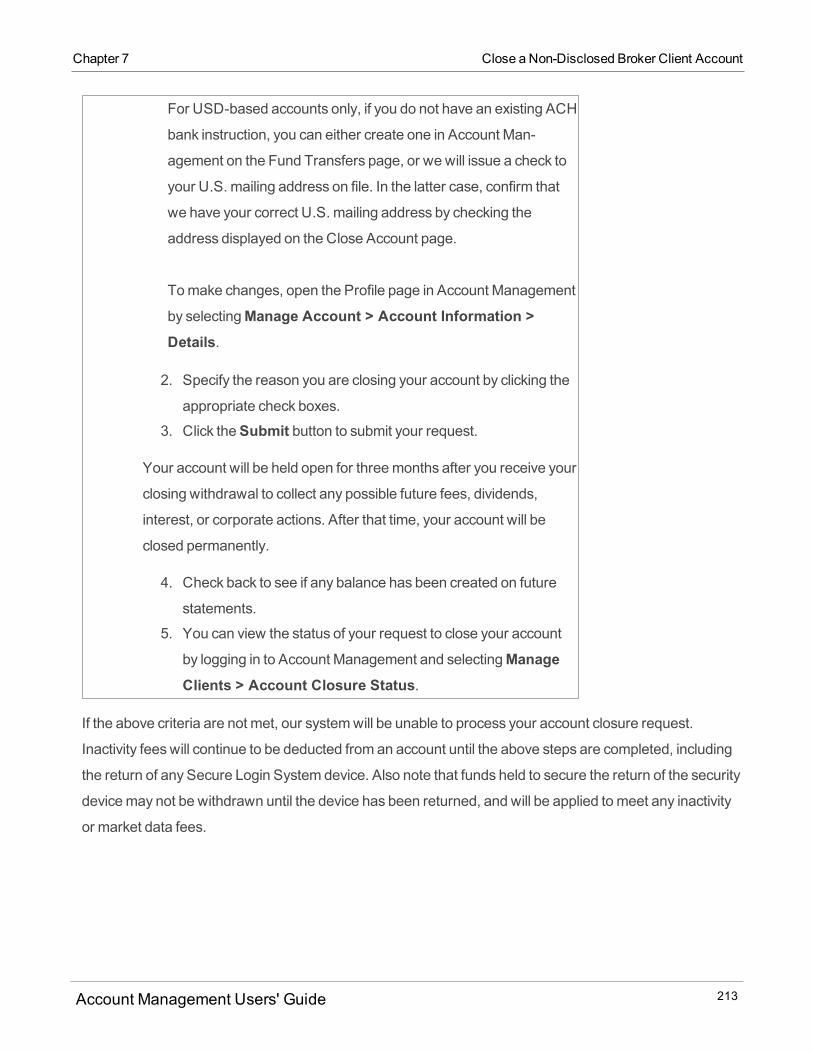
Chapter 7 Close a Non-Disclosed Broker Client Account
For USD-based accounts only, if you do not have an existing ACH
bank instruction, you can either create one in Account Man-
agement on the Fund Transfers page, or we will issue a check to
your U.S. mailing address on file. In the latter case, confirm that
we have your correct U.S. mailing address by checking the
address displayed on the Close Account page.
Tomake changes, open the Profile page in Account Management
by selectingManage Account > Account Information >Details.
2. Specify the reason you are closing your account by clicking the
appropriate check boxes.
3. Click theSubmit button to submit your request.
Your account will be held open for threemonths after you receive your
closing withdrawal to collect any possible future fees, dividends,
interest, or corporate actions. After that time, your account will be
closed permanently.
4. Check back to see if any balance has been created on future
statements.
5. You can view the status of your request to close your account
by logging in to Account Management and selectingManageClients > Account Closure Status.
If the above criteria are not met, our systemwill be unable to process your account closure request.
Inactivity feeswill continue to be deducted from an account until the above steps are completed, including
the return of any Secure Login System device. Also note that funds held to secure the return of the security
devicemay not be withdrawn until the device has been returned, and will be applied tomeet any inactivity
or market data fees.
Account Management Users' Guide 213
Account Closure Status
TheClosure Status page lets Non-Disclosed Brokers who have submitted requests to close a client's
account view the status of their request.
To check the status of account closure request
1. Login into Account Management. Note that Account Management for closed accounts displays an
abbreviatedmenu.
2. ClickManage Clients > Accounts > Close Account.The Closure Status page displays.
Any pending or outstanding items required to close your account are displayed on the screen.
Client Fees
TheClient Feesmenu gives advisors and brokers access to client fee schedules. The following pages are
included in the Client Feesmenu:
Configure Fees - Advisors and Brokers use this page to set up client fees.
Invoicing - Advisors and Brokers use this page to submit daily fee invoices for multiple client accounts,
view and update pending invoices and review invoices. Advisors can also reimburse fees to clients.
Templates - Advisors and Brokers use this page to create and edit client fee templates.
Markup Summary - Displays a commissionmarkup summary for broker client accounts.
HFCIP Fees - Advisors can charge client fees based on clients' investments in Hedge Funds available
through our Hedge FundMarketplace.
Advisor Client Fees
Advisors can charge the following types of fees to their clients:
No fee - The advisor does not charge a client fee.
Client fees - A calculated advisor fee is automatically billed to the client's account with blanket client
authorization using onemethod or a combination of several methods:
Account Management Users' Guide 214
Chapter 7 Account Closure Status
Chapter 7 Broker Client Fees
o Annualized Percentage of Net Liquidation Value, with posting frequencies of daily, monthly or
quarterlyo Annualized Flat fee, with posting frequencies of daily, monthly or quarterlyo Percent of Profit and Loss (P&L). Themaximumpercent of P&L that you can you charge for
either period is 35%.o Fee per trade - For non-US advisors and commodity-registered advisors in the US and
US protectorates (futures only). Note that you cannot select fee per trade for MoneyManagers.
Advisors can also submit electronic invoices in Account Management for client fees.
Broker Client Fees
Brokers can set individual fee schedules that apply to specific client accounts or create fee schedule
templates and apply them to one or more client accounts.
Brokers can charge the following types of fees to their clients:
Minimumandmaximum fee per trade
Ticket charge per trade
Client markups
Absolute fees for specific products and exchanges
Regulatory and exchange fees (pass-through fees)
Interest markups andmarkdowns
Brokers can also submit electronic invoices in Account Management for client fees.
Advisor Client Fees
Professional Advisors can charge fees to their clients for services rendered using one of themethods
described below.
The information in this topic also applies toMultiple Fund Investment Managers with SeparatelyManaged
Accounts (SMAs). These Fund Investment Managers can charge the same types of fees to SMAs in their
account structure as Advisors can charge to their advisor clients.
Account Management Users' Guide 215
All advisor client fees are set up on theManage Clients > Fees > Configure page in AccountManagement.
No Fee - An advisor chooses not to charge his or clients a fee for services rendered.
Client Fees - A calculated fee is automatically billed to the client's account with blanket client author-
ization. Be aware that client fees are subject to certain caps and limitations.
Advisors can choose one of several methods of calculating client fees:o Annualized Percentage of Net Liquidation Value, with posting frequencies of daily, monthly or
quarterlyo Annualized Flat fee, with posting frequencies of daily, monthly or quarterlyo Percent of Profit and Loss (P&L). Themaximumpercent of P&L that you can you charge for
either period is 35%.o Fee per trade unit - Not available for US or US protectorate legal residents due to regulatory
restrictions, with the exception of US commodity-registered advisors, who are allowed a fee-per-
trade schedule for futures.
For Forex fee per trade unit, themark-up is calculated on the second currency of an FX pair, so
for example, if a client trades in EUR.USD, themarkup is based on the USD and not the EUR.
Invoicing - Advisors can submit electronic invoices for client fees on amonthly or quarterly basis byentering amaximumamount, a maximumpercentage of the amount of a client account's net asset
value to be invoiced, or both. Invoices can be submitted for up to ten clients at a time, but only one
invoice can be submitted per client account per day. Advisors can also upload a .csv file that contains
multiple client invoices.
Click here for client fee examples.
Regardless of themethod chosen, advisors determine the fees at the time of the client’s registration, and
canmodify them at any time. Advisor clients are required to acknowledge any fee increase with a
signature.
In addition to the advisor client fees specified, Wewill charge our normal commissions to the client.
Account Management Users' Guide 216
Chapter 7 Advisor Client Fees

Chapter 7 Fee Reimbursement
Fee Reimbursement
Advisors can reimburse fees to client accounts. Twelvemonths of fees are eligible for reimbursement, up
to amaximum (net of any prior rebate) of 50% of the trailing 12months. The following additional rules apply
to client fee reimbursements:
A rebate of fees increases the fee caps and are reflect as such in reports.
Fee reimbursements are processed as a simultaneous debit to the Advisor Master account and a credit
to the client account.
If theMaster account does not have the sufficient funds to satisfy the fee reimbursement, the fee reim-
bursement request will fail.
Advisors can submit and review fee reimbursements on the Client Invoicing page.
Charge Commissions and/or Client Fees to the Advisor Master Account
Advisors can elect to charge commissions aswell asminimummonthly fees, market data and research
fees to their ownMaster account instead of to their client accounts. Advisors canmake these elections for
individual client accounts on the Configure Fees page.
Client Fee Templates
Client fee schedules are stored as templates. As an advisor, you can configure fees for one or more client
accounts, or set up client fee schedules in templates, then assign the templates to client accounts. The use
of templates allows you to easilymaintain different fee schedules for multiple client accounts.
For more information, see Client Fee Templates.
Overview of Advisor Client Fees
With advisor client fees, a calculated fee is automatically billed to the client's account with blanket client
authorization using any of the following in any combination:
Fund Investment Managers with SeparatelyManaged Accounts (SMAs) can also configure fees based for
their SMA accounts.
See examples of advisor client fees below.
Percent of Net Liquidation Value
Account Management Users' Guide 217
Enter this as an annualized percentage, applied on a daily, monthly or quarterly basis.
Note: Check Blended to charge a blended or unblended rate based on up to five ranges of yourclient's Net Asset Value (NAV).
Flat Fee
Enter this as an annualized amount, applied on a daily, monthly or quarterly basis (apportioned by 252
days).
Percent of P&L
A fixed percent is applied to themark-to-market P&L (positive or negative) at the end of each period. Any
changesmade to the specified percent during a period will only be applied on a forward looking basis and
will not be applied retroactively.
If you domake changes during a period, we break the period into two pieces and apply fees accordingly. If
at the end of the billing period the accumulated fee calculation is negative, no fee will be charged. Two
periodsmay be specified for this calculation:
Quarterly as of 3/31, 6/30, 9/30, and 12/31. Feeswill be posted 10 days after the close of a quarter.
Annually as of 12/31. Feeswill be posted 10 days after the close of the year.
For the purpose of calculating performance fees, P&L on FX trades is included solely on the dates at which
the position is either open or closed and excludes the effect of any exchange rate fluctuations between
those dates. On the open and close dates, P&L is calculated based upon the difference between the trade
price and the end of day conversion rate.
Fee per trade unit (shares, contracts, %) - Specified by currency/asset class
Advisors can set a fee per trade unit as one of the following:
An absolutemarkup over and above our standard commissions.
A percentage of our standard commission.
An absolute amount, fromwhich our standard commissionswill be subtracted.
Fee per trade unit is not available for US or US protectorate legal residents due to regulatory restrictions,
with the exception of US commodity-registered advisors, who are allowed a per-trade schedule for futures.
Account Management Users' Guide 218
Chapter 7 Overview of Advisor Client Fees
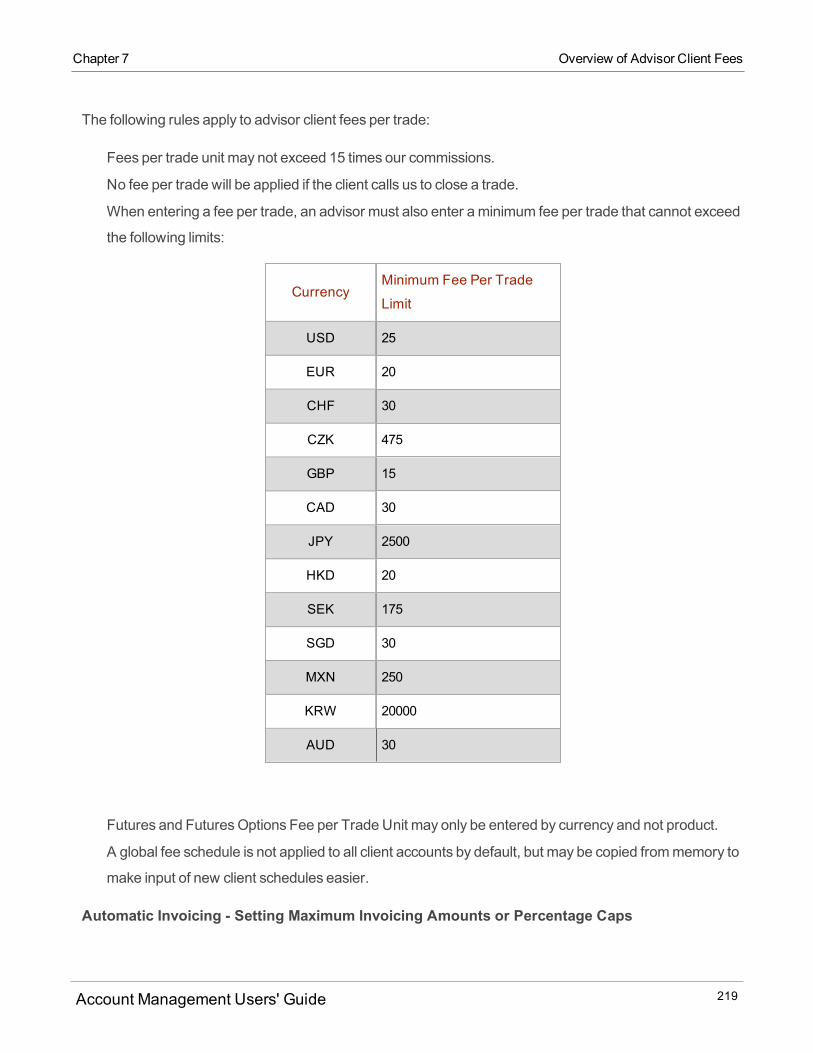
Chapter 7 Overview of Advisor Client Fees
The following rules apply to advisor client fees per trade:
Fees per trade unit may not exceed 15 times our commissions.
No fee per trade will be applied if the client calls us to close a trade.
When entering a fee per trade, an advisor must also enter aminimum fee per trade that cannot exceed
the following limits:
CurrencyMinimum Fee Per Trade
Limit
USD 25
EUR 20
CHF 30
CZK 475
GBP 15
CAD 30
JPY 2500
HKD 20
SEK 175
SGD 30
MXN 250
KRW 20000
AUD 30
Futures and FuturesOptions Fee per Trade Unit may only be entered by currency and not product.
A global fee schedule is not applied to all client accounts by default, but may be copied frommemory to
make input of new client schedules easier.
Automatic Invoicing - Setting Maximum Invoicing Amounts or Percentage Caps
Account Management Users' Guide 219
When you configure client fees, you can include amaximum invoicing amount, a percentage cap or both on
amonthly or quarterly basis. You can charge up to amaximumpercentage annually. We calculate the daily
equivalent of that limit bymultiplying themaximumannual rate by the value of your account at the end of
each business day of the previousmonth or quarter and dividing that by the average number of business
days per year. The sum of those daily values over the course of themonth or quarter is themaximum
amount you can charge for that month or quarter.
You can set an amount or a percentage cap or both. If you set both the amount and the percentage cap, we
will use the lower of the two amounts as the amount to be charged.
For percentage cap, we look back on the prior period to calculate the fee limit, while amount looks at the
current period.
(Fee Cap % x Ending Client NAV) / 252
where 252 is the average number of business days in a year.
For example:
If a client account is configured for amaximum invoicing amount of 500 USD on amonthly basis and
you log into Account Management to submit an invoice for the client in July, the total amount processed
in July cannot exceed 500 USD. You can submit multiple invoices but the total cannot exceed 500 USD
for themonth.
If a client account is configured for maximum invoicing amount of 1000 USD on a quarterly basis and
you log into Account Management to submit an invoice for the client in July, the total amount processed
between July and September cannot exceed 1000 USD. You can submit multiple invoices but the total
cannot exceed 1000 USD for the quarter.
If a client account is configured for percentage cap on amonthly basis and you log into Account Man-
agement to submit an invoice for the client in April, the available fee amount is based on the client's
daily NAV for March. You can submit multiple invoices but the total cannot exceed the limit for the
period.
If a client account is configured for percentage cap on a quarterly basis and you log into Account Man-
agement to submit an invoice for the client in November, the available fee amount is based on the cli-
ent's daily NAV from July to September. You can submit multiple invoices but the total cannot exceed
the limit for the period.
Account Management Users' Guide 220
Chapter 7 Overview of Advisor Client Fees

Chapter 7 Overview of Advisor Client Fees
If a client account is configured for both amaximum invoicing amount and a percentage cap, we cal-
culate both and use the lower of the two amounts.
To view the amount of fees that you can deduct from the client, selectManage Clients > Fees> Invoicing and look at the Available Fees column.
Monthly/Quarterly Invoicing
Before you can submit electronic fee invoices for client accounts, youmust first configure Invoicing for the
account(s) on the Client Fees page in Account Management. Youmust specify an amount or percentage
cap on amonthly or quarterly basis, then calculate themarkup and submit an electronic invoice for each
client account at any time, up to the specified limit. The invoice amount will be automatically transferred
from the client account to the advisor account. Invoices submitted prior to 5:30 (17:30) PMEST will be
processed by us the same day (U.S. night) and appear on that day's statements. Invoices submitted after
5:30 (17:30) PMEST will be processed by us on the next business day. You can submit invoices for up to
ten clients at a time, but only one invoice per client account per day.
For more information on electronic invoices, see Advisor Invoicing.
High Water Marking
Advisors who select Percent of P&L as the basis of their client fees can apply HighWater Marking to the
billing period client fees to offset periods of losses in a volatile market. For more information, see High
Water Mark Setup.
Performance Fee
Advisors who select a threshold set a static number or index/benchmark as a performance fee on an
annual or quarterly basis. Your client's performancemust exceed the threshold for the fee to be assessed
to the client.
For example, if the Advisor charges an annual performance fee of 20% and sets a 10% threshold, he/she
would not be paid a fee if the client account’s annual moneyweighted return is less than or equal to 10%. If
the account’s return for the year was 50%, the FA will receive a 20% performance fee on the excess return.
(20% of (50%-10%)).
Account Management Users' Guide 221
Caps and Limitations
Client fee schedules and electronic invoices are subject to the following limitations and caps. See the
Advisor Fees page on our website for more details on caps.
Markups for advisors are limited to three times the IB commission if the client has an account balance
of less than 25,000 USD.
Advisors fees are not deducted from client accounts with balances below 3,000 USD.
Examples
Percent of Net Liquidation Value
Description:
Percentage of Net Liquidation Value entered as an annualized percentage, applied on a daily basis (252
business days are applied in this calculationmethod).
Assumption:
You specify 5% of Net Liquidation Value as an annualized percentage, and your client’s previous day
ending-equity is $100,000.
Calculation:
Your advisor client fees for the given daywill be: 5%*$100,000/252=$19.84.
Flat Fee
Description:
Flat fee entered as an annualized amount, applied on a daily basis (apportioned by 252 days).
Assumption:
You specify $1,000 as an annual flat fee for your client.
Calculation:
Your advisor client fees daily payment will be: $1,000/252=$3.97.
Account Management Users' Guide 222
Chapter 7 Caps and Limitations
Chapter 7 Percent of Annual P&L
Percent of Annual P&L
Description:
Percentage of Annual Positive P+L entered as an annualized percentage, applied on an annually basis as
of 12/31.
Assumption:
You specify 20% of annual positive P+L as your advisor client fees, and youmade $50,000 in P+L for your
client for that year.
Calculation:
Your advisor client feeswould be: $50,000*20%=$10,000.
Percent of Market-to-Market P&L
Description:
Percentage of PositiveMarket-to-Market P&L entered as a percentage, applied on a quarterly basis as of
3/31, 6/30, 9/30, and 12/31.
Assumption:
As an example, if you specify 2% of Market-to-Market P+L, youmade $50,000 in P+L for the last quarter.
Calculation:
Your client will be charged $50,000*2%=$1,000 for the quarter.
Configure Advisor Client Fees
Advisors configure client fee schedules on the Configure Fees page. Use the Configure Fees page to:
View and sort all client accounts.
Select one or more client accounts, then view (and if necessary, modify) the current fee schedule for
those accounts.
Select one or more client accounts, then configure and apply a fee schedule to those accounts.
Account Management Users' Guide 223
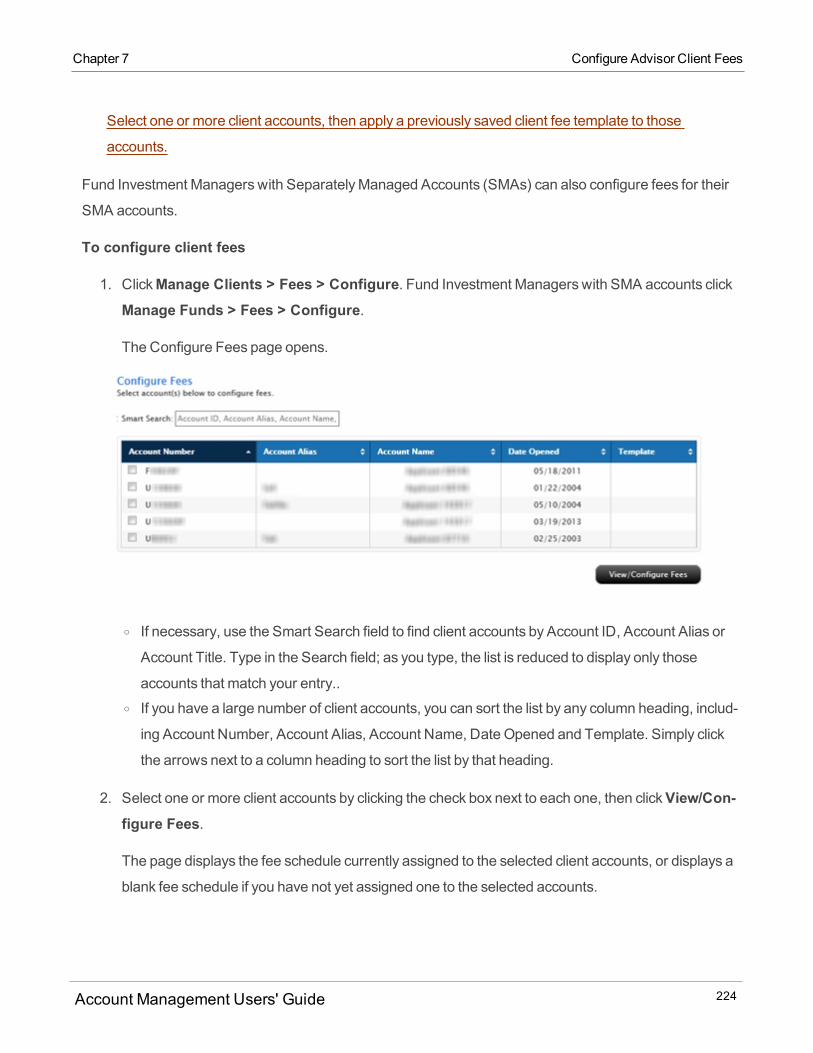
Select one or more client accounts, then apply a previously saved client fee template to those
accounts.
Fund Investment Managers with SeparatelyManaged Accounts (SMAs) can also configure fees for their
SMA accounts.
To configure client fees
1. ClickManage Clients > Fees > Configure. Fund Investment Managers with SMA accounts click
Manage Funds > Fees > Configure.
The Configure Fees page opens.
o If necessary, use the Smart Search field to find client accounts by Account ID, Account Alias or
Account Title. Type in the Search field; as you type, the list is reduced to display only those
accounts that match your entry..o If you have a large number of client accounts, you can sort the list by any column heading, includ-
ing Account Number, Account Alias, Account Name, Date Opened and Template. Simply click
the arrows next to a column heading to sort the list by that heading.
2. Select one or more client accounts by clicking the check box next to each one, then clickView/Con-figure Fees.
The page displays the fee schedule currently assigned to the selected client accounts, or displays a
blank fee schedule if you have not yet assigned one to the selected accounts.
Account Management Users' Guide 224
Chapter 7 Configure Advisor Client Fees

Chapter 7 Configure Advisor Client Fees
3. Enter client fees in the fields provided:
o To charge no fee at all, click theNo Fee check box. You can also select this option if you intend tobill your clients directly without using Account Management to configure the client's fees.
o Enter client fee amounts and select invoicing caps in any combination as desired. For details on
client fees, seeOverview of Advisor Client Fees.o For Annualized Percentage of Net Liquidation or Annualized Flat Fee, enter a percentage or
amount and then select the frequencywith which the percentage or flat fee is to be applied (Daily,
Monthly or Quarterly).o Advisors can also charge a blended rate for up to five NAV rangeswith a corresponding
fee percentage.o For Percentage of P&L, click the check box and then click the blue pencil icon to choose between
percentage of annual or percentage of quarterly P&L.o For Fee per trade unit, click the check box and then click the blue pencil icon to charge clients for
services rendered based on a fee-per-trade unit for each asset class (e.g. stocks, options, etc.),
exchange and currency. These sections are displayed in expanding and collapsing sections. Click
the gray bar to expand or collapse each section as needed to set fees per trade.
Note: Fee per trade unit is not available for US or US protectorate legal residents due to
regulatory restrictions, with the exception of US commodity-registered advisors, who are allowed a
per-trade schedule for futures.
o To enter automatic invoicing, type themaximum invoice amount in the Amount field, enter a per-
centage cap (maximumpercentage) on the amount of a client account's Net Asset Value to be
invoiced in the Cap field, and select Monthly or Quarterly (how often the invoice amount will be
Account Management Users' Guide 225
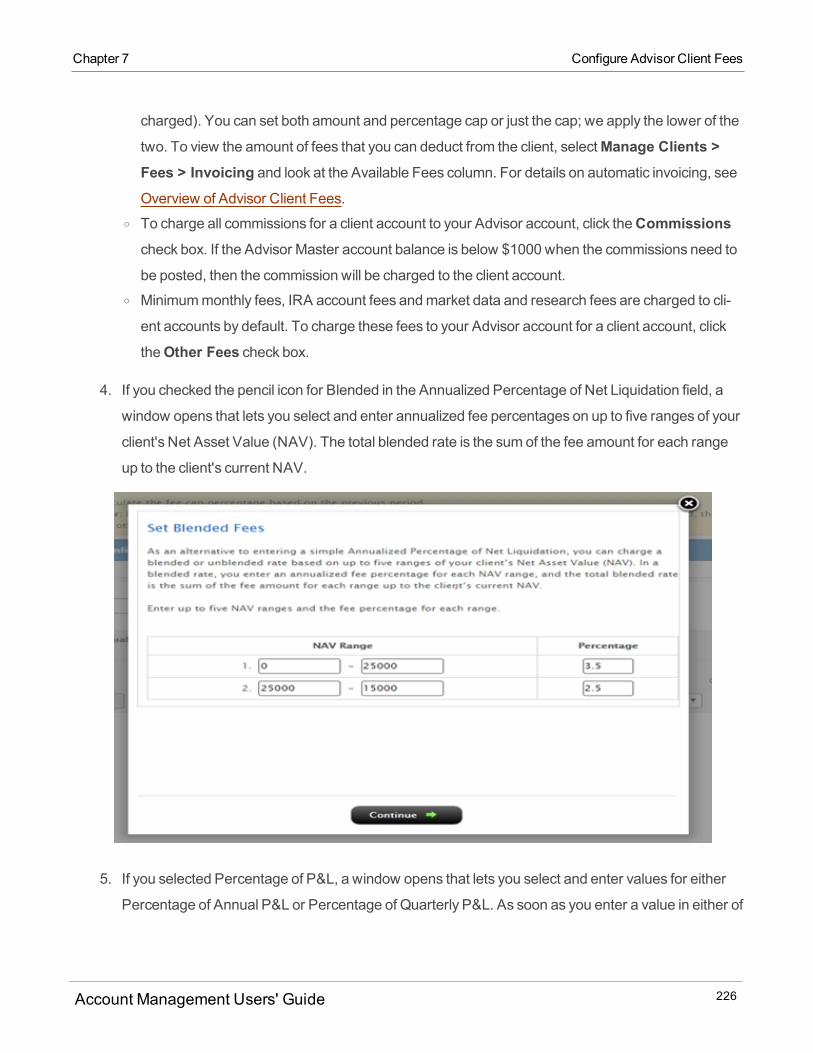
charged). You can set both amount and percentage cap or just the cap; we apply the lower of the
two. To view the amount of fees that you can deduct from the client, selectManage Clients >Fees > Invoicing and look at the Available Fees column. For details on automatic invoicing, seeOverview of Advisor Client Fees.
o To charge all commissions for a client account to your Advisor account, click theCommissionscheck box. If the Advisor Master account balance is below $1000 when the commissions need to
be posted, then the commission will be charged to the client account.o Minimummonthly fees, IRA account fees andmarket data and research fees are charged to cli-
ent accounts by default. To charge these fees to your Advisor account for a client account, click
theOther Fees check box.
4. If you checked the pencil icon for Blended in the Annualized Percentage of Net Liquidation field, a
window opens that lets you select and enter annualized fee percentages on up to five ranges of your
client's Net Asset Value (NAV). The total blended rate is the sum of the fee amount for each range
up to the client's current NAV.
5. If you selected Percentage of P&L, a window opens that lets you select and enter values for either
Percentage of Annual P&L or Percentage of Quarterly P&L. As soon as you enter a value in either of
Account Management Users' Guide 226
Chapter 7 Configure Advisor Client Fees
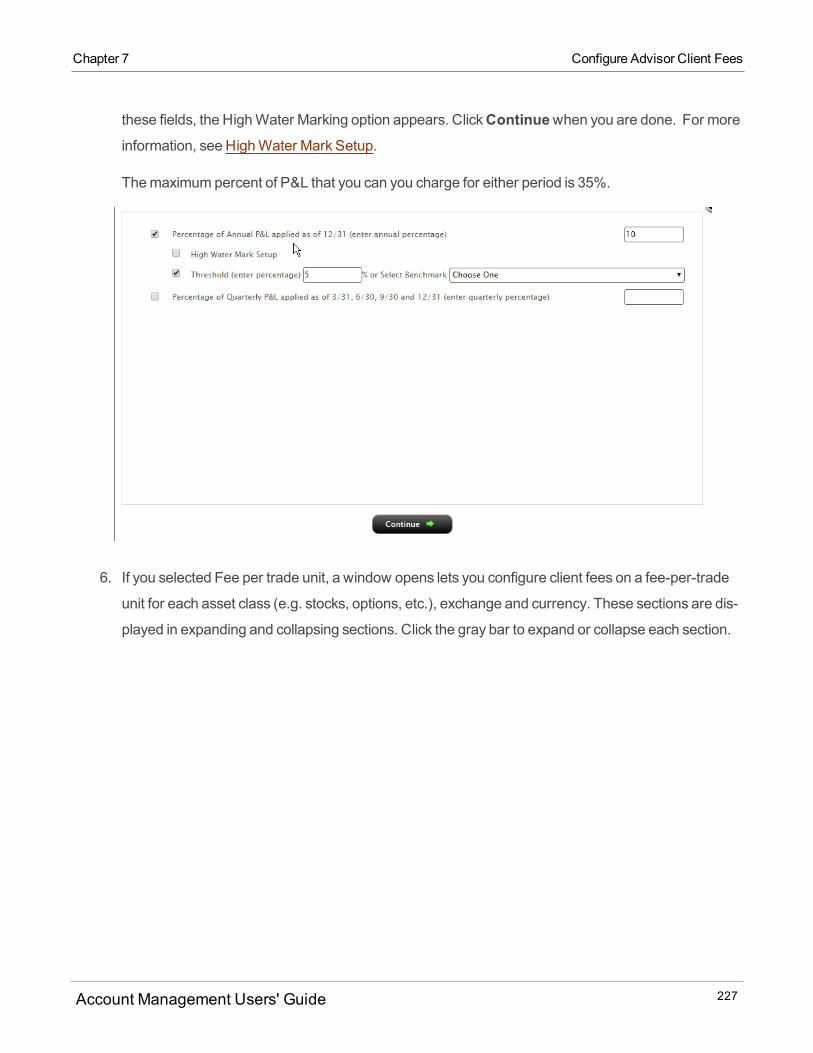
Chapter 7 Configure Advisor Client Fees
these fields, the HighWater Marking option appears. ClickContinuewhen you are done. For moreinformation, see HighWater Mark Setup.
Themaximumpercent of P&L that you can you charge for either period is 35%.
6. If you selected Fee per trade unit, a window opens lets you configure client fees on a fee-per-trade
unit for each asset class (e.g. stocks, options, etc.), exchange and currency. These sections are dis-
played in expanding and collapsing sections. Click the gray bar to expand or collapse each section.
Account Management Users' Guide 227
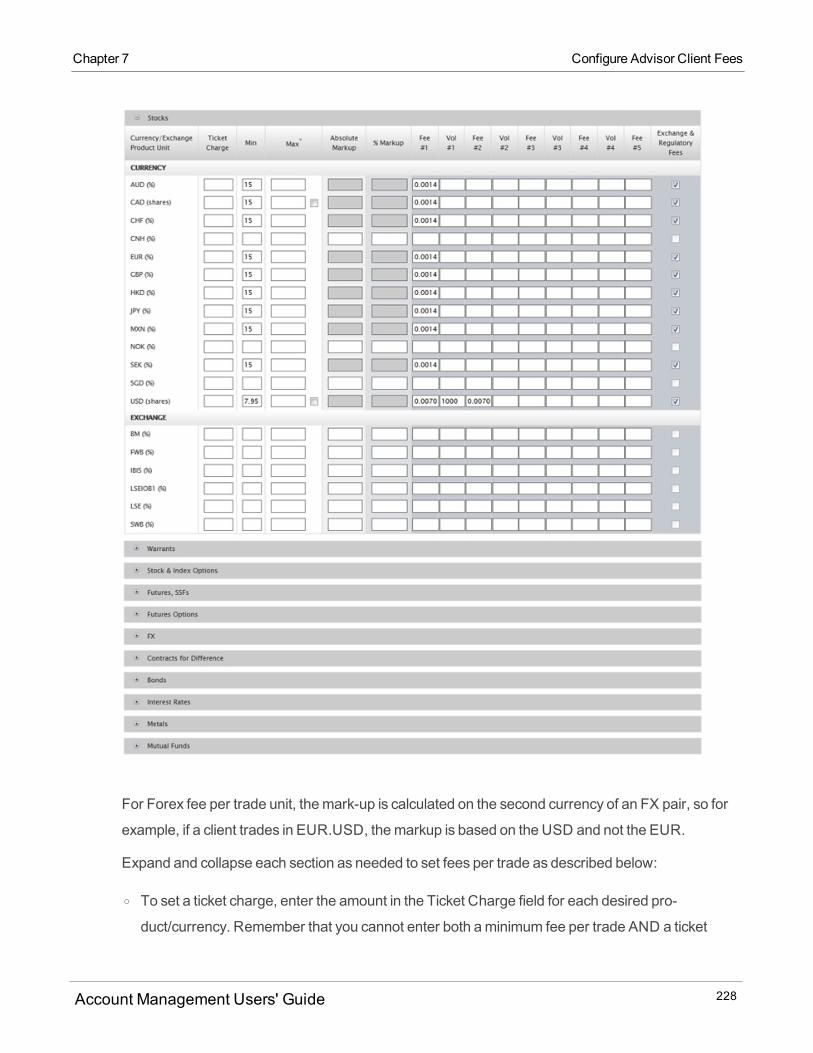
For Forex fee per trade unit, themark-up is calculated on the second currency of an FX pair, so for
example, if a client trades in EUR.USD, themarkup is based on the USD and not the EUR.
Expand and collapse each section as needed to set fees per trade as described below:
o To set a ticket charge, enter the amount in the Ticket Charge field for each desired pro-
duct/currency. Remember that you cannot enter both aminimum fee per trade AND a ticket
Account Management Users' Guide 228
Chapter 7 Configure Advisor Client Fees
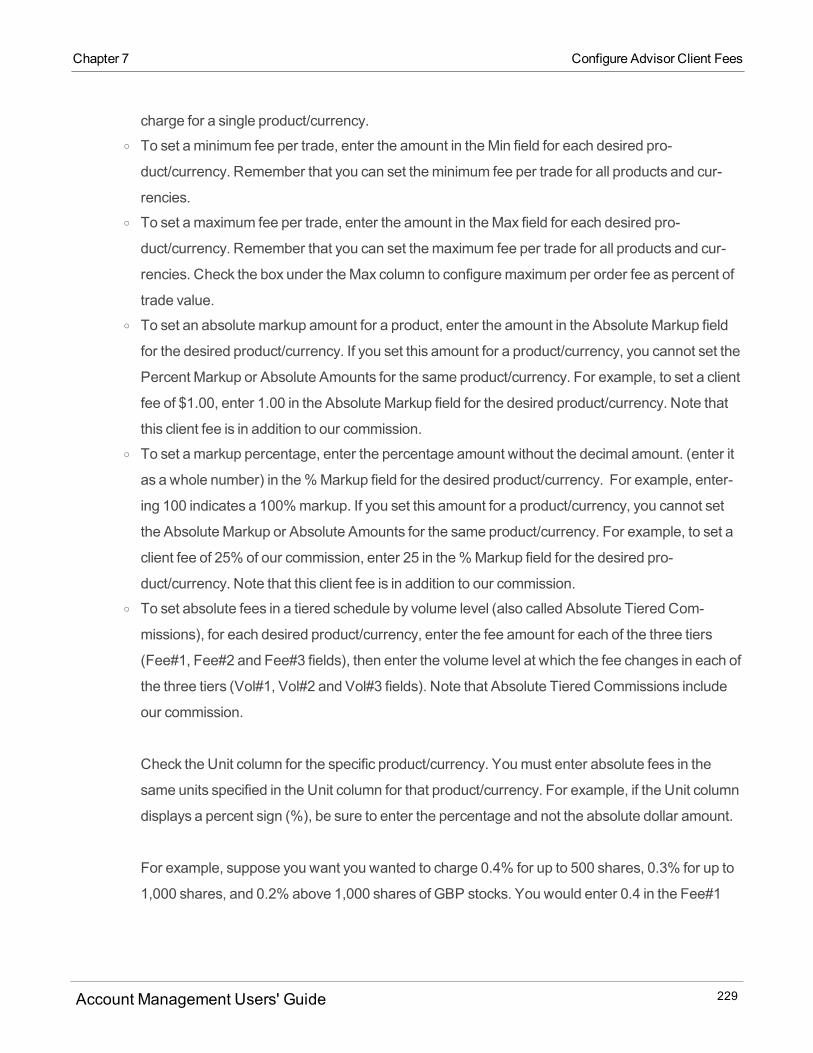
Chapter 7 Configure Advisor Client Fees
charge for a single product/currency.o To set aminimum fee per trade, enter the amount in theMin field for each desired pro-
duct/currency. Remember that you can set theminimum fee per trade for all products and cur-
rencies.o To set amaximum fee per trade, enter the amount in theMax field for each desired pro-
duct/currency. Remember that you can set themaximum fee per trade for all products and cur-
rencies. Check the box under theMax column to configuremaximumper order fee as percent of
trade value.o To set an absolutemarkup amount for a product, enter the amount in the AbsoluteMarkup field
for the desired product/currency. If you set this amount for a product/currency, you cannot set the
Percent Markup or Absolute Amounts for the same product/currency. For example, to set a client
fee of $1.00, enter 1.00 in the AbsoluteMarkup field for the desired product/currency. Note that
this client fee is in addition to our commission.o To set amarkup percentage, enter the percentage amount without the decimal amount. (enter it
as a whole number) in the%Markup field for the desired product/currency. For example, enter-
ing 100 indicates a 100%markup. If you set this amount for a product/currency, you cannot set
the AbsoluteMarkup or Absolute Amounts for the same product/currency. For example, to set a
client fee of 25% of our commission, enter 25 in the%Markup field for the desired pro-
duct/currency. Note that this client fee is in addition to our commission.o To set absolute fees in a tiered schedule by volume level (also called Absolute Tiered Com-
missions), for each desired product/currency, enter the fee amount for each of the three tiers
(Fee#1, Fee#2 and Fee#3 fields), then enter the volume level at which the fee changes in each of
the three tiers (Vol#1, Vol#2 and Vol#3 fields). Note that Absolute Tiered Commissions include
our commission.
Check the Unit column for the specific product/currency. Youmust enter absolute fees in the
same units specified in the Unit column for that product/currency. For example, if the Unit column
displays a percent sign (%), be sure to enter the percentage and not the absolute dollar amount.
For example, suppose you want you wanted to charge 0.4% for up to 500 shares, 0.3% for up to
1,000 shares, and 0.2% above 1,000 shares of GBP stocks. You would enter 0.4 in the Fee#1
Account Management Users' Guide 229
field, 500 in the Vol#1 field, 0.3 in the Fee#2 field, 1000 in the Vol#2 field, and 0.2 in the Fee#3
field. In this example, you would leave the Vol#3 field blank.
Very small numbersmay be displayed in E notation.
o Broker Master Users can set absolute amounts for products and specific exchanges. To do this,
scroll down the list of products and enter the amount in the field next to the desired product or
exchange in the applicable currency. You can also enter absolute fees in a tiered schedule as
described in the previous bullet.
o To specify that all regulatory and exchange fees be added to an Absolute Tiered Commission
schedule, click the check box for the desired product/currency.
6. To specify interest markups or markdowns for a specific currency:
o Click the PayClient No Credit Interest check box to pay all credit and short proceeds credit
interest to the broker.o In the Credit Markdown field, enter a percentage amount to be subtracted from the credit interest
paid and given to the broker.o In the Debit Markup field, enter a percentage amount to be added to the debit interest. Themax-
imummarkup is 1%.o In the Short Credit Markdown field, enter a percentage amount to be subtracted from the short
proceeds credit interest paid and given to the broker.o Specify credit markdowns and debit markups for interest associated with long and short CFDs
and long and short indexCFDs in the fields provided.
7. ClickContinue.
A confirmation page appears.
8. Click the PDF icon to print the fees schedule for your records or for your client signature, then click
Continue.
To apply a previously saved client fee template to selected accounts
1. ClickManage Clients > Fees > Configure.
The Configure Fees page opens.
Account Management Users' Guide 230
Chapter 7 Configure Advisor Client Fees
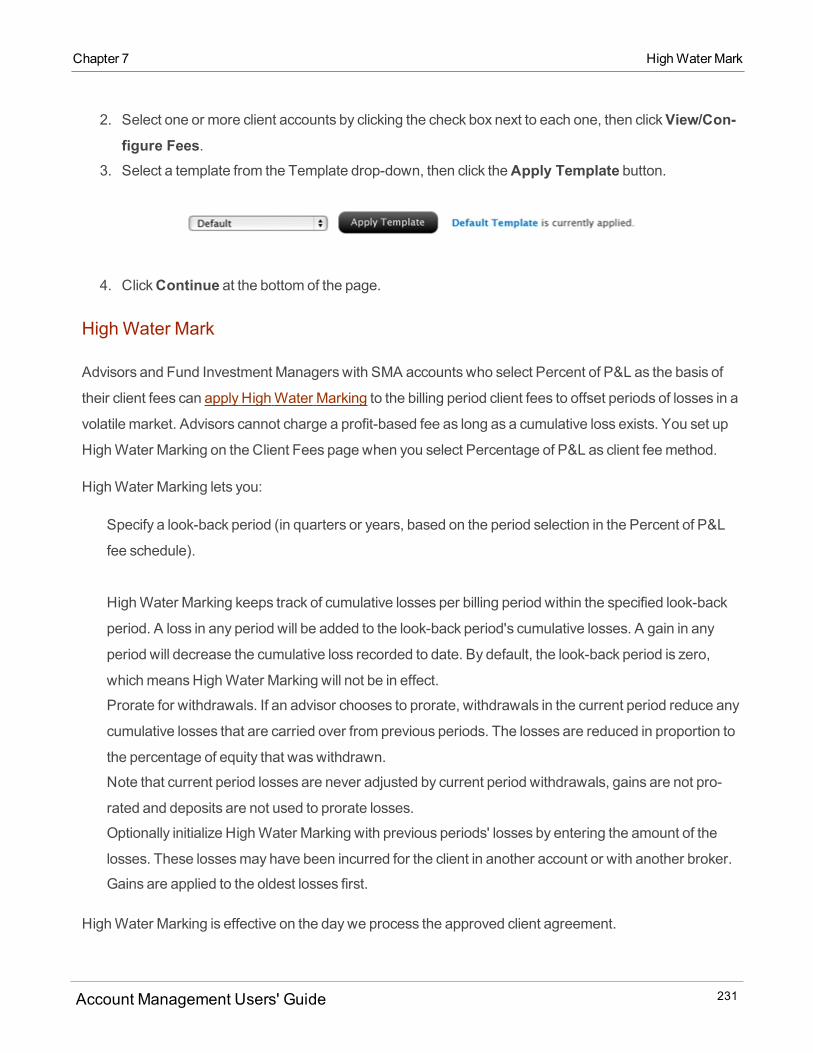
Chapter 7 HighWater Mark
2. Select one or more client accounts by clicking the check box next to each one, then clickView/Con-figure Fees.
3. Select a template from the Template drop-down, then click theApply Template button.
4. ClickContinue at the bottom of the page.
High Water Mark
Advisors and Fund Investment Managers with SMA accounts who select Percent of P&L as the basis of
their client fees can apply HighWater Marking to the billing period client fees to offset periods of losses in a
volatile market. Advisors cannot charge a profit-based fee as long as a cumulative loss exists. You set up
HighWater Marking on the Client Fees page when you select Percentage of P&L as client feemethod.
HighWater Marking lets you:
Specify a look-back period (in quarters or years, based on the period selection in the Percent of P&L
fee schedule).
HighWater Marking keeps track of cumulative losses per billing period within the specified look-back
period. A loss in any period will be added to the look-back period's cumulative losses. A gain in any
period will decrease the cumulative loss recorded to date. By default, the look-back period is zero,
whichmeansHighWater Marking will not be in effect.
Prorate for withdrawals. If an advisor chooses to prorate, withdrawals in the current period reduce any
cumulative losses that are carried over from previous periods. The losses are reduced in proportion to
the percentage of equity that waswithdrawn.
Note that current period losses are never adjusted by current period withdrawals, gains are not pro-
rated and deposits are not used to prorate losses.
Optionally initialize HighWater Marking with previous periods' losses by entering the amount of the
losses. These lossesmay have been incurred for the client in another account or with another broker.
Gains are applied to the oldest losses first.
HighWater Marking is effective on the daywe process the approved client agreement.
Account Management Users' Guide 231
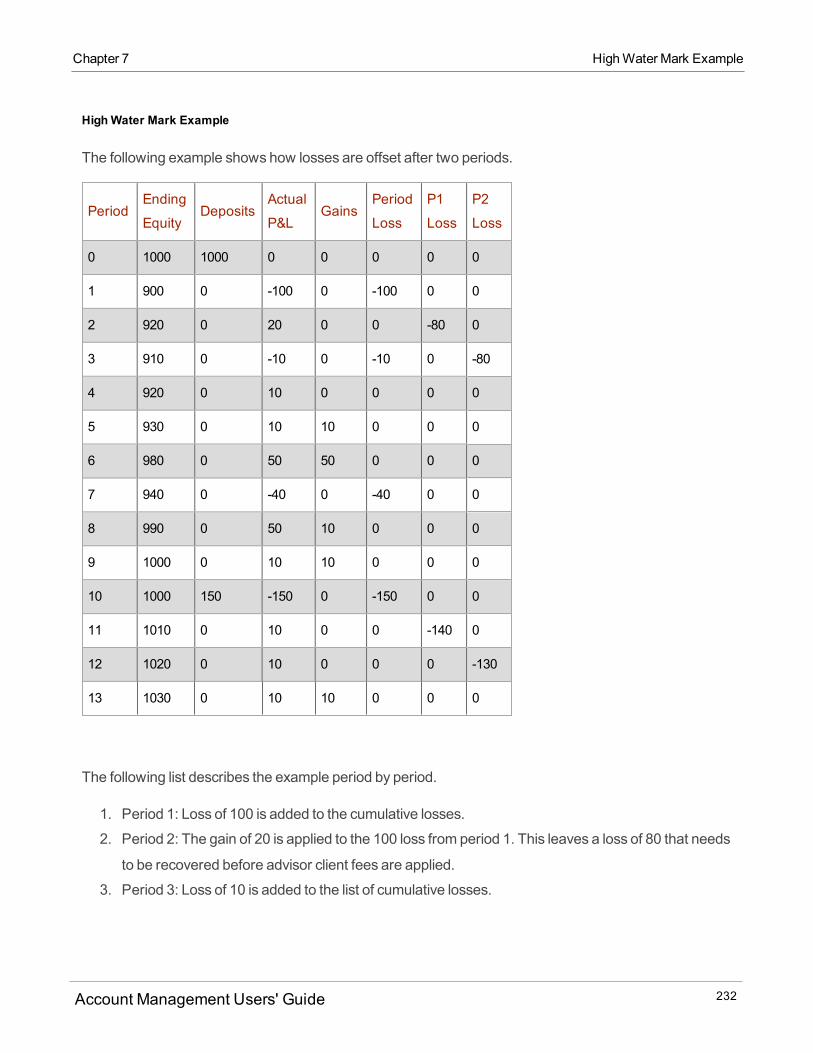
HighWater Mark Example
The following example shows how losses are offset after two periods.
PeriodEnding
EquityDeposits
Actual
P&LGains
Period
Loss
P1
Loss
P2
Loss
0 1000 1000 0 0 0 0 0
1 900 0 -100 0 -100 0 0
2 920 0 20 0 0 -80 0
3 910 0 -10 0 -10 0 -80
4 920 0 10 0 0 0 0
5 930 0 10 10 0 0 0
6 980 0 50 50 0 0 0
7 940 0 -40 0 -40 0 0
8 990 0 50 10 0 0 0
9 1000 0 10 10 0 0 0
10 1000 150 -150 0 -150 0 0
11 1010 0 10 0 0 -140 0
12 1020 0 10 0 0 0 -130
13 1030 0 10 10 0 0 0
The following list describes the example period by period.
1. Period 1: Loss of 100 is added to the cumulative losses.
2. Period 2: The gain of 20 is applied to the 100 loss from period 1. This leaves a loss of 80 that needs
to be recovered before advisor client fees are applied.
3. Period 3: Loss of 10 is added to the list of cumulative losses.
Account Management Users' Guide 232
Chapter 7 HighWater Mark Example
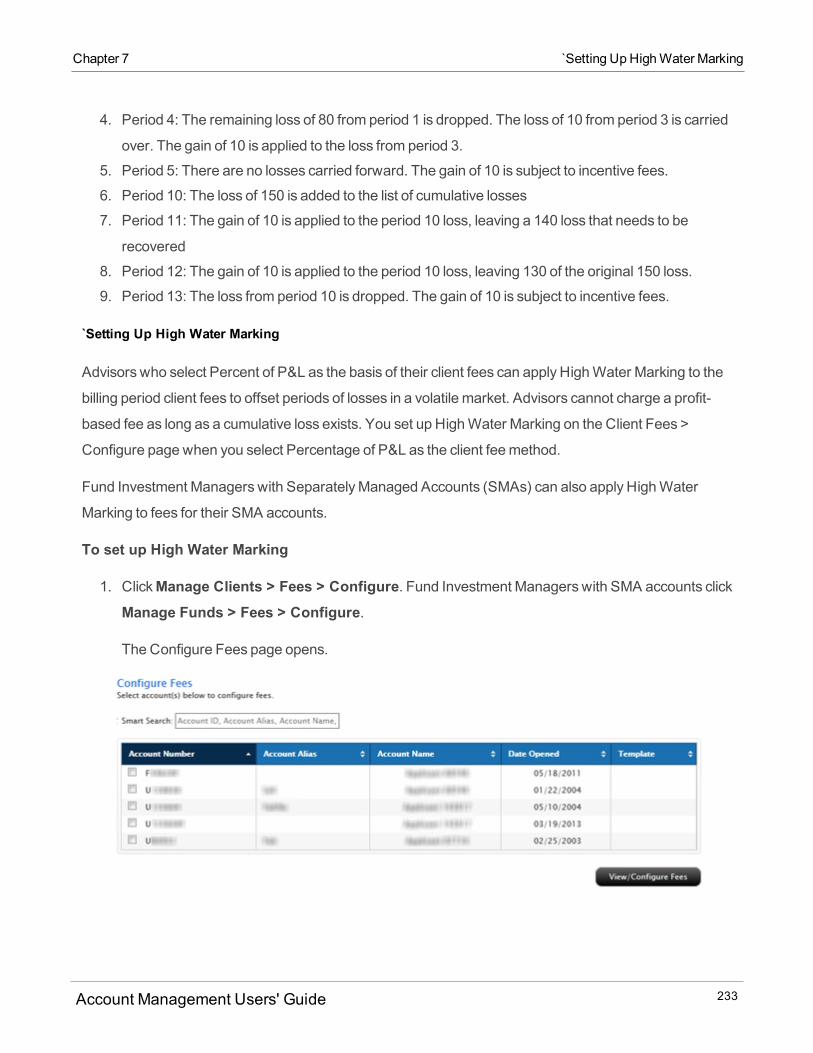
Chapter 7 `Setting UpHighWater Marking
4. Period 4: The remaining loss of 80 from period 1 is dropped. The loss of 10 from period 3 is carried
over. The gain of 10 is applied to the loss from period 3.
5. Period 5: There are no losses carried forward. The gain of 10 is subject to incentive fees.
6. Period 10: The loss of 150 is added to the list of cumulative losses
7. Period 11: The gain of 10 is applied to the period 10 loss, leaving a 140 loss that needs to be
recovered
8. Period 12: The gain of 10 is applied to the period 10 loss, leaving 130 of the original 150 loss.
9. Period 13: The loss from period 10 is dropped. The gain of 10 is subject to incentive fees.
`Setting Up High Water Marking
Advisors who select Percent of P&L as the basis of their client fees can apply HighWater Marking to the
billing period client fees to offset periods of losses in a volatile market. Advisors cannot charge a profit-
based fee as long as a cumulative loss exists. You set up HighWater Marking on the Client Fees >
Configure page when you select Percentage of P&L as the client feemethod.
Fund Investment Managers with SeparatelyManaged Accounts (SMAs) can also apply HighWater
Marking to fees for their SMA accounts.
To set up High Water Marking
1. ClickManage Clients > Fees > Configure. Fund Investment Managers with SMA accounts clickManage Funds > Fees > Configure.
The Configure Fees page opens.
Account Management Users' Guide 233
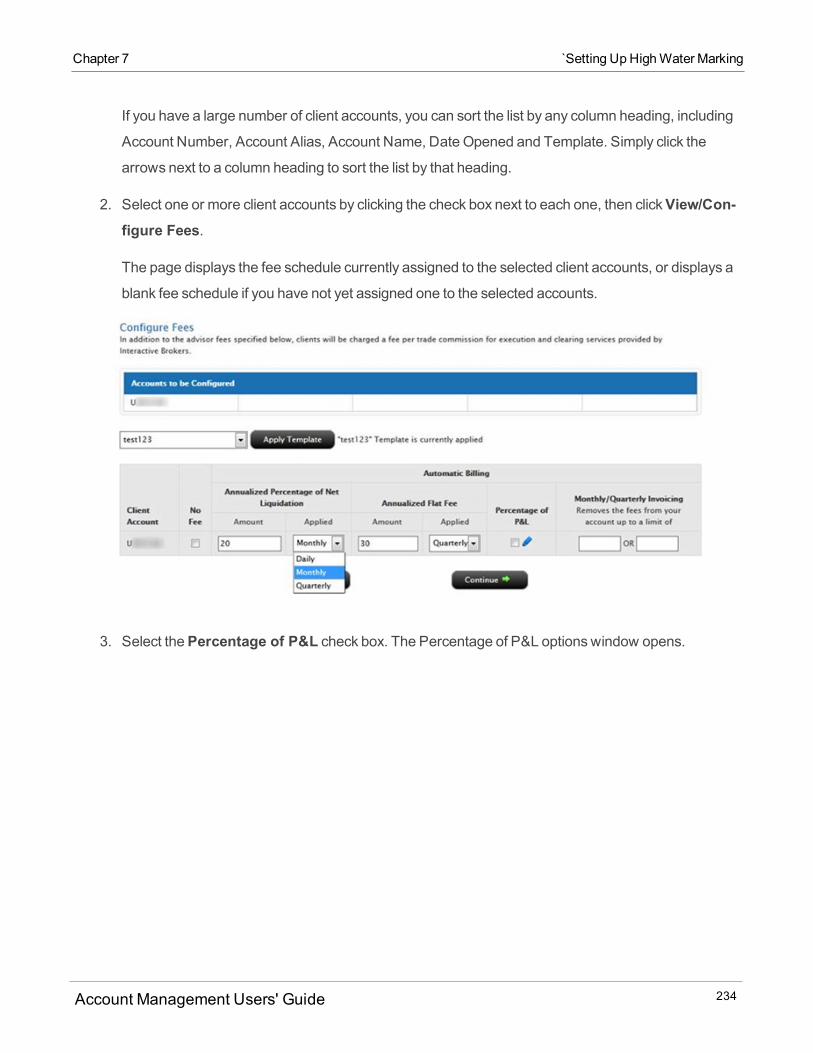
If you have a large number of client accounts, you can sort the list by any column heading, including
Account Number, Account Alias, Account Name, Date Opened and Template. Simply click the
arrows next to a column heading to sort the list by that heading.
2. Select one or more client accounts by clicking the check box next to each one, then clickView/Con-figure Fees.
The page displays the fee schedule currently assigned to the selected client accounts, or displays a
blank fee schedule if you have not yet assigned one to the selected accounts.
3. Select thePercentage of P&L check box. The Percentage of P&L optionswindow opens.
Account Management Users' Guide 234
Chapter 7 `Setting UpHighWater Marking
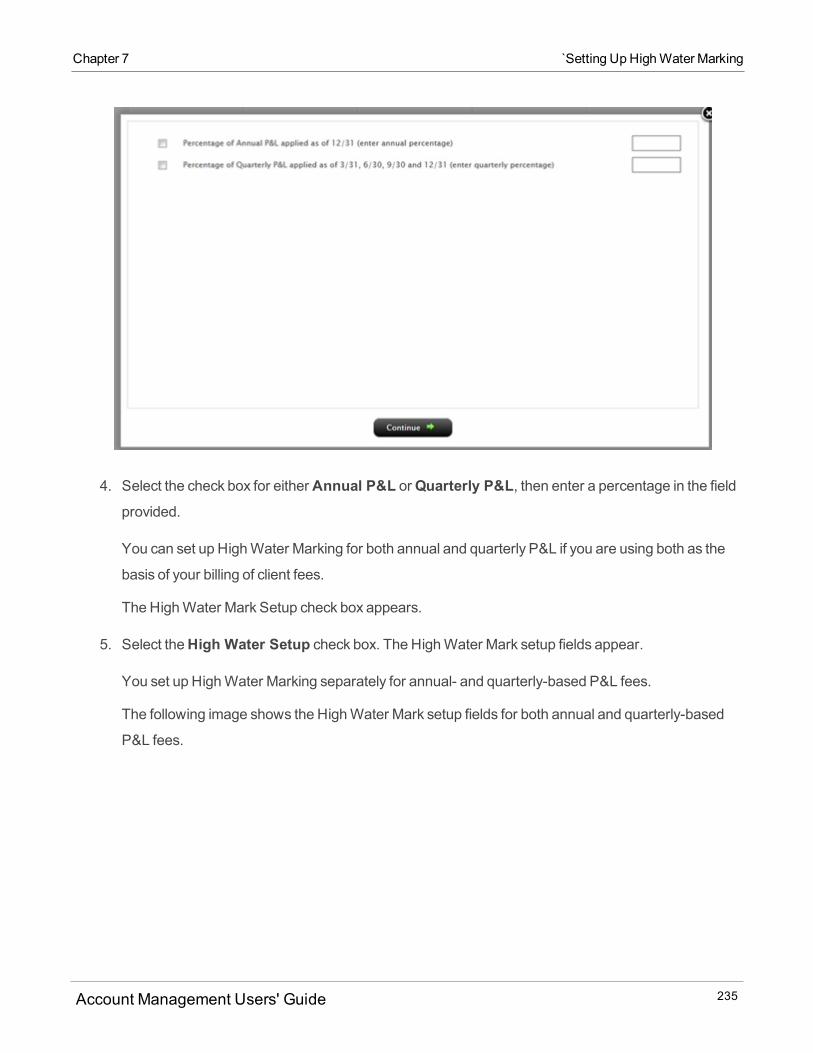
Chapter 7 `Setting UpHighWater Marking
4. Select the check box for eitherAnnual P&L orQuarterly P&L, then enter a percentage in the fieldprovided.
You can set up HighWater Marking for both annual and quarterly P&L if you are using both as the
basis of your billing of client fees.
The HighWater Mark Setup check box appears.
5. Select theHigh Water Setup check box. The HighWater Mark setup fields appear.
You set up HighWater Marking separately for annual- and quarterly-based P&L fees.
The following image shows the HighWater Mark setup fields for both annual and quarterly-based
P&L fees.
Account Management Users' Guide 235
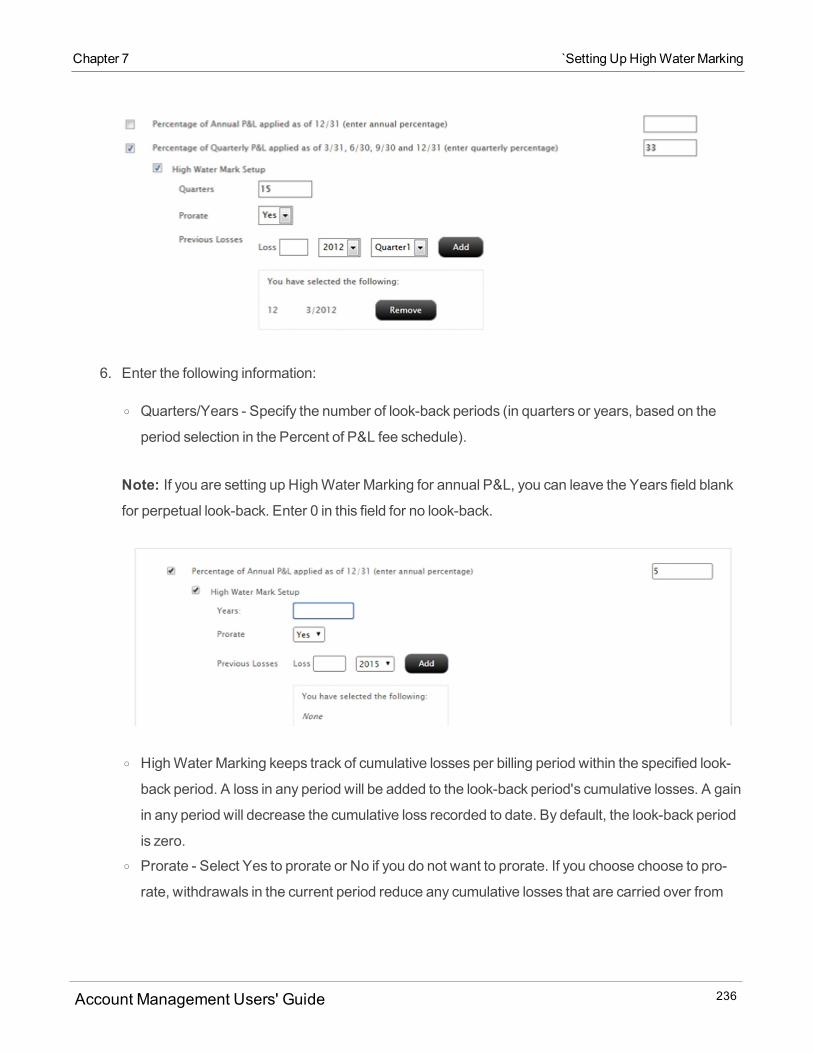
6. Enter the following information:
o Quarters/Years - Specify the number of look-back periods (in quarters or years, based on the
period selection in the Percent of P&L fee schedule).
Note: If you are setting up HighWater Marking for annual P&L, you can leave the Years field blank
for perpetual look-back. Enter 0 in this field for no look-back.
o HighWater Marking keeps track of cumulative losses per billing period within the specified look-
back period. A loss in any period will be added to the look-back period's cumulative losses. A gain
in any period will decrease the cumulative loss recorded to date. By default, the look-back period
is zero.o Prorate - Select Yes to prorate or No if you do not want to prorate. If you choose choose to pro-
rate, withdrawals in the current period reduce any cumulative losses that are carried over from
Account Management Users' Guide 236
Chapter 7 `Setting UpHighWater Marking
Chapter 7 Advisor Fee Cap Formulas
previous periods. The losses are reduced in proportion to the percentage of equity that waswith-
drawn.
Current period losses are never adjusted by current period withdrawals, gains are not prorated and
deposits are not used to prorate losses.
o Previous Losses - Initialize HighWater Marking with previous periods' losses by entering the
amount of the losses for one period. Click the Add link to add losses from additional previous peri-
ods.
7. ClickGenerate PDF for Current Fees to create a PDF file containing your current advisor clientfee schedule.
Your HighWater Marking setup will be effective on the daywe process the approved client
agreement.
8. ClickContinue.
Your modified client account fee schedule is displayed. Note that very small numbersmay be
displayed in E notation.
Advisor Fee Cap Formulas
Available Fee Cap Limit (Period X) = (R* Average Equity (Period X)) - Amount Paid (Period X)
If Available Fee Cap Limit for any period is negative, no advisor fee will be charged.
Period X = 12 30-day cumulative periods over the last 360 days. If an account has been opened less than
360 days, all the even 30-day periods up to the time the account has been opened will be included. Or the
Period X will be the exact number of days the account has been opened.
R (Period X) = ((0.252/360)*Number of Days)1/2
Available Equity = Average Equity over Period X
Amount Paid = Advisor Fees paid over Period X
For example, you have the client account open for onemonth* and the average equity for this account over
amonth is $10,000. You charged $50 as advisor fees for that month. Your available fee cap would be:
Account Management Users' Guide 237

((0.252/360)*30)1/2*$10,000-$50=$671.69
*30 days is used for this calculation.
Client Authorization
Whenever an advisor or aMultiple Fund Investment Manager with an SMA account submits a new client
fee schedule or modifies an existing client fee schedule, the client must provide authorization as described
below.
To obtain authorization from an existing advisor client or SMA
1. Submit a new or modified fee schedule for the existing client on the Client Fees page in Account Man-
agement.
2. Obtain the client's authorization in any of the following ways:
o Print the fee schedule, have it signed by your client, and return it along with a current Government
issued ID (passport, driver's license, etc.) to us for activation.o Click theGenerate PDF for Current Fees button at the bottom of the Client Fees page to print
it, then send to your client for signature. Your client can then send the signed PDF directly to us
for activation at the address/Fax number indicated on the form.
3. If the client does not want to submit the PDF, he or she can log into Account Management and
provide authorization online in the Pending Items section on the Account Management Home page.
To obtain authorization from a new advisor client or SMA
An advisor or Fund Investment Manager obtains authorization from a new client/SMA account as part of
the client account invitation process, which begins on theManage Clients/Funds > Accounts > Create >
New page:
Fully Electronic: The advisor or Fund Investment Manager specifies themonthly or quarterly limit and
sends the invitation to their client(s). The client reviews and accepts the invitation electronically.
Semi-electronic: The advisor or Fund Investment Manager completes the fees section of the account
application PDF by selecting the appropriate feemethodology (Monthly or Quarterly Invoicing) and spe-
cifying the limit. The advisor or Fund Investment Manager then prints the completed account applic-
Account Management Users' Guide 238
Chapter 7 Client Authorization
Chapter 7 Advisor Client Invoicing
ation PDF and obtains client authorization (client signature) on the PDF and submits it to us at the
address printed on the PDF.
Paper: Either the advisor/ Fund Investment Manager or the client/SMA fills out the paper account
application (PDF) and submits it us at the address printed on the PDF with a client signature.
Advisor Client Invoicing
The Invoicing page lets you submit advisor-calculated daily fee invoices for multiple client accounts, view
and update pending invoices and review invoices processed in the past seven days. Invoices submitted
prior to 5:30 (17:30) PMEST will be processed by us the same day (U.S. night) and appear on today's
statements. Invoices submitted after 5:30 (17:30) PMEST will be processed by us on the next business
day. You can upload a .csv file that contains invoices for multiple clients or submit invoices for ten clients at
a time using the form on the page, but only one invoice per client account per day. You can also reimburse
fees to your clients.
Who Can Access the Invoicing Page?
You can access this page if you are a(n):
Advisor Master User Individual
Advisor Master User Organization
Multiple Fund Investment Manager with at least one SeparatelyManaged Account (SMA)
The Invoicing page lets an Advisor or Fund Investment Manager:
Submit a fee invoice for client accounts.
View, upload or cancel pending invoice requests.
View invoices that have been processed.
Upload invoices for multiple clients in a single .csv file.
Configure invoice notifications.for all client accounts
Before you can submit fee invoices for client accounts, youmust first configure fees and invoice caps for
the account(s) on the Client Fees page.
Advisors can also reimburse fees to clients on the Advisor Invoicing page. See Advisor Fee
Reimbursements for detailed information.
Account Management Users' Guide 239
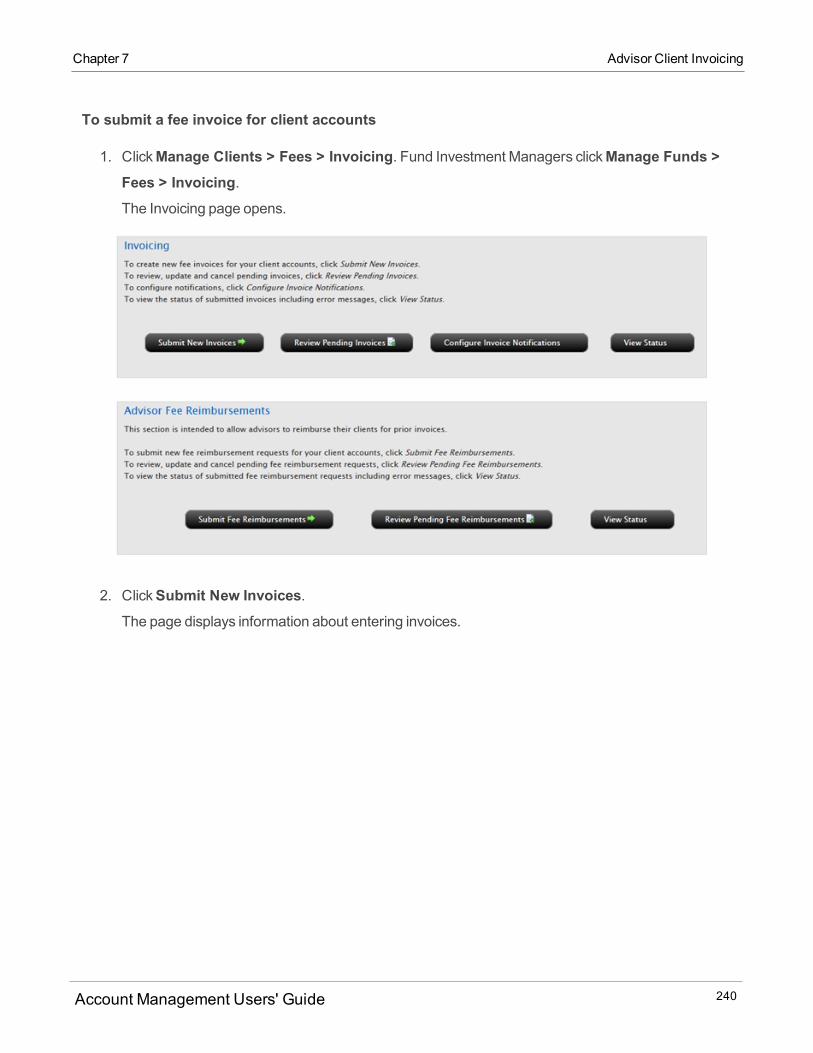
To submit a fee invoice for client accounts
1. ClickManage Clients > Fees > Invoicing. Fund Investment Managers clickManage Funds >Fees > Invoicing.The Invoicing page opens.
2. ClickSubmit New Invoices.The page displays information about entering invoices.
Account Management Users' Guide 240
Chapter 7 Advisor Client Invoicing

Chapter 7 Advisor Client Invoicing
If you are usingMoneyManagers to trade for client accounts, the page looks like this:
Account Management Users' Guide 241
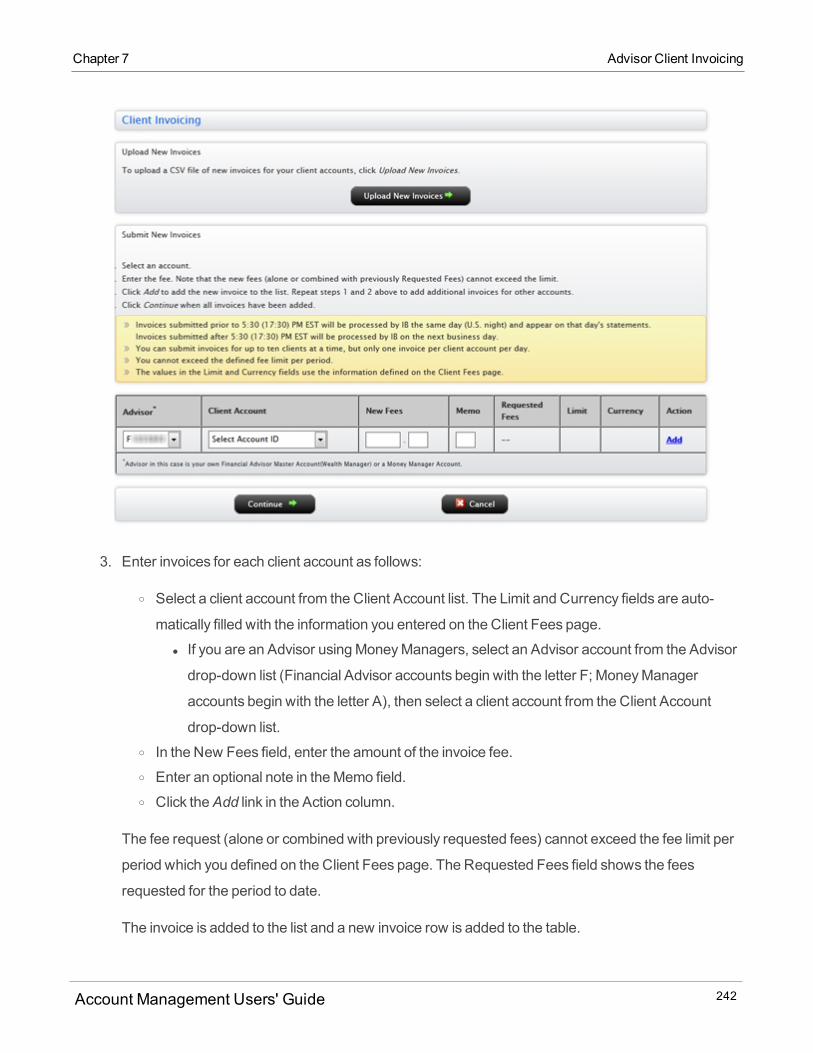
3. Enter invoices for each client account as follows:
o Select a client account from the Client Account list. The Limit and Currency fields are auto-
matically filled with the information you entered on the Client Fees page.
l If you are an Advisor usingMoneyManagers, select an Advisor account from the Advisor
drop-down list (Financial Advisor accounts begin with the letter F; MoneyManager
accounts begin with the letter A), then select a client account from the Client Account
drop-down list.o In the New Fees field, enter the amount of the invoice fee.o Enter an optional note in theMemo field.o Click theAdd link in the Action column.
The fee request (alone or combined with previously requested fees) cannot exceed the fee limit per
period which you defined on the Client Fees page. The Requested Fees field shows the fees
requested for the period to date.
The invoice is added to the list and a new invoice row is added to the table.
Account Management Users' Guide 242
Chapter 7 Advisor Client Invoicing

Chapter 7 Advisor Client Invoicing
4. Continue adding fee invoices as required.
5. ClickRemove in the Action column to remove any invoices from the list before you submit the
request.
6. When all fee requests have been added, clickContinue to submit your advisor invoicing request.ClickCancel to cancel the operation.
7. A summary of your invoice requests opens. ClickConfirm to confirm your request.
ClickCancel to cancel the operation.
8. On the next page, clickPrint to print a copy of the invoices.
To view, update or cancel pending invoice requests
1. ClickManage Clients > Fees > Invoicing. Fund Investment Managers clickManage Funds >Fees > Invoicing.The Invoicing page opens.
Account Management Users' Guide 243
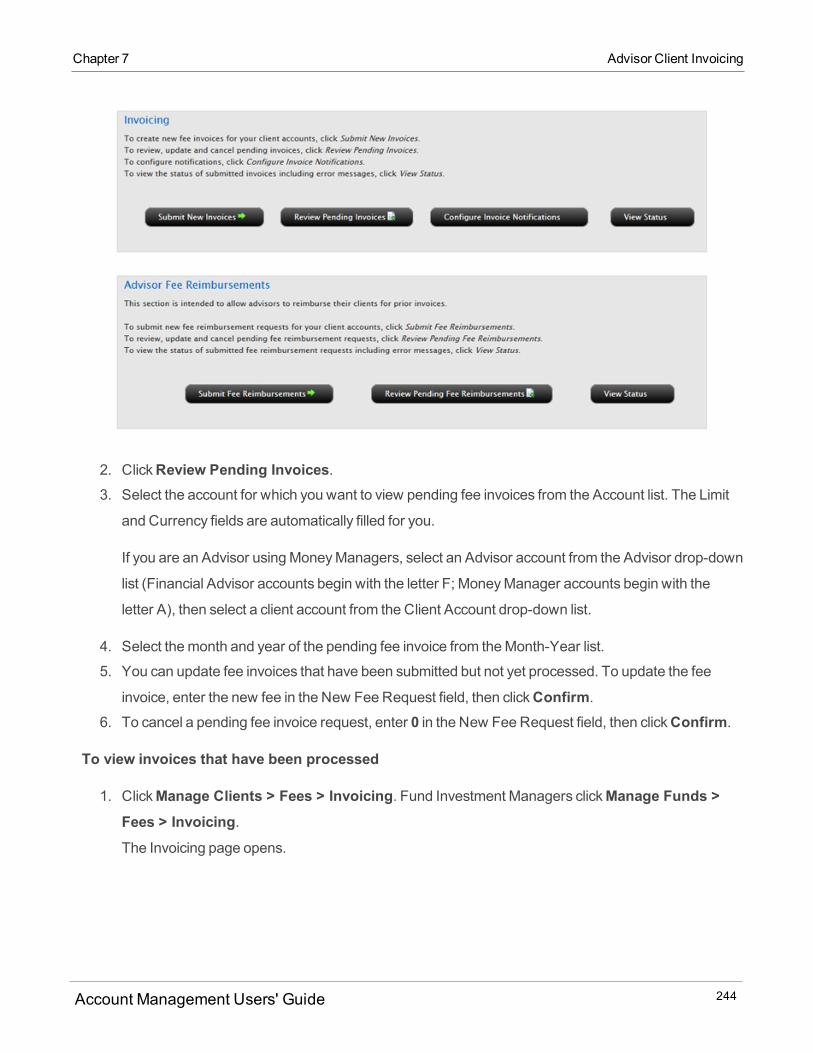
2. ClickReview Pending Invoices.3. Select the account for which you want to view pending fee invoices from the Account list. The Limit
and Currency fields are automatically filled for you.
If you are an Advisor usingMoneyManagers, select an Advisor account from the Advisor drop-down
list (Financial Advisor accounts begin with the letter F; MoneyManager accounts begin with the
letter A), then select a client account from the Client Account drop-down list.
4. Select themonth and year of the pending fee invoice from theMonth-Year list.
5. You can update fee invoices that have been submitted but not yet processed. To update the fee
invoice, enter the new fee in the New FeeRequest field, then clickConfirm.
6. To cancel a pending fee invoice request, enter 0 in the New FeeRequest field, then clickConfirm.
To view invoices that have been processed
1. ClickManage Clients > Fees > Invoicing. Fund Investment Managers clickManage Funds >Fees > Invoicing.The Invoicing page opens.
Account Management Users' Guide 244
Chapter 7 Advisor Client Invoicing

Chapter 7 Uploading Invoices
2. ClickView Status.3. Select the account for which you want to view the status of fee invoices for the past seven days from
the Account list. The Limit and Currency fields are automatically filled for you.
If you are and Advisor usingMoneyManagers, select an Advisor account from the Advisor drop-
down list (Financial Advisor accounts begin with the letter F; MoneyManager accounts begin with
the letter A), then select a client account from the Client Account drop-down list.
The page displays the following information for each invoice:
o Requested Amounto Currencyo Memo, if there is oneo Post Dateo Posted Amounto Error Reason, if there is an error
Uploading Invoices
If you havemultiple client invoices, you can create a bulk invoice file and upload it on this page. You will be
able to verify the invoice details before they are submitted for processing.
The file must be a CSV (comma-separated values) file that contains the following fields:
Account Management Users' Guide 245
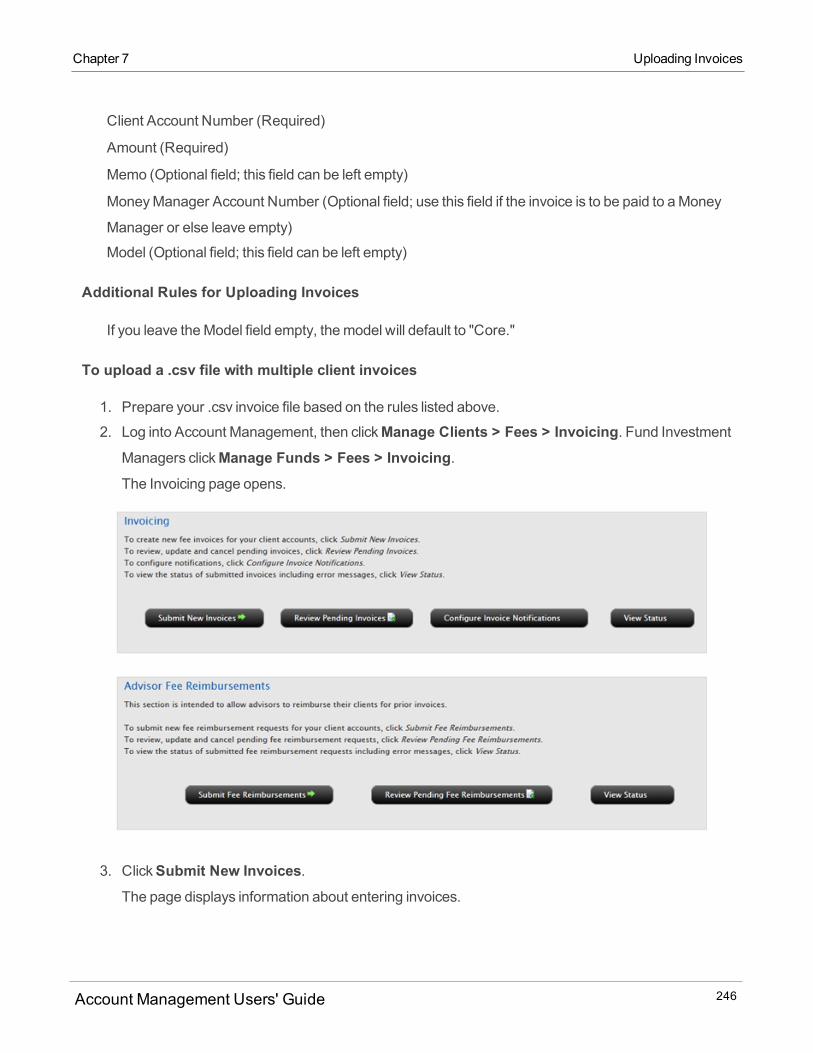
Client Account Number (Required)
Amount (Required)
Memo (Optional field; this field can be left empty)
MoneyManager Account Number (Optional field; use this field if the invoice is to be paid to aMoney
Manager or else leave empty)
Model (Optional field; this field can be left empty)
Additional Rules for Uploading Invoices
If you leave theModel field empty, themodel will default to "Core."
To upload a .csv file with multiple client invoices
1. Prepare your .csv invoice file based on the rules listed above.
2. Log into Account Management, then clickManage Clients > Fees > Invoicing. Fund InvestmentManagers clickManage Funds > Fees > Invoicing.The Invoicing page opens.
3. ClickSubmit New Invoices.The page displays information about entering invoices.
Account Management Users' Guide 246
Chapter 7 Uploading Invoices
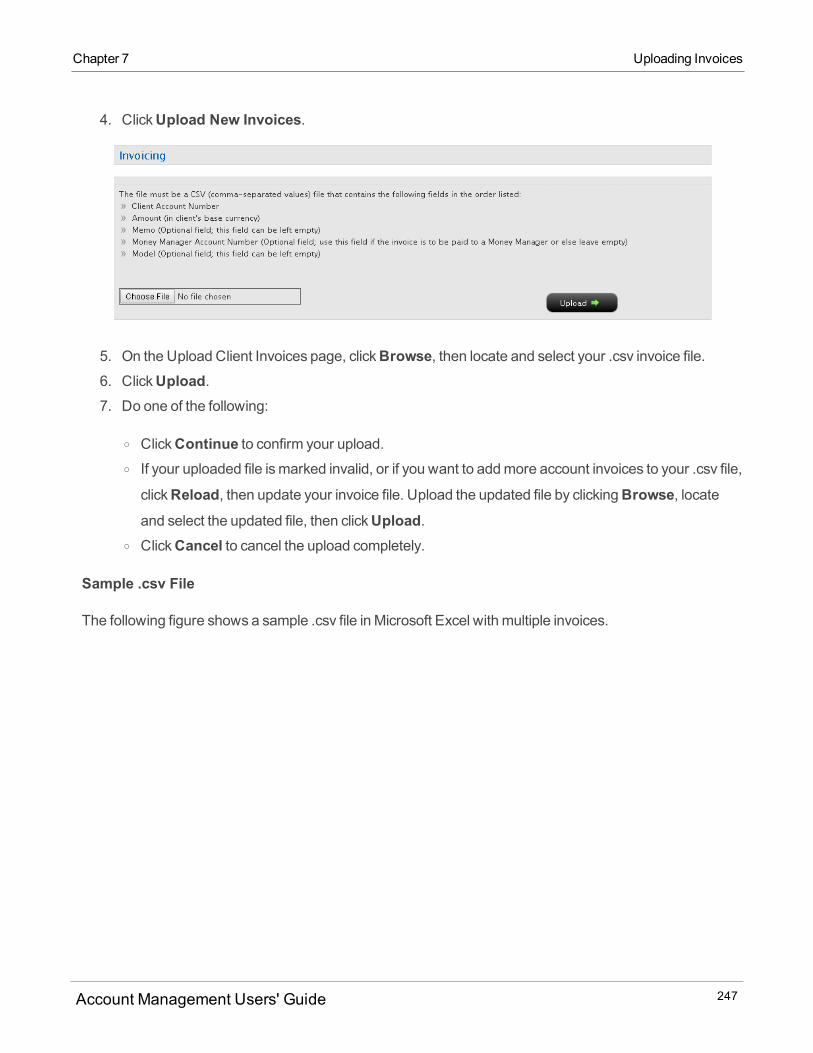
Chapter 7 Uploading Invoices
4. ClickUpload New Invoices.
5. On the Upload Client Invoices page, clickBrowse, then locate and select your .csv invoice file.6. ClickUpload.7. Do one of the following:
o ClickContinue to confirm your upload.o If your uploaded file ismarked invalid, or if you want to addmore account invoices to your .csv file,
clickReload, then update your invoice file. Upload the updated file by clickingBrowse, locateand select the updated file, then clickUpload.
o ClickCancel to cancel the upload completely.
Sample .csv File
The following figure shows a sample .csv file in Microsoft Excel with multiple invoices.
Account Management Users' Guide 247
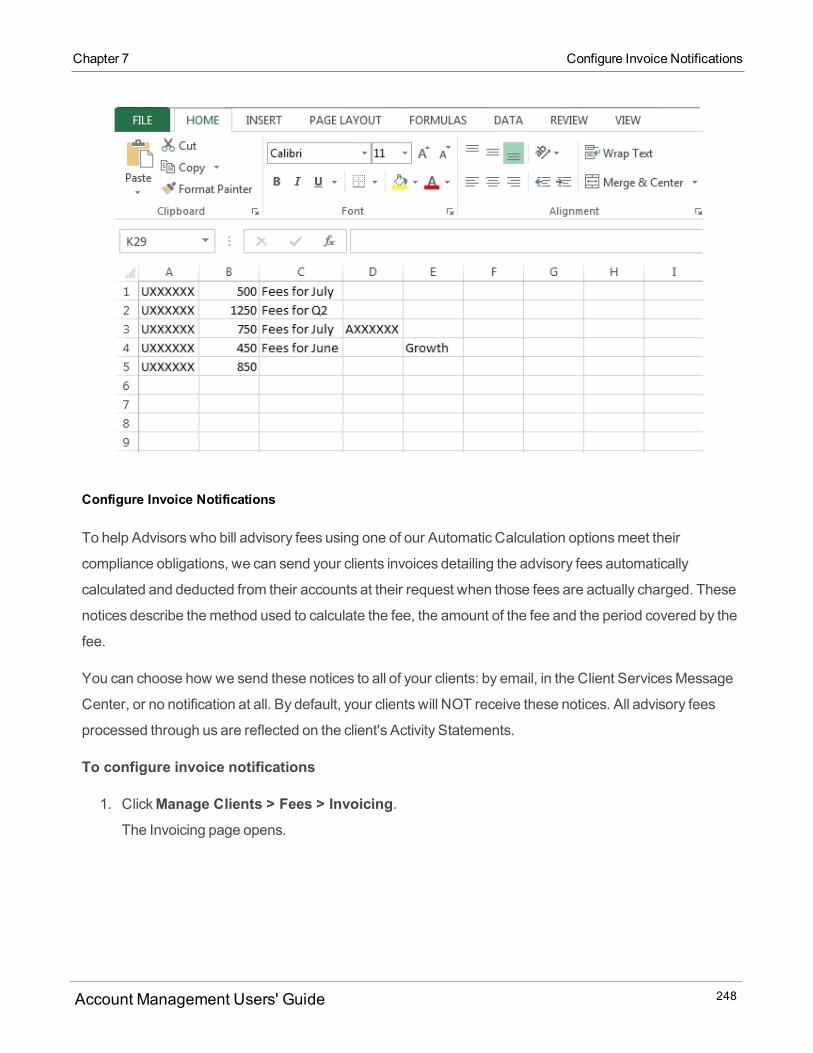
Configure Invoice Notifications
To help Advisors who bill advisory fees using one of our Automatic Calculation optionsmeet their
compliance obligations, we can send your clients invoices detailing the advisory fees automatically
calculated and deducted from their accounts at their request when those fees are actually charged. These
notices describe themethod used to calculate the fee, the amount of the fee and the period covered by the
fee.
You can choose how we send these notices to all of your clients: by email, in the Client ServicesMessage
Center, or no notification at all. By default, your clients will NOT receive these notices. All advisory fees
processed through us are reflected on the client's Activity Statements.
To configure invoice notifications
1. ClickManage Clients > Fees > Invoicing.The Invoicing page opens.
Account Management Users' Guide 248
Chapter 7 Configure Invoice Notifications
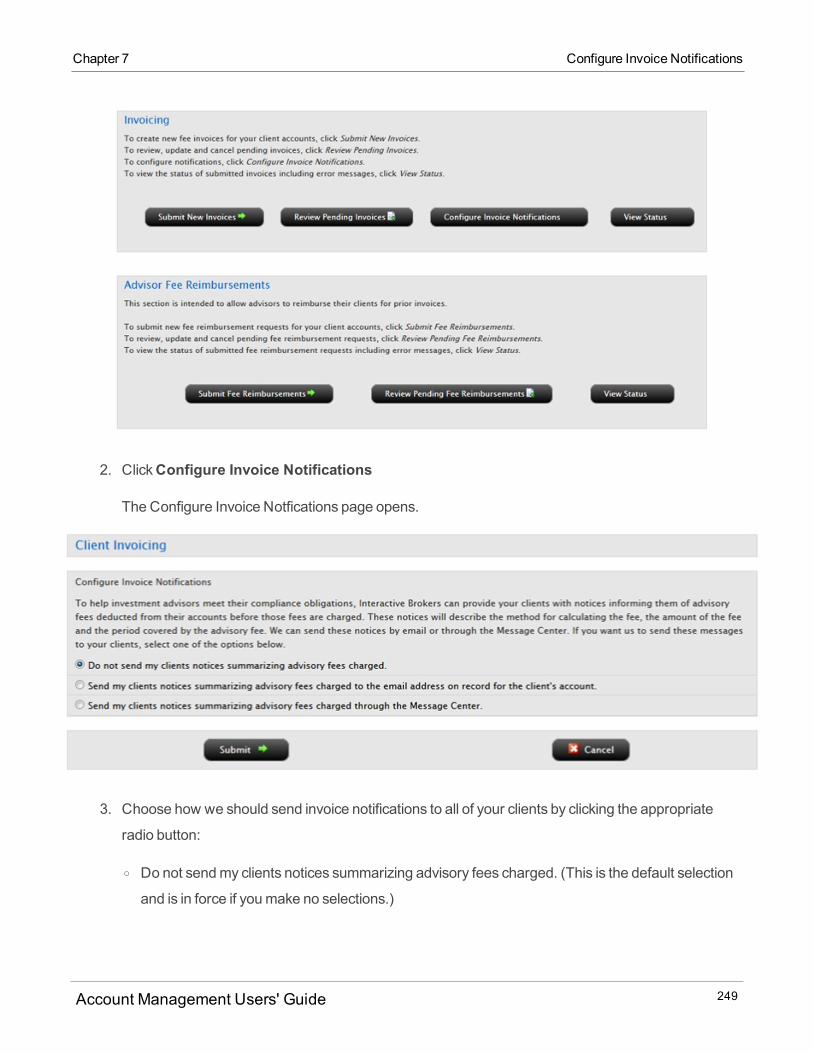
Chapter 7 Configure Invoice Notifications
2. ClickConfigure Invoice Notifications
TheConfigure Invoice Notfications page opens.
3. Choose how we should send invoice notifications to all of your clients by clicking the appropriate
radio button:
o Do not sendmy clients notices summarizing advisory fees charged. (This is the default selection
and is in force if youmake no selections.)
Account Management Users' Guide 249
o Sendmy clients notices summarizing advisory fees charged to the email on record for the client's
account.o Sendmy clients notices summarizing advisory fees charged through the Client ServicesMes-
sage Center.
4. ClickSubmit to save your changes. ClickCancel to cancel the operation.
Advisor Fee Reimbursements
Advisors can reimburse fees to client accounts on the Invoicing page.
Rules for Fee Reimbursements
You can reimburse any client fees for a 12-month period.
50% of the trailing 12months of advisor fees (net of any prior rebate) is themaximumamount that you
can reimburse.
Multiple reimbursements cannot exceed the original 50%maximum for the trailing 12-month period.
For example, if invoices in a 12-month period were $12,000, you can reimburse amaximumof $6,000
in invoices. So if you reimburse $5,000 in invoices one week, you can only reimburse amaximumof
$1,000 in invoices the following week because $5,000 + $1,000 = themaximum reimbursement of
$6,000.
Fee reimbursements should be accounted for in the fee cap calculations, meaning a rebate of feeswill
increase the fee caps.
We process fee reimbursements by simultaneously debiting themaster and crediting the client
account.
If themaster does not have the funds available to satisfy the requested fee reimbursement, the request
will not be processed.
On the Client Invoicing page, an advisor can:
Submit fee reimbursements.
View, modify or cancel pending fee reimbursements.
View fee reimbursements that have been processed.
To submit fee reimbursements
Advisors can reimburse fees to client accounts on the Advisor Invoicing page.
Account Management Users' Guide 250
Chapter 7 Advisor Fee Reimbursements

Chapter 7 Advisor Fee Reimbursements
1. ClickManage Clients > Fees > Invoicing.
The Invoicing page opens.
2. ClickSubmit Fee Reimbursements.
Account Management Users' Guide 251
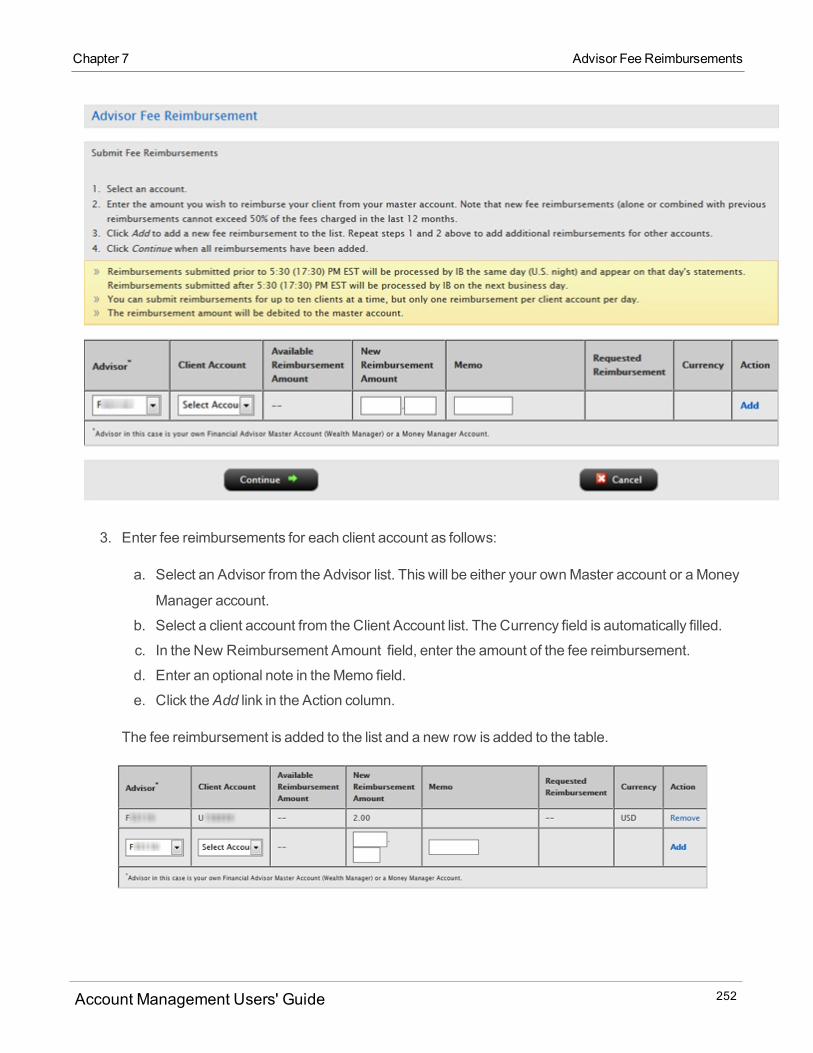
3. Enter fee reimbursements for each client account as follows:
a. Select an Advisor from the Advisor list. This will be either your ownMaster account or aMoney
Manager account.
b. Select a client account from the Client Account list. The Currency field is automatically filled.
c. In the New Reimbursement Amount field, enter the amount of the fee reimbursement.
d. Enter an optional note in theMemo field.
e. Click theAdd link in the Action column.
The fee reimbursement is added to the list and a new row is added to the table.
Account Management Users' Guide 252
Chapter 7 Advisor Fee Reimbursements
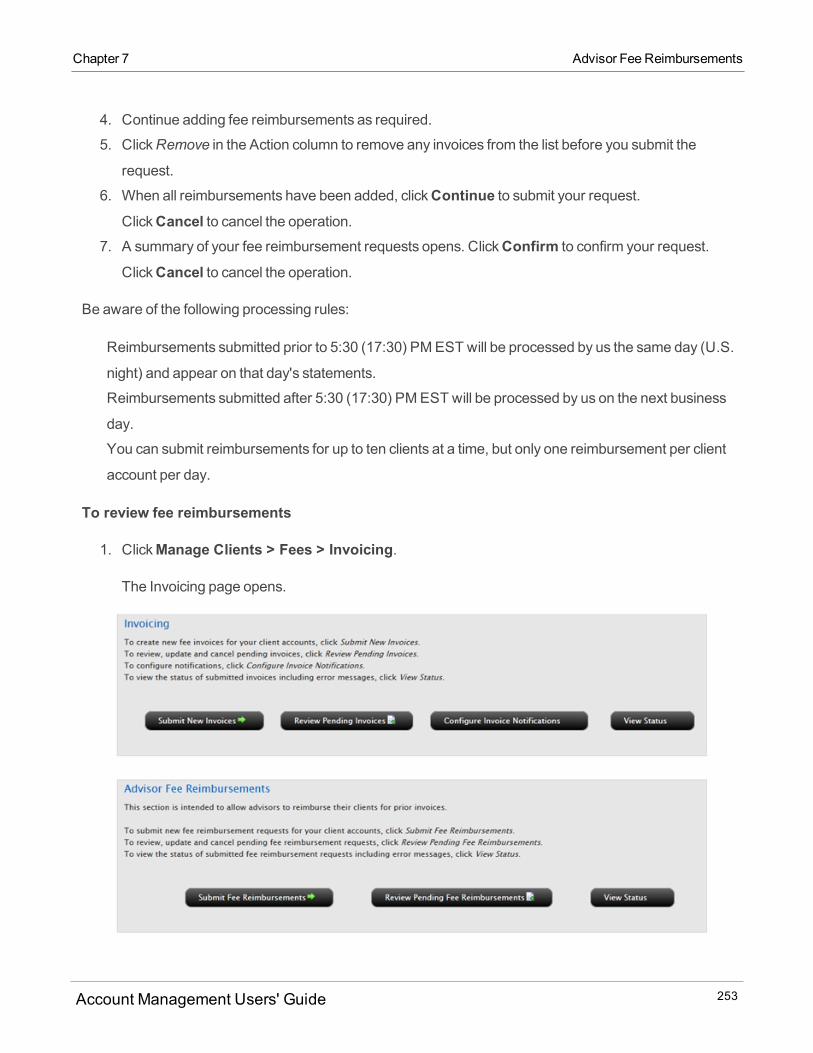
Chapter 7 Advisor Fee Reimbursements
4. Continue adding fee reimbursements as required.
5. ClickRemove in the Action column to remove any invoices from the list before you submit the
request.
6. When all reimbursements have been added, clickContinue to submit your request.ClickCancel to cancel the operation.
7. A summary of your fee reimbursement requests opens. ClickConfirm to confirm your request.
ClickCancel to cancel the operation.
Be aware of the following processing rules:
Reimbursements submitted prior to 5:30 (17:30) PMEST will be processed by us the same day (U.S.
night) and appear on that day's statements.
Reimbursements submitted after 5:30 (17:30) PMEST will be processed by us on the next business
day.
You can submit reimbursements for up to ten clients at a time, but only one reimbursement per client
account per day.
To review fee reimbursements
1. ClickManage Clients > Fees > Invoicing.
The Invoicing page opens.
Account Management Users' Guide 253
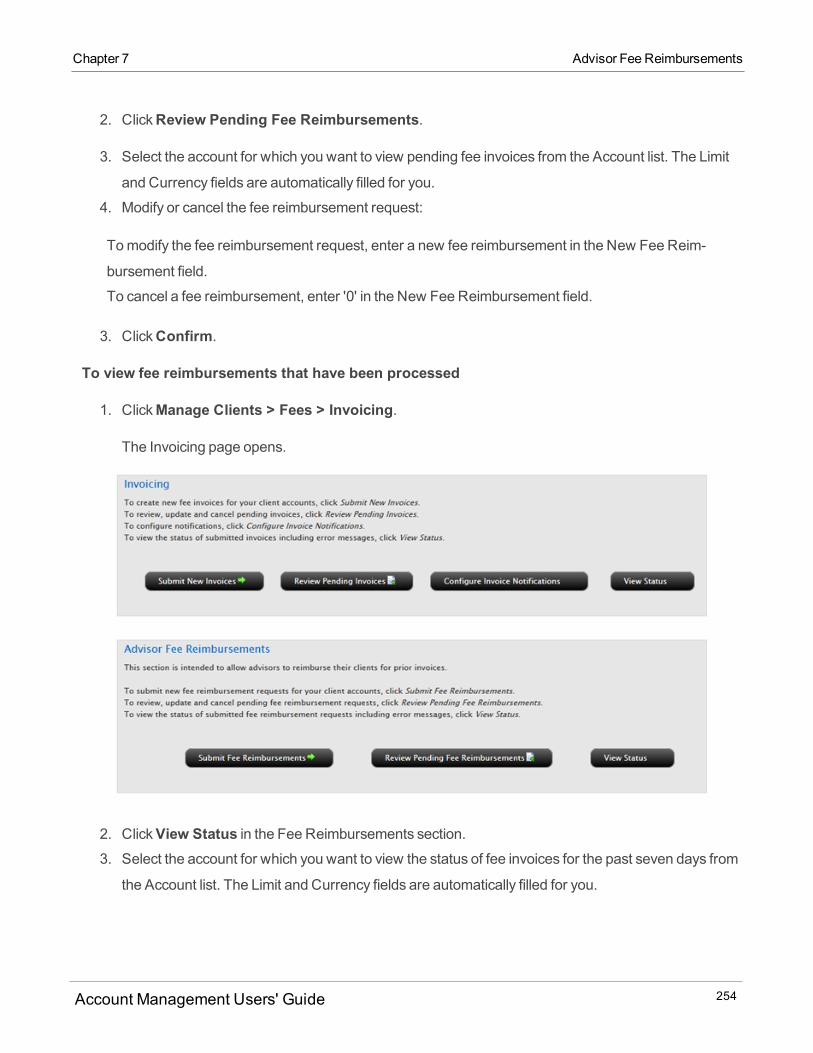
2. ClickReview Pending Fee Reimbursements.
3. Select the account for which you want to view pending fee invoices from the Account list. The Limit
and Currency fields are automatically filled for you.
4. Modify or cancel the fee reimbursement request:
Tomodify the fee reimbursement request, enter a new fee reimbursement in the New FeeReim-
bursement field.
To cancel a fee reimbursement, enter '0' in the New FeeReimbursement field.
3. ClickConfirm.
To view fee reimbursements that have been processed
1. ClickManage Clients > Fees > Invoicing.
The Invoicing page opens.
2. ClickView Status in the Fee Reimbursements section.3. Select the account for which you want to view the status of fee invoices for the past seven days from
the Account list. The Limit and Currency fields are automatically filled for you.
Account Management Users' Guide 254
Chapter 7 Advisor Fee Reimbursements

Chapter 7 Broker Client Fees
The page displays the following information for each fee reimbursement:
Requested Amount
Currency
Memo, if there is one
Post Date
Posted Amount
Error Reason, if there is an error
Broker Client Fees
Brokers can charge their clients for services rendered based on a fee-per-trade unit for each asset class
(e.g. stocks, options, etc.), exchange and currency. The trade unit is determined by the unit we use for our
commissions charges and can be on a per-share, per-contract, or percent of trade value basis.
Brokers set up client fee schedules on theManage Clients > Fees > Configure page.
For descriptions of all types of broker client fees, see Types of Broker Client Fees.
Rules for Broker Client Fees
The following general rules apply to broker client fee schedules:
If a broker has not created a fee schedule for an individual account, then the default client fee template
will automatically apply to that account.
If a broker has not created any fee schedule at all, either a client fee template or fee schedules for indi-
vidual accounts, then our standard commissionswill be charged with nomarkup for the broker.
Account Management Users' Guide 255
Client markups are limited to 15 times IBKR's highest tier rate plus external fees. For US stocks, the
highest tiered rate would be USD 0.0035 per share. USD-denominated bonds are subject to a sep-
arate cap onmarkups. US optionmarkups are limited to 10% of trade value. These limits are subject to
change and specific productsmay have an additional limit in place.
Nomarkups are applied if the client calls IBKR to close a trade.
Brokers can also specify fees per trade for specific products and exchanges but only in the global fees
schedule.
For Forex fee per trade unit, themark-up is calculated on the second currency of an FX pair, so for
example, if a client trades in EUR.USD, themarkup is based on the USD and not the EUR.
Client Fee Templates
Client fee schedules can be applied to accounts individually or can be stored in templates. As a broker, you
can configure fees for one or more client accounts, or set up client fee schedules in templates, then assign
the templates to client accounts. The use of templates allows you to easilymaintain different fee schedules
for multiple client accounts. If you are a new broker (i.e., you just opened your account), then there will be a
blank default client fee template, which you can then configure with your own fee schedule. If you are an
existing broker, your old global fee schedule is now the default client fee template.
For more information, see Client Fee Templates.
Choice of Pricing Structures for Client Accounts
When configuring fees for a single client, multiple clients or a client fee template, brokers can choose from
three pricing structures:
Tiered Pricing Structure with NoMarkups - Clients will be charged tiered commissions but no addi-
tional markups. This is the default selection.
Tiered Pricing Structure with Markups - Clients will be charged tiered commissionswith additional
markups as specified by the broker.
Fixed Pricing Structure with Markups - Clients will be charged a fix commission with additional
markups as specified by the broker.
The selected pricing structure will be applied to all securities and commodities in a client's account.
For more information about tiered and fixed commissions, see the Commissions page on our website.
Account Management Users' Guide 256
Chapter 7 Client Fee Templates
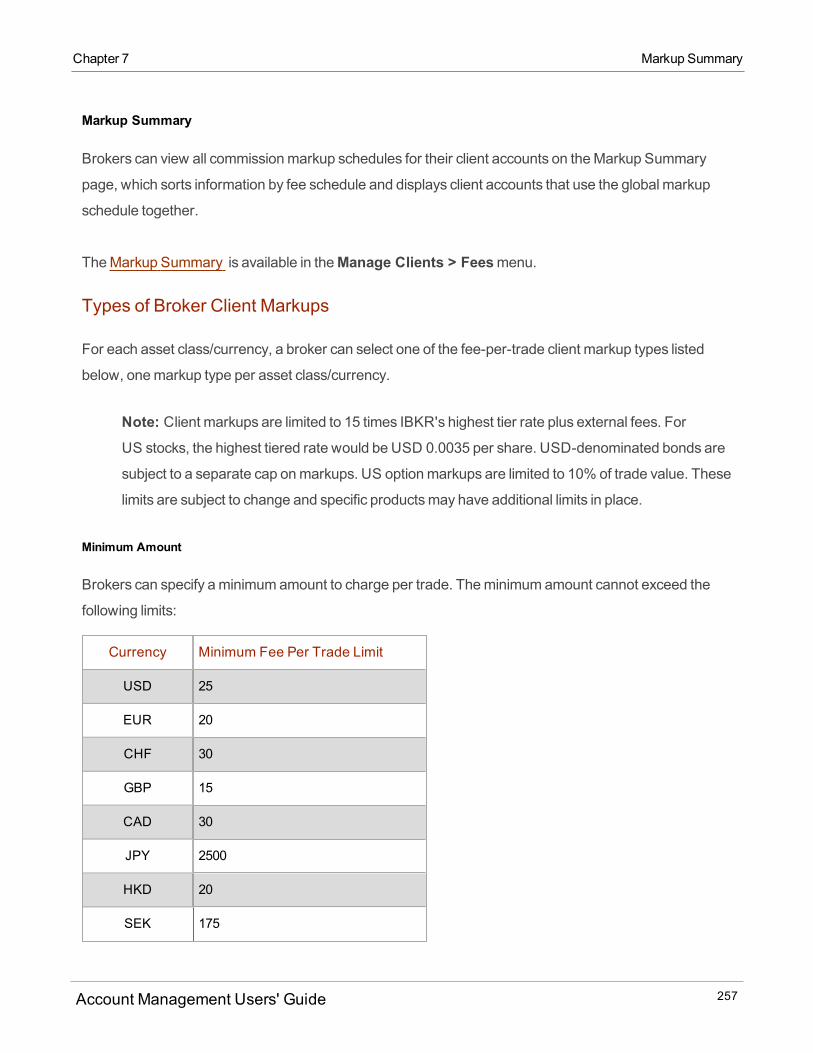
Chapter 7 Markup Summary
Markup Summary
Brokers can view all commissionmarkup schedules for their client accounts on theMarkup Summary
page, which sorts information by fee schedule and displays client accounts that use the global markup
schedule together.
TheMarkup Summary is available in theManage Clients > Feesmenu.
Types of Broker Client Markups
For each asset class/currency, a broker can select one of the fee-per-trade client markup types listed
below, onemarkup type per asset class/currency.
Note: Client markups are limited to 15 times IBKR's highest tier rate plus external fees. ForUS stocks, the highest tiered rate would be USD 0.0035 per share. USD-denominated bonds are
subject to a separate cap onmarkups. US optionmarkups are limited to 10% of trade value. These
limits are subject to change and specific productsmay have additional limits in place.
Minimum Amount
Brokers can specify aminimumamount to charge per trade. Theminimumamount cannot exceed the
following limits:
Currency Minimum Fee Per Trade Limit
USD 25
EUR 20
CHF 30
GBP 15
CAD 30
JPY 2500
HKD 20
SEK 175
Account Management Users' Guide 257
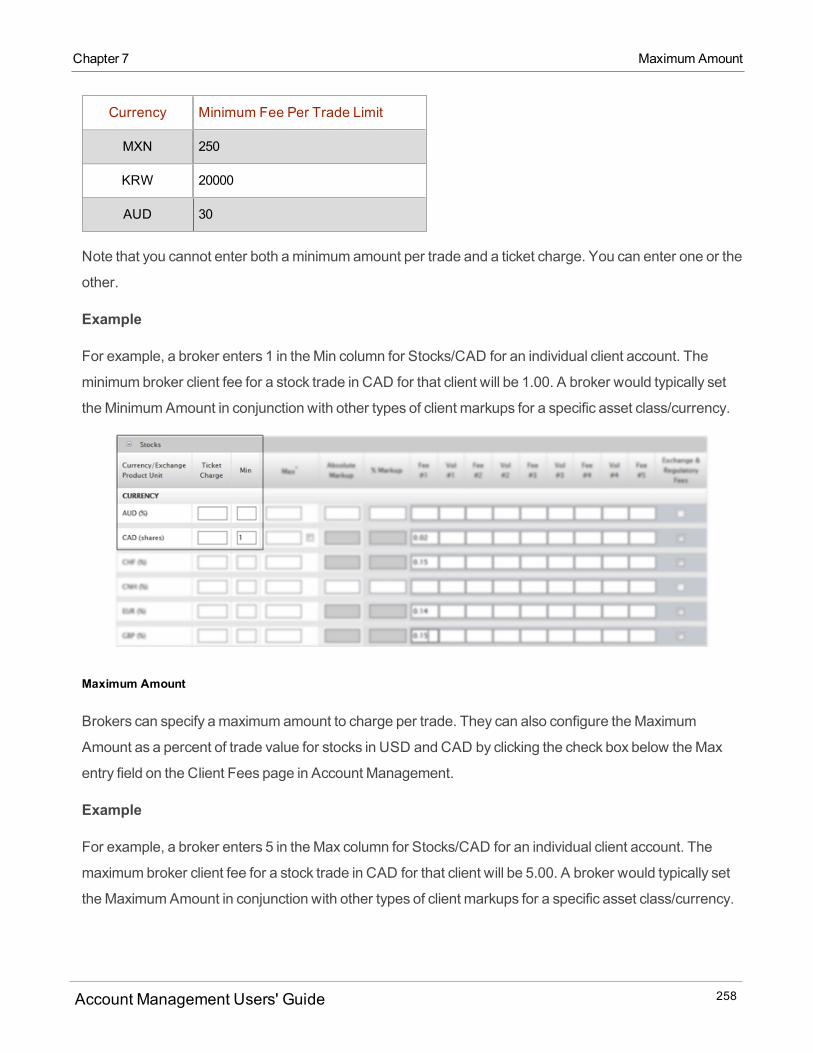
Currency Minimum Fee Per Trade Limit
MXN 250
KRW 20000
AUD 30
Note that you cannot enter both aminimumamount per trade and a ticket charge. You can enter one or the
other.
Example
For example, a broker enters 1 in theMin column for Stocks/CAD for an individual client account. The
minimumbroker client fee for a stock trade in CAD for that client will be 1.00. A broker would typically set
theMinimumAmount in conjunction with other types of client markups for a specific asset class/currency.
Maximum Amount
Brokers can specify amaximumamount to charge per trade. They can also configure theMaximum
Amount as a percent of trade value for stocks in USD andCAD by clicking the check box below theMax
entry field on the Client Fees page in Account Management.
Example
For example, a broker enters 5 in theMax column for Stocks/CAD for an individual client account. The
maximumbroker client fee for a stock trade in CAD for that client will be 5.00. A broker would typically set
theMaximumAmount in conjunction with other types of client markups for a specific asset class/currency.
Account Management Users' Guide 258
Chapter 7 Maximum Amount
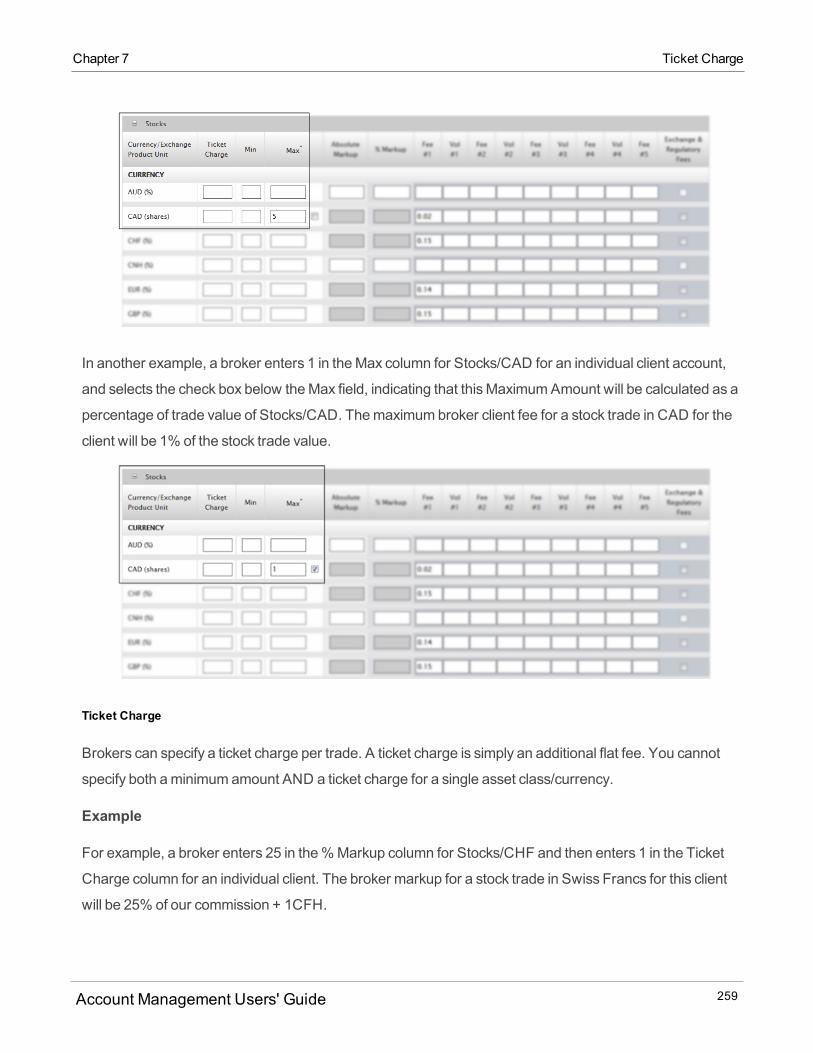
Chapter 7 Ticket Charge
In another example, a broker enters 1 in theMax column for Stocks/CAD for an individual client account,
and selects the check box below theMax field, indicating that thisMaximumAmount will be calculated as a
percentage of trade value of Stocks/CAD. Themaximumbroker client fee for a stock trade in CAD for the
client will be 1% of the stock trade value.
Ticket Charge
Brokers can specify a ticket charge per trade. A ticket charge is simply an additional flat fee. You cannot
specify both aminimumamount AND a ticket charge for a single asset class/currency.
Example
For example, a broker enters 25 in the%Markup column for Stocks/CHF and then enters 1 in the Ticket
Charge column for an individual client. The broker markup for a stock trade in Swiss Francs for this client
will be 25% of our commission + 1CFH.
Account Management Users' Guide 259
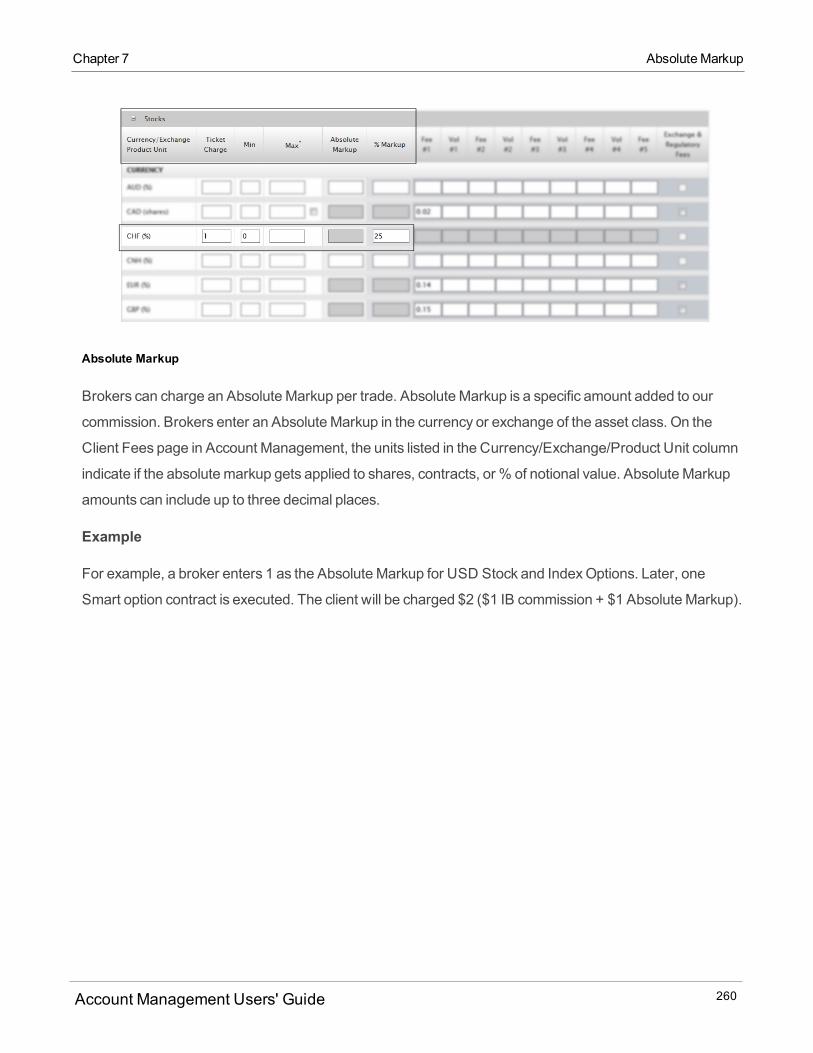
Absolute Markup
Brokers can charge an AbsoluteMarkup per trade. AbsoluteMarkup is a specific amount added to our
commission. Brokers enter an AbsoluteMarkup in the currency or exchange of the asset class. On the
Client Fees page in Account Management, the units listed in the Currency/Exchange/Product Unit column
indicate if the absolutemarkup gets applied to shares, contracts, or % of notional value. AbsoluteMarkup
amounts can include up to three decimal places.
Example
For example, a broker enters 1 as the AbsoluteMarkup for USD Stock and IndexOptions. Later, one
Smart option contract is executed. The client will be charged $2 ($1 IB commission + $1 AbsoluteMarkup).
Account Management Users' Guide 260
Chapter 7 Absolute Markup
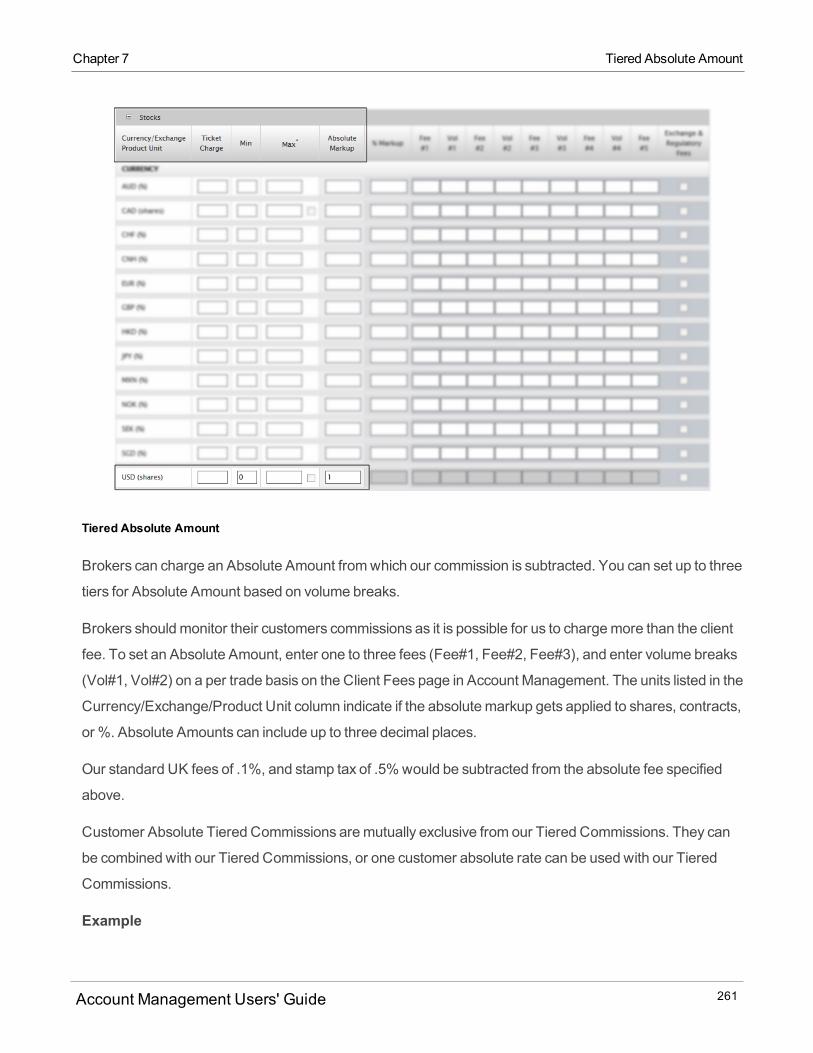
Chapter 7 Tiered Absolute Amount
Tiered Absolute Amount
Brokers can charge an Absolute Amount fromwhich our commission is subtracted. You can set up to three
tiers for Absolute Amount based on volume breaks.
Brokers shouldmonitor their customers commissions as it is possible for us to chargemore than the client
fee. To set an Absolute Amount, enter one to three fees (Fee#1, Fee#2, Fee#3), and enter volume breaks
(Vol#1, Vol#2) on a per trade basis on the Client Fees page in Account Management. The units listed in the
Currency/Exchange/Product Unit column indicate if the absolutemarkup gets applied to shares, contracts,
or %. Absolute Amounts can include up to three decimal places.
Our standard UK fees of .1%, and stamp tax of .5%would be subtracted from the absolute fee specified
above.
Customer Absolute Tiered Commissions aremutually exclusive from our Tiered Commissions. They can
be combined with our Tiered Commissions, or one customer absolute rate can be used with our Tiered
Commissions.
Example
Account Management Users' Guide 261
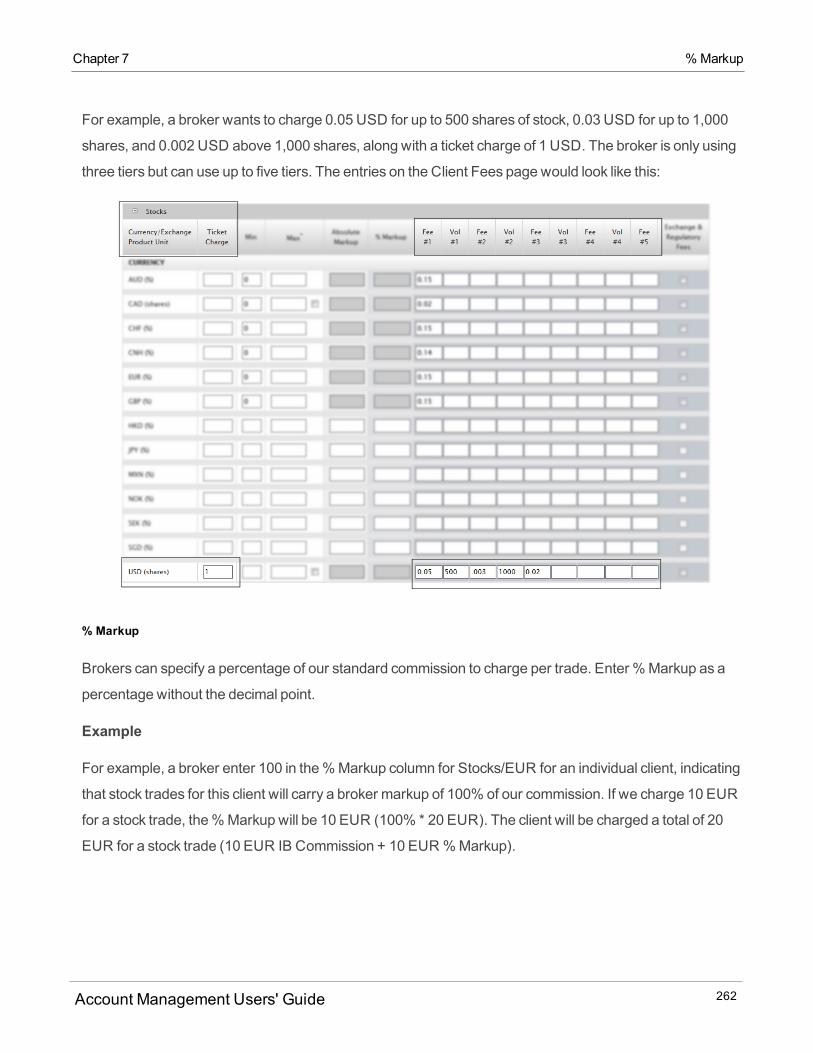
For example, a broker wants to charge 0.05 USD for up to 500 shares of stock, 0.03 USD for up to 1,000
shares, and 0.002 USD above 1,000 shares, along with a ticket charge of 1 USD. The broker is only using
three tiers but can use up to five tiers. The entries on the Client Fees page would look like this:
% Markup
Brokers can specify a percentage of our standard commission to charge per trade. Enter %Markup as a
percentage without the decimal point.
Example
For example, a broker enter 100 in the%Markup column for Stocks/EUR for an individual client, indicating
that stock trades for this client will carry a broker markup of 100% of our commission. If we charge 10 EUR
for a stock trade, the%Markup will be 10 EUR (100% * 20 EUR). The client will be charged a total of 20
EUR for a stock trade (10 EUR IB Commission + 10 EUR%Markup).
Account Management Users' Guide 262
Chapter 7 % Markup
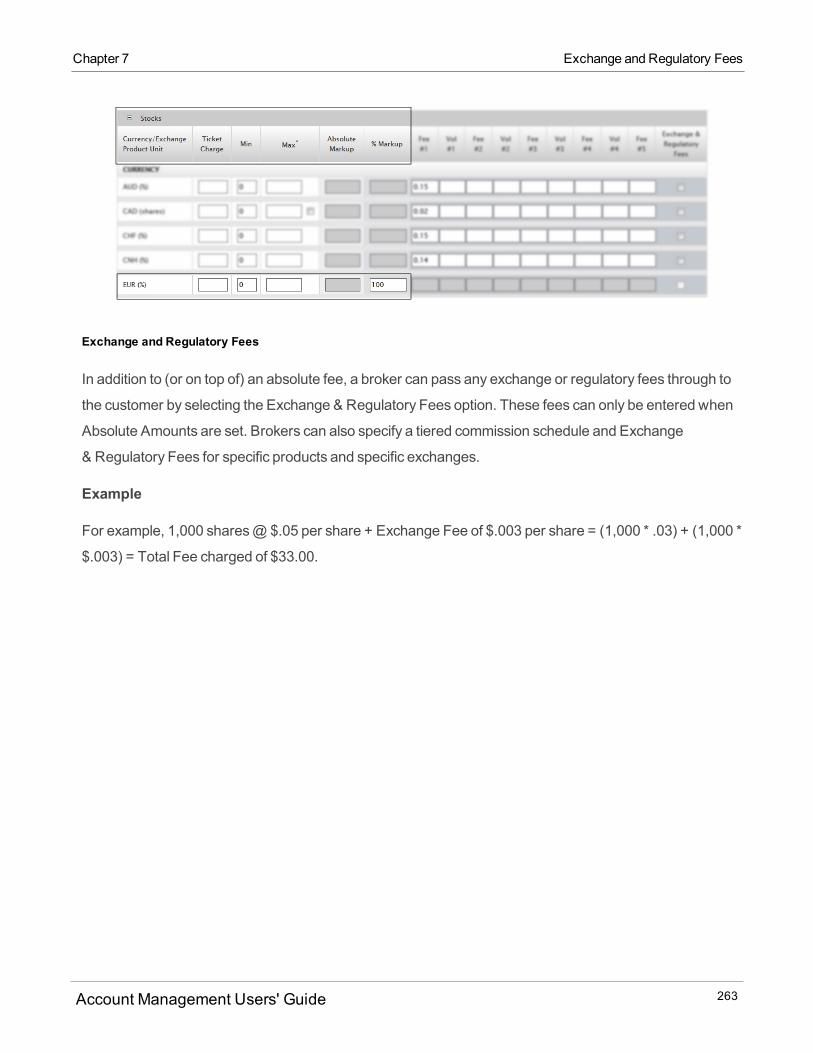
Chapter 7 Exchange and Regulatory Fees
Exchange and Regulatory Fees
In addition to (or on top of) an absolute fee, a broker can pass any exchange or regulatory fees through to
the customer by selecting the Exchange & Regulatory Fees option. These fees can only be entered when
Absolute Amounts are set. Brokers can also specify a tiered commission schedule and Exchange
& Regulatory Fees for specific products and specific exchanges.
Example
For example, 1,000 shares@ $.05 per share + Exchange Fee of $.003 per share = (1,000 * .03) + (1,000 *
$.003) = Total Fee charged of $33.00.
Account Management Users' Guide 263
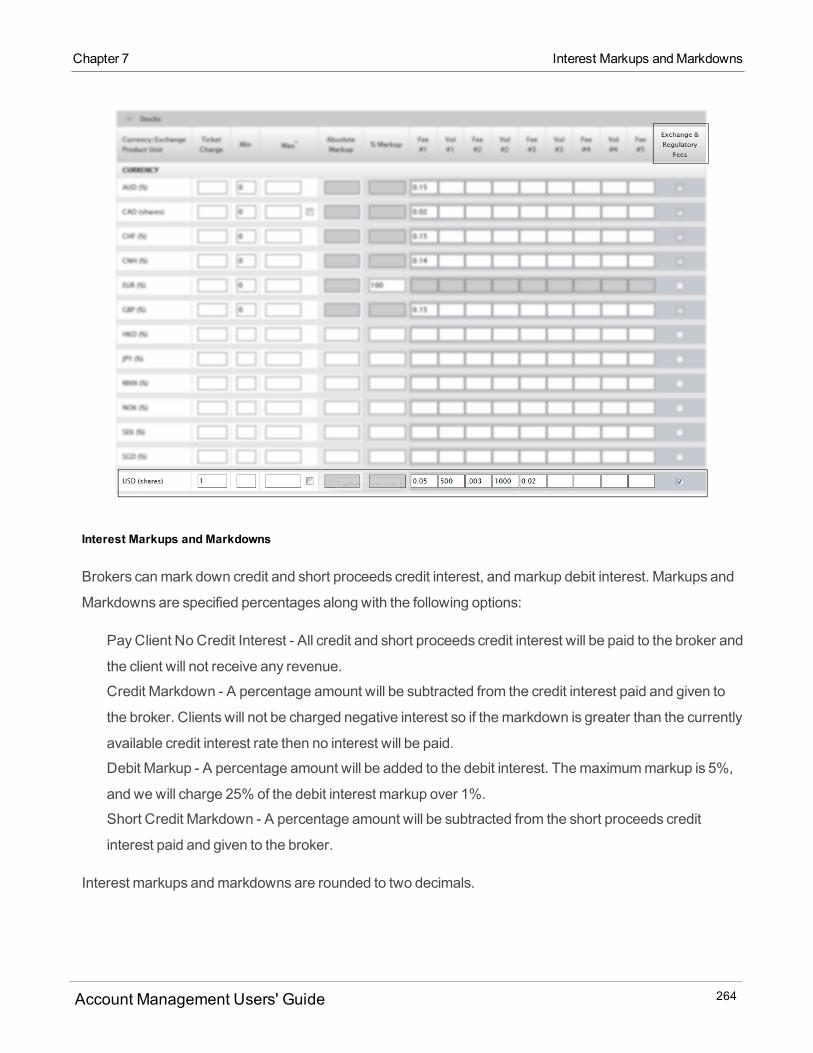
Interest Markups and Markdowns
Brokers canmark down credit and short proceeds credit interest, andmarkup debit interest. Markups and
Markdowns are specified percentages along with the following options:
PayClient No Credit Interest - All credit and short proceeds credit interest will be paid to the broker and
the client will not receive any revenue.
Credit Markdown - A percentage amount will be subtracted from the credit interest paid and given to
the broker. Clients will not be charged negative interest so if themarkdown is greater than the currently
available credit interest rate then no interest will be paid.
Debit Markup - A percentage amount will be added to the debit interest. Themaximummarkup is 5%,
and wewill charge 25% of the debit interest markup over 1%.
Short Credit Markdown - A percentage amount will be subtracted from the short proceeds credit
interest paid and given to the broker.
Interest markups andmarkdowns are rounded to two decimals.
Account Management Users' Guide 264
Chapter 7 Interest Markups andMarkdowns
Chapter 7 Markups on Borrow Fees
Markups on Borrow Fees
Brokers can chargemarkups to their clients based on our stock borrow rates, entered as a variable or fixed
percentage of our borrow rate. You can enter both types of markups and our systemwill apply themarkup
rate that results in the larger total amount.
Variable borrow feemarkup - This is a variable percentage of our borrow rate. The total cost to your cli-
ent is calculated as follows:
Borrow Rate (1 + Variable Markup Percentage)The range of acceptable values that you can enter is 0 - 25%.
Fixed borrow feemarkup - This is a fixed percentage of our borrow rate.The total cost to your client is
calculated as follows:
Borrow Rate + Fixed Markup Percentage)The range of acceptable values that you can enter is 0 - 1%.
Borrow Markup Fee Example 1
Symbol ABC Borrow Rate = 35%
Variable Borrow Markup = 20%
Fixed Borrow Markup = 1%
Calculating the total cost to your client, we have:
Variablemarkup
35% (1 + 20%) = 42% total cost to your client.
or
0.35 (1.2) = 0.42
Fixedmarkup
35% + 1% = 36%
or
0.35 + 0.01 = 0.36
Our system applies the larger total amount, so in this example, we would apply the Variable Borrow
Markup and the total cost to your client is 42%, which includes our borrow rate plus your borrow markup.
Borrow Markup Fee Example 2
Account Management Users' Guide 265
Symbol XYZ Borrow Rate = 0.25%
Variable Borrow Markup = 20%
Fixed Borrow Markup = 0.75%
Calculating the total cost to your client, we have:
Variablemarkup
0.25% (1 + 20%) = 0.30% total cost to your client.
or
0.0025 (1.2) = 0.003
Fixedmarkup
0.25% + 0.75% = 1%
or
0.0025 + 0.0075 = 1.00
Our system applies the larger amount, so in this example, we would apply the Fixed Borrow Markup and
the total cost to your client is 1%, which includes our borrow rate plus your borrow markup.
Take Up Fees for Prime Trades
Brokers can chargemarkups on prime trades of certain currency/product units in the Take Up Fees section
on the Configure Fees page. This section only appears for brokers who have at least one client who
subscribes to our IB Prime institutional service.
You specify the take up fee in the Ticket Charge field for the specific currency/product unit; for example,
US Stock. A take up fee is simply a flat fee.
Configure Broker Client Fees
Brokers configure client fee schedules on the Configure Fees page. Use the Configure Fees page to:
View and sort all client accounts.
Select one or more client accounts, then view (and if necessary, modify) the current fee schedule for
those accounts.
Select one or more client accounts, then configure and apply a fee schedule to those accounts.
Account Management Users' Guide 266
Chapter 7 Take Up Fees for Prime Trades
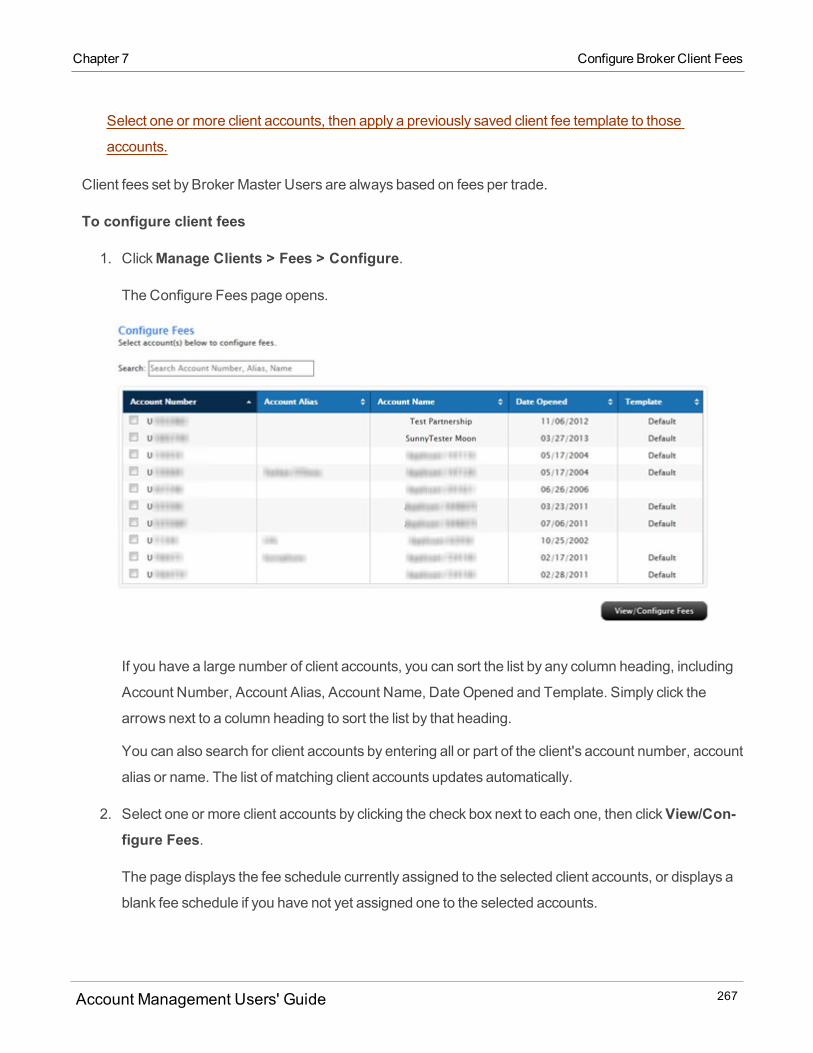
Chapter 7 Configure Broker Client Fees
Select one or more client accounts, then apply a previously saved client fee template to those
accounts.
Client fees set by Broker Master Users are always based on fees per trade.
To configure client fees
1. ClickManage Clients > Fees > Configure.
The Configure Fees page opens.
If you have a large number of client accounts, you can sort the list by any column heading, including
Account Number, Account Alias, Account Name, Date Opened and Template. Simply click the
arrows next to a column heading to sort the list by that heading.
You can also search for client accounts by entering all or part of the client's account number, account
alias or name. The list of matching client accounts updates automatically.
2. Select one or more client accounts by clicking the check box next to each one, then clickView/Con-figure Fees.
The page displays the fee schedule currently assigned to the selected client accounts, or displays a
blank fee schedule if you have not yet assigned one to the selected accounts.
Account Management Users' Guide 267
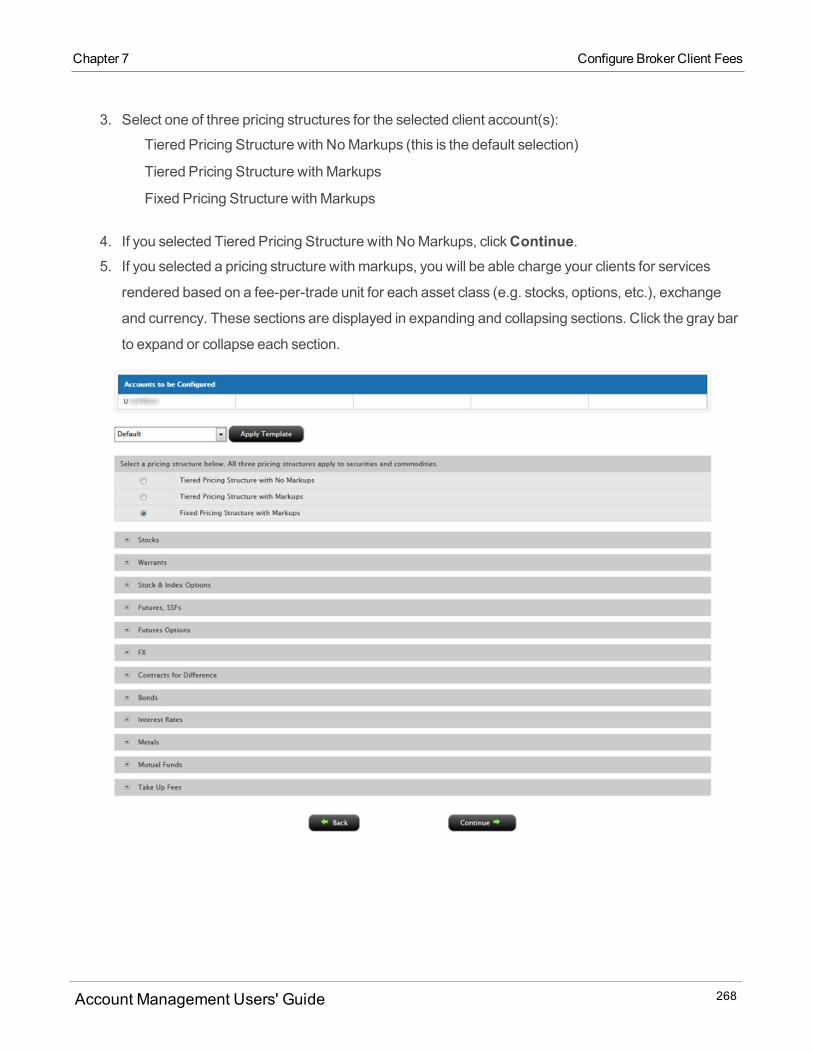
3. Select one of three pricing structures for the selected client account(s):
Tiered Pricing Structure with NoMarkups (this is the default selection)
Tiered Pricing Structure with Markups
Fixed Pricing Structure with Markups
4. If you selected Tiered Pricing Structure with NoMarkups, clickContinue.5. If you selected a pricing structure with markups, you will be able charge your clients for services
rendered based on a fee-per-trade unit for each asset class (e.g. stocks, options, etc.), exchange
and currency. These sections are displayed in expanding and collapsing sections. Click the gray bar
to expand or collapse each section.
Account Management Users' Guide 268
Chapter 7 Configure Broker Client Fees
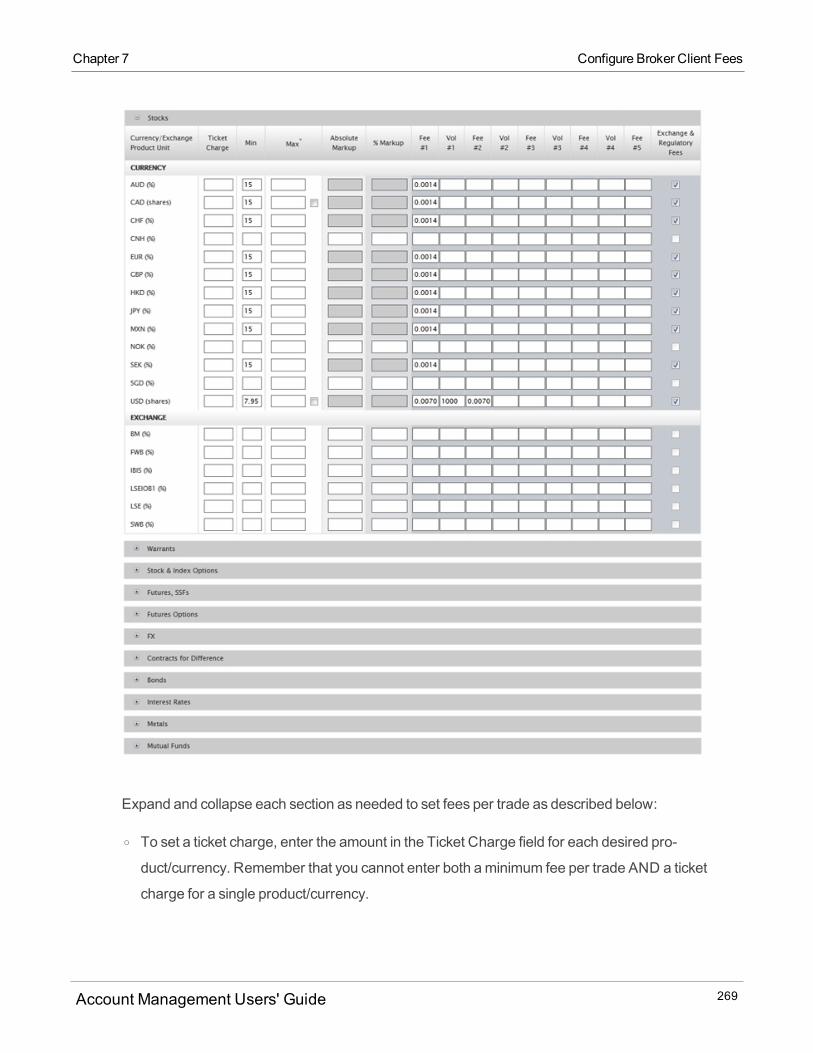
Chapter 7 Configure Broker Client Fees
Expand and collapse each section as needed to set fees per trade as described below:
o To set a ticket charge, enter the amount in the Ticket Charge field for each desired pro-
duct/currency. Remember that you cannot enter both aminimum fee per trade AND a ticket
charge for a single product/currency.
Account Management Users' Guide 269
o To set aminimum fee per trade, enter the amount in theMin field for each desired pro-
duct/currency. Remember that you can set theminimum fee per trade for all products and cur-
rencies.o To set amaximum fee per trade, enter the amount in theMax field for each desired pro-
duct/currency. Remember that you can set themaximum fee per trade for all products and cur-
rencies. Check the box under theMax column to configuremaximumper order fee as percent of
trade value.o To set an absolutemarkup amount for a product, enter the amount in the AbsoluteMarkup field
for the desired product/currency. If you set this amount for a product/currency, you cannot set the
Percent Markup or Absolute Amounts for the same product/currency. For example, to set a client
fee of $1.00, enter 1.00 in the AbsoluteMarkup field for the desired product/currency. Note that
this client fee is in addition to our commission.
For Forex fee per trade unit, themark-up is calculated on the second currency of an FX pair, so for
example, if a client trades in EUR.USD, themarkup is based on the USD and not the EUR.
o To set amarkup percentage, enter the percentage amount without the decimal amount. (enter it
as a whole number) in the%Markup field for the desired product/currency. For example, enter-
ing 100 indicates a 100%markup. If you set this amount for a product/currency, you cannot set
the AbsoluteMarkup or Absolute Amounts for the same product/currency. For example, to set a
client fee of 25% of our commission, enter 25 in the%Markup field for the desired pro-
duct/currency. Note that this client fee is in addition to our commission.o To set absolute fees in a tiered schedule by volume level (also called Absolute Tiered Com-
missions), for each desired product/currency, enter the fee amount for each of the three tiers
(Fee#1, Fee#2 and Fee#3 fields), then enter the volume level at which the fee changes in each of
the three tiers (Vol#1, Vol#2 and Vol#3 fields). Note that Absolute Tiered Commissions include
our commission.
Check the Unit column for the specific product/currency. Youmust enter absolute fees in the
same units specified in the Unit column for that product/currency. For example, if the Unit column
displays a percent sign (%), be sure to enter the percentage and not the absolute dollar amount.
For example, suppose you want you wanted to charge 0.4% for up to 500 shares, 0.3% for up to
Account Management Users' Guide 270
Chapter 7 Configure Broker Client Fees
Chapter 7 Configure Broker Client Fees
1,000 shares, and 0.2% above 1,000 shares of GBP stocks. You would enter 0.4 in the Fee#1
field, 500 in the Vol#1 field, 0.3 in the Fee#2 field, 1000 in the Vol#2 field, and 0.2 in the Fee#3
field. In this example, you would leave the Vol#3 field blank.
Very small numbersmay be displayed in E notation.
o Broker Master Users can set absolute amounts for products and specific exchanges. To do this,
scroll down the list of products and enter the amount in the field next to the desired product or
exchange in the applicable currency. You can also enter absolute fees in a tiered schedule as
described in the previous bullet.o To specify that all regulatory and exchange fees be added to an Absolute Tiered Commission
schedule, click the check box for the desired product/currency.
o To specify interest markups or markdowns for a specific currency:
l Click the PayClient No Credit Interest check box to pay all credit and short proceeds credit
interest to the broker.
l In the Credit Markdown field, enter a percentage amount to be subtracted from the credit
interest paid and given to the broker.
l In the Debit Markup field, enter a percentage amount to be added to the debit interest. The
maximummarkup is 5%, and wewill charge 25% of the debit interest markup over 1%. The
25%ChargeOver 1% column shows the interest markup that we will earn. For example, if
you enter 1 (for 1%) in the Debit Markup field, then 0 will appear in the 25%ChargeOver 1%
field. If you enter 5 (for 5%) in the Debit Markup field, 1 will appear in the 25%ChargeOver
1% field (25% of 4%, the amount of Debit Markup over 1%, is 1%).
l In the Short Credit Markdown field, enter a percentage amount to be subtracted from the
short proceeds credit interest paid and given to the broker.
l Specify credit markdowns and debit markups for interest associated with long and short
CFDs and long and short indexCFDs in the fields provided.
l Specify borrow feemarkup percentages in the Variable Borrow Markup and Fixed Borrow
Markup fields. Acceptable values for the Variable Borrow Markupmust be between 0 and
25% (you do not enter the percent sign). Acceptable values for the Fixed Borrow Markup
must be between 0 and 1% (you do not enter the percent sign).
For more information about borrow markups, see Types of Broker Client Fees.
Account Management Users' Guide 271
o To set a take up fee on trades for clients who subscribe to our IB Prime institution service, expand
the Take Up Fees section, and then enter the amount in the Ticket Charge field for each desired
product/currency.
l If you selectedmultiple clients and all of the clients are IB Prime customers, then the Take
Up Fees section appears. If you selectedmultiple clients and one of the clients is not an
IB Prime customer, then the Take Up Fees section doesNOT appear.
6. ClickContinue.
A confirmation page appears.
7. Print this page for your records, then clickContinue.
To apply a previously saved client fee template to selected accounts
1. ClickManage Clients > Fees > Configure.
The Configure Fees page opens.
2. Select one or more client accounts by clicking the check box next to each one, then clickView/Con-figure Fees.
3. Select a template from the Template drop-down, then click theApply Template button.4. ClickContinue at the bottom of the page.
Client Invoicing
TheClient Invoicing page lets you submit broker-calculated daily fee invoices for multiple client accounts,
view and update pending invoices and review invoices processed in the past seven days. Invoices
submitted prior to 5:30 (17:30) PMEST will be processed by us the same day (U.S. night) and appear on
today's statements. Invoices submitted after 5:30 (17:30) PMEST will be processed by us on the next
business day. You can submit invoices for up to ten clients per day, but only one invoice per client account
per day.
Who can access the Client Invoicing page?
You can access this page if you are a(n):
Account Management Users' Guide 272
Chapter 7 Client Invoicing

Chapter 7 Client Invoicing
Fully Disclosed Broker Master
The Broker Invoicing page lets a Fully Disclosed Broker:
Configure Invoices
Submit a fee invoice for client accounts.
View, upload or cancel pending invoice requests.
Upload invoices for multiple clients in a single .csv file.
Before you can submit fee invoices for client accounts, youmust first configure client fees and invoice caps
for the account(s).
To configure invoices for client accounts
1. ClickManage Clients > Fees > Invoicing.The Client Invoicing page appears.
2. ClickConfigure Invoicing.The Configure Invoicing page appears.
Account Management Users' Guide 273
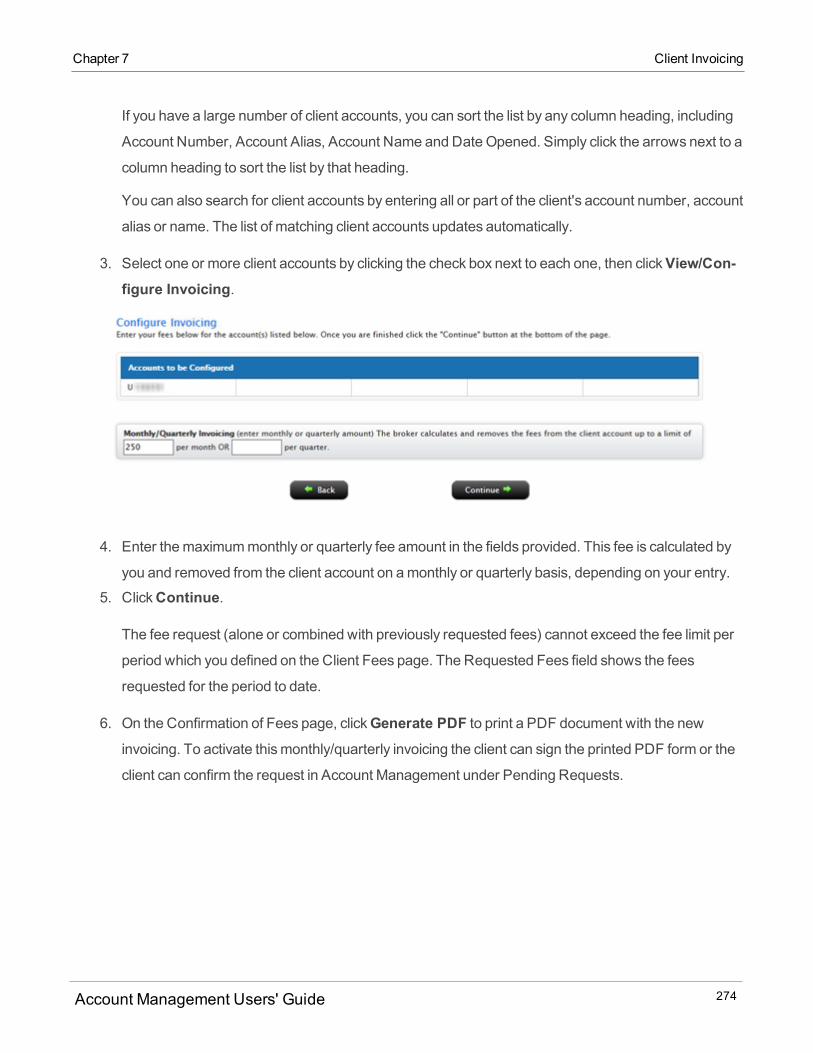
If you have a large number of client accounts, you can sort the list by any column heading, including
Account Number, Account Alias, Account Name and Date Opened. Simply click the arrows next to a
column heading to sort the list by that heading.
You can also search for client accounts by entering all or part of the client's account number, account
alias or name. The list of matching client accounts updates automatically.
3. Select one or more client accounts by clicking the check box next to each one, then clickView/Con-figure Invoicing.
4. Enter themaximummonthly or quarterly fee amount in the fields provided. This fee is calculated by
you and removed from the client account on amonthly or quarterly basis, depending on your entry.
5. ClickContinue.
The fee request (alone or combined with previously requested fees) cannot exceed the fee limit per
period which you defined on the Client Fees page. The Requested Fees field shows the fees
requested for the period to date.
6. On the Confirmation of Fees page, clickGenerate PDF to print a PDF document with the newinvoicing. To activate thismonthly/quarterly invoicing the client can sign the printed PDF form or the
client can confirm the request in Account Management under Pending Requests.
Account Management Users' Guide 274
Chapter 7 Client Invoicing
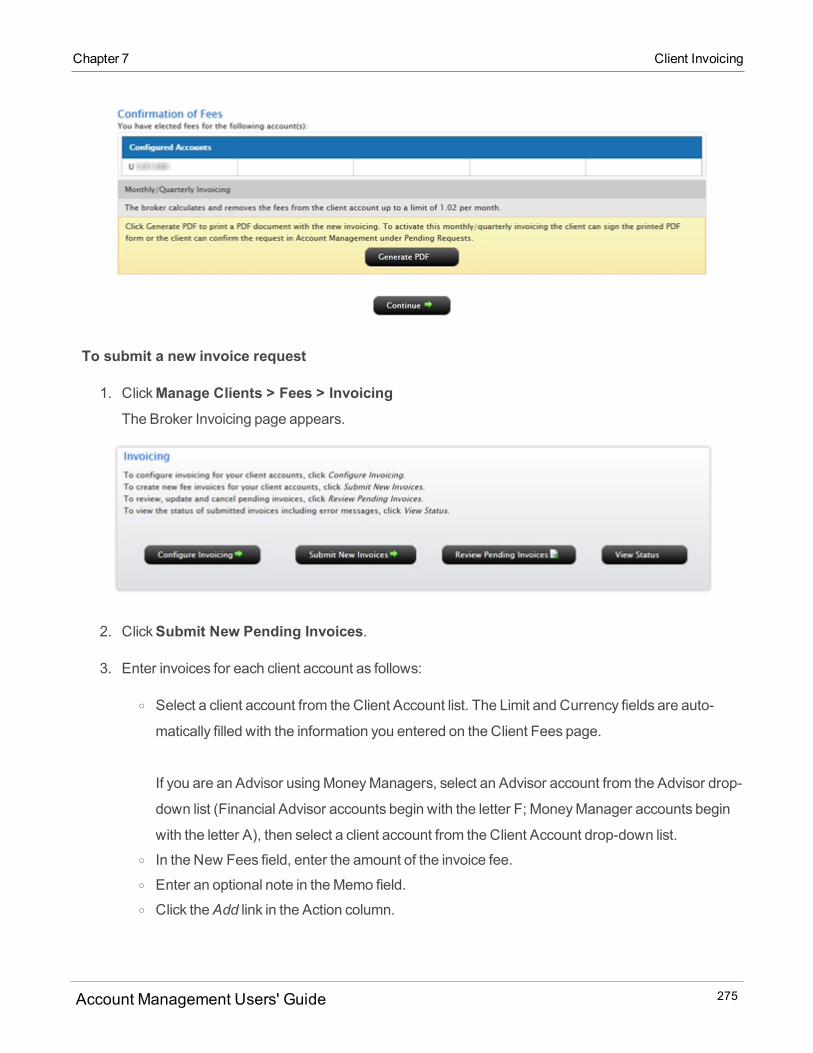
Chapter 7 Client Invoicing
To submit a new invoice request
1. ClickManage Clients > Fees > InvoicingThe Broker Invoicing page appears.
2. ClickSubmit New Pending Invoices.
3. Enter invoices for each client account as follows:
o Select a client account from the Client Account list. The Limit and Currency fields are auto-
matically filled with the information you entered on the Client Fees page.
If you are an Advisor usingMoneyManagers, select an Advisor account from the Advisor drop-
down list (Financial Advisor accounts begin with the letter F; MoneyManager accounts begin
with the letter A), then select a client account from the Client Account drop-down list.o In the New Fees field, enter the amount of the invoice fee.o Enter an optional note in theMemo field.o Click theAdd link in the Action column.
Account Management Users' Guide 275
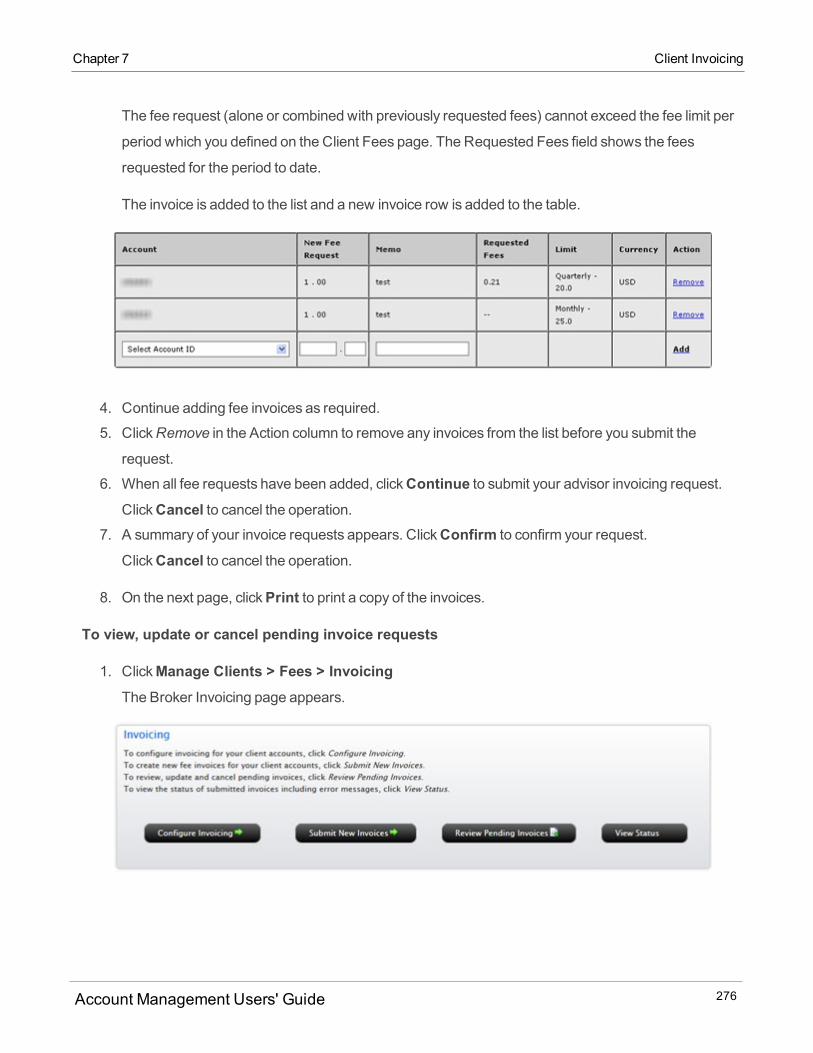
The fee request (alone or combined with previously requested fees) cannot exceed the fee limit per
period which you defined on the Client Fees page. The Requested Fees field shows the fees
requested for the period to date.
The invoice is added to the list and a new invoice row is added to the table.
4. Continue adding fee invoices as required.
5. ClickRemove in the Action column to remove any invoices from the list before you submit the
request.
6. When all fee requests have been added, clickContinue to submit your advisor invoicing request.ClickCancel to cancel the operation.
7. A summary of your invoice requests appears. ClickConfirm to confirm your request.
ClickCancel to cancel the operation.
8. On the next page, clickPrint to print a copy of the invoices.
To view, update or cancel pending invoice requests
1. ClickManage Clients > Fees > InvoicingThe Broker Invoicing page appears.
Account Management Users' Guide 276
Chapter 7 Client Invoicing
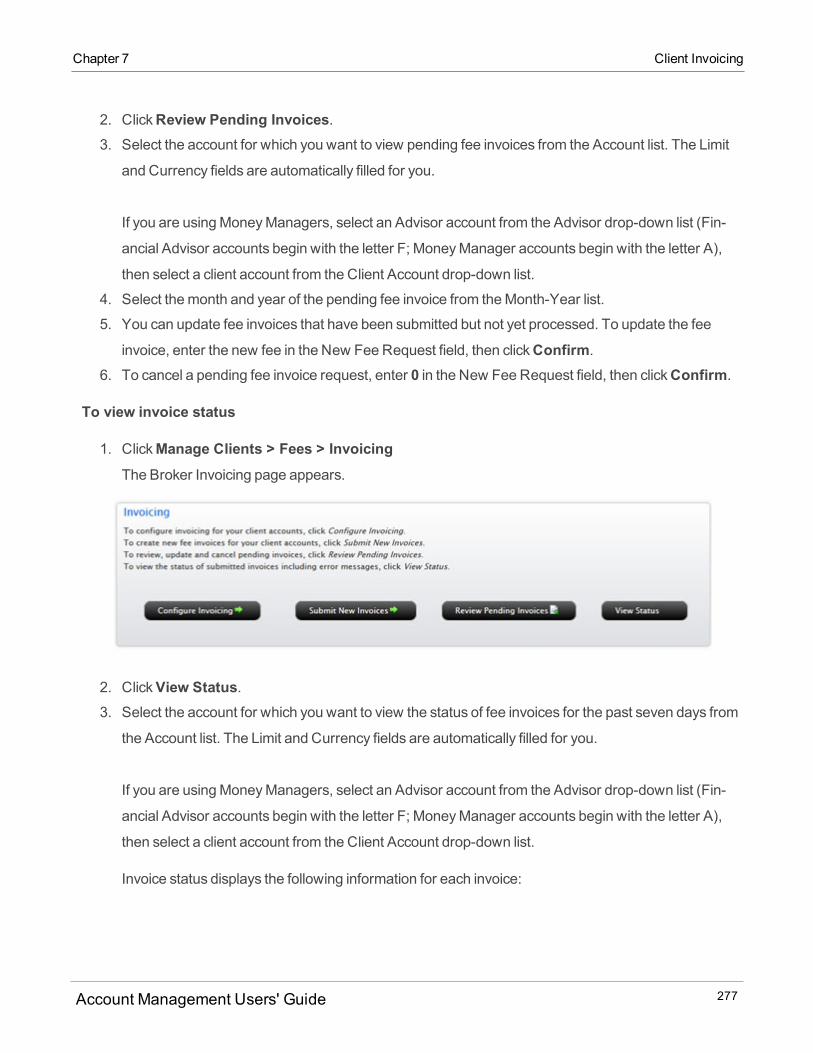
Chapter 7 Client Invoicing
2. ClickReview Pending Invoices.3. Select the account for which you want to view pending fee invoices from the Account list. The Limit
and Currency fields are automatically filled for you.
If you are usingMoneyManagers, select an Advisor account from the Advisor drop-down list (Fin-
ancial Advisor accounts begin with the letter F; MoneyManager accounts begin with the letter A),
then select a client account from the Client Account drop-down list.
4. Select themonth and year of the pending fee invoice from theMonth-Year list.
5. You can update fee invoices that have been submitted but not yet processed. To update the fee
invoice, enter the new fee in the New FeeRequest field, then clickConfirm.
6. To cancel a pending fee invoice request, enter 0 in the New FeeRequest field, then clickConfirm.
To view invoice status
1. ClickManage Clients > Fees > InvoicingThe Broker Invoicing page appears.
2. ClickView Status.3. Select the account for which you want to view the status of fee invoices for the past seven days from
the Account list. The Limit and Currency fields are automatically filled for you.
If you are usingMoneyManagers, select an Advisor account from the Advisor drop-down list (Fin-
ancial Advisor accounts begin with the letter F; MoneyManager accounts begin with the letter A),
then select a client account from the Client Account drop-down list.
Invoice status displays the following information for each invoice:
Account Management Users' Guide 277

o Requested Amounto Currencyo Memo, if there is oneo Post Dateo Posted Amounto Error Reason, if there is an error
Uploading Invoices
If you havemultiple client invoices, you can create a bulk invoice file and upload it on this page. You will be
able to verify the invoice details before they are submitted for processing.
The file must be a CSV (comma-separated values) file that contains the following fields:
Client Account Number
Amount (in client account's base currency)
MoneyManager Account Number (only if the invoice is to be paid to aMoneyManager)
The following optional field may also be included:
Memo.
To upload a .csv file with multiple client invoices
1. Prepare your .csv invoice file based on the rules listed above.
2. Log into Account Management, then clickManage Clients > Fees > InvoicingThe Broker Invoicing page appears.
3. ClickSubmit New Invoices.The page displays information about entering invoices.
Account Management Users' Guide 278
Chapter 7 Uploading Invoices
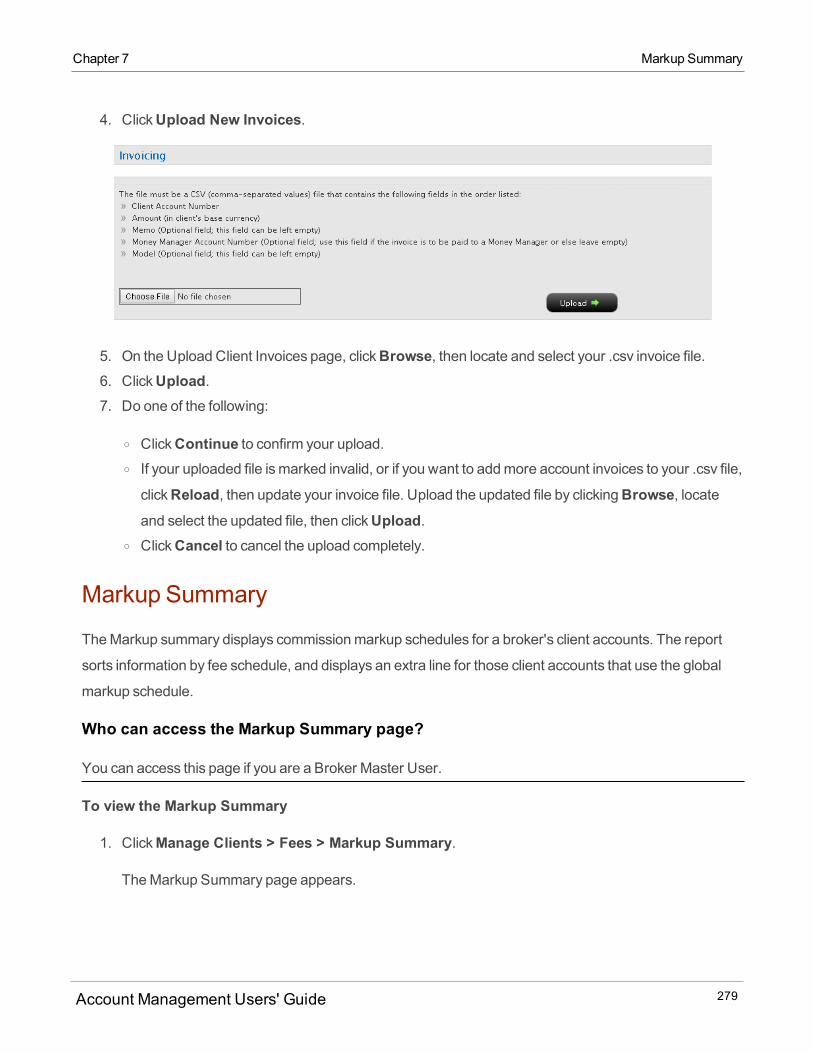
Chapter 7 Markup Summary
4. ClickUpload New Invoices.
5. On the Upload Client Invoices page, clickBrowse, then locate and select your .csv invoice file.6. ClickUpload.7. Do one of the following:
o ClickContinue to confirm your upload.o If your uploaded file ismarked invalid, or if you want to addmore account invoices to your .csv file,
clickReload, then update your invoice file. Upload the updated file by clickingBrowse, locateand select the updated file, then clickUpload.
o ClickCancel to cancel the upload completely.
Markup Summary
TheMarkup summary displays commissionmarkup schedules for a broker's client accounts. The report
sorts information by fee schedule, and displays an extra line for those client accounts that use the global
markup schedule.
Who can access the Markup Summary page?
You can access this page if you are a Broker Master User.
To view the Markup Summary
1. ClickManage Clients > Fees > Markup Summary.
TheMarkup Summary page appears.
Account Management Users' Guide 279
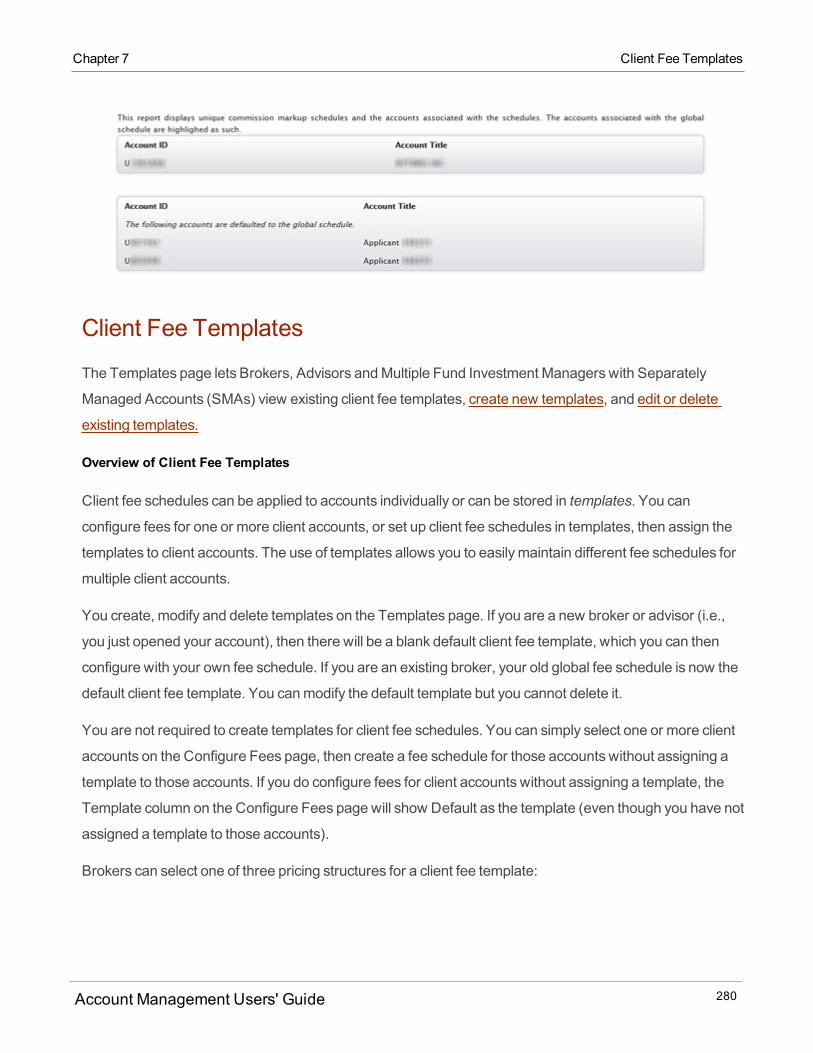
Client Fee Templates
The Templates page lets Brokers, Advisors andMultiple Fund Investment Managers with Separately
Managed Accounts (SMAs) view existing client fee templates, create new templates, and edit or delete
existing templates.
Overview of Client Fee Templates
Client fee schedules can be applied to accounts individually or can be stored in templates. You can
configure fees for one or more client accounts, or set up client fee schedules in templates, then assign the
templates to client accounts. The use of templates allows you to easilymaintain different fee schedules for
multiple client accounts.
You create, modify and delete templates on the Templates page. If you are a new broker or advisor (i.e.,
you just opened your account), then there will be a blank default client fee template, which you can then
configure with your own fee schedule. If you are an existing broker, your old global fee schedule is now the
default client fee template. You canmodify the default template but you cannot delete it.
You are not required to create templates for client fee schedules. You can simply select one or more client
accounts on the Configure Fees page, then create a fee schedule for those accounts without assigning a
template to those accounts. If you do configure fees for client accounts without assigning a template, the
Template column on the Configure Fees page will show Default as the template (even though you have not
assigned a template to those accounts).
Brokers can select one of three pricing structures for a client fee template:
Account Management Users' Guide 280
Chapter 7 Client Fee Templates
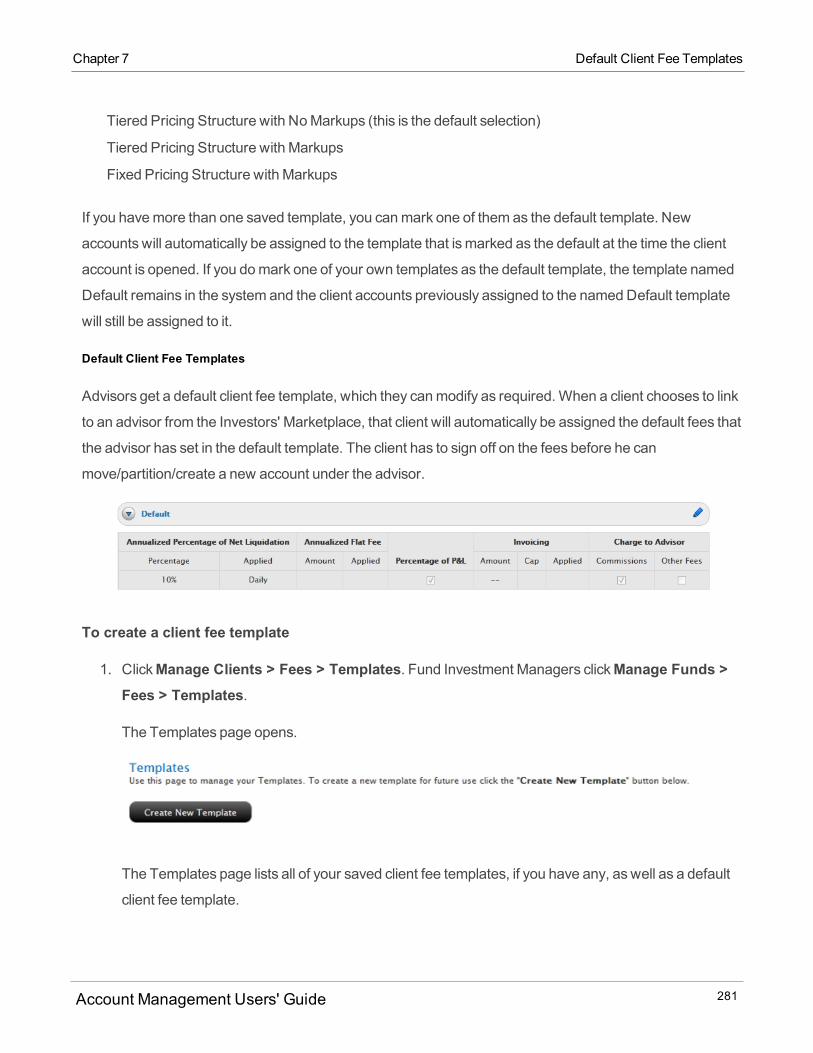
Chapter 7 Default Client Fee Templates
Tiered Pricing Structure with NoMarkups (this is the default selection)
Tiered Pricing Structure with Markups
Fixed Pricing Structure with Markups
If you havemore than one saved template, you canmark one of them as the default template. New
accounts will automatically be assigned to the template that ismarked as the default at the time the client
account is opened. If you domark one of your own templates as the default template, the template named
Default remains in the system and the client accounts previously assigned to the namedDefault template
will still be assigned to it.
Default Client Fee Templates
Advisors get a default client fee template, which they canmodify as required.When a client chooses to link
to an advisor from the Investors' Marketplace, that client will automatically be assigned the default fees that
the advisor has set in the default template. The client has to sign off on the fees before he can
move/partition/create a new account under the advisor.
To create a client fee template
1. ClickManage Clients > Fees > Templates. Fund Investment Managers clickManage Funds >Fees > Templates.
The Templates page opens.
The Templates page lists all of your saved client fee templates, if you have any, aswell as a default
client fee template.
Account Management Users' Guide 281
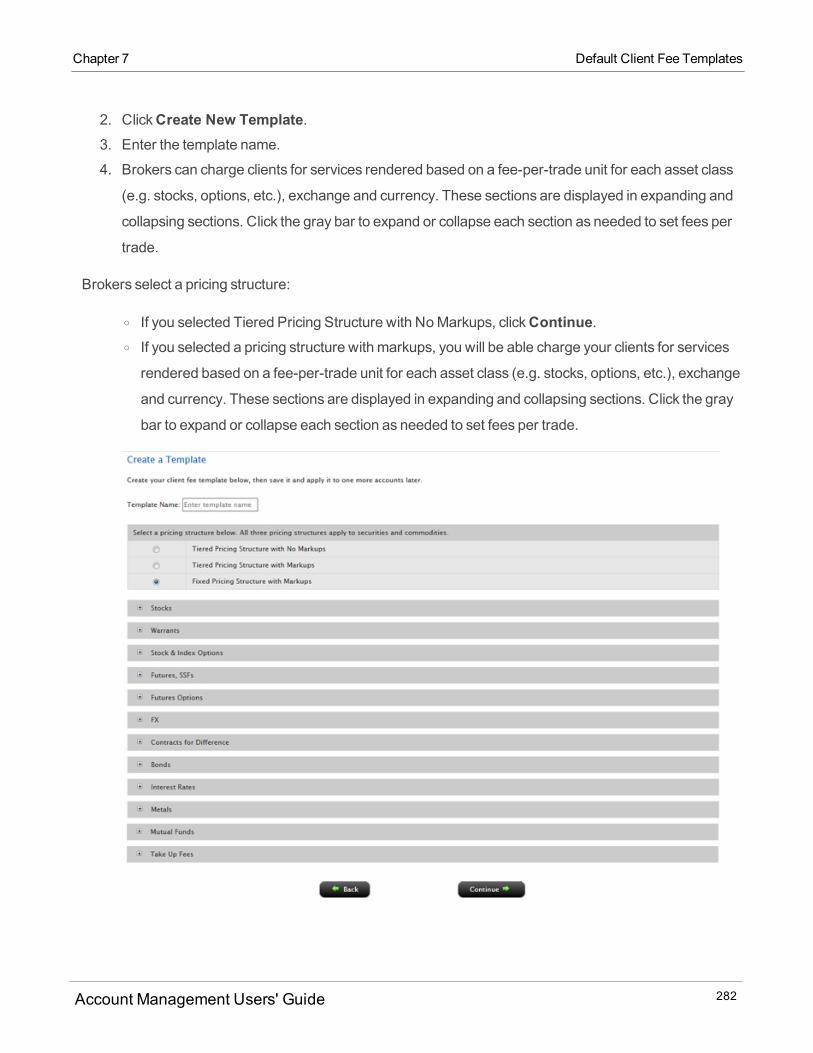
2. ClickCreate New Template.3. Enter the template name.
4. Brokers can charge clients for services rendered based on a fee-per-trade unit for each asset class
(e.g. stocks, options, etc.), exchange and currency. These sections are displayed in expanding and
collapsing sections. Click the gray bar to expand or collapse each section as needed to set fees per
trade.
Brokers select a pricing structure:
o If you selected Tiered Pricing Structure with NoMarkups, clickContinue.o If you selected a pricing structure with markups, you will be able charge your clients for services
rendered based on a fee-per-trade unit for each asset class (e.g. stocks, options, etc.), exchange
and currency. These sections are displayed in expanding and collapsing sections. Click the gray
bar to expand or collapse each section as needed to set fees per trade.
Account Management Users' Guide 282
Chapter 7 Default Client Fee Templates
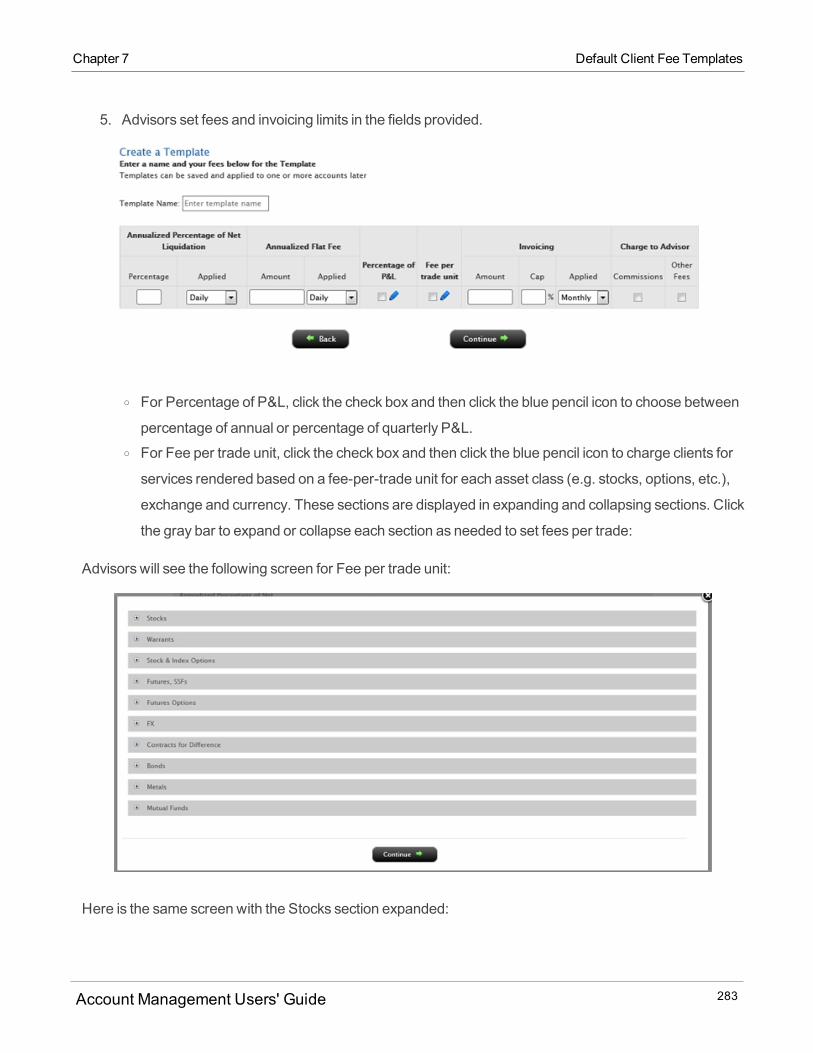
Chapter 7 Default Client Fee Templates
5. Advisors set fees and invoicing limits in the fields provided.
o For Percentage of P&L, click the check box and then click the blue pencil icon to choose between
percentage of annual or percentage of quarterly P&L.o For Fee per trade unit, click the check box and then click the blue pencil icon to charge clients for
services rendered based on a fee-per-trade unit for each asset class (e.g. stocks, options, etc.),
exchange and currency. These sections are displayed in expanding and collapsing sections. Click
the gray bar to expand or collapse each section as needed to set fees per trade:
Advisors will see the following screen for Fee per trade unit:
Here is the same screen with the Stocks section expanded:
Account Management Users' Guide 283
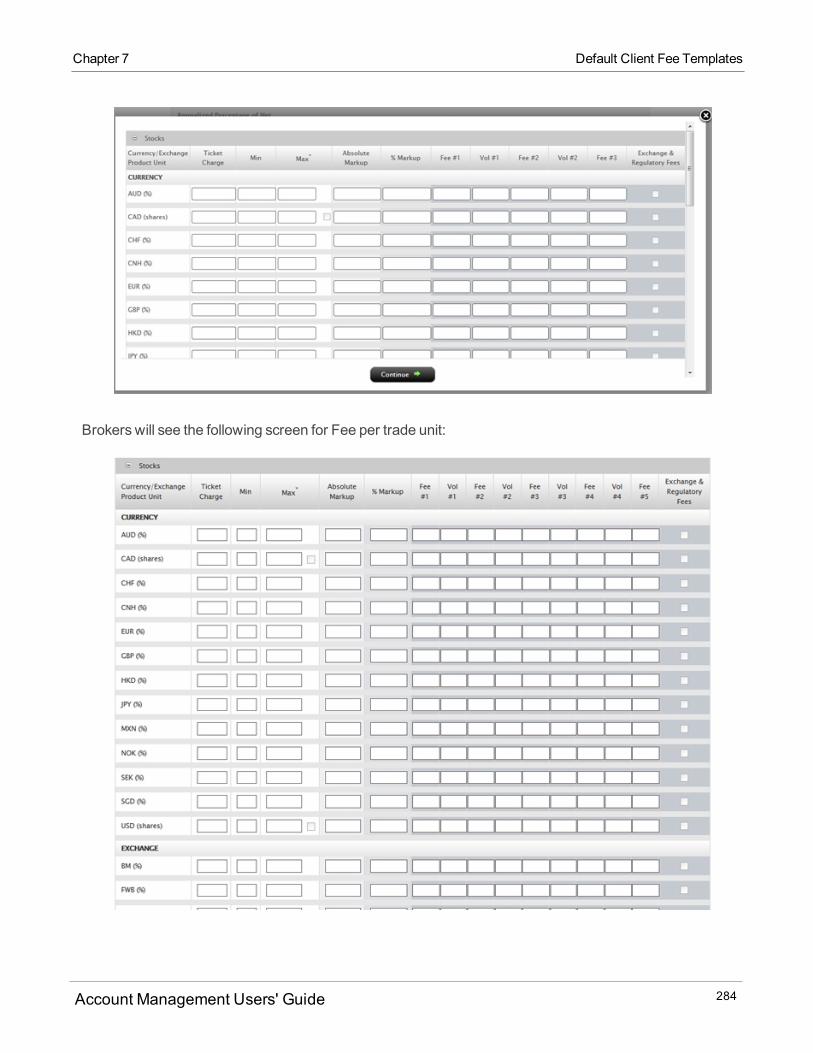
Brokers will see the following screen for Fee per trade unit:
Account Management Users' Guide 284
Chapter 7 Default Client Fee Templates
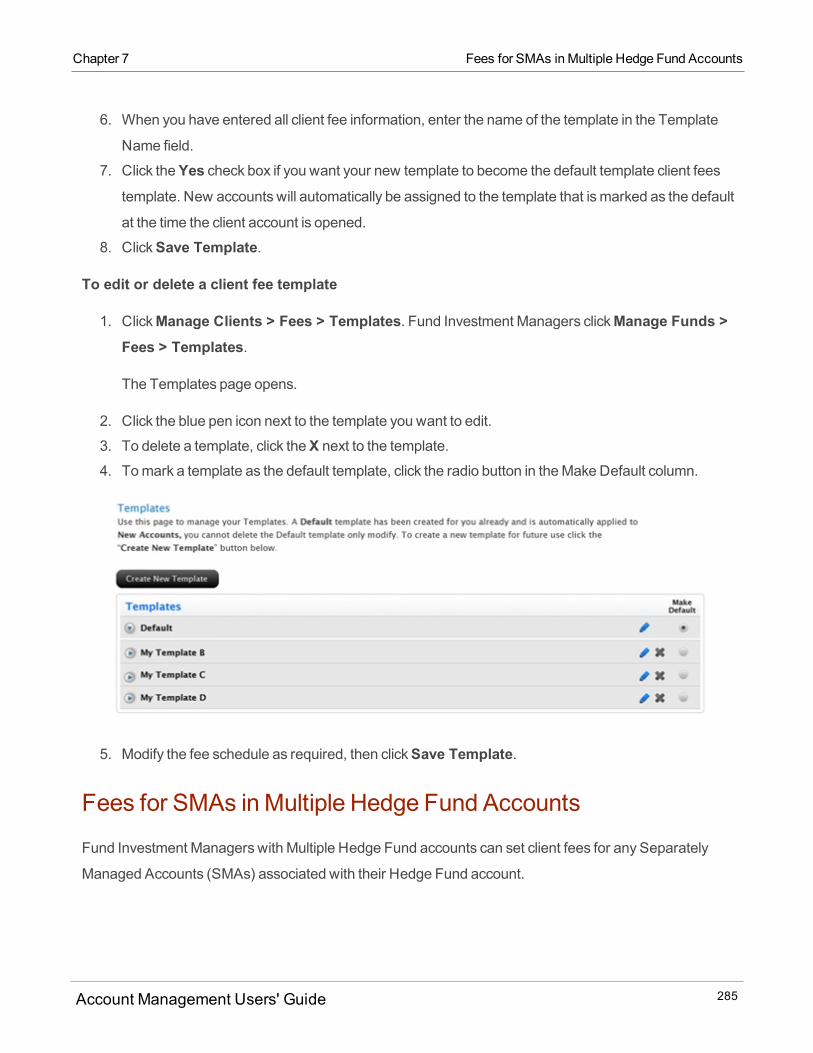
Chapter 7 Fees for SMAs inMultiple Hedge Fund Accounts
6. When you have entered all client fee information, enter the name of the template in the Template
Name field.
7. Click theYes check box if you want your new template to become the default template client fees
template. New accounts will automatically be assigned to the template that ismarked as the default
at the time the client account is opened.
8. ClickSave Template.
To edit or delete a client fee template
1. ClickManage Clients > Fees > Templates. Fund Investment Managers clickManage Funds >Fees > Templates.
The Templates page opens.
2. Click the blue pen icon next to the template you want to edit.
3. To delete a template, click theX next to the template.
4. Tomark a template as the default template, click the radio button in theMake Default column.
5. Modify the fee schedule as required, then clickSave Template.
Fees for SMAs inMultiple Hedge Fund Accounts
Fund Investment Managers with Multiple Hedge Fund accounts can set client fees for any Separately
Managed Accounts (SMAs) associated with their Hedge Fund account.
Account Management Users' Guide 285
Client fee setup for an SMA in aMultiple Hedge Fund account is IDENTICAL to the client fee setup for
Advisors. Fund Investment Managers can :
Set up client fees and configuremonthly/quarterly invoices for SMAs, including Percent of Net Liquid-
ation Value, Flat Fee, Percent of P&L, and Fee per trade unit, just like Advisors.
Set up HighWater Marking for fees based on Percent of P&L, just like Advisors.
Create client fee templates on theManage Clients > Fees > Templates page.
Submit Fund Investment Manager-calculated daily fee invoices for SMAs, just like Advisors.
SMA accounts in aMultiple Hedge Fund account must also provide authorization whenever a Fund
Investment Manager submits a new fee schedule or modifies an existing fee schedule
Note that the automatic billing fee caps and limitations that apply to Advisor client accounts also apply to
SMAs in aMultiple Hedge Fund account.
For detailed instructions on configuring fees for SMAs in aMultiple Hedge Fund account, see the Advisor
Client Fees section of this guide (click the links above for more information). The step-by-step procedures
are identical for SMAsEXCEPT that the Fund Investment Manager accesses the Fees pages from the
Manage Fundsmenu.
HFCIP Fees
Advisors use this page tomodify the fees they charge on the current value of the amount that their clients
have invested in hedge fundswho participate in our Hedge Fund Capital Introduction Program (HFCIP),
which is part of our Investors’ Marketplace.When you invest funds for your client at the Hedge Fund
Investor Site (available at theMarketplace), you will be able to enter the fees that you charge for that
investment on the form that your client must approve and sign.
For each client who invests in a participating hedge fund, you can charge fees based on the Annualized
Percentage of Net Liquidation Value of the current value of the client's investment in the Fund and/or the
percentage of profit and loss of the client's investment in the Fund, aswell as configure the fee posting
frequency (monthly or quarterly). After you complete your entries on the page, you will be presented with a
PDF form that your client must sign.
Fees entered for the first time in themiddle of a period will be calculated and applied as of the date the fee
agreement is approved and entered into the system. Fees changed during a period will take effect as of the
Account Management Users' Guide 286
Chapter 7 HFCIP Fees
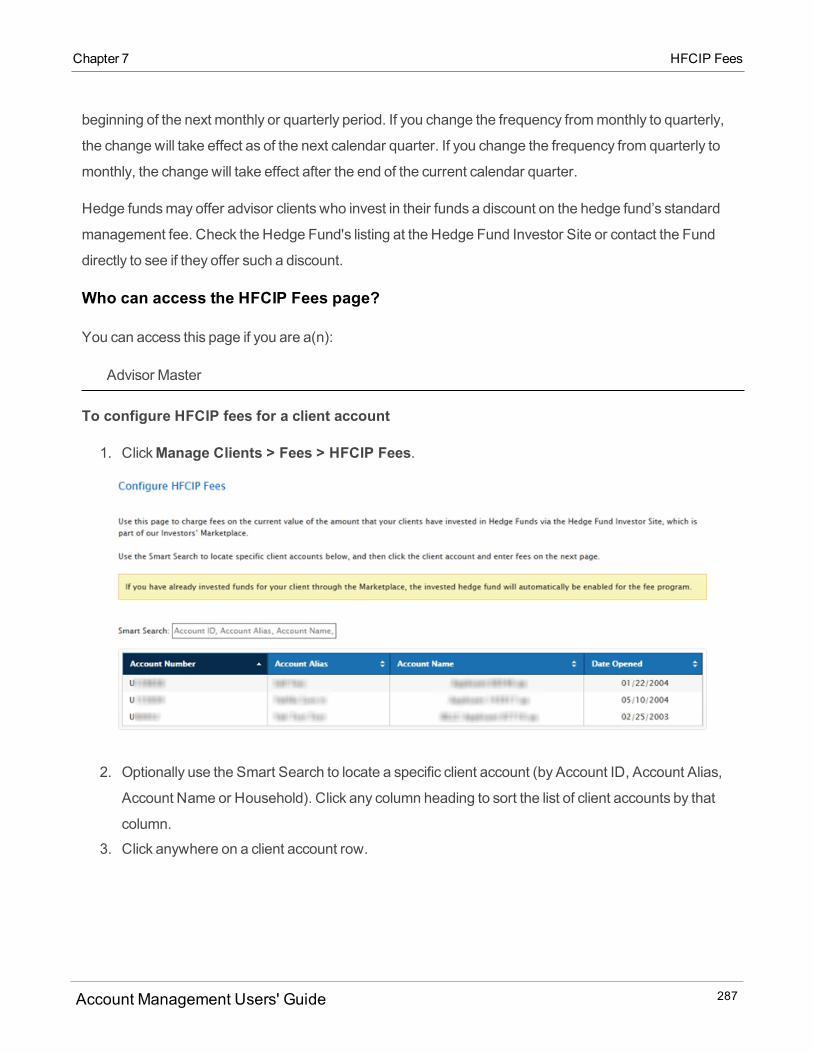
Chapter 7 HFCIP Fees
beginning of the next monthly or quarterly period. If you change the frequency frommonthly to quarterly,
the change will take effect as of the next calendar quarter. If you change the frequency from quarterly to
monthly, the change will take effect after the end of the current calendar quarter.
Hedge fundsmay offer advisor clients who invest in their funds a discount on the hedge fund’s standard
management fee. Check the Hedge Fund's listing at the Hedge Fund Investor Site or contact the Fund
directly to see if they offer such a discount.
Who can access the HFCIP Fees page?
You can access this page if you are a(n):
Advisor Master
To configure HFCIP fees for a client account
1. ClickManage Clients > Fees > HFCIP Fees.
2. Optionally use the Smart Search to locate a specific client account (by Account ID, Account Alias,
Account Name or Household). Click any column heading to sort the list of client accounts by that
column.
3. Click anywhere on a client account row.
Account Management Users' Guide 287
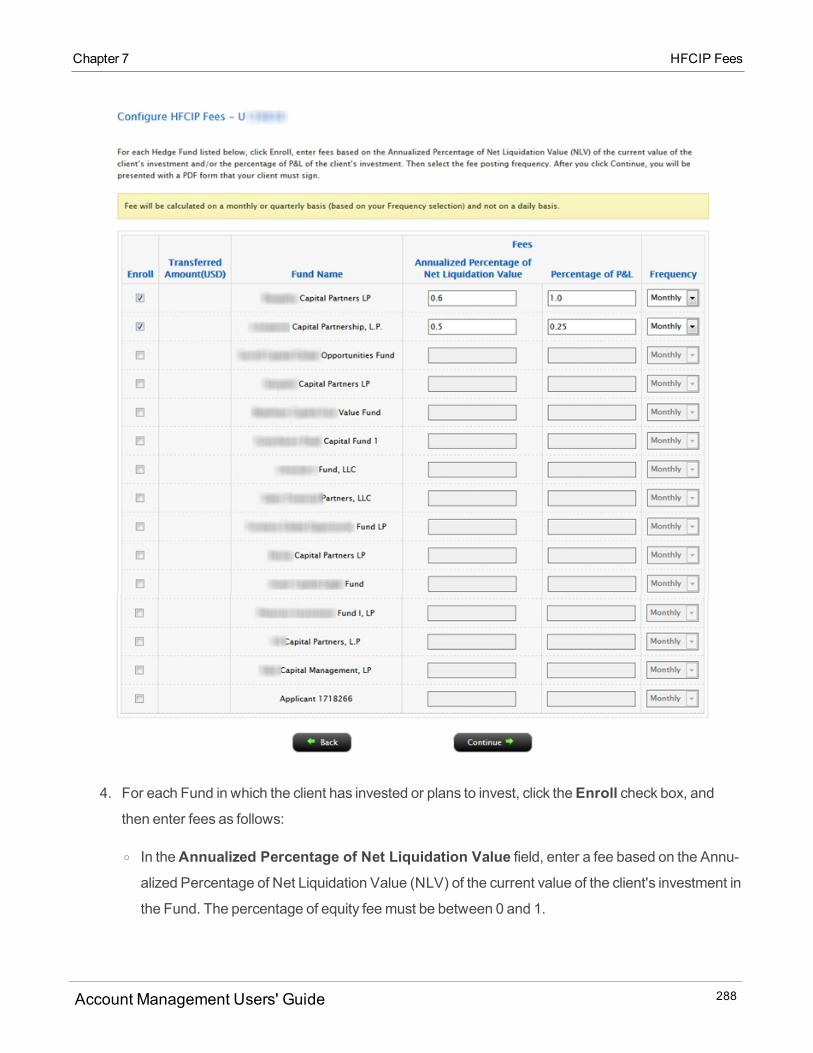
4. For each Fund in which the client has invested or plans to invest, click theEnroll check box, andthen enter fees as follows:
o In theAnnualized Percentage of Net Liquidation Value field, enter a fee based on the Annu-alized Percentage of Net Liquidation Value (NLV) of the current value of the client's investment in
the Fund. The percentage of equity feemust be between 0 and 1.
Account Management Users' Guide 288
Chapter 7 HFCIP Fees
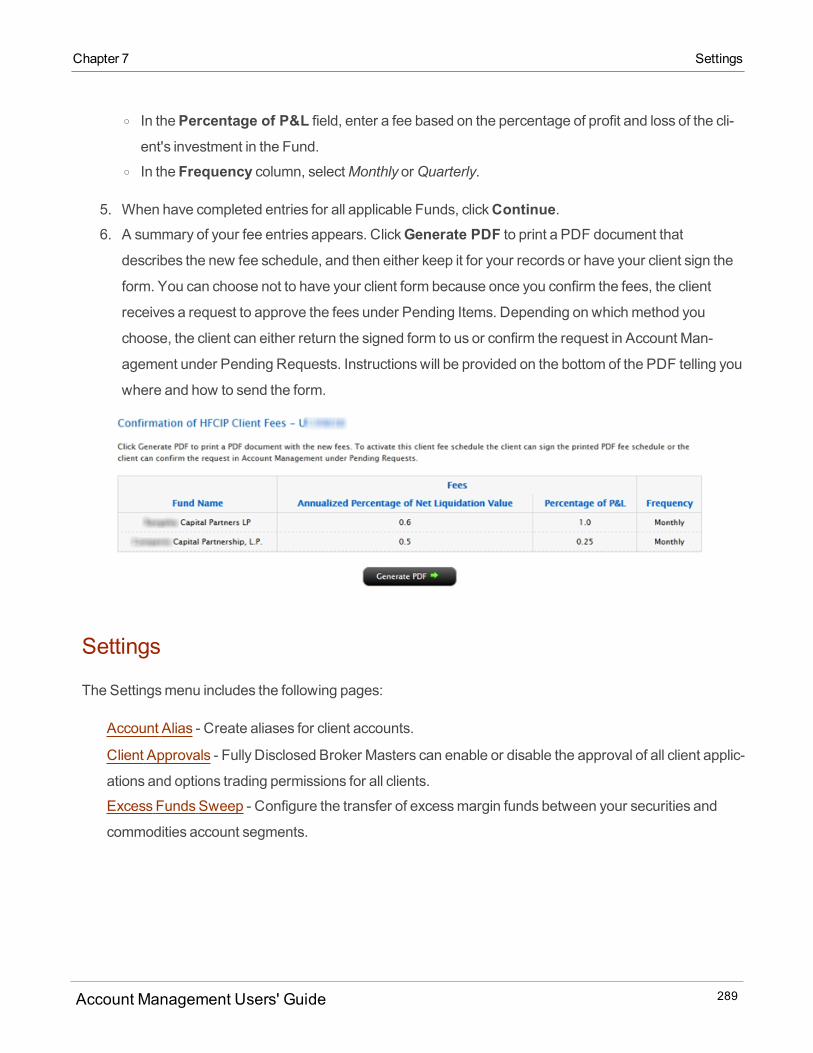
Chapter 7 Settings
o In thePercentage of P&L field, enter a fee based on the percentage of profit and loss of the cli-ent's investment in the Fund.
o In the Frequency column, selectMonthly orQuarterly.
5. When have completed entries for all applicable Funds, clickContinue.6. A summary of your fee entries appears. ClickGenerate PDF to print a PDF document that
describes the new fee schedule, and then either keep it for your records or have your client sign the
form. You can choose not to have your client form because once you confirm the fees, the client
receives a request to approve the fees under Pending Items. Depending on whichmethod you
choose, the client can either return the signed form to us or confirm the request in Account Man-
agement under Pending Requests. Instructionswill be provided on the bottom of the PDF telling you
where and how to send the form.
Settings
The Settingsmenu includes the following pages:
Account Alias - Create aliases for client accounts.
Client Approvals - Fully Disclosed Broker Masters can enable or disable the approval of all client applic-
ations and options trading permissions for all clients.
Excess Funds Sweep - Configure the transfer of excessmargin funds between your securities and
commodities account segments.
Account Management Users' Guide 289
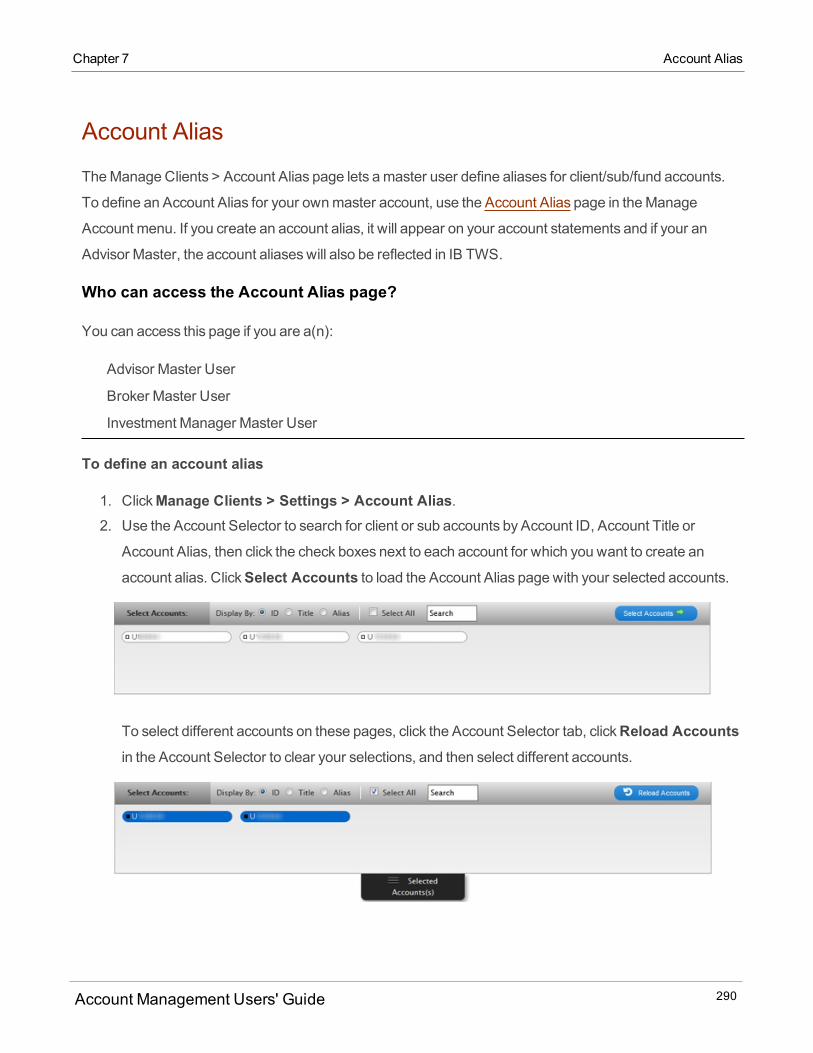
Account Alias
The Manage Clients > Account Alias page lets amaster user define aliases for client/sub/fund accounts.
To define an Account Alias for your ownmaster account, use the Account Alias page in theManage
Account menu. If you create an account alias, it will appear on your account statements and if your an
Advisor Master, the account aliaseswill also be reflected in IB TWS.
Who can access the Account Alias page?
You can access this page if you are a(n):
Advisor Master User
Broker Master User
Investment Manager Master User
To define an account alias
1. ClickManage Clients > Settings > Account Alias.2. Use the Account Selector to search for client or sub accounts by Account ID, Account Title or
Account Alias, then click the check boxes next to each account for which you want to create an
account alias. ClickSelect Accounts to load the Account Alias page with your selected accounts.
To select different accounts on these pages, click the Account Selector tab, clickReload Accountsin the Account Selector to clear your selections, and then select different accounts.
Account Management Users' Guide 290
Chapter 7 Account Alias

Chapter 7 Broker Client Approvals
3. Type the account alias in the Account Alias field for each selected account, then click Continue.
The page refreshes and displays a confirmationmessage.
Broker Client Approvals
Fully Disclosed Broker Masters use this page to enable or disable the approval of all client applications and
options trading permissions for all clients. If you enable approval, all client applications and all client
requests for options trading permissionsmust be approved by you before they are submitted to us.
Youmust enable or disable both types of approvals at the same time; you cannot enable client application
approval and disable client option trading permissions separately. Once you enable client approvals on this
page, you can view completed and pending approvals for all accounts on theManage Clients> Dashboard page, or view pending client applications that need to be approved on the Approvals tab of
theManage Clients > Dashboard page.
Who can access the Client Approvals page?
Broker Master Users with Fully Disclosed Clients
To enable or disable client approvals
1. ClickManage Clients > Settings > Client Approvals.
Account Management Users' Guide 291
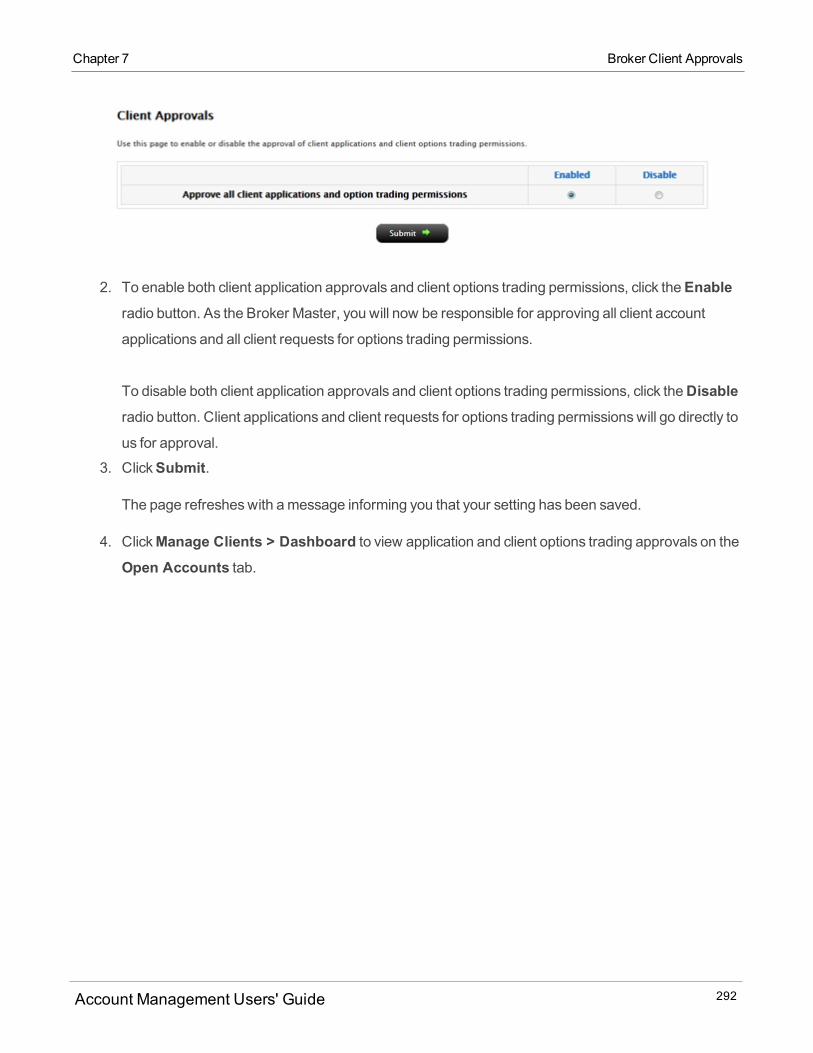
2. To enable both client application approvals and client options trading permissions, click theEnableradio button. As the Broker Master, you will now be responsible for approving all client account
applications and all client requests for options trading permissions.
To disable both client application approvals and client options trading permissions, click theDisableradio button. Client applications and client requests for options trading permissionswill go directly to
us for approval.
3. ClickSubmit.
The page refresheswith amessage informing you that your setting has been saved.
4. ClickManage Clients > Dashboard to view application and client options trading approvals on the
Open Accounts tab.
Account Management Users' Guide 292
Chapter 7 Broker Client Approvals
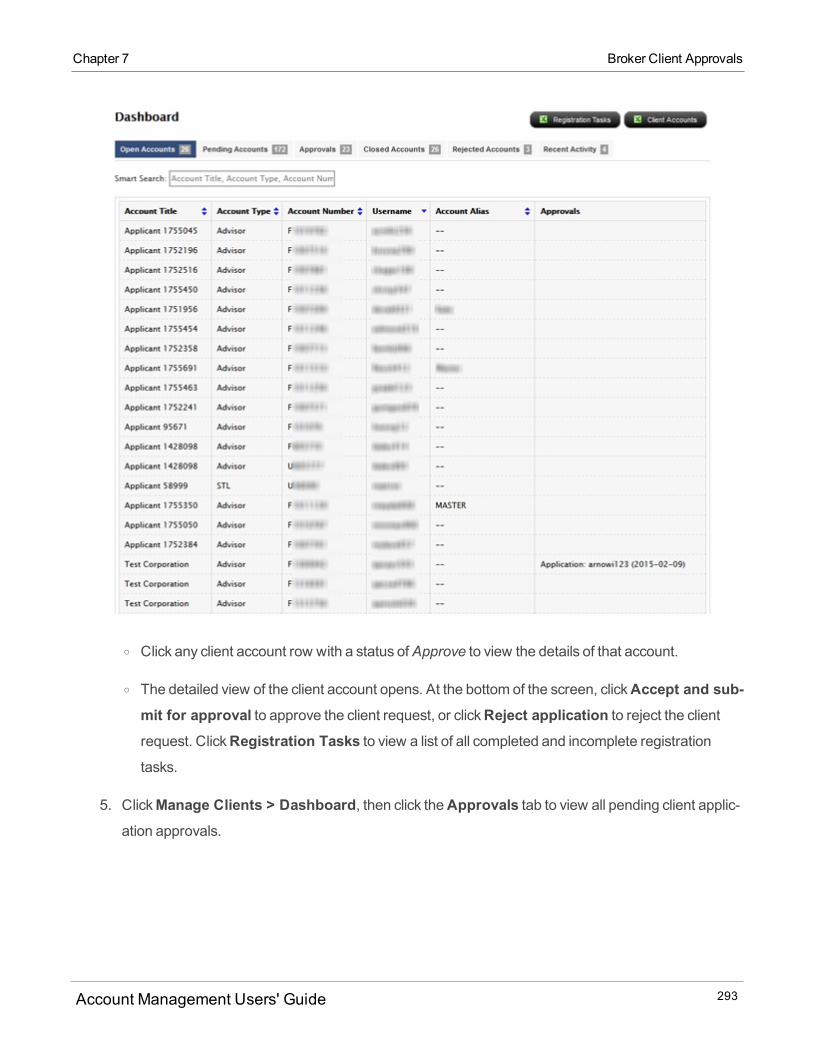
Chapter 7 Broker Client Approvals
o Click any client account row with a status of Approve to view the details of that account.
o The detailed view of the client account opens. At the bottom of the screen, clickAccept and sub-mit for approval to approve the client request, or clickReject application to reject the clientrequest. ClickRegistration Tasks to view a list of all completed and incomplete registration
tasks.
5. ClickManage Clients > Dashboard, then click theApprovals tab to view all pending client applic-
ation approvals.
Account Management Users' Guide 293
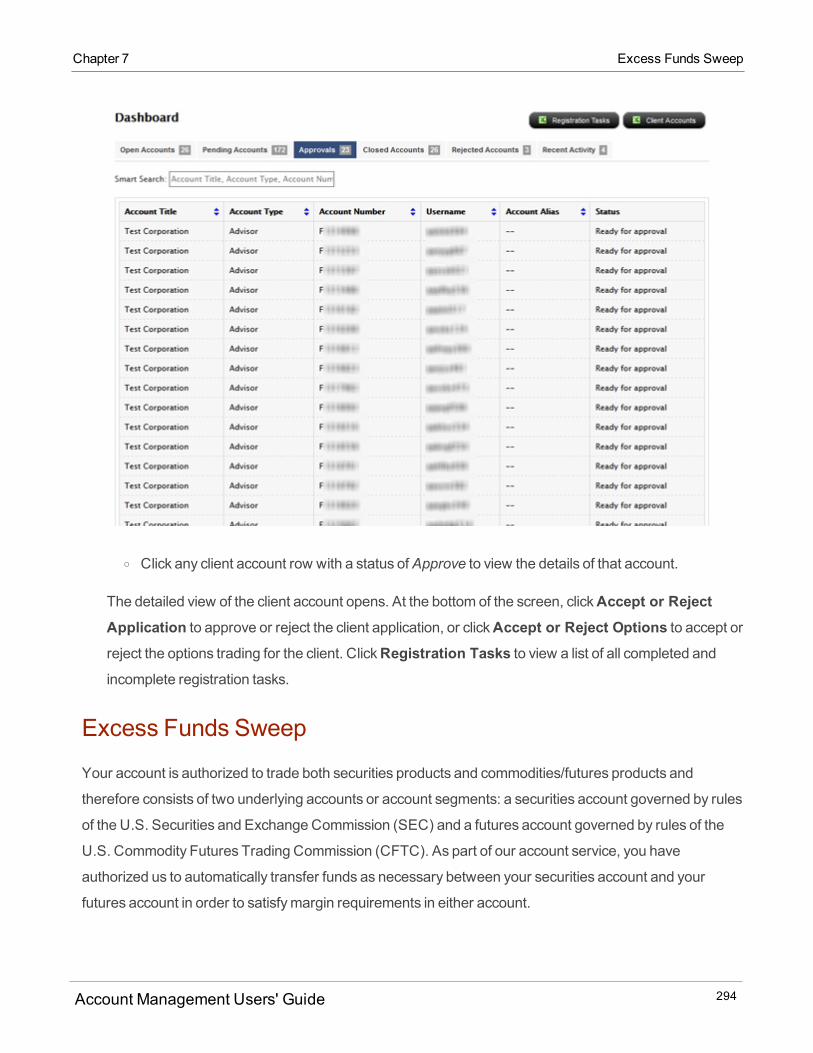
o Click any client account row with a status of Approve to view the details of that account.
The detailed view of the client account opens. At the bottom of the screen, clickAccept or RejectApplication to approve or reject the client application, or clickAccept or Reject Options to accept orreject the options trading for the client. ClickRegistration Tasks to view a list of all completed and
incomplete registration tasks.
Excess Funds Sweep
Your account is authorized to trade both securities products and commodities/futures products and
therefore consists of two underlying accounts or account segments: a securities account governed by rules
of the U.S. Securities and Exchange Commission (SEC) and a futures account governed by rules of the
U.S. Commodity Futures Trading Commission (CFTC). As part of our account service, you have
authorized us to automatically transfer funds as necessary between your securities account and your
futures account in order to satisfymargin requirements in either account.
Account Management Users' Guide 294
Chapter 7 Excess Funds Sweep
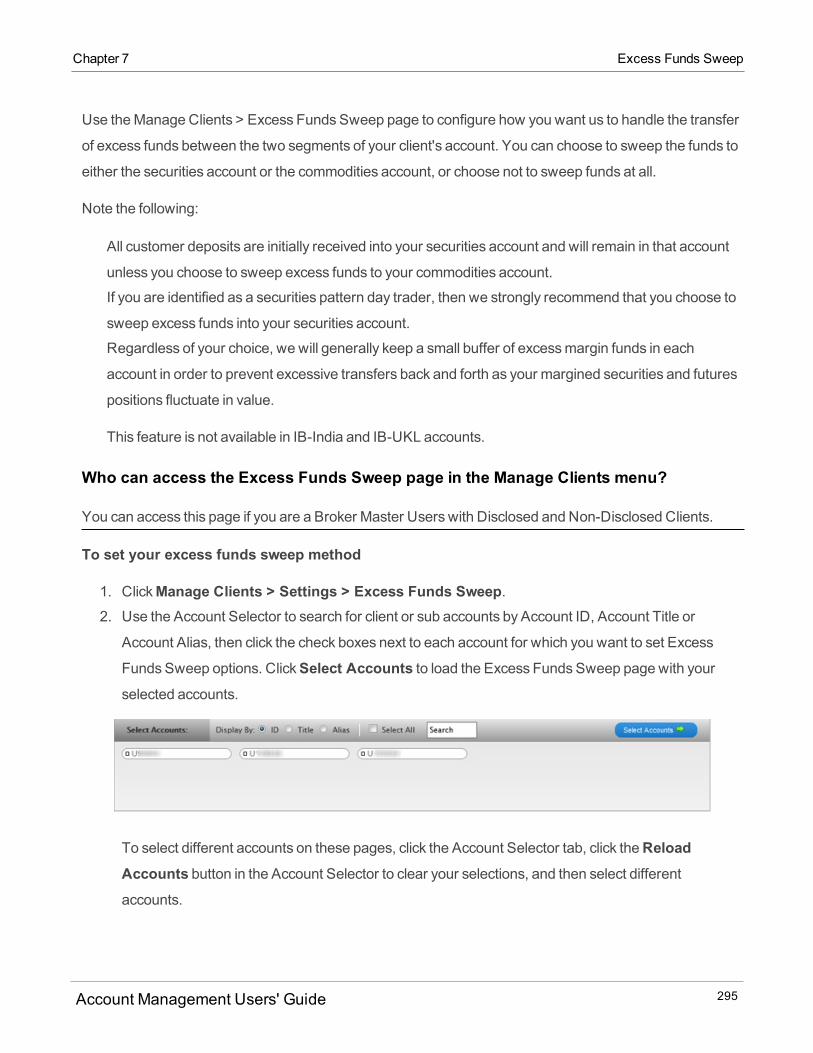
Chapter 7 Excess Funds Sweep
Use theManage Clients > Excess Funds Sweep page to configure how you want us to handle the transfer
of excess funds between the two segments of your client's account. You can choose to sweep the funds to
either the securities account or the commodities account, or choose not to sweep funds at all.
Note the following:
All customer deposits are initially received into your securities account and will remain in that account
unless you choose to sweep excess funds to your commodities account.
If you are identified as a securities pattern day trader, then we strongly recommend that you choose to
sweep excess funds into your securities account.
Regardless of your choice, we will generally keep a small buffer of excessmargin funds in each
account in order to prevent excessive transfers back and forth as your margined securities and futures
positions fluctuate in value.
This feature is not available in IB-India and IB-UKL accounts.
Who can access the Excess Funds Sweep page in the Manage Clients menu?
You can access this page if you are a Broker Master Users with Disclosed and Non-Disclosed Clients.
To set your excess funds sweep method
1. ClickManage Clients > Settings > Excess Funds Sweep.2. Use the Account Selector to search for client or sub accounts by Account ID, Account Title or
Account Alias, then click the check boxes next to each account for which you want to set Excess
Funds Sweep options. ClickSelect Accounts to load the Excess Funds Sweep page with yourselected accounts.
To select different accounts on these pages, click the Account Selector tab, click theReloadAccounts button in the Account Selector to clear your selections, and then select differentaccounts.
Account Management Users' Guide 295
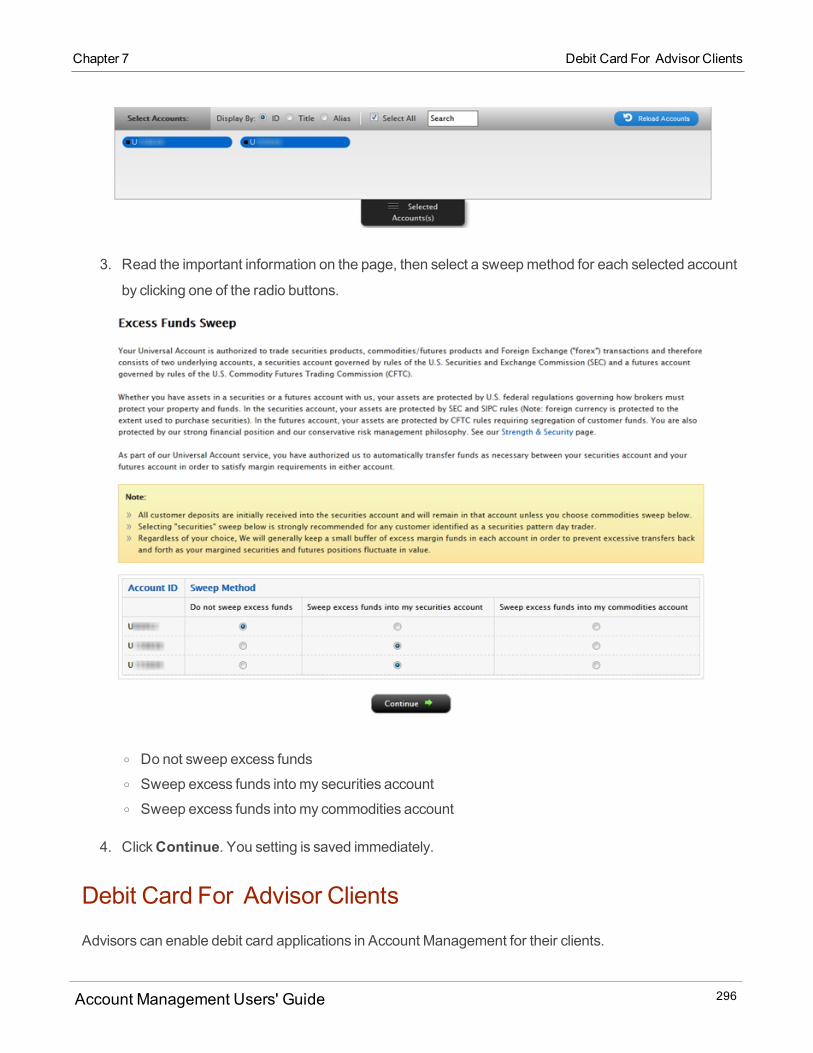
3. Read the important information on the page, then select a sweepmethod for each selected account
by clicking one of the radio buttons.
o Do not sweep excess fundso Sweep excess funds intomy securities accounto Sweep excess funds intomy commodities account
4. ClickContinue. You setting is saved immediately.
Debit Card For Advisor Clients
Advisors can enable debit card applications in Account Management for their clients.
Account Management Users' Guide 296
Chapter 7 Debit Card For Advisor Clients
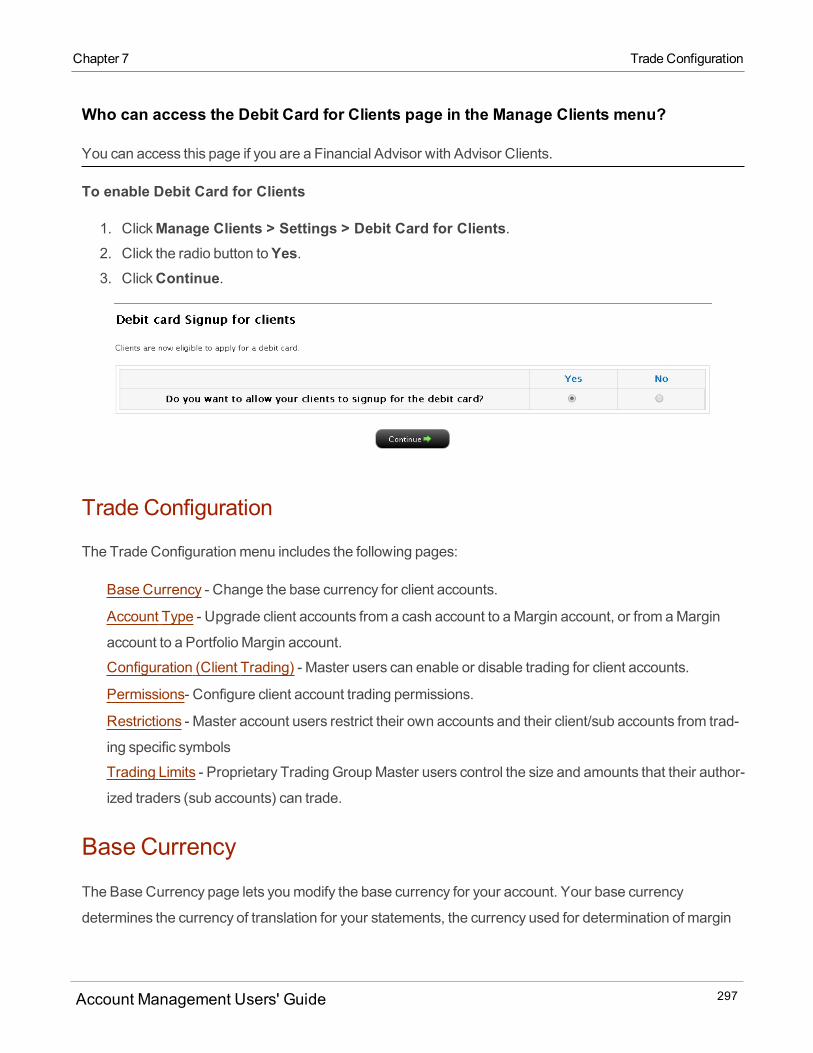
Chapter 7 Trade Configuration
Who can access the Debit Card for Clients page in the Manage Clients menu?
You can access this page if you are a Financial Advisor with Advisor Clients.
To enable Debit Card for Clients
1. ClickManage Clients > Settings > Debit Card for Clients.2. Click the radio button toYes.3. ClickContinue.
Trade Configuration
The Trade Configurationmenu includes the following pages:
Base Currency - Change the base currency for client accounts.
Account Type - Upgrade client accounts from a cash account to aMargin account, or from aMargin
account to a Portfolio Margin account.
Configuration (Client Trading) - Master users can enable or disable trading for client accounts.
Permissions- Configure client account trading permissions.
Restrictions - Master account users restrict their own accounts and their client/sub accounts from trad-
ing specific symbols
Trading Limits - Proprietary Trading GroupMaster users control the size and amounts that their author-
ized traders (sub accounts) can trade.
Base Currency
The Base Currency page lets youmodify the base currency for your account. Your base currency
determines the currency of translation for your statements, the currency used for determination of margin
Account Management Users' Guide 297
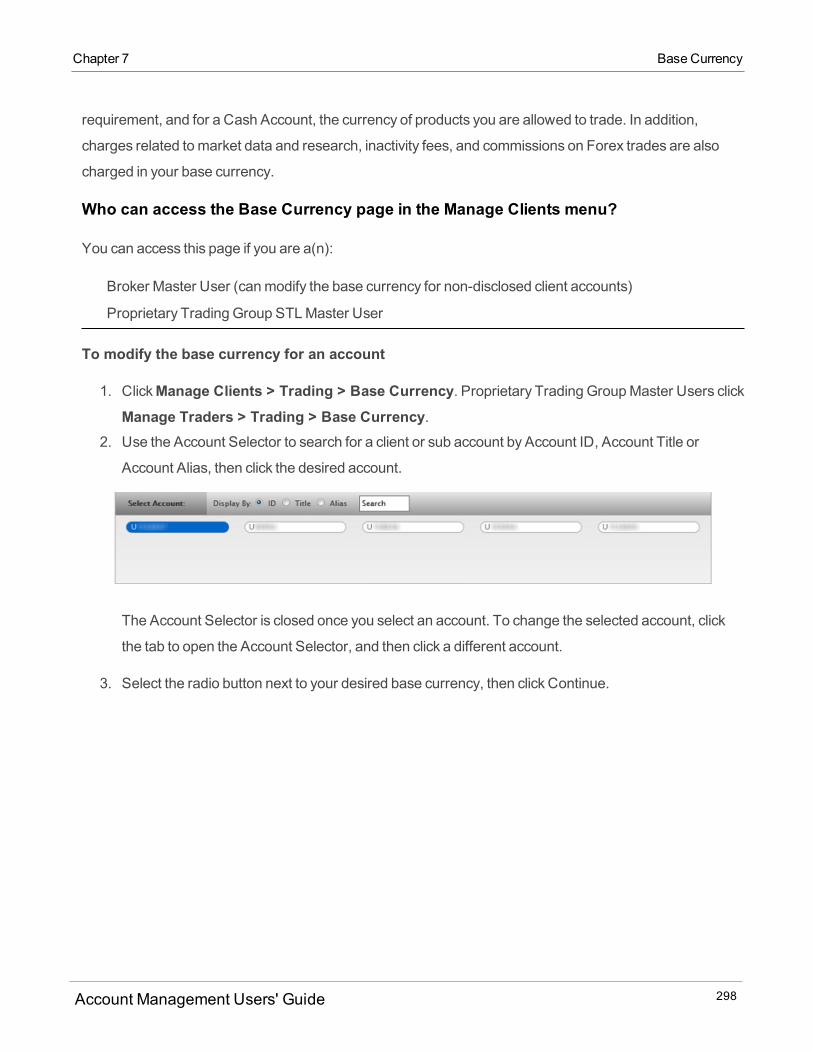
requirement, and for a Cash Account, the currency of products you are allowed to trade. In addition,
charges related tomarket data and research, inactivity fees, and commissions on Forex trades are also
charged in your base currency.
Who can access the Base Currency page in the Manage Clients menu?
You can access this page if you are a(n):
Broker Master User (canmodify the base currency for non-disclosed client accounts)
Proprietary Trading Group STL Master User
To modify the base currency for an account
1. ClickManage Clients > Trading > Base Currency. Proprietary Trading GroupMaster Users clickManage Traders > Trading > Base Currency.
2. Use the Account Selector to search for a client or sub account by Account ID, Account Title or
Account Alias, then click the desired account.
The Account Selector is closed once you select an account. To change the selected account, click
the tab to open the Account Selector, and then click a different account.
3. Select the radio button next to your desired base currency, then click Continue.
Account Management Users' Guide 298
Chapter 7 Base Currency
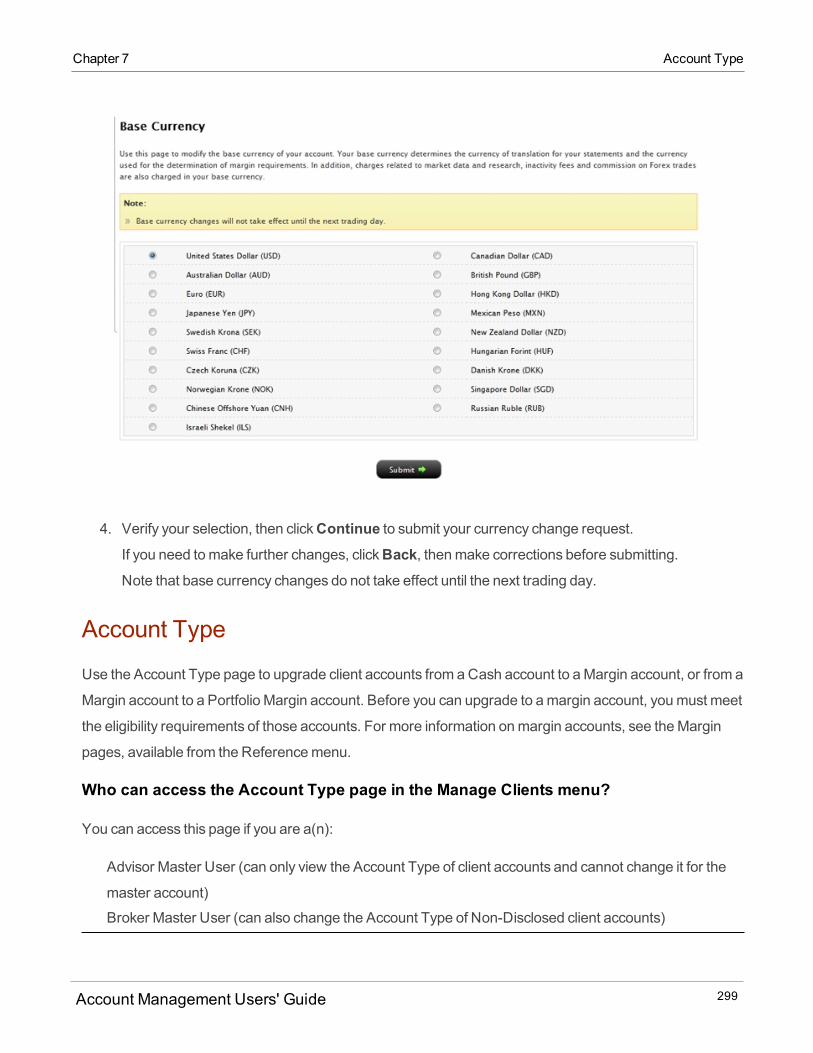
Chapter 7 Account Type
4. Verify your selection, then clickContinue to submit your currency change request.If you need tomake further changes, clickBack, thenmake corrections before submitting.Note that base currency changes do not take effect until the next trading day.
Account Type
Use the Account Type page to upgrade client accounts from aCash account to aMargin account, or from a
Margin account to a Portfolio Margin account. Before you can upgrade to amargin account, youmust meet
the eligibility requirements of those accounts. For more information onmargin accounts, see theMargin
pages, available from the Referencemenu.
Who can access the Account Type page in the Manage Clients menu?
You can access this page if you are a(n):
Advisor Master User (can only view the Account Type of client accounts and cannot change it for the
master account)
Broker Master User (can also change the Account Type of Non-Disclosed client accounts)
Account Management Users' Guide 299
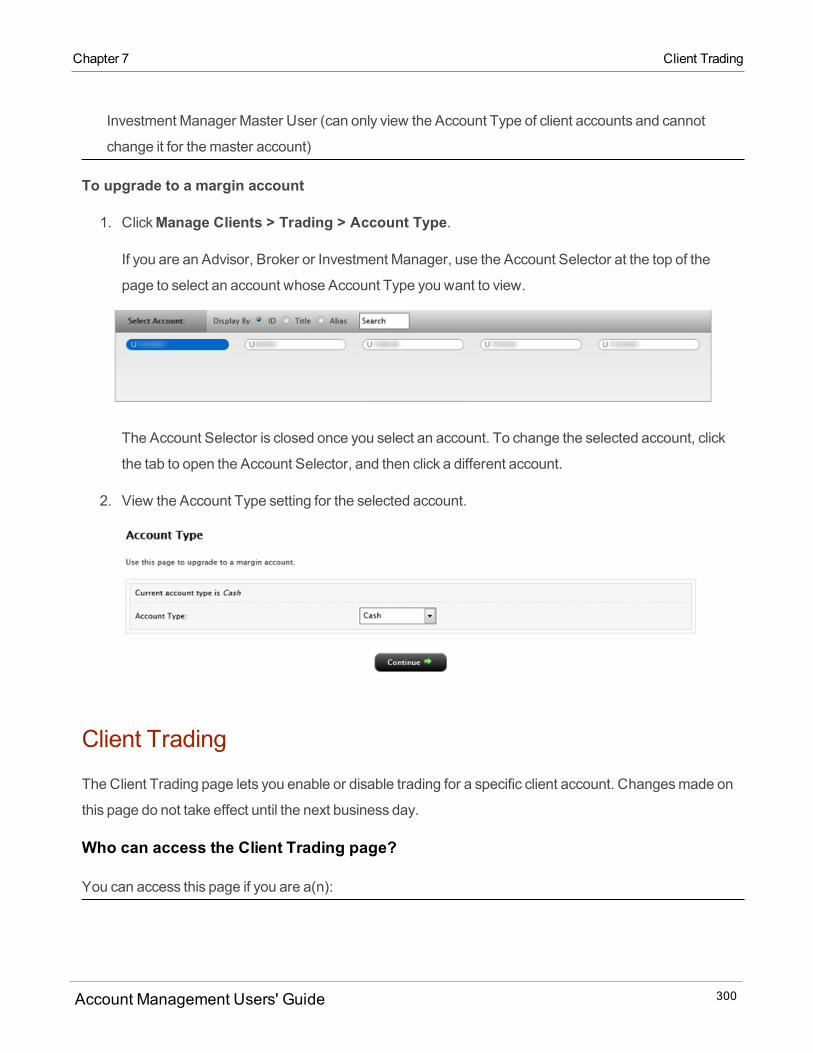
Investment Manager Master User (can only view the Account Type of client accounts and cannot
change it for themaster account)
To upgrade to a margin account
1. ClickManage Clients > Trading > Account Type.
If you are an Advisor, Broker or Investment Manager, use the Account Selector at the top of the
page to select an account whose Account Type you want to view.
The Account Selector is closed once you select an account. To change the selected account, click
the tab to open the Account Selector, and then click a different account.
2. View the Account Type setting for the selected account.
Client Trading
TheClient Trading page lets you enable or disable trading for a specific client account. Changesmade on
this page do not take effect until the next business day.
Who can access the Client Trading page?
You can access this page if you are a(n):
Account Management Users' Guide 300
Chapter 7 Client Trading
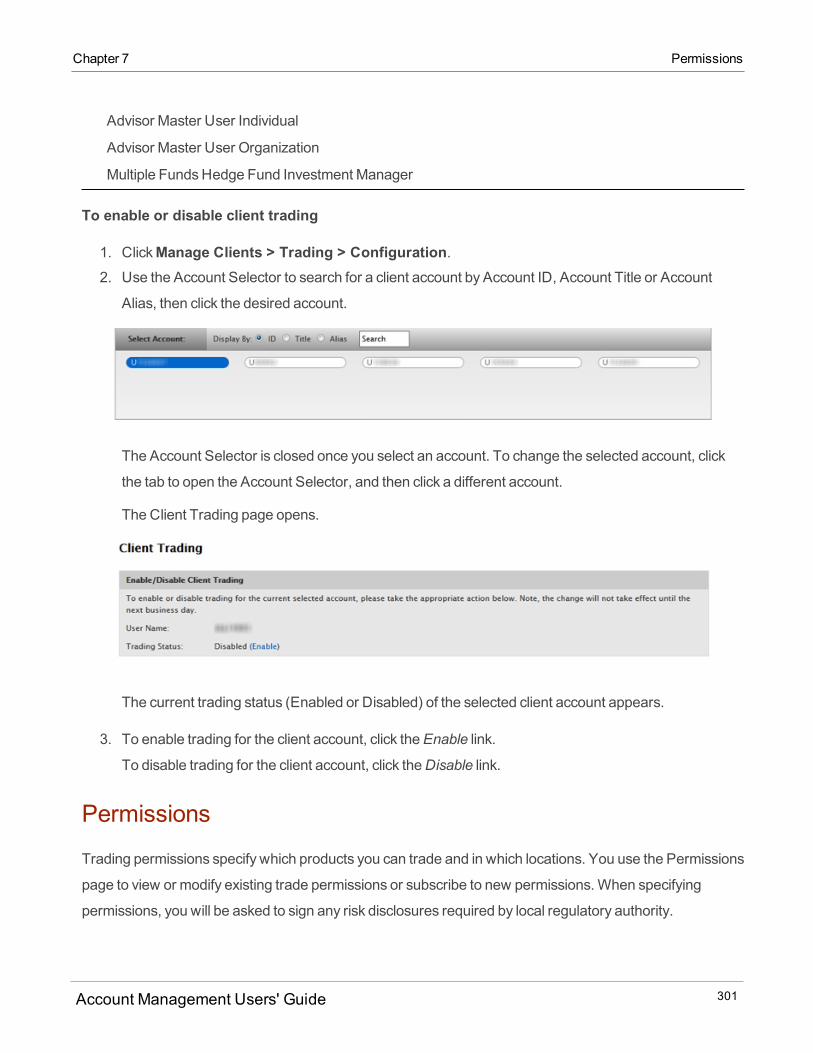
Chapter 7 Permissions
Advisor Master User Individual
Advisor Master User Organization
Multiple FundsHedge Fund Investment Manager
To enable or disable client trading
1. ClickManage Clients > Trading > Configuration.2. Use the Account Selector to search for a client account by Account ID, Account Title or Account
Alias, then click the desired account.
The Account Selector is closed once you select an account. To change the selected account, click
the tab to open the Account Selector, and then click a different account.
The Client Trading page opens.
The current trading status (Enabled or Disabled) of the selected client account appears.
3. To enable trading for the client account, click theEnable link.
To disable trading for the client account, click theDisable link.
Permissions
Trading permissions specify which products you can trade and in which locations. You use the Permissions
page to view or modify existing trade permissions or subscribe to new permissions.When specifying
permissions, you will be asked to sign any risk disclosures required by local regulatory authority.
Account Management Users' Guide 301
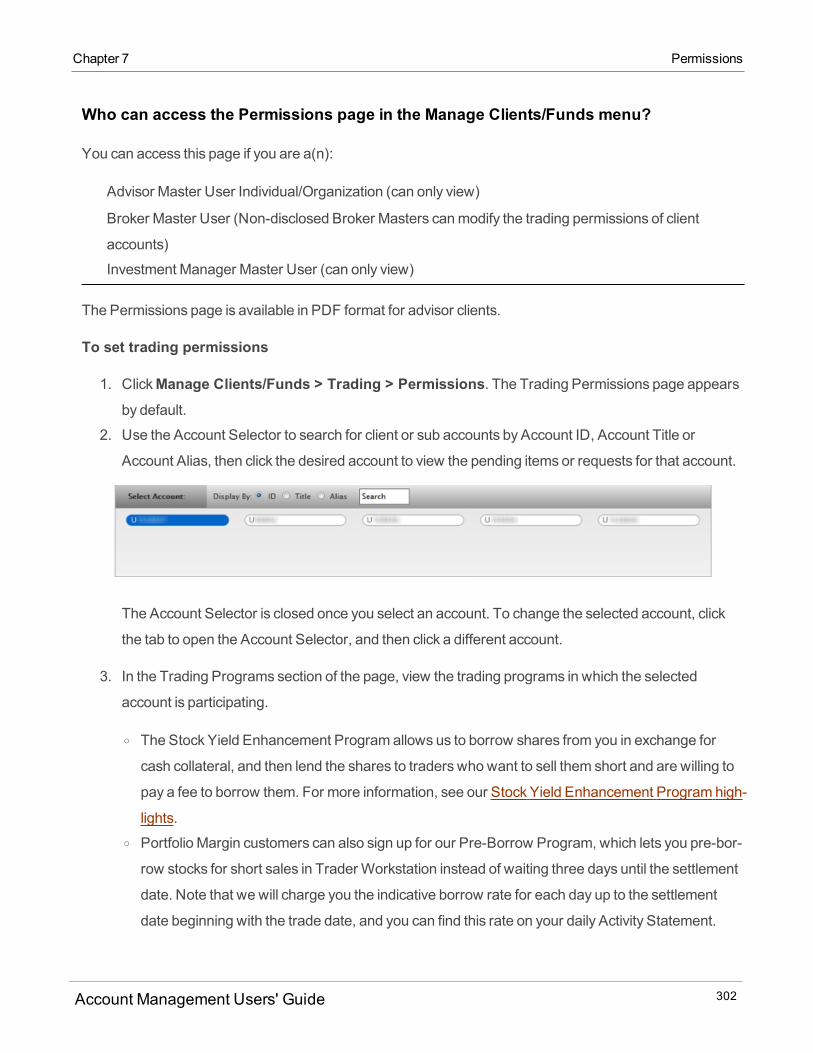
Who can access the Permissions page in the Manage Clients/Funds menu?
You can access this page if you are a(n):
Advisor Master User Individual/Organization (can only view)
Broker Master User (Non-disclosed Broker Masters canmodify the trading permissions of client
accounts)
Investment Manager Master User (can only view)
The Permissions page is available in PDF format for advisor clients.
To set trading permissions
1. ClickManage Clients/Funds > Trading > Permissions. The Trading Permissions page appearsby default.
2. Use the Account Selector to search for client or sub accounts by Account ID, Account Title or
Account Alias, then click the desired account to view the pending items or requests for that account.
The Account Selector is closed once you select an account. To change the selected account, click
the tab to open the Account Selector, and then click a different account.
3. In the Trading Programs section of the page, view the trading programs in which the selected
account is participating.
o The Stock Yield Enhancement Program allows us to borrow shares from you in exchange for
cash collateral, and then lend the shares to traders who want to sell them short and are willing to
pay a fee to borrow them. For more information, see our Stock Yield Enhancement Program high-
lights.o Portfolio Margin customers can also sign up for our Pre-Borrow Program, which lets you pre-bor-
row stocks for short sales in Trader Workstation instead of waiting three days until the settlement
date. Note that we will charge you the indicative borrow rate for each day up to the settlement
date beginning with the trade date, and you can find this rate on your daily Activity Statement.
Account Management Users' Guide 302
Chapter 7 Permissions

Chapter 7 Restrictions
4. The Trading Permissions section of the page lists all of the products that the selected account can
trade and the countries in which it can trade them.
Restrictions
Set all trading restrictions in the Pre-Trade Compliance tool. Click the LaunchPre-Trade Compliancebutton to open the program.
Account Management Users' Guide 303
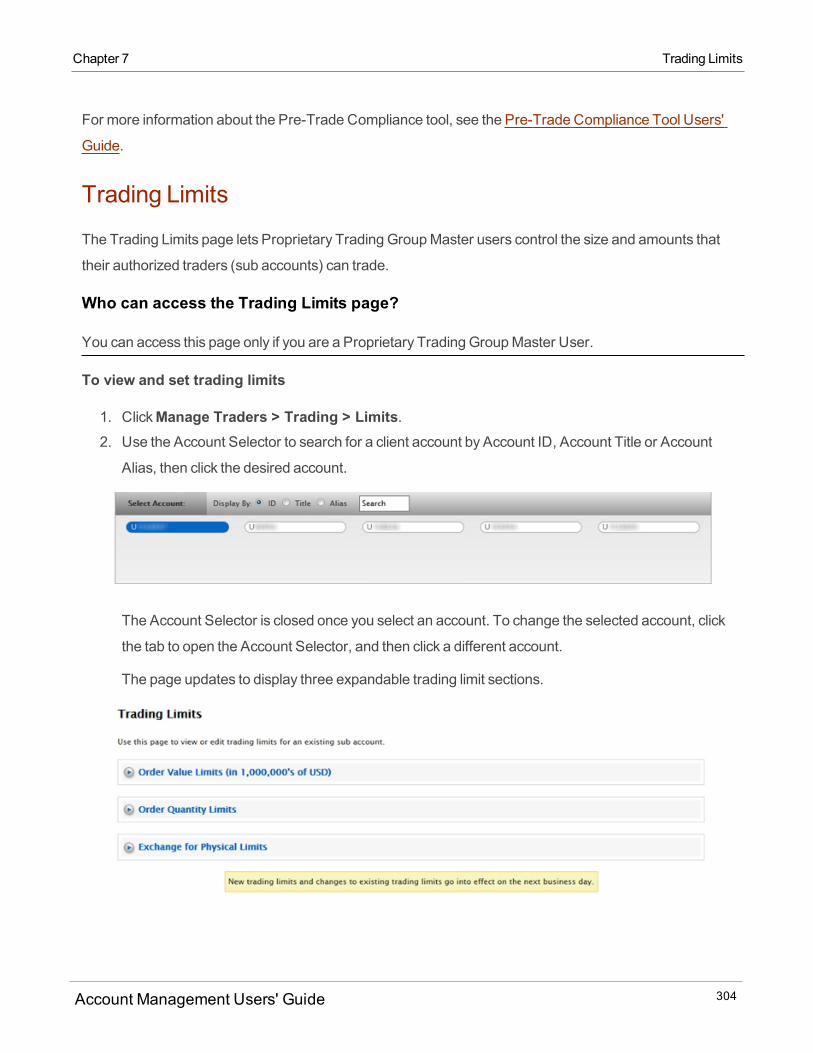
For more information about the Pre-Trade Compliance tool, see the Pre-Trade Compliance Tool Users'
Guide.
Trading Limits
The Trading Limits page lets Proprietary Trading GroupMaster users control the size and amounts that
their authorized traders (sub accounts) can trade.
Who can access the Trading Limits page?
You can access this page only if you are a Proprietary Trading GroupMaster User.
To view and set trading limits
1. ClickManage Traders > Trading > Limits.2. Use the Account Selector to search for a client account by Account ID, Account Title or Account
Alias, then click the desired account.
The Account Selector is closed once you select an account. To change the selected account, click
the tab to open the Account Selector, and then click a different account.
The page updates to display three expandable trading limit sections.
Account Management Users' Guide 304
Chapter 7 Trading Limits
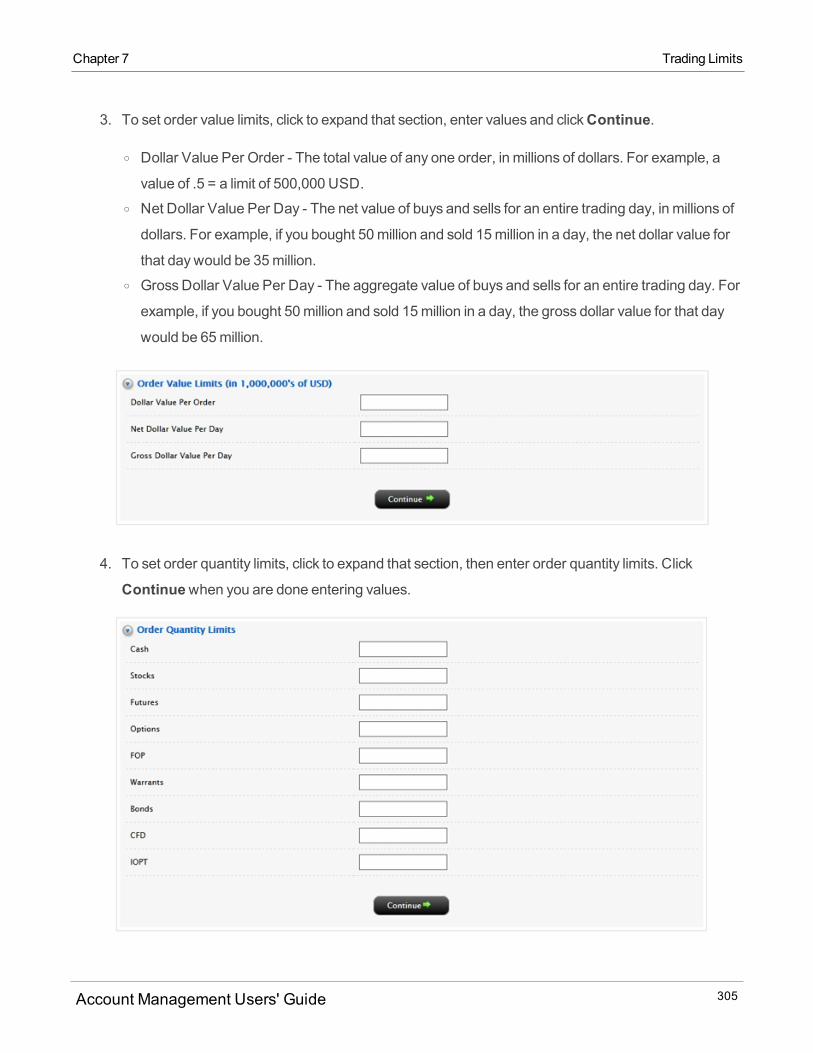
Chapter 7 Trading Limits
3. To set order value limits, click to expand that section, enter values and clickContinue.
o Dollar Value Per Order - The total value of any one order, in millions of dollars. For example, a
value of .5 = a limit of 500,000 USD.o Net Dollar Value Per Day - The net value of buys and sells for an entire trading day, in millions of
dollars. For example, if you bought 50million and sold 15million in a day, the net dollar value for
that daywould be 35million.o GrossDollar Value Per Day - The aggregate value of buys and sells for an entire trading day. For
example, if you bought 50million and sold 15million in a day, the gross dollar value for that day
would be 65million.
4. To set order quantity limits, click to expand that section, then enter order quantity limits. Click
Continuewhen you are done entering values.
Account Management Users' Guide 305
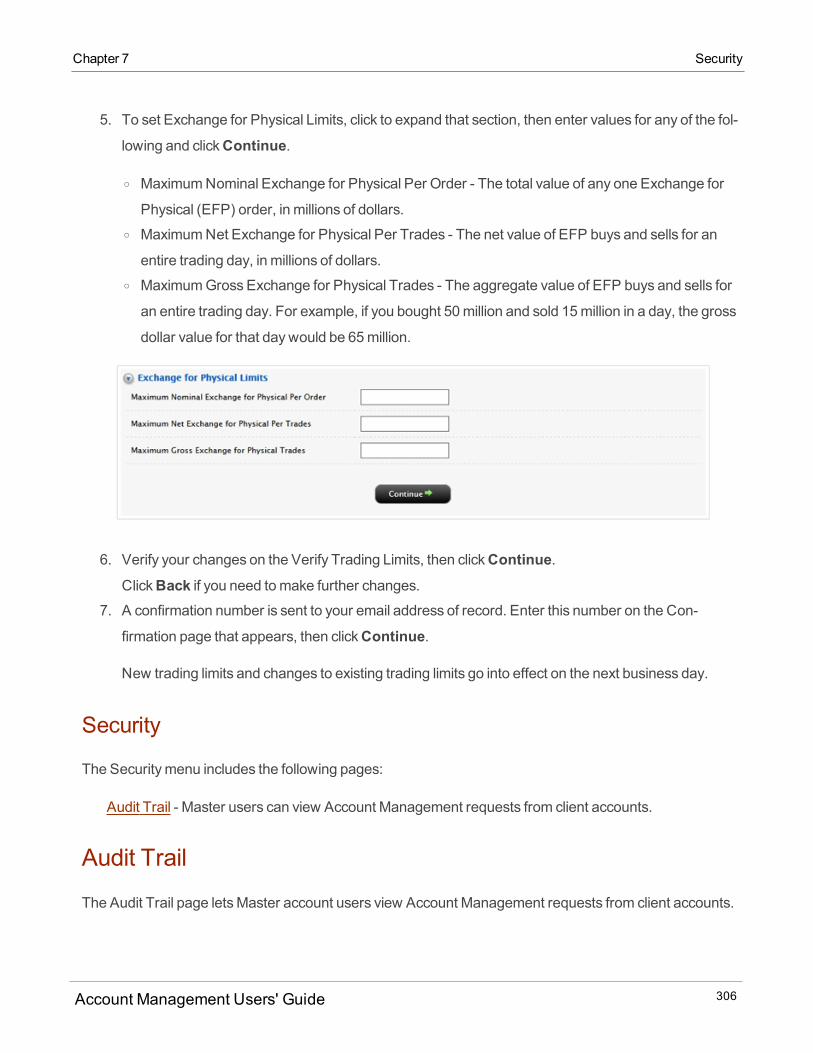
5. To set Exchange for Physical Limits, click to expand that section, then enter values for any of the fol-
lowing and clickContinue.
o MaximumNominal Exchange for Physical Per Order - The total value of any one Exchange for
Physical (EFP) order, in millions of dollars.o MaximumNet Exchange for Physical Per Trades - The net value of EFP buys and sells for an
entire trading day, in millions of dollars.o MaximumGross Exchange for Physical Trades - The aggregate value of EFP buys and sells for
an entire trading day. For example, if you bought 50million and sold 15million in a day, the gross
dollar value for that daywould be 65million.
6. Verify your changes on the Verify Trading Limits, then clickContinue.ClickBack if you need tomake further changes.
7. A confirmation number is sent to your email address of record. Enter this number on the Con-
firmation page that appears, then clickContinue.
New trading limits and changes to existing trading limits go into effect on the next business day.
Security
The Securitymenu includes the following pages:
Audit Trail - Master users can view Account Management requests from client accounts.
Audit Trail
The Audit Trail page letsMaster account users view Account Management requests from client accounts.
Account Management Users' Guide 306
Chapter 7 Security

Chapter 7 Audit Trail
Who can access the Audit Trail page?
You can access this page if you are a(n):
Advisor Master User
Broker Master User
To view the audit trail
1. ClickManage Clients > Security > Audit Trail.2. Use the Account Selector to search for a client account by Account ID, Account Title or Account
Alias, then click the desired account.
The Account Selector is closed once you select an account. To change the selected account, click
the tab to open the Account Selector, and then click a different account.
3. Select the number of days back you wish the audit trail to include by selectingAll, Previous 90
Days or Previous 180 Days from the Show requests drop-down list, then clickSubmit.
The page refresheswith the updated information.
Account Management Users' Guide 307
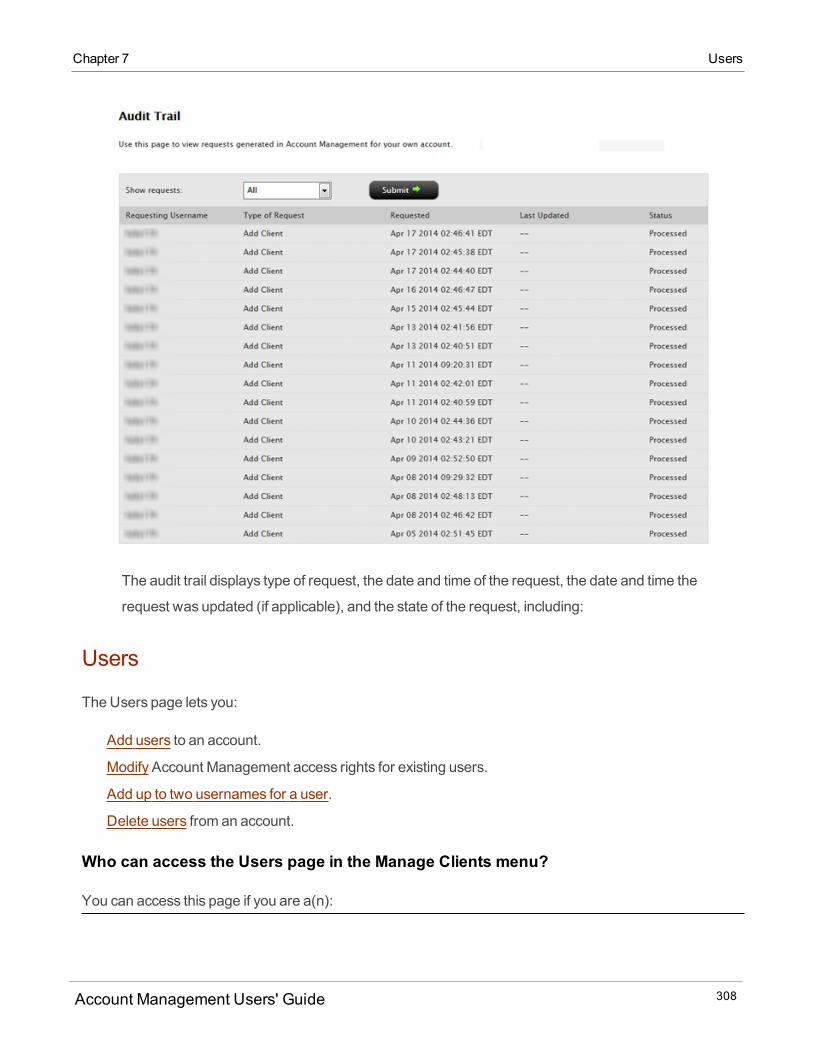
The audit trail displays type of request, the date and time of the request, the date and time the
request was updated (if applicable), and the state of the request, including:
Users
TheUsers page lets you:
Add users to an account.
Modify Account Management access rights for existing users.
Add up to two usernames for a user.
Delete users from an account.
Who can access the Users page in the Manage Clients menu?
You can access this page if you are a(n):
Account Management Users' Guide 308
Chapter 7 Users
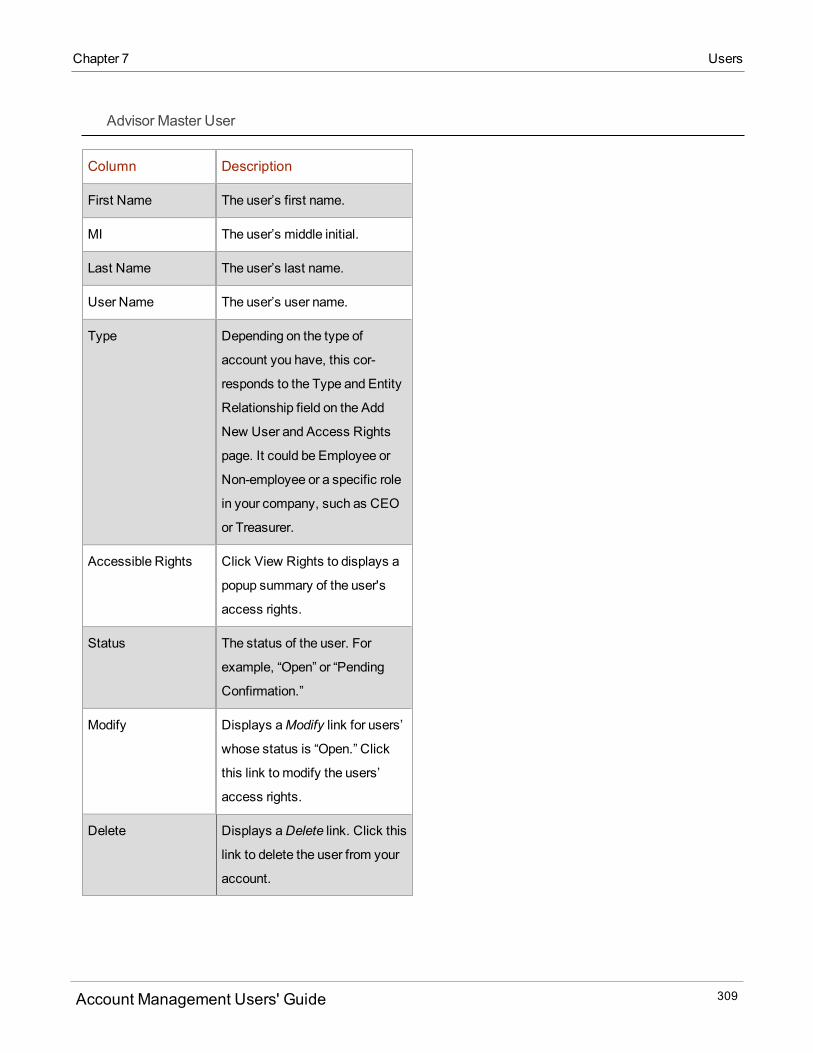
Chapter 7 Users
Advisor Master User
Column Description
First Name The user’s first name.
MI The user’s middle initial.
Last Name The user’s last name.
User Name The user’s user name.
Type Depending on the type of
account you have, this cor-
responds to the Type and Entity
Relationship field on the Add
New User and Access Rights
page. It could be Employee or
Non-employee or a specific role
in your company, such as CEO
or Treasurer.
Accessible Rights Click View Rights to displays a
popup summary of the user's
access rights.
Status The status of the user. For
example, “Open” or “Pending
Confirmation.”
Modify Displays aModify link for users’
whose status is “Open.” Click
this link to modify the users’
access rights.
Delete Displays aDelete link. Click this
link to delete the user from your
account.
Account Management Users' Guide 309
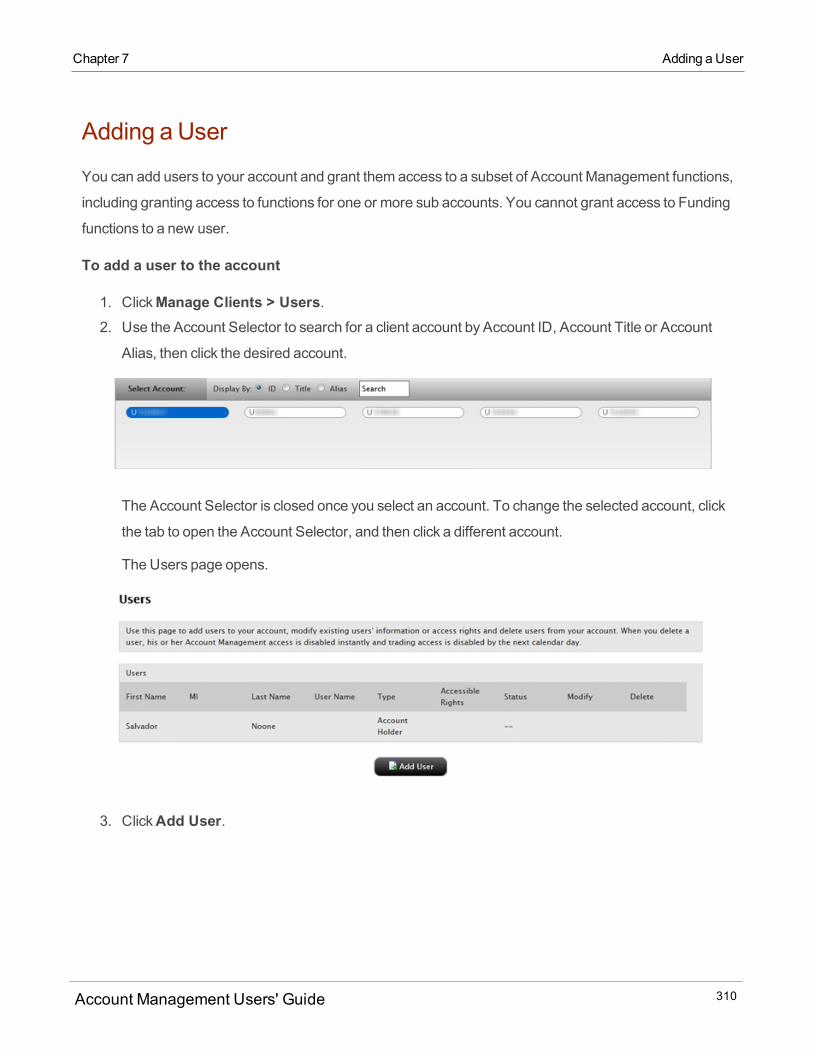
Adding a User
You can add users to your account and grant them access to a subset of Account Management functions,
including granting access to functions for one or more sub accounts. You cannot grant access to Funding
functions to a new user.
To add a user to the account
1. ClickManage Clients > Users.2. Use the Account Selector to search for a client account by Account ID, Account Title or Account
Alias, then click the desired account.
The Account Selector is closed once you select an account. To change the selected account, click
the tab to open the Account Selector, and then click a different account.
The Users page opens.
3. ClickAdd User.
Account Management Users' Guide 310
Chapter 7 Adding a User
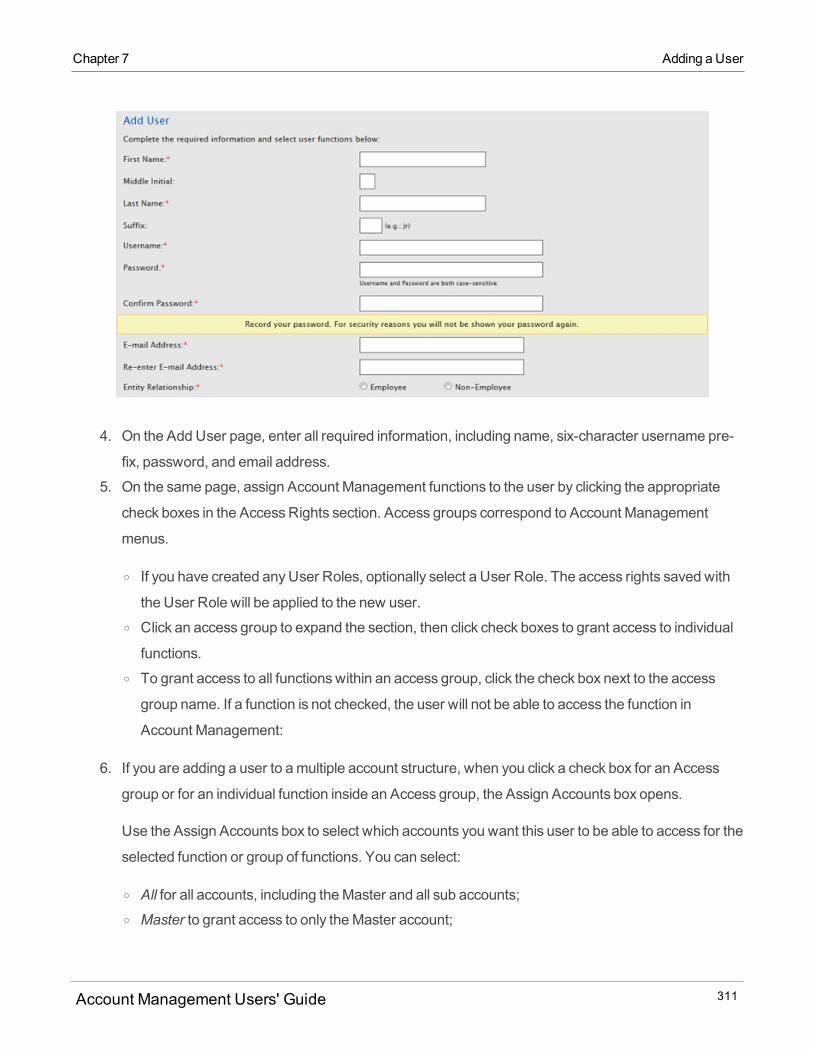
Chapter 7 Adding a User
4. On the Add User page, enter all required information, including name, six-character username pre-
fix, password, and email address.
5. On the same page, assign Account Management functions to the user by clicking the appropriate
check boxes in the AccessRights section. Access groups correspond to Account Management
menus.
o If you have created anyUser Roles, optionally select a User Role. The access rights saved with
the User Role will be applied to the new user.o Click an access group to expand the section, then click check boxes to grant access to individual
functions.o To grant access to all functionswithin an access group, click the check box next to the access
group name. If a function is not checked, the user will not be able to access the function in
Account Management:
6. If you are adding a user to amultiple account structure, when you click a check box for an Access
group or for an individual function inside an Access group, the Assign Accounts box opens.
Use the Assign Accounts box to select which accounts you want this user to be able to access for the
selected function or group of functions. You can select:
o All for all accounts, including theMaster and all sub accounts;o Master to grant access to only theMaster account;
Account Management Users' Guide 311
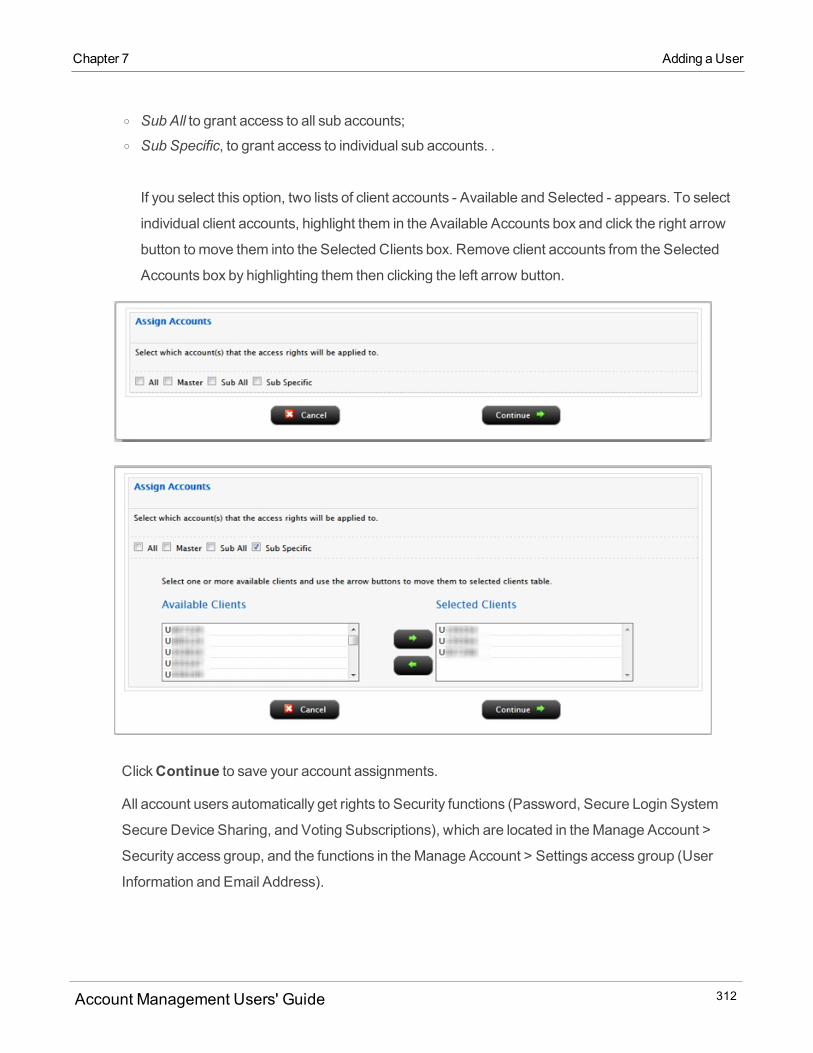
o Sub All to grant access to all sub accounts;o Sub Specific, to grant access to individual sub accounts. .
If you select this option, two lists of client accounts - Available and Selected - appears. To select
individual client accounts, highlight them in the Available Accounts box and click the right arrow
button tomove them into the Selected Clients box. Remove client accounts from the Selected
Accounts box by highlighting them then clicking the left arrow button.
ClickContinue to save your account assignments.
All account users automatically get rights to Security functions (Password, Secure Login System
Secure Device Sharing, and Voting Subscriptions), which are located in theManage Account >
Security access group, and the functions in theManage Account > Settings access group (User
Information and Email Address).
Account Management Users' Guide 312
Chapter 7 Adding a User
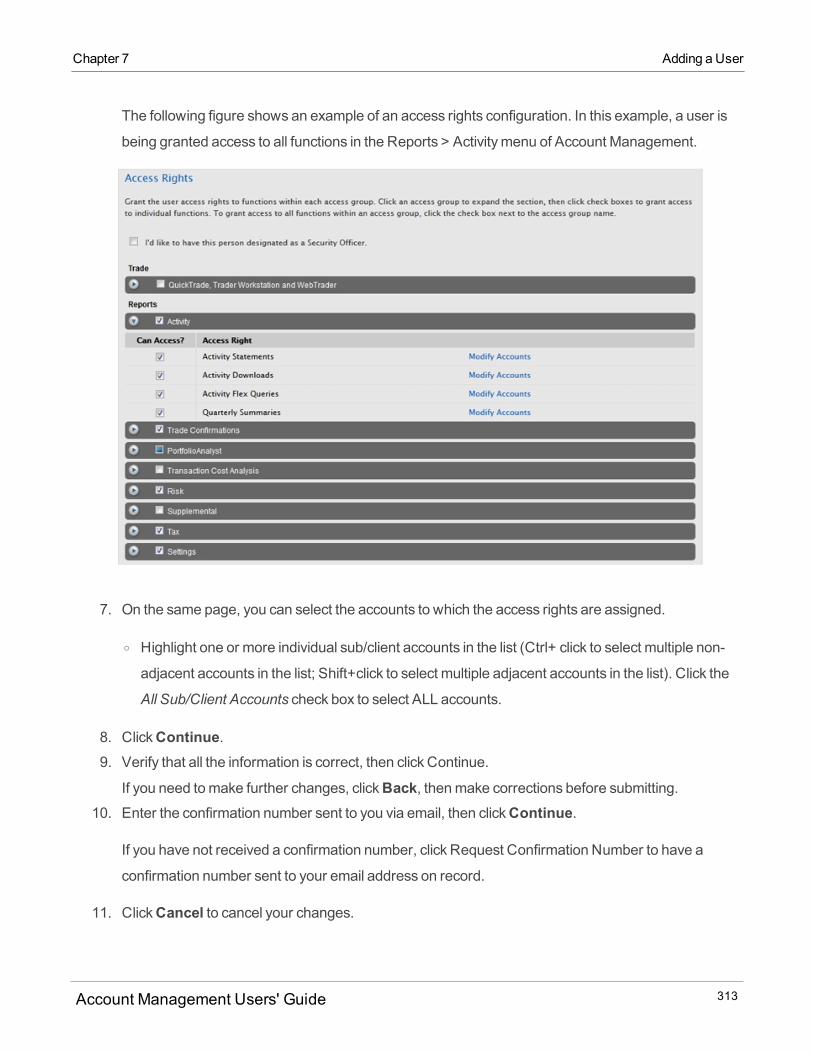
Chapter 7 Adding a User
The following figure shows an example of an access rights configuration. In this example, a user is
being granted access to all functions in the Reports > Activitymenu of Account Management.
7. On the same page, you can select the accounts to which the access rights are assigned.
o Highlight one or more individual sub/client accounts in the list (Ctrl+ click to select multiple non-
adjacent accounts in the list; Shift+click to select multiple adjacent accounts in the list). Click the
All Sub/Client Accounts check box to select ALL accounts.
8. ClickContinue.9. Verify that all the information is correct, then click Continue.
If you need tomake further changes, clickBack, thenmake corrections before submitting.10. Enter the confirmation number sent to you via email, then clickContinue.
If you have not received a confirmation number, click Request Confirmation Number to have a
confirmation number sent to your email address on record.
11. ClickCancel to cancel your changes.
Account Management Users' Guide 313
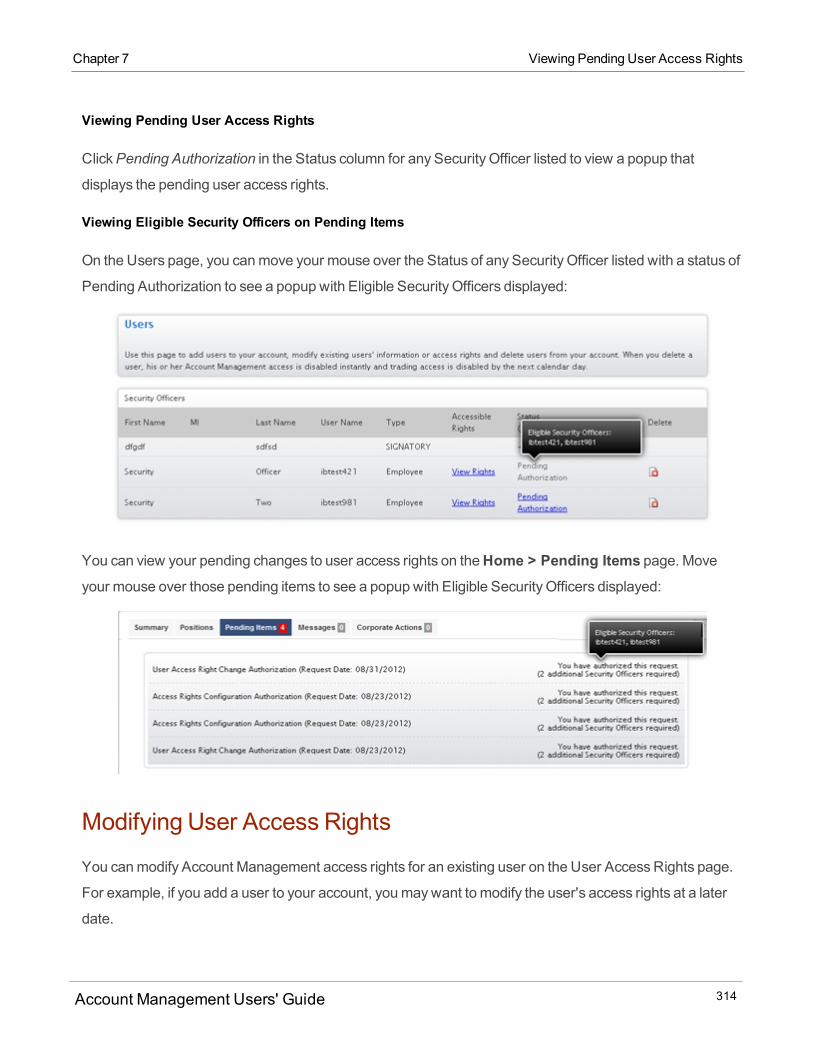
Viewing Pending User Access Rights
ClickPending Authorization in the Status column for any Security Officer listed to view a popup that
displays the pending user access rights.
Viewing Eligible Security Officers on Pending Items
On the Users page, you canmove your mouse over the Status of any Security Officer listed with a status of
Pending Authorization to see a popup with Eligible Security Officers displayed:
You can view your pending changes to user access rights on theHome > Pending Items page. Moveyour mouse over those pending items to see a popup with Eligible Security Officers displayed:
Modifying User Access Rights
You canmodify Account Management access rights for an existing user on the User AccessRights page.
For example, if you add a user to your account, youmaywant to modify the user's access rights at a later
date.
Account Management Users' Guide 314
Chapter 7 Viewing Pending User Access Rights
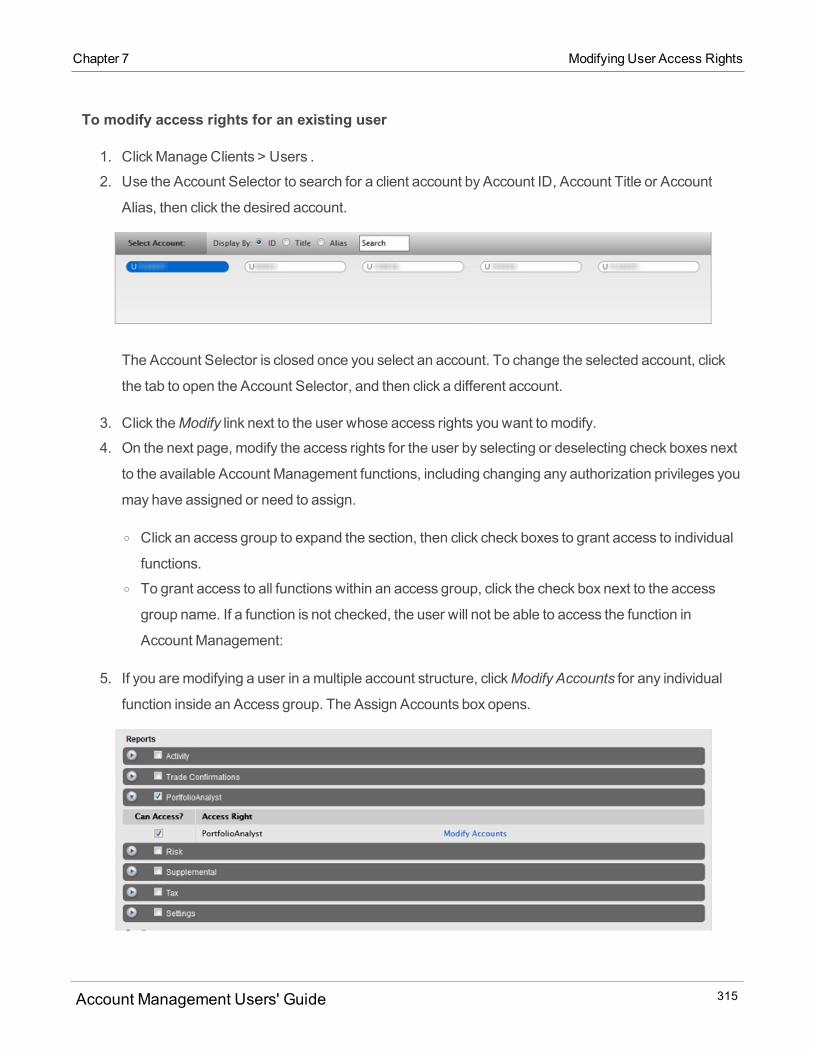
Chapter 7 Modifying User Access Rights
To modify access rights for an existing user
1. ClickManage Clients > Users .
2. Use the Account Selector to search for a client account by Account ID, Account Title or Account
Alias, then click the desired account.
The Account Selector is closed once you select an account. To change the selected account, click
the tab to open the Account Selector, and then click a different account.
3. Click theModify link next to the user whose access rights you want to modify.
4. On the next page, modify the access rights for the user by selecting or deselecting check boxes next
to the available Account Management functions, including changing any authorization privileges you
may have assigned or need to assign.
o Click an access group to expand the section, then click check boxes to grant access to individual
functions.o To grant access to all functionswithin an access group, click the check box next to the access
group name. If a function is not checked, the user will not be able to access the function in
Account Management:
5. If you aremodifying a user in amultiple account structure, clickModify Accounts for any individual
function inside an Access group. The Assign Accounts box opens.
Account Management Users' Guide 315
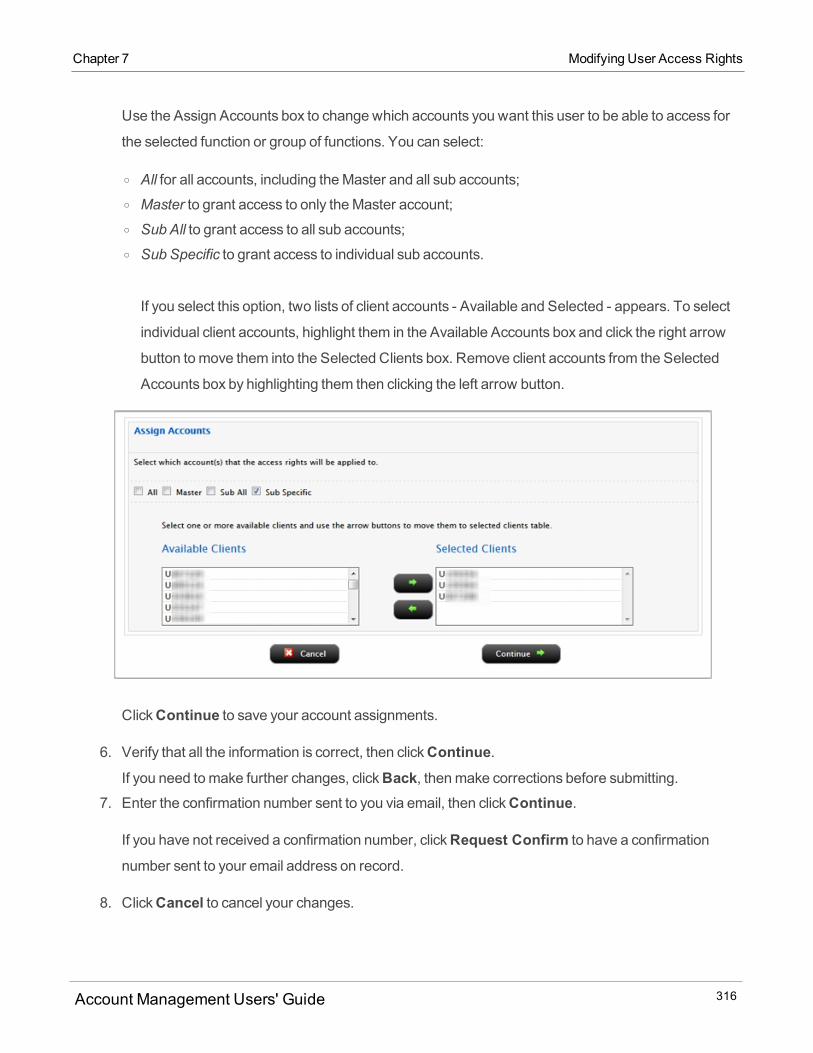
Use the Assign Accounts box to change which accounts you want this user to be able to access for
the selected function or group of functions. You can select:
o All for all accounts, including theMaster and all sub accounts;o Master to grant access to only theMaster account;o Sub All to grant access to all sub accounts;o Sub Specific to grant access to individual sub accounts.
If you select this option, two lists of client accounts - Available and Selected - appears. To select
individual client accounts, highlight them in the Available Accounts box and click the right arrow
button tomove them into the Selected Clients box. Remove client accounts from the Selected
Accounts box by highlighting them then clicking the left arrow button.
ClickContinue to save your account assignments.
6. Verify that all the information is correct, then clickContinue.If you need tomake further changes, clickBack, thenmake corrections before submitting.
7. Enter the confirmation number sent to you via email, then clickContinue.
If you have not received a confirmation number, clickRequest Confirm to have a confirmation
number sent to your email address on record.
8. ClickCancel to cancel your changes.
Account Management Users' Guide 316
Chapter 7 Modifying User Access Rights
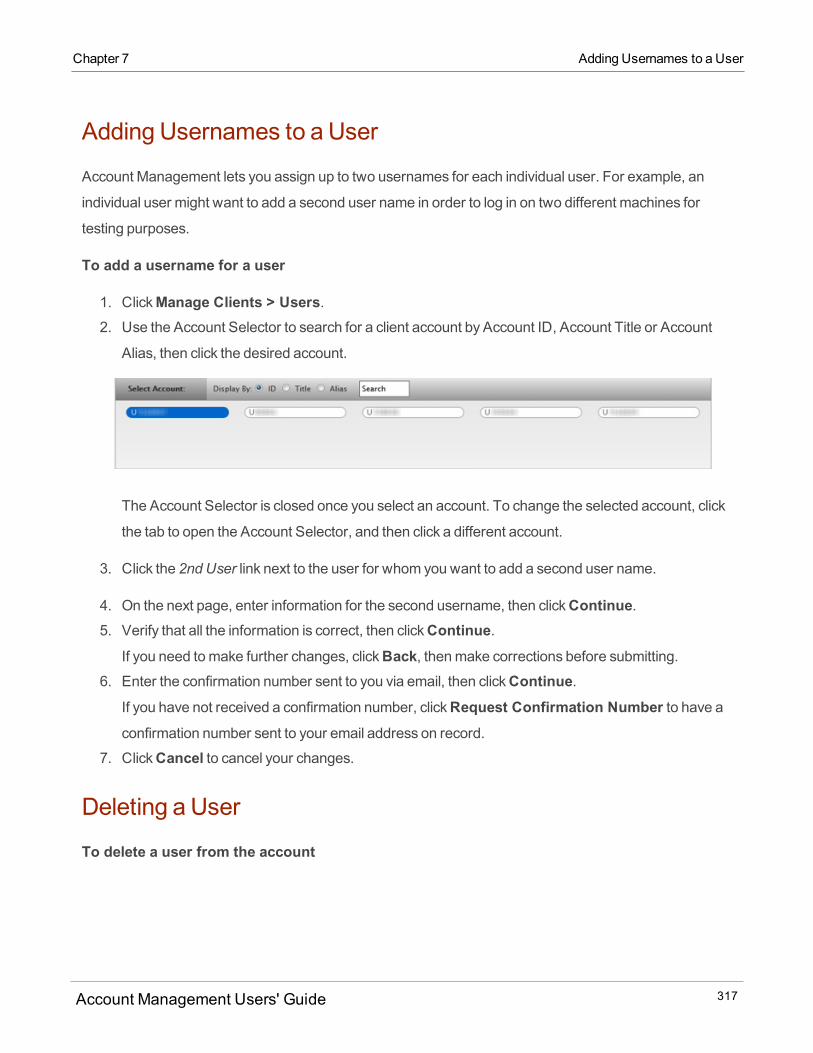
Chapter 7 Adding Usernames to a User
Adding Usernames to a User
Account Management lets you assign up to two usernames for each individual user. For example, an
individual user might want to add a second user name in order to log in on two different machines for
testing purposes.
To add a username for a user
1. ClickManage Clients > Users.2. Use the Account Selector to search for a client account by Account ID, Account Title or Account
Alias, then click the desired account.
The Account Selector is closed once you select an account. To change the selected account, click
the tab to open the Account Selector, and then click a different account.
3. Click the 2nd User link next to the user for whom you want to add a second user name.
4. On the next page, enter information for the second username, then clickContinue.5. Verify that all the information is correct, then clickContinue.
If you need tomake further changes, clickBack, thenmake corrections before submitting.6. Enter the confirmation number sent to you via email, then clickContinue.
If you have not received a confirmation number, clickRequest Confirmation Number to have aconfirmation number sent to your email address on record.
7. ClickCancel to cancel your changes.
Deleting a User
To delete a user from the account
Account Management Users' Guide 317
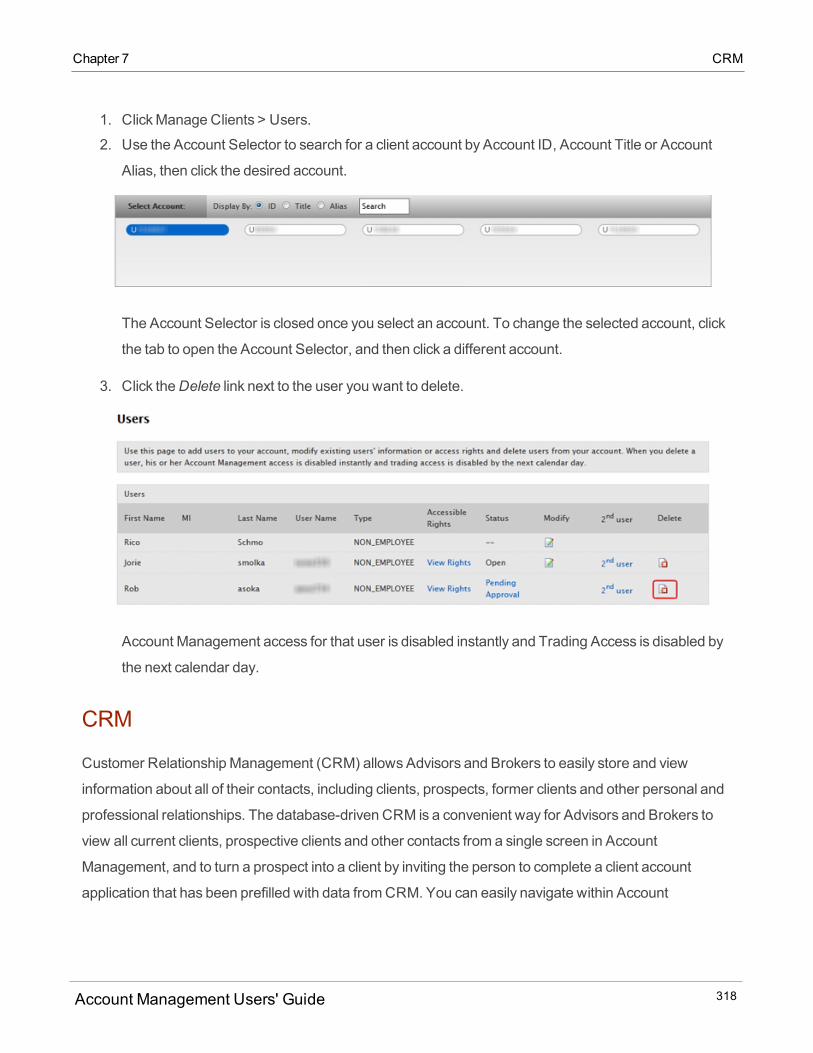
1. ClickManage Clients > Users.
2. Use the Account Selector to search for a client account by Account ID, Account Title or Account
Alias, then click the desired account.
The Account Selector is closed once you select an account. To change the selected account, click
the tab to open the Account Selector, and then click a different account.
3. Click theDelete link next to the user you want to delete.
Account Management access for that user is disabled instantly and Trading Access is disabled by
the next calendar day.
CRM
Customer RelationshipManagement (CRM) allows Advisors and Brokers to easily store and view
information about all of their contacts, including clients, prospects, former clients and other personal and
professional relationships. The database-driven CRM is a convenient way for Advisors and Brokers to
view all current clients, prospective clients and other contacts from a single screen in Account
Management, and to turn a prospect into a client by inviting the person to complete a client account
application that has been prefilled with data fromCRM. You can easily navigate within Account
Account Management Users' Guide 318
Chapter 7 CRM
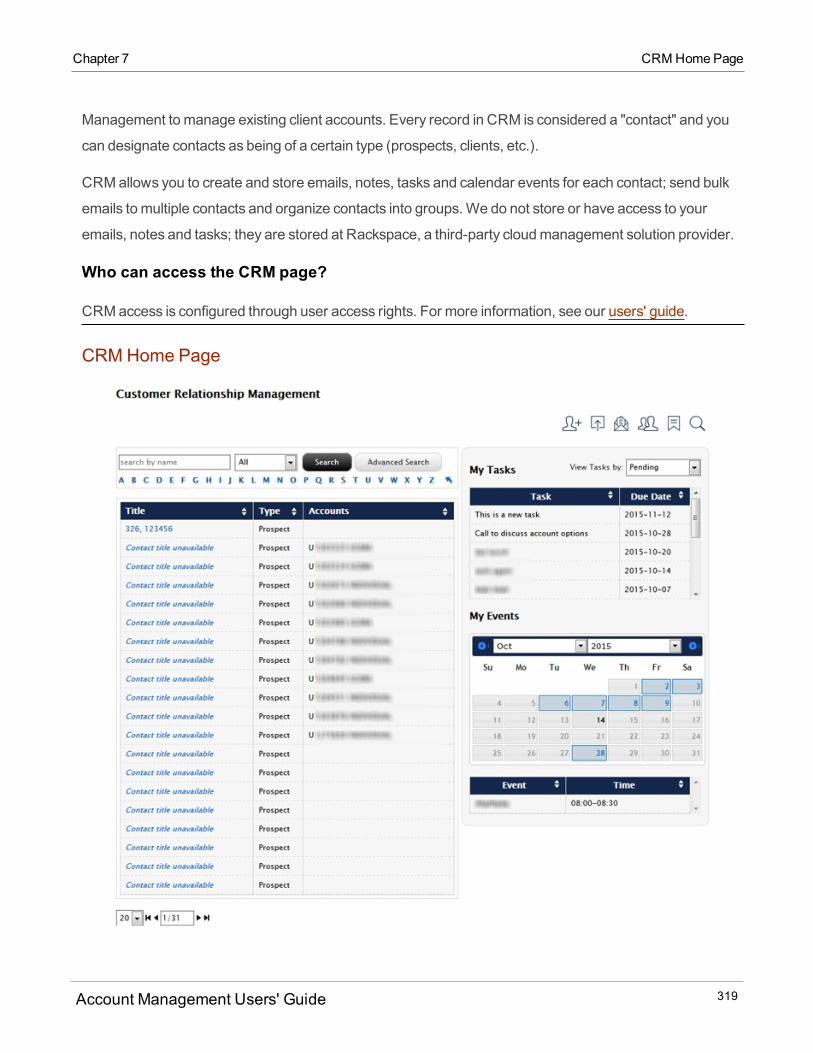
Chapter 7 CRM Home Page
Management to manage existing client accounts. Every record in CRM is considered a "contact" and you
can designate contacts as being of a certain type (prospects, clients, etc.).
CRM allows you to create and store emails, notes, tasks and calendar events for each contact; send bulk
emails to multiple contacts and organize contacts into groups.We do not store or have access to your
emails, notes and tasks; they are stored at Rackspace, a third-party cloudmanagement solution provider.
Who can access the CRM page?
CRMaccess is configured through user access rights. For more information, see our users' guide.
CRM Home Page
Account Management Users' Guide 319
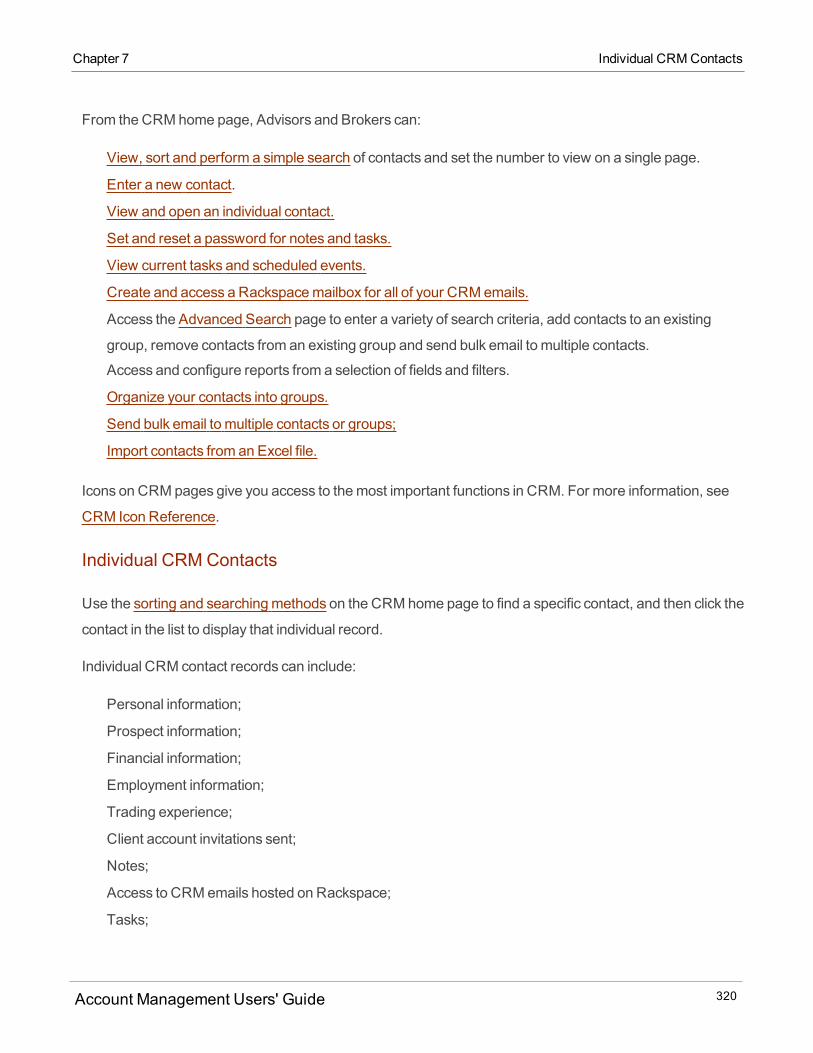
From the CRMhome page, Advisors and Brokers can:
View, sort and perform a simple search of contacts and set the number to view on a single page.
Enter a new contact.
View and open an individual contact.
Set and reset a password for notes and tasks.
View current tasks and scheduled events.
Create and access a Rackspacemailbox for all of your CRM emails.
Access the Advanced Search page to enter a variety of search criteria, add contacts to an existing
group, remove contacts from an existing group and send bulk email to multiple contacts.
Access and configure reports from a selection of fields and filters.
Organize your contacts into groups.
Send bulk email to multiple contacts or groups;
Import contacts from an Excel file.
Icons on CRMpages give you access to themost important functions in CRM. For more information, see
CRM Icon Reference.
Individual CRM Contacts
Use the sorting and searchingmethods on the CRM home page to find a specific contact, and then click the
contact in the list to display that individual record.
Individual CRM contact records can include:
Personal information;
Prospect information;
Financial information;
Employment information;
Trading experience;
Client account invitations sent;
Notes;
Access to CRMemails hosted on Rackspace;
Tasks;
Account Management Users' Guide 320
Chapter 7 Individual CRM Contacts
Chapter 7 Sharing CRM with Another User
Events;
Documents;
From an individual contact record, you can performmany additional functions, including:
Edit the information stored in the contact record;
View, add, sort and delete notes;
Add prospect information to a contact, which changes the contact to a prospect;
Enter a new contact;
View all emails that have been sent to the contact;
Send an email;
Send a prospect electronic invitation to open a client account, with information fromCRM already
entered into the new application for you.
Add, update and delete tasks.
Delete and print;
Export to aMicrosoft Excel spreadsheet;
Generate a VCard (Microsoft Outlook-compatible);
Schedule events;
Upload documents associated with a specific contact, prospect or client;
Go to the Dashboard to view account details for an existing client's open account.
View all accounts for a specific client.
Sharing CRM with Another User
Advisors and Brokers who have additional users associated with their master account can allow these
users to access all of CRM. To enable CRM access for these users, send an email to
[email protected] and include your account number the name of the primarymaster account
user. Once enabled, these additional users will have access all CRM features.
Note that only one user can edit a CRM contact at one time. A second user will not be able to edit a contact
that is currently being edited by another user. If this happens, amessage appears to inform the second
user that the record is locked for editing.
Short Videos
Account Management Users' Guide 321
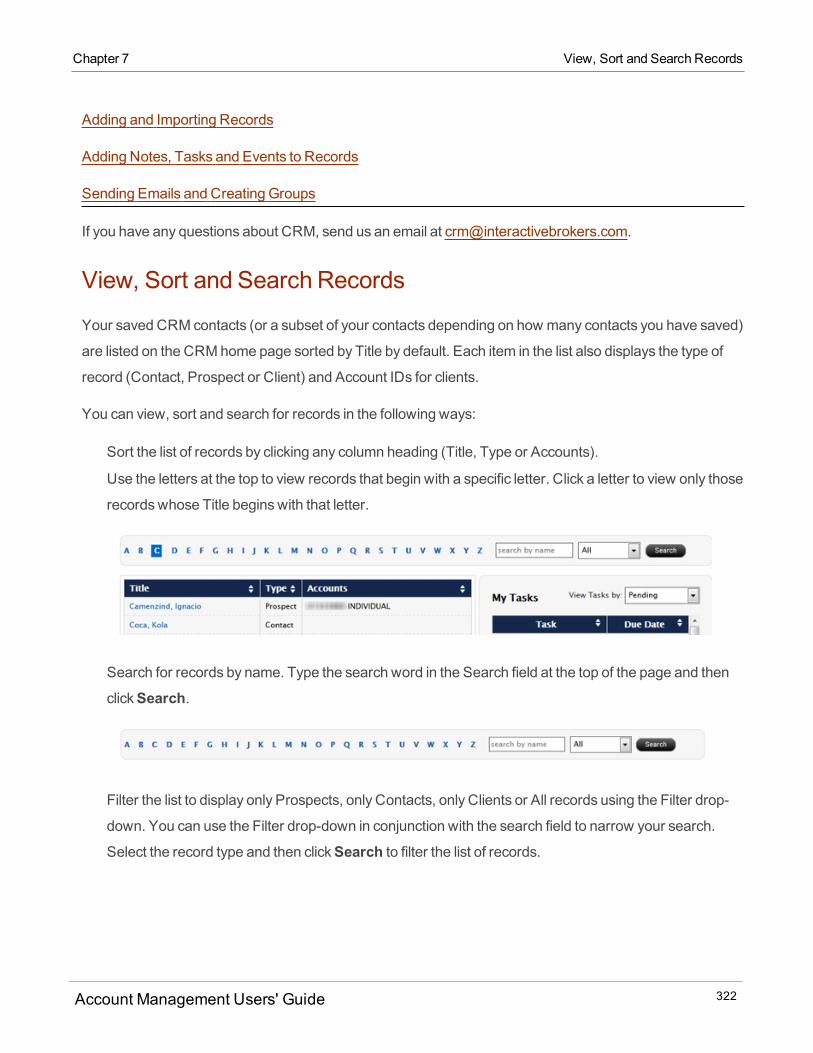
Adding and Importing Records
Adding Notes, Tasks and Events to Records
Sending Emails and Creating Groups
If you have any questions about CRM, send us an email at [email protected].
View, Sort and Search Records
Your saved CRM contacts (or a subset of your contacts depending on how many contacts you have saved)
are listed on the CRM home page sorted by Title by default. Each item in the list also displays the type of
record (Contact, Prospect or Client) and Account IDs for clients.
You can view, sort and search for records in the following ways:
Sort the list of records by clicking any column heading (Title, Type or Accounts).
Use the letters at the top to view records that begin with a specific letter. Click a letter to view only those
recordswhose Title begins with that letter.
Search for records by name. Type the search word in the Search field at the top of the page and then
clickSearch.
Filter the list to display only Prospects, only Contacts, only Clients or All records using the Filter drop-
down. You can use the Filter drop-down in conjunction with the search field to narrow your search.
Select the record type and then clickSearch to filter the list of records.
Account Management Users' Guide 322
Chapter 7 View, Sort and Search Records

Chapter 7 View Current Tasks and Events
If you have a lot of records, they are displayed onmultiple pages. You can set the number of records to
display on a single page using the control at the bottom of the page (display 20, 30, 40 or 50 records at
a time). This control lets you see how many pages of contacts you have at a glance and which page
you are looking at (for example, 1/31 lets you know that you are looking at page 1 of 31), and lets you
quickly jump to the previous page and first page or to the next page and last page.
ViewCurrent Tasks and Events
You can view all current tasks and a calendar showing all events for the current month on the CRM home
page. You can also:
Sort tasks by status
Display a specific event by clicking a date on the calendar
Navigate to different months and years on the calendar
To sort tasks by status
1. In My Tasks, select one of the statuses from the View Tasks by drop-down:
o Allo Pendingo In Progresso Completedo Suspended
Account Management Users' Guide 323
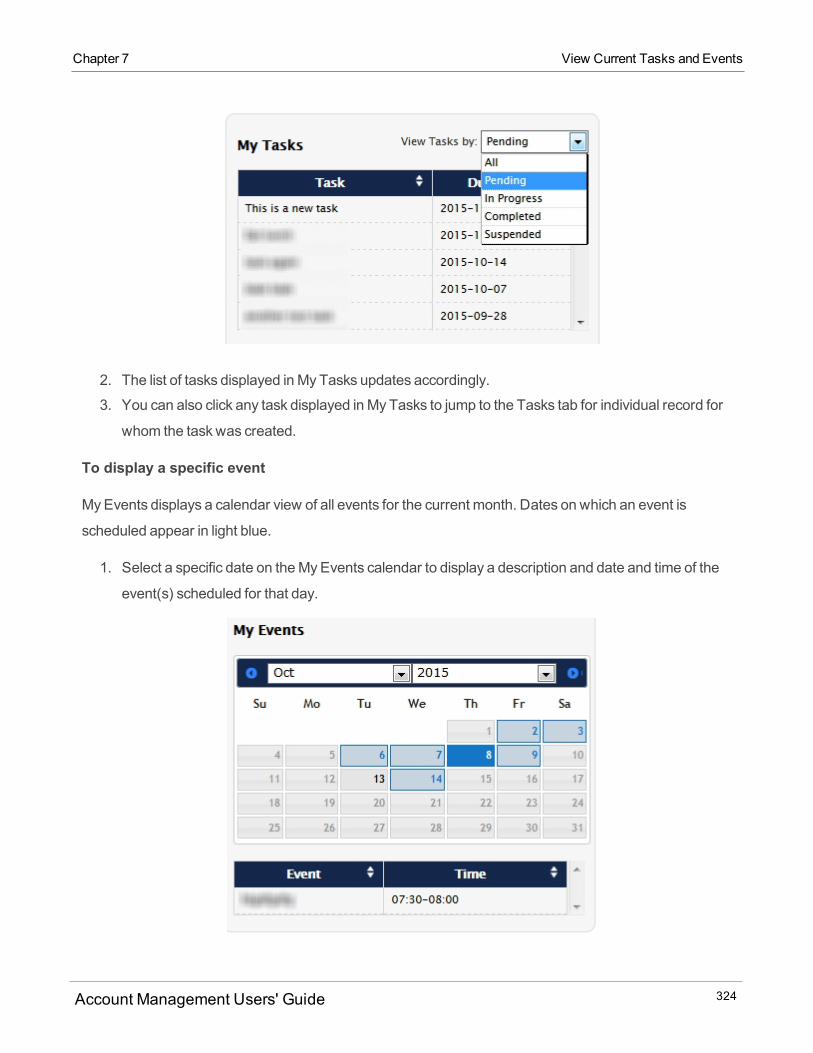
2. The list of tasks displayed inMy Tasks updates accordingly.
3. You can also click any task displayed inMy Tasks to jump to the Tasks tab for individual record for
whom the taskwas created.
To display a specific event
MyEvents displays a calendar view of all events for the current month. Dates on which an event is
scheduled appear in light blue.
1. Select a specific date on theMyEvents calendar to display a description and date and time of the
event(s) scheduled for that day.
Account Management Users' Guide 324
Chapter 7 View Current Tasks and Events
Chapter 7 Entering a New Contact, Prospect or Client
2. The selected date appears in a darker blue on the calendar.
3. You can also click the event description below the calendar to jump to the individual record for whom
the event was created.
To navigate to different months and years on the calendar
Do any of the following to display a different month and year on theMyEvents calendar:
Use themonth drop-down to select a different month.
Use the year drop-down to select a different year.
Use the small blue arrows on the left and right of the top bar of the calendar to quickly display the pre-
vious and next month, respectively.
Entering a NewContact, Prospect or Client
CRM is built on a database that contains a record for each contact, prospect and client.
To enter a new contact, prospect or client
1. ClickManage Clients > CRM.
Account Management Users' Guide 325
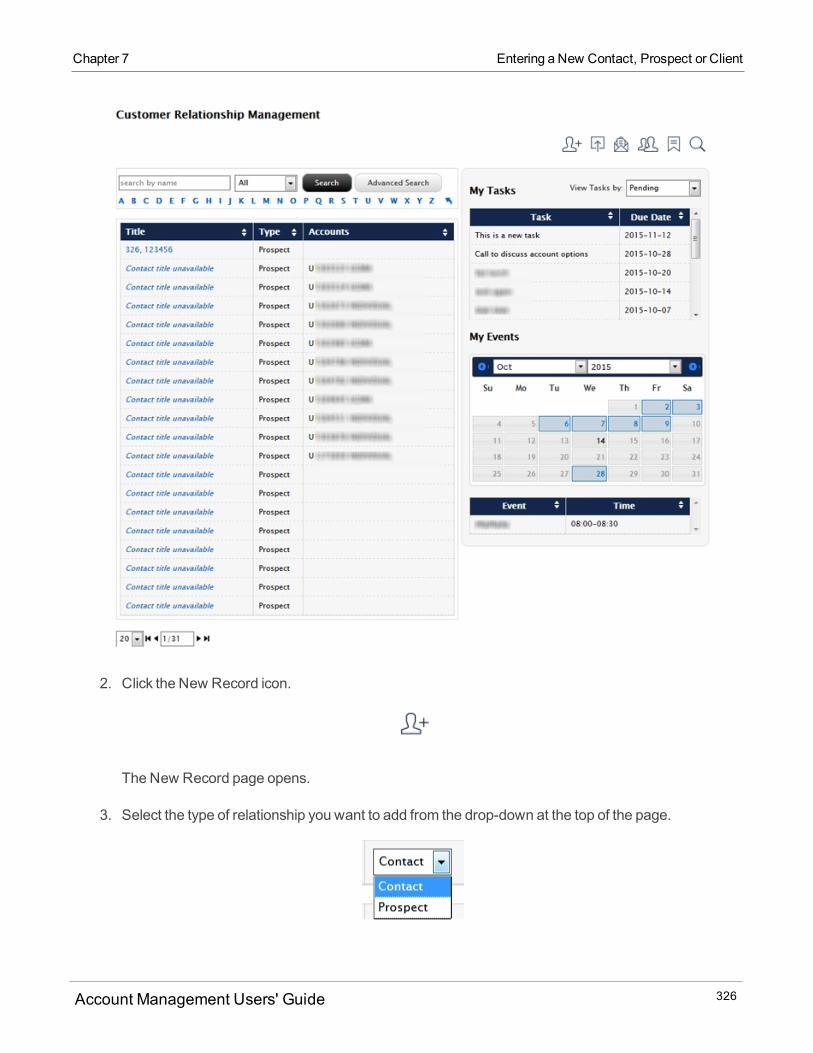
2. Click the New Record icon.
The New Record page opens.
3. Select the type of relationship you want to add from the drop-down at the top of the page.
Account Management Users' Guide 326
Chapter 7 Entering a New Contact, Prospect or Client
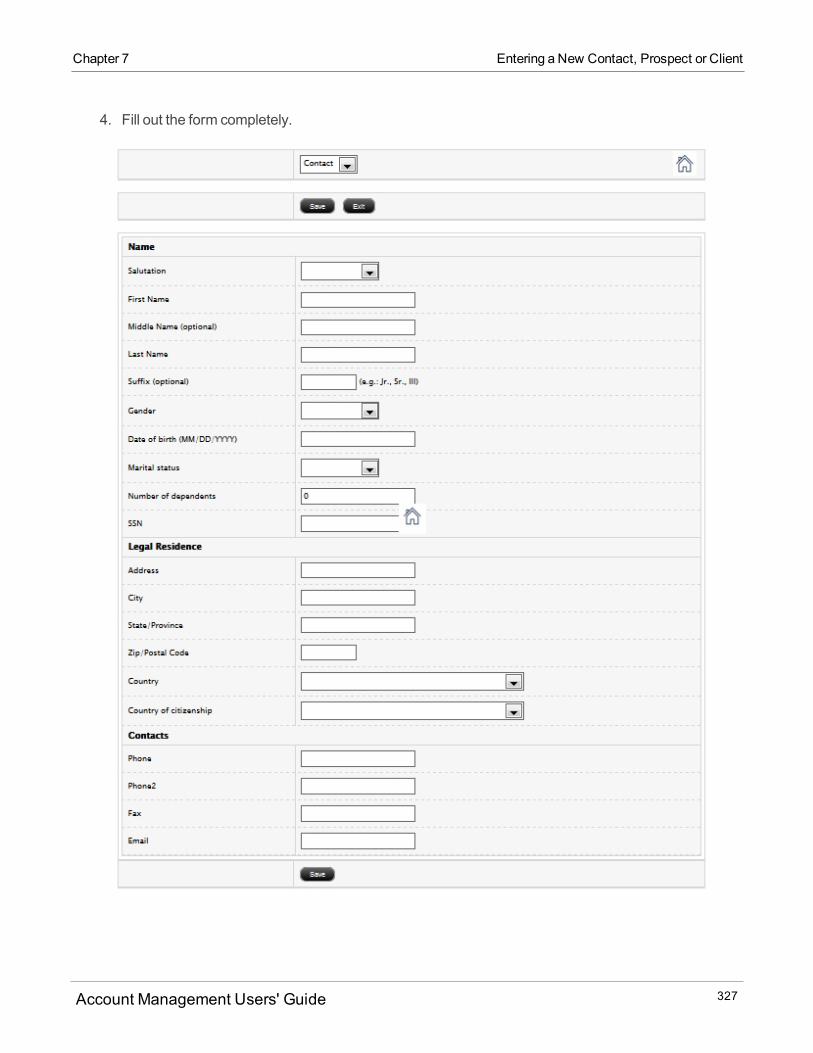
Chapter 7 Entering a New Contact, Prospect or Client
4. Fill out the form completely.
Account Management Users' Guide 327
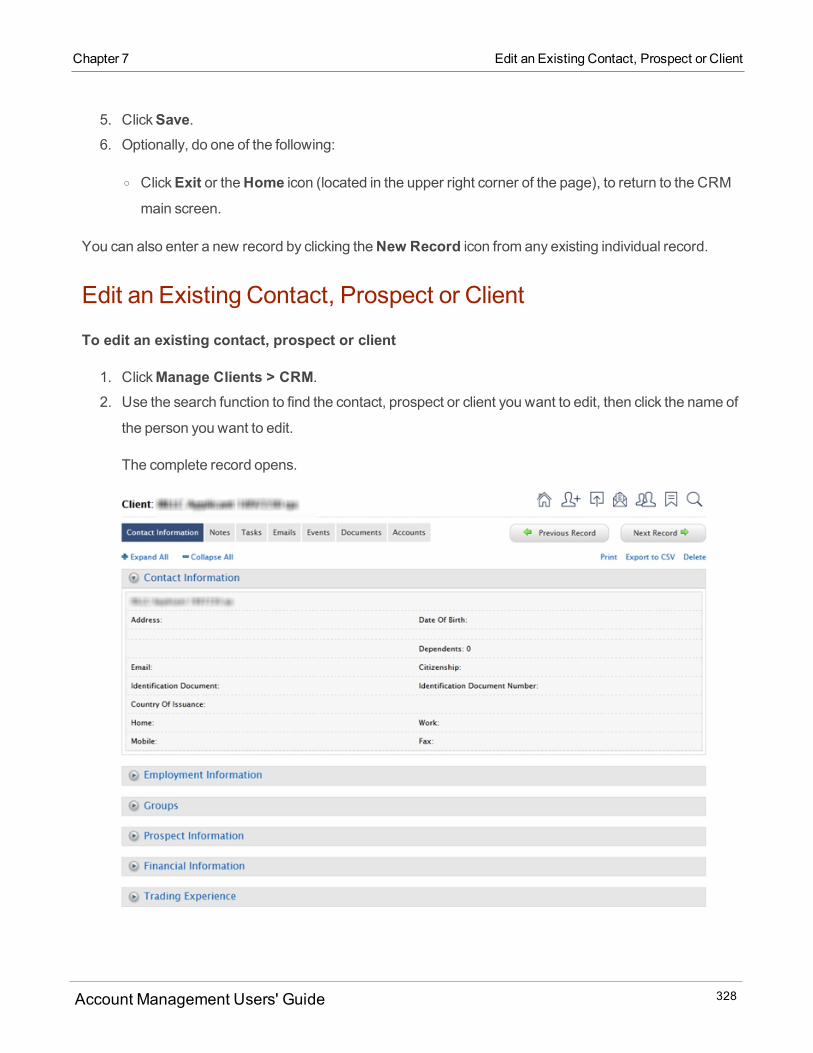
5. ClickSave.6. Optionally, do one of the following:
o ClickExit or theHome icon (located in the upper right corner of the page), to return to the CRMmain screen.
You can also enter a new record by clicking theNew Record icon from any existing individual record.
Edit an Existing Contact, Prospect or Client
To edit an existing contact, prospect or client
1. ClickManage Clients > CRM.2. Use the search function to find the contact, prospect or client you want to edit, then click the name of
the person you want to edit.
The complete record opens.
Account Management Users' Guide 328
Chapter 7 Edit an Existing Contact, Prospect or Client
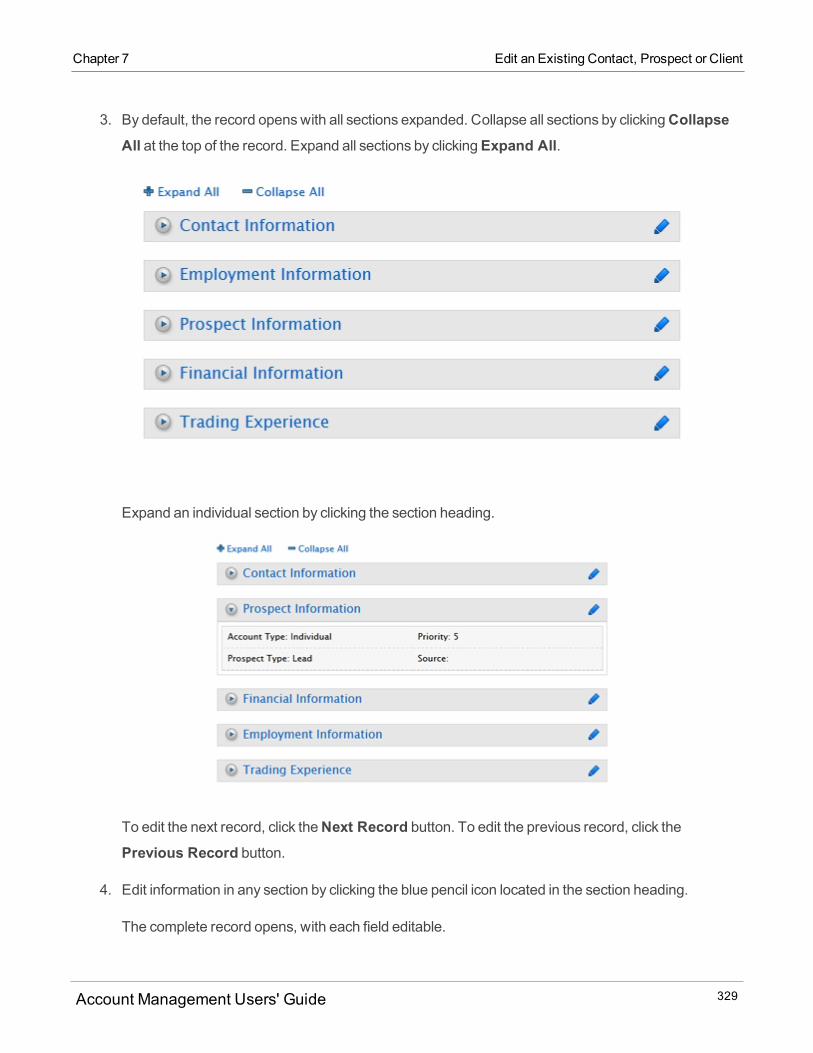
Chapter 7 Edit an Existing Contact, Prospect or Client
3. By default, the record openswith all sections expanded. Collapse all sections by clickingCollapseAll at the top of the record. Expand all sections by clickingExpand All.
Expand an individual section by clicking the section heading.
To edit the next record, click theNext Record button. To edit the previous record, click thePrevious Record button.
4. Edit information in any section by clicking the blue pencil icon located in the section heading.
The complete record opens, with each field editable.
Account Management Users' Guide 329
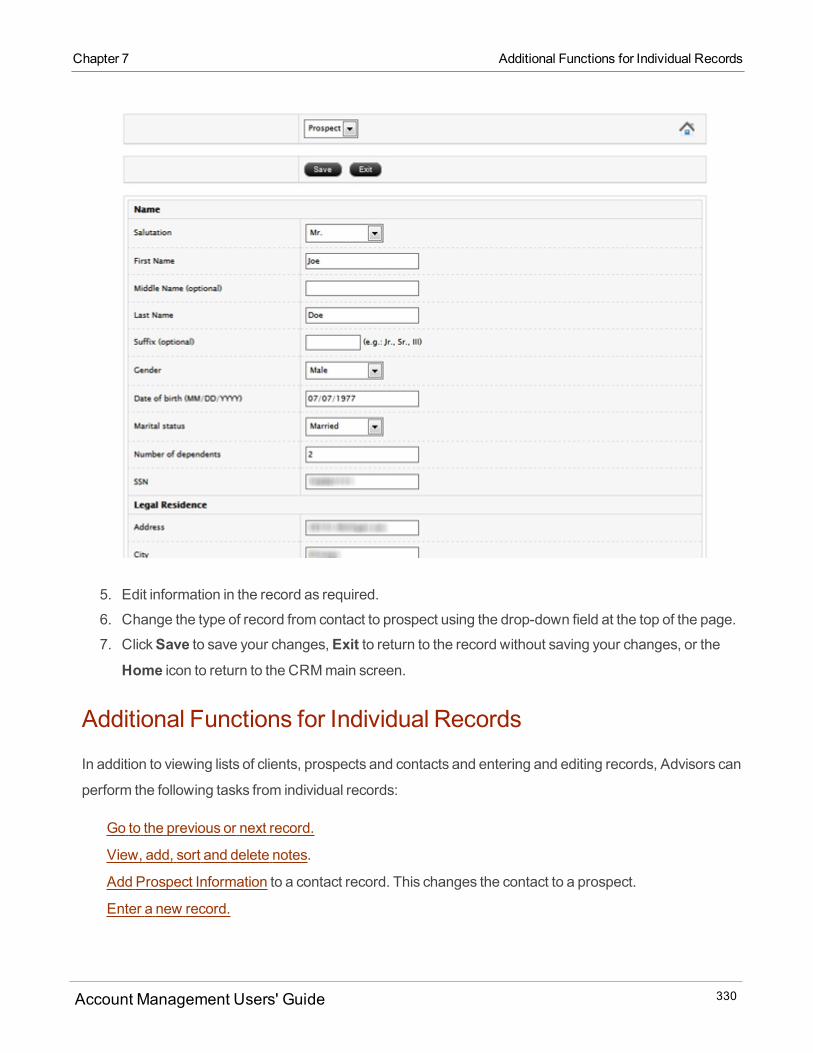
5. Edit information in the record as required.
6. Change the type of record from contact to prospect using the drop-down field at the top of the page.
7. ClickSave to save your changes,Exit to return to the record without saving your changes, or theHome icon to return to the CRM main screen.
Additional Functions for Individual Records
In addition to viewing lists of clients, prospects and contacts and entering and editing records, Advisors can
perform the following tasks from individual records:
Go to the previous or next record.
View, add, sort and delete notes.
Add Prospect Information to a contact record. This changes the contact to a prospect.
Enter a new record.
Account Management Users' Guide 330
Chapter 7 Additional Functions for Individual Records

Chapter 7 Additional Functions for Individual Records
Send an email to a contact, prospect or client.
View all emails sent to a person.
Send a prospect or a contact an invitation to open a client account. The information already entered in
CRM for the prospect or contact is automatically entered into the new client application.
Add, update and delete tasks.
Delete and print individual records.
Export an individual record to aMicrosoft Excel spreadsheet by downloading them as a .CSV (comma-
separated values) file.
Generate a VCard for an individual record (Microsoft Outlook-compatible .VCF file)
View all accounts for a specific client.
Schedule events with a specific contact, prospect or client.
Upload documents associated with a specific contact, prospect or client.
Go to the Dashboard, where you can drill down to view account details for any client account.
To go to the previous or next record
1. On the CRM home page, click the title of the record you want to view.
2. Click thePrevious Record orNext Record button to view the previous or next CRM record .
To view, add, sort and delete notes
Wedo not store or have access to your notes; they are stored on Rackspace. Before you can add notes to
a CRM record, youmust set a Notes password from the CRM home page. See Set and Reset Your Notes
Password for details.
1. On the CRM home page, use the search function to find the client, prospect or contact to whose
record you want to add a note.
2. Click the title of the record to which you want to add a note.
The record opens.
Account Management Users' Guide 331

3. Click theNotes tab.
The Notes tab lists all of your existing notes.
4. Click theCreate Note button in the Client Communications section. The Note box opens.
Account Management Users' Guide 332
Chapter 7 Additional Functions for Individual Records

Chapter 7 Additional Functions for Individual Records
5. Start typing a note in the space provided in the Note box.
6. Click theSave icon in the Note box to save your note. Click theX icon to close the Note box.7. To sort the list of notes, selectNewest orOldest from the Sort drop-down.
8. Delete a note by clicking theX icon below the note.
.
To add Prospect Information to a contact record
1. On the CRM home page, use the search function to find contact to whose record you want to add
prospect information.
2. Click the title of the record.
The record opens.
Account Management Users' Guide 333
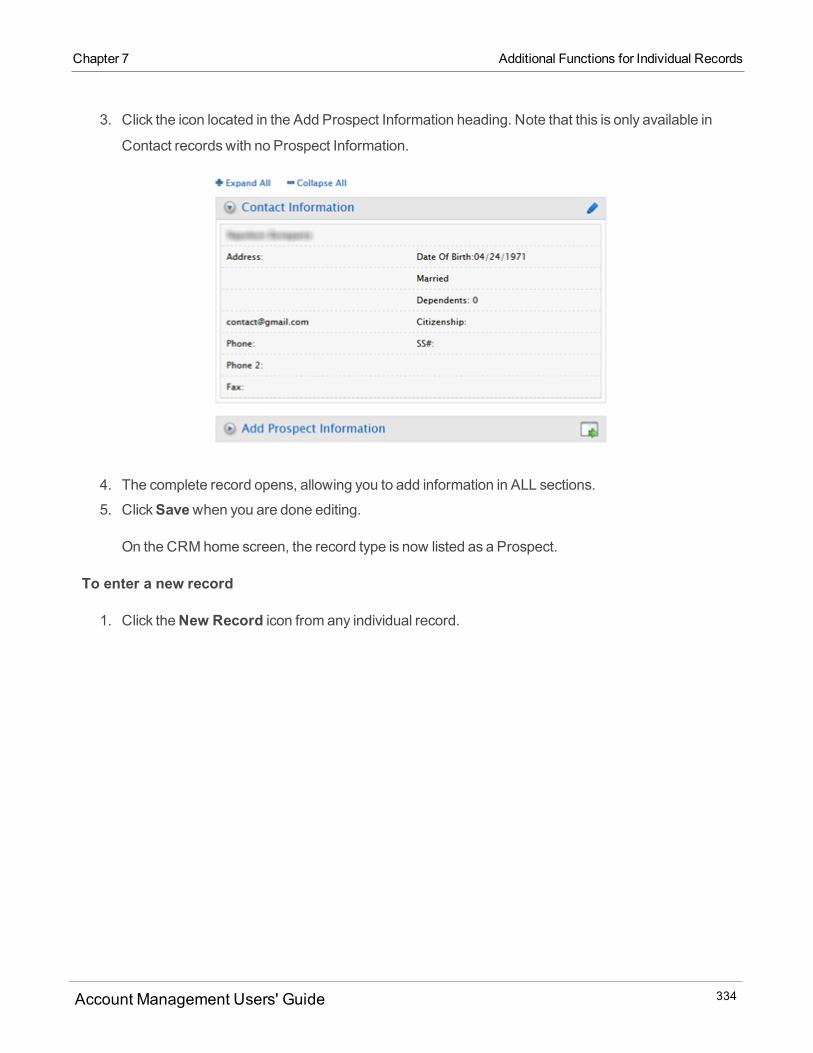
3. Click the icon located in the Add Prospect Information heading. Note that this is only available in
Contact recordswith no Prospect Information.
4. The complete record opens, allowing you to add information in ALL sections.
5. ClickSavewhen you are done editing.
On the CRM home screen, the record type is now listed as a Prospect.
To enter a new record
1. Click theNew Record icon from any individual record.
Account Management Users' Guide 334
Chapter 7 Additional Functions for Individual Records

Chapter 7 Additional Functions for Individual Records
2. Create the new record by completing the form, and then clickingSave.
You can also enter a new record by clickingNew Record on themain CRM screen.
Account Management Users' Guide 335
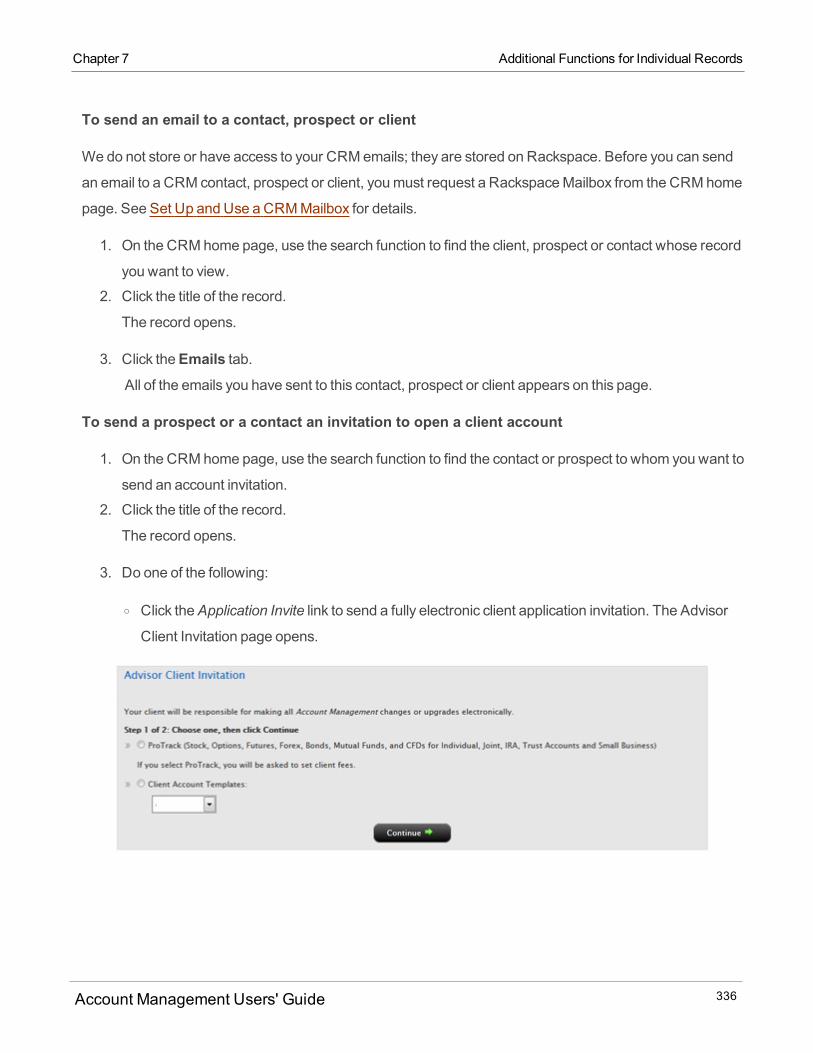
To send an email to a contact, prospect or client
Wedo not store or have access to your CRM emails; they are stored on Rackspace. Before you can send
an email to a CRM contact, prospect or client, youmust request a RackspaceMailbox from the CRM home
page. See Set Up and Use a CRM Mailbox for details.
1. On the CRM home page, use the search function to find the client, prospect or contact whose record
you want to view.
2. Click the title of the record.
The record opens.
3. Click theEmails tab.All of the emails you have sent to this contact, prospect or client appears on this page.
To send a prospect or a contact an invitation to open a client account
1. On the CRM home page, use the search function to find the contact or prospect to whom you want to
send an account invitation.
2. Click the title of the record.
The record opens.
3. Do one of the following:
o Click theApplication Invite link to send a fully electronic client application invitation. The Advisor
Client Invitation page opens.
Account Management Users' Guide 336
Chapter 7 Additional Functions for Individual Records
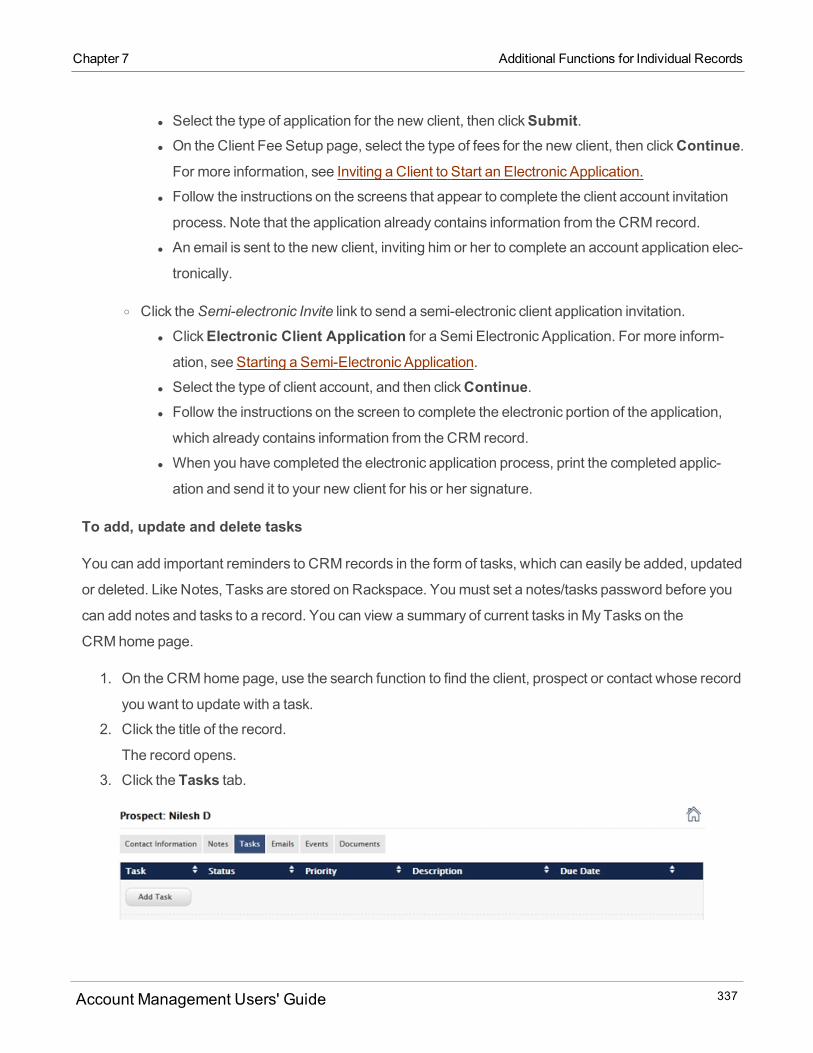
Chapter 7 Additional Functions for Individual Records
l Select the type of application for the new client, then clickSubmit.l On the Client Fee Setup page, select the type of fees for the new client, then clickContinue.For more information, see Inviting a Client to Start an Electronic Application.
l Follow the instructions on the screens that appear to complete the client account invitation
process. Note that the application already contains information from the CRM record.
l An email is sent to the new client, inviting him or her to complete an account application elec-
tronically.
o Click theSemi-electronic Invite link to send a semi-electronic client application invitation.
l ClickElectronic Client Application for a Semi Electronic Application. For more inform-ation, see Starting a Semi-Electronic Application.
l Select the type of client account, and then clickContinue.l Follow the instructions on the screen to complete the electronic portion of the application,
which already contains information from the CRM record.
l When you have completed the electronic application process, print the completed applic-
ation and send it to your new client for his or her signature.
To add, update and delete tasks
You can add important reminders to CRM records in the form of tasks, which can easily be added, updated
or deleted. Like Notes, Tasks are stored on Rackspace. Youmust set a notes/tasks password before you
can add notes and tasks to a record. You can view a summary of current tasks in My Tasks on the
CRM home page.
1. On the CRM home page, use the search function to find the client, prospect or contact whose record
you want to update with a task.
2. Click the title of the record.
The record opens.
3. Click the Tasks tab.
Account Management Users' Guide 337

4. To add a task:
o ClickAdd Task. The Add Task section appears at the bottom of the page.
o In the first drop-down from the left, select the status of the task (Pending, In Progress,
Completed, or Suspended). Pending is the default status.o In the second drop-down from the left, select the priority of the task (Low,Medium orHigh).
Medium is the default priority.o Type a name for the task.o The date field displays today's date by default. Click in the date field to display a calendar, which
lets you select a different date.o ClickSave. The new task appears in the task list.
5. To update a task:
o Click the radio button for the task. The Update Task section appears at the bottom of the page.o Update the task status, priority, name or date, and then clickSave. The task is updated in the tasklist.
6. To delete a task, click theX icon for the task, and then clickOK in the confirmation popup.
To delete an individual record
1. On the CRM home page, use the search function to find the client, prospect or contact whose record
you want to delete.
2. Click the title of the record.
The record opens.
Account Management Users' Guide 338
Chapter 7 Additional Functions for Individual Records
Chapter 7 Additional Functions for Individual Records
3. Click theDelete link.
To print an individual record
1. On the CRM home page, use the search function to find the client, prospect or contact whose record
you want to print.
2. Click the title of the record.
The record opens.
3. Click thePrint link.
To export an individual record to Excel in a .CSV file
You can download anyCRM record to a .CSV (comma-separated values) file, which can then be opened
inMicrosoft Excel or a similar program.
1. On the CRM home page, use the search function to find the client, prospect or contact whose record
you want to export to a .CSV file.
2. Click the title of the record.
The record opens.
3. Click theExport link located.
4. You are prompted to save the file to a location on your computer.
To generate a VCard for an individual record (Microsoft Outlook-compatible .VCF file)
You can download anyCRM record to a .VCF file, which is a VCard that can be opened inMicrosoft
Outlook.
1. On the CRM home page, use the search function to find the prospect, contact or client whose record
you want to export to a .VCard.
2. Click the title of the record.
The record opens.
3. Click theVCard link located.
4. You are prompted to save the file to a location on your computer.
5. SeeMicrosoft Outlook's instructions to learn how to import the VCard and add the contact to your
Outlook contacts.
To view all accounts for a specific client
Account Management Users' Guide 339

1. On the CRM home page, use the search function to find the client, prospect or contact whose record
you want to view.
2. Click the title of the record.
The record opens.
3. Click theAccounts tab to view all accounts for the client, including Account Title, Account ID,
Account Type, Date Applied, Date Open, Date Funded, Date Closed (if applicable) and Status for
each account.
To upload documents associated with a specific contact, prospect or client
You can upload one or more documents associated with a contact, prospect or client from an individual
CRM record. Each document must be between 0 and 2MB and cannot be an executable (.exe) file.
1. On the CRM home page, use the search function to find a client, prospect or contact.
2. Click the title of the record.
The record opens.
3. Click theDocuments tab. This tab lists all previously uploaded documents that are currently storedwith the contact, prospect or client record.
4. Click theChoose File button, and then search for and select the document you want to upload. Thedocument must be no larger than 2 MB.
5. ClickSubmit.The document appears in the list of documents.
6. To delete a previously uploaded document, click theX icon on the document row.
To jump to the Dashboard
1. On the CRM home page, use the search function to find the client, prospect or contact whose record
you want to view.
2. Click the title of the record.
The record opens.
Account Management Users' Guide 340
Chapter 7 Additional Functions for Individual Records
Chapter 7 Set and Reset Your Notes/Tasks Password
3. Click theAccounts tab.4. Click theDashboard button located on the upper right corner of the screen. The Dashboardmain
page opens.
Set and Reset Your Notes/Tasks Password
You can add notes and tasks to any individual CRM record.We do not store or have access to your
CRM notes; they are stored on Rackspace.
Before you can add notes and tasks to CRM records, youmust set a password from the CRM home page.
To set and reset your CRM notes/tasks password
1. ClickManage Clients > CRM.
Account Management Users' Guide 341
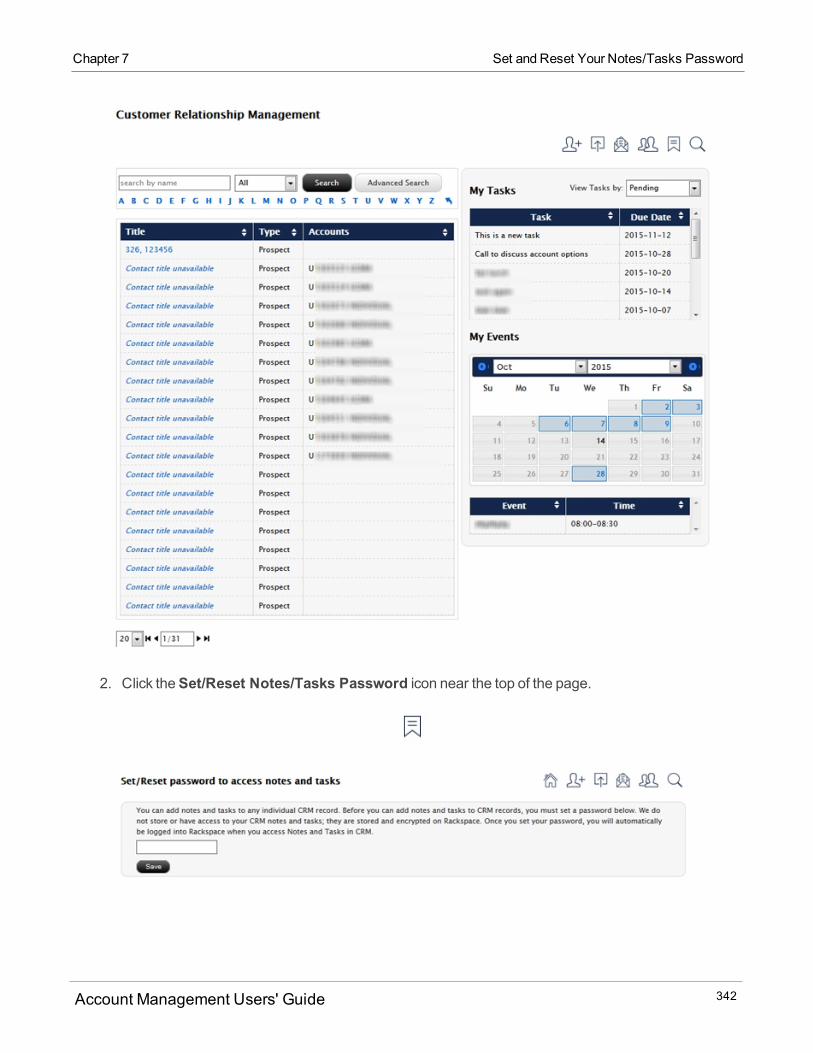
2. Click theSet/Reset Notes/Tasks Password icon near the top of the page.
Account Management Users' Guide 342
Chapter 7 Set and Reset Your Notes/Tasks Password
Chapter 7 Set Up and Use a CRMMailbox
3. Enter a password and then clickSave. (Note that you can return to themain CRM page by clickingthe Home icon located on the right side of the screen.
You will now be able to access the Notes and Tasks features in any individual CRM record.
4. To reset your notes/tasks password, click theSet/Reset Notes/Tasks Password button on theCRM home page, and then enter a new password and clickSave.
Set Up and Use a CRMMailbox
All Interactive Brokers CRMnotes and emails are hosted on Rackspace, a leadingmanaged cloud solution
provider.
Requirements for a Rackspace Mailbox
RackspaceMailboxes use your own email address. Therefore, youmust have a pre-existing email address
at your own domain before your RackspaceMailbox can be created. There is one way to do this:
You already have your own email address at your own domain. For example, jsmith@acmead-
visors.com.
Tomaintain the security of your CRMemails stored on Rackspace, email addresses at public domains,
such as Yahoo, Gmail, Hotmail or Outlook, are not allowed.
Additional Information
A Rackspacemailbox costs $1.20 per mailbox per month, subject to any change implemented byRack-
space.
Your Rackspacemailbox provides 25GB of storage.
Once your Rackspacemailbox has been created, you will be notified in Pending Items in Account Man-
agement. You can then access your mailbox from the CRMpage or from any individual CRM record.
You can update your Rackspacemailbox password at any time by accessing Settings fromwithin your
Rackspacemailbox.
Once you submit your Rackspacemailbox request, you will be charged for that period. Rackspace
does not offer refunds for canceledmailboxes.
Account Management Users' Guide 343
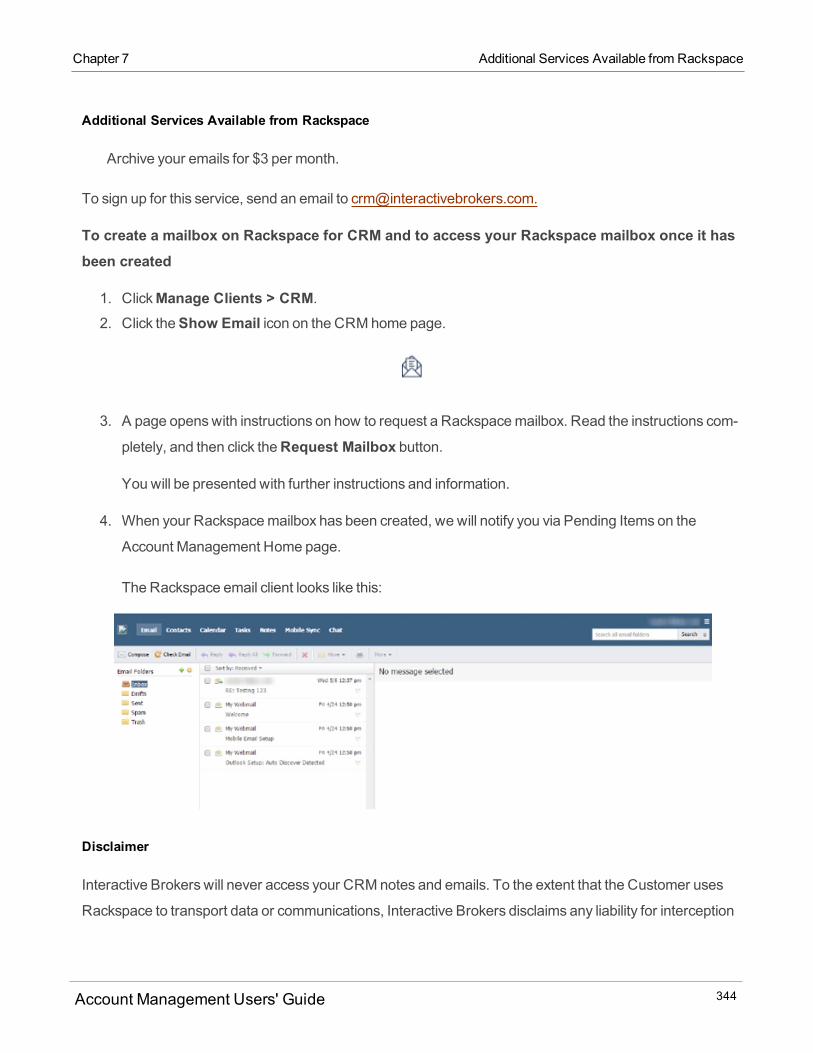
Additional Services Available from Rackspace
Archive your emails for $3 per month.
To sign up for this service, send an email to [email protected].
To create a mailbox on Rackspace for CRM and to access your Rackspace mailbox once it hasbeen created
1. ClickManage Clients > CRM.2. Click theShow Email icon on the CRM home page.
3. A page openswith instructions on how to request a Rackspacemailbox. Read the instructions com-
pletely, and then click theRequest Mailbox button.
You will be presented with further instructions and information.
4. When your Rackspacemailbox has been created, we will notify you via Pending Items on the
Account Management Home page.
The Rackspace email client looks like this:
Disclaimer
Interactive Brokers will never access your CRMnotes and emails. To the extent that the Customer uses
Rackspace to transport data or communications, Interactive Brokers disclaims any liability for interception
Account Management Users' Guide 344
Chapter 7 Additional Services Available from Rackspace
Chapter 7 Events
of any such data or communications. IB is not responsible, andmakes no warranties regarding, the access,
speed, availability or security of Rackspace, Internet or network services.
Events
The Events tab, available from any individual CRM record, lets Advisors and Brokers schedule events
using an interactive calendar with daily, weekly andmonthly views. Events can be anything from scheduled
meetings to phone calls to personal tasks. You can also view currently scheduled events on theMyEvents
calendar on the CRM home page.
To schedule an event
1. On the CRM home page, use the search function to find the client, prospect or contact to whose
record you want to add a note.
2. Click the title of the record to which you want to add a note.
The record opens.
3. Click theEvents tab. The weekly event calendar opens.
Account Management Users' Guide 345
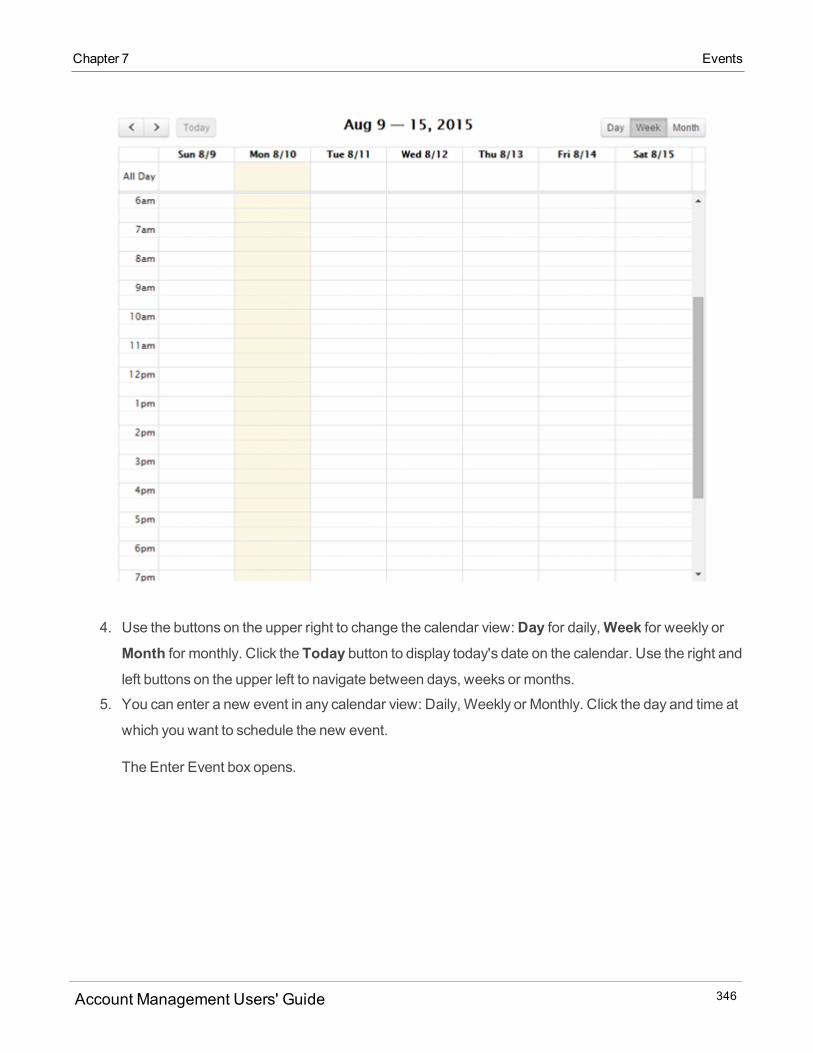
4. Use the buttons on the upper right to change the calendar view:Day for daily,Week for weekly orMonth for monthly. Click the Today button to display today's date on the calendar. Use the right andleft buttons on the upper left to navigate between days, weeks or months.
5. You can enter a new event in any calendar view: Daily, Weekly or Monthly. Click the day and time at
which you want to schedule the new event.
The Enter Event box opens.
Account Management Users' Guide 346
Chapter 7 Events

Chapter 7 Events
6. Enter the title of the event, and then select a start and end time. Click in the Start field to open the
interactive calendar.
Click the desired start time on the right side of the interactive calendar, using the scroll bar to scroll to
earlier or later times. You can also schedule the event to occur on any day using the interactive
calendar. Once you click a time, the interactive calendar closes.
Repeat for the event end time.
Account Management Users' Guide 347
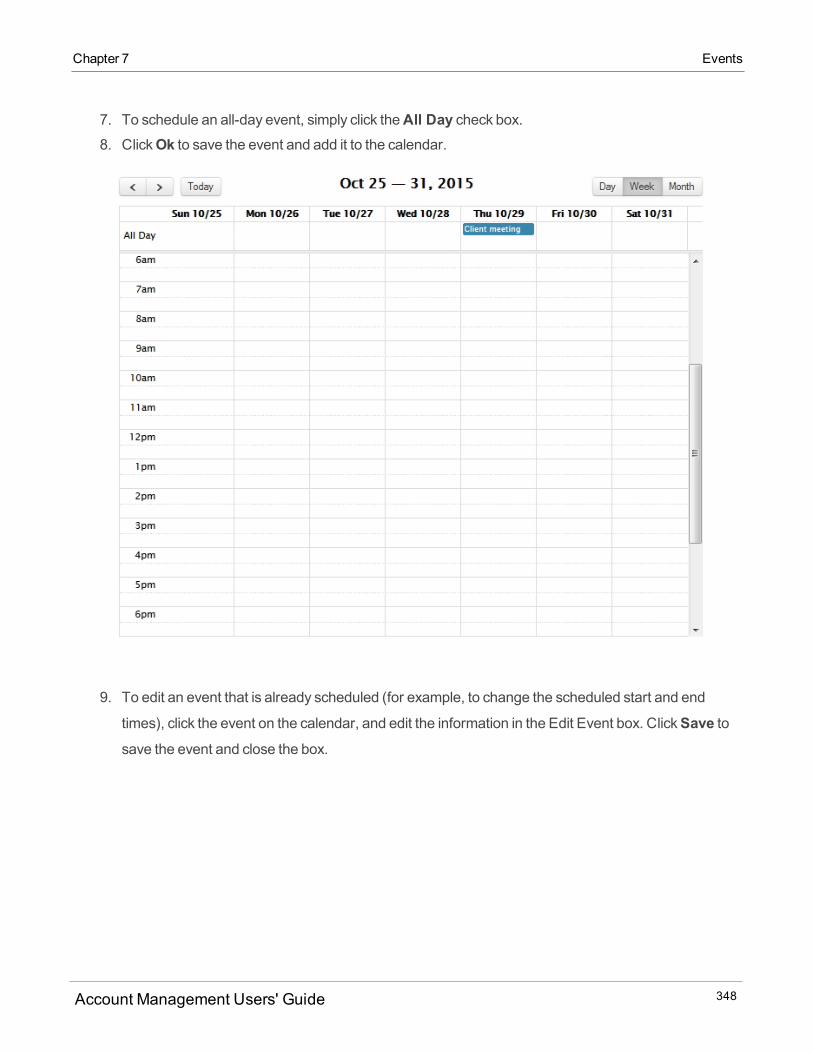
7. To schedule an all-day event, simply click theAll Day check box.8. ClickOk to save the event and add it to the calendar.
9. To edit an event that is already scheduled (for example, to change the scheduled start and end
times), click the event on the calendar, and edit the information in the Edit Event box. ClickSave tosave the event and close the box.
Account Management Users' Guide 348
Chapter 7 Events
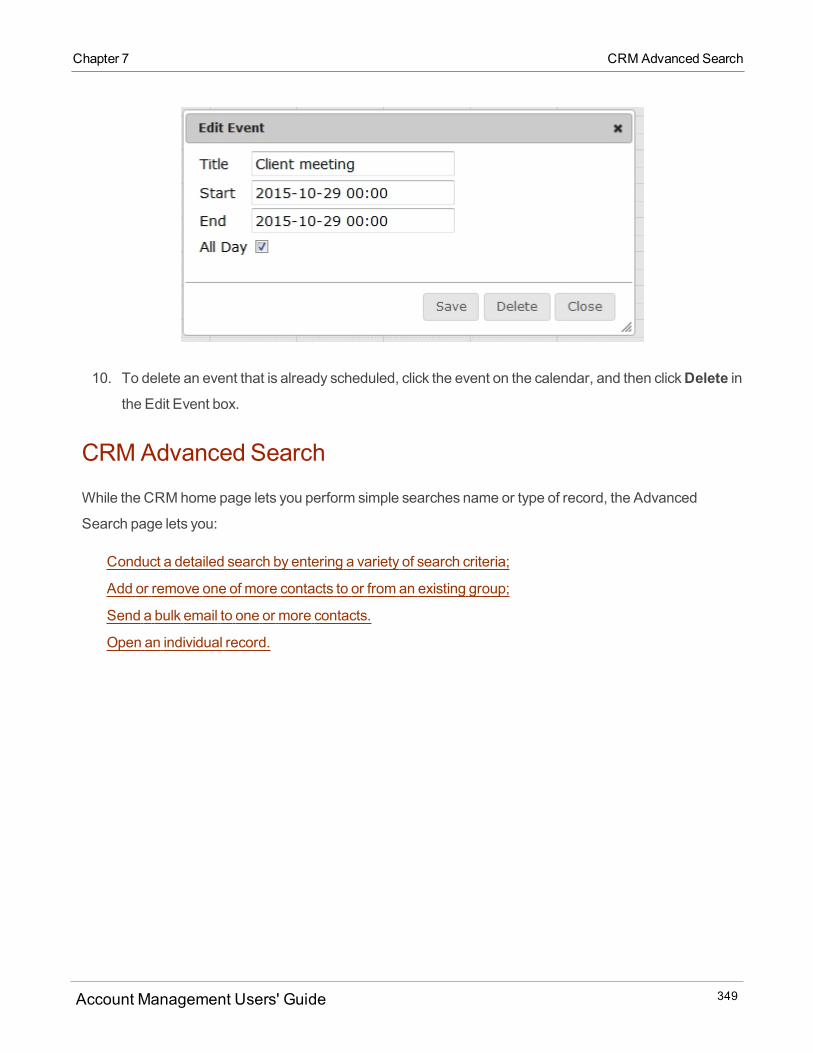
Chapter 7 CRM Advanced Search
10. To delete an event that is already scheduled, click the event on the calendar, and then clickDelete inthe Edit Event box.
CRMAdvanced Search
While the CRM home page lets you perform simple searches name or type of record, the Advanced
Search page lets you:
Conduct a detailed search by entering a variety of search criteria;
Add or remove one of more contacts to or from an existing group;
Send a bulk email to one or more contacts.
Open an individual record.
Account Management Users' Guide 349
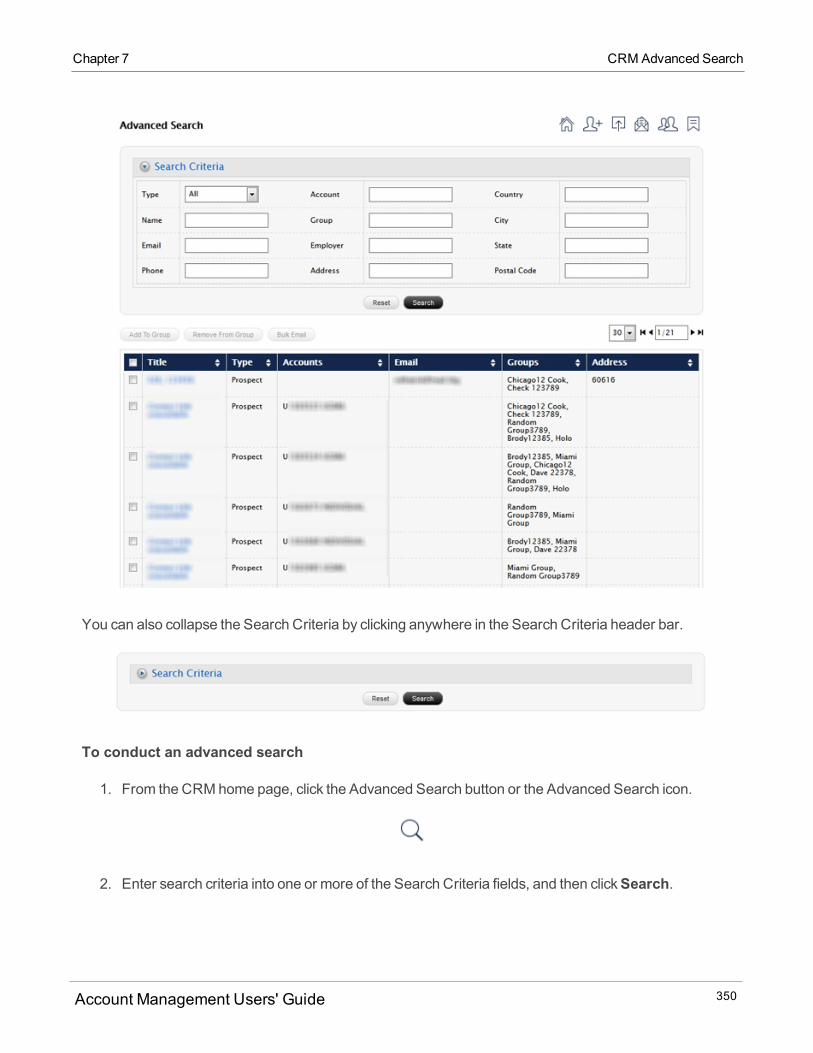
You can also collapse the Search Criteria by clicking anywhere in the Search Criteria header bar.
To conduct an advanced search
1. From the CRM home page, click the Advanced Search button or the Advanced Search icon.
2. Enter search criteria into one or more of the Search Criteria fields, and then clickSearch.
Account Management Users' Guide 350
Chapter 7 CRM Advanced Search
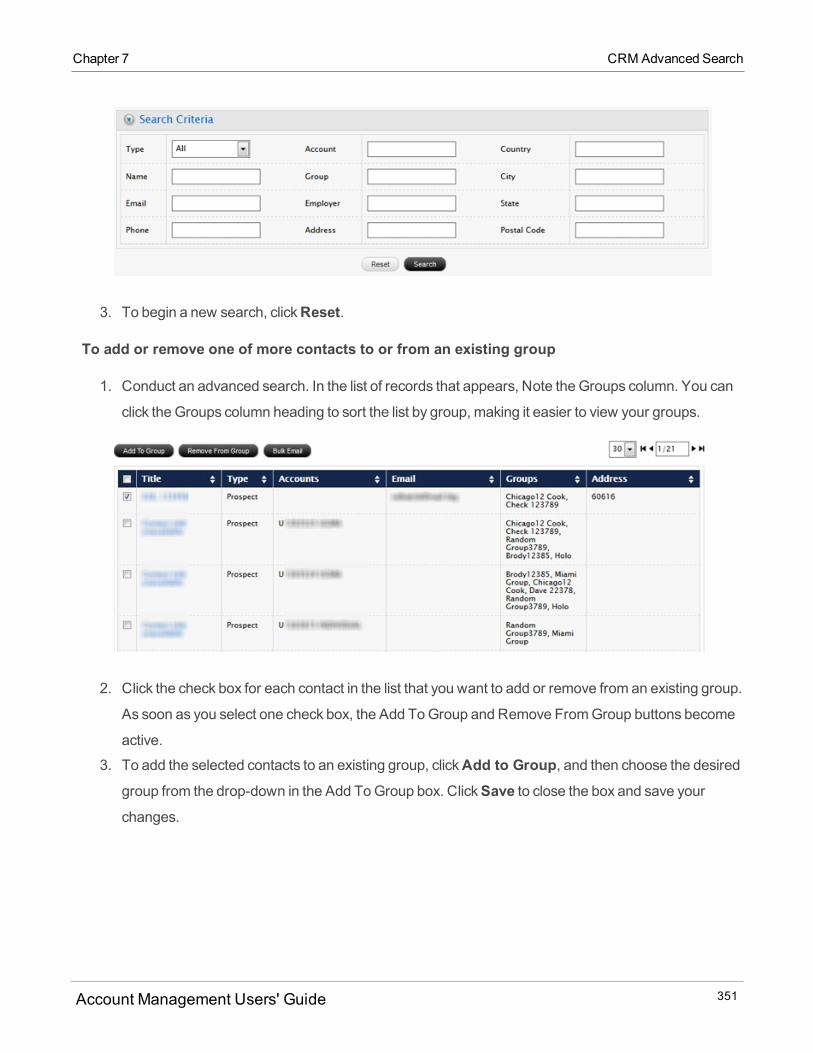
Chapter 7 CRM Advanced Search
3. To begin a new search, clickReset.
To add or remove one of more contacts to or from an existing group
1. Conduct an advanced search. In the list of records that appears, Note the Groups column. You can
click the Groups column heading to sort the list by group, making it easier to view your groups.
2. Click the check box for each contact in the list that you want to add or remove from an existing group.
As soon as you select one check box, the Add ToGroup and Remove FromGroup buttons become
active.
3. To add the selected contacts to an existing group, clickAdd to Group, and then choose the desiredgroup from the drop-down in the Add ToGroup box. ClickSave to close the box and save yourchanges.
Account Management Users' Guide 351
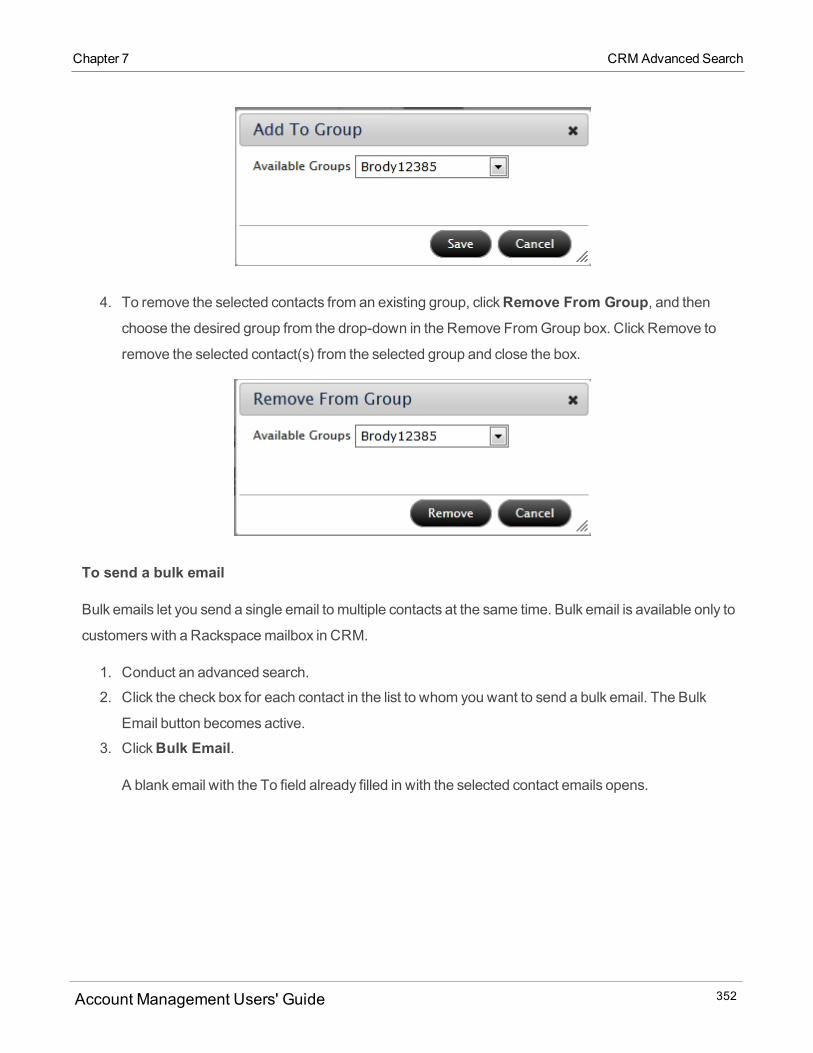
4. To remove the selected contacts from an existing group, clickRemove From Group, and thenchoose the desired group from the drop-down in the Remove FromGroup box. Click Remove to
remove the selected contact(s) from the selected group and close the box.
To send a bulk email
Bulk emails let you send a single email to multiple contacts at the same time. Bulk email is available only to
customerswith a Rackspacemailbox in CRM.
1. Conduct an advanced search.
2. Click the check box for each contact in the list to whom you want to send a bulk email. The Bulk
Email button becomes active.
3. ClickBulk Email.
A blank email with the To field already filled in with the selected contact emails opens.
Account Management Users' Guide 352
Chapter 7 CRM Advanced Search
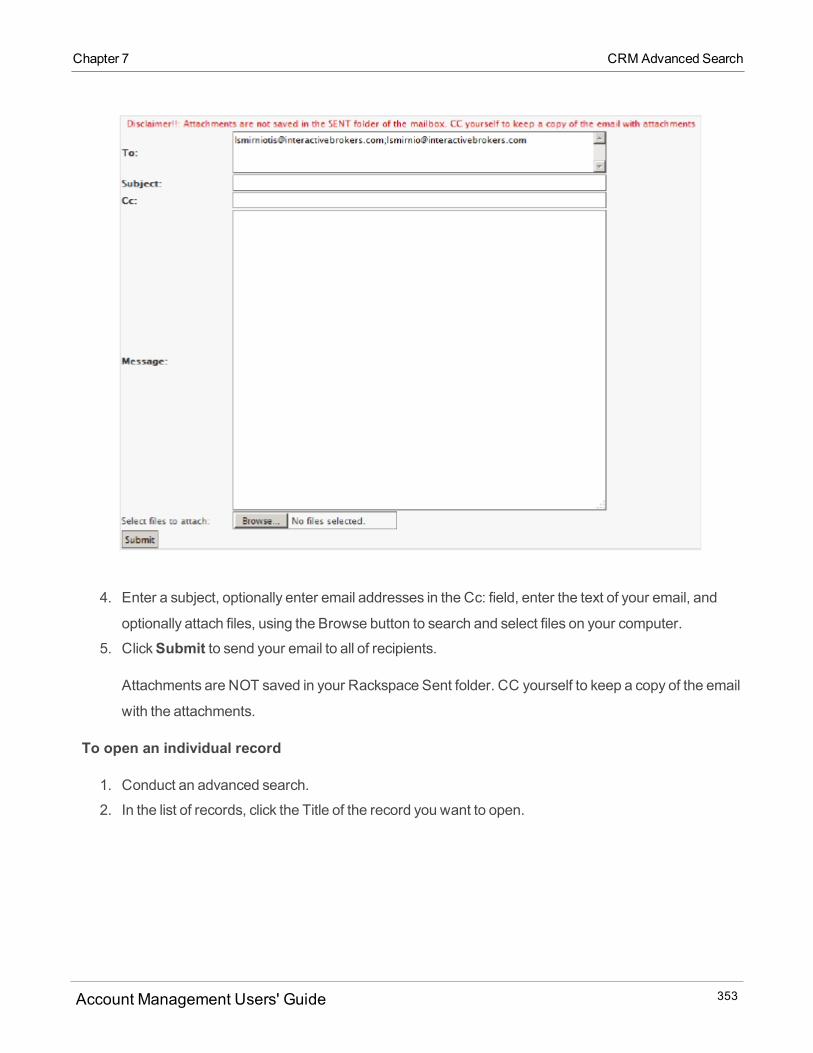
Chapter 7 CRM Advanced Search
4. Enter a subject, optionally enter email addresses in the Cc: field, enter the text of your email, and
optionally attach files, using the Browse button to search and select files on your computer.
5. ClickSubmit to send your email to all of recipients.
Attachments are NOT saved in your Rackspace Sent folder. CC yourself to keep a copy of the email
with the attachments.
To open an individual record
1. Conduct an advanced search.
2. In the list of records, click the Title of the record you want to open.
Account Management Users' Guide 353
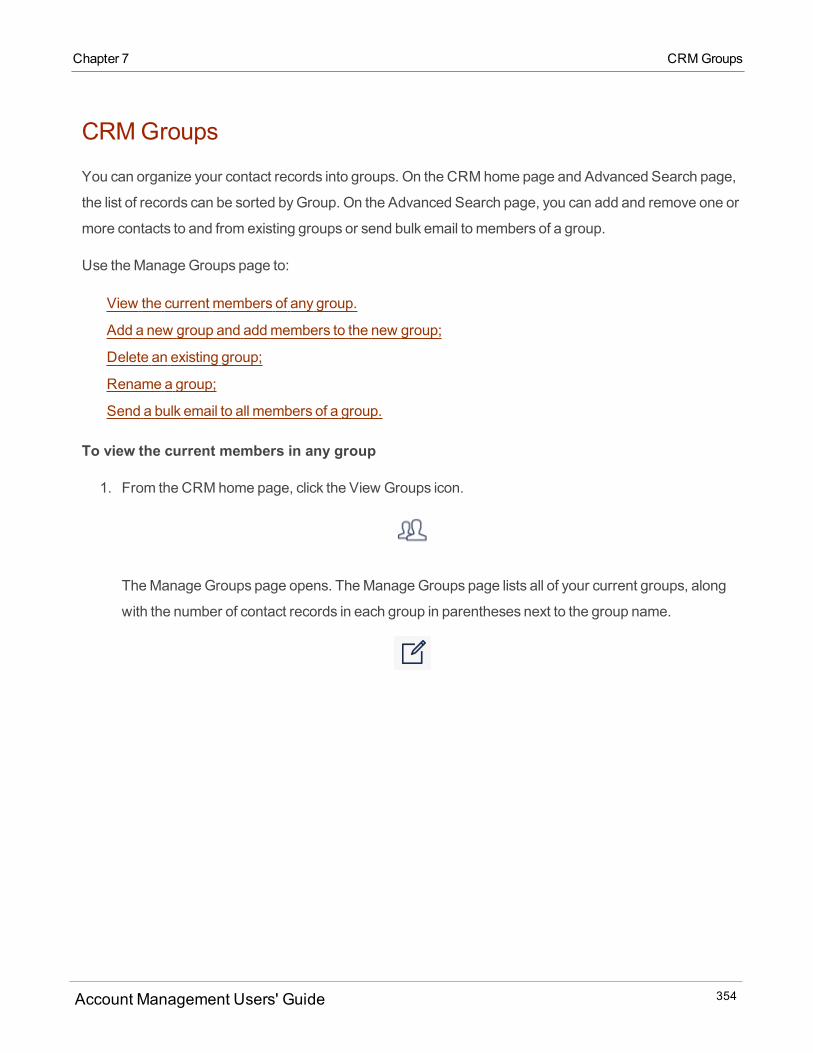
CRMGroups
You can organize your contact records into groups. On the CRM home page and Advanced Search page,
the list of records can be sorted byGroup. On the Advanced Search page, you can add and remove one or
more contacts to and from existing groups or send bulk email to members of a group.
Use theManageGroups page to:
View the current members of any group.
Add a new group and addmembers to the new group;
Delete an existing group;
Rename a group;
Send a bulk email to all members of a group.
To view the current members in any group
1. From the CRM home page, click the View Groups icon.
TheManageGroups page opens. TheManageGroups page lists all of your current groups, along
with the number of contact records in each group in parentheses next to the group name.
Account Management Users' Guide 354
Chapter 7 CRMGroups
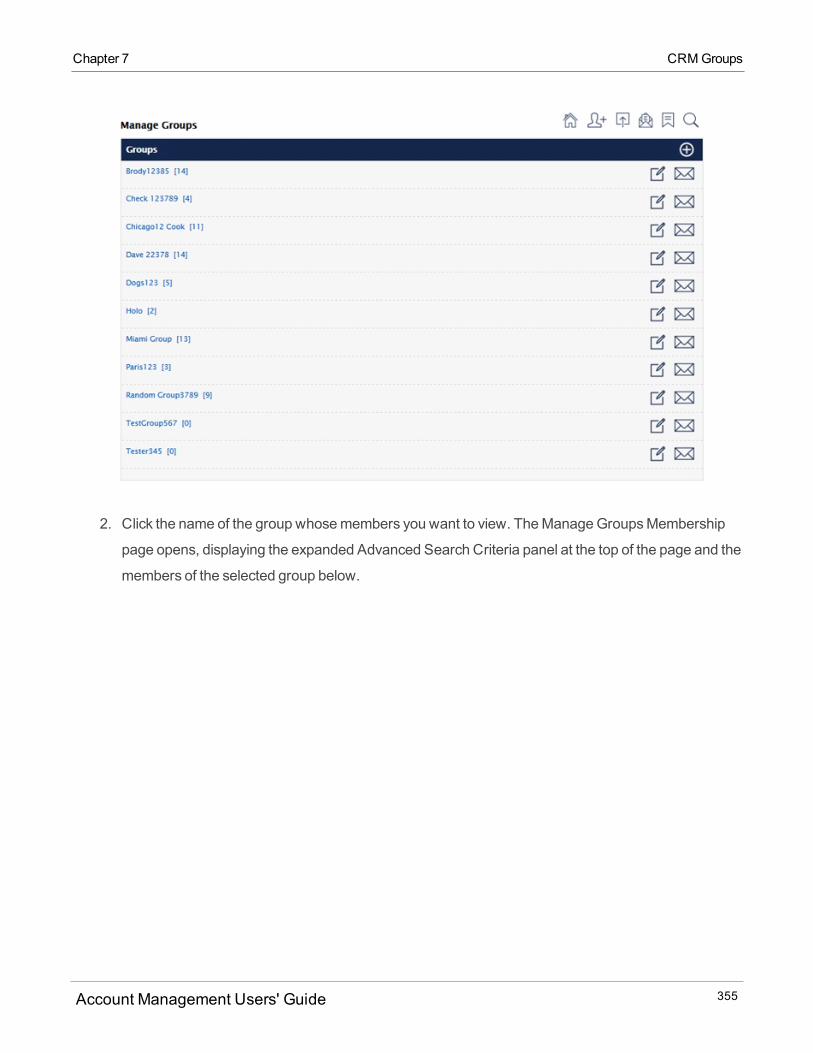
Chapter 7 CRMGroups
2. Click the name of the group whosemembers you want to view. TheManageGroupsMembership
page opens, displaying the expanded Advanced Search Criteria panel at the top of the page and the
members of the selected group below.
Account Management Users' Guide 355
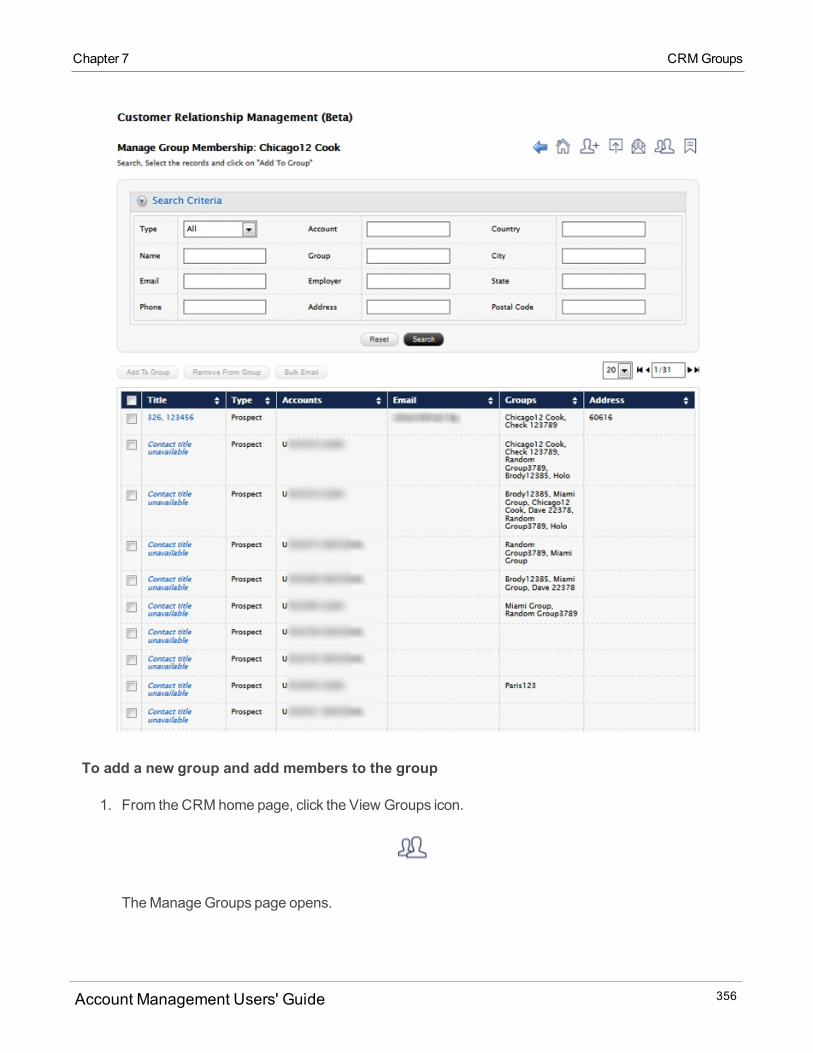
To add a new group and add members to the group
1. From the CRM home page, click the View Groups icon.
TheManageGroups page opens.
Account Management Users' Guide 356
Chapter 7 CRMGroups
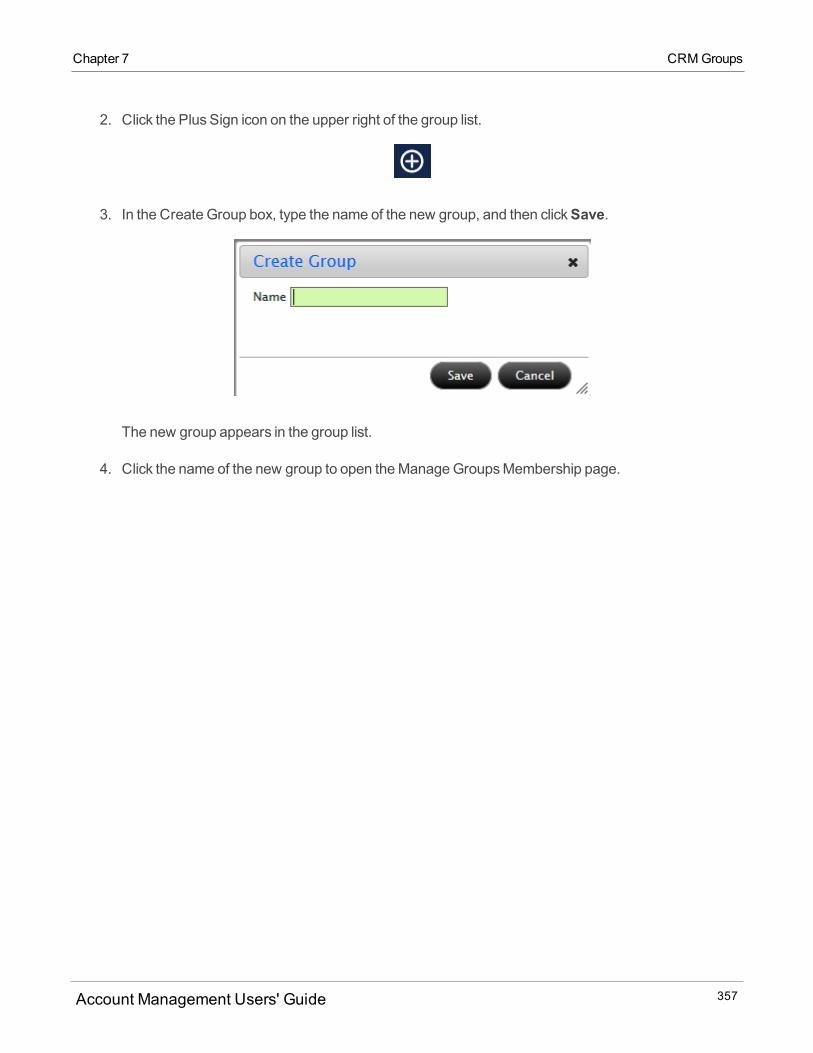
Chapter 7 CRMGroups
2. Click the Plus Sign icon on the upper right of the group list.
3. In the Create Group box, type the name of the new group, and then clickSave.
The new group appears in the group list.
4. Click the name of the new group to open theManageGroupsMembership page.
Account Management Users' Guide 357
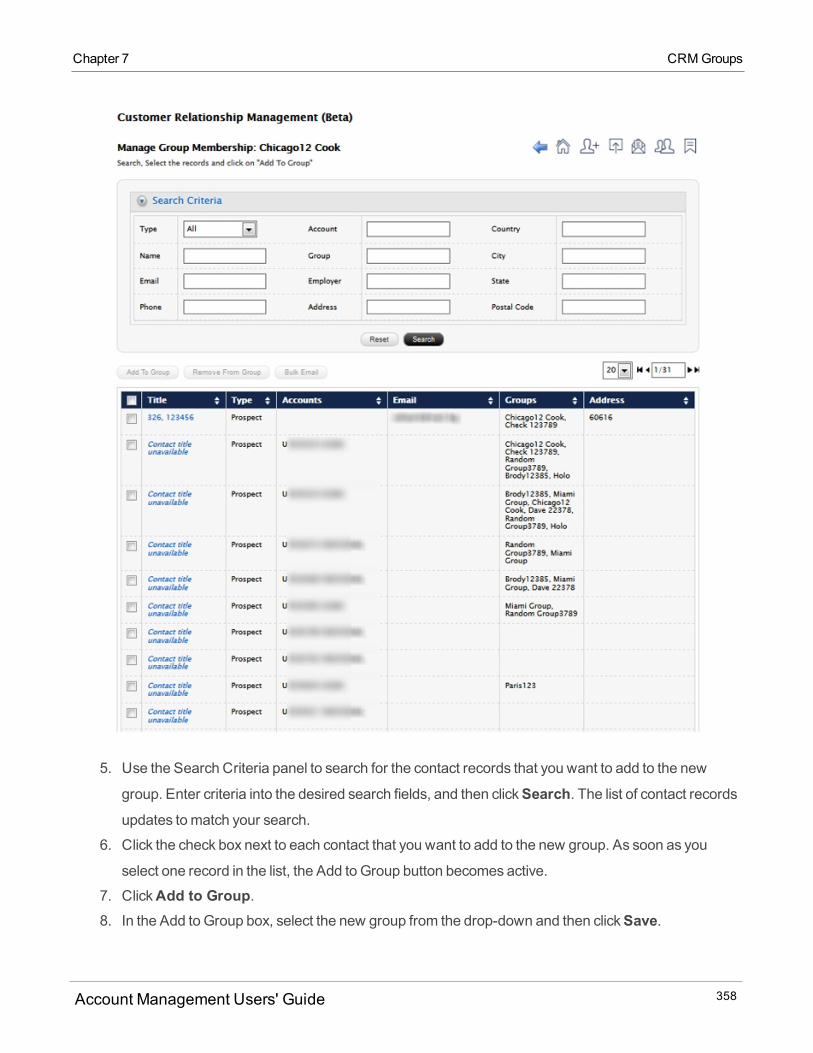
5. Use the Search Criteria panel to search for the contact records that you want to add to the new
group. Enter criteria into the desired search fields, and then clickSearch. The list of contact recordsupdates tomatch your search.
6. Click the check box next to each contact that you want to add to the new group. As soon as you
select one record in the list, the Add to Group button becomes active.
7. ClickAdd to Group.8. In the Add to Group box, select the new group from the drop-down and then clickSave.
Account Management Users' Guide 358
Chapter 7 CRMGroups
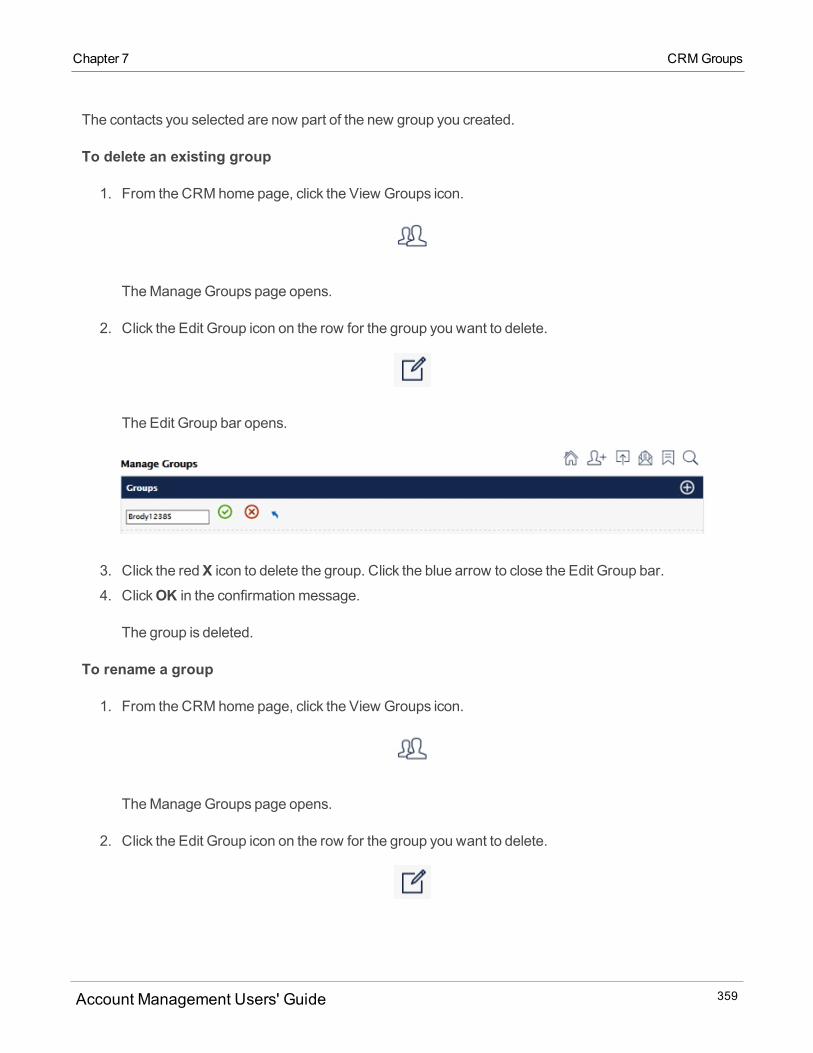
Chapter 7 CRMGroups
The contacts you selected are now part of the new group you created.
To delete an existing group
1. From the CRM home page, click the View Groups icon.
TheManageGroups page opens.
2. Click the Edit Group icon on the row for the group you want to delete.
The Edit Group bar opens.
3. Click the redX icon to delete the group. Click the blue arrow to close the Edit Group bar.
4. ClickOK in the confirmationmessage.
The group is deleted.
To rename a group
1. From the CRM home page, click the View Groups icon.
TheManageGroups page opens.
2. Click the Edit Group icon on the row for the group you want to delete.
Account Management Users' Guide 359
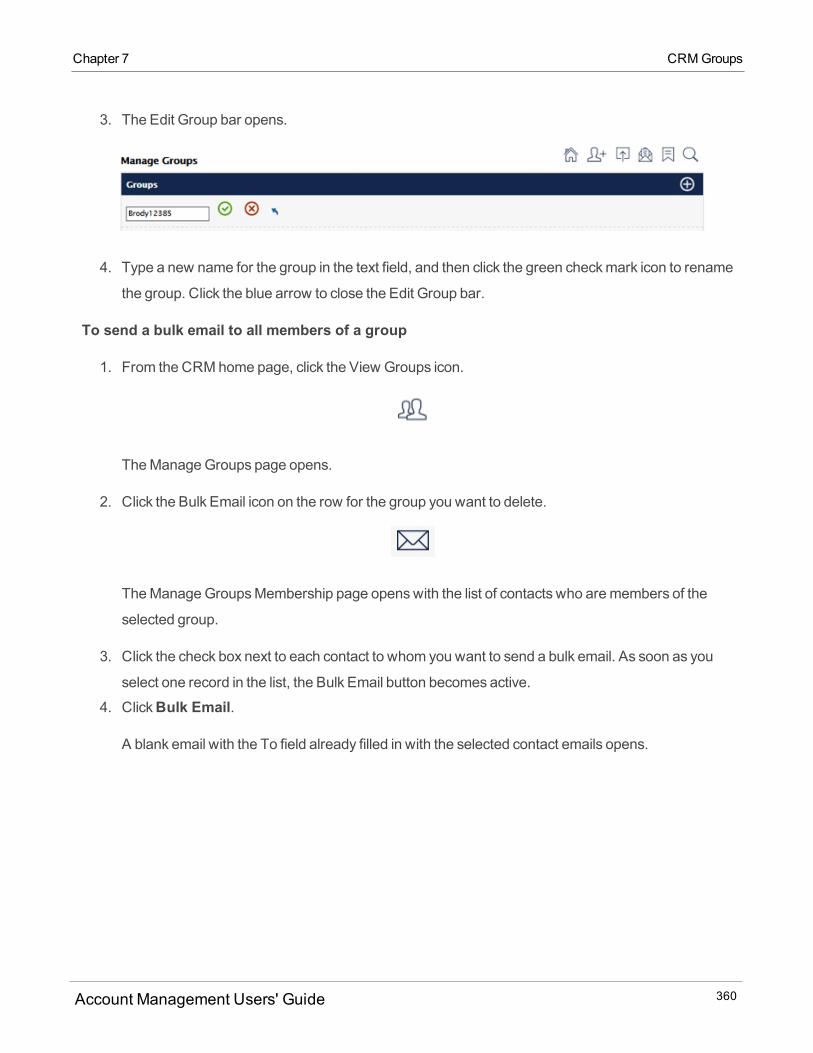
3. The Edit Group bar opens.
4. Type a new name for the group in the text field, and then click the green checkmark icon to rename
the group. Click the blue arrow to close the Edit Group bar.
To send a bulk email to all members of a group
1. From the CRM home page, click the View Groups icon.
TheManageGroups page opens.
2. Click the Bulk Email icon on the row for the group you want to delete.
TheManageGroupsMembership page openswith the list of contacts who aremembers of the
selected group.
3. Click the check box next to each contact to whom you want to send a bulk email. As soon as you
select one record in the list, the Bulk Email button becomes active.
4. ClickBulk Email.
A blank email with the To field already filled in with the selected contact emails opens.
Account Management Users' Guide 360
Chapter 7 CRMGroups
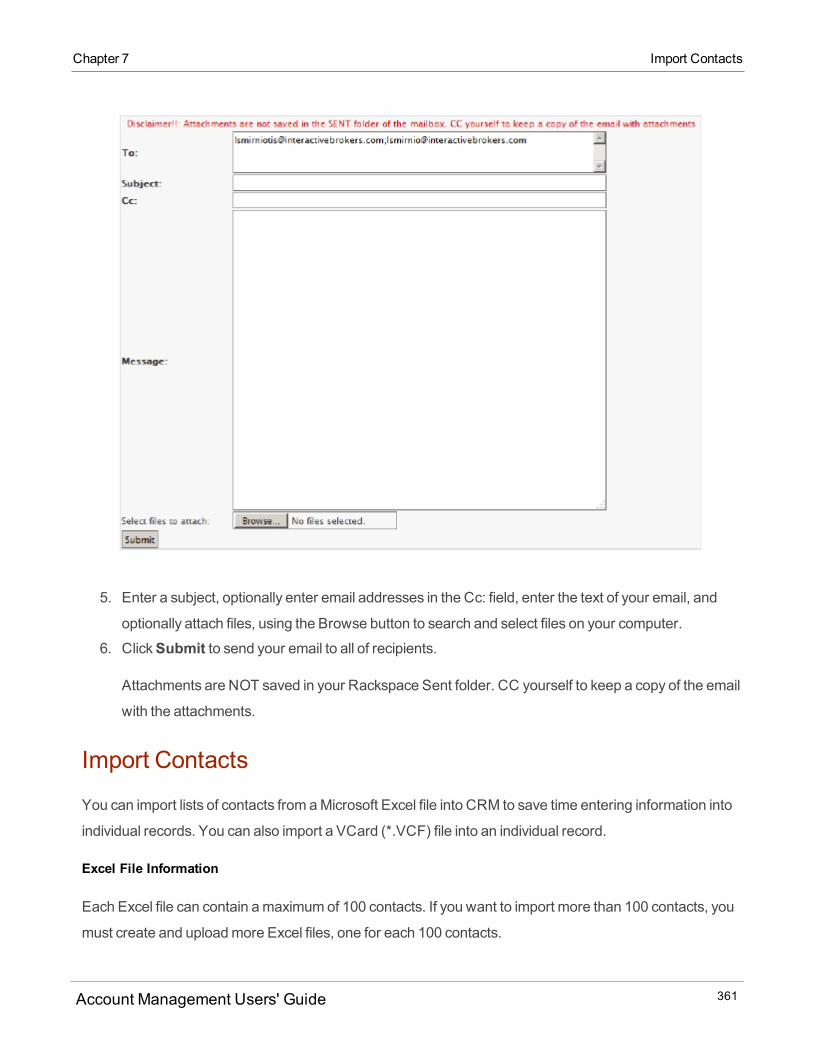
Chapter 7 Import Contacts
5. Enter a subject, optionally enter email addresses in the Cc: field, enter the text of your email, and
optionally attach files, using the Browse button to search and select files on your computer.
6. ClickSubmit to send your email to all of recipients.
Attachments are NOT saved in your Rackspace Sent folder. CC yourself to keep a copy of the email
with the attachments.
Import Contacts
You can import lists of contacts from aMicrosoft Excel file into CRM to save time entering information into
individual records. You can also import a VCard (*.VCF) file into an individual record.
Excel File Information
Each Excel file can contain amaximumof 100 contacts. If you want to import more than 100 contacts, you
must create and uploadmore Excel files, one for each 100 contacts.
Account Management Users' Guide 361
On the contact file import screen, there is a link to download a sample Excel file. This sample file contains
all of the information you need to create your own contact file in Microsoft Excel.
The file should contain the following information for each person:
Salutation (Mr., Mrs. or Ms.)
First, middle and last name
Gender (Female or Male)
Date of birth (MM/DD/YYYY format)
Marital Status (Unknown, Single, Married, Divorced,Widow)
Number of Dependents
Legal Residence, including Street (two lines, one including unit or apartment number), City, Country,
Country of Citizenship, State/Province, Zip/Postal Code
Contact Information, including Home,Work andMobile Phone, Fax and Email
Employment Information, including Employment Type (Employed, Unemployed, Retired or Self-
Employed), Name and Business of Employer, Employer Work Phone and Employer Address (same
information as Legal Residence above)
To import contacts
1. ClickManage Clients > CRM.2. Click the Import Contacts icon.
The Import Contacts page opens.
Account Management Users' Guide 362
Chapter 7 Excel File Information
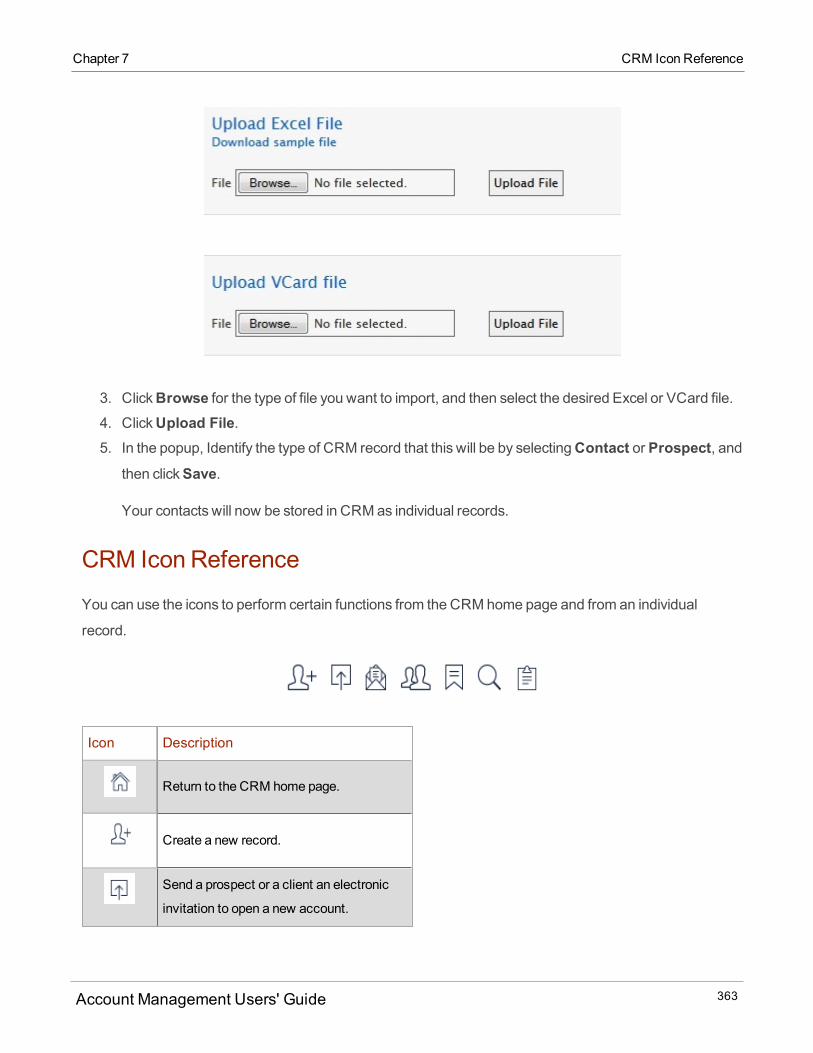
Chapter 7 CRM Icon Reference
3. ClickBrowse for the type of file you want to import, and then select the desired Excel or VCard file.4. ClickUpload File.5. In the popup, Identify the type of CRM record that this will be by selectingContact or Prospect, and
then clickSave.
Your contacts will now be stored in CRMas individual records.
CRM Icon Reference
You can use the icons to perform certain functions from the CRM home page and from an individual
record.
Icon Description
Return to the CRM home page.
Create a new record.
Send a prospect or a client an electronic
invitation to open a new account.
Account Management Users' Guide 363
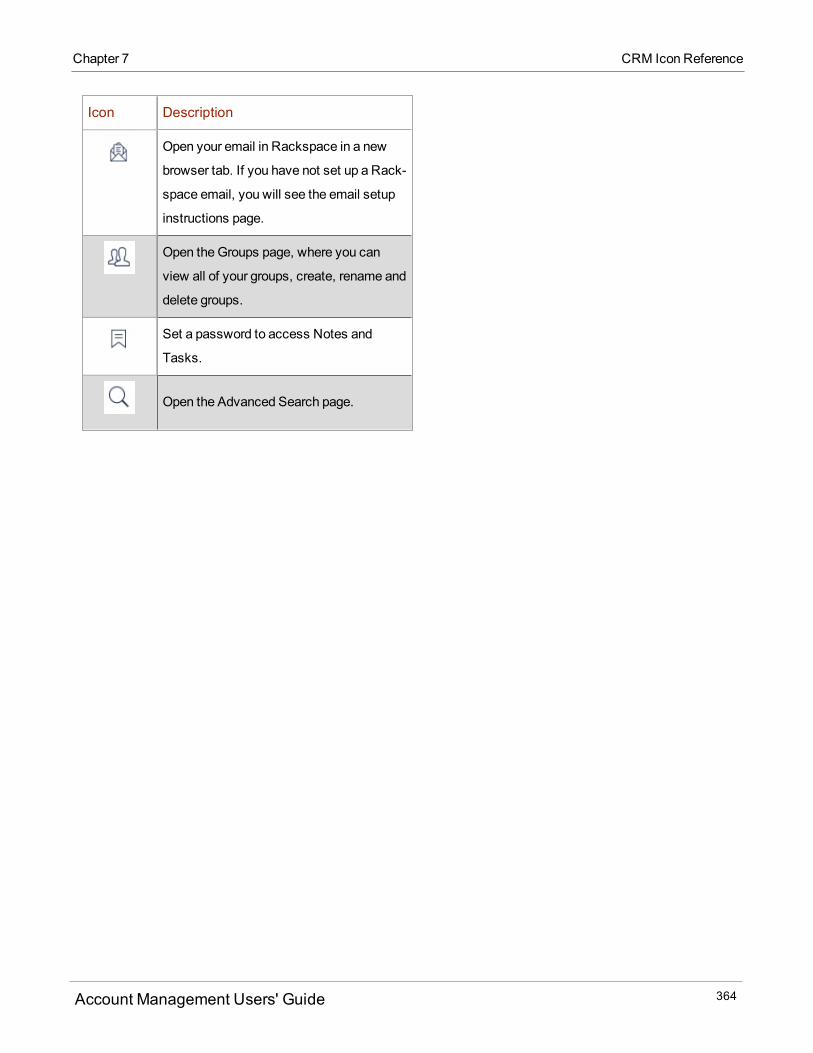
Icon Description
Open your email in Rackspace in a new
browser tab. If you have not set up a Rack-
space email, you will see the email setup
instructions page.
Open theGroups page, where you can
view all of your groups, create, rename and
delete groups.
Set a password to access Notes and
Tasks.
Open the Advanced Search page.
Account Management Users' Guide 364
Chapter 7 CRM Icon Reference
Investors' MarketplaceThis section describes the options available in the Investors' Marketplacemenu. The Investors'
Marketplace lets Individual, Broker, Advisor, Hedge Fund, MoneyManager and Administrator account
holders form connectionswith each other and with other third-party service providers to do business on our
platform.
There are actually several different marketplaceswithin Investors' Marketplace and you access them
through the following options:
Search Services - Thismenu allows customers to access different marketplaceswhere service pro-
viders advertise their services.
Advertise Services - Thismenu allows customers and other service providers to advertise their ser-
vices on the different marketplaces.
You can also access the Investors' Marketplace on the IB website by clicking the link at the bottom of any
web page.
Search Services
The Search Servicesmenu allows customers to search in several different marketplaces for participating
Advisors, Brokers, MoneyManagers, Administrators and other third parties who have products and
services to offer. Customerswho are Accredited Investors or Qualified Purchasers under SEC rules can
view information and about and invest in independent Hedge Funds on the Hedge Fund Investor Site.
The Search Servicesmenu is organized into categories, each of which contains one or more distinct
marketplaces:
Investing
Research
Technology
Administration
BusinessDevelopment
8
Account Management Users' Guide 365

Investing
The Investors' Marketplace > Search Services > Investingmenu lets customers search for and do
businesswith the following types of investment service providers:
Advisor Marketplace - Search for and connect with Professional Registered Investment Advisors
(RIAs) and Commodity Trading Advisors (CTAs).
Broker Marketplace - Search for and connect with Fully Disclosed Brokers.
Hedge FundMarketplace - Customerswho are Accredited Investors or Qualified Purchasers under
SEC rules can view information and about and invest in independent Hedge Funds.
MoneyManager - Advisors acting asWealth Managers can view information about registeredMoney
Managers, review their background information and specify your preferred contact method.
Advisor Marketplace
The Advisor Marketplace lets customers shop for, request contact from and automatically link to Advisors
(RIAs).
Access the Advisor Marketplace by clicking Investors' Marketplace > Search Services > Investing >Advisors.
You can only view Advisors for your own country. For example, US residents can only view US-based
Advisors.
Account Management Users' Guide 366
Chapter 8 Investing
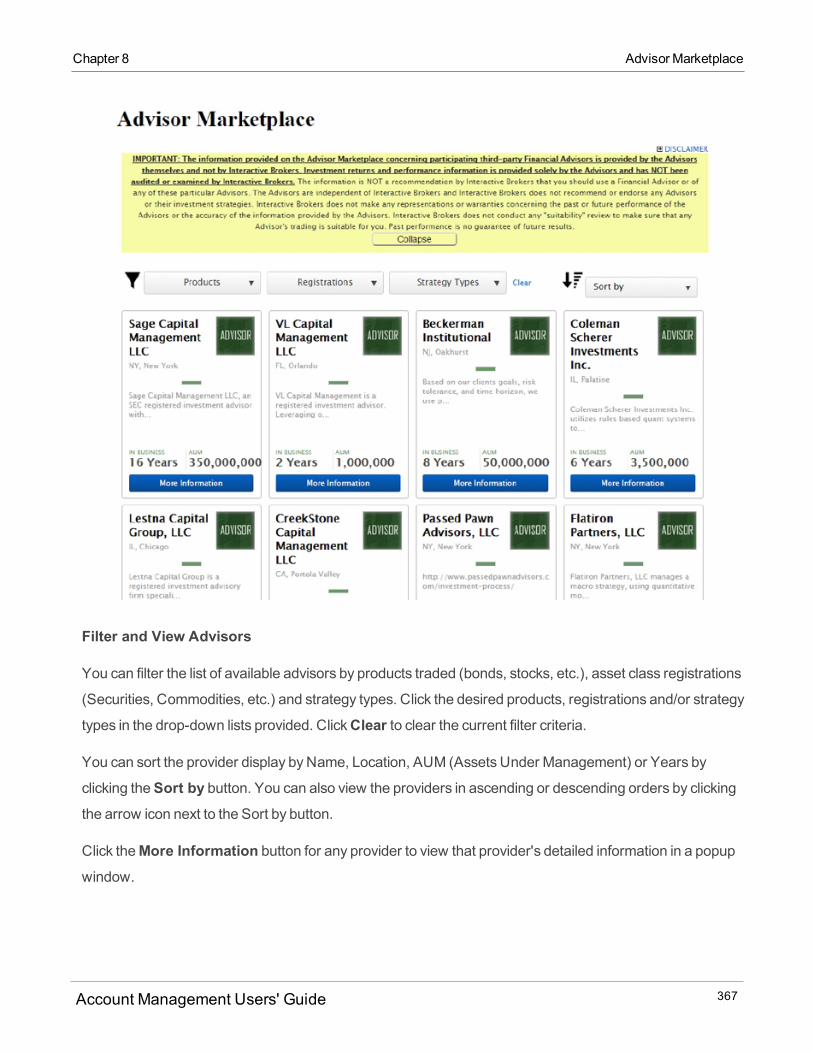
Chapter 8 Advisor Marketplace
Filter and View Advisors
You can filter the list of available advisors by products traded (bonds, stocks, etc.), asset class registrations
(Securities, Commodities, etc.) and strategy types. Click the desired products, registrations and/or strategy
types in the drop-down lists provided. ClickClear to clear the current filter criteria.
You can sort the provider display byName, Location, AUM (Assets Under Management) or Years by
clicking theSort by button. You can also view the providers in ascending or descending orders by clicking
the arrow icon next to the Sort by button.
Click theMore Information button for any provider to view that provider's detailed information in a popup
window.
Account Management Users' Guide 367
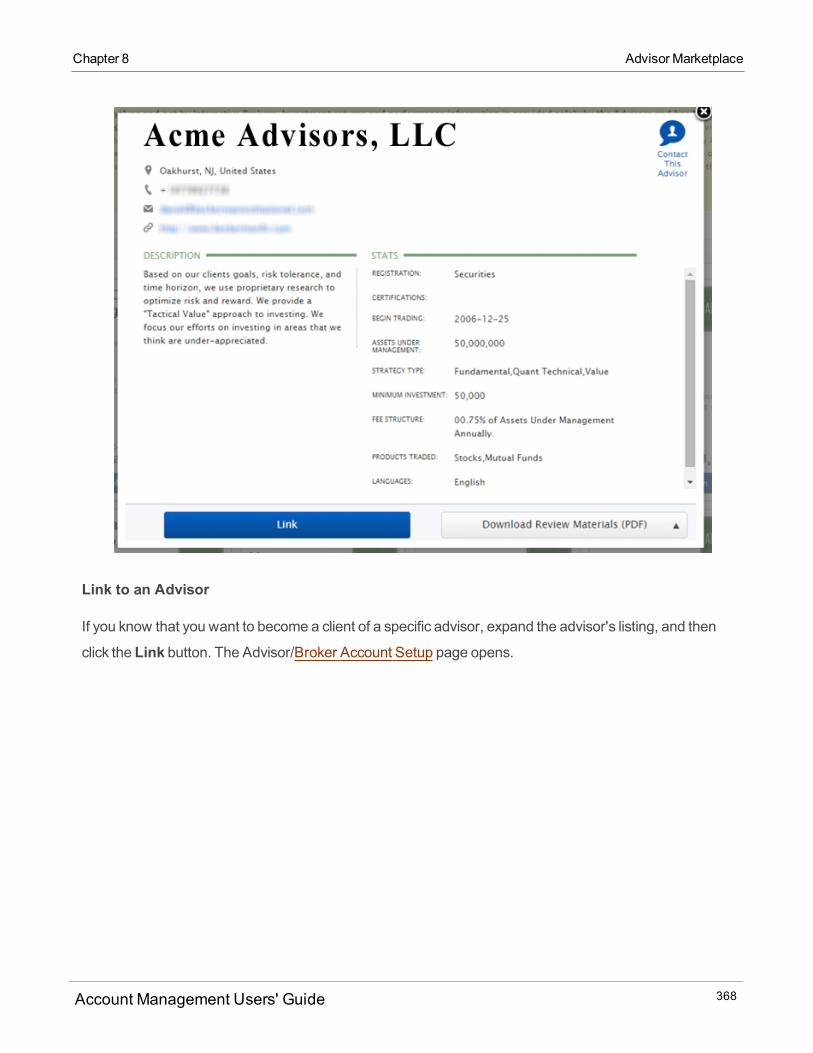
Link to an Advisor
If you know that you want to become a client of a specific advisor, expand the advisor's listing, and then
click the Link button. The Advisor/Broker Account Setup page opens.
Account Management Users' Guide 368
Chapter 8 Advisor Marketplace
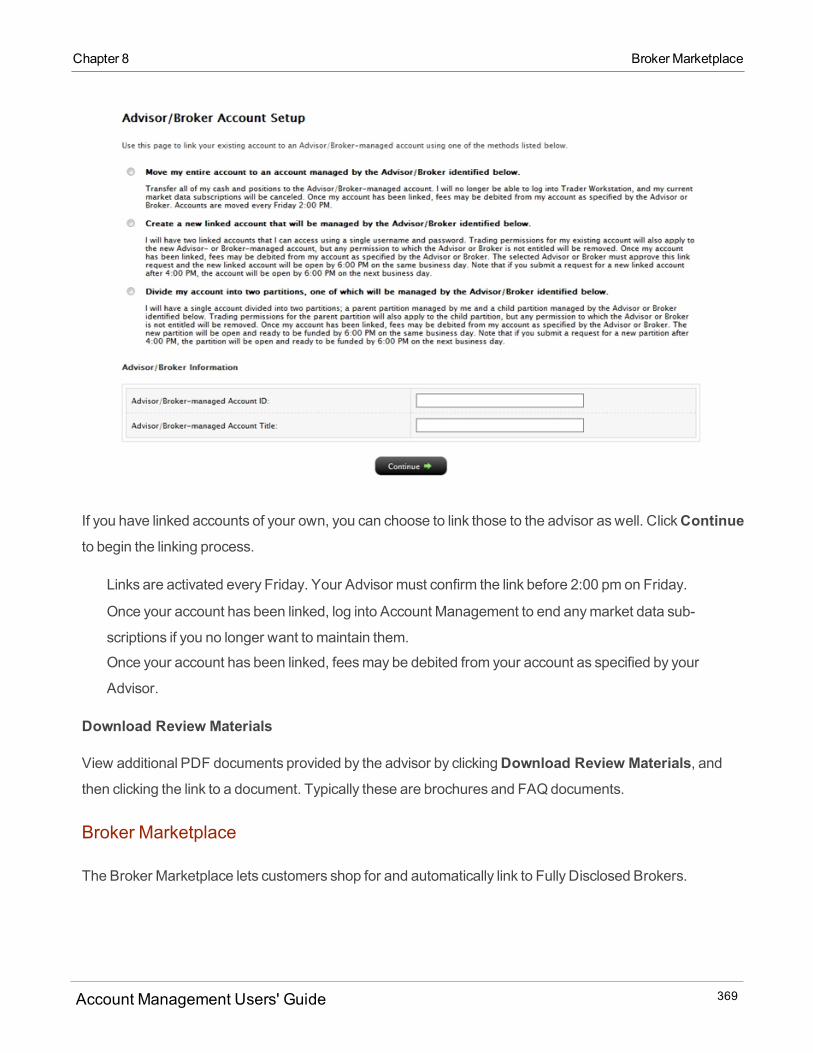
Chapter 8 Broker Marketplace
If you have linked accounts of your own, you can choose to link those to the advisor aswell. ClickContinueto begin the linking process.
Links are activated every Friday. Your Advisor must confirm the link before 2:00 pm on Friday.
Once your account has been linked, log into Account Management to end anymarket data sub-
scriptions if you no longer want to maintain them.
Once your account has been linked, feesmay be debited from your account as specified by your
Advisor.
Download Review Materials
View additional PDF documents provided by the advisor by clickingDownload Review Materials, andthen clicking the link to a document. Typically these are brochures and FAQdocuments.
Broker Marketplace
The Broker Marketplace lets customers shop for and automatically link to Fully Disclosed Brokers.
Account Management Users' Guide 369
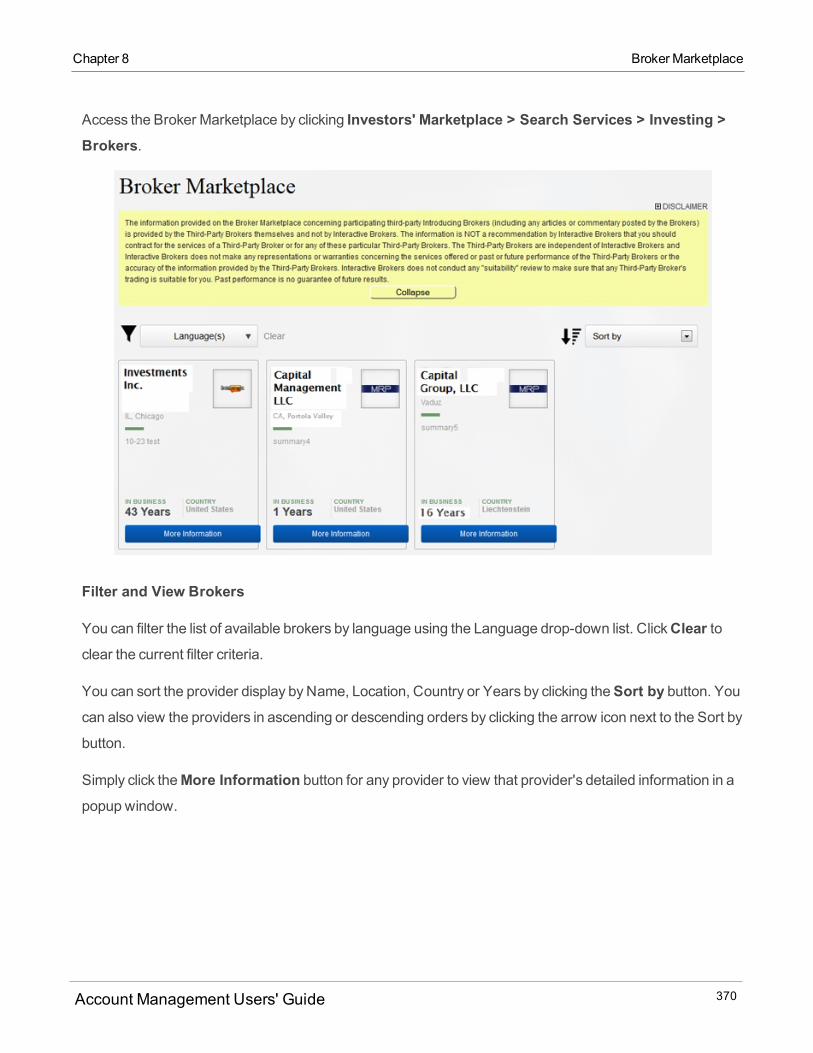
Access the Broker Marketplace by clicking Investors' Marketplace > Search Services > Investing >Brokers.
Filter and View Brokers
You can filter the list of available brokers by language using the Language drop-down list. ClickClear toclear the current filter criteria.
You can sort the provider display byName, Location, Country or Years by clicking theSort by button. Youcan also view the providers in ascending or descending orders by clicking the arrow icon next to the Sort by
button.
Simply click theMore Information button for any provider to view that provider's detailed information in a
popup window.
Account Management Users' Guide 370
Chapter 8 Broker Marketplace
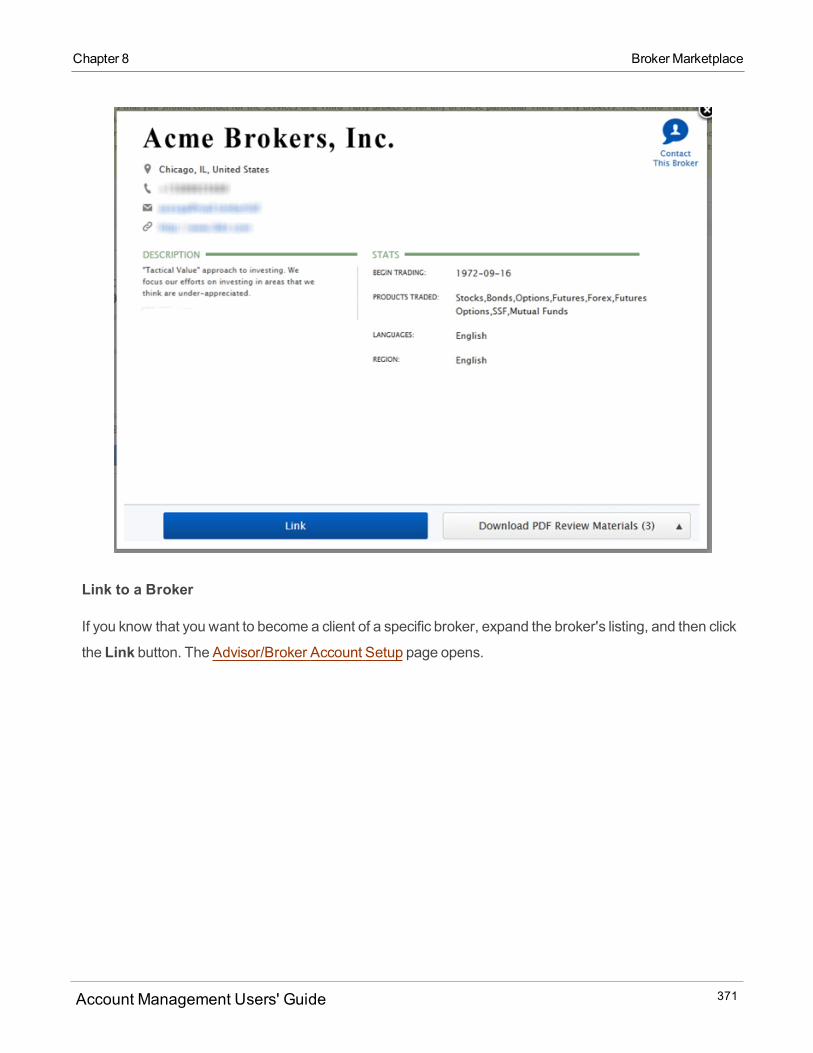
Chapter 8 Broker Marketplace
Link to a Broker
If you know that you want to become a client of a specific broker, expand the broker's listing, and then click
the Link button. The Advisor/Broker Account Setup page opens.
Account Management Users' Guide 371
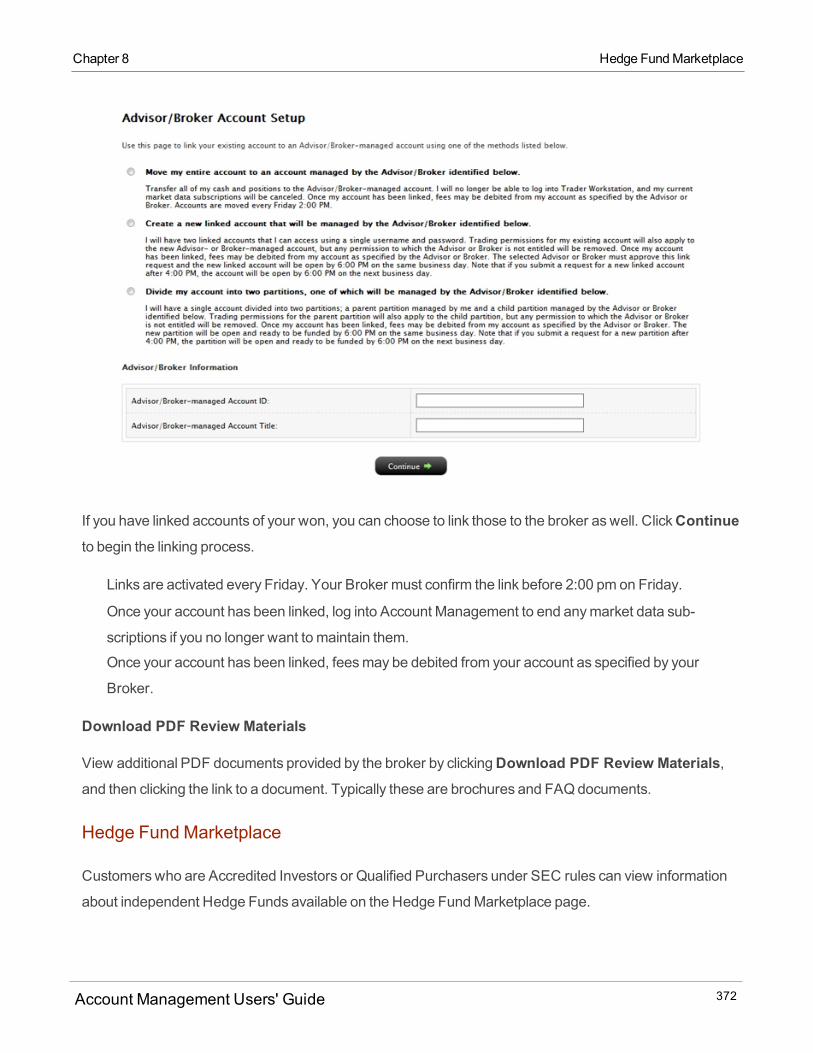
If you have linked accounts of your won, you can choose to link those to the broker aswell. ClickContinueto begin the linking process.
Links are activated every Friday. Your Broker must confirm the link before 2:00 pm on Friday.
Once your account has been linked, log into Account Management to end anymarket data sub-
scriptions if you no longer want to maintain them.
Once your account has been linked, feesmay be debited from your account as specified by your
Broker.
Download PDF Review Materials
View additional PDF documents provided by the broker by clickingDownload PDF Review Materials,and then clicking the link to a document. Typically these are brochures and FAQdocuments.
Hedge Fund Marketplace
Customerswho are Accredited Investors or Qualified Purchasers under SEC rules can view information
about independent Hedge Funds available on the Hedge FundMarketplace page.
Account Management Users' Guide 372
Chapter 8 Hedge FundMarketplace
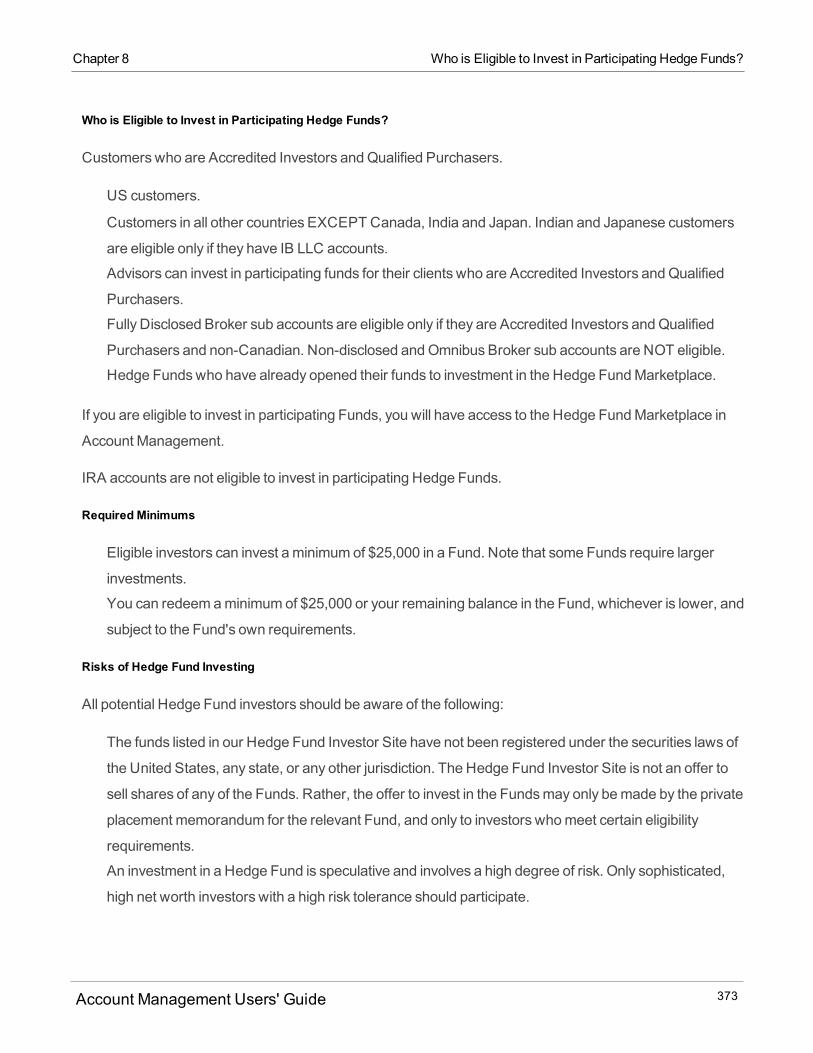
Chapter 8 Who is Eligible to Invest in Participating Hedge Funds?
Who is Eligible to Invest in Participating Hedge Funds?
Customerswho are Accredited Investors andQualified Purchasers.
US customers.
Customers in all other countries EXCEPT Canada, India and Japan. Indian and Japanese customers
are eligible only if they have IB LLC accounts.
Advisors can invest in participating funds for their clients who are Accredited Investors andQualified
Purchasers.
Fully Disclosed Broker sub accounts are eligible only if they are Accredited Investors andQualified
Purchasers and non-Canadian. Non-disclosed andOmnibus Broker sub accounts are NOT eligible.
Hedge Fundswho have already opened their funds to investment in the Hedge FundMarketplace.
If you are eligible to invest in participating Funds, you will have access to the Hedge FundMarketplace in
Account Management.
IRA accounts are not eligible to invest in participating Hedge Funds.
Required Minimums
Eligible investors can invest aminimumof $25,000 in a Fund. Note that some Funds require larger
investments.
You can redeem aminimumof $25,000 or your remaining balance in the Fund, whichever is lower, and
subject to the Fund's own requirements.
Risks of Hedge Fund Investing
All potential Hedge Fund investors should be aware of the following:
The funds listed in our Hedge Fund Investor Site have not been registered under the securities laws of
the United States, any state, or any other jurisdiction. The Hedge Fund Investor Site is not an offer to
sell shares of any of the Funds. Rather, the offer to invest in the Fundsmay only bemade by the private
placement memorandum for the relevant Fund, and only to investors whomeet certain eligibility
requirements.
An investment in a Hedge Fund is speculative and involves a high degree of risk. Only sophisticated,
high net worth investors with a high risk tolerance should participate.
Account Management Users' Guide 373
TheHedge Funds listed on the website are independent from Interactive Brokers and Interactive
Brokers will not supervise their trading decisions or be liable for losses.
Advisor Client Investments in Hedge Funds
Hedge funds can offer advisor clients who invest in their funds a discount on the hedge fund’s standard
management fee to encourage investments by financial advisors and their clients. Fundsmay offer
discounts of up to 1% of AUMand/or 5% of profits. For details, see HFCIP Fees.
Advisors can invest in a hedge fund on behalf of an eligible client via the Dashboard.
To use the Hedge Fund Investor Site
1. Log into Account Management.
2. Click Investors' Marketplace > Search Services > Investing > Hedge Funds.
If you do not see the Hedge FundMarketplace link in themenu, then you are not eligible to invest in
participating Funds.
3. All available Funds are displayed in a table. The name of the Fund is displayed and selectable; also
displayed are annual rates of return for five years, amount of assets under management, themin-
imum investment required and a summary of the investment strategy. Each column is sortable and
you can hover your mouse cursor over a column header for more information.
Some Funds have public articles that they have uploaded; these Funds aremarked with a document
icon. Click the document icon to read the article.
Account Management Users' Guide 374
Chapter 8 Advisor Client Investments in Hedge Funds
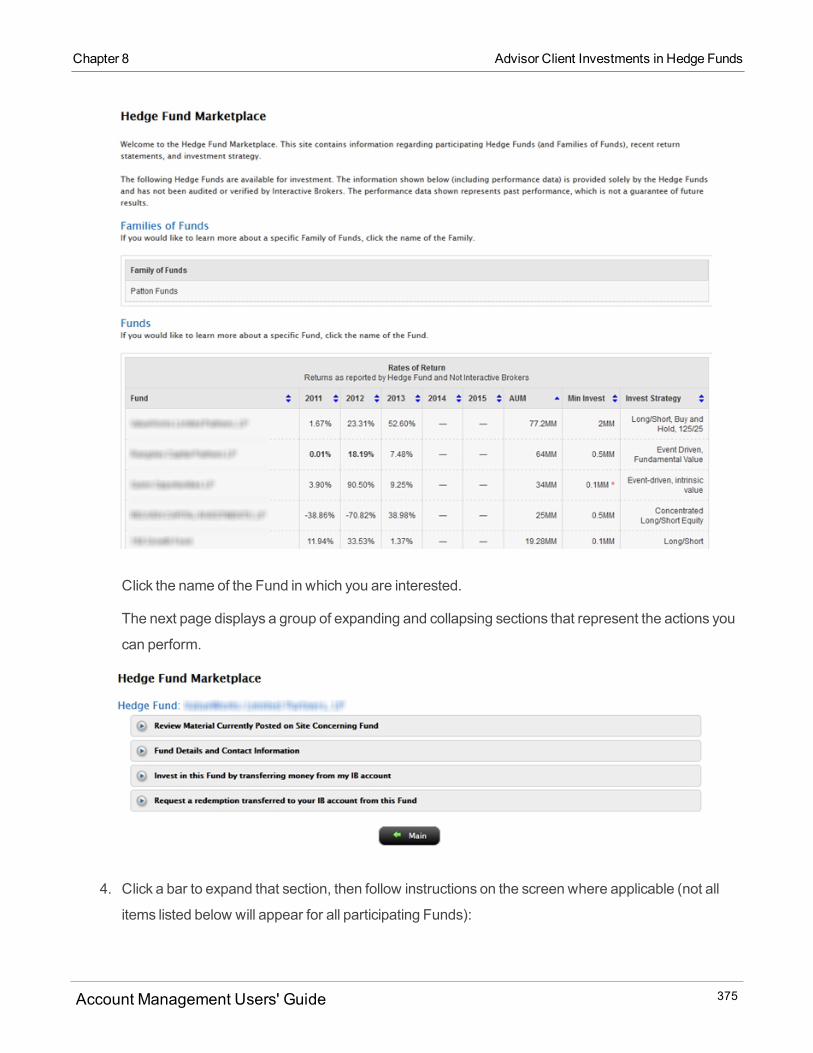
Chapter 8 Advisor Client Investments in Hedge Funds
Click the name of the Fund in which you are interested.
The next page displays a group of expanding and collapsing sections that represent the actions you
can perform.
4. Click a bar to expand that section, then follow instructions on the screen where applicable (not all
items listed below will appear for all participating Funds):
Account Management Users' Guide 375
o Review Material Currently Posted on Site Concerning Fund - Lets you view and download
PDF files uploaded by the Fund.o Fund Details and Contact Information - Lets you view miscellaneous fund details as well as
contact the Fund or request that the Fund contact you.o Contact this Fund - Lets you contact the Fund or request that the Fund contact you.o Invest in this Fund by transferring money from my account - Lets you transfer funds dir-ectly from your account to the Fund. Follow the instructions on the screen to request the transfer.
Note that requests for investment must be approved by the Fund Investment Manager and the
Fund’s Third-Party Administrator.o Request a redemption transferred to your IB account from this Fund - Lets you request aredemption from the Fund, which is a direct transfer from the Fund to your account. Follow the
instructions on the screen to request the redemption.
Note that requests for redemptionmust be approved by the Fund Investment Manager and the
Fund’s Third-Party Administrator.
6. ClickMain to return to the previous screen.
Money Manager Marketplace
Advisors acting asWealth Managers can view information about registeredMoneyManagers, review their
background information and specify your preferred contact method.
Who can access the Money Manager Marketplace page?
You can access this page if you are an Advisor who is a Registered Investment Advisor (RIA) acting as a
Wealth Manager or if you have opened aMoneyManager account. Second-tier Advisors (under a Fully
Disclosed Broker) can also access theMoneyManager Marketplace and link toMoneyManagers.
Unregistered Advisors and Friends and Family account Advisors can also access this page.
To use the Money Manager Marketplace page if you are a Wealth Manager
1. Log into Account Management using your Master account username and password.
2. Click Investors' Marketplace > Search Services > Investing > Money Manager.3. The first time you access this page, youmust sign theMoneyManager Agreement. You cannot
access theMoneyManager Marketplace until you submit the signed agreement online.
Account Management Users' Guide 376
Chapter 8 Money Manager Marketplace
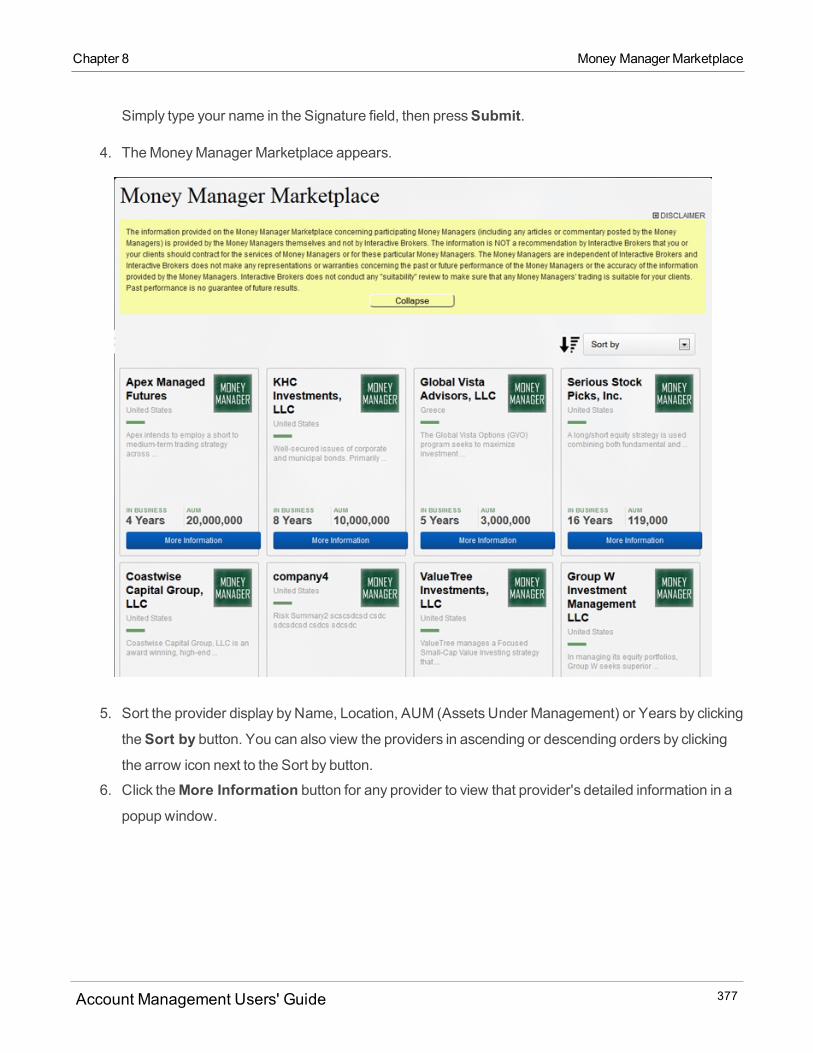
Chapter 8 Money Manager Marketplace
Simply type your name in the Signature field, then pressSubmit.
4. TheMoneyManager Marketplace appears.
5. Sort the provider display byName, Location, AUM (Assets Under Management) or Years by clicking
theSort by button. You can also view the providers in ascending or descending orders by clicking
the arrow icon next to the Sort by button.
6. Click theMore Information button for any provider to view that provider's detailed information in a
popup window.
Account Management Users' Guide 377
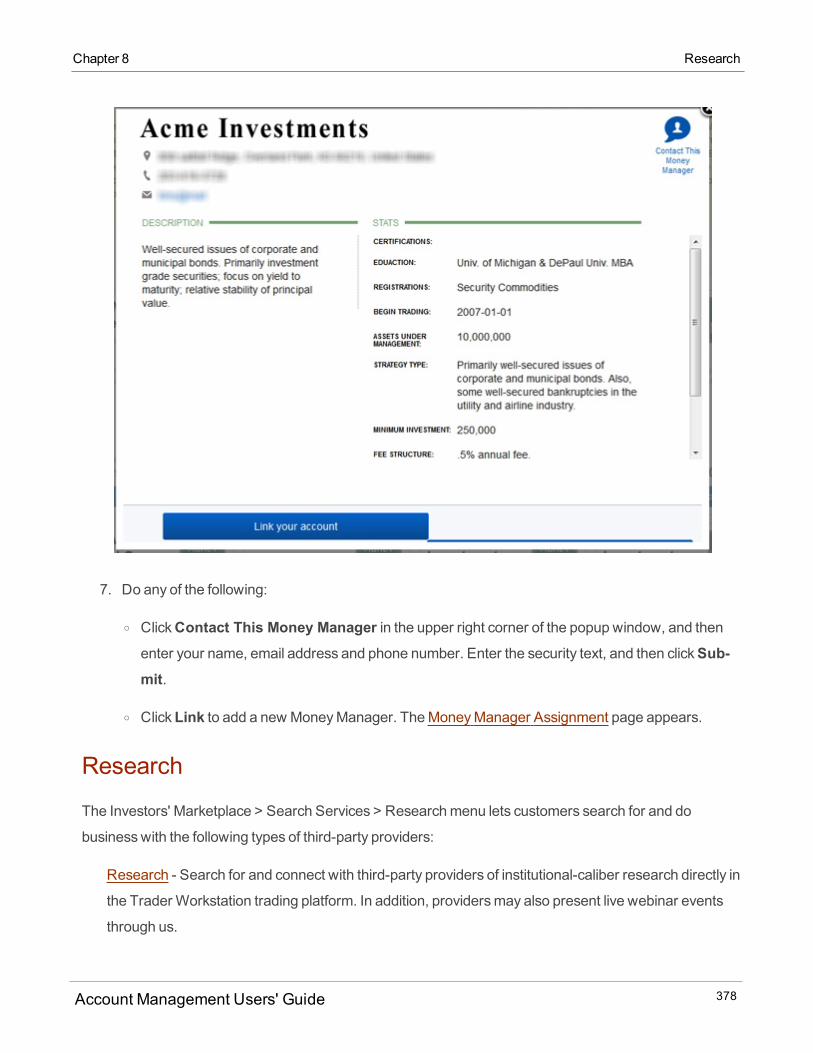
7. Do any of the following:
o ClickContact This Money Manager in the upper right corner of the popup window, and thenenter your name, email address and phone number. Enter the security text, and then clickSub-mit.
o ClickLink to add a new MoneyManager. TheMoneyManager Assignment page appears.
Research
The Investors' Marketplace > Search Services > Researchmenu lets customers search for and do
businesswith the following types of third-party providers:
Research - Search for and connect with third-party providers of institutional-caliber research directly in
the Trader Workstation trading platform. In addition, providersmay also present live webinar events
through us.
Account Management Users' Guide 378
Chapter 8 Research
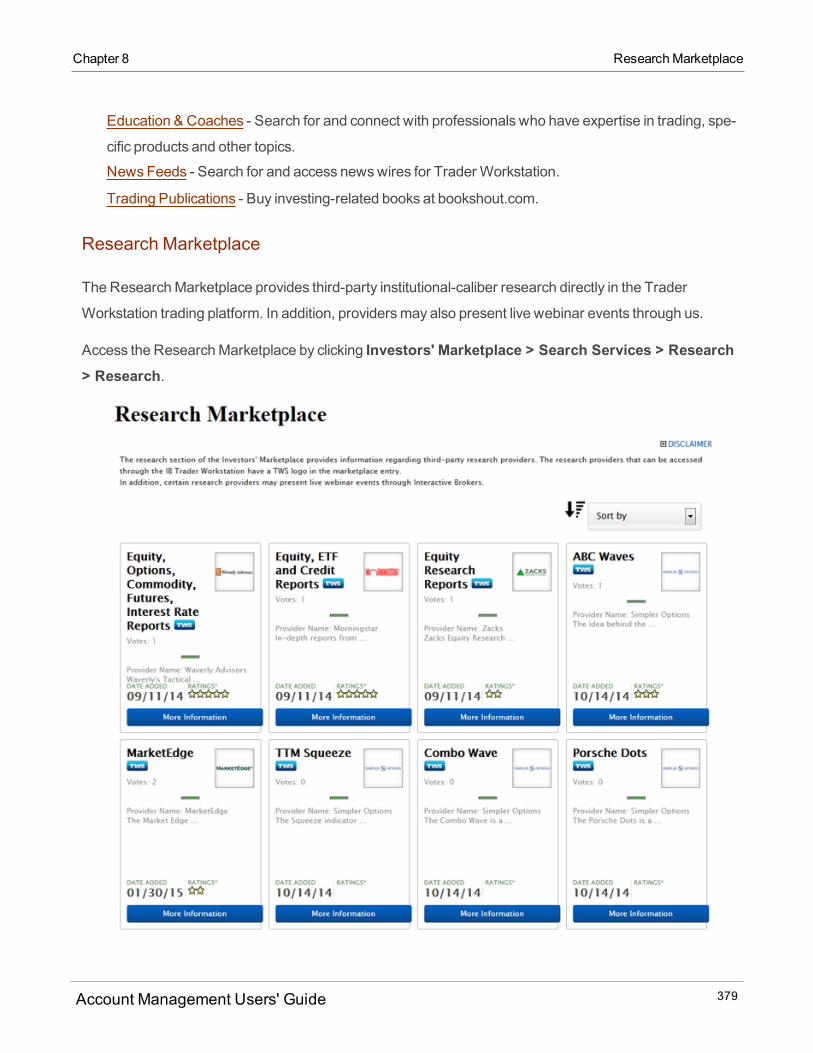
Chapter 8 ResearchMarketplace
Education & Coaches - Search for and connect with professionals who have expertise in trading, spe-
cific products and other topics.
News Feeds - Search for and access newswires for Trader Workstation.
Trading Publications - Buy investing-related books at bookshout.com.
Research Marketplace
TheResearchMarketplace provides third-party institutional-caliber research directly in the Trader
Workstation trading platform. In addition, providersmay also present live webinar events through us.
Access the ResearchMarketplace by clicking Investors' Marketplace > Search Services > Research> Research.
Account Management Users' Guide 379
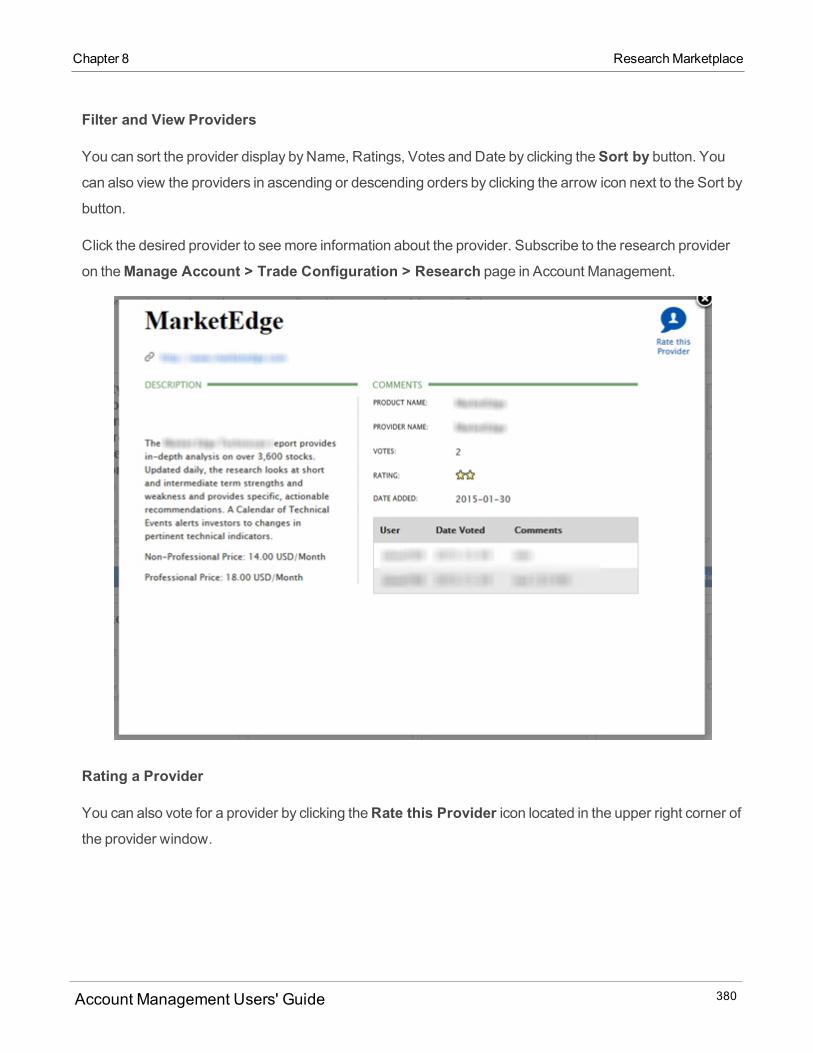
Filter and View Providers
You can sort the provider display byName, Ratings, Votes and Date by clicking theSort by button. Youcan also view the providers in ascending or descending orders by clicking the arrow icon next to the Sort by
button.
Click the desired provider to seemore information about the provider. Subscribe to the research provider
on theManage Account > Trade Configuration > Research page in Account Management.
Rating a Provider
You can also vote for a provider by clicking theRate this Provider icon located in the upper right corner ofthe provider window.
Account Management Users' Guide 380
Chapter 8 ResearchMarketplace
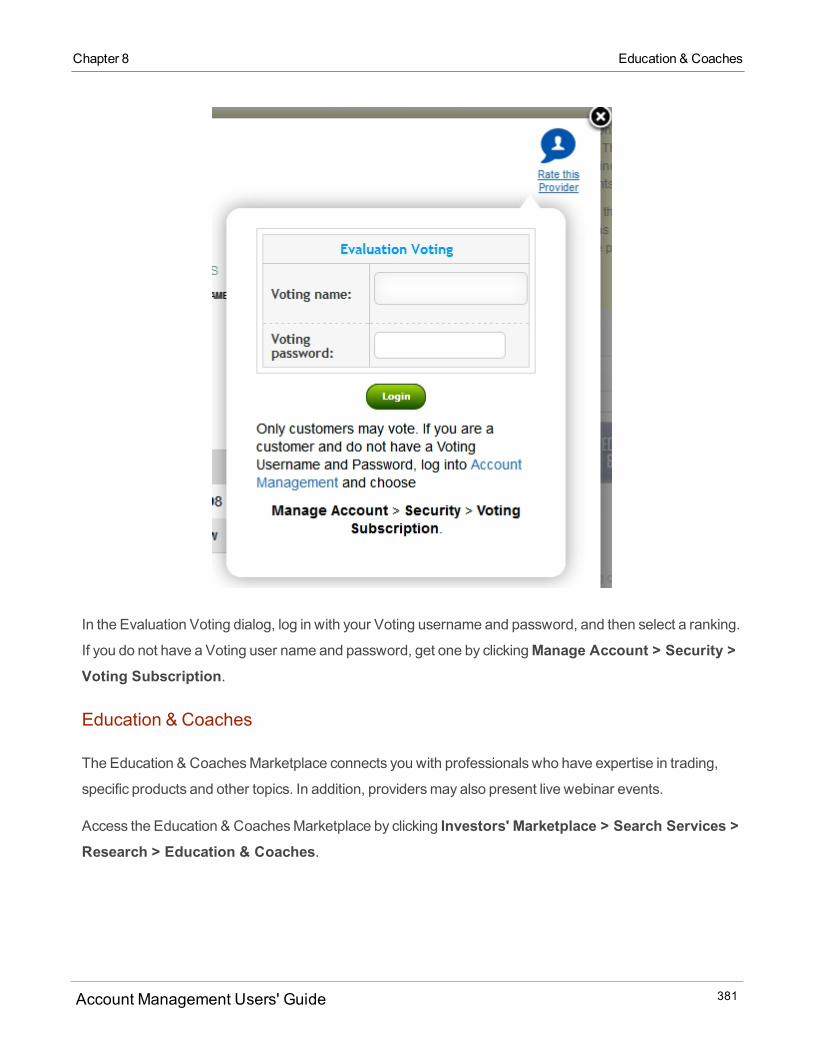
Chapter 8 Education & Coaches
In the Evaluation Voting dialog, log in with your Voting username and password, and then select a ranking.
If you do not have a Voting user name and password, get one by clickingManage Account > Security >Voting Subscription.
Education & Coaches
The Education & CoachesMarketplace connects you with professionals who have expertise in trading,
specific products and other topics. In addition, providersmay also present live webinar events.
Access the Education & CoachesMarketplace by clicking Investors' Marketplace > Search Services >Research > Education & Coaches.
Account Management Users' Guide 381

Filter and View Providers
You can sort the provider display byName, Type, Ratings, Votes and Date by clicking theSort by button.You can also view the providers in ascending or descending orders by clicking the arrow icon next to the
Sort by button.
Click the desired provider to seemore information about the provider, including contact information.
Account Management Users' Guide 382
Chapter 8 Education & Coaches

Chapter 8 Education & Coaches
Rating a Provider
You can also vote for a provider by clicking theRate this Provider icon located in the upper right corner ofthe provider window.
Account Management Users' Guide 383
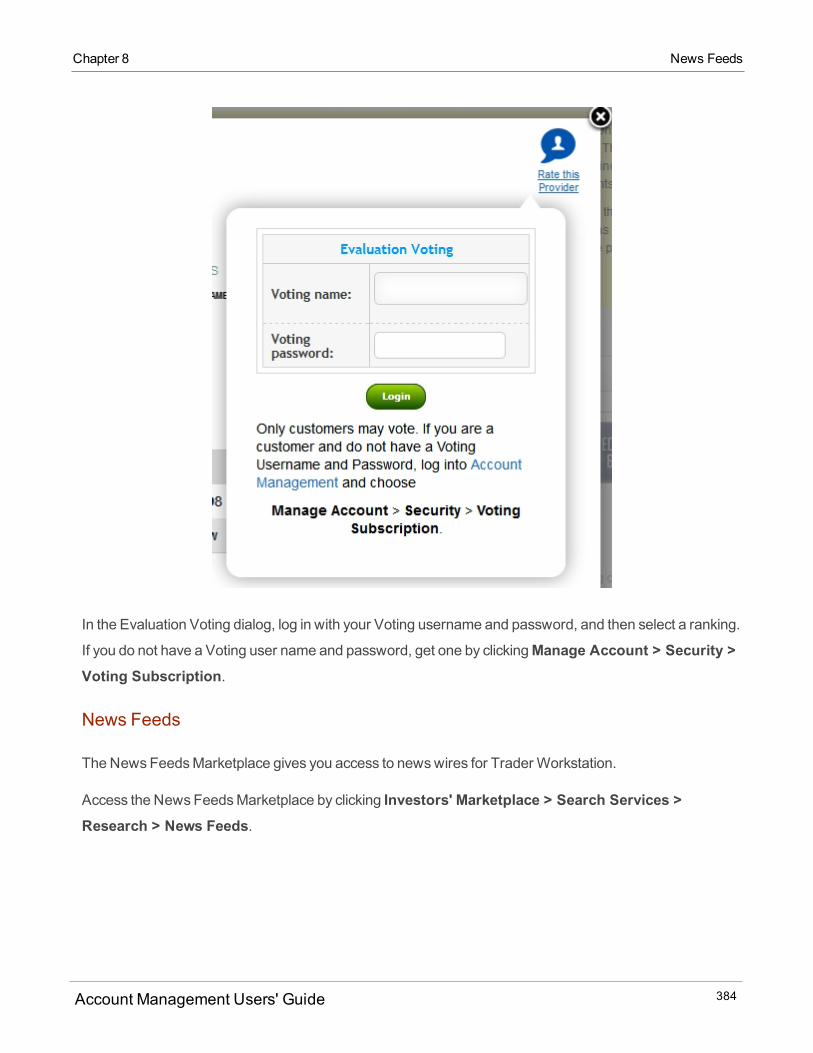
In the Evaluation Voting dialog, log in with your Voting username and password, and then select a ranking.
If you do not have a Voting user name and password, get one by clickingManage Account > Security >Voting Subscription.
News Feeds
TheNews FeedsMarketplace gives you access to newswires for Trader Workstation.
Access the News FeedsMarketplace by clicking Investors' Marketplace > Search Services >Research > News Feeds.
Account Management Users' Guide 384
Chapter 8 News Feeds

Chapter 8 News Feeds
Filter and View Providers
You can sort the provider display byName, Ratings, Votes and Date by clicking theSort by button. Youcan also view the providers in ascending or descending orders by clicking the arrow icon next to the Sort by
button.
Click the desired provider to seemore information about the provider. To subscribe to a newswire, click
theSubscribe button.
Account Management Users' Guide 385
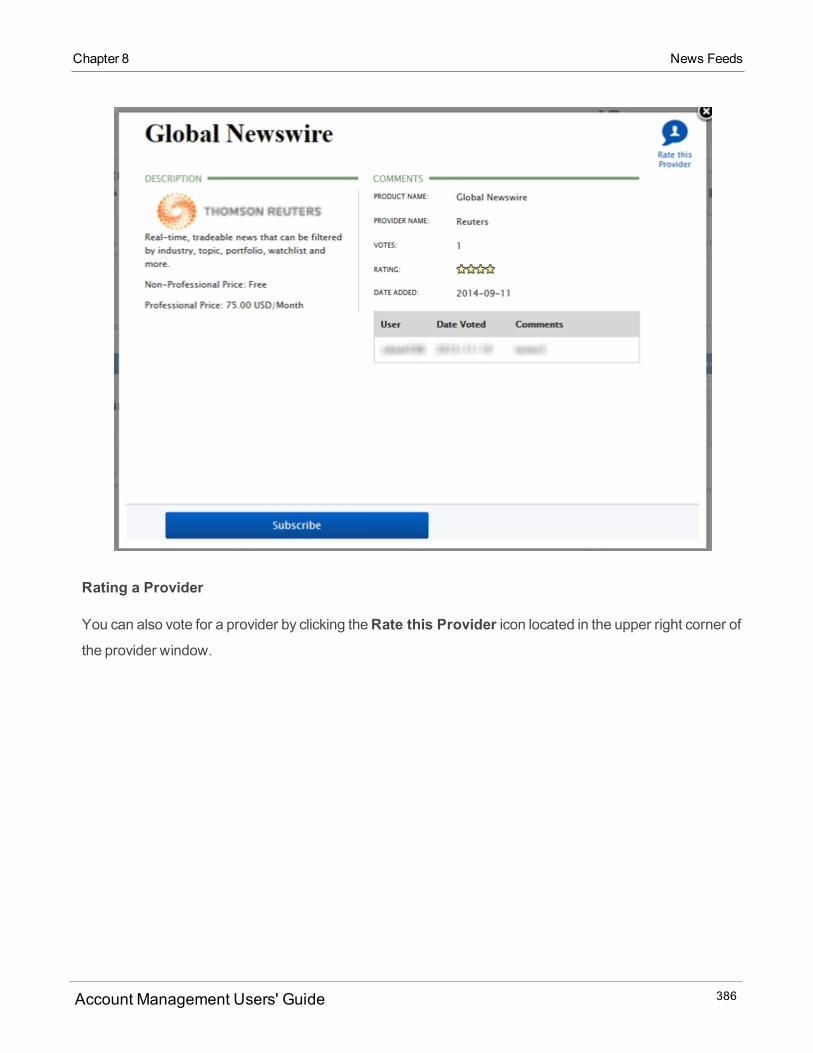
Rating a Provider
You can also vote for a provider by clicking theRate this Provider icon located in the upper right corner ofthe provider window.
Account Management Users' Guide 386
Chapter 8 News Feeds
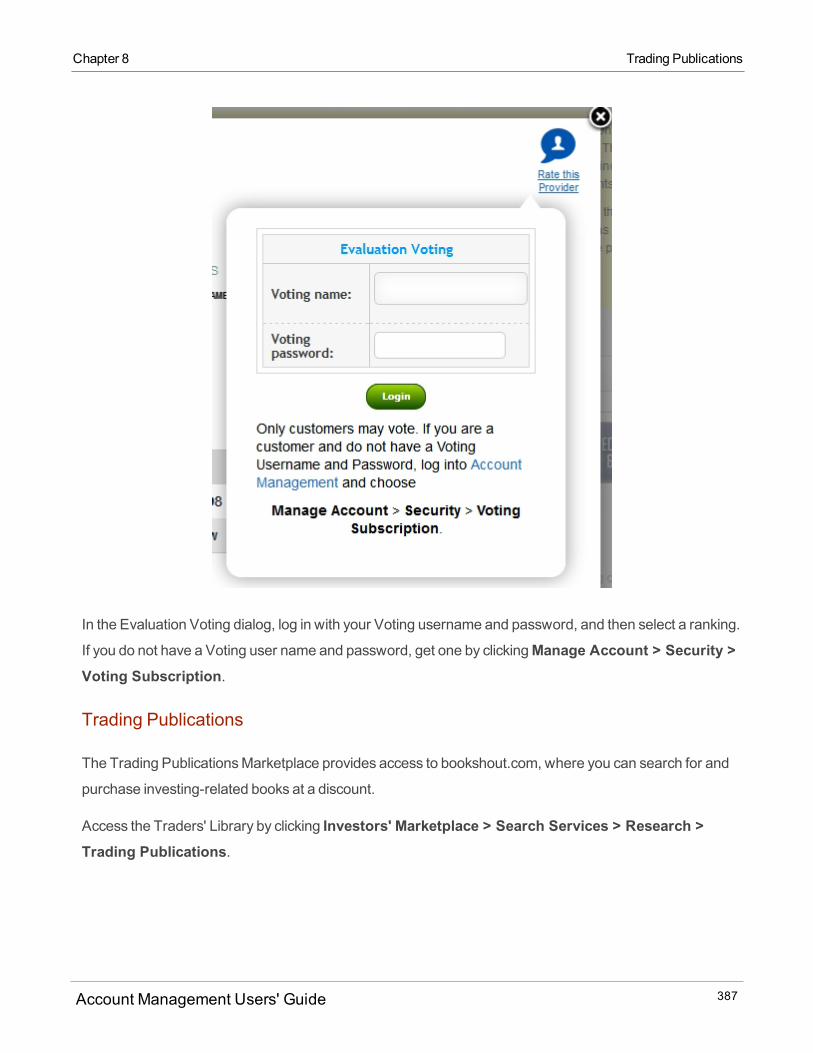
Chapter 8 Trading Publications
In the Evaluation Voting dialog, log in with your Voting username and password, and then select a ranking.
If you do not have a Voting user name and password, get one by clickingManage Account > Security >Voting Subscription.
Trading Publications
The Trading PublicationsMarketplace provides access to bookshout.com, where you can search for and
purchase investing-related books at a discount.
Access the Traders' Library by clicking Investors' Marketplace > Search Services > Research >Trading Publications.
Account Management Users' Guide 387

Technology
The Investors' Marketplace > Search Services > Technologymenu lets customers search for and do
businesswith the following types of technology service providers:
Software Vendors - Search for and connect with large and small third-party vendors who have poten-
tially complementary software programs to expand the functionality of IB TWS.
Programming Consultants - Search for and connect with developers whomay be able to assist API
and FIX CTCI customers by offering their programming expertise.
Software Vendors
TheSearch Services > Software Tools page in the Investors' Marketplace provides links to large andsmall third-party vendors who have potentially complementary software programs to expand the
functionality of IB TWS.
Account Management Users' Guide 388
Chapter 8 Technology

Chapter 8 Software Vendors
Filter and View Providers
You can sort the provider display byName, Type, Ratings, Votes and Date by clicking theSort by button.You can also view the providers in ascending or descending orders by clicking the arrow icon next to the
Sort by button.
Click the desired provider to seemore information about the provider, including contact information.
Account Management Users' Guide 389

Rating a Provider
You can also vote for a provider by clicking theRate this Provider icon located in the upper right corner ofthe provider window.
Account Management Users' Guide 390
Chapter 8 Software Vendors
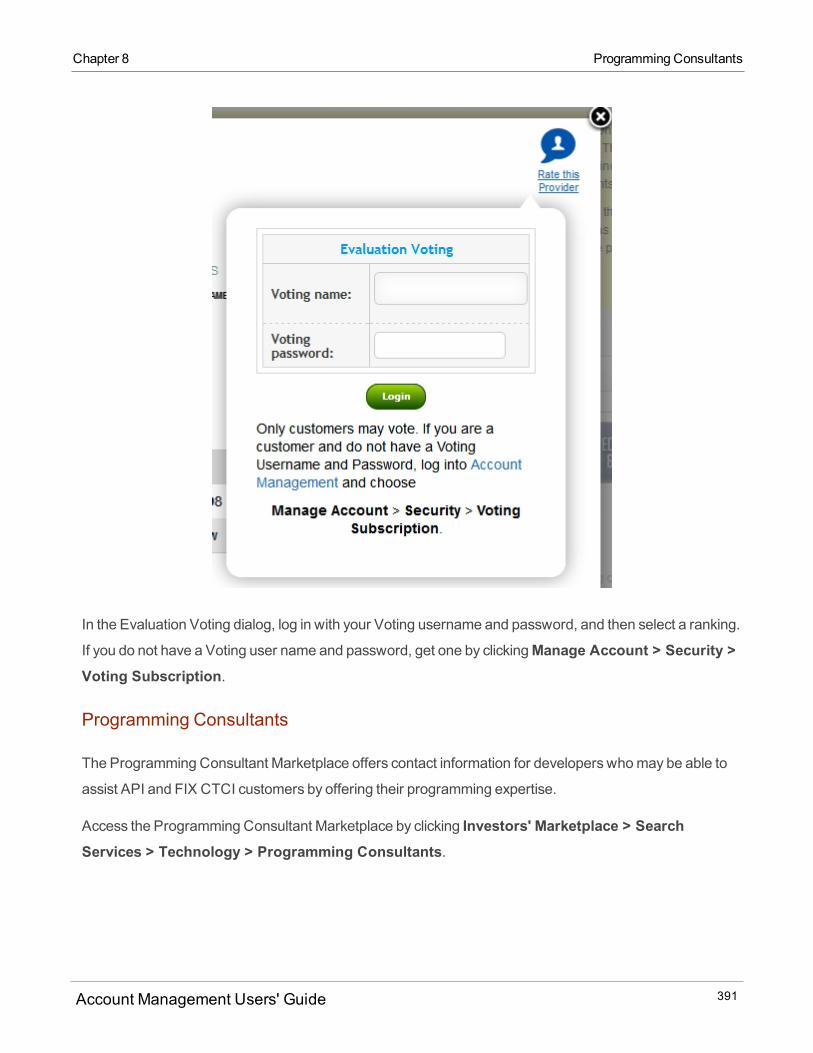
Chapter 8 Programming Consultants
In the Evaluation Voting dialog, log in with your Voting username and password, and then select a ranking.
If you do not have a Voting user name and password, get one by clickingManage Account > Security >Voting Subscription.
Programming Consultants
The Programming Consultant Marketplace offers contact information for developers whomay be able to
assist API and FIX CTCI customers by offering their programming expertise.
Access the Programming Consultant Marketplace by clicking Investors' Marketplace > SearchServices > Technology > Programming Consultants.
Account Management Users' Guide 391
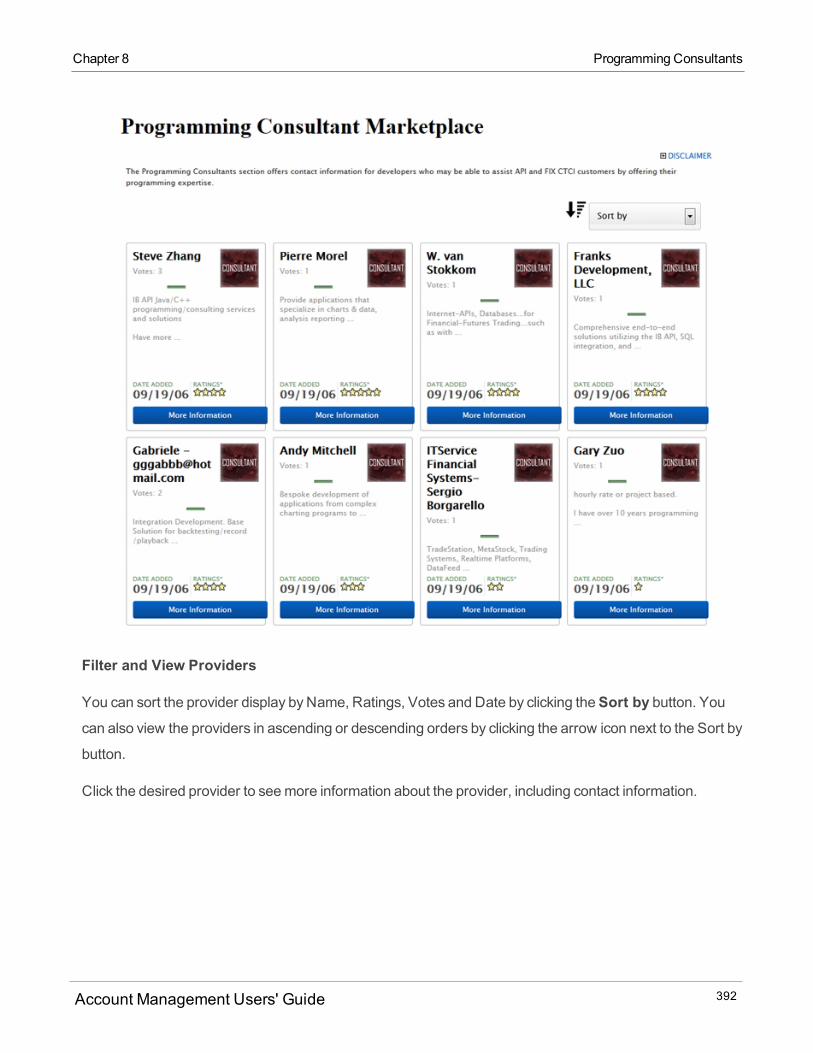
Filter and View Providers
You can sort the provider display byName, Ratings, Votes and Date by clicking theSort by button. Youcan also view the providers in ascending or descending orders by clicking the arrow icon next to the Sort by
button.
Click the desired provider to seemore information about the provider, including contact information.
Account Management Users' Guide 392
Chapter 8 Programming Consultants
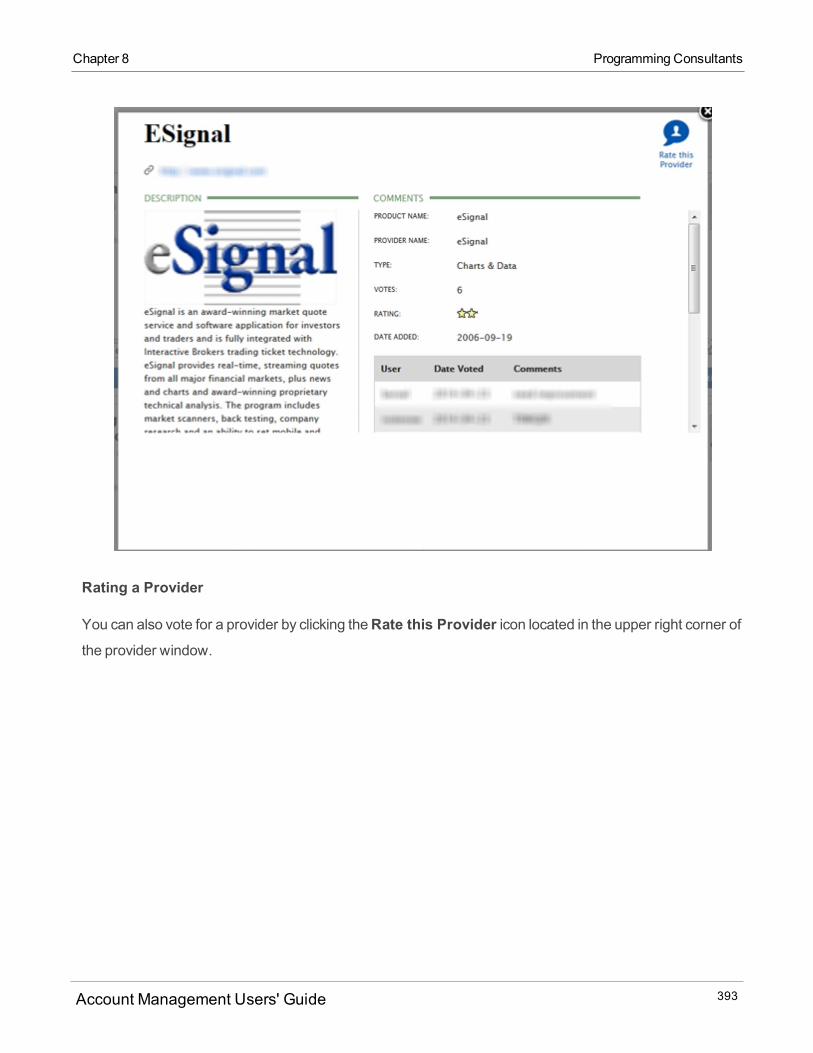
Chapter 8 Programming Consultants
Rating a Provider
You can also vote for a provider by clicking theRate this Provider icon located in the upper right corner ofthe provider window.
Account Management Users' Guide 393
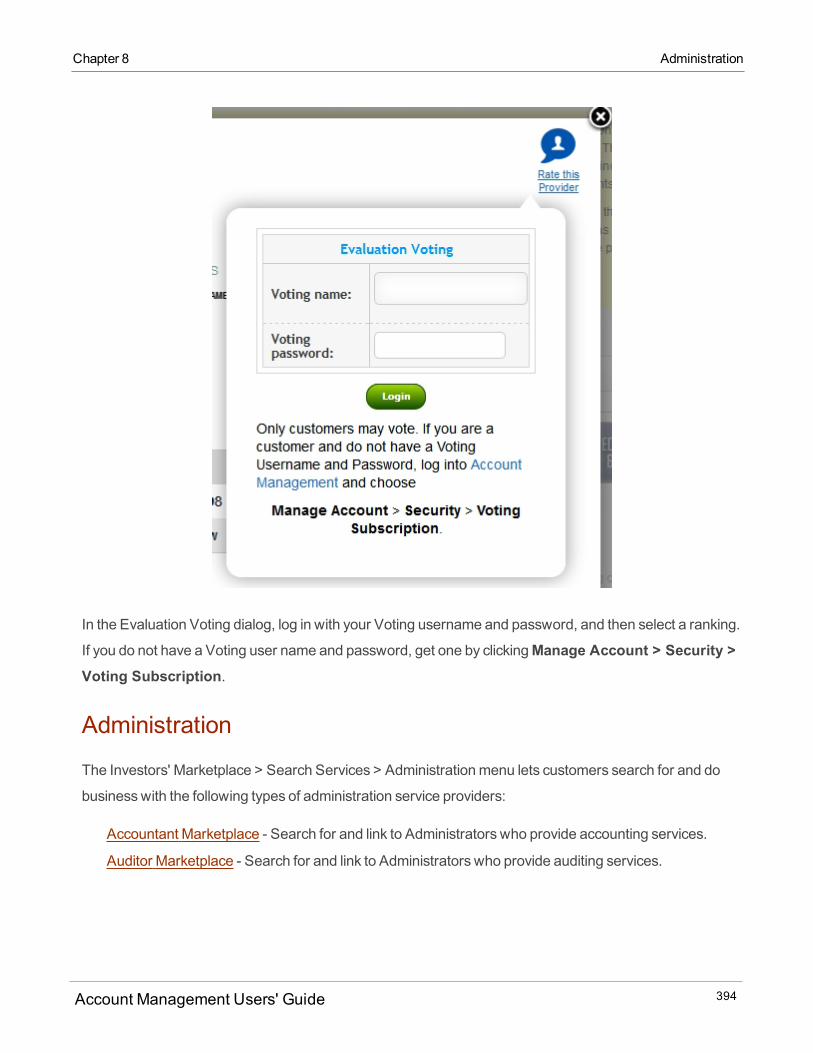
In the Evaluation Voting dialog, log in with your Voting username and password, and then select a ranking.
If you do not have a Voting user name and password, get one by clickingManage Account > Security >Voting Subscription.
Administration
The Investors' Marketplace > Search Services > Administrationmenu lets customers search for and do
businesswith the following types of administration service providers:
Accountant Marketplace - Search for and link to Administrators who provide accounting services.
Auditor Marketplace - Search for and link to Administrators who provide auditing services.
Account Management Users' Guide 394
Chapter 8 Administration
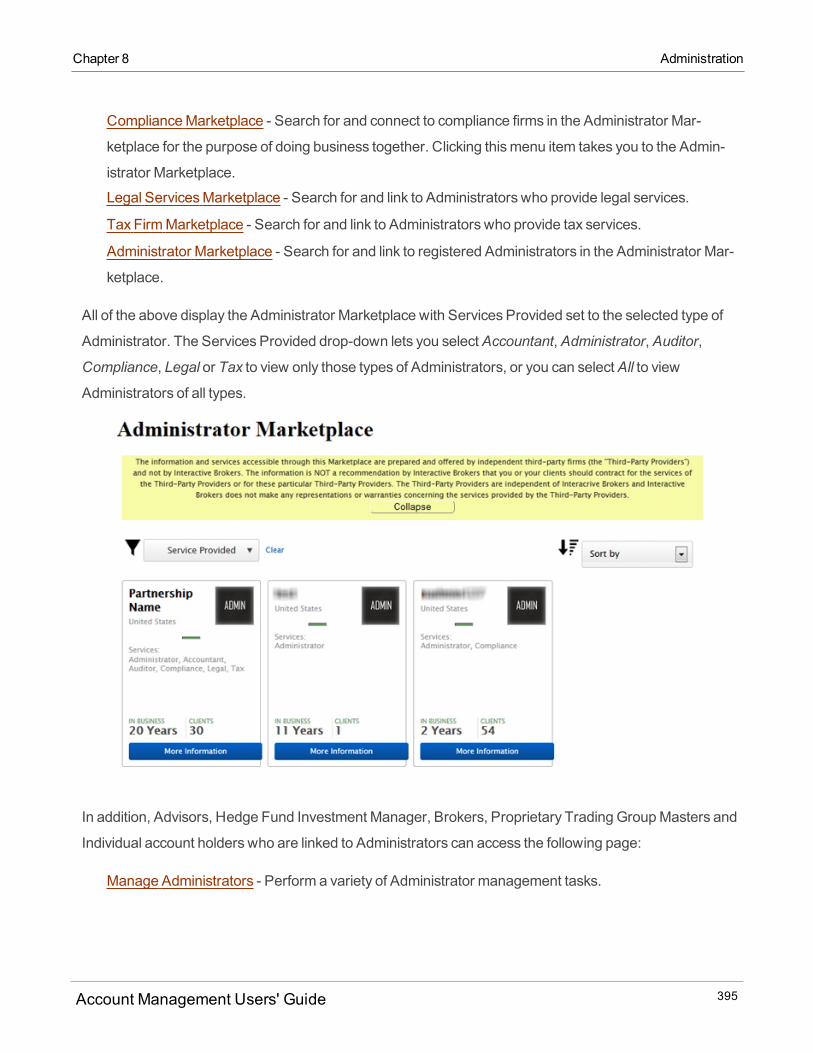
Chapter 8 Administration
ComplianceMarketplace - Search for and connect to compliance firms in the Administrator Mar-
ketplace for the purpose of doing business together. Clicking thismenu item takes you to the Admin-
istrator Marketplace.
Legal ServicesMarketplace - Search for and link to Administrators who provide legal services.
Tax FirmMarketplace - Search for and link to Administrators who provide tax services.
Administrator Marketplace - Search for and link to registered Administrators in the Administrator Mar-
ketplace.
All of the above display the Administrator Marketplace with Services Provided set to the selected type of
Administrator. The Services Provided drop-down lets you selectAccountant, Administrator, Auditor,
Compliance, Legal or Tax to view only those types of Administrators, or you can selectAll to view
Administrators of all types.
In addition, Advisors, Hedge Fund Investment Manager, Brokers, Proprietary Trading GroupMasters and
Individual account holders who are linked to Administrators can access the following page:
Manage Administrators - Perform a variety of Administrator management tasks.
Account Management Users' Guide 395
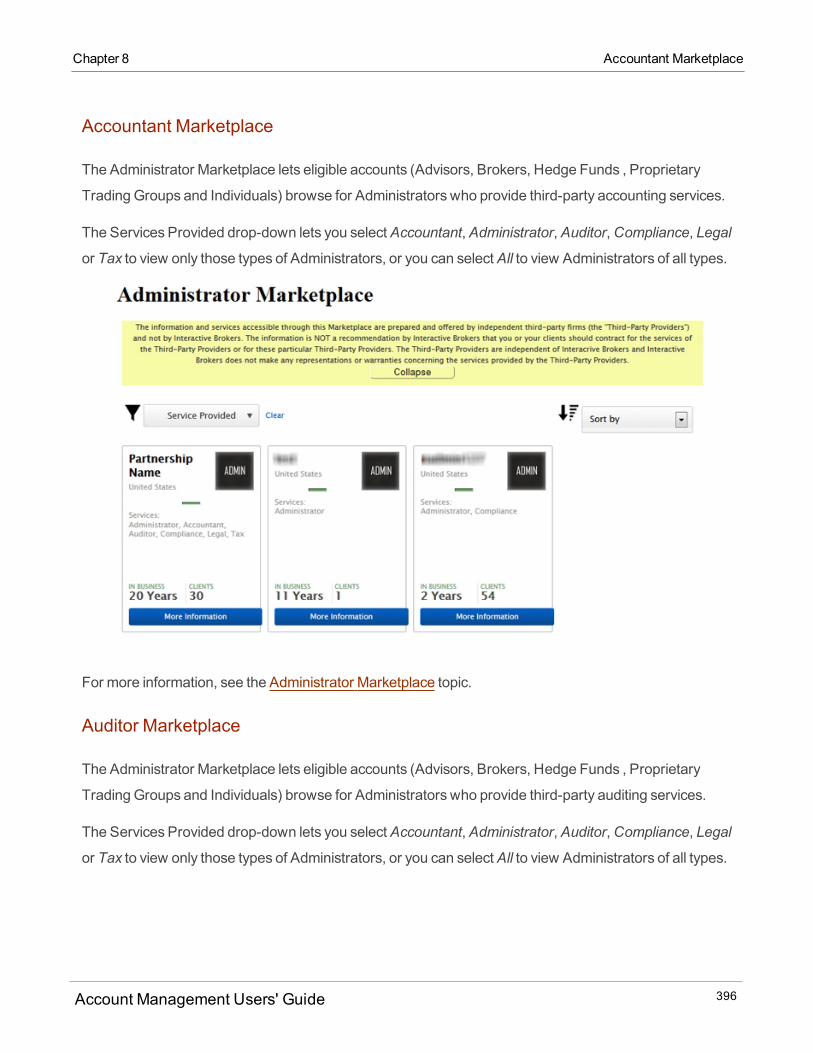
Accountant Marketplace
The Administrator Marketplace lets eligible accounts (Advisors, Brokers, Hedge Funds , Proprietary
Trading Groups and Individuals) browse for Administrators who provide third-party accounting services.
The Services Provided drop-down lets you selectAccountant, Administrator, Auditor,Compliance, Legal
or Tax to view only those types of Administrators, or you can selectAll to view Administrators of all types.
For more information, see the Administrator Marketplace topic.
Auditor Marketplace
The Administrator Marketplace lets eligible accounts (Advisors, Brokers, Hedge Funds , Proprietary
Trading Groups and Individuals) browse for Administrators who provide third-party auditing services.
The Services Provided drop-down lets you selectAccountant, Administrator, Auditor,Compliance, Legal
or Tax to view only those types of Administrators, or you can selectAll to view Administrators of all types.
Account Management Users' Guide 396
Chapter 8 Accountant Marketplace

Chapter 8 ComplianceMarketplace
For more information, see the Administrator Marketplace topic.
Compliance Marketplace
The Administrator Marketplace lets eligible accounts (Advisors, Brokers, Hedge Funds , Proprietary
Trading Groups and Individuals) browse for Administrators who provide third-party compliance services.
The Services Provided drop-down lets you selectAccountant, Administrator, Auditor,Compliance, Legal
or Tax to view only those types of Administrators, or you can selectAll to view Administrators of all types.
Account Management Users' Guide 397

For more information, see the Administrator Marketplace topic.
Legal Services Marketplace
The Administrator Marketplace lets eligible accounts (Advisors, Brokers, Hedge Funds , Proprietary
Trading Groups and Individuals) browse for Administrators who provide third-party legal services.
The Services Provided drop-down lets you selectAccountant, Administrator, Auditor,Compliance, Legal
or Tax to view only those types of Administrators, or you can selectAll to view Administrators of all types.
Account Management Users' Guide 398
Chapter 8 Legal Services Marketplace
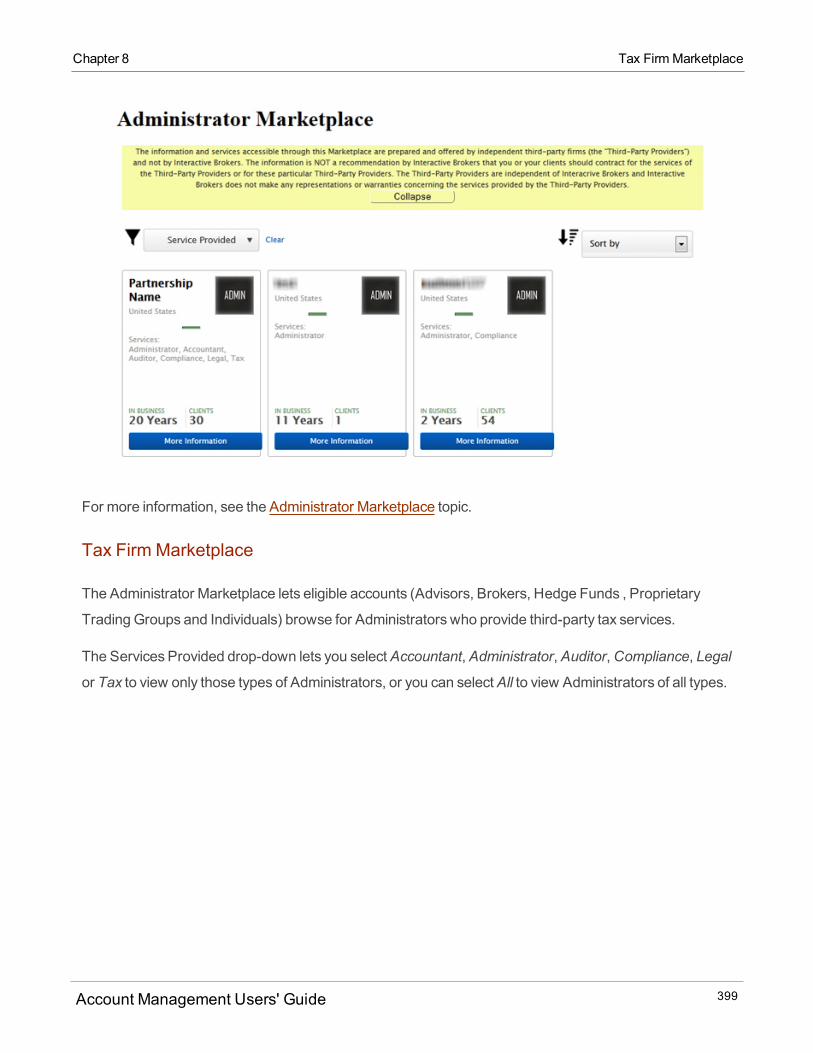
Chapter 8 Tax Firm Marketplace
For more information, see the Administrator Marketplace topic.
Tax Firm Marketplace
The Administrator Marketplace lets eligible accounts (Advisors, Brokers, Hedge Funds , Proprietary
Trading Groups and Individuals) browse for Administrators who provide third-party tax services.
The Services Provided drop-down lets you selectAccountant, Administrator, Auditor,Compliance, Legal
or Tax to view only those types of Administrators, or you can selectAll to view Administrators of all types.
Account Management Users' Guide 399
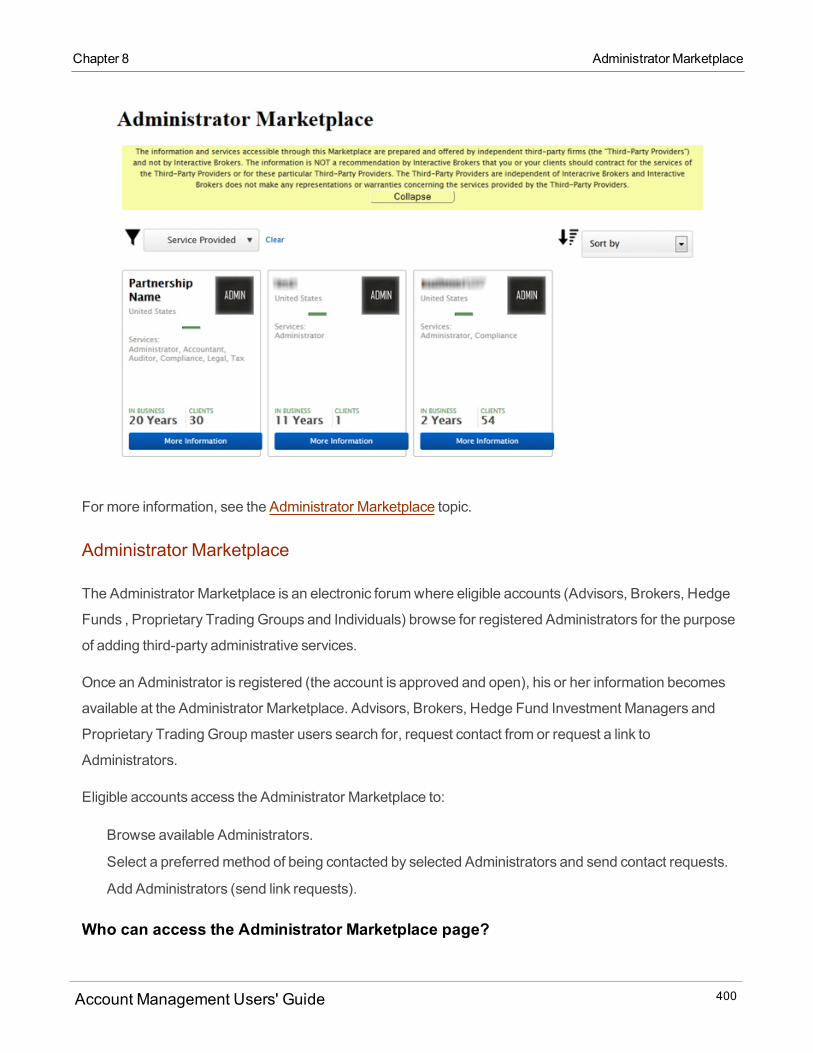
For more information, see the Administrator Marketplace topic.
Administrator Marketplace
The Administrator Marketplace is an electronic forumwhere eligible accounts (Advisors, Brokers, Hedge
Funds , Proprietary Trading Groups and Individuals) browse for registered Administrators for the purpose
of adding third-party administrative services.
Once an Administrator is registered (the account is approved and open), his or her information becomes
available at the Administrator Marketplace. Advisors, Brokers, Hedge Fund Investment Managers and
Proprietary Trading Groupmaster users search for, request contact from or request a link to
Administrators.
Eligible accounts access the Administrator Marketplace to:
Browse available Administrators.
Select a preferredmethod of being contacted by selected Administrators and send contact requests.
Add Administrators (send link requests).
Who can access the Administrator Marketplace page?
Account Management Users' Guide 400
Chapter 8 Administrator Marketplace
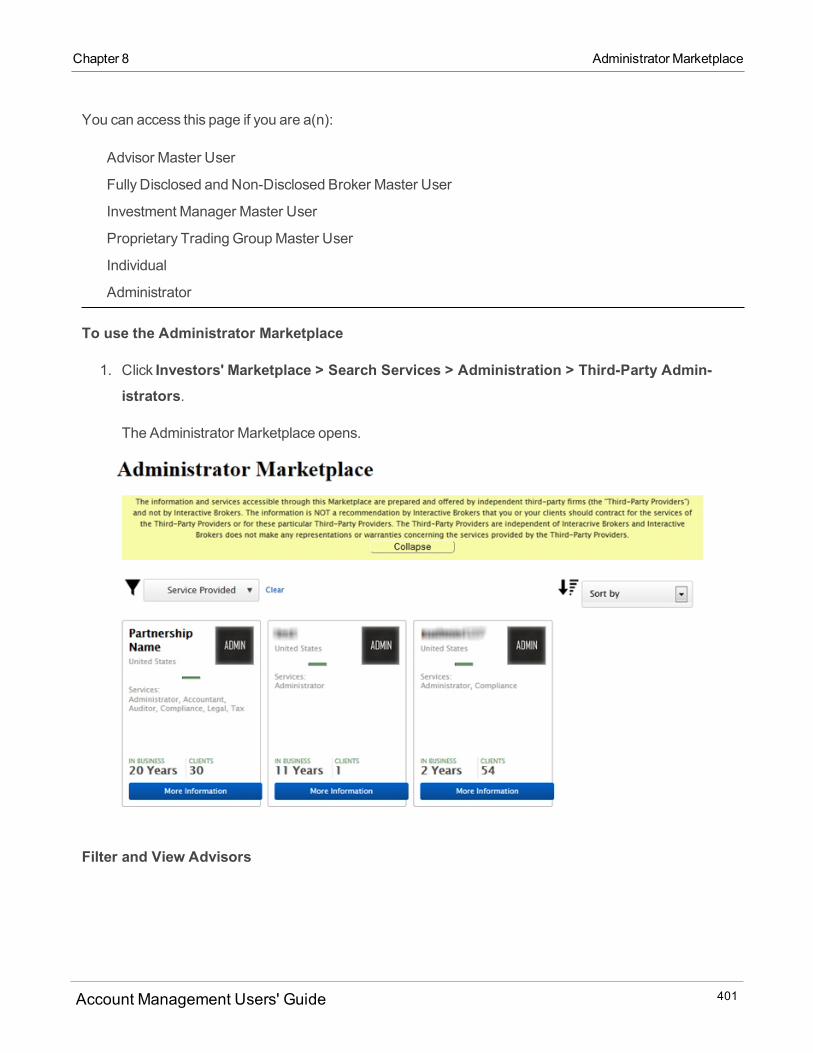
Chapter 8 Administrator Marketplace
You can access this page if you are a(n):
Advisor Master User
Fully Disclosed and Non-Disclosed Broker Master User
Investment Manager Master User
Proprietary Trading GroupMaster User
Individual
Administrator
To use the Administrator Marketplace
1. Click Investors' Marketplace > Search Services > Administration > Third-Party Admin-istrators.
The Administrator Marketplace opens.
Filter and View Advisors
Account Management Users' Guide 401
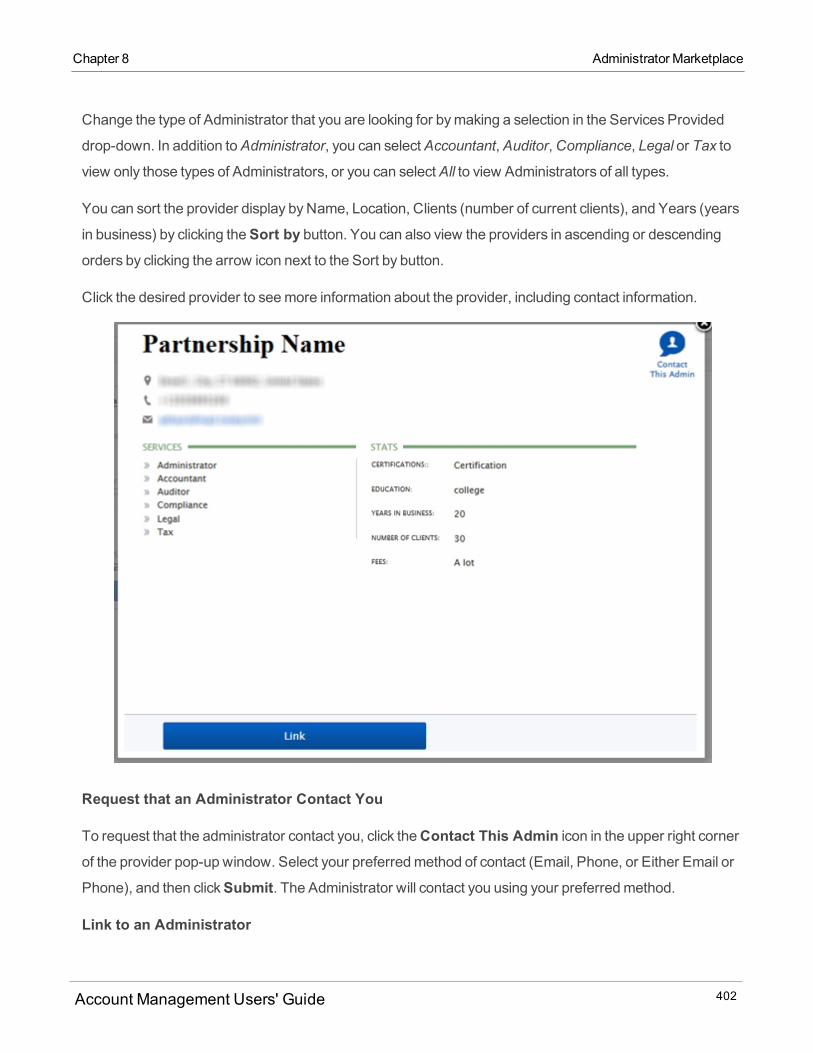
Change the type of Administrator that you are looking for bymaking a selection in the Services Provided
drop-down. In addition toAdministrator, you can selectAccountant, Auditor,Compliance, Legal or Tax to
view only those types of Administrators, or you can selectAll to view Administrators of all types.
You can sort the provider display byName, Location, Clients (number of current clients), and Years (years
in business) by clicking theSort by button. You can also view the providers in ascending or descending
orders by clicking the arrow icon next to the Sort by button.
Click the desired provider to seemore information about the provider, including contact information.
Request that an Administrator Contact You
To request that the administrator contact you, click theContact This Admin icon in the upper right cornerof the provider pop-up window. Select your preferredmethod of contact (Email, Phone, or Either Email or
Phone), and then clickSubmit. The Administrator will contact you using your preferredmethod.
Link to an Administrator
Account Management Users' Guide 402
Chapter 8 Administrator Marketplace
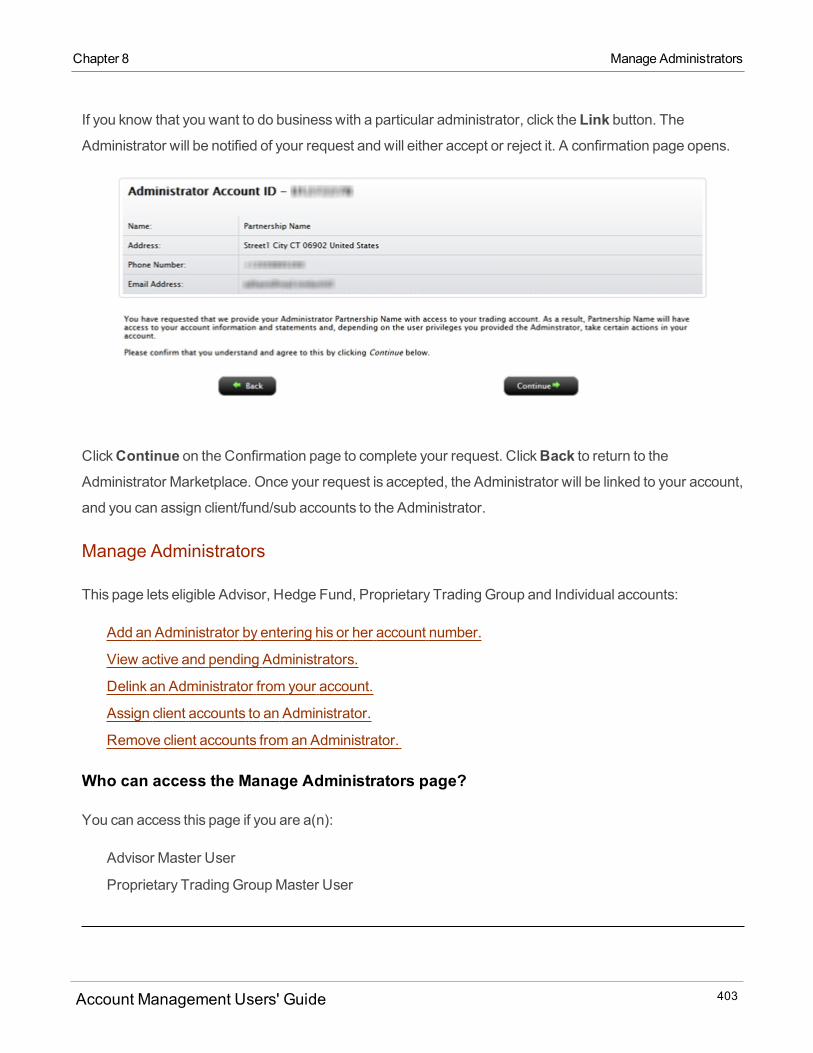
Chapter 8 Manage Administrators
If you know that you want to do businesswith a particular administrator, click the Link button. TheAdministrator will be notified of your request and will either accept or reject it. A confirmation page opens.
ClickContinue on the Confirmation page to complete your request. ClickBack to return to theAdministrator Marketplace. Once your request is accepted, the Administrator will be linked to your account,
and you can assign client/fund/sub accounts to the Administrator.
Manage Administrators
This page lets eligible Advisor, Hedge Fund, Proprietary Trading Group and Individual accounts:
Add an Administrator by entering his or her account number.
View active and pending Administrators.
Delink an Administrator from your account.
Assign client accounts to an Administrator.
Remove client accounts from an Administrator.
Who can access the Manage Administrators page?
You can access this page if you are a(n):
Advisor Master User
Proprietary Trading GroupMaster User
Account Management Users' Guide 403

Investment Manager Master User
Individual
Add an Administrator
Advisors, Hedge Fund Investment Managers and Proprietary Trading Groupmaster users and Individual
account holders can add Administrators whose account ID's they already know without having to shop for
them in the Administrator Marketplace. For example, an Advisor, Hedge Fund Investment Manager or
Proprietary Trading Groupmaster user may already have a relationship with an Administrator, so they
could simply obtain the Administrator's account ID that way.
To add an Administrator by entering an account ID
1. Click Investors' Marketplace > Search Services > Administration > ManageAdministrators.
2. ClickAdd Administrator.
The Add Administrator screen opens.
Account Management Users' Guide 404
Chapter 8 Add an Administrator
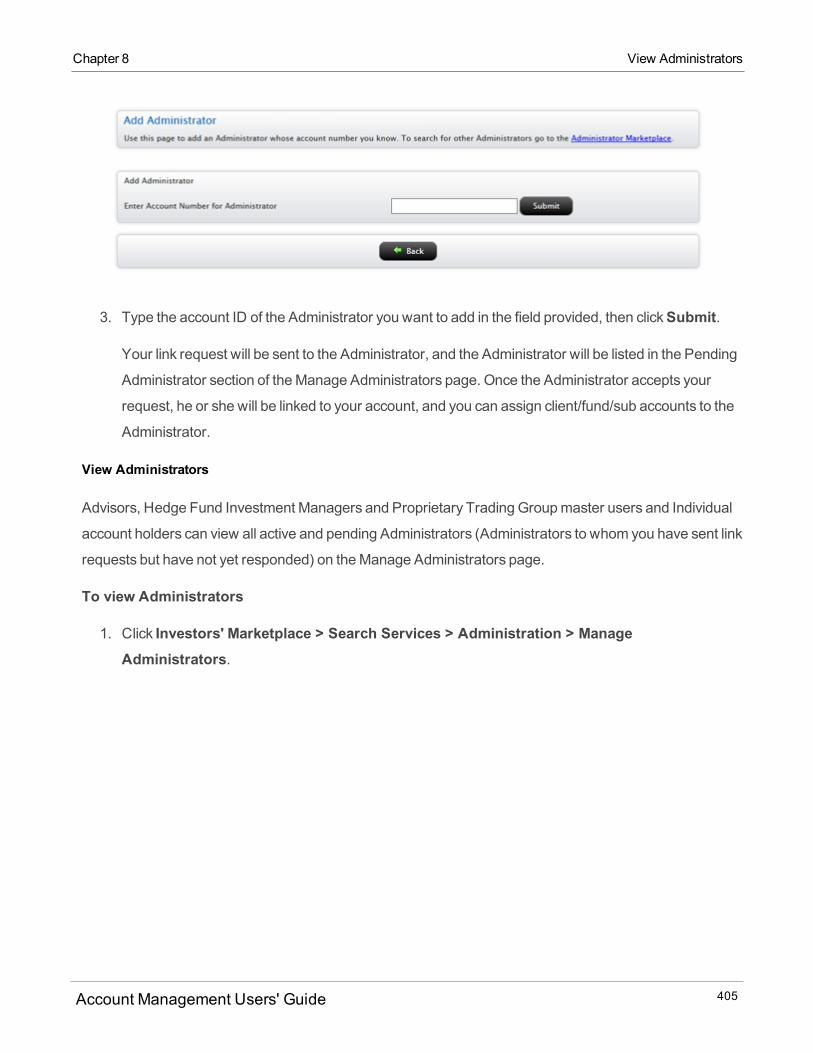
Chapter 8 View Administrators
3. Type the account ID of the Administrator you want to add in the field provided, then clickSubmit.
Your link request will be sent to the Administrator, and the Administrator will be listed in the Pending
Administrator section of theManage Administrators page. Once the Administrator accepts your
request, he or she will be linked to your account, and you can assign client/fund/sub accounts to the
Administrator.
View Administrators
Advisors, Hedge Fund Investment Managers and Proprietary Trading Groupmaster users and Individual
account holders can view all active and pending Administrators (Administrators to whom you have sent link
requests but have not yet responded) on theManage Administrators page.
To view Administrators
1. Click Investors' Marketplace > Search Services > Administration > ManageAdministrators.
Account Management Users' Guide 405

2. All Active and Pending Administrators are listed on the page in separate sections.
Delink an Administrator
Advisors, Hedge Fund Investment Managers and Proprietary Trading Groupmaster users and Individual
account holders can delink Administrators from their accounts. For example, if your relationship with an
Administrator has ended (he or she is no longer performing administrative services for your clients), you
can delink the Administrator from theManage Administrator page.
To delink an Administrator
1. Click Investors' Marketplace > Search Services > Administration > ManageAdministrators.
Account Management Users' Guide 406
Chapter 8 Delink an Administrator
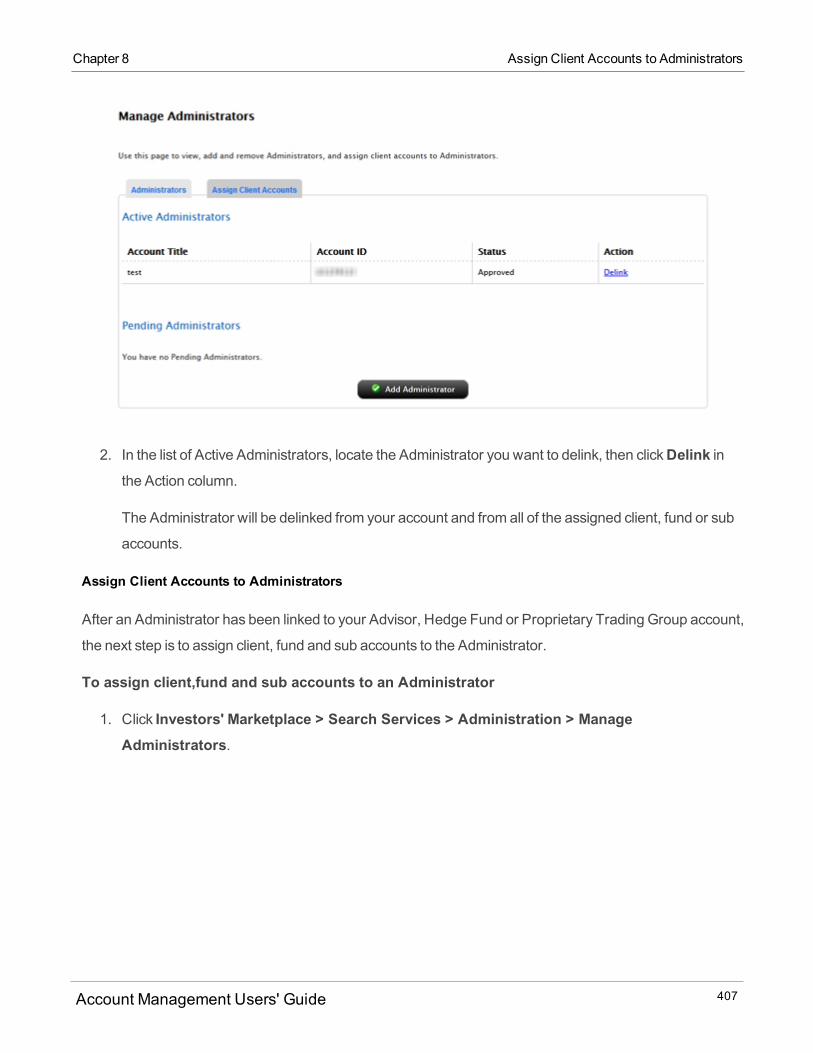
Chapter 8 Assign Client Accounts to Administrators
2. In the list of Active Administrators, locate the Administrator you want to delink, then clickDelink inthe Action column.
The Administrator will be delinked from your account and from all of the assigned client, fund or sub
accounts.
Assign Client Accounts to Administrators
After an Administrator has been linked to your Advisor, Hedge Fund or Proprietary Trading Group account,
the next step is to assign client, fund and sub accounts to the Administrator.
To assign client,fund and sub accounts to an Administrator
1. Click Investors' Marketplace > Search Services > Administration > ManageAdministrators.
Account Management Users' Guide 407

2. Click theAssign Client Accounts tab.
3. Select the desired Administrator from the drop-down.
4. The Assign Client Accounts to Administrator page opens.
Account Management Users' Guide 408
Chapter 8 Assign Client Accounts to Administrators
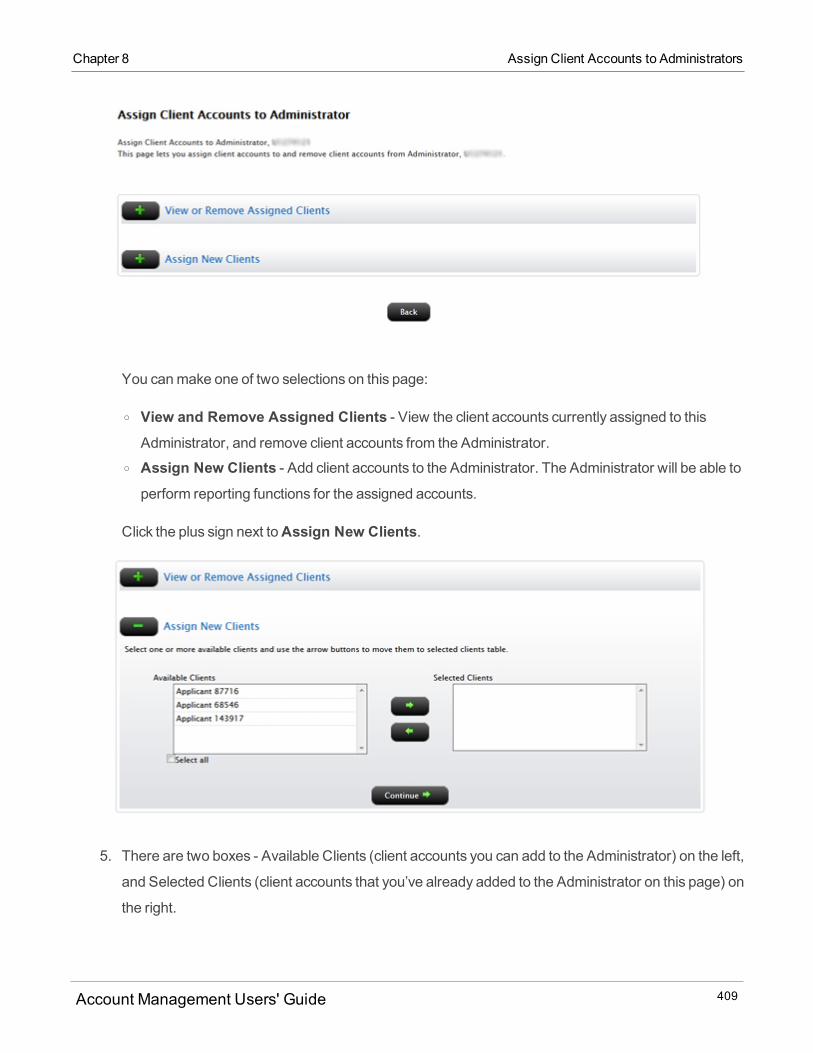
Chapter 8 Assign Client Accounts to Administrators
You canmake one of two selections on this page:
o View and Remove Assigned Clients - View the client accounts currently assigned to this
Administrator, and remove client accounts from the Administrator.o Assign New Clients - Add client accounts to the Administrator. The Administrator will be able toperform reporting functions for the assigned accounts.
Click the plus sign next toAssign New Clients.
5. There are two boxes - Available Clients (client accounts you can add to the Administrator) on the left,
and Selected Clients (client accounts that you’ve already added to the Administrator on this page) on
the right.
Account Management Users' Guide 409
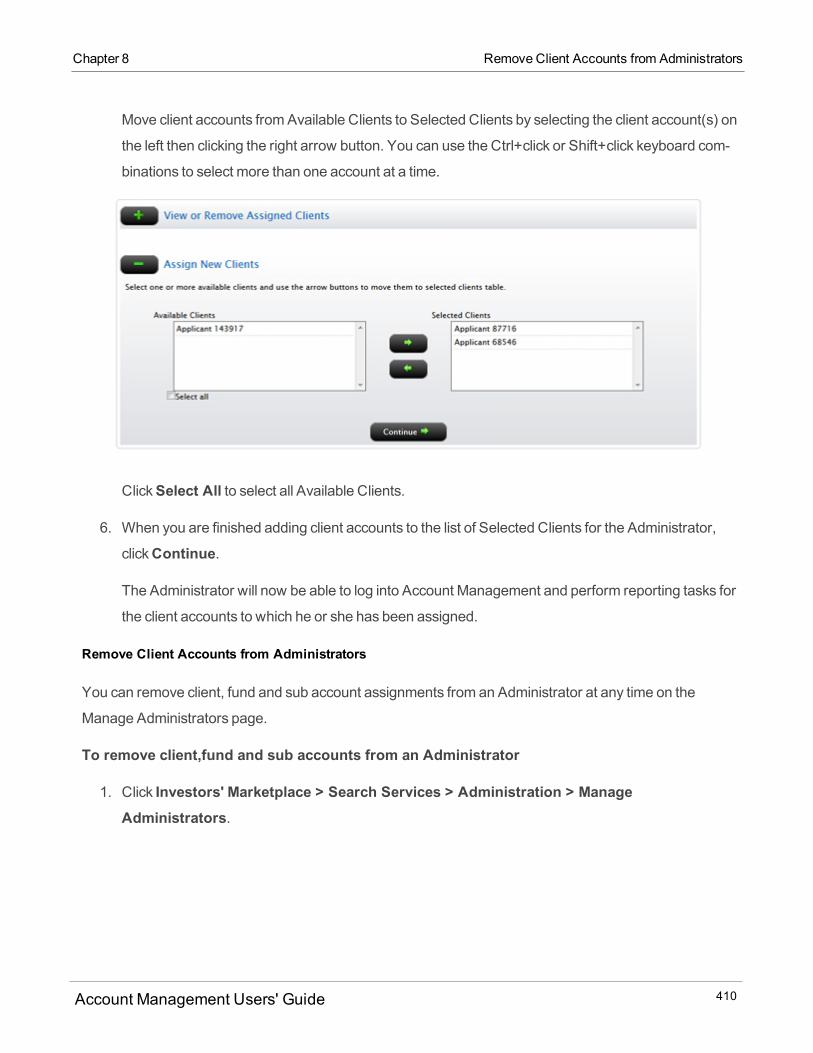
Move client accounts fromAvailable Clients to Selected Clients by selecting the client account(s) on
the left then clicking the right arrow button. You can use the Ctrl+click or Shift+click keyboard com-
binations to select more than one account at a time.
ClickSelect All to select all Available Clients.
6. When you are finished adding client accounts to the list of Selected Clients for the Administrator,
clickContinue.
The Administrator will now be able to log into Account Management and perform reporting tasks for
the client accounts to which he or she has been assigned.
Remove Client Accounts from Administrators
You can remove client, fund and sub account assignments from an Administrator at any time on the
Manage Administrators page.
To remove client,fund and sub accounts from an Administrator
1. Click Investors' Marketplace > Search Services > Administration > ManageAdministrators.
Account Management Users' Guide 410
Chapter 8 Remove Client Accounts from Administrators
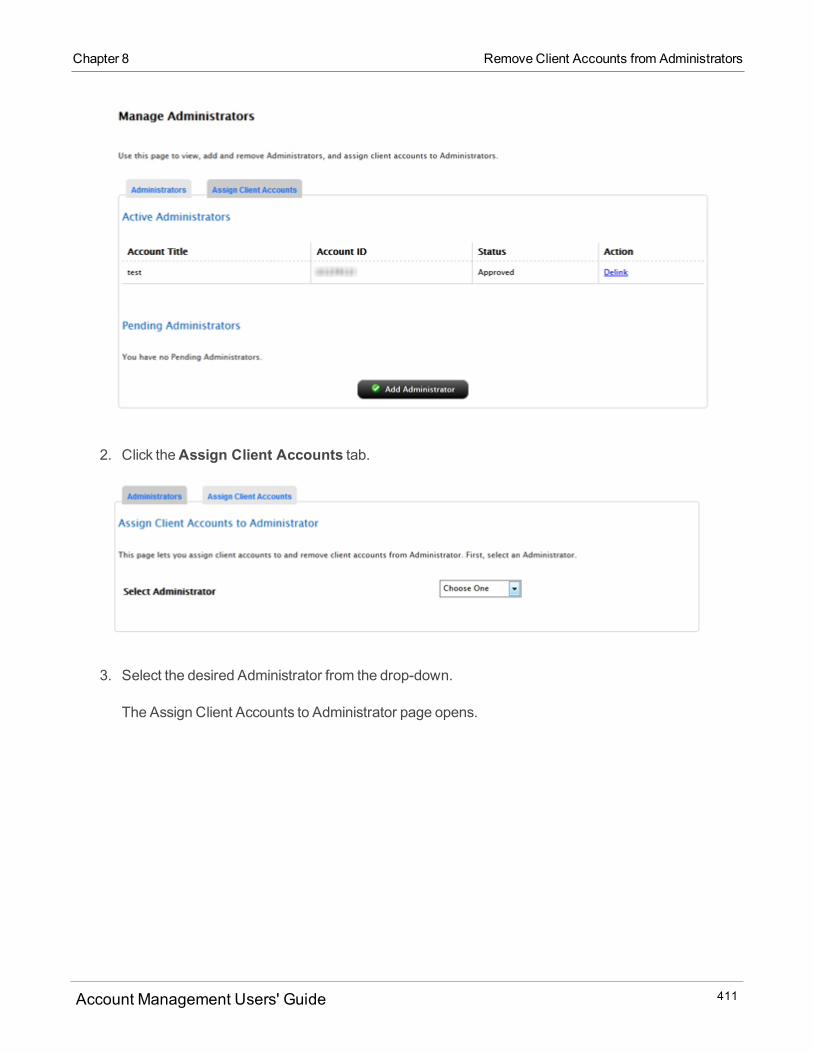
Chapter 8 Remove Client Accounts from Administrators
2. Click theAssign Client Accounts tab.
3. Select the desired Administrator from the drop-down.
The Assign Client Accounts to Administrator page opens.
Account Management Users' Guide 411
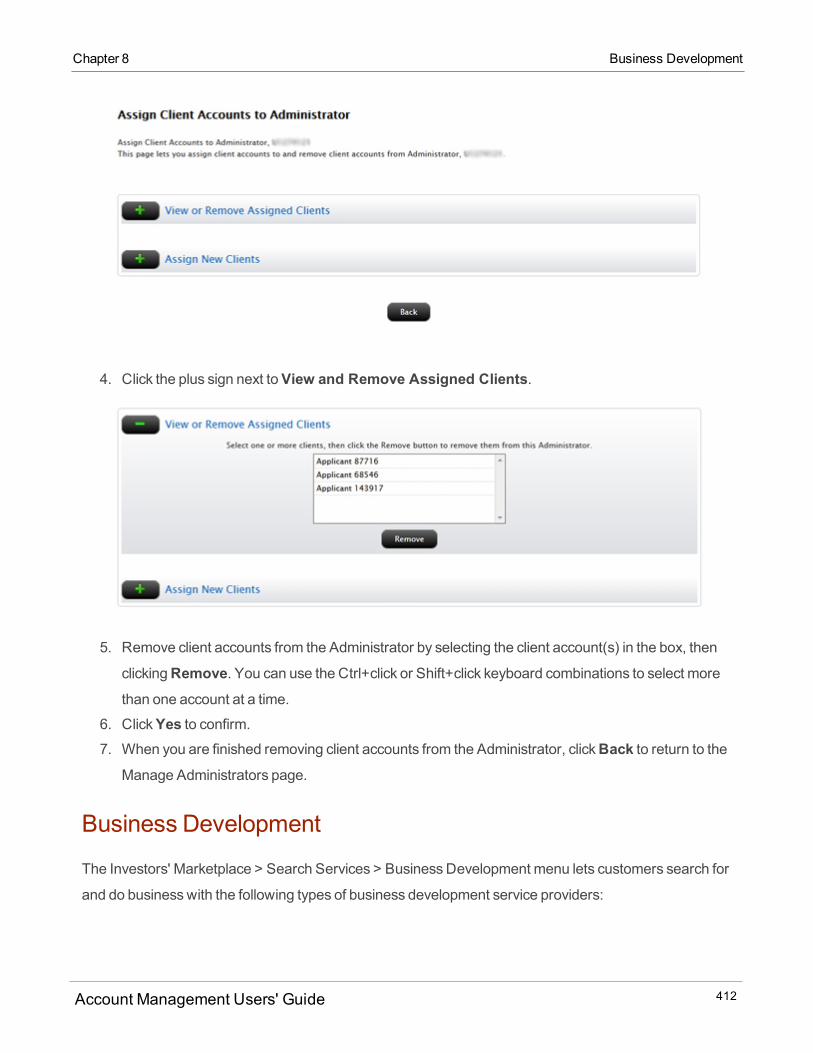
4. Click the plus sign next toView and Remove Assigned Clients.
5. Remove client accounts from the Administrator by selecting the client account(s) in the box, then
clickingRemove. You can use the Ctrl+click or Shift+click keyboard combinations to select morethan one account at a time.
6. ClickYes to confirm.7. When you are finished removing client accounts from the Administrator, clickBack to return to the
Manage Administrators page.
Business Development
The Investors' Marketplace > Search Services > BusinessDevelopment menu lets customers search for
and do businesswith the following types of business development service providers:
Account Management Users' Guide 412
Chapter 8 Business Development
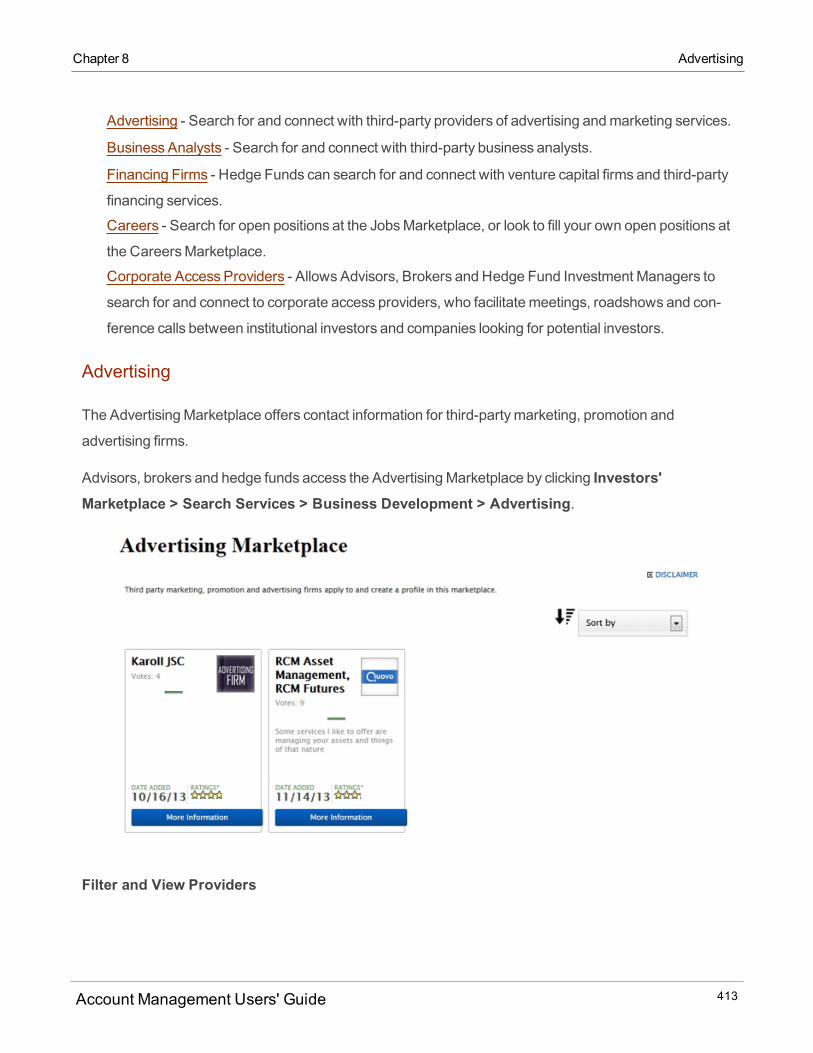
Chapter 8 Advertising
Advertising - Search for and connect with third-party providers of advertising andmarketing services.
Business Analysts - Search for and connect with third-party business analysts.
Financing Firms - Hedge Funds can search for and connect with venture capital firms and third-party
financing services.
Careers - Search for open positions at the JobsMarketplace, or look to fill your own open positions at
the CareersMarketplace.
Corporate Access Providers - Allows Advisors, Brokers and Hedge Fund Investment Managers to
search for and connect to corporate access providers, who facilitate meetings, roadshows and con-
ference calls between institutional investors and companies looking for potential investors.
Advertising
The AdvertisingMarketplace offers contact information for third-partymarketing, promotion and
advertising firms.
Advisors, brokers and hedge funds access the AdvertisingMarketplace by clicking Investors'Marketplace > Search Services > Business Development > Advertising.
Filter and View Providers
Account Management Users' Guide 413
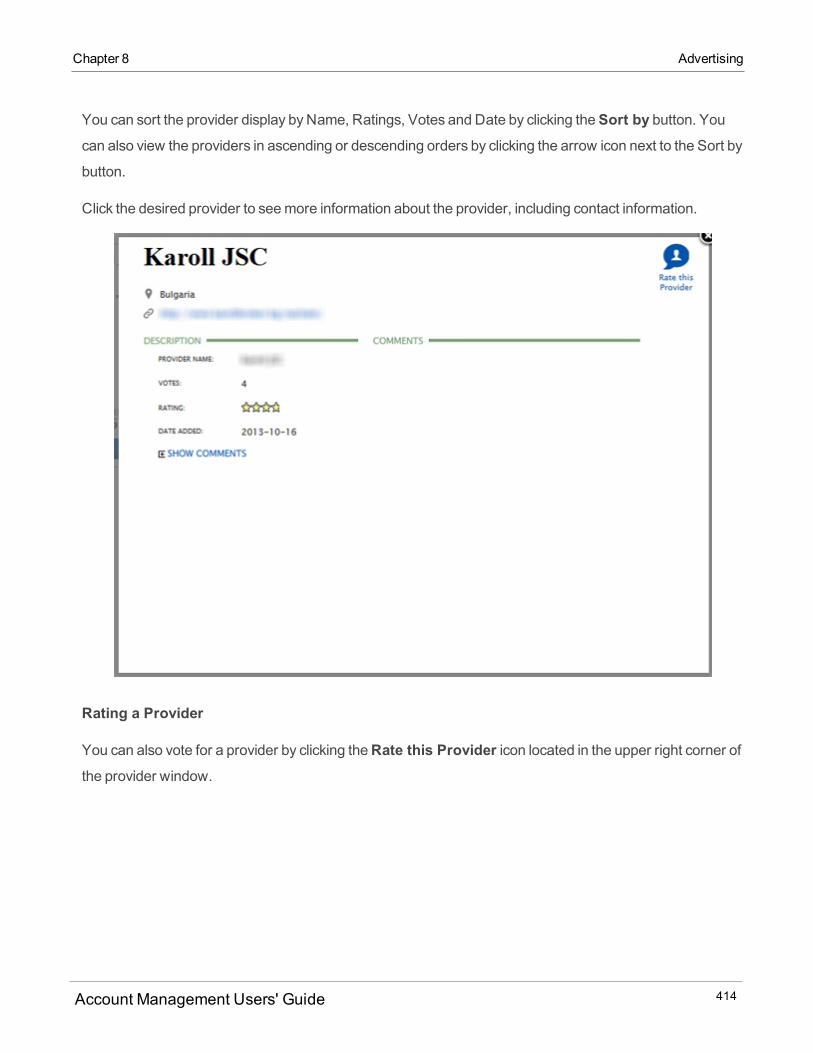
You can sort the provider display byName, Ratings, Votes and Date by clicking theSort by button. Youcan also view the providers in ascending or descending orders by clicking the arrow icon next to the Sort by
button.
Click the desired provider to seemore information about the provider, including contact information.
Rating a Provider
You can also vote for a provider by clicking theRate this Provider icon located in the upper right corner ofthe provider window.
Account Management Users' Guide 414
Chapter 8 Advertising
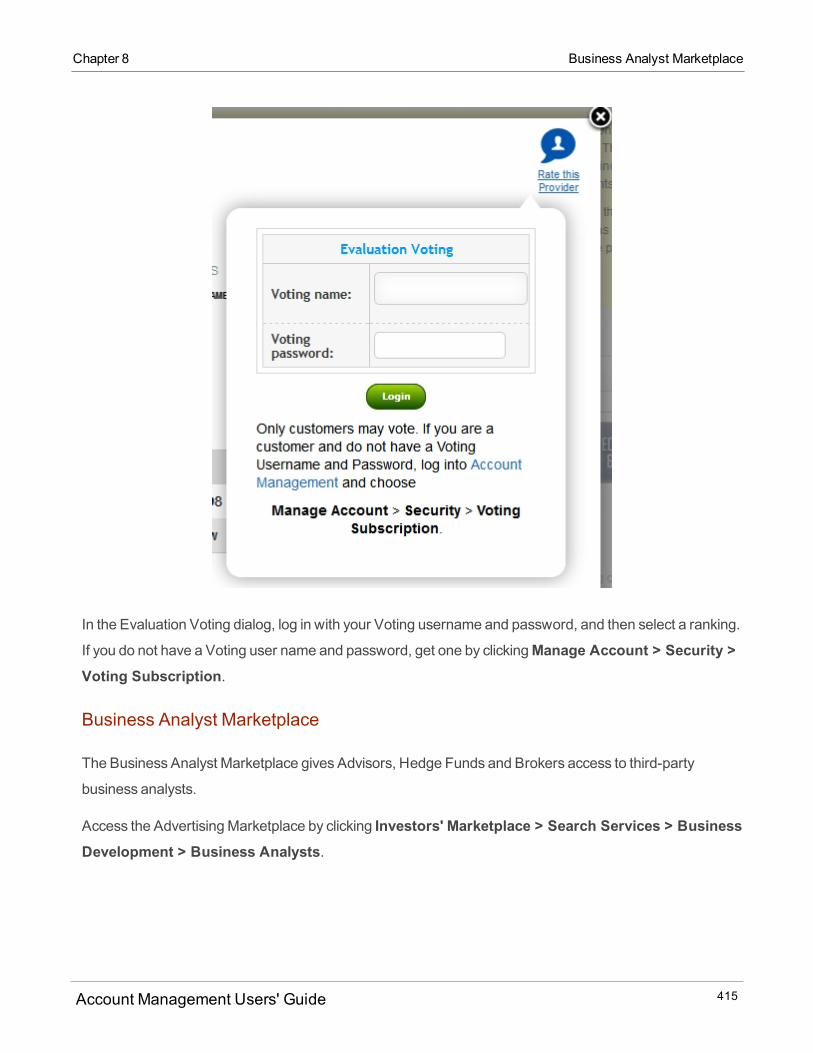
Chapter 8 Business Analyst Marketplace
In the Evaluation Voting dialog, log in with your Voting username and password, and then select a ranking.
If you do not have a Voting user name and password, get one by clickingManage Account > Security >Voting Subscription.
Business Analyst Marketplace
The Business Analyst Marketplace gives Advisors, Hedge Funds and Brokers access to third-party
business analysts.
Access the AdvertisingMarketplace by clicking Investors' Marketplace > Search Services > BusinessDevelopment > Business Analysts.
Account Management Users' Guide 415
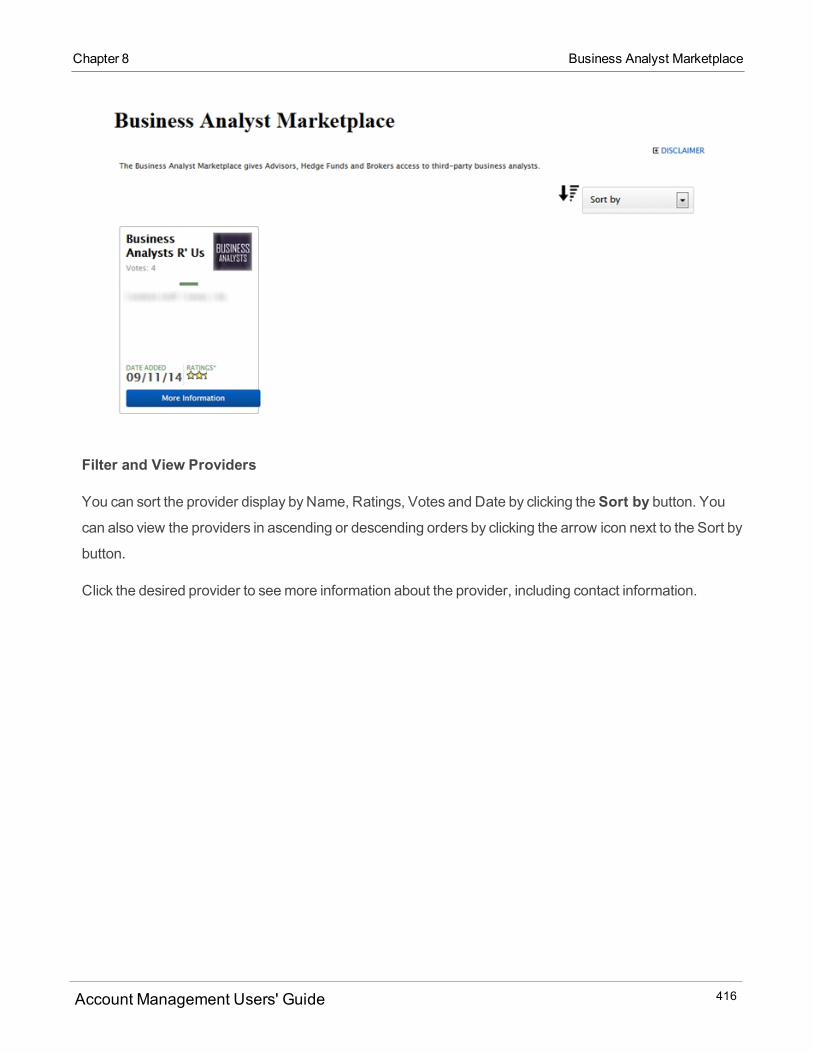
Filter and View Providers
You can sort the provider display byName, Ratings, Votes and Date by clicking theSort by button. Youcan also view the providers in ascending or descending orders by clicking the arrow icon next to the Sort by
button.
Click the desired provider to seemore information about the provider, including contact information.
Account Management Users' Guide 416
Chapter 8 Business Analyst Marketplace

Chapter 8 Business Analyst Marketplace
Rating a Provider
You can also vote for a provider by clicking theRate this Provider icon located in the upper right corner ofthe provider window.
Account Management Users' Guide 417

In the Evaluation Voting dialog, log in with your Voting username and password, and then select a ranking.
If you do not have a Voting user name and password, get one by clickingManage Account > Security >Voting Subscription.
Financing Firms
The FinancingMarketplace givesHedge Funds access to venture capital firms and third-party financing
services.
Access the FinancingMarketplace by clicking Investors' Marketplace > Search Services > BusinessDevelopment > Financing Firms.
Account Management Users' Guide 418
Chapter 8 Financing Firms
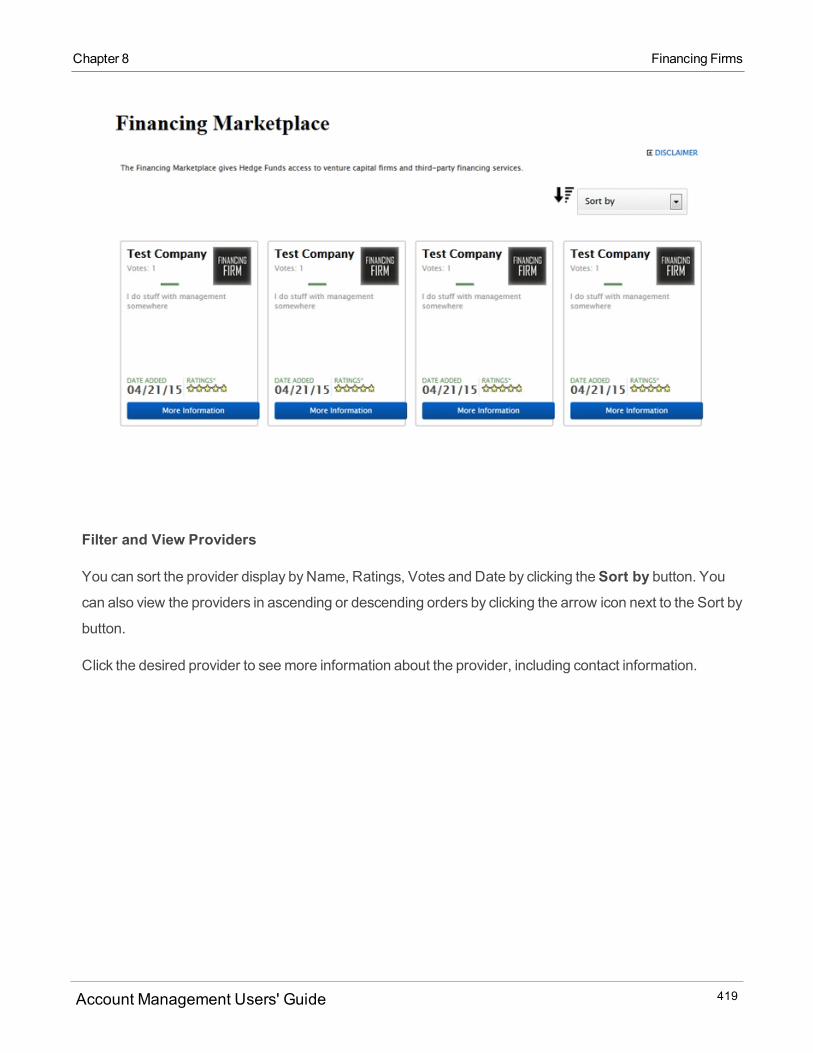
Chapter 8 Financing Firms
Filter and View Providers
You can sort the provider display byName, Ratings, Votes and Date by clicking theSort by button. Youcan also view the providers in ascending or descending orders by clicking the arrow icon next to the Sort by
button.
Click the desired provider to seemore information about the provider, including contact information.
Account Management Users' Guide 419

Rating a Provider
You can also vote for a provider by clicking theRate this Provider icon located in the upper right corner ofthe provider window.
Account Management Users' Guide 420
Chapter 8 Financing Firms

Chapter 8 Careers Marketplace
In the Evaluation Voting dialog, log in with your Voting username and password, and then select a ranking.
If you do not have a Voting user name and password, get one by clickingManage Account > Security >Voting Subscription.
Careers Marketplace
There are two versions of thismarketplace, depending on what you are looking for:
The CareersMarketplace lets account holders who are not Advisors, Hedge Funds, Proprietary Trad-
ing GroupMasters or Brokers search for open positions.
The CareersMarketplace lets Advisors, Hedge Funds, Proprietary Trading GroupMasters and
Brokers look for individual job-seekers to fill open positions.
Account Management Users' Guide 421
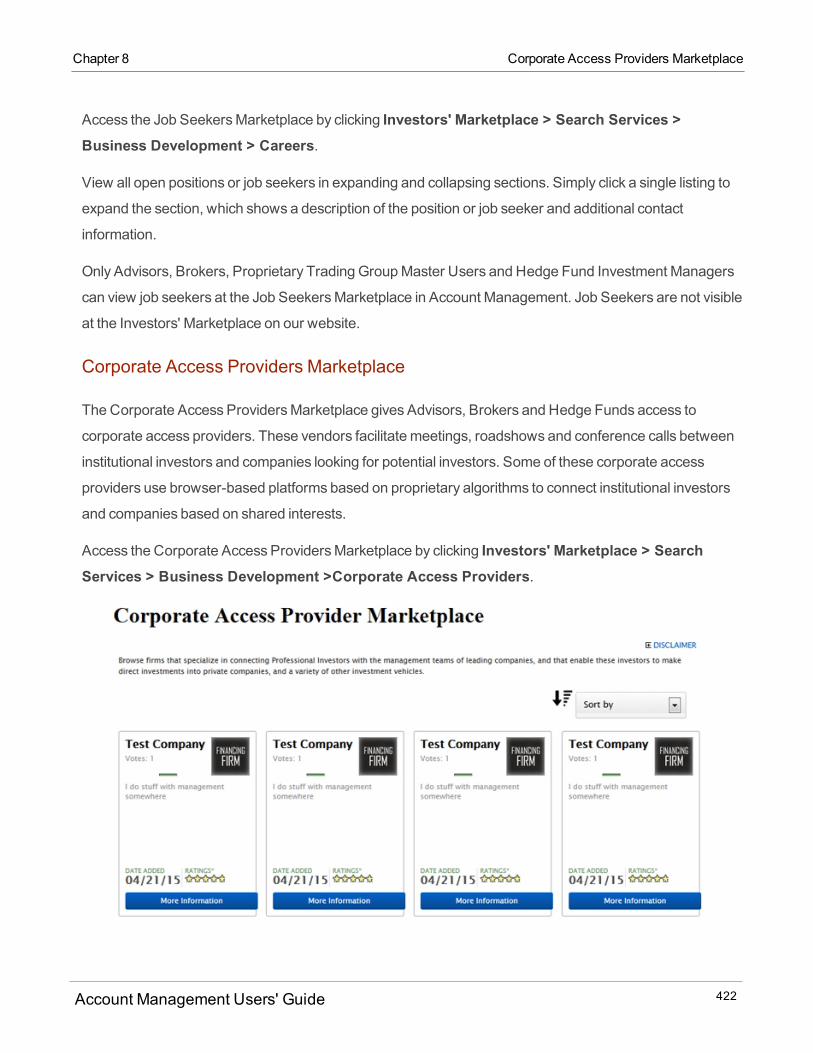
Access the Job SeekersMarketplace by clicking Investors' Marketplace > Search Services >Business Development > Careers.
View all open positions or job seekers in expanding and collapsing sections. Simply click a single listing to
expand the section, which shows a description of the position or job seeker and additional contact
information.
Only Advisors, Brokers, Proprietary Trading GroupMaster Users and Hedge Fund Investment Managers
can view job seekers at the Job SeekersMarketplace in Account Management. Job Seekers are not visible
at the Investors' Marketplace on our website.
Corporate Access Providers Marketplace
TheCorporate Access ProvidersMarketplace gives Advisors, Brokers and Hedge Funds access to
corporate access providers. These vendors facilitate meetings, roadshows and conference calls between
institutional investors and companies looking for potential investors. Some of these corporate access
providers use browser-based platforms based on proprietary algorithms to connect institutional investors
and companies based on shared interests.
Access the Corporate Access ProvidersMarketplace by clicking Investors' Marketplace > SearchServices > Business Development >Corporate Access Providers.
Account Management Users' Guide 422
Chapter 8 Corporate Access Providers Marketplace
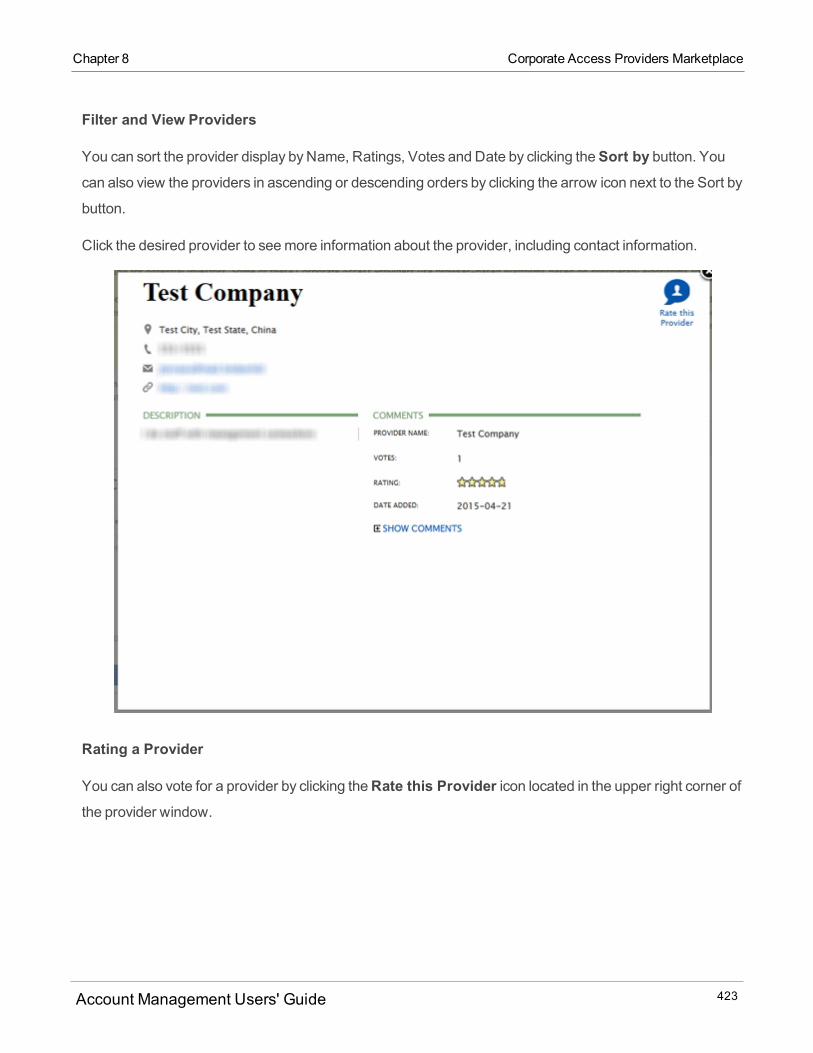
Chapter 8 Corporate Access Providers Marketplace
Filter and View Providers
You can sort the provider display byName, Ratings, Votes and Date by clicking theSort by button. Youcan also view the providers in ascending or descending orders by clicking the arrow icon next to the Sort by
button.
Click the desired provider to seemore information about the provider, including contact information.
Rating a Provider
You can also vote for a provider by clicking theRate this Provider icon located in the upper right corner ofthe provider window.
Account Management Users' Guide 423

In the Evaluation Voting dialog, log in with your Voting username and password, and then select a ranking.
If you do not have a Voting user name and password, get one by clickingManage Account > Security >Voting Subscription.
Advertise ServicesThe Advertise Servicesmenu allows customers to advertise their services to other customerswithin
Account Management.
The Advertise Servicesmenu gives you access to the following pages:
Hedge Funds - Our online version of a traditional Capital Introduction program is designed to help
Hedge Fundswho use us as their principal Prime Broker market their Funds to customerswho are
Accredited Investors andQualified Purchasers.
Account Management Users' Guide 424
Chapter 8 Advertise Services

Chapter 8 Guidelines for Advertising Software Tools, Programming Con-
sulting, Analyst Research and Educator Services
MoneyManager - MoneyManagers access theMoneyManager Marketplace, where they can register
to market their services toWealth Managers.
Administrators - Administrators access the Administrator Marketplace here to upload their information,
review contact requests and accept new link requests.
In addition, eligible customers can advertise services in the following areas:
Investing Services - Advisors and Brokers can advertise their services.
Software Vendors - Allows customers to advertise potentially complementary software programs that
expand the functionality of IB TWS to other customers.
Programming Consultants - Allows customerswhomay be able to assist API and FIX CTCI customers
to offer their programming expertise to other customers.
Research - Allows customers to advertise third-party institutional-caliber research for our trading plat-
form aswell as offer to present live webinar events through us.
Education & Coaching - Allows customerswho have expertise in trading, specific products and other
topics to offer education and coaching services to other customers.
BusinessDevelopment - Allows customers to advertise their third-party business development ser-
vices.
Guidelines for Advertising Software Tools, Programming Consulting, Analyst
Research and Educator Services
Wedo not warrant or guarantee the operation of your product or service.
The description you provide of your product or service should be short and factual.
Since we do not verify the accuracy of your product or service descriptions, youmust generally avoid
adjectives or statements that go beyond a simple factual description. Do not use words or phrases
such as "cutting-edge," "high-performance," "amazing," "unique," etc.
The description cannot promise or guarantee trading success and should not contain any statements
about returns or profits.
The description should avoid references to the speed of your service or product, as Interactive Brokers
will not and cannot verify this. Avoid terms such as "immediate," "lightning-fast," or "high-speed".
The descriptionmust avoid references to day trading aswe do not promote day trading.
Account Management Users' Guide 425

Interactive Brokers reserves the right to amend the description you provide before posting it on the IB
website, or to remove or change references to your product from the IB website for any reason.
Applications are reviewed on amonthly basis.
If you are already amember of one of these four marketplaces and need tomake changes to your
information, email them to: [email protected]
Investing
The Investors' Marketplace > Advertise Services > Investingmenu lets customers join Investors'
Marketplace to advertise their services to other customers:
Advisors - Advisors (RIAs and CTAs) can upload contact and other information about themselves and
their services, as well as written articles for potential clients. Advisors can also review contact requests
from potential clients, select whether or not to accept new clients, and approve new client requests.
Brokers - Brokers can upload contact and other information about themselves and their services, as
well as written articles for potential clients. Advisors can also review contact requests from potential cli-
ents, select whether or not to accept new clients, and approve new client requests.
Hedge FundMarketplace - Our online version of a traditional Capital Introduction program is designed
to help Hedge Fundswho use us as their principal Prime Broker market their Funds to our customers
who are Accredited Investors andQualified Purchasers.
MoneyManagers - MoneyManagers access theMoneyManager Marketplace, where they can
register to market their services toWealth Managers.
Advisor Marketplace
Advisors canmarket their services at the Advisor Marketplace. Once an advisor adds information to the
Advisor Marketplace, other customers can log into Account Management and browse themarketplace
and either request that the advisor contact them or request that the advisor add them as a client.
Advisorsmust have aminimumof 1,000,000 USD assets under management (AUM), with 70% of your
AUMat Interactive Brokers to be eligible to join the Advisor Marketplace.
Advisor Marketplace lets an Advisor:
Account Management Users' Guide 426
Chapter 8 Investing
Chapter 8 Joining the Advisor Marketplace
Modify your contact information
Add information about you and your business
Review contact requests by potential clients
Select whether or not you are open to new clients
Add PDF documents to your marketplace entry
Review PDFmaterials already posted to your marketplace entry
Approve new client requests
Add text-based articles to your marketplace entry
Who can access the Advertise Services > Investing > Advisor Marketplace page?
You can access this page only if you are a Registered Professional Advisor.
Joining the Advisor Marketplace
To join the Advisor Marketplace
1. Click Investors' Marketplace > Advertise Services > Investing > Advisors.2. An electronic agreement opens. Read the agreement, type your signature in the field provided, and
then clickSubmit.3. While you wait for us to approve the agreement, you can add information about yourself in the
Upload Information Provided in Advisor Marketplace section, upload information or documents or
add text-based Articles. Your contact information is added in the Advisor Contact Information sec-
tion automatically.
As soon aswe approve your agreement, your information appears in the Advisor Marketplace and
customers shopping for an advisor can request that you contact them or add them as clients.
Account Management Users' Guide 427

To modify your contact information
1. On the Investors' Marketplace > Advertise Services > Investing > Advisors page, clickAdvisor Contact Information to expand that section.
Some information already appears.
Account Management Users' Guide 428
Chapter 8 Joining the Advisor Marketplace
Chapter 8 Joining the Advisor Marketplace
2. ClickModify, then edit the information as required.3. ClickSubmit to save your changes.
To add information about you and your business
1. On the Investors' Marketplace > Advertise Services > Investing > Advisors page, clickUpload Information Provided in Advisor Marketplace to expand that section.
Account Management Users' Guide 429
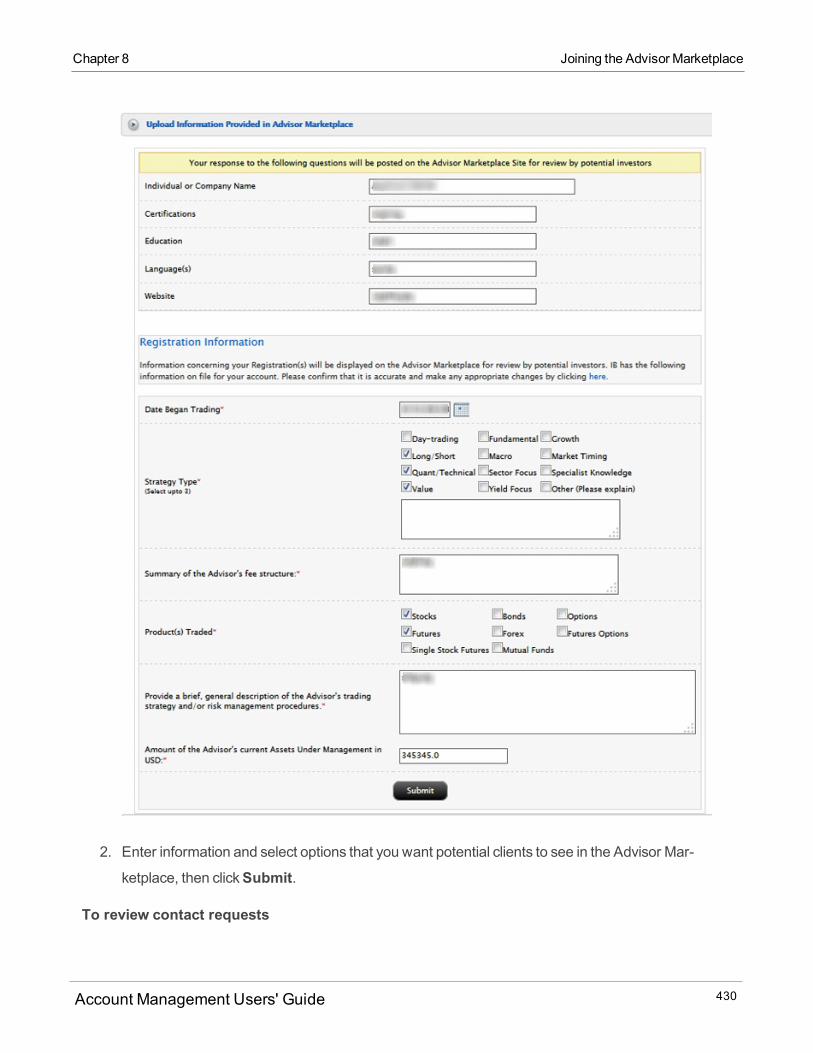
2. Enter information and select options that you want potential clients to see in the Advisor Mar-
ketplace, then clickSubmit.
To review contact requests
Account Management Users' Guide 430
Chapter 8 Joining the Advisor Marketplace
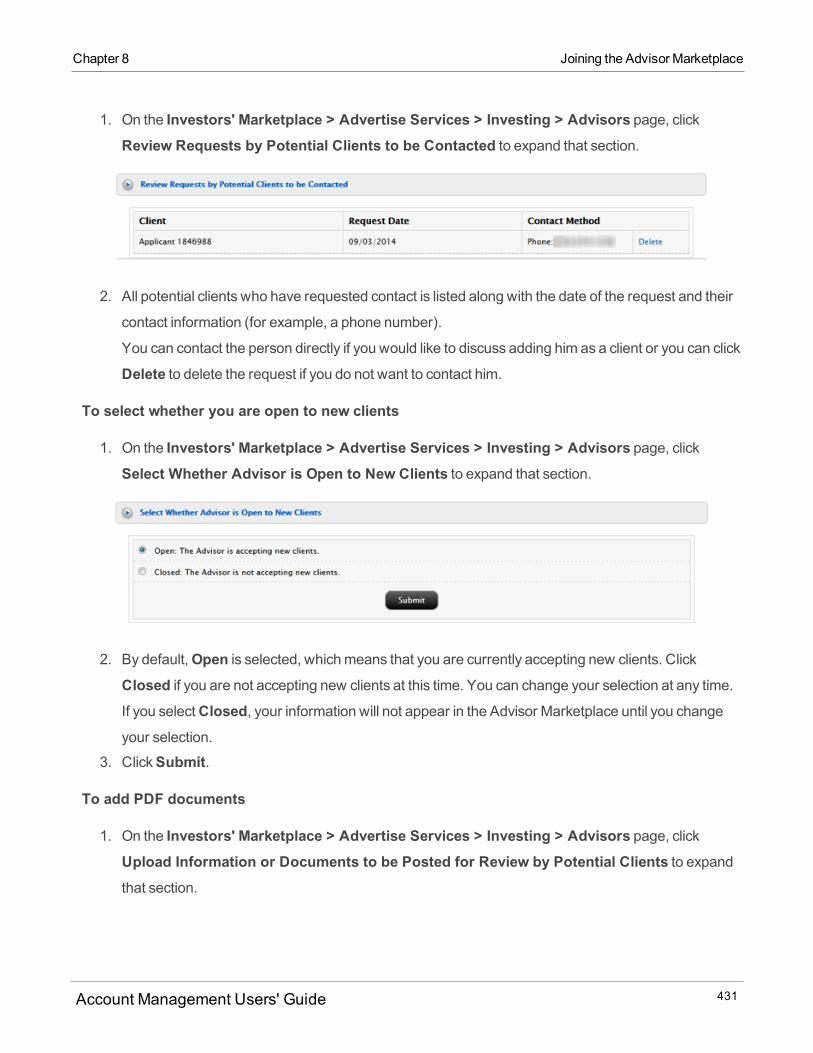
Chapter 8 Joining the Advisor Marketplace
1. On the Investors' Marketplace > Advertise Services > Investing > Advisors page, clickReview Requests by Potential Clients to be Contacted to expand that section.
2. All potential clients who have requested contact is listed along with the date of the request and their
contact information (for example, a phone number).
You can contact the person directly if you would like to discuss adding him as a client or you can click
Delete to delete the request if you do not want to contact him.
To select whether you are open to new clients
1. On the Investors' Marketplace > Advertise Services > Investing > Advisors page, clickSelect Whether Advisor is Open to New Clients to expand that section.
2. By default,Open is selected, whichmeans that you are currently accepting new clients. Click
Closed if you are not accepting new clients at this time. You can change your selection at any time.
If you selectClosed, your information will not appear in the Advisor Marketplace until you changeyour selection.
3. ClickSubmit.
To add PDF documents
1. On the Investors' Marketplace > Advertise Services > Investing > Advisors page, clickUpload Information or Documents to be Posted for Review by Potential Clients to expandthat section.
Account Management Users' Guide 431

You can upload three PDF files of the types listed, one at a time. These are: Brief Description for Applicant,
Summary of Investment Management Services for Applicant, and Summary of Financial Planning
Services for Applicant.
2. For each file you want to upload, do the following:
o Select the radio button next to the type of file you want to upload.o Click theBrowse button, then select the appropriate PDF file on your computer.o ClickSubmit.
The files you upload will appear in your Advisor Marketplace entry for potential clients to review.
To review PDF materials
1. On the Investors' Marketplace > Advertise Services> Investing > Advisors page, clickReview Material Currently Posted on Site Concerning Advisor Business to expand that sec-tion.
2. PDF documents that you have uploaded in the Upload Information or Documents to be Posted for
Review by Potential Clients section appear here. Click a document to open it and review it.
To approve new client requests
1. On the Investors' Marketplace > Advertise Services > Investing > Advisors page, clickApprove New Client Requests to expand that section.
Account Management Users' Guide 432
Chapter 8 Joining the Advisor Marketplace
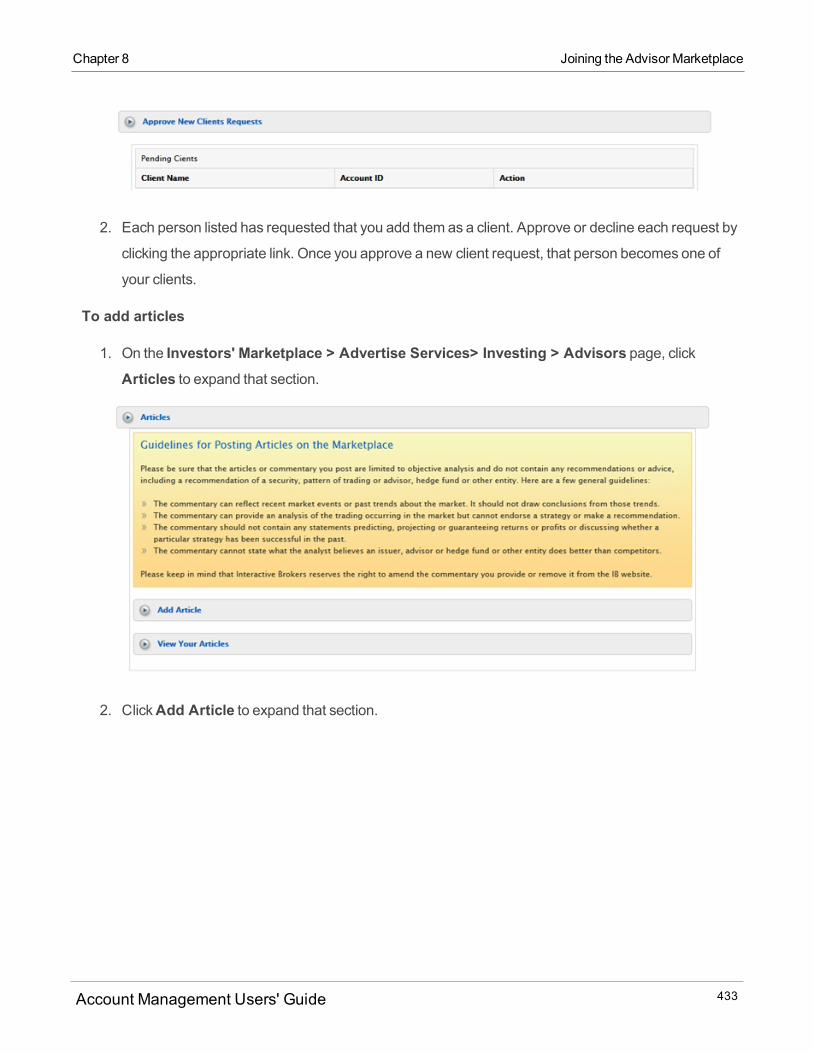
Chapter 8 Joining the Advisor Marketplace
2. Each person listed has requested that you add them as a client. Approve or decline each request by
clicking the appropriate link. Once you approve a new client request, that person becomes one of
your clients.
To add articles
1. On the Investors' Marketplace > Advertise Services> Investing > Advisors page, clickArticles to expand that section.
2. ClickAdd Article to expand that section.
Account Management Users' Guide 433

3. Enter a title for the article in the Title field, then write the article in the Article Body field. You can copy
and paste text from another program if you wish. All articles are text-based and can be amaximum
of 800 characters.
4. ClickSubmit.5. ClickView Your Articles to expand that section and view all of the text-based articles that you have
submitted and which will be available to potential clients in the Advisor Marketplace.
For more information
Broker Marketplace
Fully Disclosed Brokers canmarket their services at the Broker Marketplace. Once a broker adds
information to the Broker Marketplace, other customers can log into Account Management and browse the
marketplace and either request that the broker contact them or request that the broker add them as a
client.
Broker Marketplace lets a Broker:
Modify your contact information
Add information about you and your business
Review contact requests by potential clients
Select whether or not you are open to new clients
Account Management Users' Guide 434
Chapter 8 Broker Marketplace
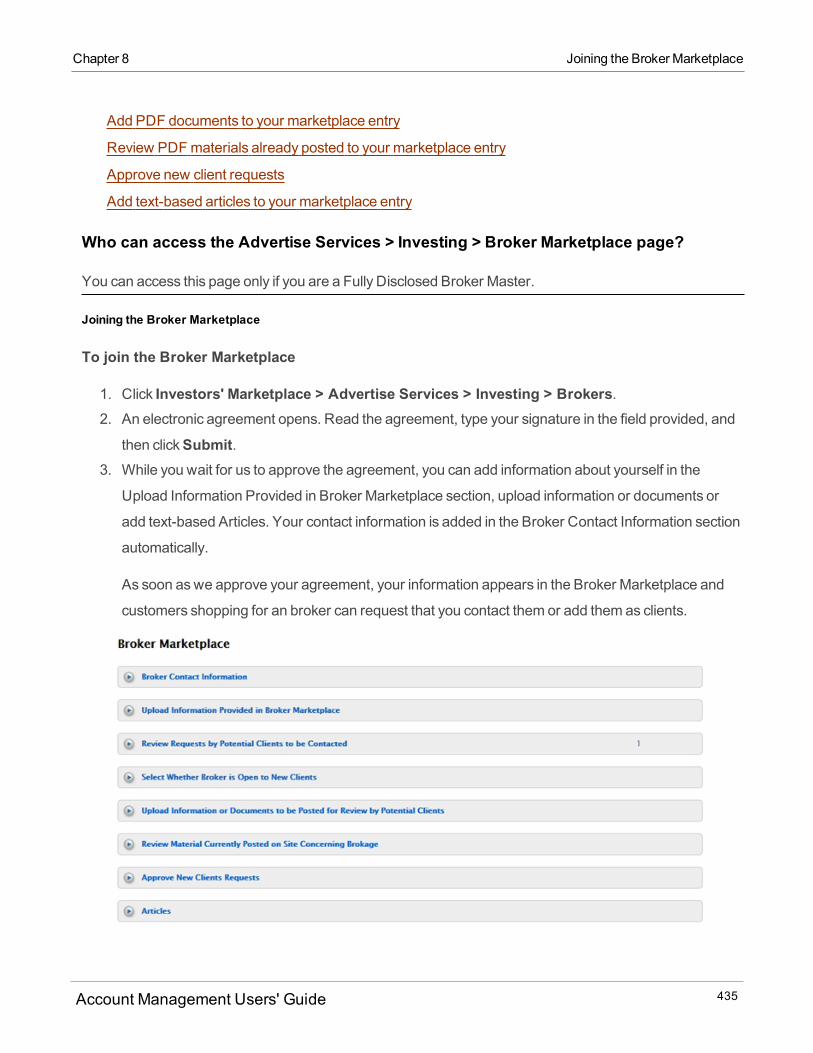
Chapter 8 Joining the Broker Marketplace
Add PDF documents to your marketplace entry
Review PDFmaterials already posted to your marketplace entry
Approve new client requests
Add text-based articles to your marketplace entry
Who can access the Advertise Services > Investing > Broker Marketplace page?
You can access this page only if you are a Fully Disclosed Broker Master.
Joining the Broker Marketplace
To join the Broker Marketplace
1. Click Investors' Marketplace > Advertise Services > Investing > Brokers.2. An electronic agreement opens. Read the agreement, type your signature in the field provided, and
then clickSubmit.3. While you wait for us to approve the agreement, you can add information about yourself in the
Upload Information Provided in Broker Marketplace section, upload information or documents or
add text-based Articles. Your contact information is added in the Broker Contact Information section
automatically.
As soon aswe approve your agreement, your information appears in the Broker Marketplace and
customers shopping for an broker can request that you contact them or add them as clients.
Account Management Users' Guide 435
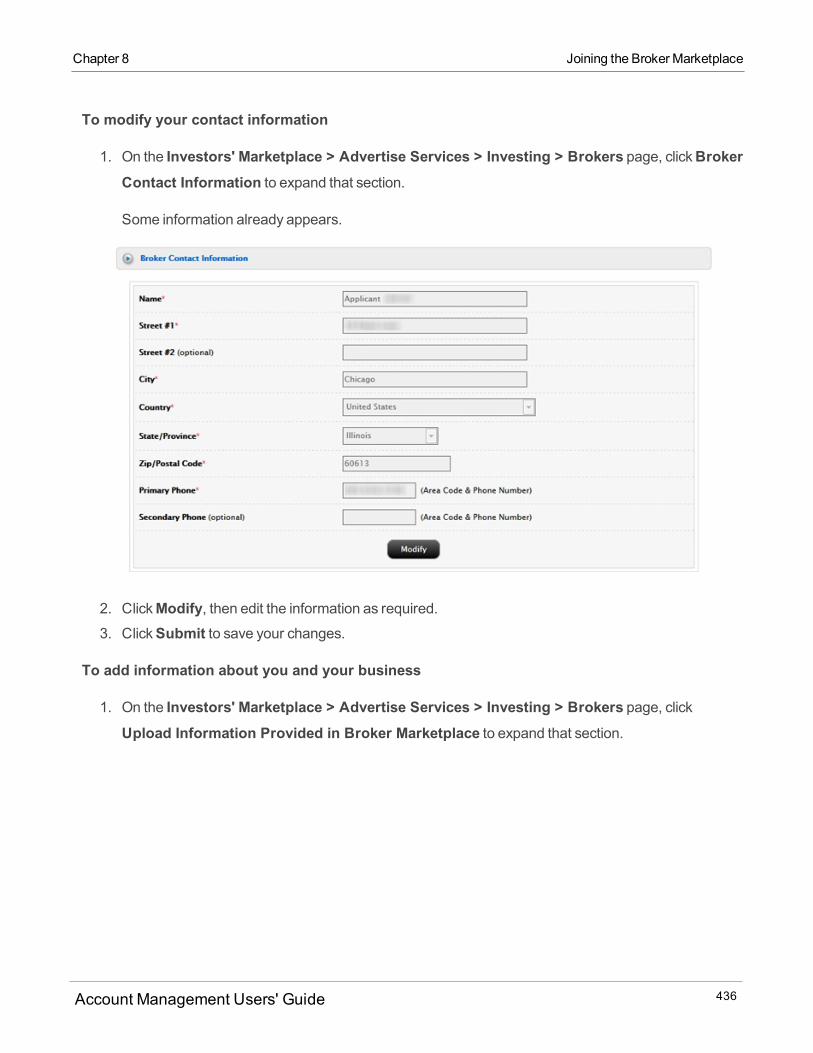
To modify your contact information
1. On the Investors' Marketplace > Advertise Services > Investing > Brokers page, clickBrokerContact Information to expand that section.
Some information already appears.
2. ClickModify, then edit the information as required.3. ClickSubmit to save your changes.
To add information about you and your business
1. On the Investors' Marketplace > Advertise Services > Investing > Brokers page, clickUpload Information Provided in Broker Marketplace to expand that section.
Account Management Users' Guide 436
Chapter 8 Joining the Broker Marketplace
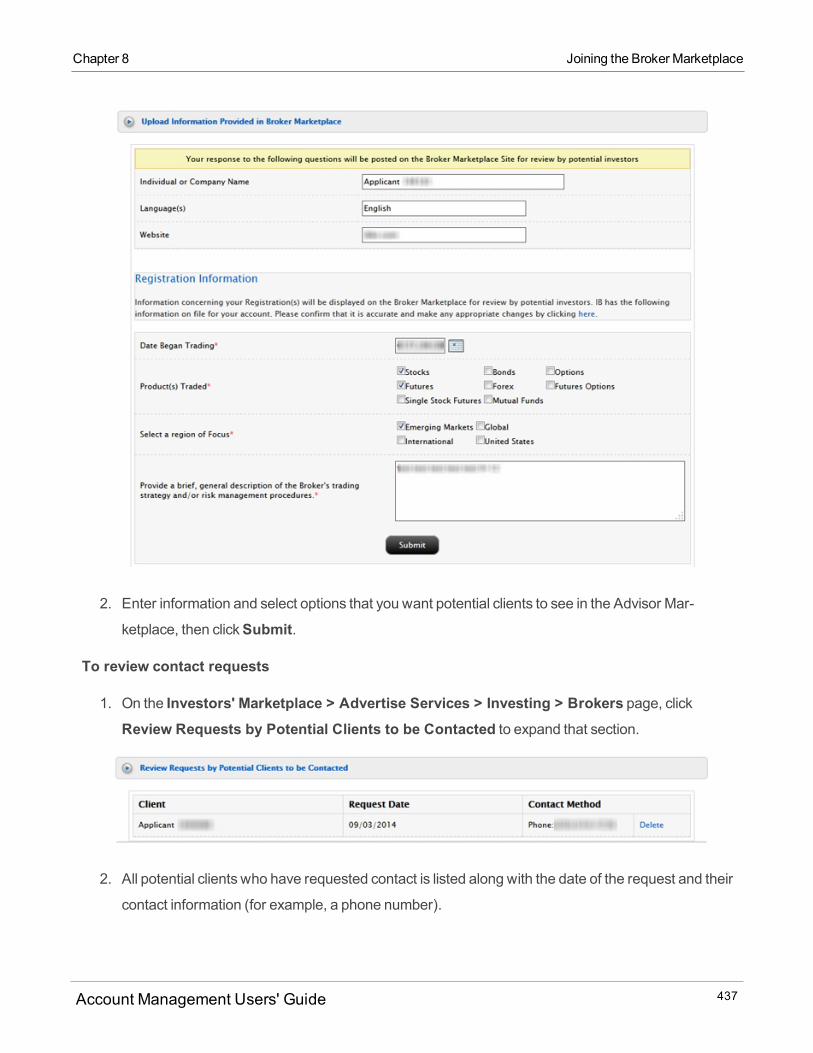
Chapter 8 Joining the Broker Marketplace
2. Enter information and select options that you want potential clients to see in the Advisor Mar-
ketplace, then clickSubmit.
To review contact requests
1. On the Investors' Marketplace > Advertise Services > Investing > Brokers page, clickReview Requests by Potential Clients to be Contacted to expand that section.
2. All potential clients who have requested contact is listed along with the date of the request and their
contact information (for example, a phone number).
Account Management Users' Guide 437
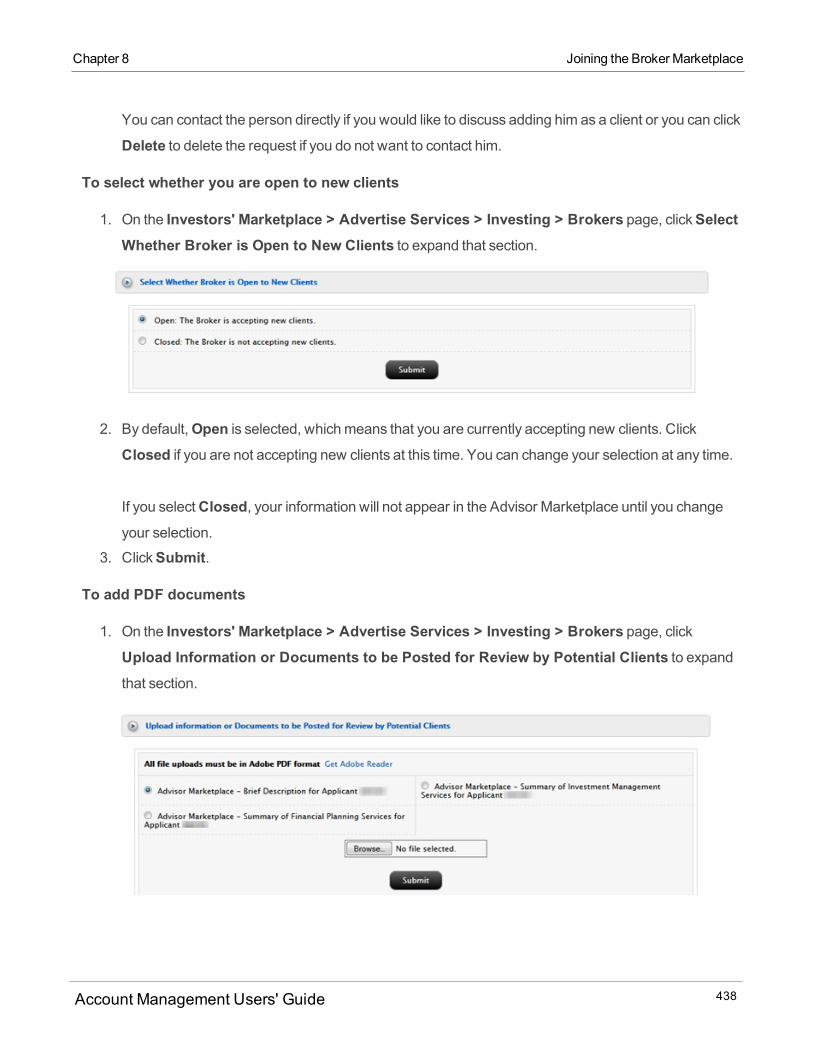
You can contact the person directly if you would like to discuss adding him as a client or you can click
Delete to delete the request if you do not want to contact him.
To select whether you are open to new clients
1. On the Investors' Marketplace > Advertise Services > Investing > Brokers page, clickSelectWhether Broker is Open to New Clients to expand that section.
2. By default,Open is selected, whichmeans that you are currently accepting new clients. Click
Closed if you are not accepting new clients at this time. You can change your selection at any time.
If you selectClosed, your information will not appear in the Advisor Marketplace until you changeyour selection.
3. ClickSubmit.
To add PDF documents
1. On the Investors' Marketplace > Advertise Services > Investing > Brokers page, clickUpload Information or Documents to be Posted for Review by Potential Clients to expandthat section.
Account Management Users' Guide 438
Chapter 8 Joining the Broker Marketplace
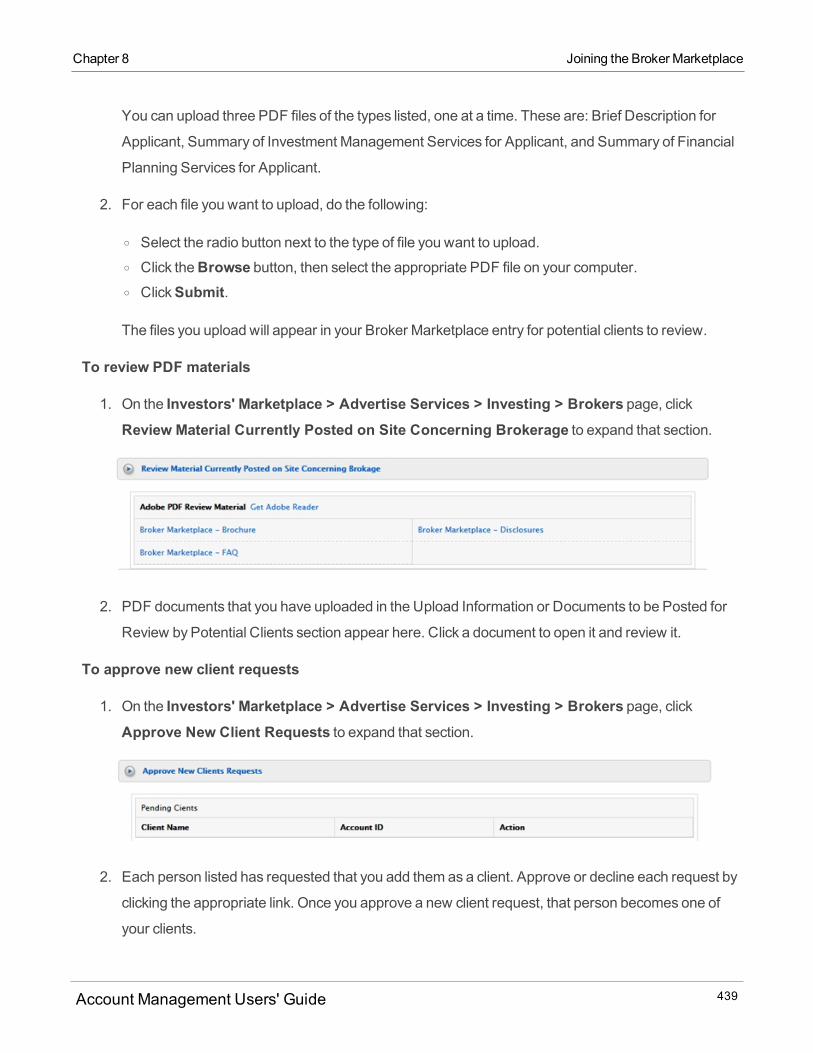
Chapter 8 Joining the Broker Marketplace
You can upload three PDF files of the types listed, one at a time. These are: Brief Description for
Applicant, Summary of Investment Management Services for Applicant, and Summary of Financial
Planning Services for Applicant.
2. For each file you want to upload, do the following:
o Select the radio button next to the type of file you want to upload.o Click theBrowse button, then select the appropriate PDF file on your computer.o ClickSubmit.
The files you upload will appear in your Broker Marketplace entry for potential clients to review.
To review PDF materials
1. On the Investors' Marketplace > Advertise Services > Investing > Brokers page, clickReview Material Currently Posted on Site Concerning Brokerage to expand that section.
2. PDF documents that you have uploaded in the Upload Information or Documents to be Posted for
Review by Potential Clients section appear here. Click a document to open it and review it.
To approve new client requests
1. On the Investors' Marketplace > Advertise Services > Investing > Brokers page, clickApprove New Client Requests to expand that section.
2. Each person listed has requested that you add them as a client. Approve or decline each request by
clicking the appropriate link. Once you approve a new client request, that person becomes one of
your clients.
Account Management Users' Guide 439
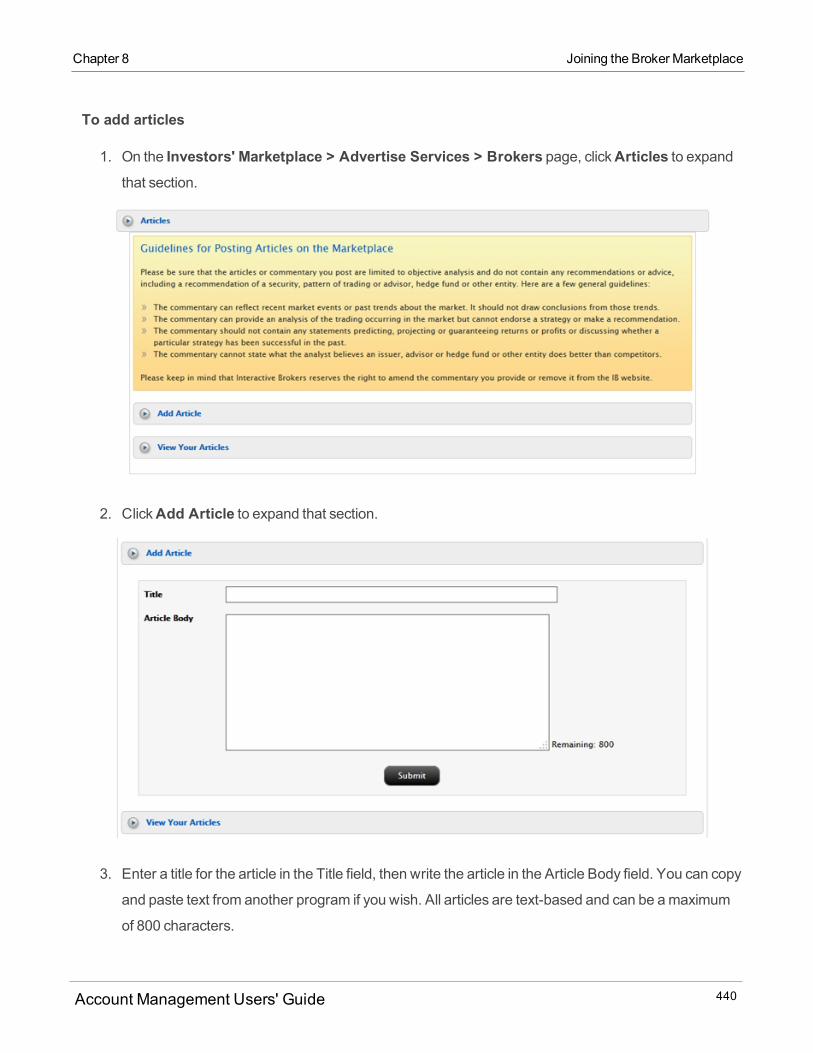
To add articles
1. On the Investors' Marketplace > Advertise Services > Brokers page, clickArticles to expandthat section.
2. ClickAdd Article to expand that section.
3. Enter a title for the article in the Title field, then write the article in the Article Body field. You can copy
and paste text from another program if you wish. All articles are text-based and can be amaximum
of 800 characters.
Account Management Users' Guide 440
Chapter 8 Joining the Broker Marketplace
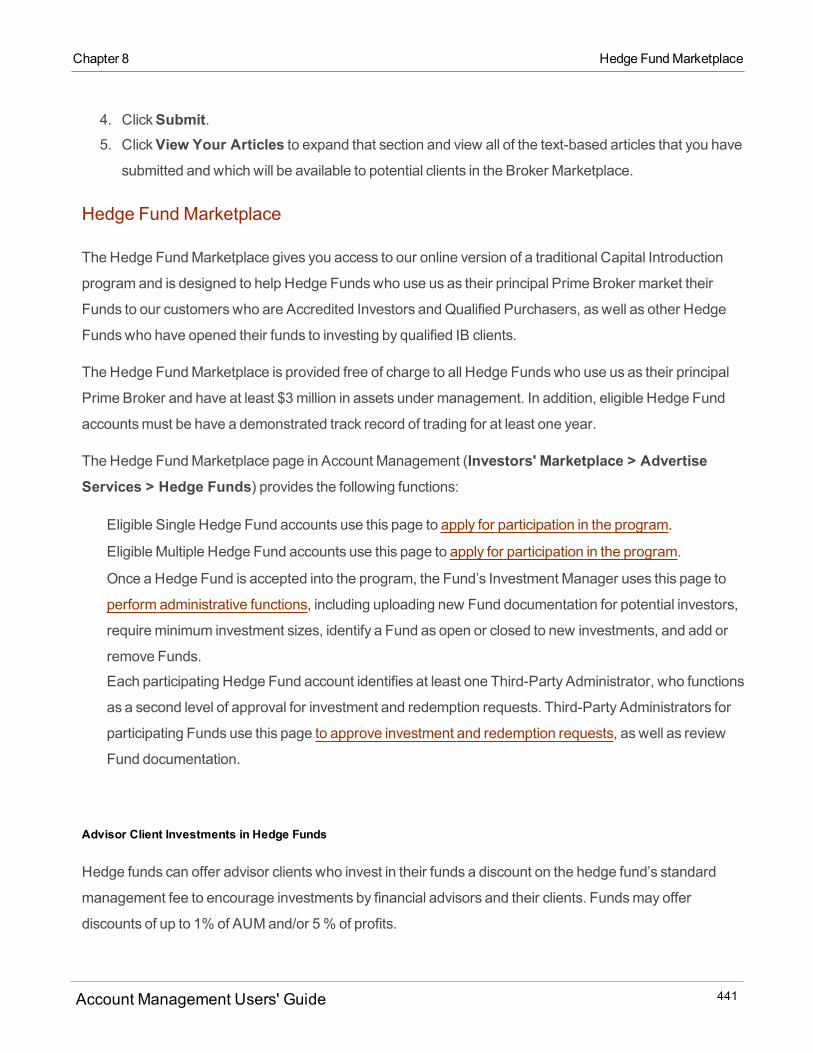
Chapter 8 Hedge FundMarketplace
4. ClickSubmit.5. ClickView Your Articles to expand that section and view all of the text-based articles that you have
submitted and which will be available to potential clients in the Broker Marketplace.
Hedge Fund Marketplace
TheHedge FundMarketplace gives you access to our online version of a traditional Capital Introduction
program and is designed to help Hedge Fundswho use us as their principal Prime Broker market their
Funds to our customerswho are Accredited Investors andQualified Purchasers, as well as other Hedge
Fundswho have opened their funds to investing by qualified IB clients.
The Hedge FundMarketplace is provided free of charge to all Hedge Fundswho use us as their principal
Prime Broker and have at least $3million in assets under management. In addition, eligible Hedge Fund
accountsmust be have a demonstrated track record of trading for at least one year.
The Hedge FundMarketplace page in Account Management (Investors' Marketplace > AdvertiseServices > Hedge Funds) provides the following functions:
Eligible Single Hedge Fund accounts use this page to apply for participation in the program.
Eligible Multiple Hedge Fund accounts use this page to apply for participation in the program.
Once a Hedge Fund is accepted into the program, the Fund’s Investment Manager uses this page to
perform administrative functions, including uploading new Fund documentation for potential investors,
require minimum investment sizes, identify a Fund as open or closed to new investments, and add or
remove Funds.
Each participating Hedge Fund account identifies at least one Third-Party Administrator, who functions
as a second level of approval for investment and redemption requests. Third-Party Administrators for
participating Funds use this page to approve investment and redemption requests, as well as review
Fund documentation.
Advisor Client Investments in Hedge Funds
Hedge funds can offer advisor clients who invest in their funds a discount on the hedge fund’s standard
management fee to encourage investments by financial advisors and their clients. Fundsmay offer
discounts of up to 1% of AUMand/or 5% of profits.
Account Management Users' Guide 441
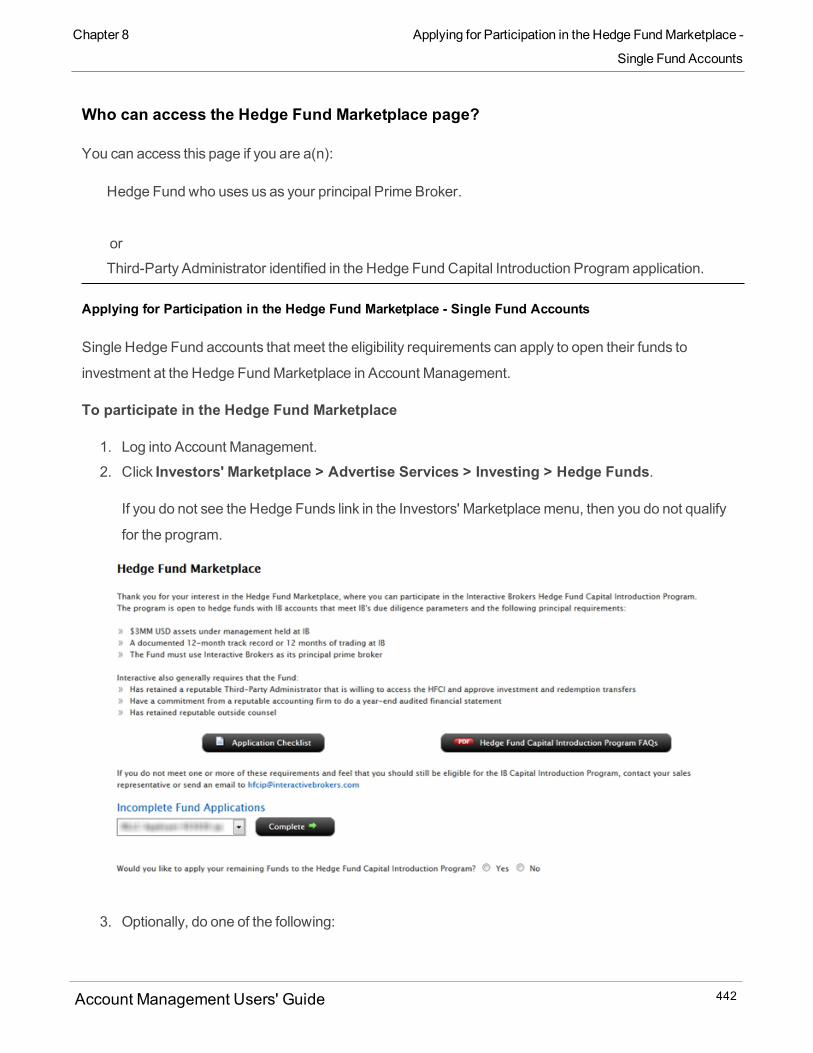
Who can access the Hedge Fund Marketplace page?
You can access this page if you are a(n):
Hedge Fund who uses us as your principal Prime Broker.
or
Third-Party Administrator identified in the Hedge Fund Capital Introduction Program application.
Applying for Participation in the Hedge Fund Marketplace - Single Fund Accounts
Single Hedge Fund accounts that meet the eligibility requirements can apply to open their funds to
investment at the Hedge FundMarketplace in Account Management.
To participate in the Hedge Fund Marketplace
1. Log into Account Management.
2. Click Investors' Marketplace > Advertise Services > Investing > Hedge Funds.
If you do not see the Hedge Funds link in the Investors' Marketplacemenu, then you do not qualify
for the program.
3. Optionally, do one of the following:
Account Management Users' Guide 442
Chapter 8 Applying for Participation in the Hedge FundMarketplace -
Single Fund Accounts

Chapter 8 Applying for Participation in the Hedge FundMarketplace - Mul-
tiple Fund Accounts
o ClickApplication Checklist to view a list of information that you will be asked to provide in the
application.o ClickHedge Fund Marketplace FAQs to view a list of frequently asked questions about the pro-
gram.
4. To apply for participation in the program:
o Read the question on the screen and click either Yes orNo to answer.If you answer No, amessage appears informing you that you are not eligible to participate in the
Hedge Fund Capital Introduction Program.o If you answered Yes to the question, clickContinue.
5. Complete the entire application, which comprises several pages. ClickContinue to advance to thenext page in the application; clickBack if you need to correct an error on a previous page.
6. A list of required documents appears on the last page of the application. Follow the instructions on
the page to provide uswith the required documents, which will complete your application.
Wewill review your application as follows:
o Confirmation of a third-party administrator.o Wewill ensure that you have provided proof of commitment from an auditor to complete an
audited financial statement for the following year.o Our Compliance department will review your fund's trading history, investment strategy/ob-
jectives, regulatory/legal history and registration status.o Our Compliance department will review your FundManagement entity, including searches on the
company, contact person and officers/directors, and third-party professionals.
Applying for Participation in the Hedge Fund Marketplace - Multiple Fund Accounts
Multiple Hedge Fund accounts that meet the eligibility requirements can apply to open their funds to
investment at the Hedge FundMarketplace in Account Management on behalf of one or a family of funds.
To participate in the Hedge Fund Marketplace
1. Log into Account Management.
2. Click Investors' Marketplace > Advertise Services > Investing > Hedge Funds.
Account Management Users' Guide 443
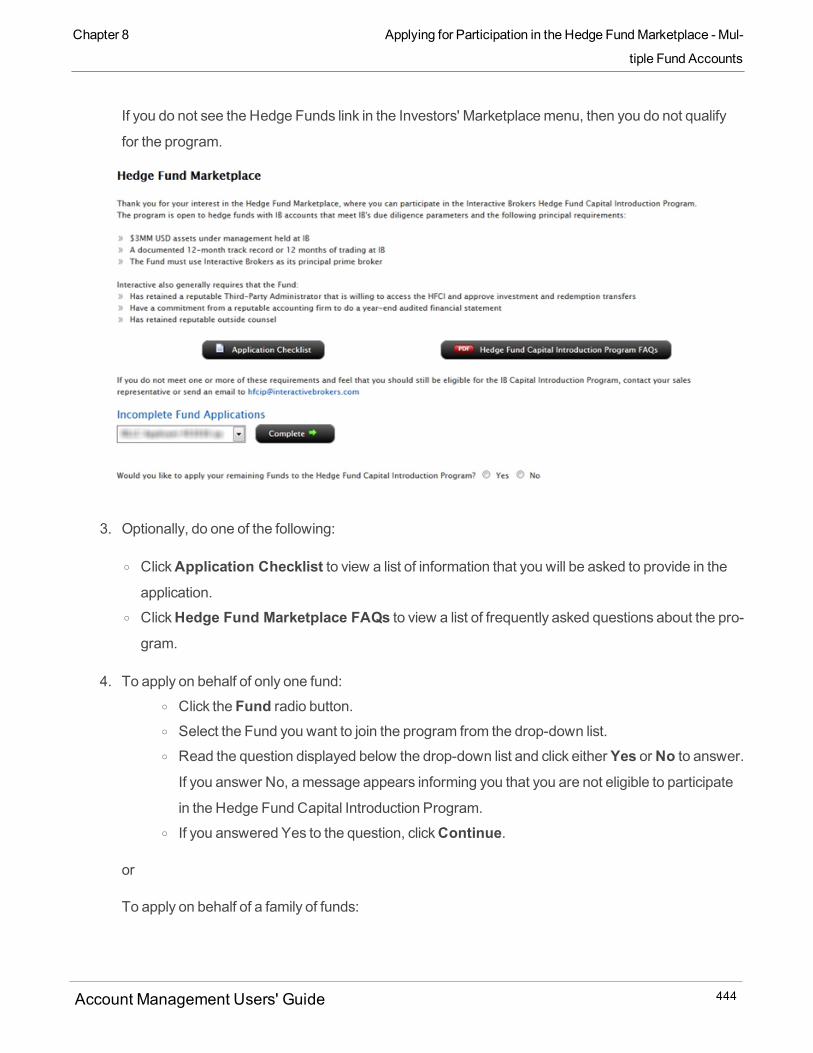
If you do not see the Hedge Funds link in the Investors' Marketplacemenu, then you do not qualify
for the program.
3. Optionally, do one of the following:
o ClickApplication Checklist to view a list of information that you will be asked to provide in the
application.o ClickHedge Fund Marketplace FAQs to view a list of frequently asked questions about the pro-
gram.
4. To apply on behalf of only one fund:o Click the Fund radio button.o Select the Fund you want to join the program from the drop-down list.o Read the question displayed below the drop-down list and click either Yes orNo to answer.If you answer No, amessage appears informing you that you are not eligible to participate
in the Hedge Fund Capital Introduction Program.o If you answered Yes to the question, clickContinue.
or
To apply on behalf of a family of funds:
Account Management Users' Guide 444
Chapter 8 Applying for Participation in the Hedge FundMarketplace - Mul-
tiple Fund Accounts
Chapter 8 Applying for Participation in the Hedge FundMarketplace - Mul-
tiple Fund Accounts
o Click the Family of Funds radio button.o Enter the name of the Family of Funds in the field provided.o Select the Funds you want to join the program from the drop-down list.o Read the question displayed below the drop-down list and click either Yes orNo to answer.If you answer No, amessage appears informing you that you are not eligible to participate
in the Hedge Fund Capital Introduction Program.o If you answered Yes to the question, clickContinue.
5. Complete the entire application. Application steps are presented as expanding/collapsing sections.
Click a section to expand it and complete the information in that section. ClickContinue to advanceto the next page in the application; clickBack if you need to correct an error on a previous page.
6. A list of required documents appears on the last page of the application. Follow the instructions on
the page to provide uswith the required documents, which will complete your application.
Wewill review your application as follows:
o Confirmation of a third-party administrator.o Wewill ensure that you have provided proof of commitment from an auditor to complete an
audited financial statement for the following year.o Our Compliance department will review your fund's trading history, investment strategy/ob-
jectives, regulatory/legal history and registration status.o Our Compliance department will review your FundManagement entity, including searches on the
company, contact person and officers/directors, and third-party professionals.
o If you have already applied for at least one Fund in your account, additional options appear on
the page.
o If you are have aMultiple Fund Account and there are any active applications that are incomplete,
you will see the Incomplete Fund Application section. In this section, you can select an applicant
with an incomplete application, then clickComplete to complete the application. You will not seethis section if you do not have any incomplete applications.
o If you are have aMultiple Fund Account and at least one of your Funds has not yet applied to par-
ticipate in the program, you will see the questionWould you like apply your remaining Fundsto the Hedge Fund Marketplace?ClickYes to apply for the remaining Funds, orNo if you do
Account Management Users' Guide 445
not want to apply for the remaining Funds. If you clickYes, you are prompted to select Fund orFamily of Funds, as in Step 3 above.
Hedge Fund Marketplace - Account Management for Participating Hedge Funds
Once your Hedge Fund has been accepted into the program, your Fund Investment Manager can log into
Account Management to perform administrative functions, including uploading new Fund documentation
for potential investors, require minimum investment sizes, identify a Fund as open or closed to new
investments, and add or remove Funds.
Rules for Updating Your Fund Information
At the end of a quarter, participating Hedge Funds have 30 days to enter updates. If they do not update
their information by that time, the Fund will bemoved to the bottom of the list of available funds on the
Hedge FundMarketplace.
If a Fund has not provided any updates after two quarters and 30 days, the Fund will be hidden from
view on the Hedge FundMarketplace.
If a Fund has not provided any updates for four quarters and 30 days, the Fund will be removed from
the Hedge FundMarketplace.
To use the Hedge Fund Marketplace Account Management Features
1. Log into Account Management. Click Investors' Marketplace > Advertise Services > HedgeFunds.
If you are aMultiple Fund account and one or more Funds are not participating in the Hedge Fund
Marketplace, you can apply on behalf of those Fundswho are not currently participating.
2. The Hedge FundMarketplace page appears.
o If you are a Single Fund Account, clickSingle Fund Account Management to continue.o If you aMultiple Fund Account, clickMultiple Fund Account Management, then select either aSingle Fund or a Family of Funds and a Fund within that Family of Funds.
The Account Management page for the selected Fund appears.
Account Management Users' Guide 446
Chapter 8 Hedge FundMarketplace - Account Management for Par-
ticipating Hedge Funds
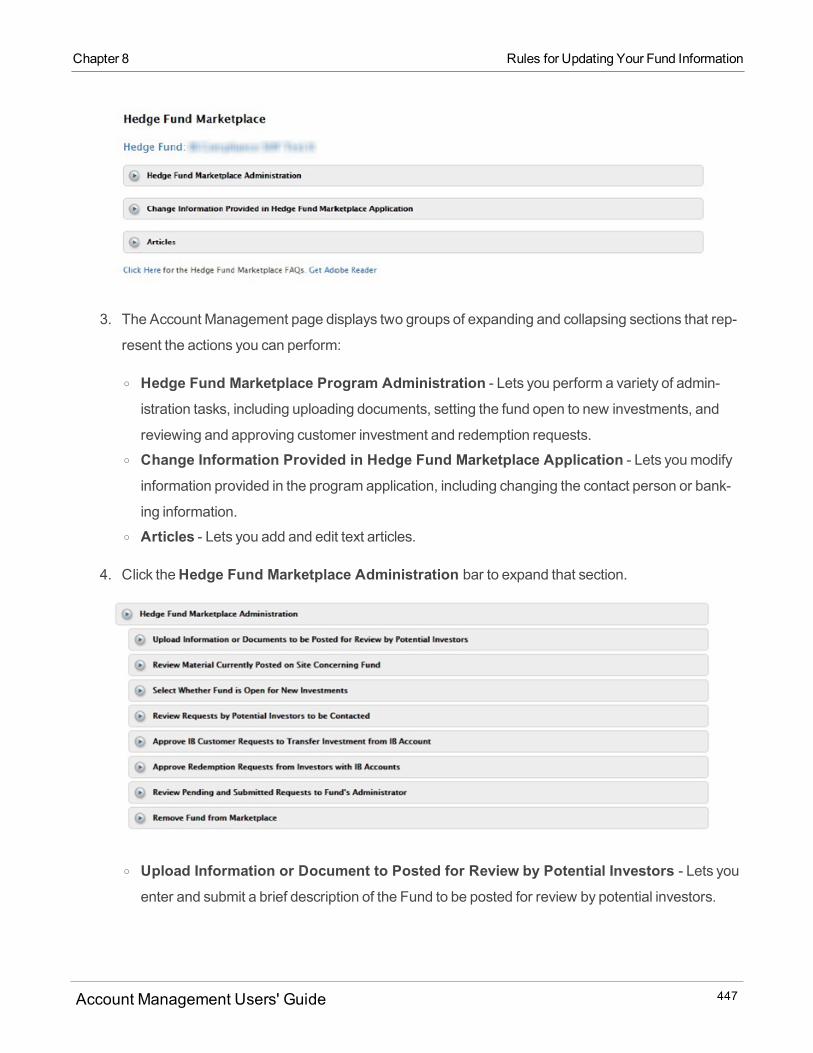
Chapter 8 Rules for Updating Your Fund Information
3. The Account Management page displays two groups of expanding and collapsing sections that rep-
resent the actions you can perform:
o Hedge Fund Marketplace Program Administration - Lets you perform a variety of admin-
istration tasks, including uploading documents, setting the fund open to new investments, and
reviewing and approving customer investment and redemption requests.o Change Information Provided in Hedge Fund Marketplace Application - Lets youmodifyinformation provided in the program application, including changing the contact person or bank-
ing information.o Articles - Lets you add and edit text articles.
4. Click theHedge Fund Marketplace Administration bar to expand that section.
o Upload Information or Document to Posted for Review by Potential Investors - Lets youenter and submit a brief description of the Fund to be posted for review by potential investors.
Account Management Users' Guide 447
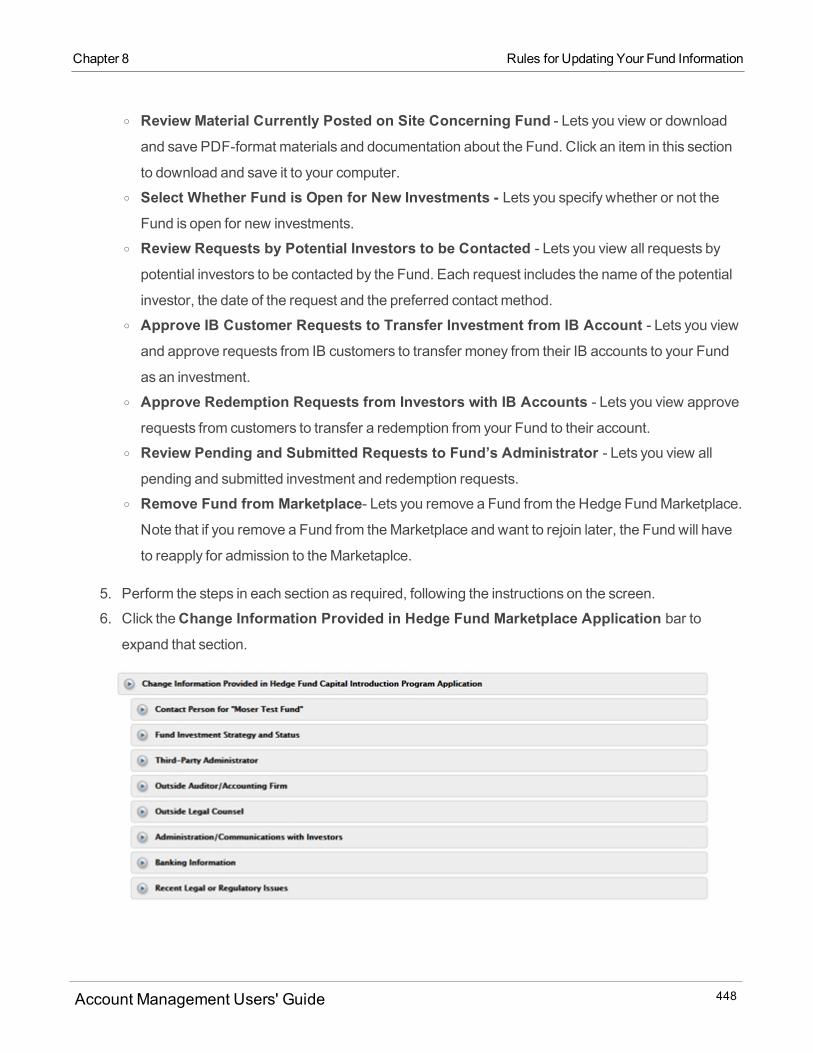
o Review Material Currently Posted on Site Concerning Fund - Lets you view or download
and save PDF-format materials and documentation about the Fund. Click an item in this section
to download and save it to your computer.o Select Whether Fund is Open for New Investments - Lets you specify whether or not theFund is open for new investments.
o Review Requests by Potential Investors to be Contacted - Lets you view all requests by
potential investors to be contacted by the Fund. Each request includes the name of the potential
investor, the date of the request and the preferred contact method.o Approve IB Customer Requests to Transfer Investment from IB Account - Lets you viewand approve requests from IB customers to transfer money from their IB accounts to your Fund
as an investment.o Approve Redemption Requests from Investors with IB Accounts - Lets you view approve
requests from customers to transfer a redemption from your Fund to their account.o Review Pending and Submitted Requests to Fund’s Administrator - Lets you view all
pending and submitted investment and redemption requests.o Remove Fund from Marketplace- Lets you remove a Fund from the Hedge FundMarketplace.
Note that if you remove a Fund from theMarketplace and want to rejoin later, the Fund will have
to reapply for admission to theMarketaplce.
5. Perform the steps in each section as required, following the instructions on the screen.
6. Click theChange Information Provided in Hedge Fund Marketplace Application bar to
expand that section.
Account Management Users' Guide 448
Chapter 8 Rules for Updating Your Fund Information
Chapter 8 Hedge FundMarketplace - Third Party Administrator
o Contact Person for “NAME OF FUND” - Lets you view andmodify information about the con-
tact person for the Fund.o Fund Investment Strategy and Status - Lets you enter information about the Fund’s strategyand status, including the number of staff, riskmanagement procedures, all saved rates of return
including the current rate of return, whether or not each rate of return has been audited, per-
centage rates of return (year-to-date, last 12months, last three years, last five years, and from
inception to date) and current assets.o Third-Party Administrator - Lets you designate a Third-Party Administrator.o Outside Auditor/Accounting Firm - Lets you view andmodify information about the outside
auditor or accounting firm used by the Fund.o Outside Legal Counsel - Lets you view andmodify information about the outside legal counsel
used by the Fund.o Administration/Communications from Investors - Lets you set the frequency andmethod ofdelivery of investor return reports and statements to investors, as well as the frequency of report-
ing to the Fund’s Third Party Administrator.o Banking Information - Lets you view andmodify the Fund’s banking information.o Recent Legal or Regulatory Issues - Lets you enter updated information about any recentlegal or regulatory issues that affecting the Fund.
7. Perform the steps in each section as required, following the instructions on the screen.
8. Click theArticles bar to expand that section.
o Add Article - Lets you enter a text-based article to be viewed by investors at the Hedge FundInvestor Site. Enter a title and the body of the article, up to 800 characters. Articlesmust be
approved before they aremade available to potential investors.o View Your Articles - Lets you view the articles that you have entered, and delete articles. Delete
an article by clicking theX icon.
9. Perform the steps in each section, following the instructions on the screen.
Hedge Fund Marketplace - Third Party Administrator
Our Hedge FundMarketplace is an online version of a traditional Capital Introduction program and is
designed to help Hedge Fundswho use IB as their principal Prime Broker market their Funds to IB
customerswho are Accredited Investors andQualified Purchasers.
Account Management Users' Guide 449
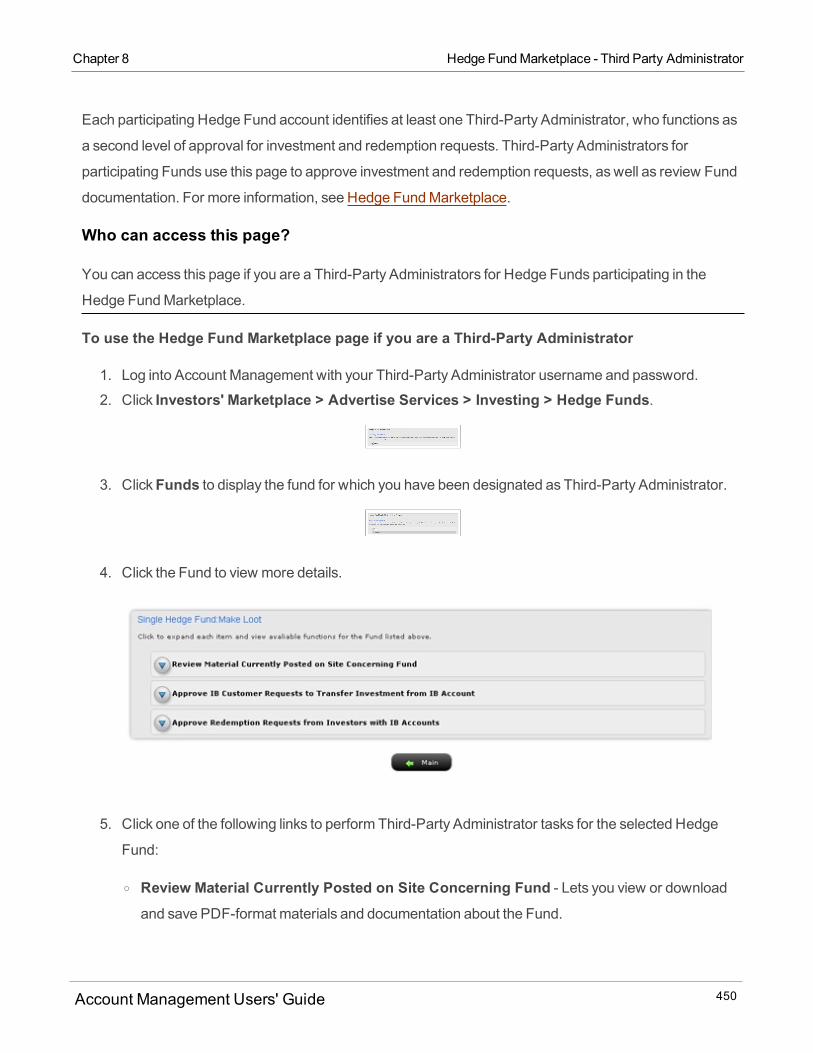
Each participating Hedge Fund account identifies at least one Third-Party Administrator, who functions as
a second level of approval for investment and redemption requests. Third-Party Administrators for
participating Funds use this page to approve investment and redemption requests, as well as review Fund
documentation. For more information, see Hedge FundMarketplace.
Who can access this page?
You can access this page if you are a Third-Party Administrators for Hedge Funds participating in the
Hedge FundMarketplace.
To use the Hedge Fund Marketplace page if you are a Third-Party Administrator
1. Log into Account Management with your Third-Party Administrator username and password.
2. Click Investors' Marketplace > Advertise Services > Investing > Hedge Funds.
3. ClickFunds to display the fund for which you have been designated as Third-Party Administrator.
4. Click the Fund to view more details.
5. Click one of the following links to perform Third-Party Administrator tasks for the selected Hedge
Fund:
o Review Material Currently Posted on Site Concerning Fund - Lets you view or download
and save PDF-format materials and documentation about the Fund.
Account Management Users' Guide 450
Chapter 8 Hedge FundMarketplace - Third Party Administrator
Chapter 8 Money Manager Marketplace
o Approve IB Customer Requests to Transfer Investment from IB Account - Lets you viewand approve requests from IB customers to transfer money from their IB accounts to your Fund
as an investment.o Approve Redemption Requests from Investors with IB Accounts - Lets you view approve
requests from IB customers to transfer a redemption from the Fund to their account.
6. Perform the steps in each section as required, following the instructions on the screen.
Money Manager Marketplace
MoneyManagers canmarket their services by registering at theMoneyManager Marketplace, where their
information can be viewed byWealth Managers.
MoneyManagers access this page to enter information about themselves and their trading services,
including their education, certification, assets and products traded, which will be available toWealth
Managers who access theMoneyManager Marketplace; and to review contact requests fromWealth
Managers.
To register at the Money Manager Marketplace
1. Log into Account Management using your Master account username and password.
2. Click Investors' Marketplace > Advertise Services > Investing > Money Manager.3. The first time you access this page, youmust sign theMoneyManager Agreement. You cannot
access theMoneyManager Marketplace until you submit the signed agreement online.
Simply type your name in the Signature field, then pressSubmit.
If you do not want your information to appear in theMoneyManager Marketplace, do not sign and
submit the agreement.
TheMoneyManager Marketplace Registration page opens.
Account Management Users' Guide 451
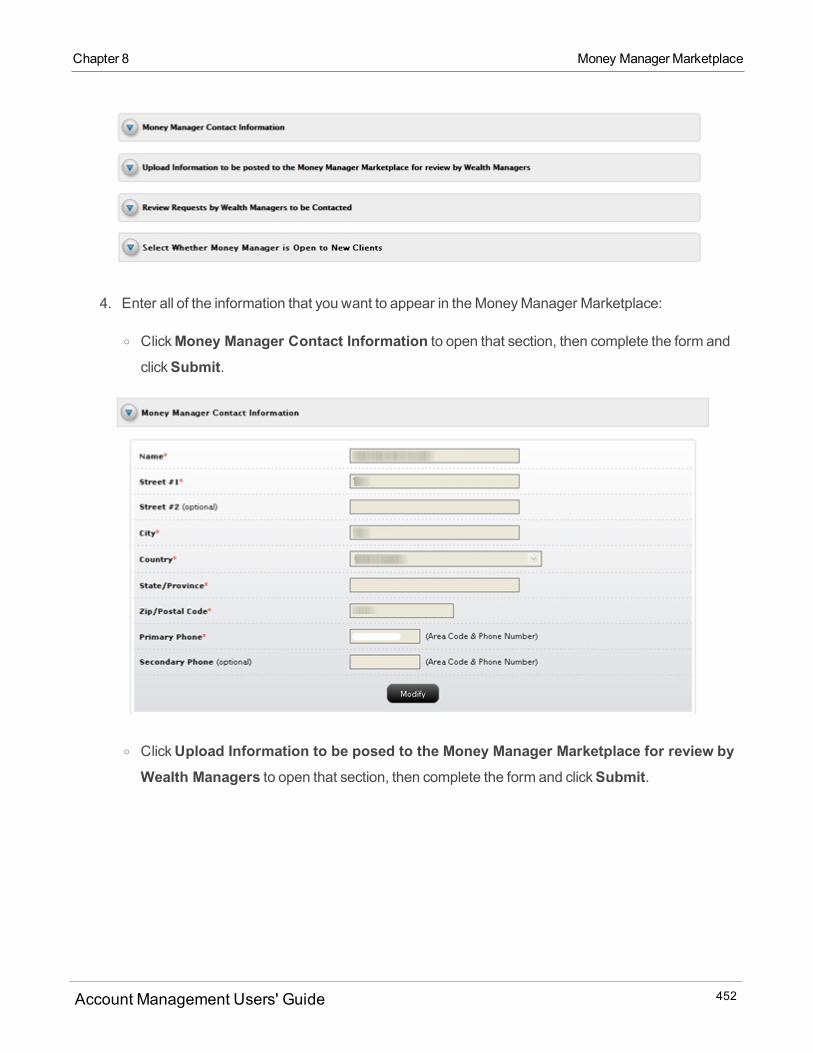
4. Enter all of the information that you want to appear in theMoneyManager Marketplace:
o ClickMoney Manager Contact Information to open that section, then complete the form and
clickSubmit.
o ClickUpload Information to be posed to the Money Manager Marketplace for review byWealth Managers to open that section, then complete the form and clickSubmit.
Account Management Users' Guide 452
Chapter 8 Money Manager Marketplace

Chapter 8 Money Manager Marketplace
o ClickReview Requests by Wealth Managers to be Contacted to open that section, then com-plete the form and clickSubmit.
Account Management Users' Guide 453
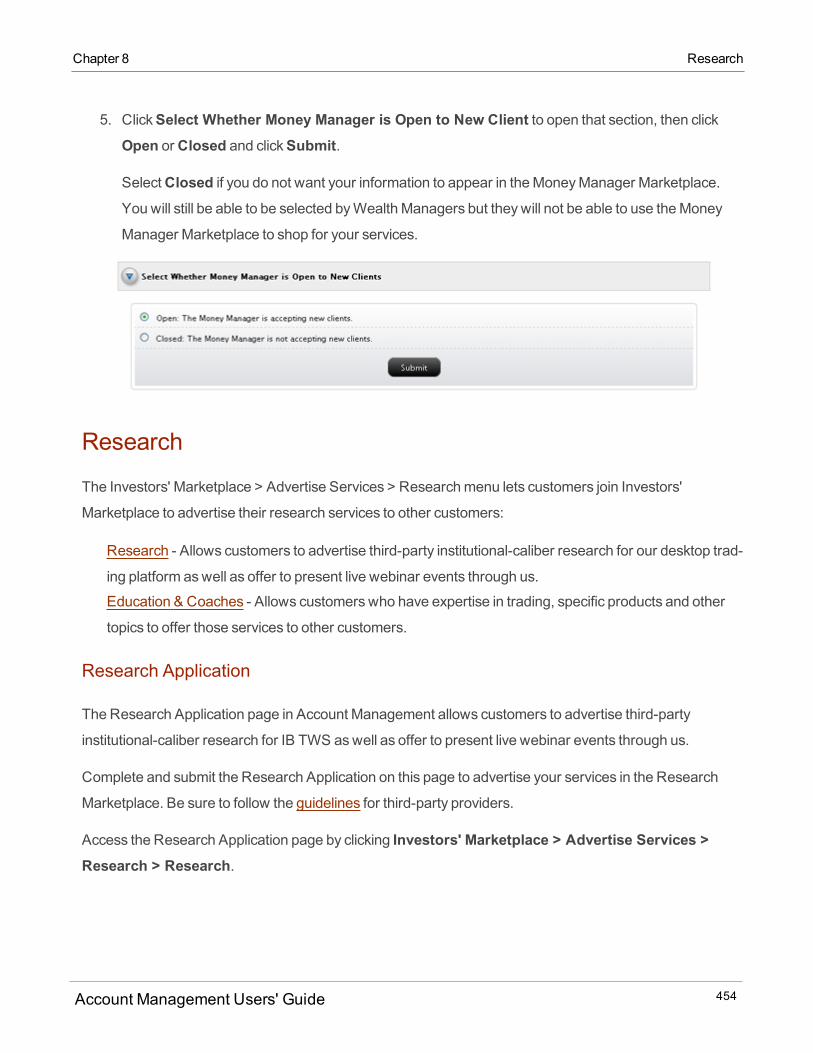
5. ClickSelect Whether Money Manager is Open to New Client to open that section, then clickOpen orClosed and clickSubmit.
SelectClosed if you do not want your information to appear in theMoneyManager Marketplace.You will still be able to be selected byWealth Managers but theywill not be able to use theMoney
Manager Marketplace to shop for your services.
Research
The Investors' Marketplace > Advertise Services > Researchmenu lets customers join Investors'
Marketplace to advertise their research services to other customers:
Research - Allows customers to advertise third-party institutional-caliber research for our desktop trad-
ing platform aswell as offer to present live webinar events through us.
Education & Coaches - Allows customerswho have expertise in trading, specific products and other
topics to offer those services to other customers.
Research Application
TheResearch Application page in Account Management allows customers to advertise third-party
institutional-caliber research for IB TWS aswell as offer to present live webinar events through us.
Complete and submit the Research Application on this page to advertise your services in the Research
Marketplace. Be sure to follow the guidelines for third-party providers.
Access the Research Application page by clicking Investors' Marketplace > Advertise Services >Research > Research.
Account Management Users' Guide 454
Chapter 8 Research
Chapter 8 Education & Coaches Application
Education & Coaches Application
The Education & Coaches Application page allows customerswho have expertise in trading, specific
products and other topics to offer those services to other customers.
Complete and submit the Educator Application on this page to advertise your services in the Education
& CoachesMarketplace. Be sure to follow the guidelines for third-party providers.
Access the Education & Coaches Application page by clicking Investors' Marketplace > AdvertiseServices > Research > Education & Coaches.
Technology
The Investors' Marketplace > Advertise Services > Technologymenu lets customers join Investors'
Marketplace to advertise their technology services to other customers:
Software Tools - Allows customers to advertise potentially complementary software programs that
expand the functionality of IB TWS to other customers.
Programming Consultants - Allows customerswhomay be able to assist API and FIX CTCI customers
to offer their programming expertise to other customers.
Software Vendors Application
TheAdvertise Services > Technology > Software Vendors page in the Investors' Marketplace allowsour customers to advertise potentially complementary software programs that expand the functionality of
our desktop trading platform to other customers.
Complete and submit the Software Vendors Application on this page to advertise your services in the
Investors' Marketplace. Be sure to follow the guidelines for third-party providers.
Programming Consultant Application
The Programming Consultant Application page allows customerswhomay be able to assist API and FIX
CTCI customers to offer their programming expertise to other customers.
Complete and submit the Programming Consultant Application on this page to advertise your services in
the Programming Consultant Marketplace. Be sure to follow the guidelines for third-party providers.
Account Management Users' Guide 455
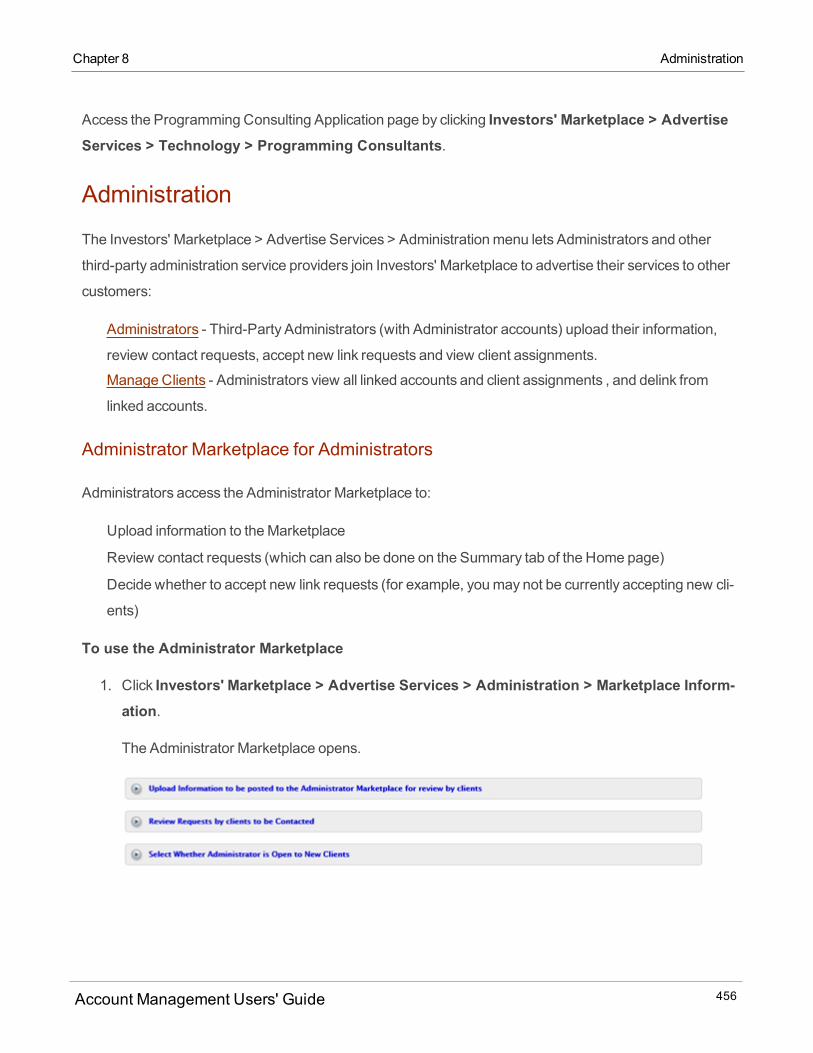
Access the Programming Consulting Application page by clicking Investors' Marketplace > AdvertiseServices > Technology > Programming Consultants.
Administration
The Investors' Marketplace > Advertise Services > Administrationmenu lets Administrators and other
third-party administration service providers join Investors' Marketplace to advertise their services to other
customers:
Administrators - Third-Party Administrators (with Administrator accounts) upload their information,
review contact requests, accept new link requests and view client assignments.
Manage Clients - Administrators view all linked accounts and client assignments , and delink from
linked accounts.
Administrator Marketplace for Administrators
Administrators access the Administrator Marketplace to:
Upload information to theMarketplace
Review contact requests (which can also be done on the Summary tab of the Home page)
Decide whether to accept new link requests (for example, youmay not be currently accepting new cli-
ents)
To use the Administrator Marketplace
1. Click Investors' Marketplace > Advertise Services > Administration > Marketplace Inform-ation.
The Administrator Marketplace opens.
Account Management Users' Guide 456
Chapter 8 Administration
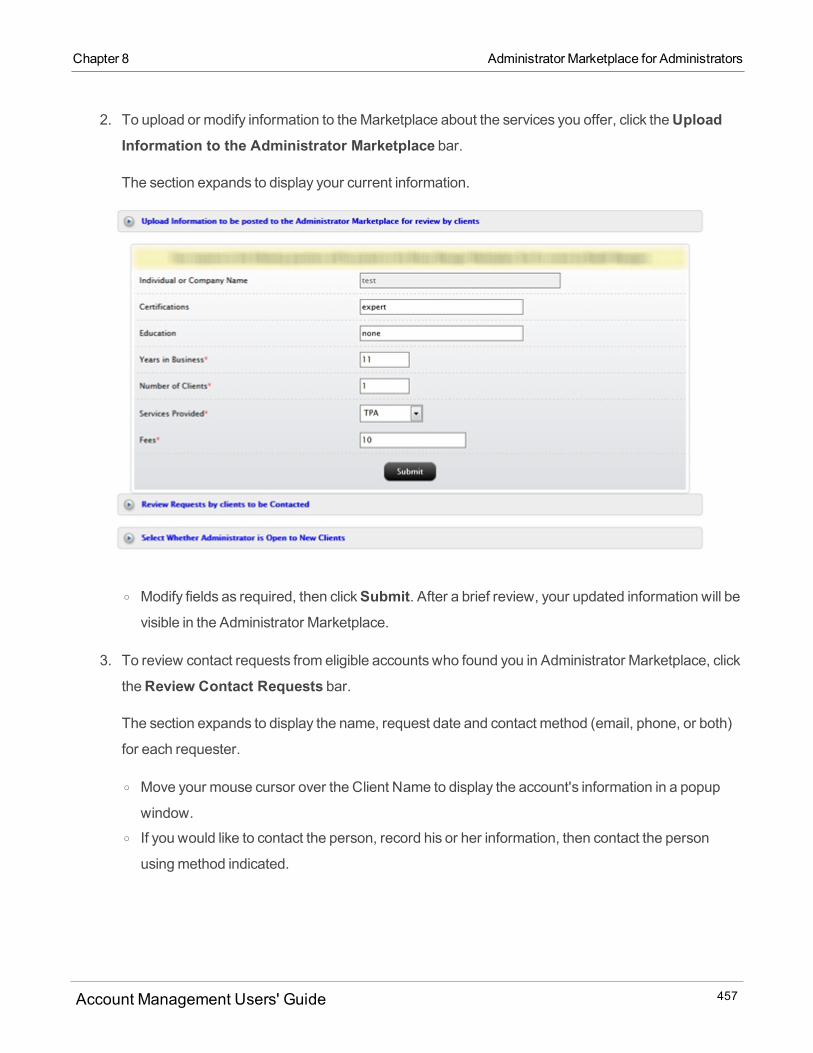
Chapter 8 Administrator Marketplace for Administrators
2. To upload or modify information to theMarketplace about the services you offer, click theUploadInformation to the Administrator Marketplace bar.
The section expands to display your current information.
o Modify fields as required, then clickSubmit. After a brief review, your updated information will bevisible in the Administrator Marketplace.
3. To review contact requests from eligible accounts who found you in Administrator Marketplace, click
theReview Contact Requests bar.
The section expands to display the name, request date and contact method (email, phone, or both)
for each requester.
o Move your mouse cursor over the Client Name to display the account's information in a popup
window.o If you would like to contact the person, record his or her information, then contact the person
usingmethod indicated.
Account Management Users' Guide 457
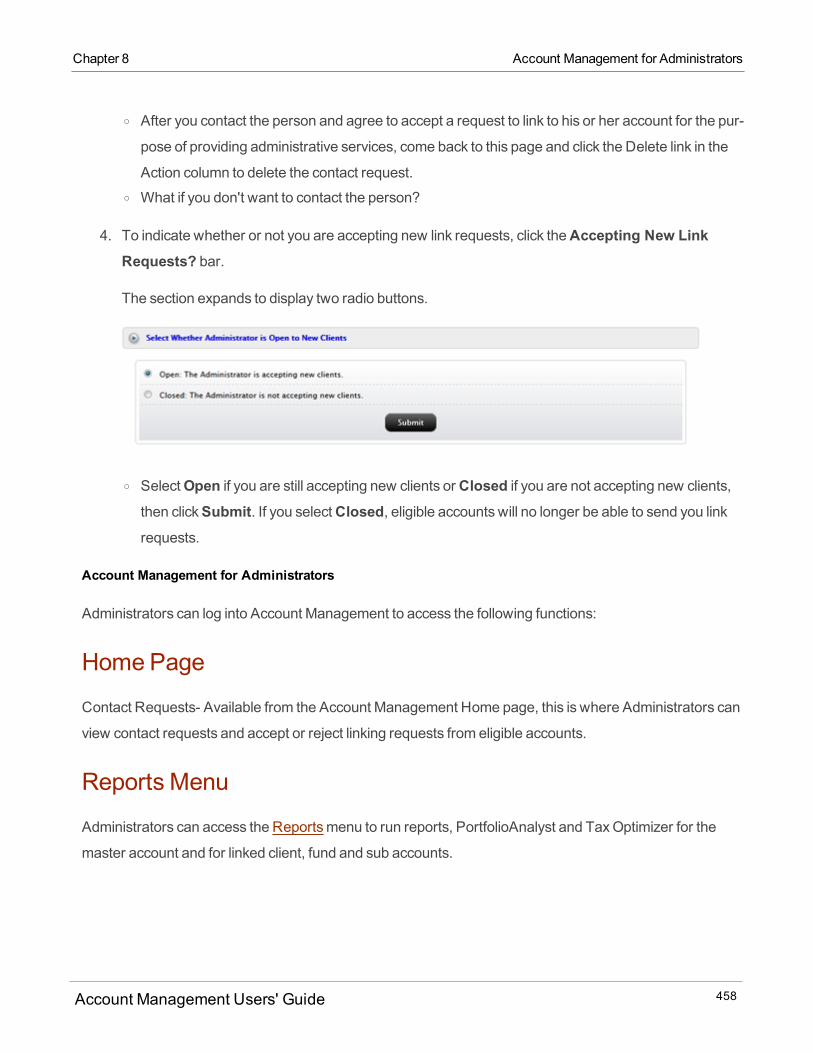
o After you contact the person and agree to accept a request to link to his or her account for the pur-
pose of providing administrative services, come back to this page and click the Delete link in the
Action column to delete the contact request.o What if you don't want to contact the person?
4. To indicate whether or not you are accepting new link requests, click theAccepting New LinkRequests? bar.
The section expands to display two radio buttons.
o SelectOpen if you are still accepting new clients orClosed if you are not accepting new clients,
then clickSubmit. If you selectClosed, eligible accounts will no longer be able to send you linkrequests.
Account Management for Administrators
Administrators can log into Account Management to access the following functions:
HomePage
Contact Requests- Available from the Account Management Home page, this is where Administrators can
view contact requests and accept or reject linking requests from eligible accounts.
Reports Menu
Administrators can access the Reportsmenu to run reports, PortfolioAnalyst and TaxOptimizer for the
master account and for linked client, fund and sub accounts.
Account Management Users' Guide 458
Chapter 8 Account Management for Administrators
Chapter 8 Manage Account Menu
Manage Account Menu
Profile - Allows an Administrator to change his or her contact information.
Close Account - Allows an Administrator to close his or her account.
Change Password - Allows an Administrator to change his or her account password.
Change Email Address - Allows an Administrator to change his or her email address of record.
Secure Login System - Allows an Administrator to request or activate a security device.
AccessRights - Allows and Administrator to add users and user roles to the account and set and
modify the users' access rights.
Investors' MarketplaceMenu
Advertise Services > Administration > Administrators - Allows an Administrator to modify his or her
information that appears in the Administrator Marketplace, upload information to theMarketplace,
review contact requests and prevent their information from being visible in theMarketplace.
Investors' Marketplace > Advertise Services > Administration > Marketplace Information - Allows an
Administrator to view all active and pending linked accounts and client/fund/sub account assignments.
Manage Clients
This page lets Administrators:
View all active and pending linked accounts.
Delink from a linked account.
View client, fund and sub accounts to which they are currently assigned.
Who can access the Manage Clients page?
You can access this page if you are an Administrator or an Administrator account user with access rights to
this page.
To use the Manage Clients page
1. Click Investors' Marketplace > Advertise Services > Administration > Manage Clients.
TheManage Clients page opens.
Account Management Users' Guide 459
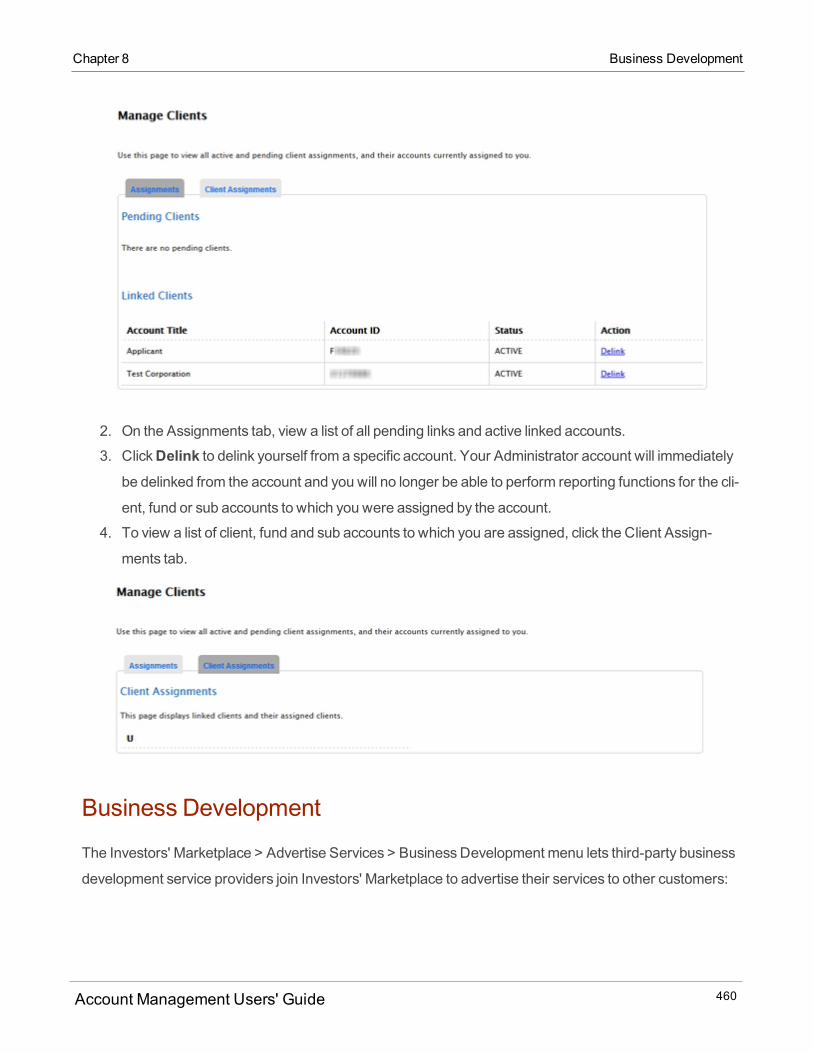
2. On the Assignments tab, view a list of all pending links and active linked accounts.
3. ClickDelink to delink yourself from a specific account. Your Administrator account will immediately
be delinked from the account and you will no longer be able to perform reporting functions for the cli-
ent, fund or sub accounts to which you were assigned by the account.
4. To view a list of client, fund and sub accounts to which you are assigned, click the Client Assign-
ments tab.
Business Development
The Investors' Marketplace > Advertise Services > BusinessDevelopment menu lets third-party business
development service providers join Investors' Marketplace to advertise their services to other customers:
Account Management Users' Guide 460
Chapter 8 Business Development
Chapter 8 Advertising Application
Advertising - Allows customers to offer their third-party advertising andmarketing services to other cus-
tomers.
Business Analysts - Allows customers to offer their third-party business analysis services to other cus-
tomers.
Financing Firms - Allows customerswho are venture
Careers - Allows customers looking for employment to post their resumes and other pertinent inform-
ation to other customerswho are looking to fill positions.
Corporate Access Providers - Allows corporate access providers to advertise their services. Corporate
access providers facilitate meetings, roadshows and conference calls between institutional investors
and companies looking for potential investors
Advertising Application
The Advertising Application page in the Investors' Marketplace allows customers to offer their advertising
andmarketing services to other customers.
Complete and submit the Advertising Application on this page to offer your advertising services in the
AdvertisingMarketplace. Be sure to follow the guidelines for third-party providers.
Access the Advertising Application page by clicking Investors' Marketplace > Advertise Services >Business Development > Advertising.
Business Analyst Application
The Business Analyst Application page in the Investors' Marketplace allows customers to offer their
business analysis services to other customers.
Complete and submit the Business Analyst Application on this page to advertise your services in the
Business Analyst Marketplace. Be sure to follow the guidelines for third-party providers.
Access the Business Analyst Application page by clicking Investors' Marketplace > Advertise Services> Business Development > Business Analysts.
Account Management Users' Guide 461
Financing Firms Application
The Financing FirmsApplication page in the Investors' Marketplace allows customers to offer their
financing services to other customers.
Complete and submit the Financing FirmsApplication on this page to offer your services in the Financing
FirmsMarketplace. Be sure to follow the guidelines for third-party providers.
Access the Advertising Application page by clicking Investors' Marketplace > Advertise Services >Business Development > Financing Firms.
Careers Application
There are two versions of this application, depending on what you are looking for:
The Careers Application lets Advisors, Hedge Funds, Proprietary Trading GroupMasters or Brokers
post open positions.
The Careers Application lets account holders who are not Advisors, Hedge Funds, Proprietary Trading
GroupMasters and Brokers post their resumes.
Access the CareersMarketplace by clicking Investors' Marketplace > Advertise Services > BusinessDevelopment > Careers.
Complete and submit the application on this page to either post an open position or post your resume. Be
sure to follow the guidelines for third-party providers.
Only Advisors, Brokers, Proprietary Trading GroupMaster Users and Hedge Fund Investment Managers
can post jobs and theymust be logged into Account Management to do so.
Corporate Access Providers Marketplace
TheCorporate Access Providers Application page in the Investors' Marketplace allows corporate access
providers to offer their services to other customers.
Complete and submit the application on this page to offer your services in the Corporate Access Providers
Marketplace. Be sure to follow the guidelines for third-party providers.
Account Management Users' Guide 462
Chapter 8 Financing Firms Application
Chapter 8 Corporate Access Providers Marketplace
Access the Advertising Application page by clicking Investors' Marketplace > Advertise Services >Business Development > Corporate Access Providers.
Account Management Users' Guide 463

Account Management Users' Guide 464
SupportThe Support menu gives you quick access to our Client Services offerings.
This chapter includes the following topics:
Message Center
Live Chat
Contacts
Service Tips
Knowledge Base
Tools
SystemStatus
Paper Forms
Client Services Message Center
TheClient ServicesMessage Center lets you submit questions directly to Client Services using inquiry
tickets and track the status of your Client Services inquiries.
Use the Client ServicesMessage Center to:
Create a new inquiry ticket, and attach a file to the ticket
Modify an existing inquiry ticket
Set Ticket Notification Preferences
Cancel or close a inquiry ticket
View corporate actions
Submit a TaxReporting Correction Form
Request a trade cancellation
The Client ServicesMessage Center includes the following features:
Every inquiry is assigned a reference number, called a ticket. This reference number can be used to effi-
ciently track the progress of the inquiry.
9
Account Management Users' Guide 465

The real-time status of an inquiry is always displayed in themainMessage Center window. You will
know if the issue has been picked up by an service expert, which expert is handling your issue, and
whether it is being addressed by our main help team or by a specialty team.
Both customers and staff can refine or add information to the ticket, permitting easy clarifications or fol-
low up to the original inquiry. In addition, customers can cancel or close tickets once the issue has been
addressed, giving them greater control over the process.
History of both open and completed inquiries.
Fast response - Tickets are assigned to an representative usually within a few minutes and always
within 2 hours during European and North American trading hours. During Asian trading hours,
response timesmay be longer.
Message Center Window
When you clickSupport > Message Center, theMessage Center appears.
Account Management Users' Guide 466
Chapter 9 Message CenterWindow
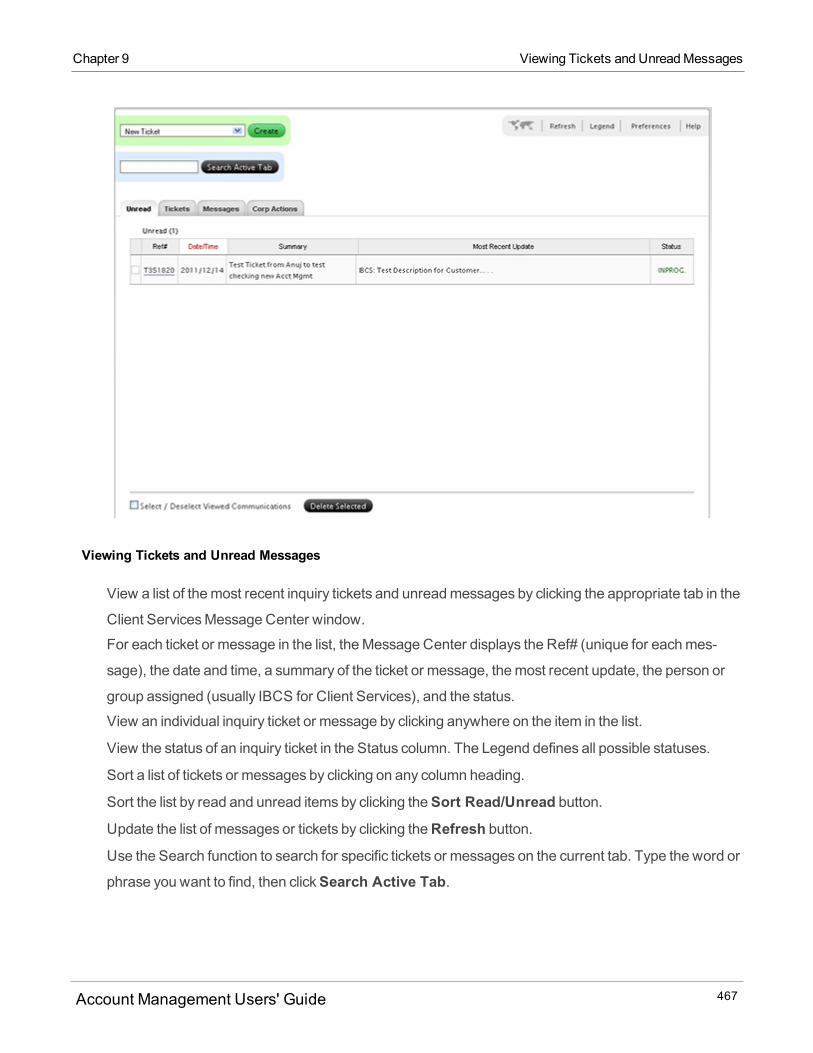
Chapter 9 Viewing Tickets and UnreadMessages
Viewing Tickets and Unread Messages
View a list of themost recent inquiry tickets and unreadmessages by clicking the appropriate tab in the
Client ServicesMessage Center window.
For each ticket or message in the list, theMessage Center displays the Ref# (unique for eachmes-
sage), the date and time, a summary of the ticket or message, themost recent update, the person or
group assigned (usually IBCS for Client Services), and the status.
View an individual inquiry ticket or message by clicking anywhere on the item in the list.
View the status of an inquiry ticket in the Status column. The Legend defines all possible statuses.
Sort a list of tickets or messages by clicking on any column heading.
Sort the list by read and unread items by clicking theSort Read/Unread button.
Update the list of messages or tickets by clicking theRefresh button.
Use the Search function to search for specific tickets or messages on the current tab. Type the word or
phrase you want to find, then clickSearch Active Tab.
Account Management Users' Guide 467
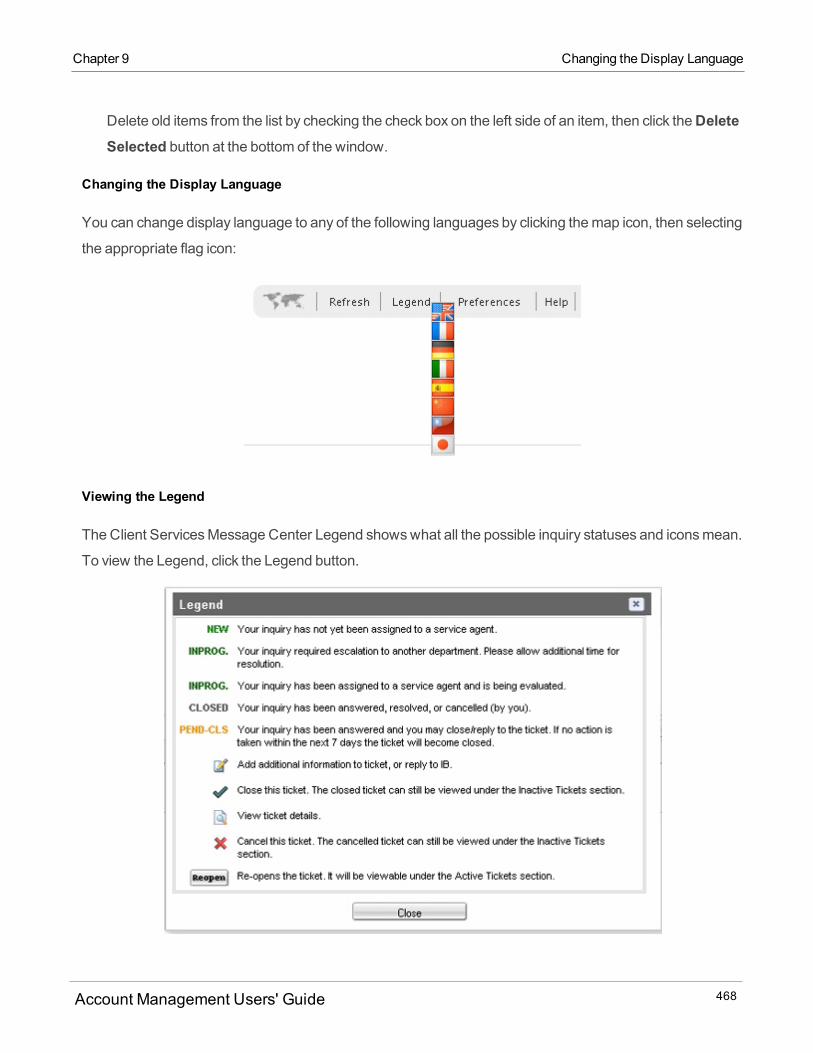
Delete old items from the list by checking the check box on the left side of an item, then click theDeleteSelected button at the bottom of the window.
Changing the Display Language
You can change display language to any of the following languages by clicking themap icon, then selecting
the appropriate flag icon:
Viewing the Legend
TheClient ServicesMessage Center Legend showswhat all the possible inquiry statuses and iconsmean.
To view the Legend, click the Legend button.
Account Management Users' Guide 468
Chapter 9 Changing the Display Language
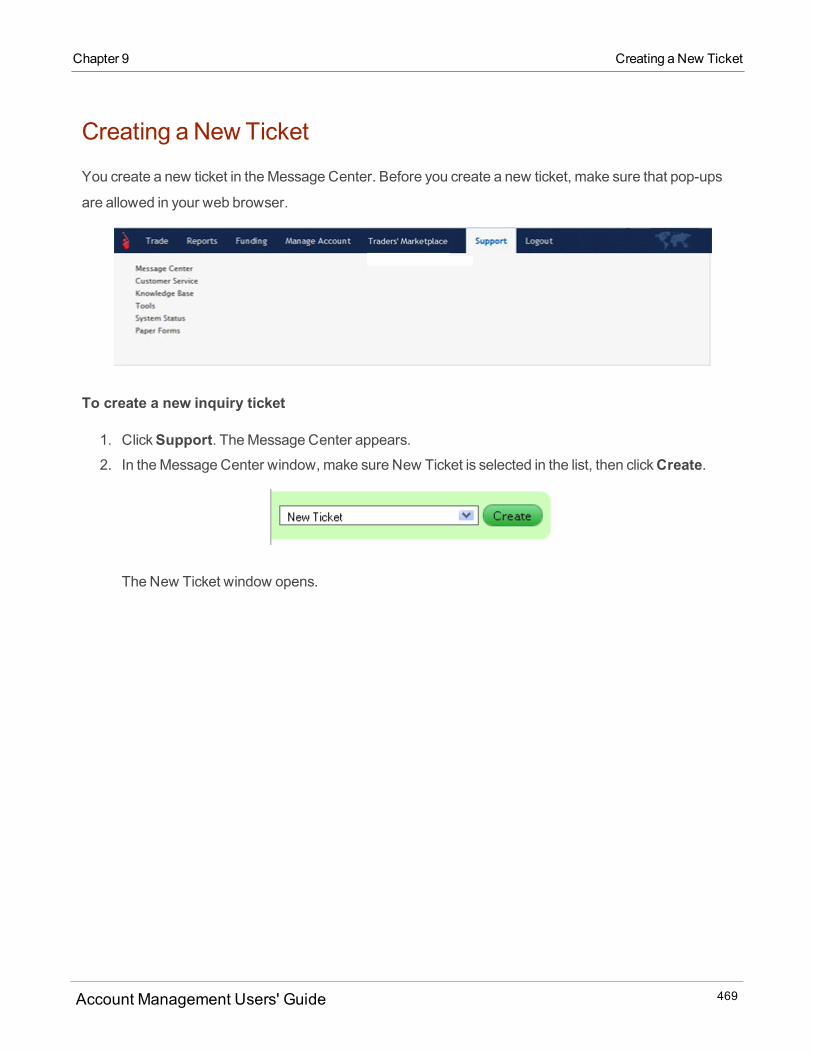
Chapter 9 Creating a New Ticket
Creating a New Ticket
You create a new ticket in theMessage Center. Before you create a new ticket, make sure that pop-ups
are allowed in your web browser.
To create a new inquiry ticket
1. ClickSupport. TheMessage Center appears.2. In theMessage Center window, make sure New Ticket is selected in the list, then clickCreate.
The New Ticket window opens.
Account Management Users' Guide 469
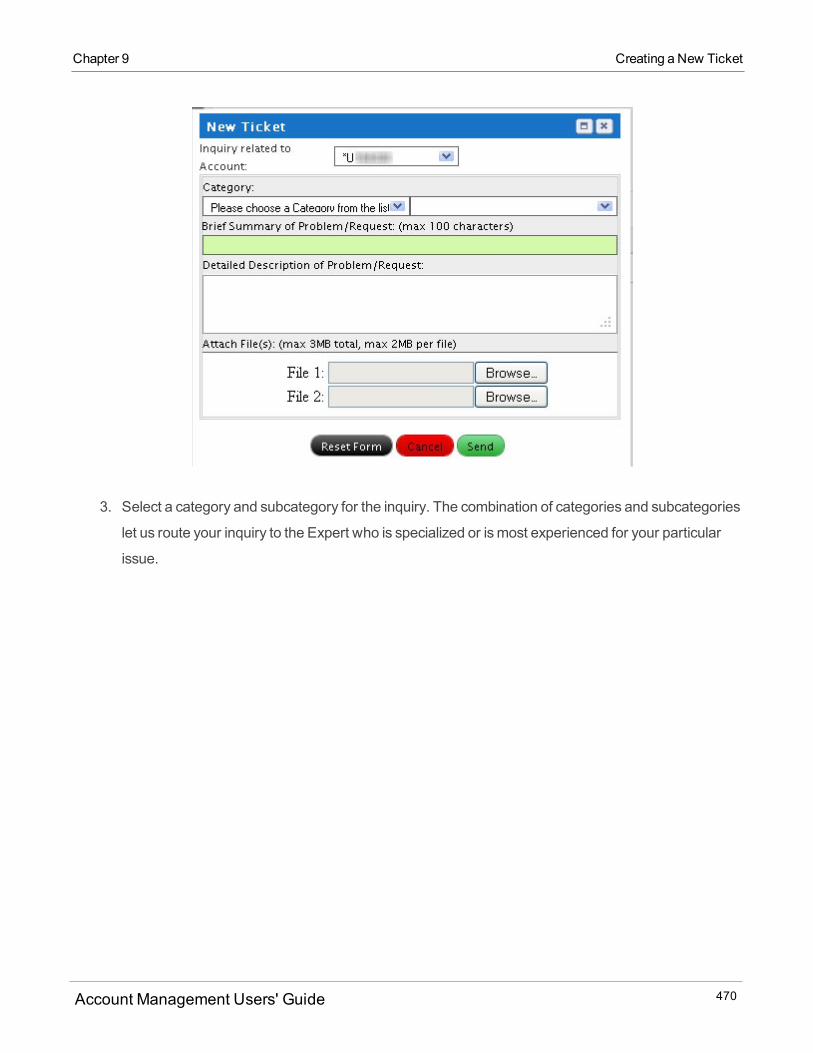
3. Select a category and subcategory for the inquiry. The combination of categories and subcategories
let us route your inquiry to the Expert who is specialized or ismost experienced for your particular
issue.
Account Management Users' Guide 470
Chapter 9 Creating a New Ticket
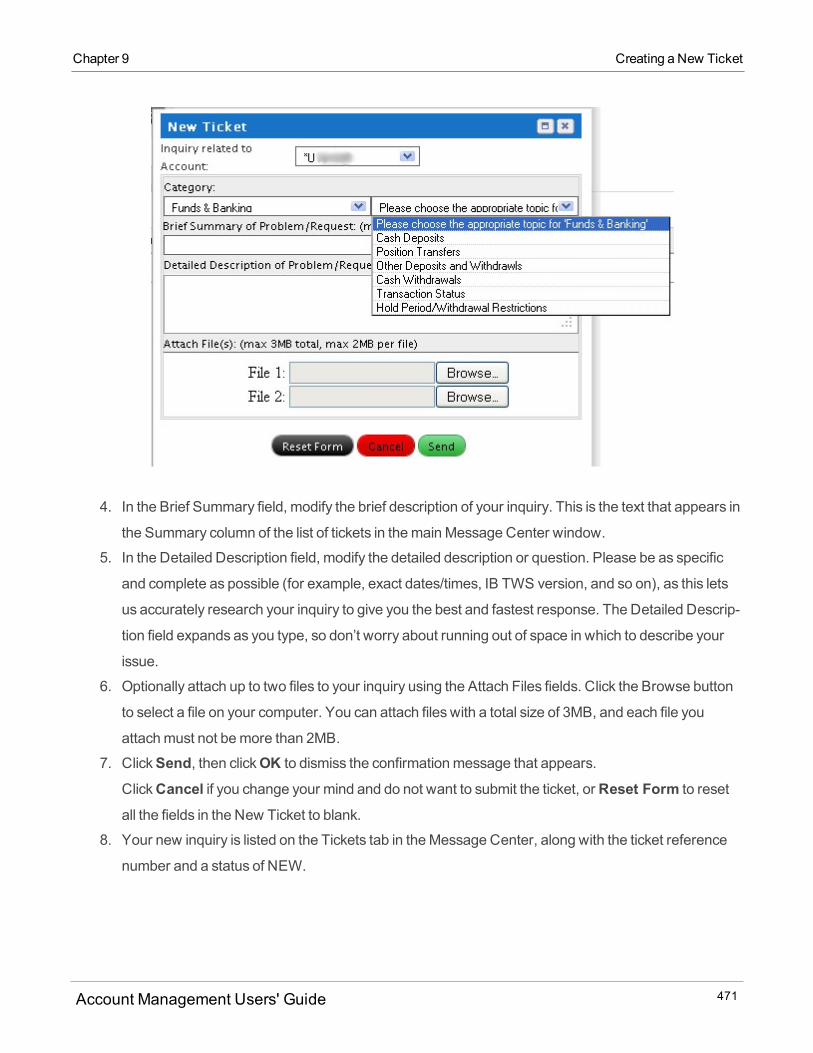
Chapter 9 Creating a New Ticket
4. In the Brief Summary field, modify the brief description of your inquiry. This is the text that appears in
the Summary column of the list of tickets in themainMessage Center window.
5. In the Detailed Description field, modify the detailed description or question. Please be as specific
and complete as possible (for example, exact dates/times, IB TWS version, and so on), as this lets
us accurately research your inquiry to give you the best and fastest response. The Detailed Descrip-
tion field expands as you type, so don’t worry about running out of space in which to describe your
issue.
6. Optionally attach up to two files to your inquiry using the Attach Files fields. Click the Browse button
to select a file on your computer. You can attach files with a total size of 3MB, and each file you
attachmust not bemore than 2MB.
7. ClickSend, then clickOK to dismiss the confirmationmessage that appears.
ClickCancel if you change your mind and do not want to submit the ticket, orReset Form to reset
all the fields in the New Ticket to blank.
8. Your new inquiry is listed on the Tickets tab in theMessage Center, along with the ticket reference
number and a status of NEW.
Account Management Users' Guide 471

Modifying a Ticket
To modify an existing inquiry ticket
1. ClickSupport. TheMessage Center appears.2. Click the Tickets tab to view all of your tickets.
3. Click the row that contains the ticket you want to modify. The View Ticket window opens.
4. ClickReply. The Edit Ticket window opens.
Account Management Users' Guide 472
Chapter 9 Modifying a Ticket
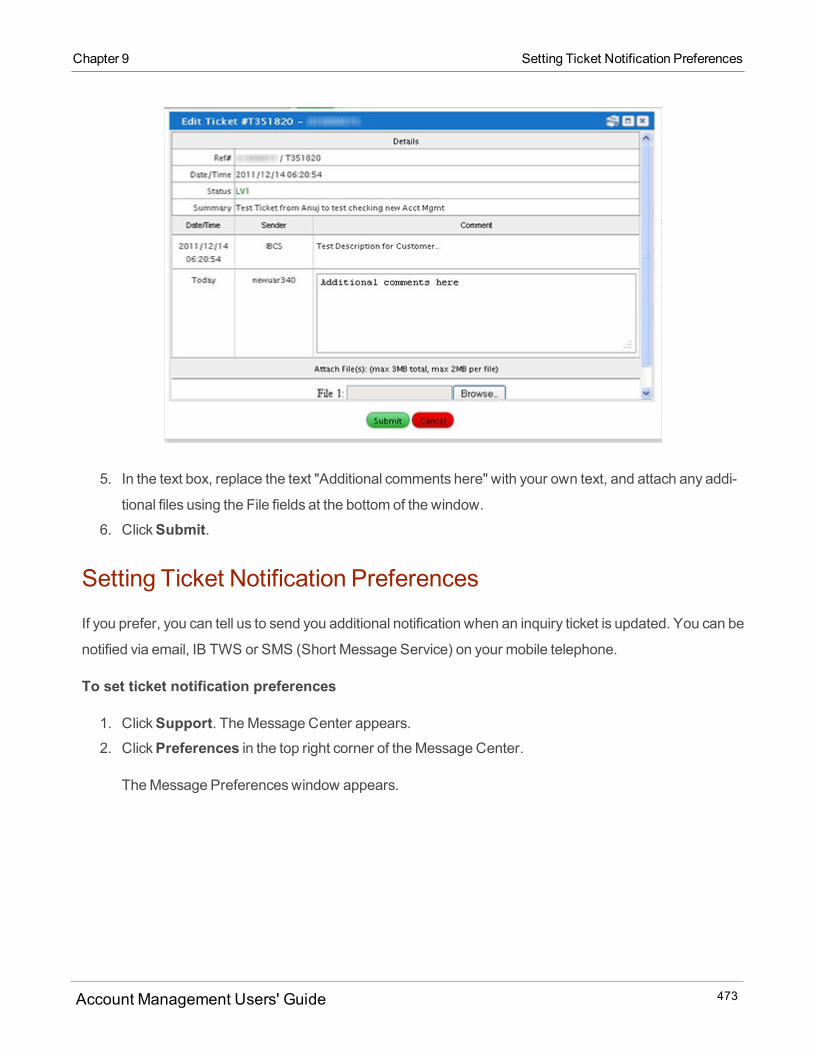
Chapter 9 Setting Ticket Notification Preferences
5. In the text box, replace the text "Additional comments here" with your own text, and attach any addi-
tional files using the File fields at the bottom of the window.
6. ClickSubmit.
Setting Ticket Notification Preferences
If you prefer, you can tell us to send you additional notification when an inquiry ticket is updated. You can be
notified via email, IB TWS or SMS (Short Message Service) on your mobile telephone.
To set ticket notification preferences
1. ClickSupport. TheMessage Center appears.2. ClickPreferences in the top right corner of theMessage Center.
TheMessage Preferenceswindow appears.
Account Management Users' Guide 473
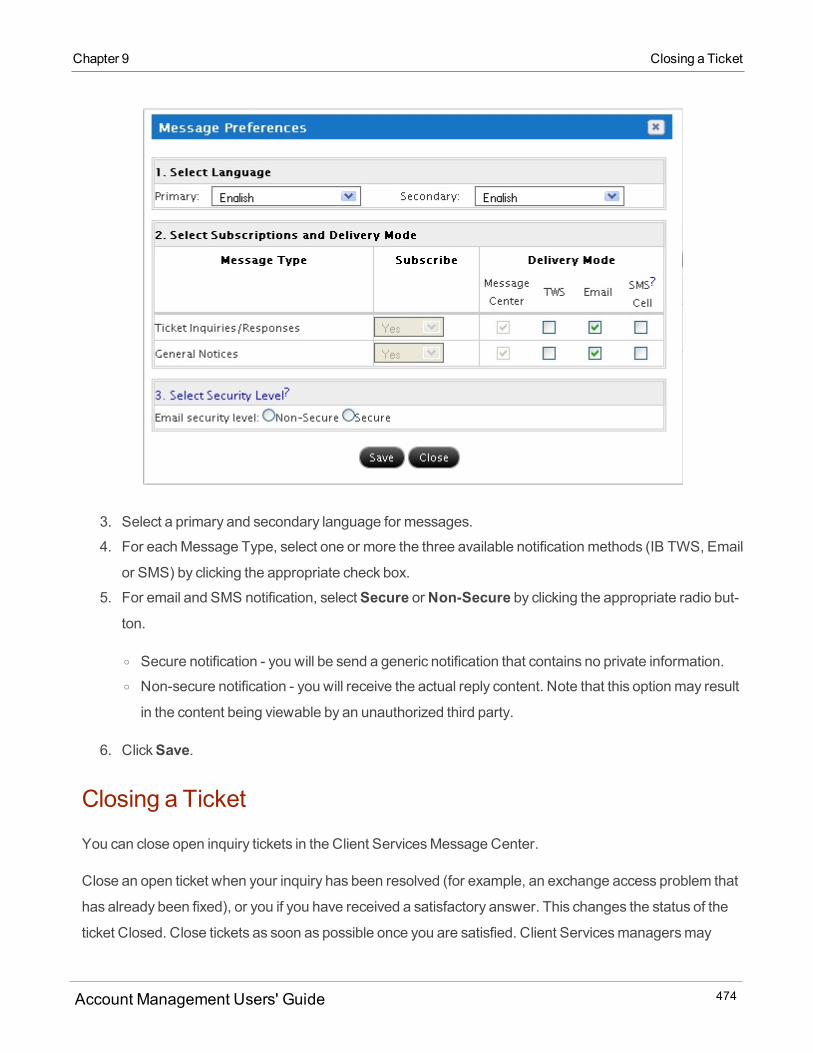
3. Select a primary and secondary language for messages.
4. For eachMessage Type, select one or more the three available notificationmethods (IB TWS, Email
or SMS) by clicking the appropriate check box.
5. For email and SMS notification, selectSecure orNon-Secure by clicking the appropriate radio but-ton.
o Secure notification - you will be send a generic notification that contains no private information.o Non-secure notification - you will receive the actual reply content. Note that this optionmay result
in the content being viewable by an unauthorized third party.
6. ClickSave.
Closing a Ticket
You can close open inquiry tickets in the Client ServicesMessage Center.
Close an open ticket when your inquiry has been resolved (for example, an exchange access problem that
has already been fixed), or you if you have received a satisfactory answer. This changes the status of the
ticket Closed. Close tickets as soon as possible once you are satisfied. Client Servicesmanagersmay
Account Management Users' Guide 474
Chapter 9 Closing a Ticket
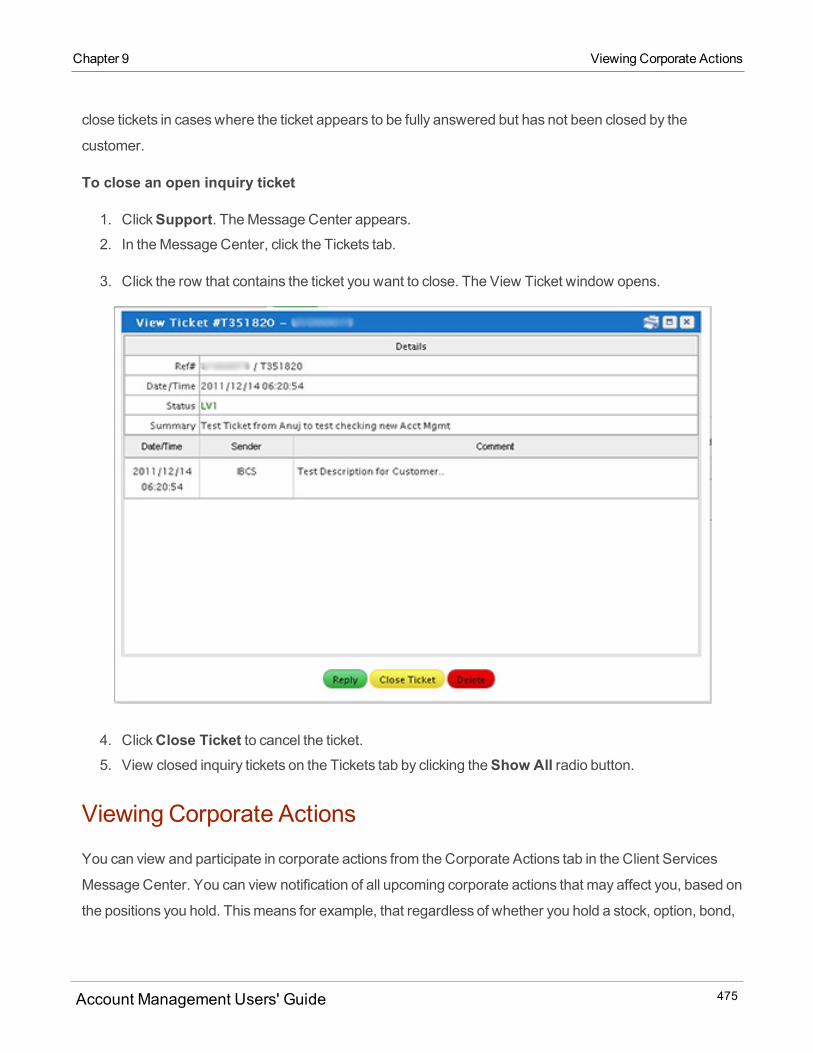
Chapter 9 Viewing Corporate Actions
close tickets in caseswhere the ticket appears to be fully answered but has not been closed by the
customer.
To close an open inquiry ticket
1. ClickSupport. TheMessage Center appears.2. In theMessage Center, click the Tickets tab.
3. Click the row that contains the ticket you want to close. The View Ticket window opens.
4. ClickClose Ticket to cancel the ticket.5. View closed inquiry tickets on the Tickets tab by clicking theShow All radio button.
Viewing Corporate Actions
You can view and participate in corporate actions from the Corporate Actions tab in the Client Services
Message Center. You can view notification of all upcoming corporate actions that may affect you, based on
the positions you hold. Thismeans for example, that regardless of whether you hold a stock, option, bond,
Account Management Users' Guide 475
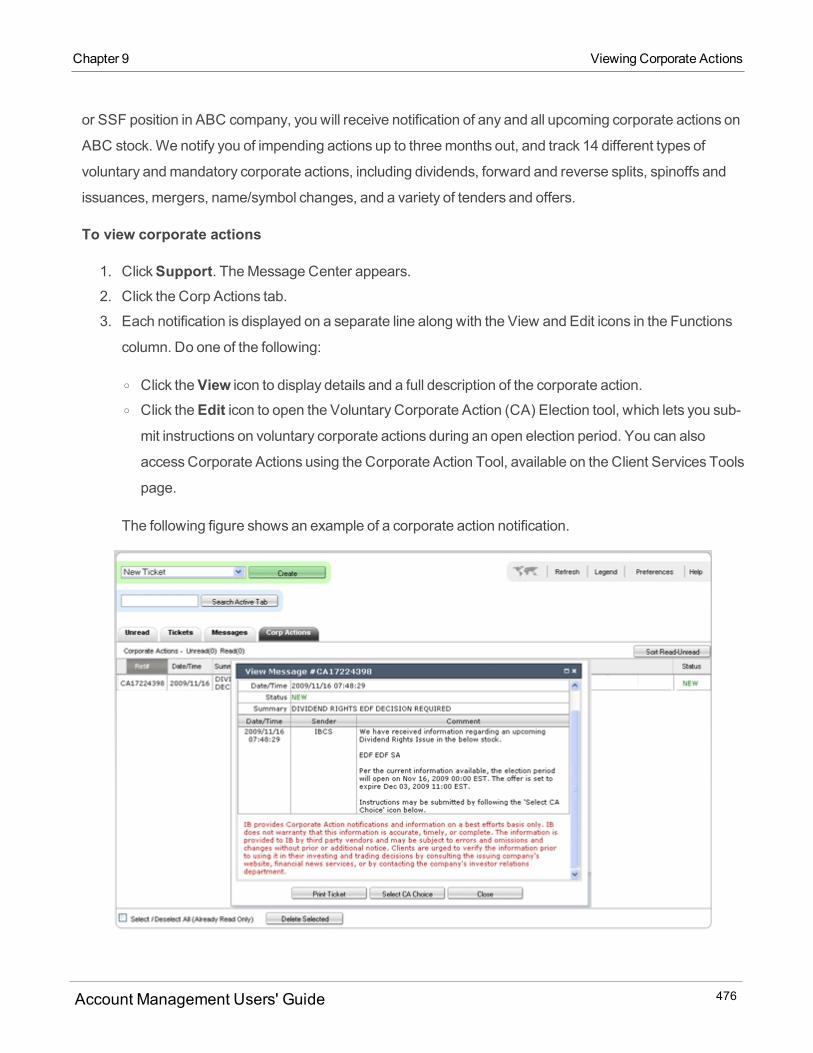
or SSF position in ABC company, you will receive notification of any and all upcoming corporate actions on
ABC stock. We notify you of impending actions up to threemonths out, and track 14 different types of
voluntary andmandatory corporate actions, including dividends, forward and reverse splits, spinoffs and
issuances, mergers, name/symbol changes, and a variety of tenders and offers.
To view corporate actions
1. ClickSupport. TheMessage Center appears.2. Click the Corp Actions tab.
3. Each notification is displayed on a separate line along with the View and Edit icons in the Functions
column. Do one of the following:
o Click theView icon to display details and a full description of the corporate action.o Click theEdit icon to open the Voluntary Corporate Action (CA) Election tool, which lets you sub-mit instructions on voluntary corporate actions during an open election period. You can also
accessCorporate Actions using the Corporate Action Tool, available on the Client Services Tools
page.
The following figure shows an example of a corporate action notification.
Account Management Users' Guide 476
Chapter 9 Viewing Corporate Actions
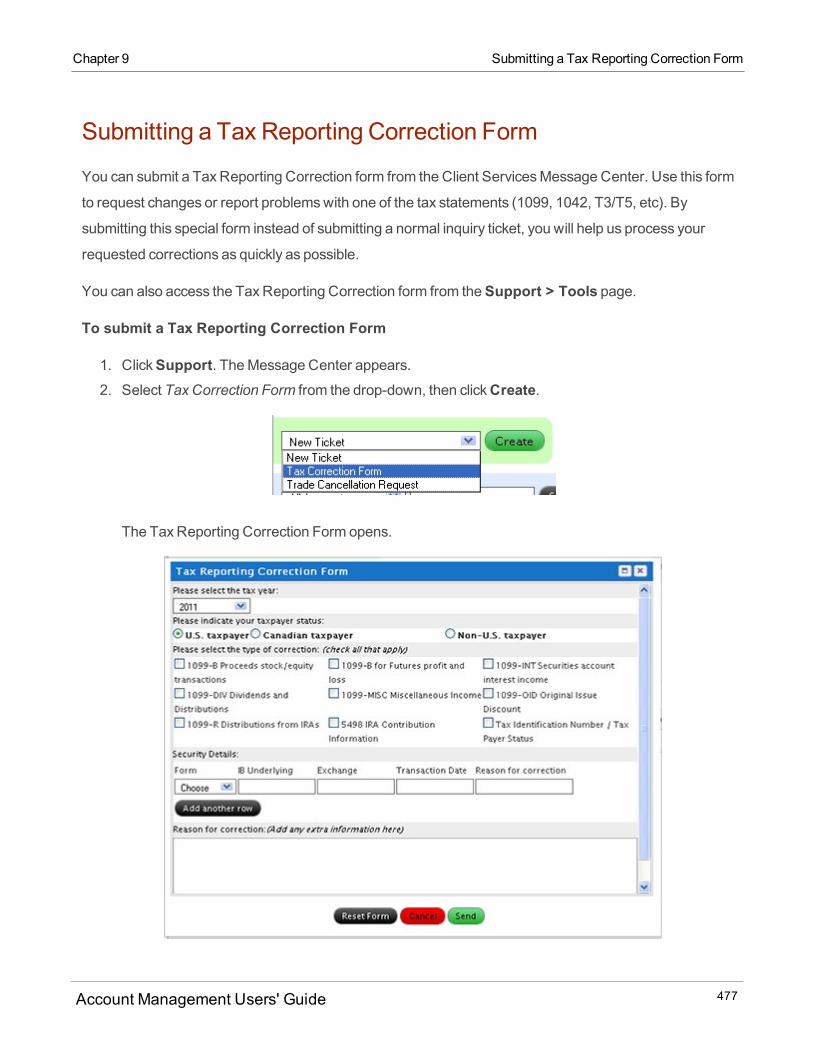
Chapter 9 Submitting a Tax Reporting Correction Form
Submitting a Tax Reporting Correction Form
You can submit a TaxReporting Correction form from the Client ServicesMessage Center. Use this form
to request changes or report problemswith one of the tax statements (1099, 1042, T3/T5, etc). By
submitting this special form instead of submitting a normal inquiry ticket, you will help us process your
requested corrections as quickly as possible.
You can also access the TaxReporting Correction form from theSupport > Tools page.
To submit a Tax Reporting Correction Form
1. ClickSupport. TheMessage Center appears.2. Select TaxCorrection Form from the drop-down, then clickCreate.
The TaxReporting Correction Form opens.
Account Management Users' Guide 477
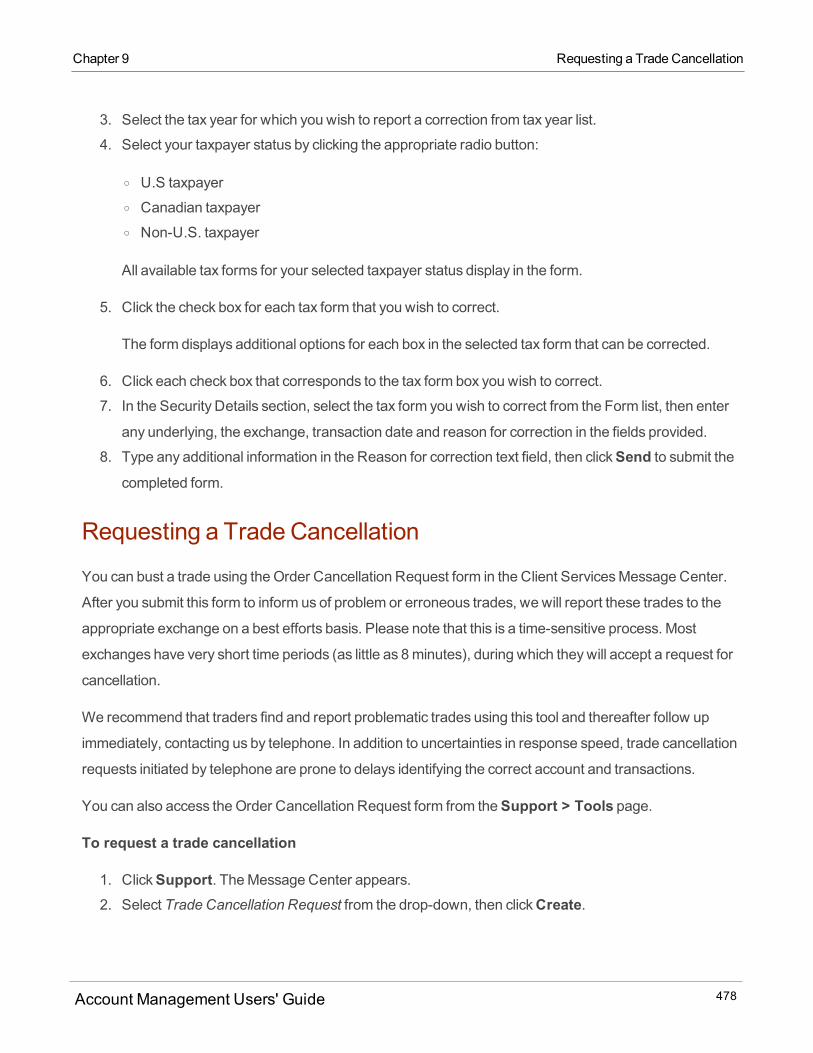
3. Select the tax year for which you wish to report a correction from tax year list.
4. Select your taxpayer status by clicking the appropriate radio button:
o U.S taxpayero Canadian taxpayero Non-U.S. taxpayer
All available tax forms for your selected taxpayer status display in the form.
5. Click the check box for each tax form that you wish to correct.
The form displays additional options for each box in the selected tax form that can be corrected.
6. Click each check box that corresponds to the tax form box you wish to correct.
7. In the Security Details section, select the tax form you wish to correct from the Form list, then enter
any underlying, the exchange, transaction date and reason for correction in the fields provided.
8. Type any additional information in the Reason for correction text field, then clickSend to submit thecompleted form.
Requesting a Trade Cancellation
You can bust a trade using theOrder Cancellation Request form in the Client ServicesMessage Center.
After you submit this form to inform us of problem or erroneous trades, we will report these trades to the
appropriate exchange on a best efforts basis. Please note that this is a time-sensitive process. Most
exchanges have very short time periods (as little as 8minutes), during which theywill accept a request for
cancellation.
We recommend that traders find and report problematic trades using this tool and thereafter follow up
immediately, contacting us by telephone. In addition to uncertainties in response speed, trade cancellation
requests initiated by telephone are prone to delays identifying the correct account and transactions.
You can also access theOrder Cancellation Request form from theSupport > Tools page.
To request a trade cancellation
1. ClickSupport. TheMessage Center appears.2. Select Trade Cancellation Request from the drop-down, then clickCreate.
Account Management Users' Guide 478
Chapter 9 Requesting a Trade Cancellation
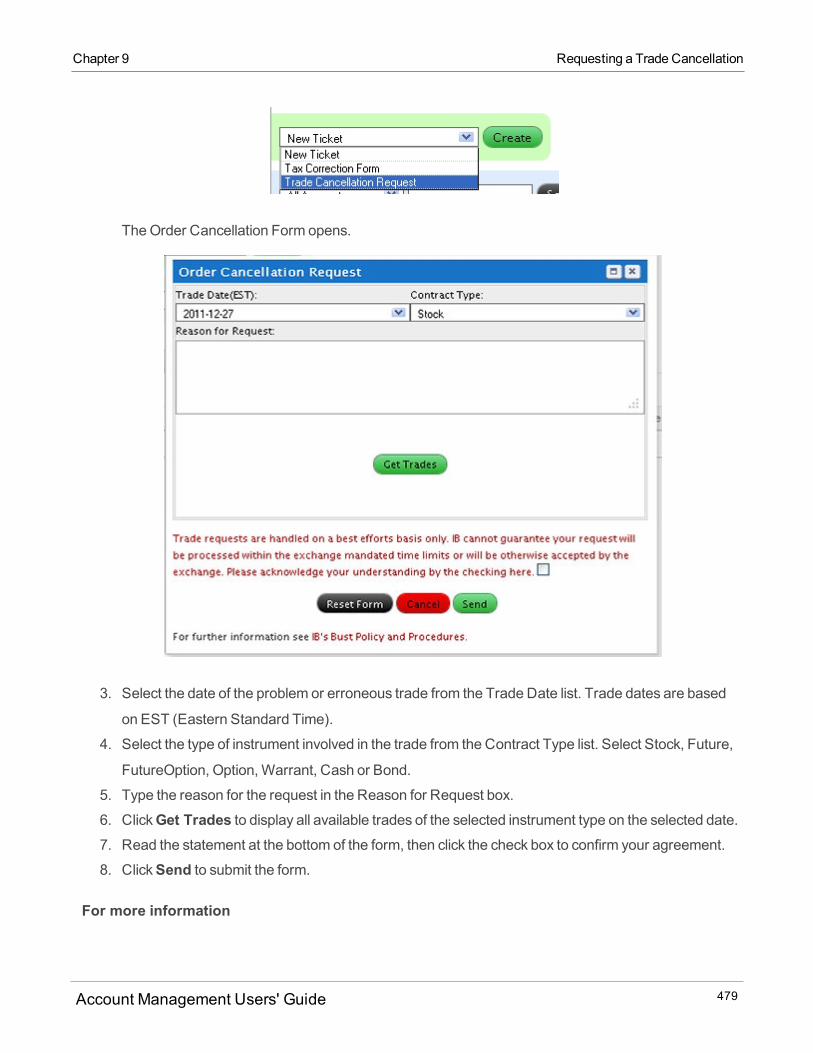
Chapter 9 Requesting a Trade Cancellation
TheOrder Cancellation Form opens.
3. Select the date of the problem or erroneous trade from the Trade Date list. Trade dates are based
on EST (Eastern Standard Time).
4. Select the type of instrument involved in the trade from the Contract Type list. Select Stock, Future,
FutureOption, Option,Warrant, Cash or Bond.
5. Type the reason for the request in the Reason for Request box.
6. ClickGet Trades to display all available trades of the selected instrument type on the selected date.7. Read the statement at the bottom of the form, then click the check box to confirm your agreement.
8. ClickSend to submit the form.
For more information
Account Management Users' Guide 479

Erroneous Trade Policy
Live Chat
Client Services Live Chat lets you communicate directly with an Client Services representative in real time.
Because it is authenticated and uses secure communications, staff are able to provide account specific
information in a securemanner. Transcripts are available on demand.We recommend using the Client
Services Live Chat for funding/banking and account application inquiries.
To access Client Services Live Chat
1. ClickSupport > Client Services > Live Chat. The Live Chat window opens.
2. In the Client Services Live Chat window, select a category from the Category list. This is the subject
on which you are seeking assistance.
3. Select a subcategory from the Sub-Category list.
Account Management Users' Guide 480
Chapter 9 Live Chat
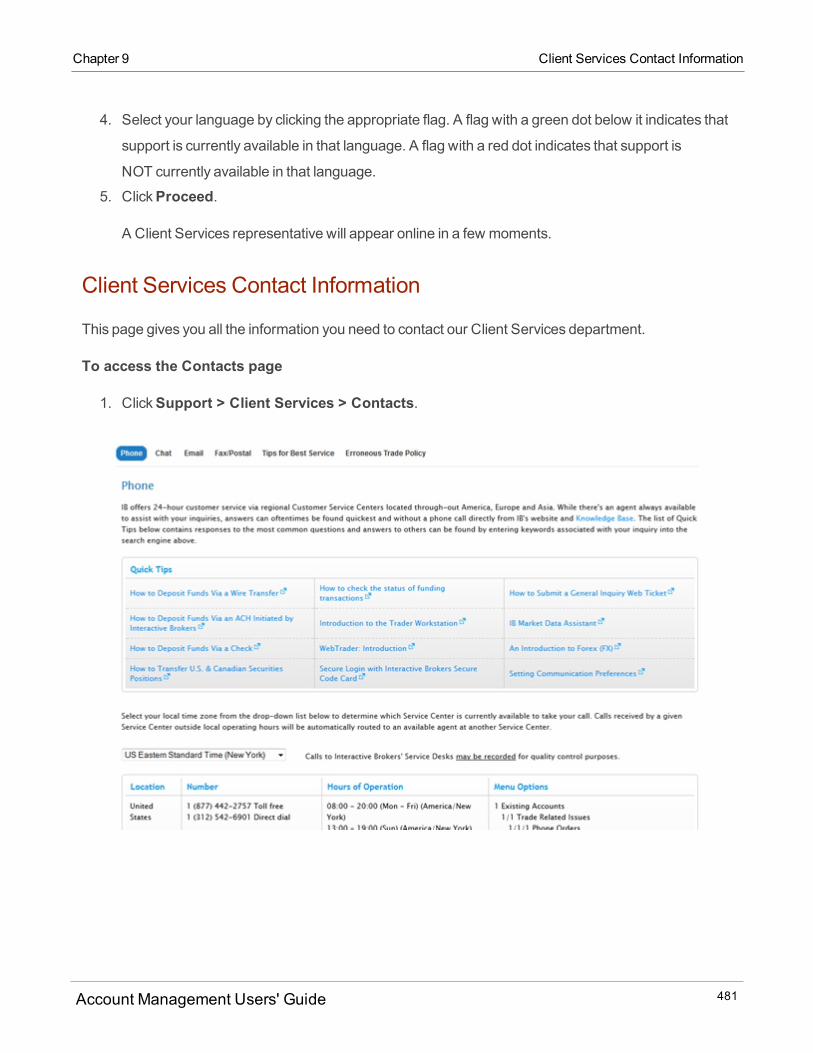
Chapter 9 Client Services Contact Information
4. Select your language by clicking the appropriate flag. A flag with a green dot below it indicates that
support is currently available in that language. A flag with a red dot indicates that support is
NOT currently available in that language.
5. ClickProceed.
A Client Services representative will appear online in a few moments.
Client Services Contact Information
This page gives you all the information you need to contact our Client Services department.
To access the Contacts page
1. ClickSupport > Client Services > Contacts.
Account Management Users' Guide 481
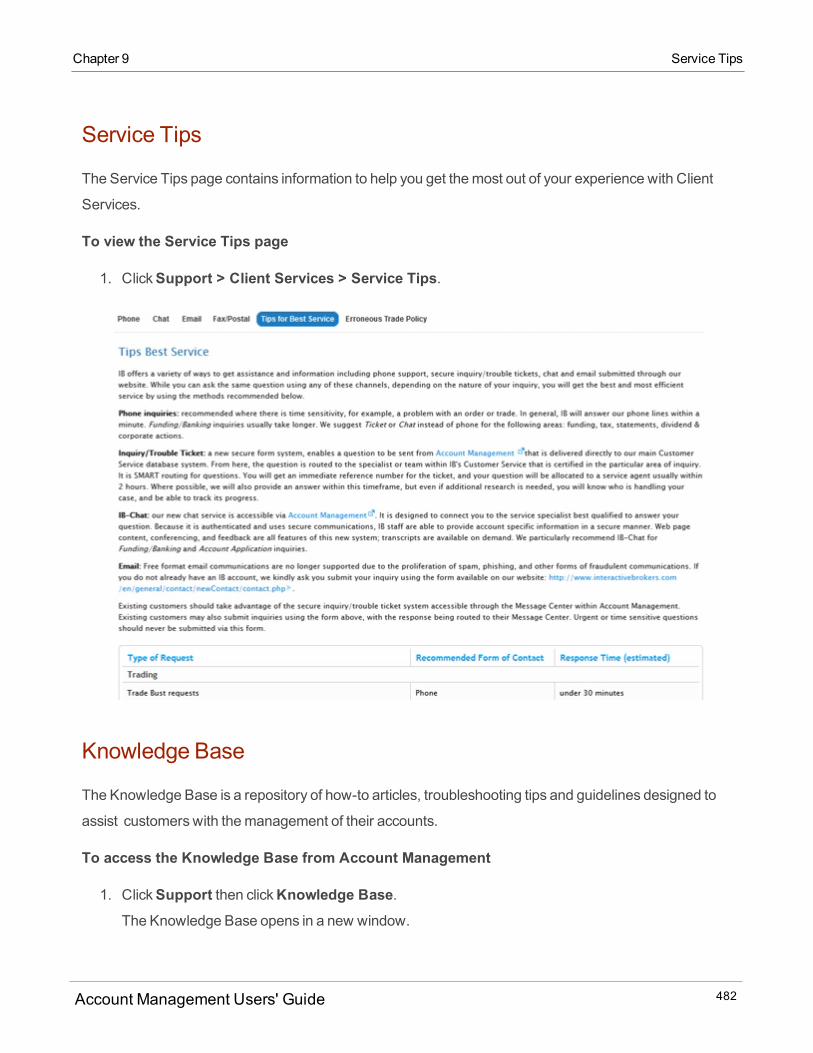
Service Tips
The Service Tips page contains information to help you get themost out of your experience with Client
Services.
To view the Service Tips page
1. ClickSupport > Client Services > Service Tips.
Knowledge Base
The Knowledge Base is a repository of how-to articles, troubleshooting tips and guidelines designed to
assist customerswith themanagement of their accounts.
To access the Knowledge Base from Account Management
1. ClickSupport then clickKnowledge Base.The Knowledge Base opens in a new window.
Account Management Users' Guide 482
Chapter 9 Service Tips
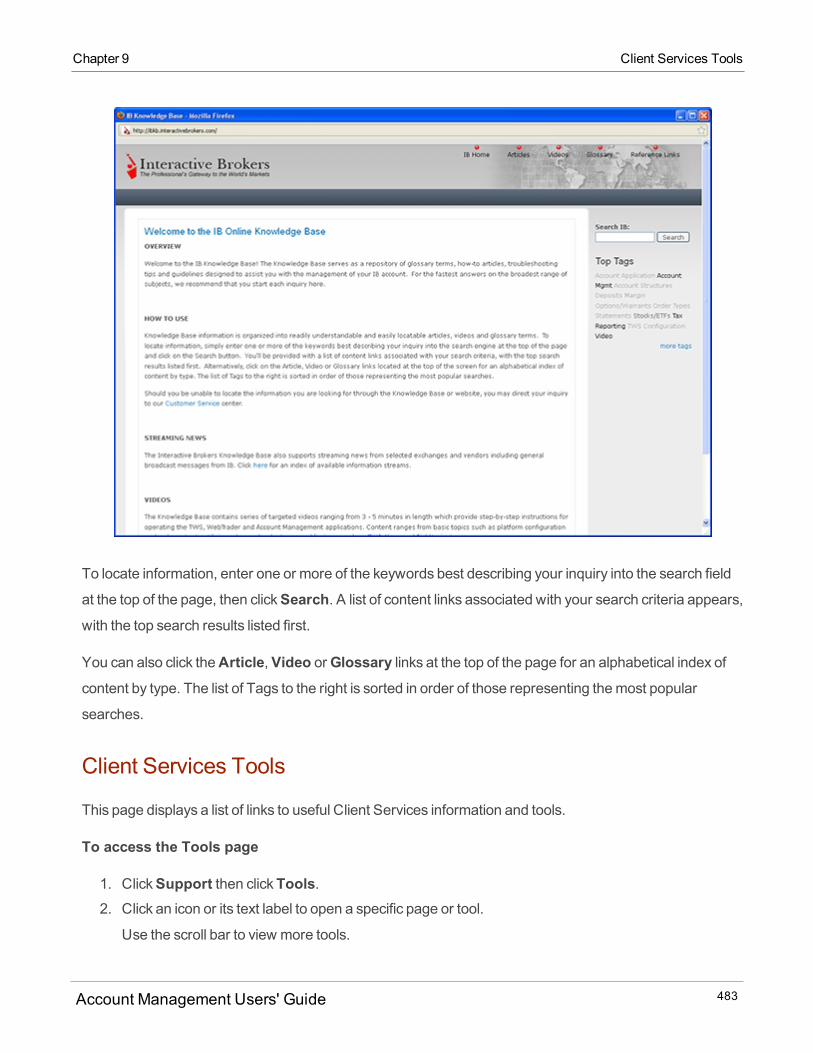
Chapter 9 Client Services Tools
To locate information, enter one or more of the keywords best describing your inquiry into the search field
at the top of the page, then clickSearch. A list of content links associated with your search criteria appears,
with the top search results listed first.
You can also click theArticle, Video orGlossary links at the top of the page for an alphabetical index ofcontent by type. The list of Tags to the right is sorted in order of those representing themost popular
searches.
Client Services Tools
This page displays a list of links to useful Client Services information and tools.
To access the Tools page
1. ClickSupport then clickTools.2. Click an icon or its text label to open a specific page or tool.
Use the scroll bar to view more tools.
Account Management Users' Guide 483
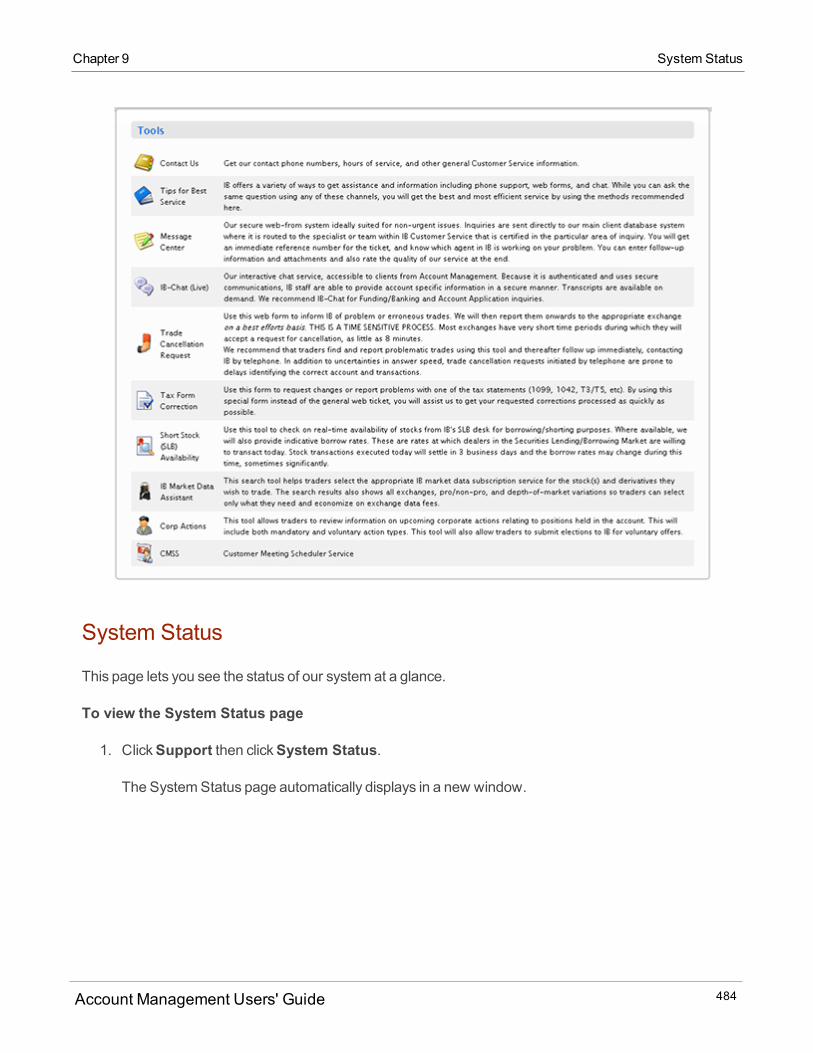
System Status
This page lets you see the status of our system at a glance.
To view the System Status page
1. ClickSupport then clickSystem Status.
The SystemStatus page automatically displays in a new window.
Account Management Users' Guide 484
Chapter 9 System Status
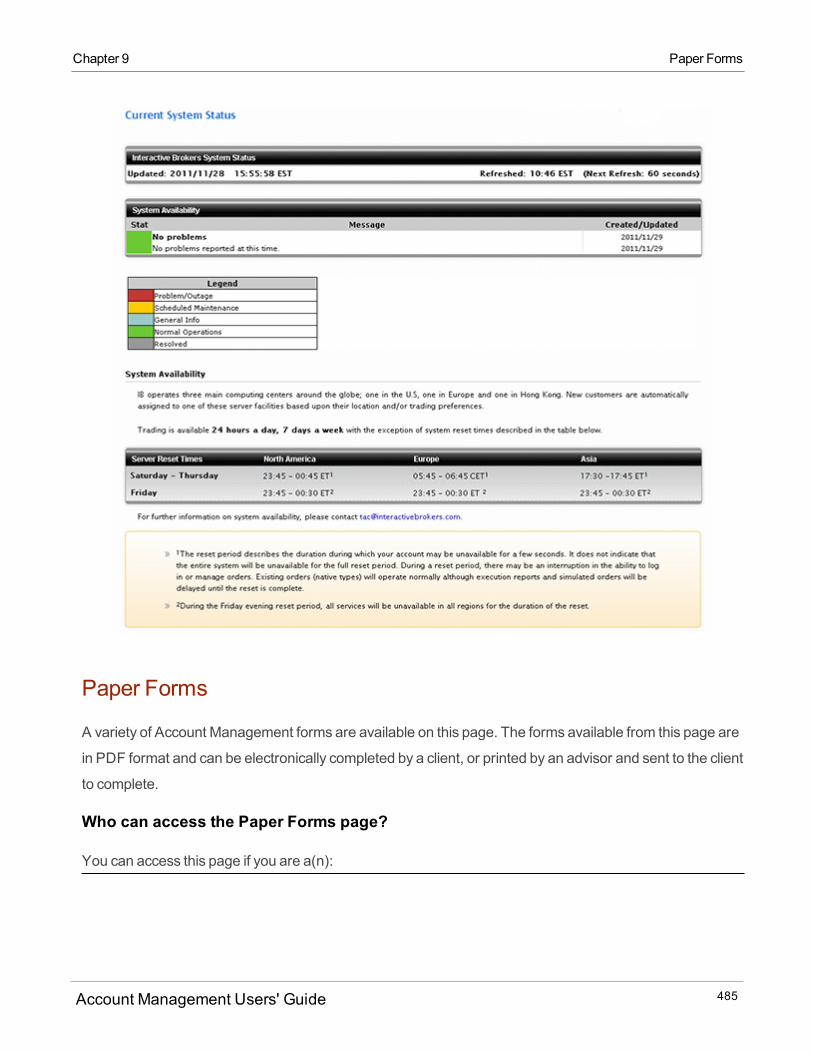
Chapter 9 Paper Forms
Paper Forms
A variety of Account Management forms are available on this page. The forms available from this page are
in PDF format and can be electronically completed by a client, or printed by an advisor and sent to the client
to complete.
Who can access the Paper Forms page?
You can access this page if you are a(n):
Account Management Users' Guide 485
Advisor Master User
Proprietary Trading GroupMaster User
Investment Manager Master User
Using Account Management Forms
Clients can log into Account Management with their personal username and password and access and
print a form thenmanually complete it, or amaster account user can log into Account Management and
print the form for a client to complete.
To access paper forms
1. ClickSupport > Paper Forms.2. Click the name of the form that you want to access. The form displays in a new browser window.
You can print the form from there.
Account Management Users' Guide 486
Chapter 9 Using Account Management Forms
IndexA
about Account Management 31
ACATS 275
full ACATS transfer 276
ACATS transfers
partial 279, 281
position instructions for 283
access research provider websites lvi
access rights
user roles 526
access rights availability 508
access rights configuration 513
access rights overview 508
AccessRights tab 507
account alias 423
for client accounts; 290
account closing 442
account closure status 444, 163, 214
account information
modifying 347
Account Informationmenu 343
Account Management
for linked accounts xxxv, xlvii
for paper trading accounts 419
menus 46
Account Management home 40
Account Management login 37
Account Managment for Administrators 458
Account Overview report 136
account partitions xlvii, xlix
account selector 54
searching for households 57
account selector for three-level accounts 58
account settings 343
Account Settingsmenu 390
account structures and Account Management
access and account structures 32
account summary
printing 344
Account Management Users' Guide 487
Index
creating customized 92
delivery settings for 199
downloading 96
quarterly for advisor clients 109
viewing 87
viewing guidelines 87
Activity Statements
batch processing 106
add a client account 120, 165
add new CRMgroup 356
Add or Link Accountsmenu xxix
adding a fully disclosed broker client 128, 173
adding amultiple hedge fund account to a fully
disclosed broker 132, 177
adding a new owner to an organization 385
adding a non-disclosed broker client 136, 186
adding a second username 524, 317
adding a Security Officer 526
adding a user 516, 310
adding a user role 526
adding an account representative 129, 174
adding an administrator 404
account type 394
inManage Clientsmenu; 299
account types
IRA 450
account values on Home page 42
Accountant Marketplace 396
ACH Initiated at IB process 264
Activate Security Device 490
activating security device for client
accounts 503
activity data
downloading to third parties 218
activity downloads 96
downloading a zip file to IE7 or IE8 100
activity flex queries 100
Activity FlexQueries
batch processing 106
Activitymenu 85
activity statements 85
about 85
archive policy 87
by account type 86
Account Management Users' Guide 488
Index
adding an advisor to a fully disclosed
broker 130, 175, 182
adding an advisor to an advisor
account 181
Adding an SMA account 187
adding an STL account to a fully disclosed
broker 131, 176
adding an STL account to an advisor
account 181-182
adding external accounts to Port-
folioAnalyst 157
addingmoneymanager lix
additional advisor authorizations 106
additional broker authorizations 108
Administrationmenu 394, 456
Administrator Marketplace for Admin-
istrators 456
Administrator Marketplace for eligible
accounts 400
administrators
Account Management for 458
adding 404
assigning client accounts to 407
managing clients 459
viewing 405
Advanced Search in CRM 349
Advertise Services 424
Advertise Services > Administrationmenu 456
Advertise Services > BusinessDevelopment
menu 460
Advertise Services > Investingmenu 426
Advertise Services > Researchmenu 454
Advertise Services > Technologymenu 455
advertising andmarketing services
offering 461
Advertising Application 461
AdvertisingMarketplace 413
advisor
adding to a fully disclosed broker 130, 175
adding to an advisor 182
advisor-managed account
linking to xlvii
transferring positions to 305
advisor client fee authorization 238
advisor client fees 215, 223
for hedge fund investments 286
Account Management Users' Guide 489

Index
advisors
adding to a fully disclosed broker 130, 175
Advisors
investing in a hedge fund for a client 110
advisors and hedge funds
rules for linking and delinking lv
Advisors fees
maximumamount or percentage fee
cap 219
alert notification 478
allocate trades 65
Allocation by Asset Class report 137
Allocation byRegion report 137
Allocation by Sector report 137
allocation details 114
allocation summary 75
allocation templates 72
application process 122, 167
archive policy for activity statements 87
articles
adding to Hedge Fund Capital Introduction
Program 449
Asia GatewayAccess 481
overview 217
reimbursing to client 217
advisor client hedge fund investment 110
advisor client templates 138, 195
advisor clients
quarterly summaries for 109
Advisor Compliance 402
monitoring groups 405
advisor dashboard 83
advisor fee cap formulas 237
advisor fee cap report 183
advisor fee invoices
viewing 187
advisor fee reimbursement 217, 250
advisor invoices
uploaded 245
Advisor Invoicing 239
Advisor Marketplace 366, 426
advisor qualifications 359
advisor registration information 359
Advisor Regulators 386
Account Management Users' Guide 490
Index
asian assets
transferring 306
assigning a synopsis to a PortfolioAnalyst
report 150
assigning access rights to new users 516
ATON position instructions 293
ATON transfers 285
full 285
partial 288, 291
audit trail 506, 306
Auditor Marketplace 396
authorized traders liii, 206
automatic billing for advisor client fees 217
available reports in Detailed PDF
Reports 136
average price trades 70
B
Back and Continue buttons 51
bank information 266, 325
modifying 326
bank information fields 327
bank instructions 266
base currency 391, 297
Batch reports 106
beneficiaries
Transfer on Death 361
Bloomberg Black Service 218
borrow rate broker markups 265
Breakdown of Accounts report 136
broker-managed account
linking to xlvii
broker client application approvals 291
broker client approvals 291
broker client fees 255, 266
pricing structure 256
rules 255
templates for;templates for broker client
fees;client fee templates for
brokers 280
types of 257
broker client invoicing 272
Broker Client Revenue and Expense Summary
Report 188
broker client statements
delivery settings for 208
broker client templates 142, 199
Account Management Users' Guide 491
Index
CashEdge/Fiserv Aggregation Services 218
change advisor or broker client trading access
from dashboard 102
change security questions 488
changing display language 60
changingmoneymanager assignments lxviii
changing the default tax lot-matching
method 189
changing your email address 486
changing your password 484
checking fund status 252
client account details 92
change trading access 102
Debit Card Enrollment 103
client account templates 137, 142, 194, 199
using a custom ID 147, 204
client accounts
activating security device for 503
adding 120, 165
assigning to administrators 407
removing from an administrator 410
selecting 54
viewing 87
broker clients
adding account representatives 129,
174
OATS setting for 223
broker dashboard 83
broker declaration 358
Broker Marketplace 369, 434
broker registration information 358
bulk advisor invoices 245
business analysis services
advertising 461
Business Analyst Application 461
Business Analyst Marketplace 415
BusinessDevelopment menu 412, 460
C
calendar of events in CRM 345
Canadian EFT process 264
cancel a transaction 230
cancelling a trade 478
Careers Application 462
CareersMarketplace 421
Cash Forex trading 465
Account Management Users' Guide 492
Index
viewing account management requests
for 506
client authorization of advisor fees 238
client fee templates
default 281
client fees 214
authorization of advisor fees 238
for advisors 223
for SMAs inMultiple Hedge Fund
accounts 285
high water mark setup 233
high water marking 231
modifying for amoneymanager lxi
client fees templates for money
managers lxi
client invoicing 272
client referrals lxxix
client security 503
client services 465
contacts 481
tools 483
Client ServicesMessage Center 465-466
Client Servicesmessages 45
client services tips 482
Client SummaryReport 184
client trading 300
clietn services live chat 480
closed accounts
reopening 445
closing a client account 442, 158, 209
closing a non-disclosed broker client
account 160, 210
closing an account 442
status 444
closing an account;account closure
process 439
closing an inquiry ticket 474
compliance for advisors 402, 404-405, 411
designating aggregated report
recipients 413
handshake requests 410
ComplianceMarketplace 397
Compliance Reports 183
compliance reports for advisors 411
configure broker fees 266
Configure Fees 223
Account Management Users' Guide 493
Index
Managers 165
creating a new support ticket 469
creating a PDF file of any page 41
creating a synopsis 149
creating custom benchmarks for Port-
folioAnlayst 146
crm
emails 343
import contacts 361
notes password 341
CRM 318
add a new group 356
adding tasks to a record 337
additional tasks for individual records 330
advanced search 349
bulk emails to groups 360
delete a group 359
edit an existing record 328
enter a new record 325
groups 354
icons 363
notes 331
configure post trade allocation settings 77
Configure tab 390
configure trading 457
configuring access rights 513
contacting customer service 481
corporate access provider application 462
corporate access providers 462
find 422
Corporate Access Providers 422, 462
corporate actions
viewing in theMessage Center 475
Corporate Actions report 143
Corporate Actions tab 46
correcting a tax form 477
cost basis for ACATS or ATON 194
cost basis for Forex balances 196
cover letters in PortfolioAnalyst 149
create a new linked account xxix
Create and Link Accountsmenu 119
Create Linked Account xxix
scenarios xxxi
Createmenu for Multiple Fund Investment
Account Management Users' Guide 494

Index
rename a group 359
scheduling events 345
sharing with another user 321
view accounts for a client 339
view members of a group 354
viewing and sorting records 322
viewing current tasks and events 323
CRMhome page
tasks and events 323
CSV files
using for position transfers 321
Cumulative BenchmarkComparison
report 138
Cumulative Performance Statistics
report 138
custom benchmarks
creating in PortfolioAnalyst 146
custom IDs for advisor and broker client
applications 147, 204
Customer RelationshipManagement 318
customer service 465
customized statements 92
profit and loss 95
cutoff times for daily statements 86
D
dashboard
uploading documents for pending Non-Dis-
closed Broker clients 118
Dashboard 83
view information about all clients 87
viewing client account details 92
data services 469
Debit Card Signup 296
default activity statements 88
default client fee templates 281
default tax lot-matchingmethod
changing 189
defining an alias for your account ID 423
delegated reporting
changing 380
delete a CRMgroup 359
deleting a user 525, 317
deleting a user role 528
deleting external accounts from
PortfolioAnalyst 162
deleting PortfolioAnlayst reports 151
Account Management Users' Guide 495
Index
Dividends report 142
documentation 50
downloading activity data to third-party
services 218
downloading activity statements 96
downloading client disclosures 127, 172
DRS transfers 299
duplicate client account settings 117, 193
duplicate client accounts 115, 191
DWAC transfers 302
E
editing Account Representatives 104
editing an existing CRM record 328
editing PortfolioAnalyst reports 151
Education & Coaches
advertising your 455
Education & Coaches Application 455
Educators 381
eligibility of positions for transfer 295
eligible security officers 521
email address
changing 486
delink an administrator 406
delinking from an advisor lv
Deliverymenu 199
delivery of security devices 496
delivery settings
broker client activity statements 208
PortfolioAnalyst 205
Delivery Settings 198
delivery settings for flex queries 204
deposit notification 254
deposit transaction history details 234
depositing funds 254
Deposits andWithdrawals report 142
designating compliance report
recipients 413
Detailed PDF Reports 130
available reports in 136
Details tab 344
Digital Security Card+ 499
display language 60
Message Center 468
dividend reinvestment 355
Account Management Users' Guide 496
Index
EMIR
changing delegated reporting 380
EMIR and LEI information 371
EMIR election
changing initial 373
enable SMS alerts 203
entering a new CRM record 325
error codes for FlexWeb Service Version
3 217
european assets
transferring 306
events in CRM records 345
Excel contacts
importing 361
excess funds sweep 395, 294
execution reports 112
explain links 50
export transaction history to Excel 234
external account portfolios 157
external account summaries 153
External Account tab in
PortfolioAnalyst 157
external accounts
adding to PortfolioAnalyst 157
deleting 162
external accounts in PortfolioAnalyst 152, 161
F
Fee Summary report 143
fees for advisor clients 223
Fees tab 397
financial information 352
Financing Firms 418
Financing FirmsApplication 462
finishing an application for a new linked
account xxxv
Flat Rate 398
flex queries
activity statements 100
delivery settings for 204
trade confirmations 116
via HTTPS 209
FlexWeb Service 209-210, 213
error codes for Version 3 217
FlexWeb Service Version 2 210
Account Management Users' Guide 497
Index
funds status 252
futures arbitration agreement 480
FYIs 476
G
generatingmargin reports 173
Getting Started 31
grouping accounts into a household 148
groups in CRM 354
H
handshake requests for advisors 410
Hedge Fund Capital Introduction Program 441
adding articles 449
Hedge Fund investments
discounts to advisor clients 374, 441
Hedge Fund Investor Site 372
advisor invests for a client 110
reading public articles 374
Hedge FundMarketplace 441
multiple fund application 443
single fund application 442
TPAs 449
Hedge FundMarketplace Account Man-
FlexWeb Service Version 3 213
FOP position transfers 310
FOP transfers 310, 313
position instructions for 315
Forex cost basis 196
Free of Payment transfers 310
full ACATS transfers 276
full ATON transfeers 285
full IRA conversion 447
fully disclosed broker clients 128, 173
fully disclosed brokers
adding Advisors, STLs andMultiple
Hedge Funds 130, 175
fund investment manager client account
templates 138, 195
fund transfers
withdrawing funds to a third party 269
fund withdrawals 258
funding 227
deposits 254
internal transfers 264
withdrawals 258
funding instructions 325
Account Management Users' Guide 498

Index
agement 446
help 50
HFCIP Fees 286
high water mark setup 233
high water marking 231
Historical Performance report 141-142
Home page 40
corporate actions 46
messages 45
pending items 44
Positions tab 44
real-time summary 42
Refresh button 42
households 148
in the account selector 57
rules for creating 149
I
IBIS 469
icons used in CRM 363
importing allocations 76
importing contacts into CRM 361
Inbound Position Transfer Cost Basis 194
inbound position transfer history details 244
inquiry tickets 469
closing 474
modifying 472
preferences for 473
instructions 325, 333
settlement 337
instructions for position transfeers 335
Interactive Brokers Asset Management 163
Interest Details report 143
internal fund transfers 264
internal position transfers 319
internal transfer transaction history details 249
international position transfers 306
introduction to access rights 508
Investingmenu 366, 426
investment experience 352
investment objectives 352
Investors' Marketplace 365
advertise Business Analyst services 461
advertise educator services 455
advertise financing services 462
Account Management Users' Guide 499
Index
IRA Contribution 451
IRA conversion
partial 449
IRA conversion to IB Roth IRA account 447
IRA conversions 454
IRA Direct Rollover 451
IRA margin accounts 450
IRA recharacterization 449
IRA recharacterizations 454
IRA reference 449
IRA Rollover 451
IRA tab 446
IRA transfer methods 451
IRA Trustee-to-Trustee 451
IRAs 449-450, 454
J
Jurisdiction 386
K
Knowledge Base 482
L
Languagemenu 60
Large Trader Identification 367
advertise programming consulting ser-
vices 455
advertise Research services 454
advertise software tools 455
Advertising your services 424
Corporate Access Providers 422, 462
offer advertising andmarketing
services 461
post your resume 462
search for Educator services 381
search for Financing Firms 418
search for Programming
Consultants 391
search for Research services 379
search for Research Services 378
search for Software Tools 388
searching for services 365
investory categories 365
inviting clients to start electronic
application 123, 168
IP restrictions 482
IPOSubscriptions 81
IRA account types 450
Account Management Users' Guide 500

Index
launchingWebTrader 64
Legal ServicesMarketplace 398
legend
Message Center 468
limit client trading 476
limitations of paper trading accounts 418
limits on withdrawals 500
link existing account xxxvi
guidelines;guidelines for linking existing
accounts; xxxvi
Link Existing Account
scenarios xxxviii
link existing accounts to three-level
accounts xxxvi
link existing client accounts 156
linkmultiple accounts xxxvi
link to a new account xxix
finishing the application xxxv
link to advisor or broker managed
account xlvii
linked accounts
Account Management for xxxv, xlvii
linking advisor client accounts 156
linking to an advisor lv
linking to an advisor/broker-managed account
account partitions xlix
linking to and delinking from a hedge funds lv
Live Chat 480
logging in 37
logging into Account Management from
TWS 39
logging out 61
Login Go Tomenu 38
Login Problems link 39
login URL 39
Logout link 61
M
Manage Account 343
manage administrators 403
Manage Clients > Createmenu 120
Manage Clientsmenu 81
Manage Fundsmenu 81
Manage Tradersmenu 81
managing groups in CRM 354
map icon 60
Account Management Users' Guide 501
Index
viewing corporate actions 475
Message Center Window 466
Messages tab 45
metals
trading 460
methods of completing an account
application 121, 166
Mint Service 218
Mobile 414
models 108
modify a pending deposit 231
modifying a recurring transaction 334
modifying an inquiry ticket 472
modifying bank information 326
modifying client fees for amoneymanager lxi
modifying financial information 352
modifying personal information 347
modifying trading permissions for moneyman-
agers lxiv
modifying Transfer on Death beneficiaries 364
modifying user access rights 521, 314
modifying user roles 528
margin account
upgrading to 394
margin reports 173
market data
for residents of China 481
Market Data Assistant 472
market data subscriber status 470
market data subscriptions 466
searching for 472
marketplace
for Advisors 426
for Brokers 434
Markup Summary 279
maximum invoice amounts for
advisors 219
menus 46
message center 465
Message Center
changing display language 468
legend 468
modifying a ticket 472
new ticket 469
Account Management Users' Guide 502
Index
moneymanager
adding lix
changing assignments lxviii
create a client fees template lxi
modifying client fees lxi
modifying trading permissions for lxiv
removing lxxv
MoneyManager Assignment lvii
MoneyManager Marketplace for Money
Managers 451
MoneyManager Marketplace for Wealth
Managers 376
MoneyManager menu lvi
monitoring groups 405
handshake requests 410
Move, Link or Partition an Account xlvii
multiple accounts
switching between 52
multiple CRMusers 321
multiple hedge funds
adding to a fully disclosed broker 130,
132, 175, 177
setting fees for SMAs 285
N
name and address
modifying 347
navigating a sequence of pages 51
navigating CRMpages 322
navigating themenus 47
new account
linking to xxix
News and Research 384
non-disclosed broker client
closing account 160, 210
non-disclosed broker client accounts 136, 186
Non-Disclosed Brokers
uploading documents for pending
clients 118
non-professional status 470
notification settings for statements 199
O
OATS settings 223
odd lot designations 74
Open Position SummaryReport 136
open the Post Trade Allocationswindow 65
Account Management Users' Guide 503

Index
partial IRA conversions 449
partial IRA recharacterizations 449
partial position transfers
uploading positions in a CSV file for 321
password change 484
creating on any page 41
PDF forms 485
pending items 44
pending user access rights 521
Percent of P&L 231
percentage cap for Advisor fees 219
performance attribution charts 145
Performance Attribution report 140, 143
performance attribution scatter plot 145
Performance by Asset Class report 140
Performance by Sector report 140
Performance by Symbol report 140
personal information
modifying 347
PortfolioAnalyst 122
adding external accounts 157
opening a paper trading account 415
options trading permissions for broker cli-
ents 291
Order Cancellation Request 478
organization owner
adding new 385
overview of security officers 512
owner
adding to an organization 385
P
P/LMarkup SummaryReport 186
paper forms 485
paper trading
how it works 417
limitations 418
paper trading account
reset password 485
paper trading accounts 415
Account Management for 419
partial ACATS transfer 279
partial ACATS transfers 281
partial ATON transfers 288, 291
Account Management Users' Guide 504
Index
available reports in Detailed PDF
Reports 136
custom benchmarks in 146
delivery settings for 205
Detailed PDF Reports 130
editing and deleting reports in 151
Snapshot PDF Reports 125
synopses 149
viewing external account portfolios 152,
157
position instructions 335
ATON 293
position instructions for ACATS
transfers 283
position instructions for FOP transfers 315
position transfer cost basis 194
position transfers 274
ACATS 275
ATON 285
betweenmaster and sub accounts 318
checking position eligibility for 295
DRS 299
DWAC 302
FOP 310
internal 319
of international assets 306
to an advisor-managed account 305
US futures 317
Positions tab 44
post job openings 421
post trade allocation configuration settings 78
post trade allocations 64-65, 70-72, 74-77
posting your resume on the CareersMar-
ketplace 462
pricing structure 398
Print Account Details 344
Print link 61
print transaction history 234
printing 61
products and countries to trade 457
Profile page 347
profit and loss
affect on statements 95
Progamming Consultant Application 455
Programming Consultants 391
Account Management Users' Guide 505
Index
removingmoneymanagers lxxv
rename aCRMgroup 359
reopening a closed account 445
report delivery 198
via SMS 203
report delivery settings
for activity statements 199
for trade reports 199
reports
on demand compliance 411
Reports 85
Request Security Device 490
Research
advertise your 454
Research Application 454
ResearchMarketplace 379
Researchmenu 378, 454
Research Services lv
research subscriptions 469
ResearchWebsite Login lvi
resetting password
paper trading account 485
programming consulting servicess
advertising your 455
PTGsub accounts
limiting trading of 473
Q
quarterly summaries 109
QuickTrade 63
R
read-only access 414
Real-time Summary 42
recharacterizations 454
recharacterizing an IB Roth IRA
account 449
recurring transactions 268, 333
modifying 334
Refresh button on Home page 42
Registered Representatives 104
Registration Information 386
regulatory information 354
reimbursing fees to advisor clients 250
reinvesting stock dividends 355
removing client accounts from an admin-
istrator 410
Account Management Users' Guide 506
Index
restrict trading on entire account
structure 476
restricting user access to TWS 482
returns and attributions effects by
sector 144
RIA compliance system 402, 404
RiskMeasures BenchmarkComparison
report 139
RiskMeasures report 139
Risk reports 173
rule for three level advisor accounts 183
rules
for uploading positions in a csv file 324
rules for broker client fees 255
rules for three-level accounts 133, 178
S
saving bank information 266
Search Services 365
Search Services > Administration
menu 394
Search Services > Business
Development 412
Search Services > Investingmenu 366
Search Services > Researchmenu 378
Search Services > Technologymenu 388
searching CRM records 322
searching for market data subscriptions 472
SEC large trader ID numbers 367
second username 524
Secure Login Device sharing 496
Secure Login System 489
enrolling in 490
opting out 501
security devices 498
Security Code Cards 498
security device 490
activating for client accounts 503
security devices 498
delivery schedule 496
Securitymenu 481
Securitymenu inManage Clientsmenu 306
Security Officer
adding 526
Security Officers 510, 512-513
selecting accounts 54
send an email to all CRMgroupmembers 360
Account Management Users' Guide 507
Index
Soft Dollar Disbursement 338
soft dollars
requesting 399
software tools
advertising your 455
Software Vendors 388
sort notes in a CRM record 331
starting a semi-electronic application 125, 170
status of account closure request 444
steps in the application process 122, 167
STL account
adding to a fully disclosed broker 131, 176
adding to an advisor account 182
STL accounts
adding to a fully disclosed broker 130, 175
stop payment on a checkwithdrawal 233
Stress Test report 176
sub accounts
selecting 54
submitting advisor fee invoices 239
subscribing
data services 469
services
available on Investors' Marketplace 365
set up and use a CRMmailbox 343
setting a CRMnotes password 341
setting alert preference 478
setting up high water marking 233
Settingsmenu inManage Clients
menu 289
settlement instructions 337
sharing a security device 496
shopping for Advisors in the Advisor Mar-
ketplace 366
shopping for brokers in the Broker Mar-
ketplace 369
simulated trading environment 415
SLS Opt Out 501
SMA accounts
adding 187
SMAs
fees for 285
SMS address 478
SMS alerts 203
Snapshot PDF Reports 125
Account Management Users' Guide 508
Index
market data 466
Summary tab in PortfolioAnalyst 153
supplemental reports 184, 186, 188
Supplemental Reports 182
support
tips for best service 482
Support menu 465
sweep excessmargin funds 395
swtiching between accounts 52
synopses 149
system status 484
T
take up fees for broker prime clients 266
tasks and events in CRM 323
TaxCorrection Form 477
Tax FirmMarketplace 399
Tax FormCollection 382
tax forms 191
Tax Informationmenu 381
Taxmenu 189
TaxOptimizer 189
Technologymenu 388, 455
third-party services 218
third-party withdrawals 269
three-level account linking xxxvi
three-level advisor accounts 181
rules for 183
three-level fully disclosed broker accounts 130,
175
rules for 133, 178
three-level multiple hedge fund accounts 181
three-tier account linking xxxvi
three-tier accounts 181
ticket notification preferences 473
Time Period BenchmarkComparison
report 138
Time Period Performance Statistics report 137
tools for customer service 483
trade allocations report 114
trade cancellation 478
Trade Configurationmenu 456, 297
Trade Confirmation FlexQueries 116
trade confirmation reports
delivery settings for 199
Account Management Users' Guide 509
Index
Transaction Cost Analysis 163
glossary 168
understanding 168
transaction history 227
deposits 234
inbound position transfers 244
internal transfers 249
withdrawalws 240
transfer methods for IRAs 451
Transfer on Death 361
removing a beneficiary 364
transferring assets to an IB Roth IRA
account 447
transferring funds internally 264
transferring position to advisor-managed
account 305
transferring positions 274
transferring positions betweenmaster and sub
accounts 318
types of broker client fees 257
U
UK CFDs 460
unallocate trades 71
trade confirmations
generating 112
Trade Confirmationsmenu 111
Trademenu 63
Trade Summary report 142
Trader ID 221
Trader Referral Program lxxix
payout rules lxxix
Trader Workstation white branding 427
Traders 205
trading 63
trading Cash Forex 465
trading limits 473, 304
trading notifications in TWS 476
trading permissions 457, 301
modifying for amoneymanager lxiv
trading platforms read-onlymode 414
Trading PublicationsMarketplace 387
trading restrictions 303
on entire account structure 476
Trading Sub Accounts 357, 205
trading UK CFDs andmetals 460
Account Management Users' Guide 510
Index
updating broker registration
information 358
updating financial information 352
updating regulatory information 349
updatingW8/W9 forms 382
upgrading to amargin account 394
uploading advisor invoices 245
uploading positions in a csv file
rules for 324
uploading positions in a CSV file 321
US Futures
transferring 317
user access rights 508, 308
modifying 521, 314
user roles 510, 526
adding 526
deleting 528
modifying 528
users 308
adding to your account 516
deleting 525
users and access rights 515
adding a user 516
users guide 50
Users page 515
users roles
view details 528
V
Value at Risk report 179
VAR report 179
VCard files
importing 361
view advisor fee invoices 187
view members of a CRMgroup 354
view user role details 528
viewing
activity statements 87
margin reports 173
tax forms 191
trade confirmations 112
viewing account management requests for cli-
ent accounts 506
viewing administrators 405
Account Management Users' Guide 511
Index
emails 431
reference table 434
registration system 432
statements 432
TWS 427
TWS entries in Account Management 427
TWS Users' Guide 436
WebTrader 430
who can configure access rights 508
withdrawal limits 500
withdrawal transaction history details 240
withdrawals 258
withdrawing funds to a third party 269
withholding 384
Withholding Statement 384
viewing and editing external accounts 161
viewing client account details 92
viewing corporate actions 46
viewing eligible security officers on pending
items 521
viewing history of transactions 227
viewing portfolios in non-IB accounts 153
viewing portfolios of non-IB accounts 152
viewing Proprietary Trading Group sub
accounts 357
Volume Tiered 398
voting 504
voting subscriptions 504
W
W-8 update 382
W-9 update 382
Wealth Manager Assignment lxxvi
wealth manager tasks lvii
WebTrader 64
white branding 430
weighting by sector 144
white branding 424
account management 432
Account Management Users' Guide 512