SGI NAS Quick Start Guide
34
SGI NAS Quick Start Guide 007-5865-001a
-
Upload
khangminh22 -
Category
Documents
-
view
6 -
download
0
Transcript of SGI NAS Quick Start Guide

SGI NASQuick Start Guide
007-5865-001a
chrisw
Typewritten Text

Copyright © 2012 SGI. All rights reserved; provided portions may be copyright in third parties, as indicated elsewhere herein. No permissionis granted to copy, distribute, or create derivative works from the contents of this electronic documentation in any manner, in whole or in part,without the prior written permission of SGI. SGI reserves the right to make changes to this document at any time without notice and assumes no responsibility for its use. Refer to the latest product announcement or contact your local SGI representative for information on feature and product availability. This document includes the latest information available at the time of publication. TRADEMARKS AND ATTRIBUTIONS SGI, Silicon Graphics, Supportfolio and the SGI logo are trademarks or registered trademarks of Silicon Graphics International Corp. or its subsidiariesin the United States and other countries. Linux is a registered trademark of Linus Torvalds in several countries. Novell and SUSE are registeredtrademarks of Novell, Inc., in the United States and other countries. Red Hat and all Red Hat-based trademarks are trademarks or registered trademarks of Red Hat, Inc. in the United States and other countries. Microsoft and Windows are registered trademarks or trademarks ofMicrosoft Corporation in the United States and/or other countries. VMware is a registered trademark of VMware, Inc. Xen and Citrix areregistered trademarks of Citrix Systems, Inc. All other trademarks mentioned herein are the property of their respective owners. Document Number: 007-5865-001a

SGI NAS Quick Start Guide
Table of Contents
1 Introduction ..............................................................................................................................1
1.1 Login.................................................................................................................................1
1.2 Document Conventions.....................................................................................................2
1.3 Terminology.......................................................................................................................3
2 Hardware Installation...............................................................................................................6
3 Three Easy Operations..........................................................................................................11
3.1 A. Registering SGI NAS..................................................................................................11
3.2 B. Configuring primary network interface and choosing transport protocol for
SGI NAS Web GUI.................................................................................................................13
3.3 C. Initial Configuration.....................................................................................................16
3.4 Configuration Wizard-I ....................................................................................................17
3.5 Configuration Wizard-II....................................................................................................21
4 Upgrading the license – Re-registering.................................................................................27
5 Contact Information................................................................................................................29
5.1 Support request...............................................................................................................29
iii
5.2 Other resources...............................................................................................................29

SGI NAS Quick Start Guide
iv

1 Introduction
SGI NAS is a software based network attached storage (NAS) appliance that meets
the current feature sets of the best of breed NAS, including unlimited snapshots,
snapshot mirroring (replication), NFS v3/v4, CIFS, and easy management of extremely
large storage pools. SGI NAS delivers richly featured software in the form of a software
appliance that is trivial to install and easy to manage.
SGI NAS is available as one of the following packages:
• SGI NAS Unified Appliance ― CD image (ISO) that can be
installed on bare-metal x86/64 hardware.
The SGI NAS installer also verifies the hardware compatibility before the
installation commences. Contact your SGI representative for more information
on hardware compatibility.
1
1.1 Login
SGI NAS is pre-configured with administrative user accounts: root and admin.
The default password for both accounts is "nasnas". Don't forget to change the
default password.

2
To obtain your permanent software license key for each system running the SGI NASsoftware, open a Supportfolio™ case using the webpagehttps://support.sgi.com/caseview/CreateNewCase or by calling 1.800.800.4744. Youmust provide the following information: • Sales Order Number(s) • System Serial Number(s) • Company Name • End User Name • Email Address • Telephone Your permanent key(s) will be emailed to you. If your purchase was for add-on plug-ins only, open a Supportfolio case as described earlier and SGI will upload the functionality for theplug-in to your original base software key(s).
1.2 Document Conventions
Command line example
Cross-reference
A notice, warning, conclusion, important remark.

1.3 Terminology
The following lists a few terms that are used in this document. For a complete list of
terms, please see the SGI NAS User Guide, 007-5860-00x.
Term Comment
SGI NAS SGI NAS Storage Appliance.
SA-API Storage Appliance API. NMS (next) is a sole provider of SA-API.
SGI NAS Management Server (NMS)
There is only one server instance per appliance. The server provides public and documented Storage Appliance API (SA-API) available to all appliance management and monitoring clients, remote and local, including (but not limited to) NMC.
SGI NAS Management Console (NMC)
The NMC can be used universally to view and configure every aspect of the appliance: volumes and folders, storage and network services, fault triggers and statistic collectors. NMC communicates with the local NMS (see previous) and remote management consoles and management servers to execute user requests. Multiple NMC instances can be running on a given appliance. NMC is a single-login management client with a capability to manage multiple appliances and groups of appliances.
SGI NAS Management View (NMV)
The web client uses the same SA-API (above) to communicate with the NMS. NMV shows status of all appliances on the network, displays graphical statistics collected by "statistic collectors", and more.
3


Installing SGI NAS:
1. Insert or mount the CD and boot the appliance by following the instructions
that appear in the wizard.
2. Choose the type of installation:
• via serial port COM1
• via keyboard/monitor
5
2 Hardware Installation

Installer's Boot Menu
The appliance can be installed via serial port COM1. The latter option is available, if your system BIOS supports keyboard/monitor to serial port redirection. Pay attention to the very first menu – the boot manager menu, an example of which is shown on the picture above. By default, the boot manager atempts to use the serial port, unless you press the Down arrow and ask it to boot using directly attached keyboard/monitor.
To install via serial port, configure the BIOS to use serial port input. The serial port parameters are the most common 9600 8,N,1
After configuring the BIOS to use serial port and inserting Installation CD, you should see the SGI NAS Installer's welcome message on the remotely connected terminal window. Please make sure that the remote terminal client supports ANSI or VT100 emulation and is also configured for 9600 8,N,1.
6
Optionally: You can postpone the installation and run a thorough memory check –
notice the 3rd entry in the menu above. Choosing to do so brings up the following
screen, with a variety of available memory-checking options and algorithms. Use
instructions at the bottom of the screen to control the execution:

3. Read and accept the product license to proceed further.
4. Select the disk drive(s) to be used as a system volume. The SGI NAS
Operating System is installed on the system volume. All existing data on the
selected disk(s) are lost during the installation process .
7

The corresponding drives are often referred to as root drives or boot
drives. At least one drive is required to install the system. However, if you
have two or three equal-sized disks with less than 100GB, it is
recommended that you set up a mirror for the system volume. The N-
way mirror can sustain simultaneous failure of (N-1) drives.
Use the Up and Down arrows and SPACEBAR to make the selection and
confirm your choice on the next screen:
8

The system volume is formatted.
The footnote that appears at the bottom of the screen, as shown above, explains
how to switch from the Installer to the Shell (F2), to Log (F3), and back to the main
screen (F1).
During the installation, you can review the detailed progress by pressing F3:
9

To switch to the shell, press F2:
To return to the main installation screen, press F1.
After you complete the installation, you are prompted to reboot the appliance.
Reboot the appliance and proceed to “Three Easy Operations ” .
10

3 Three Easy Operations
There are 3 easy operations to deploy the SGI NAS appliance:
(A) Register the appliance
(B) Configure primary network interface, and
(C) Perform a few essential Wizard-guided configuration steps.
The following are step-by-step detailed instructions on how to deploy SGI NAS
appliance products.
3.1 A: Registering SGI NAS
Step 1. Boot the SGI NAS appliance. After the appliance boots up, review
and accept the SGI NAS software license agreementA
A Some of the screenshots throughout this document may be outdated – captured from older
SGI NAS versions.
11

Step 2. Follow the instructions on the appliance's consoleB to register the
appliance software:
For the successful appliance registration, you need to provide machine
signature, a unique 9-character code that identifies your machine at the SGI
license registration page. In the example above the machine signature is
895GKAI9N. Contact SGI to obtain a valid license key.
B SGI NAS Management Console a. k. a. NMC
12

3.2 B: Configuring primary network interface and choosing transport protocol for SGI NAS Web GUI
Step 3. Ensure you enter the product registration key exactly as it
appears in the email sent as a result of registration (previous step).
Key is case sensitive. Make sure to enter the key exactly as specified in the auto-generated e-mail. The '-' separating groups of key characters need to be entered as well.
13

Once the Registration Key is entered, (“TRIA-...” in the example above),
proceed to configure primary network interface. You can connect to the
system as is via the stated address, if you configure a client on the same
network with a 192.168.1.X type address.
To facilitate initial configuration, the appliance is pre-configured with a static IP address 192.168.1.111
When going through the very first post-installation steps, please make sure that 192.168.1.111 is NOT in use. The chance that specifically this address is already in use is pretty low; however the chance exists, and if this happens the “duplicate IP address” scenario may arise on thenetwork to which appliance is currently connected.
Next, you will be prompted to reconfiguring the primary network interface.
Choose DHCP, if your environment supports it, or set up the interface
statically (you will need to specify the device’s IP address, subnet mask,
default gateway, and DNS server addresses).
In most cases you prefer to configure appliance's primary IP interface statically. General network administration guidelines do apply.
Step 4. After choosing your primary IP settings, you need to select not to
reconfigure. Finally, choose transport protocol for SGI NAS Web GUI
14

(NMV). You can select either HTTP – fast and (plain text) unsecured, or
HTTPS – secured, but less responsive:
Note
The example above shows primary networking interface and its (configured) settings. At this point you should be able to ping the appliance from an external host.
Note that during the process of network configuring you can specify Web
GUI port. The default is 2000, but you can change it to whatever you like if
it's not used by other services. For more info about TCP ports used by
SGI NAS, see the SGI NAS User Guide.
At this point the appliance is installed and READY TO BE INITIALLY CONFIGURED
via appliance's web GUI:
15
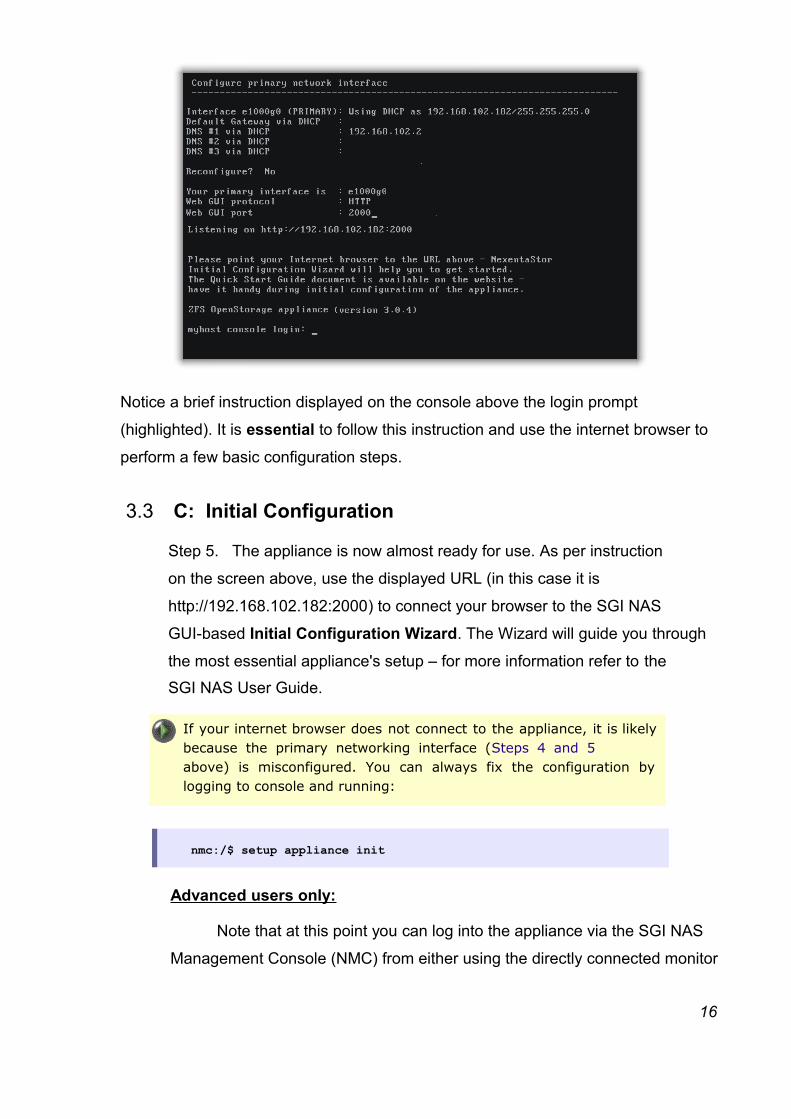
Notice a brief instruction displayed on the console above the login prompt
(highlighted). It is essential to follow this instruction and use the internet browser to
perform a few basic configuration steps.
3.3 C: Initial Configuration
Step 5. The appliance is now almost ready for use. As per instruction
on the screen above, use the displayed URL (in this case it is
http://192.168.102.182:2000) to connect your browser to the SGI NAS
GUI-based Initial Configuration Wizard. The Wizard will guide you through
the most essential appliance's setup – for more information refer to the
SGI NAS User Guide.
If your internet browser does not connect to the appliance, it is likely because the primary networking interface (Steps 4 and 5above) is misconfigured. You can always fix the configuration by logging to console and running:
nmc:/$ setup appliance init
Advanced users only:
Note that at this point you can log into the appliance via the SGI NAS
Management Console (NMC) from either using the directly connected monitor
16

or by ssh-ing to the appliance's primary IP address. In both cases, login as
root and use the default password "nasnas".
If you intend to do so, you will be greeted by the following SYSTEM
NOTICE:
This is a simple reminder that it is recommended to complete the
appliance's configuration via Initial Configuration Wizard.
3.4 Configuration Wizard-I
Your next step is to continue appliance's configuration. The appliance has a web
interface that will also initialize the system, if the network (see Step 6 above) is
available. Use the URL shown above. Security certificate is displayed since you are
connecting via secure connection:
Please accept it.
SGI NAS Initial Configuration Wizard is subdivided into two guided
stages:
• Stage I - Basic Configuration (the first screenshot below)
17

• Stage II - Configuring Network and Storage
It is important to perform all Wizard-guided steps of the Basic Configuration.
Note in the browser's address location window there is an appliance's web
GUI URL, the same one that was displayed at the end of Section 'B'
Configuring primary network interface and NMV transport" (above).
For more information on the Wizard and Wizard-guided steps of configuring
the appliance, see the SGI NAS User Guide section 'Initial ConfigurationWizard'.
Next, please assign root and admin passwords:
18
chrisw
Typewritten Text
chrisw
Typewritten Text
chrisw
Typewritten Text

SGI NAS is pre-configured with administrative user accounts: root and
admin. The default password for both accounts is "nasnas". Don't
forget to change the default password.
It is important to set up at least a mail server and mailing address for system
notifications, reports, and faults to be reported. Configure as necessary for
your site.
Setting up e-mail notification is important, as indicated on the side panel. Part of the appliance's Fault Management and Reporting is realized via notifications. It is recommended to configure either the appliance mailer or enable the appliance inbox.
If the mailer is not configured and inbox is disabled, the appliance will fail to notify of important events, and the notifications will silently end up in the appliance log file.
Mailer settings are set up on the third wizard screen:
19

Separate e-mail addresses for statistics (Volumes reports, Network Statistics, NFS
Statistics), notifications (system reports with status 'NOTICE' and 'INFO') and faults
(system reports with status 'WARNING' and 'CRITICAL') can be specified.
You can always review the changes, and either apply them (Save Configuration), or
go back and make more changes (Previous Step):
20

Both stage I and stage II of the Wizard can be re-run any time later and configuration can be modified.
3.5 Configuration Wizard-II
Most likely Stage-II Wizard will be run more often. Even though SGI NAS
Management View provides a superset of functionality, you may find it
convenient to re-run the Wizard by pointing your internet browser to the
/wizard2 URL. In the example (below) that URL is:
http://192.168.1.108:2000/wizard2
The following shows some of the Stage-II Wizard screens, to configure
Networking and Storage. Stage-II Wizard contains a number of optional
steps to setup network and storage, data volumes, folders and zvols.
At the end of this sequence you will be asked to create a system checkpoint.
21

For the freshly installed appliance, it is recommended to create system
checkpoint upon initial configuration.
Step 1. Here you can add or delete network interfaces, setup primary
interface, configure, setup default gateway and name servers.
Step 2. Configure iSCSI Initiator to use virtual disks exported via VMware or
another iSCSI target. The appliance supports all 3 types of iSCSI discovery.
22

Step 3. Allows you to review the available disks. If any new disks were added,
click on refresh and they will appear in the list:
23
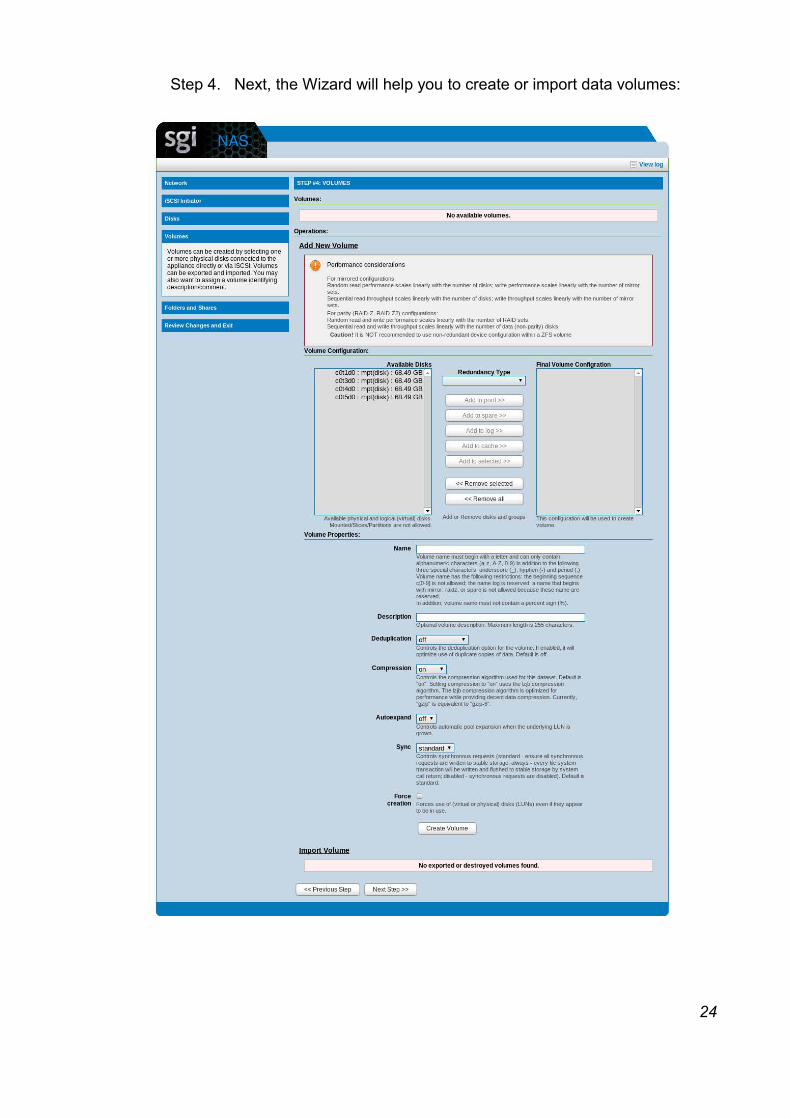
Step 4. Next, the Wizard will help you to create or import data volumes:
24

While walking through Wizard-guided steps, pay attention to system notices.
When creating a volume, please keep in mind that redundant configurations
typically improve performance and reliability but reduce effective storage
capacity.
25
Step 5. Create folders.

The Wizard will also recommend to create system checkpoint (see above) –
“a snapshot of the freshly installed and initially configured appliance”. Please
see the SGI NAS User Guide for introduction and for detailed information
on appliance's upgrade/checkpoint functionality.
To re-run any stage of the Wizard, go to Settings → Appliance → Wizard1/Wizard2. Or you can simply type in a browser: http://ip_adress:2000/wizard1
http://ip_adress:2000/wizard2
26
Step 6. Finally, with its last screen the Wizard invites to review and save all
changes:

4 Upgrading the license – Re-registering
To display appliance's license information, simply click on the About menu of the
SGI NAS Management View top level toolbar - for example:
27
Alternatively, use NMC command:
nmc:/$ show appliance license

If you changed your licensing terms (e. g., added more capacity) and received a
new license key for the appliance that is already in use, re-register the appliance
using the following NMC command:
nmc:/$ setup appliance register
For information on registering (and re-registering) appliance, see the corresponding
manual page:
nmc:/$ setup appliance register -h
Or, you can re-register using the appliance web GUI interface:
28

5 Contact information
5.1 Support request
To contact support at SGI, click on 'Support' in NMV as shown in the
screen below.
or type the following NMC command:
nmc:/$ support
which will then prompt for a subject and message.
5.2 Other resources
For licensing questions, please contact your SGI sales or support representative.
29

Product Support
SGI provides a comprehensive product support and maintenance program for
its products. For a full description of this program, do one of the following:
30
• See http://www.sgi.com/support/.
• If you are in North America, contact the Technical Assistance Center at
1 (800) 800 4SGI or contact your authorized service provider.
• If you are outside North America, see the following website for the appropriate
Customer Service phone number: http://www.sgi.com/support/supportcenters.html.