SAP S/4HANA 2020 SP00 Fully-Activated Appliance
40
SAP S/4HANA 2020 SP00 Fully-Activated Appliance December 2020 (V2.0) English PUBLIC SAP S/4HANA 2020 SP00 Fully-Activated Appliance: SAP S/4HANA Migration Cockpit – Direct Transfer Migrating Activity Types and Cost Centers Demo Guide
-
Upload
khangminh22 -
Category
Documents
-
view
11 -
download
0
Transcript of SAP S/4HANA 2020 SP00 Fully-Activated Appliance

SAP S/4HANA 2020 SP00 Fully-Activated Appliance December 2020 (V2.0)
English
PUBLIC
SAP S/4HANA 2020 SP00 Fully-Activated Appliance:
SAP S/4HANA Migration Cockpit – Direct Transfer
Migrating Activity Types and Cost Centers
Demo Guide

2
TABLE OF CONTENTS
Contents 1 Where Can This Script Be Used? ..................................................................................................................... 3
2 Before you start ................................................................................................................................................ 4 2.1 Create an SAP ERP instance and connect it to S/4HANA ........................................................................ 4
2.2 Performance / Reference Project / System Logon ................................................................................... 6
3 Demo story: Data Migration Direct Transfer (Cost Center & Activity Types) ............................................. 7 3.1 Check data in the ERP source system (example: master data / activity types) ...................... 8
3.2 Create your migration project ...................................................................................................... 10
3.3 Select data from the ERP source system and specify mapping values .................................. 17
3.4 Simulate the migration and correct errors ................................................................................. 23
3.5 Migrate the data and check results in the SAP S/4HANA target system .............................. 30
3.6 Learn how to adjust the selection ................................................................................................ 32
3.7 Select data from the ERP source system and check the selection result .............................. 38
Summary ................................................................................................................................................... 39
Document History
Revision Date Change
1.0 <2020-11-05> Release for customer for SAP S/4HANA 1909 release
2.0 <2020-03-12> Release for customer for SAP S/4HANA 2020 release

3
1 Where Can This Script Be Used?
This demo script has been written for usage with the SAP S/4HANA 2020 SP00 Fully-Activated Appliance (in short “appliance” in this script), hence you will need such an appliance to make use of this guide. The appliance can be brought up in two ways, and the demo scenario in this script is largely the same for both:
1. Via SAP Cloud Appliance Library (hosted on cloud providers)
You need a cloud provider account at AWS, MS Azure, or GCP. With this, you can deploy the appliance within 1-2
hours from https://cal.sap.com > Solutions > SAP S/4HANA 2020 SP00 Fully-Activated Appliance.
2. Via installing it on your own on-premise hardware.
You need to provide your own hardware, and order & install the appliance as explained in SAP Note 2041140.
If you are new to the SAP S/4HANA Fully-Activated Appliance, introductory information can be found here: https://blogs.sap.com/2018/12/12/sap-s4hana-fully-activated-appliance-create-your-sap-s4hana-1809-system-in-a-fraction-of-the-usual-setup-time/
Important:
Before you start your demo, please read SAP S/4HANA Fully-Activated Appliance: Demo Scripts for information
about necessary preparations, especially any post-deployment steps to ensure the full functionality of your appliance.
These steps are covered in sections;
B) General Remarks
C) Post-deployment Steps
D) Log-on to the system
Besides this, you will also find links to all demo scripts on this page.

4
2 Before you start
In this demo script, you will learn how to directly migrate data from an SAP ERP source system into SAP S/4HANA,
hence, this scenario requires an SAP ERP source system besides the SAP S/4HANA Fully-Activated Appliance target
system.
In the demo scenario we will use an instance of the SAP CAL solution “IDES EHP8 FOR SAP ERP 6.0 on SAP ASE” (the
system ID will be ABA) and connect it to your existing SAP S/4HANA Fully-Activated Appliance.
2.1 Create an SAP ERP instance and connect it to S/4HANA
Follow these steps to create the ERP system and connect it to S/4HANA:
1) Create an SAP ERP instance (system ID will be ABA)
Create an instance from the IDES ERP 6.0 solution by going to https://cal.sap.com and searching for “IDES ERP”.
You may find multiple entries, take the most recent one. The procedure to create the instance is the same as for the
S/4HANA instance and will take ~ 60 minutes.
For the demo scenario to work, the S/4 and the ERP systems need to be able to communicate via RFC (see next step
how to connect them). Normally this works smoothly if the two systems (S/4HANA and ERP 6.0) are created in the
same network segment of your chosen cloud provider (e.g. in the same CAL/cloud provider account).
If you face connectivity issues in the next step, please check your network setup.
2) Create an RFC connection from S/4HANA → SAP ERP.
Once you have both systems up and running (S/4HANA & ERP), proceed as follows:
a) Note down the external IP address of the SAP ERP 6.0 system (can be obtained from the CAL console of the SAP
ERP instance, same as what you did when mapping your /etc/hosts file).
b) Log on to SAP GUI of the S/4HANA system (either with a local SAP GUI or via the remote desktop).
c) Enter tCode SM59 in the S/4HANA system.
d) Open the entry in ABAP Connections → ABACLNT800 and click the Display <-> Change icon.
e) In tab Technical Settings, enter the external IP address of the SAP ERP system into field “IP address” or field
“target host”, dependent on which field is ready for input. Instance number is 00. Don’t mind if the system
converts something in the field “target host”.
f) Save
g) Go to tab Logon & Security.
h) Client 800 is already proposed.
i) Enter the value IDADMIN in field user.
j) Enter the value ides123 in field password.
k) Save
l) Click Connection Test or Remote Logon to check the connectivity (in case of problems, check your network
setup).

5

6
2.2 Performance / Reference Project / System Logon
A note on the migration performance
Please note that this is a trial environment, hence the system infrastructure might not be as good as in a real environment, especially the IDES ERP might take a couple of hours after the instance creation to achieve an acceptable performance. This means, the first actions you execute in the SAP ERP system take rather long, e.g. logon to the system, executing transactions for the first time. Also, the first actions which are started in the SAP S/4HANA Migration Cockpit which read by using the RFC from the SAP ERP system take rather long. During the first execution, several programs are generated in the SAP ERP system which are needed to select the data. A second execution will be much faster! When you create a project in the SAP S/4HANA Migration Cockpit, the migration objects with their definition are imported from client 000 into the current client. This procedure may take up to about 1 hour, depending on the number and complexity of the objects. A second project using the same objects will be much faster. The runtime for the selection differs for different migration objects, depending on the complexity of the data model for this object. The runtime for the simulation and migration option depends mainly on the API which is used in the migration object. In this environment you can vary the number of batch jobs per object and project in the Migration Cockpit.
In this CAL setup and the given system infrastructure, we experienced the following runtimes:
• Create a project for the first time: about 60 minutes.
Background: a lot of mapping rules have to be copied from the templates into the project. In addition, migration
programs are generated. SAP is aware of this runtime and will implemented improvements in future versions.
• Selection using migration objects which have a small data model (e.g. cost center, activity type): 2 – 3 minutes.
Second selection for the same object: about 1 min.
• Simulation & migration: clearly faster than selection.
• Selection using migration objects which have a complex data model (e.g. material, customer): up to 30 minutes
for the first selection.
Known issues
In 2020 SP00, if the runtime for an activity is longer than 60 min, a wrong runtime duration is displayed. This issue is
known and will be corrected with FPS01.
Existing projects for your reference
There exist two demo projects in the system: Demo_1909_FPS2 and Demo_2020_FPS0. The demo scripts for
migrating Cost Centers and Activity Types and for creating an own migration object have been executed in these
projects (one executed with release 1909, one in the current 2020) besides the last step Migration.
Logon data to the systems
System ABA (SAP ERP source system):
• Client: 800
• User: IDADMIN
• Password: ides123
System S4H (SAP S/4HANA target system):
• Client: 100
• User: S4H_MG
• Password: Welcome1

7
3 Demo story: Data Migration Direct Transfer (Cost Center & Activity Types)
In the following exercises, you will migrate data directly from an SAP ERP system (SAP ERP 6.0 with EHP 8
/ NetWeaver 7.50) to SAP S/4HANA (2020 SP00).
An RFC connection connects the SAP S/4HANA migration cockpit to the SAP ERP source system. The SAP
S/4HANA migration cockpit uses migration objects to identify and transfer the relevant data. SAP provides
predefined migration objects that you can use. It is possible to adjust or create own migration objects in the
migration object modeler if required.
In the ERP scenario, the standard selection criteria for selecting data from the source system is the
company code. Selection criteria can be adjusted in the migration object modeler.
In this example, in both systems (ERP source system (name: ABA) as well as SAP S/4HANA target
system (name: S4H), company code 0001 is assigned to controlling area 0001 (1:1 relationship).
For more information about the Migration Cockpit, including detailed information about the different
migration approaches or scenarios (ERP objects, AFS objects, EWM objects, CRM objects), please visit
help.sap.com and use the search criteria "SAP S/4HANA Migration Cockpit" or use the quick link to the
landing page http://help.sap.com/S4_OP_DM.
Exercise Description:
Migration object “CO-Activity Type”
1. Check data in the ERP source system
2. Create a migration project
3. Select data from the ERP source system and specify mapping values
4. Simulate the migration and correct errors
5. Migrate the data and check results in the SAP S/4HANA target system
Migration object “CO-Cost Center”
6. Learn how to adjust the selection (migration object modeler)
7. Select data from the ERP source system and check the selection result

8
3.1 Check data in the ERP source system (example: master data / activity types)
In the first part of the exercise, you will migrate activity types from the ERP source system to the SAP S/4HANA
target system. In this first step, you check which activity types exist in the ERP source system ABA in controlling area
0001.
Explanation Screenshot
Go to your CAL instance and connect to
system ABA and choose Client: 800. Click
Connect.
This opens the SAP GUI on your PC.
Use the following login data:
Client: 800
User: IDADMIN
PW: ides123
Language: EN
You are now in system ABA.
Enter KL13 in the transaction field in
order to have a look at the existing
Activity Types in the source.
Confirm your entry by pressing the Enter
Key.
1. Enter 0001 in the input field for
"Controlling Area".
2. Click .
Remark: controlling area 0001 is
assigned to company code 0001.

9
1. Enter 1 in the from field
2. Enter Z in the to field
3. Click Execute
Three Activity Type master data records
exist in the ERP source system in
Controlling Area 0001 which is assigned
to Company Code 0001.
You also see several master data fields as
e.g. Activity Type Unit and Allocation
Cost Element.
You will migrate these 3 master data
records within this exercise.

10
3.2 Create your migration project
In this step you launch the SAP S/4HANA Migration Cockpit. You create your migration project. Then you get an introduction into the handling and you will learn about the most important places within the Migration Cockpit. Please note that creating a new project takes some time until it is ready for processing (might take up to 1 hour).
In the background a lot of information (e.g. rules) must be copied from the delivered Migration Objects of client 000
into your project. Also, migration programs are generated.
You see the new project at once. The migration objects which are not yet ready for further processing are marked as “Not Ready for Processing”. This line disappears as soon as the migration object is ready, and you can proceed with the selection step for this object. If there is an issue during the creation step, please go to the project view. You find there at the top of the page a link to restart the creation.
Explanation Screenshot
Go to your CAL instance and connect to
system S4H.
Choose RDP.
Click Connect.
This opens a remote desktop connection.
Go to the welcome page and click the link
which opens FIORI.
Use the following logon data:
1. Enter User: S4H_MG.
2. Enter PW: Welcome1
(Client 100 is already suggested).
3. Click Log On.

11
1. Expand the list of all sections in the
upper-right corner header.
2. Click “Data Migration” (tick the tab in
the header).
Choose Migrate Your Data tile.
1. Click the Create button.
2. Choose Migrate Data Directly from SAP
System approach.

12
Type in:
1. Name: 00_Project_Activity_Type
2. Scenario: SAP ERP to SAP S/4HANA
3. Choose RFC: ABACLNT800
4. Development Package: $tmp (in this
example, a non-transportable
development package is used)
5. Proceed with Step 2.
1. Choose Company Code: 0001.
2. Proceed by clicking Step 3.
1. Flag the migration object: CO Activity
Type.
2. Click Arrow to locate the migration
object to the Selected Migration Object
section.

13
After you selected the migration objects,
click Review.
There comes a pop-up, asking if you want
to add the predecessor objects.
Click Do Not Add.
Click Create Project.
Choose your newly created project 00_Project_Activity_Type.

14
Click Settings in order to see the settings
of your project.
On the screen "Project Settings" you see
the basis settings which have been
defined for your project:
• RFC connection ABACLNT800 is
used to connect the SAP ERP source
system
• The selection criteria "Company
Code" is defined by SAP. In this
project, only one company code,
"0001" has been chosen.
• Within company code 0001, the data
for migration object CO-Activity type
will be selected.
Note: The selection criteria as such can
be changed in the LTMOM (migration
object modeler).
Click on number “xx” under predecessor
objects in order to get more information
on the dependent migration objects.
You see that for the migration object CO-
Activity type there are 2 predecessor
objects:
CO-Activity type group
CO-Secondary cost element
Click Documentation to check what is in
scope, what is out of scope of the
migration object and even technical
details.

15
By clicking Documentation, you will be
redirected to the Help.Sap.com portal.
Go Back and click on the migration object
name CO-Activity type to see details
regarding this migration object.
This page is a central place.
1. Click Table Structure to learn more about
the technical details of the migration
object.
This migration object selects data from
two tables in the source: data from CSLA
- master data and data from CSLT - texts
belonging to these master records.
In section "History" you find all logs.
Click Back.

16
You are now back in the migration project
view.
Additionally:
Please pay attention to the new functions
of the 2020 release: Monitoring and Job
Management.
For example, click Job Management.
When you click Job Management, you can
set up the maximum number of jobs for
the project or for the particular migration
object.

17
3.3 Select data from the ERP source system and specify mapping values
In this step you will proceed by selecting data from the source system. Then, you will edit mapping values.
Explanation Screenshot
You select the data to be migrated from
the ERP source. For the ERP scenario, the
selection criteria defined by SAP is
Company Code.
When the migration object is ready for
processing, you can start the selection.
1. Click Select Data to select the Activity
Types from the ERP source system.
Click Start Selection.
In the current project, Company Code
"0001" has been assigned (the value can
be seen in “project settings”).
Under the pop-up Running Activities you
can check the number of Running
Activities.

18
Alternatively, you can check all of your
running and completed activities by
clicking Monitoring function.
Click Monitoring.
Under Activities (4), you see 4 completed
activities.
For example, your recently completed
Select data activity.
Go Back to the Migration Project view.
Three items have been selected from the
source system.
Click 3 in order to see the three records.
You see three entries: MAINT, PROD,
ADMIN.
Click Back.

19
With the selection step, the Migration
Cockpit automatically creates mapping
proposals. The system proposes for each
field which can be mapped a 1:1 mapping,
for example:
Controlling Area "0001" (in the source) to
"0001" (in the target),
Activity Type "MAINT" to "MAINT".
You will edit the proposed mapping so
that the data to be migrated fits to the
S/4HANA target system.
Click 3 or Mapping Tasks to edit the
mapping for the three fields which can be
mapped in the current example.
In this view, you have the possibility to
confirm all mappings proposed by the
system with two clicks (mark all mapping
tasks, click confirm button).
In this exercise, we will have a closer look
into each mapping proposal.
Click Controlling Area.
On the left-hand side you get an overview
of the mapping tasks.
On the right-hand side you find the values
belonging to the mapping task.
Check the values, then mark the entry.
Click Confirm.

20
Click the second mapping task Cost
Element in order to edit the entries.
Select all entries.
The first entry is <Blank> to <Blank>.
This means there are activity types which
have no cost element assigned.
We confirm the entry as the activity type
definition shall be the same in the target
system.
Click Confirm to confirm these mapping
entries.
Click the last mapping task Activity Type
in order to edit the entries.
21
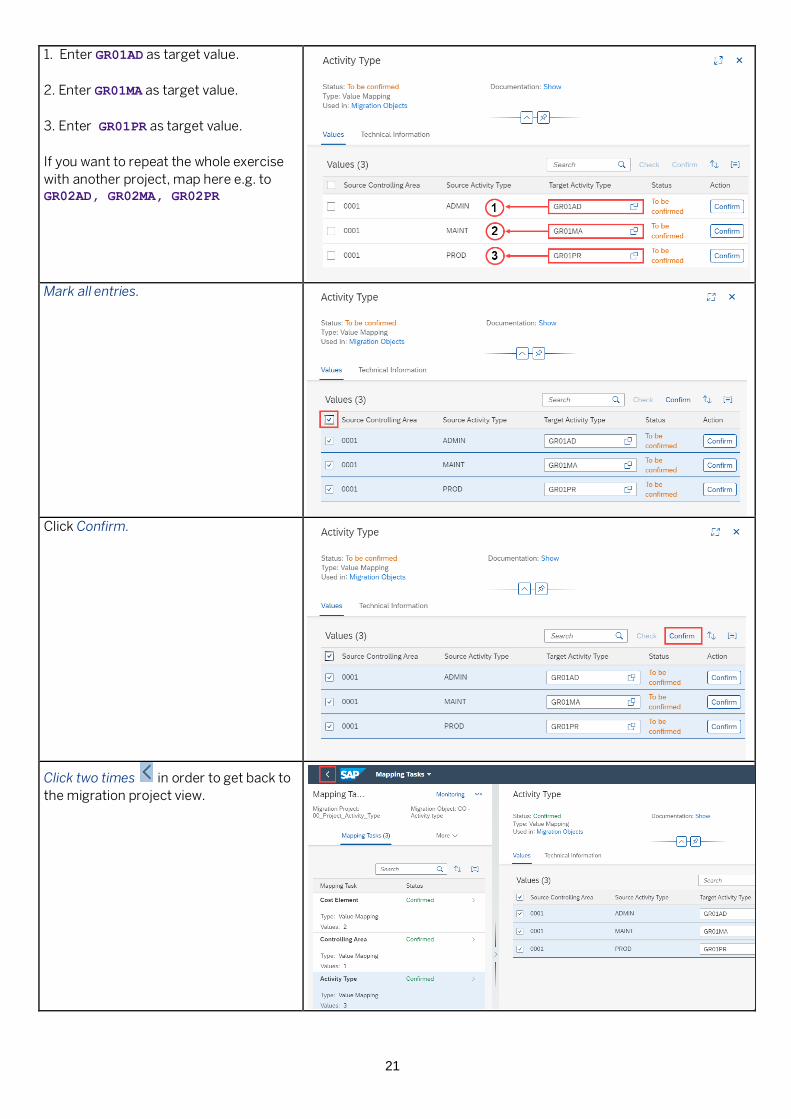
1. Enter GR01AD as target value.
2. Enter GR01MA as target value.
3. Enter GR01PR as target value.
If you want to repeat the whole exercise
with another project, map here e.g. to GR02AD, GR02MA, GR02PR
Mark all entries.
Click Confirm.
Click two times in order to get back to
the migration project view.

22
You have now edited all mapping tasks.

23
3.4 Simulate the migration and correct errors
In this step you simulate the migration of the instances. You check and correct errors. Simulation means, the SAP standard API in the target system is called and "fed" with the data. The SAP application does all the checks in the same way as if the data was created or posted manually. This guarantees that the data is created consistently in the target. You may get error messages from the Migration Cockpit or from the SAP application if, for example, target customizing does not fit, or mandatory data does not exist in the target.
Example of errors:
• Mapping has not been defined (Migration Cockpit)
• Cost element does not exist (SAP application, Financials)
• Cost element type does not fit (SAP application, Financials)
Explanation Screenshot
Click Simulate.
1. In the drop-down menu choose All
Instances.
2. 2. Click Start Simulation.
In the activity tracking part, click on the
tab “completed (..)” in order to see more
details about the status of the process.
If you would like to see the details of the
last performed activity including the
error, click Activities with Error tab.

24
Afterwards, choose View All Failed
Activities.
You are now redirected to the
Monitoring screen with the recent
activity “Simulate data”.
Click Show Messages to check the
details of the simulation you performed.
In the Migration Messages screen, you
can view the messages of different
types.
You can extract the excel with the
messages (including messages with
errors).
Click on the Excel button.
When you have downloaded and opened
the excel file, you can filter the type of
the messages – for example, you would
like to see only errors.

25
Let’s go back to the system.
Click two times in order to get back
to the migration project view.
You see one error. This means: one
instance has ended with error. Click on
the number of errors 1 to see the
instance which has an error.
1. Mark the first line
2. Click Messages
Double-click on the message text "Cost
element..." in order to get all details of
the message.

26
Scroll down the page in order to see the
full message text.
Scroll further down till “Migration
Object Data” section.
Activity Type ADMIN has a Cost
Element (0000610000) assigned
which exists in the S/4HANA target
system but has not the right type there.
You decide to map the assigned Cost
Element to a Cost Element which has
the right type 43 in the target. This is
done in the mapping tasks.
Click Mapping Tasks.
In the Migration Object screen, you
would find all messages regarding the
object Activity type (go to history, log
button).
Click on Cost Element.

27
In the second row, enter 640500 in the
box for "Target Cost Element".
This Cost Element already exists in the
target system with type 43, meaning
that the creation of Activity Type
GR01AD using this value will be
successful.
1. Select the second entry.
2. Click Confirm.
1. Click on the navigation menu.
2. Choose Migration project to go to the
project view.
Click to go again to option
"Simulate".

28
Click Simulate.
Click All Instances with Error and start the simulation.
Click Start Simulation.
Click on 3 to have a look at the simulated items.
You can see that the Activity Types
PROD, ADMIN, MAINT were simulated
successfully.
Go back to the Migration project.
1. Click on the Navigation menu.
2. Choose Migration project to go to the
project view.

29
You are back in the project view.

30
3.5 Migrate the data and check results in the SAP S/4HANA target system
In this step you start the migration and check the results in the SAP S/4HANA system.
Explanation Screenshot
Click Migrate.
1. Click on the dropdown menu and
choose All Instances.
2. Press Start Migration button.
The object migrated successfully!
In order to have a closer look at the logs
and the single instances, click on the
Monitoring tab.
Here you see all logs which have been written for this migration object during the project execution.

31
1. Open the navigation pane.
2. Click Home to get to the FIORI entry
screen.
Scroll down to the area Master Data and
click the tile Manage Activity Types.
1. Enter controlling area 0001 in field
“Controlling Area”.
2. Enter GR01* in the input field for
Activity Type in order to display the
migrated Activity Types. Don’t forget
the * at the end!
3. Click Go.
If you executed the exercise a second
time and you have mapped the Activity
Types to GR02…, enter GR02*.
You see your three migrated Activity Types in the application transaction. Activity Type GR01AD has cost element 640500 assigned.

32
3.6 Learn how to adjust the selection
In the previous exercise you selected all instances for migration object CO-Cost Center which exist in the source system in company code 0001 (which is assigned to controlling area 0001). In this exercise you will select cost centers from company code 0001 (which is assigned to controlling area 0001). This time you do not want to select all cost centers but restrict the selection to the cost centers KSDTC1 to KSDTC5. Which begin with KSDT. Therefore, you should go to the modeling environment (Migration Object Modeler) and do the respective settings. The migration object modeler offers the standard select option dialog for each field of the source table of the respective migration object data model, in this example table CSKS. Please note that as soon as you change the selection for a migration object, it becomes your responsibility to care for the consistency of the items to be selected. In the following exercise you first check the existing records in the source system. Then you create a new project in the SAP S/4HANA system (Fiori) before you go ahead adapting (modeler) and executing (Fiori) the selection.
Explanation Screenshot
You first have a look into the ERP source
system ABA to see which cost center
master data is there.
Open your SAP Logon. Choose system
ABA.
Use the following login data:
Client: 800
User: IDADMIN
PW: ides123
Language: EN
To check which cost centers exist in the
system, enter KS13 in the transaction
field.
Confirm your entry by pressing the Enter
key.

33
1. Enter 0001 in the field for Controlling
Area.
2. Click Continue .
1. 1. Enter 1 in the "from" field.
2. 2. Enter ZZZZZZZZZZ in the "to" field.
3. 3. Click Execute .
In the source system there are 7 Cost
Centers.
You want to select only the Cost Centers
which begin with KSDT to be transferred
to the S/4HANA system. This means: 6
Cost centers.
Go to your FIORI launchpad.
You probably have still the FIORI open.
Click the tile Migrate Your Data.

34
Create a new project as you did in part “Create your migration project”. Type in, respectively chose: Name: 00_Project_Cost_Center Scenario: SAP ERP to SAP S/4HANA Connection to Source System: ABACLNT800
Dev.Package: $tmp Company code: 0001 Flag migration object: CO-Cost center and move to the Selected Migration. Click “Review”. Do not add the predecessor objects. Click “Do Not Add“. Click “Create Project”.
Click on your project 00_Project_Cost_Center.
Besides the project creation, no other
actions have taken place so far.
To change the selection, you use the migration object modeler (LTMOM) which is the modeling layer.
To open the modeling environment, firstly you need to access the S/4HANA system via SAP Logon.
Open your SAP Logon. Choose system S4H (S/4HANA system).
Use the following logon data:
Client: 100
User: S4H_MG
PW: Welcome1
Language: EN

35
Enter transaction ltmom in the
transaction field and confirm your entry
by pressing the Enter key.
You are now in the modeling environment
(LTMOM) of the Migration Cockpit.
Open the first drop-down box and select
the entry Project by clicking it.
Enter your project name
00_Project_Cost_Center in the
second box.
Confirm your entry by pressing the Enter
key.
Please note: bringing up the project
definition takes some time.
Change from display mode to edit mode
by clicking Display <-> Change
.
You should see Change Project
00_Project_Cost_Center.
Expand the row "S4_CO_COST_CENTER"
by clicking the arrow.
Then double-click on “Source Structures”.
This opens a window on the right-hand
side.

36
In the window at right-hand side, double-
click in the first row on CSKS. It opens an
additional section on the right side.
Click on the tab selection criteria.
Сlick on the arrow in row KOSTL (Cost Center) and column Selection. This brings up a popup which will enable you to delimitate the selection in table CSKS.
Now, only cost center IDs which begin with KSDT should be selected when the selection is executed in the Migration Cockpit (which is the execution layer).
1. 1. Enter KSDT* in the input field.
2. 2. Click on the arrow to execute to selection.
Click Copy .

37
If you see the green cross , the selection completed successfully. Click OK.
Now you should see that the arrow in the Table Details CSKT changed to green under KOSTL raw, Selection column.
1. Click Save .
2. Click Back . Note: Please leave the LTMOM transaction otherwise you will lock yourself when executing the selection!

38
3.7 Select data from the ERP source system and check the selection result
After you have defined that the selection of cost centers shall be restricted to the ones where the IDs begin with KSDT, you will now execute the selection itself.
Explanation Screenshot
Go to the Migration Cockpit (FIORI) and
into your project
00_Project_Cost_Center.
Click Select Data.
Click Start Selection.
Selection is completed.
Click 6 in order to see the selected
instances.
Six cost centers have been selected from
the ERP source system.
Company code "0001" was defined in the
project settings. Controlling Area "0001"
is assigned in the customizing of your
source system to Company Code "0001".
From this Company code, only the Cost
centers which begin with KSDT have been
selected (you defined this in the modeler
layer / LTMOM).
Congratulations! You have successfully
finished the exercises!

39
Summary
You are now able to:
• Check data in the ERP source system
• Create a project and find the basic settings in a Migration Project
• Select data from the ERP source system and specify mapping values • Simulate the migration and correct errors
• Migrate the data and check results in the SAP S/4HANA target system
• Adjust the selection (migration object modeler)
• Select data from the ERP source system and check the selection result

40
www.sap.com/contactsap
© 2020 SAP SE or an SAP affiliate company. All rights reserved.
No part of this publication may be reproduced or transmitted in any
form or for any purpose without the express permission of SAP SE
or an SAP affiliate company.
The information contained herein may be changed without prior
notice. Some software products marketed by SAP SE and its
distributors contain proprietary software components of other
software vendors. National product specifications may vary.
These materials are provided by SAP SE or an SAP affiliate company
for informational purposes only, without representation or warranty
of any kind, and SAP or its affiliated companies shall not be liable for
errors or omissions with respect to the materials. The only
warranties for SAP or SAP affiliate company products and services
are those that are set forth in the express warranty statements
accompanying such products and services, if any. Nothing herein
should be construed as constituting an additional warranty.
SAP and other SAP products and services mentioned herein as well
as their respective logos are trademarks or registered trademarks of
SAP SE (or an SAP affiliate company) in Germany and other
countries. All other product and service names mentioned are the
trademarks of their respective companies. Please see
www.sap.com/corporate-en/legal/copyright/index.epx for additional
trademark information and notices.