Dell KACE K1000 Management Appliance Patching and ...
110
© 2004-2011 Dell, Inc. All rights reserved. Information concerning third-party copyrights and agreements, hardware and software warranty, hardware replacement, product returns, technical support terms and product licensing is in the Dell KACE End User License agreement accessible at http://www.kace.com/license/standard_eula Dell KACE K1000 Management Appliance Patching and Security Guide Release 5.3 Revision Date: May 13, 2011
-
Upload
khangminh22 -
Category
Documents
-
view
0 -
download
0
Transcript of Dell KACE K1000 Management Appliance Patching and ...

© 2004-2011 Dell, Inc. All rights reserved. Information concerning third-party copyrights and agreements, hardware and software warranty, hardware replacement, product returns, technical support terms and product licensing is in the Dell KACE End User License agreement accessible at http://www.kace.com/license/standard_eula
Dell KACE K1000 Management Appliance
Patching and Security Guide
Release 5.3
Revision Date: May 13, 2011


Contents
1 Understanding the Patching Process 7Understanding the Patch Management features . . . . . . . . . . . . . . . . . . . . . . . . . . . . . . . . . . 7
Direct Microsoft downloads. . . . . . . . . . . . . . . . . . . . . . . . . . . . . . . . . . . . . . . . . . . . . . . 7
Smart Labels . . . . . . . . . . . . . . . . . . . . . . . . . . . . . . . . . . . . . . . . . . . . . . . . . . . . . . . . . . 8
Versatile scheduling . . . . . . . . . . . . . . . . . . . . . . . . . . . . . . . . . . . . . . . . . . . . . . . . . . . . 8
Configurable reboot settings . . . . . . . . . . . . . . . . . . . . . . . . . . . . . . . . . . . . . . . . . . . . . . 8
Lumension . . . . . . . . . . . . . . . . . . . . . . . . . . . . . . . . . . . . . . . . . . . . . . . . . . . . . . . . . . . 8
Rollback support . . . . . . . . . . . . . . . . . . . . . . . . . . . . . . . . . . . . . . . . . . . . . . . . . . . . . . . 8
Replication shares . . . . . . . . . . . . . . . . . . . . . . . . . . . . . . . . . . . . . . . . . . . . . . . . . . . . . 8
Patch Management interface . . . . . . . . . . . . . . . . . . . . . . . . . . . . . . . . . . . . . . . . . . . . . 9
Understanding patch verification . . . . . . . . . . . . . . . . . . . . . . . . . . . . . . . . . . . . . . . . . . . . . 10The patch testing environment . . . . . . . . . . . . . . . . . . . . . . . . . . . . . . . . . . . . . . . . . . . 10
Application testing . . . . . . . . . . . . . . . . . . . . . . . . . . . . . . . . . . . . . . . . . . . . . . . . . . . . 10
Testing methodology. . . . . . . . . . . . . . . . . . . . . . . . . . . . . . . . . . . . . . . . . . . . . . . . . . . 10
Overview of the patching workflow . . . . . . . . . . . . . . . . . . . . . . . . . . . . . . . . . . . . . . . . . . . 11
Best practice guidelines for patching . . . . . . . . . . . . . . . . . . . . . . . . . . . . . . . . . . . . . . . . . 13Determining what you need . . . . . . . . . . . . . . . . . . . . . . . . . . . . . . . . . . . . . . . . . . . . . 13
Informing your users before patching . . . . . . . . . . . . . . . . . . . . . . . . . . . . . . . . . . . . . . 13
Finding “real world” users to help you test . . . . . . . . . . . . . . . . . . . . . . . . . . . . . . . . . . 13
Preventing unwanted software installations . . . . . . . . . . . . . . . . . . . . . . . . . . . . . . . . . 14
Suspending patching for network performance. . . . . . . . . . . . . . . . . . . . . . . . . . . . . . . 14
Using replication shares to speed up patching . . . . . . . . . . . . . . . . . . . . . . . . . . . . . . . 14
Dell KACE Knowledge Base articles. . . . . . . . . . . . . . . . . . . . . . . . . . . . . . . . . . . . . . . 14
View recently-arrived patches. . . . . . . . . . . . . . . . . . . . . . . . . . . . . . . . . . . . . . . . . . . . 14
Match patch scheduling to node type . . . . . . . . . . . . . . . . . . . . . . . . . . . . . . . . . . . . . . 15
What’s next . . . . . . . . . . . . . . . . . . . . . . . . . . . . . . . . . . . . . . . . . . . . . . . . . . . . . . . . . . . . . 15
2 Subscribing to and Downloading New Patches 17Understanding patch subscription . . . . . . . . . . . . . . . . . . . . . . . . . . . . . . . . . . . . . . . . . . . . 17
Subscribing to patches . . . . . . . . . . . . . . . . . . . . . . . . . . . . . . . . . . . . . . . . . . . . . . . . . . . . 17To prepare for subscribing . . . . . . . . . . . . . . . . . . . . . . . . . . . . . . . . . . . . . . . . . . . . . . 18
To view the available application patches. . . . . . . . . . . . . . . . . . . . . . . . . . . . . . . . . . . 18
To subscribe to patches . . . . . . . . . . . . . . . . . . . . . . . . . . . . . . . . . . . . . . . . . . . . . . . . 19
To configure patch downloads . . . . . . . . . . . . . . . . . . . . . . . . . . . . . . . . . . . . . . . . . . . 20
What’s next . . . . . . . . . . . . . . . . . . . . . . . . . . . . . . . . . . . . . . . . . . . . . . . . . . . . . . . . . . . . . 22
3 Patch Schedule Walk-Through Examples 23Patching automation overview. . . . . . . . . . . . . . . . . . . . . . . . . . . . . . . . . . . . . . . . . . . . . . . 23
Critical OS patches for workstations . . . . . . . . . . . . . . . . . . . . . . . . . . . . . . . . . . . . . . . . . . 24Subscribe to and download patches . . . . . . . . . . . . . . . . . . . . . . . . . . . . . . . . . . . . . . . 24
Create a workstation machine Smart Label . . . . . . . . . . . . . . . . . . . . . . . . . . . . . . . . . 24
To create a critical OS Patch Smart Label . . . . . . . . . . . . . . . . . . . . . . . . . . . . . . . . . . 25
To create Critical OS patch job . . . . . . . . . . . . . . . . . . . . . . . . . . . . . . . . . . . . . . . . . . . 26
Individual patches for servers . . . . . . . . . . . . . . . . . . . . . . . . . . . . . . . . . . . . . . . . . . . . . . . 30To deploy patches individually to servers . . . . . . . . . . . . . . . . . . . . . . . . . . . . . . . . . . . 30
To create a patch smart label to capture all server OS patches. . . . . . . . . . . . . . . 32
Patching and Security Guide, Version 5.3 3

Contents
To create a patch detect and deploy schedule for the server patches . . . . . . . . . . 33
What’s next . . . . . . . . . . . . . . . . . . . . . . . . . . . . . . . . . . . . . . . . . . . . . . . . . . . . . . . . . . . . . 36
4 Setting Up Patching Schedules 37Understanding patch scheduling options. . . . . . . . . . . . . . . . . . . . . . . . . . . . . . . . . . . . . . . 37
Understanding the scheduling options . . . . . . . . . . . . . . . . . . . . . . . . . . . . . . . . . . . . . . . . 39To edit an existing schedule . . . . . . . . . . . . . . . . . . . . . . . . . . . . . . . . . . . . . . . . . . . . . 39
Schedule Description . . . . . . . . . . . . . . . . . . . . . . . . . . . . . . . . . . . . . . . . . . . . . . . . . . 39
Patch Action . . . . . . . . . . . . . . . . . . . . . . . . . . . . . . . . . . . . . . . . . . . . . . . . . . . . . . . . . 39
Machine Selection. . . . . . . . . . . . . . . . . . . . . . . . . . . . . . . . . . . . . . . . . . . . . . . . . . . . . 40
Detect Patch Label Selection . . . . . . . . . . . . . . . . . . . . . . . . . . . . . . . . . . . . . . . . . . . . 40
Deploy Patch Labels Selection . . . . . . . . . . . . . . . . . . . . . . . . . . . . . . . . . . . . . . . . . . . 40
Reboot Options . . . . . . . . . . . . . . . . . . . . . . . . . . . . . . . . . . . . . . . . . . . . . . . . . . . . . . . 41
Patch Schedule . . . . . . . . . . . . . . . . . . . . . . . . . . . . . . . . . . . . . . . . . . . . . . . . . . . . . . . 41
To list unscheduled patches . . . . . . . . . . . . . . . . . . . . . . . . . . . . . . . . . . . . . . . . . . . . . 42
Undoing the last patching job . . . . . . . . . . . . . . . . . . . . . . . . . . . . . . . . . . . . . . . . . . . . 43
To determine rollback support . . . . . . . . . . . . . . . . . . . . . . . . . . . . . . . . . . . . . . . . 43
To undo the last patching job . . . . . . . . . . . . . . . . . . . . . . . . . . . . . . . . . . . . . . . . . 44
Patching workflow . . . . . . . . . . . . . . . . . . . . . . . . . . . . . . . . . . . . . . . . . . . . . . . . . . . . . . . . 44Most-used patching schedule options. . . . . . . . . . . . . . . . . . . . . . . . . . . . . . . . . . . . . . 45
All Schedule Detect/Deploy Options . . . . . . . . . . . . . . . . . . . . . . . . . . . . . . . . . . . . . . . 47
Schedule Rollback/Detect/Reboot Options . . . . . . . . . . . . . . . . . . . . . . . . . . . . . . . . . . 49
Scheduling Notes . . . . . . . . . . . . . . . . . . . . . . . . . . . . . . . . . . . . . . . . . . . . . . . . . . . . . 50
Monitoring Patching Status . . . . . . . . . . . . . . . . . . . . . . . . . . . . . . . . . . . . . . . . . . . . . . . . . 51To view patch status by computer. . . . . . . . . . . . . . . . . . . . . . . . . . . . . . . . . . . . . . . . . 51
To view patch status by patch. . . . . . . . . . . . . . . . . . . . . . . . . . . . . . . . . . . . . . . . . . . . 52
To view patch reports . . . . . . . . . . . . . . . . . . . . . . . . . . . . . . . . . . . . . . . . . . . . . . . . . . 52
Microsoft Windows update feature . . . . . . . . . . . . . . . . . . . . . . . . . . . . . . . . . . . . . . . . . . . 53
5 Managing your Patch Inventory 55Updating your K1000 Management Appliance with the newest patches. . . . . . . . . . . . . . . 55
Smart Labels for patches. . . . . . . . . . . . . . . . . . . . . . . . . . . . . . . . . . . . . . . . . . . . . . . . . . . 55To create a patch Smart Label . . . . . . . . . . . . . . . . . . . . . . . . . . . . . . . . . . . . . . . . . . . 56
To display a list of patches . . . . . . . . . . . . . . . . . . . . . . . . . . . . . . . . . . . . . . . . . . . . . . 57
Computer labels and Smart Labels . . . . . . . . . . . . . . . . . . . . . . . . . . . . . . . . . . . . . . . . . . . 57
Assessing patches before you run a schedule . . . . . . . . . . . . . . . . . . . . . . . . . . . . . . . . . . 58Selecting patches to detect and deploy . . . . . . . . . . . . . . . . . . . . . . . . . . . . . . . . . . . . 58
Understanding the patch status . . . . . . . . . . . . . . . . . . . . . . . . . . . . . . . . . . . . . . . 59Inactivating (Rejecting) Patches . . . . . . . . . . . . . . . . . . . . . . . . . . . . . . . . . . . . . . . . . . 59
Patch information in Inventory . . . . . . . . . . . . . . . . . . . . . . . . . . . . . . . . . . . . . . . . . . . . . . . 60To view patching details for a computer . . . . . . . . . . . . . . . . . . . . . . . . . . . . . . . . . . . . 60
To view patching statistics and tips. . . . . . . . . . . . . . . . . . . . . . . . . . . . . . . . . . . . . . . . 62
To view the Patch Listing page . . . . . . . . . . . . . . . . . . . . . . . . . . . . . . . . . . . . . . . . . . . 63
The status icons . . . . . . . . . . . . . . . . . . . . . . . . . . . . . . . . . . . . . . . . . . . . . . . . . . . 63
To unsubscribe to disabled patches . . . . . . . . . . . . . . . . . . . . . . . . . . . . . . . . . . . . 64
4 Patching and Security Guide, Version 5.3

Contents
Understanding detection and deployment status . . . . . . . . . . . . . . . . . . . . . . . . . . . . . 64
Patch detection. . . . . . . . . . . . . . . . . . . . . . . . . . . . . . . . . . . . . . . . . . . . . . . . . . . . 65
6 Deploying and Managing Secure Browsers 67About Secure Browsers. . . . . . . . . . . . . . . . . . . . . . . . . . . . . . . . . . . . . . . . . . . . . . . . . . . . 67
System software requirements . . . . . . . . . . . . . . . . . . . . . . . . . . . . . . . . . . . . . . . . . . . 67
Supported browsers . . . . . . . . . . . . . . . . . . . . . . . . . . . . . . . . . . . . . . . . . . . . . . . . . . . 67
Distributing Secure Browsers from your appliance . . . . . . . . . . . . . . . . . . . . . . . . . . . . . . . 67Installing the Secure Browser on the node . . . . . . . . . . . . . . . . . . . . . . . . . . . . . . . . . . 68
Setting up the Software Inventory item . . . . . . . . . . . . . . . . . . . . . . . . . . . . . . . . . . . . . 68
Creating a Managed Install for Secure Browsers . . . . . . . . . . . . . . . . . . . . . . . . . . . . . 68
Centrally Managing the Secure Browser Settings . . . . . . . . . . . . . . . . . . . . . . . . . . . . . . . . 70To add nodes to manage . . . . . . . . . . . . . . . . . . . . . . . . . . . . . . . . . . . . . . . . . . . . . . . 71
To control when users can launch the browser. . . . . . . . . . . . . . . . . . . . . . . . . . . . . . . 71
To control which Web sites a user can visit . . . . . . . . . . . . . . . . . . . . . . . . . . . . . . . . . 72
Adding Secure Browsers to the Software Library . . . . . . . . . . . . . . . . . . . . . . . . . . . . . . . . 72To create a Software Library item. . . . . . . . . . . . . . . . . . . . . . . . . . . . . . . . . . . . . . . . . 72
To return a Secure Browser to its original configuration . . . . . . . . . . . . . . . . . . . . . . . . 73
To shut down a Secure Browser on a node . . . . . . . . . . . . . . . . . . . . . . . . . . . . . . . . . . . . 74
Troubleshooting. . . . . . . . . . . . . . . . . . . . . . . . . . . . . . . . . . . . . . . . . . . . . . . . . . . . . . . . . . 74Collecting Log File Information for Support. . . . . . . . . . . . . . . . . . . . . . . . . . . . . . . . . . 74
7 Using the OVAL Security Features 77Security Overview . . . . . . . . . . . . . . . . . . . . . . . . . . . . . . . . . . . . . . . . . . . . . . . . . . . . . . . . 77
About OVAL . . . . . . . . . . . . . . . . . . . . . . . . . . . . . . . . . . . . . . . . . . . . . . . . . . . . . . . . . 77
Understanding the OVAL Tests. . . . . . . . . . . . . . . . . . . . . . . . . . . . . . . . . . . . . . . . . . . . . . 78To view OVAL definitions . . . . . . . . . . . . . . . . . . . . . . . . . . . . . . . . . . . . . . . . . . . . . . . 78
Running OVAL Tests . . . . . . . . . . . . . . . . . . . . . . . . . . . . . . . . . . . . . . . . . . . . . . . . . . 79
To use labels to restrict OVAL tests . . . . . . . . . . . . . . . . . . . . . . . . . . . . . . . . . . . . 80OVAL Updates . . . . . . . . . . . . . . . . . . . . . . . . . . . . . . . . . . . . . . . . . . . . . . . . . . . . . . . 80
Configuring OVAL Settings . . . . . . . . . . . . . . . . . . . . . . . . . . . . . . . . . . . . . . . . . . . . . . . . . 80To specify OVAL settings . . . . . . . . . . . . . . . . . . . . . . . . . . . . . . . . . . . . . . . . . . . . . . . 80
Vulnerability Report . . . . . . . . . . . . . . . . . . . . . . . . . . . . . . . . . . . . . . . . . . . . . . . . . . . . . . . 81To access OVAL vulnerability reports . . . . . . . . . . . . . . . . . . . . . . . . . . . . . . . . . . . . . . 82
To apply a label to affected machines . . . . . . . . . . . . . . . . . . . . . . . . . . . . . . . . . . . . . 82
Computer Report . . . . . . . . . . . . . . . . . . . . . . . . . . . . . . . . . . . . . . . . . . . . . . . . . . . . . . . . . 82To access OVAL computer reports . . . . . . . . . . . . . . . . . . . . . . . . . . . . . . . . . . . . . . . . 82
Creating Security Policies . . . . . . . . . . . . . . . . . . . . . . . . . . . . . . . . . . . . . . . . . . . . . . . . . . 83
Creating Windows-based Security Policies . . . . . . . . . . . . . . . . . . . . . . . . . . . . . . . . . . . . . 83Enforce Internet Explorer Settings . . . . . . . . . . . . . . . . . . . . . . . . . . . . . . . . . . . . . . . . 83
To set the Internet Explorer settings policy . . . . . . . . . . . . . . . . . . . . . . . . . . . . . . . . . . 83
Enforce XP SP3 Firewall Settings. . . . . . . . . . . . . . . . . . . . . . . . . . . . . . . . . . . . . . . . . 85
To set the XP SP3 Firewall settings policy . . . . . . . . . . . . . . . . . . . . . . . . . . . . . . . 85Enforce Disallowed Programs Settings. . . . . . . . . . . . . . . . . . . . . . . . . . . . . . . . . . . . . 86
To set the Disallowed Programs settings policy . . . . . . . . . . . . . . . . . . . . . . . . . . . 86Enforce McAfee AntiVirus Settings . . . . . . . . . . . . . . . . . . . . . . . . . . . . . . . . . . . . . . . . 87
Patching and Security Guide, Version 5.3 5

Contents
To set the McAfee AntiVirus settings policy . . . . . . . . . . . . . . . . . . . . . . . . . . . . . . 87McAfee SuperDAT Update . . . . . . . . . . . . . . . . . . . . . . . . . . . . . . . . . . . . . . . . . . . . . . 88
To create the McAfee update script . . . . . . . . . . . . . . . . . . . . . . . . . . . . . . . . . . . . 88Enforce Symantec AntiVirus Settings . . . . . . . . . . . . . . . . . . . . . . . . . . . . . . . . . . . . . . 89
To set the Symantec AntiVirus settings policy . . . . . . . . . . . . . . . . . . . . . . . . . . . . 89Quarantine Policy . . . . . . . . . . . . . . . . . . . . . . . . . . . . . . . . . . . . . . . . . . . . . . . . . . . . . 90
To set the Quarantine policy. . . . . . . . . . . . . . . . . . . . . . . . . . . . . . . . . . . . . . . . . . 91To set the Lift Quarantine Action policy . . . . . . . . . . . . . . . . . . . . . . . . . . . . . . . . . . . . 91
Creating Mac OS-based Security Policies. . . . . . . . . . . . . . . . . . . . . . . . . . . . . . . . . . . . . . 92Enforce Firewall Settings . . . . . . . . . . . . . . . . . . . . . . . . . . . . . . . . . . . . . . . . . . . . . . . 92
8 SCAP 93Overview . . . . . . . . . . . . . . . . . . . . . . . . . . . . . . . . . . . . . . . . . . . . . . . . . . . . . . . . . . . . . . . 93
Definitions . . . . . . . . . . . . . . . . . . . . . . . . . . . . . . . . . . . . . . . . . . . . . . . . . . . . . . . . . . . 93
More about Secure Content Automation Protocol . . . . . . . . . . . . . . . . . . . . . . . . . . . . . . . . 94
About Benchmarks . . . . . . . . . . . . . . . . . . . . . . . . . . . . . . . . . . . . . . . . . . . . . . . . . . . . . . . 95
How a SCAP scan works. . . . . . . . . . . . . . . . . . . . . . . . . . . . . . . . . . . . . . . . . . . . . . . . . . . 95
Overview of the SCAP Scan tab . . . . . . . . . . . . . . . . . . . . . . . . . . . . . . . . . . . . . . . . . . . . . 97To view Benchmarks. . . . . . . . . . . . . . . . . . . . . . . . . . . . . . . . . . . . . . . . . . . . . . . . . . . 97
To import and load a benchmark . . . . . . . . . . . . . . . . . . . . . . . . . . . . . . . . . . . . . . . . . 98
SCAP scan scheduling . . . . . . . . . . . . . . . . . . . . . . . . . . . . . . . . . . . . . . . . . . . . . . . . . . . . 99
Editing a SCAP scan schedule . . . . . . . . . . . . . . . . . . . . . . . . . . . . . . . . . . . . . . . . . . . . . 101Viewing the resolved XCCDF files . . . . . . . . . . . . . . . . . . . . . . . . . . . . . . . . . . . . . . . 101
Viewing the OVAL timestamp . . . . . . . . . . . . . . . . . . . . . . . . . . . . . . . . . . . . . . . . . . . 101
Viewing script tasks . . . . . . . . . . . . . . . . . . . . . . . . . . . . . . . . . . . . . . . . . . . . . . . . . . 102
SCAP scan results. . . . . . . . . . . . . . . . . . . . . . . . . . . . . . . . . . . . . . . . . . . . . . . . . . . . . . . 105
Getting the Benchmark archive . . . . . . . . . . . . . . . . . . . . . . . . . . . . . . . . . . . . . . . . . . . . . 107To access the Benchmark archive . . . . . . . . . . . . . . . . . . . . . . . . . . . . . . . . . . . . . . . 107
Index 109
6 Patching and Security Guide, Version 5.3

1
Understanding the Patching ProcessThis guide explains how use the K1000 Management Appliance patching and security features:
• This chapter provides an overview of the K1000 Management Appliance patching features and process, and then expands on some of the more important patching concepts. Finally, this chapter explains some best practices for patching.
• Chapter 2: Subscribing to and Downloading New Patches, starting on page 17 through Chapter 4: Setting Up Patching Schedules, starting on page 37 explains how to manage and distribute software patches to the nodes in your K1000 Management Appliance implementation.
• Chapter 6: Deploying and Managing Secure Browsers, starting on page 67 explains how to implement and deploy Secure Browsers from the K1000 Management Appliance.
• Chapter 7: Using the OVAL Security Features, starting on page 77 explains how to use the OVAL security feature.
This guide is independent of the Dell KACE JumpStart training but covers some of the same material. If possible, read this manual before you attend JumpStart training.
Understanding the Patch Management featuresThe K1000 Management Appliance Patch Management features provide quick, accurate, and secure patch management. First and foremost, these features are designed to proactively protect your K1000 Management Appliance implementation from the constantly-evolving threat of software attacks. These features also provide you with a flexible mechanism for managing updates to all of your software programs. You can automate the detection, analysis, and deployment of patches to your K1000 Management Appliance implementation and schedule these tasks to run on a regularly scheduled basis. You can perform these tasks immediately or as needed.
Direct Microsoft downloadsK1000 Management Appliance Patch Management provides patching support for the latest Microsoft Windows releases and locale support. Patches are downloaded directly from the software vendor (after verification). This reduces the time it takes to get patches deployed, with no decrease in testing or verification level.
Patching and Security Guide, Version 5.37

1 Understanding the Patching Process
Smart LabelsThe K1000 Management Appliance allows you to detect the latest patches based on your own custom Smart Label filtering criteria, such as manufacturer, operating system, software family, software application, or impact. After you select patches to install, you then create a schedule to deploy them. For details about Patch Smart Labels, see Smart Labels for patches, on page 55.
You can restrict the patching schedule to a specific node or nodes that you have put in a computer label. You may have already set up some computer Smart Labels as they are also described in the Administrator Guide. You can use the computer Smart Labels you have already created to organize your nodes. You can also create Smart Labels that are more specific for patching purposes. (A node can be in multiple labels.)
Versatile schedulingOnce the patching schedule is set up, you can run it any time you want, either on a regular schedule or as needed. If you suspect that patching will take a long time, you can set a time limit for patching to run. This is useful to avoid patching during peak network usage time.
See Chapter 4: Setting Up Patching Schedules, starting on page 37 for details.
Configurable reboot settingsIf your patching requires your users to reboot, you can force the reboot at patch time or offer users the option of delaying it until your K1000 Management Appliance reminds them after a configurable time limit.
For more information, see Reboot Options, on page 41.
LumensionLumension patching service supports all major operating systems and many popular applications. For a list of the supported applications, see the PDF file attached to the KBOX systems Management Appliance Patch Quality Assurance Summary article. This article is available from the Support tab of the www.kace.com website (login required).
For more information, see Understanding patch verification, on page 10.
Rollback supportIf you need to remove patches, use the patch scheduling rollback option. (Not all patches support rollback.) You use the same patching tools to select and attempt to rollback patches. As with patch deployment, the K1000 Management Appliance attempts to remove patches three times before stopping.
For more information, see Undoing the last patching job, on page 43.
Replication sharesIndividual nodes can receive patches from the K1000 Management Appliance, or you can distribute them from replication share points. Replication shares are repository patches and
8 Patching and Security Guide, Version 5.3

Understanding the Patching Process1
other files needed by nodes. They are generally used at remote sites, where the remote systems have faster connections between each other than any of them do with the K1000 Management Appliance. Once a remote share is populated with patches or other files, the K1000 Management Appliance sends information about which local nodes receive the files. This saves the bandwidth required by each local system transmitting files back and forth with the K1000 Management Appliance.
For details on replication shares, see Using replication shares to speed up patching, on page 14, and the Administrator Guide.
Patch Management interfaceThe Patch Management page provides:
• Four specialized patch feature pages.
• Three indicators that provide an at-a-glance status of your last scheduled patch deployment progress.
The patch management feature requires a constant AMP connection between the node and K1000 Management Appliance.
An icon on the Inventory list page indicates an AMP connection. For information on how to set up the constant AMP connection, see the Configuring AMP Settings for the Server section of the Administrator Guide.
Patching and Security Guide, Version 5.39

1 Understanding the Patching Process
Understanding patch verificationDell KACE partners with Lumension Security, Inc. to provide K1000 Management Appliance customers a robust content development and quality assurance process. The patching feed provided for the K1000 Management Appliance is designed with these objectives:
• Providing safe, quality patch content.
• Improving the timeliness of the patch availability without compromising patch quality and reliability, and
• Enabling the broadest possible set of OS and application patching.
To achieved these goals, Lumension:
• Verifies the patch metadata produced by each content development team.
• Validates the install and uninstall processes.
• Confirms that the patch does not disrupt the targeted operating system’s and/or application’s immediate stability.
Dell KACE also sanity-checks patch feeds after Lumension has finished with their testing. The Lumension tests are described in the following sections.
The patch testing environmentLumension invests heavily in testing infrastructure. The content development and quality teams have access to a virtual enterprise environment representing more than 1500 nodes of various configurations. Utilizing VMWare ESX and Lab Manager, in addition to custom hardware bench testing, the Lumension testing infrastructure is state of the art.
Application testing Lumension tests with various applications as necessary to ensure the requirements of the patch are satisfied.
Testing methodologyLumension puts each patch through the following tests:
General testing verifies that the:
• Patch-naming convention complies with Lumension policy.
• Patch content supports the replication process. Each patch created by the content team is validated with the Symantec Ghost Solution™ Suite distribution and Update Server products.
Assessment testing verifies that:
• An applicable non-patched system shows applicable and not patched.
• A patched system shows installed and not applicable.
• No false positives exist in the detection of the digital fingerprint.
• Patch content is compliant with mandatory baselines.
10 Patching and Security Guide, Version 5.3

Understanding the Patching Process1
• Vulnerability is correctly displayed in Update Server and all Smart Label, filtering, sorting, and other visual functionality works correctly.
Deployment testing verifies that:
• The package is successfully deployable.
• Suppress reboot functionality works correctly.
• The uninstall functionality works correctly.
• On-demand package caching works correctly.
• Automatic deployment scheduling works correctly.
• Agent package download works correctly.
• CRC checksum ensures package integrity.
• The agent automatically runs assessment after patch deployment.
• The agent restarts automatically after reboot.
Overview of the patching workflowThe K1000 Management Appliance patching workflow includes:
• (If needed) Upgrading your K1000 Management Appliance and agents to the latest release. For details on performing these steps, see the Administrator Guide.
• Subscribing to patches for the operating systems and software applications (optional) on your K1000 Management Appliance implementation. The patches you select are downloaded to your K1000 Management Appliance automatically every day (by default). In the case of critical security patches, downloads are sometimes immediate. See Chapter 2: Subscribing to and Downloading New Patches, starting on page 17 for more information.
• Filtering out the downloaded patches that your nodes don’t require. You may not want to install all of the patches that your patch subscriptions provide. You mark these patches as inactive to prevent them from being installed automatically. For details on filtering patches, see Selecting patches to detect and deploy, on page 58.
• Grouping your patches together by applications or software families in Smart Labels that your schedules use to run the detect and deploy actions. For example, a label might specify patches for all Microsoft Windows systems. (These are patch Smart Labels.) For details, see Smart Labels for patches, on page 55.
• Grouping your nodes together in Smart Labels that your schedules use to run the detect and deploy actions. (These are machine Smart Labels.) For example, you might collect all laptops running Microsoft Windows into a single label. For details, see Computer labels and Smart Labels, on page 57.
• Finding out which of your nodes requires a specific patch. This is a patch detection task, and you do this by probing each node to see if a patch has already been applied. You normally perform patch detection automatically as part of a patch schedule, but you can also do it alone. For details on managing patches, see Chapter 5: Managing your Patch Inventory, starting on page 55.
Patching and Security Guide, Version 5.311

1 Understanding the Patching Process
• Installing the patches on the nodes that need them with a deployment action, which you can also perform automatically as part of a patch schedule. For details on creating patch schedules, see Best practice guidelines for patching, on page 13.
• Putting all these pieces together by using your patch schedules to automatically run detect/deploy actions for the patches in your patch labels, on the corresponding computers in your machine labels.
For example, you might create a schedule for Microsoft Office patches on your laptops running Microsoft Office applications. You can run schedules at any interval that you choose. You will probably create different schedules for the laptops, workstations, and servers in your K1000 Management Appliance implementation, because these three types of computers have very different usage characteristics. See Chapter 4: Setting Up Patching Schedules, starting on page 37 for details.
The patches you subscribed to are downloaded to your K1000 Management Appliance from Lumension
Create a Smart Label for the machines to automatically select computers from your inventory to patch. You can use filter criteria to capture computers that are not on line yet.
Create a Smart Label to automatically select patches to detect and deploy. You can use criteria that captures similar patches that have not been downloaded yet.
Create a schedule that detects which machines in the machine label need the patches in the patch label.
Create a schedule that deploys the patches in the patch label to the machines that need them in the machine label.
?
Patching Workflow
12 Patching and Security Guide, Version 5.3

Understanding the Patching Process1
• Finally, testing your schedules on a small subset of the computers you administer to make sure everything is working the way you expect.
The next few sections expand on some of the more important patching concepts and offer some best practices advice.
Best practice guidelines for patchingThe following sections offer advice for a trouble-free patching process. Your policies may differ, but these practices are advisable for most customers.
Determining what you need When you start patching, the first thing you will probably want to do is run a detect-only schedule against all of your nodes, for all of your patches. This is a one-time operation that shows you how large your first patching job is going to be and hopefully gives you some ideas on how to allocate resources. Balance the magnitude of the task against the resources you have and the tolerance your users will have for watching their systems patch and reboot.
Another popular strategy is to start by deploying just the critical patches to all nodes immediately, and then come back and deploy the remaining patches more slowly.
Informing your users before patchingThis is an effective way to prevent unhappy users from calling your department, especially if patching requires rebooting. If you warn laptop users to leave their systems up at lunch time, you can patch during the one time when they are least likely to be working. Warning server users is more difficult. If the server runs import or critical services, you may have to warn them weeks in advance. Also, see Match patch scheduling to node type, on page 15.
Finding “real world” users to help you testToo often system administrators only test whether patches install correctly, instead of confirming that they do not break anything else.
Select these test users for their:
• Technical sophistication.
• Ability to communicate problems effectively.
• Systems and software, which reflect the norms in their groups.
To get a reasonable test, have the test users work normally for a for up to a week and ask them to launch each program that they use to perform their jobs. If they do not encounter any new problems, then you know it is probably safe to patch the rest of the computers in their organizations.
Patching and Security Guide, Version 5.313

1 Understanding the Patching Process
Preventing unwanted software installationsApplication patches sometimes install applications as well as update them. For example, a patch content feed for the Firefox program may include both application update patches and full software installers. Running a detect and deploy action with FireFox patches on machines that do not have Firefox installed, will not fail. Instead, the deploy action installs Firefox on any machines that do not already have it.
You can prevent this by only deploying application patches to machines with the application already installed.
Suspending patching for network performanceYou can prevent patching from running at hours when you expect many users to be working. This is useful for stopping the patching jobs (and reboots) before users start working on the computers while they are being patched and competing for the same system resources. This setting is particularly useful if the patching job is large or your network bandwidth is limited.
See the Patch Schedule, on page 41, for more information about the Suspend pending tasks setting.
Using replication shares to speed up patchingPatching can require significant network resources and time, two things you may not have in abundance. The K1000 Management Appliance Replication Shares feature can help with this. A replication share is a computer used as a remote storage and implementation site for software. This feature is useful for patching remote locations, or anytime you support a group of computers whose common bandwidth is faster than their connections to the K1000
Management Appliance. See the Administrator Guide for your K1000 Management Appliance for details on replication shares.
Dell KACE Knowledge Base articlesThe K1000 Management Appliance Knowledge Base articles available on the www.kace.com Support tab (login required) are a valuable source for information on K1000 Management Appliance features. The Knowledge Base is continually being updated with solutions to real-world K1000 Management Appliance problems that administrators encounter. It is recommended that you check this source occasionally. To view patching articles, search for Security.
View recently-arrived patchesSee this Knowledge Base article for instructions on setting up a label and report to view the list of patches that have arrived within a configurable time period: Patching filter to help gather a list of patches X amount of days in the K1000. Knowledge Base articles are available from the www.kace.com Web site in the Support tab (login required).
14 Patching and Security Guide, Version 5.3

Understanding the Patching Process1
Match patch scheduling to node typeMost K1000 Management Appliance implementations have computers with three different types of patch scheduling needs:
• Servers, which require careful and well-publicized upgrades.
• Workstations, which have more flexible options for patching, because they are often left on.
• Laptops, which are the most difficult to patch, because they are often only available to patch while being used.
You can organize these three types of computers into different labels, so you can match patching schedules to the way the nodes are used.
For a list of the preferred patch scheduling options for these different types of computers, see Most-used patching schedule options, on page 45.
What’s nextNow that you know the steps necessary to set up patching and understand the main patching concepts, read through the next chapter to start the patching process by subscribing to patches.
Patching and Security Guide, Version 5.315

1 Understanding the Patching Process
16 Patching and Security Guide, Version 5.3

2
Subscribing to and DownloadingNew Patches
This chapter explains the subscription process, which is the first step in patching the operating systems and applications of the nodes managed by your K1000 Management Appliance.
Understanding patch subscriptionPatch subscription is the process of selecting the operating systems and applications for which you want to receive patches. Once you have subscribed to patches, your K1000 Management Appliance automatically makes new patches available for you to assess, test, and install. You can also automatically install patches, but this is recommended for low-risk or time-important patches only.
You also have the option to download patches for all applications that the K1000 Management Appliance is contracted to support:
• Adobe Acrobat and Reader software.
• The Symantec family of Norton antivirus software.
• The McAfee family of antivirus software.
• Mozilla Firefox.
• The Computer Associates eTrust family of antivirus software.
• Microsoft Office applications.
• Apple applications, including such as QuickTime, iTunes, iLife software.
• Sun Microsystem’s Java environments.
• TrendMicro applications.
You can subscribe to all of these patches or none of them. To see the patch subscription interface, see To subscribe to patches, on page 19.
Subscribing to patchesIf your K1000 Management Appliance has been installed and connected to the network overnight, it is already populated with patch metadata as shown below on the Patch Listing
Patching and Security Guide, Version 5.3 17

2 Subscribing to and Downloading New Patches
page. A grey X indicates that a patch is available, but has not been downloaded to your K1000 Management Appliance.
To prepare for subscribingBefore starting on the subscription process, gather a list of the operating systems (and any language packs) managed by the K1000 Management Appliance. It is also good to know what applications they are running. You can get this information from the Inventory component. See Chapter 5: Managing your Patch Inventory, starting on page 55.
To view the available application patches
1. Go to Security > Patching.
2. Click Patch Listing.
The Patch Listing page appears.
3. Click Advanced Search.
The Advanced Search panel appears.
4. In the Patch Type menu, click Application.
5. Click the Search button.
To perform these steps, be sure to select your organization from the Organization drop-down list in the top-right hand corner of the page.
18 Patching and Security Guide, Version 5.3

Subscribing to and Downloading New Patches2
To subscribe to patches
Follow these steps to subscribe to the operating system and application patches of the nodes the K1000 Management Appliance manages.
1. Go to Security > Patching.
2. Click Subscription Settings.
The Patch Subscription Settings page appears.
3. Click the Edit Mode button.
4. Select only the operating systems of the computers that your K1000 Management Appliance implementation manages.
The above example shows all the Windows Vista and XP and the Macintosh OSX 10.5 x86 and 10.6 x86 operating systems selected.
5. Select the languages of the Windows computers that your K1000 Management Appliance implementation manages.
The appliance supports language selection only on Windows platforms.
To perform these steps, be sure to select your organization from the Organization drop-down list in the top-right hand corner of the page.
Patching and Security Guide, Version 5.3 19

2 Subscribing to and Downloading New Patches
6. (Optional) Select the Download Application Patches check box to include application patches as well as OS patches in your subscription.
7. (Optional) Select the Include Software Installers check box to include patch installer in your subscription.
8. (Optional) Select the Limit Patch Download to Selected Labels check box to download only patches having the selected labels.
9. (Optional) Click the Automatically Inactivate Superseded Patches check box to mark superseded patches with a grey X in the Patch Listing display. This automatically shows you when a patch has been superseded.
10. Click Save at the bottom of the page.
This completes the process of subscribing to patches for the operating systems in your environment and all applications. If the operation systems in your environment change, you can update your subscription on this page at any time.
To configure patch downloads
By default, the K1000 Management Appliance downloads new patches at 03:00AM nightly. The first patch download is large and takes a lot of network bandwidth.
1. Go to K1000 Settings > Control Panel.
2. Go to Patch settings.
To perform these steps, be sure to select System from the Organization drop-down list in the top-right hand corner of the page.
20 Patching and Security Guide, Version 5.3

Subscribing to and Downloading New Patches2
The K1000 Patch Settings page appears:
3. Click the Edit Mode button.
4. In Download New Patch Definitions, click an option to either disable patch downloading or schedule downloads.
5. In Stop Download of Patch Definitions, click an option to either allow the updates to complete no matter how long the process takes or specify a stop time for it.
For example, use an early morning stop time to keep the process from taking network bandwidth away from your users.
6. Select an Offline Update Options option to decide what to do if your K1000 Management Appliance is offline when the update process is scheduled to start.
7. Click Update Patching to update your patch files immediately.
Not Enabled Use when K1000 Management Appliance is connected to the Internet and can download patches directly.
Offline Target Uploads the patch definitions from a local directory.This feature requires you to manually copy the patch definition file (patches.tgz) to the directory: \\k1000_host\patches
Online Source Uploads the patch definitions from another K1000 Management Appliance.
Patching and Security Guide, Version 5.3 21

2 Subscribing to and Downloading New Patches
8. Click Delete All Patch Files and Delete Unused Patch Files to remove patch files to save space (usually after you have completed patching).
The patches you subscribed to are downloaded at the next scheduled interval.
What’s nextNow that you have subscribed to the operating system and application patches, you are ready to schedule patch detections and deployments to install the patches your nodes need.
If you are new to the K1000 Management Appliance patching process, see Chapter 3: Patch Schedule Walk-Through Examples, starting on page 23 for example schedules. The examples give administrators who are new to the appliance and patching some context for the many scheduling options.
If you are familiar with the patching process, see Chapter 4: Setting Up Patching Schedules, starting on page 37 which explains the patch scheduling features.
22 Patching and Security Guide, Version 5.3

3=
Patch Schedule Walk-Through Examples
This chapter explains the patching automation workflow and provides two common patching examples. If you are new to the patching process, use these examples to see how the various configurations in the patching component apply in your environment.
• Critical OS patches for workstations, on page 24. This example shows how to create a useful and important patch schedule, while introducing you to various patching features.
• Individual patches for servers, on page 30. This example shows how to create a schedule for patches that are less urgent.
If you haven’t already subscribed to patches, refer to the information in Chapter 2: Subscribing to and Downloading New Patches, starting on page 17 to do so.
Patching automation overviewThis section explains how to use the K1000 Management Appliance patching features to automatically get application and operating system patches, detect which systems need patching, deploy the patches to your nodes, and then verify that they were installed. You normally set up this strategy for patches that vendors deem critical and should be deployed immediately. Use this strategy to install patches to combat software security threats and vulnerabilities on your workstations.
Because this section refers to critical patches, your users need to accept them immediately (and reboot their computers if needed). Most software patches do not require this level of intrusion.
Scheduling these examples involves the following tasks:
• Capture workstations: Create a Machine Smart Label that identifies all nodes that are workstations and excludes servers and other devices.
• Detect workstation patch requirements: Schedule a patch job that identifies whether the nodes in the Machine Smart Label need to be updated.
• Capture critical OS patches: Create a Patch Smart Label that identifies all critical OS patches.
• Deploy critical workstation patches: Schedule a patch job that automatically installs the critical patches on the workstations and forces a reboot if required.
The process you will follow for all other patches involves these tasks, which use the label and jobs you created in the previous tasks:
Patching and Security Guide, Version 5.3 23

3 Patch Schedule Walk-Through Examples
• Review non-critical patches: Analyze the results of the Detect workstation patch requirements job and choose the patches you want to deploy.
• Label patches: Create a patch label and apply it to the patches you want to deploy.
• Deploy patches: Create a schedule that deploys patches to the nodes in your Machine Smart Label.
Critical OS patches for workstationsThis example deployment illustrates the automatic patching features by explaining the process of setting up a K1000 Management Appliance to automatically identify workstations and the corresponding critical OS patches, determine which workstations need to be patched, and deploy the patches to your workstations. These patches are good candidates for automation because they close significant security gaps and usually do not add risk to the stability of your systems.
Subscribe to and download patchesThese instructions assume that you have already passed the first nightly patch download and have patches available on your K1000 Management Appliance. If not, see the instructions in To configure patch downloads, on page 20, to download patches immediately.
Create a workstation machine Smart Label
This section explains how to create a simple Machine Smart Label that captures all computers that have an operating system other than server.
The K1000 Management Appliance evaluates the Inventory Update information provided by the agent at check in and applies Machine Smart Labels if the data matches the label criteria.
1. Click Inventory.
The Computer Inventory page appears.
2. Click the Create Smart Label link on the right side of the page.
The Create Smart Label tab appears above Inventory table.
3. Set up search criteria that selects all nodes whose operating system name does not include the word “server”.
a. On the Inventory attribute name drop-down, click OS Name.
b. On the search parameters drop-down, click does not contain.
To perform these steps, be sure to select your organization from the Organization drop-down list in the top-right hand corner of the page.
24 Patching and Security Guide, Version 5.3

Patch Schedule Walk-Through Examples3
c. In the value field, enter Server.
4. Click Test Smart Label to see which computers will be labeled the next time the K1000 Management Appliance agent sends an Inventory update.
5. Use the Test Smart Label feature to refine your criteria to include or exclude computers.
You can use any combination of the hardware criteria available from the drop-down list. Common Machine Smart Label criteria includes:
• Machine names, if you give all of your laptops a similar name.
• Model names, such as all systems with ThinkPad in the name.
• Location IP address, or the Contains action and partial IP addresses.
• BIOS serial numbers, or use the Includes partial serial number criteria. This works if the laptop manufacturer sends you laptops with sequential serial numbers. (Usually, vendors can provide you with a manifest that contains the BIOS serial numbers.)
• You can also limit systems by using the Does Not Contain criteria. For example, choose system names that do not contain Red Hat in them.
• A software product they all might have in common.
6. Click Test Smart Label to see which computers will be labeled the next time the K1000 Management Appliance agent sends an Inventory Update.
7. In the Choose Label menu, enter a name for your Machine Smart Label, such as All_Workstations.
8. Click the Create Smart Label button.
The Machine Smart Label is added to the K1000 Management Appliance.
9. (Optional) Confirm that the new machine label appears, by clicking Home > Label > Smart Labels or Label Management.
Your new Machine Smart Label appears empty at first. As computers check in, they display the new label. You can force an agent to check in by opening the computer details and then clicking Force Inventory Update. If the node is available, the agent sends an update, and all matching Machine Smart Labels are applied.
To create a critical OS Patch Smart Label
To perform these steps, be sure to select your organization from the Organization drop-down list in the top-right hand corner of the page.
Patching and Security Guide, Version 5.3 25

3 Patch Schedule Walk-Through Examples
The example in this section identifies active critical Windows OS patches, that is, Windows OS patches that the appliance is subscribed to and which have been downloaded. K1000 Management Appliance applies the Patch Smart Label immediately and then after each scheduled download.
1. Go to Security > Patching.
2. Click Patch Listing.
The Patch Listing page appears.
3. Click the Create Smart Label link to the right of the page.
The Create Smart Label table appears with a blank filter template.
4. Enter search criteria that captures active critical Windows OS patches:
• Status equal to Active
• AND, Impact equal to Critical
• AND, Operating System equal to Windows
• AND, Patch Type equal to OS
5. Click the Test Smart Label button to confirm that your search works as intended.
Repeat these steps as needed until your Smart Label is correct.
6. Enter a name for the patch, such as Critical_OS_Windows.
7. Click the Create Smart Label button.
The Patch Smart Label is applied to the patches it matches.
To create Critical OS patch job
Create a schedule that automatically detects and deploys the critical patches weekly.
1. Go to Security > Patching.
2. Click Detect and Deploy Patches.
The Patch Schedules page appears.
3. In the Choose Action menu, click Add New Item.
If you need to search for all patches that are not yet scheduled for deployment, see To list unscheduled patches, on page 42.
To perform these steps, be sure to select your organization from the Organization drop-down list in the top-right hand corner of the page.
26 Patching and Security Guide, Version 5.3

Patch Schedule Walk-Through Examples3
The Patch Schedule : Edit Detail page appears.
4. Fill in a Schedule Description and Patch Action for the new schedule.
For a discussion of the detect and deploy options for different types of computers, see Most-used patching schedule options, on page 45.
5. Complete the rest of new schedule with your new machine and patch labels:
Patching and Security Guide, Version 5.3 27

3 Patch Schedule Walk-Through Examples
6. Under Detect Patch Label Selection and Deploy Patch Label Selection, select your label:
7. Under Reboot Options, use the following settings for workstations.
You might not want to force reboot on servers or laptops. For details on rebooting strategies for different types of systems, see Most-used patching schedule options, on page 45.
a. For Reboot Mode, select Force Reboot.
b. For Reboot Message, enter a message.
c. For Message Timeout, enter the time (in minutes).
28 Patching and Security Guide, Version 5.3

Patch Schedule Walk-Through Examples3
Many Dell KACE customers patch workstations once a week, in the early hours of the morning. However, this schedule is generally inappropriate for laptops and servers. For a discussion, see Most-used patching schedule options, on page 45.
You have a wide variety of options for running your schedules. If the first four options do not offer a schedule you can use, select Run custom and create your own. Select the
question mark icon opposite the Run custom field for details on setting up a custom schedule.
8. Click Save to make your schedule take effect.
9. Inform your users.
Alert your workstation users that in order to protect their workstations, you need to update the their security software on a weekly basis. To avoid interrupting their work, you will do this every Friday before regular work hours. Their systems will automatically reboot at that time.
The schedule is now created and will deploy new critical OS patches to your workstations every Friday at 3 AM or at the time a system logs on after Friday at 3 AM. If you add new workstations that match the smart label criteria, they are automatically included in the patching schedule.
For details on tracking the status of patching, see Monitoring Patching Status, on page 51.
Now that you understand the issues and strategies for workstation patching, see the next section for an example of patching servers.
After you create a new patching schedule and add nodes to it, the schedule is still listed as “not created yet,” and the Phase column lists the nodes as “not scheduled” until you finish running the schedule for the first time. Remember that if a node is listed on the schedule, it will receive the scheduled patches.
Patching and Security Guide, Version 5.3 29

3 Patch Schedule Walk-Through Examples
Individual patches for serversThis section provides an example showing the process of setting up your K1000 Management Appliance to automatically accept all server patches, then manually running a patch detect operation on your servers to find out what patches they need, and then scheduling the patch deployment on your servers.
This section involves:
• Creating a patch Smart Label to automatically accept patches for your server operating systems. You only need to do this once, unless you add another server operating system to your K1000 Management Appliance implementation. Once created, the smart label automatically downloads new patches for your existing server operating systems as they are available.
• Creating a machine Smart Label to automatically group the servers to which you want to apply patches. You only need to do this once, unless you implement a new type of server not covered by the label settings. Once created, the machine Smart Label automatically groups the servers to be patched.
• Creating a schedule that applies the patch group to the servers identified by the machine Smart Label. Because you are patching servers, this schedule will perform both detect and deploy actions, and requires a reboot without warning. You run this patching schedule manually in the early hours of the morning, after warning users to expect service interruption.
If you have server fail-over or other redundant services, be sure to schedule patching on only one of the servers at time.
To deploy patches individually to servers
1. Confirm that your subscribed to patches are available by going to Security > Patching and selecting Patch Listing.
The Patch Listing page appears.
• If you do not have patches available on your K1000 Management Appliance, follow the instructions in To configure patch downloads, on page 20, to download patches immediately.
To perform these steps, be sure to select your organization from the Organization drop-down list in the top-right hand corner of the page.
30 Patching and Security Guide, Version 5.3

Patch Schedule Walk-Through Examples3
• If you haven’t subscribed to patches, follow the instructions in Chapter 2: Subscribing to and Downloading New Patches, starting on page 17.
2. Go to Home > Label.
3. Select Label Management.
4. In the Choose Action menu, click Add New Label.
The Label : Edit Detail page appears.
5. In the Label Name field, enter the name P_OS_Servers for the Server label.
6. In the Notes field, enter any notes about this label.
7. Click the Save button.
8. Repeat these steps to create a machine label called M_Servers to capture all servers.
Patching and Security Guide, Version 5.3 31

3 Patch Schedule Walk-Through Examples
To create a patch smart label to capture all server OS patches
Create a patch smart label as you did in To create a critical OS Patch Smart Label, on page 25.
1. Go to Security > Patching.
2. Select Patch Listing.
The Patch Listing page appears.
3. Click the Create Smart Label link.
4. Using the search criteria fields, capture only the patches that apply to the operating systems that your servers use.
As more patches come in, they are automatically included in this Smart Label. Your smart label should look something like this:
5. Test your smart label with the Test Smart Label button until the filter works as you intend.
6. Associate your smart label with your P_OS_Servers patch label by selecting it from the Choose label menu.
7. Click Create Smart Label to create your new patch filter.
8. Populate the M_Servers Machine Label with your workstations. Do this the same way you did in Create a workstation machine Smart Label, on page 24.
9. Go to Inventory > Computers.
10. Click the Create Smart Label link.
To perform these steps, be sure to select your organization from the Organization drop-down list in the top-right hand corner of the page.
32 Patching and Security Guide, Version 5.3

Patch Schedule Walk-Through Examples3
11. Enter inventory criteria that captures all of your servers. If possible, include servers you plan to add. For example:
12. For Choose label, select M_Servers.
13. Click Create Smart Label.
To create a patch detect and deploy schedule for the server patches
1. Go to Security > Patching.
2. Select Detect and Deploy Patches.
The Patch Schedules page appears.
3. In the Choose Action menu, click Add New Item.
The Patch Schedule : Edit Detail page appears.
Your new labels appear empty at first. As computers check in, they will appear in the new labels. You can test the filter by selecting a computer and selecting the Force Inventory Update button. The computer will check in immediately and appear in the label.
To perform these steps, be sure to select your organization from the Organization drop-down list in the top-right hand corner of the page.
Patching and Security Guide, Version 5.3 33

3 Patch Schedule Walk-Through Examples
4. In the Schedule Description, enter a description for this patching schedule.
5. Complete the new schedule as shown with your new patch and machine labels:
6. Select the correct filter label in the Limit Run To Selected Machine Labels list.
34 Patching and Security Guide, Version 5.3

Patch Schedule Walk-Through Examples3
7. Select the operating system label for both Detect Patch Label Selection and Deploy Patch Label Selection sections:
8. For Reboot Options, select Force Reboot.
Because you are patching servers, which system administrators maintain, you can be more intrusive than with users’ computers. Forcing a reboot after 1 minute is normal. The Message Timeout: value must be at least 1:
9. Enter in a patch schedule.
Usually, in the case of a server, you should run the schedule manually (not on a schedule). For details on rebooting strategies for different types of systems, see Most-used patching schedule options, on page 45.
Patching and Security Guide, Version 5.3 35

3 Patch Schedule Walk-Through Examples
10. Click Save at the bottom of the page to create your new schedule.
For details on tracking the status of patching, see Monitoring Patching Status, on page 51.
What’s nextNow that you have some context for using the settings in the Patching interface, see Chapter 4: Setting Up Patching Schedules, starting on page 37 which explains the patch scheduling options in detail.
36 Patching and Security Guide, Version 5.3

4
Setting Up Patching SchedulesThis chapter explains the options and best practices for creating patch schedules, and then provides detail on using the patching feature to create and run these schedules. Patch reporting is also covered.
This chapter assumes that you have:
• Followed the instructions in Chapter 2: Subscribing to and Downloading New Patches, starting on page 17 and subscribed to patches for the operating systems of the computer that your K1000 Management Appliance implementation manages.
• Already passed the first nightly patch download and have patches available on your K1000 Management Appliance. If not, see the instructions in the To configure patch downloads section to download patches immediately.
• Followed the instructions in Chapter 5: Managing your Patch Inventory, starting on page 55 and assessed and selected patches to detect and deploy.
Understanding patch scheduling optionsPatch scheduling is where you put it all together. When you create a schedule, you do the following:
• Create patch labels to specify the list of patches to detect or deploy.
• Create machine labels to specify the nodes to receive the detect and/or patch action.
• Determine whether to detect, deploy, or detect and deploy the patches. For details, see Most-used patching schedule options, on page 45, and Understanding the scheduling options, on page 39.
Patching and Security Guide, Version 5.3 37

4 Setting Up Patching Schedules
• Determine when and how often to run the detect and/or deploy action (including immediately). These are your scheduling tools:
Most of these items specify when patching jobs start. You use the Suspend pending tasks after ____ minutes from scheduled start feature to specify when patching jobs stop. Use this feature to stop patching at about the time you expect users to start work. This helps to avoid competition for bandwidth between patching jobs and users trying to work. For more details on this feature, see Undoing the last patching job, on page 43.
For details on the patching behaviors, see Most-used patching schedule options, on page 45.
The Run on next connection... feature is most useful for patch detection runs or for scheduling patching for laptops, which are not generally left on continually like servers and workstations.
• Specify reboot options. If a patch requires a system reboot, you have the following options:
• No reboot.
• Prompt the user to reboot their system. If they decline or do not respond, you can choose to give up or reprompt them periodically until they accept.
• Force the user to reboot their system.
The option you choose depends on the best strategy for the type of system being patched (laptop, workstation, or server). For details, see Most-used patching schedule options, on page 45.
38 Patching and Security Guide, Version 5.3

Setting Up Patching Schedules4
For details on creating a patch schedule, see Setting Up Patching Schedules, on page 37 and Patch Schedule Walk-Through Examples, on page 23.
Understanding the scheduling optionsThe sections below explain the scheduling options available on the appliance.
To edit an existing schedule
1. Go to Security > Patching.
2. Select Detect and Deploy Patches.
3. In the list of schedules, select the schedule you wish to edit.
The Patch Schedule: Edit Detail page appears.
4. Make changes to the schedule as needed. See the following sections for more details on the various feature selections in the Patch Schedule : Edit Detail page.
5. When you are done editing, click the Save button at the bottom of the page.
Schedule DescriptionIn the Schedule Description field, enter a descriptive name for the schedule.
Patch ActionThe options are:
• Detect
• Detect and Deploy
• Deploy
• Detect and Rollback
• Rollback
Detect and Deploy is usually appropriate for desktop workstations and servers.
The detect, deploy, and rollback schedule behavior is dependent on the combination of the reboot, detect, deploy, and rollback selections that you have made. For details, see Most-used patching schedule options, on page 45, All Schedule Detect/Deploy Options, on page 47, and Schedule Rollback/Detect/Reboot Options, on page 49.
Patching works only on systems with AMP connections to the K1000 Management Appliance.
To perform these steps, be sure to select your organization from the Organization drop-down list in the top-right hand corner of the page.
Patching and Security Guide, Version 5.3 39

4 Setting Up Patching Schedules
Machine SelectionRun on all Machines. This option is usually only useful for very small K1000 Management Appliance implementations.
Limit Run to Selected Machine Labels: This is the most commonly used machine selection option. This option restricts the schedule actions to the machines in the labels that you select. You will first have to create labels to collect all the machines on which you want to run the actions. Smart Labels are the most flexible in that regard, because they can automatically include new systems as you add them to your K1000 Management Appliance implementation. For details, see Computer labels and Smart Labels, on page 57.
Limit Run to Machines: This is useful for running detect and deploy patching actions on a small set of systems that you must select individually. You might use this option, perhaps, on a small set of users for which you do not need to create a label. Select computers from the Select Machines to add... drop down list. Once selected, they appear in the box. You can also create a filter to select systems and enter it in the Filter: field.
Limit Run to Machines With Selected Operating Systems: This is used for creating an “on the fly” filter by selecting operating systems offered in this box. The schedule actions then only work on the systems running those operating systems. The default for this option is all operating systems.
Detect Patch Label SelectionDetect All Patches: This option can take a long time. It is recommended that you target your patch detection operations as much as you can with the Limit Detect to Selected patch Labels option.
Limit Detect To Selected Patch labels: This is the most commonly used patch selection option. It restricts the schedule actions to the patches in the labels that you select. You will first have to create patch labels to collect all the patches on which you want to run actions. Filter labels are the most flexible in that regard, because they can automatically include new patches as they are added to the K1000 Management Appliance from software vendors. For details on patch labels, see Smart Labels for patches, on page 55. These sections also explain the process of creating labels:
• Critical OS patches for workstations, on page 24.
• To deploy patches individually to servers, on page 30.
Deploy Patch Labels SelectionDeploy All Patches: This option takes a long time, but it does ensure that all possible patches are applied to your systems.
Limit Deploy to Selected Patch Labels: This is the most commonly used patch deployment option. It restricts the schedule actions to the patches in the labels that you select. You will first have to create machine labels to specify the computers on which to deploy patches. Filter labels are the most flexible in that regard, because they can automatically include new machines as you add them to your K1000 Management Appliance implementation. For details on labels, see Smart Labels for patches, on page 55.
40 Patching and Security Guide, Version 5.3

Setting Up Patching Schedules4
Limit Patches to Matching Machine Labels: It is recommended that you do not use this option. It is only used to provide backward-compatibility in specific rare cases.
Max Deploy Attempts: Enter a maximum number of deployment attempts for deploying patches.
Reboot OptionsThe schedule behavior is dependent on a combination of the reboot, detect, and deploy decisions that you have made. For details, see All Schedule Detect/Deploy Options, on page 47.
Reboot Mode:
• No Reboot. Does not reboot even though it may be required to make the patch take effect.
• Prompt User. Waits for the user to accept the reboot before restarting the system. Used with the Message Timeout and Reboot Message fields.
• Force Reboot. Reboots as soon as a patch requiring it has been deployed. There is no stopping it.
Reboot Message: Enter a message prompting your users to reboot to make new patches take effect.
Message Timeout: Specify the time limit to wait for the user to respond to the Reboot Message.
Timeout Action: Specify the action to be taken upon timeout. You can select Reboot now or Reboot later.
Reprompt Interval: Specify the time interval before the system prompts the user again to reboot.
Patch ScheduleDon’t run on a schedule. This option is most useful for patching servers manually but can also be used to perform out-of-cycle patching.
Run every ____ options. These options are used for setting the schedule. These are self-explanatory.
Run custom: This option is used when a flexible schedule is required. Click the question
mark icon to view these custom scheduling options and instructions:
Patching and Security Guide, Version 5.3 41

4 Setting Up Patching Schedules
Suspend pending tasks after ___ minutes from scheduled start. This option is used to limit the amount of patching time. It is useful for stopping the patching jobs (and reboots) before users start working on the computers being patched. For details, see the Undoing the last patching job section.
To list unscheduled patches
During patch scheduling, confirm that all of your subscribed patches are accounted for in a schedule:
1. Go to Security > Patching.
2. Select Patch Listing.
The Patch Listing page appears.
3. Click the Advanced Search button in the top-right corner of the page.
The Advanced Search page appears.
4. Enter search criteria, and click the Not Scheduled check box.
5. Click the Search button.
The results show the currently unscheduled patches.
To perform these steps, be sure to select your organization from the Organization drop-down list in the top-right hand corner of the page.
42 Patching and Security Guide, Version 5.3

Setting Up Patching Schedules4
Undoing the last patching jobIf you or a patch vendor make a mistake, you may find yourself in the position of having to remove (rollback) the last patching job.
To determine rollback support
Not all patch vendors support rollbacks. For example, large software patches such as Service Packs cannot be rolled back.
To find out if your last patch can be rolled back:
1. Go to Security > Patching.
2. Select Patch Listing.
The Patch Listing page appears.
3. Click the Advanced Search button in the top-right corner of the page.
4. Select the Support Rollback check box.
5. Search for the patch using the search fields.
To check individual patches:
1. Go to Security > Patching.
2. Select Patch Listing.
The Patch Listing page appears.
3. Select a patch in the Patch Listing.
4. Scroll down to the Packages Contained in this Patch table.
The rightmost column states whether the patch supports a rollback:
To perform these steps, be sure to select your organization from the Organization drop-down list in the top-right hand corner of the page.
Patching and Security Guide, Version 5.3 43

4 Setting Up Patching Schedules
To undo the last patching job
If the patch vendor supports a rollback, you can do this by creating and running a patching schedule:
1. Go to Security > Patching.
2. Select Detect and Deploy Patches.
The Patch Schedules page appears.
3. Select a patching schedule in the list.
The Patch Schedule : Edit Detail page appears for the selected patch.
4. From the Patch Action section, select Rollback or Detect and Rollback.
5. Select the patches to rollback, in the same way that you specified them in the original schedule, by creating a patch Smart Label.
This option is only supported for removing the last installed patch on a piece of software.
For more information, see Understanding the scheduling options, on page 39, and Schedule Rollback/Detect/Reboot Options, on page 49.
Patching workflowYour actual patching workflow will look something like this:
Start the patching process:
• Subscribe to patches.
• Wait for the patches to download.
• Confirm that all systems to be patched have an AMP connection.
• Create Machine Smart Labels.
Set up automatic detect and deploy actions for Critical patches on all systems:
• Create a Patch Smart label to automatically capture critical patches for servers and workstations.
• Create a Patch Smart Label to automatically capture critical patches for laptops.
• Create and run a schedule to periodically detect and deploy critical patches on servers and workstations.
• Create and run a schedule to periodically detect critical patches on laptops.
• Create and run a schedule to periodically deploy critical patches on laptops.
• Periodically check patching status using reports and the patch.
To perform these steps, be sure to select your organization from the Organization drop-down list in the top-right hand corner of the page.
44 Patching and Security Guide, Version 5.3

Setting Up Patching Schedules4
Set up automatic detect and deploy actions for all other patches on all systems:
• Look through the list of subscribed patches. Disable any you do not want to deploy.
• Create a schedule to detect patches on all systems to find out how large the patching job will be.
• Create a schedule to detect and deploy patches to your test systems.
• Create a Patch Smart Label to automatically capture the patches to deploy on servers.
• Create and run a schedule to periodically detect and deploy patches on your servers.
• Create and run a schedule to periodically detect and deploy patches on your workstations.
• Create and run a schedule to periodically detect patches on your laptops.
• Create and run a schedule to periodically deploy patches on your laptops.
• Periodically check the patching status using reports and the K1000 Management Appliance Patch Management feature, which is accessed by going to Security > Patching.
Assess new patches and detect and deploy the ones you want:
• Create a patch filter to display all new patches.
• Create a schedule to periodically run the patch filter for new patches.
• Look through the list of new patches. Disable any you do not want to deploy.
• Create a schedule to detect and deploy the new patches to your test systems.
• Your existing schedules should automatically capture the new patches as they arrive, and detect and deploy any that have not been disabled.
• Periodically check the patching status using reports and the K1000 Management Appliance Patch Management feature, which is accessed by going to Security > Patching.
Most-used patching schedule optionsThe type of computer you are patching affects the schedule you want to use:
• Servers –Servers run critical services that your organization cannot do without for long—if at all. Schedule patching for your server long in advance, and warn your users of the temporary service outages that patching requires. Push server patches in the early morning hours or other times when the fewest possible number of users require the server resources.
Thursday nights are a popular choice for making server changes. In the event of a problem, your staff can get help on Friday. (Vendors often charge a premium for weekend support.)
• Workstations–Desktop systems are less crucial than servers and less mobile than laptops, so it easier to schedule a time to patch them. Usually, you can schedule routine updates for the early hours of the morning when users arrive at the beginning of their
Patching and Security Guide, Version 5.3 45

4 Setting Up Patching Schedules
work day and boot up their computer. If they encounter a problem, they contact you in the morning. This makes it easy to plan when to have your resources available.
• Laptops–Because laptops are often powered off or off the network, it is difficult to find a good time to patch them. The two most popular choices for patching laptops are:
• At the start of the business day.
• At lunch time, which might be the most popular choice.
Most Dell KACE customers patch laptops using two schedules, one for detecting and a separate one for deploying. (See Most-used patching schedule options, on page 45.)
Consider patching laptops in smaller increments over lunchtime when the laptop is probably available for patching but the user is doing something else. Chapter 4: Setting Up Patching Schedules, starting on page 37 has more information on patching laptops.
Platform Type
Detect/Deploy Reboot Option Behavior Notes
Laptops Detect only
N/A for detect only
Detects the patches needed by laptops.
Run anytime, but at least a day before the corresponding patch deploy action, which may require a reboot.
Laptops Deploy only
Reboot Options: Prompt user Message Timeout: 5 min. Timeout Action: Reboot later Reprompt Interval of 30 min.
1. Deploys until a patch reboot is required.2. Prompts the user to reboot:
• If No, the system prompts again after the reprompt interval. If no reprompt interval is set, the user is prompted again at the next scheduled deployment.
• If Yes, reboot and detect again. If more patching is required, the system waits until the next scheduled deployment to continue.
Set a reprompt interval to encourage users to reboot. Patching without a required reboot can leave the system in an unstable state. Use the Run on next connection if offline option to run patching the next time laptop users connect to the network. This feature can be accessed as follows:1. Go to Security >
Patching.
2. Select Detect and Deploy Patches.
The Patch Schedules page appears.
3. Select a patching schedule in the list.
The Patch Schedule : Edit Detail page appears for the selected patch.
4. Select the Run on next connection if offline check box.
46 Patching and Security Guide, Version 5.3

Setting Up Patching Schedules4
All Schedule Detect/Deploy OptionsThis table is a superset of the table of options in the Most-used patching schedule options section. The table below includes the most-used options, and all other combinations of the detect, deploy, and reboot options. Some combination of options are not recommended but are included here so that you know what to avoid.
Desktop Workstations
Detect and Deploy
Force Reboot 1. Detects patches.2. Deploys all patches, rebooting as necessary.3. After the last reboot, runs a final detection.
Deploying without a reprompt interval is risky because patching without a reboot can leave the system in an unstable mode. Also, patching is not shown as deployed until after a reboot.In the Detect and Deploy mode, patching continues until all patches have either succeeded or failed, and the patching list is exhausted.Do NOT use the Run on next connection if offline option for workstations. They are usually left on, which can cause them to never be patched.
Servers Detect and Deploy
Force Reboot 1. Detects patches.2. Deploys all patches, rebooting as necessary.3. After last reboot, runs a final detection.
You have the most flexibility in rebooting servers because they have no dedicated users. However, warn users that their services will not be available during patching/rebooting.
Platform Type
Detect/Deploy Reboot Option Behavior Notes
Most Useful For
Detect/Deploy
Reboot Option Behavior Notes
Laptop Patch Detect
Detect N/A Pushes signature files to the machine and detects patches.
Detects patches only, does not deploy.
Deploy Force Reboot
1. Deploys until the first patch reboot is required.2. Reboots.3. Detects again.
Patching continues at the next scheduled patch deployment time.
Patching and Security Guide, Version 5.3 47

4 Setting Up Patching Schedules
Deploy No Reboot 1. Deploys until the first patch reboot is required.2. Ignores reboot.3. Detects again.
Patching continues at the next scheduled patch deployment time.
Laptop Patch Deploy
Deploy Prompt User, and reprompt user at interval you set.
1. Deploys until a patch reboot is required.2. Prompts the user to reboot:
• If no, patching is finished.
• If Yes, reboot occurs and patching will start again at next scheduled patch deployment.
Patching continues at the next scheduled patch deployment time, or on next connection if the Run on next connection if offline check box is checked. (This is recommended.)
Server Patch Detection and Deploy
Detect and Deploy
Force Reboot
1. Detects patches.2. Deploys until reboot.3. Continues with deployment of patches until all patches are installed, rebooting as necessary.4. After last reboot, runs a final detection.
In this mode, patching continues until all patches have been installed.
Detect and Deploy
No Reboot 1. Detects patches.2. Deploys until a patch reboot is required.3. No reboot occurs, and patching halts until system is rebooted.4. After reboot patching continues.
This configuration is not recommended because patching without a reboot can leave systems in an unstable mode. Also patching is not shown as deployed until after a reboot.In this mode, the patching installation continues until all patches have either succeeded or failed, and the patching list is exhausted.
Most Useful For
Detect/Deploy
Reboot Option Behavior Notes
48 Patching and Security Guide, Version 5.3

Setting Up Patching Schedules4
Schedule Rollback/Detect/Reboot OptionsThis table explains the options you have for rolling back the last patch deployment.
Desktop systems patch detect and deploy.
Detect and Deploy
Prompt User
1. Detects patches.2. Deploys until a patch reboot is required.3. Prompts the user for reboot:
• If No, patching ceases until a reboot is performed. After the reboot has completed, patching will continue until the next reboot is needed.
• If Yes, the machine reboots, then the patching process continues until the patch list is exhausted.
This configuration is risky because patching without a reboot can leave the system in an unstable mode. Also patching is not shown as deployed until after a reboot.In this mode, the patching installation continues until all patches have either succeeded or failed, and the patching list is exhausted.
Most Useful For
Detect/Deploy
Reboot Option Behavior Notes
Most Useful For
Detect/Rollback Option
Reboot Option Behavior Notes
Checking whether machines have unwanted patches, and removing them if found.
Detect and Rollback
Prompt User
1. Detects whether the unwanted patches are installed. If so, continues; if not, goes on to next system.2. Attempts to remove the unwanted patches.3. Prompts the user for reboot:
• If No, rolling back continues until the next prompted reboot.
• If Yes, the machine reboots, then the rollback process continues until the patch list is exhausted.
Searches for the unwanted patch. If not found, the computer is skipped. If found, it attempts to remove it three times. If unsuccessful three times, it fails.
Patching and Security Guide, Version 5.3 49

4 Setting Up Patching Schedules
Scheduling Notes• If you only have a limited time to patch daily, perform a Deploy-only. The patching
process continues until the first reboot is required and then stops. The initial deployment is faster; however, the overall time required to patch is longer.
• If you can patch for an extended period of time without affecting users, (i.e. over the weekend) perform a Detect and Deploy and Force Reboot. The patching process continues until the patching list is exhausted.
• You can run the schedule immediately by using the Save and Run Now button at the bottom of the Patch Schedule : Edit Detail page.
• See Suspending patching for network performance, on page 14, for details on the patching Suspend setting.
• After you create a new patching schedule and add nodes to it, the schedule is misleadingly listed as “not created yet” and the patches are marked as “not scheduled to run” until the schedule is run for the first time. Remember: if a node is listed on the schedule, it will receive the scheduled patches.
Removing patches from computers that you know have unwanted patches
Rollback Prompt User
1. Attempts to remove the unwanted patches.2. Prompts the user for reboot:
• If No, rolling back continues until the next prompted reboot.
• If Yes, the machine reboots, then the rollback process continues until the patch list is exhausted.
It attempts to remove the unwanted patch three times. If unsuccessful three times, it fails.
Most Useful For
Detect/Rollback Option
Reboot Option Behavior Notes
50 Patching and Security Guide, Version 5.3

Setting Up Patching Schedules4
Monitoring Patching StatusThe page that appears under Security shows you an overview of patching status with status bars for Installation Progress, Critical Patch Compliance, and Patch tasks completed (since last scheduled run):
More detail on the status of your K1000 Management Appliance patching tasks can be seen by going to Security > Patching > Patch Listing. For details, see the To view patching statistics and tips section.
To view patch status by computer
To find out what patches an individual computer has installed:
1. Go to Inventory > Computers.
2. From the list of computers, select the system to view.
The Computers : Detail Item page for that system opens.
3. Scroll down to the Security section, and select the Patching Detect/Deploy Status link.
A list of the patches installed on this system is displayed.
To perform these steps, be sure to select your organization from the Organization drop-down list in the top-right hand corner of the page.
Patching and Security Guide, Version 5.3 51

4 Setting Up Patching Schedules
To view patch status by patch
To find a list of systems that a patch has been installed on:
1. Go to Security > Patching.
2. Select Patch Listing.
The Patch Listing page appears.
3. Click the name of a patch.
The Patch : Detail page appears with details about that patch, including a list of the systems on which it has been deployed.
To view patch reports
1. Go to Security > Patching.
2. Select Reporting.
To perform these steps, be sure to select your organization from the Organization drop-down list in the top-right hand corner of the page.
To perform these steps, be sure to select your organization from the Organization drop-down list in the top-right hand corner of the page.
52 Patching and Security Guide, Version 5.3

Setting Up Patching Schedules4
The K1000 Management Appliance Reports page appears, with Patching selected in the view by category drop-down list. This page provides quick links for viewing reports on:
3. To generate a report, click the desired format output: HTML, CSV or TXT.
Microsoft Windows update featureYour K1000 Management Appliance allows you to configure the Windows Update feature from the K1000 Management Appliance Administrator Portal Scripting component. You can specify when Windows updates are downloaded, the alerts you want to receive, and so on.
For more information, see Chapter 9, “Using the Scripting Features,” in the Administrator Guide.
Patching and Security Guide, Version 5.3 53

4 Setting Up Patching Schedules
54 Patching and Security Guide, Version 5.3

5
Managing your Patch InventoryThis chapter explains the tasks required to maintain your patch inventory:
• Changing the existing patch download settings as necessary.
• Creating a Smart Label you can use to view patches that have not been deployed.
• Assessing the new patches before you detect or deploy them.
• Viewing the patch details for a single computer.
• Viewing all patches from the K1000 Management Appliance Patch Listing page.
Before reading this chapter, you need to have subscribed to and downloaded patches as described in Chapter 2: Subscribing to and Downloading New Patches, starting on page 17 and have patches available on your K1000 Management Appliance. If you don’t have patches available, see To configure patch downloads, on page 20, to obtain patches without waiting for the nightly download.
Updating your K1000 Management Appliance with the newest patches
By default, new patch information is downloaded to your K1000 Management Appliance every night at 03:00. You can change this at any time by using the K1000 Patch Settings page. See To configure patch downloads, on page 20, for information on using the Patch Settings page to update your K1000 Management Appliance with the latest patches available.
Smart Labels for patchesThe K1000 Management Appliance patching strategy uses separate labels to specify the list of patches to install and the list of computers to install them on.
When you subscribe to the operating system and/or application patches, you can find the list of patches excessively long. Smart Filters, however, filter the list of patches to install and automatically include them in your approved list. You can also add patches to labels manually, but Smart Labels update themselves automatically.
For example, you can create a patch Smart Label that matches all Windows XP server patches. Thereafter, every time a new Windows XP server patch is made available to the K1000 Management Appliance, it is added to the label. If you set up a patching schedule to
Patching and Security Guide, Version 5.3 55

5 Managing your Patch Inventory
automatically detect and deploy machines with this label periodically, it will be automatically applied to your Windows XP servers.
Patch labels are organized by software categories, such as:
• P_Vista
• P_Vista_Critical
• P_Vista_Important
• P_MS_Office
• P_Leopard
• P_Mac10.4_Critical_Test
Similarly, you create computer Smart Labels to specify the computers you support, on which you will install patches. See Computer labels and Smart Labels, on page 57.
See the K1000 Administrator Guide for detailed information on labels, including Smart Labels and Label Groups, as well as how you can use labels in other components of the appliance.
To create a patch Smart Label
In this example, the Smart Label includes only the patches that have been released to the K1000 Management Appliance after a specified date. This label is a good tool for viewing the list of new patches available to deploy.
1. Click Security > Patching.
2. Select Patch Listing.
The Patch Listing page appears.
3. Click Create Smart Label on the right side of the page.
The Create Smart Label table appears above the list of patches.
4. Enter the search criteria that identify new patches after a specified date:
a. From the attribute name menu, select Release Date.
b. From the relational operators menu, select > (greater than).
c. In the value field, enter the date in the format yyyy-mm-dd.
d. Click Test Smart Label.
The only the patches released after the specified date are displayed.
5. Enter the search criteria that identify non-critical patches, such as Recommended:
a. From the conditional operators menu, select AND.
b. From the attribute name menu, select Impact.
To perform these steps, be sure to select your organization from the Organization drop-down list in the top-right hand corner of the page.
56 Patching and Security Guide, Version 5.3

Managing your Patch Inventory5
c. From the relational operators menu, select != (not equals).
d. From the value menu, select Critical.
e. Click Test Smart Label.
All non-critical patches added after the specified date are displayed.
6. Enter the search criteria that identify active patches only:
a. From the conditional operators menu, select AND.
b. From the attribute name menu, select Status.
c. From the relational operators menu, select = (equals).
d. From the value menu, select Active.
e. Click Test Smart Label.
7. In the Choose Label field, enter a name for the new patch, such as New Patches since 01-01-2010.
8. Click Create Smart Label.
The label is applied to the matching patches and saved.
To display a list of patches
1. Click Security > Patching.
2. Select Patch Listing.
The Patch Listing page appears.
3. From the View by menu (in the top-right corner of the page), select Label > name of your new label.
Computer labels and Smart LabelsIf you support a large K1000 Management Appliance implementation or one with different remote locations, you have probably already labeled your computers into smaller sets, which are easier to administer. K1000 Management Appliance customers who support multiple locations usually use those locations as natural divisions for support responsibilities.
For example, if you support offices in Atlanta, Dallas, and New York, you probably already have a machine label for the computers in each of those locations. To support patching, this table lists sample machine labels that you might create to support patching for those locations. (If you have centralized patch testing in one place, you only need one set of patch tests and machine test labels.)
To perform these steps, be sure to select your organization from the Organization drop-down list in the top-right hand corner of the page.
Patching and Security Guide, Version 5.3 57

5 Managing your Patch Inventory
Because different types of computers have different schedule needs, create different sets of labels for laptops, workstations, and servers. See Match patch scheduling to node type, on page 15, for details.
Assessing patches before you run a scheduleChapter 3: Patch Schedule Walk-Through Examples, starting on page 23 walks you through the process of automatically accepting critical patches for your server and workstation operating systems using Patch Smart Labels. That is the most efficient way of accepting patches—particularly for applying critical security patches as quickly as possible.
However, you may not want to automatically accept non-critical patches. To save time and resources, it is more common to manually select non-critical patches and only deploy a subset of them. In this case, set aside some time weekly or bi-weekly to review the new patches and select the ones you want to deploy.
Selecting patches to detect and deployThis section explains how to select patches for detection and deployment using features on the Patch Listing page.
New patches are downloaded to your K1000 Management Appliance nightly. By default, the patches you have subscribed to are downloaded to your K1000 Management Appliance with a status of Active. This section explains how to select patches to detect and deploy and how to inactivate (decline to approve) any remaining patches. You should do this on a regular schedule, either weekly or bi-weekly.
Location Machine Labels
Atlanta M_Laptops_ATL
M_Workstations_ATL
M_Servers_ATL
Dallas M_Laptops_DAL
M_Workstations_DAL
M_Servers_DAL
New York M_Laptops_NY
M_Workstations_NY
M_Servers_NY
ServerTest M_Server_Test
Workstation Test M_Laptop_Test
58 Patching and Security Guide, Version 5.3

Managing your Patch Inventory5
Understanding the patch status
The patches listed on the Patch Listing page have one of these statuses:
Inactivating (Rejecting) Patches
1. To reject patches, select the check box next to the patch in the Patch Listing page.
2. In the Choose Action menu, click Change Status to > Inactive.
To filter patches listed in the table, in the View by menu (located in the top-right corner of the page), select one of the following options:
• All Patches: Select all patches.
• Status: Filter the patch table by Active, Inactive, and Disabled settings.
• Impact: Filter the patch table by Critical, Recommended, etc.
• Year: Filter the patch table by released year.
Status Icon Definition Download Setting Detect Deploy
Active Denotes patches that you will detect/deploy. In other words, you have subscribed to these patches and did not inactivate them. These patches have no icon next to them.
Yes Yes Yes
Inactive Denotes patches that you subscribed to but have decided not to detect/deploy.
Yes No No
Disabled Denotes patch records (metadata) for patches that you have not subscribed to and cannot detect/deploy.
No, just the patch record
Yes Yes
To perform these steps, be sure to select your organization from the Organization drop-down list in the top-right hand corner of the page.
Patching and Security Guide, Version 5.3 59

5 Managing your Patch Inventory
• Operating System: Filter the patch table using a built in operating system search.
Patch information in InventoryThe Inventory tab contains detailed information about the computers on your K1000 Management Appliance, including:
• The list of patches deployed on the computer.
• Details on the patch schedules in which the computer resides.
• Successful and failed patching attempts.
• Any rolled back patches.
To view patching details for a computer
1. Go to Inventory > Computers.
2. Click a computer in the Computer Inventory list.
The Computer Detail page appears for that computer.
3. Scroll down to the Security section.
4. Click Patching Detect/Deploy Status.
To perform these steps, be sure to select your organization from the Organization drop-down list in the top-right hand corner of the page.
60 Patching and Security Guide, Version 5.3

Managing your Patch Inventory5
The Patching Detect/Deploy details expand.
Patching and Security Guide, Version 5.3 61

5 Managing your Patch Inventory
5. Click the question mark icons in the Scheduled Task Status and Deployment Status to display information to help you interpret the items in these two tables:
To view patching statistics and tipsThe Security > Patching page shows high-level information on the patching status on the Patch Tips table.
Click any of the links to view more details.
62 Patching and Security Guide, Version 5.3

Managing your Patch Inventory5
To view the Patch Listing page
1. Click Security > Patching.
2. Select Patch Listing.
The Patch Listing page shows all the available patches by default. The table columns indicate patch status, and show how many of your systems that require patches have them installed already.
The status iconsBy default, the Patch Listing table displays all patches, including patches you did not subscribe to. This allows you to detect whether or not computers managed by the K1000 Management Appliance need patches to which you have not already subscribed.
The status icons in this table indicate the patch availability as follows:
To perform these steps, be sure to select your organization from the Organization drop-down list in the top-right hand corner of the page.
Status Icon Definition
Sub
scri
ptio
n
Det
ect
Dep
loy
Active Subscribed to and downloaded. No icon displays.
Yes Yes Yes
Inactive Subscribed to but excluded by you from detection and deployment.
Yes No No
Patching and Security Guide, Version 5.3 63

5 Managing your Patch Inventory
To unsubscribe to disabled patches
Unsubscribing removes the information from your system after the next download and excludes it from future downloads as well as patch detection jobs.
1. Click Security > Patching.
2. Select Subscription Settings.
The Patch Subscription Settings page appears.
3. Click the Edit Mode button.
4. In the Disabled Patch Options section, select the Hide Disabled Patches on Patch Listing check box.
5. Scroll to the bottom of the page, and click Save.
After the next download, the disabled patches are removed from the K1000 Management Appliance.
Understanding detection and deployment statusThe Patch Listing columns aggregate the detection and deployment job statistics for each patch.
Disabled Not subscribed to, contains patch details only. The patch installation files have not been downloaded to your K1000 Management Appliance.
No Yes No
Status Icon Definition
Sub
scri
ptio
n
Det
ect
Dep
loy
To perform these steps, be sure to select your organization from the Organization drop-down list in the top-right hand corner of the page.
Column Description
The number of computers that meet the system requirements for this patch.
64 Patching and Security Guide, Version 5.3

Managing your Patch Inventory5
Patch detectionPatch detection is the process of finding out whether a specific computer needs a specific patch. The patch detection process identifies the computers as follows:
• Needs patching: If the computer has the appropriate software and does not already have the patch. The patch will be installed during deployment.
• No patch needed: If the computer does not have the appropriate software or has the appropriate software and has already been patched. The patch will not be applied during patch deployment.
The number of computers detected as needing this patch that are waiting for deployment.
The number of computers that have failed deployment attempts three times.
Unpatched The sum of the two right columns (waiting for deployment and failed deployment). Select Unpatched to sort by this column.
Column Description
Patching and Security Guide, Version 5.3 65

5 Managing your Patch Inventory
66 Patching and Security Guide, Version 5.3

6
Deploying and Managing SecureBrowsers
This chapter explains the tasks necessary to set up, deploy, and manage your Secure Browser Packages, and also provides troubleshooting information.
About Secure BrowsersThe Dell KACE Free Secure Browsers provide secure versions of the most popular Web browsers. The Secure Browser feature includes the following:
• Contains all Web downloads (intended and unintended) in a single directory, preventing system corruption and conflicts.
• Allows simultaneous execution of different browser versions.
• Allows you to define a list of accessible Web sites.
• Provides the ability to easily reset the browser to its installation state, clearing all downloads and installed plugins.
• Gives you control over all sub-programs and processes that the browser launches.
• Allows you to restrict all downloads to a single folder.
The www.appdeploy.com Tools Web site has a forum dedicated to this tool. This forum is both a good source of information and a place to request new features.
System software requirementsFree Secure Browsers are supported on the following platforms:
• Microsoft Windows® 7, Vista, and XP (x86) SP3.
Supported browsersSupported browser versions are currently provided as Free Secure Browsers:
• Mozilla Firefox 3 (and later)
Distributing Secure Browsers from your applianceThis section explains how to set up the Secure Browsers feature on the K1000 System Management appliance. To distribute the Secure Browser using the appliance, you should first manually install the Secure Browser on a node, allow the agent to report the Secure
Patching and Security Guide, Version 5.3 67

6 Deploying and Managing Secure Browsers
Browser as a software inventory asset, and then attach the installation files to the software asset.
Installing the Secure Browser on the nodeTo get the Secure Browser feature to appear in Inventory, you must manually install the browser on a provisioned node. The next time the agent checks in after the installation, the Secure Browser feature appears in the software inventory.
To manually install the browser on a node:
1. On the host node, download the Secure Browser from: http://www.kace.com/support/customer/faq/index.php?action=artikel&cat=63&id=1014&artlang=en.
2. Follow the installation instructions on the Dell KACE Web site.
The next time the agent checks in, the Secure Browser appears in the Inventory > Software list.
Setting up the Software Inventory itemIn order to distribute the Secure Browser using Managed Installs, you must attach the installation file to the software item in Inventory. You also add the other supported operating systems.
To attach the Installation Files:
1. Go to Inventory > Software.
2. Click the Secure Browser to open the Software : Edit Detail page. For example: Dell Secure Browser (Firefox 3).
3. Under Supported Operating Systems, use CTRL+ click to select the names of the supported operating systems for the Secure Browser.
4. Scroll down to Associated Files, click Browse.
5. Select the Secure Browser MSI and click Open.
The file name appears in the Current File (size) field.
6. Click Save.
The installation file for the Secure Browser is now associated with a software item and can be distributed using Managed Installs.
Creating a Managed Install for Secure Browsers
You can force the agent to check in sooner by clicking the Force Inventory Update button on the computer’s Inventory > Computers : Detail Item page.
To perform these steps, be sure to select your organization from the Organization drop-down list in the top-right hand corner of the page.
68 Patching and Security Guide, Version 5.3

Deploying and Managing Secure Browsers6
1. Go to Distribution > Managed Installations.
2. In the Choose Action menu, click Add New Item.
The Managed Software Installation: Edit Detail page appears.
3. From the Software drop-down list, click the name of the Secure Browser. For example: Dell Secure Browser (Firefox 3).
4. Enter the following information:
5. Specify the deployment details:
Option Description
Installation Command Select the Use Default option.
Run Parameters Leave blank/empty.
Delete Downloaded Files Select this check box to delete the package files after installation.
Use Alternate Download Clear this option.
Notes Enter additional information in this field, if any.
Managed Action Select the most appropriate time for this package to be deployed. Available options are:
• Disabled
• Execute anytime (next available)
• Execute before logon (before machine boot)
• Execute after logon (before desktop loads)
• Execute while user logged on
• Execute while user is logged off
Option Description
Deploy to All Machines Select this check box if you want to deploy the software to all machines.
Limit Deployment To Labels
Select a label (or labels) to limit deployment only to machines belonging to the selected label. Press CTRL to select multiple labels.If you have selected a label that has a replication share or an alternate download location, the appliance copies digital assets from that replication share or alternate download location instead of downloading them directly from the appliance.Note: The appliance always uses a replication share where possible rather than using an alternate location.
Limit Deployment To Listed Machines
You can limit deployment to one or more machines. Select the machines from the drop-down list to add to the list. You can filter the list by entering filter options.
Patching and Security Guide, Version 5.3 69

6 Deploying and Managing Secure Browsers
6. Set user interaction details. These options are displayed when you select the Deploy to All Machines option.
7. Click Save.
Centrally Managing the Secure Browser SettingsYou configure the Secure Browser settings on the Security > Secure Browsers page.
Deploy Order Select the order to install the software. The lower deploy order deploys first.
Max Attempts Enter the maximum number of attempts, between 0 and 99, to indicate the number of times the K1000 Management Appliance tries to install the package. If you specify 0, the appliance enforces the installation forever.
Option Description
Allow Snooze Allow users to delay. When you select this check box, the following additional fields appear:
• Snooze Message: Enter a snooze message.
• Snooze Timeout: Enter the timeout, in minutes, for which the message is displayed.
• Snooze Timeout Action: Select a timeout action to take place at the end of the timeout period. For example, if the installation is being carried out when no active users are currently accessing their desktops, you can select Install now to install the software without any hindrance to the users or select Install later if the installer needs some user interaction.
Custom Pre-Install Message
Display a message to users prior to installation. When select this check box, the following additional fields appear:
• Pre-Install User Message: Enter a pre-install message.
• Pre-Install Message Timeout: Enter a timeout, in minutes, for which the message is displayed.
• Pre-Install Timeout Action: Select a timeout action from the drop-down list. This action takes place at the end of the timeout period. Options include Install later or Install now. For example, if the installation is being carried out when no active users are currently accessing their desktops, you can select Install now to install the software without any hindrance to the users or select Install later if the installer needs some user interaction.
Custom Post-Install Message
Display a message to users after the installation is complete. When you click the check box, the following additional fields appear:
• Post-Install User Message: Enter a post-install message.
• Post-Install Message Timeout: Enter a timeout, in minutes, for which the message is displayed.
70 Patching and Security Guide, Version 5.3

Deploying and Managing Secure Browsers6
To add nodes to manage
To centrally manage the settings of Secure Browser, you must add the node to the managed computers list on the Secure Browser page.
1. Go to Security > Secure Browsers.
2. Select Manage.
The Secure Browser Management page appears.
3. Select the check box next to the Browser in the list.
4. In the Choose Action menu, click Edit Default Settings.
The Secure Browsers: Edit Settings page appears.
5. Under Add Machines, select the computers you want to manage Secure Browsers on from the Select Machine to Add drop-down menu.
The computers appear in the Management Limited To Listed Machines list.
6. Add all the computers to which you will apply these Browser settings.
If the node has the Secure Browser installed, the browser uses the settings configured on the appliance. Non-managed computers allow the user to control and configure the browser settings locally.
To control when users can launch the browser
To limit when the user can open and use the Secure Browser:
1. Go to Security > Secure Browsers.
2. Select Manage.
The Secure Browser Management page appears.
3. Select the check box next to the Browser in the list.
4. In the Choose Action menu, click Edit Default Settings.
The Secure Browsers: Edit Settings page appears.
5. Use the settings in the Launch Restrictions section:
To perform these steps, be sure to select your organization from the Organization drop-down list in the top-right hand corner of the page.
To perform these steps, be sure to select your organization from the Organization drop-down list in the top-right hand corner of the page.
Setting Description
Network Connection to K1000 Required
Only allow the Secure Browser to launch when the node is connected to the appliance.
Patching and Security Guide, Version 5.3 71

6 Deploying and Managing Secure Browsers
To control which Web sites a user can visitTo limit the Web site the user of the Secure Browser can visit:
1. Go to Security > Secure Browsers.
2. Select Manage.
The Secure Browser Management page appears.
3. Select the check box next to the Browser in the list.
4. In the Choose Action menu, click Edit Default Settings.
The Secure Browsers: Edit Settings page appears.
5. Copy and paste the Secure Browser isolation XML in the Secure Browser Isolation Configuration XML text field.
Adding Secure Browsers to the Software LibraryThe Service Desk > Software Library tab is a self-service user portal that users can use to download and install software for their systems
Choose to automatically add your Secure Browser Packages to the Software Library for your users to download as needed.
To create a Software Library item
1. Go to Service Desk > Software Library.
2. In the Choose Action menu, click Add New Item.
The Software Library: Edit Detail page appears.
3. Select or clear the Enabled check box.
Selecting this check box makes the software library visible to users on the User Portal.
4. For Package Type, select Install.
5. Select the Secure Browser from the Package Type > Select... drop-down list. For example: Dell Secure Browser (Firefox 3).
Restrict to Days of the Week
Only allow the Secure Browser to launch on the selected days.
Restrict to Time of Day Only allow the Secure Browser to launch during specified times.
Setting Description
To perform these steps, be sure to select your organization from the Organization drop-down list in the top-right hand corner of the page.
72 Patching and Security Guide, Version 5.3

Deploying and Managing Secure Browsers6
6. Enter the command line to run the installation in the Install Command Line field.
7. Specify the information to include with Secure Browser under the User Portal Page Details section
8. Specify any distribution restrictions in the Access Control section.
9. Click Save.
To return a Secure Browser to its original configuration
Follow these steps if a Secure Browser on one of your nodes has become corrupted or simply configured incorrectly.
1. Click Secure > Secure Browsers.
2. Select a Secure Browser row by double clicking the row.
The details of the instance display below the table.
Installation Instructions
Specify the installation instructions. Any defined instructions, legal policy, cost information, and so on are posted along with the portal package for user visibility.
Product Key Enter the product key. (See the Asset > Assets tab for Asset Detail license information.)
E-mail Product Key to User
Select this option to send download instructions at the time of user download.
Request Manager Notification
Select this option to require users to enter their manager’s email address for notification before downloading or installing the software.
Additional Notes (Optional) Enter any additional information.
Corporate License Text (Optional) Enter any Corporate License text.
Vendor License Text (Optional) Enter any Vendor License text.
Unit Cost (Optional) Enter a cost per unit.
Documentation File (Optional) Browse a documentation file to include. The Documentation File (size) is displayed after the file is selected.
Documentation File (size)
This value is displayed after the documentation file is selected using the Documentation File option.
Limit Access To User Labels
(Optional) Click Edit to select a label from the Limit Access To list to limit software library deployment to specific users.
Also Restrict By Machine Label
(Optional) Select the Also Restrict By Machine Label check box to restrict software library deployment by machine label.
To perform these steps, be sure to select your organization from the Organization drop-down list in the top-right hand corner of the page.
Patching and Security Guide, Version 5.3 73

6 Deploying and Managing Secure Browsers
3. Click the Revert to Install State button.
The Secure Browser original deployment configuration is restored.
To shut down a Secure Browser on a node
Alert your users before disabling their programs. To terminate all instances of a Secure Browser running on any of your nodes:
1. Click Security > Secure Browsers.
2. Select Manage.
3. Select a Secure Browser row.
The details of the instance display below the table.
4. Click the Terminate All button.
TroubleshootingThis section contains information about specific problems that you may encounter and offers suggestions for correcting the problems.
Collecting Log File Information for SupportThe information in the appliance proprietary logs may help diagnose a problem you are having with your Secure Browsers. If asked by Dell KACE personnel, follow these steps to produce log files and send them to Dell KACE for diagnosis.
1. Turn logging on.
2. Try to run the Secure Browser causing the problem.
3. Turn logging off.
4. The logs are sent to the Dell KACE Support person who requested them.
You do not need to remove an old Secure Browser to replace it with a newer or differently configured version. You can add a newer Secure Browser running the same application on any system, and the two will run side-by-side without error. However, you need to inform your users of which version to run.
1. Open a Command Prompt Window, and enter regedit.exe.
The Registry Editor window appears.
2. Navigate to HKEY_LOCAL_MACHINE/SOFTWARE/KACE/Kontainers.
3. Right click New > DWORD Value.
4. Create a new FileLogging entry with a value of 1.
To perform these steps, be sure to select your organization from the Organization drop-down list in the top-right hand corner of the page.
74 Patching and Security Guide, Version 5.3

Deploying and Managing Secure Browsers6
5. Run the problem application again. Otherwise, replicate the problem.
6. Return to the Registry Editor and set your FileLogging Entry to 0 to turn logging off.
7. Find the log files and send them to Dell KACE.
The default location for the log files is in C:\Kontainers\application_name\application_name\Podinfo by default.
For example, the WinZip program files are stored in C:\Kontainers\WinZip\WinZip\Podinfo by default. If you deploy Kontainers to a different location, look for the application_name\application_name\Podinfo subdirectory there.
8. Copy all Safe*.log files in that location and send them to Dell KACE for debugging.
Patching and Security Guide, Version 5.3 75

6 Deploying and Managing Secure Browsers
76 Patching and Security Guide, Version 5.3

7
Using the OVAL Security FeaturesThe Security component offers both patching and security features for your Dell KACE K1000 Management Appliances. K1000 Management Appliance patching features allow you to set up automatic downloading and installation of the Lumension patch feed. This feed includes verified patches for Windows, Mac OS, and many third-party and vendor-supplied applications.
The K1000 Management Appliance Security Enforcement and Audit component allows you to run vulnerability tests on your network using Open Vulnerability and Assessment Language (OVAL).
This chapter describes:
• Security Overview, on page 77
• Understanding the OVAL Tests, on page 78
• Configuring OVAL Settings, on page 80
• Vulnerability Report, on page 81
• Computer Report, on page 82
• Creating Security Policies, on page 83
• Creating Windows-based Security Policies, on page 83
• Creating Mac OS-based Security Policies, on page 92
Security OverviewWith the K1000 Management Appliance Security Enforcement and Audit component, you can ensure the health of your network. You can run vulnerability tests on the computers in your network, and using the results of these tests, you can determine how to bring the computers back into compliance. You can customize security policies to enforce certain rules, schedule tests to run automatically, and run reports based on the results.
About OVALThe K1000 Management Appliance Security Enforcement and Audit component uses Open Vulnerability and Assessment Language (OVAL), an internationally recognized standard to detect security vulnerabilities and configuration issues on computer systems. OVAL is compatible with the Common Vulnerabilities and Exposures (CVE) list. CVE content is
Patching and Security Guide, Version 5.3 77

7 Using the OVAL Security Features
determined by the CVE Editorial Board, which is composed of experts from the international information security community.
New information about security vulnerabilities discussed on the Community Forum is sent to the CVE Initiative for possible addition to the list. For more information about CVE, MITRE Corporation, or the OVAL Board, visit http://cve.mitre.org.
The ability to describe vulnerabilities and exposures in a common language makes it easier to share security data with other CVE-compatible databases and tools.
Understanding the OVAL TestsThe K1000 Management Appliance checks for nightly updates to available OVAL definitions. Definitions are displayed on the OVAL Tests tab, along with their associated OVAL ID and CVE Number.
To view OVAL definitions
1. Click Security > OVAL Assessment.
The OVAL Scan page appears.
2. Click OVAL Tests.
The OVAL Tests page appears.
3. (Optional) Limit which tests are displayed with the View by drop-down list or use the Search field to find OVAL tests by OVAL ID, CVE Number, operating system, or text.
4. Click a Description link in the OVAL Tests list.
The OVAL Tests: Definition page appears.
OVAL definitions pass through a series of phases before being released. Depending on where a definition is in this process, it is assigned one of the following statuses:
• DRAFT
• INTERIM
• ACCEPTED
Other possible status values include:
• Initial Submission
• Deprecated
To perform these steps, be sure to select your organization from the Organization drop-down list in the top-right hand corner of the page.
78 Patching and Security Guide, Version 5.3

Using the OVAL Security Features7
For more information about the stages of OVAL definitions, visit http://oval.mitre.org/about/stages.html.
When OVAL tests are enabled, all of the available OVAL tests are run on the target machines.
OVAL Test details do not indicate the severity of the vulnerability. Use your own judgment to determine whether to test your network for the presence of a particular vulnerability.
The following table contains an explanation of the fields found on the OVAL Tests : Definition page:
The table at the bottom of the page displays the list of computers in your network that contain this vulnerability. For convenience, a printer-friendly version of this data is available.
Running OVAL TestsThe K1000 Management Appliance runs OVAL tests that are automatically based on the schedule specified in OVAL Settings. Because OVAL Tests consume a large amount of memory and CPU, they impact the performance of the target machines. OVAL Tests take between 5 and 20 minutes to run. To minimize the disruption to your users, run OVAL Tests weekly or monthly and during hours when your users are least likely to be inconvenienced. For example, you may want to schedule OVAL to run tests on Saturday every week.
Status Description
DRAFT Definitions with this status have been assigned an OVAL ID number and are under discussion on the Community Forum and by the OVAL Board.
INTERIM Definitions with this status are under review by the OVAL Board and available for discussion on the Community Forum. Definitions are generally assigned this status for two weeks, unless further changes or discussion are required.
ACCEPTED Definitions with this status have passed the Interim stage and are posted on the OVAL Definition pages. All history of discussions surrounding ACCEPTED definitions are linked from the OVAL definition.
Field Description
OVAL-ID Click the OVAL-ID to visit an external Web site with more details about the vulnerability. The status of the vulnerability follows the OVAL-ID. Possible values are DRAFT, INTERIM, or ACCEPTED.
Class Indicates the nature of the vulnerability. Possible values are: compliance, deprecated, patch, and vulnerability.
Ref-ID Click the Ref-ID to visit an external Web site for more details about the vulnerability.
Description The common definition of the vulnerability as found on the CVE list.
Definition Specifies the testing steps used to determine whether or not the vulnerability exists.
Patching and Security Guide, Version 5.3 79

7 Using the OVAL Security Features
To use labels to restrict OVAL testsIf you are running OVAL tests periodically or if you want to obtain the OVAL test results for only a few machines, you can assign a label to those machines. Then, you can use the Run Now Function to run OVAL Tests on those machines only. For more information about the Run Now Function, see the Scripting chapter, in the Administrator Guide.
OVAL Updates
The K1000 Management Appliance checks www.kace.com for new OVAL definitions every night, but you should expect new definitions every month. If OVAL tests are enabled, the K1000 Management Appliance downloads new OVAL definitions to all client machines on the next scripting update interval whenever a new package becomes available, regardless of the OVAL schedule settings. The updates .zip file can be up to 2MB—large enough to impact the performance of nodes with slow connections.
For this reason, only enable OVAL tests when you want to run them. For example, if you want to schedule OVAL tests to run on January 1, you can disable them on January 2. Enable OVAL tests when it is time to run them again. Any OVAL updates that are pulled down while the OVAL tests are disabled are stored on the K1000 Management Appliance and only pushed out to the target machines when enabled again.
Configuring OVAL SettingsYou can configure OVAL scan settings using this link. You should exercise caution when applying OVAL settings.
To specify OVAL settings
1. Select Security > OVAL Assessment.
2. Click OVAL Settings.
The OVAL Settings & Schedule page appears.
3. Specify the Configuration settings:
The OVAL tests originally available with your K1000 Management Appliance might be out of date. After installation, the K1000 Management Appliance automatically checks for nightly updates.
To perform these steps, be sure to select your organization from the Organization drop-down list in the top-right hand corner of the page.
Enabled Run OVAL on the target machines. Only enabled OVAL tests will run when you want to run them.
Allow Run While Logged Off
Run OVAL even if a user is not logged in. With this turned off, the script will only run when a user is logged into the machine.
80 Patching and Security Guide, Version 5.3

Using the OVAL Security Features7
4. Edit the Deployment settings as shown:
5. In the Scheduling area, specify the time and frequency for running OVAL:
6. Click Run Now to run the script immediately.
The Run Now button only runs tests on the machines selected in the Deployment area, specified in steps 3 and 4 above. For more information about Run Now, see the Scripting chapter in Administrator Guide.
Vulnerability ReportThe Vulnerability Report link displays a list of all of the OVAL tests that have been run. At a glance, you can see which OVAL tests failed and the number of computers that failed each OVAL test.
From the test detail view, you can see all the computers that failed the OVAL test and you can assign a label to those machines so that you can patch them at a later time.
Deploy to All Machines
Select this check box if you want to deploy the OVAL settings to all the machines. Click OK in the confirmation dialog box.
Limit Deployment To Selected Labels
You can limit the deployment OVAL settings to one or more labels. Use the CTRL key to select more than one label.
Limit Deployment To Listed Machines
You can limit deployment to one or more machines. From the drop-down list, select a machine to add to the list. You can add more than one machine. You can filter the list by entering filter options. Click Remove to remove the machines.
Supported Operating Systems
Select the operating system to which you want to limit deployment. Use the CTRL key to select more than one operating system.Note: Leave this setting field empty to deploy to all operating systems.
Don’t Run on a schedule Tests will run in combination with an event rather than on a specific date or at a specific time.
Run Every n minutes/hours Test will run on every hour and minutes as specified.
Run Every day/specific day at ...
Test will run on the specified time on the specified day.
Run on the nth of every month/specific month at...
Test will run on the specified time on the 1st, 2nd, or any other date of each month or the selected month.
Custom Schedule This option allows you to set an arbitrary schedule using standard cron format. For example, 1, 2, 3, 5, 20-25, 30-35, 59 23 31 12 * * means:On the last day of year, at 23:01, 23:02, 23:03, 23:05, 23:20, 23:21, 23:22, 23:23, 23:24, 23:25, 23:30, 23:31, 23:32, 23:33, 23:34, 23:35, 23:59. The K1000 Management Appliance does not support the extended cron format.
Patching and Security Guide, Version 5.3 81

7 Using the OVAL Security Features
To access OVAL vulnerability reports
1. Select Security > OVAL Assessment.
2. Click Vulnerability Report
The OVAL Report page appears.
Here you can view vulnerability reports.
To apply a label to affected machines
1. Click Security > OVAL Assessment.
2. Click Vulnerability Report.
The OVAL Report page appears.
3. Select the check box beside the test you want to apply a label to.
4. In the Choose Action menu, click the appropriate label under Apply label to Affected Machines.
In addition, you can search tests by making the appropriate selection under View by and View by class options from the drop-down list in the top-right portion of the page.
Computer ReportThe Computer Reports link offers a list of machines with OVAL results where you can see a summary of tests run on specific computers. The label under the Machine column in the OVAL Computer Report page is the K1000 Management Appliance inventory ID assigned by the Inventory component.
For more information about any of the computers on the report, click the linked machine name to go to the computer’s Inventory Detail page.
To access OVAL computer reports
1. Select Security > OVAL Assessment.
2. Click Oval Computer Report
The OVAL Computer Report page appears.
To perform these steps, be sure to select your organization from the Organization drop-down list in the top-right hand corner of the page.
To perform these steps, be sure to select your organization from the Organization drop-down list in the top-right hand corner of the page.
To perform these steps, be sure to select your organization from the Organization drop-down list in the top-right hand corner of the page.
82 Patching and Security Guide, Version 5.3

Using the OVAL Security Features7
Here you can view OVAL computer reports.
Creating Security PoliciesThe Security component includes several wizards to help you create policies to manage the computers on your network. To view the list of available security policies you can create, select Scripting > Security Policy. This section includes descriptions of the settings for each of the policies you can create.
You can create policies using the policy wizard screens. After you click Save, the Scripting tab appears where you can specify when to run the script and which machines are targeted. If you want to modify a script that was created using one of these wizards, you can either re-edit it using the wizard or you can edit the script in the K1000 Management Appliance script editor. Opening the script in the regular K1000 Management Appliance script editor is also a useful way to determine exactly what actions the script performs.
Available wizards include:
• Enforce Internet Explorer Settings, on page 83.
• Enforce XP SP3 Firewall Settings, on page 85.
• Enforce Disallowed Programs Settings, on page 86.
• Enforce McAfee AntiVirus Settings, on page 87.
• McAfee SuperDAT Update, on page 88.
• Enforce Symantec AntiVirus Settings, on page 89.
• Quarantine Policy, on page 90.
• To set the Lift Quarantine Action policy, on page 91.
Creating Windows-based Security PoliciesThe following sections provide details on the default Windows-based policies.
Enforce Internet Explorer SettingsThis policy allows you to control user Internet Explorer preferences. You can choose to control some preferences, while leaving others as user-defined. Policy settings enforced by you will overwrite the corresponding users’ Internet Explorer preferences. Because this script modifies user settings, you will need to schedule it to run when the user is logged in.
To set the Internet Explorer settings policy
To perform these steps, be sure to select your organization from the Organization drop-down list in the top-right hand corner of the page.
Patching and Security Guide, Version 5.3 83

7 Using the OVAL Security Features
1. Click Scripting > Security Policy.
1. Click Enforce Internet Explorer Settings.
The Security Policy : Internet Explorer Policy page appears.
2. In the User Home Page section under Internet Explorer Configurator, select the Enforce user home page policy check box and then specify the URL to use as the home page.
The User Home Page policy forces the users' home pages to the specified page.
3. In the Security section, select the Enforce Internet Zone settings policy check box and then choose the security level from the Security level drop down menu.
The Security zone policies allow you to specify the security level for each zone.
4. Select the Enforce Local Intranet Zone settings policy check box and then choose the security level from the Security level drop down menu.
5. Set the following options:
• Include all local (intranet) sites not listed in other zones
• Include all sites that bypass the proxy server
• Include all network paths (UNCs)
6. Select the Enforce Trusted Zone settings policy check box and then choose the security level from the Security level drop down menu.
7. Select the Enforce Zone Map check box, and then specify the IP addresses or ranges for the following zones:
• Restricted sites
• Locale Intranet sites
• Trusted sites
The Zone Map allows you to assign specific domains and IP ranges to zones.
Note: Domains that are not listed default to the Internet Zone.
8. In the Privacy section, select the Enforce Privacy settings policy check box and then set the Cookie policy.
Privacy policies allow you to control the cookies that are accepted by Internet Explorer from the Internet Zone.
9. Select the Enforce pop-up settings policy check box.
10. Set the following options:
• Pop-up Filter Level
• Web sites to allow
11. Click Save.
The Script: Edit Detail page appears.
12. In the Scheduling section, enable and set a schedule for this policy to take effect.
84 Patching and Security Guide, Version 5.3

Using the OVAL Security Features7
Enforce XP SP3 Firewall SettingsThis policy enables you to enforce firewall settings on target computers running Windows XP with Service Pack 2. You can enforce different policies based on whether the target computer is authenticated with a domain controller or is accessing the network remotely, from home or through a wireless hotspot. If your target computer has authenticated with a domain controller, it uses the Domain Policy; otherwise, it uses the Standard Policy. Therefore, you might want to configure it to impose tighter restrictions.
To set the XP SP3 Firewall settings policy
1. Select Scripting > Security Policy.
1. Click Enforce XP SP3 Firewall settings.
2. The Security Policy : XP Firewall Config page appears.
There are two types of policies described under Windows XP SP3 Firewall Configurator area:
• Domain Policy: Used when the desktop computer has authenticated with a domain controller. If you do not have a domain controller, use the Standard Policy configuration.
• Standard Policy: Used when the desktop computer has not authenticated with a domain controller. For example, when a laptop user is at home or using a Wi-Fi hotspot. This configuration is more restrictive than the Domain Policy.
3. In either the Domain Policy or Standard Policy areas, indicate whether Firewall is Enabled, Disabled, or if No Policy is in effect.
If the firewall is enabled, the policy settings will override any settings the user may have set. If the firewall is disabled, the user will not be able to enable the firewall. If the firewall is set to no policy, the user's configuration for the firewall will be used.
The following fields are available only if you select the Enabled option for Firewall.
4. Select or clear the Enable logging check box, then specify a location and name for the log file.
By default, the log is stored in: C:\Program Files\KACE\firewall.log.
Enable Logging check box will enable the firewall to log information about the unsolicited incoming messages that it receives. The firewall will also record information about messages that it blocks as well as successful inbound and outbound messages.
5. Select or clear the check boxes for the following settings:
To perform these steps, be sure to select your organization from the Organization drop-down list in the top-right hand corner of the page.
Allow WMI traffic Enables inbound TCP traffic on ports 135 and 445 to traverse the firewall. These ports are necessary for using remote administration tools such as the Microsoft Management Console (MMC) and Windows Management Instrumentation (WMI).
Patching and Security Guide, Version 5.3 85

7 Using the OVAL Security Features
6. To specify Inbound Port Exceptions, click Add Port Exception.
Inbound Port Exceptions enables additional ports to be opened in the firewall. These may be required for the computer to run other network services. An Inbound port exception is automatically added for port 52230 for the KACE Client Listener, which is required to use the Run Now functionality.
7. Specify a Name, Port, Protocol, and Source for the exception.
8. Click Save.
The Script: Edit Detail page appears.
9. Enable and set a schedule for this policy to take effect.
Enforce Disallowed Programs SettingsThis policy allows you to quickly create a script that prevents certain programs from running on the target machines. After the resulting script is executed on a target machine, these policies take effect only after the next reboot of that machine. On Windows XP or 2000, you can add a shutdown command as the last step of the script to force a reboot. This will enable the policy to take effect immediately.
To set the Disallowed Programs settings policy
1. Select Scripting > Security Policy.
1. Click Enforce Disallowed Programs Settings.
The Security Policy : Enforce Disallowed Programs page appears.
2. In the Policy Name field, enter a name for the policy.
3. Select or clear the Disallow programs check box.
• When selected, all disallowed programs cannot run.
• When cleared, all programs can run.
Allow Remote Desktop Enables inbound TCP traffic on port 3389 to traverse the firewall. This port is required for the computer to receive Remote Desktop requests.
Allow file and printer sharing
Enables inbound TCP traffic on ports 139 and 445, and inbound UDP traffic on ports 137 and 138. These ports are required for the machine to act as a file or printer sharing server.
Allow Universal Plug-and-Play (UPnP)
Enables inbound TCP traffic on port 2869 and inbound UDP traffic on port 1900. These ports are required for the computer to receive messages from Plug-and-Play network devices, such as routers with built-in firewalls.
The script created as a result of this wizard overwrites any disallowed program settings on the target machines.
To perform these steps, be sure to select your organization from the Organization drop-down list in the top-right hand corner of the page.
86 Patching and Security Guide, Version 5.3

Using the OVAL Security Features7
4. Add disallowed programs.
For example, to prevent Notepad from running, enter notepad.exe.
Note: You can add more than one program.
5. Click Save.
The Script: Edit Detail page appears.
6. In the Scheduling section, enable and set a schedule for this policy to take effect.
Enforce McAfee AntiVirus SettingsThis policy allows you to configure selective McAfee VirusScan features to be installed on all computers. This policy works with McAfee VirusScan version 8.0i and verifies that the software is installed with the configuration you specify. The policy also confirms that the On Access Scanner (McShield) is running.
You will need to zip the McAfee VirusScan installation directory and upload it here. A Software Inventory item will be created automatically if it does not already exist.
To set the McAfee AntiVirus settings policy
1. Zip the McAfee VirusScan installation directory.
2. Select Scripting > Security Policy.
3. Click Enforce McAfee AntiVirus Setting.
The Security Policy : McAfee Policy Enforcement page appears.
4. Click Browse to search for the McAfee zip file.
5. Use the User Interaction drop-down list to specify how the installation appears to your users.
For a description of the available options, refer to the McAfee documentation.
6. Select the McAfee Features to install.
Use the CTRL key to select multiple features.
To install the Alert Manager, use the McAfee tools to include the Alert Manager installation files in the deployment package. Consult the McAfee documentation for specific information about the features available here.
7. Select or clear the following check boxes depending on your configuration:
• Enable On Access Scanner
• Lockdown VirusScan Shortcuts
• Preserve earlier version settings
• Remove other anti-virus software
To perform these steps, be sure to select your organization from the Organization drop-down list in the top-right hand corner of the page.
Patching and Security Guide, Version 5.3 87

7 Using the OVAL Security Features
8. Specify the location on the target machine where the following files will be installed:
• Install Directory (McAfee installation directory)
• Alert Manager Source Path
• SITELIST.XML Source Path
• Desktop Firewall Source Path
• EXTRA.DAT Source Path
9. In the Logging list, select the information you want to log. Use the CTRL key to select multiple log items.
10. Enter a filename for the log in the Log File Name field.
11. Enter any additional arguments in the Additional Arguments field.
12. Select the appropriate reboot option from the Reboot drop-down menu.
13. Enter the behavior following installation using the After Installation drop-down menu. Y
Your selections are Run AutoUpdate or Run AutoUpdate silently.
You can also select to Scan all local drives or Scan all local drives silently.
14. Click Save.
The Script : Edit Detail page appears.
15. In the Scheduling section, enable and set a schedule for this policy to take effect.
McAfee SuperDAT UpdateThis policy allows you to build a script for applying McAfee SuperDAT or XDAT updates. There are several steps involved in creating this script:
• Specify the update files and reboot behavior on the target machines.
• Select the software packages to push to target machines during update.
• Verify the network scan status.
To create the McAfee update script
1. Click Scripting > Security Policy.
1. Click McAfee SuperDAT Updater.
The Security Policy: McAfee SuperDAT Configurator page appears.
2. Enter a file name in the SDAT or XDAT file field.
3. Click Browse to search for the SDAT or XDAT file.
To perform these steps, be sure to select your organization from the Organization drop-down list in the top-right hand corner of the page.
88 Patching and Security Guide, Version 5.3

Using the OVAL Security Features7
4. Set update options:
5. Click Save.
The Script: Edit Detail page appears.
6. In the Scheduling section, enable and set a schedule for this policy to take effect.
Enforce Symantec AntiVirus SettingsThis policy allows you to configure which Symantec AntiVirus features are installed. It verifies that the software is installed with the configuration you specify here. This policy is intended to be run periodically to ensure that Symantec AntiVirus is installed, configured, and running properly, not only upon initial installation.
To set the Symantec AntiVirus settings policy
1. Select Scripting > Security Policy.
1. Click Enforce Symantec AntiVirus Settings.
The Security Policy: Symantec AntiVirus page appears.
2. From the Action drop-down menu, specify the action to perform:
• Install
• Uninstall
• Repair missing files
• Reinstall all files
3. From the Software drop-down menu, select the software package to use for this script.
4. If the software package is zipped, enter the MSI file name in the MSI Filename field.
5. Use the User Interaction drop-down menu to specify how the installation should appear to your users.
Install Silently Installs updates without displaying a notification on the target computers.
Prompt for Reboot
Makes the update prompt the user before rebooting. Use this option with the Install Silently option.
Reboot if Needed
Reboots the machine as needed. Without this option, a silent installation will not reboot the machine.
Force Update Updates all file versions, even if the machine already appears to have the latest versions.
You need to create a Software inventory item and upload the Symantec AntiVirus.msi file to be distributed.
To perform these steps, be sure to select your organization from the Organization drop-down list in the top-right hand corner of the page.
Patching and Security Guide, Version 5.3 89

7 Using the OVAL Security Features
6. Specify the install directory in the Install Directory field.
7. Specify any additional switches in the Additional Switches field.
8. Specify any additional properties in the Additional Properties field.
9. Specify behavior after installation in the After Install field.
10. Select a restart option from the Restart options drop-down menu.
11. Select the information you want to log in the Logging list.
Use the CTRL key to select multiple items.
12. Enter a filename for the log in the Log File Name field.
13. Select a NETWORKTYPE from the Network Management drop-down menu.
14. Specify the server name, if required, in the Server Name field. This field is mandatory if you select Managed from Network Management drop-down menu.
15. Set the AutoProtect option using the Enable AutoProtect drop-down menu.
16. Set the Disable SymProtect option using the Disable SymProtect drop-down menu.
17. Set the Live Update behavior using the Run Live Date drop-down menu.
18. Select the features you want to install from the Features to Install list. Use the CTRL key to select multiple items. Consult the Symantec documentation for specific information about the options available here.
You must include the SAVMain feature for this script to work properly (although this wizard does not enforce that).
19. Click Save.
The Script: Edit Detail page appears.
20. Use the Scheduling section to enable and set a schedule for this policy to take effect.
Quarantine PolicyUse this wizard to create a script that you can use to quarantine computers. The script that is created as a result of this wizard is merely a template. Use the script editor to modify the template script and add the appropriate verification steps to decide which computers to quarantine.
When a computer is under quarantine, all communication from it is blocked except for communication to the K1000 Management Appliance. Therefore, use care when performing this action. If you were to deploy this accidentally to all machines on your network, you could take your network down very quickly.
After a user’s machine is in quarantine, it cannot be reversed without intervention by the K1000 Management Appliance administrator. The user will not be able to recover from this without you taking some action. Quarantined computers only have access to the K1000 Management Appliance to receive a Run Now event to lift the quarantine.
90 Patching and Security Guide, Version 5.3

Using the OVAL Security Features7
To set the Quarantine policy
1. Click Scripting > Security Policy.
2. Click Quarantine Policy.
The Security Policy: Quarantine page appears.
3. (Optional) Enter a policy name in the Policy Name field.
Enter a meaningful name that relates to the vulnerability, so that you can lift the quarantine later once that vulnerability is resolved.
4. Leave the K1000 Management Appliance Server IP unchanged in the K1000 Server IP field
5. Specify the DNS Server IP address in the DNS Server IP field
6. Modify the Message dialog text as required in the Message Dialog field.
Users see this message before the appliance places their computer in quarantine.
7. Modify the description text in the Description field as required.
8. Click Save.
The Script: Edit Detail page appears.
9. In the Scheduling section, enable and set a schedule for this policy to take effect.
Modify the Verify steps in the Script : Edit Detail page to determine the conditions under which you want the quarantine to take effect. Although it will not be enabled automatically, it will be configured to deploy to everyone. For more information on how to modify the verify steps, read the scripting chapter in Administrator Guide.
For example, you can add a step under verify, to check whether the file K1000Client.exe exists on the target machine.
You can define a log message, create a message window or launch a file. The file kbq2.exe will be launched for quarantine.
To set the Lift Quarantine Action policy
Use this procedure to turn off the K1000 Management Appliance quarantine application.
1. Click Scripting > Security Policy.
2. Click Lift Quarantine Action.
The Security Policy: Lift Quarantine Action page appears.
3. Fro the Labels drop-down menu, select the label (under the Labeled Computers section) for the quarantined machines, or select the specific machine from the Computers list in the Specific Computer(s) section to remove the quarantine.
To perform these steps, be sure to select your organization from the Organization drop-down list in the top-right hand corner of the page.
To perform these steps, be sure to select your organization from the Organization drop-down list in the top-right hand corner of the page.
Patching and Security Guide, Version 5.3 91

7 Using the OVAL Security Features
You can filter the machine list by entering any filter options.
4. Click Send Lift Quarantine Now.
If there are many quarantined computers, it can take time for all of them to receive and process the request.
Creating Mac OS-based Security PoliciesThe following sections provide details on the default Windows-based policies.
Enforce Firewall SettingsThis security policy allows you to protect your Mac OS-bases systems with these four options:
You also need to enter the full path names to the application binaries. For example:
/Applications/Safari.app/Contents/MacOS/Safari
92 Patching and Security Guide, Version 5.3

8
SCAPThis chapter provides information about using the SCAP/FDCC Configuration Scan component of the Dell KACE K1000 Management Appliance to scan client systems using Secure Content Automation Protocol (SCAP).
OverviewThe SCAP/FDCC Configuration Scan component of the K1000 Management Appliance imports a security configuration checklist from the National Checklist Repository. After importing the K1000 Management Appliance verifies the checklist and performs compliance checking using the K1000 Agent on each client system. The scan implements compliance checking of a SCAP 1.1 data stream written in the XML formats using the following SCAP standards: XCCDF, CCE, CPE, and OVAL (defined in the next section: Definitions).
The agent performs the compliance check at a scheduled time and generates several files in OVAL format containing the CPE and CCE tests. These results files are then uploaded to the K1000 appliance’s Organization database and collated into a single results file for reporting to a government agency (if required). Results are also displayed for each computer on the appliance’s SCAP Configuration Scan Results page.
DefinitionsThis section provides definitions of each SCAP protocol and briefly describes how it is implemented in the K1000 Management Appliance.
Standard Definition
SCAP Secure Content Automation Protocol is a set of open standards that enumerate software flaws, monitor security-related configurations and product names, and examine systems to determine the presence of vulnerabilities and rank (score) the impact of the discovered security issues. SCAP is more fully described in More about Secure Content Automation Protocol, on page 94.
Patching and Security Guide, Version 5.3 93

8 SCAP
More about Secure Content Automation ProtocolAs previously mentioned, SCAP is a set of open standards that enumerate software flaws, monitor security-related configurations and product names, and examine systems to determine the presence of vulnerabilities and rank (score) the impact of the discovered security issues. Its features include the following:
• The ability to monitor the security configuration of systems having different kinds of operating systems and software applications.
• Allows determination of the security status of systems at any given time.
XCCDF The eXtensible Configuration Checklist Description Format is a specification language for writing security checklists, benchmarks, and related documents. An XCCDF file contains a structured collection of security configuration rules for a set of target systems. The specification is designed to support information interchange, document generation, organizational and situational tailoring, automated compliance testing, and compliance scoring. Information about how XCCDF is implemented in the K1000 Management Appliance is described in How a SCAP scan works, on page 95.
CCE Common Configuration Enumeration provides unique identifiers to system configuration issues for facilitating fast and accurate correlation of configuration data across multiple information sources and tools. The compliance checking results produced by the K1000 Management Appliance SCAP scan include the relevant CCE ID references for XCCDF and OVAL definitions for every rule checked as designated the checklist definition. CCE information is available both in the XCCDF result file and the appliance’s SCAP Configuration Scan Result page.
CPE Common Platform Enumeration is a structured naming scheme for information technology systems, platforms, and packages. Based on the generic syntax for Uniform Resource Identifiers (URI), CPE includes a formal name format, a language for describing complex platforms, a method for checking names against a system, and a description format for binding text and tests to a name. In essence, CPE ensures that the security checklist is applied to the correct platform.This information is available both in the XCCDF result file and the appliance’s SCAP Configuration Scan Result page.
OVAL Open Vulnerability and Assessment Language is an international, information security, community standard for promoting open and publicly available security content. It standardizes the transfer of this information across the entire spectrum of security tools and services.The results of each OVAL test are written to several files on the target system and then compiled into a single result file on the appliance and displayed on the SCAP Configuration Scan Results page.
Standard Definition
94 Patching and Security Guide, Version 5.3

SCAP8
• Provides compliance for various sets of security requirements.
• Furnishes a standardized, automated way of performing security tasks.
• Promotes interoperability across security tools.
These features improve software security and help avoid delays in threat assessment, decision-making, and vulnerability correction.
SCAP utilizes the National Vulnerability Database (NVD). NVD is the United States government standards-based vulnerability management data repository. NVD includes databases of security checklists, security-related software flaws, misconfigurations, product names, and impact metrics. For more information on SCAP and NVD, see the National Institute of Standards and Technology (NIST) web sites at http://scap.nist.gov/index.html and http://nvd.nist.gov/.
About BenchmarksA benchmark is a security configuration checklist. (The terms benchmark and checklist are interchangeable.) A benchmark is a series of rules for evaluating the vulnerabilities of a computer in a particular operational environment. NIST maintains the National Checklist Repository (http://checklists.nist.gov/) that contains a variety of security configuration checklists for specific IT products and categories of IT products. You can browse and search the repository to locate a particular checklist using a variety of criteria. You can tailor these checklists to meet your particular security and operational requirements. The checklists are XML documents. Two standards currently exist:
• FDCC (Federal Desktop Core Configuration): Addresses Microsoft Windows® Vista and XP operating system software.
• USGCB (United States Government Configuration Baseline): Evolved from the FDCC and currently addresses Windows 7 and Internet Explorer 8.
A checklist consists of a ZIP file that contains several XML files called a SCAP Stream. The primary file in the Stream is the XCCDF file. The XCCDF file is a structured collection of security configuration rules for a set of target systems. Essentially, it is a list of OVAL tests that should be run. The other XML files contain the OVAL tests specified in the XCCDF file. For detailed information on the XCCDF Specification, see http://scap.nist.gov/specifications/xccdf/.
A benchmark can contain one or more Profiles. A profile specifies which rules are run on which kinds of systems. For example, a benchmark may contain one set of rules for desktop systems and another set for servers.
How a SCAP scan worksThe K1000 Management Appliance imports a benchmark into the K1000 server. During the import process the benchmark is verified. After importing, the benchmark is loaded into the server and the XCCDF file undergoes a process called resolution. During resolution, the oval-command.zip file is generated. This ZIP file contains the input files necessary to run
Patching and Security Guide, Version 5.3 95

8 SCAP
a particular profile. You can view the files from the Script : Edit Detail page. See SCAP scan scheduling on page 99.
The SCAP scan is controlled by a KScript. When the scan runs, the following files are downloaded to the client as script dependencies:
• benchmark.zip: contains the benchmark files, that is, the SCAP Stream that was uploaded to the K1000 Management Appliance. (The XCCDF file is not actually used by the client.)
• oval-command.zip: contains the input files generated by the XCCDF.
• oval.ref.zip: contains the OVAL scanning engine (ovaldi.exe).
The KScript initiates the OVAL scans on the client machine and generates several results files. The OVAL scanning engine runs two or three times:
• The first run checks that the target computer is the correct platform for that benchmark profile using the CPE files contained in the Benchmark.
• The second run checks the vulnerability of the computer using the rules defined in the benchmark. It implements the CCE standard.
• The third run checks that the security patches are up-to-date.
Each run generates a results file. These files are named according to the run. For example, the file from the first run is named scap-profile-10-result-1.xml and the second is named scap-profile-10-result-2.xml. These files are located in the following directories:
Windows XP: C:\Documents and Settings\All Users\Dell\KACE\kbots_cache\packages\kbots\<working directory>
Windows Vista and Windows 7: C:\ProgramData\Dell\KACE\kbots_cache\packages\kbots\<working directory>
You can find the Agent’s working directory under Scripting Logs in Inventory > Computers > Computers : Detail Item page > Logs.
These results files are then uploaded to the K1000 server and collated into a single results file (xccdf-results.xml). You can use this file for reporting the results to a government agency such as the OMB (Office of Management and Budget). The K1000 server and client machine retain only the latest results files.
In the final step of a run, a subset of the results files are extracted and stored in the Organization database for reporting and displayed on the SCAP Configuration Scan Results for each computer page.
The database Tables that contain this information are SCAP_RESULT, SCAP_RESULT_RULE, and SCAP_RESULT_SCORE. See SCAP scan results on page 105.
96 Patching and Security Guide, Version 5.3

SCAP8
Overview of the SCAP Scan tabThe SCAP Scan tab is the primary page for accessing the K1000 Management Appliance
SCAP functionality.
To view the SCAP Scan page, click Security > SCAP Scan.
The SCAP Scan tab contains three components:
• Benchmarks: shows the status of SCAP benchmarks. Additionally from this page, you can import checklists, delete checklists, and export a checklist to CSV format.
• Scan Schedule: displays the name of the benchmarks and when they are scheduled to run. Additionally from this page, you can add and delete benchmarks, enable or disable benchmarks, and export a benchmark to CSV format.
• Scan Results: shows the general results of SCAP scans.
This page also displays a dashboard that shows the results by benchmark. For a computer to pass a benchmark, it must score 100%.
To view Benchmarks
The following instructions provide information accessing the SCAP Benchmarks page, where you can manage XCCDF checklists, see the time and date of the scan, and view scan summaries. Additionally, with the Choose Action button, you can import checklists, delete checklists, and export a checklist to CSV format.
1. Click Security > SCAP Scan.
To perform these steps, be sure to select your organization from the Organization drop-down list in the top-right hand corner of the page.
To perform these steps, be sure to select your organization from the Organization drop-down list in the top-right hand corner of the page.
Patching and Security Guide, Version 5.3 97

8 SCAP
The SCAP/FDCC Configuration page is displayed.
2. Click Benchmarks.
The SCAP Benchmark page is displayed.
3. (Optional) Specify which benchmarks are displayed using either the View by drop-down list or Search field. You can search by partial string in the title or identifier.
4. (Optional) Organize the Benchmarks by clicking a column heading.
5. Click a Benchmark - Profile to view more information about a particular Benchmark.
The SCAP Benchmark page is displayed.
The SCAP Benchmark page contains general information about the selected benchmark and the time and date that the SCAP data (XCCDF, CCE, CPE, and OVAL) was uploaded to the K1000 Management Appliance. For more information, see Getting the Benchmark archive, on page 107.
To import and load a benchmark
You can download benchmarks from the National Checklist Repository at http://checklists.nist.gov/. You can modify the downloaded benchmarks or create your own benchmarks. After the benchmarks are downloaded and ready for use, import them into the K1000 Management Appliance:
1. Click Security > SCAP Scan.
The SCAP/FDCC Configuration page is displayed.
2. Click Benchmarks.
The SCAP Benchmark page is displayed.
3. Click Choose Action and then select Import New Checklists.
The SCAP Configuration Scan Settings page is displayed and displays Step 1, Benchmark Selection of the import wizard.
To perform these steps, be sure to select your organization from the Organization drop-down list in the top-right hand corner of the page.
98 Patching and Security Guide, Version 5.3

SCAP8
4. Use the Browse button to import the Benchmark ZIP file from your computer.
5. Click Next.
A dialog box is displayed indicating that the file is being uploaded. After the file is uploaded, a message is displayed on the SCAP Configuration Scan Settings page that the import was successful.
6. Select a benchmark from the Select a profile to scan drop-down list, and then click Next.
The wizard displays Step 2. Oval Scan Engine.
7. Select the OVAL Engine that you what to use from the Scan using existing engine drop-down list.
8. (Optional) Click Browse to find and upload a custom engine and its configuration files.
A dialog box is displayed indicating that the file is being uploaded and a message is displayed on the SCAP Configuration Scan Settings page that the engine was successfully imported.
9. Click Next.
A dialog box is displayed indicating that the benchmark file is being loaded, followed by the Script : Edit Detail page. For more information about this page, see Editing a SCAP scan schedule, on page 101.
SCAP scan schedulingThe SCAP Scan Schedules page provides information about the benchmarks files that have been loaded into the K1000 Management Appliance. From this page you
The K1000 Management Appliance verifies that the ZIP file contains valid benchmarks. If no valid benchmarks are present, an error message is displayed and the file is not uploaded.
The default engine is MITRE’s OVAL Interpreter (ovaldi.exe). The K1000 automatically downloads updates to this engine when Dell KACE certifies and releases new versions of the engine and OVAL definitions.
Use a custom engine if you need local control of the OVAL engine or don't want automatic updates to change the engine. The custom engine must be a ZIP file of a folder containing the custom ovaldi.exe and any necessary configuration files required to run the engine. This ZIP file replaces the ovalref.zip dependency file in the SCAP scan script. See Viewing the resolved XCCDF files on page 101.
Patching and Security Guide, Version 5.3 99

8 SCAP
can enable, disable, run, export to CVS format, and access the Script : Edit Detail page.
The SCAP Scan Schedules page displays a list of KScripts for running the SCAP scans.
To access this page:
1. Click Security > SCAP Scan.
The SCAP/FDCC Configuration page is displayed.
2. Click Scan Schedules.
The SCAP Scan Schedules page is displayed.
3. Use the Choose Action button to add and delete benchmarks, enable or disable benchmarks, and export a benchmark to CSV format.
4. Click a benchmark to edit its schedule.
The Script : Edit Detail page is displayed.
5. Scroll down the page to the Scheduling section and make the necessary changes.
To perform these steps, be sure to select your organization from the Organization drop-down list in the top-right hand corner of the page.
Once a checklist is imported and loaded into a KScript, use this page to access the Script : Edit Detail page.
100 Patching and Security Guide, Version 5.3

SCAP8
Editing a SCAP scan scheduleYou can view or edit a benchmark schedule from the Script : Edit Detail page. This page allows you to manage and customize scripts for configuring, scheduling, and specifying which computers the SCAP scan runs on. The scripts for SCAP are regular KScripts.
You can access the Script : Detail page from the Benchmark wizard, as described in Overview of the SCAP Scan tab, on page 97 and from the SCAP Scan Schedules page, as described in SCAP scan results, on page 105.
Viewing the resolved XCCDF files
As mentioned in How a SCAP scan works, on page 95, a benchmark is loaded into the server and the XCCDF file undergoes a process called resolution, which generates the input files necessary to run a particular Profile. This section describes how to view these files:
1. On the Script : Detail page, scroll down to the Scheduling section.
2. Click the link in To edit the policy using this editor, click here.
The Dependencies section is displayed.
3. (Optional) To add any supporting executable files necessary to run the script, click Add a new dependency and then Browse.
4. (Optional) You can view the details of these files by clicking and downloading the selected ZIP file.
5. To see how these dependency files are executed, view the Task sections. Figure 8-1 on page 103 shows specific actions of how the script executes the scan.
Viewing the OVAL timestampThis section provides information on how to view the OVAL timestamp (the time the OVAL document was compiled).
1. On the Script : Edit Detail page, scroll down to the Scheduling section.
2. Click the link in To edit the policy using this editor, click here.
This section does not provide information about every feature available on the Script : Edit Detail page; it only contains information pertinent to using and understanding a SCAP scan. For more detailed information on editing a KScript, see “Using Scripting Features” in the Administrator Guide.
To perform these steps, be sure to select your organization from the Organization drop-down list in the top-right hand corner of the page.
Patching and Security Guide, Version 5.3 101
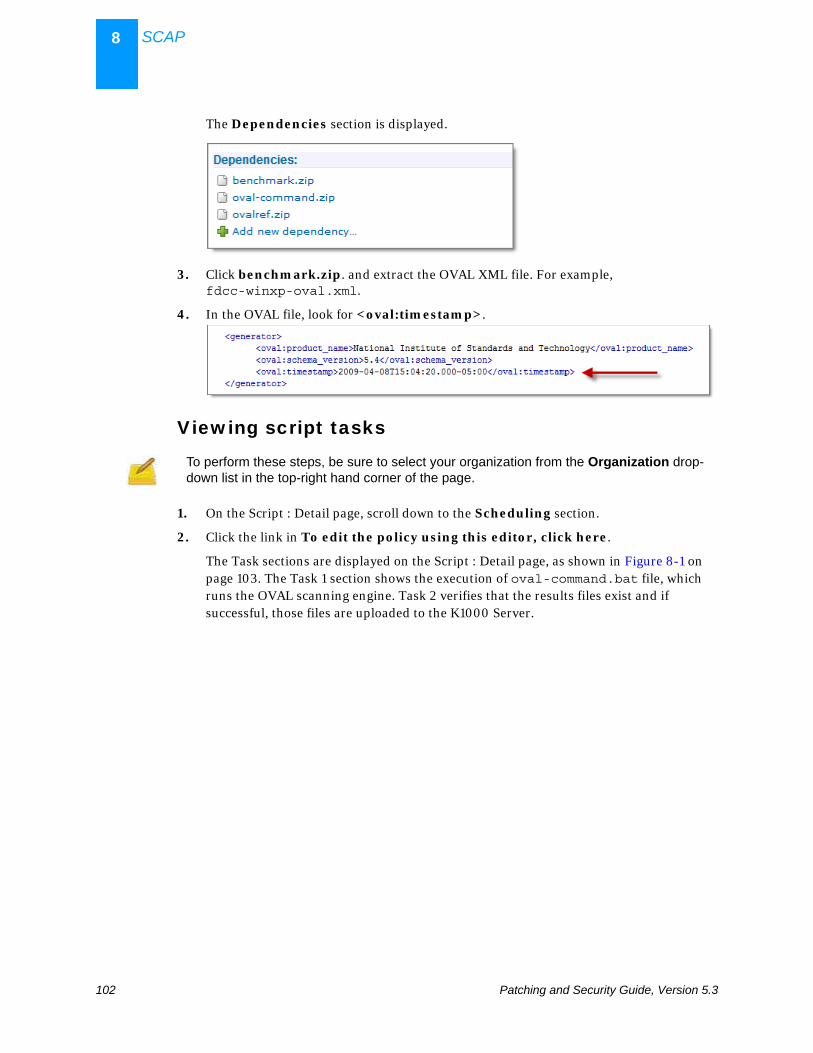
8 SCAP
The Dependencies section is displayed.
3. Click benchmark.zip. and extract the OVAL XML file. For example, fdcc-winxp-oval.xml.
4. In the OVAL file, look for <oval:timestamp>.
Viewing script tasks
1. On the Script : Detail page, scroll down to the Scheduling section.
2. Click the link in To edit the policy using this editor, click here.
The Task sections are displayed on the Script : Detail page, as shown in Figure 8-1 on page 103. The Task 1 section shows the execution of oval-command.bat file, which runs the OVAL scanning engine. Task 2 verifies that the results files exist and if successful, those files are uploaded to the K1000 Server.
To perform these steps, be sure to select your organization from the Organization drop-down list in the top-right hand corner of the page.
102 Patching and Security Guide, Version 5.3

SCAP8
Figure 8-1: SCAP Task Sections
Patching and Security Guide, Version 5.3 103

8 SCAP
104 Patching and Security Guide, Version 5.3

SCAP8
SCAP scan results
The Scan Results page shows the results of SCAP scans per machine. From this page you can access detailed information about each scan.
1. Click Security > SCAP Scan.
The SCAP/FDCC Configuration page is displayed.
2. Click Scan Results.
The SCAP Configuration Scan Results page is displayed.
3. (Optional) To display the results for a specific benchmark, click the View by drop-down list and select the desired benchmark.
The results page contains the following information:
4. To view the details on a particular computer, click its name in the Machine column.
To perform these steps, be sure to select your organization from the Organization drop-down list in the top-right hand corner of the page.
Machine The computer on which the scan was run.
Benchmark - Profile The particular profile in a benchmark that was used.
Scanned On The date and time that the scan was run.
Pass The number of rules that the computer passed.
Fail The number of rules that the computer failed.
Other The number of rules having other values such as error, unknown, not checked, not applicable, not checked, and informational. The XCCDF specification also defines “not selected”, which is excluded from the results.
Total The total number of rules that were executed.
% Pass The percentage of rules that were passed.
Score The default score defined by the benchmark.
Patching and Security Guide, Version 5.3 105

8 SCAP
A page containing the details of the scan result for the selected computer is displayed.
The following table describes each section in more detail:
Section Description
Summary Shows general information about the benchmark.
Test Results The test results are displayed in a tree structure that represents the grouping of the rules. Symbols display the pass-fail status of a rule. You can click a rule to open a dialog box containing the rule’s details. See step 5.
Scores The compliance scores for each scoring model as defined for the benchmark.
Results by CCE Pass-fail results are shown by CCE. The FDCC requires that compliance is reported by CCE.
Result XML files Contains links to the XML files:
• XCCDF Benchmark: The file processed by the XCCDF file and formatted into a single results file (xccdf-results.xml) from each run of the OVAL scanning engine.
• CPE Inventory: the file output by the first run of the OVAL scanning engine to test the whether the benchmark applies to the computer being scanned.
• Oval Compliance: the file output by the second run of the OVAL scanning engine to test the computer against the rules defined in the benchmark.
• OVAL Patches: the file output by the third run of the OVAL scanning engine to ensure that the security patches are up-to-date.
For more information, see How a SCAP scan works, on page 95.
106 Patching and Security Guide, Version 5.3

SCAP8
5. To view a rule’s details, click the rule’s icon.
The Viewing Details for that rule is displayed. This page shows a description of the rule from the XCCDF definition, whether the machine passed or failed the rule, and the XML for the rule.
Getting the Benchmark archiveOn a nightly basis, the K1000 Management Appliance gathers the SCAP scan results from every computer and creates an archive for each benchmark. The archive consists of a ZIP file that can be sent to the appropriate agency, such as the OMB.
To access the Benchmark archive
1. Click Security > SCAP Scan.
The SCAP/FDCC Configuration page is displayed.
2. Click Benchmarks.
The SCAP Benchmarks page is displayed.
3. Click the benchmark for the archive you want to download.
To perform these steps, be sure to select your organization from the Organization drop-down list in the top-right hand corner of the page.
Patching and Security Guide, Version 5.3 107

8 SCAP
The SCAP Benchmark page is displayed.
4. Click the ZIP file to download the archive.
This file contains the results for all machines that have scanned with the selected benchmark.
108 Patching and Security Guide, Version 5.3

Index
Symbols"Enforce Symantec Antivirus Settings" option 89
AAMP connection, required for patching 9application patches
viewing 18
Bbest practices for patching 13
Cchecking patch details for a computer 60Common Vulnerabilities and Exposures 78computer
patching status for one 51computer report 82configuring patch updates 20creating Mac OS-based security policies 92creating security policies 83creating Windows-based security policies 83critical patch compliance bar 51CVE 78
Ddelete all patch files 22delete unused patch files 22deployment status
about 62legend for 62
deploy-only, the fastest way to patch 50Detect All Patches 40Detect Patch Labels
40download new patch definitions 21
Eenforce internet explorer settings 83enforce XP SP2 firewall settings 85
Iinstallation progress bar 51installations, unwanted from patching 14
KK1000 patch settings page 21
Llabel name examples 57laptops
patching 46lift quarantine action 91Limit Detect to Selected Patches 40limit patches to matching machine labels
when to use 41Limit run to Machines 40Limit Run to Machines with Selected Operating
Systems 40Limit Run to Selected Machine Labels 40Lumension Security, Inc.
Patchlink, now Lumension 10
supplier of KACE patches 10
MMac OS-based security policies
enforce firewall settings 92McAfee SuperDAT updater 88Microsoft Windows Update feature 53Mitre 78monitoring patching status 51
Nnew patches
label and report to view 14using label to view new patches 55
Ooffline update options 21OVAL
computer report 82running 79settings, configuring 80updates 80
OVAL Reports 81OVAL Settings and Schedule 80OVAL Tests 78OVAL tests 81
Ppatch downloading
changing settings 20default settings 20
patch listing page 63patch reporting 52patch schedule
Deploy Patch Labels Selection 40Deploy Reboot Options 41description 39Detect Patch Label Selection 40detect, deploy, and detect and deploy 39machine selection options 40notes on 50patch action 39reboot options 41stopping patching 42
patch settings page 21patch tasks completed bar 51patches
finding unscheduled patches 42grey X for disabled 59managing 63red X for inactive 59statuses, explained 59supplier of, Lumension Security, Inc. 10
patchingAMP connection required 9application testing 10best practices 13by computer 60delete all patch files 22delete unused patch files 22details by computer 60fastest way to patch, deploy-only 50installations, unwanted and how to avoid 14
Patching and Security Guide, Version 5.2 109

Index
laptops 46larger implementations 57new patches in last 14 days, viewing 55overview 7removing 9rollback 9schedule options explained 41scheduling options, understanding 37settings, changing 20speeding up with shares 14starting 13status, for a single computer 51status, monitoring 51stopping 42stopping at a specific time 14subscription 17tasks 44testing 10testing methodology 10testing with users, importance of 13time, limiting 42undoing last patch job 43updates, configuring 20updating your appliance with the newest patches 55verification, understanding 10warning users first, importance of 13workflow 11, 44workstations 45
patching features, understanding 7patching servers 45Patchlink
now Lumension Security, Inc. 10policies
Windows-based security policies 83
Qquarantine policy 90
Rreports, patching 52rollback 9rollback behaviors 49rolling back last patch job 43Run on all Machines 40run on next connection
used for 38running OVAL tests 79
Sscheduled task status 62
legend for 62scheduling options 37Security 77security
OVAL tests 78overview 77
Security PoliciesInternet Explorer Settings 83
security policies 83creating for appliance 83enforce firewall settings (Mac OS) 92Symantec AntiVirus settings 89
servers, patching 45speed up patching with shares 14stop download patch definitions 21stop patching before it conflicts with work 14stop patching tasks with suspend 38subscription to patches understanding 17suspend pending tasks 38
behavior of 38Symantec AntiVirus settings
enforcement 89
Ttesting patching, advice 13
Uunderstanding the OVAL tests 78undoing last patching job 43update patching 21updating 55
Vvulnerability report 81
about 81
Wwarning users before patching, importance of 13Windows Update feature, using 53Windows-based security policies 90
enforce disallowed programs settings 86enforce internet explorer settings 83enforce McAfee AntiVirus Settings 87enforce XP SP2 Firewall Settings 85lift quarantine action 91McAfee SuperDAT Updater 88Symantec AntiVirus settings 89
workstations, patching 45
110 Patching and Security Guide, Version 5.2