Safety and Environment Manual for the HCI - ETH Zürich
112
Safety and Environment Manual for the HCI Version 2016 Most important rules: page 7 Technical facilities: page 43 November 2016 / T. Mäder Edited by I. Bräunlich
-
Upload
khangminh22 -
Category
Documents
-
view
2 -
download
0
Transcript of Safety and Environment Manual for the HCI - ETH Zürich

1
Safety and Environment Manual for the HCI
Version 2016
Most important rules: page 7
Technical facilities: page 43
November 2016 / T. Mäder
Edited by I. Bräunlich
2
Emergency / alerting 888 / evacuation
Alerting in case of an emergency (all cases, 24 h): Tel 888
(applicable for all ETH-internal telephones)
Emergency desk via mobile or external phone (24 h): 044 342 11 88
Look Think Act
Rule of conduct: One person:
- Conduct the alert - Safe others (do not forget self-protection!)
Group of people:
- Someone conducts the alert and coordinates the group. - The rest safes others.
Further emergency numbers:
Type in the numbers exactly in this sequence (applicable for all ETH-internal telephones):
Police 0-117
Fire department 0-118
Ambulance (First aid instructions – see last page of this handbook) 0-144
Tox Info Suisse 0-145
Where did it happen?
What happened?
How many are injured?
Who is calling?
Other risks?
Wait for further questions!
3
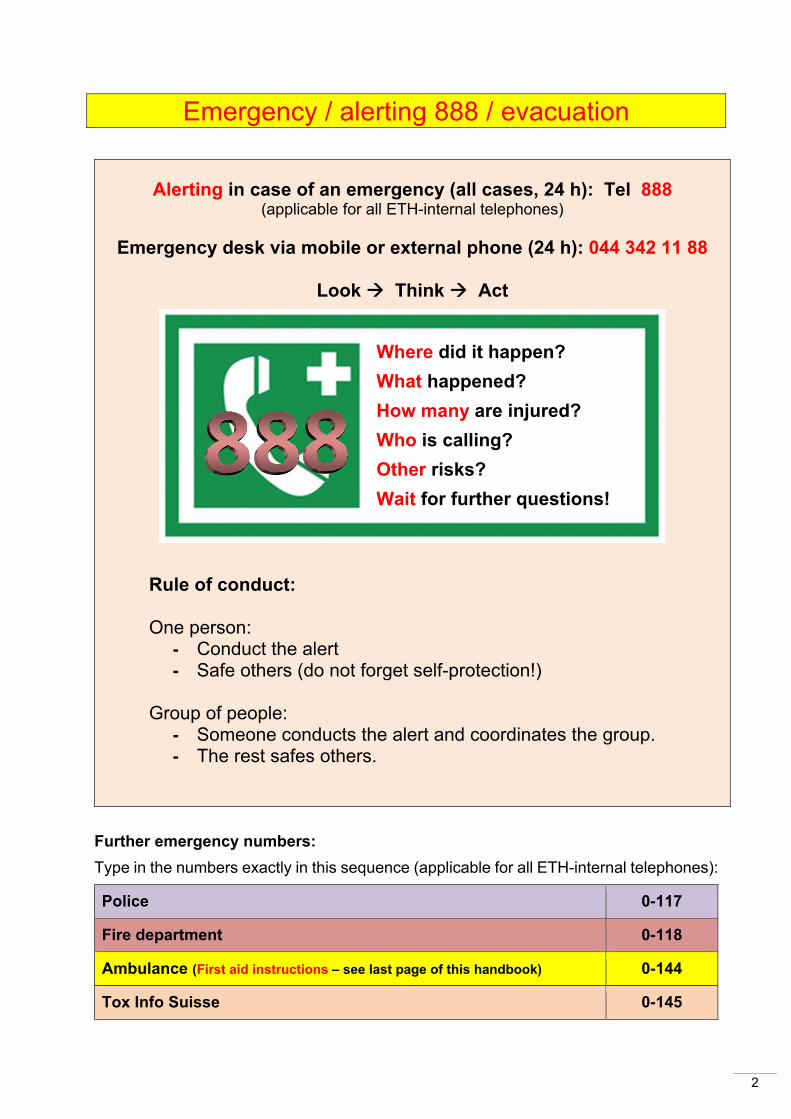
Evacuation of a building and gathering point
In case of an emergency everybody can trigger an evacuation via the emergency desk. If a siren signal is released via the loudspeakers along with a call-up to evacuate the building, please proceed immediately to the gathering point via the evacuation route (see figure on the right).
Please follow the safety instructions.
See chapter 4.2. for the evacuation concept of the HCI building.
Content
1. The most important rules and regulations for the workplace .................................. 7
2. Administration in the HCI Building .......................................................................... 92.1. ETH Zürich ....................................................................................................................... 92.2. SSHE (Safety, Security, Health and Environment) staff unit of ETH ................................ 92.3. Safety and environment management in the departments ............................................... 9
2.3.1. Organizational Structure ............................................................................................ 92.3.2. Services of the SE-management for D-CHAB and the HCI building ....................... 102.3.3. Service rooms .......................................................................................................... 102.3.4. Training concepts of the SE-management of D-CHAB ............................................ 112.3.5. Safety exams ........................................................................................................... 112.3.6. Safety inspections in HCI ......................................................................................... 122.3.7. SE-manager ............................................................................................................. 122.3.8. Safety representatives ............................................................................................. 122.3.9. Group safety representatives and assistants ........................................................... 132.3.10. Obligatory supervision in laboratory courses ........................................................ 13
3. Defect management ............................................................................................. 153.1. Reporting of defects and deficiencies ............................................................................ 153.2. BTA (Betriebstechnische Anlagen: operational installations) ......................................... 153.3. The services portal (Meldeportal) ................................................................................... 153.4. Laboratory service and laboratory safety inspections .................................................... 16

4
4. First aid in the HCI building ................................................................................... 174.1. Alerting of the ambulance in HCI.................................................................................... 174.2. Evacuations in the HCI building ..................................................................................... 18
4.2.1. HCI evacuation system ............................................................................................ 184.2.2. Assembly Point ........................................................................................................ 184.2.3. Evacuation ............................................................................................................... 184.2.4. Duties of concerned people ..................................................................................... 19
4.3. Emergency equipment cupboards.................................................................................. 214.4. Emergency niches in the HCI corridors .......................................................................... 224.5. Fire-fighting equipment and courses .............................................................................. 224.6. Emergency power-off switches ...................................................................................... 23
4.6.1. Cooling water main valve for research laboratories or practical work laboratories .. 234.6.2. Electrical main switch for research and practical laboratories ................................. 234.6.3. Methane main switch for research and practical laboratories .................................. 23
4.7. Periodic inspections of the safety infrastructure ............................................................. 24
5. Laboratory and building operation regulations for the HCI .................................... 255.1. Personal protective equipment ....................................................................................... 25
5.1.1. Safety goggles ......................................................................................................... 255.1.2. Contact Lenses ........................................................................................................ 255.1.3. Laboratory Coats ..................................................................................................... 265.1.4. Chemical resistance of gloves ................................................................................. 26
5.2. Hazard, risk and environmental analysis........................................................................ 295.2.1. The risk/hazard analysis is obligatory before each new experiment! ...................... 295.2.2. Hazard/risk analysis ................................................................................................. 29
5.3. Preventing fire incidents ................................................................................................. 325.3.1. Properties of alkali metals ........................................................................................ 325.3.2. Disposal/destruction of self-igniting chemicals ........................................................ 325.3.3. Cleaning of glassware contaminated with residual self-igniting chemicals .............. 325.3.4. Hydrogenation ......................................................................................................... 335.3.5. Distillation apparatus containing alkali metals or alkali metal hydrides ................... 335.3.6. Bunsen burner with or without gas cartridge ........................................................... 345.3.7. Use of hot air blowers/heat guns ............................................................................. 345.3.8. Danger of electrostatic discharges .......................................................................... 35
5.4. Preventing odor emissions ............................................................................................. 365.4.1. Preventing odor emissions in chemical reactions .................................................... 365.4.2. Prevention of odor emissions from dried out siphons .............................................. 375.4.3. What to do in the case of odor emissions ................................................................ 37
5.5. Handling of pressurized gas cylinders............................................................................ 385.5.1. Storage and operation of compressed gas cylinders ............................................... 385.5.2. Labelling of compressed gas cylinders .................................................................... 395.5.3. Transport of compressed gas cylinders ................................................................... 405.5.4. Reducing valves ...................................................................................................... 40
5.6. Protection against over-pressure in installations ............................................................ 415.7. At the end of the workday .............................................................................................. 425.8. Night, weekend and holiday work .................................................................................. 42
6. The HCI building and technical infrastructure ....................................................... 436.1. The HCI building ............................................................................................................ 436.2. Opening hours and access system ................................................................................ 446.3. The laboratory unit ......................................................................................................... 456.4. Escape routes ................................................................................................................ 466.5. Escape balconies, balcony and laboratory doors ........................................................... 46
6.5.1. Escape balconies/balcony doors – terms of use ..................................................... 466.5.2. Laboratory doors – terms of use .............................................................................. 47
6.6. Standard door labels ...................................................................................................... 486.7. Standard fume oods and SKAN workstations ................................................................ 49
5
6.8. Vacuum network, membrane vacuum pumps and vacuum modules ............................. 536.8.1. Introduction .............................................................................................................. 536.8.2. Membrane vacuum pumps for multiple points of use .............................................. 536.8.3. Operation of vacuum networks and vacuum modules ............................................. 556.8.4. Checklist for finding leaks in the vacuum network ................................................... 55
6.9. Cooling water modules in the media columns ................................................................ 566.9.1. Technical data ......................................................................................................... 566.9.2. Operating the cooling water module ........................................................................ 566.9.3. Technical problems with cooling water modules ..................................................... 576.9.4. Water leaks from inside a cooling water module ..................................................... 576.9.5. Proper tubing of cooling water systems ................................................................... 586.9.6. Aging effects on plastic parts: .................................................................................. 586.9.7. Media connectors for cooling water modules .......................................................... 58
6.10. Electro-installations and electro-modules ................................................................... 606.10.1. Short introduction ................................................................................................. 606.10.2. Risks emanating from the power rails on ceiling grids ......................................... 606.10.3. Structure of the local laboratory power supply 1x 230V / 3x 400V three-phase ... 606.10.4. Residual current circuit breaker ............................................................................ 616.10.5. Risks associated with busbars without a residual current circuit breaker ............. 626.10.6. Risks associated with electricity power module boxes with residual current circuit breakers 626.10.7. Risk of 10A sockets with a 16A fuse .................................................................... 636.10.8. Type 23 plugs 16 A/230 V .................................................................................... 646.10.9. Risks posed by large loads .................................................................................. 646.10.10. Installation and repair of plugs .......................................................................... 646.10.11. Disruption case risk assessment ....................................................................... 64
6.11. Gas module ................................................................................................................. 656.11.1. Operating the gas module .................................................................................... 656.11.2. Tubing for gas modules ........................................................................................ 656.11.3. Tubing for natural gas/propane gas modules ....................................................... 656.11.4. Gas connections ................................................................................................... 666.11.5. Handling of a Lüdi gas cylinder ............................................................................ 66
6.12. Waste disposal ............................................................................................................ 676.12.1. The most important waste categories and their disposal methods ....................... 676.12.2. Mobile waste disposal units .................................................................................. 706.12.3. Latest generation of mobile disposal stations....................................................... 72
6.13. Pull-out chemical storage cabinets ............................................................................. 736.14. Wall cupboards and laboratory racks .......................................................................... 746.15. Freezers/refrigerators ................................................................................................. 746.16. Equipment ................................................................................................................... 746.17. Handover of office- and laboratory rooms when leaving or moving ............................ 75
7. Storage and management of chemicals ............................................................... 777.1. Storage ........................................................................................................................... 777.2. ExpeReact-chemicals database ..................................................................................... 787.3. Storage room (reuse of chemicals in HCI) ..................................................................... 787.4. Containers and labelling of chemicals ............................................................................ 807.5. Transport of chemicals within the building ..................................................................... 80
8. Services in D-CHAB ............................................................................................. 818.1. Toxicology laboratory D312 and central distillation room D310 ..................................... 81
8.1.1. Toxlab D312; Link www.toxlab.ethz.ch .................................................................... 818.1.2. Solvent drying system for the HCI ........................................................................... 828.1.3. Central distillation room D310; Link www.distillation.ethz.ch ................................... 838.1.4. General conditions of use ........................................................................................ 84
8.2. Toxlab C174 ................................................................................................................... 858.3. High-pressure laboratory ................................................................................................ 86
6
8.3.1. Services of the high-pressure laboratory ................................................................. 868.3.2. Internal (ETH) regulations on working with high pressure ....................................... 86
8.4. HCI-shop/web-shops ...................................................................................................... 878.5. Central mechanical workshops in the HCI ..................................................................... 88
8.5.1. For D-CHAB ............................................................................................................. 888.5.2. Organization ............................................................................................................ 888.5.3. Services ................................................................................................................... 88
8.6. The safety trail HCI C280 and C286 .............................................................................. 888.7. Central filling station for liquid nitrogen .......................................................................... 89
9. Authorities/legal basis ........................................................................................... 909.1. Laws and regulations ..................................................................................................... 909.2. Chemicals Act ................................................................................................................ 909.3. State Secretariat for Economic Affairs (SECO) .............................................................. 909.4. Federal Office for Public Health (BAG) .......................................................................... 919.5. Swiss National Accident Insurance Fund (SUVA) .......................................................... 919.6. Federal Coordination Commission for Occupational Safety FCOS (EKAS) ................... 91
10. General safety knowledge .................................................................................... 9310.1. Globally Harmonized System (GHS) .......................................................................... 9310.2. H- und P-Phrases ....................................................................................................... 9410.3. Overview on (former) hazard symbols / GHS pictograms ........................................... 9410.4. Explanation of new GHS pictograms .......................................................................... 9510.5. Warning signs ............................................................................................................. 9910.6. Rules and prohibition signs ....................................................................................... 10010.7. Safety-related properties in chemistry ...................................................................... 10110.8. Night time and continuous operation ........................................................................ 102
11. Laboratory types ................................................................................................. 10311.1. Biosafety laboratories ............................................................................................... 10311.2. Laser laboratories ..................................................................................................... 10411.3. Isotope laboratories .................................................................................................. 10511.4. X-ray laboratories ...................................................................................................... 105
12. First aid in case of accidents in the laboratory .................................................... 10612.1. Leaflet for irritation .................................................................................................... 10712.2. Leaflet for burns ........................................................................................................ 10812.3. Leaflet 1 for poisoning (inhalation) ............................................................................ 10912.4. Leaflet 2 for poisoning (gastrointestinal tract, skin contact) ...................................... 11012.5. Leaflet for respiratory arrest ...................................................................................... 11112.6. Leaflet for open wounds or mechanical injuries – bleeding ...................................... 112
7
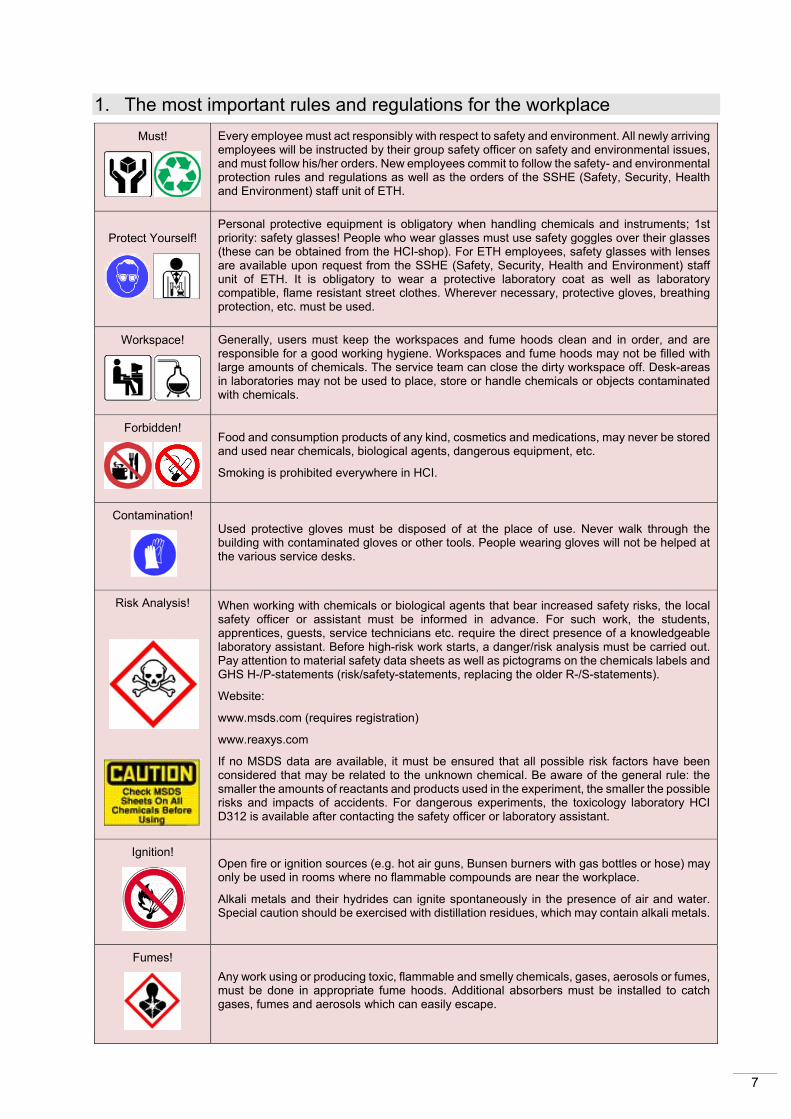
1. The most important rules and regulations for the workplace
Must!
Every employee must act responsibly with respect to safety and environment. All newly arriving employees will be instructed by their group safety officer on safety and environmental issues, and must follow his/her orders. New employees commit to follow the safety- and environmental protection rules and regulations as well as the orders of the SSHE (Safety, Security, Health and Environment) staff unit of ETH.
Protect Yourself!
Personal protective equipment is obligatory when handling chemicals and instruments; 1st priority: safety glasses! People who wear glasses must use safety goggles over their glasses (these can be obtained from the HCI-shop). For ETH employees, safety glasses with lenses are available upon request from the SSHE (Safety, Security, Health and Environment) staff unit of ETH. It is obligatory to wear a protective laboratory coat as well as laboratory compatible, flame resistant street clothes. Wherever necessary, protective gloves, breathing protection, etc. must be used.
Workspace!
Generally, users must keep the workspaces and fume hoods clean and in order, and are responsible for a good working hygiene. Workspaces and fume hoods may not be filled with large amounts of chemicals. The service team can close the dirty workspace off. Desk-areas in laboratories may not be used to place, store or handle chemicals or objects contaminated with chemicals.
Forbidden!
Food and consumption products of any kind, cosmetics and medications, may never be stored and used near chemicals, biological agents, dangerous equipment, etc.
Smoking is prohibited everywhere in HCI.
Contamination!
Used protective gloves must be disposed of at the place of use. Never walk through the building with contaminated gloves or other tools. People wearing gloves will not be helped at the various service desks.
Risk Analysis!
When working with chemicals or biological agents that bear increased safety risks, the local safety officer or assistant must be informed in advance. For such work, the students, apprentices, guests, service technicians etc. require the direct presence of a knowledgeable laboratory assistant. Before high-risk work starts, a danger/risk analysis must be carried out. Pay attention to material safety data sheets as well as pictograms on the chemicals labels and GHS H-/P-statements (risk/safety-statements, replacing the older R-/S-statements).
Website:
www.msds.com (requires registration)
www.reaxys.com
If no MSDS data are available, it must be ensured that all possible risk factors have been considered that may be related to the unknown chemical. Be aware of the general rule: the smaller the amounts of reactants and products used in the experiment, the smaller the possible risks and impacts of accidents. For dangerous experiments, the toxicology laboratory HCI D312 is available after contacting the safety officer or laboratory assistant.
Ignition!
Open fire or ignition sources (e.g. hot air guns, Bunsen burners with gas bottles or hose) may only be used in rooms where no flammable compounds are near the workplace.
Alkali metals and their hydrides can ignite spontaneously in the presence of air and water. Special caution should be exercised with distillation residues, which may contain alkali metals.
Fumes!
Any work using or producing toxic, flammable and smelly chemicals, gases, aerosols or fumes, must be done in appropriate fume hoods. Additional absorbers must be installed to catch gases, fumes and aerosols which can easily escape.

8
Overpressure!
Vacuum, overpressure and stirring in unsuitable glassware may lead to breaking of the glass. Quality and wall thicknesses of the glass containers and equipment must be selected according to the intended use. Experimental autoclaves must be equipped with a pressure gauge and with an overpressure protection disc. If the product of pressure and volume exceeds >10 [bar x l], They require approval by the SSHE (Safety, Security, Health and Environment) staff unit of ETH or may be operated in the high-pressure laboratory, depending on space requirements.
Prevention!
Before starting any experiment, all required protection measures must be taken in advance (and necessary emergency material must be organized) in order to prevent any possible accidents. This also includes protection for spreading smelly compounds!
Gas Cylinders!
Gas cylinders must always be secured with chains. Gas cylinders and pressurized gas outlets require appropriate pressure reducing valves. Corroded pressure reducers may never be used.
Liquid Gas!
Additionally to the risk of suffocation and cold burns when using liquefied gases, attention has to be paid to:
Accumulation of oxygen in liquid nitrogen, especially in cold traps of high vacuum systems. Air contact with liquid nitrogen in cold traps can lead to an accumulation of highly flammable liquid oxygen. Oxygen can react violently with condensed solvents.
Ampoules (or similar containers) with chemicals that have been frozen with liquid nitrogen under argon protection may never be sealed in this state. Warming up will possibly lead to evaporation of frozen argon, and may cause a serious risk of explosion due to overpressure.
Doors and Escape Routes!
Laboratory-, emergency balcony-, escape- and entrance doors to the building may never be blocked with any objects, left open, or prevented from closing with a wedge. Closed doors guarantee the building ventilation balance, as well as sufficient under-pressure in the laboratories, so that incidents can be better held back and fought. In case of an emergency, work must be interrupted and one must leave the laboratory, until the cause of the incident has been removed! Furthermore, open balcony doors in the D- and E-floors allow unauthorized people as well as pests such as mice, insects, etc. to enter the building. The laboratory service team will remove and dispose of illegally deposited objects on the escape route or escape balconies.
Respect!
Sound-/radio equipment may only be used with permission of the superiors and must never be perceivable outside the personal area. In case of unacceptable noise or disco-like situations, the laboratory service will disconnect and remove the equipment.
Mass emails!
The use of mass-mail addresses for personal purposes is prohibited. There is a web market available for this purpose: www.marktplatz.ethz.ch
Further information on important rules at workplaces and other important operating instructions can be found in the in the following chapters of this handbook.
9
2. Administration in the HCI Building
2.1. ETH Zürich
The website www.ethz.ch presents an overview of ETH Zurich and its staff units and research groups as well as all connections to its service and administration groups.
2.2. SSHE (Safety, Security, Health and Environment) staff unit of ETH
SSHE and the workgroup ‘Koordination für Arbeitssicherheit’ (Kooras) are responsible for all safety, security, health, environmental issues at ETH.
Website: www.sgu.ethz.ch (ETH login details are required)
In case of a personal injury or damage of property, fill in the official form and report to [email protected]. The SSHE team and representatives are responsible for handling such cases.
For any questions regarding laboratory or occupational safety, contact the CABS team (CABS = chemical and radiation protection, biosafety, occupational safety): [email protected]
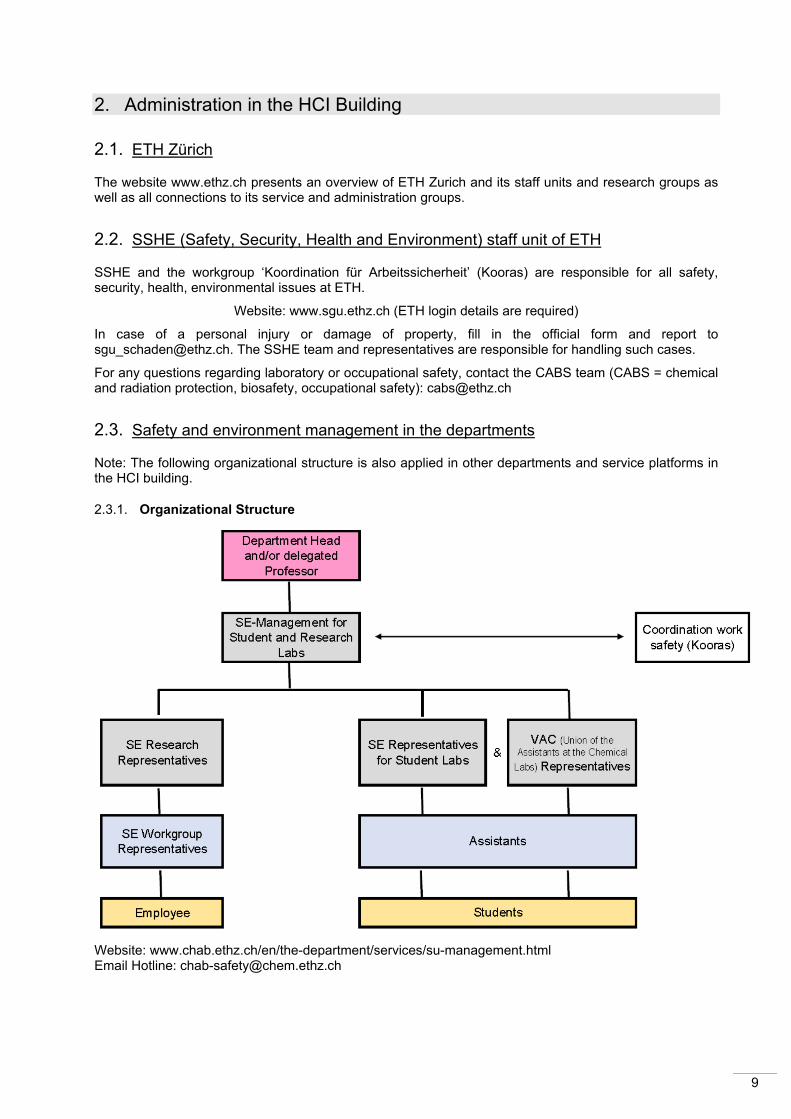
2.3. Safety and environment management in the departments
Note: The following organizational structure is also applied in other departments and service platforms in the HCI building.
2.3.1. Organizational Structure
Website: www.chab.ethz.ch/en/the-department/services/su-management.html Email Hotline: [email protected]

10
2.3.2. Services of the SE-management for D-CHAB and the HCI building
- Hotline-operations in HCI: The users in HCI can report all safety concerns and technical defects to the below stated e-mail. An understandable and concise description of the situation or the defect is required (see 3.1).
- Safety advice by the safety specialist team
- Keeping statistics on incidents in HCI as well as review of accidents and incidents. A main goal of the SE-management is to bring the causes of incidents to light using the incident statistic and specifically counteract with preventive measures. The aim is to reduce the number of incidents step-by-step.
- Help and advice in setting up risk assessments for project support. - Supply and upkeep of Emergency boxes in HCI. - Composing/handling of the safety and environment manual for the HCI. - Support and advice for projects to minimize risks. - Information of the HCI-staff on maintenance work of building services. - Testing and development of new laboratory infrastructure for the real estate division. - Operation of the storage rooms.
2.3.3. Service rooms
Most of the service rooms have their own website (see chapter 8 for details). In general, the use of these rooms is possible after online booking via the respective website.
- Toxlab D312: www.toxlab.ethz.ch - Special rooms in C174: www.c174.ethz.ch; include
o Laboratory room biolevel 2 o Toxlab 2 (cytostatics)
- Central distillation room D310 www.distillation.ethz.ch - Safety trail rooms: www.safetyparcours.ethz.ch
o Safety trail 1, chemistry o Safety trail 2, chemistry/biology/radiochemistry with seminar room
- Storage room (recycling of chemicals; for details see chapter 7) - Central filling line for liquid nitrogen D379.1. - Central storage room D486, -80°C-freezer of the IPW (D-CHAB) and IMB (D-BIOL).
Hotline contact information of D-CHAB
Email-Hotline: [email protected]
During business hours of ETH: Tel-Hotline: 044 633 48 12
Number PSA (Pager): *8034812
Outside business hours of ETH (without engagement): mobile: 075 410 99 21
Emergency/Alerting: Internal 888 / External 044 342 11 88
The safety specialist team is not an intervening unit. The safety specialist team is available for help and advice to the SE-management, the users in D-CHAB and the department SGU if required. Services:
- Safety advice for carrying out risk assessments. - Advice to users in D-CHAB in terms of danger or risk of a particular case. - Counsel of the intervening units in case of an incident. - The safety specialist team is also a direct point of contact for risk assessments of
activities in tox-labs (via the email-hotline).

11
2.3.4. Training concepts of the SE-management of D-CHAB
The Safety lecture comprises methods for risk assessments and can be found online as a PowerPoint presentation with video clips; Link: www.chab.ethz.ch/das-departement/services/su-management/safety-ausbildungen.html
The safety lecture is divided in 6 sections as shown in the overview below.
The following training courses (compulsory) are offered by the SE-management and are offered on a regular basis:
- Instruction course for safety representatives (duration approx. 3 – 4h) including emergency organization, laboratory technology (in detail) and walk-through of the building services.
- Safety course for the administration and service staff (duration approx. 3 – 4h) including emergency organization, laboratory technology (shortened) and walk-through of the building services.
- Training course for new assistants (duration approx. 1 h) including emergency organization and laboratory technology (in detail).
- Safety courses in the interactive safety trails 1 and 2 for interested people. - Once a year (for interested people in HCI):
o Seminar on the topic of eye showers. o Seminar on the use of defibrillators.
The following guidelines are at the safety representatives’ and assistant’s disposal:
o Personal safety instruction of new employees o Personal safety instruction of students.
2.3.5. Safety exams
Safety entrance exam (exam platform Moodle): New employees and students have to complete a safety entrance test within the first 3 weeks after start of employment (optionally in German or English and on different subjects. The exam contains multiple-choice questions (put together by a random generator) that have to be answered within 30 min. In each case one answer is correct. New employees are automatically invited to the safety entrance exam by the personnel division and students are invited by the laboratory course supervisor. The corresponding superior (usually the professor) will decide on further steps when people do not pass the exam several times.

12
In the following is a short overview on who has to complete the safety entrance exam:
Safety lecture exam for new assistants in student laboratories: All new assistants have to complete the exam (which is based on the safety lecture) before supervising in the student laboratories.
2.3.6. Safety inspections in HCI
- Every two years all technical rooms and laboratories in HCI are being inspected (see database of laboratory service reports).
- Safety inspections will also be carried out if requested or upon suspicion.
2.3.7. SE-manager
- The SE-manager is responsible for the SE-organization, the safety work groups in the department and has to implement new decisions. Moreover, the SE-manager is responsible for organization of the safety training management in teaching (assistants and students) and research (work colleagues and safety representatives).
- Together with the SSHE staff unit, the SE-Manager forms a team for incident- and accident investigations in the department.
- The SE-manager is also responsible for the service rooms which are affiliated to the SE-management (including the safety infrastructure).
- Furthermore, the SE-manager guarantees that the material in the emergency equipment cupboards within his/her department is up to date, complete and ready to be used.
2.3.8. Safety representatives
The institutes, technology and service platforms operating within the departments need a point of contact for safety- and environmental issues. The responsible superior appoints safety representatives or laboratory course assistants, respectively, and confirms with his signature their appointment and the corresponding duties. The superior has to provide sufficient time for the representatives/assistance to carry out their duty.
The instruction of the safety representatives of the departments, institutes and technology platforms is carried out by the SE-management.
Research laboratories Student laboratories
The test is compulsory for:
The test is not compulsory for:
The test is compulsory for:
The test is not compulsory for:
All new employees in the HCI building
Associates with < 14 working days in HCI
All new assistants
Assistants who have already completed and
passed the safety entrance test
Employees who have
already completed and passed the safety
entrance test
All students of D-CHAB, D-MATL and D-
BIOL
Students who have already completed and
passed the safety entrance test
All not-ETH students
(as for example students of the
university of Zurich)
Students of D-HEST
All students with <14 working days in HCI

13
The duties of the safety representatives are:
- Instruction and support of the group safety representatives/assistants within their division, possibly also of the safety representatives of adjoining divisions to the departments-, institutes area. (For example, the teaching laboratory, the high-pressure laboratory, workshop etc.).
- Information and advice for the building users as well as dealing with and passing on ideas and complaints in their division.
- Registration and report of incidents to the SSHE staff unit and to the SE-Management.
2.3.9. Group safety representatives and assistants
Each division and each laboratory course needs a contact person for safety and environmental issues. The responsible superior therefore appoints group safety representatives or assistants respectively.
The duties of group safety representatives are:
- Personal introduction and training of new staff/students in terms of safety and environment. The safety introduction (which has to be carried out personally) is based on the guide for safety introduction of new staff, which can be downloaded from the SE-management website.
- Ensuring that new staff/students have completed and passed the obligatory safety entrance exam. - Ensuring that new staff/students have correct personal safety equipment. They explicitly examine
that new staff/students wear their safety goggles correctly while sensitizing them to risks associated with open gaps in the facial area.
- Informing and passing on safety guidelines and directions in their division. - Consulting group members on safety issues as well as processing and forwarding suggestions and
complaints of group members. - Recording and reporting incidents to the SSHE staff unit and to the SE-Management. Accidents
must immediately be reported to the SSHE staff unit and the SE-management in a short version. In case of medical attention or a hospital stay, the accident form has to be filled in immediately and handed in separately for insurance reasons (see 4.1).
- Group safety representatives and assistants act automatically as evacuation helpers in their area.
2.3.10. Obligatory supervision in laboratory courses
Definitions: Beginner laboratory courses include all courses of general, organic, biological, physical, pharmaceutical, and analytical chemistry, in which students acquire basic knowledge on general laboratory work as well as about the use of chemicals or biologically/pharmaceutically active substances. Chemicals, glassware under vacuum or over-pressure as well as special physical, biological, pharmaceutical and chemical experiments pose a risk for the user if he or she lacks the experience and training for such work. In the beginner laboratory courses the main risks are the lack of knowledge and the inexperience of students in practical work. Good support in theory and in practice is therefore essential. Only well-structured and secured experiments should be carried out in beginner laboratory courses.
Basic laboratory courses are carried out before the students achieve their Bachelor’s degree. If there is a low hazard risk, it is up to the laboratory course supervisors to decide whether a basic course classifies rather as a beginner course or as an advanced laboratory course.
Advanced laboratory courses require certain basic knowledge in theory and practice in order to carry out the corresponding experiments. The students must be competent in carrying out their experiments safely and on a high level. The students can use their basic knowledge to carry out experiments in research such that the main risks are in the correct handling and the adherence to the safety rules.

14
Supervision of laboratory courses by the assistants The assistants make sure that all laboratory courses are being properly supervised according to the following rules: All assistants must know the current laboratory rules and act accordingly. Before starting a laboratory course, the assistants must carry out a safety introduction for the students and discuss with them the training program with all its risks. The students are not allowed to work alone in the laboratory. After work, the assistants conduct a final inspection of the laboratory and ensure that all media and devices are either safeguarded (when running) or turned off. After the final inspection, the practical laboratory has to be locked.
- Duty of supervision in beginner laboratory courses: During the course, at least one assistant must be present in the laboratory. The assistant must be able to call a deputy immediately
- Duty of supervision in basic laboratory courses: The laboratory course assistants can decide if they want to reduce the supervision given there is only low hazard risk. Otherwise the same rules are to be applied as for the beginner laboratory courses.
- Duty of supervision in advanced laboratory courses: If the hazard risk is low, the assistants can decide whether in each laboratory one assistant must be permanently present throughout the course or not. It is prerequisite that an assistant who is in the HCI building can be called immediately by phone or pager if needed.
Fact: Wherever safety representatives and assistants do an excellent job, the risk of accidents and the accident likelihood are significantly lower!
The following images show examples of lacking safety awareness: Alcohol consumption, degenerate waste mismanagement, poor hygiene at work, misapplications, neglected (protection) material, graffiti and frequent accidents…
15
3. Defect management
3.1. Reporting of defects and deficiencies
Defect fume hoods, media columns, chemical cabinets, waste disposal stations, laboratory furniture, equipment of the BTA (se 3.2) etc. can be directly reported to the email-hotline [email protected] with correct information and an understandable description of the problem. Imprecise reports will not be accepted nor be dealt with.
Defect vacuum pumps, rotary evaporators, magnetic stirrers etc. can be taken to the HCI-shop for repair. Prior to repair the laboratory users have to fill in and hand over a declaration of clearance. If a rotary vane pump has to be repaired, the laboratory user is responsible for the change of oil and the oil drain. Weblink: http://www.hci-shop.ethz.ch/en/information/appliance-service.html
Deficiencies within the domain of the technical service, the cleaning facility and waste disposal as well as the building services (heating, ventilation, air conditioning, sanitary installations, electrical installations, window blinds) have to be reported to the responsible caretaker or services portal (see 3.3).
3.2. BTA (Betriebstechnische Anlagen: operational installations)
The laboratory infrastructure is partly subdivided in operational installations (BTA):
Operation list 1: Dehumidifiers, compact coolers, laminar flow boxes, laminar flow-work-benches, nitrogen-/helium-plants, storage tank infrastructure.
Operation list 2: All fume hoods, all media columns including their modules, all cooling devices and brooders, and all ice machines.
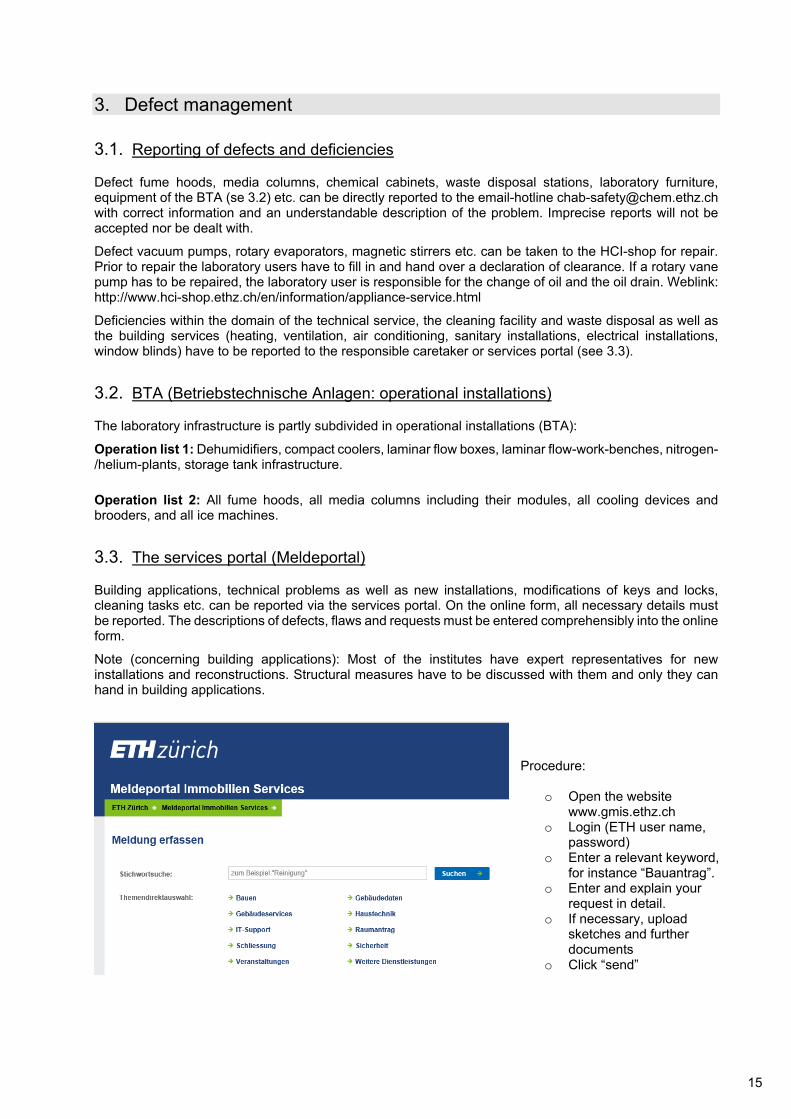
3.3. The services portal (Meldeportal)
Building applications, technical problems as well as new installations, modifications of keys and locks, cleaning tasks etc. can be reported via the services portal. On the online form, all necessary details must be reported. The descriptions of defects, flaws and requests must be entered comprehensibly into the online form.
Note (concerning building applications): Most of the institutes have expert representatives for new installations and reconstructions. Structural measures have to be discussed with them and only they can hand in building applications.
Procedure:
o Open the website www.gmis.ethz.ch
o Login (ETH user name, password)
o Enter a relevant keyword, for instance “Bauantrag”.
o Enter and explain your request in detail.
o If necessary, upload sketches and further documents
o Click “send”

16
3.4. Laboratory service and laboratory safety inspections
Maintenance and service work is carried out every two years on the laboratory media and laboratory infrastructure in all laboratories and technical rooms. This is always carried out along with a laboratory safety inspection. Usually, the maintenance and service work is announced in advance and carried out on weekends. The users of the laboratory do not have to be present during the maintenance and service work but are obliged to carry out all necessary preparatory actions to ensure that the service staff is not in any danger or at risk of injury. The service staff is not allowed to enter the technical rooms or laboratories without permission of the group leader.
After maintenance and safety inspections a report will be written. The report is the basis for discussions about more extensive measures and solutions. Moreover, the laboratory service can block access to the work places temporarily if they are in unacceptable conditions until a solution with the users and the superior is found.

17
4. First aid in the HCI building
4.1. Alerting of the ambulance in HCI
First Aid procedures – see last pages!
In case of an emergency, concerned people on-site must decide if the injuries are classified as level 1 (life-threatening) or level 2 (simple injuries). In case of doubt, the emergency has to be classified as level 1.
In case of a level 1 emergency (severe injuries/medical problems):
‐ Highest priority: call 888, and mention explicitly that there is a Level 1 emergency (see page 2 for the reporting procedure). The ETH emergency desk will then immediately call for an ambulance as well as the HCI emergency response officers (ERO).
‐ In case 888 cannot be contacted, dial 0-144 directly! (0- has to be used when using an internal phone); then inform the ETH emergency desk!
‐ In case of poisoning: Call the tox info Suisse 0-145 for further instructions!
After the call, first aid for the injured/patient has highest priority. It is important to ensure that someone waits for the ambulance staff at the ETH Hönggerberg bus stop. He has to guide the ambulance team to the main entrance of finger 3 (for emergencies in fingers 3-5) or to the respective main entrances of finger 1 and 2 (for emergencies in fingers 1 or 2). From the main entrance of finger 3, all rooms in finger 4 and 5 are accessible via the freight lift. After an alarm, the ETH emergency desk will automatically call the HCI emergency response officers (or - outside office hours - the security staff). They will go to the accident location and prepare access for the ambulance staff (24h) into the building. It takes the ambulance at least 15 minutes to arrive, but it can take them also up to 45 minutes. In serious cases REGA will be called if necessary.
In case of a Level 2 situation (simple injuries):
Highest priority: Alerting 888 (see page 2 for the reporting procedure). The ETH emergency desk will call the HCI emergency response officers and not the ambulance.
After alerting
Case a):
‐ In case the HCI emergency response team does not appear within 10 minutes, call 888 again! The ETH emergency desk will then call an ambulance.
‐ If all previous steps fail, call 0-144 directly. (0- has to be used when using an internal phone); then inform the ETH emergency desk.
Case b):
The patient recovers quickly and can be treated on site, but must be transported to the hospital for further treatment. Together with the HCI emergency response officers, the transport will be arranged as follows: ‐ The patient feels well enough to take public transport together with a work colleague or a taxi to the
hospital or a doctor. The taxi fare will be reimbursed by the safety and environment management (a payment receipt is required).
‐ In case the patient cannot travel him/herself, an ambulance will be called. The HCI emergency response team will not transport the patient.
Case c):
‐ The patient recovers quickly and does not need further treatment. Inform the ETH emergency desk that the emergency is over.
Every accident or emergency must be reported! Accidents have to be reported immediately in a short version to the SSHE division ([email protected]) and to the SE management ([email protected]). In case of medical attention or a hospital stay, the accident form has to be filled in immediately and handed in separately for insurance reasons.
Weblink: www.ethz.ch/services/de/service/sicherheit-gesundheit-umwelt/unfall-schaden.html

18
4.2. Evacuations in the HCI building
4.2.1. HCI evacuation system
Each building has its own autonomous evacuation system. The loudspeakers of the systems are in the corridors and near the staircases, as well as in rooms with larger numbers of people such as lecture halls, practical work laboratories, cafeteria, etc.
The emergency desk triggers the evacuation systems if needed. During an evacuation, a single building will be evacuated, e.g. HC3. Whenever the emergency desk triggers an evacuation in any part of the HCI complex, a siren will be heard, followed by a text message in German and in English. This sequence is stored and will be repeated via the loudspeakers. During an evacuation message, all other sound in lecture halls, cafeteria, etc. will be paused or turned off. The announcement will be repeated until it is stopped by the alarm desk or an all-clear signal is released.
The entire HCI complex has been structurally and technically divided into 6 parts (HC0 – HC5). The chances are relatively small that a new incident will spread out over several parts of the building complex. Therefore, usually only one part, e.g. HC 4, will need to be evacuated.
4.2.2. Assembly Point
The gathering point for the entire ETH Hönggerberg campus is the HXE building (Wolfgang-Pauli-Strasse). The rooms in this building hold a capacity of up to 1260 persons. The gathering point is maintained and organized by the building sector HI.
If a siren signal is released by the loudspeakers along with a call-up to evacuate the building, proceed immediately to the assembly point via the evacuation route (see figure on the right side).
Please follow the instructions of the safety directions.
4.2.3. Evacuation
Every user of the building can trigger an evacuation via the emergency desk (tel 888) in case of an emergency. (Misusing the alarm for pranks etc. has legal consequences). During an evacuation, follow the escape route signs. The use of elevators is forbidden. Everybody is obliged to assist disabled or injured persons. Keep yourself protected.
19
Internal staff for the support of the evacuation system is only present during normal ETH working hours from 7 am to 5 pm. Outside of the ETH working hours, from 5 pm to 7 am as well as on weekends and holidays no internal staff will be present in case of an emergency. This means that building users have to self-organize during these hours (see the SSHE website: “Evakuation”).
Recommendations for building users:
‐ We recommend for all users to once walk along their own escape paths. (Your safety officer will be glad to answer your questions).
‐ The evacuation system and emergency lights are protected against power failure. In case of an evacuation during night accompanied with a power failure, the normal illumination in the offices and laboratories will be switched off. There is no emergency lighting in the laboratories; only the escape route signs will provide minimal lighting. We recommend having a flashlight available in critical rooms.
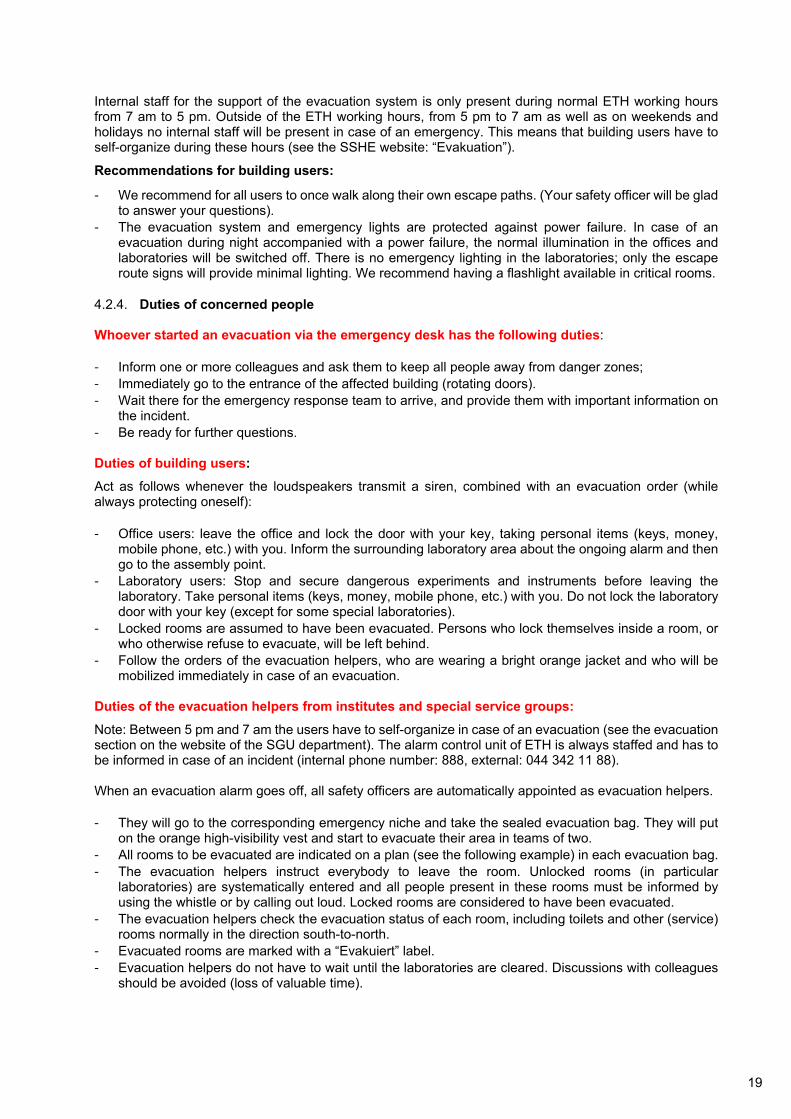
4.2.4. Duties of concerned people Whoever started an evacuation via the emergency desk has the following duties: ‐ Inform one or more colleagues and ask them to keep all people away from danger zones; ‐ Immediately go to the entrance of the affected building (rotating doors). ‐ Wait there for the emergency response team to arrive, and provide them with important information on
the incident. ‐ Be ready for further questions.
Duties of building users:
Act as follows whenever the loudspeakers transmit a siren, combined with an evacuation order (while always protecting oneself): ‐ Office users: leave the office and lock the door with your key, taking personal items (keys, money,
mobile phone, etc.) with you. Inform the surrounding laboratory area about the ongoing alarm and then go to the assembly point.
‐ Laboratory users: Stop and secure dangerous experiments and instruments before leaving the laboratory. Take personal items (keys, money, mobile phone, etc.) with you. Do not lock the laboratory door with your key (except for some special laboratories).
‐ Locked rooms are assumed to have been evacuated. Persons who lock themselves inside a room, or who otherwise refuse to evacuate, will be left behind.
‐ Follow the orders of the evacuation helpers, who are wearing a bright orange jacket and who will be mobilized immediately in case of an evacuation.
Duties of the evacuation helpers from institutes and special service groups:
Note: Between 5 pm and 7 am the users have to self-organize in case of an evacuation (see the evacuation section on the website of the SGU department). The alarm control unit of ETH is always staffed and has to be informed in case of an incident (internal phone number: 888, external: 044 342 11 88). When an evacuation alarm goes off, all safety officers are automatically appointed as evacuation helpers. ‐ They will go to the corresponding emergency niche and take the sealed evacuation bag. They will put
on the orange high-visibility vest and start to evacuate their area in teams of two. ‐ All rooms to be evacuated are indicated on a plan (see the following example) in each evacuation bag. ‐ The evacuation helpers instruct everybody to leave the room. Unlocked rooms (in particular
laboratories) are systematically entered and all people present in these rooms must be informed by using the whistle or by calling out loud. Locked rooms are considered to have been evacuated.
‐ The evacuation helpers check the evacuation status of each room, including toilets and other (service) rooms normally in the direction south-to-north.
‐ Evacuated rooms are marked with a “Evakuiert” label. ‐ Evacuation helpers do not have to wait until the laboratories are cleared. Discussions with colleagues
should be avoided (loss of valuable time).
20
‐ After the evacuation of the area, the helpers hand over their plan to the incident commander with a
yellow high-visibility vest in front of the northern building entrance, and report all important observations. The incident evacuator is therewith informed, which floors have been (or have not been) evacuated and decides on the further procedure.
‐ Evacuation helpers then wait for further instructions.
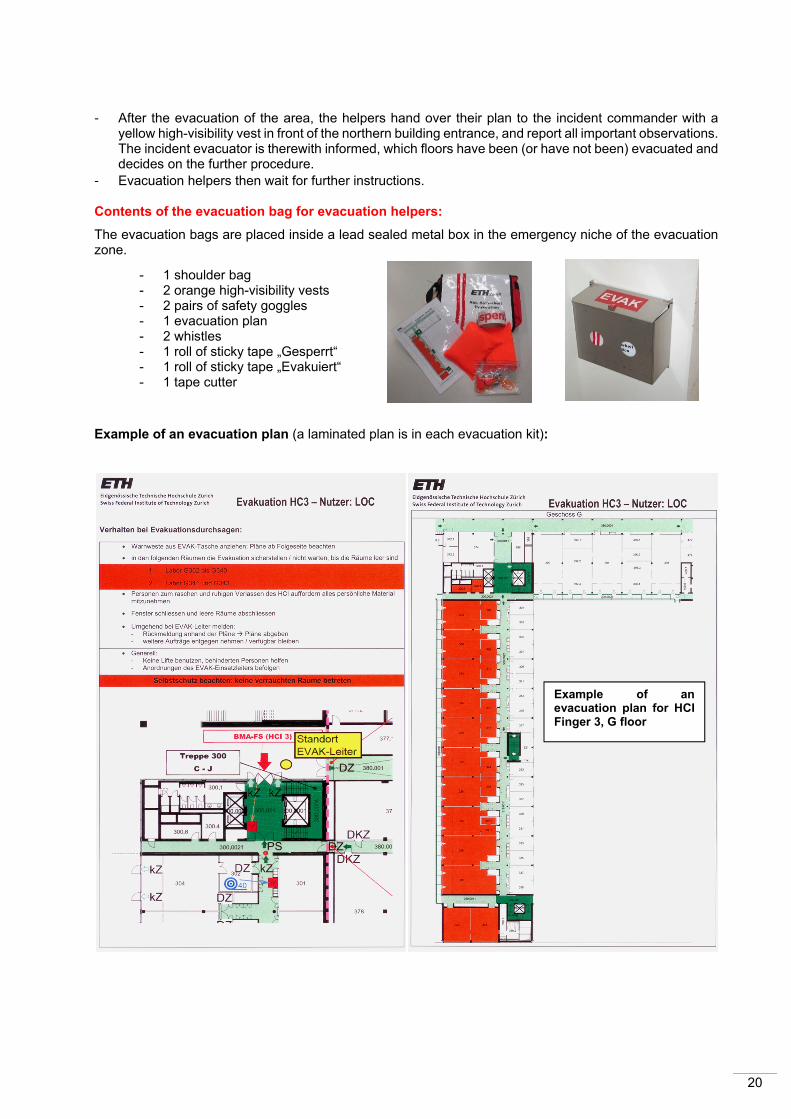
Contents of the evacuation bag for evacuation helpers:
The evacuation bags are placed inside a lead sealed metal box in the emergency niche of the evacuation zone.
Example of an evacuation plan (a laminated plan is in each evacuation kit):
Example of an evacuation plan for HCI Finger 3, G floor
- 1 shoulder bag - 2 orange high-visibility vests - 2 pairs of safety goggles - 1 evacuation plan - 2 whistles - 1 roll of sticky tape „Gesperrt“ - 1 roll of sticky tape „Evakuiert“ - 1 tape cutter

21
4.3. Emergency equipment cupboards
Every section of the HCI (HC1-HC5) has an emergency cupboard, which is placed in one of the side corridors on certain floors (see list of locations below). Next to it is a small box with the key to the cupboard, behind a glass window, which can be broken if needed. Thus, every user of the HCI always has access to first aid equipment in case of an emergency.
The basic content of the cupboards is:
- 2 gas masks (only to be used by people who are experienced or were trained during military service)
- light protective overalls - acid- and heat-resistant gloves - first aid box with instructions - anti-hydrofluoric acid set - woolen blanket - first aid blanket (foil) - various absorption materials for chemicals (for spillage of any kind) - liquid barrier - caution tape - orange box containing Diphotérine eyewash and Diphotérine spray - available only in the emergency cabinet HC3 and 2: defibrillators (1x in German, 1x in English) - as required working group-specific material
Emergency kits for cyanide poisoning are not included in these cupboards but can be requested from the emergency desk. Emergency response officers can also extend the basic range of emergency equipment upon request.
Abb.: Emergency equipment cupboard in the side corridor next to the toxicology laboratory D312.
Locations of the emergency equipment cupboards:
HC1: In the middle side corridor, next to D118
HC2: In the side corridor, next to D212
HC3: In the side corridor, next to D312
HC4: In the first side corridor on the right after access to finger 4 on the H-floor
HC4: In the side corridor, next to E412
HC5: In the side corridor, next to F512

22
4.4. Emergency niches in the HCI corridors
The emergency niches are distributed over all corridors throughout the entire HCI building. They contain 2 carbon dioxide handheld fire extinguishers, a hose-on-reel extinguisher (water), a fire blanket, fire sand, a body shower, an eye shower, a telephone, fire brigade alarm button and a small first aid set. Used first aid sets can be replaced at the technical service desk.
4.5. Fire-fighting equipment and courses
Each laboratory is equipped with at least one CO2 handheld fire extinguisher. The following recommendations should be followed when fighting a fire:
Burning material Fighting measures (things that are normally at hand are in bold)
Solid, glowing materials (wood, paper, textiles, coal, etc.)
Water, foam, fire blanket
Liquid, non-glowing materials (solvents, petrol, oil, tar, paint, fat, paraffin etc.)
Powder, carbon dioxide, fire blanket (small fires), foam (contained fires)
Gases (after closing the vials) Powder, carbon dioxide
Light metals and certain chemicals such as potassium, sodium, magnesium, phosphorus etc.
Sand, diatomaceous earth, special powder
Electrical systems (motors, transformers, laboratory equipment etc.)
Carbon dioxide, powder
A handheld fire extinguisher must always be used starting at the edge of the fire and then towards the source of the fire. Firefighting courses (obligatory for all new building users):
The SSHE staff unit has published a lot of useful information on its website www.sgu.ethz.ch about firefighting courses. Registration for the courses must also be done via this website. Firefighting courses are offered every year. New employees have to complete the fire-fighting course within their first year of employment. The administration and group safety officers must ensure that.

23
4.6. Emergency power-off switches
4.6.1. Cooling water main valve for research laboratories or practical work laboratories
In case of a leak in the cooling water system, either in a media column or any equipment connected to a media column, the main valve for the cooling water network must immediately be closed. The main valve (indicated with a red dot) can generally be found inside a vertical duct in the corridor in front of the laboratory. In some special rooms, it may be located on the ceiling instead (ask the technical staff). You can open the doors marked with a red dot with your HCI key. Behind the door, the cooling water valve is again marked with a red dot. Important: before turning the cooling water off, make sure all equipment connected to cooling water is properly secured!
4.6.2. Electrical main switch for research and practical laboratories
Must only be used in emergencies! Pushing the red button shuts down all electricity in the laboratory, including the media distribution columns and the fume hoods. Without properly functioning fume hoods, the air ventilation system in the laboratory will fail, and the fume hoods will lose their protective function. Furthermore, turning the electricity off may lead to power surges and could seriously damage fume hood control electronics, equipment and computers.
4.6.3. Methane main switch for research and practical laboratories
Some laboratories are equipped with a natural gas (methane) supply network. The main switch is close to the laboratory exit. When not in use, or in case of emergencies, the main switch must be turned off, and the key must be removed. The laboratory supervisor or the group safety officer is responsible for the key. Important: If no methane is flowing even when the supply system is on, it is possible that other main valves are closed, which cannot be accessed by everyone. Contact the technical service in such cases.
24
4.7. Periodic inspections of the safety infrastructure
The entire safety equipment and infrastructure are being inspected for functionality and completeness by staff from the SSHE department on a regular basis. Missing material, defects and faults must be reported to the SSHE staff.
All safety officers and practical work assistants must be aware of the following aspects:
‐ General labels, “how to act in an emergency“ booklets and safety manuals must always be kept up to date. Outdated material and information sheets must be removed.
‐ Protection equipment of specific work groups must be checked regularly on function and quality; Protection material must always be ready to use. Also, the expiry date has to be checked. If any material has exceeded its expiry date it must not be used anymore.
‐ Eye showers must be rinsed regularly (at least once a month) to prevent contamination and rotting.
‐ Hydrofluoric acid (HF) kits: The concerned safety representatives and assistants are contacted
periodically by the SSHE to replace expired HF-gels (calcium gluconate).
Emergency rooms:
The first emergency room is located in the lecture building HC0, E floor, room E3.3. The second one is in the back of HC4, floor E, room 473.2. The emergency rooms are not staffed and they are locked. Only in-house paramedics can open and use the emergency rooms. The SSHE is responsible for the emergency rooms.

25
5. Laboratory and building operation regulations for the HCI
Your personal protection and the protection of the environment depends largely on the proper handling of hazardous materials and proper implementation of work processes, as well as by order, cleanliness at the workplace, personal hygiene and the use of the HCI recycling system.
Never carry out potentially hazardous work alone. Always make sure there is someone with you who can help in case of an emergency.
5.1. Personal protective equipment
Use of appropriate work clothing, single use gloves, plastic foils and suitable skin care cremes increases the protection of the skin against irritations and eczema.
5.1.1. Safety goggles
Safety goggles can be obtained from the HCI shop. The HCI shop staff can help in finding the best safety goggles for your specific needs. Glasses with protection on the side must always be worn whenever working in a chemistry laboratory. In case the performed work causes a special risk to the eyes, goggles which are closed all around or a full-face shield must be worn. Persons who wear spectacles must use goggles over their glasses. ETH employees may apply for their personal protective glasses with corrective lenses.
5.1.2. Contact Lenses
Contact lenses are forbidden while conducting experiments; even when safety goggles are worn. Experience has shown that eye injuries from splashes of chemical liquids are particularly serious when contact lenses are used as they stick to the eye and need to be surgically removed.

26
5.1.3. Laboratory Coats
Proper protective clothing must be worn always inside a chemistry laboratory. For normal laboratory work, a sufficiently long laboratory coat with long sleeves made from fire resistant material such as cotton, or better yet, a mixture of polyester and cotton, is satisfactory. This holds also for private clothing underneath the coat. Shoes must be closed and solid. Units of the media columns, especially dosage valves and gas governors must not be misused as coat hooks!
The laboratory coat must not be worn in seminar rooms, libraries, lecture halls, cafeteria, etc. In general: Public access area (e.g. HCI shop, cafeteria, toilets etc.) must not be entered while wearing working clothes or carrying laboratory items – no matter whether they are clean or contaminated. Disposable gloves have to be discarded before leaving a working place, even if they are not contaminated.
5.1.4. Chemical resistance of gloves
Principally, when handling chemicals protective gloves of level II or III must be worn (protection against medium-risk chemicals and protection from deadly risks or serious and irreversible health damages). Previously, the chemical compatibility of the gloves must be evaluated. A first hint on which gloves are suitable can be found on the safety sheet of the respective chemical. It is important to check the information provided by the manufacturer concerning the protection level of the gloves with respect to a specific chemical. The gloves are available in laboratory specialized trade and most of them also in the HCI shop.
For all gloves the expiry date has to be controlled. Gloves must not be worn when they have expired.
27
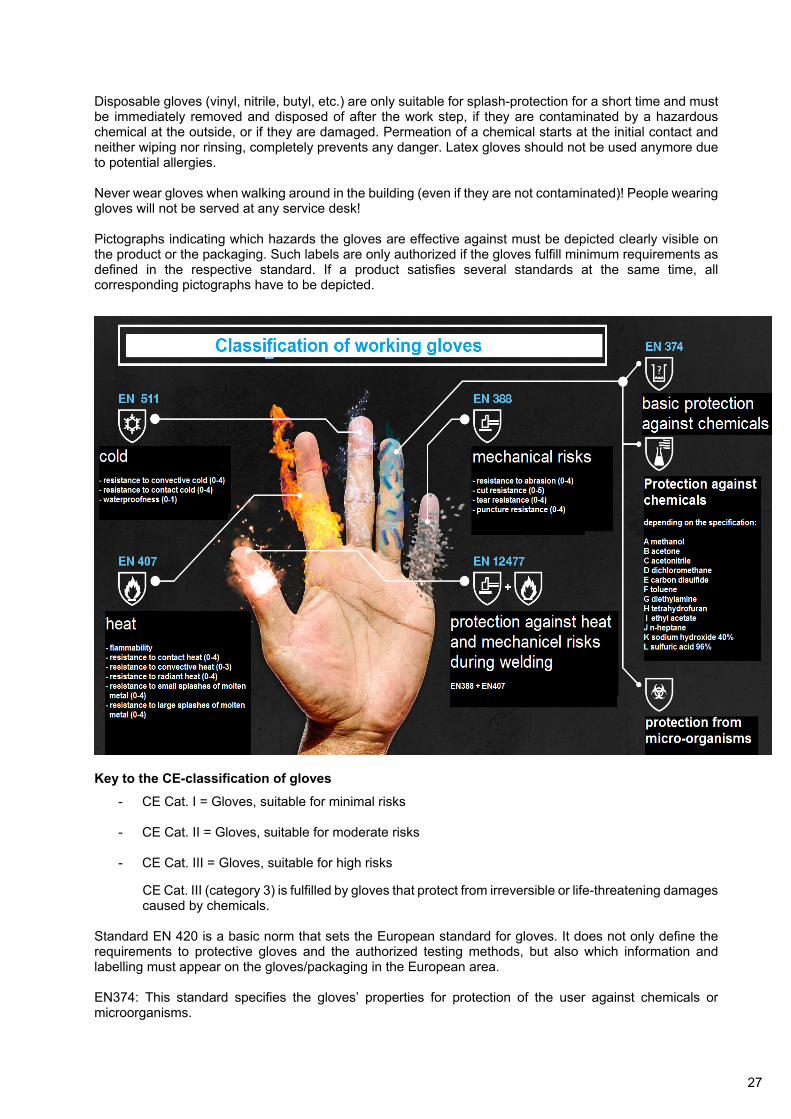
Disposable gloves (vinyl, nitrile, butyl, etc.) are only suitable for splash-protection for a short time and must be immediately removed and disposed of after the work step, if they are contaminated by a hazardous chemical at the outside, or if they are damaged. Permeation of a chemical starts at the initial contact and neither wiping nor rinsing, completely prevents any danger. Latex gloves should not be used anymore due to potential allergies. Never wear gloves when walking around in the building (even if they are not contaminated)! People wearing gloves will not be served at any service desk! Pictographs indicating which hazards the gloves are effective against must be depicted clearly visible on the product or the packaging. Such labels are only authorized if the gloves fulfill minimum requirements as defined in the respective standard. If a product satisfies several standards at the same time, all corresponding pictographs have to be depicted.
Key to the CE-classification of gloves
- CE Cat. I = Gloves, suitable for minimal risks
- CE Cat. II = Gloves, suitable for moderate risks
- CE Cat. III = Gloves, suitable for high risks CE Cat. III (category 3) is fulfilled by gloves that protect from irreversible or life-threatening damages caused by chemicals. Standard EN 420 is a basic norm that sets the European standard for gloves. It does not only define the requirements to protective gloves and the authorized testing methods, but also which information and labelling must appear on the gloves/packaging in the European area. EN374: This standard specifies the gloves’ properties for protection of the user against chemicals or microorganisms.
28
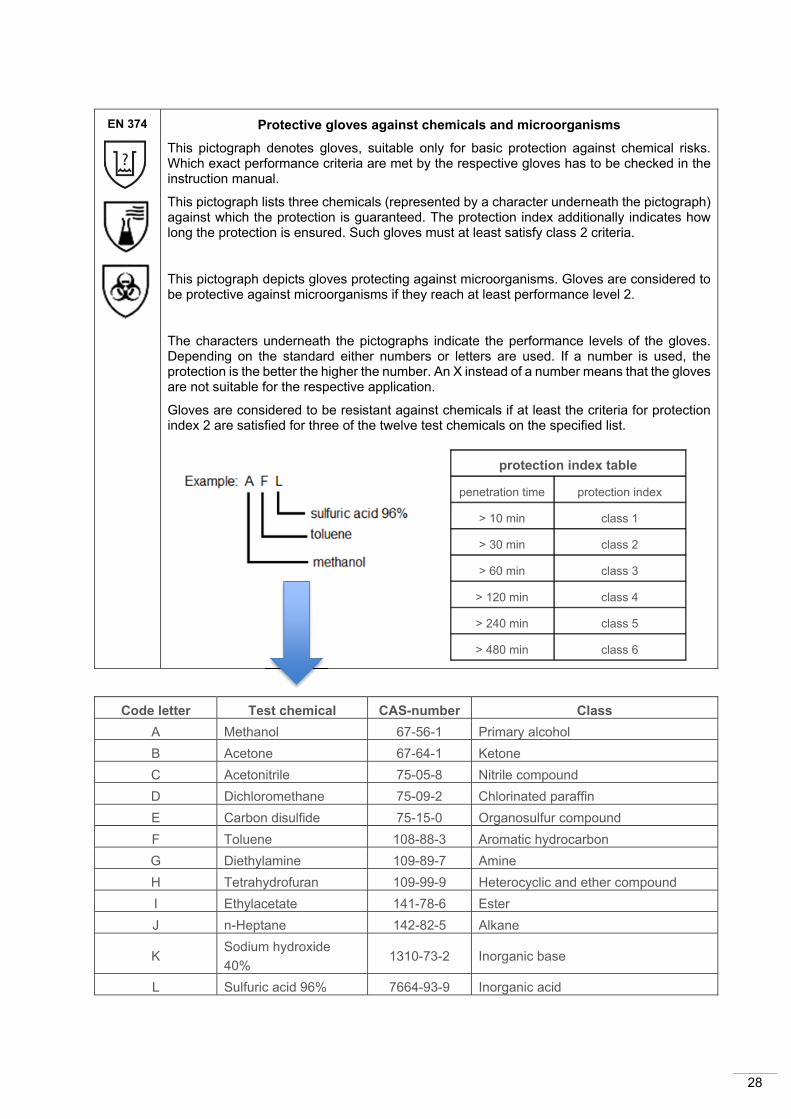
EN 374 Protective gloves against chemicals and microorganisms
This pictograph denotes gloves, suitable only for basic protection against chemical risks. Which exact performance criteria are met by the respective gloves has to be checked in the instruction manual.
This pictograph lists three chemicals (represented by a character underneath the pictograph) against which the protection is guaranteed. The protection index additionally indicates how long the protection is ensured. Such gloves must at least satisfy class 2 criteria.
This pictograph depicts gloves protecting against microorganisms. Gloves are considered to be protective against microorganisms if they reach at least performance level 2.
The characters underneath the pictographs indicate the performance levels of the gloves. Depending on the standard either numbers or letters are used. If a number is used, the protection is the better the higher the number. An X instead of a number means that the gloves are not suitable for the respective application.
Gloves are considered to be resistant against chemicals if at least the criteria for protection index 2 are satisfied for three of the twelve test chemicals on the specified list.
protection index table
penetration time protection index
> 10 min class 1
> 30 min class 2
> 60 min class 3
> 120 min class 4
> 240 min class 5
> 480 min class 6
Code letter Test chemical CAS-number Class
A Methanol 67-56-1 Primary alcohol
B Acetone 67-64-1 Ketone
C Acetonitrile 75-05-8 Nitrile compound
D Dichloromethane 75-09-2 Chlorinated paraffin
E Carbon disulfide 75-15-0 Organosulfur compound
F Toluene 108-88-3 Aromatic hydrocarbon
G Diethylamine 109-89-7 Amine
H Tetrahydrofuran 109-99-9 Heterocyclic and ether compound
I Ethylacetate 141-78-6 Ester
J n-Heptane 142-82-5 Alkane
K Sodium hydroxide
40% 1310-73-2 Inorganic base
L Sulfuric acid 96% 7664-93-9 Inorganic acid

29
5.2. Hazard, risk and environmental analysis
Note: The smaller the batch size in an experiment, the smaller the risk and energy consumption and the smaller the impact of an incident on the environment!
5.2.1. The risk/hazard analysis is obligatory before each new experiment!
Before every experiment and before using equipment and machines that bear special hazards for people and for the environment, a hazard/risk analysis must be carried out, and it must be verified whether special permission is required! Legal regulations (see Chapter 9) must be strictly followed. The environmental compatibility as well as acceptable energy use data must be kept in mind when doing experiments or using machines or equipment.
5.2.2. Hazard/risk analysis
Risks of chemicals can only be handled if you are aware of them. One of the central tasks of safety work is analyzing hazards in the laboratories and reviewing relevant risks. In the following diagram the risk potentials are shown without risk assessment and safety recommendations as well as after implementation of all safety measures. Objective of a risk assessment is to minimize the major risks in area 1 (red) by implementing safety recommendations. Completely going from area 2 (yellow) to area 3 (blue) would possibly afford excessive financial investments. A potentially residual risk has to be documented.
Machines, plants and all other technical systems can be dangerous for human beings, not only for the operators but also for the maintenance staff or uninvolved people. The level of risk depends on the type and function of the machine or plant as well as how the respective person performs the experiment. Machines or plants are usually controlled with the help of electrical or electronic systems and those systems are ultimately responsible for ensuring that people are not endangered. Therefore, there are certain requirements for such systems, which result from the risk for the person involved. To be able to grade the level of danger a machine or plant may cause, a hazard analysis is carried out. To assess the risk, a risk graph is used. The classification of the PL-value ranges from A (minor contribution to risk reduction) to E (major contribution to risk reduction). Additional information can be found on the website of SUVA (www.suva.ch).
A
B C D
E
V IV III II I

30
Checklist for danger, risk and environmental analysis
Chemicals/substances:
‐ Carefully study the material safety data sheets (MSDS) for each of the substances and chemicals that will be used. Various internet pages offer the safety data sheets for these chemicals.
Link: www.msds.com (requires registration)
‐ The safety data sheets contain all information concerning the characteristics of the substance, dangers and risks, recommended safety equipment, and advice for disposal and storage.
‐ Always pay attention to references and symbols on the labels of chemicals, as well as the GHS
(globally harmonized system of classification and labelling of chemicals) risk and safety phrase codes (H-codes = risk information, P-codes = safety information).
‐ Assessing dangers of reactions, decomposition as well as biological hazards requires a specific
literature search, e.g. in the faculty libraries of the ETH; Link: www.infozentrum.ethz.ch
‐ Reference books on all safety and environmental topics can be obtained from the website www.reaxyx.com or from ELSEVIER science & technology books. In general, a thorough literature search is also possible via various websites:
‐ Reaxys: https://cn-www.reaxys.com/reaxys/session.do ‐ TOXNET: http://toxnet.nlm.nih.gov/ ‐ e-EROS (Encyclopedia.of reagents for organic synthesis):
www.onlinelibrary.wiley.com/eros/search
‐ When performing an experiment, always ensure that you are using the appropriate infrastructure (appropriate/prescribed premises, fume hoods, ventilating systems etc.) Certain experiments may only be conducted in specific, approved laboratories (e.g., the high-pressure laboratory when synthesis/reaction proceeds at a pressure >10 bar, the toxicology laboratory when working with

31
highly toxic or highly smelly chemicals, the isotope laboratory when radioactive substances exceeding the exemption limit are used, the biosafety laboratory when working with microorganisms and genetically modified materials, etc.)
Systems and equipment:
‐ Check whether the proper equipment for the experiment is available. Only tested and certified equipment may be used. It is forbidden to use modified leisure or household equipment for laboratory experiments.
‐ The instruction manuals and safety instructions of the manufacturers / suppliers must be strictly followed.
‐ Legal requirements must also be respected and risks appropriately labelled when using home-made or converted facilities and equipment.
‐ Facilities and equipment that pose a particularly high risk may only be installed and operated in suitable laboratories. Such laboratories or areas must be equipped with warning signs and emergency instructions. Access must be refused to unauthorized and untrained cleaning and service staff.
‐ Outdated systems or equipment with excessive energy consumption should be replaced within a reasonable timeframe by more modern and secure systems, or be completely removed otherwise.
‐ A risk-/danger- and environmental analysis must be performed during the planning phase when procuring new facilities and equipment.
‐ Risk of failure assessment: The sudden failure of media supplies such as electricity, water, inert gas, etc., can lead to unexpected danger or damage. Installations and equipment must be protected against possible perturbations.
Legal requirements/competent authorities:
‐ Check whether official authorization is required or legal requirements have to be met before conducting certain experiments or operating special installations. Obtaining required authorization must be done via the SSHE division.
‐ Workplace threshold limit values must always be respected! On the SUVA website www.suva.ch you can find data for the current documentation of threshold limit values (TLV, MAK) for the workplace.
Provision of protective equipment / measures in the event of an incident:
‐ Ensure that provisions were made in case of an incident (protective equipment, extinguishing agents and / or other incident fighting measures, first aid kits, disinfecting/decontamination media, emergency shutdown, an informed second person, etc.).
Information chain:
‐ Secure the flow of information: declare (to the safety officers and the SE-Management) who is working with which hazardous materials, as well as where and how the work is carried out.
Right of access and regulations:
‐ Define and respect the regulations and right of access for the laboratories with special experiments or with special facilities and equipment in operation. Laboratories marked with special warning signs can only be entered in company of an authorized person.

32
5.3. Preventing fire incidents
5.3.1. Properties of alkali metals
Reactivity of alkali metals:
Please note: Lithium (depending on the texture) can even react under nitrogen atmosphere to lithium nitride. The reaction proceeds very slowly indeed at room temperature, however, during the reaction the rate might increase. Lithium must only be handled under argon atmosphere.
Please note: Alkali metals and their hydrides might ignite spontaneously upon contact with air or water!!!
5.3.2. Disposal/destruction of self-igniting chemicals
If you need to remove residual chemicals or if they must be disposed of because they cannot be stored or transported, please verify well in advance how dangerous they are and if they pose any threats. Otherwise, bring them in appropriate containers, if needed, under inert gas protection, to the central waste management of HCI in D276, ensuring that the contents are properly labelled and include a sender's address. It is necessary to previously announce the chemicals and arrange an appointment by phone or email.
5.3.3. Cleaning of glassware contaminated with residual self-igniting chemicals
Glass/instrument parts contaminated with spontaneously igniting chemicals require immediate separate treatment with great caution. Most small fires in HCI have been caused by the cleaning of glass and instrument parts that were contaminated with self-igniting chemicals. Such chemicals often spontaneously ignite in the sink or in waste disposal containers. Keep in mind that great quantities of highly flammable solvents are in close proximity, especially in synthesis laboratories!
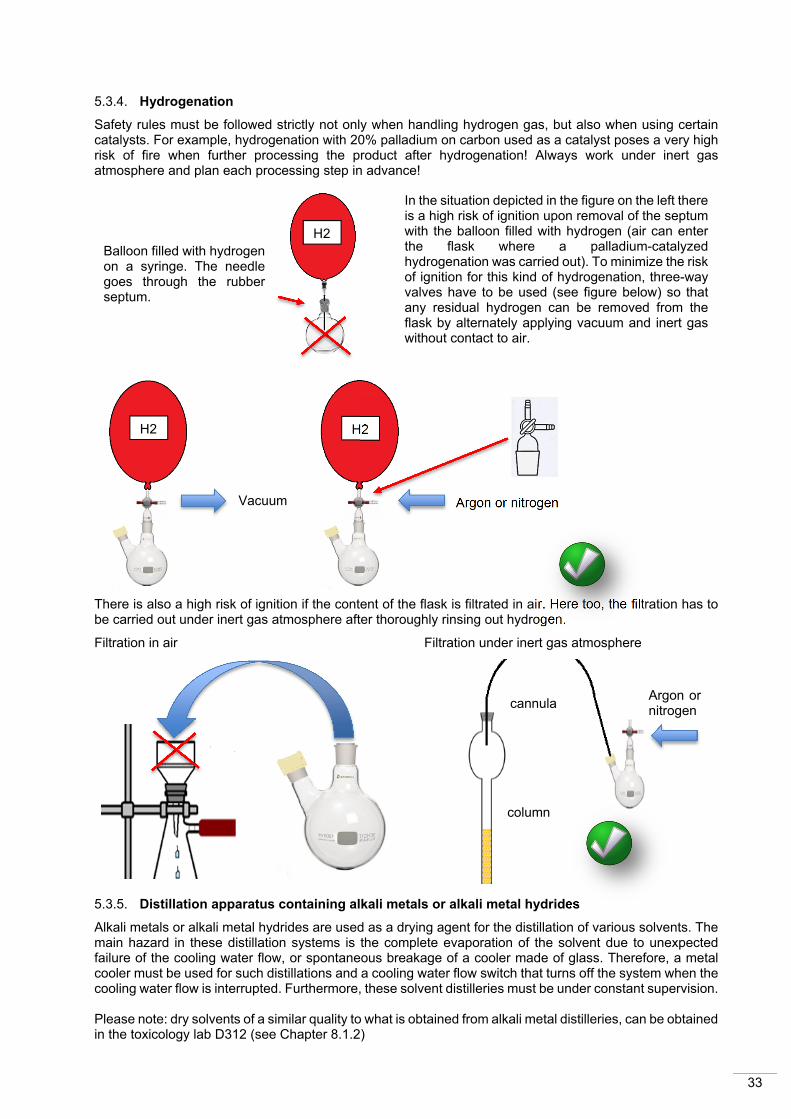
33
5.3.4. Hydrogenation
Safety rules must be followed strictly not only when handling hydrogen gas, but also when using certain catalysts. For example, hydrogenation with 20% palladium on carbon used as a catalyst poses a very high risk of fire when further processing the product after hydrogenation! Always work under inert gas atmosphere and plan each processing step in advance!
There is also a high risk of ignition if the content of the flask is filtrated in air. Here too, the filtration has to be carried out under inert gas atmosphere after thoroughly rinsing out hydrogen.
Filtration in air Filtration under inert gas atmosphere
5.3.5. Distillation apparatus containing alkali metals or alkali metal hydrides
Alkali metals or alkali metal hydrides are used as a drying agent for the distillation of various solvents. The main hazard in these distillation systems is the complete evaporation of the solvent due to unexpected failure of the cooling water flow, or spontaneous breakage of a cooler made of glass. Therefore, a metal cooler must be used for such distillations and a cooling water flow switch that turns off the system when the cooling water flow is interrupted. Furthermore, these solvent distilleries must be under constant supervision. Please note: dry solvents of a similar quality to what is obtained from alkali metal distilleries, can be obtained in the toxicology lab D312 (see Chapter 8.1.2)
Argon or nitrogen cannula
column
In the situation depicted in the figure on the left there is a high risk of ignition upon removal of the septum with the balloon filled with hydrogen (air can enter the flask where a palladium-catalyzed hydrogenation was carried out). To minimize the risk of ignition for this kind of hydrogenation, three-way valves have to be used (see figure below) so that any residual hydrogen can be removed from the flask by alternately applying vacuum and inert gas without contact to air.
H2
H2
H2
Vacuum Argon or nitrogen
Balloon filled with hydrogen on a syringe. The needle goes through the rubber septum.

34
5.3.6. Bunsen burner with or without gas cartridge
Another potential danger in the laboratory that should never be underestimated is the use of mobile Bunsen burners with gas cartridges. Bunsen burners generally should not be used near flammable materials and solvents.
Bunsen burners with gas cartridges may only be stored in ventilated cabinets, well separated from flammable and corrosive chemicals. The empty gas cartridges must not be 'temporarily disposed of' in escape routes, but only in ventilated safe containers.
5.3.7. Use of hot air blowers/heat guns
Hot air blowers are also potential sources of ignition, just like Bunsen burners. When using hot air blowers, increased risks occur when:
‐ Attempting to loosen stuck glass fittings ‐ Drying glassware after rinsing with solvent
(usually acetone) ‐ Drying substances with unknown thermal
properties ‐ Using them in close proximity to flammable
materials and solvents.
Äther

35
5.3.8. Danger of electrostatic discharges
Electrostatic discharges (ESD) are sparks caused by a very large potential difference over an insulating material, which causes a very high, short but strong, pulsed electrical current. The main cause of the potential difference is usually an accumulation of static electricity.
In a laboratory, the following can cause electrostatic discharges:
‐ Transferring powders ‐ Stirring or decanting of liquids ‐ Streaming out of compressed gases ‐ Whirling of powdered chemicals (aerosols) ‐ Movement of people wearing insulating clothing (synthetic fiber combined with plastic or rubber shoe
soles) ‐ Walking on non-conductive plastic floors or working on plastic table coverings ‐ Handling of chemical containers and equipment made of plastic or glass, with glass being somewhat
less prone to charging.
Although electrostatic discharges through the body usually only cause a small static shock, they may cause a fire in fire-risk areas. This requires extra care when handling flammable liquids or gases.
The following objects may cause discharges and sparks:
‐ Metal flanges to plastic or glass pipes: to an approaching person ‐ Electrically insulated people (rubber soles!): to grounded objects (door latch, water tap, heater,
containers, equipment)
Electrostatic discharges may be controlled by the use of appropriate materials, such as conductive plastics that do not allow high charge accumulations but instead lead these away before they build up to dangerous amounts.
The following precautions must be followed during laboratory work to prevent the generation of static electricity:
‐ In general: use conductive parts and ground them. ‐ Only transfer larger quantities of powder or highly flammable chemicals into grounded containers (but
do not attach the ground contact too close to the filling hole) ‐ Use closed installations and piping systems ‐ Use inert gas (usually nitrogen) to pneumatically pump highly flammable liquids, and build up an inert
atmosphere in the apparatus. ‐ Avoid splashing of solvents and the formation of dust clouds. Use funnels with long nozzles. ‐ Metal funnels must be grounded. Ungrounded metal funnels should not be used with glass or plastic
containers, and glass or plastic funnels should not be used with ungrounded metal containers (risk of spark formation).
‐ Ground metal parts on insulating equipment.
Figure 1: unsuitable clothes, shoes and plastic gloves which promote electrostatic discharges
Figure 2: symbol for an ESD protection component

36
5.4. Preventing odor emissions
5.4.1. Preventing odor emissions in chemical reactions
Dangerous emissions of all kinds must be eliminated or reduced as much as possible with special devices. In the case of injecting gases into liquids, devices must be installed to prevent the liquid from flowing back into the gas line or the supply vessel, e.g. in case of a pressure drop on the gas line (see figure below). All gas injection equipment must have a pressure-outlet with an exhaust gas line directly into the laboratory exhaust system. An intermediary bubble counter additionally allows the control of gas absorption in the reaction.
Escaping of large quantities of not fully reacted, toxic, smelly, corrosive gases and vapors into the extraction system must be prevented. These gases must be injected into appropriate reaction media (e.g. phosgene is absorbed in dilute sodium hydroxide)
1: gas supply bottle
2, 4, 6: empty vessels as a buffer
3: gas washing liquid
5: reaction vessel with injection pipe
7: final gas scrubber unit
Sketch: Inlet and outlet of gases
Gas washing bottle
Further safety measures: ‐ Before working with smelly and / or toxic chemicals, please acquaint yourself well about the risks.
‐ Experiments with highly toxic or smelly chemicals must be carried out in special laboratories, such as
the toxicology laboratory D312. Consult your safety representative. You must register on the website www.toxlab.ethz.ch and describe the work you wish to do in detail before working in the toxicology laboratory.

37
5.4.2. Prevention of odor emissions from dried out siphons
Depending on the biological state of the waste water, smelly (and possibly poisonous) gases and vapor might evolve in the waste water tank (and sometimes possibly poisonous). Due to the prevailing negative pressure in the building, such gas and vapor might get from the chemical holding into the laboratories via dried out siphons and cause odor emissions. Most laboratories generally have three of these siphons which lead to waste water tanks (the sink, the drain on the floor, and the siphon at about 2m height in the entrance area of the laboratory (see image)). More siphons may be hidden from view in the vertical service ducts, in small corner space or located under or behind equipment and cabinets. In case of problems, contact your house warden.
Please note: The siphon which is at about 2m above the ground in the laboratory entrance has been closed and disconnected in all laboratories in the HCI, but they have not been removed (except where air conditioning units, flow hoods, dehumidifiers, etc. drain water are installed). NEVER rinse disconnected siphons such as these with water or other fluids. For further information, contact an in-house technician. Countermeasures for dried out siphons which produce bad smells:
‐ Floor/drain siphon: fill these every 3 to 4 months with technical glycerol (use approximately 2 liters). Glycerol does not dry out over a long time and keeps back vapor and gases from the chemical wastewater tanks. The glycerol for siphon filling can be obtained at the HCI shop. Each working group is responsible for the closing of unneeded siphons
‐ Rarely used siphons: These cannot be closed with glycerol. We recommend that they be regularly rinsed with water.
‐ Never discard foul-smelling and/or toxic chemical waste of any kind via the sink!
5.4.3. What to do in the case of odor emissions
In case of an odor emission which does not originate from a dry siphon, alert your safety officer or call the emergency desk (888). Try to find the source of the smell and record your findings. In severe cases of odor emissions, the affected laboratory or even the affected part of the building will be evacuated. Never ventilate the laboratory by opening balcony and laboratory doors. This would transfer the smell into the interior of the building, thus endangering other users of the building. Note: Odor emissions can also be caused from outside of the building (agriculture, barbecue, construction).

38
5.5. Handling of pressurized gas cylinders
Before purchasing compressed gas cylinders, clarify how far and in what quantities flammable or toxic gases need to be used, or whether a better alternative is available. It is important to prevent working groups from accumulating unnecessary amounts of gas cylinders or using unnecessarily large compressed gas cylinders. The gas cylinder supply office generally does not supply 50L-pressurized gas cylinders with hazardous gas content. The SSHE division may grant an exception, after an application with sufficiently good reasoning has been submitted. Check the SSHE website for information on the gas guidelines for the use of gas cylinders and networks.
5.5.1. Storage and operation of compressed gas cylinders
Pressurized gas cylinders with non-hazardous contents can be operated in the laboratory, but they must be secured with a chain to a gas cylinder holder to prevent them from falling. If the total volume of all gas cylinders in one room amounts to 200 liters or more, they have to be stored in safety cabinets, irrespective of which kind of gas is stored (VKF fire protection regulations). If pressurized gas cylinders with flammable contents (20 liters) or pressurized gas cylinders containing at least 2 liters of dangerous substances, a risk assessment will be made to evaluate whether the cylinders have to be stored in a safety cabinet (this depends on the kind of gas, the ventilation and size of the room). In this case a permit must be obtained from the SSHE.

39
5.5.2. Labelling of compressed gas cylinders
(1) Risk and safety phrases (2) Warning labels (3) Composition of the gas resp. of the gas mixture (4) Suppliers product description (5) EU-number with unique materials or the words „gas mixture“ (6) Complete designation of the gas according to GGVS (7) Suppliers comments (8) Name, address and telephone number of the supplier
Color coding of compressed gas cylinders old-new (note: if there is still a gas cylinder with the older color coding please contact SSHE).
Old (partially still in use) New
Acetylene
yellow
Acetylene
orange
Properties Acetylene is a colorless combustible gas with a slightly ethereal, sweet odor.
Oxygen techn.
blue
Oxygen techn.
white
Properties Oxygen is a colorless, odorless gas. Air contains 20.95 vol.% of oxygen. Oxygen is not toxic. Combustion reactions proceed even at a slightly higher percentage of oxygen faster than in air. All parts in contact with oxygen must therefore be free from oil, grease or lubricants.
Argon
brown and green
Argon
emerald green
Properties Argon is a colorless and odorless inert gas that is contained in the air at 0.93 vol.%. Argon is non-flammable and nontoxic.
Nitrogen
green
Nitrogen
black
Properties Nitrogen is a colorless and odorless gas that is contained in the air at 78.09 vol.%. Nitrogen is non-flammable and nontoxic, and behaves as an inert gas towards most substances.

40
Helium
yellow and green
Helium
olive brown
Properties Helium is a colorless and odorless gas that is contained in the air at 0.00052 vol.-%. Helium is non-flammable and nontoxic.
Hydrogen
red
Hydrogen
red
Properties Hydrogen is a colorless, odorless gas that is much lighter than air. Hydrogen is not toxic, but it is flammable.
Carbon dioxide
black
Carbon dioxide
grey
Properties Carbon dioxide is a colorless, non-flammable, odorless and tasteless gas. Carbon dioxide is about 0.03 vol. % natural constituent of our atmosphere.
Color coding of compressed gas cylinders, general rules:
‐ Yellow (toxic or corrosive) - ammonia, chlorine, arsenic, fluoride, carbon monoxide, nitrogen oxide, sulfur dioxide
‐ Red (flammable) - hydrogen, methane, ethylene, forming gas, nitrogen / hydrogen mixture ‐ Light blue (oxidizing) - Oxygen, nitrous oxide mixtures (except medical inhalation mixtures) ‐ Bright green (inert) - krypton, xenon, neon, welding shield gases, compressed air (technical grade)
5.5.3. Transport of compressed gas cylinders
For transportation, the sealing cap has to be put on and the cylinder has to be chained to a gas cylinder transport trolley to the operation site! When the pressure-reducing valve is mounted during transportation, a simple fall will cause very large leverage forces to the cylinder head and could pose a serious threat. Transportation with an attached pressure-reducing valve is therefore forbidden! Compressed gas cylinders must only be transported between floors via the goods elevator, not the normal elevator (see also chapter 7.5. transportation within the building).
5.5.4. Reducing valves
Connection of a reducing valve: Pressure reducing valves must always be kept in perfect condition. Take a good look at the valve: watch out for the following things: does the valve have an intact surface at the connection flange? The seal must be smooth and even. You must also ensure that the valve is closed! Whoever mounts the pressure-reducing valve is also responsible for verifying the leak tightness! If the connection cannot be sealed properly, or if the valve turns out to be defective, it must not remain flanged to the bottle! Maintenance and passivation regulations: Special regulations exist for the maintenance of reducing valves for each specific gas. For reducing valves for dangerous gases, special regulations of the supplier must be followed (e.g. passivation regulations). Passivation (chemical inertness) means to deposit inert surfaces, typically on reactive metals. It occurs in many mildly reactive metals. Passivation is caused by the fact that an impervious layer for potential reactants develops on the surface of the metal. Removing a reducing valve: Before removal, make sure that the cylinder valve is closed. Under certain circumstances, cylinder valves with corrosive gases must be purged with nitrogen gas, as required by the manufacturer. Then unscrew the cylinder valve. Do not forget to screw the cap back onto the threaded coupling and the large steel cap on the pressure cylinder.

41
5.6. Protection against over-pressure in installations
Several accidents in HCI, which have nearly ended in worst-case scenarios, have been caused by over-pressure in gas pipes or as a result of pressure accumulation in various apparatus. Therefore, we strongly recommend the use of safety valves for all hazardous and pressure-delicate apparatus. In particular, we recommend the safety valves from “Lorch”. Different variations of such valves can be purchased from www.lorch.de/ under the section “Sicherheitsventile”.
The safety valve can, among other things, be installed easily on Lüdi-fittings. There is for example the safety valve type 2108 for neutral gas and vapor which start operating at 0.3 bar over-pressure (check the website for details). Applications: Over-pressure protection of gas pipes in flash-chromatography-columns, over-pressure protection of gas pipes in distillation using alkali metals, over-pressure protection in case of failure of the gas modules or gas amount regulator in the media column etc. The safety valve should not be applied where vacuum is applied, e.g. on a Schlenk line.
The Lorch safety valve and Lüdi-fittings can be obtained from the HCI shop.
Another option are over-pressure valves from “Stutz”. Different variations can be obtained from laboratory specialist shops. However, we do not recommend the use of the valve-type in which the critical pressure threshold has to be set manually at one’s own discretion. This valve is prone to inappropriate settings due to misjudgments and therefore led to accidents. Hence, we suggest only buying and using product versions of manufacturers with a pre-set and calibrated over-pressure protection point.
Rupture disk (= predetermined breaking point as over-pressure protection): Chemical reactions under pressure afford apparatus with a high safety level. Rupture disks are often used when pressure reactors are connected to a blow-off tank.
See chapter 8.3. regarding working under high pressure.
Check valve / over-pressure valve from "Stutz" with a spring-loaded spherical ground joint.
For an easier visual inspection, a buffer fluid can be used additionally.

42
5.7. At the end of the workday
Reactions and equipment with a low safety risk that need to stay in operation overnight (if possible with safety drip pan; heated only with a contact thermometer or regulators), must be labelled with a night work sign (see chapter 10.8.). The night work sign must be clearly visible in the fume hood window, or must be placed close to the experiment or the equipment. Equipment for continuous operation must be labelled with a phone number of the responsible person and with information on correct action in case of an emergency.
Everyone must make a final inspection in the laboratory after work, and ensure that all equipment without a night work sign is turned off, all chemicals are stored safely, all valves of gas and liquids on the media columns and on gas cylinders are closed, and that all equipment running overnight is labelled with a night work sign, and reaction vessels are working properly. Stills with alkali metals in the distillation residue, as well as the main natural gas switch must be turned off.
5.8. Night, weekend and holiday work
Interns, students, and apprentices are not permitted to work in a laboratory without the supervision of an assistant. Any work before 8am or after 7pm requires additional approval from the head of the working group. Diploma students may work before 8am. After 7pm, their instructor is responsible for their safety.
All other people require a second qualified person to be present whenever they work with chemicals or glass equipment on holidays or between 10pm and 6am. Both persons are responsible for each other and for a safe working procedure. Planned night, weekend and holiday-work that require the use of chemicals or glass equipment must be announced early to the group safety officer or assistant.

43
6. The HCI building and technical infrastructure
6.1. The HCI building
The sectors of the HCI include:
‐ Chemistry ‐ Physics ‐ Biology ‐ Materials science/process technology ‐ Pharmacy ‐ Radio chemistry/radio pharmacy
The highest risk potential in the HCI building has…
Chemistry!
Science Branch of the HCI (Brief Overview):
Sector HC1 – HC3: Lab courses
Sector HC4 – HC5: Lab courses and research
The Fingers: Research
HC5 D-MATL/D-HEST
HC4 IPW/Microbiology
HC3 LOC
HC2 LAC/LPC
Auditorium
building HC1 LAC/ICB
HC0
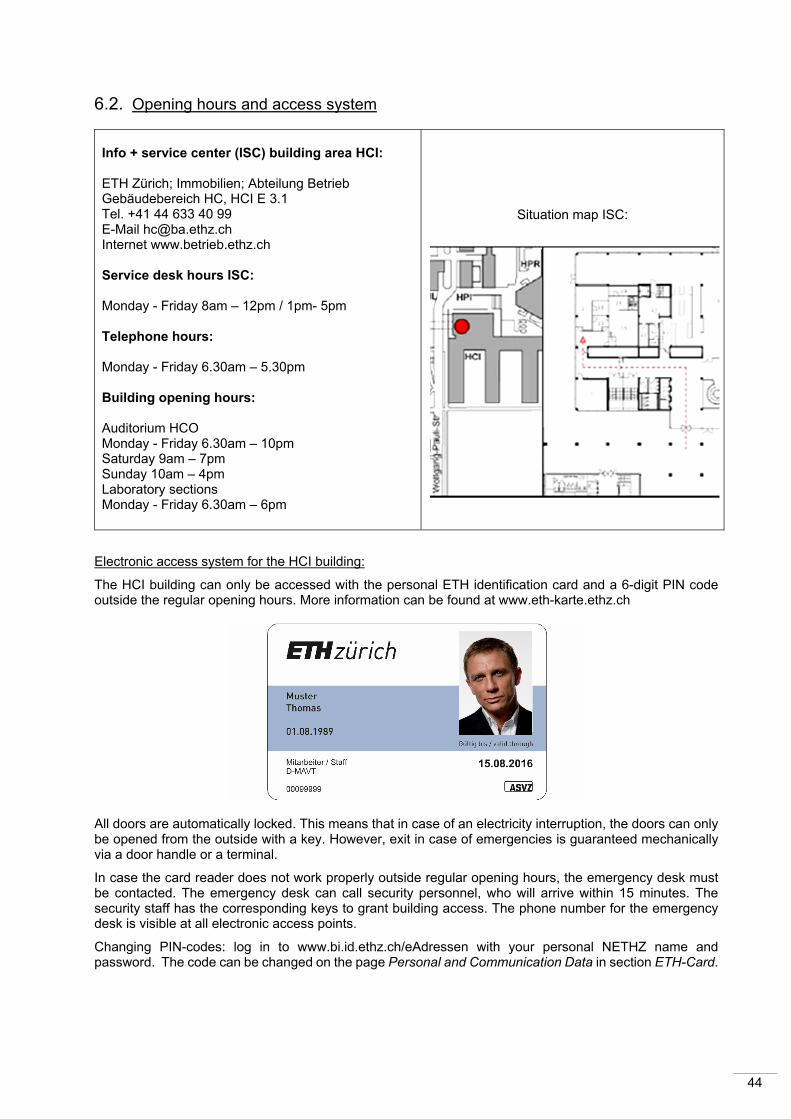
44
6.2. Opening hours and access system
Info + service center (ISC) building area HCI: ETH Zürich; Immobilien; Abteilung Betrieb Gebäudebereich HC, HCI E 3.1 Tel. +41 44 633 40 99 E-Mail [email protected] Internet www.betrieb.ethz.ch Service desk hours ISC: Monday - Friday 8am – 12pm / 1pm- 5pm Telephone hours: Monday - Friday 6.30am – 5.30pm Building opening hours: Auditorium HCO Monday - Friday 6.30am – 10pm Saturday 9am – 7pm Sunday 10am – 4pm Laboratory sections Monday - Friday 6.30am – 6pm
Situation map ISC:
Electronic access system for the HCI building:
The HCI building can only be accessed with the personal ETH identification card and a 6-digit PIN code outside the regular opening hours. More information can be found at www.eth-karte.ethz.ch
All doors are automatically locked. This means that in case of an electricity interruption, the doors can only be opened from the outside with a key. However, exit in case of emergencies is guaranteed mechanically via a door handle or a terminal.
In case the card reader does not work properly outside regular opening hours, the emergency desk must be contacted. The emergency desk can call security personnel, who will arrive within 15 minutes. The security staff has the corresponding keys to grant building access. The phone number for the emergency desk is visible at all electronic access points.
Changing PIN-codes: log in to www.bi.id.ethz.ch/eAdressen with your personal NETHZ name and password. The code can be changed on the page Personal and Communication Data in section ETH-Card.

45
6.3. The laboratory unit
Each laboratory unit (highlighted in yellow), and each practical work laboratory (marked blue) is an independent fire section. Each laboratory unit has its own autonomous pneumatic control, which regulates the exhaust air and fresh air supply flow rate to a defined value. For the safety of the users and to prevent any contamination of the rest of the building, the laboratories are generally kept at a low pressure (unless otherwise programmed). This is ensured by means of the pneumatic chamber pressure regulation. The pneumatic chamber pressure regulation allows the independent installation of one or more fume hoods, chemicals storage cabinets, DC spray hoods, etc., to the existing exhaust air. At the same time, fume hoods and other exhaust air dependent devices also function as an exhaust air system for the laboratory room. In order not to exceed the maximum limit of exhaust air in the laboratory unit, the number of installed fume hoods is limited depending on their size as well as on the other equipment. Opening the balcony and laboratory doors disturbs the delicate balance between ventilation and exhaust air in the laboratory unit, and creates an increased risk potential (incident spreading), and is combined with an unnecessary increase in energy consumption levels.
Note: Never open balcony and laboratory doors in case of an incident (fire, smoke, the release of toxic fumes and gases, odor emission etc.) In the event of an incident, the laboratory unit must be evacuated
and secured. Always call 888 in case of an emergency!
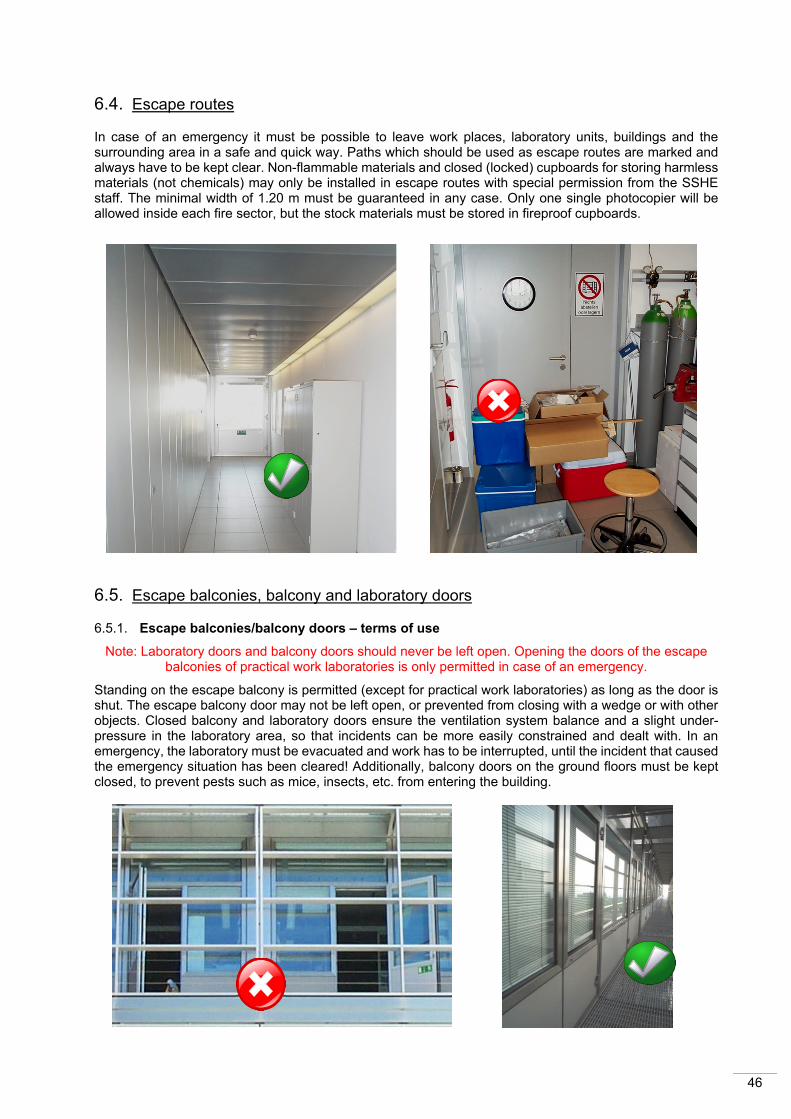
46
6.4. Escape routes
In case of an emergency it must be possible to leave work places, laboratory units, buildings and the surrounding area in a safe and quick way. Paths which should be used as escape routes are marked and always have to be kept clear. Non-flammable materials and closed (locked) cupboards for storing harmless materials (not chemicals) may only be installed in escape routes with special permission from the SSHE staff. The minimal width of 1.20 m must be guaranteed in any case. Only one single photocopier will be allowed inside each fire sector, but the stock materials must be stored in fireproof cupboards.
6.5. Escape balconies, balcony and laboratory doors
6.5.1. Escape balconies/balcony doors – terms of use
Note: Laboratory doors and balcony doors should never be left open. Opening the doors of the escape balconies of practical work laboratories is only permitted in case of an emergency.
Standing on the escape balcony is permitted (except for practical work laboratories) as long as the door is shut. The escape balcony door may not be left open, or prevented from closing with a wedge or with other objects. Closed balcony and laboratory doors ensure the ventilation system balance and a slight under-pressure in the laboratory area, so that incidents can be more easily constrained and dealt with. In an emergency, the laboratory must be evacuated and work has to be interrupted, until the incident that caused the emergency situation has been cleared! Additionally, balcony doors on the ground floors must be kept closed, to prevent pests such as mice, insects, etc. from entering the building.

47
The escape balcony normally serves as an escape path in emergency situations. Therefore, it is important that the balconies are kept clear of objects that might block the escape path.
Balcony railing ropes:
Please do not place your feet on the railing ropes. These can only bear little weight and can easily break at the fixations. Inform your house warden or the information service center of HCI in case of broken rail rope fixations.
Smoking on the escape balconies:
Ashtrays have been installed on the escape balconies.
Parties and celebrations on the escape balconies:
The roof terrace on finger 2 is available for celebrations of all kinds. Registration with the information service center HCI is mandatory. Staying out on the escape balconies is permitted, but it is forbidden to organize parties, receptions, celebrations etc.
6.5.2. Laboratory doors – terms of use
Laboratory doors must not be left open or wedged or blocked with objects. As mentioned in 6.5.1 the closed balcony and laboratory doors secure the building ventilation balance and keep the negative pressure in the laboratory areas of the fire sector, so that incidents can be better contained. In an emergency, the laboratory must be evacuated and the work in process must be interrupted, until the emergency situation has been cleared!
The window in the laboratory doors must not be blinded or otherwise obscured, except where a permit from the SSHE staff unit has been obtained (e.g. in laser laboratories).
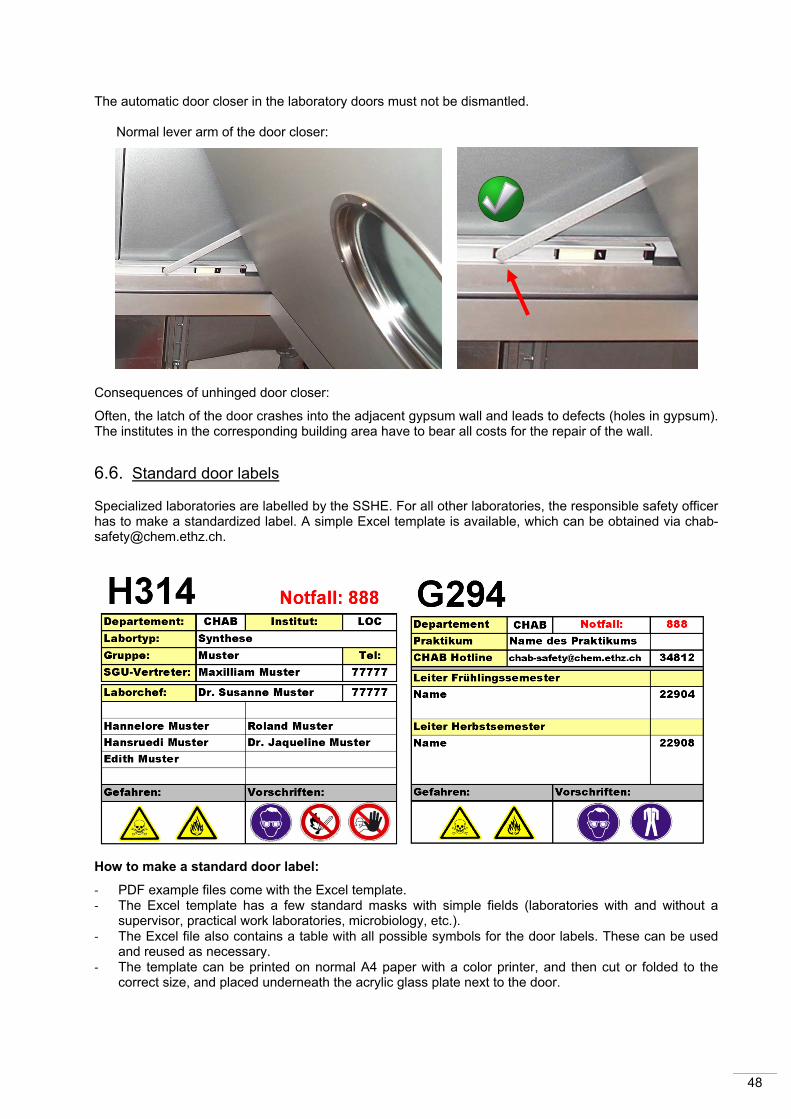
48
The automatic door closer in the laboratory doors must not be dismantled. Normal lever arm of the door closer:
Consequences of unhinged door closer:
Often, the latch of the door crashes into the adjacent gypsum wall and leads to defects (holes in gypsum). The institutes in the corresponding building area have to bear all costs for the repair of the wall.
6.6. Standard door labels
Specialized laboratories are labelled by the SSHE. For all other laboratories, the responsible safety officer has to make a standardized label. A simple Excel template is available, which can be obtained via [email protected].
How to make a standard door label:
‐ PDF example files come with the Excel template. ‐ The Excel template has a few standard masks with simple fields (laboratories with and without a
supervisor, practical work laboratories, microbiology, etc.). ‐ The Excel file also contains a table with all possible symbols for the door labels. These can be used
and reused as necessary. ‐ The template can be printed on normal A4 paper with a color printer, and then cut or folded to the
correct size, and placed underneath the acrylic glass plate next to the door.
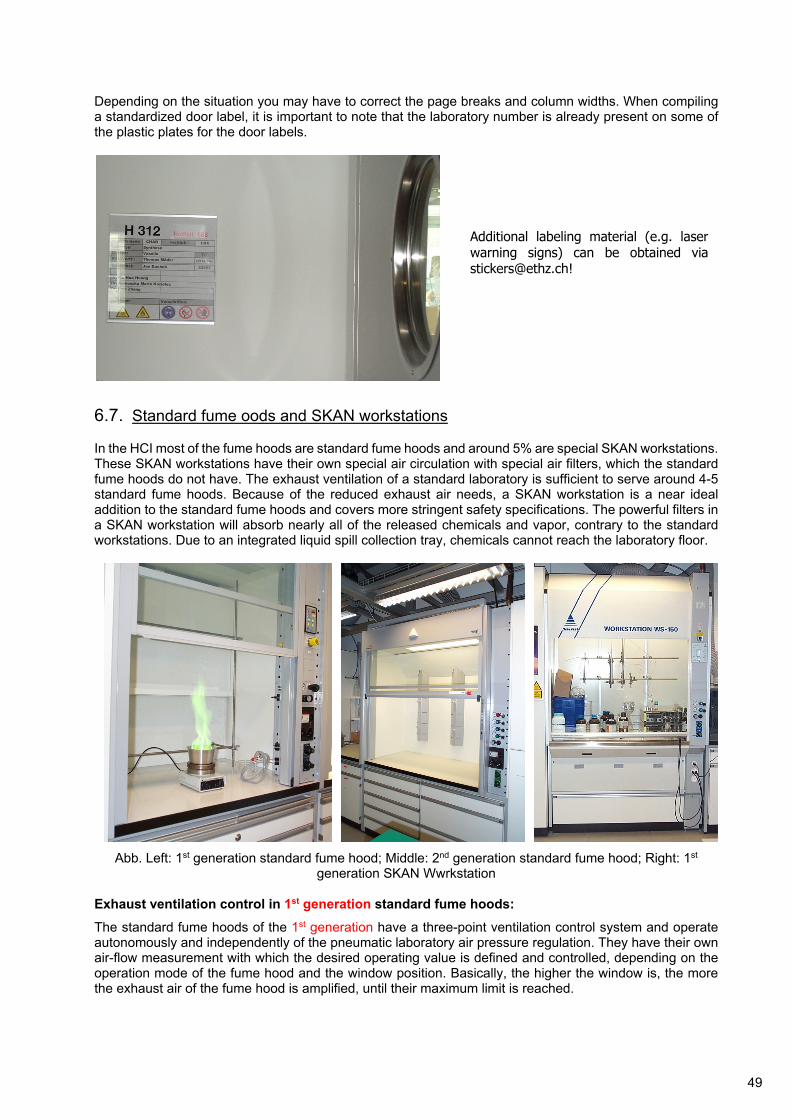
49
Depending on the situation you may have to correct the page breaks and column widths. When compiling a standardized door label, it is important to note that the laboratory number is already present on some of the plastic plates for the door labels.
6.7. Standard fume oods and SKAN workstations
In the HCI most of the fume hoods are standard fume hoods and around 5% are special SKAN workstations. These SKAN workstations have their own special air circulation with special air filters, which the standard fume hoods do not have. The exhaust ventilation of a standard laboratory is sufficient to serve around 4-5 standard fume hoods. Because of the reduced exhaust air needs, a SKAN workstation is a near ideal addition to the standard fume hoods and covers more stringent safety specifications. The powerful filters in a SKAN workstation will absorb nearly all of the released chemicals and vapor, contrary to the standard workstations. Due to an integrated liquid spill collection tray, chemicals cannot reach the laboratory floor.
Abb. Left: 1st generation standard fume hood; Middle: 2nd generation standard fume hood; Right: 1st generation SKAN Wwrkstation
Exhaust ventilation control in 1st generation standard fume hoods:
The standard fume hoods of the 1st generation have a three-point ventilation control system and operate autonomously and independently of the pneumatic laboratory air pressure regulation. They have their own air-flow measurement with which the desired operating value is defined and controlled, depending on the operation mode of the fume hood and the window position. Basically, the higher the window is, the more the exhaust air of the fume hood is amplified, until their maximum limit is reached.
Additional labeling material (e.g. laser warning signs) can be obtained via [email protected]!
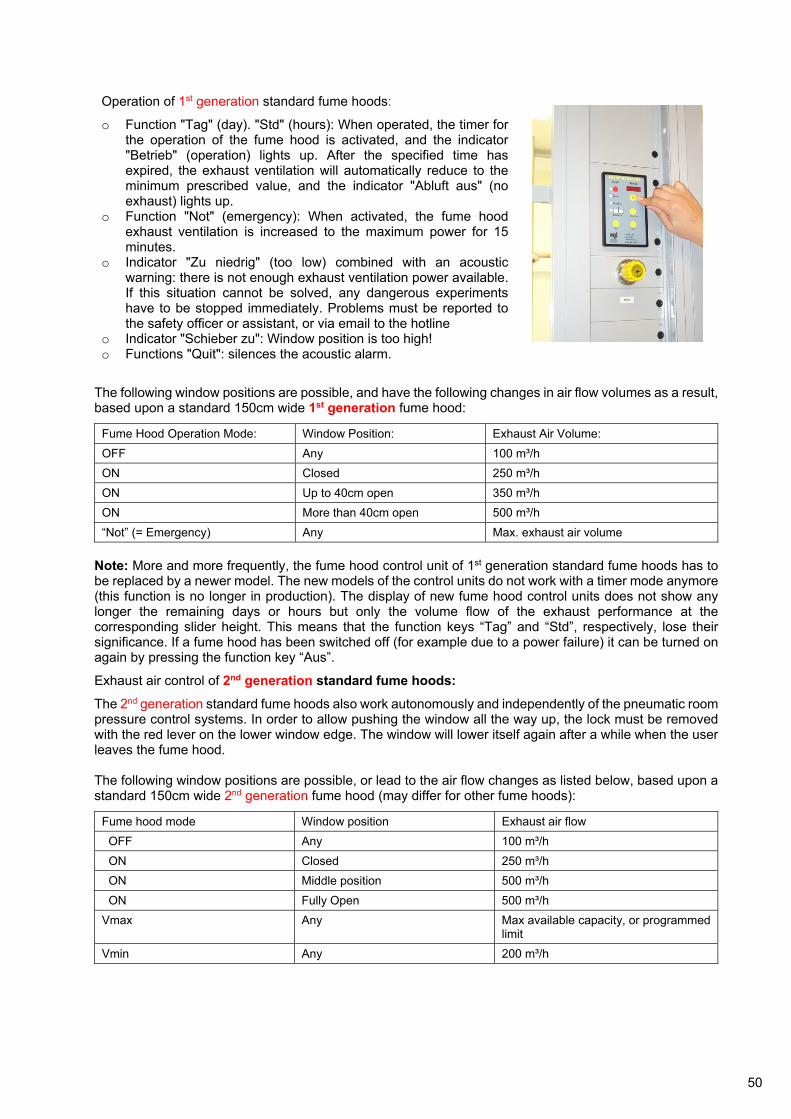
50
Operation of 1st generation standard fume hoods:
o Function "Tag" (day). "Std" (hours): When operated, the timer for the operation of the fume hood is activated, and the indicator "Betrieb" (operation) lights up. After the specified time has expired, the exhaust ventilation will automatically reduce to the minimum prescribed value, and the indicator "Abluft aus" (no exhaust) lights up.
o Function "Not" (emergency): When activated, the fume hood exhaust ventilation is increased to the maximum power for 15 minutes.
o Indicator "Zu niedrig" (too low) combined with an acoustic warning: there is not enough exhaust ventilation power available. If this situation cannot be solved, any dangerous experiments have to be stopped immediately. Problems must be reported to the safety officer or assistant, or via email to the hotline
o Indicator "Schieber zu": Window position is too high! o Functions "Quit": silences the acoustic alarm.
The following window positions are possible, and have the following changes in air flow volumes as a result, based upon a standard 150cm wide 1st generation fume hood:
Fume Hood Operation Mode: Window Position: Exhaust Air Volume:
OFF Any 100 m³/h
ON Closed 250 m³/h
ON Up to 40cm open 350 m³/h
ON More than 40cm open 500 m³/h
“Not” (= Emergency) Any Max. exhaust air volume
Note: More and more frequently, the fume hood control unit of 1st generation standard fume hoods has to be replaced by a newer model. The new models of the control units do not work with a timer mode anymore (this function is no longer in production). The display of new fume hood control units does not show any longer the remaining days or hours but only the volume flow of the exhaust performance at the corresponding slider height. This means that the function keys “Tag” and “Std”, respectively, lose their significance. If a fume hood has been switched off (for example due to a power failure) it can be turned on again by pressing the function key “Aus”.
Exhaust air control of 2nd generation standard fume hoods:
The 2nd generation standard fume hoods also work autonomously and independently of the pneumatic room pressure control systems. In order to allow pushing the window all the way up, the lock must be removed with the red lever on the lower window edge. The window will lower itself again after a while when the user leaves the fume hood. The following window positions are possible, or lead to the air flow changes as listed below, based upon a standard 150cm wide 2nd generation fume hood (may differ for other fume hoods):
Fume hood mode Window position Exhaust air flow
OFF Any 100 m³/h
ON Closed 250 m³/h
ON Middle position 500 m³/h
ON Fully Open 500 m³/h
Vmax Any Max available capacity, or programmed limit
Vmin Any 200 m³/h

51
Operating the 2nd generation fume hoods:
o Symbol : Turn fume hood ON or OFF. Even when OFF; a reduced exhaust ventilation is present.
o Upper LED, green: fume hood in operation o Upper LED, red: fume hood fault. If this fault sigh does not
disappear, any dangerous experiments must be stopped immediately. Problems must be reported to the safety officer
o Lower LED, yellow: window is open o Vmax: fume hood operating at maximum exhaust air capacity.
This function should only be used in extreme situations, or in case of emergency.
o Vmin: fume hood operating with eco-friendly reduced exhaust air capacity.
Exhaust air control of Skan work stations:
The work station is an autonomous laboratory fume hood unit without additional wall or floor mounting. The circulation filters are in the substructure section. The air flow and the cleanliness of the exhaust is monitored by sensors. It will be indicated by an acoustic-optical alarm (integrated within the work station) when the circulation filters have to be changed.
Technical data of WS-150: recirculation: 250 m³/h or 120 m³/h respectively (reduced); Exhaust air: 220 – 240 m³/h.
Handling of the fume hood control of Skan work stations:
Light
Optional enabling or disabling of an electronic device.
Enabling or disabling of sockets
Note: HI and LO do not mean high- and low-operation: HI means working (operation) and LO means standby.

52
Fume hood safety:
An optical and an acoustic signal are released to inform the user for safety reasons that the requested air flow cannot be reached.
Note: In several workstations, the red LED is permanently on, displaying ‘flow’ and ‘flow alarm’. This feature cannot be changed because of the electronic controls. However, if the ‘filter retention’ button lights up, contact your safety representative immediately.
In case of a problem or emergency, the fume hood may no longer be used for experiments or for storage of chemicals. Toxic, smelly chemicals etc. must be stored elsewhere when there is no sufficient exhaust air available.
Ecological aspects:
To protect yourself and the environment, the windows of fume hoods must always be kept as low as possible. With a fully opened window, the load on the exhaust air system, as well as the energy consumption is much higher. Additionally, this leads to loss of heat (winter) or cool air (summer). The costs of energy for m³/h fresh air in the HCI building amount to around between 1.50 CHF and 2.00 CHF per year, with an increasing tendency! This means around 190 000 CHF costs for energy / year and per building section!
Resistance of the HEPA exhaust filter is too high (not installed).
Exhaust power too low (see note below)
Control is properly fed by the power supply.
Window too high.
Green: The exhaust filters are working properly. Red: The exhaust filters have lost their functionality. Immediately inform the safety hotline [email protected]
Filter Retention
(red)
(red/green)
(green)
(red)

53
6.8. Vacuum network, membrane vacuum pumps and vacuum modules
6.8.1. Introduction
Every year in practical work laboratories and research laboratories, vacuum modules and vacuum network parts are severely damaged. The damage is usually caused by wrong usage of the vacuum modules in the media columns. The most common misuse is direct pumping of liquids (solvents, acids, bases, slag) into the vacuum network. When the liquid remains inside the vacuum network, it will seep slowly through the Teflon seal of the vacuum-regulating valve, which is screwed onto the vacuum module. As a further consequence, it will slowly dissolve the plastic nut of vacuum regulating valve which may break apart. The remaining fluid will flow out of the vacuum module and will continue to damage the underlying electrical and cooling modules (see pictures below). In future media columns, the vacuum module will thus be installed at the bottom of the media column.
6.8.2. Membrane vacuum pumps for multiple points of use
Membrane vacuum pumps are most often used for local vacuum networks connected to several rotary evaporator systems. Since most users want their evaporations to go as quickly as possible, they neglect to wait for complete condensation of the solvent vapor (in the condenser of the rotary evaporator), and the remaining vapor is pumped through the membrane pump in large amounts. The solvents then condense on the pressure side in the installed cooled intensive condenser. If necessary, an open ballast valve helps with a minimal leakage flow rate to remove the condensates in the pump heads. The membrane vacuum pumps for vacuum networks need to be checked several times a day for a filled condensate tank. Membrane vacuum pumps (type Vacuubrand or Büchi) can be taken to the central repair service in the HCI shop for service.

54
Network membrane pump system:
1st Generation: Vacuubrand MD4C network membrane pump
2nd and 3rd generation: Vacuubrand PC3004 VARIO network membrane pump set
Technical data:
Max. pump power: 3 m³/h Final pressure: 2 mbar Standby-control, not frequency controlled In use since 2011
Technical data:
Max pump power 4.6 m³/h Final pressure 1.5 mbar
Standby control, frequency controlled With water cooling: In use since 2007 With peltier element cooling: In use since 2011
Operation of pump control CVC2:
A manual can be obtained in the HCI shop.
Operation of pump control PC3400vario:
Switch to mode Vacuulan using Mode button and rotary knob.
Vacuulan mode setpoints:
Vacuum 10 mbar ON at 400 mbar Lagtime 60 min.
Use and installation of network pump systems in the laboratory:
The network pump system is usually integrated into an open cupboard under the laboratory table and networked with 4 to 6 vacuum rotary evaporators via vacuum modules in media columns. Each laboratory team can build its own vacuum network by simple means. During operation of the membrane vacuum pump systems, the pump exhaust must always be fed to an extraction device and never into the room. On the exhaust side (pressure side), the pump has an isolated intensive cooler, where residual vapor can condense. The exhaust fitting of the intense cooler is connected to an exhaust air hose; so, any remaining smelly gases and vapor can be extracted through the ceiling grid in the laboratory and into the neighboring building exhaust air network or the nearest fume hood. The pump control will automatically turn the pumping off when no vacuum is required for a longer time. If vacuum is needed, the pump control will turn the pump back on again. Also, the required cooling water flow to the intense cooler is automatically switched on or off when the pump is turned on or off.
Network vacuum pump systems must be regularly cleaned and tested for their functionality. Please prevent situations as sown below.

55
6.8.3. Operation of vacuum networks and vacuum modules
‐ Only rotation evaporation equipment may be permanently connected to the vacuum network. For a short time, It is permitted to use such vacuum networks for other purposes, as long as others, who require a good vacuum are informed and agree. For all other purposes, it must be checked beforehand if nearby vacuum networks would suffer from a long-term vacuum loss.
‐ It is absolutely forbidden to suck up liquids (even in small amounts) with a vacuum network! A liquid trap must always be between the vacuum using the system and the vacuum module.
In cases where liquids are accidentally pumped into the vacuum network, notify the safety officer or the assistant immediately.
6.8.4. Checklist for finding leaks in the vacuum network
‐ Electromagnet- and control valves on the vacuum modules: verify if all valves on the vacuum modules are closed, or if a control valve is broken. Even if only one valve is open or damaged, the vacuum performance in the local vacuum network can be significantly reduced. Verify if a boiling solvent is reducing the pump performance, or if too many or unsuitable vacuum users are present.
‐ Membrane vacuum pumps: Verify the pump performance of the membrane vacuum pumps, by isolating these from the network. If the final pressure is < 10 mbar, the pump is fine. If the pump only shows a reduced performance or no vacuum at all, the membranes may need to be replaced.
‐ Vacuum module: Check the vacuum module for cracks in the plastic block (these typically produce a hissing noise). Move the vacuum module away from the media column. If there is a crack in the plastic housing of the vacuum modules (see image to the right), report to your safety representative immediately. The damaged vacuum module will be replaced as quickly as possible.
‐ Liquids inside the vacuum network: Verify if there are any residual liquids inside the vacuum network. Depending on their vapor pressure, these can drastically reduce the vacuum performance. Clearly visible liquid residues in the vacuum network must be reported to the hotline.
‐ Screw connections / folded vacuum network hoses: Check if the vacuum network is damaged or kinked anywhere. In such cases, the damaged hoses or tubes must be replaced. Check if a screw connection has broken loose. Repair or replace the connection if this is the case. Replacement material and spare parts can be obtained from the HCI shop.

56
6.9. Cooling water modules in the media columns
Description
The plastic body of a cooling water module contains two cooling water loops, which can be closed or opened with their respective valve (0 or 1 position).
Transparent model cooling water module with valve:
Drip-stops inside the connectors:
Drip-stops are mounted inside the supply and return connectors of the module, which prevent the leaking of water from the connections in case no connectors are mounted.
6.9.1. Technical data
The cooling water modules may only be used with water. The maximum pressure is 2bar, the flow rate between 0.2 and 10 Liters/minute, the temperature is approximately 9°C. Single-sided use such as using the supply or return line only is never allowed. The main cooling water valve can usually be found inside a cupboard in the services duct in the corridor.
6.9.2. Operating the cooling water module
When the cooling water valve (3 in the drawing on the right) is in the 0-position, the flow is blocked. In case an overpressure should occur inside a closed cooling water circuit, this will release itself automatically via the return line over a membrane in the valve. Before turning the cooling water on or off, the control valve (4 in the drawing) should be closed to prevent pressure shocks. To open the cooling water flow: turn the valve slowly to the 1-position and open the control valve slowly. Note: in case no connectors have been mounted, water may suddenly spray out of the supply and return lines due to jammed drip-stops in the connectors (1 and 2 in the drawing)! This is especially the case when the drip-stops are being pushed in, when they are jammed because of depositions, or when they have been corroded. Media connections may only be mounted or dismounted if the valve has been switched to the 0-position and the control valve has been closed. If the cooling water modules are no longer needed, all media connectors must be removed, or a closed cooling water loop must be mounted.
Cooling water module in the free hanging media columns (cooling water modules in the media columns of the fume hoods are very similar.)

57
6.9.3. Technical problems with cooling water modules
Nearly all cooling-water modules show corrosion deposits on the cooling water valve and on the drip-stops, which are growing over time. Due to the corrosion and due to the deposits, the drip-stops may jam and lose their retention for water leaks.
Jammed drip-stops with deposits Cooling water valve with deposits. Control valve spindle can be seen inside.
Typical deposits inside the cooling water module
Typical deposits on one of the drip-stops
Deposits floating around inside the cooling water network
Furthermore, there is the risk of moving deposited particles between the o-ring seals and of scratching the plastic module body when rotating the cooling water valve. This leads to the risk of leaking water (despite the closed valve) from these modules, which has already led to several flooded laboratories with follow-up damages.
6.9.4. Water leaks from inside a cooling water module
In case water drips or flows from the inner body of a cooling water module, you must immediately inform the hotline, then close the main cooling water valve in the vertical services duct in the corridor to prevent a sudden water failure. All other equipment and experiments that depend on cooling water must be secured first!
Dripping, leaking drip-stops:
In case the drip-stops in the connectors of a cooling water module should leak, although the valve is turned to the 0-position, one must install a bridge connection between the supply and the return line.

58
6.9.5. Proper tubing of cooling water systems
Allowed Allowed Allowed Forbidden Forbidden
PVC tubes Strengthened PVC tubes
Polyurethane tubes
Silicone tubes Vacuum natural rubber tubes
Issues of silicone tubes in the cooling water system: Often soft silicone tubes are used for the cooling water system. They are more prone to material fatigue and damage compared to PVC tubes. In particular, also the sharp edges of metal hose clips can damage silicone tubes which might lead to a sudden rupture.
6.9.6. Aging effects on plastic parts:
All plastic parts on the media columns must be regularly checked for ageing effects (brittle) and leaks, and must be replaced if necessary.
6.9.7. Media connectors for cooling water modules
Check the O-ring seals on the metal or plastic connectors on a regular basis and replace them if necessary. The entire sealing depends on these O-rings. Hoses pushed onto the fittings must always be secured with a strap on both sides: on the media column side and on the equipment side. It is not allowed to secure a water hose by wrapping a wire around it or using tie-wraps (cable binders). Note: red gas and vacuum hoses are not meant for water and are therefore forbidden. Only appropriate hoses may be used for cooling water!
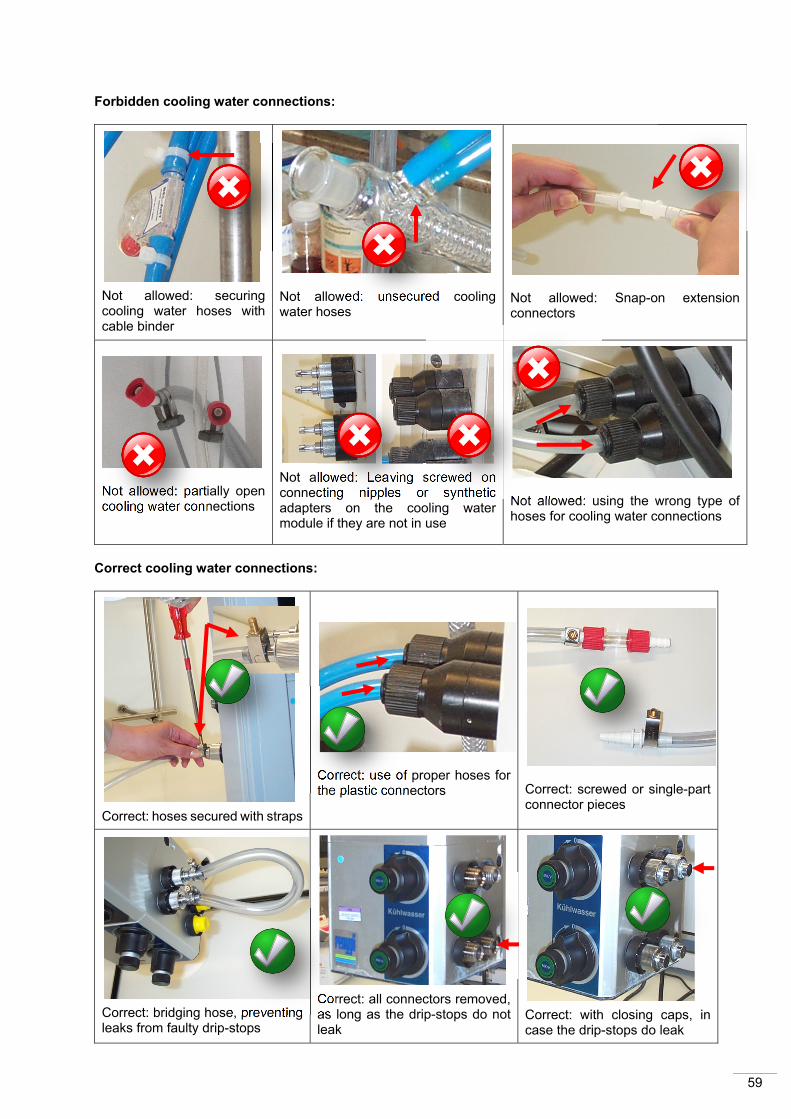
59
Forbidden cooling water connections:
Not allowed: securing cooling water hoses with cable binder
Not allowed: unsecured cooling water hoses
Not allowed: Snap-on extension connectors
Not allowed: partially open cooling water connections
Not allowed: Leaving screwed on connecting nipples or synthetic adapters on the cooling water module if they are not in use
Not allowed: using the wrong type of hoses for cooling water connections
Correct cooling water connections:
Correct: hoses secured with straps
Correct: use of proper hoses for the plastic connectors
Correct: screwed or single-part connector pieces
Correct: bridging hose, preventing leaks from faulty drip-stops
Correct: all connectors removed, as long as the drip-stops do not leak
Correct: with closing caps, in case the drip-stops do leak
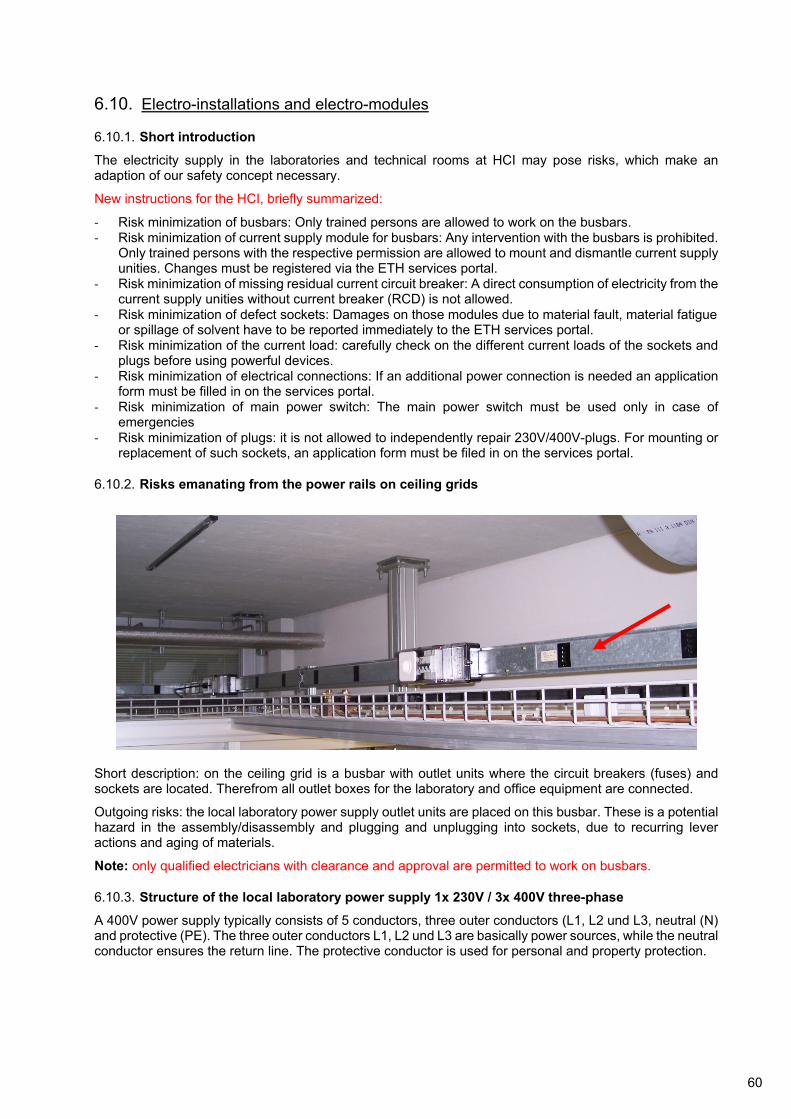
60
6.10. Electro-installations and electro-modules
6.10.1. Short introduction
The electricity supply in the laboratories and technical rooms at HCI may pose risks, which make an adaption of our safety concept necessary.
New instructions for the HCI, briefly summarized:
‐ Risk minimization of busbars: Only trained persons are allowed to work on the busbars. ‐ Risk minimization of current supply module for busbars: Any intervention with the busbars is prohibited.
Only trained persons with the respective permission are allowed to mount and dismantle current supply unities. Changes must be registered via the ETH services portal.
‐ Risk minimization of missing residual current circuit breaker: A direct consumption of electricity from the current supply unities without current breaker (RCD) is not allowed.
‐ Risk minimization of defect sockets: Damages on those modules due to material fault, material fatigue or spillage of solvent have to be reported immediately to the ETH services portal.
‐ Risk minimization of the current load: carefully check on the different current loads of the sockets and plugs before using powerful devices.
‐ Risk minimization of electrical connections: If an additional power connection is needed an application form must be filled in on the services portal.
‐ Risk minimization of main power switch: The main power switch must be used only in case of emergencies
‐ Risk minimization of plugs: it is not allowed to independently repair 230V/400V-plugs. For mounting or replacement of such sockets, an application form must be filed in on the services portal.
6.10.2. Risks emanating from the power rails on ceiling grids
Short description: on the ceiling grid is a busbar with outlet units where the circuit breakers (fuses) and sockets are located. Therefrom all outlet boxes for the laboratory and office equipment are connected.
Outgoing risks: the local laboratory power supply outlet units are placed on this busbar. These is a potential hazard in the assembly/disassembly and plugging and unplugging into sockets, due to recurring lever actions and aging of materials.
Note: only qualified electricians with clearance and approval are permitted to work on busbars.
6.10.3. Structure of the local laboratory power supply 1x 230V / 3x 400V three-phase
A 400V power supply typically consists of 5 conductors, three outer conductors (L1, L2 und L3, neutral (N) and protective (PE). The three outer conductors L1, L2 und L3 are basically power sources, while the neutral conductor ensures the return line. The protective conductor is used for personal and property protection.

61
Power is fed to the laboratory via 3x 400V und 100A (3L, N, PE). The three phrase conductors L1, L2, L3 arrive via a miniature circuit breaker (fuse) to consumers in the respective rooms. The 230V – consumers only need an outer conductor and are therefore distributed symmetrically to the power rail. The circuit breaker protects the electrical installation from damage due to overload. The protective conductor protects against dangerous contact voltages in case of error.
The maximum nominal current of the conductor rail is set to 100A. The sockets in the outlet units are protected with 16A. Large, sudden load changes or an interruption of the neutral conductor in the supply line may cause voltage rise to the respective consumers, resulting in the destruction of the connected devices. In one documented incident, the broken neutral conductor generated a voltage increase from 230 (normal) to 390V This resulted in substantial property damage. Fatigue or poor fitting outlet units on the power rails are difficult to find and an incident of this kind can therefore happen again. To minimize the risk, the power outlet unit's operation must be carried only by the IB.
6.10.4. Residual current circuit breaker
The residual current circuit breaker is used for the automatic shutdown of the power supply and thus serves to ensure personal security. One can imagine a fault current circuit breaker as a simple element consisting of a summation current transformer and shut-off device: The amount of current flowing to the consumer must be equal to the amount of current flowing back. In the case of persons accidentally touching live parts, a fault current flows and the fault current circuit breaker switches off. In case of accidental contact with live parts, one will still feel a shock as current flows until the circuit breaker cuts off the electrical circuit. The earth leakage circuit breaker in the media columns and in the current module is built in the laboratory. No earth leakage circuit breaker is located in the power rail outlet units. For this reason, a direct power consumption from the busbar.

62
6.10.5. Risks associated with busbars without a residual current circuit breaker
Past events have shown that it is only possible for qualified people to put the busbar modules correctly on the busbars. There is a major risk that busbar modules are put in operation despite they have been installed incorrectly.
On those busbar modules you can plug in an extension cable or power point distributor without an earth leakage circuit breaker. Because of this, the user is exposed to a higher risk of electric shock.
Note:
Single-handed mounting or dismounting of busbar modules is not allowed. You are obliged to file a request on the registration portal (Meldeportal).
The direct electricity consumption from the busbar modules without an earth leakage circuit breaker is not permitted (apart from the installations carried out by qualified electricians).
6.10.6. Risks associated with electricity power module boxes with residual current circuit breakers
The electricity power modules built into the media columns or the standard Lüdi electricity power module boxes include a fault current circuit breaker. The fuse (line protection) is designed for 16A.
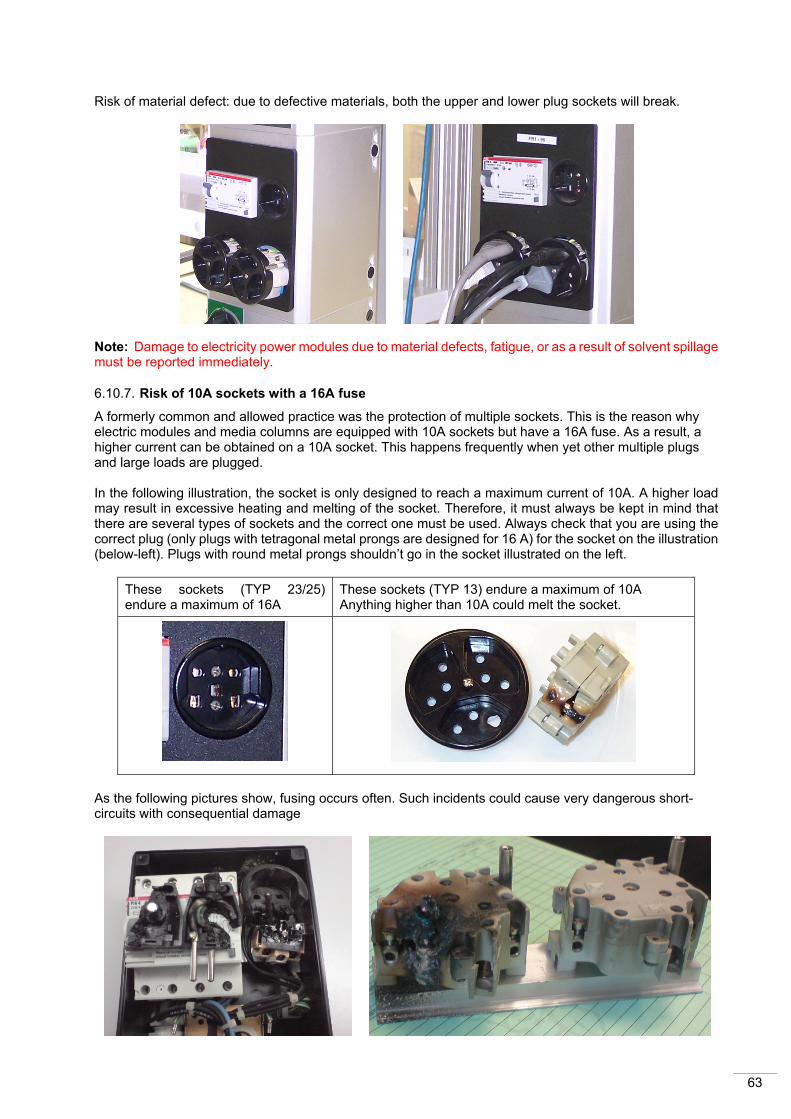
63
Risk of material defect: due to defective materials, both the upper and lower plug sockets will break.
Note: Damage to electricity power modules due to material defects, fatigue, or as a result of solvent spillage must be reported immediately.
6.10.7. Risk of 10A sockets with a 16A fuse
A formerly common and allowed practice was the protection of multiple sockets. This is the reason why electric modules and media columns are equipped with 10A sockets but have a 16A fuse. As a result, a higher current can be obtained on a 10A socket. This happens frequently when yet other multiple plugs and large loads are plugged. In the following illustration, the socket is only designed to reach a maximum current of 10A. A higher load may result in excessive heating and melting of the socket. Therefore, it must always be kept in mind that there are several types of sockets and the correct one must be used. Always check that you are using the correct plug (only plugs with tetragonal metal prongs are designed for 16 A) for the socket on the illustration (below-left). Plugs with round metal prongs shouldn’t go in the socket illustrated on the left.
These sockets (TYP 23/25) endure a maximum of 16A
These sockets (TYP 13) endure a maximum of 10A Anything higher than 10A could melt the socket.
As the following pictures show, fusing occurs often. Such incidents could cause very dangerous short-circuits with consequential damage
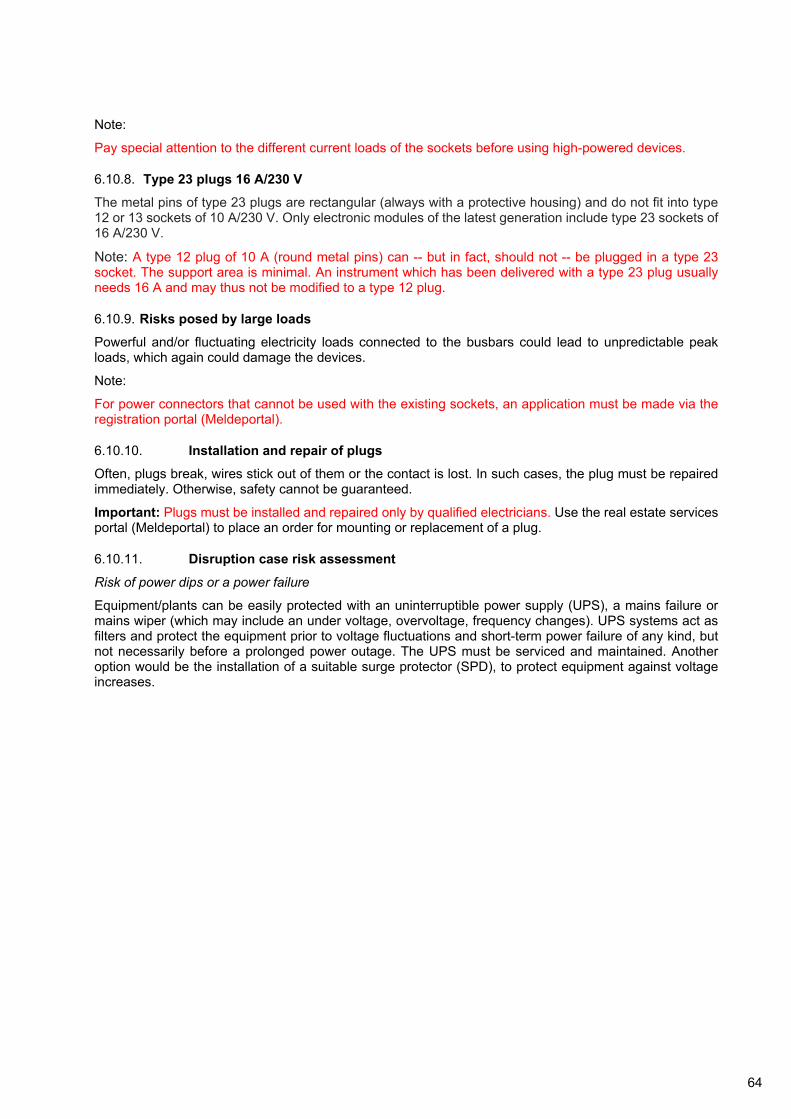
64
Note:
Pay special attention to the different current loads of the sockets before using high-powered devices.
6.10.8. Type 23 plugs 16 A/230 V
The metal pins of type 23 plugs are rectangular (always with a protective housing) and do not fit into type 12 or 13 sockets of 10 A/230 V. Only electronic modules of the latest generation include type 23 sockets of 16 A/230 V.
Note: A type 12 plug of 10 A (round metal pins) can -- but in fact, should not -- be plugged in a type 23 socket. The support area is minimal. An instrument which has been delivered with a type 23 plug usually needs 16 A and may thus not be modified to a type 12 plug.
6.10.9. Risks posed by large loads
Powerful and/or fluctuating electricity loads connected to the busbars could lead to unpredictable peak loads, which again could damage the devices.
Note:
For power connectors that cannot be used with the existing sockets, an application must be made via the registration portal (Meldeportal).
6.10.10. Installation and repair of plugs
Often, plugs break, wires stick out of them or the contact is lost. In such cases, the plug must be repaired immediately. Otherwise, safety cannot be guaranteed.
Important: Plugs must be installed and repaired only by qualified electricians. Use the real estate services portal (Meldeportal) to place an order for mounting or replacement of a plug.
6.10.11. Disruption case risk assessment
Risk of power dips or a power failure
Equipment/plants can be easily protected with an uninterruptible power supply (UPS), a mains failure or mains wiper (which may include an under voltage, overvoltage, frequency changes). UPS systems act as filters and protect the equipment prior to voltage fluctuations and short-term power failure of any kind, but not necessarily before a prolonged power outage. The UPS must be serviced and maintained. Another option would be the installation of a suitable surge protector (SPD), to protect equipment against voltage increases.

65
6.11. Gas module
6.11.1. Operating the gas module
The opening/closing valve of gas modules must always be turned slowly in the direction of the arrows to prevent pressure shocks. Accidental over-pressures in closed vessels must be prevented. Blocked or broken gas valves and malfunctioning pressure regulator valves must be reported immediately. Prevent unnecessary wasting of nitrogen gas; always make sure to use a safe but carefully chosen amount of nitrogen purging gas.
Note: The gas module can only adjust the gas pressure but not the amount of gas. For regulation of the amount of gas a dosage valve can be obtained from the HCI shop (see picture on the right).
Over pressure protection: see chapter 5.6!
6.11.2. Tubing for gas modules
Every gas can react with the tubing material. Therefore, there is a specific rubber blend for each gas. Please use the appropriate tubes for the gases. The respective information can be found on the websites of gas suppliers.
6.11.3. Tubing for natural gas/propane gas modules
Allowed Forbidden Gas tubes always have to be inspected for fatigue cracks and replaced if necessary. Gas tubes
Vacuum / natural rubber tubes
Note: All natural gas / propane tubes have to be secured with metal clamps.
Main valve on - off
Gas pressure regulation
Open gas supply
Close gas supply
Reduce pressure
Increase pressure
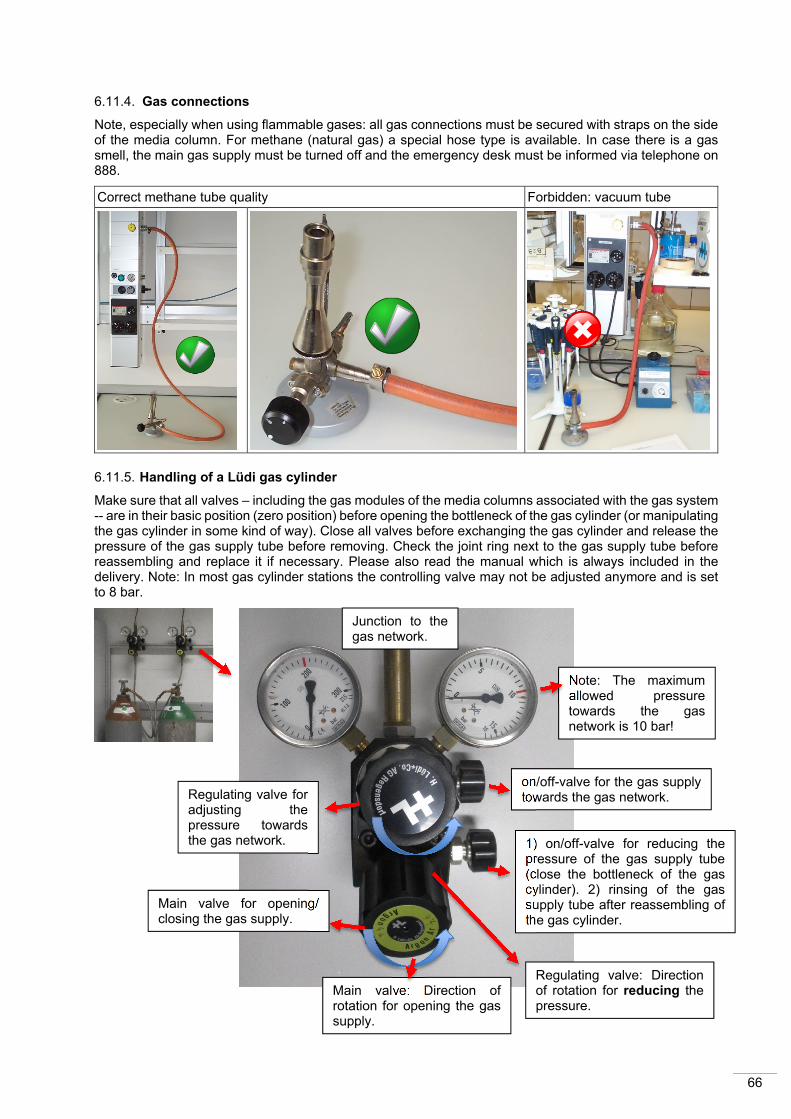
66
6.11.4. Gas connections
Note, especially when using flammable gases: all gas connections must be secured with straps on the side of the media column. For methane (natural gas) a special hose type is available. In case there is a gas smell, the main gas supply must be turned off and the emergency desk must be informed via telephone on 888.
Correct methane tube quality Forbidden: vacuum tube
6.11.5. Handling of a Lüdi gas cylinder
Make sure that all valves – including the gas modules of the media columns associated with the gas system -- are in their basic position (zero position) before opening the bottleneck of the gas cylinder (or manipulating the gas cylinder in some kind of way). Close all valves before exchanging the gas cylinder and release the pressure of the gas supply tube before removing. Check the joint ring next to the gas supply tube before reassembling and replace it if necessary. Please also read the manual which is always included in the delivery. Note: In most gas cylinder stations the controlling valve may not be adjusted anymore and is set to 8 bar.
Junction to the gas network.
Main valve for opening/ closing the gas supply.
on/off-valve for the gas supply towards the gas network.
1) on/off-valve for reducing the pressure of the gas supply tube (close the bottleneck of the gas cylinder). 2) rinsing of the gas supply tube after reassembling of the gas cylinder.
Regulating valve for adjusting the pressure towards the gas network.
Note: The maximum allowed pressure towards the gas network is 10 bar!
Regulating valve: Direction of rotation for reducing the pressure.
Main valve: Direction of rotation for opening the gas supply.
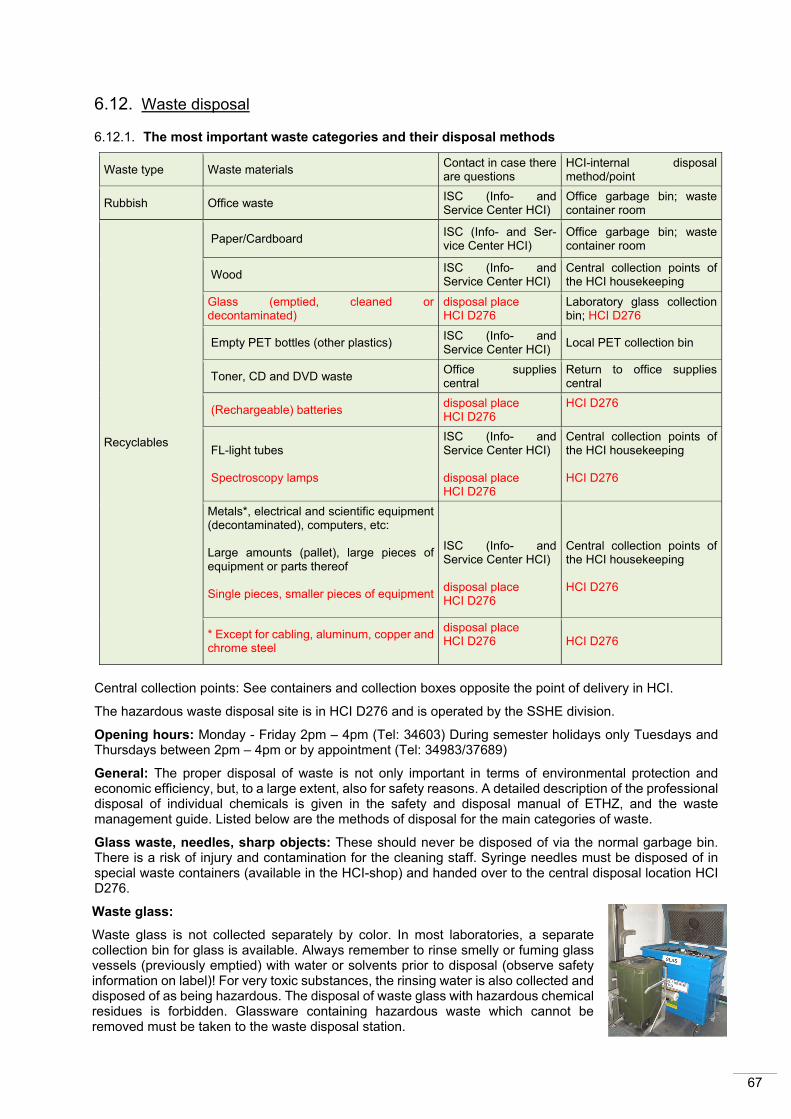
67
6.12. Waste disposal
6.12.1. The most important waste categories and their disposal methods
Waste type Waste materials Contact in case there are questions
HCI-internal disposal method/point
Rubbish Office waste ISC (Info- and Service Center HCI)
Office garbage bin; waste container room
Recyclables
Paper/Cardboard ISC (Info- and Ser-vice Center HCI)
Office garbage bin; waste container room
Wood ISC (Info- and Service Center HCI)
Central collection points of the HCI housekeeping
Glass (emptied, cleaned or decontaminated)
disposal place HCI D276
Laboratory glass collection bin; HCI D276
Empty PET bottles (other plastics) ISC (Info- and Service Center HCI)
Local PET collection bin
Toner, CD and DVD waste Office supplies central
Return to office supplies central
(Rechargeable) batteries disposal place HCI D276
HCI D276
FL-light tubes Spectroscopy lamps
ISC (Info- and Service Center HCI) disposal place HCI D276
Central collection points of the HCI housekeeping HCI D276
Metals*, electrical and scientific equipment (decontaminated), computers, etc: Large amounts (pallet), large pieces of equipment or parts thereof Single pieces, smaller pieces of equipment
ISC (Info- and Service Center HCI) disposal place HCI D276
Central collection points of the HCI housekeeping HCI D276
* Except for cabling, aluminum, copper and chrome steel
disposal place HCI D276
HCI D276
Central collection points: See containers and collection boxes opposite the point of delivery in HCI.
The hazardous waste disposal site is in HCI D276 and is operated by the SSHE division.
Opening hours: Monday - Friday 2pm – 4pm (Tel: 34603) During semester holidays only Tuesdays and Thursdays between 2pm – 4pm or by appointment (Tel: 34983/37689)
General: The proper disposal of waste is not only important in terms of environmental protection and economic efficiency, but, to a large extent, also for safety reasons. A detailed description of the professional disposal of individual chemicals is given in the safety and disposal manual of ETHZ, and the waste management guide. Listed below are the methods of disposal for the main categories of waste.
Glass waste, needles, sharp objects: These should never be disposed of via the normal garbage bin. There is a risk of injury and contamination for the cleaning staff. Syringe needles must be disposed of in special waste containers (available in the HCI-shop) and handed over to the central disposal location HCI D276.
Waste glass:
Waste glass is not collected separately by color. In most laboratories, a separate collection bin for glass is available. Always remember to rinse smelly or fuming glass vessels (previously emptied) with water or solvents prior to disposal (observe safety information on label)! For very toxic substances, the rinsing water is also collected and disposed of as being hazardous. The disposal of waste glass with hazardous chemical residues is forbidden. Glassware containing hazardous waste which cannot be removed must be taken to the waste disposal station.

68
Chlorinated and non-chlorinated solvent waste is collected separately in mobile waste disposal units. When these are full, they must be taken to the waste disposal station D276. There are proper facilities to empty them.
Liquid hazardous waste: these may be delivered to the waste disposal office in properly labelled 5, 10 or 20 liters – plastic containers, chemicals may be disposed of in 5, 10 or 20 liters – plastic containers. Organic and inorganic solids, mercury, acids, bases, solutions with heavy metals, photo chemicals, pharmaceuticals etc. must always be collected separately and disposed of properly. The filled liquid waste containers and chemical waste containers must be properly sealed and secured in proper spill control containers, and brought to the central waste disposal facilities HCI D276.
Empty containers: these can be obtained for free from the central waste disposal facilities in HCI D276.
In order to reduce the amount of waste, new or used chemicals may be stored in the original packaging and in good condition for further use (storage room).
Ethidium bromide waste: this is also collected separately. Liquid Ethidium bromide waste can be delivered to the central waste disposal facilities in well labelled 5, 10 or 20-liter liquid containers, solid Ethidium bromide waste such as pipette tips, Eppendorf caps, cellulose tissues, etc. in 5, 10 or 20-liter plastic containers. Contaminated gel trays, or other contaminated laboratory equipment must be properly decontaminated before being handed over to the waste disposal facilities.
Explosives: ETH Zürich does not have the permit for explosives of any kind (TNT, DNT, nitrocellulose, etc.). Explosive wastes may not be taken to the central waste disposal facilities. In such cases, please report to the waste disposal manager of the SSHE staff unit.
Tissues and other objects contaminated with less toxic chemicals: these must always be properly wrapped before sending them into a waste bin, so that the cleaning staff is not exposed to health risks or possible injuries.
Biologically contaminated wastes: All waste, which may be contaminated with pathogens, genetically modified organisms, or prions, must be collected separately and deactivated. The deactivation of contaminated materials is a central issue to prevent release of organisms from the laboratory, and to reduce the risk of exposure to humans and the environment. Applicable deactivation methods include steam sterilization (autoclaving) and chemical inactivation as well as dry heat sterilization. Properly deactivated biological wastes are only disposed of as usual if the label 'biohazard' or 'Biogefährdung' is no longer visible or has been removed. Before final disposal, the label must be removed, covered with other labels or hidden within a second containment.
Cell culture media, cell culture residues, and bacterial solutions: these are collected separately. Cell culture waste must be deactivated on site with an appropriate disinfectant. The waste must be taken to an autoclave in the most direct possible way. The material must immediately – and without any intermediate storage – be deactivated and subsequently taken to the laboratory waste container. Deactivated liquid wastes may be disposed of through the sewage of the building in compliance with the water pollution control rules.

69
The following interfaces with other waste disposal and safety concepts exist for the waste disposal of biologically contaminated wastes:
‐ Radioactivity: biological wastes of safety class 2 or higher which contain radioactivity, must be completely deactivated with sufficient disinfecting material, and then disposed of as radioactive waste.
‐ Chemicals: biological wastes of safety class 2 or higher which contain toxic or carcinogenic chemicals, must be completely deactivated with sufficient disinfecting material, and then disposed of as hazardous waste.
Waste separation / recycling: whenever possible, waste must be separated into the various waste categories. Recyclables should be recycled.
Animal waste, dead animals: uncontaminated or properly disinfected animal bodies may be disposed of via the regular communal dead animal collection point, or may be reported to the authorities for pick-up.
Animal by-products, which means animal bodies in parts or as a whole, must be disposed of according to the Laws and Regulations on Animal Diseases and the Regulations on the Disposal of Animal By-products, and according to the state of the art and with respect for the relevant safety requirements. Exceptions are made for dead animal bodies which are contaminated with chemicals, radioactive materials, or with pathogens or genetically modified organisms, e.g. for research or treatment reasons, and which cannot be decontaminated. Such dead animal bodies must be taken to the central waste disposal facilities in the HCI. For disposal or transport according to the law on animal diseases, dead and contaminated animals or parts thereof must be clearly identified and labelled. The type of contamination and infection hazard must be clearly declared.
Radioactive waste: Radioactively contaminated waste must be collected separately. Diluting or mixing of various isotopes is not allowed. Waste will be ordered by isotope and disposed of separately. Liquid and solid radioactive waste may be taken to the central waste disposal facilities HCI D276 in labelled containers (with details on the isotopes, half-life time, radiation intensity, etc.). Depending on the actual radiation intensity, self-protection through an absorbing barrier may be necessary.
Gas cylinders: Rented gas cylinders must be returned to the supplier (make sure you agree to this already when ordering the cylinder from the supplier). The supplier is obliged to take the cylinder back even after the end of its shelf life.
Small one-way cylinders cannot be returned to the supplier. The user is responsible for their proper disposal. Toxic gases must be neutralized on site through a proper washer or absorber. Single use cylinders that are no longer needed may be disposed of through the toxicology laboratory or be sent to the storage room for re-use.

70
6.12.2. Mobile waste disposal units
The chlorinated and non-chlorinated solvent wastes are disposed of separately in the mobile disposal units. Please never dispose of solids (e.g. silica, cinders, broken glass, syringe needles), magnetic stirrers, and never dispose of any acids, bases, specific toxins, etc. in these containers! When the collecting containers are full, they must immediately be taken to the central disposal facilities where the can be emptied with a pump. Note: If there are hard solids in the waste containers, these can significantly damage the pump! Defective and leaking waste disposal units must be reported immediately via e-mail to the hotline!
The version depicted below has been used since 2004 (HCI phase 2) resp. since 2001 (HCI phase 1), and had to be repaired laboriously several times.
Next generation: The initial start-up took place in 2009 and 2010. In 2013, in terms of emergency all collecting cans had to be replaced due to material fatigue (sudden cracking).
Weaknesses/problems: Weaknesses/problems:
The collection canisters are hidden behind doors and are therefore often overfilled. The canisters also have unnecessary holes and lids. The basin is fixed to the cabinet housing and does not have a tapered floor to the end of the drain pipe, so not all solvent waste is drained and there is always some residue, which leads to solid crusts at the bottom of the basin. The canisters bulge during the filling and their full weight pulls on the screw connections to the basin floor. This causes loosening of the seals on the inner side. Furthermore, the canisters are only poorly supported inside the cabinet, the plastic the plastic components are easily deformed during transport of the unit, and create even more leaks where the solvent waste can leak out. The open drain and the many leaks cause a constant evaporation of relatively large quantities of solvent vapours via the exhaust ventilation into the environment.
The collection canisters are directly visible. Overfilling should be avoided. Note that the front window is not solvent-resistant. The drain pan deformed over time and can no longer be correctly inserted into its original holder. A closure mechanism used in the drain pan closes and opens the drain pipe automatically with the closing and opening of the hinged cover. With that, an unnecessary evaporation of the solvent waste via the air canal into the environment can be prevented. The discharge hopper under the drain pan liners dissolves over time and will end up being permeable so that the solvent waste leaks when over spilling.
Hazard: the metallic safety drain pans are damaged with pitting corrosion and will no longer have a retention effect if solvent waste leaks from the canisters or if they are overfilled.
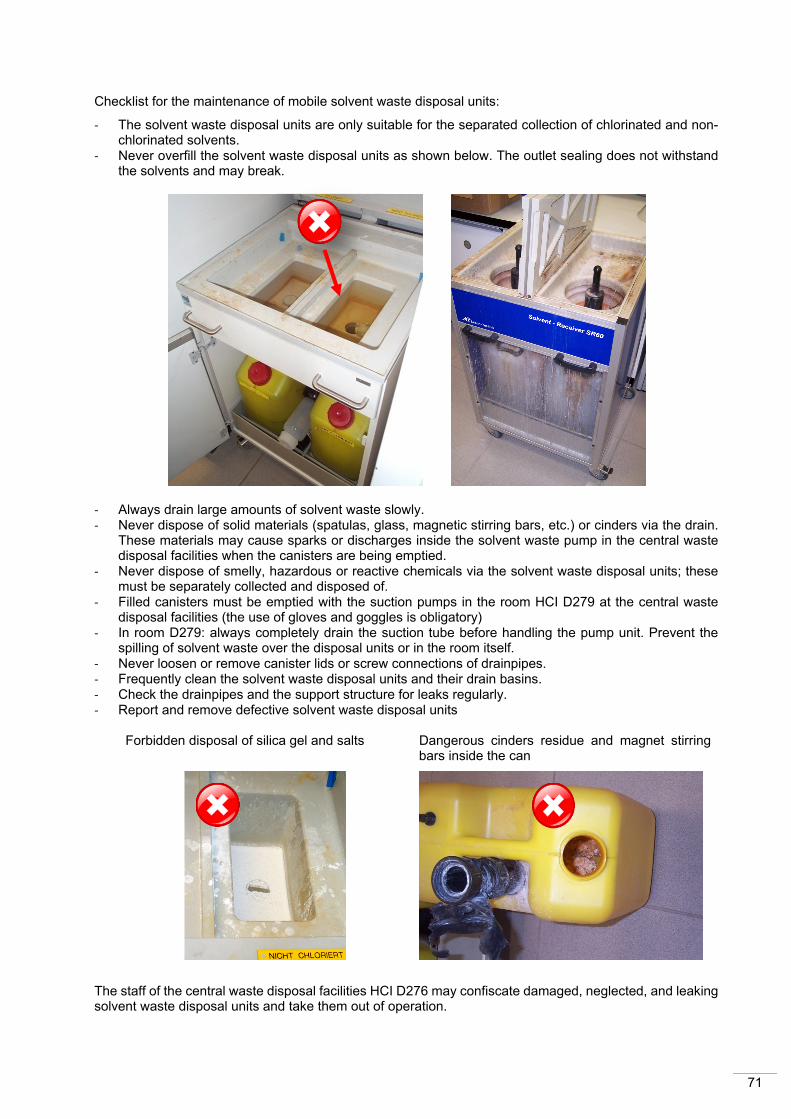
71
Checklist for the maintenance of mobile solvent waste disposal units:
‐ The solvent waste disposal units are only suitable for the separated collection of chlorinated and non-chlorinated solvents.
‐ Never overfill the solvent waste disposal units as shown below. The outlet sealing does not withstand the solvents and may break.
‐ Always drain large amounts of solvent waste slowly. ‐ Never dispose of solid materials (spatulas, glass, magnetic stirring bars, etc.) or cinders via the drain.
These materials may cause sparks or discharges inside the solvent waste pump in the central waste disposal facilities when the canisters are being emptied.
‐ Never dispose of smelly, hazardous or reactive chemicals via the solvent waste disposal units; these must be separately collected and disposed of.
‐ Filled canisters must be emptied with the suction pumps in the room HCI D279 at the central waste disposal facilities (the use of gloves and goggles is obligatory)
‐ In room D279: always completely drain the suction tube before handling the pump unit. Prevent the spilling of solvent waste over the disposal units or in the room itself.
‐ Never loosen or remove canister lids or screw connections of drainpipes. ‐ Frequently clean the solvent waste disposal units and their drain basins. ‐ Check the drainpipes and the support structure for leaks regularly. ‐ Report and remove defective solvent waste disposal units
Forbidden disposal of silica gel and salts Dangerous cinders residue and magnet stirring
bars inside the can
The staff of the central waste disposal facilities HCI D276 may confiscate damaged, neglected, and leaking solvent waste disposal units and take them out of operation.

72
6.12.3. Latest generation of mobile disposal stations
The department SSHE close the pumping device for waste solvent in the central disposal site by the end of the year 2017. Instead, all building users will use and hand off closed 5 L and/or 10 L one-way cans which will not be emptied. These 5 L and 10 L one-way cans are prescribed by the department SSHE and can be obtained for free at the central disposal site. The one-way cans have to be labelled following the specification of the SSHE department.
A suitable disposal station has been designed for the collection of waste solvent in 10 L one-way cans. These newly designed mobile disposal stations can hold four 10 L cans each and have to be filled according to the following instructions. An inspection window could not be included as such windows are not sufficiently fire-resistant.
The side walls function as doors which can be opened. Filled 10 L one-way cans can be removed via these doors. A drain funnel equipped with an overfill protector is installed on each one-way can. If the drain funnel is screwed correctly onto the can, it is basically impossible to overfill the can. The liquid can only rise to the tube underneath the drain funnel. If this level is reached the remaining air in the can cannot escape anymore and thus the liquid cannot enter the can and the liquid level will only rise in the funnel. When the funnel is filled completely, the process of filling has to be stopped and screw connection can be loosened. The air trapped in the can, can thus escape and the liquid drains off from the funnel into the can. Then, the funnel must be unscrewed and the can must be sealed. If there is a leakage the liquid drains into the dike, which must be cleaned by the causer. Mobile disposal stations may only be taken to the central disposal site when the funnels have been unscrewed before and the cans have been closed.
The newly designed mobile disposal stations are also used for other liquid waste collection, for example acids, bases, heavy metals, laser dyes, ethidium bromide solutions etc. In this case a differently colored chassis is used.
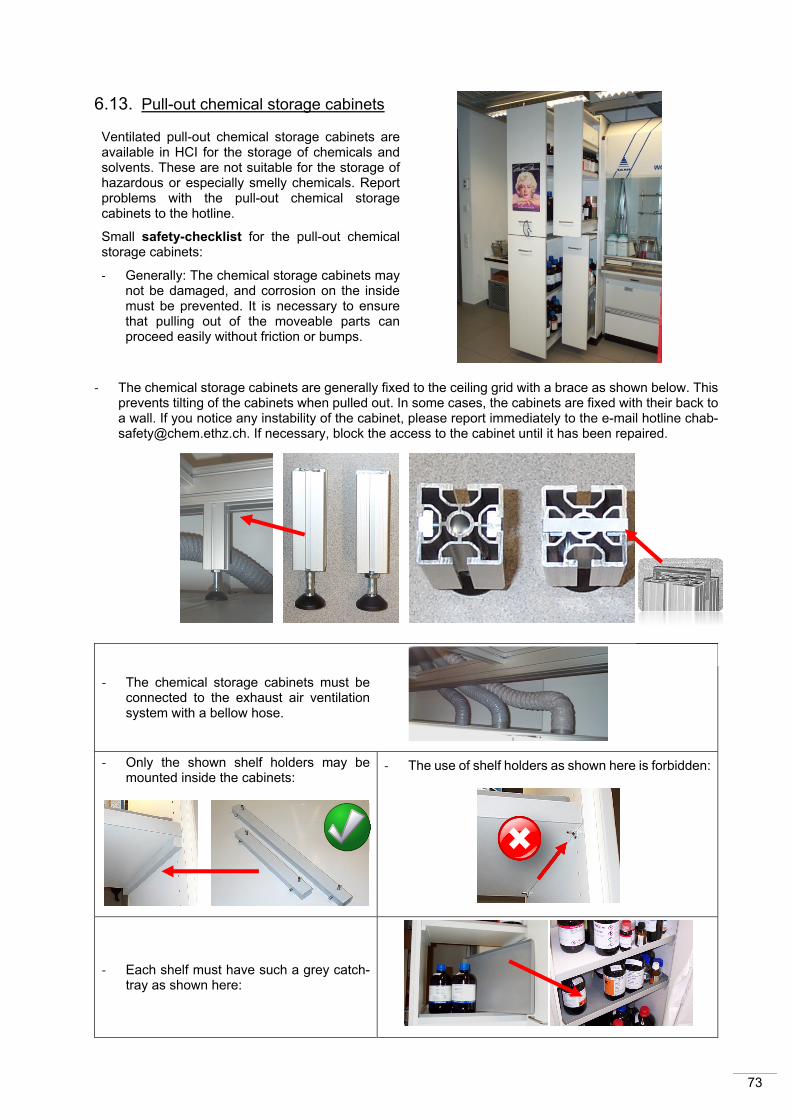
73
6.13. Pull-out chemical storage cabinets
Ventilated pull-out chemical storage cabinets are available in HCI for the storage of chemicals and solvents. These are not suitable for the storage of hazardous or especially smelly chemicals. Report problems with the pull-out chemical storage cabinets to the hotline.
Small safety-checklist for the pull-out chemical storage cabinets:
‐ Generally: The chemical storage cabinets may not be damaged, and corrosion on the inside must be prevented. It is necessary to ensure that pulling out of the moveable parts can proceed easily without friction or bumps.
‐ The chemical storage cabinets are generally fixed to the ceiling grid with a brace as shown below. This prevents tilting of the cabinets when pulled out. In some cases, the cabinets are fixed with their back to a wall. If you notice any instability of the cabinet, please report immediately to the e-mail hotline [email protected]. If necessary, block the access to the cabinet until it has been repaired.
‐ The chemical storage cabinets must be connected to the exhaust air ventilation system with a bellow hose.
‐ Only the shown shelf holders may be mounted inside the cabinets:
‐ The use of shelf holders as shown here is forbidden:
‐ Each shelf must have such a grey catch-tray as shown here:
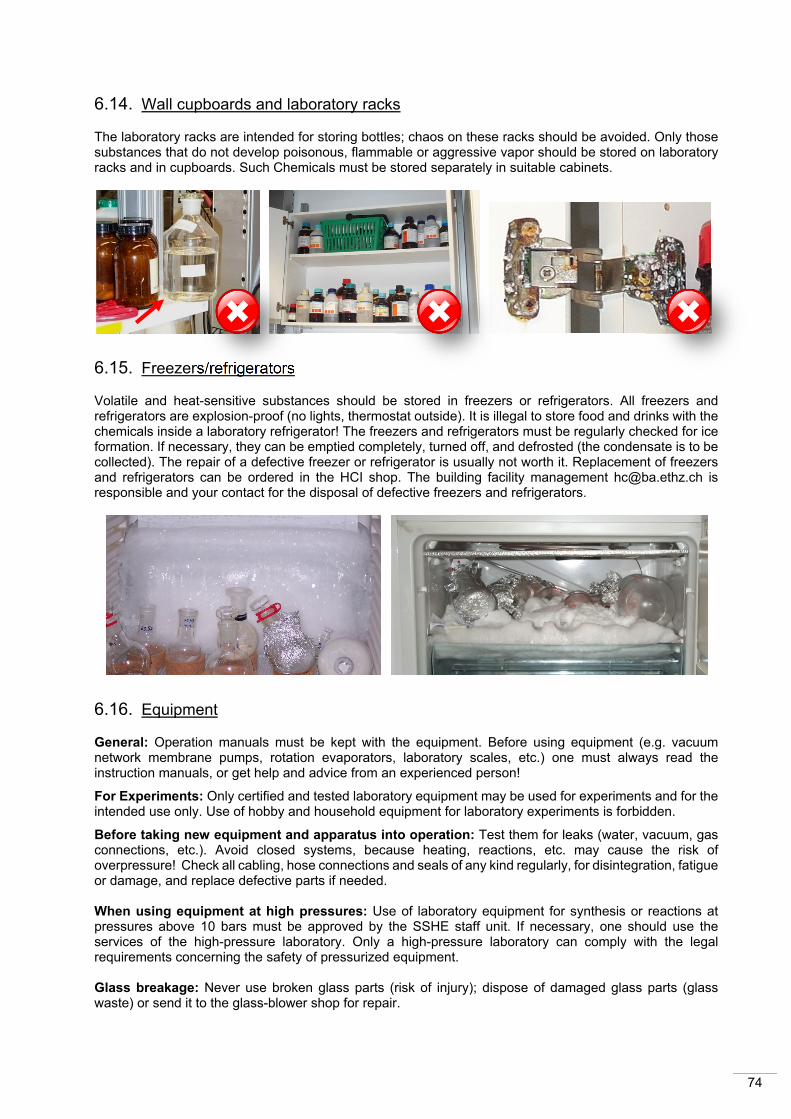
74
6.14. Wall cupboards and laboratory racks
The laboratory racks are intended for storing bottles; chaos on these racks should be avoided. Only those substances that do not develop poisonous, flammable or aggressive vapor should be stored on laboratory racks and in cupboards. Such Chemicals must be stored separately in suitable cabinets.
6.15. Freezers/refrigerators
Volatile and heat-sensitive substances should be stored in freezers or refrigerators. All freezers and refrigerators are explosion-proof (no lights, thermostat outside). It is illegal to store food and drinks with the chemicals inside a laboratory refrigerator! The freezers and refrigerators must be regularly checked for ice formation. If necessary, they can be emptied completely, turned off, and defrosted (the condensate is to be collected). The repair of a defective freezer or refrigerator is usually not worth it. Replacement of freezers and refrigerators can be ordered in the HCI shop. The building facility management [email protected] is responsible and your contact for the disposal of defective freezers and refrigerators.
6.16. Equipment
General: Operation manuals must be kept with the equipment. Before using equipment (e.g. vacuum network membrane pumps, rotation evaporators, laboratory scales, etc.) one must always read the instruction manuals, or get help and advice from an experienced person!
For Experiments: Only certified and tested laboratory equipment may be used for experiments and for the intended use only. Use of hobby and household equipment for laboratory experiments is forbidden.
Before taking new equipment and apparatus into operation: Test them for leaks (water, vacuum, gas connections, etc.). Avoid closed systems, because heating, reactions, etc. may cause the risk of overpressure! Check all cabling, hose connections and seals of any kind regularly, for disintegration, fatigue or damage, and replace defective parts if needed. When using equipment at high pressures: Use of laboratory equipment for synthesis or reactions at pressures above 10 bars must be approved by the SSHE staff unit. If necessary, one should use the services of the high-pressure laboratory. Only a high-pressure laboratory can comply with the legal requirements concerning the safety of pressurized equipment.
Glass breakage: Never use broken glass parts (risk of injury); dispose of damaged glass parts (glass waste) or send it to the glass-blower shop for repair.

75
Rotary vane vacuum pumps: In case rotary vane pumps are used in combination with a distillation of solvents or similar chemicals, a condensation-cooling trap is always necessary. This prevents the mixing of the pump oil with solvents, water or other chemicals. Consequences of contaminated pump oil: a lower viscosity, and therefore reduced lubrication of the pump; it may also lead to increased corrosion in the pump bulkhead (see following images). Pump oil must be replaced on a regular basis. Rotary vane pumps must also be cleaned regularly on the outside, and maintenance is required (e.g. replacement of the vacuum or exhaust hoses, cleaning of the oil mist filter, etc.). Before handing a pump over to the HCI-shop or for repair, the pump oil must be drained and disposed of, and a contamination declaration form must be completed, where it is necessary to declare possible contaminations with toxic or foul-smelling chemicals.
6.17. Handover of office- and laboratory rooms when leaving or moving
Obligation: The building facility management ([email protected]) is responsible for the allocation of premises (offices, laboratories, warehouses etc.) in the HCI. Assistants are responsible for returning the keys to practical work laboratories, and group heads are responsible for returning the keys of individual workspaces. When planning to leave a room, the building facility management team and the hotline must be informed as early as possible, and a handover date will be agreed upon. If nothing else is agreed upon, the rooms, wardrobe cupboards, furniture, freezers/fridges, etc. must be handed over, cleaned and in good condition. Chemicals must be either returned for further use to the storage room or disposed of. The (former) user may not disassemble and/or remove parts of the laboratory infrastructure. The house warden will make a handover report according to the following checklist, and the user must correct any flaws found. After a successful handover, the door lock cylinders will be exchanged for house warden cylinders. If you don't properly hand over a room, you may have to cover any resulting costs. Building, office and laboratory keys must be returned to the Information and Service Center HC0.

76
Checklist for the handover of offices, laboratories and work spaces
Rental equipment can be returned to the HCI shop, IT infrastructure to the IT coordinator. For personal administration issues, contact your institute's secretary. General: ‐ Report problems in the office or in the laboratory, or at your work place. ‐ Empty and clean your wardrobe cupboard. ‐ Clean hand basins, empty recycled glass containers and dishwashers. ‐ Refill unused drain siphons and floor siphons with glycerin. ‐ Check the condition of the methane network, if OK turn off its main switch. ‐ Switch off all unnecessary equipment. However, never use the main electrical switch in the laboratory area
(except in emergencies). ‐ If not agreed otherwise, disconnect all gas cylinders and return them to the gas cylinder storage room.
Special gas cylinders will be taken back with an appointment with the hotline ‐ Contact the HCI building facilities management [email protected] for the disposal of general waste,
materials, equipment, bulk waste etc. ‐ Freezers/Fridges: empty these completely, switch them off and thaw them up (collect the melt water).
Dispose of damaged and unusable freezers/fridges.
Laboratory and office furniture: ‐ Chemical and wall cupboards, under table cupboards, shelving: unless otherwise agreed upon, these must
be emptied completely. Check the general condition, the lock mechanism, the hinges, drawers, and Shelves. Leave the key in the lock of cupboards.
‐ Laboratory tables: Unless otherwise agreed upon, dismantle stand setups and return them to the HCI-shop. Clean the table surfaces and check them for damage, broken glass and defective joint seals.
‐ Mobile solvent waste disposal units: empty and clean them. Report defects and leaks.
Laboratory fume hoods: ‐ Unless otherwise agreed upon, remove stand setups and return them to the HCI-shop. ‐ Decontaminate the inside of the fume hood from residual chemicals. ‐ Clean the moving window; test its functionality. ‐ Check the table surface for damage, broken glass and defective joint seals. ‐ Test the functionality of the ventilation control. ‐ Test the functionality of the illumination.
Media columns: ‐ Vacuum modules: report damaged or missing vacuum valves and connection nipples. ‐ Vacuum networks: Switch off membrane vacuum pumps, empty condensation traps. If needed, return
vacuum pump systems to the HCI-shop for service or repair. Report damage and dents in the vacuum plumbing. There should be no liquids inside the vacuum hoses.
‐ Cooling water modules: all cooling water valves must be turned to the '0' position, all flow valves should be closed. Leave and report jammed, not rotatable valves. If no other agreement exists, disconnect all cooling water connections. Leave and report corroded or jammed cooling water connections. Check the cooling water modules for leaks, if needed close the main cooling water supply valve of the laboratory unit and report the leaks.
‐ Electrical modules: Test the functionality and stability of the sockets. Report instable or broken sockets. ‐ Gas modules: test and close the valves. Report defects.
Equipment: ‐ The following equipment (except IR equipment) can be returned to the HCI-shop for repair or for service.
Rotary vane vacuum pumps must be drained of the pump oil beforehand and a contamination certificate must be completed. Spare parts are also available from the HCI shop.
‐ Rotary evaporators: check the general condition, leak tightness, and functionality, drain and clean the water bath.
‐ High vacuum pumps: Check for vacuum performance and general condition; replace oil if necessary. ‐ Magnetic stirrers: clean, test them and verify their general functionality. ‐ IR-equipment: never turn them completely off or pull the power cord, the optical components consist of
KBr and must be protected from humidity and moisture.
Storage of chemicals: ‐ Check the chemicals for correct storage and hygiene. Well-preserved chemicals may be returned for reuse
to the storage room. ‐ Dispose of 'lost', disintegrated chemicals and specimens/samples.

77
7. Storage and management of chemicals
7.1. Storage
General: always mind the hazards of chemicals and solvents, and minimize these in the workplace and in storage to the bare minimum!
Rules:
‐ Instructions on the packaging and on the materials safety data sheets of chemicals, materials and preparations must be followed when storing these materials.
‐ Hazardous materials and preparations as well as their containers must be protected from dangerous influences, especially mechanical ones.
‐ Hazardous materials and preparations must be well organized and separated from other goods. Food, drinks and medications may not be stored in their immediate vicinity.
‐ Materials and preparations which may react with each other must be stored in separate places
‐ Highly toxic, smelly and corrosive chemicals must be stored in appropriate, vented safety cabinets. These containers must be marked specifically, e.g. with references to the dangers involved in using these chemicals, as well as the required actions in the event of an incident. Larger quantities of liquid containers must be stored in chemically resistant drip pans. Wherever corrosive chemicals are being stored, the chemical cabinets must be inspected regularly for corrosion damage. Damage to chemical cabinets must be reported to the hotline.

78
‐ Glass bottles may never be filled completely with solvents for storage; at least 5% empty volume must be left to prevent breaking of the glass as the room temperature increases.
The following pictures show examples of an inacceptable and illegal storage of chemicals!
7.2. ExpeReact-chemicals database
ExpeReact is a database application that enables users to manage multiple chemicals in separate storage rooms and laboratory working groups, to order chemicals and to retrieve safety information (MSDS: material safety data sheets). It is specially tailored to the needs of chemists. This allows for the search of chemicals by various criteria: name, structure, structural elements, CAS numbers, characteristics or location or owner.
More information about Expereact can be found at:
www.chemexper.com
7.3. Storage room (reuse of chemicals in HCI)
Storage room HCI C280/282:
Partly used (as well as new chemicals) are stored in the storage room. All work groups can collect and use these chemicals for free. The stock management works via the database Expereact: www.hci-expereact.ethz.ch. A user has to register any change in the chemical database when collecting and returning chemicals. For safety reasons this room is equipped with a monitoring camera. Access must be granted by a safety deputy. Only the safety deputies have a key which must be kept under lock. Contact the e-mail hotline [email protected] in case you have chemicals which can be stored in the storage room for reuse. Please note the following rules:
‐ Chemicals for reuse will be picked up by arrangement. The storage room may not be misused as a "disposal service" as in former years.
‐ The containers of the chemicals must be labelled properly. They have to be intact and contain at least 40% of the original quantity. The content may not be contaminated or decomposed.
‐ The chemicals have to be deregistered in the workgroup chemical database.
‐ "Precursor chemicals" which can be used for the preparation of narcotics or psychotropics cannot be accepted for storage in the storage room (see regulation "Vorläuferverordnung").
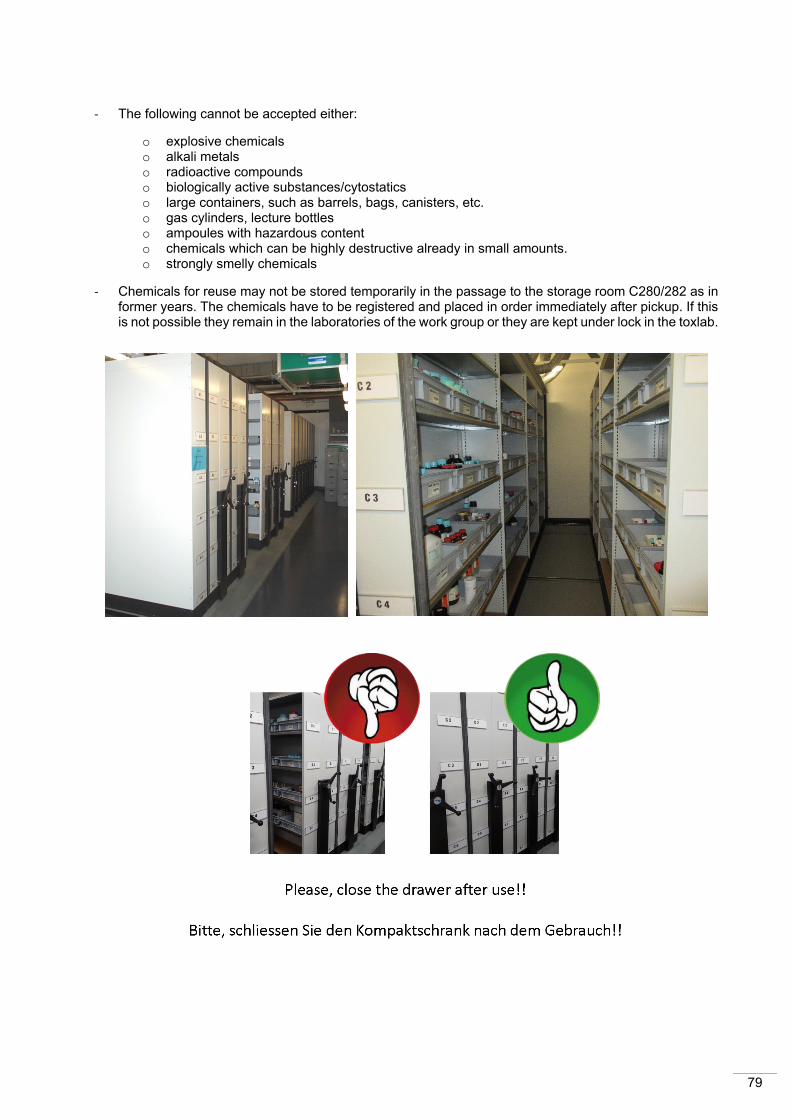
79
‐ The following cannot be accepted either: o explosive chemicals o alkali metals o radioactive compounds o biologically active substances/cytostatics o large containers, such as barrels, bags, canisters, etc. o gas cylinders, lecture bottles o ampoules with hazardous content o chemicals which can be highly destructive already in small amounts. o strongly smelly chemicals
‐ Chemicals for reuse may not be stored temporarily in the passage to the storage room C280/282 as in former years. The chemicals have to be registered and placed in order immediately after pickup. If this is not possible they remain in the laboratories of the work group or they are kept under lock in the toxlab.

80
7.4. Containers and labelling of chemicals
For permanent and temporary storage of chemicals and samples, used chemical containers, and neutral glass bottles may be used. Existing labels must be covered completely with a proper product label. The new identification label for solvents must additionally be covered with a transparent plastic protective tape. Chemicals in spray bottles, flasks, Erlenmeyer flasks etc. must at least be labelled with a permanent marker. Solvent drums must be labelled with engraved tags.
Identification of contents for chemicals and samples:
‐ Product name and/or formula ‐ User's name ‐ (Re)fill date ‐ For hazardous materials: Risk phrases, storage conditions ‐ For solvent drums: engraved tag with product name and laboratory number
Use of empty food, cosmetics and medication containers for the storage of chemicals and samples of any kind is forbidden. (Risk of confusion!).
Chemicals can be ordered only with the consent of the group leader or assistant. Newly delivered chemicals, as well as collection and the return of chemicals from and to the storage room must be recorded in the central chemical inventory systems without exceptions. Never return empty, damaged, unlabeled containers or contaminated chemicals to the chemical storage facility.
Larger quantities of liquid containers must be stored in chemically resistant drip tray. The size of the drip tray must be adjusted so that it can absorb the fluids from the largest container in case it breaks.
Only permanently labelled dash bottles are allowed for use with solvents and water. These are available for water, ethanol, methanol, isopropanol, acetone, hexane and ethyl acetate. For safety reasons, older and non-permanently labelled dash bottles may no longer be used.
7.5. Transport of chemicals within the building
The most common accidents in chemistry and biology are caused by grossly negligent spills of hazardous materials during transportation within the building. The transportation of hazardous substances must be done so that in a fall, or in the following impact, the container cannot break. For the transport of chemicals (including waste to dispose of), special safety carrying baskets must be used, and suitable Dewar vessel (available in the HCI-shop) must be used for the transport of liquefied gases. Gas cylinders > 5 liters of gas must be transported on and chained to special trolleys, with a cap screwed onto them. Canisters filled with solvents must always be closed and transported in suitable holding crates, which can be obtained from the SSHE staff unit. A stable laboratory cart with a protective boundary should also be used.
Chemicals, biological substances, liquefied gases, and mobile waste disposal units must be transported with the goods lift only, and not with the regular lifts.

81
Dewar containers and compressed gas bottles (with steel cap) may only be transported in the goods lift and have to be attached properly to specific fixtures. Users have to send the goods lift unpeopled to the respective floor and collect the goods there. Non-involved people are not allowed to use or enter the lift as long as it contains hazardous goods.
8. Services in D-CHAB
8.1. Toxicology laboratory D312 and central distillation room D310
8.1.1. Toxlab D312; Link www.toxlab.ethz.ch
Experiments in which highly toxic or smelly chemicals are used must be performed in the toxicology laboratory D312 (further details see website). The toxlab D312 may only be entered via the double door system.
Some fume hoods in the toxicology laboratory D312 have their own local vacuum supply as well as a rotary evaporator. Users must bring all other required equipment themselves, and remove it after use.
Infrastructure in the toxicology laboratory D312:
‐ 1 fluorine fume hood, 3 standard fume hoods, 1 fume hood with an exhaust air purification system ‐ 2 solvent-drying equipment for a total of 8 solvents (expandable up to 14 solvents)
‐ Mobile gas detectors (iNet) for online monitoring. The following gases can be analyzed with these devices at any time: HCN, HCl, CO, O2, CO2 Cl2, PH3. These devices are intended for emergency use but can also be used for preventative purposes. The user must make an entry in the logbook when borrowing a gas detector.
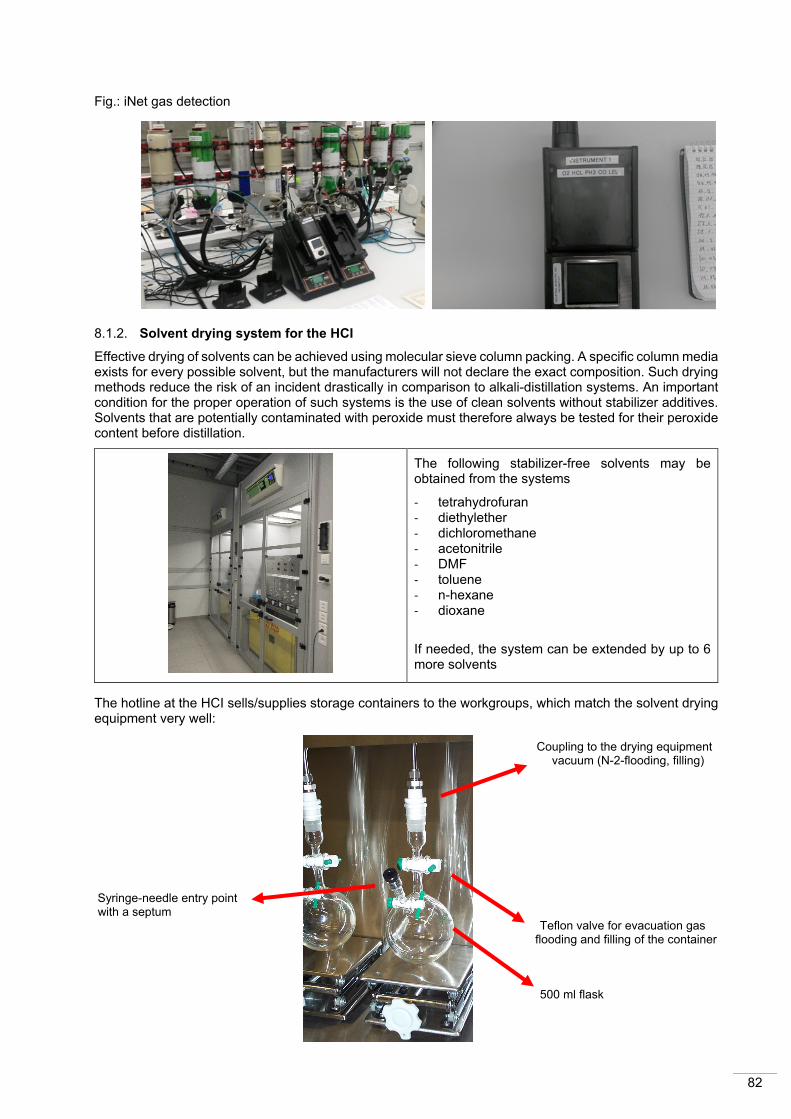
82
Fig.: iNet gas detection
8.1.2. Solvent drying system for the HCI
Effective drying of solvents can be achieved using molecular sieve column packing. A specific column media exists for every possible solvent, but the manufacturers will not declare the exact composition. Such drying methods reduce the risk of an incident drastically in comparison to alkali-distillation systems. An important condition for the proper operation of such systems is the use of clean solvents without stabilizer additives. Solvents that are potentially contaminated with peroxide must therefore always be tested for their peroxide content before distillation.
The following stabilizer-free solvents may be obtained from the systems
‐ tetrahydrofuran ‐ diethylether ‐ dichloromethane ‐ acetonitrile ‐ DMF ‐ toluene ‐ n-hexane ‐ dioxane
If needed, the system can be extended by up to 6 more solvents
The hotline at the HCI sells/supplies storage containers to the workgroups, which match the solvent drying equipment very well: Coupling to the drying equipment vacuum (N-2-flooding, filling) Syringe-needle entry point with a septum Teflon valve for evacuation gas flooding and filling of the container 500 ml flask

83
It is not allowed to draw off dry solvents into beakers, vials, etc. Only specific flasks may be used. The vessels can store a maximum of 500ml of solvent. With a balance and a barcode card, the withdrawn quantity of dried solvent is recorded on a PC next to the drying station. The special vessels are stored and managed by the working groups in the HCI. Note: dried polar solvents are very hygroscopic. When they are briefly exposed to air, they absorb water right away (> 100 ppm). Filling dried solvents from the drying system must therefore be done only into empty, well-washed and well-dried special vessels. The situation with hexane and Methylene Chloride is somewhat less critical. Special vessels are permanently connected to the drying system to prevent that humidity diffuses into the equipment, as well as for flushing the pipeline before the actual filling.
Suggestions for the storage of dried solvents:
Storage of vessels under N2-gas:
Filling of dried solvents may only be done into well-washed and well-dried vessels. We suggest adding molecular sieve to all dried solvents (except for hexane).
Molecular sieve for methanol:
Addition of ca. 10-20 g molecular sieve UOP Type 3A (02573 Fluka). Type 3A is being used to keep polar solvents (methanol, ethanol, etc.) dry.
Molecular sieve for all other solvents:
Addition of ca. 10-20 g Zeochem molecular sieve type Z4-01 (available in the HCI-Shop). ZEOCHEM® molecular sieve 4A is an alkali aluminiosilicate. The type 4A has an effective pore opening of 4 angstroms, resp. 0.4 nm. Molecules with a kinetic diameter of less than 4 angstroms can be absorbed.
Drawing off dry solvents from the storage vessels is only allowed when using special equipment and under an inert gas atmosphere. E.g. the use of single use pipettes would immediately contaminate the dry solvent with water.
The quality of the solvents is checked and reported at regular intervals with a Coulometric Karl Fischer Apparatus. The water content for polar solvents is generally better than < 10 ppm and < 5 ppm for non-polar solvents.
8.1.3. Central distillation room D310; Link www.distillation.ethz.ch
For the recycling and reprocessing of technical or poor solvent qualities, working groups may use the large rotary evaporators in HCI D310. Only trained users are allowed to use the central distillation room (further details see website). The users must do everything themselves, from the filling of the starter vessels with the solvent to be distilled, to the addition of the molecular sieve granulates for the pre-drying, or with appropriate salts for the removal of peroxides. Strict safety rules must be obeyed inside this room, in order to prevent the release of solvent vapors or an explosion by peroxide-contaminated solvents. Removal of peroxides from solvents
Removing peroxides from solvents using reducing agents will only be successful when well established instructions are followed, e.g. with iron(II)sulfate (e.g. for diethyl ether), copper(I)chloride (for tetrahydrofuran) or tin(II)chloride (for dioxane). More universally suitable is filtration through active aluminum oxide. Because peroxides are more polar than the solvent, they will be adsorbed to the aluminum oxide. The capacity of the aluminum oxide depends on the type of solvent. Please observe the details on the datasheet of the aluminum oxide from the supplier!

84
Infrastructure of the distillation room D310:
‐ 3 large rotary evaporators for the distillation of technical grade solvents or solvent recycling
8.1.4. General conditions of use
The use of toxicology laboratory D312 and central distillation room D310 must be pre-registered via www.toxlab.ethz.ch and www.distillation.ethz.ch, respectively. If only using the room for solvent-drying systems or the iNet-gas monitoring equipment, prior registration is not necessary. On the online registration, all relevant information including the name of the user, the fume hoods to be reserved or the number (ID) of large rotation evaporators, as well as a brief description and duration of work activities must be given. The safety officers of all working groups have a key to rooms D312 and D310 and users must obtain this from them, and be sure to return it afterwards. The safety officers of all working group must be informed about who is working with hazardous substances in the toxicology laboratory as well all other details (what, where, when, etc.). Any person who uses toxicology laboratory must have someone that they can contact in case of emergencies at all times. During very dangerous experiments, a second person must be on site.
The users of the toxicology laboratory and the central distillation room are required to return their workspace and equipment in a clean and orderly condition and dispose of all generated hazardous waste properly via the central waste disposal facilities in HCI D276. Anyone who fails to announce the use of the toxicology laboratory in advance can expect his materials to be confiscated and removed. Those who fail to clean their workstation after finishing their work will be fined at least CHF 600 for the cleaning service. Abandoned materials are either discarded or recycled.

85
8.2. Toxlab C174
Link: www.c174.ethz.ch
The toxicology laboratory C174 consists of two rooms, a biology laboratory (BL2) and a toxicology laboratory where mostly cytostatics are handled. These rooms may only be accessed via a central double-door system.
Room C174.1, biology laboratory BL2
This room is designed for handling biologically active substances (BL2). The room is equipped with a biosafety working bench ready for use, an autoclave, a freezer at -80°C and standard laboratory equipment.
Room C174.2, toxlab 2 (or cytostatics laboratory)
This room is designed for handling hazardous substances, analogous to the toxlab in D312. The room is equipped with two fume hoods with air filtration and standard laboratory equipment.
The use of C174 must be registered on the website www.c174.ethz.ch with the same requirements as described in 8.1.4.

86
8.3. High-pressure laboratory
8.3.1. Services of the high-pressure laboratory
The high-pressure laboratory is a service laboratory for the HCI. Since the use of synthesis and reaction apparatus > 10 bar pressure requires approval from the SSHE staff unit, you should, if necessary, consider using the high-pressure laboratories. Only a high-pressure laboratory can meet the legal requirements concerning the safety of pressurized equipment.
Website: www.hochdrucklabor.ethz.ch
8.3.2. Internal (ETH) regulations on working with high pressure
‐ The users of the high-pressure laboratories need to hand in a written request (form related to the high-pressure Laboratory) in advance for the execution of a high-pressure experiment. The application must also present a user-evaluated risk analysis. The high-pressure laboratory manager then decides to accept or reject the request.
‐ The high-pressure laboratory manager gives users the professional technical support. ‐ The users must comply with the of the HCI laboratory rules, regardless of any obligations. ‐ The user, in collaboration with the high-pressure laboratory manager, must provide an accurate
planning of the high-pressure experiment. Subsequent changes in the experiment established by the end users without informing the high-pressure laboratory manager are not allowed.
‐ The users must agree on appropriate working hours and oversight duties with the high-pressure laboratory manager.
When high-pressure equipment is being used inside a high-pressure cell, access to this cell is forbidden unless it is to pressurize or depressurize the equipment with the required gas.
Examples of high-pressure autoclaves:
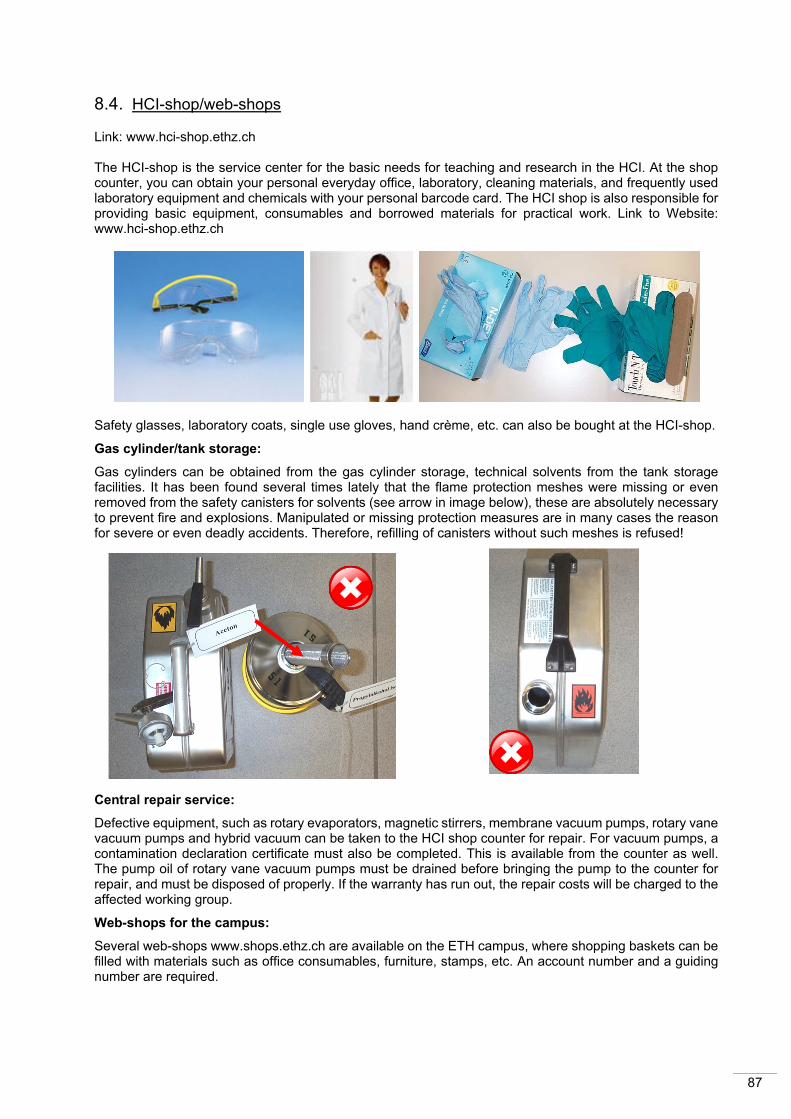
87
8.4. HCI-shop/web-shops
Link: www.hci-shop.ethz.ch The HCI-shop is the service center for the basic needs for teaching and research in the HCI. At the shop counter, you can obtain your personal everyday office, laboratory, cleaning materials, and frequently used laboratory equipment and chemicals with your personal barcode card. The HCI shop is also responsible for providing basic equipment, consumables and borrowed materials for practical work. Link to Website: www.hci-shop.ethz.ch
Safety glasses, laboratory coats, single use gloves, hand crème, etc. can also be bought at the HCI-shop.
Gas cylinder/tank storage:
Gas cylinders can be obtained from the gas cylinder storage, technical solvents from the tank storage facilities. It has been found several times lately that the flame protection meshes were missing or even removed from the safety canisters for solvents (see arrow in image below), these are absolutely necessary to prevent fire and explosions. Manipulated or missing protection measures are in many cases the reason for severe or even deadly accidents. Therefore, refilling of canisters without such meshes is refused!
Central repair service:
Defective equipment, such as rotary evaporators, magnetic stirrers, membrane vacuum pumps, rotary vane vacuum pumps and hybrid vacuum can be taken to the HCI shop counter for repair. For vacuum pumps, a contamination declaration certificate must also be completed. This is available from the counter as well. The pump oil of rotary vane vacuum pumps must be drained before bringing the pump to the counter for repair, and must be disposed of properly. If the warranty has run out, the repair costs will be charged to the affected working group.
Web-shops for the campus:
Several web-shops www.shops.ethz.ch are available on the ETH campus, where shopping baskets can be filled with materials such as office consumables, furniture, stamps, etc. An account number and a guiding number are required.

88
8.5. Central mechanical workshops in the HCI
8.5.1. For D-CHAB
The central mechanical workshop has around 15 employees and offers important support to the high-level research within the department of Chemistry and Applied Biosciences.
8.5.2. Organization
The central mechanical workshop consists of two parts: physical chemistry together with organic chemistry and chemical and bioengineering together with inorganic chemistry. Both parts are autonomous units, working for the institutes. The available equipment and machines are mostly shared and an intensive collaboration exists between the two parts.
8.5.3. Services
The central mechanical workshop is equipped with state-of-the-art tools and offers a large variety of services to the members of D-CHAB:
‐ Construction and manufacturing of complex and not commercially available research tools and -apparatus, in close collaboration with the researchers.
‐ Repair and maintenance of research equipment. ‐ Various specialized welding techniques ‐ Advice and support in all mechanical questions including the proper choice and purchasing of materials
to be used. ‐ Support of the LN2, N2- and argon-supply in the D-CHAB through LPC mechanical engineers. ‐ Collaboration with the institutes' electronics engineers.
8.6. The safety trail HCI C280 and C286
The safety trails in C280 and C286 are a part of the training concept for safety representatives and the first-intervention personnel at the HCI. In the safety trail, both obvious and hidden faults concerning technical safety, which are often encountered in the laboratories, are on display.
All safety representatives of the HCI must successfully complete the safety trail, which requires finding at least 70% of these faults.
On the website www.safetyparcours.ethz.ch, instructors can reserve the safety trail for training. You can enter the trail room with your personal HCI-key.

89
8.7. Central filling station for liquid nitrogen
The filling station in in HCI D379.1 consists of 3 cabins:
‐ cabin on the right: unpressurized filling of small dewars with liquid nitrogen ‐ cabin in the middle: unpressurized filling of large dewars with liquid nitrogen ‐ cabin on the left: pressurized filling of large dewar tanks
The filling station involves
‐ 24h/7d – self-service operation, pressurized as well as unpressurized filling of dewars. ‐ automatic booking with a card reader. Liquid nitrogen cards can be obtained at the HCI shop. ‐ emergency switches in the cabins, in the room and in front of the room. Activate the switch in case
of an emergency which will cause the entire filling system to shut down. ‐ Oxygen depletion alarm (orange signal): Stop the filling process and leave the room D379.1 until
the problem is solved. ‐ Oxygen depletion alarm (red signal/main alarm): The room D379.1 must not be entered anymore.
Leave the area immediately and report abnormalities to the intervention team.
Rules of conduct
‐ Protective equipment: Everybody is obliged to wear protective equipment (safety glasses with all-round protection, protective gloves, lab coat) and suitable clothing.
‐ Labelling of dewar tanks: All dewar tanks have to be labelled indicating the workgroup, contact person and how to reach the contact person.
‐ Outside the ETH business hours there has to be a second skilled person on site during the filling process.
‐ Specific regulations for pressurized filling: Only people trained by the service staff are allowed to use this station. The use by untrained people is strictly forbidden. Registration for a training: [email protected]
‐ In case of an evacuation of the building the use of the filling station is strictly forbidden. Follow the evacuation instructions.
‐ Alarms released by the filling station: Further use of the filling station is forbidden until the problem is solved. Follow the instructions of the service staff. If the station works properly after confirmation it may be used again.

90
9. Authorities/legal basis
9.1. Laws and regulations
On the following website, the current laws and regulations in Switzerland can be found:
www.admin.ch
Go to federal law, where you have two options
‐ Under the section federal law choose "classified compilation" ‐ Index A-Z (only available in German) ‐ Find the corresponding legal texts and regulations
9.2. Chemicals Act
The new chemicals legislation is designed to protect people and the environment from hazardous chemicals. Since August 1, 2005, the new chemicals act and its regulations have been in force. The poison act of 1969 was therefore replaced by this amendment. Thus, the five toxicity classes of the old poison act have been replaced by a new system of hazard identification, the same as used in the member States of the European Union. The following federal agencies are the most involved in the Chemicals Act and its regulations: Office for Public Health (BAG), office for environment, forests and Landscape (FOEN) and the State Secretariat for Economic Affairs (SECO). For details, see below.
9.3. State Secretariat for Economic Affairs (SECO)
SECO is the confederation's competence center for all core issues relating to economic policy. On the domestic front, SECO acts as an interface between business, social partners and government. It supports the regionally and structurally balanced development of the economy and ensures the protection of employees. Its workplace inspectors supervise the correct application of the regulations on employee protection by the cantons, in particular in the fields of health (labor law) and safety (accidents insurance act) at the work place.
Website: www.seco-admin.ch
Extracts from the labor law:
Art. 6 Obligations of employees and workers
1 The employer is obligated to take all necessary measures in protecting the health of his employees. 2 The employer must organize the operational infrastructure and workflow in such a way that health risks and overstressing of employees can be avoided as good as possible. 2bis The employer must ensure that the employee does not have to consume alcohol or other intoxicating agents during his work. The Federal Council defines the exceptions. 3 The employer must involve the employees in the health protection programs. Employees are obliged to support the employer in implementing the rules and regulations. 4 Measures for health protection in companies are defined in the regulations.

91
9.4. Federal Office for Public Health (BAG)
The Federal Office for Public Health (BAG) makes key contributions to ensuring the population is in good health. BAG promotes the development of the health system with factually substantiated contributions. It addresses politics, the people, the economy and science. BAG’s work is based upon the individual responsibilities of the people, but is aware that in certain areas measures must be taken to protect the people.
BAG also provides the legislation principles and laws for bio safety, radiation safety, laser technology, etc.
Website: www.bag.admin.ch
9.5. Swiss National Accident Insurance Fund (SUVA)
‐ Organization SUVA is an independent, non-profit company under public law. Its head office is located in Lucerne.
‐ Field of operation A financially independent body incorporated under public law, Suva insures around 110,000 companies and 2 million employees and unemployed people respectively against the consequences of accidents and occupational diseases
‐ Business operations Its range of services encompasses prevention, insurance and rehabilitation. SUVA communicates these services through its brands
o SuvaPro (occupational safety) o SuvaLiv (leisure time safety) o SuvaRisk (premiums and capital investments) o SuvaCare (claims management and rehabilitation).
Website: www.suva.ch
9.6. Federal Coordination Commission for Occupational Safety FCOS (EKAS)
The Federal Coordination Commission for Occupational Safety FCOS is the central information and coordination office for safety and health at work. It coordinates the preventive measures, the tasks in the execution and the uniform application of the rules. Their decisions are binding. Primarily, the cantons and SUVA have to surveil and advise the establishments. SUVA has for this purpose a specific department "health protection". Secondly, SECO and specific professional organizations contribute to the implementation. Link: www.ekas.ch
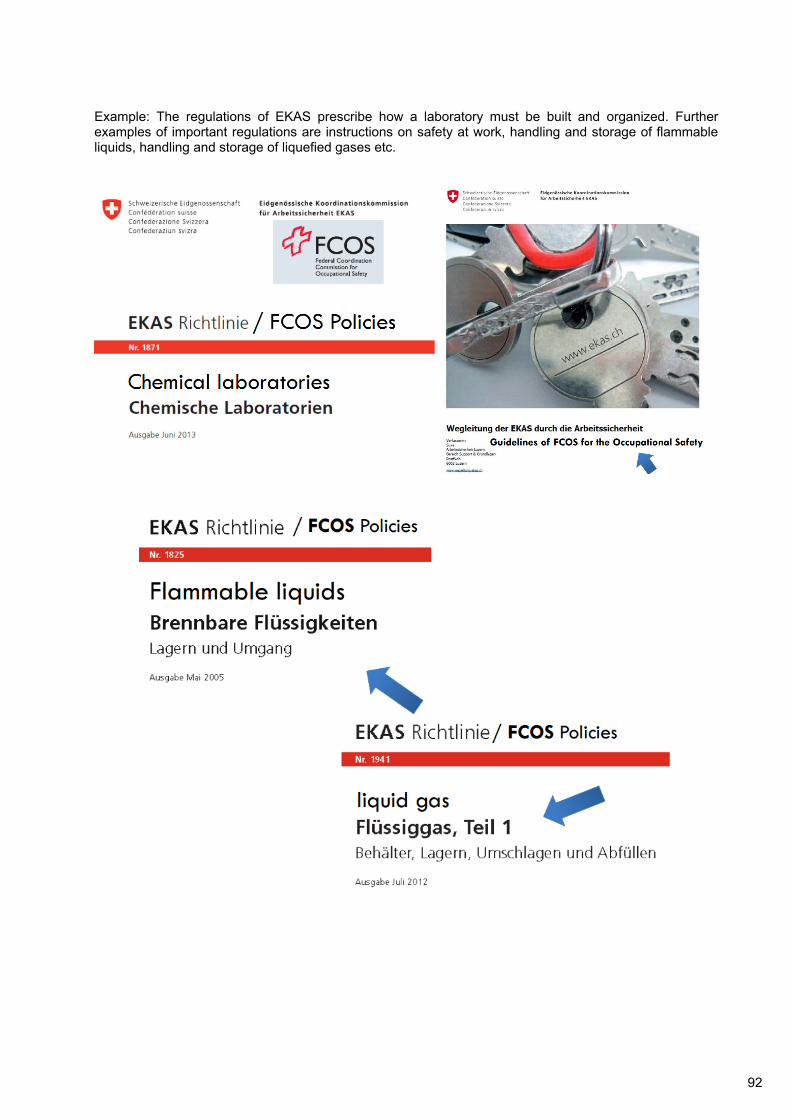
92
Example: The regulations of EKAS prescribe how a laboratory must be built and organized. Further examples of important regulations are instructions on safety at work, handling and storage of flammable liquids, handling and storage of liquefied gases etc.
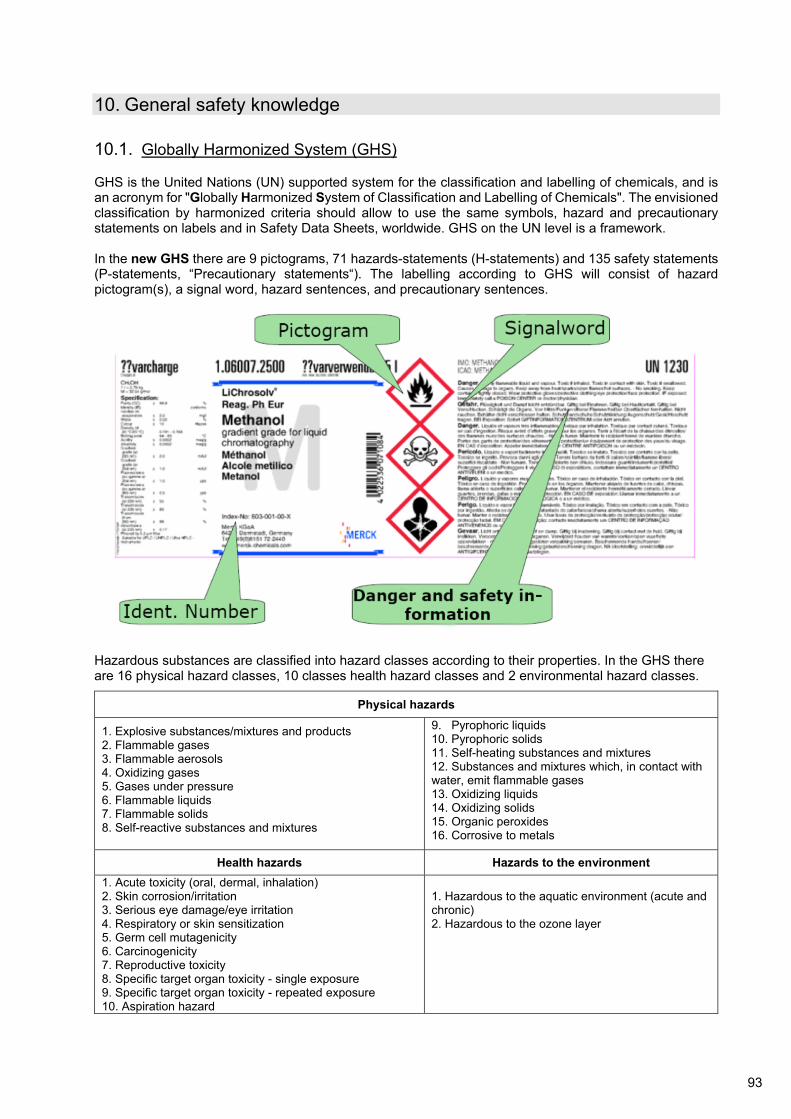
93
10. General safety knowledge
10.1. Globally Harmonized System (GHS)
GHS is the United Nations (UN) supported system for the classification and labelling of chemicals, and is an acronym for "Globally Harmonized System of Classification and Labelling of Chemicals". The envisioned classification by harmonized criteria should allow to use the same symbols, hazard and precautionary statements on labels and in Safety Data Sheets, worldwide. GHS on the UN level is a framework. In the new GHS there are 9 pictograms, 71 hazards-statements (H-statements) and 135 safety statements (P-statements, “Precautionary statements“). The labelling according to GHS will consist of hazard pictogram(s), a signal word, hazard sentences, and precautionary sentences.
Hazardous substances are classified into hazard classes according to their properties. In the GHS there are 16 physical hazard classes, 10 classes health hazard classes and 2 environmental hazard classes.
Physical hazards
1. Explosive substances/mixtures and products 2. Flammable gases 3. Flammable aerosols 4. Oxidizing gases 5. Gases under pressure 6. Flammable liquids 7. Flammable solids 8. Self-reactive substances and mixtures
9. Pyrophoric liquids 10. Pyrophoric solids 11. Self-heating substances and mixtures 12. Substances and mixtures which, in contact with water, emit flammable gases 13. Oxidizing liquids 14. Oxidizing solids 15. Organic peroxides 16. Corrosive to metals
Health hazards Hazards to the environment
1. Acute toxicity (oral, dermal, inhalation) 2. Skin corrosion/irritation 3. Serious eye damage/eye irritation 4. Respiratory or skin sensitization 5. Germ cell mutagenicity 6. Carcinogenicity 7. Reproductive toxicity 8. Specific target organ toxicity - single exposure 9. Specific target organ toxicity - repeated exposure 10. Aspiration hazard
1. Hazardous to the aquatic environment (acute and chronic) 2. Hazardous to the ozone layer

94
The hazards classes are divided into categories to indicate the degree of danger, where category 1 represents the highest degree of danger. In exceptional cases, there is an additional subdivision into type classes (organic peroxides) or subclasses (explosives/mixtures and products). Signal words:
In addition to the hazard symbols, signal words must be used, depending on the classification of a substance or mixture.
‐ Danger – signal word for severe hazard categories ‐ Warning – signal word for less severe hazard categories
10.2. H- und P-Phrases
Hazard statements - H-Phrases (formerly R-phrases)
Safety Advice - P-phrases (formerly S-phrases)
Die detaillierte Auflistung der H- und P-Sätze finden sich auf der Webseite von Wikipedia
10.3. Overview on (former) hazard symbols / GHS pictograms

95
10.4. Explanation of new GHS pictograms
GHS 01 – Pictogram: exploding bomb
Required with: ‐ Unstable explosives and mixtures ‐ Unstable explosives/mixtures and products with explosives of Divisions
1.1, 1.2, 1.3, 1.4 ‐ Self-decomposing substances and mixtures, Types A, B ‐ Organic Peroxide, Types A, B
Explanations of pictogram GHS 01: ‐ Division 1.1: Substances, mixtures and articles which have a mass explosion hazard (a mass explosion is
one which affects almost the entire quantity present virtually instantaneously). ‐ Division 1.2: Substances, mixtures and articles which have a projection hazard but not a mass explosion
hazard. ‐ Division 1.3: Substances, mixtures and articles which have a fire hazard and either a minor blast hazard or
a minor projection hazard, but not a mass explosion hazard: (i) combustion which gives rise to considerable radiant heat; or (ii) which burn one after another, producing minor blast or projection effects or both.
‐ Division 1.4: Substances, mixtures and articles which present no significant hazard: substances, mixtures and articles which present only a small hazard in the event of ignition or initiation.
‐ Substances, mixtures and articles with explosive contents of Divisions 1.5 and 1.6 do not have to be labelled in this way.
‐ Self-reactive substances and mixtures are thermally unstable liquid or solid substances or mixtures liable to undergo a strongly exothermic decomposition even without participation of oxygen (air). There are 7 different types (A – G).
‐ Type A and B are assigned the pictogram ‘exploding bomb’. Type B is also assigned the pictogram ‘flame’. Type C, D, E and F are only assigned the pictogram ‘flame’ and Type G does not require a pictogram.
‐ Organic Peroxides are classified in one of seven categories of „Types A to G“ for this class. Type A and B receive the pictogram „exploding bomb“, Type B also receives the pictogram „flame“: Type C,D,E and F only receive the pictogram „flame“ and Type G does not require a pictogram.
GHS 02 – Pictogram: Flame
Required with: ‐ Flammable gases, hazards category 1 ‐ Flammable Aerosols, hazards categories 1, 2 ‐ Flammable liquids, hazards categories 1, 2, 3 ‐ Flammable solids, hazards categories 1,2 ‐ Self-reactive substances and mixtures, Types B, C, D, E, F ‐ Pyrophoric liquids, hazards category 1 ‐ Pyrophoric solids, hazards category 1 ‐ Self-heating substances and mixtures, hazards categories 1, 2 ‐ Substances and mixtures, which upon contact with water produce
flammable gases, hazards categories 1, 2, 3 ‐ Organic peroxides, Types B, C, D, E, F
New flammability limits for liquids are shown in the following table:
Category Boiling point Flash point
1 Extremely flammable ≤ 35 °C < 23 °C
2 Highly flammable > 35 C < 23 °C
3 Flammable - 23 - 60 °C
4 Combustible * - > 60 - 93 °C
*Does not exist in the EU-GHS-regulations

96
GHS 03 – Pictogram: Flame over a circle GHS 04 – Pictogram: Gas cylinder
Required with: ‐ Oxidizing gases, hazards category 1 ‐ Oxidizing liquids, hazards categories 1, 2, 3 ‐ Oxidizing solids, hazards categories 1, 2, 3
Required with: ‐ Gases under pressure ‐ Compressed gases ‐ Liquefied gases ‐ Refrigerated liquefied gases ‐ Dissolved gases
Explanation for the pictogram GHS 03: ‐ Igniting (oxidizing) liquids (three categories) as well as igniting (oxidizing) solids (also three categories) must
be labelled with the “flame over a circle” pictogram.
GHS 05 – Pictogram: corrosion
Required with: ‐ Corrosive to metals, hazards category 1 ‐ Skin corrosion/irritation, hazards categories 1A, 1B, 1C ‐ Serious eye damage/eye irritation, hazards category 1
Explanations for the pictogram GHS 05: ‐ Corrosive to metals: A substance or a mixture which is corrosive to metals is classified in a single category
for this class. The pictogram „corrosive“ must be used here. ‐ Skin corrosion/irritation: This class includes two categories: skin corrosion - irreversible skin damage - means
category 1 and requires the pictogram "corrosion". It is further divided into three subcategories (A, B and C) according to negative effects depending on exposure time. Substances which cause a reversible irritation are classified into category 2. This health hazard is marked with the pictogram "exclamation mark".
‐ Severe eye damage/eye irritation: Here there are two categories as well. A severe eye damage is classified as category 1, substances and mixtures with this hazard require the pictogram „corrosive“. Category 2 contains substances which cause eye irritation (changes to the eye which are reversible within 21 days). The pictogram „exclamation mark“ is sufficient.

97
GHS 06 – Pictogram: Skull and crossbones
Required with ‐ acute toxicity (oral, dermal, breath), hazards categories 1, 2, 3
(Lethal)(Highly toxic)
(Toxic) (Health Hazard)
(Possible health hazard)*
LD50 oral (mg/kg)
< 5 5 – 50 50 – 300
300 – 2000 2000 – 5000
LD50 dermal (mg/kg)
< 50 50 – 200 200 – 1000
1000 – 2000
2000 – 5000
LD50 Dust/mist (mg/L/4h)
< 0,05 0,05 – 0,5
0,5 – 1 1 – 5 5 – ?
*does not exist in the EU-GHS
GHS 07 – Pictogram: exclamation mark GHS 08 – Pictogram: health hazard
Required with: ‐ Acute toxicity (oral, dermal, breath), hazard
category 4 ‐ Skin irritation, hazard category 2 ‐ Eye irritation, hazard category 2 ‐ Skin sensitization, hazard category 1 ‐ Specific target-organ toxicity (single exposure),
hazard category 3 ‐ Respiratory path irritation ‐ Narcotic effects
Required with: ‐ Respiratory sensitization, hazards category 1 ‐ Germ cell mutagenicity, hazards categories 1A,
1B, 2 ‐ Carcinogenicity, hazards categories 1A, 1B, 2 ‐ Reproductive toxicity, hazards categories 1A, 1B,
2 ‐ Specific target-organ toxicity (single exposure),
hazards categories 1, 2 ‐ Specific target-organ toxicity (repeated
exposure), hazards categories 1, 2 ‐ Aspiration hazard, hazard category 1
Category CMR 1A: Found in humans
Category CMR 1B: Found in animal models
Category CMR 2: Suspected substances
Without pictogram
Category 1
< 5
Category 2
> 5 - < 50
Category 3
> 50 - < 300
Category 4
> 300 - < 2000
Category 5
> 2000 - < 5000

98
Explanations for pictogram GHS 08:
‐ Skin or Respiratory Sensitization: Category 1 = respiratory allergen. Substances which produce an allergic reaction upon skin contact, must be labelled with the pictogram „exclamation mark.
‐ Germ cell mutagenicity: This class has two categories. Substances which are known or suspected to produce inheritable mutations in human germ cells fall in category 1. This is subdivided in two subcategories 1A and 1B. Category 2 contains all substances which cause concern for humans owing to the possibility that they may induce heritable mutations in the germ cells of humans.
‐ Carcinogenicity: Again, there are two categories, where category 1 is subdivided again in category 1A and 1B.
‐ Reproductive toxicity: for the classification for reproductive toxicity, chemical substances are allocated to one of two categories. Effects on sexual function and fertility and on development are considered. In addition, effects on lactation are allocated to a separate hazard category.
‐ Specific target organ toxicity – Single exposure: Substances that have produced significant toxicity in humans, or that, based on evidence from studies in animal experimentation can be presumed to have the potential to produce significant toxicity in humans following single exposure.
‐ Specific target organ toxicity – Repeated exposure: Substances that have produced significant toxicity in humans, or that, based on evidence from studies in experimental animals can be presumed to have the potential to produce significant toxicity in humans following repeated exposure.
‐ Aspiration hazard: aspiration means the entry of a liquid or solid chemical directly through the oral or nasal cavity, or indirectly from vomiting, into the trachea and lower respiratory system.
GHS 09 – Pictogram: Environment
Required with:
‐ Aquatic toxicity ‐ Acute aquatic toxicity of category 1 ‐ Chronic aquatic toxicity of categories 1, 2
Explanations to the pictogram GHS 09:
‐ Category 1; aquatic toxicity: A substance or mixture is considered having aquatic toxicity based upon the following classification criteria:
‐ Acute aquatic toxicity means the intrinsic property of a substance to be injurious to an organism in a short-term exposure to that substance.
‐ Potential or actual bioaccumulation means net result of uptake, transformation and elimination of a substance in an organism due to all routes of exposure (i.e. air, water, sediment/soil and food)
‐ Degradation of organic chemicals: biotic (through organisms) or abiotic (not through organisms, perhaps through solar radiation). If a substance is not rapidly degraded, it has the potential to have chronic and widespread toxic effect on the aquatic environment.
‐ Chronic aquatic toxicity: substances have a sustained hazardous effect on aquatic organisms ‐ Acute aquatic hazardous substances of the categories 1 and 2 must be labelled with the pictogram
„environment“. The classifications „chronic aquatic toxicity“ of the categories 3 and 4 do not require such a pictogram.
‐ Additional EU hazard classes: ‐ Damaging to the ozone layer: this hazard class was added to the EU proposal for the GHS Ordnance.
Substances must be classified as damaging to the ozone layer if they can be a hazard to the structure or the functioning of the ozone layer. There is no pictogram for this class of hazards.
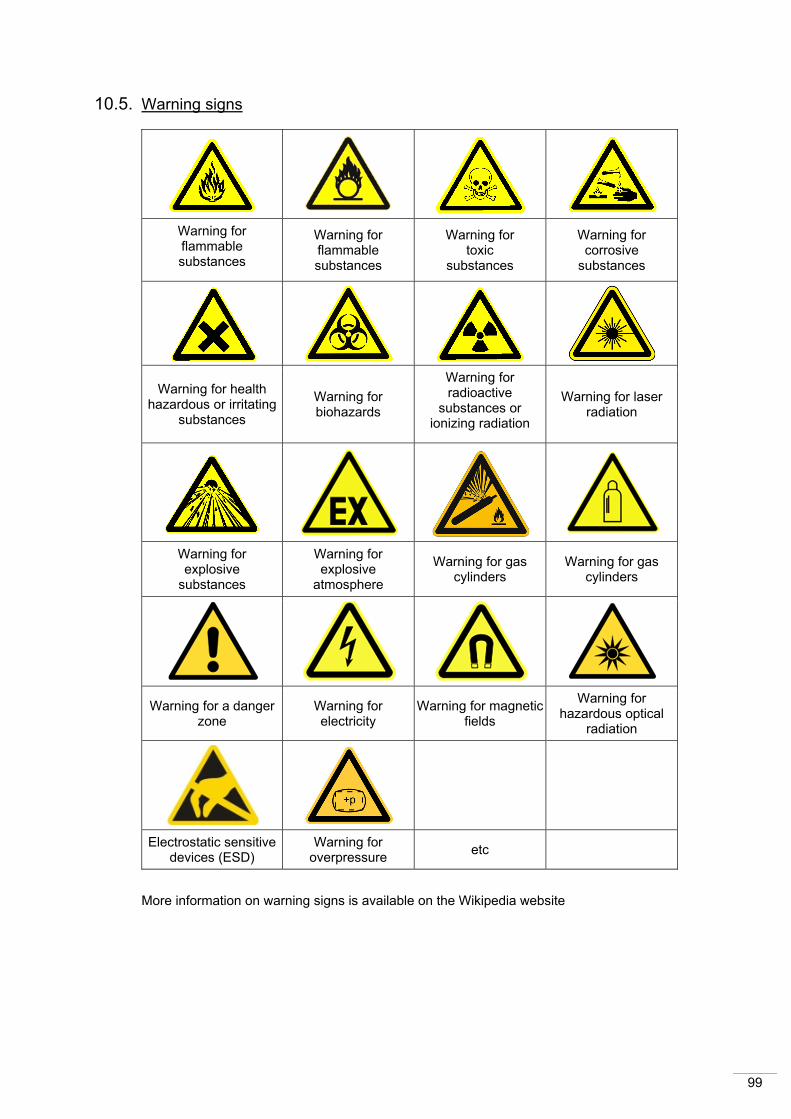
99
10.5. Warning signs
Warning for flammable substances
Warning for flammable substances
Warning for toxic
substances
Warning for corrosive
substances
Warning for health hazardous or irritating
substances
Warning for biohazards
Warning for radioactive
substances or ionizing radiation
Warning for laser radiation
Warning for explosive
substances
Warning for explosive
atmosphere
Warning for gas cylinders
Warning for gas cylinders
Warning for a danger zone
Warning for electricity
Warning for magnetic fields
Warning for hazardous optical
radiation
Electrostatic sensitive devices (ESD)
Warning for overpressure
etc
More information on warning signs is available on the Wikipedia website

100
10.6. Rules and prohibition signs
Wear protective glasses No unauthorized access
Wear protective clothing Forbidden for people with pacemakers
Wear protective gloves Forbidden for people with metal implants
Use face protection No open fires
Use breathing protection No smoking
General signs No eating and drinking
Wear solid shoes Do not extinguish with water
Use ear protection No mobile phones
More information is available on the Wikipedia website

101
10.7. Safety-related properties in chemistry
Vapor pressure:
The vapor pressure of a substance is defined as the saturation pressure above a solid or liquid substance. It is a measure of how easily the substance goes into the vapor state. Substances with high vapor pressure tend to evaporate more quickly than those with low vapor pressure. The vapor pressure increases with the temperature. With a temperature increase, therefore, the substances with high vapor pressures reach high concentrations very fast, e.g. in the air, or may cause a high pressure in closed containers.
Flashpoint ambient temperature:
The flashpoint is the lowest temperature of a flammable liquid where under defined conditions vapors can develop in such quantities that the air / vapor mixture above the liquid surface can be ignited. If the flash point is below the ambient temperature, there is inflammation or explosion hazard, is it above the ambient temperature, an explosion hazard only exists when the liquid is heated.
Ignition temperature:
The ignition temperature is the lowest temperature of a hot surface, where flammable gases or vapors of flammable liquids in a mixture with air can ignite under defined conditions.
Risk of overheating from oil baths (note the different qualities of oil in each of the catalogues of the suppliers!), or introduction of water in hot oil baths in excess of 100 ° C (danger of explosion!),
Ignition sources:
These are hot surfaces, fire, flames, heat, hot air hair dryer, mechanically and electrically generated sparks.
Explosive mixtures:
An explosive mixture is present when flammable gases, vapors or mists are in such large quantities in the air (within the explosion limits) that a response spreads automatically after ignition.
An explosion hazard exists especially in poorly ventilated spaces and containers such as in the sewers, when the vapors of large quantities of spilled, or when flammable organic solvents (e.g. diethyl ether, gasoline, etc.) come into contact with an ignition source.
Explosion limits:
Flammable vapors, gases or mist, mixed with air, are explosive only within a certain range. Below the lower explosive limit, there is too little fuel available and the mixture is too lean. Above the upper explosive limit, too much fuel or too little oxygen is present, the mixture is too rich, and it burns quietly in case of fire. The range between the lower and upper explosive limit is the explosion zone, within this range an explosion hazard exists! When dealing with flammable materials in closed reaction vessels or apparatus, the oxygen-containing atmosphere should always be replaced with argon or nitrogen gas, if possible.

102
10.8. Night time and continuous operation
Reactions and devices without increased safety risk, which stay in operation overnight, must be declared with a nighttime sign. This nighttime sign must be easily visible at the fume hood window, or must be fastened in the vicinity of the experiment or the equipment. Permanent nighttime signs are not allowed but every experiment needs a new nighttime sign. Equipment in continuous operation must be specifically identified with a phone number of the person responsible and with references to what to do in an emergency. Equipment in operation without a night sign will be turned off on weekends, public holidays and on weekdays between 10pm and 6am.
In addition to the nighttime sign, there is a continued operation sign, similar to the example below
Link: https://www.ethz.ch/content/dam/ethz/associates/services/Service/sicherheit-gesundheit-umwelt/files/laborsicherheit/de/nachttafel.pdf
----------------------------------------------------- fold here --------------------------------------------------------
Nachttafel / Overnight Experiment Stab SGU, ETH Zürich
Nachttafel für Experimente / Overnight Experiments Gebäude und Raumnummer / Building and room number: ______________
Datum und Uhrzeit date and time
Beginn start
Endeend
Verantwortliche Person und Stellvertreter responsible person and deputy
Name name
private Telefonnummerprivate phone number
Name name
private Telefonnummerprivate phone number
Experiment / Reaktion experiment / reaction
Beschreibung description
Reaktionsgleichung chemical equation
Lösemittel solvents
Medien media
0 Elektrizität electricity
0 Kühlwasser cooling water
0 St ickstoff nitrogen
0 Vakuum vacuumy
0 sonstiges: other:
Spezielle Gefahren Particular hazards
0
0
0
0
0
0
0
0
0
0
0
0
Geeignete Löschmittel Suitable extinguishing agents
0 Wasser water
0 Kohlendioxid (CO2) carbon dioxide (CO2)
0 Sand sand
Notfallmassnahmen Emergency measures
Datum und Unterschrift / date and signature:___________________________________________
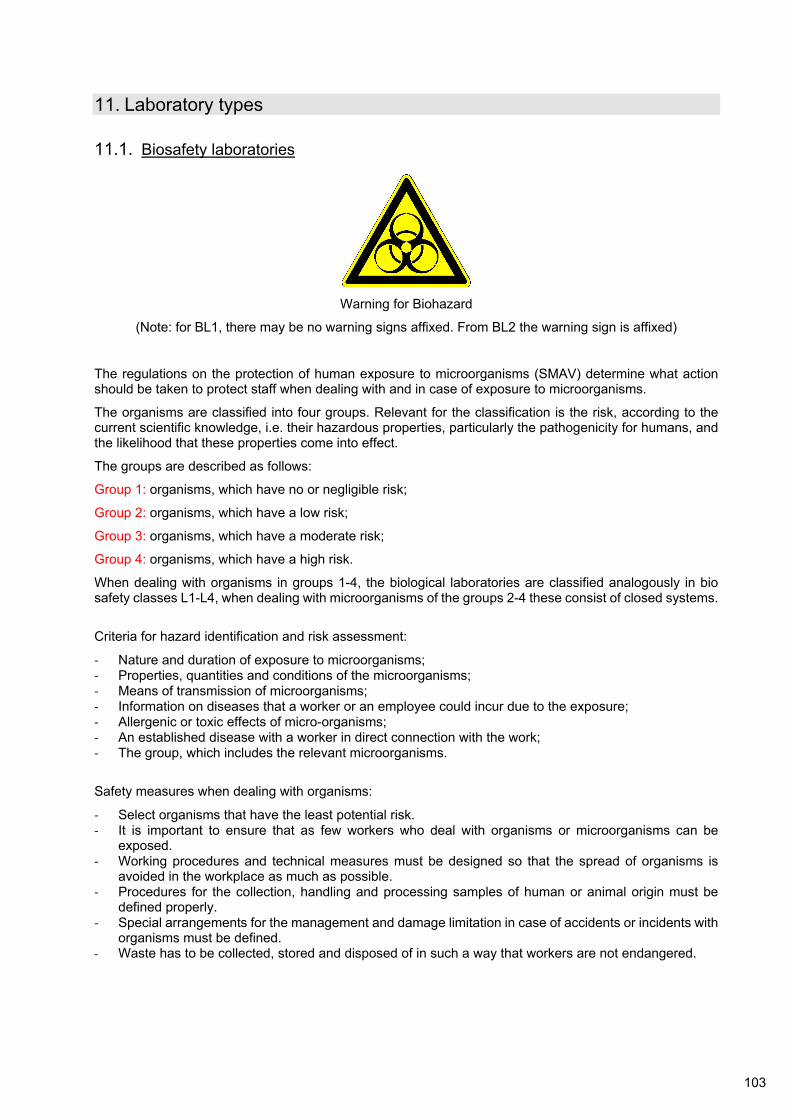
103
11. Laboratory types
11.1. Biosafety laboratories
Warning for Biohazard
(Note: for BL1, there may be no warning signs affixed. From BL2 the warning sign is affixed)
The regulations on the protection of human exposure to microorganisms (SMAV) determine what action should be taken to protect staff when dealing with and in case of exposure to microorganisms.
The organisms are classified into four groups. Relevant for the classification is the risk, according to the current scientific knowledge, i.e. their hazardous properties, particularly the pathogenicity for humans, and the likelihood that these properties come into effect.
The groups are described as follows:
Group 1: organisms, which have no or negligible risk;
Group 2: organisms, which have a low risk;
Group 3: organisms, which have a moderate risk;
Group 4: organisms, which have a high risk.
When dealing with organisms in groups 1-4, the biological laboratories are classified analogously in bio safety classes L1-L4, when dealing with microorganisms of the groups 2-4 these consist of closed systems.
Criteria for hazard identification and risk assessment:
‐ Nature and duration of exposure to microorganisms; ‐ Properties, quantities and conditions of the microorganisms; ‐ Means of transmission of microorganisms; ‐ Information on diseases that a worker or an employee could incur due to the exposure; ‐ Allergenic or toxic effects of micro-organisms; ‐ An established disease with a worker in direct connection with the work; ‐ The group, which includes the relevant microorganisms.
Safety measures when dealing with organisms:
‐ Select organisms that have the least potential risk. ‐ It is important to ensure that as few workers who deal with organisms or microorganisms can be
exposed. ‐ Working procedures and technical measures must be designed so that the spread of organisms is
avoided in the workplace as much as possible. ‐ Procedures for the collection, handling and processing samples of human or animal origin must be
defined properly. ‐ Special arrangements for the management and damage limitation in case of accidents or incidents with
organisms must be defined. ‐ Waste has to be collected, stored and disposed of in such a way that workers are not endangered.

104
Actions with genetically modified, pathogenic or invasive organisms have to be announced to the public authorities. Before starting such an action contact SSHE CABS ([email protected]).
The biosafety responsible must declare a dining, drinking, smoking, snuff and makeup ban for those rooms in which there is a risk of contamination by pathogenic microorganisms for the users, and enforce the prohibition. In such areas, no food can be kept.
Protective measures:
‐ The necessary protective equipment must be properly stored, checked and cleaned after use. Before the next use, if necessary, it must be brought in the proper state or it must be replaced.
‐ Work clothes and personal protective equipment that may have been contaminated by micro-organisms, must be taken off when leaving the work area, and must be stored separately from other clothing prior to implementing the above measures.
‐ Possibly contaminated clothes and personal protection must be cleaned and, if necessary, disinfected.
11.2. Laser laboratories
Warning for laser radiation
Laser laboratories from Laser Class 3B are marked with laser lights. When laser equipment is in operation, the laser warning lamp lights up in front of the laboratory room. When equipment is in operation, entry is only permitted if the safety representative/officer is present. The SSHE staff unit must be contacted when setting up and commissioning a laser laboratory.
Definition of a Laser:
Laser (Light Amplification by Stimulated Emission of Radiation) systems are sources of coherent, quasi-monochromatic and strongly condensed beams of radiation in the visible and near visible ranges of the electromagnetic spectrum (far infrared, infrared, ultra violet and X-ray radiation). In principle, a laser consists of three components: first, an active laser medium, which mainly determines the properties of the laser, e.g. a gas, a crystal or a diode; second a pumping mechanism, which supplies energy to the laser, e.g. a flash light or an electrically operated discharge; and finally, a laser resonator is a system made up from mirrors and other optical elements, which ensures feedback and therefore induced emission of radiation. Depending on the specific construction and the choice of components, a large range of different laser types exists, which mainly distinguish themselves in the attainable powers (from some microwatts to many kilowatts) and their frequency properties.
The current classification of laser classes and more information can be found on the website of the federal office of public health (BAG), Link: www.bag.admin.ch
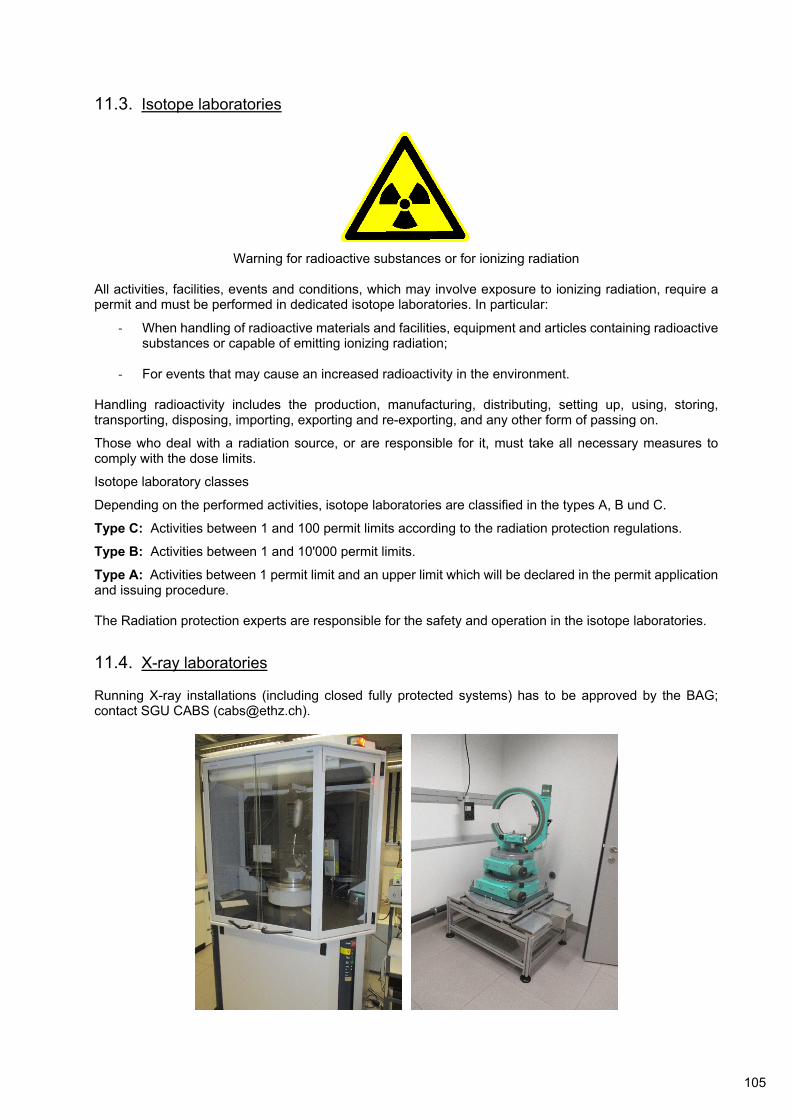
105
11.3. Isotope laboratories
Warning for radioactive substances or for ionizing radiation
All activities, facilities, events and conditions, which may involve exposure to ionizing radiation, require a permit and must be performed in dedicated isotope laboratories. In particular:
‐ When handling of radioactive materials and facilities, equipment and articles containing radioactive substances or capable of emitting ionizing radiation;
‐ For events that may cause an increased radioactivity in the environment.
Handling radioactivity includes the production, manufacturing, distributing, setting up, using, storing, transporting, disposing, importing, exporting and re-exporting, and any other form of passing on.
Those who deal with a radiation source, or are responsible for it, must take all necessary measures to comply with the dose limits.
Isotope laboratory classes
Depending on the performed activities, isotope laboratories are classified in the types A, B und C.
Type C: Activities between 1 and 100 permit limits according to the radiation protection regulations.
Type B: Activities between 1 and 10'000 permit limits.
Type A: Activities between 1 permit limit and an upper limit which will be declared in the permit application and issuing procedure. The Radiation protection experts are responsible for the safety and operation in the isotope laboratories.
11.4. X-ray laboratories
Running X-ray installations (including closed fully protected systems) has to be approved by the BAG; contact SGU CABS ([email protected]).

106
12. First aid in case of accidents in the laboratory
Accident: Someone is injured and needs help!
Procedure:
1.
If needed, call for help:
Tel 888
2.
Move injured persons away from dangerous area.
3.
Give first aid.
4.
Report to the SSHE staff unit and to the SE Management.
Email-hotline: [email protected]

107
12.1. Leaflet for irritation
Skin irritation:
‐ Remove contaminated clothing from injured person/s (while preventing injury to yourself) and immediately -
‐ wash with sufficient water (for at least 10 minutes), do not try to neutralize.
‐ Cover open corrosions with a sterile or clean piece of cloth.
‐ Contact the emergency desk (tel: 888) and possibly also tox info
Suisse (tel: 0-145).
Eye Irritation:
‐ Inform the Emergency desk (tel: 888).
‐ Immediately rinse the injured eye (eyeball and inner surface of eyelid) with sufficient amounts of water for at least 15 minutes, and ensure that the other eye (if unaffected) does not get contaminated as well. Hold the eye open to ensure effective wash behind eyelids.
‐ Cover (blindfold) both eyes to rest them.
‐ Go to the eye clinic of the university hospital in Zurich.
‐ Eyewash station: let a sufficient amount of water flow out before using it, to make sure the water is not contaminated.
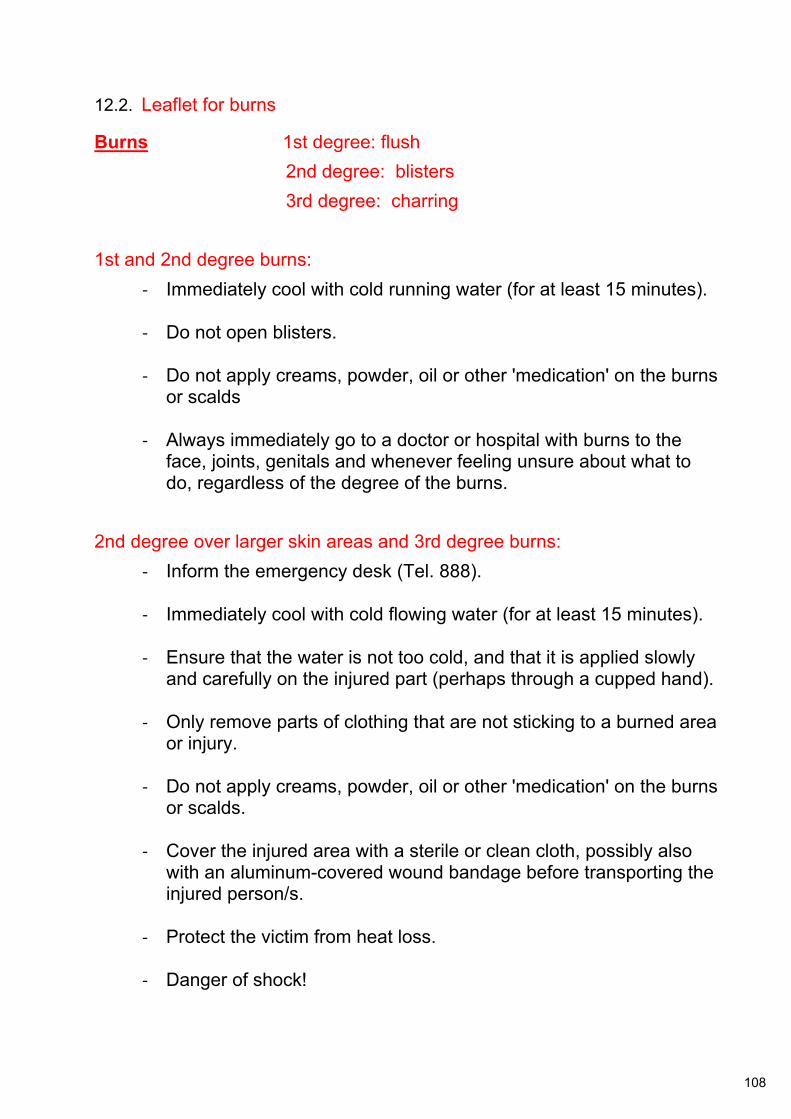
108
12.2. Leaflet for burns
Burns 1st degree: flush
2nd degree: blisters
3rd degree: charring
1st and 2nd degree burns:
‐ Immediately cool with cold running water (for at least 15 minutes).
‐ Do not open blisters.
‐ Do not apply creams, powder, oil or other 'medication' on the burns or scalds
‐ Always immediately go to a doctor or hospital with burns to the
face, joints, genitals and whenever feeling unsure about what to do, regardless of the degree of the burns.
2nd degree over larger skin areas and 3rd degree burns:
‐ Inform the emergency desk (Tel. 888).
‐ Immediately cool with cold flowing water (for at least 15 minutes).
‐ Ensure that the water is not too cold, and that it is applied slowly and carefully on the injured part (perhaps through a cupped hand).
‐ Only remove parts of clothing that are not sticking to a burned area
or injury.
‐ Do not apply creams, powder, oil or other 'medication' on the burns or scalds.
‐ Cover the injured area with a sterile or clean cloth, possibly also
with an aluminum-covered wound bandage before transporting the injured person/s.
‐ Protect the victim from heat loss.
‐ Danger of shock!

109
12.3. Leaflet 1 for poisoning (inhalation)
Inhalation of gases/steams/aerosols
‐ Move affected person/s to fresh air, while paying special attention to self-protection (wear a gas mask)!
‐ Alert the emergency desk (Tel 888). If possible, request the material safety data sheet about the chemical that caused the poisoning.
‐ If affected person/s is not breathing, follow procedures from 12.5 (Page 103) for apnoea.
‐ If necessary, contact the Tox Info Suisse (Tel 0-145). They can advise you whether resuscitation should be administered by mouth-to-mouth or artificial (respiratory mask) means.
‐ Important: the respiratory mask does not protect against toxic gases. If the patient has inhaled toxic gases, these gases could pass from their mouth up through respiratory mask. However, if the affected person vomits, the vomit will not pass through the respiratory mask’s one-way tube.
‐ For your own safety, the affected person/s can be resuscitated without a respiratory ventilator.
‐ If affected person is conscious, put their upper body in a semi-upright/raised position. If they are unconscious, place them on their side for transport to the clinic/hospital.
‐ Gas poisoning (nitrous gas, Br2, HF!) often causes secondary damage after (short term) improvement in the condition of the affected person/s. Because of this, it is imperative that you seek advice from the Tox Info Suisse!
‐ Emergency kits for hydrofluoric acid poisoning can be ordered from the First Aid room HCI E3.3 or the emergency desk.

110
12.4. Leaflet 2 for poisoning (gastrointestinal tract, skin contact)
Absorption of toxins through the digestive tract
‐ Secure poison, while paying particular attention to self-protection.
‐ Contact the Emergency desk (Tel 888) and, if necessary, Tox Info Suisse (Tel 0145), for instructions on First Aid measures. Request a copy of the Material Safety Data Sheet for the chemical that caused the poisoning and read it immediately.
‐ Perform First Aid measures in accordance with instructions from Tox Info Suisse.
‐ Keep the affected person/s calm and protected from heat loss.
‐ Treat every unknown chemical as if it were poisonous.
Poisoning by skin contact
‐ Remove contaminated clothing from affected person/s at once, while also ensuring self-protection. Rinse the affected part with sufficient amounts of hot water (and soap, if need be). Do not rub the skin too roughly.
‐ Contact the Emergency desk (Tel 888) and, if necessary, Tox Info Suisse (Tel 0145) for instructions on First Aid measures. Request a copy of the Material Safety Data Sheet for the chemical that caused the poisoning and read it immediately.
‐ Perform First Aid measures in accordance with instructions from Tox Info Suisse.

111
12.5. Leaflet for respiratory arrest
BLS = Basic Life Support
AED = Automated external defibrillation
Call for help Alarming at ETH: Tel 888 Ambulance: Tel 0-144 AED: Pick up or request

112
12.6. Leaflet for open wounds or mechanical injuries – bleeding
Bleeding wounds in general:
‐ Do not touch the wound without gloves, do not wash the wound, do not remove debris from the wound.
‐ Cover the wound with a sterile or clean cloth. Apply a protective bandage, only use disinfectant if further treatment by a doctor is not needed.
Severe bleeding:
‐ Inform the emergency desk (Tel. 888).
‐ Place the victim in a sitting position, better let him lay down.
‐ Lift and keep the bleeding part of the body up.
‐ If this does not reduce the bleeding, apply finger pressure on the correct place of the body, depending on the injured part.
‐ Apply a pressure bandage with a thick absorbing layer.
‐ In case the pressure bandage is insufficient, apply a second pressure bandage on top of the first.
‐ Lift and keep the injured extremity high up and try to calm to victim.
‐ Beware of shock symptoms! Keep the victim warm and under supervision.
‐ Do not tie off, if a pressure bandage is not possible, apply finger pressure directly in the wound.