SA750 INTEGRATED AMPLIFIER - Sarte Audio
22
SA750 INTEGRATED AMPLIFIER HANDBOOK
-
Upload
khangminh22 -
Category
Documents
-
view
0 -
download
0
Transcript of SA750 INTEGRATED AMPLIFIER - Sarte Audio
SA750 INTEGRATED AMPLIFIERHANDBOOK
EN-2
SAFETY GUIDELINES
Important Safety InstructionsRead these instructions.
1. Keep these instructions.2. Heed all warnings.3. Follow all instructions.4. Do not use this apparatus near water.5. Clean only with dry cloth.6. Do not block any ventilation openings. Install
in accordance with the manufacturer’s instructions.
7. Do not install near any heat sources such as radiators, heat registers, stoves, or other apparatus (including amplifiers) that produce heat.
8. Do not defeat the safety purpose of the polarized or grounding-type plug.A polarized plug has two blades with one wider than the other. A grounding type plug has two blades and a third grounding prong. The wide blade or the third prong are provided for your safety. If the provided plug does not fit into your outlet, consult an electrician for replacement of the obsolete outlet.
9. Protect the power cord from being walked on or pinched particularly at plugs, convenience receptacles, and the point where they exit from the apparatus.
10. Only use attachments/accessories specified by the manufacturer.
11. Use only with the cart, stand, tripod, bracket, or table specified by the manufacturer, or sold with the apparatus.When a cart is used, use caution when moving the cart/apparatus combination to avoid injury from tip-over.
12. Unplug this apparatus during lightning storms or when unused for long periods of time.
13. Refer all servicing to qualified service personnel.Servicing is required when the apparatus has been damaged in any way, such as power-supply cord or plug is damaged, liquid has been spilled or objects have fallen into the apparatus, the apparatus has been exposed to rain or moisture, does not operate normally, or has been dropped.
14. Object or liquid entryWARNING – Take care that objects do not fall and liquids are not spilled into the enclosure through any openings. The equipment shall not be exposed to dripping or splashing. Liquid-filled objects such as vases should not be placed on the equipment.
15. ClimateThe equipment has been designed for use in moderate climates and in domestic situations.
16. CleaningUnplug the unit from the mains supply before cleaning.The case should normally only require a wipe with a soft, lint-free cloth. Do not use chemical solvents for cleaning.We do not advise the use of furniture cleaning sprays or polishes as they can cause permanent white marks.
17. Power sourcesOnly connect the equipment to a power supply of the type described in the operating instructions or as marked on the equipment. The primary method of isolating the equipment from the mains supply is to remove the mains plug. The equipment must be installed in a manner that makes disconnection possible.
18. Abnormal smellIf an abnormal smell or smoke is detected from the equipment, turn the power off immediately and unplug the equipment from the wall outlet. Contact your dealer and do not reconnect the equipment.
19. Damage requiring serviceThe equipment should be serviced by qualified service personnel when:A. The power-supply cord or the plug has
been damaged, orB. Objects have fallen, or liquid has spilled
into the equipment, orC. The equipment has been exposed to rain,
orD. The equipment does not appear to
operate normally or exhibits a marked change in performance, or
E. The equipment has been dropped or the enclosure damaged.
CAUTION: To reduce the risk of electric shock, do not remove cover (or back). No user serviceable parts inside. Refer servicing to qualified service personnel.WARNING: To reduce the risk of fire or electric shock, do not expose this apparatus to rain or moisture.
The lightning flash with an arrowhead symbol within an equilateral triangle, is intended to alert the user to the presence
of uninsulated ‘dangerous voltage’ within the product’s enclosure that may be of sufficient magnitude to constitute a risk of electric shock to persons.
The exclamation point within an equilateral triangle is intended to alert the user to the presence of important operating and maintenance (servicing)
instructions in the literature accompanying the product.CAUTION: In Canada and the USA, to prevent electric shock, match the wide blade of the plug to the wide slot in the socket and insert the plug fully into the socket.
Class II ProductThis equipment is a Class II or double insulated electrical appliance. It has been designed in such a way that it does not require a safety connection to electrical earth (“ground” in the U.S.)

EN-3
WarningMains plug/appliance coupler is used to disconnect device and it shall remain readily operable.
Safety ComplianceThis equipment has been designed to meet the IEC/EN 62368-1 international electrical safety standard.This device complies with Part 15 of the FCC Rules. Operation is subject to the following two conditions:1. This device may not cause harmful
interference, and2. This device must accept any interference
received, including interference that may cause undesired operation.
The building installation shall be regarded as providing protection in accordance with the rating of the wall socket outlet.
Caution On InstallationFor proper heat dispersal, do not install this unit in a confined space, such as a bookcase or similar enclosure.
�More than 0.3m (12in) is recommended. �Do not place any other equipment on this unit.
Wall
zzz
Wall
z
FCC Information (For US Customers)PRODUCTThis product complies with Part 15 of the FCC Rules. Operation is subject to the following two conditions:1. This device may not cause harmful
interference, and2. This device must accept any interference
received, including interference that may cause undesired operation.
IMPORTANT NOTICE: DO NOT MODIFY THIS PRODUCTThis product, when installed as indicated in the instructions contained in this manual, meets FCC requirements. Modification not expressly approved by JBL may void your authority, granted by the FCC, to use the product.NOTEThis product has been tested and found to comply with the limits for a Class B digital device, pursuant to Part 15 of the FCC Rules. These limits are designed to provide reasonable protection against harmful interference in a residential installation.
This product generates, uses and can radiate radio frequency energy and, if not installed and used in accordance with the instructions, may cause harmful interference to radio communications.However, there is no guarantee that interference will not occur in a particular installation. If this product does cause harmful interference to radio or television reception, which can be determined by turning the product OFF and ON, the user is encouraged to try to correct the interference by one or more of the following measures:
�Reorient or relocate the receiving antenna. � Increase the separation between the equipment and receiver.
�Connect the product into an outlet on a circuit different from that to which the receiver is connected �Consult the local retailer authorized to distribute this type of product or an experienced radio/TV technician for help
Safety Information (For European Customers)
�Avoid high temperatures. Allow for sufficient heat dispersion when installed in a rack. �Handle the power cord carefully. Hold the plug when unplugging the cord. �Keep the unit free from moisture, water, and dust. �Unplug the power cord when not using the unit for long periods of time. �Do not obstruct the ventilation holes. �Do not let foreign objects into the unit. �Do not let insecticides, benzene, and thinner come in contact with the unit. �Never disassemble or modify the unit in any way. �Ventilation should not be impeded by covering the ventilation openings with items, such as newspapers, tablecloths or curtains. �Naked flame sources such as lighted candles should not be placed on the unit. �Observe and follow local regulations regarding battery disposal. �Do not expose the unit to dripping or splashing fluids. �Do not place objects filled with liquids, such as vases, on the unit. �Do not handle the mains cord with wet hands. �When the switch is in the OFF position, the equipment is not completely switched off from MAINS.
�The equipment shall be installed near the power supply so that the power supply is easily accessible.
A Note About RecyclingThis product’s packaging materials are recyclable and can be reused. Please dispose of any materials in accordance with the local recycling regulations.When discarding the unit, comply with local rules or regulations.Batteries should never be thrown away or incinerated but disposed of in accordance with the local regulations concerning battery disposal.This product and the supplied accessories, excluding the batteries, constitute the applicable product according to the WEEE directive
Correct Disposal Of This ProductThese markings indicate that this product should not be disposed with other household waste throughout the EU.
PbTo prevent possible harm to the environment or human health from uncontrolled waste disposal and to conserve material resources, this product should be recycled responsibly.To dispose of your product, please use your local return and collection systems or contact the retailer where the product was purchased.
EN-4
Thank You And Congratulations......for purchasing your JBL SA750 integrated amplifier.JBL has been producing specialist audio products of remarkable quality for 75 years and the new SA750 integrated amplifier is the latest in a long line of award winning Hi-Fi.This handbook is a guide to installing and using the SA750 and includes information on its more advanced features. Use the contents list on the next page to guide you to the section of interest.We hope that your product will give you years of trouble-free operation. In the unlikely event of any fault, or if you simply require further information about JBL products, our network of dealers will be happy to help you. Further information can also be found on the JBL website at www.JBLsynthesis.com.
Your SA750 Development Team
WELCOME
EN-5
CONTENTS
SAFETY GUIDELINES EN-2
WELCOME EN-4
OVERVIEW EN-6
TRADEMARK ACKNOWLEDGMENTS EN-7
FRONT PANEL CONNECTIONS AND CONTROLS EN-8
REAR PANEL CONNECTIONS AND CONTROLS EN-9
CONNECTING LOUDSPEAKERS EN-10
OPERATION EN-12
Selecting An Audio Source EN-12
LISTENING EN-13
Listening Using Headphones EN-13
Balance Control EN-13
Direct Mode EN-13
Processor Mode EN-13
Pre-Amplifier Output EN-13
CONNECTING TO A NETWORK EN-14
Home Automation Control EN-14
AirPlay Setup EN-14
Chromecast Built-In Setup EN-14
DIRAC LIVE EN-15
Using Dirac EN-15
SETUP MENU EN-17
System Settings EN-17
System Info EN-17
Audio Settings EN-17
Network Settings EN-18
SA750 DIGITAL FILTERS EN-19
TROUBLESHOOTING EN-20
SA750 SPECIFICATIONS EN-21
EN-6
OVERVIEW
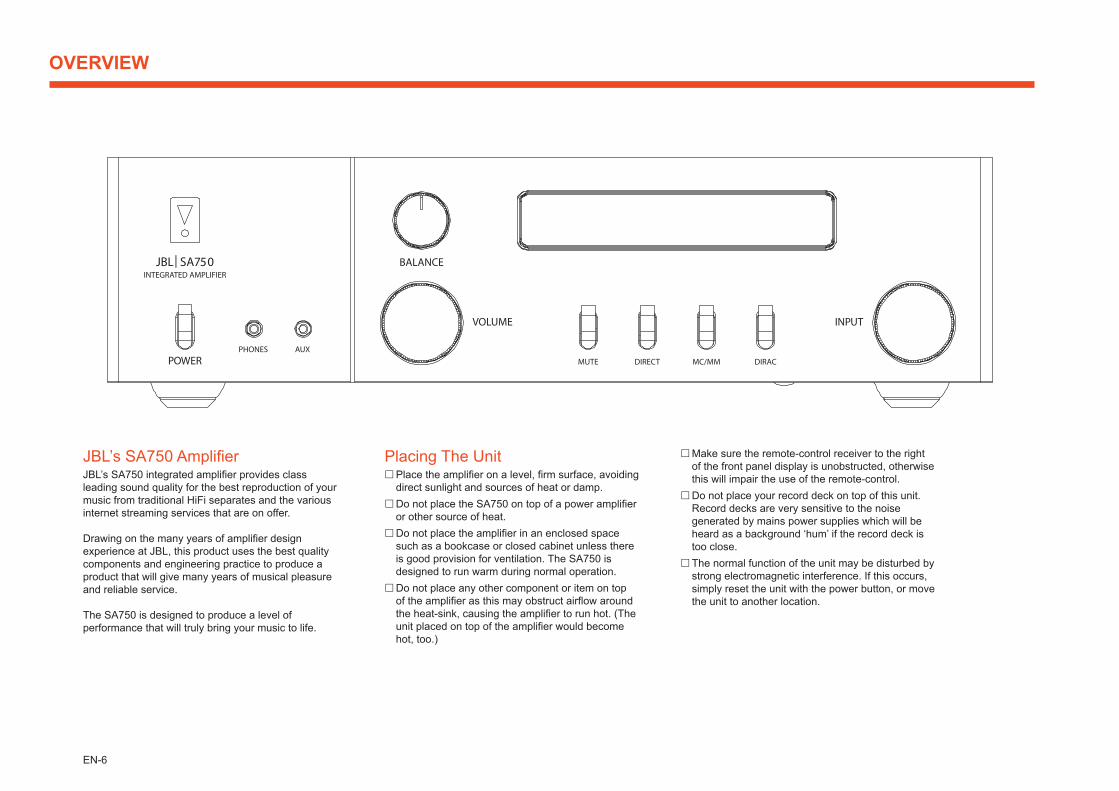
JBL’s SA750 AmplifierJBL’s SA750 integrated amplifier provides class leading sound quality for the best reproduction of your music from traditional HiFi separates and the various internet streaming services that are on offer.
Drawing on the many years of amplifier design experience at JBL, this product uses the best quality components and engineering practice to produce a product that will give many years of musical pleasure and reliable service.
The SA750 is designed to produce a level of performance that will truly bring your music to life.
Placing The Unit �Place the amplifier on a level, firm surface, avoiding direct sunlight and sources of heat or damp. �Do not place the SA750 on top of a power amplifier or other source of heat. �Do not place the amplifier in an enclosed space such as a bookcase or closed cabinet unless there is good provision for ventilation. The SA750 is designed to run warm during normal operation. �Do not place any other component or item on top of the amplifier as this may obstruct airflow around the heat-sink, causing the amplifier to run hot. (The unit placed on top of the amplifier would become hot, too.)
�Make sure the remote-control receiver to the right of the front panel display is unobstructed, otherwise this will impair the use of the remote-control. �Do not place your record deck on top of this unit. Record decks are very sensitive to the noise generated by mains power supplies which will be heard as a background ‘hum’ if the record deck is too close. �The normal function of the unit may be disturbed by strong electromagnetic interference. If this occurs, simply reset the unit with the power button, or move the unit to another location.
POWERPHONES AUX
INTEGRATED AMPLIFIERJBL | SA750
DIRECTMUTE
BALANCE
INPUTVOLUME
MC/MM DIRAC

EN-7
TRADEMARK ACKNOWLEDGMENTS
Apple, AirPlay and the AirPlay logo, iPod, iPhone and iPad are trademarks of Apple Inc., registered in the U.S. and other countries. App Store is a service mark of Apple Inc.
AirPlay 2 works with iPhone, iPad, and iPod touch with iOS 11.4 or later, Mac with OS X Mountain Lion or later, and PC with iTunes 10.2.2 or later.The Wi-Fi CERTIFIED Logo is certification marks of the Wi-Fi Alliance.Google, Google Play, Chromecast built-in, and other related marks are trademarks of Google LLC. The Google Assistant requires an internet connection and is not available in certain countries and languages. Availability and react of certain features and services are device, service, and network-dependent and may not be available in all areas. Controlling certain devices in your home requires compatible smart devices. Subscriptions for services and applications may be required and additional terms, conditions and/or charges may apply.
MP3 MPEG Layer-3 audio decoding technology licensed from Fraunhofer IIS and Thomson multimedia.
FLAC FLAC Decoder Copyright © 2000, 2001, 2002, 2003, 2004, 2005, 2006, 2007, 2008 Josh CoalsonRedistribution and use in source and binary forms, with or without modification, are permitted provided that the following conditions are met:- Redistributions of source code
must retain the above copyright notice, this list of conditions and the following disclaimer.
- Redistributions in binary form must reproduce the above copyright notice, this list of conditions and the following disclaimer in the documentation and/or other materials provided with the distribution.
- Neither the name of the Xiph. org Foundation nor the names of its contributors may be used to endorse or promote products derived from this software without specific prior written permission.
FLAC cont. THIS SOFTWARE IS PROVIDED BY THE COPYRIGHT HOLDERS AND CONTRIBUTORS ‘AS IS’ AND ANY EXPRESS OR IMPLIED WARRANTIES, INCLUDING, BUT NOT LIMITED TO, THE IMPLIED WARRANTIES OF MERCHANTABILITY AND FITNESS FOR A PARTICULAR PURPOSE ARE DISCLAIMED. IN NO EVENT SHALL THE FOUNDATION OR CONTRIBUTORS BE LIABLE FOR ANY DIRECT, INDIRECT, INCIDENTAL, SPECIAL, EXEMPLARY, OR CONSEQUENTIAL DAMAGES (INCLUDING, BUT NOT LIMITED TO, PROCUREMENT OF SUBSTITUTE GOODS OR SERVICES; LOSS OF USE, DATA, OR PROFITS; OR BUSINESS INTERRUPTION) HOWEVER CAUSED AND ON ANY THEORY OF LIABILITY, WHETHER IN CONTRACT, STRICT LIABILITY, OR TORT (INCLUDING NEGLIGENCE OR OTHERWISE) ARISING IN ANY WAY OUT OF THE USE OF THIS SOFTWARE, EVEN IF ADVISED OF THE POSSIBILITY OF SUCH DAMAGE.
MQA and the Sound Wave Device are registered trade marks of MQA Limited.© 2016
MQA (Master Quality Authenticated).MQA is an award-winning British technology that delivers the sound of the original master recording. The master MQA file is fully authenticated and is small enough to stream or download.Visit mqa.co.uk for more information.The SA750 includes MQA technology, which enables you to play back MQA audio files and streams, delivering the sound of the original master recording.MQA or MQA. indicates that the product is decoding and playing an MQA stream or file, and denotes provenance to ensure that the sound is identical to that of the source material.MQA. indicates it is playing an MQA Studio file, which has either been approved in the studio by the artist/producer or has been verified by the copyright owner.
EN-8
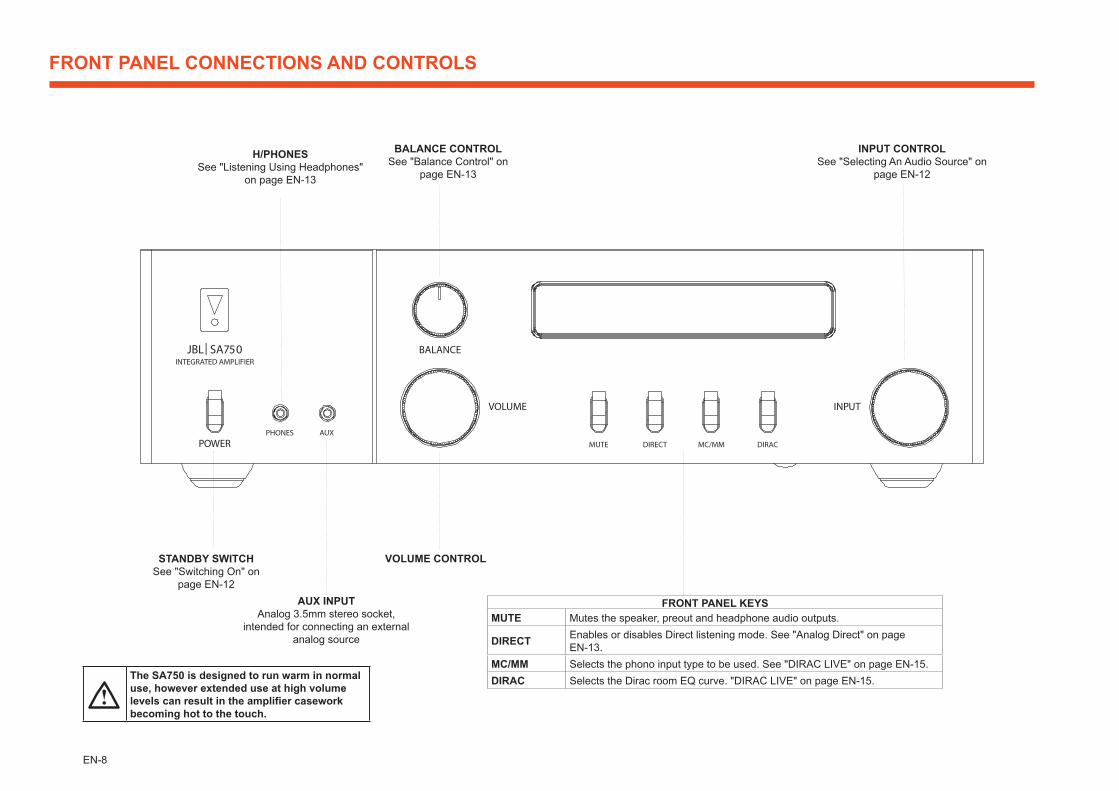
FRONT PANEL CONNECTIONS AND CONTROLS
The SA750 is designed to run warm in normal use, however extended use at high volume levels can result in the amplifier casework becoming hot to the touch.
AUX INPUTAnalog 3.5mm stereo socket,
intended for connecting an external analog source
STANDBY SWITCHSee "Switching On" on
page EN-12
H/PHONESSee "Listening Using Headphones"
on page EN-13
FRONT PANEL KEYSMUTE Mutes the speaker, preout and headphone audio outputs.
DIRECT Enables or disables Direct listening mode. See "Analog Direct" on page EN-13.
MC/MM Selects the phono input type to be used. See "DIRAC LIVE" on page EN-15.DIRAC Selects the Dirac room EQ curve. "DIRAC LIVE" on page EN-15.
VOLUME CONTROL
BALANCE CONTROLSee "Balance Control" on
page EN-13
INPUT CONTROLSee "Selecting An Audio Source" on
page EN-12
POWERPHONES AUX
INTEGRATED AMPLIFIERJBL | SA750
DIRECTMUTE
BALANCE
INPUTVOLUME
MC/MM DIRAC
EN-9
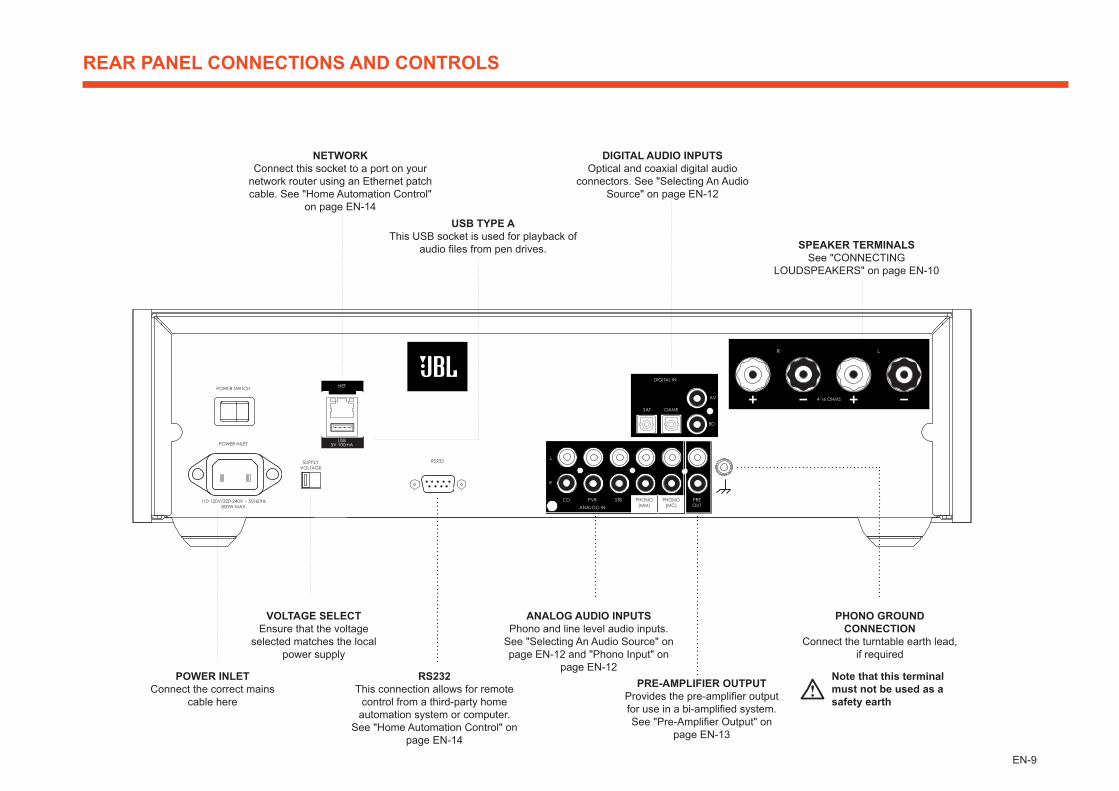
REAR PANEL CONNECTIONS AND CONTROLS
NETWORKConnect this socket to a port on your
network router using an Ethernet patch cable. See "Home Automation Control"
on page EN-14USB TYPE A
This USB socket is used for playback of audio files from pen drives.
POWER INLETConnect the correct mains
cable here
VOLTAGE SELECTEnsure that the voltage
selected matches the local power supply
RS232This connection allows for remote
control from a third-party home automation system or computer.
See "Home Automation Control" on page EN-14
ANALOG AUDIO INPUTSPhono and line level audio inputs.
See "Selecting An Audio Source" on page EN-12 and "Phono Input" on
page EN-12PRE-AMPLIFIER OUTPUT
Provides the pre-amplifier output for use in a bi-amplified system.See "Pre-Amplifier Output" on
page EN-13
PHONO GROUND CONNECTION
Connect the turntable earth lead, if required
DIGITAL AUDIO INPUTSOptical and coaxial digital audio
connectors. See "Selecting An Audio Source" on page EN-12
SPEAKER TERMINALSSee "CONNECTING
LOUDSPEAKERS" on page EN-10
Note that this terminal must not be used as a safety earth
POWER INLET
POWER SWITCH
110-120V/220-240V ~ 50/60Hz800W MAX
SUPPLYVOLTAGE
RS232
NET
R
L
CD PVR STB PREOUTANALOG IN
PHONO(MC)
PHONO(MM)
SAT
AV
BD
DIGITAL IN
GAME
4-16 OHMS
R L
USB5V 100mA

EN-10
CONNECTING LOUDSPEAKERS
There are many different ways of connecting loudspeakers to your SA750 amplifier. The following section describes how to connect the speakers and amplifier for the most common configurations.
Single WiringIf each speaker has more than one pair of connecting terminals, use the terminals labelled " " or "Low Frequency" on your speakers.
Connect the red positive terminal of the right speaker connection on the amplifier (labelled ) to the positive terminal of your right speaker. Similarly, connect the black negative terminal of the right speaker connection on the amplifier (labelled ) to the negative terminal of your speaker. Repeat the process for the left speaker, using the terminals labelled and on the amplifier.WARNING: If your speakers support bi-wiring, there will be a strip of conductive metal connecting the low-frequency (LF) terminals to the high-frequency (HF) terminals; this MUST NOT BE REMOVED in a single-wired system.
Notes On Making Speaker Connections �Do not make any connections to any amplifier while it is switched on. We recommend that your amplifier is completely disconnected from the mains supply before starting. �Before switching your amplifier on for the first time after connecting to speakers, please check all connections thoroughly. Ensure that bare wires or cables are not touching each other or the amplifier’s chassis (which could cause short circuits), and that you have connected positive (+) to positive and negative (–) to negative. Be sure to check the wiring for both the amplifier and the speaker. �After making connections: switch the amplifier on, select a source signal, then gradually increase the volume to the required listening level. � If you are unsure as to how your system should be connected, please contact your JBL dealer who will be happy to help you.
POWER INLET
POWER SWITCH
110-120V/220-240V ~ 50/60Hz800W MAX
SUPPLYVOLTAGE
RS232
NET
R
L
CD PVR STB PREOUTANALOG IN
PHONO(MC)
PHONO(MM)
SAT
AV
BD
DIGITAL IN
GAME
4-16 OHMS
R L
USB5V 100mA
HF
LF
HF
LF

EN-11
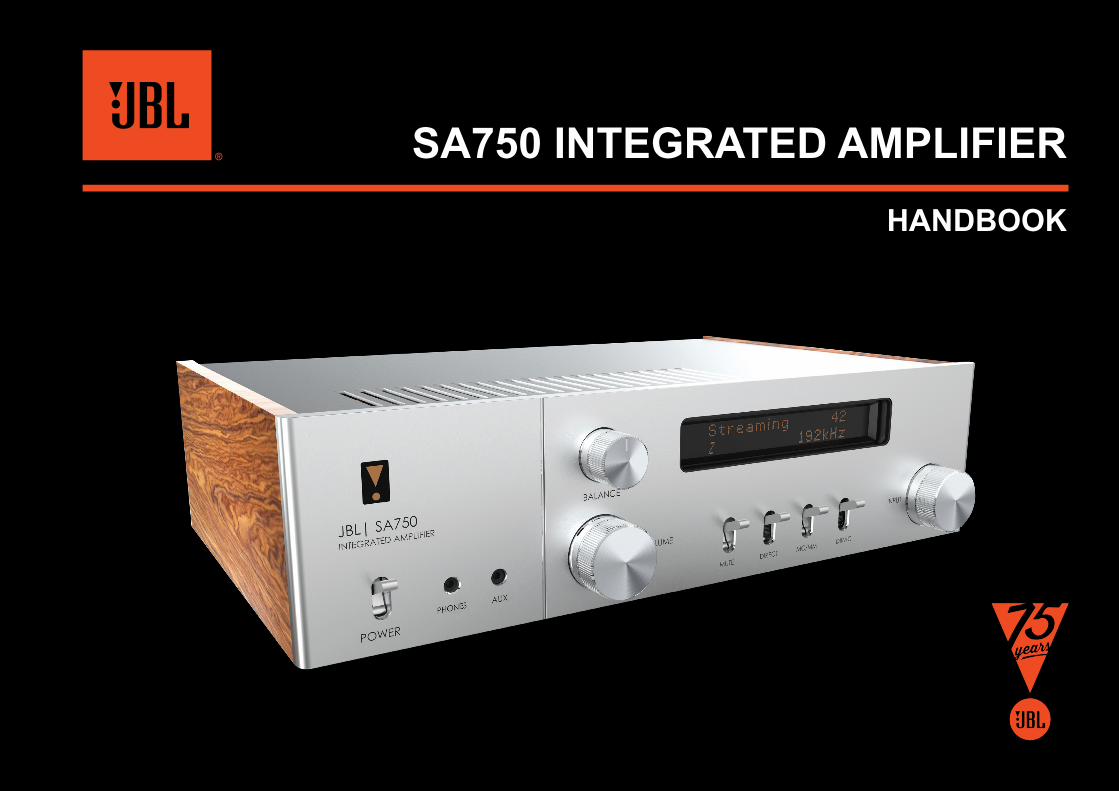
CONNECTING LOUDSPEAKERS CONTINUED
Bi-AmpingBi-amping is the separation of the amplification of low and high-frequency signals over two amplifiers.Bi-amping requires the use of two amplifiers per channel. Normally, your SA750 is used to drive the high frequency (treble) speakers, while a second amplifier (such as the JBL SDA2220) is used for the lower (bass) frequencies.Connect the SA750 to the speakers as described for single wiring, with the exception that the SA750 should be connected to the speaker terminals labelled "HF" or "High Frequency". Next, connect the SDA-2220 power amplifier to the "LF" or "LOW Frequency" terminals, as shown in the diagram. A pair of audio interconnect cables are also required to connect the pre-amp outputs of the SA750 to the power amplifier inputs of the second amplifier.
WARNING: The strip of metal on the speakers connecting the low frequency (LF) terminals to the high frequency (HF) terminals MUST BE REMOVED. Failure to do so will result in damage to both amplifiers, which will not normally be covered under warranty.
POWER INLET
POWER SWITCH
110-120V/220-240V ~ 50/60Hz800W MAX
SUPPLYVOLTAGE
RS232
NET
R
L
CD PVR STB PREOUTANALOG IN
PHONO(MC)
PHONO(MM)
SAT
AV
BD
DIGITAL IN
GAME
4-16 OHMS
R L
USB5V 100mA
HF
LF
HF
LF
RCA XLR
INPUT
+
4-16 OHMS. CLASS 2 WIRING
+- -R
ST BRIDGE DM
GAIN
25dB 31dB
MODE
L
INR INLINR
OUTR
INL
OUTL
Remove metal strips
Remove metal strips

EN-12
OPERATION
Switching OnThe switch on the rear panel switches the unit on and off. The switch on front of the amplifier and the remote control is used to switch the unit into and out of standby mode.
Setup MenuThe SA750 setup menu allows the customization of certain features of the amplifier. For details, please see "SETUP MENU" on page EN-17.
Auto StandbyIn order to comply with international regulations for consumer products, this unit is designed to enter a low power standby mode if no user interaction and no audio input signal are detected for a period of time (default time is 20 minutes). The unit can be brought out of standby by toggling the standby switch on the front panel or pressing the button on the remote control. The amount of time before the unit enters standby is configurable in the setup menu.Note: if the standby time-out is set to , the standby feature will be disabled.
DisplayPress the button on the remote control or use the display menu to adjust the brightness level of the front panel display. The brightness level can be set to ‘FULL’, ‘DIM’ or ‘ ’.If the SA750 is powered off with the display brightness set to ‘ ’, the display will momentarily resume to full brightness then turn off when the unit is powered back on.
Selecting An Audio SourceAudio sources can be selected either using the INPUT selection control on the front panel or when using the remote control, by pressing the required button, labelled as , , ,
, , , , , , or . In each case, the source is selected from the input sockets with the corresponding name.WARNING: The SA750 digital inputs only support two channel PCM audio input. Do not attempt to send multichannel audio of any type as this could result in serious damage to your amplifier and speakers
Phono InputThe SA750 provides a pre-amplification stage to work with the low-voltage output from either a MM (moving magnet) or MC (moving coil) cartridge. Each cartridge type has a dedicated input on the rear panel. To choose which type is enabled either use the MM/MC switch on the front panel or use the setup menu. See "Phono Input" on page EN-17. The input specifications are given in "SA750 SPECIFICATIONS" on page EN-21.
WARNING: NEVER play a standard line-level source into this input. This would result in serious damage to both your amplifier and speakers due to the extra gain that is applied and would not be covered under warranty.
WARNING: Be sure to use the correct input for your cartridge. The requirements for the different cartridges could result in damage to both your amplifier and speakers due the extra gain that is applied if the wrong input is used and would not be covered under warranty.
USBThis input is for playback of audio files from a USB pen drive or similar device. Simply plug in the USB stick and use the remote control to browse.
Network Audio InputsIn order to use the network audio capability of the SA750 please refer to "CONNECTING TO A NETWORK" on page EN-14 to allow you to use AirPlay, Chromecast built-in or playback from a NAS drive and selected streaming services using the Harman Music Life app.
MusicLife
EN-13
LISTENING
Listening Using HeadphonesThe headphone socket (PHONES) accepts phones with an impedance rating between 16Ω and 2kΩ, fitted with a 3.5mm stereo jack.By default the pre-amp outputs and speakers are muted when the headphones are plugged in.The speakers and pre-amp outputs can be configured to remain active when headphones are connected using the Headphone Override function in the setup menu. See "Phones Ovr" on page EN-17 for more information.The headphone output is always active, unless the amplifier has been muted.
Balance ControlUse the balance control on the front panel to move the sound stage from left to right.
Direct ModeThe SA750 allows the option to bypass certain elements of the audio processing to allow for a purer listening experience.
Analog DirectIn order to apply Dirac Live room correction the SA750 converts all analog inputs to a digital signal using a high quality Analog to Digital Convertor (ADC). Once the signal has been processed by the on board Digital Signal Processor (DSP) it is converted back to an analog signal using a high quality Digital to Analog Convertor (DAC).The DIRECT function bypasses the ADC, DSP and DAC to allow the analog signal to be sent directly to the preamp stage for the purest signal path.An icon on the display indicates if the direct path is enabled for the current analog input.
Analog direct is enabled. ADC, DSP and DAC are bypassed.
When Analog Direct is enabled DIRAC room correction cannot be applied.
Processor ModeProcessor mode can be assigned to most Analog inputs. In this mode, the volume is set to a fixed level.This mode allows the use of the SA750 to be used in conjunction with a AV receiver in a combined home cinema and two channel listening environment.Please refer to "PM Input" on page EN-17 for details on how to specify which input is to be used in processor mode. For setting the desired fixed volume level, please refer to "PM Input" on page EN-17.
Pre-Amplifier OutputTo use the SA750 as dedicated pre-amplifier, or as part of a bi-amped system, connect the
sockets to the input sockets of your power amplifier. See "Bi-Amping" on page EN-11 for details of a suggested system using an external power amplifier.
EN-14
CONNECTING TO A NETWORK
In order to use the AirPlay and Chromecast built-in functionality of the SA750 you will need to connect it to your home network via a wireless or wired connection. The following sections detail how to do this.Note: When the wired connection is used the wireless connection is automatically disabled.
Home Automation ControlWhen connected to a network the SA750 can be controlled and monitored remotely using dedicated home automation software. The same controls are also available via the RS232 input.Various third-party systems are available providing sophisticated control over all your entertainment devices. Contact your dealer or installer for details. The technical details of the remote control protocol are available upon request, by contacting JBL at [email protected] details of the available controls please refer to the control document which can be found at www.JBL.com for further information.Note: To connect the SA750 to a wireless network follow the "Wireless Connection" instructions for either "AirPlay Setup" or "Chromecast built-in Setup".
AirPlay SetupWired ConnectionPower up and connect an ethernet cable to the SA750. To listen to audio via AirPlay on your SA750, ensure your Apple device is connected to the same network as the SA750 and simply select the SA750 as the AirPlay audio playback device.Note: The SA750 will appear as SA750-xxxxxx in the Airplay speaker menu, where xxxxxx is the last 6 digits of the units wired MAC address.
Wireless ConnectionEnsure your Apple device is connected to the wireless network you wish to connect the SA750 to.Open the Wi-Fi settings menu on the Apple device and select the SA750 from the “Set up new AirPlay speaker” menu.Follow the instructions on screen.
To listen to audio via AirPlay on your SA750, ensure your Apple device is connected to the same network as the SA750 and simply select the SA750 as the AirPlay audio playback device.Note: The SA750 will appear as SA750-xxxxxx in the AirPlay speaker setup menu, where xxxxxx is the last 6 digits of the units wired MAC address.
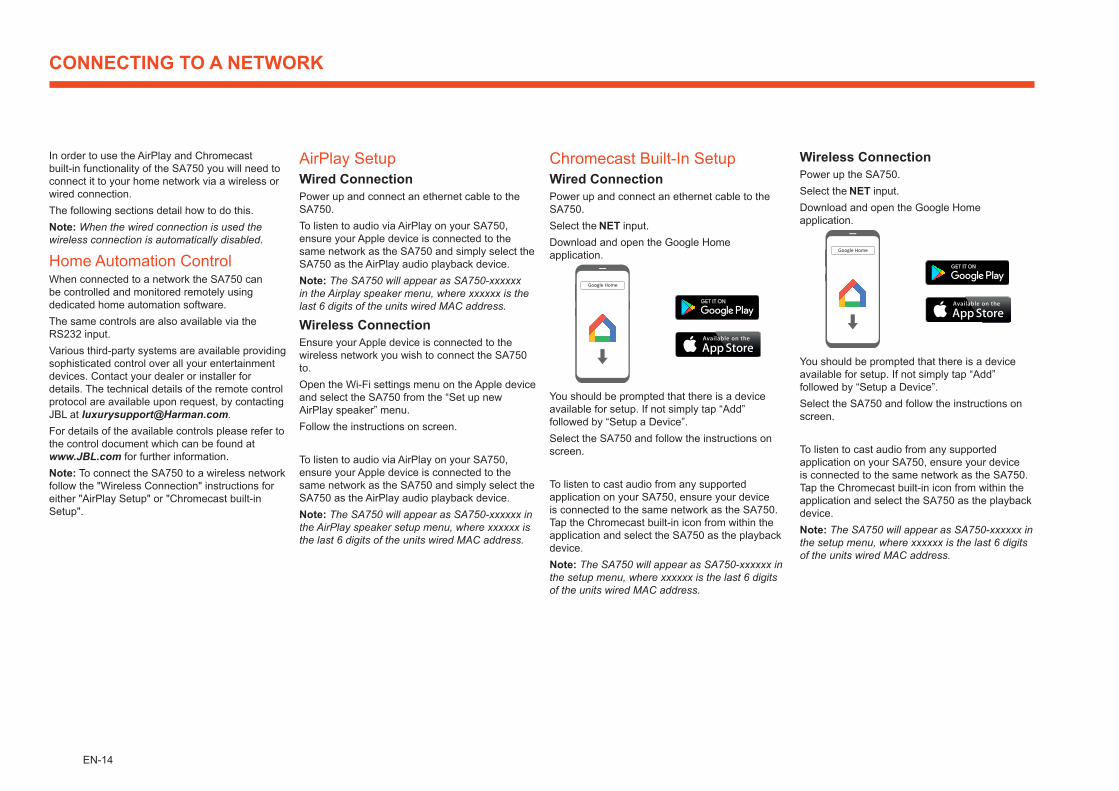
Chromecast Built-In SetupWired ConnectionPower up and connect an ethernet cable to the SA750.Select the input.Download and open the Google Home application.
Google Home
You should be prompted that there is a device available for setup. If not simply tap “Add” followed by “Setup a Device”.Select the SA750 and follow the instructions on screen.
To listen to cast audio from any supported application on your SA750, ensure your device is connected to the same network as the SA750. Tap the Chromecast built-in icon from within the application and select the SA750 as the playback device.Note: The SA750 will appear as SA750-xxxxxx in the setup menu, where xxxxxx is the last 6 digits of the units wired MAC address.
Wireless ConnectionPower up the SA750.Select the input.Download and open the Google Home application.
Google Home
You should be prompted that there is a device available for setup. If not simply tap “Add” followed by “Setup a Device”.Select the SA750 and follow the instructions on screen.
To listen to cast audio from any supported application on your SA750, ensure your device is connected to the same network as the SA750. Tap the Chromecast built-in icon from within the application and select the SA750 as the playback device.Note: The SA750 will appear as SA750-xxxxxx in the setup menu, where xxxxxx is the last 6 digits of the units wired MAC address.
EN-15
DIRAC LIVE
There is a proprietary automatic loudspeaker setup function built into your SA750 from Dirac Research. Using a PC/Mac based application, this attempts to set all the essential speaker settings for all the speakers in your system. It also calculates room equalisation (Room EQ) filter values to remove some of the worst effects of resonant frequencies in the listening room. Your SA750 is supplied with a calibration microphone, which should be inserted into a USB socket on a PC or Mac connected to the same network as the SA750 and positioned as directed by the Dirac Live for JBL PC/Mac application. This microphone picks up the special calibration tones generated by the speakers when Dirac Live for JBL application is run. The SA750 then analyses the signal and will correct any resonant frequencies in the room which need control by filtering.To help the system be as accurate as possible when performing Dirac Live for JBL setup, there are a few guidance rules that should be followed:
�Minimise any background sounds in the listening room and other nearby rooms. �Close all windows and doors in the listening room. �Turn off all fans including air-conditioning systems. �Mount the microphone on a tripod or similar. �Position the set up microphone pointing upwards at roughly head height in the normal listening position. It is not necessary to point the microphone directly at the speaker generating the test tone. (It helps if you are able to position the microphone exactly where your head would normally be for listening, with the microphone in direct unobstructed view of all speakers.)
When activated, a calibration tone is played through each channel of the SA750. The calibration tone cycles round each of the speakers multiple times as the different parameters are calculated. Note: By default, Room EQ is not applied to any of the source inputs.
You should enable Room EQ on inputs you think benefit from this feature, as required, by listening when playing typical source material through each input. After being calculated, this is enabled from within the setup menu or by the front panel or remote control button.While room equalisation can help to reduce problems with listening room acoustics, it is usually far better to try to solve these problems with the room directly. Proper loudspeaker positioning, acoustic wall treatments and moving the listening position away from walls should produce far better results overall. However it may be difficult to do this in a home environment, so Room EQ is your next best choice.
ProblemsThe Auto Speaker Setup function is normally very accurate but occasionally false results can be generated. Problems may be as a result of:
� external sounds or rumbling/handling noises picked up by the microphone � sound reflections off hard surfaces (e.g. windows or walls) close to the listening position, � very strong acoustic resonances within the room, � obstacles (such as a sofa) between speakers and the microphone.
If you are still experiencing difficulties or you wish to have the most accurate results for ultimate surround performance, we recommend using the manual method of establishing speaker distances and levels.
Downloading the Dirac Live applicationTo download the Dirac Live for JBL PC/Mac application and quick start guide, please visit:live.dirac.com
Using DiracYou can store up to three Dirac EQ curves in the SA750. Each input can use a different curve, for example a “Movie” curve on the BD input and “Music” curve on the CD input.This can be set on a per input basis using the
key on the front panel or key on the remote.Alternatively use the Dirac menu in the Audio settings menu to set the curve for each input. See "Dirac Curve" on page EN-17.Note: When Dirac is run for the first time the curve will be applied to all inputs. Subsequent curves will not be automatically applied, use the methods above to choose the required curve for the input in question.When Dirac is being used the icon will be shown on the display.
EN-16
REMOTE CONTROL
SATAUX
NET
USB
BD
AV
PHONO
PVR GAME
CD
DISP
STB
DIRECT
EQ
OK
RTN
VOL+MODE
INFO MENU
VOL-
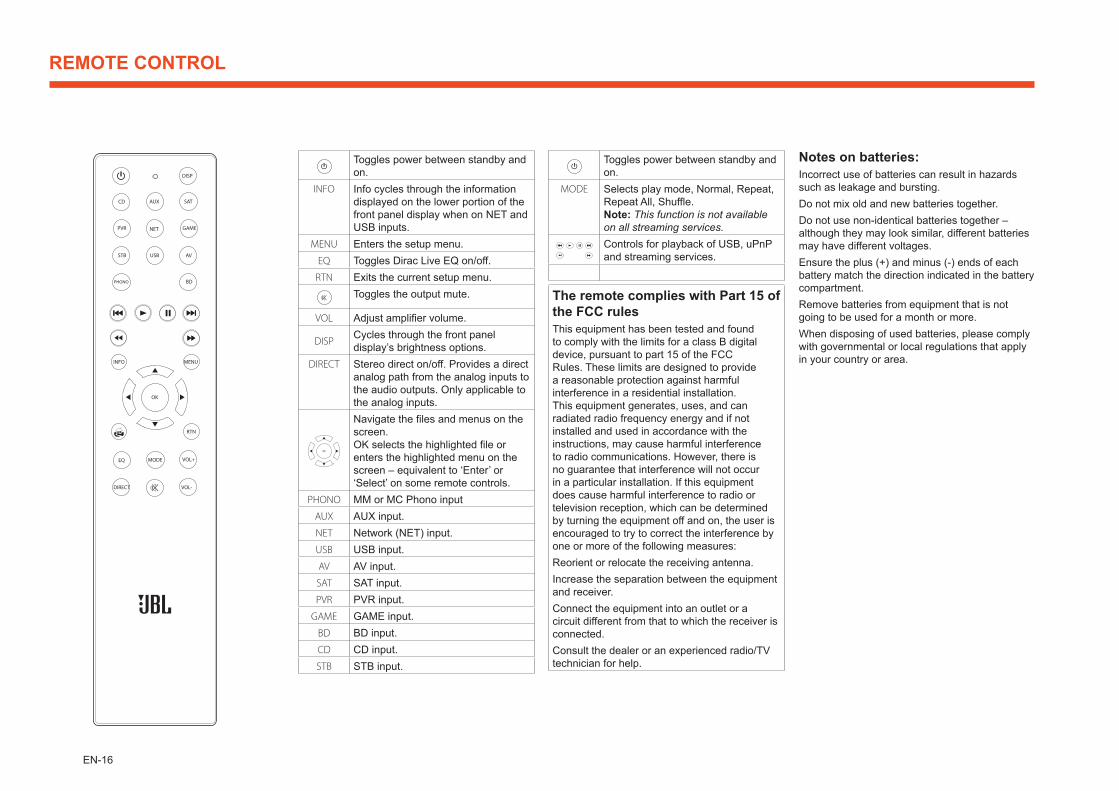
Toggles power between standby and on.
INFO Info cycles through the information displayed on the lower portion of the front panel display when on NET and USB inputs.
MENU Enters the setup menu.EQ Toggles Dirac Live EQ on/off.
RTN Exits the current setup menu.Toggles the output mute.
VOL Adjust amplifier volume.
DISP Cycles through the front panel display’s brightness options.
DIRECT Stereo direct on/off. Provides a direct analog path from the analog inputs to the audio outputs. Only applicable to the analog inputs.
OK
Navigate the files and menus on the screen.OK selects the highlighted file or enters the highlighted menu on the screen – equivalent to ‘Enter’ or ‘Select’ on some remote controls.
PHONO MM or MC Phono inputAUX AUX input.NET Network (NET) input.USB USB input.AV AV input.SAT SAT input.PVR PVR input.
GAME GAME input.BD BD input.CD CD input.STB STB input.
Toggles power between standby and on.
MODE Selects play mode, Normal, Repeat, Repeat All, Shuffle.Note: This function is not available on all streaming services.Controls for playback of USB, uPnP and streaming services.
The remote complies with Part 15 of the FCC rulesThis equipment has been tested and found to comply with the limits for a class B digital device, pursuant to part 15 of the FCC Rules. These limits are designed to provide a reasonable protection against harmful interference in a residential installation. This equipment generates, uses, and can radiated radio frequency energy and if not installed and used in accordance with the instructions, may cause harmful interference to radio communications. However, there is no guarantee that interference will not occur in a particular installation. If this equipment does cause harmful interference to radio or television reception, which can be determined by turning the equipment off and on, the user is encouraged to try to correct the interference by one or more of the following measures: Reorient or relocate the receiving antenna. Increase the separation between the equipment and receiver. Connect the equipment into an outlet or a circuit different from that to which the receiver is connected. Consult the dealer or an experienced radio/TV technician for help.
Notes on batteries:Incorrect use of batteries can result in hazards such as leakage and bursting.Do not mix old and new batteries together.Do not use non-identical batteries together – although they may look similar, different batteries may have different voltages.Ensure the plus (+) and minus (-) ends of each battery match the direction indicated in the battery compartment.Remove batteries from equipment that is not going to be used for a month or more.When disposing of used batteries, please comply with governmental or local regulations that apply in your country or area.
EN-17
SETUP MENU
The setup menu allows you to configure various aspects of the SA750 integrated amplifier.
Entering Setup MenuTo enter the setup menu, press the key on the remote control.
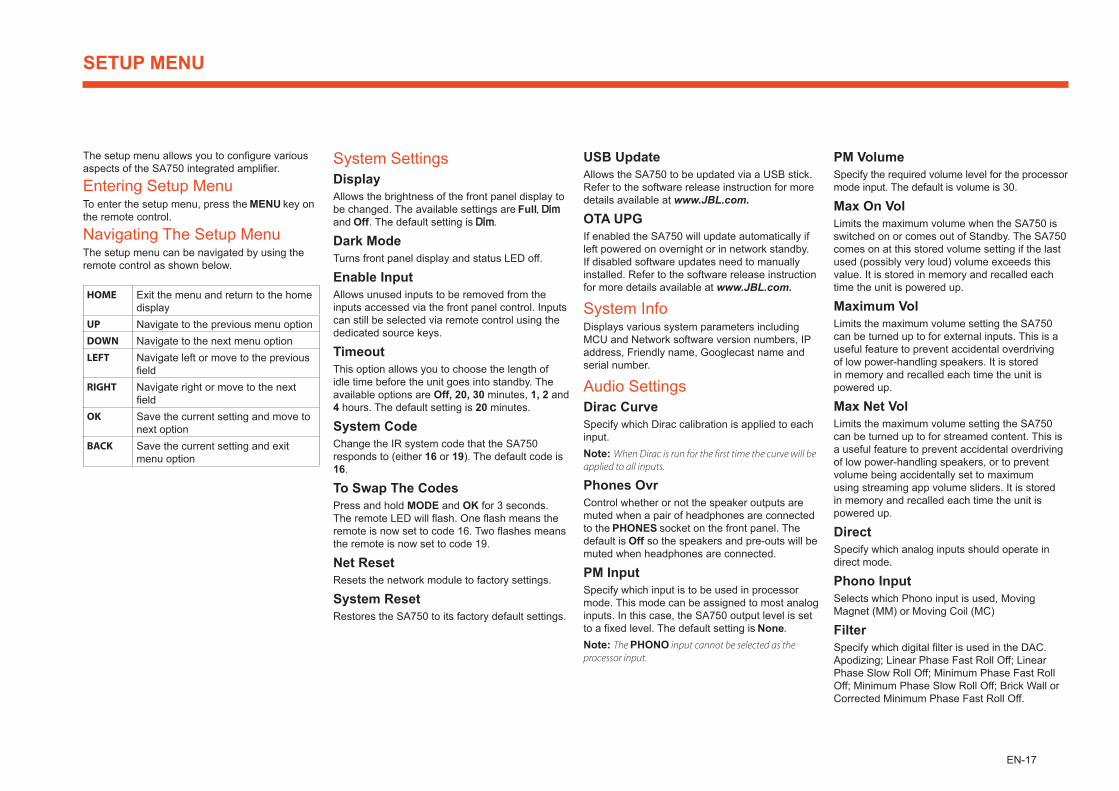
Navigating The Setup MenuThe setup menu can be navigated by using the remote control as shown below.
HOME Exit the menu and return to the home display
UP Navigate to the previous menu optionDOWN Navigate to the next menu optionLEFT Navigate left or move to the previous
fieldRIGHT Navigate right or move to the next
fieldOK Save the current setting and move to
next optionBACK Save the current setting and exit
menu option
System SettingsDisplayAllows the brightness of the front panel display to be changed. The available settings are , and . The default setting is .
Dark ModeTurns front panel display and status LED off.
Enable InputAllows unused inputs to be removed from the inputs accessed via the front panel control. Inputs can still be selected via remote control using the dedicated source keys.
TimeoutThis option allows you to choose the length of idle time before the unit goes into standby. The available options are Off, 20, 30 minutes, 1, 2 and 4 hours. The default setting is 20 minutes.
System CodeChange the IR system code that the SA750 responds to (either 16 or 19). The default code is 16.
To Swap The CodesPress and hold MODE and OK for 3 seconds. The remote LED will flash. One flash means the remote is now set to code 16. Two flashes means the remote is now set to code 19.
Net ResetResets the network module to factory settings.
System ResetRestores the SA750 to its factory default settings.
USB UpdateAllows the SA750 to be updated via a USB stick. Refer to the software release instruction for more details available at www.JBL.com.
OTA UPGIf enabled the SA750 will update automatically if left powered on overnight or in network standby. If disabled software updates need to manually installed. Refer to the software release instruction for more details available at www.JBL.com.
System InfoDisplays various system parameters including MCU and Network software version numbers, IP address, Friendly name, Googlecast name and serial number.
Audio SettingsDirac CurveSpecify which Dirac calibration is applied to each input.Note: When Dirac is run for the first time the curve will be applied to all inputs.
Phones OvrControl whether or not the speaker outputs are muted when a pair of headphones are connected to the socket on the front panel. The default is so the speakers and pre-outs will be muted when headphones are connected.
PM InputSpecify which input is to be used in processor mode. This mode can be assigned to most analog inputs. In this case, the SA750 output level is set to a fixed level. The default setting is .Note: The PHONO input cannot be selected as the processor input.
PM VolumeSpecify the required volume level for the processor mode input. The default is volume is 30.
Max On VolLimits the maximum volume when the SA750 is switched on or comes out of Standby. The SA750 comes on at this stored volume setting if the last used (possibly very loud) volume exceeds this value. It is stored in memory and recalled each time the unit is powered up.
Maximum VolLimits the maximum volume setting the SA750 can be turned up to for external inputs. This is a useful feature to prevent accidental overdriving of low power-handling speakers. It is stored in memory and recalled each time the unit is powered up.
Max Net VolLimits the maximum volume setting the SA750 can be turned up to for streamed content. This is a useful feature to prevent accidental overdriving of low power-handling speakers, or to prevent volume being accidentally set to maximum using streaming app volume sliders. It is stored in memory and recalled each time the unit is powered up.
DirectSpecify which analog inputs should operate in direct mode.
Phono InputSelects which Phono input is used, Moving Magnet (MM) or Moving Coil (MC)
FilterSpecify which digital filter is used in the DAC. Apodizing; Linear Phase Fast Roll Off; Linear Phase Slow Roll Off; Minimum Phase Fast Roll Off; Minimum Phase Slow Roll Off; Brick Wall or Corrected Minimum Phase Fast Roll Off.

EN-18
SETUP MENU
See "SA750 DIGITAL FILTERS" on page EN-19 for more explanation on the differences between the filters.
Network SettingsNetwork InfoDisplays the units wired and wireless MAC address, IP address and friendly name and host name.
Net StandbyEnables or disables the network control of the SA750 while the unit is in standby. The default setting is .Note: The unit can still be controlled via RS232 commands, even when network standby is disabled.
RS232 StandbyEnables or disables the RS232 control of the SA750 while the unit is in standby. The default setting is .
C4 SDDPEnables the Control 4 discovery function and enables the sending of a discovery beacon.
EN-19
SA750 DIGITAL FILTERS
The SA750 allows the listener to choose between a number of digital filters for use in the audio DAC. Digital filters are required to minimise unwanted antialiasing distortion in the audio band but no digital filter is perfect, all are a compromise between various parameters. These include:
Frequency response – Audio level with respect to frequency. Ideally this should not vary significantly between 20Hz and 20kHz.
Phase – The time delay introduced between reproducing different frequencies within the pass band of the filter. Ideally this would be as low as possible (linear phase).
Pre ringing – Additional audio artefacts that precede the original audio impulse. These are sometimes thought to be bad as this phenomenon does not exist in the natural world, so ideally this should be as low level and last for as short a time as possible.
Post ringing – Additional audio artefacts that follow the original audio impulse. Ideally these should be as low in level and last for as short a time as possible.
Aliasing – Additional audio artefacts introduced into the audio band from high frequency signals.
We have chosen our default filter through a combination of careful measurement and listening tests and we believe they are the best compromise to achieve the best listening experience. However, all of the filters sacrifice performance of one parameter to improve another. Therefore, dependant on your choice of listening material and personal preference, you may wish to choose one of the other options. Note that any audible differences are most likely to be heard with sample rates of 48kHz and below.
Brick Wall (B Wall)No phase shift, but introduces both pre and post ringing artefacts.
Corrected Minimum Phase Fast Roll Off (Corr MinP)Low pre-ringing and the phase response varies at higher frequencies. There is more post ringing compared with linear phase and apodizing filters.
Apodizing (Default)A compromise between phase, frequency response and ringing. Its main advantage is that it removes most of the ringing that has been introduced upstream in the recording process when the original material was recorded and mastered.
Minimum Phase Slow Roll Off (MinP Slow)No pre-ringing artefacts but can introduce phase shifts at higher frequencies. It has less post ringing than the Minimum Phase Fast Roll Off, but this is still higher than the linear phase filter options. Very high frequencies in the last half octave of the filter pass band will be slightly attenuated.
Minimum Phase Fast Roll Off (MinP Fast)No pre-ringing and the phase response varies at higher frequencies. There are significantly higher amounts of post ringing compared with the linear phase filter options.
Linear Phase Slow Roll Off (LinP Slow)Low and equal levels of pre and post ringing. No phase shifts but can introduce high frequency aliasing at a higher level than linear phase fast roll off. Very high frequencies will be slightly attenuated.
Linear Phase Fast Roll Off (LinP Fast)Higher and equal levels of pre and post ringing compared with linear phase slow roll off. No phase shifts and with minimal high frequency aliasing compared with slow roll off.
EN-20
TROUBLESHOOTING
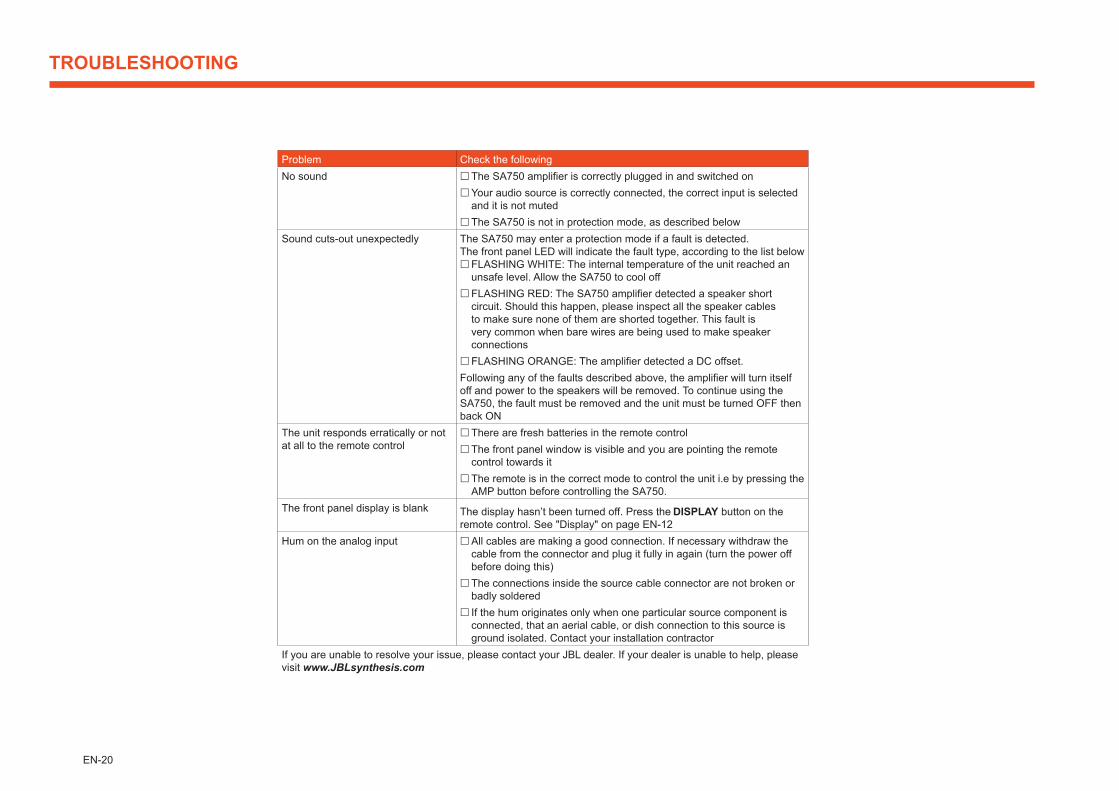
Problem Check the followingNo sound �The SA750 amplifier is correctly plugged in and switched on
�Your audio source is correctly connected, the correct input is selected and it is not muted �The SA750 is not in protection mode, as described below
Sound cuts-out unexpectedly The SA750 may enter a protection mode if a fault is detected.The front panel LED will indicate the fault type, according to the list below
�FLASHING WHITE: The internal temperature of the unit reached an unsafe level. Allow the SA750 to cool off �FLASHING RED: The SA750 amplifier detected a speaker short circuit. Should this happen, please inspect all the speaker cables to make sure none of them are shorted together. This fault is very common when bare wires are being used to make speaker connections �FLASHING ORANGE: The amplifier detected a DC offset.
Following any of the faults described above, the amplifier will turn itself off and power to the speakers will be removed. To continue using the SA750, the fault must be removed and the unit must be turned OFF then back ON
The unit responds erratically or not at all to the remote control
�There are fresh batteries in the remote control �The front panel window is visible and you are pointing the remote control towards it �The remote is in the correct mode to control the unit i.e by pressing the AMP button before controlling the SA750.
The front panel display is blank The display hasn’t been turned off. Press the button on the remote control. See "Display" on page EN-12
Hum on the analog input �All cables are making a good connection. If necessary withdraw the cable from the connector and plug it fully in again (turn the power off before doing this) �The connections inside the source cable connector are not broken or badly soldered � If the hum originates only when one particular source component is connected, that an aerial cable, or dish connection to this source is ground isolated. Contact your installation contractor
If you are unable to resolve your issue, please contact your JBL dealer. If your dealer is unable to help, please visit www.JBLsynthesis.com

EN-21
SA750 SPECIFICATIONS
Continuous power output (0.5% THD), per channelBoth channels, 8Ω, 20Hz—20kHz 130WBoth channels, 4Ω, at 1kHz 200WHarmonic distortion, 80% power, 8Ω at 1kHz
0.002%
Analog InputsADC Texas Instruments PCM4202Sample rate / bit depth 192kHz / 32 bit
Phono Inputs Moving Magnet (MM) Moving Coil (MC)Input sensitivity at 1kHz (nominal) 5mV 0.35mVInput impedance 47kΩ + 200pF 470Ω + 1nFSignal/Noise ratio (A-wtd) 80dB, ref. 5mV at 1kHz 80dB, ref. 0.35mV at 1kHzOverload margin 21dB ref. 5mV at 1kHz 21dB ref. 0.35mV at 1kHzFrequency response (ref. RIAA curve) 20Hz – 20kHz ± 1dB 20Hz – 20kHz ± 1dB
Line Inputs:Nominal sensitivity 1VInput impedance 10kΩMaximum input 4.8VrmsFrequency response 20Hz – 20kHz ± 0.2dBSignal/Noise ratio (A-wtd) 100W, ref. 2.1V input
112dB analog direct, 106dB ADC / DAC
Digital InputsDAC ESS ESS9038K2MFrequency response 20Hz - 20kHz ± 0.1dBTotal harmonics distortion + Noise 0.0007%Signal/Noise ratio (A-wtd) ref. 0dBFS/100W 113dB
Supported sample rates
Optical 32kHz, 44.1kHz, 48kHz, 88.2kHz, 96kHzCoaxial 32kHz, 44.1kHz, 48kHz, 88.2kHz, 96kHz, 176.4kHz,
192kHzBit depth 16-bit – 32-bit
Pre-amplifier outputNominal/Maximum output level 800mV / 1.25VOutput impedance 240Ω
Headphone outputMaximum output level into 600Ω 5VrmsOutput impedance 1ΩLoad range 16Ω – 2kΩ
GeneralMains voltage 110–120V or 220–240V, 50/60HzMaximum power consumption 800WLow power standby consumption 0.5WNetwork standby consumption 2WBTU rating 631 BTUDimensions W x H x D (including feet, control knob and speaker terminals)
433x100x323mm
Weight (net) 10.7kgWeight (gross) 13.8kgSupplied accessories Mains leads
Remote control2 x AAA batteriesUser ManualSetup microphoneUSB cable
All specification values are typical unless otherwise stated. JBL has a policy of continuous improvement for its products. This means that designs and specifications are subject to change without notice. E&OE.
HARMAN International, Incorporated 8500 Balboa Boulevard, Northridge, CA 91329 USA www.jblsynthesis.com
© 2021 HARMAN International Industries, Incorporated. All rights reserved. JBL is a trademarks of HARMAN International Industries, Incorporated, registered in the United States and/or other countries.
Features, specifications and appearance are subject to change without notice.
Part No: SH316 Issue: A.0