RPMS Version 8 User Guide
158
V V V 8 8 8 U U U S S S E E E R R R ’ ’ ’ S S S G G G U U U I I I D D D E E E
-
Upload
khangminh22 -
Category
Documents
-
view
3 -
download
0
Transcript of RPMS Version 8 User Guide

VVV888 UUUSSSEEERRR’’’SSS GGGUUUIIIDDDEEE

Copyright © 1985 – 2019 (manual and software) by RepSoft, LLC d/b/a RPMS, All Rights Reserved.
RPMS and Rep Profit Management System are trademarks of RepSoft, LLC. Btrieve, Pervasive, and
P.SQL are trademark of Actian Corporation. Windows, when used in this manual, refers to the Microsoft
Windows operating system. QuickBooks® is a registered trademark of Intuit, Inc. All other product names
referenced are believed to be registered trademarks of their respective companies.

i
Foreword
September 2013
RPMS Version 8 comes in two similar but distinct systems.
The Desktop version of RPMS is installed on a local computer and is set up to access data either on that
same computer, or on a shared network drive for the rep agency. Data backups, software update
application, and hardware maintenance are the responsibility of the rep agency.
The Cloud version of RPMS is installed on www.rpmscloud.com and runs as a remote application that is
maintained by RPMS. Data backups, software updates, and hardware maintenance are the responsibility of
RPMS. End users are responsible only for maintaining an Internet connection and a link to the remote
program.
This documentation covers both the desktop version of RPMS Version 8 and the remote version of
RPMSCloud. Differences (where noticeable) are explained in context.

ii
This page left blank intentionally.
iii
FOREWORD .................................................................................................................................................. I
RPMS INTRODUCTION ............................................................................................................................. 1
WHY A REP FIRM SHOULD USE RPMS ........................................................................................................ 1
HOW TO GET STARTED USING RPMS ............................................................................................................ 1
RPMS TERMINOLOGY .................................................................................................................................. 2
THE RPMS PRODUCTS ................................................................................................................................. 2
COMMON INSTALLATION AND LAUNCHING PROBLEMS................................................................................ 3
RPMS NAVIGATION ..................................................................................................................................... 5
RPMS DOCUMENTATION ............................................................................................................................. 5
WORKING WITH RPMS................................................................................................................................. 6
RPMS LISTS .................................................................................................................................................. 7
ACCESSING AND WORKING WITH CUSTOMERS, PRINCIPALS, SALES REPS AND OTHER LISTS RECORDS –
OVERVIEW .................................................................................................................................................... 7
ADDING LIST RECORDS ................................................................................................................................ 8
CHANGING LIST RECORDS ............................................................................................................................ 8
DELETING LIST RECORDS ............................................................................................................................. 9
LIST DATA OVERVIEW – COMMON OPERATIONAL NOTES AND IMPORTANT FIELD DESCRIPTIONS ........... 10
SALES REPS - OPERATIONAL NOTES AND IMPORTANT FIELD DESCRIPTIONS ............................................. 11
PRINCIPALS - OPERATIONAL NOTES AND IMPORTANT FIELD DESCRIPTIONS ............................................. 13
PRODUCTS - OPERATIONAL NOTES AND IMPORTANT FIELD DESCRIPTIONS ............................................... 15
CUSTOMERS - OPERATIONAL NOTES AND IMPORTANT FIELD DESCRIPTIONS ............................................ 17
POINTS OF SALE - OPERATIONAL NOTES .................................................................................................... 20
TERRITORIES - OPERATIONAL NOTES ......................................................................................................... 21
SYSTEM CODES - OPERATIONAL NOTES ..................................................................................................... 21
X-REFERENCES (CROSS REFERENCES) - OPERATIONAL NOTES ................................................................. 22
ADD TRANSACTIONS .............................................................................................................................. 25
TYPES AND METHODS OF ADDING TRANSACTIONS .................................................................................... 25
ADD TRANSACTIONS, SHORT FORM ........................................................................................................... 26
SHORT FORM .............................................................................................................................................. 28
AFTER AN ADD – THE LIST VIEW ............................................................................................................... 33
TRANSACTION CORRECTION....................................................................................................................... 34
ADD TRANSACTIONS, LONG FORM ............................................................................................................. 35
LONG FORM ................................................................................................................................................ 37
HEADER TAB .............................................................................................................................................. 38
DETAIL TAB................................................................................................................................................ 39
CONTACT TAB ............................................................................................................................................ 41
NOTES TAB ................................................................................................................................................. 41
SPLIT TAB ................................................................................................................................................... 41
LINE ITEMS TAB ......................................................................................................................................... 42
PRINTING TRANSACTIONS .......................................................................................................................... 47
PRINTING THE REP COMPANY LOGO ON TRANSACTION FORMS ................................................................. 48
MAINTAIN & SHIP TRANSACTIONS ................................................................................................... 49
OVERVIEW .................................................................................................................................................. 49
OPERATION ................................................................................................................................................. 49
TABS AND CONTROLS ................................................................................................................................. 50
1. PURCHASE ORDERS ................................................................................................................................ 50
2. DETAIL TAB: ........................................................................................................................................... 52
3. CONTACTS TAB: ...................................................................................................................................... 53
4. NOTES TAB: ............................................................................................................................................ 53
5. SPLITS TAB: ............................................................................................................................................ 53
6. LINE ITEMS TAB: ..................................................................................................................................... 54

iv
7. LINE ITEMS TAB: ..................................................................................................................................... 54
8. DETAIL TAB:............................................................................................................................................ 56
9. SPLITS TAB: ............................................................................................................................................. 56
RECONCILE COMMISSIONS ................................................................................................................. 57
PURPOSE AND OVERVIEW OF COMMISSION RECONCILIATION .................................................................... 57
SET UP FOR COMMISSION RECONCILIATION ............................................................................................... 57
THE RECONCILIATION PROCESS.................................................................................................................. 59
E-DATA WIZARD....................................................................................................................................... 63
TRANSLATE................................................................................................................................................. 64
PRE PASS..................................................................................................................................................... 65
UPLOAD ...................................................................................................................................................... 66
SNAPSHOTS ................................................................................................................................................ 67
HOW IS OUR BUSINESS DOING?.................................................................................................................... 67
SETTING UP THE SNAPSHOT OPTIONS ......................................................................................................... 67
WORKING WITH THE SNAPSHOT SCREEN..................................................................................................... 69
REPORTS ..................................................................................................................................................... 73
LAUNCH THE RPMS REPORTS ENGINE ....................................................................................................... 73
REPORTS ENGINE NAVIGATION .................................................................................................................. 73
COMMON REPORT CONTROLS ..................................................................................................................... 74
PREVIEW ..................................................................................................................................................... 75
LISTS ........................................................................................................................................................... 75
COMMISSIONS ............................................................................................................................................. 76
DAILY TRANSACTIONS................................................................................................................................ 77
MONTHLY HISTORIES & SUMMARIES ......................................................................................................... 77
ORDERS....................................................................................................................................................... 78
PRODUCT .................................................................................................................................................... 79
POINT OF SALE ............................................................................................................................................ 79
ACCOUNTS RECEIVABLE ............................................................................................................................. 79
SALES REP PROFILES .................................................................................................................................. 80
DIRECT MARKETING .............................................................................................................................. 83
PURPOSE AND OVERVIEW OF DIRECT MARKETING..................................................................................... 83
CREATE DIRECT MARKETING FILES ........................................................................................................... 83
CREATING A DIRECT MARKETING LIST ...................................................................................................... 84
WORKING WITH DIRECT MARKETING LISTS ............................................................................................... 88
DIRECT MARKETING UTILITIES – CATEGORY CODE SUMMARY ................................................................. 92
FORECASTING .......................................................................................................................................... 93
PURPOSE AND OVERVIEW OF FORECASTING ............................................................................................... 93
SETTING UP A FORECAST ............................................................................................................................ 93
REVIEWING A FORECAST ............................................................................................................................ 99
MAINTAINING A FORECAST ........................................................................................................................ 99
REPTIVITY................................................................................................................................................ 101
PURPOSE AND OVERVIEW OF REPTIVITY .................................................................................................. 101
SETTING UP REPTIVITY ............................................................................................................................. 101
HOW TO USE REPTIVITY – OPPORTUNITIES .............................................................................................. 104
OPPORTUNITIES - OPERATIONAL NOTES AND IMPORTANT FIELD DESCRIPTIONS ..................................... 107
HOW TO USE REPTIVITY – ACTIVITIES ..................................................................................................... 108
HOW TO USE REPTIVITY – ACTIVITY CUSTOM VIEW ............................................................................... 109
HOW TO USE REPTIVITY – ACTIVITY HISTORY ......................................................................................... 110
HOW TO USE REPTIVITY – ASSOCIATED ACTIVITIES ................................................................................ 112
v
HOW TO USE REPTIVITY – CREATE, UPDATE OR CLOSE AN ACTIVITY FROM THE EDITOR ....................... 113
ACTIVITIES - OPERATIONAL NOTES AND IMPORTANT FIELD DESCRIPTIONS ............................................ 113
HOW TO USE REPTIVITY – SET UP AND MANAGE CUSTOM ACTIVITY VIEWS .......................................... 115
INVENTORY ............................................................................................................................................. 117
PURPOSE AND OVERVIEW OF INVENTORY ................................................................................................ 117
SETTING UP INVENTORY – ESTABLISHING THE COST METHOD ................................................................ 117
SETTING UP INVENTORY – CHANGING THE COST METHOD ..................................................................... 119
SETTING UP INVENTORY – SETTING UP PRINCIPALS ................................................................................ 119
SETTING UP INVENTORY – ADDING PRODUCTS ........................................................................................ 120
SETTING UP INVENTORY – USING SERIAL NUMBER TRACKING ............................................................... 123
SETTING UP INVENTORY – SETTING UP VENDORS ................................................................................... 123
VENDORS - OPERATIONAL NOTES AND IMPORTANT FIELD DESCRIPTIONS .............................................. 124
SETTING UP INVENTORY – ESTABLISHING BEGINNING BALANCES .......................................................... 124
SETTING UP INVENTORY – DECLARING SERIAL NUMBERS ON HAND ...................................................... 125
USING INVENTORY ................................................................................................................................... 126
USING INVENTORY – WRITING ORDERS FOR NEW INVENTORY ................................................................ 127
INVENTORY TRANSACTIONS HEADER TAB ............................................................................................... 129
INVENTORY TRANSACTIONS DETAIL TAB ................................................................................................ 130
INVENTORY TRANSACTIONS CONTACTS TAB ........................................................................................... 131
INVENTORY TRANSACTIONS NOTES TAB ................................................................................................. 131
INVENTORY TRANSACTIONS LINE ITEMS TAB .......................................................................................... 131
PRINTING INVENTORY TRANSACTIONS..................................................................................................... 134
PRINTING THE REP COMPANY LOGO ON TRANSACTION FORMS ............................................................... 134
RECEIVING INVENTORY ............................................................................................................................ 135
MAINTAIN/SHIP PURCHASE ORDERS TAB ................................................................................................ 136
RECEIVE INVENTORY IN RPMS FOR ACCOUNTS PAYABLE IN QUICKBOOKS® ........................................ 137
ADJUSTING INVENTORY ........................................................................................................................... 138
FILE MENU ............................................................................................................................................... 141
PURPOSE AND OVERVIEW OF THE FILE MENU .......................................................................................... 141
ADMINISTRATION SYSTEM ....................................................................................................................... 141
BACKUP .................................................................................................................................................... 141
RESTORE................................................................................................................................................... 142
PREFERENCES ........................................................................................................................................... 143
PRINTER SETUP......................................................................................................................................... 148
EXIT RPMS .............................................................................................................................................. 149

vi
This page left blank intentionally.
Chapter 1 RPMS Introduction
1
RPMS Introduction
Why A Rep Firm Should Use RPMS
RPMS has two general purposes for independent manufacturers reps.
First, RPMS lets you know how your business is doing. Reports and snapshots give information by
principal, customer, sales rep, territory, point-of-sale, and product. They provide comparative analysis for
booked, ordered, sold (invoiced) and paid transactions.
Second, RPMS helps you figure out whether you’ve been paid what you ought to have been paid, and how
much your sales reps have earned.
There are many other things RPMS can do, since there is a certain amount of data processing necessary to
accomplish the first two purposes. For example, RPMS can tell you
• what your principals are supposed to be shipping today, this week or this month
• whether your sales reps have met, fallen below or exceeded their targeted forecasts
• how key market segments of your business are doing
• and much more…
How to get started using RPMS
You need a little rudimentary knowledge before you start using RPMS. First, you should understand what a
manufacturers’ rep is and does. For that, ask the owner of your agency. You also ought to have a fair
understanding of Microsoft Windows – terms like click, double click, drag and drop, etc. should be readily
understood. With at least that level of understanding, you are ready to begin.
For desktop installations, install the RPMS program CD according to its instructions, found on the CD
itself or on the CD jacket. The original CD sold with your system, beginning with Versions 7.2 and
higher, contains the empty data files you will use with RPMS, and a special encrypted data file that has
information about your rep company, as well as your serial number. Previous versions of RPMS had a data
diskette. Note that for network installations you will need to install the program CD on each computer that
will run RPMS, but need to install the data only once to a shared drive.
For RPMSCloud installations, you need only download and install a small link to a remote application. The
instructions vary based on the type of remote app you are installing, which is based on the hardware and
operating system platform you have selected. Follow the instructions provided for your particular situation.
Once the installations are complete, you can begin by setting up a few records. Since every transaction
must have a customer, principal and sales rep, you could begin with these records. These are the files that
are described in the next chapter titled RPMS Lists.
When you have a few records set up, you will probably want to try entering a transaction. A transaction is
an order, acknowledgement, invoice or payment. RPMS also tracks quotes and samples, but these are not
tracked historically. The chapter titled Add Transactions gives detailed explanations of the types of
transactions that can be entered and where they are found in RPMS.
Finally you will want to measure those transactions using either a report or snapshot. The information
available in RPMS can be somewhat overwhelming, so the section RPMS Reports tries to break it down
into manageable concepts. Some transactions begin as open orders, for which you can do order expedite
and open backlog reports, and summary and history reports and snapshots. Other transactions begin when
an invoice is received, for which due commission reports can be generated, as well as sales summaries and

Chapter 1 RPMS Introduction
2
histories. Some principals send only commission statements, which create data for sales rep and agency
commission statements, as well as all the summary and history reports.
A shorthand view of RPMS operations:
• Install (or be provisioned on our cloud server)
• Set up users (if multi-user) – see the Administrator’s Guide
• Set up some master files (sales reps, territories, customers, principals, etc.)
• Professional Systems Only:
• Add transactions (open orders)
• Report (expedite) open order backlog
• All Systems
• Create invoices (Pro system apply against open orders)
• Report due commissions
• Reconcile Commissions (declare payments against invoices)
• Add more transactions (commission statement data not previously evident)
• Generate commission statements for agency and sales reps
• Review sales, order and payment analysis reports
RPMS Terminology
Throughout this documentation, and in your experiences with the RPMS Technical Support staff, you will
begin to pick up terminology from the rep industry that RPMS has adopted. Not all rep industries are alike
– in your industry you may not mean manufacturer when you say ‘principal’ but that is the terminology that
RPMS uses. A list of terms and definitions appears below:
RPMS Term Other Definition
Agency The rep company
Book(ed) (ing) Write a transaction and measure it based on the input date, or date of entry
Commission Amount or percentage associated with a transaction to pay the agency or sales rep
Contact Person associated with a customer or principal
Customer Account, dealer, store, client – the buying company
Order Purchase Order, Acknowledgement – tied to the customer’s order date
Pay (id) (ment) Check, deposit, commission – tied to the date of commission payment
Point of sale POS; Distributor; Places of Sale; 4th entity tracking (customers, principals, reps & ???)
Principal Manufacturer; vendor; factory; the company that writes the invoices
Product Item; sku; part
Sale Invoice, Shipment – tied to the principal’s invoice date
Sales Rep Sales person for the agency
System Code Classifier or identifier of a category, classification, or other user-defined data
Transaction Order (acknowledgement or purchase order); Sale (invoice or shipment); Payment
Territory Geographic identifier; account type
X Reference Cross reference identification, i.e. Principal’s customer number, customer’s product ID
Vendor Inventory point of purchase; supplier of product for stocking rep agencies
The RPMS Products
RPMS is actually a set of three different applications. The main application’s file name is RPMS.EXE,
which is the program that contains all the lists, transactions forms and snapshots for the RPMS system. A

Chapter 1 RPMS Introduction
3
sub-application is called the RPMS Reports Engine. Its file name is RPMSRprt.EXE, and it contains all the
forms necessary to set up and run the various reports. The third application is called the Administration
System, and its file name is RPMSAdmin.EXE. This application administers user passwords, company
software settings and contains various utilities to manage the data.
To launch the main RPMS application, after installation you should have an icon on your desktop like the
one pictured above. Double click it to start RPMS. If installation has been accomplished correctly, the
desktop version will display a LogIn screen as shown below:
For most single user and RPMS Basic systems, the initial password is RPMS, which is already keyed into
the system for you. Click OK or press Enter to log in to the system. (The cloud-based RPMS version will
also display your cloud Network User Name, already filled out.) Type the password given to you by your
system administrator. For information about setting up additional or different user passwords, see The
Administrator’s Guide.
Common Installation and Launching Problems
If the data files to run RPMS are missing, not installed, or not converted from Version 6; or network drive
mappings have changed; or the installation did not correctly specify the folder where RPMS data files were
to reside, you can get a message like the one shown below:
If the data folder has been specified incorrectly you may choose to click No at this prompt and double
check the Start In Property of the RPMS icon. Restoring data is a serious step – your company will lose any
data entered since the time of the backup being restored. Be sure you know what you are doing and why
you are doing it before you choose to restore a backup.
If RPMS is already running on your system when you double click the icon, a small message box will be
displayed as shown below:

Chapter 1 RPMS Introduction
4
Clicking OK on the message above will cause the current foreground application to be minimized if
possible in order to try to display the background applications.
Some systems (notably some early versions of Windows 98) are unable to install RPMS successfully
despite following the installation instructions. In other cases, virus checking software or other third party
products prevent the program from installing properly. The message below indicates an incomplete
installation.
If this error message is displayed you should shut down and restart the workstation. After restart, close any
running applications that launch automatically, including those running in the system tray (the small
window on the taskbar by the clock.) Then re-install RPMS, being sure to restart the computer again when
prompted. This should install RPMS successfully.
In a multi user system it is possible to get the message shown below when attempting to log in:
This message usually indicates that another user that used this computer (user JEB in the example above)
did not log out of RPMS successfully. Answering Yes to question above will log your password in and the
other password out. You won’t be able to get in RPMS if you answer No, but you have the opportunity to
click No if you prefer to leave JEB recorded as logged in.
It is also possible in multi-user systems to have too many users already logged in. The following message
indicates that problem.

Chapter 1 RPMS Introduction
5
See the Administrator’s Guide for information about logging users out, or increasing the Simultaneous
Users count.
RPMS Navigation
The RPMS menu and menu bar are shown above. The File menu navigates to Administration, Backup,
Restore, Preferences, Printer Setup, Saved Reports, Update RPMS and Exit. The Administration
system is documented in The Administrator’s Guide.
The Lists menu navigates to lists of various table records, like customers, principals, and sales reps, and is
described in chapter two.
The Marketing menu navigates to various marketing driven add-on features, including Direct Marketing,
Forecasting, Merchandising and Reptivity. Each feature has its own documentation booklet, or a chapter in
this guide.
The Reports menu navigates to the Reports Engine and to Snapshots.
The Transactions menu allows you to add, maintain or reconcile orders, invoices, and commission
statements. It also allows ‘E Data’ transactions. E Data stands for electronic data, and represents transaction
and product files that can be automatically uploaded into RPMS. The transactions menu also contains
navigation necessary for Accounts Receivable and Inventory features.
RPMS Documentation
The RPMS system has several guides and manuals. The Administration system is documented separately in
the RPMS Administrator’s Guide. This RPMS User’s Guide (this document) contains information about
both the RPMS main application and the RPMS Reports Engine. This manual primarily presents user
information for data entry and report generation. The Administrator’s Guide covers technical details, error
information, database explanations and other higher-end concepts.
The RPMS System comes in two different purchase configurations. RPMS is the entry-level system, and is
fully documented in the User’s and Administrator’s guides. RPMS Professional (also called RPMS Pro) is
a more robust system that allows for open order, quote and sample tracking.
Additional features available include:

Chapter 1 RPMS Introduction
6
• Direct Marketing – a categorization and classification system that extracts and reports for
telemarketing, sales analysis, and mail merge functions based on user-definable criteria
• Forecasting – allows agencies and sales reps to forecast future sales and orders, set goals, and
establish and measure against quotas
• Accounts Receivable – an invoicing and receivables system for agencies that buy and resell
product – can be used with the Inventory feature. Stores gross profit as commission
• Inventory – for stocking reps to track and manage products, either consigned or bought and
resold. Can use FIFO, LIFO, Standard, Average, or Last cost method
• E-Data Upload – automatically loads orders, invoices and commission statements into RPMS,
based on agency-specified data maps, that turn principal or customer data into RPMS data.
• Remote Order Entry – laptop-carrying field sales reps enter orders to e-mail back to agency
• Reptivity – a field sales activity and customer service reporting system (subscription only)
• Merchandising – 852 customer inventory tracking and reporting for rep firms serving mass
merchant customers
To determine your system’s configuration and installed features, select Help, then About RPMS from the
menu. To add features or capabilities at any time to your RPMS system, contact your authorized
representative, or the sales or technical support department of RPMS.
Working with RPMS
RPMS has an industry wide reputation for providing timely, responsive and friendly customer support.
RPMS support is sold only by subscription in a program known as the Extended Maintenance Agreement
(EMA.)
EMA provides periodic CD and web-based software updates for subscribing agencies, unlimited toll-free
tech support (M-F U.S. Central Time zone) documentation updates, and major version upgrades.
To contact RPMS tech support via E-Mail, write to [email protected]. To contact RPMS technical support
via Fax, dial 800 337 7056. By phone dial 800 776 7435. Please note that we try to return all ‘first
available’ calls within 30 minutes. Our busiest times of day are 10:00 a.m. to 2:00 p.m. central, so please
bear with us at those times. Please note that our technicians are not able to help those customers whose
EMA subscriptions have expired. Calling or writing back would not be fair to waiting customers who have
kept their subscriptions current.
Chapter 2 Lists
7
RPMS Lists
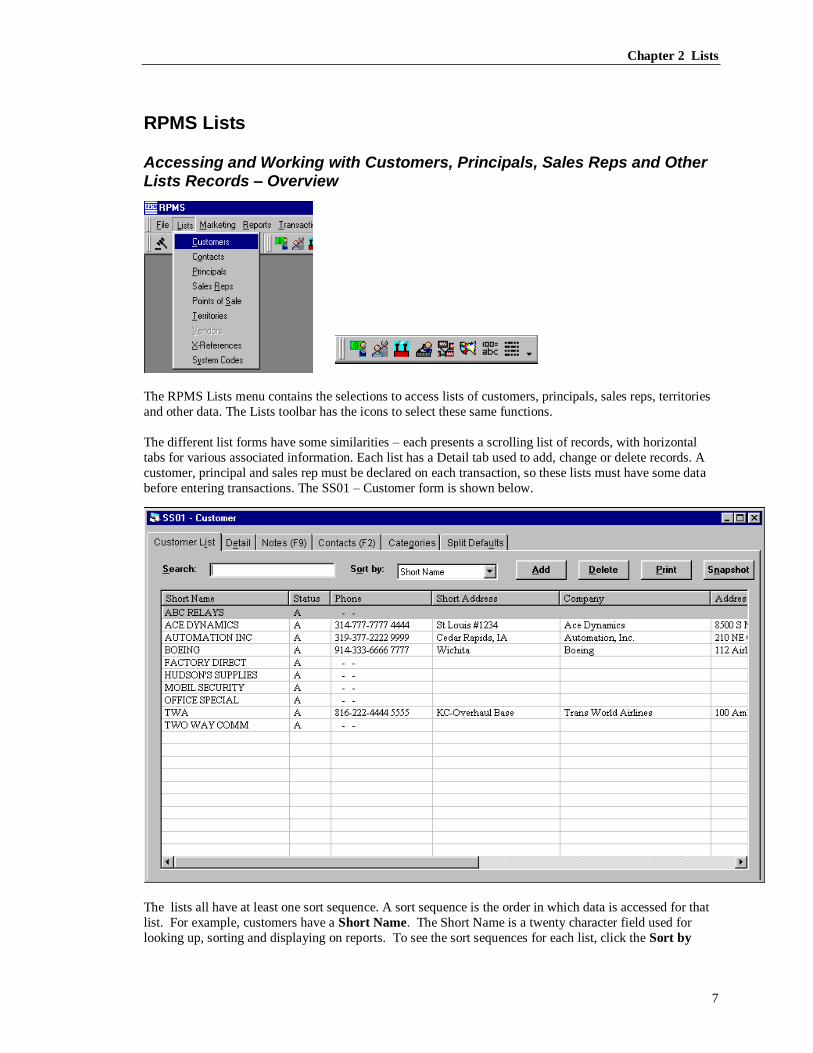
Accessing and Working with Customers, Principals, Sales Reps and Other Lists Records – Overview
The RPMS Lists menu contains the selections to access lists of customers, principals, sales reps, territories
and other data. The Lists toolbar has the icons to select these same functions.
The different list forms have some similarities – each presents a scrolling list of records, with horizontal
tabs for various associated information. Each list has a Detail tab used to add, change or delete records. A
customer, principal and sales rep must be declared on each transaction, so these lists must have some data
before entering transactions. The SS01 – Customer form is shown below.
The lists all have at least one sort sequence. A sort sequence is the order in which data is accessed for that
list. For example, customers have a Short Name. The Short Name is a twenty character field used for
looking up, sorting and displaying on reports. To see the sort sequences for each list, click the Sort by

Chapter 2 Lists
8
drop down list. Records can be located for a given sort sequence by typing in the Search field. As each
letter is typed, the highlighted record moves to the best match. If there are a large number of records in the
list, it may be displayed using vertical tabs, and more than one keystroke will be necessary to initiate the
search. See the Customers - Operational Notes and Important Field Descriptions on page 17 for an
explanation of vertical tabs.
Adding List Records
Adding records is a similar process for each list. Since sales reps must be established before customers can
be set up, there must be at least one sales rep record set up before any customer can be added.
To list sales reps, click the button shown at left or select Sales Reps from the lists menu. Add, change
and delete sales reps from the S03 – Sales Reps screen. To add a sales rep, click the Add button to navigate
to the Detail tab, fill out at least the required fields (field labels of required fields are bolded) and click Add
again. If incorrect information is added, correct the field(s) and click Change. To add another sales rep,
type over the fields and click the add button again, or clear the fields using the clear button, fill in the fields
and click add.
The key field when adding sales reps and other master records is the Short Name. This is the field by
which sales reps are located, listed and reported. It is important to use a meaningful and easily locatable
name if possible. The short name must be unique within that list. For example, if a sales rep is named Jack
Jones, and another is named Jack Jones, Jr., it will be easier to differentiate the two in the system by using J
JONES and JACK JONES JR as the respective short names. When other fields have been filled out as
necessary, click Add to add the sales rep.
Changing List Records
Once master records have been added to the system, their data may be changed by double clicking a
highlighted list record, changing appropriate fields, and then clicking the Save button.

Chapter 2 Lists
9
For example, to list customers, click the button shown at left or select Customers from the lists menu. Initially the customer list tab is displayed. The tabs above the list will navigate to other parts of the
customer form. To see the demographic details of a customer, click the Detail tab, or use the accelerator
key ALT E, or double click the selected record. The detail tab displays the editable fields of the customer
record.
To change a record, change any of the field information and then click the Save button. For example, to
reassign a customer to another sales rep, simply replace the sales rep listed. When a customer shifts from
one sales rep to another, analytical style reports for that customer will shift to the new sales rep. See
Reports on page 73 in this guide for more information about the difference between analytical and
historical reports.
Deleting List Records
Once list records have been added to the system they can be deleted by highlighting a list record, then
clicking the Delete button twice – once from the list tab, then again from the detail tab. Deleting records in
this manner will also delete corresponding transaction and detail data.
Another way to delete list records is to use the RPMS Administrators System, and access the Delete /
Transfer wizard. This program is very useful when two or more copies of the same record have been set up,
and it is necessary to consolidate their transaction history. See the RPMS Administrators Guide for more
information about the Delete / Transfer Wizard.

Chapter 2 Lists
10
List Data Overview – Common Operational Notes and Important Field Descriptions
Many of the RPMS lists contain common data elements and controls. These are described here. The data
fields that are important to individual lists are described in the sections that follow.
All the list detail records except product contain a unique serial Number. The number for the list record is
an RPMS-generated number that tracks data associated with that list record in the system. This number is
not sortable, selectable, editable or manageble by RPMS users. It may be useful for third party report
writers that make use of the ODBC compliant data structures.
Several of the list records have a Short Name field. The short name is a required twenty character unique
identifier used for lookups, reports and snapshots.
Most of the list records have a Status field. All of the lists allow status codes of “A“ for Active and I for
Inactive. When a list record is in “I” status, its data is not accumulated on historical reports under the
record’s name. Instead, that data is consolidated under the name “INACTIVE.” Some of the lists have
other status codes which are described in that list’s section in this chapter.
On most of the list detail tabs you will find a Clear button. This button will clear all of the fields on the
detail tab. This button is useful when you want to add consecutive records – rather than overtyping a
previously added record and running the risk of leaving another record’s information in place, click Clear
to start from an empty form.
On most of the list detail tabs you will find a Print button. This function will print the information on the
detail tab, and in some cases will print the data from additional tabs associated with that record.
The Snapshot button will display the snapshot setup form, with the current record selected for review. See
Snapshots on page 67 in this document.
Several of the list details have a Letter button. This button will launch a word processor program that is
declared from the Preferences screen, then paste in today’s date and name, address and salutation
information.
The Communications Information windows and corresponding controls give unlimited and extremely
flexible telephone and contact information storage. Any list record with these controls has the option to
store an unlimited number of associated telephone or other contact numbers. One part of Communications
Information is the group of three controls shown below the phone number on most list detail tabs. This
group is known as the Displayed Communication Information. The other part of the information is the
scrolling list of All the record’s associated communication information. Both are shown below.
Displayed Communication Information All Communication Information
Both of these information areas rely on the establishment of Communication Codes, which is
accomplished from the System Codes list. Once different communication codes have been established,
they may be selected to define additional telephone numbers, web site and e-mail addresses, and other
types of information as well. See System Codes - Operational Notes on page 21 for more information.
Chapter 2 Lists
11
There are two ways to add more Communication Information to a list record. One way is to use the drop-
down combo boxes in the Displayed controls. Click a drop-down, and select one of the codes. If
Communications Information for that code already exists for this list record, it will immediately be
displayed in the text box to the right. If it does not exist, type the information directly into the text box and
click Save. When Save is clicked, two things are accomplished. First, the additional Communications
Information for the list record will be stored. Second, that record will have the selected code established as
a Displayed Communication Information. So, for example, for one contact your agency may display 800,
Fax and Web. For another contact, even within the same customer, you may choose to display E-Mail,
Cell and Spouse.
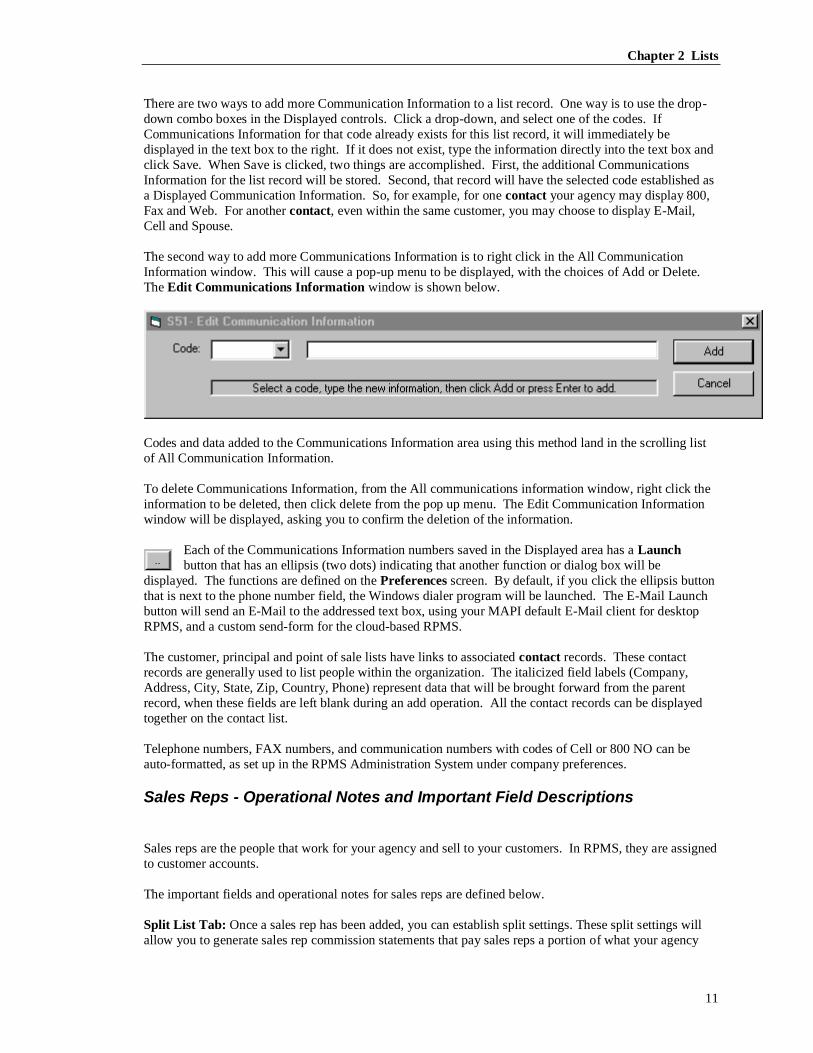
The second way to add more Communications Information is to right click in the All Communication
Information window. This will cause a pop-up menu to be displayed, with the choices of Add or Delete.
The Edit Communications Information window is shown below.
Codes and data added to the Communications Information area using this method land in the scrolling list
of All Communication Information.
To delete Communications Information, from the All communications information window, right click the
information to be deleted, then click delete from the pop up menu. The Edit Communication Information
window will be displayed, asking you to confirm the deletion of the information.
Each of the Communications Information numbers saved in the Displayed area has a Launch
button that has an ellipsis (two dots) indicating that another function or dialog box will be
displayed. The functions are defined on the Preferences screen. By default, if you click the ellipsis button
that is next to the phone number field, the Windows dialer program will be launched. The E-Mail Launch
button will send an E-Mail to the addressed text box, using your MAPI default E-Mail client for desktop
RPMS, and a custom send-form for the cloud-based RPMS.
The customer, principal and point of sale lists have links to associated contact records. These contact
records are generally used to list people within the organization. The italicized field labels (Company,
Address, City, State, Zip, Country, Phone) represent data that will be brought forward from the parent
record, when these fields are left blank during an add operation. All the contact records can be displayed
together on the contact list.
Telephone numbers, FAX numbers, and communication numbers with codes of Cell or 800 NO can be
auto-formatted, as set up in the RPMS Administration System under company preferences.
Sales Reps - Operational Notes and Important Field Descriptions
Sales reps are the people that work for your agency and sell to your customers. In RPMS, they are assigned
to customer accounts.
The important fields and operational notes for sales reps are defined below.
Split List Tab: Once a sales rep has been added, you can establish split settings. These split settings will
allow you to generate sales rep commission statements that pay sales reps a portion of what your agency

Chapter 2 Lists
12
has been paid. The split list tab display is shown below.
Standard Commmission Split: This field establishs a default split rate for the sales rep. The split rate is
expressed as a given percentage of the commission your company has been paid and allocated to the sales
rep, regardless of the actualvalue of the agency commission rate. For example, if most of the principals
your agency represents pay your company at a 5% commission rate, and you wish to give the sales rep half
of that amount, you would establish 50% as the standard commission split. You would NOT use 2.5% -
even though this would be the sales rep’s effective percentage of total sale most of the time. RPMS will do
that calculation down to 2.5% automatically, because 50% of 5% is 2.5%. Likewist a 6% line would
calculate down to 3%, a 4% agency commission down to 2% and so on.
Changing this data at a later time has no impact on those invoices (due commissions) that have already
been declared as paid. See Reconcile Commissions on page 57 for more details about this subject. If this
field or any exception rate (see below) has been established incorrectly, it is likely that the sales rep and
agency commission statements will either overpay or underpay the sales rep. If such an error is caught
before commission checks to sales reps have been written and deposited, you would likely want to change
the individual payment details of the various invoices paid incorrectly. If agency to sales rep commission
checks have already been cashed, you should probably just change one of the split rates on another invoice
to be subsequently paid to that sales rep.
Exception Rates: The table below lists some split rate exceptions that have been established for a sales
rep.

Chapter 2 Lists
13
The example table indicates that instead of the standard commission rate, this sales rep will be paid 65%
of the agency allocated commission amount when he sells for the principal Electronic Energy, and any of
Electronic Energy’s divisions (the Apply Prin Sub flag.) Similarly, if the sales rep sells to his customer
Automation Inc, in any location, he will be paid only 55% of the allocated commission. These exceptions
over-ride the standard commission rate when invoices are declared as paid. To add an exception, click
the Add button, fill out the fields on the detail tab and click save. To delete an exception, click the delete
button. To change an exception rate, double click the record to change, change necessary fields on the
detail tab and click save. Note that customers and principals must exist in the system before exceptions can
be declared for them.
In the event of a conflict within the exceptions, the customer’s rate will be used. Using the example above,
the sales rep would be paid at 55% of the allocated commission if paid for an invoice from Electronic
Energy to Automation Inc.
The word allocated is used in this section to acknowledge the possiblity that credit for any given paid
commission may be divided among up to seven sales reps within your agency. See the Chapter Add
Transactions and the topic Split Tab on page 41 for an explanation of this credit splitting process.
Delete a Sales Rep: Before deleting a sales rep, understand that transactions recorded for that sales rep will
continue to belong to that sales rep’s unique serial number, even though that number no longer exists in the
RPMS system. Therefore, reports that encounter that serial number will print “DELETED” as the sales rep
name.
It may be preferable to Inactivate the sales rep. To inactivate the rep, change the status to “I” and click the
Save button. Transactions recorded for Inactive reps will report under the sales rep heading of “INACTIVE
SALESREP.” There are two advantages of Inactive status instead versus deleting. The first is that if the
sales rep were reactivated with an “A” status, all transactions would revert back to the now active sales rep,
since his serial number would still exist. The second is that the INACTIVE SALESREPS may be excluded
on certain reports, whereas DELETED SALESREPS is always reported.
Principals - Operational Notes and Important Field Descriptions
Principals are the companies that your agency represents. In various rep industries they are also known as
manufacturers, lines, vendors, factories, or suppliers. For the most part, these principals are the companies
that invoice customers and pay sales agency commissions.
The important fields for principals are defined below.
Status: In addition to “A” and “I” as previously described, those agencies who have RPMS Professional or
RPMS Enterprise versions with either the Accounts Receivable or Inventory features may establish “S”
status principals. An “S” status indicates that this principal is a stocking or invoicing principal, tracking
inventory and/or accounts receivable within the RPMS system. Usually this is the rep agency itself,
wearing a distributor hat.
Parent: Divisions of principals may be declared using a parent-child relationship established by this
optional field. If the principal is a division of another principal that has already been set up, type the name
of the parent principal in this field. Principals that are joined in this manner can be reported together or
separately. To dissolve the relationship, blank out the name and click Save. Accounts Receivable and
Inventory principals can be set up in sub-Vendor style, where the rep firm is set up as an “S” status parent,
and the Rep Firm – Vendor is set up as an “S” status child. An Order can be written to the rep firm’s AR or
Inventory principal, with individual line items associated with different vendors.
EDI / EDI Sub: These optional fields store the matching ‘return address’ of transaction data submitted
electronically. When data is uploaded to RPMS from an electronic source, there must be a clear way to
Chapter 2 Lists
14
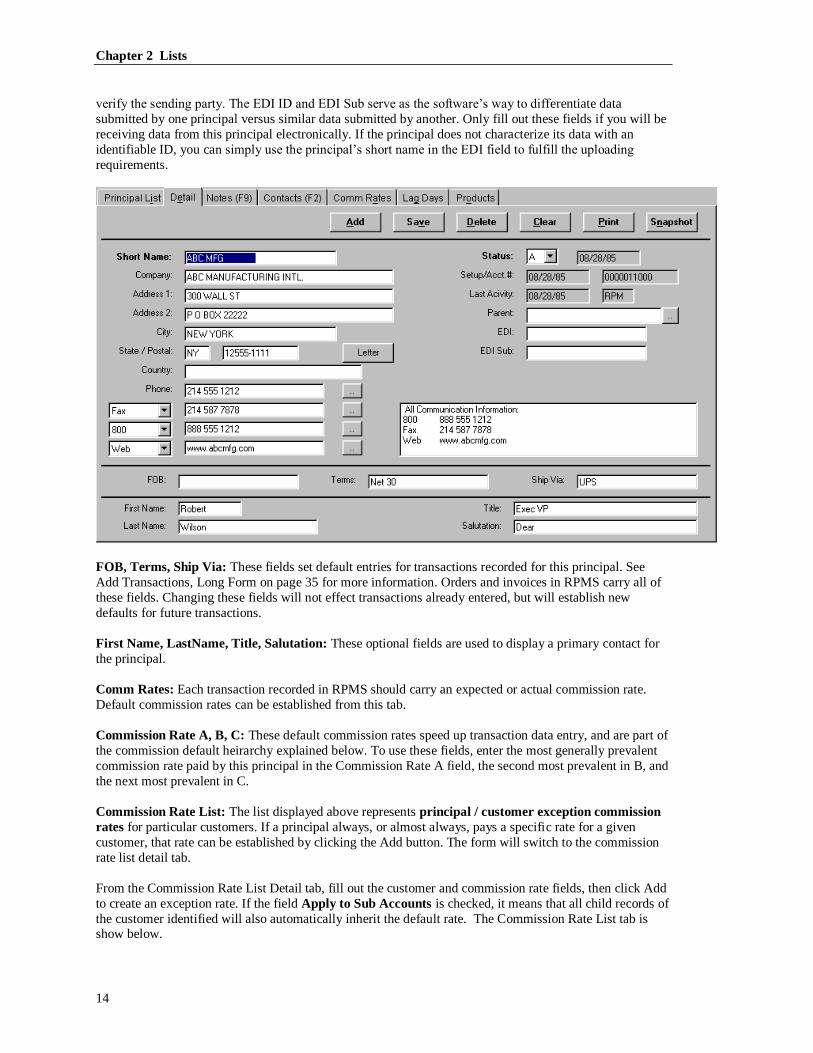
verify the sending party. The EDI ID and EDI Sub serve as the software’s way to differentiate data
submitted by one principal versus similar data submitted by another. Only fill out these fields if you will be
receiving data from this principal electronically. If the principal does not characterize its data with an
identifiable ID, you can simply use the principal’s short name in the EDI field to fulfill the uploading
requirements.
FOB, Terms, Ship Via: These fields set default entries for transactions recorded for this principal. See
Add Transactions, Long Form on page 35 for more information. Orders and invoices in RPMS carry all of
these fields. Changing these fields will not effect transactions already entered, but will establish new
defaults for future transactions.
First Name, LastName, Title, Salutation: These optional fields are used to display a primary contact for
the principal.
Comm Rates: Each transaction recorded in RPMS should carry an expected or actual commission rate.
Default commission rates can be established from this tab.
Commission Rate A, B, C: These default commission rates speed up transaction data entry, and are part of
the commission default heirarchy explained below. To use these fields, enter the most generally prevalent
commission rate paid by this principal in the Commission Rate A field, the second most prevalent in B, and
the next most prevalent in C.
Commission Rate List: The list displayed above represents principal / customer exception commission
rates for particular customers. If a principal always, or almost always, pays a specific rate for a given
customer, that rate can be established by clicking the Add button. The form will switch to the commission
rate list detail tab.
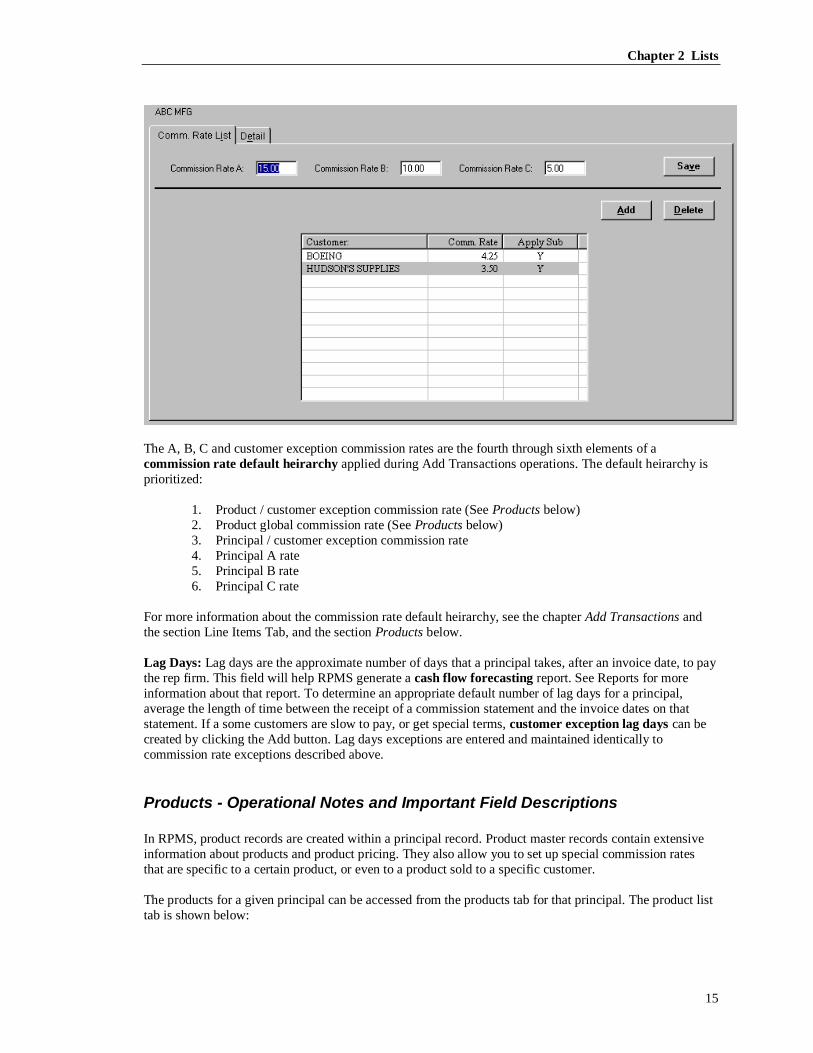
From the Commission Rate List Detail tab, fill out the customer and commission rate fields, then click Add
to create an exception rate. If the field Apply to Sub Accounts is checked, it means that all child records of
the customer identified will also automatically inherit the default rate. The Commission Rate List tab is show below.
Chapter 2 Lists
15
The A, B, C and customer exception commission rates are the fourth through sixth elements of a
commission rate default heirarchy applied during Add Transactions operations. The default heirarchy is
prioritized:
1. Product / customer exception commission rate (See Products below)
2. Product global commission rate (See Products below)
3. Principal / customer exception commission rate
4. Principal A rate
5. Principal B rate
6. Principal C rate
For more information about the commission rate default heirarchy, see the chapter Add Transactions and
the section Line Items Tab, and the section Products below.
Lag Days: Lag days are the approximate number of days that a principal takes, after an invoice date, to pay
the rep firm. This field will help RPMS generate a cash flow forecasting report. See Reports for more
information about that report. To determine an appropriate default number of lag days for a principal,
average the length of time between the receipt of a commission statement and the invoice dates on that
statement. If a some customers are slow to pay, or get special terms, customer exception lag days can be
created by clicking the Add button. Lag days exceptions are entered and maintained identically to
commission rate exceptions described above.
Products - Operational Notes and Important Field Descriptions
In RPMS, product records are created within a principal record. Product master records contain extensive
information about products and product pricing. They also allow you to set up special commission rates
that are specific to a certain product, or even to a product sold to a specific customer.
The products for a given principal can be accessed from the products tab for that principal. The product list
tab is shown below:

Chapter 2 Lists
16
When there are a large number of products for a given principal, the product list may use a vertical tab list
to bring in a subset of all the products. See the description of vertical tabs in Customers - Operational Notes
and Important Field Descriptions below.
The important fields for products are defined below.
Number: The product number is usually the principal’s uniquely identifing code for this part. In some
industries it is known as as SKU or ID. Once entered, the product number can’t be changed or deleted.
Using the RPMS Administrator’s system one product’s history may be transferred to another product.
Description: The description field for the product is broken into two separate fields. The first field is an
alternate lookup field for products, and is stored at the line item level in transaction details. The second
field is used for additional descriptions.
Bar Code: This field is used to store the UPC, or universal product code for the product.
Commission Rate: This field is used to create a default commission rate for product. If the principal pays a
particular rate for sales of this product, the percentage can be stored in this field. Transactions that declare
this product will default to the commission rate, unless supersceded by another default rate in the hierarchy,
as described in Principals above and Add Transactions below.
Stocked Item: Check this checkbox to declare that this product is a stocked product. Inventory and
Accounts Receivable featueres available with the RPMS Professional and Enterprise versions use this field
to distinguish between products that are simply represented versus those that are kept and tracked in the
warehouse.
Taxable: For RPMS Professional versions with the Accounts Receivable featuer, check this field to declare
that sales tax should be calculated for this product.
Selling Units: For RPMS Professional systems with the inventory feature, use this field to describe the
method of case or package. For example, products that are sold individually may be described with a
selling unit of EA for ‘each.’

Chapter 2 Lists
17
Unit Product Descriptions / Prices (1, 2 & 3): The standard prices to be used for this product are
displayed on a pop-up form during line item data entry, if filled out in these fields. RPMS will store these
three standard prices for this product, and three levels of custom pricing for individual customers. See the
Special Prices & Rates below. Note that each price may be extended to four decimals.
Effective Date: This optional field will list on product master lists and the product price pop up window to
document when standard pricing was established.
Locked: When selected the price is protected from price updating utilities that would otherwise
automatically raise or lower the price. See the RPMS Administrator’s Guide for more information about
product utilities.
Categories: Products can be declared to be in one to three categories. Categories can be selected as
filtering options for product history reports. Product categories are defined in the System Codes List,
described below.
Inventory Tab: This tab and its fields are described in the Inventory chapter of this guide.
Special Prices & Rates: This tab lists customer-specific prices and commission rates for this product. The
detail tab allows, for each customer, up to three additonal special prices and descriptions, and a customer-
specific commission rate. This customer / product specific rate is the ‘top’ of the default heirarchy, as
described in Principals above.
Customers - Operational Notes and Important Field Descriptions
Customers are the companies to which your agency sells. In various rep industries they are also known as
accounts, stores, dealers, distributors or OEMs.
The customer list can have vertical tabs. Vertical tabs can be thought of as index tabs. Each vertical tab
marks the beginning of another group of records. Vertical tabs show up based on settings established in
User Preferences.
Vertical tabs cause large lists to display more quickly. For example, if a customer list has 20,000 records, it
would be very slow to completely fill out the entire list. Based on your User Preference settings, RPMS
might bring in only 50 data records, with 400 tabs. When vertical tabs are in use, the Search field behaves
differently. Depending on the total number of records in the list, you may need to type two to ten letters to
cause the search to occur. This prevents the search tool from unnecessarily filling the wrong tab. A sample
of the customer list using vertical tabs is shown below:

Chapter 2 Lists
18
The important fields for customers are defined below.
Status: In addition to “A” and “I” as previously desribed, “P” status customers represent Prospective
customers. A “P” status customer is treated as an Inactive (“I” status) if there is transaction history
accorded to the customer. “P” status customers are selectable and useful for Pro Systems with the Direct
Marketing feature.
Parent: Locations of customers may be declared using a parent-child relationship established by this
optional field. If the customer is another location of a customer that has already been set up, and it is
important to track the transactions to this location, type the name of the parent customer in this field.
Customers that are joined in this manner can be reported together or separately. To dis-establish the
relationship, blank out the name and click Save. When a customer with a parent declared is originally
added, the system will prompt to allow the new child to inherit commission rates and splits from the parent.
EDI / EDI Sub: These optional fields store the matching ‘return address’ of transaction data submitted
electronically, and may also be used as an alternate lookup field on any customer prompt. When data is
uploaded to RPMS from an electronic source, there must be a clear way to verify the sending party. The
EDI ID and EDI Sub serve as the software’s way to differentiate data submitted by one principal versus
similar data submitted by another. Only fill out these fields if you will be receiving data from this customer
electronically. If the customer does not characterize its data with an identifiable ID, you can simply use the
customer’s short name in the EDI field to fulfill the uploading requirements.
Sales Rep: The sales rep is a required field that indicates the primary account manager for this customer.
To assign another rep, simply type the new name in this field and click Save. The Sales Rep assigned at the
time of a transaction receives 100% of the credit for the transaction, unless the transaction is divided with
other sales reps. See Split Tab in the chapter Add Transactions for an explanation of this credit splitting
process. Some transaction reports can be run to report either Historical or Analytical values. Historical
means the value of the transactions as they were recorded. Analytical means an analysis of the accounts
Chapter 2 Lists
19
based on their current assignments. Thus re-assigning a customer will not suddenly move all the historical
transactions to the new sales rep, but the new sales rep can receive an analytical report about his currently
assigned accounts.
Territory: A territory may optionally be assigned to this account. Reports that organize customers by
territory always look to this field to determine where to place the record. The territory field is dynamic data
– however a group of customers is currently divided by territory is the way they appear always to have been
divided.
Short Address: The short address is used as additional data on customer lookups. When entering
transactions or selecting customers for reports, the RPMS lookup fields can be dropped down (or up) to
display several customers from which to select. The Parent field, described below, is an example of a
customer lookup field. When dropped , customer lookups will display the short address and phone number
as well as the customer short name. A lookup sample with the short address circled is shown below:
Last Call / Next Call: These two date fields accept six digits in MMDDYY format. No slashes or spaces
should be used. They are optionally used to record the most recent call date for a customer, or a follow-up
date. See the Direct Marketing chapter for information about extracting customers based on these fields.
Contact Special Status: On the contact tab, the special status field is used to set default Sold To, Ship To
and Invoice To addresses for transactions. See the chapter Add Transactions and the section Contact Tab
on page 41 for an explanation about the use of contacts as Sold To, Ship To and Invoice To addresses.
Contact Replicate Button: From the Add form for a new contact, the replicate button becomes active.
This button will replicate any changes entered for all contacts within this customer. For example, to change
address line 1 of all the contacts within the customer, type the new address in the field and click Replicate.
Split Defaults: The commissions earned for this customer may be split between multiple sales reps within
your agency. This type of commission division should not be confused with the splitting that occurs
between the agency and the sales rep. That split is governed by percentages established on the sales rep’s
records. This sharing of commission credit between multiple sales reps is based on commission credit splits
assigned at the transaction level, the defaults for which can be established here.
The commission credit split window for transactions is shown below. The first sales rep listed is the
primary account manager assigned from the customer detail tab, who ordinarily receives 100% of the credit
for the commssion earned. The split window allows the addition of up to six additional sales reps, each of
whom may receive a portion of that 100%. As a new sales rep is added to the split scenario, the percentage
ascribed reduces the original sales rep’s percent of credit accordingly. The split options prompt declares
whether Gross, Commission or Both will be split. Gross refers to the order or invoice amount for the
transaction. Commission refers to the agency commission amount for the transaction. For a more detailed
explanation of splitting credit for invoices amongst multiple sales reps, see the chapter Add Transactions
and the section Split Tab on page 41.
The split defaults Split List tab shows all the split defaults established for this customer. The list includes
areas for declared principals, points of sale, and up to seven different sales rep / credit percentage
combinations. The split option field is listed at the end of the list. The split list is sorted by principal and
point of sale. A sample is shown below.
There is a hierarchical priority for the split defaults that governs which split default will be automatically
set up for a given transaction. The list below is the order of precedence:
1. When a transaction has a matching customer, principal and point of sale
2. When a transaction has a matching customer and principal
3. When a transaction has a matching customer and point of sale
4. When a transaction has a matching customer.

Chapter 2 Lists
20
Items 2, 3 and 4 above will only apply when a split record has been set up and the point of sale, principal or
both have been left blank.
Example: Jack Jones is the sales rep of record for customer ACE DYNAMICS. Normally Jack receives
100% of the credit for sales made to ACE DYNAMICS. Harry Miller has joined the rep firm, and brought a
new line, GOLD MFG, as a principal for the agency. Whenever GOLD MFG sells something to ACE
DYNAMICS, Harry is to receive 10% of the credit. To establish this, from the Split Detail tab set GOLD
MFG in the principal field and set Harry Miller in the Sales Rep 2 field, and his Split Percentage to 25%.
For clarity’s sake on reports, ‘Both’ would be the appropriate split option.
Example2: Alan is the regional sales manager for a rep firm. ABC RELAYS is a customer in the region.
Bill is the sales rep who makes the calls on ABC RELAYS, and who is paid commission for the account.
Alan should be set up as the Sales Rep on the customer detail tab. Reports run as analytical would show
ABC RELAYS under Alan’s acounts. One default split should be established for a blank principal, blank
point of sale, and with Bill receiving 100% of the credit for both gross and commission amounts. This will
cause every transaction for ABC RELAYS to be split to Bill’s credit, and reported as such for commission
statements, historical reports and snapshots.
Points of Sale - Operational Notes
Points of sale, also known as POS records, are optional records that can be referenced on individual
transactions. Some rep firms use POS to track distribution partners in the sales channel. In these situations,
rep firms are not paid until distributors sell to end users in the territory, so tying the sale to a distributor is
an ideal function for the POS record.
Chapter 2 Lists
21
Point of Sale records can also be set up to track marketing activities or branch office activity. For example,
you may wish to track “factory direct” orders versus “inside office telephone” orders versus “direct call
orders” versus “web-based” orders. By setting up four different points of sale, you can determine where
your sales come from.
Territories - Operational Notes
Territories are optional records that can be assigned to customers. Some rep firms use territories to track
branch offices, states or other geographic identifiers. Other rep firms use territory for other demographic
information about the customer, like OEM account, KEY account, INSTITUTIONAL account, or other
account types.
Territory history is reported only dynamically, as the territories are currently set up in the customer list. In
other words, changing the customer’s territory does not change the customer or sales rep’s history, but does
impact where the customer falls in a territory driven reports. This is advantageous when trying to determine
the value of changing territories or customer assignments.
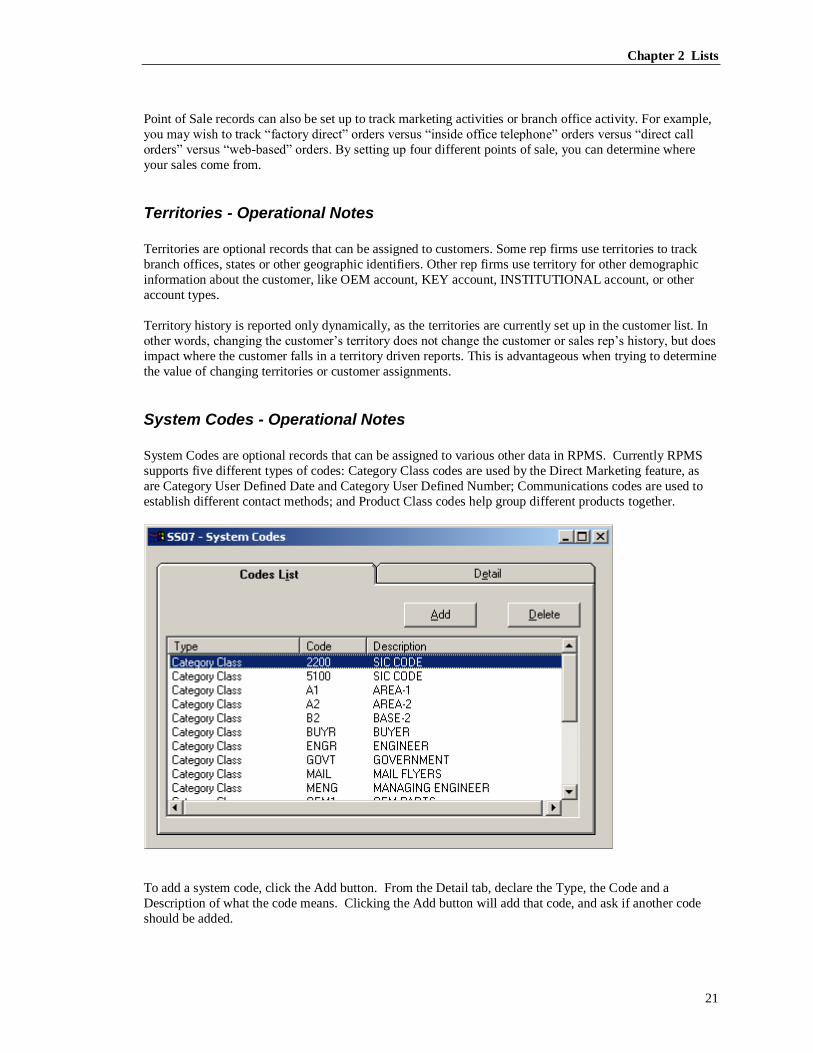
System Codes - Operational Notes
System Codes are optional records that can be assigned to various other data in RPMS. Currently RPMS
supports five different types of codes: Category Class codes are used by the Direct Marketing feature, as
are Category User Defined Date and Category User Defined Number; Communications codes are used to
establish different contact methods; and Product Class codes help group different products together.
To add a system code, click the Add button. From the Detail tab, declare the Type, the Code and a
Description of what the code means. Clicking the Add button will add that code, and ask if another code
should be added.
Chapter 2 Lists
22
To change the description of a system code, from the Codes List tab double click the code to be changed.
To change a type or code simply add another code and delete the unnecessary code.
To delete a system code, highlight the code to delete from the Code List tab and then click the Delete
button. From the Detail tab, click the Delete button once more. Note that the communication codes E-Mail
and Web are necessary for system operation and can’t be deleted.
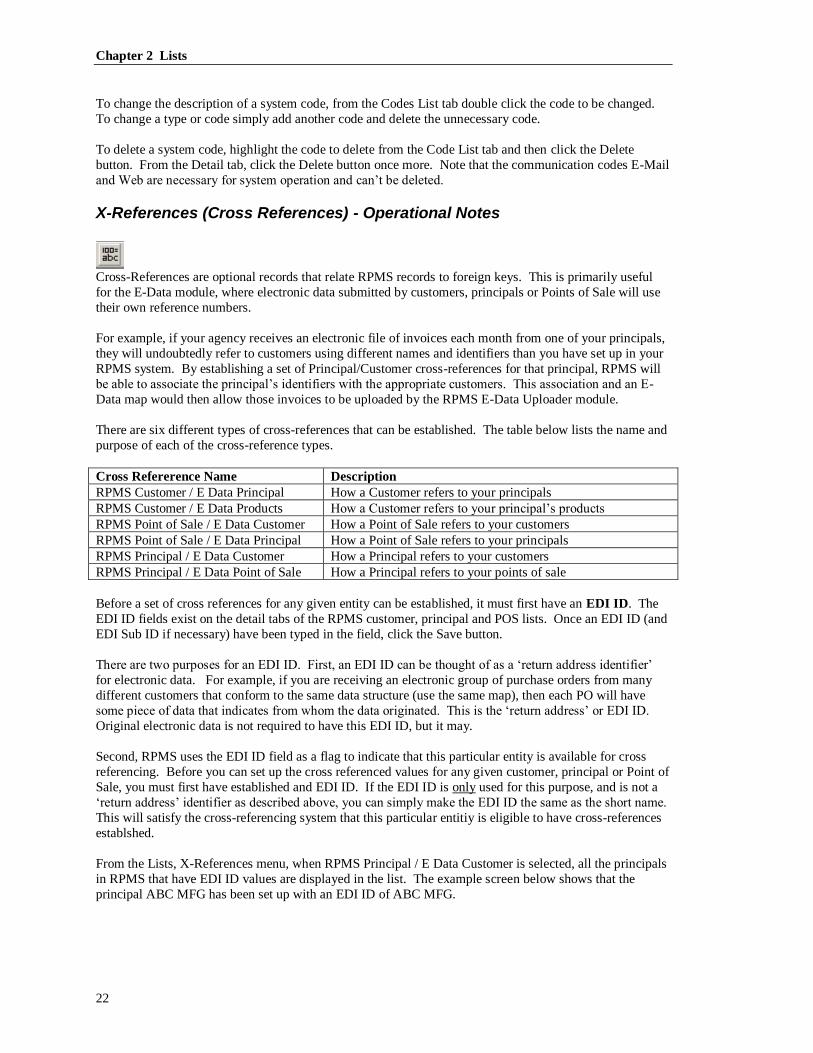
X-References (Cross References) - Operational Notes
Cross-References are optional records that relate RPMS records to foreign keys. This is primarily useful
for the E-Data module, where electronic data submitted by customers, principals or Points of Sale will use
their own reference numbers.
For example, if your agency receives an electronic file of invoices each month from one of your principals,
they will undoubtedly refer to customers using different names and identifiers than you have set up in your
RPMS system. By establishing a set of Principal/Customer cross-references for that principal, RPMS will
be able to associate the principal’s identifiers with the appropriate customers. This association and an E-
Data map would then allow those invoices to be uploaded by the RPMS E-Data Uploader module.
There are six different types of cross-references that can be established. The table below lists the name and
purpose of each of the cross-reference types.
Cross Refererence Name Description
RPMS Customer / E Data Principal How a Customer refers to your principals
RPMS Customer / E Data Products How a Customer refers to your principal’s products
RPMS Point of Sale / E Data Customer How a Point of Sale refers to your customers
RPMS Point of Sale / E Data Principal How a Point of Sale refers to your principals
RPMS Principal / E Data Customer How a Principal refers to your customers
RPMS Principal / E Data Point of Sale How a Principal refers to your points of sale
Before a set of cross references for any given entity can be established, it must first have an EDI ID. The
EDI ID fields exist on the detail tabs of the RPMS customer, principal and POS lists. Once an EDI ID (and
EDI Sub ID if necessary) have been typed in the field, click the Save button.
There are two purposes for an EDI ID. First, an EDI ID can be thought of as a ‘return address identifier’
for electronic data. For example, if you are receiving an electronic group of purchase orders from many
different customers that conform to the same data structure (use the same map), then each PO will have
some piece of data that indicates from whom the data originated. This is the ‘return address’ or EDI ID.
Original electronic data is not required to have this EDI ID, but it may.
Second, RPMS uses the EDI ID field as a flag to indicate that this particular entity is available for cross
referencing. Before you can set up the cross referenced values for any given customer, principal or Point of
Sale, you must first have established and EDI ID. If the EDI ID is only used for this purpose, and is not a
‘return address’ identifier as described above, you can simply make the EDI ID the same as the short name.
This will satisfy the cross-referencing system that this particular entitiy is eligible to have cross-references
establshed.
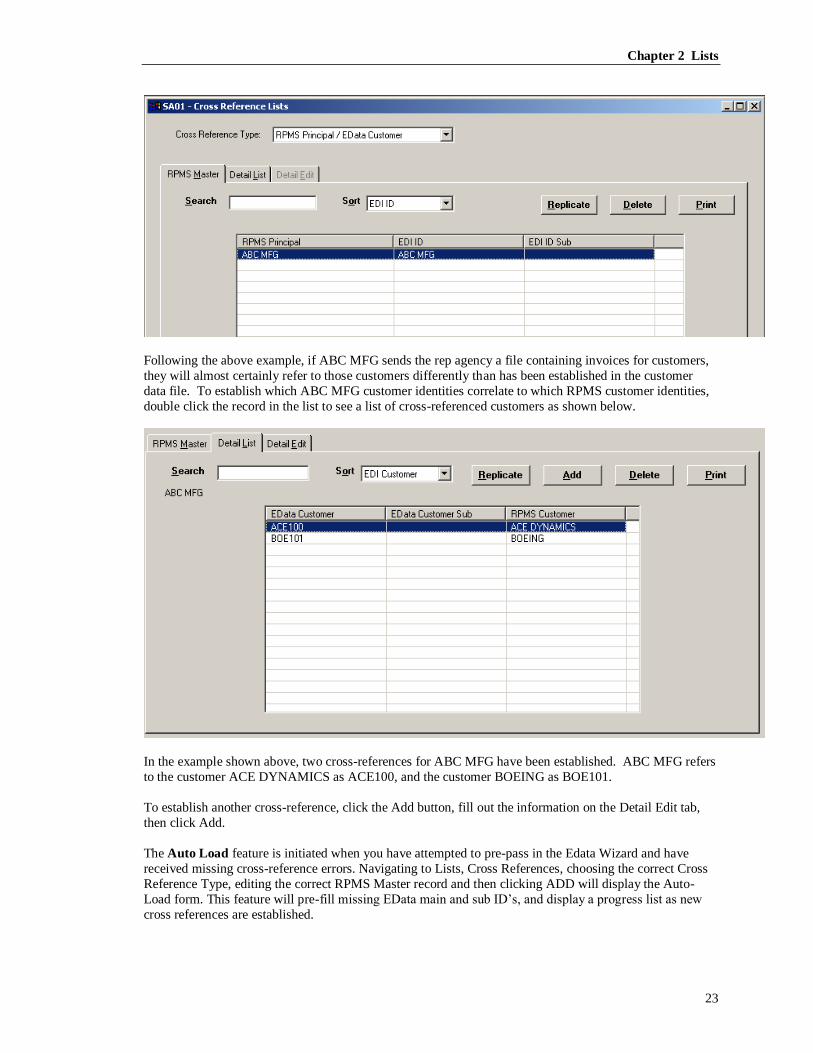
From the Lists, X-References menu, when RPMS Principal / E Data Customer is selected, all the principals
in RPMS that have EDI ID values are displayed in the list. The example screen below shows that the
principal ABC MFG has been set up with an EDI ID of ABC MFG.
Chapter 2 Lists
23
Following the above example, if ABC MFG sends the rep agency a file containing invoices for customers,
they will almost certainly refer to those customers differently than has been established in the customer
data file. To establish which ABC MFG customer identities correlate to which RPMS customer identities,
double click the record in the list to see a list of cross-referenced customers as shown below.
In the example shown above, two cross-references for ABC MFG have been established. ABC MFG refers
to the customer ACE DYNAMICS as ACE100, and the customer BOEING as BOE101.
To establish another cross-reference, click the Add button, fill out the information on the Detail Edit tab,
then click Add.
The Auto Load feature is initiated when you have attempted to pre-pass in the Edata Wizard and have
received missing cross-reference errors. Navigating to Lists, Cross References, choosing the correct Cross
Reference Type, editing the correct RPMS Master record and then clicking ADD will display the Auto-
Load form. This feature will pre-fill missing EData main and sub ID’s, and display a progress list as new
cross references are established.

Chapter 2 Lists
24
To change an existing cross reference ID to another customer, double click the cross reference record from
the Detail List tab, or highlight the record and click the Detail Edit tab. Change the RPMS customer then
click the Save button.
To delete a cross-reference, highlight the record to be deleted and click Delete, then click Delete from the
Detial Edit tab.
The Replicate button provides an opportunity to share cross-references. For example, two divisions of the
same principal may share the same computer system, and therefore refer to customers using the same
identifiers. Once one division was set up with it’s cross-references, the other division could be replicated.
Click the Replicate button to display the dialog as shown below.
The Propagate button spreads the cross-reference records of a parent customer and or parent principal to its
children. The record selected must be a Parent record (principal or customer) for the Propagate function to
work.
A Yes/No/Cancel message box prompts for full propagation or propagation limited to adding new records.
Clicking Yes at this prompt means that all children of the selected record should end up with identical
cross-reference records to the parent for the cross reference type being propagated. This handles the
scenario where every child of a given parent should carry the same cross-reference records as the parent.
Clicking No means that only those cross-reference records previously absent will be added. This handles
the situation where child entities usually use the same cross-reference records as their parent, but in some
cases have exceptions. Clicking No preserves the exceptions that have been edited for child records, but
adds any new cross references that did not previously exist.
For more information about cross-referencing and finding cross-referencing problems, see the
documentation that accompanies E-Data maps.

Chapter 3 Add Transactions
25
Add Transactions
Types and Methods of Adding Transactions
Transactions represent business documents exchanged between customers, principals, agencies and sales
reps. The types of transactions are bookings, orders, sales, and payments.
Bookings: A measurement of gross and commission dollar and unit volume, based on the month and year
of the book date, which is usually based on the date of entry. See the RPMS Administrators Guide for more
information about managing the book date.
Orders: A measurement of gross and commission dollar and unit volume, based on the order date, which
is typically the customer’s purchase order date. While all RPMS systems track order dollar and unit
volume, you may choose to auto-default the order date to be the same as the invoice date, if you prefer not
to determine actual order dates.
Sales: A measurement of gross and commission dollar and unit volume, based on the invoice date, which
is the principal’s invoice date. Therefore a sale (in RPMS terminology) does not happen until an invoice
has been entered.
Payments: A measurement of gross, gross commission and split commission dollar volume, based on the
payment date, which should be recorded as the day that the agency receives payment. Past RPMS systems
labeled the payment date as “Salesman Pay Date.” Some agencies may choose to think of the payment date
this way, but RPMS is not an Accounts Payable system. Closing the loop on the manufacturers reps’
receivables dictates using the date the agency was paid. What sales reps should subsequently be paid can be
determined by bracketing date ranges of payment dates. See the chapter Reports and the section
Commissions on page 76 for more information about Sales Rep and Agency Commission Statements.
There are several different systems that create transactions, and each system may create several different
transactions. For example, adjusting an invoice can impact bookings (based on the book date), orders
(based on the order date) and sales (based on the invoice date.) Two example scenarios are cited below.
Scenario 1 - A rep takes an order over the telephone on Nov 5 2004. He receives a copy of the invoice from
the principal on Jan 10 2005 that has an invoice date of Dec 22 2004. He receives a commission payment
on Feb 15 2005. The Booking is recorded for November of 2004, as is the Order history. The Sales
history goes up for December of 2004, and the Payment history is increased for February of '05.
Scenario 2 - A rep firm receives an acknowledgement of an order on Dec 4 2005 that was placed with the
principal directly on Nov 30 2004. An invoice copy is sent to the rep firm in January with a December
invoice date that shows half the products shipping, and the other half being cancelled in December. The
commission payment arrives in February. Bookings for the agency increase for December of 2004. Orders
History increases for November of 2004. Sales History goes up for December because of the invoice. The
cancellation causes Orders history to go down for November, and Bookings History to go down for
January. Payment History increases for February.
The systems that create transactions are known as
• Add Transactions
• Short Form
• Long Form
• Maintain/Ship Transactions

Chapter 3 Add Transactions
26
• Customer Purchase Orders
• Principal Purchase Orders
• Customer Invoices
• Reconcile Commissions
• Adjust Invoices
• Pay Invoices
This chapter describes the Add Transactions systems, Short Form and Long Form.
Add Transactions, Short Form
The simplest way to Add Transactions is to use the Short Form. Rep firms that want to enter summary style
invoices, or enter invoices directly from commission statements find the Short Form useful. The Short
Form can be used in Professional and Enterprise systems to enter highly summarized open orders.
From the menu select Transactions, Add Transactions, or click the Add Transactions toolbar button shown
above. The S04S - Add Transactions Setup Options form is displayed as shown below:
When Add Transactions is selected, RPMS establishes what batch number and book date will be used for
subsequent transactions. The batch number is an alpha-numeric label and can be used to recall a list of
transaction batches, or groups of transactions (Batch Verify and Register reports). The batch defaults to
the last batch number used by this user during this session of RPMS, or the date if this is the first time in
during this session. Depending on company preference settings, the book date may or may not be
modifiable. Check with your agency administrator if you need to change the book date, or for more
information about managing the book date, see the RPMS Administrator’s Guide.
The Form prompt declares whether this will be a short form (summary style) or long form (line item style)
transaction entry. This section describes the short form. The More button allows you to declare other setup
options for the form you will be using. Click the More button to see the form expand as shown below:
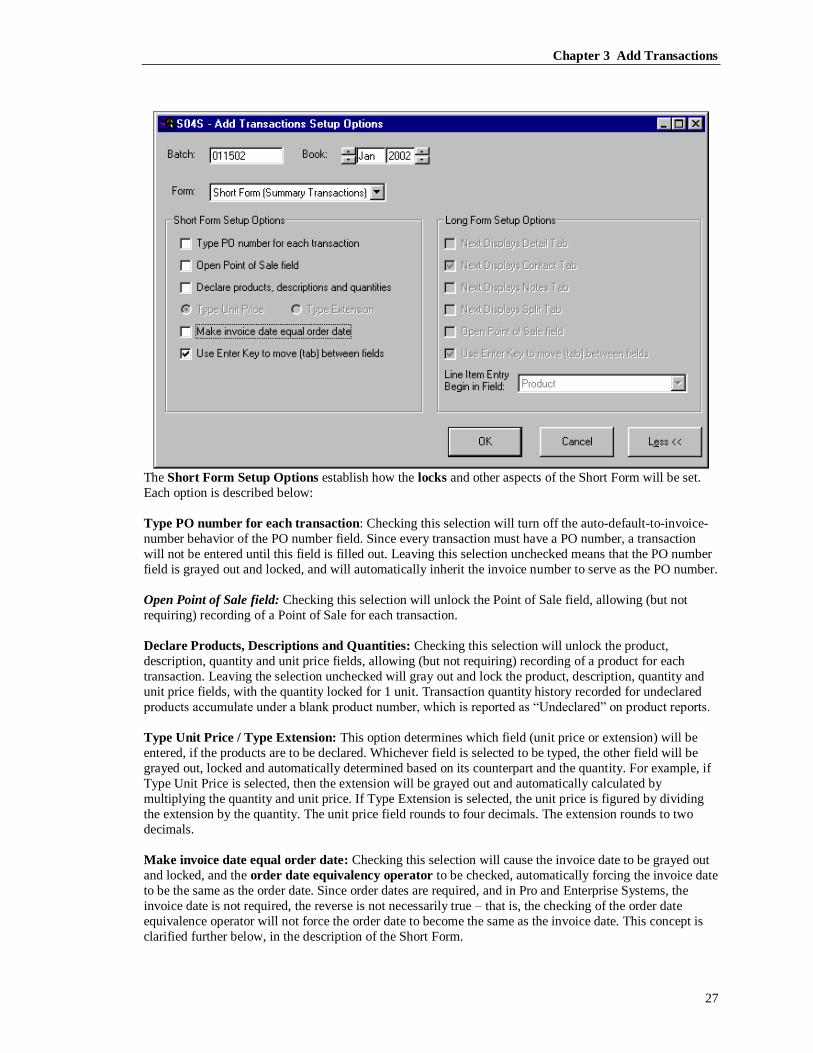
Chapter 3 Add Transactions
27
The Short Form Setup Options establish how the locks and other aspects of the Short Form will be set.
Each option is described below:
Type PO number for each transaction: Checking this selection will turn off the auto-default-to-invoice-
number behavior of the PO number field. Since every transaction must have a PO number, a transaction
will not be entered until this field is filled out. Leaving this selection unchecked means that the PO number
field is grayed out and locked, and will automatically inherit the invoice number to serve as the PO number.
Open Point of Sale field: Checking this selection will unlock the Point of Sale field, allowing (but not
requiring) recording of a Point of Sale for each transaction.
Declare Products, Descriptions and Quantities: Checking this selection will unlock the product,
description, quantity and unit price fields, allowing (but not requiring) recording of a product for each
transaction. Leaving the selection unchecked will gray out and lock the product, description, quantity and
unit price fields, with the quantity locked for 1 unit. Transaction quantity history recorded for undeclared
products accumulate under a blank product number, which is reported as “Undeclared” on product reports.
Type Unit Price / Type Extension: This option determines which field (unit price or extension) will be
entered, if the products are to be declared. Whichever field is selected to be typed, the other field will be
grayed out, locked and automatically determined based on its counterpart and the quantity. For example, if
Type Unit Price is selected, then the extension will be grayed out and automatically calculated by
multiplying the quantity and unit price. If Type Extension is selected, the unit price is figured by dividing
the extension by the quantity. The unit price field rounds to four decimals. The extension rounds to two
decimals.
Make invoice date equal order date: Checking this selection will cause the invoice date to be grayed out
and locked, and the order date equivalency operator to be checked, automatically forcing the invoice date
to be the same as the order date. Since order dates are required, and in Pro and Enterprise Systems, the
invoice date is not required, the reverse is not necessarily true – that is, the checking of the order date
equivalence operator will not force the order date to become the same as the invoice date. This concept is
clarified further below, in the description of the Short Form.
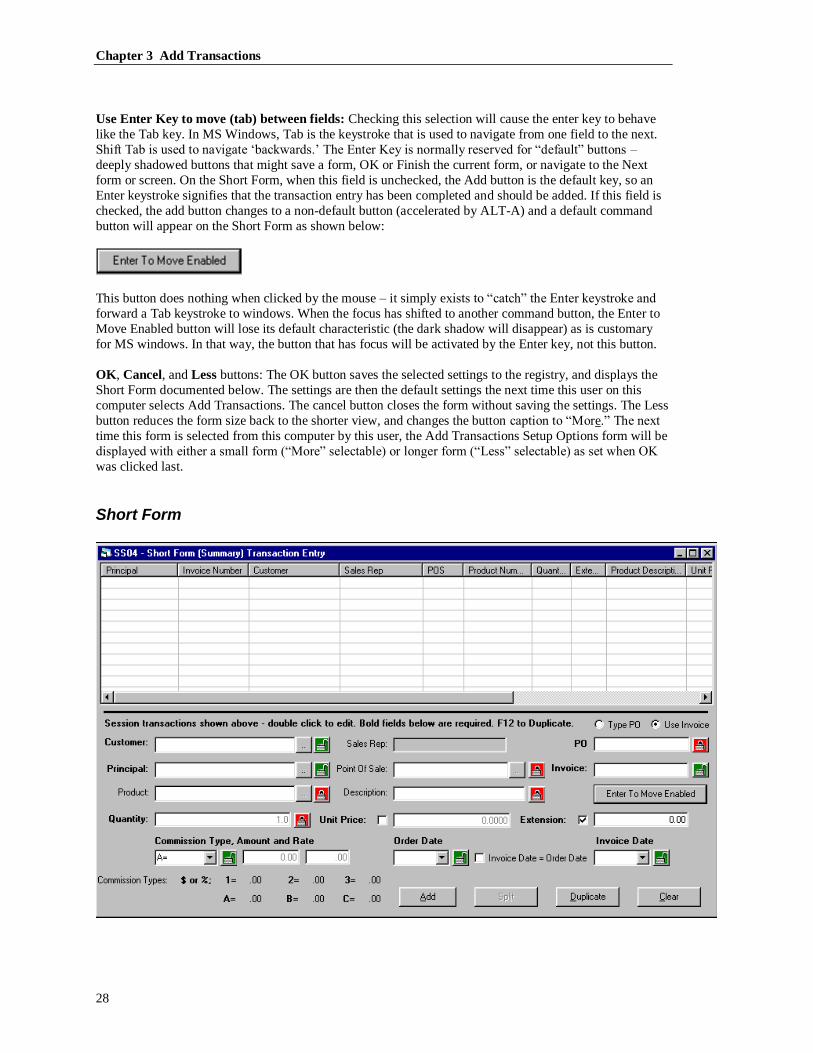
Chapter 3 Add Transactions
28
Use Enter Key to move (tab) between fields: Checking this selection will cause the enter key to behave
like the Tab key. In MS Windows, Tab is the keystroke that is used to navigate from one field to the next.
Shift Tab is used to navigate ‘backwards.’ The Enter Key is normally reserved for “default” buttons –
deeply shadowed buttons that might save a form, OK or Finish the current form, or navigate to the Next
form or screen. On the Short Form, when this field is unchecked, the Add button is the default key, so an
Enter keystroke signifies that the transaction entry has been completed and should be added. If this field is
checked, the add button changes to a non-default button (accelerated by ALT-A) and a default command
button will appear on the Short Form as shown below:
This button does nothing when clicked by the mouse – it simply exists to “catch” the Enter keystroke and
forward a Tab keystroke to windows. When the focus has shifted to another command button, the Enter to
Move Enabled button will lose its default characteristic (the dark shadow will disappear) as is customary
for MS windows. In that way, the button that has focus will be activated by the Enter key, not this button.
OK, Cancel, and Less buttons: The OK button saves the selected settings to the registry, and displays the
Short Form documented below. The settings are then the default settings the next time this user on this
computer selects Add Transactions. The cancel button closes the form without saving the settings. The Less
button reduces the form size back to the shorter view, and changes the button caption to “More.” The next
time this form is selected from this computer by this user, the Add Transactions Setup Options form will be
displayed with either a small form (“More” selectable) or longer form (“Less” selectable) as set when OK
was clicked last.
Short Form

Chapter 3 Add Transactions
29
The Short Form is displayed above. The fields labeled in bold type must be filled out. The form shown
above is from a standard RPMS system – in the Pro and Enterprise versions the Invoice and Invoice Date
fields are not required – a transaction entered without those fields is placed in the system as an open order.
Once the required fields are filled out, the add button can be clicked (note – pressing the Enter key will
attempt to click the Add button if Enter To Move was not selected, or if focus is on the Add button.) The
transaction is booked to the RPMS system and added to the temporary list of session transactions stored in
the list above the data entry fields. To change or delete an entry, double click the list item to be changed.
The Transaction Correction form is documented below.
Various fields on the form can be locked or unlocked. When a field is locked, the cursor does not land in
the field, the contents of the field can’t be edited, nor do they disappear when a transaction is added. For
example, if the data that must be entered is a series of invoices from the same principal, it would be useful
to declare the principal then lock the field, so the form would remember that principal from invoice to
invoice. To lock or unlock a field, simply click its lock toggle button, pictured above.
Once at least one transaction has been entered, the Duplicate button will duplicate all the fields from the
highlighted entry in the list. The F12 function key will duplicate the field currently with focus (where the
cursor is placed.) The Clear button will clear the data entry fields, but not the list of transactions for the
session.
As navigation occurs away from the Customer, Principal, POS, PO & Invoice fields, the system checks to
see whether commission credit splitting information exists for the declared Customer, Principal, POS, PO
and/or Invoice; or if default commission credit splits exist for the Customer, Principal and/or POS. If the
transaction will be split other than 100% to the assigned sales rep, then the system will beep (on computers
with audio and appropriate volume settings) and the status message line will display a message. The
message says “A commission credit split away from the assigned sales rep has been found.” Clicking the
Split button will display the split scenario, which can be changed for this item of the transaction. See the
Lists chapter, Customers - Operational Notes and Important Field Descriptions, Split Defaults, for
information about establishing default commission credit splits, and the Split button below for more
information.
Specific fields of interest are described below:
Customer: Type the first few letters of the customer’s short name. The name will appear as it is being
typed, becoming more accurate as more letters are typed. Or, you can press the control key once while the
cursor is in the field. This will cause the lookup to use the alternate EData Code, instead of the name, to
perform the search. It may be easier to click the lookup button, or press F4 to display a list of records to
choose from. The customer lookup on this form shows the short name, the short address and the phone
number of the customer. If a customer does not exist, you do not have to leave the form. Simply add the
customer to the system as documented in the Lists chapter, then return to this form to complete the
transaction. As the cursor advances out of the customer field, credit splitting is determined as documented
above.
Sales Rep: The sales rep field is for display only, and references the currently assigned sales rep for this
customer. Normally that is the sales rep who will receive commission credit for this transaction, unless the
transaction is split.
Type PO / Use Invoice: The option buttons above the PO field declare whether the PO should be
duplicated to be the same as the Invoice field, or should be typed separately. Whether or not the PO field is
locked, if the option to Use Invoice is selected, the PO will change as the Invoice is changed.
PO: Usually the customer’s Purchase Order number. A principal’s purchase order number can be
established using long form transaction entry, or through maintenance of the order header created by this
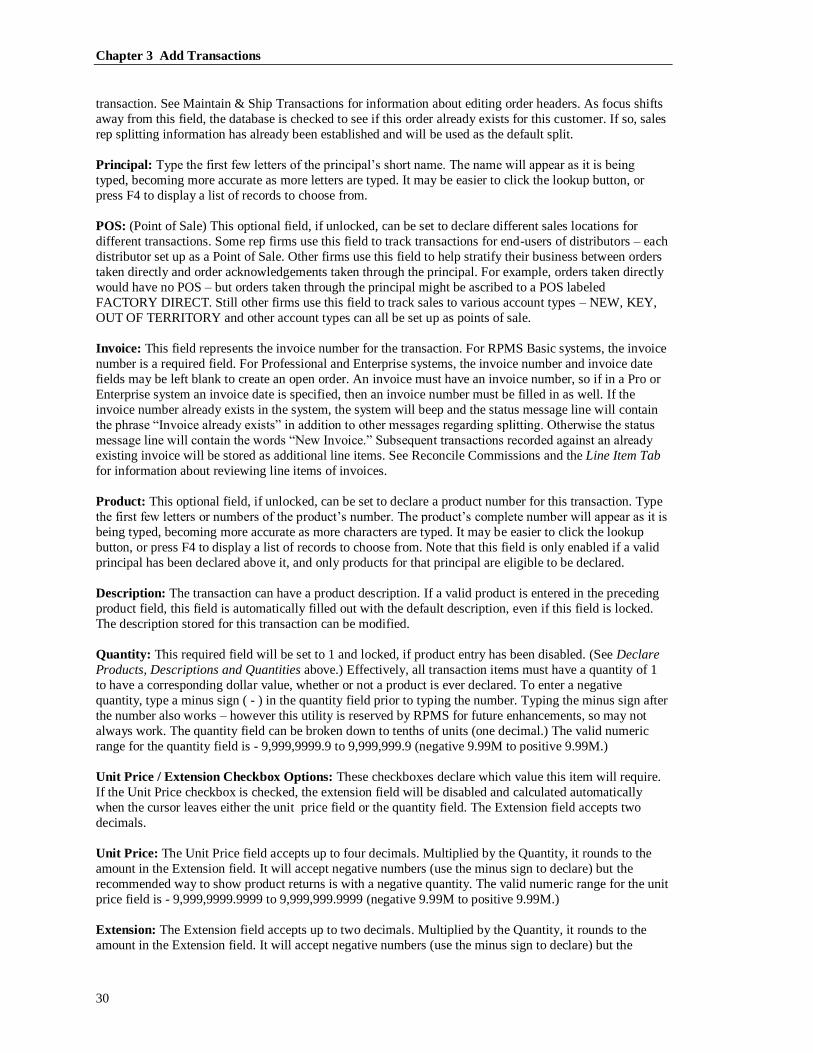
Chapter 3 Add Transactions
30
transaction. See Maintain & Ship Transactions for information about editing order headers. As focus shifts
away from this field, the database is checked to see if this order already exists for this customer. If so, sales
rep splitting information has already been established and will be used as the default split.
Principal: Type the first few letters of the principal’s short name. The name will appear as it is being
typed, becoming more accurate as more letters are typed. It may be easier to click the lookup button, or
press F4 to display a list of records to choose from.
POS: (Point of Sale) This optional field, if unlocked, can be set to declare different sales locations for
different transactions. Some rep firms use this field to track transactions for end-users of distributors – each
distributor set up as a Point of Sale. Other firms use this field to help stratify their business between orders
taken directly and order acknowledgements taken through the principal. For example, orders taken directly
would have no POS – but orders taken through the principal might be ascribed to a POS labeled
FACTORY DIRECT. Still other firms use this field to track sales to various account types – NEW, KEY,
OUT OF TERRITORY and other account types can all be set up as points of sale.
Invoice: This field represents the invoice number for the transaction. For RPMS Basic systems, the invoice
number is a required field. For Professional and Enterprise systems, the invoice number and invoice date
fields may be left blank to create an open order. An invoice must have an invoice number, so if in a Pro or
Enterprise system an invoice date is specified, then an invoice number must be filled in as well. If the
invoice number already exists in the system, the system will beep and the status message line will contain
the phrase “Invoice already exists” in addition to other messages regarding splitting. Otherwise the status
message line will contain the words “New Invoice.” Subsequent transactions recorded against an already
existing invoice will be stored as additional line items. See Reconcile Commissions and the Line Item Tab
for information about reviewing line items of invoices.
Product: This optional field, if unlocked, can be set to declare a product number for this transaction. Type
the first few letters or numbers of the product’s number. The product’s complete number will appear as it is
being typed, becoming more accurate as more characters are typed. It may be easier to click the lookup
button, or press F4 to display a list of records to choose from. Note that this field is only enabled if a valid
principal has been declared above it, and only products for that principal are eligible to be declared.
Description: The transaction can have a product description. If a valid product is entered in the preceding
product field, this field is automatically filled out with the default description, even if this field is locked.
The description stored for this transaction can be modified.
Quantity: This required field will be set to 1 and locked, if product entry has been disabled. (See Declare
Products, Descriptions and Quantities above.) Effectively, all transaction items must have a quantity of 1
to have a corresponding dollar value, whether or not a product is ever declared. To enter a negative
quantity, type a minus sign ( - ) in the quantity field prior to typing the number. Typing the minus sign after
the number also works – however this utility is reserved by RPMS for future enhancements, so may not
always work. The quantity field can be broken down to tenths of units (one decimal.) The valid numeric
range for the quantity field is - 9,999,9999.9 to 9,999,999.9 (negative 9.99M to positive 9.99M.)
Unit Price / Extension Checkbox Options: These checkboxes declare which value this item will require.
If the Unit Price checkbox is checked, the extension field will be disabled and calculated automatically
when the cursor leaves either the unit price field or the quantity field. The Extension field accepts two
decimals.
Unit Price: The Unit Price field accepts up to four decimals. Multiplied by the Quantity, it rounds to the
amount in the Extension field. It will accept negative numbers (use the minus sign to declare) but the
recommended way to show product returns is with a negative quantity. The valid numeric range for the unit
price field is - 9,999,9999.9999 to 9,999,999.9999 (negative 9.99M to positive 9.99M.)
Extension: The Extension field accepts up to two decimals. Multiplied by the Quantity, it rounds to the
amount in the Extension field. It will accept negative numbers (use the minus sign to declare) but the

Chapter 3 Add Transactions
31
recommended way to show product returns is with a negative quantity. The valid numeric range for the
extension field is – 9,999,999,9999.9999 to 9,999,999,999.9999 (negative 9.99B to positive 9.99B.)
Commission Type: The commission type is a rapid way to select a pre-selected commission rate. The valid
commission rates for the principal, or principal, customer, product combination are displayed in the lower
left hand corner of the form, as shown below
The ‘$’ and ‘%’ commission types are used to manually key in an amount or rate. For other commission
types, these fields are disabled and automatically calculated.
The commission default hierarchy is explained in some detail in the Lists chapter in both the Principal and
Product sections, where the default commission rates are established. Ultimately user selection prevails – if
you have selected and locked the % sign, the % sign will be used as the default commission type for each
transaction. But if you choose to let RPMS select the best commission type, it will do so in the following
manner:
1. If a special commission rate exists for this product being sold to this customer, the 1 rate will
be selected. See the Lists chapter, Products - Operational Notes and Important Field
Descriptions for information about establishing these defaults.
2. Absent #1 above, if a commission rate exists for this product being sold to any customer, the 2
rate will be selected. See the Lists chapter, Products - Operational Notes and Important Field
Descriptions for information about setting product-specific commission rates.
3. Absent #1 or #2 above, if a commission rate exists for this principal selling any product to this
customer, the 3 rate will be used. See the Lists chapter, Principals - Operational Notes and
Important Field Descriptions for information about establishing principal to customer
exception commission rates.
4. Absent #1, #2 and #3 above, the ‘A’ rate will be used. This rate is the primary default
commission rate for this principal.
5. Absent #1, #2, #3 & #4 above, the ‘B’ rate will be used. This rate is the second default
commission rate for this principal.
6. Absent #1 through #5 above, the ‘C’ rate will be used. This rate is the last default commission
rate for this principal.
To quickly select a commission type, in the commission type drop down list, type 1, 2, 3, A, B or C. This
will override the previously selected default setting.
The lock for commission type will lock the type, but not necessarily the rate or amount. For example, if
principal ABC CO has an A rate of 5.00 %, and principal XYZ CO has an A rate of 4.25 %, locking the
commission type to A would cause the rate to be either 5.00 % or 4.25%, depending on the principal for the
transaction.
Order Date: The order date should be the customer’s purchase order date for this transaction. If the Order
date can’t be determined or is immaterial for your agency, you will still need to make one up – but the
history of business based on order date will obviously be meaningless. Some rep firm’s prefer to use the
principal’s acknowledgement date, which creates order history agreement with the principal’s calculations.
Other rep firms only track sales and payments to begin with – to reduce data entry, make the order and
invoice dates equal by using the order date equivalency operator described below. It is not necessary to use
the date of entry for the order date – this type of history is intended to be tracked as a booking, tracked
based on the book date. Once a valid order date is typed in the field, the cursor automatically jumps to the
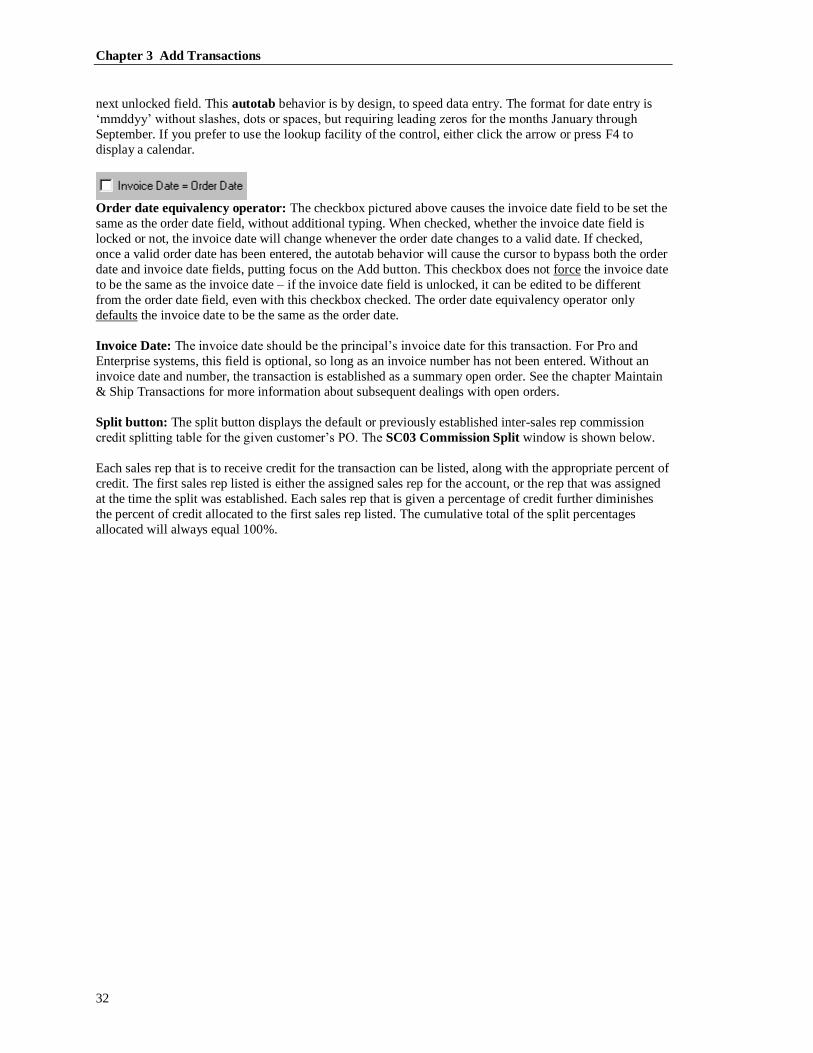
Chapter 3 Add Transactions
32
next unlocked field. This autotab behavior is by design, to speed data entry. The format for date entry is
‘mmddyy’ without slashes, dots or spaces, but requiring leading zeros for the months January through
September. If you prefer to use the lookup facility of the control, either click the arrow or press F4 to
display a calendar.
Order date equivalency operator: The checkbox pictured above causes the invoice date field to be set the
same as the order date field, without additional typing. When checked, whether the invoice date field is
locked or not, the invoice date will change whenever the order date changes to a valid date. If checked,
once a valid order date has been entered, the autotab behavior will cause the cursor to bypass both the order
date and invoice date fields, putting focus on the Add button. This checkbox does not force the invoice date
to be the same as the invoice date – if the invoice date field is unlocked, it can be edited to be different
from the order date field, even with this checkbox checked. The order date equivalency operator only
defaults the invoice date to be the same as the order date.
Invoice Date: The invoice date should be the principal’s invoice date for this transaction. For Pro and
Enterprise systems, this field is optional, so long as an invoice number has not been entered. Without an
invoice date and number, the transaction is established as a summary open order. See the chapter Maintain
& Ship Transactions for more information about subsequent dealings with open orders.
Split button: The split button displays the default or previously established inter-sales rep commission
credit splitting table for the given customer’s PO. The SC03 Commission Split window is shown below.
Each sales rep that is to receive credit for the transaction can be listed, along with the appropriate percent of
credit. The first sales rep listed is either the assigned sales rep for the account, or the rep that was assigned
at the time the split was established. Each sales rep that is given a percentage of credit further diminishes
the percent of credit allocated to the first sales rep listed. The cumulative total of the split percentages
allocated will always equal 100%.

Chapter 3 Add Transactions
33
The Split Options describes whether credit for gross, commission or both kinds of values will be spit.
Generally Split Both is the appropriate selection. An example of an occasion to choose Split Commission
would be when even though sales reps would share the commission payments, allocating paid gross dollars
to one sales rep over another would invalidate an on-going sales contest. On the other hand, Split Gross
might be used to give a gross volume commission statement to an inside sales rep, without taking real
money away from the selling reps. For more information, see the Reports chapter,
Commissions section, for more information about Agency and Sales Rep Commission Statements.
After an Add – The List View
The picture above shows the standard List View that collects the records for the transactions entered during
this session. Since the example session depicted uses the same principal and invoice number over and over
again (as though the data were being entered from a sales report or commission statement) it would be
more useful if the list view columns could be re-sized and rearranged.
Resize Icon Drag and drop column
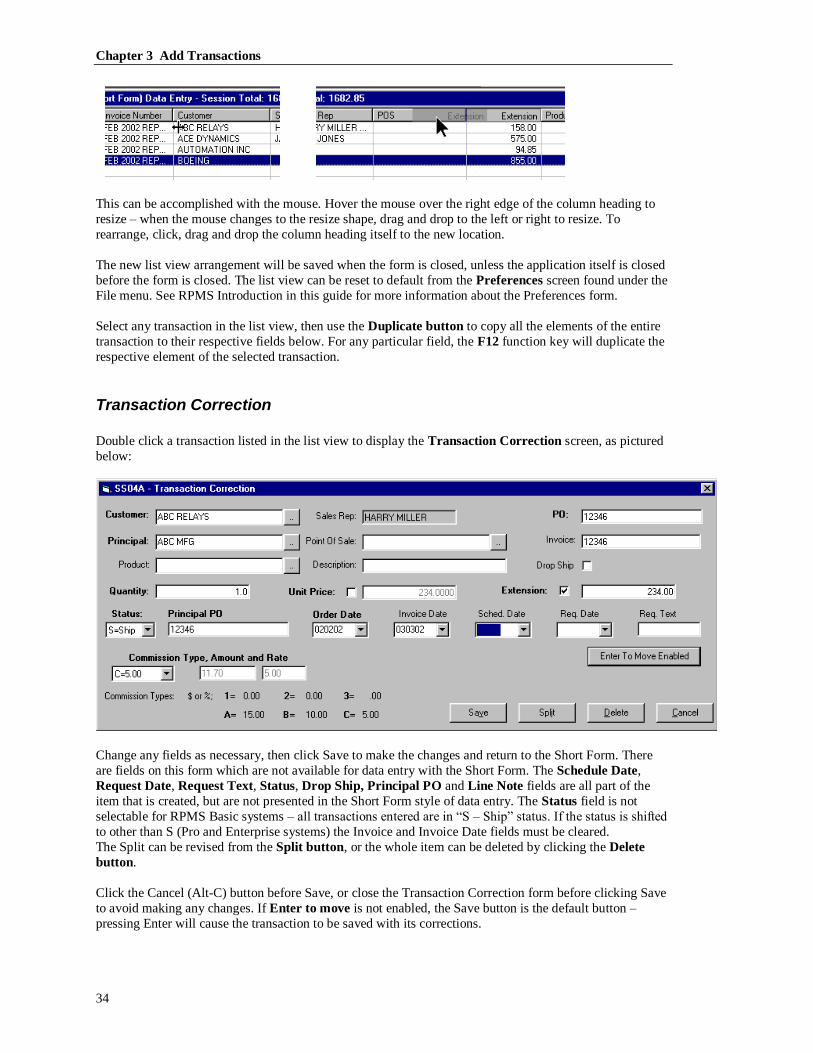
Chapter 3 Add Transactions
34
This can be accomplished with the mouse. Hover the mouse over the right edge of the column heading to
resize – when the mouse changes to the resize shape, drag and drop to the left or right to resize. To
rearrange, click, drag and drop the column heading itself to the new location.
The new list view arrangement will be saved when the form is closed, unless the application itself is closed
before the form is closed. The list view can be reset to default from the Preferences screen found under the
File menu. See RPMS Introduction in this guide for more information about the Preferences form.
Select any transaction in the list view, then use the Duplicate button to copy all the elements of the entire
transaction to their respective fields below. For any particular field, the F12 function key will duplicate the
respective element of the selected transaction.
Transaction Correction
Double click a transaction listed in the list view to display the Transaction Correction screen, as pictured
below:
Change any fields as necessary, then click Save to make the changes and return to the Short Form. There
are fields on this form which are not available for data entry with the Short Form. The Schedule Date,
Request Date, Request Text, Status, Drop Ship, Principal PO and Line Note fields are all part of the
item that is created, but are not presented in the Short Form style of data entry. The Status field is not
selectable for RPMS Basic systems – all transactions entered are in “S – Ship” status. If the status is shifted
to other than S (Pro and Enterprise systems) the Invoice and Invoice Date fields must be cleared.
The Split can be revised from the Split button, or the whole item can be deleted by clicking the Delete
button.
Click the Cancel (Alt-C) button before Save, or close the Transaction Correction form before clicking Save
to avoid making any changes. If Enter to move is not enabled, the Save button is the default button –
pressing Enter will cause the transaction to be saved with its corrections.

Chapter 3 Add Transactions
35
Add Transactions, Long Form
Using the Long Form to add transactions provides a more traditional header-to-line item style of transaction
entry.
From the menu select Transactions, Add Transactions, or click the Add Transactions toolbar button shown
above. The S04S - Add Transactions Setup Options form is displayed as shown below:
When Add Transactions is selected, RPMS establishes what batch number and book date will be used for
subsequent transactions. The batch number is an alpha-numeric label and can be used to recall a list of
transaction batches, or groups of transactions (Batch Verify and Register reports). The batch defaults to
the last batch number used by this user during this session of RPMS, or the date if this is the first time in
during this session. Depending on company preference settings, the book date may or may not be
modifiable. Check with your agency administrator if you need to change the book date, or for more
information about managing the book date, see the RPMS Administrator’s Guide.
The Form prompt declares whether this will be a short form (summary style) or long form (line item style)
transaction entry. This section describes the long form. The More button allows you to declare other setup
options for the form you will be using. Click the More button to see the form expand as shown below:

Chapter 3 Add Transactions
36
The Long Form Setup Options establish the order of presentation for the various tabbed forms available
on the long form. Each option is described below:
Next Displays Detail Tab: Checking this option means that the clicking the Next Tab button will display
the Detail tab, once the Header tab has been filled out. See the section Detail Tab below for more
information about the options on that tab.
Next Displays Contact Tab: Checking this option means that clicking the Next Tab button from the
previous tab will display the Contact tab, where Sold To, Ship To and Invoice To information can be
confirmed or established. See the section Contact Tab below for more information about the options on that
tab.
Next Displays Notes Tab: Checking this option means that clicking the Next Tab button from the previous
tab will display the Notes tab, where up to 64KB of notes can be established regarding the transaction. See
the section Notes Tab below for more information about the options on that tab.
Next Displays Split Tab: Checking this option means that clicking the Next Tab button from the previous
tab will display the Split tab, where credit for the transaction can be split between multiple sales reps. See
the section Split Tab below for more information about the options on that tab.
Open Point of Sale Field: Checking this selection will unlock the Point of Sale field, allowing (but not
requiring) recording of a Point of Sale for each transaction.
Use Enter Key To Move (tab) between fields: Checking this selection will cause the enter key to behave
like the Tab key. In MS Windows, Tab is the keystroke that is used to navigate from one field to the next.
Shift Tab is used to navigate ‘backwards.’ The Enter Key is normally reserved for “default” buttons –
deeply shadowed buttons that might save a form, OK or Finish the current form, or navigate to the Next
form or screen. On the Long Form, when this field is unchecked, the Next or Add button is the default key,
so an Enter keystroke signifies that the tab form or line item is finished and should be saved or added. If
this field is checked, the Next or Add button changes to a non-default button (accelerated by ALT-N or
ALT-A) and a default command button will appear on the Long Form as shown below:

Chapter 3 Add Transactions
37
This button does nothing when clicked by the mouse – it simply exists to “catch” the Enter keystroke and
forward a Tab keystroke to windows. When the focus has shifted to another command button, the Enter to
Move Enabled button will lose its default characteristic (the dark shadow will disappear) as is customary
for MS windows. In that way, the button that has focus will be activated by the Enter key, not this button.
Line Item Entry Begin in Field: This selection governs where your cursor should start to begin entering
each line item on the Line Item tab. The further down in the list you start, the more default items will be
selected for you. See the section Line Items Tab below for more information about the fields available on
that form.
Once you have established the Long Form Setup Options, click OK or press Enter to see the Add
Transactions – Long Form with the initial Header Tab as shown below.
Long Form
The Long Form Header Tab is displayed above. The fields labeled in bold type must be filled out.
Once the required fields are filled out, the Next Tab button can be clicked (note – pressing the Enter key
will attempt to click the Next Tab button if Enter To Move was not selected, or if focus is on the Next Tab
button.) The transaction header is evaluated for duplicates in the RPMS system, then posted to the list of
orders for the selected customer and principal. The tab that is subsequently displayed is governed by the
Long Form Setup Options selected on the preceding form. The Header tab can be revisited from other tabs
for reference, but its fields can’t be changed. To delete a transaction begun through long form, use Maintain
/ Ship Transactions as documented in below. Each of the tabs that can be displayed is documented in its
own section below.
Chapter 3 Add Transactions
38
Header Tab
Various fields on the Header tab can be locked or unlocked. When a field is locked, the cursor does not
land in the field, the contents of the field can’t be edited, nor do they disappear when a transaction is added.
For example, if the data that must be entered is a series of order acknowledgements from the same
principal, it would be useful to declare the principal then lock the field, so the form would remember that
principal from order to order. To lock or unlock a field, simply click its lock toggle button, pictured above.
Once the header for the transaction has been entered (by clicking Next Tab), the Print button will be
enabled, allowing for a print of the transaction. The New Transaction button will also be enabled. This
button clears all the data entry fields (except those on the Header Tab that were locked), resets the tab
forms, and essentially set everything back for the beginning of adding another transaction.
Specific fields of interest for the Header Tab are described below:
Customer: Type the first few letters of the customer’s short name. The name will appear as it is being
typed, becoming more accurate as more letters are typed. Or, you can press the control key once while the
cursor is in the field. This will cause the lookup to use the alternate EData Code, instead of the name, to
perform the search. It may be easier to click the lookup button, or press F4 to display a list of records to
choose from. The customer lookup on this form shows the short name, the short address and the phone
number of the customer. If a customer does not exist, you do not have to leave the form. Simply add the
customer to the system as documented in the Lists chapter, then return to this form to complete the
transaction. As the cursor advances out of the customer field, credit splitting is determined as documented
above.
Sales Rep: The sales rep field is for display only, and references the currently assigned sales rep for this
customer. Normally that is the sales rep who will receive commission credit for this transaction, unless the
transaction is split. See Split Tab below for more information about splitting credit between multiple reps.
Purchase Order Number: Usually the customer’s Purchase Order number. A principal’s purchase order
number defaults to this number, can be established as another number on the Detail tab, and can be changed
later from maintenance. See the chapter Maintain & Ship Transactions for information about editing order
headers. This field should be left blank for consigned Inventory transactions that prefer to make use of the
Get Next Notification Number system described below.
Principal: Type the first few letters of the principal’s short name. The name will appear as it is being
typed, becoming more accurate as more letters are typed. It may be easier to click the lookup button, or
press F4 to display a list of records to choose from.
Get Next Notification Number: With the Inventory feature and for S status principals, this button will find
and type the next shipment notification number available for the particular principal in the Purchase Order
Number field. It will automatically check the Consigned inventory checkbox on the Detail tab.
Status: This field allows Professional and Enterprise versions of RPMS to establish different status for the
line items to be entered. Select the status that represents the status of the most line items for this
transaction. The selections for status are shown below.

Chapter 3 Add Transactions
39
Basic systems are limited to S Shipped Order (Invoice) status. This status means that all the line items
have been shipped by the principal, and will carry an invoice number and invoice date. Professional and
Enterprise systems can select any of the other status. O Open Order, B Backorder (open) and R Rush
(open) are all different varieties of open, or unshipped line items. F Sample and Q Quote are special status
transactions that do not add to the historical bookings, but can be stored in RPMS and reported by Order
Backlog reports for follow up.
Order Date: This field represents the customer’s purchase order date for most of the line items that will be
entered for this transaction. This field governs Orders history accumulated for the customer, principal, sales
rep and Point of Sale.
POS: (Point of Sale) This optional field, if unlocked, can be set to declare different sales locations for
different transactions. Some rep firms use this field to track transactions for end-users of distributors – each
distributor set up as a Point of Sale. Other firms use this field to help stratify their business between orders
taken directly and order acknowledgements taken through the principal. For example, orders taken directly
would have no POS – but orders taken through the principal might be ascribed to a POS labeled
FACTORY DIRECT. Still other firms use this field to track sales to various account types – NEW, KEY,
OUT OF TERRITORY and other account types can all be set up as points of sale.
Invoice (Ship) Date: The invoice date should be the principal’s invoice date for this transaction. For Pro
and Enterprise systems, this field is invisible, so long as the status is not S Shipped Order. For RPMS
Basic systems, the invoice date is a required field.
Invoice: This field represents the invoice number for most of the line items of the transaction. For RPMS
Basic systems, the invoice number is a required field. For Professional and Enterprise systems, the invoice
number and invoice date fields are not visible unless the status has been set to be an S Shipped Order. An
invoice must have an invoice number.
Detail Tab
The Detail tab is automatically displayed after the Header tab if so checked in Long Form Setup Options
described above. Otherwise it is accessible after the Header has been established by clicking the Detail tab
or pressing ALT-2. The Detail tab establishes more default information for line items that will be added
with this transaction. The fields are automatically saved when you change tabs or start a new transaction.
The fields are described below.
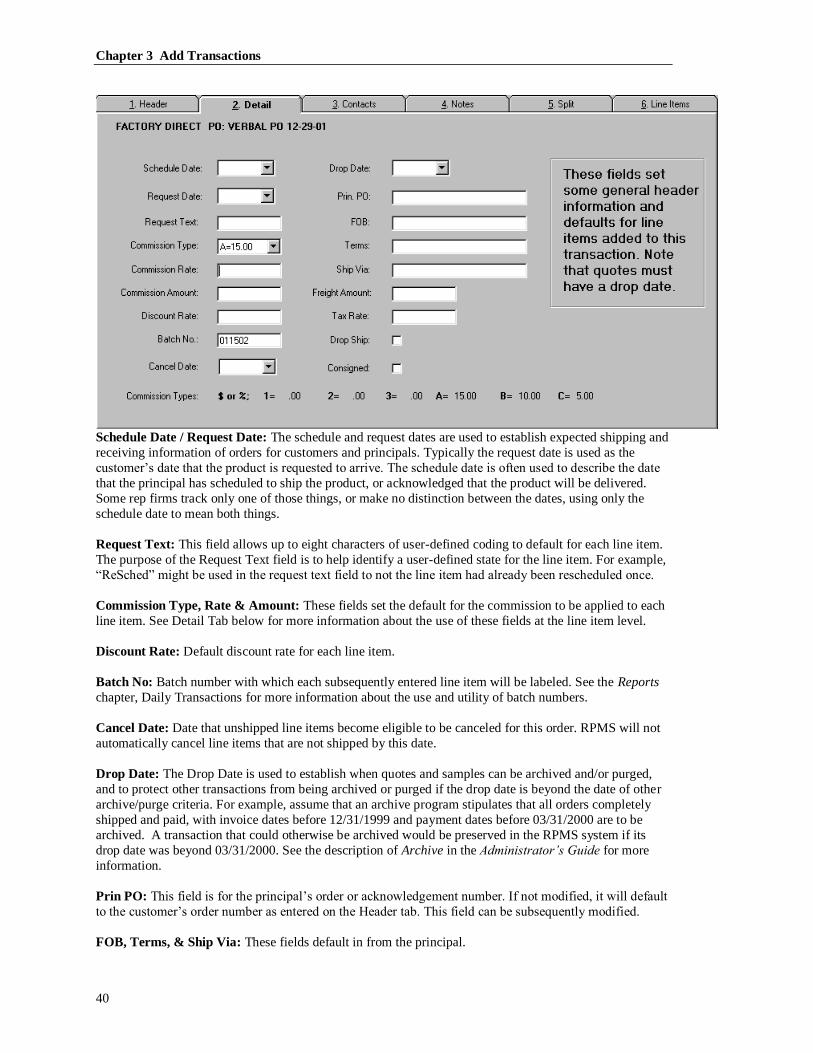
Chapter 3 Add Transactions
40
Schedule Date / Request Date: The schedule and request dates are used to establish expected shipping and
receiving information of orders for customers and principals. Typically the request date is used as the
customer’s date that the product is requested to arrive. The schedule date is often used to describe the date
that the principal has scheduled to ship the product, or acknowledged that the product will be delivered.
Some rep firms track only one of those things, or make no distinction between the dates, using only the
schedule date to mean both things.
Request Text: This field allows up to eight characters of user-defined coding to default for each line item.
The purpose of the Request Text field is to help identify a user-defined state for the line item. For example,
“ReSched” might be used in the request text field to not the line item had already been rescheduled once.
Commission Type, Rate & Amount: These fields set the default for the commission to be applied to each
line item. See Detail Tab below for more information about the use of these fields at the line item level.
Discount Rate: Default discount rate for each line item.
Batch No: Batch number with which each subsequently entered line item will be labeled. See the Reports
chapter, Daily Transactions for more information about the use and utility of batch numbers.
Cancel Date: Date that unshipped line items become eligible to be canceled for this order. RPMS will not
automatically cancel line items that are not shipped by this date.
Drop Date: The Drop Date is used to establish when quotes and samples can be archived and/or purged,
and to protect other transactions from being archived or purged if the drop date is beyond the date of other
archive/purge criteria. For example, assume that an archive program stipulates that all orders completely
shipped and paid, with invoice dates before 12/31/1999 and payment dates before 03/31/2000 are to be
archived. A transaction that could otherwise be archived would be preserved in the RPMS system if its
drop date was beyond 03/31/2000. See the description of Archive in the Administrator’s Guide for more
information.
Prin PO: This field is for the principal’s order or acknowledgement number. If not modified, it will default
to the customer’s order number as entered on the Header tab. This field can be subsequently modified.
FOB, Terms, & Ship Via: These fields default in from the principal.

Chapter 3 Add Transactions
41
Freight Amount, Tax Rate: These fields are used by the Accounts Receivable and Inventory features to
calculate amounts for invoices.
Drop Ship, Consigned: These switches indicate that most products for this transaction will be drop
shipped or represent consigned products. Drop-shipped products do not deplete inventory (applicable only
for those agencies with the Inventory feature.) Consigned products are not bought or sold (applicable only
for those with the Accounts Receivable feature) so commissions for those line items are calculated based
on percentages rather than product cost as determined in the Inventory feature. Although possible, it is
advised NOT to mix dropped-shipped items with stocked items on the same order, since printed pick tickets
and packing slips would vary from the printed purchase orders. Similarly, while it is possible to mix
consigned inventory items and purchased inventory items within the same order, they should be invoiced
separately, since printed invoices and notices of shipment will not draw distinctions between those items.
Contact Tab
The Contact tab is automatically displayed after the Header or Detail tab if so checked in Long Form Setup
Options. This tab contains the default Sold To, Ship To and Invoice To information for the transaction. To
specify different Sold To, Ship To or Invoice To addresses for this transaction, simply re-type the
information as necessary. If a contact has been set up as a default for one or more of the addresses, that
information will be set up initially. Otherwise, the customer’s address information will be placed in each
field. See the Lists section regarding Customers, Contact Special Status for information about setting up
default contacts. The contact information is automatically saved when you change tabs or start a new
transaction.
Notes Tab
The Notes tab is automatically displayed after the Header, Detail or Contact tab if so checked in Long Form
Setup Options. This tab holds up to 64K of notes for the transaction. Notes are automatically saved when
you change tabs or start a new transaction.
Split Tab
The Split tab is automatically displayed after the Header, Detail, Contact or Notes tab if so checked in Long
Form Setup Options. This tab initially contains the default credit splitting information for this customer,
principal and point of sale. See the Lists chapter, Customers - Operational Notes and Important Field
Descriptions, Split Defaults for information about establishing default commission credit splits.
Each sales rep that is to receive credit for the transaction can be listed, along with the appropriate percent of
credit. The first sales rep listed is either the assigned sales rep for the account, or the rep that was assigned
at the time the default split was established. Each sales rep that is given a percentage of credit further
diminishes the percent of credit allocated to the first sales rep listed. The cumulative total of the split
percentages allocated will always equal 100%.
The Split Options describes whether credit for gross, commission or both kinds of values will be spit.
Generally Split Both is the appropriate selection. An example of an occasion to choose Split Commission
would be when even though sales reps would share the commission payments, allocating paid gross dollars
to one sales rep over another would invalidate an on-going sales contest. On the other hand, Split Gross
might be used to give a gross volume commission statement to an inside sales rep, without taking real
money away from the selling reps. For more information, see the Reports chapter,

Chapter 3 Add Transactions
42
Commissions section, Agency and Sales Rep Commission Statements.
The Split tab is shown below:
Line Items Tab
The Line Items tab is automatically displayed after the Header tab and others pre-selected to display first as
established in Long Form Setup Options. The fields and controls on this tab will add line items to the
transaction. A sample screen is shown below:

Chapter 3 Add Transactions
43
When this tab is displayed, the Next Tab button changes its identity to an Add button. When all the fields
for a given line item have been established, clicking the Add button adds the line item to the transaction
and to the listview. The required fields for the line item have bold labels. Once all the line items of the
transaction have been added the entire form can be closed, or the New Transaction button can be clicked.
The transaction is built as each line item is added to the listview, and the total of the order is displayed in
the form’s title – there is no save or done key.
If Unit Prices will be entered, as opposed to Extensions, when the cursor leaves the quantity field the
database is checked to see if the selected product has standard or customer-specific pricing. If so, a price
selection window is displayed from which one of the prices can be selected.
If a line item is added by mistake, or with incorrect information, it can be deleted or changed from this
screen by double-clicking the line item in the listview. The transaction correction form will be displayed.
From this form the line item can be changed, deleted, or its splitting information can be modified.
Like other listviews in RPMS, the line items listview’s columns can be re-sized and rearranged using drag
and drop. This listview is also re-sizable from the bottom, using the slider control as shown below:

Chapter 3 Add Transactions
44
The slider control ‘lifts’ the listview and exposes other controls that contribute information to the line items
as they are added. Normally those pieces of data are not edited during line item entry, unless the Long
Form Setup Options were set to reveal them.
Various fields on the form can be locked or unlocked. When a field is locked, the cursor does not land in
the field, the contents of the field can’t be edited, nor do they disappear when a line item is added. For
example, if the data that must be entered has the same product, pricing and commissions, but has different
schedule dates, it would be useful to lock the unchanging fields. To lock or unlock a field, simply click its
lock toggle button, pictured above.
Each field is described below.
Principal: This field is normally hidden by the listview, unless the Long Form setup options dictated that
the line item data entry begins in this field or in the order date field. The choices in this lookup field are
limited to family records (parent and children) of the principal selected on the Header tab. In this way, line
items can have products from different divisions of the principal.
Order Date: This field is normally hidden by the listview, unless the Long Form setup options dictated
that the line item data entry begins in this field or in the principal field. The order date can be modified for
each line item within the transaction. This is useful for blanket orders, where each subsequent release can
be given a different order date.
Line Number: This field is normally hidden by the listview, unless the Long Form setup options dictated
that the line item data entry begins in this field or in the consigned or status fields. As each line item is
added, this field is automatically set up for the next available line number. Even if this field is locked, its
value will automatically increment when a line item is added. The lock here simply prevents the cursor
from landing in the field. It is possible to re-arrange line items by giving a line item a lower number before
adding it. For example, if Line Number three of a three line order (so far) should really be Line Number
four of a four line order, Line Number three could be deleted, then the Line Number field could be changed
back to line three again to add the other line item.
Consigned: This field is normally hidden by the listview, unless the Long Form setup options dictated that
the line item data entry begins in this field or in the line number or status field. If the principal is a
Accounts Receivable (S status) principal, then the consigned checkbox can be selected for line items that
should not be calculated as bought and sold, but rather from consigned inventory.
Status: This field is normally hidden by the listview, unless the Long Form setup options dictated that the
line item data entry begins in this field or the line number or consigned field. This field allows Professional
and Enterprise versions of RPMS to establish different status for the line items to be entered. The selections
for status are shown below.
Basic systems are limited to S Shipped Order (Invoice) status. This status means that the line item has
been shipped by the principal, and will carry an invoice number and invoice date. Professional and
Enterprise systems can select any of the other status. O Open Order, B Backorder (open) and R Rush
(open) are all different varieties of open, or unshipped line items. F Sample and Q Quote are special status

Chapter 3 Add Transactions
45
transactions that do not add to the historical bookings, but can be stored in RPMS and reported by Order
Backlog reports for follow up.
Invoice Number, Invoice (Ship) Date: These fields appear only if the status is S Shipped (Invoice) and if
the listview is raised to expose them. Each line item entered can have a different invoice number and/or
invoice date. These two fields are required for Shipped status items and must be blank for other status
entries.
Product, Description: These two fields represent the product number and primary description of the line
item. Products are stored by principal. See Products - Operational Notes and Important Field Descriptions
above for more information about setting up and administering products. As characters are typed in the
product field, the closest product number is displayed, and a corresponding description (if one exists) is
added to the description field. The lookup button will list products by product number. The Description
field does NOT automatically retrieve a different product number when changed. In this way any
description can be typed for the product. The description field lookup, however, will cause the part number
to change if used. Using the description lookup will sort the product list by description.
Quantity: All transaction items must have a quantity of 1 to have a corresponding dollar value, whether or
not a product is ever declared. To enter a negative quantity, type a minus sign ( - ) in the quantity field prior
to typing the number. Typing the minus sign after the number also works – however this utility is reserved
by RPMS for future enhancements, so may not always work. The quantity field can be broken down to
tenths of units (one decimal.) The valid numeric range for the quantity field is - 9,999,9999.9 to
9,999,999.9 (negative 9.99M to positive 9.99M.) Once the cursor leaves the quantity field, the database is
checked to see if the selected product has been set up with standard or customer specific pricing
Unit Price / Extension Checkbox Options: These checkboxes declare which value this item will require.
If the Unit Price checkbox is checked, the extension field will be disabled and calculated automatically
when the cursor leaves either the unit price field or the quantity field. The Extension field accepts two
decimals.
Unit Price: The Unit Price field accepts up to four decimals. Multiplied by the Quantity, it rounds to the
amount in the Extension field. It will accept negative numbers (use the minus sign to declare) but the
recommended way to show product returns is with a negative quantity. The valid numeric range for the unit
price field is - 9,999,9999.9999 to 9,999,999.9999 (negative 9.99M to positive 9.99M.)
Extension: The Extension field accepts up to two decimals. Multiplied by the Quantity, it rounds to the
amount in the Extension field. It will accept negative numbers (use the minus sign to declare) but the
recommended way to show product returns is with a negative quantity. The valid numeric range for the
extension field is – 9,999,999,9999.9999 to 9,999,999,999.9999 (negative 9.99B to positive 9.99B.)
Discount Pct: The Discount Percentage field can be combined during data entry with the unit price field to
create a discounted extension. This field is only enabled if the Unit Price Checkbox is checked. Rather than
having to calculate a new unit price, a standard unit price can be selected, and a discount can be entered.
Commission Type: The commission type is a rapid way to select a pre-selected commission rate. The valid
commission rates for the principal, or principal, customer, product combination are displayed in the drop-
down list box as shown below.
The ‘$’ and ‘%’ commission types are used to manually key in an amount or rate. For other commission
types, these fields are disabled and automatically calculated.
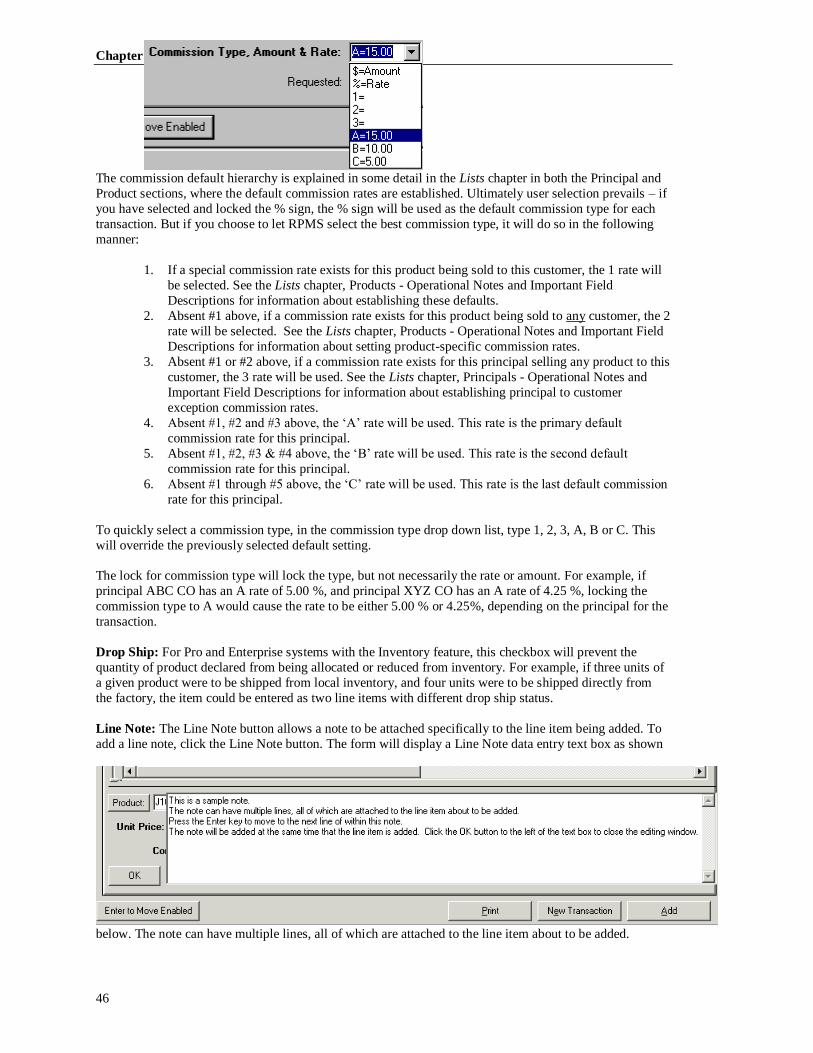
Chapter 3 Add Transactions
46
The commission default hierarchy is explained in some detail in the Lists chapter in both the Principal and
Product sections, where the default commission rates are established. Ultimately user selection prevails – if
you have selected and locked the % sign, the % sign will be used as the default commission type for each
transaction. But if you choose to let RPMS select the best commission type, it will do so in the following
manner:
1. If a special commission rate exists for this product being sold to this customer, the 1 rate will
be selected. See the Lists chapter, Products - Operational Notes and Important Field
Descriptions for information about establishing these defaults.
2. Absent #1 above, if a commission rate exists for this product being sold to any customer, the 2
rate will be selected. See the Lists chapter, Products - Operational Notes and Important Field
Descriptions for information about setting product-specific commission rates.
3. Absent #1 or #2 above, if a commission rate exists for this principal selling any product to this
customer, the 3 rate will be used. See the Lists chapter, Principals - Operational Notes and
Important Field Descriptions for information about establishing principal to customer
exception commission rates.
4. Absent #1, #2 and #3 above, the ‘A’ rate will be used. This rate is the primary default
commission rate for this principal.
5. Absent #1, #2, #3 & #4 above, the ‘B’ rate will be used. This rate is the second default
commission rate for this principal.
6. Absent #1 through #5 above, the ‘C’ rate will be used. This rate is the last default commission
rate for this principal.
To quickly select a commission type, in the commission type drop down list, type 1, 2, 3, A, B or C. This
will override the previously selected default setting.
The lock for commission type will lock the type, but not necessarily the rate or amount. For example, if
principal ABC CO has an A rate of 5.00 %, and principal XYZ CO has an A rate of 4.25 %, locking the
commission type to A would cause the rate to be either 5.00 % or 4.25%, depending on the principal for the
transaction.
Drop Ship: For Pro and Enterprise systems with the Inventory feature, this checkbox will prevent the
quantity of product declared from being allocated or reduced from inventory. For example, if three units of
a given product were to be shipped from local inventory, and four units were to be shipped directly from
the factory, the item could be entered as two line items with different drop ship status.
Line Note: The Line Note button allows a note to be attached specifically to the line item being added. To
add a line note, click the Line Note button. The form will display a Line Note data entry text box as shown
below. The note can have multiple lines, all of which are attached to the line item about to be added.

Chapter 3 Add Transactions
47
The note will be added at the same time that the line item is added. Press the Enter key to move to the next
line of within this note. Click the OK button to the left of the text box to close the editing window.
After the note has been created, but before the line item has been added, the beginning of the note can be
seen in the Line Note field as shown below, and re-edited by clicking the Line Note button again. Once the
line item has been added, the Line Note field is emptied.
Requested / Request Code / Scheduled: The scheduled and requested dates are used to establish expected
shipping and receiving information of orders for customers and principals. Typically the request date is
used as the customer’s date that the product is requested to arrive. The schedule date is often used to
describe the date that the principal has scheduled to ship the product, or acknowledged that the product will
be delivered. Some rep firms track only one of those things, or make no distinction between the dates, using
only the schedule date to mean both things. The request text field allows up to eight characters of user-
defined coding to default for each line item. The purpose of the Request Text field is to help identify a user-
defined state for the line item. For example, “ReSched” might be used in the request text field to not the
line item had already been rescheduled once.
Printing Transactions
The Print button will print the transaction as one of the standard RPMS transaction print types. The setup
screen is shown below:
A transaction need not be a Quote, Sample, Pick Ticket, Order or Change Order to print as such. Printing as
an Invoice works from the Commission Reconciliation form and from the Line Item detail form for
Maintaining Transactions. From the Transaction Maintenance Line Item tabs, the currently selected line
item of the transaction must be an invoiced (shipped) item. If your company has had a custom transaction
programmed, the option to print it will be shown in the Print Transaction As drop-down menu. If your
company has set up an “Alias” form, the option to print that will be displayed as well. So your company

Chapter 3 Add Transactions
48
may see the term “Sales Order” as a transaction type to print, which may be an alias name based on a
Purchase Order. For more information about aliases and printable forms, see the Preferences chapter in
The RPMS Version 8 Administrator’s Guide.
Destinations for printing transactions are the same as those for reports, plus various custom destinations
programmed for specific rep firms. Remote sales reps running remote systems can create outbound data
files to E-mail back to their agency for uploading as new orders. See the Remote User’s Guide.
If the Print Notes option has been checked for an invoice print, the program will first look for invoice notes
(edited from the commission reconciliation screen). If invoice notes don’t exist, the program will use order
notes. The Use Larger Font option prints a slightly different style of form, with larger type size but
somewhat less information.
For most of the transaction print types, you may choose to print product notes or line notes, but not both.
In each case, those notes will print just below the applicable line items.
Printing the Rep Company Logo on Transaction Forms
The standard printed forms can print your rep company logo, or a text version of your address.
To print your rep company logo, the logo must be stored as a file in your RPMS data folder. The file name
must be LOGO.BMP or LOGO.JPG. The file must be a bitmap or jpeg format, and should be 5 inches
wide and 1.4 inches tall. Such files can be created with graphics software like Adobe Illustrator or
Microsoft Paint. For help creating such a file, check with your graphics software vendor. In some cases
the printer who created your letterhead may be able to help you create the file.
To print simply a text version of your address, make sure that there is NOT a file called LOGO.BMP or
LOGO.JPG in your data folder. When no such file exists, RPMS reverts to the text version of your
company name and address on the printed forms.
The potential destinations for the print are listed in the second drop down, and include Printer, to
print to the current printer. To change printers, use the Printer Setup button, or select Files, Printer Setup.

Chapter 4 Maintain & Ship Transactions
49
Maintain & Ship Transactions
Overview
Transactions entered through either the short or long forms of adding transactions can be maintained using
the Maintain and Ship Transactions. The Pro and Enterprise versions of RPMS can enter Open Order status
transactions, which can be conveniently declared as shipped (invoiced) using these tools.
Typically rep firms receive copies of invoices from their principals which must be applied against open
orders. Sometimes entire orders ship at once – these shipments are accomplished from the Purchase Orders
tab of the Maintain / Ship Transactions form.
Other times those invoices indicate that portions of orders, or even portions of line items themselves will
have shipped, leaving balances of orders and line items open. This type of operation is accomplished from
the Line Items tab, where individual products can be declared shipped, leaving the remainder open.
Occasionally a customer will change or add to an existing order, or an acknowledgement of an order may
change the shipping schedule – all of these types of operations may be performed from the Maintain / Ship
Transactions forms.
Operation
Clicking the Maintain and Ship Transactions button (pictured above) or selecting Maintain/Ship
Transactions from the Transactions menu displays the Maintain & Ship Transactions Options screen
displayed below.
The Maintain & Ship Transactions Options form declares the batch number to be posted to any
transactions, whether maintenance will be performed via customer or principal, and whether the list
selected will display all records or a subset of the transactions. A sample of the transactions by customer
form is displayed below.

Chapter 4 Maintain & Ship Transactions
50
Tabs and Controls
The Customer and Principal Maintain/Ship Transactions forms have the following noteworthy tabs and
controls.
1. Purchase Orders
Customer Lookup: The customer lookup (pictured below) will reset the list of transactions when a new
customer has been selected and the control loses focus (tab or mouse click out.) The Principal Maintain /
Ship Transactions form has a corresponding lookup by principal.
Filters and Set Filters button: Each checkbox (shown below) will reset the filter criteria for the list of
transactions. To set more than one filter at a time, click the set filters button.
When there are a large number of orders for a given customer or principal and no filters have been applied,
the order list may use a vertical tab list to bring in a subset of all the orders to improve the speed of
display. The number of orders required, or whether to every use vertical tabs or not at all, may be adjusted
under Files, Preferences, List Tabs.

Chapter 4 Maintain & Ship Transactions
51
Search: Use the search field to type and locate customer PO numbers in the list of transactions. From the
Principal Maintain / Ship Transactions form, the search looks for principal PO numbers. If the list is Sorted
on a different column, the search will use the sorted column.
Sort: A different column may be used as the sorted column by clicking the column header, if vertical tabs
are not in use. The sorting column is shown with either a ^ (ascending) or v (descending) value to indicate in
which direction the column is sorted. Clicking the column heading toggles between ascending and
descending sorting.
Add Button: Click the Add button from this form to add another transaction through the long-form add
screen, as documented in Add Transactions, Long Form above. When the transaction has been added and
the long form is closed, the newly added transaction will be displayed in the list.
Print Button: Print Button: The Print button will print the transaction as one of the standard RPMS
transaction print types. The setup screen is shown below:
A transaction need not be a Quote, Sample, Pick Ticket, Order or Change Order to print as such. To print
an Invoice, the Accounts Receivable feature must be installed and the currently selected line item (from this
form, the first line item) of the transaction must be an invoiced (shipped) item.
The potential destinations for the print are listed in the second drop down, and include Printer, to print to
the current printer. To change printers, use the Printer Setup button, or select Files, Printer Setup.
Apply Button: This button initiates all the actions recorded in the Action column documented below.
Action: Type a letter corresponding to an action, or use the mouse to drop down and select from the list of
actions as pictured below.
C = Cancel indicates that all the remaining open (unshipped) line items on this transaction should be
canceled. A Cancel operation reduces bookings for the established book month, and reduces orders history
for the previously recorded order date. Tag all orders to be canceled with C, then click Apply.

Chapter 4 Maintain & Ship Transactions
52
D = Delete indicates that all remaining open (unshipped) line items on this transaction should be deleted. A
Delete operation reduces bookings for the established book month, and reduces orders history for the
previously recorded order date, and erases the line item. If all line items have been deleted or canceled, the
entire transaction is erased. Tag all orders to be deleted with D, then click Apply.
M = Model allows the transaction to be copied as a new open order or quote. The M code does not require
use of the Apply button. When M is selected or typed, the PO Model screen is displayed as shown below.
All line items of an existing transaction are modeled as either open or quoted, based on the Model choice.
The Reload Split Profile option causes default sales rep splits to be loaded into the new transaction. The
Copy Contacts option forces the new transaction to inherit the Sold To, Ship To and Invoice To contacts of
the modeled transaction.
S = Ship allows an selected open or partially shipped order transaction to shipped complete as a new
invoice. From this maintain and ship transactions list, multiple orders can be tagged with “S = Ship” and a
dialog box as shown below will prompt for an invoice number and invoice date on each order. When all
orders that are necessary to be shipped have been tagged, click the Apply button to complete the process.
2. Detail tab:

Chapter 4 Maintain & Ship Transactions
53
The Detail Tab carries information that will be defaulted for subsequent line items to be added, and
information that exists as ‘Header’ information regarding the entire transaction. For a description of each
field, review the see Add Transactions, Detail Tab in the preceding chapter. By establishing defaults on this
tab, subsequently added line items will carry the information automatically.
3. Contacts tab:
The Contact contains the Sold To, Ship To and Invoice To information for the transaction. To specify
different Sold To, Ship To or Invoice To addresses for this transaction, simply re-type the information as
necessary and click Save.
4. Notes tab:
This tab holds up to 64K of notes for the transaction. Clicking the Save button saves the notes.
5. Splits tab:
Line Item
Defaults

Chapter 4 Maintain & Ship Transactions
54
To see or maintain the transaction’s previously established default split credit between multiple sales reps,
use the Splits tab as shown above. Allocate a percentage of credit to each sales rep. As the second and
subsequent sales reps’ credit percentages are allocated, the original sales rep’s percentage of credit is
reduced. The total allocation of credit must always equal 100%. Subsequently added line items to this
transaction, as well as subsequent shipments of open line items will use the new split allocation. Changing
the splits from this tab does not affect splits on previously recorded line items. Each line item can
potentially be split differently, and should be maintained from the line item split tab labeled 9. Splits as
documented below.
The Split Options describes whether credit for gross, commission or both kinds of values will be spit.
Generally Split Both is the appropriate selection. An example of an occasion to choose Split Commission
would be when even though sales reps would share the commission payments, allocating paid gross dollars
to one sales rep over another would invalidate an on-going sales contest. On the other hand, Split Gross
might be used to give a gross volume commission statement to an inside sales rep, without taking real
money away from the selling reps. For more information, see the Reports chapter,
Commissions section, Agency and Sales Rep Commission Statements.
6. Line Items tab:
The Line Items tab is a collection of three interior tabs. The 7 Line Items tab is the list of line items
themselves. Each line item can be edited and saved from the 8 Detail tab, and each line item’s split
scenario can be reviewed and managed from the 9 Split tab.
7. Line Items tab:
Click the Add button to Add an additional line item to the transaction. Click the Print button to print the
transaction. Use the Action codes (either by typing the code or selecting the Action code with the mouse)
to manage the line items. Action codes can be tagged against multiple line items. Once all necessary codes

Chapter 4 Maintain & Ship Transactions
55
have been tagged, apply the codes against the line items by clicking the Apply button. The valid Action
codes are shown and described below.
Backorder, Open, Rush: These codes will change the status of a line item to Backordered, Open or Rush.
These three statuses mean the line item is open or awaiting shipment. A line item of any other status can be
put in one of these statuses. When an S (Ship) or P (Partial) status line item is placed in B, O or R status,
the invoice associated with the line item is reduced in value. A Quote, Sample or Canceled line item is
booked.
Cancel: When a line item is canceled, the value of the line item is de-booked from the current booking
period. Order history is reduced for the month of the order date. The line item remains for reference on the
list of line items. Sales history associated with an S (shipped) status line item is removed from the invoice
date month.
Delete: When an open or shipped line item is deleted from the transaction history for the current booking
period is reduced and the order history for the order date of the line item is also reduced. If the item was in
S (shipped) status, the sales history for month of the invoice date is reduced. Deleted line items are
removed from the transaction completely, and cannot be recovered except by recreating them (Add button)
or by restoring a backup.
Sample: Because the action code S is dedicated to ship, RPMS uses F (for Free) to designate sample line
items. A sample line item has no booking, order or sales value for either gross or commission amounts.
While the value of the item is included in the value of the transaction, it is not tracked historically.
Changing an open or shipped item to a Sample will de-book history from the current bookings period, and
reduce order history for the order date and sales history for the invoice date, if any.
Partial: When a line item has partially shipped, use the P action code to designate the quantity shipped on
this invoice. A partial shipment scenario is shown in the image below.

Chapter 4 Maintain & Ship Transactions
56
In the example above, 4 units of the J138 product were ordered, but only two have shipped for the invoice.
The Create Line checkbox when checked declares that a new line item (in the example’s case, line number
4.01) will be created to carry the balance. This line will be created in O status for 2 units, but will otherwise
be identical to line 4.00. If unchecked, the quantity balance is de-booked and deleted. Partially shipping a
line item with a quantity of 1 opens the Unit Price field, in order to declare a portion of the amount of the
line item to have been shipped.
Ship: When a line item has completely shipped, use the S action code to declare the entire quantity of the
line item shipped on this invoice.
8. Detail tab:
The detail of each line item can be reviewed and changed from the line item’s detail tab. When a line item
is removed from Ship status using this tab, the invoice number and invoice date are erased.
9. Splits tab:
The splits tab for the line item shows the way that Booking, Order and or Sales history has been split
between multiple sales reps in your company. Changing the split credit for a line item rebooks and
redistributes history accordingly.

Chapter 5 Reconcile Commissions
57
Reconcile Commissions
Purpose and Overview of Commission Reconciliation
A primary purpose of RPMS is to determine whether or not your company has been paid what they ought
to have been paid. A secondary purpose is to pay various sales reps percentages of commissions that your
agency has been paid. Both of these purposes are easily accomplished with RPMS, using commission
reconciliation.
In order for the RPMS system to know that a commission is owed to your agency, an invoice transaction
with an expected commission amount must have been entered. See the chapters Add Transactions, and
Maintain & Ship Transactions for information about adding invoices to your system.
This is not to say that every invoice to be reconciled must already exist in your system. RPMS provides
means to ‘add on the fly’ while reconciling commissions, as documented below. But typically, most rep
firms enter invoice information, then reconcile those invoices against commission statements sent by their
principals.
The process is actually very similar to reconciling a bank statement. Your bank sends you an activity
statement, like a principal sends a commission statement. Using your check register, you reconcile the bank
statement by checking off those things you had recorded correctly; adding ATM withdrawals you forgot to
record (or didn’t know your spouse had made); adjusting those items recorded incorrectly; and ultimately
balancing to the bank’s figure of your account.
Set Up for Commission Reconciliation
Click the button pictured above, or select Transactions, Reconcile Commissions to display the C01S Batch
Label – Reconciliation Options form as shown below:
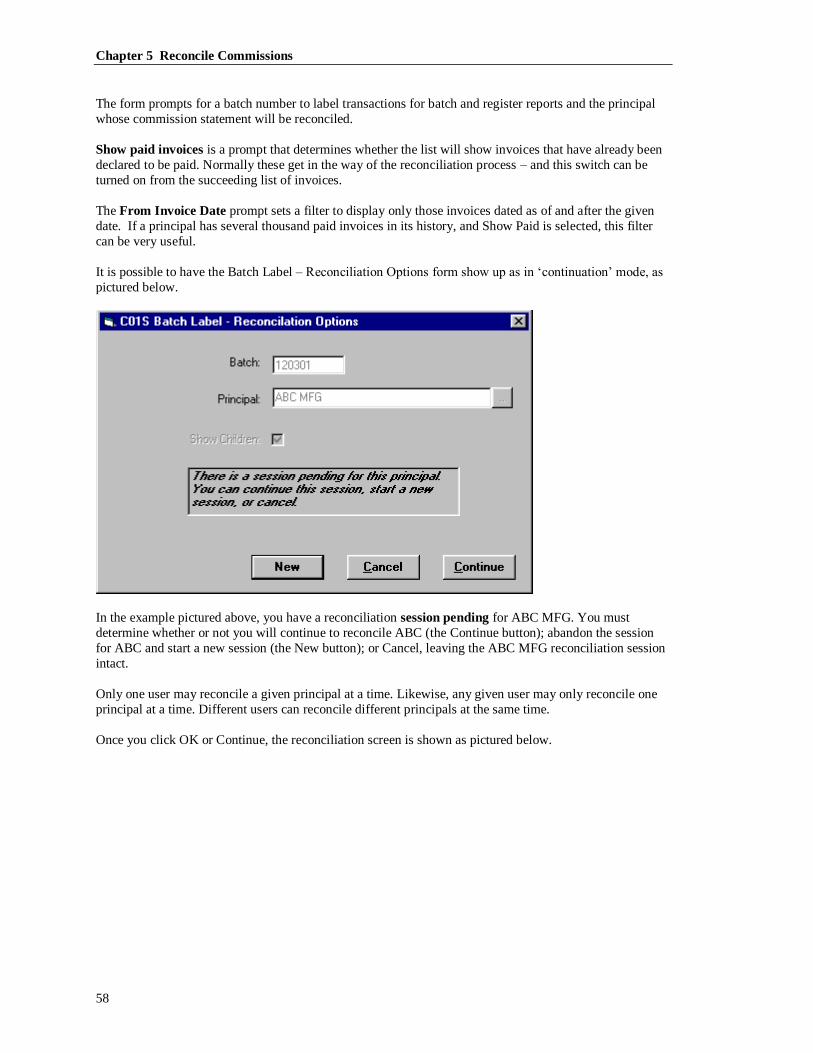
Chapter 5 Reconcile Commissions
58
The form prompts for a batch number to label transactions for batch and register reports and the principal
whose commission statement will be reconciled.
Show paid invoices is a prompt that determines whether the list will show invoices that have already been
declared to be paid. Normally these get in the way of the reconciliation process – and this switch can be
turned on from the succeeding list of invoices.
The From Invoice Date prompt sets a filter to display only those invoices dated as of and after the given
date. If a principal has several thousand paid invoices in its history, and Show Paid is selected, this filter
can be very useful.
It is possible to have the Batch Label – Reconciliation Options form show up as in ‘continuation’ mode, as
pictured below.
In the example pictured above, you have a reconciliation session pending for ABC MFG. You must
determine whether or not you will continue to reconcile ABC (the Continue button); abandon the session
for ABC and start a new session (the New button); or Cancel, leaving the ABC MFG reconciliation session
intact.
Only one user may reconcile a given principal at a time. Likewise, any given user may only reconcile one
principal at a time. Different users can reconcile different principals at the same time.
Once you click OK or Continue, the reconciliation screen is shown as pictured below.

Chapter 5 Reconcile Commissions
59
The Reconciliation Process
For each invoice on the commission statement being reconciled, determine whether or not the invoice
amount and commission amounts are the same as was expected. If they are the same, flag the invoice with
an X, either by using the keyboard X key or by clicking the drop down arrow with the mouse and selecting
‘X Select.’
For each selected invoice, the counter fields at the bottom of the form count the total quantity of invoices
selected, as well as the total Invoice, Paid Invoice, Commission, Paid Commission, Due Invoice, and Due
Commission amounts. These figures are based on the amounts as they are currently recorded on the
selected invoices. The Invoice Received and Commission Received amounts are those to which the
reconciliation attempts to balance. When finished, the amount of the commission check should be the same
as the Commission Received value.
The counter fields – difference between Commission Due and Commission Recv. due to partial payments
If an invoice or commission amount is different than what you expected, you have two choices. You can
adjust the invoice or commission amount to be the same as the commission statement, or you can declare
the invoice to be partially paid.
To adjust an invoice, tag with the letter A or N, using either the keyboard or clicking the drop down arrow.
For A the adjustment form will be shown, which is a transaction short form session with the line items for
the particular invoice being adjusted displayed within the session list view. If there is only one line item for
the invoice, the transaction correction screen will already be displayed. Make corrections or additions as
necessary, then close the short form. See Add Transactions, Short Form for information about how to

Chapter 5 Reconcile Commissions
60
manage and correct data in that screen. Closing the short form will return to the reconciliation form, with
the adjusted invoice selected for the newly adjusted amount. If you Adjust to change an invoice date, the
changes you are creating will attribute to the new date, but the invoice header (shown on the commission
reconciliation list screen) will continue to display the original invoice date. To change that display, the
invoice header would need to be changed from the Detail tab of the commission reconciliation list.
For N the Net Adjustment form will be displayed. The Net adjustment form is used when the details of an
adjustment are not known, and it is suitable for a line item to be added to the invoice that ‘nets’ the invoice
to the appropriate amounts. The Net Adjustment form is shown below.
To partially pay an invoice, tag with the letter P. The Partial Pay Invoice window, with the selected
invoice in the background, is pictured below:
The expected amount of commission in the example above is $125.00 The amount of invoice to be paid for
is $ 2,500.00. If the principal has paid half the expected amount (perhaps because they have been paid only
half of what they expect to receive) you could enter $ 75.00 and $ 1,250.00 in the respective fields, then
click OK or press Enter. On the other hand, if the $ 75.00 represents a 2.5% commission rate, when you felt

Chapter 5 Reconcile Commissions
61
your company was entitled to 5.00%, you could show the $ 2,500.00 invoice amount as fully paid, but only
$ 75.00 in the commission amount field. Either way, by leaving Place in Hold Status after Payment
checked, you would be declaring this invoice as NOT entirely paid, but HELD, for further attention.
Invoices flagged this way are counted in the counter fields Commission Received and Invoice Received
fields for the amounts declared. The remainder invoice and commission amounts of partially paid invoices
will be show as in the Commission Due column after payment has been applied. Hold status invoices can
be reported separately on the commission aging report. See the Reports chapter,
Commissions section, Commission Aging for more information.
To search for an invoice, place the cursor in the search field (Alt S) and begin to type the letters or
numbers of the invoice number, if the screen is sorted by invoice number. To search by customer, set the
sort sequence to either Sold To Company or Invoice To Company. For those transactions where a specific
Sold To or Invoice To company was not declared or defaulted, the Short Name of the customer has been
used. To search by Order Number, set the sort sequence to Order Number.
A different column may be used as the sort column by clicking the column header. The sorted column is
shown with either a ^ (ascending) or v (descending) value to indicate in which direction the column is
sorted. Clicking the column heading toggles between ascending and descending sorting. If a different
column is used for sorting, the search will use the column being sorted.
If an invoice that must be reconciled does not exist, you can use the Add button to add on the fly. Click the
Add button to go the short form to add additional invoices to the commission reconciliation session. When
you close the short form, the invoices added will be on the Commission Reconciliation screen, pre-selected
with ‘X – Select.’
If an invoice that must be reconciled was entered with the wrong invoice number, you can change it from
this form, as long as no payments have ever been recorded against it. Flag the invoice with the letter “I”, or
choose ‘I=Invoice #’ from the Action list to be prompted to change the invoice number. Changing an
invoice number causes the previous line items of that invoice to be backed out, and then re-invoiced under
the new invoice number.
Print selected records, or all displayed records, by clicking the Print button.
When the amounts of the Commission Received and Invoice Received field counters are equal to the
amount of the commission check and statement, click Apply to post the payment. The Apply window is
shown below:
The Check Date is the date of the principal’s check. The Check Number is the number of the principal’s
check. The Pay Date is best used to describe the day your agency receives and banks the commissions
check from the principal. Sales rep and agency commission statements can be bracketed to cover any range
of dates, but the Sales Rep Commission statements will have a ‘run date’ that will make it clear when the
payment actually happened. Past RPMS systems labeled the payment date as “Salesman Pay Date.” Some
agencies may choose to think of the payment date this way, but RPMS is not an Accounts Payable system.

Chapter 5 Reconcile Commissions
62
Closing the loop on the manufacturers reps’ receivables dictates using the date the agency was paid. See the
Reports chapter,
Commissions section for more information about Sales Rep and Agency Commission Statements. Click
OK to apply the payments. Note that all the now Paid invoices stay on the form, even if the Show Paid
Invoices checkbox is not selected. This is so you will have additional visual confirmation of your action.
To make them disappear, check then uncheck the Show Paid Invoices checkbox.
Other tabs are described below.
Split: A tab that shows the sales rep credit splitting for subsequent payments against the particular invoice
selected, as well as the agency to sales rep split rate. Either or both split scenarios may be modified for the
invoice from this tab. Note that changing this split only impacts subsequent payments. To change sales and
orders history, use the Line Items Tab Split Tab. To change previous payments, find the payment to change
on the Paid tab, and change its particular split.
Detail: Invoice header detail, including Payment status, Invoice date, Freight, Tax, Terms, FOB and Ship
Via. This information may be modified from this tab.
Notes: The original purchase order’s notes. These notes may be modified from this tab.
Contacts: Sold To, Ship To and Invoice To contacts. This information may be modified from this tab.
Line Items: The individual lines of the invoice, each of which has header detail and splitting information.
Pro and Enterprise systems can change line items back to open status. All systems can delete a line item.
However, if the invoice or commission amounts change for invoices that are already recorded as paid, the
difference in the amount paid so far and the new amount of the invoice will show up as an unpaid balance.
Changing a split for a given line item changes only the sales and orders history. To change splits for
subsequent payments against this invoice, use the Split tab documented above. To change splits for
previously recorded payments, use the Split tab of the Paid tab documented below.
Paid List: The list of payments recorded against this invoice, each of which can have different details and
splitting scenarios. To effectively unpay an invoice, change the detail screen to zero out the paid
commission and paid invoice amounts, then click Save. This will automatically impact the Split tab on this
Paid list. You may want to change the status of the invoice header from the Detail tab as well, i.e. from
Paid to Hold or Open (blank.) To change the split scenario of a payment already recorded, click the Split
tab for the Paid List, change the appropriate fields and click Save. Note that changing the split scenario
between multiple sales reps from this tab changes only the Paid history – in order to change the
accumulated sales, orders and bookings history the split must be modified from the Line Items Split Tab.

Chapter 6 E-Data Wizard
63
E-Data Wizard
The E-Data Wizard is the form that guides the process of electronically uploading data to RPMS. Orders
and order acknowledgements, invoices and point of sale reports can all be uploaded. The E-Data Wizard
can save hours of work every day by eliminating keyboard entry. The E-Data Wizard is only available for
those agencies with the E-Data feature.
The E-Data Wizard is a three-step process. The Translate step uses a custom-programmed map to turn
data into a format that RPMS can check and upload. The Pre Pass step checks the translated data for
structural and relational integrity. The Upload step sends the data into RPMS, just as though it had been
entered from the keyboard. Progress though each step is tracked in the Current Wizard Progress text
window at the bottom of the form. Each of the three steps is described in greater detail below.
Chapter 6 E-Data Wizard
64
Translate
The Translate step requires the selection of a map. A map is a custom program written by RPMS
specifically for the rep agency, or created by the Agency using the Imap feature in the Administration
system. A map turns a particular type of data into a format that RPMS can then check and upload. A rep
agency may have many different maps, if it receives data from more than one source.
For example, one principal may send monthly invoice data in an ASCII text file. Within that text file’s
records are customer names, invoice numbers, invoice amounts, line numbers, product numbers, quantities,
unit prices, invoice dates and commission rates. Another principal may send summary sales data for a
month in an Excel file. In that file there are only customer names and a total sales amounts for the month.
Both types of files can be mapped as invoice data for RPMS. It is the user’s responsibility to know which
map is appropriate to select for the particular file being translated. Once a map has been programmed and
installed, it can be selected from the list of available maps.
Each map is tied to an Uploader Type. There are currently five different Uploader Types. Each map must
be programmed to be of a particular Uploader Type. The six types of uploaders are called PO (for new
orders), Matching Invoice, Partial Shipping Invoice, Unique Invoice, 852 and Product Catalog.
The PO Uploader adds unique Purchase Orders into the RPMS system. If the PO is already on file in
RPMS, a ‘duplicate’ error is generated. If the data is not sorted by PO and line item, the map program
should be specified to organize them in that order, to prevent an invalid ‘duplicate’ error condition.
The Unique Invoice Uploader adds invoices into the RPMS system, and makes no attempt to match them to
existing PO’s. If the PO number and/or Invoice number is already on file, the invoice is reported as a
duplicate on the Pre-Pass Error report, but can nonetheless be uploaded – it will be issued a distinct
order/invoice number. Maps of this type can be created in the IMap feature of the Administration system.
The Matching Invoice Uploader expects a file of invoice data with Customer and PO numbers on the
records. It compares those values to existing PO’s in the RPMS system. If a PO is found, and the line
item’s Product Number, Unit Price and Quantity match and the Status is one of the open status codes (O, B,
H, R), then the line item is shipped by the uploader. If one or more of the line item qualifiers does NOT
match, the line item is reported as a ‘Not Found’ error. If the Customer & PO are NOT the PO can be
added as a new Shipped Order. If the invoice data comes in other than Customer and PO number order, the
map should be specified to re-organize the data in that order to avoid an invalid ‘Not Found’ condition.
The Partial Shipping Invoice Uploader is similar to the Matching Invoice Uploader, but does not match on
quantity. Instead, it will partially ship line items and create balance remaining open line items when the
quantity to be shipped is less than the quantity on order.
The 852 Uploader uploads ‘sell-through data ‘ to the Merchandising feature.
The Product Catalog Uploader adds or edits products for a principal, including prices and customer prices if
provided.
Once a map has been selected, various other options the map requires may appear that should be filled out
in the translate step. Batch is the label that will be used to collect the uploaded data on a batch report.
Some maps require Invoice Date when invoice dates are not supplied in the data. Some maps require Order
Date when order dates are not supplied in the order data.
If a map is selected or re-selected while a previous E-Data session is as yet incomplete, a warning message
is displayed. It simply indicates that any previously translated data may need to be re-translated, then Pre
Passed, then Uploaded. Check the Current Wizard Progress field before selecting a map.

Chapter 6 E-Data Wizard
65
All maps will require that the file to be translated be designated in the File to Translate field. This file must
correspond to the structure of the file for which the map was programmed. The checkboxes “File is Excel”;
“File is Tab Delimited”; and “File is EDI” will cause the E-Data Wizard to translate the input file in a
special manner. This special type of translation is transparent, but does in fact happen – choosing a “File
is…” checkbox when the file is NOT of that type may create an upload file that will not pass the Pre Pass
step. Please note that Excel and Tab delimited files may not contain line termination characters (CRLF)
within the cells or fields.
Once a map and file have been selected, and other necessary prompts have been filled out, click the
Translate button. A progress meter will track the translation process. When it has finished, depending on
the option selected for dealing with the original file, you may be prompted to delete it or archive it. After
that, the Step 2 Prepass will become available and evident as the next step.
Pre Pass
The Pre Pass step checks the translated data for referential and structural integrity. Referential integrity
means that identifiers like customers, principals, points of sale and products will be meaningful to RPMS.
Most of the Pre Pass and Upload programs rely on cross-referenced data. For example, a principal may
refer to your customer ACE DYNAMICS as ACE123 in it’s sales data. By cross-referencing ACE123 to
your customer ACE DYNAMICS for that principal, the Pre Pass and Upload programs understand with
whom they should associate that data. See the Lists chapter, X-References (Cross References) -
Operational Notes for information about setting up cross reference data.
Once the Pre Pass has been run, two different reports can be reviewed. The Errors Report will display
any problems that were found with the data. The Audit Report will show what will be loaded into the
RPMS system. Both reports automatically will be previewed, but can be printed from the preview form.
The Pre Pass step can be run multiple times. If an Errors Report shows that a cross reference is missing,
the cross reference can be added to the list of cross references and the Pre Pass can be re-run. The E-Data
Wizard form does not need to be closed to add a cross-reference. If you receive errors that indicate missing
cross-references, and then navigate to the cross reference list for the entity missing data, the cross reference
list form will start an “auto-load” wizard that will help you pre-load missing cross-reference keys that you
can tie to RPMS list records.
Eventually the Errors Report will be either ‘clean’ or ‘clean enough.’ That is, data need not be perfect to
for the Upload step to be run. Any records that do not pass the Pre Pass will not be included in the Upload,
and can be added manually later. However, the recommended approach is to cycle through as many Pre
Pass and cross-reference resolutions as necessary to provide clean data for the Upload step.
Some errors listed on the error reports have similar titles, but mean different things, especially insofar as
the word ‘Duplicate’ occurs.
Maps tied to the PO Uploader can generate the error ‘DUPLICATE ORDER NO’ which means that the
particular PO number for that customer is already in the RPMS system. Those maps can also generate the
error ‘DUPLICATE INPUT ORDER NO’ which means that there are duplicate PO numbers within the
input file itself. Re-sorting the input file to be in Customer-PO number order can eliminate this error.
Maps tied to the Unique Invoice Uploader Type can get the same ‘DUPLICATE’ messages as the PO
Uploader – but the ‘DUPLICATE ORDER NO’ error is really just a warning that the PO number will
change, as it goes away at the time of upload. This is because it is the nature of this particular Uploader to
guarantee a unique shipped order upload every time.
Maps tied to the Matching Invoice Uploader can get the error ‘DUPLICATE INVOICE NUMBER’ which
means that this PO / Invoice number combination is already on file for the customer. This Uploader Type
can also generate the Pre-Pass error ‘DUPLICATE INPUT INVOICE NO’ which means that within the

Chapter 6 E-Data Wizard
66
input file itself there are multiple, separated instances of a customer / PO / invoice number combination.
This error can be resolved by pre-sorting the file by customer, then PO, then invoice.
Because of these ‘warnings’ on the Errors Report, the Unique Invoice Uploader can have a Pre-pass Audit
Report that does not match the Upload Audit report. The invoices that carried warnings on the Errors
Report have their order and/or invoice numbers automatically changed to unique numbers, and then
therefore can be uploaded.
For this uploader type, the warnings are only presented on the Errors report to provide a safety feature
against uploading the same input file twice. Since, in that event, 100% of the records would have warnings,
no records would pass the audit, and no upload could accidentally occur. This behavior is by design.
The Pre Pass options can, based on the map used for the translation, designate that products that are not in
the system be automatically added, and that a particular commission type be the default type where other
commission rate rules do not apply. The options selected for the Pre Pass step will also apply when the
Upload step is selected.
Upload
The Upload step can only be run when a file has been translated and at least one record has passed the Pre
Pass step.
Once the Upload has been run, an Errors Report can be reviewed and printed to remind about the entries
that should be made manually at a later time, and an Audit report can be printed in lieu of a batch report.
The Upload options may include setting the Book Date, depending on how the Book Date control option
has been set by the system administrator. See The Administration Guide for more information about the
Book Date.
The Upload area may provide two additional checkbox options, labeled “Post and Pay” and “Pre
Reconcile.” For either of these options to be made selectable, several things must be true:
• The checkbox options can only be selected after the Pre Pass step has been run for the current
EData session
• The data being uploaded must be invoice data, and can be from only one principal
• The user uploading the data must have security rights (if security is enabled) to reconcile
commissions
• The user uploading the data must not have any other commission reconciliation sessions pending
• The principal for whom the data is being uploaded can’t have a commission reconciliation session
pending for any other user
When the upload is finished, a checked Post and Pay option will present a dialog box that prompts for a
check date, check number, and pay date. Clicking OK on the dialog causes the uploaded invoices to be
posted and paid in Commission Reconciliation, without further intervention.
The Pre Reconcile option does not ask for a check date, pay date, or check number. Instead, it creates a
commission reconciliation session for the uploaded invoices that the user may continue. For some RPMS
custom matching maps, invoices selected that had unexpected commission amounts will be highlighted in
red. For all other invoice maps, all the invoices uploaded will be pre-selected (X’d) for review and
payment.

Chapter 7 Snapshots
67
Snapshots
How is our business doing?
In the introduction you learned that RPMS has two general purposes for independent manufacturers reps. It
tells rep firms whether they’ve been paid what they ought to have been paid, and it tells them how their
business is doing. Snapshots are an easy way to figure out how your business is doing, by assembling quick
and comprehensive historical information to the screen, in a time period comparison format. That
information can be printed, graphed or exported as desired.
Snapshots are faster than reports when a very specific piece of information is of interest. For example,
while a single customer can be specified on a Summary report (see the Reports chapter, Monthly Histories
& Summaries) the essential parts of the same information can be easily understood from a snapshot for one
customer. Likewise snapshots are faster than reports for highly summarized data, like All Sales Reps,
Principals or Points of Sale. Snapshots are also a little more versatile than reports, since you can ‘drill
down’ to the monthly cell levels of the records.
Setting up the Snapshot Options
There are two ways to get to the snapshot form. One way is to click the menu bar button shown above, or
select Snapshots from the Reports menu. Another way is to click a Snapshot button from one of the list
detail tabs. Both navigation techniques will take you to the Snapshot Options Setup Screen as shown
below:
The picture above shows what the form looks like the very first time you run a snapshot after installing
RPMS. After that, the form will be pre-selected with the parameters you chose last, unless you navigated
from a list detail snapshot button. That navigation will pre-select the Create Snapshot For options with
“One” the type of entity you came from (i.e. Customer, Principal, etc.), and a lookup control for that entity
already filled out.
Select criteria of interest, then click OK to display a snapshot. Each of the controls can impact the other
controls. For example, selecting One instead of All in Create Snapshot For’s first drop down impacts what
is available to select in the second drop down. Changing the value in that impacts the Sort drop down
contents and so on.

Chapter 7 Snapshots
68
Create Snapshot For: These two controls govern the perspective and point of view of the snapshot.
Choosing All in the first control sets the perspective to ‘company wide.’ In other words, the snapshot will
display the total recorded business for the agency. The meaning of the word business would be determined
by the Value and Date controls. Choosing One would filter the snapshot to a given customer, principal,
sales rep, point of sale, or product. .This is known as the point of view. So perspective is All or One. Point
of view can be Principals, Sales Reps or Points of Sale for the All perspective, or Customer, Principal,
Sales Rep, Point of Sale or Product for the One perspective. The One perspective must be further delineated
in the case of Customer, Principal or Product points of view. An example of this type of selection is shown
below:
Selecting any of these points of view will cause additional prompts to be displayed. The customer point of
view can be for all Principals, One Principal’s products, or all Points of Sale. The principal point of view
can be for all Customers, Sales Reps, Products, One Customer’s Products, Points of Sale, or One Point of
Sale’s Products. The product point of view can be for all Customers, Sales Reps or Points of Sale.
Sort: The sort sequence that can be selected for the snapshot is governed by the point of view selected from
the Create Snapshot For prompt. All the snapshots have a sort sequence called Alphabetical. This
sequence lists the point of view in alpha sequence. All of the snapshots have a sequence called Year to
Date Descending Volume. This means the data will be sorted by the values, from highest to lowest, of the
selected date range. Some of the snapshots have a sort sequence that says Alphabetical with Sub
Accounts. This sort means that the parent record will be displayed alphabetically with its children
underneath, then sub-totaled. So the child records themselves will not be listed alphabetically for the entire
snapshot, but will be alphabetically listed within the parent.
Values: The values that can be selected for the various snapshots are governed by the point of view
selected from the Create Snapshot For prompt. The values come from the four types of data that RPMS
tracks historically: Bookings, Orders, Sales and Payments. See Types and Methods of Adding Transactions
for further discussion of these value types.
Each of the types can look at gross volume, commission volume or both. Unless the value says the word
‘commission’ it is referring to the gross. Each type is associated with a particular date – bookings with the
book date, orders with the order date, sales with the invoice date and payments with the payment date.
Therefore the Date field below is strictly associated with the value selected here.
The following is a brief description of each possible value.
Bookings: Gross volume booked by book date.
Booked Commissions: Agency commission volume booked by book date.
Bookings + Booked Commissions: Booked gross and commission, plus average commission rate.
Booked Units: Booked product unit volume.
Booked Avg. Unit Price: The ratio of booked dollars per booked unit.
Orders: Gross volume ordered by order date.

Chapter 7 Snapshots
69
Orders to Sales Ratio: Gross Order volume by order date, with sales by invoice date for the same
period, plus the percentage of orders compared to sales – so if orders exceeded sales for the same
period by 10%, the ratio would be 110.00.
Orders Commissions: Agency commission volume of orders by order date.
Orders + Orders Commissions: Order volume gross and commission, plus average commission
rate.
Orders Units: Ordered product unit volume.
Orders Avg. Unit Price: The ratio of ordered dollars per ordered unit.
Sales: Gross volume booked by invoice date.
Sales Commissions: Agency commission volume sold by invoice date.
Sales + Sales Commissions: Sold gross and commission, plus average commission rate.
Sales Units: Sold product unit volume.
Sales Avg. Unit Price: The ratio of sold dollars per sold unit.
Paid Sales: Gross invoice amounts paid for by payment date.
Paid Commissions: Agency commissions paid by payment date.
Paid Rep Commissions: Compensation earned by reps, based on payment date and split
percentages.
Paid Sales + Paid Commissions: Agency paid gross and commission, plus average commission
rate.
Date: This date range varies its meaning according to the value selected, as described in Values above. The
maximum difference between the from and through dates is 47 months. Since it is a through date, the date
range begins with the first month and year specified and includes the end month and year. Therefore a
difference of 47 months reports a total of 48 months. So 0197 – 1200 is legal, but 0197 – 0101 is not.
The end date will always be reported by itself in the first column of a snapshot. The corresponding end date
one year earlier will be reported in the second column. The third column will have the date range specified,
and the fourth column will report the same period begun and ended one year earlier. So for a date range of
0197 – 1201, the corresponding comparison would be for 0196 – 1200.
Working with the Snapshot screen
The snapshot screen is a columnar comparative report. The points of view are listed in the left-most
column. The values for the through month and its corresponding month one year prior are listed in the next
two columns. The third column is for the month range specified, and the fourth column concerns the values
one year prior to the begin and end months.
The fifth column is percent of difference – how much better or worse the selected month range is than the
one prior. Since division by zero is not possible, if the previous period was zero, the percent of difference is
expressed as 100.00 or -100.00.
Each of these columns may be used to re-sort the snapshot by that column, whenever the snapshot being
displayed is not a multi-line.
The font of the snapshot may be adjusted up or down using the font slider, pictured below.
Font slider Printer Setup
The vertical thumb scroll can be used to scroll down to other records and total lines. The Print button can
be used to print the snapshot directly to the default printer. To change printers, click the Printer Setup
button from the menu bar, or select Files, Pinter Setup.

Chapter 7 Snapshots
70
The Graph button is enabled on single dimension value displays. The graph option setup screen is shown
below.
The Graph Export screen allows you to choose between a bar chart or pie chart, and lets you determine
whether to do the single month comparison, the date range comparison, or both. The Use All Dates option
means that four bar or pie charts will be displayed.
Once enacted, the graph will take the place of the snapshot view, and the button will change to Data.
Clicking the Data button returns to the snapshot view.
The Export button allows you to export the snapshot to either an Excel file or to an ASCII CSV file. If you
use Excel, you won’t have to do anything else in order to export – simply decide whether or not you want
formulas exported in the snapshot that is created in Excel. For other spreadsheet or database programs, you
may want to declare them in User Preferences under Spreadsheet. Having done so, choose Generic Text
(ASCII CSV) as the type of export, and RPMS will generate the snapshot in another program. Both
Paradox and Lotus support this kind of export. The Export options screen is shown below.
The Reset button or Escape key allows you to declare different criteria and create another snapshot. It does
not get rid of the old snap, but will not let you print, export or graph the data until the OK button has been
clicked again.
Double click or press Enter on a given record to drill down to detail for the record. A sample detail is
shown below. The snapshot detail displays the individual month totals for up to 48 months of the range
period selected. So if your selection was Jan 2002 – Sep 2002, the Detail would display four Jan – Sep
columns, with 2002 being the left-most column.
This form has a line graph ability, which will lay the months out in order to show trends, as well as Export
and Print abilities.
Double click a different snapshot record to change the detail display.
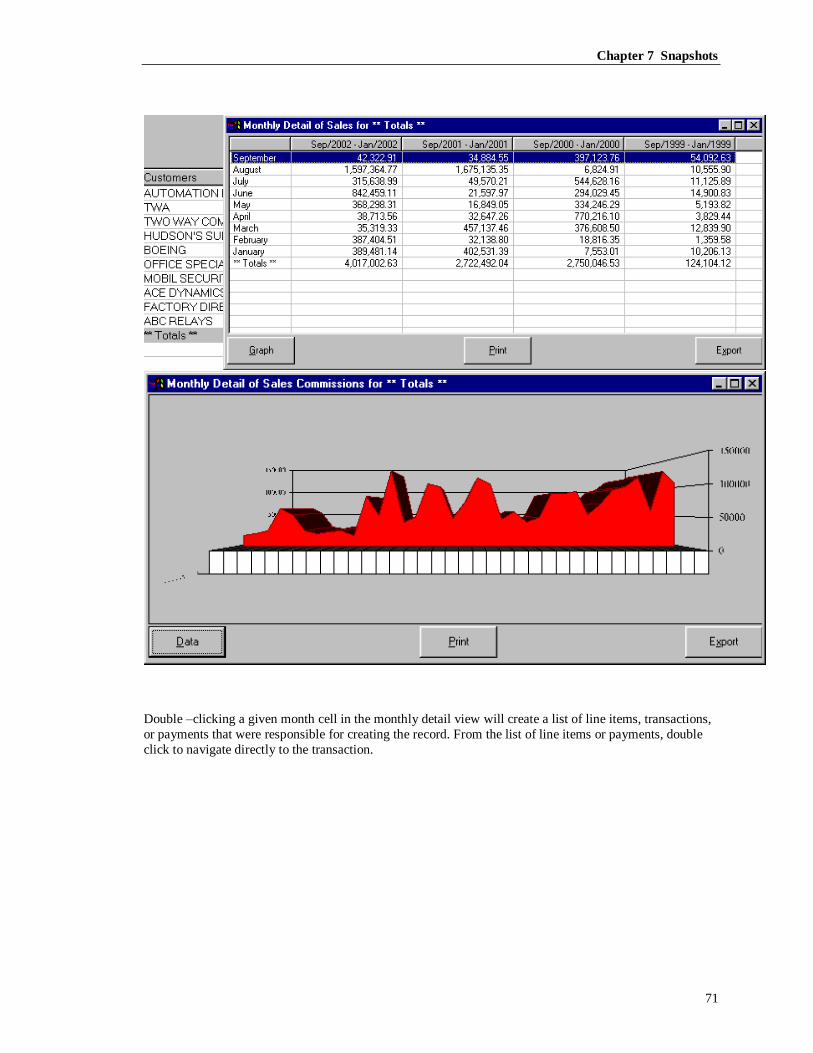
Chapter 7 Snapshots
71
Double –clicking a given month cell in the monthly detail view will create a list of line items, transactions,
or payments that were responsible for creating the record. From the list of line items or payments, double
click to navigate directly to the transaction.

Chapter 7 Snapshots
72
This page left blank intentionally.

Chapter 8 Reports
73
Reports
Launch the RPMS Reports Engine
To run reports, you must navigate to another program called the RPMS Reports Engine. This program is a
second application that ships with RPMS. It can only be launched from RPMS itself. The Reports Engine
button is pictured above. It can also be launched from Reports menu, Reports.
Reports Engine Navigation
The Reports Engine menu and menu bar are shown above. The File menu navigates to Memorized
Reports, Saved Reports, Printer Setup and Exit.
The Lists menu navigates to report forms that list various table records, like customers, principals, and sales
reps.
The Reports menu navigates to the various types of reports available in RPMS. They are broken into the
following categories:
Commissions: The reports that have to do with paid and unpaid commissions, like aging reports
and agency/sales rep commission statements.
Daily Transactions: The Batch Verify and Register reports, that examine the detail of transactions
filtered by batch (entry) number.
Forecasting: For systems with the Forecasting feature, this category contains reports that measure
against forecast.
Monthly History & Summary: Reports that summarize Bookings, Orders, Sales and Payments in
year-to-date (Summary) or spreadsheet (History) style.
Orders: Reports that examine the orders with line items, differentiating those that are late,
scheduled or closed.
Product: Reports that summarize units history in Summary (year-to-date) or History (spreadsheet)
styles.
Point of Sale: Reports that summarize, in year-to-date format, Points of Sale versus direct (non
POS) business. The POS History displays business by principal or customer for given points of
sale in a spreadsheet format.
Reptivity: For systems with the Reptivity feature, activities and opportunities.

Chapter 8 Reports
74
Common Report Controls
There are over fifty RPMS report setup forms, and most have some common controls and options that will
tailor the generated report with different options. The most common are described below.
Sort / Type: The sorting order of the report, and in some cases, the type of report. Subtotals, when
Summary is turned on, generally follow the described sorting.
Filters: Limit data selected.
Entire Family checkbox is available for single principal and customer filters, and forces the
report to consider the parent and child records or the child records of the principal or customer
selected.
Output:
Values: Usually the RPMS value types, Bookings, Orders, Sales and Payments. See Types and
Methods of Adding Transactions for more information about the value types.
Data: Detail Only, Summary Only, Both Detail and Summary refers to whether or not the
report should display subtotals and totals. Detail does not print subtotals or totals, while Summary
displays subtotals and totals exclusively.
Destination selects where the report output will land. Preview generates a viewable file that can
be saved for later management within Saved Reports. Print goes directly to the default printer.
Note that the default printer can be changed by clicking the Printer Setup button on the Reports
Engine menu bar. Excel generates an Excel 97 file. If Excel of that vintage or later is installed on
your system, the report will automatically come up in Excel. All the elements of the report are
displayed in columns, though there will also be extra information as well. The left-to-right order
of the columns may not be what you would expect based on the printed output. Rich Text Format
will save the report to an RTF file that you can name and edit with a word processor or Wordpad.
HTML will generate documents that can be read by web browsers. CSV files are comma
separated value files that can be opened by most database and spreadsheet programs. All the
elements of the report are generated in the fields, though there will also be extra information as
well. The left-to-right order of the fields may not be what you would expect based on the printed
output. Bitmap and JPEG are graphics files. Note that HTML, Bitmap and JPEG files may make
multiple files for a multiple page report. PDF files are adobe acrobat files, and are commonly used
to share reports via email. The Send Email PDF destination will both create a PDF report, and an
opportunity to send the report by email.
Start: The button that launches the report to its selected destination. A progress meter with a cancel button
will be displayed that can interrupt the report process.
Run Min: Another button that can launch the report, but does so as a minimized application. When the
report is finished, the Reports Engine will be restored to its previous size.
Memorize: Remember and save the report parameters under a name that you invent. Recall the report later
from the list of Memorized Reports.
ReDesign: For Enterprise versions only – re-design the report to your liking, using the built-in report
formatter, as documented in the Enterprise Administrator’s Guide.

Chapter 8 Reports
75
Preview
The Preview control in RPMS looks like this:
Various controls on the preview form will display the report as it would print, and will allow searching for
data, exporting in different formats, zooming the view, presenting the report in a presentation mode, and
more.
Lists
The Lists menu contains navigation to the RPMS reports that list rosters of the various files. Customers,
Points of Sale, Territories, Principals and other entities can be printed or exported.
The New and Missing Customers report is a list of customers that are either entirely new, rediscovered,
have recently gone missing, or have never purchased. The setup form for the report is shown below.
The Sort/Type has four options. The New Transaction Customers option lists customers across the entire
agency that have not purchased before, or in recent times. The New Transaction Customers for Principals
option causes the report to consider whether a customer is new or not for a given principal. The Missing

Chapter 8 Reports
76
Customers option creates a list of customers without any transactions from the Since date. The Missing
Customers for Principals option creates a list of customers without transactions from the Since date for the
given principal.
The Since date on the report governs what the relative meaning of “New” or “Missing” means, and is
inclusive of the month and year selected. In other words, a customer is NEW (or Rediscovered) if
transactions have occurred during or after the Since month and year. A customer is MISSING if
transactions have not occurred during and after the Since month and year.
For the New versions of the reports, the checkbox in the filter is labeled “Consider Customers without
Previous Transactions from”. If checked, the report will consider a customer to be NEW as long as there
are no transactions in the given period. If unchecked, a customer can’t have ANY previous transactions of
the type of value requested.
For the Missing versions of the reports, the checkbox in the filter is labeled “Consider Only Customers with
Previous Transactions from”. If checked, the report will consider a customer to be MISSING only if it had
previous transactions in the referenced period, but has not had any from the Since date forward. If
unchecked, ANY customer – including customers that have never purchased anything – would qualify to be
on the MISSING list.
Commissions
The Commissions sub menu under the Reports menu contains navigation to the RPMS reports that list
information about due and paid commissions. Agency and Sales Rep Commission Statements,
Commission Aging and Cash Flow Forecast all report information about commissions.
The Agency Commission Statement creates a statement for a time period that shows the total invoice
(sales) amount credited as paid; the total commission for each transaction paid; and the agency and sales
rep split portions of the commission. Typically this report is run to show what an agency grossed in
commissions paid for that period of time, and the net left to the agency after paying the sales reps a
percentage of the gross commission. Some agencies use this report in lieu of the sales rep commission
statement because this statement shows the total commission received by the agency.

Chapter 8 Reports
77
The Sales Rep Commission Statement creates a statement for a time period that shows a sales rep the
total invoice (sales) amount credited as paid and the portion split out to the sales rep. It shows under the
column heading ‘Rate’ the effective commission rate for that sales rep. For example, if the agency’s rate
from a principal is 5%, and the sales rep’s split commission rate is 50%, this report shows as the rate 2.5%,
and as the commission amount just 2.5% of the invoice amount. Some agencies prefer not to constantly
display the ‘overhead’ portion that they keep, so use this style of statement to pay their sales reps.
The Cash Flow Forecast shows commission expected for unshipped orders and unpaid invoices by month
for a seven month period and totals for all months. The dates used to project the commissions are the
schedule date or invoice date, plus any lag days entered for the principal (see the Lists chapter, Principals -
Operational Notes and Important Field Descriptions)
Daily Transactions
The Daily transaction reports are intended to show entries made for a period of time, as indicated by a
batch range.
The Batch Verify report shows every transaction entry made, including corrections and deletions, in
chronological order within each batch.
The Register report also shows every transaction entry made within a given batch – but it nets the effect of
each individual order or invoice into a single line.
If a line item is shipped and then it’s unit price is corrected within the same batch, the Batch Verify report
will show the original shipment, then a negative entry, and then the correction as entered. The Register
would only show the net effect of all three entries for that invoice.
These reports can be deceiving if the transaction entries being reviewed span more than the batch range
selected. If the reports don’t contain expected information, broaden or eliminate the batch filter to pull in
more data.
Monthly Histories & Summaries
The Monthly History and Summary reports are month and year breakouts of transaction history organized
by sales rep, territory, customer, principal and various combinations.
The Summary reports follow a scheme based on the month range selected. The ‘through’ month is set as
the current month and listed in the first column. The same month from the previous year is listed in the
second column. The third column (sometimes called ‘Year to Date’) is the cumulative value for the month
range selected, and the fourth column is a comparative of that same period ending one year previous. For
most values a ‘Percent Difference’ column shows whether the current period (the third column) is ahead or
behind the previous time frame’s pace. The last column is usually set to be ‘Last Year’s Totals’ which is
the fiscal year previous to the ‘through’ month.
Both the Percent Difference and Last Year’s Totals columns are eliminated when the value selected is a
combination value. Sales + Sales Commissions, Orders to Sales Ratio, Orders + Orders Commissions, etc.
are all examples of combination values. In those cases a ratio or percentage relationship between the two
current year columns is generated as the last column of the report.
The option Historical / Analytical refers to the basis of the sales reps listed on the report. When run in
Historical mode, the sales reps that were credited with the transactions will report as such – allowing for the
possibility that a sales rep would be reported alongside a customer account to which she was no longer
Chapter 8 Reports
78
assigned. When run Analytically, the same report would show the currently assigned sales rep, instead of
the sales rep that was credited with the transactions. If the intention of the report is to measure a sales reps
performance, Historical is an appropriate choice. If the intention is for sales reps to review the history of
the accounts to which they are currently assigned, then Analytical is the right selection. Previous versions
of RPMS worked Analytically.
The History report is a spreadsheet style presentation of monthly totals sorted by customer, sales rep,
principal or combinations. The ‘End Date’ dictates the arrangement of the first row for each section from
left to right, and the three rows immediately below correspond. So if the ‘End Date’ selected is September
2002, then the first row of each section will represent August 2001 through September 2002, the second
row would be August 2000 through September 2001 and so forth. A total for each row is shown to the
right.
A Matrix Summary is also commonly known as a cross-tab report. The values reported by Matrix reports
are similar to the values in a Summary report, but are shaped differently. For a matrix report, the setup form
allows a user to choose entities to display as columns across the top, and rows down the side, and the type
of value (or values) to summarize at the intersections of columns and rows.
Orders
The Orders reports are detailed line item presentations of various states of order transactions.
The Closed order report displays a list of orders that are completely shipped (no ‘O’ status line items)
where the most recent ship date is between a date range specified.
The Expedite report examines a schedule date or request date period. The intent of the report is to provide
a follow-up mechanism for a date range of expected or requested shipment. The report can also be used to
follow manage Quotes and Samples, provided follow-up dates were entered as schedule or request dates.
Line items are compared to the ‘Status Codes’ filters to determine whether or not they will be extracted for
the report. The ‘Include Late Line Items’ filter governs orders that have both qualified line items within the
date range AND open line items scheduled or requested before the date range. If the checkbox is selected,
the previously scheduled line items will print and be labeled ‘Late.’ The ‘Include Line Items Within Date
Range Only’ checkbox governs the other side of the date range. That is, if an order has at least one line
item that is qualified to be on the report, but also has line items that are scheduled or requested beyond the
date range selected, those future-scheduled line items will print unless this checkbox is checked. The
‘Include Unshipped Line Items Only’ when checked causes only open line items to print.
To print a very focused expedite report, examining only those items scheduled and open in a certain date
range, check Orders, Include Line Items Within Date Range Only, and Include Unshipped Line Items Only.
To print a wide-ranging report that prints anything and everything to do with transactions scheduled for a
given period, check Orders, Shipped & Partial Shipped, and Include Late Line Items.
The Late Orders report is a simplified version of the expedite report that reps use to track down missing
invoices or late shipments. A single date governs what ‘Late’ means – the report prints all open line items
with schedule dates prior to that date and labels them ‘Late.’
Orders by Order Date reports all transactions in line item format based on an order date range, regardless
of the status of the line items.

Chapter 8 Reports
79
Product
The Product history and product summary reports are month and year breakouts of transaction history
organized by sales rep, territory, customer, principal, product and various combinations, accumulated for
either units or dollars.
They are similar in nature and setup to the Monthly History and Summaries documented above, but add
products and units to the data.
Point of Sale
The Point of Sale reports document the history of transactions with regard to Points of Sale.
The Direct / POS Summary shows the total volume for a customer directly, cumulatively through all
Points of Sale, and in total.
The Direct / POS Detail displays the same information as the summary above, but differentiates the
various Points of Sale. It also only displays customers with values other than zero for the period selected.
So the previous period values are not actual agency totals, but rather comparative totals for customers with
values in the period requested.
The POS Summary is a spreadsheet style report that documents the history of each particular Point of
Sale.
Accounts Receivable
The Accounts Receivable reports are part of the Accounts Receivable feature. Rep agencies that also
invoice customers directly, for purchased and re-sold items, can run Accounts Receivable reports.
The Sales Aging shows the total invoice amounts due from a customer, and the age of those accounts
receivable.
The Customer Statements can be printed to show balances due for individual customers. They are
designed to be run monthly. Except in very special circumstances, always run a customer statement
showing the ‘Previous Statement Date’ to be exactly one month prior to the Statement Date.
To run a report showing Cash Receipts, use the Agency Commission Statement documented in
Commissions above, and limit the report to the Accounts Receivable principal (see Principals - Operational
Notes and Important Field Descriptions )
To run an Aging Report for Accounts Receivable invoices, use the Commission Aging report documented
above, but choose the value Sales, and limit the report to the Accounts Receivable principal.
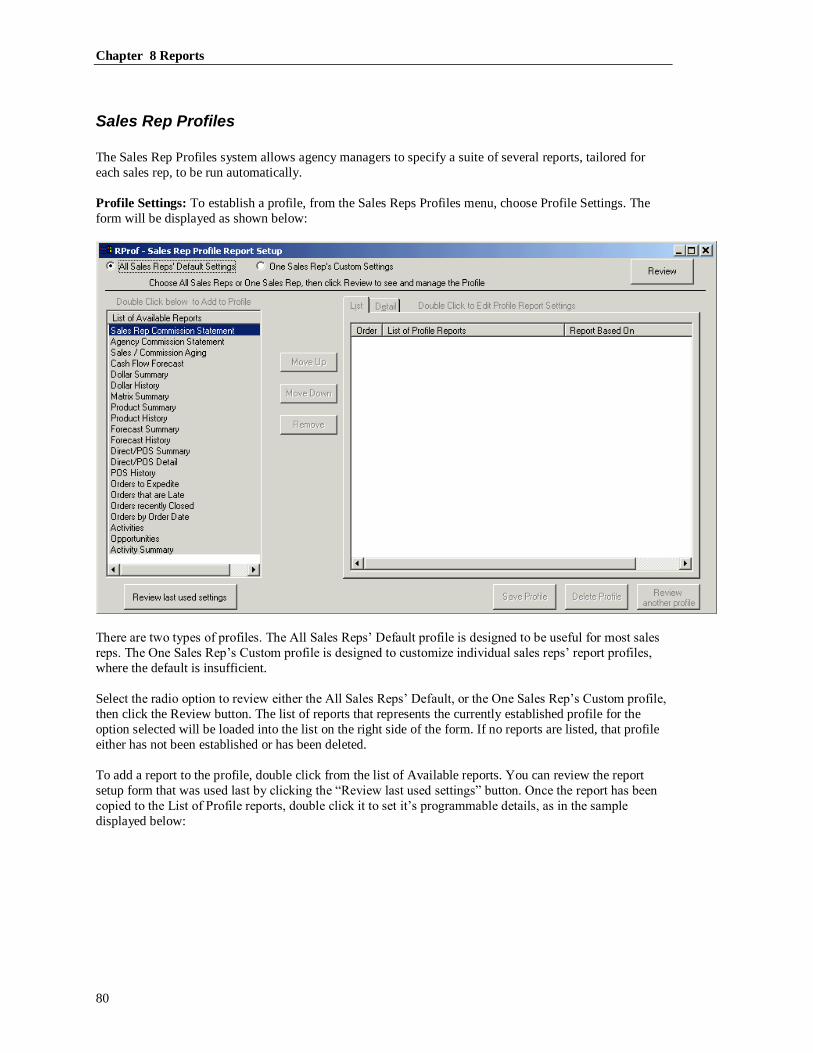
Chapter 8 Reports
80
Sales Rep Profiles
The Sales Rep Profiles system allows agency managers to specify a suite of several reports, tailored for
each sales rep, to be run automatically.
Profile Settings: To establish a profile, from the Sales Reps Profiles menu, choose Profile Settings. The
form will be displayed as shown below:
There are two types of profiles. The All Sales Reps’ Default profile is designed to be useful for most sales
reps. The One Sales Rep’s Custom profile is designed to customize individual sales reps’ report profiles,
where the default is insufficient.
Select the radio option to review either the All Sales Reps’ Default, or the One Sales Rep’s Custom profile,
then click the Review button. The list of reports that represents the currently established profile for the
option selected will be loaded into the list on the right side of the form. If no reports are listed, that profile
either has not been established or has been deleted.
To add a report to the profile, double click from the list of Available reports. You can review the report
setup form that was used last by clicking the “Review last used settings” button. Once the report has been
copied to the List of Profile reports, double click it to set it’s programmable details, as in the sample
displayed below:
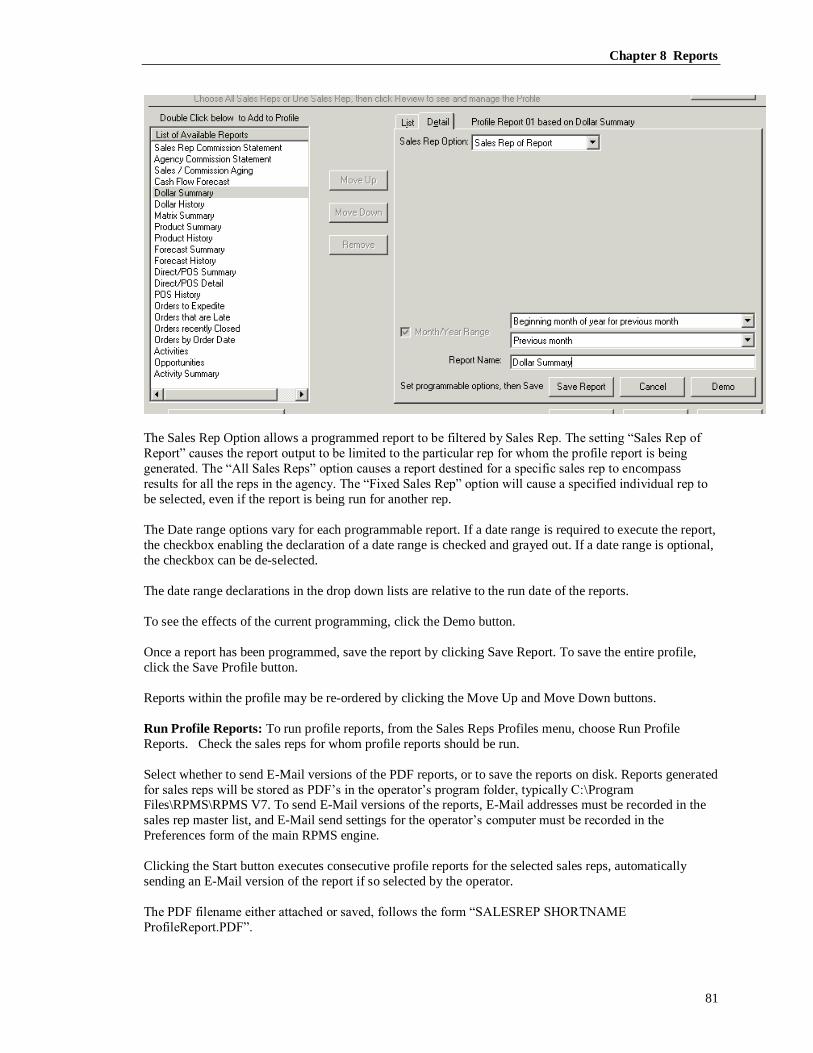
Chapter 8 Reports
81
The Sales Rep Option allows a programmed report to be filtered by Sales Rep. The setting “Sales Rep of
Report” causes the report output to be limited to the particular rep for whom the profile report is being
generated. The “All Sales Reps” option causes a report destined for a specific sales rep to encompass
results for all the reps in the agency. The “Fixed Sales Rep” option will cause a specified individual rep to
be selected, even if the report is being run for another rep.
The Date range options vary for each programmable report. If a date range is required to execute the report,
the checkbox enabling the declaration of a date range is checked and grayed out. If a date range is optional,
the checkbox can be de-selected.
The date range declarations in the drop down lists are relative to the run date of the reports.
To see the effects of the current programming, click the Demo button.
Once a report has been programmed, save the report by clicking Save Report. To save the entire profile,
click the Save Profile button.
Reports within the profile may be re-ordered by clicking the Move Up and Move Down buttons.
Run Profile Reports: To run profile reports, from the Sales Reps Profiles menu, choose Run Profile
Reports. Check the sales reps for whom profile reports should be run.
Select whether to send E-Mail versions of the PDF reports, or to save the reports on disk. Reports generated
for sales reps will be stored as PDF’s in the operator’s program folder, typically C:\Program Files\RPMS\RPMS V7. To send E-Mail versions of the reports, E-Mail addresses must be recorded in the
sales rep master list, and E-Mail send settings for the operator’s computer must be recorded in the
Preferences form of the main RPMS engine.
Clicking the Start button executes consecutive profile reports for the selected sales reps, automatically
sending an E-Mail version of the report if so selected by the operator.
The PDF filename either attached or saved, follows the form “SALESREP SHORTNAME
ProfileReport.PDF”.

Chapter 8 Reports
82
This page left blank intentionally.

Chapter 9 Direct Marketing
83
Direct Marketing
Purpose and Overview of Direct Marketing
Direct Marketing is a powerful tool designed to leverage the existing customer, contact, and principal files
for more advanced marketing and management purposes.
There are essentially two steps involved in using the Direct Marketing feature.
Step 1: Set and apply the applicable filter criteria to extract a list of customers, contacts or principals.
Step 2: Work with the extracted list to generate a report, labels or cards, or mail merge files.
Create Direct Marketing Files
To create a Direct Marketing file, first determine whether to use customers, contacts or principals. The
documentation below will assume the choice of customers, but most of the options are the same within
each group.
Once selected, a dialog box will appear that asks if you wish to use your previously extracted file or to
create a new file.
If you answer YES, your previously extracted list will be erased, and a new empty list will be created as
shown below.

Chapter 9 Direct Marketing
84
The list has many of the same features as the actual list for that entity as presented under the Lists menu,
but is a sub-set.
Creating a Direct Marketing List
There are two ways to add records to the Direct Marketing List. The first is to use the Add button to select
records one at a time. In this way a group of otherwise completely unrelated accounts could be grouped
together on a list.
When the Add button is clicked, the detail tab is selected with no information. Using the short name field,
type a few letters of the name to add to the list to find the customer. Or, you can press the control key once
while the cursor is in the field. This will cause the lookup to use the alternate EData Code, instead of the
name, to perform the search. Or click the lookup button next to the short name field to expose the lookup
list, as shown below. Once the appropriate account has been looked up on the detail tab, click the add
button to add it to the list.

Chapter 9 Direct Marketing
85
The more efficient way to add accounts to the list is to use the Filters tab to apply multiple criteria at once.
From the Filters tab, the Create button will use all the criteria established within the tabs to create a new
Direct Marketing file. The Filter button will use the current criteria to reduce a previously established list.
For example, to extract all the customers for a single sales rep, from the Filters tab and the
Rep/Terr/Family tab, select One Sales Rep, then lookup the name of the sales rep in the corresponding
lookup field. From the same tab you could also choose to select only those customers that were members
of any family (Related Only), or One Family, and choose only Parents, only Children, or both. When
multiple filters are used, extracted customers must satisfy ALL the filters.
Click the Create button to extract all the customers that meet the criteria. A message box will tell you that
the Direct Marketing file has been created, and return to the List tab. Note that at the top of the list tab the
number of records extracted will be displayed.

Chapter 9 Direct Marketing
86
There are two ways to remove records from the Direct Marketing list. You can use the Delete button from
the List tab by highlighting the customer to remove and clicking Delete. This does not delete the actual
record – it simply removes it from this particular Direct Marketing list.
The other way to remove records from the Direct Marketing list is to return to the Filters tab, establish
additional criteria and click the Filter button. This button examines the currently extracted list and applies
all the criteria against it.
Other create / filter criteria tabs are shown below.
The Category Codes tab has a category code operator that falls between up to ten selectable category
codes. Using the example codes OEM1 and 510028, the following table describes the results of the
selection of those two codes with the various Category Code operators.
Class Codes Operator Result
OEM1 510028 and Selects any records that have both OEM1 and 510028 assigned as
Category Codes.
OEM1 510028 or Selects any records that have either OEM1 OR 510028 assigned as
Category Codes.
OEM1 510028 and not Selects only records that do not have either OEM1 OR 510028
assigned as Category Codes.
N/A blanks only
When blanks only is selected, all the category code selection prompts
disappear, and only those records with NO category codes at all will
be selected
N/A All Categories When All Categories is selected, no category code criteria is applied
for either a Create or Filter operation.
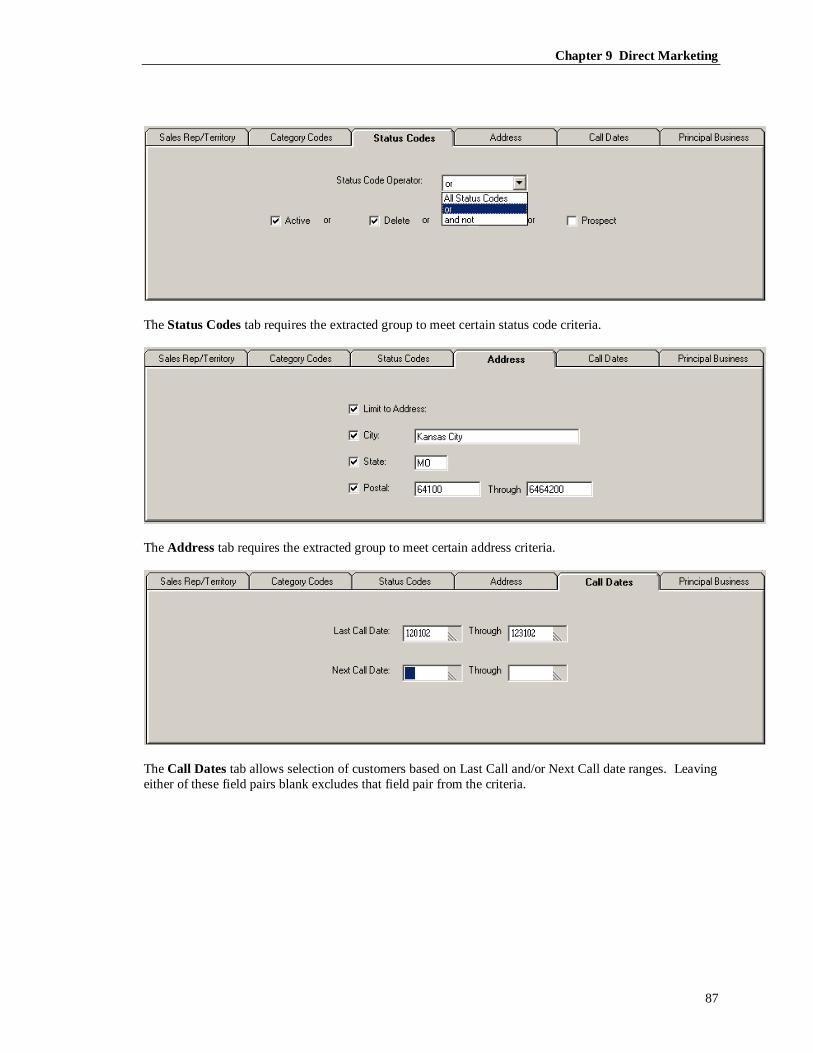
Chapter 9 Direct Marketing
87
The Status Codes tab requires the extracted group to meet certain status code criteria.
The Address tab requires the extracted group to meet certain address criteria.
The Call Dates tab allows selection of customers based on Last Call and/or Next Call date ranges. Leaving
either of these field pairs blank excludes that field pair from the criteria.
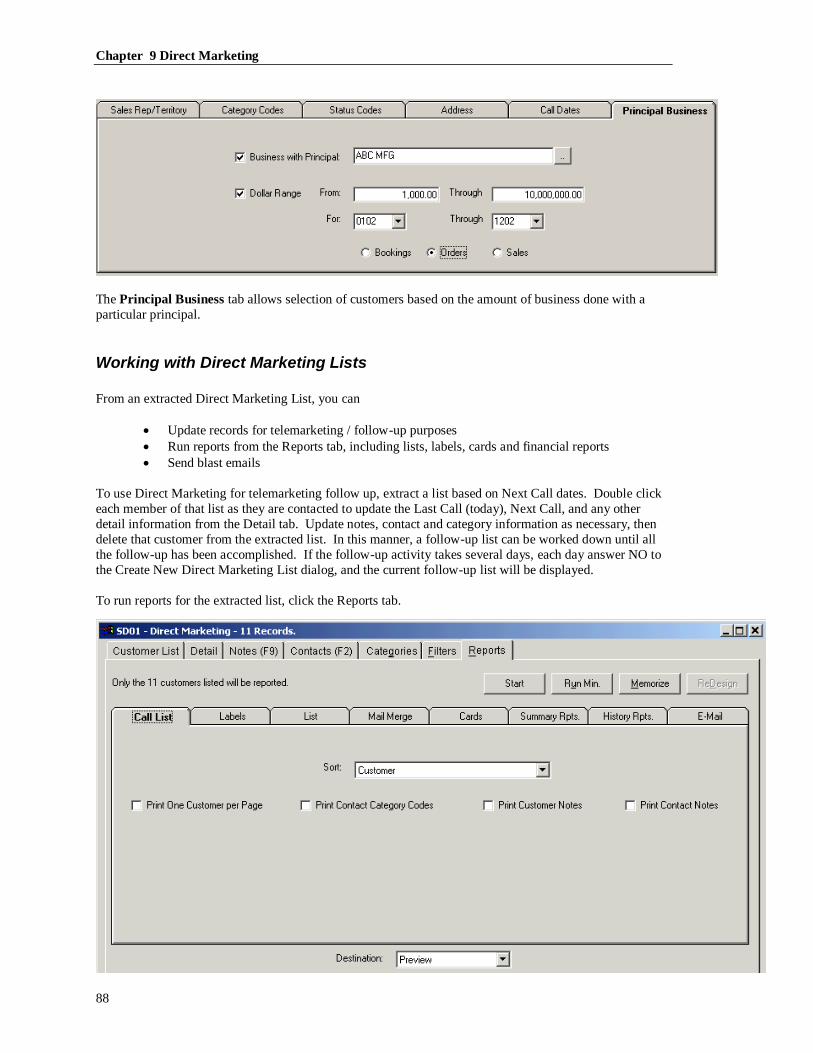
Chapter 9 Direct Marketing
88
The Principal Business tab allows selection of customers based on the amount of business done with a
particular principal.
Working with Direct Marketing Lists
From an extracted Direct Marketing List, you can
• Update records for telemarketing / follow-up purposes
• Run reports from the Reports tab, including lists, labels, cards and financial reports
• Send blast emails
To use Direct Marketing for telemarketing follow up, extract a list based on Next Call dates. Double click
each member of that list as they are contacted to update the Last Call (today), Next Call, and any other
detail information from the Detail tab. Update notes, contact and category information as necessary, then
delete that customer from the extracted list. In this manner, a follow-up list can be worked down until all
the follow-up has been accomplished. If the follow-up activity takes several days, each day answer NO to
the Create New Direct Marketing List dialog, and the current follow-up list will be displayed.
To run reports for the extracted list, click the Reports tab.

Chapter 9 Direct Marketing
89
The reports that can be run are described below:
A Call List is a specialized list that has more white space surrounding each name, for hand-written notes.
Labels are designed for laser and ink-jet printers, and conform to either Avery 5260 (2 across 1” x 4”) or
Avery 5261 (3 across 1” x 2 5/8”.)
A List is the same as the Master List found in the Reports engine, but includes only the selected group.
A Mail Merge file is a comma separated value file that can be imported by many third-party applications,
like fax software, email systems, spreadsheets and databases. For instructions about how to import files in
those applications, please consult their particular user guides and technical support.
The options on a mail merge create include Use Quotes for Delimiters and File is Rational. Use Quotes
should be engaged if any commas are embedded in the data. This will cause each field to be surrounded by
quotation marks, and most importing programs will treat fields delimited in this way as text. The File is
Rational option causes a Header record to be created that describes the fields.
The structure of each mail merge file is shown and described below:
Customer Mail Merge File Structure
Field Name Max length and description
ShortName 20 character upper case unique name
ShortAddress 20 character short identifier
CompanyName 30 character mixed case name
Address1 30 characters
Address2 30 characters
City 30 characters
State 2 characters
Zip 10 character zip or postal code
Country 25 characters
Phone 20 characters
CommuCode1 6 character first communication code identifier
CommuNo1 65 character first communication code
CommuCode2 6 character second communication code identifier
CommuNo2 65 character second communication code
CommuCode3 6 character third communication code identifier
CommuNo3 65 character third communication code
PrimaryContactFirstName 10 characters
PrimaryContactLastName 20 characters
Contact Mail Merge File Structure
Field Name Max Length & description
CompanyName 30 character mixed case company name
Address1 30 characters
Address2 30 characters
City 30 characters
State 2 characters
Zip 10 character zip or postal code
Country 25 characters
Phone 20 characters
CommuCode1 6 character first communication code identifier
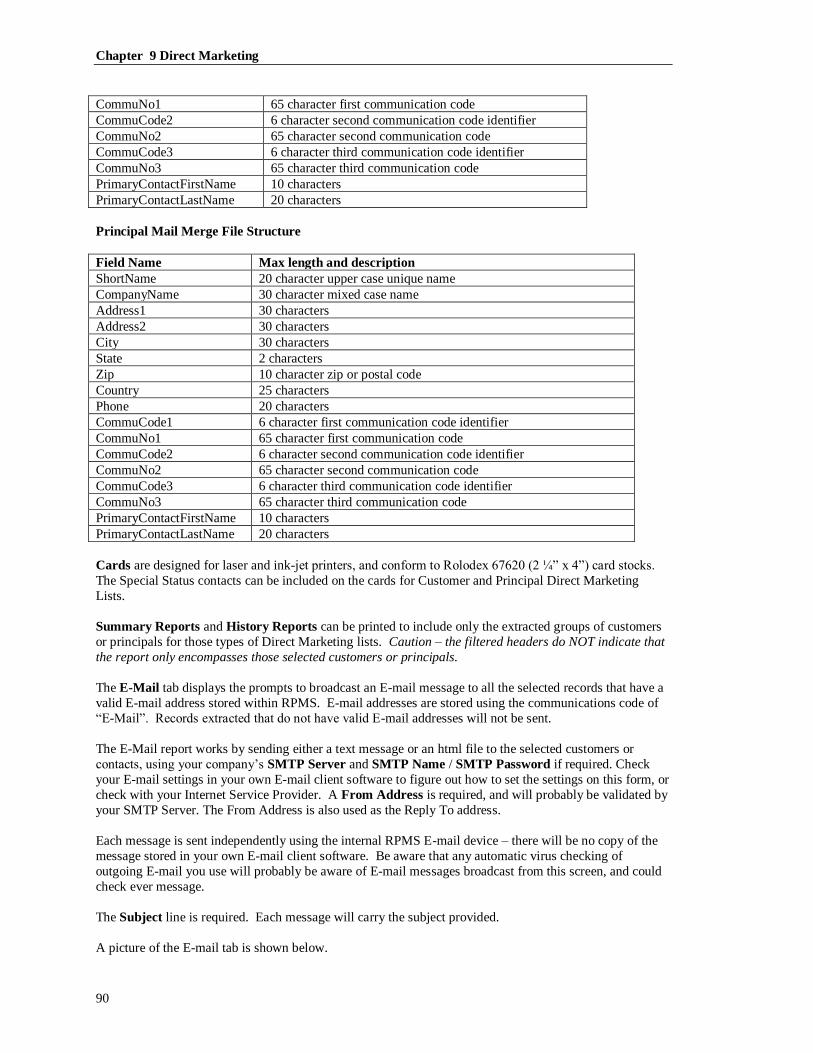
Chapter 9 Direct Marketing
90
CommuNo1 65 character first communication code
CommuCode2 6 character second communication code identifier
CommuNo2 65 character second communication code
CommuCode3 6 character third communication code identifier
CommuNo3 65 character third communication code
PrimaryContactFirstName 10 characters
PrimaryContactLastName 20 characters
Principal Mail Merge File Structure
Field Name Max length and description
ShortName 20 character upper case unique name
CompanyName 30 character mixed case name
Address1 30 characters
Address2 30 characters
City 30 characters
State 2 characters
Zip 10 character zip or postal code
Country 25 characters
Phone 20 characters
CommuCode1 6 character first communication code identifier
CommuNo1 65 character first communication code
CommuCode2 6 character second communication code identifier
CommuNo2 65 character second communication code
CommuCode3 6 character third communication code identifier
CommuNo3 65 character third communication code
PrimaryContactFirstName 10 characters
PrimaryContactLastName 20 characters
Cards are designed for laser and ink-jet printers, and conform to Rolodex 67620 (2 ¼” x 4”) card stocks.
The Special Status contacts can be included on the cards for Customer and Principal Direct Marketing
Lists.
Summary Reports and History Reports can be printed to include only the extracted groups of customers
or principals for those types of Direct Marketing lists. Caution – the filtered headers do NOT indicate that
the report only encompasses those selected customers or principals.
The E-Mail tab displays the prompts to broadcast an E-mail message to all the selected records that have a
valid E-mail address stored within RPMS. E-mail addresses are stored using the communications code of
“E-Mail”. Records extracted that do not have valid E-mail addresses will not be sent.
The E-Mail report works by sending either a text message or an html file to the selected customers or
contacts, using your company’s SMTP Server and SMTP Name / SMTP Password if required. Check
your E-mail settings in your own E-mail client software to figure out how to set the settings on this form, or
check with your Internet Service Provider. A From Address is required, and will probably be validated by
your SMTP Server. The From Address is also used as the Reply To address.
Each message is sent independently using the internal RPMS E-mail device – there will be no copy of the
message stored in your own E-mail client software. Be aware that any automatic virus checking of
outgoing E-mail you use will probably be aware of E-mail messages broadcast from this screen, and could
check ever message.
The Subject line is required. Each message will carry the subject provided.
A picture of the E-mail tab is shown below.

Chapter 9 Direct Marketing
91
The Text Message / HTML File Message radio option determines whether the message you send will be
an HTML file, or plain text. Although rare, some recipients can’t receive HTML messages. Occasionally
aggressive SPAM blocking software will reject E-mail messages that are composed entirely of HTML. If
you choose to send a text message, type the message in the area next to the Text Message radio option. If
you would rather send an HTML message, use the browse button to specify the location of the HTML file
you want to send.
Attachment files can be specified. If multiple files should be attached, you must separate them with
semicolon characters. Each E-mail message will carry the attachment(s) that you specify.
The Remember SMTP Info checkbox determines whether the form will be filled out with your SMTP
Server name, SMTP Name and SMTP Password the next time you use this form. For security reasons,
some users will uncheck this option. If Use Name & Password for SMTP Server is checked, fill out the
SMTP Name and SMTP Password prompts and choose an authentication method. If you’re not sure
which authentication method to use, try Plain first, then Login, then None and finally CRAM-5. If your
smtp provider requires TLS/SSL, contact RPMS Customer Support about using this feature.
A log file is created in the data folder of the broadcast E-Mail sesssion, and replaced each time you use this
feature. The log file is named xxxEMAIL.LOG, where xxx is representative of your RPMS login initials.
You can display this log file after sending some or all of the E-mail messages by checking Show Log After
Send. This can be useful for de-bugging problems if there are errors in transmission or you have other
difficulties using this feature.
The checkbox Request Return Receipt will cause recipients with client E-mail software that supports return receipts to be requested to indicated receipt of message back to the From Address.
The Test button does not send any E-mail messages. It does validate settings, and report how many E-mail
messages would have been sent by the Send All button.
The Send Some button displays a dialog that allows a certain number of records of the list to be sent, at a
certain slower pace if necessary, and provides an option to delete records from the E-mail list after they
have been successfully sent. This is useful if your SMTP or Internet provider limits the number of E-Mail
messages you can send at once, or the speed at which you can send them. This also provides a way to see a
list of records not sent because they did not have good E-Mail addresses.
The Send All button sends all the E-mail messages at once.

Chapter 9 Direct Marketing
92
Direct Marketing Utilities – Category Code Summary
From the Direct Marketing Utilities menu you can select Category Summary to review and understand the
mix of your category codes.
The Category Summary can be set to use either the current master lists or the currently extracted Direct
Marketing Lists as a data source. The different types of lists can also be selected – principals, customers or
contacts. Status code filters can be applied to either source for all the types.
The resulting list is a simple calculation of the number of category codes encountered. The example above
shows that for the currently extracted lists, two customers and two contacts have the category code B2.

Chapter 11 Forecasting
93
Forecasting
Purpose and Overview of Forecasting
The Forecasting feature is designed to use the accumulated sales and orders history in RPMS to predict and
measure future performance.
Version 8 Forecasting differs from previous versions in that it is not limited to being set up for principals.
A V8 forecast can be set up for principals, sales reps or customers – the other entities forecasts will follow
as natural extensions of those for which the forecast was created.
The term Forecast refers to expected sales or orders for a particular period. The term Planner defines a
special type of forecast that is used to make adjustments, try ‘what if’ scenarios and generally play numbers
games without impacting the more static Forecast.
Setting Up a Forecast
To set up a forecast, click the Forecast button, or choose Marketing, Forecasting. The F01 Forecast
Maintenance form will be displayed as shown below.
The Actual Period, Forecast Period and Planner Period prompts will set up the year-to-date time frames
for the values that will be displayed. Actual refers to RPMS Sales or Orders history that will be displayed
in the forecast, and can be used to model or measure against a Forecast or Planner period. Forecast refers to
the expected sales or orders. The Planner is a special type of forecast that is used to make adjustments, try
‘what if’ scenarios and generally play numbers games without upsetting the more static Forecast.

Chapter 11 Forecasting
94
The One Rep checkbox is used to limit the customers that can be added or viewed. The Security feature
will automatically fill this prompt if the user logged in is limited to a particular sales rep.
The Sort sequence specifies how the forecast will be established, from general down to specific, and the
order of the tabs on the forms. Which sort is used depends on the information available, and how you think
about your business. If you are interested primarily in tracking and meeting goals for principals, then you
may choose to set up forecasts for each principal. If you use forecasting primarily as a quota, or sales rep
management tool, you may find it more convenient to set up a forecast for each sales rep. Or if you have a
key group of customers that you want to forecast; or each sales rep is responsible for setting up the forecast
for each of his customers, then you may prefer to forecast by customer. There are five different sort
sequences that can be used:
1. Principal, Customer, Sales Rep
2. Principal, Sales Rep, Customer
3. Sales Rep, Principal, Customer
4. Sales Rep, Customer, Principal
5. Customer, Principal, Sales Rep
Each sort sequence supports the other. For example, if a forecast is set up in sort sequence five for one key
customer, when the forecast is reviewed in sort sequence one, all the principals forecasted for that customer
will be displayed. Clicking the second tab in that sort sequence would then ‘drill down’ to the one
customer that had been forecasted.
Which initial sort sequence a rep firm should use would depend on requirements. If only certain factories
needed to be forecasted, then sort sequences one or two would be the most efficient. If quotas for sales
reps are being established, then sort sequences three or four might be useful. If a sales rep is responsible
for creating her own forecast, she may prefer to engage the One Sales Rep checkbox and use sort sequence
five.
The first entity listed in each of the sort sequences is subsequently referred to in this documentation as the
Primary forecast, and will be displayed on the first tab.
The Value prompt specifies whether Orders or Sales values will be used to measure and populate the
forecast. It is entirely possible to have both kinds of forecasts for the same time periods, principals,
customers and sales reps.
The Display Zero Balance Forecasts checkbox governs whether or not a previously established forecast
for no value would be displayed. It is possible to create and save a forecast record without any values for
any of the periods being reviewed. If the Display Zero Balance is checked, those records will show up in
the list.
Clicking the OK button will display the Actual Sales or Orders for the period specified for any previously
forecasted records. If no forecast has been set up yet, forecast records can now be added. The form shown
below displays a list where no forecast has yet been established.

Chapter 11 Forecasting
95
In the sample above the Principal, Customers, Sales Rep sort sequence has been selected. The next step to
set up a forecast is to determine (in this example) which principal needs to be forecasted. Clicking Add
will display a dialog box that prompts to add a particular principal. Once a principal is added, the
corresponding customers (that have history in the Actual Period with that principal) and their sales reps will
automatically be added, and can be reviewed on their respective tabs.
After an add, click an underlying tab… …to see the detail of the added record…

Chapter 11 Forecasting
96
…double click again to view a deeper level…
…and double-click one last time to take it down to the individual month level for the specific principal,
customer and sales rep.
It may be most efficient to add all the primary forecast records at once, then use other tools to adjust the
forecast amounts collectively.
Once a record has been added, there are four different ways to fill out or change the Forecast or Planner
values. The first way is to use the Copy button to copy actual values to the Forecast or Planner columns.
Doing so from the Primary forecast will cause a copy to occur on all the deeper levels of the forecast. The
copy can be performed on either the selected record or all the records on that tab. A sample Copy dialog is
shown below.

Chapter 11 Forecasting
97
The second way to change a forecast is to right-click on the cell and type in a new value, as shown below.
After a right click, example shows typing $5,000,000 into the forecast for ABC. Pressing the Enter key
after typing the whole number (no decimals or commas required) will complete the entry.
Some rounding can occur, since the typed value will be allocated, or ‘spread’ by the weight of the
corresponding actual values per principal, per customer, per sales rep, per month. So typing 5000000 (five
million) in a primary field may yield 5,000,003 after pressing the enter key.
A third way to change the value of a forecast or planner amount is to click the Change button. The change
form will add or subtract dollars or a percentage to the selected or all records. To subtract dollars or
percentages, precede the entry with a negative sign (hyphen.) To add 10 and ½ percent to a forecast, set the
radio button to percentage and type 10.5 in the field. A quick way to ‘zero out’ a forecast or planner is to
reduce the forecast by 100%. A sample form is shown below.

Chapter 11 Forecasting
98
Changing All Primary forecast records up by 10%.
The most specific way to change a forecast value is to drill down to the lowest level of detail and type the
amount projected for the particular principal, customer, sales rep and month. A sample form is shown
below.
After changing the forecast for April of 2003 to $3,000 for principal ABC MFG, customer ACE
DYNAMICS and sales rep JACK JONES.
Once a forecast or planner has been added, click the Save button to save the forecast. Detail records
without forecast amounts are saved when the Save Zero Balance checkbox is selected. Once a forecast has
been saved, it can be re-displayed in another sort sequence or for different time periods by clicking Reset.

Chapter 11 Forecasting
99
Reviewing a Forecast
Once a forecast has been established, the same form use to set up a forecast can be used to review and
maintain a forecast. There are five columns of computed values shown on the first three tabs as described
below.
% Forecast 1 or % Forecast 2: The percent that the actual period’s amount is of the given forecasted
period’s amount.
% Planner 1 or % Planner 2: The percent that the actual period’s amount is of the given planner period’s
amount.
Actual % Total: The percentage that the given row’s actual amount represents of the actual column’s total.
Forecast 1 % Total or Forecast 2 % Total: The percentage that the given row’s forecast is of the forecast
column’s total.
Planner 1 % Total or Planner 2 % Total: The percentage that the given row’s planner is of the planner
column’s total.
The Print and Export buttons allow the values on a particular tab to be printed for further study or
exported to spreadsheet for additional manipulation or reporting.
The Detail tab contains measurement columns as shown on the following page.
Each % Total cell in the Actuals area represents the percentage of total for the month. A % Month cell in
a Forecast or Planner area represents the percentage of Forecast or Planner forecast achieved for that
particular month. Each % YTD cell shows the cumulative Forecast or Planner percent achieved for all
actual values through the month of that row. A %Tot Fcst cell represents the individual month’s
percentage of total Forecasted or Planned for the entire period.
Maintaining a Forecast
Once a forecast has been established it may need periodic adjustments. Any of the copying, changing or
adjusting tools described in the preceding section will also work to maintain a forecast or planner.

Chapter 11 Forecasting
100
To roll a forecast forward to another year, use the area normally used for the planner period as a Forecast 2
period instead, for the following year’s forecast. Then copy the Forecast 1 period to the Forecast 2 period.
Forecast and Planner periods can be mixed and matched as necessary to set up copy opportunities.
To remove a forecast, highlight the record to remove, then click the Remove button. Both the Forecast
and Planner (or Forecast 2) will be removed for the selected record. Save the Forecast to complete the
removal.
To adjust only a small period of time in a given forecast, use the setup controls to review only that period
of time, then apply changes. For example, selecting a Forecast date range of March 2005 through June
2005 will display and allow to be manipulated only the forecast numbers for that period of time.
Use the Add button to add another entity of the displayed type for the given tab to the forecast. Use the
Refresh button from the primary forecast tab to capture new entities. New entities are those with
transactions for the primary selected record, or all forecasted primary records, that had not previously had a
forecast record. The Refresh dialog box is shown below.

Chapter 12 Reptivity
101
Reptivity
Purpose and Overview of Reptivity
The Reptivity feature is designed to use the customer, principal, contact, user and point of sale records in
RPMS to set up, maintain, record and report sales opportunities and sales activities.
Before anyone in your company begins using Reptivity, the agency supervisor and others that will use it
should read this chapter.
Reptivity differs from other RPMS modules in that it is fully available only to EMA-covered customers.
RPMS tech support will participate with you to determine the best ways to set up and run your system.
Setting Up Reptivity
Rep agencies must determine how they will run Reptivity. The agency may establish business rules for the
way the product is run from the Reptivity Preferences form (menu Marketing, Reptivity, Preferences)
shown below.
You must type the Supervisor Password to make changes on either the Company Activity tab or Company
Opportunity tab. Any user can see the company business rules for activities and opportunities – but only a
user that types in the Supervisor Password can edit the business rule requirements for the agency. (NOTE:
Your company MUST have a Supervisor password in order to establish company rules for Reptivity. See
The RPMS Administrator’s Guide.) Upon selection of either of the Company business rules tabs, the system
provides three chances to enter the supervisor’s password. If all three chances or missed or the cancel
button is clicked, changes to the company business rules are disregarded.

Chapter 12 Reptivity
102
The business rules established on these tabs set up the required fields for activities and opportunities. For
example, if the checkbox Follow Up Date if not closed is checked on the Company Activities tab, then
every activity recorded by the agency must have a follow-up date, unless it is a closed activity. If a user
tries to create a new activity, or update an active activity without a follow-up date, a message box will tell
the user that the agency requires a valid follow-up date.
General User preferences and User E-mail preferences are specific to the user and computer upon which
they are established. The General User preference tab is shown below:
Double-clicking an activity from the list – This radio button determines helps establish whether the user
should have the system behave as for a call center helper or call center supervisor. In a call center
environment, an activity can be placed in a call queue, and the call center operator for whom that activity is
assigned can edit the activity by double clicking it. That operator should choose the first radio button – that
double clicking an activity would take her directly into editing the activity. A supervisor might prefer to
see all the details associated with that activity to this point before she actually edits the activity, so might
select the History tab option.
Editing a ‘New’ Activity immediately Activates it, and starts the timer – Activities have three states –
New, Active and Closed. When an Activity is first created it is considered NEW. This option sets the
behavior for the user of an edit of a new activity – double clicking the activity is itself an event that is
recorded. This is an ideal setting to engage for call center and inside support individuals. For example, a
call comes in and entered as a new activity, is returned by an inside sales rep, who fulfills the customer’s
request and closes the activity. The activity was entered, followed up, and then closed, with minimum data
entry for the operators involved.
Closing an Activity blanks out all Follow Up Fields – If an activity is closed, it is thought to need no
subsequent follow up, so the system can automatically erase any leftover data from previous edits. This
will not erase the detail of the various follow-ups that occurred within the thread of the activity, but will
erase any follow up data for the current stated of the activity.

Chapter 12 Reptivity
103
Check Spelling – AutoCorrect Activity and Opportunity Notes while typing – If this field is checked,
the spell checker will work in real time during typing of notes on activities and opportunities. It is
redundant to have this field checked along with the two fields below.
Spell Check Activity Notes before updating – Run the spell checker on the note field when Create,
Update, Close or Reactivate is clicked.
Spell Check Opportunity Notes before updating - Run the spell checker on the note field when Save or
Add is clicked.
Start Timer when Creating New Activities – Start the timer as soon as Add is clicked from the Activities
List tab – the time taken to add the new activity counts as time spent on the activity itself.
Return to Activity List after Creation of a New Activity – After clicking Create to add a new activity,
return to the Activity List tab. If this is unchecked, multiple activities can be added one after the other,
with locked values remaining as set.
Remember Locked Values From Last Create or Update of an Activity – Even if the Return To Activity
List checkbox above is checked, locked values will be remembered and pre-set when adding new activities.
The User E-mail preference tab is shown below:
The User E-mail tab allows Reptivity to automatically create activities for E-mails received to a particular
address, and to automatically respond. The Check whenever list loads and Check on list Refresh (F5)
checkboxes determine when the E-mail mailbox will be checked for new e-mails.
It is strongly recommended that this E-mail mailbox NOT be the users standard or personal E-mail account.
This tab is recommended for accounts like “sales@” or “info@” or “help@” and should be independent
addresses – not blind forwarding addresses.
When an e-mail is detected (either on the load of the activity list or on a refresh, or both) it is added as a
new activity, with the follow-up information based on the sender. As soon as the e-mail has been added as
an activity, it is deleted from the server.

Chapter 12 Reptivity
104
You may choose to set up an auto-response through an SMTP server. The auto-response occurs when the
e-mail has been added as an activity and the incoming message has been deleted from the e-mail server.
Check with your e-mail provider or the person that set up your e-mail accounts and passwords for
assistance setting up these preferences.
Aside from preferences about data, rep agencies must determine which users in their company will create
and edit opportunities and activities. Each user that will update Reptivity must have a distinct user name,
password and number. Users are commonly thought of as inside and outside users. Inside users are people
that work in the location where the database resides. Outside users ‘connect’ to inside computers over the
Internet via remote control products like GoToMyPC or Terminal Server in order to read and update data.
Because Reptivity is LAN-based, as far as the database is concerned all users effectively ‘inside.’
If four or more users will be using RPMS and/or Reptivity simultaneously, we recommend using
Pervasive.SQL 8 or 9 in order to achieve optimum performance.
How to Use Reptivity – Opportunities
Opportunities are records that represent new chances to do business. Here are some examples:
❑ A manufacturers rep in the commercial HVAC industry reads about a school board’s decision to build
a new high school. Though he does not yet know the contractors who will build that school – or
perhaps even the site yet – he does know that he has several factories who’s products could be sold
into that building. He establishes an opportunity titled USD 299 New High School that will lead to
other opportunities and many, many activities dedicated to winning business.
❑ A rep selling to Health and Beauty stores finds out that a small, local chain plans to hold a birthday
party celebrating their 10th year in business in the city, at all three of their locations. He sees a
marketing opportunity for three of his lines that sell heavily into that customer – and one that does not
but should – to sponsor the signage for the celebration.
❑ A sporting goods rep sees a local video photographer at a high school football game with an interesting
40-foot boom device that allows him to take end-zone video by remote control. He believes that there
is mass opportunity for the device in other applications, when combined with another line that he sells.
❑ An electronic components rep hears about a new guidance system being designed at his largest client, a
large avionics company.
Each of these is a business opportunity that can be tracked and managed until there is no more potential
business to come from that opportunity.
From the Marketing menu, choose Reptivity, then Opportunities, or click the icon from the menu bar
shown above. The resulting list of opportunities is shown below.

Chapter 12 Reptivity
105
The Opportunity List can be vertically tabbed (see p. 17) but in the example above, vertical tabbing has
been turned off from the User Preferences form. The list above has been sorted by the field Encountered
Date, and has been scrolled to view some opportunities encountered during September of 2004.
The List can be sorted originally as listed by the Sort By prompt, and then the list or individual vertical tab
displayed can be sorted using the Screen Sort prompt. The list displayed can be exported to Excel using the
Export button.
Clicking the filter button displays the Opportunity Filter form, shown below:

Chapter 12 Reptivity
106
Making use of the sorting and filtering ability of the Opportunity form is useful before adding a new
opportunity, to help determine whether the business is really new.
Clicking the Add button from the opportunity list displays the Opportunity Detail tab, shown below:

Chapter 12 Reptivity
107
The required fields for a new opportunity have bolded labels. The example above shows the default-
required fields. If the RPMS Administrator has specified that other fields are required, their labels will also
be bolded. Fields that are grayed out are set by the program, but displayed after the Add button has been
clicked to establish the new opportunity.
Fill out all the accessible required fields, and any of the optional fields, then click Add to establish the new
opportunity. The software assigns an Opportunity Number based on the next available Opportunity number
and the user setting up this opportunity,
From the Opportunity List, click the Delete button and then click Yes to delete an Opportunity. From the
Opportunity List, double click a record, make changes on the detail tab, then click Save to change an
existing Opportunity.
Opportunities - Operational Notes and Important Field Descriptions
The Number, assigned by RPMS, is a serial number with a decimal number representing the number of the
user that first added the opportunity.
The Title is the ‘name’ of the opportunity and is used for lookup purposes.
The Assigned User is the person who currently has responsibility for this opporunity.
The Linked Quotation or PO can contatin an RPMS quote or purchase order number if the customer and
principal fields are filled out.
The Status, Type, Source, Purchase Method and Account Type are all user-definded Opportunity codes.
These different values for these codes can be added to the System Codes list.
The Reportable field indicates whether or not this opporutnity should be presented on reports.

Chapter 12 Reptivity
108
The Minimum and Maximum Quantity and Price fields can be used to help establish the value of the
Opporutnity, as can the Total Estimated Value.
The Confidence Percent is a percentage indicator of your expectation that this opportunity will become a
sale.
Once an opportunity has been added, notes and activities can be attached from the Notes tab. The
Activities button provides a quick link to a list of activities connected to the opportunity.
How to Use Reptivity – Activities
Activities are records that represent actions taken in pursuit of new business. Here are some examples:
❑ A customer calls looking for information about a product’s warranty. The call is recorded on behalf of
the customer, principal, inside rep assisting, and the product. The date, time, time spent and a follow-
up date of today is also recorded. The activity’s status is “New.” When the warranty information is
located and faxed, the Activity is ‘Closed.’
❑ A sales rep calls on a store, and does some merchandising consulting on behalf of a principal. The
principal, customer, date and time spent are recorded, and the activity becomes part of a monthly
report that is sent to the principal that demonstrates the value that the rep firm adds in the territory.
The status of the activity is ‘Closed’ at the time it is recorded, because no follow-up is necessary.
❑ An inside customer support rep receives an E-mail from a principal regarding a prospect’s inquiry. In
addition to responding to the E-mail, the support rep records an activity that designates the prospect
and his E-mail address, the principal, a follow-up date and the sales rep in the company who is
responsible for the follow-up. The status of the activity is ‘Active.’
Each of these is a business activity that can be tracked and managed until closed.
Reptivity does this by maintaining three data files for Activities. The Activity file holds the current state of
each activity. The Activity Events file is a list of all the things that have happened with regard to any given
activity. The Activity Notes file holds notes for each Activity Event.
In Reptivity, an activity has a status that is either blank, meaning new, or Active, meaning some additional
activity events have occurred, or Closed, meaning no additional events are expected.
Activities are typically Created, then Updated some number of times, then Closed. Each thing that
happens – the Creation, Update, Closing, Re-Activating – is an Activity event.
From the Marketing menu, choose Reptivity, then either Open Activities, or All Activities, or click one of
the icons from the menu bar shown above. The All Activities list is shown below.

Chapter 12 Reptivity
109
The All Activities list can be vertically tabbed, as shown above, or all the activities can be shown in a
single list, based on settings in User Preferences.
The Search button will search for a particular activity number, or for certain notes about an activity.
The Sort dropdown will re-arrange the records in the current vertical tab, or in the entire list if it is not
vertically tabbed.
The Export button will export the records in the current vertical tab, or in the entire list if it is not vertically
tabbed, out to Excel.
How to Use Reptivity – Activity Custom View
The View button will open the View dropdown list, displaying all available views. The All Activities,
Open Activities, and <Custom View> options are always available in the dropdown list. If navigation to
the list of Activities came from a specific principal, customer, or opportunity, the list would also display
One Customer or One Principal or One Opportunity.
Selecting below for information about how to create a permanent custom view of activities.
Selecting <Custom View> displays the Custom View dialog, displayed below:

Chapter 12 Reptivity
110
The Custom View dialog box allows filters to be set on the Who tab, the What tab and the When tab.
The Who tab includes filters for a customer, principal, point of sale, or currently assigned user. The user
that last or first created, updated or closed an activity can also be selected. For example, selecting user
JOHN JONES in the Last field will cause any activities that were last created, last updated or last closed by
John to be extracted.
The What tab will filter the activities by Opportunity, Customer PO #, Activity Type, Activity Objective,
Reportability, Status, Activity number range, and/or Product.
The When tab will filter the list of activities for first and last creation, update, close and/or follow-up dates
in either a specific range or terminology.
Clicking the Set Filters button will apply all the selected filters to the Activities list.
How to Use Reptivity – Activity History
From any selected activity on the activity list, all the events associated with that activity – called its History
– can be reviewed from the History tab. The History tab can be sorted from the earliest event to the latest
or from latest to earliest. The “Current Details” portion of the activity history can be displayed or hidden –
this portion of the history shows the state of the activity at the moment.
Any of the notes of the displayed activity can be changed from this form, by clicking the Note Editor
button, which can cycle through the various event notes.
In the sample below, a call from a customer came in on the afternoon of 2/1/2006, inquiring about a
“warranty.” The rep firm’s receptionist, June Davis, assigned the call to an inside salesperson named Jim
Smith, who she felt would need to call the factory the next morning.
Jim, who saw the new open activity in his list of activities the next morning, called the factory, worked on
the factory’s web site to meet the customer’s request, and then, the following day, closed the activity with
an E-mail back to the customer.

Chapter 12 Reptivity
111
Activity No: 13.1 Current Details Status: Closed Customer: ACE DYNAMICS Customer Contact: Miller, Richard Principal: ABC MFG Principal Contact: Grouch, Charley Product: J104 Product Description: PREMIUM 2 OUTLET Total Time: 00:39:48 Last Event: 02/03/2006 9:10 AM First User: June Davis Last User: Jim Smith Assigned To: Jim Smith Report: True Create by June Davis on 02/01/2006 at 4:45 PM Follow Up: 02/02/2006 at 9:00 AM Via: Call Follow Up To: ABC MFG at 913 642 8000 Customer: ACE DYNAMICS Customer Contact: Miller, Richard Principal: ABC MFG Principal Contact: Product: J104 Product Description: PREMIUM 2 OUTLET Time Spent: 00:05:21 Sub Number: 0000 Assigned To: Jim Smith Report: True Richard called to check to see if his warranty could be extended - he thinks it ends this week Update by Jim Smith on 02/02/2006 at 9:04 AM Follow Up: 02/03/2006 at 9:00 AM Via: Call Follow Up To: Richard @ 314 777 7777 4444 Customer: ACE DYNAMICS Customer Contact: Miller, Richard Principal: ABC MFG Principal Contact: Grouch, Charley Product: J104 Product Description: PREMIUM 2 OUTLET Time Spent: 00:04:20 Sub Number: 0001 Assigned To: Jim Smith Report: True Spoke with Charley @ ABC MFG - he said it's probably not a warranty, but a trial period, and he could get an auto-extend by going to their web site. Close by Jim Smith on 02/03/2006 at 9:10 AM Customer: ACE DYNAMICS Customer Contact: Miller, Richard Principal: ABC MFG Principal Contact: Grouch, Charley Product: J104 Product Description: PREMIUM 2 OUTLET Time Spent: 00:30:07 Sub Number: 0002 Assigned To: Jim Smith Report: True Had trouble w/ ABC’s web site - Sent E-mail below to [email protected] Richard - Regarding the warranty for your J104 outlet - Charley at ABC tells me that it is a 'trial period' rather than a warranty, and that he's happy to extend it for you to the end of February. There is actually a web site where you can have it extended automatically, but I had some trouble with it so I called their customer service this morning and handled it. The warranty is actually three years and covers all defects. At the end of the trial period ABC will invoice for the product. So based on our conversation, they shouldn't send you an invoice for it until February. If you want to return it, try another model or have any questions about it, please don't hesitate to call.

Chapter 12 Reptivity
112
How to Use Reptivity – Associated Activities
From any selected activity on the activity list, you can review all the activities that share some common
information by clicking the Associated Activities tab, shown below.
The list of associated activities can be filtered down to only those that share a great many things in
common, or all of those that share only one or two things in common. To quickly check All the
associations, click the All button. To uncheck every association, click the None button. At least one
association must be checked before clicking the Apply button.
Click the Apply button to employ the currently checked criteria.
The resulting list of associated activities can be sorted several ways using the sort drop down, including
Activity Number Down, which puts the most recently entered associated activities at the top of the list.
The History of a given associated activity can be reviewed from the corresponding history tab.
The Edit button on both the Associated Activities and History tab can be used to add another event to the
activity selected on the Activity list tab.
The purpose of this tab and the History tab described on the previous pages is to aid a user that is following
up on an activity. That user could
1. Review the current state and history of that activity from the History tab, and
2. Review similar previous activities, before they
3. Click the Edit button to record another event – either Update or Close – the current activity.

Chapter 12 Reptivity
113
How to Use Reptivity – Create, Update or Close an Activity from the Editor
To add a new activity that will need subsequent follow up activity, click Add from the Activity List tab.
Fill out fields and add notes on the Editor and then click Create. Bold labels indicate required fields.
To add a new activity that does not need any follow up, click Add from the Activity List tab, fill out fields
and add notes on the Editor and then click Close. Bold labels indicate required fields.
To update an activity that will still need additional follow up, double click it from the Activity List tab,
change any fields on the Editor tab, add notes and click Update.
To update an activity that does not need additional follow up, double click it from the Activity List tab,
change any fields on the Editor tab, add notes and click Close.
The Editor tab is shown below.
Activities - Operational Notes and Important Field Descriptions
The Number, assigned by RPMS, is a serial number with a decimal number representing the number of the
user who originally creates the activity.
The Customer Contact and Purchase Order fields are not enabled unless a valid customer is selected.
The Assign To field selects names from the RPMS user list. Unlimited users can be added to RPMS
through the Administration System. See The RPMS Administrator’s Guide for more information about
adding users and passwords.
Chapter 12 Reptivity
114
The Date-Time fields work together. If a Date is selected and it is the same as the computer’s clock date,
the Time field gets the current time. The Time field accepts data in hH:Nn am/pm format. (Hour-Minutes-
Merdiem) like 12:15 pm. The colon between the hours and minutes as well as the “m” for meridiem can be
skipped for data entry ease. The time field defaults to times of day between 7:00 am and 6:59 p.m., and
accepts the letters “a” or “p” for exceptions to the default. An example table of Entries and Results is
shown below.
Entry Result
11 11:00 am
5 5:00 pm
430a 4:30 am
730 7:30 am
1215 12:15 pm
9p 9:00 pm
The Principal Contact and Product fields are not enabled unless a valid principal is selected.
The POS Contact field is not enabled unless a valid POS is selected.
Notes can be spell checked while typing if the appropriate user preferences have been selected, or by
clicking the SpellCheck button.
Follow Up information will be blanked out when an activity is Closed, if the appropriate user preferences
have been selected.
The Calculate time spent checkbox, when unchecked, will open the Time Spent field for manual data
entry. The time spent field accepts data in HH:MM:SS format (hours, minutes and seconds); or, will accept
“h” or “m” or “s.” in lieu thereof. An example table of Entries and Results is shown below.
Entry Result
10m 00:10:00
2h 02:00:00
1h30m 01:30:00
Clicking the Create button creates a new activity. If an existing new or active activity was double-clicked
to add another activity event, the text of the Create button will change to Update, which should be clicked
if the activity requires further actions.
If an existing closed activity was double-clicked to add another activity event, the text of the Create button
will change to Re-Activate, which should be clicked if the activity requires further actions.
If any type of activity, a new activity being established for the first time, or an active activity, or a closed
activity, requires no further action, click the Close button to change the status of the activity to Closed.

Chapter 12 Reptivity
115
How to Use Reptivity – Set up and Manage Custom Activity Views
Reptivity allows individual users to create up to nine different custom activity lists, based on certain filters
and a sort sequence. These custom filtered and sorted lists are called Views.
From the Reptivity Menu, select My Views, Edit Views to see the Edit Activity Views list, shown below.
To add a new view, click the Add button.
Once two or more views have been added, their view numbers can be modified by using the Move Up and
Move Down buttons.
The Custom Activity Views form is shown below.
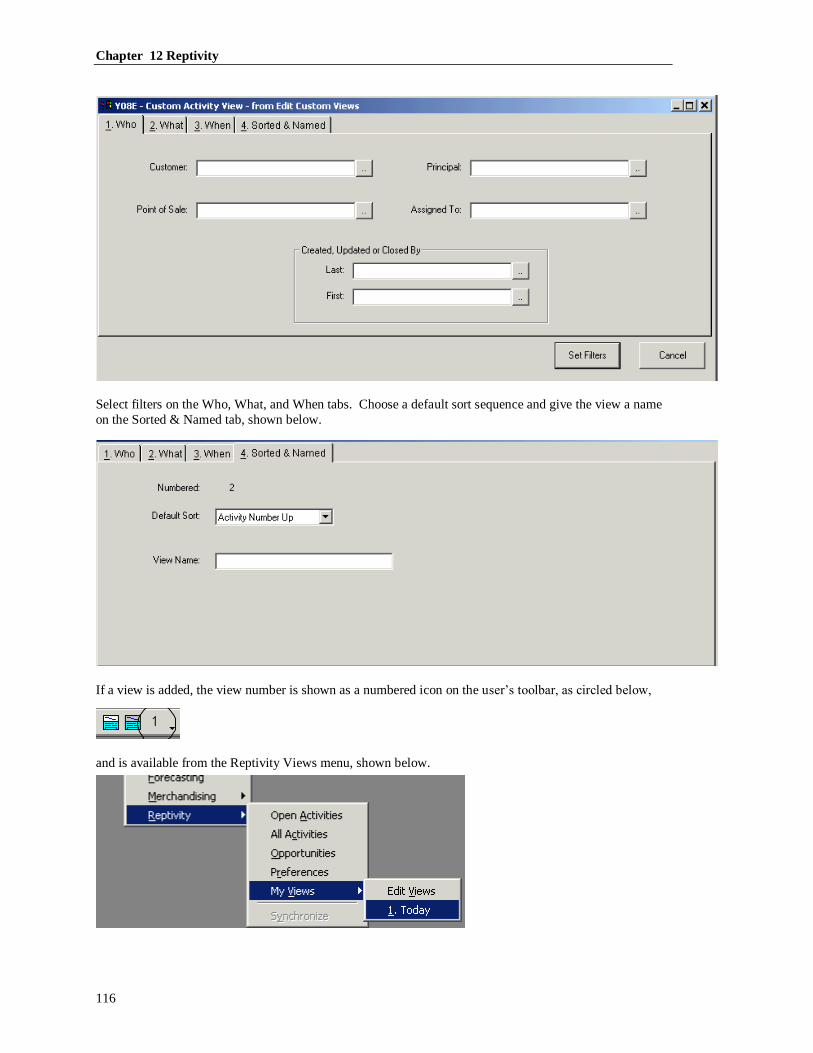
Chapter 12 Reptivity
116
Select filters on the Who, What, and When tabs. Choose a default sort sequence and give the view a name
on the Sorted & Named tab, shown below.
If a view is added, the view number is shown as a numbered icon on the user’s toolbar, as circled below,
and is available from the Reptivity Views menu, shown below.

Chapter 13 Inventory
117
Inventory
Purpose and Overview of Inventory
The Inventory feature helps rep firms that stock products. Those stocked products can be sold either via
resale on invoices generated by the rep firm, or as consigned products for principals.
When stocked products are sold from Inventory for rep firms that also have the Accounts Receivable
feature, commission dollars are automatically re-stated to be the gross profit of the line item – the cost of
the item sold, based on the Inventory Cost Method, subtracted from the selling price. When stocked
products are sold as consigned inventory, the commission calculation is based on a percentage of the selling
price. Changing the commission type from $ to % will prevent RPMS from automatically recalculating
profit at the time of shipment.
The Inventory feature automatically informs data entry operators whether inventory is on hand from the
Add Transactions Long Form. See the documentation Add Transactions, Long Form for more information
about the process. Data entry of purchase orders or acknowledgements for the commission representative
side of the business uses the same forms and procedures as the warehouse side of the business.
The Inventory feature allows rep firms to write and manage orders to vendors in order to replenish stock.
Incoming shipments can be received against Inventory orders to increment stock levels.
Stock levels can be established initially by setting Beginning Balances and adjusted periodically using
Inventory Adjustments.
The Stock Status report will count and value inventory on hand. The Reorder Quantity report helps determine how much to re-order to replenish inventory levels.
Setting Up Inventory – Establishing the Cost Method
The System Administrator must establish an Inventory Cost Method from the Administration System
Agency Preferences form, shown below.
The costs methods that can be established are Standard, Average, Last, LIFO and FIFO.
Standard means that the costs of products are those that are entered and stored on the records of the
products themselves, and must be changed by a data entry operator. Receipt of product, even at another
cost, will not change the cost of a product.
Average means that the Inventory feature will calculate the cost of any given product to be the sum of the
costs of all units of that product in stock, divided by the total number of units in stock. For example,
assume there are 100 units of product J104 on hand, and the average cost is $3.00. If 100 more are
received at a cost of $4.00, the cost of the J104 will become $3.50.
Last means that the Inventory feature will value all the units of a product at the cost of the last product
received. Using the example above, all 200 J104 units would have a cost of $4.00
For both LIFO and FIFO cost methods, the cost of an item depends on its cost when received. A product’s
cost ‘layers’ are held with received cost. In LIFO (Last In, First Out) the most recently received cost layers
are depleted first. In FIFO (First In, First Out) the oldest received cost layers are depleted first.

Chapter 13 Inventory
118
For example, in LIFO, if 100 products are received at $3.00, and later 100 more are received at $4.00, the
next one sold (and 99 thereafter, unless more are received) will be shown to have cost $4.00.
Allow Negative Balances can be checked if the Cost Method is Standard, Average or Last. Checking this
box allows product to be declared as shipped even though the system believes that the inventory levels are
insufficient. Leaving the option unchecked will prevent inventory from being over-shipped.

Chapter 13 Inventory
119
Setting Up Inventory – Changing the Cost Method
The Inventory Cost Method can be changed from the Agency preferences form, but all repercussions
should be considered. The table below describes the consequences of changing from one cost method to
another.
Changing From Changing To Note
Standard
Average or
Last
The Cost field becomes protected on the product master record.
LIFO or
FIFO
Beginning Balance and Unit Cost must be initialized using the
Inventory Data Entry program.
Average
Standard The Cost field becomes unprotected on the product master record, and
must now be periodically maintained.
Last, LIFO or
FIFO
Beginning Balance and Unit Cost must be initialized using the
Inventory Data Entry program.
Last
Standard The Cost field becomes unprotected on the product master record, and
must now be periodically maintained.
LIFO, FIFO
or Average
Beginning Balance and Unit Cost must be initialized using the
Inventory Data Entry program.
LIFO or FIFO
Standard
The Cost field becomes unprotected on the product master record, and
must now be periodically maintained.
All LIFO/FIFO records are deleted
Beginning Balance and Unit Cost must be initialized using the
Inventory Data Entry program.
Average or
Last
All LIFO/FIFO records are deleted
Beginning Balance and Unit Cost must be initialized using the
Inventory Data Entry program.
FIFO or
LIFO The Layer Sequence File is reversed for all products.
Setting Up Inventory – Setting Up Principals
The Inventory feature requires that your agency be set up as a principal. The Accounts Receivable feature
also has this requirement. The same principal record can be used for both invoicing of customers (the
Accounts Receivable feature) and as the entity that stocks the product (the Inventory feature.) Stocking
principals must be set up in S status.
Some rep agencies like to set up multiple, parent-child-related principals that designate the vendor being
sold. For example, assume the distribution side of the rep firm is called DISTYCO. The vendors that the
distributor buys from and resells for include ABC CO, BEST MFG, and CHOICE INC. One principal is
set up called DISTYCO. Three other principals are also set up, called ABC-DISTYCO, BEST-DISTYCO
and CHOICE-DISTYCO. These three are set up with a parent of DISTYCO. All four are set up in S
status. Customers’ orders come to DISTYCO, but line items are associated with the correct vendor, even
multiple vendors on the same PO.
The advantage of such an arrangement is that the snapshots and reports clearly designate how much was
sold for each vendor. Another advantage accrues to reps that carry consigned inventory – at a glance it is
clear which vendor’s products are on an order, and multiple vendors’ products can be part of the same
customer PO. The disadvantage of this approach is that order entry takes longer since the vendor must
always be known.
Other rep agencies will set up only one version of the stocking principal, because they buy the same
product from multiple vendors. These agencies do not track or care from whom a particular line item of an

Chapter 13 Inventory
120
order was purchased. The advantage of this approach is a simpler data entry scheme, since the vendor
would not be part of the line item entry. The disadvantage is on the sales analysis side – it is impossible to
determine ‘sell through’ information for vendors, since their products are indistinguishable from the same
products purchased through other vendors.
See the Lists chapter and Principals - Operational Notes and Important Field Descriptions on page 13 for
more information about setting up and managing principals.
Setting Up Inventory – Adding Products
Once the agency has been set up as a principal (and/or vendor-principal) then products must be attached to
that principal. For general information about products, see the Lists chapter and Products - Operational
Notes and Important Field Descriptions on page 15.
The following list defines the product fields specific to the Inventory feature.
Number: The product number is usually the principal’s uniquely identifing code for this part. In some
industries it is known as as SKU or ID. This number can be the same as that of the vendor from whom the
stocked products are purchased, or another number. Once entered, the product number can’t be changed or
deleted. Using the RPMS Administrator’s system one product’s history may be transferred to another
product.
Description: The description field for the product is broken into two separate fields. The first field is an
alternate lookup field for products, and is stored at the line item level in transaction details. The second
field is used for additional descriptions.
Bar Code: This optional field is used to store the UPC, or universal product code for the product. Bar
codes are printed on the product master report.

Chapter 13 Inventory
121
Commission Rate: This field is used to create a default commission rate for consigned product. If the
principal pays a particular rate for sales of this product, the percentage can be stored in this field.
Transactions that declare this product will default to the commission rate, unless supersceded by another
default rate in the hierarchy, as described in Principals above and Add Transactions below. If the product
is being sold through an Accounts Receivable principal (‘S’ status) and the items are not declared to be
consigned, this field is disregarded. The commission amount for a given line item is derived by subtracting
the cost from the unit price and multiplying the result by the quantity.
Taxable: For RPMS Professional versions with the Accounts Receivable feature, check this field to declare
that sales tax should be calculated for this product. Leave the field unchecked if the product is never
taxable.
Unit Product Descriptions / Prices (1, 2 & 3): The standard prices to be used for this product are
displayed on a pop-up form during line item data entry, if filled out in these fields. RPMS will store these
three standard prices for this product, and three levels of custom pricing for individual customers.
Effective Date: This optional field will list on product master lists and the product price pop up window to
document when standard pricing was established.
Locked: When this field is checked, the price is protected from price updating utilities that would
otherwise automatically raise or lower the price.
Categories: Products can be declared to be in one to three categories. Categories can be selected as
filtering options for product history reports. Product categories are defined in the System Codes List,
described below.
The Inventory tab of the product can be selected after the product has been added, and depending on the
cost method, may need to be updated for each stocked product. Its fields are described below.

Chapter 13 Inventory
122
Stocked Item: Check this checkbox to declare that this product is a stocked product. This field
distinguishes products that are represented versus those that are kept and tracked in the warehouse.
Standard Cost: This label will change and the field will be enabled or disabled depending on the cost
method selected. See Setting Up Inventory – Establishing the Cost Method on page 117 above.
Beginning: A field showing the orignally entered beginning balance for this product. This field can’t be
edited for stocked products.
Allocated: A field showing the total number of units customers have on order for this product but that have
not been shipped yet. This field can’t be edited for stocked products.
On Hand: A field showing the total number of units shown in inventory. This number is typically
incremented by inventory receipts, adjustments and beginning balance entries, and decrmented by
shipments out of inventory. Returns (unshipments, or shipping negative quantities) can also increase this
number. This field can’t be edited for stocked products.
On Order: A field showing the total number of units of this product on order from vendors. This field
can’t be edited for stocked products.
Serial Number Tracking: A field that determines whether this product will need individual serial numbers
tracked, and if so, at what point the tracking begins. Leaving this field set to “Never” means that serial
numbers will not be tracked for this product. See Setting Up Inventory – Using Serial Number Tracking on
page 123 below.
Reorder Point: A field that can be maintained to drive the Inventory Re-Order report. When the total of
units On Hand, minus Allocated, plus units On Order falls below this level, the product shows up on the
Re-Order report.
Reorder Quantity: A field that can be maintained to provide information for the Inventory Re-Order
report.
Conversion Factor: The divisor to be used when converting receiving units to selling units. For example,
if the Conversion Factor is 50, and the Receiving Unit is CS and the Selling Unit is EA, and 10 CS are
received, the On Hand inventory would increase by 500.
Weight: The weight of a single Selling Unit.
Cube: The cubic size of a single Selling Unit.
Selling Units: This field describes the typical method of case or package as sold. For example, products
that are sold individually may be described with a selling unit of EA for ‘each.’ It is possible to receive
units in the the Selling unit of measure. The number of Selling Units in a Receiving Unit is described by
the Conversion Factor.
Receiving Units: This field describes the typical method of case or package for units coming in to
inventory. For example, products that are received in cases may be described with a selling unit of CS for
‘case.’ It is possible to sell units in the the Receiving unit of measure. The number of Selling Units in a
Receiving Unit is described by the Conversion Factor.
Warehouse, Aisle, Shelf and Bin: These optional user-definable location codes print on Packing Slips and
Inventory Count Sheets.

Chapter 13 Inventory
123
Setting Up Inventory – Using Serial Number Tracking
Serial number tracking gives RPMS the ability to record and know the serial numbers of products stored in,
and/or shipped from inventory. The Serial Number Method drop down selection list is
There are four different Serial Number Tracking modes. The default option “Never” means that serial
numbers are not tracked for this particular product. The option “Allocated” means that serial numbers will
be declared when the product is ordered by a customer to be shipped out of the rep agency’s warehouse.
The implication of Allocated is that the serial numbers are recorded when they arrive in the warehouse,
since they must be on file to be declared when a customer orders the product. The third option “Shipped”
means that serial numbers will ONLY be declared at the time of shipment from the rep agency’s
warehouse. The fourth option, “Received then Shipped” means track serial numbers when they arrive in the
warehouse and when they are shipped – but not when they are allocated. The difference between
“Allocated” and “Received then Shipped” is in the timing of referencing the outgoing serial numbers.
Both “Allocated” and “Received then Shipped” require serial numbers to be recorded when product arrives
in the warehouse as On Hand. In an “Allocated” method, the person taking the order declares which serial
number the warehouse personnel should ship with the order, and the serial numbers print on the packing
slip which the warehouse personnel use as a pick ticket. For “Receive then Shipped”, the warehouse
personnel inform the data entry staff (usually by writing on a copy of the packing slip) which serial
numbers were shipped.
For the “Shipped” method, the warehouse personnel write the serial numbers that were shipped on a copy
of the packing slip. But instead of picking those serial numbers from a list of serial numbers on hand, those
serial numbers are created for the order just at the time the shipment is declared.
Changing the serial number method from one method is subject to the following table.
Changing To ->
Changing From Never Allocated
Received then
Shipped Shipped
Never Disallowed if open
items exist for that
product or
inventory is on
hand
Disallowed if
inventory is on
hand
Allowed
Allocated Serial Numbers are
deleted
Allocated serial
numbers are
changed to On
Hand
Allocated and On
Hand serial
numbers are
deleted
Received Then
Shipped
Serial Numbers are
deleted
Disallowed if open
items exist for that
product
On Hand serial
numbers are
deleted
Shipped Serial Numbers are
deleted
Disallowed if open
items exist for that
product or
inventory is on
hand
Disallowed if
inventory is on
hand
Setting Up Inventory – Setting Up Vendors
Although not required, the Inventory feature allows you to write, track and manage Inventory Orders to
bring new product into your facility. Inventory orders come from a Principal, and are to a Vendor.
Vendors are set up from Lists, Vendors. For general information about how all the RPMS Lists work,
including Adding, Changing and Deleting from lists, see the chapter RPMS Lists on page 7.
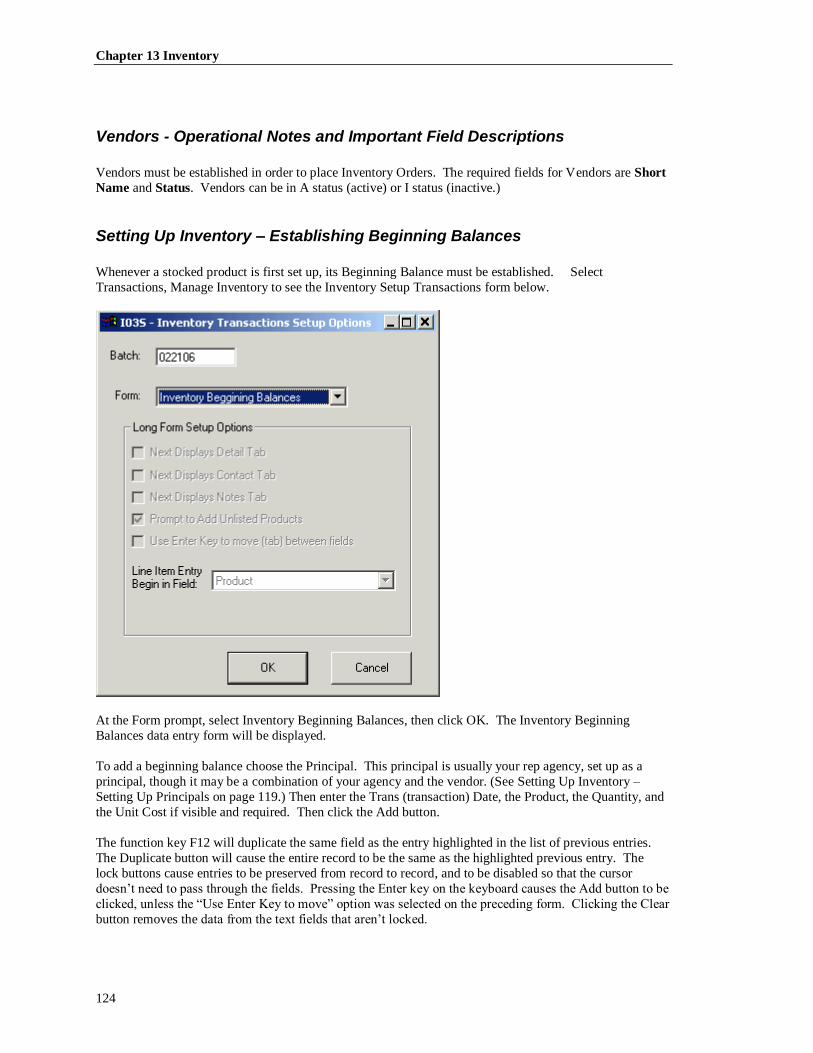
Chapter 13 Inventory
124
Vendors - Operational Notes and Important Field Descriptions
Vendors must be established in order to place Inventory Orders. The required fields for Vendors are Short
Name and Status. Vendors can be in A status (active) or I status (inactive.)
Setting Up Inventory – Establishing Beginning Balances
Whenever a stocked product is first set up, its Beginning Balance must be established. Select
Transactions, Manage Inventory to see the Inventory Setup Transactions form below.
At the Form prompt, select Inventory Beginning Balances, then click OK. The Inventory Beginning
Balances data entry form will be displayed.
To add a beginning balance choose the Principal. This principal is usually your rep agency, set up as a
principal, though it may be a combination of your agency and the vendor. (See Setting Up Inventory –
Setting Up Principals on page 119.) Then enter the Trans (transaction) Date, the Product, the Quantity, and
the Unit Cost if visible and required. Then click the Add button.
The function key F12 will duplicate the same field as the entry highlighted in the list of previous entries.
The Duplicate button will cause the entire record to be the same as the highlighted previous entry. The
lock buttons cause entries to be preserved from record to record, and to be disabled so that the cursor
doesn’t need to pass through the fields. Pressing the Enter key on the keyboard causes the Add button to be
clicked, unless the “Use Enter Key to move” option was selected on the preceding form. Clicking the Clear
button removes the data from the text fields that aren’t locked.
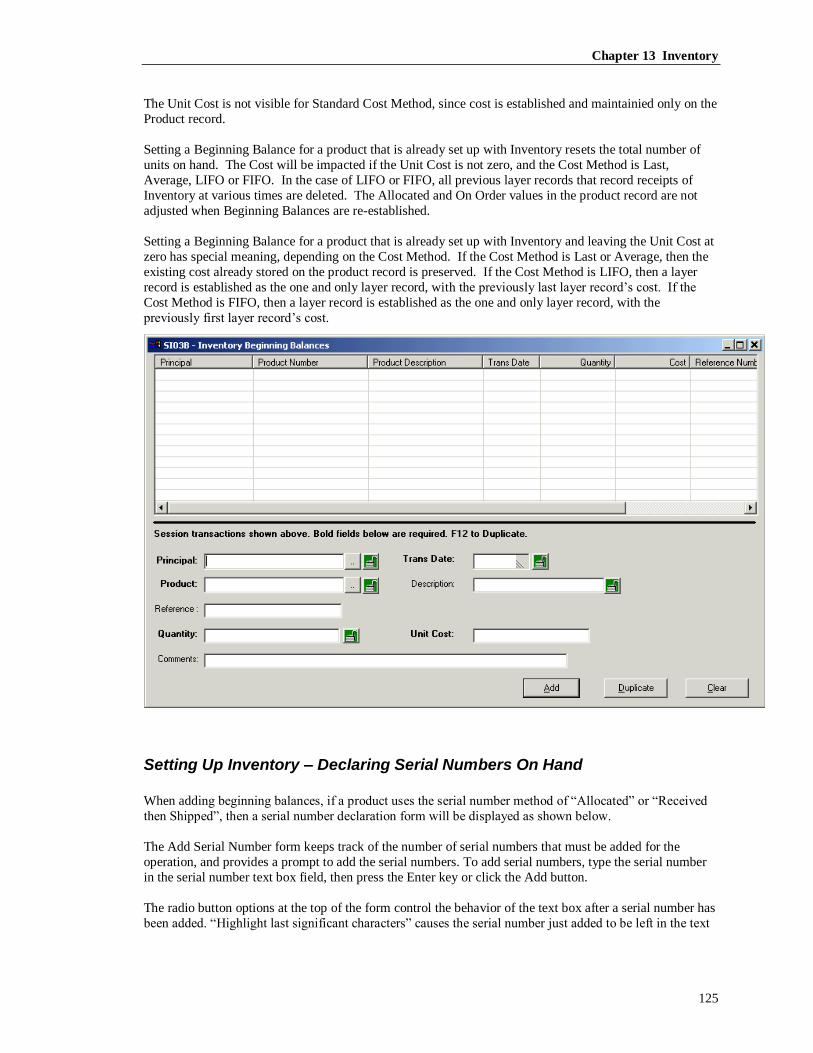
Chapter 13 Inventory
125
The Unit Cost is not visible for Standard Cost Method, since cost is established and maintainied only on the
Product record.
Setting a Beginning Balance for a product that is already set up with Inventory resets the total number of
units on hand. The Cost will be impacted if the Unit Cost is not zero, and the Cost Method is Last,
Average, LIFO or FIFO. In the case of LIFO or FIFO, all previous layer records that record receipts of
Inventory at various times are deleted. The Allocated and On Order values in the product record are not
adjusted when Beginning Balances are re-established.
Setting a Beginning Balance for a product that is already set up with Inventory and leaving the Unit Cost at
zero has special meaning, depending on the Cost Method. If the Cost Method is Last or Average, then the
existing cost already stored on the product record is preserved. If the Cost Method is LIFO, then a layer
record is established as the one and only layer record, with the previously last layer record’s cost. If the
Cost Method is FIFO, then a layer record is established as the one and only layer record, with the
previously first layer record’s cost.
Setting Up Inventory – Declaring Serial Numbers On Hand
When adding beginning balances, if a product uses the serial number method of “Allocated” or “Received
then Shipped”, then a serial number declaration form will be displayed as shown below.
The Add Serial Number form keeps track of the number of serial numbers that must be added for the
operation, and provides a prompt to add the serial numbers. To add serial numbers, type the serial number
in the serial number text box field, then press the Enter key or click the Add button.
The radio button options at the top of the form control the behavior of the text box after a serial number has
been added. “Highlight last significant characters” causes the serial number just added to be left in the text

Chapter 13 Inventory
126
box, with the right most character(s) selected for modification and add of the next serial number. This
setting is useful if the serial numbers are generally, but not entirely, in numeric or alphanumeric order.
The “Highlight All” option causes the entire just added serial number to be selected in the text box. This
option, or the “Blank Out” option are most useful when the series of serial numbers to be added are very
different from one another, and must be typed in each time.
The “Change Last” option causes the most significant final character(s) of the previously entered serial
number to be automatically changed, and highlighted for further change if necessary. This option is useful
when the serial numbers being added or mostly in series – simply pressing Enter ten times will add ten
consecutive serial numbers to the form.
Once all the serial numbers necessary for the operation have been added, click OK. If a serial number is
entered in error, use the mouse to highlight the incorrect serial number, then click Remove.
For a Beginning Balance operation, if the correct quantity of serial numbers is not specified, the Beginning
Balance will not be added. If any serial numbers for that product previously existed as On Hand, they are
deleted by the Beginning Balance operation.
Using Inventory
Once the Inventory feature has been set up, the on-going use of the Inventory feature can involve any or all
of the following:
❑ Writing Orders for New Inventory
❑ Receiving Inventory by Shipping & Partial Shipping Inventory Orders
❑ Receiving or Adjusting Inventory through Inventory Adjustments
❑ Shipping out Inventory through Add Transactions, and Maintain & Ship Transactions –see
Add Transactions, Long Form and Maintain & Ship Transactions
❑ Running Inventory-specific reports

Chapter 13 Inventory
127
Using Inventory – Writing Orders for New Inventory
Whenever a stocked product is in need of replenishment, orders for additional inventory can be written,
tracked and managed. It is possible to increase or change inventory levels without writing orders for new
inventory, so tracking inventory orders is optional.
To write an order for new inventory, click Transactions, Order Inventory, or click the icon shown above.
The Inventory Transaction Setup Options dialog will be displayed as shown below.
The Inventory Transaction Setup Options establish the order of presentation for the various tabbed forms
available on the inventory order form. Each option is described below:
Next Displays Detail Tab: Checking this option means that the clicking the Next Tab button will display
the Detail tab, once the Header tab has been filled out. See the section below for more information about
the options on that tab.
Next Displays Contact Tab: Checking this option means that clicking the Next Tab button from the
previous tab will display the Contact tab, where Sold To, Ship To and Invoice To information can be
confirmed or established. See the section below for more information about the options on that tab.
Next Displays Notes Tab: Checking this option means that clicking the Next Tab button from the previous
tab will display the Notes tab, where up to 64KB of notes can be established regarding the transaction. See
the section below for more information about the options on that tab.
Prompt to Add Unlisted Products: Checking this option causes the system to add products to the
principal’s database as they are ordered, if they have not previously been set up. Leaving the option
unchecked ?

Chapter 13 Inventory
128
Use Enter Key To Move (tab) between fields: Checking this selection will cause the enter key to behave
like the Tab key. In MS Windows, Tab is the keystroke that is used to navigate from one field to the next.
Shift Tab is used to navigate ‘backwards.’ The Enter Key is normally reserved for “default” buttons –
deeply shadowed buttons that might save a form, OK or Finish the current form, or navigate to the Next
form or screen. On the Long Form, when this field is unchecked, the Next or Add button is the default key,
so an Enter keystroke signifies that the tab form or line item is finished and should be saved or added. If
this field is checked, the Next or Add button changes to a non-default button (accelerated by ALT-N or
ALT-A) and a default command button will appear on the Inventory Order form as shown below:
This button does nothing when clicked by the mouse – it simply exists to “catch” the Enter keystroke and
forward a Tab keystroke to windows. When the focus has shifted to another command button, the Enter to
Move Enabled button will lose its default characteristic (the dark shadow will disappear) as is customary
for MS windows. In that way, the button that has focus will be activated by the Enter key, not this button.
Line Item Entry Begin in Field: This selection governs where your cursor should start to begin entering
each line item on the Line Item tab. The further down in the list you start, the more default items will be
selected for you. See the section below for more information about the fields available on that form.
Once you have established the Inventory Transaction Setup Options, click OK or press Enter to see the Add
Inventory Transactions – Long Form with the initial Header Tab as shown below.
The fields labeled in bold type must be filled out.
Once the required fields are filled out, the Next Tab button can be clicked (note – pressing the Enter key
will attempt to click the Next Tab button if Enter To Move was not selected, or if focus is on the Next Tab
button.) The Inventory transaction header is evaluated for duplicates in the RPMS system, then posted to

Chapter 13 Inventory
129
the list of Inventory orders for the selected vendor and principal. The tab that is subsequently displayed is
governed by the Inventory Transaction Long Form Setup Options selected on the preceding form. The
Header tab can be revisited from other tabs for reference, but its fields can’t be changed. To delete a
transaction begun through this form, use Receive Inventory as documented in below. Each of the tabs that
can be displayed is documented in its own section below.
Inventory Transactions Header Tab
Various fields on the Header tab can be locked or unlocked. When a field is locked, the cursor does not
land in the field, the contents of the field can’t be edited, nor do they disappear when a transaction is added.
For example, if the data that must be entered is a series of order acknowledgements from the same
principal, it would be useful to declare the principal then lock the field, so the form would remember that
principal from order to order. To lock or unlock a field, simply click its lock toggle button, pictured above.
Once the header for the inventory transaction has been entered (by clicking Next Tab), the Print button
will be enabled, allowing for a print of the transaction. The New Transaction button will also be enabled.
This button clears all the data entry fields (except those on the Header Tab that were locked), resets the tab
forms, and essentially set everything back for the beginning of adding another transaction.
Specific fields of interest for the Header Tab are described below:
Vendor: The vendor is the company from whom product is being ordered. Type the first few letters of the
vendor’s short name. The name will appear as it is being typed, becoming more accurate as more letters are
typed. It may be easier to click the lookup button, or press F4 to display a list of records to choose from.
The vendor lookup on this form shows the short name, the short address and the phone number of the
vendor. If a vendor does not exist, you do not have to leave the form. Simply add the vendor to the system
as documented in this chapter and the Lists chapter, then return to this form to complete the transaction.
Purchase Order Number: Usually the principal’s Purchase Order number. The principal is typically the
distribution side of the rep agency itself, so the scheme for Purchase Order numbers is user-defined. Once
established, the purchase order number can not be changed except by deleting and re-inputting the entire
order.
Principal: Type the first few letters of the principal’s short name. The principal is typically the distribution
side of the rep agency itself. If the setup of principals has used principal-vendor child records, use the
parent record in this field. The name will appear as it is being typed, becoming more accurate as more
letters are typed. It may be easier to click the lookup button, or press F4 to display a list of records to
choose from.
Status: This field allows RPMS to establish different status for the line items to be entered. Select the
status that represents the status of the most line items for this transaction. The selections for status are
shown below.
Receipt status means that all (or most of) the line items have been shipped by the vendor and received by
the principal (you) and will carry an invoice number and received date. O Open Order are unshipped line
items.
Order Date: This field represents the principal’s purchase order date for most of the line items that will be
entered for this transaction.

Chapter 13 Inventory
130
Received Date: The received date should be the date the product was received into inventory. This field is
required if the Status is R Receipt, and invisible if the Status is O Open Order.
Invoice Number: This field represents the invoice number for most or all of the line items of the
transaction. The invoice number and received date fields are not visible unless the status has been set to R
Received. For consigned inventory, use the Notice of Shipment number, or invent a number.
Inventory Transactions Detail Tab
The Detail tab is automatically displayed after the Header tab if so checked in Inventory Transactions Long
Form Setup Options described above. Otherwise it is accessible after the Header has been established by
clicking the Detail tab or pressing ALT-2. The Detail tab establishes more default information for line
items that will be added with this transaction. The fields are automatically saved when you change tabs or
start a new transaction. The fields are described below.
Schedule Date / Request Date: The schedule and request dates are used to establish expected shipping and
receiving information of orders for principals and vendors. Typically the request date is used as the
principal’s date that the product is requested to arrive. The schedule date is often used to describe the date
that the vendor has scheduled to ship the product, or acknowledged that the product will be delivered. Some
rep firms track only one of those things, or make no distinction between the dates, using only the schedule
date to mean both things.
Cancel Date: Date that unshipped line items become eligible to be canceled for this order. RPMS will not
automatically cancel line items that are not shipped by this date.
Drop Date: The Drop Date is used to establish when quotes and samples can be archived and/or purged,
and to protect other transactions from being archived or purged if the drop date is beyond the date of other
archive/purge criteria. For example, assume that an archive program stipulates that all orders completely
received, with invoice dates before 12/31/1999 and payment dates before 03/31/2000 are to be archived. A
Chapter 13 Inventory
131
transaction that could otherwise be archived would be preserved in the RPMS system if its drop date was
beyond 03/31/2000. See the description of Archive in the Administrator’s Guide for more information.
Batch No: Batch number with which each subsequently entered line item will be labeled. See the Reports
chapter, Daily Transactions for more information about the use and utility of batch numbers.
FOB, Terms, & Ship Via: These fields default in from the principal.
Freight Amount: The amount of freight to be charged for this order.
Inventory Transactions Contacts Tab
The Contact tab is automatically displayed after the Header or Detail tab if so checked in Inventory
Transactions Long Form Setup Options. This tab contains the default Sold To, Ship To and Invoice To
information for the transaction. To specify different Sold To, Ship To or Invoice To addresses for this
transaction, simply re-type the information as necessary. The principal’s address information will be placed
in each field. The contact information is automatically saved when you change tabs or start a new
transaction.
Inventory Transactions Notes Tab
The Notes tab is automatically displayed after the Header, Detail or Contact tab if so checked in Long Form
Setup Options. This tab holds up to 64K of notes for the transaction. Notes are automatically saved when
you change tabs or start a new transaction.
Inventory Transactions Line Items Tab
The Line Items tab is automatically displayed after the Header tab and others pre-selected to display first as
established in Inventory Transactions Long Form Setup Options. The fields and controls on this tab will
add line items to the transaction. A sample screen is shown below:
When this tab is displayed, the Next Tab button changes its identity to an Add button. When all the fields
for a given line item have been established, clicking the Add button adds the line item to the transaction
and to the listview. The required fields for the line item have bold labels. Once all the line items of the
transaction have been added the entire form can be closed, or the New Transaction button can be clicked.
The transaction is built as each line item is added to the listview, and the total of the order is displayed in
the form’s title – there is no save or done key.

Chapter 13 Inventory
132
If Unit Costs will be entered, as opposed to Extensions, when the cursor leaves the quantity field the
database is checked to see if the selected product has standard or principal-specific pricing. If so, a price
selection window is displayed from which one of the prices can be selected. Whether Unit Prices or
Extensions will be entered is governed by the checkboxes.
If a line item is added by mistake, or with incorrect information, it can be deleted or changed from this
screen by double-clicking the line item in the listview. The transaction correction form will be displayed.
From this form the line item can be changed or deleted.
Like other listviews in RPMS, the line items listview’s columns can be re-sized and rearranged using drag
and drop. This listview is also re-sizable from the bottom, using the slider control as shown below:
The slider control ‘lifts’ the listview and exposes other controls that contribute information to the line items
as they are added. Normally those pieces of data are not edited during line item entry, unless the Invenotory
Transactions Long Form Setup Options were set to reveal them.
Various fields on the form can be locked or unlocked. When a field is locked, the cursor does not land in
the field, the contents of the field can’t be edited, nor do they disappear when a line item is added. For
example, if the data that must be entered has the same product and cost but has different schedule dates, it

Chapter 13 Inventory
133
would be useful to lock the unchanging fields. To lock or unlock a field, simply click its lock toggle button,
pictured below.
Each field of the Inventory Line Item tab is described below.
Principal: This field is normally hidden by the listview, unless the Inventory Transactions Long Form
setup options dictated that the line item data entry begins in this field or in the order date field. The choices
in this lookup field are limited to family records (parent and children) of the principal selected on the
Header tab. In this way, line items can order products for different divisions of the principal.
Order Date: This field is normally hidden by the listview, unless the Inventory Transactions Long Form
setup options dictated that the line item data entry begins in this field or in the principal field. The order
date can be modified for each line item within the transaction. This is useful for blanket orders, where each
subsequent release can be given a different order date.
Line Number: This field is normally hidden by the listview, unless the Inventory Transactions Long Form
setup options dictated that the line item data entry begins in this field or in the status field. As each line
item is added, this field is automatically set up for the next available line number. Even if this field is
locked, its value will automatically increment when a line item is added. The lock here simply prevents the
cursor from landing in the field. It is possible to re-arrange line items by giving a line item a lower number
before adding it. For example, if Line Number three of a three line order (so far) should really be Line
Number four of a four line order, Line Number three could be deleted, then the Line Number field could be
changed back to line three again to add the other line item.
Status: This field is normally hidden by the listview, unless the Inventory Transactions Long Form setup
options dictated that the line item data entry begins in this field or the line number field. This field allows a
different status for the line items to be entered. The selections for status are shown below.
R Received Order (Invoice) means that the principal has received the line item, and has an invoice
number and invoice date. O Open Order indicates unshipped line items.
Invoice Number, Received Date: These fields appear only if the status is R Received (Invoice) and if the
listview is raised to expose them. Each line item entered can have a different invoice number and/or
received date. These two fields are required for Received status items and must be blank for Open status
entries.
Product, Description: These two fields represent the product number and primary description of the line
item. Products are stored by principal. See Products - Operational Notes and Important Field Descriptions
above for more information about setting up and administering products. As characters are typed in the
product field, the closest product number is displayed, and a corresponding description (if one exists) is
added to the description field. The lookup button will list products by product number. The Description
field does NOT automatically retrieve a different product number when changed. In this way any
description can be typed for the product. The description field lookup, however, will cause the part number
to change if used. Using the description lookup will sort the product list by description.
Quantity: All transaction items must have a quantity of 1 to have a corresponding dollar value. To enter a
negative quantity, type a minus sign ( - ) in the quantity field prior to typing the number. Typing the minus

Chapter 13 Inventory
134
sign after the number also works – however this utility is reserved by RPMS for future enhancements, so
may not always work. The quantity field can be broken down to tenths of units (one decimal.) The valid
numeric range for the quantity field is - 9,999,9999.9 to 9,999,999.9 (negative 9.99M to positive 9.99M.)
Units: This field is for the unit of measure, and must match either the selling or receiving units for the
product, as set up on the product’s Inventory tab. If the unit of measure being ordered is the receiving unit,
then internally the number of selling units on order will be multiplied by the Conversion Factor. See Setting
Up Inventory – Adding Products in this chapter for more information about Selling Units, Receiving Units
and the Conversion Factor.
Unit Cost / Extension Checkbox Options: These checkboxes declare which value this item will require. If
the Unit Cost checkbox is checked, the extension field will be disabled and calculated automatically when
the cursor leaves either the unit cost field or the quantity field. The Extension field accepts two decimals.
Unit Cost: The Unit Cost field accepts up to four decimals. Multiplied by the Quantity, it rounds to the
amount in the Extension field. It will accept negative numbers (use the minus sign to declare) but the
recommended way to show product returns is with a negative quantity. The valid numeric range for the unit
price field is - 9,999,9999.9999 to 9,999,999.9999 (negative 9.99M to positive 9.99M.)
Extension: The Extension field accepts up to two decimals. Multiplied by the Quantity, it rounds to the
amount in the Extension field. It will accept negative numbers (use the minus sign to declare) but the
recommended way to show product returns is with a negative quantity. The valid numeric range for the
extension field is – 9,999,999,9999.9999 to 9,999,999,999.9999 (negative 9.99B to positive 9.99B.)
Scheduled / Requested: The scheduled and requested dates are used to establish expected shipping and
receiving information of orders for principals and vendors. Typically the request date is used as the
principal’s date that the product is requested to arrive. The schedule date is often used to describe the date
that the vendor has scheduled to ship the product, or acknowledged that the product will be delivered. Some
rep firms track only one of those things, or make no distinction between the dates, using only the schedule
date to mean both things.
Printing Inventory Transactions
The Print button will print the transaction as one of the standard RPMS transaction print types.
Printing the Rep Company Logo on Transaction Forms
The standard printed forms can print your rep company logo, or a text version of your address.
To print your rep company logo, the logo must be stored as a file in your RPMS data folder. The file name
must be LOGO.BMP or LOGO.JPG. The file must be a bitmap or jpeg format, and should be 5 inches
wide and 1.4 inches tall. Such files can be created with graphics software like Adobe Illustrator or
Microsoft Paint. For help creating such a file, check with your graphics software vendor. In some cases
the printer who created your letterhead may be able to help you create the file.
To print simply a text version of your address, make sure that there is NOT a file called LOGO.BMP or
LOGO.JPG in your data folder. When no such file exists, RPMS reverts to the text version of your
company name and address on the printed forms.
The potential destinations for the print are listed in the second drop down, and include Printer, to
print to the current printer. To change printers, use the Printer Setup button, or select Files, Printer Setup.

Chapter 13 Inventory
135
Receiving Inventory
To record a receipt of new inventory for inventory ordered through the RPMS system, choose Receive
Inventory from the Transactions menu, or click the button shown above.
The SI02S Batch Label , show above, is displayed. The batch number is an alphanumeric label and can be
used to recall a list of transaction batches, or groups of transactions (Inventory Batch reports). The batch
defaults to the last batch number used by this user during this session of RPMS, or the date if this is the first
time in during this session. Type or use the F4 key to look up the vendor from whom the inventory is
being received. Uncheck Show Receive Status and Show Cancel Status to see only open Inventory Orders
if preferred, and then click OK. The Vendor Maintain/Ship Inventory Transactions form is shown below.

Chapter 13 Inventory
136
Maintain/Ship Purchase Orders Tab
If the quantity of inventory being received is known to be the same as that which was ordered, and the
invoice amount is the same as the order amount, click the action arrow and choose R = Receive, or type the
letter R. The Assign Invoice form will be displayed as shown below:
Once the form is filled out with the vendors invoice number and the date your warehouse received the
product, click OK. At that time you may also tag other open orders with R = Receive, or perform any of
the other supported functions shown below, before clicking Apply to post the changes.
Other options supported from the Maintain/Ship Inventory Transactions form include C = Cancel, to cancel
all open line items of an inventory order; D = Delete to delete all open line items of an inventory order; and
O = Open to un-receive all received items. Using the O = Open option has repercussions for inventory
stock and inventory costs. When an item is re-opened, a negative receipt of inventory is posted, and the
cost of that inventory is calculated by the cost that had previously been recorded on the receipt.
For example, even if the cost method in use is FIFO, if the cost of a just received item was $5.00, then the
cost of that item when it is opened (un-received) will still be $5.00. This is true whatever the value of the
oldest inventory items happened to have been for that product, because the operation is a receipt – a,
special, negative inbound inventory transaction as opposed to a positive outbound transaction. FIFO
dictates that the cost of a shipped out inventory item shall be that of the oldest in stock – but opening a
received item is not considered a shipment.
There can be special problems with FIFO and LIFO cost methods when using the Open operation to un-
receive inventory, if some of the inventory in question has already been shipped. For example, assume the
following order of operations for part number J104 in a LIFO warehouse:
Op. Date Time Operation Result
1 05/31/06
9:00 am Begin. Balance 5 On Hand at cost of $2 each
2 06/01/06
9:00 am
Enter Inventory PO #1
Order 10 @ $1 5 On Hand at cost of $2; 10 On Order at cost of $1
3 06/02/06
9:00 am
Enter Inventory PO #2
Order 5 @ $2 5 On Hand at $2; 10 On Order at $1; 5 On Order at $2
4 06/06/06
9:00 am
Partially Receive
Inventory PO #1 for 5
10 On Hand – 5 at $2 and 5 at $1; and
10 On Order – 5 at $1 and 5 at $2
5 06/06/06
9:05 am Ship 5 to a customer
5 Shipped at cost of $1 each, reducing inventory layer
from Op. 4 – total now of 5 On Hand at cost of $2 each
6 06/06/06
9:10 am Re-Open Inventory PO #1
0 On Hand. Negative Receipt record created, balancing
the positive Beginning Balance entry. Costs are now
immaterial.
7 06/06/06
9:11 am Receive PO #2 5 On Hand at cost of $2 each
8 06/07/06
9:00 am Receive PO #1
15 On Hand, 5 at $2, 10 at $1. Next items to ship will
be the $1 items.

Chapter 13 Inventory
137
If a partial shipment has been made, or the invoice amount does not agree with the amount ordered, double
click the order to adjust individual line items. The form will open the Line Items tab for the order, where
you can Receive one or several line items (R) or Partially Receive an item (P).
Receive Inventory in RPMS for Accounts Payable in QuickBooks®
As ordered inventory is received in RPMS, a bill can be created and passed into QuickBooks, updating the
Accounts Payable. Whenever R (Receive) or P (Partially Receive) is applied against an inventory order,
RPMS checks to see whether a connection to QuickBooks is necessary. If the connection has been
attempted but was not yet successful, a message would be displayed as shown below, allowing an attempt
at re-connection.
There are many reasons that a connection to QuickBooks would be unavailable. A common problem is that
the computer that runs QuickBooks is not turned on, or is not hooked up to the local network. Other
problems can include network-mapping problems, disabling of RPMS authorization within QuickBooks, or
that not enough time has gone by to establish the RPMS to QuickBooks connection. A user presented with
this message can work with the network system administrator, the QuickBooks administrator, and RPMS
technical support to resolve the problem before clicking Yes. If after clicking Yes the system is still unable
to connect to QuickBooks, a message will relay that information to the user and the QuickBooks controls
on the Assign Invoice dialog shown below will be disabled.
On the Assign Invoice dialog shown below, the QuickBooks prompts are displayed below the Invoice
Number and Received Date.

Chapter 13 Inventory
138
The Invoice Number will be sent to QuickBooks as the Reference Number for this bill.
The Received Date will be sent to QuickBooks as the Transaction Date for this bill.
The Post to QuickBooks® Payables option governs whether or not this transaction will be sent by this
user to QuickBooks. If this option is not enabled, the user may not have the appropriate rights to send data
to QuickBooks, or QuickBooks may not currently be available.
The Items Subtotal will be sent to QuickBooks either be added in to a single sum with tax and freight; or
will be shown as it’s own value; or will be broken into the distinct line items of this invoice. The method
used is governed by settings in the Administration system – see QuickBooks® Options in the RPMS
Administration System above.
Freight Amount is pulled over from the detail of the order, but may need adjustment for this invoice.
Changing the Freight Amount does NOT change the freight amount recorded in the RPMS order, if any.
Tax Amount can be added, if any tax was charged for this invoice.
Terms are pulled over from the detail of the order IF they match an available Terms value in QuickBooks.
Otherwise, terms may be selected from the list of QuickBooks terms values. Changing or setting the Terms
value does not change or set the Terms value for the order in RPMS.
Due Date is a date field that can be added to this bill, to establish pay precedence in QuickBooks.
The Vendor in QuickBooks will be the RPMS Vendor – you must have the identical vendor name set up in
both applications. The memo for the bill in QuickBooks will be the RPMS Order number.
Adjusting Inventory
Select Transactions, Manage Inventory, to display the Inventory Transactions Setup Options form with
Adjust Inventory automatically selected as the Form to display.
Clicking OK displays the Inventory Adjustments form, shown below:

Chapter 13 Inventory
139
To make Inventory Adjustments, declare the principal, product, transaction date, quantity and unit cost,
then click the Add button. The quantity field accepts both positive and negative numbers, and will adjust
inventory On Hand levels up or down for the specified product.

Chapter 13 Inventory
140
For LIFO and FIFO systems, the Transaction Date must correspond to a LIFO or FIFO layer record.
Clicking the ellipsis button next to the Transaction Date lookup displays layer records associated with those
cost methods, as shown above.
A typical adjustment reduces or increases the inventory on hand to reflect the findings of a physical
inventory. To increase the inventory on hand, put the positive increase in the Quantity field. To decrease
the inventory on hand, put the negative amount to decrease into the Quantity field.
Changing the quantity while leaving the cost field blank or 0 tells RPMS to make no change to the costs
associated with the given layer (FIFO or LIFO cost methods) or total quantity (Average or Last cost
methods) of inventory. This is called a ‘quantity only’ adjustment.
Sometimes it may be necessary to increase the cost of the remaining inventory. For example, if 10 products
had previously been on hand in the warehouse, each at a cost of $100, and one item was stolen, it may be
desirable to re-cost the remaining 9 items at $111.11 each, to reflect the total $1,000.00 investment in the
product.
To do this, an adjustment of –1 in the Quantity field must be accompanied by a small Unit Cost change of
.0001. This prevents RPMS from regarding the adjustment as a ‘quantity only’ adjustment. The fraction of
a cent will be subtracted from the extended cost of all products, and then the new extended cost will be
divided among the remaining products.
Increasing the cost of a given layer takes two adjustments. Use the first adjustment to temporarily increase
the quantity on hand by 1, and the total extended cost to be the cost of the true quantity. Then decrease the
quantity on hand by 1 with no cost adjustment.
For example, if the current cost of a layer of 10 units is $90 ($900), and should be $100 each, then add 1
unit to the layer at a cost of $200. This will increase the total units to 11, and the extended cost of those
units to $1,100.00. The layer will show 11 units at $100 each. Then subtract 1 unit from the layer at no
cost, to leave 10 units at $100 each.

Chapter 14 File Menu
141
File Menu
Purpose and Overview of the File Menu
The File Menu items navigate to various functions and utilities. Each function or utility is described below.
Administration System
Selecting this item launches the Administration System. Before the Administration System is launched, a
warning dialog is displayed as shown below, cautioning that the Administration System can only be run
when no other users are running RPMS, and that the RPMS program itself will be closed for desktop
systems.
For a complete description of the Administration System, see the RPMS Version 8 Administrator’s Guide.
Backup
Selecting this item displays the Backup dialog form, shown below, used to create backups of the RPMS
data.

Chapter 14 File Menu
142
The RPMSCloud system limits the backup function to make temporary backups in the user’s work folder,
and should only be made on the advice of RPMS Technical Support.
The original destination selected for the backup is set to the current data folder. A different drive or folder
can be selected by clicking and selecting from the drive dropdown list, and clicking or double-clicking
from within the folders tree.
Check Span Multiple Diskettes only if you are making a backup to a floppy disk drive. Floppy disk
backups are not recommended.
Check Backup Archived Files if you have made archives of your historical or current (transaction log)
data, and you want to make a complete backup.
For a complete discussion of Archiving, see the RPMS Version 8 Administrator’s Guide.
Later on, if you need to restore a backup to another computer and you have archived files, you will first
need to restore a complete backup including archived files. Then restore the most recent backup that does
not include archived files, if that particular backup is more recent than the one made with the archived files.
RPMS makes a backup of the data files, which is that data which is keyed or uploaded into your system.
The backup does not include the programs necessary to run the system. The backup does not include user
preferences, last-used screen settings or menu customizations for the particular computer on which the
backup was made. Those are user-computer specific settings that must be re-established over time on new
computers.
The RPMS backup is an ordinary ZIP file of the RPMS data files, which have extensions of MKD. The
structure of the backup file is RPMSmmddyy.ZIP, where mmddyy is the current date.
Restore
Selecting this item displays the Restore dialog form, shown below, used to restore older sets of data to
RPMS.
This operation is not allowed on the RPMSCloud system. RPMSCloud agencies should contact RPMS
Technical support if a data restoration is necessary.

Chapter 14 File Menu
143
If you need to restore a backup to another computer and you have archived files, you will first need to
restore a complete backup including those archived files. Then restore the most recent backup that does not
include archived files, if that particular backup is more recent than the one made with the archived files.
After the restore operation, data will be set back to the time from which it was backed up, and the login
prompt will be redisplayed.
Preferences
Selecting this item displays the Preferences dialog form, as shown below, used to establish user
preferences on this computer.
The List Tabs tab sets the vertical tab settings for the listed form’s primary listview. For another
description of Vertical Tabs and how they work, see Customers - Operational Notes and Important Field
Descriptions on page 17.
The Other Products & Settings tab displays prompt for attaching word processing and spreadsheet
programs other than Excel and Word, allows a non-system standard web browser to be used by RPMS, and
establishes the path to the QuickBooks® company file for those users that will automatically post
information to QuickBooks®.
The Other Preferences & Utilities tab has the ability to re-set the form settings and listview settings stored
for any RPMS form back to pre-installation defaults.
The E-Mail Send Settings tab governs the way that RPMS sends E-Mail PDF files of printed orders,
quotes, invoices, and packing slips.
Screen shots of all four tabs are displayed below:

Chapter 14 File Menu
144

Chapter 14 File Menu
145
The List Tabs Tab
Vertical tabs can be turned on, off or on only with large databases. The Optimize Tabs / Records will
cause the least number of reads from the database for a given list, showing approximately the same number
of tabs as records within a given tab. The Defaults button will reload all the list tab settings to their
installed defaults.

Chapter 14 File Menu
146
The Other Products & Settings Tab
Choose a different web browser, spreadsheet or word processing program. Your system’s standard web
browser, MS Word and MS Excel will work by default. A dialer program can be called with the phone
number as the supplied argument by clicking the ellipsis button next to a phone number field – check with
your telephone hardware vendor to see if your system can utilized this feature. Similarly, other
communication codes can be linked to that program or other programs, and will be called supplying the
given data as the argument. This option is not supported or used in RPMSCloud. Excel or Calc can be
licensed to work for RPMSCloud users.
Storing a QuickBooks company file path in the QuickBooks® Path field establishes that whenever an
RPMS user logs in from this computer, the RPMS to QuickBooks integration should be started for
subsequent deposit or bill paying transfers. It also establishes the particular QuickBooks company file that
should be opened by this computer. RPMSCloud does not currently support the RPMS to QuickBooks
integration.
After RPMS has been authorized to the QuickBooks company file by the QuickBooks administrator, each
individual user that wants to update QuickBooks automatically must establish their own path to the
QuickBooks company file, by following this procedure. If this is the first time any user will attempt to
establish a connection to QuickBooks, special directions should be followed. Review chapter 10 RPMS is
Made for QuickBooks in the RPMS Administrator’s Guide.
Use the standard Open dialog box that results to select the QuickBooks company file that this RPMS user’s
computer should update. If the QuickBooks Path option is disabled, it means that the QuickBooks controls
for this RPMS data set have not been enabled; or, your user password does not have appropriate Security
rights to post transactions to QuickBooks. Check with your RPMS system administrator.
Note that the open dialog box above shows selecting the sample company files that come with QuickBooks.
Check with your QuickBooks administrator to be sure that you are selecting the QuickBooks company file
that is appropriate for your agency.
Once the path to QuickBooks is in the text box, click the “Test” button to check the path and controls for
QuickBooks. A message box indicating success or failure of the test will follow the test. Below is a sample

Chapter 14 File Menu
147
of a failed test, indicating that the user was unable to connect to QuickBooks because QuickBooks was
busy.
You and your QuickBooks administrator, or RPMS technical support, can work together to try to fix any
errors you encounter in the test connection. A more successful connection is shown below…
…which will be followed by a message that QuickBooks was both connected and disconnected
successfully.
Once this message has been displayed, save user preferences by clicking the Apply button, then OK, and
then exit RPMS. Launch RPMS and log back in with the same password, from the same computer, to
automatically establish a background connection with QuickBooks.
This procedure works for one computer. If a given user runs RPMS on multiple computers, that user must
repeat this process on each of those computers.
The automatic connection to QuickBooks occurs in the background, while other RPMS operations can
continue. This connection can take several seconds, in the same manner that opening QuickBooks can take
several seconds, and is a function of the way QuickBooks opens. This delay should be transparent for most
RPMS users, since certain amounts of navigation and operation within RPMS will occur before the access
to QuickBooks is necessary.
If you are running the RPMS to QuickBooks integration and your are also expected to run QuickBooks and
RPMS simultaneously, you should start QuickBooks before running RPMS. If others in your company also
need to run QuickBooks, you should launch QuickBooks in multi-user mode.
The Other Preferences and Utilities Tab
Click to Reset Form or ListView: Use the list to select a form or list view to reset, then click the button.
This will cause saved registry entries about that form or list – the way this computer has most recently run
those forms or lists – to be reset to installation defaults.
Chapter 14 File Menu
148
The Run Reports in Debug Mode should only be used on the advice of RPMS Technical Support, as it is
a much slower way to run reports. It generates a log file of codes that RPMS Technical Support can use to
debug a given report if necessary but has no other purpose.
You can choose to have RPMS Check rpms.com for new updates whenever RPMS loads. It is
recommended that you have a full-time high bandwidth Internet connection if you check this option. If an
update is available, you will get a message when you log in to RPMS.
The Spell check notes while typing checkbox will cause RPMS to engage it’s automatic spell checker
when typing notes, for typical ‘right click / suggest / replace’ word processing.
The checkbox “Run this company in full screen mode” when checked, causes this data set to initially
occupy the entire Windows screen. Similarly “Use a white background for this company’s workspace”
and “Display logo on background (RPMSLogo.jpg from data folder)” are company specific settings for
this computer, and govern how RPMS looks when it launches.
Your company can place their own logo in the RPMS data folder, which will cause that logo to be
displayed in the background if the appropriate checkbox above is selected.
The E-Mail Send Settings Tab
RPMS can automatically, without any extra steps by the user, send PDF files via E-Mail of purchase
orders, invoices, and other transaction documents. The E-Mail Send Settings tab governs the way that
RPMS will automatically send PDF files.
The Subject and PDF Filename prompt sets up the subject and naming convention for the document to be
sent. “Tran-Type” means transaction type, and can be Purchase Order, Invoice, or any alias name.
“Recipient” and “Originator” vary according to the document type. For a PO, the Originator is the
customer and the Recipient is the Principal. The “Tran No” is the transaction number, and can be the
purchase order number or the invoice number. For example, selecting Tran-Type-Recipient-Originator-
Tran No would cause purchase order 20567 from Ace Dynamics to your manufacturer ABC MFG to be
named this way: “Purchase Order-ABC MFG-ACE DYNAMICS-20567”. That would also be the subject
of the E-Mail.
The Text Message prompt is used to add some common text to each E-Mail as it is sent. A message like
“See the purchase order attached from our customer” would be appropriate for sending PO’s to principals,
but would not be generic enough if invoices needed to be sent as well. If you would rather attach an HTML
File Message, instead of text, select that radio option and declare the file to attach to each message by
Browsing and selecting the file. Some junk mail filters may reject messages that are entirely HTML.
Since RPMS (not your E-Mail client) will send this E-Mail, you may want to select the Blind Carbon
Copy checkbox to have a record of Sent E-Mail.
Ask your system, network or E-Mail administrator about the appropriate way to fill out the remaining
prompts on this tab, or review the SMTP settings in your E-Mail application for guidance. Selecting the
Show Log After Send can be useful for de-bugging the SMTP settings used.
Printer Setup
Selecting this item displays the standard Windows Printer Selection dialog box for your operating system.
This preference will be set for this session of RPMS only. RPMSCloud users should typically keep the
default ‘Redirected’ printer selected.
Chapter 14 File Menu
149
Saved Reports
This item will display a list of previewed reports that have been saved and can be reviewed again or re-
printed.
Exit RPMS
This item exits RPMS and the Reports Engine, if running.

Chapter 14 File Menu
150
This page left blank intentionally