Square Extension for Magento 2 User Guide Version 1.6
111
1 Square Extension for Magento 2 User Guide Version 1.6
-
Upload
khangminh22 -
Category
Documents
-
view
2 -
download
0
Transcript of Square Extension for Magento 2 User Guide Version 1.6

1
Square Extension for Magento 2
User Guide
Version 1.6

2
Contents
0 - Introduction to the Square Extension ............................................................................................................................. 4
1 - Must-read ....................................................................................................................................................................... 4
2 - Installation ..................................................................................................................................................................... 5
3 - Important Configuration Information ............................................................................................................................. 6
4 - Square Configuration in Magento Admin ........................................................................................................................ 8
5 - If You Only Need the Square Payment Method ............................................................................................................ 10
5.1 Square Payment Method Set Up..................................................................................................................................... 10 5.1.1 Authorize and Capture amount when Order is placed ............................................................................................ 10 5.1.2 Authorize (without capture) amount when Order is placed .................................................................................... 13 5.1.3 Capture amount when the Invoice is being created ................................................................................................ 16 5.1.4 Void Transaction when an Order is Canceled .......................................................................................................... 18 5.1.5 Store Credit Card ..................................................................................................................................................... 20 5.1.6 Multi-store Configuration for Square Payment ....................................................................................................... 21
5.2 Gift Cards......................................................................................................................................................................... 24 5.2.1 Magento Settings .................................................................................................................................................... 24 5.2.2 Checkout Using Gift Cards ....................................................................................................................................... 25 5.2.3 Refund Orders Paid for Using Gift Cards ................................................................................................................. 27 5.2.4 View Gift Card Transactions in Square Dashboard .................................................................................................. 29
5.3 Apple Pay ........................................................................................................................................................................ 30 5.3.1 Prerequisites ............................................................................................................................................................ 30 5.3.2 Set Up ...................................................................................................................................................................... 30
6 - If You Need the Full Omni Capabilities of the Extension ............................................................................................... 34
6.1 General Configuration ..................................................................................................................................................... 34 6.1.1 Customer Synchronization ....................................................................................................................................... 34 6.1.2 Catalog and Inventory Synchronization ................................................................................................................... 35 6.1.3 Order and Transactions Synchronization................................................................................................................. 36 6.1.4 Webhooks Configuration ......................................................................................................................................... 37
6.2 Square Payment Processing Configuration ..................................................................................................................... 42 6.2.1 Authorize and Capture amount when Order is placed ............................................................................................ 42 6.2.2 Authorize (without capture) amount when Order is placed .................................................................................... 44 6.2.3 Capture amount when the Invoice is being created ................................................................................................ 47 6.2.4 Void Transaction when an Order is Canceled .......................................................................................................... 49 6.2.5 Store Credit Card ..................................................................................................................................................... 51 6.2.6 Multi-store Configuration for Square Payment ....................................................................................................... 53
6.3 Gift Cards......................................................................................................................................................................... 55 6.3.1 Magento Settings .................................................................................................................................................... 55 6.3.2 Checkout Using Gift Cards ....................................................................................................................................... 56 6.3.3 Refund Orders Paid for Using Gift Cards ................................................................................................................. 58 6.3.4 View Gift Card Transactions in Square Dashboard .................................................................................................. 60
6.4 - Apple Pay ...................................................................................................................................................................... 61 6.4.1 Prerequisites ............................................................................................................................................................ 61 6.4.2 Set Up ...................................................................................................................................................................... 61
6.5 - Customers Synchronization .......................................................................................................................................... 65 6.5.1 Admin Settings Needed ........................................................................................................................................... 65 6.5.2 Magento Customer Creation ................................................................................................................................... 66 6.5.3 Square Customer Creation....................................................................................................................................... 69 6.5.4 Edit a Customer in Square ....................................................................................................................................... 70 6.5.5 Delete a Customer in Magento................................................................................................................................ 71 6.5.6 Delete a Customer in Square ................................................................................................................................... 72

3
6.6 - Catalog Management Synchronization ......................................................................................................................... 74 6.6.1 Sources of Records ................................................................................................................................................... 74 6.6.2 Configurable Products Notes ................................................................................................................................... 75 6.6.3 Admin Settings ........................................................................................................................................................ 77
6.7 - Locations and Inventory Synchronization ..................................................................................................................... 78 6.7.1 Set Location from Magento Admin ......................................................................................................................... 78 6.7.2 Set Location During the Get OAuth Token Process .................................................................................................. 80 6.7.3 Inventory Synchronization: Square is SOR ............................................................................................................... 81 6.7.4 Inventory Synchronization: Magento is SOR ........................................................................................................... 82 6.7.5 View and Edit Inventory per Location in Magento .................................................................................................. 83
6.8 - Order and Transaction Synchronization ....................................................................................................................... 88 6.8.1 Magento Settings .................................................................................................................................................... 88 6.8.2 View Square Transactions ....................................................................................................................................... 89 6.8.3 View Square Refunds ............................................................................................................................................... 92
6.9 - In-Store Pickup Functionality ........................................................................................................................................ 95 6.9.1 Prerequisites for enabling In-Store Pickup ............................................................................................................... 95 6.9.2 Configuring the In-Store Pickup functionality .......................................................................................................... 97 6.9.3 Order journey .......................................................................................................................................................... 98 6.9.4 In-store Pickup functionality notes ........................................................................................................................ 104
Appendix-1 Entities mapping between Magento and Square .......................................................................................... 105
A-1.1 Square Locations ....................................................................................................................................................... 105 A-1.2 Square Customers ..................................................................................................................................................... 106 A-1.3 Square Catalog ........................................................................................................................................................... 107 A-1.4 Square Inventory ....................................................................................................................................................... 107 A-1.5 Square Payment Transaction ..................................................................................................................................... 108 A-1.6 Square Transactions/Refunds .................................................................................................................................... 109 A-1.7 Square Orders ............................................................................................................................................................ 110
Appendix-2 Crons schedule ............................................................................................................................................. 111

4
0 - Introduction to the Square Extension
The Square extension for Magento simplifies all the different aspects of running your business - with out-of-
the-box fraud detection, PCI compliance, simplified catalog and inventory management, and a holistic view of
your customers - so that you can focus on growing your business. The Square extension for Magento allows
merchants to power online payments on their Magento online store, as well as push transactions made on the
Square POS into Magento. Transactions, refunds, customer data, product catalog info, and inventory quantities
sync between Square and Magento systems.
A Square account is required to use this extension. Get started and create a Square account:
US
Canada
UK
Australia
Japan
1 - Must-read The following information is a quick collection of answers to the most frequently-asked-questions we encountered. If you feel you have issues with the extension, please consult this list first. This information is also presented in detail throughout the rest of this user guide:
1. Installation. Please make sure you installed the extension using one of the methods described here. If
you chose the second method, please make sure you run the following Command: a. If you are installing fresh, version 1.0.0 or later:
- the extension uses the official Square SDK: square/connect b. If upgrading from an earlier version:
- please first remove the previous SDK by running: composer
remove adriansavuosf/squarepaymentssdk 2. Configuration. When configuring the extension or after changing the configuration at a later time,
please refresh the cache.
3. Locale options. Please don't forget that the time settings under ‘Locale Options’ must match the
store’s time zone
4. Payment options. If the Square Payment method is set to "Authorize" only, without capture, then the
transaction will not be pushed to Square at the time the order is placed. It is instead pushed at the
moment the order is invoiced.
5. Payment options. The option to store credit card can only be offered to logged in customers that are
synchronized with Square. Therefore, if you set the Square payment method to work ONLY with stored
credit cards (in the Payment Methods settings), then checking out as guest will not be possible.
6. Order placing. The option to create the corresponding order in Square every time an order is placed in
Magento is designed to work with synchronized products. Catalog and Inventory synchronization
should be enabled.

5
7. Catalog and Inventory synchronization. Please note that the inventory displayed in Magento products
grid and in the product’s inventory tab has the value matching ONLY the selected default location.
Switching the default location here will also make all the inventories displayed in the grid take the
values matching the quantities on the selected location. If the products have 0 inventory on the newly
selected location, then the inventory displayed will be 0. Note that by switching the location from one
with inventory to another without inventory, the quantities are not lost. All quantities on all locations
are visible in the Locations tab of the product details. Also, switching back from a location without
inventory to one with inventory will display the quantities again.
2 - Installation
Important: Please install and use the extension first on a development or staging environment. We advise
adding the extension to your production environment only after you are satisfied with how the extension
works on the development/staging environment. When the functional mode is changed (from sandbox to
production or vice versa) as well when the location is switched, products, customers, transactions, and
inventory counts are reset to 0.
Follow these steps to install the Square extension on your Magento store:
1. Backup your database and code in order to have a recovery point in case problems appear (good
practice before the installation of a Magento module).
2. Order the Square Payments extension from the Magento marketplace.
3. As the extension is free after the order is placed, you should see a screen with the options “Install”,
“Contact Seller” and “Download”.
4. Option 1:
1) Click on Install, copy the installation key.
2) Go to the Web Setup Wizard and select Extension Manager.
3) Paste public and private keys and click submit
4) Select Review and Install.
5) Search for square/module-squareup-omni extension and click Install.
6) Add it to the Web Setup Wizard, paste the installation key under Install New Extensions, and
click install.
7) Click on Start Readiness Check.
8) After the check Is completed, click on next.
9) Click on Create Backup.
10) When the backup Is complete, click on next.
11) Click on Install.
12) Flush cache.
5. OR Option 2:
1) Click on Download, you will be prompted to save the file.
2) Command:

6
- If you are installing fresh, version 1.0.0 or later: 1. the extension uses the official Square SDK: run command composer require
square/connect - If upgrading from an earlier version:
1. please first remove the previous SDK by running: composer
remove adriansavuosf/squarepaymentssdk 2. then run command composer require square/connect
3) Command: composer dumpautoload
4) Upload and unzip the package on your server
5) Run magento setup:upgrade
6) Log out and the log back in to the admin area.
6. After finishing the installation, follow the configuration steps in order to activate the extension.
3 - Important Configuration Information
Please consider the following information when setting up the extension:
1. The Magento cache must be cleaned after each time the configuration is changed
2. The time settings under ‘Locale Options’ must match the store’s time zone:
3. Orders placed on Magento using a payment method different than Square will not be pushed to
Square.
4. If Magento is the system of record (SOR), do not add/edit/remove products in Square too as the
changes done on Square will not be reflected in Magento.
5. When the functional mode is changed (from sandbox to production or vice versa), as well when the
location is switched, products, customers, transactions, and inventory counts are reset to 0.

7
6. If multiple Square production accounts are used for the same callback URL, then Square does not
differentiate between the catalogs of each account: all products from all Square accounts are grouped
together in the Items dashboard.
7. If during the initial setup a valid Square account is used, but then during the get OAuth process a
different production account is used for logging in, the result will be that the locations of both accounts
will be brought into Magento.
8. It is HIGHLY advisable to be consistent with the choice you make for your system of records (SOR):
whatever you choose, be it Magento or Square – be sure to only make changes inside your SOR. If
you chose Magento as the system of records, then only make changes in Magento and let Square
synchronize. In the same way, if you chose Square as the system of records, then only make
changes within Square and let Magento synchronize. This is especially true for catalog and
inventory synchronization.

8
4 - Square Configuration in Magento Admin
The Application Mode drop down switches the way Magento interacts with Square between a production and
non-production environment. Use the sandbox mode to test endpoints, common failure cases, retrieve sample
data etc. Transactions in the sandbox are not sent to card networks, and credit cards are never charged. Square
sandbox does not have a visual interface, so you will not be able to see transaction, customers, products,
inventory, orders in square UI. Sandbox URL documentation:
https://docs.connect.squareup.com/articles/using-sandbox

9
Please consider that every time the application mode is switched and the Magento Admin configuration saved,
the fields below reset:
- Application ID
- Application secret
- Location ID
Set up a Square merchant account
You will need a merchant account with Square in order to set up an application which will integrate with the
extension. Sign up for a merchant account at https://squareup.com/signup/.
Create a Square app that will be connected to the Square-Magento extension
Go to https://squareup.com/developers and click on ‘Developer Dashboard’. Sign in using the same
credentials as your Square merchant account.
Click on ‘New Application’. Fill out ‘Application Name’ and click ‘Create Application’.
Keep your Square application page open as you’ll be going back and forth between this window and your
Magento admin panel.
Link your Square account to the Square extension in your Magento admin panel
For Magento 1: In the Magento admin, navigate to System > Configuration > Square Configuration
For Magento 2: In the Magento admin, navigate to Stores > Configuration > Square > Square Configuration
In the Square Developer Dashboard under ‘Credentials’, copy the ‘Application ID’ and paste it into the
Magento admin field ‘Square Application ID’.
In the Square Developer Dashboard under ‘OAuth’, show the ‘Application Secret’ and paste it in the
Magento admin field ‘Square Application Secret’. In the Magento admin area click ‘Save Config’.
In the Magento admin area locate ‘Redirect URL’ and copy the URL. In the Square Developer Dashboard
under ‘OAuth’ paste the URL in ‘Redirect URL’ and click ‘Save’.
In the Magento admin area click ‘Get OAuth Token’. In the popup window, sign in to your Square account,
accept the permission scope, and select the Square location that you want to connect to Magento. When
prompted, close the popup window. In the Magento admin page click ‘Save Config’.
In the Magento admin area, under ‘Square Location for Online Payments’ select the Square location that you
want to connect to Magento. Click ‘Save Config’.
Set up Webhooks
In the Magento admin area locate ‘Webhook URL’ and copy it. In the Square Developer Dashboard under
Webhooks paste it in ‘Notification URL’ and click ‘Save’.
Show the ‘Signature Key’ and copy it. In the Magento admin area paste it under ‘Square Signature’.
Refer to either Section 5 or 6 of the User Guide to configure other pieces of the extension (depending on
whether you only need to use the Square payment method, or the full omni capabilities of the extension)
Including ‘Customer Synchronization’, ‘Catalog and Inventory Synchronization’, and ‘Order and Transactions
Synchronization’.
Final steps in enabling the Square extension
In the Magento Configuration page navigate to Sales > Payment Methods.
Under ‘Square Payment Solution’:
o Make sure ‘Enabled’ = Yes
o Change the ‘Title’ to a credit card label that you want customers to see. We recommend ‘Credit
Card’.
o Select the ‘Payment Action’ setting you prefer.
o Select the ‘Card on File’ setting you prefer.

10
o Click ‘Save Config’.
5 - If You Only Need the Square Payment Method
5.1 Square Payment Method Set Up
5.1.1 Authorize and Capture amount when Order is placed
In order to enable the Square payment solution, please make sure it is Enabled in both Magento 2 and Square
admin. There are two options to use the Square payment solution: either authorize only on order being placed
(and capture the amount later when the invoice is generated), or authorize and capture the amount the instant
the order is placed.
Navigate to Stores > Configuration > Sales > Payment Methods > Square payment Solution section. Make sure
the solution is enabled and choose “Authorize and Capture” from the Payment Action drop down menu.

11
Save the current configuration, refresh the cache and try placing an order on the frontend.
Proceed with the checkout steps using valid data. Choose “Credit Card Square” when you get to the Payment
Information screen. Consider that a front-end validation is done on the credit card number – which needs to be
valid in order for the pay with card button to be active:

12
Finalize the placing of the order. Navigating back to Magento Admin, in Sales > Orders grid and selecting to
view the details of the order that has just been placed, shows the order status as Processing and the order’s
amount being captured:

13
5.1.2 Authorize (without capture) amount when Order is placed
Navigate to System > Configuration > Sales > Payment Methods > Square payment Solution Tab. Make sure
the solution is enabled and choose “Authorize Only” from the Payment Action drop down menu.
Save the current configuration, refresh the cache and try placing an order on the frontend.
Proceed with the checkout steps using valid data. Choose “Credit Card Square” when you get to the Payment
Information screen. Consider that a front-end validation is done on the credit card number – which needs to be
valid in order for the pay with card button to be active:

14

15
Finalize the placing of the order. Navigating back to Magento Admin, in Sales > Orders grid and selecting to view the details of the order that has just been placed, shows the order status as Processing and the order’s amount being authorized:

16
5.1.3 Capture amount when the Invoice is being created
If you chose the first option described previously (to only authorize the amount on order being placed), then the
amount will be captured when the order is invoiced. The transaction will not become visible in Square until the
order is invoiced.
Navigate to Magento Admin, in Sales > Orders grid and select to view the details of the order that placed using
the “Authorize Only” option. Click on Invoices and choose to emit the invoice for the order:

17
Going back to the orders details shows the order processing and the notification that the order amount has
been captured online:

18
5.1.4 Void Transaction when an Order is Canceled
The following preconditions need to be fulfilled to void a transaction:
- The Square Payment Solution’s payment action is set to Authorize Only:
- An order has been placed and its corresponding invoice has not yet been emitted – the order therefore has
the status “Processing” and the amount has not yet been captured:

19
From the Order’s details page, Cancel the order and confirm the action:
The new order’s status is canceled and with it, the amount authorization.

20
5.1.5 Store Credit Card
In order for customers to be able to store and reuse their credit cards, one of the “Allow card on file payments”
options must be enabled in the Square Payment Solution:
If the option is enabled, then the customer has the chance to save their credit card information during
checkout:

21
After the checkout completes and if the user returns to place another order, the stored credit card will be
available with hidden details:
Storing the credit card is not available when placing an order from the Magento Admin.
5.1.6 Multi-store Configuration for Square Payment If you have multiple stores and need to view the transactions differentiated by store in the Square dashboard,
then please consider the following information:
- The solution is only functional if you disable all the other synchronizations and only use the extension for
the Square Payment method.
- The assumption is that you have a number of locations set in Square at least equal to the number of stores
set in Magento. The solution consists in associating each Magento store to a different Square Location for Online Payments, by
having individually saved square configurations for each store.

22
a. In Admin > Stores > Configuration > Square > Square Configuration, switch the "Current Configuration
Scope" from "Default" to the "Store View" of your first store:

23
b. Uncheck the "Use Website" checkmark next to the Square Locations for Online Payment drop down. Select
the Square location you want to associate to the store currently in scope from the drop down. Save the
configuration:
Repeat steps a. and b. for your other stores (by selecting the scope for each store, selecting the Square location
associated for each store and saving)
Remember to clear the cache after each time the configuration is changed.

24
5.2 Gift Cards
5.2.1 Magento Settings Please note that using the Gift Card functionality is limited to accounts that have this option enabled on their
Square account. Please contact a Square representative and request the Gift Card functionality to be enabled
for your account before enabling this option.
If you made sure the gift card functionality is enabled on your Square account, then you can activate it in
Magento by navigating to Stores > Configuration > Sales > Payment Methods > Square Payments Solution >
Enable Gift Card:
Enabling the gift card inserts a new section inside the Square payment form on the front, where the customer
can check the value of a gift card, apply gift cards to their checkout, or remove a gift card from the ones they
previously applied.

25
5.2.2 Checkout Using Gift Cards The customers can use gift cards during the payment method step of the checkout. After typing/pasting the gift card number in the marked field, they have the option to check the balance or apply the gift card to the current order:

26
If the total balance of all applied gift cards is greater than the order value, no credit card information is required.
At this point, the customer may also decide to remove an applied gift card:
If the balance of a gift card is greater than the order value, the remaining amount will still be available for use
during a future order.

27
5.2.3 Refund Orders Paid for Using Gift Cards Refunding an order paid for using gift cards follows the normal procedure of refunding an order online: navigate to the orders grid, click to view the invoice of a specific order, create credit memo, then click Refund. This action will distribute the refunded amounts to the gift cards and credit card, with the same amounts they were charged, respectively.

28
To refund gift cards used in an order using custom amounts, navigate to the orders grid, click to view the invoice of a specific order, create credit memo (the same process as when refunding an order online), type the amount you want to refund on a specific gift card, click “Update Totals”, and then click “Refund”.

29
5.2.4 View Gift Card Transactions in Square Dashboard Transactions involving gift cards (be they payments or refunds) are visible in the Square dashboard for each order:
- Payment using a gift card in Square dashboard:
- Refund of a gift card in Square dashboard:

30
5.3 Apple Pay
5.3.1 Prerequisites
In order to be able to set up Apple Pay, the following must be true:
you have https set up on your Magento store
you have a Square production account connected In the Magento Admin
your Square account Is based In the United States
5.3.2 Set Up
No configuration or setting up is needed in your Magento Admin.
In your Square dashboard, the following actions must be performed:
Open the Application Dashboard, select the application associated with your SqPaymentForm
implementation,
Click on the Apple Pay tab for the selected application, then click on the "Add a new domain" link:

31
1. Type the domain name to your store:
2. A success message will be displayed:

32
3. Download the verification file, upload it to your domain. After the domain ownership verification is
completed, the domain will be added in the validated domains list:

33
4. If everything went well, when a customer accesses the front, the payment form will look like so:

34
6 - If You Need the Full Omni Capabilities of the Extension
6.1 General Configuration
6.1.1 Customer Synchronization
The synchronization of customers from the Square platform to the Magento one is done automatically,
periodically with the aid of a cron (currently set to run twice an hour). This requires no changes in the Magento 2
Admin settings.
In order to pick the changes from Magento and push them into Square, please make sure “Enable Customer
Synchronization” is set to “Yes” in the Magento Admin Square configuration. If the option is enabled, the
changes are instantly visible in Square. If the option is disabled, all the customers created will be pushed to
Square next time the synchronization is enabled.

35
6.1.2 Catalog and Inventory Synchronization
To enable the synchronization of products between the source of records and the client, please make sure the
“Enable Catalog Synchronization” is set to “Yes”. To find this setting, navigate to Admin > System > Square >
Square Omni Configuration > Catalog and Inventory Synchronization. In the same tab, select the source of
records from the drop down to establish the way the records are synchronized:
If you decide to switch the source of records after the initial set up of the system, please make sure that the
records sync’s destination is empty. In other words, if so far, the system had Square Up as the source of records
and you switch it to Magento, make sure you delete all records in Square before committing the switch. If so
far, the system had Magento as the source of records and you switch it to Square Up, make sure you delete all
records in Magento before committing the switch.

36
6.1.3 Order and Transactions Synchronization
The user is able to view all transactions associated with a customer inside Magento, including those done in a
physical location, if the “Import transaction and refunds” is set to yes. With the settings saved, all transactions
done in a physical location registered in Square will also be pushed to Magento. Currently, a cron job runs twice
an hour to retrieve the orders from Square and push them to the Magento 2 Admin:

37
6.1.4 Webhooks Configuration
All modifications to inventory made in Magento are instantly pushed to Square. Modifications done to the
inventory in Square need to wait for the cron to run (twice an hour) in order to be reflected in Magento.
If however you need that modifications done to the inventory in Square to be instantly visible in Magento as
well, you will have to enable webhooks. They will allow any change in inventory (including orders) to be
instantaneously synchronized with Square.
To enable webhooks:
- Navigate to Magento Admin > Stores > Configuration > Square > Square Configuration > Webhooks
Configuration:

38
- Copy the Webhook URL:
- In your Square account, manage your app: navigate to Webhooks and Enable Webhooks here:

39
- Paste the Webhook URL you copied earlier into the Notification URL field:
For a list of complete events you can subscribe to, please consult the Square documentation at https://developer.squareup.com/docs/webhooks-api/subscribe-to-events
- Click Save:

40
- Click Show Signature Key and copy it:

41
- Go back to Magento in your Square Configuration page and paste the secret you have just copied into the
Square Signature field, then save the configuration:
- Refresh the Magento cache and you are all set.

42
6.2 Square Payment Processing Configuration
6.2.1 Authorize and Capture amount when Order is placed
In order to enable the Square payment solution, please make sure it is Enabled in both Magento 2 and Square
admin. There are two options to use the Square payment solution: either authorize only on order being placed
(and capture the amount later when the invoice is generated), or authorize and capture the amount the instant
the order is placed.
Navigate to Stores > Configuration > Sales > Payment Methods > Square payment Solution section. Make sure
the solution is enabled and choose “Authorize and Capture” from the Payment Action drop down menu.
Save the current configuration, refresh the cache and try placing an order on the frontend.
Proceed with the checkout steps using valid data. Choose “Credit Card Square” when you get to the Payment
Information screen. Consider that a front-end validation is done on the credit card number – which needs to be
valid in order for the pay with card button to be active:

43
Finalize the placing of the order. Navigating back to Magento Admin, in Sales > Orders grid and selecting to
view the details of the order that has just been placed, shows the order status as Processing and the order’s
amount being captured:

44
6.2.2 Authorize (without capture) amount when Order is placed
Navigate to System > Configuration > Sales > Payment Methods > Square payment Solution Tab. Make sure
the solution is enabled and choose “Authorize Only” from the Payment Action drop down menu.
Save the current configuration, refresh the cache and try placing an order on the frontend.
Proceed with the checkout steps using valid data. Choose “Credit Card Square” when you get to the Payment
Information screen. Consider that a front-end validation is done on the credit card number – which needs to be
valid in order for the pay with card button to be active:

45

46
Finalize the placing of the order. Navigating back to Magento Admin, in Sales > Orders grid and selecting to view the details of the order that has just been placed, shows the order status as Processing and the order’s amount being authorized:

47
6.2.3 Capture amount when the Invoice is being created
If you chose the first option described previously (to only authorize the amount on order being placed), then the
amount will be captured when the order is invoiced. The transaction will not become visible in Square until the
order is invoiced.
Navigate to Magento Admin, in Sales > Orders grid and select to view the details of the order that placed using
the “Authorize Only” option. Click on Invoices and choose to emit the invoice for the order:

48
Going back to the orders details shows the order processing and the notification that the order amount has
been captured online:

49
6.2.4 Void Transaction when an Order is Canceled
The following preconditions need to be fulfilled to void a transaction:
- The Square Payment Solution’s payment action is set to Authorize Only:
- An order has been placed and its corresponding invoice has not yet been emitted – the order therefore has
the status “Processing” and the amount has not yet been captured:

50
From the Order’s details page, Cancel the order and confirm the action:
The new order’s status is canceled and with it, the amount authorization.

51
6.2.5 Store Credit Card
In order for customers to be able to store and reuse their credit cards, one of the “Allow card on file payments”
options must be enabled in the Square Payment Solution:
If the option is enabled, then the customer has the chance to save their credit card information during
checkout:

52
After the checkout completes and if the user returns to place another order, the stored credit card will be
available with hidden details:
Storing the credit card is not available when placing an order from the Magento Admin.

53
6.2.6 Multi-store Configuration for Square Payment If you have multiple stores and need to view the transactions differentiated by store in the Square dashboard,
then please consider the following information:
- The solution is only functional if you disable all the other synchronizations and only use the extension for
the Square Payment method.
- The assumption is that you have a number of locations set in Square at least equal to the number of stores
set in Magento. The solution consists in associating each Magento store to a different Square Location for Online Payments, by
having individually saved square configurations for each store.
a. In Admin > Stores > Configuration > Square > Square Configuration, switch the "Current Configuration
Scope" from "Default" to the "Store View" of your first store:

54
b. Uncheck the "Use Website" checkmark next to the Square Locations for Online Payment drop down. Select
the Square location you want to associate to the store currently in scope from the drop down. Save the
configuration:
Repeat steps a. and b. for your other stores (by selecting the scope for each store, selecting the Square location
associated for each store and saving)
Remember to clear the cache after each time the configuration is changed.

55
6.3 Gift Cards
6.3.1 Magento Settings Please note that using the Gift Card functionality is limited to accounts that have this option enabled on their
Square account. Please contact a Square representative and request the Gift Card functionality to be enabled
for your account before enabling this option.
If you made sure the gift card functionality is enabled on your Square account, then you can activate it in
Magento by navigating to Stores > Configuration > Sales > Payment Methods > Square Payments Solution >
Enable Gift Card:
Enabling the gift card inserts a new section inside the Square payment form on the front, where the customer
can check the value of a gift card, apply gift cards to their checkout, or remove a gift card from the ones they
previously applied.

56
6.3.2 Checkout Using Gift Cards The customers can use gift cards during the payment method step of the checkout. After typing/pasting the gift card number in the marked field, they have the option to check the balance or apply the gift card to the current order:

57
If the total balance of all applied gift cards is greater than the order value, no credit card information is required.
At this point, the customer may also decide to remove an applied gift card:
If the balance of a gift card is greater than the order value, the remaining amount will still be available for use
during a future order.

58
6.3.3 Refund Orders Paid for Using Gift Cards Refunding an order paid for using gift cards follows the normal procedure of refunding an order online: navigate to the orders grid, click to view the invoice of a specific order, create credit memo, then click Refund. This action will distribute the refunded amounts to the gift cards and credit card, with the same amounts they were charged, respectively.
To refund gift cards used in an order using custom amounts, navigate to the orders grid, click to view the invoice of a specific order, create credit memo (the same process as when refunding an order online), type the amount you want to refund on a specific gift card, click “Update Totals”, and then click “Refund Gift Cards”.

59
60
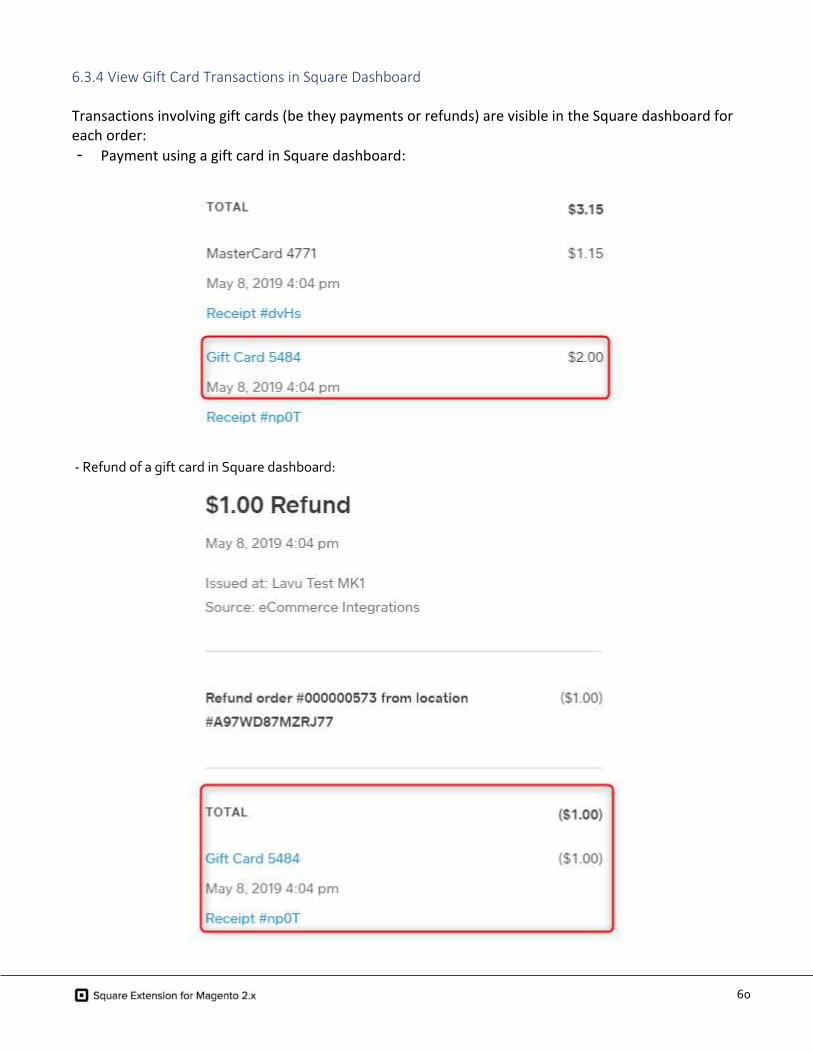
6.3.4 View Gift Card Transactions in Square Dashboard Transactions involving gift cards (be they payments or refunds) are visible in the Square dashboard for each order:
- Payment using a gift card in Square dashboard:
- Refund of a gift card in Square dashboard:

61
6.4 - Apple Pay
6.4.1 Prerequisites
In order to be able to set up Apple Pay, the following must be true:
you have https set up on your Magento store
you have a Square production account connected In the Magento Admin
your Square account Is based In the United States
6.4.2 Set Up
No configuration or setting up is needed in your Magento Admin.
In your Square dashboard, the following actions must be performed:
Open the Application Dashboard, select the application associated with your SqPaymentForm
implementation,
Click on the Apple Pay tab for the selected application, then click on the "Add a new domain" link:

62
5. Type the domain name to your store:
6. A success message will be displayed:

63
7. Download the verification file, upload it to your domain. After the domain ownership verification is
completed, the domain will be added in the validated domains list:

64
8. If everything went well, when a customer accesses the front, the payment form will look like so:

65
6.5 - Customers Synchronization
6.5.1 Admin Settings Needed
The synchronization of customers from the Square platform to the Magento one is done automatically,
periodically with the aid of a cron (currently set to run twice an hour). This requires no changes in the Magento
Admin settings.
In order to pick the changes from Magento and push them into Square, please make sure “Enable Customer
Synchronization” is set to “Yes” in the Magento Admin Square configuration. If the option is disabled, all the
customers created will be pushed to Square next time the synchronization is enabled.
Unlike the flow of information regarding customers coming from the Square platform (which is cron
dependent), changes to the customers made in Magento are instantly pushed to Square, as long as the
synchronization is enabled:

66
6.5.2 Magento Customer Creation
There are two ways for a new customer to register in Magento. Registering from the store’s front follows the
standard registration procedure on any ecommerce site. Fill the form with valid data and click register:

67
If the submission is successful, the customer is instantly visible in the Square platform. Their creation source is
marked as “third party” and their reference ID matches the Magento customers’ grid ID:
Registering a customer from the Magento admin area follows the standard admin registration procedure. Fill
the form with valid data and save the customer:

68
If the submission is successful, the customer is instantly visible in the Square platform. Their creation source is
marked as “third party” and their reference ID matches the Magento customers’ grid ID:

69
6.5.3 Square Customer Creation
While in Square, navigate to Customers, click Create Customer, fill the form with valid data and Save the newly
created customer:
If the submission is successful and once the cron runs, the customer becomes visible in the Magento platform.
Their creation source is marked as “Directory”. The customer receives a reference ID only after they are pushed
to Magento – matching their Magento customers’ grid ID:

70
A customer created in this way will be able to login on the store’s front only after a Magento admin edits them
and sets a password, or if the customer follows the “forgot password” procedure from the front.
6.5.4 Edit a Customer in Square
Changes done to a customer in the Square platform are pushed to Magento after the cron runs:

71
6.5.5 Delete a Customer in Magento
Deleting a customer from the Magento admin with the Customer synchronization enabled instantly removes
them from the Square platform as well. If the sync is disabled, they will be removed the next time the cron runs
with the option enabled:

72
6.5.6 Delete a Customer in Square
To delete a customer from the Square platform, navigate to Customers, select the user you want removed, click
on “more options” shown on the right, then “Delete Customer”. Confirm that you understood the implications
of removing a customer, then hit “Delete”:

73
Once the cron runs, the customer is also removed from Magento:

74
6.6 - Catalog Management Synchronization
6.6.1 Sources of Records
There are two possible ways the catalog synchronization can be achieved. If Magento is set to be the source of
records, the sync with Square is done in real time and is triggered every time an item is created, modified or
removed:
If Square is set to be the source of records, new additions, updates or removals are pushed to Magento during a
cron that runs every 30 minutes:

75
6.6.2 Configurable Products Notes
Please consider that the behavior of configurable products is different in Magento than it is in Square. In
Square, the configurable product and its variations make an entity in its own right: the variations are shown as
sub-products in a hierarchical tree-like display.
In Magento 2, the configurable product is a separate entity from its variations: the variations are simple normal
products, associated to a configurable product. This allows for the same variation to be used in more than one
configurable product. To see the variations of a configurable, enter the product details and expand the
Configurations tab:

76
When a configurable product is created in Square, a configurable entity is also created in Magento, and all the
variations from Square are brought to Magento as simple products and associated correctly to the configurable.
These variations in Magento, in fact simple products, have “Child product” in their description by default:

77
6.6.3 Admin Settings
To enable the synchronization of products between the source of records and the client, please make sure the
“Enable Catalog Synchronization” is set to “Yes”. To find this setting, navigate to Admin > Stores >
Configuration > Square > Square Configuration > Catalog and Inventory Synchronization. In the same tab,
select the source of records from the drop down to establish the way the records are synchronized:

78
6.7 - Locations and Inventory Synchronization
Locations created in the Square platform are instantly visible and selectable in Magento.
6.7.1 Set Location from Magento Admin
Locations can be selected in Magento by navigating to System > Stores > Configuration > Square > Square
Configuration > General Configuration > Square Location for Online Payments
WARNING!
Please note that the inventory displayed in Magento products grid and in the product’s inventory tab has the
value matching ONLY the selected location. Switching the default location here will also make all the
inventories displayed in the grid take the values matching the quantities on the selected location. If the
products have 0 inventory on the newly selected location, then the inventory displayed will be 0.
Note that by switching the location from one with inventory to another without inventory, the quantities are
not lost. All quantities on all locations are visible in the Locations tab of the product details. Also, switching
back from a location without inventory to one with inventory will display the quantities again.

79

80
6.7.2 Set Location During the Get OAuth Token Process
To avoid having no location selected in Magento Admin and a correct locations association, choosing a location
can be done during the Get OAuth Token Process. Navigate to System > Stores > Configuration > Square >
Square Configuration > Oauth Configuration and click on Get OAuth Token. After logging in to Square, a
success message is displayed and along with it, a prompt to select a location:

81
6.7.3 Inventory Synchronization: Square is SOR
Each time the inventory cron runs, any changes in the quantity of a product – analyzed for each location – is
also updated in Magento. A quantity update also happens during a sale, so even if the order synchronization is
disabled, the quantity will still be updated after a sale, as long as the inventory synchronization is enabled.
Please have a look at 6.7.5 View and Edit Inventory per Location in Magento for more details related to the
possibilities to view the inventory of a product for each location.

82
6.7.4 Inventory Synchronization: Magento is SOR
Each time a modification in the quantity of a product happens in Magento– analyzed for each location – the
inventory is also updated in Square. There are several ways to change the inventory of a product for a location
with Magento as SOR: when a new order is created, when the Magento inventory is edited or when the Square
inventory for an external location is edited from the Square tab in the product’s details page. In all these cases,
the changes in quantity are pushed to Square instantly. Please see 6.7.5 View and Edit Inventory per Location in
Magento for more details related to the possibilities to view and edit the inventory of a product for each
location.

83
6.7.5 View and Edit Inventory per Location in Magento
The default location selected in the General Configuration settings is used as the base reference for the
inventory of a product – this will be the Square location used for Online Payments:
Once this location has been selected, the inventory for each product (for the “default” location) can be viewed
inside the product details page – the Magento standard Inventory tab. Creating a new product and setting its
inventory during the creation process will assign its quantity to the same “default” location.

84
Editing this quantity while Magento is SOR will push the change to your Square dashboard.

85
The inventory displayed in the product’s details page as described above can also be seen in the Magento
Products grid:
The quantity displayed in the grid is the one corresponding to the default online location, as described earlier.
The locations column allows you to filter the products according to a specific location – only products with
inventory on the selected location will be displayed in the grid.

86
In order to view the inventory of the product on all locations, while inside the Product’s details in Magento 2,
scroll down to the Locations Inventory section:
This tab displays a list of all locations on which the product has an inventory. If Square is the system of records,
the quantity for the locations cannot be edited from here, since any modifications should be done in Square. If
Magento is the system of records, then the product’s inventory can be changed for any location from within this
section:

87
From the same menu, you can assign the product and set its inventory for any of your locations, by clicking the
“Add location” button:

88
6.8 - Order and Transaction Synchronization
6.8.1 Magento Settings
The extension always creates the corresponding orders in Square:
The first option, “Import transactions and refunds”, if enabled, retrieves the transactions from Square into
Magento.
The second option, Convert Transactions into orders, if enabled, converts transactions retrieved from Square
into Magento orders (as long as the retrieved Square transaction has all customer data associated to it and as
long as the items on the order are already synced between Magento and Square).
The Run Transactions and Refunds Sync button forces the synchronization to run: it imports the transactions
from Square to Magento before the cron job enabled by the “Yes” option above does the import.

89
6.8.2 View Square Transactions
There are two ways for the transactions done in physical locations to be viewed in Magento.
The first is to view them globally by navigating in Sales > Square > Transactions:
All transactions are displayed, and can be filtered by external location by clicking the Filters button:

90
The second method is to view the transactions for specific customers, from inside their details page.
Navigate to Customers > All Customers > Select a customer, and click on Transactions:

91
All transactions coming from external locations are visible in the grid:

92
6.8.3 View Square Refunds
There are two ways for the refunds done in physical locations to be viewed in Magento 2.
The first is to view them globally by navigating in Sales > Square > Refunds:
All refunds are displayed:

93
The second method is to view the transactions for specific customers, from inside their details page.
Navigate to Customers > All Customers > Select a customer, and click on Square refunds:

94
All transactions coming from external locations are visible in the grid:
Note: to issue partial refunds, use the Adjustment Fee field when issuing a credit memo. That way the customer
will be refunded only with the remaining value. (Example: if the total is $100 and you only want to refund $40,
then put $60 in the adjustment fee section).

95
6.9 - In-Store Pickup Functionality
6.9.1 Prerequisites for enabling In-Store Pickup
In Magento Admin, please make sure the following configurations are performed:
1. In Admin > Stores > Configuration > Square > Square Configuration:
o The credentials are set and a location is selected.
o The Get OAuth Token process was completed.

96
o The Catalog Inventory Synchronization must be enabled and the catalog items and inventory
synced (the extension checks for locations inventory before showing them as a pickup option to
customer during checkout).
2. In Admin > Stores > Configuration > Sales > Payment Methods, the Square payment solution must be
enabled (the extension sends the Square order and the pickup details inside order fulfillment at the
moment the order is invoiced). Please note that Pickup functionality can only be used with Square
payment functionality, no other payment method is allowed. If a customer selects a location to pick up
from as delivery method, then all the other payment methods will be suppressed from the checkout
process and only Square payment will show up to the customer.

97
3. In Admin > Stores > Configuration > Sales > Shipping Methods, the Square Pickup delivery method
must be enabled.
6.9.2 Configuring the In-Store Pickup functionality
The settings for configuring the In-Store Pickup functionality are found in Admin > Stores > Configuration >
Sales > Shipping Methods > Square Pickup:

98
Enabled: enable/disable functionality
Title: the name of the shipping method, as it will be displayed to the customer on frontend
Use all locations: yes/no field, if "no" option is selected then "Locations to exclude" field shows up and
allow the merchant to select locations that will not show as a pickup option.
o If there is not enough quantity of any products on cart to fulfil the order on the default location,
then only Square pickup shipping method is available.
o If there is not enough quantity of any product on cart to fulfil the order on one of the pickup
locations, then that location is excluded from the locations' options on the front.
Locations to exclude: selected locations will not show up as a pickup option
Location label: this field gives the opportunity to the merchant to modify how the locations are named
when the customers sees the locations during checkout on the front. E.g. merchant may want to show
only the address; or maybe it is better to show location city only. This field work as a template, which
can have text and some variables. Default value is "{address}, {locality}" and possible variables are:
name, address, locality (city), district, postal code, country
Schedule type: this version only contemplated "As soon as possible" option
Time to prepare: time for order preparation, in hours
ASAP label: will be showed to customers to know when their order will be ready for pick up. Default
value is "Available to pick up in {prep_time_duration}", prep_time_duration variable will show "Time to
prepare" setting followed by "hour" or "hours" string
Handling fee: the amount to charge the customer for pickup, the default value is zero
Ship to Applicable Countries: this is a default Magento setting, which allows the merchant to use pickup
for all countries or to only use it on countries selected on "Ship to Specific Countries" setting
Ship to Specific Countries: if "Ship to Applicable Countries" option is set to "Specific Countries", this
field will be enabled to select countries
Sort Order: this is a default Magento setting, which allows the merchant to define the order of the
shipping methods during the checkout process
6.9.3 Order journey
If the product is available in multiple locations not excluded from pickup:

99
…then all these locations will be displayed to the customer during checkout when selecting the shipping
method:

100
If the customer selects one of the Square Pickup options, then the only payment method available during the
next step will be the Square payment solution:

101
The user can see in their order details their selection for pick-up:

102
Once the order is placed, the location is displayed in the order details in the customer's account:

103
The store owner can see the pickup location in the admin area, in the order's details:

104
If the order is invoiced, the details will also be available in the Square dashboard:
6.9.4 In-store Pickup functionality notes The inventory is decreased from the location selected by the customer for picking up. This is visible in both the Magento Admin and in Square Dashboard. If the chosen delivery method was other than the pic-up in store, then the inventory will be subtracted from the default location selected in Magento in the default location setting found in the Square general settings screen, as described in 6.9.1. In the same way, if an order is canceled / refunded and the product is returned to stock, then the stock will be rebuilt from the location where the product was originally picked up from. For gift cards, the extension needs to create a Square order on the location selected by the customer before order completion. If the customer changes location after a Square order is created, then the extension cancels any existing gift card authorizations and the customer will need to re-enter and re-apply gift cards.

105
Appendix-1 Entities mapping between Magento and Square
A-1.1 Square Locations

106
A-1.2 Square Customers

107
A-1.3 Square Catalog
A-1.4 Square Inventory

108
A-1.5 Square Payment Transaction

109
A-1.6 Square Transactions/Refunds

110
A-1.7 Square Orders

111
Appendix-2 Crons schedule
Job Name Action Frequency
customer_export Exports all customers from
Magento to Square
Twice each hour, at minutes 5 and 35
customer_import Brings customers from Square
to Magento and performs
actions on them:
update/create/delete
Twice each hour, at minutes 10 and 40
location_import Imports all locations from
Square to Magento
Once per hour, at minute 0
oauth_refresh Prevents token expiration Once per day, at 4 am
square_transactions_import Imports transactions from
Square to Magento
Twice each hour, at minutes 25 and 55
square_refunds_import Imports refunds from Square
to Magento
Twice each hour, at minutes 25 and 55
catalog_process Synchronizes the products, in
accordance with the system of
records
Twice each hour, at minutes 15 and 45
inventory_process Synchronizes the inventory of
each product, in accordance
with the system of records
Twice each hour, at minutes 20 and 50