
QUARTER 2 | 2017 - Stampin' Up!
32
QUARTER 2 | 2017
-
Upload
khangminh22 -
Category
Documents
-
view
1 -
download
0
Transcript of QUARTER 2 | 2017 - Stampin' Up!
Q U A R T E R 2 | 2 0 1 7
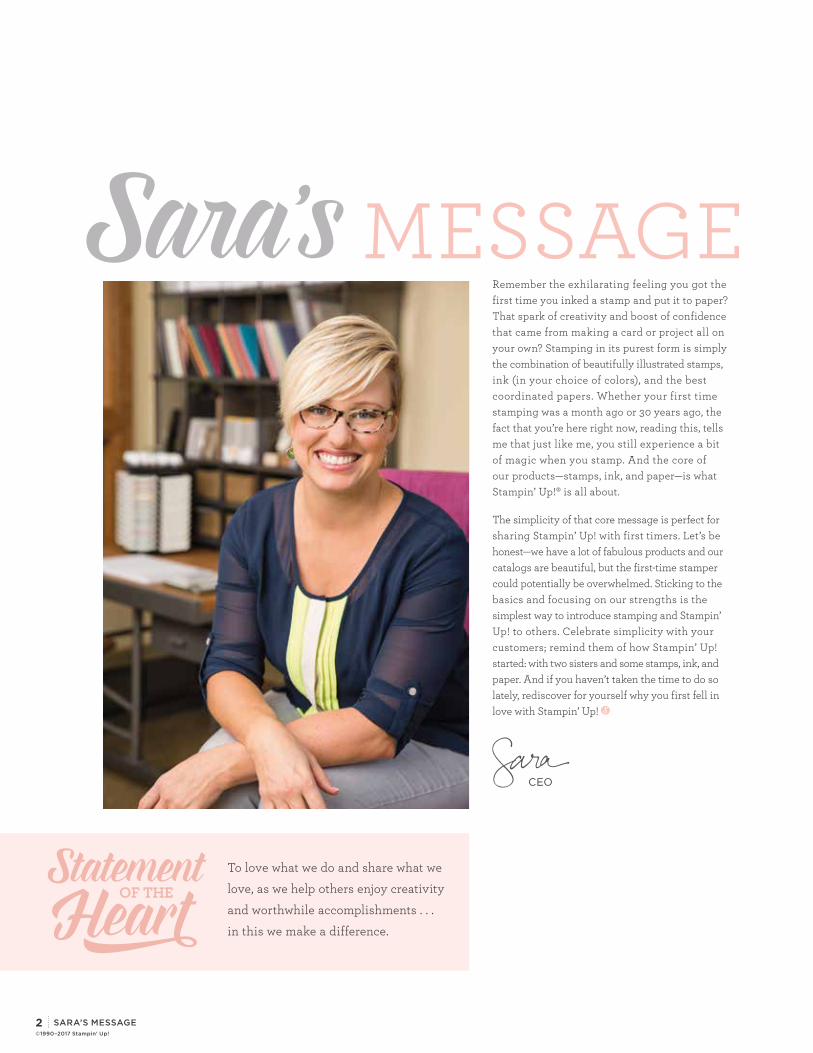
Remember the exhilarating feeling you got the first time you inked a stamp and put it to paper? That spark of creativity and boost of confidence that came from making a card or project all on your own? Stamping in its purest form is simply the combination of beautifully illustrated stamps, ink (in your choice of colors), and the best coordinated papers. Whether your first time stamping was a month ago or 30 years ago, the fact that you’re here right now, reading this, tells me that just like me, you still experience a bit of magic when you stamp. And the core of our products—stamps, ink, and paper—is what Stampin’ Up!® is all about.
The simplicity of that core message is perfect for sharing Stampin’ Up! with first timers. Let’s be honest—we have a lot of fabulous products and our catalogs are beautiful, but the first-time stamper could potentially be overwhelmed. Sticking to the basics and focusing on our strengths is the simplest way to introduce stamping and Stampin’ Up! to others. Celebrate simplicity with your customers; remind them of how Stampin’ Up! started: with two sisters and some stamps, ink, and paper. And if you haven’t taken the time to do so lately, rediscover for yourself why you first fell in love with Stampin’ Up!
CEO
To love what we do and share what we
love, as we help others enjoy creativity
and worthwhile accomplishments . . .
in this we make a difference.
Sara's MESSAGE
2 SARA’S MESSAGE©1990–2017 Stampin' Up!

4 CASEING
5 HANDMADE CLEARLY CREATIVE
6 TECHNIQUE MASKING MAGIC
8 STEP IT UP
9 DEMONSTRATOR SPOTLIGHT SARAH BERRY
10 PRODUCT WIN WITH HOST SETS
12 EVENT OF THE MONTH APRIL
14 MEMORY KEEPING SCRAPPIN’ & STAMPIN’
16 PAPER CARDSTOCK
17 DEMONSTRATOR SPOTLIGHT FIONA CARSON
18 COMPENSATION PLAN CORE COMPENSATION VS. REWARDS
20 SELLING FEATURES AND BENEFITS
21 INK INK IT UP
22 DEMONSTRATOR SPOTLIGHT KAY SMITH
23 LEADING THE MORE THE MERRIER
24 STAMPS PUT THE “STAMP” IN STAMPIN’ UP!
26 EVENT OF THE MONTH MAY
28 DEMONSTRATOR EVENTS A BUFFET
29 RECRUITING SET YOUR RECRUIT UP FOR SUCCESS
30 MAKING A DIFFERENCE THE MILE HIGH STAMPERS
31 Q & A
26
WelcomeWe’re so excited to have you as a demonstrator! This magazine—along with our Succeed Weekly email—is a benefit you receive just for being part of our team. It’s a tool for you, with stamping ideas for your personal creativity and for your events, sales training, product information, and much more.
When each issue posts online you will find additional helpful information, including instructions for all Event of the Month projects. These are called Online Extras; be sure to check them out each quarter on the demonstrator website.
Enjoy your magazine—and your success!
TO YOUR QUARTERLY MAGAZINE
icon GUIDE
CLEAR-MOUNT
WOOD-MOUNT
PHOTOPOLYMER
Investing in your business is an important strategy, especially when you’re just starting out. Read on for a few ideas you can implement.
• Host your own events. Invite everyone in your social circle to a party and kick-start your business. You can then use the Stampin’ Rewards you earn as an affordable and profitable way to reinvest in your business and get items you’ll use in future events (Bone Folders, adhesives, scissors, etc.).
• Think ahead. What kinds of events do you want to plan? Make a list of products you need for whichever event types you choose. Do you want to start holding classes? Invest in a few kits and get extra ink pads and other supplies so you’re ready to get started.
• Keep a needs list. This will help you reduce impulse buying. You’ll then be able to get the products that will help you build your business.
• Take the next step. Look ahead and make note of dates when you’re available for more parties. Always invite guests to host or attend future events.
Learn more about how to hold events on the demonstrator website: Stampin’ University>Running Your Business>Hold Events. Also check out the event article on page 12 for more information about hosting your own parties.
MAKE & TAKE
Projects marked with this logo are excellent choices for event Make & Takes.
DEMO IT
Projects marked with this logo are excellent projects for event demonstrations.
HOST GIFT
Projects marked with this logo are excellent choices for host gifts.
ONLINE EXTRAS
You’ll find all of our Online Extras in the Stampin’ Success area of the demonstrator website.
23
INVEST IN YOUR BUSINESS
3CONTENTS©1990–2017 Stampin' Up!
CASEING©1990–2017 Stampin' Up!
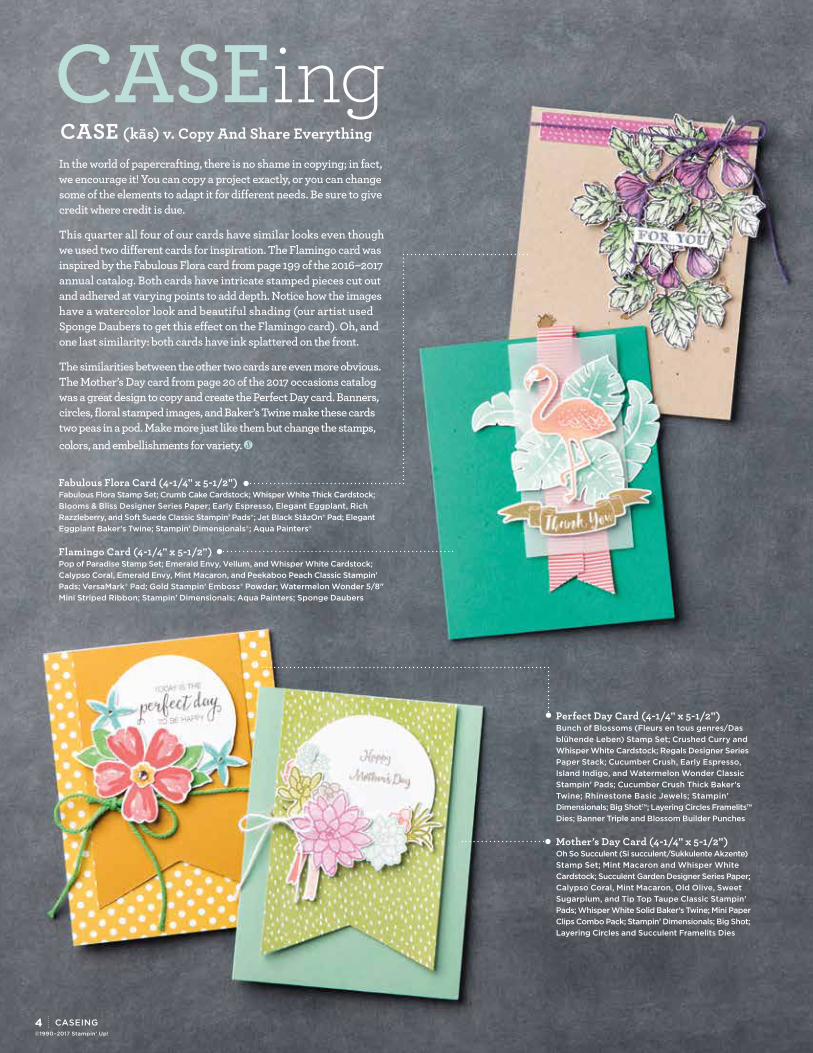
Fabulous Flora Card (4-1/4" x 5-1/2") Fabulous Flora Stamp Set; Crumb Cake Cardstock; Whisper White Thick Cardstock; Blooms & Bliss Designer Series Paper; Early Espresso, Elegant Eggplant, Rich Razzleberry, and Soft Suede Classic Stampin’ Pads®; Jet Black StāzOn® Pad; Elegant Eggplant Baker’s Twine; Stampin’ Dimensionals®; Aqua Painters®
Flamingo Card (4-1/4" x 5-1/2") Pop of Paradise Stamp Set; Emerald Envy, Vellum, and Whisper White Cardstock; Calypso Coral, Emerald Envy, Mint Macaron, and Peekaboo Peach Classic Stampin’ Pads; VersaMark® Pad; Gold Stampin’ Emboss® Powder; Watermelon Wonder 5/8" Mini Striped Ribbon; Stampin’ Dimensionals; Aqua Painters; Sponge Daubers
CASE (kās) v. Copy And Share Everything
Perfect Day Card (4-1/4" x 5-1/2") Bunch of Blossoms (Fleurs en tous genres/Das blühende Leben) Stamp Set; Crushed Curry and Whisper White Cardstock; Regals Designer Series Paper Stack; Cucumber Crush, Early Espresso, Island Indigo, and Watermelon Wonder Classic Stampin’ Pads; Cucumber Crush Thick Baker’s Twine; Rhinestone Basic Jewels; Stampin’ Dimensionals; Big Shot™; Layering Circles Framelits™ Dies; Banner Triple and Blossom Builder Punches
Mother’s Day Card (4-1/4" x 5-1/2") Oh So Succulent (Si succulent/Sukkulente Akzente) Stamp Set; Mint Macaron and Whisper White Cardstock; Succulent Garden Designer Series Paper; Calypso Coral, Mint Macaron, Old Olive, Sweet Sugarplum, and Tip Top Taupe Classic Stampin’ Pads; Whisper White Solid Baker’s Twine; Mini Paper Clips Combo Pack; Stampin’ Dimensionals; Big Shot; Layering Circles and Succulent Framelits Dies
In the world of papercrafting, there is no shame in copying; in fact, we encourage it! You can copy a project exactly, or you can change some of the elements to adapt it for different needs. Be sure to give credit where credit is due.
This quarter all four of our cards have similar looks even though we used two different cards for inspiration. The Flamingo card was inspired by the Fabulous Flora card from page 199 of the 2016–2017 annual catalog. Both cards have intricate stamped pieces cut out and adhered at varying points to add depth. Notice how the images have a watercolor look and beautiful shading (our artist used Sponge Daubers to get this effect on the Flamingo card). Oh, and one last similarity: both cards have ink splattered on the front.
The similarities between the other two cards are even more obvious. The Mother’s Day card from page 20 of the 2017 occasions catalog was a great design to copy and create the Perfect Day card. Banners, circles, floral stamped images, and Baker’s Twine make these cards two peas in a pod. Make more just like them but change the stamps, colors, and embellishments for variety.
CASEing
4
HandmadeCLEARLY CREATIVE
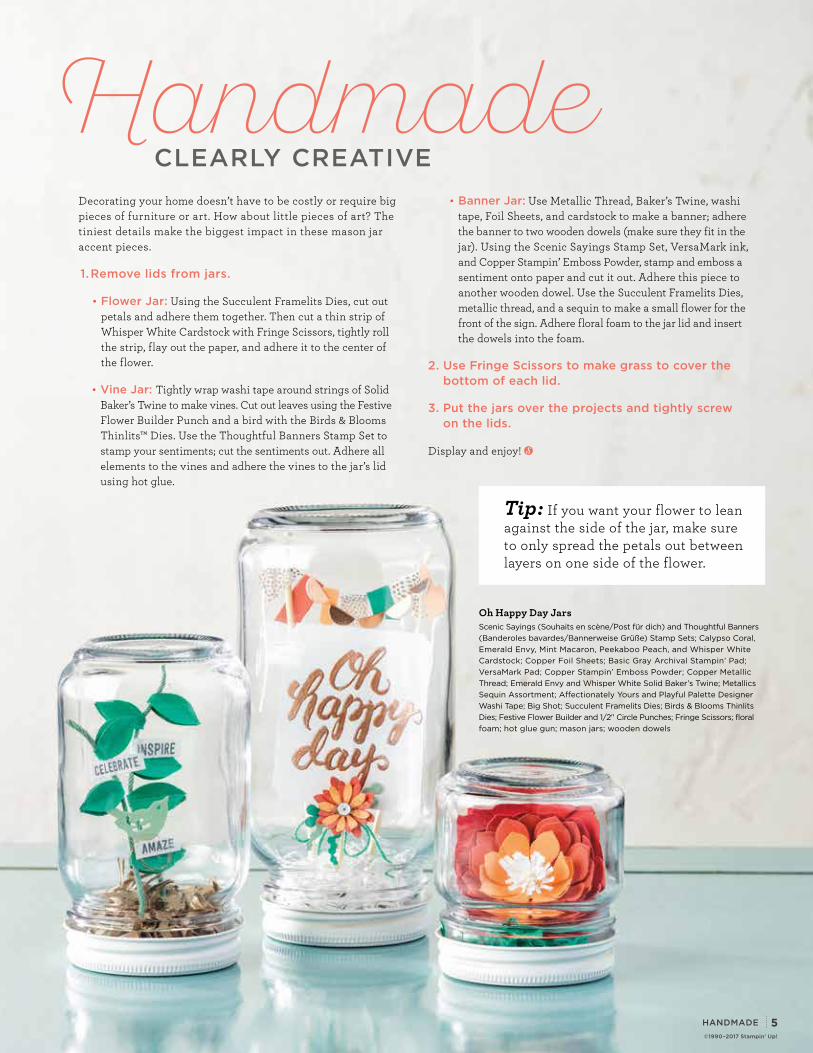
Oh Happy Day Jars Scenic Sayings (Souhaits en scène/Post für dich) and Thoughtful Banners (Banderoles bavardes/Bannerweise Grüße) Stamp Sets; Calypso Coral, Emerald Envy, Mint Macaron, Peekaboo Peach, and Whisper White Cardstock; Copper Foil Sheets; Basic Gray Archival Stampin’ Pad; VersaMark Pad; Copper Stampin’ Emboss Powder; Copper Metallic Thread; Emerald Envy and Whisper White Solid Baker’s Twine; Metallics Sequin Assortment; Affectionately Yours and Playful Palette Designer Washi Tape; Big Shot; Succulent Framelits Dies; Birds & Blooms Thinlits Dies; Festive Flower Builder and 1/2" Circle Punches; Fringe Scissors; floral foam; hot glue gun; mason jars; wooden dowels
Tip: If you want your flower to lean against the side of the jar, make sure to only spread the petals out between layers on one side of the flower.
Decorating your home doesn’t have to be costly or require big pieces of furniture or art. How about little pieces of art? The tiniest details make the biggest impact in these mason jar accent pieces.
1. Remove lids from jars.
• Flower Jar: Using the Succulent Framelits Dies, cut out petals and adhere them together. Then cut a thin strip of Whisper White Cardstock with Fringe Scissors, tightly roll the strip, flay out the paper, and adhere it to the center of the flower.
• Vine Jar: Tightly wrap washi tape around strings of Solid Baker’s Twine to make vines. Cut out leaves using the Festive Flower Builder Punch and a bird with the Birds & Blooms Thinlits™ Dies. Use the Thoughtful Banners Stamp Set to stamp your sentiments; cut the sentiments out. Adhere all elements to the vines and adhere the vines to the jar’s lid using hot glue.
• Banner Jar: Use Metallic Thread, Baker’s Twine, washi tape, Foil Sheets, and cardstock to make a banner; adhere the banner to two wooden dowels (make sure they fit in the jar). Using the Scenic Sayings Stamp Set, VersaMark ink, and Copper Stampin’ Emboss Powder, stamp and emboss a sentiment onto paper and cut it out. Adhere this piece to another wooden dowel. Use the Succulent Framelits Dies, metallic thread, and a sequin to make a small flower for the front of the sign. Adhere floral foam to the jar lid and insert the dowels into the foam.
2. Use Fringe Scissors to make grass to cover the bottom of each lid.
3. Put the jars over the projects and tightly screw on the lids.
Display and enjoy!
HANDMADE©1990–2017 Stampin' Up!
5
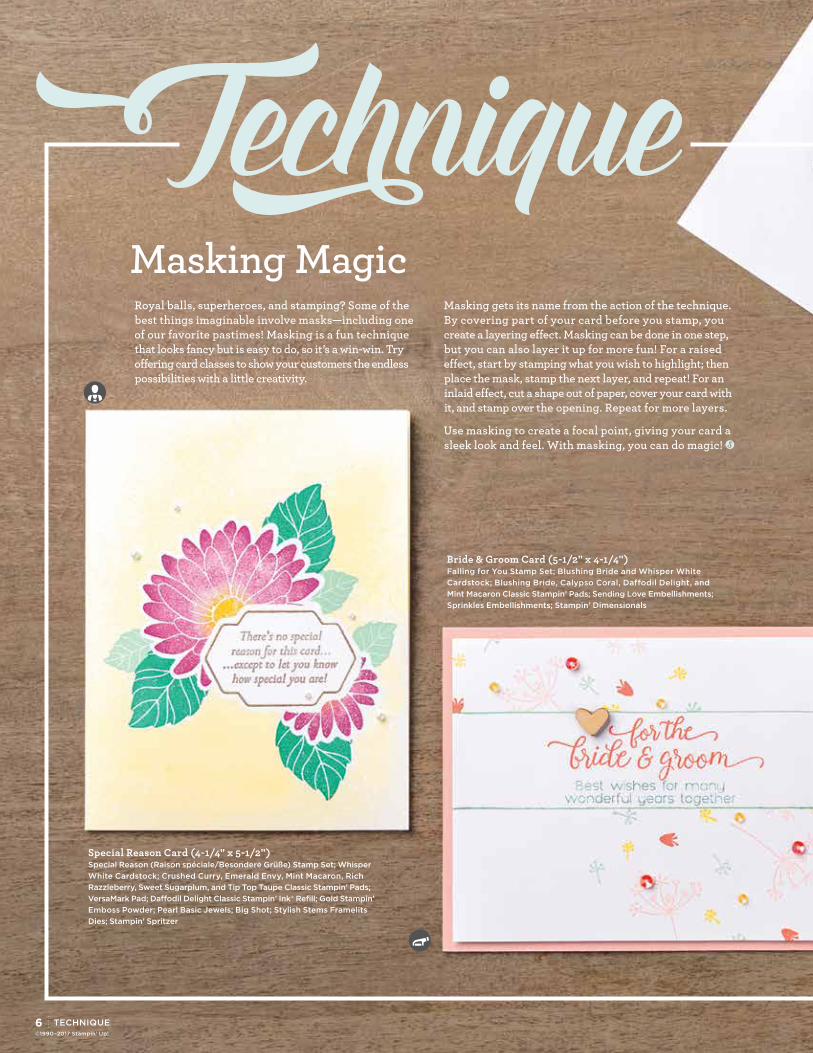
Masking Magic
TECHNIQUE©1990–2017 Stampin' Up!
Bride & Groom Card (5-1/2" x 4-1/4") Falling for You Stamp Set; Blushing Bride and Whisper White Cardstock; Blushing Bride, Calypso Coral, Daffodil Delight, and Mint Macaron Classic Stampin’ Pads; Sending Love Embellishments; Sprinkles Embellishments; Stampin’ Dimensionals
Special Reason Card (4-1/4" x 5-1/2") Special Reason (Raison spéciale/Besondere Grüße) Stamp Set; Whisper White Cardstock; Crushed Curry, Emerald Envy, Mint Macaron, Rich Razzleberry, Sweet Sugarplum, and Tip Top Taupe Classic Stampin’ Pads; VersaMark Pad; Daffodil Delight Classic Stampin’ Ink® Refill; Gold Stampin’ Emboss Powder; Pearl Basic Jewels; Big Shot; Stylish Stems Framelits Dies; Stampin’ Spritzer
Royal balls, superheroes, and stamping? Some of the best things imaginable involve masks—including one of our favorite pastimes! Masking is a fun technique that looks fancy but is easy to do, so it’s a win-win. Try offering card classes to show your customers the endless possibilities with a little creativity.
Masking gets its name from the action of the technique. By covering part of your card before you stamp, you create a layering effect. Masking can be done in one step, but you can also layer it up for more fun! For a raised effect, start by stamping what you wish to highlight; then place the mask, stamp the next layer, and repeat! For an inlaid effect, cut a shape out of paper, cover your card with it, and stamp over the opening. Repeat for more layers.
Use masking to create a focal point, giving your card a sleek look and feel. With masking, you can do magic!
6

TECHNIQUE
Oh Happy Day Card (3-1/2" x 5") Scenic Sayings (Souhaits en scène/Post für dich) Stamp Set; Hardwood Stamp; Soft Sky and Whisper White Cardstock; Dapper Denim, Flirty Flamingo, and Soft Sky Classic Stampin’ Pads; Basic Black Baker’s Twine; Aqua Painters; Big Shot; Lots of Labels Framelits Dies
1. Create a mask by cutting a label from the center of a piece of paper using the Lots of Labels Framelits Dies.
2. Place the mask over the Whisper White Cardstock and stamp the Hardwood image.
©1990–2017 Stampin' Up!
7
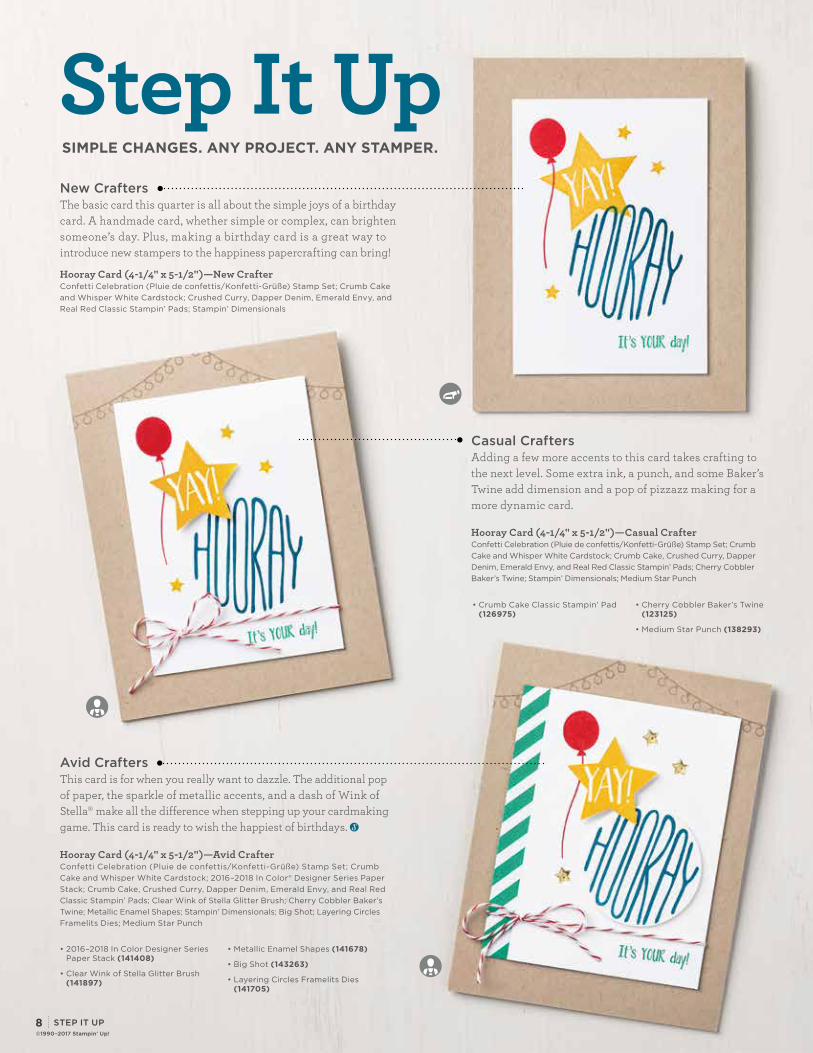
Boxes of PlentyNew Crafters The basic card this quarter is all about the simple joys of a birthday card. A handmade card, whether simple or complex, can brighten someone’s day. Plus, making a birthday card is a great way to introduce new stampers to the happiness papercrafting can bring!
Hooray Card (4-1/4" x 5-1/2")—New Crafter Confetti Celebration (Pluie de confettis/Konfetti-Grüße) Stamp Set; Crumb Cake and Whisper White Cardstock; Crushed Curry, Dapper Denim, Emerald Envy, and Real Red Classic Stampin’ Pads; Stampin’ Dimensionals
SIMPLE CHANGES. ANY PROJECT. ANY STAMPER.
Hooray Card (4-1/4" x 5-1/2")—Avid Crafter Confetti Celebration (Pluie de confettis/Konfetti-Grüße) Stamp Set; Crumb Cake and Whisper White Cardstock; 2016–2018 In Color® Designer Series Paper Stack; Crumb Cake, Crushed Curry, Dapper Denim, Emerald Envy, and Real Red Classic Stampin’ Pads; Clear Wink of Stella Glitter Brush; Cherry Cobbler Baker’s Twine; Metallic Enamel Shapes; Stampin’ Dimensionals; Big Shot; Layering Circles Framelits Dies; Medium Star Punch
Hooray Card (4-1/4" x 5-1/2")—Casual Crafter Confetti Celebration (Pluie de confettis/Konfetti-Grüße) Stamp Set; Crumb Cake and Whisper White Cardstock; Crumb Cake, Crushed Curry, Dapper Denim, Emerald Envy, and Real Red Classic Stampin’ Pads; Cherry Cobbler Baker’s Twine; Stampin’ Dimensionals; Medium Star Punch
Avid Crafters This card is for when you really want to dazzle. The additional pop of paper, the sparkle of metallic accents, and a dash of Wink of Stella® make all the difference when stepping up your cardmaking game. This card is ready to wish the happiest of birthdays.
• Crumb Cake Classic Stampin’ Pad (126975)
• Cherry Cobbler Baker’s Twine (123125)
• Medium Star Punch (138293)
• 2016–2018 In Color Designer Series Paper Stack (141408)
• Clear Wink of Stella Glitter Brush (141897)
• Metallic Enamel Shapes (141678)
• Big Shot (143263)
• Layering Circles Framelits Dies (141705)
Casual Crafters Adding a few more accents to this card takes crafting to the next level. Some extra ink, a punch, and some Baker’s Twine add dimension and a pop of pizzazz making for a more dynamic card.
STEP IT UP
Step It Up
©1990–2017 Stampin' Up!
8
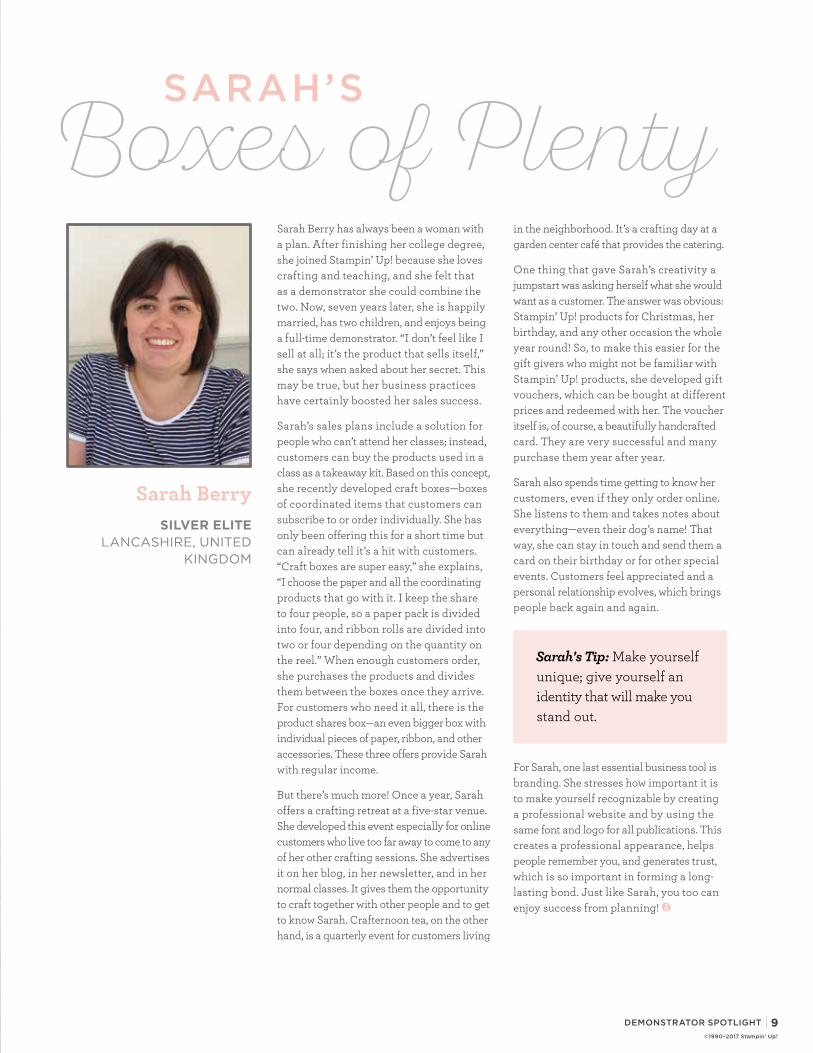
Sarah BerrySILVER ELITE
LANCASHIRE, UNITED KINGDOM
Sarah Berry has always been a woman with a plan. After finishing her college degree, she joined Stampin’ Up! because she loves crafting and teaching, and she felt that as a demonstrator she could combine the two. Now, seven years later, she is happily married, has two children, and enjoys being a full-time demonstrator. “I don’t feel like I sell at all; it’s the product that sells itself,” she says when asked about her secret. This may be true, but her business practices have certainly boosted her sales success.
Sarah’s sales plans include a solution for people who can’t attend her classes; instead, customers can buy the products used in a class as a takeaway kit. Based on this concept, she recently developed craft boxes—boxes of coordinated items that customers can subscribe to or order individually. She has only been offering this for a short time but can already tell it’s a hit with customers. “Craft boxes are super easy,” she explains, “I choose the paper and all the coordinating products that go with it. I keep the share to four people, so a paper pack is divided into four, and ribbon rolls are divided into two or four depending on the quantity on the reel.” When enough customers order, she purchases the products and divides them between the boxes once they arrive. For customers who need it all, there is the product shares box—an even bigger box with individual pieces of paper, ribbon, and other accessories. These three offers provide Sarah with regular income.
But there’s much more! Once a year, Sarah offers a crafting retreat at a five-star venue. She developed this event especially for online customers who live too far away to come to any of her other crafting sessions. She advertises it on her blog, in her newsletter, and in her normal classes. It gives them the opportunity to craft together with other people and to get to know Sarah. Crafternoon tea, on the other hand, is a quarterly event for customers living
in the neighborhood. It’s a crafting day at a garden center café that provides the catering.
One thing that gave Sarah’s creativity a jumpstart was asking herself what she would want as a customer. The answer was obvious: Stampin’ Up! products for Christmas, her birthday, and any other occasion the whole year round! So, to make this easier for the gift givers who might not be familiar with Stampin’ Up! products, she developed gift vouchers, which can be bought at different prices and redeemed with her. The voucher itself is, of course, a beautifully handcrafted card. They are very successful and many purchase them year after year.
Sarah also spends time getting to know her customers, even if they only order online. She listens to them and takes notes about everything—even their dog’s name! That way, she can stay in touch and send them a card on their birthday or for other special events. Customers feel appreciated and a personal relationship evolves, which brings people back again and again.
For Sarah, one last essential business tool is branding. She stresses how important it is to make yourself recognizable by creating a professional website and by using the same font and logo for all publications. This creates a professional appearance, helps people remember you, and generates trust, which is so important in forming a long-lasting bond. Just like Sarah, you too can enjoy success from planning!
Sarah's Tip: Make yourself unique; give yourself an identity that will make you stand out.
Boxes of PlentySARAH’S
DEMONSTRATOR SPOTLIGHT©1990–2017 Stampin' Up!
9
Make several projects using your favorite host sets and take them to your parties and classes.
They’re exclusive, time-limited, an exceptional value, and a great way to get bookings. What are we talking about?
Host stamp sets!
Host stamp sets are more than just a pretty face; they offer substantial benefits for your customers and for you.
• They’re completely exclusive. Unlike our other stamp sets, host sets are only available with Stampin’ Rewards. There’s no other way to get them.
• They’re time limited. They don’t carry over from catalog to catalog, so they’re available for a limited time only. Once they’re gone, they’re gone.
• They offer maximum value. The catalog lists two prices for each host set: the value of the set (the price of a set of similar size) and the reduced price for the host. Host sets give your customers the biggest bang for their buck. Who doesn’t love a great deal?
• They entice customers to book their own parties. Host sets are a compelling reason for hosting a party. When customers see them used on projects like those shown here, they’ll want to host a party to get them. Host sets are a great way for you to find new hosts and increase your bookings.
How can you make sure your customers understand the benefits of host sets? An easy way is to make some projects and show them at a party or class.
Say, “Don’t you love this card? I made it with the Pun Intended host set. It’s available only with Stampin’ Rewards. If you host your own party, you could get it for free!”
Make sure you point out that new host sets are available in each catalog and show customers the host set section so they know where to find it. Remember to mention that when the catalog sales period ends, those host sets are gone forever! This is also the perfect time to explain the Stampin’ Rewards chart so they know how much they can earn in free products.
Host sets come in an array of styles, so there’s something for everyone. Your customers will love the exclusive images and designs. They’ll love the value. And you’ll love how they make it easy to find new hosts and get bookings. It’s a win all around!
A color wash background is a fast way to create a unique background. Just get a little ink on an Aqua Painter and wash it over the paper like we did on the Hello card.
WIN WITH
PRODUCT©1990–2017 Stampin' Up!
10
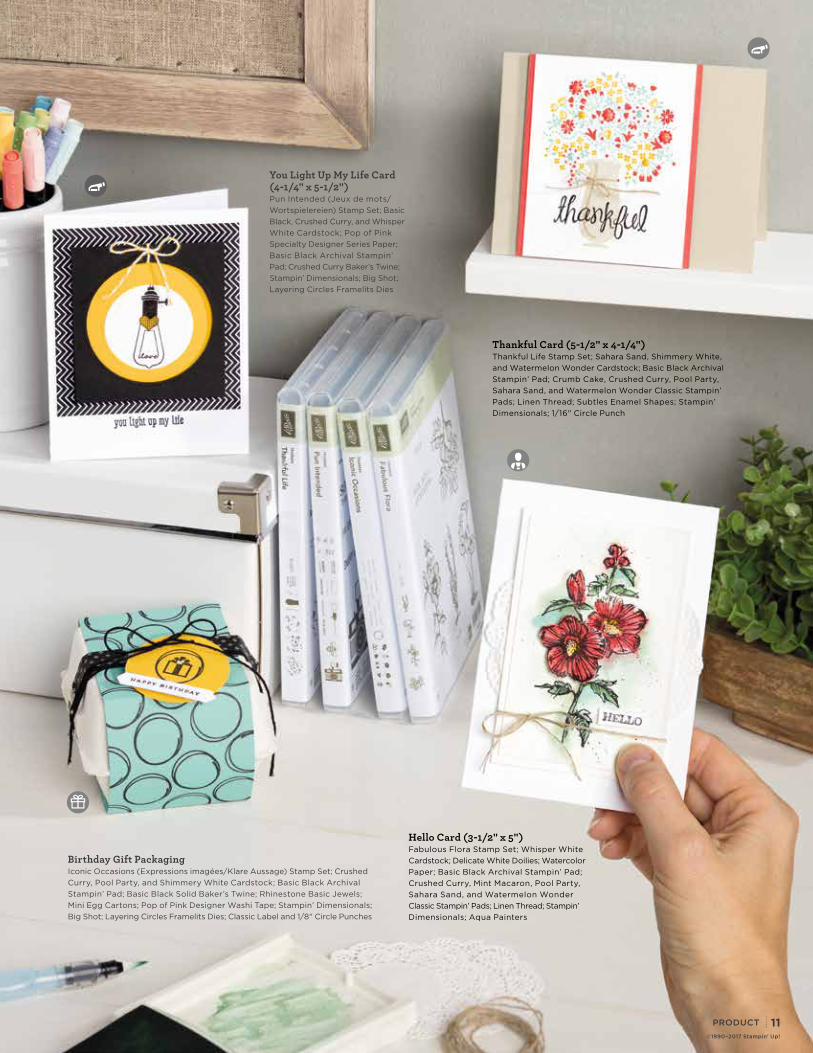
You Light Up My Life Card (4-1/4" x 5-1/2") Pun Intended (Jeux de mots/Wortspielereien) Stamp Set; Basic Black, Crushed Curry, and Whisper White Cardstock; Pop of Pink Specialty Designer Series Paper; Basic Black Archival Stampin’ Pad; Crushed Curry Baker’s Twine; Stampin’ Dimensionals; Big Shot; Layering Circles Framelits Dies
Birthday Gift Packaging Iconic Occasions (Expressions imagées/Klare Aussage) Stamp Set; Crushed Curry, Pool Party, and Shimmery White Cardstock; Basic Black Archival Stampin’ Pad; Basic Black Solid Baker’s Twine; Rhinestone Basic Jewels; Mini Egg Cartons; Pop of Pink Designer Washi Tape; Stampin’ Dimensionals; Big Shot; Layering Circles Framelits Dies; Classic Label and 1/8" Circle Punches
Hello Card (3-1/2" x 5") Fabulous Flora Stamp Set; Whisper White Cardstock; Delicate White Doilies; Watercolor Paper; Basic Black Archival Stampin’ Pad; Crushed Curry, Mint Macaron, Pool Party, Sahara Sand, and Watermelon Wonder Classic Stampin’ Pads; Linen Thread; Stampin’ Dimensionals; Aqua Painters
Thankful Card (5-1/2" x 4-1/4") Thankful Life Stamp Set; Sahara Sand, Shimmery White, and Watermelon Wonder Cardstock; Basic Black Archival Stampin’ Pad; Crumb Cake, Crushed Curry, Pool Party, Sahara Sand, and Watermelon Wonder Classic Stampin’ Pads; Linen Thread; Subtles Enamel Shapes; Stampin’ Dimensionals; 1/16" Circle Punch
PRODUCT©1990–2017 Stampin' Up!
11
You’re a brand-new demonstrator. You love beautiful stamps, Designer Series Paper, ink, and accessories. You’re dying to share all of these wonderful Stampin’ Up! products with your friends and neighbors, but you need someone to host an event for you. Hmmm . . . what to do?
Maybe now would be a good time to take a page from the DIY craze and do it yourself! Just make a few simple invitations, invite your friends and neighbors over for a relaxing hour of crafting, serve some snacks (open-house style), and get ready to be pleasantly surprised by how much your guests enjoy themselves.
On the day of the party, she set up stations featuring quick and easy projects and provided simple snacks. Though only her mom bought products that day, she felt very positive about the experience, knowing that it often takes more than one event to convert brand-new stampers into buyers. And she was right! Not long after, one of the attendees placed a big order with specific projects in mind. So her efforts began to bear fruit, and meanwhile, she had learned how simple it is to start building your business and share stamping with friends—DIY style.
EVERY EVENT OF THE MONTH article has a beautiful flyer in the Stampin’ Success section on the demonstrator website. Print it out, hand it out at your event, and each customer will have supplies and instructions for the project right in front of them while they create.
AP
RIL
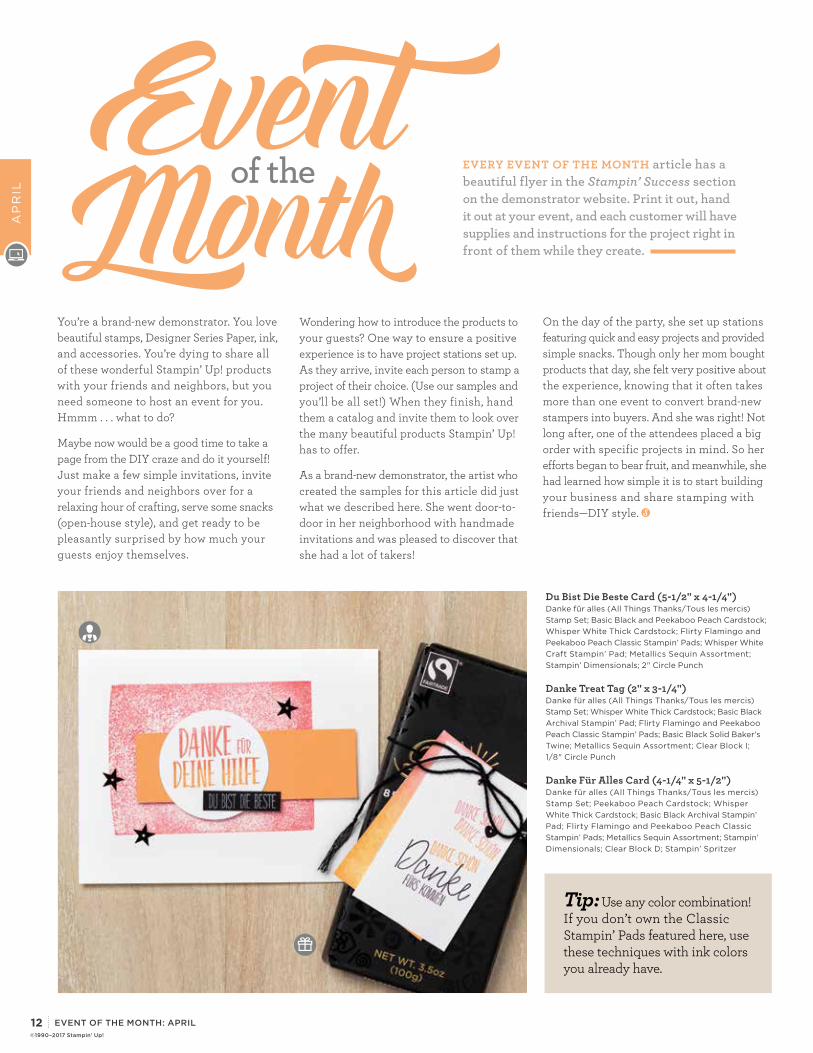
Du Bist Die Beste Card (5-1/2" x 4-1/4") Danke für alles (All Things Thanks/Tous les mercis) Stamp Set; Basic Black and Peekaboo Peach Cardstock; Whisper White Thick Cardstock; Flirty Flamingo and Peekaboo Peach Classic Stampin’ Pads; Whisper White Craft Stampin’ Pad; Metallics Sequin Assortment; Stampin’ Dimensionals; 2" Circle Punch
Danke Treat Tag (2" x 3-1/4") Danke für alles (All Things Thanks/Tous les mercis) Stamp Set; Whisper White Thick Cardstock; Basic Black Archival Stampin’ Pad; Flirty Flamingo and Peekaboo Peach Classic Stampin’ Pads; Basic Black Solid Baker’s Twine; Metallics Sequin Assortment; Clear Block I; 1/8" Circle Punch
Danke Für Alles Card (4-1/4" x 5-1/2") Danke für alles (All Things Thanks/Tous les mercis) Stamp Set; Peekaboo Peach Cardstock; Whisper White Thick Cardstock; Basic Black Archival Stampin’ Pad; Flirty Flamingo and Peekaboo Peach Classic Stampin’ Pads; Metallics Sequin Assortment; Stampin’ Dimensionals; Clear Block D; Stampin’ Spritzer
©1990–2017 Stampin' Up!
EVENT OF THE MONTH: APRIL
Tip: Use any color combination! If you don’t own the Classic Stampin’ Pads featured here, use these techniques with ink colors you already have.
of the
Wondering how to introduce the products to your guests? One way to ensure a positive experience is to have project stations set up. As they arrive, invite each person to stamp a project of their choice. (Use our samples and you’ll be all set!) When they finish, hand them a catalog and invite them to look over the many beautiful products Stampin’ Up! has to offer.
As a brand-new demonstrator, the artist who created the samples for this article did just what we described here. She went door-to-door in her neighborhood with handmade invitations and was pleased to discover that she had a lot of takers!
12

1. Ink half of the clear block with the lightest ink color, then ink the other half with a darker color.
2. Spritz the clear block with water, then “stamp” the clear block on Whisper White Thick Cardstock.
3. Stamp the sentiment in Basic Black ink, then adhere the Whisper White Thick Cardstock to the Peekaboo Peach card using Stampin’ Dimensionals.
4. Embellish the card with sequins.
EVENT OF THE MONTH: APRIL
EVERYTHING you need for this project is pictured on this page.
Stampin’ Spritzer
126185
Clear Block D 118485
Stampin’ Dimensionals
104430
Metallics Sequin Assortment
138390
Peekaboo Peach
Classic Stampin’ Pad • 141398
Flirty Flamingo
Classic Stampin’ Pad • 141397
Basic Black Archival Stampin’ Pad
140931
Whisper White Thick Cardstock 140272 • 3-3/8" x 3-1/8"
Peekaboo Peach Cardstock 141417 • 8-1/2" x 5-1/2"
All Things Thanks Stamp Set
143089 143097
Tip: Thick cardstock and Watercolor Paper work best for this technique.
Tip: Clear blocks and ink pads are great tools for creating unexpected backgrounds and accents for your projects.
©1990–2017 Stampin' Up!
13
Project Life® Card Collections are so versatile when it comes to memory keeping. They are made to fit perfectly into the Project Life Photo Pocket Pages and allow an endless array of combinations that ensure a unique look every time. But what you may not realize is that you can make similar pages with other Stampin’ Up! products. Look at our two projects in this article: One is made with the Hello Lovely Project Life Accessory Pack and Card Collection, and the other is made with Designer Series Paper. They’re both beautiful.
Memory keeping is so fun and allows for such creative freedom! But sometimes new scrapbookers don’t know where to start, and experienced scrapbookers may be looking for precise coordination with less effort. Whether you are an avid scrapbooker or someone who would like to start memory keeping, Project Life by Stampin’ Up! is a great way to ensure your pages are dynamic! As each Project Life Card Collection has a matching color scheme and a theme for the sentiments, this makes it easy to pre-select other Stampin’ Up! products to show in a crop, class, or party.
When you’ve started to get the hang of memory keeping with Project Life, switch things up with other products you love. Create our two pages and take them to your events. People are very visual, so if you share example pages ahead of time, you will allow your customers to see just how amazing scrapbooking with Stampin’ Up! products can be. In addition, this allows you to demonstrate different techniques and tools to get them excited about your memory keeping event and the wide variety of creativity that our coordinating products and colors afford!
MEMORY KEEPING
Tip: Use Framelits or Thinlits dies to add an extra pop to your scrapbook pages.
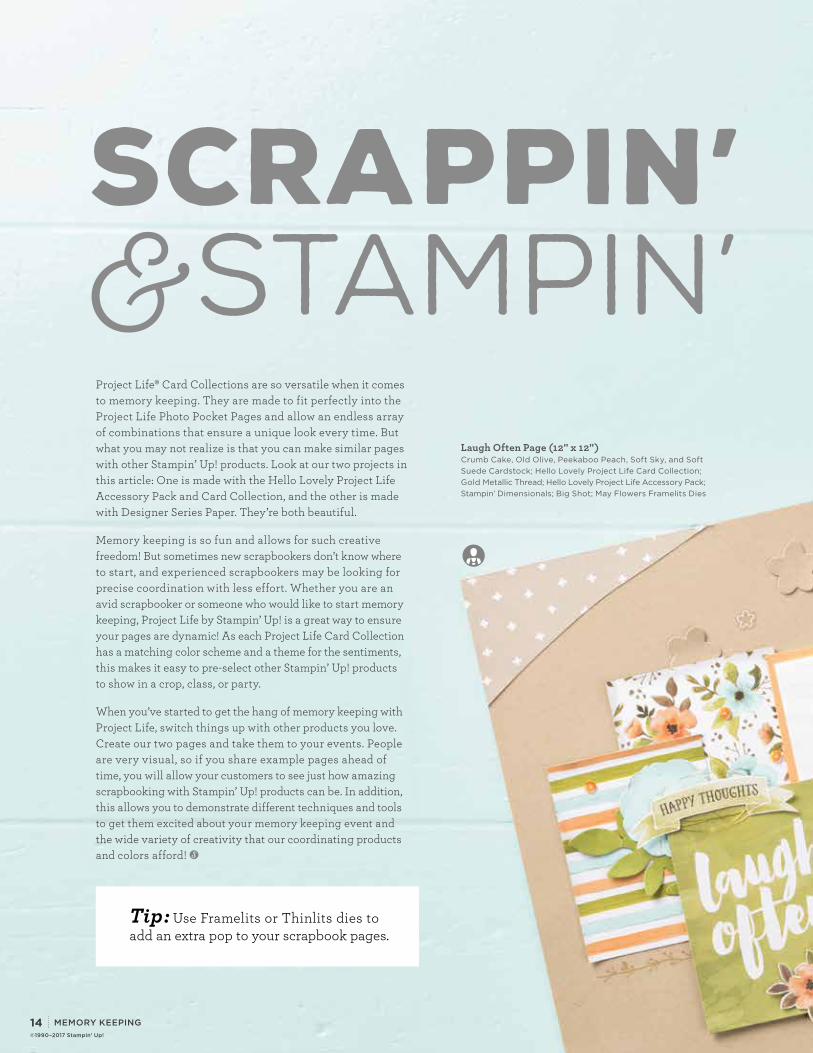
Laugh Often Page (12" x 12") Crumb Cake, Old Olive, Peekaboo Peach, Soft Sky, and Soft Suede Cardstock; Hello Lovely Project Life Card Collection; Gold Metallic Thread; Hello Lovely Project Life Accessory Pack; Stampin’ Dimensionals; Big Shot; May Flowers Framelits Dies
SCRAPPIN’ STAMPIN’&
©1990–2017 Stampin' Up!
14
MEMORY KEEPING
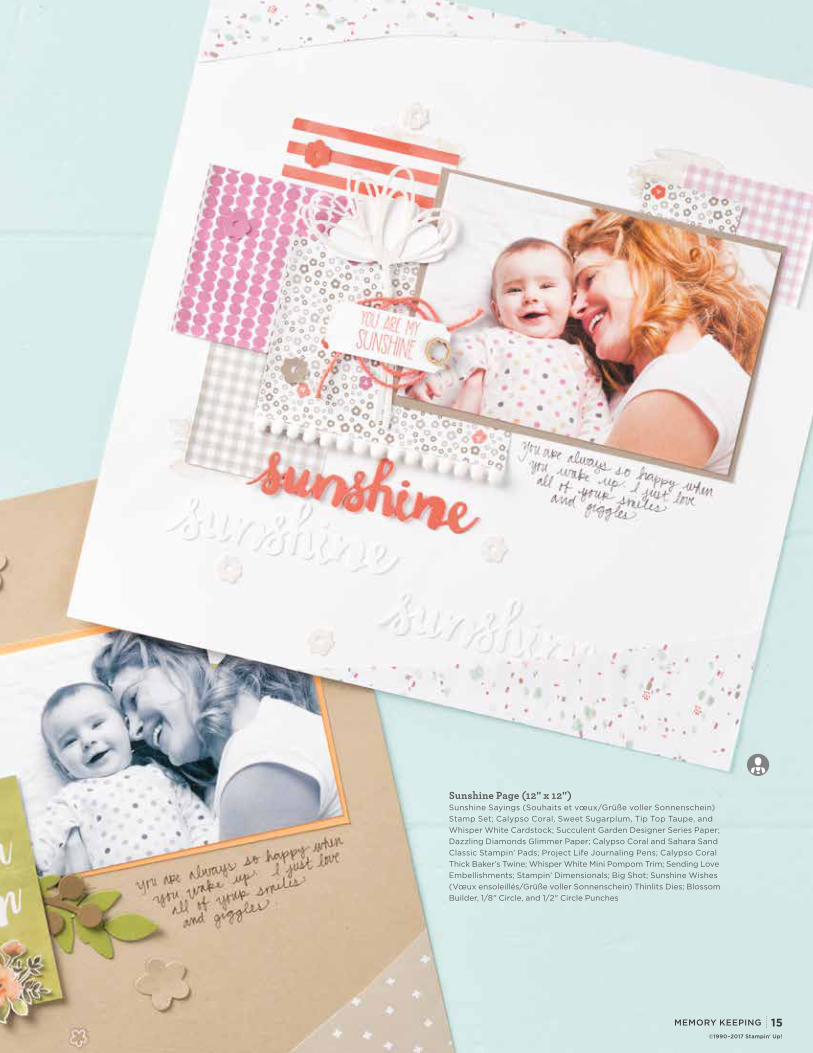
Sunshine Page (12" x 12") Sunshine Sayings (Souhaits et vœux/Grüße voller Sonnenschein) Stamp Set; Calypso Coral, Sweet Sugarplum, Tip Top Taupe, and Whisper White Cardstock; Succulent Garden Designer Series Paper; Dazzling Diamonds Glimmer Paper; Calypso Coral and Sahara Sand Classic Stampin’ Pads; Project Life Journaling Pens; Calypso Coral Thick Baker’s Twine; Whisper White Mini Pompom Trim; Sending Love Embellishments; Stampin’ Dimensionals; Big Shot; Sunshine Wishes (Vœux ensoleillés/Grüße voller Sonnenschein) Thinlits Dies; Blossom Builder, 1/8" Circle, and 1/2" Circle Punches
©1990–2017 Stampin' Up!
15
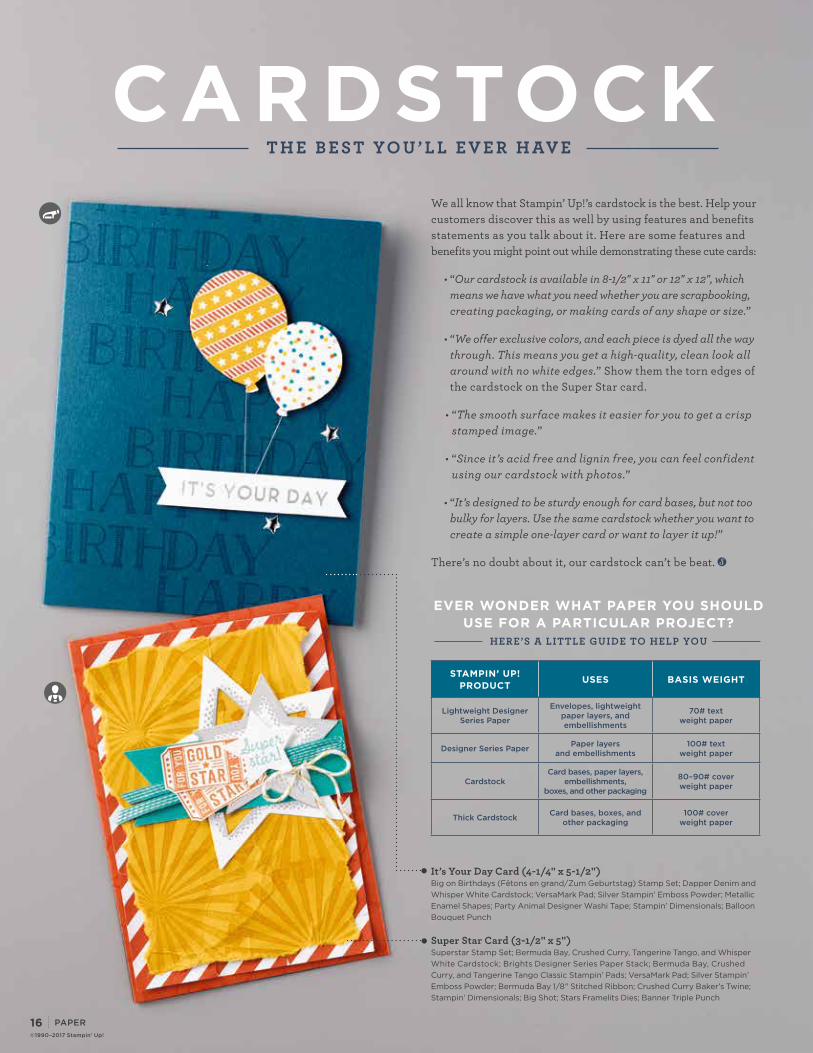
PAPER
We all know that Stampin’ Up!’s cardstock is the best. Help your customers discover this as well by using features and benefits statements as you talk about it. Here are some features and benefits you might point out while demonstrating these cute cards:
• “Our cardstock is available in 8-1/2" x 11" or 12" x 12", which means we have what you need whether you are scrapbooking, creating packaging, or making cards of any shape or size.”
• “We offer exclusive colors, and each piece is dyed all the way through. This means you get a high-quality, clean look all around with no white edges.” Show them the torn edges of the cardstock on the Super Star card.
• “The smooth surface makes it easier for you to get a crisp stamped image.”
• “Since it’s acid free and lignin free, you can feel confident using our cardstock with photos.”
• “It’s designed to be sturdy enough for card bases, but not too bulky for layers. Use the same cardstock whether you want to create a simple one-layer card or want to layer it up!”
There’s no doubt about it, our cardstock can’t be beat.
It’s Your Day Card (4-1/4" x 5-1/2") Big on Birthdays (Fêtons en grand/Zum Geburtstag) Stamp Set; Dapper Denim and Whisper White Cardstock; VersaMark Pad; Silver Stampin’ Emboss Powder; Metallic Enamel Shapes; Party Animal Designer Washi Tape; Stampin’ Dimensionals; Balloon Bouquet Punch
Super Star Card (3-1/2" x 5") Superstar Stamp Set; Bermuda Bay, Crushed Curry, Tangerine Tango, and Whisper White Cardstock; Brights Designer Series Paper Stack; Bermuda Bay, Crushed Curry, and Tangerine Tango Classic Stampin’ Pads; VersaMark Pad; Silver Stampin’ Emboss Powder; Bermuda Bay 1/8" Stitched Ribbon; Crushed Curry Baker’s Twine; Stampin’ Dimensionals; Big Shot; Stars Framelits Dies; Banner Triple Punch
STAMPIN’ UP! PRODUCT USES BASIS WEIGHT
Lightweight Designer Series Paper
Envelopes, lightweight paper layers, and embellishments
70# text weight paper
Designer Series Paper Paper layers and embellishments
100# text weight paper
Cardstock Card bases, paper layers,
embellishments, boxes, and other packaging
80–90# cover weight paper
Thick Cardstock Card bases, boxes, and other packaging
100# cover weight paper
EVER WONDER WHAT PAPER YOU SHOULD USE FOR A PARTICULAR PROJECT?
HERE’S A LITTLE GUIDE TO HELP YOU
CARDSTOCK T H E B E S T YO U ’ L L E V E R H AV E
©1990–2017 Stampin' Up!
16
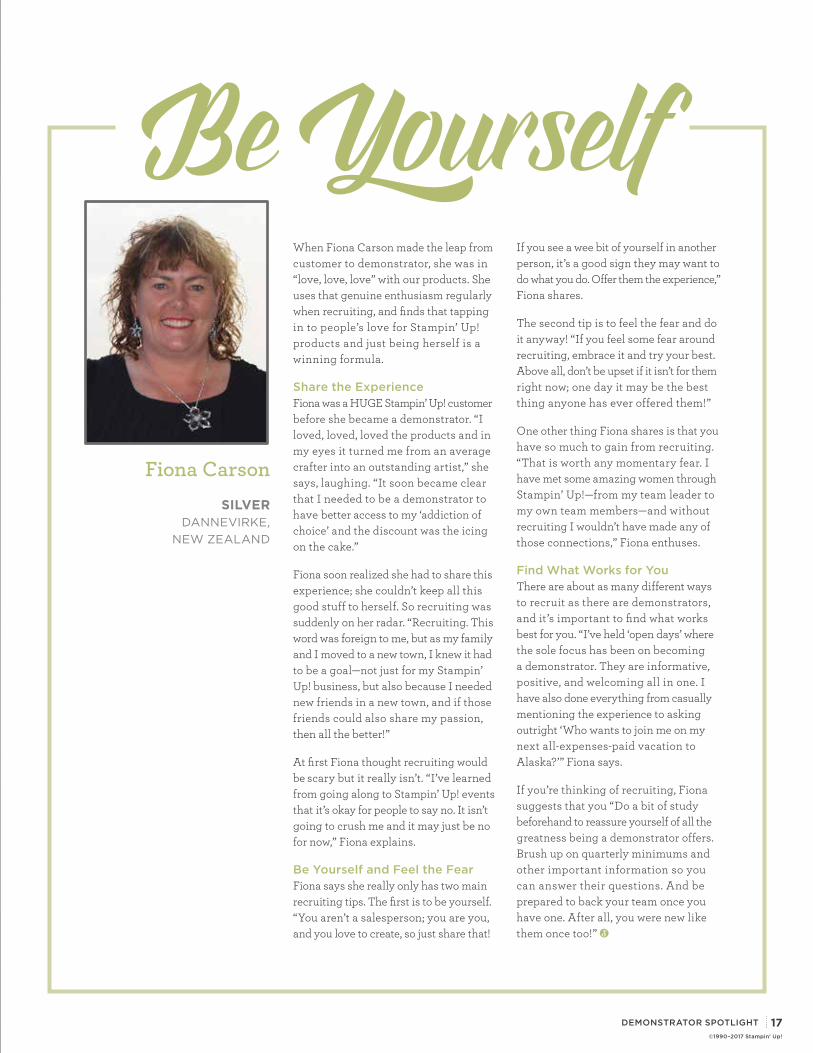
DEMONSTRATOR SPOTLIGHT
When Fiona Carson made the leap from customer to demonstrator, she was in “love, love, love” with our products. She uses that genuine enthusiasm regularly when recruiting, and finds that tapping in to people’s love for Stampin’ Up! products and just being herself is a winning formula.
Share the Experience Fiona was a HUGE Stampin’ Up! customer before she became a demonstrator. “I loved, loved, loved the products and in my eyes it turned me from an average crafter into an outstanding artist,” she says, laughing. “It soon became clear that I needed to be a demonstrator to have better access to my ‘addiction of choice’ and the discount was the icing on the cake.”
Fiona soon realized she had to share this experience; she couldn’t keep all this good stuff to herself. So recruiting was suddenly on her radar. “Recruiting. This word was foreign to me, but as my family and I moved to a new town, I knew it had to be a goal—not just for my Stampin’ Up! business, but also because I needed new friends in a new town, and if those friends could also share my passion, then all the better!”
At first Fiona thought recruiting would be scary but it really isn’t. “I’ve learned from going along to Stampin’ Up! events that it’s okay for people to say no. It isn’t going to crush me and it may just be no for now,” Fiona explains.
Be Yourself and Feel the Fear Fiona says she really only has two main recruiting tips. The first is to be yourself. “You aren’t a salesperson; you are you, and you love to create, so just share that!
If you see a wee bit of yourself in another person, it’s a good sign they may want to do what you do. Offer them the experience,” Fiona shares.
The second tip is to feel the fear and do it anyway! “If you feel some fear around recruiting, embrace it and try your best. Above all, don’t be upset if it isn’t for them right now; one day it may be the best thing anyone has ever offered them!”
One other thing Fiona shares is that you have so much to gain from recruiting. “That is worth any momentary fear. I have met some amazing women through Stampin’ Up!—from my team leader to my own team members—and without recruiting I wouldn’t have made any of those connections,” Fiona enthuses.
Find What Works for You There are about as many different ways to recruit as there are demonstrators, and it’s important to find what works best for you. “I’ve held ‘open days’ where the sole focus has been on becoming a demonstrator. They are informative, positive, and welcoming all in one. I have also done everything from casually mentioning the experience to asking outright ‘Who wants to join me on my next all-expenses-paid vacation to Alaska?’” Fiona says.
If you’re thinking of recruiting, Fiona suggests that you “Do a bit of study beforehand to reassure yourself of all the greatness being a demonstrator offers. Brush up on quarterly minimums and other important information so you can answer their questions. And be prepared to back your team once you have one. After all, you were new like them once too!”
Fiona CarsonSILVER
DANNEVIRKE, NEW ZEALAND
Be Yourself
©1990–2017 Stampin' Up!
17
COMPENSATION PLAN
CORE COMPENSATION VS. REWARDS
Stampin’ Up!’s Compensation Plan is designed to compensate and reward you, celebrate your accomplishments, and provide rewards programs that pamper you and subsidize your business costs.
earn through the Compensation Plan: core compensation and rewards. We’ll cover each sub-category of compensation and rewards briefly in this article. For more detailed information, check the Compensation Plan document on the demonstrator website under Business Resources>Compensation Plan.
©1990–2017 Stampin' Up!
INSTANT INCOME AND VOLUME REBATES
TEAM COMMISSIONS
PERFORMANCE BONUSES AND GOLD ELITE BONUS
BRONZEHOBBY
PART-TIMEBUSINESS
FULL-TIMEBUSINESS
BRONZE ELITE
SILVER
SILVER ELITE
GOLD
GOLD ELITE
PLATINUM
PLATINUM ELITE
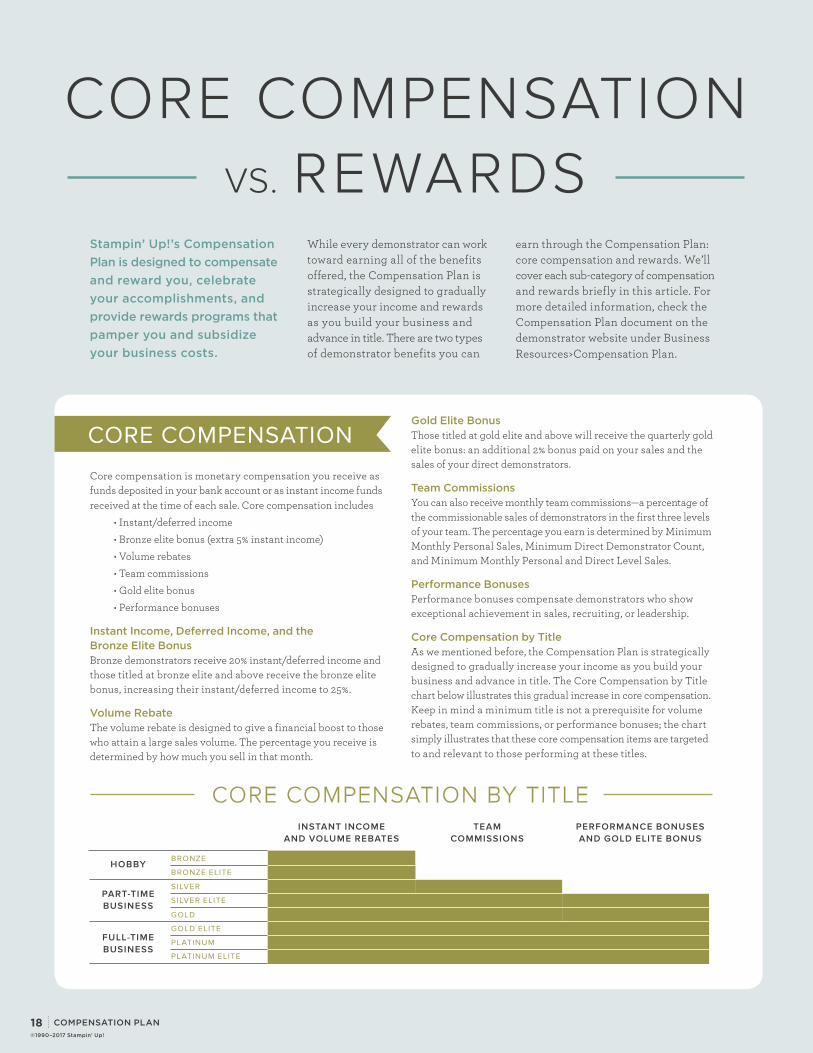
CORE COMPENSATION BY TITLE
Core compensation is monetary compensation you receive as funds deposited in your bank account or as instant income funds received at the time of each sale. Core compensation includes
• Instant/deferred income• Bronze elite bonus (extra 5% instant income)• Volume rebates• Team commissions• Gold elite bonus• Performance bonuses
Instant Income, Deferred Income, and the Bronze Elite Bonus Bronze demonstrators receive 20% instant/deferred income and those titled at bronze elite and above receive the bronze elite bonus, increasing their instant/deferred income to 25%.
Volume Rebate The volume rebate is designed to give a financial boost to those who attain a large sales volume. The percentage you receive is determined by how much you sell in that month.
Gold Elite Bonus Those titled at gold elite and above will receive the quarterly gold elite bonus: an additional 2% bonus paid on your sales and the sales of your direct demonstrators.
Team Commissions You can also receive monthly team commissions—a percentage of the commissionable sales of demonstrators in the first three levels of your team. The percentage you earn is determined by Minimum Monthly Personal Sales, Minimum Direct Demonstrator Count, and Minimum Monthly Personal and Direct Level Sales.
Performance Bonuses Performance bonuses compensate demonstrators who show exceptional achievement in sales, recruiting, or leadership.
Core Compensation by Title As we mentioned before, the Compensation Plan is strategically designed to gradually increase your income as you build your business and advance in title. The Core Compensation by Title chart below illustrates this gradual increase in core compensation. Keep in mind a minimum title is not a prerequisite for volume rebates, team commissions, or performance bonuses; the chart simply illustrates that these core compensation items are targeted to and relevant to those performing at these titles.
CORE COMPENSATION
While every demonstrator can work toward earning all of the benefits offered, the Compensation Plan is strategically designed to gradually increase your income and rewards as you build your business and advance in title. There are two types of demonstrator benefits you can
18
COMPENSATION PLAN
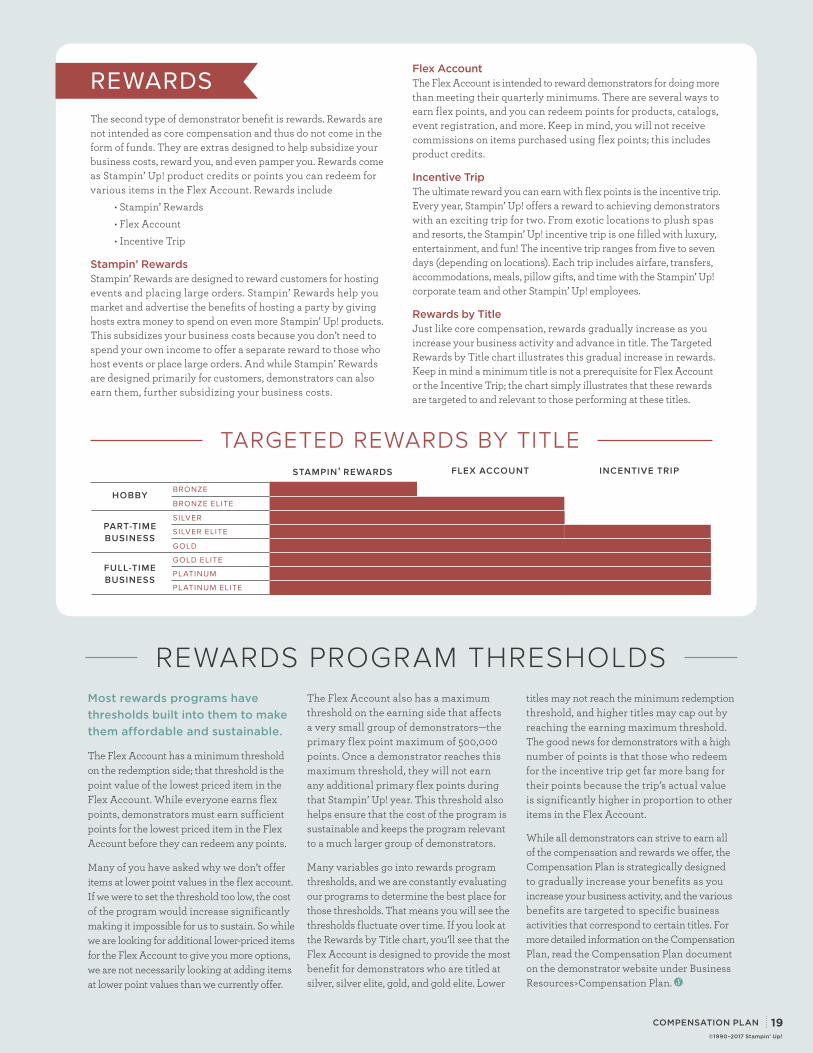
Most rewards programs have thresholds built into them to make them affordable and sustainable.
The Flex Account has a minimum threshold on the redemption side; that threshold is the point value of the lowest priced item in the Flex Account. While everyone earns flex points, demonstrators must earn sufficient points for the lowest priced item in the Flex Account before they can redeem any points.
Many of you have asked why we don’t offer items at lower point values in the flex account. If we were to set the threshold too low, the cost of the program would increase significantly making it impossible for us to sustain. So while we are looking for additional lower-priced items for the Flex Account to give you more options, we are not necessarily looking at adding items at lower point values than we currently offer.
The Flex Account also has a maximum threshold on the earning side that affects a very small group of demonstrators—the primary flex point maximum of 500,000 points. Once a demonstrator reaches this maximum threshold, they will not earn any additional primary flex points during that Stampin’ Up! year. This threshold also helps ensure that the cost of the program is sustainable and keeps the program relevant to a much larger group of demonstrators.
Many variables go into rewards program thresholds, and we are constantly evaluating our programs to determine the best place for those thresholds. That means you will see the thresholds fluctuate over time. If you look at the Rewards by Title chart, you’ll see that the Flex Account is designed to provide the most benefit for demonstrators who are titled at silver, silver elite, gold, and gold elite. Lower
titles may not reach the minimum redemption threshold, and higher titles may cap out by reaching the earning maximum threshold. The good news for demonstrators with a high number of points is that those who redeem for the incentive trip get far more bang for their points because the trip’s actual value is significantly higher in proportion to other items in the Flex Account.
While all demonstrators can strive to earn all of the compensation and rewards we offer, the Compensation Plan is strategically designed to gradually increase your benefits as you increase your business activity, and the various benefits are targeted to specific business activities that correspond to certain titles. For more detailed information on the Compensation Plan, read the Compensation Plan document on the demonstrator website under Business Resources>Compensation Plan.
©1990–2017 Stampin' Up!
REWARDS PROGRAM THRESHOLDS
TARGETED REWARDS BY TITLE
The second type of demonstrator benefit is rewards. Rewards are not intended as core compensation and thus do not come in the form of funds. They are extras designed to help subsidize your business costs, reward you, and even pamper you. Rewards come as Stampin’ Up! product credits or points you can redeem for various items in the Flex Account. Rewards include
• Stampin’ Rewards• Flex Account• Incentive Trip
Stampin’ Rewards Stampin’ Rewards are designed to reward customers for hosting events and placing large orders. Stampin’ Rewards help you market and advertise the benefits of hosting a party by giving hosts extra money to spend on even more Stampin’ Up! products. This subsidizes your business costs because you don’t need to spend your own income to offer a separate reward to those who host events or place large orders. And while Stampin’ Rewards are designed primarily for customers, demonstrators can also earn them, further subsidizing your business costs.
REWARDS
STAMPIN’ REWARDS FLEX ACCOUNT INCENTIVE TRIP
BRONZEHOBBY
PART-TIMEBUSINESS
FULL-TIMEBUSINESS
BRONZE ELITE
SILVER
SILVER ELITE
GOLD
GOLD ELITE
PLATINUM
PLATINUM ELITE
Flex Account The Flex Account is intended to reward demonstrators for doing more than meeting their quarterly minimums. There are several ways to earn flex points, and you can redeem points for products, catalogs, event registration, and more. Keep in mind, you will not receive commissions on items purchased using flex points; this includes product credits.
Incentive Trip The ultimate reward you can earn with flex points is the incentive trip. Every year, Stampin’ Up! offers a reward to achieving demonstrators with an exciting trip for two. From exotic locations to plush spas and resorts, the Stampin’ Up! incentive trip is one filled with luxury, entertainment, and fun! The incentive trip ranges from five to seven days (depending on locations). Each trip includes airfare, transfers, accommodations, meals, pillow gifts, and time with the Stampin’ Up! corporate team and other Stampin’ Up! employees.
Rewards by Title Just like core compensation, rewards gradually increase as you increase your business activity and advance in title. The Targeted Rewards by Title chart illustrates this gradual increase in rewards. Keep in mind a minimum title is not a prerequisite for Flex Account or the Incentive Trip; the chart simply illustrates that these rewards are targeted to and relevant to those performing at these titles.
19
Features and Benefits
Benefits tell customers why the features are meaningful. They help answer the question “what can this product do for me?” For example, statements such as “You will save money not having to replace lesser-quality products,” and “It will save you so much time and stress shopping for ink, cardstock, and accessories that coordinate,” serve as benefit statements for the features mentioned above. Benefits statements increase sales because they tell a customer how the product can solve a problem.
Here are some tips as you incorporate features and benefits statements into your scripting. First, use resources like catalogs, the online store, Stampin’ Up! events, videos, and Stampin’ Success to arm yourself with features. Second, talk about features and benefits together. An easy way to do this is to use a phrase like “which means.” For example, “Our catalog has products that cover several different styles, which means you don’t need to settle for something you only like . . . we’ll find something you love!” Third, personalize your benefit statements to meet the needs of individual customers. This means listening for their needs and interests so that you can show how the products provide a solution. And finally, if you feel like you are making too many features and benefits statements, put a twist on it and tell a story that offers a scenario in which a product feature was beneficial to someone.
Be sure to check out other features and benefits statements in the Stamps, Ink, and Paper articles in this issue. These will help you make features and benefits a winning combination for your business.
SELLING
Top sellers in many industries know how to use features and benefits to their advantage. Understanding the difference between the two and how to integrate them into your sales scripting are key to your selling success. In this issue of Stampin’ Success, you will find articles that show you how to incorporate features and benefits statements while showcasing our stamps, ink, and paper, which means that no matter what you share with your customers, you’ll be able to build connections for them with the products in ways that will make them want to purchase. (And for those of you keeping score at home, you just read a features and benefits statement about this issue. Check out pages 16, 21, and 24 to see more statements in action.)
So what exactly are features and benefits? Simply put, features are facts or characteristics about a product. Features alone may not sell a product but they do provide the essential information a customer wants to know as they make purchasing decisions. Some examples: “Our products must meet strict quality standards,” and “Our colors coordinate across product lines.” Sharing features allows you to not only appear knowledgeable and credible, they also set the stage to highlight benefits.
As you share Stampin’ Up! products with others, you probably already mention some great combinations: stamps and punches, ink and paper, ribbon and scissors. Here’s another combination to keep in mind as you work to increase your sales: features and benefits.
©1990–2017 Stampin' Up!
20
INK
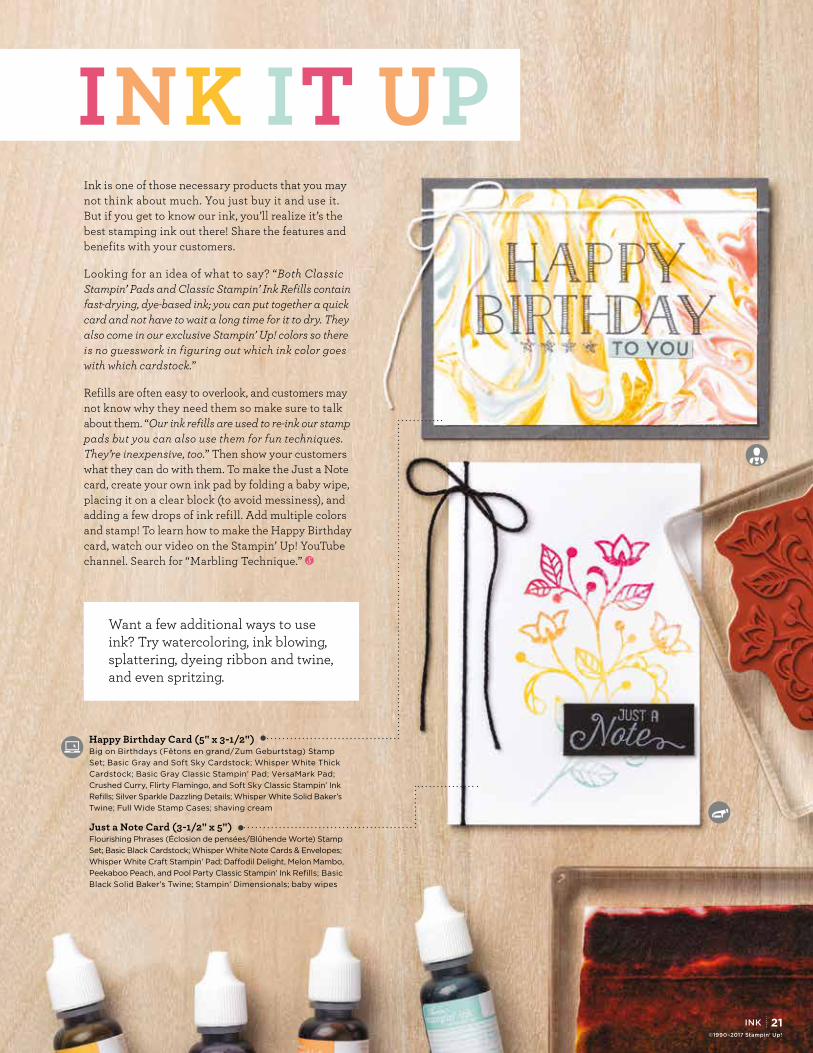
Happy Birthday Card (5" x 3-1/2") Big on Birthdays (Fêtons en grand/Zum Geburtstag) Stamp Set; Basic Gray and Soft Sky Cardstock; Whisper White Thick Cardstock; Basic Gray Classic Stampin’ Pad; VersaMark Pad; Crushed Curry, Flirty Flamingo, and Soft Sky Classic Stampin’ Ink Refills; Silver Sparkle Dazzling Details; Whisper White Solid Baker’s Twine; Full Wide Stamp Cases; shaving cream
Just a Note Card (3-1/2" x 5") Flourishing Phrases (Éclosion de pensées/Blühende Worte) Stamp Set; Basic Black Cardstock; Whisper White Note Cards & Envelopes; Whisper White Craft Stampin’ Pad; Daffodil Delight, Melon Mambo, Peekaboo Peach, and Pool Party Classic Stampin’ Ink Refills; Basic Black Solid Baker’s Twine; Stampin’ Dimensionals; baby wipes
Want a few additional ways to use ink? Try watercoloring, ink blowing, splattering, dyeing ribbon and twine, and even spritzing.
Ink is one of those necessary products that you may not think about much. You just buy it and use it. But if you get to know our ink, you’ll realize it’s the best stamping ink out there! Share the features and benefits with your customers.
Looking for an idea of what to say? “Both Classic Stampin’ Pads and Classic Stampin’ Ink Refills contain fast-drying, dye-based ink; you can put together a quick card and not have to wait a long time for it to dry. They also come in our exclusive Stampin’ Up! colors so there is no guesswork in figuring out which ink color goes with which cardstock.”
Refills are often easy to overlook, and customers may not know why they need them so make sure to talk about them. “Our ink refills are used to re-ink our stamp pads but you can also use them for fun techniques. They’re inexpensive, too.” Then show your customers what they can do with them. To make the Just a Note card, create your own ink pad by folding a baby wipe, placing it on a clear block (to avoid messiness), and adding a few drops of ink refill. Add multiple colors and stamp! To learn how to make the Happy Birthday card, watch our video on the Stampin’ Up! YouTube channel. Search for “Marbling Technique.”
INK IT UP
©1990–2017 Stampin' Up!
21
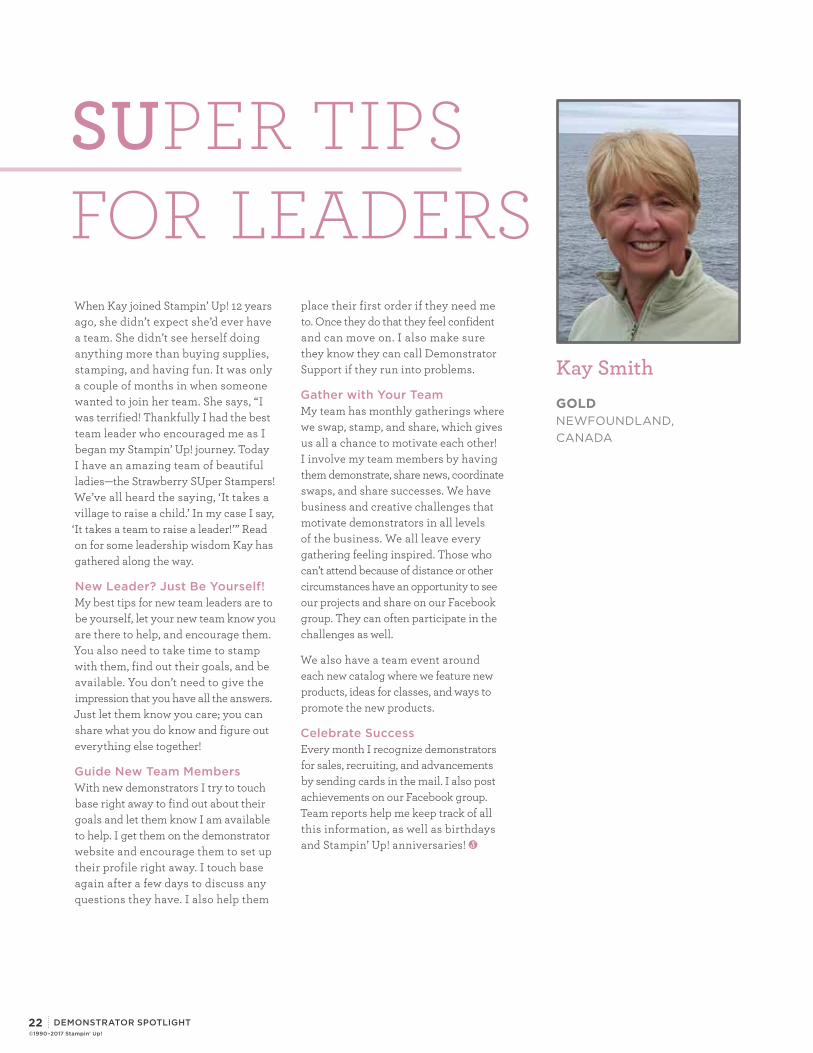
When Kay joined Stampin’ Up! 12 years ago, she didn’t expect she’d ever have a team. She didn’t see herself doing anything more than buying supplies, stamping, and having fun. It was only a couple of months in when someone wanted to join her team. She says, “I was terrified! Thankfully I had the best team leader who encouraged me as I began my Stampin’ Up! journey. Today I have an amazing team of beautiful ladies—the Strawberry SUper Stampers! We’ve all heard the saying, ‘It takes a village to raise a child.’ In my case I say, ‘It takes a team to raise a leader!’” Read on for some leadership wisdom Kay has gathered along the way.
New Leader? Just Be Yourself! My best tips for new team leaders are to be yourself, let your new team know you are there to help, and encourage them. You also need to take time to stamp with them, find out their goals, and be available. You don’t need to give the impression that you have all the answers. Just let them know you care; you can share what you do know and figure out everything else together!
Guide New Team Members With new demonstrators I try to touch base right away to find out about their goals and let them know I am available to help. I get them on the demonstrator website and encourage them to set up their profile right away. I touch base again after a few days to discuss any questions they have. I also help them
place their first order if they need me to. Once they do that they feel confident and can move on. I also make sure they know they can call Demonstrator Support if they run into problems.
Gather with Your Team My team has monthly gatherings where we swap, stamp, and share, which gives us all a chance to motivate each other! I involve my team members by having them demonstrate, share news, coordinate swaps, and share successes. We have business and creative challenges that motivate demonstrators in all levels of the business. We all leave every gathering feeling inspired. Those who can’t attend because of distance or other circumstances have an opportunity to see our projects and share on our Facebook group. They can often participate in the challenges as well.
We also have a team event around each new catalog where we feature new products, ideas for classes, and ways to promote the new products.
Celebrate Success Every month I recognize demonstrators for sales, recruiting, and advancements by sending cards in the mail. I also post achievements on our Facebook group. Team reports help me keep track of all this information, as well as birthdays and Stampin’ Up! anniversaries!
Kay SmithGOLD NEWFOUNDLAND, CANADA
DEMONSTRATOR SPOTLIGHT
SUPER TIPS FOR LEADERS
©1990–2017 Stampin' Up!
22
Leading
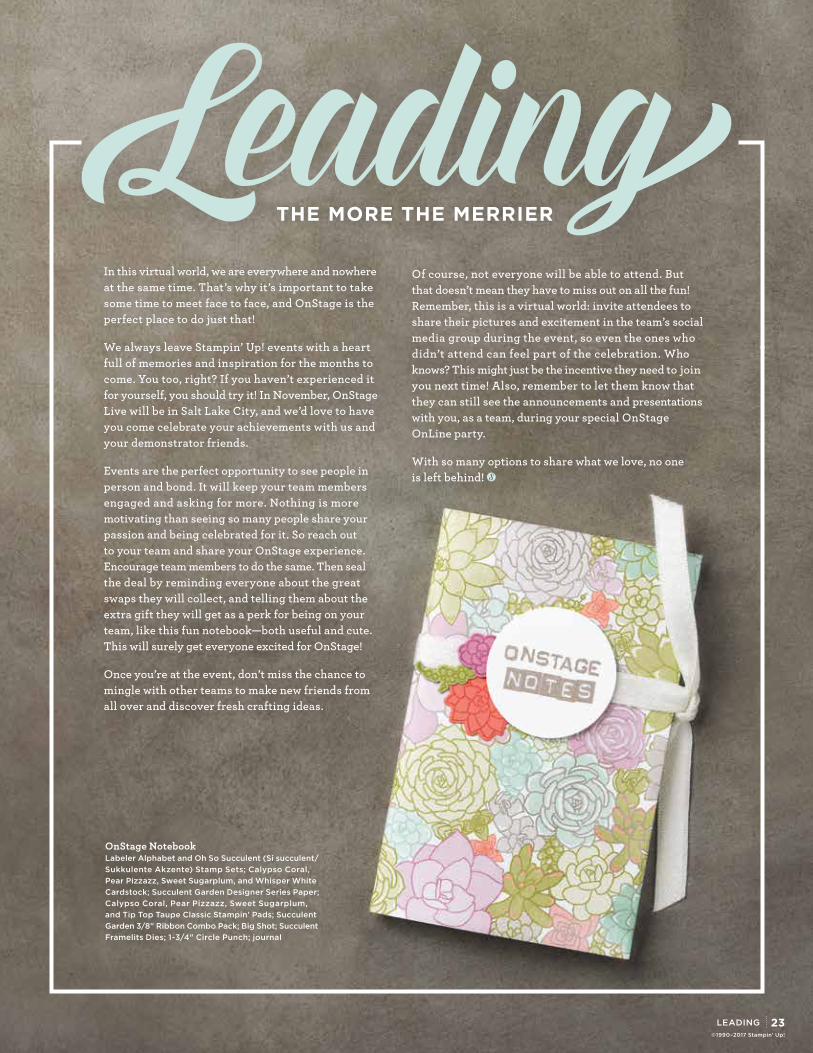
OnStage Notebook Labeler Alphabet and Oh So Succulent (Si succulent/Sukkulente Akzente) Stamp Sets; Calypso Coral, Pear Pizzazz, Sweet Sugarplum, and Whisper White Cardstock; Succulent Garden Designer Series Paper; Calypso Coral, Pear Pizzazz, Sweet Sugarplum, and Tip Top Taupe Classic Stampin’ Pads; Succulent Garden 3/8" Ribbon Combo Pack; Big Shot; Succulent Framelits Dies; 1-3/4" Circle Punch; journal
LEADING©1990–2017 Stampin' Up!
THE MORE THE MERRIER
Of course, not everyone will be able to attend. But that doesn’t mean they have to miss out on all the fun! Remember, this is a virtual world: invite attendees to share their pictures and excitement in the team’s social media group during the event, so even the ones who didn’t attend can feel part of the celebration. Who knows? This might just be the incentive they need to join you next time! Also, remember to let them know that they can still see the announcements and presentations with you, as a team, during your special OnStage OnLine party.
With so many options to share what we love, no one is left behind!
In this virtual world, we are everywhere and nowhere at the same time. That’s why it’s important to take some time to meet face to face, and OnStage is the perfect place to do just that!
We always leave Stampin’ Up! events with a heart full of memories and inspiration for the months to come. You too, right? If you haven’t experienced it for yourself, you should try it! In November, OnStage Live will be in Salt Lake City, and we’d love to have you come celebrate your achievements with us and your demonstrator friends.
Events are the perfect opportunity to see people in person and bond. It will keep your team members engaged and asking for more. Nothing is more motivating than seeing so many people share your passion and being celebrated for it. So reach out to your team and share your OnStage experience. Encourage team members to do the same. Then seal the deal by reminding everyone about the great swaps they will collect, and telling them about the extra gift they will get as a perk for being on your team, like this fun notebook—both useful and cute. This will surely get everyone excited for OnStage!
Once you’re at the event, don’t miss the chance to mingle with other teams to make new friends from all over and discover fresh crafting ideas.
23

STAMPSSTAMPS
Tip: Each kind of stamp has different features and benefits. Try hosting a workshop to teach about all three styles so customers can choose the one that best fits them.
PUT THE “STAMP” I N S TA M P I N ’ U P !
No matter the project, Stampin’ Up! has a stamp set for you and your customers. Every project—and every stamper—is just a bit different, which is why Stampin’ Up! offers three unique styles of stamps to help you create the look you love. All our stamps are made in the United States and are packaged in uniformly-sized cases with images on the side for easy storage and quick reference. Stamps are created with premium products to guarantee the best image possible. Make sure to demonstrate all three types of stamps so that you can point out the features and benefits to your customers. Read on for some ideas of what you might say to your customers.
Classic Red Rubber Stamps. Red rubber stamps are made using high-quality rubber through a special process that allows for very intricate designs and detailed images. Red rubber stamps come in two different options:
Photopolymer. “The transparent nature of photopolymer stamps makes it easy to line up images for precision placement. You’ll be able to see exactly where you are placing the image so it’s perfectly aligned every time!”
Sample Details
• Clear-Mount: “Our clear-mount stamps are made to be repositioned on acrylic blocks again and again. This means you can put them away without any blocks and save space when storing. You can also mount multiple stamps on one block to create patterns and backgrounds.”
• Wood-Mount: “Once you’ve mounted the red rubber stamp on the wood block, it will always be ready for you to use right out of the box! Wood-mount stamp sets come in larger plastic storage cases and include both stamps and one maple wood block per stamp (in coordinating sizes).”
©1990–2017 Stampin' Up!
• The Super Hero card features watercoloring on perfectly-placed photopolymer-stamped images.
• The Super Duper card includes images from both red rubber and photopolymer stamps. Use masking to get the focal sentiment stamped alone, then stamp over it with the photopolymer burst stamp.
• The Happy Birthday packaging uses markering on red rubber stamps (an excellent technique to teach new stampers), featuring colors from the Brights Stampin’ Write® Markers (item 131259).
24
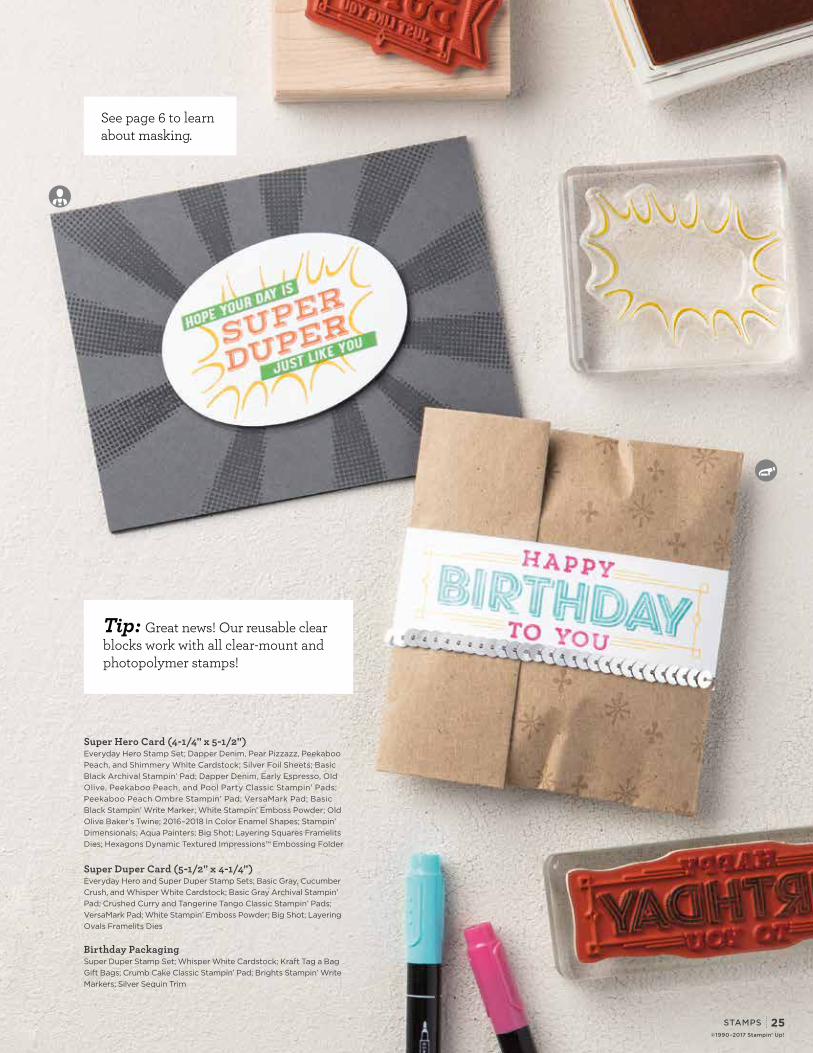
Super Duper Card (5-1/2" x 4-1/4") Everyday Hero and Super Duper Stamp Sets; Basic Gray, Cucumber Crush, and Whisper White Cardstock; Basic Gray Archival Stampin’ Pad; Crushed Curry and Tangerine Tango Classic Stampin’ Pads; VersaMark Pad; White Stampin’ Emboss Powder; Big Shot; Layering Ovals Framelits Dies
Birthday Packaging Super Duper Stamp Set; Whisper White Cardstock; Kraft Tag a Bag Gift Bags; Crumb Cake Classic Stampin’ Pad; Brights Stampin’ Write Markers; Silver Sequin Trim
Super Hero Card (4-1/4" x 5-1/2") Everyday Hero Stamp Set; Dapper Denim, Pear Pizzazz, Peekaboo Peach, and Shimmery White Cardstock; Silver Foil Sheets; Basic Black Archival Stampin’ Pad; Dapper Denim, Early Espresso, Old Olive, Peekaboo Peach, and Pool Party Classic Stampin’ Pads; Peekaboo Peach Ombre Stampin’ Pad; VersaMark Pad; Basic Black Stampin’ Write Marker; White Stampin’ Emboss Powder; Old Olive Baker’s Twine; 2016–2018 In Color Enamel Shapes; Stampin’ Dimensionals; Aqua Painters; Big Shot; Layering Squares Framelits Dies; Hexagons Dynamic Textured Impressions™ Embossing Folder
STAMPSSTAMPS
Tip: Great news! Our reusable clear blocks work with all clear-mount and photopolymer stamps!
See page 6 to learn about masking.
©1990–2017 Stampin' Up!
25
WORKSHOP OF THE MONTH©1990–2017 Stampin' Up!
of the
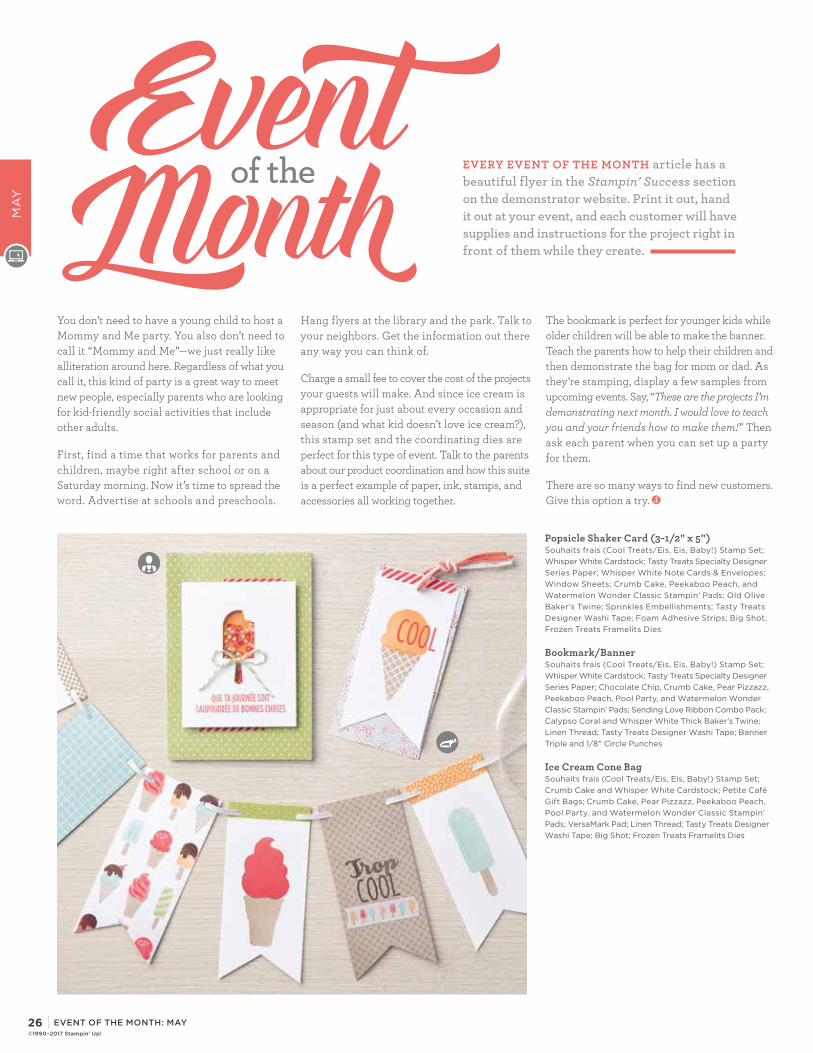
Popsicle Shaker Card (3-1/2" x 5") Souhaits frais (Cool Treats/Eis, Eis, Baby!) Stamp Set; Whisper White Cardstock; Tasty Treats Specialty Designer Series Paper; Whisper White Note Cards & Envelopes; Window Sheets; Crumb Cake, Peekaboo Peach, and Watermelon Wonder Classic Stampin’ Pads; Old Olive Baker’s Twine; Sprinkles Embellishments; Tasty Treats Designer Washi Tape; Foam Adhesive Strips; Big Shot; Frozen Treats Framelits Dies
Bookmark/Banner Souhaits frais (Cool Treats/Eis, Eis, Baby!) Stamp Set; Whisper White Cardstock; Tasty Treats Specialty Designer Series Paper; Chocolate Chip, Crumb Cake, Pear Pizzazz, Peekaboo Peach, Pool Party, and Watermelon Wonder Classic Stampin’ Pads; Sending Love Ribbon Combo Pack; Calypso Coral and Whisper White Thick Baker’s Twine; Linen Thread; Tasty Treats Designer Washi Tape; Banner Triple and 1/8" Circle Punches
Ice Cream Cone Bag Souhaits frais (Cool Treats/Eis, Eis, Baby!) Stamp Set; Crumb Cake and Whisper White Cardstock; Petite Café Gift Bags; Crumb Cake, Pear Pizzazz, Peekaboo Peach, Pool Party, and Watermelon Wonder Classic Stampin’ Pads; VersaMark Pad; Linen Thread; Tasty Treats Designer Washi Tape; Big Shot; Frozen Treats Framelits Dies
You don’t need to have a young child to host a Mommy and Me party. You also don’t need to call it “Mommy and Me”—we just really like alliteration around here. Regardless of what you call it, this kind of party is a great way to meet new people, especially parents who are looking for kid-friendly social activities that include other adults.
First, find a time that works for parents and children, maybe right after school or on a Saturday morning. Now it’s time to spread the word. Advertise at schools and preschools.
The bookmark is perfect for younger kids while older children will be able to make the banner. Teach the parents how to help their children and then demonstrate the bag for mom or dad. As they’re stamping, display a few samples from upcoming events. Say, “These are the projects I’m demonstrating next month. I would love to teach you and your friends how to make them!” Then ask each parent when you can set up a party for them.
There are so many ways to find new customers. Give this option a try.
MA
Y
WORKSHOP OF THE MONTHEVENT OF THE MONTH: MAY
EVERY EVENT OF THE MONTH article has a beautiful flyer in the Stampin’ Success section on the demonstrator website. Print it out, hand it out at your event, and each customer will have supplies and instructions for the project right in front of them while they create.
Hang flyers at the library and the park. Talk to your neighbors. Get the information out there any way you can think of.
Charge a small fee to cover the cost of the projects your guests will make. And since ice cream is appropriate for just about every occasion and season (and what kid doesn’t love ice cream?), this stamp set and the coordinating dies are perfect for this type of event. Talk to the parents about our product coordination and how this suite is a perfect example of paper, ink, stamps, and accessories all working together.
26
WORKSHOP OF THE MONTH: AUGUST©1990–2016 Stampin' Up!
27
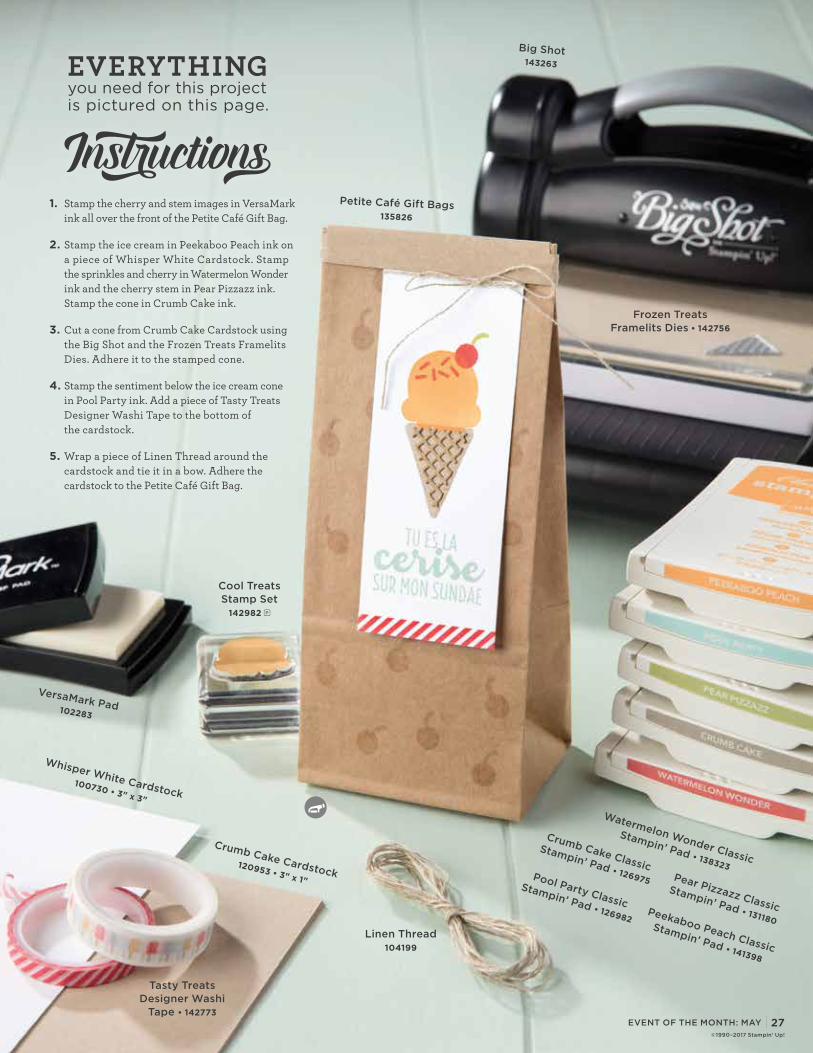
1. Stamp the cherry and stem images in VersaMark ink all over the front of the Petite Café Gift Bag.
2. Stamp the ice cream in Peekaboo Peach ink on a piece of Whisper White Cardstock. Stamp the sprinkles and cherry in Watermelon Wonder ink and the cherry stem in Pear Pizzazz ink. Stamp the cone in Crumb Cake ink.
3. Cut a cone from Crumb Cake Cardstock using the Big Shot and the Frozen Treats Framelits Dies. Adhere it to the stamped cone.
4. Stamp the sentiment below the ice cream cone in Pool Party ink. Add a piece of Tasty Treats Designer Washi Tape to the bottom of the cardstock.
5. Wrap a piece of Linen Thread around the cardstock and tie it in a bow. Adhere the cardstock to the Petite Café Gift Bag.
EVENT OF THE MONTH: MAY©1990–2017 Stampin' Up!
27
EVERYTHING you need for this project is pictured on this page.
Cool Treats Stamp Set
142982
Crumb Cake Cardstock 120953 • 3" x 1"
Whisper White Cardstock 100730 • 3" x 3"
Petite Café Gift Bags 135826
Pear Pizzazz Classic
Stampin’ Pad • 131180
Linen Thread 104199
Tasty Treats Designer Washi
Tape • 142773
Big Shot 143263
Frozen Treats Framelits Dies • 142756
Crumb Cake Classic
Stampin’ Pad • 126975
Peekaboo Peach Classic
Stampin’ Pad • 141398
Pool Party Classic
Stampin’ Pad • 126982
Watermelon Wonder Classic
Stampin’ Pad • 138323
VersaMark Pad 102283
27
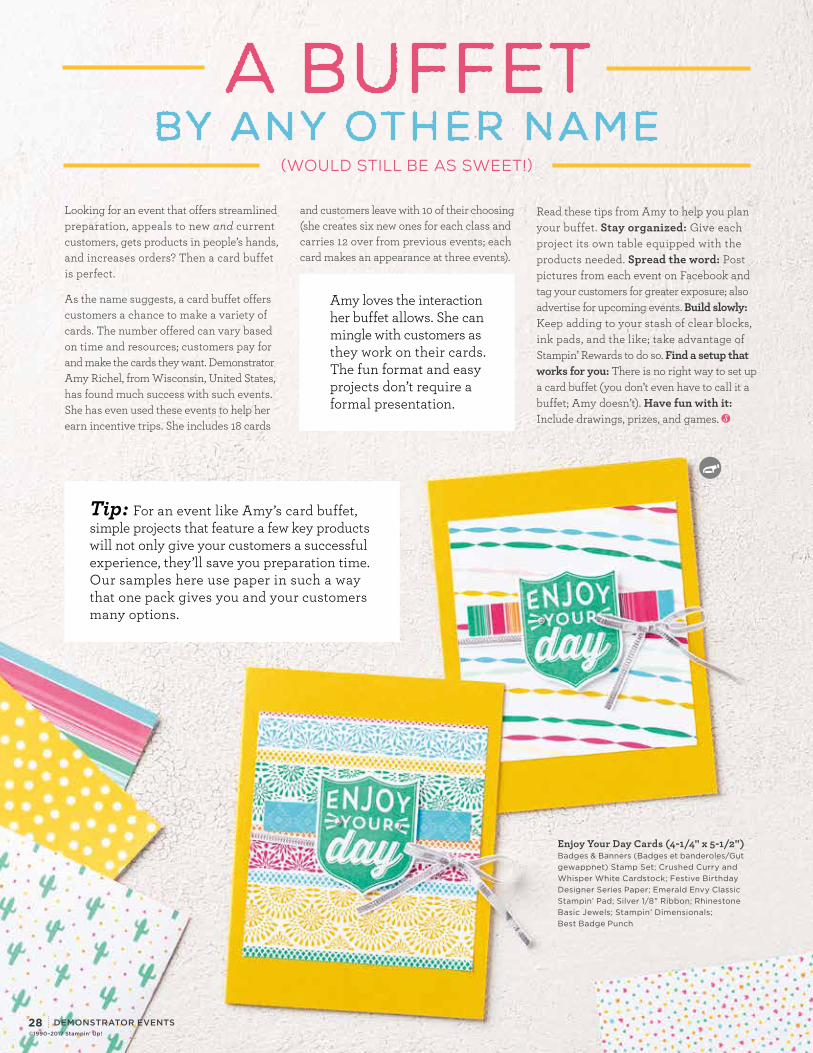
Looking for an event that offers streamlined preparation, appeals to new and current customers, gets products in people’s hands, and increases orders? Then a card buffet is perfect.
As the name suggests, a card buffet offers customers a chance to make a variety of cards. The number offered can vary based on time and resources; customers pay for and make the cards they want. Demonstrator Amy Richel, from Wisconsin, United States, has found much success with such events. She has even used these events to help her earn incentive trips. She includes 18 cards
and customers leave with 10 of their choosing (she creates six new ones for each class and carries 12 over from previous events; each card makes an appearance at three events).
Enjoy Your Day Cards (4-1/4" x 5-1/2") Badges & Banners (Badges et banderoles/Gut gewappnet) Stamp Set; Crushed Curry and Whisper White Cardstock; Festive Birthday Designer Series Paper; Emerald Envy Classic Stampin’ Pad; Silver 1/8" Ribbon; Rhinestone Basic Jewels; Stampin’ Dimensionals; Best Badge Punch
Amy loves the interaction her buffet allows. She can mingle with customers as they work on their cards. The fun format and easy projects don’t require a formal presentation.
Tip: For an event like Amy’s card buffet, simple projects that feature a few key products will not only give your customers a successful experience, they’ll save you preparation time. Our samples here use paper in such a way that one pack gives you and your customers many options.
©1990–2017 Stampin' Up!
DEMONSTRATOR EVENTS
Read these tips from Amy to help you plan your buffet. Stay organized: Give each project its own table equipped with the products needed. Spread the word: Post pictures from each event on Facebook and tag your customers for greater exposure; also advertise for upcoming events. Build slowly: Keep adding to your stash of clear blocks, ink pads, and the like; take advantage of Stampin’ Rewards to do so. Find a setup that works for you: There is no right way to set up a card buffet (you don’t even have to call it a buffet; Amy doesn’t). Have fun with it: Include drawings, prizes, and games.
A BUFFET BY ANY OTHER NAME
(Would Still Be As Sweet!)
28

RECRUITING
Being new has its challenges, whether as a new student, a new employee, or a new demonstrator. It’s easy to become overwhelmed. But as a team leader, you can help your new recruit get off to a strong start!
Think back to the days when you were a new demonstrator. Was there someone who helped walk you through it all? And look at you now. You’re ready to give back and show your new demonstrator that they, too, can be successful in this new adventure. You started out strong with a leader’s help, and now they can do the same.
Or maybe you didn’t have that experience. That’s okay—you have the tools and experience to share with your recruits, and they will be forever thankful for the time you spent helping them out at the beginning of their Stampin’ Up! journey.
Here are several ideas. Read through them and pick the ones that work best for you and your recruits:
• Carve out some face time with your new recruit. They’ll be grateful for the one-on-one interaction. Consider these ideas when you’re preparing for the conversation:
• Ask them about their goals and vision for their business and how you can best support them.
• Share the terminology—starting with Stampin’ Up! can be like learning a new language. Terms like CSV, prize patrol, and even OEX can be confusing.
• Share bite-sized information. You may feel tempted to throw everything at them at once, but ease your new recruit into being a demonstrator. Tell them about the Compensation Plan, but only go into detail about what pertains to them in that moment, such as getting up to the 25% instant income.
• Help them hold their first event. Ask if you can attend their first event and invite them to observe at one of your events.
• Offer to bring items like trimmers and Bone Folders if they don’t have enough.
• Help them find Make & Take ideas using stamp sets they ordered in their Starter Kit.
• After the event, ask them how they think it went. What will they do differently next time? What did they think was most successful? Do they have any leads for the next event?
• Introduce your new member to your team. Try one of these options:
• When is your next group meeting? That’s the perfect time for introductions.
• Create a profile about your recruit and post it to your group’s Facebook page or in the team newsletter.
• Show them the tools on the Stampin’ Up! website that you have found helpful:
• Stampin’ University
• Planning tools
• Training tips
Setting your recruit up for success will not only help them, but it will strengthen your team and set you up for more success. Now, get that recruit off to a strong start!
RecruitingSet Your Recruit Up For Success
©1990–2017 Stampin' Up!
29
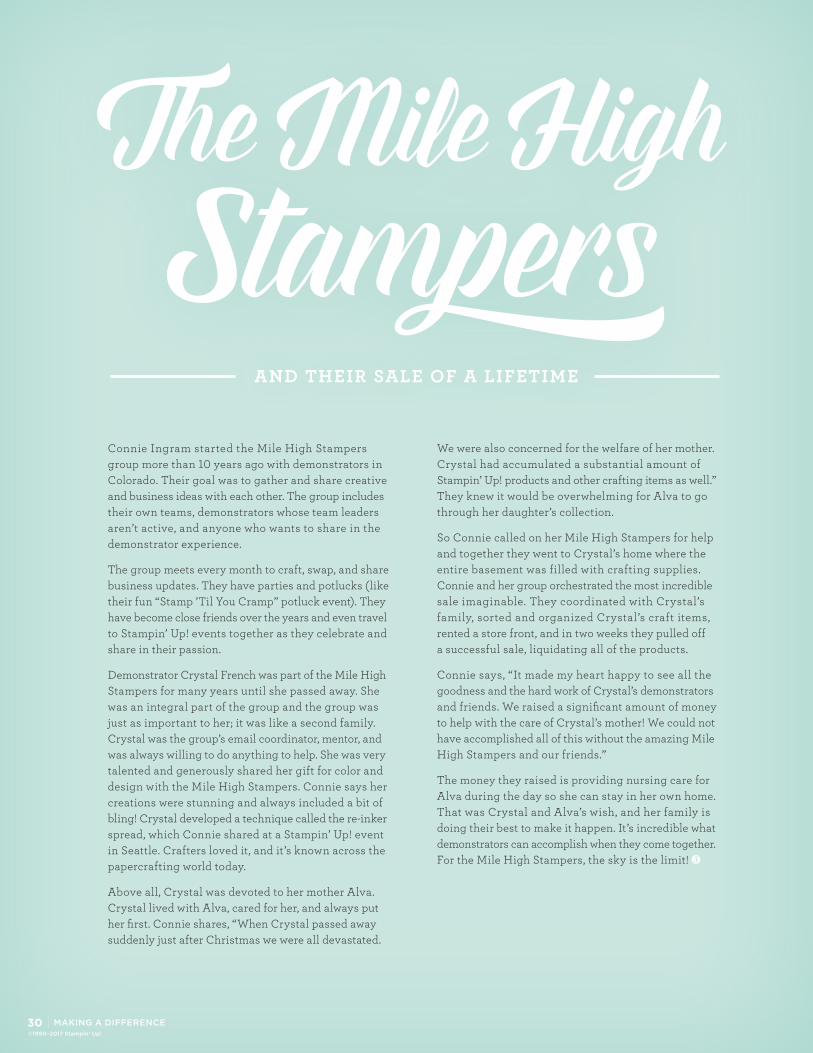
MAKING A DIFFERENCE ©1990–2017 Stampin' Up!
The Mile High Stampers
AND THEIR SALE OF A LIFETIME
Connie Ingram started the Mile High Stampers group more than 10 years ago with demonstrators in Colorado. Their goal was to gather and share creative and business ideas with each other. The group includes their own teams, demonstrators whose team leaders aren’t active, and anyone who wants to share in the demonstrator experience. The group meets every month to craft, swap, and share business updates. They have parties and potlucks (like their fun “Stamp ’Til You Cramp” potluck event). They have become close friends over the years and even travel to Stampin’ Up! events together as they celebrate and share in their passion.
Demonstrator Crystal French was part of the Mile High Stampers for many years until she passed away. She was an integral part of the group and the group was just as important to her; it was like a second family. Crystal was the group’s email coordinator, mentor, and was always willing to do anything to help. She was very talented and generously shared her gift for color and design with the Mile High Stampers. Connie says her creations were stunning and always included a bit of bling! Crystal developed a technique called the re-inker spread, which Connie shared at a Stampin’ Up! event in Seattle. Crafters loved it, and it’s known across the papercrafting world today.
Above all, Crystal was devoted to her mother Alva. Crystal lived with Alva, cared for her, and always put her first. Connie shares, “When Crystal passed away suddenly just after Christmas we were all devastated.
We were also concerned for the welfare of her mother. Crystal had accumulated a substantial amount of Stampin’ Up! products and other crafting items as well.” They knew it would be overwhelming for Alva to go through her daughter’s collection.
So Connie called on her Mile High Stampers for help and together they went to Crystal’s home where the entire basement was filled with crafting supplies. Connie and her group orchestrated the most incredible sale imaginable. They coordinated with Crystal’s family, sorted and organized Crystal’s craft items, rented a store front, and in two weeks they pulled off a successful sale, liquidating all of the products.
Connie says, “It made my heart happy to see all the goodness and the hard work of Crystal’s demonstrators and friends. We raised a significant amount of money to help with the care of Crystal’s mother! We could not have accomplished all of this without the amazing Mile High Stampers and our friends.”
The money they raised is providing nursing care for Alva during the day so she can stay in her own home. That was Crystal and Alva’s wish, and her family is doing their best to make it happen. It’s incredible what demonstrators can accomplish when they come together. For the Mile High Stampers, the sky is the limit!
30
Q & A
©1990–2017 Stampin' Up!
Q & A
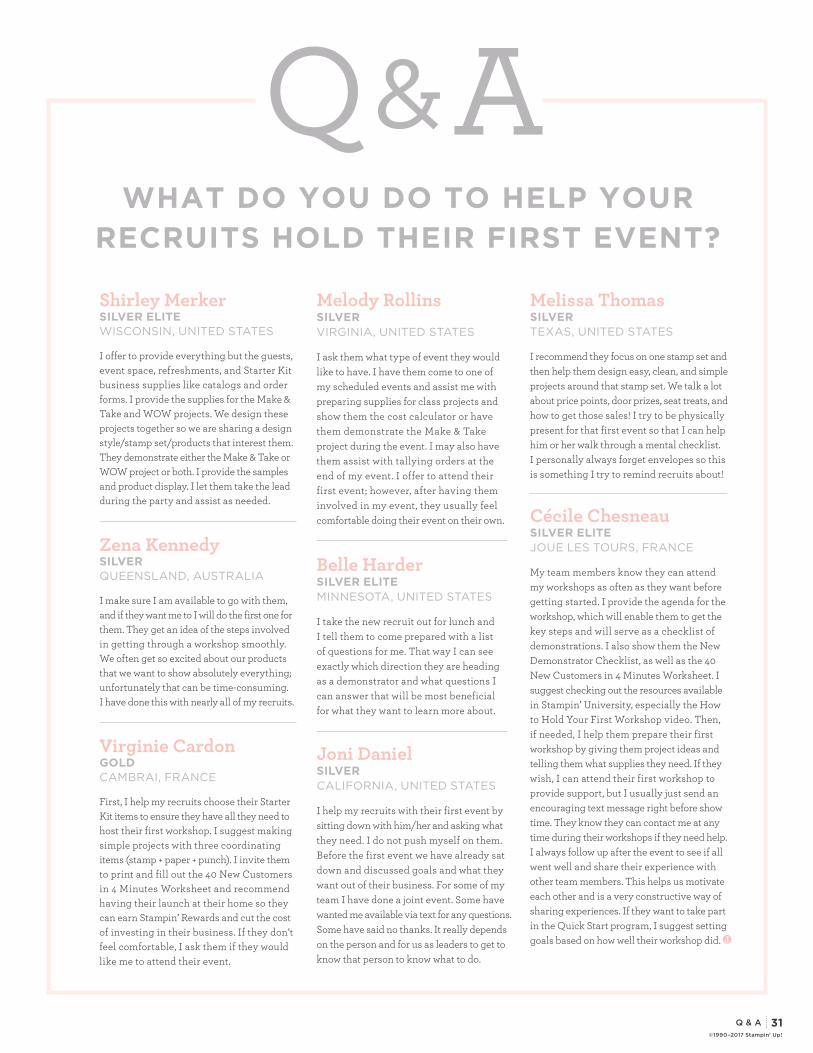
Shirley Merker SILVER ELITE WISCONSIN, UNITED STATES
I offer to provide everything but the guests, event space, refreshments, and Starter Kit business supplies like catalogs and order forms. I provide the supplies for the Make & Take and WOW projects. We design these projects together so we are sharing a design style/stamp set/products that interest them. They demonstrate either the Make & Take or WOW project or both. I provide the samples and product display. I let them take the lead during the party and assist as needed.
Zena Kennedy SILVER QUEENSLAND, AUSTRALIA
I make sure I am available to go with them, and if they want me to I will do the first one for them. They get an idea of the steps involved in getting through a workshop smoothly. We often get so excited about our products that we want to show absolutely everything; unfortunately that can be time-consuming. I have done this with nearly all of my recruits.
Virginie Cardon GOLD CAMBRAI, FRANCE
First, I help my recruits choose their Starter Kit items to ensure they have all they need to host their first workshop. I suggest making simple projects with three coordinating items (stamp + paper + punch). I invite them to print and fill out the 40 New Customers in 4 Minutes Worksheet and recommend having their launch at their home so they can earn Stampin’ Rewards and cut the cost of investing in their business. If they don’t feel comfortable, I ask them if they would like me to attend their event.
Melissa Thomas SILVER TEXAS, UNITED STATES
I recommend they focus on one stamp set and then help them design easy, clean, and simple projects around that stamp set. We talk a lot about price points, door prizes, seat treats, and how to get those sales! I try to be physically present for that first event so that I can help him or her walk through a mental checklist. I personally always forget envelopes so this is something I try to remind recruits about!
Cécile Chesneau SILVER ELITE JOUE LES TOURS, FRANCE
My team members know they can attend my workshops as often as they want before getting started. I provide the agenda for the workshop, which will enable them to get the key steps and will serve as a checklist of demonstrations. I also show them the New Demonstrator Checklist, as well as the 40 New Customers in 4 Minutes Worksheet. I suggest checking out the resources available in Stampin’ University, especially the How to Hold Your First Workshop video. Then, if needed, I help them prepare their first workshop by giving them project ideas and telling them what supplies they need. If they wish, I can attend their first workshop to provide support, but I usually just send an encouraging text message right before show time. They know they can contact me at any time during their workshops if they need help. I always follow up after the event to see if all went well and share their experience with other team members. This helps us motivate each other and is a very constructive way of sharing experiences. If they want to take part in the Quick Start program, I suggest setting goals based on how well their workshop did.
WHAT DO YOU DO TO HELP YOUR RECRUITS HOLD THEIR FIRST EVENT?
Melody Rollins SILVER VIRGINIA, UNITED STATES
I ask them what type of event they would like to have. I have them come to one of my scheduled events and assist me with preparing supplies for class projects and show them the cost calculator or have them demonstrate the Make & Take project during the event. I may also have them assist with tallying orders at the end of my event. I offer to attend their first event; however, after having them involved in my event, they usually feel comfortable doing their event on their own.
Belle Harder SILVER ELITE MINNESOTA, UNITED STATES
I take the new recruit out for lunch and I tell them to come prepared with a list of questions for me. That way I can see exactly which direction they are heading as a demonstrator and what questions I can answer that will be most beneficial for what they want to learn more about.
Joni Daniel SILVER CALIFORNIA, UNITED STATES
I help my recruits with their first event by sitting down with him/her and asking what they need. I do not push myself on them. Before the first event we have already sat down and discussed goals and what they want out of their business. For some of my team I have done a joint event. Some have wanted me available via text for any questions. Some have said no thanks. It really depends on the person and for us as leaders to get to know that person to know what to do.
31

WANT TO GO TO ALASKA?
YOU CA N !
We’re about halfway through the earning period* for the 2018 Incentive Trip, so kick things up a notch and make sure you join us in beautiful Alaska.
SEE THE DEMONSTRATOR WEBSITE FOR MORE INFORMATION
Events > Incentive Trips > 2018 Incentive Trip
*October 1, 2016–September 30, 2017
12907 South 3600 West Riverton, UT 84065
146104
NORTH AMERICA