Qlik Replicate Setup and User Guide - Qlik | Help
1179
Qlik Replicate Setup and User Guide Qlik Replicate TM November 2021 Last Updated: January 25, 2022 Copyright © 1993-2022 QlikTech International AB. All rights reserved. HELP.QLIK.COM
-
Upload
khangminh22 -
Category
Documents
-
view
17 -
download
0
Transcript of Qlik Replicate Setup and User Guide - Qlik | Help

Qlik Replicate Setup and User Guide
Qlik ReplicateTM
November 2021
Last Updated: January 25, 2022
Copyright © 1993-2022 QlikTech International AB. All rights reserved.
HELP.QLIK.COM

© 2022 QlikTech International AB. All rights reserved. All company and/or product names may be tradenames, trademarks and/or registered trademarks of the respective owners with which they are associated.
Setup and User Guide - Qlik Replicate, November 2021 3
1 What's new? 241.1 What's new in endpoints? 24Support for capturing changes from Microsoft Azure SQL Managed Instance using MS-CDC 24SAP HANA Source Enhancements 24IBM DB2 for iSeries Enhancements 25Mapping to VARIANT on Snowflake target 25Duplicate record prevention when using the IBM DB2 for z/OS source endpoint 25AWS Databricks and Microsoft Azure Databricks 25SAP Extractor Source - Filter Enhancements 26Google Cloud SQL for PostgreSQL 27Databricks on Google Cloud 27Microsoft SQL Server 2019 target - UTF-8 Support 27
1.2 What's new in engine? 28Security hardening - Log encryption 28Support for XML and JSON Subtypes 29Enhancements when using the Qlik Cloud Landing replication profile 29New header column when working with the IBM DB2 for iSeries source 30
1 Introduction 311.1 What is Qlik Replicate? 31System architecture 32
1.2 Terminology 32Change Data Capture (CDC) 32Full load 33Apply latency 33Source latency 33Target latency 33Overall latency 33Source endpoint 33Target endpoint 34
1.3 Replication Explained 341.4 Full Load and CDC processes 351.5 Replication topologies 35One to one 35Logical independence 36Hub and spoke 36
1.6 Limitations and considerations 362 Installing Qlik Replicate 382.1 Recommended hardware configuration 382.2 Setting up Qlik Replicate on Windows 39Windows permissions 39Windows software requirements 42Installing or upgrading Qlik Replicate on Windows 42Starting and stopping the Qlik Replicate Server service on Windows 44Silently installing Qlik Replicate 44Silently upgrading Qlik Replicate 45Silently uninstalling Qlik Replicate 46
Contents

Setup and User Guide - Qlik Replicate, November 2021 4
Changing the Data Directory location on Windows 472.3 Setting up Qlik Replicate on Linux 47Replicate instances and services on Linux 48Linux installation prerequisites and procedures 49Replicate server procedures 52Upgrading Qlik Replicate 52Uninstalling Qlik Replicate 55Working with additional Replicate instances 55Changing the Data Directory location on Linux 56
3 Security considerations 583.1 Securing access to the Qlik Replicate Web UI 583.2 Setting up HSTS on Replicate 59Enabling HSTS on the Replicate UI Server 59Disabling HSTS on the Replicate UI Server 59Configuring HSTS on the Replicate C UI Server 59
3.3 Setting Up Qlik Replicate console HTTPS support 61Checking if an SSL certificate is installed 61Using the self-signed certificate 61
3.4 Setting Up Qlik Replicate Server HTTPS support 62Replacing the self-signed SSL certificates on Linux 62Replacing the self-signed certificate on Windows 63
3.5 TLS Support 643.6 Changing the server password 653.7 Protecting Replicate passwords 66The master key file 67Changing and protecting the master key 68
3.8 Client password considerations 693.9 Encrypting the user permissions file 703.10 Securing connections to endpoints 703.11 Log file encryption 713.12 Application security 723.13 Using external credentials 72Limitations and considerations 73Changing the default addon name 73Step 1: Edit the MyPasswordProvider.c file 73Step 2: Compile the code 73Step 3: Edit the addons_def.json.sample file 73Step 4: Configure the endpoints 74
3.14 Controlling execution of user-defined commands 74Executing operating system commands as a different user 75
4 Working with Qlik Replicate endpoints 764.1 Using ARC CDC agents as endpoints 764.2 Replicate data types 764.3 Supported DDL statements 78How Replicate handles DDL changes 78Limitations and considerations 79
Contents
Setup and User Guide - Qlik Replicate, November 2021 5
4.4 Configuring Replicate to automatically replace the user-entered password 80Defining multiple endpoints to use the same automatically changed password 80
5 Using the Qlik Replicate Console 825.1 Opening the Qlik Replicate console 82Accessing Qlik Replicate from a remote computer 83Qlik Replicate UI server configurations 83Multiple users connecting to a single console 85
5.2 Tasks view 85Viewing specific tasks 87
5.3 Server view 905.4 List actions 90
6 Getting started: A Qlik Replicate tutorial 926.1 What you need 926.2 Open the Qlik Replicate console 926.3 Add an Oracle endpoint as a source 936.4 Add a Microsoft SQL Server database as a target 946.5 Define a replication task 97Add a replication task to the Qlik Replicate console 97Add the source and target endpoints to the task 99Select tables for the Replication task 101
6.6 Run and monitor the replication task 1026.7 View the replicated tables in Microsoft SQL Server 103
7 Defining and managing tasks 1047.1 Tasks overview 104Using multiple tasks 105
7.2 Adding tasks 105Bidirectional replication 107Editing and viewing a task description 110
7.3 Defining and managing endpoints 110Defining an endpoint 110Editing endpoint configuration information 111Viewing endpoint configuration information 111Testing an endpoint connection 112Duplicating endpoints 112Searching for endpoints 112Deleting endpoints 112
7.4 Adding a source and target endpoint to a task 1137.5 Selecting tables and/or views for replication 114Searching for tables/views to use in a replication task 116Selecting specific tables/views for replication 117Removing specific tables/views from a replication task 118Creating table/view selection patterns 118Setting load order 120
7.6 Editing a replication task 1217.7 Deleting a replication task 1217.8 Searching for tasks 122
Contents

Setup and User Guide - Qlik Replicate, November 2021 6
7.9 Migrating tasks 122Exporting tasks 122Importing tasks 123Editing an exported (json) file 125
8 Adding and managing source endpoints 1278.1 Using AWS Aurora Cloud for PostgreSQL as a source 128Source prerequisites 129Required permissions 129Setting up AWS Aurora Cloud for PostgreSQL for CDC (Change data capture) 130Limitations and considerations 130AWS Aurora Cloud for PostgreSQL source data types 131Homogeneous Replication 134Setting general connection properties 136Setting advanced connection properties 138Removing Replicate artifacts from the AWS Aurora Cloud for PostgreSQL database 139
8.2 Using Amazon RDS for SQL server as a source 140Prerequisites 141Limitations and considerations 142Required permissions 143Supported compression methods 143Amazon RDS for SQL server source data types 144Non-supported data types 146Homogeneous Replication 147Preparing the Amazon RDS for SQL server database for Replication 149Setting general connection properties 150Setting advanced connection properties 152Artifacts created by Replicate in the database 153
8.3 Using Amazon RDS for MySQL as a source 154Prerequisites 155Limitations and considerations 156Security requirements 156Data types 157Setting general connection properties 160Selecting a schema 162Setting advanced connection properties 162
8.4 Using Amazon RDS for PostgreSQL as a source 164Prerequisites 165Required permissions 165Setting up Amazon RDS for PostgreSQL for CDC (Change data capture) 165Limitations and considerations 167Amazon RDS for PostgreSQL source data types 168Homogeneous Replication 172Setting general connection properties 173Setting advanced connection properties 175Removing Replicate artifacts from the Amazon RDS for PostgreSQL database 176
8.5 Using ARC CDC solutions in Qlik Replicate 178Prerequisites for using ARC CDC solutions 179
Contents
Setup and User Guide - Qlik Replicate, November 2021 7
ARC CDC solution security considerations 180Limitations 182ARC source data type mapping 182Working with ARC CDC solutions 183Setting advanced connection properties 186
8.6 Using a file as a source 188General overview 189File source overview 189Prerequisites 192Limitations 192Setting general connection properties 192Setting advanced options 200
8.7 Using Google Cloud SQL for MySQL as a source 204Prerequisites 205Limitations and considerations 205Security requirements 206Data types 207Setting general connection properties 210Selecting a schema 212Setting advanced connection properties 212
8.8 Using Google Cloud SQL for PostgreSQL as a source 214Prerequisites 215Required permissions 215Limitations and considerations 215Supported data types 216Homogeneous Replication 220Setting general connection properties 221Setting advanced connection properties 223
8.9 Using Hadoop as a source 224Prerequisites 225Limitations 225Required permissions 225Hadoop Endpoint source data types 225Setting general connection properties 226Setting advanced connection properties 230
8.10 Using IBM DB2 for iSeries as a source 233Prerequisites 234Required permissions 235Limitations 236Supported data types 236Setting general connection properties 237Setting advanced connection properties 238
8.11 Using IBM DB2 for LUW as a source 243Prerequisites 244Replicating 4-byte UTF8 emojis 245Limitations and considerations 245IBM DB2 for LUW Database source data types 246Setting general connection properties 248
Contents

Setup and User Guide - Qlik Replicate, November 2021 8
Setting advanced connection properties 2498.12 Using IBM DB2 for z/OS as a source 251Prerequisites 252Limitations 253Handling actions resulting in subtype 83 254Controlling the CDC process 255IBM DB2 for z/OS database source data types 259Setting general connection properties 261Setting advanced connection properties 262Sample XMIT files “Receive” job 266
8.13 Using IBM Informix as a source 268Prerequisites 269Limitations 269Required permissions 270IBM Informix database source data types 270Setting general connection properties 271Setting advanced connection properties 272
8.14 Using Microsoft Azure SQL Managed Instance as a source 274Prerequisites 275Limitations and considerations 278Required permissions 279Supported compression methods 279Microsoft Azure SQL Managed Instance source data types 280Non-supported data types 282Homogeneous replication 283Setting general connection properties 285Setting advanced connection properties 286Artifacts created by Replicate in the database 287
8.15 Using Microsoft Azure SQL (MS-CDC) as a source 288Prerequisites 289Limitations and considerations 290Required permissions 292Supported compression methods 293Supported data types 293Homogeneous replication 296Setting general connection properties 298Setting advanced connection properties 299Removing Replicate artifacts from the database 300
8.16 Using Microsoft SQL Server as a source 301Supported editions 302Prerequisites 302Limitations and considerations 303Working with Microsoft SQL Server AlwaysOn Availability Groups 305Required permissions 307Supported compression methods 307Microsoft SQL Server source data types 307Homogeneous replication 311Preparing the Microsoft SQL Server database for replication 312
Contents
Setup and User Guide - Qlik Replicate, November 2021 9
Setting general connection properties 315Setting advanced connection properties 316Working with Windows authentication 320Artifacts created by Replicate in the database 320
8.17 Using Microsoft Azure database for MySQL as a source 321Prerequisites 322Client prerequisites 322Limitations and considerations 322Security requirements 323MySQL database source data types 324Setting general connection properties 327Selecting a schema 329Setting advanced connection properties 329
8.18 Using a MongoDB database as a source 331Overview 332Prerequisites 332Limitations and considerations 333Setting general connection properties 333Setting advanced connection properties 335
8.19 Using a MySQL-based database as a source 337Prerequisites 338Limitations and considerations 340Security requirements 341MySQL database source data types 342Setting general connection properties 345Selecting a schema 347Setting advanced connection properties 347
8.20 Using ODBC to connect to a source 349Prerequisites 350Qlik Replicate Server for Linux 350Limitations 350ODBC source data types 351Setting general connection properties 355Setting advanced connection properties 356
8.21 Using ODBC with CDC as a source 358Prerequisites 359Limitations and Considerations 359ODBC with CDC source data types 360Setting general connection properties 363Setting Change Processing parameters 365
8.22 Using Oracle as a source 369Supported Oracle database editions 370Client prerequisites 370Required permissions 370Limitations and considerations 374Supported encryption methods 376Supported compression methods 376Supported Standby configurations 377
Contents
Setup and User Guide - Qlik Replicate, November 2021 10
Redo log files - access method guidelines 377Handling shrink space operations 378Replicating Nested Tables 378Oracle source data types 380Non-supported data types 383Homogeneous Replication 383Preparing the Oracle database for replication 385Working with Oracle on Oracle Cloud 387Working with Amazon RDS for Oracle 387Setting general connection properties 390Setting advanced connection properties 391Finding the wallet entries used for TDE Encryption 399
8.23 Using PostgreSQL as a source 401Source prerequisites 402Required permissions 403Using an account without the "superuser" role 403Limitations and considerations 404PostgreSQL source data types 405Homogeneous replication 409Setting general connection properties 411Setting advanced connection properties 412Capturing changes from Microsoft Azure for PostgreSQL 414Removing Replicate artifacts from the database 414
8.24 Using Salesforce as a source 415Prerequisites 416Calculating the Salesforce quota 416Limitations and considerations 417Supported data types 419Setting general connection properties 420Setting advanced connection properties 421
8.25 Using SAP Application as a source 423Prerequisites 424Limitations 431SAP Application source data types 431Setting general connection properties 433Setting advanced properties 434
8.26 Using SAP Application (DB) as a source 435Prerequisites 436Limitations 443SAP Application (DB) source data types 444Setting general connection properties 445Setting advanced properties 446
8.27 Using SAP Extractor as a source 447Overview 448Prerequisites 448Limitations and considerations 460Supported data types 461Setting general connection properties 462
Contents

Setup and User Guide - Qlik Replicate, November 2021 11
Setting advanced properties 4638.28 Using SAP HANA as a source 465Prerequisites 466Limitations and considerations 468Permissions 469Supported data types 469Setting general connection properties 470Setting advanced properties 471Removing replicate artifacts from the database 474
8.29 Using SAP Sybase ASE as a source 475Prerequisites 476Limitations and considerations 476Required permissions 477SAP Sybase ASE database source data types 477Setting general connection properties 479Setting advanced connection properties 480Handling the secondary truncation point 481
8.30 Using Teradata Database as a source 483Prerequisites 484Required permissions 485Teradata source data types 485Setting general connection properties 486Setting Change Processing parameters 487
9 Adding and managing target endpoints 4919.1 Using Actian Vector as a target 493Prerequisites 494Limitations 495Permissions 495Actian Vector data types 495Setting general connection properties 497Setting advanced connection properties 498
9.2 Using Amazon EMR as a target 500Prerequisites 501Limitations 501Change data partitioning on Amazon EMR 502Amazon EMR endpoint target data types 502Setting general connection properties 503Setting advanced connection properties 504
9.3 Using Amazon Kinesis data streams as a target 508Prerequisites 509Transaction processing by the consumer 510Limitations 511Supported data types 512Setting general connection properties 514Setting advanced connection properties 516The Replicate envelope 518Metadata and data messages 520
Contents

Setup and User Guide - Qlik Replicate, November 2021 12
9.4 Using Amazon Redshift as a target 524Introducing the Amazon Redshift target endpoint for Qlik Replicate 525Limitations 525Amazon Redshift database prerequisites 525Amazon Redshift data types 527Setting general connection parameters 529Setting advanced connection properties 530
9.5 Using Amazon S3 as a target 533Prerequisites 534Amazon S3 target overview 535Limitations 535Change data partitioning 536Amazon S3 target data types 536Setting general connection properties 537Setting advanced connection properties 541Generating reference files 544Content-type and content-encoding properties 544
9.6 Using Cloudera Data Platform (CDP) Private Cloud as a target 545Prerequisites 546Limitations and considerations 546Change data partitioning 547Security requirements 547Supported data types 547Setting general connection properties 548Setting advanced connection properties 551Using Kerberos authentication on Windows 553
9.7 Using Databricks on AWS as a target 556Prerequisites 557Limitations and considerations 557Change data partitioning on Databricks on AWS 558Supported data types 558Setting general connection properties 559Setting advanced connection properties 562
9.8 Using Databricks on Google Cloud as a target 565Prerequisites 566Limitations and considerations 566Change data partitioning on Databricks on Google Cloud 568Supported data types 568Setting general connection properties 569Setting advanced connection properties 569
9.9 Using a file as a target 572File target overview 573Limitations 574Change data partitioning 575File target data types 575Setting general properties 576Setting advanced connection properties 579Generating reference files 583
Contents

Setup and User Guide - Qlik Replicate, November 2021 13
9.10 Using Google Cloud BigQuery as a target 584Prerequisites 585Limitations and considerations 586Supported data types 587Setting general connection properties 588Setting advanced connection properties 588
9.11 Using Google Cloud SQL for MySQL as a Target 590Prerequisites 591Limitations 591Security requirements 592Supported Data Types 592Setting general connection properties 595Setting advanced connection properties 596
9.12 Using Google Cloud SQL for PostgreSQL as a target 598Prerequisites 599Limitations 599Security requirements 599Google Cloud SQL for PostgreSQL database target data types 600Setting general connection properties 601Setting advanced connection properties 603
9.13 Using Google Cloud Storage as a target 604Prerequisites 605Google Cloud storage target overview 605Limitations 605Change data partitioning 605Data types 606Setting general connection properties 607Setting advanced connection properties 610Generating reference files 613
9.14 Using Google Dataproc as a target 614Prerequisites 615Limitations 615Change data partitioning on Google Dataproc 616Google Dataproc endpoint target data types 616Setting general connection properties 617Setting advanced connection properties 618
9.15 Using Hadoop as a target 621Prerequisites 622Limitations 622Change Data Partitioning on Hadoop 623Security requirements 624Hadoop endpoint target data types 624Setting general connection properties 625Setting advanced connection properties 630Using Kerberos authentication 638
9.16 Using Hortonworks Data Platform (HDP) as a target 642Prerequisites 643
Contents

Setup and User Guide - Qlik Replicate, November 2021 14
Limitations 643Change Data Partitioning 644Security requirements 644HDP Endpoint target data types 644Setting general connection properties 645Setting advanced connection properties 651Using Kerberos authentication 655
9.17 Using IBM Netezza as a target 659Prerequisites 660Limitations 660Security requirements 660IBM Netezza target data types 661Setting general connection properties 662Setting advanced connection properties 663
9.18 Using Kafka as a target 664Transaction processing by the consumer 665Prerequisites 666Limitations 666Kafka target data types 667Setting general connection properties 669Setting advanced connection properties 677Working with Confluent Cloud 678The Replicate envelope 678Metadata and data messages 680Using Kerberos authentication on Windows 685
9.19 Using a Log Stream target 6879.20 Using MapR Streams as a target 689Transaction processing by the consumer 690Prerequisites 691Limitations 691Supported data types 692Setting general connection properties 694Setting advanced connection properties 696The Replicate envelope 697Metadata and data messages 699
9.21 Using Microsoft APS PDW as a target 704Prerequisites 705Limitations and considerations 705Security requirements 705Microsoft APS PDW target data types 705Setting general connection properties 706Setting advanced connection properties 707
9.22 Using Microsoft Azure ADLS as a target 709Prerequisites 710Microsoft Azure ADLS target overview 710Limitations 710Change data partitioning 711Data types 711
Contents

Setup and User Guide - Qlik Replicate, November 2021 15
Setting general connection properties 712Setting advanced connection properties 716Generating reference files 719
9.23 Using Microsoft Azure Database for MySQL as a target 720Prerequisites 721Limitations 721Security requirements 722Supported data types 722Setting general connection properties 725Setting advanced connection properties 726
9.24 Using Microsoft Azure Database for PostgreSQL as a target 728Prerequisites 729Limitations 729Security requirements 729Microsoft Azure Database for PostgreSQL target data types 730Setting general connection properties 731Setting advanced connection properties 733
9.25 Using Microsoft Azure Databricks as a target 734Prerequisites 735Limitations and considerations 735Change data partitioning on Microsoft Azure Databricks 736Supported data types 737Setting general connection properties 738Setting advanced connection properties 740
9.26 Using Microsoft Azure Databricks Delta as a target 743Prerequisites 744Limitations and considerations 745Supported data types 746Setting general connection properties 746Setting advanced connection properties 747
9.27 Using Microsoft Azure Event Hubs as a target 749Prerequisites 750Transaction processing by the consumer 750Limitations 751Supported target data types 752Setting general connection properties 754Setting advanced connection properties 757The Replicate envelope 758Metadata and data messages 760
9.28 Using Microsoft Azure HDInsight as a target 764Prerequisites 765Limitations 765Change data partitioning on Microsoft Azure HDInsight 766Microsoft Azure HDInsight endpoint target data types 766Setting general connection properties 767Setting advanced connection properties 769
9.29 Using Microsoft Azure Synapse Analytics as a target 773
Contents

Setup and User Guide - Qlik Replicate, November 2021 16
Prerequisites 774Limitations 775Supported data types 776Setting general connection properties 777Setting advanced connection properties 779
9.30 Using Microsoft Azure SQL Database as a target 781Prerequisites 782Limitations 783Permissions 783Microsoft Azure SQL Database target data types 783Setting general connection properties 785Setting advanced connection properties 786
9.31 Using Microsoft SQL Server as a target 788Supported editions 789Prerequisites 789Limitation and considerations 790Permissions 790Microsoft SQL Server target data types 790Setting general connection properties 792Setting advanced connection properties 794
9.32 Using a MySQL-based database as a target 796Prerequisites 797Limitations 797Security requirements 798Supported data types 798Setting general connection properties 801Setting advanced connection properties 802
9.33 Using ODBC to connect to a target 804Prerequisites 805ODBC target data types 806Setting general connection properties 807Setting advanced connection properties 809
9.34 Using Oracle as a target 810Client prerequisites 811Limitations 812Security requirements 812Oracle target data types 813Setting general connection properties 815Setting advanced connection properties 816
9.35 Using Pivotal Greenplum as a target 818An overview of the Pivotal Greenplum target 819Qlik Replicate Pivotal Greenplum endpoint architecture overview 819The Pivotal Greenplum Full Load process 821Applying changes to the Pivotal Greenplum target 821Prerequisites 821Provide Pivotal Greenplum account access 823Security requirements 823Limitations 823
Contents

Setup and User Guide - Qlik Replicate, November 2021 17
Pivotal Greenplum data types 823Setting up the gpfdist program as a service 825Using multiple gpfdist programs 826Setting general connection properties 826Setting advanced connection properties 828Testing your Pivotal Greenplum Configuration and Environment 829
9.36 Using a PostgreSQL-Based database as a target 833Prerequisites 834Limitations 834Security requirements 834PostgreSQL Database target data types 835Setting general connection properties 836Setting advanced connection properties 838
9.37 Using Qlik Cloud Landing as a target 839Prerequisites 840Overview 841Limitations 841Change data partitioning 842Qlik Cloud Landing target data types 842Setting general connection properties 843Setting advanced connection properties 844
9.38 Using SAP HANA as a target 846Prerequisites 847Limitations and considerations 847Permissions 847Supported data types 847Setting general connection properties 848Setting advanced connection properties 849
9.39 Using SAP Sybase ASE as a target 850Prerequisites 851Limitations 851Security requirements 851SAP Sybase ASE database target data types 851Non-supported data types 853Setting general connection properties 853Setting advanced connection properties 854
9.40 Using SAP Sybase IQ as a target 856Prerequisites 857Limitations 857Security requirements 857SAP Sybase IQ target data types 857Setting general connection properties 858Setting advanced connection properties 859
9.41 Using SingleStore as a target 861Prerequisites 862Limitations 862Security requirements 862Supported data types 863
Contents

Setup and User Guide - Qlik Replicate, November 2021 18
Setting general connection properties 865Setting advanced connection properties 866
9.42 Using Snowflake on AWS as a target 868Prerequisites 869Limitations and considerations 870Required permissions 870Snowflake on AWS data types 871Setting general connection parameters 873Setting advanced connection properties 875
9.43 Using Snowflake on Azure as a target 877Prerequisites 878Limitations and considerations 879Required permissions 879Snowflake on Azure data types 880Setting general connection parameters 882Setting advanced connection properties 883
9.44 Using Snowflake on Google as a target 885Prerequisites 886Required permissions 886Limitations and considerations 887Snowflake on Google data types 888Setting general connection parameters 890Setting advanced connection properties 891
9.45 Using Teradata Database as a target 893An overview of the Teradata Database target 894Teradata Database target load options 894Database availability 894Required Teradata Database Software, Environments 894Providing access to the Teradata Database 896Security requirements 896Teradata Database data types 897Setting general connection properties 899Setting advanced connection properties 900
9.46 Using Vertica as a target 903Prerequisites 904Limitations 904Security requirements 904Vertica target data types 905Setting general connection properties 906Setting advanced connection properties 907
10 Using the Qlik Replicate file channel 90810.1 Prerequisites 90910.2 Limitations 90910.3 Security 91010.4 Setting Up Qlik Replicate File Channel tasks 910Local task 910Remote task 911
Contents

Setup and User Guide - Qlik Replicate, November 2021 19
Replicating to multiple targets (distribution) 91110.5 Working with the File Channel data files 912File-Channel directory structure 913
10.6 Using the File Channel as a source 91410.7 Setting general connection properties 91410.8 Setting advanced connection properties 915Internal parameters 915Settings summary 916
10.9 Using the File Channel as a target 916Setting general connection properties 916Setting advanced connection properties 917Internal parameters 918Settings summary 918
11 Using the Log Stream 91911.1 Terminology 92011.2 Overview 920The flow 920
11.3 Step 1: Create a Log Stream target endpoint 92111.4 Step 2: Create and run a Log Stream Staging task 922Log Stream Staging limitations and considerations 924
11.5 Step 3: Create a replication task to transfer the staged data to the target 925Duplicate the source endpoint and add it to the log stream staging task 926Create the replication task using the duplicated source endpoint 926Replication task limitations and considerations 928
12 Customizing tasks 92912.1 Table Settings 929Performing General tasks for a single table/view 930Defining transformations for a single table/view 931Using filters 940Parallel Load 946Handling LOB columns 950Message format 954Full Load 954
12.2 Defining global rules 955Starting the Global Transformation Rules wizard 955
966967
Starting the Global Filter Rules wizard 980Managing global rules 984
12.3 Using the Expression Builder 985Overview of the Expression Builder 986Build an expression 987Parse an expression 988Test an expression 988Using elements in the Expression Builder 990
12.4 Task Settings 1010
Contents

Setup and User Guide - Qlik Replicate, November 2021 20
Metadata 1011Bidirectional 1016Full Load 1017Change Processing 1020Error handling 1031Logging 1036Character substitution 1037More options 1038File uploads 1038Message Format 1039
13 Working with tasks at runtime 104613.1 Running a task 1046How to run a task 1046Using the Run button options 1047Advanced Run Options 1048Recovering from data folder loss or corruption 1053
13.2 Viewing the task status 105413.3 Accessing task messages and notifications 1055Viewing Notifications 1055View Log Messages for a task 1056
14 Monitoring and controlling replication tasks 105914.1 Viewing information in the monitor 105914.2 Monitoring full-load operations 1059General information for a Full Load 1059Detailed information for the Full Load 1060Monitoring throughput in a Full Load operation 1066
14.3 Monitoring change processing operations 1067General Change Processing information 1067Detailed Change Processing information 1069
14.4 Viewing messages 107614.5 Using the monitor tools 1076Viewing history information 1077Setting the task logging level 1077Viewing, downloading, and manually rolling over task log files 1078Deleting log files 1079Deleting old partitions manually 1080Downloading a memory report 1080Downloading a diagnostics package 1081
15 Qlik Replicate server settings 108215.1 Notifications settings 1082Defining notifications 1083Define the action that triggers the notification 1084Define which changes of status trigger the notification 1085Define errors or warnings that trigger the notification 1087Define the recipients 1087Define the notification message 1088Associate tasks with the notification 1093
Contents

Setup and User Guide - Qlik Replicate, November 2021 21
Review the notification rule 1094Define the event that triggers the notification 1094Review the notification rule 1097Setting up Mail parameters 1100Creating a Default Recipient List 1101Replicate Event IDs in Windows Event Log 1102
15.2 License settings 1103Requesting a license 1103Registering a license 1105Viewing a license 1107
15.3 Global error handling 110715.4 Logging 1108Setting logging levels for the Server and File Transfer Service 1109Setting automatic roll over and cleanup 1110Viewing and downloading log files 1111Manually rolling over the log files 1111Deleting server, task and FTS log files 1112
15.5 File Transfer Service 1112How it works 1112Compression 1112Encryption 1113Defining a File Transfer Service 1113Editing a File Transfer Service 1114Deleting a File Transfer Service 1114
15.6 Scheduling jobs 111415.7 User permissions 1116Managing user permissions 1118
15.8 Resource control 1119Disk space 1119System memory 1119
15.9 Operating system level credentials 112015.10 More options 112015.11 Endpoint Servers 1121Viewing Endpoint Server Properties 1121JVM configuration options 1121Endpoint Server logging 1122
A Using Change Tables 1124A.1 Working with Change Tables 1124Handling truncate operations 1124Using the Change Table model 1125
A.2 Change Tables 1125A.3 Usage example 1128
B Creating dump files 1130C Using an Audit table 1131D Setting up Qlik Replicate in a cluster environment 1134D.1 Setting up Qlik Replicate in a Windows Server cluster (HA) 1134
Contents

Setup and User Guide - Qlik Replicate, November 2021 22
Step 1: Install Qlik Replicate in the cluster 1134Step 2: Add the Qlik Replicate services 1135Step 3: Define the dependencies for each service 1136Step 4: Enable different console configurations in a high availability environment 1137
D.2 Setting up Qlik Replicate in a Linux cluster 1137E Control Tables 1138E.1 Apply exceptions 1138E.2 Replication status 1139E.3 Suspended Tables 1140E.4 Replication history 1140E.5 Change data partitions 1141E.6 DDL history 1142
F Using HP NonStop SQL/MP as an ODBC target 1145F.1 Prerequisites 1145F.2 Table settings 1146F.3 Task setting limitations 1147
G Impact of DST change on Qlik Replicate 1149H Metadata file description 1151I Supported Platforms and Endpoints 1154I.1 Supported platforms 1154Supported Windows platforms 1154Supported Linux platforms 1154
I.2 Supported source endpoints 1155Cloud-based 1155ARC-based 1157AIS-based 1157File 1157Data Lake 1158Relational databases 1158Data warehouses 1159ODBC 1159NoSQL 1159Other 1160
I.3 Supported target endpoints 1160Cloud-based 1161Streaming 1163File-based 1164Hadoop 1164Data warehouses 1164Relational databases 1165ODBC 1165
I.4 Endpoints supported in bidirectional replication 1165I.5 Supported browsers 1166
J Replicate Loggers 1167J.1 ADDONS 1167J.2 ASSERTION 1168
Contents

Setup and User Guide - Qlik Replicate, November 2021 23
J.3 COMMON 1168J.4 COMMUNICATION 1168J.5 DATA_RECORD 1168Example 1168
J.6 DATA_STRUCTURE 1168J.7 FILE_FACTORY 1169J.8 FILE_TRANSFER (AKA CIFTA) 1169J.9 INFRASTRUCTURE 1169J.10 IO 1169Example: 1169
J.11 METADATA_CHANGES 1169J.12 METADATA_MANAGER 1169J.13 PERFORMANCE 1169J.14 REST_SERVER 1169J.15 SERVER 1170J.16 SORTER 1170J.17 SORTER_STORAGE 1170J.18 SOURCE_CAPTURE 1170J.19 SOURCE_LOG_DUMP 1170J.20 SOURCE_UNLOAD 1170J.21 STREAM 1171J.22 STREAM_COMPONENT 1171Example 1171
J.23 TABLES_MANAGER 1171J.24 TARGET_APPLY 1171J.25 TARGET_LOAD 1171J.26 TASK_MANAGER 1171J.27 TRANSFORMATION 1172Example: 1172
J.28 UTILITIES 1172K Replicate add-ons API 1173K.1 Memory management methods 1173create_pool 1173destroy_pool 1174clear_pool 1174calloc 1174get_ctx_pool 1175get_ctx 1175set_ctx 1175
K.2 Log management methods 1176log_error 1176log_warning 1176log_trace 1177
L Glossary 1178
Contents

Setup and User Guide - Qlik Replicate, November 2021 24
1 What's new?This section describes the new and enhanced features introduced in Qlik Replicate November 2021.
1.1 What's new in endpoints?
Support for capturing changes from Microsoft Azure SQL ManagedInstance using MS-CDCFrom this version, when replicating from Microsoft Azure SQL Managed Instance, you can use theMicrosoft Azure SQL (MS-CDC) endpoint to capture changes from Microsoft Change Tables as opposed tothe SQL Server transaction log . Eliminating the need to rely on the transaction log minimizes the risk ofdata loss resulting from online transaction log retention time and backup transaction log inaccessibility.
SAP HANA Source EnhancementsThis section describes the SAP HANA source endpoint enhancements introduced in this version.
Log PreferenceWhen working in log-based CDCmode, you can now determine which logs Replicate will read the changesfrom. To this end, a Read changes from drop-down list was added to the endpoint settings' Advanced tab,with the following options:
l Prioritize backup log - This is the default mode as it provides best performance while also offeringgreater efficiency. In this mode, Replicate will first try to capture the changes from the backup log. Ifthe changes do not exist in the backup log, it will try to capture them from the online redo loginstead.When this option is selected, you also need to specify the locations of the Redo log shared folderand the Backup log shared folder.
l Backup log only - In this mode, Replicate requires access to the backup log only. Changes will becaptured from the backup log as soon as they become available. The backup interval and the size ofthe backup files will impact the capture time.When this option is selected, you also need to specify the location of the Backup log shared folder.
l Redo log only - This mode should not be used in production environments. In this mode, Replicaterequires access to the redo log only. Changes will only be captured if they exist in the redo log. Inthe event that the changes are not available in the redo log, the task will need to be reloaded toensure that all data and changes from the source are available on the target.When this option is selected, you also need to specify the location of the Redo log shared folder.
Parallel Load SupportCustomers can now leverage the Parallel Load feature when replicating from a SAP HANA source. ParallelLoad accelerates the replication of large tables by splitting the table into segments and loading thesegments in parallel.
Contents

Setup and User Guide - Qlik Replicate, November 2021 25
IBM DB2 for iSeries EnhancementsThis section describes the IBM DB2 for iSeries source endpoint enhancements introduced in this version.
Fine-tuning performance by adjusting the UDTF result set sizeA new UDTF result set size (MB) field has been added to the Advanced tab of the endpoint settings. Thenew field allows you to set the maximum size of the result-set buffer returned by the R4I UDTF (UserDefined Table Function). A larger result set will usually improve performance, but will also impact DB2memory consumption.
New header columnThe AR_H_PROGRAM_NAME header column can now be included in transformations. The headercolumn specifies the iSeries program that made the change to the source database.
Support for the AR_H_PROGRAM_NAME header column was first introduced in QlikReplicate May 2021 SR3.
Mapping to VARIANT on Snowflake targetOn Snowflake targets (AWS, Google, and Azure), CLOB, NCLOB, STRING, and WSTRING data typesdefined as either JSON or XML subtypes will be mapped to the VARIANT data type.
See also: Support for XML and JSON Subtypes (page 29).
Duplicate record prevention when using the IBM DB2 for z/OS sourceendpoint
Supported when using the IBM DB2 for z/OS source endpoint only.
A new Eliminate duplicate records on full load option has been added to the task settings' Full LoadSettings tab and the Table Settings' Full Load tab. This option can be useful if you need to preventduplicate records from being loaded into the target database from an IBM DB2 for z/OS source. The optioncan either be set at task level or per table. Note that selecting this option could impact performance asReplicate asks the source database to return the table records by Primary Key order and then removes anyduplicate records.
AWS Databricks and Microsoft Azure DatabricksIn previous versions, the storage could only be accessed via a DBFS mount, which some customersviewed as a potential security risk (as Databricks users can easily change the mount path). To address thisconcern, a new Databricks storage access method field has been added to the Advanced tab of theendpoint settings. The new field allows you to choose which method your Databricks cluster uses toaccess the storage: Access Directly (the default) or Access through DBFS Mount.
Contents

Setup and User Guide - Qlik Replicate, November 2021 26
SAP Extractor Source - Filter EnhancementsThe ability to create and maintain SAP Extractor endpoint filters has been enhanced to allow multiple fieldsand/or values.
In addition to being able to create and edit multiple filters via the Replicate for SAP Extractors launch pad,users can also leverage the Adjust Extract Filter option to maintain values directly in the table.
Contents

Setup and User Guide - Qlik Replicate, November 2021 27
Google Cloud SQL for PostgreSQLSSL settings were added to the endpoint settings' General tab:
Databricks on Google CloudYou can now replicate from any supported source to Databricks on Google Cloud.
Support for Databricks on Google Cloud was first introduced in Qlik Replicate May 2021 SR3.
Microsoft SQL Server 2019 target - UTF-8 SupportWhen replicating to Microsoft SQL Server 2019, UTF-8 data can now be transferred to VARCHAR, CHAR,and CLOB columns when the database collation is set to %collation%_UTF8 (for example, Latin1_General_100_CI_AS_SC_UTF8).
Contents

Setup and User Guide - Qlik Replicate, November 2021 28
1.2 What's new in engine?
Security hardening - Log encryptionStarting from this version, when the logging level is set to Verbose, sections in a Replicate log file thatmight contain customer data will be encrypted while the rest of the log will remain in clear text.
Setting the logging level to Verbose for a prolonged period will consume a large amount of diskspace and should therefore be avoided unless explicitly requested by Qlik Support.
In some support cases, R&D may require the ability to decrypt the log in order to analyze the problem. Insuch cases, Qlik Support will ask you to provide the task or environment-level encryption key. Theencryption key is automatically generated and kept in a log.key file in the following locations:
l For decrypting a task's log file: <REPLICATE_INSTALL_DIR>\data\tasks\<task-name>l For decrypting non-task related log files (e.g. server logs): <REPLICATE_INSTALL_DIR>\data
Should you wish to review the logs before sending to Qlik Support, you can decrypt them via the ReplicateCLI as described below.
Decrypting Task Logs:
1. Open the Replicate command line from Start menu (Qlik Replicate > Qlik Replicate CommandLine) or open a command prompt “as administrator” and switch to the following directory:<REPLICATE_INSTALL_DIR>\bin>
2. Run the following command:Syntax:repctl dumplog <log-file-path> <log.key-path> [> <path-to-output-file>]
Example:repctl dumplog "C:\Program Files\Attunity\Replicate\data\logs\tasks\MyTask.log"
"C:\Program Files\Attunity\Replicate\data\tasks\MyTask\log.key" > "C:\Program
Files\Attunity\Replicate\data\decrypted.log”
Decrypting Non-Task Logs:
1. Open the Qlik Replicate command line from Start menu (Qlik Replicate > Qlik ReplicateCommand Line) or open a command prompt “as administrator” and switch to the followingdirectory:<REPLICATE_INSTALL_DIR>\bin>
2. Run the following command:Syntax:repctl dumplog <log-file-path> <log.key-path> [> <path-to-output-file>]
Example:repctl dumplog "C:\Program Files\Attunity\Replicate\data\logs\repsrv.log" "C:\Program
Files\Attunity\Replicate\data\log.key" > "C:\Program
Files\Attunity\Replicate\data\decrypted.log”
Contents

Setup and User Guide - Qlik Replicate, November 2021 29
The encryption key file (log.key file) can be used to decrypt any log that was encrypted with it,not just the log for which Qlik Support requested the encryption key file. If this is a concern, youcan generate a log.key file that will only be valid for the specific log requested by Qlik Support.
To do this:
1. Delete the log.key file.
2. Restart the task or Replicate Server service (depending on the log type required) togenerate a new log.key file.
3. Send the requested log file and the log.key file to Qlik Support.
4. Delete the log.key file.
5. Repeat steps 2-4 if you need to provide additional encrypted logs.
Support for XML and JSON SubtypesThis version introduces support for the JSON and XML subtypes.
Support for the JSON and XML subtypes is applicable to Snowflake-based target endpointsonly.
The support is implemented in the following areas:
"Convert data type", "Add column", and "Replace column value" transformationsA new Subtype drop-down list has been added to these transformations. When CLOB, NCLOB, STRING,or WSTRING data types are selected, you can select Regular, JSON or XML from the Subtype drop-downlist. The default is Regular, which means that the regular data type will be used without a subtype. If asubtype is selected, make sure that the data in the column will be compatible with the selected subtype.
New metadata variable in the Expression BuilderThe AR_M_MODIFIED_COLUMN_SUBTYPE_NAME variable can be used to denote the post-transformation subtype of a column in the source table.
See also: Mapping to VARIANT on Snowflake target (page 25).
Enhancements when using the Qlik Cloud Landing replication profile
Snowflake and Microsoft Azure Synapse Analytics supportIn earlier versions, the Qlik Cloud Landing replication profile supported working with the Qlik CloudLanding target endpoint only. This version introduces support for Snowflake-based and Microsoft AzureSynapse Analytics target endpoints as well.
Contents

Setup and User Guide - Qlik Replicate, November 2021 30
New DDL handling optionA new Apply to change table and target table DDL handling option was added to the task settings' StoreChanges Settings tab. This is the default option. When this option is selected, DDL operations to thesource tables will be applied both to the Qlik Replicate Change Tables and to the corresponding targettables.
New header column when working with the IBM DB2 for iSeries sourceThe AR_H_PROGRAM_NAME header column can now be included in transformations. The headercolumn specifies the iSeries program that made the change to the source database.
Support for the AR_H_PROGRAM_NAME header column was first introduced in QlikReplicate May 2021 SR3.
Contents

1 Introduction
1 IntroductionThis section describes the main concepts of data replication and the major components of Qlik Replicate.
The term "endpoint" is used generically throughout this guide to refer to a data repository thatcan be used as a source and/or target in a Qlik Replicate task. Examples of such repositoriesinclude relational databases (such as Oracle) and files.
In this section:
l What you need (page 92)l Replication Explained (page 34)l Full Load and CDC processes (page 35)l Replication topologies (page 35)l Limitations and considerations (page 36)
1.1 What is Qlik Replicate?Qlik Replicate is a simple, powerful, easy-to-implement solution that provides replication between variousendpoints. Replicate lets you:
l Load data efficiently and quickly to operational data stores/warehousesl Create copies of production endpointsl Distribute data across endpoints
Replicate is designed to scale and support large scale enterprise data replication scenarios with a scalablemulti-server, multi-task, and multi-threaded architecture.
Replicate consists of a Web-based console and a replication server to replicate data across bothheterogeneous and homogeneous data sources. It provides users with instant visibility into current andhistorical tasks, status, performance, and resource usage information.
Replicate can execute replication tasks between a large number of enterprise endpoints including Oracle,Microsoft SQL Server, and IBM DB2. It uses a "Click-2-Replicate" design that simplifies the replicationprocess by automating the steps required to build a replication solution.
When you set up a task in Replicate, you can select any of the following:
l Full Load Replication: Creates files or tables on the target endpoint, automatically defines themetadata that is required on the target, and populates the tables with data from the source
l Change Processing, also called Change Data Capture (CDC): Captures changes in the source dataor metadata as they occur and applies them to the target endpoint as soon as possible, in near-realtime
l Store Changes: Captures changes in the source data or metadata as they occur but does not applythem to the target
Setup and User Guide - Qlik Replicate, November 2021 31

1 Introduction
Replication is log based, which means that it reads only the changes. This reduces the impact on thesource endpoints.
System architectureThe following diagram shows the basic architecture of Qlik Replicate.
In the initial load process, Qlik Replicate reads a filtered stream of rows (with relevant columns only) andpasses them to the transformation process for further filtering and subsequent writing to the target endpoint(in the expected output format).
The CDC process obtains a stream of filtered events or changes in data or metadata from the transactionlog file. It then buffers all changes for a given transaction into a single unit before forwarding them to thetarget when the transaction is committed. During the initial load process, CDC also buffers all changes thatoccur within a transaction until all affected tables have been loaded.
1.2 TerminologyThe following section describes some key terms used throughout this Help.
Change Data Capture (CDC)Captures changes in the source data or metadata as they occur and applies them to the target endpoint assoon as possible, in near-real-time. The changes are captured and applied as units of single committedtransactions and several different target tables may be updated as the result of a single source commit.This guarantees transactional integrity in the target endpoint. The CDC process for any file or table startsas soon as the data loading operation for the file or table begins.
Setup and User Guide - Qlik Replicate, November 2021 32

1 Introduction
Full loadCreates all defined files or tables on the target endpoint, automatically defines the metadata that isrequired at the target, and populates the tables with data from the source.
Apply latencyThe gap in seconds between capturing a change in one of the source tables and applying that change tothe target endpoint.
Latency when applying large transactionsThis is best explained by way of example. When the most recent Apply Latency value was 10 seconds andnow a transaction of one million rows gets committed at the source endpoint, Replicate starts to apply thattransaction to the selected target and it will take some time to write all the changes to the target (forexample 60 seconds). During the next 60 seconds, the latency value gradually grows to 70 seconds for thelast change in the transaction. Once the transaction is committed, the latency drops back to the 'regular'latency (10 seconds in this case).
Latency when no transactions are being appliedWhen a time period passes with no changes applied to the target, the latency calculation is based on thetime difference between the current time and the timestamp of the last change event read from thetransaction log. This could happen, for example, if there is a high volume of activity on tables that were notselected for replication in the current task.
Source latencyThe gap in seconds between when the source database wrote an event to its transaction log and whenReplicate captured that change.
Target latencyThe gap between when a commit is seen by Replicate (reading the source transaction log) and when thechanges of that commit are seen in the target.
Overall latencyThe overall latency is defined as the time gap between when a change is committed in the source databaseand when it is visible in the target database.
Source endpointA collection of files or tables managed by an endpoint management system (such as, Oracle, SQL Server)that is part of the main computing service of the IT organization of an enterprise. This source continuouslyupdated, may need to provide a high throughput rate, may have strict 24/7 up-time requirements, and mayreference or update a number of tables in the course of a single logical transaction while providingtransactional consistency and integrity for the data.
Setup and User Guide - Qlik Replicate, November 2021 33
1 Introduction
Target endpointA collection of files or tables managed by an Endpoint Management System (DBMS), which may bedifferent from the DBMSmanaging the source endpoint. It contains data that is derived from the source. Itmay contain only a subset of the tables, columns, or rows that appear in the source. Its tables may containcolumns that do not appear in the source but are transformations or computations based on the sourcedata.
1.3 Replication ExplainedReplication is a process that keeps two or more collections of computerized information identicallysynchronized. It facilitates:
l Load reduction: Keeping a complete or partial copy of a collection on a different server reduces theload on the main server.
l Improved service: Accessing a copy of the data can provide better service to users than havingthem access the original data.
l Restricted data access: If some users should only have access to a subset of data, replicating onlypart of a collection makes it easy to enforce security restrictions.
l Geographic distribution: Making only a subset of data relevant to a specific node (or location)available is beneficial in widely distributed enterprises (such as a chain of retail stores orwarehouses). You can still make all data available at a central location for less frequent use.
l Disaster Recovery: Keeping a copy of the main data available allows for setting up rapid fail-overclusters (the capability to switch over to a redundant or standby computer server in case the mainsystem fails).
l "Cloud" computing: Replicating data allows for implementing what is commonly known as cloudcomputing (the on-demand storage, management, and processing of Internet-based data).
The information replicated is stored as files or in a database. In the case of files, the structure and contentof a file are known only to the specialized programs that use the file. Databases are managed by databasemanagement systems (DBMS) that make use of standardized descriptions of the structure of theinformation (such as tables, columns, rows, and data types). These descriptions are known collectively asmetadata and allow a general-purpose replicator to carry out relevant operations (for example filtering anddata transformations) without the need to know anything about the contents or “meaning” of the data.Because file systems do not contain metadata, operations available for replication are more limited.
During replication, a collection of data is copied from system A to system B, where A is known as thesource (for this collection) and B is known as the target. A system can be a source, a target, or both (withcertain restrictions). A complex replication topology has a number of sources, targets, and data collectionsdefined.
The replication process must account for the fact that source data may be changing while being copied. Itis not possible to make or maintain copies instantaneously and to stop the source computer to “freeze” theinformation. Therefore, replication must account for:
l Integrity: The target data must reflect the complete result of all changes made to the source dataduring the replication process.
Setup and User Guide - Qlik Replicate, November 2021 34

1 Introduction
l Consistency: If a change affects different tables, rows, or files, the copy must reflect these changesconsistently across all affected tables, rows, or files.
l Latency: The replication process must aim at keeping latency at a minimum. Ideally, it should notexceed a few seconds.
1.4 Full Load and CDC processesThe full load process creates files or tables at the target endpoint, automatically defines the metadata thatis required at the target, and populates the tables with data from the source. Unlike the CDC process, thefull load process loads the data one entire table or file at a time, for maximum efficiency.
The source tables may be subject to update activity during the Load process. However, there is no need tostop processing in the source. Replicate automatically starts the CDC process as soon as the load processstarts. It does not apply the changes to the target until after the load of a table completes because the dataon the target might not be consistent while the load process is active. At the conclusion of the load process,however, Replicate guarantees consistency and integrity of the target data.
If the load process is interrupted, it continues from wherever it stopped when restarted.
You can add new tables to an existing target without reloading the existing tables. Similarly, you can add ordrop columns in previously populated target tables without reloading.
The CDC process captures changes in the source data or metadata as they occur and applies them to thetarget endpoint as soon as possible in near real time. It captures and applies the changes as units of singlecommitted transactions and can update several different target tables as the result of a single sourcecommit. This guarantees transactional integrity in the target endpoint. The CDC process for any file or tablestarts as soon as the data load process for the file or table begins.
CDC operates by reading the recovery log file of the source endpoint management system and groupingtogether the entries for each transaction. The process employs techniques that ensure efficiency withoutseriously impacting the latency of the target data. If the CDC process cannot apply the changes to thetarget within a reasonable amount of time (for example when the target is not accessible), it buffers thechanges on the Replication server for as long as necessary. There is no need to re-read the source DBMSlogs, which may take a long time.
1.5 Replication topologiesQlik Replicate can be set up to work in different topologies including one to one, logical independence, andhub and spoke. The following topic provides a brief overview of these topologies.
One to oneIn a one-one topology, there is one source and one target endpoint. When the source and target endpointsare distinct, Qlik Replicate guarantees transactional integrity and consistency. If you use two differentreplication tasks, the endpoints may switch roles, allowing two-way synchronization.
Setup and User Guide - Qlik Replicate, November 2021 35

1 Introduction
If the same row in a table is updated by two different replication tasks, the result of two-waysynchronization may be unpredictable. A problem can occur even if two different rows arereferentially related, that is if some application updates a row based on reading a value in adifferent row. If the rows are updated concurrently on the source and the target, the result maybe unpredictable. (CDC has no way of knowing exactly when a row was read by an applicationon one system relative to its having been changed on another system. Read operations aretypically not logged.) Such occurrences are rare, but they can occur.
Logical independenceTwo-way replication works best when updates of a row on a source and on a target are entirelyautonomous and do not affect each other. There is an assumption that any table or a horizontal or verticalsegment of a partitioned table can only be updated in one source. Qlik Replicate allows updating the samerow in several places, but in this case, the columns being updated must be distinct. Another assumption isthat if a data value in one row depends on or is derived from a value in another row, the values can bechanged only on the same server but nowhere else (except by the Replicator). This is called logicalindependence. With logical independence, concurrent update conflicts cannot occur during replication.
Hub and spokeMany-to-one and one-to-many relationships can be combined into a hub-and-spoke topology, which allowsthe merging of data into multiple targets and then distributing to other targets. It does not allow cycles ormultiple paths for propagating changes. The hub-and-spoke topology is that of an acyclic directed graph.
1.6 Limitations and considerationsWhen working with Qlik Replicate, the following limitations apply:
l Replicate does not support replication of Primary Keys that are LOB data types.l When replicating a table that has no Primary Key or Unique Index, LOB columns will not bereplicated.
l When the Limit LOB size to option is enabled, replication of structured data LOBs (e.g. XML, JSON,IMAGE, etc.) may truncate (and thereby invalidate) the structured data in the target LOB.
l In Batch Optimized Apply mode, if the target table has more columns than the source table, anyvalues in the extra columns will be replaced with NULL.The workaround is to create two tasks. One task for the target table(s) with extra columns and theother task for the source table(s) which have the same number of columns as the target tables.Then, run the task for the target table(s) with extra columns in Transactional Apply mode and runthe other task (where the target tables do not have extra columns) in Batch Optimized Apply mode.Note, however, that updating large tables in Transactional Apply mode may impact performance.
l When Replicate creates a new table in the target endpoint, it defines only one index on the table.The index will either be the Primary Key or the first Unique Key (according to alphabetical order) ofthe table. No other indexes will be defined in the target. If additional indexes are required, these willneed to be defined manually.
Setup and User Guide - Qlik Replicate, November 2021 36

1 Introduction
l If a Unique Index/Primary Key in any of the source tables contains NULL values in multiple rows,UPDATE and DELETE operations on one of the rows will UPDATE /DELETE all of the target rows(in the Unique Index/Primary Key) that have a NULL value.
l LOB columns are always created as nullable on the target database. If you create the target table(s)manually, then you must set all LOB columns to nullable.
l If you stop a task after Full Load completes, make some changes to the source tables, and laterresume the task from timestamp (by selecting the Start processing changes from run option),some changes may not be replicated to the target. This usually only happens if the transaction logsin the source database have been deleted due to a log purge policy. In this case, Replicate willresume the task from the last change in the current transaction log.
l When replicating tables without a Primary Key, there is no way to verify whether a record alreadyexists on the target. This may result in data inconsistency when UPDATE and DELETE operationsare performed on the target database.
l Replication of calculated values is not supported during Change Processing.l If a task fails with a recoverable error on the target while it is starting, it will not read changes fromthe source.
l Cached changes may be duplicated in a target table that does not have a Unique Index.l A unique index consisting of several ascending and descending columns will always be replicatedto the target as ascending columns. In other words, the descending columns will become ascendingcolumns.
l When the source table contains an identity column, Replicate does not create the identity column onthe target table. In this case, the table will need to be created manually on the target endpoint.
l Replication of tables with the same name as any of the Replicate Control tables is not supported.For a list of the Control Table names, see Control Tables (page 1138).
l CREATE TABLE operations performed on the source while a task is stopped will be applied to thetarget when the task is resumed, but will not be recorded as a DDL in the attrep_ddl_history ControlTable.
l Due to access restrictions on Windows registry entries, two installations of Replicate on the samemachine must be installed under the same user account. If they are installed under differentaccounts, only one of the installations will work.
l When using filters that do not contain a Primary Key, DELETE operations will not be captured fromendpoints that do not support Before-images. Examples of such endpoints include all PostgreSQL-based sources, Salesforce source, and Oracle source that does not have full supplemental loggingon columns included in the filtering condition.
l During change capture, a source table is renamed multiple times in quick succession, an error thatthe table already exists in the target database might be encountered.
Example renaming scenario:ALTER TABLE A1 RENAME TO A3;
ALTER TABLE A2 RENAME TO A1;
ALTER TABLE A3 RENAME TO A2;
You can prevent this error from occurring by waiting a few seconds between each renamingoperation.
Setup and User Guide - Qlik Replicate, November 2021 37

2 Installing Qlik Replicate
2 Installing Qlik ReplicateThis section describes how to install, upgrade, and uninstall Qlik Replicate.
In this section:
l Recommended hardware configuration (page 38)l Setting up Qlik Replicate on Windows (page 39)l Setting up Qlik Replicate on Linux (page 47)
2.1 Recommended hardware configurationThis section describes the recommended hardware configurations for using Qlik Replicate. For informationon the software requirements for using Qlik Replicate, see Installing Qlik Replicate (page 38).
The following table describes the recommended hardware configuration for installing Qlik Replicate onWindows and Linux operating systems. Note that the recommendations apply to mid-scale systems (i.e.hundreds of tasks) rather than large-scale systems (i.e. thousands of tasks).
BasicSystem
LargeSystem
Extra-LargeSystem
Notes:
Processor Quadcore
Quadcore base
Dual-coreper task
8-corebase
Quadcore pertask
Additional cores are useful in any of thefollowing situations:
l Many tasks running in parallell Full-load performance priorityl Multiple full-load processes running inparallel
Memory 8 GB 32 GB 64 GB More memory is useful in any of the followingsituations:
l Many tasks running in parallell Long-running transactions on thesource endpoint (for example, monthlybatch processing)
l Many active users on the sourcesystem
Recommended hardware configurations
Setup and User Guide - Qlik Replicate, November 2021 38

2 Installing Qlik Replicate
BasicSystem
LargeSystem
Extra-LargeSystem
Notes:
Diskrequirements
320 GB 500 GB
RAID
500 GB
RAID
A faster disk is useful in any of the followingsituations:
l Using a file-based target, such asPivotal Greenplum or Actian Vector
l Long-running source transactions thatmay not fit into memory
l Using tasks that are set up to continueprocessing during target outage
A larger disk is required in any of the followingsituations:
l Using tasks that are set up to continueprocessing during target outage
l Very large source transactions that donot fit into memory
RAID is recommended for system recovery incase of disk failure for all configurations.
Network 1 Gbps 10 Gbps Two 10Gbps
-
2.2 Setting up Qlik Replicate on WindowsThis section describes how to install Qlik Replicate on Windows and contains the following topics:
l Windows permissions (page 39)l Windows software requirements (page 42)l Installing or upgrading Qlik Replicate on Windows (page 42)l Starting and stopping the Qlik Replicate Server service on Windows (page 44)l Silently installing Qlik Replicate (page 44)l Silently upgrading Qlik Replicate (page 45)l Silently uninstalling Qlik Replicate (page 46)l Changing the Data Directory location on Windows (page 47)
Windows permissionsBy default, Qlik Replicate must be installed as an Administrator. After installing Qlik Replicate, you can optto run Replicate under a different account, as described in Running Replicate under a different account(page 40).
Setup and User Guide - Qlik Replicate, November 2021 39

2 Installing Qlik Replicate
The following privileges are required to start the Qlik Replicate UI Server service (which is run as a localsystem service), but are dropped as soon as the service is started:
l SE_CREATE_GLOBAL_NAMEl SE_CREATE_PAGEFILE_NAMEl SE_CREATE_PERMANENT_NAMEl SE_CREATE_SYMBOLIC_LINK_NAMEl SE_CREATE_TOKEN_NAMEl SE_DEBUG_NAMEl SE_ENABLE_DELEGATION_NAMEl SE_IMPERSONATE_NAMEl SE_INC_BASE_PRIORITY_NAMEl SE_INCREASE_QUOTA_NAMEl SE_INC_WORKING_SET_NAMEl SE_LOAD_DRIVER_NAMEl SE_LOCK_MEMORY_NAMEl SE_MACHINE_ACCOUNT_NAMEl SE_MANAGE_VOLUME_NAMEl SE_PROF_SINGLE_PROCESS_NAMEl SE_RELABEL_NAMEl SE_REMOTE_SHUTDOWN_NAMEl SE_RESTORE_NAMEl SE_SECURITY_NAMEl SE_SHUTDOWN_NAMEl SE_SYNC_AGENT_NAMEl SE_SYSTEM_ENVIRONMENT_NAMEl SE_SYSTEM_PROFILE_NAMEl SE_SYSTEMTIME_NAMEl SE_TAKE_OWNERSHIP_NAMEl SE_TCB_NAMEl SE_TIME_ZONE_NAMEl SE_TRUSTED_CREDMAN_ACCESS_NAMEl SE_UNDOCK_NAME
In addition, the account that runs Replicate needs to be granted access to the Data directory(~\Qlik\Replicate\Data) as well as any directory containing files (such as CSV files) that need to be used ina replication task.
Running Replicate under a different accountYou can run Replicate under an account with less privileges than the default account. Both the QlikReplicate Server service and the Qlik Replicate UI Server service can be run under different accounts, asdescribed in the following sections.
Setup and User Guide - Qlik Replicate, November 2021 40

2 Installing Qlik Replicate
l The Salesforce and MongoDB source endpoints are not supported when Replicate isrun under a non-admin account.
l As some endpoints may require stronger privileges than others, running Replicateunder an account with insufficient privileges may cause replication issues.
Changing the Qlik Replicate Server Service accountTo change the default Qlik Replicate Server Service Log On user for admin users:
1. Add the user to the "Log on as a service" policy in the "Local Security Policy".
2. Edit the Qlik Replicate Server service to log on with the user.
3. Restart the Qlik Replicate Server service.
4. Open Task Manager and verify that the repctl.exe process is running under the specified user.
To change the default Qlik Replicate Server Service Log On user for non-admin users:
1. Add the user to the "Log on as a service" policy in the "Local Security Policy".
2. Set the user as the Owner of the mk.dat file.The default location of the mk.dat file is:C:\Program Files\Qlik\Replicate\data\mk.dat
3. Grant the user full control over the mk.dat file.
4. Grant the user full control over the following registry entries:HKEY_LOCAL_MACHINE\SOFTWARE\Qlik\Qlik ReplicateHKEY_LOCAL_MACHINE\SOFTWARE\Microsoft\Windows\Windows ErrorReporting\LocalDumps\Repctl.exe
5. Grant the user full control over the Replicate data folder.The default location of the data folder is C:\Program Files\Qlik\Replicate\data
6. Grant the user full control over any target folders defined in relevant target endpoints (e.g. theTarget folder specified in the File target endpoint settings).
7. If execution of user-defined commands is allowed, add the user to the "Replace a process leveltoken" policy in "Local Security Policy".
8. Edit the Qlik Replicate Server service to log on with the specified user.
9. Restart the Qlik Replicate Server service.
10. Open Task Manager and verify that the repctl.exe process is running under the specified user.
Changing the Qlik Replicate UI Server Service Account
The user can either be an admin user or a non-admin user. If you change the user to a non-admin user, the user must be the same as the non-admin user set in Changing the QlikReplicate Server Service account (page 41) above (assuming that a non-admin user was set).
To change the default Qlik Replicate UI Server Service Log On user:
Setup and User Guide - Qlik Replicate, November 2021 41

2 Installing Qlik Replicate
1. Open a command prompt and run the following commands:
1. Delete the existing user (if there is one), by running the following commands:netsh http delete urlacl url=http://+:80/AttunityReplicate
netsh http delete urlacl url=https://+:443/AttunityReplicate
2. To add the user, run the following commands (where username is replaced by the name ofthe user):netsh http add urlacl url=http://+:80/AttunityReplicate user=Username
netsh http add urlacl url=https://+:443/AttunityReplicate user=Username
2. Edit the Qlik Replicate UI Server service to log on with the new user.
3. Restart the Qlik Replicate UI Server service.
Windows software requirementsTo install the Qlik Replicate Server and Console on a Windows computer, you must have the followinginstalled on your system:
l .NET Framework 4.8 or laterl Visual C++ Redistributable for Visual Studio 2015. If it is not installed or if an older version isinstalled, it will be installed automatically during installation.
l TLS 1.2 or later must be supported in the underlying OS.
OnWindows Server 2012 R2, TLS 1.2 should be turned on by default. If it is not, refer tothe Microsoft online help for instructions on how to turn it on.
See also: TLS Support (page 64)l For a list of supported browsers, see Supported browsers (page 1166).l Port 443 must be opened for outbound and inbound communication.
For a list of supported operating systems, see Supported platforms (page 1154).
Installing or upgrading Qlik Replicate on WindowsInstall Qlik Replicate using the QlikReplicate_<version-build>_X64.exe installation kit. This kit runs onWindows 64-bit (x64) environments. For a list of the Windows versions supported by Qlik Replicate, seeWindows software requirements (page 42).
Follow the instructions in the Setup wizard to install Qlik Replicate.
Later, if you need to start or stop the Qlik Replicate Server service, see the following section: Starting andstopping the Qlik Replicate Server service on Windows (page 44)
Setup and User Guide - Qlik Replicate, November 2021 42

2 Installing Qlik Replicate
In the setup wizard’s Replication Server Location screen, one of the options is Connect to aremote Linux Qlik Replicate Server. You should only select this option if you have alreadyinstalled Qlik Replicate Server on a Linux machine. If you select this option, you will beprompted for the IP address and port number of the Linux machine in the following screen.
For more information on installing Qlik Replicate Server on Linux, see Setting up Qlik Replicateon Linux (page 47).
For information on the possible deployment configurations, see Qlik Replicate UI serverconfigurations (page 83).
All of the data that is created when you use Qlik Replicate is stored in a directory called data. By default,this directory is located in the installation directory where you install Qlik Replicate. If you want to create thedata directory in a different location, select this option in the installation wizard.
If you elect to create the data directory in a different location, all command line actions must include the -d
your_data_directory_pathparameter where your_data_directory_path is the location of the "data"directory.
Upgrade instructionsTo upgrade Replicate:
1. Choose one of the backup methods below.
Method 1:
a. Stop all Replicate tasks and services.
b. Back up the Replicate "data" directory to a location outside the product folder.
This method is recommended in most cases. However, if your "data" folder is very large and there isnot enough space to back it up, then use Method 2 below.
Method 2:
a. Open a Windows command prompt and change the path to <PRODUCT_DIR>\bin.
b. Then issue the following command:repctl [-d data_directory] exportrepository
where [-d data_directory] is required when the Replicate "data" directory is in a non-default location.
2. Run the Qlik Replicate setup wizard.
3. If you notice an issue with the upgrade, you can either revert to the previous version as describedbelow or do one of the following depending on which backup method you chose above.If you chose Method 1:
a. Stop all the Replicate services.
b. Overwrite the "data" directory with the "data" directory that you backed up earlier.
c. Start all the Replicate services.
Setup and User Guide - Qlik Replicate, November 2021 43

2 Installing Qlik Replicate
If you chose Method 2:Issue the following command:repctl [-d data_directory] importrepository json_file=Full path to the
exported *.json file
where [-d data_directory] is only required if you installed the Replicate "data" directory to anon-default location.
Example:
repctl -d f:/data importrepository json_file=C:\Temp\many_tables.json
The following server settings will not be affected:l The Store trace/verbose logging in memory, but if an error occurs write to thelogs logging option.
l Global and component-specific logging levelsl File Transfer Service settings
Reverting to a previous versionTo revert to a previous version:
1. Back up the Replicate data directory to a location outside the product folder.
2. Uninstall the product and then reinstall to the same directory.
3. Once the installation is complete, stop all Replicate services.
4. Overwrite the data directory with the data directory that you backed up earlier.
5. Start all Replicate services.
Starting and stopping the Qlik Replicate Server service on WindowsIn some cases you may need to stop and start the Qlik Replicate Server service. You must do this on theWindows computer where Qlik Replicate is installed.
To stop and start the Qlik Replicate Server service on Windows
l From the Start menu on the Windows computer where Qlik Replicate is installed, find QlikReplicate; then select either Stop Replicate Server or Start Replicate Server.
Silently installing Qlik ReplicateQlik Replicate can be installed silently (i.e. without requiring user interaction). This option is useful, forexample, if you need to install Qlik Replicate on several machines throughout your organization.
Before commencing the installation, make sure that the installation prerequisites have beenmet.
The installation process consists of creating a response file and then running the silent installation.
Setup and User Guide - Qlik Replicate, November 2021 44

2 Installing Qlik Replicate
Creating a response fileBefore starting the installation, you need to create a response file.
To create the response file
1. From the directory containing the Qlik Replicate setup file, run the following command (note that thiswill also install Qlik Replicate):QlikReplicate_<version-build>_X64.exe /r /f1my_response_file
where:my_response_file is the full path to the generated response file.
Example:
QlikReplicate_<version-build>_X64.exe /r /f1C:\Replicate_install.iss
2. To change the default installation directory, open the response file in a text editor and edit the firstszDir value as necessary.
3. To change the default data directory, edit the third szDir value as necessary.
4. Save the file as <name>.iss, e.g. silent_inst_64.iss.
Running the silent installTo silently install Qlik Replicate, open a command prompt and change the working directory to the directorycontaining the Qlik Replicate setup file. Then issue the following command (where <response file> is thepath to the response file you created earlier):
Syntax:<Replicate_setup_file> /s /f1my_response_file [/f2LOG_FILE]
Example:
C:\>QlikReplicate_<version-build>_X64.exe /s /f1C:\temp\1\Replicate_install.iss
/f2C:\temp\1\silent_x64_install.log
If the installation was successful, the log file should contain the following rows:
[ResponseResult]
ResultCode=0
Silently upgrading Qlik ReplicateSilently upgrading Qlik Replicate consists of creating a response file and then running the upgrade.
Creating a response fileBefore starting the upgrade, you need to create a response file.
For instructions, see Step 1 of Creating a response file (page 45).
Running a silent upgradeBefore upgrading it is strongly recommended to back up the Replicate "Data" folder. To silently upgradeQlik Replicate, open a command prompt and change the working directory to the directory containing theQlik Replicate setup file.
Setup and User Guide - Qlik Replicate, November 2021 45

2 Installing Qlik Replicate
Then issue the following command (where my_response_file is the path to the response file you createdearlier):
Syntax:<REPLICATE_SETUP_FILE> /s /f1my_response_file [/f2LOG_FILE]
Example:
C:\>QlikReplicate_<version-build>_X64.exe /s /f1C:\temp\1\Replicate_upgrade.iss
/f2C:\temp\1\silent_x64_up.log
If the upgrade was successful, the log file should contain the following rows:
[ResponseResult]
ResultCode=0
Silently uninstalling Qlik ReplicateSilently uninstalling Qlik Replicate consists of creating a response file and then running the uninstall.
Creating a response fileBefore starting the uninstall, you need to create a response file.
To create the response file
1. Copy the response file text below into a text editor.Response file text:[{9C614355-28A0-4C2A-98DF-DB9FD674826F}-DlgOrder]Dlg0={9C614355-28A0-4C2A-98DF-DB9FD674826F}-SdWelcomeMaint-0Count=3Dlg1={9C614355-28A0-4C2A-98DF-DB9FD674826F}-MessageBox-0Dlg2={9C614355-28A0-4C2A-98DF-DB9FD674826F}-SdFinish-0[{9C614355-28A0-4C2A-98DF-DB9FD674826F}-SdWelcomeMaint-0]Result=1[{9C614355-28A0-4C2A-98DF-DB9FD674826F}-MessageBox-0]Result=6[{9C614355-28A0-4C2A-98DF-DB9FD674826F}-SdFinish-0]Result=1bOpt1=0bOpt2=0
2. Save the file as <name>.iss, e.g. silent_uninst_64.iss.
Running a silent uninstallTo silently uninstall Qlik Replicate, open a command prompt and issue the following command (whereRESPONSE_FILE is the path to the response file you created earlier and LOG_FILE is the path to the uninstalllog file):
Syntax:"C:\Program Files (x86)\InstallShield Installation Information\directory_containing_setup_
file\setup.exe" /s /f1RESPONSE_FILE [/f2LOG_FILE]
Setup and User Guide - Qlik Replicate, November 2021 46

2 Installing Qlik Replicate
The directory containing the Replicate setup file always ends with the following string:DB9FD674826F
Example:
C:\>"C:\Program Files (x86)\InstallShield Installation Information\{9C614355-28A0-4C2A-98DF-
DB9FD674826F}\setup.exe" /s /f1C:\temp\response.iss /f2C:\temp\1\silent_uninstall.log
If the uninstall was successful, the log file should contain the following rows:
[ResponseResult]
ResultCode=0
Changing the Data Directory location on WindowsThis section explains how to change the location of the Qlik Replicate Data Directory. Such a proceduremay need to be performed if the drive on which the current directory resides has insufficient space or if youare moving from a temporary POC setup to production, for example.
To change the location of the data directory
1. Stop the Qlik Replicate UI Server and Qlik Replicate Server services.
2. Move the data directory to a new location. For example:C:\Program Files\Attunity\Replicate\Data2
3. Open the Registry and perform the following procedure:
1. Browse to:HKEY_LOCAL_MACHINE\SYSTEM\CurrentControlSet\services\AttunityReplicateConsole
2. Modify the ImagePath string as follows:"C:\Program Files\Attunity\Replicate\bin\RepUiCtl.exe" -d "C:\ProgramFiles\Attunity\Replicate\Data2" service run
3. Browse to:HKEY_LOCAL_MACHINE\SYSTEM\CurrentControlSet\services\AttunityReplicateServer
4. Open the ImagePath string and add -d <path_for_new_data_directory> after the repctl.exepath. For example:"C:\Program Files\Attunity\Replicate\bin\repctl.exe" -d "C:\ProgramFiles\Attunity\Replicate\Data2" service start name=Server address=127.0.0.1 port=3552
4. Start the Qlik Replicate services.
2.3 Setting up Qlik Replicate on LinuxThis section describes how to install Qlik Replicate on Linux and contains the following topics:
l Replicate instances and services on Linux (page 48)l Linux installation prerequisites and procedures (page 49)
Setup and User Guide - Qlik Replicate, November 2021 47

2 Installing Qlik Replicate
l Replicate server procedures (page 52)l Upgrading Qlik Replicate (page 52)l Uninstalling Qlik Replicate (page 55)l Working with additional Replicate instances (page 55)l Changing the Data Directory location on Linux (page 56)
For information on supported Linux platforms, see Supported Linux platforms (page 1154).
l The login shell for the root user must be set to bash.l Before running a repctl command in a Linux shell session for the first time, you need toset the environment, either by invoking the login script manually (using: $ source arep_login.sh) or by adding that line to the ~/.bashrc script.
l For all command line operations involving files such as arep_login.sh, only the bashshell is supported.
l The commands for installing, upgrading and uninstalling Qlik Replicate must be run asroot or using the sudo command.
l All of the commands and examples in this section assume that Qlik Replicate is beinginstalled/upgraded/uninstalled as root.
Replicate instances and services on LinuxReplicate supports running multiple instances concurrently on the same Linux server with a singleinstallation. This may be useful, for instance, if you need to run several tasks or groups of tasks, but withdifferent Replicate server settings for each group or task.
Instances can be installed as Linux services, which means that the instance will be stopped in an orderlyfashion when a server is shut down and restarted when a server is rebooted. Installing Replicate createsan initial instance, named areplicate, which is installed as a service.
Additional instances can be created after Replicate is installed. An additional instance will not be installedas a service if installed by a non-root user. A new instance will not be run when it is created, allowing forconfiguration first.
Replicate instances get their environment from several files:
File Description
arep_login.sh Sets shell variables, e.g. LD_LIBRARY_PATH for all instances. This file shouldnot be modified manually.
site_arep_login.sh Created functionally null; can be modified manually to contain shell settings forall instances.
instancename_arep_
login.shCreated functionally null in the instance's data directory, for an instance-specificshell configuration.
Environment files
Setup and User Guide - Qlik Replicate, November 2021 48

2 Installing Qlik Replicate
Each instance has a unique name, uses its own ports, and has its own data directory. This means thatwhen running commands such as repctl, you need to specify the instance-specific data directory in thecommand line so that the correct instance is affected.
l When starting and stopping an instance, it is strongly suggested to use the instancescript rather than run repctl directly.
l All instances are run as the same user. Instances are listed in a file named services_list.txt in the Replicate root directory. This file should not be modified manually.
l When upgrading Replicate, all instances will be reinstalled and started, even if theywere not running prior to the upgrade.
Linux installation prerequisites and proceduresThe following topic lists the prerequisites for installing Qlik Replicate on Linux and explains how to performthe installation.
Prerequisitesl Run the following command to untar the Qlik Replicate RPM:
tar xf areplicate_<version>_<buildnum>_Linux_X64.tar.gz
l Copy the Qlik Replicate RPM file to any location on the Linux computerl For the installation to succeed, at least one of the following must already exist in the system:
l The user specified in the installation commandl The /home dir
l Port 3552 (the default rest port) needs to be opened for outbound and inbound communication,unless you override it as described below.
Installing Qlik Replicate on LinuxThe default installation directory for Qlik Replicate is: /opt/attunity/replicate
You can choose to install to a different directory as described below.
To install Qlik Replicate:
Run the following command:
[user=user] [group=group] [verbose=true|debug=true] [nocredentials=true]
[data=replicate_data_directory] [iport=number] [rport=number] rpm -i[vh] [--prefix
dirname] areplicate-<version-build>.x86_64.rpm
Example:
user=mike group=sales verbose=true iport=1024 rport=1025 rpm -i[vh] --prefix
/opt/mydir/ areplicate-6.4.0-102.x86_64.rpm
Setup and User Guide - Qlik Replicate, November 2021 49

2 Installing Qlik Replicate
For description of the optional parameters, see the Linux installation prerequisites and procedures (page49) table below.
Parameter Description
[user=user] The default user under which Qlik Replicate is installed is attunity. Youcan choose to install the product under a different user by adding theprefix user=user to the command.
See also the [nocredentials=true] parameter below.
The login shell of the Replicate user must be set to bash.
[pass=password] Sets the server password.
Users will be prompted for this password when connecting to theReplicate server through the Replicate Web Console.
You can either set this password when installing Replicate(recommended) or you can set it later as described in Changing theserver password (page 65).
[group=group] The default group under which Qlik Replicate is installed is attunity.You can choose to install the product under a different group byadding the prefix group=group to the command.
See also the [nocredentials=true] parameter below.
[nocredentials=true] If the specified user or group is not defined locally (namely, in ActiveDirectory), you must include this parameter in the command.Otherwise, the installation will fail.
[data=replicate_data_
directory]The default Qlik Replicate "data" directory is:
<product_dir>/data.
Use this parameter to install the Replicate data directory to a non-default location.
Example:
data=/opt/mydata
Command parameters
Setup and User Guide - Qlik Replicate, November 2021 50

2 Installing Qlik Replicate
Parameter Description
[--prefix dirname] Prefixes the attunity/replicate application directory with the pathspecified by dirname. So, for example, if --prefix /opt/mydir, thenReplicate will be installed to:
/opt/mydir/attunity/replicate
This is only required when installing Qlik Replicate to a non-defaultpath.
[verbose=true|debug=true] Specify verbose=true for additional information during the installation,or debug=true for detailed debug messages during the installation.
[runservice=false] This parameter prevents the services from starting. The value can onlybe "false".
This parameter can be used when installing/upgrading the product butnot when creating a Replicate instance.
[iport] The internal port, which must be a decimal number greater than 1023but less than 65535.
This parameter is required when creating a Replicate instance butoptional when installing/upgrading the product.
[rport] The REST port, which must be a decimal number greater than 1023but less than 65535.
This parameter is required when creating a Replicate instance butoptional when installing/upgrading the product.
The installation procedure will perform the following actions:
1. Create a new user and group named attunity (unless you chose to use a different user and a groupand/or a user namedattunity already exists).
2. Change the Qlik Replicate installation directory owner to the attunity user and group, or to yourpreferred user and group.
3. Install the application files.
4. Start the service (areplicate).
The Qlik Replicate/lib directory must precede the /usr/lib64 directory in the LD_LIBRARY_PATH environment variable.
The environment variable is set in the <product_dir>/bin/arep_login.sh file.
Example:
export LD_LIBRARY_PATH=/opt/attunity/replicate/lib:/usr/lib64
Setup and User Guide - Qlik Replicate, November 2021 51

2 Installing Qlik Replicate
Additional changes to LD_LIBRARY_PATH in the files site_arep_login.sh and/or instancename_arep_login.sh should be made with caution.
Replicate server proceduresThis section describes how to start and stop a Replicate instance, and how to determine whether aninstance is running.
Verifying that a Replicate instance is runningTo verify that a Replicate instance is running, run the following command:
/opt/attunity/replicate/bin/instancename status
Example:
/opt/attunity/replicate/bin/areplicate status
The output will be similar to the following:
running: /opt/attunity/replicate/bin/repctl -d /opt/attunity/replicate/data service start
port=3550 rest_port=3552
Starting and stopping a Replicate instanceTo start a Replicate instance:
Run the following command (shown using the default installation path):
/opt/attunity/replicate/bin/instancename start
Example:
/opt/attunity/replicate/bin/areplicate start
To stop an Replicate instance:
Run the following command (shown using the default installation path):
/opt/attunity/replicate/bin/instancename stop
Example:
/opt/attunity/replicate/bin/areplicate stop
Upgrading Qlik ReplicateThis section explains how to upgrade an installation of Qlik Replicate. Before upgrading it is stronglyrecommended to back up the Replicate data directory (or directories when multiple instances areinstalled).
Upgrade instructions1. Choose one of the backup methods below.
Method 1:
Setup and User Guide - Qlik Replicate, November 2021 52

2 Installing Qlik Replicate
Stop all Replicate tasks and instances.Back up the Replicate "data" directory to a location outside the product folder. This method isrecommended in most cases. However, if your "data" folder is very large and there is not enoughspace to back it up, then use Method 2 below.Method 2:Issue the following command from the product bin directory:repctl [-d data_directory] exportrepository
where [-d data_directory] is the path to the Replicate "data" directory when it's installed in a non-default location.
2. Run the following command:[user=username] [group=groupname] [nocredentials=true] [verbose=true|debug=true] rpm -U
[vh] [--prefix dirname] areplicate-<version-build>.x86_64.rpm
Where [--prefix dirname] is only required when Qlik Replicate is installed in a non-defaultdirectory.For additional information on the available command parameters see the table: Linux installationprerequisites and procedures (page 49).
3. If you notice an issue with the upgrade, you can either revert to the previous version as describedbelow or do one of the following depending on which backup method you chose above.If you chose Method 1:
1. Stop all Replicate instances.
2. Overwrite the "data" directory with the "data" directory that you backed up earlier.
3. Start all Replicate instances.
If you chose Method 2:Issue the following command:repctl [-d data-directory] importrepository json_file=Full path to the exported *.json
file
where [-d data_directory] is the path to the Replicate "data" directory when it's installed in a non-default location.Example:repctl -d /opt/mydatadir/ importrepository json_file=/opt/mydatadir/many_tables.json
To revert to a previous version:
1. Back up the Replicate "data" directory to a location outside the product folder.
2. Uninstall the product and then reinstall to the same directory.
3. Once the installation is complete, stop all Replicate instances.
4. Overwrite the "data" directory with the "data" directory that you backed up earlier.
5. Start all Replicate instances.
When upgrading from a version prior to Replicate 6.1 where the data directory is in a non-default location, you need to add the following parameter to the upgrade command:
data=existing-data-directory
Example (when Replicate is installed in the default installation directory):
data=/opt/mydatadir/ rpm -U[vh] areplicate-6.4.0-102.x86_64.rpm
Setup and User Guide - Qlik Replicate, November 2021 53

2 Installing Qlik Replicate
If the user specified in the original installation has since been deleted, the upgrade will fail.
As in the initial installation, if the new or existing user and/or group is not defined locally(namely, in Active Directory), you must include the nocredentials=true parameter in thecommand. Otherwise, the upgrade will fail.
When upgrading Replicate, all instances will be reinstalled and started, even if they were notrunning prior to the upgrade.
Resolving Configuration File ConflictsDuring an upgrade, if the new version’s repctl.cfg file contains different parameters than the existing file,and the existing file has been modified, you need to manually merge the new configuration file with theexisting one.
In such a scenario the upgrade process will:
l Rename the file from the new version.The file will be renamed repctl.cfg.rpmnew and installed in <product_dir>/replicate/bin/ (the samedirectory as the repctl.cfg file).
l Issue the following warning (assumes the default installation path):[root@bldlinux-rh62 tmp]# rpm -Uvh areplicate-version-build.x86_64.rpm
Preparing... ########################################### [100%]
1:areplicate warning:
/opt/attunity/replicate/bin/repctl.cfg created as
/opt/attunity/replicate/bin/repctl.cfg.rpmnew
########################################### [100%]
When the configuration files need to be merged, you need to restart each instance manuallyafter merging the files.
To complete the upgrade
1. Manually (and cautiously) merge the new parameters in the repctl.cfg.rpmnew file with the existingparameters in the repctl.cfg file. Save the repctl.cfg file.
2. Delete the repctl.cfg.rpmnew file by issuing the following command:rm -f <product_dir>/bin/repctl.cfg.rpmnew
3. Restart each instance by running the following commands in the <product_dir>/replicate/bindirectory:./instancename start
Example:./areplicate start
Setup and User Guide - Qlik Replicate, November 2021 54

2 Installing Qlik Replicate
Uninstalling Qlik ReplicateTo uninstall Qlik Replicate, run the following command:
[verbose=true|debug=true] rpm -e areplicate
To ensure that Qlik Replicate was removed from the computer, run the following command:
rpm -q areplicate
The output should be:
Package areplicate is not installed.
Uninstalling Replicate will not delete a Replicate instance's data directory, the services_list.txtfile, or any other modified files.
Working with additional Replicate instancesReplicate supports running multiple instances concurrently on the same Linux server with a singleinstallation.
For an overview of multiple instance support, see Replicate instances and services on Linux (page 48)
In this section:
l Installing an instance of Replicate as a service (page 55)l Uninstalling an instance of a Replicate service (page 56)
Installing an instance of Replicate as a serviceTo install a new instance, run the following command in the Replicate bin directory.
pass=server_password iport=number rport=number data=data-directory [runservice=false]
./arep.sh install instancename
For an explanation of these parameters, see Linux installation prerequisites and procedures (page 49).
Running the script will:
l Verify that the specified service name, port numbers, and data directory are not already in use
Reinstalling an instance immediately after it was stopped and uninstalled may requireyou to wait a few minutes until TCP releases the port(s).
l Create a configured copy of itself, named instancename
l Add an instancename record to the list of services in the file services_list.txt
Setup and User Guide - Qlik Replicate, November 2021 55

2 Installing Qlik Replicate
l Create a functionally empty instance-specific instancename_arep_login.sh file in the data directory,for instance-specific settings
l If run as root, running the script will:l Create start/stop links for run levels as specified in the script (chkconfig)l Create a symbolic link to /etc/init.d/instancename in the Replicate bin directory (same name)
l If a server password is specified, the script will run repctl to set the admin UI server password
Uninstalling an instance of a Replicate serviceTo uninstall an instance of Replicate, run the following command in the Replicate bin directory:
./instancename uninstall
l Uninstalling an instance will stop the instance's processes, but leave the instance's datadirectory in place.
l The script will not allow a non-root user to uninstall a service that was installed by root.
Changing the Data Directory location on LinuxThis section explains how to change the location of a Qlik Replicate instance's Data Directory. Such aprocedure may need to be performed if the drive on which the current directory resides has insufficientspace or if you are moving from a temporary POC setup to production, for example.
To change the Data Directory Location
1. Uninstall the areplicate service by running the following command:<product_dir>/bin/instancename uninstall
Example:
<product_dir>/bin/areplicate uninstall
2. Confirm that the instance is not running by running the following command:ps -ef | grep repctl
3. Move the data directory from its current location (e.g. <product_dir>/data) to your requestedlocation.
4. Reinstall the service, specifying the new location for the data directory:data=data_dir iport=number rport=number <product_dir>/bin/arep.sh install instancename
For an explanation of these parameters, see Linux installation prerequisites and procedures (page49).
5. Start the instance by running the following command:<product_dir>/bin/instancename start
Example:
<product_dir>/bin/areplicate start
Setup and User Guide - Qlik Replicate, November 2021 56

2 Installing Qlik Replicate
6. Confirm that the service is running by running the following command:<product_dir>/bin/instancename status
Setup and User Guide - Qlik Replicate, November 2021 57

3 Security considerations
3 Security considerationsQlik Replicate is tasked with replicating data within an organization, a task which involves reading fromsource endpoints (such as databases) and writing to target endpoints (including databases, files, andqueuing systems).
This section provides important information for protecting the data that Qlik Replicate stores and replicates.
In this section:
l Securing access to the Qlik Replicate Web UI (page 58)l Setting up HSTS on Replicate (page 59)l Setting Up Qlik Replicate console HTTPS support (page 61)l Setting Up Qlik Replicate Server HTTPS support (page 62)l TLS Support (page 64)l Changing the server password (page 65)l Protecting Replicate passwords (page 66)l Client password considerations (page 69)l Encrypting the user permissions file (page 70)l Securing connections to endpoints (page 70)l Log file encryption (page 71)l Application security (page 72)l Using external credentials (page 72)l Controlling execution of user-defined commands (page 74)
3.1 Securing access to the Qlik Replicate Web UIQlik Replicate offers the following Web UI configurations:
l AWindows-based Qlik Replicate UI Server service which offers granular user authorization basedon a user’s Active Directory identity and group membership. This service provides user interfacefunctionality and communicates with the backend Qlik Replicate Server (on Windows or Linux).Connecting to this server is done using HTTPS with Windows Authentication.
l The Qlik Replicate Server on Windows or Linux can also serve the Web UI directly, but supports justa single user with a fixed role of administrator (’admin’).Connecting to this server is done using HTTPS with Basic Authentication.See also Configuration 3: Replicate UI Console and Replicate server running on Linux (page 84).
In line with current industry security standards, the Qlik Replicate web user interface enforces the use ofHTTPS to protect against eavesdropping and data leakage. Using HTTPS requires a valid servercertificate to be installed on the Qlik Replicate server machine.
Setup and User Guide - Qlik Replicate, November 2021 58

3 Security considerations
3.2 Setting up HSTS on ReplicateHSTS is a web security policy mechanism that helps to protect websites against man-in-the-middle attackssuch as protocol downgrade attacks and cookie hijacking. It allows web servers to declare that webbrowsers (or other complying Dilqam) should automatically interact with it using only HTTPS connections,which provide Transport Layer Security (TLS/SSL).
You can force the Replicate Web UI and/or the Replicate REST API connections to use HSTS (HTTP StrictTransport Security). To do this, run the commands described below.
All commands should be run from as Admin from the product bin folder.
Enabling HSTS on the Replicate UI Server
Syntax:Repuictl.exe configuration set --static_http_headers header_list --rest_http_headers header_
list
where --static_http_headers are the headers required to connect to the Replicate Web UI and --rest_
http_headers are the headers required to connect using the API.
Headers should be specified using the following format:
Repuictl.exe configuration set --static_http_headers "header1:value1" "header2:value2" --rest_
http_headers "header1:value1" "header2:value2"
Example:
The following instructs the browser to treat the domain as an HSTS host for a year (there are approximately31536000 seconds in a year). The optional includeSubDomains directive means that subdomains (i.e.secure.myhealthcare.example.com) should also be treated as an HSTS domain.
Repuictl.exe configuration set --static_http_headers "Strict-Transport-Security:max-
age=31536000; includeSubDomains;" --rest_http_headers "Strict-Transport-Security":"max-
age=31536000; includeSubDomains;"
Disabling HSTS on the Replicate UI ServerYou can revert to regular HTTPS connections by running the following command:
To disable static_http_headers, run:
Repuictl.exe configuration set --static_http_headers ""
To disable rest_http_headers, run:
Repuictl.exe configuration set --rest_http_headers ""
Configuring HSTS on the Replicate C UI ServerWhen connecting directly to the Replicate C UI Server (i.e. when Replicate Server is running on Linux), youneed to add the rest_handler_response_additional_headers and the static_resources_response_additional_headers to the repctl.cfg file. The default location of this file is /opt/attunity/replicate/bin/ on
Setup and User Guide - Qlik Replicate, November 2021 59
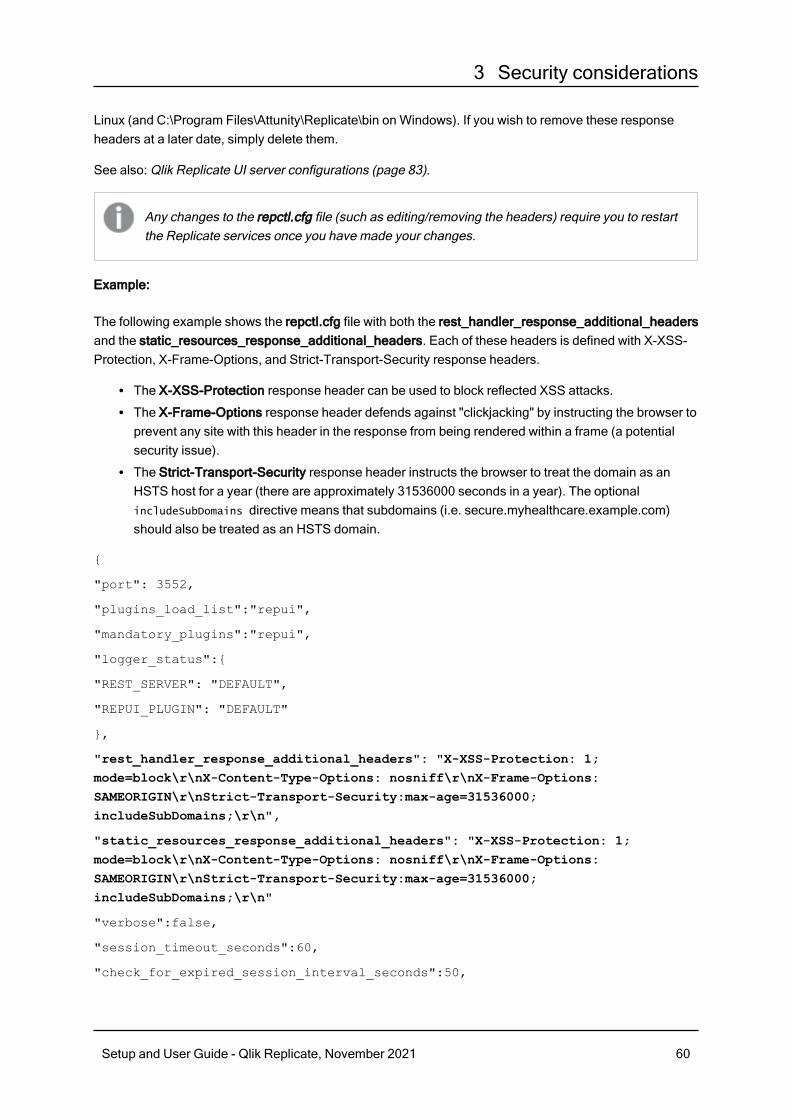
3 Security considerations
Linux (and C:\Program Files\Attunity\Replicate\bin on Windows). If you wish to remove these responseheaders at a later date, simply delete them.
See also: Qlik Replicate UI server configurations (page 83).
Any changes to the repctl.cfg file (such as editing/removing the headers) require you to restartthe Replicate services once you have made your changes.
Example:
The following example shows the repctl.cfg file with both the rest_handler_response_additional_headersand the static_resources_response_additional_headers. Each of these headers is defined with X-XSS-Protection, X-Frame-Options, and Strict-Transport-Security response headers.
l The X-XSS-Protection response header can be used to block reflected XSS attacks.l The X-Frame-Options response header defends against "clickjacking" by instructing the browser toprevent any site with this header in the response from being rendered within a frame (a potentialsecurity issue).
l The Strict-Transport-Security response header instructs the browser to treat the domain as anHSTS host for a year (there are approximately 31536000 seconds in a year). The optionalincludeSubDomains directive means that subdomains (i.e. secure.myhealthcare.example.com)should also be treated as an HSTS domain.
{
"port": 3552,
"plugins_load_list":"repui",
"mandatory_plugins":"repui",
"logger_status":{
"REST_SERVER": "DEFAULT",
"REPUI_PLUGIN": "DEFAULT"
},
"rest_handler_response_additional_headers": "X-XSS-Protection: 1;mode=block\r\nX-Content-Type-Options: nosniff\r\nX-Frame-Options:SAMEORIGIN\r\nStrict-Transport-Security:max-age=31536000;includeSubDomains;\r\n",
"static_resources_response_additional_headers": "X-XSS-Protection: 1;mode=block\r\nX-Content-Type-Options: nosniff\r\nX-Frame-Options:SAMEORIGIN\r\nStrict-Transport-Security:max-age=31536000;includeSubDomains;\r\n"
"verbose":false,
"session_timeout_seconds":60,
"check_for_expired_session_interval_seconds":50,
Setup and User Guide - Qlik Replicate, November 2021 60

3 Security considerations
"login_pam_libpam_full_path":"",
"login_pam_service_name": "system-auth",
"enable_execute_user_defined_commands": false
}
3.3 Setting Up Qlik Replicate console HTTPS supportIndustry-standard security practices dictate that web user interface for enterprise products must usesecure HTTP (HTTPS). Qlik Replicate enforces the use of HTTPS and will not work if HTTPS is configuredincorrectly.
As Qlik Replicate uses the built-in HTTPS support in Windows, it relies on the proper setup of the Windowsmachine it runs on to offer HTTPS access. In most organizations, the IT security group is responsible forgenerating and installing the SSL server certificates required to offer HTTPS. It is strongly recommendedthat the machine on which Replicate is installed already has a valid SSL server certificate installed andbound to the default HTTPS port (443).
Checking if an SSL certificate is installedTo check whether an SSL certificate is installed, you can use the following command:
netsh http show sslcert | findstr /c:":443 "
If an SSL certificate is installed, the output should look like this:
netsh http show sslcert | findstr /c:":443 "
IP:port : 192.168.1.13:443
IP:port : 192.168.1.11:443
IP:port : [fe80::285d:599c:4a55:1092%11]:443
IP:port : [fe80::3d0e:fb1c:f6c3:bc52%23]:443
With a valid SSL certificate installed, the Qlik Replicate web user interface will automatically be availablefor secure access from a web browser using the following URL:
https://<machine-name>/attunityreplicate
Using the self-signed certificateDue to the way the HTTPS protocol works, there is no way for Qlik Replicate to automatically provide andinstall a valid SSL server certificate. Still, in the event that no SSL server certificate is installed, QlikReplicate automatically generates and installs a self-signed SSL server certificate (as a temporarymeasure). This certificate is generated on the Replicate machine and cannot be exported or usedelsewhere.
It should be noted that browsers do not consider the certificate to be valid because it was not signed by atrusted certificate authority (CA).
When connecting with a browser to a server that uses a self-signed certificate, a warning page is showninforming you that the connection is not secure or similar (depending on the browser).
Setup and User Guide - Qlik Replicate, November 2021 61

3 Security considerations
The warning page informs you that the certificate was signed by an unknown certificate authority. Allbrowsers display a similar page when presented with a self-signed certificate. If you know that the self-signed certificate is from a trusted organization, then you can instruct the browser to trust the certificateand allow the connection. Instructions on how to trust the certificate vary between browsers and evenbetween different versions of the same browser. If necessary, refer to the help for your specific browser.
Some corporate security policies prohibit the use of self-signed certificates. In such cases, it isincumbent upon the IT Security department to provide and install the appropriate SSL servercertificate (as is the practice with other Windows products such as IIS and SharePoint). If aself-signed certificate was installed and needs to be removed, then the following command canbe used:
$ netsh http delete sslcert ipport=192.168.1.13:443
where ipport should be replaced with the ip:port combination generated by the netshcommand shown in Checking if an SSL certificate is installed (page 61).
3.4 Setting Up Qlik Replicate Server HTTPS supportThe Qlik Replicate Server which runs on both Windows and Linux uses the OpenSSL HTTPSimplementation. The Qlik Replicate Server automatically generates a self-signed certificate server but itallows you to replace it with a server certificate signed by a trusted certificate authority. This sectiondescribes how to accomplish this on Linux and Windows.
Replacing the self-signed SSL certificates on LinuxWhen Qlik Replicate Server starts for the first time, it checks the <product-dir>/ssl/data directory for thepresence of certificates. If the ssl folder is not found, it will then check the <product-dir>/<data-directory>/ssl/data directory (or directories when running multiple Linux instances) for the certificates.
If there are no certificates, it will create the following self-signed certificates:
l agent-ca.pem - The CA certificatel agent-certificate.pem - The public certificatel agent-private-key.pem - The private key datal agent-private-key-passphrase.dat - The private key passphrase
When working with multiple instances, instead of creating a separate set of certificates for eachinstance in <product-dir>/<data-directory>/ssl/data, you can create a single set of certificates in<product-dir>/ssl/data. This way, instead of managing multiple sets of certificates for eachinstance, you only need to create/manage a single set of certificates.
You can replace the default self-signed certificates with you own, as follows:
Setup and User Guide - Qlik Replicate, November 2021 62

3 Security considerations
1. Stop the Qlik Replicate Server service.
2. Create the required certificates using names that are identical to the certificates listed above.
3. Copy the certificates to the ssl/data directory (<product-dir>/<data-directory>/ssl/data by default).
4. Edit the agent-private-key-passphrase.dat file as follows:/clear:PRIVATE_KEY_PASSWORD
Example:
/clear:12345
When Qlik Replicate Server starts it will scramble the private key passphrase as shown in Examplesof the Scrambled Private Key Password (page 63).
5. Start the Qlik Replicate Server service.
For information on stopping and starting Qlik Replicate Server, see Setting up Qlik Replicate on Windows(page 39) and Setting up Qlik Replicate on Linux (page 47).
Examples of the Scrambled Private Key PasswordThe scrambled private key passphrase stored in the agent-private-key-passphrase.dat file will look similarto this:
{S:DEA326D0DF190430975DE44CFBD6FDFD21883C10E7651081B3B5A0A7404BB97DB520876F60390B51300C831C82DE871CF8BA22393D8DD9B359DD5A93C5956710AD2546E188155482452235C5D91B430D151E3DDA7381CA3E}
Replacing the self-signed certificate on WindowsThe instructions below are intended for organizations who wish to replace the self-signed certificategenerated by the Replicate UI Server on Windows with their own certificate. This is achieved by removingthe self-signed certificate and then importing the new certificate.
See also Setting Up Qlik Replicate console HTTPS support (page 61).
Before starting, make sure that the following prerequisites have been met:
l The replacement certificate must be a correctly configured SSL PFX file containing both the privatekey and the certificate.
l The common name field in the certificate must match the name browsers will use to access themachine.
To remove the self-signed certificate created by Qlik Replicate:
1. Stop the Qlik Replicate Server and Qlik Replicate UI Server services.
2. Open a command prompt (using the "Run as administrator" option) and change the path to theReplicate bin directory. The default path is:C:\Program Files\Qlik\Replicate\bin.
3. Run the following command:RepUiCtl.exe certificate clean
To import your own certificate:
Setup and User Guide - Qlik Replicate, November 2021 63
3 Security considerations
1. Run mmc.exe to open the Microsoft Management Console.
2. From the File menu, select Add/Remove Snap-in.The Add or Remove Snap-ins dialog box opens.
3. In the left pane, double-click Certificates.The Certificates snap-in wizard opens.
4. Select Computer account and then click Next.
5. In the Select Computer screen, make sure that Local computer is selected and then click Finish.
6. Click OK to close the Add or Remove Snap-ins dialog box.
7. In the left pane, expand the Certificates folder. Then, right-click the Personal folder and select AllTasks>Import.
8. In the File to Import screen, select your PFX certificate file. Note that by default the Open dialogbox displays CER files. In order to see your PFX files, you need to select Personal InformationExchange from the drop-down list in the bottom right of the dialog box.
9. Click Next and enter the private key password.
10. Continue clicking Next until you reach the Completing the Certificate Import Wizard screen. Thenclick Finish to exit the wizard.
11. In the Personal> Certificates folder, double-click the newly imported certificate.The Certificate dialog box opens.
12. Scroll down the Details tab until you see the Thumbprint details and copy them to the clipboard.
13. Open a command prompt and run the following commands:Syntax:¢ netsh http add sslcert ipport=0.0.0.0:443 certhash=[YOUR_CERTIFICATE_THUMBPRINT_
WITHOUT_SPACES] appid={4dc3e181-e14b-4a21-b022-59fc669b0914}
Example:netsh http add sslcert ipport=0.0.0.0:443
certhash=5f6eccba751a75120cd0117389248ef3ca716e61 appid={4dc3e181-e14b-4a21-b022-
59fc669b0914}
Syntax:¢ netsh http add sslcert ipport=[::]:443 certhash=[YOUR_CERTIFICATE_THUMBPRINT_WITHOUT_
SPACES] appid={4dc3e181-e14b-4a21-b022-59fc669b0914}
Example:netsh http add sslcert ipport=[::]:443 certhash=5f6eccba751a75120cd0117389248ef3ca716e61
appid={4dc3e181-e14b-4a21-b022-59fc669b0914}
14. Close the command prompt and Microsoft Management Console.
15. Start the Qlik Replicate Server and Qlik Replicate UI Server services.
3.5 TLS SupportReplicate supports TLS 1.2 or later. However, support for TLS 1.3 is dependent on the Replicate serveryou choose to work with.
The native Replicate server listener (port 3552) supports TLS 1.2 or later. However, if you work against theReplicate UI server (which uses the OS HTTP stack), you will need to make sure the OS HTTP includessupport for TLS 1.2 and later. Information pertaining to this should be found on the OS vendor site.
For more information on Replicate server configurations, see Qlik Replicate UI server configurations (page83).
Setup and User Guide - Qlik Replicate, November 2021 64

3 Security considerations
3.6 Changing the server passwordThis topic explains how to change the Qlik Replicate Server password using the Replicate CLI. Note that allcommands described in this section should be run as administrator from the product bin directory.
The Qlik Replicate Server has a fixed 'admin' user with an automatically generated random password thatis stored in the mk.dat file. The password is unknown, unique and safe. The Qlik Replicate UI Serverservice always connects to the Qlik Replicate Server service using the 'admin' user. When both servicesrun on the same machine the admin password is accessible to both servers, so there is no need to specifythis password explicitly.
When Qlik Replicate Server runs on a different machine or when a remote Qlik Replicate client needs tocommunicate directly with a remote Qlik Replicate Server, the server password must be known to bothsides.
The server password must be strong enough to prevent brute-force or dictionary attacks. As such, it mustsatisfy the following criteria:
Must contain at least:
l 16 charactersl One uppercase letter [A-Z]l One lowercase letter [a-z]l One digit [0-9]
Cannot contain:
l Special keyboard characters (e.g. !@#$)l Non-Latin lettersl Spaces
You can generate a strong random password using the genpassword CLI utility described below, using athird-party utility, or even manually; in fact, it's not important how the password is generated, as long itmeets the aforementioned requirements.
l Passwords set with previous versions will continue to work, as the validity check is onlyperformed when setting a new server password.
l Scripts that automate the setting up of Qlik Replicate servers (such as when setting updocker images) should be reviewed and edited if necessary to ensure password validity.
l When running multiple Replicate Linux instances, this procedure needs to be repeatedfor each instance (as each instance has its own data directory).For information on installing multiple Replicate Linux instances, see Replicate instancesand services on Linux (page 48)
To generate a strong random password:
Run the following command:repctl genpassword
Setup and User Guide - Qlik Replicate, November 2021 65

3 Security considerations
A 16 character password that satisfies the strong-password criteria will be generated.
To change the server password using a script:
1. Run the following command:repctl [-d data-directory] SETSERVERPASSWORD new_password
where data-directory is the name of the Replicate data directory.The default path is <product_dir>/data.
You only need to include -d data-directory in the command if you changed thedefault data directory (e.g. when installing multiple Replicate Linux instances).
2. Restart the Qlik Replicate services (Windows) or the Qlik Replicate instance (Linux).
To change the server password interactively:
1. Run the following command:repctl [-d data-directory]
2. Press [Enter] and then type the following:SETSERVERPASSWORD new_password
3. Press [Enter] again to set the password.
4. Restart the Qlik Replicate services (Windows) or the Qlik Replicate instance (Linux).
Notes:
When the Qlik Replicate .NET UI Server is running on one machine and the Qlik ReplicateServer is running on another, the Qlik Replicate Server password must be the same on bothmachines. The password is used during the SSL handshake to establish a secure connectionbetween the participating machines.
3.7 Protecting Replicate passwordsReplicate stores secrets (e.g. passwords and keys) in its internal repository, enabling it to perform secureoperations during runtime, such as connecting to an endpoint, connecting to a web server, connecting toan email server, connecting to a remote file transfer server, and so on.
As a rule, all UI values displayed as asterisks are stored encrypted and never transmitted or exposed bythe API. For instance, when exporting task definitions, all passwords are encrypted and can only bedecrypted if the source machine’s mk.dat file - and possibly also the account or machine identity (onWindows) - is copied to the target machine. See also Master key considerations when exporting andimporting tasks (page 69).
Secrets that appear in Replicate settings are stored in an encrypted form with the following properties:
l The secret is encrypted using the AES-256 encryption algorithm.l The encryption key, also known as the 'master key', is a 256-bit key that is stored (and protected asdescribed later) in the master key file (mk.dat).
Setup and User Guide - Qlik Replicate, November 2021 66

3 Security considerations
l The encryption process uses a salt that depends on the name and type (or 'context') of the protectedentity. This prevents reuse attacks.
l The encryption process uses a nonce so that the same secret is always encrypted differently. Thisprevents dictionary attacks.
When exported to a JSON file, secrets appear in the following format:
"{Zxhhhhhhhhhhhhhhhhhhhhhhhhhhhhhh}"
Where:
l 'Z' is a fixed characterl 'x' a protection method indicatorl 'hhhhhh…' is a hexadecimal representation of the encrypted secret
Upon import, if a secret is provided in clear text (i.e. not in the format shown above), it is automaticallyencrypted and stored in the protected format.
The master key used in encrypting secrets is stored in the master key file (mk.dat) described below.
The master key fileThe master key file is a binary file that stores the root secrets of Replicate. These root secrets currentlyinclude:
l The AES 256-bit master key, which is used for encrypting passwords and other secrets in Replicatesettings.
l The server admin password, which is used (by the UI server) to access the replication serverremotely.
When running multiple Replicate Linux instances, you need to enter the server adminpassword for each instance. For details, see Installing an instance of Replicate as aservice (page 55).
l The default location for the master key file is the product data folder - by default <product-dir>/data -or data directories when multiple instances of Replicate are installed on Linux. If the server adminpassword does not exist, it is automatically created with randomly generated passwords that aresafe but unknown. The user can change the server admin password as well as the master key toknown values, if needed (e.g to connect to the replication server remotely).For more information, see Changing the server password (page 65).
When Replicate is set to run on a cluster using the same settings and storage, the mk.dat file should alsobe the same (or shared). Similarly, if the Replicate settings are exported in order to be moved to a differentmachine, the mk.dat file should also be moved in order to avoid the need to reenter all secrets.
The procedure for changing the master key as well as measures that can be taken to protect the filecontaining the master key are described in Changing and protecting the master key.
Setup and User Guide - Qlik Replicate, November 2021 67

3 Security considerations
Changing and protecting the master keyThis section describes how to change the master key as well as how to prevent unauthorized access to themaster key file.
Changing the master key replacementThe master key is originally a randomly generated 256-bit key. It can be changed as described belowimmediately after installation with no consequences. However, if you change the master key afterendpoints or tasks are already configured, all stored secrets will no longer be valid (as they were encryptedusing the old key). Therefore, after changing the master key, you need to reenter the passwords in all therelevant places.
When running multiple Replicate Linux instances, this procedure needs to be repeated for eachinstance (as each instance has its own data directory).
For information on multiple Replicate Linux instances, see Replicate instances and services onLinux (page 48).
To change the Master Key:
1. Stop any running tasks.
2. Stop the Replicate services or instance(s) on Linux.
3. Open a command prompt as an administrator/root.
4. Change the working directory to the product "bin" directory and then run the following command (onLinux run ./repctl …):repctl [-d data-directory] setmasterkey your_new_master_key [master_key_scope=scope]
where data-directory is the name of the Replicate data directory (by default: data).
You only need to include -d data-directory in the command if you changed the defaultdata directory (e.g. when installing multiple Replicate Linux instances).
In order not to have the key appear in the shell history, you can use the commandinterface (on Linux run ./repctl):repctl {enter}
setmasterkey your_new_master_key [master_key_scope=scope] {enter}
quit {enter}
See Protecting the master key file from misuse (page 69) for the master_key_scope options.Example:repctl -d opt/mydatadir setmasterkey 78543043vuiyfyrf64454555jy65 master_key_scope=1
5. Start the Qlik Replicate Server or instance(s) on Linux.
6. Reenter the access passwords in all endpoints.
7. Start the tasks.
Setup and User Guide - Qlik Replicate, November 2021 68

3 Security considerations
Protecting the master key file from misuseAccess to the mk.dat file is restricted to administrators (Windows) or to the users in the group under whichthe product was installed (Linux). Care should be taken to maintain this file protection.
The mk.dat file is always encrypted by some built-in, fixed key. On Windows, there are two additionaloptions for preventing unauthorized access and use of the mk.dat file. These are as follows:
l Tying the mk.dat to the Machine Profile - With this option, the mk.dat file can only be used on theWindows machine where it was created. Using the file from a different machine will generate anerror. This option is not appropriate for clusters that share the mk.dat file as only one machine willbe able to read it.
l Tying the mk.dat to a User Profile - With this option, the mk.dat file can only be used under theidentity that was used while creating it (typically the user that installed the product). For this optionto work, the Replicate services must be modified to run under the same user. If the user has aroaming profile, then the mk.dat file can be used on multiple machines (e.g. in a cluster).
These options are specified in the master_key_scope option of the setmasterkey command. Theyshould be set at the same time that the master key is set since any such change invalidates the storedpasswords.
The master key scopes are:
l 1 (Constant) - The default. The mk.dat file can be used wherever it is copied to.l 2 (User) - The mk.dat file can only be used under the same account as the one that was used whencreating it.
l 3 (Machine) - The mk.dat file can only be used on the same machine where it was created.
Master key considerations when exporting and importing tasksTo be able to export tasks from one machine and then import them to another, the same master key mustexist on both machines. This means that if you change the master key on one machine, you must alsochange it on the other machine.
Replicate enforces strict access restrictions to the mk.dat file. Consequently, in order to exporta task, you will also need to open the command prompt as an administrator (on Windows) orthe product account (Linux).
For more information on importing and exporting Replicate tasks, see Exporting tasks (page 122).
3.8 Client password considerationsQlik Replicate follows industry best practices for securing credentials, including the defense-in-depthpractice of keeping all credentials encrypted in memory except for the short time they need to be used.
Still, third-party database clients may not adhere to these best practices and leave clear passwords inprocess memory. Qlik cannot take responsibility for such cases and advises taking this concern up with thedatabase client vendor in the event that such a vulnerability is discovered.
Setup and User Guide - Qlik Replicate, November 2021 69

3 Security considerations
3.9 Encrypting the user permissions fileUser permissions are stored in the following repository file:
<product_dir>\Data\GlobalRepo.sqlite
To prevent unauthorized access of this file, you can encrypt it using the procedure described below. Afteryou perform the procedure, the repository file will be encrypted with the AES-256 bit cipher.
The length of any passwords specified during the procedure must be at least 32 characters.
To encrypt the repository file:
1. Open a command prompt as administrator and change the working directory to:<product_dir>\bin
2. Run the following command to set the master user key:repuictl.exe masterukey set --password your_MasterUserPassword
Example:repuictl.exe masterukey set --password ANqaGYERP3UKmGLK6UNuMqrkAGxwH8FM
3. Restart the Qlik Replicate Server service.
4. Run the following command to set the repository password:repuictl repository setpassword --master-user-password your_MasterUserPassword --
repository-password your_RepositoryPassword
Example:repuictl repository setpassword --master-user-password ANqaGYERP3UKmGLK6UNuMqrkAGxwH8FM
--repository-password 12345678901234567890123456789000
Steps 1-4 only need to be performed the first time you want to encrypt the repository file.If you subsequently need to decrypt the repository file and then re-encrypt it, they arenot required.
5. Run the following command to encrypt the repository:repuictl.exe repository secure --on --master-user-password your_MasterUserPassword
Example:repuictl.exe repository secure --on --master-user-password
ANqaGYERP3UKmGLK6UNuMqrkAGxwH8FM
6. Restart the Qlik Replicate Server service.
To disable encryption for the repository:
l Run the following command:repuictl repository secure --off --master-user-password your_MasterUserPassword
For information on setting user permission, see User permissions (page 1116).
3.10 Securing connections to endpointsQlik Replicate communicates with the source and target endpoints (typically databases) using either thevendor provided client package or via a standard ODBC driver.
Setup and User Guide - Qlik Replicate, November 2021 70

3 Security considerations
Qlik does not implement the network protocol (see important exceptions below) and for this reason, QlikReplicate generally relies on the vendor of the source or target endpoint to offer encryption. When settingup endpoint connections, the user is able to specify any connection properties required for the use ofencryption; these properties are, invariably, vendor-specific properties. In some cases, use of encryptionrequires system-level settings (such as adding a certificate to the machine trust store) which are outside ofthe scope of Qlik Replicate. Users are referred to the operation manual of the source or target endpoint fordetails on how to set up encrypted client communication with the server.
One exception to the previous paragraph is for endpoints based on the Qlik Connect product (endpoints onzOS, iSeries, HP NonStop and HP OpenVMS). In this case, the network encryption is implemented by theQlik Connect product and is based on the AES encryption algorithm with a 256-bit key.
Another exception is for endpoints that work over HTTP. In these cases, the user is advised to ensure thatthe endpoint server is configured to offer HTTPS and then use the appropriate https:// based URL whensetting up the connection.
3.11 Log file encryptionWhen the logging level is set to Verbose, sections in a Replicate log file that might contain customer datawill be encrypted while the rest of the log will remain in clear text.
Setting the logging level to Verbose for a prolonged period will consume a large amount of diskspace and should therefore be avoided unless explicitly requested by Qlik Support.
In some support cases, R&D may require the ability to decrypt the log in order to analyze the problem. Insuch cases, Qlik Support will ask you to provide the task or environment-level encryption key. Theencryption key is automatically generated and kept in a log.key file in the following locations:
l For decrypting a task's log file: <REPLICATE_INSTALL_DIR>\data\tasks\<task-name>l For decrypting non-task related log files (e.g. server logs): <REPLICATE_INSTALL_DIR>\data
Should you wish to review the logs before sending to Qlik Support, you can decrypt them via the ReplicateCLI as described below.
Decrypting Task Logs:
1. Open the Replicate command line from Start menu (Qlik Replicate > Qlik Replicate CommandLine) or open a command prompt “as administrator” and switch to the following directory:<REPLICATE_INSTALL_DIR>\bin>
2. Run the following command:Syntax:repctl dumplog <log-file-path> <log.key-path> [> <path-to-output-file>]
Example:repctl dumplog "C:\Program Files\Attunity\Replicate\data\logs\tasks\MyTask.log"
"C:\Program Files\Attunity\Replicate\data\tasks\MyTask\log.key" > "C:\Program
Files\Attunity\Replicate\data\decrypted.log”
Setup and User Guide - Qlik Replicate, November 2021 71

3 Security considerations
Decrypting Non-Task Logs:
1. Open the Qlik Replicate command line from Start menu (Qlik Replicate > Qlik ReplicateCommand Line) or open a command prompt “as administrator” and switch to the followingdirectory:<REPLICATE_INSTALL_DIR>\bin>
2. Run the following command:Syntax:repctl dumplog <log-file-path> <log.key-path> [> <path-to-output-file>]
Example:repctl dumplog "C:\Program Files\Attunity\Replicate\data\logs\repsrv.log" "C:\Program
Files\Attunity\Replicate\data\log.key" > "C:\Program
Files\Attunity\Replicate\data\decrypted.log”
The encryption key file (log.key file) can be used to decrypt any log that was encrypted with it,not just the log for which Qlik Support requested the encryption key file. If this is a concern, youcan generate a log.key file that will only be valid for the specific log requested by Qlik Support.
To do this:
1. Delete the log.key file.
2. Restart the task or Replicate Server service (depending on the log type required) togenerate a new log.key file.
3. Send the requested log file and the log.key file to Qlik Support.
4. Delete the log.key file.
5. Repeat steps 2-4 if you need to provide additional encrypted logs.
3.12 Application securityAs a leading provider of enterprise-class big data management solutions, Qlik understands that applicationsecurity is of paramount importance. With the integration of Static Code Analysis into the developmentlifecycle, the code is rigorously tested for vulnerabilities before each product release.
3.13 Using external credentialsMany organizations prefer to keep secrets in a dedicated "vault" as a means of protecting againstunauthorized privileged account access, impersonation, fraud, and theft. Storing secrets in a vault alsoeliminates manually intensive, time consuming and error prone administrative processes.
Replicate can be easily configured to interface with such vaults, thereby adding an additional layer ofsecurity while easing administration of endpoints. In Replicate, secret fields are any fields where the inputis masked with asterisks. Such fields include database user passwords, Amazon S3 secret keys, and soon.
Setup and User Guide - Qlik Replicate, November 2021 72

3 Security considerations
It is also recommended to use the Replicate Add-ons API which allows you to take advantage ofReplicate's memory management and logging capabilities, while eliminating the need to createindependent memory and logging routines.
For more information, see Replicate add-ons API (page 1173).
To facilitate integration with an external vault, Qlik provides the following files:
<INSTALL_DIR>\addons\samples\MyPasswordProvider.c
<INSTALL_DIR>\addons\include\ar_addon_password_provider.h
The path is the same on Linux, but with slashes (/) instead of backslashes (\). Similarly,although the explanation below refers to a DLL file (Windows), on Linux this should be an SOfile.
Limitations and considerationsl Passwords starting with "lookup::" are not supportedl Password length cannot exceed 2 KBl Loading more than one passwordProvider will result in a fatal error
Changing the default addon nameYou can change the default addon name (MyPasswordProvider) simply by renaming the <INSTALL_DIR>\addons\samples\MyPasswordProvider\MyPasswordProvider.dll file as desired. Note that if yourename the DLL, you may also need to specify the new name when editing the addons_def.json.samplefile described in Step 3 below (depending on which parameters you use).
Step 1: Edit the MyPasswordProvider.c fileEdit the file MyPasswordProvider.c as follows:
1. Locate the following line:static AR_ADDONS_STATUS get_secret(char *name, const char *lookup_key, char *secret, int
secret_len, char *principal, int principal_len)
For a description of these fields, refer to the ar_addon_password_provider.h file.
2. Replace the code below this line (starting AR_AO_LOG and ending AR_ADDONS_STATUS_SUCCESS;) withthe code required to access your Secrets Vault.
Step 2: Compile the codeCompile the MyPasswordProvider.c file into a DLL/SO. Note that on Windows the file should be compiledin "Release x64" mode.
Step 3: Edit the addons_def.json.sample fileEdit the file "<INSTALL_DIR>\addons\addons_def.json.sample" as follows:
Setup and User Guide - Qlik Replicate, November 2021 73

3 Security considerations
1. Locate the following section:{
"addons": [{
"name": "MyPasswordProvider",
"type": "STARTUP",
//"lib_path": "C:\\Program Files\\Attunity
Replicate\\addons\\samples\\MyPasswordProvider\\MyPasswordProvider.dll",
//"lib_path": "/opt/attunity/replicate/addons/samples/MyPasswordProvider.so",
"init_function": "ar_addon_init"
}]
}
2. Edit the section as required, where:l name is the logical name of the DLL (can be any name). If you do not use the lib_path
parameter to specify the DLL path (see below), then the DLL file must reside in <INSTALL_DIR>\addons\<addon_name>. On Linux, the <addon_name> folder needs to be createdmanually and should either be the default addon name (MyPasswordProvider) or its newname (if you changed it).
l type is an optional parameter that specifies when to load the DLL. The only value that iscurrently supported is STARTUP.
l lib_path is the full path of your DLL (e.g. C:\Vault\MyVaultProvider.dll). This is required onlyif the DLL does not reside in <INSTALL_DIR>\addons\<addon_name> (as mentioned in thedescription of the name parameter above).
l init_function is the function name, as it appears in the C file used to generate the DLL.
3. Save the file as addons_def.json.
Step 4: Configure the endpointsAny fields where you want the secret to be retrieved from your vault should be configured as describedbelow.
Edit the field as follows:
1. In the appropriate field, enter the following:lookup::your_lookup_key
where your_lookup_key is the Replicate endpoint identifier specified in your vault access code.
2. Save your settings.
3. Click Test Connection to verify that a connection to the endpoint can be established.
4. Run the task.
3.14 Controlling execution of user-defined commandsSeveral endpoints support running user-defined commands for pre/post-processing files. In the OperatingSystem Level Credentials tab shown in SERVER view, you can provide user credentials for user-definedcommands that needs to be executed at operating system level. By default, such commands are executedunder the Replicate Server service account. This may constitute a security risk, as it allows any Replicateuser with Admin or Designer permissions to specify user-defined commands that could lead to a fullcompromise of the server.
Setup and User Guide - Qlik Replicate, November 2021 74

3 Security considerations
Note that when Replicate Server is installed on Linux, the Operating system level credentials (page 1120)tab will be hidden as the potential security risk is relevant to Windows only.
You can also determine whether to allow user-defined commands to be executed at all.
To do this:
1. On the Replicate Server machine, open the <PRODUCT_DIR>\bin\repctl.cfg fileand set the enable_execute_user_defined_commands parameter to "true" or"false" (the default) as required.
2. If Another account is selected in the Operating System Level Credentials tab andyou changed the default Attunity Replicate Server service Log On user:
a. For both admin and non-admin users:Add the user specified in the Attunity Replicate Serverservice Log On tab to the "Replace a process level token"policy in the "Local Security Policy" settings.
b. For non-admin users only:
i. Grant the user full control over theReplicate data folder.The default location of the data folderis C:\ProgramFiles\Qlik\Replicate\data
ii. Grant the user full control over the folder containingthe user-defined command to be executed.
The user must be the same as the non-admin user specified in the AttunityReplicate Server service Log On tab.
3. Restart the Qlik Replicate services.
Executing operating system commands as a different userThe load utility of the following target endpoints can run via user-provided credentials instead of theLocalSystem user:
l Microsoft APS PDWl Google Cloud BigQueryl IBM Netezzal PostgreSQL-based
Setup and User Guide - Qlik Replicate, November 2021 75

4 Working with Qlik Replicate endpoints
4 Working with Qlik Replicate endpointsQlik Replicate can replicate data from the types of endpoints listed in Supported Platforms and Endpoints(page 1154). A Replicate endpoint can be either a source or a target. A source endpoint contains theoriginal data (the data you want to copy). A target endpoint is where the replicated data is stored. Sourceand target can be completely different endpoints.. There is no need to install any additional software otherthan Replicate. You can also use CDC Agents in Attunity Replicate Connect (ARC) as source data forreplication tasks.
For a list of supported endpoint versions, see Supported Platforms and Endpoints (page 1154).
In this section:
l Using ARC CDC agents as endpoints (page 76)l Replicate data types (page 76)l Supported DDL statements (page 78)l Configuring Replicate to automatically replace the user-entered password (page 80)
4.1 Using ARC CDC agents as endpointsIn a replication project, you can use both relational and non-relational endpoints supported by AttunityReplicate Connect (ARC).
ARC CDC Agents can be used for capturing changes (CDC) only.
Relational Endpoints Non-Relational Endpoints
SQL/MP HP NonStop Enscribe
- RMS
- VSAM
- IBM IMS
Relational and Non-relational endpoints
For information on how to work with ARC, see Using ARC CDC solutions in Qlik Replicate (page 178).
4.2 Replicate data typesQlik Replicate converts source data to its own data type. For data that Replicate cannot convert, it returnsan error.
To see how a data type is mapped from source to target:
l See the chapter for the source endpoint you are using. In the section on data types, see themapping table to see the Qlik Replicate data type.
Setup and User Guide - Qlik Replicate, November 2021 76

4 Working with Qlik Replicate endpoints
l See the chapter for the target endpoint you are using. In the section on data types, see the mappingtable to see how the Replicate data type maps to the target.
For example, when replicating data from an Oracle source endpoint to a Microsoft SQL Server targetendpoint, Replicate first converts the Oracle data type BINARY to the Replicate data type BYTES. BYTESmaps to the Microsoft SQL Server data type VARBINARY (Length).
The following table describes the Qlik Replicate data types. Some data types have precision and scaleinformation that applies to them.
ReplicateData TypesDescription
STRING A character string
WSTRING A double-byte character string
BOOLEAN A Boolean value
BYTES A binary data value
DATE A date value: Year, Month, Day
TIME A time value: Hour, Minutes, Seconds
Only the following format is supported:
HH:MM:SS
DATETIME A timestamp value: Year, Month, Day, Hour, Minute, Second, FractionalSeconds
The fractional seconds have a maximum scale of 9 digits.
Year can have a maximum value of 32767.
Only the following format is supported:
YYYY:MM:DD HH:MM:SS.F(9)
INT1 A one-byte, signed integer
INT2 A two-byte, signed integer
INT4 A four-byte, signed integer
INT8 An eight-byte, signed integer
NUMERIC An exact numeric value with a fixed precision and scale
REAL4 A single-precision floating-point value
REAL8 A double-precision floating-point value
UINT1 A one-byte, unsigned integer
Replicate data type descriptions
Setup and User Guide - Qlik Replicate, November 2021 77

4 Working with Qlik Replicate endpoints
ReplicateData TypesDescription
UINT2 A two-byte, unsigned integer
UINT4 A four-byte, unsigned integer
UINT8 An eight-byte, unsigned integer
BLOB Binary Large Object
CLOB Character Large Object
NCLOB Native Character Large Object
For more information, see LOB support in Task Settings/Metadata (page 1011).
4.3 Supported DDL statementsQlik Replicate automatically changes the metadata of the target table to reflect DDL statements performedon the source endpoint.
Supported DDL statements include:
l Create tablel Drop tablel Rename tablel Add columnl Drop columnl Rename columnl Change column data type
For information about supported DDL statements for a specific endpoint, see the chapter describing thatendpoint. For more information about DDL settings, see Apply Changes Settings (page 1020). See alsoLimitations and considerations (page 79) below.
How Replicate handles DDL changesWhen DDL changes occur, Replicate:
1. Captures ALTER TABLE DDLs from the transaction log without identifying the DDL type(ADD/DROP/MODIFY COLUMN).
2. Reads the new table metadata from the source backend.
3. Compares the previous table metadata with the new table metadata in order to determine thechange. Note that a single change may include multiple DDL operations performed on the backend.
4. Uses the new table metadata to parse the subsequent DML events.
Setup and User Guide - Qlik Replicate, November 2021 78

4 Working with Qlik Replicate endpoints
Limitations and considerationsWhen capturing DDL changes, the following limitations apply:
l When a rapid sequence of DDL-DMLs-DDL occurs, Replicate may read the table metadata after thesecond DDL which may (on rare occasions) result in missing data due to incorrect parsing of DMLevents from the log.
l If you change the name of a table used in a task and then stop the task, Replicate will not captureany changes made to that table after the task is resumed.
l Renaming a source table while a task is stopped is not supported.l Reallocation of a table's Primary Key columns is not supported (and will therefore not be written tothe DDL History Control Table).
l When a column's data type is changed and the (same) column is then renamed while the task isstopped, the DDL change will appear in the DDL History Control Table as “Drop Column” and then“Add Column” when the task is resumed. Note that the same behavior can also occur as a result ofprolonged latency.
l CREATE TABLE operations performed on the source while a task is stopped will be applied to thetarget when the task is resumed, but will not be recorded as a DDL in the attrep_ddl_history ControlTable.
l Operations associated with metadata changes (e.g. ALTER TABLE, reorg, rebuilding a clusteredindex, etc.) may cause unpredictable behavior if they were performed either:
l During Full Load-OR-
l Between the Start processing changes from timestamp and the current time (i.e. the moment theuser clicks OK in the Advanced Run Options window).Example:IF:The specified Start processing changes from time is 10:00 am.AND:A column named Age was added to the Employees table at 10:10 am.AND:The user clicks OK in the Advanced Run Options window at 10:15 am.THEN:Changes that occurred between 10:00 and 10:10 may result in CDC errors.
In any of the above cases, the affected table(s) must be reloaded in order for the data to beproperly replicated to the target.
l The DDL statement ALTER TABLE ADD/MODIFY <column> <data_type> DEFAULT <>
does not replicate the default value to the target and the new/modified column is set to NULL. Notethat this may happen even if the DDL that added/modified the column was executed in the past. Ifthe new/modified column is nullable, the source endpoint updates all the table rows before loggingthe DDL itself. As a result, Qlik Replicate captures the changes but does not update the target. Asthe new/modified column is set to NULL, if the target table has no Primary Key/Unique Index,
Setup and User Guide - Qlik Replicate, November 2021 79

4 Working with Qlik Replicate endpoints
subsequent updates will generate a "zero rows affected" message.l Modifications to TIMESTAMP and DATE precision columns will not be captured.
4.4 Configuring Replicate to automatically replace the user-entered password
To prevent illicit database activity by unauthorized third-parties, Replicate can be configured toautomatically replace the user-entered password with a strong random password.
This feature is currently supported with the following endpoint types:
l Microsoft SQL Serverl Microsoft Azure SQL Databasel Oracle
This feature cannot be used when the user name is "sa".
Clicking the "Test Connection" button will verify the connection using the original password.The password will be automatically changed the first time the task runs.
To utilize this feature, the password must be defined both in the Replicate endpoint settings and on theactual database, in the following format:
replace:your_password
Example:
replace:k$RJdg7!S&ib
Defining multiple endpoints to use the same automatically changedpasswordIn Qlik Replicate, more than one endpoint may be configured to connect to the same database server.
To allow multiple endpoints to use the same (automatically changed) credentials, the password in one ofthe endpoints needs to defined. Then, each of the other endpoint connections needs to be configured toreference that endpoint.
The following rules apply:
l A source endpoint cannot reference a target endpoint, only another source endpoint.
l A target endpoint cannot reference a source endpoint, only another target endpoint.
l An endpoint cannot reference another endpoint that uses a different database server.
Setup and User Guide - Qlik Replicate, November 2021 80

4 Working with Qlik Replicate endpoints
To configure an endpoint to use the automatically changed credentials of another endpoint:
1. In the User name field, enter the user name in the following format:ref:endpoint_name
Where endpoint_name is the name of the endpoint connection whose password wasautomatically changed.
2. In the Password field, specify the password before it was automatically changed and without the"replace" prefix.Example:If the original password is:replace:54lakrfgnier3!
Specify:54lakrfgnier3!
Setup and User Guide - Qlik Replicate, November 2021 81
5 Using the Qlik Replicate Console
5 Using the Qlik Replicate ConsoleThe Qlik Replicate Console is a Web-based application that runs in most browsers (for information onsupported browsers, see Supported browsers (page 1166)). You can connect from any computer to theReplicate Server.
This section describes the user interface elements in the Replicate Console.
In this section:
l Opening the Qlik Replicate console (page 82)l Tasks view (page 85)l Server view (page 90)l List actions (page 90)
5.1 Opening the Qlik Replicate consoleYou browse to the Qlik Replicate Console using a supported Web browser from a computer in the samenetwork as the computer on which the Qlik Replicate Server is installed. For information on supportedbrowsers, see Supported browsers (page 1166).
You can open the Console from the Start menu of the computer where you installed Qlik Replicate.
To enable and control access to Qlik Replicate, you can create user roles as described in User permissions(page 1116).
To open Qlik Replicate
l Click Start and from the All Programs section point to Qlik Replicate and select Qlik ReplicateConsole.
When you connect to the Qlik Replicate Console, your browser will prompt you for a usernameand password. The username and password that you need to specify depends whetherReplicate Server is installed on Windows or Linux.
l Qlik Replicate Server on Windows: Your domain username and password.l Qlik Replicate Server on Linux: Either specify your PAM credentials or, if PAM is notset up in your environment, specify admin as your username and the Replicate Serverpassword as your password.
For information on setting the Replicate Server password, see Security considerations (page58).
For information on PAM prerequisites, see Configuration 3: Replicate UI Console andReplicate server running on Linux (page 84).
Setup and User Guide - Qlik Replicate, November 2021 82

5 Using the Qlik Replicate Console
Accessing Qlik Replicate from a remote computerYou can access Qlik Replicate from any computer in your network. The default URL is defined in a filecalled ServiceConfiguration.xml, which is located in the following directory:
<product_dir>\data
When the Qlik Replicate machine is located in a subdomain, the URL in theServiceConfiguration.xml file will contain localhost instead of the machine name. In order toconnect remotely, to the Qlik Replicate machine, you need to replace localhost with theactual machine name or IP address.
To access the Qlik Replicate Console from a remote computer, type the following address in the addressbar of your Web browser:
Qlik Replicate Server on Windows:
https://<computer name>/attunityreplicate
Qlik Replicate Server on Linux:
https://<computer name>:<port>/attunityreplicate
Where <computer name> is the name or IP address of the computer where the Qlik Replicate Server isinstalled and <port> is the C UI Server port (3552 by default). For more information on the C UI Servercomponent, see Qlik Replicate UI server configurations (page 83).
The person logged in to the computer where you are accessing the Console must be anauthorized Qlik Replicate user. For more information, see User permissions (page 1116).
Qlik Replicate UI server configurationsYou can either install Qlik Replicate on a single machine or on two separate machines. The possibleconfigurations for installing Qlik Replicate on two separate machines are described below.
When the Qlik Replicate .NET UI Server is running on one machine and the Qlik ReplicateServer is running on another, the Qlik Replicate Server password must be the same on bothmachines. The password is used during the SSL handshake to establish a secure connectionbetween the participating machines.
For information on setting the password, see Changing the server password (page 65).
Configuration 1: Replicate Server running on WindowsIn this configuration, the Replicate Console component and the Replicate Server components are runningon two separate Windows machines.
Setup and User Guide - Qlik Replicate, November 2021 83

5 Using the Qlik Replicate Console
Configuration 2: Replicate server running on LinuxIn this configuration, the Replicate Console component and the Replicate Server components are runningon two separate machines - the former on Windows and the latter on Linux.
Configuration 3: Replicate UI Console and Replicate server running on LinuxIn this configuration, the UI Console and the Web server (Qlik Replicate Server) are hosted on twoseparate Linux machines, though it is also possible to install them on a single machine.
Note that in such a configuration, the ability to assign different roles (as described in User permissions(page 1116)) is not supported. In other words, all users will have the admin role.
PAM prerequisitesTo establish a secure connection using PAM, make sure that the following prerequisites have been met:
l The Attunity user or group (or the user/group set during the installation) must be grantedpermission to read the file: etc/shadow. Note that this prerequisite is only required when QlikReplicate is installed on two machines.
l Edit the repctl.cfg file and modify the path to the fully qualified name of the libpam.so.0 library ifrequired.
Example:
"login_pam_libpam_full_path":"/lib64/libpam.so.0",
"login_pam_service_name": "system-auth"
}
Setup and User Guide - Qlik Replicate, November 2021 84

5 Using the Qlik Replicate Console
Multiple users connecting to a single consoleMultiple users can connect to a single Qlik Replicate Console using a Web browser, as follows:
1. Install Qlik Replicate on the computer that will serve as the Qlik Replicate Console.
2. If Qlik Replicate Server is installed on another computer (Linux for example), on the consolemachine, edit the Qlik Replicate URL (and port if required) in the ServiceConfiguration.xml file topoint to that machine.By default, the file is located in the following directory:C:\Program Files\Attunity\Replicate\data
3. Open the Windows Services console and restart the Qlik Replicate UI Server service.
4. Connect as described in Opening the Qlik Replicate console (page 82) above.
See also:l Managing user permissions (page 1118)
5.2 Tasks viewThe Tasks view is the default view that opens when you open Qlik Replicate for the first time, as shown inthe following image:
Setup and User Guide - Qlik Replicate, November 2021 85

5 Using the Qlik Replicate Console
It lists all replication tasks you have defined. You use this view to view, edit, run, and delete tasks, or tocreate new tasks.
This view includes the following elements:
l Toolbar running along the top. It includes buttons that let you create a new task, open, delete, run,or stop an existing task, configure advanced run options, and manage endpoint connections. Seealso Adding tasks (page 105).
l Tasks already defined in the system, listed in the left pane.You can view tasks in:
l Icons view, where each icon indicates the current state of the tasks.See the Tasks view (page 85) table for more information.
l Details view, which displays a table with additional information about each task includingtheir current state. Note that the state icons are the same as described in the Tasks view
(page 85) table, but without the part of the icon.
To toggle between these views, you can select Icons or Details from the drop-down list in the topright of the Console.For information about creating a task, see Defining and managing tasks (page 104).The Console displays each open task on its own tab along the top. For more information, seeViewing specific tasks (page 87).
l Endpoints map in the right pane, which illustrates the endpoints for the task selected in the leftpane. Any notifications (if defined) and log messages will be shown in the Messages pane belowthe map.
l Messages pane below the endpoints diagram on the right. This pane includes a Notifications tabfor progress messages and a Log Messages tab for warnings and error messages issued when
Setup and User Guide - Qlik Replicate, November 2021 86

5 Using the Qlik Replicate Console
Replicate encounters a problem. For more information, see Accessing task messages andnotifications (page 1055) and Creating a new notification (page 1083).
To access the Tasks view:
l Select Tasks from the drop-down list in the top left, below the Qlik Replicate logo.
The following table shows examples of task icons.
Icon Description
Indicates that the task has not been run yet.
Can be one of the following:
l Manually stopped by the userl Stopped due to the task definition (Full Load settings)l Stopped by the Scheduler
Indicates that the task has stopped due to an error. When you select the task,Replicate displays a list of errors on the Log Messages tab at the bottom right ofthe console.
Indicates that the task has stopped due to a recoverable error. When you selectthe task, Replicate displays a list of errors on the Log Messages tab at thebottom right of the console.
Indicates that the task is running.
Task icons
Viewing specific tasksFrom the Tasks view, you can drill down to an individual task, provided you have already created at leastone task (see Defining and managing tasks (page 104) for more information). Two modes display differentsets of information for each task:
l Designer mode (page 88): Default mode when you open a task. Here you define endpoints, selecttables, modify table settings (including filters and transformations), and create global transformationrules.
Setup and User Guide - Qlik Replicate, November 2021 87

5 Using the Qlik Replicate Console
l Monitor mode (page 89): Here you view replication task activities in real time, along with logmessages and notifications.
To view a specific task:
1. In the Tasks view, select the task you want to work with.The right pane displays the task diagram on the right side of the page.
2. On the Tasks view toolbar, click Open.
Designer modeIn Designer mode, you define endpoints, select tables to be replicated, modify table settings (includingfilters and transformations), and create global transformation rules. This is the default mode when youopen a task.
Viewing a task in Designer mode
The Designer mode includes the following elements:
l Endpoints list: Lists the source and target endpoint connections that you added to Qlik Replicate.For more information, see Defining and managing endpoints (page 110). The figure shows theEndpoints List in a collapsed state, hiding the endpoints. To expand the list, click the right arrow atthe top or anywhere below it. To close the panel, click the left arrow.
l Endpoints map: Illustrates the connection between the source and target endpoints for the task.The round icon between the endpoints represents the task type, which can indicate Full Load only,Full Load and Apply Changes, or Apply Changes only.
Setup and User Guide - Qlik Replicate, November 2021 88

5 Using the Qlik Replicate Console
l When you create a task, you can drag the endpoints to the source and target drop spots asrequired. For more information, see Adding a source and target endpoint to a task (page 113).
l Monitor and Designer buttons: Lets you switch between Monitor mode and Designer mode. Seealso Monitor mode (page 89) and Monitoring and controlling replication tasks (page 1059).
l Run button: Lets you run the task at hand.l Task Settings button: Opens the Task Settings dialog box. For more information, see TaskSettings (page 1010).
l Manage Endpoint Connections button: Lets you view the endpoints defined, edit them, or add newendpoints. For more information, see Defining and managing endpoints (page 110).
l Select and Define Tables: Lets you select the tables you want to include in your replication task. Inaddition, you can use transformation and filter operations to create new tables or to replicate partsof tables. For more information, Selecting tables and/or views for replication (page 114), Usingfilters (page 940), and Defining transformations for a single table/view (page 931).
l Global Transformations option: Lets you create transformations for all tables in a task. For moreinformation, see Starting the Global Transformation Rules wizard (page 955).
To display a task in Designer mode:
l On the right side of the toolbar, click Designer.
Monitor modeIn Monitor mode, you view the replication task activities in real time.
Viewing a task in Monitor mode
The Monitor mode includes the following elements:
Setup and User Guide - Qlik Replicate, November 2021 89

5 Using the Qlik Replicate Console
l Run button: Lets you run the task at hand.l Manage Endpoint Connections button: Lets you view the endpoints defined, edit them, or add newendpoints. For more information, see Defining and managing endpoints (page 110).
l Monitor and Designer buttons: Switch between Monitor mode and Designer mode. See alsoMonitoring and controlling replication tasks (page 1059), Designer mode (page 88), Defining andmanaging tasks (page 104).
l Tools list: Provides access to history, log management, and status information.l Change Processing/Full Load tabs: Lets you select the information you want to focus on. Bydefault, Replicate displays the Full Load view (also shown in the figure).
l Task Map: Illustrates the connection between the source and target endpoints for the task. Theround icon between the endpoints represents the task type, which can indicate Full Load only, FullLoad and Apply Changes, or Apply Changes only.
l Messages pane: Displays notifications and logging messages. For more information, seeAccessing task messages and notifications (page 1055).
To display a task in Monitor mode:
l On the right side of the toolbar, click Monitor.
5.3 Server viewSERVER view lets you view and configure the Qlik Replicate Server settings.
To switch to SERVER view:
l From the drop-down list in the top left corner of the console (below the product logo) select Server.
For information on configuring server settings, see Qlik Replicate server settings (page 1082).
5.4 List actionsThe following table describes the various list actions you can perform. Note that, depending on the list type,some of the actions may not be available.
To Do This
Sortascending orsortdescending
Right click the desired column and select one of the sorting options as required.
Restore thedefaultsorting order
Right click any of the column headings and select Default Sorting.
List actions
Setup and User Guide - Qlik Replicate, November 2021 90

5 Using the Qlik Replicate Console
To Do This
Export the listto a TSV file
The following lists can be exported: tasks, messages, selected tables, and processedtables (in Monitor view). Either click the Export to TSV button above the list or right-click any of the column headings and select Export to TSV. Choose where to save thefile and then click Save.
Add orremovecolumns
Right click any of the column headings and select Column Settings. Then add orremove columns as required.
Hide acolumn
Right click the desired column and select Hide Column.
Setup and User Guide - Qlik Replicate, November 2021 91
6 Getting started: A Qlik Replicate tutorial
6 Getting started: A Qlik Replicate tutorialThis section guides you through setting up a basic replication task to move data from an Oracle source to aMicrosoft SQL Server target.
In this section:
l What you need (page 92)l Open the Qlik Replicate console (page 92)l Add an Oracle endpoint as a source (page 93)l Open the Qlik Replicate console (page 92)l Add a Microsoft SQL Server database as a target (page 94)l Define a replication task (page 97)l Run and monitor the replication task (page 102)l View the replicated tables in Microsoft SQL Server (page 103)
6.1 What you needFor this tutorial, you need the following:
l Qlik Replicate installed on a computer in your networkl For the Oracle source:
l Access to the HR schema tables that are part of the Oracle database installation
If these tables are not available, contact your Oracle database administrator.
l system/<password> for an admin userl For the target: A Microsoft SQL Server database with the default tempdb system database (used tostore the target tables).This can be installed on your local computer.
l For the Qlik Replicate Console, one of the following Internet browsers:l Microsoft Internet Explorer version 11 or laterl Mozilla Firefoxl Google Chrome
See also: Installing Qlik Replicate (page 38)Windows permissions (page 39)
6.2 Open the Qlik Replicate consoleFrom the Windows Start menu, select All Programs > Qlik Replicate > Qlik Replicate Console.
Setup and User Guide - Qlik Replicate, November 2021 92

6 Getting started: A Qlik Replicate tutorial
You can access Qlik Replicate from any computer in your system.
To access the Console from a remote computer, type the following address in the address barof your Web browser:
https://<computer name>/attunityreplicate
where <computer name> is the name or IP address of the computer (including the Windowsdomain name) on which the Qlik Replicate Server is installed.
The person logged in to the computer hosting the Console must be an authorized QlikReplicate user. For more information, see User permissions (page 1116).
6.3 Add an Oracle endpoint as a sourceThis task guides you through adding and configuring an Oracle endpoint as the source database. This isthe database from where you want to replicate data.
To add an Oracle source database:
1. In Task view, click Manage Endpoint Connections.The Manage Endpoint Connections dialog box opens.
2. Click New Endpoint Connection.
3. Provide the following information:l Name: Type OracleSource.l Description: Optionally, enter a description or leave blank.l Role: Select Source.l Type: Select Oracle.l Connection string: Enter the connect string to the Oracle database you work with, in anyOracle format.For example, if you connect to an Oracle database on a computer called tomato using thedefault Oracle port and service name, the connect string looks like this:tomato:1521/orcl
l User Name: Enter the user name for the Oracle database you work with.The default user name is SYSTEM.
l Password: Enter the password for the Oracle database you work with.The default password is manager.
Setup and User Guide - Qlik Replicate, November 2021 93

6 Getting started: A Qlik Replicate tutorial
4. Click Test Connection to verify the information you entered and the availability of the database.
5. Click Save to add the database.
You can also set advanced settings for the Oracle database, but this beyond the scope of this tutorial. Formore information, see Setting advanced connection properties using Oracle LogMiner (page 392).
For information on adding other types of databases, see the chapter for the required database. For a list ofsupported databases, see Supported Platforms and Endpoints (page 1154).
6.4 Add a Microsoft SQL Server database as a targetThis task guides you through adding and configuring a Microsoft SQL Server endpoint as the targetdatabase connection. This is the database to where you want to replicate data.
To add a Microsoft SQL Server target endpoint:
Setup and User Guide - Qlik Replicate, November 2021 94

6 Getting started: A Qlik Replicate tutorial
1. In Tasks view, click Manage Endpoint Connections.The Manage Endpoint Connections dialog box opens.
2. Click New Endpoint Connection.
3. Provide the following information:l Name: Type sqlserver_target.l Description: Optionally, enter a description or leave blank.l Role: Select Target.l Server name: Enter the name of the computer where your Microsoft SQL Server database isinstalled.For example, if you connect to a Microsoft SQL Server database on a computer called bee,enter bee.
l Select one of the following:l Windows authentication if your Microsoft SQL Server database is configured toaccept Windows authentication.
l Microsoft SQL Server authentication if your Microsoft SQL Server database is notconfigured to accept Windows authentication. In this case, you also need to provide avalid user name and password.
l Database name: Enter tempdb, which is the name of the database to where you are goingto replicate data. If you created a new database for this purpose, enter the name of thatdatabase.
Setup and User Guide - Qlik Replicate, November 2021 95
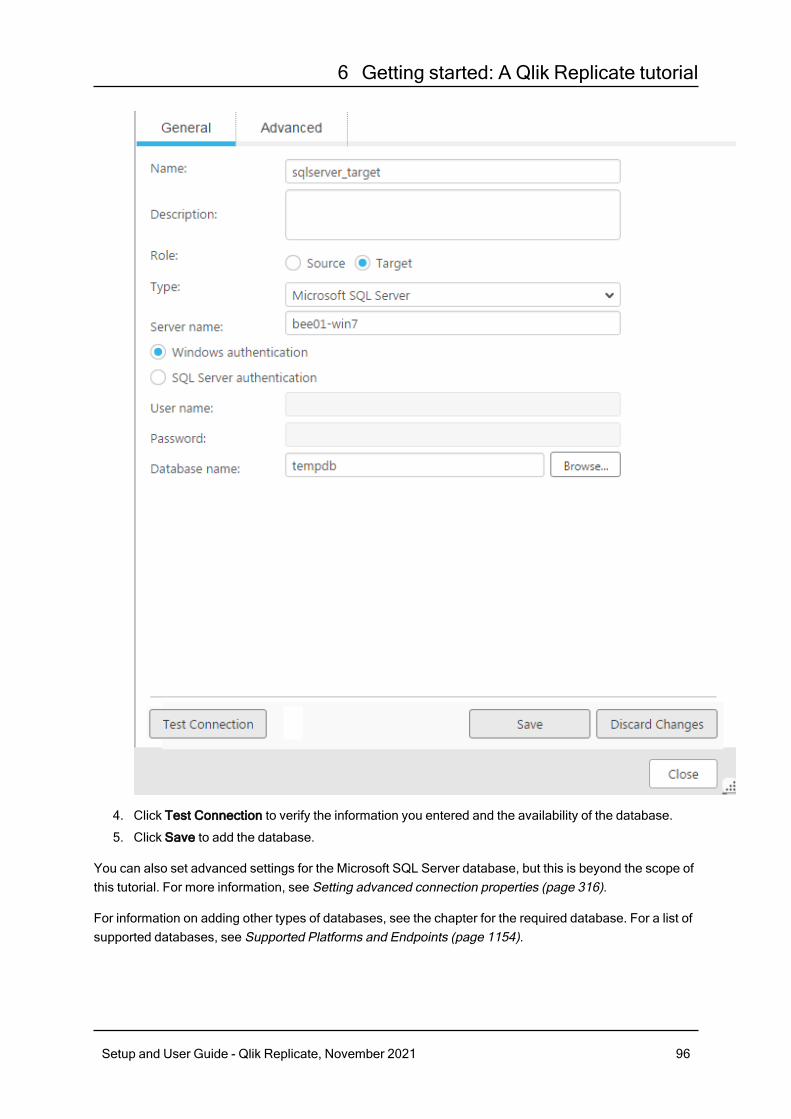
6 Getting started: A Qlik Replicate tutorial
4. Click Test Connection to verify the information you entered and the availability of the database.
5. Click Save to add the database.
You can also set advanced settings for the Microsoft SQL Server database, but this is beyond the scope ofthis tutorial. For more information, see Setting advanced connection properties (page 316).
For information on adding other types of databases, see the chapter for the required database. For a list ofsupported databases, see Supported Platforms and Endpoints (page 1154).
Setup and User Guide - Qlik Replicate, November 2021 96

6 Getting started: A Qlik Replicate tutorial
6.5 Define a replication taskThis task guides you through defining a replication task that copies the data from the HR.EMPLOYEESand HR.JOBS tables. It is not mandatory to add a source and a target database prior to this step; you canalso do this as part of setting up the replication task.
By default the Oracle database includes the HR schema. You will make a copy of the same tables in yourMicrosoft SQL Server tempdb. The EMPLOYEES and JOBS tables created in Microsoft SQL Server willbe identical to the Oracle tables.
For information on how to use Transformations and Filters when creating a replication task, see Definingtransformations for a single table/view (page 931) and Using filters (page 940).
Defining a replication task includes the following sub-tasks:
l Add a replication task to the Qlik Replicate console (page 97)l Add the source and target endpoints to the task (page 99)l Select tables for the Replication task (page 101)
Add a replication task to the Qlik Replicate consoleThis task guides you through adding a replication task to the Qlik Replicate Console.
To add a replication task:
1. Make sure Tasks is selected in the upper left corner of the Qlik Replicate Console.
2. Click New Task to open the New Task dialog box.
3. In the New Task dialog box, in the Name field, type My_Task and click OK.
Setup and User Guide - Qlik Replicate, November 2021 97

6 Getting started: A Qlik Replicate tutorial
The Qlik Replicate Console displays the task on a new tab. By default, because the task has notbeen set up yet, the tab opens in Designer view. The diagram on the left serves as a drop-off pointfor the source and target databases you defined previously. The right pane lets you select the tables
Setup and User Guide - Qlik Replicate, November 2021 98

6 Getting started: A Qlik Replicate tutorial
you want to work with and carry out transformations and filtering operations. For more information,see Tasks view (page 85), Viewing specific tasks (page 87), and Defining and managing tasks(page 104).If needed, you can also change the default task settings. For more information, see Task Settings(page 1010).
See also:l Bidirectional replication (page 107)l Using the Log Stream (page 919)
Add the source and target endpoints to the taskThis section guides you through adding the source and target endpoints to the replication task, which is asimple drag-and-drop operation. In the Endpoints tab, the following icons help you distinguish betweensource and target endpoints:
Icon Description
Source endpoint, which is represented by a database, file, or NoSQL icon, depending on theendpoint type, with an orange arrow pointing away from the source (a database in thisexample).
Target endpoint, which is represented by a database, file or NoSQL icon, depending on theendpoint type, with a blue arrow pointing toward the target (a database in this example).
Endpoint icons
The Endpoints pane consists of All, Source, and Target tabs.
To add the source or target endpoints to the task:
1. In the Endpoints pane, click the All tab.
2. Drag the OracleSource database to the Drop source endpoint here area in the endpoints diagram.
Setup and User Guide - Qlik Replicate, November 2021 99

6 Getting started: A Qlik Replicate tutorial
3. Drag the sqlserver_targetdatabase to the Drop target endpoint here area.
Next, you can select the tables from the source database to use in the replication task. For moreinformation, see Defining and managing tasks (page 104).
Setup and User Guide - Qlik Replicate, November 2021 100

6 Getting started: A Qlik Replicate tutorial
Select tables for the Replication taskAfter adding the source and target databases, you now need to select which Oracle source tables you wantto replicate to the Microsoft SQL Server target.
This task guides you through selecting specific tables (HR.EMPLOYEES and HR.JOBS) from the Oraclesource. Replicate takes all of the data from these tables "as is" and copies it to the Microsoft SQL Servertarget.
If you need to copy only some of the data to the target database, you need to use a filter. Forinformation, see Using filters (page 940).
If you need to copy the data into the target using different rows or columns than those in thesource, you need to use transforms. For more information, see Defining transformations for asingle table/view (page 931).
To add tables to the replication task:
1. In the right pane of the Qlik Replicate Console, click Table Selection. The Select Tables dialog boxopens.
2. In the Select Tables dialog box, do the following:l From the Schema list, select HR, and then click Search.l From the Table List, select EMPLOYEES, and then click the right arrow to select that table.l Repeat these steps for the JOBS table.l Click OK.
Setup and User Guide - Qlik Replicate, November 2021 101
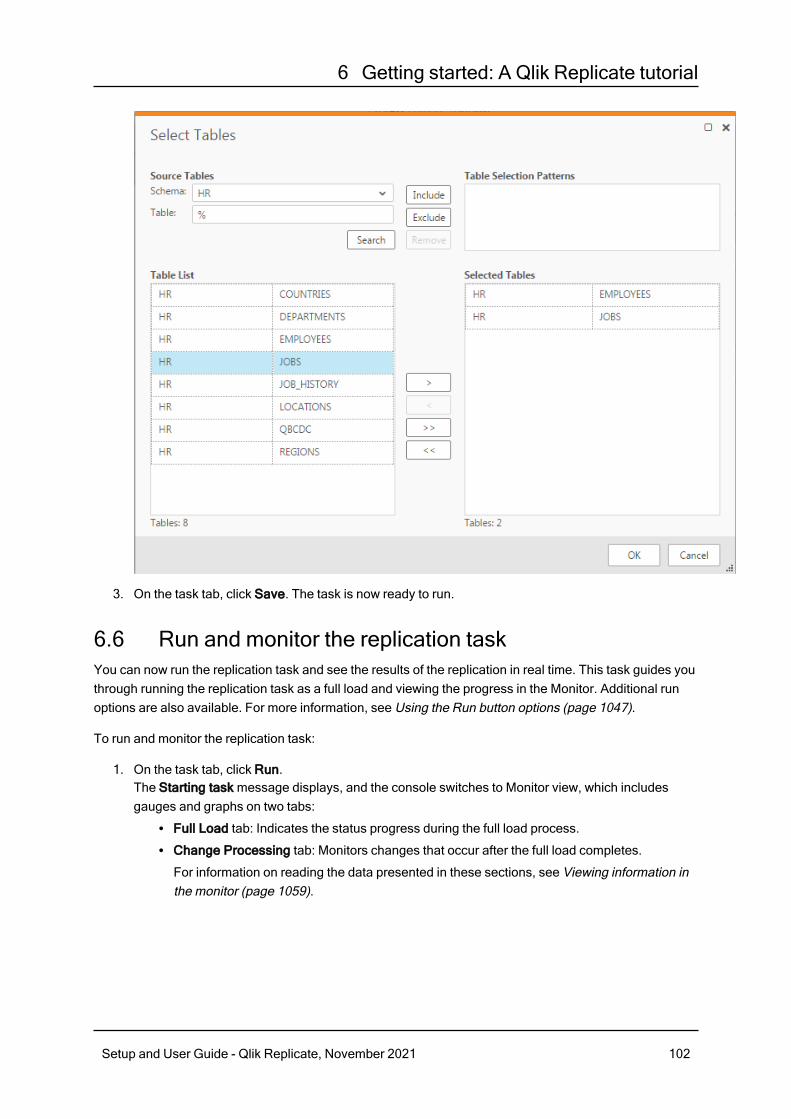
6 Getting started: A Qlik Replicate tutorial
3. On the task tab, click Save. The task is now ready to run.
6.6 Run and monitor the replication taskYou can now run the replication task and see the results of the replication in real time. This task guides youthrough running the replication task as a full load and viewing the progress in the Monitor. Additional runoptions are also available. For more information, see Using the Run button options (page 1047).
To run and monitor the replication task:
1. On the task tab, click Run.The Starting task message displays, and the console switches to Monitor view, which includesgauges and graphs on two tabs:
l Full Load tab: Indicates the status progress during the full load process.l Change Processing tab: Monitors changes that occur after the full load completes.
For information on reading the data presented in these sections, see Viewing information inthe monitor (page 1059).
Setup and User Guide - Qlik Replicate, November 2021 102

6 Getting started: A Qlik Replicate tutorial
2. Click the Select All link above the Tables graphs. Replicate displays a table below the graphs withinformation about each of the tables being processed in the task.
3. Click the individual bar graphs, such as the Completed graph and the Loading graph, to viewadditional information.For information about the data supplied in these tables, see Monitoring full-load operations (page1059).
6.7 View the replicated tables in Microsoft SQL ServerThis task guides you through viewing the tempdb database in Microsoft SQL Server. You will see that thisdatabase now includes two new tables: HR.EMPLOYEES and HR.JOBS.
To view the replicated tables in Microsoft SQL Server:
1. From the Windows Start menu, go to All Programs > Microsoft SQL Server > Microsoft SQLServer Management Studio.
2. In the Object Explorer, find the Microsoft SQL Server target computer you are working with.
3. Expand the databases folder for that computer, then expand the System databases folder, thenexpand the tempdb database. The EMPLOYEES and JOBS tables should now appear in the list.
4. Right-click the EMPLOYEES table and select Select Top 1000 Rows. Check that there is data in thetable.
5. Right-click the JOBS table and select Select Top 1000 Rows. Check that there is data in the table.
Setup and User Guide - Qlik Replicate, November 2021 103

7 Defining and managing tasks
7 Defining and managing tasksThis section describes how to design a replication task. To design a replication task, you must first be surethat you have configured at least one source endpoint and one target endpoint to work with Qlik Replicate.
A number of variables affect the amount of tasks that can be run on a single Replicate Server,including the task configuration (e.g. how many tables are being replicated), the size of thesource tables and the hardware configuration of the Replicate Server machine. Bearing this inmind, the number of tasks that can be run on a single Replicate Server should not exceed 100(and may need to be significantly less depending on the aforementioned variables). Bestpractice is to perform load testing in a Test environment before moving to Production.
In this section:
l Tasks overview (page 104)l Adding tasks (page 105)l Defining and managing endpoints (page 110)l Adding a source and target endpoint to a task (page 113)l Selecting tables and/or views for replication (page 114)l Editing a replication task (page 121)l Deleting a replication task (page 121)l Searching for tasks (page 122)l Migrating tasks (page 122)
7.1 Tasks overviewEach instance of a table synchronization activity comprises a task in Qlik Replicate. You define a taskusing the browser-based Qlik Replicate Console. When defining a task, you specify the following:
l The source and target endpointsl The source and target tables to be kept in syncl The relevant source table columnsl The filtering conditions (if any) for each source table as Boolean predicates (in SQLite syntax) onthe values of one or more source columns
l The target table columns (optionally), including their data types and values (as expressions orfunctions over the values of one or more source or target columns, using SQL syntax). If notspecified, Replicate uses the same column names and values as the source tables, with defaultmapping of the source DBMS data types onto the target DBMS data types. Replicate automaticallytakes care of the required filtering, transformations, and computations during the Load or CDCexecution.
When a task is defined, you can activate it immediately. Replicate automatically creates and loads thetarget tables with the necessary metadata definitions and activates the CDC. Using the Qlik ReplicateConsole, you can then monitor, stop, or restart the replication process.
Setup and User Guide - Qlik Replicate, November 2021 104

7 Defining and managing tasks
Using multiple tasksYou can define and activate several replication tasks at once. This is best if the tasks:
l Have different source tablesl Share some source tables but have different filtering conditions on the source rowsl Update different target tables
Updating the same target table and row by two different replication tasks would not be good practice andmay cause unpredictable results.
The different replication tasks work independently and run concurrently. Each has its own Initial Load,CDC, and Log Reader processes.
7.2 Adding tasksBefore you get started with designing the features that you need for a task, you must first define the task'sdefault behavior.
To add a task:
1. In Tasks view, click New Task.The New Task dialog box opens.
Setup and User Guide - Qlik Replicate, November 2021 105

7 Defining and managing tasks
2. Enter a name for the task. The name should be descriptive to indicate the purpose of the task. Thename cannot exceed 32 characters, contain non-Latin characters, or contain any of the followingcharacters: | \ / : * ? " < >
3. Optionally, enter a description for the task.
4. Choose one of the following replication profiles:l Unidirectional - Choose to replicate between endpoints for the purpose of Unidirectional.l Bidirectional - Choose to synchronize records between two endpoints.For more information, see the instructions on setting up Bidirectional replication (page 107).
l Log Stream Staging - Log Stream Staging enables a dedicated Replicate task to save datachanges from the transaction log of a single source database and apply them to multipletargets, without the overhead of reading the logs for each target separately.For more information, see Using the Log Stream (page 919).
l Qlik Cloud Landing - Use this profile for tasks that land data for Qlik's Hybrid Data Deliveryservice. The Hybrid Data Delivery service is part of Qlik Cloud Data Services. For moreinformation, see Hybrid data delivery.
When this profile is selected:l Tasks will have the following icon:
l The Apply Changes replication option (see below) and the Apply Changes Settingstab will be unavailable.
l The following target endpoints will be available for selection only:l Qlik Cloud Landing (for landing data into an Amazon S3 bucket)l Snowflake on AWSl Snowflake on Azurel Snowflake on Google
l You will not be able to turn off the Change Data Partitioning option in the task settings(as it is required when using this profile).
l Full Load tasks that fail will appear as "Completed" in the monitoring status bar, but a"Completed with error" message will be shown below the status bar. This is due to thefact that when working with Hybrid Data Delivery, the Replicate Full Load process isless important than the Change Capture process, which begins as soon as the taskstarts and continues for as long as the task is running. The Full Load data may evenbe provided by means other than Replicate such as shipping of a backup, forexample. So while it's important to know that the Full Load did not completesuccessfully, there's no long-term impact as the tables can be reloaded on demand(or even from an earlier "version" of the Full Load data).
5. Select task options:l Full Load: Click to enable or disable Full Load options for this task.
Setup and User Guide - Qlik Replicate, November 2021 106

7 Defining and managing tasks
When full load is enabled, Qlik Replicate loads the initial source data to the target endpoint.By default a full load is carried out for this task. If you want to change this setting after youbegin working with this task, you make the change in the Task Settings, Full Load (page1017) tab.
l Apply Changes: Click to enable or disable Apply Changes (Change Processing).When this option is enabled, Qlik Replicate processes the changes. By default, changeprocessing is carried out for this task. You can view the change processing in the Monitorview.For more information, see Monitoring change processing operations (page 1067). If youwant to change this setting after you begin working with this task, you make the change in theTask Settings > Change Processing (page 1020) tab.
l When the Bidirectional replication profile is selected, the Apply Changesoption cannot be disabled.
l When the Qlik Cloud Landing replication profile is selected, this optionwill be unavailable.
l Store Changes: Click this button to enable or disable Store Changes.If this option is enabled, changes are stored in change tables or in an audit table. By default,changes are not stored.For information about storing and applying changes, see Working with Change Tables (page1124) and Using an Audit table (page 1131).
When the Bidirectional replication profile is selected, the Store Changes buttonwill be unavailable.
6. Click OK to close the New Task dialog box and save your settings.
Bidirectional replicationBidirectional replication enables organizations to synchronize data between two endpoints (henceforthreferred to as Endpoint A and Endpoint B), ensuring that both endpoints contain identical records. Theendpoints can either be the same type (e.g. Oracle-to-Oracle) or different types (e.g. Microsoft SQLServer-to-Oracle). To implement bidirectional replication, two Bidirectional Replication tasks need to bedefined: one that captures changes made to Endpoint A and replicates them to Endpoint B (Task 1) andanother that captures changes made to Endpoint B and replicates them to Endpoint A (Task 2). Anexplanation of how to set up these tasks is provided in the following sections.
LimitationsThe following limitations apply to bidirectional replication tasks:
l Bidirectional replication does not currently support conflict resolution. To prevent conflicts,organizations should ensure that the application that updates the endpoints participating in abidirectional replication task, does not simultaneously update the same record in both endpoints.In other words, if a record in Endpoint A was updated, the equivalent record in Endpoint B shouldonly be updated after the update from Endpoint A is replicated to Endpoint B.
Setup and User Guide - Qlik Replicate, November 2021 107

7 Defining and managing tasks
l Bidirectional replication tasks currently only support DDL statements from one of the sourcesinvolved in the task only. This means that for one of the sources, you must set the Apply ChangesDDL Handling Policy to "Ignore" for all of the options (DROP, TRUNCATE, and ALTER).
The CREATE TABLE DDL is not supported.
l To ensure that the source and target endpoints are identical, transformations and filters should notbe used in bidirectional replication tasks.
l The Use direct path full load option in the Oracle target endpoint settings is not supported.l The Stopping the Task after Full Load options in the task settings' Full Load Settings tab is notsupported.
l The task's Change Processing Mode must be set to Transactional apply.
Supported endpointsBidirectional tasks support the following endpoints:
Source Endpoints:
l Oraclel Microsoft SQL Serverl MySQLl PostgreSQLl All AIS sourcesl All ARC sourcesl File Channell SAP Sybase ASEl IBM DB2 for iSeriesl Amazon RDS for MySQLl Amazon RDS for PostgreSQLl Amazon RDS for SQL Serverl AWS Aurora Cloud for PostgreSQLl Google Cloud SQL for MySQLl IBM DB2 for z/OSl IBM DB2 for LUW
Target Endpoints:
l Oraclel Microsoft SQL Serverl MySQLl Google Cloud SQL for MySQLl PostgreSQLl ODBC
Setup and User Guide - Qlik Replicate, November 2021 108

7 Defining and managing tasks
l File Channell SAP Sybase ASE
Setting up Bidirectional replicationThis section describes how to set up a Bidirectional replication task in Qlik Replicate .
To set up Bidirectional Task 1:
1. Define a Bidirectional Replication task that replicates data from Endpoint A to Endpoint B.
In a bidirectional replication task, Full Load replication is not enabled by default since itis assumed that both endpoints contain identical tables. If this is not the case (forinstance, if Endpoint A contains tables that do not exist in Endpoint B), enable Full Loadreplication as well.
2. Specify a source and target Loopback prevention table schema in the task settings’ LoopbackPrevention tab. For more information about loopback prevention settings, see Bidirectional (page1016).
3. Run the task.
To set up Bidirectional Task 2:
1. Define another Bidirectional Replication task that replicates data from Endpoint B to Endpoint A.
2. Specify a source and target Loopback prevention table schema in the task settings’ LoopbackPrevention tab. For more information about loopback prevention settings, see Bidirectional (page1016).
3. If Full Load was enabled when replicating data from Endpoint A to Endpoint B, you must first wait forthe Full Load replication to complete before running the task. Otherwise, run the task immediately.
Using bidirectional replication with the File Channel endpointYou can use bidirectional replication together with the File Channel endpoint. This is useful if you need tosynchronize two endpoints that are either not able to communicate with each other (i.e. are not physicallyconnected) or are located in the WAN. The process involves setting up six separate tasks: Two Full Load-only Unidirectional tasks and four Apply Changes-only Bidirectional tasks.
For information on setting up the File Channel endpoint, see Using the Qlik Replicate file channel (page908).
To set up bidirectional replication with File Channel Endpoints:
1. Set up and run two Full Load only Unidirectional tasks.Example (FC = File Channel):Task 1: MySQL --> FC Target Task 2: FC Source --> Oracle
2. Wait for the Full Load-only tasks to finish.
3. Set up and run four Apply Changes-only Bidirectional tasks.Example (FC = File Channel):
Setup and User Guide - Qlik Replicate, November 2021 109

7 Defining and managing tasks
Task 1: MySQL Source --> FC Target Task 2: FC Source 1 --> Oracle TargetTask 3: Oracle Source --> FC Target 2 Task 4: FC Source 2 --> MySQL Target
Editing and viewing a task descriptionYou can provide a description for specific tasks and then easily view or edit that description as required.
To provide, view or edit a task description:
1. Open the desired task.
2. In Designer or Monitor view, click the Description toolbar button.
3. Enter a description.-OR-Edit or view an existing description.
4. Click OK.
7.3 Defining and managing endpointsQlik Replicate requires information to connect to the source and target endpoints that you want to use in atask. For a list of endpoints you can work with in Qlik Replicate, see Supported Platforms and Endpoints(page 1154).
You use the Manage Endpoint Connections window to add endpoints and edit and view the endpointconnection information.
The name cannot exceed 32 characters, contain non-Latin characters, or contain any of thefollowing characters: | \ / : * ? " < >
l Defining an endpoint (page 110)l Editing endpoint configuration information (page 111)l Viewing endpoint configuration information (page 111)l Testing an endpoint connection (page 112)l Duplicating endpoints (page 112)l Searching for endpoints (page 112)l Deleting endpoints (page 112)
Defining an endpointBefore you can begin to design a task, you must add endpoints to the Replicate server. To use anendpoint, you must have access to it somewhere in your system. When you add the endpoint to theReplicate server, you must provide connection information and proper user credentials.
Setup and User Guide - Qlik Replicate, November 2021 110

7 Defining and managing tasks
Once you add endpoints to the Replicate server, you can begin to use them to build a replication task. Forinformation on how to add an endpoint to a replication task, see Adding a source and target endpoint to atask (page 113).
To add an endpoint:
1. In the Tasks view, click Manage Endpoint Connections.The Manage Endpoint Connections window opens.
2. In the Manage Endpoint Connections window, click New Endpoint.
3. Select the type of endpoint you are using. The information that you must enter depends on whichendpoint you select.For more information, see the chapter that describes the endpoint you are using. For a list ofsupported databases, see Supported Platforms and Endpoints (page 1154).
Editing endpoint configuration informationAfter you add the endpoint to the Replicate server and provide the connection information, you can makechanges to some of the information.
You cannot change the following information in the endpoint window:
l The name you provided for the endpoint.l The endpoint Type, for example Oracle or Microsoft SQL Server.l The endpoint role, either SOURCE or TARGET.
To edit endpoint configuration information:
1. In the Manage Endpoint Connections window, select the endpoint you want to edit.ORIn the Endpoints list on the left of the Designer view, double-click the endpoint you want to edit.Note that this option is only available when editing a specific task.The Manage Endpoint Connections window opens with the selected endpoint settings.
2. Make changes to the information in any of the tabs in the window.For more information, see the chapter for the specific Qlik Replicate endpoint you are using.For information which endpoints are supported by Qlik Replicate, see Supported Platforms andEndpoints (page 1154).
Viewing endpoint configuration informationAfter you add the endpoint to the Replicate server and provide the connection information, you can viewthe information in the Manage Endpoint Connections window.
To view endpoint configuration information:
l Select an endpoint from the Endpoints list in the left pane; then click the tabs to view theinformation.
Setup and User Guide - Qlik Replicate, November 2021 111

7 Defining and managing tasks
Testing an endpoint connectionYou can try to contact the endpoint to make sure that you are connected to the endpoint you want to workwith.
To test the endpoint connection:
1. In the Manage Endpoint Connections window, select the endpoint you want to work with.
2. At the bottom of the endpoint’s General tab, click Test Connection.If the connection is successful, a success message is displayed and a green check mark iconappears next to the Test Connection button.If the connection fails, an error message is displayed at the bottom of the dialog box and the ViewLog button becomes available.
3. If the connection is successful, click Close.If the connection fails, click View Log to view the server log entry with information for the connectionfailure.
Duplicating endpointsYou can duplicate an endpoint if you need to define a new endpoint with similar settings. Except for thename, all endpoint settings are duplicated to the new endpoint.
To duplicate an endpoint:
1. In the left panel of the Manage Endpoint Connections window, click the endpoint you want toduplicate.
2. Click Duplicate.
3. On the General tab, edit the name for the endpoint.
4. Make any other necessary changes.
5. Click Save; then click Close.
Searching for endpointsYou can search for endpoints by typing a sequence of letters in the Filter by box above the endpoints list.For example, to search for all endpoints whose names contain the string "Oracle", type "or". Only endpointsthat match the search string are displayed.
Deleting endpointsYou can delete endpoints that you no longer require. Note that to delete an endpoint that is defined as asource or target in a task, you first need to remove the endpoint from the task.
To delete an endpoint:
l In the left panel of the Manage Endpoint Connections window, Select the endpoint and clickDelete.
Setup and User Guide - Qlik Replicate, November 2021 112

7 Defining and managing tasks
7.4 Adding a source and target endpoint to a taskOnce you have added the endpoints, you can design the replication task. The first step in this process is todefine the source endpoint where your data is currently stored and the target endpoints where you want toreplicate the data. To do this, you just drag one of the endpoints you added into the task map (in Designermode).
Once you select the endpoint for your task, you must select the tables from the source endpoint to bereplicated. The next step in creating a replication task is Selecting tables and/or views for replication (page114).
To add source and target endpoints to a task:
1. Do one of the following:l Create a new task. When you click OK in the Create New Task dialog box, the task openson a dedicated tab. For more information, see Adding tasks (page 105).
l In the Tasks view, select the task to which you want to add endpoints and click Open. Thetask opens on a dedicated tab.
2. The Task map is displayed, with the available endpoints listed in the pane on the left, as shown inthe following figure.
Setup and User Guide - Qlik Replicate, November 2021 113

7 Defining and managing tasks
3. Drag a source endpoint to the top circle in the task map (that contains the text Drop sourceendpoint here). If dragging is not possible, make sure that the endpoint you are using is defined asa source endpoint.
4. Drag a target endpoint to the bottom circle in the task map (that contains the text Drop targetendpoint here). If dragging is not possible, make sure that the endpoint you are using is defined asa target endpoint.
5. Click Save.
7.5 Selecting tables and/or views for replicationThis procedure describes how to select the source tables or views that you want to replicate. Note thattables can be selected from any supported endpoint, but views can only be selected from the followingendpoints:
Setup and User Guide - Qlik Replicate, November 2021 114

7 Defining and managing tasks
l Teradatal Amazon Redshiftl PostgreSQLl MySQLl SAP Sybase ASEl IBM DB2 for LUWl IBM DB2 for z/OSl Oraclel Microsoft SQL Serverl ODBC with CDCl ODBC
l Replication of views is supported in Full Load Only tasks only, except when replicatingfrom the following sources:
l Amazon Redshiftl Teradatal ODBC with CDC
l Views are replicated to the target endpoint as tables
l When replicating views, the corresponding tables are created without a primary key.This presents an issue for Apply Changes tasks, which require the target tables to havea primary key. Therefore, if you are also running Apply Changes tasks (using one of theCDC-capable endpoints mentioned above), you need to define one or more primarykeys for each of the target tables using a transformation. For an explanation of how toaccomplish this, see Using the Transform tab (page 933) in Defining transformations fora single table/view (page 931).
When working with ODBC with CDC and Teradata source endpoints, any views and tables thatyou want to replicate must have the same context field(s). If you only want to replicate views,then all of the views must have the same context field(s).
For information on setting up context fields, see Configuring Change Processing Settings.
For information on setting up context fields, see "Configuring Change Processing Settings" inthe Qlik Replicate Setup and User Guide.
Once you have selected tables/views to replicate, you can run the replication task. However, if you need tomake any changes to the structure of the tables in the target endpoint or only select specific columns, youwill need to carry out one or both of the following procedures:
l Defining transformations for a single table/view (page 931)l Using filters (page 940)
Setup and User Guide - Qlik Replicate, November 2021 115

7 Defining and managing tasks
To select tables/views:
1. Open the task you are working with if it is not already displayed in a dedicated tab.For information on opening a task, see Editing a replication task (page 121).
2. In Designer mode, on the right side, click Table Selection.If the source endpoint does not support view selection, the Select Tables dialog box opens. If thesource endpoint supports view selection, the Select Tables/Views dialog box opens.See the following for information on how to work with the Select Tables/Select Tables/Viewsdialog box:
l Searching for tables/views to use in a replication task (page 116)l Selecting specific tables/views for replication (page 117)l Creating table/view selection patterns (page 118)l Setting load order (page 120)
Searching for tables/views to use in a replication taskThis topic walks you through searching for specific tables/views in preparation for including them in areplication task. You first search for tables that match specific criteria. Then you select the requiredtables/views from the search results to include them in the task. You can also carry out another search withnew criteria and then add additional tables/views to the replication task.
After you finish searching, you can select tables/views for replication. Continue with Selecting specifictables/views for replication (page 117).
To search for tables/views to use in a replication task:
1. In Designer mode, click Table Selection.
2. In the Select Tables dialog box, if the source endpoint supports view selection, select one of thefollowing:
l All to search for tables and viewsl Tables to search for tables onlyl Views to search for views only
Otherwise, skip to the next step.
3. From the Schema drop-down list, select a table/view schema.
When working with Microsoft SQL Server, quote characters in schema names - such as"\" or "[" - must be doubled in order to show the list of tables in the specified schema. Forexample, My\Schema should be specified as My\\Schema.
When selecting tables from the SAP Application or SAP Application (DB) endpoint,"Business Groups" will appear instead of "Schema".
Setup and User Guide - Qlik Replicate, November 2021 116

7 Defining and managing tasks
4. Optionally, in the Table/View field, type the name or partial name of a table/view you wish toreplicate. If you do not do this, Replicate will search for all of the tables/views in the selectedschema.
You can also include special characters in your search string. For more information, seethe Note in Creating a record selection condition for one or more columns (page 942).
5. Click Search to display a list of tables/views.
When selecting tables from the SAP Application or SAP Application (DB) endpoint, theTable List will display all of the tables in the selected Business Group. Hovering yourmouse cursor over a table will display a tooltip as shown below.
The Table List field displays any table/view that matches the specified search criteria.If the source endpoint supports view selection, an additional Type column indicates whether thedatabase object is a table or a view.
6. Click OK.
See also: Creating table/view selection patterns (page 118).
Selecting specific tables/views for replicationThis topic walks you through selecting specific tables/views to replicate.
When you select specific tables/views, all selected tables/views are replicated in full unless you definetransformations or filters for the table/view. If you need to make changes to the table/view structures in thetarget endpoint or if you only want to select specific columns, then you need to perform the proceduresdescribed in Defining transformations for a single table/view (page 931) and Using filters (page 940)respectively.
To select specific tables/views:
1. Open the Select Tables/Views dialog box.
2. Select a Schema.
3. Optionally, select the Use exact table name check box. This option is useful if your schemacontains numerous tables as it will save you having to scroll through the entire list to find onespecific table.
Setup and User Guide - Qlik Replicate, November 2021 117

7 Defining and managing tasks
4. If you selected the Use exact table name check box, type the exact name of the table you want toreplicate in the Table/View field.
5. Click Search.The table or tables (If you did not select the Use exact table name check box) will be shown in thesearch results.
6. Select the table by adding it to the list on the right.
7. To add additional tables from the same schema, repeat steps 3-6. To add additional tables from adifferent schema, repeat steps 2-6.
8. Click OK to save your settings.
If you rename a table in the database, the Designer tab will still show the original table name.The Monitor tab, on the other hand, will show the new table name.
Removing specific tables/views from a replication taskThis topic walks you through removing specific tables/views from the replication task.
To remove tables from the Selected Tables list:
1. From the Selected Tables list, select a table that you want to remove from the replication task andthen click the button with a single left-facing arrowhead (Remove).
2. To remove all of the tables/views from the Selected Tables or Selected Tables/Views list, click thebutton with two left-facing arrowheads (Remove All).
3. Click OK to close the Select Tables or Select Tables/Views dialog box.
4. Click Save to make sure that Qlik Replicate saves the table information for this task.
Creating table/view selection patternsThis topic walks you through selecting tables/views using patterns. For example, you can include alltables/views that belong to the HR schema except for one or two tables/views that you exclude. You canalso only exclude one or more table/view schemas or tables/views. This replicates the entire endpoint,except for those tables/views that you excluded.
The following example shows a pattern that replicates all tables that are members of the dbo schemaexcept for the dbo.PRODUCT_1% table.
Include dbo.%
Exclude dbo.PRODUCT_1%
You can also use the "_" wildcard character to match a single character. For example, specifying Exclude
m_d% will exclude all tables that begin with m and end with d%, such as model or msdb.
Setup and User Guide - Qlik Replicate, November 2021 118

7 Defining and managing tasks
Wildcard characters need to be escaped to prevent them from being interpreted as standardcharacters. As the escape character conventions differ across databases, you should consultyour database Help for guidance about supported escape characters. Some examples (wherean underscore is the wildcard character) are as follows:
l MySQL and PostgreSQL - \\_l Microsoft SQL Server - [_]l Oracle - For Oracle, use the escapeCharacter internal parameter to define a customescape character.
When you explicitly select tables/views, all selected tables/views are replicated in full unless you definetransformations or filters for the table/view. If you need to make changes to the table/view structures in thetarget endpoint or if you only want to select specific columns, then you need to perform the proceduresdescribed in Defining transformations for a single table/view (page 931) and Using filters (page 940)respectively.
To view all of the tables/views included when you use a table selection pattern, click the FullTable List tab in Designer view. The Full Table List lists all of the tables/views included in anytable pattern you defined as well as all explicitly selected tables/views. To view only patternsand explicitly selected tables/views, click the Patterns and Selected Tables tab in Designerview.
To create table/view selection patterns:
1. In the Designer view, in the Select Tables/Views dialog box, do any of the following:l Select a schema from the Schema drop-down list. All tables/views that belong to thatschema are included in the table/view selection pattern.
l Type the name or partial name of a table/view in the Table/View field. Any string that youenter here is included in the table/view selection pattern.
l If the table/view that you type here is a member of the schema you selected in the Schemadrop-down list, then you only have to type the name of the table/view.
l If you did not select a schema or the table/view belongs to another schema, include theschema with the table name in the following format: HR.Employees, where HR is the schema.
2. Click Include to include all of the tables/views that match the selection criteria.
3. Click Exclude to exclude any tables that match the selection criteria.
4. Click OK to close the Select Tables/Views dialog box.
5. Click Save to make sure that Qlik Replicate saves the table/view information for this task.
Excluding specific tables from the replication taskYou can easily exclude specific tables from being replicated.
To do this:
Setup and User Guide - Qlik Replicate, November 2021 119

7 Defining and managing tasks
1. Open the the Select Tables/Views dialog box.
2. Select a Schema and then click Search.Any tables in that schema will be shown in the search results.
3. Select the tables by adding them to the list on the right.
4. Click the Include button.Include <schema_name>.% will be added to the Table Selection Patterns list.
5. Select the Use exact table name check box.
6. Type the name of the table you want to exclude in the Table/View field.
7. Click the Exclude button.Exclude <schema_name>.<table_name> will be added to the Table Selection Patterns list.
8. To exclude additional tables from the same schema, repeat Steps 6-7. To exclude tables from adifferent schema, clear the Use exact table name check box and then repeat Steps 2-7.
9. Click OK to save your settings.
Setting load orderYou can set the load order for each of the selected tables. This may be useful, for example, if your selectedtables list contains tables of different sizes and you want the smaller tables to be loaded before the largertables. When a group of tables are set with the same load order, Replicate will load the tables according tothe table ID.
Load order can be set and modified (see note below) in the following places:
l The Select Tables window (opened in Designer view by clicking the Table Selection button in theright of the console).
l The Patterns and Selected Tables list in the right of the console (in Designer view).
l Load order cannot be changed while the task is running. If you want to change the loadorder, first stop the task, then change the load order as desired, and finally reload thetarget.
l Load order cannot be set for "Exclude" patterns.
To set the load order for a specific table:
1. Select the desired table in the Selected Tables list.
2. From the Load Order drop-down list, select one of the available priority levels (Lowest Priority, LowPriority, Normal Priority, High Priority, and Highest Priority).
3. This step is only relevant if you are setting load order in the Select Tables window. Click OK to saveyour settings and close the Select Tables window.
Setup and User Guide - Qlik Replicate, November 2021 120

7 Defining and managing tasks
To set the same load order for multiple tables:
1. Select the desired tables in the Selected Tables list.
2. From any of the selected items' Load Order drop-down list, select one of the available prioritylevels.
3. This step is only relevant if you are setting load order in the Select Tables window. Click OK to saveyour settings and close the Select Tables window.
7.6 Editing a replication taskYou can make changes to tasks that you previously created. Just open the task and make the changes inthe same way that you did when you created the task.
To edit a task:
1. In Tasks view, select the task and click Open.The task opens, displaying the source and target endpoints and which tables have been selectedfor replication.
2. Continue with any of the following procedures:l Adding a source and target endpoint to a task (page 113)l Selecting tables and/or views for replication (page 114)l Defining transformations for a single table/view (page 931)l Using filters (page 940)l Task Settings (page 1010)
7.7 Deleting a replication taskYou can delete tasks that you created. To prevent complications, it is recommended not to use the name ofa deleted task for a new task you create. Such a task would be created with the same settings as thedeleted task.
If you use a Microsoft SQL Server endpoint, a Microsoft SQL Server system administrator mustdelete the Microsoft SQL Server Replication Publisher definitions for the endpoint that wasused in the task from SQL Server.
For more information, see the Limitation and considerations (page 790) in the Microsoft SQLServer chapter.
To delete a task:
1. Stop the task that you want to delete.
2. In Tasks view, click Delete.The task is deleted.
Setup and User Guide - Qlik Replicate, November 2021 121

7 Defining and managing tasks
7.8 Searching for tasksIn Tasks view, you can search for tasks by typing a sequence of letters in the Filter Tasks box above thetasks. For example, to search for all tasks with names that begin with "Oracle-to", type "or". Only tasks thatmatch the search string are displayed.
7.9 Migrating tasksYou can export replication tasks to a file. When exporting a task using the command line, all exported tasksare saved to the imports folder under <product_dir>/Qlik/Replicate/Data. When exporting a task using theQlik Replicate Console, one of the following occurs (according to your browser settings):
l The task JSON file will be automatically downloaded to the default download locationl You will be prompted for a download location
You can import an export file (*.json) to another instance of the Qlik Replicate Server. This lets you use atask that you created in Qlik Replicate in a different environment. For example, if you created tasks in adevelopment environment and now want to use the task in a production environment.
Importing and exporting a task can be done using either the command line or the Qlik Replicate Console.When exporting or importing a task using the command line, you must perform this task on the computerwhere Qlik Replicate is installed.
If you need to access the computer with Qlik Replicate from a remote computer, you can use atelnet connection.
When you export a task to a different environment, you may need to edit the task information. For example,you may need to change the connection string for an endpoint.
l Exporting tasks (page 122)l Editing an exported (json) file (page 125)
Exporting tasksThe following section explains how to export a task using either the Qlik Replicate Console or thecommand line.
To export a task using the Qlik Replicate Console:
1. Switch to Tasks view (make sure you're in Designer mode).
2. Do one of the following:l In TASKS tab, select the task you want to export and then either click the Export toolbarbutton or right-click the task and select Export.OR
l In the TASK_NAME tab (opened when a task is being edited), click the Export Task toolbarbutton.
Depending on your browser settings, one of the following will occur:
Setup and User Guide - Qlik Replicate, November 2021 122

7 Defining and managing tasks
l The task JSON file will be automatically downloaded to the default download locationl You will be prompted for a download location. In this case, save the JSON file to yourpreferred location.
To export a task using the command line:
1. From the Qlik Replicate computer where you defined the task you want to import, open the QlikReplicate command line console by doing the following:On Windows: Go to All Programs in the Start menu and point to Qlik Replicate, then to Utilitiesand then select Qlik Replicate Command Line.A command-line console is displayed with the correct prompt for Qlik Replicate.
You can also open the Windows command-line console and change the directory to thefollowing:<Qlik Replicate Installation Directory>\binFor example, to use the path to the folder or directory where Qlik Replicate is installedby default, type: C:\Program Files\Attunity\Replicate\bin.On Linux: Run the following command in the Replicatebin directory:source ./arep_login.sh
2. At the prompt in the command-line console, type the following:repctl -d data-directory exportrepository task=task_name [folder_name=path]
By default, a file called <task_name>.json containing the exported task settings is created in the<product_dir>\data\imports folder. If you want the file to be created in a different folder, includethe folder_name=path parameter in the command.After the file has been created, you can import it into another Qlik Replicate instance as described inImporting tasks (page 123).
If the <product_dir>\data folder was installed in a non-default location during theinstallation - OR - if it was later moved to a non-default location, you need to tellReplicate where the folder is located.This is done by including the -d <data_folder> parameter in the command.Example:repctl -d D:\Data exportrepository task=mytask
Importing tasksThe following section explains how to import a task using either the Qlik Replicate Console or thecommand line.
Before importing tasks, make sure that the tasks on the destination server are either running orstopped (i.e. not in the process of being started).
Setup and User Guide - Qlik Replicate, November 2021 123

7 Defining and managing tasks
To import a task using the Qlik Replicate Console:
1. Switch to Tasks view (make sure you're in Designer mode).
2. Click the Import Task toolbar button.The Import Task dialog box opens.
3. Browse to the task JSON file you want to import and then click Import Task.The task is imported.
To import a task using the command line:
1. From the Qlik Replicate computer where you want to import the task, open the Qlik Replicatecommand line console by doing the following:From the Start menu, expand Qlik Replicate and then select Qlik Replicate Command Line.A command-line console is displayed with the correct prompt for Qlik Replicate.
You can also open the Windows command-line console and change the directory to thefollowing:<product_dir>\Attunity Replicate>\binFor example to use the path to the directory where Qlik Replicate is installed by default,type: C:\Program Files\Attunity\Replicate\bin.
2. Run the following command:repctl connect
3. To import the task, run the following command:importrepository [-d data-directory] json_file=<Full path to the exported *.json file>
Example:
importrepository -d D:\MyData json_file=C:\Temp\many_tables.json
The exported *.json file will be located in the <data-directory>\imports folder on the originalcomputer where the task was exported or in the folder specified by the folder_name parameter inthe export command.
Example:
<product_dir>\data\imports\many_tables.json
If the <product_dir>\data folder was installed in a non-default location during theinstallation - OR - if it was later moved to a non-default location, you need to tellReplicate where the folder is located.This is done by including the -d data_folder parameter in the command.Example:repctl -d D:\MyData importrepository json_file=C:\mytask.json
If you are importing this task into a different environment, you should copy the file to a location onthe second Qlik Replicate computer and then import the file from there.
Setup and User Guide - Qlik Replicate, November 2021 124

7 Defining and managing tasks
In many cases, when you import the task into a different environment, you will need to makechanges to the task. For example, you may need to change the connect strings for the endpoints inthe task or change the user password. In that case, you will need to edit the *.json file.See Editing an exported (json) file (page 125) for more information.
Editing an exported (json) fileYou can open the *.json file in any plain text editor. It is possible to make changes to any of the sections inthe file; however, be sure that you only change the data and not the field names. For example, the entry"name"::DB_Name" displays the name field for a source table in a defined endpoint. In this case, you canchange the data "DB_Name" but not the included metadata ("name").
Make any changes to the *.json file before you carry out the import operation.
Information about the endpoints, tables, tasks, task settings, and logger settings should bechanged using the Qlik Replicate Console after the file is imported.
To be able to use the new task, you will need to make changes to the endpoint password andconnection strings by editing the *.json file. See Making changes to the endpoint connectioninformation (page 125) for more information.
Making changes to the endpoint connection informationIn the "endpoints" section, you can make changes to the connection string and the password. Thefollowing is an example of the "endpoints" section of the *.json file.
"endpoints": [{
"name": "Oracle_Source",
"type": "Oracle",
"connection_string": "server= bee01-xp:1521/xe;username=SYSTEM",
"authenticator": "
{01000000D08C9DDF0115D1118C7A00C04FC297EB010000003EA495B32CAAE14CB9777B96B3CC00B30000000002000
000000003660000A8000000100000002765A3287AB56447DA31508F71CE62700000000004800000A00000001000000
088D5C1BBD615BEEEAF5FAC1B9B0E20800800000075D89177A9C6F11B1400000047B3110B80920DD9EB0A5FABA0567
9979B78DDD0}",
"role": "SOURCE"
}, {
"name": "SQLSERVER_Target",
"type": "SQLServer",
"connection_string": "server=bee01-
xp;endpoint=tempdb;WindowsAuthentication=Y;CDCBCP=Y;FullloadBCP=Y;BCPPacketSize=16384",
"role": "TARGET"
To change the connect string:
1. In the *.json file, under "endpoints", find "connection string".For example, "connection_string": "server= bee01:1521/xe;username=SYSTEM".
2. Change the information after the equal signs (=) as necessary.
Setup and User Guide - Qlik Replicate, November 2021 125

7 Defining and managing tasks
For example, if the endpoint in the new environment is on a computer called B2, changeserver=bee01 to server=B2.
Make sure that the connect string remains between the quotation marks (").
To change an endpoint password:
1. In the *.json file, under "endpoints", find "authenticator".For example, "authenticator": "
{01000000D08C9DDF0115D1118C7A00C04FC297EB010000003EA495B32CAAE14CB9777B96B3CC00B3000000
0002000000000003660000A8000000100000002765A3287AB56447DA31508F71CE62700000000004800000A
00000001000000088D5C1BBD615BEEEAF5FAC1B9B0E20800800000075D89177A9C6F11B1400000047B3110B
80920DD9EB0A5FABA05679979B78DDD0}".
The password is presented as an encrypted string.
2. Change the password string to the relevant password for the endpoint in the new environment. Typethe new password using plain text exactly as it is configured in the endpoint. For example, 8yTkLMt.When you save the file and then import it to the new environment, the password is encryptedautomatically.
Setup and User Guide - Qlik Replicate, November 2021 126

8 Adding and managing source endpoints
8 Adding and managing source endpointsThis topic describes how to configure source endpoint settings. When you define a replication task, thesource endpoint is the data repository containing the data that you wish to replicate.
In this section:
l Using AWS Aurora Cloud for PostgreSQL as a source (page 128)l Using Amazon RDS for SQL server as a source (page 140)l Using Amazon RDS for MySQL as a source (page 154)l Using Amazon RDS for PostgreSQL as a source (page 164)l Using ARC CDC solutions in Qlik Replicate (page 178)l Using a file as a source (page 188)l Using Google Cloud SQL for MySQL as a source (page 204)l Using Google Cloud SQL for PostgreSQL as a source (page 214)l Using Hadoop as a source (page 224)l Using IBM DB2 for iSeries as a source (page 233)l Using IBM DB2 for LUW as a source (page 243)l Using IBM DB2 for z/OS as a source (page 251)l Using IBM Informix as a source (page 268)l Using Microsoft Azure SQL Managed Instance as a source (page 274)l Using Microsoft Azure SQL (MS-CDC) as a source (page 288)l Using Microsoft SQL Server as a source (page 301)l Using Microsoft Azure database for MySQL as a source (page 321)l Using a MongoDB database as a source (page 331)l Using a MySQL-based database as a source (page 337)l Using ODBC to connect to a source (page 349)l Using ODBC with CDC as a source (page 358)l Using Oracle as a source (page 369)l Using PostgreSQL as a source (page 401)l Using Salesforce as a source (page 415)l Using SAP Application as a source (page 423)l Using SAP Application (DB) as a source (page 435)l Using SAP Extractor as a source (page 447)l Using SAP HANA as a source (page 465)l Using SAP Sybase ASE as a source (page 475)l Using Teradata Database as a source (page 483)
Setup and User Guide - Qlik Replicate, November 2021 127

8 Adding and managing source endpoints
8.1 Using AWS Aurora Cloud for PostgreSQL as a sourceThis section describes how to set up and use an AWS Aurora Cloud for PostgreSQL database as a sourcein a replication task.
In this section:
l Source prerequisites (page 129)l Required permissions (page 129)l Setting up AWS Aurora Cloud for PostgreSQL for CDC (Change data capture) (page 130)l Limitations and considerations (page 130)l AWS Aurora Cloud for PostgreSQL source data types (page 131)l Homogeneous Replication (page 134)l Setting general connection properties (page 136)l Setting advanced connection properties (page 138)l Removing Replicate artifacts from the AWS Aurora Cloud for PostgreSQL database (page 139)
Setup and User Guide - Qlik Replicate, November 2021 128

8 Adding and managing source endpoints
Source prerequisitesThe following section lists the prerequisites for working with Qlik Replicate and an AWS Aurora Cloud forPostgreSQL database source.
l Qlik Replicate Server for Windows:PostgreSQL ODBC Driver psqlodbc_12_02_0000-x64 only must be installed on the Qlik Replicatemachine.
Make sure that the psql.exe path (e.g. "C:\Program Files\PostgreSQL\1202\bin") isadded to the system PATH.
l Qlik Replicate Server for Linux: On the Qlik Replicate machine:
1. Install postgresql12. For example, postgresql12-12.1-2PGDG.rhel7.x86_64.rpm is thepackage required for Red Hat 7.
2. Install the ODBC driver postgresql12.For example, postgresql12-odbc-12.01.0000-1PGDG.rhel7.x86_64.rpm is the client requiredfor Red Hat 7.
3. Copy the driver location to the site_arep_login.sh file:echo "export LD_LIBRARY_PATH=/usr/lib:/usr/lib64:/usr/pgsql-12/lib:$LD_LIBRARY_
PATH" >> site_arep_login.sh
This will add the driver to "LD_LIBRARY_PATH" and update the driver location in the site_arep_login.sh file.
4. Makes sure that the /etc/odbcinst.ini file contains an entry for PostgreSQL, as in thefollowing example:[PostgreSQL]
Description = PostgreSQL ODBC driver
Driver = /usr/pgsql-12/lib/psqlodbc.so
Setup = /usr/pgsql-12/lib/psqlodbcw.so
Debug = 0
CommLog = 1
UsageCount = 2
l When the Apply Changes task option is enabled, the user specified in the PostgreSQL sourcedatabase’s General tab must be granted super-user permissions.
Required permissionsThe user specified in the General tab when Setting general connection properties (page 136) must begranted the following permissions in the AWS Aurora Cloud for PostgreSQL database:
l For Full Load replication: Standard SELECT on the source databasel For Apply Changes replication: See Setting up AWS Aurora Cloud for PostgreSQL for CDC(Change data capture) (page 130).
l When the Apply Changes and/or Store Changes task replication option is enabled, the userspecified in the AWS Aurora Cloud for PostgreSQL source endpoint’s General tab must be grantedsuper-user permissions.
Setup and User Guide - Qlik Replicate, November 2021 129

8 Adding and managing source endpoints
Setting up AWS Aurora Cloud for PostgreSQL for CDC (Change datacapture)You can use the AWSmaster user account for the PostgreSQL database instance as the user for the AWSAurora Cloud for PostgreSQL source endpoint. The master user account has the required roles that allow itto set up change data capture (CDC).
If you prefer not to use the master user account, the account you wish to use must have the rds_superuserrole and the rds_replication role. The rds_replication role grants permissions to manage logical slots andto stream data using logical slots.
To enable logical replication for an AWS Aurora Cloud PostgreSQL database instance:
1. Create a new DB cluster parameter group with the following configuration:
1. Set the rds.logical_replication parameter in the database parameter group to 1.
2. max_wal_senders – The number of tasks that can run in parallel.
3. max_replication_slots – Every connection (i.e. task) creates a new slot; this parameterconfigures the amount of simultaneous connections that can be established to the database.
2. Link the AWS Aurora Cloud cluster DB to the DB cluster parameter group.
If the attrep_intercept_ddl stored procedure is not being created in the default schema,you need to specify the schema name in the Create DDL artifacts under schema field.
Limitations and considerationsThe following limitations apply when AWS Aurora Cloud for PostgreSQL as a source:
l The database name cannot include a semi-colon (;).l Both the source table and the corresponding target table must have an identical Primary Key. In theevent that one of the tables does not have a Primary Key, the result of DELETE and UPDATErecord operations will be unpredictable.
l The “Start Process Changes from Timestamp” run option is not supported.l Replication of the Before Image is not supported.l Replication of multiple tables with the same name but a different case (e.g. table1, TABLE1 andTable1) may cause unpredictable behavior and is therefore not supported.
l Change processing of [CREATE | ALTER | DROP] table DDLs are not supported unless they areheld in an inner function/procedure body block or in other nested constructs.
For example, the following change will not be captured:
CREATE OR REPLACE FUNCTION attu.create_distributors1() RETURNS void
LANGUAGE plpgsql
AS $$
BEGIN
create table attu.distributors1(did serial PRIMARY KEY,name varchar(40) NOT NULL);
END;
$$;
Setup and User Guide - Qlik Replicate, November 2021 130

8 Adding and managing source endpoints
l Change processing of TRUNCATE operations is not supported.l Deferred Constraints are not supported.l Partitioned tables: When performing a Full Load replication of partitioned tables, the parent tablewill be created and separate tables will be created for each partition.A DML on the parent partitioned table will be applied on the physical partition of the correspondingtarget table only.Primary keys are not supported on partitioned tables, which may impact UPDATE operations.
See also: Replication of Partitioned Tables (page 135) for partitioned table requirements that applyto homogeneous replication (AWS Aurora Cloud for PostgreSQL-to-AWS Aurora Cloud forPostgreSQL).
l When using the Parallel Load (page 946) feature, table segmentation according to partitions or sub-partitions is not supported.
l UPDATEs to a Unique Index segment will not be applied to the target, and a record of the attemptedUPDATE(s) will be written to the attrep_apply_exceptions Control table.
l When using filters that do not contain a Primary Key, DELETE operations will not be captured.l A DDL operation that occurs during Full Load, but that was not preceded by a DML operation will notbe captured.
AWS Aurora Cloud for PostgreSQL source data typesThe following table shows the AWS Aurora Cloud for PostgreSQL target data types that are supportedwhen using Qlik Replicate and the default mapping to the Qlik Replicate data types.
When replicating from one AWS Aurora Cloud for PostgreSQL database to a PostgreSQL-based target(e.g. Microsoft Azure Database for PostgreSQL), source and target data types are identical, except for thedata types listed in Data type considerations and exceptions (page 135).
For additional information about Qlik Replicate data types, see Replicate data types (page 76).
AWS Aurora Cloud for PostgreSQL data types Qlik Replicatedata types
INTEGER INT4
SMALLINT INT2
BIGINT INT8
NUMERIC NUMERIC(28,6)
NUMERIC(p,s) If precision is =< 38, then:
NUMERIC(p,s)
If precision is => 39, then:
STRING
PostgreSQL and Qlik Replicate data types
Setup and User Guide - Qlik Replicate, November 2021 131

8 Adding and managing source endpoints
AWS Aurora Cloud for PostgreSQL data types Qlik Replicatedata types
DECIMAL NUMERIC(28,6)
DECIMAL(p,s) If precision is =< 38, then:
NUMERIC(p,s)
If precision is => 39, then:
STRING
REAL REAL4
DOUBLE REAL8
SMALLSERIAL INT2
SERIAL INT4
BIGSERIAL INT8
MONEY NUMERIC(38,4)
The MONEYdata type ismapped toFLOAT inMicrosoft SQLServer.
CHAR WSTRING (1)
CHAR(n) WSTRING (n)
VARCHAR(n)
VARCHAR without a length (n) is not recognized as a validdata type by target endpoints. Consequently, if a sourcecolumn data type is set to VARCHAR without an explicitlength, Replicate will set a default length of 8000 bytes.
You can change the default by setting the following internalparameter to the required length:
unboundedVarcharMaxSize
See also Internal Parameters.
WSTRING (n)
TEXT NCLOB
BYTEA BLOB
Setup and User Guide - Qlik Replicate, November 2021 132

8 Adding and managing source endpoints
AWS Aurora Cloud for PostgreSQL data types Qlik Replicatedata types
TIMESTAMP DATETIME
TIMESTAMP (z) DATETIME
Replicate only supports ISO formatted textual DATEformats (the default). If other formats are used, an error willbe generated. You can change the date format in the AWSAurora Cloud for PostgreSQL.conf file or using thePGDATESTYLE environment variable. You can also changethe date format at database level.
DATE DATE
TIME TIME
TIME (z) TIME
INTERVAL STRING (128) - 1 YEAR, 2MONTHS, 3 DAYS, 4HOURS, 5 MINUTES, 6SECONDS
BOOLEAN STRING (5) TRUE|FALSE
ENUM STRING (64)
CIDR STRING (50)
INET STRING (50)
MACADDR STRING (18)
BIT (n) STRING (n)
BIT VARYING (n) STRING (n)
UUID STRING
TSVECTOR CLOB
TSQUERY CLOB
XML CLOB
POINT STRING (255) "(x,y)"
LINE STRING (255) "(x,y,z)"
LSEG STRING (255) "((x1,y1),(x2,y2))"
BOX STRING (255) "((x1,y1),(x2,y2))"
Setup and User Guide - Qlik Replicate, November 2021 133

8 Adding and managing source endpoints
AWS Aurora Cloud for PostgreSQL data types Qlik Replicatedata types
PATH CLOB "((x1,y1),(xn,yn))"
POLYGON CLOB "((x1,y1),(xn,yn))"
CIRCLE STRING (255) "(x,y),r"
JSON
Reading and writing JSON data is performed using widestring (where each character occupies 2 bytes). Therefore,when replicating JSON columns to a PostgreSQL target, setthe limited lob size to twice the maximum JSON length. So,for example, if the JSON data is 4 KB, set the limited lobsize value to 8 KB.
NCLOB
JSONB
Reading and writing JSONB data is performed using widestring (where each character occupies 2 bytes). Therefore,when replicating JSONB columns to a PostgreSQL target,set the limited lob size to twice the maximum JSONB length.So, for example, if the JSONB data is 4 KB, set the limitedlob size value to 8 KB.
NCLOB
ARRAY NCLOB
COMPOSITE NCLOB
INT4RANGE STRING (255)
INT8RANGE STRING (255)
NUMRANGE STRING (255)
STRRANGE STRING (255)
CHARACTER VARYING If length is specified:
WSTRING (LENGTH)
If no length is specified:
WSTRING (8000)
TINTERVAL WSTRING(255)
Homogeneous ReplicationWhen replicating from an AWS Aurora Cloud for PostgreSQL source to a PostrgreSQL target, most of thesource and target data types will be identical. The exceptions are listed in the table below.
Setup and User Guide - Qlik Replicate, November 2021 134
8 Adding and managing source endpoints
Additionally, in homogeneous replication, source column and table collations will be replicated to the targetas described in Column and table collation (page 136).
In homogeneous replication, the source data first passes through the Qlik Replicate data typeand is therefore subject to any limitations of that type.
For information on Replicate data types and their limitations (where relevant), see Replicatedata types (page 76).
For information on which Replicate data types the source data passes through when replicatingfrom AWS Aurora Cloud for PostgreSQL, see the AWS Aurora Cloud for PostgreSQL to QlikReplicate data types mapping table described earlier.
Replication of Partitioned TablesIn order to replicate partitioned tables from a AWS Aurora Cloud for PostgreSQL source to a AWS AuroraCloud for PostgreSQL target, you need to do the following:
1. Manually create the parent and child tables in the target database.
2. Define a separate task to replicate to those tables.
3. Set the Truncate before loading option in the Full Load Settings (page 1017).
Data type considerations and exceptionsWhen replicating from one AWS Aurora Cloud for PostgreSQL database to a PostgreSQL-based target(e.g. Microsoft Azure Database for PostgreSQL), source and target data types are identical, with thefollowing exceptions:
AWS AuroraCloud forPostgreSQLsource
PostgreSQL-based target
ENUM STRING
COMPOSITE STRING
NUMERIC NUMERIC (28,6)
NUMERIC (p,s)
A numeric arraywith precision andscale.
NUMERIC
A numeric array without precision and scale.
TINTERVALAs PostgreSQL have discontinued support for the TINTERVAL datatype, tables with this data type will not be created on the target if thetarget database version does not support it.
AWS Aurora Cloud and Postgre SQL datatype differences
Setup and User Guide - Qlik Replicate, November 2021 135

8 Adding and managing source endpoints
Column and table collationWhen replicating from AWS Aurora Cloud for PostgreSQL database to a PostgreSQL-based targetdatabase, column and table collations will be replicated to the target.
To support collation replication, the DBA must ensure that the collations defined for the sourceAWS Aurora Cloud for PostgreSQL database are the same as those defined for thePostgreSQL-based target database.
Non-nullable columns and primary/unique index namesNon-nullable columns and Primary/Unique Index names are preserved during homogeneous replication.
Setting general connection propertiesThis section describes how to configure general connection properties. For an explanation of how toconfigure advanced connection properties, see Setting advanced connection properties.
To add an AWS Aurora Cloud for PostgreSQL endpoint source database to Qlik Replicate:
1. In the Qlik Replicate console, click Add database to open the Add Endpoints dialog box. For moreinformation on adding an endpoint to Qlik Replicate, see Defining and managing endpoints (page110).
2. In the Name field, type a name for your AWS Aurora Cloud for PostgreSQL database. This can beany name that will help to identify the database being used.
3. In the Description field, type a description that helps to identify the AWS Aurora Cloud forPostgreSQL database. This is optional.
4. Select Source as the database role.
5. Select AWS Aurora Cloud for PostgreSQL as the database Type.
When this endpoint is used as a duplicated source in a Log Stream Staging setup,select the Read changes from log stream check box and then select the relevant LogStream Staging task from the drop-down list.For information on setting up and managing Log Stream Staging tasks, see Using theLog Stream (page 919).
6. In the Server name field, specify the host name of the database instance, for example:myinstance.123456789012.us-east-1.rds.amazonaws.com
7. Optionally, change the default Port (5432).
8. Enter the AWS Aurora Cloud for PostgreSQL database authentication information (Username,Password) of an authorized AWS Aurora Cloud for PostgreSQL user. If you do not know thisinformation, see your AWS Aurora Cloud for PostgreSQL database system manager.
Setup and User Guide - Qlik Replicate, November 2021 136

8 Adding and managing source endpoints
Consider the following:l This information is case sensitive.l To determine if you are connected to the database you want to use or if theconnection information you entered is correct, click Test Connection.If the connection is successful a message in green is displayed. If the connectionfails, an error message is displayed at the bottom of the dialog box.To view the log entry if the connection fails, click View Log. The server log isdisplayed with the information for the connection failure. Note that this button isnot available unless the test connection fails.
Make sure that the AWS Aurora Cloud for PostgreSQL database user entered in theAWS Aurora Cloud for PostgreSQL database Authentication section has the correctaccess privileges.
9. Type the Database name or select one from the list of available endpoints. This is the name of theAWS Aurora Cloud for PostgreSQL database from which you are replicating data.
SSL authentication optionsIn the Security section, you can configure Replicate to connect to the Amazon RDS for PostgreSQLdatabase using SSL.
l SSL Mode: Select one of the following:l Prefer - Establishes an encrypted connection if the server supports encrypted connections,falling back to an unencrypted connection if an encrypted connection cannot be established.
l Disable - Connect with a surname and password only.l Allow - Establish an encrypted connection if requested by the server.l Require - Establishes an encrypted connection if the server supports encrypted connections.The connection attempt fails if an encrypted connection cannot be established.
l Verify CA - Similar to Required, but also verifies the server Certificate Authority (CA)certificate against the configured CA certificates. The connection attempt fails if no validmatching CA certificates are found.
l Verify Full - Similar to Verify CA, but also performs host name identity verification bychecking the host name the client (i.e. Replicate) uses for connecting to the server againstthe identity in the certificate that the server sends to the client. The client checks whether thehost name that it uses for connecting matches the Common Name value in the servercertificate. The connection fails if there is a mismatch.
l Client certificate path:- The path to the client certificate requested by the server.l Secret key path - The path to the client private key file in PEM format.l CA path - The path to the Certificate Authority (CA) that issued the client certificate file in PEMformat.
l CRL path - The path to the CRL certificate. This file contains certificates revoked by certificateauthorities. If the server certificate appears in this list, the connection will fail.
Setup and User Guide - Qlik Replicate, November 2021 137

8 Adding and managing source endpoints
l SSL compression -Select this option to compress the data before it is encrypted.
Setting advanced connection propertiesIn the Advanced tab, you can set the following properties:
l Capture DDLs: When this option is selected, the following actions occur:l Operational artifacts are created (by Replicate) in the database when the task starts. In orderto capture DDL events, Qlik Replicate creates various artifacts in the AWS Aurora Cloud forPostgreSQL database when the task starts. You can later remove these artifacts asdescribed in Removing Replicate artifacts from the AWS Aurora Cloud for PostgreSQLdatabase (page 139).
l Streamed DDL events are captured.l Create DDL artifacts in schema: The schema in which the operational DDL database artifacts willbe created. The default value is "Public".
l WAL heartbeat - An Apply Changes task that is running but not capturing changes (due to sourcetable inactivity) will continue to occupy the LSN position in its replication slot, thereby preventingtruncation of the WAL. Since the WAL is a server-wide resource used by all AWS Aurora Cloud forPostgreSQL processes, it may grow extremely large if no changes are captured for an extendedperiod.To prevent this from happening, enable the "WAL heartbeat" option. When this option is enabled,the AWS Aurora Cloud for PostgreSQL source endpoint mimics task activity by periodicallycommitting pseudo transactions (i.e. "Heartbeats") to the heartbeat table, thereby advancing thetask slot’s LSN position.
l Schema for heartbeat artifacts: The schema in which the WAL heartbeat table (attrep_wal_heartbeat) will be created. The default value is "public".
l Heartbeat frequency (minutes): The frequency with which to commit transactions to theheartbeat table.
Internal parametersInternal parameters are parameters that are not exposed in the UI. You should only use them if instructedby Qlik Support.
To add internal Qlik Replicate parameters:
1. Click the Internal Parameters link.The Internal Parameters dialog box opens.
2. In the edit box, type the name of the parameter you need to add and then click it.
3. The parameter is added to the table below the search box with its default value.
4. Change the default value as required.
5. To reset the parameter value to its default, click the "Restore default value" icon at the end of therow.
Setup and User Guide - Qlik Replicate, November 2021 138

8 Adding and managing source endpoints
More optionsThese options are not exposed in the UI as they are only relevant to specific versions or environments.Consequently, do not set these options unless explicitly instructed to do so by Qlik Support or productdocumentation.
To set an option, simply copy the option into the Add feature name field and click Add. Then set the valueor enable the option according to the instructions you received.
Settings summaryYou can view a summary of your settings by clicking the Setting Summary link. This is useful if you need tosend a summary of your settings to Qlik Support.
Removing Replicate artifacts from the AWS Aurora Cloud forPostgreSQL databaseIn order to capture DDLs, Qlik Replicate creates various artifacts in the AWS Aurora Cloud for PostgreSQLdatabase when the task starts. When the task completes, you may wish to remove these artifacts.
To remove the artifacts, issue the following statements (in the order they appear below), where public isthe default schema in which the artifacts were created:
drop event trigger attrep_intercept_ddl;
Note that the event trigger does not belong to a specific schema.
drop function public.attrep_intercept_ddl()
drop table public.attrep_ddl_audit
drop schema public
Dropping a schema should be done with extreme caution, if at all. Never drop an operationalschema, especially not public.
Setup and User Guide - Qlik Replicate, November 2021 139

8 Adding and managing source endpoints
8.2 Using Amazon RDS for SQL server as a sourceThis section describes how to set up and use an Amazon RDS for SQL Server database as the sourcedatabase in a replication task.
In this section:
l Prerequisites (page 141)l Limitations and considerations (page 142)l Required permissions (page 143)l Supported compression methods (page 143)l Amazon RDS for SQL server source data types (page 144)l Non-supported data types (page 146)l Homogeneous Replication (page 147)l Preparing the Amazon RDS for SQL server database for Replication (page 149)l Setting general connection properties (page 150)l Setting advanced connection properties (page 152)l Artifacts created by Replicate in the database (page 153)
Setup and User Guide - Qlik Replicate, November 2021 140

8 Adding and managing source endpoints
PrerequisitesMake sure that the following prerequisites have been met:
Qlik Replicate for WindowsInstall Microsoft ODBC Driver 17.6 for Windows on the Qlik Replicate Server machine.
Qlik Replicate for LinuxInstall Microsoft ODBC Driver 17.6 for Linux on the Qlik Replicate Server machine.
Then, on the Qlik Replicate Server machine, open a Unix shell and perform the following steps:
The procedure below assumes that you have installed a single default instance of Replicate on Linux(areplicate). If you have installed multiple instances, replace areplicate with the name of the instancerunning the task with a Microsoft SQL Server source. If several instances are running such as task, theprocedure needs to be repeated for each instance.
1. Change the working directory to:cd <product_dir>/bin
2. Stop the Replicate service:./areplicate stop
3. Optionally, confirm that the service has stopped:./areplicate status
4. Copy the driver location to the site_arep_login.sh file as follows:echo "export LD_LIBRARY_PATH=$LD_LIBRARY_PATH:/opt/microsoft/msodbcsql17/lib64/" >>
site_arep_login.sh
This will add the driver to "LD_LIBRARY_PATH" and update the driver location in the site_arep_login.sh file.
5. Optionally, confirm that the driver location was copied:cat site_arep_login.sh
6. Start the Replicate instance:./areplicate start
7. Optionally confirm that the instance has started:./areplicate status
8. Replicate requires the following ODBC library: libmsodbcsql-17.6.so.1.1To check which library version is currently installed Issue the following command:ls /opt/microsoft/msodbcsql/lib64/
If the existing library has a different version number (e.g. libmsodbcsql-17.6.so.0.2), youneed to create a symbolic link between the existing library and the required library.To do this, issue the following commands:cd /opt/microsoft/msodbcsql17/lib64/ln -s existing_library_name libmsodbcsql-17.6.so.1.1
where existing_library_name is the name of the currently installed library (e.g.libmsodbcsql-17.6.so.0.2).
Additional prerequisitesl An Amazon RDS for SQL Server account with the specific access privileges is required. See SourcePermissions for more information.
Setup and User Guide - Qlik Replicate, November 2021 141

8 Adding and managing source endpoints
l Amazon RDS for SQL Server as a source must be configured for a full backup to work with QlikReplicate. For more information, see Preparing Amazon RDS for SQL server for backup andrecovery (page 149).
Limitations and considerationsWhen using an Amazon RDS for SQL Server source endpoint in a Replicate task, the following imitationsapply:
l Amazon RDS for SQL Server moves the online logs to the backup location when the maximumallocated storage size is reached. This may sometimes occur before Replicate has read the logs,resulting in missing changes on the target.Therefore, in a system with a high volume of changes (or if you notice that some changes are notbeing captured), best practice is to increase the allocated storage size as described in How can Itroubleshoot storage consumption in my Amazon RDS DB instance that is running SQL Server?
l A Secondary SQL Server database is not supported as a source database.l The Amazon RDS for SQL Server Replication Publisher definitions for the database that was usedin the task are not removed when you remove a task. an Amazon RDS for SQL Server systemadministrator must delete these definitions from Amazon RDS for SQL Server.
l Sparse tables are not supported.l Replicating data from indexed views is not supported.l Renaming tables using sp_rename is not supported (e.g. sp_rename'Sales.SalesRegion', 'SalesReg;)
l Renaming columns using sp_rename is not supported (e.g. sp_rename'Sales.Sales.Region', 'RegID', 'COLUMN';)
l TRUNCATE events will not be captured.l Replication of computed columns is supported in Full Load replication tasks only. During changeprocessing, INSERTs to computed columns will appear as NULL on the target and UPDATEs willbe ignored.
l Partition switching is not supported.l When using the WRITETEXT and UPDATETEXT utilities, Qlik Replicate does not capture eventsapplied on the source database.
l The following DML pattern is not supported:select <*> into <new_table> from <existing_table>
l Column-level encryption is not supported.l Amazon RDS for SQL Server backup to multiple disks is not supported.l When inserting a value into SQL Server spatial data types (GEOGRAPHY and GEOMETRY), onecan either ignore the SRID (Spatial Reference System Identifier) property - in which case the defaultSRID will be used (0 for GEOMETRY and 4326 for GEOGRAPHY) - or specify a different number.When replicating tables with spatial data types, Qlik Replicate replaces the SRID that was insertedby user with the default SRID.
l Replication of GEOGRAPHY and GEOMETRY data types is only supported in limited LOB mode.l Columnstore indexes are not supported.l Memory-optimized tables (using In-Memory OLTP) are not supported.
Setup and User Guide - Qlik Replicate, November 2021 142

8 Adding and managing source endpoints
l Temporal databases are not supportedl Delayed durability is not supportedl Table change tracking is not supportedl Due to an ODBC limitation, no more than 16 columns can be part of a Primary Key.l Masked data will be created in the target without masking.l Replication from databases configured to use ADR (Accelerated Database Recovery) is notsupported.
l Capturing DDL and DML statements within a single transaction is not supported.l Replication of a table or schema with an apostrophe (') in its name is not supported.l UPDATEs to a Primary Key/Unique Index that affect multiple rows may cause conflicts whenapplying the changes to the target. This may occur, for example, if the UPDATEs are applied to thetarget as INSERT/DELETE operations rather than a single UPDATE operation. In such a scenario(where UPDATEs to a Primary Key/Unique Index affect multiple rows), working in Batch OptimizedApply Change Processing mode is not supported as it may result in the table being ignored.Working in Transactional Apply Change Processing mode however, may result in constraintviolations. If this happens, you either need to reload the relevant table or locate the problematicrecords in the Apply exceptions (page 1138)Control Table and edit them manually in the targetdatabase.See also: Change Processing Tuning (page 1027).
l DACPAC replication is not supported.
Non-supported Amazon RDS for SQL server security featuresTables that use the following Amazon RDS for SQL Server security features are not supported:
l Always Encryptedl Row-Level Security
Required permissionsTo use an Amazon RDS for SQL Server source in a Qlik Replicate task, the user specified in the AmazonRDS for SQL Server endpoint connection settings must be a member of the db_owner database role.
Supported compression methodsThe table below lists which compression methods Qlik Replicate supports.
Compression method Supported?
Row/Page Compression (at Partition Level) Yes
Vardecimal Storage Format No
Vardecimal Storage Format No
Sparse Columns No
Vardecimal Storage Format No
Sparse Columns No
Columnar Structure Compression No
Supported compression methods
Setup and User Guide - Qlik Replicate, November 2021 143

8 Adding and managing source endpoints
Amazon RDS for SQL server source data typesThe Amazon RDS for SQL Server source for Qlik Replicate supports most Amazon RDS for SQL Serverdata types. The following table shows the Amazon RDS for SQL Server source data types that aresupported when using Qlik Replicate and the default mapping to Qlik Replicate data types. Note thatAmazon RDS for SQL Server data types are only mapped to Qlik Replicate data types when the targetendpoint is not Amazon RDS for SQL Server. For information on data type mapping and collation supportwhen the target endpoint is Amazon RDS for SQL Server, see Homogeneous Replication (page 147)below.
For information on how to view the data type that is mapped in the target, see the section for the targetendpoint you are using.
For additional information about Qlik Replicate data types, see Replicate data types (page 76).
Collatable data types are indicated by an asterisk (*).
Amazon RDS for SQL server data types Qlik Replicatedata types
BIGINT INT8
BIT BOOLEAN
DECIMAL NUMERIC
INT INT4
MONEY NUMERIC (19,4)
NUMERIC (p,s) NUMERIC
SMALLINT INT2
SMALLMONEY NUMERIC (10,4)
TINYINT UINT1
REAL REAL4
FLOAT REAL8
DOUBLE REAL8
DATETIME DATETIME
DATETIME2 DATETIME
SMALLDATETIME DATETIME
DATE DATE
TIME STRING (16)
DATETIMEOFFSET STRING
SQL server and Qlik Replicate data types
Setup and User Guide - Qlik Replicate, November 2021 144

8 Adding and managing source endpoints
Amazon RDS for SQL server data types Qlik Replicatedata types
*CHAR STRING
*VARCHAR STRING
*VARCHAR (max)
*TEXT
To use this data type with Qlik Replicate, you mustenable the use of CLOBs for a specific task.
LOB columns for Amazon RDS for SQL Server tablesare updated in the target even for UPDATE statementsthat did not change the value of the LOB column inAmazon RDS for SQL Server.
During CDC, CLOB data types are supported only intables that include a primary key.
For more information, see LOB support in TaskSettings/Metadata (page 1011).
CLOB
*NCHAR WSTRING
*NVARCHAR (length) WSTRING
*NVARCHAR (max)
*NTEXT
To use this data type with Qlik Replicate, you mustenable the use of NCLOBs for a specific task.
LOB columns for Amazon RDS for SQL Server tablesare updated in the target even for UPDATE statementsthat did not change the value of the LOB column inAmazon RDS for SQL Server.
During CDC, NCLOB data types are supported only intables that include a primary key.
For more information, see LOB support in TaskSettings/Metadata (page 1011).
NCLOB
BINARY BYTES
VARBINARY BYTES
Setup and User Guide - Qlik Replicate, November 2021 145

8 Adding and managing source endpoints
Amazon RDS for SQL server data types Qlik Replicatedata types
VARBINARY (max)
IMAGE
LOB columns for Amazon RDS for SQL Server tablesare updated in the target even for UPDATE statementsthat did not change the value of the LOB column inAmazon RDS for SQL Server.
To use this data type with Qlik Replicate, you mustenable the use of BLOBs for a specific task.
BLOB data types are supported only in tables thatinclude a primary key.
For more information, see LOB support in TaskSettings/Metadata (page 1011).
BLOB
TIMESTAMP BYTES
UNIQUEIDENTIFIER STRING
HIERARCHYID STRING (250)
XML
LOB columns for Amazon RDS for SQL Server tablesare updated in the target even for UPDATE statementsthat did not change the value of the LOB column inAmazon RDS for SQL Server.
To use this data type with Qlik Replicate, you mustenable the use of NCLOBs for a specific task.
During CDC, NCLOB data types are supported only intables that include a primary key.
For more information, see LOB support in TaskSettings/Metadata (page 1011).
CLOB
GEOMETRY CLOB
GEOGRAPHY CLOB
Non-supported data typesTables that include fields with the following data types are not supported by Qlik Replicate.
l CURSORl SQL_VARIANTl TABLE
Setup and User Guide - Qlik Replicate, November 2021 146
8 Adding and managing source endpoints
User-defined data types are supported according to their base-type. For example a user-defined data type based on DATETIME is handled as a DATETIME data type.
Homogeneous ReplicationWhen replicating from an Amazon RDS for SQL Server source to an Amazon RDS for SQL Server target,most of the source and target data types will be identical. The exceptions are listed in the table below.
In homogeneous replication, the source data first passes through the Qlik Replicate data typeand is therefore subject to any limitations of that type.
For information on Replicate data types and their limitations (where relevant), see Replicatedata types (page 76).
For information on which Replicate data types the source data passes through when replicatingfrom Amazon RDS for SQL Server, see the Amazon RDS for SQL Server to Qlik Replicate datatypes mapping table described earlier.
To prevent data truncation when replicating XML data types, it is strongly recommended toenable the Allow unlimited LOB size option in the task settings.
Additionally, in homogeneous replication, source column and table collations will be replicated to the targetas described in Column and table collation (page 148).
Data type exceptionsWhen replicating from Amazon RDS for SQL Server database to a supported Microsoft SQL Server-basedtarget, source and target data types are identical, with the following exceptions:
Amazon RDS for SQL ServerSource
Microsoft SQL Server Target
DATETIME Supported database versions preceding Microsoft SQL Server2016:
DATETIME
Microsoft SQL Server 2016 or later:
DATETIME2
Data type comparisons between Amazon and Microsoft
Setup and User Guide - Qlik Replicate, November 2021 147

8 Adding and managing source endpoints
Amazon RDS for SQL ServerSource
Microsoft SQL Server Target
VARCHAR VARCHAR (x)
(when x=0 or x>8000)
else VARCHAR (max)
NVARCHAR (length) NVARCHAR (x)
(when x=0 or x>8000)
else NVARCHAR (max)
VARBINARY VARBINARY (x)
(when x=0 or x>8000)
else VARBINARY (max)
HIERARCHYID STRING(250)
TIMESTAMP VARBINARY
Column and table collationWhen replicating from Amazon RDS for SQL Server to a supported Microsoft SQL Server-based target,column and table collations will be replicated to the target.
To support collation replication, the DBA must ensure that the collations defined for the sourceAmazon RDS for SQL Server database are the same as those defined for the supportedMicrosoft SQL Server-based target.
Non-nullable columns and primary/unique index namesPrimary/Unique Index names are preserved during homogeneous replication. Non-nullable columns arealso preserved during homogeneous replication, with the exception of the following data types:
l textl ntext1l varchar(max)l nvarchar(max)l varbinary(max)l imagel xml
Setup and User Guide - Qlik Replicate, November 2021 148

8 Adding and managing source endpoints
Preparing the Amazon RDS for SQL server database for ReplicationThis section describes the configuration requirements for using an Amazon RDS for SQL Server database.An Amazon RDS for SQL Server system administrator should carry out these tasks.
l Preparing Amazon RDS for SQL server for backup and recovery (page 149)l Defining Amazon RDS for SQL server database settings (page 150)
Setting up Amazon RDS for SQL server for CDC (Change data capture)The following section explains how to set up Amazon RDS for SQL Server for CDC.
When creating the Amazon RDS for SQL Server instance, full backup must be enabled,otherwise Replicate will not be able to capture changes.
To set up Amazon RDS for SQL Server for CDC:
1. Log in as the master user in the DB instance and set up the database for MS-CDC as follows:exec msdb.dbo.rds_cdc_enable_db 'db_name'
where db_name is the name of the source database.
2. To enable MS-CDC, run the following for each of the intended source tables:
If you are running Full Load tasks, this step should only be run after Full Loadcompletes.
exec sys.sp_cdc_enable_table@source_schema = N'schema_name',
@source_name = N'table_name',@role_name = NULL,@supports_net_changes = 1GO
where schema_name and table_name are the names of the source schema and the source tablerespectively.
3. Set the retention period for the changes to be available on the source by changing the@pollinginterval of the 'capture' job to the maximum possible value.
Limitations:
l CDC is supported using the transaction log only (i.e. backup is not supported).l Events may be lost if they are moved to backup or truncated.
Preparing Amazon RDS for SQL server for backup and recoveryQlik Replicate consumes changes captured from the database transaction log (TLOG). The TLOG ismaintained by Amazon RDS for SQL Server for recovery purposes. All changes made to a database arewritten to the TLOG. The following happens when recovery is required:
Setup and User Guide - Qlik Replicate, November 2021 149

8 Adding and managing source endpoints
l A backup copy of the database is made.l Logged events are taken and used in a rolling-forward process where the recorded changes arereplayed against that copy.
To prepare for backup and recovery you must make sure that the Amazon RDS for SQL Server RecoveryModel is set up. This should be carried out by an Amazon RDS for SQL Server system administrator usingthe RDS management web interface.
The TLOG data is truncated as soon as it is no longer needed therefore the TLOG is not persistent.However, Qlik Replicate guaranteed delivery requires persistency in the changed data. To ensurepersistency:
l A full database backup must be carried out before beginning to migrate data.l The Recovery Model must be set to Bulk logged or Full.
After setting the Recovery Model, it is strongly recommended not to change it; doing so mayresult in loss of data.
Defining Amazon RDS for SQL server database settingsSet the following for the Amazon RDS for SQL Server database(s) that you are using as a source:
l Set the Recovery model to Bulk logged or Full. In this mode, the transaction Log is more durableand truncation occurs less frequently.
l Ensure that there is a full database backup for each Amazon RDS for SQL Server database that youare using as a source.
l When creating a connection string, it is possible to use any parameter supported by Amazon RDSfor SQL Server. The Amazon RDS for SQL Server system administrator must ensure that theAmazon RDS for SQL Server instance is configured correctly so that the proper authenticationcredentials are accepted.
Working with Windows authenticationYou can configure the Qlik Replicate Amazon RDS for SQL Server endpoint to log in to Amazon RDS forSQL Server (on Windows) using Windows authentication.
If you choose this option, you also need to make sure that:
l The Amazon RDS for SQL Server instance is set up to allow Windows log on.l The Qlik Replicate user is specified as the "Log on as" user for the "Qlik Replicate Server" serviceaccount.-OR-Amazon RDS for SQL Server is configured to allow login for the Qlik Replicate Server serviceaccount.
Setting general connection propertiesThis section describes how to configure connection properties.
To add an Amazon RDS for SQL Server source endpoint to Qlik Replicate:
Setup and User Guide - Qlik Replicate, November 2021 150
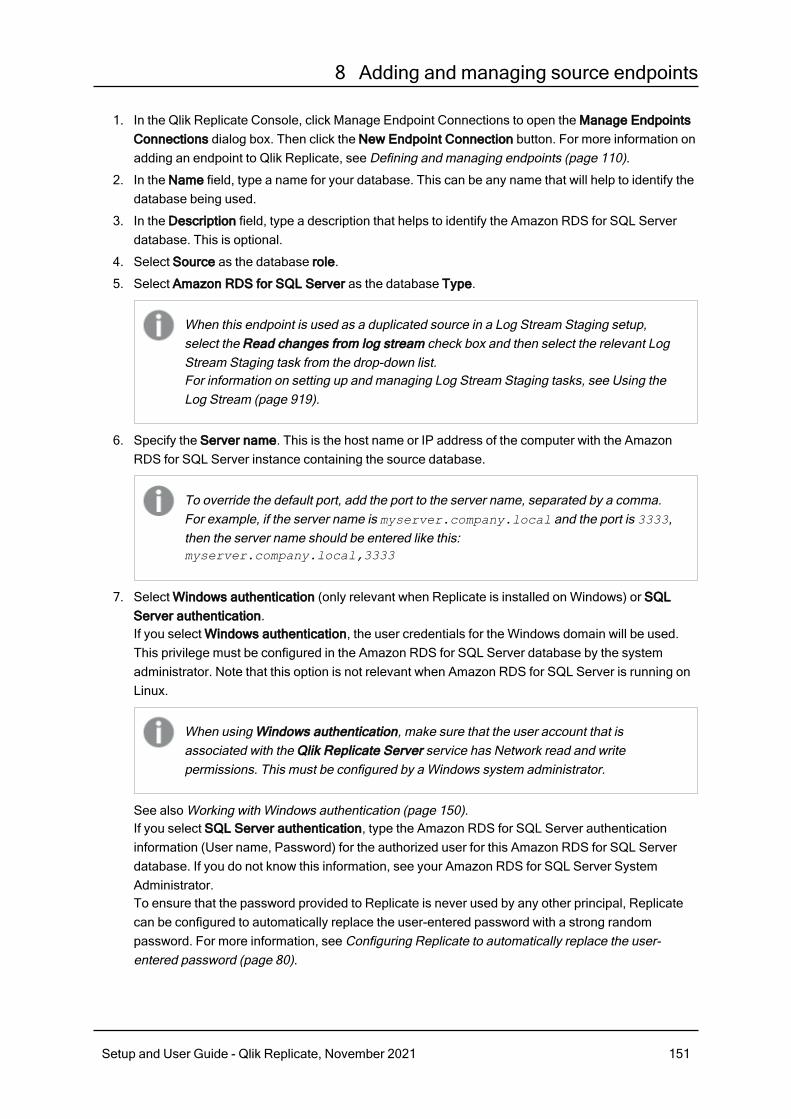
8 Adding and managing source endpoints
1. In the Qlik Replicate Console, click Manage Endpoint Connections to open the Manage EndpointsConnections dialog box. Then click the New Endpoint Connection button. For more information onadding an endpoint to Qlik Replicate, see Defining and managing endpoints (page 110).
2. In the Name field, type a name for your database. This can be any name that will help to identify thedatabase being used.
3. In the Description field, type a description that helps to identify the Amazon RDS for SQL Serverdatabase. This is optional.
4. Select Source as the database role.
5. Select Amazon RDS for SQL Server as the database Type.
When this endpoint is used as a duplicated source in a Log Stream Staging setup,select the Read changes from log stream check box and then select the relevant LogStream Staging task from the drop-down list.For information on setting up and managing Log Stream Staging tasks, see Using theLog Stream (page 919).
6. Specify the Server name. This is the host name or IP address of the computer with the AmazonRDS for SQL Server instance containing the source database.
To override the default port, add the port to the server name, separated by a comma.For example, if the server name is myserver.company.local and the port is 3333,then the server name should be entered like this:myserver.company.local,3333
7. Select Windows authentication (only relevant when Replicate is installed on Windows) or SQLServer authentication.If you select Windows authentication, the user credentials for the Windows domain will be used.This privilege must be configured in the Amazon RDS for SQL Server database by the systemadministrator. Note that this option is not relevant when Amazon RDS for SQL Server is running onLinux.
When using Windows authentication, make sure that the user account that isassociated with the Qlik Replicate Server service has Network read and writepermissions. This must be configured by a Windows system administrator.
See also Working with Windows authentication (page 150).If you select SQL Server authentication, type the Amazon RDS for SQL Server authenticationinformation (User name, Password) for the authorized user for this Amazon RDS for SQL Serverdatabase. If you do not know this information, see your Amazon RDS for SQL Server SystemAdministrator.To ensure that the password provided to Replicate is never used by any other principal, Replicatecan be configured to automatically replace the user-entered password with a strong randompassword. For more information, see Configuring Replicate to automatically replace the user-entered password (page 80).
Setup and User Guide - Qlik Replicate, November 2021 151

8 Adding and managing source endpoints
l This information is case sensitive.l To determine if you are connected to the database you want to use or if theconnection information you entered is correct, click Test Connection.If the connection is successful a message in green is displayed. If the connectionfails, an error message is displayed at the bottom of the dialog box.To view the log entry if the connection fails, click View Log. The server log isdisplayed with the information for the connection failure. Note that this button isnot available unless the test connection fails.
Make sure that the Amazon RDS for SQL Server user has the correct access privileges.For information on how to provide the required privileges, see Required permissions(page 143).
8. Type the Database name or click Browse and select one from the list of available databases. Thisis the name of the database from where you are replicating the data.
Setting advanced connection propertiesIn the Advanced tab, you can set internal parameters, set more options, and view a summary of yoursettings.
Internal parametersInternal parameters are parameters that are not exposed in the UI. You should only use them if instructedby Qlik Support.
To add internal Qlik Replicate parameters:
1. Click the Internal Parameters link.The Internal Parameters dialog box opens.
2. In the edit box, type the name of the parameter you need to add and then click it.
3. The parameter is added to the table below the search box with its default value.
4. Change the default value as required.
5. To reset the parameter value to its default, click the "Restore default value" icon at the end of therow.
More optionsThese options are not exposed in the UI as they are only relevant to specific versions or environments.Consequently, do not set these options unless explicitly instructed to do so by Qlik Support or productdocumentation.
To set an option, simply copy the option into the Add feature name field and click Add. Then set the valueor enable the option according to the instructions you received.
Setup and User Guide - Qlik Replicate, November 2021 152

8 Adding and managing source endpoints
Settings summaryYou can view a summary of your settings by clicking the Setting Summary link. This is useful if you need tosend a summary of your settings to Qlik Support.
Artifacts created by Replicate in the database
In order to capture changes, Qlik Replicate creates various artifacts in the dbo schema of the Amazon RDSfor Microsoft SQL Server database when the task starts. You can safely remove them when the taskcompletes.
The following artifact is created to track open transactions:
l #attrep_dbcc_open_trans_table
The following functions are created to verify that the LSN (Log Sequence Number) is valid:
l attrep_fn_LsnSegmentToHexa
l attrep_fn_NumericLsnToHexa
Setup and User Guide - Qlik Replicate, November 2021 153

8 Adding and managing source endpoints
8.3 Using Amazon RDS for MySQL as a sourceThis section describes how to set up and use Amazon RDS for MySQL as a source in a replication task.
In this section:
l Prerequisites (page 155)l Limitations and considerations (page 156)l Security requirements (page 156)l Data types (page 157)l Setting general connection properties (page 160)l Selecting a schema (page 162)l Setting advanced connection properties (page 162)
Setup and User Guide - Qlik Replicate, November 2021 154

8 Adding and managing source endpoints
PrerequisitesBefore using Amazon RDS for MySQL as an endpoint in a Replicate task, make sure the prerequisitesoutlined below have been met.
Client prerequisitesInstall MySQL ODBC Unicode Driver 64-bit on the Replicate Server machine.
Only these driver versions are supported:
l 5.3.11 to 5.3.13l 8.0.23 to 8.0.25
Linux only:
Make sure that the /etc/odbcinst.ini file contains an entry for MySQL, as in the following example:
[MySQL ODBC 5.3.13 Unicode Driver]Driver = /usr/lib64/libmyodbc5w.soUsageCount = 1
Amazon RDS for MySQL replicationReplication enables data from one Amazon RDS for MySQL database server (the primary server) to becopied to one or more Amazon RDS for MySQL database servers (the secondary servers).
The Replicate Amazon RDS for MySQL source endpoint can be configured to replicate data from either aprimary server or a secondary server.
To replicate changes from a secondary server (CDC), the binary logging parameter log_slave_updatesneeds to be set to true (1).
Setting up Amazon RDS for MySQL for CDC (Change data capture)To set up Amazon RDS for MySQL for CDC:
1. Follow the instructions in the AWS Help for creating a new Parameter Group (see the BinaryLogging Format section).
2. When creating the new Parameter Group, set the following values:l binlog_format=row
3. Save the new Parameter Group.
4. If you have an existing instance of Amazon RDS for MySQL, edit the instance to use the parametersspecified in Step 2 above. Or, if you are provisioning a new instance of Amazon RDS for MySQL,reference the new Parameter Group created in Step 1 above.
5. Finally, make sure that automated backup is enabled (the default).
Replicating 4-byte UTF8 emojisReplication of 4-byte UTF8 emojis to certain targets requires the following preparation:
Setup and User Guide - Qlik Replicate, November 2021 155

8 Adding and managing source endpoints
l Microsoft SQL Server Target: Transform the emojis from WSTRING(n) to WSTRING(n*2).l Amazon Redshift Target: Transform the emojis from WSTRING(n) to WSTRING(n*2).
For information on defining transformations, see Using the Transform tab (page 933).
Limitations and considerationsThe following limitations apply:
l The following DDLs are not supported:l All partition DDLsl Drop Tablel Rename Table
l Changes that are older than one year will not be captured.l Using the alter table <table_name> add column <column_name> statement to addcolumns to the beginning or to the middle of a table is not supported. When the alter table
<table_name> add column <column_name> statement is used to add a column to the middleof a table, the column will be added to the end of the table instead.
l The AR_H_USER header column is currently not supported. For information on using headercolumns, see Headers (page 991).
l If an Amazon RDS for MySQL table contains LOBs and the task's Replicate Lob columns option isdisabled, the table will be replicated without the LOB columns. Note that this only applies toMEDIUMBLOB, LONGBLOB, MEDIUMTEXT and LONGTEXT columns. This limitation does notapply to BLOB, TINYBLOB, TEXT and TINYTEXT columns.
l If the Amazon RDS for MySQL database is stopped during Full Load, the Full Load will endsuccessfully, but the tables on the target may have less rows than the source tables. If this shouldhappen, either restart the task or reload the tables with the missing rows.
l A Unique Index/Primary Key created on only part of the column data is not supported. If such aUnique Index/Primary Key is encountered, it will be created on the entire target column.The following is an example of a statement that creates a Unique Index/Primary Key using only partof the column data:CREATE INDEX partial_name ON customer (name(10));
l Changes to computed (virtual) columns will not be captured.l Replicate supports zero dates only if both the source and target MySQL-based databases areconfigured with the same "Strict Mode" (On or Off). If this is not the case, zero dates can betransformed to non-zero dates using the transformation feature.
l The Transaction ID of XA transactions will not be displayed in the Replicate ChangeTable/AuditTable transaction_id header.
l Binary log transaction compression is not supported.l The MySQL primary-primary configuration is not supported.
Security requirementsThe Qlik Replicate user must have the ReplicationAdmin role with the following privileges (according totask type):
Setup and User Guide - Qlik Replicate, November 2021 156

8 Adding and managing source endpoints
l REPLICATION CLIENT - Required for Change Processing tasks only. In other words, Full Loadonly tasks do not require this privilege.
l REPLICATION SLAVE - Required for Change Processing tasks only. In other words, Full Load onlytasks do not require this privilege.
l SUPER - Only required in versions prior to Amazon RDS for MySQL 5.6.6.
The Qlik Replicate user must also have SELECT privileges for the source tables designated for replication.
Data typesThe following table shows the Amazon RDS for MySQL database source data types that are supportedwhen using Qlik Replicate and the default mapping to Qlik Replicate data types. When replicating to aMySQL target, the source and target data types are the same, apart from the exceptions described inHomogeneous Replication (page 159).
For information on how to view the data type that is mapped in the target, see the section for the targetdatabase you are using.
For additional information about Qlik Replicate data types, see Replicate data types (page 76).
Amazon RDS for MySQL source data types Qlik Replicate data types
INT INT4
BIGINT INT8
MEDIUMINT INT4
TINYINT INT1
SMALLINT INT2
UNSIGNED TINYINT UINT1
UNSIGNED SMALLINT UINT2
UNSIGNEDMEDIUMINT UINT4
UNSIGNED INT UINT4
UNSIGNED BIGINT UINT8
DECIMAL (10) NUMERIC (10,0)
BINARY BYTES (1)
BIT BOOLEAN
BIT (64) BYTES (8)
BLOB BYTES (65535)
LONGBLOB BLOB
MEDIUMBLOB BLOB
Amazon RDS for MySQL and Qlik Replicate data type comparison
Setup and User Guide - Qlik Replicate, November 2021 157

8 Adding and managing source endpoints
Amazon RDS for MySQL source data types Qlik Replicate data types
TINYBLOB BYTES (255)
DATE DATE
DATETIME
DATETIME without a parenthetical value isreplicated without milliseconds, whereasDATETIME with a value of 1-5 - e.g.DATETIME(5) - is replicated with milliseconds.
When replicating a DATETIME column, thetime remains the same on the target (i.e. it isnot converted to UTC).
DATETIME
TIME STRING
TIMESTAMP
When replicating a TIMESTAMP column, thetime is converted to UTC on the target.
DATETIME
YEAR INT2
DOUBLE REAL8
FLOAT
If the FLOAT values are not in the range specified below,use a transformation to map FLOAT to STRING. For anexplanation of how to do this, see Using the Transform tab(page 933).
Supported FLOAT range:
- 1.79E+308 to -2.23E-308, 0
and
2.23E-308 to 1.79E+308
REAL (DOUBLE)
*VARCHAR (45) WSTRING (45)
*VARCHAR (2000) WSTRING (2000)
*VARCHAR (4000) WSTRING (4000)
VARBINARY (4000) BYTES (4000)
Setup and User Guide - Qlik Replicate, November 2021 158

8 Adding and managing source endpoints
Amazon RDS for MySQL source data types Qlik Replicate data types
VARBINARY (2000) BYTES (2000)
*CHAR WSTRING
*TEXT WSTRING (65535)
*LONGTEXT NCLOB
*MEDIUMTEXT NCLOB
*TINYTEXT WSTRING (255)
GEOMETRY BLOB
POINT BLOB
LINESTRING BLOB
POLYGON BLOB
MULTIPOINT BLOB
MULTILINESTRING BLOB
MULTIPOLYGON BLOB
GEOMETRYCOLLECTION BLOB
ENUM WSTRING (Length)
Where "Length" is the longest value in theENUM.
SET WSTRING (Length)
Where "Length" is the total of all values inthe SET, including commas.
JSON CLOB
If the DATETIME and TIMESTAMP data types are specified with a “zero” value (i.e. 0000-00-00), you need to make sure that the target database in the replication task supports "zero"values for the DATETIME and TIMESTAMP data types. If they are not supported, you can usea transformation to specify a supported value (e.g. 1970.) Otherwise, they will be recorded asnull on the target.
Homogeneous ReplicationThe following section describes how Replicate handles replication between an Amazon RDS for MySQLsource and an Amazon RDS for MySQL target (i.e. homogeneous replication).
Setup and User Guide - Qlik Replicate, November 2021 159

8 Adding and managing source endpoints
l In homogeneous replication, the source data first passes through the Qlik Replicatedata type and is therefore subject to any limitations of that type.For information on Replicate data types and their limitations (where relevant), seeReplicate data types (page 76).For information on which Replicate data types the source data passes through whenreplicating from Amazon RDS for MySQL, see the Amazon RDS for MySQL to QlikReplicate data types mapping table described earlier.
l When replicating a TIMESTAMP column, the time is converted to UTC on the target.
Data typesWhen replicating to an Amazon RDS for MySQL target endpoint, the data types will be identical with thefollowing exceptions:
Amazon RDS for MySQL source data types Amazon RDS for MySQL target data types
JSON LONGTEXT
Amazon RDS for MySQL source and target data types
When using data types from other database engines, the data type on the target will be thecorresponding MySQL data type. For more information on using non-native data types, refer tothe MySQL online Help.
CollationWhen replicating from one Amazon RDS for MySQL endpoint to another, table and column collations willbe replicated to the target. Collatable data types are indicated by an asterisk (*) in Table 11–3 above.
To support collation replication, the DBA must ensure that the collations defined for the source AmazonRDS for MySQL database are the same as those defined for the target Amazon RDS for MySQL database.
Non-nullable columns and primary/unique index namesNon-nullable columns and Primary/Unique Index names are preserved during homogeneous replication.
Setting general connection propertiesThis section describes how to configure general connection properties. For an explanation of how toconfigure advanced connection properties, see Setting advanced connection properties.
You can also use Amazon RDS for MySQL files as a source. For more information, see Usingthe Qlik Replicate file channel (page 908).
To add an Amazon RDS for MySQL source endpoint to Qlik Replicate:
Setup and User Guide - Qlik Replicate, November 2021 160

8 Adding and managing source endpoints
1. In the Qlik Replicate Console, click Manage Endpoint Connections to open the Manage EndpointsConnections dialog box. Then click the New Endpoint Connection button. For more information onadding an endpoint to Qlik Replicate, see Defining and managing endpoints (page 110).
2. In the Name field, type a name for your endpoint. This can be any name that will help to identify thedatabase being used.
3. In the Description field, type a description that helps to identify the Amazon RDS for MySQLdatabase. This is optional.
4. Select Source as the endpoint role.
5. From the Type drop-down list, select Amazon RDS for MySQL.
When this endpoint is used as a duplicated source in a Log Stream Staging setup,select the Read changes from log stream check box and then select the relevant LogStream Staging task from the drop-down list.For information on setting up and managing Log Stream Staging tasks, see Using theLog Stream (page 919).
6. In the Server field, enter the host name or IP address of the computer on which the Amazon RDSfor MySQL database is installed.
7. Optionally, change the default port (3306).
8. Type the Amazon RDS for MySQL authentication information (Username, Password) for theauthorized user for this Amazon RDS for MySQL database. If you do not know this information, seeyour Amazon RDS for MySQL database Administrator (DBA).
l The User Name, Password are case sensitive.l Passwords containing curly brackets are not supported i.e. {}.
Make sure that the Amazon RDS for MySQL user entered in the Amazon RDS forMySQL Authentication section has the correct access privileges. For information onhow to provide the required privileges, see Security requirements (page 156).
SSL authentication optionsIn the Security section, you can configure Replicate to connect to the Amazon RDS for MySQL databaseusing SSL.
l SSL Mode: Select one of the following:l Preferred - Establishes an encrypted connection if the server supports encryptedconnections, falling back to an unencrypted connection if an encrypted connection cannot beestablished.
l None - Connect with a surname and password only.l Required - Establishes an encrypted connection if the server supports encryptedconnections. The connection attempt fails if an encrypted connection cannot be established.
Setup and User Guide - Qlik Replicate, November 2021 161

8 Adding and managing source endpoints
l Verify CA - Similar to Required, but also verifies the server Certificate Authority (CA)certificate against the configured CA certificates. The connection attempt fails if no validmatching CA certificates are found.
l Verify Full - Similar to Verify CA, but also performs host name identity verification bychecking the host name the client (i.e. Replicate) uses for connecting to the server againstthe identity in the certificate that the server sends to the client. The client checks whether thehost name that it uses for connecting matches the Common Name value in the servercertificate. The connection fails if there is a mismatch.
l Client certificate path - The path to the client certificate requested by the server.l Private key path - The path to the client private key file in PEM format.l CA path - The path to the Certificate Authority (CA) that issued the client certificate file in PEMformat.
Selecting a schemaYou can choose which Amazon RDS for MySQL database to access. After configuring the Amazon RDSfor MySQL source database connection settings, open the Select Tables dialog box (by clicking the TableSelection button on the right of the console) and select which schema to use from the Schema drop downlist.
See also Defining and managing tasks (page 104).
Setting advanced connection propertiesIn the Advanced tab, you can set the following parameters:
l Check binary log for new events every: Specify how often to check the binary log for changeswhen the endpoints is idle.
l Additional ODBC connection properties: Specify any additional ODBC connection parameters thatmay be required.
l Database timezone: Select the timezone where the source database is located.
Internal parametersInternal parameters are parameters that are not exposed in the UI. You should only use them if instructedby Qlik Support.
To add internal Qlik Replicate parameters:
1. Click the Internal Parameters link.The Internal Parameters dialog box opens.
2. In the edit box, type the name of the parameter you need to add and then click it.
3. The parameter is added to the table below the search box with its default value.
4. Change the default value as required.
5. To reset the parameter value to its default, click the "Restore default value" icon at the end of therow.
Setup and User Guide - Qlik Replicate, November 2021 162

8 Adding and managing source endpoints
More optionsThese options are not exposed in the UI as they are only relevant to specific versions or environments.Consequently, do not set these options unless explicitly instructed to do so by Qlik Support or productdocumentation.
To set an option, simply copy the option into the Add feature name field and click Add. Then set the valueor enable the option according to the instructions you received.
Settings summaryYou can view a summary of your settings by clicking the Setting Summary link. This is useful if you need tosend a summary of your settings to Qlik Support.
Setup and User Guide - Qlik Replicate, November 2021 163

8 Adding and managing source endpoints
8.4 Using Amazon RDS for PostgreSQL as a sourceThis section describes how to set up and use an Amazon RDS for PostgreSQL database as a source in areplication task.
In this section:
l Prerequisites (page 165)l Required permissions (page 165)l Setting up Amazon RDS for PostgreSQL for CDC (Change data capture) (page 165)l Limitations and considerations (page 167)l Amazon RDS for PostgreSQL source data types (page 168)l Homogeneous Replication (page 172)l Setting general connection properties (page 173)l Setting advanced connection properties (page 175)l Removing Replicate artifacts from the Amazon RDS for PostgreSQL database (page 176)
Setup and User Guide - Qlik Replicate, November 2021 164

8 Adding and managing source endpoints
Prerequisitesl Qlik Replicate Server for Windows:PostgreSQL ODBC Driver psqlodbc_12_02_0000-x64 only must be installed on the Qlik Replicatemachine.
Make sure that the psql.exe path (e.g. "C:\Program Files\PostgreSQL\1202\bin") isadded to the system PATH.
l Qlik Replicate Server for Linux: On the Qlik Replicate machine:
1. Install postgresql12. For example, postgresql12-12.1-2PGDG.rhel7.x86_64.rpm is thepackage required for Red Hat 7.
2. Install the ODBC driver postgresql12.For example, postgresql12-odbc-12.01.0000-1PGDG.rhel7.x86_64.rpm is the client requiredfor Red Hat 7.
3. Copy the driver location to the site_arep_login.sh file:echo "export LD_LIBRARY_PATH=/usr/lib:/usr/lib64:/usr/pgsql-12/lib:$LD_LIBRARY_
PATH" >> site_arep_login.sh
This will add the driver to "LD_LIBRARY_PATH" and update the driver location in the site_arep_login.sh file.
4. Makes sure that the /etc/odbcinst.ini file contains an entry for PostgreSQL, as in thefollowing example:[PostgreSQL]
Description = PostgreSQL ODBC driver
Driver = /usr/pgsql-12/lib/psqlodbc.so
Setup = /usr/pgsql-12/lib/psqlodbcw.so
Debug = 0
CommLog = 1
UsageCount = 2
l When the Apply Changes task option is enabled, the user specified in the Amazon RDS forPostgreSQL source endpoint’s General tab must be granted super-user permissions.
Required permissionsThe user specified in the General tab when Setting general connection properties (page 173) must begranted the following permissions in the Amazon RDS for PostrgreSQL database:
l For Full Load replication: Standard SELECT on the source databasel For Apply Changes replication: See Setting up Amazon RDS for PostgreSQL for CDC (Changedata capture) (page 165).
Setting up Amazon RDS for PostgreSQL for CDC (Change datacapture)You can use the AWSmaster user account for the PostgreSQL database instance as the user for theAmazon RDS for PostgreSQL source endpoint. The master user account has the required roles that allowit to set up change data capture (CDC).
Setup and User Guide - Qlik Replicate, November 2021 165

8 Adding and managing source endpoints
If you prefer not to use the master user account, the account you wish to use must have the rds_superuserrole and the rds_replication role. The rds_replication role grants permissions to manage logical slots andto stream data using logical slots.
To enable logical replication for an Amazon RDS PostgreSQL database instance:
1. Create a new parameter group with the following configuration:
1. Set the rds.logical_replication parameter in the database parameter group to 1.
2. max_wal_senders – The number of tasks that can run in parallel.
3. max_replication_slots – Every connection (i.e. task) creates a new slot; this parameterconfigures the amount of simultaneous connections that can be established to the database.
2. Link the Amazon RDS instance to the parameter group.
Using an account without the "rds_superuser" roleIf you are not using an account with the "rds_superuser" role, you need to create several objects to captureData Definition Language (DDL) events. Create these objects in the selected account and then create atrigger in the master user account.
To do this:
1. Choose a schema where you want the objects to be created. The default schema is public. Ensurethat the schema exists and is accessible by the NoPriv account.
2. Create the table attrep_ddl_audit by running the following command:create table <objects_schema>.attrep_ddl_audit
(
c_key bigserial primary key,
c_time timestamp, -- Informational
c_user varchar(64), -- Informational: current_user
c_txn varchar(16), -- Informational: current transaction
c_tag varchar(24), -- Either 'CREATE TABLE' or 'ALTER TABLE' or
'DROP TABLE'
c_oid integer, -- For future use - TG_OBJECTID
c_name varchar(64), -- For future use - TG_OBJECTNAME
c_schema varchar(64), -- For future use - TG_SCHEMANAME. For now, holds
the current_schema
c_ddlqry text -- The DDL query associated with the current DDL
event)
3. Create the function attrep_intercept_ddl by running the following command:CREATE OR REPLACE FUNCTION <objects_schema>.attrep_intercept_ddl()
RETURNS event_trigger
LANGUAGE plpgsql
AS $$
declare _qry text;
BEGIN
if (tg_tag='CREATE TABLE' or tg_tag='ALTER TABLE' or tg_tag='DROP
Setup and User Guide - Qlik Replicate, November 2021 166

8 Adding and managing source endpoints
TABLE') then
SELECT current_query() into _qry;
insert into <objects_schema>.attrep_ddl_audit
values
(
default,current_timestamp,current_user,cast(TXID_CURRENT()as
varchar(16)),tg_tag,0,'',current_schema,_qry
);
delete from <objects_schema>.attrep_ddl_audit;
end if;
END;
$$;
4. If you are logged in with a NoPriv account, log out of the NoPriv account and log in with an accountthat has the rds_superuser role assigned to it.
If the attrep_intercept_ddl stored procedure is not being created in the default schema,you need to specify the schema name in the Create DDL artifacts under schema field.
For more information on the replication configuration parameters, see the PostgreSQL Help.
5. Create the event trigger attrep_intercept_ddl by running the following command:CREATE EVENT TRIGGER attrep_intercept_ddl ON ddl_command_end
EXECUTE PROCEDURE <objects_schema>.attrep_intercept_ddl();
Limitations and considerationsThe following limitations apply when using Amazon RDS for PostgreSQL as a source:
l The database name cannot include a semi-colon (;).l Task names cannot start with "rds" as RDS is a reserved string on AWS.l Both the source table and the corresponding target table must have an identical Primary Key. In theevent that one of the tables does not have a Primary Key, the result of DELETE and UPDATErecord operations will be unpredictable.
l The “Start Process Changes from Timestamp” run option is not supported.l Replication of the Before Image is not supported.l Replication of multiple tables with the same name but a different case (e.g. table1, TABLE1 andTable1) may cause unpredictable behavior and is therefore not supported.
l Change processing of [CREATE | ALTER | DROP] table DDLs are supported, unless they are heldin an inner function/procedure body block or in other nested constructs.For example, the following change will not be captured:CREATE OR REPLACE FUNCTION attu.create_distributors1() RETURNS voidLANGUAGE plpgsqlAS $$BEGINcreate table attu.distributors1(did serial PRIMARY KEY,name varchar(40)
NOT NULL);
Setup and User Guide - Qlik Replicate, November 2021 167

8 Adding and managing source endpoints
END;$$;
l Change processing of TRUNCATE operations is not supported.l Deferred Constraints are not supported.l Partitioned tables: When performing a Full Load replication of partitioned tables, the parent tablewill be created and separate tables will be created for each partition.A DML on the parent partitioned table will be applied on the physical partition of the correspondingtarget table only.Primary keys are not supported on partitioned tables, which may impact UPDATE operations.
See also: Replication of Partitioned Tables (page 172) for partitioned table requirements that applyto homogeneous replication (Amazon RDS for PostgreSQL-to-Amazon RDS for PostgreSQL).
l When using the Parallel Load (page 946) feature, table segmentation according to partitions or sub-partitions is not supported.
l When using filters that do not contain a Primary Key, DELETE operations will not be captured.l A DDL operation that occurs during Full Load, but that was not preceded by a DML operation will notbe captured.
Amazon RDS for PostgreSQL source data typesThe following table shows the Amazon RDS for PostgreSQL target data types that are supported whenusing Qlik Replicate and the default mapping to the Qlik Replicate data types.
When replicating from one Amazon RDS for PostgreSQL database to a PostgreSQL-based target (e.g.Microsoft Azure Database for PostgreSQL), source and target data types are identical, except for the datatypes listed in Data type considerations and exceptions (page 173).
For additional information about Qlik Replicate data types, see Replicate data types (page 76).
Amazon RDS for PostgreSQL data typesQlik Replicate datatypes
INTEGER INT4
SMALLINT INT2
BIGINT INT8
NUMERIC NUMERIC(28,6)
PostgreSQL and Qlik Replicate data types
Setup and User Guide - Qlik Replicate, November 2021 168

8 Adding and managing source endpoints
Amazon RDS for PostgreSQL data typesQlik Replicate datatypes
NUMERIC(p,s) If precision is =< 38,then:
NUMERIC(p,s)
If precision is => 39,then:
STRING
DECIMAL NUMERIC(28,6)
DECIMAL(p,s) If precision is =< 38,then:
NUMERIC(p,s)
If precision is => 39,then:
STRING
REAL REAL4
DOUBLE REAL8
SMALLSERIAL INT2
SERIAL INT4
BIGSERIAL INT8
MONEY NUMERIC(38,4)
TheMONEYdata type ismapped toFLOAT inMicrosoftSQLServer.
CHAR WSTRING (1)
CHAR(n) WSTRING (n)
Setup and User Guide - Qlik Replicate, November 2021 169

8 Adding and managing source endpoints
Amazon RDS for PostgreSQL data typesQlik Replicate datatypes
VARCHAR(n)
VARCHAR without a length (n) is not recognized as a valid datatype by target endpoints. Consequently, if a source column datatype is set to VARCHAR without an explicit length, Replicate willset a default length of 8000 bytes.
You can change the default by setting the following internalparameter to the required length:
unboundedVarcharMaxSize
See also Internal Parameters.
WSTRING (n)
TEXT NCLOB
BYTEA BLOB
TIMESTAMP DATETIME
TIMESTAMP (z) DATETIME
Replicate only supports ISO formatted textual DATE formats (thedefault). If other formats are used, an error will be generated. Youcan change the date format in the Amazon RDS forPostgreSQL.conf file or using the PGDATESTYLE environmentvariable. You can also change the date format at database level.
DATE DATE
TIME TIME
TIME (z) TIME
INTERVAL STRING (128) - 1YEAR, 2 MONTHS, 3DAYS, 4 HOURS, 5MINUTES, 6SECONDS
BOOLEAN STRING (5)TRUE|FALSE
ENUM STRING (64)
CIDR STRING (50)
INET STRING (50)
Setup and User Guide - Qlik Replicate, November 2021 170

8 Adding and managing source endpoints
Amazon RDS for PostgreSQL data typesQlik Replicate datatypes
MACADDR STRING (18)
BIT (n) STRING (n)
BIT VARYING (n) STRING (n)
UUID STRING
TSVECTOR CLOB
TSQUERY CLOB
XML CLOB
POINT STRING (255) "(x,y)"
LINE STRING (255) "(x,y,z)"
LSEG STRING (255) "((x1,y1),(x2,y2))"
BOX STRING (255) "((x1,y1),(x2,y2))"
PATH CLOB "((x1,y1),(xn,yn))"
POLYGON CLOB "((x1,y1),(xn,yn))"
CIRCLE STRING (255) "(x,y),r"
JSON
Reading and writing JSON data is performed using wide string(where each character occupies 2 bytes). Therefore, whenreplicating JSON columns to a PostgreSQL target, set the limitedlob size to twice the maximum JSON length. So, for example, ifthe JSON data is 4 KB, set the limited lob size value to 8 KB.
NCLOB
JSONB
Reading and writing JSONB data is performed using wide string(where each character occupies 2 bytes). Therefore, whenreplicating JSONB columns to a PostgreSQL target, set thelimited lob size to twice the maximum JSONB length. So, forexample, if the JSONB data is 4 KB, set the limited lob size valueto 8 KB.
NCLOB
Setup and User Guide - Qlik Replicate, November 2021 171

8 Adding and managing source endpoints
Amazon RDS for PostgreSQL data typesQlik Replicate datatypes
ARRAY NCLOB
COMPOSITE NCLOB
INT4RANGE STRING (255)
INT8RANGE STRING (255)
NUMRANGE STRING (255)
STRRANGE STRING (255)
CHARACTER VARYING If length is specified:
WSTRING (LENGTH)
If no length isspecified:
WSTRING (8000)
TINTERVAL WSTRING(255)
Homogeneous ReplicationWhen replicating from an Amazon RDS for PostrgreSQL source to a PostrgreSQL target, most of thesource and target data types will be identical. The exceptions are listed in the table below.
Additionally, in homogeneous replication, source column and table collations will be replicated to the targetas described in Column and table collation (page 173).
In homogeneous replication, the source data first passes through the Qlik Replicate data typeand is therefore subject to any limitations of that type.
For information on Replicate data types and their limitations (where relevant), see Replicatedata types (page 76).
For information on which Replicate data types the source data passes through when replicatingfrom Amazon RDS for PostgreSQL, see the Amazon RDS for PostgreSQL to Qlik Replicatedata types mapping table described earlier.
Replication of Partitioned TablesIn order to replicate partitioned tables from an Amazon RDS for PostgreSQL source to an Amazon RDS forPostgreSQL target, you need to do the following:
1. Manually create the parent and child tables in the target database.
2. Define a separate task to replicate to those tables.
3. Set the Truncate before loading option in the Full Load Settings (page 1017).
Setup and User Guide - Qlik Replicate, November 2021 172

8 Adding and managing source endpoints
Data type considerations and exceptionsWhen replicating from one Amazon RDS for PostgreSQL database to a PostgreSQL-based target (e.g.Microsoft Azure Database for PostgreSQL), source and target data types are identical, with the followingexceptions:
Tinterval datatype is not support on PostgreSQL version 13
Amazon RDS forPostgreSQL source
PostgreSQL-based target
ENUM STRING
COMPOSITE STRING
NUMERIC NUMERIC (28,6)
NUMERIC (p,s) : Anumeric array withprecision and scale.
NUMERIC: A numeric array without precision and scale.
TINTERVALAs PostgreSQL have discontinued support for the TINTERVALdata type, tables with this data type will not be created on thetarget if the target database version does not support it.
Amazon RDS for PostgreSQL and PostgreSQL data type exceptions
Column and table collationWhen replicating from Amazon RDS for PostgreSQL database to a PostgreSQL-based target database,column and table collations will be replicated to the target.
To support collation replication, the DBA must ensure that the collations defined for the sourceAmazon RDS for PostgreSQL database are the same as those defined for the PostgreSQL-based target database.
Non-nullable volumns and primary/unique index namesNon-nullable columns and Primary/Unique Index names are preserved during homogeneous replication.
Setting general connection propertiesThis section describes how to configure general connection properties. For an explanation of how toconfigure advanced connection properties, see Setting advanced connection properties.
To add an Amazon RDS for PostgreSQL endpoint source database to Qlik Replicate:
1. In the Qlik Replicate console, click Add database to open the Add Endpoints dialog box. For moreinformation on adding an endpoint to Qlik Replicate, see Defining and managing endpoints (page
Setup and User Guide - Qlik Replicate, November 2021 173

8 Adding and managing source endpoints
110).
2. In the Name field, type a name for your Amazon RDS for PostgreSQL database. This can be anyname that will help to identify the database being used.
3. In the Description field, type a description that helps to identify the Amazon RDS for PostgreSQLdatabase. This is optional.
4. Select Source as the database role.
5. Select Amazon RDS for PostgreSQL as the database Type.
When this endpoint is used as a duplicated source in a Log Stream Staging setup,select the Read changes from log stream check box and then select the relevant LogStream Staging task from the drop-down list.For information on setting up and managing Log Stream Staging tasks, see Using theLog Stream (page 919).
6. In the Server name field, specify the host name of the database instance, for example:myinstance.123456789012.us-east-1.rds.amazonaws.com
7. Optionally, change the default Port (5432).
8. Enter the Amazon RDS for PostgreSQL database authentication information (Username,Password) of an authorized Amazon RDS for PostgreSQL user. If you do not know this information,see your Amazon RDS for PostgreSQL database system manager.
Consider the following:l This information is case sensitive.l To determine if you are connected to the database you want to use or if theconnection information you entered is correct, click Test Connection.If the connection is successful a message in green is displayed. If the connectionfails, an error message is displayed at the bottom of the dialog box.To view the log entry if the connection fails, click View Log. The server log isdisplayed with the information for the connection failure. Note that this button isnot available unless the test connection fails.
Make sure that the Amazon RDS for PostgreSQL database user entered in the AmazonRDS for PostgreSQL database Authentication section has the correct access privileges.
9. Type the Database name or select one from the list of available endpoints. This is the name of theAmazon RDS for PostgreSQL database from which you are replicating data.
SSL authentication optionsIn the Security section, you can configure Replicate to connect to the Amazon RDS for PostgreSQLdatabase using SSL.
Setup and User Guide - Qlik Replicate, November 2021 174

8 Adding and managing source endpoints
l SSL Mode: Select one of the following:l Prefer - Establishes an encrypted connection if the server supports encrypted connections,falling back to an unencrypted connection if an encrypted connection cannot be established.
l Disable - Connect with a surname and password only.l Allow - Establish an encrypted connection if requested by the server.l Require - Establishes an encrypted connection if the server supports encrypted connections.The connection attempt fails if an encrypted connection cannot be established.
l Verify CA - Similar to Required, but also verifies the server Certificate Authority (CA)certificate against the configured CA certificates. The connection attempt fails if no validmatching CA certificates are found.
l Verify Full - Similar to Verify CA, but also performs host name identity verification bychecking the host name the client (i.e. Replicate) uses for connecting to the server againstthe identity in the certificate that the server sends to the client. The client checks whether thehost name that it uses for connecting matches the Common Name value in the servercertificate. The connection fails if there is a mismatch.
l Client certificate path:- The path to the client certificate requested by the server.l Secret key path - The path to the client private key file in PEM format.l CA path - The path to the Certificate Authority (CA) that issued the client certificate file in PEMformat.
l CRL path - The path to the CRL certificate. This file contains certificates revoked by certificateauthorities. If the server certificate appears in this list, the connection will fail.
l SSL compression -Select this option to compress the data before it is encrypted.
Setting advanced connection propertiesIn the Advanced tab, you can set the following properties:
l Capture DDLs: When this option is selected, the following actions occur:l Operational artifacts are created (by Replicate) in the database when the task starts. In orderto capture DDL events, Qlik Replicate creates various artifacts in the Amazon RDS forPostgreSQL database when the task starts. You can later remove these artifacts asdescribed in Removing Replicate artifacts from the Amazon RDS for PostgreSQL database(page 176).
l Streamed DDL events are captured.l Create DDL artifacts in schema: The schema in which the operational DDL database artifacts willbe created. The default value is "Public".
l WAL heartbeat: An Apply Changes task that is running but not capturing changes (due to sourcetable inactivity) will continue to occupy the LSN position in its replication slot, thereby preventingtruncation of the WAL. Since the WAL is a server-wide resource used by all Amazon RDS forPostgreSQL processes, it may grow extremely large if no changes are captured for an extendedperiod.
Setup and User Guide - Qlik Replicate, November 2021 175

8 Adding and managing source endpoints
To prevent this from happening, enable the "WAL heartbeat" option. When this option is enabled,the Amazon RDS for PostgreSQL source endpoint mimics task activity by periodically committingpseudo transactions (i.e. "Heartbeats") to the heartbeat table, thereby advancing the task slot’s LSNposition.
l Schema for heartbeat artifacts: The schema in which the WAL heartbeat table (attrep_wal_heartbeat) will be created. The default value is "public".
l Heartbeat frequency (minutes): The frequency with which to commit transactions to theheartbeat table.
Internal parametersInternal parameters are parameters that are not exposed in the UI. You should only use them if instructedby Qlik Support.
To add internal Qlik Replicate parameters:
1. Click the Internal Parameters link.The Internal Parameters dialog box opens.
2. In the edit box, type the name of the parameter you need to add and then click it.
3. The parameter is added to the table below the search box with its default value.
4. Change the default value as required.
5. To reset the parameter value to its default, click the "Restore default value" icon at the end of therow.
More optionsThese options are not exposed in the UI as they are only relevant to specific versions or environments.Consequently, do not set these options unless explicitly instructed to do so by Qlik Support or productdocumentation.
To set an option, simply copy the option into the Add feature name field and click Add. Then set the valueor enable the option according to the instructions you received.
Settings summaryYou can view a summary of your settings by clicking the Setting Summary link. This is useful if you need tosend a summary of your settings to Qlik Support.
Removing Replicate artifacts from the Amazon RDS for PostgreSQLdatabaseIn order to capture DDLs, Qlik Replicate creates various artifacts in the Amazon RDS for PostgreSQLdatabase when the task starts. When the task completes, you may wish to remove these artifacts.
To remove the artifacts, issue the following statements (in the order they appear below), where public isthe default schema in which the artifacts were created:
drop event trigger attrep_intercept_ddl;
Note that the event trigger does not belong to a specific schema.
Setup and User Guide - Qlik Replicate, November 2021 176

8 Adding and managing source endpoints
drop function public.attrep_intercept_ddl()
drop table public.attrep_ddl_audit
drop schema public
Dropping a schema should be done with extreme caution, if at all. Never drop an operationalschema, especially not public.
Setup and User Guide - Qlik Replicate, November 2021 177

8 Adding and managing source endpoints
8.5 Using ARC CDC solutions in Qlik ReplicateThis section describes how to use an ARC (Attunity Replicate Connect) CDC Solution as a Qlik Replicateendpoint.
l For better performance, it is strongly recommended that Replicate runs on Windowswhen working with an ARC-based source.
l For all ARC sources, it is strongly recommended to install the ARC Agent in the samedata center as the Replicate server.
In this section:
l Prerequisites for using ARC CDC solutions (page 179)l ARC CDC solution security considerations (page 180)l Limitations (page 182)l ARC source data type mapping (page 182)l Working with ARC CDC solutions (page 183)l Setting advanced connection properties (page 186)
Setup and User Guide - Qlik Replicate, November 2021 178

8 Adding and managing source endpoints
Prerequisites for using ARC CDC solutionsYou must have the following installed on your network and database to use ARC CDCsolution.
l ARC version 5.5 or later: This must be installed on the same computer as the database you areusing. You will need the installation kit for the computer platform that your database runs on. Forexample, if you are using an IBM IMS database, install ARC on the same mainframe computerwhere your IBM IMS database is located. For information on how to install ARC, see the AttunityReplicate Connect Installation Guide for the computer platform that is relevant to the CDC Solutionyou are working with.
l Attunity Studio version 5.3.2 or later: Attunity Studio is used to set up a CDC Solution. This willcreate the CDC Solution that can be used in the
l When the ARC database is on DB400-AS4002: To apply deletes to the target, journaling must beset to *BOTH.
l ARC relational data sources that support table ownership: If the table owner contains anunderscore, you must create the ARC solution with a default table owner.
l When the source endpoint is IBM IMS (ARC): The ARC IMS Bulk data source is always createdas IMS-DLI. You should specify the correct ARC IMS Bulk started task in the endpoint settings. TheARC USERLIB library contains the following started task examples:
l NVIMSSRV for IMS DLI accessl NVBMPSRV for IMS BMP access
Additional prerequisites when using ARC non-relational sourcesThe following prerequisites apply when using any of the Using ARC CDC agents as endpoints (page 76).
If the source tables contain Primary Keys, you must edit the source table metadata in Attunity Studio. Markthe Primary Key columns as shown in the figure below by checking off all necessary checkboxes. Thisshould be done at the start of creating the CDC solution when importing the tables/files.
Setup and User Guide - Qlik Replicate, November 2021 179

8 Adding and managing source endpoints
For more information on creating ARC Solutions, please refer to the Attunity Replicate Connect User Guideand Reference.
For information about installing the database you are working with, see the installation guidefor that database.
ARC CDC solution security considerationsFor an explanation of the security configurations and permissions necessary, see the CDC Solutionreference in the Attunity Replicate Connect User Guide and Reference.
Encrypting communications between Replicate and ARC data sourcesYou can encrypt sessions between Replicate and ARC data sources. When a session is encrypted, allcommunications between Replicate and the selected ARC data source will be encrypted using AES-256 bitencryption. When capturing changes from a relational data source, the encryption key needs to be definedin two locations: The Qlik Replicate ARC database and the ARC Agent machine. However, when capturing
Setup and User Guide - Qlik Replicate, November 2021 180

8 Adding and managing source endpoints
changes from a nonrelational database, the encryption key needs to be defined in four different locations:The Qlik Replicate ARC database, the ARC Agent machine, the ARC Router machine, and the RouterAuthenticator.
To encrypt communications between Replicate and ARC data sources:
1. On the Agent machine, create an encryption key as follows:
1. Open Attunity Studio in Design view.
2. In the Configuration tab, expand the machine on which your ARC Solution’s Agent isinstalled.
3. Expand the Users folder and select NAV.The User: NAV tab opens.
4. To the right of the Encryption Keys list (in the lower half of the screen), click the Add button.The Encryption Key dialog opens.
5. Enter an encryption key name and value and then click OK.
Steps 2-4 apply to non-relational ARC data sources only (e.g. VSAM). If you are workingwith a relational ARC data source, continue to Step 5.
2. On the Router machine, create an encryption key which has the same values as the encryption keythat you created on the Agent machine. The procedure is the same as described in Step 1, butinstead of expanding the machine on which your ARC Solution’s Agent is installed, expand themachine on which your ARC Solution’s Router is installed.
3. On the Router machine, define the Agent as an authenticator according to the following steps:
1. In the Configuration tab, expand the machine on which the Router is installed. Then, right-click your solution’s Router binding (e.g vsam_router) and select Open.
2. In the Machines tab, click the Security button.The NAV tab opens.
3. To the right of the Authenticators list, click the Add button.The Add Authenticator dialog box opens.
4. From the Resource type, drop-down list, select Adapter.
5. In the Resource name field, specify the name of your solution’s Agent as it appears underthe Adapters folder (e.g VSAM_ag).
6. At the bottom of the dialog box, select the Encryption key check box and then specify theencryption key name and value in the designated fields. These values must be the same asthe encryption key values defined in Step 1.
4. In the Router’s Properties tab, expand the comm property and set the defaultEncryptionMethodproperty to AES.
If the Properties tab is not displayed, open the Preferences dialog box (by selectingPreferences from the Windows menu), navigate to Studio and then select the Showadvanced environment parameters option in the Advanced tab.
Setup and User Guide - Qlik Replicate, November 2021 181

8 Adding and managing source endpoints
5. In the Advanced tab of the Replicate ARC database, specify the encryption key name and value.These values must be the same as the encryption key values defined in Step 1.For more information on the Advanced tab, see Using ARC CDC agents as endpoints (page 76).See also: Using ARC CDC agents as endpoints (page 76).
LimitationsWhen working with ARC data sources, the following limitations apply:
l IBM DB2 on iSeries (ARC): Table and field names that contain the "/" character are not supported.l Only one Replicate task can work with the same ARC Agent concurrently.l Replication of DDL changes to the target endpoint is not supported.
ARC source data type mappingThe table below shows the ARC source data types that are supported when using Qlik Replicate and thedefault mapping to Qlik Replicate data types.
For an explanation of the supported data types for the ARC CDC Solution you are using, see the CDCSolution reference in the Attunity Replicate Connect User Guide and Reference.
For information on how to view the data type that is mapped in the target, see the section for the targetdatabase you are using.
For additional information about Qlik Replicate data types, see Replicate data types (page 76).
ARCData Types Qlik ReplicateData Types
INT REAL4
REAL REAL4
FLOAT REAL8
BIT INT1
TINYINT INT1
SMALLINT INT2
BIGINT NUMERIC
DECIMAL NUMERIC
NUMERIC NUMERIC
MONEY NUMERIC
SMALLMONEY NUMERIC
DATETIME DATETIME
SMALLDATETIME DATETIME
CHAR STRING
AIS: ARC and Qlik Replicate data types
Setup and User Guide - Qlik Replicate, November 2021 182

8 Adding and managing source endpoints
ARCData Types Qlik ReplicateData Types
VARCHAR STRING
NCHAR STRING
NVARCHAR STRING
BINARY BYTES
VARBINARY BYTES
TIMESTAMP BYTES
UNIQUEIDENTIFER STRING
Working with ARC CDC solutionsTo use a CDC Solution from the Attunity Integration Suite, you must first create a CDC Solution in AttunityStudio. Then create a new database using the CDC Solution you created as the Qlik Replicate database.You can then use this database as your source for any task that you create. To use ARC CDC Solutions,carry out the following:
l Create an ARC CDC solution in attunity replicate connect studio (page 183)l Add the ARC data source to Qlik Replicate (page 184)l Add the ARC CDC solution endpoint to a task (page 186)
Create an ARC CDC solution in attunity replicate connect studioBefore you can begin to work with an ARC CDC Solution in Qlik Replicate, you must create a CDC solutionusing one of the supported ARC CDC Solutions using Attunity Replicate Connect Studio. For informationon the required ARC installation necessary to create a CDC solution, see Prerequisites for using ARC CDCsolutions (page 179).
To create a CDC solution in Attunity Replicate Connect Studio:
1. Using Attunity Replicate Connect Studio, create a CDC Solution using the CDC Solution that youwant to use as your source database in Qlik Replicate.For information on creating a CDC Solution, refer to the Attunity Integration Suite User Guide andReference.
2. At the end of the process for creating a CDC solution, you must deploy the solution. Do not activatethe solution. Qlik Replicate activates the solution automatically when you begin to work with theCDC Solution.
If you activate the solution, then disable the router and staging area workspaces andkeep the agent workspace enabled. For more information, see the Attunity ReplicateConnect User Guide and Reference.
Setup and User Guide - Qlik Replicate, November 2021 183

8 Adding and managing source endpoints
Add the ARC data source to Qlik Replicate
The next step is to add the ARC Data Source to Qlik Replicate. You do this by adding adatabase and selecting one of the supported ARC database types.
If you selected one of the supported relational data sources, continue from Adding a relational ARC datasource to Qlik Replicate (page 184).
If you selected one of the supported non-relational data sources, continue from Adding a non-relationalARC data source to Qlik Replicate (page 185).
See also Additional prerequisites when using ARC non-relational sources (page 179).
For information on how to add endpoints, see Defining and managing endpoints (page 110).
Adding a relational ARC data source to Qlik ReplicateTo add a relational ARC data source to Qlik Replicate:
1. In the Qlik Replicate console, click Manage Endpoint Connections to open the Manage EndpointConnections dialog box and then click New Endpoint Connection. For more information on addingan endpoint to Qlik Replicate, see Defining and managing endpoints (page 110).
2. In the Name field, type a name for your database. This can be any name that will help to identify thedatabase being used.
3. In the Description field, type a description that helps to identify the ARC CDC Solution. This isoptional.
4. Select Source as the role.
5. Select a relational ARC data source from the Type list. The ARC data sources are listed as <DataSource> (ARC). For a list of supported relational data sources, see Using ARC CDC agents asendpoints (page 76).
When this endpoint is used as a duplicated source in a Log Stream Staging setup,select the Read changes from log stream check box and then select the relevant LogStream Staging task from the drop-down list.For information on setting up and managing Log Stream Staging tasks, see Using theLog Stream (page 919).
6. In the Host/IP field, type the name or IP Address of the computer where the CDC Solution (datasource) you defined in Attunity Studio is located.
7. In the Port field, type the port number for the port you used when creating the CDC Solution inAttunity Studio. The default port number is 2551.
8. In the CDC Solution field, enter the name of the solution you defined when you created the datasource in Attunity Studio.
9. In the User name and Password fields, enter the username and password required to access thedatabase.
10. Click OK to add the database to Qlik Replicate. You can use this database as the source databasefor any replication task that you create.
Setup and User Guide - Qlik Replicate, November 2021 184

8 Adding and managing source endpoints
To determine if you are connected to the database you want to use or if the connectioninformation you entered is correct, click Test Connection.If the connection is successful a message in green is displayed. If the connection fails,an error message is displayed at the bottom of the dialog box.To view the log entry if the connection fails, click View Log. The server log is displayedwith the information for the connection failure. Note that this button is not availableunless the test connection fails.
Adding a non-relational ARC data source to Qlik ReplicateWhen you add a database to Qlik Replicate and you select a non-relational ARC data source as thedatabase type, the following dialog box opens.
To add an ARC source database to Qlik Replicate:
1. In the Qlik Replicate console, click Manage Endpoint Connections to open the Add EndpointConnections dialog box and then click New Endpoint Connection. For more information on addingan endpoint to Qlik Replicate, see Defining and managing endpoints (page 110).
2. In the Name field, type a name for your database. This can be any name that will help to identify thedatabase being used.
3. In the Description field, type a description that helps to identify the ARC CDC Solution. This isoptional.
4. Select Source as the role.
5. Select an ARC non-relational data source from the Type list. The ARC data sources are listed as<database> (ARC), for example RMS (ARC). For a list of supported non-relational data sources,see Using ARC CDC agents as endpoints (page 76).
When this endpoint is used as a duplicated source in a Log Stream Staging setup,select the Read changes from log stream check box and then select the relevant LogStream Staging task from the drop-down list.For information on setting up and managing Log Stream Staging tasks, see Using theLog Stream (page 919).
6. When working with theRMS (ARC)data source, choose one of the following Change Processingmodes:
l Non relational (the default) - When this mode is selected, Replicate reads the changes froma CSV file that contains the modified data records. Use this mode if you need to retrievechanges to arrays and variant tables.If you select this option, continue from Step 7 below.
l Relational - When this mode is selected, Replicate reads the changes directly from the ARCAgent. Relational mode improves performance but does not support changes to complexdata structures such as arrays and variant tables.If you select this option, continue from Step 6 in Adding a relational ARC data source to QlikReplicate (page 184).
Setup and User Guide - Qlik Replicate, November 2021 185
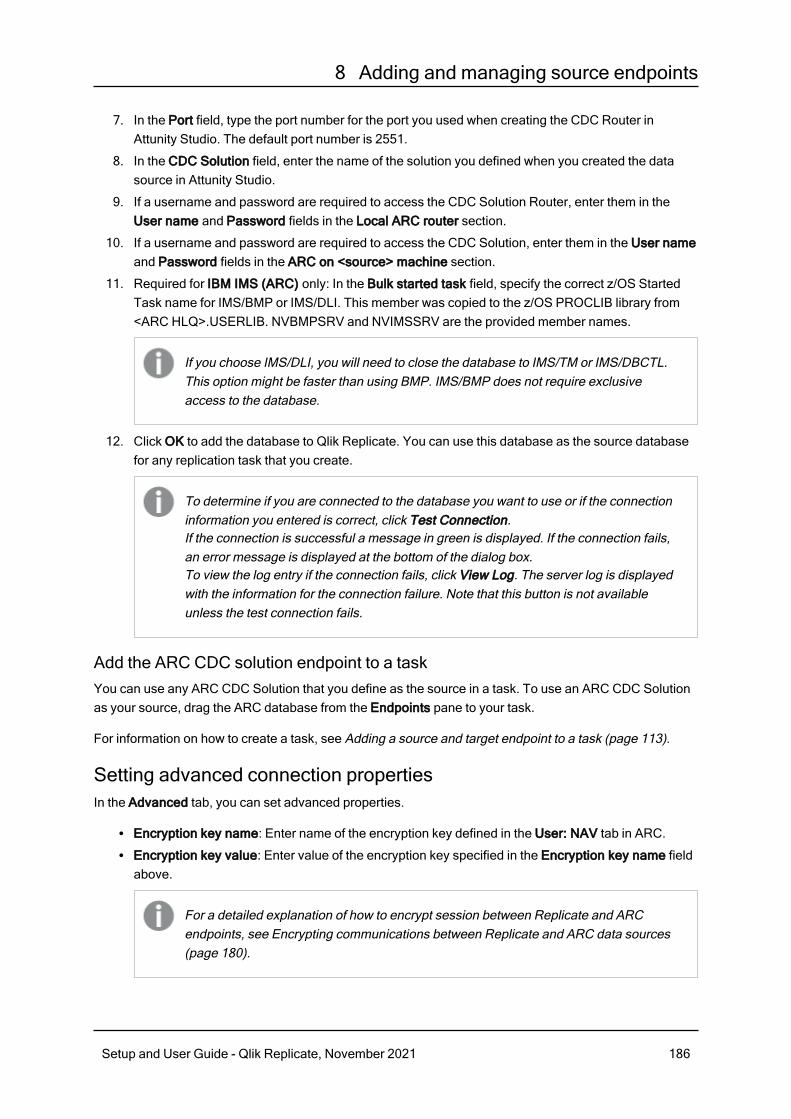
8 Adding and managing source endpoints
7. In the Port field, type the port number for the port you used when creating the CDC Router inAttunity Studio. The default port number is 2551.
8. In the CDC Solution field, enter the name of the solution you defined when you created the datasource in Attunity Studio.
9. If a username and password are required to access the CDC Solution Router, enter them in theUser name and Password fields in the Local ARC router section.
10. If a username and password are required to access the CDC Solution, enter them in the User nameand Password fields in the ARC on <source> machine section.
11. Required for IBM IMS (ARC) only: In the Bulk started task field, specify the correct z/OS StartedTask name for IMS/BMP or IMS/DLI. This member was copied to the z/OS PROCLIB library from<ARC HLQ>.USERLIB. NVBMPSRV and NVIMSSRV are the provided member names.
If you choose IMS/DLI, you will need to close the database to IMS/TM or IMS/DBCTL.This option might be faster than using BMP. IMS/BMP does not require exclusiveaccess to the database.
12. Click OK to add the database to Qlik Replicate. You can use this database as the source databasefor any replication task that you create.
To determine if you are connected to the database you want to use or if the connectioninformation you entered is correct, click Test Connection.If the connection is successful a message in green is displayed. If the connection fails,an error message is displayed at the bottom of the dialog box.To view the log entry if the connection fails, click View Log. The server log is displayedwith the information for the connection failure. Note that this button is not availableunless the test connection fails.
Add the ARC CDC solution endpoint to a taskYou can use any ARC CDC Solution that you define as the source in a task. To use an ARC CDC Solutionas your source, drag the ARC database from the Endpoints pane to your task.
For information on how to create a task, see Adding a source and target endpoint to a task (page 113).
Setting advanced connection propertiesIn the Advanced tab, you can set advanced properties.
l Encryption key name: Enter name of the encryption key defined in the User: NAV tab in ARC.l Encryption key value: Enter value of the encryption key specified in the Encryption key name fieldabove.
For a detailed explanation of how to encrypt session between Replicate and ARCendpoints, see Encrypting communications between Replicate and ARC data sources(page 180).
Setup and User Guide - Qlik Replicate, November 2021 186

8 Adding and managing source endpoints
l Fixed NAT: Select this to indicate that the connection is made with a fixed network addresstranslation.
l Timeout: Enter the amount of time, in seconds, to wait for interactions before disconnecting. 0indicates that the system does not timeout. The default value is 0.
l Event wait: Enter the maximum amount of time (in seconds) to wait for a change event to take placebefore the system times out. The default value is 300.
l CDC batch size: Enter the maximum number of change events that can be transferred in a singlebatch. The default value is 200.
l Bulk batch size: Enter the unloading batch size. The default value is 100.l Trace: Select this to enable tracing for the change processing.
Internal parametersInternal parameters are parameters that are not exposed in the UI. You should only use them if instructedby Qlik Support.
To add internal Qlik Replicate parameters:
1. Click the Internal Parameters link.The Internal Parameters dialog box opens.
2. In the edit box, type the name of the parameter you need to add and then click it.
3. The parameter is added to the table below the search box with its default value.
4. Change the default value as required.
5. To reset the parameter value to its default, click the "Restore default value" icon at the end of therow.
More optionsThese options are not exposed in the UI as they are only relevant to specific versions or environments.Consequently, do not set these options unless explicitly instructed to do so by Qlik Support or productdocumentation.
To set an option, simply copy the option into the Add feature name field and click Add. Then set the valueor enable the option according to the instructions you received.
Settings summaryYou can view a summary of your settings by clicking the Setting Summary link. This is useful if you need tosend a summary of your settings to Qlik Support.
Setup and User Guide - Qlik Replicate, November 2021 187

8 Adding and managing source endpoints
8.6 Using a file as a sourceThis section describes how to set up and use delimited text files as a source in a replication task. You canuse the File target endpoint to export database tables to files, which can then be used as a source in aReplicate task with a File source endpoint.
In this section:
l General overview (page 189)l File source overview (page 189)l Prerequisites (page 192)l Limitations (page 192)l Setting general connection properties (page 192)l Setting advanced options (page 200)
Setup and User Guide - Qlik Replicate, November 2021 188

8 Adding and managing source endpoints
General overviewThe Replicate File endpoint can be used either as a source or as a target. When used as a source, the Fileendpoint requires the source files to be in delimited text file format. When used as a target, the Fileendpoint generates the data files either in delimited text file format (CSV) or in JSON format (according tothe format selected in the endpoint settings).
Delimited text files are used to store data in tabular format. Examples of delimited text file formats includethe CSV (Comma Separated Values) and TSV (Tab Separated Values) formats. Some organizations mayimplement procedures that export data from a database to a delimited text file while others may simplyprefer this format as a convenient way of storing tabular data.
In a delimited text file, each record in the table occupies a separate row. Delimiters are used to mark thebeginning of a new row or the beginning of a new column. Virtually any character can be used as adelimiter, although a newline (\n) is often used to separate rows, and commas are commonly used toseparate columns.
In JSON files, each record is represented by a single line.
So, for example, the following table:
book_id title price is_hardcover
123 Angels 6.99 false
456 The Fallen 6.49 true
789 Rise Up 7.23 true
JSON data format example
Will be represented as:
{ "book_id": 123, "title": "Angels", "price": 6.99, "is_hardcover": false }
{ "book_id": 456, "title": "Fallen", "price": 6.49, "is_hardcover": true }
{ "book_id": 789, "title": "Rise Up", "price": 7.23, "is_hardcover": true }
See also File source overview (page 189) and File target overview (page 573).
File source overviewWhen you configure the File Source endpoint in Replicate, you need to specify which row and columndelimiters are used in your CSV source files as well as which characters are used to enclose columnscontaining delimiters. You may also need to specify which character is used to escape columns enclosedin double-quotes (should such columns exist in your source files). If you have previously used Replicate totransfer endpoint tables to files and you now wish to use those files as a source in another task, then youshould specify the same delimiters (i.e. that were used to generate target files).
For more information, see Setting general connection properties (page 192).
Setup and User Guide - Qlik Replicate, November 2021 189

8 Adding and managing source endpoints
Three types of delimited files are used in the Replicate Source File endpoint:
l Full load files (page 190)l Change files (page 191)l Reference files (page 190)
Reference filesChange Files can either reside in a single location or in multiple locations. To access Change Files thatreside in different locations and/or that do not include the target table names, you need to use a ReferenceFile. If the rows in the Change File(s) contain the names of the tables to which to apply the changes, thenthe Reference File only needs to contain the paths to the Change Files. If each Change File containschanges for a single table, then each of the Change File paths in the Reference File needs to be precededby the name of its corresponding target table.
For more information on Reference File and Reference File formats, see Change Processing.
Each row in the Reference File should be formatted as follows:
[<table_name>],<full path to Change File>
Where [<table_name>] is required only if the referenced Change File contains changes for a singletable.
Reference File names cannot exceed 70 characters (no such limitation exists for the pathlength). Reference File names that exceed 70 characters will be ignored and appropriatewarning will be written to the log.
Reference File: Each Change File contains changes for a single table:table1,c:\temp\cdc1.csv
table2,c:\temp\cdc2.csv
table3,c:\temp\cdc3.csv
Reference File: Each Change File contains changes for multiple tables:c:\temp\cdc1.csv
c:\temp\cdc2.csv
c:\temp\cdc3.csv
Full load filesFull Load Files are used to populate the empty source tables with data. Full Load Files should only containthe table data. The source tables themselves are created using the External Table Editor provided in theFile source endpoint configuration. Both the tables and their data are replicated to the target endpointduring the Full Load stage of the Replicate task.
Example of a Full Load Data File
Setup and User Guide - Qlik Replicate, November 2021 190

8 Adding and managing source endpoints
22,January,2014,male,5463565
12,May,2011,female,3236776
9,March,2009,male,9648675
For more information on Full Load data files and creating tables, see Defining tables and full load data(page 197).
Change filesA Change File is a delimited text file that contains a record of DML changes - represented as rows - toapply to the specified target tables. Replicate reads the Change File(s) and applies the changes to therelevant target tables, which can either be specified in the Change File itself or in a Reference File (seeReference files (page 190) below for details). Change Files are picked up from the source directoryaccording to their modification date, thereby ensuring that the changes will be processed in the propersequence.
The Change File modification date must be both newer than the task start timestamp andnewer than the last processed Change File.
Each row in a Change File consists of the following delimited columns:
l (Optional) The change operation e.g. DELETE. If the operation field is absent, INSERT is assumed.l The name of the target table to which to apply the change (only required if the Change File containschanges for multiple tables)
l (Optional) The timestamp of the change i.e. when the change occurredl (Optional) The user who applied the changel The data to change (one or more columns)
Change Files can either contain changes for multiple tables or for a single table, as shown in the examplesbelow.
To access Change Files that reside in different locations and/or that do not include the targettable names, you need to use a Reference File. For more information on Reference Files, seeReference files (page 190).
Change File names cannot exceed 70 characters (no such limitation exists for the path length).Change File names that exceed 70 characters will be ignored and appropriate warning will bewritten to the log.
Change File that contains changes for multiple tablesINSERT,table1,ts1,user,dog,cat,bird
INSERT,table2,ts1,user,dog,cat,bird
Setup and User Guide - Qlik Replicate, November 2021 191

8 Adding and managing source endpoints
DELETE,table3,ts1,user,dog,cat,bird
Change File that contains changes for a single tableINSERT,,ts1,user,dog,cat,bird
INSERT,,ts1,user,dog,cat,bird
DELETE,,ts1,user,dog,cat,bird
PrerequisitesBefore you begin to work with a File as a source in Qlik Replicate, make sure that the followingprerequisites have been met:
l Qlik Replicate installed in your networkl Change Files, Full Load files and Reference Files should be in delimited text file formatl Source files (including the Reference File) should be accessible from the Qlik Replicate machine.
LimitationsThe following limitations apply to the File source:
l Change Files that are currently being used in a Replicate task cannot be modified while the task isin progress.
l Stopping a Full Load task and then starting it again will start the task from the beginning (and notfrom the point at which it was stopped).
l Reload from timestamp is not supportedl Reloading a table during Change Processing is not supported
Setting general connection propertiesYou can add a File endpoint to Qlik Replicate to use as a source. For information on how to add endpoints,see Defining and managing endpoints (page 110).
To add a File source endpoint to Qlik Replicate:
1. In Tasks view, click Manage Endpoint Connections to open the Manage Endpoints Connectionsdialog box. Then click the New Endpoint Connection button.
2. In the Name field, type a name for your endpoint. This can be any name that will help to identify theendpoint being used.
3. In the Description field, type a description that helps to identify the File endpoint. This is optional.
4. Select Source as the endpoint role.
5. Select File as the endpoint Type.
Setup and User Guide - Qlik Replicate, November 2021 192

8 Adding and managing source endpoints
When this endpoint is used as a duplicated source in a Log Stream Staging setup,select the Read changes from log stream check box and then select the relevant LogStream Staging task from the drop-down list.For information on setting up and managing Log Stream Staging tasks, see Using theLog Stream (page 919).
6. Configure the settings in the General tab as described in the table below.
Option Description
File Format -
Field Delimiter The delimiter used to separate columns in the source files.The default is a comma.
Example:
mike,male
Record delimiter The delimiter used to separate records (rows) in the sourcefiles. The default is a carriage return (\n).
Example (Using an asterisk as the row delimiter)
mike,male*sara,female
Null value The character used to indicate a null value in the source files.
Example (where * is the row delimiter and @ is the nullvalue):
mike,male,295678*sara,female,@
Quote character The character used at the beginning and end of a column thatcontains the column delimiter character. The default is thedouble-quote character ("). When a column that containscolumn delimiters is enclosed in double-quotes, the columndelimiter characters are interpreted as actual data, and not ascolumn delimiters.
Example (where a comma is the column delimiter):
"sunroof, power-steering"
General tab settings
Setup and User Guide - Qlik Replicate, November 2021 193
8 Adding and managing source endpoints
Option Description
Escape character The character used to escape a string when both the stringand the column containing the string are enclosed in quotationmarks. Note that the string’s quotation marks will be removedunless they are escaped.
Example (where " is the quote character and \ is the escapecharacter):
1955,"old, \"rare\", Chevrolet",$1000
Code page Specify the code page of your source files if it is different fromthe default (65001).
Windows and Linux systems use different codepage conventions. The specified code page mustcomply with the code page convention of thesource file system.
Ignore records Optionally, specify which header and footer rows in the sourcefiles to ignore. Make sure that the header and footer rows toignore do not contain actual data.
The specified number will be ignored in Full Loadtasks only.
Change Processing
Changes cannot becaptured from ChangeFiles that are presentduring the Full Loadoperation. Consequently,the Change Files shouldbe placed in their sourcelocation(s) only after FullLoad completes.
-
Setup and User Guide - Qlik Replicate, November 2021 194

8 Adding and managing source endpoints
Option Description
Folder Select this option if your Change Files contain the target tablenames and reside in a single folder. Then specify the folderlocation in the designated field. You can optionally usewildcard characters to only process files that match thespecified pattern.
Example:
c:\temp\*changes.CSV
See also: Change files (page 191).
Use Reference Files Select this option if you are using Reference Files to point tothe location of the Change Files. Then specify one of thefollowing:
l The path to the Reference Filesl The path to a specific Reference Filel A path with a wildcard pattern that matches theReference File names (e.g. C:\Reference Files\*.csv)
The folder can either contain a single reference file (which iscontinually appended with the Change File locations) ormultiple reference files.
For information on when Reference Files should be used, seeReference files (page 190).
Change File path is preceded by tablename
Select this option if each of the Change File paths in thereference files is preceded by a table name.
Selecting this option will disable the Table namecheck box in the Header columns ordinal positionsection.
Setup and User Guide - Qlik Replicate, November 2021 195
8 Adding and managing source endpoints
Option Description
Header column order Specify the position of each header column in your ChangeFiles. Apart from the data columns which must be positionedafter the header columns, the columns can be positioned inany order.
So, for example, if your Change Files looked liked this:
DELETE,table1,timestamp,user1,dog,cat,bird
Then, the column positions would be set as follows:
Operations are in column: 1
Table names are in column: 2
Timestamps are in column: 3
User names are in column: 4
Start data from column: 5
For more information on the columns, see Change files (page191).
See also Changing the ordinal positions of the user name andtimestamp columns (page 196).
Start data from column: Specify which column to start the actual data from. Note thatdata columns must be positioned after header columns. Seethe example in the description of the Header column orderfield above.
Changing the ordinal positions of the user name and timestamp columnsTo change the ordinal positions of the "User name" and "Timestamp" columns, you first need to define twotransformations (one for each column) that add the $AR_H_TIMESTAMP and $AR_H_USER headercolumns to the Change Files.
To add the columns to a single table (i.e. Change File):
1. Open the Table Settings window as described in Defining transformations for a single table/view(page 931).
2. Select the Transform tab and then click Add Column.A new row will be added to the Output table.
3. Click the button at the end of the row (in the Expression column).
This will open the Expression Builder Window.
4. Select the column from the Header Columns tab and then click OK.
Setup and User Guide - Qlik Replicate, November 2021 196

8 Adding and managing source endpoints
5. Specify a name for the column. For example, if you selected the $AR_H_TIMESTAMP headercolumn, specify "Timestamp".
6. Repeat Steps 1-5 to add the other header column.
7. Click OK to close the Table Settings window.
To add the header column to all tables (i.e. Change Files):
1. Open the Global Transformation Rules window as described in Starting the Global TransformationRules wizard (page 955).
2. Click Next twice until you get to the How to transform screen.
3. Click the Browse button next to the Computation expression field.This will open the Expression Builder Window.
4. Select the column from the Header Columns tab and then click OK.
5. Specify a name for the column. For example, if you selected the $AR_H_TIMESTAMP headercolumn, specify "Timestamp".
6. Click Finish.
7. Repeat steps 1-6 to add the other header column.
To determine if you are connected to the endpoint you want to use or if the connectioninformation you entered is correct, click Test Connection.
If the connection is successful a message in green is displayed. If the connection fails, an errormessage is displayed at the bottom of the dialog box.
To view the log entry if the connection fails, click View Log. The server log is displayed with theinformation for the connection failure. Note that this button is not available unless the testconnection fails.
Defining tables and full load dataIn the Tables tab, you specify the location of your Full Load data files and define how the source tables willbe created. During Full Load, Replicate will copy the source tables to the target endpoint.
To define a table:
1. In the Tables tab, click New Table.The New Source Table window opens.
2. In the Table name field, specify the name of the table.
3. In the Location of full load data file(s) field, specify location of the delimited text files that containyour full load data. Wildcard characters are supported.
4. To add a field, click Add Field. Then, click the default column name to edit it.
5. To specify a data type, select the row and then select a type from the drop-down list in the Typecolumn.
Setup and User Guide - Qlik Replicate, November 2021 197

8 Adding and managing source endpoints
6. When the CLOB, NCLOB, STRING, or WSTRING data types are selected, you can also set a datasubtype. Select either JSON or XML from the drop-down list n the Subtype column. Make sure thatthe new data in the column will be compatible with the selected subtype. The default is Regular,which means that the selected data type will be used without a subtype.
7. (Optional) Click in the Key column to add or remove a Unique Index to/from a column.
8. To create the table, click OK.The table will be added to the list of tables in the Tables tab.See also the example for Creating a Table (page 198).
To edit a field:
l Double-click the column in the New/Edit Source Table dialog box and then edit the values asdescribed above.
To delete a field:
l Select the column in the New/Edit Source Table dialog box and then click the Delete Field button.
To change the position of a field:
l Select the field and then click the Up/Down and Move to Top/Move to Bottom buttons as required.
To edit a table:
l In the Tables tab, either double-click the table or select the table and then click the Edit button. Editthe table as described above.
To delete a table:
l In the Tables tab, select the table and then click the Delete button.
Creating a TableThe source table definition must match the column data values in the Full Load file(s). So, for example, ifthe Full Load data file contains the following delimited columns:
22,January,2014,male,5463565
12,May,2011,female,3236776
9,March,2009,male,9648675
30,June,2002,female,3458795
Boolean values must be expressed as the digits 1 (TRUE) or 0 (FALSE) and not TRUE orFALSE.
Then the table definitions would look something like this:
Setup and User Guide - Qlik Replicate, November 2021 198

8 Adding and managing source endpoints
Setup and User Guide - Qlik Replicate, November 2021 199

8 Adding and managing source endpoints
Setting advanced optionsIn the Advanced tab, the following options are available.
Option Description
Filepreprocessingcommand
The source file must be in delimited text format. If your source files (Full Load and/orChange Files) are not in delimited text format, you can use your own program toconvert them to the required format.
Before the Full Load task starts, the program will be executed on Location of full loaddata file(s). Then, during Change Processing, it will be executed on the filesspecified in the Change File location.
The command should be specified as in the following example:
c:\temp\files\convertfile.exe
The path is only necessary if the conversion program’s location is notdefined in the "Path" system variable
For a detailed explanation, see Setting up a File Pre-processing Command (page200).
Check forchanges every
Specify how often to check the Change Files for updates.
ChangeProcessingCleanup
Select one of the following cleanup options to determine what Replicate should dowith the processed Change Files/Reference Files:
l Do nothing - to leave the file(s) in the original location.l Delete files - to delete the file(s) from the disk.l Archive files to folder - to archive the file(s) to the specified location.
In the case of Reference Files, the Delete files and Archive filesto folder operations will only be performed if there are multiplereference files.
Advanced tab settings
Setting up a File Pre-processing CommandYour program will be executed on each of the input files, and should accept the following parameters:
l The location of the input file(s) (as specified in the Location of full load data file(s) and/or theChange File location)
l The full path of the output fileThe output file(s) will be written to the following location:
Setup and User Guide - Qlik Replicate, November 2021 200

8 Adding and managing source endpoints
PRODUCT_INSTALLATION\data\tasks\TASK_NAME\trans_files\OUTPUT_FILE_NAME
(s)
Where OUTPUT_FILE_NAME(s) are determined by your program.
Example:
Let's assume the following:
l The following files reside in the Location of full load data file(s):c:\temp\fl\table1.csv,c:\temp\fl\table2.csv
l The following files reside in the Change File location:c:\temp\cdc\table1.txtc:\temp\cdc\table2.txt
l The following program is specified in the File preprocessing command field:c:\temp\convertfile.exe
l Both the Full Load and Apply Changes replication options are enabled.
In such a scenario, Replicate will execute the following commands in sequence:
Before Full Load Starts:
c:\temp\convertfile.exe c:\temp\fl\table1.csv <PRODUCT_
INSTALLATION>\data\tasks\TASK_NAME\trans_files\table1.csv
c:\temp\convertfile.exe c:\temp\fl\table2.csv <PRODUCT_
INSTALLATION>\data\tasks\TASK_NAME\trans_files\table2.csv
During Change Processing:
c:\temp\convertfile.exe c:\tempcdc\table1.txt <PRODUCT_
INSTALLATION>\data\tasks\TASK_NAME\trans_files\table1.txt
c:\temp\convertfile.exe c:\tempcdc\table2.txt <PRODUCT_
INSTALLATION>\data\tasks\TASK_NAME\trans_files\table2.txt
Internal parametersInternal parameters are parameters that are not exposed in the UI. You should only use them if instructedby Qlik Support.
To add internal Qlik Replicate parameters:
1. Click the Internal Parameters link.The Internal Parameters dialog box opens.
2. In the edit box, type the name of the parameter you need to add and then click it.
3. The parameter is added to the table below the search box with its default value.
4. Change the default value as required.
5. To reset the parameter value to its default, click the "Restore default value" icon at the end of therow.
Setup and User Guide - Qlik Replicate, November 2021 201

8 Adding and managing source endpoints
More optionsThese options are not exposed in the UI as they are only relevant to specific versions or environments.Consequently, do not set these options unless explicitly instructed to do so by Qlik Support or productdocumentation.
To set an option, simply copy the option into the Add feature name field and click Add. Then set the valueor enable the option according to the instructions you received.
Settings summaryYou can view a summary of your settings by clicking the Setting Summary link. This is useful if you need tosend a summary of your settings to Qlik Support.
Setup and User Guide - Qlik Replicate, November 2021 202

8 Adding and managing source endpoints
Setup and User Guide - Qlik Replicate, November 2021 203

8 Adding and managing source endpoints
8.7 Using Google Cloud SQL for MySQL as a sourceThis section describes how to set up and use Google Cloud SQL for MySQL as a source in a replicationtask.
In this section:
l Prerequisites (page 205)l Limitations and considerations (page 205)l Security requirements (page 206)l Data types (page 207)l Setting general connection properties (page 210)l Selecting a schema (page 212)l Setting advanced connection properties (page 212)
Setup and User Guide - Qlik Replicate, November 2021 204

8 Adding and managing source endpoints
PrerequisitesBefore using Google Cloud SQL for MySQL as an endpoint in a Replicate task, make sure theprerequisites outlined below have been met.
Client prerequisitesInstall MySQL ODBC Unicode Driver 64-bit on the Replicate Server machine.
Only these driver versions are supported:
l 5.3.11 to 5.3.13l 8.0.23 to 8.0.25
Linux only:
Make sure that the /etc/odbcinst.ini file contains an entry for MySQL, as in the following example:
[MySQL ODBC 5.3.13 Unicode Driver]Driver = /usr/lib64/libmyodbc5w.soUsageCount = 1
Google Cloud SQL for MySQL replicationReplication enables data from one Google Cloud SQL for MySQL database server (the primary server) tobe copied to one or more Google Cloud SQL for MySQL database servers (the secondary servers).
The Replicate Google Cloud SQL for MySQL source endpoint can be configured to replicate data fromeither a the primary server or a secondary server.
To replicate changes from a secondary server (CDC), the binary logging parameter log_slave_updatesneeds to be set to true (1).
Verifying that Google Cloud SQL for MySQL is set up for CDC (Change DataCapture)Google Cloud SQL for MySQL enables binary logging (i.e. CDC) by default. To check that binary logging isindeed enabled, make sure that the Google Cloud SQL for MySQL database binlog_row_imageparameter is set to full.
Replicating 4-byte UTF8 emojisReplication of 4-byte UTF8 emojis to certain targets requires the following preparation:
l Microsoft SQL Server Target: Transform the emojis from WSTRING(n) to WSTRING(n*2).l Amazon Redshift Target: Transform the emojis from WSTRING(n) to WSTRING(n*2).
For information on defining transformations, see Using the Transform tab (page 933).
Limitations and considerationsThe following limitations apply:
Setup and User Guide - Qlik Replicate, November 2021 205

8 Adding and managing source endpoints
l The following DDLs are not supported:l All partition DDLsl Drop Tablel Rename Table
l Changes that are older than one year will not be captured.l Using the alter table <table_name> add column <column_name> statement to addcolumns to the beginning or to the middle of a table is not supported. When the alter table
<table_name> add column <column_name> statement is used to add a column to the middleof a table, the column will be added to the end of the table instead.
l The AR_H_USER header column is currently not supported. For information on using headercolumns, see Headers (page 991).
l If an Google Cloud SQL for MySQL table contains LOBs and the task's Replicate Lob columnsoption is disabled, the table will be replicated without the LOB columns. Note that this only applies toMEDIUMBLOB, LONGBLOB, MEDIUMTEXT and LONGTEXT columns. This limitation does notapply to BLOB, TINYBLOB, TEXT and TINYTEXT columns.
l If the Google Cloud SQL for MySQL database is stopped during Full Load, the Full Load will endsuccessfully, but the tables on the target may have less rows than the source tables. If this shouldhappen, either restart the task or reload the tables with the missing rows.
l A Unique Index/Primary Key created on only part of the column data is not supported. If such aUnique Index/Primary Key is encountered, it will be created on the entire target column.The following is an example of a statement that creates a Unique Index/Primary Key using only partof the column data:CREATE INDEX partial_name ON customer (name(10));
l Changes to computed (virtual) columns will not be captured.l Replicate supports zero dates only if both the source and target MySQL-based databases areconfigured with the same "Strict Mode" (On or Off). If this is not the case, zero dates can betransformed to non-zero dates using the transformation feature.
l The Transaction ID of XA transactions will not be displayed in the Replicate ChangeTable/AuditTable transaction_id header.
l Binary log transaction compression is not supported.l The MySQL primary-primary configuration is not supported.
Security requirementsThe Qlik Replicate user must have the ReplicationAdmin role with the following privileges (according totask type):
l REPLICATION CLIENT - Required for Change Processing tasks only. In other words, Full Loadonly tasks do not require this privilege.
l REPLICATION SLAVE - Required for Change Processing tasks only. In other words, Full Load onlytasks do not require this privilege.
l SUPER - Only required in versions prior to Google Cloud SQL for MySQL 5.6.6.
The Qlik Replicate user must also have SELECT privileges for the source tables designated for replication.
Setup and User Guide - Qlik Replicate, November 2021 206
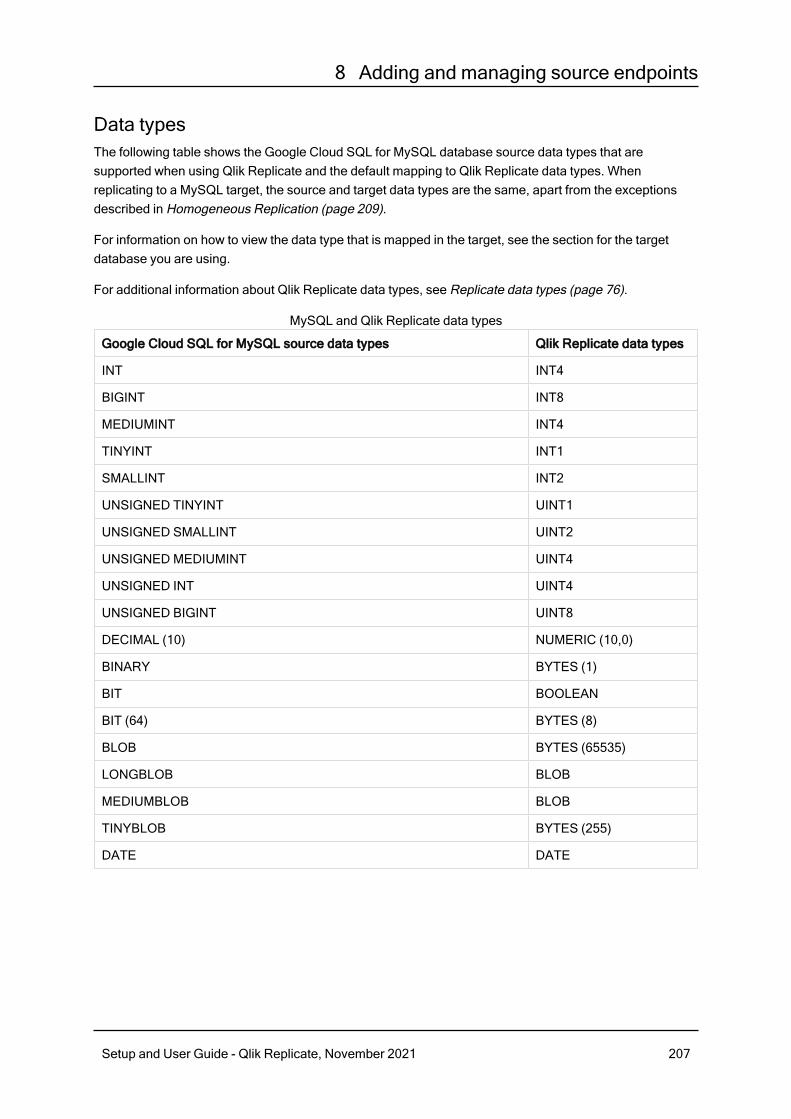
8 Adding and managing source endpoints
Data typesThe following table shows the Google Cloud SQL for MySQL database source data types that aresupported when using Qlik Replicate and the default mapping to Qlik Replicate data types. Whenreplicating to a MySQL target, the source and target data types are the same, apart from the exceptionsdescribed in Homogeneous Replication (page 209).
For information on how to view the data type that is mapped in the target, see the section for the targetdatabase you are using.
For additional information about Qlik Replicate data types, see Replicate data types (page 76).
Google Cloud SQL for MySQL source data types Qlik Replicate data types
INT INT4
BIGINT INT8
MEDIUMINT INT4
TINYINT INT1
SMALLINT INT2
UNSIGNED TINYINT UINT1
UNSIGNED SMALLINT UINT2
UNSIGNEDMEDIUMINT UINT4
UNSIGNED INT UINT4
UNSIGNED BIGINT UINT8
DECIMAL (10) NUMERIC (10,0)
BINARY BYTES (1)
BIT BOOLEAN
BIT (64) BYTES (8)
BLOB BYTES (65535)
LONGBLOB BLOB
MEDIUMBLOB BLOB
TINYBLOB BYTES (255)
DATE DATE
MySQL and Qlik Replicate data types
Setup and User Guide - Qlik Replicate, November 2021 207

8 Adding and managing source endpoints
Google Cloud SQL for MySQL source data types Qlik Replicate data types
DATETIME
DATETIME without a parenthetical value is replicated withoutmilliseconds, whereas DATETIME with a value of 1-5 - e.g.DATETIME(5) - is replicated with milliseconds.
When replicating a DATETIME column, the time remains thesame on the target (i.e. it is not converted to UTC).
DATETIME
TIME STRING
TIMESTAMP
When replicating a TIMESTAMP column, the time isconverted to UTC on the target.
DATETIME
YEAR INT2
DOUBLE REAL8
FLOAT
If the FLOAT values are not in the range specified below, use atransformation to map FLOAT to STRING. For an explanation of how todo this, see Using the Transform tab (page 933).
Supported FLOAT range:
- 1.79E+308 to -2.23E-308, 0
and
2.23E-308 to 1.79E+308
REAL (DOUBLE)
*VARCHAR (45) WSTRING (45)
*VARCHAR (2000) WSTRING (2000)
*VARCHAR (4000) WSTRING (4000)
VARBINARY (4000) BYTES (4000)
VARBINARY (2000) BYTES (2000)
*CHAR WSTRING
*TEXT WSTRING (65535)
*LONGTEXT NCLOB
Setup and User Guide - Qlik Replicate, November 2021 208

8 Adding and managing source endpoints
Google Cloud SQL for MySQL source data types Qlik Replicate data types
*MEDIUMTEXT NCLOB
*TINYTEXT WSTRING (255)
GEOMETRY BLOB
POINT BLOB
LINESTRING BLOB
POLYGON BLOB
MULTIPOINT BLOB
MULTILINESTRING BLOB
MULTIPOLYGON BLOB
GEOMETRYCOLLECTION BLOB
ENUM WSTRING (Length)
Where "Length" is thelongest value in the ENUM.
SET WSTRING (Length)
Where "Length" is the totalof all values in the SET,including commas.
JSON CLOB
If the DATETIME and TIMESTAMP data types are specified with a “zero” value (i.e. 0000-00-00), you need to make sure that the target database in the replication task supports "zero"values for the DATETIME and TIMESTAMP data types. If they are not supported, you can usea transformation to specify a supported value (e.g. 1970.) Otherwise, they will be recorded asnull on the target.
Homogeneous ReplicationThe following section describes how Replicate handles replication between an Google Cloud SQL forMySQL source and an Google Cloud SQL for MySQL target (i.e. homogeneous replication).
Setup and User Guide - Qlik Replicate, November 2021 209

8 Adding and managing source endpoints
l In homogeneous replication, the source data first passes through the Qlik Replicatedata type and is therefore subject to any limitations of that type.For information on Replicate data types and their limitations (where relevant), seeReplicate data types (page 76).For information on which Replicate data types the source data passes through whenreplicating from Google Cloud SQL for MySQL, see the Google Cloud SQL for MySQLto Qlik Replicate data types mapping table described earlier.
l When replicating a TIMESTAMP column, the time is converted to UTC on the target.
Data typesWhen replicating to an Google Cloud SQL for MySQL target endpoint, the data types will be identical withthe following exceptions:
Google Cloud SQL for MySQL source data types Google Cloud SQL for MySQL target data types
JSON LONGTEXT
MySQL source and target data types
When using data types from other database engines, the data type on the target will be thecorresponding MySQL data type. For more information on using non-native data types, refer tothe MySQL online Help.
CollationWhen replicating from one Google Cloud SQL for MySQL endpoint to another, table and column collationswill be replicated to the target. Collatable data types are indicated by an asterisk (*) in Table 11–3 above.
To support collation replication, the DBA must ensure that the collations defined for the source GoogleCloud SQL for MySQL database are the same as those defined for the target Google Cloud SQL forMySQL database.
Non-nullable columns and Primary/Unique index namesNon-nullable columns and Primary/Unique Index names are preserved during homogeneous replication.
Setting general connection propertiesThis section describes how to configure general connection properties. For an explanation of how toconfigure advanced connection properties, see Setting advanced connection properties.
You can also use Google Cloud SQL for MySQL files as a source. For more information, seeUsing the Qlik Replicate file channel (page 908).
To add an Google Cloud SQL for MySQL source endpoint to Qlik Replicate:
Setup and User Guide - Qlik Replicate, November 2021 210

8 Adding and managing source endpoints
1. In the Qlik Replicate Console, click Manage Endpoint Connections to open the Manage EndpointsConnections dialog box. Then click the New Endpoint Connection button. For more information onadding an endpoint to Qlik Replicate, see Defining and managing endpoints (page 110).
2. In the Name field, type a name for your endpoint. This can be any name that will help to identify thedatabase being used.
3. In the Description field, type a description that helps to identify the Google Cloud SQL for MySQLdatabase. This is optional.
4. Select Source as the endpoint role.
5. From the Type drop-down list, select Google Cloud SQL for MySQL.
When this endpoint is used as a duplicated source in a Log Stream Staging setup,select the Read changes from log stream check box and then select the relevant LogStream Staging task from the drop-down list.For information on setting up and managing Log Stream Staging tasks, see Using theLog Stream (page 919).
6. In the Server field, enter the host name or IP address of the computer on which the Google CloudSQL for MySQL database is installed.
7. Optionally, change the default port (3306).
8. Type the Google Cloud SQL for MySQL authentication information (Username, Password) for theauthorized user for this Google Cloud SQL for MySQL database. If you do not know this information,see your Google Cloud SQL for MySQL database Administrator (DBA).
l The User Name, Password are case sensitive.l Passwords containing curly brackets are not supported i.e. {}.
Make sure that the Google Cloud SQL for MySQL user entered in the Google CloudSQL for MySQL Authentication section has the correct access privileges. Forinformation on how to provide the required privileges, see Security requirements (page206).
SSL authentication optionsIn the Security section, you can configure Replicate to connect to the Google Cloud SQL for MySQLdatabase using SSL.
l SSL Mode: Select one of the following:l Preferred - Establishes an encrypted connection if the server supports encryptedconnections, falling back to an unencrypted connection if an encrypted connection cannot beestablished.
l None - Connect with a surname and password only.l Required - Establishes an encrypted connection if the server supports encryptedconnections. The connection attempt fails if an encrypted connection cannot be established.
Setup and User Guide - Qlik Replicate, November 2021 211

8 Adding and managing source endpoints
l Verify CA - Similar to Required, but also verifies the server Certificate Authority (CA)certificate against the configured CA certificates. The connection attempt fails if no validmatching CA certificates are found.
l Verify Full - Similar to Verify CA, but also performs host name identity verification bychecking the host name the client (i.e. Replicate) uses for connecting to the server againstthe identity in the certificate that the server sends to the client. The client checks whether thehost name that it uses for connecting matches the Common Name value in the servercertificate. The connection fails if there is a mismatch.
l Client certificate path - The path to the client certificate requested by the server.l Private key path - The path to the client private key file in PEM format.l CA path - The path to the Certificate Authority (CA) that issued the client certificate file in PEMformat.
Selecting a schemaYou can choose which Google Cloud SQL for MySQL database to access. After configuring the GoogleCloud SQL for MySQL source database connection settings, open the Select Tables dialog box (byclicking the Table Selection button on the right of the console) and select which schema to use from theSchema drop down list.
See also Defining and managing tasks (page 104).
Setting advanced connection propertiesIn the Advanced tab, you can set the following parameters:
l Check binary log for new events every: Specify how often to check the binary log for changeswhen the endpoints is idle.
l Additional ODBC connection properties: Specify any additional ODBC connection parameters thatmay be required.
l Database timezone: Select the timezone where the source database is located.
Internal parametersInternal parameters are parameters that are not exposed in the UI. You should only use them if instructedby Qlik Support.
To add internal Qlik Replicate parameters:
1. Click the Internal Parameters link.The Internal Parameters dialog box opens.
2. In the edit box, type the name of the parameter you need to add and then click it.
3. The parameter is added to the table below the search box with its default value.
4. Change the default value as required.
5. To reset the parameter value to its default, click the "Restore default value" icon at the end of therow.
Setup and User Guide - Qlik Replicate, November 2021 212

8 Adding and managing source endpoints
More optionsThese options are not exposed in the UI as they are only relevant to specific versions or environments.Consequently, do not set these options unless explicitly instructed to do so by Qlik Support or productdocumentation.
To set an option, simply copy the option into the Add feature name field and click Add. Then set the valueor enable the option according to the instructions you received.
Settings summaryYou can view a summary of your settings by clicking the Setting Summary link. This is useful if you need tosend a summary of your settings to Qlik Support.
Setup and User Guide - Qlik Replicate, November 2021 213

8 Adding and managing source endpoints
8.8 Using Google Cloud SQL for PostgreSQL as a sourceThis section describes how to set up and use a Google Cloud SQL for PostgreSQL database as a source ina replication task.
In this section:
l Prerequisites (page 215)l Required permissions (page 215)l Limitations and considerations (page 215)l Supported data types (page 216)l Homogeneous Replication (page 220)l Setting general connection properties (page 221)l Setting advanced connection properties (page 223)
Setup and User Guide - Qlik Replicate, November 2021 214

8 Adding and managing source endpoints
PrerequisitesThe following section lists the prerequisites for working with Qlik Replicate and a Google Cloud SQL forPostgreSQL source.
l Qlik Replicate Server for Windows:PostgreSQL ODBC Driver psqlodbc_12_02_0000-x64 only must be installed on the Qlik Replicatemachine.
Make sure that the psql.exe path (e.g. "C:\Program Files\PostgreSQL\1202\bin") isadded to the system PATH.
l Qlik Replicate Server for Linux: On the Qlik Replicate machine:
1. Install postgresql12. For example, postgresql12-12.1-2PGDG.rhel7.x86_64.rpm is thepackage required for Red Hat 7.
2. Install the ODBC driver postgresql12.For example, postgresql12-odbc-12.01.0000-1PGDG.rhel7.x86_64.rpm is the client requiredfor Red Hat 7.
3. Copy the driver location to the site_arep_login.sh file:echo "export LD_LIBRARY_PATH=/usr/lib:/usr/lib64:/usr/pgsql-12/lib:$LD_LIBRARY_
PATH" >> site_arep_login.sh
This will add the driver to "LD_LIBRARY_PATH" and update the driver location in the site_arep_login.sh file.
4. Makes sure that the /etc/odbcinst.ini file contains an entry for PostgreSQL, as in thefollowing example:[PostgreSQL]
Description = PostgreSQL ODBC driver
Driver = /usr/pgsql-12/lib/psqlodbc.so
Setup = /usr/pgsql-12/lib/psqlodbcw.so
Debug = 0
CommLog = 1
UsageCount = 2
Required permissionsAs the Google SQL for PostgreSQL source endpoint supports Full Load only, it's sufficient to grant the QlikReplicate user standard SELECT permission on the source database.
Limitations and considerationsThe following limitations apply when using Google Cloud SQL for PostgreSQL as a source:
l The Google Cloud SQL for PostgreSQL source endpoint supports Full Load replication only (i.e. theApply Changes and Store Changes replication options are not supported).
l The database name cannot include a semi-colon (;).l Replication of multiple tables with the same name but a different case (e.g. table1, TABLE1 andTable1) may cause unpredictable behavior and is therefore not supported.
l Deferred Constraints are not supported.
Setup and User Guide - Qlik Replicate, November 2021 215

8 Adding and managing source endpoints
l Partitioned tables: When performing a Full Load replication of partitioned tables, the parent tablewill be created and separate tables will be created for each partition.
See also: Replication of Partitioned Tables (page 220) for partitioned table requirements that applyto homogeneous replication (Google Cloud SQL for PostgreSQL-to-Google Cloud SQL forPostgreSQL).
l When using the Parallel Load (page 946) feature, table segmentation according to partitions or sub-partitions is not supported.
l When using filters that do not contain a Primary Key, DELETE operations will not be captured.l A DDL operation that occurs during Full Load, but that was not preceded by a DML operation will notbe captured.
Supported data typesThe following table shows the Google Cloud SQL for PostgreSQL target data types that are supportedwhen using Qlik Replicate and the default mapping to the Qlik Replicate data types.
When replicating from a Google Cloud SQL for PostgreSQL database to a PostgreSQL-based target,source and target data types are identical, except for the data types listed in Data type considerations andexceptions (page 221)
For additional information about Qlik Replicate data types, see Replicate data types (page 76).
Google Cloud SQL for PostgreSQL data typesQlik Replicatedatatypes
INTEGER INT4
SMALLINT INT2
BIGINT INT8
NUMERIC NUMERIC(28,6)
NUMERIC(p,s) If precision is =< 38,then:
NUMERIC(p,s)
If precision is => 39,then:
STRING
DECIMAL NUMERIC(28,6)
Setup and User Guide - Qlik Replicate, November 2021 216

8 Adding and managing source endpoints
Google Cloud SQL for PostgreSQL data typesQlik Replicatedatatypes
DECIMAL(p,s) If precision is =< 38,then:
NUMERIC(p,s)
If precision is => 39,then:
STRING
REAL REAL4
DOUBLE REAL8
SMALLSERIAL INT2
SERIAL INT4
BIGSERIAL INT8
MONEY NUMERIC(38,4)
TheMONEYdata type ismapped toFLOAT inMicrosoftSQLServer.
CHAR WSTRING (1)
CHAR(n) WSTRING (n)
Setup and User Guide - Qlik Replicate, November 2021 217
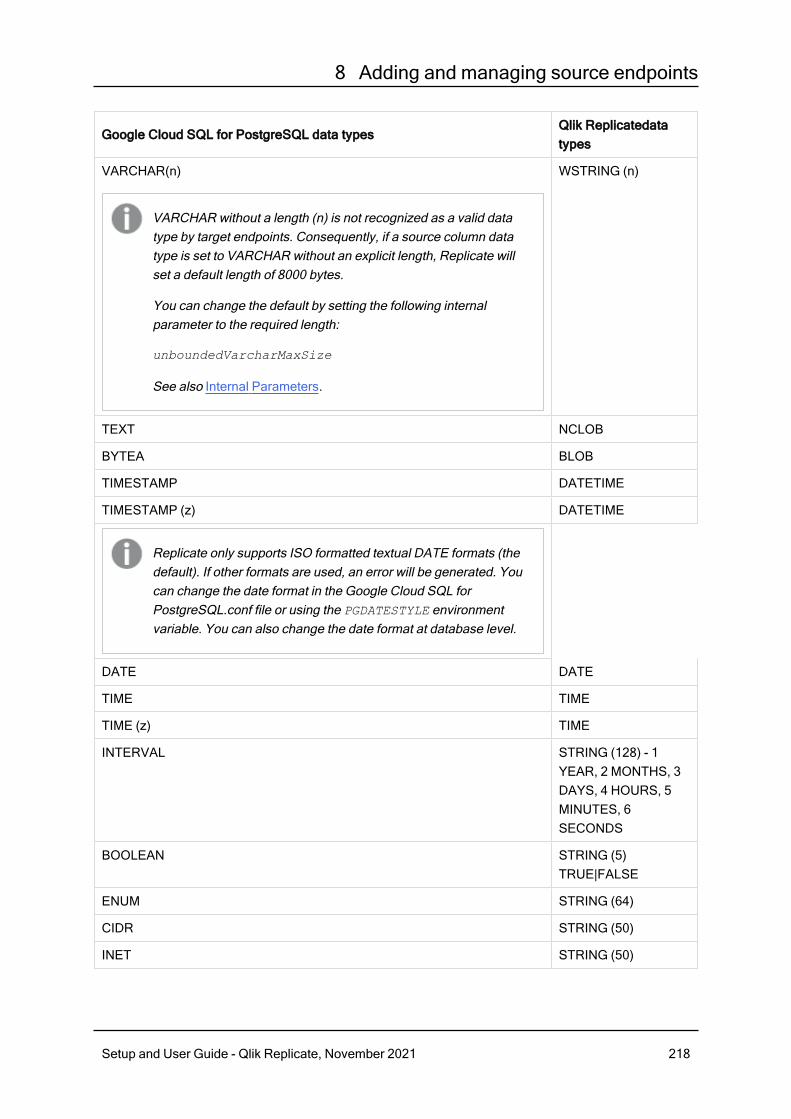
8 Adding and managing source endpoints
Google Cloud SQL for PostgreSQL data typesQlik Replicatedatatypes
VARCHAR(n)
VARCHAR without a length (n) is not recognized as a valid datatype by target endpoints. Consequently, if a source column datatype is set to VARCHAR without an explicit length, Replicate willset a default length of 8000 bytes.
You can change the default by setting the following internalparameter to the required length:
unboundedVarcharMaxSize
See also Internal Parameters.
WSTRING (n)
TEXT NCLOB
BYTEA BLOB
TIMESTAMP DATETIME
TIMESTAMP (z) DATETIME
Replicate only supports ISO formatted textual DATE formats (thedefault). If other formats are used, an error will be generated. Youcan change the date format in the Google Cloud SQL forPostgreSQL.conf file or using the PGDATESTYLE environmentvariable. You can also change the date format at database level.
DATE DATE
TIME TIME
TIME (z) TIME
INTERVAL STRING (128) - 1YEAR, 2 MONTHS, 3DAYS, 4 HOURS, 5MINUTES, 6SECONDS
BOOLEAN STRING (5)TRUE|FALSE
ENUM STRING (64)
CIDR STRING (50)
INET STRING (50)
Setup and User Guide - Qlik Replicate, November 2021 218

8 Adding and managing source endpoints
Google Cloud SQL for PostgreSQL data typesQlik Replicatedatatypes
MACADDR STRING (18)
BIT (n) STRING (n)
BIT VARYING (n) STRING (n)
UUID STRING
TSVECTOR CLOB
TSQUERY CLOB
XML CLOB
POINT STRING (255) "(x,y)"
LINE STRING (255) "(x,y,z)"
LSEG STRING (255) "((x1,y1),(x2,y2))"
BOX STRING (255) "((x1,y1),(x2,y2))"
PATH CLOB "((x1,y1),(xn,yn))"
POLYGON CLOB "((x1,y1),(xn,yn))"
CIRCLE STRING (255) "(x,y),r"
JSON
Reading and writing JSON data is performed using wide string(where each character occupies 2 bytes). Therefore, whenreplicating JSON columns to a PostgreSQL target, set the limitedlob size to twice the maximum JSON length. So, for example, ifthe JSON data is 4 KB, set the limited lob size value to 8 KB.
NCLOB
JSONB
Reading and writing JSONB data is performed using wide string(where each character occupies 2 bytes). Therefore, whenreplicating JSONB columns to a PostgreSQL target, set thelimited lob size to twice the maximum JSONB length. So, forexample, if the JSONB data is 4 KB, set the limited lob size valueto 8 KB.
NCLOB
Setup and User Guide - Qlik Replicate, November 2021 219

8 Adding and managing source endpoints
Google Cloud SQL for PostgreSQL data typesQlik Replicatedatatypes
ARRAY NCLOB
COMPOSITE NCLOB
INT4RANGE STRING (255)
INT8RANGE STRING (255)
NUMRANGE STRING (255)
STRRANGE STRING (255)
CHARACTER VARYING If length is specified:
WSTRING (LENGTH)
If no length isspecified:
WSTRING (8000)
TINTERVAL WSTRING(255)
Homogeneous ReplicationWhen replicating from a Google Cloud SQL for PostrgreSQL source to a Google Cloud SQL forPostrgreSQL target, most of the source and target data types will be identical. The exceptions are listed inthe table below.
Additionally, in homogeneous replication, source column and table collations will be replicated to the targetas described in Column and table collation (page 221).
In homogeneous replication, the source data first passes through the Qlik Replicate data typeand is therefore subject to any limitations of that type.
For information on Replicate data types and their limitations (where relevant), see Replicatedata types (page 76).
For information on which Replicate data types the source data passes through when replicatingfrom Google Cloud SQL for PostgreSQL, see the Google Cloud SQL for PostgreSQL to QlikReplicate data types mapping table described earlier.
Replication of Partitioned TablesIn order to replicate partitioned tables from a Google Cloud SQL for PostgreSQL source to a Google CloudSQL for PostgreSQL target, you need to do the following:
1. Manually create the parent and child tables in the target database.
2. Define a separate task to replicate to those tables.
Setup and User Guide - Qlik Replicate, November 2021 220

8 Adding and managing source endpoints
3. Set the Truncate before loading option in the Full Load Settings (page 1017).
Data type considerations and exceptionsWhen replicating from Google Cloud SQL for PostgreSQL database to a PostgreSQL-based target, sourceand target data types will be identical, with the following exceptions:
Google CloudSQL forPostgreSQLsource
PostgreSQL-based target
ENUM STRING
COMPOSITE STRING
NUMERIC NUMERIC (28,6)
NUMERIC (p,s)
A numeric arraywith precision andscale.
NUMERIC
A numeric array without precision and scale.
TINTERVALAs PostgreSQL have discontinued support for the TINTERVAL datatype, tables with this data type will not be created on the target if thetarget database version does not support it.
PostgreSQL source and target data types
See also the note about JSON data type replication in Supported data types (page 216).
Column and table collationWhen replicating from Google Cloud SQL for PostgreSQL database to a PostgreSQL-based target,column and table collations will be replicated to the target.
To support collation replication, the DBA must ensure that the collations defined for the GoogleCloud SQL for PostgreSQL database are the same as those defined for the PostgreSQL-basedtarget database.
Non-nullable columns and Primary/Unique index namesNon-nullable columns and Primary/Unique Index names are preserved during homogeneous replication.
Setting general connection propertiesThis section describes how to configure general connection properties.
To add a Google Cloud SQL for PostgreSQL endpoint source database to Qlik Replicate:
Setup and User Guide - Qlik Replicate, November 2021 221
8 Adding and managing source endpoints
1. In the Qlik Replicate console, click Manage Endpoints Connections to open the ManageEndpoints Connections dialog box. For more information on adding an endpoint to Qlik Replicate,see Defining and managing endpoints (page 110).
2. In the Name field, type a name for your Google Cloud SQL for PostgreSQL database. This can beany name that will help to identify the database being used.
3. In the Description field, type a description that helps to identify the Google Cloud SQL forPostgreSQL database. This is optional.
4. Select Source as the database role.
5. Select Google Cloud SQL for PostgreSQL as the database Type.
6. Type the Server name. This is the name or IP address of the computer with the Google Cloud SQLfor PostgreSQL database that you want to access.
7. Optionally, change the default port (5432).
8. Enter the Google Cloud SQL for PostgreSQL database authentication information (User name,Password) of an authorized Google Cloud SQL for PostgreSQL user.
Consider the following:l This information is case sensitive.l To determine if you are connected to the database you want to use or if theconnection information you entered is correct, click Test Connection.If the connection is successful a message in green is displayed. If the connectionfails, an error message is displayed at the bottom of the dialog box.To view the log entry if the connection fails, click View Log. The server log isdisplayed with the information for the connection failure. Note that this button isnot available unless the test connection fails.
9. Type the Database name or browse for a database.
SSL authentication optionsIn the Security section, you can configure Replicate to connect to the PostgreSQL database using SSL.
l SSL Mode: Select one of the following:l Prefer - Establishes an encrypted connection if the server supports encrypted connections,falling back to an unencrypted connection if an encrypted connection cannot be established.
l Disable - Connect with a surname and password only.l Allow - Establish an encrypted connection if requested by the server.l Require - Establishes an encrypted connection if the server supports encrypted connections.The connection attempt fails if an encrypted connection cannot be established.
l Verify CA - Similar to Required, but also verifies the server Certificate Authority (CA)certificate against the configured CA certificates. The connection attempt fails if no validmatching CA certificates are found.
l Verify Full - Similar to Verify CA, but also performs host name identity verification bychecking the host name the client (i.e. Replicate) uses for connecting to the server againstthe identity in the certificate that the server sends to the client. The client checks whether the
Setup and User Guide - Qlik Replicate, November 2021 222

8 Adding and managing source endpoints
host name that it uses for connecting matches the Common Name value in the servercertificate. The connection fails if there is a mismatch.
l Client certificate path:- The path to the client certificate requested by the server.l Secret key path - The path to the client private key file in PEM format.l CA path - The path to the Certificate Authority (CA) that issued the client certificate file in PEMformat.
l CRL path - The path to the CRL certificate. This file contains certificates revoked by certificateauthorities. If the server certificate appears in this list, the connection will fail.
l SSL compression -Select this option to compress the data before it is encrypted.
Setting advanced connection propertiesIn the Advanced tab, you can set internal parameters and view a summary of your settings.
Internal parametersInternal parameters are parameters that are not exposed in the UI. You should only use them if instructedby Qlik Support.
To add internal Qlik Replicate parameters:
1. Click the Internal Parameters link.The Internal Parameters dialog box opens.
2. In the edit box, type the name of the parameter you need to add and then click it.
3. The parameter is added to the table below the search box with its default value.
4. Change the default value as required.
5. To reset the parameter value to its default, click the "Restore default value" icon at the end of therow.
More optionsThese options are not exposed in the UI as they are only relevant to specific versions or environments.Consequently, do not set these options unless explicitly instructed to do so by Qlik Support or productdocumentation.
To set an option, simply copy the option into the Add feature name field and click Add. Then set the valueor enable the option according to the instructions you received.
Settings summaryYou can view a summary of your settings by clicking the Setting Summary link. This is useful if you need tosend a summary of your settings to Qlik Support.
Setup and User Guide - Qlik Replicate, November 2021 223
8 Adding and managing source endpoints
8.9 Using Hadoop as a sourceThis section describes how to set up and use Hadoop as the source endpoint in a replication task.
In this section:
l Prerequisites (page 225)l Limitations (page 225)l Required permissions (page 225)l Hadoop Endpoint source data types (page 225)l Setting general connection properties (page 226)l Setting advanced connection properties (page 230)
Setup and User Guide - Qlik Replicate, November 2021 224

8 Adding and managing source endpoints
PrerequisitesBefore you begin to work with a Hadoop cluster as a data source in Qlik Replicate, make sure that thefollowing prerequisites have been met:
l General:l The Hadoop WebHDFS must be accessible from the Qlik Replicate machine.l The Hadoop Data Nodes must be accessible from the Qlik Replicate machine.l The Hadoop WebHDFS service must be running.l To access Hive using WebHCat, the Hadoop WebHCat service must be running. Othermethods for accessing Hive are described later in this chapter.
l The user specified in the Qlik Replicate Hadoop target settings must have access toHiveServer2.
l SSL: Before you can use SSL, you first need to perform the following tasks:l Configure each NameNode and each DataNode with an SSL certificate (issued by the sameCA).
l Place the CA certificate on the Replicate Server machine. The certificate should be abase64-encoded PEM (OpenSSL) file.
l Permissions: The user specified in the Hadoop source settings must have read permission for theHDFS directories that contain the data files.
LimitationsThe following limitations apply:
l Change data capture is not supported. The Hadoop endpoint will not be available for selection ifeither Apply Changes or Store Changes is enabled in the task settings.
l Replicating data compressed using a method other than gzip is currently not supported.l Replicating data that is not in Text format is currently not supported.l Replicating from tables with skews, buckets or partitions is currently not supported.l Limited LOB support only.
Required permissionsThe Hadoop NameNode must be accessible from the Qlik Replicate machine.
Hadoop Endpoint source data typesThe following table shows the Hadoop data types that are supported when using Qlik Replicate and thedefault mapping to Qlik Replicate data types.
For information on how to view the data type that is mapped in the target, see the section for the targetendpoint you are using.
For additional information about Qlik Replicate data types, see Replicate data types (page 76).
Setup and User Guide - Qlik Replicate, November 2021 225

8 Adding and managing source endpoints
Hadoop data types Qlik Replicatedata types
BOOLEAN BOOL
BINARY BLOB
DATE DATE
TIMESTAMP DATETIME
TINYINT INT1
SMALLINT INT2
INT INT4
BIGINT INT8
FLOAT REAL4
DOUBLE REAL8
VARCHAR STRING
CHAR STRING
STRING CLOB
DECIMAL NUMERIC
Hadoop and Qlik Replicate data types
Unsupported data typesThe Complex Types listed below are not supported:
l ARRAYSl MAPSl STRUCTSl UNION
Setting general connection propertiesThis section describes how to configure general connection properties. For an explanation of how toconfigure advanced connection properties, see Setting advanced connection properties.
To add a Hadoop source endpoint to Qlik Replicate:
1. In the Qlik Replicate console, click the Manage Endpoint Connections toolbar button to open theManage Endpoints Connections dialog box. Then click the New Endpoint Connection button. Formore information on adding an endpoint to Qlik Replicate, see Defining and managing endpoints(page 110).
2. In the Name field, type a name for your endpoint. This can be any name that will help to identify theendpoint being used.
3. In the Description field, type a description that helps to identify the Hadoop endpoint. This isoptional.
Setup and User Guide - Qlik Replicate, November 2021 226

8 Adding and managing source endpoints
4. Select Source as the endpoint Role.
5. Select Hadoop as the endpoint Type.
6. In the Hadoop NameNode field, enter the host name or IP address of the Hadoop NameNodemachine.
Consider the following:l This information is case sensitive.l To determine if you are connected to the endpoint you want to use or if theconnection information you entered is correct, click Test Connection.If the connection is successful, a green confirmation message is displayed. If theconnection fails, an error message is displayed at the bottom of the dialog box.To view the log entry if the connection fails, click View Log. The server log isdisplayed with the information for the connection failure. Note that this button isnot available unless the test connection fails.
7. In the Security section, do the following:
a. To encrypt the data between the Replicate machine and HDFS, select Use SSL. In order touse SSL, first make sure that the SSL prerequisites described in Prerequisites (page 225)has been met.In the CA path field, either specify the directory containing the CA certificate.-OR-Specify the full path to a specific CA certificate.
b. Select one of the following authentication types:l User name - Select to connect to the Hadoop cluster with only a user name. Then, inthe User name field, specify the name of a user authorized to access the Hadoopcluster.
l Kerberos - Select to authenticate against the Hadoop cluster using Kerberos.Replicate automatically detects whether Qlik Replicate Server is running on Linux oron Windows and displays the appropriate settings.Qlik Replicate Server on Linux:When Qlik Replicate Server is running on Linux, select either Ticket or Keytab fromthe Kerberos options drop-down list.If you selected Ticket, select one of the following options:
l Use global Kerberos ticket file - Select this option if you want to use the sameticket for several Hadoop endpoints (source or target). In this case, you mustmake sure to select this option for each Hadoop endpoint instance that youdefine.
l Use specific Kerberos ticket file - Select this option if you want to use adifferent ticket file for each Hadoop endpoint. Then specify the ticket file namein the designated field.This option is especially useful if you need to perform a task-level audit ofReplicate activity (using a third-party tool) on the Hadoop NameNode. To set
Setup and User Guide - Qlik Replicate, November 2021 227

8 Adding and managing source endpoints
this up, define several instances of the same Hadoop endpoint and specify aunique Kerberos ticket file for each instance. Then, for each task, simply selecta different Hadoop endpoint instance.
l You need to define a global Kerberos ticket file even if you selectthe Use specific Kerberos ticket file option. The global Kerberosticket file is used for authentication when selecting a Hiveendpoint, when testing the connection (using the Test Connectionbutton), and when selecting which tables to replicate.
l When replicating from a Hadoop source endpoint to a Hadooptarget endpoint, both endpoints must be configured to use thesame ticket file.
For additional steps required to complete setup for Kerberos ticket-basedauthentication, see Using Kerberos authentication (page 638).If you selected Keytab, provide the following information:
l Realm: The name of the realm in which your Hadoop cluster resides.For example, if the full principal name is [email protected], thenEXAMPLE.COM is the realm.
l Principal: The user name to use for authentication. The principal must be amember of the realm entered above.For example, if the full principal name is [email protected], thenjohn.doe is the principal.
l Keytab file: The full path of the Keytab file. The Keytab file should contain thekey of the Principal specified above.
Qlik Replicate Server on Windows:When Qlik Replicate Server is running on Windows, select one of the following:
l Use the following KDC: Select Active Directory (default) if your KDC isMicrosoft Active Directory or select MIT if your KDC is MIT KDC running onLinux/UNIX.
When the Replicate KDC and the Hadoop KDC are in differentdomains, a relationship of trust must exist between the twodomains.
l Realm: The name of the realm/domain in which your Hadoop cluster resides(where realm is the MIT term while domain is the Active Directory term).
l Principal: The username to use for authentication. The principal must be amember of the realm/domain entered above.
l When Active Directory is selected - Password: The password for the principalentered above.
Setup and User Guide - Qlik Replicate, November 2021 228

8 Adding and managing source endpoints
l When MIT is selected - Keytab file: The keytab file containing the principalentered above.
When replicating from a Hadoop source endpoint to a Hadoop targetendpoint, both endpoints must be configured to use the same parameters(KDC, realm, principal, and password).
If you are unsure about any of the above, consult your IT/security administrator.For additional steps required to complete setup for Kerberos authentication, seeUsing Kerberos authentication (page 638).
l User name and password - Select to connect to the Hadoop NameNode or to theKnox Gateway (when enabled - see below) with a user name and password. Then, inthe User name and Password fields, specify the required user name and password.
Consider the following:l A user name and password is required to access the MapRControl System.
l This information is case sensitive.
Make sure that the specified user has the required Hadoop accessprivileges. For information on how to provide the required privileges, seeRequired permissions (page 225).
8. If you need to access the Hortonworks Hadoop distribution through a Knox Gateway, select UseKnox Gateway.
To be able to select this option, first select Use SSL and then select Password from theAuthentication type drop-down list.
9. Provide values for the following fields:l Knox Gateway host - The FQDN (Fully Qualified Domain Name) of the Knox Gateway host.l Knox port - The port number to use to access the host. The default is "8443".l Knox Gateway path - The context path for the gateway. The default is "gateway".
The port and path values are set in the gateway-site.xml file. If you are unsurewhether the default values have been changed, contact your IT department.
l Cluster name - The cluster name as configured in Knox. The default is "default".
10. In the HDFS section, select either WebHDFS or HttpFS as the HDFS access method. If you areaccessing MapR, it is recommended to use HttpFS.
Setup and User Guide - Qlik Replicate, November 2021 229

8 Adding and managing source endpoints
When the Use Knox Gateway option is selected, the NameNode, HttpFS Host, andPort fields described below are not relevant (and are therefore hidden).
11. Do one of the following, depending on whether you selected WebHDFS or HttpFS:If you selected WebHDFS:
1. In the NameNode field, specify the IP address of the NameNode.
This is the Active node when High Availability is enabled (see below).
2. Replicate supports replication from an HDFS High Availability cluster. In such aconfiguration, Replicate communicates with the Active node, but switches to the Standbynode in the event of failover. To enable this feature, select the High Availability check box.Then, specify the FQDN (Fully Qualified Domain Name) of the Standby NameNode in theStandby NameNode field.
3. In the Port field, optionally change the default port (50070).
If you selected HttpFS:
1. In the HttpFS Host field, specify the IP address of the HttpFS host.
2. In the Port field, optionally change the default port (14000).
12. In the Hive Access section, do the following:
When the Use Knox Gateway option is selected, the Host and Port fields describedbelow are not relevant (and are therefore hidden).
l Access Hive using field (WebHCat): This value cannot be changed.l Host field: Specify the IP address of the Hive machine.l Port field: Optionally change the default port.l Database field: Specify the name of the Hive target database.
Setting advanced connection propertiesIn the Advanced tab, you can specify source file delimiters and other properties. Note that the source filedelimiters only need to be specified if the SerDe property names used to create the source data files aredifferent from the Hadoop defaults.
The default Hadoop property names are as follows:
l field.delim (Field delimiter in the UI)l serialization.null.format (Null value in the UI)l escape.delim (Escape character in the UI)l line.delim (Record delimiter in the UI)l quote.delim (Quote character in the UI)
In the Advanced tab, you can set the parameters described in the following table.
Setup and User Guide - Qlik Replicate, November 2021 230
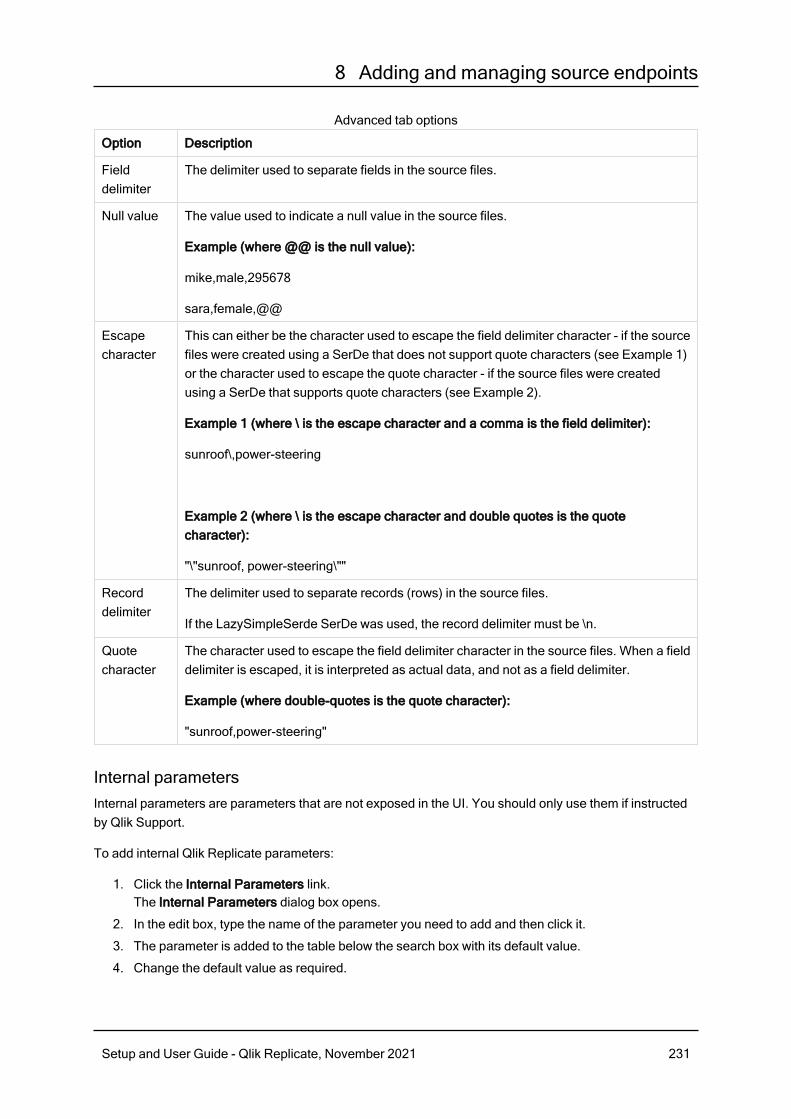
8 Adding and managing source endpoints
Option Description
Fielddelimiter
The delimiter used to separate fields in the source files.
Null value The value used to indicate a null value in the source files.
Example (where @@ is the null value):
mike,male,295678
sara,female,@@
Escapecharacter
This can either be the character used to escape the field delimiter character - if the sourcefiles were created using a SerDe that does not support quote characters (see Example 1)or the character used to escape the quote character - if the source files were createdusing a SerDe that supports quote characters (see Example 2).
Example 1 (where \ is the escape character and a comma is the field delimiter):
sunroof\,power-steering
Example 2 (where \ is the escape character and double quotes is the quotecharacter):
"\"sunroof, power-steering\""
Recorddelimiter
The delimiter used to separate records (rows) in the source files.
If the LazySimpleSerde SerDe was used, the record delimiter must be \n.
Quotecharacter
The character used to escape the field delimiter character in the source files. When a fielddelimiter is escaped, it is interpreted as actual data, and not as a field delimiter.
Example (where double-quotes is the quote character):
"sunroof,power-steering"
Advanced tab options
Internal parametersInternal parameters are parameters that are not exposed in the UI. You should only use them if instructedby Qlik Support.
To add internal Qlik Replicate parameters:
1. Click the Internal Parameters link.The Internal Parameters dialog box opens.
2. In the edit box, type the name of the parameter you need to add and then click it.
3. The parameter is added to the table below the search box with its default value.
4. Change the default value as required.
Setup and User Guide - Qlik Replicate, November 2021 231

8 Adding and managing source endpoints
5. To reset the parameter value to its default, click the "Restore default value" icon at the end of therow.
More optionsThese options are not exposed in the UI as they are only relevant to specific versions or environments.Consequently, do not set these options unless explicitly instructed to do so by Qlik Support or productdocumentation.
To set an option, simply copy the option into the Add feature name field and click Add. Then set the valueor enable the option according to the instructions you received.
Settings summaryYou can view a summary of your settings by clicking the Setting Summary link. This is useful if you need tosend a summary of your settings to Qlik Support.
Setup and User Guide - Qlik Replicate, November 2021 232

8 Adding and managing source endpoints
8.10 Using IBM DB2 for iSeries as a sourceThis section describes how to set up and use an IBM DB2 for iSeries database as the source database in areplication task.
In this section:
l Prerequisites (page 234)l Required permissions (page 235)l Limitations (page 236)l Supported data types (page 236)l Setting general connection properties (page 237)l Setting advanced connection properties (page 238)
Setup and User Guide - Qlik Replicate, November 2021 233

8 Adding and managing source endpoints
PrerequisitesThe following topic lists the prerequisites for using an IBM DB2 for iSeries endpoint in a Replicate task.
iAccess ODBC driver 7.1.0. is not supported.
Clientl Windows: To work with an IBM DB2 for iSeries database as a source in Qlik Replicate, the iSeriesODBC driver (5773-XJ1 IBM i Access for Windows) must be installed on the Replicate Servermachine.The minimum supported version is 13.64.
When Replicate is installed on Windows Server 2016, use the 5733XJ1 IBM i AccessClient Solutions instead.
The driver is part of IBM i Access Client Solutions, which can be downloaded from the IBM web siteby authorized IBM customers. Note that it is not necessary to install all of the IBM i Access ClientSolutions components, only the ODBC driver (which is installed regardless of which componentsyou choose to install).
l Linux: To work with an IBM DB2 for iSeries database as a source in Qlik Replicate, the iSeriesODBC driver (5773-XJ1 IBM i Access for Linux) must be installed on the Replicate Server machine.The minimum supported version is 13.64.The driver is part of IBM i Access Client Solutions, which can be downloaded from the IBM web siteby authorized IBM customers. Note that it is not necessary to install all of the IBM i Access ClientSolutions components, only the ODBC driver (which is installed regardless of which componentsyou choose to install).After installing the Linux Driver, edit the file /etc/odbcinst.ini and add the following section:[IBM i Access ODBC Driver 64-bit]
Description = IBM i Access for Linux 64-bit ODBC Driver
Driver = /opt/ibm/iaccess/lib64/libcwbodbc.so
Setup = /opt/ibm/iaccess/lib64/libcwbodbcs.so
Threading = 0
DontDLClose = 1
UsageCount = 1
Change processing
l All of the source tables for a given Replicate task need to be journaled to the same journal. Thename of the journal and the library in which it is located must be specified in the endpoint settings.During the task, Replicate polls this journal for changes to the source tables.When you start journaling the source tables, the Record images parameter can be set to *BOTH (forcapturing before and after images) or *AFTER.When the Record images parameter set to *AFTER. deleted records will contain NULL values in theirdata fields. To save a copy of the deleted record to the deleted record journal, you must set theRecord images parameter set to *BOTH.
Setup and User Guide - Qlik Replicate, November 2021 234

8 Adding and managing source endpoints
If you need to run several Replicate tasks (that replicate data from IBM DB2 for iSeries),it is more efficient (though not essential) to create a separate journal for each task. Asonly one journal can be specified per endpoint, you would also need to define aseparate endpoint for each task.
l The MINENTDTA parameter must be set to *NONE as *FILE (minimal logging) is not supported.
Required permissionsThe following permissions must be granted to the user specified in the General tab of the IBM DB2 foriSeries endpoint settings:
l USER CLASS = *USER (default value)l Special authority = *NONEl Full Load: Read permissions for the source tables.l CDC: Read permissions for the journal defined for the IBM DB2 for iSeries endpoint and for thetask's source tables.
l SELECT permission on the following tables:l QSYS2.SYSCOLUMNSl QSYS2.SYSTABLES
You must also set the following Authorities and Locks for the IBM DB2 for iSeries database:
l Journal Authority: *USEl Journal Library Authority: *EXECUTEl Journal Receivers Authority: *USEl Journal Receivers Library's Authority: *EXECUTEl File Authority (if specified): *USEl File Library Authority: *EXECUTEl Journal Lock: *SHRRDl Journal Receiver Lock: *SHRRDl File Lock (if specified): *SHRRD
*OBJEXIST is also required for the journal authority if any of the following are true:
l *ALLFILE has been specified for the file key.l Specified object does not exist on the system.l *IGNFILSLT or *IGNOBJSLT is specified for the journal code selection value for any selectedjournal codes.
l The journal is a remote journal.
Setup and User Guide - Qlik Replicate, November 2021 235

8 Adding and managing source endpoints
LimitationsThe following limitations apply when using the IBM for DB2 iSeries endpoint as a source in a Replicatetask:
l Multi-member (Partitioned) tables are not supportedl Field level encryption is not supportedl Journal receivers must be System Managed rather than User Managed.l Journals containing minimized data are not supported.The MINENTDTA parameter should be set to: MINENTDTA(*NONE)
l All tables must be in the same journall The DROP TABLE DDL is not supportedl The RENAME TABLE DDL is not supportedl The XML data type is not supportedl The DBCLOB data type is not supportedl Row size cannot exceed 32740 bytesl When the Use table and schema system names option is enabled (in the Advanced tab), onlytable/schema names that contain uppercase letters, digits, and underscores (_) are supported.For more information on this option, see Replicating System Names (page 241).
l Usually, Replicate only applies source database changes to the target if the transactions with thechanges were committed before the Full Load started. However, records that were deleted from thesource as part of an uncommitted transaction will not be replicated to the target during Full Load.
l DELETE operations in auto-commit mode will be ignored for tables journaled with *AFTER images.In such cases, DELETE operations will only be captured if one of the Add RRN column options isenabled and is set as the only Primary Key.
l When auto-commit=ON, the timestamp of the last committed transactions will be displayed as "01-01-1970 00:00" in the SOURCE_CURRENT_TIMESTAMP column of the attrep_status Controltable.
l Replication of columns, tables, and libraries with special characters in their name is not supported.
Supported data typesThe following table shows the IBM DB2 for iSeries database source data types that are supported whenusing Qlik Replicate and the default mapping from Qlik Replicate data types.
For information on how to view the data type that is mapped in the target, see the section for the targetdatabase you are using.
For additional information about Qlik Replicate data types, see Replicate data types (page 76).
IBM DB2 for iSeries Source Data Types Qlik Replicate Data Types
INTEGER INT4
SMALLINT INT2
Supported data types
Setup and User Guide - Qlik Replicate, November 2021 236

8 Adding and managing source endpoints
IBM DB2 for iSeries Source Data Types Qlik Replicate Data Types
BIGINT INT8
DECIMAL (p,s) NUMERIC (p,s)
FLOAT REAL8
DOUBLE REAL8
REAL REAL4
CHAR (n) If n<=32 KB, then:
STRING
VARCHAR (n) If n<=32 KB, then:
STRING
GRAPHIC (n) If n<=16 KB, then:
STRING
VARGRAPHIC (n) If n<=16 KB double byte chars, then:
STRING
DATE DATE
TIME TIME
TIMESTAMP DATETIME (6)
BLOB BLOB
Maximum size: 2 GB
CLOB CLOB
Maximum size: 2 GB
ROWID BYTES - This should be a user-defined column.
DATALINK STRING
TIMESTAMPWITH TIME ZONE NOT SUPPORTED
Setting general connection propertiesThis section describes how to configure general connection properties. For an explanation of how toconfigure advanced connection properties, see Setting advanced connection properties.
You can also use IBM DB2 for iSeries File Channel files as a source. For more information, seeUsing the Qlik Replicate file channel (page 908).
To add an IBM DB2 for iSeries source endpoint to Qlik Replicate:
Setup and User Guide - Qlik Replicate, November 2021 237

8 Adding and managing source endpoints
1. In the Qlik Replicate console, click Add database to open the Add Endpoints dialog box.
2. In the Name field, type a name for your database. This can be any name that will help to identify thedatabase being used.
3. In the Description field, type a description that helps to identify the IBM DB2 for iSeries database.This is optional.
4. Select Source as the database role.
5. Select IBM DB2 for iSeries as the database Type.
When this endpoint is used as a duplicated source in a Log Stream Staging setup,select the Read changes from log stream check box and then select the relevant LogStream Staging task from the drop-down list.For information on setting up and managing Log Stream Staging tasks, see Using theLog Stream (page 919).
6. Choose one of the following:l Use database alias (DSN) - If you choose this option, specify the IBM DB2 for iSeriesdatabase ODBC DSN.
l Use these connection properties - If you choose this option, enter the IBM DB2 for iSeriesServer (hostname or IP address).
7. Enter the IBM DB2 for iSeries authentication information (User Name, Password) for theauthorized user for this IBM DB2 for iSeries database. If you do not know this information, see yourIBM DB2 for iSeries database administrator (DBA).
This information is case sensitive.
Make sure that the specified user has the required access privileges.
8. In the Journal Name field, enter the name of the journal containing the source tables.See also: Change Processing prerequisites.
9. In the Journal Library field, enter the name of the library where the journal is located.See also: Change Processing prerequisites.
Setting advanced connection propertiesIn the Advanced tab, you can set advanced connection properties such as overriding CCSID to CharacterSet mapping and setting internal Replicate parameters
Using the R4I UDTF for Change CaptureBy default, changes captured from IBM DB2 for iSeries are filtered on Replicate using the standarddisplay_journal function. When there is a high volume of changes, this may impact Change Processingperformance.
Installing the R4I UDTF on IBM DB2 for iSeries enables captured changes to be filtered on IBM DB2 foriSeries instead of Replicate, significantly improving CDC performance.
Setup and User Guide - Qlik Replicate, November 2021 238

8 Adding and managing source endpoints
The R4I UDTF can capture up to 300 tables. If you need to capture more than 300 tables, donot use this option.
To set up change capture using the R4I UDTF:
1. Download the R4I UDTF from the Download Site and install it on IBM DB2 for iSeries.
2. Select the Enable UDTF capturing option.
3. If you changed the default CDC reader UDTF name during the R4I installation, specify the newname in the CDC reader UDTF name field.
4. In the UDTF result set size (MB) field, you can set the maximum size of the result-set bufferreturned by the R4I UDTF. A larger result set will usually improve performance, but will also impactDB2 memory consumption. Therefore, If you want to increase the result-set size, best practice is torun the task in a test environment first as insufficient memory on DB2 might result in datainconsistency on the target (due to partial records being captured).
5. Optionally, change the default Check for changes every interval (5 seconds).
Overriding CCSID to character set mappingIn some cases, character data in source tables may be encoded in a different CCSID than what is declaredin the source database table definition. For example, a specific table or column definition might indicatethat its uses CCSID 500 (EBCDIC International) whereas in fact, it uses CCSID 1148 (ENCDICInternational with EURO). In this case, you can tell Replicate that the source definition CCSID 500 shouldbe treated as CCSID 1148 (specifically, the character set named IBM-1148).
Note that when the source table definition specifies CCISD 65535 (meaning character set is unknown), youmust specify what character set should be assumed when reading data from that table or column.
If there is a conflict between the character set mapping for a specific column and the characterset mapping defined in the endpoint settings, the column-level character set mapping takesprecedence.
For more information on overriding character set mapping at column level, see Using theTransform tab (page 933).
To do this:
1. In the Override CCSID to Character Set Mapping section, click the New button.A row is added to the table.
2. Enter the CCSID in the CCSID column and the code page in the Character set column.The Character set (code page) must be specified in the proper format (e.g. ibm-1148_P100-1997).For a list of valid formats, see the ICU Converter Explorer.
3. Repeat to map additional CCSID values.
Converting to a custom code pagePerform the following procedure if your source endpoint tables are defined with an incorrect CCSID and thecorrect definition is actually in a UCM file.
Setup and User Guide - Qlik Replicate, November 2021 239

8 Adding and managing source endpoints
1. Create a mapping data file with the file extension .ucm.
If you edit an existing UCM file, you must also change the values of the <code_set_name>
and <icu:alias> properties. If the file does not contain an <icu:alias> property, thenyou only need to change the value of the <code_set_name> property.
2. Create a CNV file for the UCM file by running the following command:<product_dir>\bin\makeconv.exe -v <file_name>.ucm
Example:
"c:\Program Files\Attunity\Replicate\bin\makeconv.exe" -v 1047_EX.ucm
This will create a CNV file with the same name as the UCM file (e.g. 1047_EX.cnv).
3. Copy the file to the following location:<product_dir>\bin\icudt58l
When using the Replicate File Channel, the file should be copied to the same locationon both Replicate servers.
4. Add a new character set mapping as follows:
1. In CCSID column, enter the original source CCSID number (e.g. 1047)
2. In the Character set column, enter the name of the CNV file without the extension (e.g.1047_EX).
5. Restart the Qlik Replicate UI Server service.
Adding the RRN Column to Target TablesSource tables that do not have a primary key, a unique index, or a combination of columns that can beused as a unique index, must be registered using the relative record numbers (RRN).
Select one the following options:
l Do not add RNN column to target tablesl Add RRN column to target tables without a primary key or unique indexl Add RRN column to all target tables
To support DELETE operations in auto-commit mode for tables journaled with *AFTER images, do thefollowing:
1. Enable the Add RRN column to all target tables option.
2. Mark the new RRN column on the target as the table's sole Primary Key (using a transformation).Note that adding an RRN column without marking it as a Primary Key will result in the table beingsuspended if a DELETE operation is performed.
When you select one of the "Add RRN columns" options, both the Change Tables and the target tables willhave an extra column, ATTREP_RRN of type INTEGER, which contains a unique value for each row. Thiscolumn contains the RRN that corresponds to each source table row.
Setup and User Guide - Qlik Replicate, November 2021 240

8 Adding and managing source endpoints
The IBM DB2 for iSeries RRN values represent the exact position of the row in the file structurethat holds the table data. When a table is reorganized, the table is rebuilt resulting in new RRNsbeing allocated to each row. Consequently, reorganization of tables where the RRN is beingused as a target key should be avoided whenever possible. If such reorganization isunavoidable, you should immediately reload the reorganized table to prevent unpredictablebehavior when changes are applied to the target (e.g. failed DELETEs, duplicate INSERTs,and so on).
Replicating System NamesThe IBM DB2 for iSeries source endpoint replicates tables based on their SQL names (unlimited length). Ifyour IBM DB2 for iSeries database does not use SQL names, it's likely that you'll want to keep thereplication based on system names.
To do this, select the Use table and schema system names check box.
Skipping Journal ValidationFrom IBM DB2 for iSeries 7.3, Replicate automatically validates the specified journal. This involveschecking that the journal exists and that it contains the tables selected for replication. When numeroustables are selected for replication, this process may take some time. In such cases, if you are sure that thespecified journal exists and that it contains the correct tables, you may want to skip the validation phase.
To do this, select the Skip journal validation check box.
Internal parametersInternal parameters are parameters that are not exposed in the UI. You should only use them if instructedby Qlik Support.
To add internal Qlik Replicate parameters:
1. Click the Internal Parameters link.The Internal Parameters dialog box opens.
2. In the edit box, type the name of the parameter you need to add and then click it.
3. The parameter is added to the table below the search box with its default value.
4. Change the default value as required.
5. To reset the parameter value to its default, click the "Restore default value" icon at the end of therow.
More optionsThese options are not exposed in the UI as they are only relevant to specific versions or environments.Consequently, do not set these options unless explicitly instructed to do so by Qlik Support or productdocumentation.
To set an option, simply copy the option into the Add feature name field and click Add. Then set the valueor enable the option according to the instructions you received.
Setup and User Guide - Qlik Replicate, November 2021 241

8 Adding and managing source endpoints
Settings summaryYou can view a summary of your settings by clicking the Setting Summary link. This is useful if you need tosend a summary of your settings to Qlik Support.
Setup and User Guide - Qlik Replicate, November 2021 242

8 Adding and managing source endpoints
8.11 Using IBM DB2 for LUW as a sourceThis section describes how to set up and use an IBM DB2 for LUW database as the source database in areplication task.
In this section:
l Prerequisites (page 244)l Replicating 4-byte UTF8 emojis (page 245)l Limitations and considerations (page 245)l IBM DB2 for LUW Database source data types (page 246)l Setting general connection properties (page 248)l Setting advanced connection properties (page 249)
Setup and User Guide - Qlik Replicate, November 2021 243

8 Adding and managing source endpoints
PrerequisitesBefore you begin to work with an IBM DB2 for LUW database as a source in Qlik Replicate, make sure thatthe prerequisites described in this section have been met.
In this section:
Client prerequisitesThe IBM DB2 for LUW client prerequisites are determined by the platform on which Qlik Replicate Server isinstalled (Windows or Linux).
Qlik Replicate server on WindowsThe following versions of IBM Data Server Client must be installed on the Qlik Replicate Server machine:
l For IBM DB2 for LUW 10.5, install client version 10.5l For IBM DB2 for LUW 11.1 and 11.5, install client version 11.1
Qlik Replicate server on LinuxThe following steps need to be performed on the Qlik Replicate Server machine:
When working with IBM DB2 for LUW 11.1 or 11.5, replace 10.5 with 11.1 in the instructionsbelow.
1. Install v10.5fp9_linuxx64_server_t.tar.gz; choose to install “CLIENT”.
2. If the Qlik Replicate Server machine does not have a DB2 instance, create a DB2 instance byrunning the following commands:adduser <db2_instance_name>
/opt/ibm/db2/V10.5/instance/db2icrt <db2_instance_name>
3. Add the DB2 driver location to the Linux library path. To do this, add the following line to the site_arep_login.sh file:export LD_LIBRARY_PATH=$LD_LIBRARY_PATH:path/lib64
where path is the path to the driver.
Example:
export LD_LIBRARY_PATH=$LD_LIBRARY_PATH:/opt/ibm/db2/V10.5/lib64
4. Create a new file named odbcinst.ini under /etc and add the following entry:[IBM DB2 ODBC DRIVER]
Driver = /opt/ibm/db2/V10.5/lib64/libdb2o.so
fileusage=1
dontdlclose=1
5. Restart Qlik Replicate Server.
6. Add the IBM DB2 for LUW endpoint as described in Setting general connection properties (page248) and click Test Connection.If you get the following error:Cannot connect to DB2 LUW Server ODBC unknown error.
Setup and User Guide - Qlik Replicate, November 2021 244

8 Adding and managing source endpoints
RetCode: SQL_ERROR SqlState: NativeError: -1390 Message: [unixODBC][IBM][CLI Driver]
SQL10007N Message "0" could not be retrieved. Reason code: "3". ODBC general error.
1. Run the following command:/opt/ibm/db2/V10.5/bin /db2cli writecfg add -database <db_name_from_endpoint_
connection_settings> -host <server_name_from_endpoint_connection_settings> -port
<port_from_endpoint_connection_settings>
2. Restart Qlik Replicate Server.
IBM DB2 for LUW server prerequisitesTo enable CDC (Change Data Capture):
l Set the database to be recoverable - To capture changes, Replicate requires that the database isconfigured to be recoverable. a database is recoverable if either or both of the databaseconfiguration parameters LOGARCHMETH1 and LOGARCHMETH2 are not set to OFF.
l Permissions - The Qlik user must be granted the following permissions:l SYSADM or DBADMl DATAACCESS
l Change Data Capture: To enable data capture from IBM DB2 for LUW, the source tables need tobe created as follows:CREATE / ALTER TABLE table-name …. DATA CAPTURE CHANGES [INCLUDE LONGVAR COLUMNS];
You can either configure Replicate to perform this operation by selecting Automatically alter tablesto enable data capture or you can do this manually by selecting Let DBA set up data capture inthe Advanced tab.
When the Automatically alter tables to enable data capture option is selected, Replicateperforms the ALTER TABLE operation when the task starts to run. If a new table that matches thetable selection pattern is added (to the source database) while the task is already running,Replicate will only capture changes from it if it was created with the DATA CAPTURE CHANGE
attribute described above.
Replicating 4-byte UTF8 emojisIn order to replicate 4-byte UTF8 emojis, you must transform the emojis from STRING(n) to WSTRING(n).
For information on defining transformations, see Using the Transform tab (page 933).
Limitations and considerationsWhen using IBM DB2 for LUW as a database in a Replicate task, the following limitations currently apply:
l Clustered database is not supported
Users can define a separate IBM DB2 for LUW database for each of the endpoints in thecluster.
l Change processing limitations:
Setup and User Guide - Qlik Replicate, November 2021 245

8 Adding and managing source endpoints
l When truncating a table with multiple partitions, the number of DDL events displayed in theReplicate console will be equal to the number of partitions. This is because IBM DB2 forLUW records a separate DDL for each partition.
l The following DDLs on partitioned tables are not supported:l ALTER TABLE ADD PARTITION
l ALTER TABLE DETACH PARTITION
l ALTER TABLE ATTACH PARTITION
l Change processing does not support the DECFLOAT data type. Consequently, changes toDECFLOAT columns will be ignored during CDC.
l The RENAME COLUMN statement is not captured.l When performing updates on MDC (Multi-Dimensional Clustering) tables, each update isshown in the Replicate console as INSERT + DELETE.
l When the task setting “Include LOB columns in replication” is disabled, any table that hasLOB columns will be suspended during change processing.
l When the Audit table option is enabled in the Store Changes Settings tab, the firsttimestamp record in the audit table will be NULL.
l When the Change table option is enabled in the Store Changes Settings tab, the firsttimestamp record in the table may be Zero in some cases (i.e. 1970-01-0100:00:00.000000).
l DB2 10.5 or later: Variable-length string columns with data that is stored out-of-row will beignored. Note that this limitation is only applicable to tables created with extended row size.
l The Purescale environment is supported using the Start processing changes from sourcechange position Run option only.
l A DDL operation that occurs during Full Load, but that was not preceded by a DML operationwill not be captured.
IBM DB2 for LUW Database source data typesThe following table shows the IBM DB2 for LUW database source data types that are supported whenusing Qlik Replicate and the default mapping from Qlik Replicate data types.
For information on how to view the data type that is mapped in the target, see the section for the targetdatabase you are using.
For additional information about Qlik Replicate data types, see Replicate data types (page 76).
IBM DB2 for LUW Source Data Types Qlik Replicate Data Types
INTEGER INT4
SMALLINT INT2
BIGINT INT8
DECIMAL (p,s) NUMERIC (p,s)
Supported data types
Setup and User Guide - Qlik Replicate, November 2021 246

8 Adding and managing source endpoints
IBM DB2 for LUW Source Data Types Qlik Replicate Data Types
FLOAT REAL8
DOUBLE REAL8
REAL REAL4
DECFLOAT (p) If precision = 16, then:
REAL8
If precision is = 34, then:
STRING
GRAPHIC (n) If n<=127 KB, then:
WSTRING
VARGRAPHIC (n) If n<=16k double byte chars, then:
WSTRING
LONG VARGRAPHIC CLOB
CHAR (n) STRING
n<=255
VARCHAR (n) STRING
n<=32k
LONG VARCHAR (n) CLOB
n<=32k
CHAR (n) FOR BIT DATA BYTES
VARCHAR (n) FOR BIT DATA BYTES
LONG VARCHAR FOR BIT DATA BYTES
DATE DATE
TIME TIME
TIMESTAMP DATETIME
BLOB BLOB
CLOB CLOB
Maximum size: 2 GB
DBCLOB CLOB
Maximum size: 1 G double byte chars
XML CLOB
Setup and User Guide - Qlik Replicate, November 2021 247

8 Adding and managing source endpoints
Setting general connection propertiesYou can add an IBM DB2 for LUW database to Qlik Replicate to use as a source. For information on how toadd endpoints, see Defining and managing endpoints (page 110).
You can also use IBM DB2 for LUW File Channel files as a source. For more information, seeUsing the Qlik Replicate file channel (page 908).
To add an IBM DB2 for LUW source endpoint to Qlik Replicate:
1. In the Qlik Replicate console, click Add database to open the Add Endpoints dialog box.
2. In the Name field, type a name for your database. This can be any name that will help to identify thedatabase being used.
3. In the Description field, type a description that helps to identify the IBM DB2 for LUW database.This is optional.
4. Select Source as the database role.
5. Select IBM DB2 for LUW as the database Type.
When this endpoint is used as a duplicated source in a Log Stream Staging setup,select the Read changes from log stream check box and then select the relevant LogStream Staging task from the drop-down list.For information on setting up and managing Log Stream Staging tasks, see Using theLog Stream (page 919).
6. Choose one of the following:
When replicating from an IBM DB2 for LUW HADR environment and the task’s ApplyChanges replication option is enabled, the endpoint must be configured to read from theprimary instance.
l Use database alias (DSN) - If you choose this option, specify the IBM DB2 for LUWdatabase alias.
l Use these connection properties - If you choose this option, enter the IBM DB2 for LUWServer (hostname or IP address), Port and Database name in the designated fields.
7. Enter the IBM DB2 for LUW authentication information (User Name, Password) for the authorizeduser for this IBM DB2 for LUW database. If you do not know this information, see your IBM DB2 forLUW database administrator (DBA).
This information is case sensitive.
Make sure that the specified user has the required access privileges.
Setup and User Guide - Qlik Replicate, November 2021 248

8 Adding and managing source endpoints
Setting advanced connection propertiesIn the Advanced tab, you can set the following properties:
l Maximum Buffer Size for Read (KB): Specify the maximum number of bytes to read each time thelog is accessed during Change Processing. If you encounter performance issues, adjusting thisnumber may help.
l Change Data Capture: To enable data capture from IBM DB2 for LUW, the source tables need tobe created as follows:CREATE / ALTER TABLE table-name …. DATA CAPTURE CHANGES [INCLUDE LONGVAR COLUMNS];
You can either configure Replicate to perform this operation by selecting Automatically alter tablesto enable data capture or you can do this manually by selecting Let DBA set up data capture.
Internal parametersInternal parameters are parameters that are not exposed in the UI. You should only use them if instructedby Qlik Support.
To add internal Qlik Replicate parameters:
1. Click the Internal Parameters link.The Internal Parameters dialog box opens.
2. In the edit box, type the name of the parameter you need to add and then click it.
3. The parameter is added to the table below the search box with its default value.
4. Change the default value as required.
5. To reset the parameter value to its default, click the "Restore default value" icon at the end of therow.
More optionsThese options are not exposed in the UI as they are only relevant to specific versions or environments.Consequently, do not set these options unless explicitly instructed to do so by Qlik Support or productdocumentation.
To set an option, simply copy the option into the Add feature name field and click Add. Then set the valueor enable the option according to the instructions you received.
Settings summaryYou can view a summary of your settings by clicking the Setting Summary link. This is useful if you need tosend a summary of your settings to Qlik Support.
Resuming or starting a task from LRI in a pureScale environmentTo resume or start a task from LRI in a pureScale environment:
1. Run the db2pd DB2 command line to determine the Current Log Number:$ db2pd -log -db database_name
where database_name is the name of your database.The output will be similar to the following:
Setup and User Guide - Qlik Replicate, November 2021 249

8 Adding and managing source endpoints
Database Member 0 -- Database SAMPLE -- Active -- Up 0 days 00:27:02 -- Date 2018-05-23-
14.49.45.515600
Logs:
Current Log Number 2
Pages Written 19
Cur Commit Disk Log Reads 0
Cur Commit Total Log Reads 0
Method 1 Archive Status n/a
Method 1 Next Log to Archive n/a
Method 1 First Failure n/a
Method 2 Archive Status n/a
Method 2 Next Log to Archive n/a
Method 2 First Failure n/a
Log Chain ID 0
Current LSO 57142478
Current LSN 0x000000000004FB14
Address StartLSN StartLSO State Size Pages Filename
0x00007F164E99F090 00000000000429EC 48912001 0x00000000 1000 1000
S0000000.LOG
0x00007F16511319F0 000000000004901E 52988001 0x00000000 1000 1000
S0000001.LOG
0x00007F1651132350 000000000004F9A6 57064001 0x00000000 1000 1000
S0000002.LOG
The most recent (current) log is number 2.
2. Run the db2flsn command to determine the LRI/ LSN range of that log file:$ db2flsn -db SAMPLE -lrirange 2
The output will be similar to the following:S0000002.LOG: has LRI range
00000000000000010000000000002254000000000004F9A6 to
000000000000000100000000000022CC000000000004FB13
In the above output, the task "Start From" LRI value would be:0100000000000022CC000000000004FB13 (i.e. the 34 bytes at the end of the range).
Unable to retrieve the current LSN?If you are unable to retrieve the current LSN, you can instruct Replicate to scan the log by specifyingCurrentLSN=scan (as described in Internal parameters (page 249)) instead of the current LSN.
When CurrentLSN=scan, Replicate will search the log from the start until it finds the currentLSN. This may take some time depending on the size of the log.
Setup and User Guide - Qlik Replicate, November 2021 250

8 Adding and managing source endpoints
8.12 Using IBM DB2 for z/OS as a sourceThis section describes how to set up and use an IBM DB2 for z/OS database as the source endpoint in areplication task.
In this section:
l Prerequisites (page 252)l Limitations (page 253)l Handling actions resulting in subtype 83 (page 254)l Controlling the CDC process (page 255)l IBM DB2 for z/OS database source data types (page 259)l Setting general connection properties (page 261)l Setting advanced connection properties (page 262)l Sample XMIT files “Receive” job (page 266)
Setup and User Guide - Qlik Replicate, November 2021 251

8 Adding and managing source endpoints
PrerequisitesThe following section lays out the prerequisites for working with the Qlik Replicate IBM DB2 for z/OSendpoint.
In this section:
l Install the R4Z product on z/OS (page 252)l ODBC requirements (page 252)l Required permissions (page 253)l Change data capture requirements (page 253)
Install the R4Z product on z/OSBefore you can work with the IBM DB2 for z/OS Replicate endpoint, you must first install and configure theR4Z product on z/OS.
For instruction on how to accomplish this, refer to the R4Z Installation and Configuration Guide. The guidecan be found inside the zip file containing the R4Z kit.
ODBC requirementsThe Qlik Replicate IBM DB2 for z/OS source endpoint relies on the IBM Data Server Driver for ODBC foraccess to data, Change Data and metadata. This section describes the client side and server side ODBCprerequisites.
Client side ODBC requirements (Linux, Unix and Windows)
The "enableWLB" driver option is not supported. To force the connection to automaticallyswitch to another LPAR in a parallel sysplex (i.e. “failover”), set “enableACR” to “true” and“enableWLB” to “false” in the driver configuration.
On Windows:
Install "IBM Data Server Driver for ODBC and CLI" for DB2 11.5.6 for z/OS on the Qlik Replicate Servermachine.
On Linux:
1. Install DB2_ESE_AUSI_Svr_11.5.6_Linux_86-64.tar.gz and choose the “CLIENT” option.
2. If the Qlik Replicate Server machine does not have a DB2 instance, create a DB2 instance byrunning the following commands:adduser <db2_instance_name>
/opt/ibm/db2/V11.5/instance/db2icrt <db2_instance_name>
3. Add the DB2 driver location to the Linux library path.To do this, add the following line to the site_ arep_login.sh file in <install_dir>/replicate/bin:export LD_LIBRARY_PATH=\$LD_LIBRARY_PATH:/path/lib64
Setup and User Guide - Qlik Replicate, November 2021 252

8 Adding and managing source endpoints
where path is the path to the driver.Example:export LD_LIBRARY_PATH=$LD_LIBRARY_PATH:/opt/ibm/db2/V11.1/lib64
4. Add the following entry to the odbcinst.ini file under /etc:[IBM DB2 ODBC DRIVER]
Driver =/opt/ibm/db2/V11.5/lib64/libdb2o.so
fileusage=1
dontdlclose=1
5. Restart the Qlik Replicate Server service.
Server side ODBC setupBind the plan to be used for ODBC, as specified in the PLANNAME= value in the ODBC initialization file. Thedefault name is DSNACLI. The BIND job can be found in member DSNTIJCL, which is in the SDSNSAMP libraryof the source DB2 installation.
Use the DB2CLI bind command to bind the ODBC-supplied packages to your intended source z/OS DB2subsystem. This action is described in Configuring your developer and runtime environment on the IBMwebsite. For information about the DB2CLI utility, including an example for the bind utility, see db2cli - DB2interactive CLI command on the IBM website.
Required permissionsTo enable Replicate to extract data from the source tables (Full Load and Change Data Capture), the userspecified in the IBM DB2 for z/OS endpoint settings must be granted the following permissions:
l EXECUTE on the IFI reading the UDTF (only required for Change Data Capture)l SELECT on the source tables and on the DB2 catalog tablesl MONITOR2 to be able to start IFI sessions (only required for Change Data Capture)l SELECT ON SYSIBM.SYSLGRNX
For additional details about these permissions, see Change Data Capture Requirements.
Change data capture requirementsTo capture changes from IBM DB2 for z/OS, Qlik Replicate uses a special program - invoked as anexternal routine - which is a user-defined table function (UDTF). This program (a load module) as well asthe UDTF need to be installed and configured on the z/OS system before changes can be captured. Theinstallation procedure, which should be performed by the DBA, is described in the Qlik R4Z Installation andConfiguration Guide.
Additionally, the Data Capture Changes attribute must be set for every table whose changes you want toreplicate. You can either do this manually or allow Replicate to do this by leaving the Automatically enableData Capture Changes (requires admin privileges) option enabled (the default) in the Advanced tab.
LimitationsThe following limitations apply when using the IBM DB2 for z/OS endpoint in a Replicate task:
Setup and User Guide - Qlik Replicate, November 2021 253

8 Adding and managing source endpoints
l During a task with Full Load and Apply Changes enabled, duplicate keys may be replicated to thetarget. This is because records that were updated and cached during the Full Load stage of the taskmay have the same timestamp as the original records that were inserted during Full Load. Note thatthis usually only happens when the time difference between the inserted record and the updated(cached) record is very small (milliseconds).
l The "enableWLB" driver option is not supported. To force the connection to automatically switch toanother LPAR in a parallel sysplex (i.e. “failover”), set “enableACR” to “true” and “enableWLB” to“false” in the driver configuration.
l DDL limitations:l Drop column: Columns cannot be dropped from tables with the DATA CAPTURE CHANGESattribute.
l Change column data type: To capture changes to column data types:1. Stop the Replicate task.2. Change the data type(s).3. REORG the table with the modified data types.4. Resume the Replicate task.
l Replication of Views is supported during Full Load only (i.e. CDC is not supported).l Capturing changes from an environment with mixed RBA entries (6 and 10 byte formats) is notsupported.
Handling actions resulting in subtype 83Subtype 83 is a special diagnostic log record. The following topic describes how Replicate handles actionsresulting in subtype 83.
Action How it is Handled by Replicate
ALTER TABLE
(With somevariations, e.g.ADD COLUMN)
Handled without issue.
MODIFYRECOVERY
(With somevariations)
Handled without issue.
LOAD REPLACE
(All variations)
A warning message will be generated, with the following text (example):
DB2z utility (subtype 83) variation 4 (LOAD REPLACE) at
LSN=0000000000123abc0000
Additionally the table will be suspended if the internal Replicate parameter"db2LoadOption" is set to "SUSPEND". The default is "IGNORE", in which case awarning message will still be printed.
Subtype 83 commands
Setup and User Guide - Qlik Replicate, November 2021 254

8 Adding and managing source endpoints
Action How it is Handled by Replicate
LOAD RESUMEYES
(All variationsexceptSHRLEVELCHANGE)
-
REORGDISCARD
(If any rows arediscarded)
-
CHECK DATADELETE
(If any rows aredeleted)
-
RECOVER TOPOINT IN TIME
-
It's possible that LOAD RESUME NO, without REPLACE, may also create the subtype 83 logrecord. In such a case, the warning message shown above would indicate an unknownvariation number, with (UNIDENTIFIED) as the description. All other actions would be thesame as described above.
It is important to note that data loaded by this utility variation will not be captured.Consequently, this utility variation should be avoided.
Controlling the CDC processQlik Replicate uses ECSA memory structures - called R4Z CDC services - which are formed during CDCprocessing. Each z/OS LPAR may contain several such R4Z CDC services. To form the R4Z CDCservices, a special utility program, R4ZCTL, is provided.
This program can also be used for managing the state of CDC processing, as well as the level of traffic onthe z/OS side.
From Replicate 6.1, the CDC services (known as R4Z environment in previous versions), do not need to be“activated” prior to invocation of the CDC reader UDTF. The services are “auto-activated” by the UDTF(when inactive). This means that the R4Z control program is no longer responsible of activating the service.It is, however, required for the following purposes: checking CDC and reporting the CDC service’s status,pausing CDC processing, resuming a paused CDC, and terminating the CDC process, either normally orforcefully.
The command parameters available when running the R4ZCTL program are:
Setup and User Guide - Qlik Replicate, November 2021 255

8 Adding and managing source endpoints
If you run the command without any parameters, it will return the current status of the CDCservice.
l CHECKCONFIG - Verifies that configuration parameters are validl PAUSE_TASK - Stops the service of a specific CDC taskl PAUSE_CDC - Stops the entire activity of a CDC servicel RESUME_TASK - Enables a paused task to continuel RESUME_CDC - Enables a paused CDC service to continuel TERMINATE - Stops the CDC service, and, once stopped – releases its resourcesl FORCE - same as TERMINATE, when task holding resources “hangs”
As the R4ZCTL programs requires APF-authorization, all libraries in the STEPLIB must be APF-authorized.
When running R4ZCTL with no parameter, its completion-code is set based on whether the environmentwas initialized (CC=0) or not initialized (CC=1).
Control program invocation syntaxThe R4ZCTL program is invoked as a job step, i.e. EXEC PGM=R4ZCTL, and accepts instructions via theinvocation parameter of the job step.
The R4ZCTL invocation parameter is a string that can contain optional sub-parameters, separated by acomma as follows:
[SERVICE=CDC-service-qualifier,][MSGLVL={0 | 1},][action]
The order of the sub-parameters in the string is not important.
Where:
SERVICE=CDC-service-qualifier designates the logical scope of Replicate activity, upon which the controlprogram is to act.
For more information on CDC services, see Change data capture requirements (page 253).
MSGLVL={0 | 1 | 2} designates the level of notifications to be displayed in the message file during theoperation of the control program.
l 0 = No notificationsl 1 = Moderatel 2 = Maximum
action-verb can be one of the following:
Setup and User Guide - Qlik Replicate, November 2021 256

8 Adding and managing source endpoints
l PAUSE_TASK(*|ALL|task-qualifier)
Suspends CDC retrieval for the task(s) designated in parentheses.l PAUSE_CDC
Suspends CDC retrieval for entire CDC service. Replication tasks suspended for more than acertain time are stopped will attempt recovery multiple times. No new tasks will be served.
l RESUME_TASK(*|ALL|task-qualifier)
Resumes CDC retrieval for the task designated by task-qualifier.l RESUME_CDC
Resumes CDC retrieval for all instances matching the session-limits qualifier.l DUMP_TASK(*|ALL|task-qualifier)
Requests formatted dumping of the control information in the resident memory structures. ALLdesignates all sessions; SUMMARYONLY designates only the anchor.
l TERMINATE
Frees all the R4Z resident memory structures, terminates all active instances and deletesassociated resources. From this point on, all CDC requests will return the inactive status until CDCservice is auto-activated by an incoming call to the CDC reader UDF.
Syntax elements referenceThe elements used in the syntax descriptions above are as follows:
l CDC-service-qualifier
A 4-character name (first character alphabetic, rest alphanumeric), which designates a CDCservice.“CDC service” refers to a group of resources – memory structures, a user-defined table-function(UDTF) defined in DB2 and an application environment (APPLENV) defined in the WLM policy. R4Zlets you specify properties – memory limits and processing thresholds – per each CDC service. Itmay be necessary to manage several CDC services also for another reason: provide for more thanone Replicate release being used in a single LPAR, each maintain its memory structuresindependently on others.
l task-qualifier
A 4-digit identifier being assigned upon initiation of the task. This identifier is aimed mainly forcontrolling and tracking CDC traffic of a specific task (defined in the client’s endpoint definitions). Itis being used to form the CORRID (Correlation-ID) of the DB2 thread serving CDC – it occupiesbytes 9-12 there.
Control program completion codesl 0 – Normal completionl 1 – Environment does not exit the session-limits qualifier (when no action is specified)l 4 – Warningl 8 – Error
Sample jobs (in the INSTALL library)IV1CHECK – Checks the configuration of all CDC services
XMDUMP – Dumps all sessions
Setup and User Guide - Qlik Replicate, November 2021 257

8 Adding and managing source endpoints
XMPAUSE – Pauses a session
XMRESUME – Resumes a session
XMTERMIN – Terminates all sessions
Enabling the CDC process (auto-activation)To enable the CDC reader UDTF function to work, this function needs to be able to allocate and pre-formatmemory structures in ECSA when the UDTF is called and the first time after the z/OS system was started; italso needs to access the configurations set for the CDC service the UDTF is serving (or the “default”configurations, for values not specified at the CDC service level).
To account for this, the installation process ensures that:
1. A special UDTF is created to serve the CDC service. The created UDTF has its name suffixed with adouble-underscore (“__”) followed by the CDC-service-qualifier, forming a name as such:<schema>.R4Z_UDTF__<CDC-service-qualifier>.
2. A WLM APPLENV is created to execute invocations of the above UDTF. The created APPLENVmay also have its name suffixed with the CDC service qualifier, to ensure uniqueness of theAPPLENV name – which is recommended; however, multiple UDTFs may use a single APPLENV.
3. A JCL procedure is created to “host” the WLM APPLENV executions. This JCL procedure differsfrom a usual WLM STC procedures in that a special DDNAME, R4ZCNFG, must be specified, itsDSN referring to the CONFIG library of the R4Z product. In this library, there MUST be an existingmember named “CDCS”, specifying the default CDC service configurations. There MAY also exist amember named “CDCS<CDC-service-qualifier>” with the configuration values you want to applyfor this CDC service.
4. The content of each of the CDCS* members in the CONFIG library is a list of assignmentstatements, one per card, in the format “keyword=value”. The statement may follow spaces, and arespace-terminated; no spaces are allowed with the statement. Cards beginning with a hyphen (‘-‘)are treated as comment cards; and the content following the terminating space is also treated ascomment.
Keyword Description Minimum Maximum Default
MAXSESSIONS The maximumnumber of CDCsessions.
1 128 32
SESSIONTIMEOUTSECS The number ofseconds after whichsession is timed out.
300 7200 900
MAXIFIBUFKBYTES The maximum buffersize allowed for IFIreads, in Kbytes.
64 1024 256
Keywords, max values, min values, and default values
Setup and User Guide - Qlik Replicate, November 2021 258

8 Adding and managing source endpoints
MAXRESULTSETMBYTES The maximum sizein Mbytes for theaccumulated resultset to reach; whenreached, the resultset is returned.
1 2048 4
MAXRESULTSETSECS The maximum timeinterval, in seconds,for accumulating theresult set; whenreached, the resultset is returned.
1 120 30
Establishing R4Z CDC servicesDeciding on the CDC services: Based on predicting the need for independent replicationprocesses (to allow different versions, to ensure sufficient ECSA memory, to account for differentlatencies allowed, etc.), determine which R4Z CDC services are to exist in each LPAR. For eachservice, choose the CDC service qualifiers (4 characters). You also need to decide whether eachCDC service is to have its ownWLM APPLENV (application environment), or a single APPLENV toserve all CDC services.You need to set variable DEFWLMAE (DEFine WLM Applic. Env.) in DFSYMLST member to eitherPER (first option) or ONE (second option). Once set, you can proceed with the installation:
l If you select ONE for DEFWLMAE, jobs DO2* and DO3SRVTF should be runone time ; if you select PER , these jobs should be run for each CDC service,after the JCL SET variable CDCSRV is set to the CDC service’s qualifier.
l Job DO3SRVDF creates a CONFIG library, and places a member named“CDCS”, which serves as the default configuration file. After running jobDO3SRVTF the library will contain the configuration of all CDC services, makingit possible to edit them and change the configurations of a specific CDC service.
l If ONE is used for DEFWLMAE, then the product defaults are used instead of theCONFIG library members.
IBM DB2 for z/OS database source data typesThe following table shows the IBM DB2 for z/OS database source data types that are supported whenusing Qlik Replicate and the default mapping from Qlik Replicate data types.
For information on how to view the data type that is mapped in the target, see the section for the targetdatabase you are using.
For additional information about Qlik Replicate data types, see Replicate data types (page 76).
Setup and User Guide - Qlik Replicate, November 2021 259

8 Adding and managing source endpoints
IBM DB2 for z/OSSource Data Types
Qlik Replicate Data Types
INTEGER INT4
SMALLINT INT2
BIGINT INT8
DECIMAL (p,s) NUMERIC (p,s)
If a decimal point is set to a comma (,) in the DB2 configuration,you will need to configure Replicate to support the DB2 setting.
For information on how to configure Replicate, see R4ZConfiguration Dependency on Host.
FLOAT (8) REAL8
DOUBLE REAL8
REAL REAL4
DECFLOAT (p) If precision = 16, then:
REAL8
If precision = 34, then:
STRING
GRAPHIC If n<=127, then:
WSTRING
VARGRAPHIC If n<=16k double byte chars, then:
WSTRING
LONG VARGRAPHIC CLOB
CHAR (n) STRING
n<=255
VARCHAR (n) STRING
n<=32k
LONG VARCHAR (n) CLOB
n<=32k
Supported data types
Setup and User Guide - Qlik Replicate, November 2021 260

8 Adding and managing source endpoints
IBM DB2 for z/OSSource Data Types
Qlik Replicate Data Types
CHAR (n) FOR BITDATA
BYTES
VARCHAR (n) FORBIT DATA
CLOB
LONG VARCHARFOR BIT DATA
BLOB
DATE DATE
TIME TIME
TIMESTAMP DATETIME (6)
BLOB BLOB
CLOB CLOB
Maximum size: 2 GB
DBCLOB CLOB
Maximum size: 1 G double byte chars
XML CLOB
BINARY BYTES
VARBINARY BYTES
ROWID IGNORED
TIMESTAMPWITHTIME ZONE
NOT SUPPORTED
Setting general connection propertiesThis section describes how to configure general connection properties. For an explanation of how toconfigure advanced connection properties, see Setting advanced connection properties.
You can also use IBM DB2 for z/OS File Channel files as a source. For more information, seeUsing the Qlik Replicate file channel (page 908).
To add an IBM DB2 for z/OS source endpoint to Qlik Replicate:
1. In the Qlik Replicate Console, click Manage Endpoint Connections to open the Manage EndpointsConnections dialog box. Then click the New Endpoint Connection button. For more information onadding an endpoint to Qlik Replicate, see Defining and managing endpoints (page 110).
2. In the Name field, type a name for your database. This can be any name that will help to identify thedatabase being used.
Setup and User Guide - Qlik Replicate, November 2021 261

8 Adding and managing source endpoints
3. In the Description field, type a description that helps to identify the Microsoft SQL Server database.This is optional.
4. Select Source as the database role.
5. Select IBM DB2 for z/OS as the database Type.
When this endpoint is used as a duplicated source in a Log Stream Staging setup,select the Read changes from log stream check box and then select the relevant LogStream Staging task from the drop-down list.For information on setting up and managing Log Stream Staging tasks, see Using theLog Stream (page 919).
6. Choose one of the following:l Use database alias (DSN) - Specify the database alias you defined using the DB2Configuration Assistant or the DB2 Command Line Processor.
l Use these connection properties - If you choose this option, enter the IBM DB2 for z/OSServer (hostname or IP address), Port and Location in the designated fields.If the Server is a parallel SysPlex and data sharing members reside on multiple LPARs, thehost address may specify a DVIPA - a Dynamic Virtual IP Address (to utilize the systemredundancy and load-balancing in Replicate processing). In this case, the port numbersmust be identical for all members.The Location should be the DB2 location name defined during the installation. This shouldbe a relational database management system – under z/OS, either a subsystem or a groupconnection. This is the logical name which serves applications in order to designateresources managed by this system, either using SQL CONNECT instruction, or placing it asa qualifier of a table (preceding the schema name).To see the location name, use “-DIS DDF” DB2 command (option 7 under the DB2I panel inISPF), or look in message DSNL004I in the job log of the <ssid>MSTR address space.
7. Enter the User name and Password for an authorized user of the specified IBM DB2 for z/OSdatabase. For a list of the permissions that need to be granted to this user, see Requiredpermissions (page 253).If you do not know this information, consult with your IBM DB2 for z/OS database administrator(DBA).
l This information is case sensitive
l Make sure that the specified user has the required access privileges
8. Provider: Leave the default unless it was changed during the driver installation. Note that thisshould be the same as the name specified in the ODBC Data Source Administrator.
Setting advanced connection propertiesIn the Advanced tab, you can set advanced connection properties such as overriding CCSID to CharacterSet mapping, setting Change Data Capture properties, and setting internal Replicate parameters.
Setup and User Guide - Qlik Replicate, November 2021 262

8 Adding and managing source endpoints
Overriding CCSID to character set mappingIn some cases, character data in source tables may be encoded in a different CCSID than what is declaredin the source database table definition. For example, a specific table or column definition might indicatethat its uses CCSID 500 (EBCDIC International) whereas in fact, it uses CCSID 1148 (ENCDICInternational with EURO). In this case, you can tell Replicate that the source definition CCSID 500 shouldbe treated as CCSID 1148 (specifically, the character set named IBM-1148).
Note that when the source table definition specifies CCISD 65535 (meaning character set is unknown), youmust specify what character set should be assumed when reading data from that table or column.
If there is a conflict between the character set mapping for a specific column and the characterset mapping defined in the endpoint settings, the column-level character set mapping takesprecedence.
For more information on overriding character set mapping at column level, see Using theTransform tab (page 933).
To do this:
1. In the Override CCSID to Character Set Mapping section, click the New button.A row is added to the table.
2. Enter the CCSID in the CCSID column and the code page in the Character set column.The Character set (code page) must be specified in the proper format (e.g. ibm-1148_P100-1997).For a list of valid formats, see the ICU Converter Explorer.
3. Repeat to map additional CCSID values.
Converting to a custom code pagePerform the following procedure if your source endpoint tables are defined with an incorrect CCSID and thecorrect definition is actually in a UCM file.
1. Create a mapping data file with the file extension .ucm.
If you edit an existing UCM file, you must also change the values of the <code_set_name>
and <icu:alias> properties. If the file does not contain an <icu:alias> property, thenyou only need to change the value of the <code_set_name> property.
2. Create a CNV file for the UCM file by running the following command:<product_dir>\bin\makeconv.exe -v <file_name>.ucm
Example:
"c:\Program Files\Attunity\Replicate\bin\makeconv.exe" -v 1047_EX.ucm
This will create a CNV file with the same name as the UCM file (e.g. 1047_EX.cnv).
3. Copy the file to the following location:<product_dir>\bin\icudt58l
Setup and User Guide - Qlik Replicate, November 2021 263

8 Adding and managing source endpoints
When using the Replicate File Channel, the file should be copied to the same locationon both Replicate servers.
4. Add a new character set mapping as follows:
1. In CCSID column, enter the original source CCSID number (e.g. 1047)
2. In the Character set column, enter the name of the CNV file without the extension (e.g.1047_EX).
5. Restart the Qlik Replicate UI Server service.
Change data capture propertiesl Check for changes every: How often to check for new changes when the database is quiet. Whenthe database is active, changes are captured as soon as they are detected.
l CDC reader UDTF name: The name of the Qlik-supplied User-Defined Table Function, which is toaccess CDC data. Specify the two-part name resulting from the values you have chosen for schemaname, &R4ZSCNM and the function name, &R4ZIFITF.
l UDTF result set size (MB): Specify the maximum size to be accumulated by result rows returnedby the R4Z-supplied User-Defined Table Function, through CDC tasks using this endpoint. A largerresult set will cause less overhead time establishing the IFI session, but will result in greatermemory consumption by DB2. Specifically, because the result set is a LOB, you may need toincrease the LOBVALA limit in DB2 configuration (DSNZPARM), specifying the maximum LOB sizeallowed per user. Assuming all CDC enabling tasks are specifying the same ODBC user-ID, toaccommodate for all tasks running concurrently, LOBVALA should be set to 2 × 1024 × the followingsize:SUM[(i=all endpoints) : resultset size in endpoint(i) × #_tasks using
endpoint(i)]
(Resultset size is in Mbytes, so it needs to be multiplied by 1024 to reflect LOBVALA size, which isin Kbytes).Another DSNZPARM limit, LOBVALS, specifies the total size when across all user-IDs; so, in casemultiple user IDs are being used, you need to monitor this value as well. Note, however, thatLOBVALS is specified in Mbytes, unlike LOBVALA.
l Automatically enable Data Capture Changes (requires admin privileges): For Qlik Replicate tobe able to capture changes, the Data Capture Changes attribute needs to be set on all relevantsource tables. You can either do this manually or allow Replicate to perform this action by leavingthis option enabled (the default). When this option is enabled, the connecting user must haveALTER permission on the source tables being captured.
Setting internal parametersInternal parameters are parameters that are not exposed in the UI. With the exception of the parameterslisted in Authorized internal parameters (page 265) at the end of this section, you should only use them ifinstructed by Qlik Support.
To add internal Qlik Replicate parameters:
Setup and User Guide - Qlik Replicate, November 2021 264
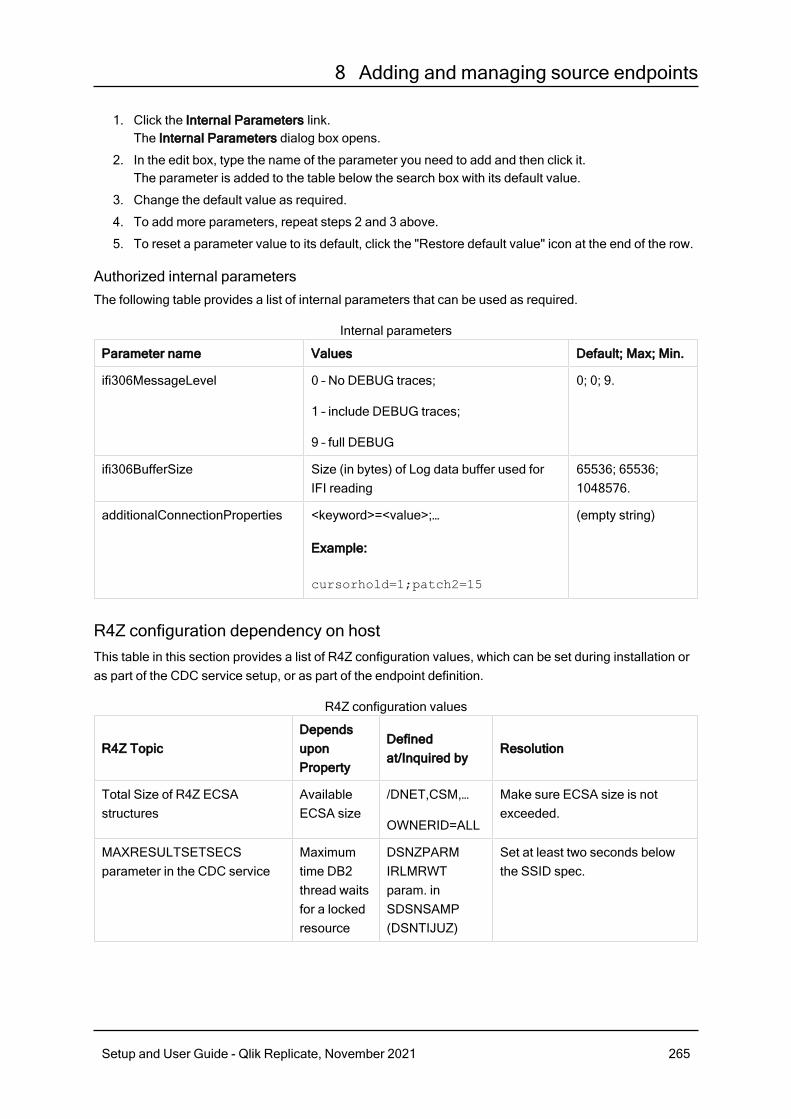
8 Adding and managing source endpoints
1. Click the Internal Parameters link.The Internal Parameters dialog box opens.
2. In the edit box, type the name of the parameter you need to add and then click it.The parameter is added to the table below the search box with its default value.
3. Change the default value as required.
4. To add more parameters, repeat steps 2 and 3 above.
5. To reset a parameter value to its default, click the "Restore default value" icon at the end of the row.
Authorized internal parametersThe following table provides a list of internal parameters that can be used as required.
Parameter name Values Default; Max; Min.
ifi306MessageLevel 0 – No DEBUG traces;
1 – include DEBUG traces;
9 – full DEBUG
0; 0; 9.
ifi306BufferSize Size (in bytes) of Log data buffer used forIFI reading
65536; 65536;1048576.
additionalConnectionProperties <keyword>=<value>;…
Example:
cursorhold=1;patch2=15
(empty string)
Internal parameters
R4Z configuration dependency on hostThis table in this section provides a list of R4Z configuration values, which can be set during installation oras part of the CDC service setup, or as part of the endpoint definition.
R4Z TopicDependsuponProperty
Definedat/Inquired by
Resolution
Total Size of R4Z ECSAstructures
AvailableECSA size
/DNET,CSM,…
OWNERID=ALL
Make sure ECSA size is notexceeded.
MAXRESULTSETSECSparameter in the CDC service
Maximumtime DB2thread waitsfor a lockedresource
DSNZPARMIRLMRWTparam. inSDSNSAMP(DSNTIJUZ)
Set at least two seconds belowthe SSID spec.
R4Z configuration values
Setup and User Guide - Qlik Replicate, November 2021 265

8 Adding and managing source endpoints
MAXRESULSETSIZEparameter in the CDC service
MaximumLOB sizeavailableper user-ID
DSNZPARMLOBVALAparam. inSDSNSAMP(DSNTIJUZ)
2 * (resultset size * max. session)
Decimal point: period or comma Designatesthe decimaleditingseparator
DSNHDECMDECIMAL=param. InDSNTIJUZ
If the decimal separator is acomma, set theadditionalConnectionPropertie
s internal parameter topatch2=15.
More optionsThese options are not exposed in the UI as they are only relevant to specific versions or environments.Consequently, do not set these options unless explicitly instructed to do so by Qlik Support or productdocumentation.
To set an option, simply copy the option into the Add feature name field and click Add. Then set the valueor enable the option according to the instructions you received.
Settings summaryYou can view a summary of your settings by clicking the Setting Summary link. This is useful if you need tosend a summary of your settings to Qlik Support.
Sample XMIT files “Receive” jobThe following is a sample job for receiving the LOAD and INSTALL libraries.
//*******************************************************************
//* Sample JCL for receiving *
//* Attunity ReplicateIBM DB2 for z/OS endpoint installation kit *
//* 1. Add a jobcard *
//* 2. Replace all <xmit-HLQ> by the High Level Qualifier used *
//* for receive files *
//* 3. Replace all <r4z-vn-hlq> by the High Level Qualifier chosen *
//* for the installation files *
//*******************************************************************
//RCVLOAD EXEC PGM=IKJEFT01,DYNAMNBR=20
//SYSPRINT DD SYSOUT=*
//SYSTSPRT DD SYSOUT=*
//SYSTSIN DD *
RECEIVE INDSN('<xmit-HLQ>.LOAD.XMIT') NODISPLAY
DATASET('<r4z-vn-hlq>.LOAD')
/*
//RCVINSTL EXEC PGM=IKJEFT01,DYNAMNBR=20
Setup and User Guide - Qlik Replicate, November 2021 266

8 Adding and managing source endpoints
//SYSPRINT DD SYSOUT=*
//SYSTSPRT DD SYSOUT=*
//SYSTSIN DD *
RECEIVE INDSN('<xmit-HLQ>.INSTALL.XMIT') NODISPLAY
DATASET('<r4z-vnd-hlq>.INSTALL')
/*
Setup and User Guide - Qlik Replicate, November 2021 267

8 Adding and managing source endpoints
8.13 Using IBM Informix as a sourceThis section describes how to set up and use an IBM Informix database as the source database in areplication task.
In this section:
l Prerequisites (page 269)l Limitations (page 269)l Required permissions (page 270)l IBM Informix database source data types (page 270)l Setting general connection properties (page 271)l Setting advanced connection properties (page 272)
Setup and User Guide - Qlik Replicate, November 2021 268

8 Adding and managing source endpoints
PrerequisitesBefore you begin to work with an IBM Informix database as a source in Qlik Replicate, make sure that thefollowing prerequisites have been met:
l Qlik Replicate machine:l Qlik Replicate installed in your network.l IBM Informix ODBC Driver (64-bit) version 3.70 or later must be installed on the computerwhere Qlik Replicate is located.
l The DB_LOCALE=<Informix_db_locale_value> environment variable must be set tobe the name of the IBM Informix database locale from which you want to capture data.
l The INFORMIXSQLHOSTS environment variable must be set to include the names of the IBMInformix servers that are available for use as Replicate source endpoints.
l IBM Informix Server:l An IBM Informix account with the required Required permissions (page 270).l CDC enabled. To enable CDC, run the script $INFORMIXDIR/etc/syscdcv1.sql on theIBM Informix server.
This requires DBA privileges (User 'IBM Informix' or another DBA user).
l Make sure that the database to be replicated was created with either the WITH LOG or theWITH BUFFERED LOG property.
LimitationsWhen using IBM Informix as a database in a Replicate task, the following limitations currently apply:
l CDC does not capture DDL changes. Due to an IBM Informix limitation, IBM Informix does not allowDDLs to be executed on tables with Full Row Logging enabled.To learn how to capture DDL changes during CDC, see Automatically enable full row logging.
l Due to an IBM Informix limitation, columns that follow columns of data types SET,MULTISET or LISTwill not be replicated during CDC.For example, in the table below, changes to Col3 will not be captured during CDC.
Name Data Type
Col1 INTEGER
Col2 SET
Col3 INTEGER
Example table
l User-defined data types are not supported.l Start from timestamp is not supported.
Choosing this option will resume the task from the current time.
Setup and User Guide - Qlik Replicate, November 2021 269

8 Adding and managing source endpoints
l If a task with an IBM Informix source is stopped before any changes have been made and thenresumed, any changes that were made between the time that the task was stopped and the timethat it was resumed will be lost.
l Due to a known issue with the IBM Informix CDC API, Replicate does not support replication oftables whose names contain spaces or non-English letters.
l All transactions should be manually stopped before starting a Full Load task. Transactions startedduring the Full Load operation will be cached.
l FIELDPROC and EDITPROC are not supported during CDC.l Replication from an IBM Informix High Availability cluster is not supported.
Required permissionsIn order to access the specified database, the user specified in the General tab must be a member of the"IBM Informix" group (which has DBA privileges) on the database server.
IBM Informix database source data typesThe following table shows the IBM Informix database source data types that are supported when using QlikReplicate and the default mapping from Qlik Replicate data types.
For information on how to view the data type that is mapped in the target, see the section for the targetdatabase you are using.
For additional information about Qlik Replicate data types, see Replicate data types (page 76).
IBM Informix Source Data Types Qlik Replicate Data Types
INTEGER INT4
SMALLINT INT2
INT8 INT8
SERIAL INT4
SERIAL8 INT8
NUMERIC (p,s) NUMERIC (p,s)
DECIMAL (p,s) NUMERIC (p,s)
MONEY (p,s) NUMERIC (p,s)
FLOAT REAL8
DOUBLE REAL8
REAL REAL4
SMALLFLOAT REAL4
BIGINT STRING (20)
DATE DATE
Supported data types
Setup and User Guide - Qlik Replicate, November 2021 270

8 Adding and managing source endpoints
IBM Informix Source Data Types Qlik Replicate Data Types
DATETIME (fraction) DATETIME (fraction)
INTERVAL STRING
CHAR STRING (n)
VARCHAR (n) STRING (n)
LVARCHAR (n) STRING (n)
NCHAR (n) STRING (n)
NVARCHAR (n) STRING (n)
BLOB BLOB
BYTE BLOB
CLOB CLOB
LIST
See also Limitations (page 269).
CLOB
MULTISET
See also Limitations (page 269).
CLOB
SET
See also Limitations (page 269).
CLOB
TEXT CLOB
BOOLEAN BOOLEAN
Unsupported data typesThe following IBM Informix data types are not supported:
l Any user-defined data type
Setting general connection propertiesThis section describes how to configure general connection properties. For an explanation of how toconfigure advanced connection properties, see Setting advanced connection properties.
You can also use IBM Informix files as a source. For more information, see Using the QlikReplicate file channel (page 908).
To add an IBM Informix source endpoint to Qlik Replicate:
1. In Tasks view, click Manage Endpoint Connections to open the Manage Endpoints Connectionsdialog box. Then click the New Endpoint Connection button.
Setup and User Guide - Qlik Replicate, November 2021 271

8 Adding and managing source endpoints
2. In the Name field, type a name for your database. This can be any name that will help to identify thedatabase being used.
3. In the Description field, type a description that helps to identify the IBM Informix database. This isoptional.
4. Select Source as the database role.
5. Select IBM Informix as the database Type.
When this endpoint is used as a duplicated source in a Log Stream Staging setup,select the Read changes from log stream check box and then select the relevant LogStream Staging task from the drop-down list.For information on setting up and managing Log Stream Staging tasks, see Using theLog Stream (page 919).
6. In the Server field, enter the name of the IBM Informix server. On Windows, this must correspond toone of the hosts defined using the setnet32.exe tool. On Linux, this must correspond to a validdbservername entry in the $INFORMIXDIR/etc/sqlhosts file on the computer running the application.
Consider the following:l This information is case sensitive.l To determine if you are connected to the database you want to use or if theconnection information you entered is correct, click Test Connection.If the connection is successful a message in green is displayed. If the connectionfails, an error message is displayed at the bottom of the dialog box.To view the log entry if the connection fails, click View Log. The server log isdisplayed with the information for the connection failure. Note that this button isnot available unless the test connection fails.
7. Enter the IBM Informix authentication information (User Name, Password) for the authorized userfor this IBM Informix database. If you do not know this information, see your IBM Informix databaseadministrator (DBA).
Make sure that the IBM Informix user entered in the IBM Informix Authentication sectionhas the correct access privileges. For information on how to provide the requiredprivileges, see Required permissions (page 270).
8. In the Database name field, enter the IBM Informix database name.
Setting advanced connection propertiesIn the Advanced tab, you can set the following parameters:
l Automatically enable full row logging: Full Row Logging is required for CDC. Select this option toautomatically enable Full Row Logging for the tables to be replicated. To automatically enable FullRow Logging, the user specified in the General tab must have administrative privileges on the IBMInformix database.
Setup and User Guide - Qlik Replicate, November 2021 272
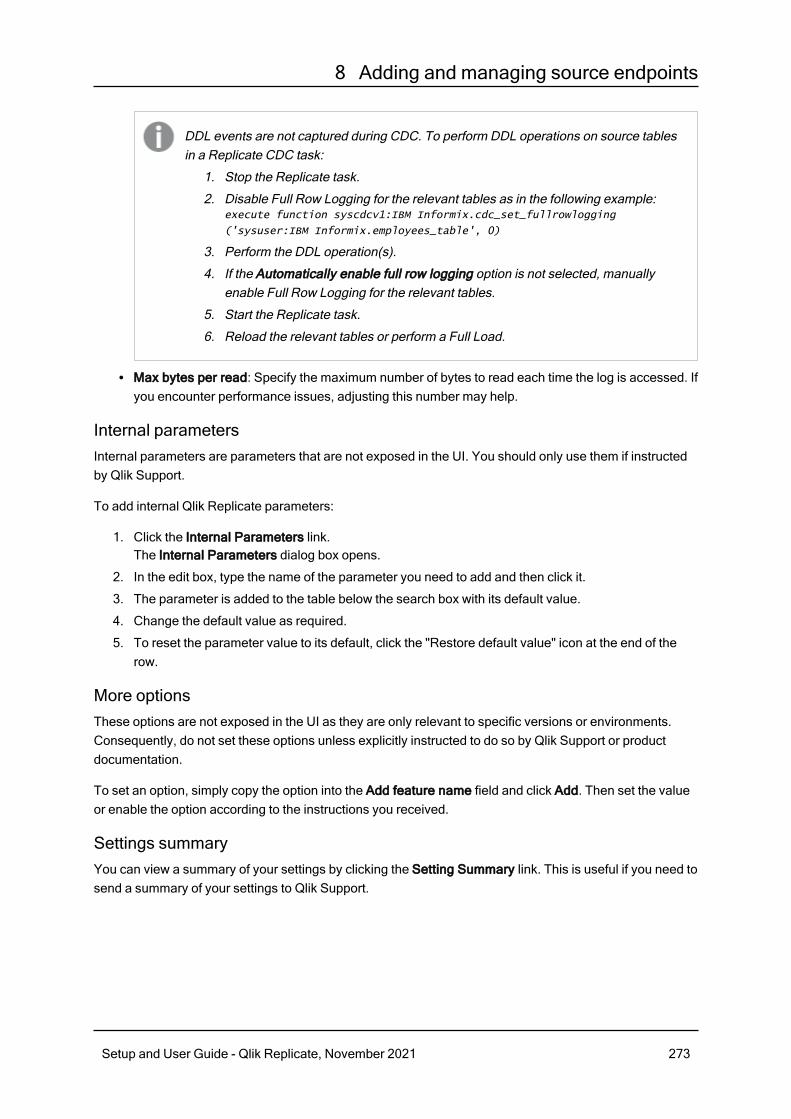
8 Adding and managing source endpoints
DDL events are not captured during CDC. To perform DDL operations on source tablesin a Replicate CDC task:
1. Stop the Replicate task.
2. Disable Full Row Logging for the relevant tables as in the following example:execute function syscdcv1:IBM Informix.cdc_set_fullrowlogging
('sysuser:IBM Informix.employees_table', 0)
3. Perform the DDL operation(s).
4. If the Automatically enable full row logging option is not selected, manuallyenable Full Row Logging for the relevant tables.
5. Start the Replicate task.
6. Reload the relevant tables or perform a Full Load.
l Max bytes per read: Specify the maximum number of bytes to read each time the log is accessed. Ifyou encounter performance issues, adjusting this number may help.
Internal parametersInternal parameters are parameters that are not exposed in the UI. You should only use them if instructedby Qlik Support.
To add internal Qlik Replicate parameters:
1. Click the Internal Parameters link.The Internal Parameters dialog box opens.
2. In the edit box, type the name of the parameter you need to add and then click it.
3. The parameter is added to the table below the search box with its default value.
4. Change the default value as required.
5. To reset the parameter value to its default, click the "Restore default value" icon at the end of therow.
More optionsThese options are not exposed in the UI as they are only relevant to specific versions or environments.Consequently, do not set these options unless explicitly instructed to do so by Qlik Support or productdocumentation.
To set an option, simply copy the option into the Add feature name field and click Add. Then set the valueor enable the option according to the instructions you received.
Settings summaryYou can view a summary of your settings by clicking the Setting Summary link. This is useful if you need tosend a summary of your settings to Qlik Support.
Setup and User Guide - Qlik Replicate, November 2021 273

8 Adding and managing source endpoints
8.14 Using Microsoft Azure SQL Managed Instance as asource
This section describes how to set up and use a Microsoft Azure SQL Managed Instance database as thesource database in a replication task.
In this section:
l Prerequisites (page 275)l Limitations and considerations (page 278)l Required permissions (page 279)l Supported compression methods (page 279)l Microsoft Azure SQL Managed Instance source data types (page 280)l Non-supported data types (page 282)l Homogeneous replication (page 283)l Setting general connection properties (page 285)l Setting advanced connection properties (page 286)l Artifacts created by Replicate in the database (page 287)
Setup and User Guide - Qlik Replicate, November 2021 274

8 Adding and managing source endpoints
PrerequisitesMake sure that the following prerequisites have been met:
Qlik Replicate for WindowsInstall Microsoft ODBC Driver 17.6 for Windows on the Qlik Replicate Server machine.
Qlik Replicate for LinuxInstall Microsoft ODBC Driver 17.6 for Linux on the Qlik Replicate Server machine.
Then, on the Qlik Replicate Server machine, open a Unix shell and perform the following steps:
The procedure below assumes that you have installed a single default instance of Replicate on Linux(areplicate). If you have installed multiple instances, replace areplicate with the name of the instancerunning the task with a Microsoft SQL Server source. If several instances are running such as task, theprocedure needs to be repeated for each instance.
1. Change the working directory to:cd <product_dir>/bin
2. Stop the Replicate service:./areplicate stop
3. Optionally, confirm that the service has stopped:./areplicate status
4. Copy the driver location to the site_arep_login.sh file as follows:echo "export LD_LIBRARY_PATH=$LD_LIBRARY_PATH:/opt/microsoft/msodbcsql17/lib64/" >>
site_arep_login.sh
This will add the driver to "LD_LIBRARY_PATH" and update the driver location in the site_arep_login.sh file.
5. Optionally, confirm that the driver location was copied:cat site_arep_login.sh
6. Start the Replicate instance:./areplicate start
7. Optionally confirm that the instance has started:./areplicate status
8. Replicate requires the following ODBC library: libmsodbcsql-17.6.so.1.1To check which library version is currently installed Issue the following command:ls /opt/microsoft/msodbcsql/lib64/
If the existing library has a different version number (e.g. libmsodbcsql-17.6.so.0.2), youneed to create a symbolic link between the existing library and the required library.To do this, issue the following commands:cd /opt/microsoft/msodbcsql17/lib64/ln -s existing_library_name libmsodbcsql-17.6.so.1.1
where existing_library_name is the name of the currently installed library (e.g.libmsodbcsql-17.6.so.0.2).
Other prerequisitesl A Microsoft Azure SQL Managed Instance account with the specific access privileges is required.See Source Permissions for more information.
Setup and User Guide - Qlik Replicate, November 2021 275

8 Adding and managing source endpoints
l When Replicate is installed on Linux, the Replicate machine and the source database must both bepart of the Azure domain.
l Microsoft Azure SQL Managed Instance as a source must be configured for a full backup to workwith Qlik Replicate. For more information, see Preparing Microsoft Azure SQL Managed Instancebackup and recovery (page 276).
Preparing the Microsoft Azure SQL Managed Instance database for replicationThis topics describes the configuration requirements for using a Microsoft Azure SQL Managed Instancedatabase. A Microsoft Azure SQL Managed Instance system administrator should carry out these tasks.
Setting up a Microsoft Azure SQL Managed Instance for CDCThe following section explains how to set up a Microsoft Azure SQL Managed Instance for CDC.
When creating the Microsoft Azure SQL Managed Instance, full backup must be enabled;otherwise, Replicate will not be able to capture changes.
To set up a Microsoft Azure SQL Managed Instance for CDC:
1. Log in as the master user in the DB instance and set up the database for MS-CDC as follows:exec source_db_name.dbo.sp_cdc_enable_db
where source_db_name is the name of the source database.
2. To enable MS-CDC, run the following for each of the intended source tables:exec sys.sp_cdc_enable_table
@source_schema = N'schema_name',
@source_name = N'table_name',
@role_name = NULL
exec sys.sp_cdc_add_job @job_type = 'capture'
exec sys.sp_cdc_add_job @job_type = 'cleanup'
GO
where schema_name and table_name are the names of the source schema and the source tablerespectively.
3. Set the retention period for the changes to be available on the source by changing the@pollinginterval of the 'capture' job to the maximum possible value.
Limitationsl CDC is supported with the transaction log only, with no option to work with backup.l Events may be lost if they are moved to backup or truncated.
Preparing Microsoft Azure SQL Managed Instance backup and recoveryQlik Replicate consumes changes captured from the database transaction log (TLOG). The TLOG ismaintained by Microsoft Azure SQL Managed Instance for recovery purposes. All changes made to adatabase are written to the TLOG. The following happens when recovery is required:
l A backup copy of the database is made.l Logged events are taken and used in a rolling-forward process where the recorded changes arereplayed against that copy.
Setup and User Guide - Qlik Replicate, November 2021 276

8 Adding and managing source endpoints
To prepare for backup and recovery you must make sure that the Microsoft Azure SQL Managed InstanceRecovery Model is set up. You select the Recovery Model in the Microsoft Azure SQL Managed InstanceManagement Studio. This should be carried out by a Microsoft Azure SQL Managed Instance systemadministrator.
The TLOG data is truncated as soon as it is no longer needed therefore the TLOG is not persistent.However, Qlik Replicate guaranteed delivery requires persistency in the changed data. To ensurepersistency:
l A full database backup must be carried out before beginning to replicate data.l The Recovery Model must be set to Bulk logged or Full.
To set the recovery model
In the database properties Options tab, set the Recovery Model to Bulk logged or Full. In these modes,the transaction Log is more durable.
After setting the Recovery Model, it is strongly recommended not to change it; doing so mayresult in loss of data.
Defining Microsoft Azure SQL Managed Instance database settingsSet the following for the Microsoft Azure SQL Managed Instance database(s) that you are using as asource:
l From the Object Explorer in the Microsoft Azure SQL Managed Instance Management Studio, rightclick the database and select Properties. In the Options tab, set the Recovery model to Bulklogged or Full. In this mode, the transaction Log is more durable and truncation occurs lessfrequently.
l Ensure that there is a full database backup for each Microsoft Azure SQL Managed Instancedatabase that you are using as a source.
l When creating a connection string, it is possible to use any parameter supported by Microsoft AzureSQL Managed Instance. The Microsoft Azure SQL Managed Instance system administrator mustensure that the Microsoft Azure SQL Managed Instance instance is configured correctly so that theproper authentication credentials are accepted.
Working with Windows AuthenticationYou can configure the Qlik Replicate Microsoft Azure SQL Managed Instance endpoint to log in toMicrosoft Azure SQL Managed Instance (on Windows) using Windows authentication.
If you choose this option, you also need to make sure that:
l The Microsoft Azure SQL Managed Instance instance is set up to allow Windows log on.l The Qlik Replicate user is specified as the "Log on as" user for the "Qlik Replicate Server" serviceaccount.-OR-Microsoft Azure SQL Managed Instance is configured to allow login for the Qlik Replicate Serverservice account.
Setup and User Guide - Qlik Replicate, November 2021 277

8 Adding and managing source endpoints
Limitations and considerationsWhen using a Microsoft Azure SQL Managed Instance source endpoint in a Replicate task, the followingimitations apply:
l A Secondary SQL Server database is not supported as a source database.l If you are using a Microsoft Azure SQL Managed Instance source database in a replication task, theMicrosoft Azure SQL Managed Instance Replication Publisher definitions for the database that wasused in the task are not removed when you remove a task. A Microsoft Azure SQL ManagedInstance system administrator must delete these definitions from Microsoft Azure SQL ManagedInstance.
l Sparse tables are not supported.l Replicating data from indexed views is not supported.l Renaming tables using sp_rename is not supported (e.g. sp_rename 'Sales.SalesRegion',
'SalesReg;)l Renaming columns using sp_rename is not supported (e.g. sp_rename 'Sales.Sales.Region',
'RegID', 'COLUMN';)l TRUNCATE events will not be captured.l Replication of computed columns is supported in Full Load replication tasks only. During changeprocessing, INSERTs to computed columns will appear as NULL on the target and UPDATEs willbe ignored.
l Microsoft Azure SQL Managed Instance partition switching is not supported.l When using the WRITETEXT and UPDATETEXT utilities, Qlik Replicate does not capture eventsapplied on the source database.
l The following DML pattern is not supported:select <*> into <new_table> from <existing_table>
l Column-level encryption is not supported.l The following limitations apply when accessing the backup transaction logs:
l Encrypted backups are not supported.l Backups stored at a URL or on Windows Azure are not supported.
l Microsoft Azure SQL Managed Instance backup to multiple disks is not supported.l When inserting a value into SQL Server spatial data types (GEOGRAPHY and GEOMETRY), onecan either ignore the SRID (Spatial Reference System Identifier) property - in which case the defaultSRID will be used (0 for GEOMETRY and 4326 for GEOGRAPHY) - or specify a different number.When replicating tables with spatial data types, Qlik Replicate replaces the SRID that was insertedby user with the default SRID.
l Replication of GEOGRAPHY and GEOMETRY data types is only supported in limited LOB mode.l Columnstore indexes are not supported.l Memory-optimized tables (using In-Memory OLTP) are not supported.l Temporal databases are not supportedl Delayed durability is not supportedl Table change tracking is not supportedl Due to an ODBC limitation, no more than 16 columns can be part of a Primary Key.
Setup and User Guide - Qlik Replicate, November 2021 278

8 Adding and managing source endpoints
l Masked data will be created in the target without masking.l Replication from databases configured to use ADR (Accelerated Database Recovery) is notsupported.
l Capturing DDL and DML statements within a single transaction is not supported.l Replication of a table or schema with an apostrophe (') in its name is not supported.l UPDATEs to a Primary Key/Unique Index that affect multiple rows may cause conflicts whenapplying the changes to the target. This may occur, for example, if the UPDATEs are applied to thetarget as INSERT/DELETE operations rather than a single UPDATE operation. In such a scenario(where UPDATEs to a Primary Key/Unique Index affect multiple rows), working in Batch OptimizedApply Change Processing mode is not supported as it may result in the table being ignored.Working in Transactional Apply Change Processing mode however, may result in constraintviolations. If this happens, you either need to reload the relevant table or locate the problematicrecords in the Apply exceptions (page 1138)Control Table and edit them manually in the targetdatabase.See also: Change Processing Tuning (page 1027).
l DACPAC replication is not supported.
Non-supported Microsoft Azure SQL Managed Instance security featuresTables that use the following Microsoft Azure SQL Managed Instance security features are not supported:
l Always Encryptedl Row-Level Security
Required permissionsTo use a Microsoft Azure SQL Managed Instance source in a Qlik Replicate task, the user specified in theMicrosoft Azure SQL Managed Instance endpoint connection settings must be a member of the db_owner
database role.
To use the db_owner database role, the following permissions are required on the master DB:
l grant view any definition
l grant view server state
l grant execute on sp_repldone
l grant execute on sp_replincrementlsn
l grant execute on sp_addpublication
l grant execute on sp_addarticle
l grant execute on sp_articlefilter
l grant select on sys.fn_dblog
Supported compression methods
Row/PageCompression (atPartition Level)
VardecimalStorageFormat
Vardecimal StorageFormatSparseColumns
Vardecimal Storage FormatSparseColumnsColumnar StructureCompression
Yes No No No
Supported compression methods
Setup and User Guide - Qlik Replicate, November 2021 279

8 Adding and managing source endpoints
Microsoft Azure SQL Managed Instance source data typesThe Microsoft Azure SQL Managed Instance source for Qlik Replicate supports most Microsoft Azure SQLManaged Instance data types. The following table shows the Microsoft Azure SQL Managed Instancesource data types that are supported when using Qlik Replicate and the default mapping to Qlik Replicatedata types. Note that Microsoft Azure SQL Managed Instance data types are only mapped to Qlik Replicatedata types when the target endpoint is not Microsoft Azure SQL Managed Instance. For information ondata type mapping and collation support when the target endpoint is Microsoft Azure SQL ManagedInstance, see Homogeneous replication (page 283) .
For information on how to view the data type that is mapped in the target, see the section for the targetendpoint you are using.
For additional information about Qlik Replicate data types, see Replicate data types (page 76).
When row size exceeds 8060, the VARCHAR, NVARCHAR, and VARBINARY data types willbe stored out-of-row. To replicate such data, use the source lookup function described in DataEnrichment (page 1003).
Collatable data types are indicated by an asterisk (*).
Microsoft Azure SQL Managed Instance Data TypesQlik Replicate DataTypes
BIGINT INT8
BIT BOOLEAN
DECIMAL NUMERIC
INT INT4
MONEY NUMERIC (19,4)
NUMERIC (p,s) NUMERIC
SMALLINT INT2
SMALLMONEY NUMERIC (10,4)
TINYINT UINT1
REAL REAL4
FLOAT REAL8
DOUBLE REAL8
DATETIME DATETIME
DATETIME2 DATETIME
Supported data types
Setup and User Guide - Qlik Replicate, November 2021 280

8 Adding and managing source endpoints
Microsoft Azure SQL Managed Instance Data TypesQlik Replicate DataTypes
SMALLDATETIME DATETIME
DATE DATE
TIME STRING (16)
DATETIMEOFFSET STRING
*CHAR STRING
*VARCHAR STRING
*VARCHAR (max)
*TEXT
To use this data type with Qlik Replicate, you must enable the use ofCLOBs for a specific task.
LOB columns for Microsoft Azure SQL Managed Instance tables areupdated in the target even for UPDATE statements that did not change thevalue of the LOB column in Microsoft Azure SQL Managed Instance.
During CDC or during Full Load when the Allow unlimited LOB size optionis enabled, LOB data types are supported only in tables with a primary keyor unique index.
CLOB
*NCHAR WSTRING
*NVARCHAR (length) WSTRING
*NVARCHAR (max)
*NTEXT
To use this data type with Qlik Replicate, you must enable the use ofNCLOBs for a specific task.
LOB columns for Microsoft Azure SQL Managed Instance tables areupdated in the target even for UPDATE statements that did not change thevalue of the LOB column in Microsoft Azure SQL Managed Instance.
During CDC or during Full Load when the Allow unlimited LOB size optionis enabled, LOB data types are supported only in tables with a primary keyor unique index.
NCLOB
BINARY BYTES
VARBINARY BYTES
Setup and User Guide - Qlik Replicate, November 2021 281

8 Adding and managing source endpoints
Microsoft Azure SQL Managed Instance Data TypesQlik Replicate DataTypes
VARBINARY (max)
IMAGE
LOB columns for Microsoft Azure SQL Managed Instance tables areupdated in the target even for UPDATE statements that did not change thevalue of the LOB column in Microsoft Azure SQL Managed Instance.
To use this data type with Qlik Replicate, you must enable the use ofBLOBs for a specific task.
During CDC or during Full Load when the Allow unlimited LOB size optionis enabled, LOB data types are supported only in tables with a primary keyor unique index.
BLOB
TIMESTAMP BYTES
UNIQUEIDENTIFIER STRING
HIERARCHYID HIERARCHYID - Whenreplicating to MicrosoftAzure SQL ManagedInstance.
STRING (250) - Whenreplicating to all otherendpoints.
XML
LOB columns for Microsoft Azure SQL Managed Instance tables areupdated in the target even for UPDATE statements that did not change thevalue of the LOB column in Microsoft Azure SQL Managed Instance.
To use this data type with Qlik Replicate, you must enable the use ofNCLOBs for a specific task.
During CDC or during Full Load when the Allow unlimited LOB size optionis enabled, LOB data types are supported only in tables with a primary keyor unique index.
CLOB
GEOMETRY CLOB
GEOGRAPHY CLOB
Non-supported data typesTables that include fields with the following data types are not supported by Qlik Replicate.
Setup and User Guide - Qlik Replicate, November 2021 282

8 Adding and managing source endpoints
l CURSORl SQL_VARIANTl TABLE
User-defined data types are supported according to their base-type. For example, a user-defined data type based on DATETIME is handled as a DATETIME data type.
Homogeneous replicationWhen replicating from a Microsoft Azure SQL Managed Instance source to a supported Microsoft SQLServer-based target, most of the source and target data types will be identical. The exceptions are listed inData type exceptions (page 283).
In homogeneous replication, the source data first passes through the Qlik Replicate data typeand is therefore subject to any limitations of that type.
For information on Replicate data types and their limitations (where relevant), see Replicatedata types (page 76).
For information on which Replicate data types the source data passes through when replicatingfrom a Microsoft Azure SQL Managed Instance, see the Microsoft Azure SQL ManagedInstance to Qlik Replicate data types mapping table described earlier.
To prevent data truncation when replicating columns with an XML data type, it is stronglyrecommended to enable the Allow unlimited LOB size option in the task settings.
Additionally, in homogeneous replication, source column and table collations will be replicated to the targetas described in Column and table collation (page 284).
Data type exceptionsWhen replicating from one Microsoft Azure SQL Managed Instance to a supported Microsoft SQL Server-based target, source and target data types are identical, with the following exceptions:
Setup and User Guide - Qlik Replicate, November 2021 283

8 Adding and managing source endpoints
Microsoft Azure SQL Managed InstanceSource
Microsoft SQL Server Target
DATETIME Supported database versions preceding Microsoft SQLServer 2016:
DATETIME
Microsoft SQL Server 2016 or later:
DATETIME2
VARCHAR VARCHAR (x)
(when x=0 or x>8000)
else VARCHAR (max)
NVARCHAR (length) NVARCHAR (x)
(when x=0 or x>8000)
else NVARCHAR (max)
VARBINARY VARBINARY (x)
(when x=0 or x>8000)
else VARBINARY (max)
HIERARCHYID VARCHAR (x)
TIMESTAMP VARBINARY
Data type exceptions
Column and table collationWhen replicating from Microsoft Azure SQL Managed Instance to a supported Microsoft SQL Server-based target, column and table collations will be replicated to the target.
To support collation replication, the DBA must ensure that the collations defined for the sourceMicrosoft Azure SQL Managed Instance database are the same as those defined for theMicrosoft SQL Server-based target.
Non-nullable columns and Primary/Unique Index namesPrimary/Unique Index names are preserved during homogeneous replication. Non-nullable columns arealso preserved during homogeneous replication, with the exception of the following data types:
l textl ntext1l varchar(max)l nvarchar(max)
Setup and User Guide - Qlik Replicate, November 2021 284

8 Adding and managing source endpoints
l varbinary(max)l imagel xml
Setting general connection propertiesThis section describes how to configure connection properties.
To add a Microsoft Azure SQL Managed Instance source endpoint to Qlik Replicate:
1. In the Qlik Replicate Console, click Manage Endpoint Connections to open the Manage EndpointsConnections dialog box. Then click the New Endpoint Connection button. For more information onadding an endpoint to Qlik Replicate, see Defining and managing endpoints (page 110).
2. In the Name field, type a name for your database. This can be any name that will help to identify thedatabase being used.
3. In the Description field, type a description that helps to identify the Microsoft Azure SQL ManagedInstance. This is optional.
4. Select Source as the database role.
5. Select Microsoft Azure SQL Managed Instance as the database Type.
6. Specify the Server name. This is the host name or IP address of the computer with the MicrosoftAzure SQL Managed Instance.
l To override the default port, add the port to the server name, separated by acomma. For example, if the server name is myserver.company.local andthe port is 3333, then the server name should be entered like this:myserver.company.local,3333
7. Select Windows authentication (only relevant when Replicate is installed on Windows) or SQLServer authentication.If you select Windows authentication, the user credentials for the Windows domain will be used.This privilege must be configured in the Microsoft Azure SQL Managed Instance database by thesystem administrator. Note that this option is not relevant when Microsoft Azure SQL ManagedInstance is running on Linux.
When using Windows authentication, make sure that the user account that isassociated with the Qlik Replicate Server service has Network read and writepermissions. This must be configured by a Windows system administrator.
See also Working with Windows Authentication (page 277).If you select SQL Server authentication, type the Microsoft Azure SQL Managed Instanceauthentication information (User name, Password) for the authorized user for this Microsoft AzureSQL Managed Instance database. If you do not know this information, see your Microsoft AzureSQL Managed Instance System Administrator.
Setup and User Guide - Qlik Replicate, November 2021 285

8 Adding and managing source endpoints
To ensure that the password provided to Replicate is never used by any other principal, Replicatecan be configured to automatically replace the user-entered password with a strong randompassword. For more information, see Configuring Replicate to automatically replace the user-entered password (page 80).
l This information is case sensitive.l To determine if you are connected to the database you want to use or if theconnection information you entered is correct, click Test Connection.If the connection is successful a message in green is displayed. If the connectionfails, an error message is displayed at the bottom of the dialog box.To view the log entry if the connection fails, click View Log. The server log isdisplayed with the information for the connection failure. Note that this button isnot available unless the test connection fails.
Make sure that the Microsoft Azure SQL Managed Instance user has the correct accessprivileges. For information on how to provide the required privileges, see Requiredpermissions (page 279).
8. Type the Database name or click Browse and select one from the list of available databases. Thisis the name of the database from where you are replicating the data.
Setting advanced connection propertiesIn the Advanced tab, you can set internal parameters, set more options, and view a summary of yoursettings.
Internal parametersInternal parameters are parameters that are not exposed in the UI. You should only use them if instructedby Qlik Support.
To add internal Qlik Replicate parameters:
1. Click the Internal Parameters link.The Internal Parameters dialog box opens.
2. In the edit box, type the name of the parameter you need to add and then click it.
3. The parameter is added to the table below the search box with its default value.
4. Change the default value as required.
5. To reset the parameter value to its default, click the "Restore default value" icon at the end of therow.
More optionsThese options are not exposed in the UI as they are only relevant to specific versions or environments.Consequently, do not set these options unless explicitly instructed to do so by Qlik Support or productdocumentation.
Setup and User Guide - Qlik Replicate, November 2021 286

8 Adding and managing source endpoints
To set an option, simply copy the option into the Add feature name field and click Add. Then set the valueor enable the option according to the instructions you received.
Settings summaryYou can view a summary of your settings by clicking the Setting Summary link. This is useful if you need tosend a summary of your settings to Qlik Support.
Artifacts created by Replicate in the database
In order to capture changes, Qlik Replicate creates various artifacts in the dbo schema of the MicrosoftAzure SQL Managed Instance when the task starts. You can safely remove them when the task completes.
The following artifact is created to track open transactions:
l #attrep_dbcc_open_trans_table
The following functions are created to verify that the LSN (Log Sequence Number) is valid:
l attrep_fn_LsnSegmentToHexa
l attrep_fn_NumericLsnToHexa
Setup and User Guide - Qlik Replicate, November 2021 287

8 Adding and managing source endpoints
8.15 Using Microsoft Azure SQL (MS-CDC) as a sourceThis section describes how to set up Microsoft Azure SQL (MS-CDC) as a source endpoint in a replicationtask. When replicating from Microsoft Azure SQL Managed Instance, you can use the Microsoft Azure SQL(MS-CDC) endpoint to capture changes from Microsoft Change Tables as opposed to the SQL Servertransaction log . Eliminating the need to rely on the transaction log minimizes the risk of data loss resultingfrom online transaction log retention time and backup transaction log inaccessibility.
In this section:
l Prerequisites (page 289)l Limitations and considerations (page 290)l Required permissions (page 292)l Supported compression methods (page 293)l Supported data types (page 293)l Homogeneous replication (page 296)l Setting general connection properties (page 298)l Setting advanced connection properties (page 299)l Removing Replicate artifacts from the database (page 300)
Setup and User Guide - Qlik Replicate, November 2021 288

8 Adding and managing source endpoints
PrerequisitesBefore you can use Microsoft Azure SQL (MS-CDC) as a source endpoint in a Replicate task, the followingprerequisites must be fulfilled:
Qlik Replicate for WindowsInstall Microsoft ODBC Driver 17.6 for Windows on the Qlik Replicate Server machine.
Qlik Replicate for LinuxInstall Microsoft ODBC Driver 17.6 for Linux on the Qlik Replicate Server machine.
Then, on the Qlik Replicate Server machine, open a Unix shell and perform the following steps:
The procedure below assumes that you have installed a single default instance of Replicate on Linux(areplicate). If you have installed multiple instances, replace areplicate with the name of the instancerunning the task with a Microsoft SQL Server source. If several instances are running such as task, theprocedure needs to be repeated for each instance.
1. Change the working directory to:cd <product_dir>/bin
2. Stop the Replicate service:./areplicate stop
3. Optionally, confirm that the service has stopped:./areplicate status
4. Copy the driver location to the site_arep_login.sh file as follows:echo "export LD_LIBRARY_PATH=$LD_LIBRARY_PATH:/opt/microsoft/msodbcsql17/lib64/" >>
site_arep_login.sh
This will add the driver to "LD_LIBRARY_PATH" and update the driver location in the site_arep_login.sh file.
5. Optionally, confirm that the driver location was copied:cat site_arep_login.sh
6. Start the Replicate instance:./areplicate start
7. Optionally confirm that the instance has started:./areplicate status
8. Replicate requires the following ODBC library: libmsodbcsql-17.6.so.1.1To check which library version is currently installed Issue the following command:ls /opt/microsoft/msodbcsql/lib64/
If the existing library has a different version number (e.g. libmsodbcsql-17.6.so.0.2), youneed to create a symbolic link between the existing library and the required library.To do this, issue the following commands:cd /opt/microsoft/msodbcsql17/lib64/ln -s existing_library_name libmsodbcsql-17.6.so.1.1
where existing_library_name is the name of the currently installed library (e.g.libmsodbcsql-17.6.so.0.2).
Preparing the database for replicationThe following section explains how to set up the database for CDC.
To set up the database for CDC:
Setup and User Guide - Qlik Replicate, November 2021 289

8 Adding and managing source endpoints
1. Set up the database for MS-CDC by executing the following:
exec source_db_name.dbo.sp_cdc_enable_db
where source_db_name is the name of the source database.
2. Replicate automatically enables MS-CDC for all the source tables. However, if you prefer to enableMS-CDCmanually, execute the following script (for each of the intended source tables):
exec sys.sp_cdc_enable_table
@source_schema = N'schema_name',
@source_name = N'table_name',
@role_name = NULL
where schema_name and table_name are the names of the source schema and the source tablerespectively.
l The CT table names must use the default naming format: <SchemaName>_<TableName>_CT
l The CT table must include the following columns: [__$start_lsn], [__$end_lsn], [__$seqval], [__$operation], [__$update_mask], <all the data columns>, [__$command_id]
3. Make sure the MS-CDC capture and cleanup jobs are running.
l You can control the jobs using sys.sp_cdc_change_job. For additionalinformation, see the Microsoft Help.
l To reduce latency, you might want to set the @pollinginterval parameter to asmall value.
Other prerequisitesl A Microsoft Azure SQL account with the specific access privileges is required. See Requiredpermissions (page 292) for more information.
l When Replicate is installed on Linux, the Replicate machine and the source database must both bepart of the Azure domain.
Limitations and considerationsWhen using a Microsoft Azure SQL (MS-CDC) source endpoint in a Replicate task, the following imitationsapply:
l A Secondary Microsoft Azure SQL Managed Instance is not supported as a source database.l Sparse tables are not supported.l Replicating data from indexed views is not supported.l Limitation due to the requirement to have MS-CDC enabled on all source tables include:
l Rename column is not supportedl Truncate table is not supported
Setup and User Guide - Qlik Replicate, November 2021 290

8 Adding and managing source endpoints
l WRITETEXT and UPDATETEXT utilities are not supported
For more information on MS-CDC limitations, see the Microsoft Help.l Limitations when capturing DDL operations are as follows:
l RENAME TABLE will no be captured. When a RENAME TABLE DDL is encountered, thetask will continue capturing the changes without renaming the target table. If the task isstopped and resumed of if there is a recoverable error, the table will be suspended to allowthe CT table to be manually aligned.
l Table-level DDLs are not supported. When a table DDL is encountered, the DDL will betransferred to the target and the table will be suspended to allow the CT table to be manuallyaligned.
l When running without the db_owner role, the following limitations apply:l Capture of DDLs is not supported. To prevent replication errors, you must clear the CaptureDDL events check box in the endpoint settings' Advanced tab before running the task.
l MS-CDC cannot be enabled automatically and should therefore be enabled manually. Toprevent replication errors, you must also clear the Enable MS-CDC on all captured tablescheck box in the endpoint settings' Advanced tab before running the task.
Special permissions are required for running without the db_owner role. For moreinformation, see Required permissions (page 292).
l Replication of computed columns is supported in Full Load replication tasks only. During changeprocessing, INSERTs to computed columns will appear as NULL on the target and UPDATEs willbe ignored.
l Microsoft Azure SQL Managed Instance partition switching is not supported.l The following DML pattern is not supported:select <*> into <new_table> from <existing_table>
l Column-level encryption is not supported.l When inserting a value into Microsoft Azure SQL Managed Instance spatial data types(GEOGRAPHY and GEOMETRY), one can either ignore the SRID (Spatial Reference SystemIdentifier) property - in which case the default SRID will be used (0 for GEOMETRY and 4326 forGEOGRAPHY) - or specify a different number. When replicating tables with spatial data types, QlikReplicate replaces the SRID that was inserted by user with the default SRID.
l Replication of GEOGRAPHY and GEOMETRY data types is only supported in limited LOB mode.l Columnstore indexes are not supported.l Memory-optimized tables (using In-Memory OLTP) are not supported.l Temporal databases are not supportedl Delayed durability is not supportedl Due to an ODBC limitation, no more than 16 columns can be part of a Primary Key.l Masked data will be created in the target without masking.l OpenLDAP is not supportedl Replication from databases configured to use ADR (Accelerated Database Recovery) is notsupported.
Setup and User Guide - Qlik Replicate, November 2021 291

8 Adding and managing source endpoints
l Capturing DDL and DML statements within a single transaction is not supported.l Replication of a table or schema with an apostrophe (') in its name is not supported.l DACPAC replication is not supported.
Non-supported Microsoft Azure SQL Managed Instance security featuresTables that use the following Microsoft Azure SQL Managed Instance security features are not supported:
l Always Encryptedl Row-Level Security
Required permissionsTo use the Microsoft Azure SQL (MS-CDC) source endpoint in a Qlik Replicate task, the user specified inthe Microsoft Azure SQL (MS-CDC) endpoint connection settings must have an Azure SQL ManagedInstance account with the following privileges:
Running with the db_owner roleIf the user defined in the Microsoft Azure SQL (MS-CDC) endpoint connection settings is a member of thedb_owner database role, the following permissions must be granted:
l On the master database:l grant VIEW ANY DEFINITIONl grant VIEW SERVER STATE
l On the MSDB database:l grant SELECT ON SYSJOBACTIVITYl grant SELECT ON SYSJOBS
Running without the db_owner roleIIf the user defined in the Microsoft Azure SQL (MS-CDC) endpoint connection settings is not a member ofthe db_owner database role, the following permissions must be granted:
On the master database:
l grant VIEW DATABASE STATE
On the replicated database:
l grant VIEW DATABASE STATEl grant SELECT
On the MSDB database:
l grant SELECT ON DBO.CDC_JOBSl grant SELECT ON DBO.SYSJOBACTIVITYl grant SELECT ON DBO.SYSJOBS
Setup and User Guide - Qlik Replicate, November 2021 292

8 Adding and managing source endpoints
There are several limitations that apply when running without the db_owner role. For moreinformation, see Limitations and considerations.
Supported compression methods
Row/PageCompression (atPartition Level)
VardecimalStorageFormat
Vardecimal StorageFormatSparseColumns
Vardecimal Storage FormatSparseColumnsColumnar StructureCompression
Yes No No No
Supported compression methods
Supported data typesThe Microsoft Azure SQL (MS-CDC) source endpoint for Qlik Replicate supports most Microsoft AzureSQL Managed Instance data types. The following table shows the Microsoft Azure SQL Managed Instancesource data types that are supported when using Qlik Replicate and the default mapping to Qlik Replicatedata types. Note that Microsoft Azure SQL Managed Instance data types are only mapped to Qlik Replicatedata types when the target endpoint is not Microsoft SQL Server-based. For information on data typemapping and collation support when the target endpoint is Microsoft SQL Server-based, seeHomogeneous replication (page 296) .
For information on how to view the data type that is mapped in the target, see the section for the targetendpoint you are using.
For additional information about Qlik Replicate data types, see Replicate data types (page 76).
Collatable data types are indicated by an asterisk (*).
Microsoft Azure SQL Managed InstanceQlik Replicate DataTypes
BIGINT INT8
BIT BOOLEAN
DECIMAL NUMERIC
INT INT4
MONEY NUMERIC (19,4)
NUMERIC (p,s) NUMERIC
SMALLINT INT2
SMALLMONEY NUMERIC (10,4)
Supported data types
Setup and User Guide - Qlik Replicate, November 2021 293

8 Adding and managing source endpoints
Microsoft Azure SQL Managed InstanceQlik Replicate DataTypes
TINYINT UINT1
REAL REAL4
FLOAT REAL8
DOUBLE REAL8
DATETIME DATETIME
DATETIME2 DATETIME
SMALLDATETIME DATETIME
DATE DATE
TIME STRING (16)
DATETIMEOFFSET STRING
*CHAR STRING
*VARCHAR STRING
*VARCHAR (max)
*TEXT
To use this data type with Qlik Replicate, you must enable the use ofCLOBs for a specific task.
LOB columns for Microsoft Azure SQL (MS-CDC) tables are updated in thetarget even for UPDATE statements that did not change the value of theLOB column in Microsoft Azure SQL (MS-CDC).
During CDC or during Full Load when the Allow unlimited LOB size optionis enabled, LOB data types are supported only in tables with a primary keyor unique index.
CLOB
*NCHAR WSTRING
*NVARCHAR (length) WSTRING
Setup and User Guide - Qlik Replicate, November 2021 294
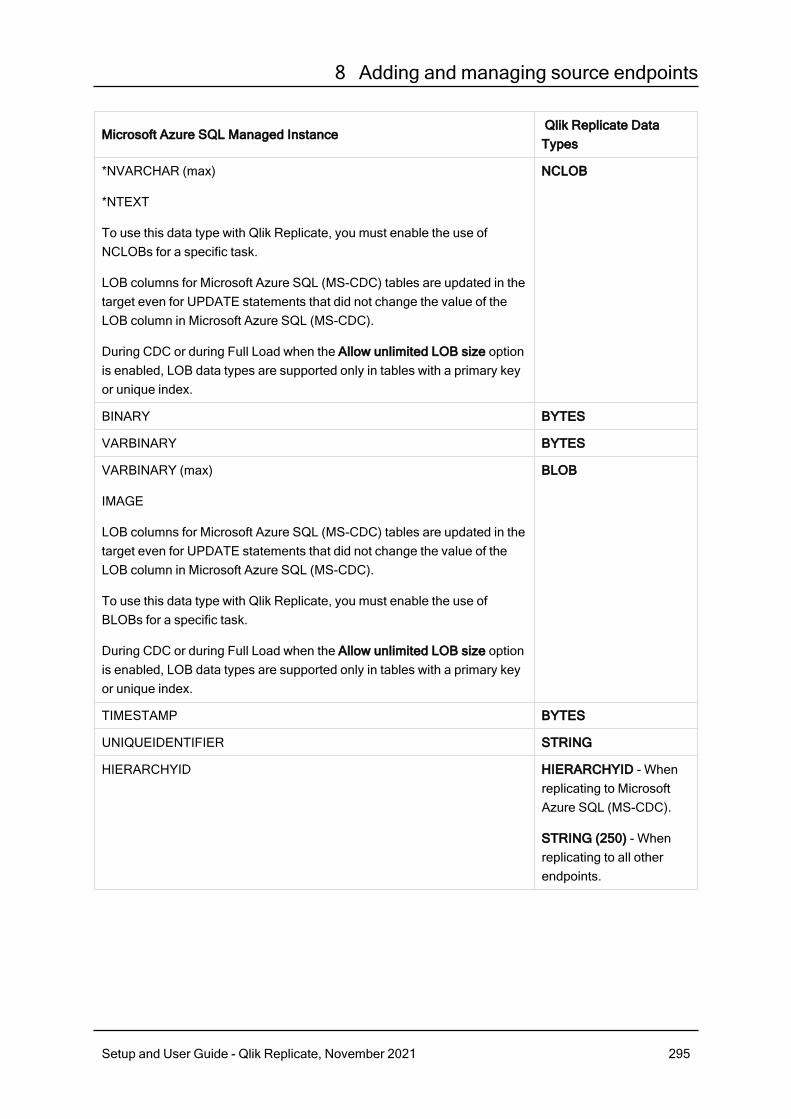
8 Adding and managing source endpoints
Microsoft Azure SQL Managed InstanceQlik Replicate DataTypes
*NVARCHAR (max)
*NTEXT
To use this data type with Qlik Replicate, you must enable the use ofNCLOBs for a specific task.
LOB columns for Microsoft Azure SQL (MS-CDC) tables are updated in thetarget even for UPDATE statements that did not change the value of theLOB column in Microsoft Azure SQL (MS-CDC).
During CDC or during Full Load when the Allow unlimited LOB size optionis enabled, LOB data types are supported only in tables with a primary keyor unique index.
NCLOB
BINARY BYTES
VARBINARY BYTES
VARBINARY (max)
IMAGE
LOB columns for Microsoft Azure SQL (MS-CDC) tables are updated in thetarget even for UPDATE statements that did not change the value of theLOB column in Microsoft Azure SQL (MS-CDC).
To use this data type with Qlik Replicate, you must enable the use ofBLOBs for a specific task.
During CDC or during Full Load when the Allow unlimited LOB size optionis enabled, LOB data types are supported only in tables with a primary keyor unique index.
BLOB
TIMESTAMP BYTES
UNIQUEIDENTIFIER STRING
HIERARCHYID HIERARCHYID - Whenreplicating to MicrosoftAzure SQL (MS-CDC).
STRING (250) - Whenreplicating to all otherendpoints.
Setup and User Guide - Qlik Replicate, November 2021 295

8 Adding and managing source endpoints
Microsoft Azure SQL Managed InstanceQlik Replicate DataTypes
XML
LOB columns for Microsoft Azure SQL (MS-CDC) tables are updated in thetarget even for UPDATE statements that did not change the value of theLOB column in Microsoft Azure SQL (MS-CDC).
To use this data type with Qlik Replicate, you must enable the use ofNCLOBs for a specific task.
During CDC or during Full Load when the Allow unlimited LOB size optionis enabled, LOB data types are supported only in tables with a primary keyor unique index.
CLOB
GEOMETRY CLOB
GEOGRAPHY CLOB
Non-supported data typesTables that include columns with the following data types are not supported by Qlik Replicate.
l CURSORl SQL_VARIANTl TABLE
User-defined data types are supported according to their base-type. For example, a user-defined data type based on DATETIME is handled as a DATETIME data type.
Homogeneous replicationWhen replicating from a Microsoft Azure SQL Managed Instance to a supported Microsoft SQL Server-based target, most of the source and target data types will be identical. The exceptions are listed in Datatype exceptions (page 297).
In homogeneous replication, the source data first passes through the Qlik Replicate data typeand is therefore subject to any limitations of that type.
For information on Replicate data types and their limitations (where relevant), see Replicatedata types (page 76).
For information on which Replicate data types the source data passes through when replicatingfrom a Microsoft Azure SQL Managed Instance, see the Microsoft Azure SQL ManagedInstance to Qlik Replicate data types mapping table described earlier.
Setup and User Guide - Qlik Replicate, November 2021 296

8 Adding and managing source endpoints
To prevent data truncation when replicating columns with an XML data type, it is stronglyrecommended to enable the Allow unlimited LOB size option in the task settings.
Additionally, in homogeneous replication, source column and table collations will be replicated to the targetas described in Column and table collation (page 297).
Data type exceptionsWhen replicating from a Microsoft Azure SQL Managed Instance to a supported Microsoft SQL Server-based target, source and target data types are identical, with the following exceptions:
Microsoft Azure SQL Managed InstanceSource
Microsoft SQL Server Target
DATETIME Supported database versions preceding Microsoft SQLServer 2016:
DATETIME
Microsoft SQL Server 2016 or later:
DATETIME2
VARCHAR VARCHAR (x)
(when x=0 or x>8000)
else VARCHAR (max)
NVARCHAR (length) NVARCHAR (x)
(when x=0 or x>8000)
else NVARCHAR (max)
VARBINARY VARBINARY (x)
(when x=0 or x>8000)
else VARBINARY (max)
HIERARCHYID VARCHAR (x)
TIMESTAMP VARBINARY
Data type exceptions
Column and table collationWhen replicating from a Microsoft Azure SQL Managed Instance to a supported Microsoft SQL Server-based target, column and table collations will be replicated to the target.
Setup and User Guide - Qlik Replicate, November 2021 297

8 Adding and managing source endpoints
To support collation replication, the DBA must ensure that the collations defined for the sourceMicrosoft Azure SQL Managed Instance database are the same as those defined for theMicrosoft SQL Server-based target.
Non-nullable columns and Primary/Unique Index namesPrimary/Unique Index names are preserved during homogeneous replication. Non-nullable columns arealso preserved during homogeneous replication, with the exception of the following data types:
l textl ntext1l varchar(max)l nvarchar(max)l varbinary(max)l imagel xml
Setting general connection propertiesThis section describes how to configure connection properties.
To add a Microsoft Azure SQL (MS-CDC) source endpoint to Qlik Replicate:
1. In the Qlik Replicate Console, click Manage Endpoint Connections to open the Manage EndpointsConnections dialog box. Then click the New Endpoint Connection button. For more information onadding an endpoint to Qlik Replicate, see Defining and managing endpoints (page 110).
2. In the Name field, specify a name for your database. This can be any name that will help to identifythe database being used.
3. In the Description field, optionally enter a description that helps to identify the Microsoft Azure SQL(MS-CDC) endpoint.
4. Select Source as the endpoint role.
5. Select Microsoft Azure SQL (MS-CDC) as the endpoint Type.
6. Specify the Server name. This is the host name or IP address of the computer with your MicrosoftAzure SQL Managed Instance database.
l To override the default port, add the port to the server name, separated by acomma. For example, if the server name is myserver.company.local andthe port is 3333, then the server name should be entered like this:myserver.company.local,3333
7. In the Username field, enter your username for accessing the Microsoft Azure SQL ManagedInstance database.
8. In the Password field, enter your password for accessing the Microsoft Azure SQL ManagedInstance database.
Setup and User Guide - Qlik Replicate, November 2021 298

8 Adding and managing source endpoints
To ensure that the password provided to Replicate is never used by any other principal,Replicate can be configured to automatically replace the user-entered password with astrong random password. For more information, see Configuring Replicate toautomatically replace the user-entered password (page 80).
l The username and password are case sensitive.l To determine if you are connected to the database you want to use or if theconnection information you entered is correct, click Test Connection.If the connection is successful a message in green is displayed. If the connectionfails, an error message is displayed at the bottom of the dialog box.To view the log entry if the connection fails, click View Log. The server log isdisplayed with the information for the connection failure. Note that this button isnot available unless the test connection fails.
9. Type the Database name or click Browse and select one from the list of available databases. Thisis the name of the Microsoft Azure SQL Managed Instance database from where you are replicatingthe data.
Setting advanced connection propertiesIn the Advanced tab, you can enable CDC, provide internal parameters, set "More Options", and view asummary of your settings.
Enabling Change Data Capturel Enable MS-CDC on all captured tables - Select this option to automatically enable MS-CDC for allselected source tables (on all columns). When this option is selected, the MS-CDC tables will becreated in the database's default filegroup.
l Capture DDL events: When this option is selected, the following operations occur:l To facilitate capture of DDL events, Replicate creates triggers and other operational artifactsin the source database when the task starts. You can later remove these artifacts asdescribed in Removing Replicate artifacts from the database (page 300).
l Streamed DDL events are captured.l Create DDL artifacts in schema - The schema in which the operational DDL database artifacts willbe created. The default value is "dbo".
Internal parametersInternal parameters are parameters that are not exposed in the UI. You should only use them if instructedby Qlik Support.
To add internal Qlik Replicate parameters:
1. Click the Internal Parameters link.The Internal Parameters dialog box opens.
2. In the edit box, type the name of the parameter you need to add and then click it.
Setup and User Guide - Qlik Replicate, November 2021 299

8 Adding and managing source endpoints
3. The parameter is added to the table below the search box with its default value.
4. Change the default value as required.
5. To reset the parameter value to its default, click the "Restore default value" icon at the end of therow.
More optionsThese options are not exposed in the UI as they are only relevant to specific versions or environments.Consequently, do not set these options unless explicitly instructed to do so by Qlik Support or productdocumentation.
To set an option, simply copy the option into the Add feature name field and click Add. Then set the valueor enable the option according to the instructions you received.
Settings summaryYou can view a summary of your settings by clicking the Setting Summary link. This is useful if you need tosend a summary of your settings to Qlik Support.
Removing Replicate artifacts from the databaseIn order to capture DDLs, Qlik Replicate creates various artifacts in the Microsoft SQL Server databasewhen the task starts. When the task completes, you may wish to remove these artifacts.
To remove the artifacts, execute the following statements (in the order they appear below), where dbo is thedefault schema in which the artifacts were created:
The event trigger does not belong to a specific schema.
DROP TRIGGER [attrep_mscdc_ddl_catcher] ON DATABASE
DROP TABLE [dbo].[attrep_mscdc_ddl_history]
Setup and User Guide - Qlik Replicate, November 2021 300
8 Adding and managing source endpoints
8.16 Using Microsoft SQL Server as a sourceThis section describes how to set up and use a Microsoft SQL Server database as the source database ina replication task.
In this section:
l Supported editions (page 789)l Prerequisites (page 302)l Limitations and considerations (page 303)l Working with Microsoft SQL Server AlwaysOn Availability Groups (page 305)l Required permissions (page 307)l Supported compression methods (page 307)l Microsoft SQL Server source data types (page 307)l Homogeneous replication (page 311)l Preparing the Microsoft SQL Server database for replication (page 312)l Setting general connection properties (page 315)l Setting advanced connection properties (page 316)l Working with Windows authentication (page 320)l Artifacts created by Replicate in the database (page 320)
Setup and User Guide - Qlik Replicate, November 2021 301

8 Adding and managing source endpoints
Supported editionsQlik Replicate supports the following Microsoft SQL Server editions:
l Enterprise Editionl Standard Editionl Workgroup Editionl Developer Editionl SQL Server Web Edition
PrerequisitesMake sure that the following prerequisites have been met:
Qlik Replicate for WindowsInstall Microsoft ODBC Driver 17.6 for Windows on the Qlik Replicate Server machine.
Qlik Replicate for LinuxInstall Microsoft ODBC Driver 17.6 for Linux on the Qlik Replicate Server machine.
Then, on the Qlik Replicate Server machine, open a Unix shell and perform the following steps:
The procedure below assumes that you have installed a single default instance of Replicate on Linux(areplicate). If you have installed multiple instances, replace areplicate with the name of the instancerunning the task with a Microsoft SQL Server source. If several instances are running such as task, theprocedure needs to be repeated for each instance.
1. Change the working directory to:cd <product_dir>/bin
2. Stop the Replicate service:./areplicate stop
3. Optionally, confirm that the service has stopped:./areplicate status
4. Copy the driver location to the site_arep_login.sh file as follows:echo "export LD_LIBRARY_PATH=$LD_LIBRARY_PATH:/opt/microsoft/msodbcsql17/lib64/" >>
site_arep_login.sh
This will add the driver to "LD_LIBRARY_PATH" and update the driver location in the site_arep_login.sh file.
5. Optionally, confirm that the driver location was copied:cat site_arep_login.sh
6. Start the Replicate instance:./areplicate start
7. Optionally confirm that the instance has started:./areplicate status
8. Replicate requires the following ODBC library: libmsodbcsql-17.6.so.1.1To check which library version is currently installed Issue the following command:ls /opt/microsoft/msodbcsql/lib64/
Setup and User Guide - Qlik Replicate, November 2021 302

8 Adding and managing source endpoints
If the existing library has a different version number (e.g. libmsodbcsql-17.6.so.0.2), youneed to create a symbolic link between the existing library and the required library.To do this, issue the following commands:cd /opt/microsoft/msodbcsql17/lib64/ln -s existing_library_name libmsodbcsql-17.6.so.1.1
where existing_library_name is the name of the currently installed library (e.g.libmsodbcsql-17.6.so.0.2).
General prerequisitesl A Microsoft SQL Server account with the specific access privileges is required. See SourcePermissions for more information.
l Microsoft SQL Server as a source must be configured for a full backup to work with Qlik Replicate.For more information, see Preparing Microsoft SQL Server backup and recovery (page 313).
l When decompressing a compressed backup transaction log, Replicate writes the decompressedlog to the same location as the compressed log. Consequently, the location of the compressedbackup transaction log must have enough space to contain the decompressed log as well.
l If your environment matches the following:l Microsoft SQL Server versions 2012 or 2014l Microsoft ODBC Driver 17 installed on Red Hat 8.1
Then, in order to work with TLS 1.2, you must install a specific Service Pack on the Windowsmachine where Microsoft SQL Server is installed.For more information, see the following Microsoft article.
Limitations and considerationsWhen using a Microsoft SQL Server source endpoint in a Replicate task, the following imitations apply:
l If you are using a Microsoft SQL Server source database in a replication task, the Microsoft SQLServer Replication Publisher definitions for the database that was used in the task are not removedwhen you remove a task. A Microsoft SQL Server system administrator must delete thesedefinitions from Microsoft SQL Server.
l Sparse tables are not supported.l Replicating data from indexed views is not supported.l Renaming tables using sp_rename is not supported (e.g. sp_rename 'Sales.SalesRegion',
'SalesReg;)l Renaming columns using sp_rename is not supported (e.g. sp_rename'Sales.Sales.Region', 'RegID', 'COLUMN';)
l TRUNCATE events will not be captured.l Replication of computed columns is supported in Full Load replication tasks only. During changeprocessing, INSERTs to computed columns will appear as NULL on the target and UPDATEs willbe ignored.
l Microsoft SQL Server partition switching is not supported.l When using the WRITETEXT and UPDATETEXT utilities, Qlik Replicate does not capture eventsapplied on the source database.
l The following DML pattern is not supported:
Setup and User Guide - Qlik Replicate, November 2021 303

8 Adding and managing source endpoints
select <*> into <new_table> from <existing_table>
l Column-level encryption is not supported.l The following limitations apply when accessing the backup transaction logs:
l Encrypted backups are not supported.l Backups stored at a URL or on Windows Azure are not supported.
l The following limitations apply when accessing the backup transaction logs at file level:l The backup transaction logs must reside in a shared folder with the appropriate permissionsand access rights.
l Active transaction logs are accessed through the Microsoft SQL Server API (and not at file-level).
l The Qlik Replicate and Microsoft SQL Server machines must reside in the same domain.l Transparent Data Encryption (TDE) is not supported. Note that when accessing the backuptransaction logs using SQL Server’s native functionality (i.e. not using file-level access), TDEencryption is supported.
l Unix platforms are not supported.l Reading the backup logs from multiple stripes is not supported.l The File Stream and Full Text features are not supported when the endpoint's Replicate hasfile-level access to the backup log files option is enabled.
For more information on configuring Qlik Replicate to access the backup transaction logs at file-level access, see Setting advanced connection properties (page 316).
l Microsoft SQL Server backup to multiple disks (i.e. MIRROR TO DISK) is not supported.l When inserting a value into SQL Server spatial data types (GEOGRAPHY and GEOMETRY), onecan either ignore the SRID (Spatial Reference System Identifier) property - in which case the defaultSRID will be used (0 for GEOMETRY and 4326 for GEOGRAPHY) - or specify a different number.When replicating tables with spatial data types, Qlik Replicate replaces the SRID that was insertedby user with the default SRID.
l Replication of GEOGRAPHY and GEOMETRY data types is only supported in limited LOB mode.l If your database is not set up for MS-REPLICATION or MS-CDC, you can still capture tables that donot have a Primary Key, but bear in mind that in such a setup only INSERT/DELETE DML eventswill be captured. UPDATE events will be ignored.
l Columnstore indexes are not supported.l Memory-optimized tables (using In-Memory OLTP) are not supported.l Temporal tables are not supportedl Delayed durability is not supportedl Table change tracking is not supportedl Due to an ODBC limitation, no more than 16 columns can be part of a Primary Key.l Masked data will be created in the target without masking.l OpenLDAP is not supportedl Replicating directly from a secondary Microsoft SQL Server database is not supported.Consequently, the Replicate Microsoft SQL Server endpoint must be configured to connect to theprimary database or the AlwaysOn Listener.
Setup and User Guide - Qlik Replicate, November 2021 304

8 Adding and managing source endpoints
l Replication from databases configured to use ADR (Accelerated Database Recovery) is notsupported.
l Capturing DDL and DML statements within a single transaction is not supported.l Replication of a table or schema with an apostrophe (') in its name is not supported.l UPDATEs to a Primary Key/Unique Index that affect multiple rows may cause conflicts whenapplying the changes to the target. This may occur, for example, if the UPDATEs are applied to thetarget as INSERT/DELETE operations rather than a single UPDATE operation. In such a scenario(where UPDATEs to a Primary Key/Unique Index affect multiple rows), working in Batch OptimizedApply Change Processing mode is not supported as it may result in the table being ignored.Working in Transactional Apply Change Processing mode however, may result in constraintviolations. If this happens, you either need to reload the relevant table or locate the problematicrecords in the Apply exceptions (page 1138)Control Table and edit them manually in the targetdatabase.See also: Change Processing Tuning (page 1027).
l DACPAC replication is not supported.
Non-supported Microsoft SQL Server security featuresTables that use the following Microsoft SQL Server security features are not supported:
l Always Encryptedl Row-Level Security
Working with Microsoft SQL Server AlwaysOn Availability GroupsThe Microsoft SQL Server AlwaysOn Availability Groups feature is a high-availability, disaster-recoverysolution that provides an enterprise-level alternative to database mirroring.
Prerequisitesl Credentials used for connecting to individual replicas should be identical to those used forconnecting to the AlwaysOn Listener.
l Replicas should be configured to allow connections.To configure this, the DBA should run the following script:ALTER AVAILABILITY GROUP [{ag_name}]
MODIFY REPLICA ON '{replica_name}'
WITH (SECONDARY_ROLE (ALLOW_CONNECTIONS = ALL, READ_ONLY_ROUTING_URL =
'TCP://{replica_name}:{Port}'))
Configuring Replicate to access the AlwaysOn ListenerWhen working with AlwaysOn Availability Groups, you need to specify the IP address/host name andaccess credentials of the AlwaysOn Listener in the Microsoft SQL Server source endpoint settings.
LimitationsThe following limitations apply when working with AlwaysOn Availability Groups:
l DAG (Distributed Availability Groups) is not supported.
Setup and User Guide - Qlik Replicate, November 2021 305

8 Adding and managing source endpoints
l An AlwaysOn Availability Group that requires Replicate to access the backup transaction logs (seebelow) is not supported when the Replicate has file-level access to the backup log files check boxis enabled in the Microsoft SQL Server source endpoint settings.
Accessing backup logs in AlwaysOn Availability GroupsAs opposed to active transaction logs which are synchronized across the AlwaysOn Availability Group,backup transaction logs are different for each individual replica. Consequently, when Replicate needs toaccess the backup transaction logs, it "asks" each Replica in turn if it has the required logs, until the backuptransaction logs are located. Note that if one of the Replicas that Replicate is trying to reach is offline,Replicate will wait until that Replica comes back online and then query it for the backup transaction logs.
Replicate needs to access the backup transaction logs on each Replica (or until it finds the required logs) inthe following scenarios:
l Working in backup only mode.For more information on this mode, see Read changes from backup only.
l Starting a task from a specific timestamp.For more information on this option, see the Tables are already loaded option in Advanced RunOptions (page 1048).
l Due to latency i.e. if there is a high rate of events (changes) that Replicate is unable to processusing the active log only.
Reading backup logs from AlwaysOn Availability Groups requires opening connections to all ofthe replicas. If you do not want to do this, set the Change processing mode in the Advancedtab to Online Logs only.
Setting up a non-sysadmin user when working with AlwaysOn availability groupsThis topic explains how to support a non-sysadmin user when working with AlwaysOn availability groups.For information on setting up non-sysadmin in a standard environment, see Setting up a non-sysadminuser in a standalone environment (page 307).
The setup procedure involves running scripts. As copying the scripts from the PDF introduces formattingissues that invalidate the scripts, the instructions are only accessible from the HTML-based online Help. Toaccess the instructions, click the Help link in the top right of the Replicate Console and navigate to Settingup a Non-Sysadmin User when Working with AlwaysOn Availability Groups.
1.MS-REPLICATION distributor should either be configured as local or in a way thatallows access to non-sysadmin users via the associated linked server.
2.The login should be created with the same SID on each replica.
Setup and User Guide - Qlik Replicate, November 2021 306

8 Adding and managing source endpoints
Required permissionsTo use a Microsoft SQL Server source in a Qlik Replicate task, the user specified in the Microsoft SQLServer endpoint connection settings can be either of the following:
l A member of both the db_owner database role and the sysAdmin fixed server role.l A member of the db_owner database role but not a member of sysAdmin fixed server role. Seealso Setting up a non-sysadmin user in a standalone environment (page 307).
Setting up a non-sysadmin user in a standalone environmentThe procedure for setting up a non-sysadmin includes running scripts. As copying the scripts from the PDFintroduces formatting issues that invalidate the scripts, the instructions are only accessible from the HTML-based online Help. To access the instructions, click the Help link in the top right of the Replicate Consoleand navigate to Setting up a Non-Sysadmin User .
If you wish to set up a non-sysadmin user in an AlwaysOn environment, see Setting up a non-sysadmin user when working with AlwaysOn availability groups (page 306).
Supported compression methodsThe table below lists which compression methods Qlik Replicate supports for each Microsoft SQL Serverversion.
MicrosoftSQL ServerVersion
Row/PageCompression (atPartition Level)
Vardecimal StorageFormat
VardecimalStorageFormat
SparseColumns
VardecimalStorage Format
Sparse Columns
ColumnarStructureCompression
2012-2016 Yes No No No
Supported compression methods
Microsoft SQL Server source data typesThe Microsoft SQL Server source for Qlik Replicate supports most Microsoft SQL Server data types. Thefollowing table shows the Microsoft SQL Server source data types that are supported when using QlikReplicate and the default mapping to Qlik Replicate data types. Note that Microsoft SQL Server data typesare only mapped to Qlik Replicate data types when the target endpoint is not Microsoft SQL Server. Forinformation on data type mapping and collation support when the target endpoint is Microsoft SQL Server,see Homogeneous replication (page 311) below.
For information on how to view the data type that is mapped in the target, see the section for the targetendpoint you are using.
For additional information about Qlik Replicate data types, see Replicate data types (page 76).
Setup and User Guide - Qlik Replicate, November 2021 307

8 Adding and managing source endpoints
When row size exceeds 8060, the VARCHAR, NVARCHAR, and VARBINARY data types willbe stored out-of-row. To replicate such data, use the source lookup function described in DataEnrichment (page 1003).
Collatable data types are indicated by an asterisk (*).
Microsoft SQL Server Data Types Qlik Replicate Data Types
BIGINT INT8
BIT BOOLEAN
DECIMAL NUMERIC
INT INT4
MONEY NUMERIC (19,4)
NUMERIC (p,s) NUMERIC
SMALLINT INT2
SMALLMONEY NUMERIC (10,4)
TINYINT UINT1
REAL REAL4
FLOAT REAL8
DOUBLE REAL8
DATETIME DATETIME
DATETIME2 DATETIME
SMALLDATETIME DATETIME
DATE DATE
TIME STRING (16)
DATETIMEOFFSET STRING
*CHAR STRING
*VARCHAR STRING
Supported source data types
Setup and User Guide - Qlik Replicate, November 2021 308

8 Adding and managing source endpoints
Microsoft SQL Server Data Types Qlik Replicate Data Types
*VARCHAR (max)
*TEXT
To use this data type with Qlik Replicate, you mustenable the use of CLOBs for a specific task.
LOB columns for Microsoft SQL Server tables areupdated in the target even for UPDATE statementsthat did not change the value of the LOB column inMicrosoft SQL Server.
During CDC or during Full Load when the Allowunlimited LOB size option is enabled, LOB data typesare supported only in tables with a primary key orunique index.
CLOB
*NCHAR WSTRING
*NVARCHAR (length) WSTRING
*NVARCHAR (max)
*NTEXT
To use this data type with Qlik Replicate, you mustenable the use of NCLOBs for a specific task.
LOB columns for Microsoft SQL Server tables areupdated in the target even for UPDATE statementsthat did not change the value of the LOB column inMicrosoft SQL Server.
During CDC or during Full Load when the Allowunlimited LOB size option is enabled, LOB data typesare supported only in tables with a primary key orunique index.
NCLOB
BINARY BYTES
VARBINARY BYTES
Setup and User Guide - Qlik Replicate, November 2021 309

8 Adding and managing source endpoints
Microsoft SQL Server Data Types Qlik Replicate Data Types
VARBINARY (max)
IMAGE
LOB columns for Microsoft SQL Server tables areupdated in the target even for UPDATE statementsthat did not change the value of the LOB column inMicrosoft SQL Server.
To use this data type with Qlik Replicate, you mustenable the use of BLOBs for a specific task.
During CDC or during Full Load when the Allowunlimited LOB size option is enabled, LOB data typesare supported only in tables with a primary key orunique index.
BLOB
TIMESTAMP BYTES
UNIQUEIDENTIFIER STRING
HIERARCHYID HIERARCHYID - When replicating toMicrosoft SQL Server.
STRING (250) - When replicating to all otherendpoints.
XML
LOB columns for Microsoft SQL Server tables areupdated in the target even for UPDATE statementsthat did not change the value of the LOB column inMicrosoft SQL Server.
To use this data type with Qlik Replicate, you mustenable the use of NCLOBs for a specific task.
During CDC or during Full Load when the Allowunlimited LOB size option is enabled, LOB data typesare supported only in tables with a primary key orunique index.
CLOB
GEOMETRY CLOB
GEOGRAPHY CLOB
Non-Supported data typesTables that include fields with the following data types are not supported by Qlik Replicate.
Setup and User Guide - Qlik Replicate, November 2021 310

8 Adding and managing source endpoints
l CURSORl SQL_VARIANTl TABLE
User-defined data types are supported according to their base-type. For example a user-defined data type based on DATETIME is handled as a DATETIME data type.
Homogeneous replicationWhen replicating from a Microsoft SQL Server source to a Microsoft SQL Server target, most of the sourceand target data types will be identical.
In homogeneous replication, the source data first passes through the Qlik Replicate data typeand is therefore subject to any limitations of that type.
For information on Replicate data types and their limitations (where relevant), see Replicatedata types (page 76).
For information on which Replicate data types the source data passes through when replicatingfrom Microsoft SQL Server, see the Microsoft SQL Server to Qlik Replicate data types mappingtable described earlier.
To prevent data truncation when replicating columns with an XML data type, it is stronglyrecommended to enable the Allow unlimited LOB size option in the task settings.
Additionally, in homogeneous replication, source column and table collations will be replicated to the targetas described in Column and table collation (page 312).
Data type exceptionsWhen replicating from one Microsoft SQL Server database to another, source and target data types areidentical for all supported Microsoft SQL Server versions, with the following exceptions:
Microsoft SQL Server Source Microsoft SQL Server Target
DATETIME Supported database versions preceding Microsoft SQL Server 2016:
DATETIME
Microsoft SQL Server 2016 or later:
DATETIME2
Data type exceptions
Setup and User Guide - Qlik Replicate, November 2021 311

8 Adding and managing source endpoints
Microsoft SQL Server Source Microsoft SQL Server Target
VARCHAR VARCHAR (x)
(when x=0 or x>8000)
else VARCHAR (max)
NVARCHAR (length) NVARCHAR (x)
(when x=0 or x>8000)
else NVARCHAR (max)
VARBINARY VARBINARY (x)
(when x=0 or x>8000)
else VARBINARY (max)
HIERARCHYID VARCHAR (x)
TIMESTAMP VARBINARY
Column and table collationWhen replicating from one Microsoft SQL Server database to another, column and table collations will bereplicated to the target.
To support collation replication, the DBA must ensure that the collations defined for the sourceMicrosoft SQL Server database are the same as those defined for the target Microsoft SQLServer database.
Non-nullable columns and primary/unique index namesPrimary/Unique Index names are preserved during homogeneous replication. Non-nullable columns arealso preserved during homogeneous replication, with the exception of the following data types:
l textl ntext1l varchar(max)l nvarchar(max)l varbinary(max)l imagel xml
Preparing the Microsoft SQL Server database for replicationThis topics describes the configuration requirements for using a Microsoft SQL Server database. AMicrosoft SQL Server system administrator should carry out these tasks.
Setup and User Guide - Qlik Replicate, November 2021 312

8 Adding and managing source endpoints
l Preparing Microsoft SQL Server backup and recovery (page 313)l Setting up Microsoft SQL Server for replication (page 313)l Replicating tables that do not have a primary key (page 314)l Defining Microsoft SQL Server database settings (page 314)
Preparing Microsoft SQL Server backup and recoveryQlik Replicate consumes changes captured from the database transaction log (TLOG). The TLOG ismaintained by Microsoft SQL Server for recovery purposes. All changes made to a database are written tothe TLOG. The following happens when recovery is required:
l A backup copy of the database is made.l Logged events are taken and used in a rolling-forward process where the recorded changes arereplayed against that copy.
To prepare for backup and recovery you must make sure that the Microsoft SQL Server Recovery Model isset up. You select the Recovery Model in the Microsoft SQL Server Management Studio. This should becarried out by a Microsoft SQL Server system administrator.
The TLOG data is truncated as soon as it is no longer needed therefore the TLOG is not persistent.However, Qlik Replicate guaranteed delivery requires persistency in the changed data. To ensurepersistency:
l A full database backup must be carried out before beginning to replicate data.l The Recovery Model must be set to Bulk logged or Full.
To set the recovery model:
In the database properties Options tab, set the Recovery Model to Bulk logged or Full. In these modes,the transaction Log is more durable.
After setting the Recovery Model, it is strongly recommended not to change it; doing so mayresult in loss of data.
Setting up Microsoft SQL Server for replicationIf you are using Microsoft SQL Server as the source in a Qlik Replicate task, you need to enable yourMicrosoft SQL Server database for MS-REPLICATION.
In the Microsoft SQL Server’s Management Studio, follow the instructions provided by the ConfigureDistribution wizard to set up replication or see the Microsoft SQL Server documentation.
To open the wizard from Microsoft SQL Server:
1. In the Microsoft SQL Server Management Studio, right-click the Replication folder and selectConfigure Distribution.The Configure Distribution wizard opens.
2. Make the following selections:
Setup and User Guide - Qlik Replicate, November 2021 313

8 Adding and managing source endpoints
In the Distributor step, select <Microsoft SQL Server Name> will act as its own distributor;Microsoft SQL Server will create a distribution database and log.
Replicating tables that do not have a primary key
This functionality is supported only for Microsoft SQL Server Enterprise edition.
By default, Qlik Replicate automatically sets up MS-REPLICATION for each of the source tables in areplication task. However, MS-REPLICATION requires each of the source tables to have a primary key,which may not always be the case. Therefore, if you need to replicate tables that do not have a primarykey, the following options are available:
l Use MS-CDC (page 314)l Do not use MS-Replication or MS-CDC (page 314)
Use MS-CDCTo set up MS-CDC, you first need to enable MS-CDC for the database by running the following command:
use [DBname]
EXEC sys.sp_cdc_enable_db
Then you need to enable MS-CDC for each of the source tables by running the following command:
EXECUTE sys.sp_cdc_enable_table @source_schema = N'MySchema', @source_name = N'MyTable',
@role_name = NULL;
Replicating tables that do not have a Primary Key or a Unique Index may adversely affectperformance (since additional database resources are required to capture the changes).However, you can prevent performance issues related to the absence of Primary Keys or aUnique Index by manually adding indexes to the target tables.
For more information on setting up MS-CDC for specific tables, please refer to the Microsoft website.
Do not use MS-Replication or MS-CDCIf your database is not set up for MS-REPLICATION or MS-CDC, you can still capture tables that do nothave a Primary Key, but bear in mind that in such a setup only INSERT/DELETE DML events will becaptured. UPDATE events will be ignored.
It is also important to note that a DELETE statement executed on an UPDATED source record, will not beapplied on the target.
Defining Microsoft SQL Server database settingsSet the following for the Microsoft SQL Server database(s) that you are using as a source:
l From the Object Explorer in the Microsoft SQL Server Management Studio, right click the databaseand select Properties. In the Options tab, set the Recovery model to Bulk logged or Full. In thismode, the transaction Log is more durable and truncation occurs less frequently.
Setup and User Guide - Qlik Replicate, November 2021 314

8 Adding and managing source endpoints
l Ensure that there is a full database backup for each Microsoft SQL Server database that you areusing as a source.
l When creating a connection string, it is possible to use any parameter supported by Microsoft SQLServer. The Microsoft SQL Server system administrator must ensure that the Microsoft SQL Serverinstance is configured correctly so that the proper authentication credentials are accepted.
l To be able to work with MS-REPLICATION, each of the source tables must have a primary key.
Setting general connection propertiesThis section describes how to configure general connection properties. For an explanation of how toconfigure advanced connection properties, see Setting advanced connection properties.
To add a Microsoft SQL Server source endpoint to Qlik Replicate:
1. In the Qlik Replicate Console, click Manage Endpoint Connections to open the Manage EndpointsConnections dialog box. Then click the New Endpoint Connection button. For more information onadding an endpoint to Qlik Replicate, see Defining and managing endpoints (page 110).
2. In the Name field, type a name for your database. This can be any name that will help to identify thedatabase being used.
3. In the Description field, type a description that helps to identify the Microsoft SQL Server database.This is optional.
4. Select Source as the database role.
5. Select Microsoft SQL Server as the database Type.
6. Specify the Server name. This is the host name or IP address of the computer with the MicrosoftSQL Server instance containing the source database.
l When working with AlwaysOn Availability Groups, you need to specify the IPaddress/host name and access credentials of the AlwaysOn Listener
l To override the default port, add the port to the server name, separated by acomma. For example, if the server name is myserver.company.local andthe port is 3333, then the server name should be entered like this:myserver.company.local,3333
7. Select Windows authentication (only relevant when Replicate is installed on Windows) or SQLServer authentication.If you select Windows authentication, the Qlik Replicate Server will use a trusted connection toconnect with SQL Server using the LogOn account set up for the Qlik Replicate Server service – noexplicit username nor password are needed. This mode must be configured in the Microsoft SQLServer database by the database administrator. Note that this option is not relevant when MicrosoftSQL Server is running on Linux.
When using Windows authentication, make sure that the user account that isassociated with the Qlik Replicate Server service has Network read and writepermissions. This must be configured by a Windows system administrator.
Setup and User Guide - Qlik Replicate, November 2021 315

8 Adding and managing source endpoints
See also Working with Windows authentication (page 320).If you select SQL Server authentication, you must specify a username and password forconnecting to Microsoft SQL Server. The username and password may be of a domain user or of adatabase user, depending on the configuration of Microsoft SQL Server. If you do not know thisinformation, see your Microsoft SQL Server Database Administrator.To ensure that the password provided to Replicate is never used by any other principal, Replicatecan be configured to automatically replace the user-entered password with a strong randompassword. For more information, see Configuring Replicate to automatically replace the user-entered password (page 80).
l This information is case sensitive.l To determine if you are connected to the database you want to use or if theconnection information you entered is correct, click Test Connection.If the connection is successful a message in green is displayed. If the connectionfails, an error message is displayed at the bottom of the dialog box.To view the log entry if the connection fails, click View Log. The server log isdisplayed with the information for the connection failure. Note that this button isnot available unless the test connection fails.
Make sure that the Microsoft SQL Server user has the correct access privileges. Forinformation on how to provide the required privileges, see Required permissions (page307).
8. Type the Database name or click Browse and select one from the list of available databases. Thisis the name of the database from where you are replicating the data.
Setting advanced connection propertiesIn the Advanced tab, you can set the following properties:
l Prevent truncation of unread changes from TLOG: For optimal performance, Qlik Replicate will tryto capture all unread changes from the active transaction log (TLOG). However, sometimes due totruncation, the active TLOGmay not contain all of the unread changes. When this occurs, QlikReplicate accesses the backup log to capture the missing changes. To minimize the need to accessthe backup log, Qlik Replicate prevents truncation using one of the following methods:
l Start transactions in the database: This is the default method. When this method is used,Qlik Replicate prevents TLOG truncation by mimicking a transaction in the database. As longas such a transaction is open, changes that appear after the transaction started will not betruncated. If you need Microsoft Replication to be enabled in your database, then you mustchoose this method.
Setup and User Guide - Qlik Replicate, November 2021 316

8 Adding and managing source endpoints
This method also requires the Log Reader Agent to be running to enabletruncation of the Microsoft SQL Server active transaction log. Note that if the LogReader Agent is not running, the active log may become full, causing the sourcedatabase to be essentially "read-only" until the issue is resolved.
When this option is selected, Replicate creates a table named attrep_truncation_safeguard in the source database. This is a very small butimportant table whose purpose is to prevent truncation of the transaction log bymimicking a transaction in the database. Make sure that the table is not includedany maintenance plan as it may cause the maintenance job to fail. The table canbe safely deleted if there are no tasks configured with the Start transactions inthe database option.
l Exclusively use sp_repldone within a single task: When this method is used, QlikReplicate reads the changes and then uses sp_repldone to mark the TLOG transactionsas ready for truncation. Although this method does not involve any transactional activities, itcan only be used when Microsoft Replication is not running. Also, using this method, onlyone Qlik Replicate task can access the database at any given time. Therefore, if you need torun parallel Qlik Replicate tasks against the same database, use the default method.
l This method requires the Log Reader Agent to be stopped in thedatabase. If the Log Reader Agent is running when the task starts, QlikReplicate will forcibly stop it. Alternatively, you can stop the Log ReaderAgent manually, before starting the Qlik Replicate task. For instructionson how to do this, refer to the Microsoft SQL Server Management Studiohelp.
l When using this method with MS-CDC, the CDC Capture and CDCCleanup jobs should be stopped and disabled.
l This method is not available when the Microsoft SQL Server Replicationjob resides on a remote Distributor machine as Replicate does not haveaccess to the remote machine.
l Apply TLOG truncation prevention policy every (seconds): Specify how often to preventTLOG truncation using one of the methods describes above. Factors that you shouldconsider when determining the policy frequency include storage availability, backup and logroutines, and the rate at which Qlik Replicate processes events.
If the Exclusively use sp_repldone within a single task option is also selected,setting a very short interval (e.g. 1) may adversely affect task processing, andpossibly even result in an error.
Setup and User Guide - Qlik Replicate, November 2021 317

8 Adding and managing source endpoints
l Alternate backup folder: The location of the backup logs when using a third-party utility to back upthe transaction logs (i.e. instead of Microsoft SQL Server’s own backup mechanism). You can runthe backup utility yourself or you can configure Qlik Replicate to run it as described in Backup filepreprocessing command below.Note that the backup files must be exported to the specified location in standard Microsoft SQLServer format.
l Change processing mode: Choose one of the following change processing modes:l Prioritize Online Logs - This is the default. Qlik Replicate will first look for the changes in theonline transaction logs. In the event that Replicate cannot find the changes in the onlinetransaction logs, it will look for them in the backup transaction logs instead.
l Prioritize Backup Logs - When this option is enabled, Qlik Replicate will first look for thechanges in the backup transaction logs. This can improve performance when reading fromthe online transaction log is slow (e.g due to lock contention) or when using file-level accessto access the backup transaction logs.In the event that Replicate cannot find the changes in the backup transaction logs, it will lookfor them in the online transaction logs instead.
l Backup Logs Only - When this option is selected, Qlik Replicate will try and find the changesin the backup transaction logs only. Selecting this method results in increased latency due tothe interval between backups. The actual latency time will remain constant, but will varyaccording to the backup schedule.
l Online Logs Only - When this option is selected, Qlik Replicate will try and find the changesin the online transaction logs only.
l Replicate has file-level access to the backup log files: Select this option if Qlik Replicate hasbeen granted file-level access to the backup log files in the Alternate backup folder.
When Qlik Replicate has file-level access to the backup transaction logs, the followingrules apply:
l The Alternate backup folder must be a common shared network folder, forexample: \\temp\backup.
l The Qlik Replicate Server service must be configured to log on using the username and password specified in the Backup folder user name and Backupfolder password fields.To do this:In the Windows Services console, double-click the Qlik Replicate Serverservice.In the Log On tab, select This account and then enter the user name andpassword.
l The specified user must be granted Read permission to the alternate backupfolder (i.e. the shared network folder).
For a complete list of the limitations affecting file-level access, see Limitation andconsiderations (page 790).
l Backup folder user name: The user name required to access the backup folder when QlikReplicate has file-level access.
Setup and User Guide - Qlik Replicate, November 2021 318

8 Adding and managing source endpoints
l Backup folder password: The password required to access the backup folder when QlikReplicate has file-level access.
l Backup folder preprocessing command: You can use a third-party utility to convert the transactionlogs to standard Microsoft SQL Server format (if they are in a different format) and back them up toan alternate backup folder. This option should be used in conjunction with the Alternate backupfolder option described above.Prerequisites and Notes:The command is invoked via the XP_CMDSHELL extended procedure.
l The backup utility is responsible for setting the system return code (0 for success, 1 forfailure), assuming that this code is delegated as the XP_CMDSHELL return value.
l The backup utility invoked by XP_CMDSHELL must have the same security rights as theMicrosoft SQL Server service account.
l XP_CMDSHELL is normally disabled. It can be enabled and disabled by using the Policy-Based Management or by executing SP_CONFIGURE.
l Using this extended procedure requires CONTROL SERVER permission (at least).
Command Usage:The backup utility should provide Qlik Replicate with the following parameters:
l {BACKUP_INFILE} - The full path to the original backed up transaction log.l {ALTDIR_OUTFILE} - The specifications of the target file to transfer to the alternatebackup folder.
l {BACKUP_SET} - The backup set to be processed within the backup log.
Example command:C:\Temp\YourBackupUtility.exe -B{BACKUP_INFILE} -A{ALTDIR_OUTFILE}"
Directory names in the command path or file names in the actual command that containspaces must be enclosed in double-quotes:Example:C:\temp\test\"my program"\"new version"\converter.exe -A{"input file"} -B{outfile}
l Delete processed backup logs: Select this option to delete the backup logs after they have beenread.
l Select virtual backup device types: When this option is selected, Qlik Replicate will read changesfrom the specified virtual device(s). Usually, this option only needs to be enabled when using athird-party backup utility (which will be recorded as a virtual device).
Internal parametersInternal parameters are parameters that are not exposed in the UI. You should only use them if instructedby Qlik Support.
To add internal Qlik Replicate parameters:
1. Click the Internal Parameters link.The Internal Parameters dialog box opens.
2. In the edit box, type the name of the parameter you need to add and then click it.
Setup and User Guide - Qlik Replicate, November 2021 319

8 Adding and managing source endpoints
3. The parameter is added to the table below the search box with its default value.
4. Change the default value as required.
5. To reset the parameter value to its default, click the "Restore default value" icon at the end of therow.
More optionsThese options are not exposed in the UI as they are only relevant to specific versions or environments.Consequently, do not set these options unless explicitly instructed to do so by Qlik Support or productdocumentation.
To set an option, simply copy the option into the Add feature name field and click Add. Then set the valueor enable the option according to the instructions you received.
Settings summaryYou can view a summary of your settings by clicking the Setting Summary link. This is useful if you need tosend a summary of your settings to Qlik Support.
Working with Windows authenticationYou can configure the Qlik Replicate Microsoft SQL Server endpoint to log in to Microsoft SQL Server (onWindows) using Windows authentication.
If you choose this option, you also need to make sure that:
l The Microsoft SQL Server instance is set up to allow Windows log on.l The Qlik Replicate user is specified as the "Log on as" user for the "Qlik Replicate Server" serviceaccount.-OR-Microsoft SQL Server is configured to allow login for the Qlik Replicate Server service account.
Artifacts created by Replicate in the database
In order to capture changes, Qlik Replicate creates various artifacts in the dbo schema of the MicrosoftSQL Server database when the task starts. You can safely remove them when the task completes.
The following artifact is created to track open transactions:
l #attrep_dbcc_open_trans_table
The following functions are created to verify that the LSN (Log Sequence Number) is valid:
l attrep_fn_LsnSegmentToHexa
l attrep_fn_NumericLsnToHexa
Setup and User Guide - Qlik Replicate, November 2021 320

8 Adding and managing source endpoints
8.17 Using Microsoft Azure database for MySQL as a sourceThis section describes how to set up and use Microsoft Azure Database for MySQL as a source in areplication task.
In this section:
l Prerequisites (page 322)l Limitations and considerations (page 322)l Security requirements (page 323)l MySQL database source data types (page 324)l Setting general connection properties (page 327)l Selecting a schema (page 329)l Setting advanced connection properties (page 329)
Setup and User Guide - Qlik Replicate, November 2021 321

8 Adding and managing source endpoints
PrerequisitesTo use Microsoft Azure Database for MySQL as an endpoint in a Qlik Replicate task, make sure theprerequisites outlined below have been met.
Client prerequisitesInstall MySQL ODBC Unicode Driver 64-bit on the Replicate Server machine.
Only these driver versions are supported:
l 5.3.11 to 5.3.13l 8.0.23 to 8.0.25
Linux only:
Make sure that the /etc/odbcinst.ini file contains an entry for MySQL, as in the following example:
[MySQL ODBC 5.3.13 Unicode Driver]Driver = /usr/lib64/libmyodbc5w.soUsageCount = 1
Verifying that Microsoft Azure database for MySQL is set up for CDC (Changedata capture)Microsoft Azure Database for MySQL enables binary logging (i.e. CDC) by default. To check that binarylogging is indeed enabled, make sure that the Microsoft Azure Database for MySQL binlog_row_imageparameter is set to full.
Replicating 4-byte UTF8 emojisReplication of 4-byte UTF8 emojis to certain targets requires the following preparation:
l Microsoft SQL Server Target: Transform the emojis from WSTRING(n) to WSTRING(n*2).l Amazon Redshift Target: Transform the emojis from WSTRING(n) to WSTRING(n*2).
For information on defining transformations, see Using the Transform tab (page 933).
Limitations and considerationsThe following limitations apply:
l The following DDLs are not supported:l All partition DDLsl Drop Tablel Rename Table
l Changes that are older than one year will not be captured.l Using the alter table <table_name> add column <column_name> statement to addcolumns to the beginning or to the middle of a table is not supported. When the alter table
Setup and User Guide - Qlik Replicate, November 2021 322

8 Adding and managing source endpoints
<table_name> add column <column_name> statement is used to add a column to the middleof a table, the column will be added to the end of the table instead.
l The AR_H_USER header column is currently not supported. For information on using headercolumns, see Headers (page 991).
l If a Microsoft Azure Database for MySQL table contains LOBs and the task's Replicate Lobcolumns option is disabled, the table will be replicated without the LOB columns. Note that this onlyapplies to MEDIUMBLOB, LONGBLOB, MEDIUMTEXT and LONGTEXT columns. This limitationdoes not apply to BLOB, TINYBLOB, TEXT and TINYTEXT columns.
l If the Microsoft Azure Database for MySQL database is stopped during Full Load, the Full Load willend successfully, but the tables on the target may have less rows than the source tables. If thisshould happen, either restart the task or reload the tables with the missing rows.
l A Unique Index/Primary Key created on only part of the column data is not supported. If such aUnique Index/Primary Key is encountered, it will be created on the entire target column.The following is an example of a statement that creates a Unique Index/Primary Key using only partof the column data:CREATE INDEX partial_name ON customer (name(10));
l Replication of computed columns is supported in Full Load replication tasks only. During changeprocessing, INSERTs to computed columns will appear as NULL on the target and UPDATEs willbe ignored.
l Replicate supports zero dates only if both the source and target MySQL-based databases areconfigured with the same "Strict Mode" (On or Off). If this is not the case, zero dates can betransformed to non-zero dates using the transformation feature.
l The Transaction ID of XA transactions will not be displayed in the Replicate ChangeTable/AuditTable transaction_id header.
l Binary log transaction compression is not supported.l The MySQL primary-primary configuration is not supported.
Security requirementsl The Qlik Replicate user must have the ReplicationAdmin role with the following privileges(according to task type):
l REPLICATION CLIENT - Required for Change Processing tasks only. In other words, FullLoad only tasks do not require this privilege.
l REPLICATION SLAVE - Required for Change Processing tasks only. In other words, FullLoad only tasks do not require this privilege.
l SUPER - Only required in versions prior to Microsoft Azure Database for MySQL 5.6.6.l The Qlik Replicate user must also have SELECT privileges for the source tables designated forreplication.
l The Qlik Replicate user must have Standard authentication in order to work with Microsoft AzureDatabase for MySQL 8.0 as a source endpoint for CDC.
Setup and User Guide - Qlik Replicate, November 2021 323

8 Adding and managing source endpoints
MySQL database source data typesThe following table shows the Microsoft Azure Database for MySQL source data types that are supportedwhen using Qlik Replicate and the default mapping to Qlik Replicate data types. When replicating to aMySQL target, the source and target data types are the same, apart from the exceptions described inHomogeneous Replication (page 326).
For information on how to view the data type that is mapped in the target, see the section for the targetdatabase you are using.
For additional information about Qlik Replicate data types, see Replicate data types (page 76).
Microsoft Azure Database for MySQL source data types Qlik Replicate Data types
INT INT4
BIGINT INT8
MEDIUMINT INT4
TINYINT INT1
SMALLINT INT2
UNSIGNED TINYINT UINT1
UNSIGNED SMALLINT UINT2
UNSIGNEDMEDIUMINT UINT4
UNSIGNED INT UINT4
UNSIGNED BIGINT UINT8
DECIMAL (10) NUMERIC (10,0)
BINARY BYTES (1)
BIT BOOLEAN
BIT (64) BYTES (8)
BLOB BYTES (65535)
LONGBLOB BLOB
MEDIUMBLOB BLOB
TINYBLOB BYTES (255)
DATE DATE
Microsoft Azure and Qlik Replicate data types
Setup and User Guide - Qlik Replicate, November 2021 324

8 Adding and managing source endpoints
Microsoft Azure Database for MySQL source data types Qlik Replicate Data types
DATETIME
DATETIME without a parenthetical value is replicatedwithout milliseconds, whereas DATETIME with a value of 1-5 - e.g. DATETIME(5) - is replicated with milliseconds.
When replicating a DATETIME column, the time remains thesame on the target (i.e. it is not converted to UTC).
DATETIME
TIME STRING
TIMESTAMP
When replicating a TIMESTAMP column, the time isconverted to UTC on the target.
DATETIME
YEAR INT2
DOUBLE REAL8
FLOAT
If the FLOAT values are not in the range specified below, use atransformation to map FLOAT to STRING. For an explanation of how todo this, see Using the Transform tab (page 933).
Supported FLOAT range:
- 1.79E+308 to -2.23E-308, 0
and
2.23E-308 to 1.79E+308
REAL (DOUBLE)
*VARCHAR (45) WSTRING (45)
*VARCHAR (2000) WSTRING (2000)
*VARCHAR (4000) WSTRING (4000)
VARBINARY (4000) BYTES (4000)
VARBINARY (2000) BYTES (2000)
*CHAR WSTRING
*TEXT WSTRING (65535)
*LONGTEXT NCLOB
Setup and User Guide - Qlik Replicate, November 2021 325

8 Adding and managing source endpoints
Microsoft Azure Database for MySQL source data types Qlik Replicate Data types
*MEDIUMTEXT NCLOB
*TINYTEXT WSTRING (255)
GEOMETRY BLOB
POINT BLOB
LINESTRING BLOB
POLYGON BLOB
MULTIPOINT BLOB
MULTILINESTRING BLOB
MULTIPOLYGON BLOB
GEOMETRYCOLLECTION BLOB
ENUM WSTRING (Length)
Where "Length" is thelongest value in the ENUM.
SET WSTRING (Length)
Where "Length" is the total ofall values in the SET,including commas.
JSON CLOB
If the DATETIME and TIMESTAMP data types are specified with a “zero” value (i.e. 0000-00-00), you need to make sure that the target database in the replication task supports "zero"values for the DATETIME and TIMESTAMP data types. If they are not supported, you can usea transformation to specify a supported value (e.g. 1970.) Otherwise, they will be recorded asnull on the target.
Homogeneous ReplicationThe following section describes how Replicate handles replication between a MySQL source and a MySQLtarget (i.e. homogeneous replication).
Setup and User Guide - Qlik Replicate, November 2021 326

8 Adding and managing source endpoints
l In homogeneous replication, the source data first passes through the Qlik Replicatedata type and is therefore subject to any limitations of that type.For information on Replicate data types and their limitations (where relevant), seeReplicate data types (page 76).For information on which Replicate data types the source data passes through whenreplicating from MySQL, see the MySQL to Qlik Replicate data types mapping tabledescribed earlier.
l When replicating a TIMESTAMP column, the time is converted to UTC on the target.
Data typesWhen replicating to a MySQL target endpoint, the data types will be identical with the following exceptions:
MySQL source data types MySQL target data types
JSON LONGTEXT
MySQL source and target data types
When using data types from other database engines, the data type on the target will be thecorresponding MySQL data type. For more information on using non-native data types, refer tothe MySQL online Help.
CollationWhen replicating from one MySQL endpoint to another, table and column collations will be replicated to thetarget. Collatable data types are indicated by an asterisk (*) in Table 11–3 above.
To support collation replication, the DBA must ensure that the collations defined for the source MySQLdatabase are the same as those defined for the target MySQL database.
Non-nullable columns and primary/unique index namesNon-nullable columns and Primary/Unique Index names are preserved during homogeneous replication.
Setting general connection propertiesThis section describes how to configure general connection properties. For an explanation of how toconfigure advanced connection properties, see Setting advanced connection properties.
To add a Microsoft Azure Database for MySQL source endpoint to Qlik Replicate:
1. In the Qlik Replicate Console, click Manage Endpoint Connections to open the Manage EndpointsConnections dialog box. Then click the New Endpoint Connection button. For more information onadding an endpoint to Qlik Replicate, see Defining and managing endpoints (page 110).
2. In the Name field, type a name for your endpoint. This can be any name that will help to identify thedatabase being used.
Setup and User Guide - Qlik Replicate, November 2021 327

8 Adding and managing source endpoints
3. In the Description field, optionally type a description that helps to identify the Microsoft AzureDatabase for MySQL endpoint.
4. Select Source as the endpoint role.
5. From the Type drop-down list, select Microsoft Azure Database for MySQL.
When this endpoint is used as a duplicated source in a Log Stream Staging setup,select the Read changes from log stream check box and then select the relevant LogStream Staging task from the drop-down list.For information on setting up and managing Log Stream Staging tasks, see Using theLog Stream (page 919).
6. In the Server Name field, enter the host name or IP address of the computer on which the MicrosoftAzure Database for MySQL database is installed.
7. Optionally, change the default port (3306).
8. Type the Microsoft Azure Database for MySQL authentication information (User Name, Password)for the authorized user for this Microsoft Azure Database for MySQL database. If you do not knowthis information, see your Microsoft Azure Database for MySQL database administrator (DBA).
Consider the following:l This information is required. If you are using the Advanced tab to create acustom string, make sure to include the User Name and Password properties.See Setting advanced connection properties (page 329) for more information.
l This information is case sensitive.l If you want to set custom properties for this database, see Setting advancedconnection properties (page 329).
Make sure that the Microsoft Azure Database for MySQL user entered in the MicrosoftAzure Database for MySQL Authentication section has the correct access privileges.For information on how to provide the required privileges, see Security requirements(page 323).
SSL authentication optionsIn the Security section, you can configure Replicate to connect to the Microsoft Azure Database for MySQLdatabase using SSL.
l SSL Mode: Select one of the following:l Preferred - Establishes an encrypted connection if the server supports encryptedconnections, falling back to an unencrypted connection if an encrypted connection cannot beestablished.
l None - Connect with a surname and password only.l Required - Establishes an encrypted connection if the server supports encryptedconnections. The connection attempt fails if an encrypted connection cannot be established.
Setup and User Guide - Qlik Replicate, November 2021 328

8 Adding and managing source endpoints
l Verify CA - Similar to Required, but also verifies the server Certificate Authority (CA)certificate against the configured CA certificates. The connection attempt fails if no validmatching CA certificates are found.
l Verify Full - Similar to Verify CA, but also performs host name identity verification bychecking the host name the client (i.e. Replicate) uses for connecting to the server againstthe identity in the certificate that the server sends to the client. The client checks whether thehost name that it uses for connecting matches the Common Name value in the servercertificate. The connection fails if there is a mismatch.
l Client certificate path - The path to the client certificate requested by the server.l Private key path - The path to the client private key file in PEM format.l CA path - The path to the Certificate Authority (CA) that issued the client certificate file in PEMformat.
Selecting a schemaYou can choose which Microsoft Azure Database for MySQL database to access. After configuring theMicrosoft Azure Database for MySQL source database connection settings, open the Select Tables dialogbox (by clicking the Table Selection button on the right of the console) and select which schema to usefrom the Schema drop down list.
See also Defining and managing tasks (page 104).
Setting advanced connection propertiesIn the Advanced tab, you can set the following parameters:
l Check binary log for new events every: Specify how often to check the binary log for changeswhen the endpoints is idle.
l Additional ODBC connection properties: Specify any additional ODBC connection parameters thatmay be required.
l Database timezone: Select the timezone where the source database is located.
Internal parametersInternal parameters are parameters that are not exposed in the UI. You should only use them if instructedby Qlik Support.
To add internal Qlik Replicate parameters:
1. Click the Internal Parameters link.The Internal Parameters dialog box opens.
2. In the edit box, type the name of the parameter you need to add and then click it.
3. The parameter is added to the table below the search box with its default value.
4. Change the default value as required.
5. To reset the parameter value to its default, click the "Restore default value" icon at the end of therow.
Setup and User Guide - Qlik Replicate, November 2021 329

8 Adding and managing source endpoints
More optionsThese options are not exposed in the UI as they are only relevant to specific versions or environments.Consequently, do not set these options unless explicitly instructed to do so by Qlik Support or productdocumentation.
To set an option, simply copy the option into the Add feature name field and click Add. Then set the valueor enable the option according to the instructions you received.
Settings summaryYou can view a summary of your settings by clicking the Setting Summary link. This is useful if you need tosend a summary of your settings to Qlik Support.
Setup and User Guide - Qlik Replicate, November 2021 330

8 Adding and managing source endpoints
8.18 Using a MongoDB database as a sourceThis section describes how to use a MongoDB database as a source endpoint in a Qlik Replicate task.
In this section:
l Overview (page 332)l Prerequisites (page 332)l Limitations and considerations (page 333)l Setting general connection properties (page 333)l Setting advanced connection properties (page 335)
Setup and User Guide - Qlik Replicate, November 2021 331

8 Adding and managing source endpoints
OverviewThe following topic provides an overview of using MongoDB as a source endpoint in a Replicate task.
TerminologyThe following describes common database terms and their MongoDB equivalents:
Relational Database Term Corresponding Term in MongoDB
Schema Database
Table Collection
Record Document
Common database terms
With most Replicate source endpoints, when you define a replication task, you can select the tables youwish to replicate from one or more schemas. With MongoDB however, instead of selecting schemas, youselect databases, and instead of selecting tables, you select collections. So, from a MongoDB perspective,any label in the UI that refers to source tables (e.g. Table Settings) is actually referring to sourcecollections, and any label that refers to source records is actually referring to source documents. Likewise,any label in the UI that refers to source schemas is actually referring to source databases.
How changes are handledReplicate reads the MongoDB oplog for changes (see Prerequisites (page 332)). If a change is detected,the modified JSON document will be replicated in its entirety to the target, where it will replace the currentJSON document. If the "Store Changes" replication option is also enabled, a record of all operations(UPDATE, DELETE, etc.) will be stored for each JSON document in the associated Change Table(s).
How target tables are createdFor each MongoDB collection, a corresponding target table is created with two columns:
l _id - a WSTRING column containing the document's _id field (the primary key).l _doc - an NCLOB column containing the JSON representation of the document.
PrerequisitesBefore you can use MongoDB as a source endpoint in a Replicate task, make sure that the followingprerequisites have been met:
l MongoDB must be configured with "majority" read concern level (which requiressupportsSnapshotReadConcern and supportsCommittedReads to be enabled). Note thatthe WiredTiger storage engine (the default) is already configured with "majority" read concern.
l Before starting a task with the Full Load and/or Apply Changes replication options enabled, set theTransaction consistency timeout value in the task settings' Full Load Tuning tab to 0. This isimportant for preventing the capture of old transactions.
l The user specified in the endpoint settings must be granted the "read" role for databases from whichyou wish to replicate.
Setup and User Guide - Qlik Replicate, November 2021 332

8 Adding and managing source endpoints
l To capture changes, the user specified in the endpoint settings must have privileges that grantchangeStream and find actions on all non-system collections for all databases in the deployment(for example: "readAnyDatabase" role).
l To enable Replicate to detect changes, MongoDB databases servers must be set up in a replica setconfiguration. In such a configuration, change operations are recorded in the primary server's oplog,which is periodically accessed by Replicate. Note that although a Replica set usually containsmultiple servers (one primary and any number of secondary servers), creating a Replica set withonly a primary server - i.e. without secondary servers - is also sufficient, as the changes will still bewritten to the oplog.
Limitations and considerationsUsing MongoDB as a source database in a Qlik Replicate task is subject to the following limitations:
l When storing changes in Change Tables, the before image will not be stored.l When processing an UPDATE operation on the source, the most up-to-date copy of the documentwill be replicated to the target, For example, if three UPDATE operations were performed on adocument, only the document with the last UPDATE will be replicated to target.
l Unlimited LOB size is not supported.l Capture of new empty databases and new empty collections is not supported. A new collectionmust contain at least one document before it can be captured.
l Table content filters are not supported.l Database names must be English only.l Dropping or renaming source collections:
l During CDC: If a source collection is renamed/dropped during CDC, it will be suspended(i.e. excluded from the replication).
l During Full Load: If a source collection is renamed/dropped during Full Load, the task willstop.
l Dropping or renaming source databases is not supported.l Replication of transactional audit data is not supported.l Replication of a document in a collection that contains a reference to other documents usingDBRefs is not supported.
Setting general connection propertiesThis section describes how to configure general connection properties. For an explanation of how toconfigure advanced connection properties, see Setting advanced connection properties.
To add a MongoDB source endpoint to Qlik Replicate:
1. In the Qlik Replicate Console, click Manage Endpoint Connections to open the Manage EndpointsConnections dialog box. Then click the New Endpoint Connection button. For more information onadding an endpoint to Qlik Replicate, see Defining and managing endpoints (page 110).
2. In the Name field, type a name for your endpoint. This can be any name that will help to identify thedatabase being used.
Setup and User Guide - Qlik Replicate, November 2021 333

8 Adding and managing source endpoints
3. In the Description field, type a description that helps to identify the MongoDB database. This isoptional.
4. Select Source as the endpoint role.
5. From the Type drop-down list, select MongoDB.
When this endpoint is used as a duplicated source in a Log Stream Staging setup,select the Read changes from log stream check box and then select the relevant LogStream Staging task from the drop-down list.For information on setting up and managing Log Stream Staging tasks, see Using theLog Stream (page 919).
6. Configure the settings according to the table below:
Option Description
Hosts When working with a MongoDB cluster, you can specify multiple hosts in thefollowing format:host1[:port1][,...hostN[:portN]]Replicate will try to connect to the first host. If it is unable to do so, it will thentry to connect to the other hosts in the order they are listed.
Authenticationmethod
Select one of the following:l SCRAM-SHA-256l SCRAM-SHA-1When one of the SCRAM authentication methods is selected, you alsoneed to provide the following information:
l User name: Specify the user name of a user with the requiredrole.
l Password: Specify the password of the above user.l Authentication database name: The name of theauthentication database on which the specified user account isdefined.
l x.509 (Certificate) - To make this available for selection, first selectthe Use SSL option.When this authentication method is selected, you also need to providethe following information:
l Certificate subject: The subject of your public key certificate.l Keystore file (in JKS format): The full path of the keystore file(containing your private key) on the Replicate Server machine.
l Keystore password: The passphrase for accessing yourkeystore file.
l None
Setting configurations
Setup and User Guide - Qlik Replicate, November 2021 334

8 Adding and managing source endpoints
Option Description
Use SSL Select to transfer data over an encrypted connection.When this option is selected, you also need to provide the followinginformation:
l Truststore file (in JKS format): The full path of the truststore file onthe Replicate Server machine. The trustore file should contain the CAcertificate for verifying the MongoDB servers' certificates.
l Truststore Password: The password for accessing your truststore.
Setting advanced connection propertiesIn the Advanced tab, you can set the following parameters:
l Set target _id column size according to auto-generated ObjectID: This is the default. Itassumes that the source document _id has been auto-generated by MongoDB. As an auto-generated ObjectId cannot exceed 24 bytes, the target column _id size will be set to 24 bytes.Clear this option if you defined custom IDs that exceed 24 bytes.
l Maximum size of target _id column: If you defined custom IDs that exceed 24 bytes, specify thesize of the largest ID. This will enable Replicate to create the _id column with a suitable VARCHARlength on the target.
l Additional connection properties: Specify any additional connection parameters that may berequired. Properties should be specified in the following format:key1=value1&key2=value2...
Internal parametersInternal parameters are parameters that are not exposed in the UI. You should only use them if instructedby Qlik Support.
To add internal Qlik Replicate parameters:
1. Click the Internal Parameters link.The Internal Parameters dialog box opens.
2. In the edit box, type the name of the parameter you need to add and then click it.
3. The parameter is added to the table below the search box with its default value.
4. Change the default value as required.
5. To reset the parameter value to its default, click the "Restore default value" icon at the end of therow.
More optionsThese options are not exposed in the UI as they are only relevant to specific versions or environments.Consequently, do not set these options unless explicitly instructed to do so by Qlik Support or productdocumentation.
To set an option, simply copy the option into the Add feature name field and click Add. Then set the valueor enable the option according to the instructions you received.
Setup and User Guide - Qlik Replicate, November 2021 335

8 Adding and managing source endpoints
Settings summaryYou can view a summary of your settings by clicking the Setting Summary link. This is useful if you need tosend a summary of your settings to Qlik Support.
Setup and User Guide - Qlik Replicate, November 2021 336

8 Adding and managing source endpoints
8.19 Using a MySQL-based database as a sourceThis section describes how to set up and use a MySQL-based database as a source in a replication task.
You need to configure the Replicate MySQL endpoint when replicating from any of the followingdatabases:
l MySQLl Perconal MariaDBl Amazon Aurora
The procedures for configuring connectivity to these endpoints are identical to those describedin this section, for MySQL. However, when using Percona as a source, there is no need toperform the procedures described in Prerequisites (page 338).
In this section:
l Prerequisites (page 338)l Limitations and considerations (page 340)l Security requirements (page 341)l MySQL database source data types (page 342)l Setting general connection properties (page 345)l Selecting a schema (page 347)l Setting advanced connection properties (page 347)
Setup and User Guide - Qlik Replicate, November 2021 337

8 Adding and managing source endpoints
PrerequisitesTo use MySQL as an endpoint in a Qlik Replicate task, make sure the prerequisites outlined below havebeen met.
Client prerequisitesInstall MySQL ODBC Unicode Driver 64-bit on the Replicate Server machine.
Only these driver versions are supported:
l 5.3.11 to 5.3.13l 8.0.23 to 8.0.25
Linux only:
Make sure that the /etc/odbcinst.ini file contains an entry for MySQL, as in the following example:
[MySQL ODBC 5.3.13 Unicode Driver]Driver = /usr/lib64/libmyodbc5w.soUsageCount = 1
General prerequisitesMake sure the following prerequisites have been met:
l A MySQL account with the required Security requirements (page 341).l A MySQL database with the tables that you want to replicate should be accessible in your network.The following MySQL editions are supported:
l MySQL Community Editionl MySQL Standard Editionl MySQL Enterprise Editionl MySQL Cluster Carrier Grade Edition
Enable binary loggingTo enable binary logging (required for CDC replication), the following parameters must be configured inMySQL’s my.ini (Windows) or my.cnf (UNIX) files.
Parameter Value
server_id Any value from 1.
Example:
server_id=1
Binary logging parameters
Setup and User Guide - Qlik Replicate, November 2021 338

8 Adding and managing source endpoints
Parameter Value
log-bin=<path>
Path to the binary log file (without an extension).
Example:
log-bin=E:\MySql_Logs\BinLog
binlog_format Must be:
binlog_format=row
expire_logs_days
To prevent disk space issues, it is strongly recommended not to use the default value(0).
Example:
expire_logs_days=5
binlog_row_image
Must be:
binlog_row_image=full
binlog_checksum
NONE or CRC32
When enabled, this parameter causes the master to write a checksum for each event inthe binary log. The default from MySQL 5.6.6 is CRC32. Before that, the default is NONE.
Only relevant from MySQL 5.6.
log_slave_updates
When replicating from a MySQL slave database server or from a Galera Cluster, thisvalue should be set to true (1). If set to 0 (the default) updates on a slave received froma master during replication are not logged to the slave's binary log. The slave's binarylog needs to be enabled for this to have an effect.
Cluster prerequisitesTo be able to replicate clustered (NDB) tables (i.e. by connecting Qlik Replicate to any of the clusternodes), the following parameters must be configured in MySQL’s my.ini (Windows) or my.cnf (UNIX) files.
l Replication from Galera Cluster for MySQL/MariaDB is also supported. For moreinformation, see Galera Cluster Considerations below.
l When using Percona as a source, there is no need to perform the procedures describedin this section.
Setup and User Guide - Qlik Replicate, November 2021 339
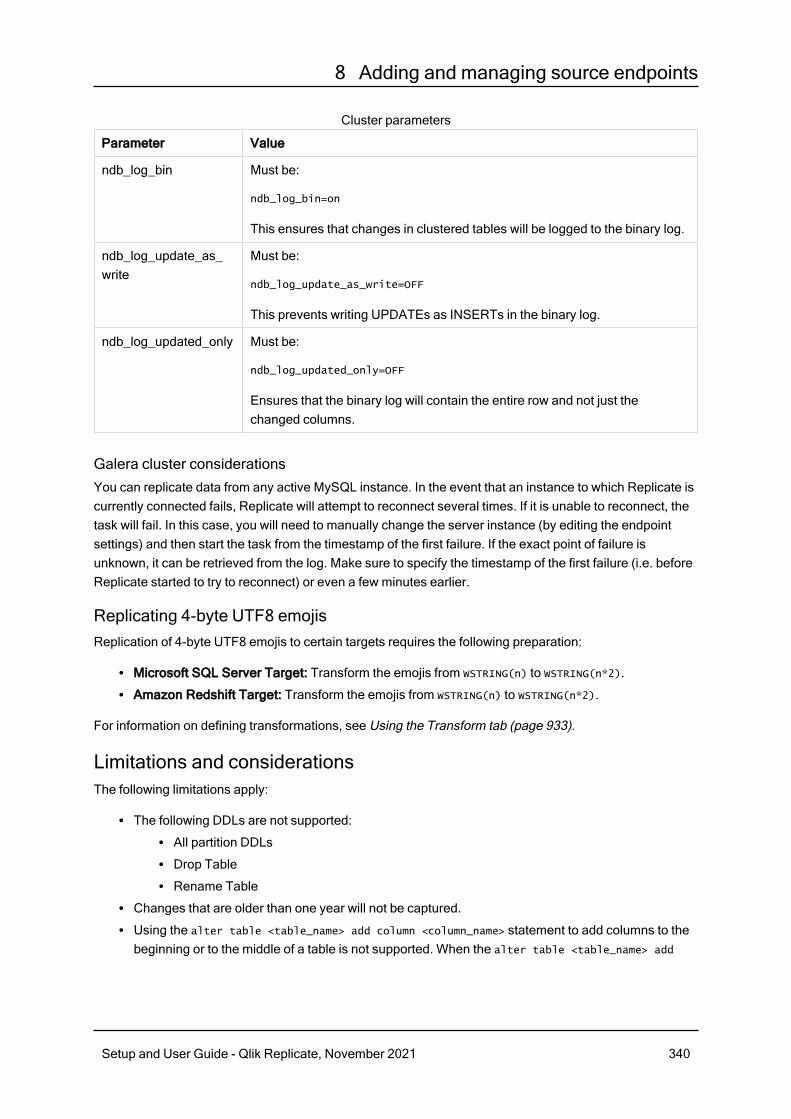
8 Adding and managing source endpoints
Parameter Value
ndb_log_bin Must be:
ndb_log_bin=on
This ensures that changes in clustered tables will be logged to the binary log.
ndb_log_update_as_write
Must be:
ndb_log_update_as_write=OFF
This prevents writing UPDATEs as INSERTs in the binary log.
ndb_log_updated_only Must be:
ndb_log_updated_only=OFF
Ensures that the binary log will contain the entire row and not just thechanged columns.
Cluster parameters
Galera cluster considerationsYou can replicate data from any active MySQL instance. In the event that an instance to which Replicate iscurrently connected fails, Replicate will attempt to reconnect several times. If it is unable to reconnect, thetask will fail. In this case, you will need to manually change the server instance (by editing the endpointsettings) and then start the task from the timestamp of the first failure. If the exact point of failure isunknown, it can be retrieved from the log. Make sure to specify the timestamp of the first failure (i.e. beforeReplicate started to try to reconnect) or even a few minutes earlier.
Replicating 4-byte UTF8 emojisReplication of 4-byte UTF8 emojis to certain targets requires the following preparation:
l Microsoft SQL Server Target: Transform the emojis from WSTRING(n) to WSTRING(n*2).l Amazon Redshift Target: Transform the emojis from WSTRING(n) to WSTRING(n*2).
For information on defining transformations, see Using the Transform tab (page 933).
Limitations and considerationsThe following limitations apply:
l The following DDLs are not supported:l All partition DDLsl Drop Tablel Rename Table
l Changes that are older than one year will not be captured.l Using the alter table <table_name> add column <column_name> statement to add columns to thebeginning or to the middle of a table is not supported. When the alter table <table_name> add
Setup and User Guide - Qlik Replicate, November 2021 340

8 Adding and managing source endpoints
column <column_name> statement is used to add a column to the middle of a table, the column will beadded to the end of the table instead.
l When MySQL is installed on Windows, changes are not captured from tables whose names containboth upper and lower case characters.
l The AR_H_USER header column is currently not supported. For information on using headercolumns, see Headers (page 991).
l If a MySQL table contains LOBs and the task's Replicate Lob columns option is disabled, the tablewill be replicated without the LOB columns. Note that this only applies to MEDIUMBLOB,LONGBLOB, MEDIUMTEXT and LONGTEXT columns. This limitation does not apply to BLOB,TINYBLOB, TEXT and TINYTEXT columns.
l If the MySQL database is stopped during Full Load, the Full Load will end successfully, but thetables on the target may have less rows than the source tables. If this should happen, either restartthe task or reload the tables with the missing rows.
l A Unique Index/Primary Key created on only part of the column data is not supported. If such aUnique Index/Primary Key is encountered, it will be created on the entire target column.The following is an example of a statement that creates a Unique Index/Primary Key using only partof the column data:CREATE INDEX partial_name ON customer (name(10));
l Changes to computed (virtual) columns will not be captured.l Replicate supports zero dates only if both the source and target MySQL-based databases areconfigured with the same "Strict Mode" (On or Off). If this is not the case, zero dates can betransformed to non-zero dates using the transformation feature.
l MySQL 5.6 introduced fractional value support for temporal data types. Consequently, replication ofthe old temporal data type format from MySQL 5.6 is not supported. Note that upgrading fromMySQL 5.5 to MySQL 5.6 does not upgrade the temporal data type format. This needs to be doneseparately. This also applies when upgrading from MariaDB 10.1.
For instruction on upgrading the temporal data type format when upgrading from MySQL 5.5 orMariaDB 10.1, see the vendor's online help.
l The Transaction ID of XA transactions will not be displayed in the Replicate ChangeTable/AuditTable transaction_id header.
l Binary log transaction compression is not supported.l The MySQL primary-primary configuration is not supported.
Security requirementsl The Qlik Replicate user must have the ReplicationAdmin role with the following privileges(according to task type):
l REPLICATION CLIENT - Required for Change Processing tasks only. Full Load only tasksdo not require this privilege.
l REPLICATION SLAVE - Required for Change Processing tasks only. Full Load only tasks donot require this privilege.
l SUPER - Only required in versions prior to MySQL 5.6.6.
Setup and User Guide - Qlik Replicate, November 2021 341

8 Adding and managing source endpoints
l The Qlik Replicate user must also have SELECT privileges for the source tables designated forreplication.
l The Qlik Replicate user must have Standard authentication in order to work with MySQL 8 as asource endpoint for CDC.
MySQL database source data typesThe following table shows the MySQL database source data types that are supported when using QlikReplicate and the default mapping to Qlik Replicate data types. When replicating to a MySQL target, thesource and target data types are the same, apart from the exceptions described in Homogeneousreplication (page 344).
For information on how to view the data type that is mapped in the target, see the section for the targetdatabase you are using.
For additional information about Qlik Replicate data types, see Replicate data types (page 76).
MySQL Source Data Types Qlik Replicate Data Types
INT INT4
BIGINT INT8
MEDIUMINT INT4
TINYINT INT1
SMALLINT INT2
UNSIGNED TINYINT UINT1
UNSIGNED SMALLINT UINT2
UNSIGNEDMEDIUMINT UINT4
UNSIGNED INT UINT4
UNSIGNED BIGINT UINT8
DECIMAL (10) NUMERIC (10,0)
BINARY BYTES (1)
BIT BOOLEAN
BIT (64) BYTES (8)
BLOB BYTES (65535)
LONGBLOB BLOB
MEDIUMBLOB BLOB
TINYBLOB BYTES (255)
DATE DATE
Supported data types
Setup and User Guide - Qlik Replicate, November 2021 342

8 Adding and managing source endpoints
MySQL Source Data Types Qlik Replicate Data Types
DATETIME
DATETIME without a parenthetical value is replicated withoutmilliseconds, whereas DATETIME with a value of 1-5 - e.g.DATETIME(5) - is replicated with milliseconds.
When replicating a DATETIME column, the time remains thesame on the target (i.e. it is not converted to UTC).
DATETIME
TIME STRING
TIMESTAMP
When replicating a TIMESTAMP column, the time isconverted to UTC on the target.
DATETIME
YEAR INT2
DOUBLE REAL8
FLOAT
If the FLOAT values are not in the range specified below, use atransformation to map FLOAT to STRING. For an explanation of how todo this, see Using the Transform tab (page 933).
Supported FLOAT range:
- 1.79E+308 to -2.23E-308, 0
and
2.23E-308 to 1.79E+308
REAL (DOUBLE)
*VARCHAR (45) WSTRING (45)
*VARCHAR (2000) WSTRING (2000)
*VARCHAR (4000) WSTRING (4000)
VARBINARY (4000) BYTES (4000)
VARBINARY (2000) BYTES (2000)
*CHAR WSTRING
*TEXT WSTRING (65535)
*LONGTEXT NCLOB
Setup and User Guide - Qlik Replicate, November 2021 343

8 Adding and managing source endpoints
MySQL Source Data Types Qlik Replicate Data Types
*MEDIUMTEXT NCLOB
*TINYTEXT WSTRING (255)
GEOMETRY BLOB
POINT BLOB
LINESTRING BLOB
POLYGON BLOB
MULTIPOINT BLOB
MULTILINESTRING BLOB
MULTIPOLYGON BLOB
GEOMETRYCOLLECTION BLOB
ENUM WSTRING (Length)
Where "Length" is thelongest value in the ENUM.
SET WSTRING (Length)
Where "Length" is the totalof all values in the SET,including commas.
JSON CLOB
If the DATETIME and TIMESTAMP data types are specified with a “zero” value (i.e. 0000-00-00), you need to make sure that the target database in the replication task supports "zero"values for the DATETIME and TIMESTAMP data types. If they are not supported, you can usea transformation to specify a supported value (e.g. 1970.) Otherwise, they will be recorded asnull on the target.
Homogeneous replicationThe following section describes how Replicate handles replication between a MySQL source and a MySQLtarget (i.e. homogeneous replication).
Setup and User Guide - Qlik Replicate, November 2021 344

8 Adding and managing source endpoints
l In homogeneous replication, the source data first passes through the Qlik Replicatedata type and is therefore subject to any limitations of that type.For information on Replicate data types and their limitations (where relevant), seeReplicate data types (page 76).For information on which Replicate data types the source data passes through whenreplicating from MySQL, see the MySQL to Qlik Replicate data types mapping tabledescribed earlier.
l When replicating a TIMESTAMP column, the time is converted to UTC on the target.
Data typesWhen replicating to a MySQL target endpoint, the data types will be identical with the following exceptions:
MySQL Source Data Types MySQL Target Data Types
JSON LONGTEXT
Exceptions
When using data types from other database engines, the data type on the target will be thecorresponding MySQL data type. For more information on using non-native data types, refer tothe MySQL online Help.
CollationWhen replicating from one MySQL endpoint to another, table and column collations will be replicated to thetarget. Collatable data types are indicated by an asterisk (*) in Table 11–3 above.
To support collation replication, the DBA must ensure that the collations defined for the source MySQLdatabase are the same as those defined for the target MySQL database.
Non-nullable columns and primary/unique index namesNon-nullable columns and Primary/Unique Index names are preserved during homogeneous replication.
Setting general connection propertiesThis section describes how to configure general connection properties. For an explanation of how toconfigure advanced connection properties, see Setting advanced connection properties.
You can also use MySQL files as a source. For more information, see Using the Qlik Replicatefile channel (page 908).
To add a MySQL source endpoint to Qlik Replicate:
1. In the Qlik Replicate Console, click Manage Endpoint Connections to open the Manage EndpointsConnections dialog box. Then click the New Endpoint Connection button. For more information on
Setup and User Guide - Qlik Replicate, November 2021 345
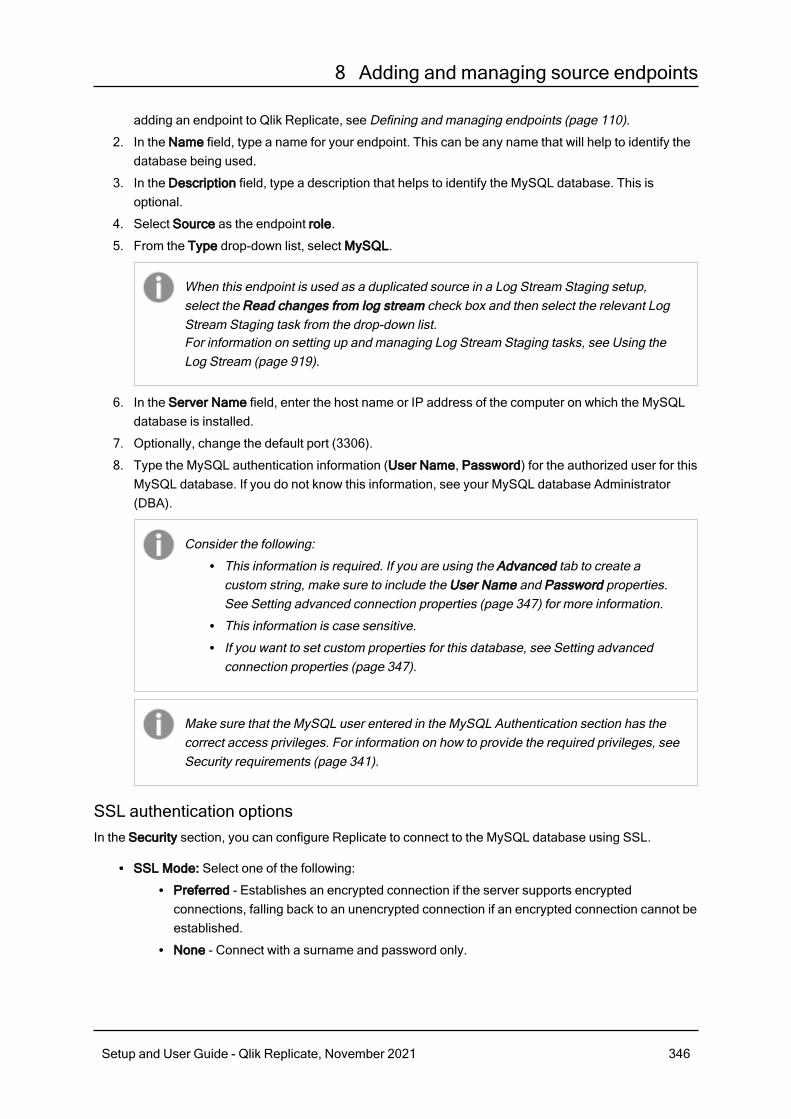
8 Adding and managing source endpoints
adding an endpoint to Qlik Replicate, see Defining and managing endpoints (page 110).
2. In the Name field, type a name for your endpoint. This can be any name that will help to identify thedatabase being used.
3. In the Description field, type a description that helps to identify the MySQL database. This isoptional.
4. Select Source as the endpoint role.
5. From the Type drop-down list, select MySQL.
When this endpoint is used as a duplicated source in a Log Stream Staging setup,select the Read changes from log stream check box and then select the relevant LogStream Staging task from the drop-down list.For information on setting up and managing Log Stream Staging tasks, see Using theLog Stream (page 919).
6. In the Server Name field, enter the host name or IP address of the computer on which the MySQLdatabase is installed.
7. Optionally, change the default port (3306).
8. Type the MySQL authentication information (User Name, Password) for the authorized user for thisMySQL database. If you do not know this information, see your MySQL database Administrator(DBA).
Consider the following:l This information is required. If you are using the Advanced tab to create acustom string, make sure to include the User Name and Password properties.See Setting advanced connection properties (page 347) for more information.
l This information is case sensitive.l If you want to set custom properties for this database, see Setting advancedconnection properties (page 347).
Make sure that the MySQL user entered in the MySQL Authentication section has thecorrect access privileges. For information on how to provide the required privileges, seeSecurity requirements (page 341).
SSL authentication optionsIn the Security section, you can configure Replicate to connect to the MySQL database using SSL.
l SSL Mode: Select one of the following:l Preferred - Establishes an encrypted connection if the server supports encryptedconnections, falling back to an unencrypted connection if an encrypted connection cannot beestablished.
l None - Connect with a surname and password only.
Setup and User Guide - Qlik Replicate, November 2021 346

8 Adding and managing source endpoints
l Required - Establishes an encrypted connection if the server supports encryptedconnections. The connection attempt fails if an encrypted connection cannot be established.
l Verify CA - Similar to Required, but also verifies the server Certificate Authority (CA)certificate against the configured CA certificates. The connection attempt fails if no validmatching CA certificates are found.
l Verify Full - Similar to Verify CA, but also performs host name identity verification bychecking the host name the client (i.e. Replicate) uses for connecting to the server againstthe identity in the certificate that the server sends to the client. The client checks whether thehost name that it uses for connecting matches the Common Name value in the servercertificate. The connection fails if there is a mismatch.
l Client certificate path - The path to the client certificate requested by the server.l Private key path - The path to the client private key file in PEM format.l CA path - The path to the Certificate Authority (CA) that issued the client certificate file in PEMformat.
Selecting a schemaYou can choose which MySQL database to access. After configuring the MySQL source databaseconnection settings, open the Select Tables dialog box (by clicking the Table Selection button on the rightof the console) and select which schema to use from the Schema drop down list.
See also Defining and managing tasks (page 104).
Setting advanced connection propertiesIn the Advanced tab, you can set the following parameters:
l Check binary log for new events every: Specify how often to check the binary log for changeswhen the endpoints is idle.
l Additional ODBC connection properties: Specify any additional ODBC connection parameters thatmay be required.
l Database timezone: Select the timezone where the source database is located.
Internal parametersInternal parameters are parameters that are not exposed in the UI. You should only use them if instructedby Qlik Support.
To add internal Qlik Replicate parameters:
1. Click the Internal Parameters link.The Internal Parameters dialog box opens.
2. In the edit box, type the name of the parameter you need to add and then click it.
3. The parameter is added to the table below the search box with its default value.
4. Change the default value as required.
5. To reset the parameter value to its default, click the "Restore default value" icon at the end of therow.
Setup and User Guide - Qlik Replicate, November 2021 347

8 Adding and managing source endpoints
More optionsThese options are not exposed in the UI as they are only relevant to specific versions or environments.Consequently, do not set these options unless explicitly instructed to do so by Qlik Support or productdocumentation.
To set an option, simply copy the option into the Add feature name field and click Add. Then set the valueor enable the option according to the instructions you received.
Settings summaryYou can view a summary of your settings by clicking the Setting Summary link. This is useful if you need tosend a summary of your settings to Qlik Support.
Setup and User Guide - Qlik Replicate, November 2021 348

8 Adding and managing source endpoints
8.20 Using ODBC to connect to a sourceThis section describes how to use ODBC connectivity to connect to a source endpoint.
The ODBC source endpoint can be used to access sources that are not included in QlikReplicate’s extensive Support Matrix. However, unless enabled through Professional Servicesand approved by your Account Manager, the ODBC source endpoint should not be used.Additionally, the ODBC source endpoint should not be used to access any sources alreadylisted in the Support Matrix.
In this section:
l Prerequisites (page 350)l Limitations (page 350)l ODBC source data types (page 351)l Setting general connection properties (page 355)l Setting advanced connection properties (page 356)
Setup and User Guide - Qlik Replicate, November 2021 349

8 Adding and managing source endpoints
PrerequisitesThe following section describes the prerequisites for working with Qlik Replicate and an ODBC sourceendpoint.
Qlik Replicate Server for WindowsYou can connect an endpoint to Qlik Replicate using ODBC by indicating the DSN (Data Source Name). Inthis case you must be sure that a DSN is defined for the ODBC endpoint on the computer where QlikReplicate is installed.
1. Install an endpoint client on the computer where Qlik Replicate is installed. The client you installdepends on the ODBC provider you are using. For example, if you are using an IBM DB2 endpoint,install an IBM DB2 client.
You must use a 64-bit ODBC provider client to work with Qlik Replicate.
2. Use the ODBC Data Source Administrator to create a System DSN. The Data Source is located inthe Windows control panel.
Qlik Replicate Server for LinuxThe following section describes the steps you need to perform to work with Qlik Replicate for Linux andODBC as a source endpoint in a Qlik Replicate task.
1. On the Qlik Replicate Server machine, install the ODBC client that you want to use (e.g.postgreSQL).
2. Makes sure that the /etc/odbcinst.ini file contains the correct entry for the driver you installed, asin the following example:[PostgeSQL]Description = ODBC for PostgreSQLDriver = /usr/lib/psqlodbc.soSetup = /usr/lib/libodbcpsqlS.soDriver64 = /usr/lib64/psqlodbc.soSetup64 = /usr/lib64/libodbcpsqlS.soFileUsage = 1
To access an IBM DB2 for LUW target using ODBC, make sure that you specify thelibdb2o.so driver (and not libdb2.so).
3. Define a DSN for the installed driver by editing the /etc/odbc.ini file, as in the following example:[Postgre_DSN]Description = TestDriver = /usr/lib64/psqlodbc.soEndpoint = MyDatabaseServername = 12.3.45.678Port = 5432
LimitationsWhen using ODBC as a source, the following limitations apply:
Setup and User Guide - Qlik Replicate, November 2021 350

8 Adding and managing source endpoints
l UPDATES to primary key fields are not supported. To update the field, define it as a unique indexinstead.
l The ODBC Source endpoint supports full-load operations only.l For providers that do not support batch operations, you must set the RowByRow=true internalparameter according to the description provided in Internal Parameters.
ODBC source data typesThe following table shows the ODBC source data types that are supported when using Qlik Replicate andthe default mapping from Qlik Replicate data types.
For information on how to view the data type that is mapped in the target, see the section for the targetendpoint you are using.
For additional information about Qlik Replicate data types, see Replicate data types (page 76).
ODBC Data Types Qlik Replicate Data Types
SQL_BIT BOOLEAN
SQL_TINYINT INT1
UINT1
SQL data types are mapped to unsigned datatypes when the UNSIGNED_ATTRIBUTE isset to SQL_TRUE for the data type beingmapped.
SQL_SMALLINT INT2
UINT2
SQL data types are mapped to unsigned datatypes when the UNSIGNED_ATTRIBUTE isset to SQL_TRUE for the data type beingmapped.
SQL_INTEGER INT4
UINT4
SQL data types are mapped to unsigned datatypes when the UNSIGNED_ATTRIBUTE isset to SQL_TRUE for the data type beingmapped.
Supported data types
Setup and User Guide - Qlik Replicate, November 2021 351

8 Adding and managing source endpoints
ODBC Data Types Qlik Replicate Data Types
SQL_BIGINT INT8
UINT8
SQL data types are mapped to unsigned datatypes when the UNSIGNED_ATTRIBUTE isset to SQL_TRUE for the data type beingmapped.
SQL_DOUBLE REAL8
SQL_FLOAT REAL8
SQL_REAL REAL8
SQL_NUMERIC (P,S) NUMERIC (P,S)
REAL8
The SQL_NUMERIC data type is mapped toREAL8 when at least one of the following istrue:
l Precision > 38l Scale < 0l Scale > 38l Scale > Precision
SQL_DECIMAL (P,S) NUMERIC (P,S)
REAL 8
The SQL_NUMERIC data type is mapped toREAL8 when at least one of the following istrue:
l Precision > 38l Scale < 0l Scale > 38l Scale > Precision
SQL_DATE
SQL_TYPE_DATE
DATE
SQL_TIME
SQL_TYPE_TIME
TIME
SQL_TIMESTAMP
SQL_TYPE_TIMESTAMP
DATETIME
Setup and User Guide - Qlik Replicate, November 2021 352

8 Adding and managing source endpoints
ODBC Data Types Qlik Replicate Data Types
SQL_CHAR
SQL_VARCHAR
STRING
SQL_WCHAR
SQL_WVARCHAR
WSTRING
SQL_LONGVARCHAR
To use this data type with Qlik Replicate,you must enable the use of CLOBs for aspecific task.
During CDC or during Full Load when theAllow unlimited LOB size option isenabled, LOB data types are supportedonly in tables with a primary key or uniqueindex.
CLOB
SQL_WLONGVARCHAR
To use this data type with Qlik Replicate,you must enable the use of NCBLOBs for aspecific task.
During CDC or during Full Load when theAllow unlimited LOB size option isenabled, LOB data types are supportedonly in tables with a primary key or uniqueindex.
NCLOB
SQL_BINARY BYTES
Setup and User Guide - Qlik Replicate, November 2021 353

8 Adding and managing source endpoints
ODBC Data Types Qlik Replicate Data Types
SQL_LONGVARBINARY
To use this data type with Qlik Replicate,you must enable the use of BLOBs for aspecific task.
During CDC or during Full Load when theAllow unlimited LOB size option isenabled, LOB data types are supportedonly in tables with a primary key or uniqueindex.
BLOB
SQL_GUID STRING
SQL_INTERVAL_YEAR
SQL_INTERVAL_MONTH
SQL_INTERVAL_DAY
SQL_INTERVAL_MINUTE
SQL_INTERVAL_HOUR
SQL_INTERVAL_SECOND
SQL_INTERVAL_YEAR_TO_MONTH
SQL_INTERVAL_DAY_TO_HOUR
SQL_INTERVAL_DAY_TO_MINUTE
SQL_INTERVAL_DAY_TO_SECOND
SQL_INTERVAL_HOUR_TO_MINUTE
SQL_INTERVAL_HOUR_TO_SECOND
SQL_INTERVAL_MINUTE_TO_SECOND
STRINGw
Setup and User Guide - Qlik Replicate, November 2021 354

8 Adding and managing source endpoints
ODBC Data Types Qlik Replicate Data Types
Provider specific data types
If column length is 0 or > 4000 then:
To use this data type with Qlik Replicate,you must enable the use of BLOBs for aspecific task.
During CDC or during Full Load when theAllow unlimited LOB size option isenabled, LOB data types are supportedonly in tables with a primary key or uniqueindex.
If column length is < or = 4000:
BYTES
If column length is 0 or > 4000:
BLOB
Setting general connection propertiesThis section describes how to configure general connection properties. For an explanation of how toconfigure advanced connection properties, see Setting advanced connection properties.
To add an ODBC source endpoint to Qlik Replicate:
1. In the Qlik Replicate Console, click Manage Endpoint Connections to open the Manage EndpointsConnections dialog box. Then click the New Endpoint Connection button.
2. In the Name field, type a name for your ODBC endpoint. This can be any name that will help toidentify the endpoint being used.
3. In the Description field, type a description that helps to identify the ODBC endpoint. This is optional.
4. Select Source as the endpoint role.
5. Select ODBC as the endpoint Type.
6. Select one of the following:l If the DSN you want to use is not included in the list, make sure that the endpoint client isinstalled on the computer with Qlik Replicate and that the DSN is defined. Note that theODBC provider client must be 64-bit. For more information, see Prerequisites (page 350).
If you are using an ARC CDC Agent as the source in a Qlik Replicate task, youcannot select the DSN for the Qlik ODBC driver as the target. In this case, to useQlik ODBC as a source, you must enter the connection string manually byselecting Connection String and following the directions for that option in thisprocedure.
l Connection String: Select this to connect to an ODBC-supported endpoint using aconnection string then type a valid connection string in the field below. For information onhow to create a connection string, see the documentation for the ODBC endpoint provideryou are using.
Setup and User Guide - Qlik Replicate, November 2021 355

8 Adding and managing source endpoints
Note that if you specify a password in your connection string, it will be revealed as plain textin the task log files. It is therefore recommended to specify the password in the GUIPassword field.
l You can use the Advanced tab to add specific properties and create acustom connect string. In this case, you do not need to enter informationin this tab. For more information on using the Advanced tab, see Settingadvanced connection properties (page 356).
l To determine if you are connected to the endpoint you want to use or if theconnection information you entered is correct, click Test Connection.If the connection is successful a message in green is displayed. If theconnection fails, an error message is displayed at the bottom of the dialogbox.To view the log entry if the connection fails, click View Log. The server logis displayed with the information for the connection failure. Note that thisbutton is not available unless the test connection fails.
7. Type the authentication information (User Name, Password) for the authorized user for the ODBCendpoint being used. For example, the IBM DB2 system administrator if you are using a IBM DB2provider. If you do not know this information, see your ODBC Endpoint System Administrator.
l When you select Connection String be sure to include User name/passwordinformation in the connection string that you type in the box.If you are using the Advanced tab to create a custom string, make sure to includethe User Name and Password properties. For more information, see Settingadvanced connection properties (page 356).
l This information is case sensitive.l You can set custom properties in the Advanced tab. For more information, seeSetting advanced connection properties (page 356).
Make sure that the ODBC endpoint user has the correct access privileges for the ODBCprovider being used.
Setting advanced connection propertiesIn the Advanced tab, you can set the following properties:
l Provider syntax: Select the name of the provider syntax if you are using an alternate providersyntax.
Internal parametersInternal parameters are parameters that are not exposed in the UI. You should only use them if instructedby Qlik Support.
To add internal Qlik Replicate parameters:
Setup and User Guide - Qlik Replicate, November 2021 356

8 Adding and managing source endpoints
1. Click the Internal Parameters link.The Internal Parameters dialog box opens.
2. In the edit box, type the name of the parameter you need to add and then click it.
3. The parameter is added to the table below the search box with its default value.
4. Change the default value as required.
5. To reset the parameter value to its default, click the "Restore default value" icon at the end of therow.
More optionsThese options are not exposed in the UI as they are only relevant to specific versions or environments.Consequently, do not set these options unless explicitly instructed to do so by Qlik Support or productdocumentation.
To set an option, simply copy the option into the Add feature name field and click Add. Then set the valueor enable the option according to the instructions you received.
Settings summaryYou can view a summary of your settings by clicking the Setting Summary link. This is useful if you need tosend a summary of your settings to Qlik Support.
Setup and User Guide - Qlik Replicate, November 2021 357

8 Adding and managing source endpoints
8.21 Using ODBC with CDC as a sourceThis section describes how to use ODBC connectivity to connect to a source endpoint in a Full Load and/orCDC task.
The ODBC with CDC source endpoint can be used to access sources that are not included inQlik Replicate’s extensive Support Matrix. However, unless enabled through ProfessionalServices and approved by your Account Manager, the ODBC with CDC source endpointshould not be used. Additionally, the ODBC with CDC source endpoint should not be used toaccess any sources already listed in the Support Matrix.
In this section:
l Prerequisites (page 359)l Limitations and Considerations (page 359)l ODBC with CDC source data types (page 360)l Setting general connection properties (page 363)l Setting Change Processing parameters (page 365)
Setup and User Guide - Qlik Replicate, November 2021 358

8 Adding and managing source endpoints
PrerequisitesThe following section describes the prerequisites for working with Qlik Replicate and an ODBC source withCDC.
Replicate server for WindowsYou can connect an endpoint to Qlik Replicate using ODBC by indicating the DSN (Data Source Name). Inthis case you must be sure that a DSN is defined for the ODBC endpoint on the computer where QlikReplicate is installed.
1. Install an endpoint client on the computer where Qlik Replicate is installed. The client you installdepends on the ODBC provider you are using. For example, if you are using an IBM DB2 endpoint,install an IBM DB2 client.
You must use a 64-bit ODBC provider client to work with Qlik Replicate
2. Use the ODBC Data Source Administrator to create a System DSN.The Data Source is located inthe Windows control panel.
Replicate server for LinuxThe following section describes the steps for working with Qlik Replicate for Linux and ODBC with CDC asa source endpoint in a Replicate task.
1. On the Qlik Replicate Server machine, install the ODBC client that you want to use (e.g.postgreSQL).
2. Makes sure that the /etc/odbcinst.ini file contains the correct entry for the driver you installed, asin the following example:[PostgeSQL]Description = ODBC for PostgreSQLDriver = /usr/lib/psqlodbc.soSetup = /usr/lib/libodbcpsqlS.soDriver64 = /usr/lib64/psqlodbc.soSetup64 = /usr/lib64/libodbcpsqlS.soFileUsage = 1
3. Define a DSN for the installed driver by editing the /etc/odbc.ini file, as in the following example:[Postgre_DSN]Description = TestDriver = /usr/lib64/psqlodbc.soEndpoint = MyDatabaseServername = 12.3.45.678Port = 5432
Limitations and ConsiderationsThe following limitations apply:
l UPDATES to primary key fields are not supported. To update the field, define it as a unique indexinstead.
Setup and User Guide - Qlik Replicate, November 2021 359

8 Adding and managing source endpoints
l For providers that do not support batch operations, you must manually add the RowByRow=true
internal parameter according to the instruction provided in Setting Change Processing parameters(page 365).
l The Start from timestamp run option is supported only if there is a single context column defined inthe Change Processing tab, and its type is TIMESTAMP.
ODBC with CDC source data typesThe following table shows the ODBC target data types that are supported when using Qlik Replicate andthe default mapping from Qlik Replicate data types.
For information on how to view the data type that is mapped in the target, see the section for the targetendpoint you are using.
For additional information about Qlik Replicate data types, see Replicate data types (page 76).
ODBC Data Types Qlik Replicate Data Types
SQL_BIT BOOLEAN
SQL_TINYINT INT1
UINT1
SQL data types are mapped to unsigned datatypes when the UNSIGNED_ATTRIBUTE isset to SQL_TRUE for the data type beingmapped.
SQL_SMALLINT INT2
UINT2
SQL data types are mapped to unsigned datatypes when the UNSIGNED_ATTRIBUTE isset to SQL_TRUE for the data type beingmapped.
SQL_INTEGER INT4
UINT4
SQL data types are mapped to unsigned datatypes when the UNSIGNED_ATTRIBUTE isset to SQL_TRUE for the data type beingmapped.
Supported data types
Setup and User Guide - Qlik Replicate, November 2021 360

8 Adding and managing source endpoints
ODBC Data Types Qlik Replicate Data Types
SQL_BIGINT INT8
UINT8
SQL data types are mapped to unsigned datatypes when the UNSIGNED_ATTRIBUTE isset to SQL_TRUE for the data type beingmapped.
SQL_DOUBLE REAL8
SQL_FLOAT REAL8
SQL_REAL REAL8
SQL_NUMERIC (P,S) NUMERIC (P,S)
REAL8
The SQL_NUMERIC data type is mapped toREAL8 when at least one of the following istrue:
l Precision > 38l Scale < 0l Scale > 38l Scale > Precision
SQL_DECIMAL (P,S) NUMERIC (P,S)
REAL 8
The SQL_NUMERIC data type is mapped toREAL8 when at least one of the following istrue:
l Precision > 38l Scale < 0l Scale > 38l Scale > Precision
SQL_DATE
SQL_TYPE_DATE
DATE
SQL_TIME
SQL_TYPE_TIME
TIME
SQL_TIMESTAMP
SQL_TYPE_TIMESTAMP
DATETIME
Setup and User Guide - Qlik Replicate, November 2021 361

8 Adding and managing source endpoints
ODBC Data Types Qlik Replicate Data Types
SQL_CHAR
SQL_VARCHAR
STRING
SQL_WCHAR
SQL_WVARCHAR
WSTRING
SQL_LONGVARCHAR
To use this data type with Qlik Replicate, you mustenable the use of CLOBs for a specific task.
During CDC or during Full Load when the Allowunlimited LOB size option is enabled, LOB data typesare supported only in tables with a primary key orunique index.
CLOB
SQL_WLONGVARCHAR
To use this data type with Qlik Replicate, you mustenable the use of NCLOBs for a specific task.
During CDC or during Full Load when the Allowunlimited LOB size option is enabled, LOB data typesare supported only in tables with a primary key orunique index.
For more information, see LOB support in TaskSettings/Metadata (page 1011).
NCLOB
SQL_BINARY BYTES
SQL_LONGVARBINARY
To use this data type with Qlik Replicate, you mustenable the use of BLOBs for a specific task.
During CDC or during Full Load when the Allowunlimited LOB size option is enabled, LOB data typesare supported only in tables with a primary key orunique index.
For more information, see LOB support in TaskSettings/Metadata (page 1011).
BLOB
SQL_GUID STRING
Setup and User Guide - Qlik Replicate, November 2021 362

8 Adding and managing source endpoints
ODBC Data Types Qlik Replicate Data Types
SQL_INTERVAL_YEAR
SQL_INTERVAL_MONTH
SQL_INTERVAL_DAY
SQL_INTERVAL_MINUTE
SQL_INTERVAL_HOUR
SQL_INTERVAL_SECOND
SQL_INTERVAL_YEAR_TO_MONTH
SQL_INTERVAL_DAY_TO_HOUR
SQL_INTERVAL_DAY_TO_MINUTE
SQL_INTERVAL_DAY_TO_SECOND
SQL_INTERVAL_HOUR_TO_MINUTE
SQL_INTERVAL_HOUR_TO_SECOND
SQL_INTERVAL_MINUTE_TO_SECOND
STRING
Provider specific data types
If column length is 0 or > 4000 then:
To use this data type with Qlik Replicate, you mustenable the use of BLOBs for a specific task.
During CDC or during Full Load when the Allowunlimited LOB size option is enabled, LOB data typesare supported only in tables with a primary key orunique index.
If column length is < or = 4000:
BYTES
If column length is 0 or > 4000:
BLOB
Setting general connection propertiesThis section describes how to configure general connection properties.
To add an ODBC with CDC source endpoint to Qlik Replicate:
1. In the Qlik Replicate console, click the Manage Endpoint Connections toolbar button to open theManage Endpoints Connections dialog box. Then click the New Endpoint Connection button. Formore information on adding an endpoint to Qlik Replicate, see Defining and managing endpoints(page 110).
2. In the Name field, type a name for your ODBC endpoint. This can be any name that will help toidentify the endpoint being used.
3. In the Description field, type a description that helps to identify the ODBC endpoint. This is optional.
Setup and User Guide - Qlik Replicate, November 2021 363
8 Adding and managing source endpoints
4. Select Source as the endpoint role.
5. Select ODBC with CDC as the endpoint Type.
When this endpoint is used as a duplicated source in a Log Stream Staging setup,select the Read changes from log stream check box and then select the relevant LogStream Staging task from the drop-down list.For information on setting up and managing Log Stream Staging tasks, see Using theLog Stream (page 919).
6. Select one of the following:l DSN: Select this to connect to an ODBC-supported endpoint using a DSN. When you selectDSN you must select the DSN you are using from the list.If the DSN you want to use is not included in the list, make sure that the endpoint client isinstalled on the computer with Qlik Replicate and that the DSN is defined. Note that theODBC provider client must be 64-bit. For more information, see Prerequisites (page 359).
If you are using a Replicate Connect CDC Agent as the source in a Replicatetask, you cannot select the DSN for the Qlik ODBC driver as the target. In thiscase, to use Qlik ODBC as a source, you must enter the connection stringmanually by selecting Connection String and following the directions for thatoption in this procedure.
l Connection String: Select this to connect to an ODBC-supported endpoint using aconnection string then type a valid connection string in the field below. For information onhow to create a connection string, see the documentation for the ODBC endpoint provideryou are using.Note that if you specify a password in your connection string, it will be revealed as plain textin the task log files. It is therefore recommended to specify the password in the GUIPassword field.
To determine if you are connected to the endpoint you want to use or if theconnection information you entered is correct, click Test Connection.If the connection is successful a message in green is displayed. If the connectionfails, an error message is displayed at the bottom of the dialog box.To view the log entry if the connection fails, click View Log (this button is notavailable unless the test connection fails). The server log is displayed with theinformation for the connection failure.
7. Type the authentication information (User Name, Password) for the authorized user for the ODBCendpoint being used. For example, the IBM DB2 system administrator if you are using a IBM DB2provider. If you do not know this information, see your ODBC Endpoint System Administrator.
Setup and User Guide - Qlik Replicate, November 2021 364

8 Adding and managing source endpoints
Consider the following:l If you select Connection String, be sure to include User name/passwordinformation in the connection string that you type in the box.
l This information is case sensitive.
Make sure that the ODBC endpoint user has the correct access privileges for the ODBCprovider being used.
Setting Change Processing parametersThe Change Processing tab lets you define change processing settings for the source database.Normally, Replicate scans a database’s transaction logs for changes and then applies those changes tothe target database. However, this method of change processing is not possible with Data Warehouseendpoint types since these endpoints do not generate transaction logs.
The good news is that you can still use Replicate to capture changes from the database - it just requires alittle bit of preparation.
PrerequisitesBefore you can define the settings in the Change Processing tab, you need to ensure that at least onespecial "Context" column exists in your source database tables. Context column(s) are basically columnsin a table that enable Replicate to determine whether the data has changed. You can add Context columnsspecifically for the purpose of change processing (either using a script or manually) or you can use existingcolumns that contain suitable "Context" data.
You can create and reference any number of Context columns in a table as long as the Contextcolumn names are the same for all source tables. Additionally, each value in the Contextcolumn(s) must be unique.
In the example below, the Context column cf has been added to the table. The cf column containsTIMESTAMPs that enable Replicate to determine whether a change occurred (by comparing the currentTIMESTAMP with the TIMESTAMP stored in its repository).
By default, all changes are assumed to be INSERTs. If UPDATE and DELETE operations are alsoperformed on the source tables, you can write an UPDATE and/or DELETE expression (described below)that will enable Replicate to identify the operation type.
Setup and User Guide - Qlik Replicate, November 2021 365

8 Adding and managing source endpoints
LimitationsThe following limitations apply when Change Processing is enabled:
l The "Start from timestamp" run option is not supported. For more information, see Advanced RunOptions (page 1048).
l If one of the Context columns is part of the Primary Key or Unique Index, then UPDATE andDELETE operations are not supported.
l Context columns cannot be LOB columnsl DDLs are not supportedl When inserting a record and then updating the same record, the task error handling settings shouldbe set as follows:
1. Open the <Task Name> Settings dialog box.
2. Select the Error Handling|Apply Conflicts tab.
3. Set a task-specific Apply Conflicts policy as described in Error Handling settings (page1032).
4. From the No record found for applying an update drop-down list, select INSERT themissing target record.
For more information on error handling, see Error handling (page 1031).
Configuring Change Processing settingsPerform the following steps to configure change processing settings.
To configure change processing settings:
Setup and User Guide - Qlik Replicate, November 2021 366

8 Adding and managing source endpoints
1. Select the endpoint's Change Processing tab.
2. In the Columns field, specify the names of the Context columns. The column names are case-sensitive and must be separated by commas.Example:context1,context2
3. Choose the sorting order of the Context columns as appropriate (Ascending or Descending). Notethat if the order you select is not the same as the actual sorting order, an error will occur.
4. In the Check for changes every field, specify how often to check for changes.
5. Enter expressions that Replicate will use to identify UPDATE and DELETE operations. If you do notenter any expressions or if no match is found for an expression, any row whose context is higher (ifthe sorting order is Ascending) or lower (if the sorting order is Descending) than the previouscontext value will be considered an INSERT.Expressions must be written in the native syntax of the source database. All examples in thissection are written using PostgreSQL syntax.
l Update expression - Enter an expression for identifying UPDATE operations.Example (based on Figure "Example of a Table with a Context Column"):case when oper='U' then 1 else 0 end
Selecting the UPDATE the existing target record option in the Apply Conflicts (page 1034)tab, eliminates the need to provide an UPDATE expression.
l Delete expression - Enter an expression for identifying DELETE operations.Example (based on Figure "Example of a Table with a Context Column"):case when oper='D' then 1 else 0 end
In addition to the DELETE expression, DELETE operations should be carried out as "Soft"deletes. This means that the row is not actually deleted from the table, but rather, marked as"deleted".
6. Select Override connection string parameters to append the connection string with parametersthat are not exposed in the UI. As such parameters are normally not required, they should only beused after consulting with Qlik Support.
Additional settings and summaryIn the Change Processing tab, you can set also set internal parameters, set more options, and view asummary of your settings.
Internal parametersInternal parameters are parameters that are not exposed in the UI. You should only use them if instructedby Qlik Support.
To add internal Qlik Replicate parameters:
1. Click the Internal Parameters link.The Internal Parameters dialog box opens.
2. In the edit box, type the name of the parameter you need to add and then click it.
3. The parameter is added to the table below the search box with its default value.
4. Change the default value as required.
Setup and User Guide - Qlik Replicate, November 2021 367

8 Adding and managing source endpoints
5. To reset the parameter value to its default, click the "Restore default value" icon at the end of therow.
More optionsThese options are not exposed in the UI as they are only relevant to specific versions or environments.Consequently, do not set these options unless explicitly instructed to do so by Qlik Support or productdocumentation.
To set an option, simply copy the option into the Add feature name field and click Add. Then set the valueor enable the option according to the instructions you received.
Settings summaryYou can view a summary of your settings by clicking the Setting Summary link. This is useful if you need tosend a summary of your settings to Qlik Support.
Setup and User Guide - Qlik Replicate, November 2021 368

8 Adding and managing source endpoints
8.22 Using Oracle as a sourceThis section describes how to set up and use an Oracle database as a source in a replication task.
In this section:
l Supported Oracle database editions (page 370)l Client prerequisites (page 811)l Required permissions (page 370)l Limitations and considerations (page 374)l Supported encryption methods (page 376)l Supported compression methods (page 376)l Supported Standby configurations (page 377)l Redo log files - access method guidelines (page 377)l Handling shrink space operations (page 378)l Replicating Nested Tables (page 378)l Oracle source data types (page 380)l Non-supported data types (page 383)l Homogeneous Replication (page 383)l Preparing the Oracle database for replication (page 385)l Working with Oracle on Oracle Cloud (page 387)l Working with Amazon RDS for Oracle (page 387)l Setting general connection properties (page 390)l Setting advanced connection properties (page 391)l Finding the wallet entries used for TDE Encryption (page 399)
Setup and User Guide - Qlik Replicate, November 2021 369

8 Adding and managing source endpoints
Supported Oracle database editionsBefore you begin to work with an Oracle database as a source or target in Qlik Replicate, make sure thatthe Oracle database with the tables that are necessary for replication is available in your system. QlikReplicate supports the following Oracle database editions:
l Oracle Enterprise Editionl Oracle Standard Editionl Oracle Standard Edition 2l Oracle Express Editionl Oracle Personal Edition
Client prerequisitesBefore you can work with an Oracle endpoint, make sure the prerequisites listed in this section have beenmet.
Support for the XMLTYPE data type requires the full Oracle Client.
l OnWindows systems, install Oracle Instant Client for Microsoft Windows (x64) Version 11.2.0.3.0or later.
l On Linux systems, install Oracle Instant Client for Linux (x86-64) Version 11.2.0.3.0 or later.In addition, if not already included in your system, you need to create a symbolic link in the $Oracle_
Home\lib directory. This link should be called libclntsh.so, and should point to a specific version ofthis file.For example, on an Oracle 12c client:lrwxrwxrwx 1 oracle oracle 63 Oct 2 14:16 libclntsh.so ->
/u01/app/oracle/home/lib/libclntsh.so.12.1
Additionally, append the LD_LIBRARY_PATH environment variable to the Oracle lib directory bycopying the driver location to the site_arep_login.sh file as follows:echo "export LD_LIBRARY_PATH=$LD_LIBRARY_PATH:/u01/app/oracle/home/lib/" > site_arep_
login.sh
When Replicate Server is installed on Red Hat 8.1, you must install Oracle Instant Clientfor Linux (x86-64) Version 12.
Required permissions
When replicating from Oracle for Amazon RDS, see Required Amazon RDS for Oraclepermissions (page 387) instead.
In this section:
l General permissions (page 371)l Access privileges when using Oracle LogMiner to access the redo logs (page 372)
Setup and User Guide - Qlik Replicate, November 2021 370

8 Adding and managing source endpoints
l Access privileges when using Replicate Log Reader to access the redo logs (page 372)l Required ASM privileges (page 373)
General permissionsTo use an Oracle source in a Qlik Replicate task, the user specified in the Qlik Replicate Oracle endpointconnection settings must be granted the following privileges in the Oracle database:
If any of the required privileges cannot be granted to a V$xxx, then grant them to the V_$xxx.
l SELECT ANY TRANSACTIONl SELECT on V_$ARCHIVED_LOGl SELECT on V_$LOGl SELECT on V_$LOGFILEl SELECT on V_$DATABASEl SELECT on V_$THREADl SELECT on V_$PARAMETERl SELECT on V_$NLS_PARAMETERSl SELECT on V_$TIMEZONE_NAMESl SELECT on GV_$TRANSACTIONl SELECT on V_$CONTAINERSl SELECT on ALL_INDEXESl SELECT on ALL_OBJECTSl SELECT on DBA_OBJECTS - Required if the Oracle version is earlier than 11.2.0.3.l SELECT on ALL_TABLESl SELECT on ALL_USERSl SELECT on ALL_CATALOGl SELECT on ALL_CONSTRAINTSl SELECT on ALL_CONS_COLUMNSl SELECT on ALL_TAB_COLSl SELECT on ALL_IND_COLUMNSl SELECT on ALL_LOG_GROUPSl SELECT on SYS.DBA_REGISTRYl SELECT on SYS.OBJ$l SELECT on SYS.ENC$l SELECT on DBA_TABLESPACESl SELECT on ALL_TAB_PARTITIONSl SELECT on ALL_ENCRYPTED_COLUMNSl If views are exposed: SELECT on ALL_VIEWS
Grant the following additional privilege (for each replicated table) when you are using a specific table list:
Setup and User Guide - Qlik Replicate, November 2021 371

8 Adding and managing source endpoints
l SELECT on <any-replicated-table>;
Grant the following additional privilege when using a pattern for the table list:
l SELECT ANY TABLE;
Grant the following additional privilege (for each replicated table) when Qlik Replicate adds supplementallogging automatically (the default behavior) and you are using a specific table list. For information on howto turn off supplemental logging, see Setting advanced connection properties using Oracle LogMiner (page392)Setting advanced connection properties using Oracle LogMiner (page 392).
l ALTER on <any-replicated-table>;
Grant the following additional privilege when Qlik Replicate adds supplemental logging automatically (thedefault behavior). For information on how to turn off supplemental logging, see Setting advancedconnection properties using Oracle LogMiner (page 392)Setting advanced connection properties usingOracle LogMiner (page 392).
l ALTER ANY TABLE;l When accessing an Oracle standby database, the following privilege must be granted:SELECT on V$STANDBY_LOG
l When accessing nested tables, the following privileges must be granted:SELECT on all_nested_tablesSELECT on all_nested_table_cols
Access privileges when using Oracle LogMiner to access the redo logsIf you are using Oracle LogMiner to access the Redo logs, grant the following privileges.
l CREATE SESSIONl EXECUTE on DBMS_LOGMNRl SELECT on V_$LOGMNR_LOGSl SELECT on V_$LOGMNR_CONTENTSl LOGMINING
This privilege is only required for Oracle 12c or later.
Access privileges when using Replicate Log Reader to access the redo logsWhen using Replicate Log Reader to access the Redo logs, the following privileges should be granted tothe user specified in the Oracle endpoint settings:
l CREATE SESSIONl SELECT on V_$TRANSPORTABLE_PLATFORMGrant the SELECT on v_$transportable_platform privilege if the Redo logs are stored in ASM andaccessed by Replicate from ASM.
l SELECT ON V_$DATABASE_INCARNATIONl CREATE ANY DIRECTORY
Setup and User Guide - Qlik Replicate, November 2021 372

8 Adding and managing source endpoints
Qlik Replicate uses following Oracle file access features:l BFILE read - Used when Replicate does not have file-level access to the Redo logs, and the Redologs are not accessed from ASM.
l DBMS_FILE_TRANSFER package - Used to copy the Redo log files to a temporary folder (in whichcase the EXECUTE ON DBMS_FILE_TRANSFER privilege needs to be granted as well)
l DBMS_FILE_GROUP package - Used to delete the Redo log files from a temporary/alternate folder(in which case the EXECUTE ON DBMS_FILE_GROUP privilege needs to be granted as well).
Oracle file features work together with Oracle directories. Each Oracle directory object includes the nameof the folder containing the files which need to be processed.
If you want Replicate to create and manage the Oracle directories, you need to grant the CREATE ANYDIRECTORY privilege specified above. Note that the directory names will be prefixed with attrep_. If youdo not grant this privilege, you need to create the corresponding directories manually. The names ofdirectories that are created manually must not be prefixed with ATTUREP_, ATTUTMP_, or ATTUGRP_. Ifyou create the directories manually and the Oracle user specified in the Oracle Source endpoint is not theuser that created the Oracle Directories, grant the READ on DIRECTORY privilege as well.
If the Oracle source endpoint is configured to copy the Redo log files to a temporary folder, and the Oracleuser specified in the Oracle source endpoint is not the user that created the Oracle directories, thefollowing additional privileges are required:
l READ on the Oracle directory object specified as the source directoryl WRITE on the directory object specified as the destination directory in the copy process
See also: Setting advanced connection properties (page 391).
Required ASM privilegesThe following section describes the additional permissions that are required when the redo logs are storedin ASM.
Grant the following read privilege:
SELECT ON v_$transportable_platform
From Oracle 11g Release 2 (11.2.0.2), Qlik Replicate must be granted the SYSASM privilege in order toaccess the ASM account. For older supported versions, granting Qlik Replicate the SYSDBA privilegeshould be sufficient.
When connecting to ASM, Qlik Replicate will first try to log in as SYSDBA and, if unsuccessful,will try to log in as SYSASM.
You can validate ASM account access by opening a command prompt and issuing the followingstatements:
sqlplus asmuser/asmpassword@+asmserver as sysdba
-OR-
sqlplus asmuser/asmpassword@+asmserver as sysasm
Setup and User Guide - Qlik Replicate, November 2021 373

8 Adding and managing source endpoints
Limitations and considerationsThe following limitations apply:
l When replicating from a CHAR column, any trailing spaces will be truncated.l Function-based indexes are not supported.l If you are managing supplemental logging and you carry out transformations on any of the columns,you must be sure that supplemental logging is activated for all fields and columns.
l The AR_H_USER header column is supported only for Oracle database version 11.2.0.3 andhigher. In Oracle database version 10, the value for this column may not be correct. For informationon using header columns, see Headers (page 991).
l Connecting to a CDB is not supported.l Virtual Private Database (VPD) is not supported.l Deferred Constraints are not supported.l The rename table <table name> to <new table name> syntax is supported by Qlik Replicate whenusing Oracle version 11 and higher.
l Data changes resulting from partition/sub-partition operations (ADD, DROP, EXCHANGE andTRUNCATE) will not be replicated and may cause the following errors:
l For ADD operations, updates and deletes on the added data may return a "0 rows affected"warning.
l For DROP and TRUNCATE operations, new inserts may result in "duplicates" errors.l For EXCHANGE operations, both a "0 rows affected" warning and "duplicates" errors may beencountered.
To replicate changes resulting from partition/sub-partition operations, you need to reload the tablesin question. When adding a new empty partition, operations on the newly added partition will bereplicated to the target as normal.
l When Limited-size LOB mode is enabled, empty LOBs on the Oracle source are replicated as NULLvalues. For more information on Limited-size LOB mode, see Task Settings Metadata (page 1011).
l Changes made by the Oracle DBMS_REDEFINITION package -( e.g. table metadata and theOBJECT_ID) - will not be captured by Qlik Replicate.
l Empty BLOB/CLOB columns are mapped to NULL on the target.l During Change Processing, columns without supplemental logging (e.g. LOB columns) that are notupdated will be inserted as NULL in the Change Table.
l During Change Processing, batch updates to numeric columns defined as a Primary Key are notsupported.Example of an unsupported UPDATE command:UPDATE tableX set ID=ID+1;
Where tableX is the table name and ID is a numeric column defined as a Primary Key.l The Allow unlimited LOB size option is not supported when Loading LONG and LONG RAWcolumns into Oracle target.Workaround: Use the Limit LOB size to (KB) option instead.
l Tables whose names contain apostrophes cannot be replicated.
Setup and User Guide - Qlik Replicate, November 2021 374

8 Adding and managing source endpoints
l Change Data Capture (CDC) is not supported from dynamic views.l Index-organized tables with an overflow segment are not supported in Change Processing (CDC)tasks.
l During CDC or during Full Load when the Allow unlimited LOB size option is enabled, LOB datatypes are supported only in tables with a primary key or unique index.
l Changes to Index-organized tables with key compression are not supported.l Replication of tables or views of type BIN$ or DR$ is not supported.l Oracle Flashback Database and restore points are not supported as the related operations affectthe consistency of Oracle redo log files.
l When using Oracle LogMiner to access the redo logs, the following limitations apply:l UPDATEs to XMLTYPE and LOB columns are not supported (i.e. replicated).l SHRINK SPACE operations are not supportedl Connecting to a PDB using Oracle LogMiner is not supported. Therefore, if you want toconnect to a PDB, make sure that the Access redo logs via Replicate Log Reader option isselected in the Advanced tab.
l Due to unpredictable behavior, it is not recommended to use Oracle LogMiner whenreplicating from a RAC environment.
l When using Replicate Log Reader to access the redo logs, the following limitations apply:l Table clusters are not supported.l Only table-level SHRINK SPACE operations are supported. These include the full table,partitions, and sub-partitions.
l Implementing online redo logs on raw devices is not supported.l The following Oracle features are not supported when using Amazon RDS for Oracle:l ASMl TDE
l When using the escape character '\' to search for a table in the Select Tables window, you need towrite '\\' (2 backslashes) instead of '\' (1 backslash). For example, to search for all tables thatinclude '_', you would need to enter %\\_%.
l When adding a pattern for include or exclude, 2 backslashes are not required (forexample, *%\_%).
l When using '$’ for the escape character, there is no limitation.
l When using Oracle 19.0 as the source, the following Oracle features are not supported:l Data-guard DML redirectl Partitioned hybrid tablesl Schema-only Oracle accounts
l From Oracle 18.x, change capture from Oracle Express Edition is not supported.
Setup and User Guide - Qlik Replicate, November 2021 375

8 Adding and managing source endpoints
l As the Oracle database does not generate a FULL after-image, the following limitation applies:When UPDATEs are applied in Batch optimized apply mode, neither the INSERT the missing targetrecord error handling option for missing records nor the Apply Changes using SQL MERGE optionare supported. If either of these options is selected, NULL will be inserted in the target columns forall unchanged user-defined data.
l When filtering records that do not contain a Primary Key, capture of DELETE operations on recordsthat do not have full supplemental logging on the columns included in the filtering condition is notsupported.
l Object names exceeding 30 characters are not supported. Consequently, tables with namesexceeding 30 characters or tables containing column names exceeding 30 characters will not bereplicated.
l When the task settings' Allow unlimited LOB size option is selected, LOB columns (CLOB, BLOB,NCLOB) with an empty_lob() value will be replicated as empty_lob(). In all other cases, aNULL value will be replicated instead of empty_lob().
Supported encryption methodsThe table below lists which encryption methods Qlik Replicate supports when working with an Oraclesource database.
Redo Logs Access Method TDE Tablespace TDE Column
Replicate Log Reader Yes Yes
Oracle LogMiner Yes Yes
Supported encryption methods
NNE (Native Network Encryption) is supported as long as it's configured correctly both onOracle and in the Oracle client sqlnet.ora file.
Replication of TDE columns encrypted with the 3DES168 algorithm is not supported.
Supported compression methodsThe table below lists which compression methods Qlik Replicate supports when working with an Oraclesource database. As the table shows, compression support depends both on your Oracle database versionand whether or not Qlik Replicate is configured to use Oracle LogMiner to access the redo logs.
Version Basic OLTPHCC (from Oracle 11gR2)
Others
Oracle 11 or later - Replicate LogReader
Yes Yes Yes
See Note below.
No
Oracle 11 or later - Oracle LogMiner Yes Yes Yes *Yes
Supported compression methods
Setup and User Guide - Qlik Replicate, November 2021 376

8 Adding and managing source endpoints
*Any compression method supported by Oracle LogMiner
When the Oracle source endpoint is configured to use Replicate Log Reader, the Query Lowlevel of the HCC compression method is only supported in the Full Load task mode.
Supported Standby configurationsThe following table lists the supported Oracle Standby configurations.
StandbyConfiguration
Supported Notes
SnapshotStandby
Yes -
PhysicalStandby
Yes l The physical standby database must have Active Data Guardenabled (available from Oracle 11g or later).
l When the Oracle LOG_ARCHIVE_DEST_n initializationparameter is configured with the DELAY option, running aFull Load and Apply Changes task on an Oracle PhysicalStandby instance may result in missing or erroneous data inthe target database.This happens because Replicate interprets the timestamp ofchanges in the Redo log as the timestamp of the Oracleinstance from where it performed the Full Load, whereas it isin fact the timestamp of the Oracle instance where thechanges occurred (i.e. the Primary Oracle instance). Theresulting timestamp discrepancy means that some of thechanges in the Redo log may be interpreted as “old” and notbe replicated.This issue can be resolved using an internal parameter. Forinformation on this parameter, please contact Qlik Support.
Logical Standby No -
Hot Standby No -
Supported configurations
Redo log files - access method guidelinesThe Replicate Oracle source endpoint can be configured to access online and archived Oracle redo logfiles using either Oracle LogMiner (Oracle’s built-in method) or Replicate Log Reader (Replicate’s high-speed redo log reader).
Setup and User Guide - Qlik Replicate, November 2021 377

8 Adding and managing source endpoints
Generally, it is recommended to use Replicate Log Reader as it is more efficient, faster, and uses lessresources.
Replicate Log Reader is especially recommended in the following situations:
l The volume of changes in the redo log is more than 30GB/hourl The volume of changes is between 10GB/hour and 30GB/hour and the changes need to beprocessed (i.e. replicated to the target) as fast as possible.
l There are multiple tasks replicating from the same source. Using Oracle LogMiner is less efficient inthis case, as it accesses the redo logs via the database, thereby consuming additional databaseresources.
Both Replicate Log Reader and Oracle LogMiner are subject to certain limitations, support differentcompression methods, and require different access permissions. It is therefore strongly recommended toreview the relevant sections before configuring the endpoint settings. In the end, your decision whether touse Replicate Log Reader or Oracle LogMiner may be based on a limitation that exists in one but not theother, the way your data is compressed, or the permissions that you are willing to grant the Replicate user.
Handling shrink space operationsWhen a SHRINK SPACE operation occurs, Replicate will capture all of the changes logged to the redo logas a result of the operation and ignore them.
The following message will appear in the task’s log file:
Operations generated by the SHRINK SPACE process were ignored.
Monitoring considerationsWhen Replicate captures changes resulting from a SHRINK SPACE operation, the task’s IncomingChanges bar will indicate an unusually large number of changes. However, these changes will not bereflected in the Applied Changes pie chart or the Applied Changes Details table.
See also the Limitations and considerations (page 374) section for the limitations related to SHRINKSPACE operations in Replicate Log Reader and LogMiner mode.
Replicating Nested TablesReplicate supports the replication of Oracle tables containing columns that are nested tables or definedtypes. To enable this functionality, select the Support nested tables option in the Advanced tab.
Replicate creates the target tables of Oracle nested tables as regular tables without a unique constraint. Asyou will most likely need join the parent and child tables for meaningful data, it is important to manuallycreate a non-unique index on the NESTED_TABLE_ID column in the target child table. The NESTED_TABLE_ID column can then be used in the JOIN ON clause, together with the parent columncorresponding to the child table name. Additionally, creating such an index will improve performance whenthe target child table data is updated/deleted by Replicate.
It is recommended to configure the task to stop after Full Load completes. After Full Load completes,manually create non-unique indexes for all the replicated child tables on the target, and then resume thetask.
Setup and User Guide - Qlik Replicate, November 2021 378

8 Adding and managing source endpoints
If a captured nested table is added to an existing parent table (captured or not captured), Replicate willhandle it correctly, but the non-unique index for the corresponding target table will not be created. Note thatin this case, if the target child table becomes extremely large, performance may be impacted. In such acase, it is recommended to stop the task, create the index, and then resume the task.
After the nested tables are replicated to the target, the DBA will need to run a JOIN statement on the parentand corresponding child tables in order to flatten the data.
PrerequisitesMake sure that you replicate parent tables for all the replicated nested tables. Both the parent tables (thetables containing the nested table column) and the child (i.e. nested) tables will be available for selection inReplicate.
Supported nested table typesThe following nested table types are supported:
l Data typel User defined Object
Limitationsl Only one level of nesting is supported.l Replicate does not verify that both the parent and child table(s) are selected for replication. In otherwords, it's possible to select a parent table without a child and vice versa.
How nested tables are replicatedThe parent and nested tables are replicated to the target as follows:
l The parent table is created identical to the source. The nested column will be defined as RAW(16)and contain a reference to its nested tables in the NESTED_TABLE_ID column.
l The child table is created identical to the source, but with an additional column named NESTED_TABLE_ID with the same type as the parent nested column and with the same meaning.
JOIN statement exampleTo flatten the parent table, the DBA should run a JOIN statement between the parent and child tables, asshown in the following example:
Creating the Type table:
CREATE OR REPLACE TYPE my_tab_t AS TABLE OF VARCHAR2(30);
Creating the parent table with a column of type my_tab_t that was defined above:
CREATE TABLE my_parent_table (id NUMBER PRIMARY KEY, col1 my_tab_t) NESTED TABLE col1 STORE AS
col1_tab;
Flattening the my_parent_table:
Select … from my_parent_table parent, col1_tab child where child.nested_table_id = parent.col1
Setup and User Guide - Qlik Replicate, November 2021 379

8 Adding and managing source endpoints
Oracle source data typesThe Oracle database for Qlik Replicate supports most Oracle data types. The following table shows theOracle source data types that are supported when using Qlik Replicate and the default mapping to QlikReplicate data types.
For information on how to view the data type that is mapped in the target, see the section for the targetdatabase you are using.
For additional information about Qlik Replicate data types, see Replicate data types (page 76).
Oracle Data Types Qlik Replicate Data Types
BINARY_FLOAT REAL4
BINARY_DOUBLE REAL8
BINARY BYTES
FLOAT (P) REAL8
NUMBER (P,S)
NUMBER according to the "Expose number as" property in the QlikReplicate Oracle source database settings.
When scale is < 0: REAL8
When scale is 0 and:
Precision = 0: REAL8
Precision < or = 2: INT1
Precision >2 and <or = 4:INT2
Precision >4 and <or = 9:INT4
Precision > 9: NUMERIC
If precision > or = scale:NUMERIC
In all other cases: REAL8
DATE DATETIME
INTERVAL_YEAR TOMONTH STRING (with intervalyear_to_month indication)
INTERVAL_DAY TO SECOND STRING (with intervalday_to_second indication)
TIMESTAMP DATETIME
TIMESTAMPWITH TIME ZONE STRING (with timestamp_with_timezone indication)
Data types
Setup and User Guide - Qlik Replicate, November 2021 380

8 Adding and managing source endpoints
Oracle Data Types Qlik Replicate Data Types
TIMESTAMPWITH LOCAL TIME ZONE STRING (with timestamp_with_local_timezoneindication)
CHAR STRING
VARCHAR2 Length <= 4000 bytes:
STRING
Length > 4000 bytes:
CLOB
NCHAR Length <= 4000 bytes:
WSTRING
Length > 4000 bytes:
NCLOB
NVARCHAR2 Length <= 4000 bytes:
WSTRING
Length > 4000 bytes:
NCLOB
RAW Length <= 2000 bytes:
BYTES
Length > 2000 bytes:
BLOB
REAL REAL8
BLOB
To use this data type with Qlik Replicate, you must enable the use ofBLOBs for a specific task.
During CDC or during Full Load when the Allow unlimited LOB sizeoption is enabled, LOB data types are supported only in tables with aprimary key or unique index.
BLOB
Setup and User Guide - Qlik Replicate, November 2021 381

8 Adding and managing source endpoints
Oracle Data Types Qlik Replicate Data Types
CLOB
To use this data type with Qlik Replicate, you must enable the use ofCLOBs for a specific task.
During CDC or during Full Load when the Allow unlimited LOB sizeoption is enabled, LOB data types are supported only in tables with aprimary key or unique index.
CLOB
NCLOB
To use this data type with Qlik Replicate, you must enable the use ofNCLOBs for a specific task.
During CDC or during Full Load when the Allow unlimited LOB sizeoption is enabled, LOB data types are supported only in tables with aprimary key or unique index.
NCLOB
LONG
The LONG data type is not supported in Batch Optimized Apply mode.
To use this data type with Qlik Replicate, you must enable the use ofLOBs for a specific task.
During CDC or during Full Load when the Allow unlimited LOB sizeoption is enabled, LOB data types are supported only in tables with aprimary key or unique index.
CLOB
LONG RAW
The LONG RAW data type is not supported in Batch Optimized Applymode.
To use this data type with Qlik Replicate, you must enable the use ofLOBs for a specific task.
During CDC or during Full Load when the Allow unlimited LOB sizeoption is enabled, LOB data types are supported only in tables with aprimary key or unique index.
BLOB
Setup and User Guide - Qlik Replicate, November 2021 382
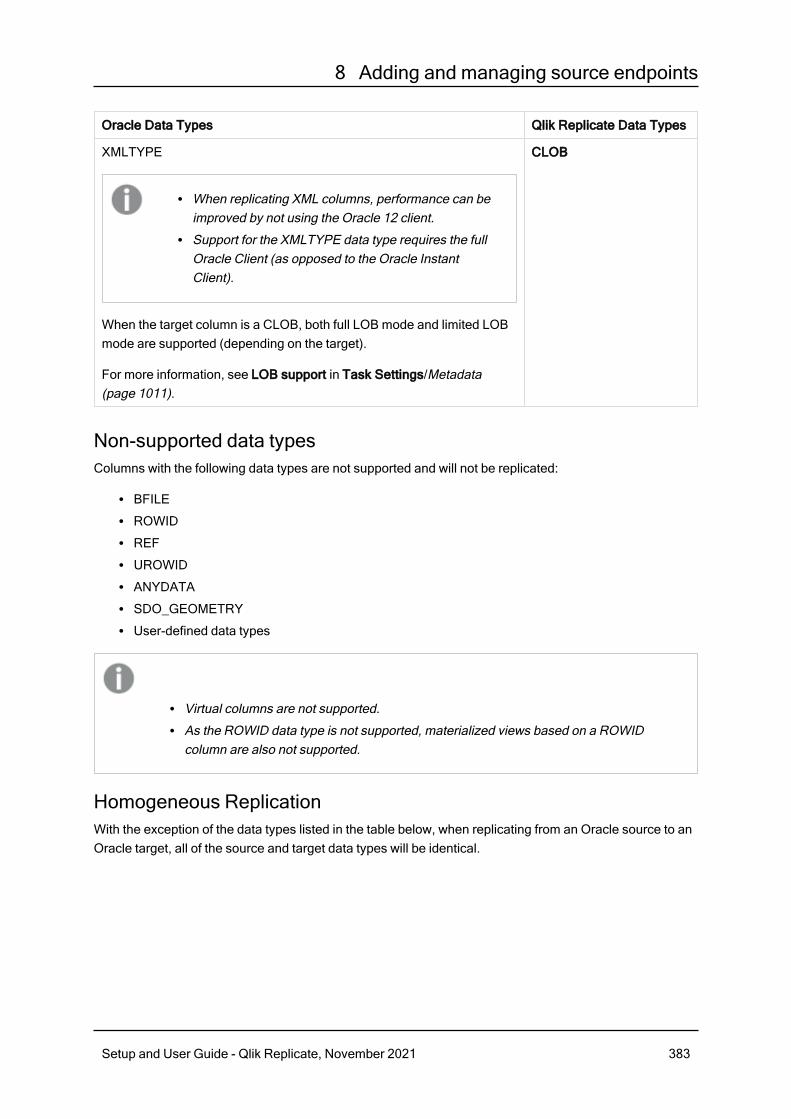
8 Adding and managing source endpoints
Oracle Data Types Qlik Replicate Data Types
XMLTYPE
l When replicating XML columns, performance can beimproved by not using the Oracle 12 client.
l Support for the XMLTYPE data type requires the fullOracle Client (as opposed to the Oracle InstantClient).
When the target column is a CLOB, both full LOB mode and limited LOBmode are supported (depending on the target).
For more information, see LOB support in Task Settings/Metadata(page 1011).
CLOB
Non-supported data typesColumns with the following data types are not supported and will not be replicated:
l BFILEl ROWIDl REFl UROWIDl ANYDATAl SDO_GEOMETRYl User-defined data types
l Virtual columns are not supported.l As the ROWID data type is not supported, materialized views based on a ROWIDcolumn are also not supported.
Homogeneous ReplicationWith the exception of the data types listed in the table below, when replicating from an Oracle source to anOracle target, all of the source and target data types will be identical.
Setup and User Guide - Qlik Replicate, November 2021 383

8 Adding and managing source endpoints
l As of Oracle 9.0, the LONG and LONG RAW data types are no longer supported byOracle.
l Primary/Unique Index names are preserved during homogeneous replication.l In homogeneous replication, the source data first passes through the Qlik Replicatedata type and is therefore subject to any limitations of that type.
l For information on Replicate data types and their limitations (where relevant), seeReplicate data types (page 76).
l For information on which Replicate data types the source data passes through whenreplicating from Oracle, see the Oracle to Qlik Replicate data types mapping tabledescribed earlier.
Oracle Data Types Qlik Replicate Data Types
VARCHAR2 Length > 4000 bytes:
CLOB
NVARCHAR2 Length > 4000 bytes:
NCLOB
RAW Length > 2000 bytes:
BLOB
LONG
The LONG data type is not supported in Batch Optimized Apply mode.
To use this data type with Qlik Replicate, you must enable the use ofLOBs for a specific task.
During CDC or during Full Load when the Allow unlimited LOB sizeoption is enabled, LOB data types are supported only in tables with aprimary key or unique index.
CLOB
LONG RAW
The LONG RAW data type is not supported in Batch Optimized Applymode.
To use this data type with Qlik Replicate, you must enable the use ofLOBs for a specific task.
During CDC or during Full Load when the Allow unlimited LOB sizeoption is enabled, LOB data types are supported only in tables with aprimary key or unique index.
BLOB
Non-identical data types in homogeneous replication
Setup and User Guide - Qlik Replicate, November 2021 384

8 Adding and managing source endpoints
Preparing the Oracle database for replicationThe following topics describe the configuration requirements for using an Oracle database with QlikReplicate as a source. An Oracle DBA should know how to carry out these tasks.
l Provide Oracle account access (page 385)l Ensure that ARCHIVELOGmode is on (page 385)l Setting up supplemental logging (page 385)
Provide Oracle account accessYou must provide Oracle account access to the Qlik Replicate user. This user must have read/writeprivileges on the Oracle database. For information on setting up access to the Oracle account, seeRequired permissions (page 370).
Ensure that ARCHIVELOGmode is onOracle can be run in two different modes: the ARCHIVELOGmode and the NOARCHIVELOGmode. To use theOracle logs with Qlik Replicate, run the database in ARCHIVELOGmode. If the log is not set to ARCHIVELOG
mode, then execute the following query:
ALTER database ARCHIVELOG
Note that if your Oracle database instance is on Amazon RDS, a different command needs to be executed.For more information, see Enabling automatic backups (page 389)and Setting up archiving (page 389) inPreparing Replication from Amazon RDS for Oracle (page 388).
Setting up supplemental loggingSupplemental logging must be enabled for the Oracle database.
l You can automatically set up supplemental logging in the Advanced tab of the Oracledatabase dialog box. If you select this option, you do not have to carry out the followingprocedure. For more information, see Setting advanced connection properties usingOracle LogMiner (page 392).
l When replicating from an Oracle standby environment, supplemental logging must beset up in the primary Oracle instance (as described below), not in the standby instance.
Set up supplemental logging as described in the steps below.
Step 1: Check that supplemental logging is enabled for the database
1. Run the following query:SELECT name, value, description FROM v$parameter WHERE name = 'compatible';
The returned result should be from GE to n.n.n where n.n.n is the Oracle database version (e.g.10.0.0).
For Replicate to work, the parameter value must match the real version of the database.
Setup and User Guide - Qlik Replicate, November 2021 385

8 Adding and managing source endpoints
2. Run the following query:SELECT supplemental_log_data_min FROM v$database;
The returned result should be YES or IMPLICIT.Enable supplemental logging by executing the following query:ALTER DATABASE ADD SUPPLEMENTAL LOG DATA
If your Oracle database instance is on Amazon RDS, a different command needs to beexecuted. For more information, see Preparing Replication from Amazon RDS forOracle (page 388).
Step 2: Make sure that the required supplemental logging is added for each table
1. If a Primary Key exists, supplemental logging must be added for the Primary Key either by using theformat to add supplemental logging on the Primary Key, or by adding supplemental logging on thePrimary Key columns.
2. If no Primary Key exists and the table has a single Unique Index, then all of the Unique Index’scolumns must be added to the supplemental log. Using SUPPLEMENTAL LOG DATA (UNIQUE INDEX)
COLUMNS does not add the Unique Index columns to the log.
3. If no Primary Key exists and the table has multiple Unique Indexes, Qlik Replicate will select the firstUnique Index. Qlik Replicate will use the first index in an alphabetically ordered ascending list.Supplemental logging must be added on the selected index's columns. Using SUPPLEMENTAL LOG
DATA (UNIQUE INDEX) COLUMNS does not add the Unique Index columns to the log.
4. If there is no Primary Key and no Unique Index, supplemental logging must be added on allcolumns.
When the target table Primary Key/Unique Index is different than the source tablePrimary Key/Unique Index, the user needs to add supplemental logging manually on thesource table columns that comprise the target table Primary Key/Unique Index.
5. If you change the target table primary key, the supplemental logging must be added on the selectedindex's columns instead of the columns of the original primary key/unique index.
Step 3: If a filter or transformation is defined for the table, additional logging might be necessary
If ALL COLUMNS supplemental logging has been added to the table, there is no need to addany additional logging.
If the table has a Unique Index or a Primary Key, you also need to add supplemental logging on eachcolumn that is involved in a filter or transformation (if those columns are different than the Primary Key orUnique Index columns).
If a transformation uses only one column, this column may not be added to a supplementallogging group. For example, "A+B" needs both columns to be added, whereas substring(A, 10)does not need "A" to be added.
Setup and User Guide - Qlik Replicate, November 2021 386

8 Adding and managing source endpoints
One method of setting up both Primary Key/Unique Index supplemental logging and supplemental loggingon specific columns is to add USER_LOG_GROUP supplemental logging only on the Primary Key/Unique Indexcolumns and on the columns that are filtered or transformed.
For example, to replicate a table named EXAMPLE.TABLE with Primary Key ID and filter by column NAME, youcan run a command similar to the one below to create the log group supplemental logging:
ALTER TABLE EXAMPLE.TABLE ADD SUPPLEMENTAL LOG GROUP example_log_group (ID,NAME)ALWAYS;
Step 4: When the Insert the missing target record Apply Conflicts option is selected, supplementallogging must be enabled for ALL the source table columns.
Working with Oracle on Oracle CloudWhen replicating from Oracle on Oracle Cloud, the following limitations apply:
l Using Oracle LogMiner to access the redo files is not supported.l Due to insufficient permissions, the following options in the endpoint settings' Advanced tab are notsupported:
l Replicate has file-level access to the redo log filesl Replace path prefix
Working with Amazon RDS for OracleBefore you can work with Amazon RDS for Oracle, make sure to fulfill the prerequisites described in thefollowing topics:
l Required Amazon RDS for Oracle permissions (page 387)l Preparing Replication from Amazon RDS for Oracle (page 388)
Amazon RDS for Oracle considerations and limitationsThe following limitations and considerations apply when replicating from Amazon RDS for Oracle:
l When replicating from Amazon RDS for Oracle, TDE is supported only with encrypted tablespaceand using Oracle LogMiner.
l Failover and reboot operations are not supported when all of the following are true:l The Amazon RDS for Oracle database is a Multi-AZ deploymentl Replicate is installed on Linuxl Replicate Log Reader is set as the redo logs access method
Required Amazon RDS for Oracle permissionsThis topic describes the permissions required when replicating from Amazon RDS for Oracle.
Grant the following privileges:
Setup and User Guide - Qlik Replicate, November 2021 387
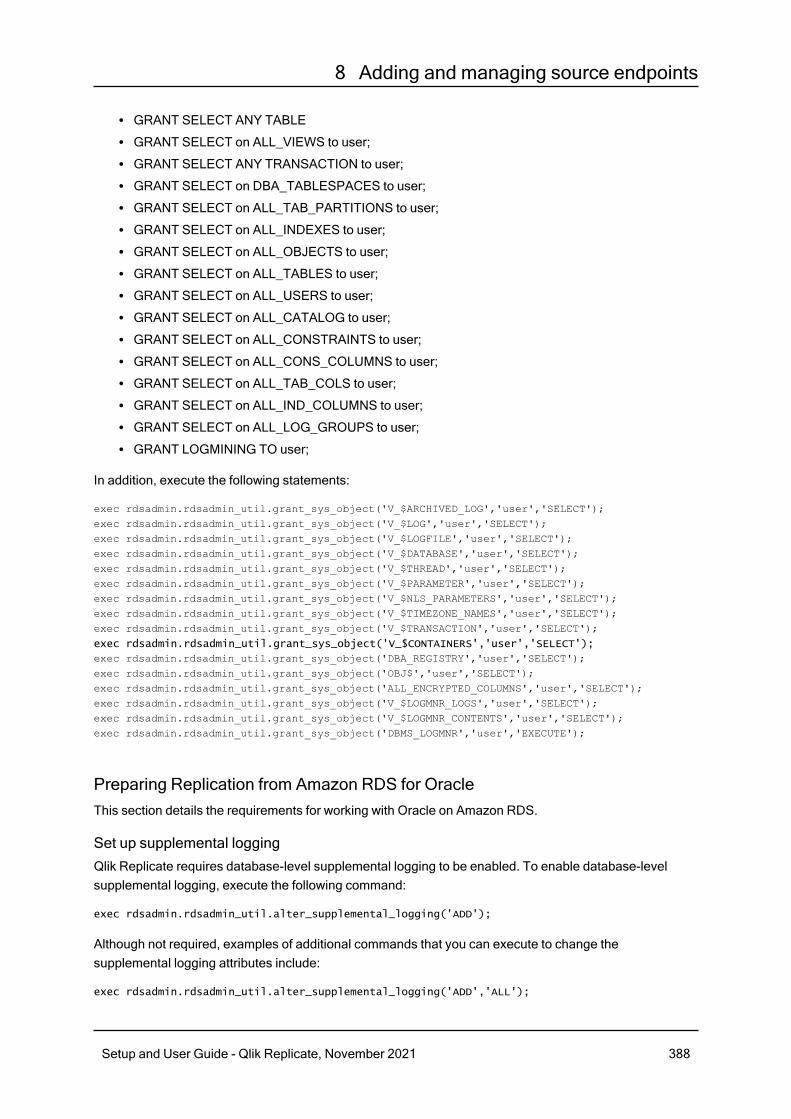
8 Adding and managing source endpoints
l GRANT SELECT ANY TABLEl GRANT SELECT on ALL_VIEWS to user;l GRANT SELECT ANY TRANSACTION to user;l GRANT SELECT on DBA_TABLESPACES to user;l GRANT SELECT on ALL_TAB_PARTITIONS to user;l GRANT SELECT on ALL_INDEXES to user;l GRANT SELECT on ALL_OBJECTS to user;l GRANT SELECT on ALL_TABLES to user;l GRANT SELECT on ALL_USERS to user;l GRANT SELECT on ALL_CATALOG to user;l GRANT SELECT on ALL_CONSTRAINTS to user;l GRANT SELECT on ALL_CONS_COLUMNS to user;l GRANT SELECT on ALL_TAB_COLS to user;l GRANT SELECT on ALL_IND_COLUMNS to user;l GRANT SELECT on ALL_LOG_GROUPS to user;l GRANT LOGMINING TO user;
In addition, execute the following statements:
exec rdsadmin.rdsadmin_util.grant_sys_object('V_$ARCHIVED_LOG','user','SELECT');exec rdsadmin.rdsadmin_util.grant_sys_object('V_$LOG','user','SELECT');exec rdsadmin.rdsadmin_util.grant_sys_object('V_$LOGFILE','user','SELECT');exec rdsadmin.rdsadmin_util.grant_sys_object('V_$DATABASE','user','SELECT');exec rdsadmin.rdsadmin_util.grant_sys_object('V_$THREAD','user','SELECT');exec rdsadmin.rdsadmin_util.grant_sys_object('V_$PARAMETER','user','SELECT');exec rdsadmin.rdsadmin_util.grant_sys_object('V_$NLS_PARAMETERS','user','SELECT');exec rdsadmin.rdsadmin_util.grant_sys_object('V_$TIMEZONE_NAMES','user','SELECT');exec rdsadmin.rdsadmin_util.grant_sys_object('V_$TRANSACTION','user','SELECT');
exec rdsadmin.rdsadmin_util.grant_sys_object('V_$CONTAINERS','user','SELECT');
exec rdsadmin.rdsadmin_util.grant_sys_object('DBA_REGISTRY','user','SELECT');exec rdsadmin.rdsadmin_util.grant_sys_object('OBJ$','user','SELECT');exec rdsadmin.rdsadmin_util.grant_sys_object('ALL_ENCRYPTED_COLUMNS','user','SELECT');exec rdsadmin.rdsadmin_util.grant_sys_object('V_$LOGMNR_LOGS','user','SELECT');exec rdsadmin.rdsadmin_util.grant_sys_object('V_$LOGMNR_CONTENTS','user','SELECT');exec rdsadmin.rdsadmin_util.grant_sys_object('DBMS_LOGMNR','user','EXECUTE');
Preparing Replication from Amazon RDS for OracleThis section details the requirements for working with Oracle on Amazon RDS.
Set up supplemental loggingQlik Replicate requires database-level supplemental logging to be enabled. To enable database-levelsupplemental logging, execute the following command:
exec rdsadmin.rdsadmin_util.alter_supplemental_logging('ADD');
Although not required, examples of additional commands that you can execute to change thesupplemental logging attributes include:
exec rdsadmin.rdsadmin_util.alter_supplemental_logging('ADD','ALL');
Setup and User Guide - Qlik Replicate, November 2021 388

8 Adding and managing source endpoints
exec rdsadmin.rdsadmin_util.alter_supplemental_logging('DROP','PRIMARY KEY');
Enabling automatic backupsIn Step 5: Management Options of setting up your Oracle database instance, set the Enabled AutomaticBackups option to Yes.
Setting up archivingTo retain archived redo logs of your Oracle database instance (which will allow Qlik Replicate to retrievethe log information using Oracle LogMiner), execute the following command (example 24 hours):
exec rdsadmin.rdsadmin_util.set_configuration('archivelog retention hours',24);
Make sure that your storage has sufficient space for the archived redo logs during the specified period.
Using Replicate Log Reader to access the redo logsThe following steps are relevant only when using Replicate Log Reader to access the redo logs.
Create directories for online and archived logs
Before you can use Replicate Log Reader, you need to create directories for the online and archived logs.
To create the directories, run the following commands:
exec rdsadmin.rdsadmin_master_util.create_archivelog_dir;
exec rdsadmin.rdsadmin_master_util.create_onlinelog_dir;
To remove the directories (if there are no ongoing replication tasks), run the following commands:
exec rdsadmin.rdsadmin_master_util.drop_archivelog_dir;
exec rdsadmin.rdsadmin_master_util.drop_onlinelog_dir;
Setting the replace path prefix parameter
Required for Oracle 11.2 and 12.1 only. For all other supported versions, select the Using thepath as it appears in the database (page 395) option in the endpoint settings' Advanced tab.
To work with Replicate Log Reader, you must set the Replace path prefix option in the Advanced tab withthe following values:
Replace path prefix: /rdsdbdata/db/<ORACLE-INSTANCE-NAME>_A/
With: /rdsdbdata/log/
Limitations and considerations
The following Oracle features are not supported when using Replicate Log Reader with Amazon RDS forOracle:
l ASMl TDE
Setup and User Guide - Qlik Replicate, November 2021 389

8 Adding and managing source endpoints
Setting general connection propertiesThis section describes how to configure general connection properties. For an explanation of how toconfigure advanced connection properties, see Setting advanced connection properties.
l Oracle can also be used as a target database. For information on using Oracle as atarget, see Setting general connection properties (page 815).
l You can also use Oracle files as a source or target. For more information, see Using afile as a source (page 188).
To add an Oracle source endpoint to Qlik Replicate
1. In Tasks view, click Manage Endpoint Connections to open the Manage Endpoints Connectionsdialog box. Then click the New Endpoint Connection button.
2. In the Name field, type a name for your database. This can be any name that will help to identify thedatabase being used.
3. In the Description field, type a description that helps to identify the Oracle database. This isoptional.
4. Select Source as the database role.
5. Select Oracle as the database Type.
When this endpoint is used as a duplicated source in a Log Stream Staging setup,select the Read changes from log stream check box and then select the relevant LogStream Staging task from the drop-down list.For information on setting up and managing Log Stream Staging tasks, see Using theLog Stream (page 919).
6. Type the Oracle Connection String for the Oracle database you want to work with. You can type theconnect string in any Oracle format, for example://host:port/service name
Where:l host: This is the name or IP address for the computer with the Oracle database that you areusing. For example, johnboy_W7 or 255.255.255.0.
l port: (optional) This is the TNS Listener Port number for the computer with the Oracledatabase that you are using. If you do not enter a port number the default Oracle TNSListener port is used.
l service name: (optional) This is the service name for the computer with the Oracle databaseyou are using. If you do not enter a service name the default service name is used.
You can also enter an Oracle Net keyword-value pair. For example:"(DESCRIPTION=(ADDRESS=(PROTOCOL=tcp) (HOST=dlsun242) (PORT=5521))
(CONNECT_DATA=(SERVICE_NAME=bjava21)))"
Setup and User Guide - Qlik Replicate, November 2021 390

8 Adding and managing source endpoints
When working with a Multitenant environment, the connection string should specify aspecific PDB.
Specifying Separate Connection Strings for Different RAC InstancesIf the Oracle endpoint is configured to use Replicate Log Reader and the node to which Replicate isconnected cannot access the logs created by the other cluster nodes, you need to specify aseparate connection string for each RAC instance.When the redo logs are stored in ASM, the connection string syntax is as follows:[<common ASM connection string>,] <thread id> <thread ASM connection string>, <thread
id> <thread ASM connection string>...
If no <common ASM connection string> is specified, all the RAC instances should bedefined in the ASM connection.
When using Replicate Log Reader to access the redo logs, the connection string syntax is asfollows:<Oracle connection string>[, <thread id>, <thread BFILE connection string>, <thread id>,
<thread BFILE connection string> ...]
<Oracle connection string> is mandatory. If specified, the <thread BFILE connection string>will be used instead of the <Oracle connection string>.
7. Type the Oracle authentication information (User Name, Password) for the authorized user for thisOracle database. If you do not know this information, see your Oracle database Administrator(DBA).
This information is case sensitive.
Make sure that the Oracle user entered in the Oracle Authentication section has thecorrect access privileges. For information on how to provide the required privileges, seeRequired permissions (page 370).
To ensure that the password provided to Replicate is never used by any other principal, Replicatecan be configured to automatically replace the user-entered password with a strong randompassword. For more information, see Configuring Replicate to automatically replace the user-entered password (page 80).
Setting advanced connection propertiesYou can configure the Oracle endpoint to access the redo logs using either Oracle LogMiner or ReplicateLog Reader, Replicate's high-speed redo log reader.
The following sections describe how to do this:
l Setting advanced connection properties using Oracle LogMiner (page 392)l Setting advanced connection properties using Replicate Log Reader (page 394)
Setup and User Guide - Qlik Replicate, November 2021 391

8 Adding and managing source endpoints
For guidelines on choosing which redo logs access method to use, see Redo log files - accessmethod guidelines (page 377).
Setting advanced connection properties using Oracle LogMinerThis section describes which properties are available in the Advanced tab when using Oracle LogMiner toaccess the redo logs. For information on which properties are available in the Advanced tab when usingReplicate Log Reader to access the redo logs, see Setting advanced connection properties usingReplicate Log Reader (page 394).
l Automatically add supplemental logging: Select this (the default) to automatically set upsupplemental logging for the Oracle database.For more information on supplemental logging, see Setting up supplemental logging (page 385).
l Under the Access redo logs via label, choose Oracle LogMiner. Changes will be captured usingthe Oracle LogMiner utility.
l Secret Store encryption entries: When some of the columns in the tables that you intend toreplicate are encrypted you need to specify the Oracle Wallet encryption keys and their values.See also: Finding the wallet entry used for TDE column encryption in a specific table (page 393) andFinding the wallet entries used for TDE Encryption (page 399).
l Retry interval: Use the counter or type the number of seconds that the system waits beforeresending a query.
l Archived redo logs destination ID: The destination of the archived redo logs. The value should bethe same as the DEST_ID number in the V$archived_log table.When working with multiple log destinations (DEST_ID), you should specify an Archived redo logslocation identifier that represents archived logs that can be accessed by Replicate. If the Archivedredo logs location identifier is not specified, Replicate will use the ID specified in the Alternatearchived redo logs destination ID field. If no alternate ID is specified, then Replicate will use theminimal existing DEST_ID.
l Alternate archived redo logs destination ID: The archive destination in the event of a failure toread from the primary destination.
l Expose NUMBER as: Select one of the following:l A precision-scale combinationl FLOATl VARCHAR
Notesl If precision is 39 or greater, select VARCHARl By default, the NUMBER data type is converted to precision 38, scale 10l The "Expose NUMBER" definition in the Oracle database is used for the NUMBER data typeonly (without the explicit precision and scale definition)
l Use archived redo logs only: When this option is selected, Qlik Replicate will only access thearchived redo logs. If the archived redo logs ares stored on ASM only, the Qlik Replicate user needsto be granted the ASM privileges described in Required ASM privileges (page 373).
Setup and User Guide - Qlik Replicate, November 2021 392

8 Adding and managing source endpoints
l Support nested tables: Select this option if you need to replicate Oracle tables containing columnsthat are nested tables or defined types.For more information on this feature and its prerequisites, see Replicating Nested Tables (page378).
l Support invisible columns: Select this option to replicate invisible columns. This option issupported from Oracle 12c and Oracle Instant Client version 12.
Internal parametersInternal parameters are parameters that are not exposed in the UI. You should only use them if instructedby Qlik Support.
To add internal Qlik Replicate parameters:
1. Click the Internal Parameters link.The Internal Parameters dialog box opens.
2. In the edit box, type the name of the parameter you need to add and then click it.
3. The parameter is added to the table below the search box with its default value.
4. Change the default value as required.
5. To reset the parameter value to its default, click the "Restore default value" icon at the end of therow.
More optionsThese options are not exposed in the UI as they are only relevant to specific versions or environments.Consequently, do not set these options unless explicitly instructed to do so by Qlik Support or productdocumentation.
To set an option, simply copy the option into the Add feature name field and click Add. Then set the valueor enable the option according to the instructions you received.
Settings summaryYou can view a summary of your settings by clicking the Setting Summary link. This is useful if you need tosend a summary of your settings to Qlik Support.
Finding the wallet entry used for TDE column encryption in a specific tableThis section describes how to find the correct encryption key used for TDE column encryption in a specifictable.
To find the Oracle Wallet entry:
1.
On the Oracle database, run the following query to return the object_id (e.g. the. table ID)according to a given owner and table name:Select object_id from all_objects where owner='<table owner>' and object_name='<table
name>' and object_type='TABLE';
2.Use the retrieved object_id in the following query to return the relevant master key:select mkeyid from sys.enc$ where obj#=OBJECT_ID;
3.Select the key value from the Oracle Wallet as follows:mkstore –wrl <full_wallet_name> -viewEntry <entry_name>
Setup and User Guide - Qlik Replicate, November 2021 393

8 Adding and managing source endpoints
For more information, see Step 5 in Finding the wallet entries used for TDE Encryption(page 399).
4. Copy the master key entry and its value into the Names and Values fields respectively.
Setting advanced connection properties using Replicate Log ReaderThis section describes which properties are available in the Advanced tab when using Replicate LogReader to access the redo logs. For information on which properties are available in the Advanced tabwhen using LogMiner to access the redo logs, see Setting advanced connection properties using OracleLogMiner (page 392).
l Automatically add supplemental logging: Select this to automatically set up supplemental loggingfor the Oracle database. This option is also available when LogMiner is selected as the redo logsaccess method.For more information on supplemental logging, see Setting up supplemental logging (page 385).
l Under the Access redo logs via label, choose Replicate Log Reader (the default). Replicate willaccess the redo logs as a binary file.
l Secret Store encryption entries: When the source tables are encrypted or contain encryptedcolumns, you need to specify the Oracle Wallet encryption keys and their values.For information on locating the required keys, see Finding the wallet entries used for TDEEncryption (page 399).
l ASM Parameters (if redo logs are stored in ASM) - If the Oracle redo logs you are using are storedusing Automated Storage Management (ASM), enter the required access information in thedesignated fields.
To access the redo logs in ASM, you also need to grant the additional privilegesdescribed in Required ASM privileges (page 373)
l ASM Connection String: The connection string to the ASM instance if your Oracle databaseis using ASM.
l ASM user name: The user name for the ASM user.l ASM password: The password for the ASM user.l Number of concurrent ASM Read threads: The number of threads to use when reading theredo logs from ASM. Increasing this number may improve performance when there is a largevolume of changes.
l To access a redo log as a binary file (i.e. not using LogMiner), select one of the following options:l Use path as it appears in the database: Select this to access the redo logs using the pathas it appears in the database. Continue from Using the Path as it Appears in the Database.-OR-
l Replace path prefix: You can determine whether to read the redo logs from a different rootlocation while leaving the relative path unchanged. Continue from Replacing the Path with aPrefix.
Setup and User Guide - Qlik Replicate, November 2021 394

8 Adding and managing source endpoints
Using the path as it appears in the databasel Replicate has file-level access to the redo log files: Select this to access and read the redo logsdirectly from the file system of the local computer where Qlik Replicate is installed.
l Copy redo logs to a temporary folder: Select this to copy the redo logs to a temporary folder andthen specify the path of the redo logs on the Oracle machine.
When configuring multiple tasks that use the same temporary folder (configured in theOracle source endpoint), do not select the Delete processed archived redo log filesoption. This is because Replicate uses the original archived log names.
When working in a RAC environment, it is strongly recommended to set up a sharedfolder that is accessible by all the RAC instances. If this is not possible, you need todefine a temporary folder with the same name on each of the RAC instances. Inaddition, you need to define separate Oracle and ASM connection strings for each RACinstance.For more information on defining RAC connection strings, see Setting generalconnection properties (page 390).
l Replicate has file-level access to temporary folder: Select this to access the archived redologs directly from the file system of the local computer where Qlik Replicate is installed.
l Access archived redo logs in folder: To enable Qlik Replicate to access thetemporary folder (when it has file level access), you need to specify the path to theshared temporary folder on the Oracle machine, e.g. \\my.oracle.box\tempshare.
When a stopped task is resumed, Replicate will try to re-copy thecurrently processed Redo logs. If there are no Redo logs in the specifieddirectory, the task will wait for them to be copied there.
l Look for missing archived redo logs in folder: Type the full path to a location from where you wantQlik Replicate to read the archived redo logs if they are not found in the default location. The foldercan be located anywhere in the network where Qlik Replicate is located, but be sure that thelocation is accessible to the Qlik Replicate user.
When this option is configured, the name of each redo log in the folder must be identicalto the name returned by v$archived_log view for the current sequence, thread, anddestination ID.As the v$archived_log view returns redo log names only when the log status isACTIVE (meaning the log exists), Replicate will be unable to determine which redo logto access when the status is not ACTIVE.
l Replicate has file-level access to the specified folder: Select this to access and read the archivedredo logs directly from the file system of the local computer where Qlik Replicate is installed.
Setup and User Guide - Qlik Replicate, November 2021 395

8 Adding and managing source endpoints
l Delete processed archived redo log files: Select this to delete the copied archived redo log filesafter they have been read.
Archived redo logs will only be deleted if the Copy redo logs to temporary folder optionis enabled as well.
This option requires the following additional permissions for the Replicate user:
l GRANT SELECT ON DBA_FILE_GROUPSExample:GRANT SELECT ON DBA_FILE_GROUPS to nonpriv_user;
l GRANT EXECUTE on SYS.DBMS_FILE_GROUPExample:GRANT EXECUTE ON SYS.DBMS_FILE_GROUP to nonpriv_user;
l EXECUTE DBMS_FILE_GROUP.GRANT_SYSTEM_PRIVILEGE with the system privilege'MANAGE_FILE_GROUP' for the Replicate user.Example:execute DBMS_FILE_GROUP.GRANT_SYSTEM_PRIVILEGE (DBMS_FILE_GROUP.MANAGE_FILE_
GROUP, 'nonpriv_user', FALSE)
Verify that another file group is not using the configured temp directory under adifferent Oracle user.
l Retry interval: Use the counter or type the number of seconds that the system waits beforeresending a query.
l Archived redo logs destination ID: The destination of the archived redo logs. The value should bethe same as the DEST_ID number in the V$archived_log table.When working with multiple log destinations (DEST_ID), you should specify an Archived redo logslocation identifier that represents archived logs that can be accessed by Replicate. If the Archivedredo logs location identifier is not specified, Replicate will use the ID specified in the Alternatearchived redo logs destination ID field. If no alternate ID is specified, then Replicate will use theminimal existing DEST_ID.
l Alternate archived redo logs destination ID: The archive destination in the event of a failure toread from the primary destination.
l Expose NUMBER as: Select one of the following:l A precision-scale combinationl FLOATl VARCHAR
Notesl If precision is 39 or greater, select VARCHARl By default, the NUMBER data type is converted to precision 38, scale 10l The "Expose NUMBER" definition in the Oracle database is used for the NUMBER data typeonly (without the explicit precision and scale definition)
Setup and User Guide - Qlik Replicate, November 2021 396

8 Adding and managing source endpoints
l Use archived redo logs only: When this option is selected, Qlik Replicate will only access thearchived redo logs. If the archived redo logs ares stored on ASM only, the Qlik Replicate user needsto be granted the ASM privileges described in Required ASM privileges (page 373).
l Support nested tables: Select this option if you need to replicate Oracle tables containing columnsthat are nested tables or defined types.For more information on this feature and its prerequisites, see Replicating Nested Tables (page378).
l Support invisible columns: Select this option to replicate invisible columns. This option issupported from Oracle 12c and Oracle Instant Client version 12.
Replacing the path prefixl Replace path prefix: You can determine whether to read the redo logs from a different root locationwhile leaving the relative path unchanged.Type the first part of the path to the current location of the redo logs. For example, C:\OldFolder.You can include one folder or directory level or multiple folders or directories in this field.With: Type the name of the folder or prefix to replace the existing prefix that you added in the fieldabove. For example, C:\NewFolder.
The following examples illustrate how to change the prefix:If the redo logs are located in C:\OldFolder\archive\logs and you specify C:\OldFolder inthe Replace path prefix field, and C:\NewFolder in the With field, the redo logs will beread from:C:\NewFolder\archive\logsIf the redo logs are located in C:\temp\oracle\logs\archive\RedoLogs and you specifyC:\temp\oracle\logs in the Replace path prefix field, and C:\companyName in the Withfield, then the redo logs will be read from:C:\companyName\archive\RedoLogsIn this case, the new folder or directory called companyName replaces all of the firstthree level folders that you included in the Replace path prefix field.
l Apply prefix replacement to online and archived redo logs: Select this to apply the prefixreplacement to the online and archived redo logs.
l Replicate has file-level access to the new location: Select this to access and readthe online and archived redo log files directly from the file system of the localcomputer where Qlik Replicate is installed.
l Apply prefix replacement to archived redo logs only: Select this to apply the prefixreplacement to the archived redo logs only (and not to the online redo logs).
l Replicate has file-level access to the original online location: Select this to accessand read the original online redo log files directly from the file system of the localcomputer where Qlik Replicate is installed.
l Replicate has file-level access to the new archive location: Select this to accessand read the archived redo log files directly from the file system of the local computerwhere Qlik Replicate is installed.
l Delete processed archived redo log files: Select this to delete the copied archived redo logfiles after they have been read.
Setup and User Guide - Qlik Replicate, November 2021 397
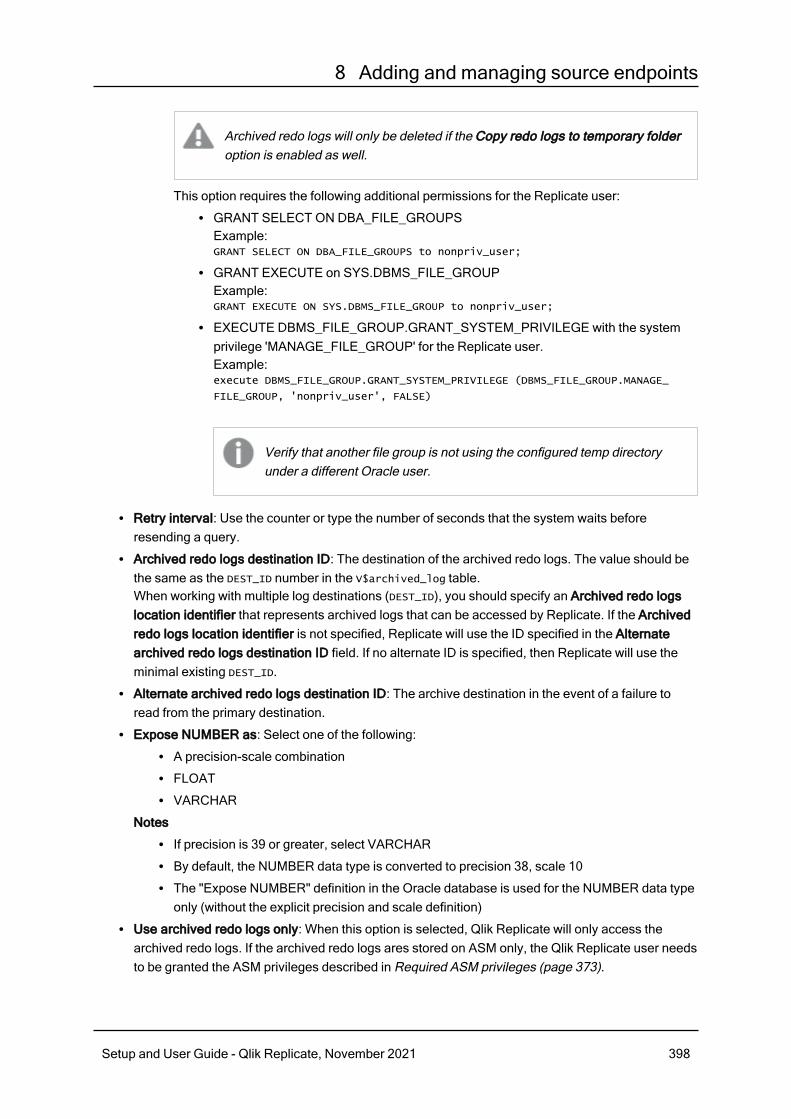
8 Adding and managing source endpoints
Archived redo logs will only be deleted if the Copy redo logs to temporary folderoption is enabled as well.
This option requires the following additional permissions for the Replicate user: l GRANT SELECT ON DBA_FILE_GROUPSExample:GRANT SELECT ON DBA_FILE_GROUPS to nonpriv_user;
l GRANT EXECUTE on SYS.DBMS_FILE_GROUPExample:GRANT EXECUTE ON SYS.DBMS_FILE_GROUP to nonpriv_user;
l EXECUTE DBMS_FILE_GROUP.GRANT_SYSTEM_PRIVILEGE with the systemprivilege 'MANAGE_FILE_GROUP' for the Replicate user.Example:execute DBMS_FILE_GROUP.GRANT_SYSTEM_PRIVILEGE (DBMS_FILE_GROUP.MANAGE_
FILE_GROUP, 'nonpriv_user', FALSE)
Verify that another file group is not using the configured temp directoryunder a different Oracle user.
l Retry interval: Use the counter or type the number of seconds that the system waits beforeresending a query.
l Archived redo logs destination ID: The destination of the archived redo logs. The value should bethe same as the DEST_ID number in the V$archived_log table.When working with multiple log destinations (DEST_ID), you should specify an Archived redo logslocation identifier that represents archived logs that can be accessed by Replicate. If the Archivedredo logs location identifier is not specified, Replicate will use the ID specified in the Alternatearchived redo logs destination ID field. If no alternate ID is specified, then Replicate will use theminimal existing DEST_ID.
l Alternate archived redo logs destination ID: The archive destination in the event of a failure toread from the primary destination.
l Expose NUMBER as: Select one of the following:l A precision-scale combinationl FLOATl VARCHAR
Notesl If precision is 39 or greater, select VARCHARl By default, the NUMBER data type is converted to precision 38, scale 10l The "Expose NUMBER" definition in the Oracle database is used for the NUMBER data typeonly (without the explicit precision and scale definition)
l Use archived redo logs only: When this option is selected, Qlik Replicate will only access thearchived redo logs. If the archived redo logs ares stored on ASM only, the Qlik Replicate user needsto be granted the ASM privileges described in Required ASM privileges (page 373).
Setup and User Guide - Qlik Replicate, November 2021 398

8 Adding and managing source endpoints
l Support nested tables: Select this option if you need to replicate Oracle tables containing columnsthat are nested tables or defined types.For more information on this feature and its prerequisites, see Replicating Nested Tables (page378).
l Support invisible columns: Select this option to replicate invisible columns. This option issupported from Oracle 12c and Oracle Instant Client version 12.
Internal parametersInternal parameters are parameters that are not exposed in the UI. You should only use them if instructedby Qlik Support.
To add internal Qlik Replicate parameters:
1. Click the Internal Parameters link.The Internal Parameters dialog box opens.
2. In the edit box, type the name of the parameter you need to add and then click it.
3. The parameter is added to the table below the search box with its default value.
4. Change the default value as required.
5. To reset the parameter value to its default, click the "Restore default value" icon at the end of therow.
More optionsThese options are not exposed in the UI as they are only relevant to specific versions or environments.Consequently, do not set these options unless explicitly instructed to do so by Qlik Support or productdocumentation.
To set an option, simply copy the option into the Add feature name field and click Add. Then set the valueor enable the option according to the instructions you received.
Settings summaryYou can view a summary of your settings by clicking the Setting Summary link. This is useful if you need tosend a summary of your settings to Qlik Support.
Finding the wallet entries used for TDE EncryptionIn order to specify the correct encryption key(s) used for TDE tablespace encryption or TDE columnencryption, you first need to find the relevant entry (or entries in the case of multiple keys) in the OracleWallet containing the encryption key(s). After you find the relevant entry or entries, copy the entry and itsvalue (or entries and values if more than one) into the Names and Values fields respectively.
Setup and User Guide - Qlik Replicate, November 2021 399
8 Adding and managing source endpoints
To enter multiple values, first copy each entry into a text editor such as Notepad making sure toseparate the values with a comma. Then, copy the string containing the values and commasfrom the text editor and paste it into the Values field. There is no need to do this for entries. Youcan paste the entries directly into the Entries field, remembering to separate each entry with acomma.
To find the Oracle Wallet entries:
1. If the ENCRYPTION_WALLET_LOCATION parameter is defined in the sqlnet.ora file, use thewallet from the directory defined by this parameter.
2. If the WALLET_LOCATION parameter is defined in the sqlnet.ora file, use the wallet from thedirectory defined by this parameter.
3. In other cases, use the wallet in the default database location.
The name of the wallet should be ewallet.p12
4. Use the “list” option in the Oracle mkstore utility to determine theORACLE.SECURITY.DB/TS.ENCRYPTION.<SUFFIX> entry name(s), as follows:mkstore –wrl <full wallet name> -list
5. If you know which entry/entries is/are used to encrypt the Redo logs, select the entry name(s) anduse the “viewEntry” option in the Oracle mkstore utility to determine the entry value, as follows:mkstore –wrl <full wallet name> -viewEntry <entry name>
If you do not know which entry is used to encrypt the Redo logs, you can select multipleDB or TS entries and determine their values as described above (and then copy andpaste the entry names and values into the Names and Values fields as described in theFinding the wallet entries used for TDE Encryption (page 399)). If the specified entriesare not correct, the task will fail and the error message will contain the correct entryname.
If the DBA changes the entry while the task is running, the task will fail and the errormessage will contain the new entry name. Add the new entry (name and value) to thealready specified entries and then resume the task.
Setup and User Guide - Qlik Replicate, November 2021 400

8 Adding and managing source endpoints
8.23 Using PostgreSQL as a sourceThis section describes how to set up and use a PostgreSQL database as a source in a replication task.
In this section:
l Source prerequisites (page 402)l Required permissions (page 403)l Using an account without the "superuser" role (page 403)l Limitations and considerations (page 404)l PostgreSQL source data types (page 405)l Homogeneous replication (page 409)l Setting general connection properties (page 411)l Setting advanced connection properties (page 412)l Capturing changes from Microsoft Azure for PostgreSQL (page 414)l Removing Replicate artifacts from the database (page 414)
Setup and User Guide - Qlik Replicate, November 2021 401

8 Adding and managing source endpoints
Source prerequisitesThe following section lists the client and server prerequisites for working with Qlik Replicate and aPostgreSQL database source.
Client sidel Qlik Replicate Server for Windows:PostgreSQL ODBC Driver psqlodbc_12_02_0000-x64 only must be installed on the Qlik Replicatemachine.
Make sure that the psql.exe path (e.g. "C:\Program Files\PostgreSQL\1202\bin") isadded to the system PATH.
l Qlik Replicate Server for Linux: On the Qlik Replicate machine:
1. Install postgresql12. For example, postgresql12-12.1-2PGDG.rhel7.x86_64.rpm is thepackage required for Red Hat 7.
2. Install the ODBC driver postgresql12.For example, postgresql12-odbc-12.01.0000-1PGDG.rhel7.x86_64.rpm is the client requiredfor Red Hat 7.
3. Copy the driver location to the site_arep_login.sh file:echo "export LD_LIBRARY_PATH=/usr/lib:/usr/lib64:/usr/pgsql-12/lib:$LD_LIBRARY_
PATH" >> site_arep_login.sh
This will add the driver to "LD_LIBRARY_PATH" and update the driver location in the site_arep_login.sh file.
4. Makes sure that the /etc/odbcinst.ini file contains an entry for PostgreSQL, as in thefollowing example:[PostgreSQL]
Description = PostgreSQL ODBC driver
Driver = /usr/pgsql-12/lib/psqlodbc.so
Setup = /usr/pgsql-12/lib/psqlodbcw.so
Debug = 0
CommLog = 1
UsageCount = 2
Server sidel The IP address of the Qlik Replicate machine must be added to the pg_hba.conf configuration filewith the "replication" keyword in the database field.Example:host replication all 176.123.1.212/32 trust
l Make sure that the test_decoding output plugin (found in the postgresql12-contrib package) isinstalled.
l For each Change Capture task, Replicate creates a slot in order to read the changes from thePostgreSQL database. To enable this process, the Replicate user (defined in the endpoint settings)must be granted read-write permissions to the source database.
l The following parameters and values must be set in the postgresql.conf configuration file.wal_level = logical
max_replication_slots = number of replication slots
Setup and User Guide - Qlik Replicate, November 2021 402

8 Adding and managing source endpoints
Where number of replication slotsmust be greater than one and should be set according to thenumber of tasks that you want to run. For example, to run five tasks you need to set max_replication_slots = 5. Slots open automatically as soon as a task starts and remain open, evenwhen task is no longer running. Note that open slots need to be manually deleted.max_wal_senders = number of concurrent tasks
Where number of concurrent tasksmust be greater than one and should be set according to thenumber of tasks that you are running concurrently. For example, to run three tasks concurrently youneed to set max_wal_senders = 3.
l The wal_sender_timeout parameter terminates replication connections that are inactive longer thanthe specified number of milliseconds. The default timeout is 60 seconds. To disable the timeoutmechanism (optional), set this parameter to zero.
By default, the value of the wal_sender_timeout parameter is interpreted by the serveras milliseconds. To explicitly specify seconds, append an "s" to the value as in thefollowing example:wal_sender_timeout=60s
For more information on the configuration parameters, visit:
https://www.postgresql.org/docs/12/runtime-config-replication.html
Required permissionsThe user specified in the General tab when Setting general connection properties (page 411) must begranted the following permissions in the PostgreSQL database:
l For Full Load replication: Standard SELECT on the source databasel For Apply Changes replication: Superuser.See also Using an account without the "superuser" role (page 403).
Using an account without the "superuser" roleIf you are not using an account with the "superuser" role, you need to create several objects to captureData Definition Language (DDL) events. Create these objects in the selected account and then create atrigger in the master user account.
To do this:
1. Choose a schema where you want the objects to be created. The default schema is public. Ensurethat the schema exists and is accessible by the NoPriv account.
2. Create the table attrep_ddl_audit by running the following command:create table <objects_schema>.attrep_ddl_audit
(
c_key bigserial primary key,
c_time timestamp, -- Informational
c_user varchar(64), -- Informational: current_user
c_txn varchar(16), -- Informational: current transaction
c_tag varchar(24), -- Either 'CREATE TABLE' or 'ALTER TABLE' or 'DROP TABLE'
c_oid integer, -- For future use - TG_OBJECTID
Setup and User Guide - Qlik Replicate, November 2021 403

8 Adding and managing source endpoints
c_name varchar(64), -- For future use - TG_OBJECTNAME
c_schema varchar(64), -- For future use - TG_SCHEMANAME. For now, holds the current_
schema
c_ddlqry text -- The DDL query associated with the current DDL event)
3. Create the function attrep_intercept_ddl by running the following command:CREATE OR REPLACE FUNCTION <objects_schema>.attrep_intercept_ddl()
RETURNS event_trigger
LANGUAGE plpgsql
AS $$
declare _qry text;
BEGIN
if (tg_tag='CREATE TABLE' or tg_tag='ALTER TABLE' or tg_tag='DROP TABLE') then
SELECT current_query() into _qry;
insert into <objects_schema>.attrep_ddl_audit
values
(
default,current_timestamp,current_user,cast(TXID_CURRENT()as varchar(16)),tg_
tag,0,'',current_schema,_qry
);
delete from <objects_schema>.attrep_ddl_audit;
end if;
END;
$$;
4. If you are logged in with a NoPriv account, log out of the NoPriv account and log in with an accountthat has the superuser role assigned to it.
If the attrep_intercept_ddl stored procedure is not being created in the default schema,you need to specify the schema name in the Create DDL artifacts under schema field.
For more information on the replication configuration parameters, see the PostgreSQL Help.
5. Create the event trigger attrep_intercept_ddl by running the following command:CREATE EVENT TRIGGER attrep_intercept_ddl ON ddl_command_end
EXECUTE PROCEDURE <objects_schema>.attrep_intercept_ddl();
Limitations and considerationsThe following limitations apply when using PostgreSQL as a source:
l The database name cannot include a semi-colon (;).l Capturing changes while the database is in Hot Standby mode is not supported.l To replicate changes from a slave database, read/write privileges must be configured on thedatabase.
l Both the source table and the corresponding target table must have an identical Primary Key. In theevent that one of the tables does not have a Primary Key, the result of DELETE and UPDATErecord operations will be unpredictable.
l The “Start Process Changes from Timestamp” run option is not supported.l Replication of the Before Image is not supported.
Setup and User Guide - Qlik Replicate, November 2021 404

8 Adding and managing source endpoints
l Replication of multiple tables with the same name but a different case (e.g. table1, TABLE1 andTable1) may cause unpredictable behavior and is therefore not supported.
l Change processing of [CREATE | ALTER | DROP] table DDLs are supported unless they are held inan inner function/procedure body block or in other nested constructs.For example, the following change will not be captured:CREATE OR REPLACE FUNCTION attu.create_distributors1() RETURNS void
LANGUAGE plpgsql
AS $$
BEGIN
create table attu.distributors1(did serial PRIMARY KEY,name varchar(40) NOT NULL);
END;
$$;
l Change processing of TRUNCATE operations is not supported.l Deferred Constraints are not supported.l Partitioned tables
l When performing a Full Load replication of partitioned tables, the parent table will be createdand separate child tables will be created for each partition.
l Changes are performed on the child tables, not on the parent table. Therefore, whenselecting tables for replication (manually or using a pattern), it is important to include thechild tables as well.
l A DML on the parent partitioned table will be applied on the physical partition of thecorresponding target table only.
l Primary keys are not supported on partitioned tables, which might impact UPDATEoperations.
See also: Replication of Partitioned Tables (page 410) for partitioned table requirements that applyto homogeneous replication (PostgreSQL-to-PostgreSQL).
l When using the Parallel Load (page 946) feature, table segmentation according to partitions or sub-partitions is not supported.
l When using filters that do not contain a Primary Key, DELETE operations will not be captured.l The default configuration of Replica identity is supported only.For more information about Replica identity, see https://www.postgresql.org/docs/10/logical-replication-publication.html
l Due to the write permission requirement (see Server side (page 402) prerequisites), thePostgreSQL read replica (in a High Availability environment) is not supported.
l A DDL operation that occurs during Full Load, but that was not preceded by a DML operation will notbe captured.
PostgreSQL source data typesThe following table shows the PostgreSQL target data types that are supported when using Qlik Replicateand the default mapping to the Qlik Replicate data types.
When replicating from one PostgreSQL database to another, source and target data types are identical forall supported PostgreSQL versions, except for the data types listed in Data type considerations andexceptions (page 410)
For additional information about Qlik Replicate data types, see Replicate data types (page 76).
Setup and User Guide - Qlik Replicate, November 2021 405

8 Adding and managing source endpoints
PostgreSQL Data TypesQlik Replicate DataTypes
INTEGER INT4
SMALLINT INT2
BIGINT INT8
NUMERIC NUMERIC(28,6)
NUMERIC(p,s) If precision is =< 38,then:
NUMERIC(p,s)
If precision is => 39,then:
STRING
DECIMAL NUMERIC(28,6)
DECIMAL(p,s) If precision is =< 38,then:
NUMERIC(p,s)
If precision is => 39,then:
STRING
REAL REAL4
DOUBLE REAL8
SMALLSERIAL INT2
SERIAL INT4
BIGSERIAL INT8
Data types
Setup and User Guide - Qlik Replicate, November 2021 406

8 Adding and managing source endpoints
PostgreSQL Data TypesQlik Replicate DataTypes
MONEY NUMERIC(38,4)
TheMONEYdata type ismapped toFLOAT inMicrosoftSQLServer.
CHAR WSTRING (1)
CHAR(n) WSTRING (n)
VARCHAR(n)
VARCHAR without a length (n) is not recognized as a valid datatype by target endpoints. Consequently, if a source column datatype is set to VARCHAR without an explicit length, Replicate willset a default length of 8000 bytes.
You can change the default by setting the following internalparameter to the required length:
unboundedVarcharMaxSize
See also Internal Parameters.
WSTRING (n)
TEXT NCLOB
BYTEA BLOB
TIMESTAMP DATETIME
TIMESTAMP (z) DATETIME
DATE
Replicate only supports ISO formatted textual DATE formats (thedefault). If other formats are used, an error will be generated. Youcan change the date format in the postgresql.conf file or using thePGDATESTYLE environment variable. You can also change the dateformat at database level.
DATE
Setup and User Guide - Qlik Replicate, November 2021 407

8 Adding and managing source endpoints
PostgreSQL Data TypesQlik Replicate DataTypes
TIME TIME
TIME (z) TIME
INTERVAL STRING (128) - 1YEAR, 2 MONTHS, 3DAYS, 4 HOURS, 5MINUTES, 6SECONDS
BOOLEAN STRING (5)TRUE|FALSE
ENUM STRING (64)
CIDR STRING (50)
INET STRING (50)
MACADDR STRING (18)
BIT (n) STRING (n)
BIT VARYING (n) STRING (n)
UUID STRING
TSVECTOR CLOB
TSQUERY CLOB
XML CLOB
POINT STRING (255) "(x,y)"
LINE STRING (255) "(x,y,z)"
LSEG STRING (255) "((x1,y1),(x2,y2))"
BOX STRING (255) "((x1,y1),(x2,y2))"
PATH CLOB "((x1,y1),(xn,yn))"
POLYGON CLOB "((x1,y1),(xn,yn))"
CIRCLE STRING (255) "(x,y),r"
Setup and User Guide - Qlik Replicate, November 2021 408

8 Adding and managing source endpoints
PostgreSQL Data TypesQlik Replicate DataTypes
JSON
Reading and writing JSON data is performed using wide string(where each character occupies 2 bytes). Therefore, whenreplicating JSON columns to a PostgreSQL target, set the limitedlob size to twice the maximum JSON length. So, for example, ifthe JSON data is 4 KB, set the limited lob size value to 8 KB.
NCLOB
JSONB
Reading and writing JSONB data is performed using wide string(where each character occupies 2 bytes). Therefore, whenreplicating JSONB columns to a PostgreSQL target, set thelimited lob size to twice the maximum JSONB length. So, forexample, if the JSONB data is 4 KB, set the limited lob size valueto 8 KB.
NCLOB
ARRAY NCLOB
COMPOSITE NCLOB
INT4RANGE STRING (255)
INT8RANGE STRING (255)
NUMRANGE STRING (255)
STRRANGE STRING (255)
CHARACTER VARYING If length is specified:
WSTRING (LENGTH)
If no length isspecified:
WSTRING (8000)
TINTERVAL WSTRING(255)
Homogeneous replicationWhen replicating from a PostrgreSQL source to a PostrgreSQL target, most of the source and target datatypes will be identical. The exceptions are listed in the table below.
Additionally, in homogeneous replication, source column and table collations will be replicated to the targetas described in Column and table collation (page 410).
Setup and User Guide - Qlik Replicate, November 2021 409

8 Adding and managing source endpoints
In homogeneous replication, the source data first passes through the Qlik Replicate data typeand is therefore subject to any limitations of that type.
For information on Replicate data types and their limitations (where relevant), see Replicatedata types (page 76).
For information on which Replicate data types the source data passes through when replicatingfrom PostgreSQL, see the PostgreSQL to Qlik Replicate data types mapping table describedearlier.
Replication of Partitioned TablesIn order to replicate partitioned tables from a PostgreSQL source to a PostgreSQL target, you need to dothe following:
1. Manually create the parent and child tables in the target database.
2. Define a separate task to replicate to those tables.
3. Set the Truncate before loading option in the Full Load Settings (page 1017).
Data type considerations and exceptionsWhen replicating from one PostgreSQL database to another, source and target data types are identical forall supported PostgreSQL versions, with the following exceptions:
PostgreSQLSource
PostgreSQL Target
ENUM STRING
COMPOSITE STRING
NUMERIC NUMERIC (28,6)
NUMERIC (p,s)
A numeric arraywith precisionand scale.
NUMERIC
A numeric array without precision and scale.
TINTERVALAs PostgreSQL have discontinued support for the TINTERVAL datatype, tables with this data type will not be created on the target if thetarget database version does not support it.
Data type exceptions
See also the note about JSON data type replication in PostgreSQL source data types (page 405).
Column and table collationWhen replicating from one PostgreSQL database to another, column and table collations will be replicatedto the target.
Setup and User Guide - Qlik Replicate, November 2021 410

8 Adding and managing source endpoints
To support collation replication, the DBA must ensure that the collations defined for the sourcePostgreSQL database are the same as those defined for the target PostgreSQL database.
Non-nullable columns and primary/unique index namesNon-nullable columns and Primary/Unique Index names are preserved during homogeneous replication.
Setting general connection propertiesThis section describes how to configure general connection properties. For an explanation of how toconfigure advanced connection properties, see Setting advanced connection properties.
To add a PostgreSQL endpoint source database to Qlik Replicate:
1. In the Qlik Replicate console, click Manage Endpoint Connections to open the Manage EndpointConnections dialog box. For more information on adding an endpoint to Qlik Replicate, seeDefining and managing endpoints (page 110).
2. In the Name field, type a name for your PostgreSQL database. This can be any name that will helpto identify the database being used.
3. In the Description field, type a description that helps to identify the PostgreSQL database. This isoptional.
4. Select Source as the database role.
5. Select PostgreSQL as the database Type.
When this endpoint is used as a duplicated source in a Log Stream Staging setup,select the Read changes from log stream check box and then select the relevant LogStream Staging task from the drop-down list.For information on setting up and managing Log Stream Staging tasks, see Using theLog Stream (page 919).
6. Type the Server name. This is the name or IP address of the computer with the PostgreSQLdatabase that you want to access.
7. Optionally, change the default port (5432).
8. Enter the PostgreSQL database authentication information (User name, Password) of anauthorized PostgreSQL user.
Setup and User Guide - Qlik Replicate, November 2021 411

8 Adding and managing source endpoints
Consider the following:l This information is case sensitive.l To determine if you are connected to the database you want to use or if theconnection information you entered is correct, click Test Connection.If the connection is successful a message in green is displayed. If the connectionfails, an error message is displayed at the bottom of the dialog box.To view the log entry if the connection fails, click View Log. The server log isdisplayed with the information for the connection failure. Note that this button isnot available unless the test connection fails.
9. Type the Database name or browse for a source database.
SSL authentication optionsIn the Security section, you can configure Replicate to connect to the PostgreSQL database using SSL.
l SSL Mode: Select one of the following:l Prefer - Establishes an encrypted connection if the server supports encrypted connections,falling back to an unencrypted connection if an encrypted connection cannot be established.
l Disable - Connect with a surname and password only.l Allow - Establish an encrypted connection if requested by the server.l Require - Establishes an encrypted connection if the server supports encrypted connections.The connection attempt fails if an encrypted connection cannot be established.
l Verify CA - Similar to Required, but also verifies the server Certificate Authority (CA)certificate against the configured CA certificates. The connection attempt fails if no validmatching CA certificates are found.
l Verify Full - Similar to Verify CA, but also performs host name identity verification bychecking the host name the client (i.e. Replicate) uses for connecting to the server againstthe identity in the certificate that the server sends to the client. The client checks whether thehost name that it uses for connecting matches the Common Name value in the servercertificate. The connection fails if there is a mismatch.
l Client certificate path:- The path to the client certificate requested by the server.l Secret key path - The path to the client private key file in PEM format.l CA path - The path to the Certificate Authority (CA) that issued the client certificate file in PEMformat.
l CRL path - The path to the CRL certificate. This file contains certificates revoked by certificateauthorities. If the server certificate appears in this list, the connection will fail.
l SSL compression -Select this option to compress the data before it is encrypted.
Setting advanced connection propertiesIn the Advanced tab, you can set the following properties:
Setup and User Guide - Qlik Replicate, November 2021 412

8 Adding and managing source endpoints
l Capture DDLs: When this option is selected, the following actions occur:l Operational artifacts are created (by Replicate) in the database when the task starts. In orderto capture DDL events, Qlik Replicate creates various artifacts in the PostgreSQL databasewhen the task starts. You can later remove these artifacts as described in RemovingReplicate artifacts from the database (page 414).
l Streamed DDL events are captured.l Create DDL artifacts in schema: The schema in which the operational DDL database artifacts willbe created. The default value is "Public".
l WAL heartbeat - An Apply Changes task that is running but not capturing changes (due to sourcetable inactivity) will continue to occupy the LSN position in its replication slot, thereby preventingtruncation of the WAL. Since the WAL is a server-wide resource used by all PostgreSQL processes,it may grow extremely large if no changes are captured for an extended period.To prevent this from happening, enable the "WAL heartbeat" option. When this option is enabled,the PostgreSQL source endpoint mimics task activity by periodically committing pseudotransactions (i.e. "Heartbeats") to the heartbeat table, thereby advancing the task slot’s LSNposition.
l Create WAL heartbeat table in schema: The schema in which the WAL heartbeat table(attrep_wal_heartbeat) will be created. The default value is "public".
l Heartbeat frequency (minutes): The frequency with which to commit transactions to theheartbeat table.
Internal parametersInternal parameters are parameters that are not exposed in the UI. You should only use them if instructedby Qlik Support.
To add internal Qlik Replicate parameters:
1. Click the Internal Parameters link.The Internal Parameters dialog box opens.
2. In the edit box, type the name of the parameter you need to add and then click it.
3. The parameter is added to the table below the search box with its default value.
4. Change the default value as required.
5. To reset the parameter value to its default, click the "Restore default value" icon at the end of therow.
More optionsThese options are not exposed in the UI as they are only relevant to specific versions or environments.Consequently, do not set these options unless explicitly instructed to do so by Qlik Support or productdocumentation.
To set an option, simply copy the option into the Add feature name field and click Add. Then set the valueor enable the option according to the instructions you received.
Setup and User Guide - Qlik Replicate, November 2021 413

8 Adding and managing source endpoints
Settings summaryYou can view a summary of your settings by clicking the Setting Summary link. This is useful if you need tosend a summary of your settings to Qlik Support.
Capturing changes from Microsoft Azure for PostgreSQLTo be able to capture changes from Microsoft Azure for PostgreSQL, you need to set the "replication"property to "logical", as described in the steps below.
1. Open the Azure CLI and run the following command:
You can download the CLI or connect via a shell command on Azure portal.
Syntax:
az postgres server configuration set --resource-group resource-group --server-name
server-name --name azure.replication_support --value logical
Example:
az postgres server configuration set --resource-group azuredb --server-name qlik-azure-
pg --name azure.replication_support --value logical
2. Restart the database (using the command line or via the portal).
Removing Replicate artifacts from the databaseIn order to capture DDLs, Qlik Replicate creates various artifacts in the PostgreSQL database when thetask starts. When the task completes, you may wish to remove these artifacts.
To remove the artifacts, execute the following statements (in the order they appear below), where public isthe default schema in which the artifacts were created:
The event trigger does not belong to a specific schema.
drop event trigger attrep_intercept_ddl;
drop function public.attrep_intercept_ddl()
drop table public.attrep_ddl_audit
Setup and User Guide - Qlik Replicate, November 2021 414
8 Adding and managing source endpoints
8.24 Using Salesforce as a sourceThis section describes how to set up and use the Salesforce source endpoint in a replication task.
In this section:
l Prerequisites (page 416)l Calculating the Salesforce quota (page 416)l Limitations and considerations (page 417)l Supported data types (page 419)l Setting general connection properties (page 420)l Setting advanced connection properties (page 421)
Setup and User Guide - Qlik Replicate, November 2021 415

8 Adding and managing source endpoints
PrerequisitesThe following section describes the prerequisites for replicating from a Salesforce database.
l The Salesforce endpoint supports replication of standard objects enabled for replication andenterprise custom objects.To enable replication of custom objects, the following permissions should be set on the object'sdetail page:
l Allow Sharingl Allow Bulk API Access - Only required when using the Bulk API for Full Loadl Allow streaming API Access - Only required for capturing changes
l For Apply Changes tasks:The Replicate user must be granted the following permissions on the Salesforce database:
l View All Datal View all Users
As Replicate interfaces with the Salesforce API, each object that you wish to capture must be addedto the selected entities in the Change Data Capture API page.
Calculating the Salesforce quotaThe Salesforce endpoint leverages Salesforce APIs to provide Full Load and Change Processingreplication functionality. When using the Salesforce endpoint, it's important to be aware of the API quotalimits in order to plan your replication tasks accordingly.
Replicate utilizes the following Salesforce APIs:
l SOAP API requests - Used for Full Load and Apply Changes replication tasks. This API will beused for Full Load when the Soap API option is selected in the Advanced tab.
l Bulk API - Used or Full Load replication only. This API will be used for Full Load when the Bulk APIoption is selected in the Advanced tab (the default). In some cases, such as lookup and replicationof metadata, the Soap API will be used even when Bulk API is selected.
l Streaming API - Used for Apply Changes replication tasks
Both Bulk API and Streaming API consumption can be monitored using Salesforce REST API requests.The output of these requests is a JSON file containing current quota consumption values. The relevantvalues from a Replicate perspective are as follows:
l DailyBulkApiRequests - The current Bulk API quota.l DurableStreamingApiConcurrentClients - The current Streaming API allowed clients.l MonthlyPlatformEvents - The number of captured Change Operations sent by Salesforce. Tocalculate the Change Operations quota per day, divide this value by 30.
For information about these quotas and their limits, and for information on monitoring Bulk API andStreaming API consumption, refer to the Salesforce Developer Help.
Setup and User Guide - Qlik Replicate, November 2021 416
8 Adding and managing source endpoints
Quota consumption by Replicate:
Full Load only tasksFull Load only tasks consume ~20 SOAP API requests per table (for meta-data and test connections). Theactual number of requests consumed is proportionate to the number of tables being replicated: the greaterthe number of tables, the lesser the number of requests required per table.
When Bulk API is used for Full Load:
If the endpoint's PK chunking option is enabled, from the perspective of SOAP API request consumption,each chunk is the equivalent of a table.
Additionally, the endpoint consumes a single Bulk API request per table and a single Bulk API request perPK chunk (when enabled).
For each table:
(~20 * [number of chunks] SOAP API units) + (1+ [number of chunks] Bulk API
units)
When SOAP API is used for Full Load:
For every 200 rows unloaded, one quota unit is consumed. For example, a table with 1000 rows willconsume five quota units.
For each table:
(~20 * SOAP API units) + (1 + [Rows of table]/200 SOAP API units)
Apply Changes only tasksApply Changes only tasks consume 10 SOAP API requests per table. For Streaming API requests, ApplyChanges only tasks consume a single quota unit per applied change. Changes that require column lookup(when there is a big textarea value) consume a single SOAP API request per change.
For Apply Changes of a single table:
(10 SOAP API units) + ([number of changes] Streaming API units) + [number of
rows require lookup] soap API units
When working with Apply Changes and/or Store Changes tasks, the Salesforce endpointsubscribes to a single Streaming API channel which logs change information for all tables.From a quota perspective, to prevent the Streaming API channel from being read multipletimes (thereby increasing quota consumption), best practice is to set up a single task.
Limitations and considerationsThe following limitations apply when using Salesforce as a source in a Replicate task:
Setup and User Guide - Qlik Replicate, November 2021 417

8 Adding and managing source endpoints
l The following object types are not supported:l External objectsl Big objectsl Non-replicable objects (i.e. tables not created by the customer such as Salesforce systemtables)
l Replicate performs CDC using the Salesforce CDC API and is therefore subjects to its limitations.For example:
l Salesforce CDC does not support all of the Salesforce standard objects. However, objectsthat are not supported using Salesforce CDC can still be replicated in a Full Load task.For a list of supported Salesforce CDC objects, visit:https://developer.salesforce.com/docs/atlas.en-us.change_data_capture.meta/change_data_capture/cdc_object_support.htm
l UPDATEs performed by the Salesforce Bulk API will not generate a Salesforce notificationand will therefore not be captured.
l The resume processing from "Source change position" Run option is uses the Salesforceretention time.
l As the Salesforce database does not generate a FULL after-image, the following limitationapplies:When UPDATEs are applied in Batch optimized apply mode, neither the INSERT themissing target record error handling option for missing records nor the Apply Changes usingSQL MERGE option are supported. If either of these options is selected, NULL will beinserted in the target columns for all unchanged user-defined data.
l DDLs are not supported.l The "Estimated Count" in the Full Load monitoring statistics will be N/A.l Only the user + password + security token authentication method is supportedl Shield Platform Encryption is not supported.l The source_lookup Data Enrichment function is not supported. For more information on thisfunction, see Data Enrichment functions (page 1003)
l The "Start from timestamp" Run option is not supported.l The AR_H_USER header column is not supported. For information on using header columns, seeHeaders (page 991).
l Using the Filter option may impact processing time as Replicate first retrieves all of the data andthen performs the filtering.
l Capturing DELETE and UPDATE operations is not supported when using filters.l Transformations that affect multiple columns are not supported.l When storing changes in Change Tables, the before-image will not be stored. Only the changedcolumns of the after-image will be stored. All other columns will have NULL values.
l Formula fields are not supported and will not be shown as part of the table's metadata.l Capture of Gap Events and Overflow Events is not supported. On encountering such events,Replicate will suspend the affected tables and require them to be reloaded. For more information onthese event types, see the Salesforce online help.
Setup and User Guide - Qlik Replicate, November 2021 418

8 Adding and managing source endpoints
l During Full Load, tables that need to be queried using filters are not supported and will besuspended. The "Vote" object, for example, is not supported as it requires the data to be filteredusing Parent or ID clauses.
l Replication of IsDeleted and LastViewedDate columns is not supported.
Supported data typesThe following table shows the Salesforce database target data types that are supported when using QlikReplicate and the default mapping to Qlik Replicate data types.
For information on the target data types, see the section for the target endpoint you are using. Foradditional information about Qlik Replicate data types, see Replicate data types (page 76).
Salesforce database Data Types Qlik Replicate Data Types
string WSTRING
boolean BOOLEAN
int INT4
double REAL8
date DATE
The DATE will be represented in UTC format on thetarget.
time TIME
The TIME will be represented in UTC format on thetarget.
datetime DATETIME
The DATETIME will be represented in UTC format onthe target.
ID WSTRING
reference WSTRING
currency REAL8
Data types
Setup and User Guide - Qlik Replicate, November 2021 419

8 Adding and managing source endpoints
Salesforce database Data Types Qlik Replicate Data Types
textarea If length is <= 1000
WSTRING
If length is > 1000
CLOB
percent REAL8
phone WSTRING
url WSTRING
email WSTRING
combobox WSTRING
picklist WSTRING
multipicklist WSTRING
Unsupported data typesThe following data types are not supported:
l ANYTYPEl BASE64
Compound columns (e.g. Address) will not be replicated in their original form. Only theirunderlying columns (such as country, city, etc.) will be replicated (as separate columns).
Setting general connection propertiesThis section describes how to configure general connection properties. For an explanation of how toconfigure advanced connection properties, see Setting advanced connection properties.
To add a Salesforce source endpoint to Qlik Replicate:
1. In Tasks view, click Manage Endpoint Connections to open the Manage Endpoints Connectionsdialog box. Then click the New Endpoint Connection button. For more information on adding anendpoint to Qlik Replicate, see Defining and managing endpoints (page 110).
2. In the Name field, type a name for your database. This can be any name that will help to identify thedatabase being used.
3. In the Description field, type a description that helps to identify the Salesforce database. This isoptional.
4. Select Source as the database role.
5. From the Type drop-down list, select Salesforce.
6. From the Connection Type drop-down list, choose one of the following:
Setup and User Guide - Qlik Replicate, November 2021 420

8 Adding and managing source endpoints
l Production to connect to a Salesforce production account using the default URL.l Sandbox to connect to a Salesforce sandbox account using the default URL.l Custom to connect to a Salesforce account at a custom URL.
7. Provide the following connection settings:l URL:If the selected Connection Type is Production, the URL will be https://login.salesforce.comIf the selected Connection Type is Sandbox, the URL will be https://test.salesforce.comIf the selected Connection Type is Custom, specify the URL of your Salesforce database.
l Username: The username for accessing the Salesforce database.l Password: The password associated with the above username.l Security Token: If you are in possession of a Salesforce Security Token, you can enter ithere.
8. To verify that your connection settings are correct, click Test Connection.
9. Click Save to save your settings.
Setting advanced connection propertiesIn the Advanced tab, you can enable PK chunking and set internal parameters and review your settings.
l Use labels for column name - Select this option if you wish to use Salesforce field labels as columnnames.
l If you clear this option while the task is stopped, you will need to select theDROP and CREATE table option in the task settings’ Full Load Settings tab,and then reload the task.
l Tables containing multiple instances of the same label are not supported.
l Replicate encrypted columns - Select this option to include encrypted columns in the replicationtask.
l To replicate encrypted columns, the user specified in the General tab must havethe Salesforce "View Encrypted Data" permission.
l Encrypted columns will not be encrypted on the target.l Replicating encrypted columns will not impact performance
l Perform Full Load using - Choose whether to use Bulk API or SOAP API for Full Load replication.While Bulk API (the default) is much faster, it is subject to more restrictive quotas and may alsosometimes be unavailable due to heavy load.See also: Calculating the Salesforce quota (page 416)
l Enable PK chunking (Available for Bulk API Full Load only) - Select to enable Primary Keychunking of supported tables during Full Load. PK chunking can be used to split bulk queries onvery large tables into chunks based on the record IDs, or primary keys of the queried records.
Setup and User Guide - Qlik Replicate, November 2021 421

8 Adding and managing source endpoints
When this option is enabled, all selected tables will be replicated regardless of whetheror not they support PK chunking. Unsupported tables will simply be replicated withoutbeing split into chunks.
As each chunk is processed as a separate batch that counts toward the user's daily batch limit, thisoption should not be enabled for standard-sized tables. In fact, Salesforce recommends that PKchunking should only be enabled when querying tables with more than 10 million records or when abulk query consistently times out. Therefore, instead of enabling this option for all tables, it isrecommended to set up two different tasks with two different Salesforce endpoints - one (withEnable PK chunking turned on) for replication of tables containing 10 million records or more, andthe other (with Enable PK chunking turned off) for any other tables that you need to replicate.For more information on the PK chunking feature as well as a list of supported objects, see theSalesforce online help.
l Chunk size - Specify the number of records within the ID boundaries for each chunk. Thedefault is 200,000, and the maximum size is 250,000.
Internal parametersInternal parameters are parameters that are not exposed in the UI. You should only use them if instructedby Qlik Support.
To add internal Qlik Replicate parameters:
1. Click the Internal Parameters link.The Internal Parameters dialog box opens.
2. In the edit box, type the name of the parameter you need to add and then click it.
3. The parameter is added to the table below the search box with its default value.
4. Change the default value as required.
5. To reset the parameter value to its default, click the "Restore default value" icon at the end of therow.
More optionsThese options are not exposed in the UI as they are only relevant to specific versions or environments.Consequently, do not set these options unless explicitly instructed to do so by Qlik Support or productdocumentation.
To set an option, simply copy the option into the Add feature name field and click Add. Then set the valueor enable the option according to the instructions you received.
Settings summaryYou can view a summary of your settings by clicking the Setting Summary link. This is useful if you need tosend a summary of your settings to Qlik Support.
Setup and User Guide - Qlik Replicate, November 2021 422
8 Adding and managing source endpoints
8.25 Using SAP Application as a sourceThis section describes how to define a SAP Application as a source endpoint in a replication task.
In this section:
l Prerequisites (page 424)l Limitations (page 431)l SAP Application source data types (page 431)l Setting general connection properties (page 433)l Setting advanced properties (page 434)
Setup and User Guide - Qlik Replicate, November 2021 423

8 Adding and managing source endpoints
PrerequisitesThe following section describes the prerequisites for working with the Qlik Replicate SAP Applicationendpoint.
l Supported SAP packages (page 436)l Set up a source endpoint for your SAP application (page 424)l Install the SAP NetWeaver RFC Client (page 424)l Install the Qlik Replicate for SAP Client on the SAP machine (page 437)l Managing business groups and tables (page 429)l Target collation (page 431)
Supported SAP packagesl Primarily SAP ERP / ECC 6.0 + all EhP levelsl All modules are supported.
When replicating from the HR module, only transparent tables are supported.
l Also supports CRM, SRM, GTS and MDG SAP Applications
See also Set up a source endpoint for your SAP Application (DB) (page 436).
Set up a source endpoint for your SAP applicationBefore you can configure the Qlik Replicate SAP endpoint, you first need to configure one of the followingsource endpoints, according to your SAP Package type:
l Microsoft SQL ServerSee: Using Microsoft SQL Server as a source (page 301).
l OracleSee: Using Oracle as a source (page 369).
l IBM DB2 for LUWSee: Using IBM DB2 for LUW as a source (page 243).
l SAP HANA
Change capture is supported using Trigger-based CDC only
See also: Using SAP HANA as a source (page 465).
Install the SAP NetWeaver RFC ClientThis topic describes how to copy the required SAP NetWeaver RFC Client files to Qlik Replicate.
Replicate supports NetWeaver RFC SDK 7.20 and 7.50, which can be downloaded from theSAP Service Marketplace.
Setup and User Guide - Qlik Replicate, November 2021 424

8 Adding and managing source endpoints
l Windows: Extract the contents of the NWRFC_xxx.SAR file and then copy the .dll files from thenwrfcsdk/lib directory to the Replicate bin directory.
l Linux: Extract the contents of the NWRFC_xxx.SAR file and then copy the .so files from thenwrfcsdk/lib directory to the Replicate lib directory.
Install the Qlik Replicate for SAP Client on the SAP machineThis section describes how to install the transports that make up the Qlik Replicate for SAP Client.
There are seven transports in total, which are provided in the following ZIP files:
l DeleteCode.zip - Required for uninstalling the Qlik Replicate for SAP Client.l DeletePackage.zip - Required for uninstalling the Qlik Replicate for SAP Client.l DeleteCodeCommon.zip - Required for uninstalling the Qlik Replicate for SAP Client.l DeletePackageCommon.zip - Required for uninstalling the Qlik Replicate for SAP Client.l InstallCode.zip (e.g. K902086.ESD) - The main transport.l InstallCodeECC.zip (e.g. K901271.ESD) - A transport with additional logic for ECC SAP systems .l InstallConfig.zip (e.g. K900012.R4S) - The configuration transport.
The installation procedure
l The transports must be installed in the order they appear below. Installing the transportsin the incorrect order or omitting/skipping any of the transports will result in unexpectedissues with replication tasks.
l When installing the Qlik Replicate for SAP client, do not chose the "overwrite" option ifGold Client is already installed on the Replicate Server machine. Otherwise, the GoldClient software will stop working.
To install the transports on ECC systems:
1. Install the main transport file (InstallCode.zip).
2. Install the ECC-specific transport (InstallCodeECC.zip).
3. Install the configuration transport (InstallConfig.zip).
To install the transports on non-ECC systems (e.g. CRM):
1. Install the main transport file (InstallCode.zip).
2. Install the configuration transport (InstallConfig.zip).
If you are applying a patch or upgrading the Qlik Replicate for SAP Client, you should onlyinstall the main transport and the ECC-specific transport (if upgrading on an ECC system). Donot install the configuration transport again, or any customizations made to the configurationwill be lost.
Setup and User Guide - Qlik Replicate, November 2021 425

8 Adding and managing source endpoints
Permissions required for installing Qlik Replicate for SAP ClientReplicate for SAP delivers its own authorization object: ZR4SAP. In addition to this authorization object,there are additional authorizations that need to be enabled for the Qlik Replicate software.
SAP users for Replicate
A dialog user in SAP is required to access the Qlik Replicate for SAP Client GUI in SAP. In addition, acommunication user is required to support the RFC calls from the Qlik Replicate software to the SAPsystem.
Identify existing users in SAP or create dedicated users for the Qlik Replicate software.
Authorizations for Replicate
Both the dialog and communication users will need to be assigned to a role with authorization object S_TCODE and value ZR4SAP.
Authorization Object S_TCODE with value ZR4SAP:
The communication user will also require the following authorization objects: S_RFC and S_OC_SEND.
Authorization Object S_RFC:
Authorization Object S_OC_SEND:
Importing the Qlik Replicate transports into the SAP systemThere are two types of files required to import the ABAP objects into the SAP system: the data-file and theco-file.
Setup and User Guide - Qlik Replicate, November 2021 426

8 Adding and managing source endpoints
Importing the data-file
The data-file begins with an "R"
The data-file should be placed in the /usr/sap/trans/data file system or in the directory of the server wherethe transports are stored.
l Typically this is a shared directory, but if not, individually place the file into that directory location forall SAP host servers.
l This file must be accessible by all systems where the Qlik Replicate for SAP Client is to be installed.l Set the permissions on the file to All for the user, Read and Execute for the group, and Read and
Execute for others.l The owner of the file should be the <sid>adm user of the system to be installed. The group ownershipshould be sapsys.
Importing the co-file
The co-file begins with a "K"
The co-file should be placed in the /usr/sap/trans/cofiles file system or in the directory of the server wherethe transports are stored.
l Typically this is a shared directory, but if not, individually place the file into that directory location forall SAP host servers.
l This file must be accessible by all systems where the Qlik Replicate for SAP Client is to be installed.l Set the permissions on the file to All for the user, Read and Execute for the group, and Read and
Execute for others.l The owner of the file should be the <sid>adm user of the system to be installed. The group ownershipshould be sapsys.
Once the files are in the correct location, import the transport into the system using either the OperatingSystem level transport tools (TP), or the Transport Management System (TMS) internally within SAP.
Importing the transports via TP1. Log on to the system at the Operating System level as the <sid> adm.
2. Change the directory to /usr/sap/trans
3. Add the transport to the R/3 buffer with the following command:# tp ‘addtobuffer SID’
4. Import the transport to the target R/3 system with the following command:# tp ‘import SID client=000 U16’
The expected result of the addtobuffer step is a successful return code of `0’.
If problems occur during the addtobuffer step, it is likely there is a problem with the files. They may bemissing, in the wrong location, or have incorrect ownership or permissions.
The expected result of the import step is a successful return code of either `0’ or `4’. A return code of `8’,`12’ or `16’ indicates transport failure. Return codes higher than `16’ indicate a major failure within thetransport tool. If this occurs, check the present working directory to ensure the correct location. Also, checkthe files for existence, location, and proper ownership and access.
Setup and User Guide - Qlik Replicate, November 2021 427

8 Adding and managing source endpoints
If problems exist during the import, retry the import step. If problems persist, check the import andactivation logs for failure reason. These files are in the /usr/sap/trans/log location and named.R6U (the `?’stands in as a wildcard).
Importing the transports via TMSBeginning in R/3 version 4.0, SAP allows importing transports through the SAP system via transactioncode STMS.
Security authorization in the SAP system must include proper access to import the transportrequest.
1. Sign-on to SAP system with a User ID that contains proper authority.
2. Execute transaction STMS.
3. Select the Transport (Truck) icon from the toolbar.
4. Select the desired system for import.
5. Add the Transport to the import queue by selecting the following path from the menu list:Extras > Other Requests > AddAdd the transport request number to the proper import queue and execute. Re-authentication of theuser.s SAP User ID is likely in order to complete the step.If an Information message is received that the "Transport request is invalid" check that the transportnumber was typed correctly. Otherwise, it may indicate a problem with the files. Verification ofexistence, location, permissions, or ownership may be needed.
6. Import the Transport request by selecting the transport number from the queue, and clicking theImport (Truck) icon from the toolbar. Set the target client to either `000’ or any other valid clientwithin the system and execute with the truck icon. Once again, re-authentication of the SAP User IDmay be necessary. The transport will execute in asynchronous mode; a record of success or failurecan be found in the transport logs.
7. The system will return to the import queue screen, where the Transport results can be checked.Select the Logs icon from the toolbar, or follow the menu path:Request > Display > LogsLocate the source system and verify all relevant logs. For this transport there should be 5 logs:
l DD Importl DD Activationl Importl Check Versionsl ABAP/scrn. Generation
All logs should display Ended OK (return code 0) or Ended with warning (return code 4). If any logsare missing, or display a return code of 8 or higher, follow the instructions in step 6 to re-import thetransport.
Upgrading/patching and uninstalling the Qlik Replicate SAP ClientThe following instructions explain how to upgrade/patch, and uninstall the Qlik Replicate SAP Client.
Setup and User Guide - Qlik Replicate, November 2021 428

8 Adding and managing source endpoints
If you are applying a patch or upgrading the Qlik Replicate for SAP Client, you should onlyinstall the main transport and the ECC-specific transport (if upgrading on an ECC system). Donot install the configuration transport again, or any customizations made to the configurationwill be lost.
To upgrade or patch the Qlik Replicate SAP Client on ECC Systems
1. Apply the new main transport (InstallCode.zip).
2. Apply the new ECC-specific transport (InstallCodeECC.zip).
To upgrade or patch the Qlik Replicate SAP Client on non-ECC systems
l Apply the new main transport (InstallCode.zip).
To uninstall the Qlik Replicate SAP Client
1. Apply the "Delete Main" transport (DeleteCode.zip).
2. Apply the "Delete Package" transport (DeletePackage.zip).
Do not apply items 3 and 4 if you are also running Qlik Gold Client Solution.
3. Apply the “Delete Common” transport (DeleteCodeCommon.zip)
4. Apply the “Delete Common Package” transport (DeletePackageCommon.zip)
Managing business groups and tablesThis prerequisite is only necessary if you want to edit the default Business Groups and/or tables beforereplicating them to the target endpoint.
Before you can manage business groups and tables, you first need to launch the SAP Client UI.
To launch the SAP Client UI:
1. Open your SAP client console.
2. Double-click one of the SAP Application Sources.You will be prompted for your user name and password.
3. Enter your credentials for logging in to the selected SAP Application Source.
4. Enter /nzr4sap in the drop-down list at the top of the console and then press [Enter].
5. Click the Business Groups Configuration button.A list of Business Groups is displayed in the left pane.
Managing business groupsTo add a new Business Group:
1. Click the Create toolbar button.The Create Business Group dialog box opens.
Setup and User Guide - Qlik Replicate, November 2021 429

8 Adding and managing source endpoints
2. Enter a name for your Business Group and then press [Enter].The new Business Group is added to the Business Groups list in the left pane.
To duplicate a Business Group
1. Click the Copy toolbar button.The Business Group Configuration dialog box opens.
2. In the New Bus Object field, enter a name for the new Business Group and then press [Enter].The duplicated Business Group is added to the Business Groups list in the left pane.
To delete a Business Group
l Select the Business Group you want to delete and then click the Delete toolbar button.The Business Group is deleted.
Managing tablesTo add a new table to a Business Group:
1. In the left pane, expand the desired Business Group.
2. Double-click the Tables icon.A list of tables is shown in the right pane.
3. Click the button above the table list to enter Edit mode.
4. Click the button that appears to the right of the button.
An empty row is added to the tables list.
5. Enter the Table Name (i.e. the virtual ABAP table) and the name of the corresponding SourceTable (i.e. the physical table).
6. To save your changes click the Save button in the main toolbar.
To remove a table from a Business Group:
1. In the left pane, expand the desired Business Group.
2. Double-click the Tables icon.A list of tables is shown in the right pane.
3. Click the button above the table list to enter Edit mode.
4. Select the table you want to delete.
5. Click the button that appears to the right of the button.
The table is deleted.
6. To save your changes click the Save button in the main toolbar.
Accessing tables with a non-English languageTo enable replication of non-English SAP tables, add them to the configuration as follows:
1. From the zr4sap transaction, click the Metadata Language Configuration button.
2. Click the Add button and select the appropriate language.
Setup and User Guide - Qlik Replicate, November 2021 430

8 Adding and managing source endpoints
3. Click Save.
To remove a previously configured language, select the desired row and click the Delete button.
Target collationAs SAP is case-sensitive, when a Replicate task is defined with a SAP Application source, the targetendpoints need to be set up with case-sensitive collation.
LimitationsWhen using SAP Application as a source endpoint in a Replicate task, the following limitations apply:
l A task with a SAP Application source and a File Channel target may replicate some tables twice -the requested table and the underlying table. To prevent this from happening, exclude theunderlying table from the list of tables to be replicated.
l When a task is defined with a SAP Application source, the Applied Changes Details monitoringmetrics in the Change Processing tab may be incorrect for clustered and pooled tables.
l During Full Load of clustered and pooled tables, the Estimated Count value in Monitor view may beincorrect. Additionally, as the Progress Bar is based on the Estimated Count value, it may notrepresent an accurate portrayal of the actual task progress.
l Replication of views is not supported.l Changes are applied to cluster tables is in transactional mode only. If you need the Batch OptimizedApply functionality, consider using the SAP Application (DB) endpoint instead.
l Unlimited LOB mode is not supported.l The source_lookup Data Enrichment function is not supported. For more information on thisfunction, see Data Enrichment functions (page 1003)
l When replicating from the HR module, only transparent tables are supported.
SAP Application source data typesThe SAP Application endpoint for Qlik Replicate supports most SAP data types. The table below shows theSAP source data types that are supported when using Qlik Replicate and the default mapping to the QlikReplicate data types.
For information on how the data type is mapped to the target, see the chapter for the target endpoint youare using.
For additional information about Qlik Replicate data types, see Replicate data types (page 76).
ABAB TYPE ABAB Type Description SAP TypeQlik Replicate DataType
h Table type - BYTES
V Character string (old Dictionary typeVARC)
- STRING
Data types
Setup and User Guide - Qlik Replicate, November 2021 431

8 Adding and managing source endpoints
ABAB TYPE ABAB Type Description SAP TypeQlik Replicate DataType
C Character string - STRING
N Character string with only digits - STRING
D Date (string: YYYYMMDD) - DATE
T Time (string: HHMMSS) - TIME
X Byte sequence INT4 (4-byteinteger)
I4
INT2 (2-byteinteger)
I2 - -
INT1 (1-byteinteger)
I1 - -
ELSE If backend type is NUMERIC:
NUMERIC
If length = 0:
BLOB
If length > 0:
BYTES
- -
I Integer number (4-byte integer withsign)
- INT4
b 2-byte integer - INT2
s 1-byte integer - INT1
P Packed number - NUMERIC
F Floating point number to accuracy of8 bytes
- R8
g Character string with variable length - STRING
y Byte sequence with variable length - BLOB
BYTES
u Structured type, flat - BYTES
v Structured type, deep - BYTES
r Reference to class/interface - BYTES
i Reference to data object - BYTES
n Numeric text NUMC STRING
Setup and User Guide - Qlik Replicate, November 2021 432

8 Adding and managing source endpoints
Setting general connection propertiesThis section describes how to set up connection parameters for a specific SAP Application server or for anSAP system using load balancing.
To connect to a specific SAP Application server1. In the Qlik Replicate console, click the Manage Endpoint Connections toolbar button to open the
Manage Endpoints Connections dialog box. Then click the New Endpoint Connection button.
2. In the Name field, enter a display name for your endpoint.
3. Optionally, in the Description field, enter a description for the SAP Application endpoint.
4. Select Source as the database role.
5. Select SAP Application as the database Type.
When this endpoint is used as a duplicated source in a Log Stream Staging setup,select the Read changes from log stream check box and then select the relevant LogStream Staging task from the drop-down list.For information on setting up and managing Log Stream Staging tasks, see Using theLog Stream (page 919).
6. From the Connection type drop-down list, select Type A.
7. In the Server name field, enter the IP address of the Application Server on which the SAPApplication source is located.
8. In the Instance number field, enter the instance number of the SAP Application source you want toreplicate.
9. In the Client field, enter the client number of the SAP Application source you want to replicate.
10. Enter your credentials (User Name, Password) for accessing the SAP Application source.These are the credentials for the communication user created earlier in SAP.
11. In the Backend endpoint field, click the Browse button and then select the name of the QlikReplicate endpoint you configured earlier. See also Set up a source endpoint for your SAPapplication (page 424).
To connect to an SAP system using load balancing1. In the Qlik Replicate console, click the Manage Endpoint Connections toolbar button to open the
Manage EndpointsConnections dialog box.
2. In the Name field, enter a display name for your endpoint.
3. Optionally, in the Description field, enter a description for the SAP Application endpoint.
4. Select Source as the database role.
5. Select SAP Application as the database Type.
6. From the Connection type drop-down list, select Type B.
7. In the Message server field, enter the host name or IP address of the message server host.
8. In the Application servers group name field, enter the name of the SAP server group. This is anoptional group of application servers in a load balancing connection.
9. In the SAP system name field, enter the SAP R/3 name.
Setup and User Guide - Qlik Replicate, November 2021 433

8 Adding and managing source endpoints
10. In the Message server service field, enter the name of the SAP message server service asspecified in the following file:<system drive>:\WINDOWS\system32\drivers\etc\services
If you do not specify a value, the Data Provider for SAP uses the following default name:sapms<R/3 system name>
11. In the Client field, enter the System ID of the SAP Application source you want to replicate.
12. Enter your credentials (User Name, Password) for accessing the SAP Application source.Note: These are the credentials for the communication user created earlier in SAP.
13. In the Backend endpoint field, click the Browse button and then select the name of the QlikReplicate endpoint you configured earlier. See also Set up a source endpoint for your SAPapplication (page 424).
Setting advanced propertiesIn the Advanced tab, you can set the following parameters:
l RFC call batch: The number of concurrent RFC calls made from Replicate back to the SAP system.If you encounter performance issues, increasing this number may help, but may also adverselyaffect monitoring updates.
Internal parametersInternal parameters are parameters that are not exposed in the UI. You should only use them if instructedby Qlik Support.
To add internal Qlik Replicate parameters:
1. Click the Internal Parameters link.The Internal Parameters dialog box opens.
2. In the edit box, type the name of the parameter you need to add and then click it.
3. The parameter is added to the table below the search box with its default value.
4. Change the default value as required.
5. To reset the parameter value to its default, click the "Restore default value" icon at the end of therow.
More optionsThese options are not exposed in the UI as they are only relevant to specific versions or environments.Consequently, do not set these options unless explicitly instructed to do so by Qlik Support or productdocumentation.
To set an option, simply copy the option into the Add feature name field and click Add. Then set the valueor enable the option according to the instructions you received.
Settings summaryYou can view a summary of your settings by clicking the Setting Summary link. This is useful if you need tosend a summary of your settings to Qlik Support.
Setup and User Guide - Qlik Replicate, November 2021 434

8 Adding and managing source endpoints
8.26 Using SAP Application (DB) as a sourceThis section describes how to define SAP Application (DB) as a source endpoint in a replication task.
You can use the SAP Application (DB) endpoint to replicate from a SAP Application with one of thesupported backend endpoints.
In this section:
l Prerequisites (page 436)l Limitations (page 443)l SAP Application (DB) source data types (page 444)l Setting general connection properties (page 445)l Setting advanced properties (page 446)
Setup and User Guide - Qlik Replicate, November 2021 435

8 Adding and managing source endpoints
PrerequisitesThe following section describes the prerequisites for working with the Qlik Replicate SAP Application (DB)endpoint.
l Set up a source endpoint for your SAP Application (DB) (page 436)l Managing business groups and tables (page 442)l Target collation (page 443)
Supported SAP packagesl Primarily SAP ERP / ECC 6.0 + all EhP levelsl All modules are supported.
When replicating from the HR module, only transparent tables are supported.
l Also supports CRM, SRM, GTS and MDG SAP Applications
See also Set up a source endpoint for your SAP Application (DB) (page 436).
Set up a source endpoint for your SAP Application (DB)
Before you can configure the Qlik Replicate SAP Application (DB) endpoint, you first need to configure oneof the following backend source endpoints, according to your SAP Package type:
Replicating from an STXL table is not supported. If you need to replicate from an STXL table,use the SAP Extractor endpoint instead.
l Oracle
When using Oracle as the backend database, any tables you want to capture must bedefined with ALL COLUMN SUPPLEMENTAL LOGGING.
See also: Using Oracle as a source (page 369).l Microsoft SQL Server
When using Microsoft SQL Server as the backend database, transparent table fieldsdefined as STRING or BINARY STRING are not supported.
See also: Using Microsoft SQL Server as a source (page 301).l IBM DB2 for LUWSee also: Using IBM DB2 for LUW as a source (page 243).
l IBM DB2 for z/OSSee also: Using IBM DB2 for z/OS as a source (page 251).
l SAP HANA
Setup and User Guide - Qlik Replicate, November 2021 436
8 Adding and managing source endpoints
When using SAP HANA as the backend database, change capture is supported usingLog-based CDC only, and with the following limitations:
l Replicate creates a hana__row_id column on the target as a Unique Index andchanges the original Primary Key/Unique Index to a standard column.
l Table DDLs are not supported and will be ignoredl Replication of transparent tables only is supportedl The Apply Conflicts error-handling policy for No record found for applyingDELETE and No record found for applying an UPDATE must be st to Ignorerecord.
See also: Using SAP HANA as a source (page 465).
For information about general limitations when using the SAP Application (DB) endpoint, see Limitations(page 443).
Backend Source Endpoint Permissions
The user specified in the underlying source endpoint settings must have SELECT permission on thefollowing objects:
l DD02Ll DD03Ll DD02Tl DD03Tl T000l /HTG/GC_HEADl /HTG/GC_TABLES1l /HTG/GC4R_BUSGRPl /HTG/GC4R_TABLES
Install the Qlik Replicate for SAP Client on the SAP machineThis section describes how to install the transports that make up the Qlik Replicate for SAP Client.
There are seven transports in total, which are provided in the following ZIP files:
l DeleteCode.zip - Required for uninstalling the Qlik Replicate for SAP Client.l DeletePackage.zip - Required for uninstalling the Qlik Replicate for SAP Client.l DeleteCodeCommon.zip - Required for uninstalling the Qlik Replicate for SAP Client.l DeletePackageCommon.zip - Required for uninstalling the Qlik Replicate for SAP Client.l InstallCode.zip (e.g. K902086.ESD) - The main transport.l InstallCodeECC.zip (e.g. K901271.ESD) - A transport with additional logic for ECC SAP systems .l InstallConfig.zip (e.g. K900012.R4S) - The configuration transport.
Setup and User Guide - Qlik Replicate, November 2021 437

8 Adding and managing source endpoints
The installation procedure
l The transports must be installed in the order they appear below. Installing the transportsin the incorrect order or omitting/skipping any of the transports will result in unexpectedissues with replication tasks.
l When installing the Qlik Replicate for SAP client, do not chose the "overwrite" option ifGold Client is already installed on the Replicate Server machine. Otherwise, the GoldClient software will stop working.
To install the transports on ECC systems:
1. Install the main transport file (InstallCode.zip).
2. Install the ECC-specific transport (InstallCodeECC.zip).
3. Install the configuration transport (InstallConfig.zip).
To install the transports on non-ECC systems (e.g. CRM):
1. Install the main transport file (InstallCode.zip).
2. Install the configuration transport (InstallConfig.zip).
If you are applying a patch or upgrading the Qlik Replicate for SAP Client, you should onlyinstall the main transport and the ECC-specific transport (if upgrading on an ECC system). Donot install the configuration transport again, or any customizations made to the configurationwill be lost.
Permissions required for installing Qlik Replicate for SAP ClientReplicate for SAP delivers its own authorization object: ZR4SAP. In addition to this authorization object,there are additional authorizations that need to be enabled for the Qlik Replicate software.
SAP users for Replicate
A dialog user in SAP is required to access the Qlik Replicate for SAP Client GUI in SAP. In addition, acommunication user is required to support the RFC calls from the Qlik Replicate software to the SAPsystem.
Identify existing users in SAP or create dedicated users for the Qlik Replicate software.
Authorizations for Replicate
Both the dialog and communication users will need to be assigned to a role with authorization object S_TCODE and value ZR4SAP.
Authorization Object S_TCODE with value ZR4SAP:
Setup and User Guide - Qlik Replicate, November 2021 438

8 Adding and managing source endpoints
The communication user will also require the following authorization objects: S_RFC and S_OC_SEND.
Authorization Object S_RFC:
Authorization Object S_OC_SEND:
Importing the Qlik Replicate transports into the SAP systemThere are two types of files required to import the ABAP objects into the SAP system: the data-file and theco-file.
Importing the data-file
The data-file begins with an "R"
The data-file should be placed in the /usr/sap/trans/data file system or in the directory of the server wherethe transports are stored.
l Typically this is a shared directory, but if not, individually place the file into that directory location forall SAP host servers.
l This file must be accessible by all systems where the Qlik Replicate for SAP Client is to be installed.l Set the permissions on the file to All for the user, Read and Execute for the group, and Read and
Execute for others.l The owner of the file should be the <sid>adm user of the system to be installed. The group ownershipshould be sapsys.
Importing the co-file
The co-file begins with a "K"
Setup and User Guide - Qlik Replicate, November 2021 439

8 Adding and managing source endpoints
The co-file should be placed in the /usr/sap/trans/cofiles file system or in the directory of the server wherethe transports are stored.
l Typically this is a shared directory, but if not, individually place the file into that directory location forall SAP host servers.
l This file must be accessible by all systems where the Qlik Replicate for SAP Client is to be installed.l Set the permissions on the file to All for the user, Read and Execute for the group, and Read and
Execute for others.l The owner of the file should be the <sid>adm user of the system to be installed. The group ownershipshould be sapsys.
Once the files are in the correct location, import the transport into the system using either the OperatingSystem level transport tools (TP), or the Transport Management System (TMS) internally within SAP.
Importing the transports via TP1. Log on to the system at the Operating System level as the <sid> adm.
2. Change the directory to /usr/sap/trans
3. Add the transport to the R/3 buffer with the following command:# tp ‘addtobuffer SID’
4. Import the transport to the target R/3 system with the following command:# tp ‘import SID client=000 U16’
The expected result of the addtobuffer step is a successful return code of `0’.
If problems occur during the addtobuffer step, it is likely there is a problem with the files. They may bemissing, in the wrong location, or have incorrect ownership or permissions.
The expected result of the import step is a successful return code of either `0’ or `4’. A return code of `8’,`12’ or `16’ indicates transport failure. Return codes higher than `16’ indicate a major failure within thetransport tool. If this occurs, check the present working directory to ensure the correct location. Also, checkthe files for existence, location, and proper ownership and access.
If problems exist during the import, retry the import step. If problems persist, check the import andactivation logs for failure reason. These files are in the /usr/sap/trans/log location and named.R6U (the `?’stands in as a wildcard).
Importing the transports via TMSBeginning in R/3 version 4.0, SAP allows importing transports through the SAP system via transactioncode STMS.
Security authorization in the SAP system must include proper access to import the transportrequest.
1. Sign-on to SAP system with a User ID that contains proper authority.
2. Execute transaction STMS.
3. Select the Transport (Truck) icon from the toolbar.
Setup and User Guide - Qlik Replicate, November 2021 440

8 Adding and managing source endpoints
4. Select the desired system for import.
5. Add the Transport to the import queue by selecting the following path from the menu list:Extras > Other Requests > AddAdd the transport request number to the proper import queue and execute. Re-authentication of theuser.s SAP User ID is likely in order to complete the step.If an Information message is received that the "Transport request is invalid" check that the transportnumber was typed correctly. Otherwise, it may indicate a problem with the files. Verification ofexistence, location, permissions, or ownership may be needed.
6. Import the Transport request by selecting the transport number from the queue, and clicking theImport (Truck) icon from the toolbar. Set the target client to either `000’ or any other valid clientwithin the system and execute with the truck icon. Once again, re-authentication of the SAP User IDmay be necessary. The transport will execute in asynchronous mode; a record of success or failurecan be found in the transport logs.
7. The system will return to the import queue screen, where the Transport results can be checked.Select the Logs icon from the toolbar, or follow the menu path:Request > Display > LogsLocate the source system and verify all relevant logs. For this transport there should be 5 logs:
l DD Importl DD Activationl Importl Check Versionsl ABAP/scrn. Generation
All logs should display Ended OK (return code 0) or Ended with warning (return code 4). If any logsare missing, or display a return code of 8 or higher, follow the instructions in step 6 to re-import thetransport.
Upgrading/patching and uninstalling the Qlik Replicate SAP ClientThe following instructions explain how to upgrade/patch, and uninstall the Qlik Replicate SAP Client.
If you are applying a patch or upgrading the Qlik Replicate for SAP Client, you should onlyinstall the main transport and the ECC-specific transport (if upgrading on an ECC system). Donot install the configuration transport again, or any customizations made to the configurationwill be lost.
To upgrade or patch the Qlik Replicate SAP Client on ECC Systems
1. Apply the new main transport (InstallCode.zip).
2. Apply the new ECC-specific transport (InstallCodeECC.zip).
To upgrade or patch the Qlik Replicate SAP Client on non-ECC systems
l Apply the new main transport (InstallCode.zip).
To uninstall the Qlik Replicate SAP Client
Setup and User Guide - Qlik Replicate, November 2021 441

8 Adding and managing source endpoints
1. Apply the "Delete Main" transport (DeleteCode.zip).
2. Apply the "Delete Package" transport (DeletePackage.zip).
Do not apply items 3 and 4 if you are also running Qlik Gold Client Solution.
3. Apply the “Delete Common” transport (DeleteCodeCommon.zip)
4. Apply the “Delete Common Package” transport (DeletePackageCommon.zip)
Managing business groups and tablesThis prerequisite is only necessary if you want to edit the default Business Groups and/or tables beforereplicating them to the target endpoint.
Before you can manage business groups and tables, you first need to launch the SAP Client UI.
To launch the SAP Client UI:
1. Open your SAP client console.
2. Double-click one of the SAP Application (DB) Sources.You will be prompted for your user name and password.
3. Enter your credentials for logging in to the selected SAP Application (DB) Source.
4. Enter /nzr4sap in the drop-down list at the top of the console and then press [Enter].
5. Click the Business Groups Configuration button.A list of Business Groups is displayed in the left pane.
Managing business groupsTo add a new Business Group
1. Click the Create toolbar button.The Create Business Group dialog box opens.
2. Enter a name for your Business Group and then press [Enter].The new Business Group is added to the Business Groups list in the left pane.
To duplicate a Business Group
1. Click the Copy toolbar button.The Business Group Configuration dialog box opens.
2. In the New Bus Object field, enter a name for the new Business Group and then press [Enter].The duplicated Business Group is added to the Business Groups list in the left pane.
To delete a Business Group
l Select the Business Group you want to delete and then click the Delete toolbar button.The Business Group is deleted.
Managing tablesTo add a new table to a Business Group
Setup and User Guide - Qlik Replicate, November 2021 442

8 Adding and managing source endpoints
1. In the left pane, expand the desired Business Group.
2. Double-click the Tables icon.A list of tables is shown in the right pane.
3. Click the button above the table list to enter Edit mode.
4. Click the button that appears to the right of the button.
An empty row is added to the tables list.
5. Enter the Table Name (i.e. the virtual ABAP table) and the name of the corresponding SourceTable (i.e. the physical table).
6. To save your changes click the Save button in the main toolbar.
To remove a table from a Business Group
1. In the left pane, expand the desired Business Group.
2. Double-click the Tables icon.A list of tables is shown in the right pane.
3. Click the button above the table list to enter Edit mode.
4. Select the table you want to delete.
5. Click the button that appears to the right of the button.
The table is deleted.
6. To save your changes click the Save button in the main toolbar.
Accessing tables with a non-English languageTo enable replication of non-English SAP tables, add them to the configuration as follows:
1. From the zr4sap transaction, click the Metadata Language Configuration button.
2. Click the Add button and select the appropriate language.
3. Click Save.
To remove a previously configured language, select the desired row and click the Delete button.
Target collationAs SAP is case-sensitive, when a Replicate task is defined with SAP Application (DB) source, the targetendpoints need to be set up with case-sensitive collation.
LimitationsWhen using SAP Application (DB) as a source endpoint in a Replicate task, the following limitations apply:
l In order for changes to the following DDLs to take effect, you need to stop the task before makingthe changes and then resume the task after the changes have been made:
l Creating a Business Groupl Adding a table to a Business Group
Setup and User Guide - Qlik Replicate, November 2021 443
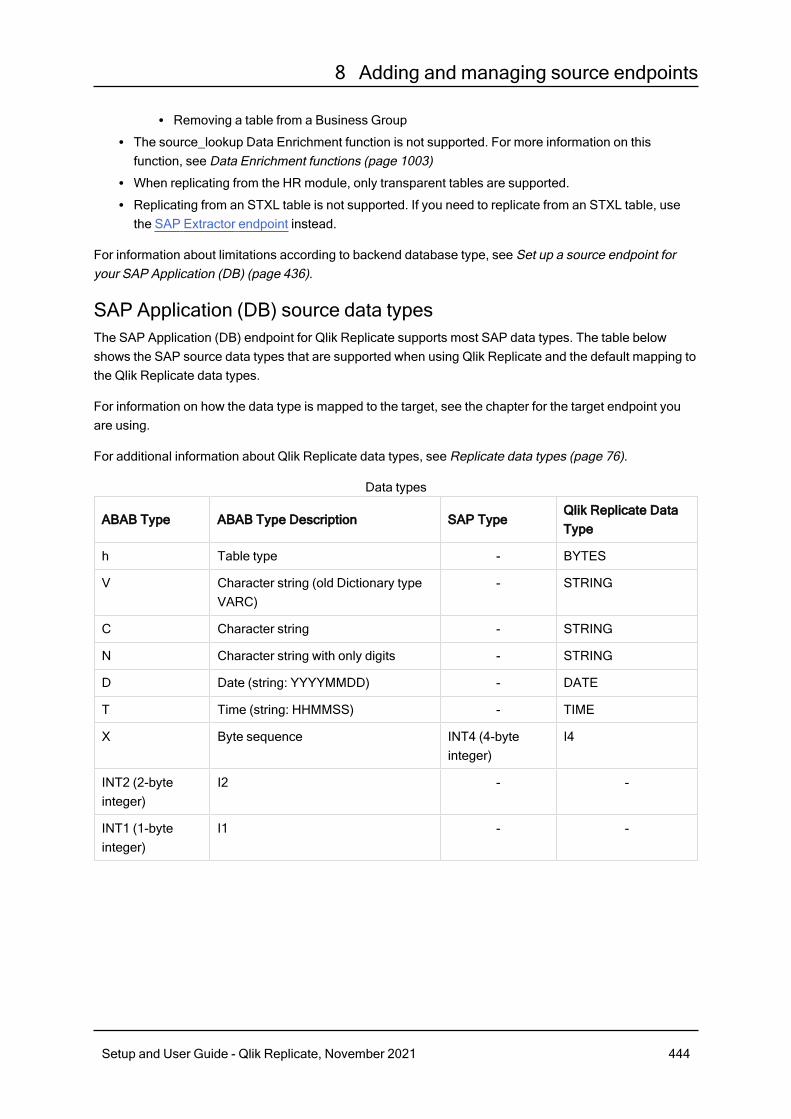
8 Adding and managing source endpoints
l Removing a table from a Business Groupl The source_lookup Data Enrichment function is not supported. For more information on thisfunction, see Data Enrichment functions (page 1003)
l When replicating from the HR module, only transparent tables are supported.l Replicating from an STXL table is not supported. If you need to replicate from an STXL table, usethe SAP Extractor endpoint instead.
For information about limitations according to backend database type, see Set up a source endpoint foryour SAP Application (DB) (page 436).
SAP Application (DB) source data typesThe SAP Application (DB) endpoint for Qlik Replicate supports most SAP data types. The table belowshows the SAP source data types that are supported when using Qlik Replicate and the default mapping tothe Qlik Replicate data types.
For information on how the data type is mapped to the target, see the chapter for the target endpoint youare using.
For additional information about Qlik Replicate data types, see Replicate data types (page 76).
ABAB Type ABAB Type Description SAP TypeQlik Replicate DataType
h Table type - BYTES
V Character string (old Dictionary typeVARC)
- STRING
C Character string - STRING
N Character string with only digits - STRING
D Date (string: YYYYMMDD) - DATE
T Time (string: HHMMSS) - TIME
X Byte sequence INT4 (4-byteinteger)
I4
INT2 (2-byteinteger)
I2 - -
INT1 (1-byteinteger)
I1 - -
Data types
Setup and User Guide - Qlik Replicate, November 2021 444

8 Adding and managing source endpoints
ABAB Type ABAB Type Description SAP TypeQlik Replicate DataType
ELSE If backend type is NUMERIC:
NUMERIC
If length = 0:
BLOB
If length > 0:
BYTES
- -
I Integer number (4-byte integer withsign)
- INT4
b 2-byte integer - INT2
s 1-byte integer - INT1
P Packed number - NUMERIC
F Floating point number to accuracy of8 bytes
- R8
g Character string with variable length - STRING
y Byte sequence with variable length - BLOB
BYTES
u Structured type, flat - BYTES
v Structured type, deep - BYTES
r Reference to class/interface - BYTES
i Reference to data object - BYTES
n Numeric text NUMC STRING
Setting general connection propertiesThis section describes how to set up connection parameters for a specific SAP Application (DB) server orfor an SAP system using load balancing.
To connect to a specific SAP Application (DB) server
1. In the Qlik Replicate console, click the Manage Endpoint Connections toolbar button to open theManage Endpoints Connections dialog box. Then click the New Endpoint Connection button.
2. In the Name field, enter a display name for your endpoint.
3. Optionally, in the Description field, enter a description for the SAP Application (DB) endpoint.
4. Select Source as the database role.
Setup and User Guide - Qlik Replicate, November 2021 445

8 Adding and managing source endpoints
5. Select SAP Application (DB) as the database Type.
When this endpoint is used as a duplicated source in a Log Stream Staging setup,select the Read changes from log stream check box and then select the relevant LogStream Staging task from the drop-down list.For information on setting up and managing Log Stream Staging tasks, see Using theLog Stream (page 919).
6. In the Client field, enter the client number of the SAP Application (DB) source you want to replicate.
7. In the SAP schema field, enter the name of the relevant SAP schema.
8. In the Backend endpoint field, click the Browse button and then select the name of the QlikReplicate endpoint you configured earlier. See also Set up a source endpoint for your SAPApplication (DB) (page 436).
Setting advanced propertiesIn the Advanced tab, you can set internal parameters and view a summary of the endpoint settings.
Internal parametersInternal parameters are parameters that are not exposed in the UI. You should only use them if instructedby Qlik Support.
To add internal Qlik Replicate parameters:
1. Click the Internal Parameters link.The Internal Parameters dialog box opens.
2. In the edit box, type the name of the parameter you need to add and then click it.
3. The parameter is added to the table below the search box with its default value.
4. Change the default value as required.
5. To reset the parameter value to its default, click the "Restore default value" icon at the end of therow.
More optionsThese options are not exposed in the UI as they are only relevant to specific versions or environments.Consequently, do not set these options unless explicitly instructed to do so by Qlik Support or productdocumentation.
To set an option, simply copy the option into the Add feature name field and click Add. Then set the valueor enable the option according to the instructions you received.
Settings summaryYou can view a summary of your settings by clicking the Setting Summary link. This is useful if you need tosend a summary of your settings to Qlik Support.
Setup and User Guide - Qlik Replicate, November 2021 446

8 Adding and managing source endpoints
8.27 Using SAP Extractor as a sourceThis section describes how to define SAP Extractor as a source endpoint in a replication task.
In this section:
l Prerequisites (page 448)l Limitations and considerations (page 460)l Supported data types (page 461)l Setting general connection properties (page 462)l Setting advanced properties (page 463)
Setup and User Guide - Qlik Replicate, November 2021 447

8 Adding and managing source endpoints
OverviewThe SAP Extractor endpoint leverages the SAP extractors to unload and capture SAP data directly fromthe SAP application, thereby eliminating the need to access the underlying database (which might not bepossible due to license restrictions). Offering increased flexibility and fine-tuning options, the SAPExtractor endpoint facilitates effortless migration of SAP data to other environments.
The endpoint supports Full Load or Full Load and Apply Changes replication from standard and genericdata sources.
During the replication process, Replicate does the following:
a. Executes the extractor using RFC protocol.
b. Stores the extracted data in an intermediate table corresponding to the source metadata structure.
c. Accesses the intermediate table using RFC protocol to retrieve the data.
d. Deletes the data from the intermediate table and runs the next extraction.
e. Performs INSERT operations on the target (even for source changes that were not INSERTs).
The SAP extractor endpoint depends on the RFC protocol to copy data retrieved by ABAP programs. As aresult, the SAP extractor endpoint performance is not as good as the Replicate SAP Application (DB)endpoint (which accesses the underlying databases directly). Therefore, if you need to replicate hugeamounts of data from SAP it is strongly recommended to use the Replicate SAP Application (DB) endpointif possible.
PrerequisitesThe following section describes the prerequisites for working with the Qlik Replicate SAP Extractorendpoint.
l Install the SAP Java Connector (page 448)l Install the Qlik Replicate for SAP Extractor on the SAP Machine (page 449)l Activate the extractors for Replicate (page 456)
Install the SAP Java ConnectorTo work with the SAP Extractor endpoint, you need to install the SAP Java Connector on the Replicatemachine.
Installing the SAP Java Connector on Replicate for WindowsTo install the SAP Java Connector:
1. Download the SAP Java Connector 3.x (64-bit) for Windows from the SAP Support Portal.To find out the exact SAP Java Connector version you need to support your SAP BW system, referto the SAP BW Help.
The SAP Java Connector 3.1 running on Windows operating systems requires theMicrosoft Visual Studio 2013 C/C++ runtime libraries to be installed on the system. SeeSAP Note 2786882 for details.
Setup and User Guide - Qlik Replicate, November 2021 448

8 Adding and managing source endpoints
2. Install the SAP Java Connector.
3. Copy the Sapjco3.jar and Sapjco3.dll files from the SAP Java Connector installation folder to thefollowing location under the Replicate installation directory:{REPLICATE_INSTALL_DIR}\endpoint_srv\externals.
4. Restart all of the Replicate services.
Installing the SAP Java Connector on Replicate for LinuxTo install the SAP Java Connector:
1. Download the SAP Java Connector 3.x (64-bit) for Linux from the SAP Support Portal.To find out the exact SAP Java Connector version you need to support your SAP BW system, referto the SAP BW Help.
2. Unzip the file you downloaded to a folder of your choice.The folder should contain the Sapjco3.jar and libsapjco3.so files.
3. Copy these files to the following location under the Replicate installation directory:{REPLICATE_INSTALL_DIR}/endpoint_srv/externals.
4. Restart all of the Replicate services.
The SAP Extractor endpoint will not be available for selection until the Java connector librarieshave been installed and the Replicate Server and Replicate UI Server services have beenrestarted.
Install the Qlik Replicate for SAP Extractor on the SAP MachineThis topic describes how to download and install the Qlik Replicate for SAP Extractor transports.
Download the R4SAPExtractor.zip file from Qlik Download Site. The file includes two folders - InstallCode(containing the installation transport), and DeleteCode (containing the uninstall transport).
Permissions required for installing Qlik Replicate for SAP ExtractorReplicate for SAP delivers its own authorization object: ZR4SAP. In addition to this authorization object,there are additional authorizations that need to be enabled for the Qlik Replicate software.
SAP users for "Replicate for SAP Extractors"
A dialog user in SAP is required to access the Qlik Replicate for SAP Extractor GUI in SAP. In addition, acommunication user is required to support the RFC calls from the Qlik Replicate software to the SAPsystem.
Identify existing users in SAP or create dedicated users for the Qlik Replicate software.
Replicate for SAP delivers its own authorization object: /QTQVC/RAO.
The authorization object /QTQVC/RAO can be turned on to enable/disable specific authorizations belowaccording to the needs of the Replicate user:
Setup and User Guide - Qlik Replicate, November 2021 449

8 Adding and managing source endpoints
Setup and User Guide - Qlik Replicate, November 2021 450

8 Adding and managing source endpoints
Authorizations for "Replicate for SAP Extractors"
The SAP system needs to be open to create the logical system. This is done using SAP Transaction/nSCC4.
Make sure the Changes and Transports for Client-Specific Objects for the Source Client is set toAutomatic Recording of Changes or Changes without Automatic Recording.
All clients need to be opened for Cross-Client Object Changes. Creating a Logical Client is a cross-clientchange that cannot be captured in a transport. It only needs to be open for a minute when the target logicalsystem is created.
Make sure the Transaction /nSE06 System Change Option > Global Setting is set to Modifiable (DuringLogical System creation and activation of Extractors).
SAP Authorizations for Administrator Role for creating the Target Logical System.
The following example shows the authorization for creating Logical system TARGETLOGI. The logicalsystem name is completely configurable to the customer’s preference.
Setup and User Guide - Qlik Replicate, November 2021 451

8 Adding and managing source endpoints
Both the dialog and communication users will need to be assigned to a role with authorization object S_TCODE and value /QTQVC/EXTREP.
Authorization Object S_TCODE with value /QTQVC/EXTREP:
The communication user will also require the following authorization objects: S_RFC and S_OC_SEND.
Authorization Object S_RFC:
Authorization Object S_OC_SEND:
Additional Authorization Objects for communication user:
Setup and User Guide - Qlik Replicate, November 2021 452

8 Adding and managing source endpoints
Importing the Qlik Replicate Transports into the SAP systemThere are two types of files required to import the ABAP objects into the SAP system: the data-file and theco-file.
Importing the Data-file
The data-file begins with an "R"
The data-file should be placed in the /usr/sap/trans/datafile system or in the directory of the server wherethe transports are stored.
Setup and User Guide - Qlik Replicate, November 2021 453
8 Adding and managing source endpoints
l Typically this is a shared directory, but if not, individually place the file into that directory location forall SAP host servers.
l This file must be accessible by all systems where the Qlik Replicate for SAP Extractor is to beinstalled.
l Set the permissions on the file to All for the user, Read and Execute for the group, and Readand Execute for others.
l The owner of the file should be the <sid>adm user of the system to be installed. The groupownership should be sapsys.
Importing the Co-file
The co-file begins with a "K"
The co-file should be placed in the /usr/sap/trans/cofiles file system or in the directory of theserver where the transports are stored.
l Typically this is a shared directory, but if not, individually place the file into that directory location forall SAP host servers.
l This file must be accessible by all systems where the Qlik Replicate for SAP Extractor is to beinstalled.
l Set the permissions on the file to All for the user, Read and Execute for the group, and Readand Execute for others.
l The owner of the file should be the <sid>adm user of the system to be installed. The groupownership should be sapsys.
Once the files are in the correct location, import the transport into the system using either the OperatingSystem level transport tools (TP), or the Transport Management System (TMS) internally within SAP.
Importing the Transports via TP1. Log on to the system at the Operating System level as the <sid> adm.
2. Change the directory to /usr/sap/trans
3. Add the transport to the R/3 buffer with the following command:# tp ‘addtobuffer SID’
4. Import the transport to the target R/3 system with the following command:# tp ‘import SID client=000 U16’
The expected result of the addtobuffer step is a successful return code of `0’.
If problems occur during the addtobuffer step, it is likely there is a problem with the files. They may bemissing, in the wrong location, or have incorrect ownership or permissions.
The expected result of the import step is a successful return code of either `0’ or `4’. A return code of `8’,`12’ or `16’ indicates transport failure. Return codes higher than `16’ indicate a major failure within thetransport tool. If this occurs, check the present working directory to ensure the correct location. Also, checkthe files for existence, location, and proper ownership and access.
If problems exist during the import, retry the import step. If problems persist, check the import andactivation logs for failure reason. These files are in the /usr/sap/trans/log location and named.R6U(the `?’ stands in as a wildcard).
Setup and User Guide - Qlik Replicate, November 2021 454

8 Adding and managing source endpoints
Importing the Transports via TMSBeginning in R/3 version 4.0, SAP allows importing transports through the SAP system via transactioncode STMS.
Security authorization in the SAP system must include proper access to import the transportrequest.
1. Sign-on to SAP system with a User ID that contains proper authority.
2. Execute transaction STMS.
3. Select the Transport (Truck) icon from the toolbar.
4. Select the desired system for import.
5. Add the Transport to the import queue by selecting the following path from the menu list:Extras > Other Requests > AddAdd the transport request number to the proper import queue and execute. Re-authentication of theuser.s SAP User ID is likely in order to complete the step.If an Information message is received that the "Transport request is invalid" check that the transportnumber was typed correctly. Otherwise, it may indicate a problem with the files. Verification ofexistence, location, permissions, or ownership may be needed.
6. Import the Transport request by selecting the transport number from the queue, and clicking theImport (Truck) icon from the toolbar. Set the target client to either `000’ or any other valid clientwithin the system and execute with the truck icon. Once again, re-authentication of the SAP User IDmay be necessary. The transport will execute in asynchronous mode; a record of success or failurecan be found in the transport logs.
7. The system will return to the import queue screen, where the Transport results can be checked.Select the Logs icon from the toolbar, or follow the menu path:Request > Display > LogsLocate the source system and verify all relevant logs. For this transport there should be 5 logs:
l DD Importl DD Activationl Importl Check Versionsl ABAP/scrn. Generation
All logs should display Ended OK (return code 0) or Ended with warning (return code 4). If anylogs are missing, or display a return code of 8 or higher, follow the instructions in step 6 to re-importthe transport.
Upgrading or Uninstalling the Qlik Replicate SAP ExtractorThe following instructions explain how to upgrade and uninstall the Qlik Replicate SAP Extractor.
To upgrade the Qlik Replicate SAP Extractor:
l Apply the Install transport.
To uninstall the Qlik Replicate SAP Extractor:
Setup and User Guide - Qlik Replicate, November 2021 455

8 Adding and managing source endpoints
l Apply the Delete transport.
Activate the extractors for ReplicateAfter importing the transports, you need to activate them before configuring the Replicate SAP Extractorendpoint.
As the transport installations are not automatically validated by Replicate, it is stronglyrecommended to validate the installations before running tasks with the SAP Extractorendpoint.
To do this:
Setup and User Guide - Qlik Replicate, November 2021 456

8 Adding and managing source endpoints
1. Open the Replicate for SAP Extractors launch pad through transaction /QTQVC/EXTREP.
Setup and User Guide - Qlik Replicate, November 2021 457

8 Adding and managing source endpoints
Setup and User Guide - Qlik Replicate, November 2021 458

8 Adding and managing source endpoints
2. Create a logical system for the Extractor solution to use as follows:
This should be separate from any other Logical System present in the system.
a. In the Configuration section, click the Target Logical System button.
b. In the Target Logical system field, enter a technical name for the Logical System and thenclick Create.
This will create the Logical System and setup its associated RFC connections for use by theReplicate endpoint.The following confirmation should be shown:Successfully created logical system.
3. Activate the extractors to associate them with the Logical System as follows:
a. In the Configuration section, click the Activate Extractors button.
b. Using the Logical System created earlier, select the extractor (also known as DataSource)you wish to activate from the list of available extractors.
l An extractor may be missing from the list if it has not yet been activated inthe ECC system in transaction RSA5.
l Activated extractors will be recorded in the ROOSPRMSC andROOSPRMSF tables associated with the Logical System.
c. Click Activate to start the activation process.You should see a confirmation message at the bottom of your screen.
Setup and User Guide - Qlik Replicate, November 2021 459
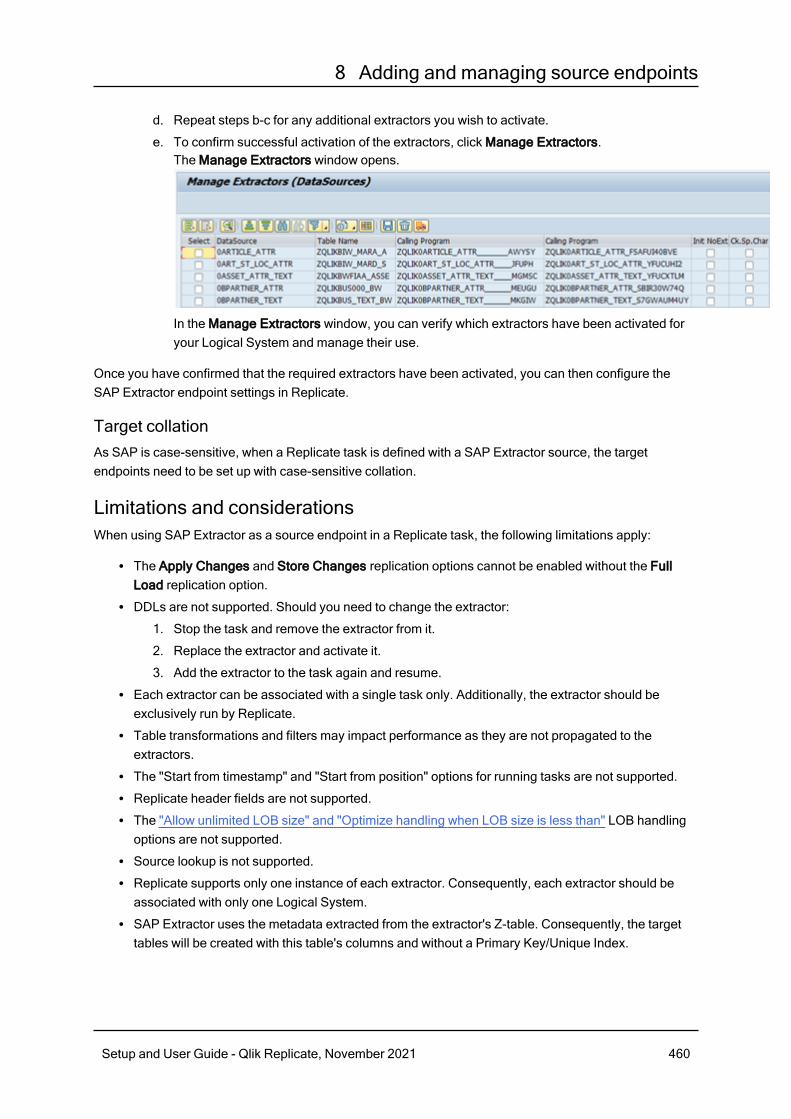
8 Adding and managing source endpoints
d. Repeat steps b-c for any additional extractors you wish to activate.
e. To confirm successful activation of the extractors, click Manage Extractors.The Manage Extractors window opens.
In the Manage Extractors window, you can verify which extractors have been activated foryour Logical System and manage their use.
Once you have confirmed that the required extractors have been activated, you can then configure theSAP Extractor endpoint settings in Replicate.
Target collationAs SAP is case-sensitive, when a Replicate task is defined with a SAP Extractor source, the targetendpoints need to be set up with case-sensitive collation.
Limitations and considerationsWhen using SAP Extractor as a source endpoint in a Replicate task, the following limitations apply:
l The Apply Changes and Store Changes replication options cannot be enabled without the FullLoad replication option.
l DDLs are not supported. Should you need to change the extractor:
1. Stop the task and remove the extractor from it.
2. Replace the extractor and activate it.
3. Add the extractor to the task again and resume.l Each extractor can be associated with a single task only. Additionally, the extractor should beexclusively run by Replicate.
l Table transformations and filters may impact performance as they are not propagated to theextractors.
l The "Start from timestamp" and "Start from position" options for running tasks are not supported.l Replicate header fields are not supported.l The "Allow unlimited LOB size" and "Optimize handling when LOB size is less than" LOB handlingoptions are not supported.
l Source lookup is not supported.l Replicate supports only one instance of each extractor. Consequently, each extractor should beassociated with only one Logical System.
l SAP Extractor uses the metadata extracted from the extractor's Z-table. Consequently, the targettables will be created with this table's columns and without a Primary Key/Unique Index.
Setup and User Guide - Qlik Replicate, November 2021 460

8 Adding and managing source endpoints
l All changes are captured as INSERT operations.l The Log Stream feature is not supported with this endpoint.
Supported data typesThe table below shows the SAP Extractor source data types that are supported when using Qlik Replicateand the default mapping to the Qlik Replicate data types.
For information on how the data type is mapped to the target, see the chapter for the target endpoint youare using.
For additional information about Qlik Replicate data types, see Replicate data types (page 76).
ABAP Data Type Qlik Replicate Data Type
ACCP DATE
CHAR STRING
CLNT STRING
CUKY STRING
CURR REAL8
DATS DATE
DEC REAL8
FLTP REAL4
INT1 INT1
INT2 INT2
INT4 INT4
LANG STRING
NUMC STRING
QUAN REAL8
RAW STRING
SSTR STRING
STRG CLOB
TIMS TIME
UNIT STRING
VARC STRING
Data types
Setup and User Guide - Qlik Replicate, November 2021 461

8 Adding and managing source endpoints
Setting general connection propertiesThis section describes how to set up connection parameters for a specific SAP Extractor server or for aSAP Extractor system using load balancing.
To connect to a specific SAP Application server:
1. In the Qlik Replicate console, click the Manage Endpoint Connections toolbar button to open theManage Endpoints Connections dialog box. Then click the New Endpoint Connection button.
2. In the Name field, enter a display name for your endpoint.
3. Optionally, in the Description field, enter a description for the SAP Application endpoint.
4. Select Source as the database role.
5. Select SAP Extractor as the database Type.
6. From the Connection mode drop-down list, select Custom Application Server.
7. In the Server name field, enter the IP address of the Application Server on which the SAP Extractorsource is located.
8. In the Instance identifier field, enter the instance number of the SAP Extractor source you want toreplicate.
9. In the Client identifier field, enter the System ID of the SAP Extractor source you want to replicate.
10. Enter your credentials (User Name, Password) for accessing the SAP Extractor source.These are the credentials for the communication user created earlier in SAP.
11. From the Number format drop-down list, select one of the following, according to the number formatin your system (Replicate needs this information in order to be able to parse the STRING correctly):
l 1,234,567.89l 1.234.567,89l 1 234 567.89
To connect to an SAP system using load balancing:
1. In the Qlik Replicate console, click the Manage Endpoint Connections toolbar button to open theManage EndpointsConnections dialog box.
2. In the Name field, enter a display name for your endpoint.
3. Optionally, in the Description field, enter a description for the SAP Application endpoint.
4. Select Source as the database role.
5. Select SAP Extractor as the database Type.
6. From the Connection mode drop-down list, select Load Balancing Server.
7. In the Message server field, enter the host name or IP address of the message server host.
8. In the Application servers group name field, enter the name of the SAP server group. This is anoptional group of application servers in a load balancing connection.
9. In the SAP system name field, enter the SAP R/3 name.
10. In the Message server service field, enter the name of the SAP message server service asspecified in the following file:<system drive>:\WINDOWS\system32\drivers\etc\services
If you do not specify a value, the Data Provider for SAP uses the following default name:sapms<R/3 system name>
Setup and User Guide - Qlik Replicate, November 2021 462

8 Adding and managing source endpoints
11. In the Client identifier field, enter the System ID of the SAP Application source you want toreplicate.
12. Enter your credentials (Username, Password) for accessing the SAP Extractor source.Note: These are the credentials for the communication user created earlier in SAP.
13. From the Number format drop-down list, select one of the following according to the number formatin your system (Replicate needs this information in order to be able to parse the STRING correctly):
l 1,234,567.89l 1.234.567,89
Setting advanced propertiesIn the Advanced tab, you can set the following parameters:
l Extractor mode - Choose one of the following:l Continuous extraction - Delta is extracted according to the Run extractor every (minutes)interval.
l Run extractor every (minutes) - Specify how often you want Replicate to check forchanges.
l Intermittent extraction - This option is useful if the current delta needs to be processed orconsumed before any subsequent delta is extracted. In this mode, all extractors will be runonce and a file indicating the completion status of the extraction process will be written to theExtract Completed Directory folder.To run additional extractions, stop the task and then resume it.When Full Load completes, the task creates a file for each table with the following name:<table-name>.txt. The file indicates the Full Load completion status.After each delta extraction, the task creates a file for each table with the following name:cdc_<task-name>_<timestamp>.txt. The file name reflects the task name and theextraction completion timestamp.
The first time the task is run, only the Full Load will be extracted. Once the FullLoad completes, stop and resume the task to extract the delta.
Internal parametersInternal parameters are parameters that are not exposed in the UI. You should only use them if instructedby Qlik Support.
To add internal Qlik Replicate parameters:
1. Click the Internal Parameters link.The Internal Parameters dialog box opens.
2. In the edit box, type the name of the parameter you need to add and then click it.
3. The parameter is added to the table below the search box with its default value.
4. Change the default value as required.
5. To reset the parameter value to its default, click the "Restore default value" icon at the end of therow.
Setup and User Guide - Qlik Replicate, November 2021 463

8 Adding and managing source endpoints
More optionsThese options are not exposed in the UI as they are only relevant to specific versions or environments.Consequently, do not set these options unless explicitly instructed to do so by Qlik Support or productdocumentation.
To set an option, simply copy the option into the Add feature name field and click Add. Then set the valueor enable the option according to the instructions you received.
Settings summaryYou can view a summary of your settings by clicking the Setting Summary link. This is useful if you need tosend a summary of your settings to Qlik Support.
Setup and User Guide - Qlik Replicate, November 2021 464

8 Adding and managing source endpoints
8.28 Using SAP HANA as a sourceThis section describes how to set up and use a SAP HANA endpoint as a source in a replication task.
The SAP HANA endpoint can either be accessed directly or via the SAP Application endpoint.For an explanantion of how to set up the SAP Application endpoint, see Using SAP Applicationas a source (page 423)
In this section:
l Prerequisites (page 466)l Limitations and considerations (page 468)l Permissions (page 469)l Supported data types (page 469)l Setting general connection properties (page 470)l Setting advanced properties (page 471)l Removing replicate artifacts from the database (page 474)
Setup and User Guide - Qlik Replicate, November 2021 465

8 Adding and managing source endpoints
PrerequisitesBefore SAP HANA can be used as a source endpoint in a replication task, the prerequisites described inthis section must be met.
PortOpen inbound port number 3xx15 to the SAP HANA server where xx is the instance number of the SAPHANA database that contains the source tables.
For example, the port for instance 90 would be 39015.
Required clientsl Windows: Install the SAP HANA ODBC 64-bit Driver 2.x for Windows on the Replicate Servermachine. The driver name is HDBODBC.
l Linux: Install the SAP HANA ODBC 64-bit Driver 2.x for Linux on the Replicate Server machine.The driver name is HDBODBC.Add the following section to the odbcinst.ini file located in directory /etc:[HDBODBC]
Description=64-bit HANA ODBC Driver
Driver=/opt/sap/hdbclient/libodbcHDB.so
fileUsage=1
Change data captureChanges can be captured from SAP HANA using either of the following methods:
l Trigger-basedl Log-based
The prerequisites for both of these methods are described below.
Trigger-basedReplicate requires the following artifacts to be created in the source database (either manually by the DBAor automatically by Replicate):
l Three triggers for each of the designated source tables: The triggers capture changes to thesource tables (INSERTs, UPDATEs, and DELETEs) and write them to the Replicate attrep_cdc_changes table described below. A separate trigger is required for each DML operation.The triggers will be created in the source table schema.
l The Replicate attrep_cdc_changes table: This table will contain changes captured by the triggersand will either be created in the schema of the user specified in the General tab of the SAP HANAendpoint settings, or in the schema specified in the endpoint settings' Advanced tab.
Setup and User Guide - Qlik Replicate, November 2021 466

8 Adding and managing source endpoints
As Replicate periodically scans the attrep_cdc_changes table for changes, the numberof UPDATEs shown in the monitor's Change Processing tab reflects the number ofUPDATEs found (in the attrep_cdc_changes table) at the time of scanning. This maynot be the actual number of UPDATEs performed on the source since UPDATEs aresometimes merged with INSERTs (depending on when the attrep_cdc_changes tablewas last scanned).
l The Replicate attrep_cdc_log table: When the Use log table option in the SAP HANA endpoint'sAdvanced tab is enabled, changes are copied from the attrep_cdc_changes table to the attrep_cdc_log table. During the task, Replicate reads the changes from the attrep_cdc_log table anddeletes the old data according to the cleanup settings (specified in the endpoint's Advanced tab).The table will either be created in the schema of the user specified in the General tab of the SAPHANA endpoint settings, or in the schema specified in the endpoint settings' Advanced tab.
To create the CDC artifacts automatically (the default):
l When defining the SAP HANA source endpoint, make sure that the Create CDC Artifacts checkbox in the Advanced tab is selected (the default).
To create the CDC artifacts manually:
1. Define the task as you would any other Replicate task, but when configuring the SAP HANA sourceendpoint, clear the Create CDC Artifacts check box in the Advanced tab.
2. Once the task is defined, select any of the Metadata only options in the Advanced Run Optionswindow, and then click OK.The task will run and generate the scripts for creating the CDC artifacts in the following location andthen stop:~/data/tasks/<task_name>/scripts
3. Execute the scripts in the source database.
4. Run the Replicate task normally.
Capturing changes from SAP HANA requires the source tables to have a Primary Key orUnique Index.
Log-basedl Supported from SAP HANA 2.0 SPS 04l Redo and backup logs:
l The logs must be in their original format onlyl The log folders must be shared with the Replicate machine.
See also: Permissions (page 469)
Setup and User Guide - Qlik Replicate, November 2021 467

8 Adding and managing source endpoints
Limitations and considerationsThe following limitations apply when using SAP HANA as a source:
General limitationsl Change Processing is not supported with SAP BW tables.l The AR_H_USER header column is not supported.l Compatibility views are not supported and will not be available for selection.l CA views are not supported and will not be available for selection.l Row store data storage is not supported.l Multitenant architecture is only supported on a single host.l Only transparent tables (including SAP S/4HANA transparent tables) are supported.
Limitations and considerations when using the Trigger-based CDC methodl Changes to a table's Primary Key will not be replicated to the target.l By default, the longest supported transaction length is 60 seconds. If there are transactions in yourenvironment that exceed 60 seconds, set the Transactional consistency value in the endpoint'sAdvanced tab to the required value.
l For tasks configured with the Apply Changes replication option, transformation filters can only usePrimary Key columns.
l Latency when applying changes - The latency shown in the User Interface is the interval betweenReplicate capturing a change from the source (i.e. not the source commit time), and that changeexisting on the target.
l DDL operations are not supported.
This limitation does not apply when accessing SAP HANA via the SAP Applicationendpoint.
l Tables without a Primary Key are not supported.
Limitations and considerations when using the Log-based CDC methodl Replicate creates a hana__row_id column on the target as a Unique Index and changes theoriginal Primary Key/Unique Index to a standard column.
l Capturing DELETE and UPDATE operations for filtered records is not supported.l Transformations that affect multiple columns are not supported.l When storing changes in Change Tables, only the Row_id and changed columns of the after-imagewill be stored. All other columns will have NULL values.
l The TRUNCATE table and PARTITION DDLs are not supported. On detecting a table with suchoperations, Replicate will suspend the table and require it to be reloaded.
l As the SAP HANA endpoint can be configured to connect to one instance only, in the event offailover in a HA environment, the endpoint must be manually reconfigured to point to the newinstance. Then reload all associated tasks.
Setup and User Guide - Qlik Replicate, November 2021 468

8 Adding and managing source endpoints
PermissionsThis section lists which permissions are required for Replicate to be able to capture changes from SAPHANA.
When using trigger-based CDCl Grant SELECT and TRIGGER on the SAP schema containing the selected source tables to theuser specified in the SAP HANA source endpoint.
l If the attrep_cdc_changes table is created in a schema owned by the user specified in the SAPHANA source endpoint settings (the default), no further permissions are required.
l If the attrep_cdc_changes table is created in a schema not owned by the user specified in theendpoint settings, grant SELECT, INSERT, UPDATE and DELETE on the attrep_cdc_changes
table to the specified user.
When using log-based CDCl Grant SELECT permission on the selected source tablesl Grant the CATALOG_READ permissionl Encrypted logs - To be able to read encrypted logs, Replicate should be able to access root keybackups or the Replicate user should be granted the ENCRYPTION ROOT KEY ADMINpermission.
Supported data typesThe following table shows the SAP HANA source data types that are supported when using Qlik Replicate,and the default mapping to Qlik Replicate data types.
For additional information about Qlik Replicate data types, see Replicate data types (page 76).
SAP HANA Data Types Qlik Replicate Data Types
DATE DATE
TIME TIME
SECONDDATE DATETIME
TIMESTAMP DATETIME
TINYINT UINT1
SMALLINT INT2
INTEGER INT4
BIGINT INT8
DECIMAL (p,s) NUMERIC
DECIMAL STRING
SMALLDECIMAL STRING
Data types
Setup and User Guide - Qlik Replicate, November 2021 469

8 Adding and managing source endpoints
SAP HANA Data Types Qlik Replicate Data Types
REAL REAL4
DOUBLE REAL8
VARCHAR STRING
NVARCHAR WSTRING
ALPHANUM STRING
SHORTTEXT WSTRING
VARBINARY BYTES
BLOB BLOB
CLOB CLOB
NCLOB NCLOB
TEXT NCLOB
BOOLEAN UINT1
Unsupported data typesThe following data types are not supported:
l ARRAYl ST_GEOMETRYl ST_POINT
Setting general connection propertiesYou can add a SAP HANA endpoint to Qlik Replicate to use as a source. For more information on how toadd endpoints, see Defining and managing endpoints (page 110).
To add a SAP HANA source endpoint to Qlik Replicate:
1. In the Qlik Replicate console, click Manage Endpoint Connections to open the Manage EndpointsConnections dialog box.
2. In the Name field, type a name for your database. This can be any name that will help to identify thedatabase being used.
3. In the Description field, optionally enter a description that helps to identify the SAP HANA database.
4. Select Source as the database role.You can do this step before any of the other steps if you want, however before you can continue withthe next step in this process, you must select the database role.
5. Select SAP HANA as the database Type.
Setup and User Guide - Qlik Replicate, November 2021 470

8 Adding and managing source endpoints
When this endpoint is used as a duplicated source in a Log Stream Staging setup,select the Read changes from log stream check box and then select the relevant LogStream Staging task from the drop-down list.For information on setting up and managing Log Stream Staging tasks, see Using theLog Stream (page 919).
6. In the Server field, specify the IP address or host name of the SAP HANA database server.To connect to a High Availability Cluster, specify all of the cluster nodes and port numbers in theServer field. The nodes should be separated by a comma.Example:12.12.1.123:3033,12.12.1.124:3034
7. In the Instance number field, enter the instance number of the SAP HANA database with the sourcetables.
8. Select either Single tenant or Multi tenant according to your Database architecture.
9. If you selected Multi tenant, enter the name of your source database.
10. Enter the Username and Password required to access the SAP HANA database. If you do notknow this information, see your SAP HANA database Administrator (DBA).
This information is case sensitive.
11. Click Test Connection to verify that the specified settings are correct.
Setting advanced propertiesIn the Advanced tab, you can configure CDC-related options as well as any additional settings or internalparameters that may be required.
Select either Trigger-based CDC or Log-based CDC according to your preferred CDCmethod.
Switching between Trigger-based CDC and Log-based CDC (or vice versa) will require you toreload the target.
Trigger-Based CDCl Create CDC artifacts: When this option is enabled (the default), Replicate creates the requiredCDC artifacts in the source database. Clear this check box if you would rather create the CDCartifacts manually.
l Create CDC table in schema: The name of the schema in the source database where you want theattrep_cdc_changes table to be created.
The specified schema must already exist in the source database.
l Log cleanup interval (min): Specify how often (in minutes) to check if Change Records need to bedeleted from the attrep_cdc_changestable.
Setup and User Guide - Qlik Replicate, November 2021 471

8 Adding and managing source endpoints
l Log retention period (min): Specify how long (in minutes) to keep Change Records in the attrep_
cdc_changes table before deleting them.l Transactional consistency (sec): By default, the longest supported transaction length is 60seconds. If you have transactions in your environment that exceed 60 seconds, you should set thisvalue to the expected transaction duration. Note, however, that the longer the transaction, thegreater the latency will be.
l Use log table: When this option is enabled, during the task, Replicate copies the changes from theattrep_cdc_changes table to the attrep_cdc_log table. This is the preferred method of working(and in future versions will be the only method of working) as it significantly reduces latency.
If you upgraded from a version preceding November 2020 (7.0), in order to use thisoption, you must first perform the procedure described in the Replicate November 2020(7.0) release notes.
l SAP archiving users to filter: Specify the user names of SAP application users whoseDELETE operations you do not want Replicate to capture. Users must be separated withcommas.
Editing the user list requires you to stop and then resume the task for thechanges to take affect.
Log-based CDCLog-based CDC is faster than Trigger-based CDC and has a smaller system footprint. When Log-basedCDC is selected, Replicate will read the changes directly from the SAP HANA logs. In order for Replicate tobe able to do this, you need to specify the location of the logs in the Redo Log Shared Folder and BackupLog Shared Folder fields respectively (both fields are mandatory).
If Replicate Server is not installed on the SAP HANA machine, the redo logs and backup logs must residein Shared Folders on the SAP HANA machine.
Log Access PreferencesYou can determine which logs Replicate will read the changes from. If the logs are encrypted, you alsoneed to provide the encryption settings as described in Encryption Settings below.
From the Read changes from drop-down list, select one of the following:
l Prioritize backup log - This is the default mode as it provides best performance while also offeringgreater efficiency. In this mode, Replicate will first try to capture the changes from the backup log. Ifthe changes do not exist in the backup log, it will try to capture them from the online redo loginstead.When this option is selected, you also need to specify the locations of the Redo log shared folderand the Backup log shared folder.
l Backup log only - In this mode, Replicate requires access to the backup log only. Changes will becaptured from the backup log as soon as they become available. The backup interval and the size ofthe backup files will impact the capture time.
Setup and User Guide - Qlik Replicate, November 2021 472

8 Adding and managing source endpoints
When this option is selected, you also need to specify the location of the Backup log shared folder.l Redo log only - This mode should not be used in production environments. In this mode, Replicaterequires access to the redo log only. Changes will only be captured if they exist in the redo log. Inthe event that the changes are not available in the redo log, the task will need to be reloaded toensure that all data and changes from the source are available on the target.When this option is selected, you also need to specify the location of the Redo log shared folder.
Encryption SettingsReplicate can decrypt encrypted redo logs and backup logs. The encryption root keys can either beretrieved automatically by Replicate or provided by the user in the designated fields.
l Automatically retrieving the encryption root keys - This method is preferable when the encryptionroot keys frequently change or if the encryption root key backup files are not accessible from theReplicate machine. This method also requires the Replicate user to be granted the ENCRYPTION_ROOT_KEY_ADMIN permission (for retrieving the encryption root keys).
l Manually providing the encryption root keys - This method is preferable when the encryption rootkeys rarely change and when the encryption root key backup files are accessible from the Replicatemachine. This method may also be preferable for organizations that do not want to grant theENCRYPTION_ROOT_KEY_ADMIN permission to the Replicate user.
The following settings are available:
Depending on your preferred method of providing Replicate with the encryption root keys(automatically or manually), some of the settings may not be relevant.
l Encrypted redo log - Select this option if the redo logs are encrypted. If you need to manuallyprovide the encryption root keys, specify the path of the redo log encryption root key backup file inthe Log root key backup (.rkb) file field. Otherwise, leave this field empty.
l Encrypted backup log - Select this option if the backup logs are encrypted. If you need to manuallyprovide the encryption root keys, specify the path of the backup log encryption root key backup filein the Backup root key backup (.rkb) file field. Otherwise, leave this field empty.
l Root key backup password - The password for reading the root key backup files.
Internal parametersInternal parameters are parameters that are not exposed in the UI. You should only use them if instructedby Qlik Support.
To add internal Qlik Replicate parameters:
1. Click the Internal Parameters link.The Internal Parameters dialog box opens.
2. In the edit box, type the name of the parameter you need to add and then click it.
3. The parameter is added to the table below the search box with its default value.
4. Change the default value as required.
Setup and User Guide - Qlik Replicate, November 2021 473

8 Adding and managing source endpoints
5. To reset the parameter value to its default, click the "Restore default value" icon at the end of therow.
More optionsThese options are not exposed in the UI as they are only relevant to specific versions or environments.Consequently, do not set these options unless explicitly instructed to do so by Qlik Support or productdocumentation.
To set an option, simply copy the option into the Add feature name field and click Add. Then set the valueor enable the option according to the instructions you received.
Settings summaryYou can view a summary of your settings by clicking the Setting Summary link. This is useful if you need tosend a summary of your settings to Qlik Support.
Removing replicate artifacts from the databaseIn order to capture changes, Qlik Replicate creates various artifacts in the SAP HANA database when thetask starts. When the task completes, you can safely remove these artifacts.
For information on the Replicate artifacts, see Change data capture (page 466).
Setup and User Guide - Qlik Replicate, November 2021 474

8 Adding and managing source endpoints
8.29 Using SAP Sybase ASE as a sourceThis section describes how to set up and use a SAP Sybase ASE database as the source endpoint in areplication task.
In this section:
l Prerequisites (page 476)l Limitations and considerations (page 476)l Required permissions (page 477)l SAP Sybase ASE database source data types (page 477)l Setting general connection properties (page 479)l Setting advanced connection properties (page 480)l Handling the secondary truncation point (page 481)
Setup and User Guide - Qlik Replicate, November 2021 475

8 Adding and managing source endpoints
PrerequisitesThis topic list the prerequisites for using the SAP Sybase ASE source endpoint in a replication task.
General prerequisitesl SAP Sybase ASE replication enabled for tables using the sp_setreptable command or privileges toenable it automatically.
l RepAgentmust be disabled on the SAP Sybase ASE database.l When replicating to SAP Sybase ASE 15.7 installed on a Windows machine configured with a non-Latin language (e.g. Chinese), Qlik Replicate requires Sybase 15.7 SP121 to be installed on theSAP Sybase ASE machine.
l Turn off automatic truncation by running the following command:sp_dboption mydb, "trunc log on chkpt", false
go
Replicate on WindowsInstall SAP Adaptive Server Enterprise ODBC Driver 16.0 (64-bit) on the Qlik Replicate computer.
Replicate on Linux1. Install SAP Adaptive Server Enterprise ODBC Driver 16.0 (64-bit) on the Qlik Replicate computer.
2. After the driver is installed, verify that the /etc/odbcinst.ini file contains an entry for Sybase, as in thefollowing example:[Adaptive Server Enterprise]
Description=Sybase ODBC Driver
Driver=/opt/sap/DataAccess64/ODBC/lib/libsybdrvodb.so
Setup=
FileUsage=-1
CPTimeout=
CPReuse=
3. Verify that the symbolic link refers to libsybdrvodb-sqllen8.so.In the event that it does not, redirect the symbolic link to libsybdrvodb-sqllen8.so by running thefollowing command:ln -fs ./libsybdrvodb-sqllen8.so libsybdrvodb.so
Limitations and considerationsThe following limitations apply:
l Sybase ASE primary/standby configuration is supported with the publish-and-subscribe model only(i.e. Warm standby/MSA is not supported).
l Only one Qlik Replicate task can be run per SAP Sybase ASE database.l Rename table is not supported (e.g. sp_rename 'Sales.SalesRegion', 'SalesReg;)l Rename column is not supported (e.g. sp_rename 'Sales.Sales.Region', 'RegID', 'COLUMN';)
Setup and User Guide - Qlik Replicate, November 2021 476

8 Adding and managing source endpoints
l Zero values located at the end of binary data type strings are truncated when replicated to the targetdatabase. For example, 0x0000000000000000000000000100000100000000 in the source table willbecome 0x00000000000000000000000001000001 in the target table.
l The reorg rebuild index command is not supported.l Clusters are not supported.l Materialized views are not supported.l Data capture from partitions is only supported from Sybase ASE 15 or later.l Merge operations performed during CDC will result in an non-recoverable error.l The WRITETEXT statement is not supported as it may result in duplicate (or more) inserts on thetarget.
l The Replicate AR_H_USER header column is not supported for database changes performed inauto-commit mode. For these changes, the header column will be empty.
l Rollback trigger on datarow locked tables is not supported.
Required permissionsTo use SAP Sybase ASE database as a source in a Replicate task, the following permissions are required:
l sa_rolel replication_rolel sybase_ts_role
If the Automatically enable Sybase replication option is enabled (in the Advanced tab), Replicate alsoneeds permission to run the stored procedure sp_setreptable.
For information on the Automatically enable SAP Sybase ASE replication option, see Setting advancedconnection properties (page 480).
SAP Sybase ASE database source data typesThe following table shows the SAP Sybase ASE database source data types that are supported whenusing Qlik Replicate and the default mapping from Qlik Replicate data types.
For information on how to view the data type that is mapped in the target, see the section for the targetdatabase you are using.
For additional information about Qlik Replicate data types, see Replicate data types (page 76).
SAP Sybase ASE Source Data Types Qlik Replicate Data Types
BIGINT INT8
UNSIGNED BIGINT UINT8
INT INT4
UNSIGNED INT UINT4
SMALLINT INT2
Data types
Setup and User Guide - Qlik Replicate, November 2021 477

8 Adding and managing source endpoints
SAP Sybase ASE Source Data Types Qlik Replicate Data Types
UNSIGNED SMALLINT UINT2
TINYINT UINT1
DECIMAL NUMERIC
NUMERIC NUMERIC
FLOAT REAL8
DOUBLE REAL8
REAL REAL4
MONEY NUMERIC
SMALLMONEY NUMERIC
DATETIME DATETIME
BIGDATETIME DATETIME (6)
SMALLDATETIME DATETIME
DATE DATE
TIME TIME
BIGTIME TIME
CHAR STRING
UNICHAR WSTRING
NCHAR WSTRING
VARCHAR STRING
UNIVARCHAR WSTRING
NVARCHAR WSTRING
BINARY BYTES
VARBINARY BYTES
BIT BOOLEAN
TEXT CLOB
UNITEXT NCLOB
IMAGE BLOB
Non-supported data typesSource SAP Sybase ASE tables with columns of the following SAP Sybase ASE data types cannot bereplicated. Replicated columns with these data types will show as null.
l UDT
Setup and User Guide - Qlik Replicate, November 2021 478

8 Adding and managing source endpoints
Setting general connection propertiesThis section describes how to configure general connection properties. For an explanation of how toconfigure advanced connection properties, see Setting advanced connection properties.
You can also use SAP Sybase ASE files as a source. For more information, see Using the QlikReplicate file channel (page 908).
To add a SAP Sybase ASE source endpoint to Qlik Replicate:
1. In the Qlik Replicate Console, click Manage Endpoint Connections to open the Manage EndpointsConnections dialog box. Then click the New Endpoint Connection button. For more information onadding an endpoint to Qlik Replicate, see Defining and managing endpoints (page 110).
2. In the Name field, type a name for your database. This can be any name that will help to identify thedatabase being used.
3. In the Description field, type a description that helps to identify the SAP Sybase ASE database.This is optional.
4. Select Source as the endpoint role.
5. Select SAP Sybase ASE as the database Type.
When this endpoint is used as a duplicated source in a Log Stream Staging setup,select the Read changes from log stream check box and then select the relevant LogStream Staging task from the drop-down list.For information on setting up and managing Log Stream Staging tasks, see Using theLog Stream (page 919).
6. In the Server Name field, enter the host name or IP address of the computer on which the SAPSybase ASE database is installed.
Consider the following:l This information is case sensitive.l You can use the Advanced tab to add specific properties and create a customconnect string. In this case, you do not need to enter information in this tab. Formore information on using the Advanced tab, see Setting advanced connectionproperties (page 480).
l To determine if you are connected to the database you want to use or if theconnection information you entered is correct, click Test ConnectionIf the connection is successful a message in green is displayed. If the connectionfails, an error message is displayed at the bottom of the dialog box.To view the log entry if the connection fails, click View Log. The server log isdisplayed with the information for the connection failure. Note that this button isnot available unless the test connection fails.
7. Optionally, change the default port (5000).
Setup and User Guide - Qlik Replicate, November 2021 479

8 Adding and managing source endpoints
8. Type the SAP Sybase ASE authentication information (User Name, Password) for the authorizeduser for this SAP Sybase ASE database. If you do not know this information, see your SAP SybaseASE database Administrator (DBA).
Consider the following:l This information is case sensitive.l This information is required. If you are using the Advanced tab to create acustom string, make sure to include the User Name and Password properties.See Setting advanced connection properties (page 480) for more information.
l If you want to set custom properties for this database, see Setting advancedconnection properties (page 480).
Make sure that the SAP Sybase ASE user entered in the SAP Sybase ASEAuthentication section has the correct access privileges. For information on how toprovide the required privileges, see Required permissions (page 477).
9. In the Database name field, enter the SAP Sybase ASE database name.
Setting advanced connection propertiesIn the Advanced tab, you can set the following parameters:
l Automatically enable SAP Sybase ASE replication: Select this to automatically enable SAPSybase ASE replication. This is only required if SAP Sybase ASE replication has not been enabledalready. For more information, see Prerequisites (page 476).
l Additional ODBC connection properties: Specify any additional ODBC connection parameters thatyou want to use.
If the user name or password specified in the General tab contains non-Latin characters(e.g. Chinese), the following property is required:charset=gb18030
l Advance truncation point every (seconds): The frequency with which to advance the secondarytruncation point when reading changes from the Sybase ASE log.
l Dump the log every (seconds): How often to dump the parts of the log which Replicate has finishedreading (i.e. the log behind the secondary truncation point). The default is "0" which means thatReplicate never dumps the log.
You must change the default value. If you do not change the default value, the log willeventually consume all available disk space. In addition to changing the default value,you also need to create a stored procedure and turn off automatic truncation oncheckpoint as described below.
Setup and User Guide - Qlik Replicate, November 2021 480

8 Adding and managing source endpoints
1. Create a stored procedure for dumping the log, as shown in the following example:
create procedure attrep_dumpaction @DbName varchar(255)
as
if @DbName = '<source_db>'
Begin
<Check dump log not running.>
<Add your database logic here.>
print "Truncating log for database '%1!'", @DbName
dump transaction <source_db> with truncate_only
end
2. Turn off automatic truncation on checkpoint as follows:
sp_dboption <source_db>, "trunc log on chkpt", false
go
Internal parametersInternal parameters are parameters that are not exposed in the UI. You should only use them if instructedby Qlik Support.
To add internal Qlik Replicate parameters:
1. Click the Internal Parameters link.The Internal Parameters dialog box opens.
2. In the edit box, type the name of the parameter you need to add and then click it.
3. The parameter is added to the table below the search box with its default value.
4. Change the default value as required.
5. To reset the parameter value to its default, click the "Restore default value" icon at the end of therow.
More optionsThese options are not exposed in the UI as they are only relevant to specific versions or environments.Consequently, do not set these options unless explicitly instructed to do so by Qlik Support or productdocumentation.
To set an option, simply copy the option into the Add feature name field and click Add. Then set the valueor enable the option according to the instructions you received.
Settings summaryYou can view a summary of your settings by clicking the Setting Summary link. This is useful if you need tosend a summary of your settings to Qlik Support.
Handling the secondary truncation pointWhen a task starts, Replicate establishes a $replication_truncation_point entry in the syslogshold
system view, indicating that a replication process is in progress. While Qlik Replicate is working, itadvances the replication truncation point at regular intervals, according to the amount of data that hasalready been copied to the target.
Setup and User Guide - Qlik Replicate, November 2021 481

8 Adding and managing source endpoints
Once the $replication_truncation_point entry has been established, the Replicate task must be keptrunning at all times to prevent the database log from becoming excessively large. If you want to stop theReplicate task permanently, the replication truncation point must be removed by issuing the followingcommand:
dbcc settrunc('ltm','ignore')
After the truncation point has been removed, the Replicate task cannot be resumed. The log will continueto be truncated automatically at the checkpoints (if automatic truncation is set).
Qlik Replicate requires the secondary truncation point to be valid. Manually changing thesecondary truncation point may result in changes not being captured or the task being stoppeddue to errors.
Setup and User Guide - Qlik Replicate, November 2021 482

8 Adding and managing source endpoints
8.30 Using Teradata Database as a sourceThis section describes how to set up and use Teradata Database as a source in a replication task.
In this section:
l Prerequisites (page 484)l Required permissions (page 485)l Teradata source data types (page 485)l Setting general connection properties (page 486)l Setting Change Processing parameters (page 487)
Setup and User Guide - Qlik Replicate, November 2021 483

8 Adding and managing source endpoints
PrerequisitesThe following section describes the prerequisites for working with Qlik Replicate and a Teradata DatabaseSource.
Replicate Server for WindowsTo work with Teradata Database 15, install Teradata Database ODBC Driver 15.00 for Windows. To workwith Teradata Database 16 or later, you need to install Teradata Database ODBC Driver 16.20 forWindows.
Replicate Server for LinuxThe following section describes the steps you need to perform to work with Qlik Replicate for Linux andTeradata Database as a source database in a Replicate task. Teradata Database Client requires theDataDirect ODBC driver manager (provided with Teradata Database Client).
To work with Teradata Database 15, install Teradata Database ODBC Driver 15.00 for Linux. To work withTeradata Database 16 or later, you need to install Teradata Database ODBC Driver 16.20 for Linux.
These instructions assume that Teradata Database Client 15.10 is being installed in thefollowing location:
/opt/teradata/client/15.10
If you are installing another version or to a different location, simply change the instructionsaccordingly.
1. Install Replicate on the Linux machine as described in Setting up Qlik Replicate on Linux (page 47).
2. Install Teradata Database Client 15.10 or later for Linux.
3. Run the following commands:TD_CLIENT=/opt/teradata/client/15.10/odbc_64/lib:/opt/teradata/client/15.10/lib64; export TD_CLIENT
ODBCINI=/opt/teradata/client/15.10/odbc_64/odbc.ini; export ODBCINI
ODBCINST=/opt/teradata/client/15.10/odbc_64/odbcinst.ini; export ODBCINST
4. Run the following command:AREP_ODBC_DRIVER_MANAGER=/opt/teradata/client/15.10/odbc_64/lib/libodbc.so; export AREP_ODBC_
DRIVER_MANAGER
5. Run the following command:LD_LIBRARY_PATH=$TD_CLIENT:/opt/attunity/replicate/lib:/lib64:/usr/lib64; export LD_
LIBRARY_PATH
6. To verify that the path is updated, run the following command:echo $LD_LIBRARY_PATH
7. Run the following command:export ODBCINI=/opt/teradata/client/15.10/odbc_64/odbc.ini
8. Add the export commands to the site_arep_login.sh file.
Setup and User Guide - Qlik Replicate, November 2021 484

8 Adding and managing source endpoints
A Replicate task cannot be defined with endpoints that use different ODBC Driver Managers.Teradata Database source is accessed using the DataDirect ODBC Driver Manager whilemost target endpoints (that can be accessed by Replicate running on Linux) are accessedusing the unixODBC Driver Manager.
Consequently, when replicating to all target endpoints excluding Oracle, Hadoop, and File(which do not use the unixODBC Driver Manager), you need to use the Replicate File Channel.For more information about setting up a task using the File Channel, see Using the QlikReplicate file channel (page 908).
Required permissionsThe user that is specified in the General tab when Setting general connection properties (page 486) mustbe registered as a user in the Teradata Database.
Teradata source data typesThe following table shows the Teradata source data types that are supported when using Qlik Replicateand the default mapping to the Qlik Replicate data types.
For additional information about Qlik Replicate data types, see Replicate data types (page 76).
Teradata Data Types Qlik Replicate Data Types
BLOB BLOB
BYTE BYTES
BYTEINT INT1
BIGINT INT8
DATE DATE
DECIMAL REAL8
DOUBLE PRECISION REAL8
FLOAT REAL8
INTEGER INT4
INTERVAL DAY STRING (Support a maximum of 9,999 days)
INTERVAL DAY TO HOUR STRING
INTERVAL DAY TOMINUTE STRING
INTERVAL DAY TO SECOND STRING
INTERVAL HOUR STRING
INTERVAL HOUR TOMINUTE STRING
Teradata and Qlik Replicate data types
Setup and User Guide - Qlik Replicate, November 2021 485

8 Adding and managing source endpoints
Teradata Data Types Qlik Replicate Data Types
INTERVAL HOUR TO SECOND STRING
INTERVAL MINUTE STRING
INTERVAL MINUTE TO SECOND STRING
INTERVAL SECOND STRING (Supports up to six fractional seconds)
CHAR STRING
CLOB CLOB
GRAPHIC STRING
INTERVAL MONTH STRING
INTERVAL YEAR STRING
INTERVAL YEAR TOMONTH STRING
REAL REAL8
SMALLINT INT2
TIME TIME
TIMESTAMP DATETIME
TIMESTAMPWITH TIME ZONE DATETIME
TIMEWITH TIME ZONE TIME
VARBYTE BYTES
VARCHAR STRING (10)
VARGRAPHIC STRING (10)
NUMERIC NUMERIC
CHAR VARYING STRING
LONG VARCHAR STRING
Setting general connection propertiesThis section describes how to configure general connection properties. For an explanation of how toconfigure change processing parameters, see Configuring Change Processing below.
To add a Teradata Database source endpoint to Qlik Replicate:
1. In the Qlik Replicate console, click Add Database to open the Add Endpoints dialog box. For moreinformation on adding an endpoint to Qlik Replicate, see Defining and managing endpoints (page110).
2. In the Name field, type a name for your Teradata database. This can be any name that will help toidentify the database being used.
Setup and User Guide - Qlik Replicate, November 2021 486

8 Adding and managing source endpoints
3. In the Description field, type a description that helps to identify the Teradata database. This isoptional.
4. Select Source as the database role.
5. Select Teradata Database as the database Type.
When this endpoint is used as a duplicated source in a Log Stream Staging setup,select the Read changes from log stream check box and then select the relevant LogStream Staging task from the drop-down list.For information on setting up and managing Log Stream Staging tasks, see Using theLog Stream (page 919).
6. Type the Server name. This is the name of the computer with the Teradata Database instance youwant to work with.
7. Type the Teradata Database authentication information (Username, Password) for the authorizeduser for this Teradata Database. If you do not know this information, see your Teradata Databasesystem manager.
Consider the following:l This information is case sensitive.l To determine if you are connected to the database you want to use or if theconnection information you entered is correct, click Test Connection.If the connection is successful a message in green is displayed. If the connectionfails, an error message is displayed at the bottom of the dialog box.To view the log entry if the connection fails, click View Log. The server log isdisplayed with the information for the connection failure. Note that this button isnot available unless the test connection fails.
Make sure that the Teradata Database user entered in the Teradata DatabaseAuthentication section has the correct access privileges. For information on how toprovide the required privileges, see Required permissions (page 485).
8. Type the Default database name or select one from the list of available endpoints. This is the nameof the Teradata Database where you are replicating the data to.
Setting Change Processing parametersThe Change Processing tab lets you define change processing settings for the Teradata Databasesource. Normally, Replicate scans a database’s transaction logs for changes and then applies thosechanges to the target database. However, this method of change processing is not possible with DataWarehouse endpoints such as Teradata Database since these endpoints do not generate transaction logs.
The good news is that you can still use Replicate to capture changes from Teradata Database - it justrequires a little bit of preparation.
Setup and User Guide - Qlik Replicate, November 2021 487

8 Adding and managing source endpoints
PrerequisitesBefore you can define the settings in the Change Processing tab, you need to ensure that at least onespecial "Context" column exists in your source database tables. Context column(s) are basically columnsin a table that enable Replicate to determine whether the data has changed. You can add Context columnsspecifically for the purpose of change processing (either using a script or manually) or you can use existingcolumns that contain suitable "Context" data.
You can create and reference any number of Context columns in a table as long as the Contextcolumn names are the same for all source tables. Additionally, each value in the Contextcolumn(s) must be unique.
In the example below, the Context column cf has been added to the table. The cf column containsTIMESTAMPs that enable Replicate to determine whether a change occurred (by comparing the currentTIMESTAMP with the TIMESTAMP stored in its repository).
By default, all changes are assumed to be INSERTs. If UPDATE and DELETE operations are alsoperformed on the source tables, you can write an UPDATE and/or DELETE expression (described below)that will enable Replicate to identify the operation type.
LimitationsThe following limitations apply when Change Processing is enabled for the Teradata Database source:
l The "Start from timestamp" run option is not supported. For more information, see Advanced RunOptions (page 1048).
Setup and User Guide - Qlik Replicate, November 2021 488

8 Adding and managing source endpoints
l If one of the Context columns is part of the Primary Key or Unique Index, then UPDATE andDELETE operations are not supported.
l Context columns cannot be LOB columnsl DDLs are not supportedl When inserting a record and then updating the same record, the task error handling settings shouldbe set as follows:
1. Open the <Task Name> Settings dialog box.
2. Select the Error Handling|Apply Conflicts tab.
3. Set a task-specific Apply Conflicts policy as described in Error Handling settings (page1032).
4. From the No record found for applying an update drop-down list, select INSERT themissing target record.
For more information on error handling, see Error handling (page 1031).
Configuring Change Processing settingsPerform the following steps to configure change processing settings.
To configure change processing settings:
1. Select the Change Processing tab in the Teradata Database source.
2. In the Columns field, specify the names of the Context columns. The column names are case-sensitive and must be separated by commas.
Example:
context1,context2
3. Choose the sorting order of the Context columns as appropriate (Ascending or Descending). Notethat if the order you select is not the same as the actual sorting order, an error will occur.
4. In the Check for changes every field, specify how often to check for changes.
5. Enter expressions that Replicate will use to identify UPDATE and DELETE operations. If you do notenter any expressions or if no match is found for an expression, any row whose context is higher (ifthe sorting order is Ascending) or lower (if the sorting order is Descending) than the previouscontext value will be considered an INSERT.
Expressions must be written in the native syntax of the Teradata Database source. Allexamples in this section are written using PostgreSQL syntax.
l Update expression - Enter an expression for identifying UPDATE operations.Example (based on Figure "Example of a Table with a Context Column"):case when oper='U' then 1 else 0 end
[Selecting the UPDATE the existing target record option in the Apply Conflicts(page 1034) tab, eliminates the need to provide an UPDATE expression.
Setup and User Guide - Qlik Replicate, November 2021 489

8 Adding and managing source endpoints
l Delete expression - Enter an expression for identifying DELETE operations.Example (based on Figure "Example of a Table with a Context Column"):case when oper='D' then 1 else 0 end
In addition to the DELETE expression, DELETE operations should be carried outas "Soft" deletes. This means that the row is not actually deleted from the table,but rather, marked as "deleted".
6. Select Override connection string parameters to append the connection string with parametersthat are not exposed in the UI. As such parameters are normally not required, they should only beused after consulting with Qlik Support.
Additional settings and summaryIn the Change Processing tab, you can set also set internal parameters, set more options, and view asummary of your settings.
Internal parametersInternal parameters are parameters that are not exposed in the UI. You should only use them if instructedby Qlik Support.
To add internal Qlik Replicate parameters:
1. Click the Internal Parameters link.The Internal Parameters dialog box opens.
2. In the edit box, type the name of the parameter you need to add and then click it.
3. The parameter is added to the table below the search box with its default value.
4. Change the default value as required.
5. To reset the parameter value to its default, click the "Restore default value" icon at the end of therow.
More optionsThese options are not exposed in the UI as they are only relevant to specific versions or environments.Consequently, do not set these options unless explicitly instructed to do so by Qlik Support or productdocumentation.
To set an option, simply copy the option into the Add feature name field and click Add. Then set the valueor enable the option according to the instructions you received.
Settings summaryYou can view a summary of your settings by clicking the Setting Summary link. This is useful if you need tosend a summary of your settings to Qlik Support.
Setup and User Guide - Qlik Replicate, November 2021 490

9 Adding and managing target endpoints
9 Adding and managing target endpointsThis topic describes how to configure target endpoint settings. When you define a replication task, thetarget endpoint is the data repository to which you wish to replicate your data.
In this section:
l Using Actian Vector as a target (page 493)l Using Amazon EMR as a target (page 500)l Using Amazon Kinesis data streams as a target (page 508)l Using Amazon Redshift as a target (page 524)l Using Amazon S3 as a target (page 533)l Using Cloudera Data Platform (CDP) Private Cloud as a target (page 545)l Using Databricks on AWS as a target (page 556)l Using Databricks on Google Cloud as a target (page 565)l Using a file as a target (page 572)l Using Google Cloud BigQuery as a target (page 584)l Using Google Cloud SQL for MySQL as a Target (page 590)l Using Google Cloud SQL for PostgreSQL as a target (page 598)l Using Google Cloud Storage as a target (page 604)l Using Google Dataproc as a target (page 614)l Using Hadoop as a target (page 621)l Using Hortonworks Data Platform (HDP) as a target (page 642)l Using IBM Netezza as a target (page 659)l Using Kafka as a target (page 664)l Using a Log Stream target (page 687)l Using MapR Streams as a target (page 689)l Using Microsoft APS PDW as a target (page 704)l Using Microsoft Azure ADLS as a target (page 709)l Using Microsoft Azure Database for MySQL as a target (page 720)l Using Microsoft Azure Database for PostgreSQL as a target (page 728)l Using Microsoft Azure Databricks as a target (page 734)l Using Microsoft Azure Databricks Delta as a target (page 743)l Using Microsoft Azure Event Hubs as a target (page 749)l Using Microsoft Azure HDInsight as a target (page 764)l Using Microsoft Azure Synapse Analytics as a target (page 773)l Using Microsoft Azure SQL Database as a target (page 781)l Using Microsoft SQL Server as a target (page 788)l Using a MySQL-based database as a target (page 796)l Using ODBC to connect to a target (page 804)l Using Oracle as a target (page 810)
Setup and User Guide - Qlik Replicate, November 2021 491

9 Adding and managing target endpoints
l Using Pivotal Greenplum as a target (page 818)l Using a PostgreSQL-Based database as a target (page 833)l Using Qlik Cloud Landing as a target (page 839)l Using SAP HANA as a target (page 846)l Using SAP Sybase ASE as a target (page 850)l Using SAP Sybase IQ as a target (page 856)l Using SingleStore as a target (page 861)l Using Snowflake on AWS as a target (page 868)l Using Snowflake on Azure as a target (page 877)l Using Snowflake on Google as a target (page 885)l Using Teradata Database as a target (page 893)l Using Vertica as a target (page 903)
Setup and User Guide - Qlik Replicate, November 2021 492

9 Adding and managing target endpoints
9.1 Using Actian Vector as a targetThis section describes how to set up and use an Actian Vector database as a target in a replication task.
In this section:
l Prerequisites (page 494)l Limitations (page 495)l Permissions (page 495)l Actian Vector data types (page 495)l Setting general connection properties (page 497)l Setting advanced connection properties (page 498)
Setup and User Guide - Qlik Replicate, November 2021 493

9 Adding and managing target endpoints
PrerequisitesAn Actian Vector database with the tables that are being used for replication must be available to thesystem. Qlik Replicate supports using an Actian Vector database on both Windows and Linux.
Actian Vector 3.0 must be installed on the same machine as Qlik Replicate Server. From Actian Vector 3.5,with the addition of remote load support, Replicate and Actian Vector do not need to be installed on thesame machine. When Actian Vector is installed on a remote machine (i.e. not on the Replicate machine),Client Runtime 3.5.1 or later for Linux/Windows needs to be installed on the Replicate machine.
For more information about the requirements for working with Qlik Replicate, see Installing Qlik Replicate(page 38).
The following sections describe the prerequisites necessary to prepare your environment to work with QlikReplicate and an Actian Vector database:
l Actian Vector Windows environment prerequisites (page 494)l Actian Vector Linux client prerequisites (page 494)
Actian Vector Windows environment prerequisitesThe following must be installed:
l Actian Vector database on any computer in your network. Make sure to configure the tables that youneed for replication.
l Actian Vector DBA Tools. This includes the Ingres ODBC driver 3.0 or later. You must install theDBA tools on the same computer as the Actian Vector database.For more information, see the Actian Web site.
Actian Vector Linux client prerequisitesTo set up the Actian Vector client on Linux:
1. Run the Vector client RPM file using yum.
2. Update the /etc/odbcinst.ini file as folllows:
[Ingres]
Driver=/opt/Actian/Vector_Client/ingres/lib/libiiodbcdriver.1.so
DriverODBCVer=3.50
DriverReadOnly=N
DriverType=Ingres
Vendor=Actian Corporation
DontDlClose=1
[Ingres CL]
Driver=/opt/Actian/Vector_Client/ingres/lib/libiiodbcdriver.1.so
DriverODBCVer=3.50
DriverReadOnly=N
DriverType=Ingres
Vendor=Actian Corporation
DontDlClose=1
3. Update the site_arep_login.sh file as follows:
Setup and User Guide - Qlik Replicate, November 2021 494

9 Adding and managing target endpoints
export LD_LIBRARY_PATH=$LD_LIBRARY_PATH:/opt/Actian/Vector_Client/ingres/lib
export II_SYSTEM=/opt/Actian/Vector_Client
4. Restart the Replicate services.
5. Change the working directory to the Vector client installation directory (by default,/opt/Actian/Vector_Client/ingres/bin/). Then run the following command:
export II_SYSTEM=/opt/Actian/Vector_Client
6. Run the ./netutil command and setup login credentials for your Actian Vector database.
Limitationsl The following DDL operations cannot be performed on the Actian Vector database using QlikReplicate:
l Change schema namel Change column typeThe replication task will fail when applying DDL changes that were captured from the sourcebut not supported on the target.
l Full LOB data types are not supported. For information on including Limited-size LOB data types inthe replication, see the Metadata (page 1011) tab section in Customizing tasks (page 929).
PermissionsThe Qlik Replicate user who is working with the Actian Vector database must be registered as a user in theActian Vector database. This is the user that is entered in the dialog box when Setting general connectionproperties (page 497). You must grant Actian Vector account access to this user before confiding thedatabase in Qlik Replicate.
Actian Vector data typesThe Actian Vector database for Qlik Replicate supports most Actian Vector data types. The following tableshows the Actian Vector target data types that are supported when using Qlik Replicate and the defaultmapping from Qlik Replicate data types.
Actian Vector does not support applying changes to binary data types in Batch optimizedapply mode. For more information on Batch optimized apply mode, see Change ProcessingTuning (page 1027).
For information on how to view the data type that is mapped from the source, see the section for the sourcedatabase you are using. For additional information about Qlik Replicate data types, see Replicate datatypes (page 76).
Setup and User Guide - Qlik Replicate, November 2021 495

9 Adding and managing target endpoints
QlikReplicateDataTypes
Actian Vector Data Types
BOOLEAN VARCHAR (length)
BYTES If length is => 1 and =< 16000, then:
VARCHAR (Length in Bytes)
If length is => 16001 and =< 2147483647, then:
VARCHAR (32000)
DATE ANSIDATE
TIME TIME
DATETIME TIMESTAMP
INT1 INTEGER1
INT2 SMALLINT
INT4 INTEGER
INT8 INTEGER8
NUMERIC DECIMAL (p,s)
REAL4 FLOAT4
REAL8 FLOAT
STRING If length is => 1 and =< 32000, then:
VARCHAR (Length)
If length is => 32001 and =< 2147483647, then:
VARCHAR (32000)
UINT1 SMALLINT
UINT2 INTEGER
UINT4 INTEGER8
UINT8 INTEGER8
WSTR If length is => 1 and =< 16000, then:
NVARCHAR (Length)
If length is => 16001 and =< 2147483647, then:
NVARCHAR (16000)
Qlik Replicate and Actian Vector data types
Setup and User Guide - Qlik Replicate, November 2021 496

9 Adding and managing target endpoints
QlikReplicateDataTypes
Actian Vector Data Types
BLOB VARCHAR (16000)
The maximum LOB size in the Metadata (page 1011) tab cannotexceed 15 KB.
NCLOB NVARCHAR (16000)
The maximum LOB size in the Metadata (page 1011) tab cannotexceed 15 KB.
CLOB In Batch optimized apply mode:
VARCHAR (32000)
In Batch optimized apply mode, the maximum LOB size in theMetadata (page 1011) tab cannot exceed 31 KB.
In Transactional apply mode:
VARCHAR (16000)
In Transactional apply mode, the maximum LOB size in the Metadata(page 1011) tab cannot exceed 31 KB.
For more information on Transactional apply and Batch optimized apply, seeChange Processing Tuning (page 1027).
Setting general connection propertiesThis section describes how to configure general connection properties. For an explanation of how toconfigure advanced connection properties, see Setting advanced connection properties.
To add an Actian Vector target endpoint to Qlik Replicate:
1. In Tasks view, click Manage Endpoint Connections to open the Manage Endpoints Connectionsdialog box. Then click the New Endpoint Connection button.
2. In the Name field, type a name for your database. This can be any name that will help to identify thedatabase being used.
3. In the Description field, type a description that helps to identify the Actian Vector database. This isoptional.
Setup and User Guide - Qlik Replicate, November 2021 497

9 Adding and managing target endpoints
4. Select Target as the database role.
5. Select Actian Vector Target as the database Type.
6. In the Server field, enter the hostname or IP address of the machine on which the Actian Vectordatabase is installed.
You can use the Advanced tab to add specific properties and create a custom connectstring. In this case, you do not need to enter information in this tab. For more informationon using the Advanced tab, see Setting advanced connection properties (page 498).
7. Type the Actian Vector authentication information (User name, Password) for the authorized userfor this Actian Vector database. If you do not know this information, see your Actian Vector systemmanager.
l If you are using the Advanced tab to create a custom string, make sure to includethe User Name property. A Password can also be included but is not required.See Setting advanced connection properties (page 498) for more information.
l This information is case sensitive.l If you want to set custom properties for this database, see Setting advancedconnection properties (page 498).
l To determine if you are connected to the database you want to use or if theconnection information you entered is correct, click Test Connection.If the connection is successful a message in green is displayed. If the connectionfails, an error message is displayed at the bottom of the dialog box.To view the log entry if the connection fails, click View Log. The server log isdisplayed with the information for the connection failure. Note that this button isnot available unless the test connection fails.
Setting advanced connection propertiesIn the Advanced tab, you can set the following parameters:
l Max file size (KB): Select or type the maximum file size. When the Actian Vector file reaches thisvalue, the data is loaded by the vmload utility. The default value is 300000 KB.
Internal parametersInternal parameters are parameters that are not exposed in the UI. You should only use them if instructedby Qlik Support.
To add internal Qlik Replicate parameters:
1. Click the Internal Parameters link.The Internal Parameters dialog box opens.
2. In the edit box, type the name of the parameter you need to add and then click it.
3. The parameter is added to the table below the search box with its default value.
Setup and User Guide - Qlik Replicate, November 2021 498

9 Adding and managing target endpoints
4. Change the default value as required.
5. To reset the parameter value to its default, click the "Restore default value" icon at the end of therow.
More optionsThese options are not exposed in the UI as they are only relevant to specific versions or environments.Consequently, do not set these options unless explicitly instructed to do so by Qlik Support or productdocumentation.
To set an option, simply copy the option into the Add feature name field and click Add. Then set the valueor enable the option according to the instructions you received.
Settings summaryYou can view a summary of your settings by clicking the Setting Summary link. This is useful if you need tosend a summary of your settings to Qlik Support.
Setup and User Guide - Qlik Replicate, November 2021 499

9 Adding and managing target endpoints
9.2 Using Amazon EMR as a targetThe following topics describe how to use Amazon EMR as a target endpoint in a Qlik Replicate task:
Hive can be configured to use the AWS Glue Data Catalog as its metastore or its ownmetastore. The metastore that will be used depends on your Amazon EMR Clusterconfiguration and requires no special configuration from a Replicate perspective.
In this section:
l Prerequisites (page 501)l Limitations (page 501)l Change data partitioning on Amazon EMR (page 502)l Amazon EMR endpoint target data types (page 502)l Setting general connection properties (page 503)l Setting advanced connection properties (page 504)
Setup and User Guide - Qlik Replicate, November 2021 500

9 Adding and managing target endpoints
PrerequisitesBefore you begin to work with Amazon EMR as a target in Qlik Replicate, make sure that the followingprerequisites have been met:
l General:l The Amazon S3 bucket you are using must be accessible from the Qlik Replicate machine.l The user specified in the Amazon EMR target endpoint's Hive access settings must haveaccess to HiveServer2.
l ODBC Driver when Replicate Server is running on Windows:
l Install Amazon Hive ODBC driver 2.6.9.1009 or later on the Replicate Server machine.
l ODBC Driver when Replicate Server is running on Linux:
1. Install Amazon Hive ODBC driver 2.6.9.1009 or later on the Replicate Server machine.
2. After the driver is installed, edit the amazon.hiveodbc.ini file as follows:DriverManagerEncoding=UTF-16ODBCInstLib=libodbcinst.so
l Permissions:l The Access type selected in the Amazon EMR endpoint's Storage settings must havewrite access to the specified bucket folder.l Hive table permissions: Replicate requires permissions to perform the followingoperations on Hive tables: CREATE, DROP, DESCRIBE, and ALTER table. ALTERtable may also include RENAME table, ADD/RENAME column, and CREATE/DROPpartitions on tables.
LimitationsThe following limitations apply:
l UPDATE/DELETE DMLs are not supported during change processing. If an UPDATE/DELETEDML was captured on the source, it will be ignored on the target and a warning will be written to thelog. If the Store Changes option is enabled in the task settings, these records will be written to theChange Table.
l Limited LOB support only.l Writing to "special" tables such as tables with partitions, buckets, or skews is not supported.l Dropping columns and changing column data types or the data type length is not supported and willsuspend the table in all cases except for data types that are mapped to STRING. Changes to thedata type length of a data type mapped to STRING (e.g. VARCHAR(50) to VARCHAR(100)) willsimply be ignored.
l Replication of Primary Key metadata is not supported.l The following Control Tables are not supported as they require UPDATE/DELETE operations(which are not supported by the Amazon EMR target endpoint):
l Replication Status (requires UPDATE).Name on target: attrep_status
Setup and User Guide - Qlik Replicate, November 2021 501

9 Adding and managing target endpoints
l Suspended Tables (requires DELETE).Name on target: attrep_suspended_tablesFor more information on Control Tables, see Control tables (page 1015).
l Table and column names can only contain ASCII characters.l Column names cannot contain the '?' symbol. If needed, the '?' symbol can be replaced with a validASCII character using a transformation.
Change data partitioning on Amazon EMRWhen Change Data Partitioning (page 1022) is enabled, the Replicate Change Tables in Hive arepartitioned by the partition_name column. Data files are uploaded to Amazon S3 storage, according tothe maximum size and time definition, and then stored in a directory under the Change Table directory.Whenever the specified partition timeframe ends, a partition is created in Hive, pointing to the Amazon S3storage.
Information about the partitions is written to the attrep_cdc_partitions Control Table.
Amazon EMR endpoint target data typesThe following table shows the Amazon EMR endpoint target data types that are supported when using QlikReplicate and the default mapping from Qlik Replicate data types.
For information on how to view the data type that is mapped from the source, see the section for the sourceendpoint you are using.
For additional information about Qlik Replicate data types, see Replicate data types (page 76).
Qlik Replicate Data Types Amazon EMR Data Types
BOOL BOOLEAN
BYTES STRING
TIME STRING
DATETIME TIMESTAMP
DATE DATE
INT1 TINYINT
INT2 SMALLINT
INT4 INT
INT8 BIGINT
NUMERIC DECIMAL (p,s)
REAL4 FLOAT
Amazon EMR endpoint target data types
Setup and User Guide - Qlik Replicate, November 2021 502

9 Adding and managing target endpoints
Qlik Replicate Data Types Amazon EMR Data Types
REAL8 DOUBLE
STRING VARCHAR (Length)
UINT1 SMALLINT
UINT2 INT
UINT4 BIGINT
UINT8 DECIMAL (20,0)
WSTRING VARCHAR (Length)
BLOB STRING
NCLOB STRING
CLOB STRING
Setting general connection propertiesThis section describes how to configure general connection properties. For an explanation of how toconfigure advanced connection properties, see Setting advanced connection properties.
To add an Amazon EMR target endpoint to Qlik Replicate:
1. In the Qlik Replicate console, click Manage Endpoint Connections to open the Manage EndpointConnections dialog box.For more information on adding an endpoint to Qlik Replicate, see Defining and managingendpoints (page 110).
2. In the Name field, type a name for your endpoint. This can be any name that will help to identify theendpoint being used.
3. In the Description field, type a description that helps to identify the Amazon EMR endpoint. This isoptional.
4. Select Amazon EMR as the endpoint Type.
5. In the Storage section:
a. In the Bucket name field, enter the name of your Amazon S3 bucket.
b. In the Bucket region drop-down list, select the Amazon S3 region where your bucket islocated.
c. From the Access type drop-down list, choose one of the following:l Key pairChoose this method to authenticate with your Access Key and Secret Key.
l IAM Roles for EC2.Choose this method if the machine on which Qlik Replicate is installed is configuredto authenticate itself using an IAM role.For information on IAM roles, see:http://docs.aws.amazon.com/IAM/latest/UserGuide/id_roles.html
Setup and User Guide - Qlik Replicate, November 2021 503
9 Adding and managing target endpoints
d. If you selected Key pair as your access method, in the Access key field, enter the accesskey information for Amazon S3.
e. If you selected Key pair as your access method, in the Secret key field, enter the secret keyinformation for Amazon S3.
f. In the Target folder field, specify the target folder in your Amazon S3 bucket.
The Target folder name can only contain ASCII characters.
6. In the Data Encryption section, choose one of the following:l Nonel Server-Side Encryption with Amazon S3-Managed Keys (SSE-S3). This is the default.l Server-Side Encryption with AWS KMS-Managed Keys (SSE-KMS)This option also requires you to specify your KMS Key ID.For more information on the available sever-side encryption methods, see:http://docs.aws.amazon.com/AmazonS3/latest/dev/serv-side-encryption.html
7. In the Hive Access section:
a. In the Host field, specify the public host name or IP address of the Hive server.
b. In the Port field, optionally change the default port.
c. From the Authentication type drop-down list, choose either Username or Username andPassword and then enter the required information in the designated fields.
d. To access Hive using SSL, select Use SSL and then specify the full path to a CA certificatefile in PEM format in the CA path field.
e. In the Database field, specify the name of the Hive target database.
f. If you configured your Amazon EMR clusters to use the AWS Glue Data Catalog, select theStore table metadata in AWS Glue Data Catalog option.
Setting advanced connection propertiesThe table below describes the settings in the Advanced tab.
Setting Description
File Format Expand this section to specify or view the file format settings.
Target storageformat
Select either Text or Sequence.
When using Text as the target storage format, new lines as part of thedata values are not supported (due to an Apache Hadoop limitation). Bestpractice is to use Sequence as the target storage format.
Advanced tab settings
Setup and User Guide - Qlik Replicate, November 2021 504

9 Adding and managing target endpoints
Setting Description
Field delimiter The delimiter that will be used to separate fields in the target file. The default is \001.Note that field delimiters should be ASCII characters unless they are non-printablecontrol characters, in which case they should be in Octal format (e.g. \247).
Null value The value that will be used to indicate a null value in the target file.
Example (where @ is the null value):
mike,male,295678
sara,female,@
Escapecharacter
The escape character is used to escape the field delimiter character. When a fielddelimiter is escaped, it is interpreted as actual data, and not as a field delimiter.
Example (where \ is the escape character and a comma is the field delimiter):
sunroof\,power-steering
When using Other SerDe: The escape character is used to escape the quotecharacter.
Example (where \ is the escape character and double quotes is the quotecharacter):
"\"sunroof, power-steering\""
Add metadataheader
When the target storage format is set to Text, you can optionally add a header row tothe data files. The header row can contain the source column names and/or theintermediate (i.e. Replicate) data types.
Example of a target file with a header row when both With column names and Withdata types are selected:
Position:DECIMAL(38,0),Color:VARCHAR(10)
1,"BLUE"
2,"BROWN"
3,"RED"
...
File Attributes Expand this section to specify or view the file attributes.
Maximum filesize
Specify the maximum file size of each target file. When the data reaches themaximum size, the file will be closed and written to the specified target folder.
Compress filesusing
Select the compression method to use on Amazon S3 storage.
Setup and User Guide - Qlik Replicate, November 2021 505

9 Adding and managing target endpoints
Setting Description
ChangeProcessing
Expand this section to specify or view change processing settings.
Apply/storechanges whenFile sizereaches
Specify the minimum size of the data required to create a file in idle state.
Apply/storechanges whenElapsed timereaches
Specify the maximum time to wait before applying the changes in idle state.
Proxy Server Expand this section to specify or view proxy settings.
Use proxyserver
Select this option to access Amazon S3 via a proxy server.
Host name The host name of the proxy server.
Port The port via which to access the proxy server.
User name The user name for accessing the proxy server.
Password The password for accessing the proxy server.
Scheme Select which protocol to use to access the server (HTTP or HTTPS). In order to useHTTPS, you must first install the CA certificate that signed the proxy’s certificate onthe Replicate Server machine, as follows:
l On Windows: Add the CA certificate to the Trusted Root CertificationAuthorities store of Local Computer
l On Linux: Add the CA certificate to /etc/pki/tls/certs/ca-bundle.crt
To facilitate rapid delivery of DDL messages, files are uploaded immediately, regardless of thespecified File size reaches or Elapsed time reaches values.
Internal parametersInternal parameters are parameters that are not exposed in the UI. You should only use them if instructedby Qlik Support.
To add internal Qlik Replicate parameters:
1. Click the Internal Parameters link.The Internal Parameters dialog box opens.
2. In the edit box, type the name of the parameter you need to add and then click it.
3. The parameter is added to the table below the search box with its default value.
4. Change the default value as required.
Setup and User Guide - Qlik Replicate, November 2021 506

9 Adding and managing target endpoints
5. To reset the parameter value to its default, click the "Restore default value" icon at the end of therow.
Settings summaryYou can view a summary of your settings by clicking the Setting Summary link. This is useful if you need tosend a summary of your settings to Qlik Support.
Setup and User Guide - Qlik Replicate, November 2021 507

9 Adding and managing target endpoints
9.3 Using Amazon Kinesis data streams as a targetThis section describes how to set up and use Amazon Kinesis Data Streams as a target endpoint in areplication task. In a task with a Amazon Kinesis Data Streams target endpoint, each source record istransformed into a message which is then written (with an optional message key) to a shard in the specifiedstream.
In this section:
l Prerequisites (page 509)l Transaction processing by the consumer (page 510)l Limitations (page 511)l Supported data types (page 512)l Setting general connection properties (page 514)l Setting advanced connection properties (page 516)l The Replicate envelope (page 518)l Metadata and data messages (page 520)
Setup and User Guide - Qlik Replicate, November 2021 508

9 Adding and managing target endpoints
PrerequisitesBefore you can use Amazon Kinesis Data Streams as a target endpoint in a Replicate task, the followingprerequisites must be met:
l Replicate connects to AWS using SSL. This requires an appropriate CA certificate to reside on theReplicate Server machine; otherwise, the connection will fail. The purpose of the CA certificate is toauthenticate the ownership of the AWS server certificate.On Windows, the required CA certificate is always present whereas on Linux it may sometimes bemissing. Therefore, if you are using Replicate for Linux, make sure that the required CA certificateexists in the following location:/etc/pki/tls/certs/ca-bundle.crtIf it does not exist, the simplest solution is to copy the certificates bundle from another Linuxmachine.
l The target streams must already exist before starting the replication task.l Create a stream named attrep_apply_exceptions before starting the replication task. Note that ifthis stream does not exist, the task will always fail when it encounters a data error, regardless of theerror handling policy.For a description of the attrep_apply_exceptions table, see Apply exceptions (page 1138)
l The AWS account specified in the General tab must have the following permissions:
All strings that begin with YOUR should be replaced with the actual value.
{
"Version": "2012-10-17",
"Statement": [
{
"Sid": "VisualEditor0",
"Effect": "Allow",
"Action": [
"kinesis:PutRecord",
"kinesis:PutRecords",
"kinesis:DescribeStream"
],
"Resource": "arn:aws:kinesis:YOUR_AWS_REGION:YOUR_ACCOUNT_
NAME:stream/YOUR_STREAM_NAME"
},
{
"Sid": "VisualEditor1",
"Effect": "Allow",
"Action": "kinesis:ListStreams",
"Resource": "*"
}
]
}
Setup and User Guide - Qlik Replicate, November 2021 509

9 Adding and managing target endpoints
Additionally, if the Kinesis Stream was configured in Amazon to encrypt the data at rest, thefollowing additional KMS permissions should be set:{
"Version": "2012-10-17",
"Statement": [
{
"Sid": "VisualEditor0",
"Effect": "Allow",
"Action": [
"kms:Encrypt",
"kms:DescribeKey"
],
"Resource": "arn:aws:kms:YOUR_AWS_REGION:YOUR_ACCOUNT_
NAME:key/YOUR_KEY_GUID"
},
{
"Sid": "VisualEditor1",
"Effect": "Allow",
"Action": "kms:GenerateDataKey",
"Resource": "*"
}
]
}
Transaction processing by the consumerWhen configuring the Qlik ReplicateKafka endpoint, users can configure various settings that affect wheremessages are published within the Kafka infrastructures (topics/partitions).
During a task's CDC stage, committed changes that are detected by the Qlik Replicate source endpoint aregrouped by transaction, sorted internally in chronological order, and then propagated to the targetendpoint. The target endpoint can handle the changes in various ways such as applying them to the targettables or storing them in dedicated Change Tables.
Each CDCmessage has both a transaction ID as well as change sequence. As the change sequence is amonotonically growing number, sorting events by change sequence always achieves chronological order.Grouping the sorted events by transaction ID then results in transactions containing chronologically sortedchanges.
However, as Kafka is a messaging infrastructure, applying changes is not feasible while storing changes intables is meaningless. The ReplicateKafka endpoint, therefore, takes a different approach, which is toreport all transactional events as messages.
How it worksEach change in the source system is translated to a data message containing the details of the changeincluding the transaction ID and change sequence in the source. The data message also includes thechanged columns before and after the change.
Setup and User Guide - Qlik Replicate, November 2021 510
9 Adding and managing target endpoints
Once a data message is ready to be sent to Kafka, the topic and partition it should go to are determined byanalyzing the endpoint settings and any transformation settings. For example, the user might decide toconfigure the endpoint in such a way that every table is sent to a different topic and set the partitionstrategy to "Random", meaning that each message (within the same table) will be sent to a differentpartition.
Transaction consistency from a consumer perspectiveIf maintaining transaction consistency is important for the consumer implementation, it means thatalthough the transaction ID exists in all data messages, the challenge is to gather the messages in a waythat would facilitate identifying a whole transaction. An additional challenge is getting the transaction in theoriginal order they were committed, which could be an even greater challenge if transactions are spreadacross multiple topics and partitions.
Although the simple way may work, it’s not very efficient at the task level as all messages end up in thesame topic and partition, not necessarily utilizing the full parallelism of the Kafka cluster. This may be anon-issue if there are multiple tasks, each taking advantage of a different topic/partition. In such asscenario, the gathering of messages from those tasks may very well utilize the cluster optimally.
The more generic way where data may be spread over multiple topics and partitions means that someintermediate buffer such as memory, a table in a relational database, or even other topics would need to beused to collect information about transactions. Then, the transactions would need to be rebuilt byperiodically (every few minutes/hours) sorting the events collected from Replicate’s Kafka output by thechange sequence and grouping them by transaction ID.
LimitationsWhen defining a task with Amazon Kinesis Data Streams as the target endpoint, the following limitationsapply:
l The Amazon Kinesis Data Streams target endpoint does not support unlimited LOB size. Therefore,when replicating from source tables with LOB columns, do not select the Allow unlimited LOB sizeoption.For more information on defining LOB settings, see Target metadata (page 1011).
l Batch optimized apply mode is not supported. If this mode is set, the task will automatically switchto Transactional apply mode and issue an appropriate warning.For more information on these modes, see Change Processing Tuning (page 1027).
l Store Changes replication mode is not supported.For more information on Store Changes mode, see Adding tasks (page 105).
l The Ignore ALTER Apply Changes setting is not supported for changes to source data types andtable renaming.
l Column names must begin with [A-Za-z_] (letters or an underscore) followed by [A-Za-z0-9_](letters, digits, or an underscore). For example, _Test_ is a valid column name whereas &Test isnot.If a source column name does not adhere to this rule, then a transformation should be used torename the column.
Setup and User Guide - Qlik Replicate, November 2021 511

9 Adding and managing target endpoints
l The Drop and Create table Target Table Preparation option is not supportedl The Truncate before loading Target Table Preparation option is not supportedl The DDL History and Change Data Partitioning Control tables are not supportedl DDL Changes: Dropping or renaming a table is not supported
Supported data typesThe following table shows the default mapping from Qlik Replicate data types to Amazon Kinesis DataStreams data types.
For information on source data type mappings, see the section for the source endpoint you are using.
For additional information about Qlik Replicate data types, see Replicate data types (page 76).
When using the JSONmessage format, binary values are represented as hexadecimal digits.
Qlik ReplicateData TypesAmazon Kinesis Data Streams Target Data Types inSchema Messages
DATE DATE
TIME TIME
DATETIME DATETIME
BYTES BYTES (length)
BLOB BLOB
REAL4 REAL4 (7)
REAL8 REAL8 (14)
INT1 INT1 (3)
INT2 INT2 (5)
INT4 INT4 (10)
INT8 INT8 (19)
UINT1 UINT1 (3)
UINT2 UINT2 (5)
UINT4
Values larger than 2^31-1are not supported.
UINT4 (10)
Supported data types
Setup and User Guide - Qlik Replicate, November 2021 512
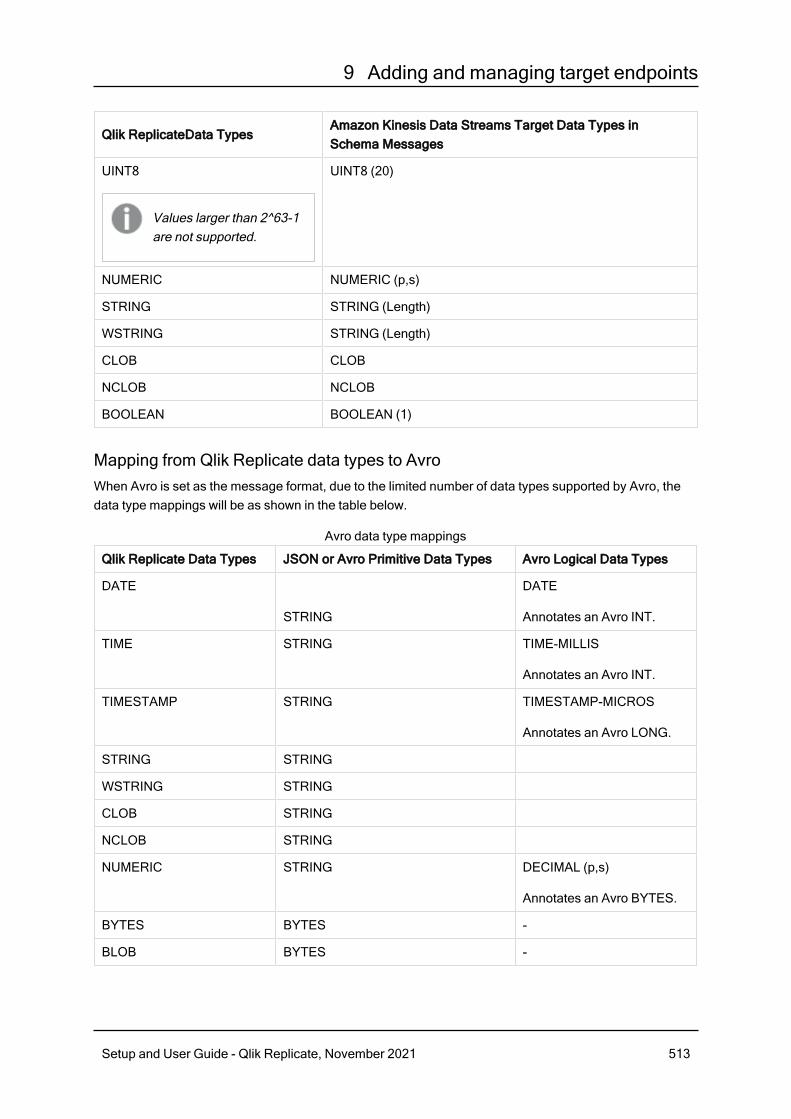
9 Adding and managing target endpoints
Qlik ReplicateData TypesAmazon Kinesis Data Streams Target Data Types inSchema Messages
UINT8
Values larger than 2^63-1are not supported.
UINT8 (20)
NUMERIC NUMERIC (p,s)
STRING STRING (Length)
WSTRING STRING (Length)
CLOB CLOB
NCLOB NCLOB
BOOLEAN BOOLEAN (1)
Mapping from Qlik Replicate data types to AvroWhen Avro is set as the message format, due to the limited number of data types supported by Avro, thedata type mappings will be as shown in the table below.
Qlik Replicate Data Types JSON or Avro Primitive Data Types Avro Logical Data Types
DATE
STRING
DATE
Annotates an Avro INT.
TIME STRING TIME-MILLIS
Annotates an Avro INT.
TIMESTAMP STRING TIMESTAMP-MICROS
Annotates an Avro LONG.
STRING STRING
WSTRING STRING
CLOB STRING
NCLOB STRING
NUMERIC STRING DECIMAL (p,s)
Annotates an Avro BYTES.
BYTES BYTES -
BLOB BYTES -
Avro data type mappings
Setup and User Guide - Qlik Replicate, November 2021 513

9 Adding and managing target endpoints
Qlik Replicate Data Types JSON or Avro Primitive Data Types Avro Logical Data Types
REAL4 FLOAT -
REAL8 DOUBLE -
INT1 INT -
INT2 INT -
INT4 INT -
UINT1 INT -
UINT2 INT -
UINT4 LONG -
INT8 LONG
UINT8 STRING DECIMAL (20,0)
Annotates an Avro BYTES.
BOOLEAN BOOLEAN -
Setting general connection propertiesThis section describes how to configure general connection properties. For an explanation of how toconfigure advanced connection properties, see Setting advanced connection properties.
To define the general connection properties:
1. Click the Manage Endpoint Connections toolbar button.The Manage Endpoints Connections dialog box opens.
2. Click the New Endpoint Connection toolbar button.The Name, Description, Type and Role fields are displayed on the right.
3. In the Name field, specify a display name for the endpoint.
4. In the Description field, optionally type a description for the Kafka endpoint.
5. Select Target as the endpoint Role.
6. Select Amazon Kinesis Data Streams as the endpoint Type.The dialog box is divided into General and Advanced tabs.
7. In the Access Details section, set the following properties:Region: Select your Amazon Kinesis Data Streams region.Access options: Choose one of the following:
l Key pairChoose this method to authenticate with your Access Key and Secret Key.
l IAM Roles for EC2.Choose this method if the machine on which Qlik Replicate is installed is configured toauthenticate itself using an IAM role.For information on IAM roles, see:http://docs.aws.amazon.com/IAM/latest/UserGuide/id_roles.html
Setup and User Guide - Qlik Replicate, November 2021 514

9 Adding and managing target endpoints
Access key: If you selected Key pair as your access method, enter your access key for AmazonKinesis Data Streams.Secret key: If you selected Key pair as your access method, enter your secret key for AmazonKinesis Data Streams.
8. In the Message Properties section, select JSON or Avro as the message Format.
Qlik provides an Avro Message Decoder SDK for consuming Avro messages producedby Qlik Replicate. You can download the SDK together with the Avro Message DecoderDeveloper's Guide as a ZIP file from the Customer Zone.An understanding of the Qlik envelope schema is a prerequisite for consuming Avromessages produced by Qlik Replicate. If you do not wish to use the SDK, see The QlikEnvelope for a description of the Qlik envelope schema.
9. In the Data Message Publishing section, set the following properties:
a. In the Publish the data to field, choose one of the following:l Specific stream - to publish the data to a single stream. Either type a stream name oruse the browse button to select the desired stream.
l Separate stream for each table - to publish the data to multiple streamscorresponding to the source table names.The target stream name consists of the source schema name and the source tablename, separated by a period (e.g. "dbo.Employees"). The format of the target streamname is important as you will need to prepare these streams in advance.
b. From the Partition strategy drop-down list, field, select either Random or By Partition Key.If you select Random, each message will be written to a randomly selected partition. If youselect By Partition Key, messages will be written to partitions based on the selectedPartition key (described below).
c. From the Partition key drop-down list, field, select one of the following:
The partition key is represented as a string, regardless of the selected datamessage format (JSON/Avro).
l Schema and table name - For each message, the partition key will contain acombination of schema and table name (e.g. "dbo+Employees").Messages consisting of the same schema and table name will be written to the samepartition.
l Primary key columns - For each message, the partition key will contain the value ofthe primary key column.Messages consisting of the same primary key value will be written to the samepartition.
10. In the Metadata Message Publishing section, specify whether or where to publish the messagemetadata.From the Publish drop-down list, select one of the following options:
l Do not publish metadata messages.l Publish metadata messages to a dedicated metadata stream
Setup and User Guide - Qlik Replicate, November 2021 515

9 Adding and managing target endpoints
If you select this option, either type the Specific stream name or use the Browse button toselect the desired stream.
It is strongly recommended not to publish metadata messages to the samestream as data messages.
Overriding the default settingsA transformation can be defined that overrides the topic and message key settings defined in the Generaltab.
Before you can define such a transformation, you first need to add a source endpoint to thetask and select the tables you want to replicate.
To define a transformation:
1. Open the task you defined.
2. If you are defining a transformation for a single table, select one of the source tables. Otherwise,skip to Step 3.
3. Define a transformation that adds one of the following columns:
The columns listed below (prefixed with a $) instruct Replicate to route the message tothe desired stream and will not be included in the actual message itself.
l $stream - To write messages to a specific stream.l $key - To create a custom message key.
For information on creating a transformation for a single table, see Defining transformations for asingle table/view (page 931).For information on creating a global transformation rule, see Starting the Global TransformationRules wizard (page 955).
4. Define an expression for the new column that returns the following values:l For a $stream column, the expression should return the topic name.l For a $key column, the expression should return the message key contents. Note that theexpression must return a non-empty value.
For information on creating expressions, see Using the Expression Builder (page 985).
Setting advanced connection propertiesIn the Advanced tab, you can set the following advanced properties for the Amazon Kinesis Data Streamstarget endpoint:
Setup and User Guide - Qlik Replicate, November 2021 516

9 Adding and managing target endpoints
Option Description
MessageMaximumSize
In the Message maximum size field, specify the maximum size of messages thatAmazon Kinesis Data Streams is configured to receive (message.max.bytes).Replicate will not send messages larger than the maximum size.
Use proxyserver
Select this option to access Amazon Kinesis Data Streams via a proxy server.
Host name The host name of the proxy server.
Port The port via which to access the proxy server.
User name The user name for accessing the proxy server.
Password The password for accessing the proxy server.
Scheme Select which protocol to use to access the server (HTTP or HTTPS). In order to useHTTPS, you must first install the CA certificate that signed the proxy’s certificate on theReplicate Server machine, as follows:
l On Windows: Add the CA certificate to the Trusted Root Certification Authoritiesstore of Local Computer
l On Linux: Add the CA certificate to /etc/pki/tls/certs/ca-bundle.crt
Connection properties
Internal parametersInternal parameters are parameters that are not exposed in the UI. You should only use them if instructedby Qlik Support.
To add internal Qlik Replicate parameters:
1. Click the Internal Parameters link.The Internal Parameters dialog box opens.
2. In the edit box, type the name of the parameter you need to add and then click it.
3. The parameter is added to the table below the search box with its default value.
4. Change the default value as required.
5. To reset the parameter value to its default, click the "Restore default value" icon at the end of therow.
More optionsThese options are not exposed in the UI as they are only relevant to specific versions or environments.Consequently, do not set these options unless explicitly instructed to do so by Qlik Support or productdocumentation.
To set an option, simply copy the option into the Add feature name field and click Add. Then set the valueor enable the option according to the instructions you received.
Setup and User Guide - Qlik Replicate, November 2021 517
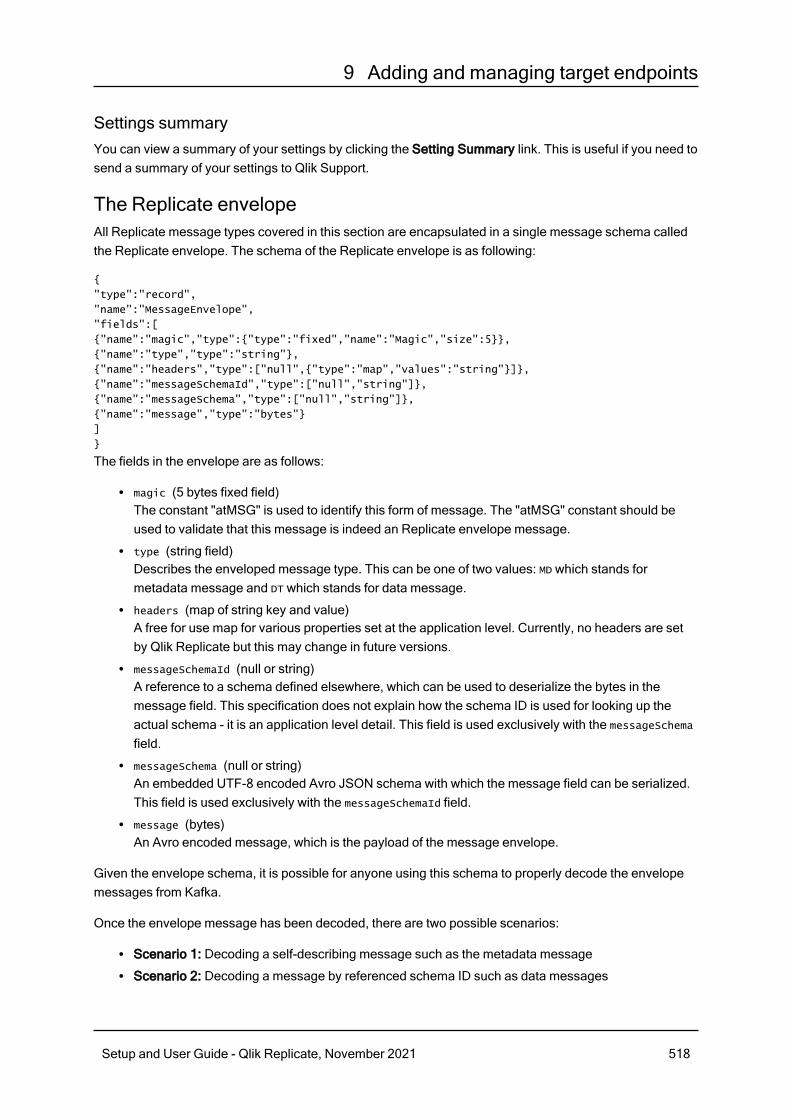
9 Adding and managing target endpoints
Settings summaryYou can view a summary of your settings by clicking the Setting Summary link. This is useful if you need tosend a summary of your settings to Qlik Support.
The Replicate envelopeAll Replicate message types covered in this section are encapsulated in a single message schema calledthe Replicate envelope. The schema of the Replicate envelope is as following:
{
"type":"record",
"name":"MessageEnvelope",
"fields":[
{"name":"magic","type":{"type":"fixed","name":"Magic","size":5}},
{"name":"type","type":"string"},
{"name":"headers","type":["null",{"type":"map","values":"string"}]},
{"name":"messageSchemaId","type":["null","string"]},
{"name":"messageSchema","type":["null","string"]},
{"name":"message","type":"bytes"}
]
}
The fields in the envelope are as follows:
l magic (5 bytes fixed field)The constant "atMSG" is used to identify this form of message. The "atMSG" constant should beused to validate that this message is indeed an Replicate envelope message.
l type (string field)Describes the enveloped message type. This can be one of two values: MD which stands formetadata message and DT which stands for data message.
l headers (map of string key and value)A free for use map for various properties set at the application level. Currently, no headers are setby Qlik Replicate but this may change in future versions.
l messageSchemaId (null or string)A reference to a schema defined elsewhere, which can be used to deserialize the bytes in themessage field. This specification does not explain how the schema ID is used for looking up theactual schema - it is an application level detail. This field is used exclusively with the messageSchema
field.l messageSchema (null or string)An embedded UTF-8 encoded Avro JSON schema with which the message field can be serialized.This field is used exclusively with the messageSchemaId field.
l message (bytes)An Avro encoded message, which is the payload of the message envelope.
Given the envelope schema, it is possible for anyone using this schema to properly decode the envelopemessages from Kafka.
Once the envelope message has been decoded, there are two possible scenarios:
l Scenario 1: Decoding a self-describing message such as the metadata messagel Scenario 2: Decoding a message by referenced schema ID such as data messages
Setup and User Guide - Qlik Replicate, November 2021 518

9 Adding and managing target endpoints
The method for logically decoding messages in both scenarios is described below.
Decoding a self-describing messageWhen the messageSchema field is not null, it means the message field can be decoded using the schemaincluded in the messageSchema field. This is fairly straightforward to perform programatically since the onlything you need to usually supply Avro is a schema and a message, both of which are provided in theenvelope message.
The Replicate metadata messages which include both table metadata, lineage and data schemadescription (to be referenced later by data messages) are enveloped in the self-describing envelope.
Decoding a message by referenced schema IDAvro schemas are JSON documents which can be quite large, usually much larger than the data encodedby Avro conforming to the schema. For example, a schema of a 10 column table could be a JSONdocument of more than 100 characters while an actual row encoding of 10 columns may be only 10 bytes(depending of course on the type and length of fields). It is therefore typically not recommended to includeschema and data together in a Kafka message because the schema information is redundant and is thesame for all data messages while the actual data is the only thing which differs between data messages.
To avoid sending schema with each data message, each schema has a 32 bytes long ID. When a datamessage based on a previously sent data message schema (via the metadata message) is constructed,the messageSchema field is set to null and the messageSchemaId field is set to the 32 bytes ID of the schemainstead. The application responsibility is to locate the data schema sent earlier in the metadata messageand use that schema to decode the data message contained in the message field.
Typical consumer logicA typical scenario involving Kafka involves Qlik Replicate as the Producer of messages into Kafka andcustomer code as the Consumer. Qlik Replicate offers the ability to define a specific topic as the schematopic and different topics for the table data.
The customer's consumer code should read metadata messages from the schema topic and then save thedata schemas and any other information the consumer wishes to access later in a customer defined zone.Another set of customer consumers should read data messages from the various data topics, and accessthe data schemas zone as required to retrieve the data schemas required for decoding the data messages.
When consuming data messages and metadata messages from several topics and partitions in a multi-thread/process manner, a situation may arise where a given consumer may attempt to read a datamessage before the corresponding metadata message has been read. As it is not possible to read a datamessage before its corresponding metadata message, the consumer's logic should wait a reasonableamount of time until the corresponding metadata message has been read. If the metadata message is stillnot available after waiting for a reasonable amount of time, the consumer should handle this as anunexpected error and activate the planned error policy. An example of such a policy could be saving themessage in a dedicated “delayed” topic for later processing.
As a rule of thumb, the number of metadata messages will be much lower (in the magnitude of 1:10000 ormore) than the number of data messages. So, assuming a metadata consumer is active, the gap betweenmetadata message and data message should be no more than a few seconds (usually, milliseconds).
Setup and User Guide - Qlik Replicate, November 2021 519

9 Adding and managing target endpoints
Metadata and data messagesThis topic describes the structure and content of the Metadata and Data messages produced by theReplicate Amazon Kinesis Data Streams endpoint.
Field Type Description
schemaId String The unique identifier of the Avro schema.
lineage Structure Information about the origin of the data (Replicate server, task,table, and so on)
server String The name of the Replicate server.
task String The name of the task.
schema String The name of the database schema.
table String The name of the table.
tableVersion Integer Replicate maintains a version number of the structure of sourcetable. Upon DDL change on the source, the version is increasedand a new metadata message is produced.
timestamp String The date and time of the metadata message.
tableStructure Structure Describes the structure of the table.
tableColumns Structure Contains the list of columns and their properties.
{columns} Structure For each column, a record with the below properties.
ordinal Integer The position of the column in the record.
type String The column data type.
length Integer The maximum size of the data (in bytes) permitted for thecolumn.
precision Integer For NUMERIC data type, the maximum number of digitsrequired to represent the value.
scale Integer For NUMERIC data type, the maximum number of digits to theright of the decimal point permitted for a number.
primaryKeyPosition Integer The position of the column in the table’s Primary Key. or UniqueIndex. The value is zero if the column is not part of the table’sPrimary Key.
dataSchema String The Avro schema for deserializing the Data messages.
Metadata message
Setup and User Guide - Qlik Replicate, November 2021 520

9 Adding and managing target endpoints
Field Type Description
headers Structure Information about the current record.
operation Enum The operation type.Full Load (Replicate transfers the existing records fromsource table)
REFRESH – insert of a record during Full Load stage.
CDC (Replicate transfers the changes from source table)
INSERT – insertion of new record
UPDATE – update of existing record
DELETE – deletion of a record
changeSequence String A monotonically increasing change sequencer that iscommon to all change tables of a task.
Use this field to order the records in chronological order.
Applicable to CDC operations.
timestamp String The original change UTC timestamp.
Applicable to CDC operations.
streamPosition String The source CDC stream position.
Applicable to CDC operations.
transactionId String The ID of the transaction that the change record belongsto.
Use this field to gather all changes of a specific transaction.
Applicable to CDC operations.
Data message
Setup and User Guide - Qlik Replicate, November 2021 521

9 Adding and managing target endpoints
Field Type Description
changeMask String Indicates which data columns were changed in the sourcetable.
The change mask is a string of hexadecimal digits,representing a bitmask of data columns in little-endianorder. The bit position in the change mask is based on theordinal of the column in the metadata message of thattable.
This means that if there are 10 data columns, they occupybits 0 to 9 in the bitmask.
If UPDATE mask is 0B hexadecimal, which is 1011 binary –it means that the columns at ordinals 1, 2 and 4 werechanged.
The following describes the bit semantics:
l For INSERT records, all the inserted columns havethe associated bits set.
l For DELETE records, only primary-key (or uniqueindex) columns have the associated bits set. Thisallows an applier to construct a DELETE statementwithout having to find the primary key fields fromanother source.
l For UPDATE records, each column with a changedvalue will have the associated bit set.
LOB columns are not included in thechangeMask bit.
Setup and User Guide - Qlik Replicate, November 2021 522
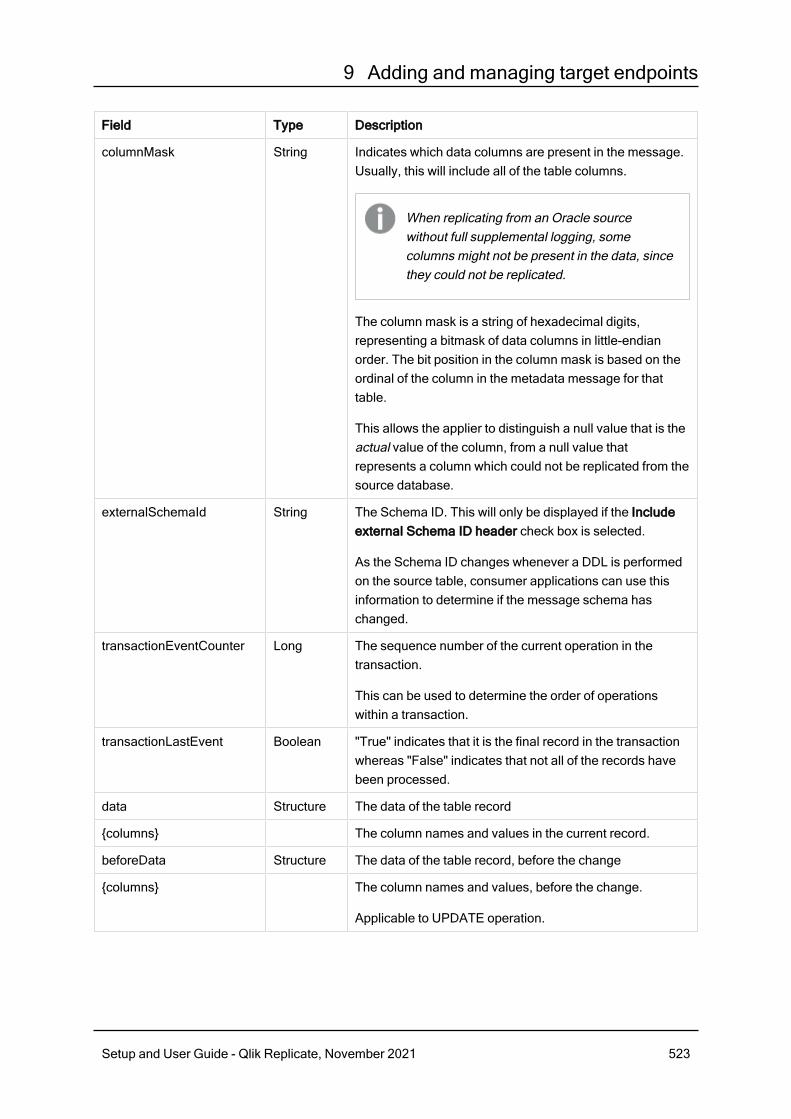
9 Adding and managing target endpoints
Field Type Description
columnMask String Indicates which data columns are present in the message.Usually, this will include all of the table columns.
When replicating from an Oracle sourcewithout full supplemental logging, somecolumns might not be present in the data, sincethey could not be replicated.
The column mask is a string of hexadecimal digits,representing a bitmask of data columns in little-endianorder. The bit position in the column mask is based on theordinal of the column in the metadata message for thattable.
This allows the applier to distinguish a null value that is theactual value of the column, from a null value thatrepresents a column which could not be replicated from thesource database.
externalSchemaId String The Schema ID. This will only be displayed if the Includeexternal Schema ID header check box is selected.
As the Schema ID changes whenever a DDL is performedon the source table, consumer applications can use thisinformation to determine if the message schema haschanged.
transactionEventCounter Long The sequence number of the current operation in thetransaction.
This can be used to determine the order of operationswithin a transaction.
transactionLastEvent Boolean "True" indicates that it is the final record in the transactionwhereas "False" indicates that not all of the records havebeen processed.
data Structure The data of the table record
{columns} The column names and values in the current record.
beforeData Structure The data of the table record, before the change
{columns} The column names and values, before the change.
Applicable to UPDATE operation.
Setup and User Guide - Qlik Replicate, November 2021 523

9 Adding and managing target endpoints
9.4 Using Amazon Redshift as a targetThis section describes how to set up and use Amazon Redshift as a target in a replication task. AmazonRedshift is located in the cloud and is accessed through an Amazon Web Services (AWS) account.
In this section:
l Introducing the Amazon Redshift target endpoint for Qlik Replicate (page 525)l Limitations (page 525)l Amazon Redshift database prerequisites (page 525)l Amazon Redshift data types (page 527)l Setting general connection parameters (page 529)l Setting advanced connection properties (page 530)
Setup and User Guide - Qlik Replicate, November 2021 524

9 Adding and managing target endpoints
Introducing the Amazon Redshift target endpoint for Qlik ReplicateAmazon Redshift is a fully-managed petabyte-scale data warehouse service in the cloud.
In the first stage of the replication process, Qlik Replicate moves the data files created by the sourcedatabase into an Amazon S3 bucket. The files are then loaded into the proper tables in the AmazonRedshift data warehouse (using the "copy" command).
The Amazon Redshift database provides full automation for:
l Schema generation and data type mappingl Full load of source database tablesl Incremental load of changes made to source tablesl Application of DDL changes made to the source tables.l Synchronization between full load and CDC processes.
Manual control is also available if needed.
LimitationsWhen using the Amazon Target endpoint, the following limitation(s) apply:
l The ALTER TABLE <NAME> MODIFY COLUMN <NAME> <DATA_TYPE> DDL is not supported.l The Allow unlimited LOB size option in the Target Metadata task settings is not supported.
Amazon Redshift database prerequisitesThe following sections describe the prerequisites necessary for working with the Amazon Redshiftdatabase:
l Get started with Amazon Redshift (page 525)l Sign up for an Amazon S3 Bucket (page 526)l Security (page 526)
Get started with Amazon RedshiftOnce you register for an Amazon Web Services (AWS) account, you can launch an Amazon Redshiftcluster and download the required SQL client tools. The following describes what you need to do to getstarted using Amazon Redshift as a Qlik Replicate target database.
l Sign up for an Amazon Web Services account. Then use the AWSManagement Console to launchan Amazon Redshift cluster. You should note the basic information about your AWS account andyour Amazon Redshift cluster, such as your password and user name. You will need thisinformation to configure Qlik Replicate to work with the Amazon Redshift database. For moreinformation, see Setting general connection parameters (page 529).
l The time on the Qlik Replicate Server machine must be accurate.
Setup and User Guide - Qlik Replicate, November 2021 525
9 Adding and managing target endpoints
l Download and install the Windows or Linux SQL client tools (according to your Replicate Serverplatform) necessary to connect to the Amazon Redshift cluster. Qlik Replicate requires that youdownload Amazon Redshift (x64) version 1.4.34.1000 or later.
On Linux, after installing the ODBC driver, edit the /etc/odbcinst.ini file as follows:
[ODBC Drivers]Amazon Redshift (x64)=Installed
and[Amazon Redshift (x64)]Description=Amazon Redshift ODBC Driver (64-bit)Driver=/opt/amazon/redshiftodbc/lib/64/libamazonredshiftodbc64.so
For a list of drivers supported by Amazon Redshift, seehttp://docs.aws.amazon.com/redshift/latest/mgmt/configure-odbc-connection.html.By default, Qlik Replicate uses the Amazon Redshift (x64) driver. If you use a different driver, youmust change this in the Amazon Redshift database settings in the Qlik Replicate Console. For moreinformation, see Setting advanced connection properties (page 530).
To avoid conflicts when installing the driver on a Linux machine, Qlik Replicate must beinstalled before you install the driver. Install the Amazon Redshift ODBC driver with --force in the command, as in the following example:rpm -ivh AmazonRedshiftODBC-64bit-1.4.34.1000-1.x86_64.rpm --
force
Once the driver is installed, edit the amazon.redshiftodbc.ini file as follows:DriverManagerEncoding=UTF-16ODBCInstLib=libodbcinst.so
For information on signing up for an Amazon Web Services account, launching an Amazon Redshiftcluster, and installing the client tools, see the Amazon Redshift Getting Started page athttp://docs.aws.amazon.com.
Sign up for an Amazon S3 BucketYou need to have an Amazon S3 bucket, preferably (for best performance) located in your AmazonRedshift cluster region. You must be able to access your Amazon S3 bucket directly from the machine.
For information on signing up for Amazon S3, see http://aws.amazon.com/s3/.
l Bucket access credentials: Make a note of the bucket name, region, access key and secret accesskey - you will need to provide them in the Amazon Redshift target endpoint settings.
l Bucket access permissions: requires read/write/delete permissions to the Amazon S3 bucket.
SecurityEnsure that the following security prerequisites have been met:
l Firewall port 5439 (Amazon Redshift Cluster) needs to be opened for outbound communication.
Setup and User Guide - Qlik Replicate, November 2021 526

9 Adding and managing target endpoints
l Replicate connects to AWS using SSL. This requires an appropriate CA certificate to reside on theReplicate Server machine; otherwise, the connection will fail. The purpose of the CA certificate is toauthenticate the ownership of the AWS server certificate.On Windows, the required CA certificate is always present whereas on Linux it may sometimes bemissing. Therefore, if you are using Replicate for Linux, make sure that the required CA certificateexists in the following location:/etc/pki/tls/certs/ca-bundle.crtIf it does not exist, the simplest solution is to copy the certificates bundle from another Linuxmachine.
Amazon Redshift data typesThe Amazon Redshift database for Qlik Replicate supports most Amazon Redshift data types. Thefollowing table shows the Amazon Redshift target data types that are supported when using Qlik Replicateand the default mapping from Qlik Replicate data types.
For information on how to view the data type that is mapped from the source, see the section for the sourcedatabase you are using. For additional information about Qlik Replicate data types, see Replicate datatypes (page 76).
Qlik ReplicateDataTypes
Amazon Redshift Data Types
BOOLEAN BOOL
BYTES VARCHAR (Length)
DATE DATE
TIME VARCHAR(20)
DATETIME If scale is => 0 and =< 6, then:
TIMESTAMP (s)
If scale is => 7 and =< 12, then:
VARCHAR (37)
INT1 INT2
INT2 INT2
INT4 INT4
INT8 INT8
Redshift data types
Setup and User Guide - Qlik Replicate, November 2021 527

9 Adding and managing target endpoints
Qlik ReplicateDataTypes
Amazon Redshift Data Types
NUMERIC If scale is => 0 and =< 37, then:
NUMERIC (p,s)
If scale is => 38 and =< 127, then:
VARCHAR (Length)
REAL4 FLOAT4
REAL8 FLOAT8
STRING If length is => 1 and =< 65535, then:
VARCHAR (Length in Bytes)
If length is => 65535 and =< 2147483647, then:
VARCHAR (65535)
UINT1 INT2
UINT2 INT4
UINT4 INT8
UINT8 NUMERIC (20,0)
WSTRING If length is => 1 and =< 65535, then:
NVARCHAR (Length in Bytes)
If length is => 65536 and =< 2147483647, then:
NVARCHAR (65535)
BLOB VARCHAR (Max LOB Size *2)
The maximum LOB size in the Metadata (page 1011) tabcannot exceed 31 KB.
NCLOB NVARCHAR (Max LOB Size)
The maximum LOB size in the Metadata (page 1011) tabcannot exceed 63 KB.
CLOB VARCHAR (Max LOB Size)
The maximum LOB size in the Metadata (page 1011) tabcannot exceed 63 KB.
Setup and User Guide - Qlik Replicate, November 2021 528

9 Adding and managing target endpoints
About Amazon Redshift LOB support:
Full LOB data types are not supported. For information on including Limited-size LOB datatypes in the replication, see the Metadata (page 1011) tab description in Customizing tasks(page 929).
Setting general connection parametersThis section describes how to configure general connection properties. For an explanation of how toconfigure advanced connection properties, see Setting advanced connection properties.
To add an Amazon Redshift Target to Qlik Replicate:
1. In the Qlik Replicate Console, click Manage Endpoint Connections to open the Manage EndpointsConnections dialog box.
2. In the Manage Endpoint Connections dialog box, click New Endpoint Connection.
3. In the Name field, type a name for your Amazon Redshift data warehouse [service]. This can be anyname that will help to identify your Amazon Redshift database.
4. Optionally, in the Description field, type a description that helps to identify the Amazon Redshifttarget database.
5. Select Target as the role.
6. Select Amazon Redshift as the Type.
7. Enter the following Amazon Redshift target information:l Redshift cluster: Type the name of the Amazon Redshift cluster you are using.l Port: Type the port number for Amazon Redshift.l User name: Type an Amazon Redshift user name for a registered user.l Password: Type the password for the user entered in the User name field.l Database name: Type the database name or select one from the list of available AmazonRedshift data warehouse [services].
The information for these properties is available from the account page for Amazon Web Services(AWS) with the Amazon Redshift cluster. If you do not have these values, refer to your AWSaccount or the Amazon Redshift System Administrator for your enterprise.
8. Enter the following Amazon S3 staging information. You may need to click the Amazon S3 stagingheader to see the information.
l Bucket name: Type the name of the Amazon S3 bucket where you are copying files to.l Bucket region: Select the Amazon S3 region where the S3 buckets and folders you areusing are hosted. The default value is US East (N. Virginia).Note: The bucket region specified must be the same region where your Amazon Redshiftdatabase is located.
l Access options: Choose one of the following:l Key pairChoose this method to authenticate with your Access Key and Secret Key.When this option is selected, specify the following:
Setup and User Guide - Qlik Replicate, November 2021 529
9 Adding and managing target endpoints
l Access key: Type the access key information for Amazon S3.l Secret key: Type the secret key information for Amazon S3.
l IAM Roles for EC2Choose this method if the machine on which Qlik Replicate is installed is configuredto authenticate itself using an IAM role.For more information about this access option, see:http://docs.aws.amazon.com/IAM/latest/UserGuide/id_roles.html
l Security Token Service (STS)Choose this method to authenticate using SAML 2.0 with Active Directory FederationServices.When this option is selected, specify the following:
l ADFS URL: The URL to an Active Directory Federation Services page,responsible for returning a SAML claims document to be sent over to AWS.
l AD principal name: The principal (user) name to use when identifying againstADFS.The format should be: user.name@domain
l AD principal password: The principal password to use when identifyingagainst ADFS
l IdP ARN: The Amazon Resource Name (ARN) of the Active Directory issuingthe SAML claims document. This is required as it enables AWS to identify thesigner of the SAML document and verify its signature.
l Role ARN: The Amazon Resource Name (ARN) of the specific role thereturned credentials should be assigned.
l Secret key: Type the secret key information for Amazon S3.
For more information about this access option, see:https://docs.aws.amazon.com/IAM/latest/UserGuide/id_roles_providers_saml.html
l Folder: The name of the Amazon S3 folder to where you want your files to be copied.
The information for these properties is available from your Amazon Web Services (AWS) account. Ifyou do not have these values, refer to your AWS account or the Amazon Redshift SystemAdministrator for your enterprise
l This information is case sensitive.l To determine if you are connected to the database you want to use or if the connectioninformation you entered is correct, click Test Connection.If the connection is successful a message in green is displayed. If the connection fails,an error message is displayed at the bottom of the dialog box.To view the log entry if the connection fails, click View Log. The server log is displayedwith the information for the connection failure. Note that this button is not availableunless the test connection fails.
Setting advanced connection propertiesIn the Advanced tab, you can set the following parameters:
Setup and User Guide - Qlik Replicate, November 2021 530

9 Adding and managing target endpoints
l Max file size (MB): Select or type the maximum size of any CSV file used to transfer data toAmazon Redshift. The default value is 1024.
l Number of threads used to upload a file: Select the number of threads used to upload a single file.The minimum number of threads is 1. The maximum value is 64. The default value is 10.
l ODBC driver: The name of the default ODBC driver you are using to connect to Amazon Redshift.The default value is Amazon Redshift (x64).
l Additional ODBC connection properties: Type any additional ODBC connection properties ifrequired.
l Maximum number of files to copy per batch: If you encounter performance issues, try adjustingthis number. The default value is 8.Note that increasing the number may not necessarily improve performance and may even degradeit. This is because increasing the number of files also increase the load on the server machine,which may degrade performance (depending on the hardware).
l Use proxy server: Select this option to access Amazon Redshift via a proxy server.l Host name: The host name of the proxy server.l Port: The port via which to access the proxy server.l User name: The user name for accessing the proxy server.l Password: The password for accessing the proxy server.l Scheme:Select which protocol to use to access the server (HTTP or HTTPS). In order to use HTTPS,you must first install the CA certificate that signed the proxy’s certificate on the ReplicateServer machine, as follows:
l On Windows: Add the CA certificate to the Trusted Root Certification Authoritiesstore of Local Computer
l On Linux: Add the CA certificate to /etc/pki/tls/certs/ca-bundle.crt
Internal parametersInternal parameters are parameters that are not exposed in the UI. You should only use them if instructedby Qlik Support.
To add internal Qlik Replicate parameters:
1. Click the Internal Parameters link.The Internal Parameters dialog box opens.
2. In the edit box, type the name of the parameter you need to add and then click it.
3. The parameter is added to the table below the search box with its default value.
4. Change the default value as required.
5. To reset the parameter value to its default, click the "Restore default value" icon at the end of therow.
More optionsThese options are not exposed in the UI as they are only relevant to specific versions or environments.Consequently, do not set these options unless explicitly instructed to do so by Qlik Support or productdocumentation.
Setup and User Guide - Qlik Replicate, November 2021 531

9 Adding and managing target endpoints
To set an option, simply copy the option into the Add feature name field and click Add. Then set the valueor enable the option according to the instructions you received.
Settings summaryYou can view a summary of your settings by clicking the Setting Summary link. This is useful if you need tosend a summary of your settings to Qlik Support.
Setup and User Guide - Qlik Replicate, November 2021 532

9 Adding and managing target endpoints
9.5 Using Amazon S3 as a targetThis chapter describes how to set up and use Amazon S3 as a target in a replication task.
In this section:
l Prerequisites (page 534)l Amazon S3 target overview (page 535)l Limitations (page 535)l Change data partitioning (page 536)l Amazon S3 target data types (page 536)l Setting general connection properties (page 537)l Setting advanced connection properties (page 541)l Generating reference files (page 544)l Content-type and content-encoding properties (page 544)
Setup and User Guide - Qlik Replicate, November 2021 533

9 Adding and managing target endpoints
PrerequisitesBefore you can use Amazon S3 as a target endpoint in a Replicate task, the following prerequisites mustbe met:
l The time on the Qlik Replicate Server machine must be accurate.
l Replicate connects to AWS using SSL. This requires an appropriate CA certificate to reside on theReplicate Server machine; otherwise, the connection will fail. The purpose of the CA certificate is toauthenticate the ownership of the AWS server certificate.On Windows, the required CA certificate is always present whereas on Linux it may sometimes bemissing. Therefore, if you are using Replicate for Linux, make sure that the required CA certificateexists in the following location:/etc/pki/tls/certs/ca-bundle.crtIf it does not exist, the simplest solution is to copy the certificates bundle from another Linuxmachine.
l You must have an Amazon S3 bucket that is accessible from the Replicate Server machine.For information on signing up for Amazon S3, see http://aws.amazon.com/s3/.
l Bucket access credentials: Make a note of the bucket name, region, access key and secret accesskey - you will need to provide them in the Qlik Replicate Amazon S3 target settings.
l Bucket access permissions: Qlik Replicate requires the following bucket access permissions:
{
"Version": "2012-10-17",
"Statement": [
{
"Sid": "Stmt1497347821000",
"Effect": "Allow",
"Action": [
"s3:GetBucketLocation",
"s3:ListBucket"
],
"Resource": [
"arn:aws:s3:::YOUR_BUCKET_NAME"
]
},
{
"Sid": "Stmt1497344984000",
"Effect": "Allow",
"Action": [
"s3:PutObject",
"s3:GetObject",
"s3:DeleteObject"
],
"Resource": [
"arn:aws:s3:::YOUR_BUCKET_NAME/target_path",
Setup and User Guide - Qlik Replicate, November 2021 534

9 Adding and managing target endpoints
"arn:aws:s3:::YOUR_BUCKET_NAME/target_path/*"
]
}
]
}
Where YOUR_BUCKET_NAME is the name of your bucket and target_path is the intended location of thetarget files in your bucket.
If the target path is the bucket root, just specify “/target_path” with an empty string.
Amazon S3 target overviewWhen using Amazon S3 as a target in a Replicate task, both the Full Load and Change Processing dataare written to data files. Depending on the endpoint settings, data files can be either CSV or JSON files.While the explanations in this section relate to CSV files, the same is true for JSON files
Full Load files are named using incremental counters e.g. LOAD00001.csv, LOAD 00002.csv, etc.whereas Apply Changes files are named using timestamps e.g. 20141029-1134010000.csv.
When Parallel Load is used, the naming convention for Full Load files is slightly different:
LOAD_$(SegmenteID)_$(IncreasingCounter)
Example:
LOAD_1_00000001 | LOAD_1_00000002 | LOAD_1_00000003 | LOAD_2_00000001
| LOAD_2_00000002
When the Create metadata files in the target folder option is enabled, a correspondingmetadata file is created using the same naming format, but with a .dfm extension.
For each source table, a folder is created in the specified Amazon S3 bucket. The data files are created onthe Replicate Server machine and are then uploaded to the specified Amazon S3 bucket once the FileAttributes (Full Load) and Change Processing upload conditions have been met.
DDL handlingWhen a DDL change is captured, Replicate will close the data file and also create a DFM file if the Createmetadata files in the target folder option is enabled. When the next batch of changes arrives, Replicatewill create a new data file containing the changes. Note that the DFM file created for the new data file willmatch the new table structure.
LimitationsThe following limitations apply to the Amazon S3 target endpoint:
Setup and User Guide - Qlik Replicate, November 2021 535
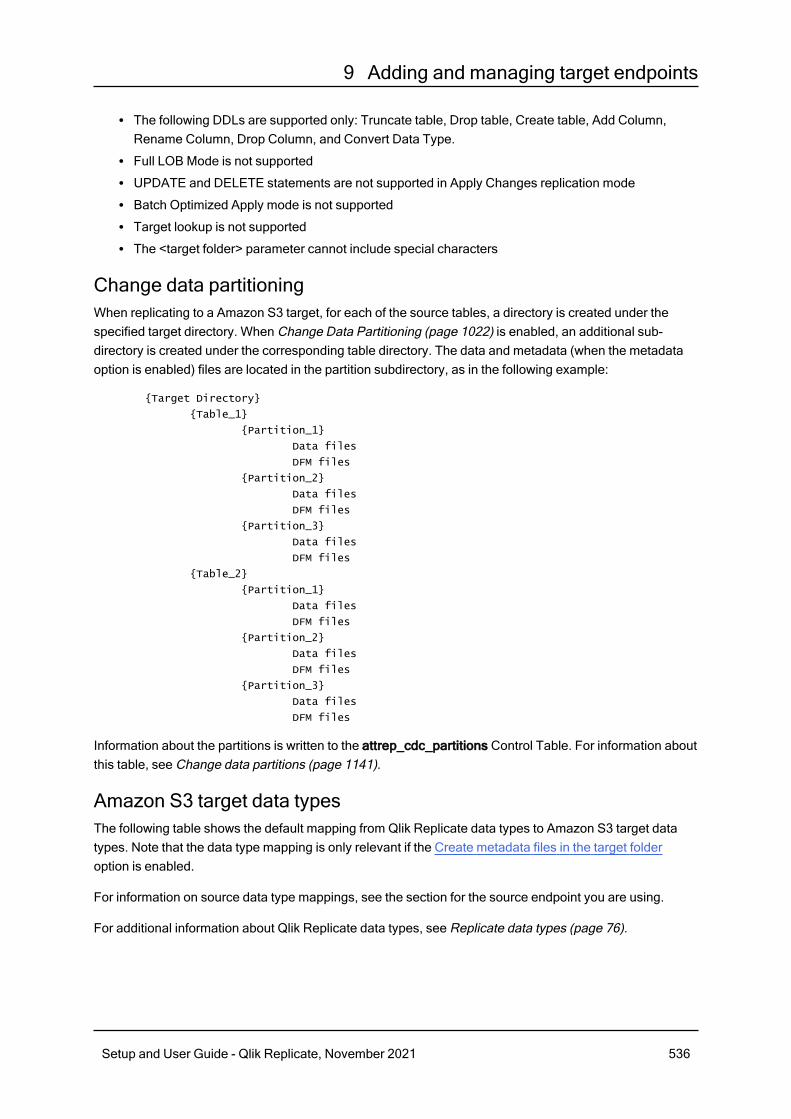
9 Adding and managing target endpoints
l The following DDLs are supported only: Truncate table, Drop table, Create table, Add Column,Rename Column, Drop Column, and Convert Data Type.
l Full LOB Mode is not supportedl UPDATE and DELETE statements are not supported in Apply Changes replication model Batch Optimized Apply mode is not supportedl Target lookup is not supportedl The <target folder> parameter cannot include special characters
Change data partitioningWhen replicating to a Amazon S3 target, for each of the source tables, a directory is created under thespecified target directory. When Change Data Partitioning (page 1022) is enabled, an additional sub-directory is created under the corresponding table directory. The data and metadata (when the metadataoption is enabled) files are located in the partition subdirectory, as in the following example:
{Target Directory}
{Table_1}
{Partition_1}
Data files
DFM files
{Partition_2}
Data files
DFM files
{Partition_3}
Data files
DFM files
{Table_2}
{Partition_1}
Data files
DFM files
{Partition_2}
Data files
DFM files
{Partition_3}
Data files
DFM files
Information about the partitions is written to the attrep_cdc_partitions Control Table. For information aboutthis table, see Change data partitions (page 1141).
Amazon S3 target data typesThe following table shows the default mapping from Qlik Replicate data types to Amazon S3 target datatypes. Note that the data type mapping is only relevant if the Create metadata files in the target folderoption is enabled.
For information on source data type mappings, see the section for the source endpoint you are using.
For additional information about Qlik Replicate data types, see Replicate data types (page 76).
Setup and User Guide - Qlik Replicate, November 2021 536

9 Adding and managing target endpoints
Qlik Replicate Data Types Amazon S3 Target Data Types
DATE DATE
TIME TIME
DATETIME DATETIME
BYTES BYTES (length)
BLOB BLOB
REAL4 REAL4 (7)
REAL8 REAL8 (14)
INT1 INT1 (3)
INT2 INT2 (5)
INT4 INT4 (10)
INT8 INT8 (19)
UINT1 UINT1 (3)
UINT2 UINT2 (5)
UINT4 UINT4 (10)
UINT8 UINT8 (20)
NUMERIC NUMERIC (p,s)
STRING STRING (Length)
WSTRING STRING (Length)
CLOB CLOB
NCLOB NCLOB
BOOLEAN BOOLEAN (1)
Data types
Setting general connection propertiesThis section describes how to configure general connection properties. For an explanation of how toconfigure advanced connection properties, see Setting advanced connection properties.
To add an Amazon S3 target endpoint to Qlik Replicate:
1. In Tasks view, click Manage Endpoint Connections to open the Manage Endpoints Connectionsdialog box. Then click the New Endpoint Connection button. For more information on adding anendpoint to Qlik Replicate, see Defining and managing endpoints (page 110).
2. In the Name field, type a name for your endpoint. This can be any name that will help to identify theendpoint being used.
3. Optionally, in the Description field, type a description that helps to identify the endpoint.
Setup and User Guide - Qlik Replicate, November 2021 537

9 Adding and managing target endpoints
4. Select Target as the endpoint role.
5. Select Amazon S3 as the endpoint Type.
6. Configure the remaining settings in the General tab as described below.
Amazon S3 Storage Data AccessThis section describes Amazon S3's storage options.Bucket name -The name of your Amazon S3 bucket.Bucket region - The Amazon S3 region where your bucket is located.Access options - Choose one of the following:
l Key pairChoose this method to authenticate with your Access Key and Secret Key.
l IAM Roles for EC2.Choose this method if the machine on which Qlik Replicate is installed is configured toauthenticate itself using an IAM role.For more information about this access option, see:http://docs.aws.amazon.com/IAM/latest/UserGuide/id_roles.html
l Security Token Service (STS)Choose this method to authenticate using SAML 2.0 with Active Directory FederationServices.For more information about this access option, see:https://docs.aws.amazon.com/IAM/latest/UserGuide/id_roles_providers_saml.html
Access key - The access key information for Amazon S3.
This option is only available when Key pair is the access option.
Secret key - The secret key information for Amazon S3.
This option is only available when Key pair is the access option.
ADFS URL- The URL to an Active Directory Federation Services page, responsible for returning aSAML claims document to be sent over to AWS.
This option is only available when Security Token Service (STS) is the access option.
AD principal name - The principal (user) name to use when identifying against ADFSThe format should be: user.name@domain
This option is only available when Security Token Service (STS) is the access option.
AD principal password - The principal password to use when identifying against ADFSIdP ARN - The Amazon Resource Name (ARN) of the Active Directory issuing the SAML claimsdocument. This is required as it enables AWS to identify the signer of the SAML document andverify its signature.
Setup and User Guide - Qlik Replicate, November 2021 538

9 Adding and managing target endpoints
SAML Role ARN - The Amazon Resource Name (ARN) of the specific role the returned credentialsshould be assigned.Switch role after assuming SAML role - Use this option to switch role after authentication.For more information, see:https://docs.aws.amazon.com/IAM/latest/UserGuide/id_roles_common-scenarios_aws-accounts.htmlWhen this option is selected, the following information is required:
l Role ARN: The ARN associated with the target role.l Role external ID: The value of the external ID condition in the target role’s trust policy.
Target folder: The target folder in your Amazon S3 bucket.
File AttributesDelimiters can be standard characters or a hexadecimal (hex) value. Note that the "0x" prefix mustbe used to denote a hexadecimal delimiter (e.g. 0x01 = SOH). In the Field delimiter, Recorddelimiter and Null value fields, the delimiter can consist of concatenated hex values (e.g. 0x0102 =SOHSTX), whereas in the Quote character and Escape character fields, it can only be a single hexvalue.The hexadecimal number 0x00 is not supported (i.e. only 0x01-0xFF are supported).
FormatYou can choose to create the target files in CSV or JSON format.In a JSON file, each record is represented by a single line, as in the following example:{ "book_id": 123, "title": "Alice in Wonderland", "price": 6.99, "is_hardcover": false }{ "book_id": 456, "title": "Winnie the Pooh", "price": 6.49, "is_hardcover": true }{ "book_id": 789, "title": "The Cat in the Hat", "price": 7.23, "is_hardcover": true }
See also: Content-type and content-encoding properties (page 544).Changing the format (i.e. from CSV to JSON or from JSON to CSV) while the task is in a stoppedstate and then resuming the task, is not supported.If you choose JSON format , the following fields will be hidden as they are only relevant to CSVformat: Field delimiter, Record delimiter, Null value, Quote character, Escape character, andAdd metadata header.
Field delimiterThe delimiter that will be used to separate fields (columns) in the target files. The default is acomma.Example using a comma as a delimiter:"mike","male"
Record delimiterThe delimiter that will be used to separate records (rows) in the target files. The default is a newline(\n).Example:"mike","male"\n
"sara","female"\n
Null valueThe string that will be used to indicate a null value in the target files.
Setup and User Guide - Qlik Replicate, November 2021 539
9 Adding and managing target endpoints
Example (where \n is the record delimiter and @ is the null value):"mike","male",295678\n
"sara","female",@\n
Quote characterThe character that will be used at the beginning and end of a text column. The default is the double-quote character ("). When a column that contains column delimiters is enclosed in double-quotes,the column delimiter characters are interpreted as actual data, and not as column delimiters.Example (where a @ is the quote character):@mike@,@male@
Quote escape characterThe character used to escape a quote character in the actual data.Example (where" is the quote character and \ is the escape character):1955,"old, \"rare\", Chevrolet","$1000"
Add metadata headerWhen the target storage format is set to Text, you can optionally add a header row to the data files.The header row can contain the source column names and/or the intermediate (i.e. Replicate) datatypes.Example of a target file with a header row when both With column names and With data types areselected:Position:DECIMAL(38,0),Color:VARCHAR(10)1,"BLUE"2,"BROWN"3,"RED"...
Maximum file sizeThe maximum size a file can reach before it is closed (and optionally compressed). This valueapplies both to data files and to Reference Files.For information on generating reference files, see Setting advanced connection properties (page541).
Compress files usingChoose GZIP to compress the target files or NONE (the default) to leave them uncompressed.
Change ProcessingThis section describes conditional settings in Change Processing.
Apply/Store changes whenl File size reaches: Specify the maximum size of Change Data to accumulate beforeuploading the file to Amazon S3.
l Elapsed time reaches: Elapsed time reaches x.
Metadata filesThis section describes the Metadata files option.
Setup and User Guide - Qlik Replicate, November 2021 540
9 Adding and managing target endpoints
Create metadata files in the target folderWhen this option is selected, for each data file, a matching metadata file with a .dfm extension willbe created under the specified target folder. The metadata files (which are in standard JSONformat) provide additional information about the task/data such as the source endpoint type, thesource table name, the number of records in the data file, and so on.For a full description of the metadata file as well as possible uses, see Metadata file description(page 1151).
Data encryptionThis section describes the Data encryption options.Choose one of the following:
l Server-Side Encryption with Amazon S3-Managed Keys (SSE-S3). This is the default.l Server-Side Encryption with AWS KMS-Managed Keys (SSE-KMS)This option also requires you to specify your KMS Key ID.For more information on the available sever-side encryption methods, see:http://docs.aws.amazon.com/AmazonS3/latest/dev/serv-side-encryption.html
l None
7. To determine if the connection information you entered is correct, click Test Connection. If theconnection test is successful, click Save.
As part of connection testing process, Replicate uploads a test file to the specified Amazon S3Target folder and then deletes it once a connection has been established.
If the connection is successful a message in green is displayed. If the connection fails, an errormessage is displayed at the bottom of the dialog box.
To view the log entry if the connection fails, click View Log. The server log is displayed with theinformation for the connection failure. Note that this button is not available unless the testconnection fails.
Setting advanced connection propertiesIn the Advanced tab, you can enable the creation of reference files and set post-processing actions. Theseoptions are described below.
Post-upload processingRun command after upload - You can process the final target files using a custom command. Thecommand will be run whenever a data file is created.
If the Generate a reference file option is selected, a row (specifying the file's location) will beadded to the Reference File only after the command completes successfully.
l Command name - The location of the command e.g. C:\utils\move.exe.l Working directory - The directory where you want the command to run.
Setup and User Guide - Qlik Replicate, November 2021 541

9 Adding and managing target endpoints
l Parameters - Specify any parameters that need to be passed to the command during runtime. Youcan use the following built-in parameters:${FILENAME} - The full path to the CSV file containing the full load or CDC data.${METADATA_FILENAME} - The full path to the DFM file containing the metadata.For information on creating metadata files, see Setting general connection properties (page 537).
l If the CSV/DFM file paths contain spaces, you must enclose these parameterswith quotation marks (e.g "${FILENAME}").
l The post-processing command must return a proper exit code. For informationon the available exit code options, see Exit codes for the post-processingcommand (page 542).
Generate Reference Files - Select this option to generate a Reference File (on Replicate Server)containing the full path to the Apply Changes data files.
The reference file only points to the location of the Apply Changes files, and not the Full Loadfiles.
Reference File(s) folder - The folder on the Replicate machine in which the Reference File will be created.
Example:
c:\temp\
Exit codes for the post-processing commandThe post-processing command must return a proper exit code. You can either use the standard exit codevalues described below or set a custom exit code value as described in Setting Post Command exit codeswith an internal parameter below.
Standard Post Command exit codes
l 0 - Successl 1 - Recoverable error. The task will recover from the point of failure according to the settings in theEnvironmental errors (page 1032) tab.
l 2 - Table error. If a table error occurs, Replicate will handle the error according to the settings in theTable Errors (page 1034) tab.
l 3 (or any other value e.g. -100) - Fatal error. The task will fail and not attempt recovery.
Setting Post Command Exit Codes with an Internal Parameter
You can use internal parameters to set exit codes with custom values. This is especially useful if yourapplication already uses the standard exit code values.
See Standard Post Command exit codes above for a description of the exit codes.
Setup and User Guide - Qlik Replicate, November 2021 542

9 Adding and managing target endpoints
l successExitCode
l recoverableErrorExitCode
l tableErrorExitCode
l fatalErrorExitCode
Proxy serverUse proxy server - Select this option to access Amazon S3 via a proxy server.
l Host name - The host name of the proxy server.l Port - The port via which to access the proxy server.l User name - The user name for accessing the proxy server.l Password - The password for accessing the proxy server.l Scheme - Select which protocol to use to access the server (HTTP or HTTPS). In order to useHTTPS, you must first install the CA certificate that signed the proxy’s certificate on the ReplicateServer machine, as follows:
l On Windows: Add the CA certificate to the Trusted Root Certification Authorities store ofLocal Computer
l On Linux: Add the CA certificate to /etc/pki/tls/certs/ca-bundle.crt
Internal parametersInternal parameters are parameters that are not exposed in the UI and should only be used if instructed byQlik Support.
To add internal Qlik Replicate parameters:
1. Click the Internal Parameters link.The Internal Parameters dialog box opens.
2. In the edit box, type the name of the parameter you need to add and then click it.
3. The parameter is added to the table below the search box with its default value.
4. Change the default value as required.
5. To reset the parameter value to its default, click the "Restore default value" icon at the end of therow.
More optionsThese options are not exposed in the UI as they are only relevant to specific versions or environments.Consequently, do not set these options unless explicitly instructed to do so by Qlik Support or productdocumentation.
To set an option, simply copy the option into the Add feature name field and click Add. Then set the valueor enable the option according to the instructions you received.
Settings summaryYou can view a summary of your setting by clicking the View Setting Summary link. This is useful if youneed to send a summary of your setting to Qlik Support.
Setup and User Guide - Qlik Replicate, November 2021 543

9 Adding and managing target endpoints
Generating reference filesIn the Advanced tab of the Amazon S3 target endpoint, you can enable the Generate a reference fileoption. The Reference File contains a list of the Change File locations and is therefore only relevant if thetask's Apply Changes or Store Changes options are enabled.
The format of the reference file name is as follows:
<amazon_s3_target_endpoint_name><counter>.csv|json
Example:
AmazonS300000001.csv
The counter suffix increases incrementally each time a new Reference File is generated (i.e.when the file reaches the maximum size defined in the General tab). Once a new ReferenceFile has been generated, you can delete the old reference file(s) if required.
Whenever an Apply Changes data file is created, a new row is added to the Reference File in the followingformat:
<Source_Table_Name>,<bucket_name>/<path>/<file_name>
Example:
employees,bigdata/new/files/my.company/20170611-120144192.csv
Note that if the Post-process files option in the Advanced tab is also enabled, the Reference File will begenerated after the post-processing completes.
Content-type and content-encoding properties
Replicate Artifact File Format Compression Content-Type Content-Encoding
Data file CSV None text/csv; charset=utf-8 N/A
Data file CSV gzip text/csv; charset=utf-8 gzip
Data file JSON (lines) None application/x-ndjson N/A
Data file JSON (lines) gzip application/x-ndjson gzip
Metadata file (DFM) JSON None application/json N/A
Content-type and content-encoding properties of files uploaded to Amazon S3
Setup and User Guide - Qlik Replicate, November 2021 544

9 Adding and managing target endpoints
9.6 Using Cloudera Data Platform (CDP) Private Cloud as atarget
This section describes how to set up and use Cloudera Data Platform (CDP) Private Cloud as the targetendpoint in a replication task.
In this section:
Prerequisites 546
Limitations and considerations 546
Change data partitioning 547
Security requirements 547
Supported data types 547
Setting general connection properties 548
Setting advanced connection properties 551
Using Kerberos authentication on Windows 553
Setup and User Guide - Qlik Replicate, November 2021 545

9 Adding and managing target endpoints
PrerequisitesBefore you begin to work with CDP Private Cloud as a target in Qlik Replicate, make sure that the followingprerequisites have been met:
l General:l The HDFS storage must be accessible from the Qlik Replicate machine.l When ODBC Access is selected, the Hive Server must be accessible from the Qlik Replicatemachine.
l ODBC Access:Accessing Hive using ODBC requires the following to be installed on the Replicate Server machine:
l Windows: Install Cloudera ODBC driver for Apache Hive 2.6.9 or later.l Linux: Install Cloudera ODBC driver for Apache Hive 2.6.9 or later.After the driver is installed, edit the odbcinst.ini file as follows:DriverManagerEncoding=UTF-16
ODBCInstLib=libodbcinst.so
l SSL:Before you can use SSL, you first need to perform the following tasks:
l Configure each NameNode and each DataNode with an SSL certificate (issued by the sameCA).
l Place the CA certificate on the Replicate Server machine. The certificate should be abase64-encoded PEM (OpenSSL) file.
l Permissions:The user specified in the CDP Private Cloud target settings must have write permission for thespecified HDFS target directory.
l Task Settings:Before starting a task with the Full Load and/or Apply Changes replication options enabled, set theChange Processing Mode to Transactional Apply as Batch Optimized Apply is not supported.
Limitations and considerationsWhen working with a CDP Private Cloud endpoint, bear in mind the following limitations andconsiderations:
l Table and column names can only contain ASCII characters.l Column names cannot contain the '?' symbol. If needed, the '?' symbol can be replaced with a validASCII character using a transformation.
l Limited LOB size support only (LOB size will be limited to the maximum STRING size available onCDP Private Cloud).
l DDL Limitations:l Changing column data types or the data type length is not supported. Changing the columnsdata type will suspend the table and changing the data type length will simply be ignored
l The DROP COLUMN DDL is not supported. Dropping a column during Change Capture willset NULL values in the target column position on subsequent INSERTs or UPDATEs.
Setup and User Guide - Qlik Replicate, November 2021 546

9 Adding and managing target endpoints
l DDL limitations and considerations when the "Apply Changes DDL Handling Policy" is set to"Ignore" (Ignore DDL changes):
l Renaming a table is not supported and will result in the table being suspended (if the TableError handling policy is "Suspend Table", which is the default).
l Renaming a column is not supported. Renaming a column during Change Capture will setNULL values in the target column position on subsequent INSERTs or UPDATEs.
l Deleting a source column will set NULLs in the corresponding target column.l Modifications to a source column will be ignored, but may cause unpredictable behavior (forinstance, when a data type is modified).
l The creation of skews, buckets or partitions in the target tables (or their preexistence in the targettables) is not supported.
l The following Control Tables are not supported as they require UPDATE/DELETE operations(which are not supported by the CDP Private Cloud target endpoint):
l Replication Status (requires UPDATE).Name on target: attrep_status
l Suspended Tables (requires DELETE).Name on target: attrep_suspended_tablesFor more information on Control Tables, see Control tables (page 1015).
l The Store task recovery data in target database Advanced Run option is not supportedl The Batch Optimized Apply Change Processing mode is not supported.
Change data partitioningWhen Change Data Partitioning (page 1022) is enabled, the Replicate Change Tables in Hive arepartitioned by the partition_name column. Data files are uploaded to HDFS, according to the maximumsize and time definition, and then stored in a directory under the Change Table directory. Whenever thespecified partition timeframe ends, a partition is created in Hive, pointing to the HDFS directory.
Information about the partitions is written to the attrep_cdc_partitions Control Table.
Security requirementsl The CDP Private Cloud NameNode (and data nodes when using WebHDFS) must be accessiblefrom the Qlik Replicate machine and the user specified in the CDP Private Cloud target settingsmust have write permission for the specified HDFS target directory.
l Hive table permissions: Replicate requires permissions to perform the following operations on Hivetables: CREATE, DROP, DESCRIBE, and ALTER table. ALTER table may also include RENAMEtable, ADD/RENAME column, and CREATE/DROP partitions on tables.
Supported data typesThe following table shows the default mapping from the Qlik Replicate data types to the supported CDPPrivate Cloud target data types.
For information on how to view the data type that is mapped from the source, see the section for the sourceendpoint you are using.
For additional information about Qlik Replicate data types, see Replicate data types (page 76).
Setup and User Guide - Qlik Replicate, November 2021 547
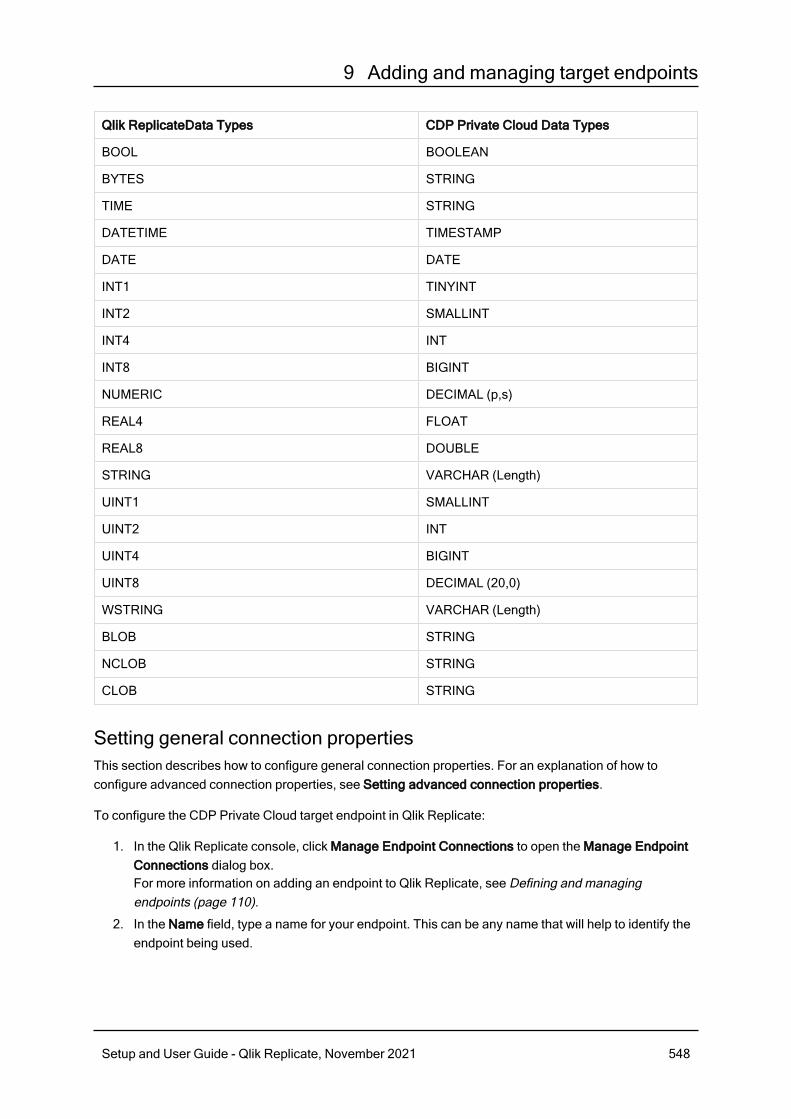
9 Adding and managing target endpoints
Qlik ReplicateData Types CDP Private Cloud Data Types
BOOL BOOLEAN
BYTES STRING
TIME STRING
DATETIME TIMESTAMP
DATE DATE
INT1 TINYINT
INT2 SMALLINT
INT4 INT
INT8 BIGINT
NUMERIC DECIMAL (p,s)
REAL4 FLOAT
REAL8 DOUBLE
STRING VARCHAR (Length)
UINT1 SMALLINT
UINT2 INT
UINT4 BIGINT
UINT8 DECIMAL (20,0)
WSTRING VARCHAR (Length)
BLOB STRING
NCLOB STRING
CLOB STRING
Setting general connection propertiesThis section describes how to configure general connection properties. For an explanation of how toconfigure advanced connection properties, see Setting advanced connection properties.
To configure the CDP Private Cloud target endpoint in Qlik Replicate:
1. In the Qlik Replicate console, click Manage Endpoint Connections to open the Manage EndpointConnections dialog box.For more information on adding an endpoint to Qlik Replicate, see Defining and managingendpoints (page 110).
2. In the Name field, type a name for your endpoint. This can be any name that will help to identify theendpoint being used.
Setup and User Guide - Qlik Replicate, November 2021 548

9 Adding and managing target endpoints
3. In the Description field, type a description that helps to identify the CDP Private Cloud endpoint.This is optional.
4. Select CDP Private Cloud as the endpoint Type.
5. In the Security section, do the following:
a. To encrypt the data between the Replicate machine and HDFS, select Use SSL. In order touse SSL, first make sure that the SSL prerequisites described in Prerequisites (page 546)been met.In the CA path field, specify one of the following items:
l The directory containing the CA certificate.l The full path to a specific CA certificate.
b. Select one of the following authentication types:l User name - Select to connect to the CDP Private Cloud cluster with only a username. Then, in the User name field, specify the name of a user authorized to accessthe CDP Private Cloud cluster.
l User name and password - Select to connect to the CDP Private Cloud NameNodeor to the Knox Gateway (when enabled - see below) with a user name and password.Then, in the User name and Password fields, specify the required user name andpassword.
l Kerberos - Select to authenticate against the CDP Private Cloud cluster usingKerberos. Replicate automatically detects whether Qlik Replicate Server is runningon Linux or on Windows and displays the appropriate settings.
Note In order to use Kerberos authentication on Linux, the Kerberosclient (workstation) package should be installed.
Qlik Replicate Server on Linux:When Qlik Replicate Server is running on Linux, provide the following information:
l Realm: The name of the realm in which your CDP Private Cloud clusterresides.For example, if the full principal name is [email protected], thenEXAMPLE.COM is the realm.
l Principal: The user name to use for authentication. The principal must be amember of the realm entered above.For example, if the full principal name is [email protected], thenjohn.doe is the principal.
l Keytab file: The full path of the Keytab file. The Keytab file should contain thekey of the Principal specified above.
Qlik Replicate Server on Windows:When Qlik Replicate Server is running on Windows, provide the following informationfor accessing your Active Directory KDC:
Setup and User Guide - Qlik Replicate, November 2021 549

9 Adding and managing target endpoints
When the Replicate KDC and the CDP Private Cloud KDC are in differentdomains, a relationship of trust must exist between the two domains.
l Realm: The name of the realm/domain in which your CDP Private Cloudcluster resides (where realm is the MIT term while domain is the ActiveDirectory term).
l Principal: The user name to use for authentication. The principal must be amember of the realm/domain entered above.
l Password: The password for the principal entered above.
If you are unsure about any of the above, consult your IT/security administrator.For additional steps required to complete setup for Kerberos authentication, seeUsing Kerberos authentication on Windows (page 553).
6. If you need to access the Hortonworks CDP Private Cloud distribution through a Knox Gateway,select Use Knox Gateway. Then provide values for the following fields:
To be able to select this option, first select Use SSL and then select Username andPassword from the Authentication type drop-down list.
l Knox Gateway host - The FQDN (Fully Qualified Domain Name) of the Knox Gateway host.l Knox port - The port number to use to access the host. The default is "8443".l Knox Gateway path - The context path for the gateway. The default is "gateway".
The port and path values are set in the gateway-site.xml file. If you are unsurewhether the default values have been changed, contact your IT department.
l Cluster name - The cluster name as configured in Knox. The default is "cdp-proxy-api".
7. In the HDFS Access section, enter the following information:l In the NameNode field, specify the IP address or hostname of the NameNode.
This is the Active node when High Availability is enabled (see below).
l Replicate supports replication to an HDFS High Availability cluster. In such a configuration,Replicate communicates with the Active node, but switches to the Standby node in the eventof failover. To enable this feature, select the High Availability check box. Then, specify theFQDN (Fully Qualified Domain Name) of the Standby NameNode in the StandbyNameNode field.
l In the Port field, optionally change the default port (9870).l In the Target Folder field, specify where to create the data files on HDFS.
The Target folder name can only contain ASCII characters.
8. In the Hive Access section, do the following:
Setup and User Guide - Qlik Replicate, November 2021 550

9 Adding and managing target endpoints
a. From the Access Hive using drop-down list, select one of the following options:
When the Use Knox Gateway option is selected or when No Access is selected,the Host and Port fields described below are not relevant (and are thereforehidden).
l ODBC - Select this option to access Hive using an ODBC driver (the default). Thencontinue from the Host field.
l No Access - When this option is selected, after the data files are created on HDFS,Replicate will take no further action.
b. In the Host field, specify the IP address of the Hive machine.
c. In the Port field, optionally change the default port (10000).
d. In the Database field, specify the name of the Hive target database.
Setting advanced connection propertiesThe tables below describe the settings in the Advanced tab.
Setting Description
Targetstorageformat
Select one of the following target storage formats: Text (the default), or Sequence.
Creating and storing the tables in text format (the default) allows data to beappended to them. This in turn reduces the number of files created on CDPPrivate Cloud, improves query performance, and reduces the number of Hivejobs running.
When using Text as the target storage format, new lines as part of the datavalues are not supported (due to an Apache Hadoop limitation). Best practiceis to use Sequence as the target storage format.
When Sequence format is selected, the data is loaded directly to the targetand stored in an external table (in sequence format). Note also that datacannot be appended in Sequence format.
Fielddelimiter
The delimiter that will be used to separate fields in the target file. The default is \001.Note that field delimiters should be ASCII characters unless they are non-printablecontrol characters, in which case they should be in Octal format (e.g. \247).
File format
Setup and User Guide - Qlik Replicate, November 2021 551

9 Adding and managing target endpoints
Setting Description
Null value The value that will be used to indicate a null value in the target file.
Example (where @ is the null value):
mike,male,295678
sara,female,@
Escapecharacter
The escape character is used to escape the field delimiter character. When a fielddelimiter is escaped, it is interpreted as actual data, and not as a field delimiter.
Example (where \ is the escape character and a comma is the field delimiter):
sunroof\,power-steering
Addmetadataheader
When the target storage format is set to Text, you can optionally add a header row to thedata files. The header row can contain the source column names and/or the intermediate(i.e. Replicate) data types.
Example of a target file with a header row when both With column names and With datatypes are selected:
Position:DECIMAL(38,0),Color:VARCHAR(10)
1,"BLUE"
2,"BROWN"
3,"RED"
...
Setting Description
Maximumfile size
Specify the maximum file size of each target file. When the data reaches the maximumsize, the file will be closed and written to the specified target folder.
Compressfiles using
Select whether or not (the default) to compress files on HDFS.
File attributes
Setting Description
Apply/store changes when file sizereaches
Specify the minimum size of the data required to apply/storethe changes.
Apply/store changes when elapsed timereaches
Specify the maximum time to wait before applying/storing thechanges.
Change processing
Setup and User Guide - Qlik Replicate, November 2021 552

9 Adding and managing target endpoints
l Changes will be applied when the Applied Changes replication option is enabled and/orstored when the Store Changes replication option is enabled.
l To facilitate rapid delivery of DDL messages, files are uploaded immediately, regardlessof the specified File size reaches or Elapsed time reaches values.
Preventing ODBC connection timeoutsThe default query timeout value is 600 seconds, which should be sufficient for most situations. However,when loading very large tables, you may need to increase the value to prevent timeouts. This can be doneusing the following internal parameter:
executeTimeout
See below for instructions on setting internal parameters.
Internal parametersInternal parameters are parameters that are not exposed in the UI. You should only use them if instructedby Qlik Support.
To add internal Qlik Replicate parameters:
1. Click the Internal Parameters link.The Internal Parameters dialog box opens.
2. In the edit box, type the name of the parameter you need to add and then click it.
3. The parameter is added to the table below the search box with its default value.
4. Change the default value as required.
5. To reset the parameter value to its default, click the "Restore default value" icon at the end of therow.
More optionsThese options are not exposed in the UI as they are only relevant to specific versions or environments.Consequently, do not set these options unless explicitly instructed to do so by Qlik Support or productdocumentation.
To set an option, simply copy the option into the Add feature name field and click Add. Then set the valueor enable the option according to the instructions you received.
Settings summaryYou can view a summary of your settings by clicking the Setting Summary link. This is useful if you need tosend a summary of your settings to Qlik Support.
Using Kerberos authentication on WindowsWhether Qlik Replicate Server is running on Linux or Windows, you can configure it to authenticate itselfagainst the CDP Private Cloud cluster using Kerberos. However, when using Kerberos authentication onWindows, you need to perform the additional setup procedures outlined below.
Setup and User Guide - Qlik Replicate, November 2021 553

9 Adding and managing target endpoints
Before beginning, make sure that the impersonated user (principal) is granted read and write permissionson the Replicate Data directory (<product_dir>\Data by default) on the Qlik Replicate server. For ActiveDirectory KDC, the impersonated user is the user configured in the user interface.
To set up Kerberos authentication on Windows, perform the following steps to ensure that theimpersonated user (principal) has the Log on as a batch job privilege on the Qlik Replicate server.
1. On the Qlik Replicate Server machine, open the Local Security Settings (Control Panel > SystemSecurity > Administrative Tools > Local Security Policy).
2. In the console tree, expand Local Policies and select User Rights Assignments.
3. In the details pane, double-click Log on as a batch job.
4. In the Log on as a batch job Properties dialog box, on the Local Security Settings tab, verify thatthe relevant user is listed. If the user is not listed, click Add User or Group, then add the user andclick OK.
Setup and User Guide - Qlik Replicate, November 2021 554

9 Adding and managing target endpoints
Your changes should take effect immediately.
Setup and User Guide - Qlik Replicate, November 2021 555

9 Adding and managing target endpoints
9.7 Using Databricks on AWS as a targetThis section describes how to set up and use Databricks on AWS as the target endpoint in a replicationtask.
Hive can be configured to use the AWS Glue Data Catalog as its metastore or its ownmetastore. The metastore that will be used depends on your Databricks on AWS Clusterconfiguration and requires no special configuration from a Replicate perspective.
In this section:
l Prerequisites (page 557)l Limitations and considerations (page 557)l Change data partitioning on Databricks on AWS (page 558)l Supported data types (page 558)l Setting general connection properties (page 559)l Setting advanced connection properties (page 562)
Setup and User Guide - Qlik Replicate, November 2021 556

9 Adding and managing target endpoints
PrerequisitesBefore you begin to work with Databricks on AWS as a target in Qlik Replicate, make sure that thefollowing prerequisites have been met:
l ODBC Driver when Replicate Server is running on Windows or Linux: Simba Spark ODBC Driver2.6.18 or later must be installed on the Qlik Replicate Server machine.
l Permissions:l The "Bucket" specified in the Databricks on AWS endpoint's Storage settings must havewrite access to the specified storage target folder.
l Databricks table permissions: Replicate requires permissions to perform the followingoperations on Databricks tables: CREATE, DROP, TRUNCATE, DESCRIBE, and ALTERtable. ALTER table may also include RENAME table and ADD column.
l In order for Replicate to connect to a Databricks cluster via ODBC, the user specified in theendpoint settings must be granted "Can Attach To" permission.
l The S3 storage bucket (or the directory under the bucket) must be mounted on theDatabricks File System (DBFS).For information on how to set this up, refer to https://docs.databricks.com/data/data-sources/aws/amazon-s3.html
l You must provide Replicate with a valid security token for access to Databricks.
Limitations and considerationsThe following limitations apply when using Databricks on AWS:
l UPDATE/DELETE DMLs are not supported during change processing. If an UPDATE/DELETEDML was captured on the source, it will be ignored on the target and a warning will be written to thelog. If the Store Changes option is enabled in the task settings, these records will be written to theChange Table.
l Limited LOB support only.l Unsupported DDL operations:
l Changing column data types or the data type length is not supported and will suspend thetable in all cases except for data types that are mapped to STRING. Changes to the datatype length of a data type mapped to STRING (e.g. VARCHAR(50) to VARCHAR(100)) willsimply be ignored. Tables updated with such operations will be suspended.
l A REMOVE COLUMN operation on the source will set NULL values in the correspondingtarget column.
l A RENAME COLUMN operation on the source will set NULL values in the correspondingtarget column.
l The Rename Table DDL is not supported when using AWS Glue Catalog as the Hivemetastore. Tables updated with Rename DDL operations will be suspended.
Setup and User Guide - Qlik Replicate, November 2021 557

9 Adding and managing target endpoints
When Replicate is set to ignore DDL changes, ADD COLUMN, RENAME TABLE,DROP TABLE, and TRUNCATE TABLE DDL operations will be ignored. UnsupportedDDL operations will not be ignored, but they will also not be applied to the target.Instead, they will behave as described above.
l The following Control Tables are not supported as they require UPDATE/DELETE operations(which are not supported by the Databricks on AWS target endpoint):
l Replication Status (requires UPDATE)Name on target: attrep_status
l Suspended Tables (requires DELETE)Name on target: attrep_suspended_tables
l Table and column names can only contain ASCII characters. Column names cannot contain the '?'symbol. If needed, the '?' symbol can be replaced with a valid ASCII character using atransformation.
l Connecting to via an HTTP proxy server with authentication is not supported.l Replication to Delta tables is not supported.l The Batch optimized apply Change Processing mode is not supported.l The Commit rate during full load option is not relevant.l The Create primary key or unique index after full load completes option is not relevant.l If you change the Databricks storage access method endpoint setting during a task or create anew task with a Databricks target whose Databricks storage access method differs from that ofexisting tasks, you must also perform the procedures described in Setting general connectionproperties (page 559).
Change data partitioning on Databricks on AWSWhen Change Data Partitioning (page 1022) is enabled, the Replicate Change Tables in Databricks arepartitioned by the partition_name column. Data files are uploaded to the Amazon S3 storage,according to the maximum size and time definition, and then stored in a directory under the Change Tabledirectory. Whenever the specified partition timeframe ends, a partition is created that points to the AmazonS3 storage location.
Information about the partitions is written to the attrep_cdc_partitions Control Table.
Supported data typesThe following table shows the Databricks on AWS endpoint target data types that are supported whenusing Qlik Replicate and the default mapping from Qlik Replicate data types.
For information on how to view the data type that is mapped from the source, see the section for the sourceendpoint you are using.
For additional information about Qlik Replicate data types, see Replicate data types (page 76).
Setup and User Guide - Qlik Replicate, November 2021 558

9 Adding and managing target endpoints
Qlik Replicate data types Databricks on AWS data types
BOOL BOOLEAN
BYTES STRING
TIME STRING
DATETIME TIMESTAMP
DATE DATE
INT1 TINYINT
INT2 SMALLINT
INT4 INT
INT8 BIGINT
NUMERIC DECIMAL (p,s)
REAL4 FLOAT
REAL8 DOUBLE
STRING STRING
UINT1 SMALLINT
UINT2 INT
UINT4 BIGINT
UINT8 DECIMAL (20,0)
WSTRING STRING
BLOB STRING
NCLOB STRING
CLOB STRING
Qlik Replicate and Databricks on AWS data types
Setting general connection propertiesThis section describes how to configure general connection properties. For an explanation of how toconfigure advanced connection properties, see Setting advanced connection properties.
To add a Databricks on AWS target endpoint to Qlik Replicate:
1. In the Qlik Replicate console, click Manage Endpoint Connections to open the Manage EndpointConnections dialog box.For more information on adding an endpoint to Qlik Replicate, see Defining and managingendpoints (page 110).
2. In the Name field, type a name for your endpoint. This can be any name that will help to identify theendpoint being used.
Setup and User Guide - Qlik Replicate, November 2021 559

9 Adding and managing target endpoints
3. In the Description field, type a description that helps to identify the endpoint. This is optional.
4. Select Databricks on AWS as the endpoint Type.
5. Expand the Databricks ODBC Access section and provide the following information:l Host - The host name of the Databricks workspace where the specified Amazon S3 bucketis mounted.
l Port - The port via which to access the workspace (you can change the default port 443, ifrequired).
l Token - Your personal token for accessing the workspace.l HTTP Path - The path to the cluster being used.l Database - The name of the Databricks target database.
6. Expand the Amazon S3 Storage Data Access section and provide the following information:l Databricks storage access method - Choose which method your Databricks cluster uses toaccess the Amazon S3 storage: Access Directly (the default) or Access through DBFSMount. AWS S3 storage can be accessed by mounting buckets using DBFS or directly.Replicate needs to know which method Databricks uses to access the storage so that it canset the "location" property when it creates the tables in Databricks. The "location" propertyenables Databricks to access the storage data using its configured storage access method.
l Mount Path - When Access through DBFS Mount is selected, you also need tospecify the mount path.
The mount path cannot contain special characters or spaces.
For more information on configuring Databricks to access the Amazon S3 storage, seehttps://docs.databricks.com/data/data-sources/aws/amazon-s3.html
Setup and User Guide - Qlik Replicate, November 2021 560

9 Adding and managing target endpoints
All tables being replicated in a single task must be configured to access thestorage using the Databricks storage access method defined in the endpointsettings (see earlier). The same is true for Replicate Control Tables, which arecommon to all tasks. Any tables that are configured to use a different storageaccess method will not be replicated or, in the case of Control Tables, will not bewritten to the target database. To prevent this from happening, you must performthe procedures below if you need to do any of the following:
l Change the Databricks storage access method during a task and retainthe existing tables
l Define a new task with a Databricks target whose Databricks storageaccess method differs from existing tasks (with a Databricks target)
To change the Databricks storage access methods during a task:
1. Stop the task.
2. Change the Databricks storage access method.
3. For all tables (including Control Tables), execute the ALTER TABLEstatement:ALTER TABLE table_identifier [ partition_spec ] SET LOCATION
'new_location'
For details, see https://docs.databricks.com/spark/latest/spark-sql/language-manual/sql-ref-syntax-ddl-alter-table.html#set-location.
4. Start the task.
To create a new task with a Databricks endpoint whose "Databricks storageaccess method" differs from existing tasks:
l When you define the task, specify a dedicated Control Table schema inthe task settings' Control tables (page 1015) tab.
l Replicate S3 Storage Accessl Bucket name -The name of your Amazon S3 bucket.l Bucket region - The Amazon S3 region where your bucket is located.l Access options - Choose one of the following:
l Key pairChoose this method to authenticate with your Access Key and Secret Key.
l IAM Roles for EC2Choose this method if the machine on which Qlik Replicate is installed isconfigured to authenticate itself using an IAM role.For more information about this access option, see:http://docs.aws.amazon.com/IAM/latest/UserGuide/id_roles.html
l Access key - The access key information for Amazon S3.
Setup and User Guide - Qlik Replicate, November 2021 561

9 Adding and managing target endpoints
This option is only available when Key pair is the access option.
l Secret key - The secret key information for Amazon S3.
This option is only available when Key pair is the access option.
l Target folder: The target folder in your Amazon S3 bucket.
Setting advanced connection propertiesThe table below describes the settings in the Advanced tab.
Setting Description
File Format Expand this section to specify or view the file format settings.
Target storage format Select either Text or Sequence.
When using Text as the target storage format, newlines as part of the data values are not supported (dueto an Apache Hadoop limitation). Best practice is touse Sequence as the target storage format.
Field delimiter The delimiter that will be used to separate fields in the target file.The default is \001. Note that field delimiters should be ASCIIcharacters unless they are non-printable control characters, inwhich case they should be in Octal format (e.g. \247).
Null value The value that will be used to indicate a null value in the target file.
Example (where @ is the null value):
mike,male,295678
sara,female,@
Escape character The escape character is used to escape the field delimitercharacter. When a field delimiter is escaped, it is interpreted asactual data, and not as a field delimiter.
Example (where \ is the escape character and a comma is thefield delimiter):
sunroof\,power-steering
File Attributes Expand this section to specify or view the file attributes.
Advanced tab settings
Setup and User Guide - Qlik Replicate, November 2021 562

9 Adding and managing target endpoints
Setting Description
Maximum file size Specify the maximum file size of each target file. When the datareaches the maximum size, the file will be closed and written to thespecified target folder.
Compress files using Select the compression method to use on Amazon S3 storage.
Change Processing Expand this section to specify or view change processing settings.
Apply/Store changes when filesize reaches
Specify the minimum size of the data required to create a file inidle state.
Apply/Store changes whenelapsed time reaches
To facilitate rapiddelivery of DDLmessages, files areuploaded immediately,regardless of thespecified File sizereaches or Elapsedtime reaches values.
Specify the maximum time to wait before applying the changes inidle state.
Data Encryption Expand this section to edit or view encryption settings.
Encryption options Choose one of the following:
l Server-Side Encryption with Amazon S3-Managed Keys(SSE-S3). This is the default.
l Server-Side Encryption with AWS KMS-Managed Keys(SSE-KMS)This option also requires you to specify your KMS Key ID.For more information on the available sever-sideencryption methods, see:http://docs.aws.amazon.com/AmazonS3/latest/dev/serv-side-encryption.html
l None
Proxy Server Expand this section to edit or view proxy settings.
Use proxy server Select this option to access Amazon S3 via a proxy server.
Host name The host name of the proxy server.
Port The port via which to access the proxy server.
User name The user name for accessing the proxy server.
Password The password for accessing the proxy server.
Setup and User Guide - Qlik Replicate, November 2021 563

9 Adding and managing target endpoints
Setting Description
Scheme Select which protocol to use to access the server (HTTP orHTTPS). In order to use HTTPS, you must first install the CAcertificate that signed the proxy’s certificate on the ReplicateServer machine, as follows:
l On Windows: Add the CA certificate to the Trusted RootCertification Authorities store of Local Computer
l On Linux: Add the CA certificate to /etc/pki/tls/certs/ca-bundle.crt
Internal parametersInternal parameters are parameters that are not exposed in the UI. You should only use them if instructedby Qlik Support.
To add internal Qlik Replicate parameters:
1. Click the Internal Parameters link.The Internal Parameters dialog box opens.
2. In the edit box, type the name of the parameter you need to add and then click it.
3. The parameter is added to the table below the search box with its default value.
4. Change the default value as required.
5. To reset the parameter value to its default, click the "Restore default value" icon at the end of therow.
More optionsThese options are not exposed in the UI as they are only relevant to specific versions or environments.Consequently, do not set these options unless explicitly instructed to do so by Qlik Support or productdocumentation.
To set an option, simply copy the option into the Add feature name field and click Add. Then set the valueor enable the option according to the instructions you received.
Settings summaryYou can view a summary of your settings by clicking the Setting Summary link. This is useful if you need tosend a summary of your settings to Qlik Support.
Setup and User Guide - Qlik Replicate, November 2021 564

9 Adding and managing target endpoints
9.8 Using Databricks on Google Cloud as a targetThis section describes how to set up and use Databricks on Google Cloud as the target endpoint in areplication task.
In this section:
l Prerequisites (page 566)l Limitations and considerations (page 566)l Change data partitioning on Databricks on Google Cloud (page 568)l Supported data types (page 568)l Setting general connection properties (page 569)l Setting advanced connection properties (page 569)
Setup and User Guide - Qlik Replicate, November 2021 565

9 Adding and managing target endpoints
PrerequisitesBefore you begin to work with Databricks on Google Cloud as a target in Qlik Replicate, make sure that thefollowing prerequisites have been met:
Any permissions listed below must be granted to the user account associated with the JSONcredentials field in the endpoint's General tab.
l ODBC Driver when Replicate Server is running on Windows or Linux: Simba Spark ODBC Driver2.6.18 or later must be installed on the Qlik Replicate Server machine.
l Bucket permissions: The Google service account should be granted the following permissions onthe bucket:
l storage.buckets.get
l storage.objects.get
l storage.objects.list
l storage.objects.create
l storage.objects.delete
l Browse permission: The Google service account should be granted thestorage.buckets.list permission. This permission is required in order to browse for a bucketin the Google Cloud Storage Data Access section of the endpoint’s General tab.
l Databricks table permissions: Grant the user account permission to perform the followingoperations on Databricks tables: CREATE, DROP, DESCRIBE, and ALTER table.
l "Can Attach To" permission: To enable Replicate to connect to the Databricks cluster via ODBC,the user account must be granted "Can Attach To" permission.For more information, see the Databricks online help.
l Valid security token: You must provide Replicate with a valid security token for Databricks access.l Storage account access: To access the storage directories from the Databricks cluster, you needto add a configuration for that storage account and its key. For an explanation of how to do this, seethe instructions for accessing a GCS bucket directly in the Databricks online help.
Limitations and considerationsThe following limitations apply when using Databricks on Google Cloud as a target endpoint in a Replicatetask:
l Supports LOB replication in Limited LOB mode only. LOB size will be limited to the maximumSTRING size supported by Databricks.
l Table names can only contain alphanumeric and underscore characters.l Table and column names can only contain ASCII characters. Column names cannot contain the '?'symbol. If a columns does contain the '?' symbol, it can be replaced with a valid ASCII characterusing a transformation.
Setup and User Guide - Qlik Replicate, November 2021 566

9 Adding and managing target endpoints
l With the exception of the STRING and VARCHAR data types, changes to a column's data type ordata type length will not be captured and will result in the table being suspended. Changes to thelength of STRING or VARCHAR data types (e.g. VARCHAR(50) to VARCHAR(100)) will simply beignored.
l Connecting to via an HTTP proxy server with authentication is not supported.l Replication to Delta tables is not supported.l Managed tables are not supported. Tables should be created as External tables.l DDL changes limitations and considerations when the Apply Changes DDL Handling Policy is set to"Ignore" for all types DDL (DROP, TRUNCATE, and ALTER):
l Modifying a column is not supported. Changes to a data type or data type length will not becaptured.
l Truncating a table is supported. Capturing changes to a truncated table will cause dataconflicts as the target table will not be truncated.
l Renaming a table is not supported. Capturing changes to a renamed table will result in thetable being suspended if the task is stopped and resumed (when the default table errorhandling policy is set).
l Dropping a column is not supported, regardless of the DDL Handling Policy setting. Capturingchanges to a table with a dropped column will set NULL values in the corresponding target column.
l Renaming a column is not supported, regardless of the DDL Handling Policy setting. Capturingchanges to a table with a renamed column will set NULL values in the corresponding target column.
l The creation of buckets, partitions or any other special attributes in the Databricks target tables isnot supported.
l The Batch optimized apply option in the task settings' Change Processing Tuning tab is notsupported.
l The Store task recovery data in target database option in the task settings' Change ProcessingTuning tab is not supported.
l The Commit rate during full load option in the task settings' Full Load Tuning tab is not relevant.l The Create primary key or unique index after full load completes option in the task settings' FullLoad Settings tab is not relevant.
l UPDATE/DELETE DMLs are not supported during change processing. If an UPDATE/DELETEDML was captured on the source, it will be ignored on the target and a warning will be written to thelog. If the Store Changes option is enabled in the task settings, these records will be written to theChange Table.
l The following Replicate Control Tables are not supported as they require UPDATE/DELETEoperations:
l Replication Status (actual name on target: attrep_status)l Suspended Tables (actual name on target: attrep_suspended_tables)
l As support for the VARCHAR data type was introduced in Databricks 8, creating a task thatreplicates to Databricks 8.x and then downgrading the cluster to an earlier Databricks version (in thesame task) requires the task to be reloaded.
Setup and User Guide - Qlik Replicate, November 2021 567

9 Adding and managing target endpoints
Change data partitioning on Databricks on Google CloudWhen Change Data Partitioning (page 1022) is enabled, the Replicate Change Tables in Databricks arepartitioned by the partition_name column. Data files are uploaded to Google Cloud Storage, accordingto the maximum size and time definition, and then stored in a directory under the Change Table directory.Whenever the specified partition timeframe ends, a partition is created that points to the Google CloudStorage location.
Information about the partitions is written to the attrep_cdc_partitions Control Table.
Supported data typesThe following table shows the Databricks on Google Cloud endpoint target data types that are supportedwhen using Qlik Replicate and the default mapping from Qlik Replicate data types.
For information on how to view the data type that is mapped from the source, see the section for the sourceendpoint you are using.
For additional information about Qlik Replicate data types, see Replicate data types (page 76).
Qlik Replicate data types Databricks on Google Cloud data types
BOOL BOOLEAN
BYTES STRING
TIME STRING
DATETIME TIMESTAMP
DATE DATE
INT1 TINYINT
INT2 SMALLINT
INT4 INT
INT8 BIGINT
NUMERIC DECIMAL (p,s)
REAL4 FLOAT
REAL8 DOUBLE
STRING VARCHAR (Length)
UINT1 SMALLINT
UINT2 INT
UINT4 BIGINT
UINT8 DECIMAL (20,0)
WSTRING VARCHAR (Length)
Qlik Replicate and Databricks on Google Cloud data types
Setup and User Guide - Qlik Replicate, November 2021 568

9 Adding and managing target endpoints
Qlik Replicate data types Databricks on Google Cloud data types
BLOB STRING
NCLOB STRING
CLOB STRING
Setting general connection propertiesThis section describes how to configure general connection properties. For an explanation of how toconfigure advanced connection properties, see Setting advanced connection properties.
To add a Databricks on Google Cloud target endpoint to Qlik Replicate:
1. In the Qlik Replicate console, click Manage Endpoint Connections to open the Manage EndpointConnections dialog box.For more information on adding an endpoint to Qlik Replicate, see Defining and managingendpoints (page 110).
2. In the Name field, type a name for your endpoint. This can be any name that will help to identify theendpoint being used.
3. In the Description field, type a description that helps to identify the endpoint. This is optional.
4. Select Databricks on Google Cloud as the endpoint Type.
5. Expand the Databricks ODBC Access section and provide the following information:l Host: The host name of the Databricks workspace containing the Google Cloud Storagebucket.
l Port: The port through which to access the workspace (you can change the default port 443,if required).
l Token: Your personal token for accessing the workspace.l HTTP path: The path to the cluster being used.l Database: The name of the Databricks target database.
6. Expand the Google Cloud Storage Data Access section and provide the following information:l JSON credentials: The JSON credentials for the service account key used to access theGoogle Cloud Storage bucket.For more information about JSON credentials, see the Google Cloud online help.
l Bucket name: The name of the bucket in Google Cloud Storage where you want the datafiles to be written. This must be the same as the bucket you configured for your Databrickscluster.
l Target directory: Where to create the data files in the specified bucket.
Setting advanced connection propertiesIn the Advanced tab, you can set file format, file attributes, change processing, and proxy settings.
File FormatExpand this section to edit or view the file format options.
Setup and User Guide - Qlik Replicate, November 2021 569

9 Adding and managing target endpoints
l Target storage format: Select either Text or Sequence.
When using Text as the target storage format, new lines as part of the data values arenot supported (due to an Apache Hadoop limitation). Best practice is to use Sequenceas the target storage format.
l Field delimiter: The delimiter that will be used to separate fields in the target file. The default is\001. Note that field delimiters should be ASCII characters unless they are non-printable controlcharacters, in which case they should be in Octal format (e.g. \247).
l Null value: The value that will be used to indicate a null value in the target file.
Example (where @ is the null value):mike,male,295678sara,female,@
l Escape character: The escape character is used to escape the field delimiter character. When afield delimiter is escaped, it is interpreted as actual data, and not as a field delimiter.
Example (where \ is the escape character and a comma is the field delimiter):sunroof\,power-steering
File AttributesExpand this section to edit or view the file attribute options.
l Maximum file size (KB): Specify the maximum file size of each target file. When the data reachesthe maximum size, the file will be closed and written to the specified target folder.
l Compress files using: Select None to store files uncompressed on Google Cloud Storage or Gzipto compress files.
Change ProcessingExpand this section to edit or view change processing options.
Apply/store changes when one of these conditions is fulfilled:
l File size reaches: The minimum size of the data required to create a file in idle state.l When elapsed time reaches: The maximum time to wait before applying the changes in idle state.
To facilitate rapid delivery of DDL messages, files are uploaded immediately, regardless of thespecified File size reaches or Elapsed time reaches values.
Proxy ServerExpand this section to edit or view proxy options.
l Use proxy server: Select this option to access Databricks on Google Cloud via a proxy server.l Host name: The host name of the proxy server.
Setup and User Guide - Qlik Replicate, November 2021 570

9 Adding and managing target endpoints
l Port: The port via which to access the proxy server.l User name: The user name for accessing the proxy server.l Password: The password for accessing the proxy server.
Internal parametersInternal parameters are parameters that are not exposed in the UI. You should only use them if instructedby Qlik Support.
To add internal Qlik Replicate parameters:
1. Click the Internal Parameters link.The Internal Parameters dialog box opens.
2. In the edit box, type the name of the parameter you need to add and then click it.
3. The parameter is added to the table below the search box with its default value.
4. Change the default value as required.
5. To reset the parameter value to its default, click the "Restore default value" icon at the end of therow.
More optionsThese options are not exposed in the UI as they are only relevant to specific versions or environments.Consequently, do not set these options unless explicitly instructed to do so by Qlik Support or productdocumentation.
To set an option, simply copy the option into the Add feature name field and click Add. Then set the valueor enable the option according to the instructions you received.
Settings summaryYou can view a summary of your settings by clicking the Setting Summary link. This is useful if you need tosend a summary of your settings to Qlik Support.
Setup and User Guide - Qlik Replicate, November 2021 571

9 Adding and managing target endpoints
9.9 Using a file as a targetThis section describes how to set up and use delimited text files as a target in a replication task. You canuse the File target endpoint to export database tables to files, which can then be used as a source in aReplicate task with a File source endpoint.
In this section:
l General overview (page 189)l File target overview (page 573)l Limitations (page 574)l Change data partitioning (page 575)l File target data types (page 575)l Setting general properties (page 576)l Setting advanced connection properties (page 579)l Generating reference files (page 583)
Setup and User Guide - Qlik Replicate, November 2021 572

9 Adding and managing target endpoints
File target overview
The File target endpoint generates the data files either in delimited text file format (e.g. CSV) or in JSONformat (according to the format selected in the endpoint settings).
Delimited text files are used to store data in tabular format. Examples of delimited text file formats includethe CSV (Comma Separated Values) and TSV (Tab Separated Values) formats. Some organizations mayimplement procedures that export data from a database to a delimited text file while others may simplyprefer this format as a convenient way of storing tabular data.
In a delimited text file, each record in the table occupies a separate row. Delimiters are used to mark thebeginning of a new row or the beginning of a new column. Virtually any character can be used as adelimiter, although a newline (\n) is often used to separate rows, and commas are commonly used toseparate columns.
In JSON files, each record is represented by a single line.
So, for example, the following table:
book_id title price is_hardcover
123 Angels 6.99 false
456 The Fallen 6.49 true
789 Rise Up 7.23 true
JSON data format example
Will be represented as:
{ "book_id": 123, "title": "Angels", "price": 6.99, "is_hardcover": false }
{ "book_id": 456, "title": "Fallen", "price": 6.49, "is_hardcover": true }
{ "book_id": 789, "title": "Rise Up", "price": 7.23, "is_hardcover": true }
When using a File as a target in a Replicate task, both the Full Load and the CDC data are written to CSVor JSON files (depending on the endpoint settings). While the explanations in this topic relate to CSV files,the same is true for JSON files.
Full Load files are named using incremental counters e.g. LOAD00001.csv, LOAD 00002.csv, etc.whereas Apply Changes files are named using timestamps e.g. 20141029-1134010000.csv.
Setup and User Guide - Qlik Replicate, November 2021 573

9 Adding and managing target endpoints
When Parallel Load is used, the naming convention for Full Load files is slightly different:
LOAD_$(SegmenteID)_$(IncreasingCounter)
Example:
LOAD_1_00000001 | LOAD_1_00000002 | LOAD_1_00000003 | LOAD_2_00000001
| LOAD_2_00000002
l The Apply Changes CSV files appear with a .tmp extension while they are in idle state.For more information on idle state, see Change Processing.
l When the Create metadata files in the target folder option is enabled, a correspondingmetadata file is created using the same naming format, but with a .dfm extension.
For each source table, a folder is created under the specified target folder. All files - i.e. Full Load, ApplyChanges, and Metadata (if enabled) - are written to the relevant folder, according to the settings defined inthe File target’s General tab.
After a task completes, you can define another task with a File source endpoint that uses the generatedCSV files.
DDL handlingWhen a DDL change is captured, Replicate will close the data file and also create a DFM file if the Createmetadata files in the target folder option is enabled. When the next batch of changes arrives, Replicatewill create a new data file containing the changes. Note that the DFM file created for the new data file willmatch the new table structure.
LimitationsThe following limitations apply to the File target endpoint:
l Only the following DDLs are supported: Truncate table, Drop table, Create table, Add Column,Rename Column, Drop Column, and Convert Data Type.
l Full LOB Mode is not supportedl UPDATE and DELETE statements are not supported in Apply Changes replication model Batch Optimized Apply mode is not supportedl Target lookup is not supportedl The <target folder> parameter cannot include special charactersl When the When source table is altered Apply Changes setting is set to Ignore ALTER, data fileswill be updated, but metadata files and metadata headers (if defined) will not.
l Source schema and table names cannot contain periods. If they do, you should use a globaltransformation to remove/replace the periods; otherwise, data loss will occur.
Setup and User Guide - Qlik Replicate, November 2021 574

9 Adding and managing target endpoints
Change data partitioningWhen replicating to a File target, for each of the source tables, a directory is created under the specifiedtarget directory. When Change Data Partitioning (page 1022) is enabled, an additional sub-directory iscreated under the corresponding table directory. The data and metadata (when the metadata option isenabled) files are located in the partition subdirectory, as in the following example:
{Target Directory}
{Table_1}
{Partition_1}
Data files
DFM files
{Partition_2}
Data files
DFM files
{Partition_3}
Data files
DFM files
{Table_2}
{Partition_1}
Data files
DFM files
{Partition_2}
Data files
DFM files
{Partition_3}
Data files
DFM files
Information about the partitions is written to the attrep_cdc_partitions Control Table. For information aboutthis table, see Change data partitions (page 1141).
File target data typesThe following table shows the default mapping from Qlik Replicate data types to File target data types.Note that the data type mapping is only relevant if the Create metadata files in the target folder option isenabled.
For information on source data type mappings, see the section for the source endpoint you are using.
For additional information about Qlik Replicate data types, see Replicate data types (page 76).
Qlik Replicate Data Types File Target Data Types
DATE DATE
TIME TIME
DATETIME DATETIME
BYTES BYTES (length)
Data types
Setup and User Guide - Qlik Replicate, November 2021 575

9 Adding and managing target endpoints
Qlik Replicate Data Types File Target Data Types
BLOB BLOB
REAL4 REAL4 (7)
REAL8 REAL8 (14)
INT1 INT1 (3)
INT2 INT2 (5)
INT4 INT4 (10)
INT8 INT8 (19)
UINT1 UINT1 (3)
UINT2 UINT2 (5)
UINT4 UINT4 (10)
UINT8 UINT8 (20)
NUMERIC NUMERIC (p,s)
STRING STRING (Length)
WSTRING STRING (Length)
CLOB CLOB
NCLOB NCLOB
BOOLEAN BOOLEAN (1)
Setting general propertiesThis section describes how to configure general properties. For an explanation of how to configureadvanced properties, see Setting Advanced Properties below.
To configure general properties for the File target endpoint:
1. In Tasks view, click Manage Endpoint Connections to open the Manage Endpoints Connectionsdialog box. Then click the New Endpoint Connection button. For more information on adding anendpoint to Qlik Replicate, see Defining and managing endpoints (page 110).
2. In the Name field, type a name for your endpoint. This can be any name that will help to identify theendpoint being used.
3. In the Description field, type a description that helps to identify the File endpoint. This is optional.
4. Select Target as the endpoint role.
5. Select File as the endpoint Type.
6. In the Target folder field, specify the full path of the folder to which you the target files to be written.
7. Configure the remaining settings in the General tab as described below.
Setup and User Guide - Qlik Replicate, November 2021 576

9 Adding and managing target endpoints
File Format
FormatYou can choose to create the target files in CSV or JSON format.
In a JSON file, each record is represented by a single line, as in the following example:
{ "book_id": 123, "title": "Alice in Wonderland", "price": 6.99, "is_hardcover": false }
{ "book_id": 456, "title": "Winnie the Pooh", "price": 6.49, "is_hardcover": true }
{ "book_id": 789, "title": "The Cat in the Hat", "price": 7.23, "is_hardcover": true }
If you choose JSON format , the following fields will be hidden as they are only relevant to CSVformat: Field delimiter, Record delimiter, Null value, Quote character, Escape character,Code page, and Add metadata header.
About delimitersDelimiters can be standard characters or a hexadecimal (hex) value. Note that the "0x" prefix must be usedto denote a hexadecimal delimiter (e.g. 0x01 = SOH). In the Field delimiter, Record delimiter and Nullvalue fields, the delimiter can consist of concatenated hex values (e.g. 0x0102 = SOHSTX), whereas in theQuote character and Escape character fields, it can only be a single hex value.
The hexadecimal number 0x00 is not supported (i.e. only 0x01-0xFF are supported).
Field delimiterThe delimiter that will be used to separate fields (columns) in the target files. The default is a comma.
Example using a comma as a delimiter:
"mike","male"
Record delimiterThe delimiter that will be used to separate records (rows) in the target files. The default is a newline (\n).
Example:
"mike","male"\n
"sara","female"\n
Null valueThe string that will be used to indicate a null value in the target files.
Example (where \n is the record delimiter and @ is the null value):
"mike","male",295678\n
"sara","female",@\n
Setup and User Guide - Qlik Replicate, November 2021 577

9 Adding and managing target endpoints
Quote CharacterThe character that will be used at the beginning and end of a text column. The default is the double-quotecharacter ("). When a column that contains column delimiters is enclosed in double-quotes, the columndelimiter characters are interpreted as actual data, and not as column delimiters.
Example (where a @ is the quote character):
@mike@,@male@
Escape characterThe character used to escape a quote character in the actual data.
Example (where" is the quote character and \ is the escape character):
1955,"old, \"rare\", Chevrolet","$1000"
Add metadata headerWhen the target storage format is set to Text, you can optionally add a header row to the data files. Theheader row can contain the source column names and/or the intermediate (i.e. Replicate) data types.
Example of a target file with a header row when both With column names and With data types areselected:
Position:DECIMAL(38,0),Color:VARCHAR(10)
1,"BLUE"
2,"BROWN"
3,"RED"
...
Code pageSpecify the code page of your target files if it is different from the default (65001).
Windows and Linux systems use different code page conventions. The specified code pagemust comply with the code page convention of the source file system.
File Attributesl Maximum file size - The maximum size a file can reach before it is closed (and optionallycompressed). This value applies both to data files and to Reference Files.For information on generating reference files, see Generating reference files (page 583).
l Compress files using - Choose GZIP to compress the target files or NONE (the default) to leavethem uncompressed.
Setup and User Guide - Qlik Replicate, November 2021 578

9 Adding and managing target endpoints
Change Processingl Consider state idle when no changes have been processed for - Specify how long to wait beforeconsidering the state to be idle. In idle state, you can apply changes to files using data that hasalready been processed if the specified size and time conditions are met (see below).
l Apply/store changes when:l File size reaches - Specify the maximum size of the data required in order to apply changesto the target file in idle state.
l Elapsed time reaches - Specify the maximum time to wait before applying the changes inidle state.
l Allow a single transaction to be split into multiple files - By default, a single transaction will not besplit across multiple files, regardless of the values specified in the File size reaches and Elapsedtime reaches fields. This is important for organizations who require files to contain transactions intheir entirety. However, this may also result in very large file sizes. For example, if the File sizereaches value is 32 MB and Replicate starts to apply changes for a new 2 GB transaction at 31 MB,the target file will only be closed at 2.031 GB.You should therefore select this option if it is critical that the values in the File size reaches andElapsed time reaches fields are adhered to (even if it means splitting a transaction across multiplefiles).
Metadata FilesCreate metadata files in the target folder - When this option is selected, for each data file, a matchingmetadata file with a .dfm extension will be created under the specified target folder. The metadata files(which are in standard JSON format) provide additional information about the task/data such as the sourceendpoint type, the source table name, the number of records in the data file, and so on.
For a full description of the metadata file as well as possible uses, see Metadata file description (page1151).
To verify that the connection information you entered is correct, click Test Connection.
If the connection is successful a message in green is displayed. If the Replicate is unable toconnect to the endpoint, an error message will be displayed at the top of the dialog box.
Setting advanced connection propertiesIn the Advanced tab, you can enable the creation of a reference file and set post-processing actions.These options are described in detail below.
Setup and User Guide - Qlik Replicate, November 2021 579

9 Adding and managing target endpoints
Option Description
Generatereference files
Select this option to generate a Reference File containing the full path to the ApplyChanges data files.
The reference file only points to the location of the Apply Changes files,and not the Full Load files.
For more information on this feature, see Generating reference files (page 583).
For information on using reference files with the File source endpoint, see Referencefiles (page 190).
Reference filefolder
The folder on the Replicate machine in which the Reference File will be created.
Multiple tasks with file target endpoints that have the same target directoryare not supported (as each task will attempt to write to the same referencefile).
Example:
c:\temp\
Advanced tab settings
Setup and User Guide - Qlik Replicate, November 2021 580

9 Adding and managing target endpoints
Option Description
Post-processfiles
You can process the final target files using a custom command. The command will berun whenever a data file is created.
If the Generate a reference file option is selected, a row (specifying thefile's location) will be added to the Reference File only after the commandcompletes successfully.
l Command name - The location of the command e.g. C:\utils\move.exe.l Working directory - The directory where you want the command to run.l Parameters - Specify any parameters that need to be passed to the commandduring runtime. You can use the following built-in parameters:${FILENAME} - The full path to the CSV file containing the full load or CDCdata.${METADATA_FILENAME} - The full path to the DFM file containing themetadata.
l If the CSV/DFM file paths contain spaces, you must enclosethese parameters with quotation marks (e.g"${FILENAME}").
l The post-processing command must return a proper exitcode. For information on the available exit code options, seeExit codes for the Post-Processing command (page 582).
For information on creating metadata files, see Setting general properties (page 576).
After postprocessingcompletes
You can decide what to do with the original target files after post-processingcompletes:
l Do nothing - Leaves the files in their original locationl Delete files - Deletes the files from the diskl Replace file extension with - Replaces the file extension with the specifiedextension.
Setup and User Guide - Qlik Replicate, November 2021 581

9 Adding and managing target endpoints
Exit codes for the Post-Processing commandThe post-processing command must return a proper exit code. You can either use the standard exit codevalues described below or set a custom exit code value as described in Setting Post Command exit codeswith an internal parameter below.
Standard Post Command exit codes
l 0 - Successl 1 - Recoverable error. The task will recover from the point of failure according to the settings in theEnvironmental errors (page 1032) tab.
l 2 - Table error. If a table error occurs, Replicate will handle the error according to the settings in theTable Errors (page 1034) tab.
l 3 (or any other value e.g. -100) - Fatal error. The task will fail and not attempt recovery.
Setting Post Command Exit Codes with an Internal Parameter
You can use internal parameters to set exit codes with custom values. This is especially useful if yourapplication already uses the standard exit code values.
See Standard Post Command exit codes above for a description of the exit codes.
l successExitCode
l recoverableErrorExitCode
l tableErrorExitCode
l fatalErrorExitCode
Internal parametersInternal parameters are parameters that are not exposed in the UI and should only be used if instructed byQlik Support.
To add internal Qlik Replicate parameters:
1. Click the Internal Parameters link.The Internal Parameters dialog box opens.
2. In the edit box, type the name of the parameter you need to add and then click it.
3. The parameter is added to the table below the search box with its default value.
4. Change the default value as required.
5. To reset the parameter value to its default, click the "Restore default value" icon at the end of therow.
More optionsThese options are not exposed in the UI as they are only relevant to specific versions or environments.Consequently, do not set these options unless explicitly instructed to do so by Qlik Support or productdocumentation.
To set an option, simply copy the option into the Add feature name field and click Add. Then set the valueor enable the option according to the instructions you received.
Setup and User Guide - Qlik Replicate, November 2021 582

9 Adding and managing target endpoints
Settings summaryYou can view a summary of your setting by clicking the View Setting Summary link. This is useful if youneed to send a summary of your setting to Qlik Support.
Generating reference filesIn the Advanced tab of the File Target endpoint, you can enable the Generate a reference file option. TheReference File contains a list of the Change File locations and is therefore only relevant if the task's ApplyChanges or Store Changes options are enabled.
The reference file name format is as follows:
<file_target_endpoint_name><counter>.csv|json
Example:
FileTarget00000001.csv
The counter suffix increases incrementally each time a new Reference File is generated (i.e.when the file reaches the maximum size defined in the General tab). Once a new ReferenceFile has been generated, you can delete the old reference file(s) if required.
Whenever an Apply Changes data file is created, a new row is added to the Reference File in the followingformat:
<Source_Table_Name>,<full_path_to_data_file>
Example:
MyTable,c:\temp\filetarget\dbo.MyTable\20170102-091759447.csv
Note that if the Post-process files option in the Advanced tab is also enabled, the Reference File will begenerated after the post-processing completes.
l When both the Post-process files and the Delete files (after post-processingcompletes) options are enabled, the reference file will not be generated.
l If the Archive files to folder (after post-processing completes) option is selected, thereference file will be updated to reflect the archive location of the data files.
Setup and User Guide - Qlik Replicate, November 2021 583

9 Adding and managing target endpoints
9.10 Using Google Cloud BigQuery as a targetThis section describes how to set up and use a Google Cloud BigQuery target endpoint in a replicationtask.
In this section:
l Prerequisites (page 585)l Limitations and considerations (page 586)l Supported data types (page 587)l Setting general connection properties (page 588)l Setting advanced connection properties (page 588)
Setup and User Guide - Qlik Replicate, November 2021 584

9 Adding and managing target endpoints
PrerequisitesThe following section describes the client prerequisites when replicating to a Google Cloud BigQuerytarget.
PermissionsThis section describes the Google Cloud BigQuery Service Account permissions required by Replicate:
Project > Viewer
BigQuery > BigQuery Data Editor
When you create a service account key, a JSON file containing the connection information will bedownloaded to your computer. You will need to copy the contents of this file to the Service account keyfield in the Google Cloud BigQuery endpoint.
Qlik Replicate on Windows1. Download the Simba ODBC driver for Google BigQuery and install it on the Replicate Server
machine:https://storage.googleapis.com/simba-bq-release/odbc/SimbaODBCDriverforGoogleBigQuery64_2.3.3.1005.msi
2. Install Google Cloud SDK 352.0.0 on the Replicate Server machine as follows:
a. Download and install the latest Google Cloud SDK version from Google.
b. Downgrade to version 352.0.0 by issuing the following command:gcloud components update --version 352.0.0
Qlik Replicate on LinuxTo be able to use Google Cloud BigQuery as a target endpoint in a Replicate task when Replicate isrunning on Linux, you need to perform the following procedure:
1. Download the Simba ODBC driver version 2.3.3.1005 to the Replicate Server machine.
2. Extract:SimbaODBCDriverforGoogleBigQuery64_2.3.3.1005.tar.gzto:/opt/SimbaODBCDriverforGoogleBigQuery_2.3.3.1005-Linux
3. Move the files GoogleBigQueryODBC.did and simba.googlebigqueryodbc.ini to the lib directoryunder the Simba ODBC driver directory.Example:Move the files from:/opt/SimbaODBCDriverforGoogleBigQuery_2.3.3.1005-Linux/setupto:/opt/SimbaODBCDriverforGoogleBigQuery_2.3.3.1005-Linux/SimbaODBCDriverforGoogleBigQuery64_2.3.3.1005/lib
4. Edit the googlebigqueryodbc.ini file as follows:
a. Change the ErrorMessagesPath to the path of the XML file containing the ODBCmessages. The default location is:
Setup and User Guide - Qlik Replicate, November 2021 585

9 Adding and managing target endpoints
ErrorMessagesPath=/opt/SimbaODBCDriverforGoogleBigQuery_2.3.3.1005-
Linux/SimbaODBCDriverforGoogleBigQuery64_2.3.3.1005/ErrorMessages
b. Change the DriverManagerEncoding to UTF-16.
5. Add the following path to the site_arep_login.sh file located in the Qlik Replicate bin directory:export LD_LIBRARY_PATH=$LD_LIBRARY_
PATH:/opt/SimbaODBCDriverforGoogleBigQuery_2.3.3.1005-
Linux/SimbaODBCDriverforGoogleBigQuery64_2.3.3.1005/lib
6. Edit the /etc/odbcinst.ini file and add the driver path (i.e. the path where the driver is installed):[ODBC Drivers]Simba= InstalledSimba ODBC Driver for Google BigQuery = Installed[Simba ODBC Driver for Google BigQuery]Description=Simba ODBC Driver for Google BigQuery(64-bit)Driver=/opt/SimbaODBCDriverforGoogleBigQuery_2.3.3.1005-
Linux/SimbaODBCDriverforGoogleBigQuery64_
2.3.3.1005/lib/libgooglebigqueryodbc_sb64.so
7. Restart the Replicate services.
8. Install gcloud on Linux without initializing the SDK.
For installation instructions, see Quickstart: Getting started with Cloud SDK.
9. Download and install Google Cloud SDK 352.0.0 for Linux on the Replicate Server machine.
Limitations and considerationsThe following limitations apply when using Google Cloud BigQuery as a target in a Replicate task:
l The following DDLs are not supported:l Drop columnl Rename columnl Change column data typel Rename table
l Files will be loaded to BigQuery uncompressed and unencrypted.l The Transactional Apply Change Processing Mode is not supported.l The Allow unlimited LOB size LOB handling option is not supported.l Capturing changes from source tables without a Primary Key or Unique Index is not supported. Ifyou need to capture changes from such tables, you can add a Primary Key using a transformation.Additionally, Primary Key or Unique Index columns cannot contain NULLs. If you are aware thatsuch columns will be populated with NULL values, define a transformation to change the NULLs tonon-nullable values.
l The Log record to the exceptions table error handling option for Apply Conflicts and Data Errors isnot supported.
l With the following task settings configuration, Replicate will perform a DELETE operation followedby an INSERT operation when an UPDATE is encountered:
Setup and User Guide - Qlik Replicate, November 2021 586

9 Adding and managing target endpoints
l Change Processing Mode is set to Batch optimized applyl The Apply changes using SQL MERGE option is not selectedl The Apply Conflicts error handling for UPDATEs is set to: No record found for applying anUPDATE: INSERT the missing target record
As Google Cloud BigQuery does not support rollback, in the event that Replicate is unable to insertthe updated row, the data will be deleted from the target.
Supported data typesThe following table shows the Google Cloud BigQuery database target data types that are supported whenusing Qlik Replicate and the default mapping from Qlik Replicate data types.
For information on how to view the data type that is mapped from the source, see the section for the sourcedatabase you are using. For additional information about Qlik Replicate data types, see Replicate datatypes (page 76).
Qlik ReplicateData Types Google Cloud BigQuery database data types
BYTES BYTES
DATE DATE
TIME TIME
DATETIME If fraction <=6:
TIMESTAMP If fraction >6:
STRING
INT1 INTEGER
INT2 INTEGER
INT4 INTEGER
INT8 INTEGER
NUMERIC If the data can be stored in 38,9, then:
NUMERIC
If not, then:
STRING with length of original precision +2.
REAL4 FLOAT
REAL8 FLOAT
STRING STRING
UINT1 INTEGER
UINT2 INTEGER
Qlik Replicate and Google Cloud BigQuery database data types
Setup and User Guide - Qlik Replicate, November 2021 587

9 Adding and managing target endpoints
Qlik ReplicateData Types Google Cloud BigQuery database data types
UINT4 INTEGER
UINT8 INTEGER
WSTRING STRING
BLOB BYTES
NCLOB STRING
CLOB STRING
BOOLEAN BOOLEAN
Setting general connection propertiesThis section describes how to configure general connection properties. For an explanation of how toconfigure advanced connection properties, see Setting advanced connection properties.
To add a Google Cloud BigQuery target endpoint to Qlik Replicate:
1. In Tasks view, click Manage Endpoint Connections to open the Manage Endpoints Connectionsdialog box. Then click the New Endpoint Connection button. For more information on adding anendpoint to Qlik Replicate, see Defining and managing endpoints (page 110).
2. In the Name field, type a name for your database. This can be any name that will help to identify thedatabase being used.
3. In the Description field, type a description that helps to identify the Google Cloud BigQuerydatabase. This is optional.
4. Select Target as the database role.
5. From the Type drop-down list, select Google Cloud BigQuery.
6. In the Service account key field, paste the contents of the JSON file (including curly brackets) thatwas downloaded when you created your BigQuery service account key.
7. To verify that the connection information you entered is correct, click Test Connection.If the connection is successful a confirmation will be displayed at the top of the dialog box. IfReplicate is unable to connect to the endpoint, an error message will be displayed instead.
Setting advanced connection propertiesIn the Advanced tab, you can set the following properties:
You can set the following properties:
l Max file size (KB): Select or type the maximum size (in KB) of a CSV file before the file is loadedinto the Google Cloud BigQuery target database.
l Location: Where to upload the dataset created by Replicate.l Default dataset prefix: Specify a prefix for the BigQuery dataset where you want Replicate tocreate and update the target tables.
Setup and User Guide - Qlik Replicate, November 2021 588

9 Adding and managing target endpoints
This is required when the Apply Changes replication option is selected.
l Create tables as clustered by primary key: When this option is selected, the target tables will becreated as clustered (according to the first four Primary Key columns that support clustering). Ingeneral, clustered tables usually provide much better query performance as well as reducing billingcosts.
l Only tables with primary keys of the following data types can be created asclustered: DATE, BOOL, GEOGRAPHY, INT64, NUMERIC, STRING, andTIMESTAMP.
l If you select this option and then later decide that you do not want the tables tobe created as clustered on the target, turn off this option and reload the task.
Internal parametersInternal parameters are parameters that are not exposed in the UI. You should only use them if instructedby Qlik Support.
To add internal Qlik Replicate parameters:
1. Click the Internal Parameters link.The Internal Parameters dialog box opens.
2. In the edit box, type the name of the parameter you need to add and then click it.
3. The parameter is added to the table below the search box with its default value.
4. Change the default value as required.
5. To reset the parameter value to its default, click the "Restore default value" icon at the end of therow.
More optionsThese options are not exposed in the UI as they are only relevant to specific versions or environments.Consequently, do not set these options unless explicitly instructed to do so by Qlik Support or productdocumentation.
To set an option, simply copy the option into the Add feature name field and click Add. Then set the valueor enable the option according to the instructions you received.
Settings summaryYou can view a summary of your settings by clicking the Setting Summary link. This is useful if you need tosend a summary of your settings to Qlik Support.
Setup and User Guide - Qlik Replicate, November 2021 589

9 Adding and managing target endpoints
9.11 Using Google Cloud SQL for MySQL as a TargetThis section describes how to set up and use a Google Cloud SQL for MySQL target endpoint in areplication task.
In this section:
l Prerequisites (page 591)l Limitations (page 591)l Security requirements (page 592)l Supported Data Types (page 592)l Setting general connection properties (page 595)l Setting advanced connection properties (page 596)
Setup and User Guide - Qlik Replicate, November 2021 590

9 Adding and managing target endpoints
PrerequisitesBefore using Google Cloud SQL for MySQL as an endpoint in a Qlik Replicate task, make sure that theprerequisites outlined below have been met.
Client prerequisitesInstall MySQL ODBC Unicode Driver 64-bit on the Replicate Server machine.
Only these driver versions are supported:
l 5.3.11 to 5.3.13l 8.0.23 to 8.0.25
Linux only:
Make sure that the /etc/odbcinst.ini file contains an entry for MySQL, as in the following example:
[MySQL ODBC 5.3.13 Unicode Driver]Driver = /usr/lib64/libmyodbc5w.soUsageCount = 1
General prerequisitesIn addition to the client prerequisites detailed above, make sure that the following prerequisites have alsobeen met:
l A Google Cloud SQL for MySQL account with the required Security requirements (page 592).l A Google Cloud SQL for MySQL database with the tables that you want to replicate should beaccessible in your network.The following Google Cloud SQL for MySQL editions are supported:
l Google Cloud SQL for MySQL Community Editionl Google Cloud SQL for MySQL Standard Editionl Google Cloud SQL for MySQL Enterprise Editionl Google Cloud SQL for MySQL Cluster Carrier Grade Edition
l In order to work with Google Cloud SQL for MYSQL 8 as a target endpoint, you need to:l Set the parameter secure_file_priv = NULL in the MySQL database.l If you are using LOB columns, set the parameter sort_buffer_size = 128M in theGoogle Cloud SQL for MySQL database.
Replicating 4-byte UTF8 emojisTo support replication of 4-byte UTF8 emojis, the target schema character set must be set to utf8mb4.
LimitationsThe following limitations apply:
Setup and User Guide - Qlik Replicate, November 2021 591

9 Adding and managing target endpoints
l When only the LOB column in the source table is updated, Replicate will not update thecorresponding target LOB column. The target LOB column will only be updated if at least one othercolumn is also updated in the same transaction.
l Due to the way MySQL operates, when loading data to a Google Cloud SQL for MySQL targetduring a Full Load task, duplicate key errors will not be reported to the logs.
l When updating a column's value to its existing value, a zero rows affected is returned from MySQL(unlike Oracle and Microsoft SQL Server that perform an update of one row). This generates anentry in the attrep_apply_exceptions control table and the following warning:Some changes from the source database had no impact when applied to the
target database. See attrep_apply_exceptions table for details.
l Due to an issue with MySQL versions 5.6 and 5.7 (which was resolved in version 8.0), Replicatecannot insert multibyte characters into TEXT columns when the Full Load uses CSV files.Consequently, if the target endpoint is MySQL 5.6/5.7 and a replicated table contains TEXTcolumns with UTF-8 multibyte characters, the target table might be empty.
Workaround:In the Advanced tab, set the loadUsingCSV internal parameter to FALSE. Note that this mightimpact performance.
Security requirementsYou must provide Google Cloud SQL for MySQL account access to the Qlik Replicate user. This user musthave read/write privileges in the Google Cloud SQL for MySQL database.
Additionally, for each target schema involved in the replication, the Qlik Replicate user must have thefollowing permissions:
l ALTERl CREATEl CREATE TEMPORARY TABLESl DELETEl DROPl INSERTl SELECTl UPDATE
Supported Data TypesThe following table shows the Google Cloud SQL for MySQL database target data types that are supportedwhen using Qlik Replicate and the default mapping from Qlik Replicate data types.
For information on how to view the data type that is mapped from the source, see the section for the sourceendpoint you are using.
For additional information about Qlik Replicate data types, see Replicate data types (page 76).
Setup and User Guide - Qlik Replicate, November 2021 592

9 Adding and managing target endpoints
Qlik Replicate Data Types Google Cloud SQL for MySQL Data Types
BOOL BOOL
BYTES If length is => 1 and =< 8095, then:
VARBINARY (Length)
If length is => 8096 and =< 65535, then:
BLOB
If length is => 65536 and =< 16777215, then:
MEDIUMBLOB
If length is => 16777216 and =< 2147483647, then:
LONGBLOB
DATE DATE
TIME TIME
DATETIME If scale is => 0 and =< 6, then:
DECIMAL (p,s)
If scale is => 7 and =< 12, then:
VARCHAR (37)
INT1 TINYINT
INT2 SMALLINT
INT4 INTEGER
INT8 BIGINT
NUMERIC If scale is => 0 and =< 30, then:
DECIMAL (p,s)
If scale is => 31 and =< 100, then:
VARCHAR (45)
REAL4 FLOAT
REAL8 DOUBLE
Supported data types
Setup and User Guide - Qlik Replicate, November 2021 593

9 Adding and managing target endpoints
Qlik Replicate Data Types Google Cloud SQL for MySQL Data Types
STRING If length is => 1 and =< 8095, then:
VARCHAR (Length)
If length is => 8096 and =< 65535, then:
TEXT
If length is => 65536 and =< 16777215, then:
MEDIUMTEXT
If length is => 16777216 and =< 2147483647, then:
LONGTEXT
UINT1 UNSIGNED TINYINT
UINT2 UNSIGNED SMALLINT
UINT4 UNSIGNED INTEGER
UINT8 UNSIGNED BIGINT
WSTRING If length is => 1 and =< 8095, then:
VARCHAR (Length)
If length is => 8096 and =< 65535, then:
TEXT
If length is => 65536 and =< 16777215, then:
MEDIUMTEXT
If length is => 16777216 and =< 2147483647, then:
LONGTEXT
BLOB If length is => 1 and =< 65535, then:
BLOB
If length is => 65536 and =< 16777215, then:
MEDIUMBLOB
If length is => 16777215 and =< 2147483647, then:
LONGBLOB
Setup and User Guide - Qlik Replicate, November 2021 594

9 Adding and managing target endpoints
Qlik Replicate Data Types Google Cloud SQL for MySQL Data Types
NCLOB If length is => 1 and =< 65535, then:
TEXT CHARACTER SET UTF16
If length is => 65536 and =< 2147483647, then:
LONGTEXT CHARACTER SET UTF16
CLOB If length is => 1 and =< 65535, then:
TEXT
If length is => 65536 and =< 2147483647, then:
LONGTEXT
Setting general connection propertiesThis section describes how to configure general connection properties. For an explanation of how toconfigure advanced connection properties, see Setting advanced connection properties.
To add a Google Cloud SQL for MySQL target endpoint to Qlik Replicate:
1. In the Qlik Replicate Console, click Manage Endpoint Connections to open the ManageEndpointsConnections dialog box. Then click the New Endpoint Connection button. For moreinformation on adding an endpoint to Qlik Replicate, see Defining and managing endpoints (page110).
2. In the Name field, type a name for your database. This can be any name that will help to identify thedatabase being used.
3. In the Description field, type a description that helps to identify the Google Cloud SQL for MySQLdatabase. This is optional.
4. Select Target as the database role.
5. From the Type drop-down list, select Google Cloud SQL for MySQL.
6. In the Server field, enter the host name or IP address of the computer on which the database isinstalled.
l This information is case sensitive.l To determine if you are connected to the database you want to use or if theconnection information you entered is correct, click Test Connection.If the connection is successful a message in green is displayed. If the connectionfails, an error message is displayed at the bottom of the dialog box.To view the log entry if the connection fails, click View Log. The server log isdisplayed with the information for the connection failure. Note that this button isnot available unless the test connection fails.
7. Optionally, change the default port (3306).
Setup and User Guide - Qlik Replicate, November 2021 595

9 Adding and managing target endpoints
8. Type the Google Cloud SQL for MySQL authentication information (User Name, Password) for theauthorized user for this database. If you do not know this information, see your MySQL databaseAdministrator (DBA).
9. Select one of the following Load source schemas into options:l The following database - When this option is selected, all source schemas will be loadedinto the selected database.
l Multiple endpoints - When this option is selected, each of the source schemas will be loadedinto its corresponding database.
Setting advanced connection propertiesIn the Advanced tab, you can set the following properties:
l Max file size (KB): Select or type the maximum size (in KB) of a CSV file before it is loaded into theGoogle Cloud SQL for MySQL target database. The default value is 32000 KB.
l Use parallel loading: Select this option to improve performance when loading data into theGoogleCloud SQL for MySQL target database.
l Use the following number of threads: Specify how many threads to use to load the data intothe Google Cloud SQL for MySQL target database. Note that setting a large number ofthreads may have an adverse effect on database performance since a separate connectionis required for each thread.
Internal parametersInternal parameters are parameters that are not exposed in the UI. You should only use them if instructedby Qlik Support.
To add internal Qlik Replicate parameters:
1. Click the Internal Parameters link.The Internal Parameters dialog box opens.
2. In the edit box, type the name of the parameter you need to add and then click it.
3. The parameter is added to the table below the search box with its default value.
4. Change the default value as required.
5. To reset the parameter value to its default, click the "Restore default value" icon at the end of therow.
More optionsThese options are not exposed in the UI as they are only relevant to specific versions or environments.Consequently, do not set these options unless explicitly instructed to do so by Qlik Support or productdocumentation.
To set an option, simply copy the option into the Add feature name field and click Add. Then set the valueor enable the option according to the instructions you received.
Setup and User Guide - Qlik Replicate, November 2021 596

9 Adding and managing target endpoints
Settings summaryYou can view a summary of your settings by clicking the Setting Summary link. This is useful if you need tosend a summary of your settings to Qlik Support.
Setup and User Guide - Qlik Replicate, November 2021 597
9 Adding and managing target endpoints
9.12 Using Google Cloud SQL for PostgreSQL as a targetThis section describes how to set up and use a Google Cloud SQL for PostgreSQL target endpoint in areplication task.
In this section:
l Prerequisites (page 599)l Limitations (page 834)l Security requirements (page 599)l Google Cloud SQL for PostgreSQL database target data types (page 600)l Setting general connection properties (page 601)l Setting advanced connection properties (page 603)
Setup and User Guide - Qlik Replicate, November 2021 598

9 Adding and managing target endpoints
PrerequisitesThe following section describes the client prerequisites when replicating to a Google Cloud SQL forPostgreSQL target.
l Qlik Replicate Server for Windows:l The PostgreSQL ODBC Driver: PostgreSQL ODBC Driver psqlodbc_12_02_0000-x64 orabove must be installed on the Qlik Replicate machine.
l Postgresql-binaries:
1. Download postgresql-12.6-3-windows-x64-binaries.zip.
2. Copy the bin folder to a Replicate machine.
3. Add the bin folder path to the system PATH.
If PostgreSQL binaries and the Greenplum client are deployed on the sameReplicate Server, tasks configured to use a PostgreSQL target will fail.
l Microsoft Visual Studio 2013 Redistributable (x86) - not (x64) - must be installed on the QlikReplicate machine.
l Qlik Replicate Server for Linux: On the Qlik Replicate machine:
1. Install postgresql12. For example, postgresql12-12.1-2PGDG.rhel7.x86_64.rpm is thepackage required for Red Hat 7.
2. Install the ODBC driver postgresql12.For example, postgresql12-odbc-12.01.0000-1PGDG.rhel7.x86_64.rpm is the client requiredfor Red Hat 7.
3. Copy the driver location to the site_arep_login.sh file:echo "export LD_LIBRARY_PATH=/usr/lib:/usr/lib64:/usr/pgsql-12/lib:$LD_LIBRARY_
PATH" >> site_arep_login.sh
This will add the driver to "LD_LIBRARY_PATH" and update the driver location in the site_arep_login.sh file.
4. Makes sure that the /etc/odbcinst.ini file contains an entry for PostgreSQL, as in thefollowing example:[PostgreSQL]
Description = PostgreSQL ODBC driver
Driver = /usr/pgsql-12/lib/psqlodbc.so
Setup = /usr/pgsql-12/lib/psqlodbcw.so
Debug = 0
CommLog = 1
UsageCount = 2
LimitationsUPDATE and DELETE operations on tables without a Primary Key/Unique Index that contain duplicaterecords is not supported. Any changes to these tables will affect all the records in the target.
Security requirementsThe user specified in the General tab when Setting general connection properties (page 601) must be aregistered user in the Google Cloud SQL for PostgreSQL database.
Setup and User Guide - Qlik Replicate, November 2021 599

9 Adding and managing target endpoints
Google Cloud SQL for PostgreSQL database target data typesThe Google Cloud SQL for PostgreSQL endpoint for Qlik Replicate supports most Google Cloud SQL forPostgreSQL database data types. The following table shows the Google Cloud SQL for PostgreSQLdatabase target data types that are supported when using Qlik Replicate and the default mapping from QlikReplicate data types. Unsupported data types are listed below the table.
For information on how to view the data type that is mapped from the source, see the section for the sourcedatabase you are using. For additional information about Qlik Replicate data types, see Replicate datatypes (page 76).
Qlik Replicate data types Google Cloud SQL for PostgreSQL database data types
BOOL BOOL
BYTES BYTEA
DATE DATE
TIME TIME
DATETIME If scale is => 0 and =< 6, then:
TIMESTAMP
If scale is => 7 and =< 12, then:
VARCHAR (37)
INT1 SMALLINT
INT2 SMALLINT
INT4 INTEGER
INT8 BIGINT
NUMERIC DECIMAL (P, S)
REAL4 FLOAT4
REAL8 FLOAT8
STRING If length is 1 - 21845, then:
VARCHAR (Length in Bytes = The STRING value multiplied by three)
If length is 21846 - 2147483647, then:
VARCHAR (65535)
UINT1 SMALLINT
UINT2 INTEGER
UINT4 BIGINT
UINT8 BIGINT
Setup and User Guide - Qlik Replicate, November 2021 600
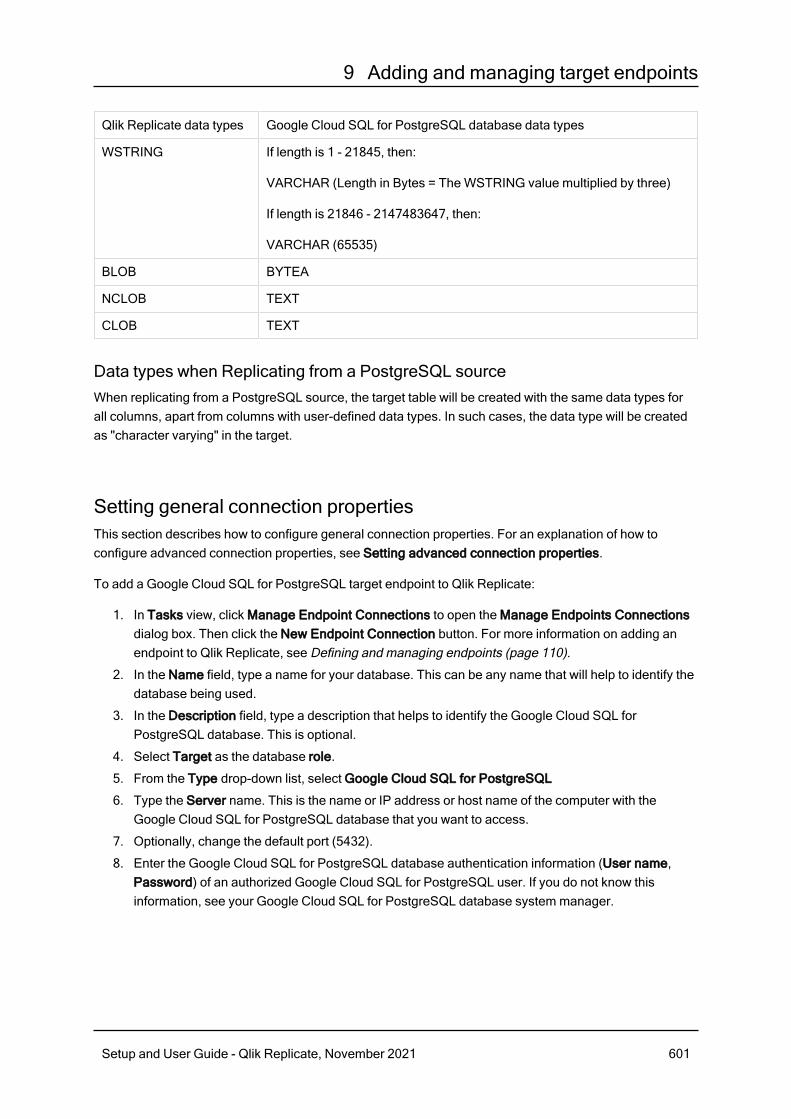
9 Adding and managing target endpoints
Qlik Replicate data types Google Cloud SQL for PostgreSQL database data types
WSTRING If length is 1 - 21845, then:
VARCHAR (Length in Bytes = The WSTRING value multiplied by three)
If length is 21846 - 2147483647, then:
VARCHAR (65535)
BLOB BYTEA
NCLOB TEXT
CLOB TEXT
Data types when Replicating from a PostgreSQL sourceWhen replicating from a PostgreSQL source, the target table will be created with the same data types forall columns, apart from columns with user-defined data types. In such cases, the data type will be createdas "character varying" in the target.
Setting general connection propertiesThis section describes how to configure general connection properties. For an explanation of how toconfigure advanced connection properties, see Setting advanced connection properties.
To add a Google Cloud SQL for PostgreSQL target endpoint to Qlik Replicate:
1. In Tasks view, click Manage Endpoint Connections to open the Manage Endpoints Connectionsdialog box. Then click the New Endpoint Connection button. For more information on adding anendpoint to Qlik Replicate, see Defining and managing endpoints (page 110).
2. In the Name field, type a name for your database. This can be any name that will help to identify thedatabase being used.
3. In the Description field, type a description that helps to identify the Google Cloud SQL forPostgreSQL database. This is optional.
4. Select Target as the database role.
5. From the Type drop-down list, select Google Cloud SQL for PostgreSQL
6. Type the Server name. This is the name or IP address or host name of the computer with theGoogle Cloud SQL for PostgreSQL database that you want to access.
7. Optionally, change the default port (5432).
8. Enter the Google Cloud SQL for PostgreSQL database authentication information (User name,Password) of an authorized Google Cloud SQL for PostgreSQL user. If you do not know thisinformation, see your Google Cloud SQL for PostgreSQL database system manager.
Setup and User Guide - Qlik Replicate, November 2021 601

9 Adding and managing target endpoints
Consider the following:l This information is case sensitive.l To determine if you are connected to the database you want to use or if theconnection information you entered is correct, click Test Connection.If the connection is successful a message in green is displayed. If the connectionfails, an error message is displayed at the bottom of the dialog box.To view the log entry if the connection fails, click View Log. The server log isdisplayed with the information for the connection failure. Note that this button isnot available unless the test connection fails.
Make sure that the specified Google Cloud SQL for PostgreSQL database user has thecorrect access privileges.
9. Type the Database name or select one from the list of available endpoints. This is the name of theGoogle Cloud SQL for PostgreSQL database to which you are replicating data.
SSL authentication optionsIn the Security section, you can configure Replicate to connect to the Google Cloud SQL for PostgreSQLdatabase using SSL.
The specified certificates are relevant only for bulk insert operations.
l SSL Mode: Select one of the following:l Prefer - Establishes an encrypted connection if the server supports encrypted connections,falling back to an unencrypted connection if an encrypted connection cannot be established.
l Disable - Connect with a surname and password only.l Allow - Establish an encrypted connection if requested by the server.l Require - Establishes an encrypted connection if the server supports encrypted connections.The connection attempt fails if an encrypted connection cannot be established.
l Verify CA - Similar to Required, but also verifies the server Certificate Authority (CA)certificate against the configured CA certificates. The connection attempt fails if no validmatching CA certificates are found.
l Verify Full - Similar to Verify CA, but also performs host name identity verification bychecking the host name the client (i.e. Replicate) uses for connecting to the server againstthe identity in the certificate that the server sends to the client. The client checks whether thehost name that it uses for connecting matches the Common Name value in the servercertificate. The connection fails if there is a mismatch.
l Client certificate path:- The path to the client certificate requested by the server.l Secret key path - The path to the client private key file in PEM format.l CA path - The path to the Certificate Authority (CA) that issued the client certificate file in PEMformat.
Setup and User Guide - Qlik Replicate, November 2021 602

9 Adding and managing target endpoints
l CRL path - The path to the CRL certificate. This file contains certificates revoked by certificateauthorities. If the server certificate appears in this list, the connection will fail.
l SSL compression -Select this option to compress the data before it is encrypted.
Setting advanced connection propertiesIn the Advanced tab, you can set the following properties:
You can set the following properties:
l Max file size (KB): Select or type the maximum size (in KB) of a CSV file before the file is loadedinto the Google Cloud SQL for PostgreSQL target database. The default value is 32000 KB.
Internal parametersInternal parameters are parameters that are not exposed in the UI. You should only use them if instructedby Qlik Support.
To add internal Qlik Replicate parameters:
1. Click the Internal Parameters link.The Internal Parameters dialog box opens.
2. In the edit box, type the name of the parameter you need to add and then click it.
3. The parameter is added to the table below the search box with its default value.
4. Change the default value as required.
5. To reset the parameter value to its default, click the "Restore default value" icon at the end of therow.
More optionsThese options are not exposed in the UI as they are only relevant to specific versions or environments.Consequently, do not set these options unless explicitly instructed to do so by Qlik Support or productdocumentation.
To set an option, simply copy the option into the Add feature name field and click Add. Then set the valueor enable the option according to the instructions you received.
Settings summaryYou can view a summary of your settings by clicking the Setting Summary link. This is useful if you need tosend a summary of your settings to Qlik Support.
Setup and User Guide - Qlik Replicate, November 2021 603

9 Adding and managing target endpoints
9.13 Using Google Cloud Storage as a targetThis chapter describes how to set up and use Google Cloud Storage as a target in a replication task.
In this section:
l Prerequisites (page 605)l Google Cloud storage target overview (page 605)l Limitations (page 605)l Change data partitioning (page 605)l Data types (page 606)l Setting general connection properties (page 607)l Setting advanced connection properties (page 610)l Generating reference files (page 613)
Setup and User Guide - Qlik Replicate, November 2021 604

9 Adding and managing target endpoints
PrerequisitesBefore you can use Google Cloud Storage as a target endpoint in a Replicate task, the followingprerequisites must be met:
l Permissions: The JSON credentials specified in the Google Cloud Storage endpoint's GoogleCloud Storage settings must be for an account that has read and write access to the specifiedbucket and folder.
Google Cloud storage target overviewWhen using Google Cloud Storage as a target in a Replicate task, both the Full Load and ChangeProcessing data are written to data files. Depending on the endpoint settings, data files can be either CSVor JSON files. While the explanations in this section relate to CSV files, the same is true for JSON files
Full Load files are named using incremental counters e.g. LOAD00001.csv, LOAD 00002.csv, etc.whereas Change Processing files are named using timestamps e.g. 20141029-1134010000.csv.
When the Create metadata files in the target folder option is enabled, a correspondingmetadata file is created using the same naming format, but with a .dfm extension.
For each source table, a folder is created in the specified Google Cloud Storage target folder. The data filesare created on the Replicate Server machine and are then uploaded to the specified Google Cloud Storagetarget folder once the File Attributes (Full Load) and Change Processing upload conditions have been met.
DDL handlingWhen a DDL change is captured, Replicate will close the data file and also create a DFM file if the Createmetadata files in the target folder option is enabled. When the next batch of changes arrives, Replicatewill create a new data file containing the changes. Note that the DFM file created for the new data file willmatch the new table structure.
LimitationsThe following limitations apply to the Google Cloud Storage target endpoint:
l The following DDLs are supported only: Truncate table, Drop table, Create table, Add Column,Rename Column, Drop Column, and Convert Data Type.
l Full LOB Mode is not supportedl UPDATE and DELETE statements are not supported in Apply Changes replication model Batch Optimized Apply mode is not supportedl Target lookup is not supportedl The <target folder> parameter cannot include special characters
Change data partitioningWhen replicating to a Google Cloud Storage target, for each of the source tables, a directory is createdunder the specified target directory. When Change Data Partitioning (page 1022) is enabled, an additionalsub-directory is created under the corresponding table directory. The data and metadata (when the
Setup and User Guide - Qlik Replicate, November 2021 605

9 Adding and managing target endpoints
metadata option is enabled) files are located in the partition subdirectory, as in the following example:
{Target Directory}
{Table_1}
{Partition_1}
Data files
DFM files
{Partition_2}
Data files
DFM files
{Partition_3}
Data files
DFM files
{Table_2}
{Partition_1}
Data files
DFM files
{Partition_2}
Data files
DFM files
{Partition_3}
Data files
DFM files
Information about the partitions is written to the attrep_cdc_partitions Control Table. For information aboutthis table, see Change data partitions (page 1141).
Data typesThe following table shows the default mapping from Qlik Replicate data types to Google Cloud Storagetarget data types. Note that the data type mapping is only relevant if the Create metadata files in the targetfolder option is enabled.
For information on source data type mappings, see the section for the source endpoint you are using.
For additional information about Qlik Replicate data types, see Replicate data types (page 76).
Qlik Replicatedata types Google Cloud Storage Target data types
DATE DATE
TIME TIME
DATETIME DATETIME
BYTES BYTES (length)
BLOB BLOB
REAL4 REAL4 (7)
REAL8 REAL8 (14)
INT1 INT1 (3)
Qlik Replicate and Google Cloud Storage data types
Setup and User Guide - Qlik Replicate, November 2021 606

9 Adding and managing target endpoints
Qlik Replicatedata types Google Cloud Storage Target data types
INT2 INT2 (5)
INT4 INT4 (10)
INT8 INT8 (19)
UINT1 UINT1 (3)
UINT2 UINT2 (5)
UINT4 UINT4 (10)
UINT8 UINT8 (20)
NUMERIC NUMERIC (p,s)
STRING STRING (Length)
WSTRING STRING (Length)
CLOB CLOB
NCLOB NCLOB
BOOLEAN BOOLEAN (1)
Setting general connection propertiesThis section describes how to configure general connection properties. For an explanation of how toconfigure advanced connection properties, see Setting advanced connection properties.
To add an Google Cloud Storage target endpoint to Qlik Replicate:
1. In Tasks view, click Manage Endpoint Connections to open the Manage Endpoints Connectionsdialog box. Then click the New Endpoint Connection button. For more information on adding anendpoint to Qlik Replicate, see Defining and managing endpoints (page 110).
2. In the Name field, type a name for your endpoint. This can be any name that will help to identify theendpoint being used.
3. Optionally, in the Description field, type a description that helps to identify the endpoint.
4. Select Target as the endpoint role.
5. Select Google Cloud Storage as the endpoint Type.
6. Configure the remaining settings in the General tab as described in the table below.
Option Description
JSONcredentials
The JSON credentials for the service account key with read and write access to theGoogle Cloud Storage bucket.
Bucket name The Google Cloud Storage bucket.
Target folder Where to create the data files in the specified bucket.
Google Cloud Storage option descriptions
Setup and User Guide - Qlik Replicate, November 2021 607

9 Adding and managing target endpoints
Option Description
FileAttributes
Delimiters can be standard characters or a hexadecimal (hex) value. Note that the "0x"prefix must be used to denote a hexadecimal delimiter (e.g. 0x01 = SOH). In the Fielddelimiter, Record delimiter and Null value fields, the delimiter can consist ofconcatenated hex values (e.g. 0x0102 = SOHSTX), whereas in the Quote characterand Escape character fields, it can only be a single hex value.
The hexadecimal number 0x00 is not supported (i.e. only 0x01-0xFF aresupported).
Format You can choose to create the target files in CSV or JSON format.
In a JSON file, each record is represented by a single line, as in the following example:
{ "book_id": 123, "title": "Alice in Wonderland", "price": 6.99, "is_hardcover": false }
{ "book_id": 456, "title": "Winnie the Pooh", "price": 6.49, "is_hardcover": true }
{ "book_id": 789, "title": "The Cat in the Hat", "price": 7.23, "is_hardcover": true }
Changing the format (i.e. from CSV to JSON or from JSON to CSV) whilethe task is in a stopped state and then resuming the task, is not supported.
If you choose JSON format , the following fields will be hidden as they areonly relevant to CSV format: Field delimiter, Record delimiter, Null value,Quote character, Escape character, and Add metadata header.
Fielddelimiter
The delimiter that will be used to separate fields (columns) in the target files. The defaultis a comma.
Example using a comma as a delimiter:
"mike","male"
Recorddelimiter
The delimiter that will be used to separate records (rows) in the target files. The defaultis a newline (\n).
Example:
"mike","male"\n
"sara","female"\n
Setup and User Guide - Qlik Replicate, November 2021 608

9 Adding and managing target endpoints
Option Description
Null value The string that will be used to indicate a null value in the target files.
Example (where \n is the record delimiter and @ is the null value):
"mike","male",295678\n
"sara","female",@\n
Quotecharacter
The character that will be used at the beginning and end of a text column. The default isthe double-quote character ("). When a column that contains column delimiters isenclosed in double-quotes, the column delimiter characters are interpreted as actualdata, and not as column delimiters.
Example (where a @ is the quote character):
@mike@,@male@
Quoteescapecharacter
The character used to escape a quote character in the actual data.
Example (where" is the quote character and \ is the escape character):
1955,"old, \"rare\", Chevrolet","$1000"
Addmetadataheader
When the target storage format is set to Text, you can optionally add a header row tothe data files. The header row can contain the source column names and/or theintermediate (i.e. Replicate) data types.
Example of a target file with a header row when both With column names and Withdata types are selected:
Position:DECIMAL(38,0),Color:VARCHAR(10)
1,"BLUE"
2,"BROWN"
3,"RED"
...
Maximum filesize
The maximum size a file can reach before it is closed (and optionally compressed). Thisvalue applies both to data files and to Reference Files.
For information on generating reference files, see Setting advanced connectionproperties (page 610).
Compressfiles using
Choose GZIP to compress the target files or NONE (the default) to leave themuncompressed.
Option Description
Change Processing option descriptions
Setup and User Guide - Qlik Replicate, November 2021 609

9 Adding and managing target endpoints
Apply/Store changes when filesize reaches
Specify the maximum size of Change Data to accumulate beforeuploading the file to Google Cloud Storage .
Apply/Store changes whenElapsed time reaches
Specify the maximum time to wait before applying the changes.
Option Description
Createmetadatafiles in thetargetfolder
When this option is selected, for each data file, a matching metadata file with a .dfmextension will be created under the specified target folder. The metadata files (which arein standard JSON format) provide additional information about the task/data such as thesource endpoint type, the source table name, the number of records in the data file, andso on.
For a full description of the metadata file as well as possible uses, see Metadata filedescription (page 1151).
Metadata files option descriptions
7. To determine if the connection information you entered is correct, click Test Connection. If theconnection test is successful, click Save.
Setting advanced connection propertiesIn the Advanced tab, you can set post-processing actions and enable the creation of reference files. Theseoptions are described in detail below.
Post upload processing
Run command after uploadSelect Run command after upload if you wish to process the final target files using a custom command.The command will be run whenever a data file is created.
If the Generate Reference Files option is also selected, a row (specifying the file's location)will be added to the Reference File, but only if the command completes successfully.
Command name
The location of the command e.g. C:\utils\move.exe.
Working directory
The directory where you want the command to run.
Parameters
Specify any parameters that need to be passed to the command during runtime. You can use the followingbuilt-in parameters:
${FILENAME} - The full path to the CSV file containing the full load or CDC data.
${METADATA_FILENAME} - The full path to the DFM file containing the metadata.
Setup and User Guide - Qlik Replicate, November 2021 610

9 Adding and managing target endpoints
For information on creating metadata files, see Setting general connection properties (page 607).
If the CSV/DFM file paths contain spaces, you must enclose these parameters with quotationmarks (e.g "${FILENAME}").
Standard post command exit codes
The post-processing command must return a proper exit code. You can either use the standard exit codevalues described below or set a custom exit code value as described in Setting post command exit codeswith an internal parameter below.
l 0 - Successl 1 - Recoverable error. The task will recover from the point of failure according to the settings in theEnvironmental errors (page 1032) tab.
l 2 - Table error. If a table error occurs, Replicate will handle the error according to the settings in theTable Errors (page 1034) tab.
l 3(or any other value e.g. -100) - Fatal error. The task will fail and not attempt recovery.
Setting post command exit codes with an internal parameter
You can use internal parameters to set exit codes with custom values. This is especially useful if yourapplication already uses the standard exit code values.
See Standard post command exit codes above for a description of the exit codes.
l successExitCode
l recoverableErrorExitCode
l tableErrorExitCode
l fatalErrorExitCode
For instructions on setting internal parameters, see Internal parameters (page 612).
Generate reference filesSelect the Generate Reference Files option to generate a Reference File (on Replicate Server) containingthe full path to the Apply Changes data files.
The reference file only points to the location of the Change Processing files, and not the FullLoad files.
Reference File(s) folder
The folder on the Replicate machine in which the Reference File will be created.
Example:
c:\temp\
Use proxy serverSelect the Use proxy server option to access Google Cloud Storage via a proxy server.
Setup and User Guide - Qlik Replicate, November 2021 611

9 Adding and managing target endpoints
Host nameThe host name of the proxy server.
PortThe port via which to access the proxy server.
User nameThe user name for accessing the proxy server.
PasswordThe password for accessing the proxy server.
SchemeSelect which protocol to use to access the server (HTTP or HTTPS).
SSL CA Path
The location of the CA file on the Replicate Server machine when HTTPS is the selected Scheme.
Internal parametersInternal parameters are parameters that are not exposed in the UI and should only be used if instructed byQlik Support.
To add internal Qlik Replicate parameters:
1. Click the Internal Parameters link.The Internal Parameters dialog box opens.
2. In the edit box, type the name of the parameter you need to add and then click it.
3. The parameter is added to the table below the search box with its default value.
4. Change the default value as required.
5. To reset the parameter value to its default, click the "Restore default value" icon at the end of therow.
More optionsThese options are not exposed in the UI as they are only relevant to specific versions or environments.Consequently, do not set these options unless explicitly instructed to do so by Qlik Support or productdocumentation.
To set an option, simply copy the option into the Add feature name field and click Add. Then set the valueor enable the option according to the instructions you received.
Settings summaryYou can view a summary of your setting by clicking the View Setting Summary link. This is useful if youneed to send a summary of your setting to Qlik Support.
Setup and User Guide - Qlik Replicate, November 2021 612

9 Adding and managing target endpoints
Generating reference filesIn the Advanced tab of the Google Cloud Storage target endpoint, you can enable the Generate areference file option. The Reference File contains a list of the Change File locations and is therefore onlyrelevant if the task's Apply Changes or Store Changes options are enabled.
The format of the reference file name is as follows:
<google_cloud_storage_target_endpoint_name><counter>.csv|json
Example:
MyGoogleCloudStorage00000001.csv
The counter suffix increases incrementally each time a new Reference File is generated (i.e.which occurs when the file reaches the maximum size defined in the General tab). Once a newReference File has been generated, you can delete the old reference file(s) if required.
Whenever an Change Processing data file is created, a new row is added to the Reference File in thefollowing format:
<Source_Table_Name>,<Data_Lake_Store_name>/<path>/<file_name>
Example:
employees,mydatalakestore/new/files/my.company/20170611-120144192.csv
Note that if the Run command after upload option in the Advanced tab is also enabled, the Reference Filewill be generated after the post-processing completes.
Setup and User Guide - Qlik Replicate, November 2021 613

9 Adding and managing target endpoints
9.14 Using Google Dataproc as a targetThis section describes how to set up and use Google Dataproc as the target endpoint in a replication task.
In this section:
l Prerequisites (page 615)l Limitations (page 615)l Change data partitioning on Google Dataproc (page 616)l Google Dataproc endpoint target data types (page 616)l Setting general connection properties (page 617)l Setting advanced connection properties (page 618)
Setup and User Guide - Qlik Replicate, November 2021 614

9 Adding and managing target endpoints
PrerequisitesBefore you begin to work with Google Dataproc as a target in Qlik Replicate, make sure that the followingprerequisites have been met:
l General:l The storage location must be accessible from the Qlik Replicate machine.l The user specified in the Google Dataproc target endpoint's Hive access settings must haveaccess to HiveServer2.
l ODBC Driver (Windows and Linux): Install Cloudera ODBC driver for Apache Hive 2.6.9 or later,or any other Google Dataproc compatible driver on the Replicate Server machine.
l Bucket and folder permissions: The JSON Credentials specified in the Google Dataprocendpoint's Google Cloud Storage settings must be for an account that has read and writeaccess to the specified bucket and target folder.
l Hive table permissions: Replicate requires permissions to perform the following operations on Hivetables: CREATE, DROP, DESCRIBE, and ALTER table. ALTER table may also include RENAMEtable, ADD/RENAME column, and CREATE/DROP partitions on tables.
LimitationsThe following limitations apply:
l UPDATE/DELETE DMLs are not supported during change processing. If an UPDATE/DELETEDML was captured on the source, it will be ignored on the target and a warning will be written to thelog. If the Store Changes option is enabled in the task settings, these records will be written to theChange Table.
l Limited LOB support only.l Dropping columns and changing column data types or the data type length is not supported and willsuspend the table in all cases except for data types that are mapped to STRING. Changes to thedata type length of a data type mapped to STRING (e.g. VARCHAR(50) to VARCHAR(100)) willsimply be ignored.
l Writing to "special" tables such as tables with partitions, buckets, or skews is not supported.l The following Control Tables are not supported as they require UPDATE/DELETE operations(which are not supported by the Google Dataproc target endpoint):
l Replication Status (requires UPDATE).Name on target: attrep_status
l Suspended Tables (requires DELETE).Name on target: attrep_suspended_tablesFor more information on Control Tables, see Control tables (page 1015).
l Table and column names can only contain ASCII characters.l Column names cannot contain the '?' symbol. If needed, the '?' symbol can be replaced with a validASCII character using a transformation.
Setup and User Guide - Qlik Replicate, November 2021 615

9 Adding and managing target endpoints
l Google Cloud Storage limitations:l Append operation is not supported
l Proxy:l Does not affect the ODBC (Hive) connection (i.e. it affects the storage connection only).
Change data partitioning on Google DataprocWhen Change Data Partitioning (page 1022) is enabled, the Replicate Change Tables in Hive arepartitioned by the partition_name column. Data files are uploaded to Google Cloud Storage, accordingto the maximum size and time definition, and then stored in a directory under the Change Table directory.Whenever the specified partition timeframe ends, a partition is created in Hive, pointing to Google CloudStorage.
Information about the partitions is written to the attrep_cdc_partitions Control Table.
Google Dataproc endpoint target data typesThe following table shows the Google Dataproc endpoint target data types that are supported when usingQlik Replicate and the default mapping from Qlik Replicate data types.
For information on how to view the data type that is mapped from the source, see the section for the sourceendpoint you are using.
For additional information about Qlik Replicate data types, see Replicate data types (page 76).
Qlik Replicatedata types Google Dataproc data types
BOOL BOOLEAN
BYTES STRING
TIME STRING
DATETIME TIMESTAMP
DATE DATE
INT1 TINYINT
INT2 SMALLINT
INT4 INT
INT8 BIGINT
NUMERIC DECIMAL (p,s)
REAL4 FLOAT
REAL8 DOUBLE
STRING VARCHAR (Length)
UINT1 SMALLINT
Qlik Replicate and Google Dataproc data types
Setup and User Guide - Qlik Replicate, November 2021 616

9 Adding and managing target endpoints
Qlik Replicatedata types Google Dataproc data types
UINT2 INT
UINT4 BIGINT
UINT8 DECIMAL (20,0)
WSTRING VARCHAR (Length)
BLOB STRING
NCLOB STRING
CLOB STRING
Setting general connection propertiesThis section describes how to configure general connection properties. For an explanation of how toconfigure advanced connection properties, see Setting advanced connection properties.
To add a Google Dataproc target endpoint to Qlik Replicate:
1. In the Qlik Replicate console, click Manage Endpoint Connections to open the Manage EndpointConnections dialog box.For more information on adding an endpoint to Qlik Replicate, see Defining and managingendpoints (page 110).
2. In the Name field, type a name for your endpoint. This can be any name that will help to identify theendpoint being used.
3. In the Description field, type a description that helps to identify the Google Dataproc endpoint. Thisis optional.
4. Select Google Dataproc as the endpoint Type.
5. Configure the remaining settings in the General tab as described in the table below.
Option Description
JSONcredentials
The JSON credentials for the service account key with read and write access tothe Google Cloud Storage bucket.
Bucket name The Google Cloud Storage bucket.
Target folder Where to create the data files in the specified bucket.
Google Cloud Storage option descriptions
Option Description
Host The host name of the Hive server.
Port The port of the Hive server. The default is 10,000.
Authentication type Select either User name or User name and Password.
Hive acess option descriptions
Setup and User Guide - Qlik Replicate, November 2021 617

9 Adding and managing target endpoints
Username The user name for accessing the Hive server.
Password The password for accessing the Hive server.
Database The name of the Hive target database.
Setting advanced connection propertiesThe table below describes the settings in the Advanced tab.
Setting Description
File Format Expand this section to specify or view the file formatsettings.
Target storage format Select either Text or Sequence.
When using Text as the target storage format, newlines as part of the data values are not supported(due to an Apache Hadoop limitation). Bestpractice is to use Sequence as the target storageformat.
Field delimiter The delimiter that will be used to separate fields in the targetfile. The default is \001. Note that field delimiters should beASCII characters unless they are non-printable controlcharacters, in which case they should be in Octal format (e.g.\247).
Null value The value that will be used to indicate a null value in the targetfile.
Example (where @ is the null value):
mike,male,295678
sara,female,@
Escape character The escape character is used to escape the field delimitercharacter. When a field delimiter is escaped, it is interpretedas actual data, and not as a field delimiter.
Example (where \ is the escape character and a comma isthe field delimiter):
sunroof\,power-steering
Setup and User Guide - Qlik Replicate, November 2021 618
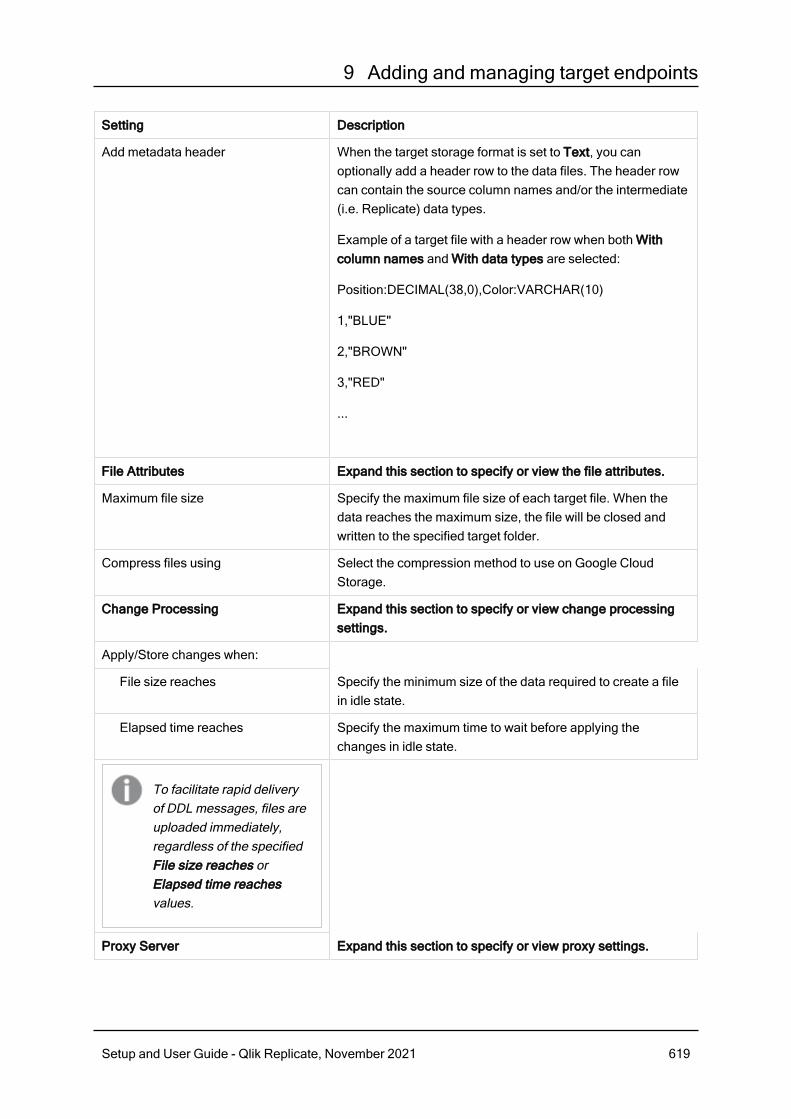
9 Adding and managing target endpoints
Setting Description
Add metadata header When the target storage format is set to Text, you canoptionally add a header row to the data files. The header rowcan contain the source column names and/or the intermediate(i.e. Replicate) data types.
Example of a target file with a header row when both Withcolumn names and With data types are selected:
Position:DECIMAL(38,0),Color:VARCHAR(10)
1,"BLUE"
2,"BROWN"
3,"RED"
...
File Attributes Expand this section to specify or view the file attributes.
Maximum file size Specify the maximum file size of each target file. When thedata reaches the maximum size, the file will be closed andwritten to the specified target folder.
Compress files using Select the compression method to use on Google CloudStorage.
Change Processing Expand this section to specify or view change processingsettings.
Apply/Store changes when:
File size reaches Specify the minimum size of the data required to create a filein idle state.
Elapsed time reaches Specify the maximum time to wait before applying thechanges in idle state.
To facilitate rapid deliveryof DDL messages, files areuploaded immediately,regardless of the specifiedFile size reaches orElapsed time reachesvalues.
Proxy Server Expand this section to specify or view proxy settings.
Setup and User Guide - Qlik Replicate, November 2021 619

9 Adding and managing target endpoints
Setting Description
Use proxy server Select this option to access Google Dataproc via a proxyserver.
Host name The host name of the proxy server.
Port The port via which to access the proxy server.
User name The user name for accessing the proxy server.
Password The password for accessing the proxy server.
Scheme Select which protocol to use to access the server (HTTP orHTTPS).
The proxy configuration applies to the GoogleCloud Storage, but not to the ODBC connection.
Internal parametersInternal parameters are parameters that are not exposed in the UI. You should only use them if instructedby Qlik Support.
To add internal Qlik Replicate parameters:
1. Click the Internal Parameters link.The Internal Parameters dialog box opens.
2. In the edit box, type the name of the parameter you need to add and then click it.
3. The parameter is added to the table below the search box with its default value.
4. Change the default value as required.
5. To reset the parameter value to its default, click the "Restore default value" icon at the end of therow.
More optionsThese options are not exposed in the UI as they are only relevant to specific versions or environments.Consequently, do not set these options unless explicitly instructed to do so by Qlik Support or productdocumentation.
To set an option, simply copy the option into the Add feature name field and click Add. Then set the valueor enable the option according to the instructions you received.
Settings summaryYou can view a summary of your settings by clicking the Setting Summary link. This is useful if you need tosend a summary of your settings to Qlik Support.
Setup and User Guide - Qlik Replicate, November 2021 620

9 Adding and managing target endpoints
9.15 Using Hadoop as a targetThis section describes how to set up and use Hadoop as the target endpoint in a replication task.
In this section:
l Prerequisites (page 622)l Limitations (page 622)l Change Data Partitioning on Hadoop (page 623)l Security requirements (page 624)l Hadoop endpoint target data types (page 624)l Setting general connection properties (page 625)l Setting advanced connection properties (page 630)l Using Kerberos authentication (page 638)
Setup and User Guide - Qlik Replicate, November 2021 621

9 Adding and managing target endpoints
PrerequisitesBefore you begin to work with a Hadoop cluster as a target in Qlik Replicate, make sure that the followingprerequisites have been met:
l General:l The Hadoop WebHDFS must be accessible from the Qlik Replicate machine.l The Hadoop Data Nodes must be accessible from the Qlik Replicate machine.l The Hadoop WebHDFS service must be running.
l ODBC Access:When accessing Hive using ODBC, the following ODBC drivers are supported:
l Hortonworks: Cloudera ODBC Driver for Apache Hive 2.06.09.1009 only.l Cloudera: Cloudera ODBC Driver for Apache Hive 2.06.09.1009 only.
Cloudera ODBC drivers 2.5.20 or later do not support the Snappy compressionmethod.
l SSL: Before you can use SSL, you first need to perform the following tasks:l Configure each NameNode and each DataNode with an SSL certificate (issued by the sameCA).
l Place the CA certificate on the Replicate Server machine. The certificate should be abase64-encoded PEM (OpenSSL) file.
l Permissions: The user specified in the Hadoop target settings must have write permission for thespecified HDFS target directory.
Prerequisites for using the Cloudera Distribution as a Hadoop targetIf you are replicating to a Cloudera Hadoop Distribution and you want to use Snappy compression and/orset a File Format that is not Text, you first need to install Cloudera's Hive ODBC driver on the ReplicateServer machine. Then configure the Hadoop target endpoint to access Hive using ODBC. For moreinformation on this setting, see Setting general connection properties (page 625)
See also Prerequisites for using a Linux ODBC driver (page 622).
Prerequisites for using a Linux ODBC driverTo use a Linux ODBC driver, make sure to:
l Install the latest 64-bit ODBC driver for your Hadoop distribution on the Replicate Server machine.l After the driver is installed: Edit the <distribution>.hiveodbc.ini file as follows:
l DriverManagerEncoding=UTF-16
l ODBCInstLib=libodbcinst.so
See also Setting general connection properties (page 625).
LimitationsThe following limitations apply:
Setup and User Guide - Qlik Replicate, November 2021 622

9 Adding and managing target endpoints
l UPDATE/DELETE DMLs are not supported during change processing. If an UPDATE/DELETEDML was captured on the source, it will be ignored on the target and a warning will be written to thelog. If the Store Changes option is enabled in the task settings, these records will be written to theChange Table.
l Limited LOB support only.l Dropping columns and changing column data types or the data type length is not supported and willsuspend the table in all cases except for data types that are mapped to STRING. Changes to thedata type length of a data type mapped to STRING (e.g. VARCHAR(50) to VARCHAR(100)) willsimply be ignored.
l The Replicate Hadoop target endpoint does not support the creation of skews, buckets or partitionsin the target tables. Tables with such properties must already exist on the target before the taskstarts. For more information on preparing such tables in Hive, see Support for Partitions, Bucketsand Skews.When loading data into existing skewed, bucketed or partitioned target tables, the followinglimitations apply:
l The DROP and CREATE table and ARCHIVE and CREATE table options in the tasksettings’ Full Load Settings (page 1017) tab should not be selected (as the new table will becreated without the special properties).
l The Apply Changes replication option is not supported.l The following Control Tables are not supported as they require UPDATE/DELETE operations(which are not supported by the Hadoop target endpoint):
l Replication Status (requires UPDATE).Name on target: attrep_status
l Suspended Tables (requires DELETE).Name on target: attrep_suspended_tablesFor more information on Control Tables, see Control tables (page 1015).
l Table and column names can only contain ASCII characters.l Column names cannot contain the '?' symbol. If needed, the '?' symbol can be replaced with a validASCII character using a transformation.
Change Data Partitioning on HadoopWhen Change Data Partitioning (page 1022) is enabled, the Replicate Change Tables in Hive arepartitioned by the partition_name column. Data files are uploaded to HDFS, according to the maximumsize and time definition, and then stored in a directory under the Change Table directory. Whenever thespecified partition timeframe ends, a partition is created in Hive, pointing to the HDFS directory.
Information about the partitions is written to the attrep_cdc_partitions Control Table.
PrerequisitesThe prerequisites for using Change Data Partitioning with a Hadoop target endpoint are as follows:
l The target file format must be set to Text or Sequencel Hive access must be set to ODBC
Setup and User Guide - Qlik Replicate, November 2021 623

9 Adding and managing target endpoints
Security requirementsl The Hadoop NameNode (and data nodes when using WebHDFS) must be accessible from the QlikReplicate machine and the user specified in the Hadoop target settings must have write permissionfor the specified HDFS target directory.
l Hive table permissions: Replicate requires permissions to perform the following operations on Hivetables: INSERT from SELECT, CREATE, DROP, DESCRIBE, and ALTER table. ALTER table mayalso include RENAME table, ADD/RENAME column, and CREATE/DROP partitions on tables.
Hadoop endpoint target data typesThe following table shows the Hadoop endpoint target data types that are supported when using QlikReplicate and the default mapping from Qlik Replicate data types.
For information on how to view the data type that is mapped from the source, see the section for the sourceendpoint you are using.
For additional information about Qlik Replicate data types, see Replicate data types (page 76).
Qlik Replicatedata typesHadoop datatypes
BOOL BOOLEAN
BYTES STRING
TIME STRING
DATETIME TIMESTAMP
DATE
When Avro is selected as the Target storage format, the TIMESTAMPand DATE data types (which are not supported by Avro) are mapped toVARCHAR(37).
DATE
INT1 TINYINT
INT2 SMALLINT
INT4 INT
INT8 BIGINT
NUMERIC DECIMAL (p,s)
REAL4 FLOAT
REAL8 DOUBLE
STRING VARCHAR(Length)
Setup and User Guide - Qlik Replicate, November 2021 624

9 Adding and managing target endpoints
Qlik Replicatedata typesHadoop datatypes
UINT1 SMALLINT
UINT2 INT
UINT4 BIGINT
UINT8 DECIMAL(20,0)
WSTRING VARCHAR(Length)
BLOB STRING
NCLOB STRING
CLOB STRING
Setting general connection propertiesThis section describes how to configure general connection properties. For an explanation of how toconfigure advanced connection properties, see Setting advanced connection properties.
Support for Partitions, Buckets and Skews To load data into tables with partitions, buckets or skews, youfirst need to perform the procedure described below.
To load data into tables with partitions, buckets or skews:
1. Create the tables in Hive with these attributes (partitions, buckets or skews) prior to running thetask.
2. Add the following values to thehive.security.authorization.sqlstd.confwhitelist.append property in the Hiveconfiguration file:If the target tables are partitioned:|hive.exec.dynamic.partition|hive.exec.dynamic.partition.mode
If the target tables have buckets:|hive.enforce.bucketing
If the target tables have skews:|hive.mapred.supports.subdirectories
In some Hadoop Distributions, you may need to specify the value without the "hive"prefix.For example, |enforce.bucketing instead of |hive.enforce.bucketing.
Setup and User Guide - Qlik Replicate, November 2021 625
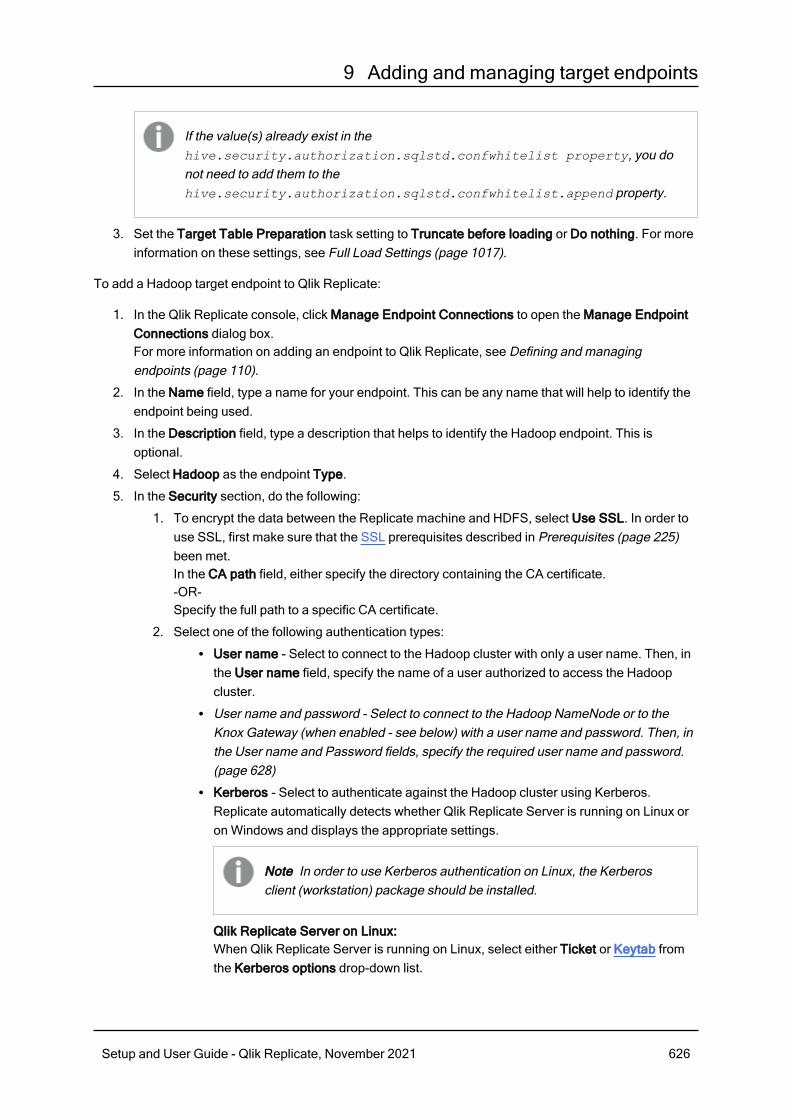
9 Adding and managing target endpoints
If the value(s) already exist in thehive.security.authorization.sqlstd.confwhitelist property, you donot need to add them to thehive.security.authorization.sqlstd.confwhitelist.append property.
3. Set the Target Table Preparation task setting to Truncate before loading or Do nothing. For moreinformation on these settings, see Full Load Settings (page 1017).
To add a Hadoop target endpoint to Qlik Replicate:
1. In the Qlik Replicate console, click Manage Endpoint Connections to open the Manage EndpointConnections dialog box.For more information on adding an endpoint to Qlik Replicate, see Defining and managingendpoints (page 110).
2. In the Name field, type a name for your endpoint. This can be any name that will help to identify theendpoint being used.
3. In the Description field, type a description that helps to identify the Hadoop endpoint. This isoptional.
4. Select Hadoop as the endpoint Type.
5. In the Security section, do the following:
1. To encrypt the data between the Replicate machine and HDFS, select Use SSL. In order touse SSL, first make sure that the SSL prerequisites described in Prerequisites (page 225)been met.In the CA path field, either specify the directory containing the CA certificate.-OR-Specify the full path to a specific CA certificate.
2. Select one of the following authentication types:l User name - Select to connect to the Hadoop cluster with only a user name. Then, inthe User name field, specify the name of a user authorized to access the Hadoopcluster.
l User name and password - Select to connect to the Hadoop NameNode or to theKnox Gateway (when enabled - see below) with a user name and password. Then, inthe User name and Password fields, specify the required user name and password.(page 628)
l Kerberos - Select to authenticate against the Hadoop cluster using Kerberos.Replicate automatically detects whether Qlik Replicate Server is running on Linux oron Windows and displays the appropriate settings.
Note In order to use Kerberos authentication on Linux, the Kerberosclient (workstation) package should be installed.
Qlik Replicate Server on Linux:When Qlik Replicate Server is running on Linux, select either Ticket or Keytab fromthe Kerberos options drop-down list.
Setup and User Guide - Qlik Replicate, November 2021 626

9 Adding and managing target endpoints
If you selected Ticket, select one of the following options:l Use global Kerberos ticket file - Select this option if you want to use the sameticket for several Hadoop endpoints (source or target). In this case, you mustmake sure to select this option for each Hadoop endpoint instance that youdefine.
l Use specific Kerberos ticket file - Select this option if you want to use adifferent ticket file for each Hadoop endpoint (source or target). Then specifythe ticket file name in the designated field.This option is especially useful if you need to perform a task-level audit ofReplicate activity (using a third-party tool) on the Hadoop NameNode. To setthis up, define several instances of the same Hadoop endpoint and specify aunique Kerberos ticket file for each instance. Then, for each task, simply selecta different Hadoop endpoint instance.
l You need to define a global Kerberos ticket file even if you selectthe Use specific Kerberos ticket file option. The global Kerberosticket file is used for authentication when selecting a Hiveendpoint, when testing the connection (using the Test Connectionbutton), and when selecting which tables to replicate.
l When replicating from a Hadoop source endpoint to a Hadooptarget endpoint, both endpoints must be configured to use thesame ticket file.
For additional steps required to complete setup for Kerberos ticket-basedauthentication, see Using Kerberos authentication (page 638).If you selected Keytab, provide the following information:
l Realm: The name of the realm in which your Hadoop cluster resides.For example, if the full principal name is [email protected], thenEXAMPLE.COM is the realm.
l Principal: The user name to use for authentication. The principal must be amember of the realm entered above.For example, if the full principal name is [email protected], thenjohn.doe is the principal.
l Keytab file: The full path of the Keytab file. The Keytab file should contain thekey of the Principal specified above.
Qlik Replicate Server on Windows:When Qlik Replicate Server is running on Windows, select one of the following:
l Use the following KDC: Select Active Directory (default) if your KDC isMicrosoft Active Directory or select MIT if your KDC is MIT KDC running onLinux/UNIX.
Setup and User Guide - Qlik Replicate, November 2021 627

9 Adding and managing target endpoints
When the Replicate KDC and the Hadoop KDC are in differentdomains, a relationship of trust must exist between the twodomains.
l Realm: The name of the realm/domain in which your Hadoop cluster resides(where realm is the MIT term while domain is the Active Directory term).
l Principal: The user name to use for authentication. The principal must be amember of the realm/domain entered above.
l When Active Directory is selected - Password: The password for the principalentered above.
l When MIT is selected - Keytab file: The keytab file containing the principalentered above.
When replicating from a Hadoop source endpoint to a Hadoop targetendpoint, both endpoints must be configured to use the same parameters(KDC, realm, principal, and password).
If you are unsure about any of the above, consult your IT/security administrator.For additional steps required to complete setup for Kerberos authentication, seeUsing Kerberos authentication (page 638).
l User name and password - Select to connect to the Hadoop NameNode or to theKnox Gateway (when enabled - see below) with a user name and password. Then, inthe User name and Password fields, specify the required user name and password.
Consider the following:l A user name and password is required to access the MapRControl System.
l This information is case sensitive.
Make sure that the specified user has the required Hadoop accessprivileges. For information on how to provide the required privileges, seeSecurity requirements (page 624).
6. If you need to access the Hortonworks Hadoop distribution through a Knox Gateway, select UseKnox Gateway. Then provide values for the following fields:
To be able to select this option, first select Use SSL and then select Password from theAuthentication type drop-down list.
l Knox Gateway host - The FQDN (Fully Qualified Domain Name) of the Knox Gateway host.l Knox port - The port number to use to access the host. The default is "8443".
Setup and User Guide - Qlik Replicate, November 2021 628
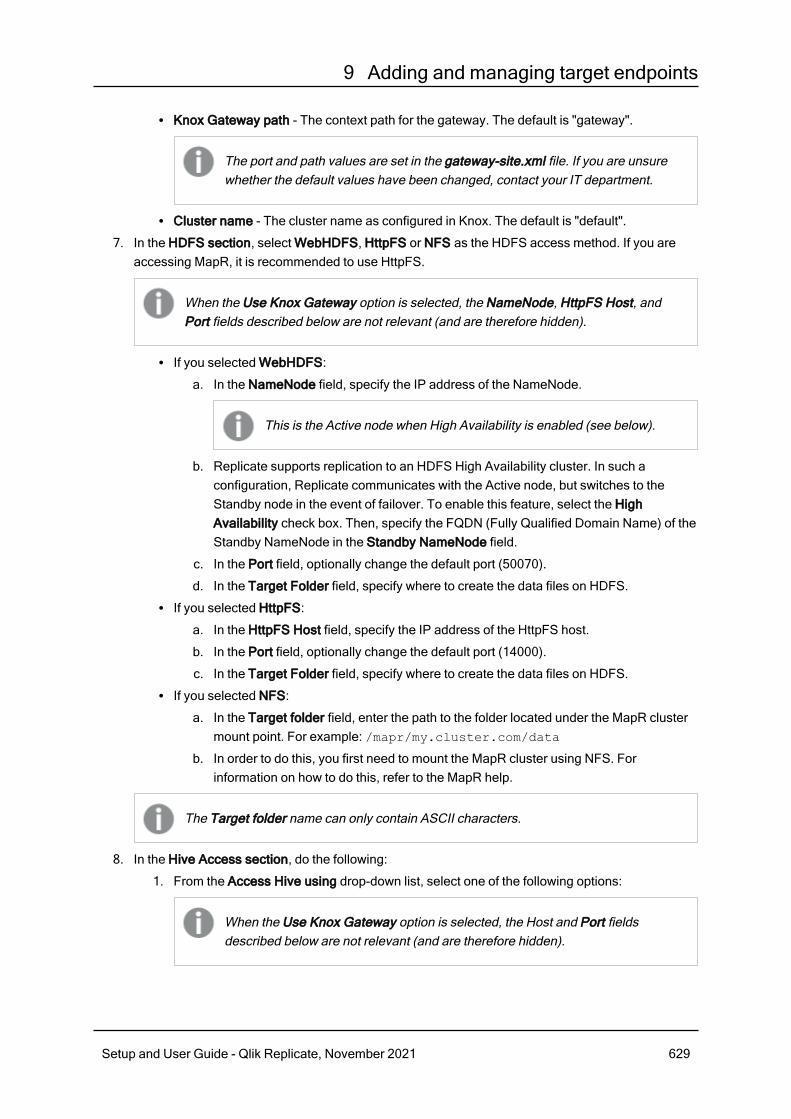
9 Adding and managing target endpoints
l Knox Gateway path - The context path for the gateway. The default is "gateway".
The port and path values are set in the gateway-site.xml file. If you are unsurewhether the default values have been changed, contact your IT department.
l Cluster name - The cluster name as configured in Knox. The default is "default".
7. In the HDFS section, select WebHDFS, HttpFS or NFS as the HDFS access method. If you areaccessing MapR, it is recommended to use HttpFS.
When the Use Knox Gateway option is selected, the NameNode, HttpFS Host, andPort fields described below are not relevant (and are therefore hidden).
l If you selected WebHDFS:
a. In the NameNode field, specify the IP address of the NameNode.
This is the Active node when High Availability is enabled (see below).
b. Replicate supports replication to an HDFS High Availability cluster. In such aconfiguration, Replicate communicates with the Active node, but switches to theStandby node in the event of failover. To enable this feature, select the HighAvailability check box. Then, specify the FQDN (Fully Qualified Domain Name) of theStandby NameNode in the Standby NameNode field.
c. In the Port field, optionally change the default port (50070).
d. In the Target Folder field, specify where to create the data files on HDFS.l If you selected HttpFS:
a. In the HttpFS Host field, specify the IP address of the HttpFS host.
b. In the Port field, optionally change the default port (14000).
c. In the Target Folder field, specify where to create the data files on HDFS.l If you selected NFS:
a. In the Target folder field, enter the path to the folder located under the MapR clustermount point. For example: /mapr/my.cluster.com/data
b. In order to do this, you first need to mount the MapR cluster using NFS. Forinformation on how to do this, refer to the MapR help.
The Target folder name can only contain ASCII characters.
8. In the Hive Access section, do the following:
1. From the Access Hive using drop-down list, select one of the following options:
When the Use Knox Gateway option is selected, the Host and Port fieldsdescribed below are not relevant (and are therefore hidden).
Setup and User Guide - Qlik Replicate, November 2021 629

9 Adding and managing target endpoints
l ODBC - Select this option to access Hive using an ODBC driver (the default). Thencontinue from the Host field.
If you select his option, make sure that the latest 64-bit ODBC driver foryour Hadoop distribution is installed on the Qlik Replicate Servermachine.
l HQL scripts - When this option is selected, Replicate will generate HQL tablecreation scripts in the specified Script folder.
When this option is selected, the target storage format must be set to"Text".
l No Access - When this option is selected, after the data files are created on HDFS,Replicate will take no further action.
2. In the Host field, specify the IP address of the Hive machine.
3. In the Port field, optionally change the default port.
4. In the Database field, specify the name of the Hive target database.
Setting advanced connection propertiesThe table below describes the settings in the Advanced tab.
Setting Description
File Format Expand this section to specify or view the file format settings.
Advanced tab settings
Setup and User Guide - Qlik Replicate, November 2021 630

9 Adding and managing target endpoints
Setting Description
Targetstorageformat
Select one of the following target storage formats: Text (the default), Avro, ORC,Parquet, Sequence.
For both regular tables and Replicate Control Tables, creating and storingthe tables in text format (the default) allows data to be appended to them.This in turn reduces the number of files created on Hadoop, improves queryperformance, and reduces the number of Hive jobs running.
If Avro, ORC or Parquet is selected or if the target tables haveskews/buckets, Replicate first converts the source data to a temporarysequence file and then runs a Hive process to convert the sequence file tothe desired target format. As this will increase latency due to the additionalHive processes, it is recommended not use the aforementioned formatsunless absolutely necessary.
When using the default text Serde (see below), new lines as part of the datavalues are not supported (due to an Apache Hadoop limitation). Althoughother Serdes may support new lines, best practice is to use Sequence asthe target storage format.
Unlike other binary formats that need to be converted to the desired targetformat (see above), when Sequence format is selected, the data is loadeddirectly to the target and stored in an external table (in sequence format).
Note that Snappy compression is not available for sequence format.
See also: Prerequisites for using the Cloudera Distribution as a Hadoop target (page622).
ControlTablesstorageformat
l Text: This is the default method.l Same as the target storage format: This method is only recommended if, forwhatever reason, you cannot use Text format. For example, this may be thecase if you have an existing process that only knows how to read/interpret theControl Table data in a different format).
Use DefaultSerDe
Choose the SerDe interface to use when accessing the Hive database tables. Thedefault is LazySimpleSerde.
Setup and User Guide - Qlik Replicate, November 2021 631

9 Adding and managing target endpoints
Setting Description
Other SerDe LazySimpleSerde creates the target files in delimited text file format. To create thetarget files in a different format, select the Other SerDe field and then specify the nameof the SerDe that you want to use.
Fielddelimiter
The delimiter that will be used to separate fields in the target file. The default is \001.Note that field delimiters should be ASCII characters unless they are non-printablecontrol characters, in which case they should be in Octal format (e.g. \247).
When using other SerDe:
The default name for the field delimiter property is field.delim. If youselected Other SerDe and the specified SerDe uses a different propertyname (e.g. separatorChar), in addition to specifying the property valuehere, you also need to specify both the property name and its value in theSerDe properties field (e.g. separatorChar=\t).
Null value The value that will be used to indicate a null value in the target file.
Example (where @ is the null value):
mike,male,295678
sara,female,@
When using other SerDe:
The default name for the null value property isserialization.null.format. If you selected Other SerDe and thespecified SerDe uses a different property name (e.g. nullChar), inaddition to specifying the property value here, you also need to specify boththe property name and its value in the SerDe properties field (e.g.nullChar=@).
Setup and User Guide - Qlik Replicate, November 2021 632

9 Adding and managing target endpoints
Setting Description
Escapecharacter
When using LazySimpleSerde: The escape character is used to escape the fielddelimiter character. When a field delimiter is escaped, it is interpreted as actual data,and not as a field delimiter.
Example (where \ is the escape character and a comma is the field delimiter):
sunroof\,power-steering
When using Other SerDe: The escape character is used to escape the quotecharacter.
Example (where \ is the escape character and double quotes is the quotecharacter):
"\"sunroof, power-steering\""
When using other SerDe:
The default name for the escape character property is escape.delim. Ifyou selected Other SerDe and the specified SerDe uses a differentproperty name (e.g. escapeChar), in addition to specifying the propertyvalue here, you also need to specify both the property name and its value inthe SerDe properties field (e.g. escapeChar={).
Recorddelimiter
The \n delimiter is used to separate records (rows) in the target files. When using thedefault SerDe (LazySimpleSerde), the record delimiter cannot be changed.
When using other SerDe:
The default name for the record delimiter property is line.delim. If youselected Other SerDe and the specified SerDe uses a different propertyname (e.g. recordChar), in addition to specifying the property value here,you also need to specify both the property name and its value in the SerDeproperties field (e.g. recordChar=\r).
Setup and User Guide - Qlik Replicate, November 2021 633

9 Adding and managing target endpoints
Setting Description
Quotecharacter
The quote character is used to escape the field delimiter character. When a fielddelimiter is escaped, it is interpreted as actual data, and not as a field delimiter. Notethat the quote character is not available when using the default SerDe(LazySimpleSerde).
Example (where double-quotes is the quote character):
"mike,male"
When using other SerDe:
The default name for the quote character property is quote.delim. If youselected Other SerDe and the specified SerDe uses a different propertyname (e.g. quoteChar), in addition to specifying the property value here,you also need to specify both the property name and its value in the SerDeproperties field (e.g. quoteChar=’).
SerDeproperties
Enter the SerDe properties if Other SerDe is selected and the SerDe properties are notthe same as the Hadoop defaults (field.delim, serialization.null.format,escape.delim, line.delim, quote.delim).
The properties should be written using the following format:
"KEY1=VALUE1,KEY2=VALUE2,KEY3=VALUE3"
The list of properties should begin and end with a quotation mark.
Example:
"separatorChar=\t,escapeChar={,quoteChar=’"
When " is specified as a value, it needs to be enclosed with quotation marksand escaped with a quotation mark, as follows: """"
Setup and User Guide - Qlik Replicate, November 2021 634

9 Adding and managing target endpoints
Setting Description
Addmetadataheader
When the target storage format is set to Text, you can optionally add a header row tothe data files. The header row can contain the source column names and/or theintermediate (i.e. Replicate) data types.
Example of a target file with a header row when both With column names and Withdata types are selected:
Position:DECIMAL(38,0),Color:VARCHAR(10)
1,"BLUE"
2,"BROWN"
3,"RED"
...
This option is only available when "No Access" is selected as the Hiveaccess method (in the General tab).
FileAttributes
Expand this section to specify or view the file attributes.
Use Hadoopdefaults
Select to work with the default block size of your Hadoop target.
Use thisblock size(MB)
Select to work with a different block size. The default value is 64.
Maximum filesize
Specify the maximum file size of each target file. When the data reaches the maximumsize, the file will be closed and written to the specified target folder.
Setup and User Guide - Qlik Replicate, November 2021 635

9 Adding and managing target endpoints
Setting Description
Compressfiles using
Select the compression method to use on HDFS.
Cloudera ODBC drivers 2.5.20 or later do not support the Snappycompression method.
To use Snappy compression when the Setting advanced connectionproperties (page 630) is set to Avro, Parquet or Text, you must add thefollowing values to thehive.security.authorization.sqlstd.confwhitelist.append
property in the Hive configuration file:]
l For Avro:|hive.exec.compress.output|avro.output.codec
l For Parquet:|hive.exec.compress.output|parquet.compression
l For Text:|hive.exec.compress.output|parquet.compression
Note that in some Hadoop Distributions, compression will only work if youspecify the value without the "hive" prefix. For example|exec.compress.output instead of|hive.exec.compress.output.
If the value(s) already exist in thehive.security.authorization.sqlstd.confwhitelist property,you do not need to add them to thehive.security.authorization.sqlstd.confwhitelist.append
property.
See also: Prerequisites for using the Cloudera Distribution as a Hadooptarget (page 622).
ChangeProcessing
Expand this section to specify or view change processing settings.
Considerstate idlewhen nochangeshave beenprocessedfor
Specify how long to wait before considering the state to be idle. In idle state, you cancreate files from data that has already been processed if the specified size and timeconditions are met (see below).
Setup and User Guide - Qlik Replicate, November 2021 636

9 Adding and managing target endpoints
Setting Description
File sizereaches
Specify the minimum size of the data required to create a file in idle state.
Elapsedtimereaches
Specify the maximum time to wait before applying the changes in idle state.
To facilitate rapid delivery of DDL messages, files are uploaded immediately, regardless of thespecified File size reaches or Elapsed time reaches values.
Preventing ODBC connection timeoutsThe default query timeout value is 600 seconds, which should be sufficient for most situations. However,when loading very large tables, you may need to increase the value to prevent timeouts. This can be doneusing the following internal parameter:
executeTimeout
See below for instructions on setting internal parameters.
Internal parametersInternal parameters are parameters that are not exposed in the UI. You should only use them if instructedby Qlik Support.
To add internal Qlik Replicate parameters:
1. Click the Internal Parameters link.The Internal Parameters dialog box opens.
2. In the edit box, type the name of the parameter you need to add and then click it.
3. The parameter is added to the table below the search box with its default value.
4. Change the default value as required.
5. To reset the parameter value to its default, click the "Restore default value" icon at the end of therow.
More optionsThese options are not exposed in the UI as they are only relevant to specific versions or environments.Consequently, do not set these options unless explicitly instructed to do so by Qlik Support or productdocumentation.
To set an option, simply copy the option into the Add feature name field and click Add. Then set the valueor enable the option according to the instructions you received.
Settings summaryYou can view a summary of your settings by clicking the Setting Summary link. This is useful if you need tosend a summary of your settings to Qlik Support.
Setup and User Guide - Qlik Replicate, November 2021 637

9 Adding and managing target endpoints
Using Kerberos authenticationWhether Qlik Replicate Server is running on Linux or Windows, you can configure it to authenticate itselfagainst the Hadoop cluster using Kerberos.
This requires you to perform the following steps on the Qlik Replicate machine before starting the QlikReplicate Server.
Using Kerberos authentication on LinuxTo use Kerberos authentication on Linux:
The commands described below should be issued under the "Attunity" user or under the userthat was selected during the Replicate installation.
1. Obtain a valid TGT (Ticket-Granting Ticket) from the Kerberos KDC (Key Distribution Center) butsave the TGT to a non-default cache file. Usually, a keytab file is used to perform non-interactiveauthentication to Kerberos.Command Syntax:kinit -kt [keytab_file] -c [cache_file_name] [principal_name]
2. This step is only required for the global Kerberos ticket file. Set the Kerberos cache environmentvariable (for Replicate to use later on).To set the environment variable:
a. Change the working directory to the Replicate "bin" directory by issuing the followingcommand (assumes the default installation path):cd /opt/attunity/replicate/bin
b. Stop the Qlik Replicate Server services on the Linux by running:/opt/attunity/replicate/bin/areplicate stop
3. Create a file named site_arep_login.sh in the Qlik Replicate bin folder.
a. Add the following command to the file:export KRB5CCNAME=cache_file_name
Example:export KRB5CCNAME=/temp/kerberos/global.ticket
b. Save the file and
c. Start the Qlik Replicate Server services on the Linux by running:/opt/attunity/replicate/bin/areplicate start
Now, whenever Qlik Replicate needs to use Kerberos authentication, it will perform the followingoperations:
l When Use global Kerberos ticket file is selected: Replicate will check whether the KRB5CCNAMEenvironment variable is set and, if so, will use the ticket(s) inside the cache file specified by theenvironment variable.
l When Use specific Kerberos ticket file is selected:l During design-time (e.g. when selecting tables, testing the connection, etc.), Replicate willuse the ticket(s) inside the cache file specified by the KRB5CCNAME environment variable.
Setup and User Guide - Qlik Replicate, November 2021 638

9 Adding and managing target endpoints
l During runtime, Replicate will use the ticket file specified in the Hadoop endpoint settings.
If the ticket in the cache file expires or becomes invalid, repeating the kinit commandshown in Step 1 above will write a new TGT to the cache file and allow Qlik Replicate tocontinue working. This can be done without restarting the Qlik Replicate Server.
Using Kerberos authentication on WindowsBefore beginning, make sure that the impersonated user (principal) is granted read and write permissionson the Replicate Data directory (<product_dir>\Data by default) on the Qlik Replicate server. For ActiveDirectory KDC, the impersonated user is the user configured in the user interface. For MIT KDC, this is theWindows user to which the MIT principal is mapped.
To set up Kerberos authentication on Windows, perform the following steps to ensure that theimpersonated user (principal) has the Log on as a batch job privilege on the Qlik Replicate server.
1. On the Qlik Replicate Server machine, open the Local Security Settings (Control Panel > SystemSecurity > Administrative Tools > Local Security Policy).
2. In the console tree, expand Local Policies and select User Rights Assignments.
3. In the details pane, double-click Log on as a batch job.
4. In the Log on as a batch job Properties dialog box, on the Local Security Settings tab, verify thatthe relevant user is listed. If the user is not listed, click Add User or Group, then add the user andclick OK.
Setup and User Guide - Qlik Replicate, November 2021 639

9 Adding and managing target endpoints
Your changes should take effect immediately.
MIT KerberosWhen MIT Kerberos is set in the endpoint, you need to perform the following steps to allow the QlikReplicate server process to keep a specific privilege on startup. By default, Qlik Replicate server drops allprivileges on startup. These steps are not required if you use Active Directory KDC.
1. Open the Windows registry (regedit.exe).
2. Browse to: HKEY_LOCAL_MACHINE\SOFTWARE\Qlik\QlikReplicate\Services\AttunityReplicateServer
Setup and User Guide - Qlik Replicate, November 2021 640

9 Adding and managing target endpoints
3. Modify the PrivilegesKeep string to include the value SeTcbPrivilege.
4. Close the Registry Editor window.
5. Restart the Qlik Replicate Server service.
Setup and User Guide - Qlik Replicate, November 2021 641

9 Adding and managing target endpoints
9.16 Using Hortonworks Data Platform (HDP) as a targetThis section describes how to set up and use Hortonworks Data Platform (HDP) as the target endpoint in areplication task.
In this section:
l Prerequisites (page 643)l Limitations (page 643)l Change Data Partitioning (page 644)l Security requirements (page 644)l HDP Endpoint target data types (page 644)l Setting general connection properties (page 645)l Setting advanced connection properties (page 651)l Using Kerberos authentication (page 655)
Setup and User Guide - Qlik Replicate, November 2021 642

9 Adding and managing target endpoints
PrerequisitesBefore you begin to work with an HDP cluster as a target in Qlik Replicate, make sure that the followingprerequisites have been met:
l General:l The HDFS or Amazon S3 storage must be accessible from the Qlik Replicate machine.
l ODBC Access:l The Hive Server must be accessible from the Qlik Replicate machine.l Cloudera ODBC driver for Apache Hive 2.6.9 or later must be installed on the Qlik Replicatemachine.
l SSL: Before you can use SSL, you first need to perform the following tasks:l Configure each NameNode and each DataNode with an SSL certificate (issued by the sameCA).
l Place the CA certificate on the Replicate Server machine. The certificate should be abase64-encoded PEM (OpenSSL) file.
l Permissions: The user specified in the HDP target settings must have write permission for thespecified HDFS or Amazon S3 target directory (depending on your preferred storage type).
Prerequisites for using a Linux ODBC driverTo use a Linux ODBC driver, make sure to:
l Install the latest 64-bit ODBC driver for HDP on the Replicate Server machine.l After the driver is installed: Edit the <distribution>.hiveodbc.ini file as follows:
l DriverManagerEncoding=UTF-16
l ODBCInstLib=libodbcinst.so
See also Setting general connection properties (page 645).
LimitationsThe following limitations apply:
l UPDATE/DELETE DMLs are not supported during change processing. If an UPDATE/DELETEDML was captured on the source, it will be ignored on the target and a warning will be written to thelog. If the Store Changes option is enabled in the task settings, these records will be written to theChange Table.
l Limited LOB support only.l Dropping columns and changing column data types or the data type length is not supported and willsuspend the table in all cases except for data types that are mapped to STRING. Changes to thedata type length of a data type mapped to STRING (e.g. VARCHAR(50) to VARCHAR(100)) willsimply be ignored.
l The following Control Tables are not supported as they require UPDATE/DELETE operations(which are not supported by the Hortonworks target endpoint):
l Replication Status (requires UPDATE).Name on target: attrep_status
Setup and User Guide - Qlik Replicate, November 2021 643

9 Adding and managing target endpoints
l Suspended Tables (requires DELETE).Name on target: attrep_suspended_tablesFor more information on Control Tables, see Control tables (page 1015).
l Tables with partitions, buckets or skews are not supported.
l Table and column names can only contain ASCII characters.l Column names cannot contain the '?' symbol. If needed, the '?' symbol can be replaced with a validASCII character using a transformation.
Change Data PartitioningWhen Change Data Partitioning (page 1022) is enabled, the Replicate Change Tables in Hive arepartitioned by the partition_name column. Data files are uploaded to your preferred storage provider,according to the maximum size and time definition, and then stored in a directory under the Change Tabledirectory. Whenever the specified partition timeframe ends, a partition is created in Hive, pointing to thetarget directory on your preferred storage provider.
Information about the partitions is written to the attrep_cdc_partitions Control Table.
PrerequisitesThe prerequisites for using Change Data Partitioning with the Hortonworks Data Platform (HDP) endpointare as follows:
l The target file format must be set to Text or Sequencel Hive access must be set to ODBC
Security requirementsl The HDP NameNode (and data nodes when using WebHDFS) must be accessible from the QlikReplicate machine and the user specified in the HDP target settings must have write permission forthe specified HDFS target directory.
l Hive table permissions: Replicate requires permissions to perform the following operations on Hivetables: CREATE, DROP, DESCRIBE, and ALTER table. ALTER table may also include RENAMEtable, ADD/RENAME column, and CREATE/DROP partitions on tables.
HDP Endpoint target data typesThe following table shows the HDP endpoint target data types that are supported when using QlikReplicate and the default mapping from Qlik Replicate data types.
For information on how to view the data type that is mapped from the source, see the section for the sourceendpoint you are using.
For additional information about Qlik Replicate data types, see Replicate data types (page 76).
Setup and User Guide - Qlik Replicate, November 2021 644

9 Adding and managing target endpoints
Qlik Replicatedata types HDP data types
BOOL BOOLEAN
BYTES STRING
TIME STRING
DATETIME TIMESTAMP
DATE DATE
INT1 TINYINT
INT2 SMALLINT
INT4 INT
INT8 BIGINT
NUMERIC DECIMAL (p,s)
REAL4 FLOAT
REAL8 DOUBLE
STRING VARCHAR (Length)
UINT1 SMALLINT
UINT2 INT
UINT4 BIGINT
UINT8 DECIMAL (20,0)
WSTRING VARCHAR (Length)
BLOB STRING
NCLOB STRING
CLOB STRING
Qlik Replicate and HDP data types
Setting general connection propertiesThis section describes how to configure general connection properties. For an explanation of how toconfigure advanced connection properties, see Setting advanced connection properties.
To add a Hortonworks Data Platform (HDP) target endpoint to Qlik Replicate:
1. In the Qlik Replicate console, click Manage Endpoint Connections to open the Manage EndpointConnections dialog box.For more information on adding an endpoint to Qlik Replicate, see Defining and managingendpoints (page 110).
2. In the Name field, type a name for your endpoint. This can be any name that will help to identify theendpoint being used.
Setup and User Guide - Qlik Replicate, November 2021 645

9 Adding and managing target endpoints
3. In the Description field, type a description that helps to identify the HDP endpoint. This is optional.
4. Select Hortonworks Data Platform (HDP) as the endpoint Type.
5. In the Security section, do the following:
These settings are relevant for HDFS storage and Hive only.
1. To encrypt the data between the Replicate machine and HDFS, select Use SSL. In order touse SSL, first make sure that the SSL prerequisites described in Prerequisites (page 643)been met.In the CA path field, specify one of the following:
l The full path of a CA certificate file (in PEM format).l The directory containing the certificate files with hash names.
2. Select one of the following authentication types:l User name - Select to connect to the HDP cluster with only a user name. Then, in theUser name field, specify the name of a user authorized to access the cluster.
l User name and password - Select to connect to the HDP NameNode or to the KnoxGateway (when enabled) with a user name and password. Then, in the User nameand Password fields, specify the required user name and password.
l Kerberos - Select to authenticate against the HDP cluster using Kerberos. Replicateautomatically detects whether Qlik Replicate Server is running on Linux or onWindows and displays the appropriate settings.
Note In order to use Kerberos authentication on Linux, the Kerberosclient (workstation) package should be installed.
Qlik Replicate Server on Linux:When Qlik Replicate Server is running on Linux, select either Ticket or Keytab fromthe Kerberos options drop-down list.If you selected Ticket, select one of the following options:
l Use global Kerberos ticket file - Select this option if you want to use the sameticket for several HDP endpoints. In this case, you must make sure to selectthis option for each HDP endpoint instance that you define.
l Use specific Kerberos ticket file - Select this option if you want to use adifferent ticket file for each HDP endpoint. Then specify the ticket file name inthe designated field.This option is especially useful if you need to perform a task-level audit ofReplicate activity (using a third-party tool) on the HDP NameNode. To set thisup, define several instances of the same HDP endpoint and specify a uniqueKerberos ticket file for each instance. Then, for each task, simply select adifferent HDP endpoint instance.
Setup and User Guide - Qlik Replicate, November 2021 646

9 Adding and managing target endpoints
l You need to define a global Kerberos ticket file even if you selectthe Use specific Kerberos ticket file option. The global Kerberosticket file is used for authentication when selecting a Hiveendpoint, when testing the connection (using the Test Connectionbutton), and when selecting which tables to replicate.
l When replicating from a Hadoop source endpoint to an HDP targetendpoint, both endpoints must be configured to use the sameticket file.
For additional steps required to complete setup for Kerberos ticket-basedauthentication, see Using Kerberos authentication (page 655).If you selected Keytab, provide the following information:
l Realm: The name of the realm in which your HDP cluster resides.For example, if the full principal name is [email protected], thenEXAMPLE.COM is the realm.
l Principal: The user name to use for authentication. The principal must be amember of the realm entered above.For example, if the full principal name is [email protected], thenjohn.doe is the principal.
l Keytab file: The full path of the Keytab file. The Keytab file should contain thekey of the Principal specified above.
Qlik Replicate Server on Windows:When Qlik Replicate Server is running on Windows, select one of the following:
l Use the following KDC: Select Active Directory (default) if your KDC isMicrosoft Active Directory or select MIT if your KDC is MIT KDC running onLinux/UNIX.
When the Replicate KDC and the HDP KDC are in differentdomains, a relationship of trust must exist between the twodomains.
l Realm: The name of the realm/domain in which your HDP cluster resides(where realm is the MIT term while domain is the Active Directory term).
l Principal: The user name to use for authentication. The principal must be amember of the realm/domain entered above.
l When Active Directory is selected - Password: The password for the principalentered above.
l When MIT is selected - Keytab file: The keytab file containing the principalentered above.
Setup and User Guide - Qlik Replicate, November 2021 647
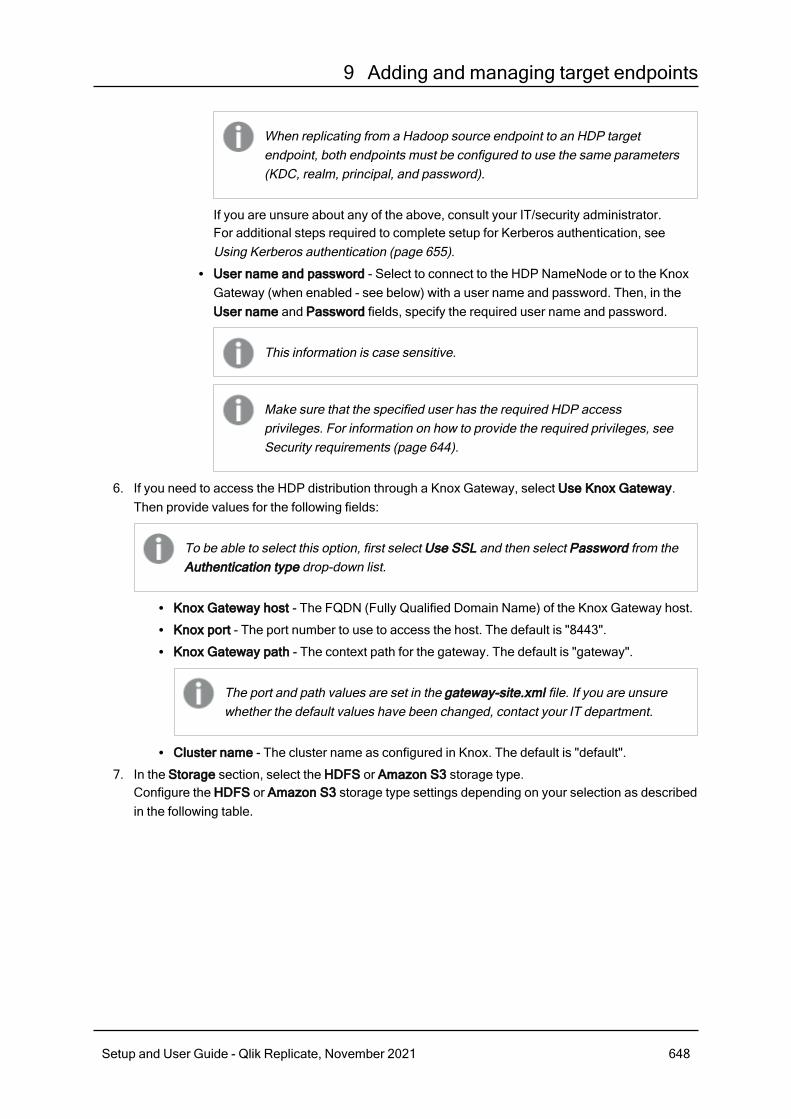
9 Adding and managing target endpoints
When replicating from a Hadoop source endpoint to an HDP targetendpoint, both endpoints must be configured to use the same parameters(KDC, realm, principal, and password).
If you are unsure about any of the above, consult your IT/security administrator.For additional steps required to complete setup for Kerberos authentication, seeUsing Kerberos authentication (page 655).
l User name and password - Select to connect to the HDP NameNode or to the KnoxGateway (when enabled - see below) with a user name and password. Then, in theUser name and Password fields, specify the required user name and password.
This information is case sensitive.
Make sure that the specified user has the required HDP accessprivileges. For information on how to provide the required privileges, seeSecurity requirements (page 644).
6. If you need to access the HDP distribution through a Knox Gateway, select Use Knox Gateway.Then provide values for the following fields:
To be able to select this option, first select Use SSL and then select Password from theAuthentication type drop-down list.
l Knox Gateway host - The FQDN (Fully Qualified Domain Name) of the Knox Gateway host.l Knox port - The port number to use to access the host. The default is "8443".l Knox Gateway path - The context path for the gateway. The default is "gateway".
The port and path values are set in the gateway-site.xml file. If you are unsurewhether the default values have been changed, contact your IT department.
l Cluster name - The cluster name as configured in Knox. The default is "default".
7. In the Storage section, select the HDFS or Amazon S3 storage type.Configure the HDFS or Amazon S3 storage type settings depending on your selection as describedin the following table.
Setup and User Guide - Qlik Replicate, November 2021 648

9 Adding and managing target endpoints
Option Description
HDFS accessmethod
Choose one of the following:l WebHDFSl HttpFS
When the Use Knox Gateway option is selected, the NameNode,HttpFS Host, and Port fields described below are not relevant (andare therefore hidden).
WhenWebHDFS isthe selectedaccessmethod:
-
NameNode Specify the IP address of the NameNode.
This is the Active node when High Availability is enabled (seebelow).
HighAvailability
Replicate supports replication to an HDFS High Availability cluster. In such aconfiguration,Replicate communicates with the Active node, but switches to theStandby node in the event of failover. To enable this feature, select the HighAvailability check box. Then, specify the FQDN (Fully Qualified Domain Name)of the Standby NameNode in the Standby NameNode field.
Port Optionally, change the default port (50070).
Target Folder Specify where to create the data files on HDFS.
When HttpFSis theselectedaccessmethod:
-
HttpFS Host Specify the IP address of the HttpFS host.
Port Optionally, change the default port (14000).
Target Folder Specify where to create the data files on HDFS.
HDFS storage
Setup and User Guide - Qlik Replicate, November 2021 649

9 Adding and managing target endpoints
Option Description
Bucket name Enter the name of your Amazon S3 bucket.
Bucket region Select the Amazon S3 region where your bucket is located.
Access options Choose one of the following:l Key pairChoose this method to authenticate with your Access Key andSecret Key.
l IAM Roles for EC2.Choose this method if the machine on which Qlik Replicate isinstalled is configured to authenticate itself using an IAM role.For more information about this access option, see:http://docs.aws.amazon.com/IAM/latest/UserGuide/id_roles.html
l Security Token Service (STS)Choose this method to authenticate using SAML 2.0 with ActiveDirectory Federation Services.For more information about this access option, see:https://docs.aws.amazon.com/IAM/latest/UserGuide/id_roles_providers_saml.html
When Key pair isthe access option:
-
Access key Enter the access key information for Amazon S3.
Secret key Enter the secret key information for Amazon S3.
When SecurityToken Service(STS) is the accessoption:
-
ADFS URL The URL to an Active Directory Federation Services page, responsible forreturning a SAML claims document to be sent over to AWS.
AD principal name The principal (user) name to use when identifying against ADFSThe format should be: user.name@domain
AD principalpassword
The principal password to use when identifying against ADFS
IdP ARN The Amazon Resource Name (ARN) of the Active Directory issuing theSAML claims document. This is required as it enables AWS to identify thesigner of the SAML document and verify its signature.
SAML Role ARN The Amazon Resource Name (ARN) of the specific role the returnedcredentials should be assigned.
Amazon S3 storage
Setup and User Guide - Qlik Replicate, November 2021 650
9 Adding and managing target endpoints
Option Description
Switch role afterassuming SAMLrole
Use this option to switch role after authentication.For more information, see:https://docs.aws.amazon.com/IAM/latest/UserGuide/id_roles_common-scenarios_aws-accounts.htmlWhen this option is selected, the following information is required:Role ARN: The ARN associated with the target role.Role external ID: The value of the external ID condition in the target role’strust policy.
For all accessoptions:
-
Target folder Enter the target folder in your Amazon S3 bucket.
8. In the Hive Access section, do the following:
1. From the Access Hive using drop-down list, select one of the following options:
When the Use Knox Gateway option is selected, the Host and Port fieldsdescribed below are not relevant (and are therefore hidden).
l ODBC - Select this option to access Hive using an ODBC driver (the default). Thencontinue with the Host field.
If you select his option, make sure that the latest 64-bit ODBC driver foryour Hadoop distribution is installed on the Qlik Replicate Servermachine.
l HQL scripts - When this option is selected, Replicate will generate HQL tablecreation scripts in the specified Script folder.
When this option is selected, the target storage format must be set to"Text".
l No Access - When this option is selected, after the data files are created on HDFS,Replicate will take no further action.
2. In the Host field, specify the IP address of the Hive machine.
3. In the Port field, optionally change the default port.
4. In the Database field, specify the name of the Hive target database.
Setting advanced connection propertiesThe table below describes the settings in the Advanced tab.
Setup and User Guide - Qlik Replicate, November 2021 651

9 Adding and managing target endpoints
Setting Description
File Format Expand this section to specify or view the file format settings.
Target storage format Select the target storage format: Text (the default) orSequence.
When using Text as the target storage format, newlines as part of the data values are not supported(due to an Apache Hadoop limitation). Bestpractice is to use Sequence as the target storageformat.
Field delimiter The delimiter that will be used to separate fields in the targetfile. The default is \001. Note that field delimiters should beASCII characters unless they are non-printable controlcharacters, in which case they should be in Octal format (e.g.\247).
Null value The value that will be used to indicate a null value in the targetfile.
Example (where @ is the null value):
mike,male,295678
sara,female,@
Escape character When using LazySimpleSerde: The escape character isused to escape the field delimiter character. When a fielddelimiter is escaped, it is interpreted as actual data, and not asa field delimiter.
Example (where \ is the escape character and a comma isthe field delimiter):
sunroof\,power-steering
Example (where \ is the escape character and doublequotes is the quote character):
"\"sunroof, power-steering\""
Advanced tab settings
Setup and User Guide - Qlik Replicate, November 2021 652

9 Adding and managing target endpoints
Setting Description
Add metadata header When the target storage format is set to Text, you canoptionally add a header row to the data files. The header rowcan contain the source column names and/or the intermediate(i.e. Replicate) data types.
Example of a target file with a header row when both Withcolumn names and With data types are selected:
Position:DECIMAL(38,0),Color:VARCHAR(10)
1,"BLUE"
2,"BROWN"
3,"RED"
...
File Attributes Expand this section to specify or view the file attributes.
Maximum file size Specify the maximum file size of each target file. When thedata reaches the maximum size, the file will be closed andwritten to the specified target folder.
Compress files using Select the compression method to use on HDFS.
Change Processing Expand this section to specify or view change processingsettings.
Apply/store changes when: Specify how long to wait before applying or storing thechanges.
File size reaches Specify the minimum size of the data file required to apply orstore the changes.
Elapsed time reaches
To facilitate rapid deliveryof DDL messages, files areuploaded immediately,regardless of the specifiedFile size reaches orElapsed time reachesvalues.
Specify the maximum time to wait before applying or storingthe changes.
Proxy Server Expand this section to specify the settings required when thestorage (Amazon S3/HDFS) is accessed via a proxy server.
Use proxy server Select this option to access the storage via a proxy server.
Setup and User Guide - Qlik Replicate, November 2021 653

9 Adding and managing target endpoints
Setting Description
Host name The host name of the proxy server.
Port The port via which to access the proxy server.
User name The user name for accessing the proxy server.
Password The password for accessing the proxy server.
Scheme Select which protocol to use to access the server (HTTP orHTTPS).
In order to use HTTPS when the Storage type field is set toAmazon S3, you must first install the CA certificate thatsigned the proxy’s certificate on the Replicate Servermachine, as follows:
l On Windows: Add the CA certificate to the TrustedRoot Certification Authorities store of Local Computer
l On Linux: Add the CA certificate to /etc/pki/tls/certs/ca-bundle.crt
SSL CA Path
When HDFS is the Storage type and HTTPS is the selectedScheme, specify the location of the CA file on the ReplicateServer machine .
Internal parametersInternal parameters are parameters that are not exposed in the UI. You should only use them if instructedby Qlik Support.
To add internal Qlik Replicate parameters:
1. Click the Internal Parameters link.The Internal Parameters dialog box opens.
2. In the edit box, type the name of the parameter you need to add and then click it.
3. The parameter is added to the table below the search box with its default value.
4. Change the default value as required.
5. To reset the parameter value to its default, click the "Restore default value" icon at the end of therow.
More optionsThese options are not exposed in the UI as they are only relevant to specific versions or environments.Consequently, do not set these options unless explicitly instructed to do so by Qlik Support or productdocumentation.
To set an option, simply copy the option into the Add feature name field and click Add. Then set the valueor enable the option according to the instructions you received.
Setup and User Guide - Qlik Replicate, November 2021 654

9 Adding and managing target endpoints
Settings summaryYou can view a summary of your settings by clicking the Setting Summary link. This is useful if you need tosend a summary of your settings to Qlik Support.
Using Kerberos authenticationWhether Qlik Replicate Server is running on Linux or Windows, you can configure it to authenticate itselfagainst the HDP cluster using Kerberos.
This requires you to perform the following additional steps on the Qlik Replicate machine.
Using Kerberos authentication on LinuxTo use Kerberos authentication on Linux:
The commands described below should be issued under the "Attunity" user or under the userthat was selected during the Replicate installation.
1. Obtain a valid TGT (Ticket-Granting Ticket) from the Kerberos KDC (Key Distribution Center) butsave the TGT to a non-default cache file. Usually, a keytab file is used to perform non-interactiveauthentication to Kerberos.Command Syntax:kinit -kt [keytab_file] -c [cache_file_name] [principal_name]
2. This step is only required for the global Kerberos ticket file. Set the Kerberos cache environmentvariable (for Replicate to use later on).To set the environment variable:
a. Change the working directory to the Replicate "bin" directory by issuing the followingcommand (assumes the default installation path):cd /opt/attunity/replicate/bin
b. Stop the Qlik Replicate Server services on the Linux by running:/opt/attunity/replicate/bin/areplicate stop
3. Create a file named site_arep_login.sh in the Qlik Replicate bin folder.
a. Add the following command to the file:export KRB5CCNAME=cache_file_name
Example:export KRB5CCNAME=/temp/kerberos/global.ticket
b. Save the file and
c. Start the Qlik Replicate Server services on the Linux by running:/opt/attunity/replicate/bin/areplicate start
Now, whenever Qlik Replicate needs to use Kerberos authentication, it will perform the followingoperations:
l When Use global Kerberos ticket file is selected: Replicate will check whether the KRB5CCNAMEenvironment variable is set and, if so, will use the ticket(s) inside the cache file specified by the
Setup and User Guide - Qlik Replicate, November 2021 655

9 Adding and managing target endpoints
environment variable.l When Use specific Kerberos ticket file is selected:
l During design-time (e.g. when selecting tables, testing the connection, etc.), Replicate willuse the ticket(s) inside the cache file specified by the KRB5CCNAME environment variable.
l During runtime, Replicate will use the ticket file specified in the HDP endpoint settings.
If the ticket in the cache file expires or becomes invalid, repeating the kinit commandshown in Step 1 above will write a new TGT to the cache file and allow Qlik Replicate tocontinue working. This can be done without restarting the Qlik Replicate Server.
Using Kerberos authentication on WindowsBefore beginning, make sure that the impersonated user (principal) is granted read and write permissionson the Replicate Data directory (<product_dir>\Data by default) on the Qlik Replicate server. For ActiveDirectory KDC, the impersonated user is the user configured in the user interface. For MIT KDC, this is theWindows user to which the MIT principal is mapped.
To set up Kerberos authentication on Windows, perform the following steps to ensure that theimpersonated user (principal) has the Log on as a batch job privilege on the Qlik Replicate server.
1. On the Qlik Replicate Server machine, open the Local Security Settings (Control Panel > SystemSecurity > Administrative Tools > Local Security Policy).
2. In the console tree, expand Local Policies and select User Rights Assignments.
3. In the details pane, double-click Log on as a batch job.
4. In the Log on as a batch job Properties dialog box, on the Local Security Settings tab, verify thatthe relevant user is listed. If the user is not listed, click Add User or Group, then add the user andclick OK.
Setup and User Guide - Qlik Replicate, November 2021 656
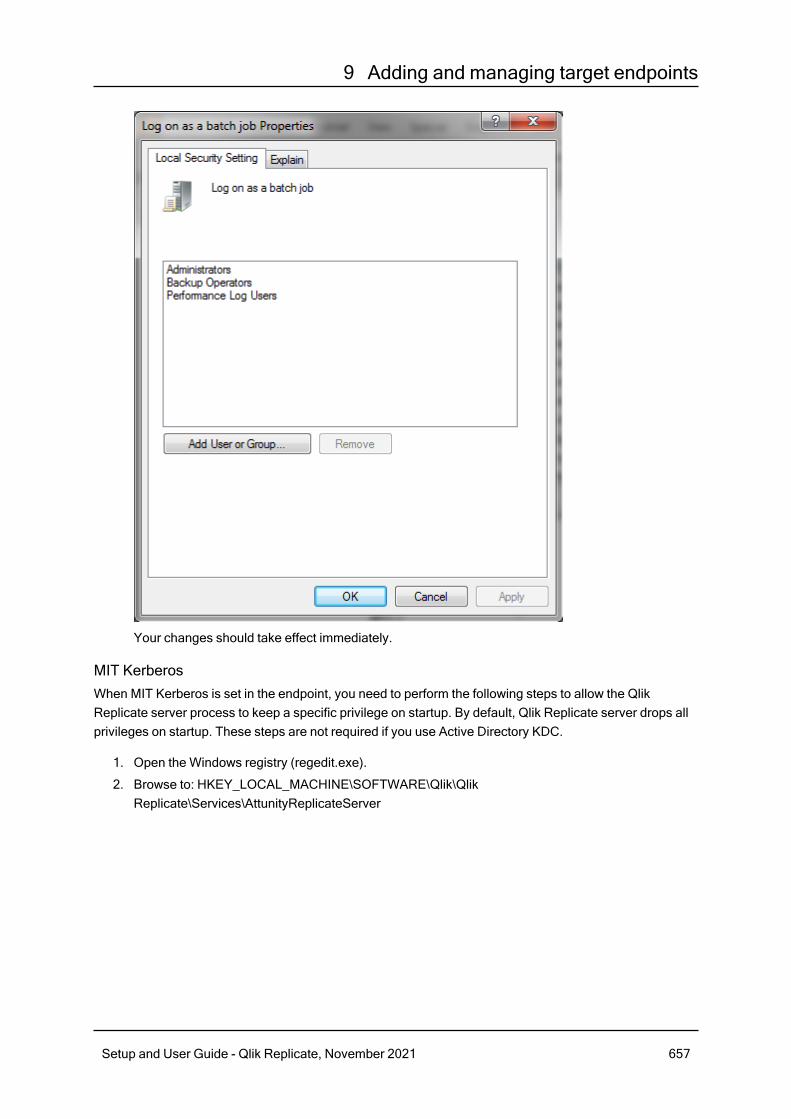
9 Adding and managing target endpoints
Your changes should take effect immediately.
MIT KerberosWhen MIT Kerberos is set in the endpoint, you need to perform the following steps to allow the QlikReplicate server process to keep a specific privilege on startup. By default, Qlik Replicate server drops allprivileges on startup. These steps are not required if you use Active Directory KDC.
1. Open the Windows registry (regedit.exe).
2. Browse to: HKEY_LOCAL_MACHINE\SOFTWARE\Qlik\QlikReplicate\Services\AttunityReplicateServer
Setup and User Guide - Qlik Replicate, November 2021 657

9 Adding and managing target endpoints
3. Modify the PrivilegesKeep string to include the value SeTcbPrivilege.
4. Close the Registry Editor window.
5. Restart the Qlik Replicate Server service.
Setup and User Guide - Qlik Replicate, November 2021 658

9 Adding and managing target endpoints
9.17 Using IBM Netezza as a targetThis section describes how to set up and use an IBM Netezza database as a target database in areplication task.
In this section:
l Prerequisites (page 660)l Limitations (page 660)l Security requirements (page 660)l IBM Netezza target data types (page 661)l Setting general connection properties (page 662)l Setting advanced connection properties (page 663)
Setup and User Guide - Qlik Replicate, November 2021 659

9 Adding and managing target endpoints
Prerequisites
l Qlik Replicate must be installed on any Windows computer in your network.l An IBM Netezza account with the required access privileges is required.
Make sure the following prerequisites have been met:
l IBM Netezza ODBC 64-bit client installed on the Qlik Replicate machine.l IBM Netezza Tools 7.0.4.2 or later installed on the Qlik Replicate machine. Make sure that theWindows Path environment variable includes the bin folder of IBM Netezza Tools (i.e.installation directory\bin).
LimitationsUsing IBM Netezza as a target database in a Qlik Replicate task is subject to the following limitations:
l The IBM Netezza target database uses the IBM Netezza NZLOAD utility, which does not supportloading tables with non-Latin names (e.g. Chinese). If any of your source tables has a non-Latinname, you can map it to a table with a Latin name.For more information on mapping table names, see Performing General tasks for a single table/view(page 930) and Starting the Global Transformation Rules wizard (page 955).
l Full LOB data types are not supported. For information on including Limited-size LOB data types inthe replication, see the Metadata (page 1011) tab section in Customizing tasks (page 929).Note also that the size of a row in the IBM Netezza database cannot exceed 64KB. This should betaken into consideration when specifying the maximum LOB size in the Metadata (page 1011) tab.
Security requirementsThe Qlik Replicate user must be granted access to the IBM Netezza account as well as the followingprivileges:
Database privilegesl LIST on <database> to <Replicate user>l SELECT on <database> to <Replicate user>
Table privilegesl CREATE TABLE to <Replicate user>l LIST on TABLE to <Replicate user>
Schema privilegesl CREATE SCHEMA to <Replicate user>l LIST on SCHEMA to <Replicate user>
Setup and User Guide - Qlik Replicate, November 2021 660

9 Adding and managing target endpoints
View privilegesl SELECT on _T_DATABASE to <Replicate user>l SELECT on _V_SCHEMA to <Replicate user>l SELECT on _V_USER to <Replicate user>l SELECT on _V_TABLE to <Replicate user>l SELECT on _V_TABLE_DIST to <Replicate user>l SELECT on _V_RELATION_KEYDATA to <Replicate user>l LIST on _T_DATABASE to <Replicate user>l LIST on _V_SCHEMA to <Replicate user>l LIST on _V_USER to <Replicate user>l LIST on _V_TABLE to <Replicate user>l LIST on _V_TABLE_DIST to <Replicate user>l LIST on _V_RELATION_KEYDATA to <Replicate user>
IBM Netezza target data typesThe IBM Netezza database for Qlik Replicate supports most IBM Netezza data types. The following tableshows the IBM Netezza target data types that are supported when using Qlik Replicate and the defaultmapping from Qlik Replicate data types.
IBM Netezza does not support applying changes to binary data types in Batch optimized applymode. For more information on Batch optimized apply mode, see Change Processing Tuning(page 1027).
For information on how to view the data type that is mapped from the source, see the section for the sourcedatabase you are using.
For additional information about Qlik Replicate data types, see Replicate data types (page 76).
Qlik Replicate Data Types IBM Netezza Data Types
BOOLEAN BOOLEAN
BYTES VARCHAR (Length in Bytes)
DATE DATE
TIME TIME
DATETIME If scale < 7:
TIMESTAMP
If scale 7-9:
CHARACTER VARYING(37)
Supported data types
Setup and User Guide - Qlik Replicate, November 2021 661

9 Adding and managing target endpoints
Qlik Replicate Data Types IBM Netezza Data Types
INT1 BYTEINT
INT2 SMALLINT
INT4 INTEGER
INT8 BIGINT
NUMERIC NUMERIC (p,s)
REAL4 REAL
REAL8 DOUBLE
STRING VARCHAR (Length)
UINT1 SMALLINT
UINT2 INTEGER
UINT4 BIGINT
UINT8 BIGINT
WSTRING NVARCHAR (Length)
BLOB VARCHAR (64,000)
NCLOB NVARCHAR (7,000)
CLOB VARCHAR (64,000)
Setting general connection propertiesThis section describes how to configure general connection properties. For an explanation of how toconfigure advanced connection properties, see Setting advanced connection properties.
To add an IBM Netezza target endpoint to Qlik Replicate:
1. In Tasks view, click Manage Endpoint Connections to open the Manage Endpoints Connectionsdialog box. Then click the New Endpoint Connection button.
2. In the Name field, type a name for your database. This can be any name that will help to identify thedatabase being used.
3. In the Description field, type a description that helps to identify the IBM Netezza database. This isoptional.
4. Select Target as the database role.
5. Select IBM Netezza as the database Type.
6. In the Server field, enter the name of the IBM Netezza server.
7. Optionally, change the default Port (5480).
8. Type the IBM Netezza authentication information (User Name, Password) for the authorized userfor this IBM Netezza database. If you do not know this information, see your IBM Netezza databaseAdministrator (DBA).
Setup and User Guide - Qlik Replicate, November 2021 662

9 Adding and managing target endpoints
l This information is required. If you are using the Advanced tab to create acustom string, make sure to include the User Name and Password properties.See Setting advanced connection properties (page 663) for more information.
l This information is case sensitive.l If you want to set custom properties for this database, see Setting advancedconnection properties (page 663).
Make sure that the IBM Netezza user entered in the IBM Netezza Authentication sectionhas the correct access privileges. For information on how to provide the requiredprivileges, see Security requirements (page 660).
9. In the Database name field, enter the name of the IBM Netezza database.
Setting advanced connection propertiesIn the Advanced tab, you can set the following parameters:
l Max file size: Select or type the maximum size (in KB) of a CSV file before the file is loaded into theIBM Netezza database. The default value is 32000 KB.
Internal parametersInternal parameters are parameters that are not exposed in the UI. You should only use them if instructedby Qlik Support.
To add internal Qlik Replicate parameters:
1. Click the Internal Parameters link.The Internal Parameters dialog box opens.
2. In the edit box, type the name of the parameter you need to add and then click it.
3. The parameter is added to the table below the search box with its default value.
4. Change the default value as required.
5. To reset the parameter value to its default, click the "Restore default value" icon at the end of therow.
More optionsThese options are not exposed in the UI as they are only relevant to specific versions or environments.Consequently, do not set these options unless explicitly instructed to do so by Qlik Support or productdocumentation.
To set an option, simply copy the option into the Add feature name field and click Add. Then set the valueor enable the option according to the instructions you received.
Settings summaryYou can view a summary of your settings by clicking the Setting Summary link. This is useful if you need tosend a summary of your settings to Qlik Support.
Setup and User Guide - Qlik Replicate, November 2021 663
9 Adding and managing target endpoints
9.18 Using Kafka as a targetThis section describes how to set up and use Kafka as a target endpoint in a replication task. In a task witha Kafka target endpoint, each source record is transformed into a message which is then written (with anoptional message key) to a partition in the specified topic.
In this section:
l Transaction processing by the consumer (page 665)l Prerequisites (page 666)l Limitations (page 666)l Kafka target data types (page 667)l Setting general connection properties (page 669)l Setting advanced connection properties (page 677)l Working with Confluent Cloud (page 678)l The Replicate envelope (page 678)l Metadata and data messages (page 680)l Using Kerberos authentication on Windows (page 685)
Setup and User Guide - Qlik Replicate, November 2021 664
9 Adding and managing target endpoints
Transaction processing by the consumerWhen configuring the Qlik Replicate Kafka endpoint, users can configure various settings that affect wheremessages are published within the Kafka infrastructures (topics/partitions).
During a task's CDC stage, committed changes that are detected by the Qlik Replicate source endpoint aregrouped by transaction, sorted internally in chronological order, and then propagated to the targetendpoint. The target endpoint can handle the changes in various ways such as applying them to the targettables or storing them in dedicated Change Tables.
Each CDCmessage has both a transaction ID as well as change sequence. As the change sequence is amonotonically growing number, sorting events by change sequence always achieves chronological order.Grouping the sorted events by transaction ID then results in transactions containing chronologically sortedchanges.
However, as Kafka is a messaging infrastructure, applying changes is not feasible while storing changes intables is meaningless. The Replicate Kafka endpoint, therefore, takes a different approach, which is toreport all transactional events as messages.
How it worksEach change in the source system is translated to a data message containing the details of the changeincluding the transaction ID and change sequence in the source. The data message also includes thechanged columns before and after the change. As explained above, the order in which the Kafka targetwrites the messages is the same as order of changes within each transaction.
Once a data message is ready to be sent to Kafka, the topic and partition it should go to are determined byanalyzing the endpoint settings as well as potentially transformation settings. For example, the user mightdecide to configure the endpoint in such a way that every table is sent to a different topic and set thepartition strategy to "Random", meaning that each message (within the same table) will be sent to adifferent partition.
Transaction consistency from a consumer perspectiveIf maintaining transaction consistency is important for the consumer implementation, it means thatalthough the transaction ID exists in all data messages, the challenge is to gather the messages in a waythat would facilitate identifying a whole transaction. An additional challenge is getting the transaction in theoriginal order they were committed, which could be an even greater challenge if transactions are spreadacross multiple topics and partitions.
The simplest way of achieving the above goal is to direct Replicate to a specific topic and a specificpartition (in the endpoint settings). This means that all data messages will end up in a single partition, thusguaranteeing ordered delivery both of transactions and of changes within a transaction. The consumingapplication could then consume messages - accumulating a transaction in some intermediate memorybuffer - and when a new transaction ID is detected, mark the previous transaction as completed.
Although the simple way may work, it’s not very efficient at the task level as all messages end up in thesame topic and partition, not necessarily utilizing the full parallelism of the Kafka cluster. This may be anon-issue if there are multiple tasks, each taking advantage of a different topic/partition. In such asscenario, the gathering of messages from those tasks may very well utilize the cluster optimally.
Setup and User Guide - Qlik Replicate, November 2021 665

9 Adding and managing target endpoints
The more generic way where data may be spread over multiple topics and partitions means that someintermediate buffer such as memory, a table in a relational database, or even other Kafka topics wouldneed to be used to collect information about transactions. Then, the transactions would need to be rebuiltby periodically (every few minutes/hours) sorting the events collected from Replicate’s Kafka output by thechange sequence and grouping them by transaction ID.
PrerequisitesBefore you can use Kafka as a target endpoint in a Replicate task, the following prerequisites must be met:
l Open TCP ports to all the brokers from the Replicate Server machinel Set permissions that will allow Qlik Replicate to write to the target topics. One way to do this is touse the Kafka ACLs script (kafka-acls).
l Either create a topic named attrep_apply_exceptions before starting the replication task orconfigure the brokers with auto.create.topics.enable=true.Note that if this topic does not exist, the task will always fail when it encounters a data error,regardless of the error handling policy.For a description of the attrep_apply_exceptions table, see Apply exceptions (page 1138)
LimitationsWhen defining a task with Kafka as the target endpoint, the following limitations apply:
l The Kafka target endpoint does not support unlimited LOB size. Therefore, when replicating fromsource tables with LOB columns, do not select the Allow unlimited LOB size option.For more information on defining LOB settings, see Target metadata (page 1011).
l Batch optimized apply mode is not supported. If this mode is set, the task will automatically switchto Transactional apply mode and issue an appropriate warning.For more information on these modes, see Change Processing Tuning (page 1027).
l Store Changes mode is not supported.For more information on Store Changes mode, see Adding tasks (page 105).
l Kafka topic names cannot exceed 255 characters (249 from Kafka 0.10) and can only contain thefollowing characters:a-z|A-Z|0-9|. (dot)|_(underscore)|-(minus)If the source table names exceed the maximum permitted length or contain unsupported characters,you need to either modify the names before starting the task or define a global transformation. Forinformation on defining global transformations, see Starting the Global Transformation Rules wizard(page 955).
l The Ignore ALTER Apply Changes setting is not supported for changes to source data types andtable renaming.
l Column names must begin with [A-Za-z_] (letters or an underscore) followed by [A-Za-z0-9_](letters, digits, or an underscore). For example, _Test_ is a valid column name whereas &Test isnot.If a source column name does not adhere to this rule, then a transformation should be used torename the column.
Setup and User Guide - Qlik Replicate, November 2021 666

9 Adding and managing target endpoints
l The Drop and Create table Target Table Preparation option is not supportedl The Truncate before loading Target Table Preparation option is not supportedl The DDL History and Change Data Partitioning Control tables are not supportedl DDL Changes: Dropping or renaming a table is not supported
Kafka target data typesThe following table shows the default mapping from Qlik Replicate data types to Kafka data types.
For information on source data type mappings, see the section for the source endpoint you are using.
For additional information about Qlik Replicate data types, see Replicate data types (page 76).
When using the JSONmessage format, binary values are represented as hexadecimal digits.
Qlik Replicate Data TypesKafka Target Data Types inSchema Messages
DATE DATE
TIME TIME
DATETIME DATETIME
BYTES BYTES (length)
BLOB BLOB
REAL4 REAL4 (7)
REAL8 REAL8 (14)
INT1 INT1 (3)
INT2 INT2 (5)
INT4 INT4 (10)
INT8 INT8 (19)
UINT1 UINT1 (3)
UINT2 UINT2 (5)
UINT4
Values larger than 2^31-1 are not supported.
UINT4 (10)
Kafka data mapping
Setup and User Guide - Qlik Replicate, November 2021 667

9 Adding and managing target endpoints
Qlik Replicate Data TypesKafka Target Data Types inSchema Messages
UINT8
Values larger than 2^63-1 are not supported.
UINT8 (20)
NUMERIC NUMERIC (p,s)
STRING STRING (Length)
WSTRING STRING (Length)
CLOB CLOB
NCLOB NCLOB
BOOLEAN BOOLEAN (1)
Mapping from Qlik Replicate data types to AvroWhen Avro is set as the message format, due to the limited number of data types supported by Avro, thedata type mappings will be as shown in the table below.
Replicate data types will only be mapped to supported Avro logical data types if the Use logicaldata types for specific data types check box is selected.
Qlik Replicate DataTypes
JSON or Avro Primitive Data Types (When not usinglogical data types)
Avro Logical DataTypes
DATE
STRING
DATE
Annotates an AvroINT.
TIME STRING TIME-MILLIS
Annotates an AvroINT.
TIMESTAMP STRING TIMESTAMP-MICROS
Annotates an AvroLONG.
STRING STRING
WSTRING STRING
Avro data type mappings
Setup and User Guide - Qlik Replicate, November 2021 668

9 Adding and managing target endpoints
Qlik Replicate DataTypes
JSON or Avro Primitive Data Types (When not usinglogical data types)
Avro Logical DataTypes
CLOB STRING
NCLOB STRING
NUMERIC STRING DECIMAL (p,s)
Annotates an AvroBYTES.
BYTES BYTES -
BLOB BYTES -
REAL4 FLOAT -
REAL8 DOUBLE -
INT1 INT -
INT2 INT -
INT4 INT -
UINT1 INT -
UINT2 INT -
UINT4 LONG -
INT8 LONG
UINT8 STRING DECIMAL (20,0)
Annotates an AvroBYTES.
BOOLEAN BOOLEAN -
Setting general connection propertiesThis section describes how to configure general connection properties. For an explanation of how toconfigure advanced connection properties, see Setting advanced connection properties.
To define the general connection properties:
1. Click the Manage Endpoint Connections toolbar button.The Manage Endpoints Connections dialog box opens.
2. Click the New Endpoint Connection toolbar button.The Name, Description, Type and Role fields are displayed on the right.
3. In the Name field, specify a display name for the endpoint.
4. In the Description field, optionally type a description for the Kafka endpoint.
5. Select Target as the endpoint Role.
6. Select Kafka as the endpoint Type.
Setup and User Guide - Qlik Replicate, November 2021 669

9 Adding and managing target endpoints
The dialog box is divided into General and Advanced tabs.
7. In the Broker servers field, specify one or more broker servers using the following format (for highavailability):
server1[:port1][,server2[:port2]]
Example:
192.168.1.100:9092,192.168.1.101:9093
Replicate will connect to the first available host. If a host is specified without a port then port 9092will be used as the default.
When using SSL or Kerberos authentication, you must specify the broker FQDN (i.e. notthe IP address).
All of the broker servers in your cluster need to be accessible to Replicate. However,you do not need to specify all of the servers in the Broker servers field. This is becauseReplicate only need to connect to one of the servers in order to retrieve the connectiondetails for the other servers in the cluster. It is therefore best practice to specify theservers that are most likely to be available when the task is run. The servers to whichReplicate produces messages is determined by the topic and partitioning topic andpartitioning settings described below.
8. Continue as described below.
Security
l The Use SSL and Certificate authentication options are only supported from Kafka 0.9or later.
l The CA file, public key file and private key file must all be in PEM format.l The Kerberos and User name and password authentication methods are onlysupported from Kafka 0.10 or later.
l All of the broker servers in the cluster must be configured to accept connection requestsusing the selected Authentication method.
In the Security section, the following options can be set:
l Use SSL (supports TLS 1.0, 1.1 and 1.2): Select this option to encrypt the communication betweenthe Replicate machine and the broker server(s). If the brokers are configured to require SSL, thenyou must select this option.
l CA path: Specify either the full path (i.e. including the file name) to a specific CA certificate inPEM format or the directory containing certificate files with hash names.
l Authentication: Select one of the following:
Setup and User Guide - Qlik Replicate, November 2021 670

9 Adding and managing target endpoints
l None - No authentication.l Certificate - If you select this option, you also need to provide the following information:Note The public and private key files must be in PEM format.
l Public key file - The full path to the public key file on the Replicate Server machine.l Private key file - The full path to the private key file on the Replicate Server machine.l Private key password - The password for the private key file.
l Kerberos (SASL/GSSAPI) - Select to authenticate against the Kafka cluster usingKerberos. Replicate automatically detects whether Qlik Replicate Server is running on Linuxor on Windows and displays the appropriate settings.Qlik Replicate Server on Linux:
l Principal - The Kerberos principal used to authenticate against the broker server(s).l Keytab file - The full path to the keytab file (that contains the specified principal) onthe Replicate Server machine.
In order to use Kerberos authentication on Linux, the Kerberos client(workstation) package should be installed.
Qlik Replicate Server on Windows:
Note Both Replicate Server and the Kafka brokers must be connected to ActiveDirectory KDC.
l Realm - The name of the domain in which the broker servers reside.l Principal - The user name to use for authentication. The principal must be a memberof the domain entered above.
l Password - The password for the principal entered above.
For additional steps required to complete setup for Kerberos authentication, see UsingKerberos Authentication on Windows.
l Username and password(SASL/PLAIN) - You can select this option to authenticateyourself using a user name and password (SASL/PLAIN). To prevent the password frombeing sent in clear text, it is strongly recommended to enable the Use SSL option as well.
l Username and Password (SASL/SCRAM-SHA-256) - You can select this option toauthenticate yourself using a user name and password (SASL/SCRAM-SHA-256).Note that selecting this option also requires each broker's server.properties file to beconfigured with the corresponding SASL/SCRAMmechanism.
l Username and Password (SASL/SCRAM-SHA-512) - You can select this option toauthenticate yourself using a user name and password (SASL/SCRAM-SHA-512).Note that selecting this option also requires each broker's server.properties file to beconfigured with the corresponding SASL/SCRAMmechanism.
Message PropertiesIn the Message Properties section, set the following properties:
Setup and User Guide - Qlik Replicate, November 2021 671

9 Adding and managing target endpoints
1. Choose JSON or Avro as the message format.
Qlik provides an Avro Message Decoder SDK for consuming Avro messages producedby Qlik Replicate. You can download the SDK together with the Avro Message DecoderDeveloper's Guide as a ZIP file from the Download Site.An understanding of the Replicate envelope schema is a prerequisite for consumingAvro messages produced by Qlik Replicate. If you do not wish to use the SDK, see TheQlik Envelope for a description of the Replicate envelope schema.
2. From the Compression drop-down list, optionally select one of the available compression methods(Snappy or gzip). The default is None.
3. If you selected Avro, optionally select the Use logical data types for specific data types check boxto map some of the number-based Qlik Replicate data types to Avro logical data types. When thisoption is not selected (the default), all Qlik Replicate data types will be mapped to Avro primitivedata types.For more information on Qlik Replicate to Avro data type mapping, see Mapping from Qlik ReplicateData Types to Avro.
4. If the message Format is set to Avro, Publish is set to Publish data schemas to ConfluentSchema Registry or Publish data schemas to Hortonworks Schema Registry (see below), andthe Message Key is not set to None, you can select the Encode message key in Avro formatcheck box. When this option is not selected (the default), the message key will be in text format.
If you are using the Confluent JDBC Sink Connector to consume messages, this optionmust be enabled.
Data Message PublishingIn the Data Message Publishing section, set the following properties:
1. In the Publish the data to field, choose one of the following:l Specific topic - to publish the data to a single topic. Either type a topic name or use thebrowse button to select the desired topic.
l Specific topic for each table - to publish the data to multiple topics corresponding to thesource table names.The target topic name consists of the source schema name and the source table name,separated by a period (e.g. "dbo.Employees"). The format of the target topic name isimportant as you will need to prepare these topics in advance.
If the topics do not exist, configure the brokers with auto.create.topics.enable=true toenable Replicate to create the topics during runtime. Otherwise, the task will fail.
2. From the Partition strategy drop-down list, field, select either Random or By message key. If youselect Random, each message will be written to a randomly selected partition. If you select Bymessage key, messages will be written to partitions based on the selected By message key(described below).
Setup and User Guide - Qlik Replicate, November 2021 672
9 Adding and managing target endpoints
3. From the Message key drop-down list, field, select one of the following:
Note If the message Format is set to Avro and the Encode message key in Avroformat option is enabled, the message key will be an Avro record with an Avro schema.
l None - To create messages without a message key.l Schema and table name - For each message, the message key will contain a combinationof schema and table name (e.g. "dbo+Employees").When By message key is selected as the Partition strategy, messages consisting of thesame schema and table name will be written to the same partition.
l Primary key columns - For each message, the message key will contain the value of theprimary key column.When By message key is selected as the Partition strategy, messages consisting of thesame primary key value will be written to the same partition.
Metadata Message PublishingIn the Metadata Message Publishing section, specify whether or where to publish the message metadata.
From the Publish drop-down list, select one of the following options:
l Do not publish metadata messagesWhen this option is selected, only the data messages will be published. Additionally, the Wrap datamessages with the Replicate Envelope option (enabled by default) will be displayed. This option isuseful for organizations that wish to leverage the Qlik Envelope structure to process the datamessages. If you do not require the additional information provided by the Attunity Envelope (e.g.due to existing message consumption processes), then disable this option.
l Publish metadata messages to a dedicated metadata topicIf you select this option, either type the Topic name or use the Browse button to select the desiredtopic. This option is required if the message format is set to Avro since Avro-formatted messagescan only be opened using the Avro schema.
l Publish data schemas to the Confluent Schema RegistryIf you select this option, you must also configure the Schema Registry Connection Propertiesdescribed below.
l Publish data schemas to the Hortonworks Schema RegistryIf you select this option, you must also configure the Schema Registry Connection Propertiesdescribed below.
Setup and User Guide - Qlik Replicate, November 2021 673

9 Adding and managing target endpoints
l It is strongly recommended not to publish schema messages to the same topic as datamessages.
l If the topics do not exist, configure the brokers with auto.create.topics.enable=true toenable Replicate to create the topics during runtime. Otherwise, the task will fail.
l The Confluent and Hortonworks Schema Registry options support Avro messageformat only.
Schema Registry Connection Propertiesl Schema Registry servers: Specify one or more Schema Registry servers using the followingformat (for high availability):When publishing data schemas to the Confluent Schema Registry:server1:port1[,server2[:port2]]
Example:
192.168.1.100:8081,192.168.1.101:8081
Replicate will connect to the first available host.When publishing data schemas to the Hortonworks Schema Registry:server1:port1[,server2[:port2]]
Example:
192.168.1.100:7788,192.168.1.101:7788
Replicate will connect to the first available host.
l Use SSL (supports TLS 1.0, 1.1 and 1.2): Select this option to encrypt the data between theReplicate machine and the Schema Registry server(s). If the servers re configured to require SSL,then you must select this option.
l CA path: Specify one of the following:l The full path (i.e. including the file name) to a specific CA certificate in PEM formatl The directory containing certificate files with hash names
l Authentication - Select one of the following Schema Registry authentication options:l None - No authentication.l Kerberos - Select to authenticate using Kerberos.
l This option is only supported when publishing data schemas to theHortonworks Schema Registry and when Qlik Replicate Server is runningon Linux.
l In order to use Kerberos authentication on Linux, the Kerberos client(workstation) package should be installed.See also Using Kerberos authentication on Windows (page 685).
Setup and User Guide - Qlik Replicate, November 2021 674

9 Adding and managing target endpoints
l Principal - The Kerberos principal used to authenticate against the Schema Registry.l Keytab file - The full path to the keytab file (that contains the specified principal) onthe Replicate Server machine.
l Certificate - Select to authenticate using a certificate.
This option is only supported when publishing to the Confluent Schema Registry.
If you select this option, you also need to provide the following information:l Public key file - The full path to the public key file on the Replicate Server machine.l Private key file - The full path to the private key file on the Replicate Server machine.l Private key password - The password for the private key file.
l Username and Password - Select to authenticate with a username and password.
This option is only supported when publishing to the Confluent Schema Registry.
l Use proxy server - Select to publish to the Schema Registry via a proxy server.
This option is only supported when publishing to the Confluent Schema Registry.
l Host name - The host name of the proxy server.l Port - The port via which to access the proxy server.l User name - The user name for accessing the proxy server.l Password - The password for accessing the proxy server.l Scheme - Select which protocol to use to access the server (HTTP or HTTPS). In order touse HTTPS, you must first install the CA certificate that signed the proxy’s certificate on theReplicate Server machine, as follows:
l On Windows: Add the CA certificate to the Trusted Root Certification Authoritiesstore of Local Computer
l On Linux: Add the CA certificate to /etc/pki/tls/certs/ca-bundle.crtl SSL CA Path: The location of the CA file on the Replicate Server machine when HTTPS isthe selected Scheme.
Setup and User Guide - Qlik Replicate, November 2021 675

9 Adding and managing target endpoints
Schema Registry Subject Properties
Subject Name Strategy
l The first strategy (Schema and Table Name Strategy) is a proprietary Qlik strategy whilethe other three are standard Confluence subject name strategies.
l For strategies with "Topic" in the subject name, the following should be considered:l When the "add $topic column" method is used, the subject will be created onlyonce (as the $topic expression might create multiple subjects).See also steps 3 and 4 in Overriding the default settings (page 676).
l The "Metadata only" Advanced run option is not supported. This is becauseReplicate depends on the arrival of the first record per table in order to create thesubject.
Select one of the available subject name strategies.
l Schema and Table Name - The defaultl Topic Namel Record Namel Topic and Record Name - See also: Message Format (page 1039).
For more information on Confluent's subject name strategies, seehttps://docs.confluent.io/platform/current/schema-registry/serdes-develop/index.html#subject-name-strategy
Subject Compatibility Mode
Select a compatibility mode from the Subject compatibility mode drop-down list. A description of theselected mode will appear below the drop-down list.
l Depending on the selected Subject Name Strategy, some of the compatibility modesmay not be available.
l When publishing messages to a Schema Registry, the default subject compatibilitymode for all newly created Control Table subjects will be None, regardless of theselected Subject compatibility mode.Should you wish the selected Subject compatibility mode to apply to Control Tables aswell, set the setNonCompatibilityForControlTables internal parameter to false.
Overriding the default settingsA transformation can be defined that overrides the topic, partition and message key settings defined in theGeneral tab.
Before you can define such a transformation, you first need to add a source endpoint to thetask and select the tables you want to replicate.
Setup and User Guide - Qlik Replicate, November 2021 676

9 Adding and managing target endpoints
To define a transformation:
1. Open the task you defined.
2. If you are defining a transformation for a single table, select one of the source tables. Otherwise,skip to Step 3.
3. Define a transformation that adds one of the following columns:
The columns listed below (prefixed with a $) instruct Replicate to route the message tothe desired topic and/or partition, and will not be included in the actual message itself.
l $topic - To write messages to a specific topic.l $partition - To write messages to a specific partition.l $key - To create a custom message key.
For information on creating a transformation for a single table, see Defining transformations for asingle table/view (page 931).For information on creating a global transformation rule, see Starting the Global TransformationRules wizard (page 955).
4. Define an expression for the new column that returns the following values:l For a $topic column, the expression should return the topic name.l For a $partition column, the expression should return the partition number. Note that anerror will be returned during runtime if the partition number does not exist.
l For a $key column, the expression should return the message key contents. Note that theexpression must return a non-empty value.
For information on creating expressions, see Using the Expression Builder (page 985).
Setting advanced connection propertiesIn the Advanced tab, you can define advanced properties for the Kafka target endpoint:
l Message Maximum SizeIn the Message maximum size field, specify the maximum size of messages that the broker(s) areconfigured to receive (message.max.bytes). Replicate will not send messages larger than themaximum size.
Internal parametersInternal parameters are parameters that are not exposed in the UI. You should only use them if instructedby Qlik Support.
To add internal Qlik Replicate parameters:
1. Click the Internal Parameters link.The Internal Parameters dialog box opens.
2. In the edit box, type the name of the parameter you need to add and then click it.
3. The parameter is added to the table below the search box with its default value.
4. Change the default value as required.
Setup and User Guide - Qlik Replicate, November 2021 677

9 Adding and managing target endpoints
5. To reset the parameter value to its default, click the "Restore default value" icon at the end of therow.
More optionsThese options are not exposed in the UI as they are only relevant to specific versions or environments.Consequently, do not set these options unless explicitly instructed to do so by Qlik Support or productdocumentation.
To set an option, simply copy the option into the Add feature name field and click Add. Then set the valueor enable the option according to the instructions you received.
Settings summaryYou can view a summary of your settings by clicking the Setting Summary link. This is useful if you need tosend a summary of your settings to Qlik Support.
Working with Confluent CloudThe following topic explains how to configure the Replicate Kafka endpoint to work with Confluent Cloud.
1. Create a cluster in Confluent Cloud.
2. Copy the Bootstrap server value from the cluster settings to the Broker servers field in General tabof the Replicate Kafka endpoint settings.
3. In the General tab of the Replicate Kafka endpoint settings, select Username and Password(SASL/PLAIN) from the Authentication drop-down list.
4. In your Confluent Cluster's API access screen, create an API key pair.
5. Copy the key and the secret to the Kafka endpoint's Username and Password fields respectively.
6. In the Kafka endpoint settings, select the Use SSL option and specify the full path to the CA file inthe CA path field. The CA file should be created according to Confluent’s guidelines and shouldcontains the CA that signs all of the Confluent Cloud certificates as well as its Root CA Signer.
You should be all set now to work with Confluent Cloud.
The Replicate envelopeAll Replicate message types covered in this section are encapsulated in a single message schema calledthe Replicate envelope. The schema of the Replicate envelope is as following:
{
"type":"record",
"name":"MessageEnvelope",
"fields":[
{"name":"magic","type":{"type":"fixed","name":"Magic","size":5}},
{"name":"type","type":"string"},
{"name":"headers","type":["null",{"type":"map","values":"string"}]},
{"name":"messageSchemaId","type":["null","string"]},
{"name":"messageSchema","type":["null","string"]},
{"name":"message","type":"bytes"}
]
}
The fields in the envelope are as follows:
Setup and User Guide - Qlik Replicate, November 2021 678

9 Adding and managing target endpoints
l magic (5 bytes fixed field)The constant "atMSG" is used to identify this form of message. The "atMSG" constant should beused to validate that this message is indeed an Replicate envelope message.
l type (string field)Describes the enveloped message type. This can be one of two values: MD which stands formetadata message and DT which stands for data message.
l headers (map of string key and value)A free for use map for various properties set at the application level. Currently, no headers are setby Qlik Replicate but this may change in future versions.
l messageSchemaId (null or string)A reference to a schema defined elsewhere, which can be used to deserialize the bytes in themessage field. This specification does not explain how the schema ID is used for looking up theactual schema - it is an application level detail. This field is used exclusively with the messageSchema
field.l messageSchema (null or string)An embedded UTF-8 encoded Avro JSON schema with which the message field can be serialized.This field is used exclusively with the messageSchemaId field.
l message (bytes)An Avro encoded message, which is the payload of the message envelope.
Given the envelope schema, it is possible for anyone using this schema to properly decode the envelopemessages from Kafka.
Once the envelope message has been decoded, there are two possible scenarios:
l Scenario 1: Decoding a self-describing message such as the metadata messagel Scenario 2: Decoding a message by referenced schema ID such as data messages
The method for logically decoding messages in both scenarios is described below.
Decoding a self-describing messageWhen the messageSchema field is not null, it means the message field can be decoded using the schemaincluded in the messageSchema field. This is fairly straightforward to perform programatically since the onlything you need to usually supply Avro is a schema and a message, both of which are provided in theenvelope message.
The Replicate metadata messages which include both table metadata, lineage and data schemadescription (to be referenced later by data messages) are enveloped in the self-describing envelope.
Decoding a message by referenced schema IDAvro schemas are JSON documents which can be quite large, usually much larger than the data encodedby Avro conforming to the schema. For example, a schema of a 10 column table could be a JSONdocument of more than 100 characters while an actual row encoding of 10 columns may be only 10 bytes(depending of course on the type and length of fields). It is therefore typically not recommended to includeschema and data together in a Kafka message because the schema information is redundant and is thesame for all data messages while the actual data is the only thing which differs between data messages.
Setup and User Guide - Qlik Replicate, November 2021 679

9 Adding and managing target endpoints
To avoid sending schema with each data message, each schema has a 32 bytes long ID. When a datamessage based on a previously sent data message schema (via the metadata message) is constructed,the messageSchema field is set to null and the messageSchemaId field is set to the 32 bytes ID of the schemainstead. The application responsibility is to locate the data schema sent earlier in the metadata messageand use that schema to decode the data message contained in the message field.
Typical consumer logicA typical scenario involving Kafka involves Qlik Replicate as the Producer of messages into Kafka andcustomer code as the Consumer. Qlik Replicate offers the ability to define a specific topic as the schematopic and different topics for the table data.
The customer's consumer code should read metadata messages from the schema topic and then save thedata schemas and any other information the consumer wishes to access later in a customer defined zone.Another set of customer consumers should read data messages from the various data topics, and accessthe data schemas zone as required to retrieve the data schemas required for decoding the data messages.
When consuming data messages and metadata messages from several topics and partitions in a multi-thread/process manner, a situation may arise where a given consumer may attempt to read a datamessage before the corresponding metadata message has been read. As it is not possible to read a datamessage before its corresponding metadata message, the consumer's logic should wait a reasonableamount of time until the corresponding metadata message has been read. If the metadata message is stillnot available after waiting for a reasonable amount of time, the consumer should handle this as anunexpected error and activate the planned error policy. An example of such a policy could be saving themessage in a dedicated “delayed” topic for later processing.
As a rule of thumb, the number of metadata messages will be much lower (in the magnitude of 1:10000 ormore) than the number of data messages. So, assuming a metadata consumer is active, the gap betweenmetadata message and data message should be no more than a few seconds (usually, milliseconds).
Metadata and data messagesThis topic describes the structure and content of the Metadata and Data messages produced by theReplicate Kafka endpoint.
Field Type Description
schemaId String The unique identifier of the Avro schema.
lineage Structure Information about the origin of the data (Replicate server, task,table, and so on)
server String The name of the Replicate server.
task String The name of the task.
schema String The name of the database schema.
table String The name of the table.
Metadata message
Setup and User Guide - Qlik Replicate, November 2021 680

9 Adding and managing target endpoints
Field Type Description
tableVersion Integer Replicate maintains a version number of the structure of sourcetable. Upon DDL change on the source, the version is increasedand a new metadata message is produced.
timestamp String The date and time of the metadata message.
tableStructure Structure Describes the structure of the table.
tableColumns Structure Contains the list of columns and their properties.
{columns} Structure For each column, a record with the below properties.
ordinal Integer The position of the column in the record.
type String The column data type.
length Integer The maximum size of the data (in bytes) permitted for thecolumn.
precision Integer For NUMERIC data type, the maximum number of digitsrequired to represent the value.
scale Integer For NUMERIC data type, the maximum number of digits to theright of the decimal point permitted for a number.
primaryKeyPosition Integer The position of the column in the table’s Primary Key. or UniqueIndex. The value is zero if the column is not part of the table’sPrimary Key.
dataSchema String The Avro schema for deserializing the Data messages.
Field Type Description
headers Structure Information about the current record.
operation Enum The operation type.Full Load (Replicate transfers the existing records fromsource table)
REFRESH – insert of a record during Full Load stage.
CDC (Replicate transfers the changes from source table)
INSERT – insertion of new record
UPDATE – update of existing record
DELETE – deletion of a record
Data message
Setup and User Guide - Qlik Replicate, November 2021 681

9 Adding and managing target endpoints
Field Type Description
changeSequence String A monotonically increasing change sequencer that iscommon to all change tables of a task.
Use this field to order the records in chronological order.
Applicable to CDC operations.
timestamp String The original change UTC timestamp.
Applicable to CDC operations.
streamPosition String The source CDC stream position.
Applicable to CDC operations.
transactionId String The ID of the transaction that the change record belongsto.
Use this field to gather all changes of a specific transaction.
Applicable to CDC operations.
Setup and User Guide - Qlik Replicate, November 2021 682

9 Adding and managing target endpoints
Field Type Description
changeMask String Indicates which data columns were changed in the sourcetable.
The change mask is a string of hexadecimal digits,representing a bitmask of data columns in little-endianorder. The bit position in the change mask is based on theordinal of the column in the metadata message of thattable.
This means that if there are 10 data columns, they occupybits 0 to 9 in the bitmask.
If UPDATE mask is 0B hexadecimal, which is 1011 binary –it means that the columns at ordinals 1, 2 and 4 werechanged.
The following describes the bit semantics:
l For INSERT records, all the inserted columns havethe associated bits set.
l For DELETE records, only primary-key (or uniqueindex) columns have the associated bits set. Thisallows an applier to construct a DELETE statementwithout having to find the primary key fields fromanother source.
l For UPDATE records, each column with a changedvalue will have the associated bit set.
LOB columns are not included in thechangeMask bit.
Setup and User Guide - Qlik Replicate, November 2021 683

9 Adding and managing target endpoints
Field Type Description
columnMask String Indicates which data columns are present in the message.Usually, this will include all of the table columns.
When replicating from an Oracle sourcewithout full supplemental logging, somecolumns might not be present in the data, sincethey could not be replicated.
The column mask is a string of hexadecimal digits,representing a bitmask of data columns in little-endianorder. The bit position in the column mask is based on theordinal of the column in the metadata message for thattable.
This allows the applier to distinguish a null value that is theactual value of the column, from a null value thatrepresents a column which could not be replicated from thesource database.
externalSchemaId String The Schema ID. This will only be displayed if the Includeexternal Schema ID header check box is selected.
As the Schema ID changes whenever a DDL is performedon the source table, consumer applications can use thisinformation to determine if the message schema haschanged.
transactionEventCounter Long The sequence number of the current operation in thetransaction.
This can be used to determine the order of operationswithin a transaction.
transactionLastEvent Boolean "True" indicates that it is the final record in the transactionwhereas "False" indicates that not all of the records havebeen processed.
data Structure The data of the table record
{columns} The column names and values in the current record.
beforeData Structure The data of the table record, before the change
{columns} The column names and values, before the change.
Applicable to UPDATE operation.
Setup and User Guide - Qlik Replicate, November 2021 684

9 Adding and managing target endpoints
Using Kerberos authentication on WindowsWhether Qlik Replicate Server is running on Linux or Windows, you can configure it to authenticate itselfagainst the Kafka cluster using Kerberos.
On Windows, this requires you to perform the following steps on the Qlik Replicate machine before startingthe Qlik Replicate Server.
Before beginning, make sure that the impersonated user (principal) is granted read and write permissionson the Replicate Data directory (<product_dir>\Data by default) on the Qlik Replicate server. For ActiveDirectory KDC, the impersonated user is the user configured in the user interface.
To set up Kerberos authentication on Windows, perform the following steps to ensure that theimpersonated user (principal) has the Log on as a batch job privilege on the Qlik Replicate server.
1. On the Qlik Replicate Server machine, open the Local Security Settings (Control Panel > SystemSecurity > Administrative Tools > Local Security Policy).
2. In the console tree, expand Local Policies and select User Rights Assignments.
3. In the details pane, double-click Log on as a batch job.
4. In the Log on as a batch job Properties dialog box, on the Local Security Settings tab, verify thatthe relevant user is listed. If the user is not listed, click Add User or Group, then add the user andclick OK.
Setup and User Guide - Qlik Replicate, November 2021 685

9 Adding and managing target endpoints
Your changes should take effect immediately.
Setup and User Guide - Qlik Replicate, November 2021 686

9 Adding and managing target endpoints
9.19 Using a Log Stream targetFor information on using Log Stream as a target, see Using the Log Stream (page 919).
Setup and User Guide - Qlik Replicate, November 2021 687

9 Adding and managing target endpoints
Setup and User Guide - Qlik Replicate, November 2021 688

9 Adding and managing target endpoints
9.20 Using MapR Streams as a targetThis section describes how to set up and use MapR Streams as a target endpoint in a replication task. In atask with a MapR Streams target endpoint, each source record is transformed into a message which isthen written (with an optional message key) to a partition in the specified topic.
In this section:
l Transaction processing by the consumer (page 690)l Prerequisites (page 691)l Limitations (page 691)l Supported data types (page 692)l Setting general connection properties (page 694)l Setting advanced connection properties (page 696)l The Replicate envelope (page 697)l Metadata and data messages (page 699)
Setup and User Guide - Qlik Replicate, November 2021 689

9 Adding and managing target endpoints
Transaction processing by the consumerWhen configuring the Qlik Replicate MapR Streams endpoint, users can configure various settings thataffect where messages are published within the MapR Streams infrastructures (topics/partitions).
During a task's CDC stage, committed changes that are detected by the Qlik Replicate source endpoint aregrouped by transaction, sorted internally in chronological order, and then propagated to the targetendpoint. The target endpoint can handle the changes in various ways such as applying them to the targettables or storing them in dedicated Change Tables.
Each CDCmessage has both a transaction ID as well as change sequence. As the change sequence is amonotonically growing number, sorting events by change sequence always achieves chronological order.Grouping the sorted events by transaction ID then results in transactions containing chronologically sortedchanges.
However, as MapR Streams is a messaging infrastructure, applying changes is not feasible while storingchanges in tables is meaningless. The Replicate MapR Streams endpoint, therefore, takes a differentapproach, which is to report all transactional events as messages.
How it worksEach change in the source system is translated to a data message containing the details of the changeincluding the transaction ID and change sequence in the source. The data message also includes thechanged columns before and after the change. As explained above, the order in which the MapR Streamstarget writes the messages is the same as order of changes within each transaction.
Once a data message is ready to be sent to MapR Streams, the topic and partition it should go to aredetermined by analyzing the endpoint settings and any transformation settings. For example, the usermight decide to configure the endpoint in such a way that every table is sent to a different topic and set thepartition strategy to "Random", meaning that each message (within the same table) will be sent to adifferent partition.
Transaction consistency from a consumer perspectiveIf maintaining transaction consistency is important for the consumer implementation, it means thatalthough the transaction ID exists in all data messages, the challenge is to gather the messages in a waythat would facilitate identifying a whole transaction. An additional challenge is getting the transaction in theoriginal order they were committed, which could be an even greater challenge if transactions are spreadacross multiple topics and partitions.
The simplest way of achieving the above goal is to direct Replicate to a specific topic and a specificpartition (in the endpoint settings). This means that all data messages will end up in a single partition, thusguaranteeing ordered delivery both of transactions and of changes within a transaction. The consumingapplication could then consume messages - accumulating a transaction in some intermediate memorybuffer - and when a new transaction ID is detected, mark the previous transaction as completed.
Although the simple way may work, it’s not very efficient at the task level as all messages end up in thesame topic and partition, not necessarily utilizing the full parallelism of the MapR Streams cluster. This maybe a non-issue if there are multiple tasks, each taking advantage of a different topic/partition. In such asscenario, the gathering of messages from those tasks may very well utilize the cluster optimally.
Setup and User Guide - Qlik Replicate, November 2021 690

9 Adding and managing target endpoints
The more generic way where data may be spread over multiple topics and partitions means that someintermediate buffer such as memory, a table in a relational database, or even other topics would need to beused to collect information about transactions. Then, the transactions would need to be rebuilt byperiodically (every few minutes/hours) sorting the events collected from Replicate’s MapR Streams outputby the change sequence and grouping them by transaction ID.
PrerequisitesBefore you can use MapR Streams as a target endpoint in a Replicate task, the following prerequisitesmust be met:
l Install and configure MapR Client 5.2.1 or later on the Qlik Replicate Server machine.To verify the configuration, issue the following command in a Linux shell:hadoop fs -ls maprfs://<cluster_name>/
The command should return a directory listing.l Install the mapr-librdkafka package on the Qlik Replicate Server machine.l Create a topic named attrep_apply_exceptions before starting the replication task. Note that if thistopic does not exist, the task will always fail when it encounters a data error, regardless of the errorhandling policy.For a description of the attrep_apply_exceptions table, see Apply exceptions (page 1138)
l Add the following files to the /opt/attunity/replicate/lib directory:l librdkafka.so, libMapRClient_c.so, and libMapRClient.so (copy from the /opt/mapr/libdirectory)
l libjvm.so (copy from the $JAVA_HOME/lib/amd64/server/lib directory)
LimitationsWhen defining a task with MapR Streams as the target endpoint, the following limitations apply:
l Unlimited LOB size is not supported. Therefore, when replicating from source tables with LOBcolumns, do not select the Allow unlimited LOB size option.For more information on defining LOB settings, see Target metadata (page 1011).
l Batch optimized apply mode is not supported. If this mode is set, the task will automatically switchto Transactional apply mode and issue an appropriate warning.For more information on these modes, see Change Processing Tuning (page 1027).
l Store Changes mode is not supported.For more information on Store Changes mode, see Adding tasks (page 105).
l MapR Streams topic names cannot exceed 255 characters and can only contain the followingcharacters:a-z|A-Z|0-9|. (dot)|_(underscore)|-(minus)If the source table names exceed the maximum permitted length or contain unsupported characters,you need to either modify the names before starting the task or define a global transformation. Forinformation on defining global transformations, see Starting the Global Transformation Rules wizard(page 955).
l The Ignore ALTER Apply Changes setting is not supported for changes to source data types andtable renaming.
Setup and User Guide - Qlik Replicate, November 2021 691

9 Adding and managing target endpoints
l Column names must begin with [A-Za-z_] (letters or an underscore) followed by [A-Za-z0-9_](letters, digits, or an underscore). For example, _Test_ is a valid column name whereas &Test isnot.If a source column name does not adhere to this rule, then a transformation should be used torename the column.
Supported data typesThe following table shows the default mapping from Qlik Replicate data types to MapR Streams data types.
For information on source data type mappings, see the section for the source endpoint you are using.
For additional information about Qlik Replicate data types, see Replicate data types (page 76).
When using the JSONmessage format, binary values are represented as hexadecimal digits.
Qlik Replicate Data TypesMapR Streams Target Data Types in SchemaMessages
DATE DATE
TIME TIME
DATETIME DATETIME
BYTES BYTES (length)
BLOB BLOB
REAL4 REAL4 (7)
REAL8 REAL8 (14)
INT1 INT1 (3)
INT2 INT2 (5)
INT4 INT4 (10)
INT8 INT8 (19)
UINT1 UINT1 (3)
UINT2 UINT2 (5)
UINT4
Values larger than 2^31-1 arenot supported.
UINT4 (10)
Supported data types
Setup and User Guide - Qlik Replicate, November 2021 692

9 Adding and managing target endpoints
Qlik Replicate Data TypesMapR Streams Target Data Types in SchemaMessages
UINT8
Values larger than 2^63-1 arenot supported.
UINT8 (20)
NUMERIC NUMERIC (p,s)
STRING STRING (Length)
WSTRING STRING (Length)
CLOB CLOB
NCLOB NCLOB
BOOLEAN BOOLEAN (1)
Mapping from Qlik Replicate data types to AvroWhen Avro is set as the message format, due to the limited number of data types supported by Avro, thedata type mappings will be as shown in the table below.
Qlik Replicate Data Types JSON or Avro Primitive Data Types Avro Logical Data Types
DATE
STRING
DATE
Annotates an Avro INT.
TIME STRING TIME-MILLIS
Annotates an Avro INT.
TIMESTAMP STRING TIMESTAMP-MICROS
Annotates an Avro LONG.
STRING STRING
WSTRING STRING
CLOB STRING
NCLOB STRING
NUMERIC STRING DECIMAL (p,s)
Annotates an Avro BYTES.
BYTES BYTES -
BLOB BYTES -
Avro data type mappings
Setup and User Guide - Qlik Replicate, November 2021 693

9 Adding and managing target endpoints
Qlik Replicate Data Types JSON or Avro Primitive Data Types Avro Logical Data Types
REAL4 FLOAT -
REAL8 DOUBLE -
INT1 INT -
INT2 INT -
INT4 INT -
UINT1 INT -
UINT2 INT -
UINT4 LONG -
INT8 LONG
UINT8 STRING DECIMAL (20,0)
Annotates an Avro BYTES.
BOOLEAN BOOLEAN -
Setting general connection propertiesThis section describes how to configure general connection properties. For an explanation of how toconfigure advanced connection properties, see Setting advanced connection properties.
To define the general connection properties:
1. Click the Manage Endpoint Connections toolbar button.The Manage Endpoints Connections dialog box opens.
2. Click the New Endpoint Connection toolbar button.The Name, Description, Type and Role fields are displayed on the right.
3. In the Name field, specify a display name for the endpoint.
4. In the Description field, optionally type a description for the MapR Streams endpoint.
5. Select Target as the endpoint Role.
6. Select MapR Streams as the endpoint Type.The dialog box is divided into General and Advanced tabs.
7. In the Cluster name field, specify the MapR Streams cluster name.To check if the cluster is valid, execute the following command in a Linux shell:hadoop fs -ls maprfs://cluster_name/
If there is a directory listing for the cluster, the cluster is valid.
8. In the Data Publishing section, set the following properties:
a. In the Publish the data to field, choose one of the following:l Specific topic - to publish the data to a single topic. Type the stream name followedby a colon and the topic name.Example:MapRStreamName:MapRTopicName
Setup and User Guide - Qlik Replicate, November 2021 694
9 Adding and managing target endpoints
l Specific topic for each table - to publish the data to multiple topics corresponding tothe source table names.In the Stream name field, enter the stream name only (i.e. stream-name as opposedto stream name:topic-name).
If the topics do not exist, the stream must be configured with autocreate=true toenable Replicate to create the topics during runtime. Otherwise, the task will fail.
b. From the Partition strategy drop-down list, field, select either Random or By message key.If you select Random, each message will be written to a randomly selected partition. If youselect By message key, messages will be written to partitions based on the selected Bymessage key (described below).
c. From the Message key drop-down list, field, select one of the following:
Note The message key is represented as a string, regardless of the selecteddata message format (JSON/Avro).
l None - To create messages without a message key.l Schema and table name - For each message, the message key will contain acombination of schema and table name (e.g. "dbo+Employees").When By message key is selected as the Partition strategy, messages consisting ofthe same schema and table name will be written to the same partition.
l Primary key columns - For each message, the message key will contain the value ofthe primary key column.When By message key is selected as the Partition strategy, messages consisting ofthe same primary key value will be written to the same partition.
10. In the Message Properties section, set the following properties:
a. Choose JSON or Avro as the message format.
Qlik provides an Avro Message Decoder SDK for consuming Avro messagesproduced by Qlik Replicate. You can download the SDK together with the AvroMessage Decoder Developer's Guide as a ZIP file from the Customer Zone.An understanding of the Qlik envelope schema is a prerequisite for consumingAvro messages produced by Qlik Replicate. If you do not wish to use the SDK,see The Qlik Envelope for a description of the Qlik envelope schema.
b. To publish the schema message (for the corresponding data message) to a topic, select theUse Schema Messages check box and then type the stream name followed by a colon andthe topic name.Example:MapRStreamName:MapRTopicName
This option is required if the message format is set to Avro since Avro-formatted messagescan only be opened using the Avro schema.
Setup and User Guide - Qlik Replicate, November 2021 695
9 Adding and managing target endpoints
It is strongly recommended not to publish schema messages to the same topicas data messages.
If the topics do not exist, the stream must be configured with autocreate=true toenable Replicate to create the topics during runtime. Otherwise, the task will fail.
Overriding the default settingsA transformation can be defined that overrides the topic, partition and message key settings defined in theGeneral tab.
Before you can define such a transformation, you first need to add a source endpoint to thetask and select the tables you want to replicate.
To define a transformation:
1. Open the task you defined.
2. If you are defining a transformation for a single table, select one of the source tables. Otherwise,skip to Step 3.
3. Define a transformation that adds one of the following columns:
The columns listed below (prefixed with a $) instruct Replicate to route the message tothe desired topic and/or partition, and will not be included in the actual message itself.
l $topic - To write messages to a specific topic.l $partition - To write messages to a specific partition.l $key - To create a custom message key.
For information on creating a transformation for a single table, see Defining transformations for asingle table/view (page 931).For information on creating a global transformation rule, see Starting the Global TransformationRules wizard (page 955).
4. Define an expression for the new column that returns the following values:l For a $topic column, the expression should return the topic name.l For a $partition column, the expression should return the partition number. Note that anerror will be returned during runtime if the partition number does not exist.
l For a $key column, the expression should return the message key contents. Note that theexpression must return a non-empty value.
For information on creating expressions, see Using the Expression Builder (page 985).
Setting advanced connection propertiesIn the Advanced tab, you can define advanced properties for the Mapr Streams target endpoint:
Setup and User Guide - Qlik Replicate, November 2021 696
9 Adding and managing target endpoints
l Message Maximum SizeIn the Message maximum size field, specify the maximum size of messages. Replicate will notsend messages larger than the maximum size.
Internal parametersInternal parameters are parameters that are not exposed in the UI. You should only use them if instructedby Qlik Support.
To add internal Qlik Replicate parameters:
1. Click the Internal Parameters link.The Internal Parameters dialog box opens.
2. In the edit box, type the name of the parameter you need to add and then click it.
3. The parameter is added to the table below the search box with its default value.
4. Change the default value as required.
5. To reset the parameter value to its default, click the "Restore default value" icon at the end of therow.
More optionsThese options are not exposed in the UI as they are only relevant to specific versions or environments.Consequently, do not set these options unless explicitly instructed to do so by Qlik Support or productdocumentation.
To set an option, simply copy the option into the Add feature name field and click Add. Then set the valueor enable the option according to the instructions you received.
Settings summaryYou can view a summary of your settings by clicking the Setting Summary link. This is useful if you need tosend a summary of your settings to Qlik Support.
The Replicate envelopeAll Replicate message types covered in this section are encapsulated in a single message schema calledthe Replicate envelope. The schema of the Replicate envelope is as following:
{
"type":"record",
"name":"MessageEnvelope",
"fields":[
{"name":"magic","type":{"type":"fixed","name":"Magic","size":5}},
{"name":"type","type":"string"},
{"name":"headers","type":["null",{"type":"map","values":"string"}]},
{"name":"messageSchemaId","type":["null","string"]},
{"name":"messageSchema","type":["null","string"]},
{"name":"message","type":"bytes"}
]
}
The fields in the envelope are as follows:
Setup and User Guide - Qlik Replicate, November 2021 697

9 Adding and managing target endpoints
l magic (5 bytes fixed field)The constant "atMSG" is used to identify this form of message. The "atMSG" constant should beused to validate that this message is indeed an Replicate envelope message.
l type (string field)Describes the enveloped message type. This can be one of two values: MD which stands formetadata message and DT which stands for data message.
l headers (map of string key and value)A free for use map for various properties set at the application level. Currently, no headers are setby Qlik Replicate but this may change in future versions.
l messageSchemaId (null or string)A reference to a schema defined elsewhere, which can be used to deserialize the bytes in themessage field. This specification does not explain how the schema ID is used for looking up theactual schema - it is an application level detail. This field is used exclusively with the messageSchema
field.l messageSchema (null or string)An embedded UTF-8 encoded Avro JSON schema with which the message field can be serialized.This field is used exclusively with the messageSchemaId field.
l message (bytes)An Avro encoded message, which is the payload of the message envelope.
Given the envelope schema, it is possible for anyone using this schema to properly decode the envelopemessages from MapR Streams.
Once the envelope message has been decoded, there are two possible scenarios:
l Scenario 1: Decoding a self-describing message such as the metadata messagel Scenario 2: Decoding a message by referenced schema ID such as data messages
The method for logically decoding messages in both scenarios is described below.
Decoding a self-describing messageWhen the messageSchema field is not null, it means the message field can be decoded using the schemaincluded in the messageSchema field. This is fairly straightforward to perform programatically since the onlything you need to usually supply Avro is a schema and a message, both of which are provided in theenvelope message.
The Replicate metadata messages which include both table metadata, lineage and data schemadescription (to be referenced later by data messages) are enveloped in the self-describing envelope.
Decoding a message by referenced schema IDAvro schemas are JSON documents which can be quite large, usually much larger than the data encodedby Avro conforming to the schema. For example, a schema of a 10 column table could be a JSONdocument of more than 100 characters while an actual row encoding of 10 columns may be only 10 bytes(depending of course on the type and length of fields). It is therefore typically not recommended to includeschema and data together in a MapR Streams message because the schema information is redundant andis the same for all data messages while the actual data is the only thing which differs between datamessages.
Setup and User Guide - Qlik Replicate, November 2021 698

9 Adding and managing target endpoints
To avoid sending schema with each data message, each schema has a 32 bytes long ID. When a datamessage based on a previously sent data message schema (via the metadata message) is constructed,the messageSchema field is set to null and the messageSchemaId field is set to the 32 bytes ID of the schemainstead. The application responsibility is to locate the data schema sent earlier in the metadata messageand use that schema to decode the data message contained in the message field.
Typical consumer logicA typical scenario involving MapR Streams involves Qlik Replicate as the Producer of messages intoMapR Streams and customer code as the Consumer. Qlik Replicate offers the ability to define a specifictopic as the schema topic and different topics for the table data.
The customer's consumer code should read metadata messages from the schema topic and then save thedata schemas and any other information the consumer wishes to access later in a customer defined zone.Another set of customer consumers should read data messages from the various data topics, and accessthe data schemas zone as required to retrieve the data schemas required for decoding the data messages.
When consuming data messages and metadata messages from several topics and partitions in a multi-thread/process manner, a situation may arise where a given consumer may attempt to read a datamessage before the corresponding metadata message has been read. As it is not possible to read a datamessage before its corresponding metadata message, the consumer's logic should wait a reasonableamount of time until the corresponding metadata message has been read. If the metadata message is stillnot available after waiting for a reasonable amount of time, the consumer should handle this as anunexpected error and activate the planned error policy. An example of such a policy could be saving themessage in a dedicated “delayed” topic for later processing.
As a rule of thumb, the number of metadata messages will be much lower (in the magnitude of 1:10000 ormore) than the number of data messages. So, assuming a metadata consumer is active, the gap betweenmetadata message and data message should be no more than a few seconds (usually, milliseconds).
Metadata and data messagesThis topic describes the structure and content of the Metadata and Data messages produced by theReplicate MapR Streams endpoint.
Field Type Description
schemaId String The unique identifier of the Avro schema.
lineage Structure Information about the origin of the data (Replicate server, task,table, and so on)
server String The name of the Replicate server.
task String The name of the task.
schema String The name of the database schema.
table String The name of the table.
Metadata message
Setup and User Guide - Qlik Replicate, November 2021 699

9 Adding and managing target endpoints
Field Type Description
tableVersion Integer Replicate maintains a version number of the structure of sourcetable. Upon DDL change on the source, the version is increasedand a new metadata message is produced.
timestamp String The date and time of the metadata message.
tableStructure Structure Describes the structure of the table.
tableColumns Structure Contains the list of columns and their properties.
{columns} Structure For each column, a record with the below properties.
ordinal Integer The position of the column in the record.
type String The column data type.
length Integer The maximum size of the data (in bytes) permitted for thecolumn.
precision Integer For NUMERIC data type, the maximum number of digitsrequired to represent the value.
scale Integer For NUMERIC data type, the maximum number of digits to theright of the decimal point permitted for a number.
primaryKeyPosition Integer The position of the column in the table’s Primary Key. or UniqueIndex. The value is zero if the column is not part of the table’sPrimary Key.
dataSchema String The Avro schema for deserializing the Data messages.
Field Type Description
headers Structure Information about the current record.
operation Enum The operation type.Full Load (Replicate transfers the existing records fromsource table)
REFRESH – insert of a record during Full Load stage.
CDC (Replicate transfers the changes from source table)
INSERT – insertion of new record
UPDATE – update of existing record
DELETE – deletion of a record
Data message
Setup and User Guide - Qlik Replicate, November 2021 700

9 Adding and managing target endpoints
Field Type Description
changeSequence String A monotonically increasing change sequencer that iscommon to all change tables of a task.
Use this field to order the records in chronological order.
Applicable to CDC operations.
timestamp String The original change UTC timestamp.
Applicable to CDC operations.
streamPosition String The source CDC stream position.
Applicable to CDC operations.
transactionId String The ID of the transaction that the change record belongsto.
Use this field to gather all changes of a specific transaction.
Applicable to CDC operations.
Setup and User Guide - Qlik Replicate, November 2021 701

9 Adding and managing target endpoints
Field Type Description
changeMask String Indicates which data columns were changed in the sourcetable.
The change mask is a string of hexadecimal digits,representing a bitmask of data columns in little-endianorder. The bit position in the change mask is based on theordinal of the column in the metadata message of thattable.
This means that if there are 10 data columns, they occupybits 0 to 9 in the bitmask.
If UPDATE mask is 0B hexadecimal, which is 1011 binary –it means that the columns at ordinals 1, 2 and 4 werechanged.
The following describes the bit semantics:
l For INSERT records, all the inserted columns havethe associated bits set.
l For DELETE records, only primary-key (or uniqueindex) columns have the associated bits set. Thisallows an applier to construct a DELETE statementwithout having to find the primary key fields fromanother source.
l For UPDATE records, each column with a changedvalue will have the associated bit set.
LOB columns are not included in thechangeMask bit.
Setup and User Guide - Qlik Replicate, November 2021 702

9 Adding and managing target endpoints
Field Type Description
columnMask String Indicates which data columns are present in the message.Usually, this will include all of the table columns.
When replicating from an Oracle sourcewithout full supplemental logging, somecolumns might not be present in the data, sincethey could not be replicated.
The column mask is a string of hexadecimal digits,representing a bitmask of data columns in little-endianorder. The bit position in the column mask is based on theordinal of the column in the metadata message for thattable.
This allows the applier to distinguish a null value that is theactual value of the column, from a null value thatrepresents a column which could not be replicated from thesource database.
externalSchemaId String The Schema ID. This will only be displayed if the Includeexternal Schema ID header check box is selected.
As the Schema ID changes whenever a DDL is performedon the source table, consumer applications can use thisinformation to determine if the message schema haschanged.
transactionEventCounter Long The sequence number of the current operation in thetransaction.
This can be used to determine the order of operationswithin a transaction.
transactionLastEvent Boolean "True" indicates that it is the final record in the transactionwhereas "False" indicates that not all of the records havebeen processed.
data Structure The data of the table record
{columns} The column names and values in the current record.
beforeData Structure The data of the table record, before the change
{columns} The column names and values, before the change.
Applicable to UPDATE operation.
Setup and User Guide - Qlik Replicate, November 2021 703

9 Adding and managing target endpoints
9.21 Using Microsoft APS PDW as a targetThis section describes how to set up and use Microsoft APS PDW as a target database in a replicationtask.
In this section:
l Prerequisites (page 705)l Limitations and considerations (page 705)l Security requirements (page 705)l Microsoft APS PDW target data types (page 705)l Setting general connection properties (page 706)l Setting advanced connection properties (page 707)
Setup and User Guide - Qlik Replicate, November 2021 704

9 Adding and managing target endpoints
Prerequisites
l Qlik Replicate must be installed on any Windows computer in your network.l A Microsoft APS PDW account with the required access privileges is required.
The following client components must be installed on the Qlik Replicate machine:
l SQL Server Native Client 11.0l Microsoft SQL Server 2012 Parallel Data Warehouse Tools x64
Limitations and considerationsSource columns with CHAR/VARCHAR data types and a non-Latin collation (e.g. "Chinese_PRC_CI_AS")need to be mapped to NVARCHAR. This can be done by defining a global transformation for all tables inthe replication task or by defining a single transformation for a specific table.
For more information on defining transformations, see Starting the Global Transformation Rules wizard(page 955) and Defining transformations for a single table/view (page 931).
Security requirementsYou must provide Microsoft APS PDW account access to the Qlik Replicate user. This user must haveLOAD permission and applicable permissions (INSERT, UPDATE, DELETE) on the destination table.
Microsoft APS PDW target data typesThe Microsoft APS PDW database for Qlik Replicate supports most Microsoft APS PDW data types. Thefollowing table shows the Microsoft APS PDW target data types that are supported when using QlikReplicate and the default mapping from Qlik Replicate data types.
For information on how to view the data type that is mapped from the source, see the section for the sourcedatabase you are using.
For additional information about Qlik Replicate data types, see Replicate data types (page 76).
Qlik Replicate Data Types Microsoft APS PDW Data Types
BOOLEAN BIT
BYTES VARBINARY (Length)
DATE DATE
TIME TIME
DATETIME DATETIME2 (scale)
INT1 TINYINT
INT2 SMALLINT
Target data types
Setup and User Guide - Qlik Replicate, November 2021 705

9 Adding and managing target endpoints
Qlik Replicate Data Types Microsoft APS PDW Data Types
INT4 INTEGER
INT8 BIGINT
NUMERIC DECIMAL (p,s)
REAL4 FLOAT (24)
REAL8 FLOAT (53)
STRING VARCHAR (Length)
UINT1 TINYINT
UINT2 SMALLINT
UINT4 INTEGER
UINT8 BIGINT
WSTRING NVARCHAR (Length)
BLOB VARBINARY (8000)
NCLOB NVARCHAR (4000)
CLOB VARCHAR (8000)
Setting general connection propertiesThis section describes how to configure general connection properties. For an explanation of how toconfigure advanced connection properties, see Setting advanced connection properties.
To add a Microsoft APS PDW target endpoint to Qlik Replicate:
1. In Tasks view, click Manage Endpoint Connections to open the Manage Endpoints Connectionsdialog box. Then click the New Endpoint Connection button.
2. In the Name field, type a name for your database. This can be any name that will help to identify thedatabase being used.
3. In the Description field, type a description that helps to identify the Microsoft APS PDW database.This is optional.
4. Select Target as the database role.
5. Select Microsoft APS PDW as the database Type.
6. In the Server name field, enter the hostname or IP address of the Microsoft APS PDWmachine.
7. Optionally, change the default Port (5000).
8. Type the Microsoft APS PDW authentication information (User Name, Password) for theauthorized user for this Microsoft APS PDW database. If you do not know this information, see yourMicrosoft APS PDW database Administrator (DBA).
Setup and User Guide - Qlik Replicate, November 2021 706
9 Adding and managing target endpoints
l This information is required. If you are using the Advanced tab to create acustom string, make sure to include the User Name and Password properties.See Setting advanced connection properties (page 707) for more information.
l This information is case sensitive.l If you want to set custom properties for this database, see Setting advancedconnection properties (page 707).
Make sure that the Microsoft APS PDW user entered in the Microsoft APS PDWAuthentication section has the correct access privileges. For information on how toprovide the required privileges, see Security requirements (page 705).
9. In the Database name field, enter the name of the Microsoft APS PDW database.
Setting advanced connection propertiesIn the Advanced tab, you can set the following parameters:
l Maximum file size: Select or type the maximum size (in KB) of a CSV file before the file is loadedinto the Microsoft APS PDW database. The default value is 32000 KB.
l Create hash distribution: Enabling this option will turn on the Microsoft APS PDW hash distributionfunction.
l Additional ODBC connection properties: Specify any additional ODBC connection parameters thatyou want to use.
Internal parametersInternal parameters are parameters that are not exposed in the UI. You should only use them if instructedby Qlik Support.
To add internal Qlik Replicate parameters:
1. Click the Internal Parameters link.The Internal Parameters dialog box opens.
2. In the edit box, type the name of the parameter you need to add and then click it.
3. The parameter is added to the table below the search box with its default value.
4. Change the default value as required.
5. To reset the parameter value to its default, click the "Restore default value" icon at the end of therow.
More optionsThese options are not exposed in the UI as they are only relevant to specific versions or environments.Consequently, do not set these options unless explicitly instructed to do so by Qlik Support or productdocumentation.
Setup and User Guide - Qlik Replicate, November 2021 707

9 Adding and managing target endpoints
To set an option, simply copy the option into the Add feature name field and click Add. Then set the valueor enable the option according to the instructions you received.
Settings summaryYou can view a summary of your settings by clicking the Setting Summary link. This is useful if you need tosend a summary of your settings to Qlik Support.
Setup and User Guide - Qlik Replicate, November 2021 708

9 Adding and managing target endpoints
9.22 Using Microsoft Azure ADLS as a targetThis chapter describes how to set up and use Microsoft Azure ADLS as a target in a replication task.
In this section:
Prerequisites 710
Microsoft Azure ADLS target overview 710
Limitations 710
Change data partitioning 711
Data types 711
Setting general connection properties 712
Setting advanced connection properties 716
Generating reference files 719
Setup and User Guide - Qlik Replicate, November 2021 709

9 Adding and managing target endpoints
PrerequisitesBefore you can use Microsoft Azure ADLS as a target endpoint in a Replicate task, the followingprerequisites must be met:
l Permissions:l The "Azure Active Directory application ID" specified in the Microsoft Azure ADLS endpoint'sStorage settings must have write access to the specified ADLS storage target folder.
l In the Access Control (IAM) settings for the ADLS Gen2 file system, assign the “Storage Blob DataContributor” role to Replicate (AD App ID). It may take a few minutes for the role to take effect.
l Supported Platforms: Qlik Replicate on Windows or Linux.
You do not need to install any drivers on the Qlik Replicate Server machine.
Microsoft Azure ADLS target overviewWhen using Microsoft Azure ADLS as a target in a Replicate task, both the Full Load and ChangeProcessing data are written to data files. Depending on the endpoint settings, data files can be either CSVor JSON files. While the explanations in this section relate to CSV files, the same is true for JSON files
Full Load files are named using incremental counters such as LOAD00001.csv, LOAD 00002.csv, and soon, whereas Apply Changes files are named using timestamps e.g. 20141029-1134010000.csv.
When the Create metadata files in the target folder option is enabled, a correspondingmetadata file is created using the same naming format, but with a .dfm extension.
For each source table, a folder is created in the specified Microsoft Azure ADLS target folder. The data filesare created on the Replicate Server machine and are then uploaded to the specified Microsoft Azure ADLStarget folder once the File Attributes (Full Load) and Change Processing upload conditions have been met.
DDL handlingWhen a DDL change is captured, Replicate will close the data file and also create a DFM file if the Createmetadata files in the target folder option is enabled. When the next batch of changes arrives, Replicatewill create a new data file containing the changes. Note that the DFM file created for the new data file willmatch the new table structure.
LimitationsThe following limitations apply to the Microsoft Azure ADLS target endpoint:
l The following DDLs are supported only: Truncate table, Drop table, Create table, Add Column,Rename Column, Drop Column, and Convert Data Type.
l Full LOB Mode is not supportedl UPDATE and DELETE statements are not supported in Apply Changes replication model Batch Optimized Apply mode is not supported
Setup and User Guide - Qlik Replicate, November 2021 710

9 Adding and managing target endpoints
l Target lookup is not supportedl The <target folder> parameter cannot include special characters
l Proxy:l Accessing Azure Data Lake Storage (ADLS) Gen2 storage via a proxy is not supported withHTTPS protocol.
l Accessing Azure Data Lake Storage (ADLS) Gen2 storage via an authenticated proxy is notsupported.
Change data partitioningWhen replicating to a Microsoft Azure ADLS target, for each of the source tables, a directory is createdunder the specified target directory. When Change Data Partitioning (page 1022) is enabled, an additionalsub-directory is created under the corresponding table directory. The data and metadata (when themetadata option is enabled) files are located in the partition subdirectory, as in the following example:
{Target Directory}
{Table_1}
{Partition_1}
Data files
DFM files
{Partition_2}
Data files
DFM files
{Partition_3}
Data files
DFM files
{Table_2}
{Partition_1}
Data files
DFM files
{Partition_2}
Data files
DFM files
{Partition_3}
Data files
DFM files
Information about the partitions is written to the attrep_cdc_partitions Control Table. For information aboutthis table, see Change data partitions (page 1141).
Data typesThe following table shows the default mapping from Qlik Replicate data types to Microsoft Azure ADLStarget data types. Note that the data type mapping is only relevant if the Create metadata files in the targetfolder option is enabled.
For information on source data type mappings, see the section for the source endpoint you are using.
For additional information about Qlik Replicate data types, see Replicate data types (page 76).
Setup and User Guide - Qlik Replicate, November 2021 711

9 Adding and managing target endpoints
Qlik Replicate Data Types Microsoft Azure ADLS Target Data Types
DATE DATE
TIME TIME
DATETIME DATETIME
BYTES BYTES (length)
BLOB BLOB
REAL4 REAL4 (7)
REAL8 REAL8 (14)
INT1 INT1 (3)
INT2 INT2 (5)
INT4 INT4 (10)
INT8 INT8 (19)
UINT1 UINT1 (3)
UINT2 UINT2 (5)
UINT4 UINT4 (10)
UINT8 UINT8 (20)
NUMERIC NUMERIC (p,s)
STRING STRING (Length)
WSTRING STRING (Length)
CLOB CLOB
NCLOB NCLOB
BOOLEAN BOOLEAN (1)
Default data mapping
Setting general connection propertiesThis section describes how to configure general connection properties. For an explanation of how toconfigure advanced connection properties, see Setting advanced connection properties.
To add an Microsoft Azure ADLS target endpoint to Qlik Replicate:
1. In Tasks view, click Manage Endpoint Connections to open the Manage Endpoints Connectionsdialog box. Then click the New Endpoint Connection button. For more information on adding anendpoint to Qlik Replicate, see Defining and managing endpoints (page 110).
2. In the Name field, type a name for your endpoint. This can be any name that will help to identify theendpoint being used.
3. Optionally, in the Description field, type a description that helps to identify the endpoint.
Setup and User Guide - Qlik Replicate, November 2021 712

9 Adding and managing target endpoints
4. Select Target as the endpoint role.
5. Select Microsoft Azure ADLS as the endpoint Type.
6. Configure the remaining settings in the General tab as described in the tables below.
Some of the settings are specific to the selected the storage type (Azure Data LakeStorage (ADLS) Gen2 or Azure Data Lake Storage (ADLS) Gen1).
Option Description
Storage type Choose one of the following as appropriate:
l Azure Data Lake Storage (ADLS) Gen2l Azure Data Lake Storage (ADLS) Gen1
Storageaccount
If you selected the Azure Data Lake Storage (ADLS) Gen2 storage type, specify thename of your storage account.
Data LakeStore name
If you selected the Azure Data Lake Storage (ADLS) Gen1 storage type, specify thefull name of the ADLS storage.
Azure ActiveDirectory ID
The Azure Active Directory ID.
Azure ActiveDirectoryapplication ID
The Azure Active Directory application ID.
Azure ActiveDirectoryapplicationkey
The Azure Active Directory application key.
File system If you selected the Azure Data Lake Storage (ADLS) Gen2 storage type, specify thefile system containing your folders and files.
SSL CAPath:
If you selected the Azure Data Lake Storage (ADLS) Gen1 storage type, specify thepath of a CA certificate (or certificate chain if needed) in PEM format. The CA file mustalso contain the CA of login.microsoftonline.com.
Target folder Specify where to create the data files on ADLS.
If you selected theAzure Data Lake Storage (ADLS) Gen2 storage type, this should bea location in your file system.
ADLS storage
Delimiters can be standard characters or a hexadecimal (hex) value. Note that the "0x" prefix must be usedto denote a hexadecimal delimiter (e.g. 0x01 = SOH). In the Field delimiter, Record delimiter and Nullvalue fields, the delimiter can consist of concatenated hex values (e.g. 0x0102 = SOHSTX), whereas in theQuote character and Escape character fields, it can only be a single hex value.
Setup and User Guide - Qlik Replicate, November 2021 713

9 Adding and managing target endpoints
The hexadecimal number 0x00 is not supported (i.e. only 0x01-0xFF are supported).
Option Description
Format You can choose to create the target files in CSV or JSON format.
In a JSON file, each record is represented by a single line, as in the following example:
{ "book_id": 123, "title": "Alice in Wonderland", "price": 6.99, "is_hardcover": false }
{ "book_id": 456, "title": "Winnie the Pooh", "price": 6.49, "is_hardcover": true }
{ "book_id": 789, "title": "The Cat in the Hat", "price": 7.23, "is_hardcover": true }
Changing the format (i.e. from CSV to JSON or from JSON to CSV) while thetask is in a stopped state and then resuming the task, is not supported.
If you choose JSON format , the following fields will be hidden as they areonly relevant to CSV format: Field delimiter, Record delimiter, Null value,Quote character, Escape character, and Add metadata header.
Fielddelimiter
The delimiter that will be used to separate fields (columns) in the target files. The defaultis a comma.
Example using a comma as a delimiter:
"mike","male"
Null value The string that will be used to indicate a null value in the target files.
Example (where \n is the record delimiter and @ is the null value):
"mike","male",295678\n
"sara","female",@\n
Quoteescapecharacter
The character used to escape a quote character in the actual data.
Example (where" is the quote character and \ is the escape character):
1955,"old, \"rare\", Chevrolet","$1000"
File attributes
Setup and User Guide - Qlik Replicate, November 2021 714

9 Adding and managing target endpoints
Option Description
Recorddelimiter
The delimiter that will be used to separate records (rows) in the target files. The default isa newline (\n).
Example:
"mike","male"\n
"sara","female"\n
Quotecharacter
The character that will be used at the beginning and end of a text column. The default isthe double-quote character ("). When a column that contains column delimiters isenclosed in double-quotes, the column delimiter characters are interpreted as actualdata, and not as column delimiters.
Example (where a @ is the quote character):
@mike@,@male@
Addmetadataheader
When the target storage format is set to Text, you can optionally add a header row to thedata files. The header row can contain the source column names and/or the intermediate(i.e. Replicate) data types.
Example of a target file with a header row when both With column names and With datatypes are selected:
Position:DECIMAL(38,0),Color:VARCHAR(10)
1,"BLUE"
2,"BROWN"
3,"RED"
...
Maximumfile size
The maximum size a file can reach before it is closed (and optionally compressed). Thisvalue applies both to data files and to Reference Files.
For information on generating reference files, see Setting advanced connectionproperties (page 716).
Compressfiles using
Choose GZIP to compress the target files or NONE (the default) to leave themuncompressed.
Option Description
Apply/store changes when:File size reaches
Specify the maximum size of Change Data to accumulate beforeuploading the file to Microsoft Azure ADLS .
Apply/store changes when:Elapsed time reaches
Specify the maximum time to wait before applying the changes.
Change processing
Setup and User Guide - Qlik Replicate, November 2021 715

9 Adding and managing target endpoints
Option Description
Createmetadatafiles in thetargetfolder
When this option is selected, for each data file, a matching metadata file with a .dfmextension will be created under the specified target folder. The metadata files (which arein standard JSON format) provide additional information about the task/data such as thesource endpoint type, the source table name, the number of records in the data file, andso on.
For a full description of the metadata file as well as possible uses, see Metadata filedescription (page 1151).
Metadata files
7. To determine if the connection information you entered is correct, click Test Connection. If theconnection test is successful, click Save.
As part of connection testing process, Replicate uploads a test file to the specified MicrosoftAzure ADLS Target folder and then deletes it once a connection has been established.
If the connection is successful, a message in green is displayed. If the connection fails, an errormessage is displayed at the bottom of the dialog box.
To view the log entry if the connection fails, click View Log. The server log is displayed with theinformation for the connection failure. Note that this button is not available unless the testconnection fails.
Setting advanced connection propertiesIn the Advanced tab, you can enable the creation of reference files and set post-processing actions. Theseoptions are described in detail below.
Post upload processing - Run command after uploadYou can process the final target files using a custom command. The command will be run whenever a datafile is created.
If the Generate a reference file option is selected, a row (specifying the file's location) will beadded to the Reference File only after the command completes successfully.
l Command name - The location of the command e.g. C:\utils\move.exe.l Working directory - The directory where you want the command to run.l Parameters - Specify any parameters that need to be passed to the command during runtime. Youcan use the following built-in parameters:${FILENAME} - The full path to the CSV file containing the full load or CDC data.${METADATA_FILENAME} - The full path to the DFM file containing the metadata.For information on creating metadata files, see Setting general connection properties (page 712).
Setup and User Guide - Qlik Replicate, November 2021 716

9 Adding and managing target endpoints
l If the CSV/DFM file paths contain spaces, you must enclose these parameterswith quotation marks (e.g "${FILENAME}").
l The post-processing command must return a proper exit code. For informationon the available exit code options, see Exit Codes for the Post-ProcessingCommand (page 718).
Generate Reference Files - Select this option to generate a Reference File (on Replicate Server)containing the full path to the Apply Changes data files.
The reference file only points to the location of the Apply Changes files, and not the Full Loadfiles.
Reference File(s) folder - The folder on the Replicate machine in which the Reference File will be created.
Example:
c:\temp\
Proxy ServerUse proxy server - Select this option to access Microsoft Azure ADLS via a proxy server.
Host name - The host name of the proxy server.
Port - The port via which to access the proxy server.
User name - The user name for accessing the proxy server.
Password - The password for accessing the proxy server.
Scheme - Select which protocol to use to access the server (HTTP or HTTPS).
l Applicable to Azure Data Lake Storage (ADLS) Gen1 storage only.l The selected Scheme applies to the storage, but does not apply to the ODBCconnection.
SSL CA Path - The location of the CA file on the Replicate Server machine when HTTPS is the selectedScheme.
Note: Applicable to Azure Data Lake Storage (ADLS) Gen1 storage only.
Setup and User Guide - Qlik Replicate, November 2021 717

9 Adding and managing target endpoints
Exit Codes for the Post-Processing CommandThe post-processing command must return a proper exit code. You can either use the standard exit codevalues described below or set a custom exit code value as described in Setting Post Command exit codeswith an internal parameter below.
Standard Post Command exit codes
l 0 - Successl 1 - Recoverable error. The task will recover from the point of failure according to the settings in theEnvironmental errors (page 1032) tab.
l 2 - Table error. If a table error occurs, Replicate will handle the error according to the settings in theTable Errors (page 1034) tab.
l 3 (or any other value e.g. -100) - Fatal error. The task will fail and not attempt recovery.
Setting Post Command Exit Codes with an Internal Parameter
You can use internal parameters to set exit codes with custom values. This is especially useful if yourapplication already uses the standard exit code values.
See Standard Post Command exit codes above for a description of the exit codes.
l successExitCode
l recoverableErrorExitCode
l tableErrorExitCode
l fatalErrorExitCode
Internal ParametersInternal parameters are parameters that are not exposed in the UI and should only be used if instructed byQlik Support.
To add internal Qlik Replicate parameters:
1. Click the Internal Parameters link.The Internal Parameters dialog box opens.
2. In the edit box, type the name of the parameter you need to add and then click it.
3. The parameter is added to the table below the search box with its default value.
4. Change the default value as required.
5. To reset the parameter value to its default, click the "Restore default value" icon at the end of therow.
More optionsThese options are not exposed in the UI as they are only relevant to specific versions or environments.Consequently, do not set these options unless explicitly instructed to do so by Qlik Support or productdocumentation.
To set an option, simply copy the option into the Add feature name field and click Add. Then set the valueor enable the option according to the instructions you received.
Setup and User Guide - Qlik Replicate, November 2021 718

9 Adding and managing target endpoints
Settings SummaryYou can view a summary of your setting by clicking the View Setting Summary link. This is useful if youneed to send a summary of your setting to Qlik Support.
Generating reference filesIn the Advanced tab of the Microsoft Azure ADLS target endpoint, you can enable the Generate areference file option. The Reference File contains a list of the Change File locations and is therefore onlyrelevant if the task's Apply Changes or Store Changes options are enabled.
The format of the reference file name is as follows:
<microsoft_azure_adls_target_endpoint_display_name><counter>.csv|json
Example:
MyAzureADLS00000001.csv
The counter suffix increases incrementally each time a new Reference File is generated (i.e.which occurs when the file reaches the maximum size defined in the General tab). Once a newReference File has been generated, you can delete the old reference file(s) if required.
Whenever an Apply Changes data file is created, a new row is added to the Reference File in the followingformat:
<Source_Table_Name>,<Data_Lake_Store_name>/<path>/<file_name>
Example:
employees,mydatalakestore/new/files/my.company/20170611-120144192.csv
Note that if the Run command after upload option in the Advanced tab is also enabled, the Reference Filewill be generated after the post-processing completes.
Setup and User Guide - Qlik Replicate, November 2021 719

9 Adding and managing target endpoints
9.23 Using Microsoft Azure Database for MySQL as a targetThis section describes how to set up and use a Microsoft Azure Database for MySQL target endpoint in areplication task.
In this section:
l Prerequisites (page 721)l Limitations (page 721)l Security requirements (page 722)l Supported data types (page 722)l Setting general connection properties (page 725)l Setting advanced connection properties (page 726)
Setup and User Guide - Qlik Replicate, November 2021 720

9 Adding and managing target endpoints
PrerequisitesBefore using Microsoft Azure Database for MySQL as an endpoint in a Qlik Replicate task, make sure thatthe prerequisites outlined below have been met.
Client prerequisitesInstall MySQL ODBC Unicode Driver 64-bit on the Replicate Server machine.
Only these driver versions are supported:
l 5.3.11 to 5.3.13l 8.0.23 to 8.0.25
Linux only:
Make sure that the /etc/odbcinst.ini file contains an entry for MySQL, as in the following example:
[MySQL ODBC 5.3.13 Unicode Driver]Driver = /usr/lib64/libmyodbc5w.soUsageCount = 1
General prerequisitesMake sure that the following prerequisites have been met:
l A Microsoft Azure Database for MySQL account with the required Security requirements (page722).
l A Microsoft Azure Database for MySQL database with the tables that you want to replicate shouldbe accessible in your network.The following Microsoft Azure Database for MySQL editions are supported:
l Microsoft Azure Database for MySQL Community Editionl Microsoft Azure Database for MySQL Standard Editionl Microsoft Azure Database for MySQL Enterprise Editionl Microsoft Azure Database for MySQL Cluster Carrier Grade Edition
l In order to work with Microsoft Azure Database for MySQL 8 as a target endpoint, you need to:l Set the parameter secure_file_priv = NULL in the Microsoft Azure Database for MySQLdatabase.
l If you are using LOB columns, set the parameter sort_buffer_size = 128M in the MicrosoftAzure Database for MySQL database.
Replicating 4-byte UTF8 emojisTo support replication of 4-byte UTF8 emojis, the target schema character set must be set to utf8mb4.
LimitationsThe following limitations apply:
Setup and User Guide - Qlik Replicate, November 2021 721

9 Adding and managing target endpoints
l When replicating to the MariaDB target database, if the DATETIME value is set to zero, you need todefine a transformation that replaces the DATETIME with valid values. For example:replace($datetime_column,'9999-12-31 23:59:59','2000-01-01 22:00:00')
l When only the LOB column in the source table is updated, Replicate will not update thecorresponding target LOB column. The target LOB column will only be updated if at least one othercolumn is also updated in the same transaction.
l Due to the way Microsoft Azure Database for MySQL operates, when loading data to a MicrosoftAzure Database for MySQL target during a Full Load task, duplicate key errors will not be reportedto the logs.
l When updating a column's value to its existing value, a zero rows affected is returned fromMicrosoft Azure Database for MySQL (unlike Oracle and Microsoft SQL Server that perform anupdate of one row). This generates an entry in the attrep_apply_exceptions control table and thefollowing warning:Some changes from the source database had no impact when applied to the target database.
See attrep_apply_exceptions table for details.
l Due to an issue with MySQL versions 5.6 and 5.7 (which was resolved in version 8.0), Replicatecannot insert multibyte characters into TEXT columns when the Full Load uses CSV files.Consequently, if the target endpoint is MySQL 5.6/5.7 and a replicated table contains TEXTcolumns with UTF-8 multibyte characters, the target table might be empty.
Workaround:In the Advanced tab, set the loadUsingCSV internal parameter to FALSE. Note that this mightimpact performance.
Security requirementsYou must provide Microsoft Azure Database for MySQL account access to the Qlik Replicate user. Thisuser must have read/write privileges in the Microsoft Azure Database for MySQL database.
Additionally, for each target schema involved in the replication, the Qlik Replicate user must have thefollowing permissions:
l ALTERl CREATEl CREATE TEMPORARY TABLESl DELETEl DROPl INSERTl SELECTl UPDATE
Supported data typesThe following table shows the Microsoft Azure Database for MySQL database target data types that aresupported when using Qlik Replicate and the default mapping from Qlik Replicate data types.
Setup and User Guide - Qlik Replicate, November 2021 722
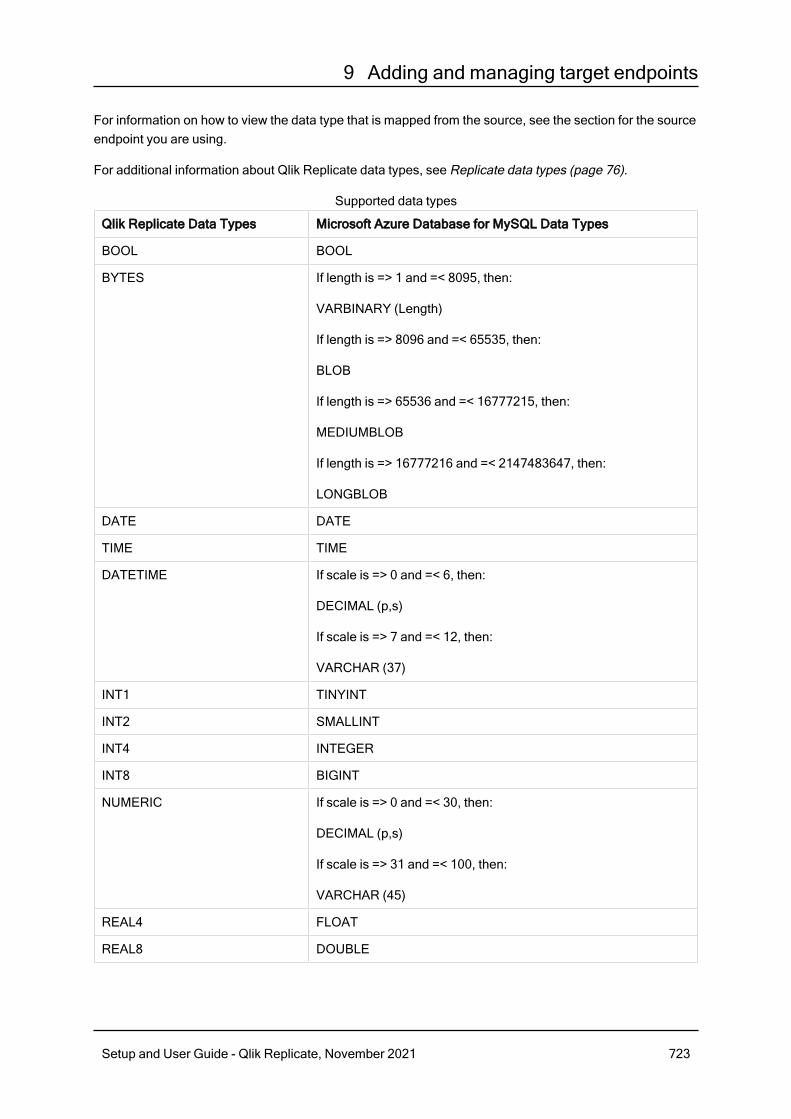
9 Adding and managing target endpoints
For information on how to view the data type that is mapped from the source, see the section for the sourceendpoint you are using.
For additional information about Qlik Replicate data types, see Replicate data types (page 76).
Qlik Replicate Data Types Microsoft Azure Database for MySQL Data Types
BOOL BOOL
BYTES If length is => 1 and =< 8095, then:
VARBINARY (Length)
If length is => 8096 and =< 65535, then:
BLOB
If length is => 65536 and =< 16777215, then:
MEDIUMBLOB
If length is => 16777216 and =< 2147483647, then:
LONGBLOB
DATE DATE
TIME TIME
DATETIME If scale is => 0 and =< 6, then:
DECIMAL (p,s)
If scale is => 7 and =< 12, then:
VARCHAR (37)
INT1 TINYINT
INT2 SMALLINT
INT4 INTEGER
INT8 BIGINT
NUMERIC If scale is => 0 and =< 30, then:
DECIMAL (p,s)
If scale is => 31 and =< 100, then:
VARCHAR (45)
REAL4 FLOAT
REAL8 DOUBLE
Supported data types
Setup and User Guide - Qlik Replicate, November 2021 723

9 Adding and managing target endpoints
Qlik Replicate Data Types Microsoft Azure Database for MySQL Data Types
STRING If length is => 1 and =< 8095, then:
VARCHAR (Length)
If length is => 8096 and =< 65535, then:
TEXT
If length is => 65536 and =< 16777215, then:
MEDIUMTEXT
If length is => 16777216 and =< 2147483647, then:
LONGTEXT
UINT1 UNSIGNED TINYINT
UINT2 UNSIGNED SMALLINT
UINT4 UNSIGNED INTEGER
UINT8 UNSIGNED BIGINT
WSTRING If length is => 1 and =< 8095, then:
VARCHAR (Length)
If length is => 8096 and =< 65535, then:
TEXT
If length is => 65536 and =< 16777215, then:
MEDIUMTEXT
If length is => 16777216 and =< 2147483647, then:
LONGTEXT
BLOB If length is => 1 and =< 65535, then:
BLOB
If length is => 65536 and =< 16777215, then:
MEDIUMBLOB
If length is => 16777215 and =< 2147483647, then:
LONGBLOB
Setup and User Guide - Qlik Replicate, November 2021 724

9 Adding and managing target endpoints
Qlik Replicate Data Types Microsoft Azure Database for MySQL Data Types
NCLOB If length is => 1 and =< 65535, then:
TEXT CHARACTER SET UTF16
If length is => 65536 and =< 2147483647, then:
LONGTEXT CHARACTER SET UTF16
CLOB If length is => 1 and =< 65535, then:
TEXT
If length is => 65536 and =< 2147483647, then:
LONGTEXT
Setting general connection propertiesThis section describes how to configure general connection properties. For an explanation of how toconfigure advanced connection properties, see Setting advanced connection properties.
To add a Microsoft Azure Database for MySQL target endpoint to Qlik Replicate:
1. In the Qlik Replicate Console, click Manage Endpoint Connections to open the Manage EndpointsConnections dialog box. Then click the New Endpoint Connection button. For more information onadding an endpoint to Qlik Replicate, see Defining and managing endpoints (page 110).
2. In the Name field, type a name for your database. This can be any name that will help to identify thedatabase being used.
3. In the Description field, type a description that helps to identify the Microsoft Azure Database forMySQL database. This is optional.
4. Select TARGET as the database role.
5. From the Type drop-down list, select Microsoft Azure Database for MySQL.
6. In the Server field, enter the host name or IP address of the computer on which the Microsoft AzureDatabase for MySQL database is installed.
Notesl This information is case sensitive.l To determine if you are connected to the database you want to use or if theconnection information you entered is correct, click Test Connection.If the connection is successful a message in green is displayed. If the connectionfails, an error message is displayed at the bottom of the dialog box.To view the log entry if the connection fails, click View Log. The server log isdisplayed with the information for the connection failure. Note that this button isnot available unless the test connection fails.
7. Optionally, change the default port (3306).
Setup and User Guide - Qlik Replicate, November 2021 725

9 Adding and managing target endpoints
8. Type the Microsoft Azure Database for MySQL authentication information (User Name, Password)for the authorized user for this database. If you do not know this information, see your databaseAdministrator (DBA).
9. Select one of the following Load source schemas into options:l The following database - When this option is selected, all source schemas will be loadedinto the selected database.
l Multiple endpoints - When this option is selected, each of the source schemas will be loadedinto its corresponding database.
Setting advanced connection propertiesIn the Advanced tab, you can set the following properties:
l Max file size (KB): Select or type the maximum size (in KB) of a CSV file before it is loaded into thetarget database. The default value is 32000 KB.
l Use parallel loading: Select this option to improve performance when loading data into the targetdatabase.
l Use the following number of threads: Specify how many threads to use to load the data intothe Microsoft Azure Database for MySQL target database. Note that setting a large numberof threads may have an adverse effect on database performance since a separateconnection is required for each thread.
Internal parametersInternal parameters are parameters that are not exposed in the UI. You should only use them if instructedby Qlik Support.
To add internal Qlik Replicate parameters:
1. Click the Internal Parameters link.The Internal Parameters dialog box opens.
2. In the edit box, type the name of the parameter you need to add and then click it.
3. The parameter is added to the table below the search box with its default value.
4. Change the default value as required.
5. To reset the parameter value to its default, click the "Restore default value" icon at the end of therow.
More optionsThese options are not exposed in the UI as they are only relevant to specific versions or environments.Consequently, do not set these options unless explicitly instructed to do so by Qlik Support or productdocumentation.
To set an option, simply copy the option into the Add feature name field and click Add. Then set the valueor enable the option according to the instructions you received.
Setup and User Guide - Qlik Replicate, November 2021 726

9 Adding and managing target endpoints
Settings summaryYou can view a summary of your settings by clicking the Setting Summary link. This is useful if you need tosend a summary of your settings to Qlik Support.
Setup and User Guide - Qlik Replicate, November 2021 727

9 Adding and managing target endpoints
9.24 Using Microsoft Azure Database for PostgreSQL as atarget
This section describes how to set up and use a Microsoft Azure Database for PostgreSQL target endpointin a replication task.
In this section:
l Prerequisites (page 729)l Limitations (page 834)l Security requirements (page 729)l Microsoft Azure Database for PostgreSQL target data types (page 730)l Setting general connection properties (page 731)l Setting advanced connection properties (page 733)
Setup and User Guide - Qlik Replicate, November 2021 728

9 Adding and managing target endpoints
PrerequisitesThe following section describes the client prerequisites when replicating to a Microsoft Azure Database forPostgreSQL target.
l Qlik Replicate Server for Windows:l The PostgreSQL ODBC Driver: PostgreSQL ODBC Driver psqlodbc_12_02_0000-x64 orabove must be installed on the Qlik Replicate machine.
l Postgresql-binaries:
1. Download postgresql-12.6-3-windows-x64-binaries.zip.
2. Copy the bin folder to a Replicate machine.
3. Add the bin folder path to the system PATH.
If PostgreSQL binaries and the Greenplum client are deployed on the sameReplicate Server, tasks configured to use a PostgreSQL target will fail.
l Microsoft Visual Studio 2013 Redistributable (x86) - not (x64) - must be installed on the QlikReplicate machine.
l Qlik Replicate Server for Linux: On the Qlik Replicate machine:
1. Install postgresql12. For example, postgresql12-12.1-2PGDG.rhel7.x86_64.rpm is thepackage required for Red Hat 7.
2. Install the ODBC driver postgresql12.For example, postgresql12-odbc-12.01.0000-1PGDG.rhel7.x86_64.rpm is the client requiredfor Red Hat 7.
3. Copy the driver location to the site_arep_login.sh file:echo "export LD_LIBRARY_PATH=/usr/lib:/usr/lib64:/usr/pgsql-12/lib:$LD_LIBRARY_
PATH" >> site_arep_login.sh
This will add the driver to "LD_LIBRARY_PATH" and update the driver location in the site_arep_login.sh file.
4. Makes sure that the /etc/odbcinst.ini file contains an entry for PostgreSQL, as in thefollowing example:[PostgreSQL]
Description = PostgreSQL ODBC driver
Driver = /usr/pgsql-12/lib/psqlodbc.so
Setup = /usr/pgsql-12/lib/psqlodbcw.so
Debug = 0
CommLog = 1
UsageCount = 2
LimitationsUPDATE and DELETE operations on tables without a Primary Key/Unique Index that contain duplicaterecords is not supported. Any changes to these tables will affect all the records in the target.
Security requirementsThe user specified in the General tab when Setting general connection properties (page 731) must be aregistered user in the Microsoft Azure Database for PostgreSQL database.
Setup and User Guide - Qlik Replicate, November 2021 729

9 Adding and managing target endpoints
Microsoft Azure Database for PostgreSQL target data typesThe Microsoft Azure Database for PostgreSQL endpoint for Qlik Replicate supports most Microsoft AzureDatabase for PostgreSQL database data types. The following table shows the Microsoft Azure Databasefor PostgreSQL database target data types that are supported when using Qlik Replicate and the defaultmapping from Qlik Replicate data types. Unsupported data types are listed below the table.
For information on how to view the data type that is mapped from the source, see the section for the sourcedatabase you are using. For additional information about Qlik Replicate data types, see Replicate datatypes (page 76).
Qlik Replicate Data Types Microsoft Azure Database for PostgreSQL Data Types
BOOL BOOL
BYTES BYTEA
DATE DATE
TIME TIME
DATETIME If scale is => 0 and =< 6, then:
TIMESTAMP
If scale is => 7 and =< 12, then:
VARCHAR (37)
INT1 SMALLINT
INT2 SMALLINT
INT4 INTEGER
INT8 BIGINT
NUMERIC DECIMAL (P, S)
REAL4 FLOAT4
REAL8 FLOAT8
STRING If length is 1 - 21845, then:
VARCHAR (Length in Bytes = The STRING value multiplied by three)
If length is 21846 - 2147483647, then:
VARCHAR (65535)
UINT1 SMALLINT
UINT2 INTEGER
UINT4 BIGINT
Supported data types
Setup and User Guide - Qlik Replicate, November 2021 730

9 Adding and managing target endpoints
Qlik Replicate Data Types Microsoft Azure Database for PostgreSQL Data Types
UINT8 BIGINT
WSTRING If length is 1 - 21845, then:
VARCHAR (Length in Bytes = The WSTRING value multiplied by three)
If length is 21846 - 2147483647, then:
VARCHAR (65535)
BLOB BYTEA
NCLOB TEXT
CLOB TEXT
Data types when replicating from a PostgreSQL sourceWhen replicating from a PostgreSQL source, the target table will be created with the same data types forall columns, apart from columns with user-defined data types. In such cases, the data type will be createdas "character varying" in the target.
Setting general connection propertiesThis section describes how to configure general connection properties. For an explanation of how toconfigure advanced connection properties, see Setting advanced connection properties.
To add a Microsoft Azure Database for PostgreSQL target endpoint to Qlik Replicate:
1. In Tasks view, click Manage Endpoint Connections to open the Manage Endpoints Connectionsdialog box. Then click the New Endpoint Connection button. For more information on adding anendpoint to Qlik Replicate, see Defining and managing endpoints (page 110).
2. In the Name field, type a name for your database. This can be any name that will help to identify thedatabase being used.
3. In the Description field, type a description that helps to identify the Microsoft Azure Database forPostgreSQL database. This is optional.
4. Select Target as the database role.
5. From the Type drop-down list, select Microsoft Azure Database for PostgreSQL.
6. Type the Server name. This is the name or IP address or host name of the computer with theMicrosoft Azure Database for PostgreSQL database that you want to access.
7. Optionally, change the default port (5432).
8. Enter the Microsoft Azure Database for PostgreSQL database authentication information (Username, Password) of an authorized Microsoft Azure Database for PostgreSQL user. If you do notknow this information, see your database system manager.
Setup and User Guide - Qlik Replicate, November 2021 731

9 Adding and managing target endpoints
Consider the following:l This information is case sensitive.l To determine if you are connected to the database you want to use or if theconnection information you entered is correct, click Test Connection.If the connection is successful a message in green is displayed. If the connectionfails, an error message is displayed at the bottom of the dialog box.To view the log entry if the connection fails, click View Log. The server log isdisplayed with the information for the connection failure. Note that this button isnot available unless the test connection fails.
Make sure that the specified Microsoft Azure Database for PostgreSQL database userhas the correct access privileges.
9. Type the Database name or select one from the list of available endpoints. This is the name of theMicrosoft Azure Database for PostgreSQL database to which you are replicating data.
SSL authentication optionsIn the Security section, you can configure Replicate to connect to the Microsoft Azure Database forPostgreSQL database using SSL.
The specified certificates are relevant only for bulk insert operations.
l SSL Mode: Select one of the following:l Prefer - Establishes an encrypted connection if the server supports encrypted connections,falling back to an unencrypted connection if an encrypted connection cannot be established.
l Disable - Connect with a surname and password only.l Allow - Establish an encrypted connection if requested by the server.l Require - Establishes an encrypted connection if the server supports encrypted connections.The connection attempt fails if an encrypted connection cannot be established.
l Verify CA - Similar to Required, but also verifies the server Certificate Authority (CA)certificate against the configured CA certificates. The connection attempt fails if no validmatching CA certificates are found.
l Verify Full - Similar to Verify CA, but also performs host name identity verification bychecking the host name the client (i.e. Replicate) uses for connecting to the server againstthe identity in the certificate that the server sends to the client. The client checks whether thehost name that it uses for connecting matches the Common Name value in the servercertificate. The connection fails if there is a mismatch.
l Client certificate path:- The path to the client certificate requested by the server.l Secret key path - The path to the client private key file in PEM format.l CA path - The path to the Certificate Authority (CA) that issued the client certificate file in PEMformat.
Setup and User Guide - Qlik Replicate, November 2021 732
9 Adding and managing target endpoints
l CRL path - The path to the CRL certificate. This file contains certificates revoked by certificateauthorities. If the server certificate appears in this list, the connection will fail.
l SSL compression -Select this option to compress the data before it is encrypted.
Setting advanced connection propertiesIn the Advanced tab, you can set the following properties:
You can set the following properties:
l Max file size (KB): Select or type the maximum size (in KB) of a CSV file before the file is loadedinto the Microsoft Azure Database for PostgreSQL target database. The default value is 32000 KB.
Internal parametersInternal parameters are parameters that are not exposed in the UI. You should only use them if instructedby Qlik Support.
To add internal Qlik Replicate parameters:
1. Click the Internal Parameters link.The Internal Parameters dialog box opens.
2. In the edit box, type the name of the parameter you need to add and then click it.
3. The parameter is added to the table below the search box with its default value.
4. Change the default value as required.
5. To reset the parameter value to its default, click the "Restore default value" icon at the end of therow.
More optionsThese options are not exposed in the UI as they are only relevant to specific versions or environments.Consequently, do not set these options unless explicitly instructed to do so by Qlik Support or productdocumentation.
To set an option, simply copy the option into the Add feature name field and click Add. Then set the valueor enable the option according to the instructions you received.
Settings summaryYou can view a summary of your settings by clicking the Setting Summary link. This is useful if you need tosend a summary of your settings to Qlik Support.
Setup and User Guide - Qlik Replicate, November 2021 733

9 Adding and managing target endpoints
9.25 Using Microsoft Azure Databricks as a targetThis section describes how to set up and use Microsoft Azure Databricks as the target endpoint in areplication task.
In this section:
l Prerequisites (page 735)l Limitations and considerations (page 735)l Change data partitioning on Microsoft Azure Databricks (page 736)l Supported data types (page 737)l Setting general connection properties (page 738)l Setting advanced connection properties (page 740)
Setup and User Guide - Qlik Replicate, November 2021 734

9 Adding and managing target endpoints
PrerequisitesBefore you begin to work with Microsoft Azure Databricks as a target in Qlik Replicate, make sure that thefollowing prerequisites have been met:
l The Azure Data Lake Storage (ADLS) Gen2 file system or Blob storage location (whichever youare using) must be accessible from the Qlik Replicate machine.
l ODBC Driver when Replicate Server is running on Windows or Linux: Simba Spark ODBC Driver2.6.18 or later must be installed on the Qlik Replicate Server machine.
l Permissions:l The "Storage account" (when using Blob storage) or "Azure Active Directory application ID"(when using ADLS) specified in the Microsoft Azure Databricks endpoint's Storage settingsmust have write access to the specified Blob/ADLS storage target folder.
l Databricks table permissions: Replicate requires permissions to perform the followingoperations on Databricks tables: CREATE, DROP, DESCRIBE, and ALTER table. ALTERtable may also include RENAME table and ADD column.
l In the Access Control (IAM) settings for the ADLS Gen2 file system, assign the “Storage BlobData Contributor” role to Replicate (AD App ID). It may take a few minutes for the role to takeeffect.
l In order for Replicate to connect to a Databricks cluster via JDBC/ODBC, you must have"Can Attach To" permission
l The Blob storage container or Data Lake Store (for ADLS) must be mounted on the Databricks FileSystem (DBFS).
l For information on how to set this up with Blob storage, see Azure storagel For information on how to set this up with ADLS Gen2 storage, see Azure DataLake Gen2 storage
l You must provide Replicate with a valid security token for access to Databricks.l When configuring a new cluster with Azure Data Lake Storage (ADLS) Gen2, the line"spark.hadoop.hive.server2.enable.doAs false" must be added to the "SparkConfig" section.
Supported blob storage typesThe following blob storage types are supported:
l Standard storage with block blobsl Premium storage with block blobs only
Limitations and considerationsThe following limitations apply when using Microsoft Azure Databricks:
Setup and User Guide - Qlik Replicate, November 2021 735

9 Adding and managing target endpoints
l Microsoft Azure Databricks with Blob Storage is currently available ONLY onWindows.l UPDATE/DELETE DMLs are not supported during change processing. If an UPDATE/DELETEDML was captured on the source, it will be ignored on the target and a warning will be written to thelog. If the Store Changes option is enabled in the task settings, these records will be written to theChange Table.
l Limited LOB support only.l The RENAME COLUMN DDL is not supported. Renaming a column during CDC will generate awarning and cause any future inserts to that column to return NULL values.
The same happens when the Apply Changes DDL Handling Policy is set to "Ignore".
l Dropping columns and changing column data types or the data type length is not supported and willsuspend the table in all cases except for data types that are mapped to STRING. Changes to thedata type length of a data type mapped to STRING (e.g. VARCHAR(50) to VARCHAR(100)) willsimply be ignored.
l The Replicate Azure Databricks target endpoint does not support the creation of skews, buckets orpartitions in the target tables.
l The following Control Tables are not supported as they require UPDATE/DELETE operations(which are not supported by the Microsoft Azure Databricks target endpoint):
l Replication Status (requires UPDATE)Name on target: attrep_status
l Suspended Tables (requires DELETE)Name on target: attrep_suspended_tables
l Table and column names can only contain ASCII characters. Column names cannot contain the '?'symbol. If needed, the '?' symbol can be replaced with a valid ASCII character using atransformation.
l Connecting to via an HTTP proxy server with authentication is not supported.l Blob Storage is available for Replicate on Windows onlyl If you change the Databricks storage access method endpoint setting during a task or create anew task with a Databricks target whose Databricks storage access method differs from that ofexisting tasks, you must also perform the procedures described in Setting general connectionproperties (page 738)
l As support for the VARCHAR data type was introduced in Databricks 8, creating a task thatreplicates to Databricks 8.x and then downgrading the cluster to an earlier Databricks version (in thesame task) requires the task to be reloaded.
Change data partitioning on Microsoft Azure DatabricksWhen Change Data Partitioning (page 1022) is enabled, the Replicate Change Tables in Databricks arepartitioned by the partition_name column. Data files are uploaded to the Blob/Azure Data Lake Storage(ADLS) Gen2 storage, according to the maximum size and time definition, and then stored in a directoryunder the Change Table directory. Whenever the specified partition timeframe ends, a partition is createdthat points to the Blob/ADLS folder.
Information about the partitions is written to the attrep_cdc_partitions Control Table.
Setup and User Guide - Qlik Replicate, November 2021 736

9 Adding and managing target endpoints
Supported data typesThe following table shows the Microsoft Azure Databricks endpoint target data types that are supportedwhen using Qlik Replicate and the default mapping from Qlik Replicate data types.
For information on how to view the data type that is mapped from the source, see the section for the sourceendpoint you are using.
For additional information about Qlik Replicate data types, see Replicate data types (page 76).
Qlik ReplicateData Types Microsoft Azure Databricks Data Types
BOOL BOOLEAN
BYTES STRING
TIME STRING
DATETIME TIMESTAMP
DATE DATE
INT1 TINYINT
INT2 SMALLINT
INT4 INT
INT8 BIGINT
NUMERIC DECIMAL (p,s)
REAL4 FLOAT
REAL8 DOUBLE
STRING Databricks 7.x and earlier:
STRING
Databricks 8.2 and later:
VARCHAR (Length)
UINT1 SMALLINT
UINT2 INT
UINT4 BIGINT
UINT8 DECIMAL (20,0)
WSTRING STRING
BLOB STRING
NCLOB STRING
CLOB STRING
Qlik Replicate and Microsoft Azure Databricks data types
Setup and User Guide - Qlik Replicate, November 2021 737

9 Adding and managing target endpoints
Setting general connection propertiesThis section describes how to configure general connection properties. For an explanation of how toconfigure advanced connection properties, see Setting advanced connection properties.
To add a Microsoft Azure Databricks target endpoint to Qlik Replicate:
1. In the Qlik Replicate console, click Manage Endpoint Connections to open the Manage EndpointConnections dialog box.For more information on adding an endpoint to Qlik Replicate, see Defining and managingendpoints (page 110).
2. In the Name field, type a name for your endpoint. This can be any name that will help to identify theendpoint being used.
3. In the Description field, type a description that helps to identify the endpoint. This is optional.
4. Select Microsoft Azure Databricks as the endpoint Type.
5. Expand the Databricks ODBC Access section and set the following properties:l Host - The host name of the Databricks workspace where the Blob or ADLS storagecontainers are mounted.
l Port - The port via which to access the workspace (you can change the default port 443, ifrequired).
l Token - Your personal token for accessing the workspace.l HTTP Path - The path to the cluster being used.l Database - The name of the Databricks target database.
6. Expand the Azure Storage Data Access section and set the following properties:l Databricks storage access method - Choose which method your Databricks cluster uses toaccess the Azure storage: Access Directly (Default) or Access through DBFS Mount.Azure storage can be accessed by mounting the storage using DBFS or directly. Replicateneeds to know which method Databricks uses to access the storage so that it can set the"location" property when it creates the tables in Databricks. The "location" property enablesDatabricks to access the storage data using its configured storage access method.
l Mount Path - When Access through DBFS Mount is selected, you also need tospecify the mount path.
The mount path cannot contain special characters or spaces.
For more information on configuring Databricks to access Azure storage, seehttps://docs.databricks.com/data/data-sources/azure/azure-storage.html
Setup and User Guide - Qlik Replicate, November 2021 738

9 Adding and managing target endpoints
All tables being replicated in a single task must be configured to access thestorage using the Databricks storage access method defined in the endpointsettings (see earlier). The same is true for Replicate Control Tables, which arecommon to all tasks. Any tables that are configured to use a different storageaccess method will not be replicated or, in the case of Control Tables, will not bewritten to the target database. To prevent this from happening, you must performthe procedures below if you need to do any of the following:
l Change the Databricks storage access method during a task and retainthe existing tables
l Define a new task with a Databricks target whose Databricks storageaccess method differs from existing tasks (with a Databricks target)
To change the Databricks storage access methods during a task:
1. Stop the task.
2. Change the Databricks storage access method.
3. For all tables (including Control Tables), execute the ALTER TABLEstatement:ALTER TABLE table_identifier [ partition_spec ] SET LOCATION
'new_location'
For details, see https://docs.databricks.com/spark/latest/spark-sql/language-manual/sql-ref-syntax-ddl-alter-table.html#set-location.
4. Start the task.
To create a new task with a Databricks endpoint whose "Databricks storageaccess method" differs from existing tasks:
l When you define the task, specify a dedicated Control Table schema inthe task settings' Control tables (page 1015) tab.
l Storage type - select one of the following:l Blob Storage
The Blob Storage option is not supported when Qlik Replicate is runningon Linux.
l Azure Data Lake Storage (ADLS) Gen2
7. If you selected Blob Storage:l In the Storage account field, specify the name of an account with write permissions to thecontainer.
l In the Access key field, specify the account access key.l In the Container name field, specify the container name.l In the Target folder field, specify where to create the data files on Blob storage.
If you selected Azure Data Lake Storage (ADLS) Gen2:
Setup and User Guide - Qlik Replicate, November 2021 739

9 Adding and managing target endpoints
l In the Storage account field, specify the name of your storage account.l In the Azure Active Directory ID field, specify the Azure Active Directory ID.l In the Azure Active Directory application ID field, specify the Azure Active Directoryapplication ID.
l In the Azure Active Directory application key field, specify the Azure Active Directoryapplication key.
l In the Container name field, specify the container in which your folders and files and foldersreside.
l In the Target folder field, specify where to create the data files on ADLS.
l The Target folder name can only contain ASCII characters.l Connecting to a proxy server with a username and password is not supportedwith Azure Data Lake Storage (ADLS) Gen2 storage.
Setting advanced connection propertiesThe table below describes the settings in the Advanced tab.
Setting Description
File Format Expand this section to specify or view the file format settings.
Target storageformat
Select either Text or Sequence.
When using Text as the target storage format, new lines as part of thedata values are not supported (due to an Apache Hadoop limitation).Best practice is to use Sequence as the target storage format.
Field delimiter The delimiter that will be used to separate fields in the target file. The default is\001. Note that field delimiters should be ASCII characters unless they are non-printable control characters, in which case they should be in Octal format (e.g.\247).
Null value The value that will be used to indicate a null value in the target file.
Example (where @ is the null value):
mike,male,295678
sara,female,@
Advanced tab settings
Setup and User Guide - Qlik Replicate, November 2021 740

9 Adding and managing target endpoints
Setting Description
Escapecharacter
The escape character is used to escape the field delimiter character. When a fielddelimiter is escaped, it is interpreted as actual data, and not as a field delimiter.
Example (where \ is the escape character and a comma is the field delimiter):
sunroof\,power-steering
File Attributes Expand this section to specify or view the file attributes.
Maximum filesize
Specify the maximum file size of each target file. When the data reaches themaximum size, the file will be closed and written to the specified target folder.
Compress filesusing
Select the compression method to use on ADLS/Blob storage.
ChangeProcessing
Expand this section to specify or view change processing settings.
Apply/Storechangeswhen file sizereaches
Specify the minimum size of the data required to create a file in idle state.
Apply/Storechangeswhen elapsedtime reaches
Specify the maximum time to wait before applying the changes in idle state.
Proxy Server Expand this section to specify or view proxy settings.
Connecting to a proxy server with a username and password is notsupported with Azure Data Lake Storage (ADLS) Gen2 storage.
Use proxy server Select this option to access Microsoft Azure Databricks via a proxy server.
Host name The host name of the proxy server.
Port The port via which to access the proxy server.
User name The user name for accessing the proxy server.
Password The password for accessing the proxy server.
To facilitate rapid delivery of DDL messages, files are uploaded immediately, regardless of thespecified File size reaches or Elapsed time reaches values.
Internal parametersInternal parameters are parameters that are not exposed in the UI. You should only use them if instructedby Qlik Support.
Setup and User Guide - Qlik Replicate, November 2021 741

9 Adding and managing target endpoints
To add internal Qlik Replicate parameters:
1. Click the Internal Parameters link.The Internal Parameters dialog box opens.
2. In the edit box, type the name of the parameter you need to add and then click it.
3. The parameter is added to the table below the search box with its default value.
4. Change the default value as required.
5. To reset the parameter value to its default, click the "Restore default value" icon at the end of therow.
More optionsThese options are not exposed in the UI as they are only relevant to specific versions or environments.Consequently, do not set these options unless explicitly instructed to do so by Qlik Support or productdocumentation.
To set an option, simply copy the option into the Add feature name field and click Add. Then set the valueor enable the option according to the instructions you received.
Settings summaryYou can view a summary of your settings by clicking the Setting Summary link. This is useful if you need tosend a summary of your settings to Qlik Support.
Setup and User Guide - Qlik Replicate, November 2021 742

9 Adding and managing target endpoints
9.26 Using Microsoft Azure Databricks Delta as a targetThis section describes how to set up and use Microsoft Azure Databricks Delta as the target endpoint in areplication task.
In this section:
l Prerequisites (page 744)l Limitations and considerations (page 745)l Supported data types (page 746)l Setting general connection properties (page 746)l Setting advanced connection properties (page 747)
Setup and User Guide - Qlik Replicate, November 2021 743

9 Adding and managing target endpoints
PrerequisitesBefore you begin to work with Microsoft Azure Databricks Delta as a target in Qlik Replicate, make sure thefollowing prerequisites have been met.
ClientsODBC Driver when Replicate Server is running on Windows or Linux: Simba Spark ODBC Driver 2.6.18or later must be installed on the Qlik Replicate Server machine.
Performance and cloud services usage optimizationIn order to optimize both cloud service usage and overall performance, the change processing mode mustbe set to Batch optimized apply in the Change Processing Tuning (page 1027) tab. It is also stronglyrecommend to enable the Apply batched changes to multiple tables concurrently option in the same tab.
When the Apply batched changes to multiple tables concurrently option is selected, theoption to set a Global Error Handling policy will not be available. Also, some of the task-specificerror handling defaults will be different.
Permissions and accessl The Azure Active Directory application ID specified in the endpoint's Storage settings must havewrite access to the specified ADLS storage staging folder.
l Databricks table permissions: Replicate requires permissions to perform the following operationson Databricks tables: CREATE, DROP, TRUNCATE, DESCRIBE, and ALTER table.
l In the Access Control (IAM) settings for the ADLS Gen2 file system, assign the “Storage Blob DataContributor” role to Replicate (AD App ID). It may take a few minutes for the role to take effect.
l In order for Replicate to connect to a Databricks cluster via ODBC, users must be granted "CanAttach To" permission in their Databricks account.
l A valid security token is required to access Databricks. The token should be specified whenconfiguring the Databricks ODBC Access fields in the endpoint settings.
l When configuring a new cluster with Azure Data Lake Storage (ADLS) Gen2, the following linemust be added to the "Spark Config" section.spark.hadoop.hive.server2.enable.doAs false
l To be able to access the storage directories from the Databricks cluster, users need to add aconfiguration (in Spark Config) for that Storage Account and its key.
Example:
fs.azure.account.key.<storage-account-name>.dfs.core.windows.net
<storage-account-access-key>
For details, refer to the Databricks online help at:https://docs.databricks.com/clusters/configure.html#spark-configuration
l Best practice is not to use the root location for the Databricks' databases (/Usr/Hive/Warehouse/) asdoing so may impact performance.
Setup and User Guide - Qlik Replicate, November 2021 744
9 Adding and managing target endpoints
Limitations and considerationsThe following limitations apply when using Microsoft Azure Databricks Delta:
l Supports LOB replication in Limited LOB mode only. LOB size will be limited to the maximumSTRING size supported by Databricks.
l Table names can only contain alphanumeric and underscore characters.l With the exception of the STRING data type, changes to a column's data type or data type lengthwill not be captured and will result in the table being suspended. Changes to the length of STRINGdata types (e.g. VARCHAR(50) to VARCHAR(100)) will simply be ignored as the concept of stringlength does not exist on Databricks.
l Connecting to via an HTTP proxy server with authentication is not supported.l DDL changes limitations and considerations when the Apply Changes DDL Handling Policy is set to"Ignore" for all types DDL (DROP, TRUNCATE, and ALTER):
l Dropping a column is not supported. Capturing changes to a table with a dropped column willset NULL values in the corresponding target column.
l Renaming a column is not supported. Capturing changes to a table with a renamed columnwill set NULL values in the corresponding target column.
l Modifying a column is not supported. Changes to a data type or data type length will not becaptured.
l Truncating a table is supported. Capturing changes to a truncated table will cause dataconflicts as the target table will not be truncated.
l Renaming a table is not supported. Capturing changes to a renamed table will result in thetable being suspended (when the default the table error handling policy is set).
l Target tables with buckets or partitions will not be created axiomatically on the target. PreexistingDatabricks Delta target tables with buckets or partitions (which are identical to those of thecorresponding source tables) are supported though.
l The Transactional apply Change Processing mode is not supported.l The Apply Changes replication mode supports tables with a Primary Key only. Tables withoutPrimary Keys will be suspended at the Change Processing stage.
Possible workarounds for tables without Primary Keys:l Configure a transformation to add a Primary Key column during replicationl Create a Store Changes replication task for tables without Primary Keys
l The Store task recovery data in target database Change Processing option is not supported.l The Replication Status Control Table (Name on target: attrep_status) is not supported.l If a connectivity-token to Databricks expires during a task, you must stop and resume the task oncethe new token is set.
l Changing the Target table schema is the equivalent of changing the specified database name in theendpoint settings.
Setup and User Guide - Qlik Replicate, November 2021 745

9 Adding and managing target endpoints
Supported data typesThe following table shows the Microsoft Azure Databricks Delta endpoint target data types that aresupported when using Qlik Replicate and the default mapping from Qlik Replicate data types.
For information on how to view the data type that is mapped from the source, see the section for the sourceendpoint you are using.
For additional information about Qlik Replicate data types, see Replicate data types (page 76).
Qlik Replicate Data Types Microsoft Azure Databricks Delta Data Types
BOOL BOOLEAN
BYTES STRING
TIME STRING
DATETIME TIMESTAMP
DATE DATE
INT1 TINYINT
INT2 SMALLINT
INT4 INT
INT8 BIGINT
NUMERIC DECIMAL (p,s)
REAL4 FLOAT
REAL8 DOUBLE
STRING STRING
UINT1 SMALLINT
UINT2 INT
UINT4 BIGINT
UINT8 DECIMAL (20,0)
WSTRING STRING
BLOB STRING
NCLOB STRING
CLOB STRING
Qlik Replicate and Microsoft Azure Databricks Delta data types
Setting general connection propertiesThis section describes how to configure general connection properties. For an explanation of how toconfigure advanced connection properties, see Setting advanced connection properties.
To add a Microsoft Azure Databricks Delta target endpoint to Qlik Replicate:
Setup and User Guide - Qlik Replicate, November 2021 746

9 Adding and managing target endpoints
1. Click Manage Endpoint Connections to open the Manage Endpoint Connections dialog box.For more information on adding an endpoint to Qlik Replicate, see Defining and managingendpoints (page 110).
2. In the Name field, specify a name for your endpoint.
3. Optionally, in the Description field, provide additional information about the endpoint.
4. Select Microsoft Azure Databricks Delta as the endpoint Type.
5. In the Databricks Delta ODBC Access section, provide the following information:
a. In the Host field, specify the host name of the Databricks Delta workspace where the ADLSstorage containers are mounted.
b. In the Port field, specify the port via which to access the workspace (you can change thedefault port 443, if required).
c. In the Token field, enter your personal token for accessing the workspace.
d. In the HTTP Path field, specify the path to the cluster being used.
e. In the Database field, specify the name of the Databricks Delta target database.
6. In the Staging section, provide the following information:
a. In the Storage account field, specify the name of your storage account.
b. In the Azure Active Directory ID field, specify the Azure Active Directory ID.
c. In the Azure Active Directory application ID field, specify the Azure Active Directoryapplication ID.
d. In the Azure Active Directory application key field, specify the Azure Active Directoryapplication key.
e. In the File system field, specify the file system containing your folders and files.
f. In the Staging directory field, specify where to create the data files on ADLS.
The Staging directory name can only contain ASCII characters.
Setting advanced connection propertiesThe table below describes the settings in the Advanced tab.
File attributesMaximum file size (MB): Select or type the maximum size of any CSV file used to transfer data toMicrosoft Azure Databricks Delta . The default value is 100.
ODBC attributesODBC driver: The name of the default ODBC driver you are using to connect to Microsoft Azure DatabricksDelta. The default driver is Simba Spark ODBC Driver.
Proxy serverl Use proxy server: Select this option to access Microsoft Azure Databricks Delta via a proxy server.
l Host name: The host name of the proxy server.l Port: The port via which to access the proxy server.
Setup and User Guide - Qlik Replicate, November 2021 747

9 Adding and managing target endpoints
Internal parametersInternal parameters are parameters that are not exposed in the UI. You should only use them if instructedby Qlik Support.
To add internal Qlik Replicate parameters:
1. Click the Internal Parameters link.The Internal Parameters dialog box opens.
2. In the edit box, type the name of the parameter you need to add and then click it.
3. The parameter is added to the table below the search box with its default value.
4. Change the default value as required.
5. To reset the parameter value to its default, click the "Restore default value" icon at the end of therow.
More optionsThese options are not exposed in the UI as they are only relevant to specific versions or environments.Consequently, do not set these options unless explicitly instructed to do so by Qlik Support or productdocumentation.
To set an option, simply copy the option into the Add feature name field and click Add. Then set the valueor enable the option according to the instructions you received.
Settings summaryYou can view a summary of your settings by clicking the Setting Summary link. This is useful if you need tosend a summary of your settings to Qlik Support.
Setup and User Guide - Qlik Replicate, November 2021 748

9 Adding and managing target endpoints
9.27 Using Microsoft Azure Event Hubs as a targetThis section describes how to set up and use Microsoft Azure Event Hubs as a target endpoint in areplication task. In a task with a Microsoft Azure Event Hubs target endpoint, each source record istransformed into a message which is then written (with an optional message key) to a partition in thespecified hub.
In this section:
l Prerequisites (page 750)l Transaction processing by the consumer (page 750)l Limitations (page 751)l Supported target data types (page 752)l Setting general connection properties (page 754)l Setting advanced connection properties (page 757)l The Replicate envelope (page 758)l Metadata and data messages (page 760)
Setup and User Guide - Qlik Replicate, November 2021 749

9 Adding and managing target endpoints
PrerequisitesBefore you can use Microsoft Azure Event Hubs as a target endpoint in a Replicate task, the followingprerequisites must be met:
l The target hubs must already exist before starting the replication task. Note that if you intend to usethe Separate hub for each table option in the endpoint settings, the hub name must adhere to thefollowing format:SourceSchemaName.HubName
where HubName must be identical to the source table name.Example:HR.Employees
l Create a hub named attrep_apply_exceptions before starting the replication task. Note that if thishub does not exist, the task will always fail when it encounters a data error, regardless of the errorhandling policy.For a description of the attrep_apply_exceptions table, see Apply exceptions (page 1138)
l To be able to browse for hubs (in the General tab), the namespace Shared Access Policy must have"Manage" permission.
l If the namespace shared access policy does not have "Manage" permission, then the hub SharedAccess Policy must have at least "Send" permission.
Transaction processing by the consumerWhen configuring the Qlik Replicate Microsoft Azure Event Hubs endpoint, users can configure varioussettings that affect where messages are published within the Microsoft Azure Event Hubs infrastructures(hubs/partitions).
During a task's CDC stage, committed changes that are detected by the Qlik Replicate source endpoint aregrouped by transaction, sorted internally in chronological order, and then propagated to the targetendpoint. The target endpoint can handle the changes in various ways such as applying them to the targettables or storing them in dedicated Change Tables.
Each CDCmessage has both a transaction ID as well as change sequence. As the change sequence is amonotonically growing number, sorting events by change sequence always achieves chronological order.Grouping the sorted events by transaction ID then results in transactions containing chronologically sortedchanges.
However, as Microsoft Azure Event Hubs is a messaging infrastructure, applying changes is not feasiblewhile storing changes in tables is meaningless. The Replicate Microsoft Azure Event Hubs endpoint,therefore, takes a different approach, which is to report all transactional events as messages.
How it worksEach change in the source system is translated to a data message containing the details of the changeincluding the transaction ID and change sequence in the source. The data message also includes thechanged columns before and after the change. As explained above, the order in which the Microsoft AzureEvent Hubs target writes the messages is the same as order of changes within each transaction.
Setup and User Guide - Qlik Replicate, November 2021 750

9 Adding and managing target endpoints
Once a data message is ready to be sent to Microsoft Azure Event Hubs, the hub and partition it should goto are determined by analyzing the endpoint settings as well as potentially transformation settings. Forexample, the user might decide to configure the endpoint in such a way that every table is sent to adifferent hub and set the partition strategy to "Random", meaning that each message (within the sametable) will be sent to a different partition.
Transaction consistency from a consumer perspectiveIf maintaining transaction consistency is important for the consumer implementation, it means thatalthough the transaction ID exists in all data messages, the challenge is to gather the messages in a waythat would facilitate identifying a whole transaction. An additional challenge is getting the transaction in theoriginal order they were committed, which could be an even greater challenge if transactions are spreadacross multiple hubs and partitions.
The simplest way of achieving the above goal is to direct Replicate to a specific hub and a specific partition(in the endpoint settings). This means that all data messages will end up in a single partition, thusguaranteeing ordered delivery both of transactions and of changes within a transaction. The consumingapplication could then consume messages - accumulating a transaction in some intermediate memorybuffer - and when a new transaction ID is detected, mark the previous transaction as completed.
Although the simple way may work, it’s not very efficient at the task level as all messages end up in thesame hub and partition, not necessarily utilizing the full parallelism of the Microsoft Azure Event Hubscluster. This may be a non-issue if there are multiple tasks, each taking advantage of a differenthub/partition. In such as scenario, the gathering of messages from those tasks may very well utilize thecluster optimally.
The more generic way where data may be spread over multiple hubs and partitions means that someintermediate buffer such as memory, a table in a relational database, or even other hubs would need to beused to collect information about transactions. Then, the transactions would need to be rebuilt byperiodically (every few minutes/hours) sorting the events collected from Replicate’s Microsoft Azure EventHubs output by the change sequence and grouping them by transaction ID.
LimitationsWhen defining a task with Microsoft Azure Event Hubs as the target endpoint, the following limitationsapply:
l The Microsoft Azure Event Hubs target endpoint does not support unlimited LOB size. Therefore,when replicating from source tables with LOB columns, do not select the Allow unlimited LOB sizeoption.For more information on defining LOB settings, see Target metadata (page 1011).
l Batch optimized apply mode is not supported. If this mode is set, the task will automatically switchto Transactional apply mode and issue an appropriate warning.For more information on these modes, see Change Processing Tuning (page 1027).
l Store Changes replication mode is not supported.For more information on Store Changes mode, see Adding tasks (page 105).
l The Ignore ALTER Apply Changes setting is not supported for changes to source data types andtable renaming.
Setup and User Guide - Qlik Replicate, November 2021 751

9 Adding and managing target endpoints
l Column names must begin with [A-Za-z_] (letters or an underscore) followed by [A-Za-z0-9_](letters, digits, or an underscore). For example, _Test_ is a valid column name whereas &Test isnot.If a source column name does not adhere to this rule, then a transformation should be used torename the column.
l The Drop and Create table Target Table Preparation option is not supportedl The Truncate before loading Target Table Preparation option is not supportedl The DDL History and Change Data Partitioning Control tables are not supportedl DDL Changes: Dropping or renaming a table is not supported
Supported target data typesThe following table shows the default mapping from Qlik Replicate data types to Microsoft Azure EventHubs data types.
For information on source data type mappings, see the section for the source endpoint you are using.
For additional information about Qlik Replicate data types, see Replicate data types (page 76).
When using the JSONmessage format, binary values are represented as hexadecimal digits.
Qlik Replicate Data TypesMicrosoft Azure Event Hubs Target Data Types in SchemaMessages
DATE DATE
TIME TIME
DATETIME DATETIME
BYTES BYTES (length)
BLOB BLOB
REAL4 REAL4 (7)
REAL8 REAL8 (14)
INT1 INT1 (3)
INT2 INT2 (5)
INT4 INT4 (10)
INT8 INT8 (19)
UINT1 UINT1 (3)
UINT2 UINT2 (5)
Qlik Replicate and Microsoft Azure Event Hubs data types
Setup and User Guide - Qlik Replicate, November 2021 752

9 Adding and managing target endpoints
Qlik Replicate Data TypesMicrosoft Azure Event Hubs Target Data Types in SchemaMessages
UINT4
Values larger than 2^31-1are not supported.
UINT4 (10)
UINT8
Values larger than 2^63-1are not supported.
UINT8 (20)
NUMERIC NUMERIC (p,s)
STRING STRING (Length)
WSTRING STRING (Length)
CLOB CLOB
NCLOB NCLOB
BOOLEAN BOOLEAN (1)
Mapping from Qlik Replicate data types to AvroWhen Avro is set as the message format, due to the limited number of data types supported by Avro, thedata type mappings will be as shown in the table below.
Qlik Replicate Data Types JSON or Avro Primitive Data Types Avro Logical Data Types
DATE
STRING
DATE
Annotates an Avro INT.
TIME STRING TIME-MILLIS
Annotates an Avro INT.
TIMESTAMP STRING TIMESTAMP-MICROS
Annotates an Avro LONG.
STRING STRING
WSTRING STRING
CLOB STRING
NCLOB STRING
Avro data type mappings
Setup and User Guide - Qlik Replicate, November 2021 753

9 Adding and managing target endpoints
Qlik Replicate Data Types JSON or Avro Primitive Data Types Avro Logical Data Types
NUMERIC STRING DECIMAL (p,s)
Annotates an Avro BYTES.
BYTES BYTES -
BLOB BYTES -
REAL4 FLOAT -
REAL8 DOUBLE -
INT1 INT -
INT2 INT -
INT4 INT -
UINT1 INT -
UINT2 INT -
UINT4 LONG -
INT8 LONG
UINT8 STRING DECIMAL (20,0)
Annotates an Avro BYTES.
BOOLEAN BOOLEAN -
Setting general connection propertiesThis section describes how to configure general connection properties. For an explanation of how toconfigure advanced connection properties, see Setting advanced connection properties.
To define the general connection properties:
1. Click the Manage Endpoint Connections toolbar button.The Manage Endpoints Connections dialog box opens.
2. Click the New Endpoint Connection toolbar button.The Name, Description, Type and Role fields are displayed on the right.
3. In the Name field, specify a display name for the endpoint.
4. In the Description field, optionally type a description for the Microsoft Azure Event Hubs endpoint.
5. Select Target as the endpoint Role.
6. Select Microsoft Azure Event Hubs as the endpoint Type.The dialog box is divided into General and Advanced tabs.
7. In the Access Details section, set the following properties:l Namespace: Enter the name of your Event Hubs namespace.Example: eventhubdemo
Setup and User Guide - Qlik Replicate, November 2021 754

9 Adding and managing target endpoints
l Shared Access Policy Level: Select either Namespace level or Event Hub level accordingto the level defined for your Shared Access Policy.
l Shared Policy Name: Enter the name of your shared access policy.Example: RootManageSharedAccessKey
l Shared Access Key: Enter your shared access primary or secondary key.Example: BZLreXGxiWiRpGAog9Zf6b3K7ycRsImfBWqsR+SJp34=
8. In the Message Properties section, select either JSON or Avro as the message format.
Qlik provides an Avro Message Decoder SDK for consuming Avro messages producedby Qlik Replicate. You can download the SDK together with the Avro Message DecoderDeveloper's Guide as a ZIP file from the Customer Zone.An understanding of the Qlik envelope schema is a prerequisite for consuming Avromessages produced by Qlik Replicate. If you do not wish to use the SDK, see The QlikEnvelope for a description of the Qlik envelope schema.
9. Optionally, in the Namespace Settings section, adjust the number of Throughput units. Increasingthe number of throughput units may improve performance in certain scenarios.
10. In the Data Message Publishing section, set the following properties:
a. In the Publish the data to field, choose one of the following:l Specific hub - to publish the data to a single hub. Either type a hub name or use thebrowse button to select the desired hub.
l Separate hub for each table - to publish the data to multiple hubs corresponding tothe source table names. If you select this option, the hub name format must be asdescribed in the prerequisites.
Microsoft Azure Event Hubs supports a maximum of ten hubs, whichincludes hubs that are required for storing Replicate Control Table data.At least one of the ten hubs must be set aside for the mandatory attrep_apply_exceptions Control Table, leaving nine hubs to which sourcedata can be published (providing that no other Control Tables are set).
The target hub name consists of the source schema name and the source tablename, separated by a period (e.g. "dbo.Employees"). The format of the target hubname is important as you will need to prepare these hubs in advance.
b. From the Partition strategy drop-down list, field, select either Random or By message key.If you select Random, each message will be written to a randomly selected partition. If youselect By message key, messages will be written to partitions based on the selectedMessage key (described below).
c. From the Message key drop-down list, field, select one of the following:
Note The message key is represented as a string, regardless of the selecteddata message format (JSON/Avro).
Setup and User Guide - Qlik Replicate, November 2021 755
9 Adding and managing target endpoints
l Schema and table name - For each message, the message key will contain acombination of schema and table name (e.g. "dbo+Employees").When By message key is selected as the Partition strategy, messages consisting ofthe same schema and table name will be written to the same partition.
l Primary key columns - For each message, the message key will contain the value ofthe primary key column.When By message key is selected as the Partition strategy, messages consisting ofthe same primary key value will be written to the same partition.
11. In the Metadata Message Publishing section, specify whether or where to publish the messagemetadata.From the Publish drop-down list, select one of the following options:
l Do not publish metadata messages - When this option is selected, only data messages willbe published.
l Publish metadata messages to a dedicated metadata hubIf you select this option, either type the Hub name or use the Browse button to select thedesired hub. Note that the Browse button will only be available if the Shared Access PolicyLevel described above is set to Namespace level.
It is strongly recommended not to publish metadata messages to the samestream as data messages.
Overriding the default settingsA transformation can be defined that overrides the topic, partition and message key settings defined in theGeneral tab.
Before you can define such a transformation, you first need to add a source endpoint to thetask and select the tables you want to replicate.
To define a transformation:
1. Open the task you defined.
2. If you are defining a transformation for a single table, select one of the source tables. Otherwise,skip to Step 3.
3. Define a transformation that adds one of the following columns:
The columns listed below (prefixed with a $) instruct Replicate to route the message tothe desired hub and/or partition, and will not be included in the actual message itself.
l $hub - To write messages to a specific hub.l $partition - To write messages to a specific partition.l $key - To create a custom message key.
Setup and User Guide - Qlik Replicate, November 2021 756

9 Adding and managing target endpoints
For information on creating a transformation for a single table, see Defining transformations for asingle table/view (page 931).For information on creating a global transformation rule, see Starting the Global TransformationRules wizard (page 955).
4. Define an expression for the new column that returns the following values:l For a $hub column, the expression should return the topic name.l For a $partition column, the expression should return the partition number. Note that anerror will be returned during runtime if the partition number does not exist.
l For a $key column, the expression should return the message key contents. Note that theexpression must return a non-empty value.
For information on creating expressions, see Using the Expression Builder (page 985).
Setting advanced connection propertiesIn the Advanced tab, you can set the following advanced properties for the Microsoft Azure Event Hubstarget endpoint:
Option Description
MessageMaximumSize
In the Message maximum size field, specify the maximum size of messages that thenamespace is configured to receive (message.max.bytes). Replicate will not sendmessages larger than the maximum size.
Use proxyserver
Select this option to access the namespace via a proxy server.
Replicate uses AMQP protocol to access the namespace.
Host name The host name of the proxy server.
Port The port via which to access the proxy server.
User name The user name for accessing the proxy server.
Password The password for accessing the proxy server.
Scheme Select which protocol to use to access the server (HTTP or HTTPS). In order to useHTTPS, you must first install the CA certificate that signed the proxy’s certificate on theReplicate Server machine, as follows:
l On Windows: Add the CA certificate to the Trusted Root Certification Authoritiesstore of Local Computer
l On Linux: Add the CA certificate to /etc/pki/tls/certs/ca-bundle.crt
Connection properties
Internal parametersInternal parameters are parameters that are not exposed in the UI. You should only use them if instructedby Qlik Support.
To add internal Qlik Replicate parameters:
Setup and User Guide - Qlik Replicate, November 2021 757

9 Adding and managing target endpoints
1. Click the Internal Parameters link.The Internal Parameters dialog box opens.
2. In the edit box, type the name of the parameter you need to add and then click it.
3. The parameter is added to the table below the search box with its default value.
4. Change the default value as required.
5. To reset the parameter value to its default, click the "Restore default value" icon at the end of therow.
More optionsThese options are not exposed in the UI as they are only relevant to specific versions or environments.Consequently, do not set these options unless explicitly instructed to do so by Qlik Support or productdocumentation.
To set an option, simply copy the option into the Add feature name field and click Add. Then set the valueor enable the option according to the instructions you received.
Settings summaryYou can view a summary of your settings by clicking the Setting Summary link. This is useful if you need tosend a summary of your settings to Qlik Support.
The Replicate envelopeAll Replicate message types covered in this section are encapsulated in a single message schema calledthe Replicate envelope. The schema of the Replicate envelope is as following:
{
"type":"record",
"name":"MessageEnvelope",
"fields":[
{"name":"magic","type":{"type":"fixed","name":"Magic","size":5}},
{"name":"type","type":"string"},
{"name":"headers","type":["null",{"type":"map","values":"string"}]},
{"name":"messageSchemaId","type":["null","string"]},
{"name":"messageSchema","type":["null","string"]},
{"name":"message","type":"bytes"}
]
}
The fields in the envelope are as follows:
l magic (5 bytes fixed field)The constant "atMSG" is used to identify this form of message. The "atMSG" constant should beused to validate that this message is indeed an Replicate envelope message.
l type (string field)Describes the enveloped message type. This can be one of two values: MD which stands formetadata message and DT which stands for data message.
l headers (map of string key and value)A free for use map for various properties set at the application level. Currently, no headers are setby Qlik Replicate but this may change in future versions.
l messageSchemaId (null or string)
Setup and User Guide - Qlik Replicate, November 2021 758

9 Adding and managing target endpoints
A reference to a schema defined elsewhere, which can be used to deserialize the bytes in themessage field. This specification does not explain how the schema ID is used for looking up theactual schema - it is an application level detail. This field is used exclusively with the messageSchema
field.l messageSchema (null or string)An embedded UTF-8 encoded Avro JSON schema with which the message field can be serialized.This field is used exclusively with the messageSchemaId field.
l message (bytes)An Avro encoded message, which is the payload of the message envelope.
Given the envelope schema, it is possible for anyone using this schema to properly decode the envelopemessages from Microsoft Azure Event Hubs.
Once the envelope message has been decoded, there are two possible scenarios:
l Scenario 1: Decoding a self-describing message such as the metadata messagel Scenario 2: Decoding a message by referenced schema ID such as data messages
The method for logically decoding messages in both scenarios is described below.
Decoding a self-describing messageWhen the messageSchema field is not null, it means the message field can be decoded using the schemaincluded in the messageSchema field. This is fairly straightforward to perform programatically since the onlything you need to usually supply Avro is a schema and a message, both of which are provided in theenvelope message.
The Replicate metadata messages which include both table metadata, lineage and data schemadescription (to be referenced later by data messages) are enveloped in the self-describing envelope.
Decoding a message by referenced schema IDAvro schemas are JSON documents which can be quite large, usually much larger than the data encodedby Avro conforming to the schema. For example, a schema of a 10 column table could be a JSONdocument of more than 100 characters while an actual row encoding of 10 columns may be only 10 bytes(depending of course on the type and length of fields). It is therefore typically not recommended to includeschema and data together in a Microsoft Azure Event Hubs message because the schema information isredundant and is the same for all data messages while the actual data is the only thing which differsbetween data messages.
To avoid sending schema with each data message, each schema has a 32 bytes long ID. When a datamessage based on a previously sent data message schema (via the metadata message) is constructed,the messageSchema field is set to null and the messageSchemaId field is set to the 32 bytes ID of the schemainstead. The application responsibility is to locate the data schema sent earlier in the metadata messageand use that schema to decode the data message contained in the message field.
Setup and User Guide - Qlik Replicate, November 2021 759

9 Adding and managing target endpoints
Typical consumer logicA typical scenario involving Microsoft Azure Event Hubs involves Qlik Replicate as the Producer ofmessages into Microsoft Azure Event Hubs and customer code as the Consumer. Qlik Replicate offers theability to define a specific hub as the schema hub and different hubs for the table data.
The customer's consumer code should read metadata messages from the schema hub and then save thedata schemas and any other information the consumer wishes to access later in a customer defined zone.Another set of customer consumers should read data messages from the various data hubs, and accessthe data schemas zone as required to retrieve the data schemas required for decoding the data messages.
When consuming data messages and metadata messages from several hubs and partitions in a multi-thread/process manner, a situation may arise where a given consumer may attempt to read a datamessage before the corresponding metadata message has been read. As it is not possible to read a datamessage before its corresponding metadata message, the consumer's logic should wait a reasonableamount of time until the corresponding metadata message has been read. If the metadata message is stillnot available after waiting for a reasonable amount of time, the consumer should handle this as anunexpected error and activate the planned error policy. An example of such a policy could be saving themessage in a dedicated “delayed” hub for later processing.
As a rule of thumb, the number of metadata messages will be much lower (in the magnitude of 1:10000 ormore) than the number of data messages. So, assuming a metadata consumer is active, the gap betweenmetadata message and data message should be no more than a few seconds (usually, milliseconds).
Metadata and data messagesThis topic describes the structure and content of the Metadata and Data messages produced by theReplicate Microsoft Azure Event Hubs endpoint.
Field Type Description
schemaId String The unique identifier of the Avro schema.
lineage Structure Information about the origin of the data (Replicate server, task,table, and so on)
server String The name of the Replicate server.
task String The name of the task.
schema String The name of the database schema.
table String The name of the table.
tableVersion Integer Replicate maintains a version number of the structure of sourcetable. Upon DDL change on the source, the version is increasedand a new metadata message is produced.
timestamp String The date and time of the metadata message.
tableStructure Structure Describes the structure of the table.
Metadata message
Setup and User Guide - Qlik Replicate, November 2021 760

9 Adding and managing target endpoints
Field Type Description
tableColumns Structure Contains the list of columns and their properties.
{columns} Structure For each column, a record with the below properties.
ordinal Integer The position of the column in the record.
type String The column data type.
length Integer The maximum size of the data (in bytes) permitted for thecolumn.
precision Integer For NUMERIC data type, the maximum number of digitsrequired to represent the value.
scale Integer For NUMERIC data type, the maximum number of digits to theright of the decimal point permitted for a number.
primaryKeyPosition Integer The position of the column in the table’s Primary Key. or UniqueIndex. The value is zero if the column is not part of the table’sPrimary Key.
dataSchema String The Avro schema for deserializing the Data messages.
Field Type Description
headers Structure Information about the current record.
operation Enum The operation type.Full Load (Replicate transfers the existing records fromsource table)
REFRESH – insert of a record during Full Load stage.
CDC (Replicate transfers the changes from source table)
INSERT – insertion of new record
UPDATE – update of existing record
DELETE – deletion of a record
changeSequence String A monotonically increasing change sequencer that iscommon to all change tables of a task.
Use this field to order the records in chronological order.
Applicable to CDC operations.
Data message
Setup and User Guide - Qlik Replicate, November 2021 761

9 Adding and managing target endpoints
Field Type Description
timestamp String The original change UTC timestamp.
Applicable to CDC operations.
streamPosition String The source CDC stream position.
Applicable to CDC operations.
transactionId String The ID of the transaction that the change record belongsto.
Use this field to gather all changes of a specific transaction.
Applicable to CDC operations.
changeMask String Indicates which data columns were changed in the sourcetable.
The change mask is a string of hexadecimal digits,representing a bitmask of data columns in little-endianorder. The bit position in the change mask is based on theordinal of the column in the metadata message of thattable.
This means that if there are 10 data columns, they occupybits 0 to 9 in the bitmask.
If UPDATE mask is 0B hexadecimal, which is 1011 binary –it means that the columns at ordinals 1, 2 and 4 werechanged.
The following describes the bit semantics:
l For INSERT records, all the inserted columns havethe associated bits set.
l For DELETE records, only primary-key (or uniqueindex) columns have the associated bits set. Thisallows an applier to construct a DELETE statementwithout having to find the primary key fields fromanother source.
l For UPDATE records, each column with a changedvalue will have the associated bit set.
LOB columns are not included in thechangeMask bit.
Setup and User Guide - Qlik Replicate, November 2021 762

9 Adding and managing target endpoints
Field Type Description
columnMask String Indicates which data columns are present in the message.Usually, this will include all of the table columns.
When replicating from an Oracle sourcewithout full supplemental logging, somecolumns might not be present in the data, sincethey could not be replicated.
The column mask is a string of hexadecimal digits,representing a bitmask of data columns in little-endianorder. The bit position in the column mask is based on theordinal of the column in the metadata message for thattable.
This allows the applier to distinguish a null value that is theactual value of the column, from a null value thatrepresents a column which could not be replicated from thesource database.
externalSchemaId String The Schema ID. This will only be displayed if the Includeexternal Schema ID header check box is selected.
As the Schema ID changes whenever a DDL is performedon the source table, consumer applications can use thisinformation to determine if the message schema haschanged.
transactionEventCounter Long The sequence number of the current operation in thetransaction.
This can be used to determine the order of operationswithin a transaction.
transactionLastEvent Boolean "True" indicates that it is the final record in the transactionwhereas "False" indicates that not all of the records havebeen processed.
data Structure The data of the table record
{columns} The column names and values in the current record.
beforeData Structure The data of the table record, before the change
{columns} The column names and values, before the change.
Applicable to UPDATE operation.
Setup and User Guide - Qlik Replicate, November 2021 763

9 Adding and managing target endpoints
9.28 Using Microsoft Azure HDInsight as a targetThis section describes how to set up and use Microsoft Azure HDInsight as the target endpoint in areplication task.
In this section:
l Prerequisites (page 765)l Limitations (page 765)l Change data partitioning on Microsoft Azure HDInsight (page 766)l Microsoft Azure HDInsight endpoint target data types (page 766)l Setting general connection properties (page 767)l Setting advanced connection properties (page 769)
Setup and User Guide - Qlik Replicate, November 2021 764
9 Adding and managing target endpoints
PrerequisitesBefore you begin to work with Microsoft Azure HDInsight as a target in Qlik Replicate, make sure that thefollowing prerequisites have been met:
l General:l The ADLS or Blob storage location (whichever you are using) must be accessible from theQlik Replicate machine.
l The user specified in the Microsoft Azure HDInsight target endpoint's Hive access settingsmust have access to HiveServer2.
l ODBC Driver when Replicate Server is running on Windows: Microsoft Hive ODBC Driver2.06.12.1012 or later must be installed on the Qlik Replicate Server machine.
l ODBC Driver when Replicate Server is running on Linux:
1. Install Cloudera ODBC driver for Apache Hive 2.06.09.1009 or later on the Replicate Servermachine.
2. Afterthe driver is installed, edit the hortonworks.hiveodbc.ini file as follows:DriverManagerEncoding=UTF-16ODBCInstLib=libodbcinst.so
l Permissions:l The "Storage account" (when using Blob storage) or "Azure Active Directory application ID"(when using ADLS) specified in the Microsoft Azure HDInsight endpoint's Storage settingsmust have write access to the specified Blob/ADLS storage target folder.
l In the Access Control (IAM) settings for the ADLS Gen2 file system, assign the “Storage BlobData Contributor” role to Replicate (AD App ID). It may take a few minutes for the role to takeeffect.
l Hive table permissions: Replicate requires permissions to perform the following operationson Hive tables: CREATE, DROP, DESCRIBE, and ALTER table. ALTER table may alsoinclude RENAME table, ADD/RENAME column, and CREATE/DROP partitions on tables.
Supported blob storage typesThe following blob storage types are supported:
l Standard storage with block blobsl Premium storage with block blobs only
LimitationsThe following limitations apply:
l UPDATE/DELETE DMLs are not supported during change processing. If an UPDATE/DELETEDML was captured on the source, it will be ignored on the target and a warning will be written to thelog. If the Store Changes option is enabled in the task settings, these records will be written to theChange Table.
l Limited LOB support only.
Setup and User Guide - Qlik Replicate, November 2021 765

9 Adding and managing target endpoints
l Dropping columns and changing column data types or the data type length is not supported and willsuspend the table in all cases except for data types that are mapped to STRING. Changes to thedata type length of a data type mapped to STRING (e.g. VARCHAR(50) to VARCHAR(100)) willsimply be ignored.
l Writing to "special" tables such as tables with partitions, buckets, or skews is not supported.l The following Control Tables are not supported as they require UPDATE/DELETE operations(which are not supported by the Microsoft Azure HDInsight target endpoint):
l Replication Status (requires UPDATE).Name on target: attrep_status
l Suspended Tables (requires DELETE).Name on target: attrep_suspended_tablesFor more information on Control Tables, see Control tables (page 1015).
l Table and column names can only contain ASCII characters.l Column names cannot contain the '?' symbol. If needed, the '?' symbol can be replaced with a validASCII character using a transformation.
l Blob storage limitations:l Supported on Windows onlyl Append operation is not supported
l Proxy:l Does not affect the ODBC (Hive) connection. Affects the storage connection only.l When using Blob storage, the HTTPS scheme is not supported.l Accessing Azure Data Lake Storage (ADLS) Gen2 storage via a proxy is not supported withHTTPS protocol.
l Connecting to a proxy server with a username and password is not supported with AzureData Lake Storage (ADLS) Gen2 storage.
Change data partitioning on Microsoft Azure HDInsightWhen Change Data Partitioning (page 1022) is enabled, the Replicate Change Tables in Hive arepartitioned by the partition_name column. Data files are uploaded to the Blob/ADLS storage, accordingto the maximum size and time definition, and then stored in a directory under the Change Table directory.Whenever the specified partition timeframe ends, a partition is created in Hive, pointing to the Blob/ADLSstorage.
Information about the partitions is written to the attrep_cdc_partitions Control Table.
Microsoft Azure HDInsight endpoint target data typesThe following table shows the Microsoft Azure HDInsight endpoint target data types that are supportedwhen using Qlik Replicate and the default mapping from Qlik Replicate data types.
For information on how to view the data type that is mapped from the source, see the section for the sourceendpoint you are using.
For additional information about Qlik Replicate data types, see Replicate data types (page 76).
Setup and User Guide - Qlik Replicate, November 2021 766

9 Adding and managing target endpoints
Qlik Replicate Data Types Microsoft Azure HDInsight Data Types
BOOL BOOLEAN
BYTES STRING
TIME STRING
DATETIME TIMESTAMP
DATE DATE
INT1 TINYINT
INT2 SMALLINT
INT4 INT
INT8 BIGINT
NUMERIC DECIMAL (p,s)
REAL4 FLOAT
REAL8 DOUBLE
STRING VARCHAR (Length)
UINT1 SMALLINT
UINT2 INT
UINT4 BIGINT
UINT8 DECIMAL (20,0)
WSTRING VARCHAR (Length)
BLOB STRING
NCLOB STRING
CLOB STRING
Qlik Replicate and Microsoft Azure HDInsight data type comparison
Setting general connection propertiesThis section describes how to configure general connection properties. For an explanation of how toconfigure advanced connection properties, see Setting advanced connection properties.
To add a Microsoft Azure HDInsight target endpoint to Qlik Replicate:
1. In the Qlik Replicate console, click Manage Endpoint Connections to open the Manage EndpointConnections dialog box.For more information on adding an endpoint to Qlik Replicate, see Defining and managingendpoints (page 110).
Setup and User Guide - Qlik Replicate, November 2021 767

9 Adding and managing target endpoints
2. In the Name field, type a name for your endpoint. This can be any name that will help to identify theendpoint being used.
3. In the Description field, type a description that helps to identify the Microsoft Azure HDInsightendpoint. This is optional.
4. Select Microsoft Azure HDInsight as the endpoint Type.
5. In the Security section's SSL CA path field, specify the location of the SSL CA certificate in PEMformat (or certificate chain if needed) on the Replicate Server machine. If you do not have your ownCA certificate, you can specify the path to the cacerts.pem file provided with the ODBC driverinstallation.Note that if you select the Azure Data Lake Storage (ADLS) Gen1 storage type, the CA file mustalso contain the CA of login.microsoftonline.com.
6. In the Azure Storage section, from the Storage type drop-down list, select the desired storage type.
The Blob storage option is not supported when Qlik Replicate is running on Linux.
If you selected Blob storage:
1. In the Storage account field, specify the name of an account with write permissions to thecontainer.
2. In the Access key field, specify the account access key.
3. In the Container name field, specify the container name.
4. In the Target folder field, specify where to create the data files on Blob storage.
If you selected Azure Data Lake Storage (ADLS) Gen1:
1. In the Data Lake Store name field, specify the full name of the ADLS storage.
2. In the Azure Active Directory ID field, specify the Azure Active Directory ID.
3. In the Azure Active Directory application ID field, specify the Azure Active Directoryapplication ID.
4. In the Azure Active Directory application key field, specify the Azure Active Directoryapplication key.
5. In the Target folder field, specify where to create the data files on ADLS.
If you selected Azure Data Lake Storage (ADLS) Gen2:
a. In the Storage account field, specify the name of your storage account.
b. In the Azure Active Directory ID field, specify the Azure Active Directory ID.
c. In the Azure Active Directory application ID field, specify the Azure Active Directoryapplication ID.
d. In the Azure Active Directory application key field, specify the Azure Active Directoryapplication key.
e. In the File system field, specify the file system containing your folders and files.
f. In the Target folder field, specify where to create the data files on ADLS.
Setup and User Guide - Qlik Replicate, November 2021 768

9 Adding and managing target endpoints
l The Target folder name can only contain ASCII characters.l Connecting to a proxy server with a username and password is not supported withAzure Data Lake Storage (ADLS) Gen2 storage.
7. In the Hive Access section:
1. In the Host field, specify the host name of the Hive server.
2. Enter your Username and Password for accessing the Hive server in the designated fields.
3. In the Database field, specify the name of the Hive target database.
Setting advanced connection propertiesThe table below describes the settings in the Advanced tab.
Setting Description
File Format Expand this section to specify or view the file format settings.
Target storageformat
Select either Text or Sequence.
When using Text as the target storage format, new lines as part of thedata values are not supported (due to an Apache Hadoop limitation). Bestpractice is to use Sequence as the target storage format.
Field delimiter The delimiter that will be used to separate fields in the target file. The default is \001.Note that field delimiters should be ASCII characters unless they are non-printablecontrol characters, in which case they should be in Octal format (e.g. \247).
Null value The value that will be used to indicate a null value in the target file.
Example (where @ is the null value):
mike,male,295678
sara,female,@
Escapecharacter
The escape character is used to escape the field delimiter character. When a fielddelimiter is escaped, it is interpreted as actual data, and not as a field delimiter.
Example (where \ is the escape character and a comma is the field delimiter):
sunroof\,power-steering
Advanced tab settings
Setup and User Guide - Qlik Replicate, November 2021 769
9 Adding and managing target endpoints
Setting Description
Add metadataheader
When the target storage format is set to Text, you can optionally add a header row tothe data files. The header row can contain the source column names and/or theintermediate (i.e. Replicate) data types.
Example of a target file with a header row when both With column names and Withdata types are selected:
Position:DECIMAL(38,0),Color:VARCHAR(10)
1,"BLUE"
2,"BROWN"
3,"RED"
...
File Attributes Expand this section to specify or view the file attributes.
Maximum filesize
Specify the maximum file size of each target file. When the data reaches themaximum size, the file will be closed and written to the specified target folder.
Compress filesusing
Select the compression method to use on ADLS/Blob storage.
ChangeProcessing
Expand this section to specify or view change processing settings.
Apply/Storechanges whenfile sizereaches
Specify the minimum size of the data required to create a file in idle state.
Apply/Storechanges whenelapsed timereaches
Specify the maximum time to wait before applying the changes in idle state.
Proxy Server Expand this section to specify or view proxy settings.
Connecting to a proxy server with a username and password is notsupported with Azure Data Lake Storage (ADLS) Gen2 storage.
Use proxyserver
Select this option to access Microsoft Azure HDInsight via a proxy server.
Host name The host name of the proxy server.
Setup and User Guide - Qlik Replicate, November 2021 770

9 Adding and managing target endpoints
Setting Description
Port The port via which to access the proxy server.
User name The user name for accessing the proxy server.
Password The password for accessing the proxy server.
Scheme Select which protocol to use to access the server (HTTP or HTTPS). When usingBlob storage, only HTTP is available. When using ADLS, both HTTP and HTTPS areavailable.
The proxy configuration applies to the storage (Blob/ADLS), but does notapply to the ODBC connection.
SSL CA Path: The location of the CA certificate on the Replicate Server machine when HTTPS isthe selected Scheme.
To facilitate rapid delivery of DDL messages, files are uploaded immediately, regardless of thespecified File size reaches or Elapsed time reaches values.
Internal parametersInternal parameters are parameters that are not exposed in the UI. You should only use them if instructedby Qlik Support.
To add internal Qlik Replicate parameters:
1. Click the Internal Parameters link.The Internal Parameters dialog box opens.
2. In the edit box, type the name of the parameter you need to add and then click it.
3. The parameter is added to the table below the search box with its default value.
4. Change the default value as required.
5. To reset the parameter value to its default, click the "Restore default value" icon at the end of therow.
More optionsThese options are not exposed in the UI as they are only relevant to specific versions or environments.Consequently, do not set these options unless explicitly instructed to do so by Qlik Support or productdocumentation.
To set an option, simply copy the option into the Add feature name field and click Add. Then set the valueor enable the option according to the instructions you received.
Settings summaryYou can view a summary of your settings by clicking the Setting Summary link. This is useful if you need tosend a summary of your settings to Qlik Support.
Setup and User Guide - Qlik Replicate, November 2021 771

9 Adding and managing target endpoints
Setup and User Guide - Qlik Replicate, November 2021 772
9 Adding and managing target endpoints
9.29 Using Microsoft Azure Synapse Analytics as a targetThis section describes how to set up and use Microsoft Azure Synapse Analytics as a target in a replicationtask. Microsoft Azure Synapse Analytics is located in the cloud and is accessed through your MicrosoftAzure account.
In this section:
l Prerequisites (page 774)l Limitations (page 775)l Supported data types (page 776)l Setting general connection properties (page 777)l Setting advanced connection properties (page 779)
Setup and User Guide - Qlik Replicate, November 2021 773

9 Adding and managing target endpoints
PrerequisitesThe following sections describe the prerequisites necessary for using Microsoft Azure Synapse Analyticsas a target endpoint in a Replicate task.
l Sign up for Microsoft Azure Blob Storage (not required when using ADLS Gen2 Storage) (page 774)l Sign up for Microsoft Azure Synapse Analytics (page 774)l Install the required client (page 774)l Required permissions (page 774)l Open the required firewall port(s) (page 775)
Sign up for Microsoft Azure Blob Storage (not required when using ADLS Gen2Storage)Sign up for an Azure Blob Storage account and make a note of the account name, account key, containername and target folder - you will need to provide them later.
For best performance, the Azure Blob Storage container should be in the same region as yourMicrosoft Azure Synapse Analytics .
Supported blob storage typesThe following blob storage types are supported:
l Standard storage with block blobsl Premium storage with block blobs only
Sign up for Microsoft Azure Synapse AnalyticsSign up for Microsoft Azure Synapse Analytics and make a note of the server name, port, user name,password, database name and Azure Blob Storage access Credential - you will need to provide them later.Note that if you have not already created an Azure Blob Storage access Credential, you can configureReplicate to create one automatically as described in Setting general connection properties (page 777).
Install the required clientInstall one of the supported clients, as described below.
Qlik Replicate for WindowsIinstall Microsoft ODBC Driver 17.6 for SQL Server or later on the Qlik Replicate Server machine.
Qlik Replicate for LinuxInstall Microsoft ODBC Driver 17.6 for SQL Server or later on the Qlik Replicate Server machine.
Required permissionsThe following topic describes which permissions are required when using Microsoft Azure SynapseAnalytics as a target endpoint in a Replicate task.
Setup and User Guide - Qlik Replicate, November 2021 774

9 Adding and managing target endpoints
Storage permissionsThe user specified in the Microsoft Azure Synapse Analytics endpoint settings must be granted thefollowing storage permissions.
l Applicable when using either Blob storage or ADLS Gen2 storage:l On the Azure Blob/ADLS Gen2 Storage container: LISTl On the Azure Blob/ADLS Gen2 Storage folder: READ, WRITE and DELETE
l Relevant when using ADLS Gen2 storage only:l In the Access Control (IAM) settings for the ADLS Gen2 file system, assign the “Storage BlobData Contributor” role to Replicate (AD App ID). It may take a few minutes for the role to takeeffect.
Database permissionsThe user specified in the Microsoft Azure Synapse Analytics endpoint settings must be granted thefollowing permissions:
l General permissions:l db_owner role
l Table permissions:l SELECT, INSERT, UPDATE and DELETEl Bulk Loadl CREATE, ALTER, DROP (if required by the task's definition)
Open the required firewall port(s)l When Replicate Server runs on a machine outside Azure - Open port 1433 for outbound traffic.l When Replicate Server runs on an AzureVM - Open the following ports for outbound traffic:
l 1433l 11000-11999l 14000-14999
LimitationsThe following section describes the limitations of using Microsoft Azure Synapse Analytics as a Replicatetarget.
l Source columns with CHAR/VARCHAR data types and a non-Latin collation (e.g. "Chinese_PRC_CI_AS") need to be mapped to NVARCHAR. This can be done by defining a global transformationfor all tables in the replication task or by defining a single transformation for a specific table.For more information on defining transformations, see Starting the Global Transformation Ruleswizard (page 955) and Defining transformations for a single table/view (page 931).
l Microsoft Azure Synapse Analytics does not support empty (NULL) columns. Consequently, whenreplicating a source column with an empty value, Replicate inserts a space into the correspondingtarget column.
l The rename column DDL is not supported.l Blob storage is not supported when Qlik Replicate is installed on Linux.
Setup and User Guide - Qlik Replicate, November 2021 775

9 Adding and managing target endpoints
l Full LOB replication is not supported.l Replication of records exceeding 1 MB is not supported.
Change processing (CDC) limitations:l Capture of BLOB column changes exceeding 2000 bytes is not supportedl Capture of CLOB/NCLOB column changes exceeding 4000 bytes is not supported
Supported data typesThe Microsoft Azure Synapse Analytics Replicate endpoint supports most Microsoft Azure SynapseAnalytics data types. The following table shows the Microsoft Azure Synapse Analytics target data typesthat are supported when using Qlik Replicate and the default mapping from Qlik Replicate data types.
For information on how to view the data type that is mapped from the source, see the section for the sourcedatabase you are using. For additional information about Qlik Replicate data types, see Replicate datatypes (page 76).
Qlik Replicate Data Types Microsoft Azure Synapse Analytics Data Types
BOOL BIT
BYTES If length is => 1 and =< 8000, then:
VARBINARY (Length in Bytes)
If length is => 8001 and =< 2147483647, then:
VARBINARY (8000)
DATE DATE
TIME TIME
DATETIME DATETIME2 (s)
INT1 SMALLINT
INT2 SMALLINT
INT4 INTEGER
INT8 BIGINT
NUMERIC DECIMAL (p,s)
REAL4 FLOAT(24)
REAL8 FLOAT(53)
Supported data types
Setup and User Guide - Qlik Replicate, November 2021 776

9 Adding and managing target endpoints
Qlik Replicate Data Types Microsoft Azure Synapse Analytics Data Types
STRING If length is => 1 and =< 8000, then:
VARCHAR (Length in Bytes)
If length is => 8001 and =< 2147483647, then:
VARCHAR (8000)
UINT1 TINYINT
UINT2 SMALLINT
UINT4 INTEGER
UINT8 BIGINT
WSTRING If length is => 1 and =< 4000, then:
NVARCHAR (Length in Bytes)
If length is => 4001 and =< 2147483647, then:
NVARCHAR (4000)
BLOB Full Load:
VARBINARY (8000)
Change Processing:
VARBINARY (4000)
NCLOB NVARCHAR (4000)
CLOB Full Load:
VARCHAR (8000)
Change Processing:
VARCHAR (4000)
About Microsoft Azure Synapse Analytics LOB support:Full LOB data types are not supported. For information on including Limited-size LOB datatypes in the replication, see the Metadata (page 1011) tab description in Customizing tasks(page 929).
Setting general connection propertiesThis section describes how to configure general connection properties. For an explanation of how toconfigure advanced connection properties, see Setting advanced connection properties.
To add a Microsoft Azure Synapse Analytics target to Qlik Replicate:
Setup and User Guide - Qlik Replicate, November 2021 777

9 Adding and managing target endpoints
1. In the Qlik Replicate Console, click Manage Endpoint Connections to open the Manage EndpointsConnections dialog box.
2. In the Manage Endpoint Connections dialog box, click New Endpoint Connection.
3. In the Name field, type a name for your Microsoft Azure Synapse Analytics Synapse Analytics[service]. This can be any name that will help to identify your Microsoft Azure Synapse Analyticsdatabase.
4. In the Description field, type a description that helps to identify the Microsoft Azure SynapseAnalytics target database. This is optional.
5. Select Target as the role.
6. Select Microsoft Azure Synapse Analytics as the Type.
7. Enter the following Synapse ODBC Access information:l Server name: Specify the name of the Microsoft Azure Synapse Analytics server you areusing.
l Authentication method: Select either SQL Authentication or Azure Active DirectoryAuthentication as appropriate.
l Port: Specify the port number for connecting to Microsoft Azure Synapse Analytics .l User name: Specify the user name of a registered Microsoft Azure Synapse Analytics user.l Password: Specify the password for the user entered in the User name field.l Database name: Specify the target database name.If you do not have these values, contact the Microsoft Azure account owner or yourcompany’s Microsoft Azure Synapse Analytics System Administrator.
l Select one of the following as appropriate:l Automatically create SQL Server Credentiall Use existing SQL Server Credential
During a replication task, Microsoft Azure Synapse Analytics authenticates itself to theexternal data source using an SQL Server Credential. You can either configure Replicate tocreate the Credential automatically during runtime (the default) or use an existing Credential.
8. In the Staging on Azure section, from the Storage type drop-down list, select the desired storagetype.
The Blob storage option is not supported when Qlik Replicate is running on Linux.
If you selected Azure Blob Storage:
a. In the Azure Storage account name field, specify the name of an account with writepermissions to the container.
b. In the Container name field, specify the container name.
Container names must comply with the Microsoft guidelines. For moreinformation, see the Microsoft Help on this subject.
Setup and User Guide - Qlik Replicate, November 2021 778

9 Adding and managing target endpoints
c. In the Access key field, specify the account access key.
d. In the Staging folder field, specify where to create the data files on Blob storage.
If you selected Azure Data Lake Storage (ADLS) Gen2:
a. In the Storage account field, specify the name of your storage account.
b. In the Container field, specify the container containing your folders and files.
c. In the Azure Active Directory ID field, specify the Azure Active Directory ID.
d. In the Azure Active Directory application ID field, specify the Azure Active Directoryapplication ID.
e. In the Azure Active Directory application key field, specify the Azure Active Directoryapplication key.
f. In the Access key field, specify the account access key for connecting to Microsoft Azure.
g. In the Staging folder field, specify where to create the data files on ADLS.
Setting advanced connection propertiesIn the Advanced tab, you can set the following properties:
File attributesMax file size (MB): Select or type the maximum size of any CSV file used to transfer data to MicrosoftAzure Synapse Analytics . The default value is 1000.
ODBC attributesl ODBC driver: The name of the default ODBC driver you are using to connect to Microsoft AzureSynapse Analytics. The default driver is ODBC Driver 17 for SQL Server.
l Additional ODBC connection properties: Enter additional ODBC connection properties if required.
Proxy serverl Use proxy server: Select this option to access Microsoft Azure Synapse Analytics via a proxyserver.
l Host name: The host name of the proxy server.l Port: The port via which to access the proxy server.l User name: The user name for accessing the proxy server.l Password: The password for accessing the proxy server.
Internal parametersInternal parameters are parameters that are not exposed in the UI. You should only use them if instructedby Qlik Support.
To add internal Qlik Replicate parameters:
1. Click the Internal Parameters link.The Internal Parameters dialog box opens.
2. In the edit box, type the name of the parameter you need to add and then click it.
3. The parameter is added to the table below the search box with its default value.
Setup and User Guide - Qlik Replicate, November 2021 779

9 Adding and managing target endpoints
4. Change the default value as required.
5. To reset the parameter value to its default, click the "Restore default value" icon at the end of therow.
More optionsThese options are not exposed in the UI as they are only relevant to specific versions or environments.Consequently, do not set these options unless explicitly instructed to do so by Qlik Support or productdocumentation.
To set an option, simply copy the option into the Add feature name field and click Add. Then set the valueor enable the option according to the instructions you received.
Settings summaryYou can view a summary of your settings by clicking the Setting Summary link. This is useful if you need tosend a summary of your settings to Qlik Support.
Setup and User Guide - Qlik Replicate, November 2021 780

9 Adding and managing target endpoints
9.30 Using Microsoft Azure SQL Database as a targetThis section describes how to set up a Microsoft Azure SQL Database as a target in a replication task.
In this section:
l Prerequisites (page 782)l Limitations (page 783)l Permissions (page 783)l Microsoft Azure SQL Database target data types (page 783)l Setting general connection properties (page 785)l Setting advanced connection properties (page 786)
Setup and User Guide - Qlik Replicate, November 2021 781

9 Adding and managing target endpoints
PrerequisitesMake sure that the following prerequisites have been met:
Qlik Replicate for WindowsInstall Microsoft ODBC Driver 17.6 for Windows on the Qlik Replicate Server machine.
Qlik Replicate for LinuxInstall Microsoft ODBC Driver 17.6 for Linux on the Qlik Replicate Server machine.
Then, on the Qlik Replicate Server machine, open a Unix shell and perform the following steps:
The procedure below assumes that you have installed a single default instance of Replicate on Linux(areplicate). If you have installed multiple instances, replace areplicate with the name of the instancerunning the task with a Microsoft SQL Server source. If several instances are running such as task, theprocedure needs to be repeated for each instance.
1. Change the working directory to:cd <product_dir>/bin
2. Stop the Replicate service:./areplicate stop
3. Optionally, confirm that the service has stopped:./areplicate status
4. Copy the driver location to the site_arep_login.sh file as follows:echo "export LD_LIBRARY_PATH=$LD_LIBRARY_PATH:/opt/microsoft/msodbcsql17/lib64/" >>
site_arep_login.sh
This will add the driver to "LD_LIBRARY_PATH" and update the driver location in the site_arep_login.sh file.
5. Optionally, confirm that the driver location was copied:cat site_arep_login.sh
6. Start the Replicate instance:./areplicate start
7. Optionally confirm that the instance has started:./areplicate status
8. Replicate requires the following ODBC library: libmsodbcsql-17.6.so.1.1To check which library version is currently installed Issue the following command:ls /opt/microsoft/msodbcsql/lib64/
If the existing library has a different version number (e.g. libmsodbcsql-17.6.so.0.2), youneed to create a symbolic link between the existing library and the required library.To do this, issue the following commands:cd /opt/microsoft/msodbcsql17/lib64/ln -s existing_library_name libmsodbcsql-17.6.so.1.1
where existing_library_name is the name of the currently installed library (e.g.libmsodbcsql-17.6.so.0.2).
Other prerequisites
Setup and User Guide - Qlik Replicate, November 2021 782

9 Adding and managing target endpoints
l Ports:l When Replicate Server runs on a machine outside Azure - Open port 1433 for outboundtraffic.
l When Replicate Server runs on an AzureVM - Open the following ports for outbound traffic:l 1433l 11000-11999l 14000-14999
l A Microsoft Azure SQL Database account with the specific access privileges is required. See TargetPermissions for more information.
LimitationsWhen using a Microsoft Azure SQL Database as a target in a Replicate task, The following imitationsapply:
l When Use BCP for loading tables is selected in the Advanced tab (the default), unlimited LOBcolumns are not supported in Batch optimized apply change processing mode. You can workaround this limitation by limiting LOB column size in the task settings, clearing the Use BCP forloading tables option or switching to Transactional apply mode.
l When the Use BCP for loading tables option is enabled in the Advanced tab, triggers are notexecuted.
PermissionsThe following describes the security requirements for using Qlik Replicate with a Microsoft Azure SQLDatabase target.
The Qlik Replicate user (i.e. the user specified in the Microsoft Azure SQL Database endpoint settings)must have at least the db_owner user role on the Microsoft Azure SQL Database you are connecting to.
A Microsoft Azure SQL Database system administrator must provide this permission for all Qlik Replicateusers.
Microsoft Azure SQL Database target data typesThe Microsoft Azure SQL Database target for Qlik Replicate supports most Microsoft Azure SQL Databasedata types. The following table shows the Microsoft Azure SQL Database target data types that aresupported when using Qlik Replicate and the default mapping from Qlik Replicate data types.
For information on how to view the data type that is mapped from the source, see the section for the sourcedatabase you are using.
For additional information about Qlik Replicate data types, see Replicate data types (page 76).
Setup and User Guide - Qlik Replicate, November 2021 783

9 Adding and managing target endpoints
When replicating to Microsoft SQL Server 2019, UTF-8 data can be transferred to VARCHAR,CHAR, and CLOB columns when the database collation is set to %collation%_UTF8 (forexample, Latin1_General_100_CI_AS_SC_UTF8). When working with an earlier MicrosoftSQL Server version or a different collation, use a transformation (global or table-specific) totransform the column data type to WSTRING.
See also Using the Transform tab (page 933) and Defining global rules (page 955).
QlikReplicateData Types
Microsoft Azure SQL Database Data Types
BOOLEAN TINYINT
BYTES VARBINARY (length)
DATE DATE
TIME TIME(0)
DATETIME DATETIME2 (scale)
INT1 SMALLINT
INT2 SMALLINT
INT4 INT
INT8 BIGINT
NUMERIC NUMERIC (p,s)
REAL4 REAL
REAL8 FLOAT
STRING If column is date or time then:
DATETIME2
If the column is not a date or time:
VARCHAR (length)
UINT1 TINYINT
UINT2 SMALLINT
UINT4 INT
UINT8 BIGINT
WSTRING NVARCHAR (length)
Supported data types
Setup and User Guide - Qlik Replicate, November 2021 784

9 Adding and managing target endpoints
QlikReplicateData Types
Microsoft Azure SQL Database Data Types
BLOB VARBINARY (max)
IMAGE
To use this data type with Qlik Replicate, you must enable the use of BLOBs for aspecific task.
During CDC or during Full Load when the Allow unlimited LOB size option is enabled,LOB data types are supported only in tables with a primary key or unique index.
CLOB VARCHAR (max)
TEXT
To use this data type with Qlik Replicate, you must enable the use of CLOBs for aspecific task.
During CDC or during Full Load when the Allow unlimited LOB size option is enabled,LOB data types are supported only in tables with a primary key or unique index.
NCLOB NVARCHAR (max)
NTEXT
To use this data type with Qlik Replicate, you must enable the use of NCLOBs for aspecific task.
During CDC or during Full Load when the Allow unlimited LOB size option is enabled,LOB data types are supported only in tables with a primary key or unique index.
Setting general connection propertiesThis section describes how to configure general connection properties. For an explanation of how toconfigure advanced connection properties, see Setting advanced connection properties.
To add a Microsoft Azure SQL Database target endpoint to Qlik Replicate:
1. In the Qlik Replicate Console, click Manage Endpoint Connections to open the Manage EndpointsConnections dialog box and then click New Endpoint Connection. For more information on addingan endpoint to Qlik Replicate, see Defining and managing endpoints (page 110).
2. In the Name field, type a name for your database. This can be any name that will help to identify thedatabase being used.
3. In the Description field, type a description that helps to identify the Microsoft Azure SQL Databasedatabase. This is optional.
4. Select Target as the database role.
5. Select Microsoft Azure SQL Database as the database Type.
Setup and User Guide - Qlik Replicate, November 2021 785

9 Adding and managing target endpoints
6. Enter the following Microsoft Azure SQL Database information:l Server name: Specify the name of the Microsoft Azure SQL Database server you are using.
To override the default port, add the port to the server name, separated by acomma. For example, if the server name is myserver.company.local and the portis 3333, then the server name should be specified as follows:myserver.company.local,3333
l Authentication method: Select either SQL Authentication or Azure Active DirectoryAuthentication as appropriate.
l Username: Specify the user name of a registered Microsoft Azure SQL Database user.
Make sure that the Microsoft Azure SQL Database user has the correct accessprivileges. For information on how to provide the required privileges, seePermissions (page 783).
l Password: Specify the password for the user entered in the Username field.To ensure that the password provided to Replicate is never used by any other principal,Replicate can be configured to automatically replace the user-entered password with astrong random password. For more information, see Configuring Replicate to automaticallyreplace the user-entered password (page 80).
l Database: Specify the target database name.
Testing the connectionTo check if the connection information you entered is correct, click Test Connection.
If the connection is successful a message in green is displayed. If the connection fails, an error message isdisplayed at the bottom of the dialog box.
To view the log entry if the connection fails, click View Log. The server log is displayed with the informationfor the connection failure. Note that this button is not available unless the test connection fails.
Setting advanced connection propertiesIn the Advanced tab, you can set the following properties:
l Use BCP for loading tables: Select this to transfer data for full-load operations using BCP.
When the target table contains an identity column that does not exist in the source table,you must disable the Use BCP for loading tables option.
l BCP packet size: The maximum size of the packets (in bytes) used to transfer data using BCP.l Filegroup for Qlik Replicate internal tables: Optionally, specify a filegroup for the Qlik Replicateinternal tables. When the replication task starts, all of the internal Qlik Replicate control tables willbe created in the specified filegroup.The following is an example of a command for creating a filegroup:
Setup and User Guide - Qlik Replicate, November 2021 786

9 Adding and managing target endpoints
ALTER database replicate
ADD FILEGROUP Test1FG1;
GO
ALTER database replicate
ADD FILE
(
NAME = test1dat5,
FILENAME = 'C:\temp\DATA\t1dat5.ndf',
SIZE = 5MB,
MAXSIZE = 100MB,
FILEGROWTH = 5MB
)
TO FILEGROUP Test1FG1;
GO
l Additional ODBC connection properties: Specify any additional ODBC connection parameters thatyou want to use.
Internal parametersInternal parameters are parameters that are not exposed in the UI. You should only use them if instructedby Qlik Support.
To add internal Qlik Replicate parameters:
1. Click the Internal Parameters link.The Internal Parameters dialog box opens.
2. In the edit box, type the name of the parameter you need to add and then click it.
3. The parameter is added to the table below the search box with its default value.
4. Change the default value as required.
5. To reset the parameter value to its default, click the "Restore default value" icon at the end of therow.
More optionsThese options are not exposed in the UI as they are only relevant to specific versions or environments.Consequently, do not set these options unless explicitly instructed to do so by Qlik Support or productdocumentation.
To set an option, simply copy the option into the Add feature name field and click Add. Then set the valueor enable the option according to the instructions you received.
Settings summaryYou can view a summary of your settings by clicking the Setting Summary link. This is useful if you need tosend a summary of your settings to Qlik Support.
Setup and User Guide - Qlik Replicate, November 2021 787
9 Adding and managing target endpoints
9.31 Using Microsoft SQL Server as a targetThis section describes how to set up and use a Microsoft SQL Server database as a target in a replicationtask.
When configuring a task with a Microsoft SQL Server target endpoint, note the following:
l If the Apply Changes task option is enabled and the change processing mode is set toBatch optimized apply, it is recommended to enable the Apply batched changes tomultiple tables concurrently option in the Change Processing Tuning (page 1027) tab.
l When the Apply batched changes to multiple tables concurrently option is selected,the option to set a Global Error Handling policy will not be available. Also, some of thetask-specific error handling defaults will be different.For more information, see the Apply batched changes to multiple tables concurrentlyoption in the Change Processing Tuning (page 1027) tab.
In this section:
l Supported editions (page 789)l Prerequisites (page 789)l Limitation and considerations (page 790)l Permissions (page 790)l Microsoft SQL Server target data types (page 790)l Setting general connection properties (page 792)l Setting advanced connection properties (page 794)
Setup and User Guide - Qlik Replicate, November 2021 788

9 Adding and managing target endpoints
Supported editionsQlik Replicate supports the following Microsoft SQL Server editions:
l Enterprise Editionl Standard Editionl Workgroup Editionl Developer Editionl SQL Server Web Edition
PrerequisitesMake sure the following prerequisites have been met:
Qlik Replicate for WindowsInstall Microsoft ODBC Driver 17.6 for Windows on the Qlik Replicate Server machine.
Qlik Replicate for LinuxInstall Microsoft ODBC Driver 17.6 for Linux on the Qlik Replicate Server machine.
Then, on the Qlik Replicate Server machine, open a Unix shell and perform the following steps:
The procedure below assumes that you have installed a single default instance of Replicate on Linux(areplicate). If you have installed multiple instances, replace areplicate with the name of the instancerunning the task with a Microsoft SQL Server source. If several instances are running such as task, theprocedure needs to be repeated for each instance.
1. Change the working directory to:cd <product_dir>/bin
2. Stop the Replicate service:./areplicate stop
3. Optionally, confirm that the service has stopped:./areplicate status
4. Copy the driver location to the site_arep_login.sh file as follows:echo "export LD_LIBRARY_PATH=$LD_LIBRARY_PATH:/opt/microsoft/msodbcsql17/lib64/" >>
site_arep_login.sh
This will add the driver to "LD_LIBRARY_PATH" and update the driver location in the site_arep_login.sh file.
5. Optionally, confirm that the driver location was copied:cat site_arep_login.sh
6. Start the Replicate instance:./areplicate start
7. Optionally confirm that the instance has started:./areplicate status
8. Replicate requires the following ODBC library: libmsodbcsql-17.6.so.1.1To check which library version is currently installed Issue the following command:ls /opt/microsoft/msodbcsql/lib64/
Setup and User Guide - Qlik Replicate, November 2021 789

9 Adding and managing target endpoints
If the existing library has a different version number (e.g. libmsodbcsql-17.6.so.0.2), youneed to create a symbolic link between the existing library and the required library.To do this, issue the following commands:cd /opt/microsoft/msodbcsql17/lib64/ln -s existing_library_name libmsodbcsql-17.6.so.1.1
where existing_library_name is the name of the currently installed library (e.g.libmsodbcsql-17.6.so.0.2).
Limitation and considerationsWhen using a Microsoft SQL Server database as a target in a Replicate task, The following imitationsapply:
l When Use BCP for loading tables is selected in the endpoint settings' Advanced tab (the default),the following limitations apply:
l LOB columns are not supported in Batch optimized apply change processing mode. Youcan work around this limitation by limiting LOB column size in the task settings, clearing theUse BCP for loading tables option, or switching to Transactional apply mode.
l BLOB columns that are empty in the source endpoint (zero length), will be written to theMicrosoft SQL Server target as 0x0000 (2 bytes) during Full Load. During ChangeProcessing, an empty BLOB column will be applied to the target correctly (as 0 bytes).
l Microsoft SQL Server 2012 Target: When the target table is created manually with acomputed column, Full Load replication is not supported in BCP mode. Disabling the UseBCP for loading tables option in the Advanced tab will resolve this issue.
l Triggers are not executed.
For more information on the Use BCP for loading tables mode, see Setting advanced connectionproperties (page 794).
l When both the Batch Optimized Apply and Limit LOB size to options are enabled, BLOB columnson the target will be truncated to a quarter of the size specified in the Limit LOB size to field.
PermissionsThe following describes the security requirements for using Qlik Replicate with a Microsoft SQL Servertarget.
The Qlik Replicate user must have at least the db_owner user role on the Microsoft SQL Server databaseyou are connecting to.
A Microsoft SQL Server system administrator must provide this permission for all Qlik Replicate users.
Microsoft SQL Server target data typesThe Microsoft SQL Server target for Qlik Replicate supports most Microsoft SQL Server data types. Thefollowing table shows the Microsoft SQL Server target data types that are supported when using QlikReplicate and the default mapping from Qlik Replicate data types.
For information on how to view the data type that is mapped from the source, see the section for the sourcedatabase you are using.
Setup and User Guide - Qlik Replicate, November 2021 790

9 Adding and managing target endpoints
For additional information about Qlik Replicate data types, see Replicate data types (page 76).
When replicating to Microsoft SQL Server 2019, UTF-8 data can be transferred to VARCHAR,CHAR, and CLOB columns when the database collation is set to %collation%_UTF8 (forexample, Latin1_General_100_CI_AS_SC_UTF8). When working with an earlier MicrosoftSQL Server version or a different collation, use a transformation (global or table-specific) totransform the column data type to WSTRING.
See also Using the Transform tab (page 933) and Defining global rules (page 955).
QlikReplicateData Types
Microsoft SQL Server Data Types
BOOLEAN TINYINT
BYTES VARBINARY(length)
DATE DATE
TIME TIME(0)
DATETIME DATETIME2(scale)
INT1 SMALLINT
INT2 SMALLINT
INT4 INT
INT8 BIGINT
NUMERIC NUMERIC(p,s)
REAL4 REAL
REAL8 FLOAT
STRING If column is date or time then:
DATETIME2
If the column is not a date or time:
VARCHAR(length)
UINT1 INT2
UINT2 INT4
UINT4 INT8
UINT8 NUMERIC(20)
WSTRING NVARCHAR(length)
Supported target data types
Setup and User Guide - Qlik Replicate, November 2021 791

9 Adding and managing target endpoints
QlikReplicateData Types
Microsoft SQL Server Data Types
BLOB VARBINARY(max)
IMAGE
To use this data type with Qlik Replicate, you must enable the use of BLOBs for aspecific task.
During CDC or during Full Load when the Allow unlimited LOB size option is enabled,LOB data types are supported only in tables with a primary key or unique index.
CLOB VARCHAR(max)
TEXT
To use this data type with Qlik Replicate, you must enable the use of CLOBs for aspecific task.
During CDC or during Full Load when the Allow unlimited LOB size option is enabled,LOB data types are supported only in tables with a primary key or unique index.
NCLOB NVARCHAR(max)
NTEXT
To use this data type with Qlik Replicate, you must enable the use of NCLOBs for aspecific task.
During CDC or during Full Load when the Allow unlimited LOB size option is enabled,LOB data types are supported only in tables with a primary key or unique index.
Setting general connection propertiesThis section describes how to configure general connection properties. For an explanation of how toconfigure advanced connection properties, see Setting advanced connection properties.
To add a Microsoft SQL Server target endpoint to Qlik Replicate:
1. In the Qlik Replicate Console, click Manage Endpoint Connections to open the Manage EndpointsConnections dialog box and then click New Endpoint Connection. For more information on addingan endpoint to Qlik Replicate, see Defining and managing endpoints (page 110).
2. In the Name field, type a name for your database. This can be any name that will help to identify thedatabase being used.
3. In the Description field, type a description that helps to identify the Microsoft SQL Server database.This is optional.
4. Select Target as the database role.
5. Select Microsoft SQL Server as the database Type.
Setup and User Guide - Qlik Replicate, November 2021 792

9 Adding and managing target endpoints
6. In the Server name field, specify the host name or IP address of the computer with the MicrosoftSQL Server instance containing the target database.
To override the default port, add the port to the server name, separated by a comma.For example, if the server name is myserver.company.local and the port is 3333,then the server name should be written like this:myserver.company.local,3333
7. Select Windows authentication (only relevant when Replicate is installed on Windows) or SQLServer authentication.If you select Windows authentication, you will work with the user credentials for the Windowsdomain. This privilege must be configured in the Microsoft SQL Server database by the systemadministrator. Note that this option is not relevant when Microsoft SQL Server is running on Linux.
When using Windows authentication, make sure that the user account that is associatedwith the Qlik Replicate Server service has Network read and write permissions. Thismust be configured by a Windows system administrator.
See also Working with Windows authentication (page 320).If you select SQL Server authentication, type the Microsoft SQL Server authentication information(User name, Password) for the authorized user for this Microsoft SQL Server database. If you do notknow this information, see the Microsoft SQL Server System Administrator.To ensure that the password provided to Replicate is never used by any other principal, Replicatecan be configured to automatically replace the user-entered password with a strong randompassword. For more information, see Configuring Replicate to automatically replace the user-entered password (page 80).
This information is case sensitive.
Make sure that the Microsoft SQL Server user has the correct access privileges. Forinformation on how to provide the required privileges, see Permissions (page 790).
To determine if you are connected to the database you want to use or if the connectioninformation you entered is correct, click Test Connection.If the connection is successful a message in green is displayed. If the connection fails,an error message is displayed at the bottom of the dialog box.To view the log entry if the connection fails, click View Log. The server log is displayedwith the information for the connection failure. Note that this button is not availableunless the test connection fails.
8. Type the Database name or click Browse and select one from the list of available databases. Thisis the name of the database from where you are replicating the data.
Setup and User Guide - Qlik Replicate, November 2021 793

9 Adding and managing target endpoints
Setting advanced connection propertiesIn the Advanced tab, you can set the following properties:
l Use BCP for loading tables: Select this to transfer data for full-load operations using BCP.
When the target table contains an identity column that does not exist in the source table,you must disable the Use BCP for loading tables option.
l BCP packet size: The maximum size of the packets (in bytes) used to transfer data using BCP.l Filegroup for Qlik Replicate internal tables: Optionally, specify a filegroup for the Qlik Replicateinternal tables. When the replication task starts, all of the internal Qlik Replicate control tables willbe created in the specified filegroup.The following is an example of a command for creating a filegroup:ALTER database replicate
ADD FILEGROUP Test1FG1;
GO
ALTER database replicate
ADD FILE
(
NAME = test1dat5,
FILENAME = 'C:\temp\DATA\t1dat5.ndf',
SIZE = 5MB,
MAXSIZE = 100MB,
FILEGROWTH = 5MB
)
TO FILEGROUP Test1FG1;
GO
Internal parametersInternal parameters are parameters that are not exposed in the UI. You should only use them if instructedby Qlik Support.
To add internal Qlik Replicate parameters:
1. Click the Internal Parameters link.The Internal Parameters dialog box opens.
2. In the edit box, type the name of the parameter you need to add and then click it.
3. The parameter is added to the table below the search box with its default value.
4. Change the default value as required.
5. To reset the parameter value to its default, click the "Restore default value" icon at the end of therow.
More optionsThese options are not exposed in the UI as they are only relevant to specific versions or environments.Consequently, do not set these options unless explicitly instructed to do so by Qlik Support or productdocumentation.
Setup and User Guide - Qlik Replicate, November 2021 794

9 Adding and managing target endpoints
To set an option, simply copy the option into the Add feature name field and click Add. Then set the valueor enable the option according to the instructions you received.
Settings summaryYou can view a summary of your settings by clicking the Setting Summary link. This is useful if you need tosend a summary of your settings to Qlik Support.
Setup and User Guide - Qlik Replicate, November 2021 795

9 Adding and managing target endpoints
9.32 Using a MySQL-based database as a targetThis section describes how to set up and use a MySQL target endpoint in a replication task.
You need to configure a MySQL endpoint when replicating to any of the following databases:
l MySQLl MariaDBl Amazon Aurora (MySQL)l Amazon RDS for MariaDBl Amazon RDS for MySQL
In this section:
l Prerequisites (page 797)l Limitations (page 797)l Security requirements (page 798)l Supported data types (page 798)l Setting general connection properties (page 801)l Setting advanced connection properties (page 802)
Setup and User Guide - Qlik Replicate, November 2021 796

9 Adding and managing target endpoints
PrerequisitesBefore using MySQL as an endpoint in a Qlik Replicate task, make sure that the prerequisites outlinedbelow have been met.
Client prerequisitesInstall MySQL ODBC Unicode Driver 64-bit on the Replicate Server machine.
Only these driver versions are supported:
l 5.3.11 to 5.3.13l 8.0.23 to 8.0.25
Linux only:
Make sure that the /etc/odbcinst.ini file contains an entry for MySQL, as in the following example:
[MySQL ODBC 5.3.13 Unicode Driver]Driver = /usr/lib64/libmyodbc5w.soUsageCount = 1
General prerequisitesMake sure that the following prerequisites have been met:
l A MySQL account with the required Security requirements (page 798).l A MySQL database with the tables that you want to replicate should be accessible in your network.The following MySQL editions are supported:
l MySQL Community Editionl MySQL Standard Editionl MySQL Enterprise Editionl MySQL Cluster Carrier Grade Edition
l In order to work with MYSQL 8 as a target endpoint, you need to:l Set the parameter secure_file_priv = NULL in the MySQL database.l If you are using LOB columns, set the parameter sort_buffer_size = 128M in theMySQL database.
Replicating 4-byte UTF8 emojisTo support replication of 4-byte UTF8 emojis, the target schema character set must be set to utf8mb4.
LimitationsThe following limitations apply:
l When replicating to the MariaDB target database, if the DATETIME value is set to zero, you need todefine a transformation that replaces the DATETIME with valid values. For example:replace($datetime_column,'9999-12-31 23:59:59','2000-01-01 22:00:00')
Setup and User Guide - Qlik Replicate, November 2021 797

9 Adding and managing target endpoints
l When only the LOB column in the source table is updated, Replicate will not update thecorresponding target LOB column. The target LOB column will only be updated if at least one othercolumn is also updated in the same transaction.
l Due to the way MySQL operates, when loading data to a MySQL target during a Full Load task,duplicate key errors will not be reported to the logs.
l When updating a column's value to its existing value, a zero rows affected is returned from MySQL(unlike Oracle and Microsoft SQL Server that perform an update of one row). This generates anentry in the attrep_apply_exceptions control table and the following warning:Some changes from the source database had no impact when applied to the target database.
See attrep_apply_exceptions table for details.
l Due to an issue with MySQL versions 5.6 and 5.7 (which was resolved in version 8.0), Replicatecannot insert multibyte characters into TEXT columns when the Full Load uses CSV files.Consequently, if the target endpoint is MySQL 5.6/5.7 and a replicated table contains TEXTcolumns with UTF-8 multibyte characters, the target table might be empty.
Workaround:In the Advanced tab, set the loadUsingCSV internal parameter to FALSE. Note that this mightimpact performance.
Security requirementsYou must provide MySQL account access to the Qlik Replicate user. This user must have read/writeprivileges in the MySQL database.
Additionally, for each target schema involved in the replication, the Qlik Replicate user must have thefollowing permissions:
l ALTERl CREATEl CREATE TEMPORARY TABLESl DELETEl DROPl INSERTl SELECTl UPDATE
Supported data typesThe following table shows the MySQL database target data types that are supported when using QlikReplicate and the default mapping from Qlik Replicate data types.
For information on how to view the data type that is mapped from the source, see the section for the sourceendpoint you are using.
For additional information about Qlik Replicate data types, see Replicate data types (page 76).
Setup and User Guide - Qlik Replicate, November 2021 798

9 Adding and managing target endpoints
Qlik Replicate Data Types MySQL Data Types
BOOL BOOL
BYTES If length is => 1 and =< 8095, then:
VARBINARY (Length)
If length is => 8096 and =< 65535, then:
BLOB
If length is => 65536 and =< 16777215, then:
MEDIUMBLOB
If length is => 16777216 and =< 2147483647, then:
LONGBLOB
DATE DATE
TIME TIME
DATETIME If scale is => 0 and =< 6, then:
DECIMAL (p,s)
If scale is => 7 and =< 12, then:
VARCHAR (37)
INT1 TINYINT
INT2 SMALLINT
INT4 INTEGER
INT8 BIGINT
NUMERIC If scale is => 0 and =< 30, then:
DECIMAL (p,s)
If scale is => 31 and =< 100, then:
VARCHAR (45)
REAL4 FLOAT
REAL8 DOUBLE
Supported data types
Setup and User Guide - Qlik Replicate, November 2021 799

9 Adding and managing target endpoints
Qlik Replicate Data Types MySQL Data Types
STRING If length is => 1 and =< 8095, then:
VARCHAR (Length)
If length is => 8096 and =< 65535, then:
TEXT
If length is => 65536 and =< 16777215, then:
MEDIUMTEXT
If length is => 16777216 and =< 2147483647, then:
LONGTEXT
UINT1 UNSIGNED TINYINT
UINT2 UNSIGNED SMALLINT
UINT4 UNSIGNED INTEGER
UINT8 UNSIGNED BIGINT
WSTRING If length is => 1 and =< 8095, then:
VARCHAR (Length)
If length is => 8096 and =< 65535, then:
TEXT
If length is => 65536 and =< 16777215, then:
MEDIUMTEXT
If length is => 16777216 and =< 2147483647, then:
LONGTEXT
BLOB If length is => 1 and =< 65535, then:
BLOB
If length is => 65536 and =< 16777215, then:
MEDIUMBLOB
If length is => 16777215 and =< 2147483647, then:
LONGBLOB
Setup and User Guide - Qlik Replicate, November 2021 800
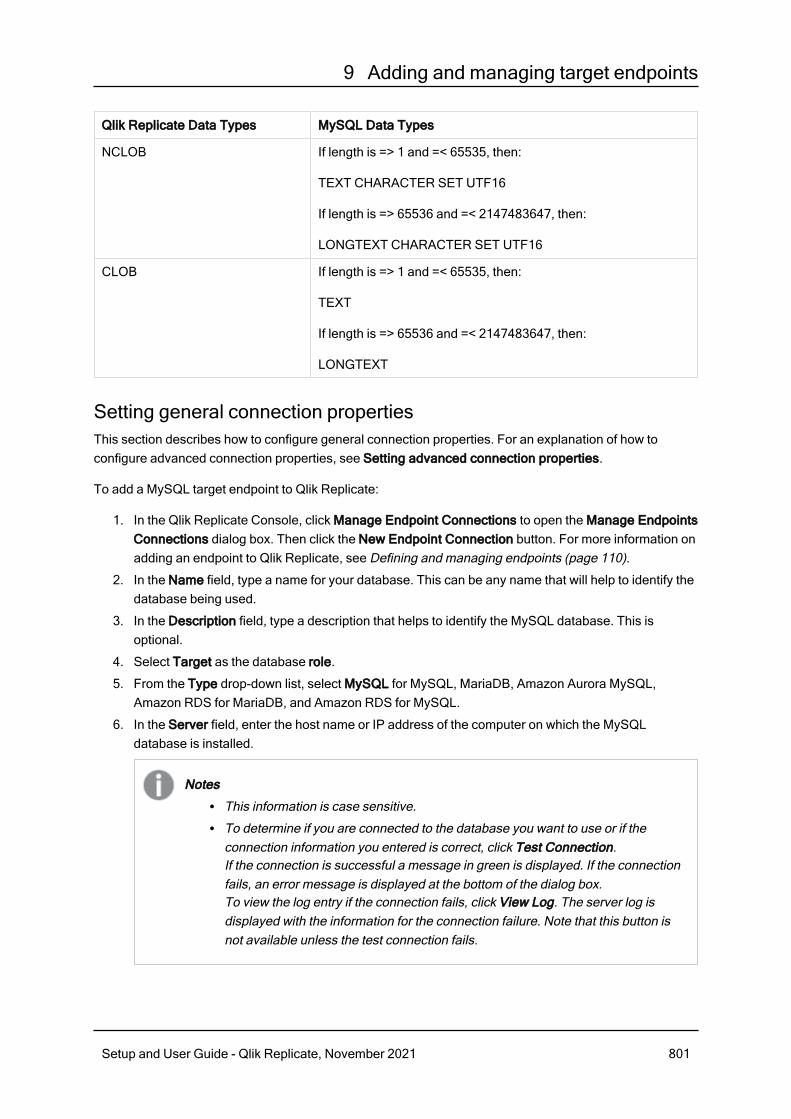
9 Adding and managing target endpoints
Qlik Replicate Data Types MySQL Data Types
NCLOB If length is => 1 and =< 65535, then:
TEXT CHARACTER SET UTF16
If length is => 65536 and =< 2147483647, then:
LONGTEXT CHARACTER SET UTF16
CLOB If length is => 1 and =< 65535, then:
TEXT
If length is => 65536 and =< 2147483647, then:
LONGTEXT
Setting general connection propertiesThis section describes how to configure general connection properties. For an explanation of how toconfigure advanced connection properties, see Setting advanced connection properties.
To add a MySQL target endpoint to Qlik Replicate:
1. In the Qlik Replicate Console, click Manage Endpoint Connections to open the Manage EndpointsConnections dialog box. Then click the New Endpoint Connection button. For more information onadding an endpoint to Qlik Replicate, see Defining and managing endpoints (page 110).
2. In the Name field, type a name for your database. This can be any name that will help to identify thedatabase being used.
3. In the Description field, type a description that helps to identify the MySQL database. This isoptional.
4. Select Target as the database role.
5. From the Type drop-down list, select MySQL for MySQL, MariaDB, Amazon Aurora MySQL,Amazon RDS for MariaDB, and Amazon RDS for MySQL.
6. In the Server field, enter the host name or IP address of the computer on which the MySQLdatabase is installed.
Notesl This information is case sensitive.l To determine if you are connected to the database you want to use or if theconnection information you entered is correct, click Test Connection.If the connection is successful a message in green is displayed. If the connectionfails, an error message is displayed at the bottom of the dialog box.To view the log entry if the connection fails, click View Log. The server log isdisplayed with the information for the connection failure. Note that this button isnot available unless the test connection fails.
Setup and User Guide - Qlik Replicate, November 2021 801

9 Adding and managing target endpoints
7. Optionally, change the default port (3306).
8. Type the MySQL authentication information (User Name, Password) for the authorized user for thisMySQL database. If you do not know this information, see your MySQL database Administrator(DBA).
9. Select one of the following Load source schemas into options:l The following database - When this option is selected, all source schemas will be loadedinto the selected database.
l Multiple endpoints - When this option is selected, each of the source schemas will be loadedinto its corresponding database.
Setting advanced connection propertiesIn the Advanced tab, you can set the following properties:
l Max file size (KB): Select or type the maximum size (in KB) of a CSV file before it is loaded into theMySQL target database. The default value is 32000 KB.
l Use parallel loading: Select this option to improve performance when loading data into the MySQLtarget database.
l Use the following number of threads: Specify how many threads to use to load the data intothe MySQL target database. Note that setting a large number of threads may have anadverse effect on database performance since a separate connection is required for eachthread.
Internal parametersInternal parameters are parameters that are not exposed in the UI. You should only use them if instructedby Qlik Support.
To add internal Qlik Replicate parameters:
1. Click the Internal Parameters link.The Internal Parameters dialog box opens.
2. In the edit box, type the name of the parameter you need to add and then click it.
3. The parameter is added to the table below the search box with its default value.
4. Change the default value as required.
5. To reset the parameter value to its default, click the "Restore default value" icon at the end of therow.
More optionsThese options are not exposed in the UI as they are only relevant to specific versions or environments.Consequently, do not set these options unless explicitly instructed to do so by Qlik Support or productdocumentation.
To set an option, simply copy the option into the Add feature name field and click Add. Then set the valueor enable the option according to the instructions you received.
Setup and User Guide - Qlik Replicate, November 2021 802
9 Adding and managing target endpoints
Settings summaryYou can view a summary of your settings by clicking the Setting Summary link. This is useful if you need tosend a summary of your settings to Qlik Support.
Setup and User Guide - Qlik Replicate, November 2021 803

9 Adding and managing target endpoints
9.33 Using ODBC to connect to a targetThis topic describes how to use ODBC connectivity to connect to a target endpoint.
The ODBC target endpoint can be used to access targets that are not included in QlikReplicate’s extensive Support Matrix. However, unless enabled through Professional Servicesand approved by your Account Manager, the ODBC target endpoint should not be used.Additionally, the ODBC target endpoint should not be used to access any targets already listedin the Support Matrix.
When using HP NonStop SQL/MP (ARC) as an ODBC target, several additional proceduresmust be performed. For a detailed explanation, see Using HP NonStop SQL/MP as an ODBCtarget (page 1145).
In this section:
l Prerequisites (page 350)l ODBC target data types (page 806)l Setting general connection properties (page 807)l Setting advanced connection properties (page 809)
Setup and User Guide - Qlik Replicate, November 2021 804

9 Adding and managing target endpoints
PrerequisitesThe following section describes the prerequisites for working with Qlik Replicate and an ODBC targetendpoint.
In this section:
l Qlik Replicate Server for Windows (page 805)l Qlik Replicate Server for Linux (page 805)
Qlik Replicate Server for WindowsYou can connect an endpoint to Qlik Replicate using ODBC by indicating the DSN (Data Source Name). Inthis case you must be sure that a DSN is defined for the ODBC endpoint on the computer where QlikReplicate is installed.
1. Install an endpoint client on the computer where Qlik Replicate is installed. The client you installdepends on the ODBC provider you are using. For example, if you are using an IBM DB2 endpoint,install an IBM DB2 client.
You must use a 64-bit ODBC provider client to work with Qlik Replicate.
2. Use the ODBC Data Source Administrator to create a System DSN. The Data Source is located inthe Windows control panel.
Qlik Replicate Server for LinuxThe following section describes the steps you need to perform to work with Qlik Replicate for Linux andODBC as a target endpoint in a Qlik Replicate task.
1. On the Qlik Replicate Server machine, install the ODBC client that you want to use (e.g.postgreSQL).
2. Makes sure that the /etc/odbcinst.ini file contains the correct entry for the driver you installed, asin the following example:[PostgeSQL]Description = ODBC for PostgreSQLDriver = /usr/lib/psqlodbc.soSetup = /usr/lib/libodbcpsqlS.soDriver64 = /usr/lib64/psqlodbc.soSetup64 = /usr/lib64/libodbcpsqlS.soFileUsage = 1
To access an IBM DB2 for LUW target using ODBC, make sure that you specify thelibdb2o.so driver (and not libdb2.so).
3. Define a DSN for the installed driver by editing the /etc/odbc.ini file, as in the following example:[Postgre_DSN]Description = TestDriver = /usr/lib64/psqlodbc.soEndpoint = MyDatabase
Setup and User Guide - Qlik Replicate, November 2021 805

9 Adding and managing target endpoints
Servername = 12.3.45.678Port = 5432
ODBC target data typesThe following table shows the ODBC target data types that are supported when using Qlik Replicate andthe default mapping from Qlik Replicate data types.
ODBC does not support applying changes to binary data types in Batch optimized applymode. For more information on Batch optimized apply mode, see Change Processing Tuning(page 1027).
For information on how to view the data type that is mapped from the source, see the section for the sourceendpoint you are using.
For additional information about Qlik Replicate data types, see Replicate data types (page 76).
Qlik Replicate Data Types ODBC Data Types
BOOLEAN SQL_BIT
BYTES SQL_VARBINARY
DATE SQL_TYPE_DATE
TIME SQL_TYPE_TIME
DATETIME SQL_TYPE_TIMESTAMP
INT1 SQL_SMALLINT
INT2 SQL_SMALLINT
INT4 If the target endpoint supports precision and scale then:
SQL_INTEGER
Otherwise:
SQL_VARCHAR
INT8 SQL_BIGINT
NUMERIC SQL_NUMBER
REAL4 SQL_REAL
REAL8 SQL_DOUBLE
STRING SQL_VARCHAR
UINT1 SQL_TINYINT
UINT2 SQL_SMALLINT
Supported data types
Setup and User Guide - Qlik Replicate, November 2021 806

9 Adding and managing target endpoints
Qlik Replicate Data Types ODBC Data Types
UINT4 SQL_INTEGER
UINT8 SQL_BIGINT
WSTRING SQL_WVARCHAR
CLOB CLOB
BLOB BLOB
If the target endpoint does not support ODBC data types, data types are mapped to SQL_VARCHAR.
Setting general connection propertiesThis section describes how to configure general connection properties. For an explanation of how toconfigure advanced connection properties, see Setting advanced connection properties.
To add an ODBC endpoint to Qlik Replicate:
1. In Tasks view, click Manage Endpoint Connections to open the Manage Endpoints Connectionsdialog box. Then click the New Endpoint Connection button.
2. In the Name field, type a name for your ODBC endpoint. This can be any name that will help toidentify the endpoint being used.
3. In the Description field, type a description that helps to identify the ODBC endpoint. This is optional.
4. Select Target as the endpoint role.
5. Select ODBC as the endpoint Type.
6. Select one of the following:l DSN: Select this to connect to an ODBC-supported endpoint using a DSN. When you selectDSN you must select the DSN you are using from the list.
When connecting to SQL/MP, you must use a connection string, which shouldinclude the name of the Replicate ARC Unicode ODBC driver. See ConnectionString for an example.
If the DSN you want to use is not included in the list, make sure that the endpoint client isinstalled on the computer with Qlik Replicate and that the DSN is defined. Note that theODBC provider client must be 64-bit. For more information, see Prerequisites (page 350).
Setup and User Guide - Qlik Replicate, November 2021 807
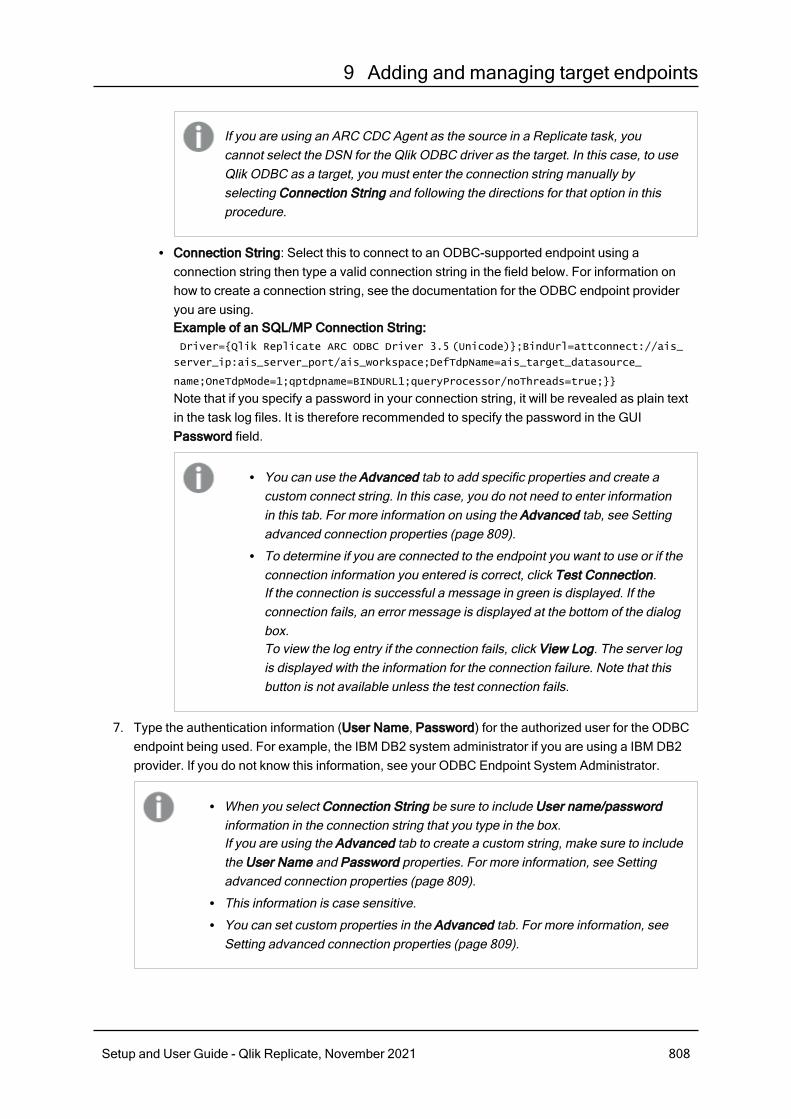
9 Adding and managing target endpoints
If you are using an ARC CDC Agent as the source in a Replicate task, youcannot select the DSN for the Qlik ODBC driver as the target. In this case, to useQlik ODBC as a target, you must enter the connection string manually byselecting Connection String and following the directions for that option in thisprocedure.
l Connection String: Select this to connect to an ODBC-supported endpoint using aconnection string then type a valid connection string in the field below. For information onhow to create a connection string, see the documentation for the ODBC endpoint provideryou are using.Example of an SQL/MP Connection String:Driver={Qlik Replicate ARC ODBC Driver 3.5 (Unicode)};BindUrl=attconnect://ais_
server_ip:ais_server_port/ais_workspace;DefTdpName=ais_target_datasource_
name;OneTdpMode=1;qptdpname=BINDURL1;queryProcessor/noThreads=true;}}
Note that if you specify a password in your connection string, it will be revealed as plain textin the task log files. It is therefore recommended to specify the password in the GUIPassword field.
l You can use the Advanced tab to add specific properties and create acustom connect string. In this case, you do not need to enter informationin this tab. For more information on using the Advanced tab, see Settingadvanced connection properties (page 809).
l To determine if you are connected to the endpoint you want to use or if theconnection information you entered is correct, click Test Connection.If the connection is successful a message in green is displayed. If theconnection fails, an error message is displayed at the bottom of the dialogbox.To view the log entry if the connection fails, click View Log. The server logis displayed with the information for the connection failure. Note that thisbutton is not available unless the test connection fails.
7. Type the authentication information (User Name, Password) for the authorized user for the ODBCendpoint being used. For example, the IBM DB2 system administrator if you are using a IBM DB2provider. If you do not know this information, see your ODBC Endpoint System Administrator.
l When you select Connection String be sure to include User name/passwordinformation in the connection string that you type in the box.If you are using the Advanced tab to create a custom string, make sure to includethe User Name and Password properties. For more information, see Settingadvanced connection properties (page 809).
l This information is case sensitive.l You can set custom properties in the Advanced tab. For more information, seeSetting advanced connection properties (page 809).
Setup and User Guide - Qlik Replicate, November 2021 808

9 Adding and managing target endpoints
Make sure that the ODBC endpoint user has the correct access privileges for the ODBCprovider being used.
Setting advanced connection propertiesIn the Advanced tab, you can set the following properties:
l Provider syntax: Select the name of the provider syntax. Note that when replicating to an HPNonStop SQL/MP target, you must select SQLMP (ARC) as the provider type.
l Load using CSV: Select to load the data using a CSV file.l Max file size (KB): Select or type the maximum size (in KB) of a CSV file before the file is movedinto the load folder. The default value is 32000 KB.
Internal parametersInternal parameters are parameters that are not exposed in the UI. You should only use them if instructedby Qlik Support.
To add internal Qlik Replicate parameters:
1. Click the Internal Parameters link.The Internal Parameters dialog box opens.
2. In the edit box, type the name of the parameter you need to add and then click it.
3. The parameter is added to the table below the search box with its default value.
4. Change the default value as required.
5. To reset the parameter value to its default, click the "Restore default value" icon at the end of therow.
More optionsThese options are not exposed in the UI as they are only relevant to specific versions or environments.Consequently, do not set these options unless explicitly instructed to do so by Qlik Support or productdocumentation.
To set an option, simply copy the option into the Add feature name field and click Add. Then set the valueor enable the option according to the instructions you received.
Settings summaryYou can view a summary of your settings by clicking the Setting Summary link. This is useful if you need tosend a summary of your settings to Qlik Support.
Setup and User Guide - Qlik Replicate, November 2021 809
9 Adding and managing target endpoints
9.34 Using Oracle as a targetThis section describes how to set up and use an Oracle database as a target endpoint in a replication task.
When replicating to an Oracle database with a full disk and/or partition where Oracle is trying towrite archived redo log files, insert operations may fail. In such a case, no error will be shownand the task will not progress past the loading stage. To confirm that this is an Oracle Archivererror, stop and attempt to restart the task. The task will not start and an appropriate errorshould be shown.
In this section:
l Supported Oracle database editions (page 370)l Client prerequisites (page 811)l Limitations (page 812)l Security requirements (page 812)l Oracle target data types (page 813)l Setting general connection properties (page 815)l Setting advanced connection properties (page 816)
Setup and User Guide - Qlik Replicate, November 2021 810

9 Adding and managing target endpoints
Client prerequisitesBefore you can work with an Oracle endpoint, make sure the prerequisites listed in this section have beenmet.
Support for the XMLTYPE data type requires the full Oracle Client.
l OnWindows systems, install Oracle Instant Client for Microsoft Windows (x64) Version 11.2.0.3.0or later.
l On Linux systems, install Oracle Instant Client for Linux (x86-64) Version 11.2.0.3.0 or later.In addition, if not already included in your system, you need to create a symbolic link in the $Oracle_
Home\lib directory. This link should be called libclntsh.so, and should point to a specific version ofthis file.For example, on an Oracle 12c client:lrwxrwxrwx 1 oracle oracle 63 Oct 2 14:16 libclntsh.so ->
/u01/app/oracle/home/lib/libclntsh.so.12.1
Additionally, append the LD_LIBRARY_PATH environment variable to the Oracle lib directory bycopying the driver location to the site_arep_login.sh file as follows:echo "export LD_LIBRARY_PATH=$LD_LIBRARY_PATH:/u01/app/oracle/home/lib/" > site_arep_
login.sh
When Replicate Server is installed on Red Hat 8.1, you must install Oracle Instant Clientfor Linux (x86-64) Version 12.
Connecting to an Oracle autonomous data warehouseThe following procedure should be performed when replicating to an Oracle Autonomous DataWarehouse.
To set up connectivity to Oracle Autonomous Data Warehouse (ADW), you need the Client Credentials(Wallet) ZIP file that you downloaded when you set up your Oracle Autonomous Data Warehouseenvironment.
To enable Replicate to connect to Oracle Autonomous Data Warehouse:
1. Extract the contents of the Client Credentials ZIP file to a folder of your choice.This can be any folder, but for the purpose of this procedure, C:\myapp\adw_credentials will be theWindows folder containing the extracted files while /home/adw_credentials will be the Linux foldercontaining the extracted files.
2. In the folder containing the extracted files, edit the sqlnet.ora file, replacing ?/network/admin withthe path of the folder containing the extracted files:Replicate on Windows:WALLET_LOCATION = (SOURCE = (METHOD = file) (METHOD_DATA = (DIRECTORY="C:\myapp\adw_
credentials")))
SSL_SERVER_DN_MATCH=yes
Replicate on Linux:WALLET_LOCATION = (SOURCE = (METHOD = file) (METHOD_DATA = (DIRECTORY="/home/adw_
credentials")))
Setup and User Guide - Qlik Replicate, November 2021 811

9 Adding and managing target endpoints
SSL_SERVER_DN_MATCH=yes
3. Create the TNS_ADMIN environment variable and set it to the location of the credentials file.Replicate on Windows:Set the TNS_ADMIN to C:\myapp\adw_credentialsReplicate on Linux:Run the following commands:export TNS_ADMIN=/home/adw_credentials
export PATH=$TNS_ADMIN:$PATH
4. In the Connection String field in the endpoint's General tab, enter one of the names from thetnsnames.ora file.
For more information on setting up connectivity to Oracle ADW, see:
Connect Autonomous Transaction Processing Using a Client Application
LimitationsThe following limitations apply:
l The Use direct path full load option does not support the following:l Tables with INDEXTYPE CONTEXTWorkaround: Use Array Load.
l Bidirectional replicationl Triggers
l Qlik Replicate cannot create a new schema on the Oracle database. To replicate to a new schema,the new schema name must already exist on the Oracle target. You can then specify the newschema name in the Task Settings’ Target metadata (page 1011) and Control tables (page 1015)tabs as required.
l When working in Batch optimized apply mode, empty LOB columns might be replicated as NULLvalues.
Security requirementsA user must have the following privileges granted in the Oracle database to use an Oracle target in a QlikReplicate task:
l CREATE ANY TABLEl CREATE ANY INDEXESl ALTER ANY TABLEl DROP ANY TABLEl INSERT ANY TABLEl UPDATE ANY TABLEl DELETE ANY TABLEl SELECT ANY TABLEl SELECT all_indexesl SELECT all_ind_columns
Setup and User Guide - Qlik Replicate, November 2021 812

9 Adding and managing target endpoints
l SELECT all_constraintsl SELECT all_cons_columns
Oracle target data typesThe Oracle database for Qlik Replicate supports most Oracle data types. The following table shows theOracle target data types that are supported when using Qlik Replicate and the default mapping from QlikReplicate data types.
For information on how to view the data type that is mapped from the source, see the section for the sourcedatabase you are using.
For additional information about Qlik Replicate data types, see Replicate data types (page 76).
Qlik Replicate Data Types Oracle Data Types
BOOLEAN NUMBER (1)
BYTES RAW (length)
DATE DATETIME
TIME TIMESTAMP (0)
DATETIME If scale <= 9, then TIMESTAMP (scale)
Otherwise, VARCHAR2 (37)
INT1 NUMBER (3)
INT2 NUMBER (5)
INT4 NUMBER (10)
INT8 NUMBER (19)
NUMERIC NUMBER (p,s)
REAL4 BINARY_FLOAT
REAL8 BINARY_DOUBLE
Data types
Setup and User Guide - Qlik Replicate, November 2021 813

9 Adding and managing target endpoints
Qlik Replicate Data Types Oracle Data Types
STRING With date indication: DATE
With time indication: TIMESTAMP
With timestamp indication: TIMESTAMP
With timestamp_with_timezone indication: TIMESTAMPWITH TIMEZONE
With timestamp_with_local_timezone indication: TIMESTAMPWITH LOCAL TIMEZONE
With interval_year_to_month indication: INTERVAL YEAR TOMONTH
with interval_day_to_second indication: INTERVAL DAY TOSECOND
If Length > 4000: CLOB
In all other cases: VARCHAR2 (Length)
UINT1 NUMBER (3)
UINT2 NUMBER (5)
UINT4 NUMBER (10)
UINT8 NUMBER (19)
WSTRING NVARCHAR2 (length)
Note that when length is greater than 2000, the column datatype will be NCLOB.
BLOB BLOB
To use this data type with Qlik Replicate, you must enable theuse of BLOBs for a specific task.
During CDC or during Full Load when the Allow unlimitedLOB size option is enabled, LOB data types are supportedonly in tables with a primary key or unique index.
CLOB CLOB
To use this data type with Qlik Replicate, you must enable theuse of CLOBs for a specific task.
During CDC or during Full Load when the Allow unlimitedLOB size option is enabled, LOB data types are supportedonly in tables with a primary key or unique index.
Setup and User Guide - Qlik Replicate, November 2021 814

9 Adding and managing target endpoints
Qlik Replicate Data Types Oracle Data Types
NCLOB NCLOB
To use this data type with Qlik Replicate, you must enable theuse of NCLOBs for a specific task.
During CDC or during Full Load when the Allow unlimitedLOB size option is enabled, LOB data types are supportedonly in tables with a primary key or unique index.
The XMLTYPE target data type is onlyrelevant in Oracle-to-Oraclereplication tasks. See the note below.
XMLTYPE
When the source database is Oracle, the source data types will be replicated "as is" to theOracle target. For example, an XMLTYPE data type on the source will be created as anXMLTYPE data type on the target.
Setting general connection propertiesThis section describes how to configure general connection properties. For an explanation of how toconfigure advanced connection properties, see Setting advanced connection properties.
The total number of columns per table supported in Batch optimized apply mode can beexpressed using the following formula:
2 * columns_in_original_table + columns_in_primary_key <= 999
So, for example, if the original tables has 25 columns and its Primary Key consists of 5columns, then the total number of columns would be 55. If a table exceeds the supportednumber of columns, Replicate will apply all of the changes in one-by-one mode.
To add an Oracle target endpoint to Qlik Replicate:
1. In the Qlik Replicate console, click Add database to open the Add Endpoints dialog box. For moreinformation on adding an endpoint to Qlik Replicate, see Defining and managing endpoints (page110).
2. In the Name field, type a name for your database. This can be any name that will help to identify thedatabase being used.
3. In the Description field, type a description that helps to identify the Oracle database. This isoptional.
4. Select Target as the database role.
5. Select Oracle as the database Type.
6. Type the Oracle Connection String for the Oracle database you want to work with.
Setup and User Guide - Qlik Replicate, November 2021 815

9 Adding and managing target endpoints
l When replicating to an Oracle Autonomous Data Warehouse, you first need toperform the procedure described in Connecting to an Oracle autonomous datawarehouse (page 811).
l This information is case sensitive.
You can type the connect string in any Oracle format, for example://host:port/service name
Where:l host: This is the name or IP address for the computer with the Oracle database that you areusing. For example, johnboy_W7 or 255.255.255.0.
l port: (optional) This is the TNS Listener Port number for the computer with the Oracledatabase that you are using. If you do not enter a port number the default Oracle TNSListener port is used.
l service name: (optional) This is the service name for the computer with the Oracle databaseyou are using. If you do not enter a service name the default service name is used.
You can also enter an Oracle Net keyword-value pair. For example:"(DESCRIPTION=(ADDRESS=(PROTOCOL=tcp) (HOST=dlsun242) (PORT=5521))
(CONNECT_DATA=(SERVICE_NAME=bjava21)))"
7. Type the Oracle authentication information (User Name, Password) for the authorized user for thisOracle database. If you do not know this information, see your Oracle database Administrator(DBA).To ensure that the password provided to Replicate is never used by any other principal, Replicatecan be configured to automatically replace the user-entered password with a strong randompassword. For more information, see Configuring Replicate to automatically replace the user-entered password (page 80).
Make sure that the Oracle user entered in the Oracle Authentication section has thecorrect access privileges. For information on how to provide the required privileges, seeSecurity requirements (page 812).
This information is case sensitive.
To determine if you are connected to the database you want to use or if the connectioninformation you entered is correct, click Test Connection.If the connection is successful a message in green is displayed. If the connection fails,an error message is displayed at the bottom of the dialog box.To view the log entry if the connection fails, click View Log. The server log is displayedwith the information for the connection failure. Note that this button is not availableunless the test connection fails.
Setting advanced connection propertiesYou can set additional properties in the Advanced tab of the Oracle database connection settings.
Setup and User Guide - Qlik Replicate, November 2021 816

9 Adding and managing target endpoints
You can set the following properties:
l Use direct path full load: Select this to use the OCI direct path protocol for bulk loading Oracletables. This is the default selection.
Due to an issue with Oracle Direct Path, when this option is selected and If target tablealready exists is set to Do nothing in the Full Load Settings (page 1017), the followingoccurs:
l The first time the task runs, no error will be issued and rows with the samePrimary Key may be added to the target table.
l The second time the task runs, the setting will take effect.l Any subsequent times the task runs, an error will be generated.
Internal parametersInternal parameters are parameters that are not exposed in the UI. You should only use them if instructedby Qlik Support.
To add internal Qlik Replicate parameters:
1. Click the Internal Parameters link.The Internal Parameters dialog box opens.
2. In the edit box, type the name of the parameter you need to add and then click it.
3. The parameter is added to the table below the search box with its default value.
4. Change the default value as required.
5. To reset the parameter value to its default, click the "Restore default value" icon at the end of therow.
More optionsThese options are not exposed in the UI as they are only relevant to specific versions or environments.Consequently, do not set these options unless explicitly instructed to do so by Qlik Support or productdocumentation.
To set an option, simply copy the option into the Add feature name field and click Add. Then set the valueor enable the option according to the instructions you received.
Settings summaryYou can view a summary of your settings by clicking the Setting Summary link. This is useful if you need tosend a summary of your settings to Qlik Support.
Setup and User Guide - Qlik Replicate, November 2021 817

9 Adding and managing target endpoints
9.35 Using Pivotal Greenplum as a targetThis section describes how to set up and use a Pivotal Greenplum database as a target in a replicationtask.
In this section:
l An overview of the Pivotal Greenplum target (page 819)l Qlik Replicate Pivotal Greenplum endpoint architecture overview (page 819)l The Pivotal Greenplum Full Load process (page 821)l Applying changes to the Pivotal Greenplum target (page 821)l Prerequisites (page 821)l Provide Pivotal Greenplum account access (page 823)l Security requirements (page 823)l Limitations (page 823)l Pivotal Greenplum data types (page 823)l Setting up the gpfdist program as a service (page 825)l Using multiple gpfdist programs (page 826)l Setting general connection properties (page 826)l Setting advanced connection properties (page 828)l Testing your Pivotal Greenplum Configuration and Environment (page 829)
Setup and User Guide - Qlik Replicate, November 2021 818

9 Adding and managing target endpoints
An overview of the Pivotal Greenplum targetThe Qlik Replicate database for Pivotal Greenplum is a powerful operational data warehousing solutionthat manages Big Data analytics and challenges. Qlik Replicate uses Pivotal Greenplum’s Scatter/GatherStreaming technology to help with data integration. This technology handles large amounts of data well.
The Qlik Replicate Pivotal Greenplum database makes it possible to load data from other heterogeneousdata sources and maintain the most up to date information. This is done by capturing changes andstreaming the changes to the Pivotal Greenplum data warehouse. This can be done with a very low impacton the source data.
The Qlik Replicate Pivotal Greenplum database provides full automation for:
l Schema generation and data type mappingl Full load of source database tablesl Incremental load of changes made to source tablesl Application of DDL changes made to the source tables.l Synchronization between full load and CDC processes.
Manual control is also available if needed.
The Qlik Replicate Pivotal Greenplum database integrates with the Pivotal Greenplum database in twoways:
l Pivotal Greenplum ODBC API. This is used for metadata management. The Pivotal GreenplumODBC API lets Qlik Replicate test the database connection, get the table list and the table schema,build procedures that create external tables to process a file, and invoke the procedures that loadthe destination table or apply changes from the external table. During the schema generation, datatypes can be mapped, such as Pivotal Greenplum to Postgres. Primary keys and distributionclauses are generated based on the primary key.
l Pivotal Greenplum Parallel File Distribution Server (gpfdist). This utility is used with read-onlyexternal tables for fast, parallel data loading into a Pivotal Greenplum data warehouse. gpfdist usesmaximum parallelism while reading from external tables.Qlik Replicate works closely with gpfdist to take advantage of its optimized fast, parallel loadingfacilities. Qlik Replicate uses the Pivotal Greenplum Parallel File Distribution Server to support bothfull load and incremental load activities.
See Qlik Replicate Pivotal Greenplum endpoint architecture overview (page 819) for a description of thesystem architecture used with the Pivotal Greenplum database.
Qlik Replicate Pivotal Greenplum endpoint architecture overviewThe following shows the Qlik Replicate Pivotal Greenplum endpoint system architecture for:
l Full load (page 820)l CDC (page 820)
Setup and User Guide - Qlik Replicate, November 2021 819
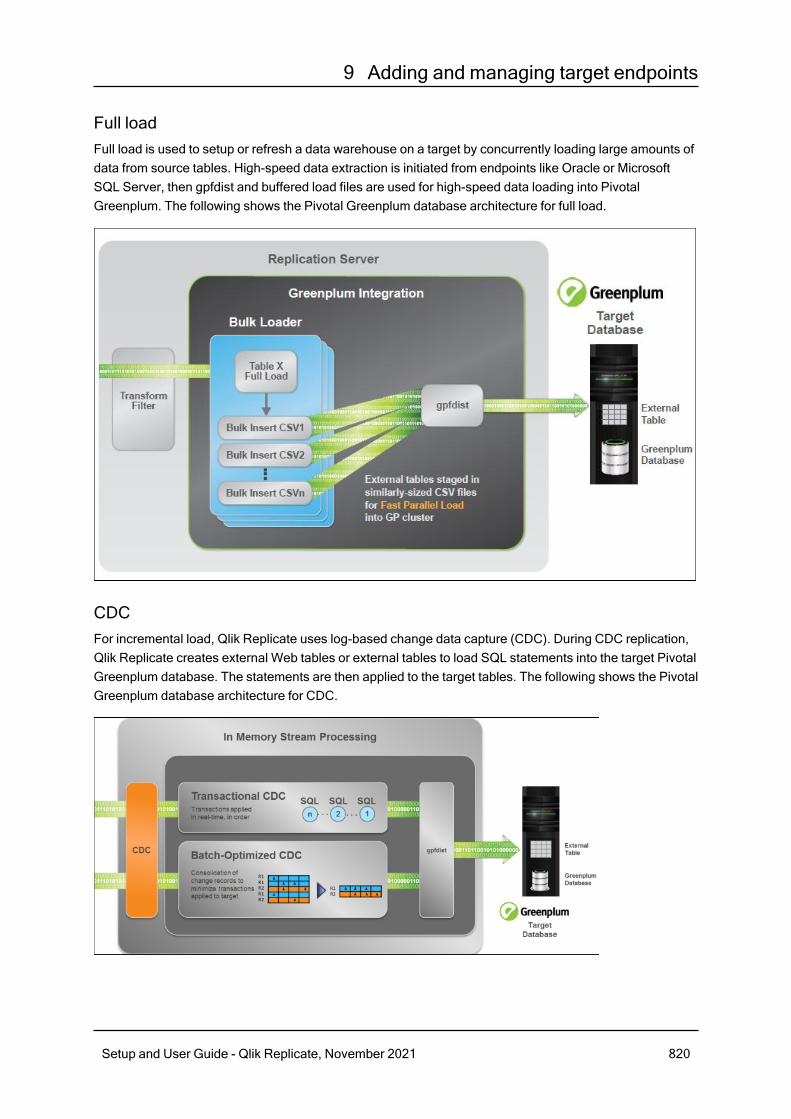
9 Adding and managing target endpoints
Full loadFull load is used to setup or refresh a data warehouse on a target by concurrently loading large amounts ofdata from source tables. High-speed data extraction is initiated from endpoints like Oracle or MicrosoftSQL Server, then gpfdist and buffered load files are used for high-speed data loading into PivotalGreenplum. The following shows the Pivotal Greenplum database architecture for full load.
CDCFor incremental load, Qlik Replicate uses log-based change data capture (CDC). During CDC replication,Qlik Replicate creates external Web tables or external tables to load SQL statements into the target PivotalGreenplum database. The statements are then applied to the target tables. The following shows the PivotalGreenplum database architecture for CDC.
Setup and User Guide - Qlik Replicate, November 2021 820

9 Adding and managing target endpoints
The Pivotal Greenplum Full Load processOn the first run of a task the Pivotal Greenplum target writes the data being replicated to CSV files into afolder that is defined for the task. The CSV files are named sequentially, for example, loadNNNN, whereNNNN is an incremental number starting from 0. The maximum file size of the CSV file is set by the userwhen configuring the Pivotal Greenplum database.
When the CSV file reaches its maximum size it is renamed and moved into a load folder. It is then read bythe gpfdist utility, which executes an SQL statement that loads the data into the target table. Once the fileloading is complete, the file is deleted.
Applying changes to the Pivotal Greenplum targetYou can apply changes in one of two modes:
l Transactional Apply Mode (page 821)l Batch-Optimized Apply Mode (page 821)
For information on how to use the transactional apply mode, see Apply Changes Settings (page 1020).
Transactional Apply ModeIn this mode, the Pivotal Greenplum database writes all the change records to CSV files as DMLstatement. When a file is ready, the Pivotal Greenplum database creates an external Web table that usesthe gpfdist server to read changes from the file and executes the DML statements in each row returnedfrom the external Web table. When the changes are applied, the file is deleted.
Batch-Optimized Apply ModeIn this mode, the Pivotal Greenplum database writes net changes only to CSV files. When a file is ready,the Pivotal Greenplum database uses an external table that uses the gpfdist server to read the net changesfrom the file to a temporary table. The net changes are then applied to the target tables in the most efficientway. When the changes are applied, the file is deleted.
PrerequisitesYou can use the Pivotal Greenplum database with Qlik Replicate on either a Windows or Linux computer.The following topic describe the prerequisites for working with Qlik Replicate and a Pivotal Greenplumdatabase.
Replicate on Windows: Required softwareYou must install the following software on the computer where the Qlik Replicate Server is installed:
l greenplum-db-clients-6.7.1l PROGRESS_DATADIRECT_CONNECT64_ODBC_7.1.6.HOTFIX
To prevent errors during replication tasks, make sure that the Pivotal Greenplum ODBC driverhas a valid license.
Setup and User Guide - Qlik Replicate, November 2021 821

9 Adding and managing target endpoints
Replicate on Linux: Required softwareOn the Linux computer, perform the following steps:
1. Open port 8080.
2. Install the following Greenplum software:l greenplum-db-clients-6.7.1l PROGRESS_DATADIRECT_CONNECT64_ODBC_7.1.6.HOTFIX
3. Update the odbcinst.ini file located in the etc directory, as in the following example:
[DataDirect 7.1 Greenplum Wire Protocol]
Driver=/opt/Progress/DataDirect/Connect64_for_ODBC_71/lib/ddgplm27.so
Setup=/opt/Progress/DataDirect/Connect64_for_ODBC_71/lib/ddgplm27.so
APILevel=0
ConnectFunctions=YYY
DriverODBCVer=3.52
FileUsage=0
HelpRootDirectory=/opt/Progress/DataDirect/Connect64_for_ODBC_71/help
SQLLevel=0
4. Update the /opt/attunity/replicate/bin/site_arep_login.sh file so that the Pivotal Greenplumenvironment scripts are executed when logging into the account where Qlik Replicate is run.
Example:
LD_LIBRARY_PATH=$LD_LIBRARY_PATH:/opt/Progress/DataDirect/Connect64_for_ODBC_71/lib
export GPHOME_CLIENTS=/usr/local/greenplum-db-clients
5. Make sure you create a symbolic link from greenplum-db-clients to the Greenplum ODBC client.
Example:
greenplum-db-clients -> /usr/local/greenplum-db-clients-6.7.1 (make sure that the path starts with/usr/local).
6. Restart Replicate Server.
Configuration and environmentQlik Replicate relies on the proper functioning of the Pivotal Greenplum's gpfdist program on the computerwith Qlik Replicate (the local computer). gpfdist is a simple Web server program with special performancecustomization for concurrent access from Pivotal Greenplum database segment nodes to data files on thelocal computer.
Because gpfdist is a Web server program and because it needs to be accessible from the PivotalGreenplum database segment nodes, there are some networking configuration settings that must be inplace to allow for this access. This is documented in the EMC Pivotal Greenplum database AdministrationGuide.
For further information, see Testing your Pivotal Greenplum Configuration and Environment (page 829).
Setup and User Guide - Qlik Replicate, November 2021 822

9 Adding and managing target endpoints
Provide Pivotal Greenplum account accessThe Qlik Replicate user who is working with the Pivotal Greenplum database must be registered as a userin the Pivotal Greenplum database. This is the user that is entered in the dialog box when Setting generalconnection properties (page 826). You must grant Pivotal Greenplum account access to this user beforeconfiguring the database in Qlik Replicate.
One of the Qlik Replicate computer network cards must be part of the Pivotal Greenplumdatabase segments network to allow communication with the gpfdist program.
See Testing your Pivotal Greenplum Configuration and Environment (page 829) for additional informationabout connecting to and configuring a Pivotal Greenplum database to work with Qlik Replicate.
Security requirementsA user must have the following privileges granted in the Pivotal Greenplum database to use a PivotalGreenplum target in a Qlik Replicate task:
l CREATE table/external table/Web external tablel TRUNCATE tablel ALTER tablel INSERT/UPDATE/DELETE
LimitationsQlik Replicate cannot update columns that are part of the distribution key.
The Pivotal Greenplum target database has limited LOB support. You cannot use an unlimited LOB size forthis database. For more information, see Pivotal Greenplum data types (page 823).
Pivotal Greenplum data typesThe Pivotal Greenplum database for Qlik Replicate supports most Pivotal Greenplum data types. Thefollowing table shows the Pivotal Greenplum target data types that are supported when using QlikReplicate and the default mapping from Qlik Replicate data types.
For information on how to view the data type that is mapped from the source, see the section for the sourcedatabase you are using. For additional information about Qlik Replicate data types, see Replicate datatypes (page 76).
QlikReplicateData Types
Pivotal Greenplum Data Types
BOOLEAN bool
BYTES bytea
Data types
Setup and User Guide - Qlik Replicate, November 2021 823

9 Adding and managing target endpoints
QlikReplicateData Types
Pivotal Greenplum Data Types
DATE date
TIME time (p)
DATETIME timestamp (p)
INT1 int2
INT2 int2
INT4 int4
INT8 int8
NUMERIC numeric (p,s)
REAL4 float4
REAL8 float8
STRING varchar (n); n=data length
UINT1 int2
UINT2 int4
UINT4 int8
UINT8 numeric (20)
WSTRING varchar (n); n=length
BLOB bytea
To use this data type with Qlik Replicate, you must enable the use of BLOBs for aspecific task.
During CDC or during Full Load when the Allow unlimited LOB size option is enabled,LOB data types are supported only in tables with a primary key or unique index.
The Pivotal Greenplum target database has limited LOB support. You cannot use anunlimited LOB size for this database.
For more information, see Task Settings/Metadata (page 1011).
Setup and User Guide - Qlik Replicate, November 2021 824

9 Adding and managing target endpoints
QlikReplicateData Types
Pivotal Greenplum Data Types
CLOB text
To use this data type with Qlik Replicate, you must enable the use of CLOBs for aspecific task.
During CDC or during Full Load when the Allow unlimited LOB size option is enabled,LOB data types are supported only in tables with a primary key or unique index.
The Pivotal Greenplum target database has limited LOB support. You cannot use anunlimited LOB size for this database.
For more information, see Task Settings/Metadata (page 1011).
NCLOB text
To use this data type with Qlik Replicate, you must enable the use of NCLOBs for aspecific task.
During CDC or during Full Load when the Allow unlimited LOB size option is enabled,LOB data types are supported only in tables with a primary key or unique index.
The Pivotal Greenplum target database has limited LOB support. You cannot use anunlimited LOB size for this database.
For more information, see Task Settings/Metadata (page 1011).
Setting up the gpfdist program as a serviceYou can use the gpfdist program as a service when replicating data to Pivotal Greenplum endpoints usingQlik Replicate. In this way it is assured that a replication task that is running will not lose its connection togpfdist. This solution is best used when more than one task is using the same gpfdist program.
Note that you can set up Pivotal Greenplum endpoints as described in Setting general connectionproperties (page 826) and test it without creating a service, but you should create the service before youbegin to work with the Pivotal Greenplum endpoints.
If you want to use multiple gpfdist programs, then you should set them up on different ports.See Using multiple gpfdist programs (page 826).
To create use a gpfdist service:
1. From the command-line console on the computer where Qlik Replicate is installed, change thedirectory to the directory where Qlik Replicate is installed.
2. Type the following at the command-line prompt to create the service.repctl service create <name of service (optional)> database=<name of Pivotal Greenplum
database>
Setup and User Guide - Qlik Replicate, November 2021 825

9 Adding and managing target endpoints
The Pivotal Greenplum database that you use in this command must be configured inQlik Replicate. If you have defined more than one Pivotal Greenplum database, you canuse any of the database names. All of the defined endpoints on the same Qlik Replicateinstance are included in the defined service.
3. Start the service before you run any Pivotal Greenplum tasks by typing the following at thecommand line prompt:sc start AttunityReplicateServer_<name of database you defined the service with>
If you chose to create a data folder in a separate location from where you installed QlikReplicate, you must add the prefix -d <path to data folder> before any command linetask described in this section. For example, to start the service you must type:-d <path to data folder> sc start AttunityReplicateServer_<name of database>Working with a data folder in a different location is recommended when working withlarge Pivotal Greenplum endpoints. For more information, see Setting up Qlik Replicateon Windows (page 39).
To stop the service:
l Type the following at the command-line prompt:sc stop AttunityReplicateServer_<name of database you defined the service with>
To delete the service:
l Type the following at the command-line prompt:sc delete AttunityReplicateServer_<name of database you defined the service with>
A log file is available in the Qlik Replicate data folder and in the Pivotal Greenplum debug files,which is accessed through the Pivotal Greenplum database console.
Using multiple gpfdist programsYou can define each replication task that has a Pivotal Greenplum database as a target to use a separategpfdist program. In this case each gpfdist should run on a different port. If you want to use the same gpfdistprogram for each task, you may want to use the gpfdist program as a service. For more information, seeSetting up the gpfdist program as a service (page 825).
To use gpfdist on multiple ports:
1. Install gpfdist programs on the computers you want to use them.
2. Make sure that you assign a different port number for the gpfdist program in each task. For moreinformation, see Setting general connection properties (page 826).
Setting general connection propertiesThis section describes how to configure general connection properties. For an explanation of how toconfigure advanced connection properties, see Setting advanced connection properties.
Setup and User Guide - Qlik Replicate, November 2021 826

9 Adding and managing target endpoints
To add a Pivotal Greenplum Target endpoint to Qlik Replicate:
1. In Tasks view, click Manage Endpoint Connections to open the Manage Endpoint Connectionsdialog box.
2. In the Manage database Connections dialog box, click New Endpoint Connection.
3. In the Name field, type a name for your database. This can be any name that will help to identify thedatabase being used.
4. In the Description field, type a description that helps to identify the Pivotal Greenplum database.This is optional.
5. Select Target as the database role.
6. Select Pivotal Greenplum as the database Type.
7. Type the Database host name. This is the name of the computer with the Pivotal Greenpluminstance you want to work with.
Although the gpfdist program acts as a Webserver, it does not carry out security checkson any requests made to it. Therefore, when you define the path to the gpfdist program,it must be to a specific location so that no other data on the computer is accessed.You can use the Advanced tab to add specific properties and create a custom connectstring. In this case, you do not need to enter information in this tab. For more informationon using the Advanced tab, see Setting advanced connection properties (page 828).
8. Type the Pivotal Greenplum database Port, where the Pivotal Greenplum instance you are workingwith is located. The default value is 5432.
9. Type the Pivotal Greenplum authentication information (User Name, Password) for the authorizeduser for this Pivotal Greenplum database. If you do not know this information, see your PivotalGreenplum system manager.
l If you are using the Advanced tab to create a custom string, make sure to includethe User Name property. A Password can also be included but is not required.See Setting advanced connection properties (page 828) for more information.
l This information is case sensitive.l If you want to set custom properties for this database, see Setting advancedconnection properties (page 828).
l To determine if you are connected to the database you want to use or if theconnection information you entered is correct, click Test ConnectionIf the connection is successful a message in green is displayed. If the connectionfails, an error message is displayed at the bottom of the dialog box.To view the log entry if the connection fails, click View Log. The server log isdisplayed with the information for the connection failure. Note that this button isnot available unless the test connection fails.
Setup and User Guide - Qlik Replicate, November 2021 827

9 Adding and managing target endpoints
Make sure that the Pivotal Greenplum user entered in the Pivotal GreenplumAuthentication section has the correct access privileges. For information on how toprovide the required privileges, see Security requirements (page 823).
10. Type the Database name or select one from the list of available databases. This is the name of thePivotal Greenplum database where you are replicating the data to.
11. Type the gpfdist hostname for the server where the gpfdist program is installed.
12. Type the gpfdist port number where the gpfdist program is listening. The default value is 8080.
13. In the Security section:
1. To enable SSL, select the Use SSL check box.
2. In the CA Path, specify the folder containing the certificate required to execute gpfdist.
3. In the Public key file field, specify the full path of the public key file (i.e. including the filename). The file can reside in the same folder as the CA certificate.
4. In the Private key file field, specify the full path of the private key file (i.e. including the filename). The file can reside in the same folder as the CA certificate.
Setting advanced connection propertiesIn the Advanced tab, you can set the following parameters:
l gpfdist max row length: Select or type the maximum length of a row (number of characters) in theCSV file that is sent to the gpfdist program. This is the maximum row length read by gpfdist. Thedefault value is 32,768. The larger the size of the rows the more resources the gpfdist programuses.
l Create tables in tablespace: Type the name of the tablespace where you want create the targettables. This is optional. Note that the tablespace that you enter must exist in the Pivotal Greenplumdatabase.
l Max file size (KB): Select or type the maximum size (in KB) of a CSV file before the file is movedinto the load folder. The default value is 32000 KB.
l Write buffer size: (KB): Select or type the maximum amount of memory (in Kilobytes) used to storethe data before moving it to the load folder. The default value is 1001.
l ODBC driver: Type the name of the ODBC driver you are using to connect to the Pivotal Greenplumdatabase you are working with. The default value is DataDirect 7.0 Pivotal Greenplum WireProtocol.
l Additional ODBC connection properties: Type any additional ODBC connection properties ifrequired
l Use externally managed gpfdist: Select this check box to use an external gpfdist with this PivotalGreenplum database.
l Storage folder: Type the name and location (enter full path) of the folder that holds the CSV files forloading. This is available only if you are using an externally managed gpfdist.
Internal parametersInternal parameters are parameters that are not exposed in the UI. You should only use them if instructedby Qlik Support.
Setup and User Guide - Qlik Replicate, November 2021 828

9 Adding and managing target endpoints
To add internal Qlik Replicate parameters:
1. Click the Internal Parameters link.The Internal Parameters dialog box opens.
2. In the edit box, type the name of the parameter you need to add and then click it.
3. The parameter is added to the table below the search box with its default value.
4. Change the default value as required.
5. To reset the parameter value to its default, click the "Restore default value" icon at the end of therow.
More optionsThese options are not exposed in the UI as they are only relevant to specific versions or environments.Consequently, do not set these options unless explicitly instructed to do so by Qlik Support or productdocumentation.
To set an option, simply copy the option into the Add feature name field and click Add. Then set the valueor enable the option according to the instructions you received.
Settings summaryYou can view a summary of your settings by clicking the Setting Summary link. This is useful if you need tosend a summary of your settings to Qlik Support.
Testing your Pivotal Greenplum Configuration and EnvironmentQlik Replicate relies on the proper functioning of Pivotal Greenplum's gpfdist program on the computer withQlik Replicate (the local computer). gpfdist is a simple Web server program with special performancecustomizing for concurrent access from Pivotal Greenplum database segment nodes to data files on thelocal computer.
Because gpfdist is a Web server program and because it needs to be accessible from the PivotalGreenplum database segment nodes, there are some networking configuration settings that must be inplace to allow for this access. This is documented in the EMC Greenplum database Administration Guide.
The following sections provide a simple test that verifies the proper configuration of the Pivotal Greenplumdatabase and the local software installation. You can run this test before installing any Qlik software onyour local computer. This test must be completed successfully to ensure that Qlik Replicate can work witha Pivotal Greenplum database.
l Collect Connection Information (page 829)l Create a Test Input File (page 830)l Create an SQL Script File (page 830)l Start gpfdist (page 830)l Run the SQL Script (page 830)
Collect Connection InformationThe following is the information required for this test. You should write down the information for yoursystem to use later in this test.
Setup and User Guide - Qlik Replicate, November 2021 829

9 Adding and managing target endpoints
l <<Pivotal Greenplum-host>>: The Pivotal Greenplum database host name (master).l <<Pivotal Greenplum-port>>: The Pivotal Greenplum database port number (master). In manycases the port number is 5432
l <<Pivotal Greenplum-user>>: The username that is used to connect to the Pivotal Greenplumdatabase. This user must have permission to create an external table.
l <<Pivotal Greenplum-password>>: The password of the selected Pivotal Greenplum user.l <<Pivotal Greenplum-database>>: The Pivotal Greenplum database name where the test iscreated.
l <<Pivotal Greenplum-host>>: The local computer name as seen from the Pivotal Greenplumsegment nodes.
l <<gpfdist-port>>: The port number where the gpfdist program is listening.
Create a Test Input FileCreate a text file called greenplum_test123.txt with the following content:
Scott,Greenplum
Tiger,Woods
Create an SQL Script FileCreate a text file called greenplum_test123.sql with the following content, replacing the <<.fgf.>> tokenswith the information for your system that you wrote down in step 1:
CREATE EXTERNAL TABLE greenplum_test123 ( name text, descr text )
LOCATION ('gpfdist://<<gpfdist-host>>:<<gpfdist-port>>/greenplum_test123.txt')
FORMAT 'TEXT' (DELIMITER ',');
SELECT * FROM greenplum_test123;
DROP EXTERNAL TABLE greenplum_test123;
Start gpfdistOpen a command shell and change the current directory to the directory where you created the Test InputFile and the SQL Script File. Then start the gpfdist program with the following command:
$ gpfdist -v -p <<gpfdist-port>> -d .
Run the SQL ScriptRun the SQL script that you created with the following command:
$ psql -d <<Pivotal Greenplum-database>> -h <<Pivotal Greenplum-host>> -p <<Pivotal Greenplum-
port>> -U <<Pivotal Greenplum-user>> -f greenplum_test123.sql
If the script runs successfully, the following is displayed:
CREATE EXTERNAL TABLE
name | descr
-------+-----------
Scott | Pivotal Greenplum
Tiger | Woods
(2 rows)
DROP EXTERNAL TABLE
If the script is not successful, you will get an output that is similar to the following example:
Setup and User Guide - Qlik Replicate, November 2021 830

9 Adding and managing target endpoints
CREATE EXTERNAL TABLE
psql:greenplum_test123.sql:4: ERROR: connection with gpfdist failed for
gpfdist://atturepl:18080/greenplum_test123.txt. effective url: http://192.168.165.12:
18080/greenplum_test123.txt. error code = 110 (Connection timed out) (seg0 slice1
greenplum421.acme.local:40000 pid=31364)
DROP EXTERNAL TABLE
In the example above, the problem was that a firewall on the local computer prevented the PivotalGreenplum database segment from reaching the local gpfdist instance.
Any error that occurs must be resolved before using Qlik Replicate with EMC Pivotal Greenplum. Once youresolve the error, you should run this test again to ensure that you can work with the Pivotal Greenplumdatabase.
For information about what to do if this test fails, see Troubleshooting gpfdist issues (page 831).
Troubleshooting gpfdist issuesIf the test described in Testing your Pivotal Greenplum Configuration and Environment (page 829) fails,you should carry out the following checks:
l Did gpfdist start on the correct port or protocol? (page 831)l Can Pivotal Greenplum reach gpfdist? (page 831)
Did gpfdist start on the correct port or protocol?To check whether gpfdist is listening on the correct port or protocol, enter the following command:
For Windows:
$ netstat -a -n | find "<<gpfdist-port>>"
For Linux:
$ netstat -a -n | grep "<<gpfdist-port>>"
The following is the output that you should get if gpfdist started on port 8080 on Windows:
$ netstat -a -n | find "8080"
TCP 0.0.0.0:8080 0.0.0.0:0 LISTENING
TCP [::]:8080 [::]:0 LISTENING
This indicates that gpfdist is listening on any network interface on both IPv4 (0.0.0.0:8080) and IPv6([::]:8080).
If only the IPv6 line is shown in most cases there is a local networking configuration problem. PivotalGreenplum's recommendation in this case is to disable IPv6 on the local computer (see the Microsoftknowledge base article on how to carry this out at http://support.microsoft.com/kb/929852).
Can Pivotal Greenplum reach gpfdist?For gpfdist to work, all Pivotal Greenplum database segments must be able to communicate with the localmachine (the ETL machine as described by Pivotal Greenplum) using the HTTP protocol.
While gpfdist is running, run the following command from each one of the Pivotal Greenplum databasesegment nodes to ensure that all segments can access gpfdist:
$ wget http?//<<Pivotal Greenplum-host>>?<<Pivotal Greenplum-port>>/gpfdist/status
Setup and User Guide - Qlik Replicate, November 2021 831

9 Adding and managing target endpoints
This should return a status page with the following or similar content:
read_bytes 0
total_bytes 0
total_sessions 0
When carrying out the network checks from the Pivotal Greenplum internal master node, there is usually afile called seg_host that contains a list of the Pivotal Greenplum database segment node names. If thisfile exists, you can check access from all segment nodes using a single Pivotal Greenplum gpssh
command:
$ gpssh -f seg_host
=> wget http?//<<Pivotal Greenplum-host>>?<<Pivotal Greenplum-port>>/gpfdist/status
If this check fails, a network or system manager must change the network or system configuration so thatthe check succeeds.
Setup and User Guide - Qlik Replicate, November 2021 832

9 Adding and managing target endpoints
9.36 Using a PostgreSQL-Based database as a targetThis section describes how to set up and use a PostgreSQL-based target endpoint in a replication task.
You need to configure a PostgreSQL-based endpoint when replicating to any of the following databases:
l PostgreSQLl Amazon Aurora (PostgreSQL)l Amazon RDS for PostgreSQL
In this section:
l Prerequisites (page 834)l Limitations (page 834)l Security requirements (page 834)l PostgreSQL Database target data types (page 835)l Setting general connection properties (page 836)l Setting advanced connection properties (page 838)
Setup and User Guide - Qlik Replicate, November 2021 833

9 Adding and managing target endpoints
PrerequisitesThe following topic describes the client prerequisites when replicating to a PostgreSQL target.
l Qlik Replicate Server for Windows:l The PostgreSQL ODBC Driver: PostgreSQL ODBC Driver psqlodbc_12_02_0000-x64 orabove must be installed on the Qlik Replicate machine.
l Postgresql-binaries:
1. Download postgresql-12.6-3-windows-x64-binaries.zip.
2. Copy the bin folder to a Replicate machine.
3. Add the bin folder path to the system PATH.
If PostgreSQL binaries and the Greenplum client are deployed on the sameReplicate Server, tasks configured to use a PostgreSQL target will fail.
l Microsoft Visual Studio 2013 Redistributable (x86) - not (x64) - must be installed on the QlikReplicate machine.
l Qlik Replicate Server for Linux: On the Qlik Replicate machine:
1. Install postgresql12. For example, postgresql12-12.1-2PGDG.rhel7.x86_64.rpm is thepackage required for Red Hat 7.
2. Install the ODBC driver postgresql12.For example, postgresql12-odbc-12.01.0000-1PGDG.rhel7.x86_64.rpm is the client requiredfor Red Hat 7.
3. Copy the driver location to the site_arep_login.sh file:echo "export LD_LIBRARY_PATH=/usr/lib:/usr/lib64:/usr/pgsql-12/lib:$LD_LIBRARY_
PATH" >> site_arep_login.sh
This will add the driver to "LD_LIBRARY_PATH" and update the driver location in the site_arep_login.sh file.
4. Makes sure that the /etc/odbcinst.ini file contains an entry for PostgreSQL, as in thefollowing example:[PostgreSQL]
Description = PostgreSQL ODBC driver
Driver = /usr/pgsql-12/lib/psqlodbc.so
Setup = /usr/pgsql-12/lib/psqlodbcw.so
Debug = 0
CommLog = 1
UsageCount = 2
LimitationsUPDATE and DELETE operations on tables without a Primary Key/Unique Index that contain duplicaterecords is not supported. Any changes to these tables will affect all the records in the target.
Security requirementsThe user specified in the General tab when Setting general connection properties (page 836) must be aregistered user in the PostgreSQL database.
Setup and User Guide - Qlik Replicate, November 2021 834

9 Adding and managing target endpoints
PostgreSQL Database target data typesThe PostgreSQL endpoint for Qlik Replicate supports most PostgreSQL database data types. Thefollowing table shows the PostgreSQL database target data types that are supported when using QlikReplicate and the default mapping from Qlik Replicate data types.
For information on how to view the data type that is mapped from the source, see the section for the sourcedatabase you are using. For additional information about Qlik Replicate data types, see Replicate datatypes (page 76).
Qlik Replicate Data Types PostgreSQL database Data Types
BOOL BOOL
BYTES BYTEA
DATE DATE
TIME TIME
DATETIME If scale is => 0 and =< 6, then:
TIMESTAMP
If scale is => 7 and =< 12, then:
VARCHAR (37)
INT1 SMALLINT
INT2 SMALLINT
INT4 INTEGER
INT8 BIGINT
NUMERIC DECIMAL (P, S)
REAL4 FLOAT4
REAL8 FLOAT8
STRING If length is 1 - 21845, then:
VARCHAR (Length in Bytes = The STRING value multiplied by three)
If length is 21846 - 2147483647, then:
VARCHAR (65535)
UINT1 SMALLINT
UINT2 INTEGER
UINT4 BIGINT
UINT8 BIGINT
Data types
Setup and User Guide - Qlik Replicate, November 2021 835

9 Adding and managing target endpoints
Qlik Replicate Data Types PostgreSQL database Data Types
WSTRING If length is 1 - 21845, then:
VARCHAR (Length in Bytes = The WSTRING value multiplied by three)
If length is 21846 - 2147483647, then:
VARCHAR (65535)
BLOB BYTEA
NCLOB TEXT
CLOB TEXT
Data types when replicating from a PostgreSQL sourceWhen replicating from a PostgreSQL source, the target table will be created with the same data types forall columns, apart from columns with user-defined data types. In such cases, the data type will be createdas "character varying" in the target.
Setting general connection propertiesThis section describes how to configure general connection properties. For an explanation of how toconfigure advanced connection properties, see Setting advanced connection properties.
To add a PostgreSQL target endpoint to Qlik Replicate:
1. In Tasks view, click Manage Endpoint Connections to open the Manage Endpoints Connectionsdialog box. Then click the New Endpoint Connection button. For more information on adding anendpoint to Qlik Replicate, see Defining and managing endpoints (page 110).
2. In the Name field, type a name for your database. This can be any name that will help to identify thedatabase being used.
3. In the Description field, type a description that helps to identify the PostgreSQL database. This isoptional.
4. Select Target as the database role.
5. From the Type drop-down list, select PostgreSQL for PostgreSQL, Amazon Aurora PostgreSQL,and Amazon RDS for PostgreSQL.
6. Type the Server name. This is the name or IP address or host name of the computer with thePostgreSQL database that you want to access.
7. Optionally, change the default port (5432).
8. Enter the PostgreSQL database authentication information (User name, Password) of anauthorized PostgreSQL user. If you do not know this information, see your PostgreSQL databasesystem manager.
Setup and User Guide - Qlik Replicate, November 2021 836

9 Adding and managing target endpoints
Consider the following:l This information is case sensitive.l To determine if you are connected to the database you want to use or if theconnection information you entered is correct, click Test Connection.If the connection is successful a message in green is displayed. If the connectionfails, an error message is displayed at the bottom of the dialog box.To view the log entry if the connection fails, click View Log. The server log isdisplayed with the information for the connection failure. Note that this button isnot available unless the test connection fails.
Make sure that the specified PostgreSQL database user has the correct accessprivileges.
9. Type the Database name or select one from the list of available endpoints. This is the name of thePostgreSQL database to which you are replicating data.
SSL authentication optionsIn the Security section, you can configure Replicate to connect to the PostgreSQL database using SSL.
The specified certificates are relevant only for bulk insert operations.
l SSL Mode: Select one of the following:l Prefer - Establishes an encrypted connection if the server supports encrypted connections,falling back to an unencrypted connection if an encrypted connection cannot be established.
l Disable - Connect with a surname and password only.l Allow - Establish an encrypted connection if requested by the server.l Require - Establishes an encrypted connection if the server supports encrypted connections.The connection attempt fails if an encrypted connection cannot be established.
l Verify CA - Similar to Required, but also verifies the server Certificate Authority (CA)certificate against the configured CA certificates. The connection attempt fails if no validmatching CA certificates are found.
l Verify Full - Similar to Verify CA, but also performs host name identity verification bychecking the host name the client (i.e. Replicate) uses for connecting to the server againstthe identity in the certificate that the server sends to the client. The client checks whether thehost name that it uses for connecting matches the Common Name value in the servercertificate. The connection fails if there is a mismatch.
l Client certificate path:- The path to the client certificate requested by the server.l Secret key path - The path to the client private key file in PEM format.l CA path - The path to the Certificate Authority (CA) that issued the client certificate file in PEMformat.
Setup and User Guide - Qlik Replicate, November 2021 837

9 Adding and managing target endpoints
l CRL path - The path to the CRL certificate. This file contains certificates revoked by certificateauthorities. If the server certificate appears in this list, the connection will fail.
l SSL compression -Select this option to compress the data before it is encrypted.
Setting advanced connection propertiesIn the Advanced tab, you can set the following properties:
You can set the following properties:
l Max file size (KB): Select or type the maximum size (in KB) of a CSV file before the file is loadedinto the PostgreSQL target database. The default value is 32000 KB.
Internal parametersInternal parameters are parameters that are not exposed in the UI. You should only use them if instructedby Qlik Support.
To add internal Qlik Replicate parameters:
1. Click the Internal Parameters link.The Internal Parameters dialog box opens.
2. In the edit box, type the name of the parameter you need to add and then click it.
3. The parameter is added to the table below the search box with its default value.
4. Change the default value as required.
5. To reset the parameter value to its default, click the "Restore default value" icon at the end of therow.
More optionsThese options are not exposed in the UI as they are only relevant to specific versions or environments.Consequently, do not set these options unless explicitly instructed to do so by Qlik Support or productdocumentation.
To set an option, simply copy the option into the Add feature name field and click Add. Then set the valueor enable the option according to the instructions you received.
Settings summaryYou can view a summary of your settings by clicking the Setting Summary link. This is useful if you need tosend a summary of your settings to Qlik Support.
Setup and User Guide - Qlik Replicate, November 2021 838

9 Adding and managing target endpoints
9.37 Using Qlik Cloud Landing as a targetUse this endpoint if you need to land data into an Amazon S3 bucket when working with theQlik Cloud - Hybrid Data Delivery service.
For more information about the Hybrid Data Delivery service, see Hybrid data delivery.
Setup and User Guide - Qlik Replicate, November 2021 839
9 Adding and managing target endpoints
In this section:
l Prerequisites (page 840)l Overview (page 841)l Limitations (page 841)l Change data partitioning (page 842)l Qlik Cloud Landing target data types (page 842)l Setting general connection properties (page 843)l Setting advanced connection properties (page 844)
PrerequisitesBefore you can use Qlik Cloud Landing as a target endpoint in a Replicate task, the following prerequisitesmust be met:
l The time on the Qlik Replicate Server machine must be accurate.
l The task should be defined with the Full Load and Store Changes replication options only.
l Replicate connects to AWS using SSL. This requires an appropriate CA certificate to reside on theReplicate Server machine; otherwise, the connection will fail. The purpose of the CA certificate is toauthenticate the ownership of the AWS server certificate.On Windows, the required CA certificate is always present whereas on Linux it may sometimes bemissing. Therefore, if you are using Replicate for Linux, make sure that the required CA certificateexists in the following location:/etc/pki/tls/certs/ca-bundle.crtIf it does not exist, the simplest solution is to copy the certificates bundle from another Linuxmachine.
l You must have an Amazon S3 bucket that is accessible from the Replicate Server machine.For information on signing up for Amazon S3, see http://aws.amazon.com/s3/.
l Bucket access credentials: Make a note of the bucket name, region, access key and secret accesskey - you will need to provide them in the Qlik Replicate Qlik Cloud Landing target settings.
l Bucket access permissions: Qlik Replicate requires the following bucket access permissions:
{
"Version": "2012-10-17",
"Statement": [
{
"Sid": "Stmt1497347821000",
"Effect": "Allow",
"Action": [
"s3:GetBucketLocation",
"s3:ListBucket"
],
"Resource": [
"arn:aws:s3:::YOUR_BUCKET_NAME"
Setup and User Guide - Qlik Replicate, November 2021 840

9 Adding and managing target endpoints
]
},
{
"Sid": "Stmt1497344984000",
"Effect": "Allow",
"Action": [
"s3:PutObject",
"s3:GetObject",
"s3:DeleteObject"
],
"Resource": [
"arn:aws:s3:::YOUR_BUCKET_NAME/target_path",
"arn:aws:s3:::YOUR_BUCKET_NAME/target_path/*"
]
}
]
}
Where YOUR_BUCKET_NAME is the name of your bucket and target_path is the intended location of thetarget files in your bucket.
If the target path is the bucket root, just specify “/target_path” with an empty string.
OverviewWhen using Qlik Cloud Landing as a target in a Replicate task, both the Full Load and Change Processingdata are written to data files in CSV format.
Full Load files are named using incremental counters e.g. LOAD00001.csv, LOAD 00002.csv, etc.whereas Apply Changes files are named using timestamps e.g. 20141029-1134010000.csv.
When Parallel Load is used, the naming convention for Full Load files is slightly different:
LOAD_$(SegmenteID)_$(IncreasingCounter)
Example:
LOAD_1_00000001 | LOAD_1_00000002 | LOAD_1_00000003 | LOAD_2_00000001
| LOAD_2_00000002
For each source table, a folder is created in the specified Amazon S3 bucket. The data files are created onthe Replicate Server machine and are then uploaded to the specified Amazon S3 bucket once the FileAttributes (Full Load) and Change Processing upload conditions have been met.
LimitationsThe following limitations apply to the Qlik Cloud Landing target endpoint:
Setup and User Guide - Qlik Replicate, November 2021 841
9 Adding and managing target endpoints
l The following DDLs are supported only: Create table, Add Column, Rename Column, Drop Column,and Convert Data Type.
l Full LOB Mode is not supportedl The Apply Changes replication mode is not supported as it is not relevant for this endpoint.l The <target folder> parameter cannot include special characters
Change data partitioningWhen replicating to a Qlik Cloud Landing target, for each of the source tables, a directory is created underthe specified target directory. When Change Data Partitioning (page 1022) is enabled, an additional sub-directory is created under the corresponding table directory. The data files are located in the partitionsubdirectory, as in the following example:
{Target Directory}
{Table_1}
{Partition_1}
Data files
{Partition_2}
Data files
{Partition_3}
Data files
{Table_2}
{Partition_1}
Data files
{Partition_2}
Data files
{Partition_3}
Data files
Information about the partitions is written to the attrep_cdc_partitions Control Table. For information aboutthis table, see Change data partitions (page 1141).
Qlik Cloud Landing target data typesThe following table shows the default mapping from Qlik Replicate data types to Qlik Cloud Landing targetdata types.
For information on source data type mappings, see the section for the source endpoint you are using.
For additional information about Qlik Replicate data types, see Replicate data types (page 76).
Qlik Replicate Data Types Qlik Cloud Landing Target Data Types
DATE DATE
TIME TIME
DATETIME DATETIME
BYTES BYTES (length)
BLOB BLOB
Data types
Setup and User Guide - Qlik Replicate, November 2021 842

9 Adding and managing target endpoints
Qlik Replicate Data Types Qlik Cloud Landing Target Data Types
REAL4 REAL4 (7)
REAL8 REAL8 (14)
INT1 INT1 (3)
INT2 INT2 (5)
INT4 INT4 (10)
INT8 INT8 (19)
UINT1 UINT1 (3)
UINT2 UINT2 (5)
UINT4 UINT4 (10)
UINT8 UINT8 (20)
NUMERIC NUMERIC (p,s)
STRING STRING (Length)
WSTRING STRING (Length)
CLOB CLOB
NCLOB NCLOB
BOOLEAN BOOLEAN (1)
Setting general connection propertiesThis section describes how to configure general connection properties. For an explanation of how toconfigure advanced connection properties, see Setting advanced connection properties.
To add a Qlik Cloud Landing target endpoint to Qlik Replicate:
1. In Tasks view, click Manage Endpoint Connections to open the Manage Endpoints Connectionsdialog box. Then click the New Endpoint Connection button. For more information on adding anendpoint to Qlik Replicate, see Defining and managing endpoints (page 110).
2. In the Name field, type a name for your endpoint. This can be any name that will help to identify theendpoint being used.
3. Optionally, in the Description field, type a description that helps to identify the endpoint.
4. Select Target as the endpoint role.
5. Select Qlik Cloud Landing as the endpoint Type.
6. Configure the remaining settings in the General tab as described below.l Bucket name - The name of your Amazon S3 bucket.l Bucket region -The Amazon S3 region where your bucket is located.l Access key - The access key information for Amazon S3.l Secret key - The secret key information for Amazon S3.
Setup and User Guide - Qlik Replicate, November 2021 843
9 Adding and managing target endpoints
l Target folder - The target folder in your Amazon S3 bucket.
For each table, a unique subfolder with a timestamp will be automatically createdunder the target folder as part of the Full Load operation, and whenever the taskor table is reloaded. As the data in these folders is not purged automatically, tooptimize performance and preserve disk space, it is recommended to deletethem manually when they are no longer needed.
7. To determine if the connection information you entered is correct, click Test Connection. If theconnection test is successful, click Save.
As part of connection testing process, Replicate uploads a test file to the specified Amazon S3Target folder and then deletes it once a connection has been established.
If the connection is successful a message in green is displayed. If the connection fails, an errormessage is displayed at the bottom of the dialog box.
To view the log entry if the connection fails, click View Log. The server log is displayed with theinformation for the connection failure. Note that this button is not available unless the testconnection fails.
Setting advanced connection propertiesIn the Advanced tab, you can configure file-related and proxy server options. These options are describedbelow.
File attributesl Maximum file size - The maximum size a file can reach before it is closed.l Store the changes when one of these conditions is fulfilled:
l File size reaches: Specify the maximum size of Change Data to accumulate beforeuploading the file to Amazon S3.
l Elapsed time reaches: Elapsed time reaches x.
Proxy serverUse proxy server - Select this option to access Amazon S3 via a proxy server.
l Host name - The host name of the proxy server.l Port - The port via which to access the proxy server.l User name - The user name for accessing the proxy server.l Password - The password for accessing the proxy server.l Scheme - Select which protocol to use to access the server (HTTP or HTTPS). In order to useHTTPS, you must first install the CA certificate that signed the proxy’s certificate on the ReplicateServer machine, as follows:
Setup and User Guide - Qlik Replicate, November 2021 844

9 Adding and managing target endpoints
l On Windows: Add the CA certificate to the Trusted Root Certification Authorities store ofLocal Computer
l On Linux: Add the CA certificate to /etc/pki/tls/certs/ca-bundle.crt
Internal parametersInternal parameters are parameters that are not exposed in the UI and should only be used if instructed byQlik Support.
To add internal Qlik Replicate parameters:
1. Click the Internal Parameters link.The Internal Parameters dialog box opens.
2. In the edit box, type the name of the parameter you need to add and then click it.
3. The parameter is added to the table below the search box with its default value.
4. Change the default value as required.
5. To reset the parameter value to its default, click the "Restore default value" icon at the end of therow.
More optionsThese options are not exposed in the UI as they are only relevant to specific versions or environments.Consequently, do not set these options unless explicitly instructed to do so by Qlik Support or productdocumentation.
To set an option, simply copy the option into the Add feature name field and click Add. Then set the valueor enable the option according to the instructions you received.
Settings summaryYou can view a summary of your setting by clicking the View Setting Summary link. This is useful if youneed to send a summary of your setting to Qlik Support.
Setup and User Guide - Qlik Replicate, November 2021 845

9 Adding and managing target endpoints
9.38 Using SAP HANA as a targetThis section describes how to set up and use a SAP HANA database as a target database in a replicationtask.
In this section:
l Prerequisites (page 847)l Limitations and considerations (page 847)l Permissions (page 847)l Supported data types (page 847)l Setting general connection properties (page 848)l Setting advanced connection properties (page 849)
Setup and User Guide - Qlik Replicate, November 2021 846

9 Adding and managing target endpoints
Prerequisitesl Windows: Install the SAP HANA ODBC 64-bit Driver 2.x for Windows on the Replicate Servermachine. The driver name is HDBODBC.
l Linux: Install the SAP HANA ODBC 64-bit Driver 2.x for Linux on the Replicate Server machine.The driver name is HDBODBC.Add the following section to the odbcinst.ini file located in directory /etc:[HDBODBC]
Description=64-bit HANA ODBC Driver
Driver=/opt/sap/hdbclient/libodbcHDB.so
fileUsage=1
Limitations and considerationsThe following limitations apply when using the SAP HANA target endpoint in a Replicate task:
l INSERTs and UPDATEs of the BLOB data type are not supported in Batch optimized applyChange Processing mode. Use "Transactional apply" mode instead.
PermissionsThe user specified in the SAP HANA endpoint settings must be granted the following permissions:
l CREATE TABLESl ALTERl SELECTl INSERTl DELETEl DROP
Supported data typesThe Qlik Replicate SAP HANA target endpoint supports most SAP HANA data types. The following tableshows the SAP HANA target data types that are supported when using Qlik Replicate and the defaultmapping from Qlik Replicate data types.
For information on how to view the data type that is mapped from the source, see the section for the sourcedatabase you are using.
For additional information about Qlik Replicate data types, see Replicate data types (page 76).
Qlik Replicate Data Types SAP HANA Data Types
BOOL BOOLEAN
BYTES VARBINARY (Length)
DATE DATE
TIME TIME
Data types
Setup and User Guide - Qlik Replicate, November 2021 847

9 Adding and managing target endpoints
Qlik Replicate Data Types SAP HANA Data Types
DATETIME TIMESTAMP
INT1 TINYINT
INT2 SMALLINT
INT4 INTEGER
INT8 BIGINT
NUMERIC DECIMAL (p,s)
REAL4 REAL
REAL8 DOUBLE
STRING VARCHAR (Length)
UINT1 TINYINT
UINT2 SMALLINT
UINT4 INTEGER
UINT8 BIGINT
WSTRING NVARCHAR (Length)
BLOB BLOB
NCLOB NCLOB
CLOB CLOB
Setting general connection propertiesThis section describes how to configure general connection properties. For an explanation of how toconfigure advanced connection properties, see Setting advanced connection properties.
To add a SAP HANA target endpoint to Qlik Replicate:
1. In the Qlik Replicate console, click Manage Endpoint Connections to open the Manage EndpointsConnections dialog box.
2. In the Name field, type a name for your database. This can be any name that will help to identify thedatabase being used.
3. In the Description field, optionally enter a description that helps to identify the SAP HANA database.
4. Select Target as the database role.You can do this step before any of the other steps if you want, however before you can continue withthe next step in this process, you must select the database role.
5. Select SAP HANA as the database Type.
6. In the Server field, specify the IP address or host name of the SAP HANA database server.To connect to a High Availability Cluster, specify all of the cluster nodes and port numbers in theServer field. The nodes should be separated by a comma.
Setup and User Guide - Qlik Replicate, November 2021 848
9 Adding and managing target endpoints
Example:12.12.1.123:3033,12.12.1.124:3034
7. In the Instance field, enter the instance number of the target SAP HANA database.
8. Enter the Username and Password required to access the SAP HANA database. If you do notknow this information, see your SAP HANA database administrator (DBA).
This information is case sensitive.
9. Click Test Connection to verify that the specified settings are correct.
Setting advanced connection propertiesIn the Advanced tab, you can set internal parameters and view a summary of your settings for the SAPHANA target endpoint.
Internal parametersInternal parameters are parameters that are not exposed in the UI. You should only use them if instructedby Qlik Support.
To add internal Qlik Replicate parameters:
1. Click the Internal Parameters link.The Internal Parameters dialog box opens.
2. In the edit box, type the name of the parameter you need to add and then click it.
3. The parameter is added to the table below the search box with its default value.
4. Change the default value as required.
5. To reset the parameter value to its default, click the "Restore default value" icon at the end of therow.
More optionsThese options are not exposed in the UI as they are only relevant to specific versions or environments.Consequently, do not set these options unless explicitly instructed to do so by Qlik Support or productdocumentation.
To set an option, simply copy the option into the Add feature name field and click Add. Then set the valueor enable the option according to the instructions you received.
Settings summaryYou can view a summary of your settings by clicking the Setting Summary link. This is useful if you need tosend a summary of your settings to Qlik Support.
Setup and User Guide - Qlik Replicate, November 2021 849
9 Adding and managing target endpoints
9.39 Using SAP Sybase ASE as a targetThis section describes how to set up and use a SAP Sybase ASE database as the target endpoint in areplication task.
In this section:
l Prerequisites (page 851)l Limitations (page 851)l Security requirements (page 851)l SAP Sybase ASE database target data types (page 851)l Non-supported data types (page 853)l Setting general connection properties (page 853)l Setting advanced connection properties (page 854)
Setup and User Guide - Qlik Replicate, November 2021 850

9 Adding and managing target endpoints
PrerequisitesThis topic lists the prerequisites for using the SAP Sybase ASE target endpoint in a replication task.
l Install SAP Adaptive Server Enterprise ODBC Driver 16.0 (64-bit) on the Qlik Replicate machine.l When replicating to SAP Sybase ASE 15.7 installed on a Windows machine configured with a non-Latin language (e.g. Chinese), Qlik Replicate requires Sybase 15.7 SP121 to be installed on theSAP Sybase ASE machine.
LimitationsThe following limitations apply:
l Only one Qlik Replicate task can be run per SAP Sybase ASE database.l Zero values located at the end of binary data type strings are truncated when replicated to the targetdatabase. For example, 0x0000000000000000000000000100000100000000 in the source table willbecome 0x00000000000000000000000001000001 in the target table.
l Qlik Replicate creates the target table with columns that do not allow NULL values, if the databasedefault is not to allow NULL values. Consequently, if a Full Load or CDC replication task containsempty values, errors will occur.To prevent this from happening:
1. Right-click the database name and select Properties from the context menu.
2. In the Options tab, select Allow nulls by default and then click OK.
Security requirementsYou must provide SAP Sybase ASE account access to the Qlik Replicate user. This user must haveread/write privileges in the SAP Sybase ASE database.
SAP Sybase ASE database target data typesThe following table shows the SAP Sybase ASE database target data types that are supported when usingQlik Replicate and the default mapping from Qlik Replicate data types.
SAP Sybase ASE does not support applying changes to binary data types in Batch optimizedapply mode. For more information on Batch optimized apply mode, see Change ProcessingTuning (page 1027).
For information on how to view the data type that is mapped from the source, see the section for the sourceendpoint you are using.
For additional information about Qlik Replicate data types, see Replicate data types (page 76).
Setup and User Guide - Qlik Replicate, November 2021 851
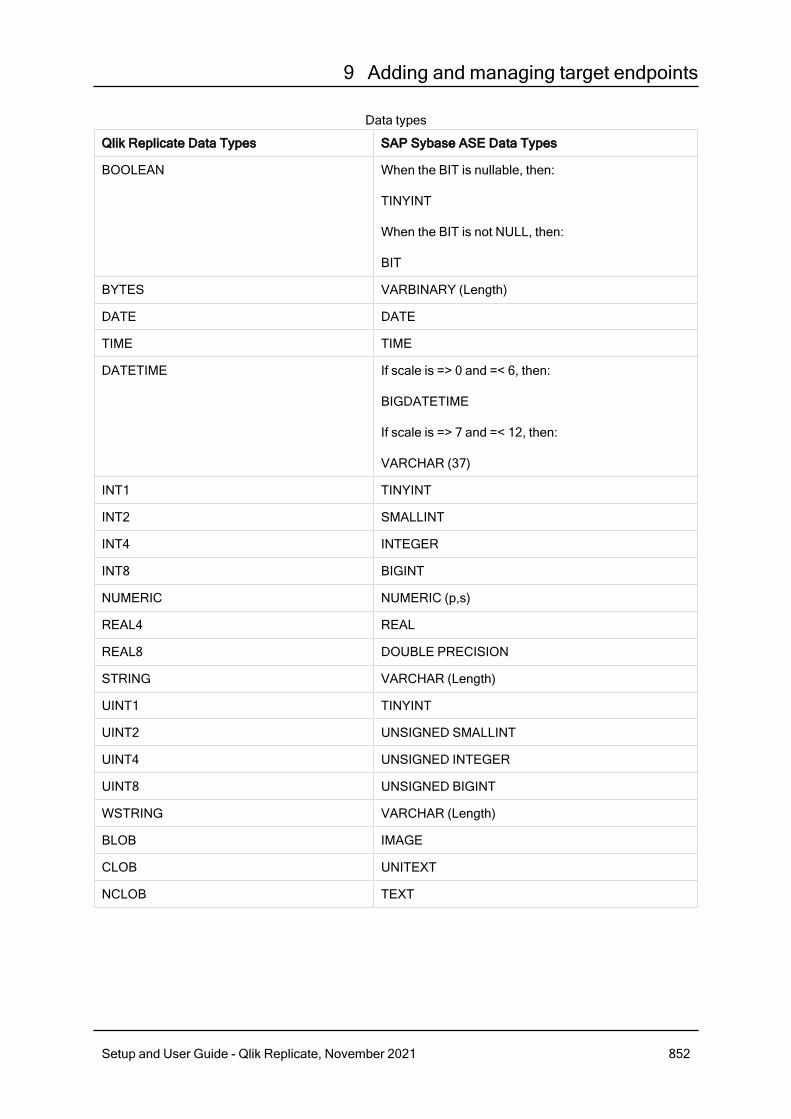
9 Adding and managing target endpoints
Qlik Replicate Data Types SAP Sybase ASE Data Types
BOOLEAN When the BIT is nullable, then:
TINYINT
When the BIT is not NULL, then:
BIT
BYTES VARBINARY (Length)
DATE DATE
TIME TIME
DATETIME If scale is => 0 and =< 6, then:
BIGDATETIME
If scale is => 7 and =< 12, then:
VARCHAR (37)
INT1 TINYINT
INT2 SMALLINT
INT4 INTEGER
INT8 BIGINT
NUMERIC NUMERIC (p,s)
REAL4 REAL
REAL8 DOUBLE PRECISION
STRING VARCHAR (Length)
UINT1 TINYINT
UINT2 UNSIGNED SMALLINT
UINT4 UNSIGNED INTEGER
UINT8 UNSIGNED BIGINT
WSTRING VARCHAR (Length)
BLOB IMAGE
CLOB UNITEXT
NCLOB TEXT
Data types
Setup and User Guide - Qlik Replicate, November 2021 852
9 Adding and managing target endpoints
Non-supported data typesTarget SAP Sybase ASE tables with columns of the following SAP Sybase ASE data types cannot bereplicated. Replicated columns with these data types will show as null.
l UDT
Setting general connection propertiesThis section describes how to configure general connection properties. For an explanation of how toconfigure advanced connection properties, see Setting advanced connection properties.
To add a SAP Sybase ASE target endpoint to Qlik Replicate:
1. In the Qlik Replicate Console, click Manage Endpoint Connections to open the Manage EndpointsConnections dialog box. Then click the New Endpoint Connection button. For more information onadding an endpoint to Qlik Replicate, see Defining and managing endpoints (page 110).
2. In the Name field, type a name for your database. This can be any name that will help to identify thedatabase being used.
3. In the Description field, type a description that helps to identify the SAP Sybase ASE database.This is optional.
4. Select Target as the database role.
5. Select SAP Sybase ASE as the database Type.
6. In the Server Name field, enter the host name or IP address of the computer on which the SAPSybase ASE database is installed.
Consider the following:l This information is case sensitive.l You can use the Advanced tab to add specific properties and create a customconnect string. In this case, you do not need to enter information in this tab. Formore information on using the Advanced tab, see Setting advanced connectionproperties (page 854).
l To determine if you are connected to the database you want to use or if theconnection information you entered is correct, click Test Connection.If the connection is successful a message in green is displayed. If the connectionfails, an error message is displayed at the bottom of the dialog box.To view the log entry if the connection fails, click View Log. The server log isdisplayed with the information for the connection failure. Note that this button isnot available unless the test connection fails.
7. Optionally, change the default port (5000).
8. Type the SAP Sybase ASE authentication information (User Name, Password) for the authorizeduser for this SAP Sybase ASE database. If you do not know this information, see your SAP SybaseASE database Administrator (DBA).
Setup and User Guide - Qlik Replicate, November 2021 853
9 Adding and managing target endpoints
Consider the following:l This information is case sensitive.l This information is required. If you are using the Advanced tab to create acustom string, make sure to include the User Name and Password properties.See Setting advanced connection properties (page 854) for more information.
l If you want to set custom properties for this database, see Setting advancedconnection properties (page 854).
Make sure that the SAP Sybase ASE user entered in the SAP Sybase ASEAuthentication section has the correct access privileges. For information on how toprovide the required privileges, see Security requirements (page 851).
9. In the Database name field, enter the SAP Sybase ASE database name.
Setting advanced connection propertiesIn the Advanced tab, you can set the following properties:
l Additional ODBC connection properties: Specify any additional ODBC connection parameters thatyou want to use.
If the user name or password specified in the General tab contains non-Latin characters (e.g.Chinese), the following property is required:
charset=gb18030
Internal parametersInternal parameters are parameters that are not exposed in the UI. You should only use them if instructedby Qlik Support.
To add internal Qlik Replicate parameters:
1. Click the Internal Parameters link.The Internal Parameters dialog box opens.
2. In the edit box, type the name of the parameter you need to add and then click it.
3. The parameter is added to the table below the search box with its default value.
4. Change the default value as required.
5. To reset the parameter value to its default, click the "Restore default value" icon at the end of therow.
More optionsThese options are not exposed in the UI as they are only relevant to specific versions or environments.Consequently, do not set these options unless explicitly instructed to do so by Qlik Support or productdocumentation.
Setup and User Guide - Qlik Replicate, November 2021 854

9 Adding and managing target endpoints
To set an option, simply copy the option into the Add feature name field and click Add. Then set the valueor enable the option according to the instructions you received.
Settings summaryYou can view a summary of your settings by clicking the Setting Summary link. This is useful if you need tosend a summary of your settings to Qlik Support.
Setup and User Guide - Qlik Replicate, November 2021 855

9 Adding and managing target endpoints
9.40 Using SAP Sybase IQ as a targetThis section describes how to set up and use a SAP Sybase IQ database as a target database in areplication task.
In this section:
l Prerequisites (page 857)l Limitations (page 857)l Security requirements (page 857)l SAP Sybase IQ target data types (page 857)l Setting general connection properties (page 858)l Setting advanced connection properties (page 859)
Setup and User Guide - Qlik Replicate, November 2021 856
9 Adding and managing target endpoints
PrerequisitesMake sure the following prerequisites have been met:
l Qlik Replicate is installed on any Windows computer in your network.l A Sybase account with the required access privileges exists.l SAP Sybase IQ 64-bit ODBC client installed on the computer where Qlik Replicate is located.
LimitationsThe following limitations apply:
l Full LOB mode is not supported.l Replication of LOBs during Change Processing is not supported in Bulk Apply mode (LOB valuesare replicated to NULL).
Security requirementsThe user specified in the SAP Sybase IQ endpoint settings must have DBA permissions in the SAP SybaseIQ database.
SAP Sybase IQ target data typesThe following table shows the Sybase target data types that are supported when using Qlik Replicate andthe default mapping from Qlik Replicate data types.
SAP Sybase IQ does not support applying changes to binary data types in Batch optimizedapply mode. For more information on Batch optimized apply mode, see Change ProcessingTuning (page 1027).
For information on how to view the data type that is mapped from the source, see the section for the sourcedatabase you are using.
For additional information about Qlik Replicate data types, see Replicate data types (page 76).
Qlik Replicate Data Types SAP Sybase IQ Data Types
BOOLEAN BIT
BYTES VARBINARY (Length)
DATE DATE
TIME TIME
Supported data types
Setup and User Guide - Qlik Replicate, November 2021 857

9 Adding and managing target endpoints
Qlik Replicate Data Types SAP Sybase IQ Data Types
DATETIME If scale is => 0 and =< 6, then:
TIMESTAMP
If scale is => 7 and =< 12, then:
VARCHAR (37)
INT1 TINYINT
INT2 SMALLINT
INT4 INTEGER
INT8 BIGINT
NUMERIC NUMERIC (p,s)
REAL4 REAL
REAL8 DOUBLE
STRING VARCHAR (Length)
UINT1 TINYINT
UINT2 SMALLINT
UINT4 INTEGER
UINT8 BIGINT
WSTRING VARCHAR (Length)
BLOB BLOB
CLOB CLOB
NCLOB CLOB
The SAP Sybase IQ database requires a special license to support LOBs.
Setting general connection propertiesThis section describes how to configure general connection properties. For an explanation of how toconfigure advanced connection properties, see Setting advanced connection properties.
l Sybase can also be used as a source database. For information on using Sybase as asource, see Using SAP Sybase ASE as a target (page 850).
l You can also use Sybase files as a source or target. For more information, see Usingthe Qlik Replicate file channel (page 908).
To add a SAP Sybase IQ database to Qlik Replicate:
Setup and User Guide - Qlik Replicate, November 2021 858

9 Adding and managing target endpoints
1. In Tasks view, click Manage Endpoint Connections to open the Manage Endpoints Connectionsdialog box. Then click the New Endpoint Connection button.
2. In the Name field, type a name for your database. This can be any name that will help to identify thedatabase being used.
3. In the Description field, type a description that helps to identify the Sybase database. This isoptional.
4. Select Target as the database role.
5. Select SAP Sybase IQ as the database Type.
6. In the Host field, enter the hostname or IP address of the computer on which SAP Sybase IQ isinstalled.
7. In the Server field, enter the name of the Sybase server.
8. Optionally, change the default port (7878).
9. Type the Sybase authentication information (User Name, Password) for the authorized user for thisSybase database. If you do not know this information, see your Sybase database Administrator(DBA).
l This information is required. If you are using the Advanced tab to create acustom string, make sure to include the User Name and Password properties.See Setting advanced connection properties (page 859) for more information.
l This information is case sensitive.l If you want to set custom properties for this database, see Setting advancedconnection properties (page 859).
Make sure that the Sybase user entered in the Sybase Authentication section has thecorrect access privileges. For information on how to provide the required privileges, seeSecurity requirements (page 857).
10. In the Database field, enter the name of the SAP Sybase IQ database.
Setting advanced connection propertiesIn the Advanced tab, you can set the following parameters:
l Max file size: Select or type the maximum size (in KB) of a CSV file before the file is loaded into theSybase database. The default value is 32000 KB.
Internal parametersInternal parameters are parameters that are not exposed in the UI. You should only use them if instructedby Qlik Support.
To add internal Qlik Replicate parameters:
1. Click the Internal Parameters link.The Internal Parameters dialog box opens.
Setup and User Guide - Qlik Replicate, November 2021 859

9 Adding and managing target endpoints
2. In the edit box, type the name of the parameter you need to add and then click it.
3. The parameter is added to the table below the search box with its default value.
4. Change the default value as required.
5. To reset the parameter value to its default, click the "Restore default value" icon at the end of therow.
More optionsThese options are not exposed in the UI as they are only relevant to specific versions or environments.Consequently, do not set these options unless explicitly instructed to do so by Qlik Support or productdocumentation.
To set an option, simply copy the option into the Add feature name field and click Add. Then set the valueor enable the option according to the instructions you received.
Settings summaryYou can view a summary of your settings by clicking the Setting Summary link. This is useful if you need tosend a summary of your settings to Qlik Support.
Setup and User Guide - Qlik Replicate, November 2021 860

9 Adding and managing target endpoints
9.41 Using SingleStore as a targetThis section describes how to set up and use a SingleStore target endpoint in a replication task.
In this section:
l Prerequisites (page 862)l Limitations (page 862)l Security requirements (page 862)l Supported data types (page 863)l Setting general connection properties (page 865)l Setting advanced connection properties (page 866)
Setup and User Guide - Qlik Replicate, November 2021 861

9 Adding and managing target endpoints
PrerequisitesInstall MySQL ODBC 64-bit client 5.2.6 only on the Replicate Server machine.
Linux only:
Make sure that the /etc/odbcinst.ini file contains an entry for MySQL, as in the following example:
[MySQL ODBC 5.2.6 Unicode Driver]Driver = /usr/lib64/libmyodbc5w.soUsageCount = 1
LimitationsWhen replicating to a SingleStore target, the following limitations apply:
l When only the LOB column in the source table is updated, Replicate will not update thecorresponding target LOB column. The target LOB column will only be updated if at least one othercolumn is also updated in the same transaction.
l Due to the way SingleStore operates, when loading data to a SingleStore target during a Full Loadtask, duplicate key errors will not be reported to the logs.
l Updating the Primary Key is not supported as the Primary Key columns in SingleStore also serve asthe shard key.
l When updating a column's value to its existing value, a zero rows affected is returned fromSingleStore (unlike Oracle and Microsoft SQL Server, for example, that perform an update of onerow). This generates an entry in the attrep_apply_exceptions control table and the followingwarning:Some changes from the source database had no impact when applied to the target database.
See attrep_apply_exceptions table for details.
l Columnstore tables without a Primary Key or Unique Index are not supported.l UPDATEs to a source column's data type or size will not be captured when the Create columnstoretables option is enabled in the Advanced tab.
Such UPDATEs can be performed on the target using a global or table transformation.
Security requirementsYou must provide SingleStore account access to the Qlik Replicate user. This user must have read/writeprivileges in the SingleStore database.
Additionally, for each target schema involved in the replication, the Qlik Replicate user must have thefollowing permissions:
l ALTERl CREATEl CREATE TEMPORARY TABLESl DELETEl DROP
Setup and User Guide - Qlik Replicate, November 2021 862

9 Adding and managing target endpoints
l INSERTl SELECTl UPDATE
Supported data typesThe following table shows the SingleStore database target data types that are supported when using QlikReplicate and the default mapping from Qlik Replicate data types.
For information on how to view the data type that is mapped from the source, see the section for the sourceendpoint you are using.
For additional information about Qlik Replicate data types, see Replicate data types (page 76).
Qlik Replicate Data Types SingleStore Data Types
BOOL BOOL
BYTES If length is => 1 and =< 8095, then:
VARBINARY (Length)
If length is => 8096 and =< 65535, then:
BLOB
If length is => 65536 and =< 16777215, then:
MEDIUMBLOB
If length is => 16777216 and =< 2147483647, then:
LONGBLOB
DATE DATE
TIME TIME
DATETIME If scale is => 0 and =< 6, then:
DECIMAL (p,s)
If scale is => 7 and =< 12, then:
VARCHAR (37)
INT1 TINYINT
INT2 SMALLINT
INT4 INTEGER
INT8 BIGINT
Supported data types
Setup and User Guide - Qlik Replicate, November 2021 863

9 Adding and managing target endpoints
Qlik Replicate Data Types SingleStore Data Types
NUMERIC If scale is => 0 and =< 30, then:
DECIMAL (p,s)
If scale is => 31 and =< 100, then:
VARCHAR (45)
REAL4 FLOAT
REAL8 DOUBLE
STRING If length is => 1 and =< 8095, then:
VARCHAR (Length)
If length is => 8096 and =< 65535, then:
TEXT
If length is => 65536 and =< 16777215, then:
MEDIUMTEXT
If length is => 16777216 and =< 2147483647, then:
LONGTEXT
UINT1 UNSIGNED TINYINT
UINT2 UNSIGNED SMALLINT
UINT4 UNSIGNED INTEGER
UINT8 UNSIGNED BIGINT
WSTRING If length is => 1 and =< 8095, then:
VARCHAR (Length)
If length is => 8096 and =< 65535, then:
TEXT
If length is => 65536 and =< 16777215, then:
MEDIUMTEXT
If length is => 16777216 and =< 2147483647, then:
LONGTEXT
Setup and User Guide - Qlik Replicate, November 2021 864

9 Adding and managing target endpoints
Qlik Replicate Data Types SingleStore Data Types
BLOB If length is => 1 and =< 65535, then:
BLOB
If length is => 65536 and =< 16777215, then:
MEDIUMBLOB
If length is => 16777215 and =< 2147483647, then:
LONGBLOB
NCLOB If length is => 1 and =< 65535, then:
TEXT CHARACTER SET UTF16
If length is => 65536 and =< 2147483647, then:
LONGTEXT CHARACTER SET UTF16
CLOB If length is => 1 and =< 65535, then:
TEXT
If length is => 65536 and =< 2147483647, then:
LONGTEXT
Setting general connection propertiesThis section describes how to configure general connection properties. For an explanation of how toconfigure advanced connection properties, see Setting advanced connection properties.
To add a SingleStore target endpoint to Qlik Replicate:
1. In the Qlik Replicate Console, click Manage Endpoint Connections to open the ManageEndpointsConnections dialog box. Then click the New Endpoint Connection button. For moreinformation on adding an endpoint to Qlik Replicate, see Defining and managing endpoints (page110).
2. In the Name field, type a name for your database. This can be any name that will help to identify thedatabase being used.
3. In the Description field, type a description that helps to identify the SingleStore database. This isoptional.
4. Select TARGET as the database role.
5. From the Type drop-down list, select SingleStore.
6. In the Server field, enter the host name or IP address of the computer on which the SingleStoredatabase is installed.
Setup and User Guide - Qlik Replicate, November 2021 865

9 Adding and managing target endpoints
Notesl This information is case sensitive.l To determine if you are connected to the database you want to use or if theconnection information you entered is correct, click Test Connection.If the connection is successful a message in green is displayed. If the connectionfails, an error message is displayed at the bottom of the dialog box.To view the log entry if the connection fails, click View Log. The server log isdisplayed with the information for the connection failure. Note that this button isnot available unless the test connection fails.
7. Optionally, change the default port (3306).
8. Enter the Username and Password of a user authorized to access the SingleStore databasespecified below. If you do not know this information, see your SingleStore database Administrator(DBA).
9. In the Database field, specify the target SingleStore database.
Setting advanced connection propertiesIn the Advanced tab, you can set advanced properties, define internal parameters, and view a summary ofyour settings.
l Max file size (KB): Select or type the maximum size (in KB) of a CSV file before it is loaded into theSingleStore target database. The default value is 32000 KB.
l Select Create columnstore tables to create the target tables in columnstore format (as opposed tothe default rowstore format).Rowstore format is typically used for highly concurrent OLTP and mixed OLTP/analyticalworkloads. Columnstore format is used primarily for analytical applications where the queriesmainly involve aggregations over data sets that are too large to store in memory. For a moredetailed explanation of the differences between rowstore and columnstore tables, refer to theSingleStore Help.
l Additional ODBC connection properties: Set any additional ODBC connection properties asnecessary.
Internal parametersInternal parameters are parameters that are not exposed in the UI. You should only use them if instructedby Qlik Support.
To add internal Qlik Replicate parameters:
1. Click the Internal Parameters link.The Internal Parameters dialog box opens.
2. In the edit box, type the name of the parameter you need to add and then click it.
3. The parameter is added to the table below the search box with its default value.
4. Change the default value as required.
Setup and User Guide - Qlik Replicate, November 2021 866

9 Adding and managing target endpoints
5. To reset the parameter value to its default, click the "Restore default value" icon at the end of therow.
More optionsThese options are not exposed in the UI as they are only relevant to specific versions or environments.Consequently, do not set these options unless explicitly instructed to do so by Qlik Support or productdocumentation.
To set an option, simply copy the option into the Add feature name field and click Add. Then set the valueor enable the option according to the instructions you received.
Settings summaryYou can view a summary of your settings by clicking the Setting Summary link. This is useful if you need tosend a summary of your settings to Qlik Support.
Setup and User Guide - Qlik Replicate, November 2021 867

9 Adding and managing target endpoints
9.42 Using Snowflake on AWS as a targetThis section describes how to set up and use Snowflake on AWS as a target in a replication task.Snowflake on AWS is located in the cloud and is accessed through an Amazon Web Services (AWS)account.
Qlik Replicate first stages the source data either directly on Snowflake or in an Amazon S3 bucket, andthen loads it into the relevant tables in the Snowflake data warehouse.
When configuring a task with a Snowflake on AWS target endpoint, note the following:
l If the Apply Changes task option is enabled and the change processing mode is set toBatch optimized apply, it is recommended to enable the Apply batched changes tomultiple tables concurrently option in the Change Processing Tuning (page 1027) tab.
l When the Apply batched changes to multiple tables concurrently option is selected,the option to set a Global Error Handling policy will not be available. Also, some of thetask-specific error handling defaults will be different.For more information, see the Apply batched changes to multiple tables concurrentlyoption in the Change Processing Tuning (page 1027) tab.
In this section:
l Prerequisites (page 869)l Limitations and considerations (page 879)l Required permissions (page 879)l Snowflake on AWS data types (page 871)l Setting general connection parameters (page 873)l Setting advanced connection properties (page 875)
Setup and User Guide - Qlik Replicate, November 2021 868

9 Adding and managing target endpoints
PrerequisitesThe following describes the general prerequisites for using Snowflake on AWS as a Qlik Replicate targetendpoint.
Amazon Web Services account prerequisitesSign up for an Amazon Web Services account. Then use the AWSManagement Console to purchaseSnowflake on AWS On Demand - Standard or Snowflake on AWS On Demand - Premier and launch aSnowflake on AWS cluster. After registering for an Amazon Web Services (AWS) account, you can launcha Snowflake on AWS cluster and download the required client tools.
Make a note of the basic information about your AWS account and your Snowflake on AWS cluster, suchas your password and user name. You will need this information to configure Qlik Replicate to work withthe Snowflake on AWS data warehouse. For more information, see Setting general connection parameters(page 873).
For more information on setting up Snowflake on AWS as an AWS service, see:
Snowflake Documentation
Amazon S3 staging prerequisitesYou can configure the Snowflake on AWS endpoint to stage the data files on Snowflake (internally) or onAmazon S3. If you want to use Amazon S3 staging, you need to have an Amazon S3 bucket, preferably (forbest performance) located in your Snowflake on AWS cluster region.
You must be able to access your Amazon S3 bucket directly from the Replicate machine.
For information on signing up for Amazon S3, visit:
https://aws.amazon.com/console/
l Bucket access credentials: Make a note of the bucket name, region, access key and secret accesskey - you will need to provide them in the Qlik Replicate Snowflake on AWS target settings.
l Bucket access permissions: Qlik Replicate requires read/write/delete permissions to the AmazonS3 bucket.
Client prerequisitesl Qlik Replicate for Windows: Download and install Windows 64-bit ODBC driver 2.24.0 or later.l Qlik Replicate for Linux: Download and install Linux 64-bit ODBC driver 2.24.0 or later.
Performance and cloud services usage optimizationIn order to optimize both Snowflake Cloud Services usage and overall performance, it is stronglyrecommended to enable the Apply batched changes to multiple tables concurrently option in the tasksettings' Change Processing Tuning tab.
For information about charges incurred when using Snowflake Cloud Services, see Snowflake: AdditionalBilling (Cloud Services Layer) Impact
Setup and User Guide - Qlik Replicate, November 2021 869
https://aws.amazon.com/marketplace/pp/B01MTL0TYF?qid=1508324784953&sr=0-2&ref_=srh_res_product_title

9 Adding and managing target endpoints
General prerequisitesl The time on the Qlik Replicate Server machine must be accurate.
Firewall prerequisitesFirewall port 443 needs to be opened for outbound communication.
Limitations and considerationsThe following limitations apply when using the Snowflake target endpoint in a Replicate task:
l The Transactional apply Change Processing mode is not supported.l Replication of tables with backslashes in their names (e.g. SPECIAL\\TABLE\N)is not supported.
Required permissionsThis topic describes the permissions required for working with this endpoint.
Setting a custom roleWhen Replicate establishes an ODBC connection to Snowflake, it uses the default user role on Snowflake,which is SYSADMIN.
However, if your corporate security policy dictates that third-part applications should not have SYSADMINprivileges, it is possible to create a custom role with fewer privileges and use that instead.
This can be done using either of the following methods:
l In the Advanced tab's Additional ODBC connection properties field, specify role=MYROLEwhere MYROLE is a custom role defined on Snowflake.
l Change the default user role on Snowflake from SYSADMIN to the desired custom role.
Required permissionsThe required permissions differ according to whether or not the schema and/or the target tables alreadyexisted before the Replicate task started.
Tables created by ReplicatePermissions required if the schema does not exist:
l USAGE ON DATABASEl CREATE SCHEMA ON DATABASE
Permissions required if the schema already exists:
l USAGE ON DATABASEl USAGE ON SCHEMAl CREATE FILE FORMAT ON SCHEMAl CREATE STAGE ON SCHEMAl CREATE TABLE ON SCHEMA
Setup and User Guide - Qlik Replicate, November 2021 870

9 Adding and managing target endpoints
Tables that existed before the Replicate task startedAlthough not recommended, if you wish data to be replicated to existing tables that were created by a userwith a different role, the Snowflake user specified in the endpoint settings must have the following tableprivileges:
l SELECTl INSERTl UPDATEl TRUNCATEl DELETEl REFERENCES
Snowflake on AWS data typesThe Snowflake on AWS endpoint for Qlik Replicate supports most Snowflake data types. The followingtable shows the Snowflake on AWS target data types that are supported when using Qlik Replicate and thedefault mapping from Qlik Replicate data types.
Snowflake on AWS does not support applying changes to binary data types in Batch optimizedapply mode. For more information on Batch optimized apply mode, see Change ProcessingTuning (page 1027).
For information on how to view the data type that is mapped from the source, see the section for the sourcedatabase you are using. For additional information about Qlik Replicate data types, see Replicate datatypes (page 76).
Qlik Replicate Data Types Snowflake on AWS Data Types
BOOL BOOLEAN
BYTES If length is => 1 and =< 8388608, then:
BINARY (Length in Bytes)
If length is => 8388609 and =< 2147483647, then:
BINARY (8388608)
DATE DATE
TIME TIME
DATETIME TIMESTAMP (precision)
INT1 NUMBER
INT2 NUMBER
INT4 NUMBER
Supported data types
Setup and User Guide - Qlik Replicate, November 2021 871

9 Adding and managing target endpoints
Qlik Replicate Data Types Snowflake on AWS Data Types
INT8 NUMBER
NUMERIC If scale is => 0 and =< 37, then:
NUMBER (p,s)
If scale is => 38 and =< 127, then:
NUMBER (Length)
REAL4 FLOAT4
REAL8 FLOAT8
UINT1 BYTEINT
UINT2 INTEGER
UINT4 INTEGER
UINT8 BIGINT
STRING If length is => 1 and =< 16777216, then:
VARCHAR (Length in Bytes)
If length is => 16777217 and =< 2147483647, then:
VARCHAR (16777216)
If subtype is JSON or XML, then:
VARIANT
WSTRING If length is => 1 and =< 21845, then:
VARCHAR (Length in Bytes)
If length is => 21846 and =< 2147483647, then:
VARCHAR (65535)
If subtype is JSON or XML, then:
VARIANT
BLOB If length is => 1 and =< 8388608, then:
BINARY (Length in Bytes)
If length is => 8388609 and =< 2147483647, then:
BINARY (8388608)
Setup and User Guide - Qlik Replicate, November 2021 872

9 Adding and managing target endpoints
Qlik Replicate Data Types Snowflake on AWS Data Types
NCLOB NVARCHAR (Max LOB Size)
If subtype is JSON or XML, then:
VARIANT
CLOB VARCHAR (Max LOB Size)
If subtype is JSON or XML, then:
VARIANT
Full LOB data types are not supported. For information on including Limited-size LOB datatypes in the replication, see the Metadata (page 1011) tab description in Customizing tasks(page 929).
Setting general connection parametersThis section describes how to configure general connection properties. For an explanation of how toconfigure advanced connection properties, see Setting advanced connection properties.
To add a Snowflake on AWS target endpoint to Qlik Replicate:
1. In the Qlik Replicate Console, click Manage Endpoint Connections to open the Manage EndpointsConnections dialog box.
2. In the Manage Endpoint Connections dialog box, click New Endpoint Connection.
3. In the Name field, specify a name for your Snowflake on AWS endpoint.
4. Optionally, in the Description field, enter a description for the Snowflake on AWS target endpoint.
5. Select Target as the role.
6. Select Snowflake on AWS as the Type.
7. Configure the remaining settings in the General tab as described in the table below.l Snowflake on AWS Target:
l Snowflake URL: Your URL for accessing Snowflake on AWS.l User name: Your Snowflake user name.l Password: The password for the user entered in the User name field.l Warehouse: The name of your Snowflake warehouse.l Database name: The name of your Snowflake database.
l Staging - Choose either Snowflake or AWS S3.If you selected AWS S3, provide the following information:
l Bucket name: The name of the Amazon S3 bucket to where the files will be copied.l Bucket region: The Amazon S3 region where the S3 buckets and folders you areusing are hosted. The default value is US East (N. Virginia).
Setup and User Guide - Qlik Replicate, November 2021 873

9 Adding and managing target endpoints
l Access type: Choose one of the following:l Key pair - Choose this method to authenticate with your Access Key andSecret Key. Then provide the following additional information:
l Access key: Type the access key information for Amazon S3.l Secret key: Type the secret key information for Amazon S3.
l IAM Roles for EC2 - Choose this method if the machine on which QlikReplicate is installed is configured to authenticate itself using an IAM role.Then provide the following additional information:
l External stage name: The name of your external stage. To use theIAM Roles for EC2 access type, you must create an external stage thatreferences the S3 bucket.
To use the IAM Roles for EC2 access method, you also need to fulfill theprerequisites described in Prerequisite for using the IAM Roles for EC2Access Type (page 874).
l Folder: The bucket folder to where the files will be copied.
The information for these properties is available from the account page for Amazon WebServices (AWS) with the Snowflake on AWS cluster. If you do not have these values, refer toyour AWS account or the Snowflake on AWS System Administrator for your enterprise.
Prerequisite for using the IAM Roles for EC2 Access TypeTo use the IAM Roles for EC2 access type, you must run the following commands on the Snowflake onAWS database before running the task:
Command 1:
create or replace file format MY_FILE_FORMAT TYPE='CSV' field_delimiter=','compression='GZIP'
record_delimiter='\n' null_if=('attrep_null') skip_header=0 FIELD_OPTIONALLY_ENCLOSED_BY='\"';
Command 2:
create or replace stage “PUBLIC”.MY_S3_STAGE file_format=MY_FILE_FORMAT url='s3://MY_STORAGE_
URL' credentials=(aws_role='MY_IAM_ROLE');
Where:
MY_FILE_FORMAT - Can be any value.
MY_S3_STAGE - The name specified in the External stage name field above.
MY_STORAGE_URL - The URL of your Amazon S3 bucket
MY_IAM_ROLE - Your IAM role name.
Setup and User Guide - Qlik Replicate, November 2021 874
9 Adding and managing target endpoints
To determine if you are connected to the database you want to use or if the connectioninformation you entered is correct, click Test Connection.
If the connection is successful a message in green is displayed. If the connection fails, an errormessage is displayed at the bottom of the dialog box.
To view the log entry if the connection fails, click View Log. The server log is displayed with theinformation for the connection failure. Note that this button is not available unless the testconnection fails.
Setting advanced connection propertiesIn the Advanced tab, you can set the parameters described in the table below.
Option Description
Max file size (MB) Select or type the maximum size of the CSV file used to transfer data toSnowflake. The default value is 100 MB.
ODBC driver The name of the default ODBC driver you are using to connect to Snowflake.The default value is SnowflakeDSIIDriver.
Additional ODBCconnection properties
Type any additional ODBC connection properties if required.
General properties
Option Description
Use proxyserver
Select this option to access Amazon S3 via a proxy server.
Host name The host name of the proxy server.
Port The port via which to access the proxy server.
User name The user name for accessing the proxy server.
Password The password for accessing the proxy server.
Scheme Select which protocol to use to access the server (HTTP or HTTPS). In order to useHTTPS, you must first install the CA certificate that signed the proxy’s certificate on theReplicate Server machine, as follows:
l On Windows: Add the CA certificate to the Trusted Root Certification Authoritiesstore of Local Computer
l On Linux: Add the CA certificate to /etc/pki/tls/certs/ca-bundle.crt
Proxy server properties
Setup and User Guide - Qlik Replicate, November 2021 875

9 Adding and managing target endpoints
Internal parametersInternal parameters are parameters that are not exposed in the UI. You should only use them if instructedby Qlik Support.
To add internal Qlik Replicate parameters:
1. Click the Internal Parameters link.The Internal Parameters dialog box opens.
2. In the edit box, type the name of the parameter you need to add and then click it.
3. The parameter is added to the table below the search box with its default value.
4. Change the default value as required.
5. To reset the parameter value to its default, click the "Restore default value" icon at the end of therow.
More optionsThese options are not exposed in the UI as they are only relevant to specific versions or environments.Consequently, do not set these options unless explicitly instructed to do so by Qlik Support or productdocumentation.
To set an option, simply copy the option into the Add feature name field and click Add. Then set the valueor enable the option according to the instructions you received.
Settings summaryYou can view a summary of your settings by clicking the Setting Summary link. This is useful if you need tosend a summary of your settings to Qlik Support.
Setup and User Guide - Qlik Replicate, November 2021 876

9 Adding and managing target endpoints
9.43 Using Snowflake on Azure as a targetThis section describes how to set up and use Snowflake on Azure as a target in a replication task.
When configuring a task with a Snowflake on Azure target endpoint, note the following:
l If the Apply Changes task option is enabled and the change processing mode is set toBatch optimized apply, it is recommended to enable the Apply batched changes tomultiple tables concurrently option in the Change Processing Tuning (page 1027) tab.
l When the Apply batched changes to multiple tables concurrently option is selected,the option to set a Global Error Handling policy will not be available. Also, some of thetask-specific error handling defaults will be different.For more information, see the Apply batched changes to multiple tables concurrentlyoption in the Change Processing Tuning (page 1027) tab.
In this section:
l Prerequisites (page 878)l Limitations and considerations (page 879)l Required permissions (page 879)l Snowflake on Azure data types (page 880)l Setting general connection parameters (page 882)l Setting advanced connection properties (page 883)
Setup and User Guide - Qlik Replicate, November 2021 877

9 Adding and managing target endpoints
PrerequisitesThe following section describes the prerequisites for using Snowflake on Azure as a Qlik Replicate targetendpoint.
Client prerequisitesl Qlik Replicate for Windows: Download and install Windows 64-bit ODBC driver 2.24.0 or later.l Qlik Replicate for Linux: Download and install Linux 64-bit ODBC driver 2.24.0 or later.
Performance and Cloud Services usage optimizationIn order to optimize both Snowflake Cloud Services usage and overall performance, it is stronglyrecommended to enable the Apply batched changes to multiple tables concurrently option in the tasksettings' Change Processing Tuning tab.
For information about charges incurred when using Snowflake Cloud Services, see Snowflake: AdditionalBilling (Cloud Services Layer) Impact
Microsoft Azure Blob Storage prerequisitesYou can configure the Snowflake on Azure endpoint to stage the data files on Snowflake (Windows andLinux) or on Azure Blob storage (Windows only). If you want to use Azure Blob storage, you need to signup for a Microsoft Azure Blob Storage account and make a note of the account name, access key,container name, SAS token (Shared Access Signature), and target folder.
Note that the duration of the SAS token must be the same as the Replicate task duration. For anexplanation of how to configure the SAS token, visit:
https://docs.Snowflake on Azure.net/manuals/user-guide/data-load-azure-config.html
For information on signing up for a Microsoft Azure Blob Storage account, visit:
How to get started with Snoflake on Azure
Microsoft Azure Blob Storage permissionsQlik Replicate performs the following operations on the Azure Blob Storage container/folder:
l On the Azure Blob Storage container: LIST and CREATE on SCHEMA publicl On the Azure Blob Storage folder: READ, WRITE, and DELETE
Supported blob storage typesThe following blob storage types are supported:
l Standard storage with block blobsl Premium storage with block blobs only
Firewall prerequisitesFirewall port 443 needs to be opened for outbound communication.
Setup and User Guide - Qlik Replicate, November 2021 878

9 Adding and managing target endpoints
Limitations and considerationsThe following limitations apply when using the Snowflake target endpoint in a Replicate task:
l The Transactional apply Change Processing mode is not supported.l Replication of tables with backslashes in their names (e.g. SPECIAL\\TABLE\N)is not supported.
Required permissionsThis topic describes the permissions required for working with this endpoint.
Setting a custom roleWhen Replicate establishes an ODBC connection to Snowflake, it uses the default user role on Snowflake,which is SYSADMIN.
However, if your corporate security policy dictates that third-part applications should not have SYSADMINprivileges, it is possible to create a custom role with fewer privileges and use that instead.
This can be done using either of the following methods:
l In the Advanced tab's Additional ODBC connection properties field, specify role=MYROLEwhere MYROLE is a custom role defined on Snowflake.
l Change the default user role on Snowflake from SYSADMIN to the desired custom role.
Required permissionsThe required permissions differ according to whether or not the schema and/or the target tables alreadyexisted before the Replicate task started.
Tables created by ReplicatePermissions required if the schema does not exist:
l USAGE ON DATABASEl CREATE SCHEMA ON DATABASE
Permissions required if the schema already exists:
l USAGE ON DATABASEl USAGE ON SCHEMAl CREATE FILE FORMAT ON SCHEMAl CREATE STAGE ON SCHEMAl CREATE TABLE ON SCHEMA
Tables that existed before the Replicate task startedAlthough not recommended, if you wish data to be replicated to existing tables that were created by a userwith a different role, the Snowflake user specified in the endpoint settings must have the following tableprivileges:
Setup and User Guide - Qlik Replicate, November 2021 879

9 Adding and managing target endpoints
l SELECTl INSERTl UPDATEl TRUNCATEl DELETEl REFERENCES
Snowflake on Azure data typesQlik Replicate Snowflake on Azure endpoint supports most Snowflake data types. The following tableshows the Snowflake target data types that are supported when using Qlik Replicate and the defaultmapping from Qlik Replicate data types.
The Snowflake on Azure endpoint does not support applying changes to binary data types inBatch optimized apply mode. For more information on Batch optimized apply mode, seeChange Processing Tuning (page 1027).
For information on how to view the data type that is mapped from the source, see the section for the sourcedatabase you are using. For additional information about Qlik Replicate data types, see Replicate datatypes (page 76).
Qlik Replicate Data Types Snowflake on Azure Data Types
BOOL BOOLEAN
BYTES If length is => 1 and =< 8388608, then:
BINARY (Length in Bytes)
If length is => 8388609 and =< 2147483647, then:
BINARY (8388608)
DATE DATE
TIME TIME
DATETIME TIMESTAMP (precision)
INT1 NUMBER
INT2 NUMBER
INT4 NUMBER
INT8 NUMBER
Replicate and Snowflake on Azure data types
Setup and User Guide - Qlik Replicate, November 2021 880

9 Adding and managing target endpoints
Qlik Replicate Data Types Snowflake on Azure Data Types
NUMERIC If scale is => 0 and =< 37, then:
NUMBER (p,s)
If scale is => 38 and =< 127, then:
NUMBER (Length)
REAL4 FLOAT4
REAL8 FLOAT8
UINT1 BYTEINT
UINT2 INTEGER
UINT4 INTEGER
UINT8 BIGINT
STRING If length is => 1 and =< 16777216, then:
VARCHAR (Length in Bytes)
If length is => 16777217 and =< 2147483647, then:
VARCHAR (16777216)
If subtype is JSON or XML, then:
VARIANT
WSTRING If length is => 1 and =< 21845, then:
VARCHAR (Length in Bytes)
If length is => 21846 and =< 2147483647, then:
VARCHAR (65535)
If subtype is JSON or XML, then:
VARIANT
BLOB If length is => 1 and =< 8388608, then:
BINARY (Length in Bytes)
If length is => 8388609 and =< 2147483647, then:
BINARY (8388608)
Setup and User Guide - Qlik Replicate, November 2021 881

9 Adding and managing target endpoints
Qlik Replicate Data Types Snowflake on Azure Data Types
NCLOB VARCHAR (Max LOB Size)
If subtype is JSON or XML, then:
VARIANT
CLOB VARCHAR (Max LOB Size)
If subtype is JSON or XML, then:
VARIANT
Full LOB data types are not supported. For information on including Limited-size LOB datatypes in the replication, see the Metadata (page 1011) tab description in Customizing tasks(page 929).
Setting general connection parametersThis section describes how to configure general connection properties. For an explanation of how toconfigure advanced connection properties, see Setting advanced connection properties.
To add a Snowflake on Azure target endpoint to Qlik Replicate:
1. In the Qlik Replicate Console, click Manage Endpoint Connections to open the Manage EndpointsConnections dialog box.
2. In the Manage Endpoint Connections dialog box, click New Endpoint Connection.
3. In the Name field, type a name for your Snowflake on Azure endpoint.
4. Optionally, in the Description field, enter a description for your Snowflake on Azure target endpoint.
5. Select Target as the role.
6. Select Snowflake on Azure as the Type.
7. Configure the remaining settings in the General tab as described below.l Snowflake on Azure Target:
l Snowflake URL: Your URL for accessing Snowflake on Microsoft Azure.l User name: Your Snowflake user name.l Password: The password for the user entered in the User name field.l Warehouse: The name of your Snowflake warehouse.l Database name: The name of your Snowflake database.
l Staging:l Storage Type: Choose one of the following:
l Azure Blob storage - If you select this option, you also need to provide theaccess and storage information specified below.
l Snowflake- When this option is selected, Snowflake's internal storage will beused.
Setup and User Guide - Qlik Replicate, November 2021 882

9 Adding and managing target endpoints
l Storage account: The name of an account with write permissions to the container.l Access key: The account access key.
l SAS token: Your SAS (Shared Access Signature) for accessing the container.l Container name: The container name.l Folder: The container folder to where the files will be copied.
To determine if you are connected to the database you want to use or if the connectioninformation you entered is correct, click Test Connection.
If the connection is successful a message in green is displayed. If the connection fails, an errormessage is displayed at the bottom of the dialog box.
To view the log entry if the connection fails, click View Log. The server log is displayed with theinformation for the connection failure. Note that this button is not available unless the testconnection fails.
Setting advanced connection propertiesIn the Advanced tab, you can set the parameters described in the table below.
Option Description
Max file size (MB) Select or type the maximum size of the CSV file used to transfer data toSnowflake on Azure. The default value is 100 MB.
ODBC driver The name of the default ODBC driver you are using to connect to Snowflakeon Azure. The default value is SnowflakeDSIIDriver.
Additional ODBCconnection properties
Type any additional ODBC connection properties if required.
Advanced connection properties
Internal parametersInternal parameters are parameters that are not exposed in the UI. You should only use them if instructedby Qlik Support.
To add internal Qlik Replicate parameters:
1. Click the Internal Parameters link.The Internal Parameters dialog box opens.
2. In the edit box, type the name of the parameter you need to add and then click it.
3. The parameter is added to the table below the search box with its default value.
4. Change the default value as required.
5. To reset the parameter value to its default, click the "Restore default value" icon at the end of therow.
Setup and User Guide - Qlik Replicate, November 2021 883

9 Adding and managing target endpoints
More optionsThese options are not exposed in the UI as they are only relevant to specific versions or environments.Consequently, do not set these options unless explicitly instructed to do so by Qlik Support or productdocumentation.
To set an option, simply copy the option into the Add feature name field and click Add. Then set the valueor enable the option according to the instructions you received.
Settings summaryYou can view a summary of your settings by clicking the Setting Summary link. This is useful if you need tosend a summary of your settings to Qlik Support.
Setup and User Guide - Qlik Replicate, November 2021 884

9 Adding and managing target endpoints
9.44 Using Snowflake on Google as a targetThis section describes how to set up and use Snowflake on Google as a target in a replication task.
When configuring a task with a Snowflake on Google target endpoint, note the following:
l If the Apply Changes task option is enabled and the change processing mode is set toBatch optimized apply, it is recommended to enable the Apply batched changes tomultiple tables concurrently option in the Change Processing Tuning (page 1027) tab.
l When the Apply batched changes to multiple tables concurrently option is selected,the option to set a Global Error Handling policy will not be available. Also, some of thetask-specific error handling defaults will be different.For more information, see the Apply batched changes to multiple tables concurrentlyoption in the Change Processing Tuning (page 1027) tab.
In this section:
l Prerequisites (page 886)l Required permissions (page 886)l Limitations and considerations (page 887)l Snowflake on Google data types (page 888)l Setting general connection parameters (page 890)l Setting advanced connection properties (page 891)
Setup and User Guide - Qlik Replicate, November 2021 885

9 Adding and managing target endpoints
PrerequisitesThe following section describes the prerequisites for using Snowflake on Google as a Qlik Replicate targetendpoint.
Client prerequisitesl Qlik Replicate for Windows: Download and install Windows 64-bit ODBC driver 2.24.0 or later.l Qlik Replicate for Linux: Download and install Linux 64-bit ODBC driver 2.24.0 or later.
The expected name for the ODBC driver is SnowflakeDSIIDriver (the default).
Performance and Cloud Services usage optimizationIn order to optimize both Snowflake Cloud Services usage and overall performance, it is stronglyrecommended to enable the Apply batched changes to multiple tables concurrently option in the tasksettings' Change Processing Tuning tab.
For information about charges incurred when using Snowflake Cloud Services, see Snowflake: AdditionalBilling (Cloud Services Layer) Impact
Storage integration nameYou need to specify a storage integration name in the Snowflake on Google target endpoint settings.Integrations avoid the need for passing explicit cloud provider credentials such as secret keys or accesstokens; instead, integration objects reference a Cloud Storage service account.
For more information on creating a storage integration name, see Configuring an Integration for GoogleCloud Storage
Firewall prerequisitesFirewall port 443 needs to be opened for outbound communication.
Required permissionsThis topic describes the permissions required for working with this endpoint.
Setting a custom roleWhen Replicate establishes an ODBC connection to Snowflake, it uses the default user role on Snowflake,which is SYSADMIN.
However, if your corporate security policy dictates that third-part applications should not have SYSADMINprivileges, it is possible to create a custom role with fewer privileges and use that instead.
This can be done by changing the default user role on Snowflake from SYSADMIN to the desired customrole.
Setup and User Guide - Qlik Replicate, November 2021 886

9 Adding and managing target endpoints
Required permissionsThe required permissions differ according to whether or not the schema and/or the target tables alreadyexisted before the Replicate task started.
Tables created by ReplicatePermissions required if the schema does not exist:
l USAGE ON DATABASEl CREATE SCHEMA ON DATABASE
Permissions required if the schema already exists:
l USAGE ON DATABASEl USAGE ON SCHEMAl CREATE FILE FORMAT ON SCHEMAl CREATE STAGE ON SCHEMAl CREATE TABLE ON SCHEMA
Tables that existed before the Replicate task startedAlthough not recommended, if you wish data to be replicated to existing tables that were created by a userwith a different role, the Snowflake user specified in the endpoint settings must have the following tableprivileges:
l SELECTl INSERTl UPDATEl TRUNCATEl DELETEl REFERENCES
Google cloud storageThe JSON credentials that you need to specify in the Snowflake on Google target endpoint settings mustbe for an account that has read and write access to the specified bucket and folder.
Limitations and considerationsThe following limitations apply when using the Snowflake target endpoint in a Replicate task:
l The Transactional apply Change Processing mode is not supported.l Applying changes to binary data types is not supported.l Supports working in Limited LOB mode only.l Connecting to a proxy server via HTTPS is not supported.l Replication of tables with backslashes in their names (e.g. SPECIAL\\TABLE\N)is not supported.
Setup and User Guide - Qlik Replicate, November 2021 887

9 Adding and managing target endpoints
Snowflake on Google data typesQlik Replicate Snowflake on Google endpoint supports most Snowflake data types. The following tableshows the Snowflake target data types that are supported when using Qlik Replicate and the defaultmapping from Qlik Replicate data types.
l The Snowflake on Google endpoint does not support applying changes to binary datatypes in Batch optimized apply mode. For more information on Batch optimized applymode, see Change Processing Tuning (page 1027).
l The INT , INTEGER , BIGINT , SMALLINT , TINYINT , BYTEINT data types will alwaysbe represented as NUMBER(38, 0) on Snowflake. For more information, see theSnowflake Help.
For information on how to view the data type that is mapped from the source, see the section for the sourcedatabase you are using. For additional information about Qlik Replicate data types, see Replicate datatypes (page 76).
Qlik Replicate Data Types Snowflake on Google Data Types
BOOL BOOLEAN
BYTES If length is => 1 and =< 8388608, then:
BINARY (Length in Bytes)
If length is => 8388609 and =< 2147483647, then:
BINARY (8388608)
DATE DATE
TIME TIME
DATETIME TIMESTAMP (precision)
INT1 NUMBER
INT2 NUMBER
INT4 NUMBER
INT8 NUMBER
NUMERIC If scale is => 0 and =< 37, then:
NUMBER (p,s)
If scale is => 38 and =< 127, then:
NUMBER (Length)
REAL4 FLOAT4
Replicate and Snowflake data types
Setup and User Guide - Qlik Replicate, November 2021 888

9 Adding and managing target endpoints
Qlik Replicate Data Types Snowflake on Google Data Types
REAL8 FLOAT8
UINT1 BYTEINT
UINT2 INTEGER
UINT4 INTEGER
UINT8 BIGINT
STRING If length is => 1 and =< 16777216, then:
VARCHAR (Length in Bytes)
If length is => 16777217 and =< 2147483647, then:
VARCHAR (16777216)
If subtype is JSON or XML, then:
VARIANT
WSTRING If length is => 1 and =< 21845, then:
VARCHAR (Length in Bytes)
If length is => 21846 and =< 2147483647, then:
VARCHAR (65535)
If subtype is JSON or XML, then:
VARIANT
BLOB If length is => 1 and =< 8388608, then:
BINARY (Length in Bytes)
If length is => 8388609 and =< 2147483647, then:
BINARY (8388608)
NCLOB VARCHAR (Max LOB Size)
If subtype is JSON or XML, then:
VARIANT
CLOB VARCHAR (Max LOB Size)
If subtype is JSON or XML, then:
VARIANT
Setup and User Guide - Qlik Replicate, November 2021 889

9 Adding and managing target endpoints
Full LOB data types are not supported. For information on including Limited-size LOB datatypes in the replication, see the Metadata (page 1011) tab description in Customizing tasks(page 929).
Setting general connection parametersThis section describes how to configure general connection properties. For an explanation of how toconfigure advanced connection properties, see Setting advanced connection properties.
To add a Snowflake on Google target endpoint to Qlik Replicate:
1. In the Qlik Replicate Console, click Manage Endpoint Connections to open the Manage EndpointsConnections dialog box.
2. In the Manage Endpoint Connections dialog box, click New Endpoint Connection.
3. In the Name field, enter a display name for your Snowflake on Google endpoint.
4. Optionally, in the Description field, enter a description for your Snowflake on Google targetendpoint.
5. Select Target as the role.
6. Select Snowflake on Google as the Type.
7. Configure the remaining settings in the General tab as described in the tables below.
Option Description
Snowflake host Your URL for accessing Snowflake on Google.
User name Your Snowflake user name.
Password The password for the user entered in the User name field.
Warehouse The name of your Snowflake warehouse.
Database name The name of your Snowflake database.
Snowflake Access configuration
Option Description
JSONcredentials
The JSON credentials for the service account key with read and write access tothe Google Cloud Storage bucket.
Bucket name The Google Cloud Storage bucket.
Stagingfolder
Where to create the data files in the specified bucket.
Storageintegrationname
Your storage integration name. Integrations avoid the need for passing explicitcloud provider credentials such as secret keys or access tokens; instead,integration objects reference a Cloud Storage service account.For more information on creating a storage integration name, seehttps://docs.snowflake.com/en/user-guide/data-load-gcs-config.html
Staging on Google Cloud Storage configuration
Setup and User Guide - Qlik Replicate, November 2021 890

9 Adding and managing target endpoints
To determine if you are connected to the database you want to use or if the connectioninformation you entered is correct, click Test Connection.
If the connection is successful a message in green is displayed. If the connection fails, an errormessage is displayed at the bottom of the dialog box.
To view the log entry if the connection fails, click View Log. The server log is displayed with theinformation for the connection failure. Note that this button is not available unless the testconnection fails.
Setting advanced connection propertiesIn the Advanced tab, you can set the parameters described in the tables below.
Option Description
Max file size(MB)
Select or type the maximum size of the CSV file used to transfer data to Snowflake onGoogle. The default value is 100 MB.
File Attributes parameters
Option Description
Use proxy server Select this option to access Snowflake on Google via a proxy server.
Host name The host name of the proxy server.
Port The port via which to access the proxy server.
User name The user name for accessing the proxy server, if required.
Password The password for accessing the proxy server, if required.
Proxy Server parameters
Internal parametersInternal parameters are parameters that are not exposed in the UI. You should only use them if instructedby Qlik Support.
To add internal Qlik Replicate parameters:
1. Click the Internal Parameters link.The Internal Parameters dialog box opens.
2. In the edit box, type the name of the parameter you need to add and then click it.
3. The parameter is added to the table below the search box with its default value.
4. Change the default value as required.
5. To reset the parameter value to its default, click the "Restore default value" icon at the end of therow.
Setup and User Guide - Qlik Replicate, November 2021 891

9 Adding and managing target endpoints
More optionsThese options are not exposed in the UI as they are only relevant to specific versions or environments.Consequently, do not set these options unless explicitly instructed to do so by Qlik Support or productdocumentation.
To set an option, simply copy the option into the Add feature name field and click Add. Then set the valueor enable the option according to the instructions you received.
Settings summaryYou can view a summary of your settings by clicking the Setting Summary link. This is useful if you need tosend a summary of your settings to Qlik Support.
Setup and User Guide - Qlik Replicate, November 2021 892

9 Adding and managing target endpoints
9.45 Using Teradata Database as a targetThis section explains how to set up and use Teradata Database as a target endpoint in a replication task.
Although the information in this section refers to Teradata Database, it is relevant for TeradataVantage as well.
In this section:
l An overview of the Teradata Database target (page 894)l Teradata Database target load options (page 894)l Database availability (page 894)l Required Teradata Database Software, Environments (page 894)l Providing access to the Teradata Database (page 896)l Security requirements (page 896)l Teradata Database data types (page 897)l Setting general connection properties (page 899)l Setting advanced connection properties (page 900)
Setup and User Guide - Qlik Replicate, November 2021 893

9 Adding and managing target endpoints
An overview of the Teradata Database targetThe Qlik Replicate database for Teradata Database is a powerful operational data warehousing solutionthat manages Big Data analytics and challenges. Qlik Replicate uses the Teradata Database ParallelTransporter (TPT) API to facilitate data loading. The ODBC API is used for other purposes such asmetadata queries (DDL requests) and retrieving information from Teradata Database error tables.
Qlik Replicate for Teradata Database uses the TPT load to bulk load data into a Teradata Database targetdatabase. You can replicate data to the Teradata Database from any source database supported by QlikReplicate. In addition, Qlik Replicate can replicate data from any source database that supports ODBC.
Teradata Database target load optionsYou can apply changes in one of two modes:
l TPT stream mode (page 894)l TPT load mode (page 894)
TPT stream modeWhen using the TPT stream mode, the TPT Stream operator uses the Teradata Database TPump protocolto perform high-speed DML transactions in a near-real-time mode on tables. The TPT STREAM operator isless restrictive than the LOAD operator.
This mode lets tables be queried at the same time that a DML operation takes place.
TPT load modeWhen using the TPT load mode, the TPT LOAD operator uses the Teradata Database FastLoad protocolto load a large volume of data at high speed into an empty table on the Teradata Database.
The TPT LOAD operator has some restrictions that include the following:
l The target table must be empty.l The target table cannot have secondary indexes defined.
Database availabilityTeradata Database with the tables that are being used for replication must be available to the system. Thiscan be installed on any computer in your network.
For more information about the requirements for working with Qlik Replicate, see Installing Qlik Replicate(page 38).
Required Teradata Database Software, EnvironmentsThe following describes the prerequisites necessary to prepare your environment to work with QlikReplicate and Teradata Database.
Teradata Database must be installed in your network and be reachable from the computerwhere Qlik Replicate is installed.
Setup and User Guide - Qlik Replicate, November 2021 894

9 Adding and managing target endpoints
Replicate server for WindowsYou must install the following on the same computer where the Qlik Replicate Server is installed:
l To work with Teradata Database 15, install Teradata Database ODBC Driver 15.00 for Windows. Towork with Teradata Database 16 or later, you need to install Teradata Database ODBC Driver 16.20for Windows.
l Teradata Database Parallel Processor API (TPT API) with the load and Stream TPT operators.Install either version 14.00 with the latest patch or version 15.10.
Replicate server for LinuxThe following section describes the steps you need to perform to work with Qlik Replicate for Linux andTeradata Database as a target database in a Replicate task. Teradata Database Client requires theDataDirect ODBC driver manager (provided with Teradata Database Client).
A Replicate task cannot be defined with endpoints that use different ODBC Driver Managers.Teradata Database target is accessed using the DataDirect ODBC Driver Manager. With theexception of Oracle, Hadoop, File and Replicate Connect sources (which are not subject to theabove limitation), all other source endpoints use the unixODBC Driver Manager.
To configure a task with a unixODBC source and a DataDirect target (e.g. Microsoft SQLServer to Teradata Database Target), you need to use the Replicate File Channel. For moreinformation about setting up a task using the File Channel, see Using the Qlik Replicate filechannel (page 908).
1. Install Replicate on the Linux machine as described in Setting up Qlik Replicate on Linux (page 47).
2. Install the following Teradata client components:l To work with Teradata Database 15, install Teradata Database ODBC Driver 15.00 for Linux.To work with Teradata Database 16 or later, you need to install Teradata Database ODBCDriver 16.20 for Linux.
l Teradata Database Parallel Processor API (TPT API) with the Load and Stream TPToperators
3. Open the Teradata odbcinst.ini file:cat $TD_CLIENT_DIR/odbc_64/odbcinst.ini
Then verify that it contains a definition for the Teradata ODBC client (version 14.10 in the examplebelow):[ODBC DRIVERS]
Teradata=Installed
[Teradata]
Driver=/opt/teradata/client/14.10/odbc_64/lib/tdata.so
DriverODBCVer=3.51
4. Check that directory /usr/lib64 contains symbolic links to the DataDirect driver manager sharedlibraries:ll /usr/lib64/libodbc*.so
The output should look like this (e.g. for version 14.10):lrwxrwxrwx 1 root root 47 Oct 28 14:58 /usr/lib64/libodbcinst.so ->
/opt/teradata/client/ODBC_64/lib/libodbcinst.so
Setup and User Guide - Qlik Replicate, November 2021 895

9 Adding and managing target endpoints
lrwxrwxrwx 1 root root 43 Oct 28 14:58 /usr/lib64/libodbc.so ->
/opt/teradata/client/ODBC_64/lib/libodbc.so
5. Add the Teradata Database name to the hosts file as described in Editing the hosts file (page 896).
6. Run the following commands (e.g. for version 14.10):export LD_LIBRARY_PATH=$TD_CLIENT:/opt/attunity/replicate/lib:/lib64:/usr/lib64
export AREP_ODBC_DRIVER_MANAGER=/opt/teradata/client/14.10/odbc_64/lib/libodbc.so
export ODBCINI=/opt/teradata/client/14.10/odbc_64/odbc.ini
Providing access to the Teradata DatabaseThe Qlik Replicate user who is working with the Teradata Database must be registered as a user in theTeradata Database. This is the user that is entered in the dialog box when Setting general connectionproperties (page 899). You must grant Teradata Database access to this user before configuring thedatabase in Qlik Replicate.
Editing the hosts fileTo enable Qlik Replicate to access the Teradata Database, you need to add the Teradata Databasemachine IP/name and database mappings to the Windows/Linux hosts file.
To add the Teradata Database mappings to the hosts file:
1. Open the Windows/Linux hosts file on the Qlik Replicate machine.On Windows, the default path for the hosts file is:~:\Windows\System32\drivers\etc\hosts
On Linux, the default path for the hosts file is:/etc/hosts
2. Add the following line (note the “cop1” after the database name):<Teradata Database IP address/hostname> <Teradata Database name>cop1
Example:
123.123.123.1 teradatadbonecop1
Make sure that the database name added to the hosts files is the same as the databasespecified in the Default database field in the Teradata Database target databasesettings.
3. Save your changes.
Security requirementsA user must have the following privileges granted in the Teradata Database to use a Teradata Databasetarget in a Qlik Replicate task:
l GRANT SELECT ON <database>l GRANT INSERT ON <database>l GRANT DELETE ON <database>l GRANT UPDATE ON <database>l GRANT EXECUTE ON <database>
Setup and User Guide - Qlik Replicate, November 2021 896

9 Adding and managing target endpoints
l GRANT EXECUTE FUNCTION ON <database>l GRANT EXECUTE PROCEDURE ON <database>l GRANT CREATE TABLE ON <database>l GRANT DROP TABLE ON <database>l GRANT CREATE VIEWON <database>l GRANT DROP VIEWON <database>l GRANT NONTEMPORAL on <database>l GRANT CHECKPOINT ON <database>When the Stream TPT Operator is selected (in the Advanced tab), the following privilege is alsorequired:
l GRANT CREATE MACRO ON <database>
Teradata Database data typesThe Teradata Database target endpoint for Qlik Replicate supports most Teradata Database data types.The following table shows the Teradata Database target data types that are supported when using QlikReplicate and the default mapping from Qlik Replicate data types. Unsupported data types are listed belowthe table.
Teradata Database does not support applying changes to binary data types in Batch optimizedapply mode. For more information on Batch optimized apply mode, see Change ProcessingTuning (page 1027).
For information on how to view the data type that is mapped from the source, see the section for the sourcedatabase you are using. For additional information about Qlik Replicate data types, see Replicate datatypes (page 76).
Qlik Replicate Data TypesTeradata DatabaseData Types
BOOLEAN BYTEINT
BYTES VARBYTE (Size)
Maximumsize is640000.
DATE DATE
TIME TIME (P)
DATETIME TIMESTAMP (P)
INT1 BYTEINT
Supported data types mapping
Setup and User Guide - Qlik Replicate, November 2021 897

9 Adding and managing target endpoints
Qlik Replicate Data TypesTeradata DatabaseData Types
INT2 SMALLINT
INT4 INTEGER
INT8 BIGINT
NUMERIC NUMERIC (P, S)
REAL4 FLOAT
FLOAT is equivalent toREAL and DOUBLEPRECISION.
REAL8 FLOAT
STRING
See also the note in Teradata Database data types (page 897) below.
VARCHAR (Size)
Note: Maximum size is64000.
UINT1 BYTEINT
UINT2 SMALLINT
UINT4 INTEGER
UINT8 BIGINT
WSTRING
See also the note in Teradata Database data types (page 897) below.
VARCHAR (Size)
Maximumsize is640000.
BLOB VARBYTE(${MAX_LOB_SIZE})
MAX_LOB_SIZE is themaximum LOB sizespecified in Limited-Size LOB Mode.
Setup and User Guide - Qlik Replicate, November 2021 898

9 Adding and managing target endpoints
Qlik Replicate Data TypesTeradata DatabaseData Types
CLOB
By default, Replicate multiplies the value of each varchar columnby three, in order to support NLS. For example, a varchar columnwith 36 characters in the source database will have 108characters in Teradata Database. This may result in TeradataDatabase varcharcolumns being longer than you actually needthem (and unnecessarily increasing the row size). In such cases,you can override the default multiplication factor by using thenlsFactor internal parameter. For instructions on using thenlsFactor parameter, contact Qlik Support.
VARCHAR(${MAX_LOB_SIZE})
Unicode case-insensitive characterset.
MAX_LOB_SIZE is themaximum LOB sizespecified in Limited-Size LOB Mode.
NCLOB
See the note in CLOB (page 899) above.
VARCHAR(${MAX_LOB_SIZE})
Case-insensitivecharacter set.
MAX_LOB_SIZE is themaximum LOB sizespecified in Limited-Size LOB Mode.
About Teradata Database LOB support:Full LOB data types are not supported in the Teradata Database. For information on includingLimited-size LOB data types in the replication, see Metadata (page 1011). Note also that thesize of a row in the Teradata Database cannot exceed 64KB. This should be taken intoconsideration when specifying the maximum LOB size in the Metadata tab.See also the note in CLOB (page 899) above.
The following Teradata Database data types are not supported:
l PERIOD
Setting general connection propertiesThis section describes how to configure general connection properties. For an explanation of how toconfigure advanced connection properties, see Setting advanced connection properties.
To add a Teradata Database Target to Qlik Replicate:
1. In Tasks view, click Manage Endpoint Connections to open the Manage Endpoints Connectionsdialog box. Then click the New Endpoint Connection button. For more information on adding an
Setup and User Guide - Qlik Replicate, November 2021 899

9 Adding and managing target endpoints
endpoint to Qlik Replicate, see Defining and managing endpoints (page 110).
2. In the Name field, type a name for your database. This can be any name that will help to identify thedatabase being used.
3. In the Description field, type a description that helps to identify the Teradata Database. This isoptional.
4. Select Target as the database role.
5. Select Teradata Database as the database Type.
6. Type the Server name. This is the name of the computer with the Teradata Database instance youwant to work with.
7. Type the Teradata Database authentication information (Username, Password) for the authorizeduser for this Teradata Database. If you do not know this information, see your Teradata Databasesystem manager.
Consider the following:l If you are using the Advanced tab to create a custom string, make sure to includethe USERNAME property. A Password can also be included but is not required.See Setting advanced connection properties (page 900) for more information.
l This information is case sensitive.l If you want to set custom properties for this database, see Setting advancedconnection properties (page 900).
l To determine if you are connected to the database you want to use or if theconnection information you entered is correct, click Test Connection.If the connection is successful a message in green is displayed. If the connectionfails, an error message is displayed at the bottom of the dialog box.To view the log entry if the connection fails, click View Log. The server log isdisplayed with the information for the connection failure. Note that this button isnot available unless the test connection fails.
Make sure that the Teradata Database user entered in the Teradata DatabaseAuthentication section has the correct access privileges. For information on how toprovide the required privileges, see Security requirements (page 896).
8. Type the Default database name or select one from the list of available endpoints. This is the nameof the Teradata Database where you are replicating the data to.For more information, see Teradata Database target load options (page 894).
Setting advanced connection propertiesYou can set custom properties or change the default settings for various parameters by adding them to acustom connect string in the Advanced tab of the Add Database dialog box.
You can set the following parameters:
Setup and User Guide - Qlik Replicate, November 2021 900

9 Adding and managing target endpoints
l TPT Operator: Select the TPT Operator used to access the Teradata Database. The possibleoptions are:
l Load: Select this to use the TPT load mode (page 894).l Stream: Select this to use the TPT stream mode (page 894).
See Teradata Database target load options (page 894).l TPT Attributes: You can define one or more of the following attributes:
l Account String: The account (database server login) that the DBA assigned to the username for theQlik Replicate user.
l Buffer Size: The output buffer size (in KB) for sending Load parcels to the Teradata Database.You can enter a value from 1 to 64.
l Buffers: The number of request buffers used.You can enter any value from 2 or higher.
l Explicit sessions range: Select this if you want set a minimum and/or maximum number ofsessions that can log on to the Teradata Database.
l Maximum: The maximum number of sessions that can log on to the Teradata Database. Thedefault value is 1. The value cannot be higher than the number of Access Module Processors(AMPs) available.
l Minimum: The minimum number of sessions that can log on to the Teradata Database.l Dynamic statement packing: Select this check box if you want the stream driver to dynamicallydetermine the maximum possible pack for the current STREAM job.
l Statement packing: Use the counter or type the number of statements that can be packedinto a multiple-statement request (STREAM).You can enter a value from 2 to 600.This is available only if Statement packing is not selected.
l Additional ODBC connection properties: Type any additional ODBC connection properties, ifrequired.
Internal parametersInternal parameters are parameters that are not exposed in the UI. You should only use them if instructedby Qlik Support.
To add internal Qlik Replicate parameters:
1. Click the Internal Parameters link.The Internal Parameters dialog box opens.
2. In the edit box, type the name of the parameter you need to add and then click it.
3. The parameter is added to the table below the search box with its default value.
4. Change the default value as required.
5. To reset the parameter value to its default, click the "Restore default value" icon at the end of therow.
Setup and User Guide - Qlik Replicate, November 2021 901

9 Adding and managing target endpoints
More optionsThese options are not exposed in the UI as they are only relevant to specific versions or environments.Consequently, do not set these options unless explicitly instructed to do so by Qlik Support or productdocumentation.
To set an option, simply copy the option into the Add feature name field and click Add. Then set the valueor enable the option according to the instructions you received.
Settings summaryYou can view a summary of your settings by clicking the Setting Summary link. This is useful if you need tosend a summary of your settings to Qlik Support.
Setup and User Guide - Qlik Replicate, November 2021 902

9 Adding and managing target endpoints
9.46 Using Vertica as a targetThis section describes how to set up and use an Vertica database as a target database in a replicationtask.
In this section:
l Prerequisites (page 904)l Limitations (page 904)l Security requirements (page 904)l Vertica target data types (page 905)l Setting general connection properties (page 906)l Setting advanced connection properties (page 907)
Setup and User Guide - Qlik Replicate, November 2021 903
9 Adding and managing target endpoints
PrerequisitesThe following section describes the prerequisites for working with Qlik Replicate on Windows or Linux andthe Vertica target database.
Replicate server for WindowsThe following section describes the steps you need to perform to work with Qlik Replicate for Windows andVertica as a target database in a Replicate task:
l Vertica ODBC 64-bit client installed on the computer where Qlik Replicate is located.l VSQL CLI Client installed on the computer where Qlik Replicate is located.
Replicate server for LinuxThe following section describes the steps you need to perform to work with Qlik Replicate for Linux andVertica as a target database in a Replicate task:
1. On the Qlik Replicate machine, install the Vertica client for Linux:vertica-client-<version>.x86_64
Example:
vertica-client-7.0.0-0.x86_64
Vertica 7.1 client is not compatible with database versions earlier than Vertica 7.1.
2. Makes sure that the /etc/odbcinst.ini file contains the following entry for Vertica, as in thefollowing example:[Vertica]
Driver = /opt/vertica/lib64/libverticaodbc.so
DriverODBCVer = 3.0
UsageCount = 1
LimitationsThe following limitations apply to the Vertica target endpoint:
l In "Batch optimized apply" Change Processing mode, binary data types (e.g. VARBINARY) arelimited to 32500 bytes on the target.
Security requirementsYou must provide Vertica account access to the Qlik Replicate user. The Replicate user must also have thefollowing privileges in the Vertica database:
l CREATE TABLE Privileges:l CREATE privilege on schema
l DROP TABLE Privileges:l USAGE privilege on the schema that contains the table or schema owner
l TRUNCATE Privileges (If the task is configured to truncate existing tables):
Setup and User Guide - Qlik Replicate, November 2021 904

9 Adding and managing target endpoints
l USAGE privilege on the schema that contains the table or schema ownerl ALTER TABLE (ADD/DROP/ RENAME/ALTER-TYPE COLUMN) Privileges:
l USAGE privilege on the schema that contains the table or schema ownerl INSERT Privileges:
l INSERT privilege on tablel USAGE privilege on the schema that contains the table
l UPDATE Privileges:l UPDATE privilege on tablel USAGE privilege on the schema that contains the tablel SELECT privilege on the table when executing an UPDATE statement that references tablecolumn values in a WHERE or SET clause
l DELETE Privileges:l DELETE privilege on tablel USAGE privilege on schema that contains the tablel SELECT privilege on the table when executing a DELETE statement that references tablecolumn values in a WHERE or SET clause
Vertica target data typesThe Vertica database for Qlik Replicate supports most Vertica data types. The following table shows theVertica target data types that are supported when using Qlik Replicate and the default mapping from QlikReplicate data types.
Vertica does not support applying changes to binary data types in Batch optimized applymode. For more information on Batch optimized apply mode, see Change Processing Tuning(page 1027).
For information on how to view the data type that is mapped from the source, see the section for the sourcedatabase you are using.
For additional information about Qlik Replicate data types, see Replicate data types (page 76).
Qlik Replicate Data Types Vertica Data Types
BOOLEAN BOOLEAN
BYTES VARBINARY (Length)
DATE DATE
TIME TIME (p)
DATETIME TIMESTAMP
INT1 INTEGER
Supported data types
Setup and User Guide - Qlik Replicate, November 2021 905

9 Adding and managing target endpoints
Qlik Replicate Data Types Vertica Data Types
INT2 INTEGER
INT4 INTEGER
INT8 INTEGER
NUMERIC NUMERIC (p,s)
REAL4 FLOAT
REAL8 FLOAT
STRING VARCHAR (Length multiplied by three)
For example, STRING (50) becomes VARCHAR (150).
UINT1 INTEGER
UINT2 INTEGER
UINT4 INTEGER
UINT8 INTEGER
WSTRING VARCHAR (Length in Bytes)
BLOB VARBINARY (65,000)
CLOB VARCHAR (65,000)
NCLOB VARCHAR (65,000)
Setting general connection propertiesThis section describes how to configure general connection properties. For an explanation of how toconfigure advanced connection properties, see Setting advanced connection properties.
To add an Vertica target endpoint to Qlik Replicate:
1. In Tasks view, click Manage Endpoint Connections to open the Manage Endpoints Connectionsdialog box. Then click the New Endpoint Connection button.
2. In the Name field, type a name for your database. This can be any name that will help to identify thedatabase being used.
3. In the Description field, type a description that helps to identify the Vertica database. This isoptional.
4. Select Target as the database role.
5. Select Vertica as the database Type.
6. In the Server field, enter the name of the Vertica server.
7. Optionally, change the default Port (5433).
8. Type the Vertica authentication information (User Name, Password) for the authorized user for thisVertica database. If you do not know this information, see your Vertica database Administrator(DBA).
Setup and User Guide - Qlik Replicate, November 2021 906

9 Adding and managing target endpoints
l This information is required. If you are using the Advanced tab to create acustom string, make sure to include the User Name and Password properties.See Setting advanced connection properties (page 907) for more information.
l This information is case sensitive.l If you want to set custom properties for this database, see Setting advancedconnection properties (page 907).
Make sure that the Vertica user entered in the Vertica Authentication section has thecorrect access privileges. For information on how to provide the required privileges, seeSecurity requirements (page 904).]
9. In the Database name field, enter the name of the Vertica database.
Setting advanced connection propertiesIn the Advanced tab, you can set the following parameters:
l Max file size: Select or type the maximum size (in KB) of a CSV file before the file is loaded into theVertica database. The default value is 32000 KB.
Internal parametersInternal parameters are parameters that are not exposed in the UI. You should only use them if instructedby Qlik Support.
To add internal Qlik Replicate parameters:
1. Click the Internal Parameters link.The Internal Parameters dialog box opens.
2. In the edit box, type the name of the parameter you need to add and then click it.
3. The parameter is added to the table below the search box with its default value.
4. Change the default value as required.
5. To reset the parameter value to its default, click the "Restore default value" icon at the end of therow.
More optionsThese options are not exposed in the UI as they are only relevant to specific versions or environments.Consequently, do not set these options unless explicitly instructed to do so by Qlik Support or productdocumentation.
To set an option, simply copy the option into the Add feature name field and click Add. Then set the valueor enable the option according to the instructions you received.
Settings summaryYou can view a summary of your settings by clicking the Setting Summary link. This is useful if you need tosend a summary of your settings to Qlik Support.
Setup and User Guide - Qlik Replicate, November 2021 907

10 Using the Qlik Replicate file channel
10 Using the Qlik Replicate file channelThis topic describes how to use the Qlik Replicate File Channel as a source or target in a replication task.
If you use File Channel as both source and target, the version (build) of the Qlik Replicateservers on both sides should be identical.
In this section:
l Setting Up Qlik Replicate File Channel tasks (page 910)l Working with the File Channel data files (page 912)l Prerequisites (page 909)l Security (page 910)l Limitations (page 909)l Using the File Channel as a source (page 914)l Using the File Channel as a target (page 916)
Setup and User Guide - Qlik Replicate, November 2021 908

10 Using the Qlik Replicate file channel
10.1 Prerequisitesl To work with the file-channel endpoint, you must install Qlik Replicate anywhere on the network foreach LAN that you are working with.
l When using the File Transfer Service, make sure to open the firewall port defined in the FileTransfer Service settings. For more information on working with the File Transfer Service, see thefollowing sections:
l File Transfer Service (page 1112)l Setting advanced connection properties (page 915)(File Channel source)l Setting advanced connection properties (page 917) (File Channel target)
10.2 LimitationsThe following limitations apply:
l The File Channel endpoint does not support Full LOB mode.l You cannot use the Full Load resume function if you are using the File Channel endpoint. Toresume a Full Load operation, you must delete the original data and then run the task again.
l You must delete the File Channel folder before restarting an Apply Changes task.l After modifying an existing transformation in a remote File Channel task, both the local and theremote File Channel tasks need to be restarted (by selecting the Reload Target run option in bothtasks).
l Control tables defined for the local File Channel task but not for the remote File Channel task will notbe created on the remote task’s target endpoint.For information on defining Control Tables, see Control tables (page 1015).
l If the local task fails, or is stopped, it is possible that the Full Load operation in the remote task willnot complete successfully.
l The source_lookup Data Enrichment function is not supported. For more information on thisfunction, see Data Enrichment functions (page 1003)
l The Unsuspend table option is not supported.l The following functionality is not supported by the local File Channel task and should be set in theremote File Channel task only:
l Store Changes replicationl Table-level or global transformationsl The ignore DDL changes options (DROP, TRUNCATE, and ALTER) in the Apply ChangesSettings (page 1020) tab
l Changing the schema in which the Replicate Control tables will be createdl Stopping the Task after Full Load options
l The following functionality is not supported by the remote File Channel task and should be set in thelocal File Channel task only:
l Metadata only run options
Setup and User Guide - Qlik Replicate, November 2021 909
10 Using the Qlik Replicate file channel
10.3 SecurityWhen using the File Transfer Service, file-channel files are always transferred over an encrypted session.
The session is encrypted as follows:
The client and server create an AES-256 session key using the Diffie-Hellman key exchange protocol(using the OpenSSL library). After the key is created, all file transfers between the client and the server willtake place over a secure and encrypted communication channel.
However, even though the session is encrypted, communication between the client and the server may stillbe susceptible to man-in-the-middle attacks. A man-in-the-middle in possession of the session key wouldbe able to intercept any data transferred between the client and the server.
To eliminate man-in-the-middle attacks, a "shared password" needs to be provided when configuring thelocal and remote file channel endpoints. Once the session is established, both the client and the server usethe shared password to re-key the session key during the next packet exchange, thereby preventing theoriginal session key from being used for man-in-the-middle attacks.
To sum up:
1. Strong encryption is used regardless of whether a password was provided.
2. Providing a password eliminates the risk of a man-in-the-middle attack.
For more information about the File Transfer Service, see File Transfer Service (page 1112).
10.4 Setting Up Qlik Replicate File Channel tasksTo replicate data using the file channel, you must set up two tasks of the following type:
l Local task (page 910)l Remote task (page 911)
When using file channel, Change Tables can be enabled for the remote task but not for thelocal task (enabling Change Tables for the local task will result in remote task failure).
Local taskYou set up the local task using the File-Channel endpoint as a target. The binary file created in this task isused as the source for one or more remote tasks using the File-Channel source endpoint.
The local task replicates data from a Qlik Replicate supported endpoint to the file channel. If you changedthe default folder for storing data files (during the installation), then you must specify the location of thebinary file created by the file channel. This location can be anywhere in your system. For more informationon setting up a local task, see Using the File Channel as a target (page 916).
Setup and User Guide - Qlik Replicate, November 2021 910

10 Using the Qlik Replicate file channel
Remote taskRemote tasks use the File Channel as a source endpoint. You use the file created by the local task for thissource. You can replicate the data to any endpoint that is supported by Qlik Replicate. You define thelocation of the File-Channel file as the remote location where the file was created. The data is pushed overthe network to the defined location anywhere in your system. You can also define more than one locationfor the replicated data. In this case, define a separate remote task for each location.
For remote tasks configured with the File Channel source endpoint, you must enable Full Loadreplication and set the If target table already exists option in the task settings' Full LoadSettings (page 1017) tab to Do Nothing.
The attrep_cdc_partitions Control Table is not supported when using File Channel as a sourceendpoint.
If you want to push the data to an endpoint that is not in your LAN, use the File Transfer Service (page1112) to send the files created in the local task to the remote location.
When you run the remote task, data is sent to the target in the following instances:
l The first time you run the task as a full load.l Each time changes are made to the file. In this case, change processing takes place.
When the remote task runs, it will continuously look for the source file until the task is stopped. When thefile is found, the data is replicated to the target endpoint. If no source file is found, an error is displayed;however, the task will continue to check for the correct file. Therefore, it is recommended that you run thelocal task first to ensure that the file exists.
To replicate tables that were added to the local file channel task after the initial full load, youneed to reload both the local and the remote file channel tasks.
For more information on setting up a remote task, see Using the File Channel as a source (page 914).
Replicating to multiple targets (distribution)You can use the File Channel to distribute from a single source endpoint to multiple targets, either of thesame type (e.g. Microsoft SQL Server to Microsoft SQL Server) or of different types (e.g. Microsoft SQLServer to Oracle and SAP Sybase ASE).
To do this:
1. For each of the target endpoints, define a separate (remote) task that replicates from the FileChannel source to the target endpoint. In the Advanced tab of the File Channel source settings,make sure to clear the Delete processed files check box. This ensures that the File Channel fileswill be available for distribution as required.
Setup and User Guide - Qlik Replicate, November 2021 911

10 Using the Qlik Replicate file channel
2. Define a local task that replicates from the source endpoint to a File Channel target.
3. Run the local task (this will create the File Channel files required by the remote task).
4. For each of the remote tasks, select which tables to replicate (from the File Channel source) andoptionally apply Filters and Transformations to them.
5. Run the remote tasks.
For more information on defining tasks, see Defining and managing tasks (page 104).
For information on Filters and Transformations, see Customizing tasks (page 929).
By default, all the metadata for the selected source tables is replicated from the Local task(page 910) to the Remote task (page 911). This allows you to remove, add and transformtables in the remote task as needed. However, if you want the tables in the source and targetendpoints to be identical, you can prevent replication of the metadata (and thereby shorten theprocessing time) by specifying provideremotemetadata=N in the Override connectionstring parameters field of the File Channel target’s Advanced tab.
Adding tables to a running remote taskWhen distributing to multiple targets, it is possible to replicate a different subset of tables to each target ifnecessary. Before starting the task, you can select which tables to replicate using the standard proceduredescribed in Selecting tables and/or views for replication (page 114). However, if the task is alreadyrunning, you need to perform the following procedure:
1. Stop the remote task.
2. Add the desired tables (as described in Selecting tables and/or views for replication (page 114)).
3. Resume the remote task. The newly added tables will be marked as “Queued”.
4. Reload the newly added tables in the local task (by selecting the tables and clicking the Reload iconin Monitor view).
For information on removing specific tables from a replication task, see Removing specific tables/viewsfrom a replication task (page 118).
Adding tables to the remote task is not supported in Apply Changes (CDC-only) replicationtasks. For more information on the available replication options, see Adding tasks (page 105).
10.5 Working with the File Channel data filesThe File Channel stream data files are encoded in an internal binary format. For full-load operations, theFile Channel binary files contain packed data records for each of the table records and an end-of-file (EOF)record. For change-processing operations, the file contains:
l A packed data record for each DDL and/or DML change.l A begin-load-table record with the stream name that marks the beginning of table loading.
Setup and User Guide - Qlik Replicate, November 2021 912

10 Using the Qlik Replicate file channel
l A packed table-definition record with the table metadata. These records come before each DDL andbegin-load-table record.
You do not need to work directly with the file-channel files, however if you find it necessary to work withthem they are located in the File-Channel Directory Structure described below.
File-Channel directory structureThe file-channel directory contains the following files and folders:
l s_msgs: This folder contains messages sent from the source side to the replication server on theremote target side.Messages are removed from this folder at the source side when an acknowledgment message isreceived stating that the file was transferred successfully or possibly with a timeout.Messages are removed from this folder at the target side after they are read.This folder contains the following files:
l s_msgs/xxxxxxxx.fcm: This file contains a JSONmessage from the source side to the targetside.
l yyyymmddhhMMsss.mtd: This file contains the captured tables list.l s_status: This folder contains status updates from the source side to the target side. Status updatesappear as a fixed name file that is periodically updated. This file lists the last processed target statusfile. It receives the t_status/cccccccc.fcs file. These files are deleted when the file-channel sourceendpoint finishes reading the file. You can configure the file-channel source to keep the files, ifnecessary. See Setting advanced connection properties (page 915) for more information.
l t_status: This folder contains status updates from the target side to the source side. Status updatesappear as an infinite set of data files that are created according to a specific schedule. These filesare sent from the target by the source. The folder contains also a fixed name file that is updated withthe last created status file name. It contains the following file:
l t_status/cccccccc.fcs: This is a file channel status file (.fcs) where the file name is ahexadecimal counter of length 8. These files will be transferred in order with the lowernumbers transferred first. If you need to view them, you should order them by timestampbecause alphabetical ordering will not be consistent with the hexidecimal name.File channel status files are deleted by the source after being read and by the target whensource status file indicates that this file was already processed.You can configure the maximum amount of time that the files are kept before a new file iscreated as well as the maximum file size for each file. The minimum file size is 50 MB.For more information, see Setting advanced connection properties (page 917).
l streams/<stream-name>: This folder contains stream sub-folder, one sub-folder per stream. Astream represents a finite or infinite set of data files being sent from the source to the target. The filechannel allows creating and destroying named streams dynamically. For example, there can be afixed-named stream cdc (streams/cdc) and there could be a dynamically created streamloadXXXXXXXX that can be removed at the source side when a status update from the target isreceived (for example, when processing completed) in the t_status folder.You can configure the maximum number of streams and the maximum disc space for each stream.For more information, see Change Processing (page 1020).This folder contains the following file:
Setup and User Guide - Qlik Replicate, November 2021 913

10 Using the Qlik Replicate file channel
l streams/<stream-name>/cccccccc.fcd: This is a file channel data file (.fcd) where the filename is a hexadecimal counter of length 8. These files are processed at the target in order orin parallel depending on the case. However, the files are transferred in order with the lowernumbers transferred first.File channel data files are deleted by the source when transferred successfully and by thetarget when processed.You can configure the maximum amount of time that the files are kept before being creatinga new file and the maximum file size for each file. The minimum file size is 10 MB and theminimum time that a file is kept is 5 seconds.
10.6 Using the File Channel as a sourceThe File Channel source endpoint is a Qlik Replicate endpoint that consumes and applies the contents of afile channel directory structure that was produced by a corresponding File Channel target endpoint.
10.7 Setting general connection propertiesThis section describes how to configure general connection properties. For an explanation of how toconfigure advanced connection properties, see Setting advanced connection properties.
To add the File Channel source to Qlik Replicate:
1. In Tasks view, click Manage Endpoint Connections toolbar button to open the Manage EndpointConnections window.
2. In the Name field, type a name for your endpoint. This can be any name that will help to identify theendpoint being used.
3. In the Description field, type a description that helps to identify the information being replicated tothe file. This is optional.
4. Select Source as the endpoint Role.
5. Select File Channel as the endpoint Type.
6. Type the full path to the Storage Folder where the File Channel files will be created. The defaultpath when not using the File Transfer Service is:C:\Program Files\Qlik\Replicate\data\tasks\<task_name>
If you are using the File Transfer Service, the default path is:C:\Program Files\Qlik\Replicate\data\endpoints\<file-channel_db_name>\fc
The Replicate File Transfer Service always transfers the local file channel task’s files tothe default directory on the remote system (C:\ProgramFiles\Attunity\Replicate\data\endpoints\<remote_file-channel_db_
name>\fc). Consequently, if you are using the File Transfer Service, ensure that thedefault directory always has enough space for the incoming files.For more information on using the File Transfer Service, see File Transfer Service (page1112) and Setting advanced properties.
Setup and User Guide - Qlik Replicate, November 2021 914

10 Using the Qlik Replicate file channel
The actual size of the File Channel files is usually three-to-four times larger than the sizeof the source data. You should therefore make sure that the location of the specifiedStorage Folder has sufficient disk space.
This folder should be in a location that is accessible from anywhere in the WAN you are workingwith.
To determine if you are connected to the endpoint you want to use or if the connectioninformation you entered is correct, click Test Connection.If the connection is successful a message in green is displayed. If the connection fails,an error message is displayed at the bottom of the dialog box.To view the log entry if the connection fails, click View Log. The server log is displayedwith the information for the connection failure. Note that this button is not availableunless the test connection fails.
7. Click OK to finish the setup and save the changes.
10.8 Setting advanced connection propertiesYou can set the following properties in the Advanced tab:
l Input files are received via file transfer service: Select this check box to receive the source inputfiles using the Replicate File Transfer Service.
l Password: The password that will be used to establish a secure connection with the FileChannel Target.
When using the File Transfer Service, an agreed upon password is required inorder to establish a secure connection between the File Channel Source and theFile Channel Target. Accordingly, the password specified in the File ChannelSource settings and the password specified in the File Channel Target settingsmust be identical.
For more information about the File Transfer Service, see File Transfer Service (page 1112).l Delete processed files: Select this check box to delete the File Channel files after the data hasbeen replicated to the target endpoint.You should clear this check box if other tasks need to use the files.
Internal parametersInternal parameters are parameters that are not exposed in the UI. You should only use them if instructedby Qlik Support.
To add internal Qlik Replicate parameters:
1. Click the Internal Parameters link.The Internal Parameters dialog box opens.
Setup and User Guide - Qlik Replicate, November 2021 915

10 Using the Qlik Replicate file channel
2. In the edit box, type the name of the parameter you need to add and then click it.
3. The parameter is added to the table below the search box with its default value.
4. Change the default value as required.
5. To reset the parameter value to its default, click the "Restore default value" icon at the end of therow.
Settings summaryYou can view a summary of your settings by clicking the Setting Summary link. This is useful if you need tosend a summary of your settings to Qlik Support.
10.9 Using the File Channel as a targetThe File-Channel target endpoint is a Qlik Replicate endpoint that creates and maintains a file-baseddirectory structure containing replication artifacts (task definitions, metadata, full load data, CDC data andstatus updates). This file channel directory structure is consumed by a corresponding File-Channel sourceendpoint in a different task and possibly in a remote location.
Setting general connection propertiesThis section describes how to configure general connection properties. For an explanation of how toconfigure advanced connection properties, see Setting advanced connection properties.
l The Type is different depending on the type of file you are creating, however theinformation you enter is the same for all file types.
l All files are used as targets, however you can use a Qlik Replicate file as a source onlyafter you created the file by loading data into it as a target.
To add the File Channel target to Qlik Replicate:
1. In the Qlik Replicate Console, click the Manage Endpoint Connections toolbar button to open theManage Endpoints Connections dialog box. Then click the New Endpoint Connection button.
2. In the Name field, type a name for your endpoint. This can be any name that will help to identify theendpoint being used.
3. In the Description field, type a description that helps to identify the information being replicated tothe file. This is optional.
4. Select Target as the endpoint role.
5. Select File Channel as the endpoint Type.
6. If you changed the default data folder during installation, type the full path to the Storage Folder(e.g. D:\data\tasks\) where the file is being created. Otherwise, you can leave this field empty.Note that this field will be ignored when the Transfer files to remote file channel option is enabledin the Advanced tab.
Setup and User Guide - Qlik Replicate, November 2021 916

10 Using the Qlik Replicate file channel
To determine if you are connected to the endpoint you want to use or if the connectioninformation you entered is correct, click Test Connection.If the connection is successful a message in green is displayed. If the connection fails,an error message is displayed at the bottom of the dialog box.To view the log entry if the connection fails, click View Log. The server log is displayedwith the information for the connection failure. Note that this button is not availableunless the test connection fails.
7. Click OK to finish the setup and save the changes.
Setting advanced connection propertiesYou can set the following properties in the Advanced tab:
l Max file size (KB): Click the arrows to select, or type the maximum file size (in kilobytes) allowed forthe files created in the target.
l Limit storage size to (MB): To allocate a specific amount of disk space to the File Channel files,enable this option and then specify the amount of disk space to set aside (using the arrows or bytyping). When the limit is reached, Qlik Replicate will stop writing the files to the designated storage.
l Max batching time interval (seconds): Click the arrows to select, or type the maximum time (inseconds) for files to be batched before being written in a single operation.
l Transfer files to remote file channel: Select this check box to transfer files to the File ChannelSource (on the remote Qlik Replicate Server) using the Qlik Replicate File Transfer Service. Thiscan dramatically improve transfer speeds when the source endpoint and the target endpoint arelocated on different LANs. For more information about the Qlik Replicate File Transfer Service, seeFile Transfer Service (page 1112).
l Remote file transfer service host: The host name or IP address of the computer on whichthe Qlik Replicate File Transfer Service is running.
l Remote file transfer service port: The port on the remote computer through which the fileswill be transferred (from the storage folder to the remote file channel).
l Remote file transfer service endpoint name: The name of the File Channel Sourceendpoint on the remote machine.
l Additional remote file channels: When sending to multiple File Channel Source endpoints,specify the target destinations using the following format:file_channel_db_name@host:port,file_channel_db_name@host:port
l Max transfer streams: The maximum number of streams to use when transferring the files.Adjust the number of streams as required to optimize transfer speeds.
l Password: The password that will be used to establish a secure connection with the FileChannel Source.
When using the File Transfer Service, an agreed upon password is required in order toestablish a secure connection between the File Channel Source and the File ChannelTarget. Accordingly, the password specified in the File Channel Target settings and thepassword specified in the File Channel Source(s’) settings must be identical.
Setup and User Guide - Qlik Replicate, November 2021 917

10 Using the Qlik Replicate file channel
Internal parametersInternal parameters are parameters that are not exposed in the UI. You should only use them if instructedby Qlik Support.
To add internal Qlik Replicate parameters:
1. Click the Internal Parameters link.The Internal Parameters dialog box opens.
2. In the edit box, type the name of the parameter you need to add and then click it.
3. The parameter is added to the table below the search box with its default value.
4. Change the default value as required.
5. To reset the parameter value to its default, click the "Restore default value" icon at the end of therow.
Settings summaryYou can view a summary of your settings by clicking the Setting Summary link. This is useful if you need tosend a summary of your settings to Qlik Support.
Setup and User Guide - Qlik Replicate, November 2021 918

11 Using the Log Stream
11 Using the Log StreamThis section explains how to use the Log Stream feature. Log Stream enables a dedicated Replicate taskto save data changes from the transaction log of a single source database and apply them to multipletargets, thereby eliminating the overhead of reading the logs for each target separately.
In this section:
l Terminology (page 920)l Overview (page 920)l Step 1: Create a Log Stream target endpoint (page 921)l Step 2: Create and run a Log Stream Staging task (page 922)l Step 3: Create a replication task to transfer the staged data to the target (page 925)
Setup and User Guide - Qlik Replicate, November 2021 919

11 Using the Log Stream
11.1 TerminologyThe following terms are used throughout this section.
l Log Stream - The name of the functionality that allows users to stream and store transaction logdata as files on a disk.
l Log Stream target endpoint - The name of the component that writes the streamed log data to theLog Stream Staging folder.
l Log Stream Staging folder – The location of the files created from the streamed log data.l Log Stream Staging task - The name of the task type that writes the data to the Log Stream Stagingfolder.
l Replication task - The name of the task type that reads the data from the Log Stream Staging folderand writes it to the final target endpoint.
11.2 OverviewLog Stream enables a dedicated Replicate task to save data changes from the transaction log of a singlesource database and apply them to multiple targets, thereby eliminating the overhead of reading the logsfor each target separately. Data changes from the log are written to a file in the Log Stream Staging folderenabling one or more targets to access them via separate Replication tasks.
Log Stream provides the following enhancements:
l When multiple CDC tasks read changes from large databases that share a single transaction log(e.g. Oracle and IBM DB2 for z/OS), the log is polled for only one target (the Log Stream target)instead of being polled separately for each target. This improves performance while greatlyreducing the load on the source database and network.
l Changes are continuously written to the log stream regardless of the availability of the targetendpoint. This is especially beneficial in situations where the original source transaction logs are nolonger online or cannot be accessed efficiently. Additionally, this approach significantly reduceslatency when the target endpoint becomes available again as the logs are read from the stagingfolder instead of from the source database.
l As the changes are constantly streamed to the Replicate server machine, the Replicate SLA thatrequires an extended log retention policy to be defined on the source in case the target cannot beaccessed is no longer applicable. This allows you to reallocate valuable resources on the sourcewhile ensuring that log files will be up-to-date (on the Replicate Server machine) even if the targetbecome unavailable.
l When replicating a single source database to multiple targets, each target can have its own subsetof the log stream data (tables, rows, etc.) and be started, stopped, and scheduled independently ofthe others.
The flowAs mentioned above, a Log Stream setup provides benefits both when replicating to a single target andwhen replicating to multiple targets. The following diagram illustrates the end-to-end flow of a Log Streamsetup with multiple target endpoints:
Setup and User Guide - Qlik Replicate, November 2021 920

11 Using the Log Stream
1. A Log Stream Staging task streams the source logs from the specified source endpoint to adesignated staging folder on Replicate Server (specified in the Log Stream target endpointsettings).
Then, at least one Replication task:
2. Performs a Full Load of the source data to the designated target endpoint(s).
3. Transfers the changes from the Log Stream Staging folder to the final target endpoint(s).
The Log Stream Staging task and replication task must both run on the same Replicate server.
11.3 Step 1: Create a Log Stream target endpointTo create a new target endpoint:
1. In the Manage Endpoint Connections window, select New Endpoint Connection. For informationon how to add an endpoint, edit and view its configuration, see Defining and managing endpoints(page 110).
2. In the General tab, specify the following information:l Name for the endpoint. For example, Log Stream Staging Target.l Optionally, provide a description.l Select the Target role option.l From the Type drop-down list, select Log Stream.l In the Storage path field, specify the full path in which to store the streamed data (i.e., thebinary file with the record changes). You cannot specify a relative path. Note that the Stagingfile folder must be on the Replicate server.
l Batch: Specify when to close the batch of operations that will be applied to the targetendpoint:
l Apply batch after (seconds): Length of time that the batch should run. Default is 5seconds. Maximum permitted time is 60 seconds.
Setup and User Guide - Qlik Replicate, November 2021 921

11 Using the Log Stream
This parameter effects the start time of the Replication task; until at least one batch iswritten by the Log Stream Staging task, the Replication task will not start.
l Apply batch when number of changes reaches: Maximum number of changeoperations to include in the batch. Default is 10,000. Maximum permitted number ofoperations is 1,000,000.
l Retention: Specify when the staging file should be deleted (note that active files will not bedeleted):
l Delete staging files after (hours): Select the check box and specify the maximumtime before a file is deleted. Default is 48 hours. Maximum permitted time is 10,000hours.
l Delete oldest files when the total size of all staging files exceeds (MB): Themaximum size that you want to allocate for the staging folder. If the specified size isreached, Replicate will start deleting files from the oldest to the newest until the totalsize falls below the upper limit.Default is 100,000 MB. The minimum size should be at lease twice the definedrollover size. Maximum permitted size is 1000 TB.
l Rollover: Specify when to start writing to a new staging file:l Roll over file after (minutes): Number of minutes after which a new staging fileshould be started. Default is 120 minutes. Maximum permitted time is 10,080 minutes(one week).
l Roll over files larger than (MB): Size of the file after which a new staging file shouldbe started. Default is 500 MB. Maximum permitted size is 100,000 MB.
l Compression: Optionally move the slider to change the file compression level. The higherthe compression level, the greater the processing latency will be. Therefore, a lowercompression level (e.g. 2) is recommended when processing speed is more important thansaving disk space.
3. Click Test Connection to verify the information you entered and the availability of the targetdatabase.
4. Click Save.
11.4 Step 2: Create and run a Log Stream Staging taskOnce the Log Stream target endpoint is created, a Log Stream Staging task must be defined that willreplicate any changes to the original source endpoint data and metadata to the Log Stream Staging folder.
The Log Stream Staging task creates a “Staging” file in the Log Stream Staging folder. This file containsthe changes from the source database transaction log as a compressed binary file.
Before running the Log Stream Staging task, you must define and add the source endpoint where your datais currently stored and the target endpoint where you want to replicate the data – in this case, the LogStream target endpoint. After you add the endpoints to your task, you can select the tables from the sourceendpoint that you want to replicate. For information on selecting tables, see Selecting tables and/or viewsfor replication (page 114).
Setup and User Guide - Qlik Replicate, November 2021 922

11 Using the Log Stream
l Log Stream Staging tasks can be imported or exported. For details, see Exporting andImporting Tasks.
l Log Stream Staging tasks can process files created by previous versions of QlikReplicate. The files will include an indication of the version number.
To define a Log Stream Staging task:
1. In the Tasks view, click New Task. The New Task dialog box opens.
2. Specify a name for the task.
3. Choose the Log Stream Staging replication profile option.
4. Click OK.
5. The next step in the Log Stream Staging task is to select the source endpoint where your data iscurrently stored, and the Log Stream target endpoint.
l All source endpoint connections are available for selection.
l Only target endpoints of type "Log Stream" are available for selection.l Log Stream target endpoints that are already associated with other Log Stream Stagingtasks are not available for selection.
Setup and User Guide - Qlik Replicate, November 2021 923

11 Using the Log Stream
The following figure provides an example of selected source and target endpoints for a Log Stream Stagingtask:
6. In the right pane in the Console, click Table Selection to select the source tables that you want toreplicate.The task will create the metadata in the Log Stream staging folder and then capture the changesfrom the specified source endpoint.The task is now ready to run.
7. To execute the Log Stream Staging Task, click the Run button.
The Log Stream Staging task must be run before the Replication task described in Step3: Create a replication task to transfer the staged data to the target (page 925).
You can view and monitor the results of the replication in real-time.
Log Stream Staging limitations and considerationsl The Full Load and Store Changes replication options are not relevant.l Using the Reload Target Run option is not supported.l In the Advanced Run Options dialog box, only the following options are supported:
l Tables are already loaded. Start processing changes from: Date and Time.l Recovery: Recover using locally stored checkpoint
Setup and User Guide - Qlik Replicate, November 2021 924

11 Using the Log Stream
l In the Task Settings window, under the Target Metadata tab:l Target table schema is unavailablel The Allow unlimited LOB size option is disabled.l Limit LOB size to (KB): Default is 8 KB; maximum permitted size is 102,400 KB
l In the Task Settings window, the following tabs and/or settings are not available:l Metadata > Control Tables tabl Full Load tabl Under the Change Processing tab: Apply Changes Settings tab, and Store ChangesSettings tab.
l In the Change Processing Tuning tab: Batch Tuning and Miscellaneous Tuning settingsl Change processing mode: only Transactional Apply is availablel Error handling: Data Errors tab, Table Errors tab, Apply Conflicts tabl Character Substitution tab
l In the Table Settings window:l The following tabs are not available: Transform, Filter, Parallel Load, and LOB ColumnHandling
l In the General tab, the Map to target table section is unavailable.l Global Transformations are not available.l The source_lookup Data Enrichment function is not supported. For more information on thisfunction, see Data Enrichment functions (page 1003)
l Source endpoints that do not support CDC (such as, ODBC, Hadoop) cannot be used as sourcesfor Log Stream Staging tasks.
l File Channel cannot be used as a source for a Log Stream Staging task.l When the source endpoint is IBM DB2 for z/OS or IBM DB2 for iSeries, the option in the Tablessettings' Transform tab for changing the character set or data type for a specific input column is notsupported.
11.5 Step 3: Create a replication task to transfer the stageddata to the target
After the data is updated in the Log Stream Staging folder, you then need to create a Replication task totransfer the changes from the Log Stream Staging folder to the final target endpoint.
If you stop the task and define a metadata transformation for one of the tables (such asdropping a column), make sure the DROP and CREATE table option is selected (the default)in the Task Settings' Full Load Settings tab before resuming the task.
Setup and User Guide - Qlik Replicate, November 2021 925

11 Using the Log Stream
To do this, you must first duplicate of the source endpoint that has the data you want to replicate. Then, youcan create a Replication task in which the source endpoint is the duplicated source endpoint of the LogStream Staging task and the target is any required target endpoint.
Duplicate the source endpoint and add it to the log stream staging task
l When duplicating a source endpoint for use in a Replication task, you can definecredentials that are different to those used in the Log Stream Staging task.
l Instead of duplicating the source endpoint, you can create a new endpoint and give itthe same properties as the existing one.
To duplicate a specific endpoint and connect it to the Log Stream Staging task:
1. In the left panel of the Manage Endpoint Connections window, select the original source endpointdefined for the Log Stream Staging task.
2. Click the Duplicate button.
3. In the General tab, do the following:
1. Replace the name of the source endpoint prefixed by “Copy of …” with a meaningful name forthe duplicated endpoint (for example, Oracle1 with Log Stream).
2. Select the check box Read changes from log stream staging folder.
This check box only appears if the duplicated source is connected to the LogStream Staging endpoint.
3. From the Log stream staging task drop-down list, select the name of the relevant LogStream Staging task.
All Log Stream Staging tasks that are related to the duplicated source areprovided in the drop-down list. If a task was never run, "Not Run" is displayednext to its name.
4. Click Test Connection to determine if you are connected to the Log Stream staging task and if theinformation you entered is correct.
5. Click Save and then Close.
Create the replication task using the duplicated source endpointBefore you begin: Make sure that the Log Streaming Staging task is running and that it includes all thetables you need for the Replication task.
To create a new Replication task using the duplicated source endpoint
1. In the Tasks view, click New Task. The New Task dialog box opens.
2. Specify a meaningful name for the replication task.
Setup and User Guide - Qlik Replicate, November 2021 926

11 Using the Log Stream
3. Choose the Unidirectional replication profile option.
4. If required, select the Full Load or Store Changes task options.
5. Click Apply Changes, and then OK.
6. Select the required source with Log Stream endpoint from the list of endpoint connections, and dragit to the top circle in the endpoints map.
Example:
l A Log Stream indication is added to the source endpoint icon.l The Task Name links directly to the Log Stream Staging task.
7. Select the required target endpoint from the list of endpoint connections, and drag it to the bottomcircle in the task map.
8. From the right pane in the Console, click Table Selection and select the tables that you want toreplicate. You can select any of the tables that were included in the Log Stream Staging task.
9. Click the Run button to execute the Replication task.The Replication task will load the tables to the final target endpoint, replicating the full load from theoriginal source endpoint and the changes from the Log Stream Staging folder.
Setup and User Guide - Qlik Replicate, November 2021 927

11 Using the Log Stream
Replication task limitations and considerationsl The Bidirectional replication profile is not supported.l In the Target Metadata tab of the Task Settings dialog box, if you want to enable the ReplicateLOB columns option, the Limit LOB size to value must be the same as the value specified in theLog Stream Staging task. Note however that if the Replicate LOB columns option is disabled forthe Log Stream Staging task, it cannot be enabled in the Replication task.
l In the Table Settings window, most tabs are available and functional with the exception of the LOBColumn Handling tab which is not available (at table level).
l The source_lookup Data Enrichment function is not supported. For more information on thisfunction, see Data Enrichment functions (page 1003)
l The Source change position (e.g. SCN or LSN) Advanced Run option is not supported.l When the Use all table partitions Parallel Load method is enabled, source data in a partition thatwas created after the Log Stream Staging task started, will not be replicated to the target defined forthe Replication task.
Setup and User Guide - Qlik Replicate, November 2021 928

12 Customizing tasks
12 Customizing tasksThis section describes how to customize a replication task. For example, you can create new tables orcolumns for the target endpoint or select only some of the data from each column to be replicated. This isdone using transformations and filters.
Although the descriptions in this section only refer to tables, the procedures described hereinare applicable to views as well. When a transformation is defined for a view, the word "View(s)"appears in the UI instead of the word "Table(s)".
In this section:
l Table Settings (page 929)l Defining global rules (page 955)l Using the Expression Builder (page 985)l Task Settings (page 1010)
12.1 Table SettingsIn the <Table_Name> - Table Settings window, you can define how the data for each individual table/viewis replicated to the target.
Some of the table settings are not available in a Log Stream Staging setup.
For information on the availability of table settings in a Log Stream Staging setup, see Usingthe Log Stream (page 919).
To open the Table Settings window:
1. Open the task you are working with.For information on opening a task, see Editing a replication task (page 121).
2. In Designer view, select the desired table from one of the following tabs on the right of the console:l The Patterns and Selected Tables tab - if the desired table was explicitly selected.l The Full Table List tab - if the desired table was selected using a table inclusion pattern.For information on how to define table selection patterns, see Creating table/view selectionpatterns (page 118).
3. Click the Table Settings button above the table list.The <Table_Name> - Table Settings window opens.
4. In the Table Settings window, perform any of the following tasks:l Performing General tasks for a single table/view (page 930)l Defining transformations for a single table/view (page 931)l Using filters (page 940)
Setup and User Guide - Qlik Replicate, November 2021 929
12 Customizing tasks
l Parallel Load (page 946)l Handling LOB columns (page 950)l Message format (page 954)l Full Load (page 954)
5. Click OK to close the Table Settings window.
6. Click Save in the main toolbar to preserve the table and column information for this task.
To restore the default table values:
l Click Restore Table Defaults at the bottom left of the Table Settings window. This option isavailable in all tabs.Any changes you made will be discarded and the table's default settings will be restored.
The names of modified tables will be followed by the word (changed), enabling you to easilyidentify which tables have been modified.
Performing General tasks for a single table/view
Although the descriptions in this section only refer to tables, the procedures describe herein areapplicable to views as well. When a task is being performed for a view, the word "View(s)" willappear in the UI instead of the word "Table(s)"
The General tab in the Table Settings window displays basic information about the selected table andallows you to define new names for the table/schema on the target as well as override the defaulttablespace for the table and its index (Oracle target only).
To edit the general table settings:
1. Open the Table Settings (page 929) window.
2. Click the General tab on the left side of the window, as shown below.
Setup and User Guide - Qlik Replicate, November 2021 930

12 Customizing tasks
In the Map to target table section, the following options are available:l Table Schema: Specify the schema in which you want the table to be created on the target.l Table Name: Specify a new name for the table on the target.l Table tablespace: This option is only available when the task is defined with an Oracletarget endpoint.Specify the name of the tablespace in which you want the table to be created on the target.By default (i.e. when this field is empty), the table will either be created in the source tabletablespace on the target (when replicating from an Oracle source) or in the defaulttablespace (when replicating from any other source).
l Index tablespace: This option is only available when the task is defined with an Oracletarget endpoint.Specify the name of the tablespace in which you want the table's index to be created on thetarget. By default (i.e. when this field is empty), the index will either be created in the sourcetable tablespace on the target (when replicating from an Oracle source) or in the defaulttablespace (when replicating from any other source).
Defining transformations for a single table/view
Although the descriptions in this section only refer to tables, the procedures describe herein areapplicable to views as well. When a transformation is defined for a view, the word "View(s)" willappear in the UI instead of the word "Table(s)".
Setup and User Guide - Qlik Replicate, November 2021 931

12 Customizing tasks
This section describes how to define data transformations. Data transformations are performed when thetask is run. They are optional. If you do not define any transformations, the data is replicated "as is" fromthe source to the target.
Qlik Replicate lets you make the following changes to the tables and columns:
l Rename any column for the target tablel Delete a target columnl Change the data type and/or the length of any target columnl Add additional target columnsl Designate which target columns (i.e. segments) will comprise the Unique Indexl Recalculate the data
LimitationsTransformations are subject to the following limitations:
l They are not supported for calculating columns of Right-to-Left languages.l Transformations cannot be performed on columns that contain special characters (e.g. #, \, /, -) intheir name.
l They cannot be performed on columns that have a pound character (#) in their name.l The only supported transformation for LOB/CLOB data types is to drop the column on the target.
You can use the method described here for transformations that are specific to a single table or a fewtables in your task. To make a similar change over multiple tables, see Starting the Global TransformationRules wizard (page 955).
For an explanation of how to configure transformations, see Using the Transform tab (page 933).
To define a data transformation for a single table:
1. Select the table you want to transform and open the Table Settings (page 929) window.
2. Click Transform on the left side of the window.
The following figure shows the information in the Transform tab of the Table Settings window.
Setup and User Guide - Qlik Replicate, November 2021 932

12 Customizing tasks
Using the Transform tabIn the Transform tab, you can define transformations using Replicate's built-in functionality.
Customers that requires functionality not provided by Replicate's built-in transformations canwrite their own transformations, and then access them from the Replicate Expression Builder.For an explanation of how to create user-defined transformations (requires basic programmingskills), see User-defined transformations (page 1008).
The Transform tab in the Table Settings window consists of the following elements:
Setup and User Guide - Qlik Replicate, November 2021 933

12 Customizing tasks
l Input: This lists the columns on which you can perform transformations.
When creating a transformation for the SAP Application source endpoint, you can hoveryour mouse cursor over an Input column to see a tooltip with the table’s actual name:
l Output: This table shows the defined output for the columns in the table where you are performingthe transformation(s). See Transformation Options below for information on how to change thedefault output.
Limitations and considerationsl Dropping a column, saving your changes, and then adding a column with the same name anddefining an expression corresponding to the dropped column's data, is not supported. If youmistakenly drop a column, simply add the column back again without an expression.
l If you stop a task and define a metadata transformation for one of the tables (such as dropping acolumn), make sure the DROP and CREATE table option is selected (the default) in the TaskSettings' Full Load Settings tab before resuming the task.
l In homogeneous replication tasks (such as Oracle to Oracle), modifying a single table column (bychanging the column data type or length for example), will break the homogeneity for the entiretable.
Transformation options
The following table describes the transformation options available in the Transform tab.
To Do This
Rename a column Select the Name column for the table column you want to change. Type in anew name.
The top right corner turns blue when the name is changed. To view theoriginal name, hover the mouse pointer over the field and the original nameis displayed.
Set a column as aprimary key/unique keyor disable a column'sprimary key/unique key
1. Select the desired row in the Output table and then click the cell in theKey column.A key icon will be displayed.
2. Repeat to set primary keys/unique keys for additional columns.
3. To disable the primary key/unique key, click the key icon.
Transform actions
Setup and User Guide - Qlik Replicate, November 2021 934

12 Customizing tasks
To Do This
Change the data typefor a column
Select the Type column for the table column you want to change and select anew data type from the drop-down list. Make sure that the data type youselect is compatible with the data in that column.
For a description of Qlik Replicate data types, see Replicate data types(page 76).
For information about data-type mapping from the native endpoint to QlikReplicate data types, see the chapter for the endpoint you are using. For alist of supported databases, see Supported Platforms and Endpoints (page1154).
Change the datasubtype for a column
This option is available for the CLOB, NCLOB, STRING, and WSTRINGdata types only.
Select the Subtype column for the table column whose data type you want tochange, and then select either JSON or XML from the drop-down list. Makesure that the data in the column is compatible with the selected subtype. Thedefault is Regular, which means that data type in the Type column will beused with no subtype.
For a description of Qlik Replicate data types, see Replicate data types(page 76).
For information about data-type mapping from the native endpoint to QlikReplicate data types, see the chapter for the endpoint you are using. For alist of supported databases, see Supported Platforms and Endpoints (page1154).
Add a new column Click Add Column to add a new column. When you add a column, the Nameis blank and the Type is listed as string(50).
Type a name for the new column in the Name column. If needed (accordingto the column data), click in the Type column and select a data type from thelist.
Setup and User Guide - Qlik Replicate, November 2021 935

12 Customizing tasks
To Do This
Add an existing column From the Input pane, select one or more columns and click the right facingarrow button.
To add all of the columns, click the right-facing double arrow.
l By default all tables columns are included in the Outputlist. To include only some of the columns clear the Bydefault include all columns check box at the top of theTransform tab. This removes all of the columns from thelist. You can then add back any existing column asrequired.
l If a column is explicitly added at the table level but thendropped at the global level (using a global transformationrule), the column will still be created on the target, butwithout any data.
Delete a column From the Output list, select the row with the column you want to delete andclick the left-facing arrow button.
To remove all columns, click the left-facing double arrow. Note that all thecolumns except for columns defined as a primary key/unique index aredeleted.
Add/Remove a UniqueIndex segment to/from atarget column
A key icon indicates which target columns segments of the Unique Index.
To add a Unique Index segment, click in the Key column to the left of targetcolumn to which you want to add the segment. A key icon will appear.
To remove a Unique Index segment, click the key icon to the left of the targetcolumn from which you want to remove the segment. The key icon willdisappear.
Recalculate the data fora column in the targetendpoint
Click in the Expression column in the row with the table column you want tochange the data for. Enter an expression using SQLite syntax.
See Creating an expression for transformations (page 938) and UsingSQLite syntax with transformations (page 939) for information on creatingexpressions.
Once you add a calculated expression, you can test the expression. SeeUsing the Expression Builder (page 985).
Setup and User Guide - Qlik Replicate, November 2021 936

12 Customizing tasks
To Do This
Change the data typefor a specific inputcolumn
Supportedwith the IBMDB2 foriSeries andIBM DB2 forz/OS sourceendpointsonly.
This is required if a source column is defined as character type but the datastored in that column is binary or vice versa.
When the source column type is STRING, WSTRING, CLOB, orNCLOB, you must also select a Character Set, otherwise anerror will be shown and the OK button will be disabled.
In the Input table, click the relevant cell in the Type column and then selecteither STRING or BYTES from the drop-down list as required.
If you change a column's Type in the Input table, you also needto set the same Type for the corresponding column in the Outputtable.
Note that if you select STRING, you can also change the character set, asexplained below.
Modified cells will display a triangle in the top right corner. To seethe original value, click the triangle.
Change the CharacterSet for a specific inputcolumn
Supportedwith the IBMDB2 foriSeries andIBM DB2 forz/OS sourceendpointsonly.
This is required if a source character column is wrongly encoded. Forexample, if a source character column is described as encoded in CCSID X,but the data stored in that column is actually encoded in CCSID Y.
You can also set a custom character set as described in Setting a customcharacter set (page 938) below.
In the Input table:
1. Click the relevant cell in the Type column and select STRING fromthe drop-down list.
2. Click the relevant cell in the Character Set column and then selectthe appropriate character set from the drop-down list.
l Only character sets compatible with the selectedType will be available for selection.
l Modified cells will display a triangle in the top rightcorner. To see the original value, click the triangle.
For a description of the various list actions that you can perform, see List actions (page 90).
Setup and User Guide - Qlik Replicate, November 2021 937

12 Customizing tasks
Setting a custom character setThe following procedure is supported with the IBM DB2 for iSeries and IBM DB2 for z/OS source endpointsonly.
Perform the steps below if the source table is defined with an incorrect CCSID and the correct definition isactually in a UCM file.
1. Create a mapping data file with the file extension .ucm.
If you edit an existing UCM file, you must also change the values of the <code_set_name>
and <icu:alias> properties. If the file does not contain an <icu:alias> property, thenyou only need to change the value of the <code_set_name> property.
2. Create a CNV file for the UCM file by running the following command:<product_dir>\bin\makeconv.exe -v <file_name>.ucm
Example:
"c:\Program Files\Attunity\Replicate\bin\makeconv.exe" -v 1047_EX.ucm
This will create a CNV file with the same name as the UCM file (e.g. 1047_EX.cnv).
3. Copy the file to the following location:<product_dir>\bin\icudt58l
When using the Replicate File Channel, the file should be copied to the same locationon both Replicate servers.
4. Restart the Qlik Replicate UI Server service.
5. Select the custom character set from the Character Set drop-down list; it will appear as the CNV filename followed by the word "Custom" e.g. 1047_EX.cnv (Custom).
Using a column's before-image data in a transformationYou can use a column's before-image data in a transformation. This is useful if you need to store thebefore-image data on the target.
To do this, simply specify the source column name in Output table's Expression column, in the followingformat:
$BI__MyColumn
Where $BI__ is a mandatory prefix (that instructs Replicate to capture the before-image data) andMyColumn is the source column name.
Although you can store the before-image data in an existing target column, it is recommended to create anew target column (using the Add Column button) in which to store the before-image data.
Creating an expression for transformationsUse an expression to define the contents of a new or re-calculated column.
Setup and User Guide - Qlik Replicate, November 2021 938

12 Customizing tasks
To create an expression:
1. In the Transform tab, select the row with the column for which you want to create an expression.orClick Add Column to add a new column.
2. Click the button in the Expression column.
The Expression Builder opens.
3. Build an expression as described in Using the Expression Builder (page 985).
Using SQLite syntax with transformationsThe following table lists the SQLite operators that are supported with transformations.
Operator Description
|| Concatenate strings.
FIRST_NAME||LAST_NAME
PHONE_NUMBER||<Office Only> (adds the string Office Only to the telephone number).
+ Adds two values together.
DEPARTMENT_ID+100 (adds 100 to each ID number). Any column used in an expressionwith this operator must be a numeric data type.
- Subtracts a value from another value.
MANAGER_ID-100 (subtracts 100 from each ID number). Any column used in an expressionwith this operator must be a numeric data type.
% Uses the remainder of a division expression as the value.
%SALARY/7 (Divides the value of the Salary column by 7 and uses any remainder from theexpression as the column value).
/ Divides one value into another.
SALARY/.16 (Divides the value of the Salary column by .16.
If the two values in the division expression are integers (two NUMERICcolumns with no digits after the decimal) and the result is a fractional value,the result returned will be 0.
* SALARY*.16 (Multiplies the value of the Salary column by .16. This could be used tocalculate taxes that are subtracted from a salary).
SQLITE syntax operators
For more information about SQLite syntax, see the SQLite documentation.
Setup and User Guide - Qlik Replicate, November 2021 939

12 Customizing tasks
Using filtersFilters let you include or exclude records from a replication task based on the value(s) of the source tablecolumns, thereby allowing you to replicate only the specific data that you need.
In this section:
l Filter limitations (page 940)l Opening the Filter tab (page 940)l Creating a filter condition for a specified column (page 942)l Creating a record selection condition for one or more columns (page 942)l Adding or removing filter ranges (page 944)l Using SQLite syntax with filtering (page 945)
Filter limitationsWhen creating a filter, the following limitations apply:
l Filters are not supported for calculating columns of Right-to-Left languages.l Filters can only be applied to immutable columns.l Filters on mutable columns:When a filter is created to exclude/include specific rows in a column, the specified rows will alwaysbe excluded/included, even if the rows that were originally excluded/included are later changed. Forexample, if you chose to exclude/include rows "1-10" in a column named "Age" and those rows werelater changed to "11-20", the rows will continue to be excluded/included, even though the data is nolonger the same.Additionally, if a row outside the filter scope was changed (i.e. updated or updated and then deleted)so that it should now be excluded/included (as defined by the filter), it will not be replicated to thetarget. So, for example if you created a filter to exclude/include rows less than 5 and then changedrow 6 to -6, it will not be replicated (even though it is included in the filter's criteria range).
l Filter cannot be applied to LOB columns.l When specifying numeric data as a filtering condition, the data preceding the decimal point cannotexceed int64.
Opening the Filter tabThe Filter Table tab contains the following information:
l Data Columns list: This list contains a list of the columns for the table where you filtering data. Youcan use these to select the columns to use in the filtering operations.This list has the following tabs:
l Source: This tab lists the original source columns in the table.l Header: This tab lists the available header columns. You can create filters using thesecolumns and include them in expressions. For information on these header columns, seeHeaders (page 991).
Setup and User Guide - Qlik Replicate, November 2021 940

12 Customizing tasks
l Calculated: This tab lists the columns added to the table. You add columns throughtransformations. For more information, see Defining transformations for a single table/view(page 931).
l Filter Conditions table: This table has the following columns:l Name: The name of the column where you are filtering the data.l Type: The data type for the column.l Include/Exclude: Indicate whether to include or exclude the filtered data for this column.l Ranges: Click the button on the right of the Ranges field to open the Range Builder. Forinformation on creating a value or ranges with the Range Builder, see Adding or removingfilter ranges (page 944).For more information on typing in the filter ranges manually, see Using SQLite syntax withfiltering (page 945).
l Record Selection Condition: Enter a complex condition that can include multiple columns. Thecondition must evaluate to TRUE to be accepted. You can create a condition using SQLiteoperators or by Using the Expression Builder (page 985). For information on using the SQLiteoperators, see Creating a record selection condition for one or more columns (page 942).
The following figure is an example of the information in the Filter tab of the Table Settings window.
Table Settings: Filter
To open the Filter tab:
1. Select the table you want to filter and then open the Table Settings (page 929) window.
2. Click the Filter tab on the left side of the window.
Setup and User Guide - Qlik Replicate, November 2021 941

12 Customizing tasks
Creating a filter condition for a specified columnYou can create a simple condition for a single column in the table you are working with. You can includeany combination of ranges or specific values in the filter and determine whether to include or exclude thedefined data.
To create a filter condition:
1. Select a column from the data columns list and then click the right-facing arrow next to the FilterConditions table.To remove the column, click on it in the Filter Conditions table and then click the left-facing arrow.Any data entered for this column in the Include/Exclude or Values columns is also deleted.
2. Click in the Include/Exclude column to select whether to include or exclude the data that meets thiscondition.
3. Click the Edit Ranges button in the Ranges column.
4. The <Name> <Include|Exclude> Ranges window opens. Continue from Adding or removing filterranges (page 944).
Creating a record selection condition for one or more columnsYou can create a record selection condition manually and/or by using the Expression Editor.
When entering a string, you can use the following special characters:
l %: Matches any string of zero or more characters. For example, Mc% searches for every name thatbegins with Mc or %bob% includes every name that contains bob.
l _:Matches a single character (as a wildcard). For example: ’Sm_th’ includes names that begin withSm and end with th, such as Smith or Smyth. To search for an underscore character, use [_]".
l [..]: Includes a range or set of characters. For example, [CK]ars[eo] includes names Carsen,Karsen, Carson, and Karson or [M-Z]inger includes all words that end in inger with the first letterbetween M and Z, such as Ringer, Singer, or Zinger.
For more information, see documentation on how to use Transact-SQL.
For information on what SQLite operators can be used to create Record Selection Condition filters, seeUsing SQLite syntax with filtering (page 945).
To create a record selection condition:
1. From the Data Columns list, select a source column, header column or calculated column and thenclick the arrow to the left of the Record Selection Condition pane.
2. Use SQLite operators, such as < or = to create the condition. Use any amount of strings or columnsas you need to create a condition.For example $EMPLOYEE_ID < 100 AND $SALARY > 100,000
In this case only rows that satisfy both of these conditions are replicated in the replication task.The following example provides an example using SQL search pattern strings. Only rows thatsatisfy this condition are replicated.$EMPLOYEE_NAME IS ’Sm_th’
Setup and User Guide - Qlik Replicate, November 2021 942

12 Customizing tasks
To create a record selection condition using the Expression Builder:
l Click Open Expression Builder. This button is located directly under the record selection conditionbox. Follow the directions for creating an expression in the section Using the Expression Builder(page 985).
Applying updates to specific columns onlyYou can define an expression that instructs Replicate only to apply UPDATEs when a user-definedcondition has been met, for example, only when specific columns have changed. This is useful in situationswhen there are many updates in the source that the user has deemed not relevant for the target, as"irrelevant" updates will be ignored.
Limitationsl Does not support columns that do not have Before-Image data (e.g. LOB columns)l Does not support the following sources (i.e. sources that do not support Before-Image records):l ODBC with CDCl Teradatal Subject to the existing expression builder and filter limitationsl Content-based filtering may result in loss of data or data corruption. For example, if the Primary Keyvalue changes (an UPDATE operation), the expression may ignore the UPDATE if the columns thatwere specified in the expression did not change. The result in this case would be that a "phantom"row with the old row contents will remain, even if a change was later applied to the columnsspecified in the expression.
How toAssume that you have a source table named table1 with columns c1-c10 but you are only interested inupdating columns c7, c8 and c9 on the target.
To do this, you would need to:
1. Open the Table Settings for table1 and select the Filter tab.
2. Click the Expression Builder button at the bottom right of the tab.The Expression Builder opens.
3. Optionally, select the Headers tab.
Although selecting the Headers tab is optional, selecting it will enable you to add $AR_H_
OPERATION to your expression (as required in Step 4 below) simply by double-clicking thecolumn on the left of the tab.
4. Enter the following expression in the Build Expression pane and then click OK:($AR_H_OPERATION != 'UPDATE') OR
(($AR_H_OPERATION = 'UPDATE') AND (( ifnull($BI__c7,0) != ifnull($c7,0)) OR ( ifnull
($BI__c8,0) != ifnull($c8,0)) OR ( ifnull($BI__c9,0) != ifnull($c9,0))))
The above expression means that changes will be applied to c7, c8 and c9 only if one of thefollowing is true:
Setup and User Guide - Qlik Replicate, November 2021 943

12 Customizing tasks
l The operation is not an UPDATE.l The value of c7, c8 or c9 has changed as the result of an UPDATE operation.
When used in an expression, Before-Image columns must be prefixed with $BI__. Foroperations other than UPDATE, the value of the specified columns will be NULL.
Adding or removing filter rangesYou can add one or more values to the Ranges column using the Range Builder. Values that match any ofthe ranges in the list are included in the replication.
You can also delete a filter range using the Range Builder.
Filter ranges that you enter manually are also displayed in the Filter Builder. You can use theFilter Builder to delete them.
To use the Range Builder:
1. In the Filter tab of the Table Settings (page 929) window, select a column to filter. For moreinformation, see Using filters (page 940).
2. Click the button to the right of the Ranges column.The Ranges Builder opens.
3. Click Add Range. Select any of the following from the drop-down list displayed.l Equal to: Select Equal to to enter a single value. The following is displayed in the range list.Equal to = [N]Click the [N] and type a value in the field that is displayed.When the value in the selected column equals the value you enter, the result is included orexcluded in the replication task depending on the option selected in the Include/Excludecolumn.
l Between: Click Between to enter a range of values. The following is displayed in the rangelist.Between [N] - [N]Click each [N] and type a value in the fields that are displayed.When the column contains the values between the two values entered, the result is includedor excluded in the replication task depending on the option selected in the Include/Excludecolumn.
l Less than or equal to: Select Less than or equal to and enter a maximum value. Thefollowing is displayed in the range list.Less than or Equal to =< [N]Click the [N] and type a value in the field that is displayed.When the value in the selected column is equal to or less than the value you enter, the resultis included or excluded in the replication task depending on the option selected in theInclude/Exclude column.
Setup and User Guide - Qlik Replicate, November 2021 944

12 Customizing tasks
l Greater than or equal to: Select Greater than or equal to and enter a minimum value. Thefollowing is displayed in the range list.Greater than or Equal to => [N]Click the [N] and type a value in the field that is displayed.When the value in the selected column is equal to or more than the value you enter, theresult is included or excluded in the replication task depending on the option selected in theInclude/Exclude column.
To delete a filter range from the Range Builder:
1. In the Filter tab of the Table Settings (page 929) window, select the column with the filter conditionyou want to delete.
2. Click the button to the right of the Ranges column. The Ranges Builder opens.
3. Click the X next to the range you want to delete. The deleted range is removed from the list.
Using SQLite syntax with filteringQlik Replicate supports the following SQLite operators when creating Record Selection Condition filters.
You must put the ($) in front of each input as shown below.
Operator Description
< Is less than.
$SALARY<100000
<= Is less than or equal to
$SALARY<=100000
> Is greater than
$SALARY>100000
>= Is more than or equal to
$SALARY>=100000
= Is equal to
$SALARY=100000
!= or <> Is not equal to
$SALARY!=100000
SQLITE syntax operators
Setup and User Guide - Qlik Replicate, November 2021 945

12 Customizing tasks
Operator Description
IS Is the same as
$HIRE_DATE IS 2014-09-29
IS functions the same as = unless one or both of the operands are NULL. In this case, ifboth operands are NULL, then the IS operator evaluates to 1 (true). If one operand isNULL and the other is not, then the IS operator evaluates to 0 (false).
IS NOT Is not the same as
$HIRE_DATE IS NOT 2014-09-29
IS NOT functions the same as != unless one or both of the operands are NULL. In thiscase, if both operands are NULL, the IS NOT operator evaluates to 0 (false). If oneoperand is NULL and the other is not, then the IS NOT operator evaluates to 1 (true).
AND Both operands are true.
$MANAGER_ID AND EMPLOYEE ID >100
OR Either operand is true.
$MANAGER_ID OR EMPLOYEE ID >100
For more information on how to use the SQLite syntax, see the SQLite documentation.
Parallel LoadIn Full Load replication mode, you can accelerate the replication of large tables by splitting the table intosegments and loading the segments in parallel. Tables can be segmented by data ranges, by partitions, orby sub-partitions.
Supported endpointsThe task must be defined with a combination of the following source and target endpoints:
Supported source endpoints:
l Oraclel Microsoft SQL Serverl MySQLl PostgreSQL
Table segmentation by partitions or sub-partitions is not supported with the PostgreSQLsource endpoint.
l IBM DB2 for LUWl IBM DB2 for z/OS
Setup and User Guide - Qlik Replicate, November 2021 946

12 Customizing tasks
Table segmentation by partitions or sub-partitions is not supported with the IBM DB2 forz/OS source endpoint.
l SAP Sybase ASEl SAP Applicationl SAP Application (DB)l SAP HANAl Amazon RDS for Microsoft SQL Serverl Teradata
Supported target endpoints:
l Oraclel Microsoft SQL Serverl Hadoop (Hortonworks, Cloudera, and MapR)l PostgreSQLl Google Cloud SQL for PostgreSQLl Sybase ASEl Vertical MySQLl Filel Amazon S3l Amazon Redshiftl Amazon EMRl Databricks on AWSl Databricks on Google Cloudl Microsoft Azure SQL Databasel Microsoft Azure Database for MySQLl Microsoft Azure ADLSl Microsoft Azure Database for PostgreSQLl Microsoft Azure Databricksl Microsoft Azure Data Warehousel Microsoft Azure HDInsightl Google Cloud SQL for MySQLl Google Cloud BigQueryl Google Dataprocl Google Cloud Storagel Hortonworks Data Platform (HDP)l Snowflake on AWSl Snowflake on Azure
Setup and User Guide - Qlik Replicate, November 2021 947

12 Customizing tasks
l Snowflake on Googlel Cloudera Data Platform (CDP) Private Cloud
Setting up Parallel Load
To define segment boundaries by data range:
1. In the Parallel Load tab's Select Parallel Load Method section, select Use Data Ranges.
2. In the Select Details section, click Select Segment Columns.The Columns window opens
3. For all endpoints, the Unique Index column is automatically selected. Select which additionalcolumns whose data you wish to use to delineate the ranges and then click OK.
l Selecting indexed columns will significantly improve performancel You can select up to ten columns (multi-selection is supported)l Records with null values will not be replicatedl The following data types cannot be used to define segments by ranges:DOUBLE, FLOAT, and LOB (BLOB, CLOB, NCLOB)
4. In the Define Segment Boundaries section:
a. Click Add Segment to add a segment.The columns that you selected will appear as table headings.
b. Enter the upper data range for the segment in the selected columns.
Values in DATE columns must be entered in the format supported by the source.For example, for an Oracle source, the correct format would be:
l ALTER SESSION SET NLS_DATE_FORMAT:'YYYY-MM-DD HH24:MI:SS' (specifying YYYY-MM-DD only is also valid)
l ALTER SESSION SET NLS_TIMESTAMP_FORMAT:'YYYY-MM-DD HH24:MI:SS.FF9'
l ALTER SESSION SET NLS_TIMESTAMP_TZ_FORMAT:'YYYY-MM-DD HH24:MI:SS.FF9 TZH:TZM'
c. Add additional segments as required.
d. Click Validate to validate that the specified data corresponds to the source column data typeand that all of the defined segments contain values.
e. To delete a segment, select the desired segment and then click Delete.
5. Click OK to save your settings.
When Use Data Ranges is selected, all of the table data will be replicated, even if data rangesare not defined for all of the columns.
Setup and User Guide - Qlik Replicate, November 2021 948

12 Customizing tasks
Usage exampleLet's assume that the following segments are defined in the Define Segment Boundaries table:
Column_1 Column_2 Column_3
10 30 105
20 20 120
100 12 99
Example table data
In this case, the following "WHERE" clauses will be created for each load segment:
l Segment 1: ((COL1 < 10) OR ((COL1 = 10) AND (COL2 < 30)) OR ((COL1 = 10) AND (COL2 = 30)
AND (COL3 < 105)))
l Segment 2: NOT ((COL1 < 10) OR ((COL1 = 10) AND (COL2 < 30)) OR ((COL1 = 10) AND (COL2 =
30) AND (COL3 < 105))) AND ((COL1 < 20) OR ((COL1 = 20) AND (COL2 < 20)) OR ((COL1 = 20)
AND (COL2 = 20) AND (COL3 < 120)))
l Segment 3: NOT ((COL1 < 20) OR ((COL1 = 20) AND (COL2 < 20)) OR ((COL1 = 30) AND (COL2 =
20) AND (COL3 < 120))) AND ((COL1 < 100) OR ((COL1 = 100) AND (COL2 < 12)) OR ((COL1 =
100) AND (COL2 = 12) AND (COL3 < 99)))
l Segment 4: NOT ((COL1 < 100) OR ((COL1 = 100) AND (COL2 < 12)) OR ((COL1 = 100) AND
(COL2 = 12) AND (COL3 < 99)))
To define segment boundaries by all of the table partitions:
Only select this method if you are sure that the table is already partitioned.
1. In the Parallel Load tab's Select Parallel Load Method section, select Use Partitions.
2. In the Select Partitions section, select Use all table partitions. This will segment the tableaccording to partitions that already exist in the source database.
3. Select one the following:l Use main partitionsl Use sub partitions
This option will be disabled if the source database does not support sub-partitions.
4. Click OK.
To define segment boundaries by specific partitions:
Only select this method if you are sure that the table is already partitioned.
Setup and User Guide - Qlik Replicate, November 2021 949

12 Customizing tasks
1. In the Parallel Load tab's Select Parallel Load Method section, select Use Partitions.
2. In the Select Partitions section, select Specify partitions. This will split the data according to thespecified source partitions.
When Specify partitions is selected, only the specified partitions will be replicated.
3. Click Add Partition.
4. Specify the name of an existing partition or sub-partition.
5. If you specified the name of a sub-partition, select the check box in the Sub-Partition column.
The check box will be disabled if the source database does not support sub-partitions.
6. Add additional partitions/sub-partitions as required.
7. To delete a partition/sub-partition, select the partition/sub-partition and then click Delete.
8. Click OK to save your settings.
Adjusting the number of segments that can be loaded in parallelYou can increase or decrease the number of segments that will be loaded in parallel. For example, if youselected the Use all table partitions option and the source table has 20 partitions, increasing the defaultnumber of concurrent tasks (5) may improve performance.
Sub-tasks are allocated for each segment \ partition \ sub partition.
For example: If you select a table with 6 partitions and load the table using the Use Partitionsmethod, 5 partitions will be loaded in parallel, corresponding with the default number ofconcurrent tasks (5). When one of the sub-tasks completes its run, it will be assigned to loadingthe sixth partition.
The currently set value is displayed at the bottom of the Parallel Load tab. You can modify this value in theMaximum number of tables to load in parallel field in the Full Load Tuning (page 1019) tab.
Handling LOB columnsYou can override the task's LOB settings for individual tables.
This option is only available for tasks defined with any combination of the following source andtarget endpoints: Oracle source, Oracle target, PostgreSQL source, PostgreSQL target,Microsoft SQL Server source, Microsoft SQL Server target, MySQL source, and MySQL target.
Setup and User Guide - Qlik Replicate, November 2021 950
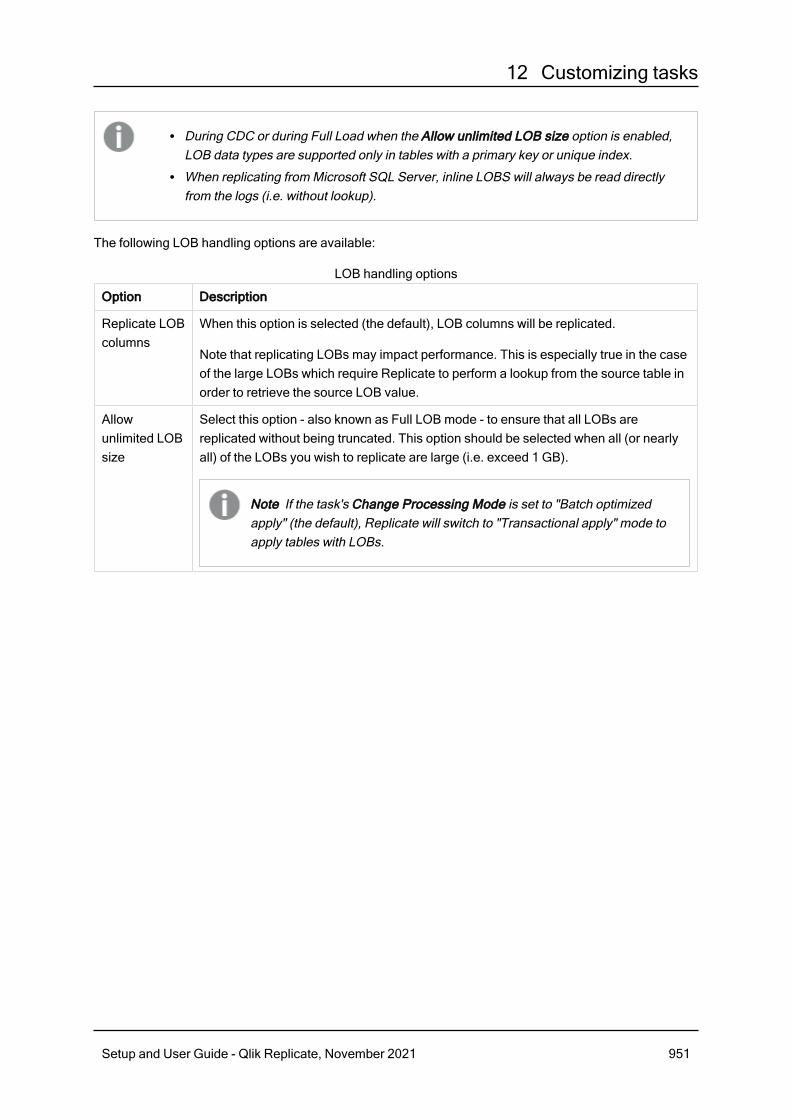
12 Customizing tasks
l During CDC or during Full Load when the Allow unlimited LOB size option is enabled,LOB data types are supported only in tables with a primary key or unique index.
l When replicating from Microsoft SQL Server, inline LOBS will always be read directlyfrom the logs (i.e. without lookup).
The following LOB handling options are available:
Option Description
Replicate LOBcolumns
When this option is selected (the default), LOB columns will be replicated.
Note that replicating LOBs may impact performance. This is especially true in the caseof the large LOBs which require Replicate to perform a lookup from the source table inorder to retrieve the source LOB value.
Allowunlimited LOBsize
Select this option - also known as Full LOB mode - to ensure that all LOBs arereplicated without being truncated. This option should be selected when all (or nearlyall) of the LOBs you wish to replicate are large (i.e. exceed 1 GB).
Note If the task's Change Processing Mode is set to "Batch optimizedapply" (the default), Replicate will switch to "Transactional apply" mode toapply tables with LOBs.
LOB handling options
Setup and User Guide - Qlik Replicate, November 2021 951

12 Customizing tasks
Option Description
Optimizehandling whenLOB size isless than (KB)
Select this option when you need to replicate both small and large LOBs, and most ofthe LOBs are small.
This option is supported with the following endpoints only:
l Sources: Oracle, Microsoft SQL server, MySQL, PostgreSQL, IBMDB2 for LUW, and Sybase ASE.
l Targets: Oracle, Microsoft SQL Server, MySQL, PostgreSQL, andSybase ASE.
When this option is selected, during Full Load, the small LOBs "inline" (which is moreefficient), and the large LOBs by performing a lookup from the source table.
During Change Processing, however, both small and large LOBs will be replicated byperforming a lookup from the source table.
When this option is selected, Replicate will check all of the LOB sizes todetermine which ones to transfer "inline". LOBs larger than the specifiedsize will be replicated using Full LOB mode.
Therefore, if you know that most of the LOBs are larger than the specifiedsetting, it is better to use the Allow unlimited LOB size option instead.
Chunk size(KB)
Optionally, change the size of the LOB chunks to use when replicating the data to thetarget. The default chunk size should suffice in most cases, but if you encounterperformance issues, adjusting the size may improve performance.
With some databases, data type validation occurs when the data isinserted or updated. In such cases, replication of structured data types(e.g. XML, JSON, GEOGRAPHY, etc.) may fail if the data is bigger thanthe specified chunk size.
Setup and User Guide - Qlik Replicate, November 2021 952

12 Customizing tasks
Option Description
Limit LOB sizeto (KB)
Select this option if you only need to replicate small LOBs or if the target endpoint doesnot support unlimited LOB size. The maximum permitted value for this field is 102400KB (100 MB).
When replicating small LOBs, this option is more efficient than the Allow unlimitedLOB size option since the LOBs are replicated "inline" as opposed to via "lookup" fromthe source. During Change Processing, small LOBs are usually replicated via "lookup"from the source.
As the value of the Limit LOB size to is in bytes, the size should be calculatedaccording to the following formulas:
l BLOB – The length of the largest LOB.l NCLOB – The length of the longest TEXT in characters multiplied by two (aseach character is handled as a double-byte).If the data includes 4-byte characters, multiply it by four.
l CLOB – The length of the longest TEXT in characters (as each character ishandled as a UTF8 character).If the data includes 4-byte characters, multiply it by two.
l Any LOBs larger than the specified size will be truncated.l During Change Processing from Oracle source, inline BLOBs arereplicated inline.
l Changes to this setting will only affect existing tables after they arereloaded.
In some scenarios, tasks configured to replicate tables with multiple LOB columns mayconsume a large amount of memory. This is because Replicate allocates memory bymultiplying the Limit LOB size to value by the Commit rate during full load value, the sum ofwhich, it multiplies by the number of LOB columns being replicated. So, for example, if LOBsize is limited to 5 MB and the default commit rate is used (10000 events), a task replicating 6LOB columns will consume 30 GB of memory. Note that other factors such as the databasetype and version may also affect memory consumption.
Should you encounter memory consumption issues and suspect that a combination of theabove factors may be the cause, stop the task and lower the value in the Commit rate duringfull load field. Then resume the task. Repeat this process until acceptableperformance/memory levels are reached.
These instructions apply to Change Processing and Full Load tasks.
Setup and User Guide - Qlik Replicate, November 2021 953

12 Customizing tasks
Changes to a column’s LOB size while a task is running will not be reflected in the ChangeTable, unless the target tables are created by Qlik Replicate. In such cases, the task must beconfigured to drop and create the Change Table (the default) and the target tables need to bereloaded (after the LOB size has changed).
For more information on the Change Table, see Store Changes Settings (page 1021). Forinformation on reloading target tables, see Working with tasks at runtime (page 1046).
Message formatThis tab is only available for tasks defined with a supported streaming endpoint.
When a task is defined with such an endpoint, you can specify a custom message format that will overridethe default Replicate message format. This may be useful if the consumer application needs to process themessage in a particular format.
The custom message format can be defined at task level and/or at table level. When it is defined at bothtask and table level, the message format defined for the table will take precedence over the messageformat defined for the task.
To define a custom message at table level:
1. Select a table.
2. Open the Table Settings window as described in Table Settings (page 929).
3. Select the Message Format tab and click the Change to Table Policy button.
4. Configure the message format as described in Message Format (page 1039).
5. To use the message format defined for the task, click the Change to Task Policy button.
For information on defining a custom message at task level, see Message Format (page 1039).
Full LoadThis tab is only available for tasks defined with an IBM DB2 for z/OS source endpoint.
Select the Eliminate creation of duplicate records on full load option if you need to prevent duplicaterecords from being replicated during Full Load. You can either set the option at task level or per table.
Note that selecting this option could impact performance as Replicate instructs the source database toreturn the table records by Primary Key order and then removes any duplicate records.
To prevent creation of duplicate records per table:
1. Select the desired table and then open the Table Settings window as described in Table Settings(page 929).
2. Select the Full Load tab and click the Change to Table Policy button.
3. Select the Prevent creation of duplicate records on the target check box.
Setup and User Guide - Qlik Replicate, November 2021 954

12 Customizing tasks
For information on preventing creation of duplicate records at task level, see Full Load Settings (page1017).
12.2 Defining global rulesGlobal rules are a useful way of making changes across multiple tables and columns in the same task. Youcan define transformation rules that modify the source data or metadata before it reaches the target, and/oryou can define filter rules that determine which records will be replicated to the target.
Global rules are not available in a Log Stream Staging setup.
For information on Log Stream Staging, see Using the Log Stream (page 919).
l Transformations - One way transformations can be used is to change the names of all tables in atask. You can change the names using wildcards and patterns. For example, you may want tochange the names of the tables from account_% to ac_%. This is helpful when replicating data from aMicrosoft SQL Server endpoint to an Oracle endpoint where the Microsoft SQL Server endpoint hasa limit of 128 characters for a table name and the Oracle endpoint has a limit of 31 characters.You may also need to change a specific data type in the source to a different data type in the targetfor many or all of the tables in the task. Global transformation will allow you to accomplish thiswithout having to define a transformation for each individual table.
Table-specific transformations override global transformations. For example, you candefine a global transformation that changes the data type for all tables from DATE toDATETIME(6) and then define another transformation for a specific table that changesthe data type from DATE to STRING(50).For information on defining a transformation for a specific table, see DefiningTransformations for a Single Table/View.
For an explanation of how to create global transformation, see Starting the Global TransformationRules wizard (page 955).
l Filters - Use filter rules to determine which records will be replicated to the target. Filter can bebased on column data (e.g. only replicate records where Age is greater than 18) or record attributes(e.g. only replicate UPDATED records).
For an explanation of how to create global filters, see Starting the Global Filter Rules wizard (page980).
Starting the Global Transformation Rules wizardYou define global transformations using the Global Transformation Rules wizard.
Setup and User Guide - Qlik Replicate, November 2021 955

12 Customizing tasks
To start the Global Transformations wizard:
1. Open the task for which you want to create a global transformations or a global filter.You can click Open above the Tasks list or double-click the task.
2. If you are not in the Designer mode, click Designer at the top right of the screen.For more information on the Task View and the Designer mode, see Designer mode (page 88).
3. In Designer mode, click Global Rules.The Global Rules window opens.
4. Click the New Rule toolbar button and select Transformation.The New Transformation Rule wizard opens.
5. Enter the information to define a global transformation rule. The first step is selecting theTransformation type (page 956).
Limitations for global transformationsThe following limitations apply to global transformations:
l Transformations are not supported for columns with Right-to-Left languages.l Transformations cannot be performed on columns that contain special characters (e.g. #, \, /, -) intheir name.
l The only supported transformation for columns that are mapped to BLOB/CLOB data types (byReplicate) is to drop the column on the target.
l Expressions musty be written using SQLite syntax only.
Transformation typeIn the Transformation type step of the New Transformation Rule wizard, you define the type oftransformation you want to be performed.
You can only create one rule for each transformation type on the same object (e.g. a column). Ifyou create multiple rules for a single transformation type on the same object, only the last ruleyou create will be valid. For example, if you create the following rules (in order) to rename aschema:
Rename Schema: Add Prefix
Rename Schema: Add Suffix
OR
Rename Column: Add Prefix
Rename Column: Add Suffix
Only the second rule (adding a suffix) will be executed.
Setup and User Guide - Qlik Replicate, November 2021 956

12 Customizing tasks
To select the transformation type:
1. Enter a name for the rule.The name cannot exceed 32 characters, contain non-Latin characters, or contain any of thefollowing characters: \/:*?"<>|
2. Select one of the following:Table or Schema:
l Rename schema: Select this to change the schema name for multiple tables. For example,if you want all HR tables to be renamed PERS.
l Rename table: Select this to change the name of multiple tables. For example, if you wantall tables named SALARY to be called WAGES.
Tablespace:l Change table tablespace: Select this to change the table tablespace on the target. You canchange the table tablespace regardless of what objects it contains or you can specify acondition for it to be renamed. For example, change all table tablespaces that contain thetable Employees in the schema Company.By default (i.e. when this option is not selected), the tables will either be created in the sourcetable tablespace on the target (when replicating from an Oracle source) or in the defaultdatabase tablespace (when replicating from any other source).
This option is only available for tasks with an Oracle target endpoint.
l Change index tablespace: Select this to change the index tablespace on the target. Youcan change the index tablespace regardless of what objects it contains or you can specify acondition for it to be renamed. For example, change all table tablespaces that contain thetable Employees in the schema Company.By default (i.e. when this option is not selected), the indexes will either be created in thesource table tablespace on the target (when replicating from an Oracle source) or in thedefault database tablespace (when replicating from any other source).
This option is only available for tasks with an Oracle target endpoint.
Column:l Rename column: Select this to change the name of multiple columns. For example, if youwant to change all columns with word MINIMUM to MIN.
l Add column: Select this to add a column with a similar name to multiple tables.l Drop column: Select this to drop a column with a similar name from multiple tables.l Convert data type: Select this if you want to change a specific data type to a different oneacross multiple tables. For example, if you want to change all Integer data types to a string.
l Replace column data: Select this to replace column data across multiple target tables.
Setup and User Guide - Qlik Replicate, November 2021 957

12 Customizing tasks
In homogeneous replication tasks (such as Oracle to Oracle), modifying a single tablecolumn (by changing the column data type or length for example), will break thehomogeneity for the entire table.
Change Table:Change Table transformations are only available when the Store Changes replication option isenabled.For more information on Change Tables, see Using Change Tables (page 1124).
l Rename Change Table: Select this to rename the Replicate Change Table for all tables orfor any table that matches the specified schema name and/or table name.
l Rename Change Table schema: Select this to change the schema under which theReplicate Change Table will be created, for all tables or for any table that matches thespecified schema name and/or table name.
3. Click Next to proceed to the Transformation scope (page 958) step.
Transformation scopeIn the Transformation scope screen, you define which tables will be affected by the transformation. Forexample, you can apply the rule to all tables that contain the word SALARY as part of their name.
The options displayed in this screen depend on the selected Transformation Type.
The following table describes all available options. The second column lists the Transformation Typewhere the option to be available.
Setup and User Guide - Qlik Replicate, November 2021 958

12 Customizing tasks
Option Transformation Type Description
Schema nameis like %
All Leave the % sign to include all schemas in your globaltransformation.
Click the % sign to add a filter. In this case you canenter any name combination to include only thatschema in your global transformation rule.
For example, enter HR to include only tables that havethe schema HR.
You can use the % sign as a wildcard. For example, H%includes all tables with a schema that begins with theletter H, such as HR, HELLO, or HQ.
The % wildcard can be used in any position. Forexample, if you use it at the beginning, %H, then alltable names that end in H are included in thetransformation rule. The % can also be used in amiddle position.
If you are using an Oracle target, youmust enter a schema that exists on thetarget endpoint. Qlik Replicate does notcreate new schemas on an Oracleendpoint. If you want to use a newschema for the target, create the schemaon the Oracle endpoint before running thetask. For more information, see UsingOracle as a target (page 810).
Transformation conditions
Setup and User Guide - Qlik Replicate, November 2021 959

12 Customizing tasks
Option Transformation Type Description
Tabletablespace islike %
Change table tablespaceThis option is only available if the task isdefined with an Oracle target endpoint.
Leave the % sign to include all table tablespace namesin your global transformation.
Click the % sign to add a filter. In this case, you canenter any name combination to include only thespecified table tablespace in your globaltransformation rule.
For example, enter SYSTEM to include only tabletablespaces called SYSTEM.
You can also use the % sign as a wildcard anywhere inthe string. For example, H% includes all tabletablespaces that begin with the letter "H" whereas %Hincludes all table tablespaces that end with the letter"H".
Indextablespace islike %
Change index tablespaceThis option is only available if the task isdefined with an Oracle target endpoint.
Leave the % sign to include all index tablespacenames in your global transformation.
Click the % sign to add a filter. In this case, you canenter any name combination to include only thespecified index tablespace in your globaltransformation rule.
For example, enter SYSTEM to include only indextablespaces called SYSTEM.
You can also use the % sign as a wildcard anywhere inthe string. For example, H% includes all indextablespaces that begin with the letter "H" whereas %Hincludes all index tablespaces that end with the letter"H".
Setup and User Guide - Qlik Replicate, November 2021 960

12 Customizing tasks
Option Transformation Type Description
Table name islike %
All Leave the % sign to include all table names in yourglobal transformation rule.
Click the % sign to add a filter. In this case you canenter any name combination to include only tableswith that specific name in your global transformationrule.
You can use the % sign as a wildcard. For example, J%includes all tables with a name that begins with theletter J, such as JOBS, JOBS_HISTORY, or JACKSONVILLE.
The % wildcard can be used in any position. Forexample, if you use it at the beginning, %H, then alltable names that end in H are included in thetransformation rule. The % can also be used in amiddle position.
Column nameis like %
Rename column
Drop column
Convert data type
Replace column value
Leave the % sign to include all column names in yourglobal transformation rule.
Click the % sign to add a filter. In this case you canenter any name combination to include only columnswith that specific name in your global transformationrule.
You can use the % sign as a wildcard. For example, N%includes all columns with a name that begins with theletter N, such as NAME, NAME_FIRST, or NAME_LAST.
The % wildcard can be used in any position. Forexample, if you use it at the beginning, %IES, then allcolumn names that end in with the string "IES" areincluded in the transformation rule. The % can also beused in a middle position.
Setup and User Guide - Qlik Replicate, November 2021 961
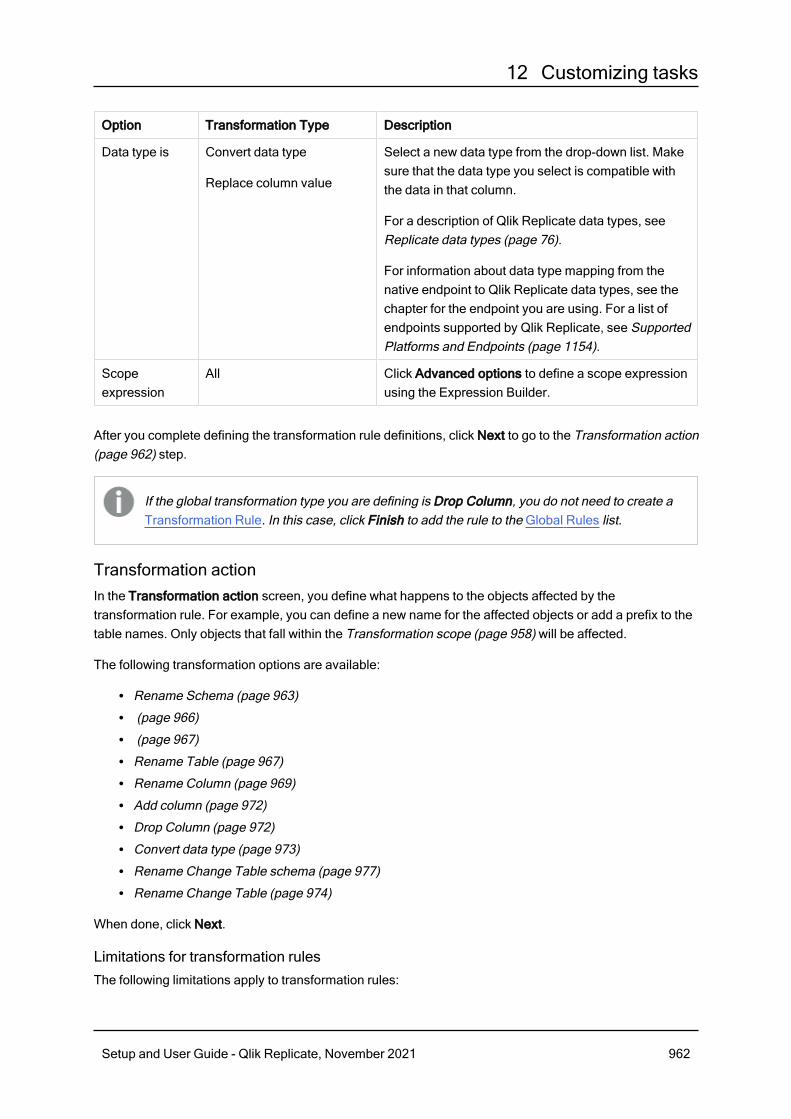
12 Customizing tasks
Option Transformation Type Description
Data type is Convert data type
Replace column value
Select a new data type from the drop-down list. Makesure that the data type you select is compatible withthe data in that column.
For a description of Qlik Replicate data types, seeReplicate data types (page 76).
For information about data type mapping from thenative endpoint to Qlik Replicate data types, see thechapter for the endpoint you are using. For a list ofendpoints supported by Qlik Replicate, see SupportedPlatforms and Endpoints (page 1154).
Scopeexpression
All Click Advanced options to define a scope expressionusing the Expression Builder.
After you complete defining the transformation rule definitions, click Next to go to the Transformation action(page 962) step.
If the global transformation type you are defining is Drop Column, you do not need to create aTransformation Rule. In this case, click Finish to add the rule to the Global Rules list.
Transformation actionIn the Transformation action screen, you define what happens to the objects affected by thetransformation rule. For example, you can define a new name for the affected objects or add a prefix to thetable names. Only objects that fall within the Transformation scope (page 958) will be affected.
The following transformation options are available:
l Rename Schema (page 963)l (page 966)l (page 967)l Rename Table (page 967)l Rename Column (page 969)l Add column (page 972)l Drop Column (page 972)l Convert data type (page 973)l Rename Change Table schema (page 977)l Rename Change Table (page 974)
When done, click Next.
Limitations for transformation rulesThe following limitations apply to transformation rules:
Setup and User Guide - Qlik Replicate, November 2021 962

12 Customizing tasks
l Transformations are not supported for columns with Right-to-Left languages.l Transformations cannot be performed on columns that contain special characters (e.g. #, \, /, -) intheir name.
l The only supported transformation for columns that are mapped to BLOB/CLOB data types (byReplicate) is to drop the column on the target.
l Expressions musty be written using SQLite syntax only.
The options displayed in this screen depend on the Transformation Type selected.
Rename SchemaIf your transformation type is Rename Schema, you can do the following:
l Rename schema to (string) (page 963)l Add a prefix or suffix (page 963)l Remove a prefix or suffix (page 964)l Replace a prefix or suffix with different characters (page 964)l Convert schema name to uppercase (page 965)l Convert schema name to lowercase (page 965)l Rename schema (Expression) (page 965)
Rename schema to (string)
Use the Rename schema to: [string] option to change the name of all table schemas that you defined inthe Transformation scope (page 958) step to a different name. For example, if you have a schema calledHuman_Resources and want to change all instances of this name to HR then enter the string HR. You can enterany string in this field.
Add a prefix or suffix
Use the Add a prefix or suffix option to add additional characters to the beginning or end of the schemaname for all schemas that fit the definition you created in the Transformation scope (page 958) step. Forexample, if the schema name is HR, you can add a suffix, such as TAR or _TAR to the schema name for alltables with that schema name. In this case, the resulting schema name will be HRTAR or HR_TAR.
If you are using Oracle as your target endpoint, Qlik Replicate does not create a new schema.Therefore, the schema name that is the result of replacing a prefix or suffix with a differentstring of characters must exist in the Oracle target endpoint. If the resulting schema name doesnot exist, you must create the schema in the Oracle endpoint before carrying out this task.
For more information, see Limitations (page 812) for using Oracle as a Target.
To globally add a prefix or suffix
1. Select Add <Prefix/Suffix> Insert Characters to matching schema names.
2. Click the word Prefix or Suffix and select one of these two from the list.
Setup and User Guide - Qlik Replicate, November 2021 963

12 Customizing tasks
3. Click [string] to activate the field.
4. Type the characters you want as the prefix or suffix. If you want to include an underscore or otherlegal character to separate the prefix/suffix from the original name, you must add it as part of thecharacter string.
5. Click Finish to add the rule to the Global Rules list.
Remove a prefix or suffix
Use the Remove a prefix or suffix option to remove a string of characters from the beginning or end of aschema name for all schema that fit the definition you created in the Transformation scope (page 958)step.
For example, you can use this option to remove the letters _REV from the schema name for all tables in theschema HR_REV. In this case the schema name in the target will be HR.
If you are using Oracle as your target endpoint, Qlik Replicate does not create a new schema.Therefore, the schema name that is the result of replacing a prefix or suffix with a differentstring of characters must exist in the Oracle target endpoint. If the resulting schema name doesnot exist, you must create the schema in the Oracle endpoint before carrying out this task.
For more information, see Limitations (page 812) for using Oracle as a Target.
To globally remove a prefix or suffix
1. Select Remove <Prefix/Suffix> Insert Characters from matching schema names.
2. Click the word Prefix or Suffix and select one of these two from the list.
3. Click [string] to activate the field.
4. Type the characters you want to remove. If you want to remove an underscore or other legalcharacter from the original name, you must add it as part of the character string.
5. Click Finish to add the rule to the Global Rules list.
Replace a prefix or suffix with different characters
Use the Replace a prefix or suffix option to replace a string of characters with a different string ofcharacters. You determine whether to replace the characters at the beginning or end of a schema name forall schema that fit the definition you created in the Transformation scope (page 958) step.
For example, you can use this option to replace the letters _ORIG with _REPL in the schema name for alltables in the schema HR_ORIG. In this case the schema name in the target will be HR_REPL.
If you are using Oracle as your target endpoint, Qlik Replicate does not create a new schema.Therefore, the schema name that is the result of replacing a prefix or suffix with a differentstring of characters must exist in the Oracle target endpoint. If the resulting schema name doesnot exist, you must create the schema in the Oracle endpoint before carrying out this task.
For more information, see Limitations (page 812) for using Oracle as a Target.
Setup and User Guide - Qlik Replicate, November 2021 964
12 Customizing tasks
To globally replace a prefix or suffix
1. Select Replace <Prefix/Suffix> Insert Characters by Insert Characters for all matching schemanames.
2. Click the word Prefix or Suffix and select one of these two from the list.
3. Click the first [string] to activate the field.
4. Type the characters from the existing (source) schema that you want to replace. If you want toinclude an underscore or other legal character from the original name in the string that you want toreplace, you must add it as part of the character string.
5. Click the second [string] to activate the field.
6. Type the characters you want to use in the target. These characters replace the original (source)characters in the target.
7. Click Finish to add the rule to the Global Rules list.
Convert schema name to uppercase
Use the convert to uppercase option to convert all of the letters in a schema name to upper case. Forexample:
l Schema_cat, becomes SCHEMA_CATl schema_cat, becomes SCHEMA_CATl sChEMa_Cat, becomes SCHEMA_CAT
To globally change the schema name to all uppercase
1. Select Convert schema name to uppercase.
2. Click Finish to add the rule to the Global Rules list.
Convert schema name to lowercase
Use the convert to lowercase option to convert all of the letters in a schema name to lower case. Forexample:
l Schema_cat, becomes schema_catl SCHEMA_CAT, becomes schema_catl sChEMa_Cat, becomes schema_cat
To globally change the schema name to all uppercase
1. Select Convert schema name to lowercase.
2. Click Finish to add the rule to the Global Rules list.
Rename schema (Expression)
Use the Rename schema to [expression] option to change the name of all table schemas that you definedin the Transformation scope (page 958) step to a different name. For example, if you have a schema calledHuman_Resources and want to change all instances of this name to HR.
Setup and User Guide - Qlik Replicate, November 2021 965

12 Customizing tasks
If you are using Oracle as your target endpoint, Qlik Replicate does not create a new schema.Therefore, the schema name that is the result of replacing a prefix or suffix with a differentstring of characters must exist in the Oracle target endpoint. If the resulting schema name doesnot exist, you must create the schema in the Oracle endpoint before carrying out this task.
For more information, see Limitations (page 812) for using Oracle as a Target.
To globally change a schema name
1. Select Rename schema to [expression]
2. Click the button to the right of the Rename schema option to open the Expression Editor. Forinformation on how to use the Expression Editor, see Using the Expression Builder (page 985).Then go to step 4.orClick [expression] to activate the field and continue with step 3.
3. Type an SQLite expression or a string (in quotes) to rename the schema. For example:l "New_Schema"l ’PREF_’||$SCHEMA_NAME_VAR||’_SUFF’
You can use the following variables in the SQLite expression:l $SCHEMA_NAME_VARl $TABLE_NAME_VARl $COLUMN_NAME_VARl $COLUMN_DATATYPE_VAR
4. Click Finish to add the rule to the Global Rules list.
Change table tablespaceIf your transformation type is Change table tablespace, you can change the table tablespace on an Oracletarget. You can also set certain conditions that must exist in the source for the table tablespace to bechanged. These include schema name, table name and table tablespace name.
For more information, see the following topics:
l Transformation type (page 956)l Transformation action (page 962)
Change index tablespaceIf your transformation type is Change index tablespace, you can change the index tablespace on anOracle target. You can also set certain conditions that must exist in the source for the tablespace to bechanged. These include schema name, table name and index tablespace name.
For more information, see the following topics:
l Transformation type (page 956)l Transformation action (page 962)
Setup and User Guide - Qlik Replicate, November 2021 966

12 Customizing tasks
Rename TableIf your transformation type is Rename Table, you can do the following:
l Rename table to (string) (page 967)l Add a prefix or suffix (page 967)l Remove a prefix or suffix (page 967)l Replace a prefix or suffix with different characters (page 968)l Convert table name to uppercase (page 968)l Convert table name to lowercase (page 968)l Rename table (expression) (page 969)
Rename table to (string)
Use the Rename table to: [string] option to change the name of all tables that you defined in theTransformation scope (page 958) step to a different name. For example, if you have a table calledEMPLOYEE and want to change all instances of this name to EMP then enter the string EMP. You can enter anystring in this field.
Add a prefix or suffix
Use the Add a prefix or suffix option to add additional characters to the beginning or end of the table namefor all tables that fit the definition you created in the Transformation scope (page 958) step. For example, ifthe table name is EMPLOYEES, you can add a suffix, such as TAR or _TAR to the table name for all tables withthat table name. In this case, the resulting table name will be EMPLOYEESTAR or EMPLOYEES_TAR.
To globally add a prefix or suffix:
1. Select Add <Prefix/Suffix> Insert Characters to matching table names.
2. Click the word Prefix or Suffix and select one of these two from the list.
3. Click [string] to activate the field.
4. Type the characters you want as the prefix or suffix. If you want to include an underscore or otherlegal character to separate the prefix/suffix from the original name, you must add it as part of thecharacter string.
5. Click Finish to add the rule to the Global Rules list.
Remove a prefix or suffix
Use the Remove a prefix or suffix option to remove a string of characters from the beginning or end of atable name for all tables that fit the definition you created in the Transformation scope (page 958) step.
For example, you can use this option to remove the letters _REV from the table name for all tables with thename EMPLOYEES. In this case the table name in the target will be EMPLOYEES.
To globally remove a prefix or suffix:
1. Select Remove <Prefix/Suffix> Insert Characters from matching table names.
2. Click the word Prefix or Suffix and select one of these two from the list.
3. Click [string] to activate the field.
Setup and User Guide - Qlik Replicate, November 2021 967

12 Customizing tasks
4. Type the characters you want to remove. If you want to remove an underscore or other legalcharacter from the original name, you must add it as part of the character string.
5. Click Finish to add the rule to the Global Rules list.
Replace a prefix or suffix with different characters
Use the Replace a prefix or suffix option to replace a string of characters with a different string ofcharacters. You determine whether to replace the characters at the beginning or end of a table name for alltables that fit the definition you created in the Transformation scope (page 958) step.
For example, you can use this option to replace the letters _ORIG with _REPL in the table names for all tablescalled EMPLOYEE_ORIG. In this case the table name in the target will be EMPLOYEE_REPL.
To globally replace a prefix or suffix:
1. Select Replace <Prefix/Suffix> Insert Characters by Insert Characters for all matching schemanames.
2. Click the word Prefix or Suffix and select one of these two from the list.
3. Click the first [string] to activate the field.
4. Type the characters from the existing (source) schema that you want to replace. If you want toinclude an underscore or other legal character from the original name in the string that you want toreplace, you must add it as part of the character string.
5. Click the second [sting] to activate the field.
6. Type the characters you want to use in the target. These characters replace the original (source)characters in the target.
7. Click Finish to add the rule to the Global Rules list.
Convert table name to uppercase
Use the convert to uppercase option to convert a table name to all upper case. For example:
l Table_cat, becomes TABLE_CATl table_cat, becomes TABLE_CATl taBLe_Cat, becomes TABLE_CAT
To globally change the table name to all uppercase:
1. Select Convert table name to uppercase.
2. Click Finish to add the rule to the Global Rules list.
Convert table name to lowercase
Use the convert to lowercase option to convert a table name to all lower case. For example:
l Table_cat, becomes table_catl TABLE_CAT, becomes table_catl taBLe_Cat, becomes table_cat
Setup and User Guide - Qlik Replicate, November 2021 968

12 Customizing tasks
To globally change the table name to all lowercase:
1. Select Convert table name to lowercase.
2. Click Finish to add the rule to the Global Rules list.
Rename table (expression)
Use the Rename table to [expression] option to change the name of all tables that fit the definition youcreated in the Transformation scope (page 958) step. For example, if you have a table called EMPLOYEE andwant to change all instances of this name as defined in the previous step it to EMP.
To change the table name:
1. Select Rename table to: [expression]
2. Click the button to the right of the Rename table option to open the Expression Editor. Forinformation on how to use the Expression Editor, see Using the Expression Builder (page 985).Then go to step 4.orClick [expression] to activate the field and continue with step 3.
3. Type an SQLite expression or a string (in quotes) to rename the table. For example:l "New_Table"l ’PREF_’||$TABLE_NAME_VAR||’_SUFF’
You can use the following variables in the SQLite expression:l $SCHEMA_NAME_VARl $TABLE_NAME_VARl $COLUMN_NAME_VARl $COLUMN_DATATYPE_VAR
Rename ColumnIf your transformation type is Rename Column, you can do the following:
l Rename column to (string) (page 969)l Add a prefix or suffix (page 970)l Remove a prefix or suffix (page 970)l Replace a prefix or suffix with different characters (page 970)l Convert column name to uppercase (page 971)l Convert column name to lowercase (page 971)l Rename column (expression) (page 971)
Rename column to (string)
Use the Rename column to: [string] option to change the name of all columns that you defined in theTransformation scope (page 958) step to a different name. For example, if you have a table called SALARY
and want to change all instances of this name to EMP then enter the string SAL. You can enter any string inthis field.
Setup and User Guide - Qlik Replicate, November 2021 969

12 Customizing tasks
Add a prefix or suffix
Use the Add a prefix or suffix option to add additional characters to the beginning or end of the columnname for all columns that fit the definition you created in the Transformation scope (page 958) step. Forexample, if the column name is SALARY, you can add a suffix, such as TAR or _TAR to the table name for alltables with that table name. In this case, the resulting table name will be SALARYTAR or SALARY_TAR.
To globally add a prefix or suffix:
1. Select Add <Prefix/Suffix> Insert Characters to matching column names.
2. Click the word Prefix or Suffix and select one of these two from the list.
3. Click the [string] to activate the field.
4. Type the characters you want as the prefix or suffix. If you want to include an underscore or otherlegal character to separate the prefix/suffix from the original name, you must add it as part of thecharacter string.
5. Click Finish to add the rule to the Global Rules list.
Remove a prefix or suffix
Use the Remove a prefix or suffix option to remove a string of characters from the beginning or end of acolumn name for all columns that fit the definition you created in the Transformation scope (page 958) step.
For example, you can use this option to remove the letters _REV from the column name for all columns withthe name SALARY. In this case the column name in the target will be SALARY.
To globally remove a prefix or suffix:
1. Select Remove <Prefix/Suffix> Insert Characters from matching column names.
2. Click the word Prefix or Suffix and select one of these two from the list.
3. Click [string] to activate the field.
4. Type the characters you want to remove. If you want to remove an underscore or other legalcharacter from the original name, you must add it as part of the character string.
5. Click Finish to add the rule to the Global Rules list.
Replace a prefix or suffix with different characters
Use the Replace a prefix or suffix option to replace a string of characters with a different string ofcharacters. You determine whether to replace the characters at the beginning or end of a column name forall columns that fit the definition you created in the Transformation scope (page 958) step.
For example, you can use this option to replace the letters _ORIG with _REPL in the column names for allcolumns called SALARY_ORIG. In this case the column name in the target will be SALARY_REPL.
To globally replace a prefix or suffix:
1. Select Replace <Prefix/Suffix> Insert Characters by Insert Characters for all matching schemanames.
2. Click the word Prefix or Suffix and select one of these two from the list.
3. Click the first [string] to activate the field.
Setup and User Guide - Qlik Replicate, November 2021 970

12 Customizing tasks
4. Type the characters from the existing (source) column that you want to replace. If you want toinclude an underscore or other legal character from the original name in the string that you want toreplace, you must add it as part of the character string.
5. Click the second [string] to activate the field.
6. Type the characters you want to use in the target. These characters replace the original (source)characters in the target.
7. Click Finish to add the rule to the Global Rules list.
Convert column name to uppercase
Use the convert to uppercase option to convert a column name to all upper case. For example:
l Column_cat, becomes COLUMN_CATl column_cat, becomes COLUMN_CATl coLUMnM_Cat, becomes COLUMN_CAT
To globally change the table name to all uppercase
1. Select Convert column name to uppercase.
2. Click Finish to add the rule to the Global Rules list.
Convert column name to lowercase
Use the convert to lowercase option to convert a column name to all lower case. For example:
l Column_cat, becomes column_catl column_cat, becomes column_catl coLUMnM_Cat, becomes column_cat
To globally change the column name to all lowercase:
1. Select Convert column name to lowercase.
2. Click Finish to add the rule to the Global Rules list.
Rename column (expression)
Use the Rename column to [expression] option to change the name of all tables that fit the definition youcreated in the Transformation scope (page 958) step. For instance, if you have a column called SALARY andwant to change it to SAL.
To change the column name:
1. Select Rename column to: [expression]
2. Click the button to the right of the Rename column option to open the Expression Editor. Forinformation on how to use the Expression Editor, see Using the Expression Builder (page 985).Then go to step 4.orClick [expression] to activate the field and continue with step 3.
3. Type an SQLite expression or a string (in quotes) to rename the column. For example:
Setup and User Guide - Qlik Replicate, November 2021 971

12 Customizing tasks
l "New_Column"l ’PREF_’||$COLUMN_NAME_VAR||’_SUFF’
You can use the following variables in the SQLite expression:l $SCHEMA_NAME_VARl $TABLE_NAME_VARl $COLUMN_NAME_VARl $COLUMN_DATATYPE_VAR
Add columnWhen you add a column to multiple tables, you must provide a name, define the data type for the columnand define the data that the column contains. The column that you define here is added to all tables that fitthe definition you created in step Transformation scope (page 958).
The following describes the information you must enter in the transformation rule page for adding acolumn.
l Column name: Click the [string] to activate the field. Type the name for the column in the field. Acolumn with this name is added to all tables that fit the definition you created in step Transformationscope (page 958).
l Add to Primary Key: Select to add the column to the target tables' Primary Key.l Expression: Click the button to the right of this field to open the Expression Builder or type anexpression using SQLite operators to define the data in the column.For information on how to use the Expression Editor to create an expression, see Using theExpression Builder (page 985).For more information on creating expressions, see Creating an expression for transformations(page 938) and Using SQLite syntax with transformations (page 939).
l Set target data type to: Click the drop-down for a list of data types and select a new data type fromthe drop-down list. Make sure that the data type you select is compatible with the data in thatcolumn. When BYTES, STRING or WSTRING is selected, specify a Length as well. WhenNUMERIC is selected, specify a Precision and Scale as well.
l Subtype: When CLOB, NCLOB, STRING, or WSTRING data types are selected, you can also seta data subtype. Select either JSON or XML from the Subtype drop-down list. Make sure that thedata in the new column will be compatible with the selected subtype. The default is Regular, whichmeans that the regular data type will be used without a subtype.
For a description of available data types, see Replicate data types (page 76). For information aboutdata type mapping from the native endpoint to Qlik Replicate data types, see the section for theendpoint you use. For a list of supported databases, see Supported Platforms and Endpoints (page1154).
Drop ColumnThis option does not require a transformation rule. For this option you complete the Global transformationrule after the Transformation scope (page 958) step.
Setup and User Guide - Qlik Replicate, November 2021 972

12 Customizing tasks
Convert data typeThe data type that you define in this step is applied to all columns and tables that fit the definition youcreated in the Transformation scope (page 958) step. Make sure that the data type you select is compatiblewith the data in the columns you defined.
l Set target data type to - If you change the target value type (e.g. string to numeric), you may alsoneed to change the data type of the target columns as well.For the BYTES, STRING, and WSTRING data types, you can optionally specify the Length as well.If you leave the default value ("0"), Replicate will calculate the data type length based on the sourcecolumn value. You can also set the length using an expression. When you click the fx button to theright of the Length field, the Expression Builder opens showing the Metadata tab. For anexplanation of the variables in this tab, see Metadata (Global transformations only) (page 991).
Example:
The following expression multiplies the modified data type length by two.$AR_M_MODIFIED_DATATYPE_LENGTH * 2
For the NUMERIC data type, you can optionally set the Precision and Scale. If you leave thedefault value ("0"), Replicate will calculate the precision and/or scale based on the source columnvalue.
l Subtype: When CLOB, NCLOB, STRING, or WSTRING data types are selected, you can also seta data subtype. Select either JSON or XML from the Subtype drop-down list. Make sure that thenew data in the column will be compatible with the selected subtype. The default is Regular, whichmeans that the regular data type will be used without a subtype.
For a description of available data types, see Replicate data types (page 76). For information about datatype mapping from the native endpoint to Qlik Replicate data types, see the section for the endpoint youuse. For a list of supported databases, see Supported Platforms and Endpoints (page 1154).
Replace column valueUse the Replace column value transformation to replace the values in the source columns (set in theTransformation scope) with different values in the corresponding target columns.
The following options are available:
l Replace target value with - Create an expression for replacing the value in the source columnvalues with a different value in the target columns. When you click the fx button to the right of thefield, the Expression Builder opens showing the Data tab. For an explanation of the variables in thistab, see Data (global transformations only) (page 990).
Example:
The following expression appends the string "_new" to the original source column values.$AR_M_SOURCE_COLUMN_DATA || '_new'
l Set target data type to - If you change the target value type (e.g. string to numeric), you may alsoneed to change the data type of the target columns as well.
Setup and User Guide - Qlik Replicate, November 2021 973

12 Customizing tasks
For the BYTES, STRING, and WSTRING data types, you can optionally specify the Length as well.If you leave the default value ("0"), Replicate will calculate the data type length based on the sourcecolumn value. You can also set the length using an expression. When you click the fx button to theright of the Length field, the Expression Builder opens showing the Metadata tab. For anexplanation of the variables in this tab, see Metadata (Global transformations only) (page 991).
Example:
The following expression multiplies the modified data type length by two.$AR_M_MODIFIED_DATATYPE_LENGTH * 2
For the NUMERIC data type, you can optionally set the Precision and Scale. If you leave thedefault value ("0"), Replicate will calculate the precision and/or scale based on the source columnvalue.
l Subtype: When CLOB, NCLOB, STRING, or WSTRING data types are selected, you can also seta data subtype. Select either JSON or XML from the Subtype drop-down list. Make sure that thenew data in the column will be compatible with the selected subtype. The default is Regular, whichmeans that the regular data type will be used without a subtype.
See also: Using the Expression Builder (page 985)
Rename Change Table
This transformation is only available when the Store Changes replication option is turned on.
If your transformation type is Rename Change Table, you can do the following:
l Rename Change Table to (string) (page 975)l Add a prefix or suffix (page 975)l Remove a prefix or suffix (page 975)l Replace a prefix or suffix with different characters (page 975)l Convert Change Table name to uppercase (page 976)l Convert Change Table name to lowercase (page 976)l Rename Change Table (expression) (page 976)
l Globally renaming a Change Table will override the Change Table suffix defined in thetask settings.
l The Change Table name must be different from the source table names. Otherwise, atable error will occur.
Setup and User Guide - Qlik Replicate, November 2021 974

12 Customizing tasks
Rename Change Table to (string)
Use the Rename Change Table to: [string] option to change the name of all Change Tables that youdefined in the Transformation scope (page 958) step to a different name. For example, if you have aChange Table called EMPLOYEE and want to change all instances of this name to EMP then enter the stringEMP. You can enter any string in this field.
Add a prefix or suffix
Use the Add a prefix or suffix option to add additional characters to the beginning or end of the ChangeTable name for all Change Tables that fit the definition you created in the Transformation scope (page 958)step. For example, if the Change Table name is EMPLOYEES, you can add a suffix, such as TAR or _TAR to theChange Table name for all Change Tables with that name. In this case, the resulting Change Table namewill be EMPLOYEESTAR or EMPLOYEES_TAR.
To globally add a prefix or suffix:
1. Select Add <Prefix/Suffix> <String> to matching Change Table names.
2. Click the word Prefix or Suffix and select one of these two from the list.
3. Click [string] to activate the field.
4. Type the characters you want as the prefix or suffix. If you want to include an underscore or otherlegal character to separate the prefix/suffix from the original name, you must add it as part of thecharacter string.
5. Click Finish to add the rule to the Global Rules list.
Remove a prefix or suffix
Use the Remove a prefix or suffix option to remove a string of characters from the beginning or end of aChange Table name for all Change Tables that fit the definition you created in the Transformation scope(page 958) step.
For example, you can use this option to remove the letters _REV from the Change Table name for allChange Tables with the name EMPLOYEES. In this case the Change Table name in the target will beEMPLOYEES.
To globally remove a prefix or suffix:
1. Select Remove <Prefix/Suffix> <String> from matching Change Table names.
2. Click the word Prefix or Suffix and select one of these two from the list.
3. Click [string] to activate the field.
4. Type the characters you want to remove. If you want to remove an underscore or other legalcharacter from the original name, you must add it as part of the character string.
5. Click Finish to add the rule to the Global Rules list.
Replace a prefix or suffix with different characters
Use the Replace a prefix or suffix option to replace a string of characters with a different string ofcharacters. You determine whether to replace the characters at the beginning or end of a Change Tablename for all Change Tables that fit the definition you created in the Transformation scope (page 958) step.
Setup and User Guide - Qlik Replicate, November 2021 975

12 Customizing tasks
For example, you can use this option to replace the letters _ORIG with _REPL in the Change Table names forall Change Tables called EMPLOYEE_ORIG. In this case the Change Table name in the target will beEMPLOYEE_REPL.
To globally replace a prefix or suffix:
1. Select Replace <Prefix/Suffix> <String> by <String> for all matching Change Table names.
2. Click the word Prefix or Suffix and select one of these two from the list.
3. Click the first [string] to activate the field.
4. Type the characters from the existing (source) schema that you want to replace. If you want toinclude an underscore or other legal character from the original name in the string that you want toreplace, you must add it as part of the character string.
5. Click the second [sting] to activate the field.
6. Type the characters you want to use in the target. These characters replace the original (source)characters in the target.
7. Click Finish to add the rule to the Global Rules list.
Convert Change Table name to uppercase
Use the convert to uppercase option to convert a Change Table name to all upper case. For example:
l Table_cat, becomes TABLE_CATl Change Table_cat, becomes TABLE_CATl taBLe_Cat, becomes TABLE_CAT
To globally change the Change Table name to all uppercase:
1. Select Convert Change Table name to uppercase.
2. Click Finish to add the rule to the Global Rules list.
Convert Change Table name to lowercase
Use the convert to lowercase option to convert a Change Table name to all lower case. For example:
l Table_cat, becomes Change Table_catl TABLE_CAT, becomes Change Table_catl taBLe_Cat, becomes Change Table_cat
To globally change the Change Table name to all lowercase:
1. Select Convert Change Table name to lowercase.
2. Click Finish to add the rule to the Global Rules list.
Rename Change Table (expression)
Use the Rename Change Table to [expression] option to change the name of all Change Tables that fitthe definition you created in the Transformation scope (page 958) step. For example, if you have a ChangeTable called EMPLOYEE and want to change all instances of this name as defined in the previous step it toEMP.
Setup and User Guide - Qlik Replicate, November 2021 976

12 Customizing tasks
To change the Change Table name:
1. Select Rename Change Table to: [expression]
2. Click the button to the right of the Rename Change Table option to open the Expression Editor. Forinformation on how to use the Expression Editor, see Using the Expression Builder (page 985).Then go to step 4.orClick [expression] to activate the field and continue with step 3.
3. Type an SQLite expression or a string (in quotes) to rename the table. For example:l "New_Change_Table_Name"l ’PREF_’||$AR_M_SOURCE_TABLE_NAME||’_SUFF’
You can use the following metadata in the SQLite expression:l $AR_M_SOURCE_COLUMN_DATATYPEl $AR_M_SOURCE_COLUMN_NAMEl $AR_M_SOURCE_SCHEMAl $AR_M_SOURCE_TABLE_NAME
Rename Change Table schema
This transformation is only available when the Store Changes replication option is turned on.
If your transformation type is Rename Change Table schema, you can do the following:
l Rename Change Table schema to (string) (page 977)l Add a prefix or suffix (page 977)l Remove a prefix or suffix (page 978)l Replace a prefix or suffix with different characters (page 978)l Convert Change Table schema name to uppercase (page 979)l Convert Change Table schema name to lowercase (page 979)l Rename Change Table schema (expression) (page 979)
Rename Change Table schema to (string)
Use the Rename Change Table schema to: [string] option to change the name of all Change Tableschemas that you defined in the Transformation scope (page 958) step to a different name. For example, ifyou have a Change Table schema called EMPLOYEE and want to change all instances of this name to EMP
then enter the string EMP. You can enter any string in this field.
Add a prefix or suffix
Use the Add a prefix or suffix option to add additional characters to the beginning or end of the ChangeTable schema name for all tables that fit the definition you created in the Transformation scope (page 958)step. For example, if the Change Table schema name is EMPLOYEES, you can add a suffix, such as TAR or _TAR to the Change Table schema name for all Change Table schemas with that Change Table schemaname. In this case, the resulting Change Table schema name will be EMPLOYEESTAR or EMPLOYEES_TAR.
Setup and User Guide - Qlik Replicate, November 2021 977

12 Customizing tasks
To globally add a prefix or suffix:
1. Select Add <Prefix/Suffix> Insert Characters to matching Change Table schema names.
2. Click the word Prefix or Suffix and select one of these two from the list.
3. Click [string] to activate the field.
4. Type the characters you want as the prefix or suffix. If you want to include an underscore or otherlegal character to separate the prefix/suffix from the original name, you must add it as part of thecharacter string.
5. Click Finish to add the rule to the Global Rules list.
Remove a prefix or suffix
Use the Remove a prefix or suffix option to remove a string of characters from the beginning or end of aChange Table schema name for all tables that fit the definition you created in the Transformation scope(page 958) step.
For example, you can use this option to remove the letters _REV from the Change Table schema name forall Change Table schemas with the name EMPLOYEES. In this case the Change Table schema name in thetarget will be EMPLOYEES.
To globally remove a prefix or suffix:
1. Select Remove <Prefix/Suffix> <String> from matching Change Table schema names.
2. Click the word Prefix or Suffix and select one of these two from the list.
3. Click [string] to activate the field.
4. Type the characters you want to remove. If you want to remove an underscore or other legalcharacter from the original name, you must add it as part of the character string.
5. Click Finish to add the rule to the Global Rules list.
Replace a prefix or suffix with different characters
Use the Replace a prefix or suffix option to replace a string of characters with a different string ofcharacters. You determine whether to replace the characters at the beginning or end of a Change Tableschema name for all tables that fit the definition you created in the Transformation scope (page 958) step.
For example, you can use this option to replace the letters _ORIG with _REPL in the Change Table schemanames for all Change Table schemas called EMPLOYEE_ORIG. In this case the Change Table schema namein the target will be EMPLOYEE_REPL.
To globally replace a prefix or suffix:
1. Select Replace <Prefix/Suffix> <String> by <String> for all matching schema names.
2. Click the word Prefix or Suffix and select one of these two from the list.
3. Click the first [string] to activate the field.
4. Type the characters from the existing (source) Change Table schema name that you want toreplace. If you want to include an underscore or other legal character from the original name in thestring that you want to replace, you must add it as part of the character string.
5. Click the second [sting] to activate the field.
Setup and User Guide - Qlik Replicate, November 2021 978
12 Customizing tasks
6. Type the characters you want to use in the target. These characters replace the original (source)characters in the target.
7. Click Finish to add the rule to the Global Rules list.
Convert Change Table schema name to uppercase
Use the convert to uppercase option to convert a Change Table schema name to all upper case. Forexample:
l Table_cat, becomes TABLE_CATl table_cat, becomes TABLE_CATl taBLe_Cat, becomes TABLE_CAT
To globally change the Change Table schema name to all uppercase:
1. Select Convert Change Table schema name to uppercase.
2. Click Finish to add the rule to the Global Rules list.
Convert Change Table schema name to lowercase
Use the convert to lowercase option to convert a Change Table schema name to all lower case. Forexample:
l Table_cat, becomes table_catl TABLE_CAT, becomes table_catl taBLe_Cat, becomes table_cat
To globally change the Change Table schema name to all lowercase:
1. Select Convert Change Table schema name to lowercase.
2. Click Finish to add the rule to the Global Rules list.
Rename Change Table schema (expression)
Use the Rename Change Table schema to [expression] option to change the name of all tables that fallwithin the scoped you defined in the Transformation scope (page 958) step. For example, if you have aChange Table schema called EMPLOYEE and want to change all instances of the Change Table schemaname as defined in the previous step to EMP.
To rename the Change Table schema:
1. Select Rename Change Table schema to.
2. Click the button to the right of the Rename Change Table schema to option to open the ExpressionEditor. For information on how to use the Expression Editor, see Using the Expression Builder(page 985).orClick [expression] to activate the field and continue with step 3.
3. Type an SQLite expression or a string (in quotes) to rename the table. For example:
Setup and User Guide - Qlik Replicate, November 2021 979

12 Customizing tasks
l "New_Change_Table_Schema"l ’PREF_’||$AR_M_SOURCE_SCHEMA||’_SUFF’
You can use the following metadata in the SQLite expression:l $AR_M_SOURCE_COLUMN_DATATYPEl $AR_M_SOURCE_COLUMN_NAMEl $AR_M_SOURCE_SCHEMAl $AR_M_SOURCE_TABLE_NAME
4. When you're done, click Next to see a summary of your rule and replace the default name anddescription, or Finish to add the rule to the Global Rules list.
Starting the Global Filter Rules wizardYou define global filters using the Global Filter Rules wizard.
To start the Global Filters wizard:
1. Open the task for which you want to create a global transformations or a global filter.You can click Open above the Tasks list or double-click the task.
2. If you are not in the Designer mode, click Designer at the top right of the screen.For more information on the Task View and the Designer mode, see Designer mode (page 88).
3. In Designer mode, click Global Rules.The Global Rules window opens.
4. Click the New Rule toolbar button and select Filter.The New Filter Rule wizard opens.
5. Enter the information to define a global transformation rule. The first step is selecting the Filter type(page 980).
Limitations for global filtersl Filters cannot be applied to columns that contain special characters (e.g. #, \, /, -) in their name.l When specifying numeric data as a filtering condition, the data preceding the decimal point cannotexceed int64.
Filter typeIn the Filter Type screen of the New Filter Rule wizard, you define the type of filtering you want to beperformed.
l Filter by columns - Only include records that match specific column data. For example, only includerecords where Birth Date is later than 02-Feb-2021.
Filtering by columns containing changeable values (e.g. Age) may result in inconsistentdata on the target.
l Filter by record attributes - Only include records that match specific record attributes. For example,only include UPDATE or INSERTED records.
Setup and User Guide - Qlik Replicate, November 2021 980

12 Customizing tasks
Filter scopeIn the Filter Scope screen of the New Filter Rule wizard, you define which tables will be filtered. Forexample, you can limit the filter to all tables that contain the word SALARY as part of their name.
The options displayed in this screen depend on selected filter type.
Scope options when filtering by columnsThe following table describes the options that are available when filtering by columns.
Option Description
Schemaname is like %
Leave the % sign to apply the rule to all source schemas (the default).
Alternatively, enter a custom string. The rule will only be applied to columns in schemasthat match the specified string.
For example, enter HR to include only columns that belong to schema HR.
You can use the % symbol as a wildcard. For example, specifying H% will include allcolumns in tables that belong to schemas beginning with the letter H, such as HR, HELLO,or HQ.
The % wildcard can be used in any position. For example, if you use it at the beginning(%H), then the rule will be applied to all columns in schemas that end with the letter "H".The % symbol can also be used in the middle of a string.
If you are using an Oracle target, you must enter a schema that exists on thetarget endpoint. Qlik Replicate does not create new schemas on an Oracleendpoint. If you want to use a new schema for the target, create the schemaon the Oracle endpoint before running the task. For more information, seeUsing Oracle as a target (page 810).
Table nameis like %
Leave the % sign to apply the rule to all source tables (the default).
Alternatively, enter a custom string. The rule will only be applied to columns in tablesthat match the specified string.
You can use the % symbol as a wildcard. For example, specifying J% will include allcolumns in tables with names beginning with the letter J, such as JOBS, JOBS_HISTORY, orJACKSONVILLE.
The % wildcard can be used in any position. For example, if you use it at the beginning(%H), then the rule will be applied to all columns in tables that end with the letter "H". The% symbol can also be used in the middle of a string.
Columns filtering scope
Setup and User Guide - Qlik Replicate, November 2021 981

12 Customizing tasks
Option Description
Columnname is like %
Leave the % sign to apply the rule to all source columns (the default).
Alternatively, enter a custom string. The rule will only be applied to columns that matchthe specified string.
You can use the % symbol as a wildcard. For example, specifying N% will include allcolumns with names beginning with the letter N, such as NAME, NAME_FIRST, or NAME_LAST.
The % wildcard can be used in any position. For example, if you use it at the beginning(%n), then the rule will be applied to all columns that end with the letter "n". The % symbolcan also be used in the middle of a string.
Data type is Optionally, select a specific data type from the drop-down list. Make sure the data typeyou select is compatible with the data in that column.
For a description of Qlik Replicate data types, see Replicate data types (page 76).
For information about data type mapping from the native endpoint to Qlik Replicate datatypes, see the chapter for the endpoint you are using. For a list of endpoints supportedby Qlik Replicate, see Supported Platforms and Endpoints (page 1154).
Scopeexpression
Click Advanced options to define a scope expression using the expression builder.
Scope options when filtering by record attributesThe following table describes the options that are available when filtering by record attributes.
Setup and User Guide - Qlik Replicate, November 2021 982

12 Customizing tasks
Option Description
Schemaname is like %
Leave the % sign to apply the rule to all source schemas (the default).
Alternatively, enter a custom string. The rule will only be applied to columns in schemasthat match the specified string.
For example, enter HR to include only columns that belong to schema HR.
You can use the % symbol as a wildcard. For example, specifying H% will include allcolumns in tables that belong to schemas beginning with the letter H, such as HR, HELLO,or HQ.
The % wildcard can be used in any position. For example, if you use it at the beginning(%H), then the rule will be applied to all columns in schemas that end with the letter "H".The % symbol can also be used in the middle of a string.
If you are using an Oracle target, you must enter a schema that exists on thetarget endpoint. Qlik Replicate does not create new schemas on an Oracleendpoint. If you want to use a new schema for the target, create the schemaon the Oracle endpoint before running the task. For more information, seeUsing Oracle as a target (page 810).
Table nameis like %
Leave the % sign to apply the rule to all source tables (the default).
Alternatively, enter a custom string. The rule will only be applied to columns in tablesthat match the specified string.
You can use the % symbol as a wildcard. For example, specifying J% will include allcolumns in tables with names beginning with the letter J, such as JOBS, JOBS_HISTORY, orJACKSONVILLE.
The % wildcard can be used in any position. For example, if you use it at the beginning(%H), then the rule will be applied to all columns in tables that end with the letter "H". The% symbol can also be used in the middle of a string.
Scopeexpression
Click Advanced options to define a scope expression using the expression builder.
Record attributes filtering scope
After defining the filter scope, click Next to proceed to the Transformation action (page 962) screen.
Filter actionIn the Filter action screen, you create an expression for selecting records based on their column data(when defining a Filter by columns) or based on their attributes (when defining a Filter by recordattributes). Only records that fall within the Filter scope (page 981) will be affected.
Setup and User Guide - Qlik Replicate, November 2021 983

12 Customizing tasks
Filter action for columnsUse the Expression Builder to define a record selection expression based on column data. Click the fxbutton to open the Expression Builder.
The Expression Builder opens displaying the Data tab. Define an expression using the availableparameters.
Example (Assumes that "Age" is the column being filtered):
Create the following expression to select all records for citizens between the age of 50 and 80.
$AR_M_SOURCE_COLUMN_DATA > '60' AND $AR_M_SOURCE_COLUMN_DATA < '70'
Filter action for record attributesUse the Expression Builder to define a record selection expression based on record attributes. Click the fxbutton to open the Expression Builder.
The Expression Builder opens displaying the Headers tab. Define an expression using the availableHeader columns.
Header columns are not relevant for Full Load tasks. They are only relevant when the task'sApply Changes or Store Changes replication options are enabled.
Example:
Create the following expression to select UPDATED records only:
$AR_H_OPERATION='UPDATE'
See also: Using the Expression Builder (page 985)
Managing global rulesThe Global Rules window lists the names and descriptions of all rules that are defined for the QlikReplicate instance you are working with. This is where you go to edit, delete, reposition, oractivate/deactivate rules.
Editing global rules
You cannot change the name of a transformation rule
To edit a global rule:
1. In the Global Rules window, select the rule you want to edit.
2. Click the Edit button or double-click the rule.The Edit Existing Transformation Rule wizard or Edit Existing Filter Rule wizard opens.
Setup and User Guide - Qlik Replicate, November 2021 984

12 Customizing tasks
3. Make any changes you need in the wizard.For information on how to configure a global transformation, see the following topics:
l Transformation type (page 956)l Transformation scope (page 958)l Transformation action (page 962)
For information on how to configure a global filter, see the following topics:l Filter type (page 980)l Filter scope (page 981)l Filter action (page 983)
Deleting global rules
To delete a global rule:
1. In the Global Rules window, select the rule you want to delete.
2. Click the Delete button.
3. When prompted for confirmation, click OK.The rule is removed from the list and deleted from the system.
Positioning global rulesRules are applied in the order they appear. To prevent conflicts therefore, ensure that rules are arranged ina logical order. You can use the up/down arrows to rearrange the rule order.
Activating or deactivating global rulesTo activate or deactivate a rule, select or clear the check box in the Activate column as needed.
12.3 Using the Expression BuilderThe Qlik Replicate Expression Builder provides an easy way to build an expression. It provides you witheasy access to the required elements for your expression without having to type out any informationmanually. You access the Expression Builder through the dialog boxes where you define Filters, Definingtransformations for a single table/view (page 931), and Global Transformations when you do any of thefollowing:
l Rename Schema (page 963)l Rename Table (page 967)l Rename Column (page 969)
The following topics describe the Expression Builder:
l Overview of the Expression Builder (page 986)l Build an expression (page 987)l Parse an expression (page 988)l Test an expression (page 988)l Using elements in the Expression Builder (page 990)
Setup and User Guide - Qlik Replicate, November 2021 985

12 Customizing tasks
Overview of the Expression BuilderThe following is an example of the Expression Builder with its four main parts shown. The ExpressionBuilder you are working with may look different depending on whether you want to build an expression for afilter, a transformation, or a global transformation.
Expression Builder for filters, transformations, and global transformations
The following sections describe the tasks you can perform in each part of the Expression Builder:
l Elements Pane (on the left): This pane contains elements that you can add to an expression.Select elements and move them into the Expression Builder box to create the expression. For moreinformation, see Build an expression (page 987).The Elements Pane contains the following tabs:
l Metadata (available only when working with Global transformations)l Input (available only when working with transformations or filters)l Header (for Global transformations, this tab is available only when you select Add Column)l Variablesl Operatorsl Functions
For more information on these elements, see Using elements in the Expression Builder (page 990).
Setup and User Guide - Qlik Replicate, November 2021 986
12 Customizing tasks
l Build Expression Panel: The Build Expression Panel is where you put together the expression youare building. You move elements, such as columns or operators into the box. You can also type allor part of an expression in this box.For more information, see Build an expression (page 987).
l Parse Expression Panel: This panel displays the parameters for the expression. After you build theexpression, click Parse Expression to list the expression parameters. You can then enter a value orargument for each of the parameters. For more information, see Parse an expression (page 988).The top part of the Expression panel contains the Operator toolbar. This toolbar contains the mostcommon operators. Click the operator you want to use to add it to the expression. You can also addoperators from the Element Pane, Operators tab.
l Test Expression Panel: This panel displays the results of a test that you can run after you providevalues to each of the parameters in your expression. For more information, see Test an expression(page 988).
Build an expressionThe first step in using the expression builder is to build an expression. The expression that you build isdisplayed in the top section of the right pane. You can open the Expression when:
l You define Defining transformations for a single table/view (page 931) for a single table.l You define Filters for a single table.l You use the Global transformations dialog box to Rename Schema (page 963), Rename Table(page 967), Rename Column (page 969), or Add column (page 972).
Note: To add operators to your expression, you can use the Operator tab in the Element pane or theOperator buttons at the top of the Build Expression panel or any combination of these. See Operators(page 996) and Operator toolbar (page 987).
For example, to create an expression that will combine the first name and last name, do the following:
1. In the Input Columns tab add the FIRST_NAME column to the Build Expression box.
2. Click the concatenate (||) operator from the Operator bar at the top of the Build Expression box.
3. In the Input Columns tab add the LAST_NAME column into the Build Expression box.
To build an expression:
1. In the Elements Pane, select any element you want to include in your expression. For informationon the elements you can use in an expression, see Functions (page 999).
2. Add an element to the Build Expression panel by selecting it and then clicking the arrow to the rightof the element.
3. Continue to add elements as needed.
Operator toolbarThe Operator toolbar is above the Build Expression box. It contains the most common operators so youcan easily add them to an expression.
The following operators are available in the Operator toolbar: addition, subtraction, multiplication, division,percentage, not equal, equal, concatenate, AND, OR.
Setup and User Guide - Qlik Replicate, November 2021 987

12 Customizing tasks
For information on these operators, see Operators (page 996).
To use the Operator toolbar:
1. Click the place in the Build Expression box where you want to add the operator.
2. Click the operator you want to add. It is added to the expression.
Parse an expressionYou can parse an expression to determine its parameters and to determine whether the expression isvalid.
To parse an expression:
1. In the Expression Builder window, create an expression as described in Build an expression (page987).
2. Click Parse Expression.If the expression is not valid, an error message is written in red at the bottom of the ExpressionBuilder window.If the expression is valid, the expression parameters are displayed in the Parameter column in theParse Expression section. See the figure under Test an expression (page 988).
3. Type a valid value for each of the parameters in the Value column to Test an expression (page988).For example, type John for the FIRST_NAME and Smith for the LAST_NAME in the Value column.Once you type in values, you can Test an expression (page 988).
Test an expressionYou can use the Qlik Replicate Test procedure to display the results of a test expression. The followingfigure is an example of a built expression that is evaluated and contains a test result.
Setup and User Guide - Qlik Replicate, November 2021 988

12 Customizing tasks
Test Expression dialog
To test an expression:
1. From the Expression Builder window, Build an expression (page 987).
2. Click Evaluate. See Parse an expression (page 988) for more information.
Setup and User Guide - Qlik Replicate, November 2021 989

12 Customizing tasks
3. View the parameters that are displayed. If your expression is not valid, an error message isdisplayed. See Parse an expression (page 988).
4. Type values for each parameter then click Test to see the calculated expression.For example, type John for FIRST_NAME and Smith for LAST_NAME. The result displayed isJohnSmith. If you want a space between the words add it to the end of the FIRST_NAME value orthe beginning of the LAST_NAME value.Note: Testing calls to the source_lookup and target_lookup functions is not supported.
Using elements in the Expression BuilderYou can use the following types of elements to build expressions for transformations, filters, and globaltransformations. Select the appropriate tab to select the elements.
l Columns (transformations and filters only) (page 990)l Data (global transformations only) (page 990)l Metadata (Global transformations only) (page 991)l Variables (page 995)l Operators (page 996)l Functions (page 999)l Headers (page 991)l User-defined transformations (page 1008)
Data (global transformations only)In this tab, you can create an expression that leverages modified source column data and/or the originalsource column data. Modified column data is data that has been replaced or modified using a globaltransformation (e.g. Replace column value) whereas the original source column data is the data as itappears in the source database.
The following options are available:
l $AR_M_MODIFIED_COLUMN_DATA - Use to specify column data that has been replaced ormodified using a global transformation.
l $AR_M_SOURCE_COLUMN_DATA - Use to specify the original column data.
Example:For a source column called "Age", the following expression can be defined to exclude all records forcitizens between the age of 50 and 80.
$AR_M_SOURCE_COLUMN_DATA > '50' AND $AR_M_SOURCE_COLUMN_DATA < '80'
Columns (transformations and filters only)This tab lists the columns for the table you are working with. The table you are working with is the table youselected when you opened the Table Settings dialog box.
Setup and User Guide - Qlik Replicate, November 2021 990

12 Customizing tasks
Expressions containing a condition for a NUMBER exceeding 19 digits are not valid. Forexample, the following expression is not valid:
case when $ID==12345678910111213149 then '1' else '0' end
Metadata (Global transformations only)The Metadata tab contains the following variables that you can use in an expression. Variables withMODIFIED in their name can be used to specify metadata that has been replaced or modified using aglobal transformation (such as Convert data type) whereas variables names without MODIFIED can beused to specify the original metadata as it is defined in the source database.
l AR_M_MODIFIED_SCHEMA - The modified source schema name.l AR_M_MODIFIED_TABLE_NAME - The modified source table name.l AR_M_MODIFIED_COLUMN_NAME - The modified column name in the source table.l AR_M_MODIFIED_COLUMN_SUBTYPE_NAME - The modified data type subtype of a column in the sourcetable.
l AR_M_MODIFIED_DATATYPE_NAME - The modified data type of a column in the source table.l AR_M_MODIFIED_DATATYPE_LENGTH - The modified data type length of a column in the source table.l AR_M_MODIFIED_DATATYPE_PRECISION - The modified data type precision of a column in the sourcetable.
l AR_M_MODIFIED_DATATYPE_SCALE - The modified data type scale of a column in the source table.l AR_M_SOURCE_SCHEMA - The name of the source schema.l AR_M_SOURCE_TABLE_NAME - The name of the source table.l AR_M_SOURCE_COLUMN_NAME - The name of a column in the source table.l AR_M_SOURCE_DATATYPE_NAME - The data type of a column in the source table.l AR_M_SOURCE_DATATYPE_LENGTH - The data type length of a column in the source table.l AR_M_SOURCE_DATATYPE_PRECISION - The data type precision of a column in the source table.l AR_M_SOURCE_DATATYPE_SCALE - The data type scale of a column in the source table.
Example: Using metadata variables in the Rename Column transformationTo rename all columns named "product" to "source_schema.table_name", enter "product" in the Columnname is like field (in the Transformation scope (page 958) screen) and then enter the following expressionin the Rename column to field (in the Transformation action (page 962) screen):
$AR_M_SOURCE_SCHEMA ||"."|| $AR_M_SOURCE_TABLE_NAME
HeadersBy default, headers for source tables are not replicated to the target. You can determine which, if any,headers to replicate when you define a transformation by creating an expression that includes the header.
You can create a filter using header values. Header filters are applied during change processing. SeeUsing filters (page 940) for additional information.
Setup and User Guide - Qlik Replicate, November 2021 991

12 Customizing tasks
l The Headers tab in the Expression builder is available for filters and transformations. Itis available for Global transformations only when you select Add Columns. SeeTransformation type (page 956).
l Header columns are supported by all endpoints, except where explicitly stated to thecontrary.
The available headers are described below.
AR_H_CHANGE_SEQ
Value in Change Processing
A monotonically increasing change sequencer that is common to all Change tables of a task. The Changesequence has the following format (with time being the UTC time on Replicate Server):
YYYYMMDDHHmmSShhxxxxxxxxxxxxxxxxxxx
Where:
l YYYY is the four-digit year (such as 2012)l MM is the two-digit month (range from 01-12)l HH is the hour in the day (range from 00-23)l mm is the minute in the hour (range from 00-59)l SS is the second in the minute (range from 00-59)l hh is the hundredth of the second (range from 00-99)l xxxxxxxxxxxxxxxxxxx is a 19-digit, zero prefixed change number (global per task).
The time part usually refers to the commit time of the transaction that includes the change record. QlikReplicate contains logic that maintains the monotonicity of the sequence number so modifying or adjustingthe endpoint time may result in multiple changes to seem that they are within the same timestamp but withincreasing change number.
The xxx...xxx is usually the internal change number from the data record except that for BEFORE-IMAGErecords it is the same as the change number of the matching UPDATE record (for example, if the changenumber of BEFORE-IMAGE is 1000 and that of the UPDATE is 1001, then both have 1001). This allows asimple left-outer-join between the table and itself where on the left we scan until the point in time but filterout operation=before-image, and on the right we join on the same change_seq with the change_oper being'B' .
Value in Full Load
Empty
Data type
VARCHAR(35)
Setup and User Guide - Qlik Replicate, November 2021 992

12 Customizing tasks
AR_H_STREAM_POSITION
Value in Change Processing
The stream position value on the source - usually the SCN or LSN - which allows Replicate tasks to resumefrom the last processed event.
Value in Full Load
Empty string
Data type
STRING
AR_H_TIMESTAMP
Value in Change Processing
The timestamp of the Change operation, which is represented as the local time on Replicate Server. If yourdatabase and Replicate Server are located in the same timezone, the timestamp will be approximatelyrepresentative of the actual Change operation.
Value in Full Load
Current timestamp
Data type
DATETIME
AR_H_TRANSACTION_ID
Value in Change Processing
The ID of the transaction to which the Change record belongs. The actual value is a hex-string of the 128-bit transaction ID. Depending on the source endpoint type, the ID may either be similar to the transaction IDin the source database or identical to it.
The transaction ID is not guaranteed to be unique and therefore should not be used to createreports or any other operation that relies upon its uniqueness.
Value in Full Load
Empty
Data type
VARCHAR (32)
AR_H_COMMIT_TIMESTAMP
Value in Change Processing
The source database commit timestamp, according to Replicate Server time. When the source databaseand Replicate Server are in the same timezone, the timestamp will be the approximate time of the actualcommit on the source database.
Value in Full Load
Current timestamp
Setup and User Guide - Qlik Replicate, November 2021 993

12 Customizing tasks
Data type
DATETIME
AR_H_DB_COMMIT_TIMESTAMP
Value in Change Processing
The source database commit timestamp, according to the database server time.
Relevant for the following source endpoints only: Oracle, Microsoft SQL Server, IBM DB2 forz/OS, Microsoft Azure SQL Managed Instance, and Amazon RDS for SQL Server.
Value in Full Load
NULL
Data type
DATETIME
AR_H_OPERATION
Value in Change Processing
Can be one of the following: INSERT, UPDATE, or DELETE.
Value in Full Load
INSERT
Data type
STRING
AR_H_USER
Value in Change Processing
The user that made the change to the source database.
Relevant for the following source endpoints only:
l Microsoft SQL Serverl Microsoft Azure SQL Managed Instancel Amazon RDS for SQL Serverl IBM Informixl IBM DB2 for z/OSl IBM DB2 for LUWl Oraclel Filel AIS-based sourcesl SAP Sybase ASE
Setup and User Guide - Qlik Replicate, November 2021 994

12 Customizing tasks
Value in Full Load
Empty
Data type
STRING
AR_H_JOB_NAME
Value in Change Processing
The iSeries job that made the change to the source database.
Relevant for the IBM DB2 for iSeries source endpoint only.
Value in Full Load
Empty
Data type
STRING
AR_H_PROGRAM_NAME
Value in Change Processing
The iSeries program that made the change to the source database.
Relevant for the IBM DB2 for iSeries source endpoint only.
Value in Full Load
Empty
Data type
STRING
VariablesYour expression can contain any of the variables (which will be replaced during runtime) described in thetable below.
Variable Name Description Data Type
AR_V_HOST_NAME
The host name of the machine on which Qlik Replicate Serveris installed.
STRING (50)
AR_V_SOURCE_NAME
The logical name of the source endpoint defined in the endpointsettings.
STRING (50)
AR_V_TARGET_NAME
The logical name of the target endpoint defined in the endpointsettings.
STRING (50)
Variables
Setup and User Guide - Qlik Replicate, November 2021 995

12 Customizing tasks
Variable Name Description Data Type
AR_V_TASK_NAME The task name. STRING (50)
AR_V_TASK_UUID A unique string (Universal Unique Identifier) that identifies thetask.
STRING (50)
AR_V_RELOAD_TIME
The time the source tables were reloaded. DATETIME(6)
AR_V_START_TIME
The time the task started. DATETIME(6)
OperatorsThe sections below describe the SQLite operators you can use to build an expression with the Expressionbuilder. The Expression builder divides the operators into the following categories:
l Strings (page 996)l Logical (page 996)l Mathematical (page 999)
With the exception of table-level transformations, all operator symbols must be preceded by aspace and followed by a space. For example, the expression for concatenating a first and lastname should be specified like this:
FIRST_NAME || LAST_NAME
And not like this:
FIRST_NAME||LAST_NAME
StringsYou can use the following string:
||
Name: Concatenate strings.
Examples:
FIRST_NAME || LAST_NAME
PHONE_NUMBER || <Office Only> (adds the string Office Only to the telephone number).
LogicalThe following table describes the logical SQLite operators used by the Qlik Replicate Expression Builder.
Setup and User Guide - Qlik Replicate, November 2021 996

12 Customizing tasks
Operator Description
!= or <> Is not equal to
$SALARY!=100000
IS Is the same as
$HIRE_DATE IS 2014-09-29
IS functions the same as = unless one or both of the operands are NULL. In this case, ifboth operands are NULL, then the IS operator evaluates to 1 (true). If one operand isNULL and the other is not, then the IS operator evaluates to 0 (false).
IS NOT Is not the same as
$HIRE_DATE IS NOT 2014-09-29
IS NOT functions the same as != unless one or both of the operands are NULL. In thiscase, if both operands are NULL, the IS NOT operator evaluates to 0 (false). If oneoperand is NULL and the other is not, then the IS NOT operator evaluates to 1 (true).
IN The IN operator takes a single scalar operand on the left and a vector operand on theright formed by an explicit list of zero or more scalars or by a single subquery. When theright operand of an IN operator is a subquery, the subquery must have a single resultcolumn. When the right operand is an empty set, the result of IN is false regardless of theleft operand and even if the left operand is NULL.
SQLite allows the parenthesized list of scalar values on the right-hand side of an INoperator to be an empty list but most other SQL endpoint engines and the SQL92standard require the list to contain at least one element.
LIKE The LIKE operator does a pattern matching comparison. The operand to the right of theLIKE operator contains the pattern and the left operand contains the string to matchagainst the pattern. A percent symbol ("%") in the LIKE pattern matches any sequence ofzero or more characters in the string. An underscore ("_") in the LIKE pattern matchesany single character in the string. Any other character matches itself or its lower/uppercase equivalent. (By default SQLite only understands upper/lower case for ASCIIcharacters. The LIKE operator is case sensitive by default for unicode characters that arebeyond the ASCII range.
For example, the expression 'a' LIKE 'A' is TRUE but 'æ' LIKE 'Æ' is FALSE.)
LIKE can be preceded by the NOT keyword.
Logical operators
Setup and User Guide - Qlik Replicate, November 2021 997

12 Customizing tasks
Operator Description
CASE Evaluates a list of conditions and returns one of multiple possible result expressions.
Example 1:
WHEN $NEWEST = 'Y' THEN '1' ELSE '0' END
Example 2:
case length($month)
when 2 then $year||$month
when 1 then $year||0||$month end
GLOB The GLOB operator acts in the same way as the LIKE operator but uses the UNIX fileglobbing syntax for its wildcards. GLOB is case sensitive.
GLOB can be preceded by the NOT keyword to invert the sense of the test. The infixGLOB operator is implemented by calling the function glob(Y,X) and can be modified byoverriding that function.
MATCH The MATCH operator is a special syntax for the match() application-defined function. Thedefault match() function implementation raises an exception and is not really useful foranything. But extensions can override the match() function with more helpful logic.
REGEXP The REGEXP operator is a special syntax for the regexp() user function. No regexp()user function is defined by default and so use of the REGEXP operator will normallyresult in an error message.
AND Both operands are true.
$MANAGER_ID AND EMPLOYEE ID >100
OR Either operand is true.
$MANAGER_ID OR EMPLOYEE ID >100
<< Bitwise shift left.
x << n
A bitwise shift to the left of x by n bits.
>> Bitwise shift right.
x >> n
A bitwise shift to the right of x by n bits.
& Unary and
| Unary or
< Is less than.
$SALARY<100000
Setup and User Guide - Qlik Replicate, November 2021 998

12 Customizing tasks
Operator Description
<= Is less than or equal to
$SALARY<=100000
> Is greater than
$SALARY>100000
>= Is more than or equal to
$SALARY>=100000
= or == Is equal to
$SALARY=100000
MathematicalThe following table describes the mathematical SQLite operators used by the Expression Builder.
Operator Description
+ Adds two values together.
DEPARTMENT_ID+100 (adds 100 to each ID number). Any column used in an expressionwith this operator must be a numeric data type.
- Subtracts a value from another value.
MANAGER_ID-100 (subtracts 100 from each ID number). Any column used in an expressionwith this operator must be a numeric data type.
% Uses the remainder of a division expression as the value.
%SALARY/7 (Divides the value of the Salary column by 7 and uses any remainder from theexpression as the column value).
/ Divides one value into another.
SALARY/.16 (Divides the value of the Salary column by .16.
Note: If the two values in the division expression are integers (two NUMERIC columnswith no digits after the decimal) and the result is a fractional value, the result returned willbe 0.
* SALARY*.16 (Multiplies the value of the Salary column by .16. This could be used tocalculate taxes that are subtracted from a salary).
Mathematical operators
FunctionsThe sections below describe the SQLite functions you can use to build an expression with the Expressionbuilder. The Expression builder divides the functions into the following categories:
Setup and User Guide - Qlik Replicate, November 2021 999
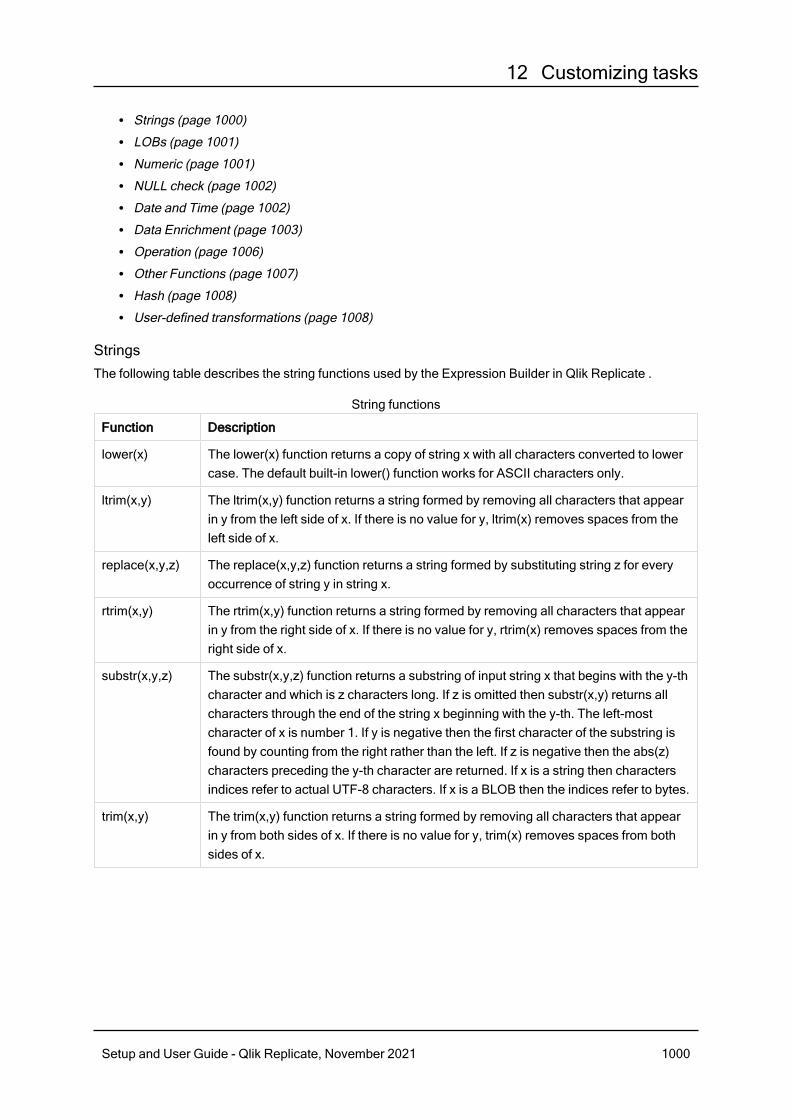
12 Customizing tasks
l Strings (page 1000)l LOBs (page 1001)l Numeric (page 1001)l NULL check (page 1002)l Date and Time (page 1002)l Data Enrichment (page 1003)l Operation (page 1006)l Other Functions (page 1007)l Hash (page 1008)l User-defined transformations (page 1008)
StringsThe following table describes the string functions used by the Expression Builder in Qlik Replicate .
Function Description
lower(x) The lower(x) function returns a copy of string x with all characters converted to lowercase. The default built-in lower() function works for ASCII characters only.
ltrim(x,y) The ltrim(x,y) function returns a string formed by removing all characters that appearin y from the left side of x. If there is no value for y, ltrim(x) removes spaces from theleft side of x.
replace(x,y,z) The replace(x,y,z) function returns a string formed by substituting string z for everyoccurrence of string y in string x.
rtrim(x,y) The rtrim(x,y) function returns a string formed by removing all characters that appearin y from the right side of x. If there is no value for y, rtrim(x) removes spaces from theright side of x.
substr(x,y,z) The substr(x,y,z) function returns a substring of input string x that begins with the y-thcharacter and which is z characters long. If z is omitted then substr(x,y) returns allcharacters through the end of the string x beginning with the y-th. The left-mostcharacter of x is number 1. If y is negative then the first character of the substring isfound by counting from the right rather than the left. If z is negative then the abs(z)characters preceding the y-th character are returned. If x is a string then charactersindices refer to actual UTF-8 characters. If x is a BLOB then the indices refer to bytes.
trim(x,y) The trim(x,y) function returns a string formed by removing all characters that appearin y from both sides of x. If there is no value for y, trim(x) removes spaces from bothsides of x.
String functions
Setup and User Guide - Qlik Replicate, November 2021 1000

12 Customizing tasks
Function Description
replaceChars(X,Y,Z)
The replaceChars(X,Y,Z) function replaces any character in string X that alsoexists in string Y (characters to be replaced) with Z (replacement characters) in thesame position. This is especially useful for removing non-valid characters from pathsand file names.
l If string Z (replacement characters) does not include a character that hascorresponding position in string X, it will be replaced with the first character instring Z.
l If string X includes a character that does not exist in string Z, the originalcharacter will be left unchanged.
So, for example, specifying replaceChars("abcde","abcd","123") wouldreturn 1231e.
LOBsThe following table describes the LOB functions used by the Expression Builder in Qlik Replicate .
Function Description
hex(x) The hex() function receives an argument as a BLOB and returns an upper-casehexadecimal string version of the BLOB content.
randomblob(N)
The randomblob(N) function returns an N-byte BLOB that contains pseudo-randombytes. If N is less than 1 then a 1-byte random BLOB is returned.
zeroblob(N) The zeroblob(N) function returns a BLOB that consists of N bytes of 0x00.
LOB functions
NumericThe following table describes the numeric functions used by the Expression Builder in Qlik Replicate .
Function Description
abs(x) The abs(x) function returns the absolute value of the numeric argument X. Abs(x) returnsNULL if x is NULL. Abs(x) returns 0.0 if x is a string or BLOB that cannot be converted to anumeric value.
random() The random() function returns a pseudo-random integer between -9223372036854775808 and +9223372036854775807.
round(x,y) The round(x,y) function returns a floating-point value x rounded to y digits to the right ofthe decimal point. If there is no value for y, it is assumed to be 0.
Numeric functions
Setup and User Guide - Qlik Replicate, November 2021 1001

12 Customizing tasks
Function Description
max(x,y...) The multi-argument max() function returns the argument with the maximum value, orreturns NULL if any argument is NULL. The multi-argument max() function searches itsarguments from left to right for an argument that defines a collating function and uses thatcollating function for all string comparisons. If none of the arguments to max() define acollating function, then the BINARY collating function is used. Note that max() is a simplefunction when it has two or more arguments but operates as an aggregate function if ithas a single argument.
min(x,y...) The multi-argument min() function returns the argument with the minimum value. Themulti-argument min() function searches its arguments from left to right for an argumentthat defines a collating function and uses that collating function for all string comparisons.If none of the arguments to min() define a collating function, then the BINARY collatingfunction is used. Note that min() is a simple function when it has two or more argumentsbut operates as an aggregate function if it has a single argument
NULL checkThe following table describes the NULL check functions used by the Expression Builder in Qlik Replicate .
Function Description
coalesce(x,y...)
The coalesce() function returns a copy of its first non-NULL argument, it returns NULL ifall arguments are NULL. Coalesce() have at least two arguments.
ifnull(x,y) The ifnull() function returns a copy of its first non-NULL argument, it returns NULL if botharguments are NULL. Ifnull() must have exactly two arguments. The ifnull() function is thesame as coalesce() with two arguments.
nullif(x,y) The nullif(x,y) function returns a copy of its first argument if the arguments are differentand returns NULL if the arguments are the same. The nullif(x,y) function searches itsarguments from left to right for an argument that defines a collating function and uses thatcollating function for all string comparisons. If neither argument to nullif() defines acollating function then the BINARY is used.
NULL check functions
Date and TimeThe following table describes the Date and Time functions used by the Expression Builder in Qlik Replicate.
Function Description
date(timestring,modifier, modifier...)
Returns the date in the format YYYY-MM-DD.
time(timestring,modifier, modifier...)
Returns the time in the format HH:MM:SS.
Date and Time functions
Setup and User Guide - Qlik Replicate, November 2021 1002

12 Customizing tasks
Function Description
datetime(timestring,modifier, modifier...)
Returns the date and time in the format YYYY-MM-DD HH:MM:SS.
julianday(timestring,modifier, modifier...)
The julianday() function returns the number of days since noon in Greenwichon November 24, 4714 B.C.
strftime(format,timestring, modifier,modifier...)
The strftime() routine returns the date formatted according to the formatstring specified as the first argument. It supports the following variables:
%d: day of month
%H: hour 00-24
%f: ** fractional seconds SS.SSS
%j: day of year 001-366
%J: ** Julian day number
%m: month 01-12
%M: minute 00-59
%s: seconds since 1970-01-01
%S: seconds 00-59
%w: day of week 0-6 sunday==0
%W: week of year 00-53
%Y: year 0000-9999
%%: %
Data EnrichmentData Enrichment functions allow the selected source tables to be augmented with data from other recordslocated in either the source or target endpoints. Practical applications of data enrichment functions includecode lookup or master record lookup (e.g. social security number lookup to find a person’s name).
You can enrich the target tables with supplemental data retrieved from the source or target endpoint bydefining a transformation on the table. For more information about defining transformations on a singletable, see Defining transformations for a single table/view (page 931).
Limitations
Amazon Redshift is not supported.
Data Enrichment functions
The table below describes the source and target lookup functions, which can be used both for tabletransformations and for global transformations. For a description of the parameters available for thesefunctions, see Input Parameters below.
Setup and User Guide - Qlik Replicate, November 2021 1003
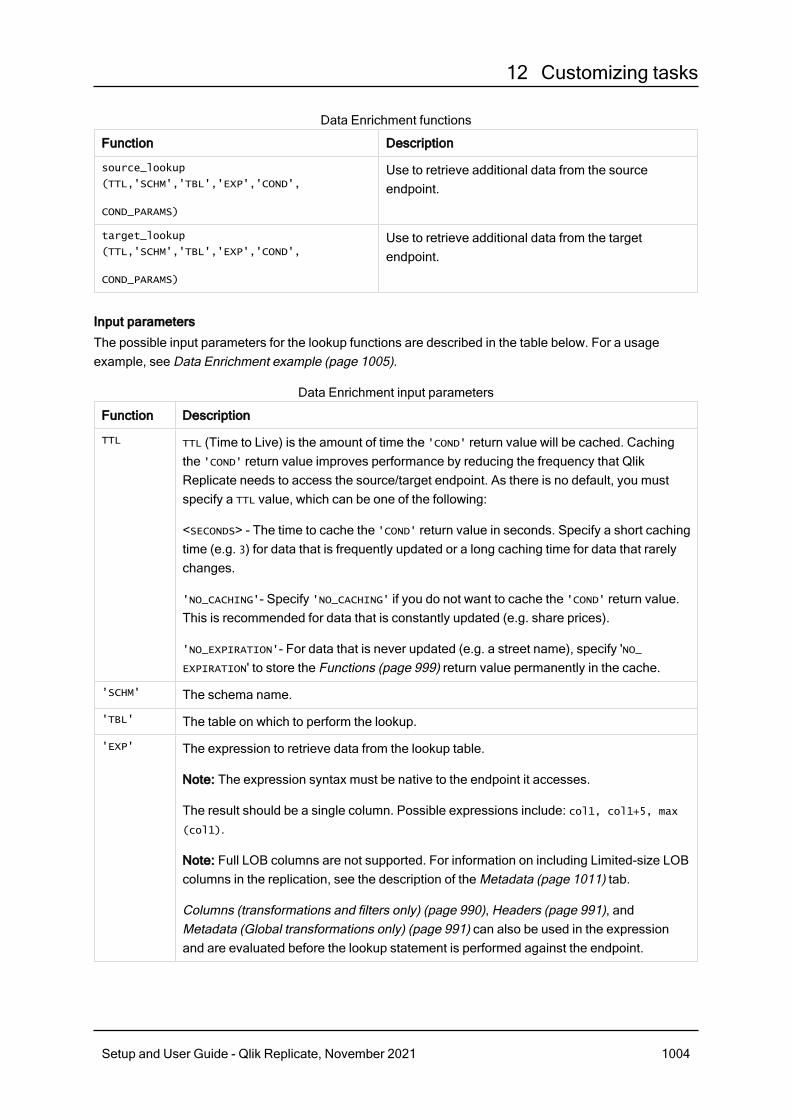
12 Customizing tasks
Function Description
source_lookup
(TTL,'SCHM','TBL','EXP','COND',
COND_PARAMS)
Use to retrieve additional data from the sourceendpoint.
target_lookup
(TTL,'SCHM','TBL','EXP','COND',
COND_PARAMS)
Use to retrieve additional data from the targetendpoint.
Data Enrichment functions
Input parameters
The possible input parameters for the lookup functions are described in the table below. For a usageexample, see Data Enrichment example (page 1005).
Function Description
TTL TTL (Time to Live) is the amount of time the 'COND' return value will be cached. Cachingthe 'COND' return value improves performance by reducing the frequency that QlikReplicate needs to access the source/target endpoint. As there is no default, you mustspecify a TTL value, which can be one of the following:
<SECONDS> - The time to cache the 'COND' return value in seconds. Specify a short cachingtime (e.g. 3) for data that is frequently updated or a long caching time for data that rarelychanges.
'NO_CACHING'- Specify 'NO_CACHING' if you do not want to cache the 'COND' return value.This is recommended for data that is constantly updated (e.g. share prices).
'NO_EXPIRATION'- For data that is never updated (e.g. a street name), specify 'NO_EXPIRATION' to store the Functions (page 999) return value permanently in the cache.
'SCHM' The schema name.
'TBL' The table on which to perform the lookup.
'EXP' The expression to retrieve data from the lookup table.
Note: The expression syntax must be native to the endpoint it accesses.
The result should be a single column. Possible expressions include: col1, col1+5, max
(col1).
Note: Full LOB columns are not supported. For information on including Limited-size LOBcolumns in the replication, see the description of the Metadata (page 1011) tab.
Columns (transformations and filters only) (page 990), Headers (page 991), andMetadata (Global transformations only) (page 991) can also be used in the expressionand are evaluated before the lookup statement is performed against the endpoint.
Data Enrichment input parameters
Setup and User Guide - Qlik Replicate, November 2021 1004

12 Customizing tasks
Function Description
'COND' The condition for the lookup statement.
Note: The condition syntax must be native to the endpoint it accesses.
The COND is a single field referencing all required fields.
Example if the lookup table is located in Oracle:
'Fieldname1=:1 and Fieldname2=:2 and Fieldname3 =:3'
Example if the lookup table is located in Microsoft SQL Server:
'Fieldname1=? and Fieldname2=? and Fieldname3=?'
Columns (transformations and filters only) (page 990), Headers (page 991), andMetadata (Global transformations only) (page 991) can also be used in the expressionand are evaluated before the lookup statement is performed against the endpoint.
COND_
PARAMSAny parameters required by the COND parameter.
The COND_PARAMS (condition parameters) is not a single field, but a list of fields.
Syntax:
$FIELDNAME1 , $FIELDNAME2 , $FIELDNAME3
Full example:
source_lookup(
10000 ,
'HR' ,
'DEPARTMENTS' ,
'DEPARTMENT_NAME’ ,
'COMPANY_ID=? and DIVISION_ID=? and DEPT_ID=?' ,
$COMP_ID , $DIV_ID , $DEPT_ID )
To improve efficiency, the source/target lookup tables should be indexed for the specified lookup fields.
Data Enrichment example
In the following example, Mike needs to add the DEPARTMENT_NAME column to the HR.JOB_HISTORY table. TheDEPARTMENT_NAME column is located in the HR.DEPARTMENTS table in the source endpoint.
This is how the HR.JOB_HISTORY table appears before the column is added:
Setup and User Guide - Qlik Replicate, November 2021 1005
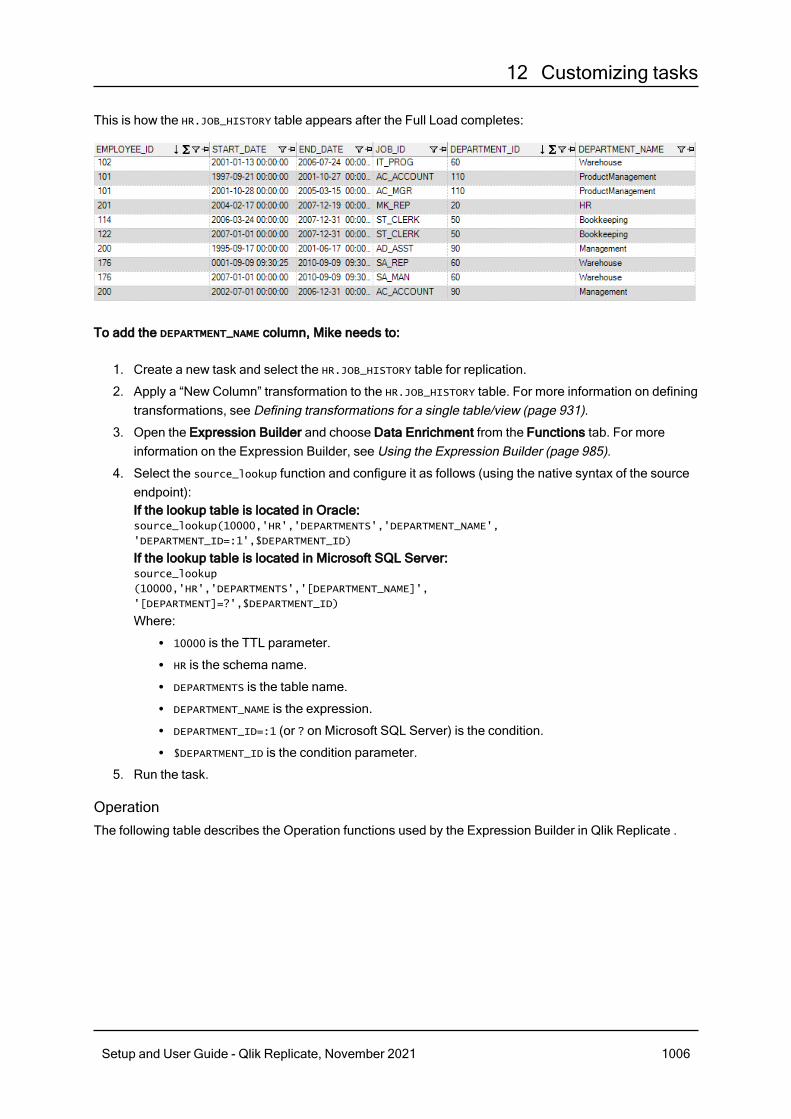
12 Customizing tasks
This is how the HR.JOB_HISTORY table appears after the Full Load completes:
To add the DEPARTMENT_NAME column, Mike needs to:
1. Create a new task and select the HR.JOB_HISTORY table for replication.
2. Apply a “New Column” transformation to the HR.JOB_HISTORY table. For more information on definingtransformations, see Defining transformations for a single table/view (page 931).
3. Open the Expression Builder and choose Data Enrichment from the Functions tab. For moreinformation on the Expression Builder, see Using the Expression Builder (page 985).
4. Select the source_lookup function and configure it as follows (using the native syntax of the sourceendpoint):If the lookup table is located in Oracle:source_lookup(10000,'HR','DEPARTMENTS','DEPARTMENT_NAME',
'DEPARTMENT_ID=:1',$DEPARTMENT_ID)
If the lookup table is located in Microsoft SQL Server:source_lookup
(10000,'HR','DEPARTMENTS','[DEPARTMENT_NAME]',
'[DEPARTMENT]=?',$DEPARTMENT_ID)
Where:l 10000 is the TTL parameter.l HR is the schema name.l DEPARTMENTS is the table name.l DEPARTMENT_NAME is the expression.l DEPARTMENT_ID=:1 (or ? on Microsoft SQL Server) is the condition.l $DEPARTMENT_ID is the condition parameter.
5. Run the task.
OperationThe following table describes the Operation functions used by the Expression Builder in Qlik Replicate .
Setup and User Guide - Qlik Replicate, November 2021 1006

12 Customizing tasks
Function Description
operation_
indicator
(value_on_
delete,
value_on_
update,
value_on_
insert)
When the operation_indicator function is invoked on its own or as part of anexpression, records deleted from the source endpoint will not be deleted from the targetendpoint. Instead, the corresponding target record will be flagged (with a user-providedvalue) to indicate that it was deleted from the source. The operation_indicator
function also requires you to provide values to indicate records that were inserted orupdated in the source endpoint.
Note: The operation_indicator function is not supported on tables that do not have aPrimary Key.
Note: It is recommended to add a dedicated column for the flag values, for example,OPERATION. For an explanation of how to add a column, see Using the Transform tab(page 933).
To specify the function values:
Replace value_on_delete, value_on_insert and value_on_update with the values thatyou want to appear in the target endpoint.
Values should be formatted according to the corresponding column type.
Example when the column type is INT4:
operation_indicator(’1’, ’0’, ’0’)
Example when the column type is STRING:
operation_indicator(’Deleted’, ’Updated’, ’Inserted’)
Operation functions
Other FunctionsThe following table describes additional functions used by the Expression Builder in Qlik Replicate .
Function Description
length(x) For a string value x, the length(x) function returns the number of characters (not bytes) inx before to the first NULL character.
If x is NULL then length(x) is NULL. If x is numeric then length(X) returns the length of astring representation of X.
like(x,y,z) The like() function is used to implement the "Y LIKE X [ESCAPE Z]" expression. TheESCAPE (z) clause is optional. If there is a z clause, then the like() function is invokedwith three arguments. Otherwise, it is invoked with two arguments.
typeof(x) The typeof(x) function returns a string that indicates the datatype of the expression x:null, integer, real, text, or BLOB.
Other functions
Setup and User Guide - Qlik Replicate, November 2021 1007

12 Customizing tasks
HashThe Hash function generates a hash value for an inputted column (using the SHA-256 algorithm) and thenreturns the hex value of the generated hash value.
To use the function in an expression, add the hash_sha256(x) function to the Build Expression pane andthen replace the "x" with the desired source column name (from the Input Columns tab).
The function is especially useful for masking sensitive information. In the expression below, for example,the Hash function has been used to obfuscate employees' email addresses.
User-defined transformationsCustomers that requires functionality not provided by Replicate's built-in transformations can write theirown transformations, and then access them from the Replicate Expression Builder.
It is also recommended to use the Replicate Add-ons API which allows you to take advantage ofReplicate's memory management and logging capabilities, while eliminating the need to createindependent memory and logging routines.
For more information, see Replicate add-ons API (page 1173).
The procedure below is based on the sample files located in:
<INSTALL_DIR>\addons\samples\MyTransformation
Setup and User Guide - Qlik Replicate, November 2021 1008

12 Customizing tasks
The path is the same on Linux, but with slashes (/)instead of backslashes (\). Similarly,although the explanation below refers to a DLL file (Windows), on Linux this should be an SOfile.
Changing the default addon nameYou can change the default addon name (MyTransformation) simply by renaming the <INSTALL_DIR>\addons\samples\MyTransformation\MyTransformation.dll file as desired. Note that if you rename theDLL, you may also need to specify the new name when editing the addons_def.json.sample file describedbelow (depending on which parameters you use).
Creating a user-defined transformation
To create a user-defined transformation:
1. Create a shared library that implements the following exported initialization function:typedef int AR_ADDON_INIT_FUNC(AR_ADDON_CONTEXT *context);
All of the types and prototypes are defined in the ar_addon.h andar_addon_transformation.h files located under <INSTALL_DIR>\addons\include.
2. Make sure your shared library is in the following location:<INSTALL_DIR>\addons\samples\addon_name
When working in a High Availability setup, the created binaries should be installed on allof the cluster instances.
3. Compile the transformation.The DLL is automatically created in the following location:<installation_dir>\addons\addon_name\addon_name.dll
4. Register the library in the addons_def.json.sample file located under <INSTALL_DIR>\addons.{
"addons": [{
"name": "MyTransformation",
"type": "STARTUP",
//"lib_path": "C:\\Program Files\\Attunity
Replicate\\addons\\samples\\MyTransformation\\MyTransformation.dll",
//"lib_path":
"/opt/attunity/replicate/addons/samples/MyTransformation/MyTransformatio
n.so",
"init_function": "my_transformation_init_func"
}]
}
Where:
Setup and User Guide - Qlik Replicate, November 2021 1009

12 Customizing tasks
l name is the logical name of the DLL (can be any name). If you do not use the lib_path
parameter to specify the DLL path (see below), then the DLL file must reside in <INSTALL_DIR>\addons\<addon_name>. On Linux, the <addon_name> folder needs to be createdmanually and should either be the default addon name (MyTransformation) or its new name(if you changed it).
l type is an optional parameter that specifies when to load the DLL. The only value that iscurrently supported is STARTUP.
l lib_path is the full path of your DLL (e.g. C:\Transformations\MyManipulator.dll). This isrequired only if the DLL does not reside in <INSTALL_DIR>\addons\<addon_name> (asmentioned in the description of the name parameter above).
l init_function is the function name, as it appears in the C file used to generate the DLL.
5. Save the file as addons_def.json.
6. Register the new function in the addon initialization function (mentioned in Step 1) as in thefollowing example:USER_DEFINED_TRANSFORMATION_DEF *transdef = GET_AR_AO_TRANSFORMATION_DEF
();
transdef->displayName = "prefix_with(X, Y)";
transdef->functionName = "prefix_with";
transdef->description = "prefix_with adds the prefix <Y_> to a given
string X";
transdef->func = trans_prefix_with;
transdef->nArgs = 2;
AR_AO_REGISRATION->register_user_defined_transformation(transdef);
7. Restart the Qlik Replicate Server service.
The new "prefix_with" function will be available in the Expression Builder under Functions->User Defined.
12.4 Task SettingsTask-specific replication settings can be configured in the <Task Name> - Settings dialog box.
Some of the task settings are not available in a Log Stream Staging setup.
For information on the availability of task settings in a Log Stream Staging setup, see Using theLog Stream (page 919).
To open the <Task Name> - Settings dialog box:
1. Open the desired task.For information on opening a task, see Editing a replication task (page 121).
2. Click the Task Settings toolbar button.The <Task Name> - Settings dialog box opens, displaying the following tabs:
Setup and User Guide - Qlik Replicate, November 2021 1010

12 Customizing tasks
l Metadata (page 1011)l Target metadata (page 1011)l Control tables (page 1015)
l Bidirectional (page 1016)l Full Load (page 1017)
l Full Load Settings (page 1017)l Full Load Tuning (page 1019)
l Change Processing (page 1020)l Apply Changes Settings (page 1020)l Store Changes Settings (page 1021)l Change Processing Tuning (page 1027)
l Error handling (page 1031)l Error Handling settings (page 1032)l Environmental errors (page 1032)l Data Errors (page 1032)l Table Errors (page 1034)l Apply Conflicts (page 1034)
l Logging (page 1036)l Character substitution (page 1037)l More options (page 1120)l File uploads (page 1038)l Message Format (page 1039)
MetadataClicking the Metadata tab in the Task Settings window reveals the following sub-tabs:
l Target metadata (page 1011)l Control tables (page 1015)
Target metadataTarget table schema: (if empty, use the schema from the source table): This will automatically add theowner prefix for the target endpoint to all tables if no source schema is defined.
When replicating to a Hadoop target endpoint, the value specified in this field will be interpretedas a database name (as opposed to a schema name).
LOB handling optionsFor information on how to override these settings for individual tables, see Handling LOB columns (page950).
Setup and User Guide - Qlik Replicate, November 2021 1011

12 Customizing tasks
l During CDC or during Full Load when the Allow unlimited LOB size option is enabled,LOB data types are supported only in tables with a primary key or unique index.
l When replicating from Microsoft SQL Server, inline LOBS will always be read directlyfrom the logs (i.e. without lookup).
The following LOB handling options are available:
Option Description
Replicate LOBcolumns
When this option is selected (the default), LOB columns will be replicated.
Note that replicating LOBs may impact performance. This is especially true in the caseof the large LOBs which require Replicate to perform a lookup from the source table inorder to retrieve the source LOB value.
Allowunlimited LOBsize
Select this option - also known as Full LOB mode - to ensure that all LOBs arereplicated without being truncated. This option should be selected when all (or nearlyall) of the LOBs you wish to replicate are large (i.e. exceed 1 GB).
Note If the task's Change Processing Mode is set to "Batch optimizedapply" (the default), Replicate will switch to "Transactional apply" mode toapply tables with LOBs.
LOB handling options
Setup and User Guide - Qlik Replicate, November 2021 1012

12 Customizing tasks
Option Description
Optimizehandling whenLOB size isless than (KB)
Select this option when you need to replicate both small and large LOBs, and most ofthe LOBs are small.
This option is supported with the following endpoints only:
l Sources: Oracle, Microsoft SQL server, MySQL, PostgreSQL, IBMDB2 for LUW, and Sybase ASE.
l Targets: Oracle, Microsoft SQL Server, MySQL, PostgreSQL, andSybase ASE.
When this option is selected, during Full Load, the small LOBs "inline" (which is moreefficient), and the large LOBs by performing a lookup from the source table.
During Change Processing, however, both small and large LOBs will be replicated byperforming a lookup from the source table.
When this option is selected, Replicate will check all of the LOB sizes todetermine which ones to transfer "inline". LOBs larger than the specifiedsize will be replicated using Full LOB mode.
Therefore, if you know that most of the LOBs are larger than the specifiedsetting, it is better to use the Allow unlimited LOB size option instead.
Chunk size(KB)
Optionally, change the size of the LOB chunks to use when replicating the data to thetarget. The default chunk size should suffice in most cases, but if you encounterperformance issues, adjusting the size may improve performance.
With some databases, data type validation occurs when the data isinserted or updated. In such cases, replication of structured data types(e.g. XML, JSON, GEOGRAPHY, etc.) may fail if the data is bigger thanthe specified chunk size.
Setup and User Guide - Qlik Replicate, November 2021 1013

12 Customizing tasks
Option Description
Limit LOB sizeto (KB)
Select this option if you only need to replicate small LOBs or if the target endpoint doesnot support unlimited LOB size. The maximum permitted value for this field is 102400KB (100 MB).
When replicating small LOBs, this option is more efficient than the Allow unlimitedLOB size option since the LOBs are replicated "inline" as opposed to via "lookup" fromthe source. During Change Processing, small LOBs are usually replicated via "lookup"from the source.
As the value of the Limit LOB size to is in bytes, the size should be calculatedaccording to the following formulas:
l BLOB – The length of the largest LOB.l NCLOB – The length of the longest TEXT in characters multiplied by two (aseach character is handled as a double-byte).If the data includes 4-byte characters, multiply it by four.
l CLOB – The length of the longest TEXT in characters (as each character ishandled as a UTF8 character).If the data includes 4-byte characters, multiply it by two.
l Any LOBs larger than the specified size will be truncated.l During Change Processing from Oracle source, inline BLOBs arereplicated inline.
l Changes to this setting will only affect existing tables after they arereloaded.
In some scenarios, tasks configured to replicate tables with multiple LOB columns mayconsume a large amount of memory. This is because Replicate allocates memory bymultiplying the Limit LOB size to value by the Commit rate during full load value, the sum ofwhich, it multiplies by the number of LOB columns being replicated. So, for example, if LOBsize is limited to 5 MB and the default commit rate is used (10000 events), a task replicating 6LOB columns will consume 30 GB of memory. Note that other factors such as the databasetype and version may also affect memory consumption.
Should you encounter memory consumption issues and suspect that a combination of theabove factors may be the cause, stop the task and lower the value in the Commit rate duringfull load field. Then resume the task. Repeat this process until acceptableperformance/memory levels are reached.
These instructions apply to Change Processing and Full Load tasks.
Setup and User Guide - Qlik Replicate, November 2021 1014

12 Customizing tasks
Changes to a column’s LOB size while a task is running will not be reflected in the ChangeTable, unless the target tables are created by Qlik Replicate. In such cases, the task must beconfigured to drop and create the Change Table (the default) and the target tables need to bereloaded (after the LOB size has changed).
For more information on the Change Table, see Store Changes Settings (page 1021). Forinformation on reloading target tables, see Working with tasks at runtime (page 1046).
Control tablesControl Tables provide information about the replication task as well as useful statistics that can be used toplan and manage both the current replication task and future replication tasks. Aside from the ApplyExceptions table which is always created, you can choose which Control Tables to create on the target.
Create target control tables in schema: Enter the endpoint schema for the target Control Tables. If you donot enter any information in this field, then the tables will be created in the default location in the endpoint.
When this field is left empty, the target endpoint is MySQL, and the Multiple Endpoints option isenabled, a default database named attrep_control will be created on the MySQL server. Theselected control tables will be created in this database.
For more information on the Multiple Endpoints option, see Setting general connectionproperties (page 801).
When replicating to a Hadoop target endpoint, the value specified in this field will be interpretedas a database name (as opposed to a schema name).
Create target control tables in tablespace: When the target endpoint is Oracle, specify the tablespacewhere you want the target control tables to be created. If you do not enter any information in this field, thetables will be created in the default tablespace in the target database.
Create target control table indexes in tablespace: When the target endpoint is Oracle, specify thetablespace where you want the control table indexes to be created. If you do not enter any information inthis field, the indexes will be created in the same tablespace as the control tables.
Replication history time slot (minutes): The length of each time slot in the Replication History table. Thedefault is 5 minutes.
Table selectionIn addition to the Apply Exceptions table (required), select which of the following Control Tables you wantQlik Replicate to create on the target endpoint:
l Replication Status: Provides details about the current task including task status, amount ofmemory consumed by the task, number of changes not yet applied to the target and the position inthe source endpoint from which Qlik Replicate is currently reading.
Setup and User Guide - Qlik Replicate, November 2021 1015

12 Customizing tasks
l Suspended Tables: Provides a list of suspended tables as well as the reason they weresuspended.
l Replication History: Provides information about the replication history including the number andvolume of records processed during a replication task, latency at the end of a CDC task, amongothers.
l Change Data Partitions: The attrep_cdc_partitions table contains records of partitions created onthe target database when Change Data Partitioning (page 1022) is enabled for a Replicate task.You can use this information to identify partitioned data that needs to be further processed.
l DDL History: The attrep_ddl_history table contains a history of all supported DDL changes thatoccurred during a task.For a list of DDL changes supported by Replicate, see Supported DDL statements (page 78). Notethat DDL changes written to this Control Table are also subject to the limitations described in thesection in Limitations when Capturing DDL Changes.
The DDL History table is currently supported with the following target endpoints only:l Hadoopl Hortonworks Data Platforml Microsoft Azure HDInsightl Amazon EMRl Google Dataprocl Microsoft Azure Databricksl Databricks on AWSl Databricks on Google Cloudl Cloudera Data Platform (CDP) Private Cloud
For a detailed description of these tables, see Control Tables (page 1138).
BidirectionalThis tab is only applicable to bidirectional replication tasks. When you click Bidirectional in the TaskSettings dialog box, the Loopback Prevention tab is displayed. In bidirectional replication, loopbackprevention is a mechanism that prevents the same data from being replicated back and forth in an endlessloop. To enable loopback prevention, you need to specify a source and target Loopback prevention tableschema.
Bidirectional replication consists of two separate tasks: Task 1 captures changes made to Endpoint A andreplicates them to Endpoint B. Task 2 captures changes made to Endpoint B and replicates them toEndpoint A. When configuring Task 1 of a bidirectional replication setup, the source loopback preventiontable schema must be identical to the target loopback prevention table schema specified in the LoopbackPrevention settings of Task 2.
Likewise, when configuring Task 2 of a bidirectional replication setup, the source loopback prevention tableschema must be identical to the target loopback prevention table schema specified in the LoopbackPrevention settings of Task 1.
Setup and User Guide - Qlik Replicate, November 2021 1016
12 Customizing tasks
Oracle schemas are case-sensitive. Therefore, when specifying an Oracle table schema, makesure to use the correct case in the Loopback Prevention settings in both Tasks.
For instructions on setting up bidirectional replication, see Bidirectional replication (page 107).
Full LoadClicking the Full Load tab in the Task Settings window reveals the following sub-tabs:
l Full Load Settings (page 1017)l Full Load Tuning (page 1019)
Full Load SettingsClick the Full Load Settings sub-tab to configure the following:
Full is ON/OFF.
Click this button to toggle full load on or off. The initial setting is determined when Adding tasks (page 105).
When full load is ON, Qlik Replicate loads the initial source data to the target endpoint.
Full load can be turned on or off at any stage even if change processing is on. Once the taskbegins to process changes, the full load on/off switch is used only as additional protectionagainst accidental or unauthorized reload.
Target table preparationIf target table already exists: Select one of the following from the list to determine how you want to handleloading the target at full-load start up:
The option to drop or truncate the target tables is relevant only if such operations are supportedby the source endpoint.
l DROP and Create table: The table is dropped and a new table is created in its place.
Replicate Control Tables will not be dropped. However, any suspended tables that aredropped will also be deleted from the attrep_suspended_tables Control Table if theassociated task is reloaded.
l TRUNCATE before loading: Data is truncated without affecting the table metadata. Note that whenthis option is selected, enabling the Create primary key or unique index after full load completesoption will have no effect.
Setup and User Guide - Qlik Replicate, November 2021 1017

12 Customizing tasks
l ARCHIVE and CREATE table: A copy of the existing table will be saved to the same schemabefore the new table is created. The archived table name will be appended with a timestamp,indicating when the archiving operation occurred (e.g. Customers_20170605175601).
Currently this option is only available for the Hadoop target endpoint.
l Do nothing: Existing data and metadata of the target table will not be affected. New data will beadded to the table.
Replicate expects the source column data types to be compatible with the corresponding targetcolumn data types. If you choose either TRUNCATE before loading or Do nothing and one ormore target data types are different than the data types for the corresponding source columns,use a transformation to convert the data types as required.
For information on creating data type transformations, see Defining transformations for a singletable/view (page 931).
Primary Key or Unique Index CreationCreate primary key or unique index after full load completes: Select this option if you want to delayprimary key or unique index creation on the target until after full load completes.
Stopping the Task after Full LoadAfter Full Load completes, stop the task: You can set the task to stop automatically after Full Loadcompletes. This is useful if you need to perform DBA operations on the target tables before the task’s ApplyChanges (i.e. CDC) phase begins.
During Full Load, any DML operations executed on the source tables are cached. When Full Loadcompletes, the cached changes are automatically applied to the target tables (as long as the Before/Aftercached changes have been applied option(s) described below are disabled).
This feature is not available for bidirectional replication tasks.
Select Before cached changes have been applied to stop the task before the cached changes areapplied and/or After cached changes have been applied to stop the task after the cached changes areapplied.
Selecting the Before cached changes have been applied option will stop the task immediately after FullLoad completes. Selecting the After cached changes have been applied option will stop the task as soonas data is consistent across all tables in the task.
Setup and User Guide - Qlik Replicate, November 2021 1018

12 Customizing tasks
When configuring Replicate to stop the task after Full Load completes, note the following:
l The After cached changes have been applied option is not supported with all file-based and Hadoop-based target endpoints, namely:
l File-based: File, Amazon S3, Microsoft Azure ADLS, and Google Storage.l Hadoop-based: Hadoop, Hortonworks Data Platform, Amazon EMR, MicrosoftAzure HDInsight , Google Dataproc, Cloudera Data Platform (CDP) PrivateCloud, and Microsoft Azure Databricks.
l The task will stop after Full Load completes even if there are no cached changes toapply.
l Choosing to stop the task before cached changes have been applied may adverselyaffect performance, since the cached changes will only be applied to tables (even thosethat have already completed Full Load) after the last table completes Full Load.
l When the Before/After cached changes have been applied option is selected and aDDL is executed on one of the source tables during the Full Load process (in a Full Loadand Apply Changes task), Replicate will reload the table. This effectively means thatany DML operations executed on the source tables will be replicated to the target beforethe task stops.
l When working with the File Channel endpoint, these options should be set in the remoteFile Channel task and not in the local File Channel task.For more information on the File Channel endpoint, see Using the Qlik Replicate filechannel (page 908).
Duplicate Record Prevention
Supported when using the IBM DB2 for z/OS source endpoint only.
Select the Eliminate creation of duplicate records on full load option if you need to prevent duplicaterecords from being replicated during Full Load. You can either set the option at task level or per table.
Note that selecting this option could impact performance as Replicate instructs the source database toreturn the table records by Primary Key order and then removes any duplicate records.
For information on preventing creation of duplicate records at table level, see Full Load (page 954).
Full Load TuningClick the Full Load Tuning sub-tab to configure the following:
Tuning settings:
l Maximum number of tables to load in parallel: Enter the maximum number of tables to load intothe target at one time. The default value is 5.
Setup and User Guide - Qlik Replicate, November 2021 1019

12 Customizing tasks
l Transaction consistency timeout (seconds): Enter the number of seconds that Qlik Replicate waitsfor transactions to close, if they are open when the task starts, before beginning the Full Loadoperation. The default value is 600 (10 minutes). Qlik Replicate will begin the full load after thetimeout value is reached even if there are open transactions.Note: To replicate transactions that were open when Full Load started but were only committedafter the timeout value was reached, you need to reload the target tables.
l Commit rate during full load: The maximum number of events that can be transferred together. Thedefault value is 10000.
Change ProcessingClicking the Change Processing tab in the Task Settings window reveals the following sub-tabs:
l Apply Changes Settings (page 1020)l Store Changes Settings (page 1021)l Change Processing Tuning (page 1027)
Apply Changes SettingsClick the Apply Changes Settings sub-tab to configure the following:
Apply Changes is ON/OFF:
Click this button to toggle Apply Changes (Change Processing) on or off. The initial setting is determinedwhen Adding tasks (page 105).
When Apply Changes is ON, Qlik Replicate processes the changes. You can view the change processingin the Monitor. For more information, see Monitoring change processing operations (page 1067).
When you turn on apply changes you must reload the task or position back to the point of theprevious reload.
DDL handling policy: Determine how to handle the target table for the change capture:
l Executing a DDL on a source table during the Full Load process in a Full Load andApply Changes task will cause Replicate to reload the table.
l The option to drop or truncate the target tables is relevant only if such operations aresupported by the source endpoint.
l When source table is dropped, select one of the following:l DROP target tablel Ignore DROP
l When source table is truncated, select one of the following:l TRUNCATE target tablel Ignore TRUNCATE
Setup and User Guide - Qlik Replicate, November 2021 1020

12 Customizing tasks
l When source table is altered, select one of the following:l ALTER target tablel Ignore ALTER
Store Changes SettingsWhen you click Store Changes in the Task Settings dialog box, you can configure the Store ChangesSettings for a replication task.
Store changes processing is ON/OFF:
Click this button to toggle Store Changes on or off. The initial setting is determined when Adding tasks(page 105). If this option is ON, changes are stored in either Change Tables or an Audit Table.
For more information about storing and applying changes, see Using an Audit table (page 1131) andWorking with Change Tables (page 1124).
Store Changes can be turned on or off at any time without affecting anything in the task.Changes that are processed and not stored as a result of change storage being turned off canbe recovered only by setting the task to an earlier point in time.
If Store Changes is ON, use the following options to determine how to store changes. Changes can bestored in Change Tables or in a single Audit table. From the Store changes in drop-down list, chooseeither Change tables or Audit table according to your needs.
Storing changes in Change TablesThe following section describes the options that are available when storing changes in Change Tables.
l Suffix: Type a string to use as the suffix for all Change Tables. The default value is __ct.The Change Table names are the name of the target table with the suffix appended. For example, ifyou have a table called HR and use the default value, the name of the Change Table will be HR__ct.For more information, see Working with Change Tables (page 1124).
l Header column prefix: Type a string to use as the prefix for all of the Change Table headercolumns. The default value is header__.For example, the header column stream_position when using the default value is called header__
stream_position.For more information, see Change Tables (page 1125).
l DDL options: Select one of the following options to determine how to handle DDL operations on thesource tables:
l Apply to change table - DDL operations to the source tables (such as a column beingadded) will be applied to the corresponding Replicate Change Tables only.
l Ignore - All DDL operations to source tables will be is ignored.l Apply to change table and target table
This option is available with the Qlik Cloud Landing replication profile only.
Setup and User Guide - Qlik Replicate, November 2021 1021

12 Customizing tasks
This is the default option. When this option is selected, DDL operations to the source tableswill be applied both to the Replicate Change Tables and to the corresponding target tables.
l On UPDATE: Select one of the following options to determine how to store UPDATEs to the sourcetables:
l Store before and after image - To store both the pre-UPDATE data and the post-UPDATEdata.
l Store after image only - To store only the post-UPDATE data.
Change table creation:
If Change Table exists when full load starts: Select one of the following from the list to determine how youwant to handle loading the Change Tables at full-load startup:
l DROP and CREATE Change Table: The table is dropped and a new table is created in its place.l ARCHIVE and CREATE Change Table:A copy of the existing table will be saved to the sameschema before the new table is created. The archived table name will be appended with atimestamp, indicating when the archiving operation occurred (e.g. Customers___ct_20170605175601).
Currently this option is only available for the Hadoop target endpoint.
l Delete old changes and store new changes in existing Change Table: Data is truncated andadded without affecting the table metadata.
l Keep old changes and store new changes in existing Change Table: Data and metadata of theexisting Change table are not affected.
Change Data Partitioning
This feature is supported with the following target endpoints only:
l Hadoop (Hortonworks, Cloudera, and MapR)l Filel Amazon S3l Microsoft Azure Databricksl Microsoft Azure HDInsightl Google Cloud Storagel Microsoft Azure ADLSl Cloudera Data Platform (CDP) Private Cloudl Databricks on AWSl Databricks on Google Cloudl Google Data Procl Amazon EMRl Hortonworks Data Platform (HDP)
Setup and User Guide - Qlik Replicate, November 2021 1022

12 Customizing tasks
In a standard replication task, changes are replicated to the target in no particular order. Change DataPartitioning enables processing of Change Data from many tables in a consistent fashion. You can definethe duration of partitions as well as the partitioning base time, thereby ensuring overall consistency of thepartitioned data (i.e. no partial transactions, no order headers without order lines, and so on.)
The partitioned data is stored in the Replicate Change Tables. When the Change Data Partitions table isselected (in the Control tables (page 1015) tab), information about the partitions will be recorded in theattrep_cdc_partitions Control Table on the target database. This information can be used to identifypartitioned data that needs to be further processed.
The partitioning options are as follows:
l Off - Replicate Change Data without partitioning.l Partition every - Specify the length (in hours and minutes) of each partition.
It is recommended to specify a partition length in excess of one hour. Althoughspecifying a partition length less than one hour may improve latency, creating manypartitions on the target may also impact (target) performance (especially in systems withlarge volumes of changes).If you resume a task from BEFORE the time that the last partition was created,Replicate will write to a partition that has already been closed.
l Partition base time - Partitions are created during a 24 hour time period, which is calculatedaccording to the specified “Partitioning base time” on the source database (in UTC time). Forexample, a partition interval of 8 hours with a “Partitioning base time” time of 02:00 will create thefollowing partitions: 02:00-10:00, 10:00-18:00, 18:00-02:00 - but not necessarily in that order. Forinstance, if a task started at 01:00, then the timeframe of the first partition will be 18:00-02:00.Additionally, if a task started in the middle of a partition (e.g. at 04:00), its Change Data will beinserted into the 02:00-10:00 partition (even though no changes were captured before 04:00).
l Speed partition mode
This feature is supported with Hadoop-based target endpoints only.
By default, Change Data Partitions for all tables in a replication task are registered on the target atthe same time. As soon as the partitions are registered, information about them (such as apartition's start and end time) is also published to the Change Data Partitions Control Table. Thisensures data consistency across all of the replicated tables.
In Speed partition mode, rather than waiting for all Change Data files to be uploaded (for all tables),Replicate creates and registers a partition per-table as soon as the partition’s first data file isuploaded (to its table). Creating and registering partitions before all the Change Data has beenuploaded is especially useful for consuming applications such as Qlik Compose that need toprocess changes with a minimum of delay, as the Change Data rapidly becomes available forconsumption, even if it is incomplete.
Setup and User Guide - Qlik Replicate, November 2021 1023

12 Customizing tasks
For example, if an endpoint is configured to upload Change Data files every five minutes, eachbatch of changes can be processed immediately, even if the Partition every interval is set to sixhours.However, despite significantly reducing latency, working in this mode may have some possibledrawbacks:
l Accumulation of a large number of files per partition, which may impact performance on thetarget.It is therefore strongly recommended to clean up old partitions using the Partition Retentionoptions (see below) provided for this purpose.
l Inconsistent results may be encountered when querying several tables due to the ChangeData arriving on the target at different times.
Change Tables that were created before Change Data Partitioning was enabled need to bedropped or renamed so that they can be recreated with the additional "partition_name" column.
Deleting old partitions periodically
Over time, Change Data Partitioning can result in a large number of files and partitions accumulating on thetarget system, which may significantly impact performance. Therefore, to ensure optimal performance,best practice is to delete old partitions from time to time.
There are two ways of deleting processed partitions: periodically and ad-hoc. This topic explains how to setup periodic partition deletion. For information on ad-hoc partition deletion, see Deleting old partitionsmanually (page 1080).
Currently, this feature is supported with the Microsoft Azure Databricks endpoint only.
Setting up periodic deletion is a two-phase process which involves specifying a deletion interval in the UI,and setting a partition retention barrier using the Enterprise Manager API.
To do this:
1. Enable the Partition Retention option.Any partitions created while this option is disabled will not be deleted when deletion is initiated(either periodic or manual). Therefore, the Partition Retention option should only be disabled if youare absolutely certain that periodic deletion will not be initiated at any point in the future.
2. Specify a partition deletion interval in Day, Hours or Minutes.To prevent the deletion of open partitions or recently closed partitions, the partition deletion intervalmust be at least double the Partition every value.
3. Set a retention barrier date by calling the relevant Enterprise Manager API method.To ensure that only old (i.e. processed) partitions will be deleted, periodic deletion requires aretention barrier date to be set. The retention barrier date should be set by the consumingapplication each time it finishes processing a partition. A consuming application can be anyapplication (Qlik or otherwise) tasked with processing the partitioned data. There may be severalconsuming applications, each of which sets its own retention barrier. In this case, partitions will be
Setup and User Guide - Qlik Replicate, November 2021 1024

12 Customizing tasks
deleted up to the earliest retention barrier. For example, if Application A sets July 7th, 2020 as abarrier, Application B sets August 7th, 2020 as a barrier, and Application C sets September 7th,2020 as a barrier, partitions will be deleted up to July 7th, 2020.As soon as a retention barrier is set, periodic deletion will start to run according to the definedinterval, until any of the following occurs:
l The Partition Retention option is disabledl An API call removes the retention barrierl All partitions until the retention barrier have been deleted
For more information on setting and removing a partition retention barrier using the API, refer to theEnterprise Manager Developer's Guide.
Limitations and considerationsl If a connection error occurs during the partition deletion operation, the operation will fail (with awarning). The operation will continue from the point of failure the next time that deletion isperformed (either periodically or manually).
l If a specific object (partition or storage) cannot be deleted due to other errors (i.e. not connectionerrors), a warning will be written to the log and deletion of the remaining objects will continue.Partitions that cannot be deleted due to such errors must be deleted directly from the database bythe DBA.
l To prevent deletion of open partitions, the last partition in a table will not be deleted, even if meetsthe criteria for deletion.
l Deletion of partitions in renamed tables is not supported.l Reloading a target with the Drop and Create tables option (the default) will delete both the tablesand their partitions, regardless of any partition deletion policy. However, reloading a target with theDo nothing option, will leave the partitions untouched. In this case, partitions created prior to thetarget reload cannot be deleted using the Replicate partition deletion tools.
Selecting Change Table header columnsThe Change Table header columns provide information about the Change Processing operation such asthe type of operation (e.g. INSERT), the commit time, and so on. If you do not need this information, youcan configure Replicate to create the Change Tables without some or all of the header columns, therebyreducing their footprint in the target database. To do this, clear the check boxes next to the header columnsthat you wish to exclude.
Note that you cannot remove additional columns or restore columns while a task is running. To changeyour initial selection, you first need to stop the task, then modify your selection, and finally reload the targettables.
When Change Data Partitioning is enabled, an extra header column named "partition_name"is added to the Change Tables and automatically selected in the UI. As this column is required,it cannot be excluded.
For a description of the header columns, see Change Tables (page 1125).
Setup and User Guide - Qlik Replicate, November 2021 1025

12 Customizing tasks
Storing changes in an Audit tableThe following section describes the options that are available for storing changes in an Audit table.
l If your source tables contain records exceeding 4096 characters, to prevent truncationof these records, you must turn on the Task Settings' Replicate LOB columns option(even if the source tables do not contain any LOB columns).
l LOB columns with unlimited size are not supported in the CHANGE_RECORD and BU_CHANGE_RECORD columns. The other fields will be recorded but the LOB will have aNULL value.
l For a description of the audit table structure, see Using an Audit table (page 1131).
l Audit table schema: Specify a schema if you do not want the Audit table to be created under thetarget endpoint's default schema.
The default schema are as follows:
Endpoint Default Schema
Pivotal Greenplum Public
Amazon Redshift Public
Oracle The connected user’s user name.
Teradata The endpoint name.
All others The user’s default schema.
Default schema by endpoint
l Audit table tablespace: This option is only available when the task's target endpoint is Oracle.Enter the tablespace name on the target where you want the Audit table to be created. If you do notenter any information in this field, then the tables will created in the default permanent tablespace.
l Audit table name: Specify a name for the Audit table.The default value is attrep__audit_table.
Audit table creation:
If audit table exists when the target is reloaded: Select one of the following to determine how you want tohandle the Audit table when the target is reloaded:
l DROP and CREATE audit table: The Audit table is dropped and a new table is created in its place.l ARCHIVE and CREATE audit table: A copy of the existing table will be saved to the same schemabefore the new table is created. The archived table name will be appended with a timestamp,indicating when the archiving operation occurred (e.g. attrep_audit_table_20170605175601).
Currently this option is only available for the Hadoop target endpoint.
Setup and User Guide - Qlik Replicate, November 2021 1026

12 Customizing tasks
l Delete old changes and store new changes in existing audit table: Data is truncated and addedwithout affecting the Audit table metadata.
l Keep old changes and store new changes in existing audit table: Data and metadata of theexisting Audit table are not affected.
For a description of the audit table structure, see Using an Audit table (page 1131).
Change Processing TuningClick the Change Processing Tuning sub-tab to fine-tune the Apply Changes settings.
Change Processing ModeDetermine which method will be used to apply changes.
Changes to tables without a Unique Index or Primary Key will always be applied inTransactional apply mode.
l Transactional apply: Select this to apply each transaction individually, in the order it is committed.In this case, strict referential integrity is ensured for all tables.
Applying cached events in transactional mode to endpoints that do not enforceconstraints (such as Vertica and IBM Netezza), may result in duplicate records on thetarget. This is because such endpoints do not return duplicate errors.
l Batch optimized apply: Select this to commit the changes in batches. In this case, a pre-processingaction occurs to group the transactions into batches in the most efficient way. This may affecttransactional integrity. Therefore, you must select one of the following to determine how the systemwill handle referential integrity issues:
In the event of a recoverable error during the Batch Optimized Apply process, multipleattrep_changes tables may be created in the target database (each with a uniquename). These tables will need to be deleted manually as the automatic cleanup processwill not delete them.
l Preserve transactional integrity
This option is only supported when replicating to an Oracle target.
l Allow temporary lapses in transactional integrity to improve performance
Setup and User Guide - Qlik Replicate, November 2021 1027

12 Customizing tasks
These options are not displayed in bidirectional tasks since such tasks always use the"Preserve transactional integrity" option.
The following target endpoints do not support applying binary data types in Batch OptimizedApply mode:
ODBC, SAP Sybase IQ, SAP Sybase ASE, Vertica, IBM Netezza, Teradata, and AmazonRedshift.
When LOB columns are included in the replication, Batch optimized apply can only be usedwith the Limit LOB size to option. For more information about including LOB columns in thereplication, see Metadata (page 1011).
Using Batch Optimized Apply to apply changes to tables with foreign keys is not supported.
Batch tuningThe following options are available when Batch optimized apply is selected as the Change ProcessingMode:
l Apply batched changes in intervals:l Longer than: The minimum amount of time to wait between each application of batchchanges. The default value is 1.Increasing the Longer than value decreases the frequency with which changes are appliedto the target while increasing the size of the batches. This can improve performance whenapplying changes to target endpoints that are optimized for processing large batches, suchas Teradata, Vertica, and Pivotal Greenplum.
l But less than: The maximum amount of time to wait between each application of batchchanges (before declaring a timeout). In other words, the maximum acceptable latency. Thedefault value is 30. This value determines the maximum amount of time to wait beforeapplying the changes, after the Longer than value has been reached.
l Force apply a batch when processing memory exceeds (MB): The maximum amount of memoryto use for pre-processing in Batch optimized apply mode. The default value is 500.For maximum batch size, set this value to the highest amount of memory you can allocate to QlikReplicate. This can improve performance when applying changes to target endpoints that areoptimized for processing large batches, such as Teradata, Vertica, and Pivotal Greenplum.
l Apply batched changes to multiple tables concurrently: Selecting this option should improveperformance when applying changes from multiple source tables.
l Maximum number of tables: The maximum number of tables to apply batched changes toconcurrently. The default is five, the maximum is 50, and the minimum is two.
Setup and User Guide - Qlik Replicate, November 2021 1028

12 Customizing tasks
Limitations:When the Apply batched changes to multiple tables concurrently option is enabled,the following limitations apply:
l Supported by the following target endpoints only: Snowflake on Azure,Snowflake on AWS, Snowflake on Google, Microsoft SQL Server, AmazonRedshift, Microsoft Azure Databricks Delta, Microsoft Azure Synapse Analytics,and Microsoft Azure SQL Database.
l Error handling limitations:The global error handling policy will be unavailable.The task error handling policy defaults will be unchanged for Environmental andTable errors, but the Data errors and Apply Conflicts error handling options willbe set as follows:Data Errors:
l Data truncation errors: Suspend tablel Other data errors: Suspend table
Apply Conflicts Errors:l Deletes: Ignore recordl Inserts: UPDATE the existing target recordNote that this is not relevant for a Snowflake target (as Snowflake doesnot support Primary Keys).
l Updates: Ignore record
Escalation Action:l The Escalation action for both Data errors and Apply Conflicts is notsupported.
l Control Table limitations:l The attrep_apply_exception Control Table is not supported.
l Limit the number of changes applied per change processing statement to: To limit the number ofchanges applied in a single change processing statement, select this check box and then optionallychange the default value. The default value is 10,000.
This option is not available for tasks configured with a Snowflake target endpoint.
The following options are available when Transactional apply is selected as the Change ProcessingMode:
l Minimum number of changes per transaction: The minimum number of changes to include in eachtransaction. The default value is 1000.
Setup and User Guide - Qlik Replicate, November 2021 1029

12 Customizing tasks
Replicate applies the changes to the target either when the number of changes is equalto or greater than the Minimum number of changes per transaction value OR when thebatch timeout value is reached (see below) - whichever occurs first. Because thefrequency of changes applied to the target is controlled by these two parameters,changes to the source records may not immediately be reflected in the target records.
l Maximum time to batch transactions before applying (seconds): The maximum time to collecttransactions in batches before declaring a timeout. The default value is 60.
Transaction offload tuningThe following tuning options are available, regardless of which Change processing mode is selected:
l Offload transaction in progress to disk if:Qlik Replicate usually keeps transaction data in memory until it is fully committed to the sourceand/or target. However, transactions that are larger than the allocated memory or that are notcommitted within the specified time limit will be offloaded to disk.
l Transaction memory size exceeds (MB): The maximum size that all transactions canoccupy in memory before being offloaded to disk. The default value is 1000.
l Transaction duration exceeds (seconds): The maximum time that each transaction canstay in memory before being offloaded to disk. The duration is calculated from the time thatQlik Replicate started capturing the transaction. The default value is 60.
Miscellaneous tuningl Statements cache size (number of statements): The maximum number of prepared statements tostore on the server for later execution (when applying changes to the target). The default is 50. Themaximum is 200.
l Store task recovery data in target database: Select this option to store task-specific recoveryinformation in the target database. When this option is selected, Replicate creates a table namedattrep_txn_state in the target database. This table contains transaction data that can be used torecover a task in the event that the files in the Data folder are corrupted or if the storage devicecontaining the Data folder has failed.For more information about this option, see Recovering from data folder loss or corruption (page1053).
l Apply changes using SQL MERGE - When this option is not selected, the Batch Optimized Applyoperation executes separate bulk INSERT, UPDATE and DELETE statements for each of thedifferent change types in the Replicate NET table. It then executes a single MERGE statement toapply the entire set of NET table changes to the target tables. While this method is highly efficient,enabling the Apply changes using SQL MERGE option is even more efficient when working withendpoints that support this option.This is due to the following reasons:
l It reduces the number of SQL statements run per table from three to one. Most UPDATEoperations in large, immutable, file-based cloud databases (such as Google CloudBigQuery), involve rewriting of affected files. With such operations, the reduction of per-tableSQL statements from three to one is very significant.
l The target database only needs to scan the NET table once, significantly reducing I/O.
Setup and User Guide - Qlik Replicate, November 2021 1030

12 Customizing tasks
l When this option is enabled:l Non-fatal data errors or data errors that cannot be recovered will behandled as table errors
l The Global error handling policy will not be availablel The Apply Conflicts error handling policy will be preset and uneditablel Some of the Data error handling policy options will not be available
l This option is available for tasks configured with the following target endpointsonly:
l Google Cloud BigQueryl Snowflake on Azure, Snowflake on Google, and Snowflake on Amazon
l This option is not supported with the Salesforce and Oracle source endpoints.For more information, see the "Limitations and Considerations" topic for theseendpoints.
Error handlingQlik Replicate handles different types of errors during its operation. The way the system should respond tothese errors depends on several aspects, including the component where the error occurred, the type oferror, and the scope of the error. Because different sites may have different requirements for errorbehavior, Qlik Replicate lets you configure the error handling.
You can also add an environment variable that instructs Replicate to create dump files in the event of acrash. The dump files can then be used by Qlik Support to troubleshoot the cause of the crash. For moreinformation, see Creating Dump Files.
You can determine whether or not to override the global error handling settings. For more information, seeError Handling Settings.
The option to set a Global Error Handling policy is not available when the Apply batchedchanges to multiple tables concurrently option is selected in the Task Settings' ChangeProcessing Tuning tab.
Clicking the Error Handling tab in the Task Settings window reveals the following sub-tabs:
l Environmental Errors: An error that is caused by an environmental problem in the source or targetendpoint or on the network. Some examples of environmental errors are loss of communication withthe source or target endpoint, restarting a database, or network problems.
l Data Errors: An error related to data processing at the record level. Some examples of data errorsare conversion errors, errors in transformations, or bad data.
l Table Errors: An error in processing data or metadata for a specific table. This only includes generaltable data and not an error that relates to a specific record.
l Apply Conflicts: Errors that occur when the target endpoint is not synchronized with the sourceendpoint when processing changes.
Setup and User Guide - Qlik Replicate, November 2021 1031

12 Customizing tasks
This can cause duplicate key errors on INSERT operations or zero rows affected onUPDATE/DELETE operations.
Error Handling settingsThe option to switch between the Global Error Handling policy and a Task Error Handling policy is availablein each of the Error Handling sub-tabs. However, the policy you enable will be applied to all error types,regardless of where it was enabled. For example, you cannot enable a Task Error Handling policy for DataErrors and then enable the Global Error Handling policy for Table Errors and Environmental Errors.
For information on setting the global error handling policy, see Global error handling (page 1107).
To set a Task-Specific Error Handling policy:
l Click the Change to Task Policy button in any of the Error Handling sub-tabs.
To revert to the Global Error Handling policy:
1. Click the Change to Global Policy button in any of the Error Handling sub-tabs.
2. Click OK when prompted to confirm your action.
Environmental errorsClick the Environmental Errors sub-tab and then click Change to Task Policy to configure the following:
l Maximum retry count: Select this option and then specify the maximum number of attempts to retrya task when a recoverable environmental error occurs.
1. To never retry a task, clear the check box or specify "0".
2. To retry the task an infinite number of times, specify "-1" (the global error handling default).
When the system attempts to retry the task the designated number of times, the task is stopped andmanual intervention is required.
l Interval between retry attempts: Use the counter to select or type the number of seconds that thesystem waits between attempts to retry a task.Valid values are 0-2,000.
l Increase retry interval for long outages: Select this check box to increase the retry interval for longoutages. When this option is enabled, Replicate doubles the interval between each retry attemptand the next, until the Maximum retry interval is reached (and continues retrying according to thespecified maximum interval).
l Maximum retry interval: Use the counter to select or type the number of seconds to wait betweenattempts to retry a task when the Increase retry interval for long outages option is enabled. Validvalues are 0-2,000.
Data ErrorsClick the Data Errors sub-tab and then click Change to Task Policy to configure the following:
l For a data truncation error: Click the triangle to open the list and select what happens when antruncation occurs in one or more specific records. You can select one of the following from the list:
Setup and User Guide - Qlik Replicate, November 2021 1032

12 Customizing tasks
l Ignore record: The task continues and the error is ignored.l Log record to the exceptions table (default): The task continues and the error is written tothe exceptions table.
l Suspend table: The task continues but data from the table with the error record is movedinto an error state and its data is not replicated
l Stop task: The task is stopped and manual intervention is required.
Data truncation error handling is only supported in the following cases:
l Replication is to the following target endpoints: MySQL, PostgreSQL, Oracle, MicrosoftSQL Server, SAP Sybase ASE, File, Amazon Redshift, Microsoft Azure Database forPostgreSQL, Google Cloud SQL for PostgreSQL, Microsoft Azure Database forMySQL, Google Cloud SQL for MySQL, and Microsoft Azure SQL Database
l Change Processing replication only (i.e. not Full Load)
l For other data errors: Click the triangle to open the list and select what happens when an erroroccurs in one or more specific records. You can select one of the following from the list:
l Ignore record: The task continues and the error is ignored.l Log record to the exceptions table (default): The task continues and the error is written tothe exceptions table.
l Suspend table: The task continues but data from the table with the error record is movedinto an error state and its data is not replicated
l Stop task: The task is stopped and manual intervention is required.l Escalate error handling when other data errors reach (per table): Select this check box toescalate error handling when the number of non-truncation data errors (per table) reaches thespecified amount. Valid values are 1-10,000.
The escalation options are not available when the Apply changes using SQL MERGEtask setting is enabled.
l Escalation action: Choose what action Replicate should perform when error handling isescalated. Note that the available actions are dependent on the action selected from the Forother data errors drop-down list described above.
l Log record to the exceptions table: The task continues and the error is written to theexceptions table.
l Suspend table (default): The task continues but data from the table with the errorrecord is moved into an error state and its data is not replicated.
Setup and User Guide - Qlik Replicate, November 2021 1033

12 Customizing tasks
The behavior differs according to the Change Processing Mode:l In Transactional apply mode, the last changes will not bereplicated
l In Batch optimized apply mode, a situation is possible wherethere will be no replication of data or data replication will occur inpart
l Stop task: The task is stopped and manual intervention is required.
Table ErrorsClick the Table Errors sub-tab and then click Change to Task Policy to configure the following:
When encountering a table error: Select one of the following from the drop-down list:
l Suspend table (default): The task continues but data from the table with the error record is movedinto an error state and its data is not replicated
l Stop task: The task is stopped and manual intervention is required.
Escalate error handling when table errors reach (per table): Select this check box to escalate errorhandling when the number of table errors (per table) reaches the specified amount. Valid values are 1-10,000.
l Escalation action: The escalation policy for table errors is set to Stop task and cannot be changed.
Apply Conflicts
The Apply Conflicts error handling policy will be preset and uneditable when the Apply changesusing SQL MERGE task setting is enabled.
Click the Apply Conflicts sub-tab and then click Change to Task Policy to configure the following:
No record found for applying a DELETE: Click the triangle to open the list and select what happens whenthere is a conflict with a DELETE operation. You can select one of the following from the list:
l Ignore record (default): The task continues and the error is ignored.l Log record to the exceptions table: The task continues and the record is written to the exceptionstable.
l Suspend table: The task continues but data from the table with the error record is moved into anerror state and its data is not replicated.
l Stop task: The task is stopped and manual intervention is required.
Duplicate key when applying an INSERT: Click the triangle to open the list and select what happenswhen there is a conflict with an INSERT operation. You can select one of the following from the list:
Setup and User Guide - Qlik Replicate, November 2021 1034

12 Customizing tasks
l Ignore record: The task continues and the error is ignored.l Log record to the exceptions table (default): The task continues and the record is written to theexceptions table.
l Suspend table: The task continues but data from the table with the error record is moved into anerror state and its data is not replicated.
l Stop task: The task is stopped and manual intervention is required.l Update the existing target record: The target record with the same primary key as the INSERTEDsource record is updated.
No record found for applying an UPDATE: Click the triangle to open the list and select what happenswhen there is a conflict with an UPDATE operation. You can select one of the following from the list:
l Ignore record: The task continues and the error is ignored.l Log record to the exceptions table (default): The task continues and the record is written to theexceptions table.
l Suspend table: The task continues but data from the table with the error record is moved into anerror state and its data is not replicated
l Stop task: The task is stopped and manual intervention is required.l Insert the missing target record: The missing target record will be inserted into the target table.When the source endpoint is Oracle, selecting this option requires supplemental logging to beenabled for all the source table columns.
Escalate handling when apply conflicts reach (per table): Select this check box to escalate errorhandling when the number of apply conflicts (per table) reaches the specified amount. Valid values are 1-10,000.
l When this option is selected and the number of conflicts reaches the specified number,l Apply Conflicts errors are counted for each table separately when a task is run. When atask stops, the error count reverts to zero. When a task is resumed/reloaded, thenumber of errors for all the tables are reset.
l When working in Batch optimized apply Change Processing mode, the calculation of theApply Conflicts amount does not include DELETE and UPDATE conflicts that wereignored (as a result of enabling the Ignore Record option described above).
Escalation action: Choose what action Replicate should perform when handling is escalated. Note that theavailable actions are dependent on the action selected in the drop-down lists described above.
When this option is selected and the number of conflicts reaches the specified number, only theescalation action will be performed (i.e. the original action set for the Apply conflict will not beperformed).
l Log record to the exceptions table (default): The task continues and the error is written to the tasklog and to the exceptions table.
Setup and User Guide - Qlik Replicate, November 2021 1035

12 Customizing tasks
l Suspend table: The task continues but data from the table with the error record is moved into anerror state and its data is not replicated.
l Stop task: The task is stopped and manual intervention is required.
LoggingYou can set the logging level for task logs by selecting the Logging tab in the Task Settings dialog box andthen selecting the Logging Level sub-tab.The level you set determines what information is written to thelog.
You can also set the task logging level from the Tools menu in Monitor view.
For more information, see Monitor mode (page 89) and Setting the task logging level (page1077).
For more information on monitoring, see Monitor mode (page 89). For more information onsetting the task logging level in Qlik Replicate, see the Qlik Replicate Setup and User Guide.
The following are the available logging levels. The list is in order from the lowest level to the highest level.
1. Error
2. Warning
3. Info
4. Trace
5. Verbose
The higher levels always include the messages from the lower levels. Therefore, if you select Error, onlyerror messages are written to the log. However, if you select Info, informational messages, warnings, anderror messages are included. Selecting Verbose writes all possible messages to the log.
For information on how to set the logging level, see Setting the task logging level (page 1077).
Storing trace and verbose logging in memoryWhen the logging level is set to "Trace" or "Verbose", you can instruct Replicate to store the logginginformation in memory until an error occurs. On detecting an error, Replicate will begin writing to thephysical logs and continue to do so for a few minutes after the initial occurrence of the error.
If no error occurs before the allocated memory is used up, Replicate will empty the memory buffer and startafresh.
This option is useful for tasks that fail unpredictably and for no obvious reason. The problem withcontinually writing large amounts of information to the logs is twofold:
l Running in "Trace" or "Verbose" logging mode will quickly use up available disk space (unless thelogging settings have been configured to prevent this).
l Continually writing large amounts of data to the logs will affect performance.
To use this option
Setup and User Guide - Qlik Replicate, November 2021 1036

12 Customizing tasks
1. Select the Store trace/verbose logging in memory, but if an error occurs, write to the logs checkbox at the top of the tab.
2. In the Allocate memory up to (MB) field, specify the amount of memory you want to allocate forstoring logging information.
Character substitutionYou can substitute or delete source characters in the target database and/or you can substitute or deletesource characters that are not supported by a selected character set.
l All characters must be specified as Unicode code points.l Character substitution will also be performed on Replicate Control Tables.
l Invalid values will be indicated by a red triangle in the top right of the table cell. Hoveringyour mouse cursor over the triangle will show the error message.
l Any table-level or global transformations defined for the task will be performed after thecharacter substitution has been completed.
l Substitutions actions defined in the Substitute or Delete Source Characters table areperformed before the substitution action defined in the Substitute or Delete SourceCharacters Unsupported by the Selected Character Set table.
l Character substitution does not support LOB data types.
Substituting or deleting Source CharactersUse the Substitute or Delete Source Characters table to define replacements for specific sourcecharacters. This may be useful, for example, when the Unicode representation of a character is different onthe source and target platforms. For example, on Linux, the minus character in the Shift_JIS character setis represented as U+2212, but on Windows it is represented as U+FF0D.
To Do This
Define substitutionactions.
1. Click the Add Character button above the table.
2. Specify a source character and a target character in the SourceCharacter and Substitute Character fields respectively.For example to replace the letter "a" with the letter "e", specify 0061and 0065 respectively.
To delete the specified source character, enter 0 in theSubstitute Character column.
3. Repeat steps 1-2 to replace or delete additional characters.
Substitution actions
Setup and User Guide - Qlik Replicate, November 2021 1037

12 Customizing tasks
To Do This
Edit the specified sourceor target character
Click anywhere in the relevant column and change the character asrequired.
Delete entries from thetable
Select the desired entry or entries and click the Delete button.
Substituting or deleting Source Characters unsupported by the selected charactersetUse the Substitute or Delete Source Characters Unsupported by the Selected Character Set table todefine a single replacement character for all characters not supported by the selected character set.
To Do This
Define or edita substitutionaction.
1. Select a character set from the Character Set drop-down list in the table.Any characters not supported by the selected character set will be replaced onthe target by the character specified in step 2 below.
2. In the Substitute Character column, click anywhere in the column and specifythe replacement character. For example, to replace all unsupported characterswith the letter "a", enter 0061.
To delete all unsupported characters, enter 0.
Disable thesubstitutionaction.
Select the blank entry from the Character Set drop-down list.
Unsupported character substitution actions
More optionsThese options are not exposed in the UI as they are only relevant to specific versions or environments.Consequently, do not set these options unless explicitly instructed to do so by Qlik Support or productdocumentation.
To set an option, simply copy the option into the Add feature name field and click Add. Then set the valueor enable the option according to the instructions you received.
File uploadsNote that the File Uploads tab will only be shown if the task is defined with an endpoint that supports thisfeature.
Click the Optimize File Uploads button to improve performance when replicating to file-based targets suchas Amazon S3 and Hadoop. When this feature is enabled, the button text changes to Disable File UploadOptimization. Click the Disable File Upload Optimization button to disable file upload optimization.
The upload mode depends on the task type:
Setup and User Guide - Qlik Replicate, November 2021 1038
12 Customizing tasks
l Full Load - Multiple files created from the same table are transferred in parallel, in no particularorder.
l Apply Changes - Files created from multiple tables are transferred in parallel. Files created from thesame table are transferred sequentially according to creation time.
l Change Data Partitioning - Files created from multiple tables and files created from the same tableare transferred in parallel.
Note that disabling this option after the task has already started will require you to do one of the following:
l If the task is in the Full Load stage, reload the target using the Reload Target Run option.l If the task is in the Change Processing stage, resume the task using the Start processing changesfrom Run option.
l Supported by the following target endpoints only: Amazon S3, Hadoop (Hortonworks,Cloudera, and MapR) Microsoft Azure ADLS, Microsoft Azure Databricks, Databricks onAWS, Microsoft Azure HDInsight, Hortonworks Data Platform (HDP), Google CloudStorage, Google Cloud Dataproc, Amazon EMR, and Cloudera Data Platform (CDP)Private Cloud.
l General Limitations and Considerations:l Post Upload Processing endpoint settings are not supported.
l Hadoop - Limitations and Considerations:l When replicating to a Hadoop target, only Text and Sequence file formats aresupported.
l Hive jobs are not supported as they will prevent the file upload.l Append is not supported when using Text file format.
l Amazon S3 and Microsoft Azure ADLS - Limitations and Considerations:l When working with Reference Files, a new entry is added to the Reference Fileimmediately after the data file is uploaded (even if the DFM file has not beenuploaded yet).
l The existence of the DFM file does not necessarily mean that the associateddata file has also been uploaded.
Message FormatThe Message Format tab will only be shown if the task is defined with a streaming target endpoint thatsupports this feature.
When a task is defined with such an endpoint, you can specify a custom message format that will overridethe default Replicate message format. This may be useful if the consumer application needs to process themessage in a particular format.
Setup and User Guide - Qlik Replicate, November 2021 1039

12 Customizing tasks
The custom message format can be defined at task level and/or at table level. When it is defined at bothtask and table level, the message format defined for the table will take precedence over the messageformat defined for the task.
For information on defining a custom message format at table level, see Message format (page 954).
l Supported by the Kafka target endpoint onlyl The custom message format feature cannot be used in conjunction the Attunity AvroMessage Decoder SDK
l Hierarchical structured messages are not supported.
General rules and usage guidelinesWhen defining a custom message, it is import to consider the rules and usage guidelines listed below.
Section names:
The following naming rules apply:
l Section names must start with the characters a-z, A-Z, or _ (an underscore) and can then befollowed by any of the following characters: a-z, A-Z, 0-9, _
l With the exception of the Record name and Key name sections (that do not end with a slash),removing the slash from section names will flatten the hierarchy of the associated section (seeSlashes below).
l All section names except Record name and Key name can be deleted (see Deletion: (page 1041)below)
l The Data name and Include record Before-data section names cannot both be deletedl The Data name and Include record Before-data section names cannot be the same
Slashes:
Some of the section names in the UI end with a slash (e.g. beforeData/). The purpose of the slash is tomaintain a hierarchy of the different sections within the message. If the slash is removed, the following willoccur:
l The hierarchical structure of that section will be flattened, resulting in the section name beingremoved from the message
l The section name will be prefixed to the actual metadata, either directly or using a separatorcharacter (e.g. an underscore) that you appended to the name
Example of a data message when headers/ is specified with a slash:
"message":{
"data":{
"COL1": "159",
"COL2": "159"
},
Setup and User Guide - Qlik Replicate, November 2021 1040

12 Customizing tasks
"beforeData": null,
"headers": {
"operation": "INSERT",
"changeSequence": "2018100811484900000000233",
Example of a data message when headers_ is specified with an underscore instead of a slash:
"message":{
"data":{
"COL1": "159",
"COL2": "159"
},
"beforeData": null,
"headers_operation": "INSERT",
"headers_changeSequence": "2018100811484900000000233",
Deletion:
Deleting a section name from the message will flatten the hierarchical structure of that section. This willresult in all of that section's data appearing immediately below the content of the preceding section.
Example of a data message with the headers section name:
"message":{
"data":{
"COL1": "159",
"COL2": "159"
},
"headers": {
"operation": "INSERT",
"changeSequence": "2018100811484900000000233",
Example of a data message without the headers section name:
"message":{
"data":{
"COL1": "159",
"COL2": "159"
},
"beforeData": null,
"operation": "INSERT",
"changeSequence": "2018100811484900000000233",
Variables
You can add variables to names by clicking the button at the end of the row. The following variables are
available:
Setup and User Guide - Qlik Replicate, November 2021 1041

12 Customizing tasks
l SERVER_NAME - The host name of the Replicate Serverl TARGET_TABLE_NAME - The name of the tablel TARGET_TABLE_OWNER - The table ownerl TASK_NAME - The name of the Replicate task
The TARGET_TABLE_OWNER variable is not available for the Record name and Key nameoptions (described in the table below).
Defining a custom message formatTo define a custom message format, click the Custom Message Format button and configure the optionsas described in the table below.
To revert to the default message format, click the Default Message Format button.
Setup and User Guide - Qlik Replicate, November 2021 1042

12 Customizing tasks
Option Description
IncludeNamespace
A unique identifier for the message. This should be a string, separated by periods. Notethat the Namespace will be included in both the message and the message key.
Example:
mycompany.queue.msg
Default name:
com.attunity.queue.msg.{{TASK_NAME}}.{{TARGET_TABLE_OWNER}}.{{TARGET_TABLE_NAME}}
Default name for Control Tables:
com.attunity.queue.msg.{{TARGET_TABLE_NAME}}
The default Control Table Namespace cannot be changed via the UI. You can,however, change the default Control Table Namespace as follows:
1. In the Task Settings Message Format tab, click the Custom MessageFormat button and then click OK.
2. Save the task and then export it using the Export Task toolbar button.
3. Open the exported JSON file and add the control_table_namespace
parameter as follows (replacing MyNameSpace with your own value):
4. Save the JSON file and then import it to Replicate using the ImportTask toolbar button.
For instructions on exporting/importing tasks, see Migrating tasks (page 122).
Message format options
Setup and User Guide - Qlik Replicate, November 2021 1043

12 Customizing tasks
Option Description
Recordname
The name of the record (i.e. message).
Default name:
DataRecord
Dataname
All of the data columns included in the record.
Default name:
data/
IncludeHeaders
Header columns provide additional information about the source operations.
For more information, see Include the following headers (page 1044) below.
Includeheadersnamespace
A unique identifier for the header columns section. This should be a string, separated byperiods.
Example:
headers.queue.msg
Default name:
com.attunity.queue.msg
Headersname
The name of the section containing the Replicate column headers.
Default name:
headers/
Includethefollowingheaders
For a description of the available header columns, see Data Messages in Metadata anddata messages (page 680).
Default:
All columns are included by default, except the External Schema ID column.
IncluderecordBefore-data
When this check box is selected (the default), both pre and post UPDATE data will beincluded in UPDATE messages.
To include only the post UPDATE data in messages, clear the check box.
Default name:
beforeData/
Setup and User Guide - Qlik Replicate, November 2021 1044

12 Customizing tasks
Option Description
Key name The name of the section containing the message key.
Default name:
keyRecord
This option is only applicable when:
l The Encode the message key in Avro format option is enabledl The Metadata Publishing Method is set to Publish data schemas to ConfluentRegistry Schema or Publish data schemas to Hortonworks Schema Registry
l The Message key is not set to None
Setup and User Guide - Qlik Replicate, November 2021 1045

13 Working with tasks at runtime
13 Working with tasks at runtimeThis section describes how to work with tasks that you design. For information on how to design a task, seeDefining and managing tasks (page 104). This chapter contains information on running tasks, viewing thetask status, and viewing messages about the task. Information on monitoring and working with tasks duringruntime is in the section Monitoring and controlling replication tasks (page 1059).
In this section:
l Running a task (page 1046)l Viewing the task status (page 1054)l Accessing task messages and notifications (page 1055)
13.1 Running a taskAfter you design a task (see Defining and managing tasks (page 104)), you can run and monitor itsprogress with one click in Qlik Replicate. This simple Click-2-Replicate function is described in this section.In addition, the various types of run options available are also described.
In this section:
l How to run a task (page 1046)l Using the Run button options (page 1047)l Advanced Run Options (page 1048)l Recovering from data folder loss or corruption (page 1053)
The task run buttons area available in the toolbar at the top of the console in the followingviews:
l Tasks view (page 85) (in both Designer mode (page 88) and Monitor mode (page 89))l When Viewing specific tasks (page 87)
How to run a taskClick the Run button to execute a replication task. The task process continues to run until you click theStop button to stop the task.
Setup and User Guide - Qlik Replicate, November 2021 1046

13 Working with tasks at runtime
When you click Run, the following occurs:
l If this is the first time that a task is run, the Start Processing operation is run.l If the task has been started and stopped, the Resume Processing operation describedin Using the Run button options (page 1047) is run.
l If changes were made to the endpoint, change processing takes place after the full loadoperation. If you do not want change processing to occur or if you want to start changeprocessing from a predetermined point, you must make the appropriate Advanced RunOptions (page 1048) selection.
In some cases, task replication may stop due to an error although the task process is still running.
See Tasks view (page 85) for information on the task status and how Qlik Replicate displays information onthe current task status.
The Run button is available in the following views:
l The Tasks view when you select a task from the Task List.l For the individual task, both the Designer mode and Monitor mode have the Run and Stop buttonsavailable.
You must be in the Monitor mode to view the task progress.
Using the Run button optionsClicking the Run button runs a full-load replication task from the source to the target. This is a first time taskthat creates the target endpoints and loads the source data to the target according to your task definitions.
Subsequent runs allow you to resume processing from a specific point and process changes. In addition,you can also specify from what point you want the replication to start.
The following options are available:
l Start Processing - This is available the first time you run the task only. This will execute the initialfull load operation. If Change Processing is also enabled for the task or if it is an Apply Changesonly task type, change processing will start as soon as any changes are made to the sourceendpoint.(switches to Resume Processing after the task has started)
l Resume Processing - Resumes task execution from the point that it was stopped. You can alsoresume processing by clicking the Run button if the task has been stopped.
If the schema or a filter was changed after the task stopped, the task should be reloadedas opposed to resumed (see below).
Setup and User Guide - Qlik Replicate, November 2021 1047
13 Working with tasks at runtime
l Reload Target (Only available when the Full Load or Full Load and Apply Changes replicationoptions are enabled) - Starts the Full Load and Change Processing (if enabled) from the beginning.Tables that have already been processed are handled according to the relevant "Target tablepreparation" setting.
To replicate tables that were added to the local file channel task after the initial full load,you need to reload both the local and the remote file channel tasks.
l Advanced run options - Advanced options for controlling task execution. For more information, seeAdvanced Run Options (page 1048)
Advanced Run OptionsAdvanced Run Options provide you with additional options for resuming and restarting tasks.
Some of the advanced run options are not available in a Log Stream Staging setup.
For information on the availability of advanced run options in a Log Stream Staging setup, seeLog Stream Staging Limitations and Considerations.
To use Advanced Run Options, click the triangle next to the Run button and select Advanced RunOptions.
The Advanced Run Options dialog box opens.
The Advanced Run Options dialog box lets you do the following:
l **Restart task and start processing changes from current time: This starts the Apply Changesreplication task from the beginning (as if the task has not run before).**Only available for Apply Changes replication tasks.
l Tables are already loaded. Start processing changes from:l Date and Time: Select the date and time from where you want to Replicate to startprocessing changes.
Setup and User Guide - Qlik Replicate, November 2021 1048

13 Working with tasks at runtime
l When logs are deleted from the database (e.g. due to a purge policy), alog matching the specified date and time may not exist. In this case,Replicate will resume the task from the earliest point possible, after thespecified date and time.
l With the IBM DB2 for LUW source endpoint, this option cannot be used tostart Apply Changes tasks from a point before the original start time of theApply Changes task. Or, to put it another way, it can only be used to starttasks from any time after the original start time of the Apply Changes task.
l The timestamp uses the local time of the browser machine.l This option is not relevant for the File Source endpoint.l DDLs performed on the source while a task is stopped (e.g. drop column)will not be replicated when the task is resumed from timestamp.
l Source change position (e.g. SCN or LSN): Specify the position in the log from where toresume change processing. The source change position format differs according to yoursource endpoint. For more information, see How to Find the Source Change Position (page1052).
The Source change position option is supported with the following sourceendpoints only:Oracle, Microsoft SQL Server, MySQL, PostgreSQL, IBM DB2 for z/OS, and IBMDB2 for LUW.
Metadata Only:
The "Metadata only" options described below allow you to:
l Create empty tables on the target and then manually edit them.l Create tables during a task.
Enabling the options will also ensure that supplemental logging is set up correctly on the source tablesbefore starting the actual replication task.
The "Metadata only" feature is not supported when the task is defined with the Apply Changesonly task option. any of the following task options:
l Apply Changes onlyl Store Changes onlyl Apply Changes and Store Changes
Setup and User Guide - Qlik Replicate, November 2021 1049

13 Working with tasks at runtime
l Recreate all tables and stop: Select this option to recreate the target tables as defined in the FullLoad Settings tab. When "Store Changes" is enabled, the Change tables/Audit table will be createdas defined in the Store Changes Settings tab. To use this option, stop the existing task, run the taskwith this option enabled (the task will stop automatically) and finally, resume the task.
l Create missing tables and stop: Select this option to create missing target tables including ChangeTables. You can use this option to create Change Tables on the target after enabling the "StoreChanges" option (in the Store Changes Settings tab) for an existing task. To use this option, stopthe existing task, run the task with this option enabled (the task will stop automatically) and finally,resume the task.
The table below shows which tables are created in the target database when the Metadata only option isenabled for a unidirectional task. As the table shows, when certain task options are enabled, Control tablesand the Audit table will not be created on the target.
Enabled Task Options Tables Created on the Target
Full Load All tables except for Control tables
Full Load and Apply Changes All tables except for Control tables
Full Load, Apply Changes and Store Changes - When changesare stored in Change tables
All tables except for Control tables
Full Load and Store Changes - When changes are stored in anAudit table
All tables except for Control tablesand the Audit table
Full Load, Apply Changes and Store Changes - When changesare stored in an Audit table
All tables except for Control tablesand the Audit table
Recovery:
l Recover using locally stored checkpoint: Use this option if recovery is not possible using theResume Processing or Start process changes from options (due to corrupt swap files, forexample). When this option is selected, Replicate uses the checkpoint data stored in <Data_Folder_
Path>\data\tasks\<task_name>\StateManager to recover the task.
Setup and User Guide - Qlik Replicate, November 2021 1050

13 Working with tasks at runtime
When using this option, the following limitations apply:l The following source endpoints are supported only:
l Oraclel Microsoft SQL Serverl MySQLl PostgreSQLl IBM DB2 for z/OSl SAP HANA
l Tasks can only be recovered during Change Processing (i.e. after Full LoadCompletes)
l With the exception of the File Channel endpoint, all target endpoints aresupported. The following limitations apply:
l In Transactional apply Change Processing mode: All target endpointsthat support transactions are supported.
l In Batch optimized apply Change Processing mode: Oracle targetendpoint only is supported. Also requires the Preserve transactionalintegrity option to be enabled.
l For all other target endpoints or Change Processing modes, recovery issupported, but may cause duplicates on the target.
l Recover using checkpoint stored on target: Select to recover a task using the CHECKPOINT valuefrom the attrep_txn_state table (created in the target database).
When using this option, the following limitations apply:l Only the following source and target endpoints are supported:
l Oraclel Microsoft SQL Server
l Tasks can only be recovered during Change Processing (i.e. after Full LoadCompletes)
l The task Change Processing mode must be set to either:Batch optimized apply with the Preserve transactional integrity option enabled.Note that this mode is only supported with the Oracle target endpoint.ORTransactional applyFor information about setting the Change Processing mode, see ChangesProcessing Tuning.
This option will only be available if the Store task recovery data in target database option wasenabled in the Task Settings' Change Processing Tuning (page 1027) tab before ChangeProcessing completed.Select this option (as opposed to the Recover using locally stored checkpoint option) if the files inthe Data folder are corrupted or if the storage device containing the Data folder has failed.
Setup and User Guide - Qlik Replicate, November 2021 1051

13 Working with tasks at runtime
For a detailed explanation of how to set up and implement recovery using the attrep_txn_state
table, see Recovering from data folder loss or corruption (page 1053).
How to Find the Source Change PositionThe following topic explains how to locate the source change position for each of the supported databases.
MySQL
OPTION 1:
1. Execute:SHOW BINARY LOGS;
2. Choose a binlog file (e.g. log.000123).
3. Execute:SHOW BINLOG EVENTS IN 'binlog_filename';
Example:SHOW BINLOG EVENTS IN 'log.000123';
4. Locate the position of a BEGIN or DDL statement (e.g. 1777888).
MySQL does not support a "start from position" located in the middle of a transaction,which is why you must select either BEGIN or DDL.
5. Set the internal parameter:StartFromPosition = binlog_filename:begin_or_ddl_position
Example:StartFromPosition = log.000123:1777888
OPTION 2:
1. Execute:SHOW MASTER STATUS;
2. Set the "Start from position" as:firstColumnValue:secondColumnValueExample:mysql.007472:775
Microsoft SQL Server
Execute:
SELECT MAX([Current LSN]) FROM fn_dblog(null,null);
Example: 00002717:00000e08:0003
Oracle
Execute:
SELECT current_scn FROM V$DATABASE;
Example: 1471212002
Setup and User Guide - Qlik Replicate, November 2021 1052

13 Working with tasks at runtime
PostgreSQL
Execute:
SELECT * FROM pg_current_xlog_location();
Example: 0/67A47288)
IBM DB2 for z/OS
Specify the LSN, which is the RBA in a non data sharing environment, and the LRSN in a data sharingenvironment
IBM DB2 for LUW
1. Execute db2pd to find the correct log name.
2. Execute db2flsn with the returned log name and use the current LRI value.See also: Resuming or starting a task from LRI in a pureScale environment (page 249)
Recovering from data folder loss or corruptionDuring normal operation, Qlik Replicate maintains the replication state in the following location:
<Data_Folder_Path>\data\tasks\<task_name>\StateManager
This enables tasks that cannot be resumed normally (due to corrupt swap files, for example) to berecovered using the Recover using locally stored checkpoint option described in Advanced Run Options(page 1048).
However, if the files in the data folder become corrupted or if the storage device containing the data folderfails, tasks must be recovered using the means described below.
This option is supported when replicating between the following endpoints only:
Supported source endpoints Supported target endpoints
l Amazon RDS for MySQLl Amazon RDS for PostgreSQLl Amazon RDS for SQLl AWS Aurora Cloud for PostgreSQLl Google Cloud SQL for MySQLl Google Cloud SQL for PostgreSQLl IBM DB2 for z/OSl Microsoft Azure Database for MySQLl Microsoft Azure SQL Managed Instancel Microsoft SQL Serverl MySQLl Oraclel PostrgreSQLl SAP HANA
l Amazon Redshiftl Google Cloud SQL for PostgreSQLl Microsoft Azure Database for MySQLl Microsoft Azure Database for PostgreSQLl Microsoft SQL Serverl MySQLl Oraclel PostgreSQLl Snowflake on Azurel Snowflake on Googlel Snowflake on AWS
Supported source and target endpoints
Setup and User Guide - Qlik Replicate, November 2021 1053
13 Working with tasks at runtime
Setting up and initiating task recoveryFor recovery to be successful, the source database transaction logs must be available from the time thetask failed.
To set up a task for recovery
1. Design a task. Make sure to enable the Store task recovery data in target database option in theTask Settings' Change Processing Tuning (page 1027) tab. This option can be enabled at any timeduring Change Processing, although it must be enabled before Change Processing completes.
2. Export the task definitions as described Exporting tasks (page 122).
3. Run the task.
In addition to the selected source tables, the task will write the checkpoint data to the following table in thetarget database (and automatically create the table if it has not already been created by another task):
attrep_txn_state
To initiate recovery
1. Import the task definition exported when you set up the task.
2. Enter the passwords in the endpoint connection settings.
3. Access the attrep_txn_state table on the target database and locate the failed task in the TASK_
NAME column. If there are tasks with the same name running on multiple Replicate Servers, you willalso need to locate the appropriate server in the SERVER_NAME column. After locating the relevanttask, copy the value in the corresponding CHECKPOINT column.
4. Select the Recover using checkpoint stored on target option and then provide the CHECKPOINT
value (preferably by pasting) as described in Advanced Run Options (page 1048).
5. Click OK to start the recovery.
During recovery, Replicate does not write anything to the target database until it identifies the commit eventcorresponding to the CHECKPOINT value. Once it identifies the CHECKPOINT commit event, recovery isperformed and the task reverts to standard operation.
13.2 Viewing the task statusIn the Tasks View, you can see the task status by viewing the icon for the task. After a task is run, the taskicons in the Task view display the current status of the task. For additional information on the possiblestatuses, see Tasks view (page 85).
The following icon represents a task that is in an error status.
There are two types of errors:
Error icon Description
Error icon descriptions
Setup and User Guide - Qlik Replicate, November 2021 1054

13 Working with tasks at runtime
Recoverable error: A recoverable error indicates that there is a temporaryproblem, such as an inability to connect to one of the endpoints. The task icon isblue indicating that the task is still active. In this case, Qlik Replicate attempts torestart the task according to the Error handling (page 1031)settings.
The task remains active but paused throughout the error state. You can stop thetask at any time and resolve the error manually, if necessary.
See also Error handling (page 1031).
Fatal Error: When a fatal error occurs, the task stops and you must resolve theerror manually. You cannot start the task again until the error is resolved. Use thelogs or the messages in the Alerts pane to see the error type.
See also:
View Log Messages for a task (page 1056)
Viewing Notifications (page 1055)
13.3 Accessing task messages and notificationsTask messages are displayed in the Messages section of the Qlik Replicate Console. The Messagessection is located at the bottom right of the console in the Monitor mode (page 89) and when Viewingspecific tasks (page 87).
The Message section has two types of messages that provide information about events that occur in atask. Each type of message is displayed in the following tabs:
l Viewing Notifications (page 1055)l View Log Messages for a task (page 1056)
Viewing NotificationsThe Notifications tab displays notifications about the task. These messages alert you to specific eventsencountered by a task, such as the task starting or stopping, a specific error type, or information aboutlatency and disk space.
The Notifications tab displays the time of a notification and a description of the notification. You define thenotifications that are sent for each task and a description for each notification in the Settings area. For moreinformation, see Creating a new notification (page 1083).
Using the Notifications listWhen a notification is sent, it is displayed in the Notifications tab. This section describes the tasks that canbe performed in the Notifications tab.
Setup and User Guide - Qlik Replicate, November 2021 1055

13 Working with tasks at runtime
Opening a NotificationWhen you open a notification, you can see the full message presented in a dialog box. The dialog boxcontains a button to copy the text so that you can use it somewhere else for troubleshooting and thetimestamp for the notification.
To open a notification:
1. In the Messages section of the console, click the Notifications tab. The Notifications tab opens.
2. Select the notification you want to open from the list.
3. Double-click the notification or click Open from the toolbar at the top of the list.
Clearing a NotificationYou can clear notifications from the list to make sure that you are seeing only those that are relevant to you.
To clear a notification:
1. In the Messages section of the console, click the Notifications tab.
2. Select the notification you want to clear from the list.
3. Click Clear from the toolbar at the top of the list.
Sorting NotificationsYou can sort log messages according to Date and Time and Message.
To sort the notifications:
1. In the Messages section of the console, click the Notifications tab.
2. Click the Date and Time or Message column according to how you want to sort the messages.An upward arrow indicates that the column is sorted in ascending order whereas a downward arrowindicates that the column is sorted in descending order.
View Log Messages for a taskThe Log Messages tab displays log messages for errors or warnings from a task. The errors are listed inthis tab with the time of the error or warning and the log entry for the event. You can choose to view botherrors and warnings or only one of them.
If errors or warnings exist in the task, a red circle with the total number of errors and warnings is displayed.The number displayed may be the number of errors, the number of warnings, or the total of number oferrors and warnings depending on what you select to view in this tab. The Log Messages tab is shown inthe figure below.
Using the Log Messages listWhen a log error or warning is sent, it is displayed in the Log Messages tab. This section describes thetasks that can be performed in the Log Messages tab.
Setup and User Guide - Qlik Replicate, November 2021 1056

13 Working with tasks at runtime
Selecting the log message typeTwo types of log messages are displayed in the Log Messages list. You can view Errors, Warnings, orboth.
To select the log message type:
l Select the check box or boxes for the type messages you want to view. The check boxes arelocated at the top of the Log Messages List.
Opening a log messageWhen you open a log message, you can see the full log text presented in a dialog box. The dialog boxcontains a button to copy the text so that you can use it somewhere else for trouble shooting and thetimestamp for the log message.
To open a log message:
1. In the Messages section of the console, click the Log Messages tab.
2. Select the log message you want to open from the list.
3. Double-click the log message or click Open from the toolbar at the top of the list.
Clearing a log message
You can clear log messages from the list to make sure that you are seeing only those that are relevant toyou.
To clear a log message:
1. In the Messages section of the console, click the Log Messages tab.
2. Select the log message you want to clear from the list.
3. Click Clear from the toolbar at the top of the list.
Sorting log messagesYou can sort log messages according to Date and Time, Level and Message.
To sort the log messages:
1. In the Messages section of the console, click the Log Messages tab.
2. Click the Date and Time, Level or Message column according to how you want to sort themessages.An upward arrow indicates that the column is sorted in ascending order whereas a downward arrowindicates that the column is sorted in descending order.
Viewing the log file in the Log ViewerIn addition to viewing the log messages, you can view the entire log file in the log viewer.
Setup and User Guide - Qlik Replicate, November 2021 1057

13 Working with tasks at runtime
To view the log in the Log Viewer:
l From the Messages section, click View Logs.The Log Viewer opens.
For a description of actions you can perform in the Log Viewer, see Viewing, downloading, and manuallyrolling over task log files (page 1078).
Setup and User Guide - Qlik Replicate, November 2021 1058

14 Monitoring and controlling replication tasks
14 Monitoring and controlling replication tasksWhen you monitor and run a task, you can use the Click-2-Replicate function to carry out the replicationtask and view its functions in near real time. This section describes how to run and monitor a replicationtask.
In this section:
l Viewing information in the monitor (page 1059)l Monitoring full-load operations (page 1059)l Monitoring change processing operations (page 1067)l Viewing messages (page 1076)l Using the monitor tools (page 1076)
14.1 Viewing information in the monitorYou access the Monitor view when you open a specific task. The monitor provides near real-timeinformation for the task you select.
To access the Monitor:
1. When Viewing specific tasks (page 87), select the task you want to monitor.
2. From the toolbar at the top of the console, click Open.
3. From the toolbar at the top right, click Monitor.The Monitor opens. To view the information in real time, you need to run the task (if the task has notalready started). For information on running a task, see Running a task (page 1046).
14.2 Monitoring full-load operationsYou can view the progress of a full-load operation in the left side of the Monitor.
To make sure you are viewing the information for a full-load operation, select the Full Load tab.
You can view the following:
l General information for a Full Load (page 1059)l Detailed information for the Full Load (page 1060)l Monitoring throughput in a Full Load operation (page 1066)
General information for a Full LoadGeneral information about the Full Load is presented in a graphical format. The following figure shows thegraphical information displayed when a task is running.
Setup and User Guide - Qlik Replicate, November 2021 1059

14 Monitoring and controlling replication tasks
This section has the following information:
l Status bars: Indicates the status of the tables being loaded.l Completed: The number of tables that finished loading into the target endpoint.l Loading: The number of tables that are in the process of loading into the target endpoint.l Queued: The number of tables that are waiting to load into the target endpoint.l Error: The number of tables that could not be loaded due to an error. See Accessing taskmessages and notifications (page 1055) for information about error messages.
l Full-load total completion bar: Displays the progress of all records being loaded to the targetendpoint. The bar is located in the Full Load tab at the top of the graph section.
l Throughput gauge: Displays the current throughput.Throughput displays the number of events readin the task for a specified amount of time.
You can also view Detailed information for the Full Load (page 1060).
Detailed information for the Full LoadFor each of the status bars displayed in the General information for a Full Load (page 1059) graphs, a tableis displayed in the section below with specific information about the current loading status. The followinginformation is available:
l General information for a completed task (page 1060)l Information for each table in the task (page 1061)l Information for tables that have completed loading (page 1063)l Information for tables that are currently loading (page 1064)l Information for tables that are in the loading queue (page 1065)l Information for tables with errors (page 1066)
General information for a completed taskThis section displays a table with information for all of the completed tables in a task. To view this table,click the Total Completion bar, shown in the figure below.
Setup and User Guide - Qlik Replicate, November 2021 1060

14 Monitoring and controlling replication tasks
Total Completion Status
This table displays the following Progress Details:
Detail Total Completed Remaining Notes
Tables The total number oftables that areincluded in the task.
The total number oftables that completedloading at the currenttime.
The total number oftables waiting to beloaded.
Additionalinformation.
Records The total records thatcompleted loading atthe current time.
The total number ofrecords that completedloading at the currenttime.
The total number ofrecords waiting to beloaded.
Additionalinformation.
Time The estimated time toload all of theselected tables in thetask.
The total elapsed time. The estimatedamount of time toload the remainingtables.
Additionalinformation.
Progress details
Adding a table and then reloading the task or simply reloading the task will not affect the FullLoad start/end time or duration as these times always pertain to the original Full Load.
Information for each table in the taskThis section describes the progress of each of the tables being processed for the task. To display thisinformation, click the [Select all] link above the
Setup and User Guide - Qlik Replicate, November 2021 1061

14 Monitoring and controlling replication tasks
Select All Tables
The information is displayed in a table that has the following columns:
l Table Name: The names of the source tables that are included in the task.l Status: This is a statement that describes the status for the table. The following are the statuses thatcan be displayed:
l Queued: The table is in the queue waiting to be loaded to the target endpoint.l Loading: The table is being processed but is not finished loading.l Completed: All of the table records are loaded to the target.l Error: The table stopped loading due to an error. See Accessing task messages andnotifications (page 1055) for more information about task errors.
l Estimated Count: The number of records that are loaded to the target.l Elapsed Time: The total elapsed time since the table records began processing.l Progress: The table status and the time the table entered that status.
Reloading or unsuspending tablesYou can reload or unsuspend a table, depending on the current task state and type.
Reloading tables
To reload selected tables, select the tables you want to reload and then click the Reload buttonabove the table list. When prompted to confirm the operation, click OK. The data in the selectedtables will be reloaded to the target endpoint. Note that this option is not available for tasks that aredefined without the Full Load replication option (such as "Apply Changes only" tasks).
Unsuspending tables
Tables that were suspended due to errors can be unsuspended once the errors are resolved. Tounsuspend a table, simply select the table (or tables) and click the Unsuspend button.
Setup and User Guide - Qlik Replicate, November 2021 1062

14 Monitoring and controlling replication tasks
Tables in a Full Load and Apply Changes task that were suspended during the Full Loadstage cannot be unsuspended. Such tables need to be reloaded instead.
It's possible to perform an unsuspend operation on multiple tables, but only if all tables are eligiblefor unsuspension. For example, simultaneously unsuspending a table that was suspended duringthe Full Load stage of a "Full Load and Apply Changes" task, and a table that was suspended duringthe Apply Changes stage, is not supported as the former table cannot be unsuspended.
Changes that were applied to a table while it was suspended will be lost when that tableis unsuspended. To work around this issue, simply define another task with the affectedtables and use the “Start from timestamp” Run option to resume the task.
For information on the "Reload" and "Start from Timestamp Run" options, see Working with tasks atruntime (page 1046)
Information for tables that have completed loadingThis section displays a table with information for each of the completed tables. To view this table, click theCompleted bar, shown in the figure below.
Completed Tables Status
The information is displayed in a table that has the following columns:
l Table name: The names of the source tables that have completed loading.l Loaded On: The time that Replicate started loading the table records to the target.l Transferred Count: The number of records loaded to the target.
Setup and User Guide - Qlik Replicate, November 2021 1063

14 Monitoring and controlling replication tasks
When filters are applied to source tables, the number shown in this column will reflectthe total number of records before the include/exclude filter was applied. Consequently,the "Transferred Count" number may be higher than the actual number of records thatwere replicated to the target.
l Transferred Volume: The volume of the records (in MB) loaded to the target.l Load Duration: The amount of time that it took for all records to load to the target.l Throughput Records: The average throughput rate for the table. Throughput describes the numberof records read per second. For more information on throughput, see Monitoring throughput in a FullLoad operation (page 1066).
l Throughput Volume: The average throughput rate for the table. Throughput describes the volumeof records (in KB) read per second. For more information on throughput, see Monitoring throughputin a Full Load operation (page 1066).
l Reload: Click the Reload icon to reload the data for selected tables and run the full-load operationagain.
Information for tables that are currently loadingThis section displays a table with information for each of the tables that are currently loading. To view thistable, click the Loading bar, shown in the figure below.
When replicating to an Oracle database with a full disk and/or partition where Oracle is trying towrite archived redo log files, insert operations may fail. In such as case, no error will be shownand the task will not progress past the loading stage. To confirm that this is indeed an OracleArchiver error, stop and attempt to restart the task. The task will not start and an appropriateerror should be shown.
Loading Tables Status
The information is displayed in a table that has the following columns:
l Table Name: The names of the source tables that are currently loading.l Load Duration: The amount of time that it took for all records to load to the current point in time.l Estimated Count: The estimated number of rows that are to be loaded in the full load operation.
Setup and User Guide - Qlik Replicate, November 2021 1064

14 Monitoring and controlling replication tasks
l Transferred Count: The number of records that are loaded to the target endpoint.
When filters are applied to source tables, the number shown in this column will reflectthe total number of records before the include/exclude filter was applied. Consequently,the "Transferred Count" number may be higher than the actual number of records thatwere replicated to the target.
l Current Throughput: The current throughput rate for the table. Throughput describes the number ofrecords read per second. For more information on throughput, see Monitoring throughput in a FullLoad operation (page 1066).
l Cached Changes (not relevant for Full Load only tasks) - The number of changes (DMLs) appliedto the source table since the Replicate started loading the table to the target.
l Estimated Finish Time: The approximate time the task finished loading the tables. The timestampdisplayed indicates the date and time.
There may sometimes be a discrepancy between the "Estimated Finish Time" andthe"Time Remaining (Estimated)" values.The "Time Remaining (Estimated)" value is calculated by the combined transfer rate ofall the records of the task, while the "Estimated Finish Time" is calculated per table.The discrepancy arises when the table transfer rate at the beginning of the task is veryfast, but slows down towards the end of the task.In this situation, the "Time Remaining (Estimated)" value will be greater and lessaccurate than the "Estimated Finish Time" value.
l Progress: The table status and the time the table entered that status.l Reload: Click the Reload icon to reload the data for selected tables and run the full-load operationagain.
Information for tables that are in the loading queueThis section displays a table with information for each of the tables that are waiting to be loaded. To viewthis table, click the Queued bar, shown in the figure below.
Setup and User Guide - Qlik Replicate, November 2021 1065
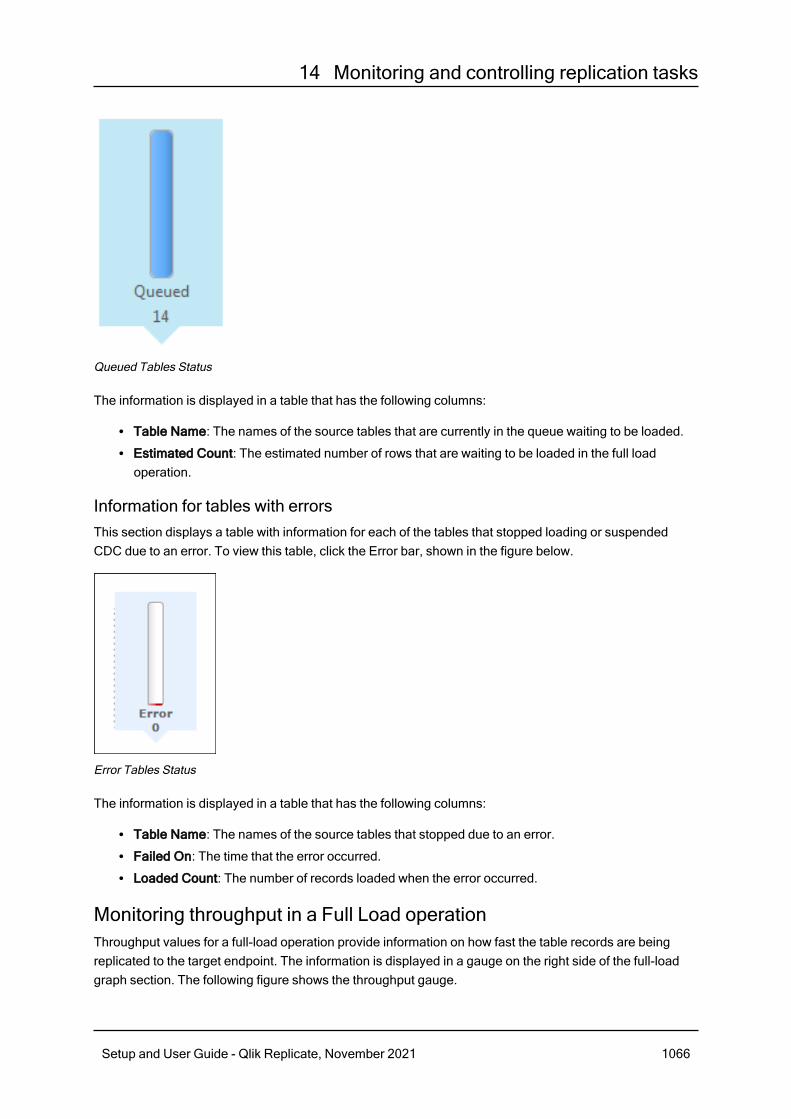
14 Monitoring and controlling replication tasks
Queued Tables Status
The information is displayed in a table that has the following columns:
l Table Name: The names of the source tables that are currently in the queue waiting to be loaded.l Estimated Count: The estimated number of rows that are waiting to be loaded in the full loadoperation.
Information for tables with errorsThis section displays a table with information for each of the tables that stopped loading or suspendedCDC due to an error. To view this table, click the Error bar, shown in the figure below.
Error Tables Status
The information is displayed in a table that has the following columns:
l Table Name: The names of the source tables that stopped due to an error.l Failed On: The time that the error occurred.l Loaded Count: The number of records loaded when the error occurred.
Monitoring throughput in a Full Load operationThroughput values for a full-load operation provide information on how fast the table records are beingreplicated to the target endpoint. The information is displayed in a gauge on the right side of the full-loadgraph section. The following figure shows the throughput gauge.
Setup and User Guide - Qlik Replicate, November 2021 1066

14 Monitoring and controlling replication tasks
Throughput Gauge
You can set the throughput measurement values either to the number of records replicated per second, orto the number of kilobytes replicated per second. The display is always based on the current loadoperation.
To set the unit of throughput measurement:
l Select either rec/sec or kbyte/sec from the drop-down menu above the Throughput gauge.
Click the Throughput gauge to display a graph with the target throughput details. To view the graph only,click the expand/collapse arrow on the right of the gray bar above the graph. Click the arrow again torestore the status bars and throughput gauge.
14.3 Monitoring change processing operationsYou can view the progress of the change-processing operation in the left section of the Monitor.
To make sure you are viewing the information for a change-processing operation, select the ChangeProcessing tab.
You can view the following:
l General Change Processing information (page 1067)l Detailed Change Processing information (page 1069)
General Change Processing informationGeneral information about the Change Processing task is presented in a graphical format. The followingfigure shows the graphical information displayed.
Setup and User Guide - Qlik Replicate, November 2021 1067
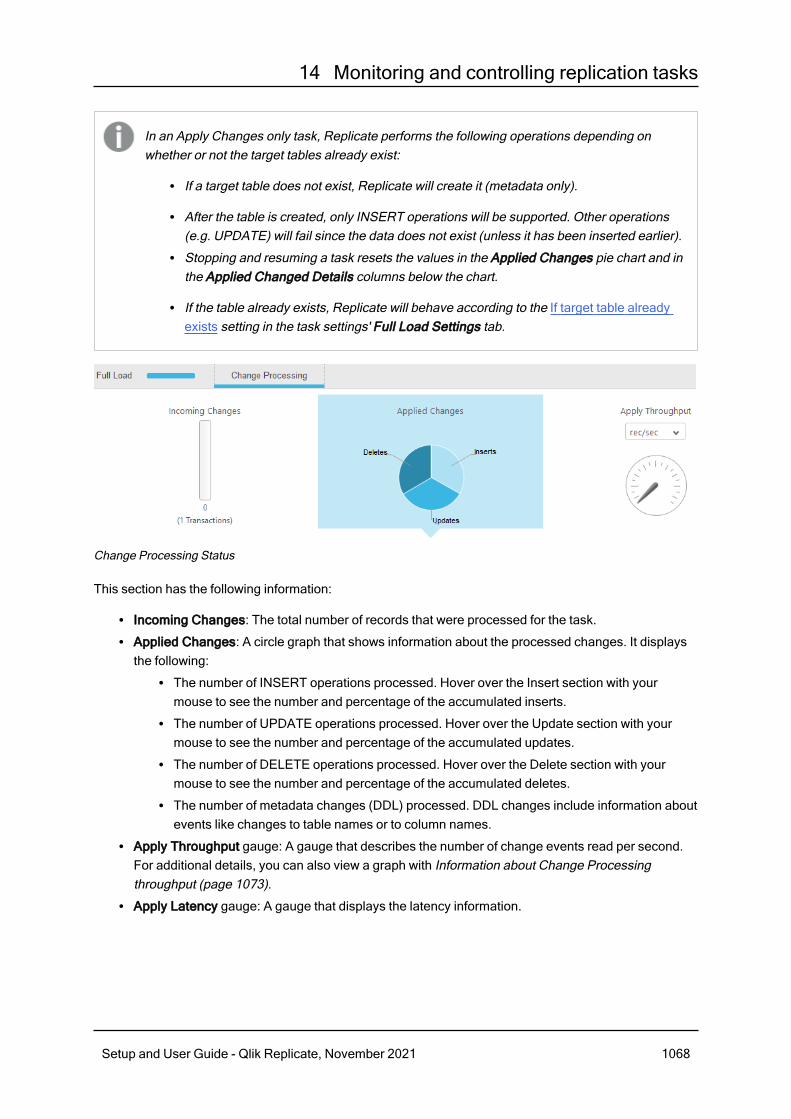
14 Monitoring and controlling replication tasks
In an Apply Changes only task, Replicate performs the following operations depending onwhether or not the target tables already exist:
l If a target table does not exist, Replicate will create it (metadata only).
l After the table is created, only INSERT operations will be supported. Other operations(e.g. UPDATE) will fail since the data does not exist (unless it has been inserted earlier).
l Stopping and resuming a task resets the values in the Applied Changes pie chart and inthe Applied Changed Details columns below the chart.
l If the table already exists, Replicate will behave according to the If target table alreadyexists setting in the task settings' Full Load Settings tab.
Change Processing Status
This section has the following information:
l Incoming Changes: The total number of records that were processed for the task.l Applied Changes: A circle graph that shows information about the processed changes. It displaysthe following:
l The number of INSERT operations processed. Hover over the Insert section with yourmouse to see the number and percentage of the accumulated inserts.
l The number of UPDATE operations processed. Hover over the Update section with yourmouse to see the number and percentage of the accumulated updates.
l The number of DELETE operations processed. Hover over the Delete section with yourmouse to see the number and percentage of the accumulated deletes.
l The number of metadata changes (DDL) processed. DDL changes include information aboutevents like changes to table names or to column names.
l Apply Throughput gauge: A gauge that describes the number of change events read per second.For additional details, you can also view a graph with Information about Change Processingthroughput (page 1073).
l Apply Latency gauge: A gauge that displays the latency information.
Setup and User Guide - Qlik Replicate, November 2021 1068

14 Monitoring and controlling replication tasks
The latency values displayed in the Qlik Replicate Console measure the time delay (latency)between the time when a change is visible to the source (and committed), and the time when thissame change is visible to the target. The display is always based on the current change beingapplied.You should take the following into consideration:
l Latency when applying large transactions:For example, when the most recent latency value was 10 seconds and now a transaction ofone million rows gets committed at the source endpoint, Qlik Replicate starts to apply thattransaction to the selected target and it will take some time to write all the changes to thetarget (for example 60 seconds). During the next 60 seconds, the latency value graduallygrows to 70 seconds for the last change in the transaction. Once the transaction iscommitted, the latency drops back to the 'regular' latency (10 seconds in this case).
l Latency when no transactions are being applied:When a time period passes with no changes applied to the target, the latency calculation isbased on the time difference between the current time and the timestamp of the last changeevent read from the transaction log. This could happen if, for example, there is high activityon tables which are not selected for replication in the current task.
For additional details, you can also view a graph with Information about Apply Latency (page 1074).
Detailed Change Processing informationFor each of the status indicators displayed in the General Change Processing information (page 1067)section, a table or graph is displayed in the section below with detailed information about the changeprocessing status. The following information is available:
l Information about Incoming Changes (page 1069)l Information about applied changes (page 1071)l Information about Change Processing throughput (page 1073)l Information about Apply Latency (page 1074)
Information about Incoming ChangesThis section displays two bar graphs with information about incoming changes. Incoming changes displaysa snapshot of the number of change records currently being read from the source endpoint and written tothe target endpoint. To view these graphs, click the Incoming Changes bar, shown in the figure below.
Setup and User Guide - Qlik Replicate, November 2021 1069

14 Monitoring and controlling replication tasks
Incoming Changes
The following graphs are displayed.
Incoming Change Graphs
The graphs have the following information:
l Accumulating: These bars display the number of records currently being read from the sourceendpoint. These records are accumulated in a queue until they are applied to the target. Thefollowing is displayed:
l In Memory: The number of accumulating records that are currently in the computer memory.l On Disk: The number of accumulating records that are currently stored on disk.
l Applying: The number of records currently being written to the target. These are the appliedchanges. The following is displayed:
Setup and User Guide - Qlik Replicate, November 2021 1070

14 Monitoring and controlling replication tasks
l In Memory: The number of records being applied that are currently in the computer memory.l On Disk: The number of records being applied that are currently stored on disk.
Information about applied changesInformation about the applied changes is shown in the following tables:
l Recent Activity (page 1071) -Shows changes that were committed to the source.l Aggregates (page 1073) - Shows the total changes committed to the target for each change typeand transaction type.
To view these tables, click the Applied Changes pie graph, shown in the figure below. The AppliedChanges pie graph indicates which changes were committed to the target.
Applied Changes graph
The following tables are available when you click the Applied Changes pie chart:
l Recent Activity (page 1071)l Aggregates (page 1073)
Recent ActivityClick the Recent Activity tab in the Applied Changes Details pane to view information about whichchanges occurred in each table, including:
l Table Name: The names of the source tables that are included in the task.l Insert: The number of INSERT operations processed for the specific table.l Delete: The number of DELETE operations processed for the specific table.l Update: The number of UPDATE operations processed for the specific table.l DDL: The number of metadata changes (DDL) processed. DDL changes include information aboutevents like changes to table names or to column names.
l Total Applied: The total number of changes applied to the target.l Data Errors: The number of data processing errors for the specific table. Data errors occur at therecord level and include conversion errors, errors in transformations, and bad data.
Setup and User Guide - Qlik Replicate, November 2021 1071

14 Monitoring and controlling replication tasks
Resetting the Data Errors CountAfter you have resolved the data errors it is recommended to reset the data errors count. This isespecially important if you have configured Replicate to perform an escalation action when thenumber of errors reaches a certain amount.Details about the errors can be found in the attrep_apply_exceptions control table.To reset the error count for a specific table, select the table and then click the Reset data errorsbutton above the table list. Note that resetting the error count does not delete the error informationfrom the attrep_apply_exceptions table.For information about setting a data error escalation policy, see Data Errors.For information about the attrep_apply_exceptions table, see Apply exceptions (page 1138)
Reloading a table resets the data error count for that table.
l Last Modified: The time the last change occurred for the specific table.
Reloading or unsuspending tablesYou can reload or unsuspend a table, depending on the current task state and type.
Reloading tables
To reload selected tables, select the tables you want to reload and then click the Reload button above thetable list. When prompted to confirm the operation, click OK. The data in the selected tables will bereloaded to the target endpoint. Note that this option is not available for tasks that are defined without theFull Load replication option (such as "Apply Changes only" tasks).
Unsuspending tables
Tables that were suspended due to errors can be unsuspended once the errors are resolved. Tounsuspend a table, simply select the table (or tables) and click the Unsuspend button.
Tables in a Full Load and Apply Changes task that were suspended during the Full Load stagecannot be unsuspended. Such tables need to be reloaded instead.
It's possible to perform an unsuspend operation on multiple tables, but only if all tables are eligible forunsuspension. For example, simultaneously unsuspending a table that was suspended during the FullLoad stage of a "Full Load and Apply Changes" task, and a table that was suspended during the ApplyChanges stage, is not supported as the former table cannot be unsuspended.
Changes that were applied to a table while it was suspended will be lost when that table isunsuspended. To work around this issue, simply define another task with the affected tablesand use the “Start from timestamp” Run option to resume the task.
For information on the "Reload" and "Start from Timestamp Run" options, see Working with tasks atruntime (page 1046)
Setup and User Guide - Qlik Replicate, November 2021 1072

14 Monitoring and controlling replication tasks
AggregatesClick the Aggregates tab in the Applied Changes Details pane to view information about total changes foreach change type and transaction type.
The Aggregate table displays the total changes (for all tables) applied for each of the following types ofoperations:
l INSERTl UPDATEl DELETEl DDL
The Aggregate table also displays the information about transactions. It displays the total number andvolume of:
l COMMITSl ROLLBACKS
Information about Change Processing throughputThroughput values for apply throughput in a change-processing operation provide information on how fastthe change records are loaded to the target endpoint. The information is displayed in a gauge in theChange-Processing graph section. The following figure shows the Apply Throughput gauge:
Apply Throughput Gauge
You can set the Apply Throughput measurement values either to the number of change records replicatedper second, or to the number of kilobytes replicated per second. The display is always based on the currentload operation.
To set the unit of throughput measurement:
l Select either rec/sec or kbyte/sec from the drop-down menu below the Apply Throughput gauge.
Setup and User Guide - Qlik Replicate, November 2021 1073

14 Monitoring and controlling replication tasks
Click the Apply Throughput gauge to display a graph with the throughput details as shown in the figurebelow. To view the graph only, click the expand/collapse arrow in right side of the gray bar above thegraph. Click the arrow again to restore the progress bars and Change Processing gauges.
Apply Throughput Details Graph
The Apply Throughput metrics represented by the graph may not be always accurate. Foraccurate metrics, check the gauge described above.
Information about Apply LatencyLatency values for apply latency in a change-processing operation provide information about the timedelay (latency) between the time when a change is visible to the source (and committed), and the timewhen this same change is visible to the target. The information is displayed in a gauge in the Change-Processing graph section. The following figure shows the Apply Latency gauge.
Setup and User Guide - Qlik Replicate, November 2021 1074

14 Monitoring and controlling replication tasks
Apply Latency
The latency values displayed in the Qlik Replicate Console measure the time delay (latency) between thetime when a change is visible to the source (and committed), and the time when this same change is visibleto the target. The display is always based on the current change being applied. For more information aboutlatency, see Apply Latency gauge.
Select the Apply Latency gauge to display a graph with the latency details. To view the graph only, click theexpand/collapse arrow in right side of the gray bar above the graph. Click the arrow again to restore theprogress bars and Change Processing gauges.
During data capture, the target latency will always be equal to the source latency (even thoughno data has reached the target yet). This is simply because target latency is the sum of sourcelatency + apply latency, and can therefore never be less than the source latency.
Setup and User Guide - Qlik Replicate, November 2021 1075

14 Monitoring and controlling replication tasks
Apply Latency Details Graph
14.4 Viewing messagesYou can see messages sent for the task while in the monitor view. For information on viewing messages,see Accessing task messages and notifications (page 1055).
14.5 Using the monitor toolsThe monitor tools let you view additional information about the task. The following topics describe theinformation available through these tools:
l Viewing history information (page 1077)l Setting the task logging level (page 1077)l Viewing, downloading, and manually rolling over task log files (page 1078)l Deleting log files (page 1079)l Downloading a diagnostics package (page 1081)l Downloading a memory report (page 1080)
Setup and User Guide - Qlik Replicate, November 2021 1076

14 Monitoring and controlling replication tasks
Viewing history informationThe History window displays information for each event carried out in the task. To access the Historyinformation, from Monitor mode (page 89), click Tools in the toolbar and then select History.
You can view the following information in the History window:
l Event type: The type of event that occurred, for example Task started or Task table load finished.l Timestamp: A timestamp that indicates when the event took place. The timestamp is in the format,
YYYY-MM-DD hh:mm:ss.milliseconds (to six places).l Table Name: The name of the table where the event takes place if the event is related to a table.l Description: A description of the event. This is not displayed for all events.You can double-click the description cell to view a window with the full message if the entiredescription is not available.
The following figure shows the History window.
History Window
Setting the task logging levelIn the Log Management window, you can set the logging level for the task you are currently monitoring aswell as view, download, and delete log files.
Setup and User Guide - Qlik Replicate, November 2021 1077

14 Monitoring and controlling replication tasks
l The logging level can also be set in the Logging Level sub-tab in the Task Settingsdialog box. For more information, see Logging (page 1036).
To set logging levels:
1. Open the task you are working with if it is not displayed in the Qlik Replicate Console. Forinformation on opening a task, see Editing a replication task (page 121).
2. Switch to Monitor view. Then, click the Tools toolbar button and select Log Management.The Log Managementwindow opens.
3. At the top of the Log Management window, set the Component Logging Level slider to the loglevel you want. This sets the logging level for all log modules. Note that all of the sliders for theindividual modules move to the same position that you set in the main slider.
4. Make any changes to the sliders for the individual modules. This is optional. Note that if you changethe main slider, all of the individual sliders are reset to the new position. If you want to maintain adifferent logging level for a specific module, you need to reset it.
Storing trace and verbose logging in memoryWhen the logging level is set to "Trace" or "Verbose", you can instruct Replicate to store the logginginformation in memory until an error occurs. On detecting an error, Replicate will begin writing to thephysical logs and continue to do so for a few minutes after the initial occurrence of the error.
If no error occurs before the allocated memory is used up, Replicate will empty the memory buffer and startafresh.
This option is useful for tasks that fail unpredictably and for no obvious reason. The problem withcontinually writing large amounts of information to the logs is twofold:
l Running in "Trace" or "Verbose" logging mode will quickly use up available disk space (unless thelogging settings have been configured to prevent this).
l Continually writing large amounts of data to the logs will affect performance.
To use this option
1. Select the Store trace/verbose logging in memory, but if an error occurs, write to the logs checkbox at the top of the tab.
2. In the Allocate memory up to (MB) field, specify the amount of memory you want to allocate forstoring logging information.
Viewing, downloading, and manually rolling over task log filesIn the Log Viewer window, you can view the logs for the task you are currently monitoring , manually rollthem over if necessary, and download them.
Viewing and downloading the task log filesFollow the steps below to view or download the task log files.
Setup and User Guide - Qlik Replicate, November 2021 1078

14 Monitoring and controlling replication tasks
To open the Log Viewer window:
1. Open the task whose log files you want to view or download.For information on opening a task, see Editing a replication task (page 121).
2. Switch to Monitor view.
3. Either, click the Tools toolbar button and then select View Logs.ORClick the View Logs button in the Messages pane in the lower right of the console.The Log Viewer window opens.
4. Select the log file you want to view or download from the list in the Log Files pane. If you want todownload the file, skip to Step 8.
5. The contents of the log file will be displayed in the right pane. When you select a row in the log file, atooltip will be display the full message of the selected row.
6. You can browse through the log file using the scroll bar on the right and the navigation buttons at thetop of the window.
7. To search for a specific string in the log file, enter the search string in the search box at the top of thewindow.Any terms that match the specified string will be highlighted blue.
8. To download the log file, click the toolbar button.
Depending on your browser settings, one of the following will occur:l The task JSON file will be automatically downloaded to the default download locationl You will be prompted for a download location. In this case, save the JSON file to yourpreferred location.
Manually rolling over task log filesYou can manually roll the log file for the task you are monitoring in the Log Viewer. This lets you stoplogging to the current log file and begin to log to a new log file. The current log file is called reptask_<name
of task> and saved (older) log files have the file name reptask_<name of task>_xxxxxxxxxxxx wherexxxxxxxxxxxx represents a 12-digit timestamp.
To immediately roll over the selected log file, click the Roll Log File button in the top right of the window.
Deleting log filesIn the Delete Logs window, you can manually delete log files older than the specified number of days.
To delete the logs:
1. Open the task whose log files you want to delete.For information on opening a task, see Editing a replication task (page 121).
2. Switch to Monitor view.
3. Click the Tools toolbar button and then select Delete Logs.The Delete Logs window opens.
4. Optionally change the default number of days (45) and then click the Delete button.All log files older than the specified number of days will be deleted.
Setup and User Guide - Qlik Replicate, November 2021 1079

14 Monitoring and controlling replication tasks
Deleting old partitions manuallyOver time, Change Data Partitioning can result in a large number of files and partitions accumulating on thetarget system, which may significantly impact performance. Therefore, to ensure optimal performance,best practice is to delete old partitions from time to time.
Partitions can be deleted manually (as described below) or automatically as described in Deleting oldpartitions periodically (page 1024).
To manually delete processed partitions:
1. From the Tools menu, select Delete Processed Changed Data Partitions.The Delete Processed Changed Data Partitions window opens.
2. From the Delete partitions older than drop-down lists, select a time period.
3. Click Delete Partitions.
4. If the task is running, the partitions will be deleted. Otherwise, a message will be shown, informingyou that the partitions will only be deleted when the task starts running.
The minimum age of partitions that can be deleted may be preset by a consuming application.This is usually only happens when some partitions have not yet been processed. In this case, anote to this effect will be shown in the UI and you will not be able to change the minimum age.
Downloading a memory reportThe memory report is a diagnostics tool that can be used to diagnose memory-related issues, such asunusually high memory consumption by a specific task.
Usually, multiple memory reports showing the gradual increase in memory consumption will need to begenerated.
To download a memory report:
1. Open the task you are working with if it is not displayed in the Qlik Replicate Console. Forinformation on opening a task, see Editing a replication task (page 121).
2. Click the Tools toolbar button and then select Support > Download Memory Report.Depending on your browser settings, the following file will either be automatically downloaded toyour designated download folder or you will be prompted to download it:File name:<task_name>__diagnostics__<timestamp>.memp
Example:MyTask__diagnostics__20180109161333.memp
3. Send the report to Qlik.
Setup and User Guide - Qlik Replicate, November 2021 1080

14 Monitoring and controlling replication tasks
Downloading a diagnostics packageYou can generate a task-specific diagnostics package for Support to review. The diagnostics packagecontains the task log files and various debugging data that may assist in troubleshooting task-relatedissues.
To download a diagnostics package:
1. Open the task you are working with if it is not displayed in the Qlik Replicate Console. Forinformation on opening a task, see Editing a replication task (page 121).
2. Click the Tools toolbar button and then select Support > Download Diagnostics Package.Depending on your browser settings, the following file will either be automatically downloaded toyour designated download folder or you will be prompted to download it:File name:<task_name>__diagnostics__<timestamp>.zip
Example:MyTask__diagnostics__20180109161333.zip
Setup and User Guide - Qlik Replicate, November 2021 1081
15 Qlik Replicate server settings
15 Qlik Replicate server settingsThis chapter describes how to configure the Qlik Replicate Server settings. Server settings are managed inSERVER view.
To switch to SERVER view:
l From the drop-down list in the top left corner of the console (below the product logo) select Server.
l Server settings affect all Tasks that are created in the Qlik Replicate instance you areworking with.
l Changes to server settings will not affect running tasks.
In this section:
l Notifications settings (page 1082)l License settings (page 1103)l Global error handling (page 1107)l Logging (page 1108)l File Transfer Service (page 1112)l Scheduling jobs (page 1114)l User permissions (page 1116)l Resource control (page 1119)l Operating system level credentials (page 1120)l More options (page 1120)l Endpoint Servers (page 1121)
15.1 Notifications settingsThe following can be defined in the Notifications settings:
l Defining notifications (page 1083)l Setting up Mail parameters (page 1100)l Creating a Default Recipient List (page 1101)
Changes to notification settings will not affect running tasks.
To view and edit the Notification settings:
l In Server view, click the Notifications tab on the left. Then click the Notifications sub-tabs to enteryour settings.
Setup and User Guide - Qlik Replicate, November 2021 1082

15 Qlik Replicate server settings
Defining notificationsTo configure and create notifications, click the Notifications sub-tab.
You use notifications to send messages about events that occur when running tasks in Qlik Replicate.Notifications are sent to inform users of any change in the system state, including:
l A task is started or stoppedl Latency is too highl Memory utilization is too highl Disk utilization is too highl An error or a specific type of error occurred
You can manage notifications that you create from the Notifications list. This list provides you withinformation about each notification defined and lets you activate/deactivate a notification. In addition, youcan make changes to the definitions of existing notifications or delete them.
The following topics describe how to define notifications in Qlik Replicate:
l Creating a new notification (page 1083)l The Notifications List (page 1099)l Editing a notification (page 1099)l Deleting a notification (page 1100)
To open the Notifications page:
From the Server view, click Notifications from the menu list at the left. The Notifications sub-tab isdisplayed.
Notifications are sent by:
l An email message to the default list of users and/or to a custom list of users.l Writing an entry in the Windows Event Log.l Displaying a message in the Qlik Replicate Console.
Creating a new notificationUse the New Notification wizard to determine the notifications that are sent and who receives them.
To start the New Notification Wizard:
1. In Server view, click the Notifications tab on the left and then click the New Notification toolbarbutton.
2. From the drop-down menu, select Task Events or Server Events according to the notification youwant to define.
3. The New Notification wizard opens displaying either the Task Events or Server Events screen(according to your earlier selection).
Setup and User Guide - Qlik Replicate, November 2021 1083

15 Qlik Replicate server settings
4. Continue from Define the action that triggers the notification (page 1084) or Define the event thattriggers the notification (page 1094) as appropriate.
Creating a Notification for a task eventUse the New Notification wizard to create notifications for task-based events.
For changes to task notification settings to take effect, the task(s) needs to be stopped andresumed.
To create a notification for a task event
1. Launch the New Notification wizard as described in Creating a new notification (page 1083).
2. In the Notification Name field, type a name for the notification.
3. Perform the following steps to define the notification:l Define the action that triggers the notification (page 1084)l Define which changes of status trigger the notification (page 1085)l Define errors or warnings that trigger the notification (page 1087)l Define the recipients (page 1087)l Define the notification message (page 1088)l Associate tasks with the notification (page 1093)l Review the notification rule (page 1094)
Define the action that triggers the notificationIn the Processing Status section of the Task Events page, you can determine the action that triggers thenotification. If the Operator section is not displayed, click on the header with the word Operator to displaythe options for this section. Select one of the following:
l Task was started manually or by the Scheduler: To send the notification when the task is startedmanually or by the Scheduler.
l Task was stopped manually or by the Scheduler: To send the notification when the task isstopped manually or by the Scheduler.
l Task was stopped after Full Load: Cached changes were not applied: To send the notificationwhen the task is stopped after Full Load completes but before cached changes (changes to thesource tables that occurred during Full Load) are applied to the target.
l Task was stopped after Full Load: Cached changes were applied: To send the notification whenthe task is stopped after Full Load completes and cached changes (changes to the source tablesthat occurred during Full Load) have been applied to the target.
l Full Load started: To send the notification when the Full Load process starts.l Full Load completed: To send the notification when the Full Load process completes.
Once you determine when to send the notification, you can decide whether specific changes in statustrigger the notification.
Setup and User Guide - Qlik Replicate, November 2021 1084

15 Qlik Replicate server settings
If you want to send a message about problems in latency, memory utilization, or disk utilization, clickPerformance/Resources. See Define which changes of status trigger the notification (page 1085) for anexplanation.
If you want to send the notification when certain errors occur, click Errors. See Define errors or warningsthat trigger the notification (page 1087) for an explanation.
Or you can click Next to Define the recipients (page 1087).
Define which changes of status trigger the notificationIn the Performance/Resources section of the Task Events page, you can define specific parameters forlatency, disk utilization, or memory utilization that trigger a notification.
To set up notifications for latency, disk utilization, or memory utilization:
1. In the New Notification Wizard'sTask Events page, click Performance/Resources.
2. Select one of the following:l Latency is higher than [N] seconds.l Memory utilization exceeded [N] MBl Disk utilization exceeded [N] MB
3. Define the value for the option you select. See the table below for an explanation on each of theseoptions and how to set the value.
If you select one of these options, the notification is sent only when the selected parameter istrue. However, you must also Define the action that triggers the notification (page 1084).
Notification Set Value Notes
Latency ishigher thanValue seconds
Click [N] and enter a value in the field that isdisplayed.
Latency is the time interval in secondsbetween the time a change was committed inthe source system and the time it is appliedand committed in the target system.
-
Set Values for Latency, Disk Utilization, Memory Utilization
Setup and User Guide - Qlik Replicate, November 2021 1085

15 Qlik Replicate server settings
Notification Set Value Notes
Clearnotificationwhen latencydrops below<n> seconds.
Use this to set the value that determineswhen latency returns to "normal limits."
Click [N] and enter a value.
When latency is below the valueentered in this field, it is considered tobe in the "normal" range and thenotification status ends.
If selected, a notification is sent toindicate that latency returned to"normal" status.
For more information, see Define thenotification message (page 1088).
MemoryutilizationexceededValue MB
Click [N] and enter a value in the field that isdisplayed.
Memory utilization is the amount of memoryused by the task.
Clearnotificationwhen memoryutilization isbelow <n> MB
Use this to set the value that determineswhen memory utilization returns to "normallimits."
Click [N] and enter a value.
When memory utilization is below thevalue entered in this field, it isconsidered to be in the "normal"range and the notification status ends.
For more information, see Define thenotification message (page 1088).
Disk utilizationexceededValue MB
Click [N] and enter a value in the field that isdisplayed.
Disk utilization is the amount of disk spaceused.
Set a value that indicates that the currentamount of disk space used is problematic torunning a replication task.
Clearnotificationwhen diskutilization isbelow <n> MB
Use this to set the value that determineswhen disk utilization returns to "normallimits."
Click [N] and enter a value.
When disk utilization is below thevalue entered in this field, it isconsidered to be in the "normal"range and the notification status ends.
For more information, see Define thenotification message (page 1088).
Once you determine the status changes that trigger a notification, you can decide whether specific errorstrigger a notification.
If you want to send the notification when certain errors occur, click Errors. See Define errors or warningsthat trigger the notification (page 1087) for an explanation.
Setup and User Guide - Qlik Replicate, November 2021 1086

15 Qlik Replicate server settings
Or you can click Next to Define the recipients (page 1087).
Define errors or warnings that trigger the notificationIn the Errors and Warnings dialog of the Task Events wizard, you can determine whether notifications aresent when an error occurs. You can determine whether to send the notification for all errors or only forspecific error types.
To set up notifications for errors:
1. In the New Notification Wizard's Task Events dialog, click Errors and Warnings.
2. Select one of the following:l Task was stopped due to a non-recoverable error: Select this to receive a notification whenan error that cannot be retried is returned and the task is stopped due to this error.
l Table processing was suspended due to errors: Select this to receive a notification whenan error causes a table to stop processing during a full-load operation or suspend CDC. Inthis case, the table process stops, but the task continues.
l Any Error: Select this to receive a notification when any error occurs in the system. Note thatnotification will not be sent for the following error types:
l Recoverable errors. Recoverable errors are printed as INFO in the log (unless thetask logging is set to TRACE, in which case they will be printed as ERROR).
l Certain user-defined error handling policies. For example, if the Duplicate key whenapplying INSERT Apply Conflicts handling option is set to Log record to theexceptions table, no notification will be sent. However, if it set to Stop task, anotification will be sent.
Setting this option may result in a large volume of notifications, depending on thenumber of tasks running and their current status. It is therefore recommended todefine this notification for selected tasks rather than for all tasks.
l Any Warning: Select this to receive a notification when a warning is issued in the system.
Once you determine the error types that trigger a notification, you can:
l Define the action that triggers the notification (page 1084), if you have not done this already.l Define which changes of status trigger the notification (page 1085) if you have not done this already.l Or you can click Next to Define the Recipients.
Define the recipientsNotifications are always displayed in Notifications tab in the Messages panel of the Replicate Console. Inthe Recipients page of the New Notification wizard, you can determine whether to also send thenotification to Windows Event Log and/or email recipients.
To determine the notification recipients:
Select any of the following to determine the notification recipients:
Setup and User Guide - Qlik Replicate, November 2021 1087

15 Qlik Replicate server settings
l Event log: Select this if you want the notification message to be written to the Windows/Linux Eventlog. For information on how to view the Windows/Linux Event log, see the online help for the versionof Windows or Linux you are using.
l Default notification email list: Select this option if you want to send an email message to the all therecipients on the Default Notification Email List. For more information, see Creating a DefaultRecipient List (page 1101). To see the current list of default recipients, click Show List.
l Custom email recipients: Select this option to send the email notification to specific recipients.Then:
l Click the Add Recipient button.The Name field in the first available row in the list is activated.
l Type the name of the user that you want to receive the message.
If you click another part of the Replicate Console, the cell will become inactive.You can double-click the cell to enter additional information.
l Press the [tab] key or double click in the in the Email cell, then type the email address for theuser you entered in the Name cell.
l Repeat the above to add more recipients.
When you have finished, click Next to Define the Notification Message.
Define the notification messageYou can create a custom message for your notification. By default, a standard message is created basedon your settings in the Task Events screen.
To create a notification message:
1. In the New Notification Wizard's, Message page, double-click in any of the table cells to open theEdit Notification Message dialog box. See the table below for an explanation of the information toenter in each field.
2. Click in the right pane of the dialog box and begin to type your message. In some cases a defaultmessage is displayed based on the information you entered in the previous pages of the NewNotification Rule wizard. You can edit or delete the message, or create a new message to be sentwith the notification in this dialog box.
3. Add variables in messages and email headers you define for notifications, if necessary. You canenter variables in one of two ways:
l Type a variable into the message pane on the right using the following format:{{<VARIABLE_NAME >}}For example: {{TASK_NAME}}.
l Use the variables from the left pane of the Edit Notification dialog box. To add a variable tothe notification message, you can:Double-click the variable. The variable is inserted where your cursor is located in thenotification message in the right pane.
Setup and User Guide - Qlik Replicate, November 2021 1088

15 Qlik Replicate server settings
Select the variable you want to use and click the arrow key in the middle of the EditNotification Message dialog box. The variable is inserted where your cursor is located in thenotification message in the right pane.Drag the variable from the left pane to the location you want to place it in the notificationmessage in the right pane.For more information, see the Supported notification variables (page 1097).
4. Click OK to enter the message.
The following table describes how to enter the information in the Message page.
To where: Notification On Message Notification Off Message
This column describeswhere the message issent.
For more information,see Define therecipients (page 1087).
The Notification On Message issent when the replication taskmeets the conditions for thenotification to be sent.
For more information, see Definethe action that triggers thenotification (page 1084), Definewhich changes of status trigger thenotification (page 1085), andDefine errors or warnings thattrigger the notification (page 1087).
The Notification Off Message is sentwhen the replication task returns to itsnormal state. This type of message issent for notifications about latency,disk utilization, and memory utilization.
For more information, see Definewhich changes of status trigger thenotification (page 1085).
Creating a Notification Message
Setup and User Guide - Qlik Replicate, November 2021 1089

15 Qlik Replicate server settings
To where: Notification On Message Notification Off Message
Console:
The messages in thisrow are sent to the QlikReplicate Console.They are displayed inthe Messages sectionfor a specific task. Thissection is displayed in:
The Monitor for aspecific task. For moreinformation, seeAccessing taskmessages andnotifications (page1055).
The right pane of theTasks page. For moreinformation, seeViewing specific tasks(page 87).
This message is alsosent to the WindowsEvent log if you selectthis option. For moreinformation, see Definethe recipients (page1087).
In this field, you can edit, change ordelete the message that is sent tothe Qlik Replicate Console whenthe replication task meets theconditions for the notification to besent.
Example:
[{{SERVER_NAME}}\
{{NOTIFICATION_NAME}}]
{{TASK_NAME}} replication
task latency exceeds
defined limits.
Current latency is
{{LATENCY}} seconds.
This message is sent to theconsole when latency reaches avalue higher than the value youdefined.
In this field, you can edit, change, ordelete the message that is sent to theQlik Replicate Console when thereplication task returns to the normalrange as you defined when you Definewhich changes of status trigger thenotification (page 1085)
This field is relevant only fornotifications about latency, diskutilization, and memory utilization.
Example:
Latency is back to normal,
latency is {{LATENCY}}
seconds
This message is sent when latencyreturns to within its normal limits.
Setup and User Guide - Qlik Replicate, November 2021 1090

15 Qlik Replicate server settings
To where: Notification On Message Notification Off Message
Email Subject:
This is the subject of theemail messages sentfor the notification.
See Define therecipients (page 1087)for information aboutsending a notificationas an email.
In this field, you can edit, change ordelete the subject line for an emailthat is sent when the replicationtask meets the conditions for thenotification to be sent.
Example:
[{{SERVER_NAME}}\
{{NOTIFICATION_NAME}}]
{{TASK_NAME}} high
latency notification
This is the subject for an emailmessage sent when latencyreaches a value higher than thevalue you defined.
In this field, you can edit, change ordelete the subject line for an email thatis sent when the replication taskreturns to the normal range as youdefined when you Define whichchanges of status trigger thenotification (page 1085).
This field is relevant only fornotifications about latency, diskutilization, and memory utilization.
Example:
Replicate notification '
{{NOTIFICATION_NAME}}' for
task '{{TASK_NAME}}'
This is the subject for an emailmessage sent when latency returns towithin its normal limits.
Setup and User Guide - Qlik Replicate, November 2021 1091

15 Qlik Replicate server settings
To where: Notification On Message Notification Off Message
Email Message:
This is the body of theemail message sent forthe notification.
See Define therecipients (page 1087)for information aboutsending a notificationas an email.
In this field, you can edit, change ordelete the message that is sent byemail when the replication taskmeets the conditions for thenotification to be sent.
Example:
The latency for
replication task {{TASK_
NAME}} exceeds defined
limits.
The current latency is
{{LATENCY}} seconds.
-------------------------
-------------------------
----------------
This is an automated
message generated by Qlik
Replicate server
{{SERVER_NAME}} for
notification
{{NOTIFICATION_NAME}}.
This is an email message sentwhen latency reaches a valuehigher than the value you defined.
In this field, you can edit, change, ordelete the message that is sent byemail when the replication task returnsto the normal range as you definedwhen you Define which changes ofstatus trigger the notification (page1085).
This field is relevant only fornotifications about latency, diskutilization, and memory utilization.
Example
Latency is back to normal,
latency is {{LATENCY}}
seconds
This is an email message sent whenlatency returns to within its normallimits.
Setup and User Guide - Qlik Replicate, November 2021 1092

15 Qlik Replicate server settings
To where: Notification On Message Notification Off Message
Event viewer In this field, you can edit, change ordelete the message that is sent tothe Windows/Linux event viewerwhen the replication task meets theconditions for the notification to besent.
Note: This field is available onlywhen you select Event log whenyou Define the recipients (page1087).
Example:
[{{SERVER_NAME}}\
{{NOTIFICATION_NAME}}]
{{TASK_NAME}} high
latency notification
The latency for
replication task {{TASK_
NAME}} exceeds defined
limits.
The current latency is
{{LATENCY}} seconds.
This message is sent to the eventviewer when latency reaches avalue higher than the value youdefined.
-
After you define the message sent with the notification, click Next to associate tasks with the notification.
Associate tasks with the notificationBy default, notifications are sent for all tasks that are defined in the Qlik Replicate instance you are using.You can determine whether to send the notification to specific tasks defined in the Qlik Replicate instanceyou are using. For example, you can define a different latency rate for a specific task that is replicating froma slow system.
To associate the notification with tasks:
1. In the New Notification Wizard's Associate page, select one of the following:l All Tasks: To associate this notification with all tasks that are defined in the Qlik Replicateinstance you are working with. In this case all tasks that were previously defined and anyfuture task will be associated with this notification.
Setup and User Guide - Qlik Replicate, November 2021 1093

15 Qlik Replicate server settings
If you choose to associate this notification with All Tasks, then click Next to review thenotification rule.
l Selected Tasks: To associate this notification with one or more specific tasks only. Continuewith the next step.
2. Select the check box next to any of the tasks you want to associate with this notification. You canselect one or more tasks.
The Task check box at the top of the check-box column lets you select all of the tasksthat are displayed. When you select this check box it is as if you select each of the tasksindividually. Therefore, if you add tasks in the future they will not be included.
3. Click Next to Review the Notification Rule.
Review the notification ruleThe Summary page lets you review the notification rule that you defined so that you can determinewhether the selections you made in the wizard are correct. If you want to make changes, click Back and goto the page or pages you want to change.
When you are sure that the notification rule is defined in the way that you want, click Finish to close thewizard and add the rule to the notification list (seeThe Notifications List (page 1099)).
After you close the wizard, make sure to click Save at the top of the Settings page. This will save theinformation for all settings, not only for the notification rule that you created. If you made changes that youdo not want to keep, click Discard to discard all changes before you make changes to any of the othersettings.
Creating a notification for a server eventUse the New Notification wizard to create notifications for server-based events.
Server notifications are not written to the console (Task > Monitor > Notifications).
To create a notification for a server event
1. Launch the New Notification wizard as described in Creating a new notification (page 1083).
2. In the Notification Name field, type a name for the notification.
3. Perform the following steps to define the notification:
a. Define the event that triggers the notification (page 1094)
b. Define the recipients (page 1096)
c. Define the notification message (page 1096)
d. Review the notification rule (page 1097)
Define the event that triggers the notificationIn the Disk Space section, you can determine the disk space utilization event that triggers the notification.
Setup and User Guide - Qlik Replicate, November 2021 1094

15 Qlik Replicate server settings
Disk space is checked only for the drive where the data folder resides.
Select one of the following:
l Disk space utilization reaches the high threshold: The notification will be triggered when diskspace utilization reaches the percentage defined for the high threshold.
l Disk space utilization reaches the critical threshold: The notification will be triggered when diskspace utilization reaches the percentage defined for the critical threshold.
l Disk space utilization returns to normal: The notification will be triggered when disk spaceutilization returns to normal percentage (i.e. not high or critical).
l Disk space utilization reaches any of the defined thresholds or returns to normal: Thenotification will be triggered in any of the following scenarios:
l Disk space utilization increases from normal to the high thresholdl Disk space utilization increases from normal to the critical thresholdl Disk space utilization increases from the high threshold to the critical thresholdl Disk space utilization returns to normal from the high thresholdl Disk space utilization returns to normal from the critical thresholdl Disk space utilization returns to the high threshold from the critical threshold
In the System Memory section, you can determine the system memory utilization event that triggers thenotification.
Memory utilization check also takes into account the swap file space.
Select one of the following:
l System memory utilization reaches the high threshold: The notification will be triggered whensystem memory utilization reaches the percentage defined for the high threshold.
l System memory utilization reaches the critical threshold: The notification will be triggered whensystem memory utilization reaches the percentage defined for the critical threshold.
l System memory utilization returns to normal: The notification will be triggered when systemmemory utilization returns to normal percentage (i.e. not high or critical).
l System memory utilization reaches any of the defined thresholds or returns to normal: Thenotification will be triggered in any of the following scenarios:
l System memory utilization increases from normal to the high thresholdl System memory utilization increases from normal to the critical thresholdl System memory utilization increases from the high threshold to the critical thresholdl System memory utilization returns to normal from the high thresholdl System memory utilization returns to normal from the critical thresholdl System memory utilization returns to the high threshold from the critical threshold
Click Next to Define the recipients (page 1096).
Setup and User Guide - Qlik Replicate, November 2021 1095

15 Qlik Replicate server settings
Define the recipients
For more information, see Define the recipients (page 1087).
Define the notification message
You can create a custom message for your notification. By default, a standard message is created basedon your settings in the Server Events screen.
To edit the default notification message:
1. In the New Notification Wizard, Message page, click the message text to open the Edit NotificationMessage dialog box. See the table Define the event that triggers the notification (page 1094) for anexplanation of the information to enter in each field.
2. Click in the right pane of the dialog box and begin to type your message. In some cases a defaultmessage is displayed based on the information you entered in the previous pages of the NewNotification Rule wizard. You can edit the message or create a new message to be sent with thenotification in this dialog box.
3. Optionally, add variables in messages and email headers you define for notifications. You can entervariables in one of two ways:
l Type a variable into the message pane on the right using the following format:{{<VARIABLE_NAME >}}
For example: {{TASK_NAME}}.l Use the variables from the left pane of the Edit Notification Message dialog box. To add avariable to the notification message, you can:Double-click the variable. The variable is inserted where your cursor is located in thenotification message in the right pane.Select the variable you want to use and click the arrow key in the middle of the EditNotification Message dialog box. The variable is inserted where your cursor is located in thenotification message in the right pane.Drag the variable from the left pane to the location you want to place it in the notificationmessage in the right pane.For more information, see the Supported notification variables (page 1097).
4. Click OK to enter the message.
5. After you define the message sent with the notification, click Next to Review the notification rule(page 1097).
The following table describes how to enter the information in the Message page.
To where: Notification Message
This column describes where the message is sent.
For more information, see Define the recipients (page1096).
Sent when the server meets the conditionsfor the notification to be sent.
Message page entry fields
Setup and User Guide - Qlik Replicate, November 2021 1096

15 Qlik Replicate server settings
To where: Notification Message
Console:
The messages in this row are sent to the Console.
The same message is also sent to theWindows Event Log if you chose to sendmessages to the Windows Event Log. Formore information, see Define the recipients(page 1096).
In this field, you can edit the message that issent to the Qlik Replicate Console when theserver meets the conditions for thenotification to be sent.
Email Subject:
This is the subject of the email messages sent for thenotification.
See Define the recipients (page 1096) for informationabout sending a notification as an email.
In this field, you can edit the subject line foran email that is sent when the server meetsthe conditions for the notification to be sent.
Email Message:
This is the body of the email message sent for thenotification.
See Define the recipients (page 1096) for informationabout sending a notification as an email.
In this field, you can edit the message that issent by email when the server meets theconditions for the notification to be sent.
Review the notification ruleThe Summary page lets you review the notification rule that you defined so that you can determinewhether the selections you made in the wizard are correct. If you want to make changes, click Back and goto the page or pages you want to change.
When you are sure that the notification rule is defined in the way that you want, click Finish to close thewizard and add the rule to the notification list (see The Notifications List (page 1099)).
After you close the wizard, make sure to click Save at the top of the Settings page. This will save theinformation for all settings, not only for the notification rule that you created. If you made changes that youdo not want to keep, click Discard to discard all changes before you make changes to any of the othersettings.
Supported notification variablesThe table below describes which variables can be included in notification messages.
The following variables are not supported even though they are available for selection:ACTIVE_TABLES, ERROR_TABLES , COMMAND, COMMAND_CODE, FULLLOAD_ERROR_TABLES, ERROR_CODE, SQL_STATEMENT, and COMMAND_PARAMETERS.
Setup and User Guide - Qlik Replicate, November 2021 1097

15 Qlik Replicate server settings
Variable Description
LATENCY The task latency.
For a definition of latency, see Terminology (page 32).
MEMORY_USAGE The amount of memory being consumed by all tasks on the ReplicateServer machine.
DISK_USAGE The amount of disk space being utilized by the task on the ReplicateServer machine.
COUNT_ERROR_TABLES The number of tables in the task with an error status.
COUNT_ACTIVE_TRANSACTION
The number of open transactions in the task.
COUNT_DATA_ERRORS The number of data errors encountered by the task.
For more information on data errors, see Global error handling (page1107)
LOADED_RECORDS The number of records loaded to the target database during the task.
CHANGES_RECORDS The number of change records processed during the task.
FULLLOAD_COUNT_REQUESTED_TABLES
The number of tables that are queued for loading to the target.
FULLLOAD_COUNT_COMPLETED_TABLES
The number of tables that were loaded to the target.
FULLLOAD_COUNT_ERROR_TABLES
The number of tables that could not be loaded to the target due toerror.
FULLLOAD_REQUESTED_TABLES_LIST
The names of the tables that are queued for loading to the target.
FULLLOAD_COMPLETED_TABLES_LIST
The names of the tables that were loaded to the target.
TABLE_NAME The name of the table being processed when the notification wassent.
TABLE_OWNER The owner of the table being processed when the notification wassent.
RECORD_COUNTER The number of records that had been processed when thenotification was sent.
ERROR_TEXT The error message when a task ends with an error.
TASK_NAME The name of the task.
NOTIFICATION_NAME The name of the notification.
Notification variables
Setup and User Guide - Qlik Replicate, November 2021 1098

15 Qlik Replicate server settings
Variable Description
TABLE_COUNT_APPLY_ERRORS
The number of tables with Apply Conflict errors.
For more information on Apply Conflict errors, see Global errorhandling (page 1107)
SERVER_NAME The host name of the Replicate Server machine.
STORAGE_UTILIZATION_OLD_STATE
The storage utilization state before it moved to the "new" statedescribed below.
For a description of possible states, see Define the event thattriggers the notification (page 1094).
STORAGE_UTILIZATION_NEW_STATE
The storage utilization state after it moved from the "old" statedescribed above.
For a description of possible states, see Define the event thattriggers the notification (page 1094).
USED_STORAGE_UTILIZATION
The amount of disk space (on the drive where the Replicate Datafolder is located) used by all tasks.
TOTAL_STORAGE_UTILIZATION
The total amount of disk space available on the drive where theReplicate Data folder is located.
The Notifications ListThe Notifications List lists all of the notification rules that are defined for the Qlik Replicate instance you areworking with. It has the following information:
l Name: Displays the name of the notification rule.l Condition: Displays the condition that triggers the notification to be sent. For more information, seeCreating a new notification (page 1083).
l Send Message To: Displays custom users that receive the message. For more information, seeCreating a new notification (page 1083).
l Tasks: Displays the tasks that are associated with this notification rule. For more information, seeCreating a new notification (page 1083).
l Active: Select the check box in this column to activate the notification. If this check box is cleared,notifications defined by this rule are not sent. This check box is selected by default.
Editing a notificationYou can make changes to any notification rule.
To edit a notification rule:
1. From the Notification List, select the notification you want to edit.
2. Click Open (at the top of the list).or
Setup and User Guide - Qlik Replicate, November 2021 1099

15 Qlik Replicate server settings
Double-click the notification you want to edit.The Edit Notification Rule wizard opens.
3. Make any changes you need in the wizard. For information on how to work with each of the pages inthe New Notification Rule wizard, see Creating a new notification (page 1083).
You can only make changes to those sections that you defined when Creating a newnotification (page 1083).
l You cannot change name of the notification.l If you defined a notification to let you know when the task or full load started orstopped, this cannot be edited. For example, if you created a notification rule forstarting a task and you now also want to get notified when the task stops, youmust create a new notification rule.
l In the Notify When? page, you can make changes to the data you defined in theoriginal notification rule. For example, if you defined a Memory utilizationmessage in the Notify when? page, Performance/Resources section, you canonly change this parameter. If you want to add information about something thatwas not defined in the original notification rule, for example you want to adderrors to your notification or you want to get information about latency, you mustcreate a new notification rule.
Deleting a notificationYou can delete notification rules that you no longer want to use.
When you delete a notification, it is deleted permanently.
To delete a notification:
1. From the Notification List select the notification you want to delete.
2. Click Delete (at the top of the list).
Setting up Mail parametersThe Mail parameters define the mail server used to send notifications.
To set the Mail parameters:
1. Click the Mail Settings sub-tab and enter the following information:l Mail server: Specify the outgoing mail server you wish to use to send task and servernotifications, for example, smtp.example.com.
l Port: Specify the port number where the mail server is located. The default value is 25.l Use SSL: Select to connect to the mail server (for sending notifications) using SSL.l Verify peer: Select if you want the mail server to send a certificate proving its identity. OnWindows, the certificate will be authenticated using the default CA certificates.
Setup and User Guide - Qlik Replicate, November 2021 1100

15 Qlik Replicate server settings
l CA Path: On Linux, specify the location of the server CA certificate.l Verify host: Select to verify that the host name in the certificate matches the host name ofthe mail server.
l Anonymous login: Select to allow a Qlik Replicate user to access the mail server withouthaving to provide any user credentials.
l User name: Specify the user name for logging in to the SMTP Server.l Password: Specify the password for logging in to the SMTP Server.l Sender email address: Enter the email address that sends the email notifications. This isthe address that appears in the From field of the email notification.
l Send test email: Click to open the Send Test Email dialog box.l Email address for test email: Type an email address to receive a test email message fromthe server you configured. Use this to determine that the Mail Parameters you defined arevalid.
2. Click the Save toolbar button to save all of your changes.
If you made changes that you do not want to keep, click Discard to discard all changesbefore you make changes to any of the other settings.
Creating a Default Recipient ListClick the Default Recipients List sub-tab to create a default recipient list.
A default recipient list is a list of recipients that receive all of the notifications that you define for task-basedor server-based events. This allows you to use one list for all email notifications without having to definethe list each time you create a notification.
You can choose to send notifications to a different list or to additional users for any specificnotification. You define these exceptions when you create the specific notification. For moreinformation, see Creating a new notification (page 1083).
To create a Default Recipient List:
1. At the top of the Default Recipient List settings page, click Add Recipient.The next row in the Recipient List table becomes available.
2. Type the name of the user you want to add to the list of default recipients. Continue to enter a nameand email address for each recipient you want to include in the default list.
3. Press the [tab] key or double click in the in the Email cell, then type the email address for the useryou entered in the Name cell.
4. Click Save at the top of the screen to save all of the changes you made.
Setup and User Guide - Qlik Replicate, November 2021 1101

15 Qlik Replicate server settings
Click Save to save the information for all settings, not only for the recipient list. If youmade changes that you do not want to keep, click Discard to discard all changes beforeyou make changes to any of the other settings.
Replicate Event IDs in Windows Event LogThe table below lists the Event IDs for Replicate events in Windows Event Log.
Event ID Description
261 Any error.
262 Any warning.
263 Errors containing the specified codes.
OTHER Event IDs
Event ID Description
300 Server disk usage has changed.
300 Disk utilization has changed
301 Server disk usage has reached the high threshold.
302 Server disk usage has reached the critical threshold.
303 Server disk usage has returned to normal.
320 Server system memory usage has changed.
320 Memory utilization has changed.
321 Server system memory usage has reached the high threshold.
322 Server system memory usage has reached the critical threshold.
323 Server system memory usage has returned to normal.
340 Server state has changed.
SERVER Event IDs
Event ID Description
400 Task has started.
401 Full load has started.
402 Full load has completed.
403 Task has stopped after Full Load – cached changes were applied.
404 Task has stopped after Full Load – cached changes were not applied.
TASK Event IDs
Setup and User Guide - Qlik Replicate, November 2021 1102

15 Qlik Replicate server settings
405 Task has stopped (other cases).
406 Task has stopped due to a non-recoverable error.
430 Task latency has exceeded the set limit.
431 Task latency is back to normal.
432 Task memory usage has exceeded the set limit.
433 Task memory usage is back to normal.
434 Task disk usage has exceeded the set limit.
435 Task disk usage is back to normal.
Event ID Description
502 Table processing was suspended due to errors.
TABLE Event IDs
15.2 License settingsYou need to register the software before you can use Qlik Replicate. Your Qlik vendor should provide youwith a text file called license.txt. This file contains details such as the product expiration date (if any).
Use the License settings page for:
l Requesting a license (page 1103)l Registering a license (page 1105)l Viewing a license (page 1107)
Changes to license settings will not affect running tasks.
To open the License settings page:
l From the Server view, click License from the menu list at the left. The License sub-tab is displayed.
Requesting a licenseYou must have a valid license to work with Qlik Replicate. You can request a license from the Licensesettings page in the Qlik Replicate Console. In the License Request dialog box, fill out the requiredinformation and submit the request by email. Once your request is approved, the license file is sent to youby email. To use Qlik Replicate, register the license by using the procedure described in Registering alicense (page 1105).
To request a license:
1. From the Server page, click License.
2. At the top of the License tab, click Request License.
Setup and User Guide - Qlik Replicate, November 2021 1103

15 Qlik Replicate server settings
The Replication License Request dialog box opens.
3. Enter the requested information:l Request type: Select one of the following:
l New License: Select this if this is your initial license request.l Extend License: Select this if you have a license and want to extend its period ofvalidity.
l Alter License: Select this if you want to make changes to an existing license. Forexample, if you want to add additional sources or targets or change the hostcomputer.
l License to: Type the name of the company or group that is requesting a license to use QlikReplicate.
l License type: Select one of the following:
Setup and User Guide - Qlik Replicate, November 2021 1104
15 Qlik Replicate server settings
l Permanent: Select this if the license will always be valid. Permanent licenses do notrequire an expiration date.
l Evaluation: Select this if you are requesting a temporary license to use Qlik Replicatefor a trial period.
l Term: Select this if you are requesting a license that is valid for a specific period oftime. In this case you must be sure to include an expiration date in your request.
l Expiration date: Click in this field to select the expiration date using the pop-up calendar.This is required only if you selected Evaluation or Term in as the License type.
l Hosts: Type the name of the local computer where Qlik Replicate is installed. By default thename of the local computer is displayed in this field. You can change this or add additionalcomputers if you are installing Qlik Replicate in a different or an additional location.
l Source Types: Click Edit to open the Edit Source Types dialog box. Check the endpointtypes you are working with as your replication sources. You can select one or more endpointendpoints as necessary. If you need to work with all available endpoints, click All.
l Target Types: Click Edit to open the Edit Target Types dialog box. Check the endpoint typesyou are working with as your replication targets. You can select one or more endpointendpoints as necessary. If you need to work with all available endpoints, click All.
4. Click Send by Mail to open an email request for the license. Send the email to the address enteredin the recipient field of your default email client.
If you have not registered a default email client, clicking the Send by Mail button will notopen your email client. For instructions on registering a default email client, refer to yourbrowser's or operating system's online help.
Click Copy to Clipboard to copy the information to the computer’s clipboard. You can paste thisinformation into the Advanced license request and edit it as necessary. For more information, seeUsing the advanced license request option.
Using the advanced license request optionThe advanced license request option lets you request a license by manually typing the information. Makesure to include all of the information required as described in Requesting a license. The following is asuggested format for the advanced option:
Request type:New License
License to: <company name>
License type: Permanent
Expiration date:
Hosts: bee01-xp.company.local
Source Types: Oracle
Target Types: SQLServer
Registering a licenseYou must have a valid license to work with Qlik Replicate. If you did not receive a license.txt file, you canrequest a license using the procedure described in Requesting a license (page 1103). Once you receivethe license, you must register it to work with Qlik Replicate.
Setup and User Guide - Qlik Replicate, November 2021 1105

15 Qlik Replicate server settings
To register a license:
1. Copy the license.txt file to your computer or any computer in your network you have access to.
2. From the Server page, click License.
3. At the top of the License tab, click Register License.The Register License dialog box opens.
4. Click Load and browse to find and select the license file.The license text is displayed in the dialog box as shown above. Check to be sure that the details arecorrect.
5. Click Register License to register the license. A message indicating the license was registeredsuccessfully is displayed.
Setup and User Guide - Qlik Replicate, November 2021 1106
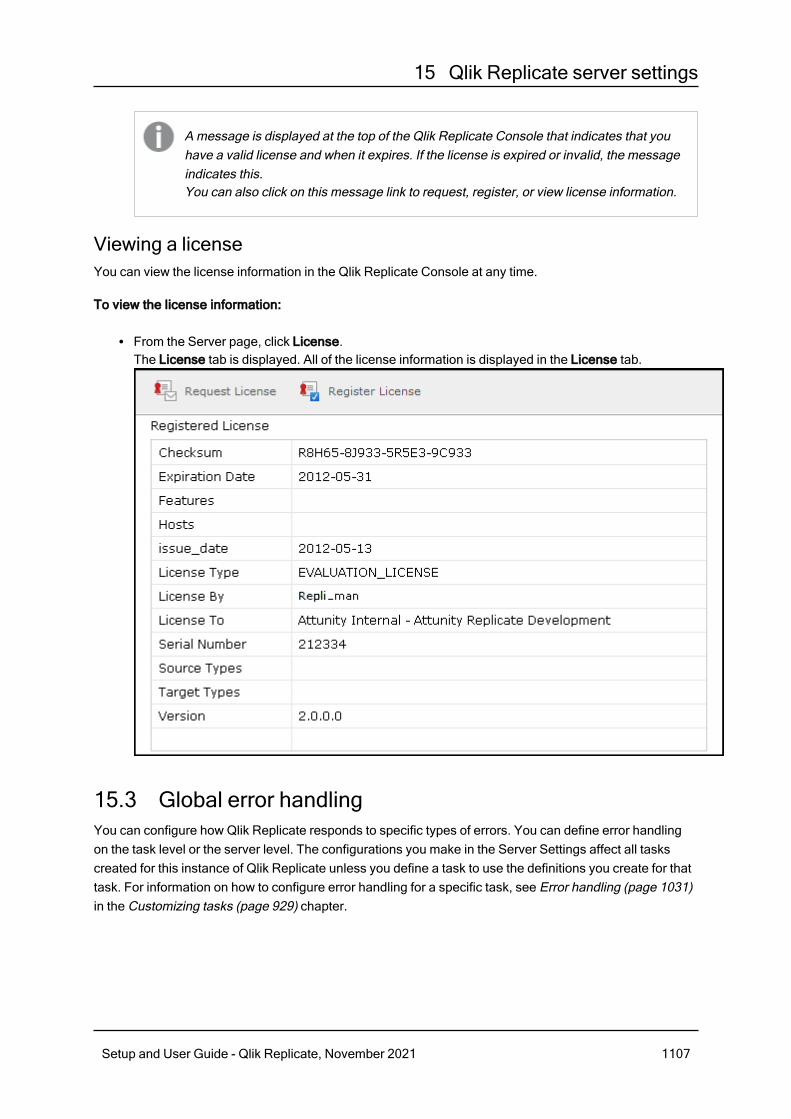
15 Qlik Replicate server settings
A message is displayed at the top of the Qlik Replicate Console that indicates that youhave a valid license and when it expires. If the license is expired or invalid, the messageindicates this.You can also click on this message link to request, register, or view license information.
Viewing a licenseYou can view the license information in the Qlik Replicate Console at any time.
To view the license information:
l From the Server page, click License.The License tab is displayed. All of the license information is displayed in the License tab.
15.3 Global error handlingYou can configure how Qlik Replicate responds to specific types of errors. You can define error handlingon the task level or the server level. The configurations you make in the Server Settings affect all taskscreated for this instance of Qlik Replicate unless you define a task to use the definitions you create for thattask. For information on how to configure error handling for a specific task, see Error handling (page 1031)in the Customizing tasks (page 929) chapter.
Setup and User Guide - Qlik Replicate, November 2021 1107

15 Qlik Replicate server settings
l Changes to global error handling settings will not affect running tasks.l Global error handling is not available when the Apply changes using SQL MERGE tasksetting is enabled.
In Server view, click the Global Error Handling tab on the left.
The following sub-tabs are available:
l Environmental Errors: An error that is caused by an environmental problem in the source or targetendpoint or on the network. Environmental errors can be restarted.The information you enter in this tab is the same as the information you enter in the EnvironmentalErrors tab for tasks. For information about the options available in this tab, see Environmentalerrors (page 1032).
l Data Error: An error related to data processing at the record level.The information you enter in this tab is the same as the information you enter in the Data Error tabfor tasks. For information about the options available in this tab, see Data Errors (page 1032) in theCustomizing Tasks chapter.
l Table Error: An error in processing data or metadata for a specific table. This only includes generaltable data and not an error that relates to a specific record.The information you enter in this tab is the same as the information you enter in the Table Error tabfor tasks. For information about the options available in this tab, see Table Errors (page 1034) in theCustomizing Tasks chapter.
l Apply Conflicts: Errors that occur when the target endpoint is not synchronized with the sourceendpoint when processing changes. This can cause duplicate key errors on INSERT operations orzero rows affected on UPDATE/DELETE operations.The information you enter in this tab is the same as the information you enter in the Apply Conflictstab for tasks. For information about the options available in this tab, see Apply Conflicts (page 1034)in the Customizing Tasks chapter.
15.4 LoggingThe following topics describe the server logging management options:
l Setting logging levels for the Server and File Transfer Service (page 1109)l Setting automatic roll over and cleanup (page 1110)l Viewing and downloading log files (page 1111)l Manually rolling over the log files (page 1111)l Deleting server, task and FTS log files (page 1112)
Changes to logging settings will not affect running tasks.
Setup and User Guide - Qlik Replicate, November 2021 1108

15 Qlik Replicate server settings
Setting logging levels for the Server and File Transfer ServiceYou set the logging level for the Replicate Serverlogs and File Transfer Service logs in Server view. Thelevel you set determines what information is written to the logs. The Server logs provide information aboutthe Qlik Replicate Server instance you are working with as opposed to individual tasks. For information onconfiguring the task logs, see Setting the task logging level (page 1077).
The following logging levels are available, ordered from the lowest level to the highest:
1. Errors
2. Warnings
3. Info
4. Trace
5. Verbose
The higher levels always include the messages from the lower levels. Therefore, if you select Error, onlyerror messages are written to the log. However, if you select Info, informational messages, warnings, anderror messages are included. Selecting Verbose writes all possible messages to the log.
You can set a global logging level for all components or you can set a separate logging level for eachcomponent.
To set the logging levels:
1. On the left side of the Server view, click Logging and then click the Server Logging Levels or FileTransfer Service Logging Levels sub-tab as required.The Component Logging Level sliders are displayed.
2. To set a global logging level, move the top slider (the slider with the labels) to the log level you want.Note that all of the sliders for the individual modules move to the same position that you set in themain slider.
3. Make any changes to the sliders for the individual modules. This is optional. Note that if you changethe main slider, all of the individual sliders are reset to the new position. If you want to maintain adifferent logging level for a specific module, you need to reset it.
4. Click Save at the top of the screen. Changes to the logging level take place immediately. There isno need to restart the Qlik Replicate Server.
Click Save to save the information for all settings, not only for the logging settings. If youmade changes that you do not want to keep, click Discard Changes to discard allchanges before you make changes to any of the other settings.
Storing trace and verbose logging in memoryWhen the logging level is set to "Trace" or "Verbose", you can instruct Replicate to store the logginginformation in memory until an error occurs. On detecting an error, Replicate will begin writing to thephysical logs and continue to do so for a few minutes after the initial occurrence of the error.
Setup and User Guide - Qlik Replicate, November 2021 1109

15 Qlik Replicate server settings
If no error occurs before the allocated memory is used up, Replicate will empty the memory buffer and startafresh.
This option is useful for tasks that fail unpredictably and for no obvious reason. The problem withcontinually writing large amounts of information to the logs is twofold:
l Running in "Trace" or "Verbose" logging mode will quickly use up available disk space (unless thelogging settings have been configured to prevent this).
l Continually writing large amounts of data to the logs will affect performance.
To use this option
1. Select the Store trace/verbose logging in memory, but if an error occurs, write to the logs checkbox at the top of the tab.
2. In the Allocate memory up to (MB) field, specify the amount of memory you want to allocate forstoring logging information.
Setting automatic roll over and cleanupIn the Log File Management sub-tab, you can define when Replicate should roll over the server log files(repsrv and repcmd) and tasks log files (reptask_<task_name>) and when to delete old log files from thesystem.
Automatic rolloverYou can determine when to stop logging to the current log file and begin to log to a new log file. Rolled overlog files are appended with a 12-digit timestamp. The current server log file is named repserv while saved(older) server log files are named repserv_xxxxxxxxxxxx.
The current running task log file is named reptask_<task_name> while saved (older) task log files arenamed reptask_<task_name>_xxxxxxxxxxxx.
For both server and task saved log file names, xxxxxxxxxxxx represents a 12-digit timestamp.
l Roll over the log if the log file is older than (days): Select the check box and then specify themaximum number of days the current log file is allowed to exist before being rolled over.The default value is 7 days.
l Roll over the log if the log file is larger than (MB): Select the check box and then specify themaximum number of megabytes the current log file is allowed to reach before being rolled over.
When the Store trace/verbose logging in memory, but if an error occurs, write to thelogs option is enabled, the actual size of the repsrv.log may reach the sum of theAllocate memory up to (MB) size and the Roll over the log if the log file is larger than(MB) size, before it is rolled over.For more information on the "Store trace/verbose logging in memory" option, seeSetting logging levels for the Server and File Transfer Service (page 1109)
The default value is 100 megabytes.
Setup and User Guide - Qlik Replicate, November 2021 1110
15 Qlik Replicate server settings
l If you edit this setting while tasks are running, the new setting will not affect the task logfiles until the tasks are stopped and then resumed. The server log files are not affectedby this limitation.
l The scheduled process (LogFileCleanLogs) that checks the log file size runs every fiveminutes. Consequently, the actual size/age of the rolled over log file may deviate slightlyfrom the specified value(s).
l The time of a file is determined by its "modified" time as opposed to its "created" time.
Automatic cleanupYou can determine the maximum number of days old log files (i.e. log files that have been rolled over) areretained before being deleted.
l Delete log files that are older than (days): Select the check box and then specify the maximumnumber of days to retain a saved log file. Log files that are older than the specified number of dayswill be automatically deleted from the system. For example, if you specify 4, then on the fifth day,any log file older than 4 days will be deleted.The default value is 45 days.
Viewing and downloading log filesYou can view log files and download them if necessary.
To view or download the log files:
1. Select the Server Logging Levels or File Transfer Service Logging Level sub-tab as required.
2. Click the Log Viewer toolbar button.The Log Viewer window opens.
3. Continue from step 4 in Viewing, downloading, and manually rolling over task log files (page 1078).
Manually rolling over the log filesYou can manually roll over the Replicate Server log files if necessary. This lets you stop logging to thecurrent log file and begin to log to a new log file. The currently open log file does not have a timestamp. Thename of saved (older) log files is appended with a 12-digit timestamp.
To roll over the log files:
1. Select the Server Logging Levels sub-tab.
2. Click the View Logs toolbar button.The Log Viewer window opens.
3. Select the log file without a timestamp and then click the Roll Log File toolbar button in the top rightof the window.
Setup and User Guide - Qlik Replicate, November 2021 1111

15 Qlik Replicate server settings
Deleting server, task and FTS log filesYou can manually delete task, server, and File Transfer Service log files older than the specified number ofdays.
To delete the log files:
1. Select the Logging tab.
2. Click the Delete Logs toolbar button.The Delete Logs window opens.
3. Select which logs to delete and, for each log, optionally change the default number of days (45).
4. Click Delete.Selected logs older than the specified number of days will be immediately deleted.
15.5 File Transfer ServiceThe Qlik File Transfer Service (FTS) is a robust and reliable file transfer engine designed to efficientlytransfer files over the WAN. This can dramatically improve transfer speeds when the source endpoint andthe target endpoint are located on different LANs.
Changes to File Transfer Service settings will not affect running tasks.
How it worksA solution using FTS consists of two Qlik Replicate Servers: A local Qlik Replicate Server installed on thesource endpoint LAN and a remote Qlik Replicate Server installed on the target endpoint LAN.
A local task on the local server is defined from the source endpoint to a File Channel target. A remote taskon the remote Qlik Replicate Server is defined from a File Channel source to the target endpoint.
The FTS runs on the remote Qlik Replicate Server only and transfers the File Channel files from thestorage location defined in the local task to the storage location defined in the remote task.
Upon file transfer, and before Compression (page 1112) and Encryption (page 1113), large files are splitinto smaller blocks which form recoverable transport units, and small files are merged into bigger blocks tobe sent at the same time. The blocks are then transferred and reconstructed into File Channel files whenreceived by the FTS server.
For information on setting up a File Channel source or target to use FTS, see Setting advanced connectionproperties (page 915) and Setting advanced connection properties (page 917) respectively.
CompressionFile Channel files are compressed upon sending using GZIP. You can disable the compression and controlthe compression level.
Setup and User Guide - Qlik Replicate, November 2021 1112

15 Qlik Replicate server settings
EncryptionAfter compression, File Channel files are encrypted using a randomly generated AES-256 session key.The session key is exchanged between the client and server using the Diffie-Hellman key exchangeprotocol which is authenticated using a secret key that is shared between the client and the server.
The File Transfer Service should be configured on the remote Qlik Replicate Server only.
Defining a File Transfer ServiceDefine a File Transfer Service as described below.
To add a File Transfer Service:
1. Switch to Server view as described in Server view (page 90).
2. In the left side of the Server view, click File Transfer Service.The File Transfer Service list is displayed.
3. In the Actions toolbar, click Add File Transfer Service.The Add File Transfer Service window opens.
4. Edit the values in the Name, Host and Port columns as follows:l Name: The name of the File Transfer Service.l Host: The host name or IP address of machine on which the remote Qlik Replicate Server isinstalled. The default is 0.0.0.0 (all interfaces). If the server has multiple NICs (NetworkInterface Cards), you can define a different File Transfer Service for each card.
l Port: The port through which the File Channel files are received.l Enabled: select the check box to enable the File Transfer Service.
5. Click Save to save your settings.
Setup and User Guide - Qlik Replicate, November 2021 1113

15 Qlik Replicate server settings
Editing a File Transfer ServiceYou can edit a File Transfer Service as described below.
To edit a File Transfer Service:
1. Select the File Transfer Service you want to edit.
2. Edit the values in the Name, Host and Port columns as follows:
a. Click the cell to make it editable.
b. Change the value as required and then click Save.
When you edit a File Transfer Service, make sure that any File Channel targetsconfigured to use the File Transfer Service are also updated accordingly. For moreinformation on File Channel Targets, see Using the File Channel as a target (page 916).
Deleting a File Transfer ServiceYou can delete File Transfer Services that you no longer want to use.
To delete a File Transfer Service:
1. In the File Transfer Services List, select the item you want to delete.
2. Click the Remove toolbar button.
15.6 Scheduling jobsUse the Qlik Replicate Scheduler to schedule a one-time job or a recurrent job for specific Replicate taskoperations. A job is essentially an operation that can be scheduled to occur once, daily, weekly or monthly.
The following operations can be scheduled:
l Run/Resume a taskl Stop a taskl Reload a task
l Changes to Scheduler settings will not affect running tasks.l Compose tasks are not supported.
To schedule a new job:
1. Switch to Server view as described in Server view (page 90).
2. In the left side of the Server view, click the Scheduler tab.The Scheduler tab consists of two sub-tabs: Scheduled Jobs and Executed Jobs. The ScheduledJobs tab contains a list of jobs that are scheduled to run periodically or once only while theExecuted Jobs tab contains a list of jobs that have already run.
Setup and User Guide - Qlik Replicate, November 2021 1114

15 Qlik Replicate server settings
The Executed Jobs tab will only show executed jobs that were scheduled to run onceonly. In other words, jobs scheduled to run periodically (e.g. Daily, Weekly, Monthly) willnot be shown.
3. Click the New Scheduled Job toolbar button.The New Scheduled Job window opens.
4. Specify a Job Name and then, from the Select scheduled job type drop-down list, select one of thefollowing:
l Run task to run or resume the task(s) at the scheduled time.
For Full Load only tasks, it is preferable to select Reload target rather than Runtask when the scheduling is set to Daily, Weekly or Monthly. This will update thetable’s data whereas Run task will replace the existing table.
l Stop taskl Reload target
Selecting Reload target will execute the task according to the task's replicationsettings. For example, if the task's Full Load and Apply Changes options areenabled, Reload target will reload the target tables and apply any subsequentchanges.
5. Select one of the following time conventions:l Use server local time - When this option is selected (the default), the job will run when thespecified time is reached in the server's location.See also: Impact of DST Change on Qlik Replicate.
l Use universal time (UTC) - When this option is selected, the job will run at the specifiedUTC time. So, for example, if the server is located in a UTC + 2 timezone, a job scheduled torun at 13:00 UTC time will actually run at 15:00 local server time. Scheduling a job to run inUTC mode may be useful if you need tasks on several Replicate servers (located in differenttimezones) to run concurrently.
For reference, both the server local time and the UTC time are displayed to the right ofthe Scheduled Time heading.
6. Select and define one of following scheduling options:l Once (Run the job once on the specified day and at the specified time)l Daily - (Run the job every day at the specified time)l Weekly - (Run the job on the specified days and at the specified time)l Monthly - (Run the job on the specified day of the month)
Setup and User Guide - Qlik Replicate, November 2021 1115

15 Qlik Replicate server settings
To run the job on the last day of evey month, select Last day of every monthfrom the Day of month drop-down list.
7. For the Apply to tasks option, select which tasks to schedule. Select either All tasks to apply the jobto all current and future tasks or Selected tasks to apply the job to specific tasks. If you chooseSelected tasks, a list of currently defined tasks is displayed. Select which tasks to apply the job to.
8. Click OK to save your settings.
To enable or disable a scheduled job:
l In the Scheduled Jobs tab, select or clear the check box in the Enabled column as required.
To edit a scheduled job:
1. Select the job in the Scheduled Jobs or Executed Jobs list.
2. Click the Open toolbar button and edit the job as required.
To delete a scheduled job:
1. Select the job in the Scheduled Jobs or Executed Jobs list.
2. Click the Delete toolbar button.
15.7 User permissionsYou can grant Qlik Replicate users different permissions according to the tasks you want them to perform.Four predefined "roles" are available: Admin, Designer, Operator and Viewer. Each role has its own set ofpermissions, which are described in the following table.
Permissions Admin Designer Operator Viewer
View task history Yes Yes Yes Yes
Download a memory report Yes Yes Yes No
Download a Diagnostics Package Yes Yes Yes No
View and download log files Yes Yes Yes No
Perform runtime operations (such as start, stop, orreload targets)
Yes Yes Yes No
Create and design tasks Yes Yes No No
Edit task description in Monitor View Yes Yes No No
Delete tasks Yes Yes No No
Export tasks Yes Yes Yes No
Default user permissions according to roles
Setup and User Guide - Qlik Replicate, November 2021 1116

15 Qlik Replicate server settings
Permissions Admin Designer Operator Viewer
Import tasks Yes No No No
Change logging level Yes Yes Yes No
Delete logs Yes Yes Yes No
Manage endpoint connections (add, edit,duplicate, and delete)
Yes Yes No No
Open the Manage Endpoint Connections windowand view the following endpoint settings: Name,type, description, and role.
Yes Yes Yes Yes
Click the Test Connection button in the ManageEndpoint Connections window.
Yes Yes Yes No
View all of the endpoint settings in the ManageEndpoint Connections window.
Yes Yes Yes No
Edit the following server settings: Notifications,scheduled jobs, and executed jobs.
Yes Yes Yes No
Edit the following server settings: Mail serversettings, default notification recipients, licenseregistration, global error handling, logmanagement, file transfer service, userpermissions, and resource control.
Yes No No No
Specify credentials for running operating systemlevel post-commands on Replicate Server.
For details, see Operating system levelcredentials (page 1120).
Yes No No No
The user under whose account Qlik Replicate is installed will be associated with the Admin roleby default.
You can set user permissions using Active Directory Groups or Local Groups. To set user permissionsusing Active Directory groups, you can either create Active Directory groups with the names listed in thefollowing table or you can create Active Directory groups with different names. Then, add users to thegroups according to the role you want them to perform.
Role Active Directory Groups
Administrator AttunityReplicateAdmins
Designer AttunityReplicateDesigner
Roles and Active Directory Groups
Setup and User Guide - Qlik Replicate, November 2021 1117

15 Qlik Replicate server settings
Role Active Directory Groups
Operator AttunityReplicateOperator
Viewer AttunityReplicateViewer
For information on encrypting user permissions, see Encrypting the user permissions file (page 70).
If you create Active Directory groups with different names, you need to add them to the UserPermissions window and set their permissions as described in Managing user permissions(page 1118).
Managing user permissionsThis section explains how to edit user permissions as well as how to add or remove users and groups.
To edit the user permissions:
1. Switch to Server view as described in Server view (page 90).
2. In the left side of the Server view, click the User Permissions tab.
3. Adjust the permission sliders as desired.
4. Click Save to save your settings or Discard to revert them.
To add new users or groups:
1. Switch to Server view as described in Server view (page 90).
2. In the left side of the Server view, click the User Permissions tab.
3. Click the Add toolbar button.The Add User/Group dialog box opens.
4. Select User or Group as appropriate.
5. Enter the user or group name in the following format:For domain users/groups: domain\group_name or domain\user_name
Active Directory distribution groups are not supported.
For local users/groups: computer_name\group_name or computer_name\user_nameThen click OK.The user/group is added to the User/Group list.
6. Click Save to save your settings or Discard to revert them.
To remove a user or group:
1. Switch to Server view as described in Server view (page 90).
2. In the left side of the Server view, click the User Permissions tab.
3. Select the user/group you want to remove and then click the Delete toolbar button.
Setup and User Guide - Qlik Replicate, November 2021 1118
15 Qlik Replicate server settings
The user/group is deleted.
4. Click Save to save your settings or Discard to revert them.
15.8 Resource controlYou can set high and critical disk space and memory utilization thresholds.
Note Disk space is checked only for the drive where the data folder resides.
Thresholds are calculated as a percentage of total capacity. So, for example, a disk space utilizationthreshold of 80% would mean that 20% of available disk space remains.
After setting the thresholds, you can click the New Notification button to define a notification that will besent whenever a given threshold is exceeded and/or returns to normal.
Changes to resource control settings will not affect running tasks.
Disk spaceIn the High Disk Space Utilization Threshold section, specify the high disk space utilization threshold (interms of percentage). When the threshold is reached, a notification will be sent (if defined).
In the Critical Disk Space Utilization Threshold section, specify the critical disk space utilization threshold(in terms of percentage). When the threshold is reached, all tasks will be stopped and a notification will besent (if enabled). Replicate will resume the tasks automatically when there is sufficient disk space to do so.
System memoryMemory utilization is calculated using the following formula (note that “swap file” is used generically to referto both page file memory on Windows and swap file memory on Linux):
(used_swap_file + used_physical_memory) /(total_swap_file + total_physical_memory) * 100
Example:
(5 GB + 5 GB) / (10 GB + 10 GB) * 100 = 50%
In the High System Memory Utilization Threshold section, specify the high system memory utilizationthreshold (in terms of percentage). When the threshold is reached, a notification will be sent (if defined).
In the Critical System Memory Utilization Threshold section, specify the critical system memoryutilization threshold (in terms of percentage). When the threshold is reached, Replicate will start stoppingtasks and a notification will be sent (if enabled). The tasks will be resumed automatically when there issufficient memory to do so.
Setup and User Guide - Qlik Replicate, November 2021 1119

15 Qlik Replicate server settings
15.9 Operating system level credentialsSeveral endpoints support running user-defined commands for pre/post-processing files. In this tab, youcan provide user credentials for user-defined commands that needs to be executed at operating systemlevel.
By default, such commands are executed under the Replicate Server service account. This may constitutea security risk, as it allows any Replicate user with Admin or Designer permissions to specify user-definedcommands that could lead to a full compromise of the server.
Note that when Replicate Server is installed on Linux, this tab will be hidden as the potential security risk isrelevant to Windows only.
Changes to operating system credentials will not affect running tasks.
Endpoints that support user-defined commands are as follows:
l Amazon S3 targetl File sourcel File targetl Google Cloud Storage targetl Microsoft Azure ADLS target
IMPORTANT Execution of user-defined commands is blocked by default. To allow executionof user-defined commands, follow the procedure described in Controlling execution of user-defined commands (page 74).
To run user-defined commands under the Replicate service (Log On) account (the default):
l Select Replicate service account.
To run user-defined commands under a different account:
1. Select Another account and then specify a user name and password in the designated fields.For domain users, the user name should be entered in the following format: Domain/UsernameFor local users, the Domain is not required.
2. If you changed the default Attunity Replicate Server service Log On user, add the user specified inthe Attunity Replicate Server service Log On tab to the "Replace a process level token" policy inthe "Local Security Policy" settings.
15.10 More optionsThese options are not exposed in the UI as they are only relevant to specific versions or environments.Consequently, do not set these options unless explicitly instructed to do so by Qlik Support or productdocumentation.
Setup and User Guide - Qlik Replicate, November 2021 1120

15 Qlik Replicate server settings
To set an option, simply copy the option into the Add feature name field and click Add. Then set the valueor enable the option according to the instructions you received.
15.11 Endpoint ServersAn Endpoint Server is a Java service that is installed with Replicate and starts automatically if anappropriate license is detected. The Endpoint Server is responsible for managing a set of custom endpointtypes (developed using the Qlik Replicate Custom Endpoint SDK).
Endpoint Servers can be added and managed via the Replicate console. After you add an EndpointServer, you will be able to You can create endpoint connections and run Replicate tasks for any customendpoint types associated with the Endpoint Server.
l The procedure for adding custom endpoint connections and configuring tasks is thesame as that for adding regular Replicate endpoints/tasks.
l In future versions, the Add Endpoint Server, Edit, and Remove toolbar options willallow you to add and manage additional endpoint servers. In this version however, theyshould only be used if requested by a Qlik Support Engineer.
l Changes to endpoint server settings will not affect running tasks.
Viewing Endpoint Server PropertiesWhen the Endpoint Server is selected, the right pane will display all associated endpoint types.Additionally, the following properties will be displayed in the grid:
l Status – Indicates whether the Endpoint Server is running, stopped or in error.l Name – The name of the Endpoint Server.l Host – The host machine on which the Endpoint Server is installed.l Port – The port of the Endpoint Server.l Version – The version of the Endpoint Server.l Message – Displayed if the Endpoint Server is in an error state or Replicate cannot connect to it.l Last Connection – The last time Replicate successfully connected to the Endpoint Server.
JVM configuration optionsThe AT_JVM_OPT system environment variable enables you to set additional JVM configuration optionssuch as limiting the heap memory consumed by the endpoint server, setting verbose logging, and so on.AT_JVM_OPT is supported on both Windows and Linux and is set on the former using the "set" command,and on the latter using the "export" command.
For example, to set AT_JVM_OPT with verbose logging on Windows:
1. Issue the following command:set AT_JVM_OPT=-verbose:class
2. Restart the Qlik Replicate Server service.
Setup and User Guide - Qlik Replicate, November 2021 1121

15 Qlik Replicate server settings
Endpoint Server loggingThe following topic explains how to set Endpoint Server logging levels as well as how to manage and viewassociated log files.
Before you can perform the actions described in this topic, first switch to Server view (as described inServer view (page 90)) and then select the Endpoint Servers tab.
Setting logging levels
To set the logging levels for an Endpoint Server:
1. Select the desired Endpoint Server from the grid.
2. In the Actions toolbar, click Logging Settings.
3. Click the Logging Levels tab.
4. Set the logging level for an individual component by moving the slider to the desired level next to thecomponent name.ORSet a global logging level for all components by moving the top-most slider to the desired level.
5. Click Save.
This will set the logging level for the Endpoint Server only. To modify the logging levels for atask associated with a custom endpoint type, open the Replicate task and navigate to TaskSettings | Logging.
Log file management
To set the rollover and retention policies for Endpoint Server log files:
1. Select the desired Endpoint Server from the grid.
2. From the Actions toolbar, click Logging Settings.
3. Click the Log File Management tab.
4. Select the Automatic Rollover check box to enable automatic rollover of log files and enter themaximum size for each log (in MB). To disable automatic rollover of log files, clear the check box.
5. Select the Automatic Cleanup check box to enable automatic cleanup of log files and enter themaximum number of log files to retain. To disable automatic cleanup of log files, clear the checkbox.
6. Click Save.
Viewing log files
To view the log files for an Endpoint Server:
1. Select the desired Endpoint Server from the grid.
2. From the Actions toolbar, click View Logs.
Setup and User Guide - Qlik Replicate, November 2021 1122

15 Qlik Replicate server settings
3. Select the log file you want to view or download from the list in the Log Files pane. The contents ofthe log file will be displayed in the right pane.
4. Browse through the log file using the scroll bar on the right and the navigation buttons at the top ofthe window.
5. To search for specific text in the log file, enter the text in the search box; any matching text will behighlighted blue.
6. To download the log file, click the Download Log File icon in the top right of the window.
7. To manually roll over the current log file, click the Roll Log File icon in the top right of the window.
Selecting View Logs will display Endpoint Server logs only.
To view log files for individual tasks on the Endpoint Server machine:
1. Open the task.
2. Switch to Monitor view.
3. Click View Logs.
4. Select Source Endpoint Server from the drop-down list.
Setup and User Guide - Qlik Replicate, November 2021 1123

A Using Change Tables
A Using Change TablesYou can use Qlik Replicate tasks to save the change events in change tables. This section describes howto use Qlik Replicate with change tables.
In this section:
l Working with Change Tables (page 1124)l Change Tables (page 1125)l Usage example (page 1128)
A.1 Working with Change TablesIn addition to replicating changes from source endpoint tables to corresponding tables in a target endpoint,Qlik Replicate can also replicate changes to corresponding Change Tables in the target endpoint. Thisprocess occurs simultaneously when applying changes to the target tables. Qlik Replicate lets youdetermine whether to replicate the changes to the target only, store changes in the Change Tables, orboth. See Using the Change Table model (page 1125) below for more information.
UPDATEs applied to the source that do not change the source data will be applied to the targetbut will not be applied to the corresponding Change Table. For example, if an UPDATEoperation on Column A in the source changes all values greater than 10 to 1, and one of therecords in Column A is already 1, then the UPDATE for that record will not be written to theChange Table.
The Change Tables have the same names as the tables that are being replicated, however a suffix isadded to each table name. By default the suffix is __ct, however you can change the suffix name in theQlik Replicate Console. For more information on changing the suffix added to the Change Table names,see Store Changes Settings (page 1021).
In addition to the selected columns from the source table, the Change Table also includes special headercolumns that provide more information on the change the row represents such as the operation, thetransaction and the timestamp. This lets you use SQL Query Language to carry out various analysis of thechange events, such as fraud detection, trend analysis, triggering of business processes, and DisasterRecovery. For more information about reading the Change Tables, see Change Tables (page 1125).
Handling truncate operationsTRUNCATE operations will not truncate the Change Table. Instead, an additional record will be added tothe table with operation=TRUNCATE.This also means that, when replicating to a Hadoop target, theHDFS files corresponding to the Change Table will not be deleted.
Regarding the actual target table, if both the Apply Changes and Store Changes replication options areenabled, the target table will be truncated. This also means that, when replicating to a Hadoop target, theHDFS files corresponding to the Change Table will also be deleted.
Setup and User Guide - Qlik Replicate, November 2021 1124

A Using Change Tables
To apply TRUNCATE operations to both the Change Table and the Target Table (for sources that supportTRUNCATE):
1. In the task settings' Store Changes Settings tab, make sure that Apply to Change Table (thedefault) is selected from the DDL options drop-down list.
2. In the task settings' Apply Changes Settings tab, make sure that TRUNCATE target table (thedefault) is selected from the When source table is truncated drop-down list.
Using the Change Table modelWhen you work with Change Tables you can determine whether to store the changes in the ChangeTables, apply the changes to the target tables, or both store and apply the changes. You determine thiswhen you define the replication task. For more information on this setting, see Store Changes Settings(page 1021).
In cases where you are both applying and storing the changes, the following is true:
l The target and Change Tables must be in the same endpoint, although they can have differentschemas. For example, the Change Tables will contain the metadata headers.For further details about changing the schema, see Rename Change Table schema (page 977).
l Changes applied to the Change Table will be handled exactly the same as the changes performedin the corresponding transaction in the source database. Therefore, when using Transactionalapply mode or Batch optimized apply mode with the Preserve transaction consistency optionselected, the changes will be processed as a single transaction.The exception to this is when an error is encountered and Replicate switches to "one-by-one" applymode in order to determine which of the Change operations is responsible for the error.
l The same data columns are both applied and stored with the exception of the change headercolumns, which are only added to the stored Change Tables.
A.2 Change TablesYou can use the tools for your target endpoint to get information using the metadata in the change tables.This data is defined by the header columns added to the change table schema. These headers aredescribed in the table below.
For every target table in the replication task, a change table with the corresponding name is maintained byQlik Replicate in the endpoint with the target tables. For more information, see Working with ChangeTables (page 1124). A change table contains the original table columns, and header columns. The headercolumns contain a prefix so that the name does not conflict with the source table column names. Thedefault prefix is header__. For information on how to change this prefix, see the Change tables listingunder Metadata (page 1011) in Task Settings (page 1010). The following table lists the default changetable header columns.
Setup and User Guide - Qlik Replicate, November 2021 1125

A Using Change Tables
Column Name Type Description
[header_
_]change_seqvarchar (35) A monotonically increasing change sequencer that is common to
all change tables of a task. The change sequence has thefollowing format:
YYYYMMDDHHmmSShhxxxxxxxxxxxxxxxxxxx
Where:
l YYYY is the four-digit year (such as 2012)l MM is the two-digit month (range from 01-12)l HH is the hour in the day (range from 00-23)l mm is the minute in the hour (range from 00-59)l SS is the second in the minute (range from 00-59)l hh is the hundredth of the second (range from 00-99)l xxxxxxxxxxxxxxxxxxx is a 19-digit, zero prefixed changenumber (global per task).
The time part usually refers to the commit time of the transactionthat includes the change record. Qlik Replicate contains logic thatmaintains the monotonicity of the sequence number so modifyingor adjusting the endpoint time may result in multiple changes toseem that they are within the same timestamp but with increasingchange number.
The xxx...xxx is usually the internal change number from the datarecord except that for BEFORE-IMAGE records it is the same asthe change number of the matching UPDATE record (for example,if the change number of BEFORE-IMAGE is 1000 and that of theUPDATE is 1001, then both have 1001). This allows a simple left-outer-join between the table and itself where on the left we scanuntil the point in time but filter out operation=before-image,and on the right we join on the same change_seq with thechange_oper being 'B' .
[header_
_]change_opervarchar (1) The operation type. This can be one of the following:
l I: INSERTl D: DELETEl U: UPDATEl B: Before Image
Setup and User Guide - Qlik Replicate, November 2021 1126

A Using Change Tables
Column Name Type Description
[header__]
change_maskvarbinary(128)
The change mask indicates which data columns in the changetable are associated with columns that changed in the sourcetable.
The bit position in the change mask is based on the column ordinalin the change table. This means that if there are 5 header columns,they occupy bits 0 to 4 and the first data column is bit 5 in thechange mask.
The change mask is a binary column (a byte array) representingthe change mask in little-endian order:
Byte 0 bit7 bit6 bit5 bit4 bit3 bit2 bit1 bit0
Byte 1 bit15 bit14 bit13 bit12 bit11 bit10 bit9 bit8
In this example, bit#N indicates that the change table column ofordinal N relates to a column that changed in the source table. Ifupdate mask is 11000 and the column ordinal is 3 the column didnot change.
The following describes the bit semantics:
l For INSERT records, all the inserted columns have theassociated bits set.
l For DELETE records only primary-key (or unique index)columns have the associated bits set. This allows anapplier to construct a DELETE statement without having tofind the primary key fields from another source.
l For BEFORE-IMAGE records, all bits are clear (the changemask can be empty).
l For UPDATE records, each column whose value changedbetween the BEFORE-IMAGE and the UPDATE will havethe associated bit set.
For space and processing efficiency, the actual number of bytesstored in the change-mask can be null-trimmed. This means thattrailing zeros do not need to be stored. The handling logic shouldtake this into consideration.
[header__]
stream_
position
varchar(128)
The source CDC stream position.
Setup and User Guide - Qlik Replicate, November 2021 1127

A Using Change Tables
Column Name Type Description
[header__]
operationvarchar (12) The operation associated with the change record. It can be one of
the following:
l INSERTl UPDATEl DELETEl BEFOREIMAGE
[header__]
transaction_
id
varchar (32) The ID of the transaction that the change record belongs to.
The value is a hex-string of the 128-bit transaction ID.
[header__]
timestamptimestamp The original change UTC timestamp (the value may be
approximate).
With PostgreSQL source, the timestamp is only knownafter the commit occurs. Therefore, until the changesare committed to the source tables, the default datewill be displayed (e.g. 1970-01-01).
[header__]partition_
name
string The name of the partition created on the target when Change DataPartitioning is enabled. The partition name consists of the partitionstart and end time.
Example:
20170313T123000_20170313T170000
A.3 Usage exampleThe following SQL statement returns a range of changes that starts after the last handled event (of changesequence "20120723144522110000000000000901203") and until the event committed on 23-Jul-2012 at23:00:00.00. For update we also get the before image value (here for the salary before and after).
SELECT CHANGE.[header__change_seq]
,CHANGE.[header__stream_position]
,CHANGE.[header__operation]
,CHANGE.[header__transaction_id]
,CHANGE.[header__timestamp]
,CHANGE.[EMPLOYEE_ID]
,CHANGE.[FIRST_NAME]
,CHANGE.[LAST_NAME]
Setup and User Guide - Qlik Replicate, November 2021 1128

A Using Change Tables
,CHANGE.[SALARY]
,BI.[SALARY]
FROM [Replication].[HR].[EMPLOYEES_ct] CHANGE LEFT OUTER JOIN
[Replication].[HR].[EMPLOYEES_ct] BI ON
BI.[header__change_seq] = CHANGE.[header$__change_seq] AND
BI.[header__change_oper] = 'B'
WHERE CHANGE.header__oper <> 'B' AND
CHANGE.[header__stream_position] > '20120723144522110000000000000901203' AND
CHANGE.[header__stream_position] <= '2012072323000000Z' AND
ORDER BY
CHANGE.[header__stream_position], CHANGE.[header$__stream_oper]
Setup and User Guide - Qlik Replicate, November 2021 1129

B Creating dump files
B Creating dump filesDump files are created when a component crashes and creates an exception code. They are useful fortroubleshooting such crashes as they states at exactly what line or area of memory the crash occurred.
To create a dump file:
1. Create a new environment variable with the following name and value:Variable: AREP_CRASH_DUMP_TYPEPossible values: FULL, MINI or NONE
2. Restart both Replicate services.
3. This step is optional. If AREP_CRASH_DUMP_TYPE is set to FULL or MINI, navigate to the followingregistry key:HKEY_LOCAL_MACHINE\SOFTWARE\Microsoft\Windows\Windows ErrorReporting\LocalDumps\repctl.exeVerify that the data value for the DumpType Binary Value is either 1 (MINI) or 2 (FULL).
4. After a crash occurs the dump files will be created in the following directory:<Product_Dir>\minidumps
When AREP_CRASH_DUMP_TYPE is set to NONE, no dump files will be created in theevent of a crash.
Setup and User Guide - Qlik Replicate, November 2021 1130

C Using an Audit table
C Using an Audit tableWhen defining a replication task, you can choose to store changes to all tables in a single Audit table(located in the target endpoint). The changes can then be pushed from a single stream to any queue (JMSfor example).
The following table describes the structure of the Audit table.
Column Name Type Description
task_name varchar(128)
The name of the Qlik Replicate replication task.
change_seq bigint A monotonically increasing change sequencer. The changesequence has the following format:
YYYYMMDDHHmmSShhxxxxxxxxxxxxxxxxxxx
Where:
YYYY is the four-digit year (such as 2012)
MM is the two-digit month (range from 01-12)
HH is the hour in the day (range from 00-23)
mm is the minute in the hour (range from 00-59)
SS is the second in the minute (range from 00-59)
hh is the hundredth of the second (range from 00-99)
xxxxxxxxxxxxxxxxxxx is a 19-digit, zero prefixed change number(global per task).
The time part usually refers to the commit time of the transactionthat includes the change record. Qlik Replicate contains logicthat maintains the monotonicity of the sequence number somodifying or adjusting the endpoint time may result in multiplechanges appearing as if they are within the same timestamp, butwith increasing change number.
The xxx...xxx is usually the internal change number from thedata record except that for BEFORE-IMAGE records it is thesame as the change number of the matching UPDATE record(for example, if the change number of BEFORE-IMAGE is 1000and that of the UPDATE is 1001, then both have 1001).
Audit table structure
Setup and User Guide - Qlik Replicate, November 2021 1131

C Using an Audit table
Column Name Type Description
change_oper varchar (1) The operation type. This can be one of the following:
I: INSERT
D: DELETE
U: UPDATE
B: Before Image
stream_position varchar(128)
The source CDC stream position.
schema_name nvarchar(128)
The name of the source table schema.
table_name nvarchar The name of the source table.
operation varchar (12) The operation associated with the change record. It can be oneof the following:
l INSERTl UPDATEl DELETEl BEFOREIMAGE
transaction_id varchar (32) The ID of the transaction that the change record belongs to.
The value is a hex-string of the 128-bit transaction ID.
timestamp timestamp The original change timestamp (the value may be approximate).
change_record
The datais storedin JSONformat.
nclob The new data.
LOB columns with unlimited size are not supportedin the change_record field. The other fields will berecorded but the LOB will have a NULL value.
bu_change_
record
The datais storedin JSONformat.
nclob The data before the update.
LOB columns with unlimited size are not supportedin the bu_change_record field. The other fieldswill be recorded but the LOB will have a NULL value.
Setup and User Guide - Qlik Replicate, November 2021 1132

C Using an Audit table
Column Name Type Description
Partition start Partition name, partition start time (UTC), and estimatedpartition end time (UTC)
Partition end Partition name, partition start time (UTC), partition end time(UTC), and a list of changed tables (identified by table name andschema name).
For more information on storing changes in an audit table, see Store Changes Settings (page 1021).
Setup and User Guide - Qlik Replicate, November 2021 1133

D Setting up Qlik Replicate in a cluster environment
D Setting up Qlik Replicate in a clusterenvironment
This section describes how to set up Qlik Replicate in Windows and Linux clustering environments.
When building failover cluster solutions with Replicate using Windows Server Failover Cluster(WSFC) or a Linux failover cluster software Qlik recommends using a block device (physical,virtual or iSCSI-based) for the shared Replicate DATA folder. Using NFS or SMB-basedstorage is not supported due to the associated latency which could greatly degrade the datatransfer performance, as well as due to reduced reliability and compatibility issues. Whenbuilding a cloud-based high availability solution that needs to span different availability zones,it is recommended to use a Storage-as-a-Service solution that can handle the block-levelreplication of the storage and that is integrated with the chosen failover clustering software.
In this section:
l Setting up Qlik Replicate in a Windows Server cluster (HA) (page 1134)l Setting up Qlik Replicate in a Linux cluster (page 1137)
D.1 Setting up Qlik Replicate in a Windows Server cluster(HA)
This section describes how to set up Qlik Replicate in a Windows Server Cluster cluster environment. Forinstructions on setting up a Windows clustering environment, refer to the Microsoft Help.
The steps should be performed in the order they appear below:
l Step 1: Install Qlik Replicate in the cluster (page 1134)l Step 2: Add the Qlik Replicate services (page 1135)l Step 3: Define the dependencies for each service (page 1136)l Step 4: Enable different console configurations in a high availability environment (page 1137)
Step 1: Install Qlik Replicate in the clusterTo install Qlik Replicate in your cluster environment, perform steps 1-3 on each of the cluster nodes:
1. Run the Qlik Replicate setup wizard on the first node that is part of your cluster. Install QlikReplicate to a local folder. The default is:C:\Program Files\Attunity\Replicate.In the setup wizard, specify a shared storage location for the "data" folder; for example,F:\Replicate\data.For more information, see Setting up Qlik Replicate on Windows (page 39).
Setup and User Guide - Qlik Replicate, November 2021 1134

D Setting up Qlik Replicate in a cluster environment
2. Open a command prompt as an administrator and change the working directory to the Replicate bindirectory. Then, run the following two commands, where Command 1 should only be run on the firstcluster node.
l The new_master_user_keymust be identical on all participating clusternodes.For more information on the role played by the master user key in Replicate, seeEncrypting the user permissions file (page 70).
l Setting the admin password using the setserverpassword command willinvalidate the master key. Therefore, make sure to set the admin passwordbefore running the setmasterkey command.
l The setmasterkey command overrides the mk.dat file, rendering all storedsecrets invalid (as they were encrypted using the old key). Therefore, afterchanging the master key, you need to reenter the passwords in all of the relevantplaces. For more information, see Changing and protecting the master key (page68).Additionally, because the Replicate server password is also stored in the mk.datfile, you need to reset it as described in Changing the server password (page 65)
Command 1:repctl -d "replicate_data_folder" setmasterkey new_master_key master_
key_scope=1
Command 2:RepUiCtl -d "replicate_data_folder" masterukey set -p new_master_user_
key
where:replicate_data_folder is the shared storage location of the Replicate data folder definedearlier (e.g. F:\Replicate\data), new_master_key is the new master key, and new_master_user_key is the new master user key.
3. Stop the Replicate services.
4. Now move your cluster to the next cluster node and install Qlik Replicate as described in Steps 1-3above, making sure only to run the second command in Step 2.
5. After Replicate is installed on all nodes, edit the ServiceConfiguration.xml file in the "data" folderand change the Https:// and Http:// entries to use the Client Access Point name.
Step 2: Add the Qlik Replicate servicesThe two Qlik Replicate services must be added as resources to the role.
The Qlik Replicate services are called Qlik Replicate UI Server and Qlik Replicate Server.
To add the Qlik Replicate services:
1. In the left pane of the Failover Cluster Manager, select Roles. The available roles will be listed in theright pane of the console. Right-click the role you are working with and point to Add a resource.Then select Generic Service.
Setup and User Guide - Qlik Replicate, November 2021 1135

D Setting up Qlik Replicate in a cluster environment
2. In the Select Service screen of the New Resource wizard, select Qlik Replicate UI Server from theList.
3. Click Next and follow the directions in the wizard to create the resource. For information on how touse this wizard, see the Microsoft online help.
4. Repeat the same steps for the Qlik Replicate Server.
For the Qlik Replicate services to be available in the list, Qlik Replicate must be installed on thecomputers where you defined the service.
Step 3: Define the dependencies for each serviceYou should define dependencies for the Qlik Replicate services. This allows the Storage and the Networknames to start before the Qlik Replicate services. If these resources do not start up before the services,Qlik Replicate will not start because it will continue to search for the data location.
To define the dependencies:
1. In the left pane of the Failover Cluster Manager console, select Roles. The available roles will belisted in the right pane of the console. Select the role you are working with and then, in the bottomright pane, select the Resource tab. From the list of the available roles, select Qlik Replicate UIServer.
2. Right-click the Qlik Replicate UI Server role and select Properties.The Qlik Replicate UI Server Properties dialog box opens.
3. In the Qlik Replicate UI Server Properties dialog box, select the Dependencies tab.
4. Click Insert. A new line is added to the Resource list.
5. In the Resource column, click the arrow and select the Replicate Data storage resource from thelist.
6. Click Insert and add the Network Name resource (its name should be the same as the clustername).
7. Repeat the steps for the Qlik Replicate Server service.
8. Start the Services using the Failover Cluster Manager and access the console using the Networkname.
9. Register the license. The license should contain all host names of the cluster.
To open Qlik Replicate Console, it is recommended to use an address that includes thename or IP address of the cluster machine (as opposed to the specific node name).Example:https://cluster_name_ip/attunityreplicate/6.3.118/#
Setup and User Guide - Qlik Replicate, November 2021 1136
D Setting up Qlik Replicate in a cluster environment
Step 4: Enable different console configurations in a high availabilityenvironmentIn a High Availability active-passive scenario, it is recommended to install the Qlik Replicate data folder ona shared storage device. The data folder contains various configuration files in XML format (e.g.ServiceConfiguration.xml). In a standard installation, you do not need to change the names of thesefiles. However, in a High Availability environment in which Qlik Replicate Console is installed on twodifferent machines, you may want each machine to have its own unique settings. In such a situation,changing the name of these files to include the hostname of the Qlik Replicate Console machine (as itappears in the output of the Windows hostname command) will allow you to store a different configurationfor each machine.
The file name should be formatted as follows: [Name]Configuration-[hostname].xml
For example, let’s assume that one Qlik Replicate Console is installed on a machine called replicate-main and the other Qlik Replicate Console is installed on a machine called replicate-failover. Toset up a different configuration for each machine, simply create two copies of theServiceConfiguration.xml file and then rename them to ServiceConfiguration-replicate-main.xml and ServiceConfiguration-replicate-failover.xml accordingly. After renamingthe files, edit each of them with your desired settings.
D.2 Setting up Qlik Replicate in a Linux clusterThis section describes how to set up Qlik Replicate in a Linux Cluster Environment. There are severalcommercially available clustering solutions for Linux including Veritas Cluster Server, Red Hat ClusterSuite and IBM HACMP for Linux.
When one of the available clustering solutions is already in place, Qlik Replicate can be set up like anyother cluster application while adhering to the following guidelines:
l Replicate should be installed on the participating cluster nodes.For more information, see Setting up Qlik Replicate on Linux (page 47).
l Replicate only supports the failover cluster configuration (active-passive).l Qlik Replicate data (the data folder, tasks folder, file channel, etc.) should be stored in a SAN forshared access between the cluster nodes. To change the default location of the Qlik Replicate datafolder, run the following command on the primary cluster node when the installation completes:./repctl-d <shared_storage_path> service start
l Only one instance of Replicate can be active at a given data location. The cluster software shouldbe set so that during failover, one Replicate instance is stopped and the other is started.
Setup and User Guide - Qlik Replicate, November 2021 1137
E Control Tables
E Control TablesThis section describes the Qlik Replicate Control Tables that are created on the target endpoint when thecorresponding table is selected in the Control Tables tab.
l All Control Table timestamps are in UTC format.
l Control tables are not created in Full Load only replication tasks.
l Setting Replicate to DROP and CREATE the table if the target table already exists willnot affect Control Tables.
l Replicate automatically creates the Control tables on the target during runtime. If youprefer to manually create the tables, make sure that all column names and table namesare lower case, apart from the Apply Exceptions table (attrep_apply_exceptions)which should be upper case.
The Control Tables describe in this section are as follows:
l Apply exceptions (page 1138)l Replication status (page 1139)l Suspended Tables (page 1140)l Replication history (page 1140)l Change data partitions (page 1141)l DDL history (page 1142)
E.1 Apply exceptionsChange Processing errors are recorded in the attrep_apply_exceptions table, which is describedbelow.
The data in this table is never deleted.
Column Type Description
TASK_NAME nvchar The name of theQlik Replicate task.
TABLE_OWNER nvchar The table owner.
TABLE_NAME nvchar The table name.
ERROR_TIME (inUTC)
timestamp The time the exception (error) occurred.
STATEMENT nvchar The statement that was being executed when the erroroccurred.
ERROR nvchar The actual error.
Exceptions table
Setup and User Guide - Qlik Replicate, November 2021 1138

E Control Tables
E.2 Replication statusThe attrep_status table contains the current status of each replication task and the target data.Although updates for the tasks in the attrep_status table are generated every few seconds, Replicatewill only apply the updates after it has applied changes to the target tables. In some cases, this may take afew minutes.
Column Type Description
SERVER_NAME
nvchar The name of the machine on which Qlik Replicate is installed.
TASK_NAME nvchar The name of the Qlik Replicate task.
TASK_STATUS varchar One of the following:
l FULL LOADl CHANGE PROCESSING
Task status is FULL LOAD as long as there is at least one table infull load. After all tables have been loaded, the task status changesto CHANGE PROCESSING.
STATUS_TIME timestamp When the status was last updated.
PENDING_CHANGES
int The number of change records that were not yet applied to thetarget.
DISK_SWAP_SIZE
int The amount of disk space that is occupied by old or offloadedtransactions.
TASK_MEMORY
int Current memory consumption in MB.
SOURCE_CURRENT_POSITION
varchar The POSITION in the source endpoint that Qlik Replicate is currentlyreading from.
SOURCE_CURRENT_TIMESTAMP
timestamp The TIMESTAMP in the source from which Qlik Replicate iscurrently reading.
Replicate aligns the timestamp read from the sourcewith the timestamp on the Replicate Server machine(according to the source latency). So, for example, if thetime on the source was 12:30 and the time on theReplicate Server machine is 12:32, Replicate will addtwo minutes to the original source time. This will be thevalue in the SOURCE_CURRENT_TIMESTAMPcolumn.
Column descriptions
Setup and User Guide - Qlik Replicate, November 2021 1139

E Control Tables
Column Type Description
SOURCE_TAIL_POSITION
varchar
The POSITION of the oldest start transaction that is still notcommitted. This represents the newest position that you can revertto, without losing any changes. There may, of course, be duplicates.
SOURCE_TAIL_TIMESTAMP
timestamp The TIMESTAMP of the oldest start transaction that is still notcommitted. This represents the newest TIMESTAMP that you canrevert to, without losing any changes. There may, of course, beduplicates.
SOURCE_TIMESTAMP_APPLIED
timestamp This is the timestamp of the last transaction committed. In a bulkapply this will be the timestamp for the commit of the last transactionin that batch. It will only be changed as part of the last transaction inthe batch.
E.3 Suspended TablesWhen a table is suspended, information about the table including the reason for its suspension is recordedin the attrep_suspended_tables table. If a table is suspended and then unsuspended while the task isrunning, the entries for that table will be deleted from the attrep_suspended_tables table.
When a task with suspended tables stops, records for that task will remain in the attrep_suspended_tables table. In the event that the tables are still suspended when the task is restarted, the data is deletedand then recorded again.
Column Type Description
SERVER_NAME nvchar The name of the machine on which Qlik Replicate isinstalled.
TASK_NAME nvchar The name of the Qlik Replicate task.
TABLE_OWNER nvchar The owner of the suspended table.
TABLE_NAME nvchar The name of the suspended table.
SUSPEND_REASON varchar The reason why the table was suspended.
SUSPEND_TIMESTAMP
timestamp The date and time the table was suspended.
Column descriptions
E.4 Replication historyThe attrep_history table provides statistics about each task, such as the number and volume ofrecords processed during a particular timeslot.
A new record is appended to the table at the end of each TIMESLOT_DURATION (page 1141). In otherwords, the data in this table is never deleted.
Setup and User Guide - Qlik Replicate, November 2021 1140

E Control Tables
Column Type Description
SERVER_NAME
nvchar The name of the machine on which Qlik Replicate is installed.
TASK_NAME nvchar The name of the Qlik Replicate task.
TIMESLOT_TYPE
varchar One of the following:
l FULL LOADl CHANGE PROCESSING (CDC)
When FULL LOAD and CHANGE PROCESSING are running inparallel (some tables in full load, some in CDC), two history recordswill occupy the same time slot.
TIMESLOT timestamp The end timestamp of the time slot.
TIMESLOT_DURATION
int The duration of each history record in minutes.
TIMESLOT_LATENCY
int The latency at the end of the time slot. This is only applicable to CDCtime slots. Note that this value contains the value of the target latencyonly.
TIMESLOT_RECORDS
int The number of records processed during the time slot.
TIMESLOT_VOLUME
int The volume of data processed in MB.
Column descriptions
E.5 Change data partitionsThe attrep_cdc_partitions table contains records of partitions created on the target database whenChange Data Partitioning (page 1022) is enabled for a Replicate task. You can use this information toidentify partitioned data that needs to be further processed.
Column Type Description
SERVER_NAME STRING The name of the machine on which Qlik Replicate isinstalled.
TASK_NAME STRING The name of the Qlik Replicate task.
PARTITION_NAME STRING The partition name consists of the partition start and endtime.
Example:
20170313T123000_20170313T170000
attrep_cdc_partitions table fields
Setup and User Guide - Qlik Replicate, November 2021 1141

E Control Tables
Column Type Description
PARTITION_START_TIME
TIMESTAMP When the partition was opened:
Example:
2017-03-13 12:30:00.000
PARTITION_END_TIME TIMESTAMP When the partition was closed:
Example:
2017-03-13 17:00:00.000
TABLE_OWNER STRING The table schema or owner.
TABLE_NAME STRING The table name.
E.6 DDL historyThe attrep_ddl_history table contains a history of DDL changes that occurred in the source duringreplication to the target.
The DDL History table is currently supported with the following target endpoints only:
l Hadoopl Hortonworks Data Platforml Microsoft Azure HDInsightl Amazon EMRl Google Dataprocl Microsoft Azure Databricksl Databricks on AWSl Databricks on Google Cloudl Cloudera Data Platform (CDP) Private Cloud
A new record is inserted into the table whenever a supported DDL change occurs in the source. MultipleALTER TABLE statements that occur during a task may be represented as a single row in the control table.The JSON buffer (see below) describes all the changes that occurred (e.g. ADD COLUMN A, DROPCOLUMN B, ALTER COLUMN C).
For information on enabling the DDL History Control Table as well as its limitations, see Control tables(page 1015).
When the Apply Changes task option is enabled, an entry is created for the base table (e.g.tblT1). If the Store Changes task option is also enabled, an additional entry is created for theCT table (e.g. tblT1__CT).
Setup and User Guide - Qlik Replicate, November 2021 1142

E Control Tables
Column Type Description
SERVER_NAME
STRING The name of the machine on which Qlik Replicate is installed.
TASK_NAME STRING The name of the Qlik Replicate task.
TABLE_OWNER
STRING The source table schema or owner.
TABLE_NAME STRING The source table name. If the table was renamed, this will be thetable name before the change.
CHANGE_SEQ STRING See Change_Seq in Using Change Tables (page 1124).
TIMESTAMP TIMESTAMP When the change occurred.
TABLE_VERSION
INTEGER Replicate assigns an internal version number to the table. Theversion number increases whenever a DDL change occurs in thesource table.
DDL_TYPE STRING CREATE_TABLE, DROP_TABLE, ALTER_TABLE, TRUNCATE_TABLE
Column descriptions
Setup and User Guide - Qlik Replicate, November 2021 1143

E Control Tables
Column Type Description
DETAILS CLOB JSON document describing the change(s)
Example:
{
"owner": "string",
"table": "string",
"tableNewName": "string",
"version": number,
"columns":
{
"col1":
{
"columnNewName": "string",
"action": "string",
"type":" string",
"length": number,
"precision": number,
"scale": number,
"primaryKeyPosition": number,
"nullable": boolean,
"ordinal": number
},
"col2":
{
…
}
}
}
where:
l tableNewName is NULL if the table was not renamedl col1 and col2 are the original column names (or the onlycolumn names if the columns were not renamed)
l columnNewName is the new column name or NULL if thecolumn was not renamed
l action is ADD (also for CREATE TABLE), DROP, orALTER
l type is the Replicate data typel primaryKeyPosition is ZERO if the column is not partof the primary key
Setup and User Guide - Qlik Replicate, November 2021 1144

F Using HP NonStop SQL/MP as an ODBC target
F Using HP NonStop SQL/MP as an ODBCtarget
HP NonStop SQL/MP can be used as an ODBC target in a Replicate task. However, to ensure thatReplicate and non-HP NonStop SQL/MP sources comply with HP NonStop SQL/MP conventions, severaladditional steps need to be performed. In addition, when defining the task settings, certain options will beunavailable or limited in their availability.
Note that when replicating to an HP NonStop SQL/MP target, you must select SQLMP (ARC) as theprovider type. For information on how to select a provider type as well as a detailed explanation of how todefine HP NonStop SQL/MP as an ODBC target in a Replicate task, see Using ODBC to connect to atarget (page 804).
In this section:
l Prerequisites (page 1145)l Table settings (page 1146)l Task setting limitations (page 1147)
F.1 PrerequisitesBefore designing a task with HP NonStop SQL/MP as an ODBC Target, the following prerequisites mustbe met:
l All source tables and their indexes must already exist on the target database.l The default name for the Replicate Apply Exceptions table (attrep_apply_exceptions) is notcompliant with HP NonStop SQL/MP table naming conventions which dictate that table namescannot exceed 8 characters or contain non-alphanumeric characters. To resolve this conflict, youneed to add the following entry to your NAVMAP file or create a new NAVMAP file (The NAVMAPfile is located in the subvolume where ARC is installed):Syntax:[SQLMP]
attrep_apply_exceptions= \machine_name.$volume_name.subvolume_name.atreapexYou also need to manually create the Apply Exceptions table on the HP NonStop SQL/MP targetbefore starting the task. The table should be named atreapex and should contain the followingcolumns:
Column name Data type
TASK_NAME Varchar(128)
TABLE_OWNER Varchar(128)
TABLE_NAME Varchar(128)
ERRORTIME Datetime year to fraction
Column name data types
Setup and User Guide - Qlik Replicate, November 2021 1145

F Using HP NonStop SQL/MP as an ODBC target
Column name Data type
STATEMENT Varchar(1000)
ERROR Varchar(1000)
l If you intend to enable the Replicate Store Changes option, you need to manually create the audittable on the HP NonStop SQL/MP target before starting the task.
This also requires you make the following changes in the Store Changes Settings (page1021) tab:
1. Select Audit table from the Store changes drop-down list.
2. Change the default audit table name from attrep_audit_table toatreauta.
Create a table named atreauta with the following parameters:
Column Name Data Type
*task_name Varchar(110)
*stream_position Varchar(128)
change_seq Varchar(35)
change_oper Varchar(1)
schema_name Varchar(128)
table_name Varchar(128)
operation Varchar(12)
transaction_id Varchar(32)
timestamp Timestamp
change_record Varchar(1000)
bu_change_record Varchar(1000)
Parameter data types
: You also need to create a Unique Index consisting of the task_name and stream_position columns (marked with an asterisk above).
F.2 Table settingsWhen the source database in a Replicate task is not HP NonStop SQL/MP, you must make sure that theselected source tables comply with HP NonStop SQL/MP conventions and limitations. This sectiondescribes how to apply transformations to source tables that are not HP NonStop SQL/MP-compliant.
Setup and User Guide - Qlik Replicate, November 2021 1146

F Using HP NonStop SQL/MP as an ODBC target
l The maximum size of a Unique Index in HP NonStop SQL/MP cannot exceed 240 bytes. In theTransform tab of the <Table_Name> Table Settings dialog box, you can check which columnscomprise the Unique Index and change them if necessary (i.e. if their combined Type valueexceeds 240 bytes). For an explanation of how to do this, see Using the Transform tab (page 933).
l HP NonStop SQL/MP does not support UPDATE operations on Primary Key columns. Therefore, ifyour application updates source tables columns that are part of a Primary Key, you will need tocreate the target table with a Unique Index on those columns instead of a Primary Key. For anexplanation of how to do this, see Using the Transform tab (page 933).
l Valid HP NonStop SQL/MP table names cannot exceed 8 characters or contain non-alphanumericcharacters. If any of the source table names are not HP NonStop SQL/MP-compliant, you will needto map them to a valid name.To do this:
1. Open the <Table_Name> Table Settings dialog box as described in Table Settings (page929).
2. In the General tab’s Table Name field, enter the new table name.
F.3 Task setting limitationsWhen defining your task settings, the following limitations apply:
l Metadata:l Target Metadata: As HP NonStop SQL/MP does not support LOB data types, the setting inthis tab are not relevant.
l Control Tables: None of the optional tables are supported. The Apply Exceptions table,which is required, should be configured as described in Prerequisites (page 1145) above.
l Full Load:l Full Load Settings: As the source tables need to be created manually on the target, theDROP and CREATE table option is not supported.
l Full Load Tuning: No limitations.l Change Processing:
l Apply Changes Settings: No limitationsl Store Changes Settings: Change tables are not supported. If you want Replicate to storecaptured changes on HP NonStop SQL/MP, choose Audit table from the Store changes indrop-down list. This also requires you to manually create the Audit Table on HP NonStopSQL/MP before starting the task, as described in Prerequisites (page 1145) above.After creating the Audit table, specify its name in the Audit table name field (instead of thedefault name).Audit table creation options:As the Audit Table is created manually, the DROP and CREATE audit table option is notsupported.
l Change Processing Tuning: Only "Transactional apply" Change processing mode issupported.
l Error Handling: No limitations.l Logging: No limitations.
Setup and User Guide - Qlik Replicate, November 2021 1147

F Using HP NonStop SQL/MP as an ODBC target
For a detailed description of Task Settings, see Task Settings (page 1010).
Setup and User Guide - Qlik Replicate, November 2021 1148

G Impact of DST change on Qlik Replicate
G Impact of DST change on Qlik ReplicateThis topic describes the impact of Daylight Saving Time (DST) on Qlik Replicate and provides guidelinesfor handling changes brought about by DST.
Tasks that move from Full Load to Change Processing when DST comes into effect may encounter dataloss. However, such data loss can be prevented by adhering to the guidelines outlined in this appendix.
Additionally, the times displayed in the Replicate Console may not be synced with the server. Should youencounter any time discrepancy issues, either restart the Qlik Replicate Server service or stop and resumethe tasks.
There are two types of DST changes:
l DST On - Occurs approximately when Summer starts (actual date is country specific). Its impact onlocal time is that local time is moved one hour forward (so, for example, 01:00 AM becomes 02:00AM). This DST change does not impact Qlik Replicate because it does not result in time overlap.
l DST Off - Occurs approximately when Winter starts (actual date is country specific). Its impact onlocal time is that local time is moved back one hour (so, for example, 02:00 AM becomes 01:00 AM).This DST change results in time overlap where local time travels over the same hour twice in a row.
The comments below assume that the customer has not changed the time but rather the timezone or theDST setting. Changing the actual time (not for minor time adjustments) is a sensitive operation and is bestdone when Qlik Replicate is stopped.
Running Qlik Replicate tasks do not depend on the timezone or DST for correctly scanning and processingthe transaction logs. Internally, Qlik Replicate timers use UTC.
Still, there are several places where DST may have an effect:
1. Timestamps in logs and audit messages are in local time. As a result, when Winter time starts, thelogs will show the time going back an hour; conversely, when Summer time starts, the logs mayappear to be missing one hour.
2. Scheduled jobs as well as the global and table manipulation variables timestamp and commit_
timestamp use local time so these will also be affected. The impact of this depends on themanipulation done and on the intended use of the timestamp based data.
Setup and User Guide - Qlik Replicate, November 2021 1149

G Impact of DST change on Qlik Replicate
To prevent timestamp and scheduling anomalies resulting from DST starting or ending,the following best practices should be observed:
l DST Off (summer to winter): Do not schedule a task to start from the time theclock changes until the following hour. For example, if DST ends at 02:00 am, donot schedule a task to run between 02:00 and 02:59, as the task will run twice.
l DST On (winter to summer): Do not schedule a task to start from the time theclock changes until the following hour. For example, if DST starts at 02:00 am, donot schedule a task to run between 02:00 and 02:59 as this hour does not exist.
l The initial Full Load of tables or reloading of tables should not be done during theDST change window. It is recommended to perform such operations either anhour before or an hour after DST.
If you have existing jobs scheduled to start at the overlap time and you do not want tomodify them, then you need to stop the Qlik Replicate Server. Going in to Winter time,for example, if at 02:00 AM the clock is to be set back to 01:00 AM then when the time is00:55 AM the Qlik Replicate Server should be stopped and, after an hour and tenminutes (at 01:05 AM), should be started again.If you forget to do this, all scheduled jobs will run an hour earlier than intended. You canrectify this by setting the desired scheduling time and then restarting the Qlik ReplicateServer service.
3. Statistics shown on the console are also sensitive to local time and thus may also showconfusing/inaccurate data in the overlap period (going in to Winter time) or for the skipped period(going into Summer time).
4. If the clock on Qlik Replicate Server machine is one hour behind the clock on the Qlik ReplicateConsole (UI) machine, the following issues are known to occur:
l The Applied Changes graph (page 1071) circle graph will be updated as the changes areapplied, but the information in the Recent Activity (page 1071)tab will not be updated.
l Scheduled jobs will start according to the Qlik Replicate Server time (as expected), but willremain in the Active Jobs list after execution instead of moving to the Expired Jobs tab.
For more information on scheduling jobs, see Scheduling jobs (page 1114).
In general, it is recommended to avoid non-critical task design changes during the first overlap period(going in to Winter time) so as to prevent confusion about when the changes took place.
In addition to Qlik Replicate, other components are also involved including:
l The source endpoint systeml The target endpoint systeml The local operating systeml The task design (specifically using timestamp based variables)
Given the complexity of the topic and the involvement of many independent components and settings, Qlikgenerally recommends that customers first verify the impact of DST changes in their test environment.
Setup and User Guide - Qlik Replicate, November 2021 1150

H Metadata file description
H Metadata file descriptionWhen the Create metadata files in the target folder option in the File target endpoint or Amazon S3 targetendpoint is selected, for each CSV/JSON file Replicate creates a corresponding metadata file under thespecified target folder.
The metadata file offers several benefits such as enabling custom batch processes to perform bettervalidation, supporting deeper automation, offering lineage information and improving processing reliability.
The metadata files (which are in standard JSON format) are described in the tables below.
All timestamps are in ISO-8601 format, for example 2016-08-02T10:05:04.802.
Field Description
name The name of the Replicate task.
sourceEndpoint The name defined in the source endpoint settings.
sourceEndpointType The endpoint type defined in the source endpoint settings (e.g. Oracle,MySQL, etc.).
sourceEndpointUser The user defined in the source endpoint settings.
replicationServer The hostname of the machine on which Qlik Replicate is installed.
operation If a target data file has been created, this field will contain the following value:dataProduced
Task Information file
Field Description
name The name of the data file without the extension.
extension The extension of the data file (.csv or.json according to the selectedtarget file format).
location The location of the data file.
startWriteTimestamp UTC timestamp indicating when writing to the file started.
endWriteTimestamp UTC timestamp indicating when writing to the file ended.
firstTransactionTimestamp UTC timestamp of the first record in the file.
lastTransactionTimestamp UTC timestamp of the last record in the file.
content The values can either be data (i.e.Full Load replication) or changes (i.eChange Processing replication) according to the data in thecorresponding CSV file.
File Information file
Setup and User Guide - Qlik Replicate, November 2021 1151

H Metadata file description
Field Description
recordCount The number of records in the file.
errorCount The number of data errors encountered during file creation.
Field Description
format delimited or json according to the selected target file format.
options The options for delimited file format. These options will not be shown for jsonformat as they are not relevant.
recordDelimiter The delimiter used to separate records (rows) in the target files. The default isnewline (\n).
fieldDelimiter The delimiter used to separate fields (columns) in the target files. The default is acomma.
nullValue The string used to indicate a null value in the target file.
quoteChar The character used at the beginning and end of a column. The default is thedouble-quote character (").
escapeChar The character used to escape a string when both the string and the columncontaining the string are enclosed in double quotes. Note that the string’s quotationmarks will be removed unless they are escaped.
Example (where " is the quote character and \ is the escape character):
1955,"old, \"rare\", Chevrolet",$1000
Format Information file
Field Description
customInfo This section contains any custom parameters that were set using thedfmCustomProperties internal parameter.
The dfmCustomProperties internal parameter must be specified in the followingformat:
Parameter1=Value1;Parameter2=Value2;Parameter3=Value3
Example:
Color=Blue;Size=Large;Season=Spring
For an explanation of how to set internal parameters, see Internal parameters (page582).
Custom Information file
Setup and User Guide - Qlik Replicate, November 2021 1152

H Metadata file description
Field Description
sourceSchema The schema containing the source table.
sourceTable The name of the source table.
targetSchema The name of the target table schema (if the source schema name was changed).
For information on changing the source schema name, see Performing Generaltasks for a single table/view (page 930).
targetTable The name of the target table (if the source table name was changed).
For information on changing the source table name, see Performing General tasksfor a single table/view (page 930).
tableVersion Replicate assigns an internal version number to the table. The version numberincreases whenever a DDL change occurs in the source table.
columns Information about the table columns.
ordinal The position of the column in the record (1, 2, 3, etc.).
name The column name.
type The column data type. See File target data types (page 575)or Amazon S3 TargetData Types for more information.
width The maximum size of the data (in bytes) permitted for the column.
scale The maximum number of digits to the right of the decimal point permitted for anumber.
primaryKeyPos The position of the column in the table’s Primary Key or Unique Index. The value iszero if the column is not part of the table’s Primary Key.
Data Information file
Setup and User Guide - Qlik Replicate, November 2021 1153

I Supported Platforms and Endpoints
I Supported Platforms and EndpointsIn this section
l Supported platforms (page 1154)l Supported source endpoints (page 1155)l Supported target endpoints (page 1160)l Endpoints supported in bidirectional replication (page 1165)l Supported browsers (page 1166)
In addition to providing a complete list of the source and target endpoints supported by QlikReplicate, theSupport Matrix also provides information about which platforms (Windows/Linux) are supported byQlikReplicate.
Note that depending on your license, some of the listed endpoints may not be available in your version ofQlik Replicate.
For each certified major version of a supported endpoint, Qlik performs a complete set ofcompatibility tests on one minor version in the same release family. Once certified, any minorversions in that family will also be supported, providing backward compatibility with the majorversion is preserved. For example, Oracle 19.x means that Oracle 19.0, 19.3 and 19.5 aresupported as well.
If an incompatibility is discovered in a minor version, a note to this effect will be added to theSupport Matrix until such time the issue is resolved.
I.1 Supported platforms
Supported Windows platformsQlik Replicate can be installed on any of the following Windows platforms:
l Windows Server 2012 (64-bit)l Windows Server 2012 R2 (64-bit)l Windows Server 2016 (64-bit)l Windows Server 2019 (64-bit)
Supported Linux platformsQlik Replicate can be installed on the following Linux platforms:
Setup and User Guide - Qlik Replicate, November 2021 1154

I Supported Platforms and Endpoints
l Red Hat Enterprise Linux 7.x (where x ≥ 4) and 8.x (64-bit)
Although Qlik Replicate is certified on Red Hat, it is also fully supported on anycorresponding and compatible Linux distribution, such as CentOS.
l Amazon Linux 2 (on Amazon EC2)
I.2 Supported source endpointsThis section lists the source endpoint versions supported by Qlik Replicate, according to endpoint type.
l Cloud-based (page 1155)l ARC-based (page 1157)l AIS-based (page 1157)l File (page 1157)l Data Lake (page 1158)l Relational databases (page 1158)l Data warehouses (page 1159)l ODBC (page 1159)l NoSQL (page 1159)l Other (page 1160)
Cloud-based
Endpoint Supported Versions WindowsRedHatLinux
Amazon Aurora MySQL
Supported via the MySQL sourceendpoint.
Same as the MySQL sourceendpoint.
✔ ✔
AWS Aurora Cloud for PostgreSQL Same as the PostgreSQLsource endpoint (starting from10.7)
✔ ✔
Amazon RDS for MySQL Same as the MySQL sourceendpoint.
✔ ✔
Amazon RDS for MariaDB
Supported via the MySQL sourceendpoint.
Same as the MySQL sourceendpoint (starting from 10.3)
✔ ✔
Supported Cloud-based sources
Setup and User Guide - Qlik Replicate, November 2021 1155
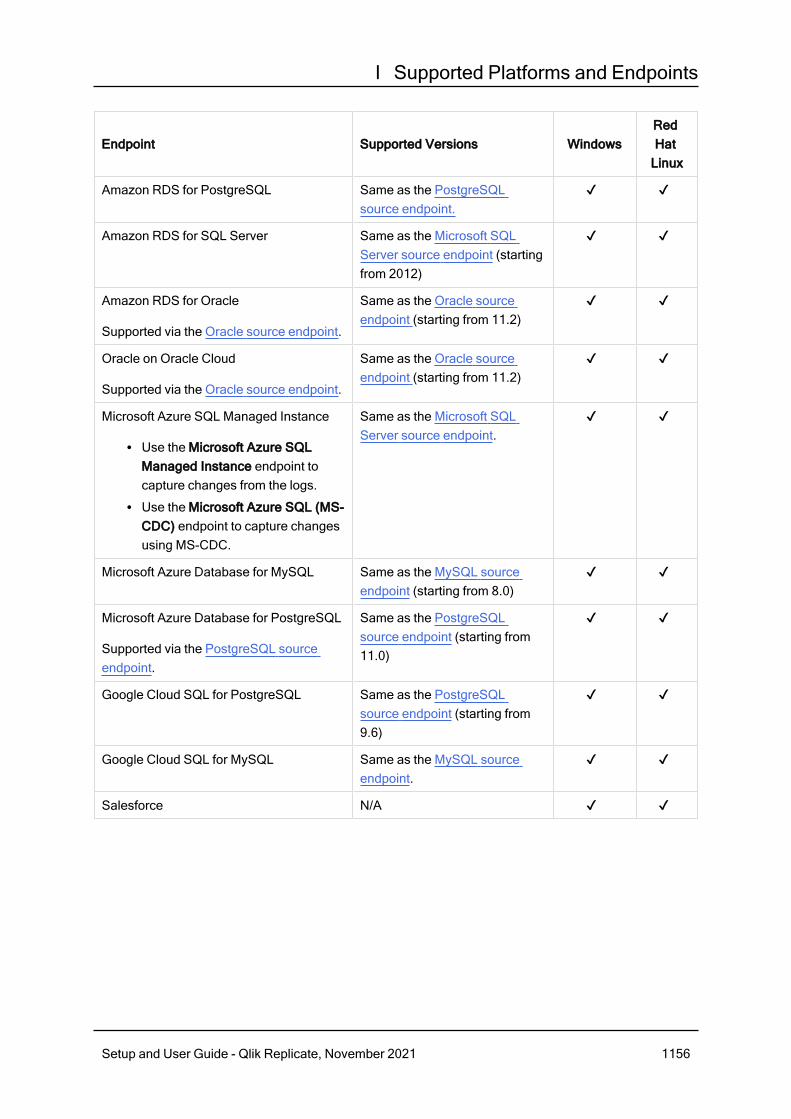
I Supported Platforms and Endpoints
Endpoint Supported Versions WindowsRedHatLinux
Amazon RDS for PostgreSQL Same as the PostgreSQLsource endpoint.
✔ ✔
Amazon RDS for SQL Server Same as the Microsoft SQLServer source endpoint (startingfrom 2012)
✔ ✔
Amazon RDS for Oracle
Supported via the Oracle source endpoint.
Same as the Oracle sourceendpoint (starting from 11.2)
✔ ✔
Oracle on Oracle Cloud
Supported via the Oracle source endpoint.
Same as the Oracle sourceendpoint (starting from 11.2)
✔ ✔
Microsoft Azure SQL Managed Instance
l Use the Microsoft Azure SQLManaged Instance endpoint tocapture changes from the logs.
l Use the Microsoft Azure SQL (MS-CDC) endpoint to capture changesusing MS-CDC.
Same as the Microsoft SQLServer source endpoint.
✔ ✔
Microsoft Azure Database for MySQL Same as the MySQL sourceendpoint (starting from 8.0)
✔ ✔
Microsoft Azure Database for PostgreSQL
Supported via the PostgreSQL sourceendpoint.
Same as the PostgreSQLsource endpoint (starting from11.0)
✔ ✔
Google Cloud SQL for PostgreSQL Same as the PostgreSQLsource endpoint (starting from9.6)
✔ ✔
Google Cloud SQL for MySQL Same as the MySQL sourceendpoint.
✔ ✔
Salesforce N/A ✔ ✔
Setup and User Guide - Qlik Replicate, November 2021 1156

I Supported Platforms and Endpoints
ARC-based
Endpoint Supported Versions Windows Red Hat Linux
IBM IMS (ARC) IBM z/OS:
2.3 and 2.4
IMS:
13, 14, and 15.1
✔ ✔
IBM VSAM Batch (ARC) IBM z/OS:
2.3
✔ ✔
Supported ARC-based sources
AIS-based
Endpoint Supported Versions Windows Red Hat Linux
HP Nonstop SQL/MP (AIS)
HP Nonstop Enscribe (AIS)
Himalaya:
G06.32
Itanium:
H06.22/J06.14
✔ ✔
OpenVMS RMS (AIS) Alpha:
8.3
Itanium:
8.3
✔ ✔
Supported AIS-based sources
File
Endpoint Supported Versions Windows Red Hat Linux
File N/A ✔ ✔
File Channel N/A ✔ ✔
Supported file-based sources
Setup and User Guide - Qlik Replicate, November 2021 1157

I Supported Platforms and Endpoints
Data Lake
Endpoint Supported Versions WindowsRed HatLinux
Hadoop -Cloudera
Please contact your Qlik Account Manager forsupport details.
✔ ✔
Hadoop -Hortonworks
Please contact your Qlik Account Manager forsupport details.
✔ ✔
Supported data lake sources
Relational databases
Endpoint Supported Versions WindowsRed HatLinux
IBM DB2 for LUW 10.5, and 11.1, and 11.5
10.5 with fix pack 5 is notsupported.
✔ ✔
IBM DB2 for z/OS DB2:
11 and 12
IBM z/OS:
2.3 and 2.4
✔ ✔
IBM DB2 for iSeries 7.2, 7.3, and 7.4 ✔ ✔
IBM Informix 11.5, 11.7, 12.1, and 14.10 ✔
Microsoft SQL Server 2012, 2014, 2016, 2017, and 2019 ✔ ✔
MySQL 5.6, 5.7, and 8.0 ✔ ✔
MariaDB
Supported via the MySQLsource endpoint.
10.0.x (where x >=24), 10.2, 10.3, 10.4,and 10.5
✔ ✔
Percona
Supported via the MySQLsource endpoint.
Same as the MySQL source endpoint,(starting from 5.6.28)
X ✔
Oracle 11.x (starting from 11.2.0.4), 12.x, 18.x,and 19.x
✔ ✔
Supported relational database sources
Setup and User Guide - Qlik Replicate, November 2021 1158

I Supported Platforms and Endpoints
Endpoint Supported Versions WindowsRed HatLinux
PostgreSQL 9.5, 9.6, 10.x, 11.x, 12, and 13. ✔ ✔
SAP Sybase ASE 12.5, 15, 15.5, 15.7, and 16 ✔ ✔
SAP HANA 1.0 and 2.0 ✔ ✔
Data warehouses
Endpoint Supported Versions Windows Red Hat Linux
Teradata Database 15.x, 16.x, and 17.x ✔ ✔
Supported data warehouse sources
ODBC
The ODBC and ODBC with CDC source endpoints can be used to access sources that are notincluded in Qlik Replicate’s extensive Support Matrix. However, unless enabled throughProfessional Services and approved by your Account Manager, ODBC source endpoint typesshould not be used. Additionally, ODBC source endpoint types should not be used to accessany sources already listed in the Support Matrix.
Endpoint Supported Versions Windows Red Hat Linux
ODBC 3.0 and 3.5 ✔ ✔
ODBC with CDC 3.0 and 3.5 ✔ ✔
Supported ODBC sources
NoSQL
Endpoint Supported Versions Windows Red Hat Linux
MongoDB 4.x ✔ ✔
Supported NoSQL sources
Setup and User Guide - Qlik Replicate, November 2021 1159

I Supported Platforms and Endpoints
Other
Endpoint Supported Versions WindowsRed HatLinux
SAP Application Supported backend endpoints:
l Microsoft SQL Serverl Oraclel IBM DB2 for LUWl SAP HANA
See Relational Databases above for version andplatform information.
✔ ✔
SAP Application(DB)
Supported backend endpoints:
l Oraclel Microsoft SQL Serverl IBM DB2 for LUWl IBM DB2 for z/OSl SAP HANA
See Relational Databases above for version andplatform information.
✔ ✔
SAP Extractor N/A ✔ ✔
Other supported sources
I.3 Supported target endpointsThis section lists the target endpoint versions supported by Qlik Replicate, according to endpoint type.
l Cloud-based (page 1161)l Streaming (page 1163)l File-based (page 1164)l Hadoop (page 1164)l Data warehouses (page 1164)l Relational databases (page 1165)l ODBC (page 1165)
Setup and User Guide - Qlik Replicate, November 2021 1160

I Supported Platforms and Endpoints
Cloud-based
Endpoint Supported Versions WindowsRedHatLinux
Amazon Aurora MySQL
Supported via the MySQL targetendpoint.
Same as the MySQL targetendpoint.
✔ ✔
Amazon Aurora PostgreSQL
Supported via the PostgreSQL targetendpoint.
Same as the PostgreSQL targetendpoint.
✔ ✔
Amazon RDS for MariaDB
Supported via the MySQL targetendpoint.
Same as the MySQL targetendpoint.
✔ ✔
Amazon RDS for MySQL
Supported via the MySQL targetendpoint.
Same as the MySQL targetendpoint (starting from 5.6)
✔ ✔
Amazon RDS for SQL Server
Supported via the Microsoft SQL Servertarget endpoint.
Same as the Microsoft SQLServer target endpoint (startingfrom 2012)
✔ ✔
Amazon RDS for Oracle
Supported via the Oracle target endpoint.
Same as the Oracle targetendpoint (starting from 11.2)
✔ ✔
Amazon RDS for PostgreSQL
Supported via the PostgreSQL targetendpoint.
Same as the PostgreSQL targetendpoint.
✔ ✔
Amazon Redshift N/A ✔ ✔
Snowflake on AWS (S3 storage) N/A ✔ ✔
Snowflake on AWS (Snowflake storage) N/A ✔ ✔
Snowflake on Azure (Azure Blob storage) N/A ✔ X
Snowflake on Azure (Snowflake storage) N/A ✔ ✔
Snowflake on Google (Google CloudStorage)
N/A ✔ ✔
Amazon S3 N/A ✔ ✔
Cloud-based supported target endpoints
Setup and User Guide - Qlik Replicate, November 2021 1161

I Supported Platforms and Endpoints
Endpoint Supported Versions WindowsRedHatLinux
Amazon EMR 5.x (starting from 5.2.x) and 6.x ✔ ✔
Google Cloud SQL for MySQL Same as the MySQL targetendpoint.
✔ ✔
Google Cloud SQL for PostgreSQL Same as the PostgreSQL targetendpoint (starting from 9.6)
✔ ✔
Google Cloud Storage N/A ✔ ✔
Google Cloud BigQuery N/A ✔ ✔
Google Dataproc 1.x (starting from 1.2) and 2.x ✔ ✔
Microsoft Azure SQL Synapse Analytics(Blob storage)
N/A ✔ X
Microsoft Azure SQL Synapse Analytics(Data Lake Storage Gen2)
N/A ✔ ✔
Microsoft Azure SQL Database Same as the Microsoft SQLServer target endpoint.
✔ ✔
Microsoft Azure SQL Managed Instance
Supported via the Microsoft SQL Servertarget endpoint.
Same as the Microsoft SQLServer target endpoint.
✔ ✔
Microsoft Azure Database for MySQL Same as the MySQL targetendpoint, (starting from 5.6)
✔ ✔
Microsoft Azure Database forPostgreSQL
Same as the PostgreSQL targetendpoint (starting from 9.5)
✔ ✔
Databricks on AWS 6.x (starting from 6.2) 7.x, and 8.x(starting from 8.2)
✔ ✔
Databricks on Google Cloud 8.x (starting from 8.2) ✔ ✔
Microsoft Azure Databricks (Blob or DataLake Storage Gen2)
5.x, 6.x, 7.x, and 8.x (starting from8.2)
✔ ✔
Microsoft Azure Databricks Delta 7.x, and 8.x (starting from 8.2) ✔ ✔
Microsoft Azure ADLS (Data LakeStorage Gen1 or Data Lake StorageGen2)
N/A ✔ ✔
Microsoft Azure HDInsight (Blob, DataLake Storage Gen1, or Data LakeStorage Gen2)
3.6 and 4.x (based on ApacheHadoop 3.1)
✔ ✔
Setup and User Guide - Qlik Replicate, November 2021 1162

I Supported Platforms and Endpoints
Endpoint Supported Versions WindowsRedHatLinux
Oracle Autonomous Data Warehouse
Supported via the Oracle target endpoint.
Same as the Oracle targetendpoint (starting from Oracle18.x)
✔ ✔
Oracle on Oracle Cloud
Supported via the Oracle target endpoint.
Same as the Oracle targetendpoint (starting from Oracle12.2)
✔ ✔
Qlik Cloud Landing N/A ✔ ✔
Teradata Vantage
Supported via the Teradata targetendpoint.
16.20 and 17.10 ✔ ✔
Streaming
Endpoint Supported Versions WindowsRedHatLinux
Kafka
Certified with:
l Confluent Cloud, based on ApacheKafka 2.x and Confluent Platform5.x, and 6.x
l Confluent Schema Registry 5.x(starting from 5.3.1)
l Hortonworks Schema Registry 0.x.x(starting from 0.8.1)
1.x, 2.x ✔ ✔
Microsoft Azure Event Hubs N/A ✔ X
Amazon Kinesis Data Streams N/A ✔ ✔
MapR Streams Please contact your QlikAccount Manager for supportdetails.
X ✔
Streaming supported target endpoints
Setup and User Guide - Qlik Replicate, November 2021 1163

I Supported Platforms and Endpoints
File-based
Endpoint Supported Versions Windows Red Hat Linux
File N/A ✔ ✔
File Channel N/A ✔ ✔
File-based supported target endpoints
Hadoop
Endpoint Supported Versions WindowsRed HatLinux
Hadoop - Cloudera 5.x (starting from 5.15) and 6.x(starting from 6.1)
✔ ✔
Hadoop - Hortonworks 2.x (starting from 2.6) and 3.x(starting from 3.1)
✔ ✔
Hortonworks Data Platform (HDP) 2.x (starting from 2.6) and 3.x(starting from 3.1)
✔ ✔
Cloudera Data Platform (CDP)Private Cloud
7.x ✔ ✔
Hadoop supported target endpoints
Data warehouses
Endpoint Supported Versions Windows Red Hat Linux
Actian Vector 3.0 and 3.5 ✔ ✔
Vertica 8.x, and 9.x ✔ ✔
IBM Netezza 6.x and 7.x ✔ X
Microsoft APS PDW AU2 ✔ X
Pivotal Greenplum 5.x, and 6.x ✔ ✔
SAP Sybase IQ 15.x and 16.x ✔ X
Teradata Database 15.x, 16.x, and 17.x ✔ ✔
SingleStore 6.0.18 ✔ ✔
Data warehouses supported target endpoints
Setup and User Guide - Qlik Replicate, November 2021 1164

I Supported Platforms and Endpoints
Relational databases
Endpoint Supported Versions WindowsRed HatLinux
Microsoft SQL Server 2012, 2014, 2016, 2017, and2019
✔ ✔
MySQL 5.6, 5.7, and 8.0 ✔ ✔
MariaDB
Supported via the MySQL targetendpoint.
10.x (where x >=24) and 10.3 ✔ ✔
Oracle 11.x, 12.x, 18.x, and 19.x ✔ ✔
PostgreSQL 9.5, 9.6, 10.x, and 11.x, 12, and13.
✔ ✔
SAP Sybase ASE 15.x and 16.x ✔ X
SAP HANA 2.0 ✔ ✔
Relational databases supported target endpoints
ODBC
The ODBC target endpoint, can be used to access targets that are not included in QlikReplicate’s extensive Support Matrix. However, unless enabled through Professional Servicesand approved by your Account Manager, the ODBC target endpoint should not be used.Additionally, the ODBC target endpoint should not be used to access any targets already listedin the Support Matrix.
Endpoint Supported Versions Windows Red Hat Linux
ODBC 3.0 and 3.5 ✔ ✔
ODBC supported target endpoints
I.4 Endpoints supported in bidirectional replicationBidirectional tasks support the following endpoints:
Source Endpoints:
l Oraclel Microsoft SQL Serverl MySQL
Setup and User Guide - Qlik Replicate, November 2021 1165

I Supported Platforms and Endpoints
l PostgreSQLl All AIS sourcesl All ARC sourcesl File Channell SAP Sybase ASEl IBM DB2 for iSeriesl Amazon RDS for MySQLl Amazon RDS for PostgreSQLl Amazon RDS for SQL Serverl AWS Aurora Cloud for PostgreSQLl Google Cloud SQL for MySQLl IBM DB2 for z/OSl IBM DB2 for LUW
Target Endpoints:
l Oraclel Microsoft SQL Serverl MySQLl Google Cloud SQL for MySQLl PostgreSQLl ODBCl File Channell SAP Sybase ASE
I.5 Supported browsersThe following browsers are supported:
l Microsoft Internet Explorer version 11 or abovel Microsoft Edge (with automatic updates turned on)l Mozilla Firefox (with automatic updates turned on)l Google Chrome (with automatic updates turned on)
Displaying the console in a window that spans multiple vertical windows is not supported.
Setup and User Guide - Qlik Replicate, November 2021 1166

J Replicate Loggers
J Replicate LoggersThis appendix provides a description of the following Replicate loggers:
l ADDONS (page 1167)l ASSERTION (page 1168)l COMMON (page 1168)l COMMUNICATION (page 1168)l DATA_RECORD (page 1168)l DATA_STRUCTURE (page 1168)l FILE_FACTORY (page 1169)l FILE_TRANSFER (AKA CIFTA) (page 1169)l INFRASTRUCTURE (page 1169)l IO (page 1169)l METADATA_CHANGES (page 1169)l METADATA_MANAGER (page 1169)l PERFORMANCE (page 1169)l REST_SERVER (page 1169)l SERVER (page 1170)l SORTER (page 1170)l SORTER_STORAGE (page 1170)l SOURCE_CAPTURE (page 1170)l SOURCE_LOG_DUMP (page 1170)l SOURCE_UNLOAD (page 1170)l STREAM (page 1171)l STREAM_COMPONENT (page 1171)l TABLES_MANAGER (page 1171)l TARGET_APPLY (page 1171)l TARGET_LOAD (page 1171)l TASK_MANAGER (page 1171)l TRANSFORMATION (page 1172)l UTILITIES (page 1172)
J.1 ADDONSOnly relevant when working with a Replicate add-on. Currently, the only add-ons are user-definedtransformations.
Setup and User Guide - Qlik Replicate, November 2021 1167

J Replicate Loggers
J.2 ASSERTIONWhen the log contains an ASSERTIONWARNING, it usually means that Replicate detected an anomalywith the data, which might result in replication issues at some stage. These warnings are not exposed inthe web console and do not trigger notifications.
J.3 COMMONWrites low level messages such as network activity.
Not recommended to set to "Trace" as it will write a huge amount of data to the log.
J.4 COMMUNICATIONProvides additional information about the communication between Replicate and the Source and Targetcomponents. For example, when using Hadoop, it will print the CURL debug messages and the "Apply" ofthe actual files (Mainly CURL and HTTP Client).
J.5 DATA_RECORDOnly available for some endpoints and may be implemented differently for each endpoint. It writesinformation about each change that occurs. While in Oracle it writes only the header fields, for someendpoints, such as Sybase ASE and IBM DB2 for LUW sources, it will also include the changed data. Itrecords when a specific event was captured as well as the event context.
The content will not be presented; all events will be logged, even when a record is not in the task scope.(This is not relevant for Oracle LogMiner, as the list of objects are propagated to the LogMiner session).
ExampleProduce INSERT event: object id 93685 context
'0000000003A4649301000001000005190000821F001000010000000003A46427' xid [000000000f9abd46]
timestamp '2017-06-07 09:01:58' thread 1 (oracdc_reader.c:2178)
J.6 DATA_STRUCTUREUsed for internal Replicate data structures and is related to how the code deals with the data and stores itin memory. In general, data structure is a way of organizing data in a computer so that it can be usedefficiently.
Do not set to "Trace" unless specifically requested by Qlik.
Setup and User Guide - Qlik Replicate, November 2021 1168

J Replicate Loggers
J.7 FILE_FACTORYRelevant to Hadoop Target, Amazon Redshift and Microsoft Azure SQL Synapse Analytics. Thiscomponent is responsible for moving the files from Replicate to the target which, in the case of Hadoop, isthe HDFS stage of the task.
J.8 FILE_TRANSFER (AKA CIFTA)Writes to the log when the File Transfer component is used to push files to a specific location.
J.9 INFRASTRUCTURERecords infrastructure information related to the infrastructure layers of Replicate code: ODBCinfrastructure, logger infrastructure, PROTO_BUF, REPOSITORY, FILES USE, opening a new thread,closing a thread, saving the task state, and so on.
J.10 IOLogs all IO operations (i.e. file operations), such as checking directory size, creating directories, deletingdirectories, and so on.
Example:[IO ]T: scanning 'E:\Program Files\Attunity\Replicate\data\tasks\Task_name/data_files'
directory size (at_dir.c:827)
J.11 METADATA_CHANGESWill show the actual DDL changes which are included in the scope (available for specific endpoints).
J.12 METADATA_MANAGERWrites information whenever Replicate reads metadata from the source or target, or stores it. Managetables metadata, metadata store, and dynamic metadata.
J.13 PERFORMANCECurrently used for latency only. Logs latency values for source and target endpoints every 30 seconds.
J.14 REST_SERVERHandles all REST requests (API and UI). Also shows the interaction between Replicate and Qlik EnterpriseManager.
Setup and User Guide - Qlik Replicate, November 2021 1169

J Replicate Loggers
J.15 SERVERThe server thread in the task that communicates with the Replicate Server service on task start, stop, etc.Includes init functions for the task and the task definition.
J.16 SORTERThe main component in CDC that routes the changes captured from the source to the target.
Responsible for:
l Synchronizing Full Load and CDC changesl Deciding which events to apply as cached changesl Storing the transactions that arrive from the source database until they are committed, and sendingthem to the target database in the correct order (i.e. by commit time).
Whenever there is a CDC issue such as missing events, events not applied, or unacceptable CDC latency,it is recommended to enable "Verbose" for this logger.
J.17 SORTER_STORAGESORTER_STORAGE is the storage component of the Sorter which stores transactions (i.e. Changes) inmemory and offloads them to disk when the transactions are too large, or unreasonably long. As this loggerrecords a large amount of information, it should only be set to "Trace" if you encounter storage issues suchas corrupt swap files, poor performance when offloading changes on disk, and so on.
J.18 SOURCE_CAPTUREThis is main CDC component on the source side. As such, it should be used to troubleshoot any CDCsource issue. Note that setting to "Verbose" is not recommended unless absolutely necessary as it willrecord an enormous amount of data to the log.
Some target side components that use the source (e.g. LOB lookup) also use this logger. Setting thelogger to “Trace” may be useful for troubleshooting performance issues and other source CDC issues suchas bad data read from the source CDC.
J.19 SOURCE_LOG_DUMPWhen using Replicate Log Reader, this component creates additional files with dumps of the readchanges. The logger will write the actual record as it's being captured from the source.
Note that the data will be stored in a separate file and not in the log itself.
J.20 SOURCE_UNLOADRecords source activity related to Full load operations and includes the SELECT statement executedagainst the source tables prior to Full Load.
Setup and User Guide - Qlik Replicate, November 2021 1170

J Replicate Loggers
J.21 STREAMThe Stream is the buffer in memory where data and control commands are kept. There are two types ofstream: Data streams and Control streams. In the Data stream, source data is passed to the target or to theSorter using this memory buffer. In the Control stream, Commands such as Start Full Load and Stop FullLoad are passed to components.
As it records a large amount of data, this logger should only be set to "Trace" when a specific stream issueis encountered. Examples of stream issues include poor performance, issues with Control commands (e.g.commands not being performed), issues when loading many tables that may overload the control streamwith Control commands, and so on.
J.22 STREAM_COMPONENTUsed by the Source, Sorter and Target to interact and communicate with the Stream component.
ExampleForce switch to Transactional Apply mode for Hadoop target (endpointshell.c:1340)
J.23 TABLES_MANAGERManage the table status including whether they were loaded into the target, the number of events, how thetables are partitioned, and so on.
J.24 TARGET_APPLYDetermines which changes are applied to the target during CDC and is relevant to both the BatchOptimized Apply and Transactional Apply methods. It provides information about all Apply issues includingmissing events, bad data, and so on. As it usually does not record a lot of data, it can be safely set to"Verbose" in order to troubleshoot issues.
The logged messages will differ according to the target database.
J.25 TARGET_LOADProvides information about Full Load operations on the target side. Depending on the target, it may alsoprint the metadata of the target table.
J.26 TASK_MANAGERThis is the parent task component that manages the other components in the task.
It is responsible for issuing commands to start loading or finish loading a table, create the differentcomponents threads, start or stop tasks, and so on.
Setup and User Guide - Qlik Replicate, November 2021 1171

J Replicate Loggers
It is useful for troubleshooting situations such as tables not loading, tables stuck in loading, one of thecomponents not stopping or starting properly, and so on.
J.27 TRANSFORMATIONLogs information related to transformations. When set to "Trace", it will log the actual transformations beingused by the task.
Example:In the example below, a new column named "C" was added to the table. The expression is $AR_H_STREAM_POSITION.
[TRANSFORMATION ]T: Transformation on table USER3.TEST1 exists (manipulation_manager.c:511)
[TRANSFORMATION ]T: Set transformation for table 'USER3.TEST1' (manipulator.c:596)
[TRANSFORMATION ]T: New column 'C', type: 'kAR_DATA_TYPE_STR' (manipulator.c:828)
[TRANSFORMATION ]T: Transformation expression is '$AR_H_STREAM_POSITION' (manipulator.c:551)
[TRANSFORMATION ]T: Final expression is '$AR_H_STREAM_POSITION' (expression_calc.c:822)
J.28 UTILITIESIn most cases, UTILITIES logs issues related to notifications.
Setup and User Guide - Qlik Replicate, November 2021 1172

K Replicate add-ons API
K Replicate add-ons APIWhen developing add-on utilities that integrate with Replicate, best practice dictates that the utilities'memory requirements and logging capabilities should be managed by Replicate, rather thanindependently. To this end, the following SDK is provided. For information on Replicate add-on utilities, seeUser-defined transformations (page 1008) and Using external credentials (page 72).
All of the methods described in this API can be found in <INSTALL_DIR>\addons\include\ar_addon.h. Touse these methods, you must reference this header file in your source code (#include "ar_addon.h").
All methods will return one of the following values:
AR_ADDONS_STATUS_SUCCESS = 0,
AR_ADDONS_STATUS_FAILED = 1,
In this section
l Memory management methods (page 1173)l Log management methods (page 1176)
K.1 Memory management methodsThe following methods can be called to utilize Replicate's memory management procedures.
create_poolCreates a new memory pool.
Syntaxcreate_pool (AR_AO_MPOOL *parentPool,
char *poolName,
AR_AO_MPOOL **newPool);
Parameter Type Description
parentPool AR_AO_MPOOL
The pool to allocate from (required).
poolName char The new memory pool name (optional).
The poolName value is assumed to be a static, unmanagedspace that does not need to be freed. The value will not becopied internally.
newPool AR_AO_MPOOL
Returns the new memory pool.
create_pool parameters
Setup and User Guide - Qlik Replicate, November 2021 1173

K Replicate add-ons API
destroy_poolDeletes the given pool and deallocates the memory associated with it.
Using the clear_poolmethod (described below) will provide much better performance thanusing the destroy_pool and create_poolmethods.
Syntaxdestroy_pool (AR_AO_MPOOL *Pool);
Parameter Type Description
Pool AR_AO_MPOOL The pool to destroy.
destroy_pool parameters
clear_poolDeallocates the memory associated with a given pool.
Syntaxclear_pool (AR_AO_MPOOL *pool);
Parameter Type Description
pool AR_AO_MPOOL The pool to deallocate.
clear_pool parameters
callocPerforms the following operations:
l Allocates memory from a given pool
Different pools can be used to allocate memory on multiple threads concurrently.However, it's not thread safe to do this on the same pool.
l Allocates a buffer and sets all bytes to zerol Aborts a process if no memory remains
Syntaxcalloc (AR_AO_MPOOL *pool,
size_t *size
);
Setup and User Guide - Qlik Replicate, November 2021 1174
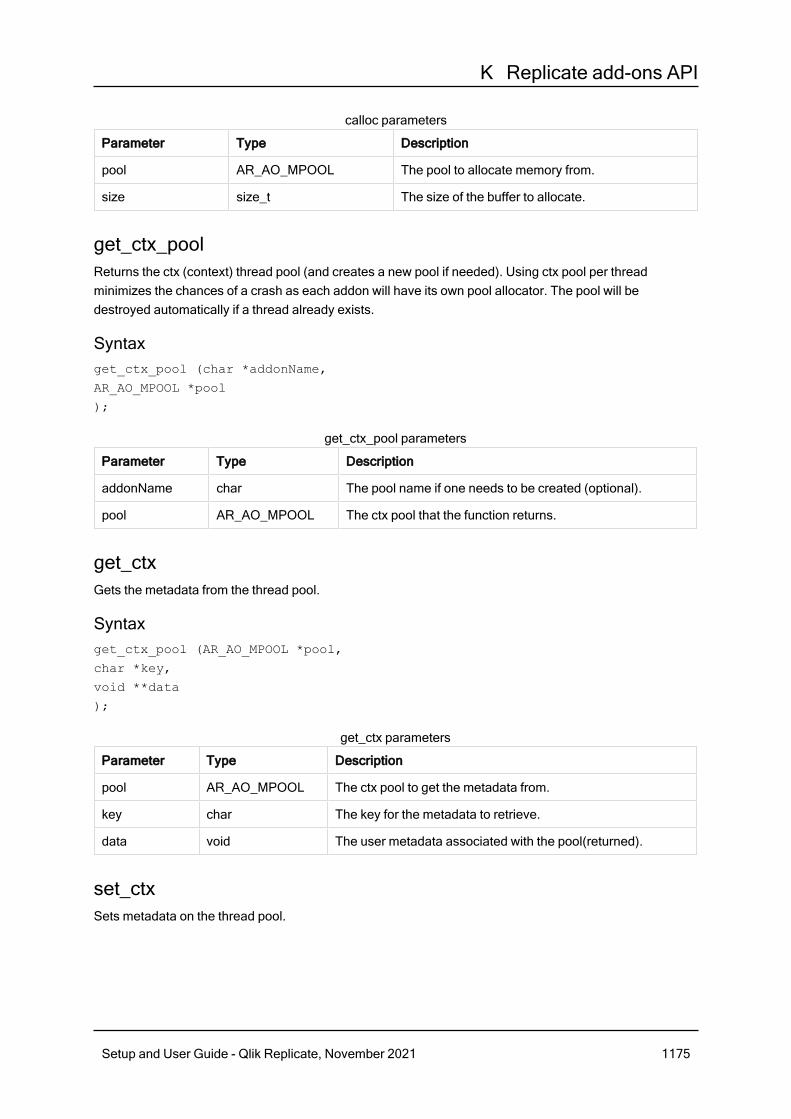
K Replicate add-ons API
Parameter Type Description
pool AR_AO_MPOOL The pool to allocate memory from.
size size_t The size of the buffer to allocate.
calloc parameters
get_ctx_poolReturns the ctx (context) thread pool (and creates a new pool if needed). Using ctx pool per threadminimizes the chances of a crash as each addon will have its own pool allocator. The pool will bedestroyed automatically if a thread already exists.
Syntaxget_ctx_pool (char *addonName,
AR_AO_MPOOL *pool
);
Parameter Type Description
addonName char The pool name if one needs to be created (optional).
pool AR_AO_MPOOL The ctx pool that the function returns.
get_ctx_pool parameters
get_ctxGets the metadata from the thread pool.
Syntaxget_ctx_pool (AR_AO_MPOOL *pool,
char *key,
void **data
);
Parameter Type Description
pool AR_AO_MPOOL The ctx pool to get the metadata from.
key char The key for the metadata to retrieve.
data void The user metadata associated with the pool(returned).
get_ctx parameters
set_ctxSets metadata on the thread pool.
Setup and User Guide - Qlik Replicate, November 2021 1175

K Replicate add-ons API
The data to be attached to the pool should have a life span at least as long as the pool to whichit is being attached.
Syntaxset_ctx (AR_AO_MPOOL *pool,
char *key,
void *data,
AR_ADDONS_MEM_CTX_CLEANUP cleanup
);
Parameter Type Description
pool AR_AO_MPOOL The ctx pool.
key char The key for the metadata to retrieve.
data void The user metadata to be associated with the pool.
cleanup AR_ADDONS_MEM_CTX_CLEANUP
Cleans the data when pool is destroyed. Returns "0"on success.
set_ctx parameters
K.2 Log management methodsThe following methods can be used to write messages to the Replicate log files.
l To see messages in the log, you also need to set the "ADDONS" component (in thetask's Log Settings) to the relevant logging level.
l Pointers should use %pp in the strFormat
log_errorWrites errors to the log.
Syntaxlog_error (const char *strFormat, ...);
Parameters
Parameter Type Description
strFormat char The error msg format.
log_error parameters
log_warningWrites warnings to the log.
Setup and User Guide - Qlik Replicate, November 2021 1176

K Replicate add-ons API
Syntaxlog_warning (const char *strFormat, ...);
Parameters
Parameter Type Description
strFormat char The warning message format.
log_warning parameters
log_traceWrites trace messages to the log.
Syntaxlog_trace(const char *strFormat, ...);
Parameters
Parameter Type Description
strFormat char The trace message format.
log_trace parameters
Setup and User Guide - Qlik Replicate, November 2021 1177
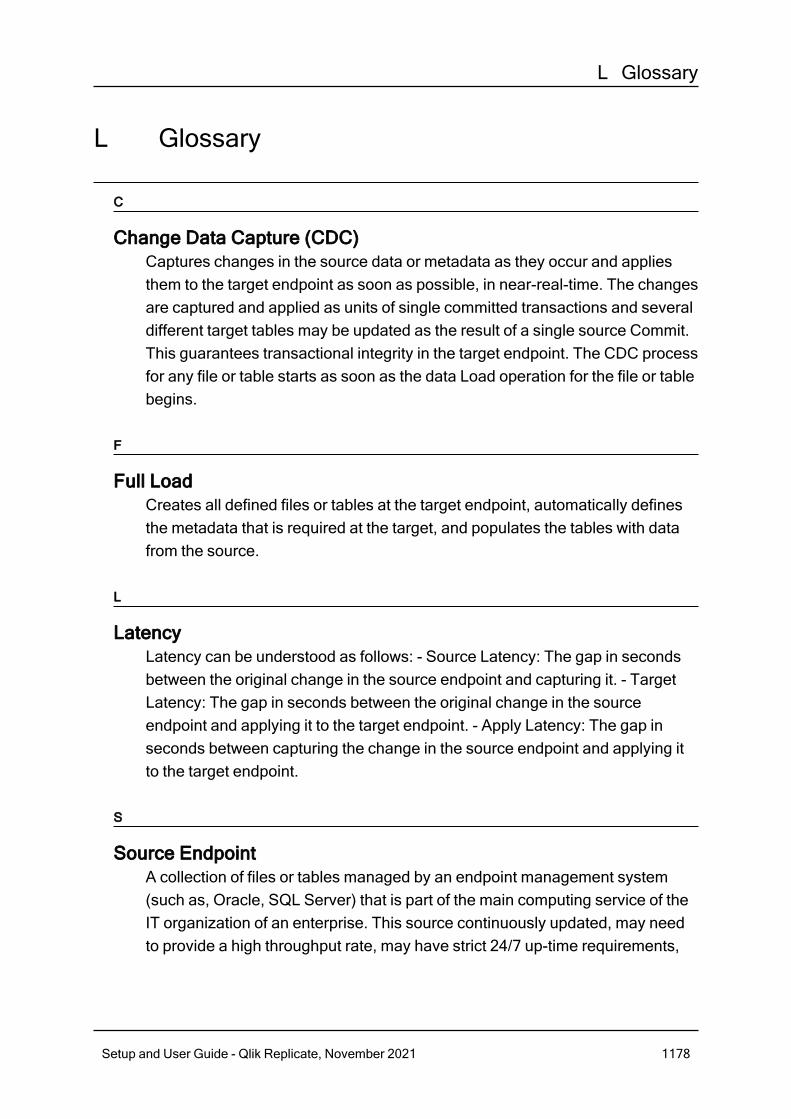
L Glossary
L Glossary
C
Change Data Capture (CDC)Captures changes in the source data or metadata as they occur and appliesthem to the target endpoint as soon as possible, in near-real-time. The changesare captured and applied as units of single committed transactions and severaldifferent target tables may be updated as the result of a single source Commit.This guarantees transactional integrity in the target endpoint. The CDC processfor any file or table starts as soon as the data Load operation for the file or tablebegins.
F
Full LoadCreates all defined files or tables at the target endpoint, automatically definesthe metadata that is required at the target, and populates the tables with datafrom the source.
L
LatencyLatency can be understood as follows: - Source Latency: The gap in secondsbetween the original change in the source endpoint and capturing it. - TargetLatency: The gap in seconds between the original change in the sourceendpoint and applying it to the target endpoint. - Apply Latency: The gap inseconds between capturing the change in the source endpoint and applying itto the target endpoint.
S
Source EndpointA collection of files or tables managed by an endpoint management system(such as, Oracle, SQL Server) that is part of the main computing service of theIT organization of an enterprise. This source continuously updated, may needto provide a high throughput rate, may have strict 24/7 up-time requirements,
Setup and User Guide - Qlik Replicate, November 2021 1178

L Glossary
and may reference or update a number of tables in the course of a single logicaltransaction while providing transactional consistency and integrity for the data.
T
Target EndpointA collection of files or tables managed by an Endpoint Management System(DBMS), which may be different from the DBMSmanaging the sourceendpoint. It contains data that is derived from the source. It may contain only asubset of the tables, columns, or rows that appear in the source. Its tables maycontain columns that do not appear in the source but are transformations orcomputations based on the source data.
Setup and User Guide - Qlik Replicate, November 2021 1179