Indirect rapid prototyping of antibacterial acid anhydride copolymer microneedles
Upload
khangminh22Category
view
1download
0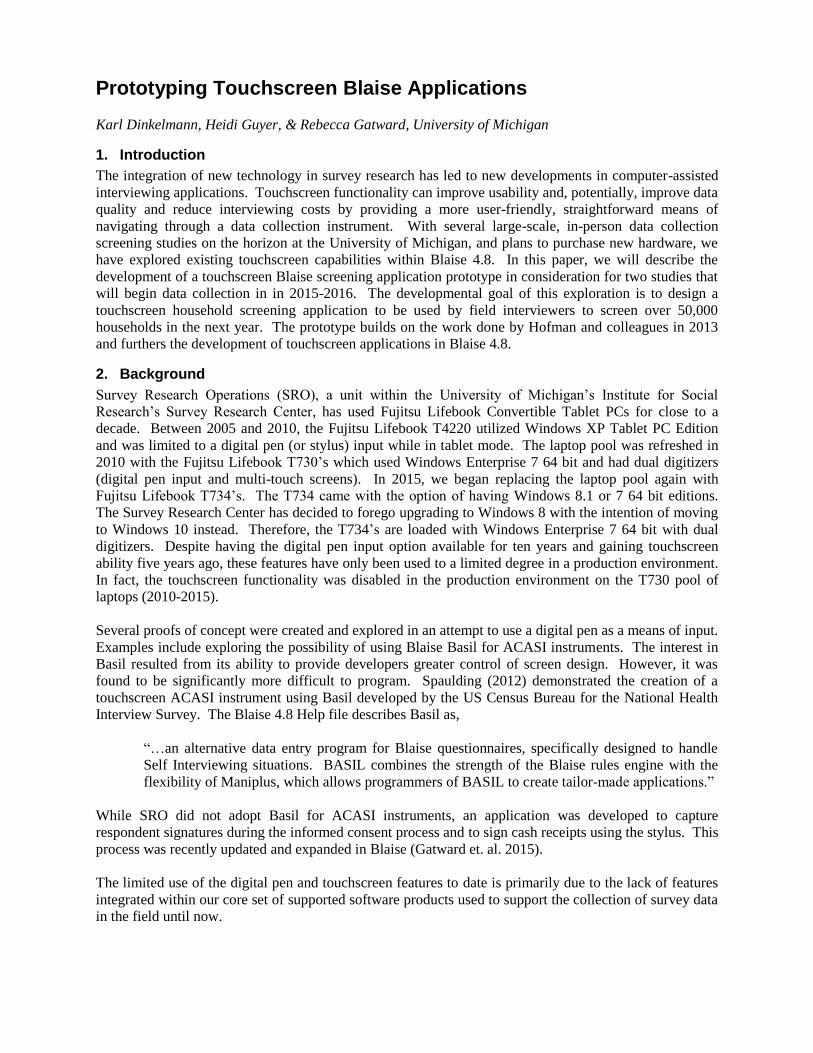
Prototyping Touchscreen Blaise Applications
Karl Dinkelmann, Heidi Guyer, & Rebecca Gatward, University of Michigan
1. Introduction
The integration of new technology in survey research has led to new developments in computer-assisted
interviewing applications. Touchscreen functionality can improve usability and, potentially, improve data
quality and reduce interviewing costs by providing a more user-friendly, straightforward means of
navigating through a data collection instrument. With several large-scale, in-person data collection
screening studies on the horizon at the University of Michigan, and plans to purchase new hardware, we
have explored existing touchscreen capabilities within Blaise 4.8. In this paper, we will describe the
development of a touchscreen Blaise screening application prototype in consideration for two studies that
will begin data collection in in 2015-2016. The developmental goal of this exploration is to design a
touchscreen household screening application to be used by field interviewers to screen over 50,000
households in the next year. The prototype builds on the work done by Hofman and colleagues in 2013
and furthers the development of touchscreen applications in Blaise 4.8.
2. Background
Survey Research Operations (SRO), a unit within the University of Michigan’s Institute for Social
Research’s Survey Research Center, has used Fujitsu Lifebook Convertible Tablet PCs for close to a
decade. Between 2005 and 2010, the Fujitsu Lifebook T4220 utilized Windows XP Tablet PC Edition
and was limited to a digital pen (or stylus) input while in tablet mode. The laptop pool was refreshed in
2010 with the Fujitsu Lifebook T730’s which used Windows Enterprise 7 64 bit and had dual digitizers
(digital pen input and multi-touch screens). In 2015, we began replacing the laptop pool again with
Fujitsu Lifebook T734’s. The T734 came with the option of having Windows 8.1 or 7 64 bit editions.
The Survey Research Center has decided to forego upgrading to Windows 8 with the intention of moving
to Windows 10 instead. Therefore, the T734’s are loaded with Windows Enterprise 7 64 bit with dual
digitizers. Despite having the digital pen input option available for ten years and gaining touchscreen
ability five years ago, these features have only been used to a limited degree in a production environment.
In fact, the touchscreen functionality was disabled in the production environment on the T730 pool of
laptops (2010-2015).
Several proofs of concept were created and explored in an attempt to use a digital pen as a means of input.
Examples include exploring the possibility of using Blaise Basil for ACASI instruments. The interest in
Basil resulted from its ability to provide developers greater control of screen design. However, it was
found to be significantly more difficult to program. Spaulding (2012) demonstrated the creation of a
touchscreen ACASI instrument using Basil developed by the US Census Bureau for the National Health
Interview Survey. The Blaise 4.8 Help file describes Basil as,
“…an alternative data entry program for Blaise questionnaires, specifically designed to handle
Self Interviewing situations. BASIL combines the strength of the Blaise rules engine with the
flexibility of Maniplus, which allows programmers of BASIL to create tailor-made applications.”
While SRO did not adopt Basil for ACASI instruments, an application was developed to capture
respondent signatures during the informed consent process and to sign cash receipts using the stylus. This
process was recently updated and expanded in Blaise (Gatward et. al. 2015).
The limited use of the digital pen and touchscreen features to date is primarily due to the lack of features
integrated within our core set of supported software products used to support the collection of survey data
in the field until now.
3. From Keyboard & Mouse to Touch-Friendly Applications
The process of transitioning from traditional keyboard and mouse driven data entry to one that is touch-
friendly can take many forms and involves understanding the core elements needed for one to complete a
given task, or set of tasks, without the use of the traditional mouse or keyboard. If the task requires a
keyboard entry, is the operating system’s native touchscreen keyboard sufficient? If the native keyboard
does not work, then one must build their own keyboard. Finally, the traditional menu driven process
within software applications was not created with touch input in mind. Therefore, this transitional
process needs to take into account larger elements allowing for finger input, as is done via a keyboard.
Our prototype took a transitional process that built on successive approximations and the starting point
was a sample menu provided by Statistics Netherlands, used in the Caribbean Netherlands
Implementation (Hofman et. al. 2013), and progressed through fluid iterative processes of exploring what
was possible. A key requirement was the ability to enter text into the application at the point where we
capture individual’s names within a household listing while screening for eligible respondents. We
created many keyboards and the final proof of concept implemented was to emulate the look and feel of a
more familiar mobile keyboard within the Blaise Menu file. This led to building an elaborate keyboard
using the Blaise Menu file. Building a new keyboard required several iterations in order to understand the
placement of elements. An early version of the keyboard prototype is presented in figure 1. Although,
this version would allow one to enter an individual’s name on text fields in an instrument, this standard
keyboard was not ideal because of the rudimentary nature of the keyboard.
Figure 1: Example Keyboard in a Blaise 4.8 Menu File
We then began to look for available images that would provide a cleaner presentation that appeared more
like a real keyboard. One version had black keys with matte letters, as shown in figure 2. This keyboard
is completely functional and gives the feel of a more authentic keyboard presentation. Nevertheless, we
felt we could do better.
Figure 2: Keyboard in a Blaise 4.8 Menu File using Images of Black Keys
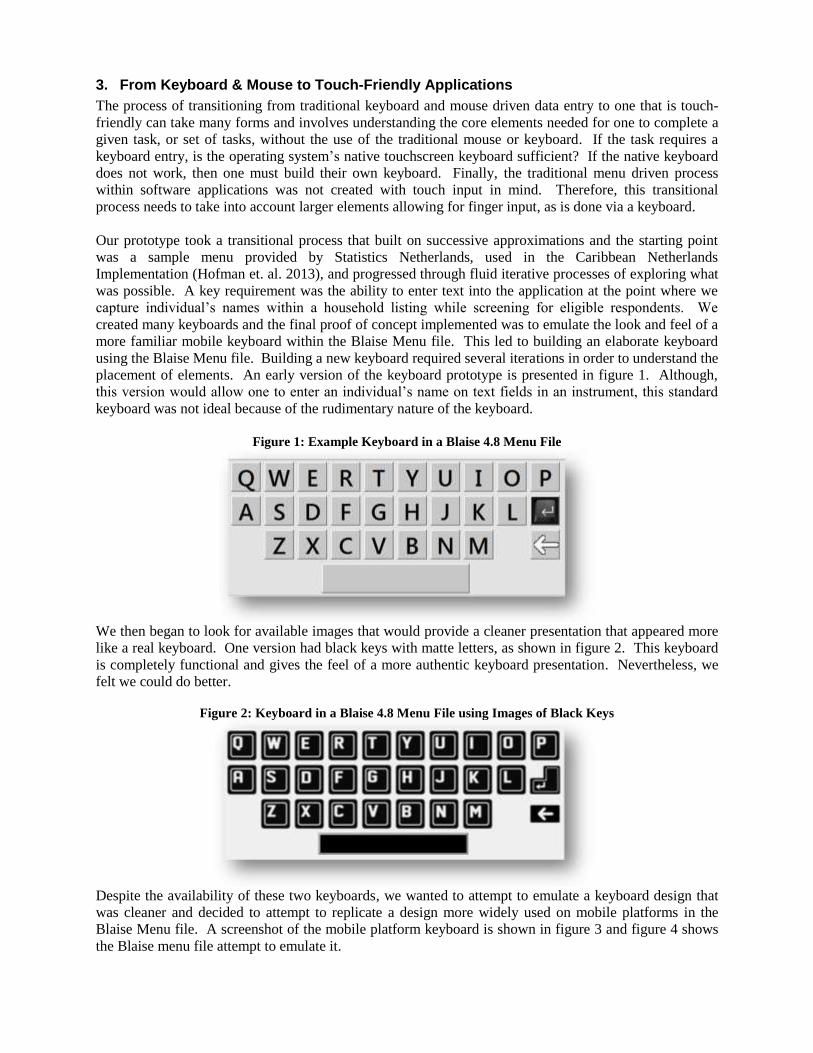
Despite the availability of these two keyboards, we wanted to attempt to emulate a keyboard design that
was cleaner and decided to attempt to replicate a design more widely used on mobile platforms in the
Blaise Menu file. A screenshot of the mobile platform keyboard is shown in figure 3 and figure 4 shows
the Blaise menu file attempt to emulate it.
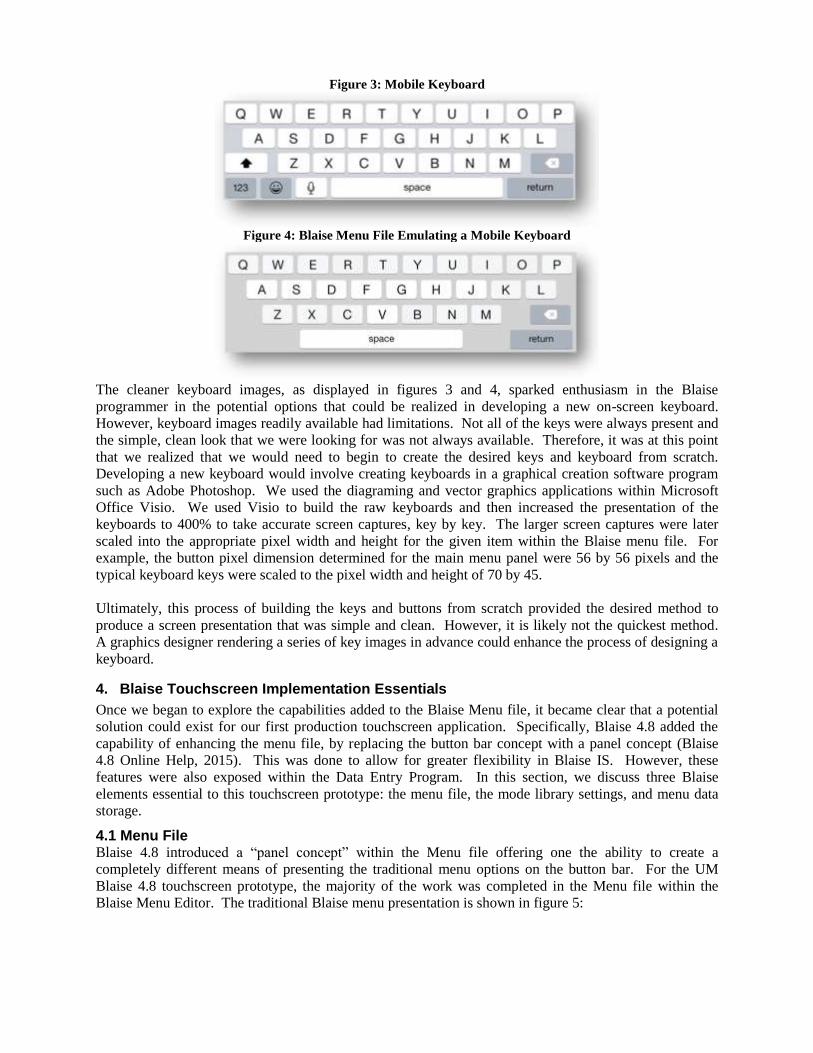
Figure 3: Mobile Keyboard
Figure 4: Blaise Menu File Emulating a Mobile Keyboard
The cleaner keyboard images, as displayed in figures 3 and 4, sparked enthusiasm in the Blaise
programmer in the potential options that could be realized in developing a new on-screen keyboard.
However, keyboard images readily available had limitations. Not all of the keys were always present and
the simple, clean look that we were looking for was not always available. Therefore, it was at this point
that we realized that we would need to begin to create the desired keys and keyboard from scratch.
Developing a new keyboard would involve creating keyboards in a graphical creation software program
such as Adobe Photoshop. We used the diagraming and vector graphics applications within Microsoft
Office Visio. We used Visio to build the raw keyboards and then increased the presentation of the
keyboards to 400% to take accurate screen captures, key by key. The larger screen captures were later
scaled into the appropriate pixel width and height for the given item within the Blaise menu file. For
example, the button pixel dimension determined for the main menu panel were 56 by 56 pixels and the
typical keyboard keys were scaled to the pixel width and height of 70 by 45.
Ultimately, this process of building the keys and buttons from scratch provided the desired method to
produce a screen presentation that was simple and clean. However, it is likely not the quickest method.
A graphics designer rendering a series of key images in advance could enhance the process of designing a
keyboard.
4. Blaise Touchscreen Implementation Essentials
Once we began to explore the capabilities added to the Blaise Menu file, it became clear that a potential
solution could exist for our first production touchscreen application. Specifically, Blaise 4.8 added the
capability of enhancing the menu file, by replacing the button bar concept with a panel concept (Blaise
4.8 Online Help, 2015). This was done to allow for greater flexibility in Blaise IS. However, these
features were also exposed within the Data Entry Program. In this section, we discuss three Blaise
elements essential to this touchscreen prototype: the menu file, the mode library settings, and menu data
storage.
4.1 Menu File Blaise 4.8 introduced a “panel concept” within the Menu file offering one the ability to create a
completely different means of presenting the traditional menu options on the button bar. For the UM
Blaise 4.8 touchscreen prototype, the majority of the work was completed in the Menu file within the
Blaise Menu Editor. The traditional Blaise menu presentation is shown in figure 5:
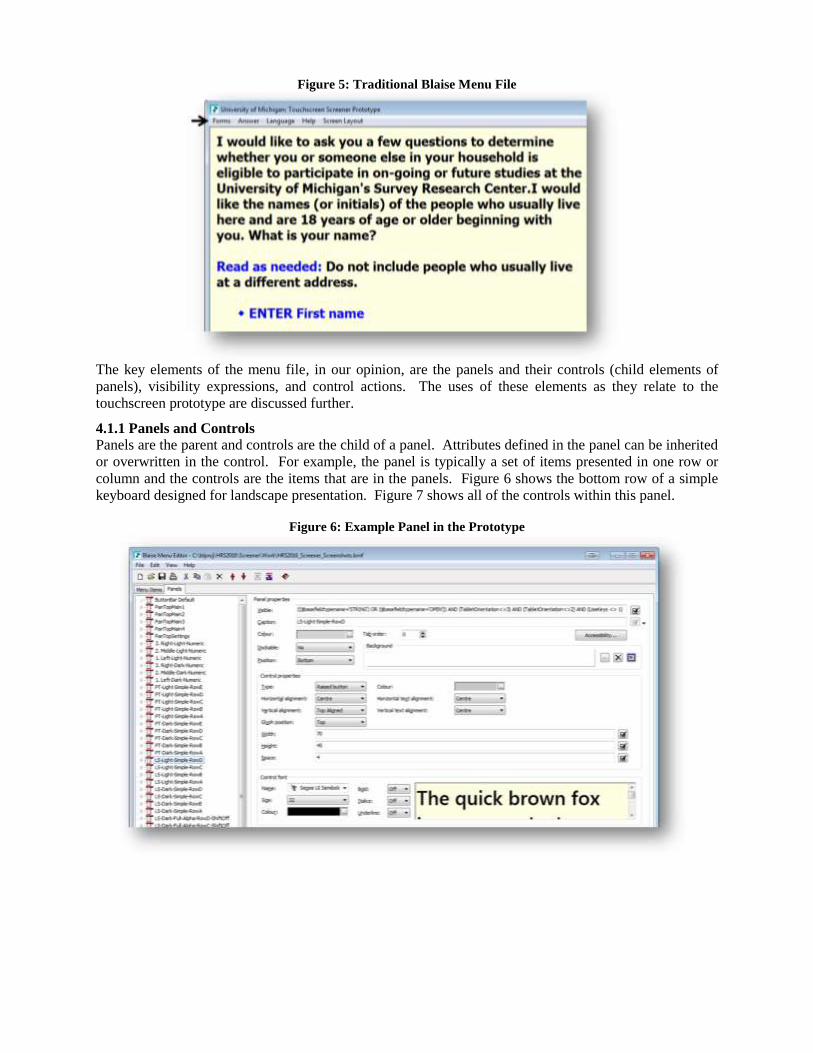
Figure 5: Traditional Blaise Menu File
The key elements of the menu file, in our opinion, are the panels and their controls (child elements of
panels), visibility expressions, and control actions. The uses of these elements as they relate to the
touchscreen prototype are discussed further.
4.1.1 Panels and Controls
Panels are the parent and controls are the child of a panel. Attributes defined in the panel can be inherited
or overwritten in the control. For example, the panel is typically a set of items presented in one row or
column and the controls are the items that are in the panels. Figure 6 shows the bottom row of a simple
keyboard designed for landscape presentation. Figure 7 shows all of the controls within this panel.
Figure 6: Example Panel in the Prototype
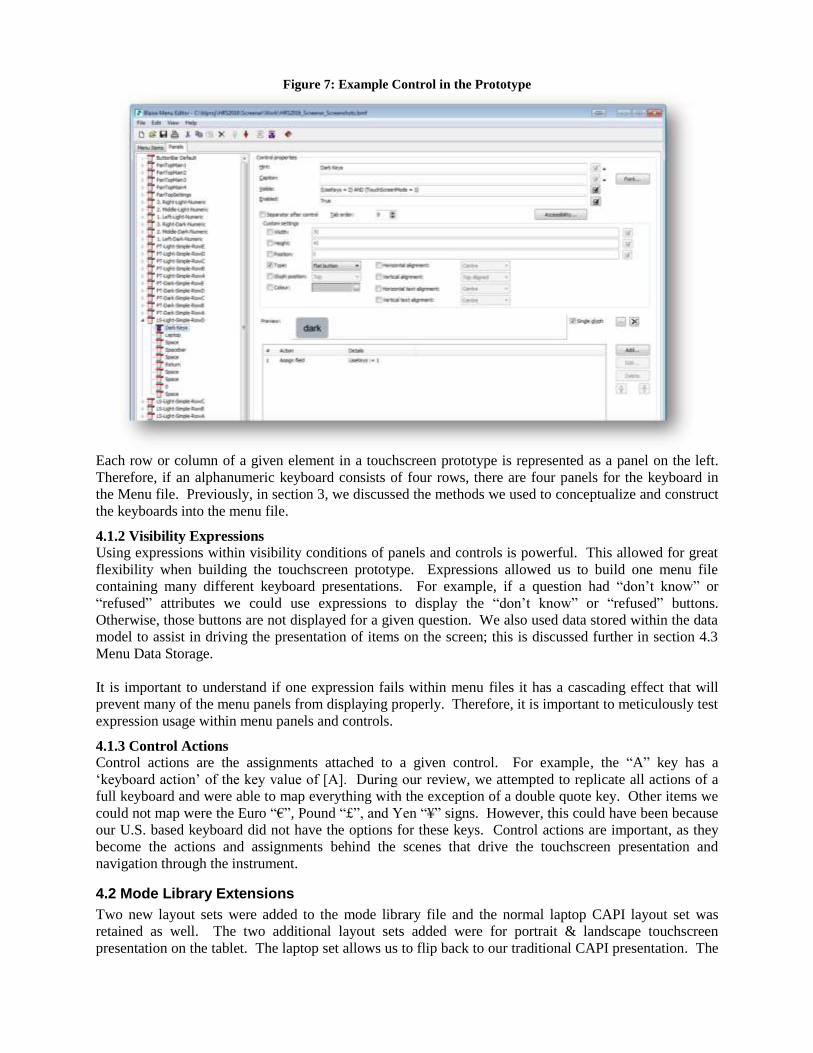
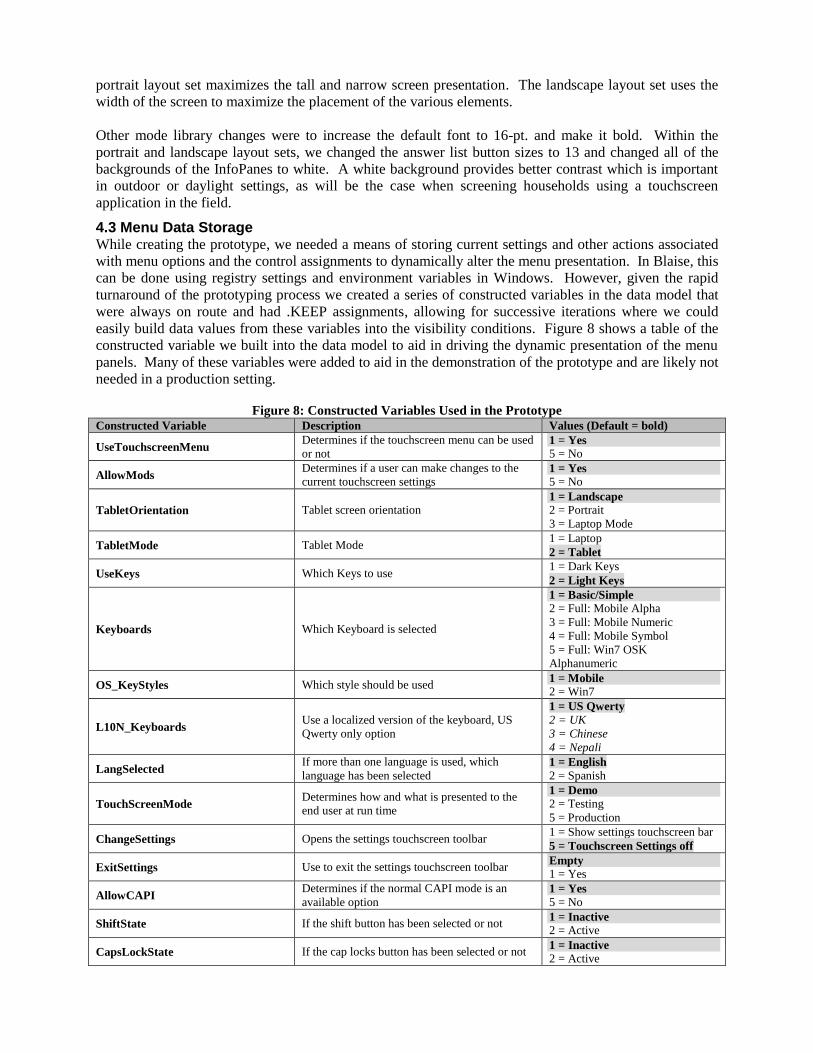
Figure 7: Example Control in the Prototype
Each row or column of a given element in a touchscreen prototype is represented as a panel on the left.
Therefore, if an alphanumeric keyboard consists of four rows, there are four panels for the keyboard in
the Menu file. Previously, in section 3, we discussed the methods we used to conceptualize and construct
the keyboards into the menu file.
4.1.2 Visibility Expressions
Using expressions within visibility conditions of panels and controls is powerful. This allowed for great
flexibility when building the touchscreen prototype. Expressions allowed us to build one menu file
containing many different keyboard presentations. For example, if a question had “don’t know” or
“refused” attributes we could use expressions to display the “don’t know” or “refused” buttons.
Otherwise, those buttons are not displayed for a given question. We also used data stored within the data
model to assist in driving the presentation of items on the screen; this is discussed further in section 4.3
Menu Data Storage.
It is important to understand if one expression fails within menu files it has a cascading effect that will
prevent many of the menu panels from displaying properly. Therefore, it is important to meticulously test
expression usage within menu panels and controls.
4.1.3 Control Actions
Control actions are the assignments attached to a given control. For example, the “A” key has a
‘keyboard action’ of the key value of [A]. During our review, we attempted to replicate all actions of a
full keyboard and were able to map everything with the exception of a double quote key. Other items we
could not map were the Euro “€”, Pound “£”, and Yen “¥” signs. However, this could have been because
our U.S. based keyboard did not have the options for these keys. Control actions are important, as they
become the actions and assignments behind the scenes that drive the touchscreen presentation and
navigation through the instrument.
4.2 Mode Library Extensions
Two new layout sets were added to the mode library file and the normal laptop CAPI layout set was
retained as well. The two additional layout sets added were for portrait & landscape touchscreen
presentation on the tablet. The laptop set allows us to flip back to our traditional CAPI presentation. The
portrait layout set maximizes the tall and narrow screen presentation. The landscape layout set uses the
width of the screen to maximize the placement of the various elements.
Other mode library changes were to increase the default font to 16-pt. and make it bold. Within the
portrait and landscape layout sets, we changed the answer list button sizes to 13 and changed all of the
backgrounds of the InfoPanes to white. A white background provides better contrast which is important
in outdoor or daylight settings, as will be the case when screening households using a touchscreen
application in the field.
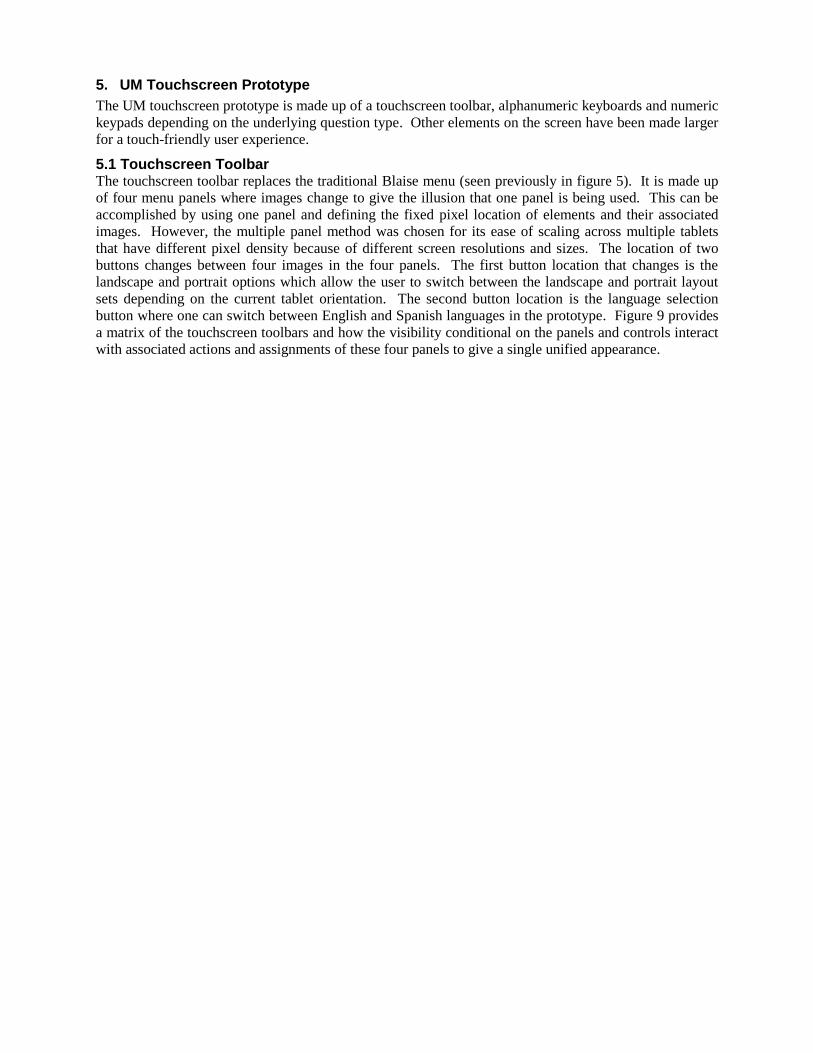
4.3 Menu Data Storage While creating the prototype, we needed a means of storing current settings and other actions associated
with menu options and the control assignments to dynamically alter the menu presentation. In Blaise, this
can be done using registry settings and environment variables in Windows. However, given the rapid
turnaround of the prototyping process we created a series of constructed variables in the data model that
were always on route and had .KEEP assignments, allowing for successive iterations where we could
easily build data values from these variables into the visibility conditions. Figure 8 shows a table of the
constructed variable we built into the data model to aid in driving the dynamic presentation of the menu
panels. Many of these variables were added to aid in the demonstration of the prototype and are likely not
needed in a production setting.
Figure 8: Constructed Variables Used in the Prototype
Constructed Variable Description Values (Default = bold)
UseTouchscreenMenu Determines if the touchscreen menu can be used
or not 1 = Yes
5 = No
AllowMods Determines if a user can make changes to the
current touchscreen settings 1 = Yes
5 = No
TabletOrientation Tablet screen orientation 1 = Landscape
2 = Portrait
3 = Laptop Mode
TabletMode Tablet Mode 1 = Laptop
2 = Tablet
UseKeys Which Keys to use 1 = Dark Keys
2 = Light Keys
Keyboards Which Keyboard is selected
1 = Basic/Simple
2 = Full: Mobile Alpha
3 = Full: Mobile Numeric
4 = Full: Mobile Symbol
5 = Full: Win7 OSK
Alphanumeric
OS_KeyStyles Which style should be used 1 = Mobile
2 = Win7
L10N_Keyboards Use a localized version of the keyboard, US
Qwerty only option
1 = US Qwerty
2 = UK
3 = Chinese
4 = Nepali
LangSelected If more than one language is used, which
language has been selected 1 = English
2 = Spanish
TouchScreenMode Determines how and what is presented to the
end user at run time
1 = Demo
2 = Testing
5 = Production
ChangeSettings Opens the settings touchscreen toolbar 1 = Show settings touchscreen bar
5 = Touchscreen Settings off
ExitSettings Use to exit the settings touchscreen toolbar Empty 1 = Yes
AllowCAPI Determines if the normal CAPI mode is an
available option 1 = Yes
5 = No
ShiftState If the shift button has been selected or not 1 = Inactive
2 = Active
CapsLockState If the cap locks button has been selected or not 1 = Inactive
2 = Active
5. UM Touchscreen Prototype
The UM touchscreen prototype is made up of a touchscreen toolbar, alphanumeric keyboards and numeric
keypads depending on the underlying question type. Other elements on the screen have been made larger
for a touch-friendly user experience.
5.1 Touchscreen Toolbar The touchscreen toolbar replaces the traditional Blaise menu (seen previously in figure 5). It is made up
of four menu panels where images change to give the illusion that one panel is being used. This can be
accomplished by using one panel and defining the fixed pixel location of elements and their associated
images. However, the multiple panel method was chosen for its ease of scaling across multiple tablets
that have different pixel density because of different screen resolutions and sizes. The location of two
buttons changes between four images in the four panels. The first button location that changes is the
landscape and portrait options which allow the user to switch between the landscape and portrait layout
sets depending on the current tablet orientation. The second button location is the language selection
button where one can switch between English and Spanish languages in the prototype. Figure 9 provides
a matrix of the touchscreen toolbars and how the visibility conditional on the panels and controls interact
with associated actions and assignments of these four panels to give a single unified appearance.
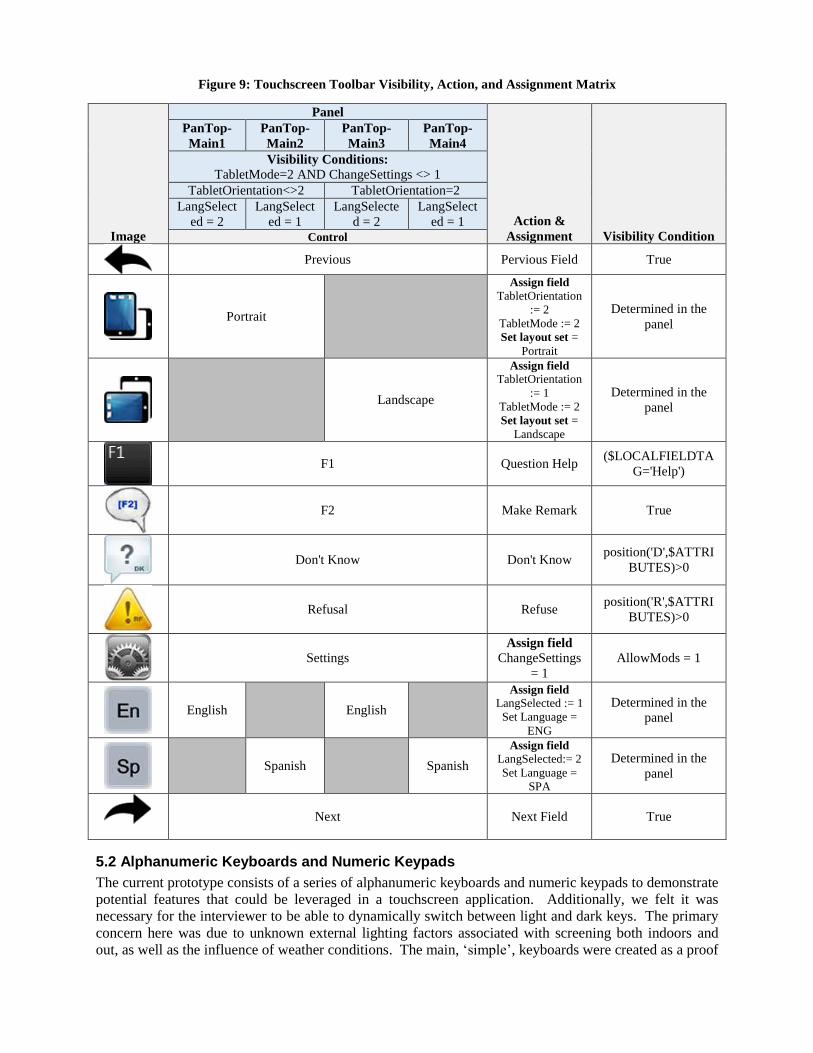
Figure 9: Touchscreen Toolbar Visibility, Action, and Assignment Matrix
Image
Panel
Action &
Assignment Visibility Condition
PanTop-
Main1
PanTop-
Main2
PanTop-
Main3
PanTop-
Main4
Visibility Conditions:
TabletMode=2 AND ChangeSettings <> 1
TabletOrientation<>2 TabletOrientation=2
LangSelect
ed = 2
LangSelect
ed = 1
LangSelecte
d = 2
LangSelect
ed = 1
Control
Previous Pervious Field True
Portrait
Assign field
TabletOrientation
:= 2
TabletMode := 2
Set layout set =
Portrait
Determined in the
panel
Landscape
Assign field
TabletOrientation
:= 1
TabletMode := 2
Set layout set =
Landscape
Determined in the
panel
F1 Question Help ($LOCALFIELDTA
G='Help')
F2 Make Remark True
Don't Know Don't Know position('D',$ATTRI
BUTES)>0
Refusal Refuse position('R',$ATTRI
BUTES)>0
Settings Assign field
ChangeSettings
= 1
AllowMods = 1
English English
Assign field LangSelected := 1
Set Language =
ENG
Determined in the
panel
Spanish Spanish
Assign field LangSelected:= 2
Set Language =
SPA
Determined in the
panel
Next Next Field True
5.2 Alphanumeric Keyboards and Numeric Keypads
The current prototype consists of a series of alphanumeric keyboards and numeric keypads to demonstrate
potential features that could be leveraged in a touchscreen application. Additionally, we felt it was
necessary for the interviewer to be able to dynamically switch between light and dark keys. The primary
concern here was due to unknown external lighting factors associated with screening both indoors and
out, as well as the influence of weather conditions. The main, ‘simple’, keyboards were created as a proof
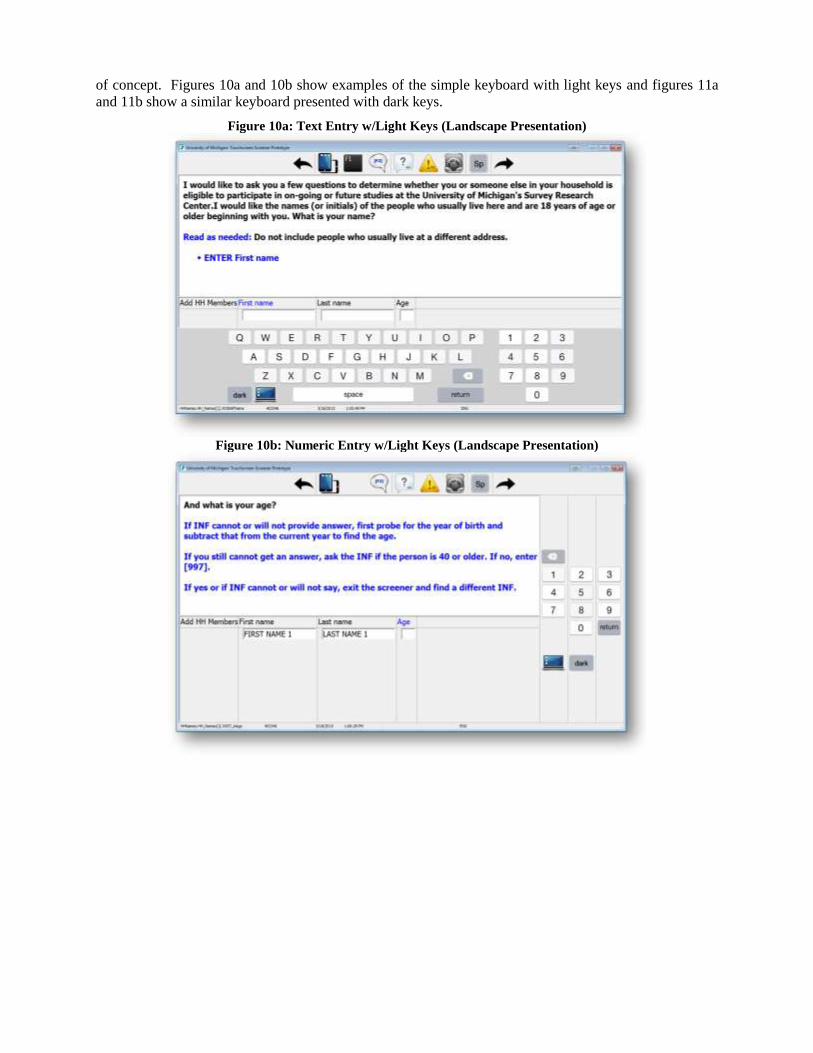
of concept. Figures 10a and 10b show examples of the simple keyboard with light keys and figures 11a
and 11b show a similar keyboard presented with dark keys.
Figure 10a: Text Entry w/Light Keys (Landscape Presentation)
Figure 10b: Numeric Entry w/Light Keys (Landscape Presentation)
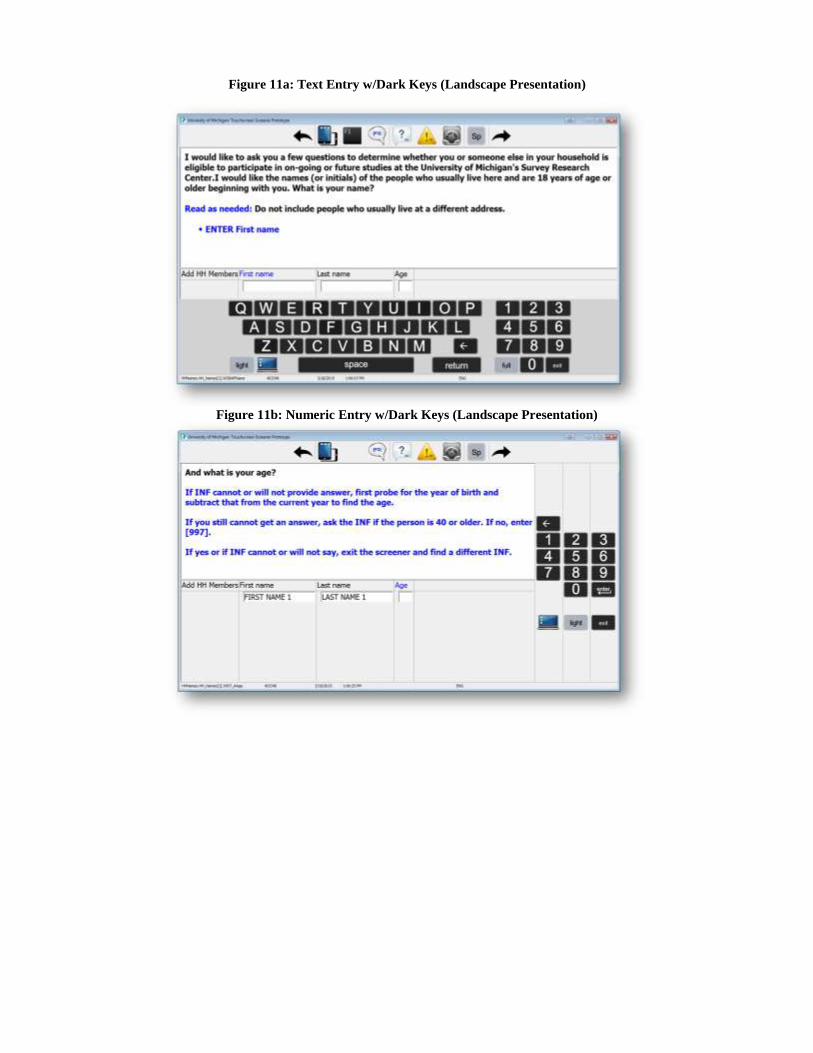
Figure 11a: Text Entry w/Dark Keys (Landscape Presentation)
Figure 11b: Numeric Entry w/Dark Keys (Landscape Presentation)
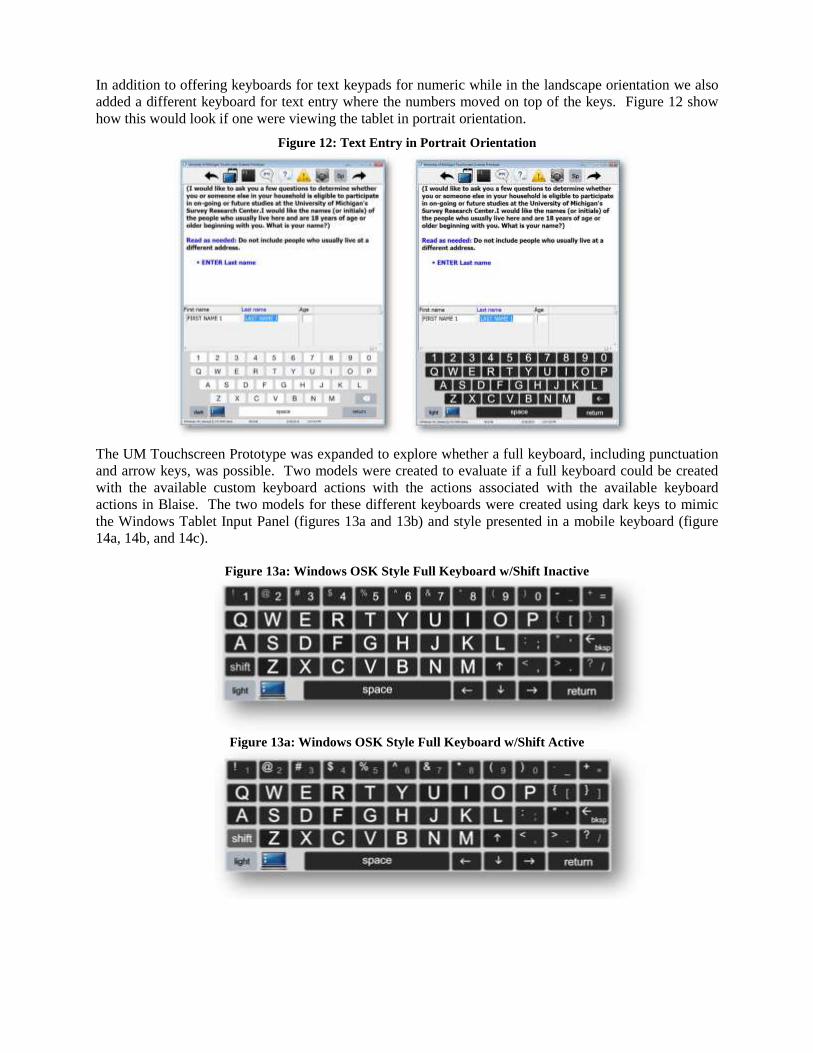
In addition to offering keyboards for text keypads for numeric while in the landscape orientation we also
added a different keyboard for text entry where the numbers moved on top of the keys. Figure 12 show
how this would look if one were viewing the tablet in portrait orientation.
Figure 12: Text Entry in Portrait Orientation
The UM Touchscreen Prototype was expanded to explore whether a full keyboard, including punctuation
and arrow keys, was possible. Two models were created to evaluate if a full keyboard could be created
with the available custom keyboard actions with the actions associated with the available keyboard
actions in Blaise. The two models for these different keyboards were created using dark keys to mimic
the Windows Tablet Input Panel (figures 13a and 13b) and style presented in a mobile keyboard (figure
14a, 14b, and 14c).
Figure 13a: Windows OSK Style Full Keyboard w/Shift Inactive
Figure 13a: Windows OSK Style Full Keyboard w/Shift Active
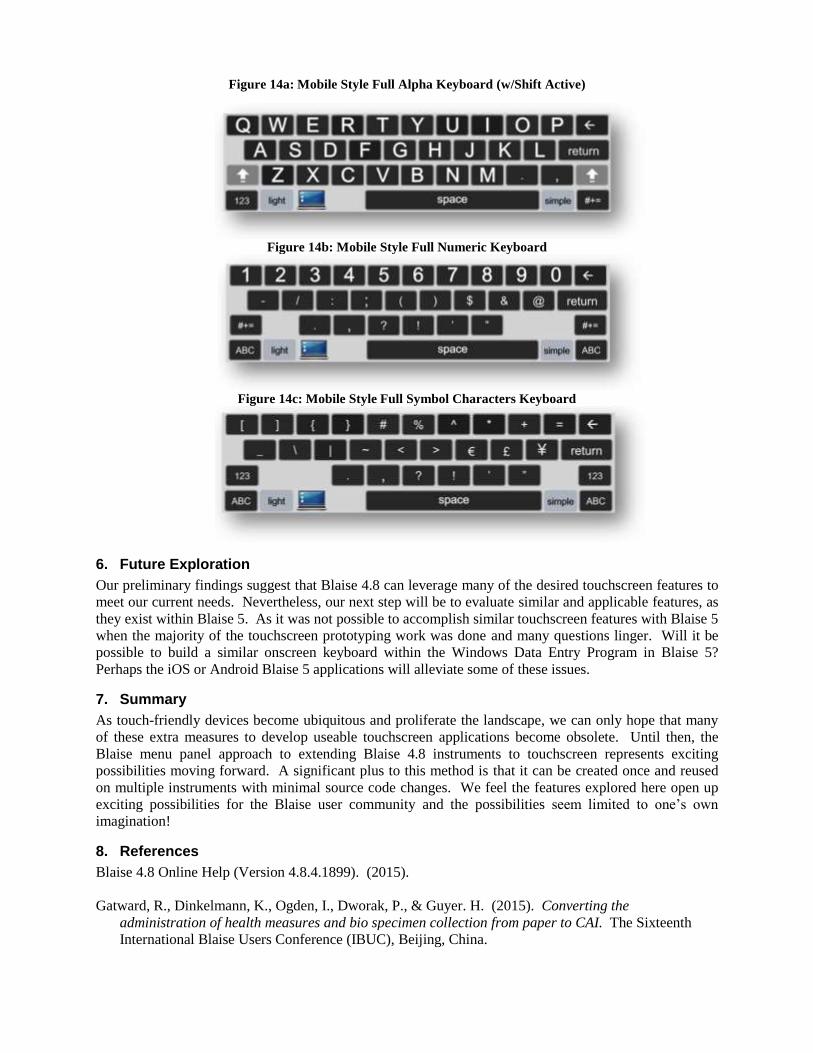
Figure 14a: Mobile Style Full Alpha Keyboard (w/Shift Active)
Figure 14b: Mobile Style Full Numeric Keyboard
Figure 14c: Mobile Style Full Symbol Characters Keyboard
6. Future Exploration
Our preliminary findings suggest that Blaise 4.8 can leverage many of the desired touchscreen features to
meet our current needs. Nevertheless, our next step will be to evaluate similar and applicable features, as
they exist within Blaise 5. As it was not possible to accomplish similar touchscreen features with Blaise 5
when the majority of the touchscreen prototyping work was done and many questions linger. Will it be
possible to build a similar onscreen keyboard within the Windows Data Entry Program in Blaise 5?
Perhaps the iOS or Android Blaise 5 applications will alleviate some of these issues.
7. Summary
As touch-friendly devices become ubiquitous and proliferate the landscape, we can only hope that many
of these extra measures to develop useable touchscreen applications become obsolete. Until then, the
Blaise menu panel approach to extending Blaise 4.8 instruments to touchscreen represents exciting
possibilities moving forward. A significant plus to this method is that it can be created once and reused
on multiple instruments with minimal source code changes. We feel the features explored here open up
exciting possibilities for the Blaise user community and the possibilities seem limited to one’s own
imagination!
8. References
Blaise 4.8 Online Help (Version 4.8.4.1899). (2015).
Gatward, R., Dinkelmann, K., Ogden, I., Dworak, P., & Guyer. H. (2015). Converting the
administration of health measures and bio specimen collection from paper to CAI. The Sixteenth
International Blaise Users Conference (IBUC), Beijing, China.

Hofman, L., Dolmans, R., & de Bolster, G. (2013). Blaise on a Windows 8 tablet. The Caribbean
Netherlands Implementation. The Fifteenth International Blaise Users Conference (IBUC),
Washington, DC., USA.
Spaulding, T. (2012). Implementing Audio Computer Assisted Self Interviewing in Basil. The Fourteenth
International Blaise Users Conference (IBUC), London, UK.
Copyright © 2022 FDOKUMEN