PROGRAMMING IN VISUAL BASIC WORKSHOP
7
[FACULTY OF COMPUTER SCIENCE AND INFORMATION TECHNOLOGY] | Page 1 PROGRAMMING IN VISUAL BASIC WORKSHOP (CSC 2201) (LECTURE ON: HOW TO CREATE A PROGRESS BAR) BY UMAR SAIDU AUNA DEPARTMENT OF COMPUTER SCIENCE FACULTY OF COMPUTER SCIENCE AND INFORMATION TECHNOLOGY (FCSIT) BAYERO UNIVERSITY, KANO 2013
Transcript of PROGRAMMING IN VISUAL BASIC WORKSHOP

[ F A C U L T Y O F C O M P U T E R S C I E N C E A N D I N F O R M A T I O N T E C H N O L O G Y ]
| Page 1
PROGRAMMING IN VISUAL BASIC WORKSHOP
(CSC 2201)
(LECTURE ON: HOW TO CREATE A PROGRESS BAR)
BY UMAR SAIDU AUNA
DEPARTMENT OF COMPUTER SCIENCE FACULTY OF COMPUTER SCIENCE AND INFORMATION
TECHNOLOGY (FCSIT)
BAYERO UNIVERSITY, KANO
2013

[ F A C U L T Y O F C O M P U T E R S C I E N C E A N D I N F O R M A T I O N T E C H N O L O G Y ]
| Page 2
Learning Objectives
At the end of this topic, the students should be
able to:
Design the graphical interface of the progress
bar
Know how to use the codes when writing the
program
Know how to deploy it as a software
INTRODUCTION
Progress bar also known as “Splash Screen” is a component in a graphical user
interface used to visualize the progression of an extended computer operation,
such as download, file transfer, or installation. Sometimes, the graphic is
accompanied by a texture representation of the progress in a percent format.
DEVELOPING PROGRESS BAR IN VISUAL BASIC
We are going to use Visual basic 2010 in developing the progress bar,
toolboxes that we are going to use are:-
Progress bar
Timer
Label
Button (Not compulsory)
Picture(Not compulsory)

[ F A C U L T Y O F C O M P U T E R S C I E N C E A N D I N F O R M A T I O N T E C H N O L O G Y ]
| Page 3
LET GET STARTED
Open the Visual basic 2010 and Click on “NEW PROJECT” as shown in the
diagram above. This will take the User to Visual basic templates they are
listed below:-
Window forms application
WPF application
Console application
Class library
WPF browser application
Among all this templates we are only going to use “WINDOWS FORMS
APPLICATION” in developing the splash screen (progress bar).

[ F A C U L T Y O F C O M P U T E R S C I E N C E A N D I N F O R M A T I O N T E C H N O L O G Y ]
| Page 4
The user will change the name to “SPLASH SCREEN” as seen on the diagram
then click “OK”.
This is how the form will look like when you are about to start designing
the graphical interface of the application.

[ F A C U L T Y O F C O M P U T E R S C I E N C E A N D I N F O R M A T I O N T E C H N O L O G Y ]
| Page 5
FORM PROPERTIES TIMER PROPERTIES
Name: Splash Screen Name: Timer1
Form border style: None Enabled: False
Generate member: True
LABEL PROPERTIES PROGRESS BAR PROPERTIES
Text: Progress bar Name: Progress bar1
Font: size=26, font style= bold
Lastly we are going to create a second form because after the progress bar
finish displaying the next form to show up is form 2.

[ F A C U L T Y O F C O M P U T E R S C I E N C E A N D I N F O R M A T I O N T E C H N O L O G Y ]
| Page 6
HOW TO CREATE A SECOND FORM
Click on project on the menu bar select “Add windows form” and click on
windows form and lastly click on add.
[ F A C U L T Y O F C O M P U T E R S C I E N C E A N D I N F O R M A T I O N T E C H N O L O G Y ]
| Page 7
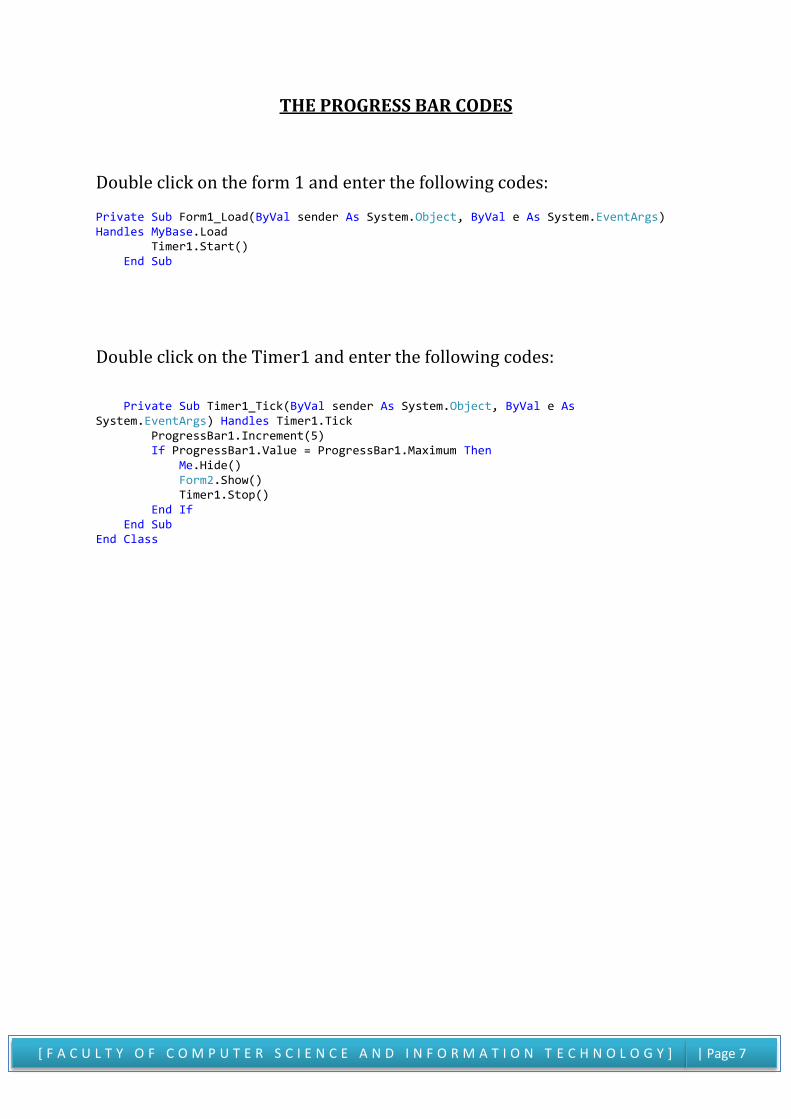
THE PROGRESS BAR CODES
Double click on the form 1 and enter the following codes:
Private Sub Form1_Load(ByVal sender As System.Object, ByVal e As System.EventArgs) Handles MyBase.Load Timer1.Start() End Sub
Double click on the Timer1 and enter the following codes:
Private Sub Timer1_Tick(ByVal sender As System.Object, ByVal e As System.EventArgs) Handles Timer1.Tick ProgressBar1.Increment(5) If ProgressBar1.Value = ProgressBar1.Maximum Then Me.Hide() Form2.Show() Timer1.Stop() End If End Sub End Class