Pro5 Mac user guide - Renewed Vision
136
Last edited on February 1, 2012. All content is current as of version 5.0 build 6524. Mac User Manual
-
Upload
khangminh22 -
Category
Documents
-
view
0 -
download
0
Transcript of Pro5 Mac user guide - Renewed Vision

Last edited on February 1, 2012.All content is current as of version 5.0 build 6524.
Mac User Manual

Copyright ©2005-‐2012 Renewed Vision, Inc. All rights reserved.
ProPresenter is owned by Renewed Vision, Inc. 6720 Jamestown DriveAlphareGa, GA 30005
Licensing InformaLon
There are two types of licenses available for ProPresenter. Both forms of the license refer to a single geographical locaLon. If your church or organizaLon wants to use ProPresenter in mulLple geographical locaLons, each locaLon is required to own its own license.
A SINGLE USER LICENSE grants permission for one (1) computer to be used as the presentaLon computer at a given Lme. The license may be installed on an unlimited number of computers for ediLng purposes or for CONCURRENT (non-‐simultaneous) presentaLon use. A SINGLE USER LICENSE removes the watermark from one presentaLon computer at a Lme. A SINGLE USER LICENSE is plaYorm specific to Mac or Windows.
A SITE LICENSE grants permission for an unlimited number of computers to be used as the presentaLon computer simultaneously. Any computer with an acLve SITE LICENSE may be used as an ediLng or presentaLon computer at any Lme. The watermark is removed from all computers with a SITE LICENSE. A SITE LICENSE may be acLvated on both Mac and Windows computers simultaneously.
Planning Center Online (“PCO”) is wholly owned by Ministry Centered Technologies, LLC (“Ministry Centered Technologies”). License fees may apply and are the sole responsibility of the user.
SongSelect is wholly owned by ChrisLan Copyright Licensing, Inc. (“CCLI”). License fees may apply and are the sole responsibility of the user.
ProPresenter 5 for Mac User Manual
© 2005-2012! Renewed Vision, Inc.

Table of Contents
Installing ProPresenter 1Info Center 4Free Media Content 5Configuring your computer for first use 7
System Display Preferences 7DVD seHngs 8Other seHngs 8
ProPresenter Preferences 9General 10Display Preferences 12
Corner Pinning 14Label 16DVD 17Live 18Sync 19Network 21
Master Control Slave 21ProPresenter Remote Server Se6ngs 21Remote Stage Display Server Se6ngs 21PVP Network Se6ngs 22Planning Center Online 22
Advanced 23Modules 24Toolbar 25
Copyright SeHngs 29CCLI ReporUng 32PresentaUon Layers 33Working with Templates 35Working with Media 36
Video/Image Bin 36Media Browser 38Media ProperUes 39
Working with PresentaUons 44PresentaUon File Formats 44Using the Library 45Adding new presentaUons 46Using mulUple libraries 47Playlists 49Planning Center Online Playlist 50Slide and Table View 53Working with Slides 54Slide Grouping and Arrangements 55Document ProperUes 57TransiUons 58Resizing PresentaUons 59
ProPresenter 5 for Mac User Manual
© 2005-2012! Renewed Vision, Inc.

EdiUng Slides 60Go to Next Timer 68Hot Keys 70Saving Files 71Slide Reflow 72
ImporUng and ExporUng Files 74PrinUng 80Song Select 82
Accessing SongSelect 83ExporUng from SongSelect 84
PowerPoint and Keynote Triggering 85Bibles 86
Downloading, Installing, Registering 86Using the Bible Module 89Bible PresentaUons 90
Props 92Clocks 93Messages 94Mask Layer 96Audio Bin 97Timeline 98Using DVDs 99Displaying Web Pages 101Stage Display 102Twi_er 106LocalizaUon 108Modules 109
Demo Modules and Registering Modules 110Alpha Key Module 111Edge Blending Module 113Master Control Module 115MulU-‐Screen Module 117SDI Output Module 119
Matrox ConfiguraUon 120ProPresenter Remote 122Remote Stage Display 123Display Pa_erns 124Backing Up and Transferring Files 125Keyboard Shortcuts 126TroubleshooUng 128AddiUonal Resources 131
ProPresenter 5 for Mac User Manual
© 2005-2012! Renewed Vision, Inc.

ProPresenter 5 for Mac User Manual
© 2005-2012! Renewed Vision, Inc.

Installing ProPresenterWhen you are ready to download and install ProPresenter, go to the Renewed Vision website. Under Download in the menu bar, select ProPresenter. You will then click on the Download Now opLon for the Mac version.
When you click on Download Now, the disk image (.dmg) will begin downloading automaLcally. “Disk Image” is the term used to describe the file used to package installaLon files for Mac OS X.
Select “Save File” and then click OK to conLnue with the download.
Ader the download completes, locate the file in your Downloads folder in the Finder, and double-‐click on the disk image icon to open the installer uLlity. You can also open the file locaLon through the Downloads manager in your web browser if you can’t locate your Downloads folder.
© 2011 Renewed Vision, Inc. ! Page 1 of 131

When you open the disk image, you will be shown the licensing agreement. Read and make sure that you understand the license terms and then click Agree to conLnue with the installaLon.
Ader agreeing to the license terms, the disk image will be opened. To install the applicaLon on your computer, click on the ProPresenter icon and drag it across the gray arrow onto the ApplicaLons folder. This will install ProPresenter in your ApplicaLons folder in Finder. Since ProPresenter 5 has a unique name and files, it can be installed simultaneously with ProPresenter 3 or ProPresenter 4.
You can now close the installer window and launch ProPresenter 5 from your ApplicaLons folder in the Finder.
ProPresenter 5 for Mac User Manual
© 2005-2012 Renewed Vision, Inc. ! Page 2 of 131

You will see the message shown below the first Lme you launch the program, click Open to conLnue.
When ProPresenter launches, you will be prompted to enter your License RegistraLon informaLon. This informaLon is provided to you electronically ader purchasing a license or when you request a trial code.
Note: A single user license is platform specific, so a Windows code wonʼt work in the Mac version and a Mac code wonʼt work in the Windows version. Each version of ProPresenter (3, 4, and 5) have unique codes, so your previous codes wonʼt be able to unlock Pro5.
If you have not purchased a code, or don’t have a trial code, you can choose to either purchase a code by clicking on “Buy Now” or open ProPresenter by clicking on “Demo”. The demo version is fully funcLonal, but it does have a watermark on the main output and the stage display output.
If you receive a message saying your code is invalid, check the following things:• Is your code a ProPresenter 5 code?• If it’s a single user code, is it a Mac Single User code (starts with ‘M’)?• Are you entering the 25-‐digit code? Is it five sets of five alphanumeric characters?• Did you include the dashes in the code if you manually entered it?• Is there an extra space on the end of the Unlock Code if you copied/pasted it?• Did you transcribe any leGers/numbers incorrectly?
Before contacLng us directly, please go to www.renewedvision.com/support and aGempt to retrieve your registraLon informaLon. If you purchased from a reseller and need to redeem your acLvaLon code, please go to hGp://www.renewedvision.com/registraLon.php.
Once you have successfully entered your license informaLon you will be asked to enter your user account password for your computer. We can’t help you if you don’t know this password.
ProPresenter 5 for Mac User Manual
© 2005-2012 Renewed Vision, Inc. ! Page 3 of 131

Info CenterThe first Lme you launch ProPresenter you will see the ProPresenter InformaLon Center. You can access this later by clicking on the ProPresenter logo in the upper-‐right corner of the applicaLon. Uncheck the “Open Info Center ader Launch” opLon at the boGom to prevent this screen from opening every Lme you launch the program.
Import Pro Library ProPresenter will detect whether you have ProPresenter 3 or ProPresenter 4 installed automaLcally. When you click on this buGon, the correct import uLlity will open. If you have both versions installed, the newer version will be used. ImporLng libraries is covered in more detail later in this user guide.
Install Sample Library This will install a small collecLon of public domain hymns. There is no need to install these if you don’t use old hymns.
Download User Manual This will download a copy of the user guide as a PDF to your computer.
Video Tutorials The ProPresenter 5 tutorial videos can be viewed directly in the program. An internet connecLon is required
ProPresenter FAQs This will load our FAQ page. An internet connecLon is required.
Looking for great content? This buGon will launch our media store page where you can download the free samples or buy addiLonal content.
Forgot your Unlock Code? Enter the email address that was used to buy ProPresenter to have your registraLon informaLon resent.
More QuesUons? This link will take you to our user forums where you can get more help.
ProPresenter 5 for Mac User Manual
© 2005-2012 Renewed Vision, Inc. ! Page 4 of 131

Free Media ContentWe have partnered with WorshipHouseMedia to power the media store that is accessible directly through ProPresenter. If you have purchased anything from WorshipHouseMedia before, you will be able to use those credenLals to log into the store, otherwise you will create a new account during the check out process that you can then use in the future to buy addiLonal media.
To access the Store and the free content, click on the Store icon in the toolbar then select the RenewedVision Video Sample Download link. Depending on the size of your screen, you may have to scroll down a liGle to see this banner. If nothing is loading on this page, ensure that you have the latest version of Flash for Safari installed.
Everyone who purchases a ProPresenter 5 license (new or upgrade) is qualified to receive 60 free moLon backgrounds from Centerline New Media, CreaLonPower Media, Graceway Media, Igniter Media, pixelgirl media, and Playback Media.
If you have purchased a site license, you will also have access to 50 addiLonal clips from 12 Inch Design, Igniter Media, WorshipFilms.com, Midnight Oil PRoducLons, and Highway. If you are a current Pro4 user, this is the same bundle you already have access to.
All users also have access to an addiLonal 120 sLll images. A download link is provided to these files in your purchase receipt.
ProPresenter 5 for Mac User Manual
© 2005-2012 Renewed Vision, Inc. ! Page 5 of 131
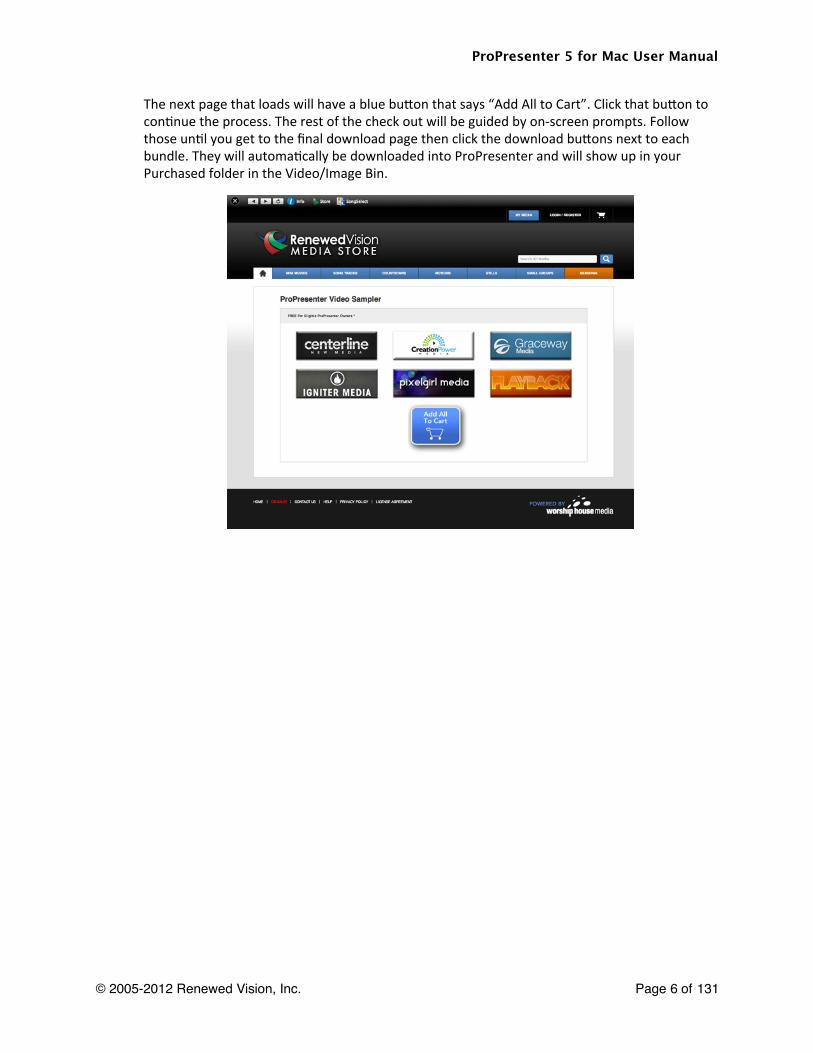
The next page that loads will have a blue buGon that says “Add All to Cart”. Click that buGon to conLnue the process. The rest of the check out will be guided by on-‐screen prompts. Follow those unLl you get to the final download page then click the download buGons next to each bundle. They will automaLcally be downloaded into ProPresenter and will show up in your Purchased folder in the Video/Image Bin.
ProPresenter 5 for Mac User Manual
© 2005-2012 Renewed Vision, Inc. ! Page 6 of 131

Configuring your computer for first useIf this is the first Lme you are seong up a computer to use ProPresenter, there are a few things you need to do first to opLmize your experience. The most important thing is to make sure your screens are properly configured, which is covered below. There are some addiLonal links to online resources that we think you will find useful while seong up your computer.
System Display Preferences
The first step to geong your displays configured correctly is making sure that your system display preferences are set up properly. Before you begin, connect your primary output to your computer. Seong up the Stage Display will be discussed later in this manual.
To access Display Preferences, click on the Apple menu in the top-‐led corner of your screen and select System Preferences. Click on Displays to open up the display preferences.
Ader Displays is opened, click on the Arrangement tab. Ensure that the Mirror Displays opLon is unchecked. You can also do this by pressing Command-‐F1 on your keyboard.
Your Display resoluLons should be correct automaLcally, but if you need to make a change to your external display resoluLon, click on Gather Windows, select the Display Preferences for the external display and change the resoluLon.
ProPresenter 5 for Mac User Manual
© 2005-2012 Renewed Vision, Inc. ! Page 7 of 131

DVD seHngs
If this is a new computer you will need to localize the DVD playback so that it will work in proPresenter. To do this, open the Finder, select your hard drive (“Macintosh HD”), open ApplicaLons, double-‐click on DVD Player. When DVD Player opens for the first Lme, you will be asked to select your region. If you live in the US, this will be Region 1. Ader you have selected this seong, you can close DVD Player.
If you forget to do this, the first Lme you try to use a DVD in ProPresenter, it won’t work and you’ll need to come back to this step.
It is also recommended that you turn off auto play seongs on your Mac to prevent resource conflicts between DVD Player.app and ProPresenter’s DVD player. To find these seongs, open System Preferences then click on CDs & DVDs under the Hardware opLons. Change the When you insert a video DVD opLon to Ignore.
When you need to use your computer to watch a DVD you will need to manually open DVD Player.app from your ApplicaLons folder. This seongs prevents your Mac from automaLcally trying to play the DVD, which can interfere with ProPresenter’s DVD funcLonality.
Other settings
You may also want to change your desktop image on each display to a solid color. You should also adjust your screensaver and power opLons so not engage if the computer is led idle for only a few minutes.
ProPresenter 5 for Mac User Manual
© 2005-2012 Renewed Vision, Inc. ! Page 8 of 131

ProPresenter PreferencesThis secLon will cover the Preference menu in ProPresenter 5. It’s likely that you will need to make very few changes to your Preferences beyond the iniLal setup.
Preferences are accessed by clicking on the ProPresenter menu and then selecLng Preferences, or by pressing Command-‐, (Command and the comma key).
ProPresenter 5 for Mac User Manual
© 2005-2012 Renewed Vision, Inc. ! Page 9 of 131

General
Check for updates at startupThis opLon is enabled by default. ProPresenter will automaLcally check for updates when the program launches as long as you have an internet connecLon. If you don’t want to be noLfied of updates automaLcally, uncheck this opLon, but remember to check regularly for updates.
Library folderThis menu allows you to select from mulLple libraries as well as add addiLonal libraries. Adding addiLonal libraries will be covered later in this guide in the secLon Ltle Working with the Library.
Default LogoThe ProPresenter logo is the default logo. You can check this by clicking on this buGon and selecLng your own image. Having your organizaLon’s logo or other image here provides you with something to go to in an emergency. Checking Preserve aspect raUo will maintain the aspect raLo of the logo image.
ApplicaUon DataBy default, the ApplicaLon Data is stored per user (“Only this User”). This allows you to have mulLple user accounts on the computer and unique ProPresenter environments in each account. If you would like to enable all of the user accounts to access this data, you can select the “For All Users” opLon. This will create a new set of applicaLon data files on the root directory (hard drive instead of user account) that each user can access. You can also store this on a custom path if your setup requires this.
Media Repository The first Lme you launch ProPresenter you will be asked where you want your default media stored. This is the directory where any media purchased through the store is downloaded to and where media that is imported with bundles is stored.
ProPresenter 5 for Mac User Manual
© 2005-2012 Renewed Vision, Inc. ! Page 10 of 131
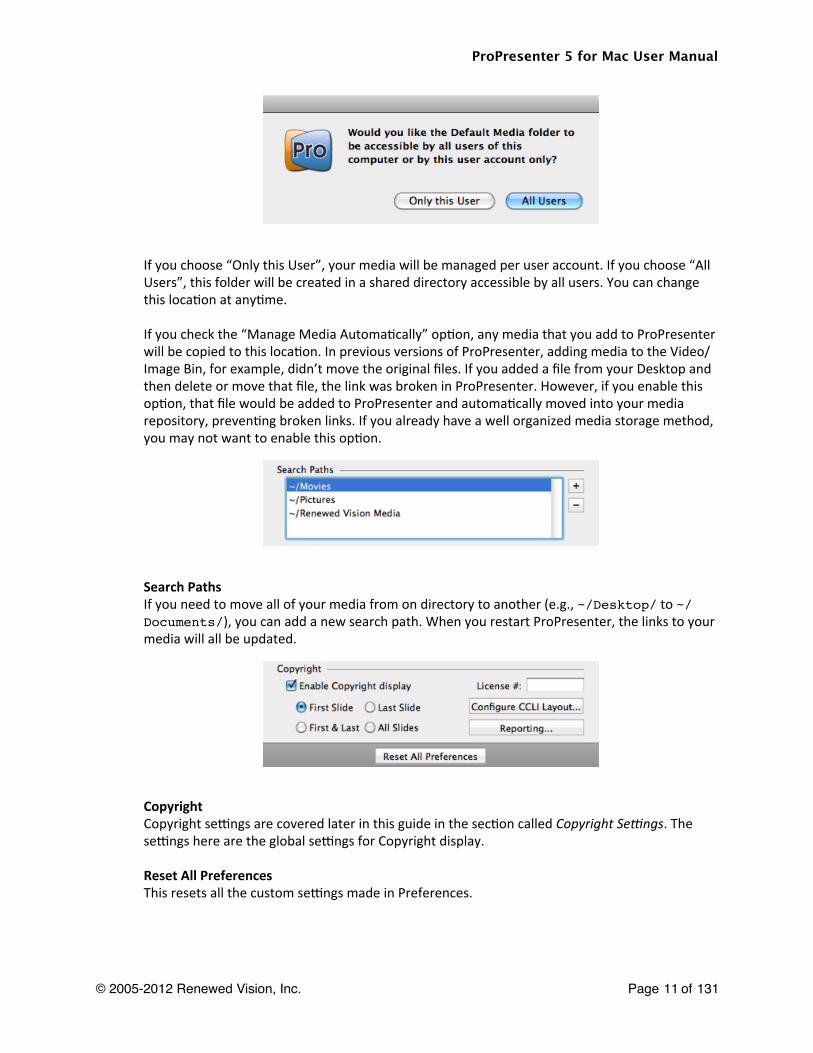
If you choose “Only this User”, your media will be managed per user account. If you choose “All Users”, this folder will be created in a shared directory accessible by all users. You can change this locaLon at anyLme.
If you check the “Manage Media AutomaLcally” opLon, any media that you add to ProPresenter will be copied to this locaLon. In previous versions of ProPresenter, adding media to the Video/Image Bin, for example, didn’t move the original files. If you added a file from your Desktop and then delete or move that file, the link was broken in ProPresenter. However, if you enable this opLon, that file would be added to ProPresenter and automaLcally moved into your media repository, prevenLng broken links. If you already have a well organized media storage method, you may not want to enable this opLon.
Search PathsIf you need to move all of your media from on directory to another (e.g., ~/Desktop/ to ~/Documents/), you can add a new search path. When you restart ProPresenter, the links to your media will all be updated.
CopyrightCopyright seongs are covered later in this guide in the secLon called Copyright Se4ngs. The seongs here are the global seongs for Copyright display.
Reset All PreferencesThis resets all the custom seongs made in Preferences.
ProPresenter 5 for Mac User Manual
© 2005-2012 Renewed Vision, Inc. ! Page 11 of 131

Display Preferences
Display at Top Most Window LayerSelect this box to keep the ProPresenter output above any other windows on your output screen. Disable this box if you need to show a full-‐screen video using the Web browser, or you need to show a PowerPoint or Keynote presentaLon.
Scale to Fit Output DisplayThis will scale your presentaLon to the output resoluLon if they don’t match.
Enable Stage DisplayThis will enable the stage display on the indicated screen. You can also enable the Stage Display screen by pressing Command-‐2 on your keyboard.
Configure Stage DisplayThis will bring up the stage display layout editor. This is covered in more detail later in this guide in the secLon called Stage Display.
The Output (Out) and Stage Display (SD) outputs can be set within the Display preferences by clicking and dragging the displays to the right posiLons. Note that you are only moving the
ProPresenter 5 for Mac User Manual
© 2005-2012 Renewed Vision, Inc. ! Page 12 of 131

screen indicators in ProPresenter. The physical arrangement of the screens can only be changed in System Preferences.
Edit System Display seHngsThis will open the Display seongs available in System Preferences that were covered earlier in this guide.
Output ScreenClicking Full Screen will automaLcally use the resoluLon you set in Display preferences. If you need to use a custom size, enter the resoluLon and click Update.
Corner Pinning This allows you to make adjustments to the display output and will be covered later in this user guide.
Screen ColorThis specifies the default slide background color. This is the color you will see on your thumbnails and if no other background is selected. You can use any color.
Screen PosiUonThis allows you to designate which part of the screen your presentaLon will be anchored to if the presentaLon dimensions are smaller than the actual output resoluLon.
Toggle OutputThis turns your primary output on and off. This can also be done by pressing Command-‐1 on your keyboard.
ProPresenter 5 for Mac User Manual
© 2005-2012 Renewed Vision, Inc. ! Page 13 of 131

Corner Pinning
In ProPresenter 5 we have included the ability to use corner pinning on the output from the program. This will allow you to make modificaLons to the output shape when keystoning isn’t quite enough, or you’re projecLng onto a surface with angled sides.
From the Display preference tab, enable Corner Pinning by checking the box next to it. Click on the Corners buGon to open the seongs. The seongs default to a perfect square using your Output Screen resoluLon.
ProPresenter 5 for Mac User Manual
© 2005-2012 Renewed Vision, Inc. ! Page 14 of 131

The images below shows what changes to each value does to the actual output. For this illustraLon, the output screen has been set to 640x480. The led image shows the iniLal screen seongs and the second shows the adjusted output seongs. Each seong is represented individually by the eight thumbnails below. The default slide color is set to Cyan to make it easier to see the results of the corner pinning. The eight thumbnails are arranged in the same order as the pinning values.
ProPresenter 5 for Mac User Manual
© 2005-2012 Renewed Vision, Inc. ! Page 15 of 131

Label
Library Categories
You can use Categories in the Library to help sort your presentaLon. Labels are set when creaLng a new presentaLon, but can be changed at any Lme. Use this secLon to create addiLonal categories that you might need. To delete a category, select it and press the Delete key on your keyboard.
Group & Slide Labels
Group labels are used with the Grouping and Arrangements feature that is covered later in this user guide. Slide groups work like stanzas and allow you to keep sets of slides together to easily arrange them.
Within each group you can designate more specific labels on individual slides if you need to. To add these labels, open the Editor, go to the Slide ProperLes tab, and assign the label. Slide labels will sLll exist within a slide group. You can see groups for Verse 1 and Verse 2 in the image below as well as an Instrumental slide within Verse 1.
ProPresenter 5 for Mac User Manual
© 2005-2012 Renewed Vision, Inc. ! Page 16 of 131

DVD
Disable DVD playback feature SelecLng this opLon will prevent DVDs from being played in ProPresenter.
Prevent DVD spin down SelecLng this opLon will keep the DVD spinning so that there is less delay when you click on a selected DVD clip. It’s recommended to keep this opLon checked.
Install HandBrakeCLI This is a new feature in ProPresenter 5. If you frequently use DVDs and would like the ability to rip clips to your computer instead of playing them directly back from the DVD, install this component.
We also recommend installing VLC (it’s free) to expand the DVDs that this feature can be used with. Ripping DVDs will be covered later in this user guide.
ProPresenter 5 for Mac User Manual
© 2005-2012 Renewed Vision, Inc. ! Page 17 of 131

Live
ProPresenter supports a live video feed over FireWire, SDI, or USB input. While this feature is convenient, it does have some drawbacks like latency (delay) when using FireWire. It's best suited for overflow rooms or small services where you may have a single camera and cost is more important than latency. It's not recommended for larger, mulL-‐camera venues that are served best by a mulL-‐port switcher.
Video SourceSelect the input device for your video source. This can be the iSight camera, an external camera source, or a sodware “camera” like CamTwist or ManyCams.
Audio SourceSelect the audio source (if needed) to be used with your camera.
Preserve Aspect RaUoThis prevents your camera input from being stretched full-‐screen if your output resoluLon and the camera resoluLon don’t match.
Disable Video InputThis prevents the Live buGon in the toolbar (or F7) from sending a camera signal to your output.
ProPresenter 5 for Mac User Manual
© 2005-2012 Renewed Vision, Inc. ! Page 18 of 131

Sync
ProPresenter 5 makes it easy to sync files between computers, including files other than just your Library. This makes it much easier to setup a new computer with ProPresenter as well as being able to keep computers in sync with each other.
We introduced Sync in ProPresenter 4, but it could only sync Library files. In ProPresenter 5 we have added the ability to sync all of your files to a central folder in order keep mulLple computers matched up.
The diagram below shows you the basic idea of how Sync works now. Before you can even begin syncing, you will need to have a central folder for everything to be stored. This folder cannot be the same as your library folder used by ProPresenter since it is going to be used to facilitate your files for syncing.
Once you have your central folder in place, use the “Sync files up” opLon on Mac 1 to create the necessary sync folders and to copy the data. You will have up to five folders in your sync folder. Ader the sync is complete, you can use any of the sync opLons. If you are seong up addiLonal computers to match the first one, you would select the central folder and choose “Sync files down” to move the files to that computer. In the future you would probably use “BidirecLonal sync”.
ProPresenter 5 for Mac User Manual
© 2005-2012 Renewed Vision, Inc. ! Page 19 of 131

Sync files downThis will move files from the Source to your computer.
Sync files upThis will move files from your computer to the Source.
BidirecUonal syncThis will look for differences between your computer and the Source and sync those files. If a newer version of a file is detected, you will be shown a prompt alerLng you that the older version is being replaced.
Replace My Files/Replace Files on ServerThis will replace the files in the desLnaLon folder regardless of the Lmestamp on files. This opLon isn’t available on BidirecLonal sync.
ProPresenter 5 for Mac User Manual
© 2005-2012 Renewed Vision, Inc. ! Page 20 of 131

Network
Master Control SlaveThis is a new feature in ProPresenter 5. It will be covered in more detail later in this user manual in Master Control Module secLon.
ProPresenter Remote Server SeHngsThis secLon of Network preferences enables the iOS ProPresenter Remote app. Check Enable and then either (or both) Controller or Observer and set new passwords for each. If your computer and iOS device are on the same network, you can connect to ProPresenter and use the remote to control playlists or to follow along.
You may need to disable your computer’s firewall if you have connecLon issues. Open System Preferences, go to Security. Click on the Firewall tab and click on Stop to turn off the firewall.
Remote Stage Display Server SeHngsEnabling this seong will allow you to use the iOS ProPresenter Stage Display app. This allows you to use any iOS device as a wireless stage display. Set a new password for this. If you are on a
ProPresenter 5 for Mac User Manual
© 2005-2012 Renewed Vision, Inc. ! Page 21 of 131

very restricted network, as your network administrator for a port that you can use if you can’t connect.
PVP Network SeHngsIf you are using ProVideoPlayer, you can control the videos that are loaded in ProPresenter simultaneously. Enable Receive Network Commands for this to work. In PVP, open Preferences>Network and make sure this computer is showing up as being connected.
If you want to be able to control the visual properLes of the videos, check the Enable Visual Adjustments opLon.
You will need to configure your playlists in ProPresenter’s Video/Image Bin to match the ones in PVP for this to work properly. Commands are sent based on the order of playlists and the posiLon of the clip, not based on names. If you use any folders to sort your media in ProPresenter, move those below the playlists you want PVP to control.
PVP Network seongs will be included for all uses with ProPresenter 5 and is no longer part of the Advanced Module.
Planning Center OnlineThis is a new feature in ProPresenter 5 and will be covered in more detail later in this user manual in the secLon all Planning Center Online. The seongs listed here allow you to control the basic behavior of the PCO integraLon.
Changes made to a PCO service order online can automaLcally be detected by ProPresenter, and documents added in ProPresenter to a PCO playlist can be uploaded to the service element online for future use.
If you check the opLon to Show Historical Service Plans then past services will also be available to you. Otherwise, only plans from the current date and later will be available.
You can log in or log out of Planning Center Online from here as well.
ProPresenter 5 for Mac User Manual
© 2005-2012 Renewed Vision, Inc. ! Page 22 of 131

Advanced
The image above shows the default view of the Advanced preferences. If you enable the Alpha Key or SDI Output module, addiLonal seongs are shown at the boGom of this screen. Those will be covered later in this user guide.
Import Video/Image Scale Behavior These seongs affect how backgrounds and foregrounds are formaGed when you import them into ProPresenter. Generally you will want to set Background to Stretch to Fill so that backgrounds fill your enLre screen. Foreground will usually be Scale to Fit so that the aspect raLo of the video remains the same when displayed on your screens.
Video Playback These seongs are usually led unchecked. High Quality can be used if you are showing videos that have small-‐point text embedded in the video. Deinterlace and Play Every Frame are only needed if you are using files that are encoded using a DV codec.
Render Output Behavior These seongs are used for troubleshooLng rather than general performance. Render Output as Anamorphic allows you to use 16x9 content in a 4x3 environment without distorLng the original video. Turn off Preview disables the preview screen in ProPresenter.
ProPresenter 5 for Mac User Manual
© 2005-2012 Renewed Vision, Inc. ! Page 23 of 131

Modules
The Modules tab is new in ProPresenter 5. We have relocated this funcLon from the RegistraLon menu. We’ve also made it possible to demo any of the modules before you buy them.
Note: Demo modules add a watermark to the output screen while in use and are also reset when you restart ProPresenter. The Master Control module has a 10 minute time limit.
New Module CodeIf you have purchased a module, enter the 25-‐digit code here and then click the + to acLvate the module. Ader you have acLvated a module, the blue “Buy” buGon will change to a green check mark. When ProPresenter is registered, an ID Code will be shown as well. This is needed to purchase a module and link it to a specific computer.
Demo ModulesIf you click this buGon, all the modules will be enabled in demo mode for the current session of ProPresenter. You will have the full funcLonality of the modules, but the ProPresenter watermark will be placed on the output screen. When you close ProPresenter, the modules will be turned off again.
Purchased modules will have a green check next to them instead of the blue “Buy” buGon.
Each module will be covered in more detail later in this user manual.
ProPresenter 5 for Mac User Manual
© 2005-2012 Renewed Vision, Inc. ! Page 24 of 131

Toolbar
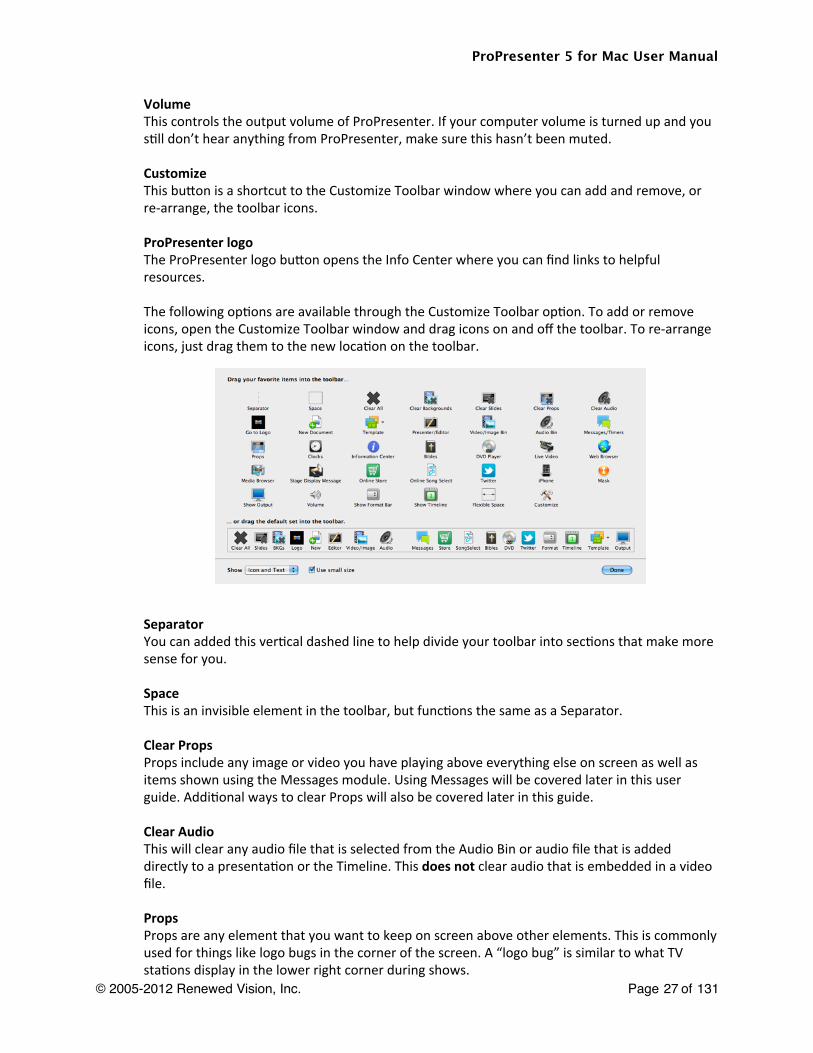
If you are familiar with ProPresenter 4 you will noLce that several of the icons in the default toolbar have been changed, some new ones are there, and others aren’t there. This secLon covers all the default icons first, and then explains the remaining icons that can be added to the toolbar through the Customize Toolbar opLon.
Clear AllThis removes everything that is acLve in ProPresenter: slides, videos, pictures, audio, websites, etc. When you click this buGon it will clear the screen and show your default slide color that is set in Preferences. This also stops Lmed presentaLons or the Timeline.
SlidesThis will remove anything that is part of the slide layer. Normally this is just text, but may also have pictures on a slide, or other slide objects. Clearing slides will keep the background showing and allow audio files to conLnue playing. If you are using a Lmed presentaLon or a Timeline, these will conLnue and the next slide that is triggered will be displayed.
BackgroundsThis will clear the background, sLll image or video, from the screen but everything else will conLnue. When you clear the background from a presentaLon, the default slide color will be used instead unLl a new background is selected.
Tip: If you want to select a slide that has a background linked to it, but donʼt want to use that background at the time, press the Option key to temporarily remove the backgrounds from the presentation while you select the slide. Release the Option key and the backgrounds will be shown again.
LogoThis buGon will show the default logo that you have set in Preferences. This funcLons the same as a Clear command and removes all other content from the screen.
NewThis creates a new Library document. You will be able to select the Template and Category of the presentaLon before adding it to your Library.
EditorWhen a Library presentaLon is selected, you can use this buGon to open the presentaLon in the Editor to make changes.
Video/ImageThis opens the Video/Image Bin below the Slide Viewer. The Video/Image Bin is used to organize your media files in ProPresenter.
AudioThis opens the Audio bin to the right of the Slide Viewer. The Audio Bin can be used to play audio files for walk in music, sound effects for plays, or whenever you want to play music from ProPresenter.
ProPresenter 5 for Mac User Manual
© 2005-2012 Renewed Vision, Inc. ! Page 25 of 131

Messages This opens the Messages module. Messages include any on-‐screen announcement you need to make, like a child number, or countdown clocks shown to the audience.
StoreThis opens to our media store, which is powered by Worship House Media. You can download the free media samples through the store, or you can purchase new media for your organizaLon.
Song SelectThis will open to CCLI’s SongSelect service. This is a subscripLon service and is not part of Renewed Vision. We only provide access to this service.
BiblesThis will open the Bibles module in ProPresenter. You can access any installed translaLon or add new translaLons at any Lme. Bible searches can be turned into new presentaLons, added to the currently selected presentaLon, or shown directly from here.
DVDThis opens the DVD module. You can create clips from a DVD and add them to a presentaLon or playlist, shown a DVD segment directly from here, or rip a DVD clip into a file on your computer.
Note: Newer Mac minis and all MacBook Airs don’t have a built-‐in DVD player. You will need an external opLcal drive to use this feature. MulLple opLcal drives are not supported.
Twi_erThis opens the TwiGer module, allowing you to show a stream of tweets directly within ProPresenter. This is covered in more detail later in this user guide.
FormatThis opens the in-‐line formaong toolbar that allows you to make fast formaong changes to the font style of your slides from within the Slide Viewer instead of having to open the Editor.
TimelineThis opens the Timeline interface for a song. CreaLng a Lmeline is covered in more detail later in the user guide.
TemplateYou can change the template for the acLve presentaLon from this buGon. You’re also able to change the template for an individual slide or mulLple presentaLon at once depending on the selecLons that are made.
Note: This funcLons differently than it did in ProPresenter 4. Instead of applying to newly create slides or presentaLons, this actually changes the template right away.
OutputThis buGon toggles the primary output on and off.
ProPresenter 5 for Mac User Manual
© 2005-2012 Renewed Vision, Inc. ! Page 26 of 131
VolumeThis controls the output volume of ProPresenter. If your computer volume is turned up and you sLll don’t hear anything from ProPresenter, make sure this hasn’t been muted.
CustomizeThis buGon is a shortcut to the Customize Toolbar window where you can add and remove, or re-‐arrange, the toolbar icons.
ProPresenter logoThe ProPresenter logo buGon opens the Info Center where you can find links to helpful resources.
The following opLons are available through the Customize Toolbar opLon. To add or remove icons, open the Customize Toolbar window and drag icons on and off the toolbar. To re-‐arrange icons, just drag them to the new locaLon on the toolbar.
Separator You can added this verLcal dashed line to help divide your toolbar into secLons that make more sense for you.
Space This is an invisible element in the toolbar, but funcLons the same as a Separator.
Clear PropsProps include any image or video you have playing above everything else on screen as well as items shown using the Messages module. Using Messages will be covered later in this user guide. AddiLonal ways to clear Props will also be covered later in this guide.
Clear AudioThis will clear any audio file that is selected from the Audio Bin or audio file that is added directly to a presentaLon or the Timeline. This does not clear audio that is embedded in a video file.
PropsProps are any element that you want to keep on screen above other elements. This is commonly used for things like logo bugs in the corner of the screen. A “logo bug” is similar to what TV staLons display in the lower right corner during shows.
ProPresenter 5 for Mac User Manual
© 2005-2012 Renewed Vision, Inc. ! Page 27 of 131

ClocksAny clock that is started from here will only show up on the Stage Display.
InformaUon CenterThis gives you quick access to the InformaLon Center page.
Live VideoThis will enable your selected camera input that you set in Preferences.
Web BrowserThis opens the built-‐in web browser, allowing you to show enLre websites seamlessly from within ProPresenter.
Media BrowserThis opens the Media Browser. The Media Browser will be covered in more detail later in this user guide.
Stage Display MessageThis will open a message window that sends a message to just the Stage Display if it is enabled in the Stage Display layout.
iPhoneThis toolbar item gives you a quick on and off switch for the iOS remote app. If you have the Network seongs properly configured for the remote, this will enable and disable the seongs.
MaskThe Mask layer is another layer available in presentaLons. Since most users probably don’t need this feature, we don’t include it in the default toolbar. The Mask layer will be covered in more detail later in this user guide.
Flexible SpaceThis is similar to “Space”, but it grows and shrinks depending on the size of the ProPresenter window.
ProPresenter 5 for Mac User Manual
© 2005-2012 Renewed Vision, Inc. ! Page 28 of 131

Copyright SeHngsProPresenter makes it easy to display copyright informaLon for songs. When you import a song from SongSelect, the data is automaLcally filled in. If you create your own song files, you can manually enter the copyright informaLon if you want to.
There are two places that you need to configure copyright display. The first place is in Preferences at the boGom of the General tab. These are the global seongs that apply to every presentaLon in the library. As you can see, you can choose to show the copyright informaLon on the first, last, first and last, or every slide of your presentaLon.
The License # box on the right is for you to enter your church’s unique license number. You will need to contact CCLI for this number if you aren’t sure what it is.
To change the copyright elements that are shown (Title, ArLst, publishing informaLon, etc.) click on the Configure CCLI Layout... buGon. This will open the opLons shown below.
Each of the copyright elements are controlled by “Tokens”, a feature in ProPresenter that allows text from one part of the program to be automaLcally shown by a different feature. The tokens on the led are the acLve tokens, meaning these are the ones that will be shown. The column on the right shows all of the opLons available. You can add and remove tokens from the led column by clicking and dragging them in and out of the right column.
ProPresenter 5 for Mac User Manual
© 2005-2012 Renewed Vision, Inc. ! Page 29 of 131

Note: The copyright symbol is not included as a token, so if you accidentally delete it you can use Command-‐G on your keyboard to type it again.
Clicking on Edit Template will open the Template Editor and allow you to format the posiLon and text seongs for your copyright informaLon. Since tokens aren’t actually text, the only thing you’ll see in the text box is the copyright symbol. If you want to see how text will look formaGed, add any text you want since this will be replaced automaLcally.
Once you have configured how you want your copyright informaLon to be displayed, you will need to make sure a presentaLon has informaLon to display and that it’s enabled. If you have imported a song from SongSelect, this informaLon is filled in automaLcally and Display Copyright is checked by default.
ProPresenter 5 for Mac User Manual
© 2005-2012 Renewed Vision, Inc. ! Page 30 of 131

To access the copyright informaLon, click on the blue info buGon next to the presentaLon Ltle at the top of the slide viewer. If this data isn’t already filled in, you can fill in as much as you know. If you need to change whether or not the copyright informaLon is shown for a specific presentaLon, check or uncheck the Display Copyright box
This informaLon is used by the tokens that you enabled in the previous secLon. If you include a token but there is no informaLon in that text field, nothing will be shown on the slide(s) that the copyright informaLon is displayed on.
Note: The Title entered here can be different than the name of the presentaLon in the Library. If you want to have mulLple copies of a presentaLon, but show the correct copyright informaLon for each presentaLon, just change the name of the presentaLon in the library and leave this as is.
The rest of this panel is covered later in this user guide.
ProPresenter 5 for Mac User Manual
© 2005-2012 Renewed Vision, Inc. ! Page 31 of 131

CCLI ReporUng
One feature we have been asked for over and over again is the ability to generate a CCLI report. In ProPresenter 5 we make it easy to generate a report of all the new songs you’ve added to your library. CCLI only requires that you report when you add a song to your library, not how many Lmes you use the song.
To access this, open Preferences, go to the General tab, and click on the ReporUng... buGon at the boGom.
You can reset this list to make it easy for you to track your songs during each reporLng period. You can also export the list as a text file if you want to keep a backup copy of this list for your records.
ProPresenter 5 for Mac User Manual
© 2005-2012 Renewed Vision, Inc. ! Page 32 of 131

PresentaUon Layers
ProPresenter 5 presentaLons are composed of up to six layers.
Mask LayerHave you ever wanted to project onto something that wasn’t a projector screen? Did you use tape and cardboard to block out your project’s light to fit that shape? We introduced the Mask Layer in ProPresenter 4 to solve that problem. Instead of placing things in front of your projectors, you can draw a Mask in ProPresenter, or using Photoshop to create custom projecLon areas. Once enabled, a Mask will automaLcally acLvate when ProPresenter opens. Masks can only be enabled and disabled from the Mask module. You will need to customize your toolbar to add the Mask module buGon.
Props LayerProps are items that sit on the topmost-‐layer of your visible output (not visible over a Mask). The most common Prop type is a logo “bug.” This is a small graphic that is usually shown in the lower right corner of the screen at all Lmes. This is the same thing as a cable channel logo that is shown on TV. Messages and Countdowns are also shown in the Props layer, in addiLon to actual Prop.
Slide LayerSlides are the most fundamental element of ProPresenter and exist within Library presentaLons. They contain the bulk of the informaLon most users will be displaying. The slide layer may contain ext slides, announcement loops, slideshows or any other pre-‐formaGed text and/or
ProPresenter 5 for Mac User Manual
© 2005-2012 Renewed Vision, Inc. ! Page 33 of 131

graphic slides. We have conLnued building upon this layer in ProPresenter 5, adding several new features that will be covered later in this user guide.
Video PlaybackThis layer is used for any full-‐screen video or image playback. There are two variaLons on this layer: Backgrounds and Foregrounds.
• Backgrounds are videos or graphics played underneath the Slide Layer. They persist across mulLple slides and conLnue to display unLl cleared or another background is triggered. Background videos are automaLcally set to loop, but this can be changed in the seongs for each file in Media ProperLes. Backgrounds can be assigned directly to slides or selected from the Video/Image Bin.
• Foregrounds are generally any video or image that you would notate on a cue sheet, such as sermon illustraLon videos, announcement videos, or any other video or image that is intended to be shown by itself. They will clear the output when triggered and be cleared when another slide is triggered. Foreground videos are set to play just once, but this can be changed in the Media ProperLes for each file. They can be added directly to presentaLons, Playlists, or played directly from the Video/Image Bin.
Live VideoThe Live Video funcLon in ProPresenter takes a live camera feed from any QuickTime-‐compaLble video interface and shows it full screen underneath the other layers menLoned above. If a background is acLve, you will need to clear the background in order to see the Live Video source.
Background ColorThis is the default color you want to show when absolutely nothing else is shown on the screen (by default this is set to black). In addiLon to the default global screen color defined in Preferences, a default background color can be defined for each presentaLon as well as individual slides within a presentaLon.
ProPresenter 5 for Mac User Manual
© 2005-2012 Renewed Vision, Inc. ! Page 34 of 131

Working with TemplatesTemplates allow you to quickly reformat a song to a new layout, or to change an enLre set of songs. If you’re familiar with ProPresenter 4 you’ll quickly realize some things have changed with how Templates are selected and applied. Templates also support some new slide features, but those will be covered later in this user guide in different secLons.
When you create a new presentaLon, you select the Template every Lme. Instead of choosing the Template from a different menu, we have merged Templates into the new document menu. Unless you need to change this, once you select the Template the first Lme, it will conLnue being used for all new songs.
In the same fashion, we have made a similar change to how new slides are created in a presentaLon. There are two opLons for creaLng new slides in a presentaLon. In the image below, you can see a plus sign and a down arrow. If you select the plus (+) buGon, it will create a new slide using the last used template from this menu. If you click the down arrow you will see a list of Templates. SelecLng a template will create a slide with those properLes. This will also become the Template used when clicking the plus buGon in that presentaLon.
Finally, we have changed how you apply a Template to an exisLng, or set of exisLng, presentaLons. In ProPresenter 4, you had to click on the Format buGon, then Templates. In ProPresenter 5 we’ve moved this buGon to the toolbar (don’t confuse this with the Templates toolbar buGon in ProPresenter 4). Choosing a Template from here will update the selected slide, presentaLon, or set of presentaLons.
ProPresenter 5 for Mac User Manual
© 2005-2012 Renewed Vision, Inc. ! Page 35 of 131

Working with Media
Video/Image Bin
The Video/Image Bin is the best locaLon for managing your media within ProPresenter. In ProPresenter 5 we have added a couple of new features that now make the Video/Image Bin even more useful for you.
To access the Video/Image Bin, click on the Video/Image icon in the toolbar. You can also press Control-‐V or open it from the View menu. Once the bin is open, you will find it below the slide viewer. The first Lme you open this, it will be empty, but once you have started adding content it will begin to look like the image below.
The led secLon of the Video/Image Bin is used to maintain your playlists and help you organize your content. The top three bins-‐-‐Backgrounds, Foregrounds, and Purchased-‐-‐are the default bins and can’t be renamed, moved or deleted. These three bins are your iniLal organizaLonal tools for your media. To add playlists or folders, click the acLon menu in the lower-‐led corner of the Video/Image Bin playlist column. You can resize or hide the playlist column using the verLcal handle bars in the lower-‐right corner of the playlist column.
Backgrounds are automaLcally set to loop while they play, Foregrounds are automaLcally set to play just once, and anything you download through the in-‐app Store is added to Purchased and automaLcally set as a background or foreground depending on the type of media. When you download the free media bundle, it will be added to the Purchased folder.
You can further organize your content into playlists. Playlists in the Video/Image Bin work similar to those in the Library in that you can add content from your main bins into the playlist without removing them from the main bins. You can also add media directly from the Finder into a playlist. When you do this, the file will also appear in your Backgrounds bin.
If you need to organize your playlists further you can create a new Group Folder (black folder icon). Folders are used to organize playlists, so if you created a folder called “Holidays” like the one shown above, you can then add playlists to that folder for each holiday. Folders are really useful to organize playlists of special purpose media like this. Media cannot be added directly to a folder.
The new feature in the Video/Image Bin is the Hot Folder. Hot Folders are used to link directly to a folder on your computer. Any Lme you add or remove media from that folder, those changes
ProPresenter 5 for Mac User Manual
© 2005-2012 Renewed Vision, Inc. ! Page 36 of 131

will be reflected in the Hot Folder. Media cannot be added to a Hot Folder from within ProPresenter. Hot Folders are useful if you have a temporary work folder that you’re constantly updaLng. Since the Hot Folder will watch for changes, you can move files in and out of that folder as much as you need to. Media in a Hot Folder is not included in the Backgrounds or Foregrounds bins.
To add media to your Video/Image Bin you can use any of three different opLons. The fastest way to add media is to open the folder containing the media in the Finder and drag the files into the Video/Image Bin where you want them located. The other opLons are to click on the plus buGon on the boGom of the bin or by going to File>Import>Import Video/Image and locaLng the media in the Finder window that opens. Using the laGer opLon will import the media to the selected bin or playlist in the Video/Image Bin.
If you want to change the sort order of your media, click on the Sort By drop-‐down menu at the top of the Video/Image Bin. There are a number of opLons that you can use to sort your media. If you are looking for files with specific words in the file name, type that in the Search box to search the current bin or playlist.
In addiLon to the new playlist opLons in ProPresenter 5, we’ve also added the opLon to use different transiLon effects for media. In earlier versions of ProPresenter, the only opLons you had were either a cut or dissolve transiLon.
To access these new transiLon opLons, click on the transiLons buGon in the lower-‐led corner of the Video/Image Bin. Select the transiLon you want your media to use and set the duraLon, then click Done.
The icons in the lower-‐right corner and the slider allow you to toggle between a thumbnail and a list view of your media and to change the size of the thumbnails.
If you see thumbnails with a quesLon mark on top of them it means the file path to that media file has changed. Either relink the file, or remove it from the Video/Image Bin.
ProPresenter 5 for Mac User Manual
© 2005-2012 Renewed Vision, Inc. ! Page 37 of 131

Media Browser
To access the Media Browser, click on View and then select Media Browser. You can also customize your toolbar and add a buGon or press Control-‐K on your keyboard to open it.
The Media Browser gives you another opLon for accessing your media files. If you have use iMovie you may be familiar with this interface since it is similar to the media browser in that program. Media is automaLcally categorized in Images, Audio, Movies, and Links, making it easy for you to quickly find what you’re looking for.
To use content from the Media Browser, click and drag it to the slide that you want it applied to. Images, Audio, and Movies can only be added to presentaLon; you cannot use the Media Browser to add content to your Video/Image Bin. Links pull the bookmarks from Safari and can then be added to a playlist and will open the Web Browser when selected.
ProPresenter 5 for Mac User Manual
© 2005-2012 Renewed Vision, Inc. ! Page 38 of 131

Media ProperUes
In ProPresenter 4 we added the ability to adjust the color properLes of videos and images, as well as the ability to change the speed of videos. Now you have even more opLons to make your media library even more dynamic.
Any image or video can be adjusted using the following seongs, but these must be set before using the clip since the effects aren’t applied in real-‐Lme. The benefit of using these effects within ProPresenter is that you can use the same clip on your hard drive mulLple Lmes with different looks. Before, if you wanted five different looks on the same clip, you would have had to render five different files; now you just create five references to the same file.
To access the Media Cue Inspector, right-‐click on a thumbnail in the Video/Image Bin, or on a thumbnail in a presentaLon, and choose ProperLes. This will open the window shown below.
From this window, you can adjust the In and Out points for any video file. If you have a longer video and only want to show part of it, this is where you can make those changes without having to edit the original video. If you need to change the thumbnail or remove the custom in and out points, use the two buGons below the playback controls.
If you need to locate this file on your computer, click on the magnifying glass icon next to the file path.
On the right side of this window, the buGons at the top switch between basic informaLon tab (shown), the ProperLes tab, and the Effects tab.
The Label will use the file name by default, but as you can see with the video that’s open, the file name doesn’t necessarily make a lot of sense. You can change the Label to something that
ProPresenter 5 for Mac User Manual
© 2005-2012 Renewed Vision, Inc. ! Page 39 of 131

makes more sense for you and it will then be shown below the thumbnail in the Video/Image Bin.
The Info secLon shows you details about the video or image file.
If you want to set a custom transiLon for the media file, you can change that here as well. These effects will actually be available in the Video/Image Bin and in a presentaLon once set.The second tab in the Media Cue Inspector is the ProperLes tab. These seongs can be used to change the way a file is scaled, where it’s posiLoned on screen, and the orientaLon of the file. If you are working with a video, you can also change the volume of the audio track, the play rate (speed) of the video and whether the video loops or stops when it reaches the end of the file. There is also an opLon called “palindrome” for videos. When the video reaches the end of the file, it will play in reverse.
ProPresenter 5 for Mac User Manual
© 2005-2012 Renewed Vision, Inc. ! Page 40 of 131

In the image above, there are two arrows shown in the lower-‐right corner of the window. These arrows are shown when you select mulLple media cues and open all of them in the Inspector. Clicking the arrows will switch to the next or previous file.
The third screen in the Cue Inspector is new in ProPresenter 5. From this screen, you can now apply several new effects to your media.
When you first select the Effects tab, you can make a few basic changes.
Image Blur applies a blurring mask to the enLre video or image. Moving the slider led and right will change how much blurring is used.
Edge Blue applies a circular blurring mask from the outer edges. The the sliders change the amount of blurring that is applied.
Hue, SaturaLon, Contrast, and Brightness change the basic look of the video or image.
ProPresenter 5 for Mac User Manual
© 2005-2012 Renewed Vision, Inc. ! Page 41 of 131
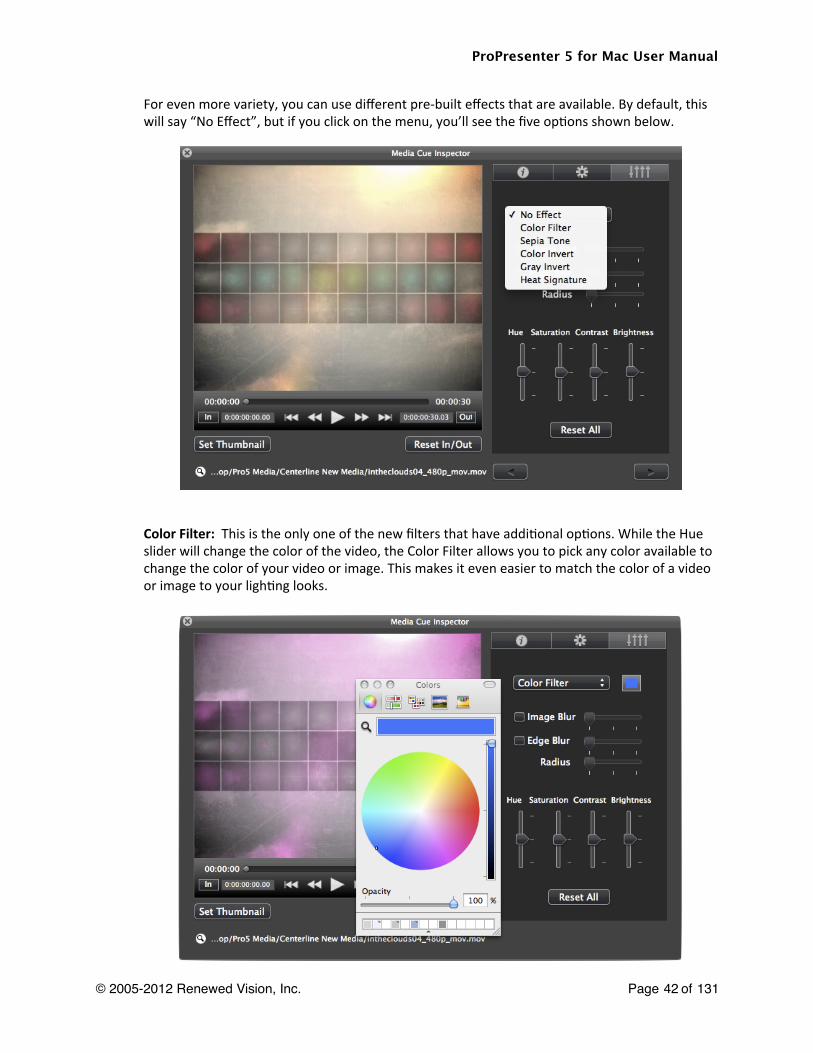
For even more variety, you can use different pre-‐built effects that are available. By default, this will say “No Effect”, but if you click on the menu, you’ll see the five opLons shown below.
Color Filter: This is the only one of the new filters that have addiLonal opLons. While the Hue slider will change the color of the video, the Color Filter allows you to pick any color available to change the color of your video or image. This makes it even easier to match the color of a video or image to your lighLng looks.
ProPresenter 5 for Mac User Manual
© 2005-2012 Renewed Vision, Inc. ! Page 42 of 131
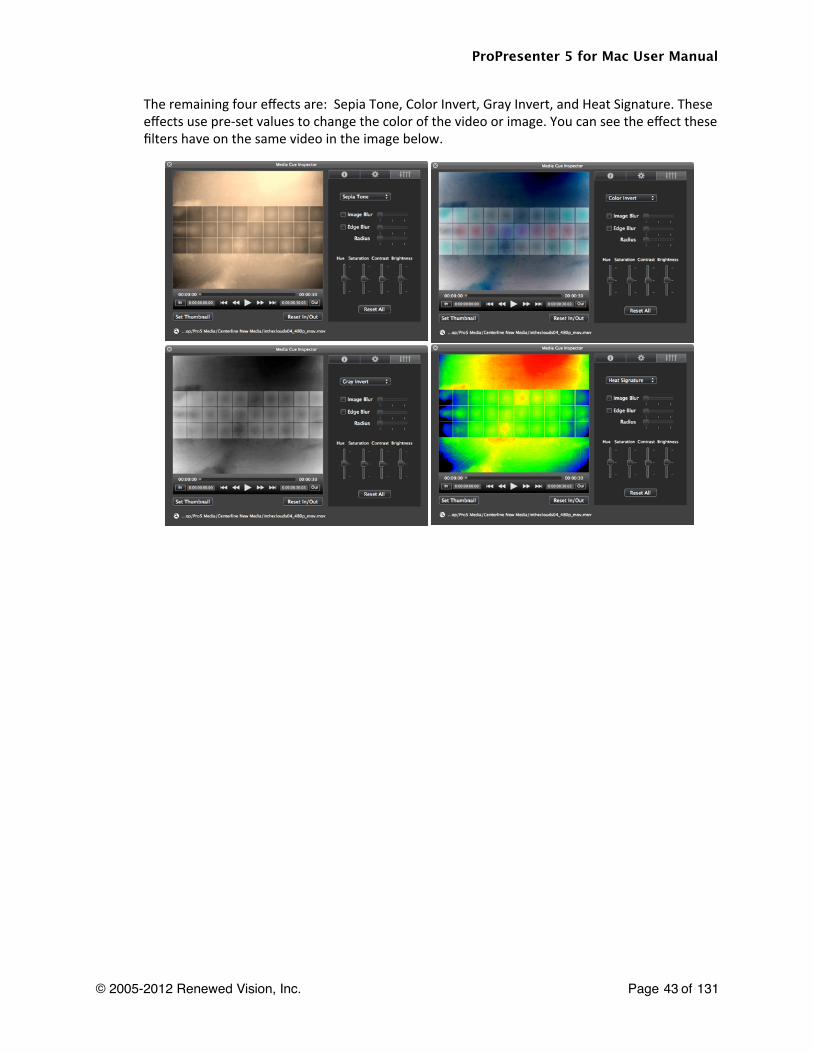
The remaining four effects are: Sepia Tone, Color Invert, Gray Invert, and Heat Signature. These effects use pre-‐set values to change the color of the video or image. You can see the effect these filters have on the same video in the image below.
ProPresenter 5 for Mac User Manual
© 2005-2012 Renewed Vision, Inc. ! Page 43 of 131
Working with PresentaUons
PresentaUon File Formats
ProPresenter has three basic file types. These formats are cross compaLble between the Mac and Windows versions.
.pro5 -‐-‐ This file extension is used on documents found in the Library. If you open up the folder where your Library is stored, you will see files such as “Amazing Grace.pro5”.
.pro5x -‐-‐ This file extension is used when you create a bundle. A bundle is a compressed folder similar to a .zip folder. Bundles include presentaLon documents (.pro5) as well as any media elements associated to the presentaLons or playlist selected. This can be a single presentaLon or a playlist with bundled media.
.pro5plx -‐-‐ This file extension is used when exporLng a playlist without media files bundled with the document files.
To import any of these three formats, simply double-‐click on the file on the computer you want to open the file with and follow the prompts to add the content to the correct locaLons. You can also go to File > Import >Import File to locate your file and import it.
ProPresenter 5 for Mac User Manual
© 2005-2012 Renewed Vision, Inc. ! Page 44 of 131

Using the Library
The Library in ProPresenter is your central storage locaLon for all of your presentaLons. These can be song documents, scripture presentaLons, speaker notes, announcement loops, or any other custom presentaLon types.
You can locate any file in your Library using the search funcLon at the top of the Library panel. You can search by keywords in either the Ltle or the contents of a presentaLon, and you can further sort the results by their categories with the Filter drop-‐down menu.
Clicking on a presentaLon name in the Library will immediately open that document in the slide viewer and allow you to being using it immediately.
If you want to change the order that the results are sorted, click on either Title, Category, or Last Used. If you want to remove any of the columns, right-‐click on one of the column Ltles and uncheck the columns you don’t want to see.
To rename a presentaLon, right-‐click and choose Rename, or double-‐click the name to edit the Ltle. You can change the category of a presentaLon by right-‐clicking on the name and selecLng a new Category.
In addiLon to the Rename opLon, there are several other opLons available when you right-‐click in the Library.
Reveal in Finder: Opens the file in the Finder.Rename: Change the name of the presentaLon.Category: Change the presentaLon category.Resize: Change the size of one or more presentaLons.Reflow: This will be covered later in this user guide.Duplicate: Creates a duplicate copy of the presentaLon.Delete: Deletes the selected file.Print: Opens the Print dialog.Export Pro5 Bundle: This will be covered in more detail later in this user guide.
ProPresenter 5 for Mac User Manual
© 2005-2012 Renewed Vision, Inc. ! Page 45 of 131

Adding new presentaUons
ProPresenter 5 makes some subtle but powerful changes to how new songs are created. When you create a new presentaLon (File>New, Command-‐N, or clicking “New” in the toolbar), a blank unLtled presentaLon isn’t just added to the library anymore. Before a file is added to your library, you can give it a Ltle, select the template that will be used for the slides, and change the category and size of the presentaLon if needed.
ProPresenter 5 for Mac User Manual
© 2005-2012 Renewed Vision, Inc. ! Page 46 of 131
Using mulUple libraries
Beginning in ProPresenter 4 we supported mulLple libraries. This makes it easy for mulLple organizaLons or groups to use the same computer without having to share library files or create lots of alternate versions of files.
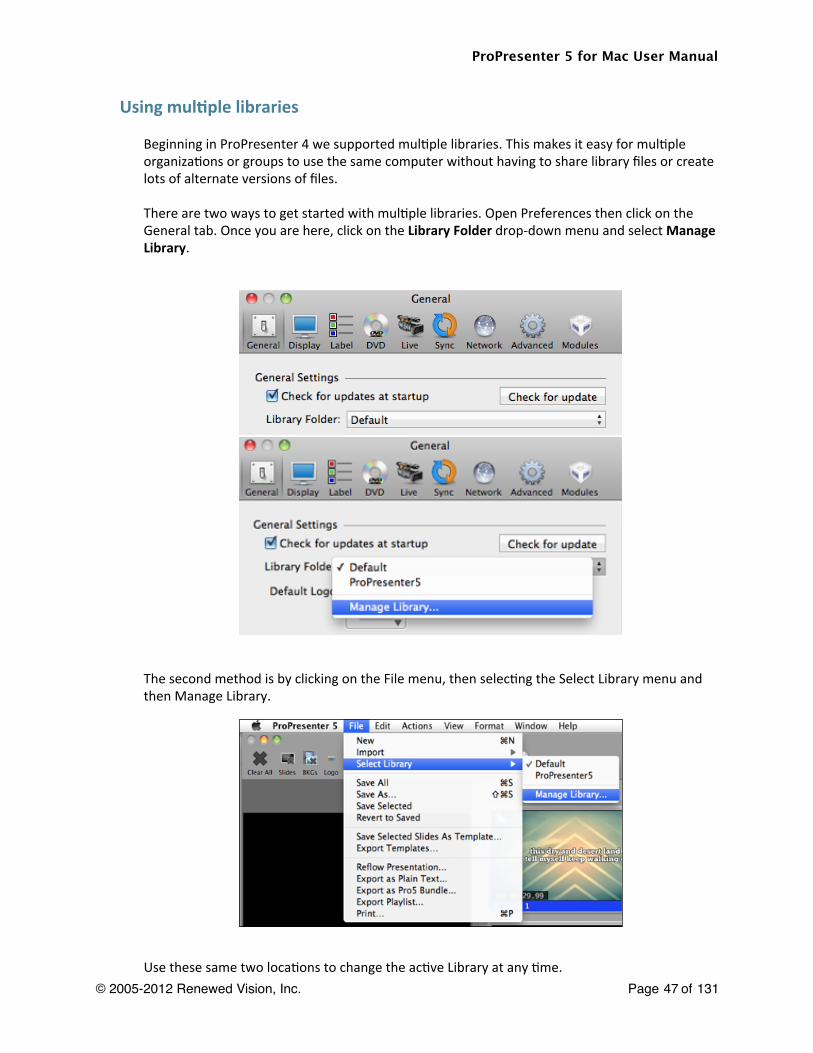
There are two ways to get started with mulLple libraries. Open Preferences then click on the General tab. Once you are here, click on the Library Folder drop-‐down menu and select Manage Library.
The second method is by clicking on the File menu, then selecLng the Select Library menu and then Manage Library.
Use these same two locaLons to change the acLve Library at any Lme.
ProPresenter 5 for Mac User Manual
© 2005-2012 Renewed Vision, Inc. ! Page 47 of 131

Ader you have selected Manage Library using one of these methods, you will see the menu shown below. This will show you the currently linked libraries. In this, there are two libraries: one is called “Default” and the second is called “Youth group library.”
To add addiLonal libraries, click the add (+) buGon. This will open the Finder. Browse to where you want to add the new library, create the folder and select it. It will be added to this list. If you want to remove a linked library, select that library, then click the remove (-‐) buGon. This won’t delete the folder, just the ProPresenter link to the folder.
It doesn’t really maGer where you keep your folders or how you name them with the excepLon of two locaLons.
The first locaLon is directly in the main hard drive directory. The second place is inside your default library folder. If the file path for the second library was “Macintosh HD/Youth group library” or “/Users/chris/Documents/ProPresenter5/Youth group library”, then it should be moved to a different locaLon. Using either of these two locaLons can cause problems with your Library. We recommend keeping your library stored on your computer to avoid any problems.
ProPresenter 5 for Mac User Manual
© 2005-2012 Renewed Vision, Inc. ! Page 48 of 131

Playlists
Immediately below the Library is the Playlist manager. Playlists are a way to create an outline of your service or event with all the elements contained in a single list.
There are three different opLons available in this secLon: Playlists, Group Folders, and Planning Center Online Playlists. Planning Center Online Playlists allow you to connect to your Planning Center Online account and pull in the order of service directly into ProPresenter. This will be covered in more detail later in this use guide. For now, we’ll focus on regular Playlists and Folders.
To create a playlist, click on the acLon menu in the lower led corner and select the type of playlist you want to create, or select to create a folder. The New Document opLon creates a new file in the Library.
Note: Playlists are used to organize presentaLons and media. Group Folders are used to organize your Playlists.
To add presentaLons from your Library or media from the Video/Image Bin, click on the item and drag it into the playlist. You can also drag media files, PowerPoint, or Keynote files from the Finder directly into a Playlist. PowerPoint and Keynote files in a Playlist will create a trigger to launch the appropriate program for naLve-‐playback of the presentaLon.
If you double-‐click on a playlist or folder, you can rename it. If you want to move a playlist into a Folder, drag the playlist name to the Folder and it will be moved into the Folder.
Normally when you click on an item in a playlist, it only shows that presentaLon or file. However, if you click on the ConUguous buGon, everything in the playlist will be loaded into the Slide Viewer for one conLnuous view of the playlist contents.
The buGon in the lower-‐right corner with the four arrows will resize the Playlist window and hide the list of playlists on the led and the Library above, allowing you to see the Playlist easier.
To export a playlist, right-‐click on the playlist name and select Export Playlist. Choose the file path and check the Include Media opLon if you want to export all of the associated media. You can also drag the playlist name directly to another folder on your computer to automaLcally export the playlist with all the media.
ProPresenter 5 for Mac User Manual
© 2005-2012 Renewed Vision, Inc. ! Page 49 of 131

Planning Center Online Playlist
One of the new features in ProPresenter 5 is the ability to create a playlist from your service order in Planning Center Online (PCO).
Note: Planning Center Online is not a Renewed Vision product. You are required to have an acLve Planning Center Online account to use this feature. You can find out more about Planning Center online at hGp://get.planningcenteronline.com/.
You can connect to your organizaLon’s PCO account two different ways. The first way to do this is to simply choose New PCO Playlist in the Playlist manager and log-‐in through the interface shown below. The second is through ProPresenter’s Network Preferences menu. This will be covered later as there are other seongs available from there.
Anyone who can log into your organizaLon’s PCO account can use this feature with their own credenLals, or you can select remember me and allow everyone to use the same login.
Ader you login, you will see a second window asking you to authorize ProPresenter to connect to your account.
ProPresenter 5 for Mac User Manual
© 2005-2012 Renewed Vision, Inc. ! Page 50 of 131

Once you have connected to PCO and authorized your account to be used by ProPresenter, you will see a list of all the available services in PCO. This is also the window you will be taken directly to when you add future PCO Playlists in ProPresenter since you will already be connected to your account.
Once you have found the service that you would like to add to ProPresenter, click on the plus (+) buGon in the lower-‐right corner.
During the import process, ProPresenter will aGempt to find songs in your Library that match songs in the PCO playlist. If it finds files, it will automaLcally link them for you. If no matches are found, you will need to add the songs to ProPresenter and then link them to the PCO playlist.
Ader you have added a PCO playlist, you’ll noLce there are several icons shown in the Playlist that aren’t available in a regular ProPresenter playlist. ProPresenter 5 can recognize the extra playlist elements that are available in Planning Center, making these playlists even more useful to you and your volunteers because you can add notes directly in the playlist.
One of the key parts of this new feature is that your ProPresenter song files can be uploaded and stored in Planning Center for future use. Once ProPresenter has scanned your PCO playlist for changes, you will see an alert about aGachments at the top of the playlist.
Clicking on A_achments will allow you to upload or change files as needed in the playlist to reconcile ProPresenter and Planning Center.
You can also right-‐click on the playlist name and choose Refresh if you need to update any files.
ProPresenter 5 for Mac User Manual
© 2005-2012 Renewed Vision, Inc. ! Page 51 of 131

As you can see in the image below, there are some local files that need to be uploaded, and one that already exists in Planning Center that needs to be updated.
For the song “Amazing Grace”, which is a local file, there is an opLon to Ignore (shown) or to Upload (not shown). Choosing Ignore will not upload the file to Planning Center. If you choose to Upload, the .pro5 file will be linked to the song in Planning Center.
The second song, “Cannons”, exists in the Library and in Planning Center. You can choose to conLnue using your Library file, overwrite the file in your Library with the one from Planning Center, or create a new copy in your Library. Click Apply to make the necessary changes to the Library and the playlist.
Once a ProPresenter presentaLon has been included in a PCO playlist, it’s considered Linked. If you realize that the song version of a song was linked to the PCO playlist, you can unlink it by clicking on the Unlink buGon. If a file is missing from the PCO playlist, you can add it by dragging the file from your Library into the area indicated.
The image below shows a PCO playlist in ConLguous view to make it easier to see these three opLons.
ProPresenter 5 for Mac User Manual
© 2005-2012 Renewed Vision, Inc. ! Page 52 of 131
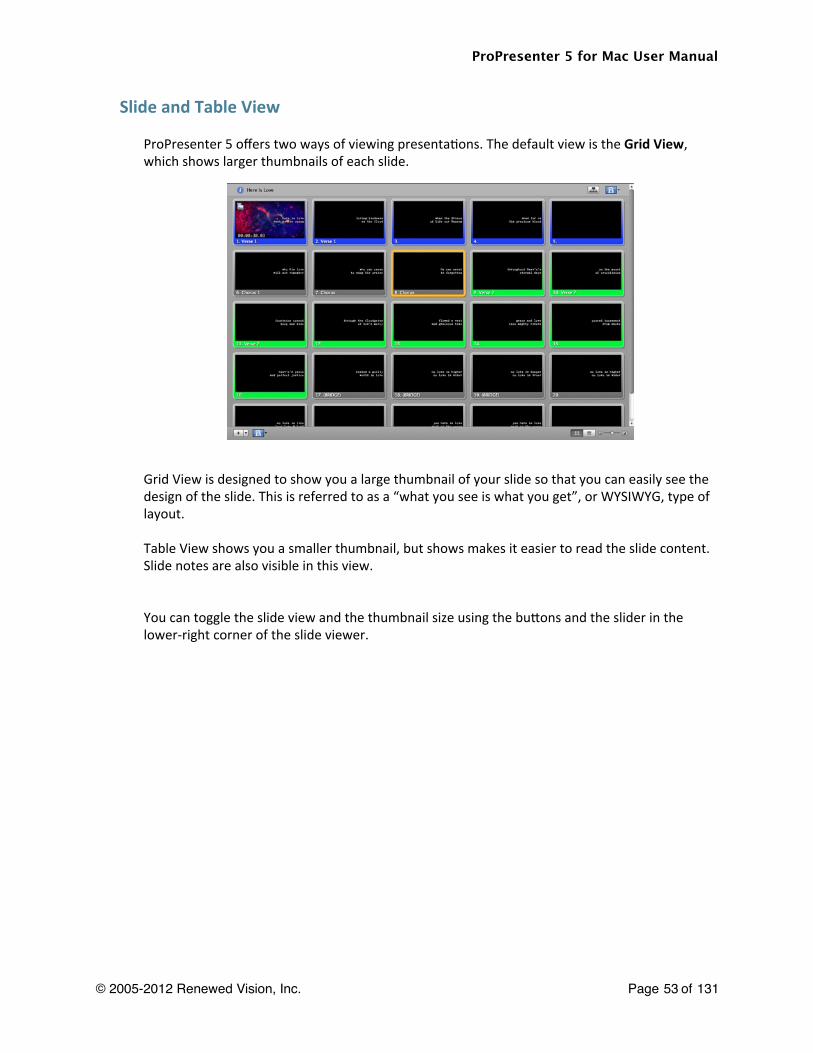
Slide and Table View
ProPresenter 5 offers two ways of viewing presentaLons. The default view is the Grid View, which shows larger thumbnails of each slide.
Grid View is designed to show you a large thumbnail of your slide so that you can easily see the design of the slide. This is referred to as a “what you see is what you get”, or WYSIWYG, type of layout.
Table View shows you a smaller thumbnail, but shows makes it easier to read the slide content. Slide notes are also visible in this view.
You can toggle the slide view and the thumbnail size using the buGons and the slider in the lower-‐right corner of the slide viewer.
ProPresenter 5 for Mac User Manual
© 2005-2012 Renewed Vision, Inc. ! Page 53 of 131

Working with Slides
It’s important to note that ProPresenter is always “live”. When you click on a slide, it will immediately be sent to your output screen. Any media will also be shown if included with the slide. When a slide is live, it has an orange outline around it so that you can quickly see which slide is being shown. In Table View, the enLre row will be orange, as shown in the previous image.
When a background video or image is added to a slide, it is indicated with the icon in the upper-‐led corner. This icon will match the Backgrounds and Foregrounds icons from the Video/Image Bin. If you have added a video to a slide, a box in the lower-‐led corner will show you how long the video is. Other icons will appear in the upper-‐right corner; those will be covered in other secLons throughout this user guide.
If you need to re-‐arrange slides, you can simply click and drag the slide to the new posiLon. In previous versions of ProPresenter, you needed to also hold the Command key while clicking, but in ProPresenter 5, simply holding down the mouse buGon while dragging a slide is all that’s necessary.
Another new way of re-‐arranging slides is through Slide Grouping and Arrangement. This is a new feature in ProPresenter 5. This feature will be covered in more detail later in this user guide.
Slides can be duplicated within a presentaLon, making it easy for you to create slides for repeated secLons of a presentaLons. DuplicaLng is similar to copying and then pasLng a slide. To duplicate a slide, select the slide while pressing the Command key and then press Shid-‐D. You can also right-‐click on a slide and choose Duplicate.
ProPresenter also allows you to disable specific slides. To disable a slide, right-‐click on it and choose Disable Slide from the menu. To re-‐enable the slide, right-‐click on the slide and choose Enable Slide. A disabled slide will be skipped when advancing through a presentaLon using the space bar or arrow keys, and will also be grayed out to indicate it is disabled. Disabled slides can sLll be used if you click on the slide or use a hot key to select it.
As you can see in the image above, this slide is marked with “Verse 1” and is blue. Slides can be labeled and grouped together in ProPresenter. Due to the new use of these labels, these will be covered in the secLon on “Slide Grouping and Arrangements” later in this user guide.
ProPresenter 5 for Mac User Manual
© 2005-2012 Renewed Vision, Inc. ! Page 54 of 131
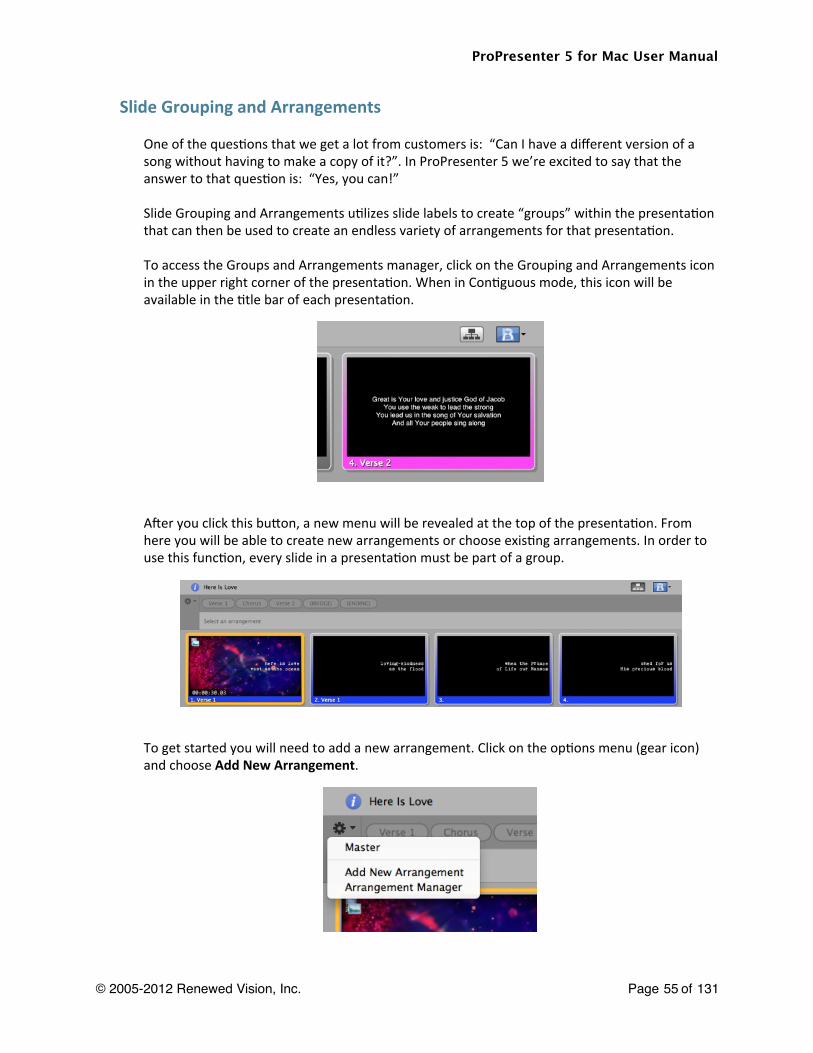
Slide Grouping and Arrangements
One of the quesLons that we get a lot from customers is: “Can I have a different version of a song without having to make a copy of it?”. In ProPresenter 5 we’re excited to say that the answer to that quesLon is: “Yes, you can!”
Slide Grouping and Arrangements uLlizes slide labels to create “groups” within the presentaLon that can then be used to create an endless variety of arrangements for that presentaLon.
To access the Groups and Arrangements manager, click on the Grouping and Arrangements icon in the upper right corner of the presentaLon. When in ConLguous mode, this icon will be available in the Ltle bar of each presentaLon.
Ader you click this buGon, a new menu will be revealed at the top of the presentaLon. From here you will be able to create new arrangements or choose exisLng arrangements. In order to use this funcLon, every slide in a presentaLon must be part of a group.
To get started you will need to add a new arrangement. Click on the opLons menu (gear icon) and choose Add New Arrangement.
ProPresenter 5 for Mac User Manual
© 2005-2012 Renewed Vision, Inc. ! Page 55 of 131

Ader you choose Add New Arrangement you will be prompted to give the arrangement a name. When you create the new arrangement, the slide view will be blank because the program is waiLng on you to create a new arrangement for the presentaLon.
CreaLng arrangements is as easy as dragging the group name tokens from the top row into the lower row. The top row is considered the Master arrangement. This is the default layout of the presentaLon. Dragging tokens from the Master arrangement to the new arrangement will add the slide groups in the order you arrange them.
By introducing Arrangements in ProPresenter 5 we are also able to address another common request that we get. When you make a change to a slide in a Group, every other instance of that slide in the Arrangement is also updated. That means if you’re arranging a song and you find a misspelled word in the Chorus, you no longer have to change mulLple slides every Lme you repeat chorus in the arrangement. Simply select one of the slides to edit and all of the others will be updated simultaneously.
If you need to delete arrangements, click on the OpLon menu again and choose Arrangement Manager. This will show you a list of all the arrangements that you have saved. Select the Arrangement that you want to remove and press the Delete key on your keyboard to remove it.
Arrangements can be used with presentaLons in the Library or in a Playlist. If you select a presentaLon from the Library and then select an arrangement, the arrangement will only be acLve as long as you viewing that presentaLon. When you select a different presentaLon the arrangement will revert to the Master arrangement. However, when you change the arrangement of a presentaLon in a Playlist, it is stored as the acLve arrangement. You can have mulLple copies of the same presentaLon in a playlist and each instance can have a different arrangement selected.
If you are using anything other than the Master arrangement, you will see that indicated in the Ltle bar of the presentaLon, as shown in the image above.
Arrangements are included with the presentaLon data, so when you export files to use on different computers, the arrangements go with the files.
ProPresenter 5 for Mac User Manual
© 2005-2012 Renewed Vision, Inc. ! Page 56 of 131

Document ProperUes
Every presentaLon in your Library has the ability to support addiLonal data about the file. This will typically only be used for songs since the primary data is copyright informaLon.
To access this informaLon, click on the blue info buGon to the led of the presentaLon name in the slide viewer. When you click this buGon, it will open the panel shown in the image below.
This informaLon is automaLcally included on any song imported from SongSelect, or that has the copyright informaLon properly formaGed in a text file. The copyright informaLon is used when displaying the copyright informaLon, which is covered later in this user guide.
The only new feature available in this secLon is the addiLon of the Chord Chart opLon. ProPresenter 5 now supports the ability to display a PDF file on the Stage Display. If you have a single PDF for the enLre song, you can choose to add that here and it will show on the Stage Display the enLre Lme you are using this song. Using PDFs to display chord charts will be covered in more detail in the Stage Display secLon later in this user guide.
Notes that are added here are shown at the top of the presentaLon in a dark gray bar above the Ltle. Notes are useful if you need to include a general reminder about something related to the presentaLon for the person running ProPresenter.
In addiLon to the copyright informaLon and the chord chart, you can also change the default slide color, size and category of the current presentaLon if you need to. Clicking the blue info buGon a second Lme will close this panel. You can also access this same informaLon in the Editor, which is covered later in this user guide.
ProPresenter 5 for Mac User Manual
© 2005-2012 Renewed Vision, Inc. ! Page 57 of 131
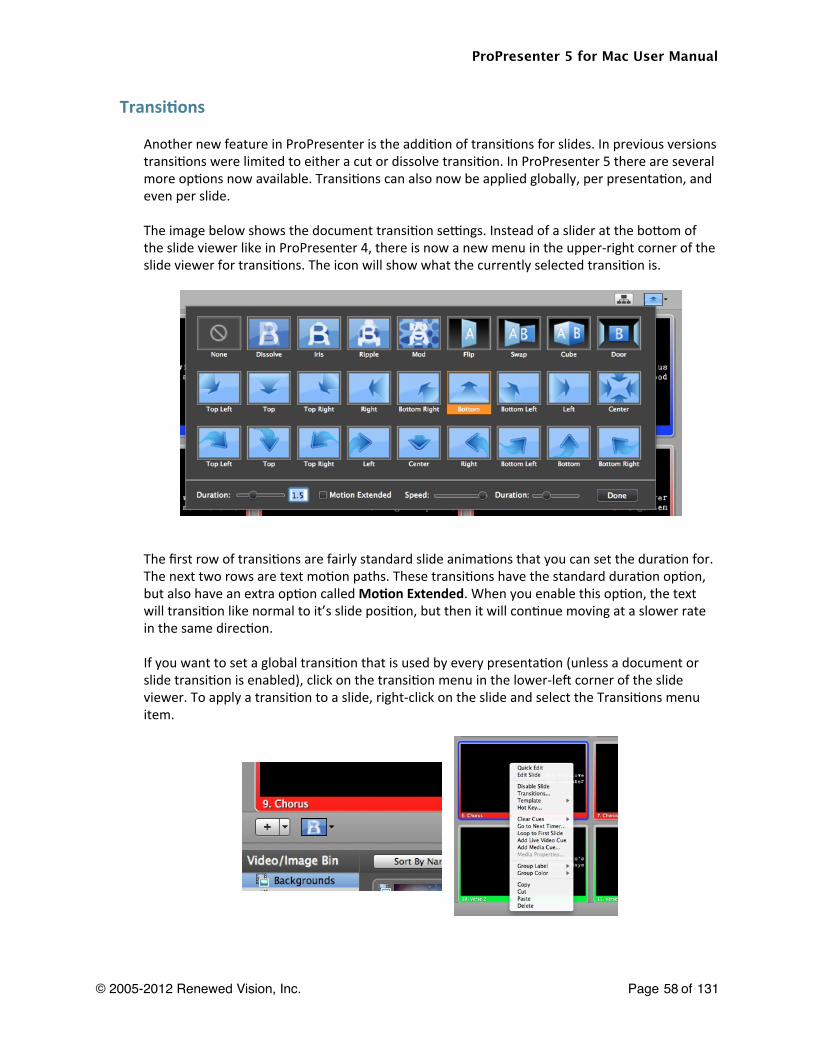
TransiUons
Another new feature in ProPresenter is the addiLon of transiLons for slides. In previous versions transiLons were limited to either a cut or dissolve transiLon. In ProPresenter 5 there are several more opLons now available. TransiLons can also now be applied globally, per presentaLon, and even per slide.
The image below shows the document transiLon seongs. Instead of a slider at the boGom of the slide viewer like in ProPresenter 4, there is now a new menu in the upper-‐right corner of the slide viewer for transiLons. The icon will show what the currently selected transiLon is.
The first row of transiLons are fairly standard slide animaLons that you can set the duraLon for. The next two rows are text moLon paths. These transiLons have the standard duraLon opLon, but also have an extra opLon called MoUon Extended. When you enable this opLon, the text will transiLon like normal to it’s slide posiLon, but then it will conLnue moving at a slower rate in the same direcLon.
If you want to set a global transiLon that is used by every presentaLon (unless a document or slide transiLon is enabled), click on the transiLon menu in the lower-‐led corner of the slide viewer. To apply a transiLon to a slide, right-‐click on the slide and select the TransiLons menu item.
ProPresenter 5 for Mac User Manual
© 2005-2012 Renewed Vision, Inc. ! Page 58 of 131

Resizing PresentaUons
There may be Lmes when you are given a presentaLon to use in ProPresenter that was created on a different computer that had a different output resoluLon set. When this happens, you will see a yellow triangle in the upper-‐right corner of the slide viewer. When you click on this alert, you’ll be shown a message like the one below telling you what size the document will be resized to. All slide elements will be scaled correctly to maintain the same look on your slides.
If you need to resize a lot of presentaLons at the same Lme, you can select mulLple files in the Library, then right-‐click and choose the correct size from the Resize menu. If one of the four standard opLons doesn’t work for you, click on Custom Size and enter the correct dimensions.
ProPresenter 5 for Mac User Manual
© 2005-2012 Renewed Vision, Inc. ! Page 59 of 131

EdiUng Slides
ProPresenter offers a few ways to edit presentaLons. Individual slides can be changed using Quick Edit, the overall look of a presentaLon can be changed using the Format menu, or you can make extensive edits using the Editor. Templates can also be used to change the look of a presentaLon, but that will be covered later in this user guide.
The quickest way to edit a slide is with Quick Edit.
The Quick Edit funcLon allows you to make simple changes to individual slides. This is useful if you find small grammar or spelling mistakes or realize you need to change a line break or other simple change. The Quick Edit window is a small, floaLng edit window that opens when you right-‐click on a slide and select Quick Edit. You can conLnue selecLng on other slides while this is open.
In the image below you will noLce that “remember” is misspelled. By opening Quick Edit, it only takes a few seconds to correct the spelling. Clicking the ‘X’ in the top-‐led corner of the Quick Edit window applies the change to that slide immediately. As menLoned earlier in this user guide, if you have your slides grouped together, every repeated instance of that slide will also be updated. In the image below, the slide being changed is the first slide of the Chorus. Since the chorus of a song tends to be repeated several Lmes in a song, being able to change this once saves even more Lme.
ProPresenter 5 for Mac User Manual
© 2005-2012 Renewed Vision, Inc. ! Page 60 of 131

The second way to edit a presentaLon is with the Format toolbar. The locaLon of the Format buGon is a minor user interface tweak from ProPresenter 4. Instead of being located in the Ltle bar of a presentaLon, this is now a buGon in the toolbar. Clicking the Format buGon will reveal the toolbar shown below.
As you change the different formaong opLons, the presentaLon you’re working with will be updated immediately so you can see the changes. If you need to make changes to mulLple presentaLons, just click the Apply All buGon as you select the rest of the presentaLons to apply the same seongs again.
ProPresenter 5 for Mac User Manual
© 2005-2012 Renewed Vision, Inc. ! Page 61 of 131

The Editor is the most robust way to edit a presentaLon. Here you have full access to the slides and can modify the contents of the slides and edit all of the various properLes of the presentaLon. Since the Editor is a WYSIWYG (what you see is what you get) editor, what you are seeing in the editor is exactly what will be shown on your output screen.
To open the Editor, click on the Editor buGon in the toolbar, or right-‐click on a slide and select Edit Slide.
To begin ediLng a slide, select the slide you want to work with from the thumbnails on the led side of the Editor. This will change the slide that is open in the Editor. If you are done ediLng a presentaLon and need to edit another one, you can select the other presentaLon without having to close the Editor. You can also edit presentaLons even if you have another one running as a slideshow loop or have any slide or video showing.
Use the buGons in the lower-‐led corner to add new slides as needed. These two buGons are the same ones from the Slide Viewer.
The first five buGons across the top of the Editor are used to add slide objects. These objects are: Text Box, Shape, Image, Video, and Live Video. Slides in ProPresenter can support any combinaLon of these objects on an individual slide. Click on the object that you want to add to the slide, then resize and posiLon it where you would like it to be on the slide.
The next buGon opens rulers on the led side and top of the Editor to make it easier for you to size and posiLon objects on the slide. The last two buGons are used to change the arrangement of layers on the slide. The first is Bring Forward and the second is Send Backward.
ProPresenter 5 for Mac User Manual
© 2005-2012 Renewed Vision, Inc. ! Page 62 of 131

If you are trying to center an object on the slide, yellow crosshairs will show up when you have reached the verLcal and horizontal center points.
If you want to change the zoom level of the slide, click on the zoom menu in the lower-‐right corner and select a new zoom level. By default this is set to Scale to Fit so that you can see the enLre slide regardless of your screen size or layout.
The column on the right side of the Editor is where most of the funcLonality exists. There are five different sets of properLes that you can change.
The first set of properLes are the Document ProperLes. This is the same informaLon that can be edited in the slide viewer and was discussed earlier in this user manual.
On this panel you can override the default background color set in Preferences for this one presentaLon. You can also change the size of the document and the category of the presentaLon.
If you set a transiLon it will apply for the enLre presentaLon and override the global transiLon.
The boGom secLon allows you to edit the copyright informaLon, add notes for the person running ProPresenter, and add a PDF chord chart to be shown on the Stage Display.
If you add a chord chart on the Document ProperLes tab, that PDF will be shown the enLre Lme you’re on this presentaLon unless you have a PDF linked to an individual slide. If your PDF for the song is only one page, this would be the ideal place to add it. More detail on adding chord charts will be covered in the Stage Display secLon later in this user guide.
ProPresenter 5 for Mac User Manual
© 2005-2012 Renewed Vision, Inc. ! Page 63 of 131

The second set of properLes are Slide ProperLes.These seongs apply to the current slide only.
If you need to disable a slide, uncheck the Enabled box. If you need to change the background color of an individual slide, you can do that by enabling the Background opLon and selecLng a color. Hot keys are used to trigger slides using your keyboard; these can be any leGer from A to Z.
If you set a transiLon here it will apply to just this slide.
If you have mulLple objects on a slide, it can become difficult to keep track of the order of the object. Clicking on the layer will select the object that it goes with on the slide so you can idenLfy which object is where.
The slide label shows up as the name of the slide. These are used to idenLfy slide groups and to create groups and arrangements.
If you need to use mulLple chord charts throughout the presentaLon, add them to the appropriate slide that they need to be shown with.
The third tab is the Object ProperLes tab. This is where you adjust the general properLes of slide objects.
The top secLon of allows you to change the coordinates of an object’s posiLon, as well as its size and rotaLon.
The Name label doesn’t apply to regular slides, but is used with the TwiGer module and Bible templates, so it will be covered in those secLons.
The Fill Color is used to change the color of a shape or the color of a text box. Fill Color also supports opacity. The Line Color changes the outline of the object or text box and Line Width is the thickness of the line. Corner Radius controls the roundness of the corners of an object or text box. If you need to make a circle, enter 360 in this box.
The Shadow seongs can be used on slide objects or on text. The Angle of the shadow is similar to what direcLon you want the shadow to come off the object or text. The dial next to Angle allows you to quickly adjust the posiLon of the shadow. Length controls how far away from the object or text the shadow is and Radius controls the blurriness of the shadow.
Tip: If you have very intricate fonts, a high radius value may cause some performance issues.
If you have a shadow applied to text, and then add a fill color to the box, the shadow will move from the leGers to the text box automaLcally. So if you need to have the shadow on the text and a colored box behind it, you will need to add a shape object behind the text box.
ProPresenter 5 for Mac User Manual
© 2005-2012 Renewed Vision, Inc. ! Page 64 of 131

The fourth set of properLes are the Text ProperLes.
The top secLon allows you to choose your font, font color, font styles, and color. You can also add an outline to text and select an outline color.
Tracking and Leading may be two terms you aren’t familiar with. Tracking refers to the amount of space between the leGers in a single line (horizontal spacing). Leading refers to the amount of space between lines of text (verLcal spacing). Leading is not supported by the Windows version of ProPresenter, so this seong won’t transfer between plaYorms.
The next area controls the alignment of the text. The first row is the horizontal alignment of the text and the second row is the verLcal alignments. Checking Adjust to Fit will dynamically resize the text box as needed.
If you click Apply All, all of the seongs on this panel will be applied to the other text boxes in your presentaLon.
Text Reveal is a new feature in ProPresenter 5. One of the primary reasons many of our users sLll use PowerPoint for their Pastor’s sermon notes is the need for bullet lists and fill-‐in-‐the-‐blank slides.
To use the new Text Reveal funcLon, select either Bullet List or Fill in the Blank from the drop-‐down menu. This will change the funcLonality of the selected text box. It is not possible to combine the two funcLons in a single text box.
CreaLng a Bullet List is as easy as pressing the Return key and creaLng a new line of text in the text box. If you want to add bullet characters, click the Ruler at the top of the editor. When you have a text box selected, you’ll see opLons to add bullet symbols.
ProPresenter 5 for Mac User Manual
© 2005-2012 Renewed Vision, Inc. ! Page 65 of 131

When you have a slide that has a bullet list or fill in the blank, you will see dot indicaLng the number of builds on the slide. Each Lme you click on the slide, or use the keyboard to advance, one new level will be revealed. If you need to go backwards on a slide, use the led arrow key on your keyboard.
Below you can see an example of a bullet list and a fill in the blank slide along with the output view.
If you happen to create a slide with more reveals than your slide can display, it will change from the dots to a numerical indicator of where you are in the list. This can be seen in the image below.
ProPresenter 5 for Mac User Manual
© 2005-2012 Renewed Vision, Inc. ! Page 66 of 131
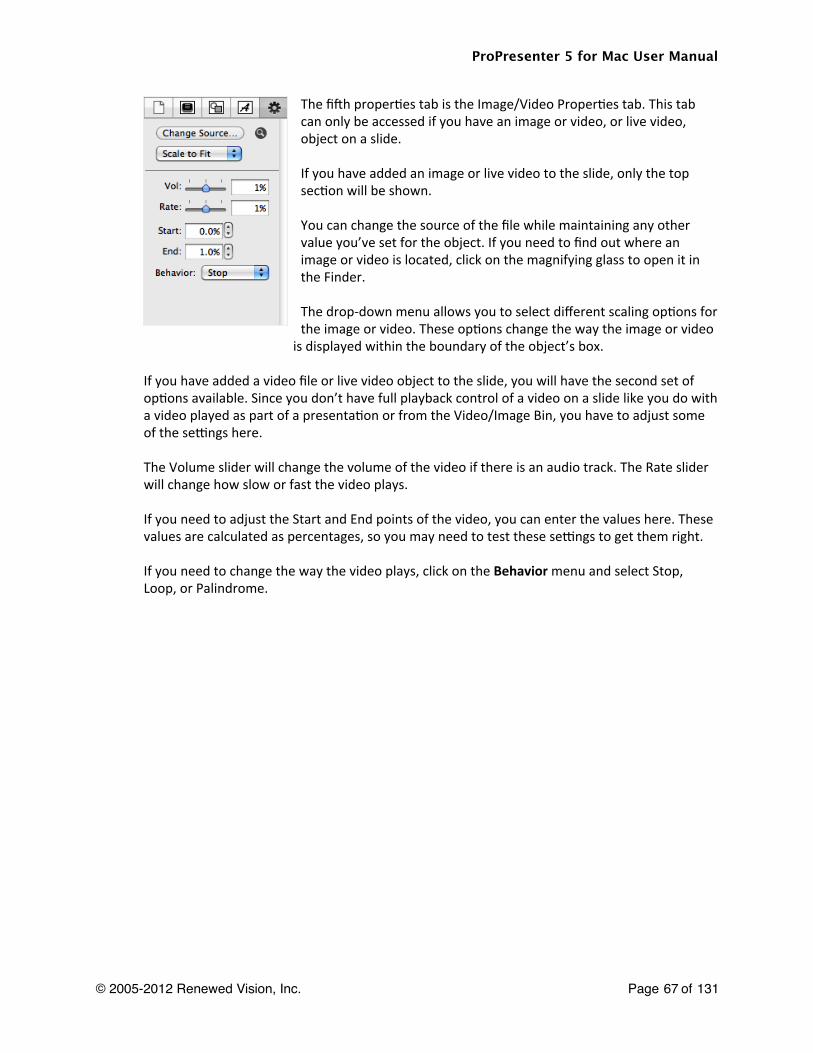
The fidh properLes tab is the Image/Video ProperLes tab. This tab can only be accessed if you have an image or video, or live video, object on a slide.
If you have added an image or live video to the slide, only the top secLon will be shown.
You can change the source of the file while maintaining any other value you’ve set for the object. If you need to find out where an image or video is located, click on the magnifying glass to open it in the Finder.
The drop-‐down menu allows you to select different scaling opLons for the image or video. These opLons change the way the image or video
is displayed within the boundary of the object’s box.
If you have added a video file or live video object to the slide, you will have the second set of opLons available. Since you don’t have full playback control of a video on a slide like you do with a video played as part of a presentaLon or from the Video/Image Bin, you have to adjust some of the seongs here.
The Volume slider will change the volume of the video if there is an audio track. The Rate slider will change how slow or fast the video plays.
If you need to adjust the Start and End points of the video, you can enter the values here. These values are calculated as percentages, so you may need to test these seongs to get them right.
If you need to change the way the video plays, click on the Behavior menu and select Stop, Loop, or Palindrome.
ProPresenter 5 for Mac User Manual
© 2005-2012 Renewed Vision, Inc. ! Page 67 of 131

Go to Next Timer
A common need in ProPresenter is the ability to create an announcement loop from a series of slides, graphics, or short videos. There are two easy ways to do this. The first is to use a Go to Next Timer, the second is to use the Timeline. The Lmeline method will be covered later in this user guide.
A Go to Next Timer can be applied to slides, images or videos in a presentaLon. A Lmer can’t be applied to media in the Video/Image Bin.
While using a Go to Next Time is simple, it does take a liGle bit of prep work to make sure it works the way you want it to and the way you expect it to work.
Before creaLng your Lmer it’s important to know the difference in how a Go to Next Timer works with Foreground video versus Background videos. There is no difference with slides or graphics.
Backgrounds: If your video is a Background, a Go to Next Timer begins counLng from the start of the video. This means that if your video is 30 seconds long, but your Lmer is set to 10 seconds, then the video will only play for 10 seconds before advancing. If your
video is 30 seconds long and your Lme is 45 seconds, then the video will play one complete Lme and then advance halfway through the second Lme.
Foregrounds: If your video is a Foreground, a Go to Next Timer begins counLng at the end of the video. This means that when your video ends, then the Lmer is triggered. If you have a 30 second video and a 10 second Lmer, your video will play completely one
Lme, then wait 10 seconds before advancing to the next item. If you want the videos to play one right ader the next, set the Lmer to 0 seconds.
You can set a Lmer from two different locaLons. The easiest opLon is from the toolbar. Click on Format then on the clock icon. There are only a few standard opLons available here. SelecLng one of these will apply the Lme to all the slides in a presentaLon. The last slide in the presentaLon will also automaLcally have a loop to first slide cue added.
ProPresenter 5 for Mac User Manual
© 2005-2012 Renewed Vision, Inc. ! Page 68 of 131

The second, and more flexible, opLon is to select all the slides that you want to add a Lmer to, then right-‐click on any one slide, and choose Go to Next Timer from the menu. You can enter any value, in seconds, that you want to use for the transiLon Lme. Remember that if you are using Foreground videos and want them to advanced automaLcally, use zero seconds.
If you need to enter different values for individual slides, you can edit the Lmer seongs for each slide. If you want your presentaLon to loop conLnuously, check the box next to Loop to first slide on the last slide in your presentaLon. You can also assign a loop cue by right-‐clicking on the slide and selecLng Loop to first slide without entering the Timer Seongs.
If you have added a Lmer or loop cue to a slide, it will be shown in the upper right corner of the slide so that you can quickly see what the seongs are for that slide.
When you are showing slides with a slide Lmer, you will see a stop sign icon with a clock on it under the playback controls. Clicking this buGon will stop the Lmer from running unLl you click on a slide again.
ProPresenter 5 for Mac User Manual
© 2005-2012 Renewed Vision, Inc. ! Page 69 of 131

Hot Keys
Hot Keys allow you to assign specific leGers (A through Z) to slides. Some users prefer to assign leGers to certain parts of songs to make it easier to quickly jump between secLons. To add alphabeLcal hot keys to slides, right-‐click on a slide and choose Hot Key from the menu. This will open a window that allows you to assign any lowercase leGer to that slide. You can also edit the hot key assigned to a slide in the Editor from the Slide ProperLes tab.
You can also select slides using a numeric keypad or the number row on your keyboard. To jump to any slide, type the number and press Enter on your keyboard. The slide will be selected immediately. The slide number is found in the lower led corner of the slide thumbnail.
You have two seconds between key strokes to enter another value. Ader two seconds, if the enter/return key has not been pressed, the hot key trigger window will automaLcally close. Pressing the escape key will also close this slide selecLon overlay.
ProPresenter 5 for Mac User Manual
© 2005-2012 Renewed Vision, Inc. ! Page 70 of 131

Saving Files
Since ProPresenter does not have an auto-‐save feature, it’s important to remember to save your changes regularly. The fastest way to do this is by using the standard Command-‐S shortcut. You can also choose from the Save opLons under the FIle menu.
Save All will save all the changes you’ve made throughout your Library.Save As... will allow you make a new file from the one you’re working on.Save Selected will only save the selected Library files.Revert to Saved will undo all changes you’ve made since the last Lme you saved.
ProPresenter 5 for Mac User Manual
© 2005-2012 Renewed Vision, Inc. ! Page 71 of 131

Slide Reflow
Slide Reflow is a new feature in ProPresenter 5. In previous versions of ProPresenter the only way to edit the content of a presentaLon was directly in the Editor. This can be a tedious process if you need to merge slides together or make a lot of adjustments to the text and don’t want to have to scroll through a lot of slides.
There are three ways to access the Reflow feature. The first is when imporLng a new presentaLon. Click on the buGon with the double arrows then click on the Edit buGon. If you are imporLng mulLple files, select the one you need to edit.
ProPresenter 5 for Mac User Manual
© 2005-2012 Renewed Vision, Inc. ! Page 72 of 131

The other two ways to use the Reflow tool is with exisLng files. You can open this from the File menu (File>Reflow PresentaLon) or by right-‐clicking on a file name in the Library and selecLng Reflow.
While simple to use, the Reflow editor is easier to understand if you can see it in acLon. Take a look at this tutorial video for more informaLon about this feature.
ProPresenter 5 for Mac User Manual
© 2005-2012 Renewed Vision, Inc. ! Page 73 of 131

ImporUng and ExporUng FilesThis secLon will cover the various import and export opLons available from the File menu in ProPresenter 5.
To access the Import opLons, click on File>Import and choose the opLon you want to use. You can also drag files from the Finder directly to the Library or Video/Image Bin to start the import process.
The different Export opLons are at the boGom of the File menu. You can also export files by right-‐clicking on the name and choose Export or dragging the presentaLon or playlist to a folder on your computer.
Import File
This opLon is used to import text files (.txt or .rY) or Word files (.doc or .docx).
Ader you select the file that you want to import, you’ll see the menu to the led. There are two opLons for how you want the text in your file broken Paragraph Break, each paragraph in the file will be created as a new slide. The second opLon is Line Break (not shown). We’ve improved the Line Break opLon so that you can now set how many lines you want per slide. If you want 1, 2, 3, 4, or more, lines on each slide, just enter that number.
The middle secLon allows you to update the size, category and template that will be used for the file you’re imporLng.
You can also decide if you want the file to go to the Library, to just the selected Playlist, or to a new
Playlist. If you choose New Playlist you’ll be prompted to enter a name.
ProPresenter 5 for Mac User Manual
© 2005-2012 Renewed Vision, Inc. ! Page 74 of 131

The buGon in the lower-‐led corner opens the new Slide Reflow feature. Using Slide Reflow will be covered later in this user guide.
Import Video/Image
This opLon opens a new Finder window. Navigate to the video or image that you want to import and select it. The file will automaLcally be added to whichever bin or playlist is currently selected in the Video/Image Bin.
Import Copied Text
This opLon uses the same import opLons as Import File, but allows you to copy text from a website or a file such as a PDF or other file type not supported by ProPresenter and import it into the Library.
Import PowerPoint
If you have PowerPoint installed on your computer, you can convert PowerPoint files into files ProPresenter can use.
Note: PowerPoint 2008 or 2011 will work if you are running Snow Leopard. If you are running Lion, you will need to have PowerPoint 2011.
Once you have located the PowerPoint file that you want to convert, choose the opLon that you want to use before clicking Open. NaLve PowerPoints with full animaLons and layers can not be imported this way. Keynote files can not be converted at all. If you need to use a PowerPoint file or Keynote presentaLon with full animaLon, drag the file from the Finder directly into a Playlist. This will create a trigger that opens the correct program to run the program.
ProPresenter 5 for Mac User Manual
© 2005-2012 Renewed Vision, Inc. ! Page 75 of 131

ImporUng data from ProPresenter 3
The following steps require ProPresenter 3 to be installed on the same computer as ProPresenter 5.
When the ProPresenter 3 Data Import menu opens, you can select from either a Basic or Advanced set of opLons.
Basic is the easiest method. Select any, or all, of the three opLons, then click Import to copy the data into ProPresenter 5.
Advanced allows you to select more opLons for imporLng such as specific files or playlists if you only want parts of your ProPresenter 3 content. Select the opLons you want to use, then click Import.
For more informaLon about imporLng your data from ProPresenter 3 that is installed on a different computer, refer to Knowledge Base ArLcle #80.
ProPresenter 5 for Mac User Manual
© 2005-2012 Renewed Vision, Inc. ! Page 76 of 131

ImporUng data from ProPresenter 4
ProPresenter 4 is required to be installed in order to import your files using this method.
From this window, select the library, or libraries, that you want to convert to ProPresenter 5 files. If you check the “Include Playlists, Media Bins and User data”, this data will also be imported and converted to the correct format for ProPresenter 5.
If you want to change New LocaLon opLon beside a library, double-‐click the file path and type the new path. Remember that ~ indicates your current user folder on the Mac.
If files are detected in ProPresenter 5 that already exist you will be asked to either Skip, Add New Version, or Write Over the exisLng file.
ProPresenter 5 for Mac User Manual
© 2005-2012 Renewed Vision, Inc. ! Page 77 of 131

Export Template
In ProPresenter 5 we have added the ability to easily export templates to be used on another computer. Instead of having to search through the FInder to find these files and manually add them on another computer, you can now export specific templates to a single bundle file. When you double-‐click this file on another computer, the templates will be imported and be available for immediate use.
Export as Plain Text
This opLon will export the select presentaLon(s) as a plain text file with a .txt extension. This export method strips all formaong except line and paragraph breaks.
Export as Pro5 Bundle
Bundles are used to gather Library files and media files together into a single package that can be opened in ProPresenter on another computer running ProPresenter 5. If you select mulLple songs in your Library, they will all be included in the same bundle along with the media. ImporLng bundle file will add the files to your Library.
ProPresenter 5 for Mac User Manual
© 2005-2012 Renewed Vision, Inc. ! Page 78 of 131
Export Playlist
This opLon will export the selected playlist. When you export a playlist you can choose to include the media with the playlist if you want. ImporLng a playlist on another computer will rebuild the playlist exactly the way it is on the original computer. Playlists can also be exported by right-‐clicking on the playlist name, or dragging the playlist name to a folder on your computer.
Export as Pro4
This is a new opLon in ProPresenter 5. If you sLll have some computers that are using ProPresenter 4, you can use this export opLon to create a file that will open in ProPresenter 4. This removes all of the new ProPresenter 5 features like transiLons, arrangements, and text reveals.
ProPresenter 5 for Mac User Manual
© 2005-2012 Renewed Vision, Inc. ! Page 79 of 131

PrinUngIf you have used a previous version of ProPresenter you’re aware that the prinLng opLons were limited. In ProPresenter 5 we’ve added a new Thumbnail View and updated the Outline View opLons.
When you open the print dialog you’ll need to expand the print opLons to see these features.
The two images below show the Thumbnail View and the opLons available as well as a secLon of a sample print out.
ProPresenter 5 for Mac User Manual
© 2005-2012 Renewed Vision, Inc. ! Page 80 of 131

The two images below show the Outline View and the opLons available as well as a secLon of a sample print out.
ProPresenter 5 for Mac User Manual
© 2005-2012 Renewed Vision, Inc. ! Page 81 of 131

Song SelectSongSelect is owned by ChrisLan Copyright Licensing InternaLonal (CCLI). If you are an acLve license holder of a CCLI license for your church or organizaLon then you have the opLon of purchasing a subscripLon to SongSelect.
For more informaLon about CCLI and SongSelect, visit www.ccli.com.
If you have access to SongSelect, ProPresenter can store the registraLon informaLon for you and provide direct access to SongSelect through the program. This makes it easy to get songs from SongSelect without having to leave ProPresenter.
ProPresenter 5 for Mac User Manual
© 2005-2012 Renewed Vision, Inc. ! Page 82 of 131

Accessing SongSelect
To access SongSelect, click on the SongSelect icon in the toolbar. This will open a window in ProPresenter for you to enter your SongSelect registraLon informaLon. Ader you enter your registraLon info, ProPresenter can store it for you so that you don’t have to enter this informaLon every Lme.
Ader you have logged in, you can then browse the enLre CCLI catalog in SongSelect and export song files directly to your ProPresenter Library.
ProPresenter 5 for Mac User Manual
© 2005-2012 Renewed Vision, Inc. ! Page 83 of 131

ExporUng from SongSelect
Ader you have searched for the song you want to add to your ProPresenter Library, you can export it directly to your Library. To do this, click on the Lyrics tab and select Copy or Save (as .txt file) or Export (as .usr file). Either opLon will open the Import panel in ProPresenter to allow you to select your import seongs. You can repeat this process for as many songs as you need to in one session.
ProPresenter 5 for Mac User Manual
© 2005-2012 Renewed Vision, Inc. ! Page 84 of 131

PowerPoint and Keynote TriggeringImporLng PowerPoint and converLng it into JPEGs or ProPresenter slides has been covered earlier in this manual. This secLon will cover imporLng PowerPoint and Keynote files as full-‐feature presentaLons.
Due to limitaLons with PowerPoint and Keynote, ProPresenter is triggering the presentaLon and relying on the appropriate program to play the presentaLon. This means that while a PowerPoint or Keynote file is being shown, that program controls the output and any content within ProPresenter (Mask, Props, Messages, etc) can’t be shown over the output content.
The process of adding a PowerPoint or Keynote presentaLon to ProPresenter for Mac is very simple. Open a new Finder window and drag the file into a playlist. You will see the presentaLon name listed the same way any item added to a playlist is shown. PowerPoint and Keynote files are disLnguished by using the applicaLon icon associated with the file.
Ader you select the presentaLon that you want to use, a slide for the presentaLon will appear in the slide viewer. When you click on this slide, the appropriate presentaLon program will open up over ProPresenter and switch the output to either PowerPoint or Keynote.
PowerPoint and Keynote files can only be added to a playlist and not into the Library or another presentaLon file.
ProPresenter 5 for Mac User Manual
© 2005-2012 Renewed Vision, Inc. ! Page 85 of 131

Bibles
Downloading, Installing, Registering
One way to add Bibles to ProPresenter is to purchase and download directly from our website. When you buy a Bible, you will be sent an unlock code that allows you to download your purchased Bibles. Public Domain Bibles don’t require a code and can be downloaded at any Lme from the website.
Once you have received your Bible unlock code, go to our website and enter the code. When you click Enable, the purchased Bible will then be available for you to download.
When you buy a Bible, you will need to enter your ProPresenter registraLon informaLon before compleLng the purchase. Licensed Bibles are $15 and can only be installed on one computer. There is no site license for a Bible.
Ader you have purchased and downloaded the Bible installaLon file, you will need to install it. Similar to how you installed ProPresenter, open the Bible disk image from your downloads folder. When it opens, you will see the Bible installer package icon. Double-‐click this item to launch the Bible installer.
Follow the remaining on-‐screen prompts to install the Bible and enter your computer password when prompted.
Ader the Bible has been installed you will need to enter the Bible unlock code a second Lme in ProPresenter when prompted for it the first Lme you select the Bible translaLon. Public domain Bibles do not require an unlock code to download or acLve.
The second way to add Bibles to ProPresenter is through the Bible module. To open the Bible module, click on the Bibles icon in the toolbar. If you haven’t installed any Bibles, you will see the image below in the Bible module. Click on the Get Bibles buGon to open the in-‐app store page.
ProPresenter 5 for Mac User Manual
© 2005-2012 Renewed Vision, Inc. ! Page 86 of 131

If you have installed Bibles and need to purchase addiLonal translaLons, the image below is how the Bible module will look for you. Click on the Get Bibles buGon to open the in-‐app store page.
Ader you click on Get Bibles, you will see a window like the one shown in the image below. Scroll down to the Bibles secLon and select the Bibles you want to install. Only licensed Bibles can be added this way. If you are looking for a public domain Bible, click on the View Public Domain Bibles to be taken to our website to download those translaLons. Bibles purchased this way will automaLcally be downloaded and installed into ProPresenter.
ProPresenter 5 for Mac User Manual
© 2005-2012 Renewed Vision, Inc. ! Page 87 of 131

Ader you have purchased and installed a Bible, you need to complete the process by registering the Bible in ProPresenter. To do this, select the Bible from the drop-‐down menu in the top-‐led corner of the Bible module window. The window shown below will open for unregistered licensed Bibles. Enter the unlock code for the Bible and click the Register buGon to complete the process.
Public Domain Bibles don’t need to be registered and are available when you install them.
ProPresenter 5 for Mac User Manual
© 2005-2012 Renewed Vision, Inc. ! Page 88 of 131

Using the Bible Module
Searching
There are three ways to search for passages in the Bible module. You can select from the Book menu, search by a specific passage, or use a keyword search.
Before searching, you need to select a specific translaLon from the menu on the led. To use the passage selector, click on the Book menu, then choose a book and chapter of the Bible; this will load all the verses in that chapter. To search for a specific range of verses, type in the passage and press Enter. The Bible passage search also recognizes shortened versions of book names. To do a keyword search, type in your search term in the search box on the right.
Display OpUons
As with songs and other presentaLons, you can apply a template to Bible passages to format them the way you need. Bibles also include several extra seongs that are unique to Bible passages.
• Verse Numbers: Checking this opLon enables verse numbers to be displayed in Bible passages.
• Break on New Verse: Checking this will create new slides for each verse of a passage.• Verse Refs: This opLon is only available if Break on New Verse is selected. SelecLng this opLon will display the verse reference on each slide.
• Passage Each: SelecLng this opLon will show the reference for the enLre passage being shown on each slide.
• Passage Last: This opLon will only display the passage reference on the last slide.• No Reference: This opLon doesn’t display the passage reference on any slide.• Display TranslaUon: Checking this opLon will show the translaLon that is being used.
ProPresenter 5 for Mac User Manual
© 2005-2012 Renewed Vision, Inc. ! Page 89 of 131

Bible PresentaUons
The Bible module is designed to make it easy for you to quickly pull up scripture with liGle or no noLce. However, it’s likely that you will know all the Bible verses being used ahead of Lme. This is why in ProPresenter 5 we have made it easy to create presentaLons from a Bible search and to add verses before or ader the original search if necessary.
In ProPresenter 5 we’ve added a new opLon to add verses to an exisLng presentaLon instead of having to merge mulLple presentaLons together later.
Once you have found the passage that you want to use, click on the acLon menu in the lower-‐led corner and choose either Save as Document or Copy to Current Document. The Save as Document opLon will create a new presentaLon in your Library with the Ltle of the passage. The Copy to Current Document opLon will add the passage to the document that is currently selected in the library or a playlist. This opLon makes it much easier for you to prepare a single presentaLon for a sermon.
You can easily add the previous or next verse to a passage by clicking on the Previous Verse or Next Verse buGons. These two buGons are available in the Bible module as well as on Bible presentaLons in the Library.
Ader you have created a presentaLon for the Bible verses, you can format the slides the same way you format song presentaLons.
While the Bible module hasn’t changed other than a few interface changes, one big change related to Bibles is the use of templates. Previously the text and reference had the same formaong unless you manually changed this ader creaLng a presentaLon. In ProPresenter 5 we’ve added new funcLonality to templates allowing you to create individual text boxes for the Bible text and the reference.
ProPresenter 5 for Mac User Manual
© 2005-2012 Renewed Vision, Inc. ! Page 90 of 131

To create a new Bible template that supports individual styles for the reference and verse text, click on the Template buGon then choose Create New Template. This will open the Template Editor, which is similar to the standard Editor.
Once the editor is open, add two text boxes to the slide and format the text how you want each part to look. For the example below, each text box has had a line added around the box to make it easier to see the two boxes.
Ader you have created your two text boxes, the next step is to name the two boxes so that ProPresenter knows how to use this template in the Bible module. To name each box, select the Object ProperLes tab on the right, select one of the text boxes, then choose either Bible Text or Bible Reference from the Name menu. You can see in the image above that the Bible Text opLon is shown while the text box that says “Verse Text” is selected. The image below shows Bible Reference selected.
ProPresenter 5 for Mac User Manual
© 2005-2012 Renewed Vision, Inc. ! Page 91 of 131

PropsProps make it easy to leave items on screen for an extended Lme, but are also easy to clear at any Lme. Some common uses for props may be a lower-‐third graphic, a logo bug (a “bug” is a broadcast term for a small graphic in the corner), or other persistent graphic that you want to leave on screen.
A prop can remain on screen for just one slide, mulLple slides, or for the enLre presentaLon. This layer is independent of other layers allowing props to be triggered at any moment. Props adhere to transparency seongs for those graphic formats that support them (.PNG sLlls or animaLon videos with an alpha channel).
In ProPresenter 5, Props are not part of the default toolbar set. Click on the Customize buGon, or right-‐click on the toolbar and select Customize. You can then drag the Props icon to where you want it on the toolbar. You can also open Props from the View menu or by pressing Control-‐P on your keyboard.
To acLvate a prop, click on the prop thumbnail. You can clear individual props by clicking on the prop’s name in the toolbar. If you want to clear all of the props at once, add the Clear Props buGon to the toolbar and use that. The Clear Props buGon is not included in the default toolbar.
If you want to change the Props module to a floaLng window, click on the icon in the top-‐right corner. To return it to a docked posiLon, click on the same corner again.
The first buGon in the lower-‐led corner is the Edit buGon. Clicking on this will open the Props Editor where you can create as many props as you need. The second buGon allows you to set transiLons for the Props. The slider in the lower-‐right corner changes the size of the thumbnails.
ProPresenter 5 for Mac User Manual
© 2005-2012 Renewed Vision, Inc. ! Page 92 of 131

ClocksTo access the clocks module, customize the toolbar to add the Clocks icon, select it from the View menu, or use Control-‐C on your keyboard.
The clocks module serves two purposes. The primary purpose is controlling clocks that are seen only on the stage display. The second is controlling countdown clocks that can be shown on the stage display, in a Message, or both.
This secLon will cover the basics of how this module works, and using clocks and countdowns on the stage display and in messages will be covered later in this user guide.
Clock Format allows you to choose the way you want to display the system clock in ProPresenter.
Time Elapsed starts counLng up from zero from the Lme you start this clock. You can have this clock start automaLcally when ProPresenter is opened by selecLng the Auto Start opLon. When this opLon is selected, the clock will begin running when when a presentaLon or piece of media is selected.
You can rename the three countdown clocks by entering the new name in the name field. Countdowns have two funcLons: Countdown Lmer and countdown to Lme. A countdown Lmer is a standard countdown clock that runs for a given amount of Lme. The countdown to Lme Lmer allows you to indicate a specific Lme of day of countdown to.
Note: When you change the name or Lme of a clock, press Enter or Tab on your keyboard to confirm the change. Otherwise the previous name or Lme value will be used.
If you change the Lme, click the reset buGon to the led of the clock to update the Lme. Clicking Stop will end the clock. Over Run allows a clock to conLnue running past zero. The buGons at the boGom will start, reset, or stop all of the clocks simultaneously.
If you want to change the Clock module to a floaLng window, click on the icon in the top right corner. To return it to a docked posiLon, click on the same corner again.
ProPresenter 5 for Mac User Manual
© 2005-2012 Renewed Vision, Inc. ! Page 93 of 131

MessagesIn ProPresenter 5 it is now possible to have mulLple messages formaGed and ready to go on-‐demand and even display mulLple messages on the same screen simultaneously with different formaong for each message. To open the Messages module, click on the Messages icon in the toolbar.
There are two views available for the Messages module. The iniLal, collapsed, view allows you to easily change the content of a message or a countdown clock. You can choose various messages from the drop-‐down menu.
If you want to change the Messages module to a floaLng window, click on the icon in the top right corner. To return it to a docked posiLon, click on the same corner again.
When you open the Messages module, you can click on the drop-‐down menu to select from any message that has already been created. If you need to add a new message, click on the plus buGon. To edit a message, click the edit buGon to the right of the new message buGon.
Messages work using a combinaLon of predefined text and token text. Tokens create content dynamically depending on your needs. There are some included tokens or you can add any custom token that you need. As you can see in the image to the above, the selected message just has one text field called “Message”.
The image to the led shows a message that can be used to ask parents to come to their child’s room. Along with the predefined text, there are also two tokens in use. Using tokens makes it easy to create messages that need to be updated regularly.
Instead of having to type this enLre message every Lme it’s need, the person running ProPresenter would only need to enter the child number and the room number. These two numbers will be formaGed properly and inserted into the rest of the message.
The boGom row of buGons control showing and hiding a message ,as well as the transiLon that is used when displaying a message.
ProPresenter 5 for Mac User Manual
© 2005-2012 Renewed Vision, Inc. ! Page 94 of 131

The Nursery Call number shown in the last image would appear on screen like the image below. The template that is selected has a blue bar with white text that formats the message when it is displayed.
The second funcLon that the Messages module serves is to create on-‐screen countdowns for your audience. If you don’t want to buy a countdown video for an event, ProPresenter makes it easy to format a countdown clock that can be used over any of your own content.
As with regular messages, countdowns can contain text and a countdown. The two images below show a countdown message and the resulLng output. If you don’t want the clock to show extra zeros at the front as Lme runs down, check the Strip Leading Zeros opLon.
ProPresenter 5 for Mac User Manual
© 2005-2012 Renewed Vision, Inc. ! Page 95 of 131

Mask LayerThe purpose of a Mask is to allow you to physically change the output of ProPresenter that is shown on your displays or screens. With a Mask you can quickly change the output to be virtually any shape you want. Masks are also perpetual items in ProPresenter; when you enable a Mask, unLl you clear it, the mask will be visible. Masks are displayed when ProPresenter opens if a mask was enabled when the program was closed.
Before using the Mask module you will need to customize your toolbar and add the Mask icon. You can also open the Mask module from the View menu or by pressing Control-‐Shid-‐M.
The images below show three masks and the resulLng output of each. Masks can be especially useful if you are doing environmental projecLon, or need to project onto unusual surfaces. The first and second mask are designed for environmental projecLon, meaning that instead of projecLng on a screen, the projector is pointed at a stage or wall. The first mask is designed to keep the projector from shining on the choir and ceiling; the second is designed to keep the project for hiong a screen on the middle of the wall. The third mask would be used to block out everything but an oval projecLon surface.
Only one mask can be acLve at any Lme. Masks also have their own transiLon Lme, but do not have transiLon effects. To enable a mask, click on the thumbnail. To clear it, you must return to this module and click the Clear Mask buGon or select the Clear Mask opLon from the AcUons menu. There is no shortcut buGon or key combinaLon to clear a mask.
If you need to create more advanced masks, you can use Photoshop or other editors and import images with transparencies. The Oval screen mask was made in Photoshop and the other two were made in ProPresenter using rectangles.
CreaLng a mask may take a lot of work depending on your environment and needs, so be prepared to spend more than just a few minutes creaLng it.
ProPresenter 5 for Mac User Manual
© 2005-2012 Renewed Vision, Inc. ! Page 96 of 131

Audio BinThe audio bin allows you to control audio playlists directly from inside the program without having to rely on an outside applicaLon to play music or sound effects.
To open the Audio Bin, click on the Audio icon in the toolbar, select Audio Bin from the View menu, or press Control-‐A.
There are four components of the Audio Bin. At the top are playback controls. Any audio file played from the Audio Bin or added directly to a slide are controlled from here.
The top part of the Audio Bin lists the folders and playlists used to organize audio files. All audio files added to the bin are listed under Library, but can then be sorted into individual playlists. To add a folder or playlist, click on the acLon menu buGon.
The lower secLon lists all the songs or sound effects in the selected playlist. Clicking on the name of a file will trigger the audio to start playing. You can change the columns shown by right-‐clicking on one of the headers (Title, ArLst, DuraLon) and unchecking the opLons you don’t want.
Clicking the plus buGon at the boGom of the Audio Bin will open a Finder window for you to select the tracks you want to import. You can also drag files directly from the Finder into the Audio Bin.
There are two audio types that can be imported into the Audio Bin.
Audio Tracks are full-‐length songs. Only one audio track can be played at a Lme. If you have a song in the Audio Bin, you can drag it directly to a slide or to the Lmeline to link it with a specific presentaLon.
Sound Effects: These are short audio files that do not require full audio control. MulLple sound effects can be played simultaneously. These files can only be stopped with the Clear Audio or Clear All command.
The type of audio file is selected by default based on audio length. Longer files are Audio Tracks and shorter files are Sound Effects. Right-‐click on the file to bring up a contextual menu to change the audio files type.
If you want to change the playback behavior, you have three opLons: Loop, Go to Next, and Stop. To change the behavior, right-‐click on the file and select the Behavior menu.
Either audio type can be dragged onto a slide to create an Audio Cue in the same manner as media cues. When a slide with an audio-‐cue clip is clicked, it will automaLcally play the audio clip. These clips are controlled by the playback controls in the Audio Bin.
ProPresenter 5 for Mac User Manual
© 2005-2012 Renewed Vision, Inc. ! Page 97 of 131

TimelineProPresenter 5 makes it easy to sequence slides in a Lmeline with or without an audio track. This makes it easy for you to create presentaLons with custom Lmings between slides or to record the slides to match a song. The ability to sequence slides with music is especially useful for worship leaders who don’t have a band or someone to run lyrics for them since the song and lyrics can be started with a single click.
To begin this process, click the Timeline buGon in the toolbar to open a new Lmeline for the acLve song.
There are three ways to add slides to a Lmeline. The first is to drag the thumbnails from the presentaLon to the Lmeline. The second is by clicking on the Slide Show buGon in the lower-‐right corner of the Lmeline and selecLng a preset value. This will space all of the slides out at the same interval. The third way is to record the Lmeline.
Audio files can be added to the Lmeline by clicking the Audio Track buGon, dragging a file from the Audio Bin, or dragging a file from the Finder to the Lmeline. Ader you have added an audio track, you’ll see a solid green bar with the song name added and the duraLon value in the upper right corner will show the total length in seconds. To remove an audio file, click on Audio Track and select Remove Current Track.
Click on the Record buGon to ready the Lmeline for recording, then press the play buGon when you are ready. If you have added an audio file, the audio will begin playing. To record slides to a Lmeline, click on the slides like you normally would when going through a presentaLon.
The Lmeline has a hidden feature that isn’t available anywhere else in the program. If you click mulLple Lmes in a row on a slide, each word will highlight in yellow during playback, creaLng a karaoke or sing-‐along effect with the words. If you have a slide with five words, click once for each word when that word is sung before moving to the next slide.
If you find that the audio track is playing too fast for you to accurately record the slides, you can manually move the slide cues when you’re done, or you’re can slow down the song with the Rate slider. This will cause the song to play slower so that you can have more Lme to anLcipate slides.
When you have finished recording a presentaLon, click the record and playback to stop the recording. If you need a Lmeline to loop, click on the loop buGon to the led of the DuraLon Lme box. Entering a value in Offset will move all of the slide cues by a given amount. DuraLon can only be changed if there is no audio file aGached to a Lmeline.
Clicking the info buGon in the upper right corner of a cue will let you change the cue label and see any sub-‐cues that were recorded as part of the cue. The Seconds slider changes the Lme scale of the Lmeline so you can see more or fewer slides at once.
ProPresenter 5 for Mac User Manual
© 2005-2012 Renewed Vision, Inc. ! Page 98 of 131

Using DVDs
ProPresenter makes it easy to use a DVD during your presentaLon by allowing you to select specific clips for playback from a DVD. In ProPresenter 5 we’ve taken it one step further by building in DVD ripping capabiliLes. Instead of having to rely on a DVD working properly or having to use third-‐party programs to rip DVD clips, you can now do that directly from within ProPresenter.
There are two ways to use DVD content in ProPresenter. The first way is to create clips from the DVD. When you create a clip, you aren’t saving the DVD content to your computer, you’re simply creaLng reference points to the DVD. The DVD must be in the computer in order for a clip to be played.
To create a DVD clip, click on the DVD icon in the toolbar to open up the DVD player. You can also open the DVD player by selecLng it from the View menu. This will open the window shown below.
Play the DVD as normal using the standard DVD controls at the boGom of this interface.
To create a DVD clip, click the Set buGons on the boGom right of the interface to set the start and end points of the DVD clip. If you need to reset either the start or end point, click Clear and reset the points. Next, choose a name for your clip and press the Save buGon.
DVD images used with permission from New Tribes Mission. www.NTM.org/reach.
ProPresenter 5 for Mac User Manual
© 2005-2012 Renewed Vision, Inc. ! Page 99 of 131

Saved clips are shown in the column on the right. You can view clips for the mounted disc only or click on the Show All DVD Clips checkbox to show all DVD clips that have been created in the applicaLon. SelecLng a clip will load it in the DVD interface. Once you have saved a clip, you can click and drag it into a playlist or a presentaLon and it will be shown like other media.
Once you have saved a DVD clip, you can play it by clicking on the thumbnail in the column on the right or ader you’ve added it to a playlist or presentaLon. If you want to show an enLre DVD and would rather just cue it in the DVD player and not make a clip, click on the Full Screen buGon next to the Eject buGon.
The DVD must be in the computer for a clip to be used. Saving a clip only creates a bookmark for the clip on the disc. However, if you would rather not rely on the DVD to be in the computer, you can actually rip DVD clips with ProPresenter 5.
Preparing to rip a DVD clip is the same as saving a clip. Set the in and out points and name the clip, but instead of clicking on Save, click on Rip. You will see a progress bar while the clip is being ripped.
Note: You will need to install the HandBrakeCLI. This can be installed on the DVD Preferences panel within ProPresenter’s Preference menu. We also recommend installing VLC to expand the types of DVDs you can rip content from.
When a DVD clip is ripped, the enLre chapter that contains the In and Out point will be ripped. As you can see in the illustraLon below, the orange segment represents the part of the DVD that is selected to be shown. The In point is in Chapter 1 and the Out point is in Chapter 2. Both of these chapters will be ripped in their enLrety, but ProPresenter will automaLcally set the In and Out points on the final clip to the correct spot. The DVD clip will be placed in your Foregrounds bin in the Video/Image Bin. If you need to adjust the in or out point, you can do that within the range of the video that was ripped.
Note: If you are using an SDI card to send your output signal from ProPresenter you will not be able to use this feature. DVD playback isn’t rendered the same way as other content in ProPresenter, and can’t be shown via SDI.
ProPresenter 5 for Mac User Manual
© 2005-2012 Renewed Vision, Inc. ! Page 100 of 131

Displaying Web PagesProPresenter 5 allows you to easily share a live web page with your audience. The sodware provides a web browser within the interface that is mirrored to the output display without all the extra interface pieces such as address bars, bookmarks, and other distracLng elements, so the focus remains on the content of the page itself.
You will need to add the Web browser icon to your toolbar, select it from the view menu, or press Control-‐W to access the web browser.
Click on the Show buGon in the top right corner of the browser to immediately display the webpage for the audience to see. You can then interact with the website within the browser on your computer and your audience will be able to see what you’re doing. The toolbar also contains basic browser funcLons: Back, Forward, Refresh and Go. The globe allows you to create a bookmark cue in a playlist by dragging the icon to a playlist. The square buGon on the far right allows you to switch the browser window between a docked screen or a floaLng window.
To display full-‐screen Youtube videos, you will need to disable the Display at Top Most Window Layer seong in Preferences as was covered earlier in this manual.
Note: If you are using an SDI card to send your output signal from ProPresenter you will not be able to use this feature. Web pages aren’t rendered the same way as other content in ProPresenter, and can’t be shown via SDI.
ProPresenter 5 for Mac User Manual
© 2005-2012 Renewed Vision, Inc. ! Page 101 of 131

Stage DisplayThis feature requires an addiLonal video output from your computer. Most users will need a USB display adapter like the one available for sale in our store. If you have a newer 27” iMac, you may have two Thunderbolt ports which can be used for your primary output and your stage display out. Mac Pro users can opLonally use a second video card.
To enable the Stage Display output, open Preferences and select the Display tab. If all three of your displays are acLve, you will see three boxes on the Display preferences screen. Check the box next to Enable Stage Display. This will acLvate the Stage Display output.
At this point, a purple box labeled SD will show on display preferences. This box may become acLve on the wrong screen when you enable the stage display. If this happens, click on the stage display box and drag it to the correct box represenLng your stage display.
The image below shows you what your display should look like. The arrangement may be different on your screen depending on system seongs. The blue box with the white bar at the top represents your local monitor. The black box that says Out is your primary output. The purple box with SD is your stage display output.
ProPresenter 5 for Mac User Manual
© 2005-2012 Renewed Vision, Inc. ! Page 102 of 131

There are two ways to access the configuraLon for stage display. The first is by clicking on the Configure Stage Display buGon on the Display preferences screen. The second is by selecLng the Window menu and choosing Configure Stage Display. Both methods open the same configuraLon display that is shown to the led.
If you have used the Stage Display in ProPresenter 4 you may noLce a few new opLons that are available for configuraLon now.
You can now adjust the color and alignment of “Text Only” opLons, show the countdown Lme of video files, change the overrun color of clocks, and turn the message flashing off as well as change its color.
You can also show chord charts on the stage display by linking PDF files to presentaLons.
At the top of the Stage Display OpLons window is a lisLng of all the available stage display layouts that you have created. To add or remove layouts, click on the plus and minus buGons on the right and name your new layout. You can create as many layouts as you need. Anyone who is using an iOS device with the stage display app can select from any available layout. Only one layout at a Lme can be used with a wired stage display.
The next set of opLons controls how the current and next slides, and their notes, are shown. In ProPresenter 4 the only Text Only opLon was the size of the text. In ProPresenter 5 we have expanded this to allow you to change the alignment of the text and to change the color of the text. As you can see in the image below, the slide color has been changed to make it easier to disLnguish the slides, but the slide notes have been led white for addiLonal contrast.
If you don’t select Text Only for the slides, a thumbnail image of the slide will be shown instead. Media is shown as a thumbnail when it is assigned to either the current or next slide. Videos can’t be shown on the stage display.
Slides notes are added in the Editor on the Slide ProperLes tab. If no notes are entered, nothing will be shown in the Slide Notes boxes.
ProPresenter 5 for Mac User Manual
© 2005-2012 Renewed Vision, Inc. ! Page 103 of 131

The ability to show chord charts on the stage display is a new feature in ProPresenter 5. There are three ways to add a chord chart to a song.
The first way is in the Document ProperLes menu located in the slide viewer at the top of each presentaLon. This was covered earlier in this user guide. The second opLon is from the Document ProperLes tab in the Editor. This opLon and the first are the same thing, but located in different areas of the program. If your chord chart is a single-‐page PDF, link it to the song using one of these two opLons so that it is displayed the enLre Lme the song is acLve on the stage display.
The third opLon is to add chord charts to individual slides. If you have a mulL-‐page PDF where each stanza has its own page, this is the opLon you will want to use so that you can link the correct page with the slide.
In the Editor, click on the slide that you want to link a PDF page to and then select the Slide ProperLes tab to the right. Click on the box next to Chord Chart and then click on Add Chord Chart. This will open a Finder window; browse to the locaLon of your PDF and select it. This same method is used to add a chord chart from either
of the Document ProperLes locaLons.
If your PDF is a single page it will be added right away. If it’s a mulL-‐page PDF, you will see the window shown below. Select the page that you want to link to a specific slide from the column on the right, then click Save to use that page. You can use the same document on mulLple slides just by selecLng different pages within the PDF. As with media, when a PDF is linked to a slide, it will be shown unLl a different PDF page is selected. If you have mulLple slides for a stanza, you only need to add the PDF to the first slide of the stanza.
When you enable the stage display opLon to show chord charts, a new box will be added to the layout. You can move and resize the box to fit your needs. You select a slide with a linked chord chart, it will be shown on the stage display. This is supported in the wireless stage display as well.
ProPresenter 5 for Mac User Manual
© 2005-2012 Renewed Vision, Inc. ! Page 104 of 131

The clock and countdown seongs for stage display are linked to the Clocks module in ProPresenter. You can start any clock from the Clocks module, or if you have a Countdown Message that uses a clock that is enabled on the stage display, it will start with that clock as well. Clocks on the stage display are useful for showing how much Lme is led before an event starts and for showing a speaker how much Lme he has led.
There are three new features in the clocks secLon of the stage display. As with the text only seongs, we have implemented the ability to change the color of all the stage display clocks. We have also added the ability to see how much Lme is led on the current video. This doesn’t disLnguish between background and foreground videos, so it will run the enLre Lme a video is being shown. Enabling this opLon is useful so that people on stage know how much Lme is led in a video. Since clocks also support a funcLon called Over Run, you can now have the clock change colors when it passes zero.
The boGom set of layout opLons control how stage display messages are shown. Stage display messages are unique because these are only shown on the stage display. In ProPresenter 4, when you sent a stage display message, the box flashed to get the aGenLon of those on stage. In ProPresenter 5, you can change the color of the box when it flashes, or you can disable the flashing effect enLrely.
To access this feature, open the View menu and select Stage Display Message, add a buGon to your toolbar, or press Control-‐S. Type your message and click the Send Message; the Message box on the stage display will show the message and flash if you have that enabled. Clear will remove the message completely and Hide removes the message from the stage display, but doesn’t delete the message.
ProPresenter 5 for Mac User Manual
© 2005-2012 Renewed Vision, Inc. ! Page 105 of 131
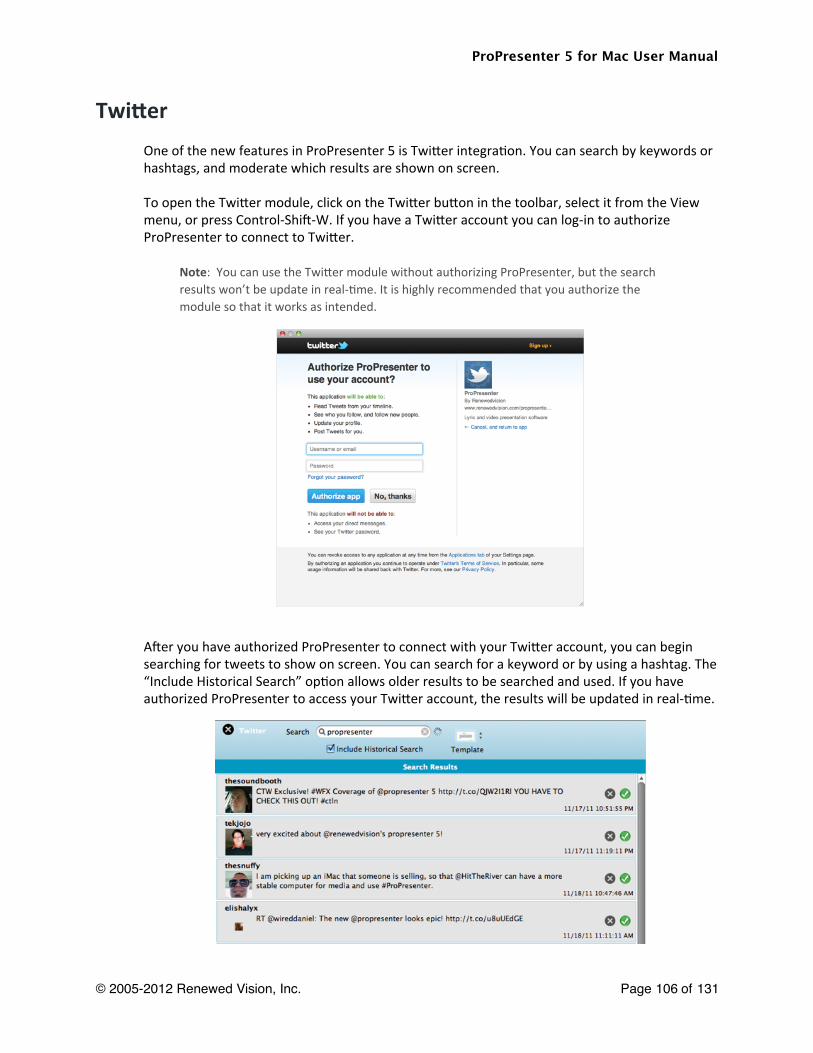
Twi_erOne of the new features in ProPresenter 5 is TwiGer integraLon. You can search by keywords or hashtags, and moderate which results are shown on screen.
To open the TwiGer module, click on the TwiGer buGon in the toolbar, select it from the View menu, or press Control-‐Shid-‐W. If you have a TwiGer account you can log-‐in to authorize ProPresenter to connect to TwiGer.
Note: You can use the TwiGer module without authorizing ProPresenter, but the search results won’t be update in real-‐Lme. It is highly recommended that you authorize the module so that it works as intended.
Ader you have authorized ProPresenter to connect with your TwiGer account, you can begin searching for tweets to show on screen. You can search for a keyword or by using a hashtag. The “Include Historical Search” opLon allows older results to be searched and used. If you have authorized ProPresenter to access your TwiGer account, the results will be updated in real-‐Lme.
ProPresenter 5 for Mac User Manual
© 2005-2012 Renewed Vision, Inc. ! Page 106 of 131

Once you have search results available you can remove results, ignore them, or approve them. Clicking the X will remove a results if it isn’t relevant or you don’t want to see it, and clicking the check will approve the tweet. Approved tweets are moved to the column on the right and go into the display rotaLon.
You can choose a transiLon opLon that all of the approved tweets will use. In the lower-‐led corner of the search results you can change the number of tweets that are loaded. You can change the length of Lme each tweet is shown on screen as well as start and pause the rotaLon from the lower-‐right corner. If you want to remove an approved tweet, click on the X and it will be deleted from the approved list.
The preview shown in the image above is created using the template shown below. The template is made of one image object (with a placeholder image) and three text boxes. You can layout these objects however you want. You aren’t required to have all four objects, either. Ader you have placed the objects on the slide, select the Object ProperLes tab for the slide. Select each object and choose the appropriate opLon from the Name list. When you select this template from the TwiGer module, the appropriate elements will be placed on the slide based on your template.
Tweets are currently there own slides and cannot be used as Props or Messages with other content.
ProPresenter 5 for Mac User Manual
© 2005-2012 Renewed Vision, Inc. ! Page 107 of 131

LocalizaUonProPresenter 5 now has the ability to be localized into other languages. As of the release, only Spanish and Korean will be included, but other languages will be added over Lme.
Instead of localizing the applicaLon directly, we have included language packs in the program that are changed based on your system language seongs. If you choose a language other than Spanish or Korean, ProPresenter will use English as the default language.
To change the language seongs, open System Preferences, select Language & Text and choose the correct language.
ProPresenter 5 for Mac User Manual
© 2005-2012 Renewed Vision, Inc. ! Page 108 of 131

ModulesProPresenter has included addiLonal add-‐on modules since ProPresenter 3. In ProPresenter 5 we’ve made it easier to test these modules to see if they are right for you. We’ve also added a new module and made some changes to others to further enhance their funcLonality.
Each of the features covered in this secLon of the user guide require an addiLonal purchase of an unlock code, and in some case, addiLonal hardware is required. For informaLon about pricing, please visit our website.
Unlike a ProPresenter license, modules are licensed per computer and do not have a site license opLon. If you require the same module on mulLple computers, you will need to purchase mulLple copies of the module.
Modules are linked directly to a computer by a system ID Code and cannot be transferred as needed. Modules can be transferred by our sales department in the event of hardware upgrades or hardware failure.
ProPresenter 5 for Mac User Manual
© 2005-2012 Renewed Vision, Inc. ! Page 109 of 131

Demo Modules and Registering Modules
In ProPresenter 5 we have added the ability to easily demo any of our modules before purchasing them. To access these opLons, open ProPresenter Preferences and click on the Modules tab. You will see the interface shown below.
If you have purchased modules in a previous version of ProPresenter on this same computer, they will have been automaLcally upgraded to ProPresenter 5 and will show has already being purchased.
To demo the modules, click the Demo Module buGon at the boGom of the menu. This will acLvate all of the modules in Preferences. When you acLvate a demo module, a watermark will be applied to your output screen. Modules are also only acLve for the current session of ProPresenter. When you close and re-‐launch the program, you will need to acLve the demo modules again. Demo modules are intended for determining if they will fit your needs and are not intended to be used in a live event. No temporary trial codes for modules will be available.
If you want to purchase a module, click on the blue Buy buGon. This will open the in-‐app store where you can purchase the module. Modules purchased this way will automaLcally be registered and acLvated on the same computer.
If you have purchased a module from a reseller or directly from our website, enter the 25-‐digit code and then click the plus buGon to acLvate it. When you purchase a module, you will be sent an acLvaLon code. You will need to follow the instrucLons in the receipt to acLvate that number for the unlock code. You will also need the ID Code shown on the Modules tab in order to link the code to the right computer.
ProPresenter 5 for Mac User Manual
© 2005-2012 Renewed Vision, Inc. ! Page 110 of 131

Alpha Key Module
The Alpha Key Module has two funcLons: (1) Blend ProPresenter’s content over incoming video and then send that combined content back to a switcher or projector; (2) Generate a key and fill signal that is then sent to a broadcast-‐quality switcher that is able to accept this type of signal.
When using method one, the actual composiLng of the incoming video signal and the content in ProPresenter (text or lower-‐third graphics normally) is done on the video card itself and then sent back out to a switcher or projector. Choose this method by selecLng Internal from the drop-‐down menu.
The second method sends what are referred to as a “key and fill signals” to your switcher allowing you to have a broadcast-‐quality signal. Choose this method by selecLng External from the drop-‐down menu.
These are the seongs that you should set on the Advanced tab in Preferences.
• Check the box for Enable Output Device and choose the "Blackmagic Video Output".• For the Mode seong, choose the appropriate seong whether it be standard definiLon (NTSC) or High DefiniLon (720p, 1080p).
• The Compression seong should be led blank.
Finally, you will need to specify what kind of keying you wish to do under the "Alpha Key Seongs" secLon:
• Disabled: This will output a full video out signal to your program and preview ports on the Decklink card
• Internal Key: If you are using the Alpha Keyer as a downstream key, with a video input coming into the Decklink card and one going out of it, then this is an Internal Key (be aware
ProPresenter 5 for Mac User Manual
© 2005-2012 Renewed Vision, Inc. ! Page 111 of 131
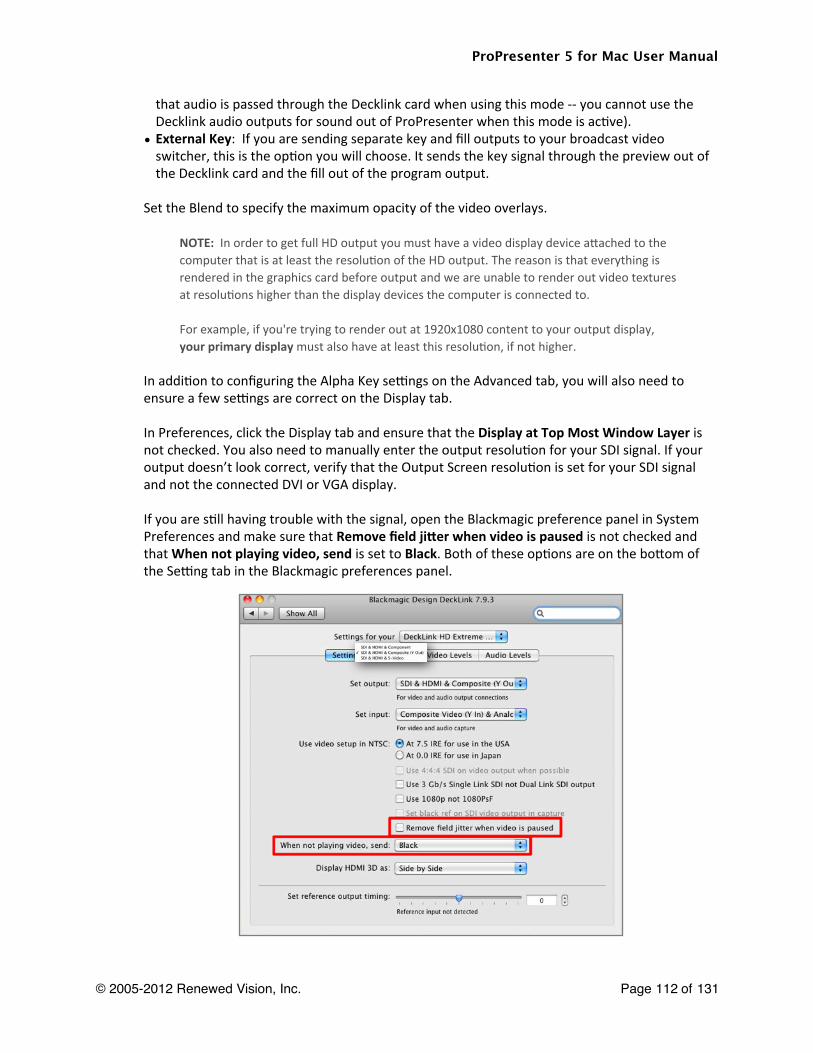
that audio is passed through the Decklink card when using this mode -‐-‐ you cannot use the Decklink audio outputs for sound out of ProPresenter when this mode is acLve).
• External Key: If you are sending separate key and fill outputs to your broadcast video switcher, this is the opLon you will choose. It sends the key signal through the preview out of the Decklink card and the fill out of the program output.
Set the Blend to specify the maximum opacity of the video overlays.
NOTE: In order to get full HD output you must have a video display device aGached to the computer that is at least the resoluLon of the HD output. The reason is that everything is rendered in the graphics card before output and we are unable to render out video textures at resoluLons higher than the display devices the computer is connected to.
For example, if you're trying to render out at 1920x1080 content to your output display, your primary display must also have at least this resoluLon, if not higher.
In addiLon to configuring the Alpha Key seongs on the Advanced tab, you will also need to ensure a few seongs are correct on the Display tab.
In Preferences, click the Display tab and ensure that the Display at Top Most Window Layer is not checked. You also need to manually enter the output resoluLon for your SDI signal. If your output doesn’t look correct, verify that the Output Screen resoluLon is set for your SDI signal and not the connected DVI or VGA display.
If you are sLll having trouble with the signal, open the Blackmagic preference panel in System Preferences and make sure that Remove field ji_er when video is paused is not checked and that When not playing video, send is set to Black. Both of these opLons are on the boGom of the Seong tab in the Blackmagic preferences panel.
ProPresenter 5 for Mac User Manual
© 2005-2012 Renewed Vision, Inc. ! Page 112 of 131

Edge Blending Module
The Edge Blending module makes it easy and affordable to use edge blending in your environment. Edge blending consists of two or three overlapping projected images that have the overlapping regions adjusted to create a seamless blend. Because the outputs of each projector have to overlap in order for blending to occur, the actual width of your output will be smaller than the output resoluLon.
Before you make your adjustments to the Edge Blending Module, you will need to configure a Matrox DualHead2Go or TripleHead2Go, as well as your computer and ProPresenter, for the proper resoluLon. Refer to the Matrox ConfiguraUon secLon later in this user guide for details on seong up a Matrox DualHead2Go or TripleHead2Go.
Once you have properly configured your computer and ProPresenter to work with double-‐wide or triple-‐wide media, you can configure the Blend module. To start, check both the Enable Data and Enable Blending boxes. Select the number of projectors (two or three) that you are going to be using. To get started, you can enter the number of screens as your Screen Size, however, entering the final screen width in inches will give you a more precise blend. The Blend Area and Total Blend need to be posiLve values, so if they aren’t, double-‐check the screen resoluLon seongs.
The lower secLon is used to adjust your blend areas. The black-‐and-‐white box is actually the representaLon of the curve being used to apply the blending adjustments. The three opLons-‐-‐Linear, Cubic, and QuadraLc-‐-‐will result in slightly different blends. Test each opLon to see which works best for you since this varies depending on projectors and environmental factors.
ProPresenter 5 for Mac User Manual
© 2005-2012 Renewed Vision, Inc. ! Page 113 of 131

The four sliders allow you to adjust the values of the blend. You will need to spend some Lme working with these to get the best blend you can. It’s recommended that you start with the first two sliders, Blend and Intensity, at 100% to help you establish a good baseline for adjusLng your blend. Gamma adjusts the brightness of the non-‐blended are compared to the blended regions. If you find that your blended areas are brighter than the rest of your screen, you will want to adjust this seongs. Black Level adjusts the video black brightness. Since a projector doesn’t display black, the brightness between the blended area and the rest of the screen may vary slightly.
You will want to use the blend grid to help you align your projectors and get them as perfectly aligned as possible before adjusLng the blend seongs. Geong the alignment perfect is criLcal to being able to achieve the best edge blend possible. If your projectors are slightly out of alignment, your blended area may be visible.
Due to the wide range of projects and their quality, achieving a “perfect” edge blend is quite difficult, even for the most skilled person. Due to many factors, such as quality of the projectors, age of the lamps in the projectors, number of hours each projector has been used, and even the brand of the lamps in the projector, you may sLll see a slightly visible area where the images overlap. This occurs with any edge blending soluLon.
If you aren’t familiar with edge blending, you may want to watch the tutorial on our website first.
ProPresenter 5 for Mac User Manual
© 2005-2012 Renewed Vision, Inc. ! Page 114 of 131
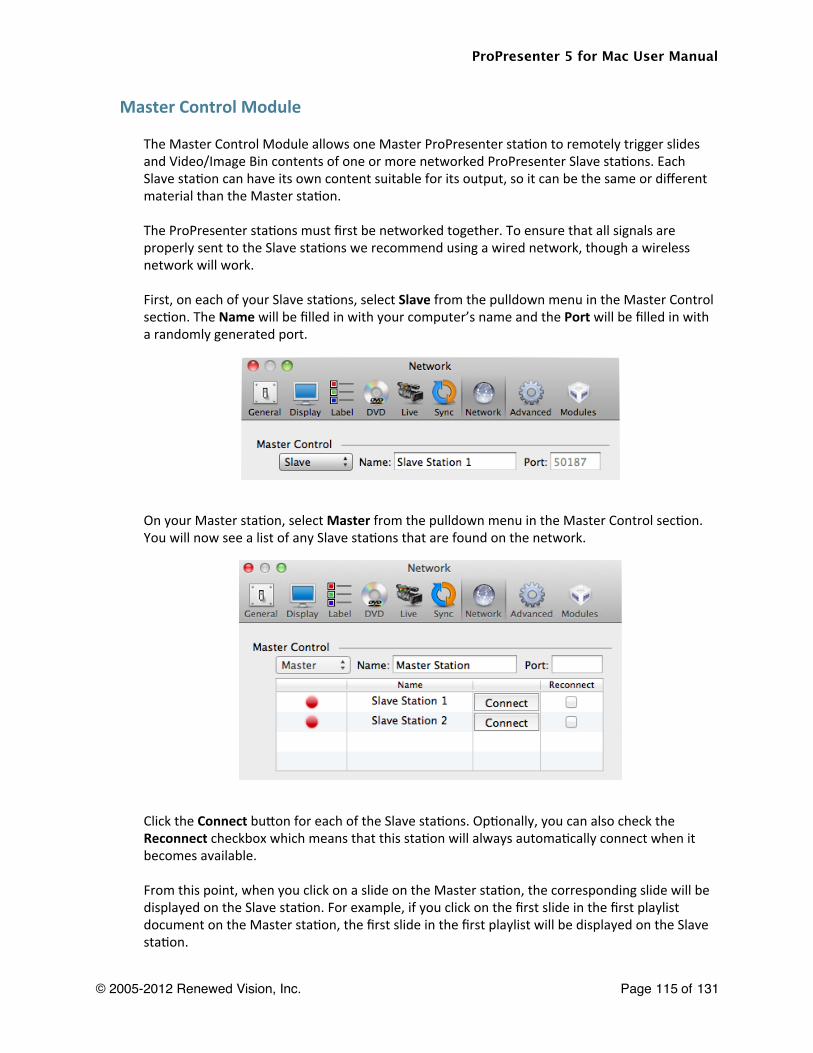
Master Control Module
The Master Control Module allows one Master ProPresenter staLon to remotely trigger slides and Video/Image Bin contents of one or more networked ProPresenter Slave staLons. Each Slave staLon can have its own content suitable for its output, so it can be the same or different material than the Master staLon.
The ProPresenter staLons must first be networked together. To ensure that all signals are properly sent to the Slave staLons we recommend using a wired network, though a wireless network will work.
First, on each of your Slave staLons, select Slave from the pulldown menu in the Master Control secLon. The Name will be filled in with your computer’s name and the Port will be filled in with a randomly generated port.
On your Master staLon, select Master from the pulldown menu in the Master Control secLon. You will now see a list of any Slave staLons that are found on the network.
Click the Connect buGon for each of the Slave staLons. OpLonally, you can also check the Reconnect checkbox which means that this staLon will always automaLcally connect when it becomes available.
From this point, when you click on a slide on the Master staLon, the corresponding slide will be displayed on the Slave staLon. For example, if you click on the first slide in the first playlist document on the Master staLon, the first slide in the first playlist will be displayed on the Slave staLon.
ProPresenter 5 for Mac User Manual
© 2005-2012 Renewed Vision, Inc. ! Page 115 of 131

Similarly, when you click on an item in the Video/Image Bin on the Master staLon, the corresponding item will be displayed on the Slave staLon.
For more advanced configuraLon, you can change the Name or Port of the Slave staLon by switching the Master Control pulldown menu to Off, making the necessary changes, and then switching back to Slave.
ProPresenter 5 will include the Slave funcLonality for free, but the Master Control Module will be an addiLonal add-‐on purchase. Pricing is available on our website.
ProPresenter 5 for Mac User Manual
© 2005-2012 Renewed Vision, Inc. ! Page 116 of 131

MulU-‐Screen Module
The MulL-‐Screen module (formerly the Advanced Module) allows you to extend your projecLon from one screen, to two or three screens. In ProPresenter 5 we have further expanded the funcLonality of this module to make it even more useful.
Refer to the Matrox ConfiguraUon secLon later in this user guide for details on seong up a Matrox DualHead2Go or TripleHead2Go. This secLon will assume that your computer and hardware have been properly configured.
Once you have enabled the MulLScreen module, you can select either DualHead2Go or TripleHead2Go from the drop-‐down menu. The configuraLon is idenLcal within in ProPresenter, but for this purpose, the seongs are shown for TripleHead2Go.
The second secLon is the first new feature of the MulLScreen module. In previous versions of ProPresenter, only one layout was supported, and that was whatever was configured here. In ProPresenter 5 you can now create mulLple mulLscreen layouts that can also be cued with a slide in a presentaLon. To create a new layout, click on the plus buGon and name the new layout. Use the minus buGon to remove a layout.
The opLons in the lower half of this preference menu allow you to designate which elements are shown on which screen. There are two addiLonal new features here. The first is that you can use different templates for individual screens. If you want to have large text on one screen, but want to use lower-‐third text on the other two screens, simply create templates and then select them on the correct screen. Live Video also has its own seongs now. So instead of your live video input following the Video/Image seongs, it can now be shown on specific screens.
ProPresenter 5 for Mac User Manual
© 2005-2012 Renewed Vision, Inc. ! Page 117 of 131

Note: If you have certain elements in a template and they donʼt exist in the Alt. Template (e.g., Text Reveal settings), those wonʼt be used. So if the certain screen is doing a text reveal, but the Alt Template on the side screens doesnʼt have a text box with the same Text Reveal setting enabled, the full text will be shown immediately.
Once you have create the layouts that you want to use, you’re ready to go. If you create mulLple layouts, the one that is selected will be the one that is used by default. If you want to change to a different layout on cue, right-‐click on a slide and select the appropriate layout from the mulLscreen cue menu.
SelecLng Tile next to video with extend the same video or graphic all the way across your aGached displays. Leaving this box unchecked will cause your video or graphic to be shown on each of the three screens.
DVD clips can only be shown on one screen. Due to how DVDs are played we aren’t able to provide any addiLonal control over the posiLoning of DVD playback.
Web pages will be shown stretched across all three screens.
A TH2G can also funcLon as a DH2G, you just have to change the seongs in the GXM Control Panel and the MulLScreen panel.
The MulLScreen module doesn’t affect the Stage Display and both can be used simultaneously.
Masks can be used with a MulLScreen set up, but you will need to create a custom sized Mask layer sized to your output resoluLon. To do this, open the Mask module, click on the Document ProperLes tab, and enter a custom size for the resoluLon.
ProPresenter 5 for Mac User Manual
© 2005-2012 Renewed Vision, Inc. ! Page 118 of 131

SDI Output Module
The SDI Output module allows you to send true high-‐definiLon video to your video system. When you enable this module, addiLonal seongs will be enabled on the Advanced tab in Preferences.
Check the box for Enable Output Device and then choose the appropriate device and mode that is required for your video system. This module is designed to work with Blackmagic video cards. Other SDI cards may work, but they are not supported.
In Preferences, click the Display tab and ensure that the Display at Top Most Window Layer is not checked. You also need to manually enter the output resoluLon for your SDI signal. If your output doesn’t look correct, verify that the Output Screen resoluLon is set for your SDI signal and not the connected DVI or VGA display.
If you are sLll having trouble with the signal, open the Blackmagic preference panel in System Preferences and make sure that Remove field ji_er when video is paused is not checked and that When not playing video, send is set to Black. Both of these opLons are on the boGom of the Seong tab in the Blackmagic preferences panel.
ProPresenter 5 for Mac User Manual
© 2005-2012 Renewed Vision, Inc. ! Page 119 of 131

Matrox ConfiguraUon
The Edge Blending module and the MultScreen module both require a Matrox DualHead2Go (DH2G) or TripleHead2Go (TH2G). We do not support any other hardware for these two modules.
If you have not already purchased a DH2G or TH2G and you aren’t certain which unit to get, use this tool from Matrox to help you determine what you need to order. We recommend purchasing Matrox units directly from us since we have confirmed that the bundles we provide have all of the required hardware that you will need.
We recommend downloading the latest sodware driver directly from Matrox’s website rather than installing the one on the CD. You can choose the version you need here.
The following instrucLons are only for the Digital EdiLon or DisplayPort EdiLon DH2G and TH2G. If your computer has a MiniDisplayPort or ThunderBolt connecLon, you must use the DisplayPort EdiLon.
Ader the sodware is installed, you can access the Matrox GXM Control Panel from your Apple System Preferences.
ProPresenter 5 for Mac User Manual
© 2005-2012 Renewed Vision, Inc. ! Page 120 of 131
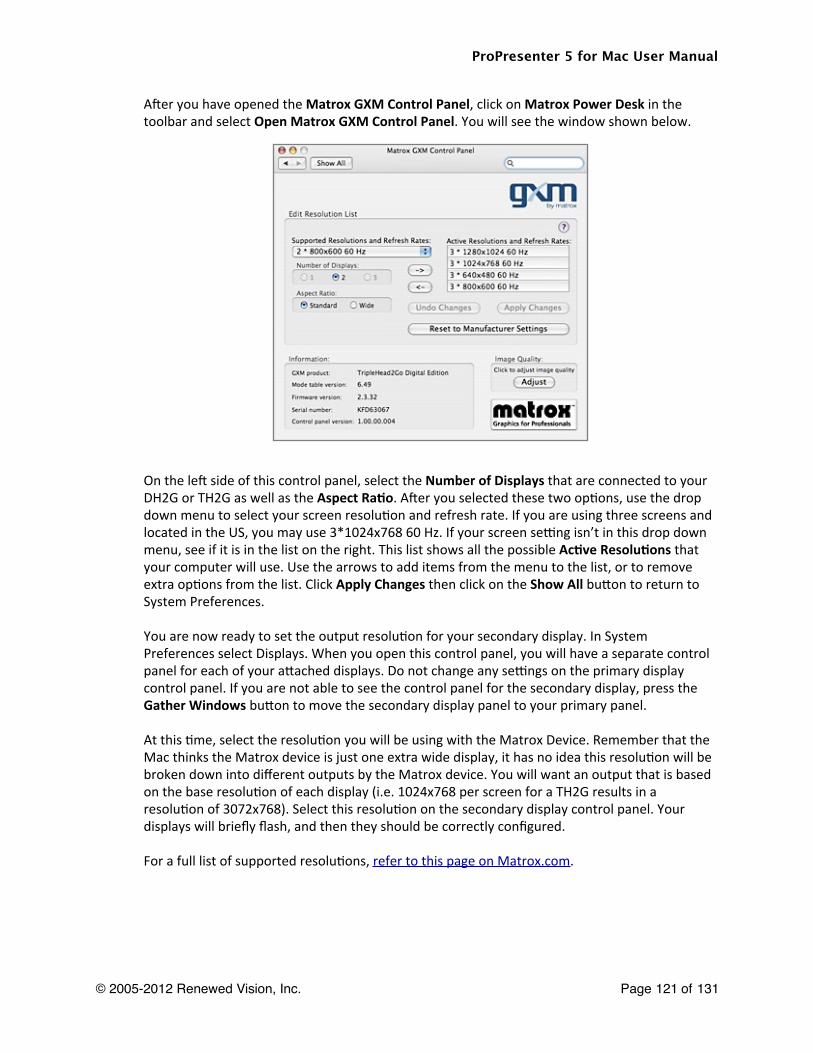
Ader you have opened the Matrox GXM Control Panel, click on Matrox Power Desk in the toolbar and select Open Matrox GXM Control Panel. You will see the window shown below.
On the led side of this control panel, select the Number of Displays that are connected to your DH2G or TH2G as well as the Aspect RaUo. Ader you selected these two opLons, use the drop down menu to select your screen resoluLon and refresh rate. If you are using three screens and located in the US, you may use 3*1024x768 60 Hz. If your screen seong isn’t in this drop down menu, see if it is in the list on the right. This list shows all the possible AcUve ResoluUons that your computer will use. Use the arrows to add items from the menu to the list, or to remove extra opLons from the list. Click Apply Changes then click on the Show All buGon to return to System Preferences.
You are now ready to set the output resoluLon for your secondary display. In System Preferences select Displays. When you open this control panel, you will have a separate control panel for each of your aGached displays. Do not change any seongs on the primary display control panel. If you are not able to see the control panel for the secondary display, press the Gather Windows buGon to move the secondary display panel to your primary panel.
At this Lme, select the resoluLon you will be using with the Matrox Device. Remember that the Mac thinks the Matrox device is just one extra wide display, it has no idea this resoluLon will be broken down into different outputs by the Matrox device. You will want an output that is based on the base resoluLon of each display (i.e. 1024x768 per screen for a TH2G results in a resoluLon of 3072x768). Select this resoluLon on the secondary display control panel. Your displays will briefly flash, and then they should be correctly configured.
For a full list of supported resoluLons, refer to this page on Matrox.com.
ProPresenter 5 for Mac User Manual
© 2005-2012 Renewed Vision, Inc. ! Page 121 of 131

ProPresenter RemoteProPresenter is able to be remotely controlled over a Wi-‐Fi connecLon by an Apple iPhone, iPod touch, or iPad. You can find the ProRemote iOS applicaLon in the iTunes Store.
To enable the ProPresenter Remote within ProPresenter, open ProPresenter’s Preferences, click on the Network tab, then check the Enable box under ProPresenter Remote Server. You will also need to check one, or both, of the Controller or Observer opLons. You can change the passwords if you want.
The Remote can operate in one of two modes. If you are in Observe mode, the applicaLon will follow along with the slides as they are advanced in ProPresenter. If you are in Control mode, then selecLng a slide of any presentaLon will cause ProPresenter to switch to that presentaLon and select that slide immediately.
Launch the ProPresenter Remote on your iOS device. If the device is correctly connected to a Wi-‐Fi network with the computer, you will see the computer name listed. If mulLple computers are listed, select the one you want to connect to and enter the observe or control password, then tap Connect.
The image below is from an iPad. If you are using the remote on an iPhone or iPod Touch, the login screen will look slightly different.
To display the Clear Commands (i.e. clear background, clear text, etc), press the eraser buGon in the upper right corner of your device.
ProPresenter 5 for Mac User Manual
© 2005-2012 Renewed Vision, Inc. ! Page 122 of 131

Remote Stage DisplayThe Remote Stage Display app for iOS devices allows you to use your iPhone, iPod, or iPad as a wireless stage display. This is especially useful for portable churches, or churches on a budget, who don’t want to setup extra displays or run extra cables.
To enable the Remote Stage Display within ProPresenter, open ProPresenter’s Preferences, click on the Network tab, then check the Enable box under Remote Stage Display Server SeHngs. You can change the default password if you want. Unless you need to use a specific port to connect, leave this opLon blank.
Once you have enable this seong, you are ready to connect your iOS device to ProPresenter. Launch the app on your device and enter the password you selected. Your computer and iOS device need to be on the same network to interact with each other. Certain network seongs may interfere with the connecLon, so check with your IT administrator if you think everything is configured properly with ProPresenter and the app.
Once the app loads, you will see a layout similar to what you see on a physically connected stage display. If you have configured mulLple stage display layouts in ProPresenter, you can tap the screen on your device to select from the list of available layouts. This allows every person using the remote stage display app to have a different layout on their device if needed.
If your iOS device supports connecLng to an external display, you can use the stage display app on a large display as well.
To log out of the app, either close ProPresenter, or tap the screen again and click on Log Out.
ProPresenter 5 for Mac User Manual
© 2005-2012 Renewed Vision, Inc. ! Page 123 of 131

Display Pa_ernsProPresenter 5 has three different display paGerns built into the program to make it easier for you to adjust projectors. These can be found by clicking on the View menu and selecLng the paGern you want to use from the Display pa_erns sub-‐menu.
Color Bars is useful for calibraLng the color of your projectors.Blend Grid makes it easy to configure overlapping projector images.Focus provides five points of reference for focusing and adjusLng key stone.
ProPresenter 5 for Mac User Manual
© 2005-2012 Renewed Vision, Inc. ! Page 124 of 131

Backing Up and Transferring FilesIf you are transferring to a new computer or adding an addiLonal computer to your inventory, you may want to create a duplicate copy of ProPresenter on the new computer. Doing this is fairly simple, but does involve several steps.
To protect yourself against hardware failures or accidental file deleLon, you may want to occasionally create a backup version of your Library folder(s) since this porLon of ProPresenter requires the most work to rebuild.
You will need to copy the following files and folders from your original computer into the same locaLons on the new computer. Before you conLnue, make sure that ProPresenter has been installed and registered on the new computer, and that ProPresenter is closed on both computers.
You will need to open a new Finder window to navigate to these locaLons. The easiest way to move the files will be to create a new folder on your desktop or external storage device and copy each of these files to that locaLon. Ader you move these files to the new computer, you will be replacing the default versions of each of these. When prompted, confirm that you want to replace the file or folder.
Library
By default, the Library folder is stored in your Documents folder. Copy the ProPresenter 5 folder. Inside of this folder are all of your Library documents ending in .pro4. If you have any custom libraries stored in other locaLons, copy those as well. Place custom libraries where you want them to be stored; do not place the folder inside the ProPresenter 5 folder.
Preferences
This file contains user-‐defined preferences. If you don’t mind reseong the preferences on your new computer, you don’t need to copy this file.
In Finder, click on the Go menu and choose Home. Once Finder has opened this locaLon, open the following folder in order: Library > Preferences. Scroll down in this list unLl you see a file called com.renewedvision.ProPresenter 5.plist. Copy this file to your temporary folder.
Program Files
This folder contains all the informaLon related to playlists (Library playlists, Video/Image Bin playlists, and Audio Bin playlists), as well as any Bibles you have created, and templates, props and masks.
In Finder, click on the Go menu and choose Home. Navigate to Library > ApplicaLonSupport > RenewedVision. Copy the ProPresenter 5 folder to your temporary locaLon.
ProPresenter 5 for Mac User Manual
© 2005-2012 Renewed Vision, Inc. ! Page 125 of 131

Keyboard ShortcutsThe following secLon outlines all of the keyboard shortcuts that are available in the program. Learning keyboard shortcuts for many of the common tasks you do will speed up your work flow and make you more efficient in ProPresenter. The majority of these shortcuts are listed in the menus at the top of the program and are grouped according to the menu they appear under. The last set of short cuts are not listed under a menu, but are useful to know when ediLng slides.
ProPresenter Menu• Preferences: Command-‐, (Command and the comma key)• Empty Cache: Control-‐Command-‐E• Hide ProPresenter: Command-‐H• Hide Others: Command-‐OpLon-‐H• Quit ProPresenter: Command-‐Q
File Menu• New PresentaLon: Command-‐N• Save All: Command-‐S• Save As: Shid-‐Command-‐S• Print: Command-‐P
Edit Menu• Undo: Command-‐Z• Redo: Shid-‐Command-‐Z • Cut: Command-‐X• Copy: Command-‐C• Paste: Command-‐V• Paste and Match Style: OpLon-‐Shid-‐Command-‐V• Duplicate Slide: Shid-‐Command-‐D• Select All: Command-‐A• Deselect: Command-‐D• Show Spelling and Grammar: Command-‐: (Command and the colon key)• Check Spelling: Command-‐; (Command and the semicolon key)• Special Characters: Command-‐OpLon-‐T
AcUon Menu• Next Slide: Right Arrow• Previous Slide: Led Arrow• Next Background: Command-‐Right arrow• Previous Background: Command-‐Led arrow• Clear All: F1• Clear Slide: F2• Clear Background: F3• Clear Props: F4• Clear Audio: F5• Logo: F6• Live Video: F7• Search Library: Command-‐F• Show Library SelecLon: Command-‐L
ProPresenter 5 for Mac User Manual
© 2005-2012 Renewed Vision, Inc. ! Page 126 of 131
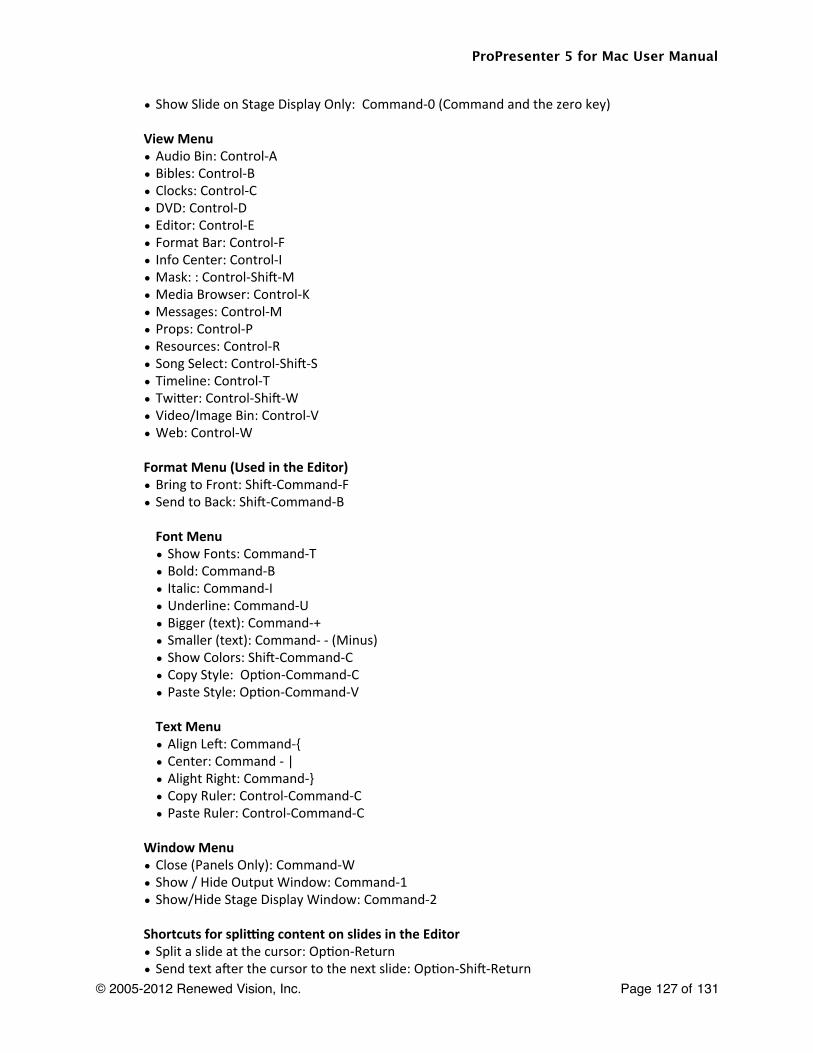
• Show Slide on Stage Display Only: Command-‐0 (Command and the zero key)
View Menu• Audio Bin: Control-‐A• Bibles: Control-‐B• Clocks: Control-‐C• DVD: Control-‐D• Editor: Control-‐E• Format Bar: Control-‐F• Info Center: Control-‐I• Mask: : Control-‐Shid-‐M• Media Browser: Control-‐K• Messages: Control-‐M• Props: Control-‐P• Resources: Control-‐R• Song Select: Control-‐Shid-‐S• Timeline: Control-‐T• TwiGer: Control-‐Shid-‐W• Video/Image Bin: Control-‐V• Web: Control-‐W
Format Menu (Used in the Editor)• Bring to Front: Shid-‐Command-‐F• Send to Back: Shid-‐Command-‐B
Font Menu• Show Fonts: Command-‐T• Bold: Command-‐B• Italic: Command-‐I• Underline: Command-‐U• Bigger (text): Command-‐+• Smaller (text): Command-‐ -‐ (Minus)• Show Colors: Shid-‐Command-‐C• Copy Style: OpLon-‐Command-‐C• Paste Style: OpLon-‐Command-‐V
Text Menu• Align Led: Command-‐{• Center: Command -‐ |• Alight Right: Command-‐} • Copy Ruler: Control-‐Command-‐C• Paste Ruler: Control-‐Command-‐C
Window Menu• Close (Panels Only): Command-‐W• Show / Hide Output Window: Command-‐1• Show/Hide Stage Display Window: Command-‐2
Shortcuts for spliHng content on slides in the Editor• Split a slide at the cursor: OpLon-‐Return• Send text ader the cursor to the next slide: OpLon-‐Shid-‐Return
ProPresenter 5 for Mac User Manual
© 2005-2012 Renewed Vision, Inc. ! Page 127 of 131

TroubleshooUngWhile we hope that you never have any problems with ProPresenter, should something go wrong, please use this secLon to resolve any problems that you are having. Please try the following common soluLons before contacLng us. Most problems are resolved with one of these soluLons.
Sonware Update
If you do experience an issue, please first make sure that your sodware is current. You can do this by clicking on Check for Updates in the ProPresenter menu. If you cannot access the program to check for updates, please go to our website and download the latest version. UpdaLng or reinstalling the program will never wipe out any of your data.
If you are trying to open ProPresenter and the icon bounces in the Dock and then quits, you need to reinstall the program by downloading the latest version from our website.
Reset Preferences
Note: Before reseong preferences it is recommended that you make notes of your preference seongs (ProPresenter menu, Preferences) because they will be reset to factory default seongs.
The first step to resolving many small problems is to reset the ProPresenter preferences. The first way to do this is from the Preferences menu. Select the General tab then click the Reset All Preferences buGon at the boGom of the window. Quit ProPresenter, reopen it, and see if the problem you were having is sLll present. If you are sLll having problems, or if you are unable to open ProPresenter to perform this step you will need to manually reset the preference file on your computer.
To manually reset the preference file you will need to use the Finder. Make sure that ProPresenter is completely closed before conLnuing with this step.
Open a new Finder window and then press Command-‐Shid-‐G. When the “Go” window opens, type ~/Library/Preferences and then click Go. Scroll down in this list unLl you see a file called com.renewedvision.ProPresenter5.plist.
Since this contains the general preferences in ProPresenter, you may want to just move this file to your Desktop while you test to see if this fixes your issues. If your problem persists, close ProPresenter and place this file back in the above locaLon, replacing the new copy of this file that’s now there. If your problem has been resolved, you can delete this file from your Desktop since you confirmed it isn’t working. You will need to reset the preferences in ProPresenter manually ader this.
If reseong Preferences does resolve the issues you’re experiencing, please contact our support team or post a message in our user forum.
ProPresenter 5 for Mac User Manual
© 2005-2012 Renewed Vision, Inc. ! Page 128 of 131

Rebuilding ApplicaUonSupport Data
If reinstalling the applicaLon and reseong Preferences didn’t resolve the problems you’re experiencing, there may be a corrupt file in your ApplicaLon Support data. There are two ways that you can test this, you can rename or move the folder all at once, or you can test individual items within the ApplicaLon Support folder.
To access the ApplicaLon Support folder for ProPresenter, open a new Finder window, press Command-‐Shid-‐G and type ~/Library/ApplicaLonSupport/RenewedVision. You can then name or move the ProPresenter5 folder, or test individual items within that folder.
The most common issue that is resolved here is a corrupt Video/Image Bin. If you open the ProPresenter5 folder you will see an item called “media.pro5pl”. Move this file to your Desktop or modify the name then launch ProPresenter to see if the program works now. The Video/Image Bin will be empty, but the program will work again. You can then delete the original version “media.pro5pl” since there isn’t a way to recover the data.
Other problems may be caused by corrupt thumbnail data. DeleLng the two items with “Thumbnails” and “PosterFrames” in their names (a folder and .plist file for both) will clear the stored thumbnail data and allow ProPresenter to rebuild this informaLon.
If you conLnue having problems even ader those steps, work your way through the files by modifying the file name and tesLng ProPresenter ader each change by closing and opening the program.
Licensing Issues
If you purchased a ProPresenter single or site license directly from us, you should have received an email with your registraLon name and 25-‐digit unlock code. If you purchased through a reseller, you would have been sent a shorter code that needs to be redeemed. You can do this by going to www.renewedvision.com/registraLon. Once you have your 25-‐digit code, keep a copy of it for your records in case you need to install ProPresenter on a new computer.
If you are having trouble entering your license informaLon, please first make sure that you are copying and pasLng your RegistraUon Name and Unlock Code from the email that you received. Dashes are required in the unlock code.
If you get a message saying “Invalid Unlock Code” ensure that you are using the code for the correct version of ProPresenter. Codes do not work between versions of ProPresenter.
If you cannot get ProPresenter to accept your registraLon informaLon and you have verified it is correct, or if you have to enter your registraLon informaLon every Lme you open ProPresenter, follow these steps.
• Quit ProPresenter.• Open a new Finder window, press Command-‐Shid-‐G and type /Library/ApplicaLon Support/.• If there is a folder named “RenewedVision” conLnue to the next step. If there isn’t, click on File>New Folder and create a folder with that name.
• Open the “RenewedVision”. If you should see a folder named “ProPresenter 5”. If not, create this folder before going to the next step.
ProPresenter 5 for Mac User Manual
© 2005-2012 Renewed Vision, Inc. ! Page 129 of 131

• Open the “ProPresenter 5” folder. If there is a file named “mapdata”. Delete the file. You can now try to register your copy of ProPresenter. If this file didn’t exist, go back up to where you see the “RenewedVision” folder again.
• When you see the “RenewedVision” folder, single-‐click on the folder and press Command-‐I on your keyboard to open the Info panel.
• Expand the opLons under Sharing & Permissions at the boGom. Click on the lock icon and enter your password for the computer.
• Change the permission on each of the listed users to “Read & Write”.• Click the AcLon menu (the box with the gear icon) and select “Apply to Enclosed Items”. You should now be able to register your copy of ProPresenter.
If you conLnue to have issues ader trying all of these troubleshooLng steps, please contact our support team or post a message in our support forum to get further help.
ProPresenter 5 for Mac User Manual
© 2005-2012 Renewed Vision, Inc. ! Page 130 of 131

AddiUonal ResourcesTutorial Videos
There are a number of quick tutorial videos that will introduce you to the basics of many of the new features in ProPresenter 5. These are not intended to be training resources, but are simply to help you understand how features work and where things are located.
Click here to watch the tutorials.
FAQ
There is a comprehensive Frequently Asked QuesLons secLon on our website. If we receive quesLons repeatedly we create a new FAQ on this website so that others can easily find the answer without needing to contact support. This makes it easy for you to find answers ader-‐hours and to save yourself some Lme by not having to call. Not every quesLon will be here, so if you can’t find an answer, try one of our other resources or contact us directly.
User Forums
Our user forums are a great place to get help from other users and from our support staff. You must create an account in the forums in order to post messages or replies, but this is a free resource.
Phone and E-‐mail
You can find our direct contact informaLon on our website.
Twi_er
You can find us on TwiGer using these names: @renewedvision, @propresenter, @rvsupport.
ProPresenter 5 for Mac User Manual
© 2005-2012 Renewed Vision, Inc. ! Page 131 of 131