Digestive Parameters and Water Turnover of the Leopard Tortoise.
Upload
khangminh22Category
view
6download
0
Mac OS X
HintsLeopard edition
By Rob Griffiths
Superguide
$12.95

mac os x hints, leopard edition
1
Back in the fall of 2000, I was making the transition from Mac OS 9 to OS X and
finding the new operating system both complex and a bit unintuitive. In particular, I
kept getting tripped up by features that weren’t documented on Apple’s Web site or
covered in OS X’s help files. Being somewhat geeky by nature, I decided to create a
Web site where I could keep track of all the little tips, tricks, and hidden features I was
discovering in OS X. That way, I could easily access the tips from any machine I hap-
pened to be using. And because I knew I wasn’t the only one out there exploring the
inner workings of Apple’s new operating system, I built the site so others could post
their own OS X tips and insights.
I had no grand aspirations for the Web site; I merely hoped it would serve as a useful
resource for OS X tidbits. Over the last eight years, however, that little site—MacOSXHints.com, in case you haven’t
guessed by now—has grown into a collection of more than 10,000 OS X tips, covering every major release from the
initial public beta through 10.5. (Along the way, the site also changed the direction of my career; Macworld purchased
it and hired me in 2006.) The site still focuses on demystifying OS X’s hidden features and sharing useful knowledge
that you won’t find in any help files. And with thousands of contributors from across the globe, it offers a constantly
growing collection of OS X knowledge—all freely searchable.
But the site’s not perfect. Many of the tips assume a high degree of familiarity with OS X and fairly deep techni-
cal knowledge—especially tips involving Terminal. And searching through more than 10,000 hints to find the one
you really want can be complicated, to say the least. That’s where this book comes into play. We’ve scoured not
just MacOSXHints.com, but also Macworld.com, to find the most useful tips and tricks for OS X 10.5 users. We’ve
also rewritten them all in a clear, straightforward fashion, complete with screenshots, to make them as easy to use
as possible.
The tips in this book cover almost every corner of Leopard, from customizing the Finder to unlocking hidden Sys-
tem Preferences to speeding up Safari. Whether you’re a power user looking to bend OS X to your will, or a relative
newcomer hoping to get more from your OS, these tips will give you the inside scoop you’re craving. And we encour-
age you to share the wealth—post your own discoveries and tips at www.macosxhints.com.
—Rob Griffiths, Editor, MacOSXHints.comMarch 2008
Foreword

Mac OS X HintS, LeOpard editiOn
2
Table of ContentsMaster Your System
6 PreferencesCustomized System Preferences are the key to a happy Mac-user experience. These handpicked system tweaks, covering everything from parental controls to secret screen savers, are the perfect place to start.
9 ProductivityWant to work faster, leaner, and smarter? Of course you do. Master these productivity hints and streamline how you capture screens, find menu items, and uninstall any program.
12 ConnectionsSet up and troubleshoot your network and peripheral connections with these can’t-miss hints. We break down the steps for adding functions to Apple’s screen-sharing tool, and teach you the best way to switch between wire-less networks.
14 PrintingDon’t just print—print smarter with these clever hints. They’ll show you what’s new in Leopard and uncover hid-den tricks, like how to quickly cancel big print jobs.
15 DiscsDo more with your discs, including burning bootable copies, setting disc actions, and even freeing those pesky stuck discs.
17 TextWant to add more character to your text? Start by learning the best tricks for working with fonts and adding symbols. We also run down the best methods for cleaning up your spelling checks.
Navigate Leopard
20 FinderThe Finder does so much more in Leopard than just find things. Now you can take Leopard navigation to the next level by learning the lesser-
known tricks the Finder has up its sleeve, like using hidden canned searches.
23 SpotlightApple has taken Spotlight to the next level in Leopard, where it now casts a wider, smarter net. Use these indispens-able searching secrets and never loose a file again.
26 Quick LookMaking its OS X debut, the supersleek Quick Look has more power than its simple interface lets on. Take some time to explore its many functions.
28 Spaces and ExposéDon’t let a plethora of open windows confuse and overwhelm you—bring order to a cluttered desktop or an elaborate multi-screen setup with Exposé and Leopard’s new Spaces.
30 The Dock and StacksHaving trouble figuring out how to best take advantage of the Dock and its new sidekick, Stacks? Try out these twists on OS X’s organizational mainstay, like creating a stack for your Trash.
Unleash OS X’s Programs
34 MailMail probably gets more of your atten-tion than all other pro-grams combined. So don’t just send and receive; organize, personalize, and synchronize with these hints. We’ve also got tips for keeping your Address Book in order and for combining multiple e-mail messages to print together.
Mac OS X HintS, LeOpard editiOn
3
tabLe Of cOntentS
course on the anatomy of a command, as well as steps for copying files and combining different commands.
60 What’s New in LeopardLike most other Mac programs, Terminal is greatly improved in Leopard. We highlight the best new features Terminal has to offer. For instance, it has two new utilities for working with system and network preferences, and it provides more information about kernel extensions.
62 Do More with TerminalLike almost everything in OS X, Terminal has its share of tricks and secrets. Discover goodies like navigating with tabs, opening folders, and playing an old-school, choose-your-own-adventure game in Terminal.
65 Superpowered SearchingYou already know that Spotlight is a great search tool. But when you need to add extra strength to your searches, try these methods in Terminal. We’ll walk you through running a live search, including hidden files, and using metadata.
67 Command-Line LifesaversDabbling in Terminal shouldn’t be taken lightly. It only takes one typo to irrevocably mess up your system. This section explains what commands require extra care, as well as what measures you can take to minimize the risk.
40 iCalTry adding these tips to your iCal arsenal. They’ll show you how to link e-mail messages to events, merge calendars, and view your schedule in Cover Flow mode.
42 SafariBrowsing is too passive a word to describe what a skilled surfer can do in Safari—especially once he or she gets a hold of these excellent Safari hints.
46 iTunesIs it time to crank up your iTunes skills? Start by taking advantage of the program’s less obvious features for mas-tering playlists, podcasts, and Cover Flow. And because iTunes isn’t the only program that works with videos, we also have three tips for improving QuickTime playback.
50 iChatEven non-chatterboxes can appreciate the multitalented iChat. It doesn’t just talk, it also sends data, and it works on mobile devices, so it goes where you go. And for other fun ways to use your built-in camera, take advantage of our Photo Booth tricks.
53 PreviewIf you’re only using Preview to look at pictures, you’ve just scratched the surface. We’ve collected the best hints to show you what this little tool is really capable of doing.
55 DashboardDo you sometimes forget about Dashboard? After reading about all these shortcuts and new features, you’ll never go a day without using it again.
Take Command of Terminal
58 Learn the Terminal BasicsTerminal can seem intimidating until you understand how it works. This section will give you an introduction to using the command line, including a crash
OS X HinTS, LeOpard ediTiOn Editor Kelly Turner
President and CEO Mike Kisseberth VP, Editorial Director Jason Snell
Managing Editor Jennifer Werner Associate Editor Heather Kelly Copy Editor Peggy Nauts, Gail Nelson-Bonebrake
Art Director Rob Schultz Designers Lori Flynn, Carli Morgenstein
Production Director Steve Spingola Prepress Manager Tamara Gargus
Macworld is a publication of Mac Publishing, L.L.C., and International Data Group, Inc. Macworld is an independent journal not affiliated with Apple, Inc. Copyright © 2008, Mac Publishing, L.L.C. All rights reserved. Macworld, the Macworld logo, the Macworld Lab, the mouse-ratings logo, MacCentral.com, PriceGrabber, and Mac Developer Journal are registered trademarks of International Data Group, Inc., and used under license by Mac Publishing, L.L.C. Apple, the Apple logo, Mac, and Macintosh are registered trademarks of Apple, Inc. Printed in the United States of America.
GeT THe COdeTo copy any of the Terminal commands or scripts used in this book, go to macworld .com/3443.

4
mac os x hints, leopard edition
Contributors
Senior editor Christopher Breen answers readers’ questions
and offers troubleshooting advice in his Mac 911 blog. He wrote
the Mac 911 sidebars that appear throughout this book. He is also
the author of The iPod and iTunes Pocket Guide, second edition,
and The iPhone Pocket Guide (both Peachpit, 2007).
Andy Ihnatko is the technology columnist for the Chicago
Sun-Times and the author of the forthcoming Mac OS X Leopard
Book (Wiley, 2008). He is also the creator of several of the
Automator workflows in this book.
Joe Kissell is the senior editor of TidBits (www.tidbits.com) and
the author of Take Control of Easy Backups in Leopard (Tidbits
Publishing, 2007; www.takecontrolbooks.com).
Greg Knauss has been programming computers since he was 13
years old. He wrote “Learn the Terminal Basics” in the Take Com-
mand of Terminal chapter.
Contributing editor Ted Landau continues to ferret out new
ways to get into and out of trouble with your Mac. His latest
book, Take Control of Your iPhone (Take Control Books, 2007),
extends this perspective to the iPhone.
Kirk McElhearn writes about Macs and much more. Visit his
blog, Kirkville (www.mcelhearn.com), for information about
Macs, iPods, books, music, and more.
Special thanks to the readers of MacOSXHints.com for their
generous contributions of tips, insights, and thoughtful analysis
of nearly every aspect of OS X. Without their enthusiasm and
help, this book would not have been possible.
ALSO frOM THE EdITOrS Of Macworld…Get more insider tips and troubleshooting advice from the Mac experts. Our Superguide series offers useful insight and step-by-step instructions for the latest Mac hardware and software.
Each of the books in the series is available in three convenient formats: as a downloadable PDF for immediate access; on CD for easy offline storage; or as a full-color book printed on high-quality paper.
To order any of the Superguide books, go to macworld.com/superguide-offer. Enter the code MWREADER6 to get a discount on your next order.
rob Griffiths is the creator and editor of MacOSXHints.com, a collection of reader-submitted tips and tricks for OS X. He is also a senior editor at Macworld, where he writes the popular Mac OS X Hints blog and column, and covers the latest Mac hardware and software.

Mac OS X HintS, LeOpard editiOn
5
Master Your SystemLearn the Secret Ins and Outs of Settings, Sharing, and Printing in Leopard
hen you move into a new home, you have to clean up, arrange the furniture, do a few repairs, and tweak the lighting before you can finally settle in. Your Mac is no
different. That’s why OS X is overflowing with clever tricks and fixes for customizing your system and how you use it. They can make the time you spend in front of the screen infinitely more productive. And since Leopard isn’t perfect, it’s also good to be aware of possible system glitches and how to troubleshoot them. A little rearranging will go a long way toward making your Mac a more pleasant place to spend your time.
Table of conTenTs
6 Preferences9 Productivity12 Connections14 Printing15 Discs17 Text
W

Mac OS X HintS, LeOpard editiOn
6
MaSter YOur SYSteM
Preferenceshe cornerstone of any good Mac-user relationship is
personalized preferences. Train Leopard to meet all of
your unique needs and whims.
AcceSS InvISIble logIn buttonSIf you have little kids around who love to click on buttons, con-
sider disabling the login window’s Restart, Sleep, and Shut Down
options. To do so, go to the Accounts preference pane and click
on Login Options. (You might need to click on the lock at the bot-
tom of the dialog box first and enter your password.) Deselect
the Show The Restart, Sleep, And Shut Down Buttons option.
But what if you want to put your machine to sleep, restart it,
or shut it down from the login window after you’ve disabled the
buttons? No problem—just make sure your login window is in
Name And Password mode (see “Childproof”). You can set this
permanently in the Login Options window by selecting the Name
And Password option. Another trick is to switch the window in
real time: go to the login window, use the arrow keys to highlight
a user, and press shift-option-return. The window will show the
list of users. In the Name field, type >sleep, >restart, or
>shutdown. Click on Log In or just press return. It’ll take a while
before the munchkins figure that one out.
ReveAl logIn IteMS In the FIndeREver wondered where some of those items in your Login Items
list (in Accounts preferences) came from? In Tiger, you could
hold your cursor over an item to see its path. In Leopard, just
right-click (or control-click) on any login item and then choose
Reveal In Finder from the resulting contextual menu.
T
copY And pASte pARentAl contRol SettIngS If you have more than one child at home, this is an easy way to
create multiple user accounts with identical Parental Control set-
tings. First, set up one account. Then, in the Parental Controls list,
select that account, click on the Action button at the bottom of
the window, and choose Copy Settings For Account. Then, to
apply those settings to another account, select that other ac-
count, click on the Action button, and choose Paste Settings
To Account. Even if you don’t plan on configuring each account
identically; you can use this technique to copy settings and then
edit them as necessary rather than starting from scratch.
uncoveR SecRet ScReen SAveRSTired of Leopard’s built-in screen savers? A slew of hidden Quartz
Composer compositions can add visual variety to your Mac’s
dozing screen. To try them, first quit System Preferences if it’s
running. Go to /System/Library/Compositions and drag as many
of these files as you like from there to your user folder/Library/
Screen Savers. (Create this folder yourself if it doesn’t already
exist.) Not all of these Quartz compositions will work as screen
savers. In general, if you can see a moving image in the Finder’s
preview pane, the file should work. Defocus.qtz, Fall.qtz, Grid.qtz,
Image Hose.qtz, Moving Shapes.qtz, Travelator.qtz, and Wall.qtz
are some neat ones. Once you’ve copied the files, open System
Preferences, select Desktop & Screen Saver, scroll down to the
Other section of the left pane, and select a new screen saver (see
“Fresh Saver”). Clicking on the Options button will let you tweak
the settings on some screen savers.
childproof Once you’ve deselected the Show The Restart,
Sleep, And Shut Down Buttons option, your baby (computer) will
be much safer from your babies (children).
Fresh Saver Access the collection of trippy, secret screen sav-
ers hidden in your /System/Library/Compositions folder.

Mac OS X HintS, LeOpard editiOn
7
MaSter YOur SYSteM
MAke YouR AleRtS vISuAlOne alternative to the aural alert is a visual alert—a screen flash.
This is handy if you’d rather not have your music interrupted by
system beeps or if you keep your volume off. In the Universal
Access preference pane, which Apple provides for people with
physical disabilities, you can opt to see system alerts. Open the
Universal Access preference pane, select the Hearing tab, and
then click on the Flash Screen button. If you like what you see,
select the Flash The Screen When An Alert Sound Occurs option
(see “Silent Flash”).
With this option selected, you’ll hear an audio alert in addition
to seeing the screen flash, unless you’ve muted your Mac’s sound.
So how can you have a screen-flash alert without having to mute
your system’s audio? Go to the Sound preference pane, click on
the Sound Effects tab, and adjust the Alert volume slider to mute.
From now on, any system alerts will result in a screen flash that
will get your attention without making a sound.
SIlence the voluMe-chAngIng beepUsually the point of lowering your computer volume is to make
less noise, not more. To silence the volume-changing beep, hold
down the shift key while pressing the volume-down or volume-up
key. (This doesn’t work when you use your mouse to select the
volume menu on the right side of your menu bar.) If you’re using
a portable Mac and you’ve set the Keyboard & Mouse preference
pane to require the fn key in addition to the volume-changing
key, don’t worry: adding the shift key still silences the beep and
doesn’t require too much in the way of finger gymnastics.
eASIlY ReMove thIRd-pARtY ScReen SAveRSIn Tiger, if you installed third-party screen savers and later
wanted to remove one, you had to navigate to ~/Library/Screen
Savers and then find and delete the unwanted plug-in. In Leop-
ard, you can just go to the Desktop & Screen Saver preference
pane, right-click (or control-click) on the offending screen saver,
and choose Move To Trash in the resulting contextual menu.
Mac 911 enlARge YouR ScReenIf you find interface elements too small to read comfort-ably, OS X will let you zoom in for a better look. Choose System Preferences from the Apple menu, click on Univer-sal Access, and, in the Seeing tab, enable the Zoom option. Now when you press 1-option–equal sign (=), whatever is on your display will be enlarged. (Use the equal sign that ap-pears at the top of the regular keyboard rather than the one
on the keypad.) Press 1-option-hyphen (–) and the display zooms out. If your mouse has a scroll wheel or scroll ball, you can also zoom in and out by simply holding down the control key while moving the scroll wheel up and down.
By clicking on the Options button next to the Zoom entry, you can set the maximum and minimum zoom levels and decide how you want the display to react to your cursor; whether it should scroll only when the cur-sor reaches the edge of the screen, follow the cursor continuously, or keep the cursor centered.
To quickly turn the zoom feature on or off, press 1-option-8.
big picture Universal Access provides a way to zoom in on tiny text.
Silent Flash The flashing alert, available in the Universal Access
preference pane, is a good alternative for the noise averse or
people with hearing impairments.

Mac OS X HintS, LeOpard editiOn
8
MaSter YOur SYSteM
ZooM wIth the tRAckpAdBy default you can just hold down the control key and use your
mouse’s scroll wheel to zoom in and out on your display. But how
can this be accomplished on a laptop that offers no scroll wheel?
Universal Access offers this cool zooming feature: on Apple lap-
tops that allow two-finger scrolling, press control and use your
two fingers on the trackpad. Drag them up and the screen zooms;
drag them down and the image shrinks back to normal size.
FInd out whAt’S onSometimes, when you have Universal Access turned on, your
Mac starts doing all sorts of strange things—using its display
to impersonate an X-ray machine, reciting the name of the cur-
rently selected item, that sort of thing. Usually this is the result
of a slip of the fingers combined with a Universal Access feature
being mistakenly switched on. Leopard can help you quickly
identify the problem. Open the Universal Access preference pane,
and the Show Universal Access Status In The Menu Bar option at
the bottom of the window. That done, you should see a Universal
Access icon in the Mac’s menu bar (see “Instant Access”). Click on
that and you’ll see a list of Universal Access options as well as their
current state—Mouse Keys On, for example. Note that this truly is
a status menu: it only shows what’s on and off. To fix the problem,
you’ll have to go back to the Universal Access preference pane.
uSe MouSe keYS on A lAptopThe Universal Access preference pane’s Mouse tab (called Mouse
& Trackpad on Apple laptops) has long offered Mouse Keys, a
way to use the numeric keypad to control the mouse. But how do
you use this feature on a laptop that has no keypad? Press your
Mac’s number lock key (F6) and use keys 7, 8, 9, U, I, O, J, K, and L
as the numeric keypad.
tRASh tAlkIngThat little crumpling sound your Mac makes when you empty the Trash may sound satisfyingly final, but don’t be lulled into a false sense of security. Traces of your personal information and even entire files can easily be left behind on your machine. Follow these steps to make sure your Trash is gone for good.
Securely erase Your hard disk Before you sell or give away a Mac, make sure that no per-sonal data remains on it. After you’ve copied all your files to your new Mac, restart the old one from the Mac OS X installation disc. Open Disk Utility and select your hard disk from the list on the left. Click on the Erase tab and then on Security Options. Next, choose one of the several erasure methods that are offered. The 7-Pass Erase option is probably sufficient for most people, but if you’re truly paranoid, select 35-Pass Erase, which will make it nearly impossible for anyone, even James Bond, to recover your files. If you’re using a laptop, make sure it’s plugged in. This process can take a long time.
delete Stubborn Files Have a file that just won’t delete? There are third-party solutions, such as Marco Balestra’s handy and free Super Empty Trash (donations accepted; www.faqintosh.com). Or you can use the rm -rf com-
mand in Terminal to remove the file. Unfortunately, if you mess up with that command, you might erase your hard drive.
Here’s a third method to try. It may take longer, but it’s very safe and will work on files that seem immune to all other attempts. Start by creating a new user in the
Accounts preference pane. It doesn’t matter what name or access level you give the new ac-count; it’s going to have a very short life. Once the account is created, move the troublesome file from the Trash into the /Users/Shared folder. Now go to the Apple menu and choose Log Out user name, and then log in as the new user. Open the /Users/Shared folder, and move the pesky file into the new user’s Trash.
Now log out of the new account and log in to your main account. Return to the Accounts preference pane, select the account you just created, and click on the minus sign (–), or just press the delete key. A dialog box will appear, asking you if you’re sure you want to do this. Of the three options—Cancel, OK, and Delete Immediately—select Delete Immediately. The troublesome file, along with the new user account and the disk space it used, will disap-pear. Selecting OK will leave the file on your disk.
Instant Access A menu-bar icon offers a fast way to see what
Universal Access settings you have enabled at any time.
Mac OS X HintS, LeOpard editiOn
9
MaSter YOur SYSteM
Productivityow that your Mac’s settings are customized to your
liking, it’s time to revise how you operate. Dig into
OS X’s best shortcuts and timesaving secrets.
MAke YouR own ShoRtcutSYou know you waste time whenever you reach for the mouse to
activate commonly used commands. But what if the command’s
keyboard shortcut is awkward, or there isn’t one for something
you do a lot? Open up the Keyboard & Mouse preference pane
and create your own shortcuts.
chAnge A ShoRtcut It’s a snap to reassign a shortcut if
it’s listed in the Keyboard & Mouse preference pane’s Keyboard
Shortcuts tab. Just double-click on the existing shortcut and
then press the combination you’d rather use. You can use the
Keyboard Shortcuts tab to change not only program-specific
but also systemwide shortcuts. This can be helpful if a standard
shortcut is hard for you to remember, or when a shortcut in one
program has a completely different function in another.
cReAte A new ShoRtcut The Keyboard Shortcuts
pane is also useful when you want to create shortcuts for com-
mands that don’t have them—even a systemwide command
such as Sleep. To make a Sleep shortcut, click on the plus sign (+)
in the Keyboard Shortcuts tab and set the Applications pop-up
menu to All Applications. Type Sleep (capitalization counts) in
the Menu Title field, and then go to the Keyboard Shortcut box
and press the shortcut you want to use. Click on Add.
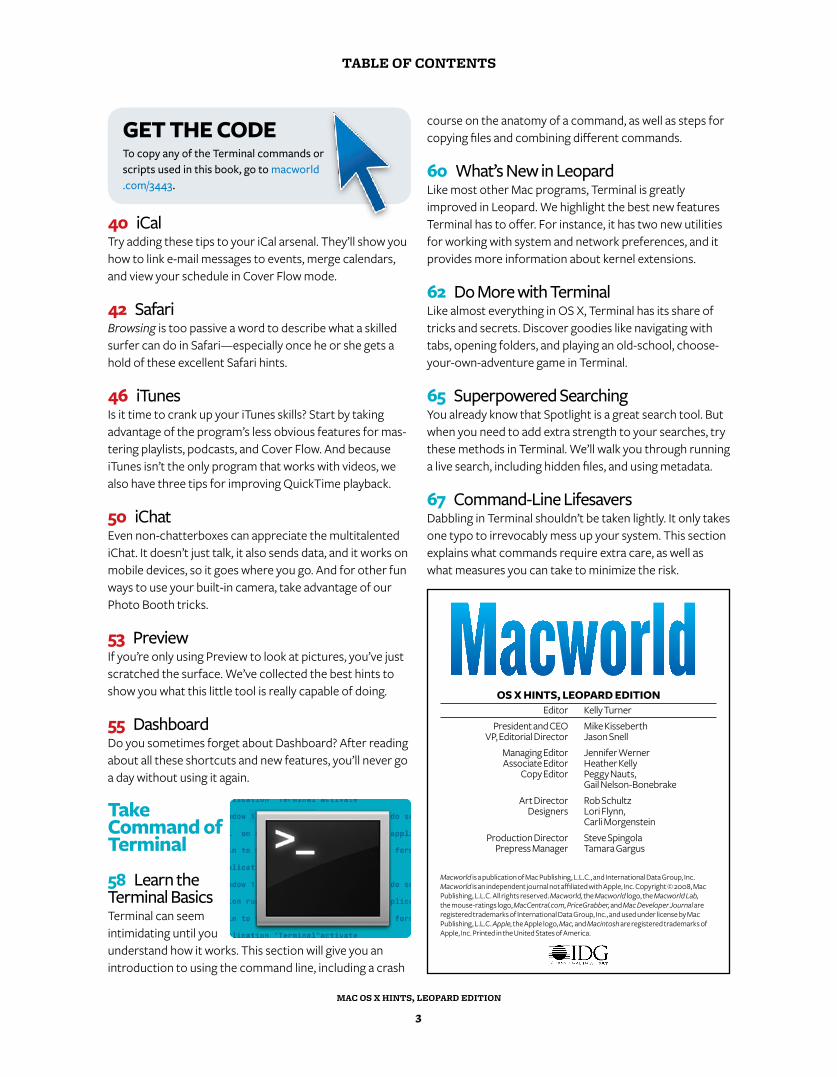
uSe 10.5’S help on Menu IteMSOS X’s help system, freshly revised for Leopard, offers a variety
of ways to get assistance. Instead of simply opening a mini-
browser for a given program’s help files, opening Help—either
by clicking on it or by using the 1-shift-slash ( / ) shortcut—now
displays a drop-down menu with a search box and a list of key
help topics.
But the real power of the new help system is in the search
box; enter a search word or words, and Help will search both the
program’s help files and its menus for the information you’ve
typed. You can then execute any displayed menu command by
clicking on it with the mouse or using the down arrow, highlight-
ing it, and pressing enter.
Alternatively, if you just want some help remembering where
that menu command lives, either hover over (but don’t click on)
it, or use the down arrow to highlight it. When you do, the help
system will show you the location of that command, along with
a can’t-miss-it colorful arrow pointing at that menu item—the
arrow even shimmies around a bit to draw your attention to the
right spot (see “A More Helpful Help”). Instead of wasting time
looking through menus, you’ve found just what you wanted by
typing a few keys.
leARn new ScReen-cAptuRe optIonSThe screen-capture tool—that’s 1-shift-4, which turns your
cursor into a draggable crosshairs—has learned quite a few new
tricks in Leopard. Since the days of 10.2, if you added the control
key into the mix, the capture would go to your Clipboard, instead
of to a file. (This is a great way to grab a quick screenshot for
an iChat session, by the way. Just press 1-shift-control-4, drag
around the area you want to capture, release, then switch back
to iChat and press 1-V to paste.)
With Leopard, Apple has found new uses for the shift, space,
and option keys as well. If you start a screen capture, either with
or without the control key, you can change how the selection
A More help-
ful help The
floating arrow
in the new Help
menu will point
out the com-
mand you’re
looking for.
N

Mac OS X HintS, LeOpard editiOn
10
MaSter YOur SYSteM
FullY unInStAll pRogRAMS Installing Mac applications is a piece of cake, but what about un-
installing? Unlike the Window’s OS, OS X has no strange .dll files
or registry, and programs typically install everything they need
to run within the application itself (excluding some settings files
area functions by using the following keys—note that you can
release the original keys once the crosshairs appear, as long as
you’ve started dragging, and you keep the mouse button down.
SpAcebAR Press and hold the spacebar once your region is
the desired dimensions, and the size of the current region is then
locked and can be dragged around the screen.
ShIFt Press and hold the shift key, and one side of the
region will be locked, based on which way you then move the
mouse. For instance, if you press and hold shift, and then move
your mouse down, you’ll only be able to resize the region verti-
cally; the horizontal size will be fixed. Move the mouse left or
right, and you can resize the region horizontally while keeping the
vertical size fixed.
optIon Press and hold option while dragging your region,
and you’ll change the way the region grows as you drag. By
default, your region is anchored at the upper left corner; when
you press option, the anchor point moves to the center of the
current region, which expands in all directions from that point.
You can even combine some of these keystrokes. Shift
and the spacebar together will allow a fixed-size region to be
dragged in either a vertical or a horizontal direction, depend-
ing on which direction you first move the mouse after pressing
the keys. If you combine shift and option, then you can expand
your region from the center, restricting either the vertical or
horizontal size.
ReoRdeR FIle nAMeS wIth leAdIng SpAceSThere’s an old trick many Mac veterans use to force certain files
and folders to the top of directory listings: they insert leading-
spaces at the beginning of the file’s or folder’s name, which
forces that item to the top of any view that’s sorted by name.
Items with more spaces at the front of their names go closer
to the top of the list. With previous versions of OS X, you could
select these files using the keyboard, too: you just pressed the
spacebar while browsing a directory with such files in it, and the
first one would be selected.
In 10.5, however, the spacebar has been assigned a new
task in Finder: it invokes Quick Look. You can still use the
old leading-space trick by adding the option key to the mix.
When viewing a folder containing a file with a space for its
first character, press and hold option, then press the space-
bar. This will select the first file, without invoking Quick
Look. If any of your files have multiple spaces at the start
of their names, you can press the spacebar again to select
them—there’s no need to hold down the option key after
the first press of the spacebar. If you want to preview a file
with a space before its name, wait just a bit after selecting
the file or folder, then press the spacebar again to invoke
Quick Look.
Mac 911 hunt down pRoceSSoR hogSHas your Mac suddenly become sluggish? The problem may be a hidden program that doesn’t pop up in the Force Quit menu. To spot these troublemakers, launch Activity Monitor (/Applications/Utilities) and, from the pop-up menu at the top of the window, choose My Pro-cesses. This shows the activity of any currently running applications (and their associated helper programs) and widgets. Keep in mind that none of your Mac’s hidden Unix processes appear in the window (which is good, because you don’t want to mess with this stuff unless you know what you’re doing). When you’ve located an item that appears to be gumming up the works (a helper program that didn’t quit with its host program, for example), select it and click on the Quit Process button at the top of the window.
Activity Monitor offers an additional advantage: it can show you what’s occupying your Mac’s mind. Just click on the CPU column to see which applications are hammering on your Mac’s CPU. Or take a look at the Real Memory column to view the RAM hogs you’re running.
If quitting the hidden process doesn’t solve your slowdowns, try restarting your Mac. This will usually clear out the cobwebs and get your system back up to speed.
Attention grabber Use Activity Monitor to see which processes are taxing your Mac’s processor.

Mac OS X HintS, LeOpard editiOn
11
MaSter YOur SYSteM
option that will automatically remove all the program’s files. If
you don’t see this option, check the program’s documentation or
online help for uninstall instructions.
MonItoR YouR cpu coReSActivity Monitor’s CPU pane is nice, but if you want a bigger pic-
ture of what’s going on inside your Mac’s CPU, navigate to
your user folder/Library/Application Support/HWPrefs and
launch the CPUPalette program. (If you don’t find it there, insert
your Leopard install disc, click on Optional Installs, select Xcode
Tools, then Packages, and double-click on CHUD.pkg; that will
install CPUPalette.) It will display two graphs showing how busy
your CPU’s cores are, and let you disable one or more of them
(see “CPU Watching”). Click on the oblong button in the upper
right corner to reveal a settings panel where you can adjust
transparency, sample interval and history, and chart format. You
can drag the program to your Dock, sidebar, or toolbar for fast
future access; to quit it, click on the red close button.
Speed up FoldeR ActIonSFolder actions—scripts you can attach to specific folders—have
been available in OS X since version 10.2. In Leopard, a Folder
Action Dispatcher program triggers them, checking for modifica-
tions in a folder at a specified interval. Unfortunately, the default
interval is 180 seconds, which can sometimes be way too long.
Because Folder Action Dispatcher is scriptable, you can change
that interval. Open Script Editor (/Applications/AppleScript), and
type the following (all on one line):
tell application "Folder Action Dispatcher" to set polling interval to x
Replace x with your desired polling interval in seconds. Click
on the Run button in the toolbar, and voilà. If the Script Editor
asks where Folder Action Dispatcher is, browse to /System/
Library/CoreServices/.
in your user folder). As a result, what is almost always a laborious
process on a Windows PC is a very quick operation on a Mac.
To uninstall most programs on a Mac, go to the Applications
folder. Drag the program’s folder to the Trash and empty the
Trash. That’s it—you’re done. It’s true that there will still be some
small bits related to the application left over. So if you really want
to make sure you get everything, look in your user folder/Library/
Application Support for any references to the program. Also
check in your user folder/Library/Preferences for the program’s
preferences. If you find something related to the uninstalled
program, you can drag it to the Trash. But there’s really no need
to—the files you find won’t cause any damage if they’re simply
left alone.
A small number of programs require you to double-click on
an installer to install them. If that was the case, try rerunning
the installer first. After you launch it, you should see an uninstall
cpu watching The CPUPalette program, located in your user folder/Library/Application Support/HWPrefs, provides more information than the Activity Monitor.
Geek IT Up tuRbochARge MIce And tRAckpAdSDoes your mouse or trackpad move slower than you’d like? If your desktop is spread across two 30-inch LCD monitors—or you have some other deluxe setup—reaching the File menu with a poky cursor can feel like a grueling event in the Elbow Olympics. When maxing out the settings in the Keyboard & Mouse preference pane isn’t enough, you can use a simple Terminal command to give your built-in trackpad or stock Apple mouse a speed boost. Open Terminal (/Applications/Utilities) and type one of the following commands (with no spaces before the periods, and the command on one line):
If you have a mouse:
defaults write -g com.apple.mouse .scaling number
If you have a trackpad:
defaults write -g com.apple .trackpad.scaling number
The number at the end of each command must be replaced by a number indicating the speed you’d like to use. The higher the number, the faster the tracking will be. The default value for maximum mouse speed is 3.0; maximum trackpad speed is 1.5. You might try a starting value of 5.0 for your turbocharged mouse, and 2.5 or 3.0 for a turbocharged trackpad.
The easiest way to make your changes take effect is to log out and then log in again. Just take it easy with the increases, as you may find that a superfast cursor is unusable. Also note that if you ever move the speed slider in the Keyboard & Mouse preference pane again, you’ll override your turbo settings.

Mac OS X HintS, LeOpard editiOn
12
MaSter YOur SYSteM
Connectionsetworking and screen sharing in Leopard are simpler (and
cooler) than ever, but they’re not without their glitches.
Here are some useful tips so you don’t miss a connection.
poweR up ScReen ShARIngYou can add some hidden functions to the Screen Sharing tool.
Quit Screen Sharing, switch to Terminal, and type the following:
defaults write com.apple.ScreenSharing 'NSToolbar Configuration ControlToolbar' -dict-add 'TB Item Identifiers' '(Scale, Control,Share,Curtain,Capture,FullScreen, GetClipboard,SendClipboard,Quality)'
This code should all be entered as one line. Note that there is a
space after ControlToolbar'. (You can also copy and paste
the code directly from macworld.com/3308.)
When you relaunch Screen Sharing, you should see five new
buttons and a slider on your toolbar. (If you can’t see the toolbar,
use View: Show Toolbar to make it visible.) See “Customize Screen
Sharing” for a rundown of what each button does. These features
don’t always work flawlessly, but for the most part they run just
fine. You can customize the toolbar as you wish—for example,
using 1-drag to rearrange the icons. To undo this hint, go back to
View: Customize Toolbar and drag the default set back up onto
the toolbar.
customize Screen Sharing The second button in the row A switches between letting you control the remote Mac (the default)
and simply observing the other machine. The third one B switches between allowing the person at the remote Mac to use its key-
board and mouse (the default) and locking him or her out. The fourth button C locks the other Mac’s screen, displaying an all-black
background, a huge lock icon, and any text you enter after clicking on the button. The fifth button D captures the remote Mac’s full
screen to a local file; the system will ask you to pick a name and a save location. The sixth button e toggles between windowed (the
default) and full-screen modes. In full-screen mode, the toolbar floats in the upper left corner of the screen. To exit full-screen mode,
click on the X that appears in the floating toolbar. If screen updates are going slowly, you can use the slider f to reduce the image
quality—all the way down to a badly dithered black-and-white view—and speed things up.
a b c d E F
N

Mac OS X HintS, LeOpard editiOn
13
MaSter YOur SYSteM
FASteR ScReen ShARIngYou probably know that you can share screens with another
Mac from iChat and the Finder. But a more powerful tool for this
purpose, cleverly named Screen Sharing, is hidden in /System/
Library/CoreServices (see “Making a Shared Connection”). When
you launch it, you’ll see a dialog box asking for the network
address of the remote machine. If you don’t know the IP address,
quit Screen Sharing, switch to Terminal, and type (all on one line):
defaults write com.apple.ScreenSharing ShowBonjourBrowser_Debug 1
Now launch Screen Sharing again and revel in the new Bon-
jour Browser window, where you can pick the machine to which
you’d like to connect. You’ll still have to supply a user name and
password, but at least you don’t have to enter the full network
address. To make future access a bit easier, select Add To My
Computers to add that machine to the Bonjour Browser window.
To get rid of the Bonjour Browser window, trash the com.apple
.ScreenSharing.plist file in your Library/Preferences folder.
copY text between two MAcSLeopard’s screen sharing includes a way to send items to and
from a remote Mac’s clipboard, using the Edit: Send Clipboard
and Edit: Get Clipboard menu items. But it turns out there’s a
simpler way to retrieve a snippet of text from the remote
machine: you can drag and drop text to and from the remote
Mac. Just highlight the text in the remote Mac’s browser, press
and hold the mouse button down for a second, then drag the text
off the edge of the screen-sharing window. After a brief delay,
you’ll see the dragged text appear over your cursor on the local
Mac. Now continue dragging to the destination application, then
drop the text. This trick only works with text; if you need nontext
data from the other machine, use the Clipboard functions. And
if you need to transfer files, you’ll have to do that as if you were
sitting in front of that Mac—drag a file onto a mounted server,
for instance, or drop it into a user’s drop box.
get MoRe detAIlS About AIRpoRt The AirPort icon in the Leopard menu bar contains a lot of useful
information that’s hidden by default. To reveal
it, hold down the option key when you click
on the AirPort menu icon. When the menu
opens, you should now see more detailed
information below the name of the network
to which you’re connected: the MAC address of the wireless sta-
tion, which channel is in use, the signal strength (RSSI), and finally
an indication of the data transmission rate. A perfect connection
would be represented by an RSSI of 0; a negative number means
the signal is less than perfect. With the menu still open and the
option key pressed, move your cursor over one of the other
networks on the list. When you hover over the network name
for a second, a tool tip will pop up showing the network's signal
strength and what type of security it's using. This is useful for
quickly finding the public connection with the strongest signal.
FlY between AIRpoRt netwoRkSSuppose you need to connect regularly to two different wireless
networks—at work and at home, for example. Of course, each
one uses a different network setup, such as DHCP in one case
and a manual IP address in the other. In earlier versions of OS
X, that meant you had to set up a separate network location for
each and switch between them. Now you can create multiple
AirPort configurations for the same network location. This allows
for seamless switching without having to select a different loca-
tion each time, saving some hassle and mouse-clicking. Simply
open the Network preference pane and select Network Port
Configurations from the Show pop-up menu. Then click on the
New button and select AirPort from the Port pop-up menu.
get netwoRked on-the-goOS X makes it very easy to connect two Macs via a FireWire
cable—you don’t even have to use Target Disk Mode. On both
computers, go to the Network preference pane, select Network
Port Configurations from the Show pop-up menu, and enable
the Built-in FireWire option. Next, go to the Sharing preference
pane (again, on both computers) and click on the Start button to
activate Personal File Sharing. This is much faster than using an
Ethernet connection to transfer files. There’s only one problem:
if you’re already using the FireWire port to connect peripheral
FireWire devices, either the peripheral devices or the network
connection may not work. The simplest workaround is to discon-
nect the peripheral devices while using the FireWire network.
Making a Shared connection Simply enter an IP address to
open up a new Bonjour Browser window.

Mac OS X HintS, LeOpard editiOn
14
MaSter YOur SYSteM
PrintingS ome subtle changes have been made to the printing
settings in Leopard. Familiarize yourself with what’s
new and learn a few new tricks before pressing 1-P.
MAke the pRInteR Icon dISAppeARLeopard has changed the way your printer icons are handled.
After printing a document, the printer icon will remain in the
Dock until you quit it yourself, instead of vanishing when the print
job is completed. To bring back the auto-vanish behavior, print a
test document. When the print job completes, control-click on
the printer icon in the Dock and choose Auto Quit from the pop-
up menu (see “Removing the Printer Icon”). Now the printer will
vanish from the Dock after each print job. You’ll have to repeat
this process for each printer you use, but only once per printer.
ReSet the pRIntIng SYSteMPrinter Setup Utility in Tiger provided a Reset Printing System
command that could often solve printing problems when all
other troubleshooting techniques failed. But Printer Setup Utility
is nowhere to be found in Leopard. Fortunately, Reset Printing
System is still around, just well hidden. To find it, open the Print
& Fax preference pane, and then right-click (or control-click) on
any printer in the Printers list; you’ll find the reset command in
the contextual menu that appears.
uncoveR AdvAnced pRInteR optIonSAnother process that required the Printer Setup Utility tool-
bar was connecting your Mac to a nonstandard printer, or to a
standard printer using a nonstandard protocol (such as some
PCL-only Windows-shared printers). Previously you used the
Advanced setup screen by clicking on the Add button in the
Printer Setup Utility’s toolbar, then option-clicking on the More
Printers button and selecting Advanced from the pop-up menu.
In Leopard, this screen has moved to a more accessible spot, but
it’s hidden by default. To reach it in OS X 10.5, first click on the
plus sign (+) in the Print & Fax preference pane. When the next
window appears, right-click on its toolbar and choose Custom-
ize Toolbar. When the customization sheet appears, drag the
Advanced button into the toolbar, and click on Done. When you
click on this new button, you’ll be presented with an advanced
configuration pane.
QuIcklY cAncel pRInt jobSThere are many ways to stop print jobs, including using the Printer
Setup Utility and disconnecting the printer’s cable from the
computer. But using Printer Setup Utility can be time-consuming,
meaning you’ll waste more pages before the job terminates, and
pulling the cable may
leave your print job or-
phaned in the queue.
Here are two fast and
easy alternatives. If you
are comfortable in Ter-
minal, you can kill pend-
ing print jobs by entering
this simple command
and pressing return:
cancel -a -
But opening Terminal
takes a bit of time, and
when you’re trying to
cancel a print job, time is
of the essence. So here’s
an even simpler solution.
Open Script Editor, in
/Applications /Utilities,
and enter the following
lines:
do shell script "cancel -a -"display dialog "No more printing jobs"
buttons ["OK"] default button 1Save the script somewhere convenient, such as a folder in
your user’s Documents folder. In the Script Editor’s Save dialog
box, give your program a name, and set the File Format pop-up
menu to Application. After saving the file, locate it in the Finder
and then drag it to the sidebar, up to the toolbar, or down into
the Dock. Now when you need to kill a print job, just click on the
new icon. If you have a fast connection to a printer with lots of
RAM, the job may already be gone from your Mac. If so, powering
down the printer is the best solution.
Add new pRIntIng ShoRtcutSIn 10.5, you can now assign keyboard shortcuts to entries in the
Print dialog’s PDF drop-down menu. To set up the shortcuts,
open the Keyboard & Mouse preference pane, then click on the
Keyboard Shortcuts tab. Click on the plus sign at the lower left
to add a new shortcut, and when the new dialog appears, leave
the Application pop-up menu set to All Applications. In the Menu
Title box, enter the exact text of the PDF menu command for
which you’d like to create a shortcut. For the Keyboard Shortcut,
enter the shortcut you’d like to use to activate the chosen menu
item. Once you have the key combo entered, click on the Add
button. Now switch to any application and press 1-P. You can
use your new shortcut once the Print dialog appears.
Removing the printer Icon Set
up the printer icon to automatically
disappear when you’re not using it.

Mac OS X HintS, LeOpard editiOn
15
MaSter YOur SYSteM
o more with your discs than just play music and install
programs. Burn, borrow, and reboot better.
buRn A bootAble duplIcAte oF A dIScWant to make a backup copy of your OS X install DVD? You could
burn a copy from the Finder, but you wouldn’t be able to boot
from it. The simple way to create a bootable duplicate is to use
Disk Utility to make a disk image and then burn a new disc.
First, launch Disk Utility and mount the CD or DVD. Select the
disc from Disk Utility’s left column. Then select File: New: Disk
Image From name of disc. A Save dialog box appears. From the
Image Format pop-up menu, select DVD/CD Master. Click on
Save. After Disk Utility has created the image file, select Images:
Burn. In the dialog box that appears, select the image file and
click on Burn. Insert a blank disc when prompted.
DiscsD
Mac 911 InStAllIng SoFtwARe wIthout A SupeRdRIve If you have an older PowerPC Mac with a CD-RW drive, you may be stumped as to how to in stall software that comes on a DVD—for example, if you want to erase the drive and install a fresh copy of Tiger before you donate the Mac to a friend or sell it on eBay. Of course, you could just purchase an external DVD drive. But if you have access to other Macs, you can probably get by without the additional investment.
Installing oS x To install a copy of the OS, you’ll need to locate a PowerPC-based Mac that has a DVD drive (check with a friend or a local Macintosh user group). And yes, it does need to be a PowerPC system; although you can swap data between an Intel Mac and a PowerPC Mac, you can’t use one to install the Mac OS on the other. (They each run different versions of the Mac OS.)
Once you have that other Mac, string a FireWire cable between it and your old iMac. Restart your iMac while holding down the T key to boot into Target Disk mode (you’ll know you’re there when you see a FireWire symbol bouncing around the screen). Fire up the borrowed PowerPC Mac, insert the Tiger disc into its media drive, and double-click on the installer application. That Mac will reboot from the Tiger disc.
Once the installer is running, select your old iMac’s hard drive as the destination for the installation. (When you’re
in Target Disk mode, that Mac will treat your iMac’s internal drive like any other local hard drive.) Choose the Erase And Install option by clicking on the Options button in the ap-propriate screen. The installation will proceed, and in half an hour or so, you’ll have a clean copy of Tiger running on the iMac.
other Software If you’re trying to install other software—such as Apple’s iLife—you can
follow the same steps, or you can create a disk image. For the latter, plunk the disc
into any Mac (Intel or PowerPC) you have access to and launch Disk Utility (found in /Applications/Utilities). Select the software disc in the list of volumes, and
choose File: New Image From Disk. In the Convert Image window that ap-
pears, choose DVD/CD Master from the Image Format pop-up menu and leave the En-
cryption pop-up menu set to None. Now click on Save to create the image.
Once the image is saved, copy it to the Mac you want to install it on (you can do this while the Mac is still in FireWire Target Disk mode). Once the image is copied over, you need to press the Mac’s power button to restart it. When it boots, locate the disk image you created and double-click on it to mount it. Once it’s mounted, you can treat it just like a DVD. Run the installer, and the software will soon be on the Mac’s hard drive.
cReAte A MultISeSSIon dIScDo you hate being wasteful? There’s a way to record more than
once, even to so-called “write-once” CDs and DVDs. You can’t
erase what’s already there, but you can keep adding content to a
disc until there’s no more free space left. Use Disk Utility to set up
the CD or DVD as a multisession disc the first time you burn it.
To begin, launch Disk Utility, create an image file of the data
you want to burn, and then select Images: Burn. In the dialog box
that appears, locate the image file and click on Burn. You are now
ready for a crucial step: in the window that appears, select the
Leave Disc Appendable option. Click on Burn, and you’re done.
To add more data, you must again use Disk Utility; you cannot
add data via the Finder’s Burn command. You can repeat the ap-
pending process until the disc is full. When you mount a disc with
multiple sessions, each session will mount as a separate volume.
Mac OS X HintS, LeOpard editiOn
16
MaSter YOur SYSteM
sure you have the Apple Remote in hand, and press and hold the
Menu button during startup. Just as if you were at the machine,
the boot loader will appear. From here, use the Forward and
Backward buttons to cycle between the two operating systems,
and activate the desired one by pressing Play. No muss, no fuss,
no keyboard required.
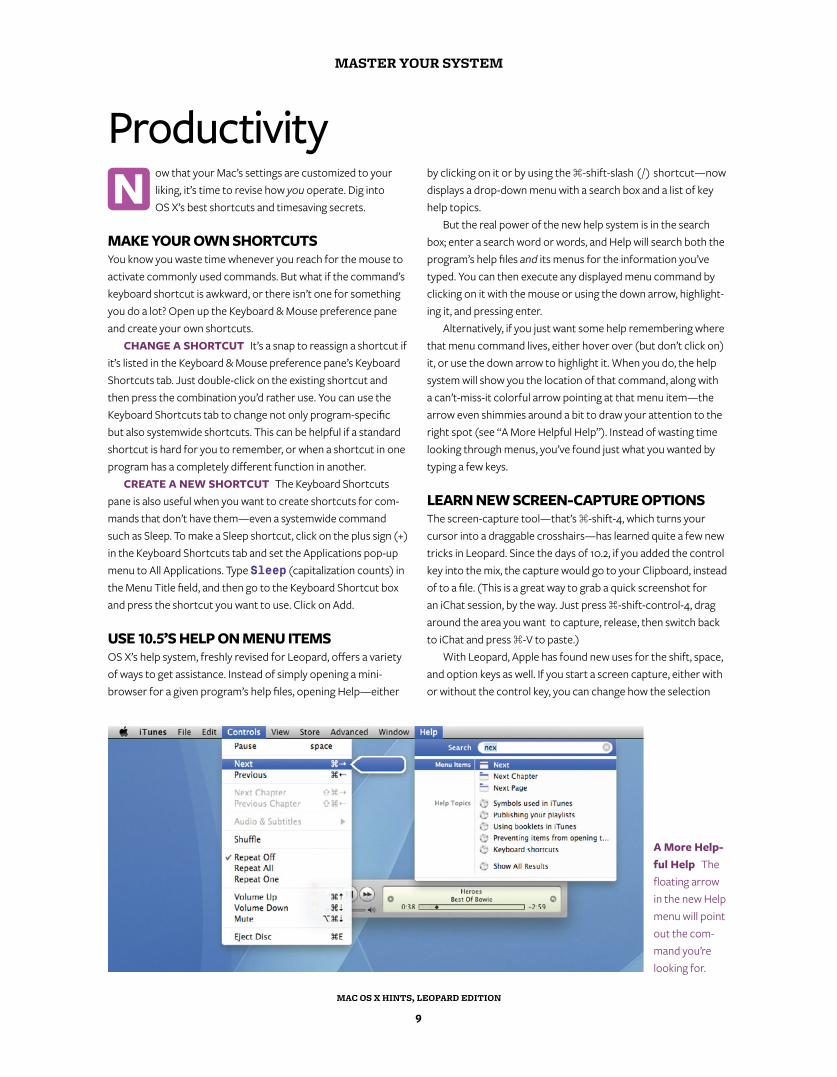
Set dISk ActIonSExactly what happens after you insert a disc depends on settings
in your CDs & DVDs preference pane. By changing them, you
can make the system launch a particular program, switch to the
Finder, run an AppleScript, ask you what to do, or do nothing at
all when you insert a disc. Pop-up menus let you set the behavior
for each disc type—from blank CDs to video DVDs. Knowing this
can save you a step if, for example, you’d prefer that Photoshop,
instead of iPhoto, launch whenever you insert a picture CD.
Hold down the option key while you click on one of the
menus, and you’ll see a new item—Options—at the bottom.
There’s actually only one option: Perform Action At Login. Select
it, and the action you’ve chosen will occur when you log in as well.
For example, if you want any movie disc you’ve left in your laptop
to start playing as soon as you log back in, set the When You In-
sert A Video DVD menu to Open DVD Player. Then hold down the
option key, click on the menu again, choose Options, and select
Perform Action At Login.
ReMedY Stuck dIScSHow do you get a disc out? Easy, just press the eject key. That
works most of the time, but what should you do when a disc gets
stuck? First, quit all your running programs. Sometimes an open
file might cause OS X to think that a disc is busy when it’s not.
After quitting, try ejecting the disc again. If that doesn’t work,
and if you have an older Mac, look for a small hole close to the
CD-DVD tray. If it has one, insert a straightened paper clip into
the hole and gently press—that should eject the disc. If your Mac
doesn’t have this hole, try restarting your computer and holding
down your mouse or trackpad button while it boots.
If you’re using a laptop, try shutting it down, positioning it
upside down in your lap, and then booting it up while holding the
mouse or trackpad button down. If all these tricks fail, you may
have to take your Mac to your nearest service provider—some-
times discs really are just stuck.
Select boot cAMp StARtup dISc SAnS keYboARdIf you own an Intel-based Mac, and have installed Windows on
it via Apple’s Boot Camp, then you’re familiar with how you tell
your Mac whether to boot into OS X or Windows: just hold down
the option key at startup, then use the arrow keys or mouse to
choose the Windows or OS X partition.
But here’s a fun alternative—good for those situations when
you can’t reach the keyboard after choosing to reboot. Make
Geek IT Up uSe extRA SpAce on A cd-RWhen you burn a CD-R from the Finder, you may be wasting precious space. Many CD-Rs today ship with 700MB of capacity, yet the Finder will only use 670MB of that space. How can you use the extra space? It requires a quick trip to Terminal, but the solution is pretty simple.
First create a new folder in the Finder and drag in all the items you wish to burn (up to 700MB). Open Terminal and type cd ~/Desktop, and then press the enter key (this changes Terminal’s active directory to your Desktop folder). Now type hdiutil makehybrid -o myburn.iso (there’s a space after iso), but don’t press enter. Instead, switch to the Finder, drag and drop the folder you just created onto the Terminal window, and press enter. Terminal should fill in the full path to the folder, and the enter key will then execute the command.
You’ve just used the hdiutil Unix command to create a hybrid disk image named myburn.iso (you can choose whatever name you like, but use .iso for the extension). You’ll see the message “Creating hybrid image” in your Terminal window, as well as an indication of the task’s progress. When finished, you should see a disk image called myburn.iso on your desktop. You can now either use Disk Utility to burn this image, or you can just type hdiutil burn ~/Desktop/myburn.iso in Terminal, insert a blank CD-R when prompted, and just sit back and wait. When it’s done, you should have a burned CD-R with nearly 700MB of data on it.

Mac OS X HintS, LeOpard editiOn
17
MaSter YOur SYSteM
o more with your words. These hints will help you
master fonts and learn key shortcuts for dealing with
characters.
Solve pRobleMS wIth Font book Whether you want to disable a typeface or add a new one, it's
helpful to know how OS X handles fonts. All Macs include a basic
font-management tool called Font Book (/Applications) that
lets you see a list of all your fonts in one window. Here you can
preview, or get detailed information about, any font. Some, such
as Bookman Old Style and Arial, even come with educational
descriptions of their backgrounds. You can also use Font Book
to deactivate fonts—in other words, to turn them off without
removing them from your system.
Font Book is most useful for dealing with common font
problems. For instance, when you install applications, sometimes
they place newer versions of system fonts in your Fonts folder.
This can result in duplicate fonts, which might cause problems
in some applications. To resolve this, click on the Font column,
press 1-A to select all, and then choose Edit: Resolve Duplicates
(see “Don’t Be Duped”).
You can also use Font Book to check for font corruption,
which can cause application crashes and other unexpected be-
havior. Select all the fonts in the Fonts column again; then choose
File: Validate Fonts. Font Book will indicate problematic fonts in
the Font Validation window. To remove a font, select the check
box next to its name and then click on Remove Checked.
pRevIew YouR FontS Prior to 10.5, you could preview a font in Font Book or in an
application that supported font previews. In Leopard, there are
several new ways to preview fonts. If you just want a quick idea of
what your fonts look like, open a fonts folder (your user folder/
Library/Fonts, Library/Fonts, or /System/Library/Fonts) in the
Finder. In List view, the file icon will contain a very small preview
of an uppercase A and a lowercase g in that font. In Column view,
you’ll see a slightly larger version in the preview pane. Switch to
Icon view, and you’ll get a slightly larger preview. Switch to Cover
Flow, and you’ll get still larger, flippable icons. The best way to
preview fonts, though, is with Quick Look. Select a font file in the
Finder, then press the spacebar. Instead of seeing just the A and
the g in that font, you’ll see uppercase and lowercase versions
of the alphabet, along with the digits 0 through 9. This makes it
simple to get a quick glance at a font.
Seek SYMbolSWhether it’s the copyright symbol (©), the divide character
(÷), the registered trademark symbol (™), or the euro symbol
(€), sometimes you need a character that isn’t printed on your
keyboard’s keys. OS X has a few utilities that can help you find
what you want.
The Keyboard Viewer (found in the International prefer-
ence pane's Input Menu tab) shows you an on-screen version of
your keyboard. Just select a font from the tool’s Font menu and
experiment with pressing combinations of option, shift, and 1
TextD
don’t be duped Font problems are often as easy to solve as looking for duplicates using Font Book.

Mac OS X HintS, LeOpard editiOn
18
MaSter YOur SYSteM
until you see the special symbol you’re after. When you do, you’ve
discovered the key combination you need to access it. Using the
Character Palette to do this is even easier. It shows you every
symbol you can create from any font. Best of all, it organizes the
symbols by group—for example, Arrows or Mathematical Sym-
bols. Choose a symbol and click on Insert to put it in your text.
In many programs—including the Finder, Safari, Apple’s Mail,
and more—all you need to do to open the Character Palette is
select Edit: Special Characters (see “Cast of Characters”). Anoth-
er way is to use the Input Menu, represented by a small flag icon
on your menu bar. To activate this, open the International prefer-
ence pane and click on the Input Menu tab. Select Character
Palette and Keyboard Viewer. Then select the Show Input Menu
In Menu Bar option. Your region’s flag should appear in the menu
bar. Click on this flag to access a menu where you can choose to
open the Character Palette or the Keyboard Viewer.
AcceSS SYMbolS YouR own wAYBut what if you don’t want the Input menu’s flag taking up
precious space in your menu bar? Luckily, you can access the
Character Palette and Keyboard Viewer from your Dock, sidebar,
or toolbar—if you know the trick.
Navigate to /System/Library/Components, control-click on
the file called CharacterPalette.component, and choose Show
Package Contents from the contextual menu. In the window that
opens, navigate to the Contents/SharedSupport folder, where
you’ll see a file called CharPaletteServer. This is the program
that displays the Character Palette. Drag it directly to your Dock,
sidebar, or toolbar to make a version of it appear there for quick
access. (This creates an alias; you can’t move the program itself,
as you lack the rights to do so.)
cast of characters Don’t miss a single umlaut or accent in
your correspondence and documents.
To do the same with the Keyboard Viewer, navigate to
/System/Library/ Components again, control-click on Keyboard-
Viewer.component, and choose Show Package Contents from
the contextual menu. Open the Contents/SharedSupport folder
inside, and drag the KeyboardViewerServer file to your Dock,
sidebar, or toolbar.
Once you’re sure everything works, return to the Interna-
tional preference pane and disable the checked items in the Input
Menu tab. Your menu-bar space will be yours once again.
Mac 911 tAke contRol oF oS x SpellIng checkeROS X’s built-in spell-checker feature becomes smarter as you train it. If it underlines a word that you know is right, simply control-click on the word and select Learn Spelling from the contextual menu. But if you acciden-tally make it learn the wrong words, or want to move your customized dictionary from one Mac to another, these tips will help:
Move It Want to replace a puny spell-checker dictionary on one Mac with the more robust dictionary from another Mac? Travel to your user folder/Library/Spelling and look for the en file. This file contains all of your additions to the spelling dictionary. (Note that you’ll see this Spelling folder only if you’ve added at least one word to the spell-checker dictionary.) To make the move, copy this en file to the same location on your second Mac, replacing the en file on that Mac. (Move the original file to a safe location in case you’re unhappy with the results of your work.) Restart your Mac to begin using the new file.
edit Additions To review the user additions to the spell-checker dictionary, download a copy of Bare Bones Software’s TextWrangler tool (free; macworld.com/1725). Open the en file in TextWrangler and, from the Text Options pop-up menu at the top of the window, select Show Invisibles. You’ll find that the additions are now separated by a red upside-down question mark (¿).
To edit user additions, delete any additions you don’t care for or add new ones, separating them with this red character, which you’ve copied from within the document. Save the file, and then log out and log back in again for the changes to take effect.

Mac OS X HintS, LeOpard editiOn
19
navigate LeOpard
Navigate LeopardMove Around OS X Like a Pro Using Leopard’s Sleek Navigation Tools
ringing order to the chaos —namely, all your programs, photos, and documents—is a complicated chore that Apple doesn’t take lightly. With each new version of OS X that’s
released, well-thought-out changes are made to navigation tools like the Finder, the Dock, and Spotlight. In Leopard, a few new goodies have even been thrown into the mix, like Stacks, Spaces, and Quick Look. Each feature, new or just improved, is here to help Mac users get oriented. Take them out for a spin and see where they take you.
Table of conTenTs
20 The Finder23 Spotlight26 Quick Look28 Spaces and Exposé30 The Dock and Stacks
B

Mac OS X HintS, LeOpard editiOn
20
navigate LeOpard
The Finderhe Finder is your Mac’s home base. With Leopard,
Apple has added valuable new tools to make the
Finder faster to use and easily customizable.
Put the Path Bar uP toPLove the convenience of the Finder’s path bar but want to
change its location? When you select View: Show Path Bar, the
path to the current folder will appear at the bottom of the Finder
window. That display is also functional: You can drag an item
onto any of the folders shown in the path bar to move the item
to that folder, and you can double-click on any folder in the path
to quickly switch to that folder. If you want to see the path to the
current folder at the top of the window, open Terminal and type:
defaults write com.apple.finder _FXShowPosixPathInTitle -bool YES Then press return. Next, holding down the option key, right-click
on the Finder icon in the Dock and select Relaunch. From now
on, the path should appear, in traditional Unix format, in the title
bar of all your Finder windows. To undo the change, repeat the
procedure, replacing YES with NO, and then relaunch the Finder.
add More CaNNed SearCheSThere are still some predefined searches available in the Search
For section of the Finder’s sidebar, but a number of additional
searches didn’t quite make the cut. To find them, go to /System/
Library/CoreServices and control-click on Finder.app. From the
pop-up menu, choose Show Package Contents, and navigate to
/Contents/Resources/CannedSearches (see “Can It”). There,
you’ll find searches such as All Applications, All Music, and All
Presentations. To add one of these bonus canned searches to
your sidebar, copy it to the desktop. Then control-click on it
and choose Show Package Contents from the pop-up menu. In
the first folder that opens, you’ll see a search.savedSearch file.
Rename this to whatever you like, and drag it into the sidebar.
Geek iT up eaSiLy Create New foLderSHave you ever had to create a series of folders, perhaps for a new project, for a new client, or just as part of organizing your massive hard drive? If so, you know that it’s a cinch to create a single folder in the Finder: just press 1-shift-N. But if you have 20 or 30 folders to set up, the process can get tedious. Terminal can make things a lot easier.
Make a folder in terminal The command mkdir creates new directories—in other words, folders. For instance, the following command creates a new folder named My Folder in the current directory:
mkdir "My Folder"To change the current directory, type the command
cd and then the path to the correct location. (Drag a folder to the Terminal window to add its path automati-cally.) For example, if you want the folder to appear in your Documents folder, use this command before you create the folder:
cd /Users/your_user_name/DocumentsMake a few folders To create several folders at
once, add additional names to the command. You must include quotation marks around each new folder’s name if the names contain spaces—for example:
mkdir "My Folder" "My Other Folder" "Not That Folder"
Make Bunches of folders If you have a lot of fold-ers to create, make a text file containing the name of each folder you want—one entry per line. Name the file dirlist.txt, place it in the folder where you’d like all the new folders to appear, and then use the cd command to make sure you’re in that folder in Terminal. Finally, type this command:
cat dirlist.txt | xargs mkdirEach entry in the file will become a folder in the cur-
rent directory.automate the Names When you’d like to create
a selection of folders, each with the same basic name and a unique suffix—for example, Project A, Project B, Project C, and so on—you don’t have to type out all those names. Use this command:
mkdir "Project "{A,B,C,D,E,F}You’re not restricted to single letters, of course—
anything you want can go within the curly brackets. Just remember that if you want spaces in the names, you’ll need to enclose them in quotes, too—for example:
mkdir "Project "{"New Home","Vacation","To Do"}
Can it Add any of these helpful canned searches to your finder.
T

Mac OS X HintS, LeOpard editiOn
21
navigate LeOpard
There is a useful menu hiding behind the Icon view button in the
Save or Open dialog’s toolbar. To make the menu appear, click
and hold on this button. (Control-clicking on it will not work.) In
addition to changing the icon sizes, you can move the icon labels
from the bottom to the right using the Label Position menu item
(see “Extra Icon Options”). Keep in mind that changes made in
this dialog box apply to all applications, not just the one you’re
changing them from within. The settings are also permanent and
will stick around even after logouts and restarts.
Set your defauLtSOnce you have your Finder window set to your liking, you may
want to use the settings for every subsequent window. In OS
X 10.4, you did this by opening the View Options window and
choosing from two options (This Window Only or All Windows).
But you won’t find these options in Leopard. Instead, the View
Options window in Leopard includes a new Use As Defaults
button (this option isn’t available for Column view). Unless you
click on that button, changes you make to the Finder window will
apply only to the current window.
exPLore LeoPard’S Get iNfo wiNdowOS X 10.5 has added a few new ways to use the Get Info window.
To bring up this window, you can select an item in the Finder, and
press 1-I, go to File: Get Info, or control-click on the item and
select Get Info. The first new thing you’ll notice is that Get Info
is actually a window. Before it was a floating dialog box, which
add Saved SearCheS to oPeN aNd SaveThe sidebar in Open and Save dialog boxes is similar to the
sidebar in Finder windows—except that the Search For section
and the saved searches in it are conspicuously missing. Here’s an
easy way to add saved searches to Open and Save dialog boxes: In
the Finder, go to the folder containing your searches (your user
folder/Library/Saved Searches by default), and drag the desired
saved searches to the Places section of the sidebar. The next time
you’re in an Open or Save dialog box, you’ll be able to access the
contents of those saved searches in Places.
Modify uSer-Created SMart foLderSAfter you’ve saved a search in 10.5, you can access it in many
ways, including the convenient Search For section of the Finder’s
sidebar. However, what if you want to edit the saved search after
you recall it? Option-clicking on the search name in the sidebar
doesn’t work, and there aren’t any Edit options when you look
in the Finder’s menu or the saved search’s contextual menu. So
how do you do it? After activating your saved search, click on the
Action icon (shaped like a gear) in the Finder’s toolbar, and you’ll
see Show Search Criteria in the drop-down menu that appears.
ChaNGe iCoN view oPtioNS iN oPeN aNd Save diaLoG BoxeSThis is a good tip for those who prefer working in Icon view. Now
when you see a Save or Open dialog box in OS X, you can change
the displayed icon size as well as the position of the text labels.
Mac 911 CLeaN uP the ‘oPeN with’ MeNuSometimes when you control-click on a file to use the Open With contextual menu, you’ll see double entries in the list of available programs. You may even see pro-grams you know you’ve removed from your Mac. To clean up this list, you’ll need to rebuild the Launch-Services database. To do so, open Terminal and type this command (all on one line; there should be no
spaces between characters until -kill):
/System/Library/Frameworks/CoreServices.framework/Versions/A/Frameworks/LaunchServices.framework/Versions/A/Support/lsregister -kill-r -domain local -domain system-domain user
Once the database is rebuilt, the list of available applications should be duplicate-free.
extra icon options Change icon sizes or move icon labels
from the bottom to the right.

Mac OS X HintS, LeOpard editiOn
22
navigate LeOpard
or scroll down to it with the down-arrow key (don’t click, as that
will open the item), and then press 1-I. You can also open Get
Info windows from the Open and Save dialog boxes within an ap-
plication using 1-I. This will work on grayed-out files in the Save
dialog box, even though nothing is visibly selected.
Preview PdfS iN CoLuMN viewWhen browsing your files in Column view, you get a large
icon preview of the selected item in the rightmost column. If
you’re previewing a PDF document, moving the mouse cursor
over this icon displays back and forward buttons. Use these
buttons to flip through the pages of the document right there
in the icon preview.
meant you couldn’t do things like close it with 1-w or see it in
Expose’s All windows mode. Now the icon in the title bar of the
window is a true proxy icon—meaning you can 1- or control-
click on it and see a drop-down menu that shows the full path to
the selected item (see “The More You Know”). You can also click
and hold on the proxy icon to drag it to a new location.
Another useful thing about the Get Info window is that it’s
now accessible from some unexpected spots, like when you’re
viewing matches in the Spotlight drop-down list. To summon the
Get Info window, just hold your mouse over the item of interest,
the More you Know Leopard has given the Get Info window
a makeover. You can now 1- or control-click on it to see an item’s full path.
oS x—101: MaSter the fiNderSave time by learning how to use key combinations in the Finder. Pressing control, 1, option, or shift—or a combination of them—in conjunction with a click or drag gives you all sorts of ways to get things done more easily.1-Click The 1 key right next to your spacebar
(alternately called the command key, the cloverleaf key, or the Apple key) lets you select noncontiguous items. Just hold it down and click on the items you want. Once you’re done, you can then drag and drop the selected items onto a program or move them to a new location.
Shift-Click In the Column or List view, you can shift-click to select a group of contiguous files. Click on the first file you want to select, press and hold the shift key, move the cursor to the last file in your group, and then click on it. Now all the contiguous files are se-lected. In the Icon view, shift-click works the same way.
Control-Click When you press and hold the control key and then click on an icon in the Finder, you’ll see a pop-up contextual menu. If you have a two-button mouse, this is the same as right-clicking on an item.
Control-click on an application, and you’ll see Show Package Contents in the menu; control-click on a docu-ment, and Open With will appear in the menu.
option-drag By default, OS X moves files when you drag them from one spot to another on the same hard drive. To force the Finder to copy the file instead, hold down the option key while you drag.1-drag By default, OS X copies objects when you
drag them from one hard drive to another. But what if you’d rather just move the file? In that case, press and hold 1 while dragging the file.1-option-drag If you press and hold both 1 and
option as you drag something, you’ll create an alias of the chosen file(s) in the destination folder. Aliases are a useful way to collect pointers to different files all in one convenient location.

Mac OS X HintS, LeOpard editiOn
23
navigate LeOpard
Spotlightt its simplest, Spotlight is a fast search tool for your
entire computer. You type in what you’re looking for,
and it serves up a selection of matches. Cool, yes, but
it’s just a taste of what this feature can do.
SPotLiGht BaSiCSPerforming a basic Spotlight search is a cinch. Click on the Spot-
light icon on the right side of the menu bar or press 1-spacebar
to call up the Spotlight menu, and then type in one or more
words—you don’t have to worry about capitalization. Spotlight
immediately starts presenting matches, looking for those search
terms in your files’ names, content, and hidden information
called metadata. As you type in more of the word or phrase,
Spotlight refines its results.
aPPLy BooLeaN SearChiNG One of the biggest additions to Spotlight is support for true
Boolean searching, which uses logical operators (AND, OR, NOT)
to refine a search. For instance, if you type "time machine" OR morlocks, you’ll see references to Leopard’s backup tool,
Geek iT up uNCover uNuSed fiLeSHave you ever wanted to remove unused files from a folder—for example, your user folder’s Preferences folder? Finding the files isn’t always easy—naming schemes are sometimes obvious only to the developer.
Enter Spotlight and the Unix mdls command. (See the Take Command of Terminal chapter for more infor-mation.) For example, use mdls to look at the kMDItemFSContentChangeDate attribute to track changes to a file’s metadata, which is modified every time you or a program access the file. To see when your Dock’s preferences were last updated, type the following:
cd ~/Library/Preferences This takes you to your Preferences directory. Then type this command:
mdls com.apple.dock.plist | grep kMDItemFSContentChangeDate
When you press enter, you will get something that looks like this:
kMDItemFSContentChangeDate = 2008-01-21 20:39:44 -0700
Now you know that the file was last changed on January 21. When thinking about deleting something, use this trick first to quickly find out whether the un-known file has been accessed recently.
as well as any files related to H. G. Wells’ fictional species. To find
files that include time machine but make no mention of H. G.
Wells, input "time machine" NOT Wells. Whenever
you perform a Boolean search, make sure to type operators in all
caps (see “Spotlight on Boolean Searches”).
uSe Metadata In addition to scouring your files’ names and contents, Spotlight
also peruses metadata—information about your files generated
by the program or the device that created the file. For example,
digital photos contain metadata for the camera’s settings at the
time the image was taken, including such information as the type
of camera, focal length, color space, exposure time, and so forth.
If you want to find all photos taken using a certain camera, just
enter its name or model number into the search field.
To view what kinds of metadata a file is storing, select it in
the Finder, press 1-I to open a Get Info window, and click on the
triangle next to More Info. You’re not limited to the metadata you
Spotlight on Boolean Searches Spotlight now recognizes
Boolean searches in Leopard.
A

Mac OS X HintS, LeOpard editiOn
24
navigate LeOpard
fuN SPotLiGht additioNSIn addition to all the practical improvements made to Spotlight in
Leopard, there are these clever new tricks:
diCtioNary When you come across a word you don’t
recognize, you can look it up in Spotlight. Whenever you type a
word into the Spotlight menu, the definition appears in the list of
results. Hover your cursor over the result to view the full defini-
tion in a tooltip.
ProGraM LauNCher Applications now appear as the
top hit, so you can launch them much more quickly. To fire up
Safari, type saf into the menu and press return.
CaLCuLator Type an equation into the Spotlight menu
and let your Mac do your math. For example, type 2*2, and
you’ll get 4. If you need the area of a circle with a diameter of
10 feet, type pi*10. Need the square root of 1,024? Enter
sqrt(1024). How about 64 squared? Just type pow(64,2).
Even geekier, Spotlight supports all of the standard C math(3)
functions. For example, type sqrt(9), and you’ll get 3. Type
pow(2,2), and you’ll get 4. It also supports pi as a constant.
see here, however; you can also add your own keywords to any
file. In the Get Info window, click on the triangle next to Spotlight
Comments. In the text field that appears, enter any keywords that
might help you in future searches, such as the project to which
the file is related or the last name of a person you associate with
it. For example, by adding the comment HOUSE07 to any files
having to do with the purchase and remodeling of your new
home, you’ll be able to find all of those files in one shot.
autoMate SPotLiGht CoMMeNtSWant to avoid the tedium of assigning the same comments to
multiple files? There’s an easier way. Launch Automator, select
Files & Folders from the Library column, and drag Set Spotlight
Comments For Finder Items from the action list to the workflow
pane (see “Constant Comments”). Click on Options and select
Show This Action When Workflow Runs. Go to File: Save As Plug-
In. Give the plug-in a name, such as Spotlight Comments, and
select Finder from the Plug-In For pull-down menu. To put your
new Automator workflow to use, simply control-click (or right-
click) on the files. In the contextual menu that appears, select
More: Automator: Spotlight Comments (or whatever you named
your plug-in item). A dialog box appears, allowing you to append
your comments to dozens of files at once.
Save a triPThere’s an easy way to perform a Spotlight search from within
Web pages and documents. If you come across a word or phrase
you’d like to use as a search query, highlight the text, control-
click on the selection, and choose Search In Spotlight from the
contextual menu. (Note that not all programs offer this feature.)
This opens a Finder window and launches an AND search for the
selected text.
Mac 911 SearCh SySteM fiLeSBy default Spotlight doesn’t search the guts of the System and Library folders. In part, this is to discour-age you from tampering with these essential files. But you can force its hand. First, switch to the Finder and press 1-F to open a new search window. Choose Other from the Kind pop-up menu. In the sheet that appears, type System in the Search field. Select the System Files entry. If you think you’ll need to conduct a similar search in the future, you can save some time for yourself by enabling the In Menu option to the right of the System Files entry. Spotlight will then add System Files to the Kind menu. Click on OK. Finally, from the pull-down menu next to System Files, choose Include. Your results will now include the files the Mac OS tries to keep hidden from prying eyes.
Search the System Use these settings in a Find window to search your Mac’s more arcane files.
Constant Comments Let Automator help you append your
comments to multiple files at once.

Mac OS X HintS, LeOpard editiOn
25
navigate LeOpard
the drive and click on the minus-sign (–) button. By dragging the
drive into this list, you force Spotlight to erase the index; when
you remove the drive from the list, Spotlight notes that it is again
available for indexing and starts chugging away at that task.
Keep in mind that if you have a ton of files, rebuilding the
index may take quite a bit of time. While Spotlight is indexing the
hard drive, you’ll see a pulsing dot inside the Spotlight icon. If you
try to use the Spotlight menu, you’ll get a message saying that
it’s busy indexing your drive. Take a break and get a cup of coffee.
You’ll be thankful once it’s finished and your searches are much
more efficient.
SiMPLify your iNdex You’ve got lots of files on your Mac, but that doesn’t mean you
want Spotlight to search them all. You may want to keep some of
your more sensitive files from turning up in a search (especially
if you share a user account with someone else). Or perhaps it’s
just a matter of expediency: you don’t want to waste time having
Spotlight search backups or archives that live on a second parti-
tion or hard disk.
Spotlight indexes every drive you connect to your Mac's ex-
ternal hard disks, removable media (if they’re writable), and even
iPods (if they’re set to appear as a external hard drive). You can,
however, choose to exclude certain folders or volumes. In Spot-
light’s preference pane, click on the Privacy tab. If you want to
exclude a folder or volume on your Mac (such as one containing
sensitive information), drag it to this list, or click on the plus-sign
(+) button and select it (see “Privacy, Please”).
If you want to exclude an external volume, first connect the
drive, then add it to the list. When you do this, Spotlight deletes
any current index for the folder or volume and adds this item to
a list of areas it won’t index or search. If you need to search that
external hard disk down the line, connect it, remove it from the
Privacy list, and then wait while Spotlight reindexes the device.
reBoot SPotLiGhtSometimes Spotlight refuses to find what you’re looking for, even
though you know the file exists. This problem occurs when Spot-
light’s indexes get out of sync. To set things right, try rebuilding
the indexes, which forces Spotlight to scour your drive again and
serve up the right search results.
Open the Spotlight preference pane. Click on the Privacy
tab, then drag your hard drive to the list of locations that you
don’t want Spotlight to search. Wait a few seconds, then select
Privacy, Please If you don’t want Spotlight to search certain folders or volumes, just make a trip to the Spotlight preference pane.
add BooLeaNS to fiNder SearCheSYou can use Booleans by typing them in, of course, but if you’re more visual by nature, you can also use a hidden feature in the Finder’s search window to create Boolean searches—without ever typing AND, OR, or NOT.
In the Finder search window, click on the plus sign and use the pull-down menus to set up your first condition. At this point you would typically click on the plus sign again to add your second condition. But to add a Boolean search term to your next condition, option-click instead. The plus sign will turn into an ellipsis (…) and you’ll get a new conditional pull-down menu with options for Any (OR), All (AND), or None (NOT).
Now just add conditions to this new indented section to
create a Boolean search. This trick adds a lot of power to your Finder searches; just remember you can only option-click after you have at least one criterion already created for your search.

Mac OS X HintS, LeOpard editiOn
26
navigate LeOpard
to make sure it’s really the one you wanted to delete, for exam-
ple—only to have Mac OS X tell you that you can’t open it because,
well, it’s in the Trash? Thanks to Quick Look, you never have to face
this situation again. Just open the Trash, select the items you want
to preview, and press the spacebar to view them in Quick Look.
PLay a QuiCK LooK SLide ShowYou may know that, in addition to pressing the spacebar, you can
invoke Quick Look by control-clicking on an item and choosing
Quick Look name of item. But you may not know that you can im-
mediately play an item (or a playlist) by control-clicking on it, then
pressing the option key and choosing Slideshow name of item. If
you’d like to skip the contextual menus (and you have the Quick
Quick Lookhe invaluable new Quick Look feature lets you view a
file without having to open it. To invoke Quick Look,
click on a file and press the spacebar, or select Quick
Look from an item’s contextual menu. Once you have those
basics down, explore with these Quick Look hints.
ZooMiNG iN QuiCK LooK ModeQuick Look is a great way to get a preview of nearly any docu-
ment without opening the application that created it. Quick Look
is especially useful for PDFs and images. In addition to paging
through PDFs in Quick Look mode using your scroll wheel (or
two-finger scrolling on a trackpad), you can zoom in and out on
both PDF and image files within the Quick Look window. To zoom
in on a PDF, click inside the PDF file, and then press 1-equal sign
(=). To zoom out, press 1-minus sign (–).
Images, confusingly, require a different method of zooming.
To zoom in on an image, option-click on the area you want to
enlarge. To zoom out, shift-option-click on the window. With
both PDFs and images, once you’ve zoomed in, you can move
around with your scroll wheel, trackpad scrolling, or the good
old-fashioned drag thumbs in the scroll bars.
Mix fiLeS iN QuiCK LooKYou can open a mix of files in Quick Look. Just select the items
you want to view in Quick Look—pictures, text documents, mov-
ies, and audio files, for example—and press the spacebar. Click
on the Index Sheet button in the resulting Quick Look window
to view all the items you’ve selected on a grid. To move from one
to the next, use the Mac’s arrow keys. To bring a document to
the fore, press the return key. To play a media file, click on the
Play button. As a file plays, you can play the next or previous file
simply by pressing the right- or left-arrow key. Note that the
Play/Pause button is active even when you have a nonmedia file.
So if you click on Play when one of these documents is showing
and then press the right-arrow key, the media file that appears
will play—there's no need to click again.
toGGLe QuiCK LooK viewSTo open the grid view for multiple files without leaving the
keyboard, press 1-return (see “Gridlock”). For extra eye candy,
hold down the shift key, too, and you’ll get to see the switchover
between the two view modes in glorious, though time-consum-
ing, slow motion.
taKe a QuiCK LooK at the traShHow many times have you tried to open a file that’s in the Trash—
Gridlock To see multiple thumbnail images in Quick Look,
select the index sheet button or press 1-return.
T

Mac OS X HintS, LeOpard editiOn
27
navigate LeOpard
view PLiStS iN QuiCK LooKAt some point in OS X’s evolution, Apple began saving plists in
binary format instead of in XML. That was a pain if you just
wanted to look quickly at preference settings. You either had to
convert the file to XML using the plutil command or open
the file in Property List Editor, which is a poor browser. But in
Leopard, Quick Look displays binary plists as XML. You can select
a bunch of plists, launch Quick Look, and view all of them using
Quick Look’s simple navigation tools.
Look button in your Finder toolbar), select items in a window,
hold down the option key, and click on the Slideshow button
(which, before you pressed the option key, was the Quick Look
button). You can also pull down the File menu, hold the option
key, and choose Slideshow name of item.
NaviGate QuiCK LooK froM KeyBoardPeople tend to highlight an item, invoke Quick Look, and then dis-
miss the Quick Look window. But you can keep Quick Look front
and center while you navigate the current directory using either
your keyboard or mouse; new items you select in the Finder will
display in the Quick Look window as you go. All standard Finder
keyboard shortcuts will continue to work, too.

Mac OS X HintS, LeOpard editiOn
28
navigate LeOpard
such as Stickies, iTunes (especially if you have the window mini-
mized to the controller view), and perhaps iChat.
ChooSe a SPaCe for the fiNderEach space can have its own set of Finder windows. That can be
annoying if you want access to one folder from several different
spaces; you’ll have to open a new Finder window in each space.
If this bugs you, assign the Finder to Every Space; that way your
Finder windows are the same regardless of which space you’re
viewing. To do this, follow the instructions above for assigning an
application to a space, this time navigating to the /System/Library
/CoreServices folder and selecting Finder.app.
ChaNGe the SPaCe-SwitCh deLayWhen you drag a window to the edge of the screen and hold it
there for a moment, you move that window to the space adja-
cent to that edge of your screen. The default delay before the
window moves to the next space is 0.75 seconds. To change that
delay, open Terminal and enter this command:
defaults write com.apple.dock workspaces-edge-delay -float 0.5
Press return, then enter killall Dock. Replace 0.5
with whatever value you wish. To return to the original value,
enter the commands again, with the value 0.75.
Spaces and Exposépaces and Exposé, Leopard’s desktop navigation
features, are only as convenient as you make them.
Memorize these tricks for getting the most out of
virtual desktops and window viewing shortcuts.
NaviGate SPaCeS with your KeyBoardSpaces supports numerous keyboard shortcuts. For example, to
display an overview of all your spaces, press F8. In this view, you
can move between spaces using the arrow keys and press the
spacebar or return to display the selected space. Another way to
switch is by simply typing a space number to display it instantly.
To move directly to another space, hold down the control key
and type that space’s number. Spaces are numbered sequentially
from left to right, starting in the upper left corner. To cycle from
one space to the next, hold down control and press an arrow key.
(You can, of course, customize those shortcut keys in the Exposé
& Spaces preference pane.)
Move aLL wiNdowS at oNCe iN SPaCeSWhat if you want to move all the windows for a given applica-
tion to another space in F8 mode? Sure, you can drag them one
by one, but that’s a pain. Instead, hold down the shift or 1 key
before you click and hold on a window. Still holding down that
key, drag one window of a program to the desired space; all the
other windows of that same program will follow. You can also use
this trick to move just one window to exactly the same location in
a new space. Say you’ve got a Finder window open, and it’s maybe
200 pixels down and to the right from the Apple menu. To move
this window to precisely the same position in another space,
start dragging the window, then press and hold shift before you
drop it into its new space. When you drop the window, it will
move into the same position it occupied in the prior space.
aSSiGN aPPLiCatioNS to aLL SPaCeSBy default, a given window will stay in the space that was active
when you opened that window (unless you move it to another
space manually). As a result, a given application may have one
or more windows in each of several spaces. If you want all the
windows from an application to appear in every space, go to the
Exposé & Spaces preference pane. On the Spaces tab, click on
the plus-sign (+) button, navigate to the application, and click on
Add. Then, from the pop-up menu in the Space column next to
that application’s name, choose Every Space (see “Spacing Out”).
The Every Space setting is appropriate for applications you use
constantly, regardless of what other tasks you’re performing—
S
Spacing out Making an application appear in all of your spaces
is as easy as a trip to System Preferences.

Mac OS X HintS, LeOpard editiOn
29
navigate LeOpard
box appears over every window. Instead of mousing around, just
press and hold option, identify the window you’d like to switch to
based on the displayed name, and then select it via the mouse.
aSSiGN aLL exPoSé ModeS to oNe KeyBy default, Exposé’s three modes—All Windows, Application
Windows, and Show Desktop—are assigned to three different
function keys. If you’re running short on those F-keys, or if you
just want two fewer shortcuts to remember, you can assign those
three modes to a single key with modifiers. Open the Exposé &
Spaces preference pane and switch to the Exposé tab. Choose
your first basic shortcut key (F3 for Show Desktop, for example).
Next, hold down a modifier key, such as option, and choose the
same F-key from the All Windows pop-up menu; that modifier
key is now part of the shortcut. Finally, hold down a different
modifier or combination of modifiers, and assign the same F-key
to Application Windows.
trouBLeShoot SPaCeS with doCK reStartIf you start having problems with Spaces and don’t want to
reboot your Mac, try going to Terminal and typing the following:
killall DockThe Dock will restart, along with Spaces. (Alternatively, you
can kill the Dock from Activity Monitor.)
exPoSé via MouSeIf you use Exposé, you’re probably aware that once you’ve
invoked either All Windows (F9) or Application Windows (F10)
mode, you can see the name of any window by simply moving
your cursor over the window. This is quite useful when you
have a lot of windows open, since many of them look the same
in their reduced state. However, it’s also a bit of a pain to have to
move the cursor to each window to check if it’s the one you want
or not. Luckily, there’s a shortcut: just hold down the option key
after activating Exposé. When you do, the floating white-on-black

Mac OS X HintS, LeOpard editiOn
30
navigate LeOpard
The Dock and Stacks
he Dock brings order to your desktop. Leopard’s new
Stacks feature brings folders to the Dock. These tips
will bring ease to your day-to-day Mac routines. Dig in.
add SPaCerS to the doCKOne easy tweak that will make your Dock more orderly is adding
spaces to separate your icons into groups. To add a space to the
applications area of the Dock, launch Terminal and enter this:
defaults write com.apple.dock persistent-apps -array-add '{tile- data={}; tile-type="spacer-tile";}'
To add a spacer to the documents side of the Dock, enter:
defaults write com.apple.dock persistent-others -array-add '{tile- data={}; tile-type="spacer-tile";}'
To see the changes you’ve wrought, type killall Dock
at the command line (see “Make Space on the Dock”). If you
want to get rid of the space you’ve added, just drag it off the
Dock and poof, it’s gone.
override doCK MaGNifiCatioN SettiNGSOne of the features of the OS X Dock is its ability to magnify
the items in it as the cursor passes over them. You can control
this feature in the Dock preference pane, where you can set the
amount of magnification and enable or disable the feature. You
can also enable or disable it by control-clicking on the Dock’s
divider bar and choosing Turn Magnification On/Off from the
pop-up menu. You can’t control the amount of magnification
from this menu, however.
Leopard adds a new feature to this magnification effect—the
ability to temporarily reverse the on/off status by holding down
a couple of modifier keys. To see a demonstration, first run your
TGeek iT up reNaMe traSh iN the doCKWhen you hover the cursor over each item in your Dock—including the Trash—Mac OS X displays its name in a small floating label. What you may not have realized is that you’re not stuck with the name Trash. To rename it, launch Terminal and type these three commands:
cd /System/Library/CoreServices/Dock.app/Contents/Resources/English .lproj
sudo cp InfoPlist.strings InfoPlist.bak
sudo cp InfoPlist.strings ~/Desktop/InfoPlist.txt
You just navigated into the Dock’s application bundle, created a backup copy of a file, and copied the original file to your desktop. Leave the Terminal window open and switch back to the Finder, navigate to your desktop, and double-click on the InfoPlist.txt file you’ll find there. Now type whatever new name you’d like within the quotation marks. Don’t change anything to the left side of the equal sign (=). Just change the word Trash to whatever you like, making sure to leave the quotation marks intact. Save the file, and click on Over-ride if you get a warning that the file is write-protected. Close the file and switch back to Terminal.
Next, overwrite the default InfoPlist.strings file with the newly modified version. To do that, type this com-mand in Terminal and press return:
sudo cp ~/Desktop/InfoPlist.txt InfoPlist.strings
To make the changes take effect, quit and restart the Dock by typing killall Dock and pressing return. When you do so, the Dock will disappear and reappear. Hover the cursor over the Dock’s Trash icon. You should see your newly chosen name. To replace the altered file with the backup you created earlier, use these two Terminal commands:
cd /System/Library/CoreServices/Dock.app/Contents/Resources/English .lproj
sudo cp InfoPlist.bak InfoPlist .strings
Restart the Dock and everything will return to its original settings.
Make Space on the dock Create some order on your Dock by
adding spaces. You can drag a space to wherever you like, or drag
it off the Dock altogether to delete it.

Mac OS X HintS, LeOpard editiOn
31
navigate LeOpard
draG aNd droP froM StaCKSIf you want to launch a stack item in an application other than the
one it normally opens with, you can drag the item from its stack
onto the program you want to use. It can be in the Dock, the
Applications folder, the sidebar, or the toolbar. You can also drag
items from a stack to another location: Open that other location
in the Finder, then drag the item to it from the stack.
Show a StaCK iN the fiNderIf you click and hold on a stack, you can choose the Show in
Finder command from the contextual menu. But you can also
expose the folder containing the stack items by holding down the
1 key as you click on the stack.
LauNCh StaCK eNtrieS with KeyBoardOnce you’ve clicked on a stack to open it, you can use the key-
board to navigate it. To select a file, type the first couple of letters
of its name. You can also use the Mac’s arrow and tab keys.
oPeN MuLtiPLe iteMSIf you want to open more than one item in a stack, just hold down
the option key; each time you click on an item, that item will open
cursor over the Dock and notice if the icons magnify or not.
Now, while holding down shift and control, run the cursor over
the Dock again; you’ll see the opposite of the prior behavior (see
“Magnificent Magnification”).
If you keep magnification off, you might wonder how to con-
trol the size of the effect when you use this temporary override.
The answer lies in the Dock preference pane. First, temporarily
enable Magnification. Then drag the slider to set the desired
amount of magnification. When you disable Magnification again,
your size settings will remain in place.
NaviGate the doCK with the KeyBoardWhile you could control the Dock from the keyboard in previous
versions of OS X, the Dock is even more keyboard-friendly in OS
X 10.5. As before, you can activate the Dock by pressing control-
F3. In addition to using the left- and right-arrow keys to select
icons, you can now also type the first letters of the program, file,
or folder you’d like to select. The Dock will highlight matches as
you type. Matching is based on the full name of the program as
shown in the Finder, so you can do some renaming to make this
easier. For instance, removing “Microsoft” from the names of
Office applications will let you type Exc , Pow , or Wor to select
Excel, PowerPoint, and Word. As before, once you’ve selected an
icon, pressing return will open it and the up-arrow key will sum-
mon its Dock menu.
MaKe a reCeNt iteMS StaCKAnother feature that Apple has included in Leopard but hasn’t
made easily available is the ability to create a stack for recent
items. To do so, type the following in Terminal:
defaults write com.apple.dock persistent-others -array-add '{ "tile- data" = { "list-type" = 1; }; "tile-type" = "recents-tile"; }'
Now press return, enter killall Dock, and press return
again. To select what kinds of recent items to include in this stack,
control-click on it and choose to show recently used applica-
tions, documents, servers, volumes, or “items” (the latter being
entries in the Places section of your Finder sidebar).
You can run the command multiple times for multiple recent
items stacks.
Magnificent Magnification Holding down shift-control while moving the cursor over your Dock items makes them magnify if they don’t do so automatically, and stay tiny if they do.
Geek iT up QuiCKLy CLear StaCKSYou can use Leopard’s stacks to increase productivity; just create a stack for projects you are currently work-ing on. To get quick access to all your current files, drag the aliases (not the originals) for all the relevant files into the Working stack in the Dock. While the Working stack will help a lot, it’s annoying to have to empty it when-ever you finish or switch projects. To fix that, use this Automator workflow to clear all the files in the stack:
1. Files & Folders: Get Specified Finder Items
Specify the Working folder you created in your home directory.
2. Files & Folders: Get Folder Contents
3. Files & Folders: Filter Finder Items: Name Is Not Equal To Clear Working.app
4. Files & Folders: Move Finder Items To Trash
Save this workflow as Clear Working.app and put it in the Working stack itself. Whenever you finish a project, open the stack and double-click on the Clear Working workflow.

Mac OS X HintS, LeOpard editiOn
32
navigate LeOpard
in the Finder while the stack remains open. If the Finder isn’t the
frontmost application, the windows will open in the background.
add a traSh StaCKQuickly view and restore recently deleted files by making a
Trash stack. Open a new Finder window and press 1-shift-G
to open the Go To Folder dialog window. In the input box, type
~/.Trash, then press Go. You should now have a Finder win-
dow displaying the contents of your Trash folder. When you drag
that folder’s proxy icon from the window’s title bar to your Dock,
Finder will create a Trash stack (see “Stack Your Trash”).
add a MouSe-over effeCtApple has included a nice mouse-over effect in Stacks that high-
lights items as your cursor passes over them in grid view. Unfortu-
nately, it hasn’t provided an easy way to turn on this feature. The
best way to do it is to open Terminal and type the following:
defaults write com.apple.dock mouse-over-hilte-stack -boolean YES
Press return, then type killall Dock. To revert back
to Leopard’s stock Dock, repeat the two previous commands,
changing YES to NO.
Stack your trash If you’d like to take a peek inside your Trash without having to open it, try adding a Trash stack to the Dock. One click lets you see everything you're throwing away.

Mac OS X HintS, LeOpard editiOn
33
Unleash OS X’s ProgramsDiscover Hidden Powers in Mail, Safari, iChat, and Others
rom 3-D modelers to video editors to scientific analyzers, there’s no shortage of great Mac programs on the market. But no matter what you use your Mac to do, there are a
few programs almost every Mac user relies on—including an e-mail manager, a Web browser, a media library, a calendar, and so on.
That’s why Apple built these essential programs right into OS X. With Mail, iCal, iChat, Address Book, Safari, Preview, and others, Leopard gives you the tools you need to manage your information and keep in touch with others—and wraps them in a simple interface that almost anyone can use without having to resort to a manual. But sometimes, that simplicity can mask the program’s true power. If you’re ready to unlock the hidden potential in Leopard’s built-in programs, these tips will help.
Table of conTenTs
34 Mail 40 iCal42 Safari46 iTunes50 iChat53 Preview55 Dashboard
F

Mac OS X HintS, LeOpard editiOn
34
UnLeaSH OS X’S prOgraMS
at the top level of your hierarchy (otherwise, it will go within the
currently selected folder). The second slash tells Mail to create
the 2006 mailbox within the Vacations folder (see “A Mailbox
Shortcut”). Click on OK, and you’ll find a new Vacations folder in
your list of mailboxes, and a 2006 folder within it.
You can now move folders into and out of (or create new
folders within) the Vacations folder as you see fit.
Get Rid Of the RSS fOldeRIf you’re not using Mail’s RSS reader, you might think you’re still
stuck with that RSS folder in your sidebar. You’re not. To make
it vanish, open up the RSS folder, hold down the shift key, and
click on each listed feed. Then control-click on the selection
and choose Delete Feeds from the pop-up menu. Confirm when
asked, and when all of the feeds are deleted, the RSS folder icon
in the sidebar will also vanish.
QUickly hide Mail’S PReview PaneMail’s preview pane lets you quickly read messages without hav-
ing to open them in separate windows. (Don’t see the preview
pane? Double-click on the little dot at the bottom of the Mail
window.)
The problem is that when you use your Mac in an open office
environment, there may be times when you want to quickly hide
the contents of the message you’re reading. Perhaps it’s a note
about an upcoming surprise party, and the subject of said party is
walking toward your cubicle.
There are many ways to handle this situation. First, in the
message list, 1-click on the message that’s currently displayed
in the preview area to deselect it. The preview area will become
blank. You can also hide the entire preview pane, by double-
clicking on the bar that divides it from the message list. However,
the 1-click method makes it easier to return to preview mode
when you’re done being secretive—just click on any message to
reveal it again.
RePly in Mail while keePinG the ORiGinal OPenWhen you have an e-mail message open in a separate window
and then click on the Reply button, Mail takes over the existing
message window and turns it into the reply window. The same
thing happens when you click on Reply All or Forward—Mail
steals the window for your response. This can be pretty annoy-
ing, especially if you were going to copy and paste discrete sec-
tions of the original into your reply. Of course, you can select the
text you wish to quote in the message before clicking on Reply
f you’re like most of us, the first thing you do when
you sit down to your Mac in the morning is check your
e-mail account for new messages. Your e-mail manager
is also probably one of the few programs you actively monitor
all day long. With so much time invested in e-mail, shouldn’t you
make sure you’re being as productive as possible? If you use
Mail, these tips will help you move through your messages more
efficiently, streamline the program’s interface, and automate
tedious tasks.
ORGanize yOUR fOldeRSIn the new version of Mail, the sidebar folders—Mailboxes, On
My Mac, Reminders, Smart Mailboxes, and so on—can now be
rearranged. Just click and hold on any folder, then drag it to a
new position. You don’t even have to have Mailboxes at the top
of the list; it can be moved elsewhere, too. This is useful, for
example, if you have a lot of IMAP accounts cluttering the sidebar
with needless folders. While you can’t get rid of the folders, you
can at least now move On My Mac up above them, making it
easier to file e-mails.
cReate neSted MailbOX fOldeRSIf you have a lot of mailboxes, you can help keep things tidy by
organizing them into folders. In fact, you can create a folder and
nested mailbox in a single stroke.
Select Mailbox: New Mailbox. In the dialog box that appears,
type a forward slash ( / ) , then two names separated by another
forward slash. The slashes indicate a path hierarchy. For example,
say you wanted to create a new, white Vacations folder, and with-
in that, a subfolder named 2006. You’d open the New Mailbox
dialog box and type /Vacations/2006 into the Name field.
The leading slash tells Mail that the Vacations folder needs to be
MailI
a Mailbox Shortcut Quickly create nested mailboxes in Mail by
typing a slash and then their names, separated by another slash,
into the New Mailbox dialog box. Here, we’re creating a folder
named Vacations that contains a folder named 2006.

Mac OS X HintS, LeOpard editiOn
35
UnLeaSH OS X’S prOgraMS
RetRieve a MiSSinG QUOte If you begin composing a new message in Mail and then realize
that you meant to quote part of another message, you don’t
have to open a new window, copy, switch back, and paste.
Instead, select the message you want to quote, return to your
new message window, and choose Edit: Append Selected
2 addReSS bOOk tiPSMail wouldn’t be much without OS X’s built-in contact manager, which stores e-mail addresses—as well as phone numbers, street addresses, birthdays, and more—for your friends, coworkers, and acquaintanc-es. Here are two ways to extend Address Book’s reach.
eXPORt MUltiPle cOntactS fROM addReSS bOOkThe vCard file format makes life easier when you want to move contact information from OS X’s Address Book to another program. Simply drag and drop any contact’s name from Address Book to your desktop (or elsewhere) to cre-ate a new vCard. Then import this vCard into any program that supports the standard, including Microsoft Entourage and Outlook for Windows.
If you try the same drag-and-drop trick with multiple con-tacts selected in Address Book, you’ll end up with one vCard file named something like “Sally Sample and five others.” But certain programs (Microsoft Entourage and Outlook, to name two) can’t handle a group vCard. When you drop your newly exported vCard onto Entourage, for instance, only the first contact will show up.
Does that mean you need to manually drag and drop each contact you want to transfer? Thankfully, no. The trick is to use the option key. Make your selections in Address Book. With the option key held down, click and hold on your selection for about a second, and then drag the contacts to your desktop. Individual vCards for each contact will appear. You can then import them into Entourage, for instance, by dragging and dropping the whole selection of exported files onto the pro-gram’s Dock icon.
PRint yOUR addReSS bOOk Want a printed copy of your Address Book—maybe to keep in the car for emergencies?
In Leopard, Address Book offers four printing templates for outputting contact details to paper: Envelopes; Mailing Labels; Lists; and Pocket Address Book, which produces a small tab-style address booklet. Go to Print and choose Pocket Address Book from the Style menu. Set Paper Size to US Letter and choose the contact attributes—Company,
E-mail, Address, and so on—you’d like to include for each contact (see “Little Black Book”). To conserve paper, OS X prints several Address
Book pages on one sheet, with cutting guides. Cut out the pages and staple them together, and you’ll have a handy paper backup of your electronic address book.
Address Book’s printing options will get the job done, but if you want more flexible printing options, download a free copy of Palm Desktop 4.2.1 for Macintosh (macworld.com/3432). Yes, this ancient collection of software works under Leopard. Open Address Book, create a group for the contacts that you’d like to print, and drag that group to the desktop to create a vCard of your contacts. Then launch Palm Desktop, choose View: Address List, and drag your vCard into Palm’s Address List win-dow. Now select File: Print. The Paper Planner Interview dialog box appears, giving you the option of creating printed pages formatted for Franklin, Day Runner, Day-Timer, or Other planners (and yes, you can also choose the binder size of the planner you use within each brand). Print and you’re on your way.
to have it automatically included in the reply, but if you forget,
or simply want to be able to move between the original and the
reply, you can avoid this problem. The solution is to hold down
the option key before clicking on the Reply, Reply All, or Forward
button. Mail will open your reply in a new window, leaving the
original message intact.
little black book Put your digital address book on paper with Address Book’s printing features.

Mac OS X HintS, LeOpard editiOn
36
UnLeaSH OS X’S prOgraMS
work. That’s because e-mail clients often insert line breaks in long
URLs so that only part of the address ends up as a clickable link.
When your recipients click on it, they’ll get a “page not found”
message. So how do you avoid this problem? Try these tricks out,
and see which one works best with the e-mail clients you and
your friends use.
If you send e-mail in Rich Text Format (RTF) from Apple’s
Mail, an easy solution is to use Mail’s Add Hyperlink feature. First
copy the long URL from your browser’s address bar (1-C). Then
open a new e-mail message and make sure that you’re using
RTF (Format: Make Rich Text). Start composing your e-mail, and
when you reach the spot where you want the link to be, type in a
short phrase describing the URL. Now select that phrase, choose
Edit: Link, and then paste the URL (1-V) into the text field that
appears (see “E-mail Long URLs”). When you click on OK, you’ll
see that your phrase has been underlined; you’ve created a click-
able link.
If you don’t want to send RTF e-mails, try putting angle
brackets at either end of your URL: <www.example .com/ref=amb_link_4263902_/002-5510588-1062447>. URLs enclosed in angle brackets should remain
clickable—even if the recipient’s e-mail client inserts a line break
for formatting purposes.
PRUne yOUR ReciPientS liSt Mail simplifies addressing your e-mail messages by completing
some addresses for you. But what if Mail keeps putting in an old
one? Choose Window: Previous Recipients to see a list of all the
addresses to which you’ve sent e-mail messages. Select the ones
you’d like to remove, and click on the Remove From List button.
The selected addresses should no longer appear when you begin
typing an e-mail address.
cOMbine Mail MeSSaGeS fOR PRintinGHave you ever wanted to print multiple e-mail messages in Mail
at once? You can do so easily; just 1-click on each message you
Messages (or press 1-option-I). The quoted message (including
any attachments) will appear at the bottom of the new message.
ReMOve Mail QUOteSIf there has been a lot of back and forth in an e-mail exchange,
the body of the message may be littered with quotes, small lines
that mark each time the mail was responded to. If you find these
lines distracting, you can remove them from your response—one
level at a time.
Just create a reply message, select the quoted text you’ve
excerpted, and then press 1-option–single quote (’). With each
press, one level of quotes disappears.
tRiM Mail attachMentSBy default, Mail keeps a copy of all your attachments, even if you
routinely save these files elsewhere—eating up valuable hard
drive space. So how can you track these files down? In Mail, select
Mailbox: New Smart Mailbox, and when the dialog box appears,
name the mailbox Messages With Attachments. Select Contains
Attachments from the pop-up menu and then click on OK. This
mailbox will now contain a convenient list of all e-mail messages
you’ve received that include attachments.
Open your new smart mailbox and click on the Size column
header to sort your attachments by size, and then scan the
messages with large attachments (see “Spot the Space Hogs”). If
you’ve already saved these files, delete their respective messages
or remove the attachments (Message: Remove Attachments).
Alternately, leave the smart mailbox sorted by date to quickly find
your oldest attachments, which might be good candidates for
trimming. By the way, you can remove attachments from multiple
messages at once by selecting them while holding down the shift
or 1 key, and then choosing Message: Remove Attachments.
Send lOnG URlS via e-MailIf you sometimes e-mail URLs to friends or colleagues, you may
be vexed when recipients write back to say that a link doesn’t
Spot the Space Hogs To find large attachments that are taking up lots of disc space, create a smart mailbox that finds messages with attachments and then sorts by size.
e-mail long URls Rather than pasting a long URL into your
e-mail and taking the chance that it won’t work, turn a short
phrase into a hyperlink.

Mac OS X HintS, LeOpard editiOn
37
UnLeaSH OS X’S prOgraMS
want to print, and then press 1-P. But there’s a downside: each
message prints on a separate sheet of paper, so if you print
four ten-line e-mail messages, you’ll waste three full sheets of
paper. Ugh.
You can save some trees by using Automator to create a
workflow that prints multiple Mail messages as one message—
and therefore uses as little paper as possible.
SteP 1 To begin, launch Automator (/Applications) and
select Custom from the opening dialog box. In the Automator
window, click on Mail in the Library column and drag Get Se-
lected Mail Items from the Action column into the workflow area.
Next, drag the Combine Mail Messages action below the first
action. Then drag the New Mail Message action to the bottom
position. That’s the entire workflow.
The next step is to make it easy to use. Select File: Save As,
name your workflow Combine Mail Messages, and change the
File Format pop-up menu to Application. Now, you could save
your new program in your Applications folder, but if you did,
you’d have to hunt it down each time you wanted to use it.
Instead, use the Script menu to make your workflow accessible
directly from Mail.
To enable the Script menu, switch to the Finder and launch
the AppleScript Utility (/Applications/AppleScript). In the window
that appears, select the Show Script Menu In Menu Bar option.
This puts a small scroll icon, which represents the Script menu,
on the right side of your menu bar. Before you can really use the
menu for this tip, though, you need to create a few folders.
SteP 2 Navigate to your user folder/Library. There, create a
folder (File: New Folder) named Scripts. Inside that folder, create
a folder named Applications. And inside that folder, create a
folder named Mail. Any Automator programs or AppleScripts you
place inside this Mail folder will be directly accessible from Mail.
SteP 3 Switch back to Automator. While still in the Save As
menu, navigate to the new Mail folder you just created, and save
your program.
SteP 4 Now you’re ready to combine messages. Launch
Mail, and 1-click to select a few messages. Click on the script
icon in the menu bar. In the menu that appears, you’ll see Com-
bine Mail Messages at the bottom. Select it, and then wait while
the workflow runs. When it’s done, a new message will open,
containing all of the previously selected messages. They’re even
separated by a nice dividing line, so you can see where each mes-
sage starts. Print this new e-mail message, and you can read all
the selected messages—without any wasted paper.
take a Peek at what’S On the SeRveRIf you don’t like the thought of e-mail sitting around on your
server, you can easily set up your POP e-mail accounts in Mail so
that messages are removed from the server immediately after
Mac 911 delete StUbbORn Mail MeSSaGeSIf you find yourself stuck with stubborn messages in your Spam folder that refuse to disappear when you delete them, the problem may be that you have your IMAP account settings configured improperly. Try this:Open Mail’s Accounts preferences and select your IMAP account. Click on the Mailbox Behaviors tab and disable the Store Deleted Messages On The Server option. Close the Preferences window and click on Save when prompted.
If that doesn’t do the trick, try disabling the Move Deleted Messages To The Trash Mailbox option for that account. Again, close the window and click on Save.
As a last resort, select the Spam mailbox and choose Mailbox: Rebuild.
This last trick can also help you eliminate a message that’s stuck in Mail’s Drafts folder. To remove the message, quit Mail and navigate to your user folder/Library/Mail. Locate the folder that contains this draft—it might be called something like POP-your [email protected] .com. Zero in on the Drafts.mbox folder inside this folder and then the Messages folder within that folder. Inside you should find a numbered file with a .emlx extension—something like 18391.emlx, for example. That’s your nagging message. Toss it.
Next, launch Mail. There will likely still be something in the Drafts mailbox. Select it (you shouldn’t see any mes-sage body because you’ve killed the message). Now delete that entry, select that specific mailbox under Drafts, and choose Mailbox: Rebuild. This should get rid of the message for good.
Skip the Server If your deleted mail won’t
go away, turn off the Store Deleted Messages
On The Server option.
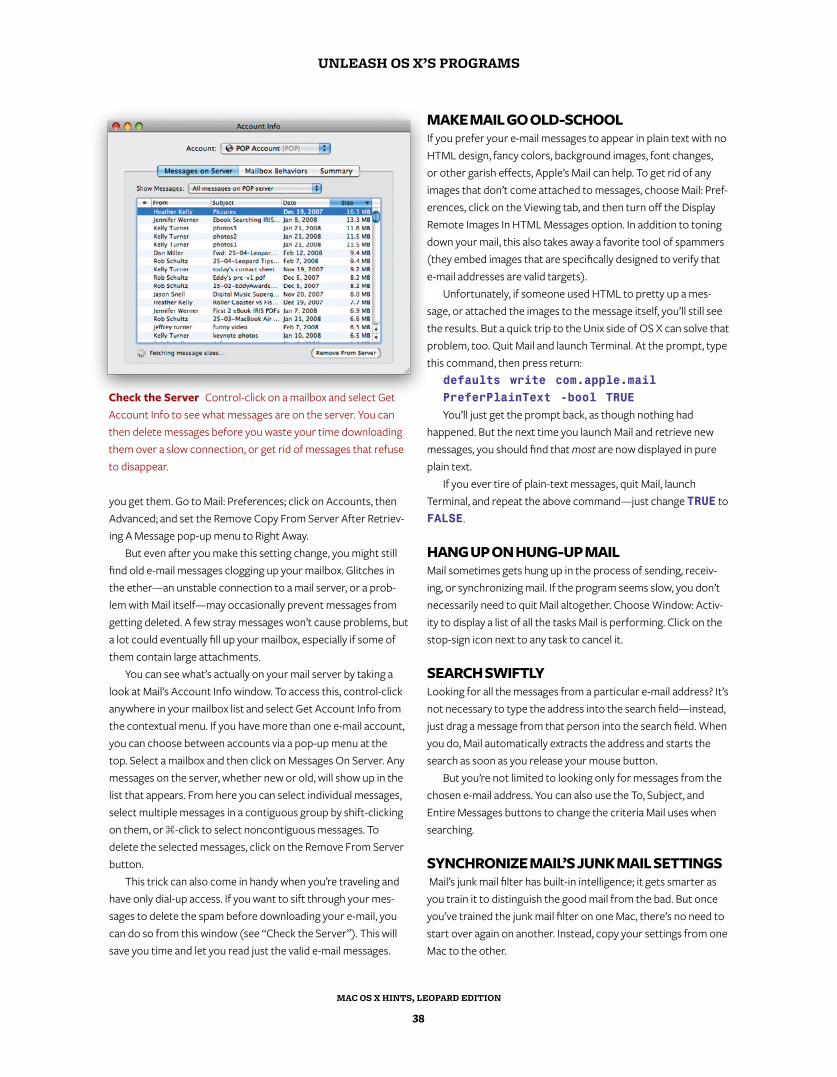
Mac OS X HintS, LeOpard editiOn
38
UnLeaSH OS X’S prOgraMS
Make Mail GO Old-SchOOlIf you prefer your e-mail messages to appear in plain text with no
HTML design, fancy colors, background images, font changes,
or other garish effects, Apple’s Mail can help. To get rid of any
images that don’t come attached to messages, choose Mail: Pref-
erences, click on the Viewing tab, and then turn off the Display
Remote Images In HTML Messages option. In addition to toning
down your mail, this also takes away a favorite tool of spammers
(they embed images that are specifically designed to verify that
e-mail addresses are valid targets).
Unfortunately, if someone used HTML to pretty up a mes-
sage, or attached the images to the message itself, you’ll still see
the results. But a quick trip to the Unix side of OS X can solve that
problem, too. Quit Mail and launch Terminal. At the prompt, type
this command, then press return:
defaults write com.apple.mailPreferPlainText -bool TRUEYou’ll just get the prompt back, as though nothing had
happened. But the next time you launch Mail and retrieve new
messages, you should find that most are now displayed in pure
plain text.
If you ever tire of plain-text messages, quit Mail, launch
Terminal, and repeat the above command—just change TRUE to
FALSE.
hanG UP On hUnG-UP Mail Mail sometimes gets hung up in the process of sending, receiv-
ing, or synchronizing mail. If the program seems slow, you don’t
necessarily need to quit Mail altogether. Choose Window: Activ-
ity to display a list of all the tasks Mail is performing. Click on the
stop-sign icon next to any task to cancel it.
SeaRch Swiftly Looking for all the messages from a particular e-mail address? It’s
not necessary to type the address into the search field—instead,
just drag a message from that person into the search field. When
you do, Mail automatically extracts the address and starts the
search as soon as you release your mouse button.
But you’re not limited to looking only for messages from the
chosen e-mail address. You can also use the To, Subject, and
Entire Messages buttons to change the criteria Mail uses when
searching.
SynchROnize Mail’S JUnk Mail SettinGS Mail’s junk mail filter has built-in intelligence; it gets smarter as
you train it to distinguish the good mail from the bad. But once
you’ve trained the junk mail filter on one Mac, there’s no need to
start over again on another. Instead, copy your settings from one
Mac to the other.
you get them. Go to Mail: Preferences; click on Accounts, then
Advanced; and set the Remove Copy From Server After Retriev-
ing A Message pop-up menu to Right Away.
But even after you make this setting change, you might still
find old e-mail messages clogging up your mailbox. Glitches in
the ether—an unstable connection to a mail server, or a prob-
lem with Mail itself—may occasionally prevent messages from
getting deleted. A few stray messages won’t cause problems, but
a lot could eventually fill up your mailbox, especially if some of
them contain large attachments.
You can see what’s actually on your mail server by taking a
look at Mail’s Account Info window. To access this, control-click
anywhere in your mailbox list and select Get Account Info from
the contextual menu. If you have more than one e-mail account,
you can choose between accounts via a pop-up menu at the
top. Select a mailbox and then click on Messages On Server. Any
messages on the server, whether new or old, will show up in the
list that appears. From here you can select individual messages,
select multiple messages in a contiguous group by shift-clicking
on them, or 1-click to select noncontiguous messages. To
delete the selected messages, click on the Remove From Server
button.
This trick can also come in handy when you’re traveling and
have only dial-up access. If you want to sift through your mes-
sages to delete the spam before downloading your e-mail, you
can do so from this window (see “Check the Server”). This will
save you time and let you read just the valid e-mail messages.
check the Server Control-click on a mailbox and select Get
Account Info to see what messages are on the server. You can
then delete messages before you waste your time downloading
them over a slow connection, or get rid of messages that refuse
to disappear.

Mac OS X HintS, LeOpard editiOn
39
UnLeaSH OS X’S prOgraMS
Select Music from the Library column and drag the Add Songs
To Playlist action to the end of the workflow. Select the name of
your new e-mail playlist. (Automator does have an Add Songs
To iPod action, but your mail will be easier to find if you use this
technique instead.)
There you go. Click on the Run button and behold the majesty
of Automator. (But get comfy: if you’re buried in communiqués,
it could take a while.) The audio file should appear in the iTunes
playlist you created, ready to be transported to your iPod during
your next sync (see “Mail Call”).
There are a number of ways to trick out this workflow further.
For instance, by saving it as a plug-in (File: Save As Plug-in) and
selecting iCal Alarm, you can make your workflow show up in
your calendar. Using the Details pane in iCal, set the time you
want the workflow to run—say, every morning before you leave
the house—as well as how often you want it to repeat. Add an
Update iPod action to the very end of your workflow, and your
audio e-mail file will be ready to go when you are.
On your trained Mac, go to your user folder/Library/Mail and
locate the LSMMap2 file. It’s within this file that Mail stores its
junk mail training data.
Quit Mail on your new Mac, navigate to this same path, and
move its LSMMap2 file to the desktop just in case you need it
later (you’d only need it if the replacement copy didn’t work to
your satisfaction). Now copy the LSMMap2 file from the older
Mac to the same location on your new Mac (you can do this via
a network between the two machines or by copying the file to
a USB drive). Launch Mail, and your new Mac should have the
same junk mail filtering savvy as your old one.
liSten tO e-Mail On yOUR iPOdWant to get your iPod to read your e-mail to you during your
morning commute? With Mail and Automator it’s a mere trifle.
First, launch Automator and create a new Custom workflow.
Click on Mail in the Library column and drag the Find Mail Items
action from the Action column into the empty workflow pane.
This action collects messages that match the terms you specify.
For instance, to find all unread e-mails from your boss, select
Messages from the Find pop-up menu, and then choose Sender
Contains and type in your boss’s e-mail address. Click on the
plus-sign (+) button and set the second set of pull-down menus
to Read Status Is False.
Next, drag the Combine Mail Messages action to the bottom
of your workflow. This action mashes all e-mails found in the
previous step into one blob of text.
Select Text from the Library column and drag the Text To
Audio File action to the bottom of your workflow. This action
converts written words to an audio file of spoken text. From the
System Voice pop-up menu, choose one of the system’s built-in
synthetic voices—we recommend Alex, which is new to Leopard
and sounds great. Enter a name for the audio file, as well as
where you want to save it.
Now you need to get your audio file of spoken e-mails onto
your iPod. Create a playlist in iTunes (File: New Playlist) and
give it a name (for instance, Mail Call). Return to Automator.
Mail call This Automator workflow will gather any unread mes-sages from your boss and present them as an audio file that you can then sync with your iPod.

Mac OS X HintS, LeOpard editiOn
40
UnLeaSH OS X’S prOgraMS
link tO e-Mail MeSSaGeS in icalWant even more linking goodness? The latest version of iCal also
lets you link to a specific e-mail message from an iCal event. First,
make sure you can see both the message you’d like to link to and
your event editing window in iCal. Now drag the message from
Mail onto the editing window in iCal, and you’re done—iCal will
add a link in the URL field (see “Link to Mail”). Click on that, and
you'll be switched over to Mail with the chosen message opened
in its own window. This is a great way to connect e-mailed confir-
mations for flights with your calendar events.
If you want to build links to messages in other programs that
don’t support drag and drop, it’s relatively easy to do. In Mail,
select the message of interest and then choose View: Message:
Long Headers (or Raw Source). Search the newly revealed
header for the line that starts with Message-ID—for example:
Message-Id: <12345.123.0.0.1.1234554321.mailhost@ example.com>
You can create a link to this message in other programs that
support hyperlinks by entering a URL in this format:
message://< 12345.123.0.0.1.1234554321 [email protected] >
iCalpple’s calendar program is more than just a schedule
keeper. With a little know-how, you can use iCal to link
your appointments with files, URLs, e-mail messages,
and to-dos, and turn the program into your own personal
assistant.
QUickly edit eventSHere’s a small time-saver for iCal’s new interface. If you just want
to change the name of an event, don’t double-click on it, which
brings up the editing pop-up window. Instead, highlight it by
clicking once with the mouse (or by using the arrow keys), then
press return.
You can edit the name in place, without ever seeing the
pop-up editing window. It’s still a far cry from the easy event
viewing and editing we had in OS X 10.4, but it’s a step in the right
direction. To quickly edit other event details of a selected iCal
item, press 1-E.
USinG URlS in icalWhen you’re creating an event for your coworker’s party, you
might find it useful to include a link to the online invitation listing
the time and location. iCal makes it easy to include a link to a Web
page with an event or a to-do item. Just create the event and
then type the Web address in the Info pane’s URL field. (If you
don’t see this field, choose View: Show Info.) Once you do, you
can jump to that URL from within the event. But that’s not the
only way to include URLs—you can also create events or to-do
items that have a clickable link as their actual title.
Drag a URL from your browser’s address bar directly into
iCal, and the program will create a new event with that URL as its
title. When you click on this event’s title, the specified URL will
load in your browser. If you use Month view, you might think it’s
now impossible to edit this event, because anywhere you click
seems to take you to your browser. Not true. Switch back to iCal
and press 1-I to open the Info pane and then change the event’s
particulars from there.
Alternatively, you can create your own hyperlinked events
and to-do items by typing a URL inside angle brackets as part
of the item’s title—for example, Meet with Apple <http://www.apple.com>. After you finalize the event or
to-do item, you’ll see that the URL portion of the title functions
as a clickable link while the text outside the angle brackets does
not. You wouldn’t want to use an extralong URL as a clickable link,
but you might find this approach useful if you have Web-related
events or to-dos. (And you can always use the TinyURL.com site
to shrink long addresses.)
A
link to Mail Drag an e-mail message from Mail into an open iCal event and you’ll get a Show In Mail link in the URL field. Click on this to quickly open the message.

Mac OS X HintS, LeOpard editiOn
41
UnLeaSH OS X’S prOgraMS
box appears, choose a name and a location for the exported file.
Then click on Export.
Now choose File: Import. In the Import dialog box, leave the
Import An iCal File option selected and click on Import. Navigate
to the file; then click on Import again. The Add Events dialog box
will appear. The middle pop-up menu lets you specify the destina-
tion calendar for the imported events (see “Merge Two Calen-
dars”). Choose the one you want, and then click on OK to add the
events to it. You’re now free to delete the first calendar.
view ical eventS in cOveR flOwYou can use the Finder’s new Cover Flow view mode and
Spotlight to look at tasks on your iCal calendars in a new and
interesting manner. First, in the Finder, switch to Cover Flow view
mode (View: As Cover Flow), then press 1-F to place the cursor
in the Finder’s search box. To isolate Spotlight matches to just
iCal events, enter kind:ical in the search box, then press the
spacebar, and type in the word or words that you’d like to find
on those iCal events. If you don’t see matches in the results area,
don’t worry. By default in 10.5, iCal events are not included in
Spotlight searches, so you need to manually include them.
Click on the plus-sign button just below the search box to add
a new search criterion. From the Kind drop-down menu, select
Other. When the new dialog box appears, scroll down and click
on Spotlight Items. (If you think you’ll be using this technique a
lot, also select In Menu to save yourself a trip to the Other dialog
box in the future.) Click on OK to return to the Finder. Set the
next pop-up to Include, and you should see your results. You
can now easily see and flip through the matching events, each of
which displays the event’s name and title on the calendar page
(see “Browse Your Events”).
Clicking on that link should then open the chosen message in
Mail. If you’re going to do this a lot, you should probably set Mail
up so that you can always see the Message-ID header. Open Mail’s
Preferences, select Viewing, and then set the Show Header Detail
menu to Custom. In the box that drops down, click on the plus
sign and type Message-Id, and then click on OK. From now
on, the message ID field will be displayed along with the standard
Mail headers.
cOPy ical event infORMatiOnHave you ever wanted to capture the basics of an iCal appoint-
ment so you could use the information in another program? If
you drag an iCal event to the desktop (or another location in the
Finder), you’ll wind up with an .ics file. While that’s helpful in mov-
ing the event to another calendar, it’s not so useful for extracting
text about the event.
There are two simple ways to get event text out of iCal. You
can select the event and then choose Edit: Copy (1-C) to copy it.
Switch to the destination program and then choose Edit: Paste
(1-V). What you get won’t be perfectly formatted, but it’s good
enough for e-mailing to a friend. You can even copy and paste
multiple events—just hold down the 1 key as you select the
events, and then copy and paste them. But you’ll have to insert a
line break between each event yourself—this process doesn’t do
it for you. If you prefer to use the mouse, try this trick: drag and
drop the event from iCal directly to the other program.
MeRGe twO ical calendaRSHave you ever set up two iCal calendars and then wished you’d
created only one? Luckily, you don’t have to manually move all
the events from one calendar to another. Instead, turn to iCal’s
Export command. In the Calendars column, select the calendar
you want to eliminate, and select File: Export. When the dialog
Merge two calendars Combining two iCal calendars into one
is simple, once you know the secret. Just export one calendar
and then import its events into the other.
browse your events With the help of Spotlight, you can scan
through your iCal events in Cover Flow view.

Mac OS X HintS, LeOpard editiOn
42
UnLeaSH OS X’S prOgraMS
about such things is by looking at examples from other sites.
Typically, though, that involves opening the site, viewing the
source code, scanning for the CSS and JavaScript URLs, copy-
ing them, opening a new window, and then pasting the copied
URL into your browser’s address bar. Safari’s Activity window
simplifies this process: click on the disclosure triangle for the site
you’re viewing, scan the list of objects for .css or .js files, and then
double-click on one. The selected file will open in Safari.
You can use the same technique to view embedded Flash or
QuickTime movies in their own windows—just find the .flv, .wmv,
or .mov files in the list, and double-click on them. Want to down-
load something that’s on the page? Just option–double-click on
any element in the window, and it will appear in Safari’s Down-
loads window and start downloading. Want to download a bunch
of stuff? Make your selection, press 1-C to copy the entries,
switch to the Downloads window, and then press 1-V to paste
the list. Bingo, everything you copied will start downloading.
Get inStant definitiOnSIf you end up on a technical Web site with lots of words you
don’t understand, OS X’s Dictionary can help you decipher the
text. Select a word and press 1-control-D. You’ll instantly see
the word’s definition (see “Look It Up”). You can even continue
to hold down 1-control, move your mouse around, and get the
definitions of other words as you roll over them. By the way, this
works in most of Apple’s applications, including Mail and TextEdit,
as well as in many third-party apps.
Safariodern browsers make surfing the Web so simple,
it’s easy to fall into a rut. If you’re ready to explore
Safari 3’s hidden potential, use these tips to eliminate
annoying warnings and slowdowns, organize your bookmarks,
control downloads, and access developer tools.
SPOt Stalled web PaGeSSafari’s very useful Activity window (Window: Activity) shows
activity related to the Web pages you’re viewing. If you try to load
a page and it stalls, for instance, the Activity window will show
you exactly what’s causing the problem. Click on the disclosure
triangle next to the page in question, and you’ll see an entry for
every item on the page, as well as (if the item is loaded) the item’s
size or (if it’s not loaded) a message showing its status (see “Web
Page Parts”).
take a Peek behind the SceneSSafari’s Activity window also lets you do some interesting things
with a site’s source code and page elements. Are you an aspiring
Web designer trying to learn more about Cascading Style Sheets
(CSS) or JavaScript programming? One of the best ways to learn
M
web Page Parts Safari’s Activity window lists all the compo-nents that make up a Web page. Here you see Apple’s home page.
look it Up You don’t have to leave Safari when you come across a word you don’t know. Just press 1-control-D to get a definition on the spot.

Mac OS X HintS, LeOpard editiOn
43
UnLeaSH OS X’S prOgraMS
Recognition tab, and set Speakable Items to On. A small round
window will appear on your screen; that’s the speech-recognition
controller (see “Create Spoken Bookmarks”). Notice the word
Esc in the middle. This indicates that you’ll need to press the
escape key to activate speech recognition. By default, your Mac
will listen to you only when you’re holding down that key. (You
can change this setting in the Speech preference pane.)
Click on the small arrow at the bottom of the speech-recog-
nition controller and choose Open Speech Commands Window
from the drop-down menu. This window contains a list of preset
commands that you can say to your Mac—for example, “Get
my mail” or “Open my browser.” Launch Safari to reveal a Safari
SORt SafaRi’S bOOkMaRkSIt’s easy to add, view, and manipulate your collection of book-
marks in Safari. Just select Bookmarks: Show All Bookmarks to
open a window where you can move bookmarks around as you
like. But one very simple feature is missing: the ability to sort
bookmarks alphabetically. You can rearrange them manually, of
course, but that’s just tedious.
Here’s how to do it yourself. First, open Safari’s Bookmarks
window. Make sure you can see your desktop and the Bookmarks
window at the same time. Now drag the bookmark folder you
want sorted from the Safari window to your desktop. Switch to
the Finder, and open the folder. Choose the List view (View: List),
and then close the window. Drag the folder back into Safari’s
Bookmarks window. Safari will treat it like a newly imported
folder and add it to the list. Open the folder in the Bookmarks
window, and you’ll see your bookmarks, sorted alphabetically.
The original, unsorted folder will still be in your Bookmarks
list. Click on it to select it, and then press the delete key. (Re-
member to delete the folder from the Finder as well.) You can
use this trick only to sort alphabetically. If you try to sort the
List view window by any other column heading—for example,
Date Modified—and import the folder, Safari won't display the
bookmarks in that order.
SURf with yOUR vOiceSpeech recognition is probably one of the most underused fea-
tures in Mac OS X. But you can do some fun and practical things
with it—for instance, use your voice instead of your hands to
open Safari bookmarks.
First, open the Speech preference pane, click on the Speech
Geek IT Up PaGe lOadinG: Pie veRSUS baRWhen Safari is loading a new page, it slowly fills the address field with color to indicate its progress. Some people find this annoying, while new Mac users sometimes fail to recognize it as a progress bar. With a simple Terminal command, however, you can change Safari’s behavior and have it present the more tradi-tional “pie chart” progress indicator.
Start by making sure Safari 3 isn’t running. Then launch Terminal, enter this command, and press return:
defaults write com.apple.Safari DebugUsePieProgressIndicator -bool true
That’s all there is to it; the next time you launch Safari 3, you’ll have the new progress indicator. If you ever want the old behavior back, quit Safari and repeat the above com-mand, but replace true with false.
easy as Pie To replace the normal page-loading bar (front window) with a pie-shaped indicator (back window), use Terminal.
create Spoken bookmarks Tired of typing? Use the Mac’s
built-in speech capabilities to create spoken bookmarks in Safari.
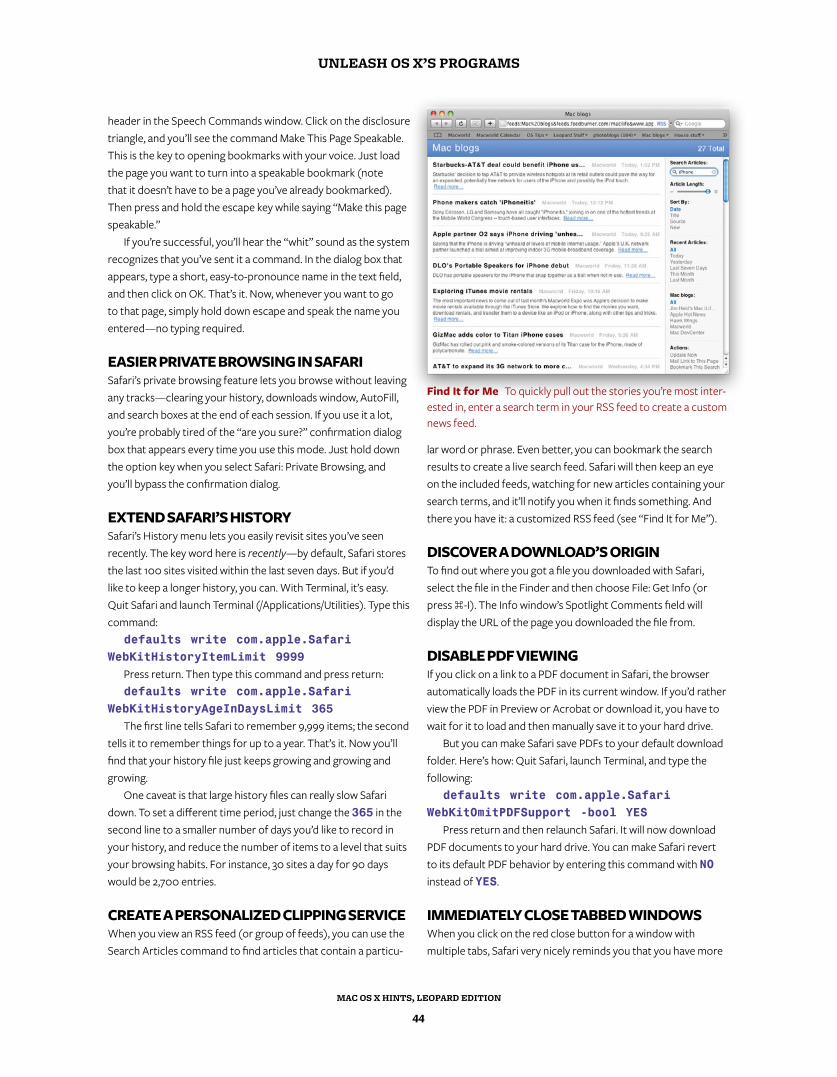
Mac OS X HintS, LeOpard editiOn
44
UnLeaSH OS X’S prOgraMS
lar word or phrase. Even better, you can bookmark the search
results to create a live search feed. Safari will then keep an eye
on the included feeds, watching for new articles containing your
search terms, and it’ll notify you when it finds something. And
there you have it: a customized RSS feed (see “Find It for Me”).
diScOveR a dOwnlOad’S ORiGinTo find out where you got a file you downloaded with Safari,
select the file in the Finder and then choose File: Get Info (or
press 1-I). The Info window’s Spotlight Comments field will
display the URL of the page you downloaded the file from.
diSable Pdf viewinGIf you click on a link to a PDF document in Safari, the browser
automatically loads the PDF in its current window. If you’d rather
view the PDF in Preview or Acrobat or download it, you have to
wait for it to load and then manually save it to your hard drive.
But you can make Safari save PDFs to your default download
folder. Here’s how: Quit Safari, launch Terminal, and type the
following:
defaults write com.apple.Safari WebKitOmitPDFSupport -bool YES
Press return and then relaunch Safari. It will now download
PDF documents to your hard drive. You can make Safari revert
to its default PDF behavior by entering this command with NO
instead of YES.
iMMediately clOSe tabbed windOwSWhen you click on the red close button for a window with
multiple tabs, Safari very nicely reminds you that you have more
header in the Speech Commands window. Click on the disclosure
triangle, and you’ll see the command Make This Page Speakable.
This is the key to opening bookmarks with your voice. Just load
the page you want to turn into a speakable bookmark (note
that it doesn’t have to be a page you’ve already bookmarked).
Then press and hold the escape key while saying “Make this page
speakable.”
If you’re successful, you’ll hear the “whit” sound as the system
recognizes that you’ve sent it a command. In the dialog box that
appears, type a short, easy-to-pronounce name in the text field,
and then click on OK. That’s it. Now, whenever you want to go
to that page, simply hold down escape and speak the name you
entered—no typing required.
eaSieR PRivate bROwSinG in SafaRi Safari’s private browsing feature lets you browse without leaving
any tracks—clearing your history, downloads window, AutoFill,
and search boxes at the end of each session. If you use it a lot,
you’re probably tired of the “are you sure?” confirmation dialog
box that appears every time you use this mode. Just hold down
the option key when you select Safari: Private Browsing, and
you’ll bypass the confirmation dialog.
eXtend SafaRi’S hiStORySafari’s History menu lets you easily revisit sites you’ve seen
recently. The key word here is recently—by default, Safari stores
the last 100 sites visited within the last seven days. But if you’d
like to keep a longer history, you can. With Terminal, it’s easy.
Quit Safari and launch Terminal (/Applications/Utilities). Type this
command:
defaults write com.apple.Safari WebKitHistoryItemLimit 9999
Press return. Then type this command and press return:
defaults write com.apple.Safari WebKitHistoryAgeInDaysLimit 365
The first line tells Safari to remember 9,999 items; the second
tells it to remember things for up to a year. That’s it. Now you’ll
find that your history file just keeps growing and growing and
growing.
One caveat is that large history files can really slow Safari
down. To set a different time period, just change the 365 in the
second line to a smaller number of days you’d like to record in
your history, and reduce the number of items to a level that suits
your browsing habits. For instance, 30 sites a day for 90 days
would be 2,700 entries.
cReate a PeRSOnalized cliPPinG SeRviceWhen you view an RSS feed (or group of feeds), you can use the
Search Articles command to find articles that contain a particu-
find it for Me To quickly pull out the stories you’re most inter-ested in, enter a search term in your RSS feed to create a custom news feed.

Mac OS X HintS, LeOpard editiOn
45
UnLeaSH OS X’S prOgraMS
disable this feature, you can—but this is a permanent change, so
you won’t see any warnings in the future, even legitimate ones.
To make this change, quit Safari, open Terminal, and enter this
command on one line:
defaults write com.apple.Safari DebugConfirmTossingUnsubmittedFormText 0
Relaunch Safari, and you’ll never see another incomplete
form warning. To get the warnings back, quit Safari, then repeat
the above command, but replace the 0 at the end with a 1.
debUG with web inSPectORIf you’re a Web designer, you may be familiar with Firefox’s Fire-
bug extension(www.getfirebug.com), which helps analyze and
debug issues on Web pages. While Safari 3 doesn’t have a tool as
robust as Firebug built in, it does have a very nice Web Inspector
tool you can use. The Web Inspector makes it easy to see how
your HTML, CSS, and properties are being used to build your
page; it’s particularly handy for Web designers trying to trouble-
shoot problem with their pages.
To enable it, quit Safari and launch Terminal, then enter this
command and press return:
defaults write com.apple.Safari WebKitDeveloperExtras -bool TRUE
Note that the Web Inspector may already be enabled on your
machine if you have enabled the Debug menu in either Safari 2 or
Safari 3.
Now launch Safari, control-click on any element on a Web
page, and choose Inspect Element from the contextual menu to
open the Web Inspector (see “Web Inspector”). To disable the
Web Inspector, quit Safari and repeat the above command, but
replace TRUE with FALSE.
than one tab open, and asks if you’re sure you’d like to close the
window. But when you’re certain you want to close the window,
this dialog can be a bit of a pain, as it requires action on your part
to clear it. So when you’re really certain you want to close a multi-
tabbed window, just hold down the option key before you click
on the red close button, and you won't get a warning. (Note: This
will also close any other open Safari windows.)
OveRRide fORM waRninGSSafari will also warn you if you attempt to close a window with
unsubmitted form fields that contain data. This is generally a very
good thing. However, some Web 2.0 sites that rely on Ajax can
falsely trip the nonsubmitted form detector, leading to lots of
annoying warnings that really aren’t warnings at all. If you’d like to
web inspector The Web Inspector makes it easy to peek behind the curtain and see how HTML, CSS, and properties are being used to build a page.

Mac OS X HintS, LeOpard editiOn
46
UnLeaSH OS X’S prOgraMS
bandwidth issue of some sort? The actual speed of the download
might then be more useful to you, as opposed to the estimate of
minutes remaining. To switch to the alternate view, click on the
progress bar (see “Download Details”). Each time you click on
it, the display will toggle between the minutes remaining and the
download speed.
tRanSfORM SMaRt PlayliStS intO ReGUlaR PlayliStSIf you’ve used iTunes’ Smart Playlist feature, you know that you
can sometimes get very interesting results from it. Say you create
a smart playlist (File: New Smart Playlist) that chooses songs that
are in the Latin dance genre and that you haven’t played more
than two times. But to keep things from getting overwhelming,
you turn on the Limit It To 25 Items Selected By Random option.
With these settings, your smart playlist will change over time. If
your playlist delivers a particularly good grouping one day—
perhaps it’s the perfect soundtrack for your weekly salsa-dancing
practice—you could well lose it with the next live update. But you
don’t have to—if you know a few tricks.
There are two ways to create a standard playlist from the
contents of a smart playlist. The first is to open the smart playlist,
select all the songs, and then drag them to an empty area in the
leftmost column in iTunes. A new untitled playlist containing all
the tracks will appear.
The second way is to drag the smart playlist from its present
location and drop it on the Playlists header. A new standard
playlist with the same name will appear at the bottom of your list
of playlists. (This doesn’t work if the smart playlist is in a folder.)
iTuneshanks to the iTunes Store, you’re never more than a
few clicks away from your favorite music, podcasts, TV
shows, movies, audiobooks, and more. But managing all
of that media can take some fancy footwork. Let these tips help
you take back control of your growing library.
QUickly edit SMaRt PlayliStSDo you use a lot of smart playlists to help organize your music
and video in interesting ways? Are you constantly tweaking them
to get them just right? If so, here’s a quick way to edit them—
quicker even than using the control-click contextual menu. Just
option-click on the smart playlist you’d like to edit, and the Smart
Playlist editing window will instantly appear.
chanGe PlayliStS’ defaUlt cOlUMnSIf your playlists don’t automatically show the columns you find
most useful—or if they show columns you find unnecessary—
you may be frustrated that you have to open the View menu
(View: View Options) and reset your preferences every time you
create a new playlist.
Well, here’s a fix that makes playlists include the columns you
want by default. With your Music library selected, open the View
Options pane (1-J) and choose your fields (see “Custom Playlist
Columns”). From now on, iTunes will use those fields whenever
you create a new playlist. That’s it; whatever you’ve set for the
global Music library will be the default for future playlists.
See itUneS StORe’S dOwnlOad SPeedWhen you download something from the iTunes Store, you
can see how the download is progressing by clicking on the
Downloads item in the Store section of the iTunes window. The
Downloads screen shows each download on its own line, along
with a progress bar and estimated download time remaining.
But what if you’re detail oriented, or you suspect you’re having a
T
custom Playlist columns To set the default columns for all newly created playlists, first select your Music library and then select the columns you want iTunes to display.
download details Click on the file’s progress bar to toggle the display to show not just how much time is left, but also the download speed.

Mac OS X HintS, LeOpard editiOn
47
UnLeaSH OS X’S prOgraMS
Playlist) with only one rule: Size Is Greater Than 0MB. Make sure
Live Updating is selected so that the smart playlist will update as
you add new content to iTunes. Give your smart playlist a name
such as Kitchen Sink (to make your smart playlist pop to the top
of the list, press option-space at the beginning of the name).
You’re done. If you prefer, you can even sort your merged library
by type of content—just make sure the Kind column is visible in
the main iTunes window by control-clicking on the column head-
ers and choosing Kind from the pop-up menu.
You can also use this trick to turn a Party Shuffle playlist into a
standard playlist—just drag it to the Playlists header.
See eveRythinG in itUneSWith the advent of iTunes 7, Apple split the monolithic library
entry into several distinct libraries: Music, Movies, TV Shows,
Podcasts, and Radio. While this makes sense, at times you may
want to browse your entire collection of stuff. You can with the
help of a smart playlist. Create a smart playlist (File: New Smart
3 wayS tO cOntROl QUicktiMe Take control of video playback with these hidden features.
SlOw dOwn QUicktiMe MOvieS Don’t want to miss a second of the latest iPod ad (or any other QuickTime content)? Watch it in superslow motion. Once the clip starts playing, you can simply press the right-arrow key to move through the movie frame by frame. If you hold the key down, the movie moves at nor-mal speed without sound. The left-arrow key does the same thing, but in reverse (QuickTime seems to have more trouble playing backward than playing forward, so the results are some-what jerky).
You can get even more control over playback by using a scroll wheel mouse. Make sure your cursor is some-where within the movie frame, and then simply move the scroll wheel up or down while the movie is playing to control the playback speed and direction.
Unveil QUicktiMe fRaMe nUMbeRSDid you know that QuickTime lets you see video time codes and frame numbers? Time codes show you exactly what point of a movie you’re at, which is important when you’re trying to make precise edits. And frame numbers can be even more useful: when you want to make a cut or a splice on a particular frame, knowing its number makes that a lot easier.
How do you view these features? At the bottom of the QuickTime Player window, next to the progress bar, a time stamp shows the position of the playhead in hours, minutes, and seconds. When you click on the time display, you’ll see a drop-down menu with (depending on the source of your clip) up to two additional display options: Non-Drop-Frame and Frame Number (see “New Playback Options”).
ReSize QUicktiMe MOvieSWhen viewing a movie in QuickTime Player, you might have used the View menu to change the size of the playback
window. You can choose between Half Size (1-0), Actual Size (1-1), Double Size (1-2), Fit To Screen (1-3), and—if you’ve upgraded to the Pro version of QuickTime—Full Screen (1-F). However, QuickTime offers two other some-what hidden ways for you to resize your movies.
If you hold down the option key and drag on the window-resizing triangle at the lower right corner of the
window, QuickTime will resize the movie only to those resolutions that it can display most smoothly. Depending on the size of your monitor, this may give you more viewing options than the four provided by the View menu. The other method of resizing is to use the shift key while resizing the movie. When you hold the shift key down, QuickTime
removes all constraints on the size of the movie. This can actually be useful—if you receive a clip that seems to have the incorrect aspect ratio, you can use this trick to set it to something more appropriate. Of course, you can also distort clips for the sheer fun of it. After you’re finished, simply press 1-1, and your clip will return to its default size and aspect ratio.
new Playback Options Tucked into QuickTime is a
new—and if you edit video, handy—menu. Click on the time
display to reveal options for seeing a video’s time code or
frame numbers.

Mac OS X HintS, LeOpard editiOn
48
UnLeaSH OS X’S prOgraMS
the update has a chance to run. When you next connect your
iPod, you may find that you don’t have any new podcasts.
You can, of course, check for new podcasts manually by
clicking on Podcasts in iTunes’ Source list and then clicking on
the Refresh button, but a one-line AppleScript will save you some
work if you find yourself doing this often. First open Script Editor
(/Applications/AppleScript/) and type this line:
tell application "iTunes" to updateAllPodcasts
Select File: Save As and name your script Update Podcasts. In
the Save As dialog box, then navigate to your user folder/Library/
iTunes/Scripts. (If you don’t see the Scripts folder, click on New
Folder to create it.) Now switch to iTunes, and you’ll see a new
AppleScript icon between the Window and Help menus. Click on
it and choose Update Podcasts.
RaiSe yOUR POdcaSt iQWhen you click on Podcasts in the Library list, you get a list of
every podcast you’ve downloaded. Look closely, and you’ll see
the standard Mac disclosure triangle to the left of each podcast’s
title (see “Podcast List”). Clicking on one reveals the episodes
within that podcast. But you can do more.
First, if you hold down the 1 key when clicking on any pod-
cast’s triangle, every podcast in your list expands; 1-click again,
and they all collapse.
If you’ve deleted podcast episodes from the list, you can see
what you’re missing by option-clicking on the disclosure triangle.
iTunes queries the server and downloads the information for
any missing episodes. Click on the Get button to retrieve the
files again. You can even combine these two tips—hold down
1-option and click on a disclosure triangle. Every podcast in the
list will expand, and iTunes will download all missing episode de-
tails. Note that this action will download episode information for
all podcasts in your list—even those you no longer subscribe to.
naviGatinG itUneS’ cOveR flOwiTunes’ Cover Flow view (View: Cover Flow View) offers a novel
way to look through your music library—by album cover. Just
fORce SOnGS tO deleteWhen you’re viewing items in a playlist, pressing the delete key
will remove the item only from the playlist. It’ll still appear in
your main library and in other playlists. To remove it from your
computer entirely, press option-delete.
Save tiMe in the itUneS StORe The iTunes Store is basically a customized Web browser within
the iTunes program. You can quickly jump back (or forward)
through the highlights of your browsing history by clicking on
and holding either the left- or the right-arrow buttons at the top
of the iTunes Store window. When you do, a pop-up window
appears, from which you can quickly jump to any of the major
pages you’ve been to recently (see “Jump Back”). This feature
makes it easy to jump around within the store without having to
move back or forward a screen at a time.
aUtOMatically UPdate POdcaStSIf you select iTunes: Preferences and click on the Podcasts tab,
you can choose to update podcasts hourly, daily, weekly, or
manually. But sometimes none of these options fits the bill—say
you select Daily, but you shut down iTunes in the evening before
Podcast list With a couple of keyboard shortcuts, you can quickly expand and contract your full list of pod-casts, as well as retrieve the complete list of episodes—even if you’ve deleted some of them.
Jump back To quickly go backward through your browsing his-tory on the iTunes Store, click and hold on the left-arrow button.

Mac OS X HintS, LeOpard editiOn
49
UnLeaSH OS X’S prOgraMS
drag the scroll bar to the left or right to flip through the album
art for your music. But there are also two less obvious ways to
peruse your collection. If you’ve got a large library and are look-
ing for something specific, first make sure that iTunes’ browsing
pane is active by clicking on any song in the library or in a playlist.
Once you’ve done that, type a few letters, and Cover Flow will
jump to a matching CD in your collection (see “Cover Flow
Browsing”). What iTunes jumps to is determined by how your
library or playlist is sorted. For example, if you click on the Album
column and then type no c , Cover Flow will jump to the first
matching album name (for example, No Code, by Pearl Jam). If
you sort by artist, those same characters will take you to the first
artist that matches your search.
USe line bReakS in cOMMentS If you’re detail oriented, you’ve probably spent some time in
iTunes’ Info window (1-I) entering custom details about the
selected song—such as Year, Grouping, Composer, and Genre.
The Comments field is particularly useful for keeping track of
items in your collection. Anything you type here will be picked up
by Spotlight searches and can be used in creating smart playlists.
For example, you could add your spouse’s name as a comment
for her tracks, and then quickly create a playlist of just her tunes.
However, the Comments field has a somewhat annoying limi-
tation: you can’t create line breaks in it, so all of the comments
run together in a single line. So what do you do if you want to use
line breaks to format some of your comment text? With the Info
window open, click on the Lyrics tab (or press 1-6), and enter
your comment text there. In this field, you can use the return key
to insert line breaks. Once you’ve typed your comment, highlight
it, press 1-X to cut the text, switch back to the Info tab (1-2),
and paste (1-V). Presto! You have line breaks in the Comments
field. (Be aware that if you export your data, these line breaks
may mess up the formatting.)
cover flow browsing When viewing your library in Cover Flow mode, you can jump to a particular album by simply typ-ing its name.

Mac OS X HintS, LeOpard editiOn
50
UnLeaSH OS X’S prOgraMS
iChateopard’s built-in SMS client, iChat, isn’t limited to
just sending short text messages to your friends and
coworkers—it can also host video chats, conference
calls, and slide shows. To eke out even more power—including
forwarding conversations to your phone, controlling music play-
back, and adding motion to your icon—try these tricks.
bReak UP yOUR PROSe If you’ve tried to send a friend a list in iChat, you may have been
vexed by your inability to make line breaks. Instead, when you
press return, your text is sent. There’s an easy fix. To create a line
break, press option-return.
aUtO-accePt chatSiChat, being the good citizen that it is, pops up a dialog box when-
ever someone initiates a chat with you; you can use the dialog to
accept or reject the chat request. But what if you’re a sociable
sort, and you always accept your chat invitations? In that case,
the dialog box is nothing but a waste of time and energy that
you’d rather do without. In Leopard, you can get rid of it without
actually clicking on the Accept button each time.
Open iChat’s preferences and click on the Alerts tab. From
the Event pop-up menu, select Text Invitation. Enable the Run
AppleScript option and select Auto Accept.applescript from the
pull-down menu (see “Ready to Chat”). To do the same thing for
video and audio chats, repeat the process, selecting Video Invita-
tion or Audio Invitation from the Event menu. (If you’d like to
L Geek IT Up enable data detectORS in ichatOne of our favorite new features in Mail 3 is support for data detectors. Data detectors work by watching your e-mail messages for content that seems related to appointments—things like meet next Wednesday or lunch on Tuesday—or phone numbers or addresses. When you hover your mouse over these detected phrases, Mail offers a contextual menu with options for adding the information to Address Book or as a new iCal event.
By default, this incredibly useful feature only works in Mail. But if you don’t mind taking a trip to Terminal, you can add the same feature to the new version of iChat.
To begin, quit iChat. Launch Terminal, enter this command, and then press return:
defaults write com.apple.iChat EnableDataDetectors 1
When you next launch iChat, you’ll see the same mouse-over effects and contextual menu options when iChat detects date- or event-related information. In our testing, this feature worked nearly perfectly. However, if the feature stops functioning, try this simple fix: select View: Messages and select any Show As option other than the one you’re currently using. Then immediately switch the view back to your preferred style, and data detectors should start working again.
If you decide you’d rather not use data detectors in iChat, quit iChat, then repeat the above Terminal com-mand, but change the 1 to a 0.
see the source for these scripts, you’ll find them in the top-level
Library: Scripts: iChat folder.)
StalkeRS be GOne Find yourself leaving iChat turned off just to avoid a certain
someone who sends you 100 messages a day? You don’t need
to hide or get a new AIM or .Mac address. Instead, go to iChat:
Preferences, click on the Accounts tab, and then click on Security
(see “Get Rid of Pests”). Select the Block Specific People op-
tion and then click on the plus-sign (+) button. Enter as many
addresses as you like, and click on OK. Poof! The people you’ve
blocked will see you go offline in their Buddy Lists—forever. Get Rid of Pests Use iChat’s Accounts preferences to block chats from troublesome acquaintances.

Mac OS X HintS, LeOpard editiOn
51
UnLeaSH OS X’S prOgraMS
PhOtO bOOth fUnLike iChat, Photo Booth uses your Mac’s camera to capture photos and video. Mix in funky effects and a new multiphoto option, similar to what you get from traditional photo booths, and you’ve got endless potential for entertainment.
eliMinate the cOUntdOwn in PhOtO bOOthWhen you click on the red circular camera button, Photo Booth starts an audible and visual countdown (3-2-1), then flashes the screen white (to brighten the image) and snaps the picture. Simple enough. But if you’re playing around and taking lots of photos, the three-second lag and audible countdown can get a bit annoying.
If you’d like to have Photo Booth take a picture right away, hold down the option key before you click on the red camera button. The screen will still flash, and you’ll hear the shutter effect, but there won’t be a countdown of any sort.
take a PictURe withOUt the flaShIf you already like the lighting in your scene, you may be frustrated that Photo Booth automatically sets off a flash when it snaps your picture. However, you can make Photo Booth forgo the flash effect by holding down the shift key when you click on the red camera button.
By the way, if you want to skip the flash and the count-down, you can combine this tip with the previous one; hold down the option and shift keys when clicking on the camera button.
eXtRact a PhOtO fROM a MUltiPhOtO iMaGeLeopard’s Photo Booth has a new burst mode, which takes four pictures in quick succession and then displays the
results as a single multipane image (see “One of Many”). You can then click on the iPhoto button
to send your montage to iPhoto. But what if you decide you’d like to keep only one or two of the
four images in your montage? It turns out that Photo Booth actually does store four separate pictures when you take a burst mode photo—you can find them all in the Photo Booth folder within your user folder/Pictures. Once you’ve tracked them down, you can drag any one of the pictures to iPhoto.
One of Many In burst mode, Photo Booth takes four images in quick succession. But if you want to save only one of those, look inside your Pictures folder.
Ready to chat If you make a habit of accepting chat invitations,
you can skip the acceptance dialog box and just get to talking.
chat anywheReDid you know you can use iChat to send a message to any cell
phone that supports Short Message Service (SMS)? Select
File: Send SMS (or press 1-shift-N). Enter the person’s phone
number and click on OK. The program will open up a new chat
window for sending text messages to that number. Depending on
what service provider your friend uses, he or she might be able to
reply to your message from the cell phone.
If you’d like to get all of your iChat messages while you’re away
from your computer, it’s pretty easy. The trick is that you need
an AIM screen name, not a .Mac account, to do so. If you don’t
have one yet, visit my.screenname.aol.com and sign up for a free
account. Then configure iChat to use your AIM screen name,

Mac OS X HintS, LeOpard editiOn
52
UnLeaSH OS X’S prOgraMS
if doesn’t already, by visiting iChat: Preferences and clicking on
Accounts. Click on the plus sign to add new account information.
Once you’re logged in to iChat via your AIM screen name, visit
AOL’s Mobile page, mobile.aol.com. Click on Sign In and log in
with your AIM screen name if necessary. Once logged in, click on
Mobile Settings under your user name and follow the instruc-
tions. Once you enable forwarding, AIM will send all received
iChat messages to your cell phone via SMS.
tURn ichat intO a MUSic cOntROlleRIf you have more than one Mac in your home and one of them
is set up to play iTunes music, you can use iChat to control that
playback from any Mac on the network.
First, set up iChat to use Bonjour messaging (in Preferences:
Accounts). On the iTunes-owning Mac, open iChat’s Alerts pref-
erences and set the Event menu to Message Received. Select the
Run AppleScript option and then choose iTunes Remote Control.
applescript from the pull-down menu.
You can then send the iTunes-owning Mac these commands
as chat messages from another Mac: status, next,
previous, mute, unmute, help, play, and pause. Just
type each one on a line of its own and press return; the iTunes
Controller AppleScript on the other end will then tell iTunes what
to do.
cReate aniMated GifSIn Leopard, iChat now supports animated buddy icons. You can
find a wealth of animated GIFs online, or you can use Photo
Booth’s burst mode to quickly create your own (for more Photo
Booth tips, see “Photo Booth Fun”). Once you’ve taken a multi-
pane photo, select it and choose File: Export. Photo Booth turns
the four images into an animated GIF.
You can then use this animated GIF as your iChat buddy
icon. In iChat, click on your user picture and select Edit Picture.
Click on Choose, navigate to the animated GIF you just created,
and then click on Set. Other Leopard users (and those using
third-party AIM clients that support animated buddy icons) will
then see your four-picture set. Note that the option to display
animated buddy icons is disabled by default; to enable it, open
iChat’s preferences and turn on the Animate Buddy Pictures
option in the General tab (see “Put It in Motion”).
Put it in Motion iChat now lets you use an animated buddy
icon—something you can create yourself with the help of Photo
Booth. To see your animated GIF, other users will have to open
iChat’s General preferences and turn on the Animate Buddy
Pictures option.

Mac OS X HintS, LeOpard editiOn
53
UnLeaSH OS X’S prOgraMS
eliMinate PReview’S Slide-ShOw cOntROlleR Preview can display multipage PDFs and groups of images in
a slide show. Just press 1-shift-F. When you do, you get an
on-screen slide-show controller. But if the controller is cover-
ing some of the PDF’s or image’s contents—or if you just find it
distracting—you can get rid of it. While in Slideshow mode, click
anywhere to the side of the screen. The controller will disap-
pear—as long as you don’t move your mouse.
Once you’ve hidden the controller, you can use the left-
and right-arrow keys to move backward and forward through
the PDF.
USe PReview tO cReate iMaGe fileSPreview not only opens most of the PDFs and images you come
across, it can also create images from graphics you have saved on
the Clipboard. This can be handy, for example, if you use Apple’s
Keynote and want to create an image from a slide. Press 1-C with
the slide highlighted in the navigator, switch to Preview, and press
1-N. Preview automatically creates a file from the contents of
the Clipboard. Now use File: Save to save the image in the format
and location of your choosing.
This trick is also handy if you’ve grabbed a portion of a screen
(using the shortcut 1-shift-control-4), and then decide you’d
Previewreview isn’t just a handy viewer for images and PDF
files. In Leopard, you can also use Preview to quickly
sort photos, track down hidden graphics files, and even
create new images.
chanGe PReview’S SORt ORdeRIf you have multiple images open in a Preview window, you can
quickly change the order of the drawer’s thumbnails—and get
additional information about the images—by clicking on the gear
icon at the bottom of the drawer. From the menu that appears,
select Sort By and then Name, Path, Date, Size, Kind, or Keyword.
When you do, the images’ sort order changes based on the
selected criterion (if you choose Size, for example, the smallest
files will appear at the top) and you’ll see the information cor-
responding to your selection (see “A Different View”).
cOPy fileS fROM PReview’S SidebaRIn earlier versions of OS X, if you dragged an image out of Pre-
view’s sidebar, it would vanish in a puff of smoke, much like when
you remove something from the Dock. However, this was a basi-
cally meaningless action—nothing would actually happen to the
file you dragged. In the Finder, the original file could still be found
in its original folder. In 10.5, though, Preview’s sidebar images are
now connected to the source files. When you drag a thumbnail
from Preview’s sidebar to a folder in the Finder, you’ll create a
copy of that file. The original file is not moved. This can be useful,
for example, if you use Preview to quickly scan images and sort
them into different folders—perhaps one for keepers and one
for rejects. Just drag the images you wish to keep into your Keep
folder directly from the sidebar, and you can do all your review-
ing and sorting directly from Preview.
Peek inSide aPPlicatiOnS in PReviewYou probably know that you can open a folder of images by sim-
ply dragging the folder icon from the Finder onto Preview’s icon
in the Dock or onto the program’s icon in the Finder. But did you
know that you can also use Preview to quickly find all the inter-
esting images that are sometimes hidden within an application?
An application is nothing more than a special type of folder. Just
hold down 1-option and drop the application icon (TextEdit,
for example) onto Preview’s icon. Preview displays any images it
finds in a new Preview window. Just be careful about trying this
with large applications such as DVD Studio Pro. The process of
collecting all the images can take a very long time. If you run into
trouble, click on the Cancel button in the dialog box to stop the
process.
P
a different view Use the gear icon at the bottom of the sidebar to sort a group of photos by size, kind, name, and more.

Mac OS X HintS, LeOpard editiOn
54
UnLeaSH OS X’S prOgraMS
File: Print Selected Images, or press 1-P. In the dialog box that
appears, choose the number of images you want on each page
from the Images Per Page pop-up menu. (Don’t see this? Reveal
more options by clicking on the disclosure triangle to the right
of your printer’s name.) You can choose to have multiple copies
of each image if you check the Print N Copies Per Page option;
otherwise, each image is printed once (see “Save Paper”).
add keywORdS tO iMaGeS OR PdfSSpotlight keywords make it possible for you to find certain files
easily by using a special keyword that other files won’t contain.
For example, you could add the keyword REPVOLC to that
report you are writing about volcanoes, and Spotlight will find it
instantly.
You can add Spotlight comments to any file by selecting it in
the Finder, pressing 1-I, and typing in the Spotlight Comments
field. But if you send files by e-mail or iChat, or even just transfer
them over a network, comments added in this way disappear. To
add keywords permanently in Preview, open the file and select
Tools: Inspector (or press 1-I). In the palette that appears, click
on the Spotlight tab. Click on the plus sign (+) to add a new key-
word, then type your text. You can add as many keywords as you
want. (Note that this doesn’t work for images in PNG format.)
When you’re done, save the file. Now these keywords will stay
put, no matter where the file travels, so that you can always find
it easily. You’ll find them in the Finder’s Info palette (1-I) in the
More Info section, listed under Keywords.
rather have the image be a file of its own. Just switch to Preview
and press 1-N—there’s no need to grab the screenshot again.
PRint MUltiPle iMaGeS PeR PaGeWhen you want to print a handful of images, it’s a shame to waste
a lot of paper printing one to a page. While many programs let
you print a bunch of images on a page, they typically require mul-
tiple steps to do so. Preview has a printing trick that does it auto-
matically. First, put all your images in a single Preview window. If
you already have one image open, display Preview’s sidebar and
then drag the other images from the Finder to the sidebar. If you
don’t have any images open, you can drag them all onto Preview’s
icon in the Dock or in the Finder. Next, select all the images in the
sidebar by clicking on one and then pressing 1-A. Now choose
Save Paper Print several images per page to save paper using Preview’s Print dialog options.

Mac OS X HintS, LeOpard editiOn
55
UnLeaSH OS X’S prOgraMS
Dashboardhen Apple created Dashboard in OS X 10.4, the idea
was to give users one-click access to helpful tools
like the calculator and weather update without
having to have these programs visible at all times. Since then,
third-party developers have created hundreds of widgets for
Dashboard, offering everything from drink recipes to TV guides.
And with Leopard, users can now create their own widgets from
often-visited Web pages. But if Dashboard is beginning to feel a
bit crowded, use these tricks to maintain order.
See daShbOaRd in a flaShDashboard usually runs in a toggle mode: you press F12 to
activate Dashboard so you can use the widgets, and then you
press F12 to exit it. But if you only want to view widgets, instead
of interacting with them, you can use Dashboard in a temporary
mode. Instead of pressing and releasing F12, hold it down. Dash-
board will remain visible for as long as you hold down the key,
letting you view any already-open widgets. When you release F12,
Dashboard will vanish.
acceSS widGet baR withOUt clickinG Tired of having to mouse over and click on the big plus sign (+) to
bring up Dashboard’s widget bar? Here’s a little-known keyboard
shortcut: after activating Dashboard, just press 1–equal sign (=)
to bring up the Widget bar. Hold down the 1 key while pressing
the left- or right-arrow key to move through multiple panes of
widgets. Press the 1–equal sign combo again to make the bar
vanish. Unfortunately, you can’t activate individual widgets with-
out resorting to the mouse.
whiP widGetS intO ShaPeHaving problems getting a widget to work? Often, all you need to
do is reload it. To do so, click on the widget and press 1-R.
ReSize web cliP widGetSIf you use Safari’s new Web Clip feature to make a Dashboard
widget out of a small Web item, you may be dismayed to find that
Safari enforces a minimum size of about 128 by 128 pixels. The
solution is simple, if not obvious: after creating the widget, click
on the i icon on the widget’s face and then click on Edit. You can
then resize and reframe the widget as you wish.
Place a widGet in the findeRIf you’d rather see a widget all the time—not just when you
switch to Dashboard—you can move the widget to the Finder, so
it appears on the desktop. Launch Terminal, type the following
W Mac 911 SPeed UP daShbOaRdThe problem may start slowly—each time you activate Dashboard, the process takes a bit longer or you experi-ence delays when working with certain widgets. One day you realize that Dashboard is just plain slow. Why? As you work with various widgets, the Dashboard application caches information. In other words, it cre-ates a local copy of widgets’ data. If you need to access that data again, the cache should make the process faster by sparing Dashboard a trip to the Internet. But in some cases, it takes longer to read the cache file than it would to go get the data again.
The solution is to throw all of Dashboard’s cache files in the Trash and then empty the Trash. You’ll find the files in your user folder/Library/Caches/Dashboard-Client. After doing this, you’ll need to restart the Dock, as that’s the program that controls Dashboard. You can do this by using Terminal or Activity Monitor (both in /Applications/Utilities). In Terminal, just type killall Dock. In Activity Monitor, type dock into the pro-gram’s search box, click once on the Dock process, click on the Quit Process button, and then click on the Quit button in the resulting dialog box. In either case, the Dock will restart automatically; after it does, try loading Dashboard and see if it runs any faster.
If this technique works and you would like to permanently prevent Dashboard from creating cache files, that’s quite simple to do, too. Navigate to the DashboardClient folder, select it, and then open the Get Info window (1-I). In the General section of the Info window, select the Locked option. Once the folder is locked, Dashboard won’t be able to write to it any more. (Obviously, to reverse this, just open Get Info again and deselect the Locked option.)

Mac OS X HintS, LeOpard editiOn
56
UnLeaSH OS X’S prOgraMS
on one of those words to jump to its definition, or click on the
capital letter again (before clicking on another word), and you’ll
switch back to the standard definition of rain. Toggle the widget
from Dictionary mode to Thesaurus mode, and the same trick
works; here it will show you a list of other words in the thesaurus
that are similar in meaning to the chosen word.
command, and then press return.
defaults write com.apple.dashboard devmode YES
Log out of your account and then log back in, or restart the
Dock in Terminal by typing killall Dock. You’ll now be
able to pull as many widgets into the Finder layer as you like.
Click on an active widget on the screen and drag it slightly to
the side. Without releasing the mouse button, press F12 to close
Dashboard. When you release the mouse, the widget will appear
on the desktop. To put a widget back into the Dashboard, start
dragging it in the Finder, press F12, and then drop the widget.
tRy dictiOnaRy widGet tRickSMac OS X’s Dictionary widget provides a convenient way to look
up the occasional word in the dictionary or thesaurus. But this
little program does have a few hidden nuances.
First, as is the case with text in many OS X applications,
you can get the search box to show you possible completions
based on the characters you’ve typed so far. How? Just press
the escape key, and you’ll see a drop-down list of completions.
Scroll down to the word you’d like to use and press return, and its
definition will appear.
Once you have a definition visible, Dictionary has one more
trick up its sleeve. Type rain, for instance, and you’ll see its defi-
nition. Now click on the half-circle with the capital R on it, sticking
out on the widget’s left edge. A list of other known words and
phrases that start with rain appears (see “Find a Phrase”). Click
find a Phrase To see a list of phrases that start with rain, simply click on the R icon to the left of the definition.

mac os x hints, leopard edition
57
Take Command of TerminalDig Deeper into Mac OS X with This Powerful Behind-the-Scenes Tool
ith a little bit of know-how and the right commands, even the most novice of Mac owners can use Terminal. By tapping into the power of Unix, anyone can stream-
line workflow and manipulate files in ways otherwise impossible in the OS X interface. Though it might seem a little intimidating at first, Terminal is a snap to use once you learn its secrets. These hints cover what’s new in Leopard, how to search using Terminal, and safety tips to make sure your forays into the command line don’t end in tears.
Table of conTenTs
58 Learn the Terminal Basics60 What’s New in Leopard62 Do More with Terminal65 Superpowered Searching67 Command-Line Lifesavers
W

mac os x hints, leopard edition
58
Take Command of Terminal
see all the details about (as well as examples of ) its options and
functions.
ArgumenTs Like many other commands, ls also takes
arguments to define what input the program responds to. For
instance, ls /Users will show you the user folders of all the
users on your machine, along with the universal Shared folder. If
you enter the following command, it brings up the contents of
the jdoe and rroe user folders:
ls /Users/jdoe /Users/rroe
You can use wild cards to specify a range of names more easily:
an asterisk can stand in for any group of characters, and a ques-
tion mark can substitute for a single character. For example, ls /usr/bin/s* will show you all the files that
start with the letter s in your computer’s /usr/bin
directory. This is handy when you want to narrow
the program’s arguments to a manageable range.
ChAnge DireCTories Unlike the Finder, which allows you to have any
number of folders open at once, the Terminal
limits you to a single place at any one time—this
is your working directory. The cd (change directory) command
allows you to choose a new working directory.
Type cd Sites to move into your Sites folder and make
it the working directory. Type cd .. to move one step back
toward the root of your hard drive, or cd / to move all the way
there. The command cd ~ will return you to your user folder. If
you get confused about which directory you’ve ended up in, the
command pwd (print working directory) will show you where
you are in the folder hierarchy.
hAve Fun wiTh Files Want to do more than list files? Give the ditto command a
try and make copies. To use ditto, follow it with the source
file(s) or folder(s) and the destination file(s) or folder(s). Feel
free to use wild cards when you’re specifying the source files and
folders. For example, to copy all of the word processing docu-
ments in your user folder to a folder called Word_Docs, type the
following:
ditto ~/*doc ~/Desktop/word_docs The ditto command has a lot of different options, too—
type "man ditto" for more help with these.
To view the copies, press 1-shift-G in the Finder and
enter ~/Desktop/word_docs. You can also use cd ~/Desktop/word_docs and ls from the command line.
Learn the Terminal Basicsefore you start typing away in the Terminal window,
take a moment to learn how the command line works,
as well as some basic commands to get you started.
how iT worksUnix commands can be broken down into four parts. The first
part is the command-line program, which is like any other Mac
application, but has a text-based rather than a graphic interface.
Next come options. The command-line equivalent of prefer-
ences, options allow you to modify how a program functions.
The general rule is that options are identified by either a single
dash or a double dash, followed by either a single character or
a whole word. An additional parameter may
follow the option.
The third component is arguments, or the
input the program acts upon. A program’s
arguments are usually file names, but they can
be almost anything, including the output of
other command-line programs.
Finally, there’s output, the result of the
program. Just like a regular program’s output,
a command-line program’s output can be a file or a printed page,
but most often it’s a screen test.
ProgrAms Hundreds of command-line programs are
available in the standard installation of OS X, ranging from the
incredibly simple (echo will output whatever you type as its
arguments) to the ridiculously obscure (yes repeatedly presses
the Y key for you).
One of the most common programs is the ls (list) com-
mand. This command displays the contents of the current
folder (or directory, in Unix lingo). When you enter it, you
should see the names of all the folders and files in your user
folder, including Desktop, Documents, Sites, and so on. To
modify the default behavior of a command, you can combine it
with options.
oPTions You can use ls with several options that change
the way it works. For example, ls -l will display a long list in-
cluding such details as file sizes and modification times. ls -a
will show all files, including those whose names begin with a dot
(.), which are normally hidden. (Names of Unix configuration
files are often preceded by a dot so they won’t clutter up normal
listings.) You can combine options too: ls -l -a will give you
an expanded list of folder contents with all of the files displayed.
How do you find out what options a command has? Type man
(manual) followed by the name of any command-line program to
B

mac os x hints, leopard edition
59
Take Command of Terminal
As complicated as it looks, this breaks down very simply. The
find command lists files based on several criteria: name, date,
owner, and many more. To list every file name in your user folder
and its subfolders that ends with .doc, enter this command:
find ~ -name '*.doc' The contents of that list are passed to the cpio (copy in and
out) command, basically a simplified Unix version of StuffIt. The
-o (output) option tells the program you’re creating an archive.
That data is sent to gzip, a Unix compression program
that shrinks the archive and writes the result to a file made up
of the output of the date command: your user folder (~), the
exact date (%Y%m%d), and finally the typical Unix file extension
attached to a file that has passed through cpio and gzip
(.cpio.gz).
Although files are stored in a single archive, you retrieve
them individually. To recover a file, reverse the process using the
following command:
gzip -d -c YYYYMMDD.cpio.gz | cpio -i -d -r '*filename*'
Replace YYYYMMDD with the date you made your archive and
filename with at least part of the name you’d like to restore.
This command will prompt you with the name of each archived
file that matches, allowing you to skip it, restore it to its old loca-
tion, or put it someplace new. If you’d like a chance to restore any
file in the archive, remove the file-name portion of the com-
mand ('*filename*'), and you’ll be asked about every file the
archive contains. To restore the whole archive without question,
remove the -r option.
use reDireCTionBy stringing Unix commands together with redirection—using
the output of one program as the input for another—you can
accomplish things that are otherwise impossible.
There are three ways to redirect a command’s output so that
another command can use it as input. The vertical bar, or pipe
(|), sends output directly to the following command-line pro-
gram for use as input. For example, ls -l | more uses the
more command to pause after each screenful of data.
If you surround a command with backward apostrophes, or
backtick marks (`), the command will include its output in the
argument list of another command.
One example is cd `cat gohere.txt`. The cat
(concatenate) command displays files on screen. Combined with
backticks and cd, it can change the folder listed in a file into your
working directory.
Finally, the greater-than sign (>) will dump the output in a
file instead of the screen. For example, to create a file called
myfiles.txt in your user folder with a long list of its contents, type:
ls -l ~ > ~/myfiles.txt
Combine CommAnDs The true power of the command line comes out when you mix
commands, options, arguments, and redirection together. This
command saves compressed backup copies of all the Word docu-
ments in your user directory, complete with a dated file name:
find ~ -name '*.doc' | cpio -o | gzip > `date +~/%Y%m%d.cpio.gz`

mac os x hints, leopard edition
60
Take Command of Terminal
screen, while | more tells Terminal to pause after each page
of output. You can see a list of third-party kernel extensions by
inserting -not before bundle-id in the command above.
Just because an extension is listed, however, doesn’t mean
it’s active. To see which of your third-party extensions are active,
type the following (include a space after -id):
kextfind -loaded -not -bundle-id -substring 'com.apple.' | moreThis is basically the same command as before, with the addition
of the -loaded flag to list only those extensions that are cur-
rently active.
If you’re experiencing kernel panics, this list is a good place to
start looking for suspects—try removing the device or program
associated with the extension and rebooting. If the kernel panics
vanish, you’ve found the source of the problem. To find a lot of
good examples of other uses for this command, check the man kextfind manual pages.
Dig inTo insTAller PACkAges Apple’s installer keeps track of things it installs—you can see ev-
erything it’s done by looking at the /Library/Receipts folder. From
there, you can dig into packages and see what’s been installed.
However, rooting around in that folder by hand isn’t a lot of
fun—lots of cd and lsbom commands are required. 10.5’s new
pkgutil command makes things much simpler.
To see a list of installed packages, just type pkgutil --pkgs and press return. Each entry in the list represents a
package ID, and you can use that string to get more information
on that particular package. For instance, if you’d like to know
every file the recent security update installed, just type this com-
mand and press return:
pkgutil --files com.apple.pkg.update.security.2007.009 | more
seT sysTem AnD neTwork PreFerenCes OS X 10.5 includes two good utilities, systemsetup and
networksetup, that you can use to view and configure vari-
ous network and machine-wide System Preferences settings.
These programs aren’t actually new in 10.5; they were available in
10.4, too. But in 10.4, they were buried deep in the System folder.
As of 10.5, Apple has placed them in a standard Unix folder, mak-
ing them easily accessible to everyone.
So just what can you do with them, and why would you want
to do those things? One way these programs are useful is in
managing remote connections. Say you’ve used ssh to connect
to a remote Mac. You might then need its Ethernet card’s MAC
S X 10.5 brings a number of changes to its Unix core,
perhaps more so than any prior OS X release. Many of
the changes are routine—newer versions of key Unix
programs such as the bash shell (from 2.0.5b to 3.2), the vi text
editor (from version 6.2 to 7.0), and even the man manual page
reader (from 1.5o1 to 1.6c). Most of these version changes will be
invisible to the casual Terminal user. More interesting, however,
are the totally new (or substantially revised) Unix commands that
can be found in 10.5.
Those Pesky DoT-unDersCore Files If you’ve ever used a USB stick to move files to a Windows or
Linux machine, or written files to a non-HFS server, you’re prob-
ably very familiar with the “dot files” that are created when you
do so—depending on what you did to the files and folders on
the Mac, you’ll see any number of files whose names begin with
dot-underscore (._), followed by the name of other folders on
the disk. The Mac uses these files on your HFS disk, but they’re
useless on non-HFS systems.
Prior to 10.5, you had to manually delete dot-underscore files
on the other system, or use Terminal trickery to remove them
on the Mac prior to copying. As of 10.5, though, you can just
use the dot_clean command on the directory in question.
Type dot_clean "full path to folder", and the
dot-underscore files will be joined with their parent files. You can
read the manual pages (man dot_clean) for more informa-
tion on this program.
leArn AbouT kernel exTensions Kernel extensions (also known as kexts) are low-level pieces of
code that talk directly to the heart of the Mac operating system.
They are very powerful, and potentially dangerous: if there’s
a bug in a kernel extension, it can crash your Mac. (At worst, a
buggy application can crash only itself.) In 10.5, you can use the
kextfind command to find out which kernel extensions are on
your machine.
Most of the kernel extensions on your Mac are bundled with
OS X; you can see exactly what’s installed by using this command:
kextfind -case-insensitive -bundle-id -substring 'com.apple.' -print | more
While that command may look intimidating, it’s pretty
straightforward. The -case-insensitive argument tells
the system to find all matches, regardless of capitalization. Next,
-bundle-id and -substring tell kextfind to look for the
text string 'com.apple.' in the extension’s bundle identifier.
The print switch tells kextfind to output the results to the
What’s New in LeopardO
mac os x hints, leopard edition
61
Take Command of Terminal
change a startup disk with the -setstartupdisk option;
you follow this option with the path to that disk’s CoreServices
folder, as displayed in the -liststartupdisks option.
Both of these commands have lots of additional features—
check out man systemsetup and man networksetup
for a very thorough explanation of all of their capabilities.
DireCTory serviCes First and foremost, if you’ve previously used the NetInfo com-
mands (niutil, niload, and so forth) in prior releases of
OS X, prepare yourself for a change—they no longer exist in 10.5.
Instead, you’ll be using the Directory Services command-line util-
ity, dscl. This new all-encompassing utility handles everything
related to users and groups (and more) from the command line.
Covering it, however, is well beyond the scope of this chapter—
you can use man dscl to get a sense of everything you can do
with this program.
Another handy utility related to dscl, dscacheutil,
is primarily of interest to Web developers and others who
work with DNS, as it can be used to flush your DNS cache:
dscacheutil -flushcache. (In 10.4, the lookupd
command handled this function.)
address to set up a router. To get that information, just type
sudo networksetup -getmacaddress en0.
(You’ll need sudo for some options with these commands, as
they require administrative privileges.) Want to see what net-
work services are available on the remote Mac? Try typing
networksetup -listallnetworkservices.
You can then use the names of the services returned in other
commands, such as this one, to display the DNS servers on the
remote Mac:
sudo networksetup -getdnsservers "ethernet 1"
If you then wanted to change those DNS servers, you’d use
the -setdnsservers option.
The systemsetup command has similarly interesting
abilities. For instance, you can see the sleep settings for your
computer and display with either of these two commands:
systemsetup -getcomputersleepsystemsetup -getdisplaysleep
To change the display sleep setting to four minutes, you’d
type systemset -displaysleep 4.
You can see which disks will start up the Mac by typing
systemsetup -liststartupdisks. You can also

mac os x hints, leopard edition
62
Take Command of Terminal
use. Instead, try pressing 1-shift and the left- or right-arrow key.
Some people prefer this undocumented shortcut to the one
using the brackets. If you leave out the shift key, that same short-
cut will cycle between open windows.
mAnAge TAbs in TerminAlTabs in Terminal can perform many of the same tricks that tabs in
Safari do. In practice, that means you can turn any tab into a new
window by simply dragging it off the tab bar. You can also rear-
range tabs by clicking and holding on a tab, sliding it along the tab
bar, then releasing the mouse button; as you move one tab, the
others will jump out of the way.
You can also merge multiple windows into one tabbed win-
dow. If you have many open windows and want to combine them
all, just use the Window: Merge All Windows menu command. If
you’d rather be more selective about which windows to merge,
you can drag and drop a stand-alone window into the tab area of
another window. (For this trick to work, the tab bar must be vis-
ible in both windows.) You can set the tab bar to always be visible
using the View: Show Tab Bar menu item.
show remoTe hosT nAmes in TAb TiTlesIf you use ssh to connect to more than one host on a regular
basis, you’ll end up with multiple tabs. Here’s a useful trick for
making the tab label indicate what machine you’re connected to.
With Leopard’s update to Terminal, it’s straightforward to
save connections that automatically ssh to the desired host, and
also display the remote system’s name as the window title. While
it’s not obvious, there is a way to override the default tab label,
which displays the shell name.
Do More with Terminalhis is a collection of the top tricks, new and old, that
make using Terminal easy and fun. Test them out and
make them part of your Terminal routine.
oPen TerminAl urls in DeFAulT browserIn previous versions of Terminal, users could 1–double-click on a
URL to load that URL into their default browser. This has changed
in 10.5, since 1–double-click now selects whatever word is under
the cursor. To do URL clicking in Terminal in 10.5, use 1-shift–
double-click.
geT File PAThs FAsTOS X has always let you drag a file or folder to the Terminal win-
dow to add its path to a command. However, you had to switch
to the Finder, make sure the Terminal window was visible, and
then drag the item into that window. Now you can simply copy
the file or folder, and then paste it into the Terminal window to
add its path.
seT TerminAl’s welCome messAgeIn prior versions of OS X, you’d see a “Welcome to Darwin!” mes-
sage when you opened a new Terminal window. When you open
a new Terminal window in 10.5, you see the date and time you last
opened a new Terminal window instead of the old welcome mes-
sage. To customize this greeting line, open Terminal and enter
cd /etc, press return, then type sudo pico motd.
That second command launches a text editor and loads a new
file called motd (message of the day). Type what you’d like as
your message, then press control-X (for exit), Y (for yes, to save
changes), and return (to accept the file name, which will appear
as motd). From now on, new Terminal windows will display your
custom greeting, right below the date and time of the last login.
nAvigATe TerminAl TAbsOne of the most welcome new features in Terminal is the
addition of tabs. Now, instead of having five separate Terminal
windows open, you can have just one main window containing
five tabs. To create a new tab, simply press 1-T; you can then
switch between tabs by pressing 1-shift–close bracket ( ]) and
1-shift–open bracket ( [ ) (see “Tabbing Along with Terminal”).
If you find that last combination awkward to remember and to
execute, you could reassign it using the Keyboard Shortcuts
panel in the Keyboard & Mouse preference pane. But that’s time-
consuming, and you would have to repeat it on each machine you
T
Tabbing Along with Terminal In Leopard, you can use tabs instead of keeping multiple Terminal windows open. Just press on 1-T to create a new tab.

mac os x hints, leopard edition
63
Take Command of Terminal
Simply create a hard link to the ssh binary with the name of
each remote system you need to connect to (symbolic links don’t
work; ssh is still displayed):
sudo ln /usr/bin/ssh /usr/bin/ remote-name
Then, while running Terminal, copy one of the existing ter-
minal templates and modify it as you normally would. After that,
in the shell settings tab, substitute the remote-name link you’ve
previously created for ssh.
For example, instead of ssh -l username remote-name, specify remote-name -l username remote-name, and voilà, the remote system’s name will now appear in
the tab label.
ProTeCT inFormATion wiTh ACCess ConTrol lisTsUnix geeks will appreciate OS X’s support for Access Control
Lists (ACLs). ACLs give you more control over permissions than
you get from OS X’s Info windows or even from standard Unix
commands. For example, you can use ACLs to set unique access
permissions for everyone who has an account on your Mac.
ACLs are enabled by default only in Mac OS X Server. But you
can easily turn this feature on in the standard version of Leopard.
In Terminal, type sudo /usr/sbin/fsaclctl -p / -e and then enter your administrator password at the prompt.
Type man chmod to learn more about using ACL features.
One caution: creating an archived file via the Create Archive
command in the Finder strips away any ACL information con-
tained in the file.
Time mAChine bACkuPs From TerminAlFew features in Leopard have gotten as much coverage as Time
Machine, OS X’s new automated backup feature. As you’re
probably aware by now, you can start a Time Machine backup in
OS X 10.5 by control-clicking on the Time Machine drive’s icon
in the sidebar and selecting Back Up Now. For those who use
Time Machine in manual mode, this is the only way to run
a backup.
However, this also requires that you be at the computer to
execute the command. What if you’re away and realize you forgot
to run a backup before you left? If you’re on another Mac, you
can use Screen Sharing (or VNC from a non-Mac) to log in to the
GUI. But you might not want to run the full GUI for something as
trivial as clicking on one button in a menu. So here’s a Terminal
solution you can use in an ssh session.
After connecting to the Mac via ssh from whichever machine
you’re using, enter this command in Terminal as one line:
/System/Library/CoreServices/backupd.bundle/Contents/Resources/backupd-helper &
GeeK IT UP use AuTomATor To oPen FolDers in TerminAlIf you work with Terminal, you probably switch back and forth between it and the Finder a lot. Using this simple Automator workflow, you can create a Finder plug-in that lets you control-click on an object in the Finder and navigate to it in Terminal. If you choose a file, the plug-in will open the folder that contains it; if you choose a folder, the plug-in will open the folder itself.
Open Automator and choose Custom on the first screen, then click on Choose. Click on the Files & Folders entry in the Library column. Drag Get Selected Finder Items from the Action column into the blank work area to its right. Next, click on the Utilities entry in the Library column, and then drag the Run AppleScript entry from the Action column into the work area—drop it below the action you’ve already moved there.
Type this code into the script area of the Run Apple-Script action you just placed in the work area. Replace all the existing text with this code:
on run {input, parameters}tell application "Finder"set myWin to window 1set theWin to (quoted form of
POSIX path of (target of myWin as alias))
tell application "Terminal"activatetell window 1do script "cd " & theWinend tellend tellend tellreturn inputend runNow choose File: Save As Plug-in from Automator’s
menu. In the Save Plug-in As box, name your workflow something descriptive. Make sure the Plug-in For pop-up menu says Finder, and then click on Save. Switch to the Finder, select any item, and control-click on your selection. Choose Automator: name of workflow to open a new Terminal window. The cd command will execute, switching you to the folder you’ve selected.

mac os x hints, leopard edition
64
Take Command of Terminal
by giving compass directions such as “east” (or just “e”). Based
on what you tell the game to do, you’ll see a new output blurb ap-
pear, describing the result of your action, your new location, and
so forth. Over time, as you explore and solve puzzles, more and
more of the world is revealed to you, and additional objectives
become apparent.
To play Dunnet, launch Terminal and type this line, followed
by the return key:
emacs -batch -l dunnetDunnet is hiding inside the emacs text editor. Here are a few
basic commands to get you started:
help Gives some background on the game, as well as basic
commands and objectives.
inventory Tells you what you’re carrying.
save and restore Saves and restores the game, so
you can remember to go eat occasionally.
quit Ends the game.
Press return, and your Time Machine backup will start.
The ampersand at the end runs the job as a background process,
so that you’ll have the Terminal prompt back before the backup
completes. This can be very useful if you find yourself needing to
connect someplace where you only have command-line access
to your home machine.
PlAy An olD-sChool ADvenTure gAmeBack before color screens, hard drives, or anything resembling
OS X, there were text-based computer games. All you needed to
play a text-based game were a keyboard, a screen, and an active
imagination. If you’re feeling nostalgic or have some free time to
kill, Terminal has its own text-based game called Dunnet, and it’s
included with every copy of OS X.
In text-based games, you interact with the game through
a simple language parser, using two-word commands like “get
shovel,” “dig rock,” and “attack bear.” You can also move about

mac os x hints, leopard edition
65
Take Command of Terminal
ForCe sPoTlighT To seArCh hiDDen FilesIf mdfind’s abilities sound familiar to you, then you’re probably
acquainted with the locate command. However, there are
some differences between the two. The locate command
searches all the nooks and crannies of your Mac, but looks just
for file names. Also, it updates only when you run the weekly Unix
maintenance routine or use this command:
/usr/libexec/locate.updatedbOn the other hand, mdfind updates its results automatically
every time you create or add a new file, but it doesn’t search
everywhere on your Mac. You can combine the powers of
mdfind and locate using another of Spotlight’s command-line
additions—the mdimport command.
By default, Spotlight ignores many directories, such as certain
system directories. Sure, that makes results easier to comb
through if you never need to look for configuration files
in the Unix part of your Mac, but if you do need to
search these directories, it can be a real pain.
Use the mdimport command to add files to
your Spotlight indexes. When you do, you’ll be able
to search for much more than the default selec-
tion of files and folders. (When you add normally
unsearchable items to your indexes this way, Spotlight
won’t continue to index the new files automatically; you’ll have to
run the command again.)
The mdimport command forces Spotlight to index all the
contents of a directory and its subdirectories. The basic com-
mand structure looks like this:
mdimport -f directory name So if you want to index your System Folder and be able to
search for the more arcane files it contains, you would type this:
mdimport -f /System
If you want to index other folders, or if Spotlight is not find-
ing certain files, use the same command with the appropriate
paths to index or reindex specific directories or volumes. Note
that Spotlight doesn’t index text files that lack the .txt extension.
That means you won’t be able to improve its ability to find, for
example, configuration ( .config) files and preference (.plist) files.
sToP sPoTlighT inDexingIf you peruse the Spotlight preference pane, you’ll see that you
can prevent Spotlight from indexing specific volumes or folders.
Click on the Privacy tab and add the areas you don’t want indexed
to the list. This is handy if you don’t want your Mac grinding away
every time you connect your backup drive to archive files, or if
potlight has its limitations, especially when you’re
searching your Mac’s more out-of-the-way corners. For
greater control over searching, take a trip to Terminal.
These command-line tricks offer new ways to seek out even the
most obscure files on your Mac.
FinD Files From TerminAlLike a regular Spotlight search, the mdfind command lets you
quickly find files on your Mac according to keywords—and it
adds an extra twist or two. For example, if you run the command
mdfind Shakespeare, you’ll find any files that contain the
word Shakespeare in their names, content, or other metadata.
This could include a digital copy of King Lear, a video of Shake-
speare in Love, or an album by Robbie Shakespeare.
geT sPeCiFiC If you know that a file is in a certain directory, or if you
want to search only files in that directory, use the
-onlyin directory name option to narrow
down the search (put a space after -onlyin):
mdfind Shakespeare -onlyin /Users/will/Documents
(Remember that you can simply drag the folder
you want to search to the Terminal window to add its
path name quickly.)
If you simply want to know how many matching items you
have, try the -count flag; for example, to find out how many
files contain Shakespeare on your Mac, run this command:
mdfind Shakespeare -count
Try live seArChes Another option is to run a live search running the -live command,
which updates results as users add files. This is particularly useful
if you’re waiting for people to put files in your Drop Box, or if
you run a server and want to see when files containing certain
content or metadata appear in a shared folder. Since Spotlight is
constantly indexing your files, you can see when it adds new files
that match certain criteria.
For example, if you type mdfind -live Shakespeare,
the command will alert you each time it discovers an additional
file containing Shakespeare on your Mac. A message will appear
at the bottom of the Terminal window—for instance, this one:
Query update: 20 matchesThe command will continue to update this number until you
stop it by pressing control-C. If you want to see the names of all
the files, you must run the command again.
Superpowered SearchingS

mac os x hints, leopard edition
66
Take Command of Terminal
It lets you see what type of metadata Spotlight has indexed for
any file. Running the command mdls "file name.txt" in
this format shows the metadata for a text file. You can see some
simple information, such as the following:
kMDItemContentType = "public .plain-text"
kMDItemLastUsedDate = 2008-02-12 11:52:18 +0100
The first line above shows the document type, and the
second line is the last date someone changed the file. You’ll see
different metadata for different files. A file you downloaded from
a Web site will have a URL. Music files will have tag information.
A digital photo will have everything from the camera’s make to
whether your flash was on. Once you know all the terms, you can
search for any of the metadata types.
Say you want to find a file that a friend sent you by e-mail, but
you can’t remember its name or what it contained. Just search
for the sender’s e-mail address. Run the mdls command on an
e-mail message to find out how to search for such metadata.
(You can just drag a file to the prompt to enter its path and
name.) The attributes it returns are the arguments you can use.
Once you have the right arguments, you’re ready to search.
For example, to find a file received via Apple’s Mail (Spotlight
doesn’t index e-mail from all programs), you’d use the mdfind
command like this:
mdfind "kMDItemAuthorEmailAddresses == '*macworld.com*'"
This command searches for any file received from a
macworld.com e-mail address. Pay close attention to the use of
quotation marks, asterisks, capital letters, and the double equal
sign (==). Type man mdfind for more on this command’s syntax.
see The ATTribuTes To see all the attributes you can search by, use the mdimport
command. Type mdimport -A in Terminal, and you’ll see a
long list of more than 100 attributes, as well as a short descrip-
tion of each one. The actual list will depend on whether you have
any third-party programs installed that have Spotlight importers.
you don’t want it to provide duplicate search results (the same
files on both your main drive and your backup) when the backup
is connected.
The mdutil command gives Mac administrators similar
powers. (You must preface it with sudo, which tells Terminal
to run it as the superuser after you authenticate with your
administrator password.) Using this command, you can specify
which volumes to index, and you can also make Spotlight reindex
volumes by erasing the current indexes.
FliCk The on-oFF swiTCh To turn indexing on or off for a volume, run sudo mdutil -i on "volume name" or sudo mdutil -i off "volume name", respectively. For example, if you want to
turn off indexing for a volume called Backup, the command
would be as follows:
sudo mdutil -i off /Volumes/BackupTo delete the index for a volume, run this command:
sudo mdutil -E "volume name"
If indexing is on for the volume, Spotlight will reindex it
immediately. If indexing is off, it will remain that way until you
turn it on again. That means you’ll reclaim all of the disk space
that the index used.
Sometimes Spotlight’s indexes get out of sync, and you’ll find
that you simply can’t find files you know are on your Mac. Using
the above commands to turn indexing off and then on again
allows Spotlight to rebuild its index from scratch. In most cases,
this allows you to find all your files again.
meeT your meTADATASpotlight doesn’t just index file names and file content, it also
indexes metadata (data about your files). Metadata might include
the last save date or the author of a Microsoft Word document;
the artists, composers, albums, and genres of digital music files;
or, in the case of an e-mailed file, the sender’s e-mail address.
Every file contains an astonishingly long list of metadata.
The problem is that you probably don’t know what kinds of
metadata you have in your index. The mdls command can help.

mac os x hints, leopard edition
67
Take Command of Terminal
Command-Line LifesaversI
The source can be one file or several files. The destination can
be a single file or a directory. For example, cp Report2005 ~/Documents/Archives copies the Report2002 file from
the current working directory to the Archives directory in your
Documents folder. If you want to change the file’s name—to
Report2002_copy, for instance—when you copy it, you can run
this command:
cp Report2005 ~/Documents/Archives/ Report2005_copy
The danger of the cp command is not just that it replaces
any existing file with the same name, but that it does so without
warning you as the Finder would.
TAke sAFeTy meAsures The cautious Unix founders wisely added the -i, or interactive,
option to the command line as a safety measure. When you
use this option, Terminal will verify certain commands with you
before executing them. It’s the best option to protect
yourself from harmful typos. To use -i, add it to
a command, like this:
rm -i Report2005Terminal will display a message—“remove
Report2005?”—asking whether you’re sure you
want to remove the file. You must type yes, or
simply y, before the rm command does its work.
If, however, you type anything else, such as no or
n, or simply press return, you cancel the operation.
Both cp and mv also offer the interactive option,
and using it whenever possible is a good idea. When you
use this option, Terminal displays the following message if your
command is going to replace an existing file: “overwrite file
name and path? (y/n [n])”. Press return to select the default
answer, which is no. Type y or yes to tell Terminal to overwrite
the file.
ADD AuTomATiC ProTeCTion If you know you’re forgetful, set up Terminal to use the interac-
tive option automatically whenever you invoke rm, cp, or mv.
To do this, you must create a shell alias. Your shell (bash,
by default) is the program that runs in Terminal whenever
you launch the application. A shell alias is nothing like a Finder
alias. Rather, it’s a way of having one Unix command run
another one.
You need to add your alias in the .profile file in your user
folder. If you don’t already have such a file, use your favorite
plain-text editor to create a file with that name.
f you’re new to the command-line interface, you’ve
probably heard horror stories about people who’ve
erased all their files with one command. And if you’re
a Terminal veteran, you’ve undoubtedly had a few brushes with
disaster. When you work with the command line, you work
without a safety net—there’s no Trash to fish files out of and no
Undo command. But there are some ways to protect yourself
from missteps.
know your erAsers Terminal is an amazingly efficient tool for deleting, moving,
and copying files. One slip-up when you use these commands,
though, and your files may be gone forever.
Perhaps the most hazardous of commands is rm, the remove
command. Omit a character or press return just a bit too quickly,
and you can wipe out the wrong file, an entire folder full of files,
or an entire hard drive.
For example, if you wanted to delete a file called
Report from your desktop, you’d run the rm
command, like so:
rm ~/Desktop/ReportNow say you have several files with
names such as Report2005, Report2006,
Report2007, and Report2008, and you
want to delete the report from 2005
using the command line. If you acciden-
tally type Report2007 instead and press
return, you won’t be able to retrieve the file
unless you have a backup.
And that’s not the worst mistake you can make when you’re
using rm. When you reference file and folder names that contain
multiple words, Unix requires that you use either quotation
marks, as in rm ~/Desktop/"Report 2005", or a back-
slash, as in rm ~/Desktop/Report\ 2005, to indicate
that both words are part of the name. Quotation marks are the
safer choice because it’s very easy to forget the backslash. Leave
out the backslash, and the rm command will think you’re telling it
to delete two separate items.
The other two commands to be careful with are cp and mv.
The cp command is Terminal’s equivalent of dragging a file in the
Finder to another volume, or option-dragging a file (or selecting
File: Duplicate) to copy it to a different location. Likewise, you
use the mv command to move files from one place to another,
much as you would drag a file to a different folder. You run both
the cp and mv commands like this:
command source destination

mac os x hints, leopard edition
68
Take Command of Terminal
command to sort a list of phone numbers in a file, and then save
the results in a file called sorted_phone.txt:
sort phone.txt > sorted_phone.txtRemember to give your output file a new name or you’ll lose
the original file.
PrevenT overwriTingSince redirecting output is such a common action (you may use
it when you parse log files or run complex find commands), the
Unix folks created a special variable, aptly named noclobber,
that you can set in your shell. With this variable in place, Terminal
will prevent you from overwriting files when you use the redirec-
tion character.
All you have to do is open your .bash_profile file and add the
following line:
set -o noclobberNow, when you redirect output with the redirection char-
acter, you’ll see this error message: “cannot overwrite existing
file.” This will save you from losing the original redirected data, or
any other files with the same names as those you’ve chosen for
redirection. All you need to do then is run your command again,
renaming the output file, to save the output.
Now, add the following lines:
alias rm='rm -i'alias cp='cp -i'alias mv='mv -i'When you save the file, the Finder will warn you that you’re
creating an invisible file. To proceed, click on the Use ‘.’ button.
Essentially, you’ve created shortcuts for all these commands.
Every time you type the mv command in Terminal, no matter
how complex the actual command is, the shell will run that com-
mand with the safer -i option, helping you avoid any unwanted
deletion or overwriting. To make Terminal ignore any alias you’ve
set, run the rm command as follows:
\rm fileBy using the backslash, you're telling the shell to use the real
command instead of its alias.
use reDireCTion When the output of a command is long, or when you want to
save it to review later, it’s convenient to save the output to a file
instead of displaying it in Terminal. You do this by using the redi-
rection character, a close angle bracket (>), followed by a space
and then the destination file’s name. For example, use the sort
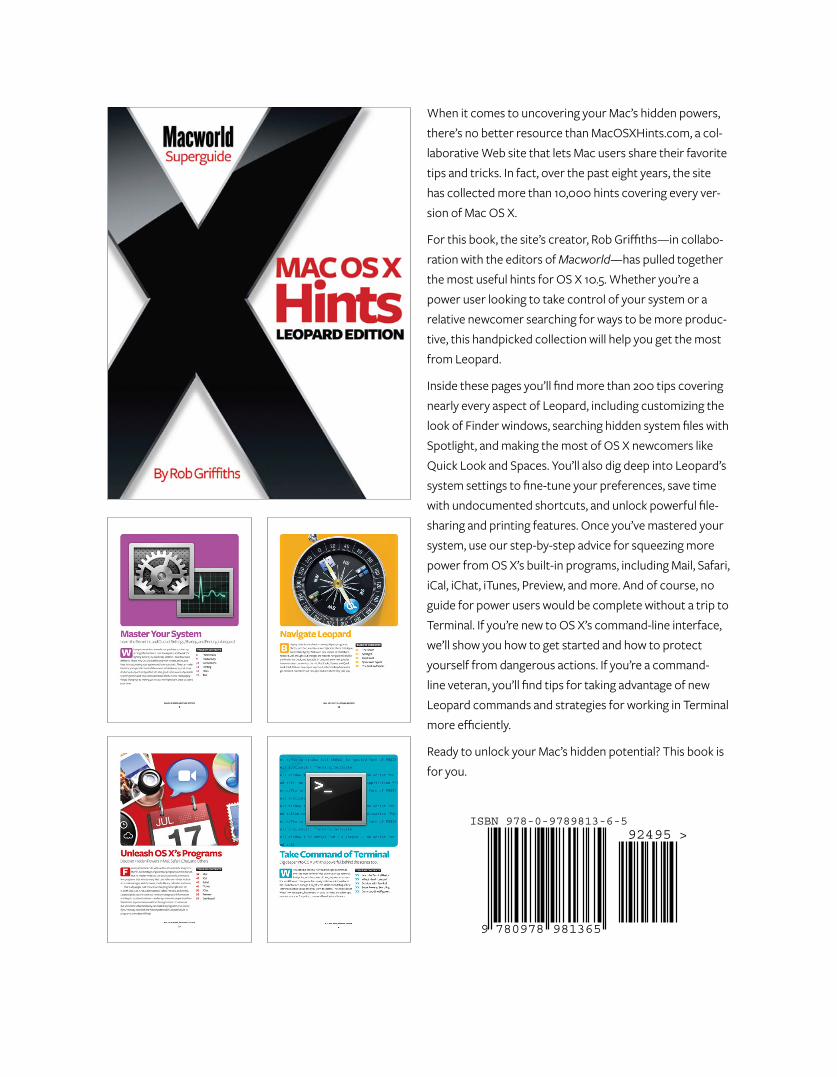
When it comes to uncovering your Mac’s hidden powers,
there’s no better resource than MacOSXHints.com, a col-
laborative Web site that lets Mac users share their favorite
tips and tricks. In fact, over the past eight years, the site
has collected more than 10,000 hints covering every ver-
sion of Mac OS X.
For this book, the site’s creator, Rob Griffiths—in collabo-
ration with the editors of Macworld—has pulled together
the most useful hints for OS X 10.5. Whether you’re a
power user looking to take control of your system or a
relative newcomer searching for ways to be more produc-
tive, this handpicked collection will help you get the most
from Leopard.
Inside these pages you’ll find more than 200 tips covering
nearly every aspect of Leopard, including customizing the
look of Finder windows, searching hidden system files with
Spotlight, and making the most of OS X newcomers like
Quick Look and Spaces. You’ll also dig deep into Leopard’s
system settings to fine-tune your preferences, save time
with undocumented shortcuts, and unlock powerful file-
sharing and printing features. Once you’ve mastered your
system, use our step-by-step advice for squeezing more
power from OS X’s built-in programs, including Mail, Safari,
iCal, iChat, iTunes, Preview, and more. And of course, no
guide for power users would be complete without a trip to
Terminal. If you’re new to OS X’s command-line interface,
we’ll show you how to get started and how to protect
yourself from dangerous actions. If you’re a command-
line veteran, you’ll find tips for taking advantage of new
Leopard commands and strategies for working in Terminal
more efficiently.
Ready to unlock your Mac’s hidden potential? This book is
for you.
9813657809789
ISBN 978-0-9789813-6-592495 >
Copyright © 2022 FDOKUMEN