


Practical Bandaging - Forgotten Books
141
-
Upload
khangminh22 -
Category
Documents
-
view
0 -
download
0
Transcript of Practical Bandaging - Forgotten Books

PRACTICAL BANDAGING
INCLUDING
ADHE SIVE AND PLASTE R OF—PARIS
DRE SSINGS
BY
ELDR IDGE L. ELIASON,A .R .
ASS ISTANT INSTRUCTOR IN SU RGERY IN THE UN IVERS ITY OF PENNSYLVAN IA MEDICAL SCHOOL "ASS ISTANT SU RGEON . UN IVERS ITY OF PENNSYLVAN IA HOSP ITAL " ASS ISTANT SU RGEON ,
HOWARD HOSP ITAL " MEM B ER OF THE COLLEGE OF PHYS IC IANS OF PH ILADELPH IA .
155 ORIGINAL DRAWINGS AND P HOTOGRAPHS
PHILADELPHIA AND LONDON
J . B . L IPP INCOTT COMPANY
G IFT PAO l Fl C COAST J OURNAL
DE P T.
COPYR IGHT , 19 14
BY J . B . ppmcor'
r COMPANY
E lectrotyped and P rinted by J . B
The Washington Square P ress , P hiladelphia, U. S. A .

To
PROF. EDWARD MARTIN ,A.M . , M .D .
TO W HOSE E " AM P L E , A ID AND
PR E C E PT THE AUTHOR OW E S MUCH
743534

PRE FACE
TH IS work has been written for students and nurses , and
for that reason has been made as s imple and non-techn ical as
poss ible. An endeavor has been made to clear up a numbero f po ints in the app l icat ion o f bandages , that have been more
or less indefinitely p resented hereto fore . A l l the recognized
class ical bandages in common use are descr ibed . In addition,however
,the author has added paragraphs or i l lustrat ions
o f methods or turns wh ich have been found more effic ient
in h is exper ience . An effort has been made to have the i l lus
trations absolutely correct and for th i s reason al l the draw
ings were made from a model dress ing.
Some o f the i l lustrat ions are retained as photographs,thus
hoping to make the impress ion more real i st ic and lasting.
Due to the increas ing usage of gauze bandage the p l ia
bility of wh ich covers a multi tude o f s ins,there i s a tendency
to neglect the fundamental pr inciples o f bandag ing. One
should remember that every bandage properly appl ied takes
les s material,reta ins i ts place better and gives a much better
impress ion , than one improperly app l ied .
One chapter i s given up to the miscel laneous bandages and
dress ings and includes handkerch ie f bandages,cravats sl ings
,
swathes and var ious especially constructed dress ings in moreor less common use .
A short chapter handles in a br ie f manner rubber or
elastic bandages and the i r substi tutes .
Chapter IV treats in detai l the quest ion of adhes ive
plasters , descr ibing the various types , the i r storage , appl ica
tion and removal . I l lustrat ions show the various dress ings
employed .0

PREFACE
The last chapter d iscusses plaster of Pari s in al l its
phases . The reader i s shown every step from the mak ing of
the ind iv idual p laster bandage to the appl ication o f the com
pleted dress ing in i ts many forms and finally its removal .
Th is work i s meant merely to descr ibe the various dress
ings and thei r appl icat ion . No attempt has been made to
cons ider the ind icat ions for such dress ings .
TH E AUTHOR .
PHILADELPHIA , JULY, 1914.

CONTE NTS
PART IROLLER BANDAGES PAGE
FUNDAMENTAL FACTSPREPARATION OF BANDAGE SHOW To ROLL BANDAGESSTARTING BANDAGES . .
RE" U IS ITE S OF A BANDAGE .
END ING A BANDAGE .
FUNDAMENTAL TURNS OR BANDAGESSPIRAL OF F INGER . .
SPIRAL REVERSE OF THE F INGERDEM IGAUNTLET BANDAGESGAUNTLET BANDAGESPI CA OF THESPIRAL REVERSE OF UPPER E" TREMITYSPICA OF THE SHOULDERSPIRAL REVERSE OF THE LOWER E" TREMITYSPIRAL OF THE FOOT COVERING THE HEELSPICA OF THE FOOT .
F IGURE -OF-8 OF THE LE G.
SPICA OF THE GROINDOUBLE SPICA OF THE GROINCROSSED BANDAGE OF THE PERINEUMP
'
OSTERIOR F IGURE-OF -S OF SHOULDERS AND BACKANTERIOR F IGURE-OF-8 OF SHOULDERS AND CHESTSUSPENSORY OF THESUSPENSORY OF BREASTSUSPENSORY OF BOTH BREASTSF IGURE-OF-8 OF THE BREASTS (KIWISCH)DESAULTDAVIS BANDAGE .
VELPEAU (MODIFIED)VELPEAU MODIFIED (DULLES)F IGURE-OF-8 OF THE HEAD AND NECKBARTONGIBSON BANDAGE .
OBL I" UE OF THE JAWDOUBLE OBL I " UE OF THE JAwRECURRENT OF THE SCALP .
CONTENTS
TRANSVERSE RE CURRENT OF THE SCALP .
RE CURRENT OF SCALP WITH DOUBLE ROLLERMONOCLE OR CROSSED BANDAGE OF ONE E YE
B INOCULAR OR CROSSED BANDAGE OF BOTH EYES
PART II
MISCELLANEOUS BANDAGES
TAILED BANDAGESPERINEAL “ T " BANDAGE .
PERINEAL BANDAGE (CUNN INGHAM)THE T BANDAGE OF THE SCALPTHE T BANDAGE OF THE E YETHE T BANDAGE OF THE E ARTHE DOUBLE “ T " OF THE CHESTTHE FOUR-TA ILED BANDAGE OF CH INFOUR-TAILED BANDAGE OF THE NOSE AND UPPER" UADRANGLE BANDAGE OF OCCI PUT" UADRANGLE BANDAGE OF THE VERTE"" UADRANGLE BANDAGE OF" UADRANGLE BANDAGE OR SL ING OF THE SHOULDER" UADRANGLE BANDAGE OR SL ING OF ARM AND FOREARMMANY TAILED BANDAGE S (SCULTETUS)
HANDKERCH IEF BANDAGES .
OCC I PITOFRONTAL TRIANGLEFRONTo-OCC I PITAL TRIANGLEB ITEMPORALVERTICOMENTAL TRIANGLEAuRICULo-OCC I PITAL TRIANGLE .
THE TRIANGLE OF THE HEAD . .
S" UARE CAP OF THE HEAD .
POSTERIOR TRIANGLE OF SHOULDERSTHE THORACICOSCAPULAR TRIANGLETHORAC ICOHUMERAL TRIANGLE .
TRIANGLE SUSPENSORY OF THE BREASTSBRACHIOCE RVICAL TRIANGLE (a)BRACHIOCE RVICAL TRIANGLE (b)BRACHIOSCAPULAR TRIANGLE (a)BRACHIOSCAPULAR TRIANGLE (b)MAYOR’S BANDAGEMOD IFICATION OF MAYOR’
S BANDAGESHOULDER TRIANGLEHAND TRIANGLEANTERIOR PELVI C TRIANGLE .
CONTENTS
POSTERIOR PELVI C TRIANGLESCROTAL HAMMOCKSCROTAL TRIANGLESCROTAL S " UAREGLUTEAL TR IANGLEINGU INAL TRIANGLETIB IOCE RVICAL SL INGKNEE TRIANGLEFOOT TRIANGLECRAVATS
PART II IELASTIC BANDAGES
MARTIN ’S RUBBER BANDAGEELAST IC WEBB INGESMARCH TUBE OR TOURN I " UETELAST IC FABRI C BANDAGEUNNA’S DRESS ING . .
PART IVADHESIVE DRESSINGS
SURGEON’S ADHES IVE PLASTERZO ADHES IVE PLASTERJANUS ADHESIVE PLASTERDE LA COUR’S ADHES IVE PLASTERI SINGLASS PLASTERABDOMEN .
UMB IL ICUS .
SHOULDER (SAYRE DRESS ING)SAYRE MODIFIED . .
ACROM IOCLAVICULAR JOINTTAPED ADHES IVE (MONTGOMERY STRAP)CATHETER STRAPSDUMB -BELL ADHES IVE STRAPLACED ADHES IVE .
SPL INTSFURUNCLE CONEBACK .
STIRRUP E" TENSION STRAP (BUCK’S E" TENS ION)
ANKLECHEST .
KNEE .
LE G .
INGUINAL DRESSING 0 0 0 0 0 0 0
x CONTENTS
ACH ILLES TENDONTHE TEST ICLESADHES IVE SUSPENSORYPELVIC B INDER .
PART V
PLASTER-OF-PARIS OR GYPSUM BANDAGES
GENERAL CONSIDERATIONSAPPL ICATION OF A PLASTER CASTMETHOD OF REMOVING A PLASTER CASTFENESTRATION OF CASTSAMBULATORY CASTSSEGMENTED OR BRACKET CASTSPLASTERBAVARIAN SPL INT . .
PLASTER JACKETPLASTER SPICA OF THE LOWER E" TREM ITYPLASTER SHOULDER CAPSODIUM S IL ICATE (LI" U ID GLASS)STARCH BANDAGE
ILLUSTRATIONS
PAGEI . Roll er Bandage . a, Single " b, Doub le
'
2 . Bandage Roller3. Roll ing Bandage by Hand4. Method of Holding a Bandage5. C ircul arTurns of a Bandage .
6. Ob l ique Fixat ion of a Bandage7. a, Slow Spiral Turns " Rapid Spiral Turns8 , 9. Spiral Reverse10. Figure oi-8 Turns (Ascending Spica)I I . Figure-Oi-STurns (Descending Spica)1 2. Recurrent Turns13, 14, 15. Spiral Reverse of F inger16 . Demigaunt let Bandage17. Gaun t let Wi th Spiral of Ring Finger18 . Spica Of the Thumb (Ascending)19. Spica of the Thumb (Descending)20 , 2 1 . Spiral Reverse of the Upper Extrem i ty22 . Sp iral Reverse of the Upper Extremi ty23. Spica of the Shoulder24. Spica Loops of the Shou lder25. Sp iral Reverse Of Lower Extremi ty26. 0 , Spiral Of Foot Covering the Hee l ° b , Second S tage27. Sp iral of Foot Cover ing the Heel28 . Spica of the Foot (First S tep) .
29. Spica of the Foot30. Figure-of-8 of the Leg (Method 1 )
31 . Figure-0f-8 Of the Leg (Method 2 )32 . Figure-oi-8 of the Leg (Method 3)33. Figure-of-8 of theLeg34. Spica of the Groin (First Turn)35. Spica of the Groin36. Spica Of the Groin37. Spica Of the Groin (Ascending) wi th Ob l ique Fixat ion38 . Spica of the Groin (Descend ing) wi th Ob lique F ixat ion39. Doub le Spica of the Groin (F irst Turn) .
40. Doub le Spica41 . Crossed Bandage of Perineum (F irst Turn)42 . Crossed Bandage of Perineum
ILLUSTRATIONS
Crossed Bandage of the PerineumPoster ior F igure-0f-8 Of the Shoul ders and Back .
Suspensory of the Breast (Righ t)Suspensory of the Breast .
Suspensory of the Breas tSuspensory Of Both B reastsF igure-0f-8 Of the Breas tF igure-of-8 of the BreastDesau lt Bandage .
Dav is Bandage .
Velpeau (S tar t)VelpeauVelpeau (Side View)Velpeau (Posterior V iew)Ve lpeau (Modified) .
Velpeau Modified (Dull es)F igure-oi-8 of the Head and Neck .
Barton BandageGibson Bandage .
Ob l ique Of the Jaw (Reverse Side)Ob l ique Of the Jaw (Righ t Side)Doub le Ob l ique Of the JawRecurrent of the Scalp (F irst Step)Recurrent of the ScalpTransverse Recurrent of the Scalp (Firs t S teps)Recurren t of the Scalp w i th Doub le RollerCrossed Bandage of the E yeCrossed Bandage of Both E yes
MISCELLANEOUS
a ,T Bandage " b , Four-tailed Bandage .
T Bandage Of the Perineum .
Modified T Bandage Of the PerineumModified T Bandage of the PerineumT Bandage Of the Scalp .
T Bandage of the E ye .
T Bandage of the E ar.
T Band age of the Groin .
T Bandage of the But tockDoub le T of Chest .
Four-tailed Bandage of the ChinFour-tailed Bandage of the Nose and Lip" uadrangle Bandage of the Occiput" uadrangle Bandage of the Vertex" uadrangle Bandage of the Neck .
ILLUSTRATIONS xiii
86 . " uadrangle Bandage of the Shoulder87. " uadrangle Bandage Of the
‘ Arm and ForearmMany Tailed Bandages
89. Swathe
HANDKE RCHIE F BANDAGES
90. a , Handkerchief " b,Cravat91 . Occ ip i tofron tal Tr iangle92 . Pronto-occip i tal Tr iangle93. B i temporal Triangle94. Vert icomental Triangle95. Auricu lo-occipi tal Triangle96a . Hun ter’s Cap.
96b. Hunter’s Cap.
97a. Square Bandage of the Head (Method 1 )Square Bandage of the Head (Method
976 . Square Bandage Of the Head (Method 3)98 . Posterior Tr iangle of the Shou lders99. ThoracicoscapularTriangle100. Thorac icohumeral Triangle .
101 . Triangle Suspensory of the Breast102 . Tr iangle Suspensory of Both B reasts103. Brachiocervical Triangle or S l ing104. Brachiocervical Triangle Sl ing105 . BrachioscapularTriangle Sl ing106 . Brachioscapular Tr iangle S l ing107. Brachioscapular Triangle S l ing108 . BrachioscapularTriangle S ling109. Mayor’s BandageI 10 . Mod ificat ion of Mayor’s Bandage1 I I . Shoulder Tr iangle .
1 12 . Hand Triangle .
I 13. Anterior Pelv ic Triangle1 14. ScrotalHammock .
I 15 . Scrotal Hammock1 16 . a, Knee Triangle" b, Foot Triangle1 17a. Rubber Bandage1 17b. E last ic Fabric Bandage1 17c. Esmarch Tourniquet1 1 8 . Heat ing Adhesive Plast1 19. Remov ing Adhesive Strips1zod . Rose Binder Pat tern .
120b. Rose B inder Being Appl ied1206 . Rose B inder (PosteriorView)
xiv ILLUSTRATIONS
Rose B inder (An ter ior View)Sayre Dress ing ModifiedAcrom ioclav icu lar SupportAdhes ive DressingsBack Strapping .
Buck’s Extension
Ankle StrappingChest S trappingKnee Strapp ingIngu inal Dress ingAch ill es Tendon S trappingPelv ic B inder
PLASTER
Making Plaster BandagesMethod of Squeez ing Water from BandageInstrtunents forRemoval of Plas ter CastsRemoval of Cas tFenestrat ion of Cas tSegmented orBracketed CastMaking Plaster-oi-Paris Sp l intMaking a Plaster Splint of F lannelPlaster Spl intMould ing and B ind ing in Posi tionPlaster Sp lints RemovedPat ient Suspended forApp licat ion of Plaster-oi-Paris Jacket .
Plaster JacketShowing the Appl icat ion of a Plaster Sp ica of the Groin . Usingthe Mart in-El iason S lingCast Completed and the Pat ient is Being P laced in BedPlaster Shou lder Cap.
PRACTICAL~ NDAGING
ADHESIVE AND PLASTER—OF—PAR IS
DRESSINGS
P ART I
ROLLER BANDAGES
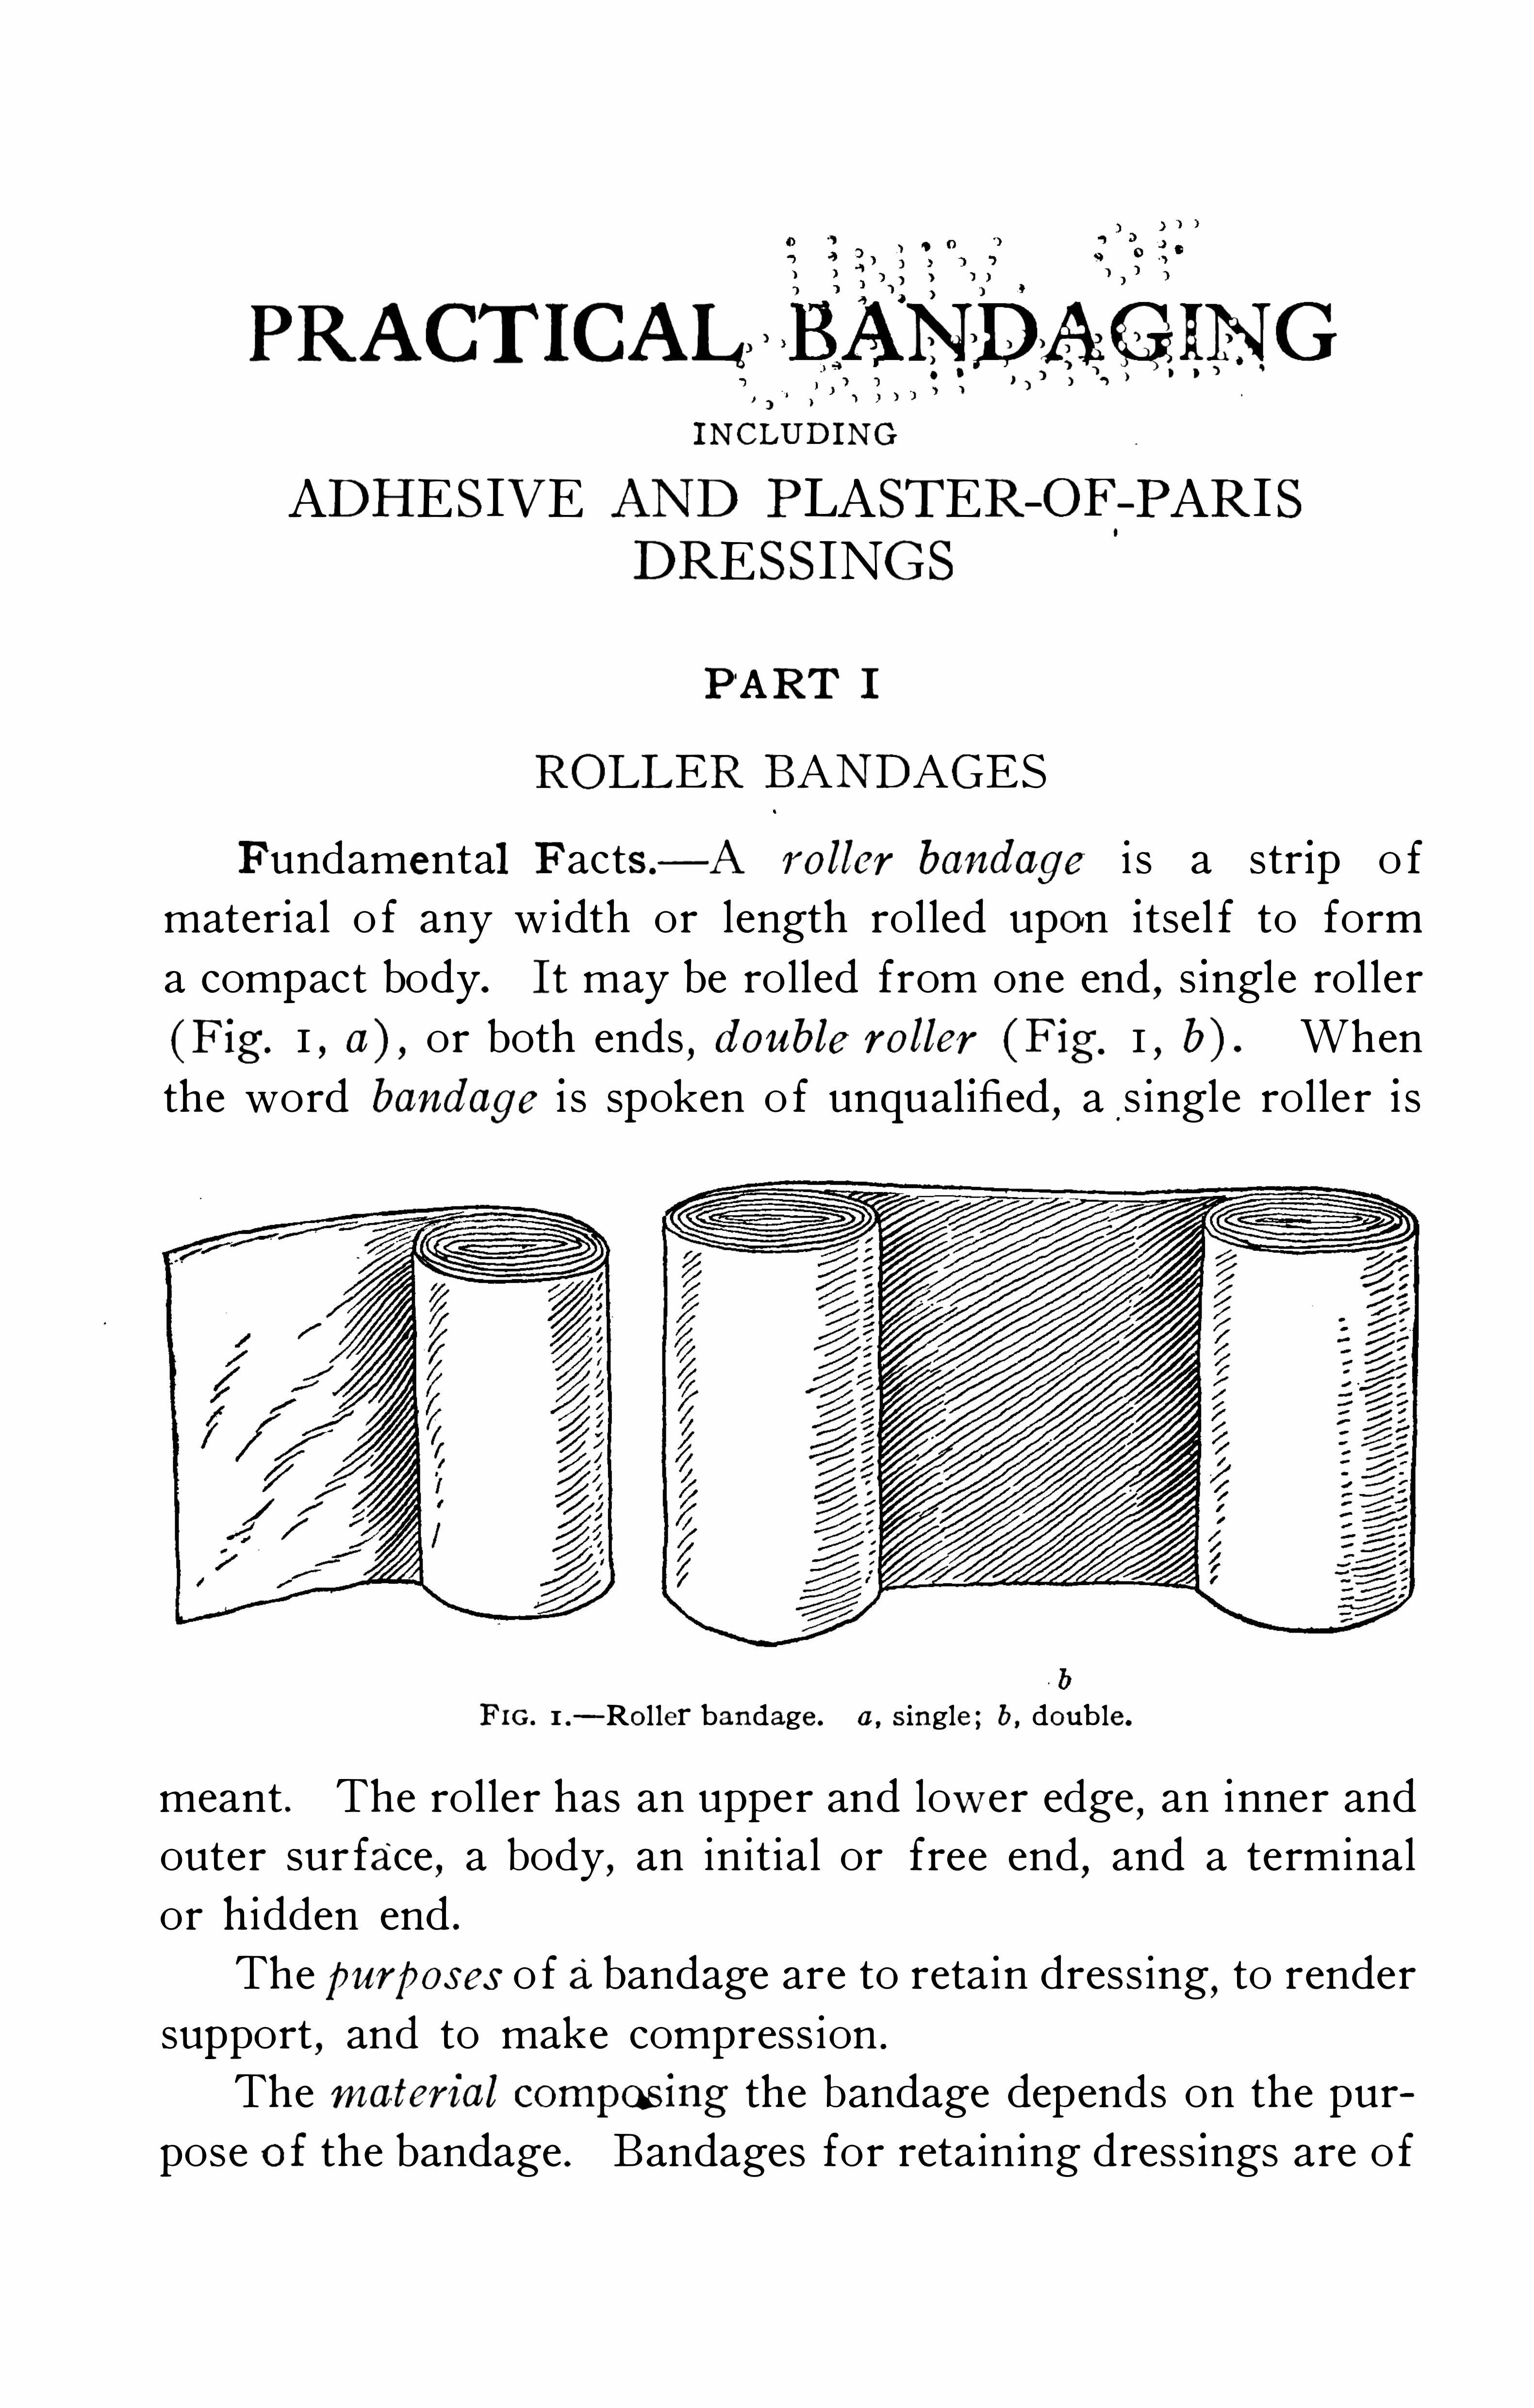
Fundamental F acts — A rol ler bandage i s a str ip o f
material o f any width or length rol led upon i tsel f to form
a compact body. It may be rolled from one end , s ingle rol ler
(F ig. I , a) , or both ends , double rol ler (Fig. I , b) . When
the word bandage i s spoken o f unqual ified , a s ingle rolle r i s
F IG. 1 .
—Rol ler bandage . a , s ingle " b , doub le .
meant . The roller has an upper and lower edge,an inner and
outer sur face,a body, an initial or free end , and a terminal
or h idden end .
Thepurposes o f abandage are to retain dress ing, to rendersupport , and to make compress ion .
The material compasing the bandage depends on the purpose O i the bandage . Bandages for retaining dress ings are o f
2PRACTICAL BANDAGING
gauze or mus l in . Gauze i s o ftenest used as i t is so ft and
pliable and‘
lends itsel fe as to the shape o f the part covered .
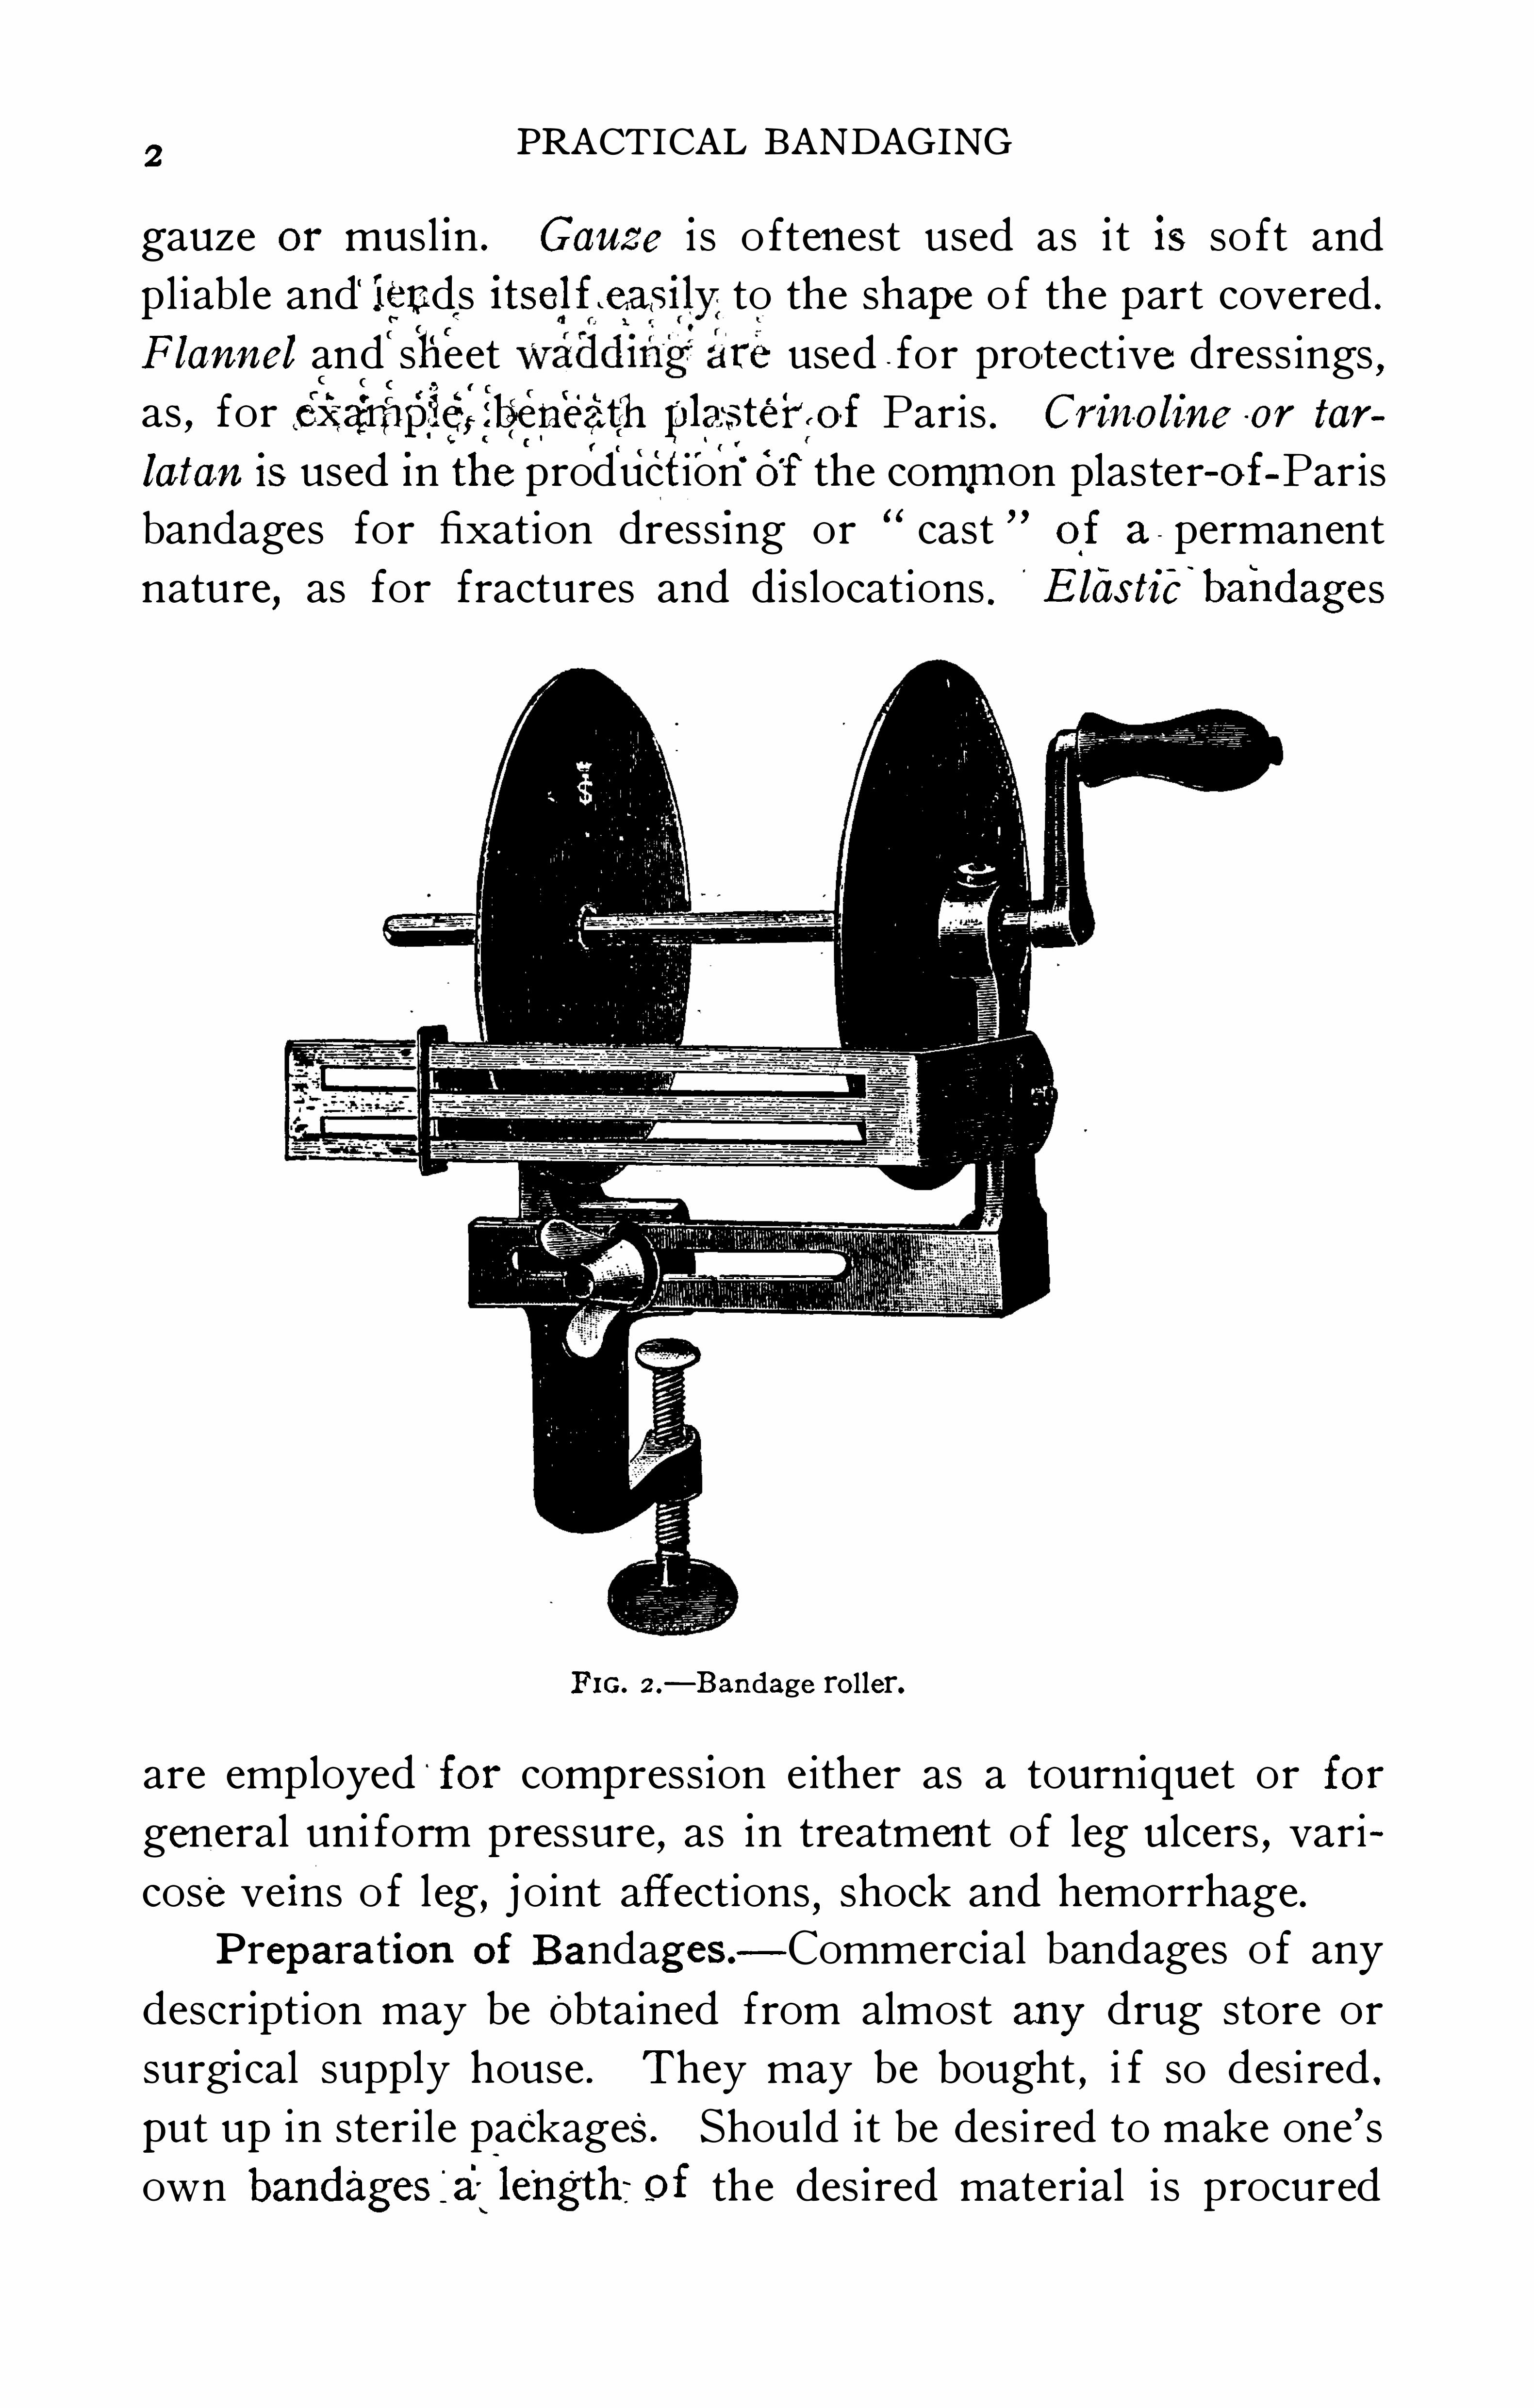
F lannel and sheet re used for protect ive dress ings,
as , for oxarnple, beneathplaSterof Paris . Crinoline or tar
latan is used In the production Of the common plaster—of Parisbandages for fixation dressing or “ cast " of a - permanent
nature, as for fractures and d islocations . E las tié‘
bandages
F IG. 2 .
— Bandage roller.
are employed for compress ion either as a tourniquet or for
general un i form pressure, as in treatmen t o f leg ulcers , vari
cose veins o f leg, j oint affections , shock and hemorrhage .
Preparation of Bandages — Commercial bandages o f any
descr iption may be Obtained from almost any drug store or
surgical supply house . They may be bought , i f so desi red .
put up in steri le packages. Should i t be desi red to make one’s
own bandages ja'
l le'
ng‘
throf the des ired material i s procured
4PRACTICAL BANDAGING
thus tighten ing the rol l . Back the winch rod three or four
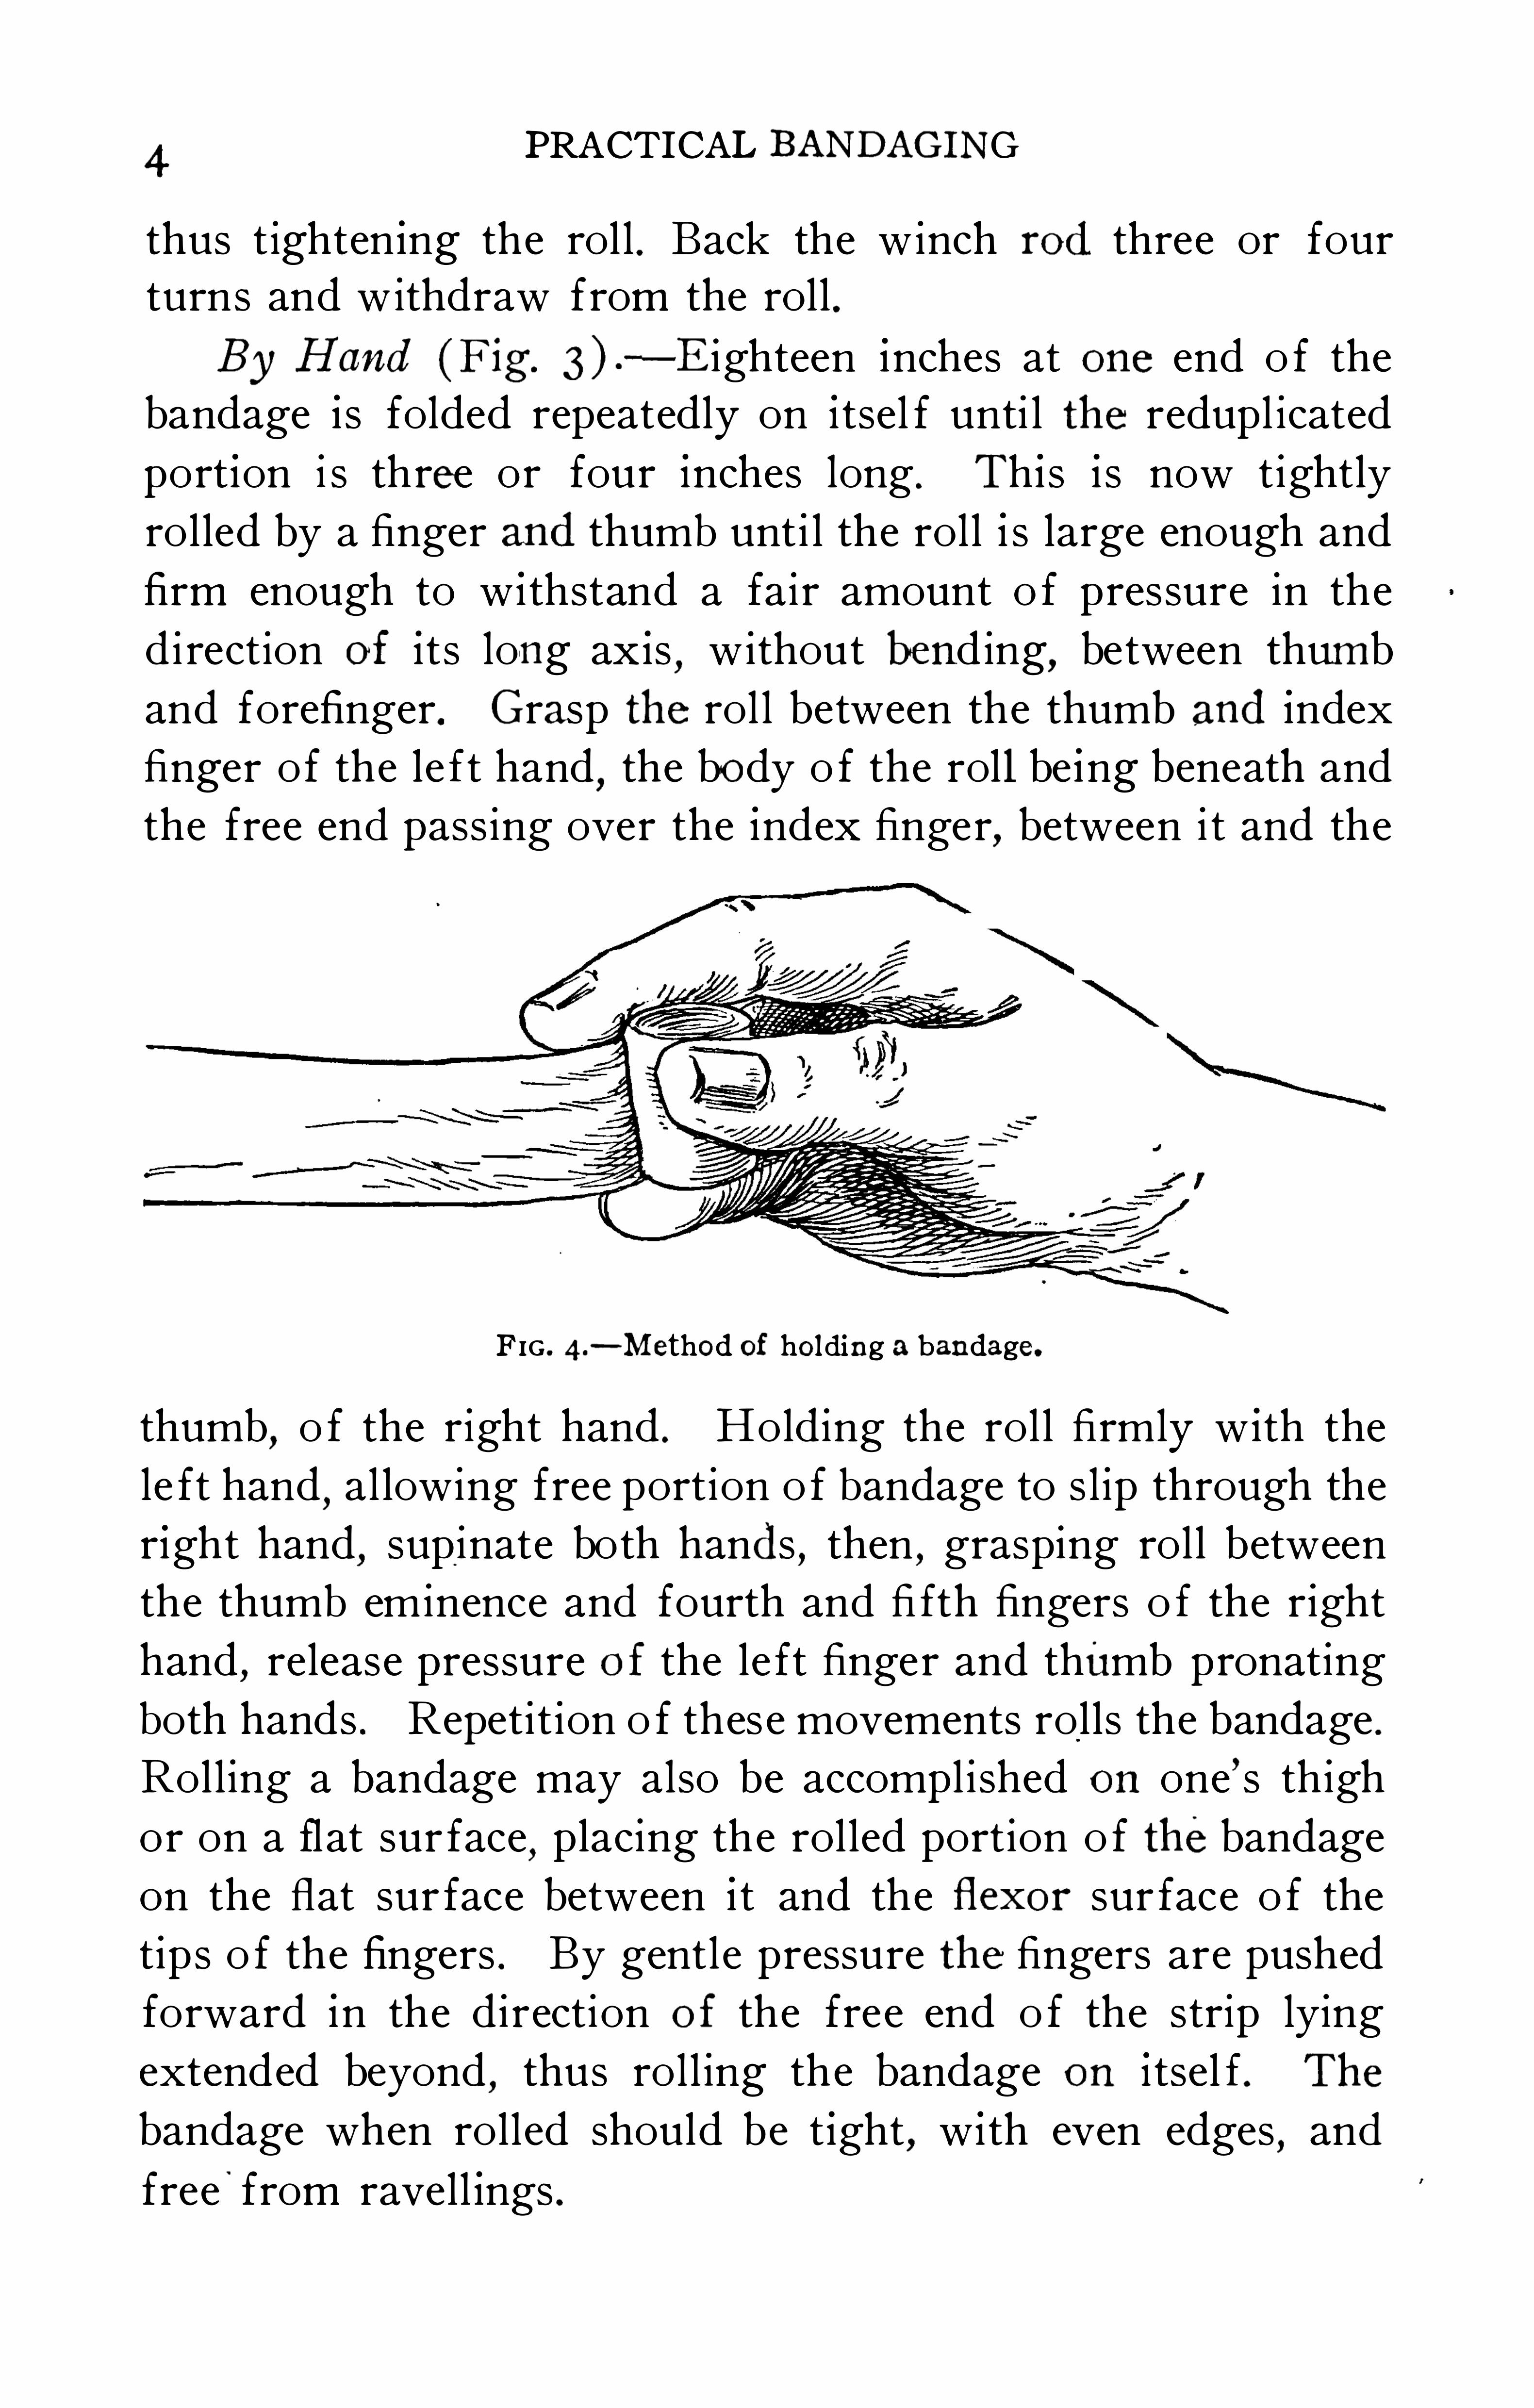
turns and withdraw from the roll .By Hand (Fig.
— E ighteen inches at one end o f thebandage is folded repeatedly on i tsel f unti l the redupl icated
port ion i s three or four inches long . Th is i s now tightly
rolled by a finger and thumb unti l the roll i s large enough and
firm enough to w i thstand a fair amount o f pressure in the
di rection of its long axis,without bending
,between thumb
and forefinger. Grasp the rol l between the thumb and index
finger of the le ft hand,the body o f the rol l be ing beneath and
the free end pass ing over the index finger,between i t and the
FIG . 4.— Method of holding a bandage.
thumb,o f the right hand . Holding the rol l firmly w ith the
le ft hand,al lowing free portion o f bandage to s l ip through the
right hand,supinate both hands , then , grasping roll between
the thumb eminence and fourth and fi fth fingers o f the right
hand,release pressure of the le ft finger and thumb pronating
both hands . Repetit ion o f these movements rolls the bandage .
Rol l ing a bandage may also be accomplished on one’s thigh
or on a flat sur face,placing the rolled portion o f thebandage
on the flat sur face between i t and the flex or sur face o f the
tips o f the fingers . By gentle pressure the fingers are pushed
forward in the direction of the free end o f the strip lying
extended beyond,thus roll ing the bandage on i tsel f . The
bandage when rolled should be t ight, w i th even edges , and
free'
from ravell ings .
ROLLER BANDAGES5
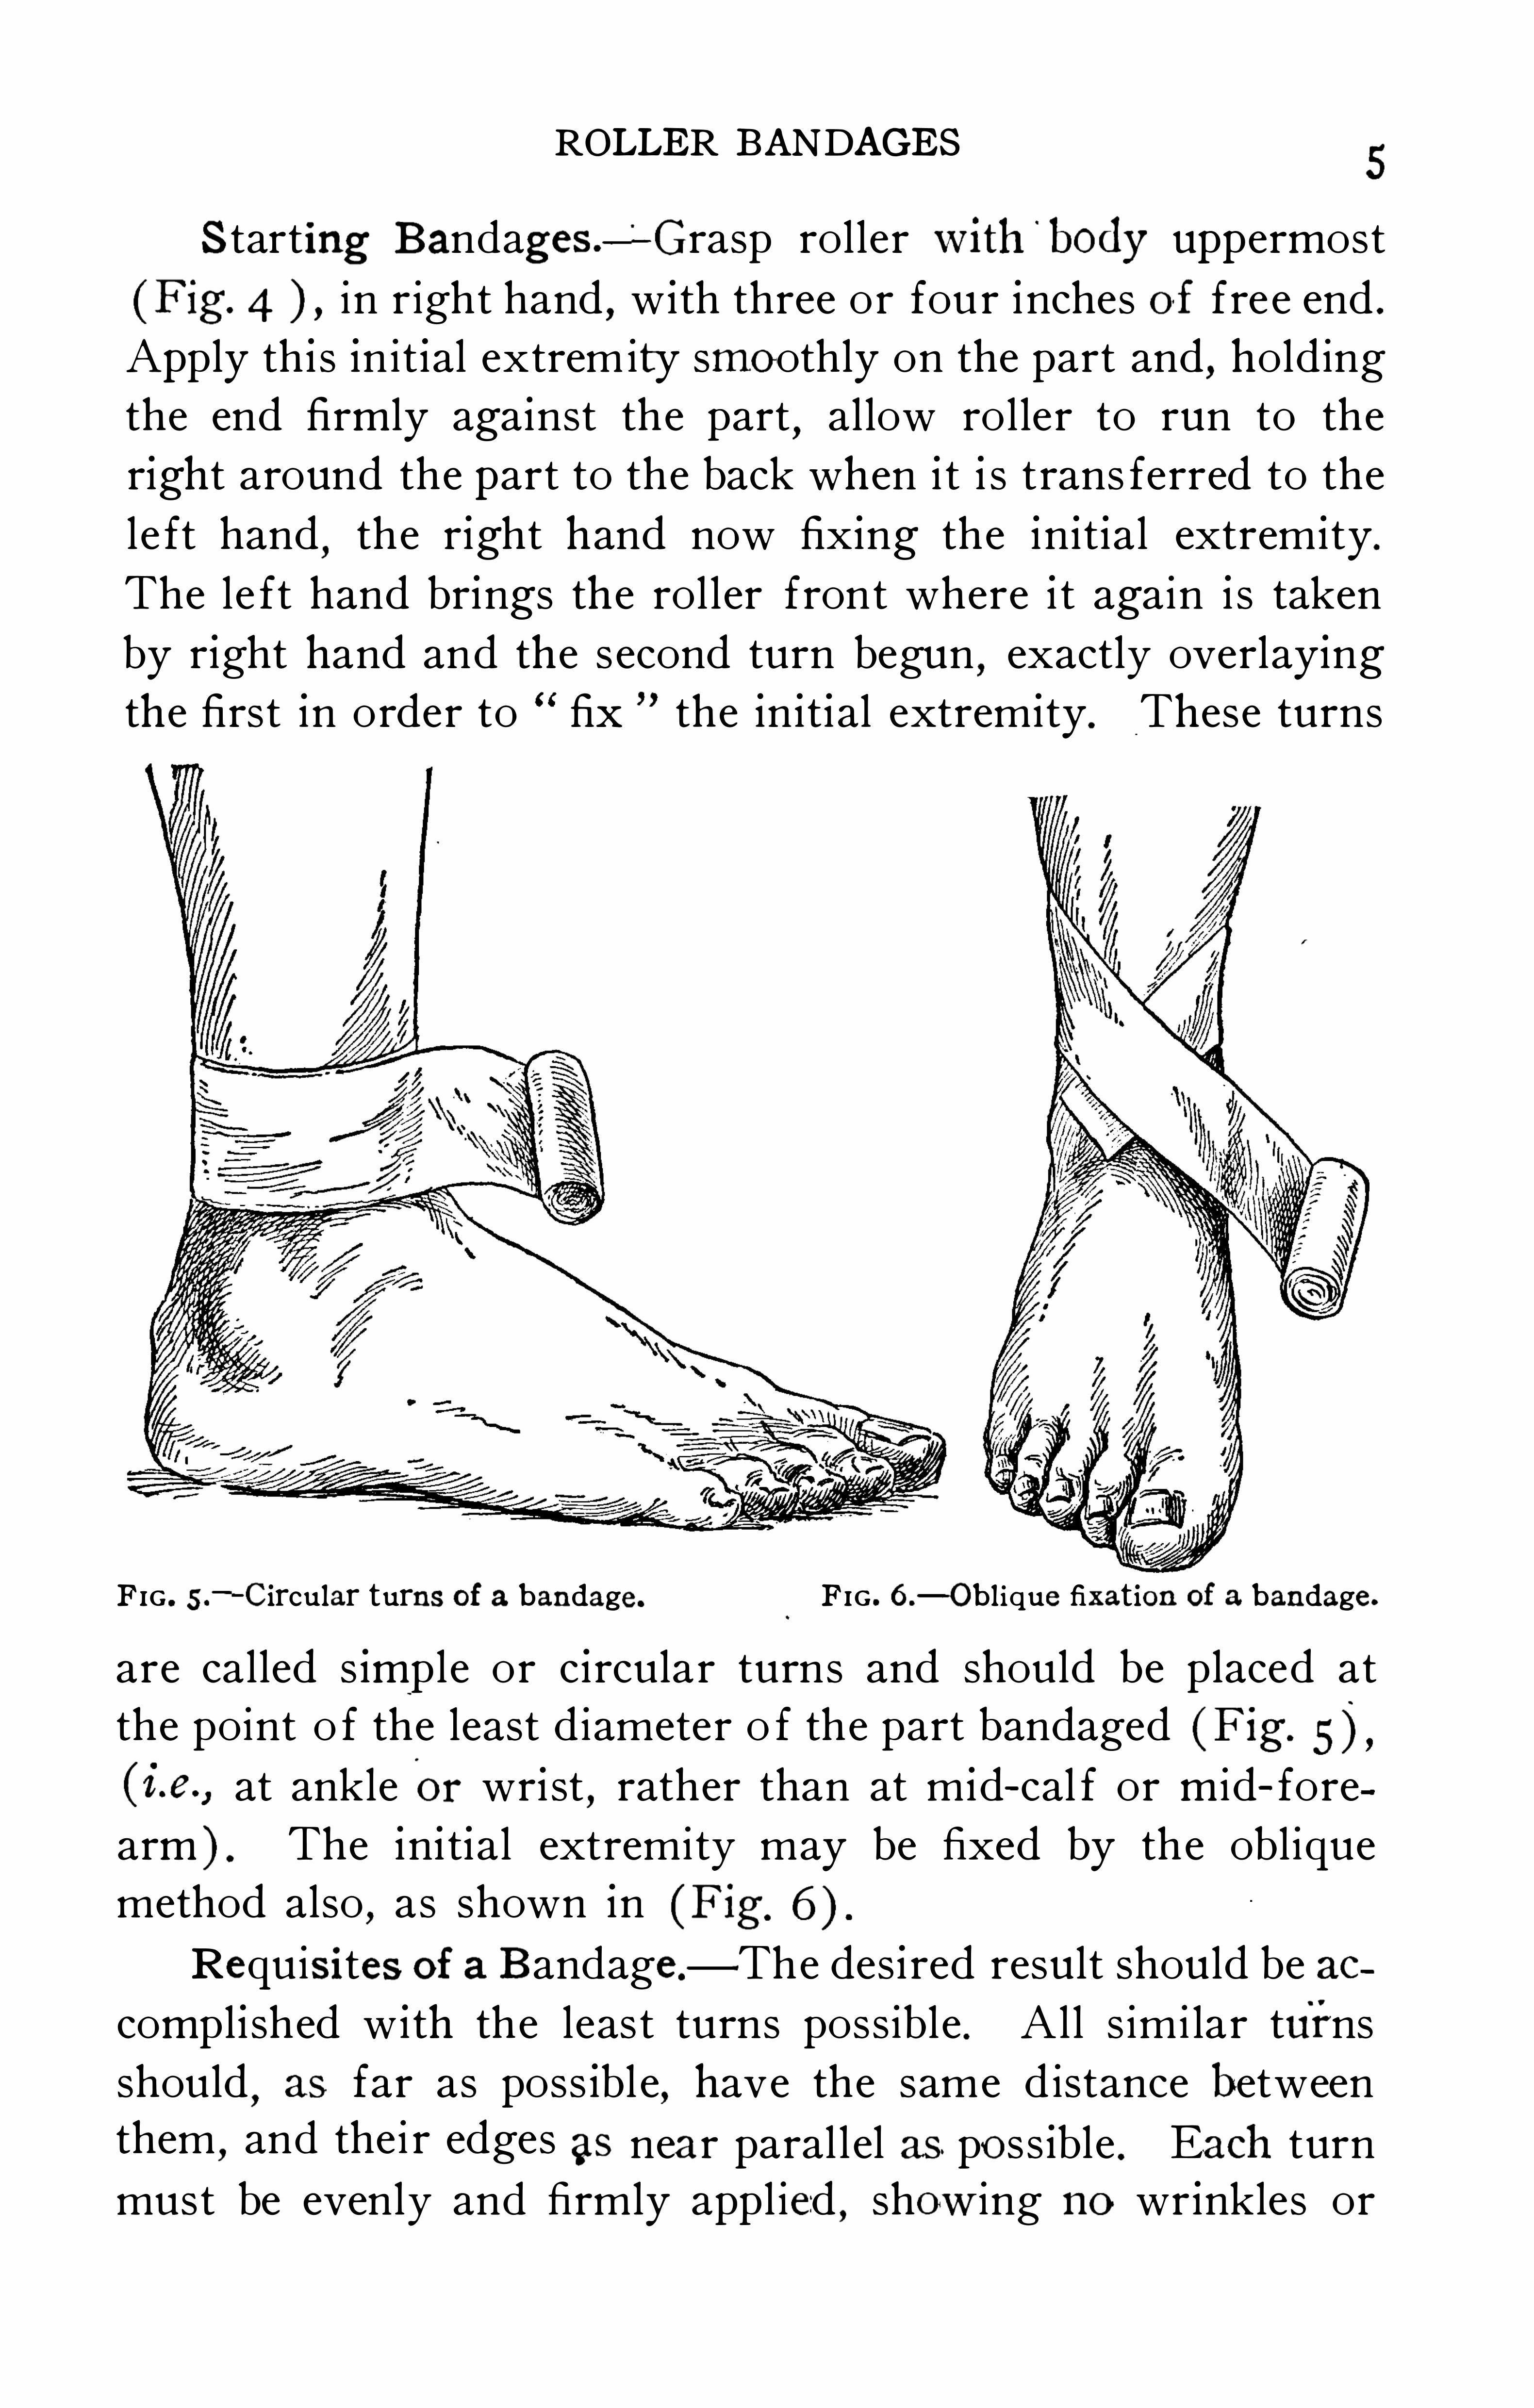
Starting Bandages .-Grasp roller with
'
body uppermost
(F ig. 4 in right hand,w ith three or four inches of fre e end .
Apply th i s init ial extrem ity smoothly on the part and , holding
the end firmly aga inst the part,allow roller to run to the
right around the part to the back when i t i s trans ferred to the
le ft hand,the r ight hand now fix ing the in it ial extrem ity.
The le ft hand brings the rol ler front where i t again i s taken
by r ight hand and the second turn begun,exactly overlaying
the first in order to fix the in it ial extrem ity. These turns
FIG . 5 .-Circular turns of a bandage. FIG . 6 .
— Oblique fixation of a bandage.
are called s imple or c ircular turns and should be placed at
the point o f the least diameter o f the part bandaged (Fig. 5)at ankle
i
or wr i st , rather than at m id-cal f or m id- fore
arm ) . The ini tial extremity may be fixed by the oblique
method also , as shown in (F ig.
Requisites of a B andage — The des ired resu lt shou ld be accompl ished w i th the leas t turns possible . A l l s imi lar turns
should , as far as poss ible, have the same d istance betweenthem , and thei r edges as near paral l el as. pos s ible . Each turn
must be evenly and firmly appl ied,show ing no wr inkles or
6 PRACTICAL BANDAGING
ravell ings or gaps between turns . The sur face of the band
age must l i e flat on the part bandaged . I f appl ied too loosely
the bandage displaces eas i ly. I f applied too tightly i t i s uncom fortable and may obstruct the blood supply caus ing swell
ings,d iscolorat ion , numbness and tingl ing, pallor , coldness
or subsequen t gangren e i f t ight enough to shut off blood
supp ly. In applying turns near a j oint care should be taken
to have the j oint in the pos i t ion in which i t is to rema in after
the dress ing i s completed . Speci al care must be taken with
regard to bony prominences that they are wel l protected from
pressure by the interpos it ion of cotton . Skin surfaces ought
never to be bandaged in direct contact . Always interposegauze or l int whenever poss ible . Leave some portion o f the
part di stal to the bandage exposed whenever possibl e,in order
that the c i rculat ion may be watched . In applying a simple
ci rcular bandage around a cyl indrical part,place the initial
extremity at right angles to the axi s o f the part . In case one
bandage i s too short for the dress ing, confine the distal ex
tremity by one or two fixat ion turns of a second bandage,and then proceed as be fore .
End ing a Bandage ."—A fter the appl icat ion i s completed
,
the distal extremity may be secured by a pin,adhesive strips ,
sewing,or spl i tting the end o f the bandage for a distance
o f more than hal f the d iameter of the part and pass ing the
ends around in oppos ite d i rect ions and tying. Should none
o f these methods be feas ible,s imply tuck the end o f the band
age under the last turn appl ied .
F undamental Turns or Bandages .— A circular bandage is
appl icable to cyl indrical parts,the turns being appl ied at
r ight-angles to the long ax is o f part and each turn exactly
overlapp ing the preceding (Fig.
A spiral bandage covers a part in a sp i ral manner . Begin
n ing with a ci rcular turn to fix the bandage,i t i s then carried
sl ightly upward and sp iral ly around the part , each turn
ROLLER BANDAGES
parallel ing the preced ing one
wh ich i t overlaps from one-hal f
to two-thirds i ts . w idth . The
spi ral bandage may be ascend
ing or descending depend ing
upon ' whether the succeeding
turns approach or recede from
the trunk . The ascend ing
sp iral is. the one generally em
ployed . A s low spi ral coversa con ical part s lowly, leav ing
no gaps (Fig. 7, a) . A rap id
sp i ral proceeds up the part
rapidly,leav ing gaps between
turns (Fig. 7, b) .
A spiral reverse bandage i sused under those condit ions
where the shape o f the part to
be covered i s that o f a rapidlyincreas ing cone . Here
,in order
to have the bandage l ie flat ,and yet perm i t no gaps , thed irection o f spi ral turns must
be changed . The reverse ac
comp l ishes thi s and is made
as follows : When in the application of spi ral turns
,a point
is reached where by reason of
the increased conical shape of
the part , the bandage, in order
to l ie flat and not lose its
paral lel ism to the last turn , orto prevent gaping, must be
reversed , then the.
body of FIG . 7.— a, s low spiral turns " b. rapid
sp iral turns.
8 PRACTICAL BANDAGING
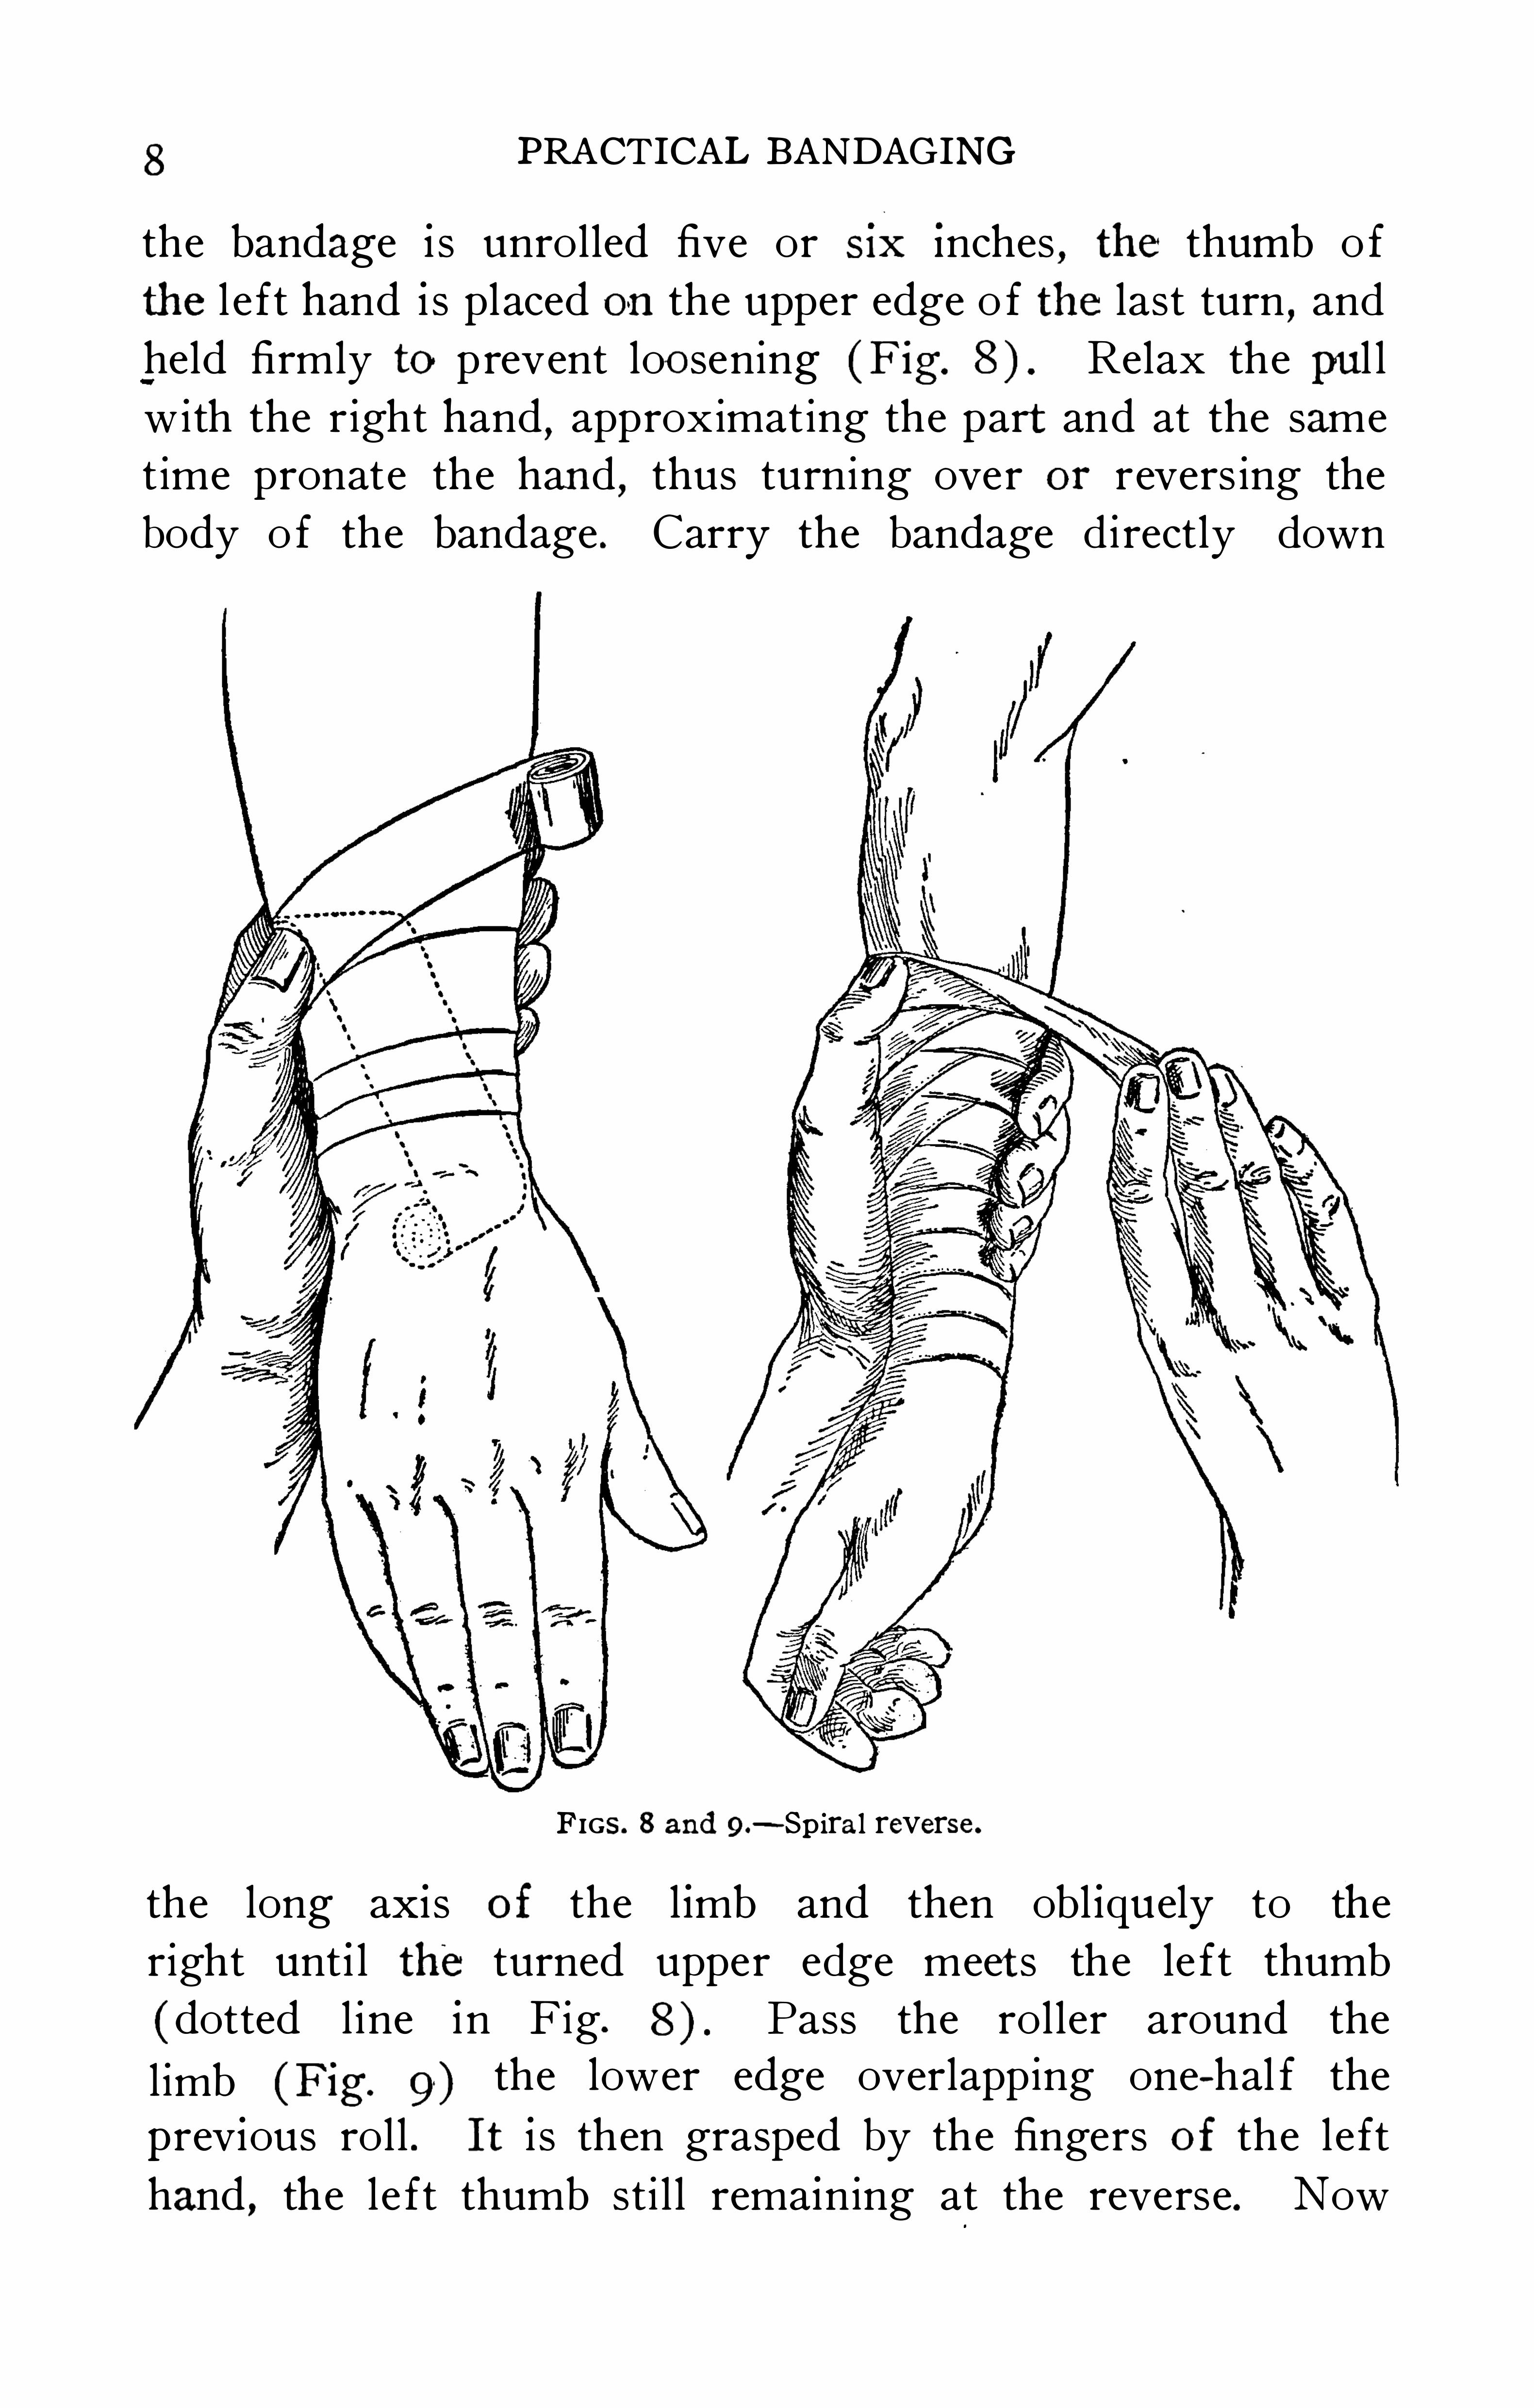
the bandage i s unrolled five or six Inches, the thumb o f
the l e ft hand i s placed on the upper edge o f the last turn , and
held firmly to prevent loosening (Fig. Relax the pul lw ith the right hand
,approximating the part and at the same
time pronate the hand,thus turning over or revers ing the
body o f the bandage . Carry the bandage d i rectly down
FIGS. 8 and 9.-Spiral reverse .
the long axis of the l imb and then obl iquely to the
right unt i l the turned upper edge meet s the le ft thumb
( dotted l ine in F ig. Pass the roller around the
l imb (Fig. 9) the lower edge overlapping one—hal f the
previous roll. It i s then grasped by the fingers of the left
hand , the le ft thumb sti l l remaining at the reverse. Now
ROLLER BANDAGES9
give gentle traction to settle the reverse in p lace. Reverses
are always made toward the operator or toward the smallerend o f the cone and should not be employed unless needed .
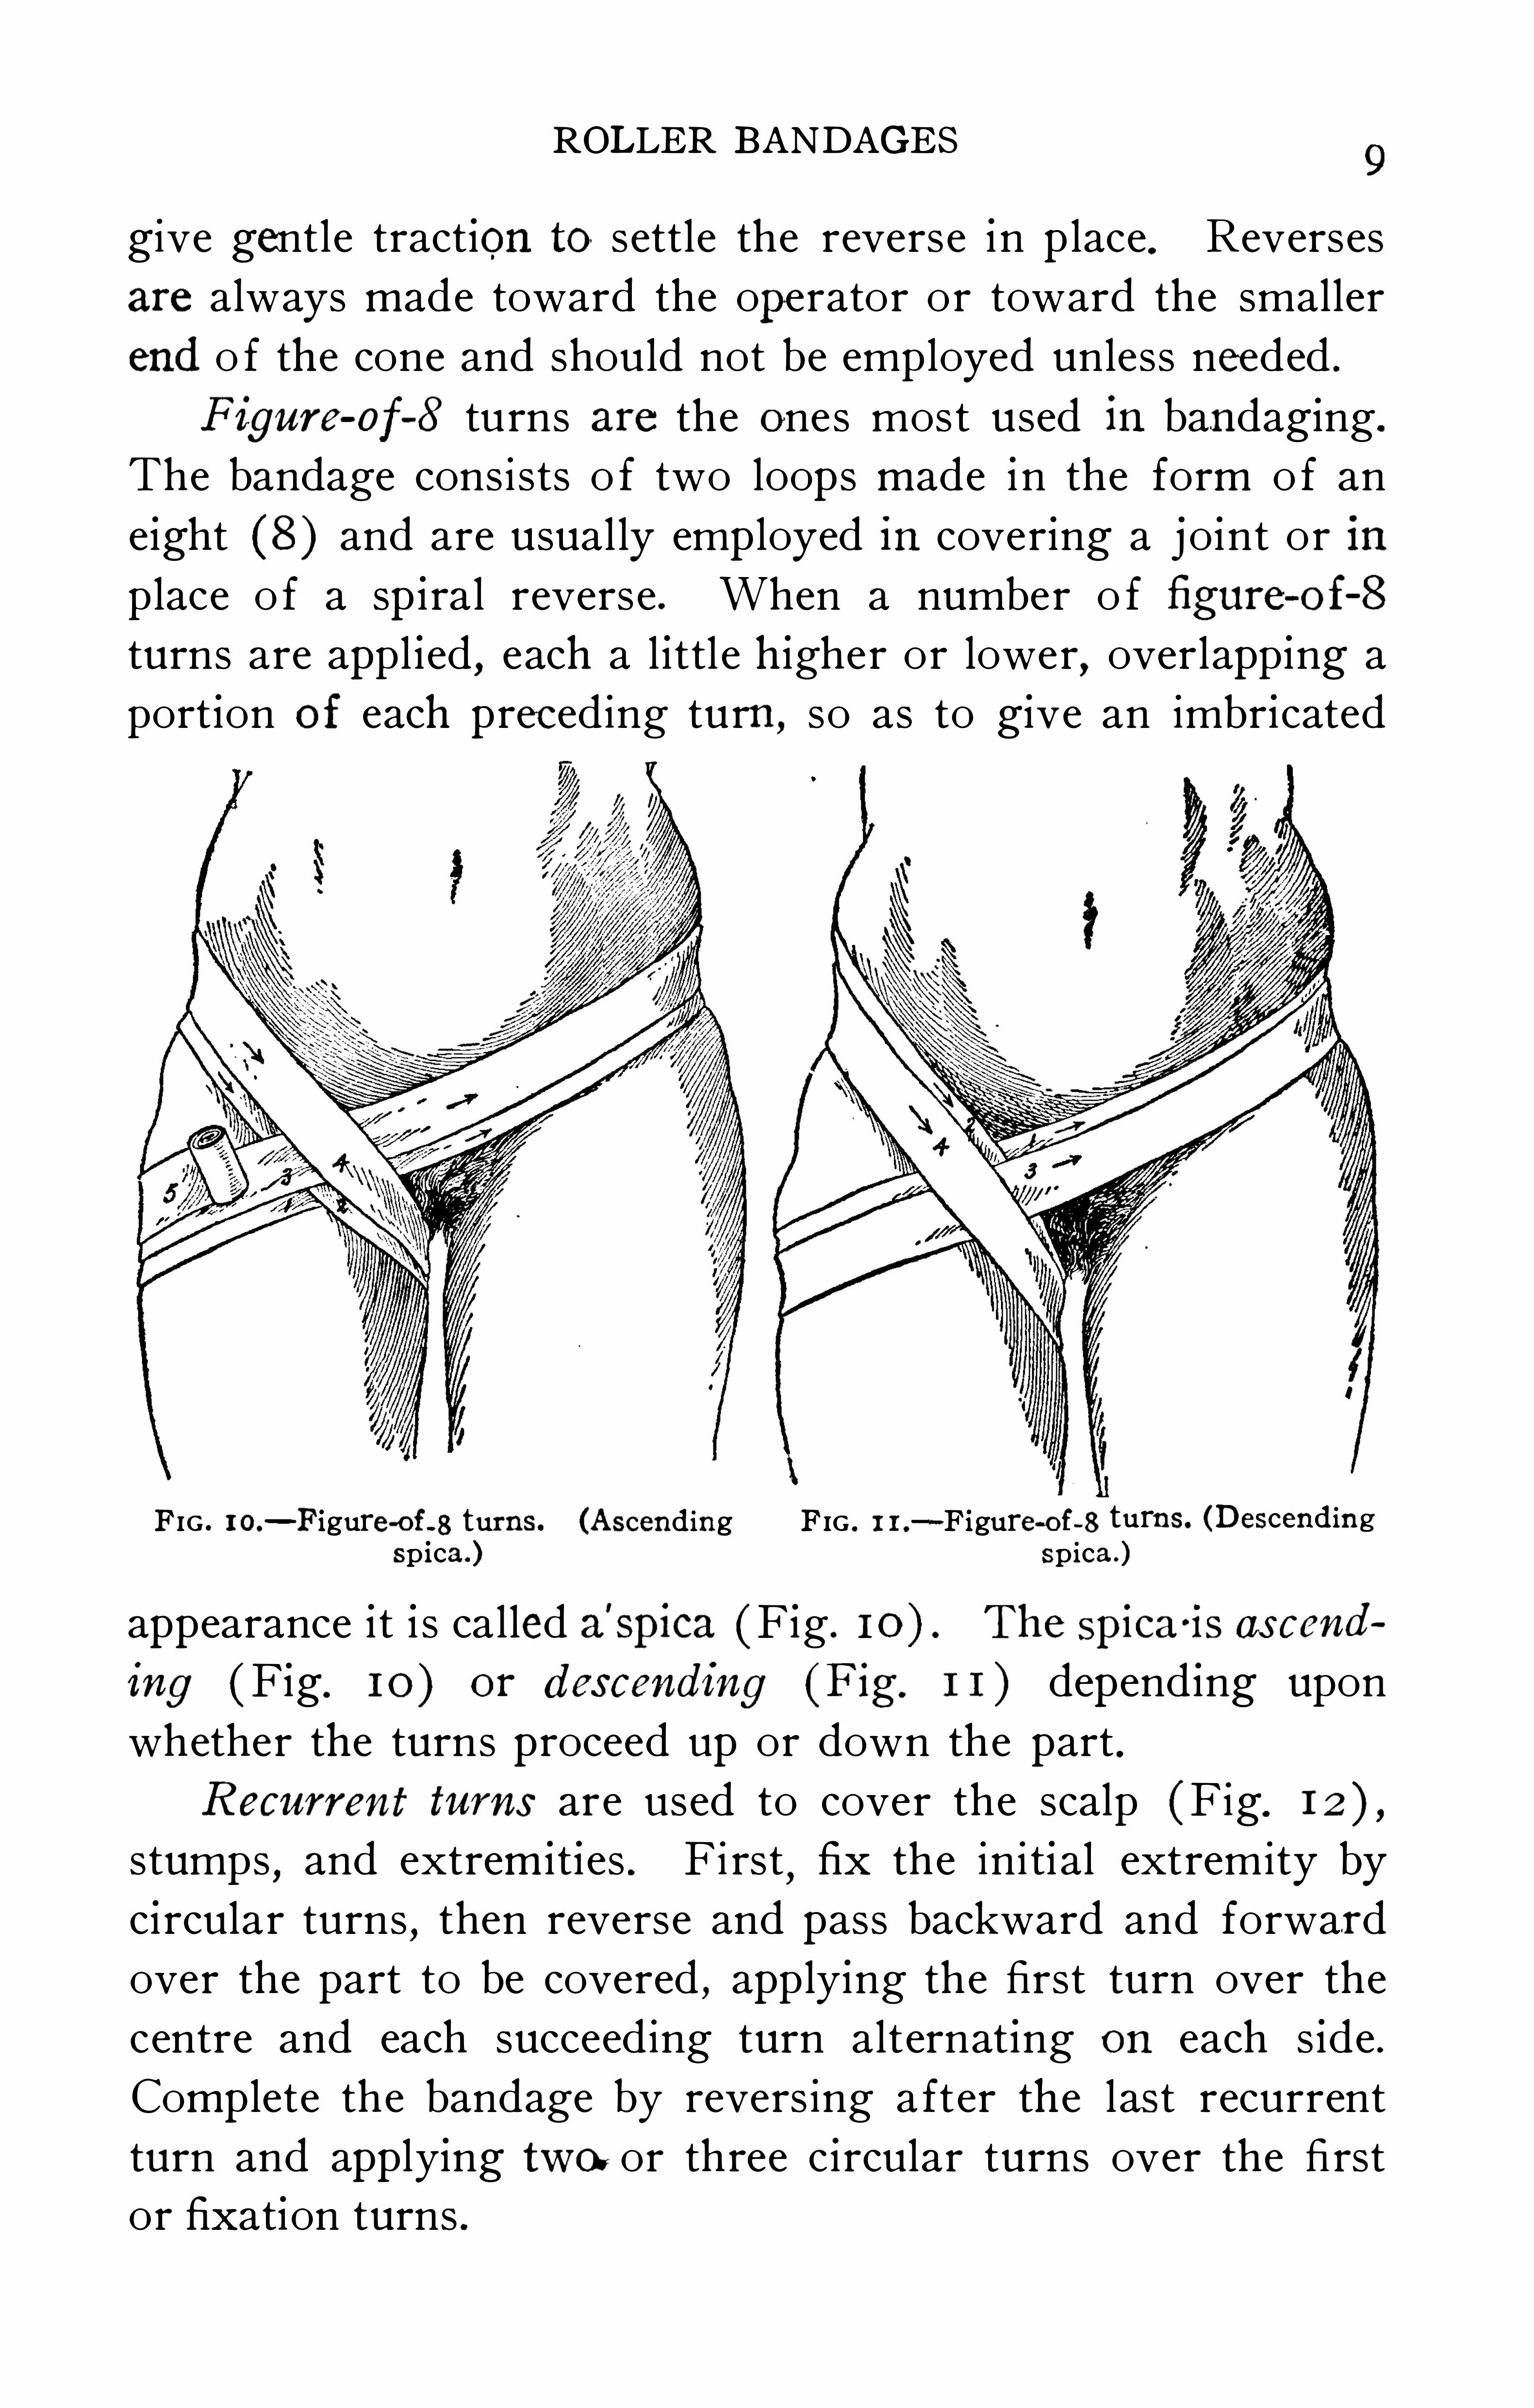
F igure-of—S turns are the ones most used in bandaging.
The bandage consi sts o f two loops made in the form o f an
e ight (8 ) and are usual ly emp loyed in cover ing a jo int or in
place o f a spiral reverse . When a number o f figure-oi-S
turns are appl ied,each a l ittl e higher or lower
,overlapp ing a
port ion of each preceding turn ,so as to give an imbr icated
FIG . 1 0.— Figure-of-8 turns . (Ascending FIG . 1 1 .
-Figure-of-8 turns. (Descendingspica.) sp ica .)
appearance i t i s called a'
spica (Fig . The spica'is ascend
ing (Fig. 10 ) or descending (Fig. 1 1 ) depend ing upon
whether the turns proceed up or down the part .
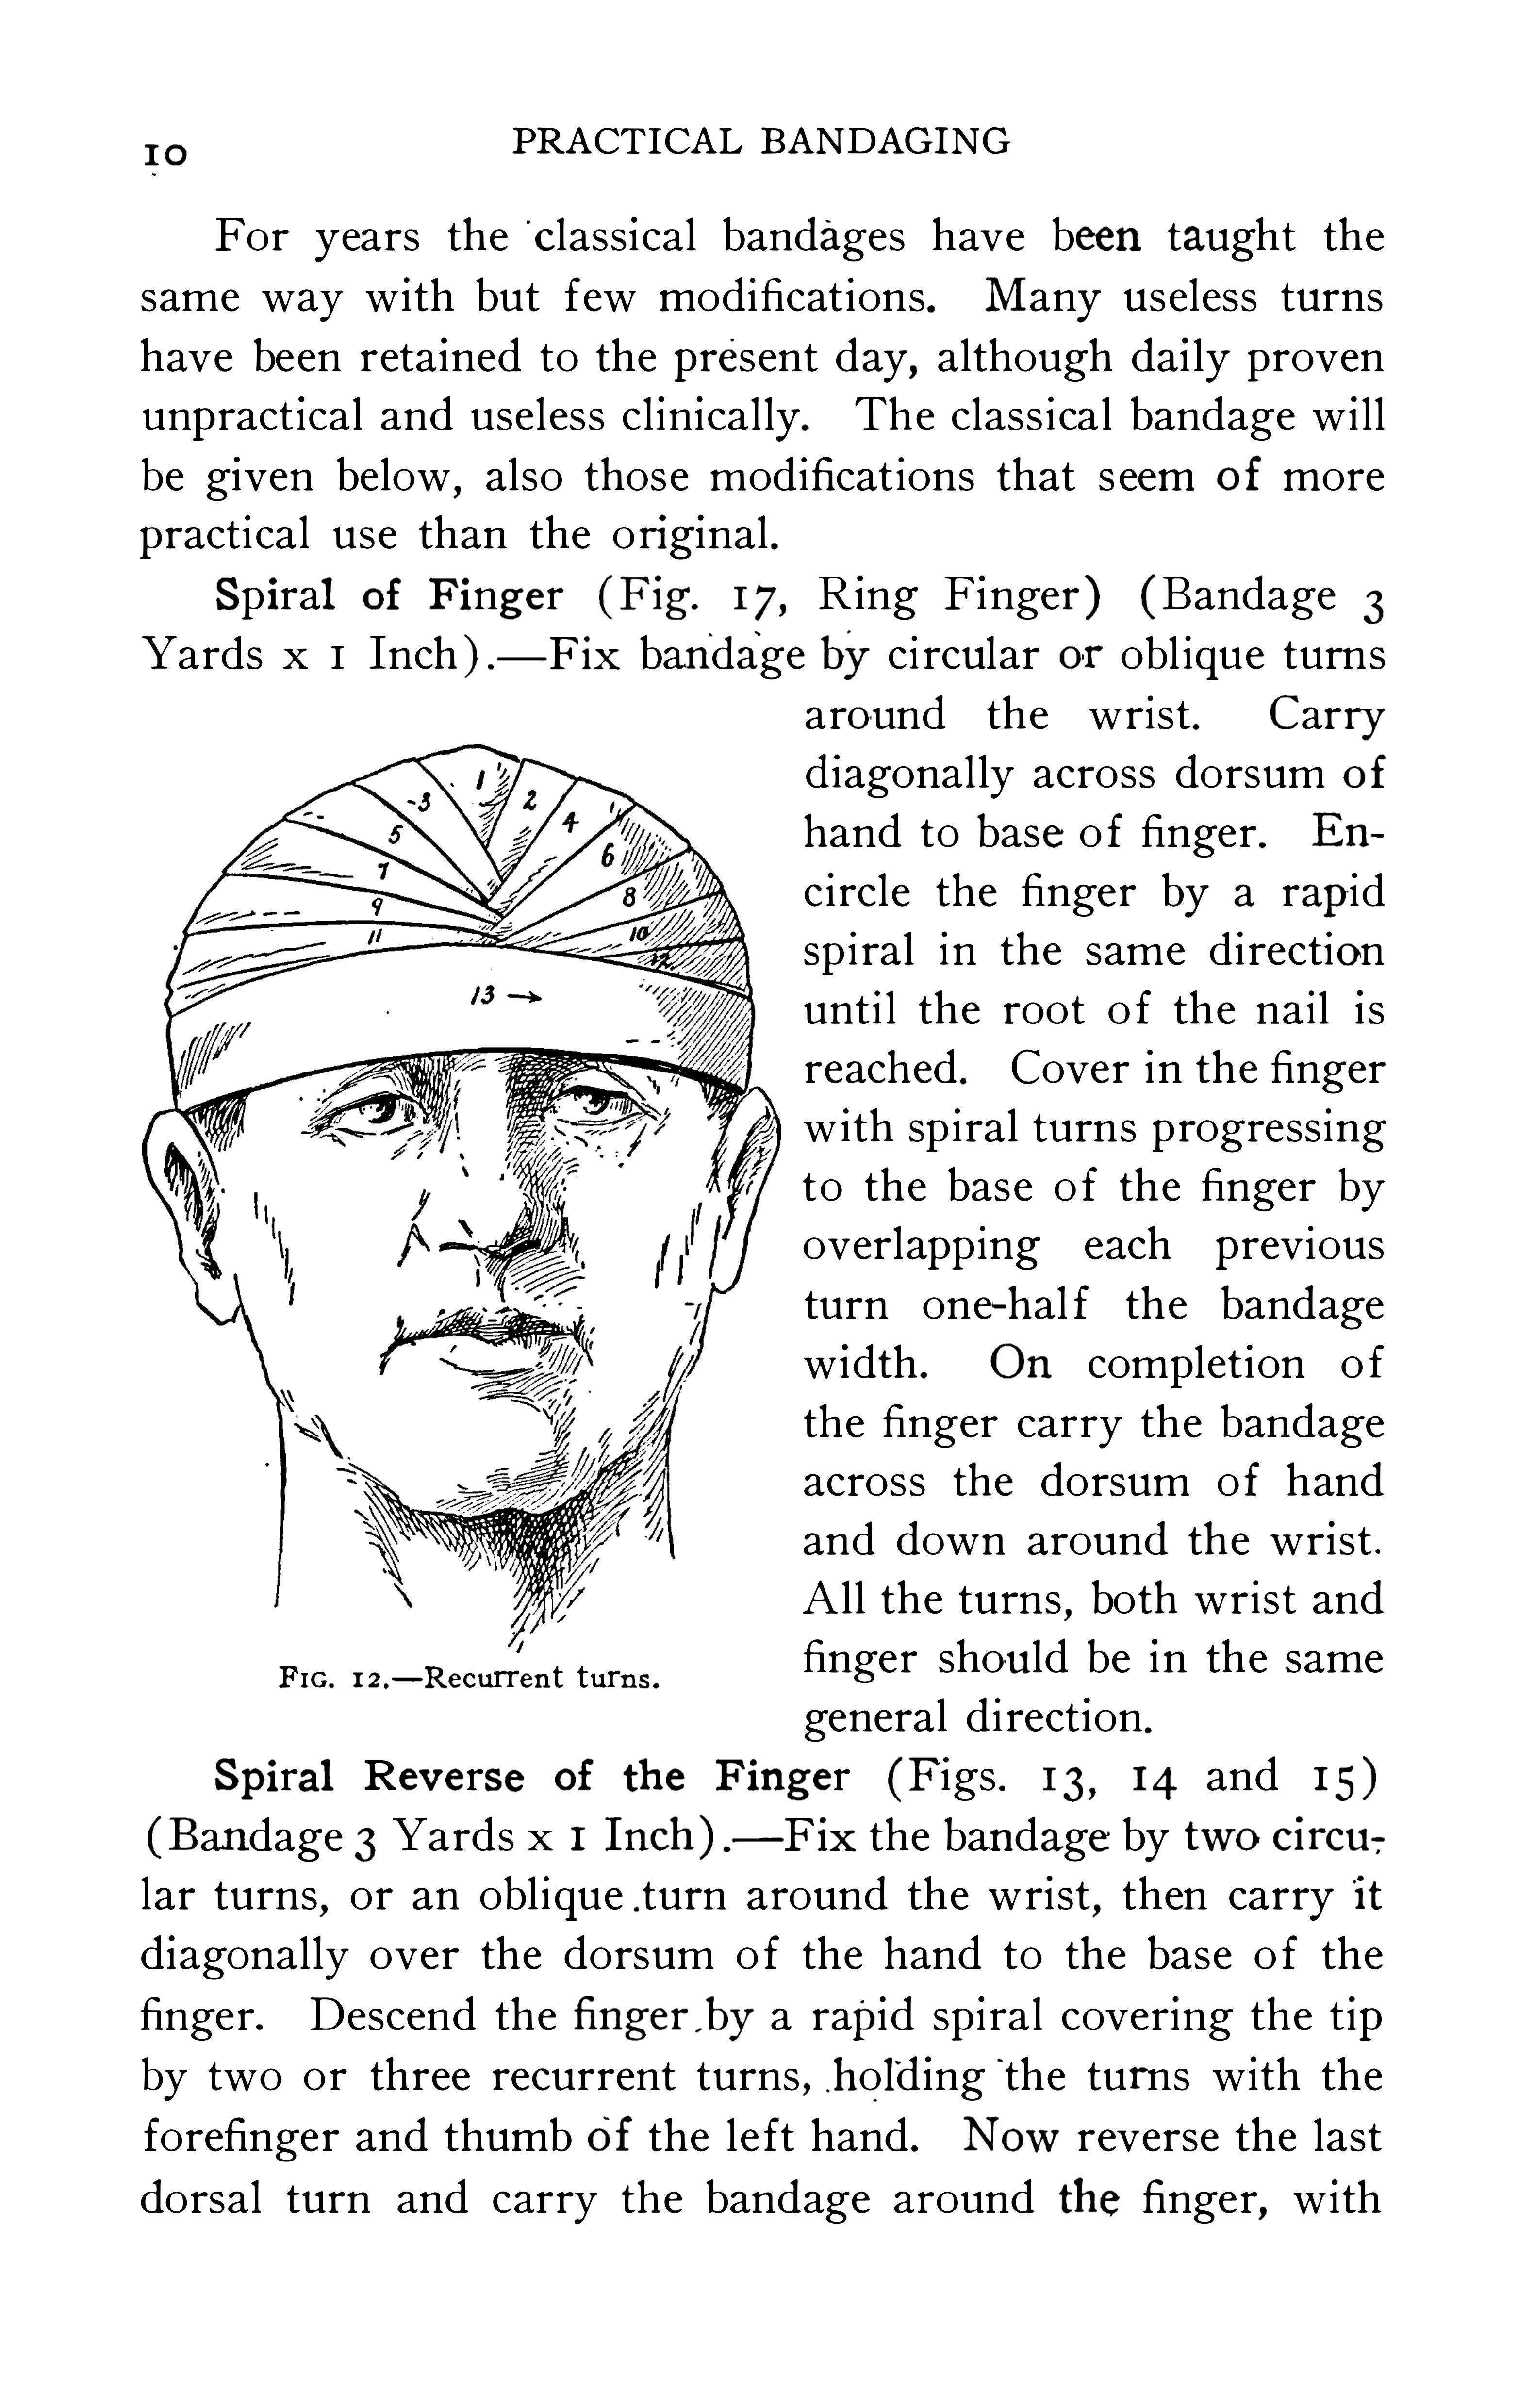
Recurrent turns are used to cover the scalp (F ig.
stumps,and extremities . F i rst
,fix the ini tial extremity by
circular turns , then reverse and pass backward and forward
over the part to be covered , apply ing the first turn over the
centre and each succeeding turn alternat ing on each s ide .
Comp lete the bandage by revers ing a fter the las t recurrent
turn and applying two" or three c ircular turns over the fi rst
or fixation turns .
I OPRACTICAL BANDAGING
For years the C lass ical bandages have been taught the
same way w ith but few modifications . Many useless turns
have been retained to the present day,although dai ly proven
unpract ical and useless cl inically. The class ical bandage w i l l
be given below,also those modificat ions that s eem of more
practical use than the original .
Spiral of F inger (F ig. 17, R ing Finger ) (Bandage 3Yards x I Inch ) .
— F ix bandage by ci rcular or obl ique turnsaround the wrist . Carrydiagonal ly across dorsum of
hand to base o f finger . E n
circle the finger by a rapidsp i ral in the same d i rection
unti l the root o f the nail i s
reached . Cover in the finger
with sp iral turns progressing
to the base o f the finger by
overlapping each previous
turn one~hal f the bandage
w idth . On completion o f
the finger carry the bandage
across the dorsum of hand
and down around the wr ist .
A l l the turns,both wrist and
finger shou ld be in the same
general di rect ion .
Spiral Reverse of the Finger (F igs . 13, 14 and 15)
(Bandage 3Yards x 1 Inch ) — F ix the bandage by two circu7
lar turns,or an obl ique .turn around the wrist , then carry it
d iagonally over the dorsum o f the hand to the base o f the
finger. Descend the finger, by a rapid sp iral covering the t ipby two or three recurrent turns , h o ld ing
“
the turns w ith the
forefinger and thumb Of the le ft hand . Now reverse the last
dorsal turn and carry the bandage around the finger, w ith
FIG . 1 2 .— Recurrent turns .

1 2 PRACTICAL BANDAGING
spiral reverse turns,in the same direct ion o f the first turns
around the wrist . Continue these turns,overlapping one-hal f
to one- third,unti l the upper edge of the bandage reaches
the finger web. Then d i rect the two circular turns around
the wrist .
Demigauntl et Bandages (F ig. 16 ) ( Bandage 3 Yards x 1
Inch ) — Fix the bandage around the wrist . Carry the band
FIG . 1 6.- Demigauntlet bandage. FIG . 1 7.
— Gauntlet with spiral of ring finger.
age across the back o f the hand and loop around the base
of the thumb or l ittle finger, then back to wrist and around
i t in same di rection . By applying repeated S imi lar turns
around each success ive digi t , the enti re dorsum o f the hand i s
covered .
Gauntle t B andage (Fig. 17) (Bandage 3 Yards x I
Inch ) .
— This bandage i s s imply composed of spiral reverse
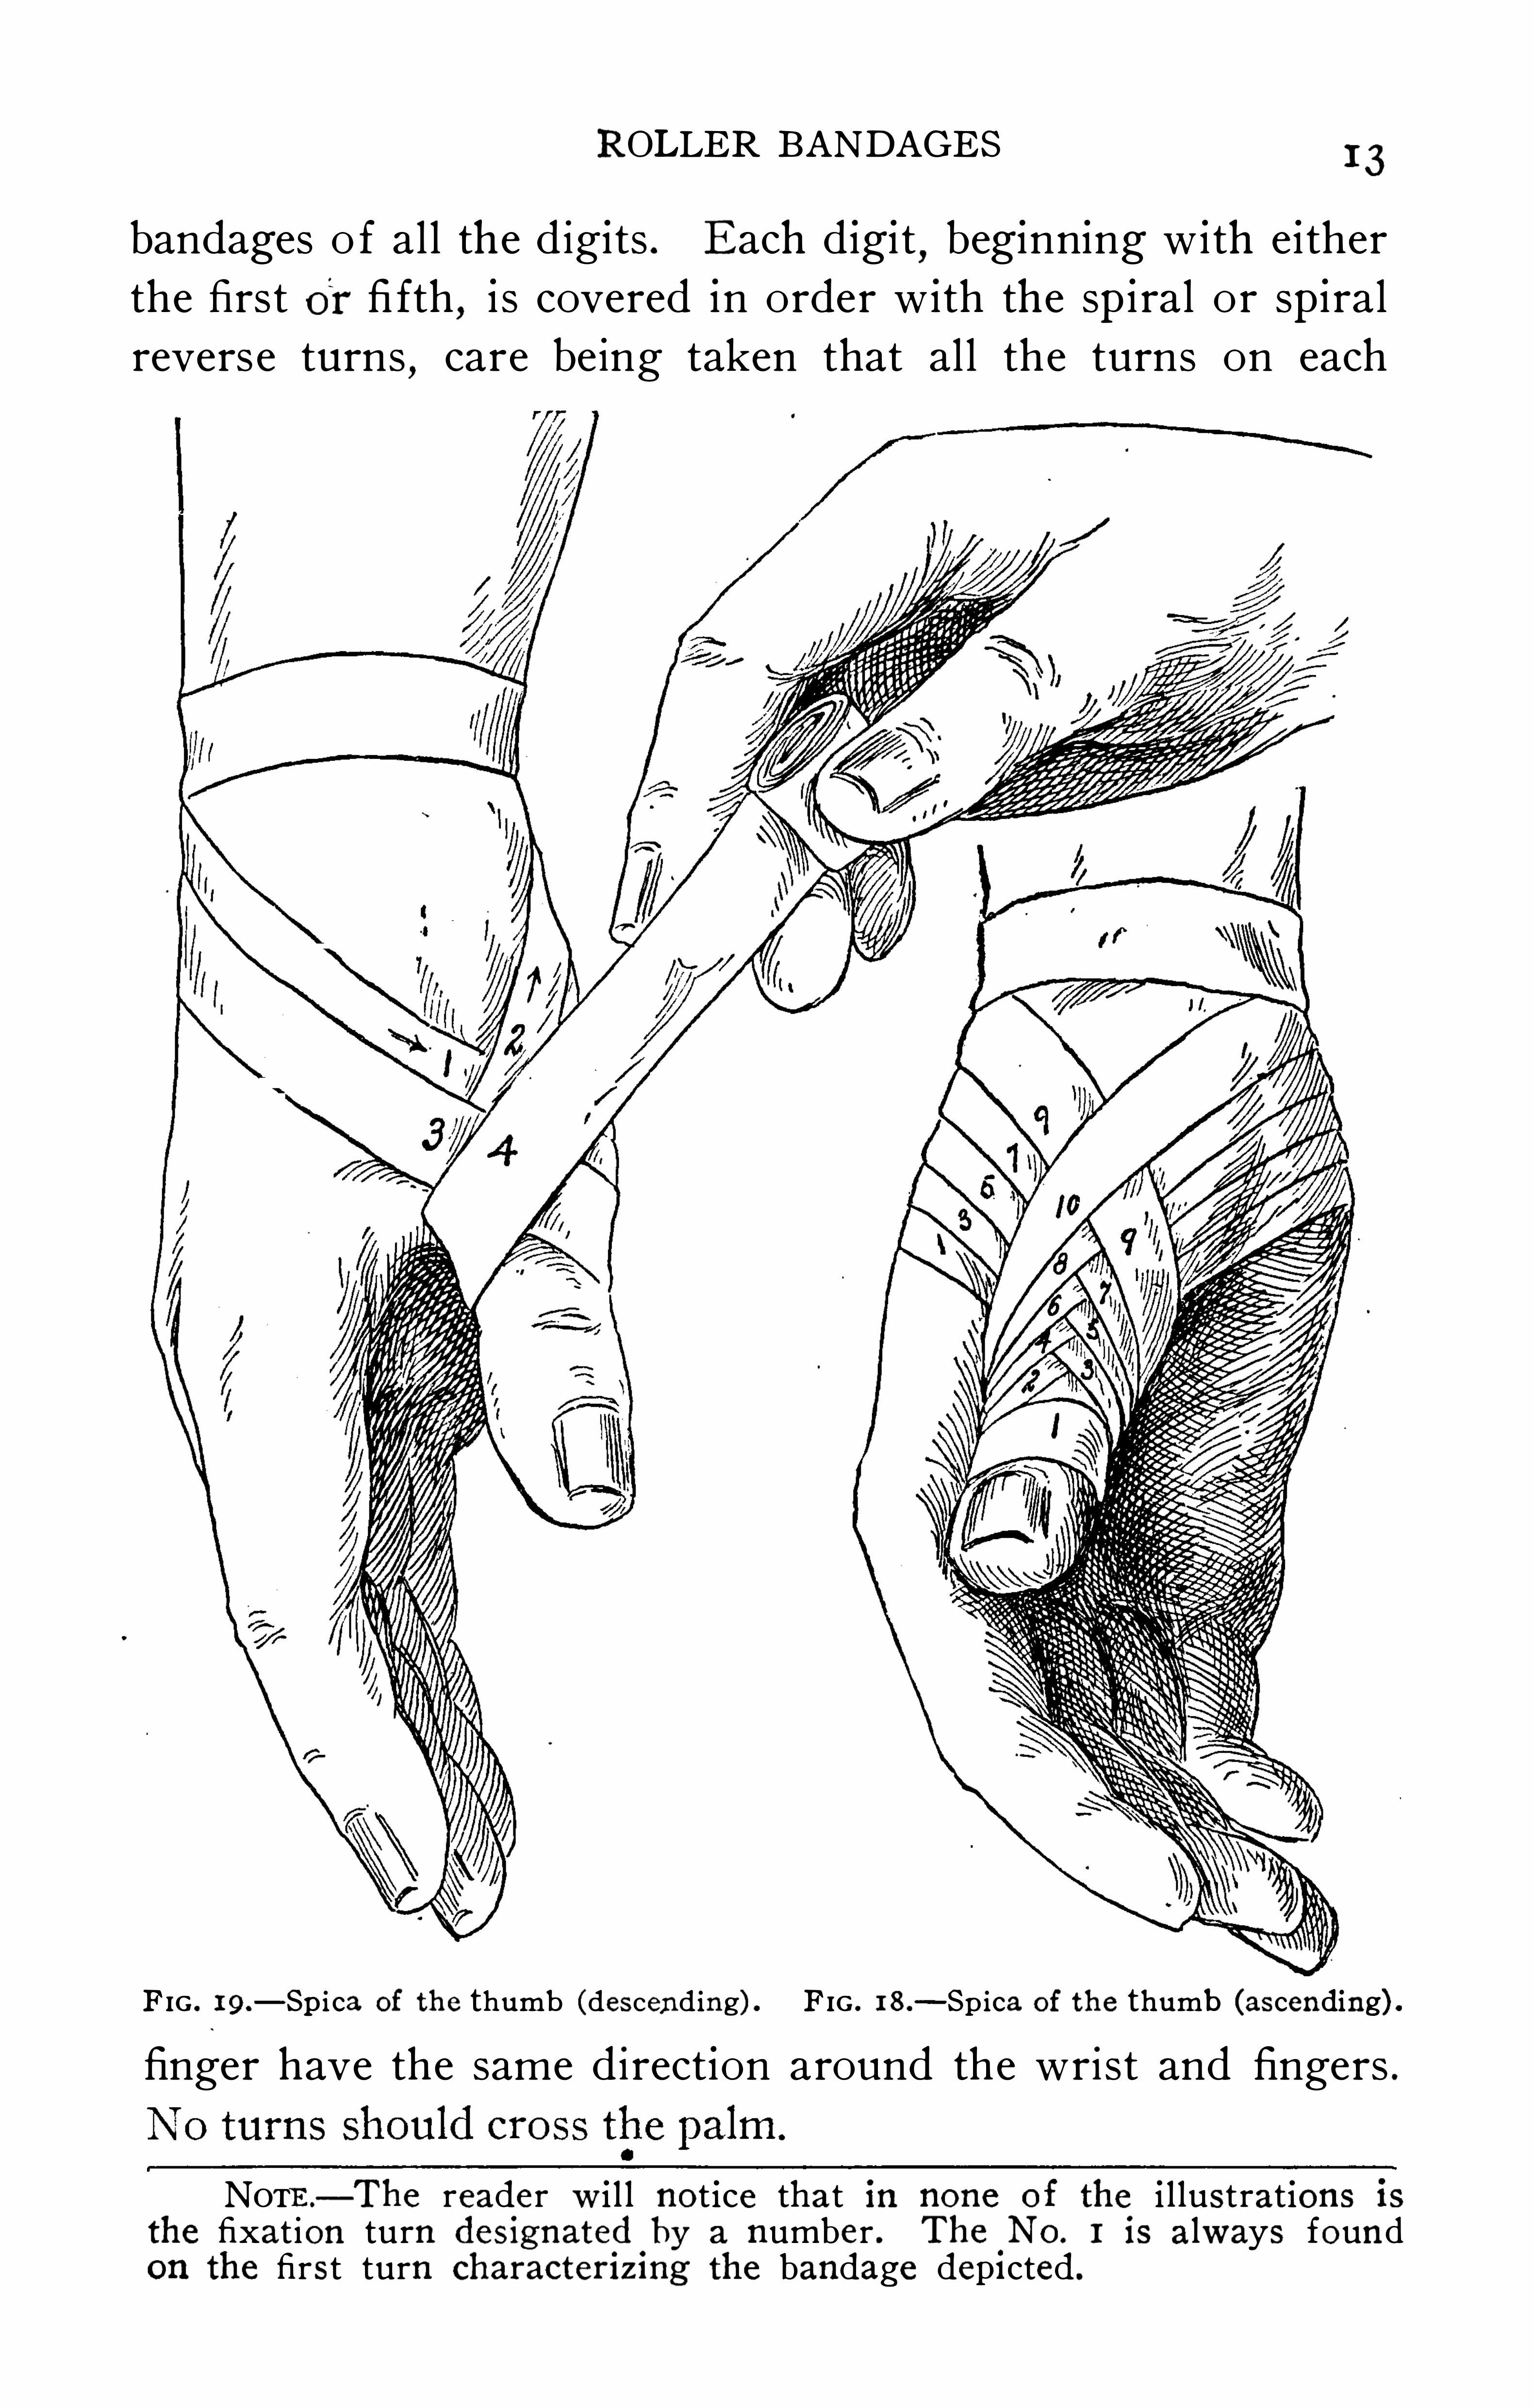
ROLLER BANDAGES 13
bandages o f al l the digits . E ach d igi t,beginning w i th e i ther
the first fi fth,i s covered in order w ith the spiral or spiral
reverse turns,care being taken that al l the turns on each
FIG . 19.
— Spica of the thumb (descending) . FIG . 1 8 .— Sp ica of the thumb (ascending) .
finger have the same direction around the wrist and fingers .
NOTE — The reader w i l l not ice that in none of the i l lustrations isthe fixat ion turn designated
o
by a number . The‘No. 1 is always found
on the first turn characterizmg the bandage depicted .
I 4PRACTICAL BANDAGING
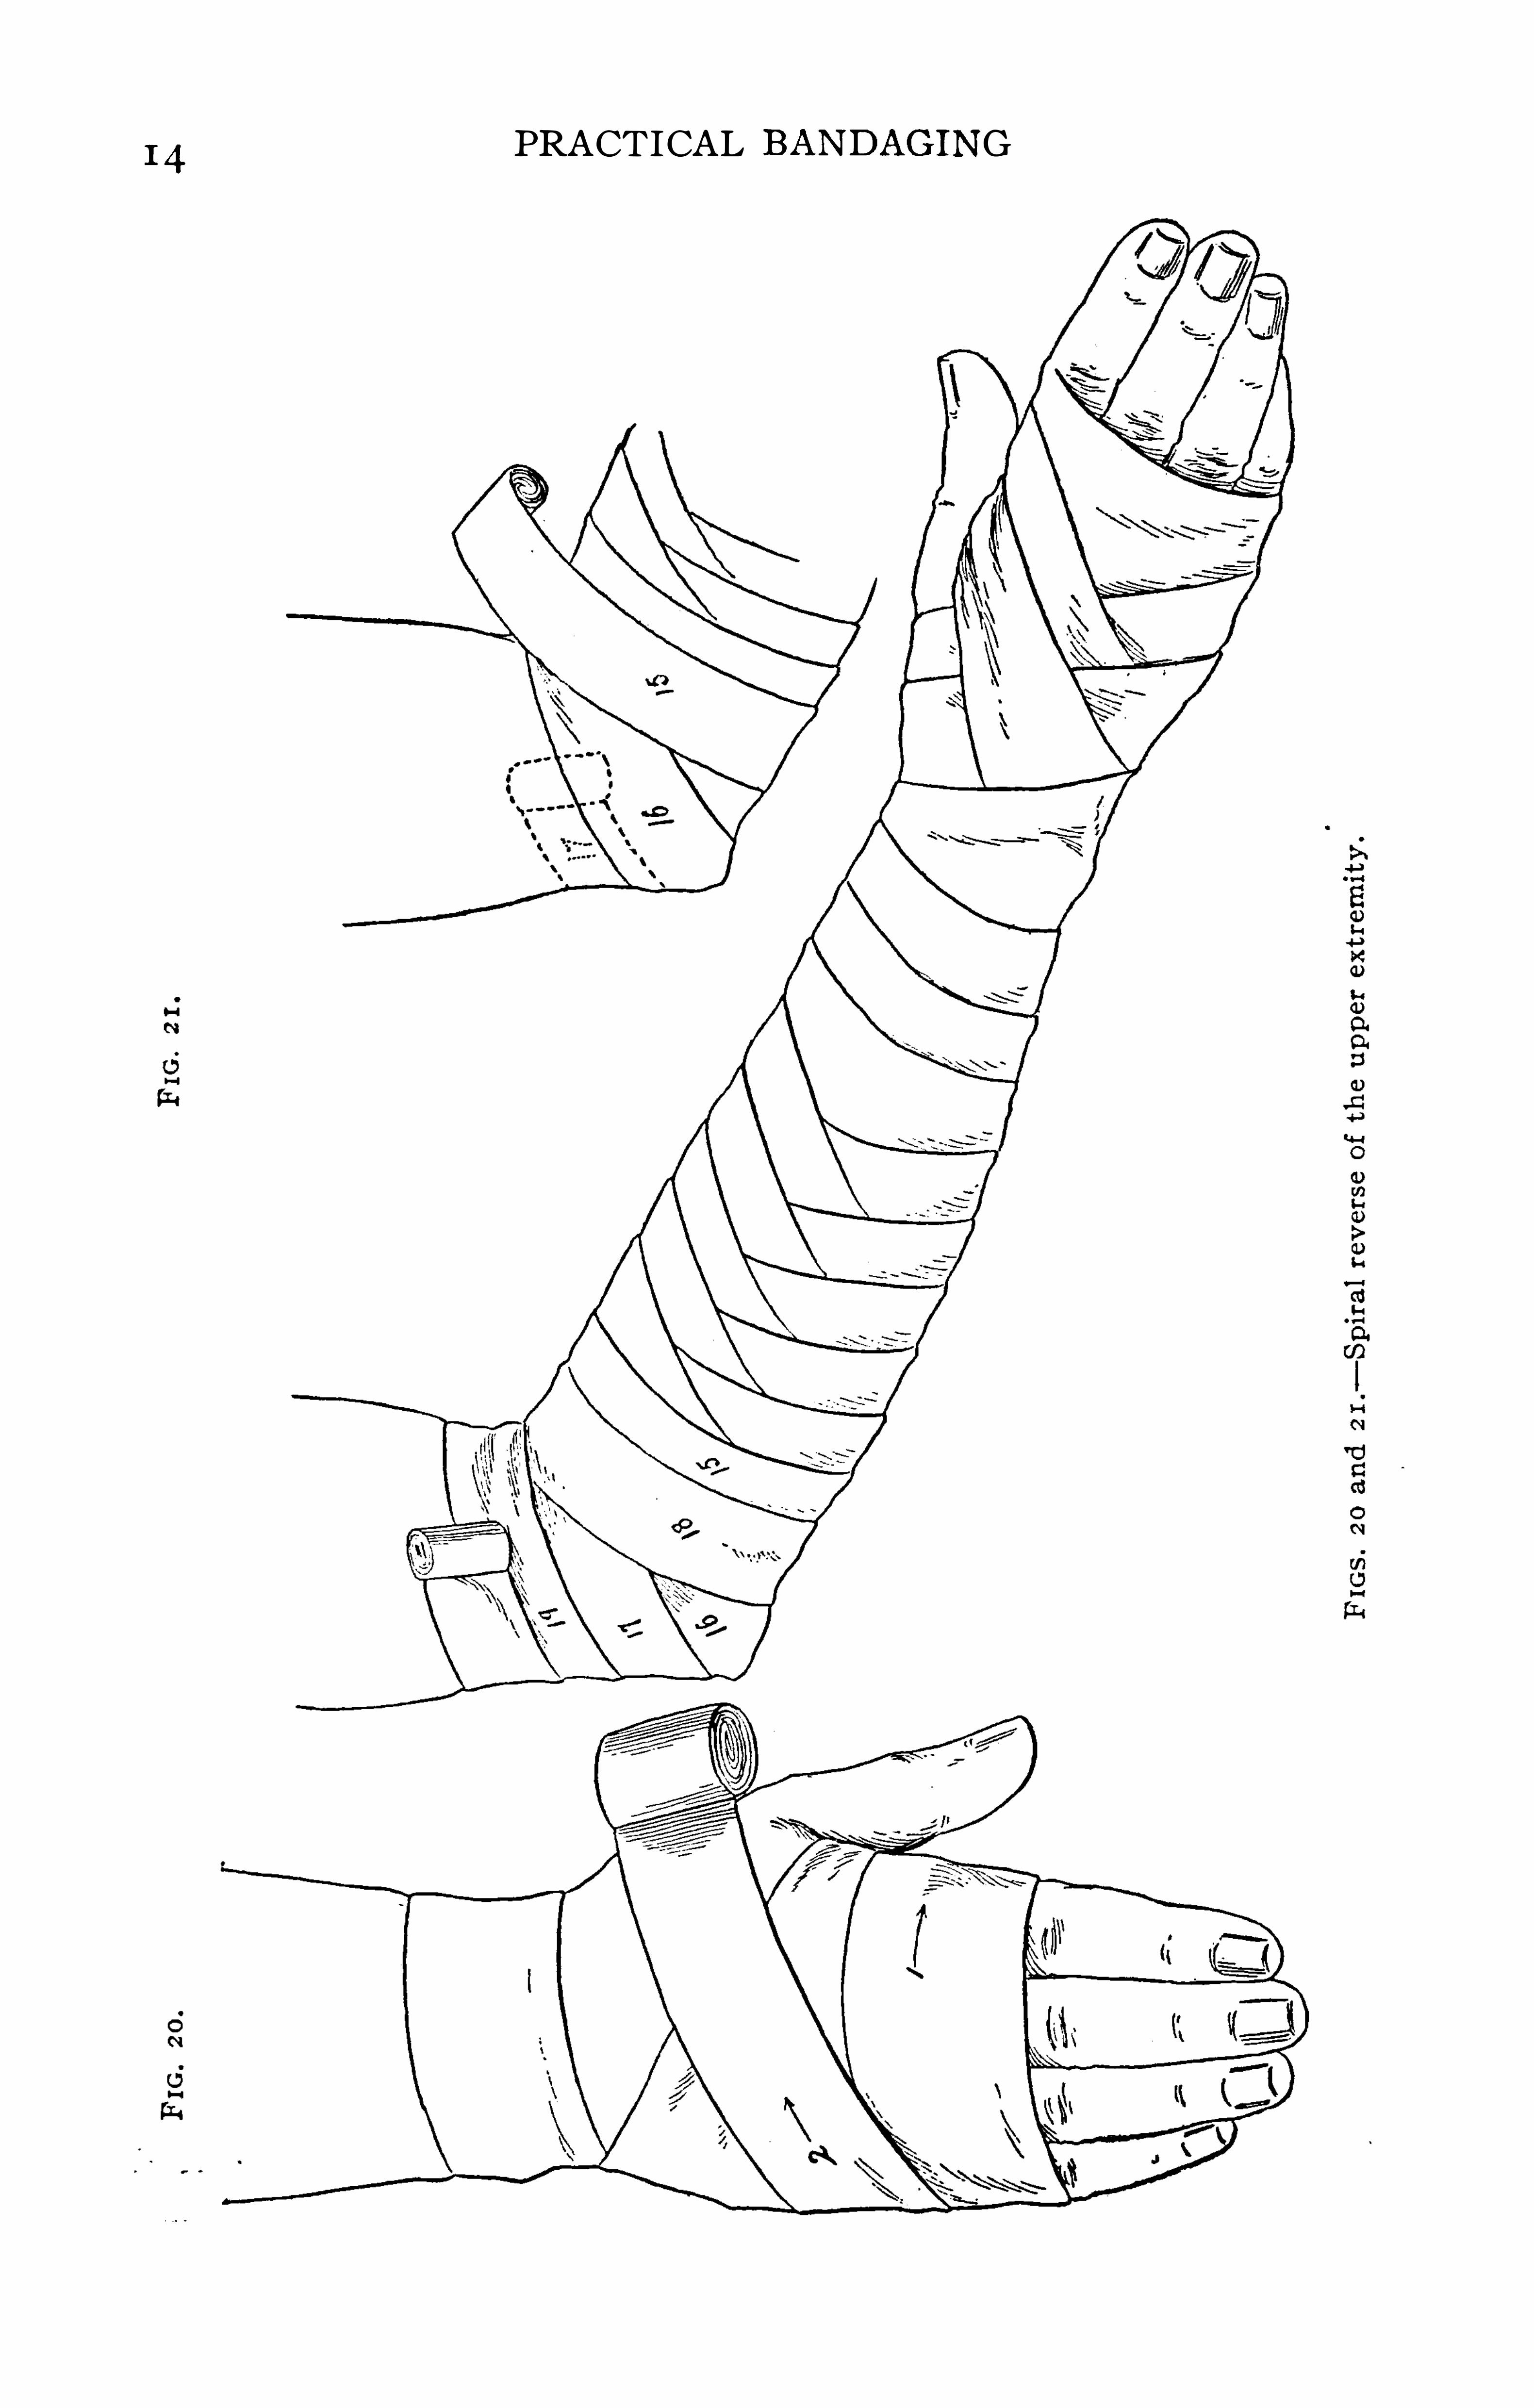
22.— Spiral reverseupper extremity.
ROLLER BANDAGES
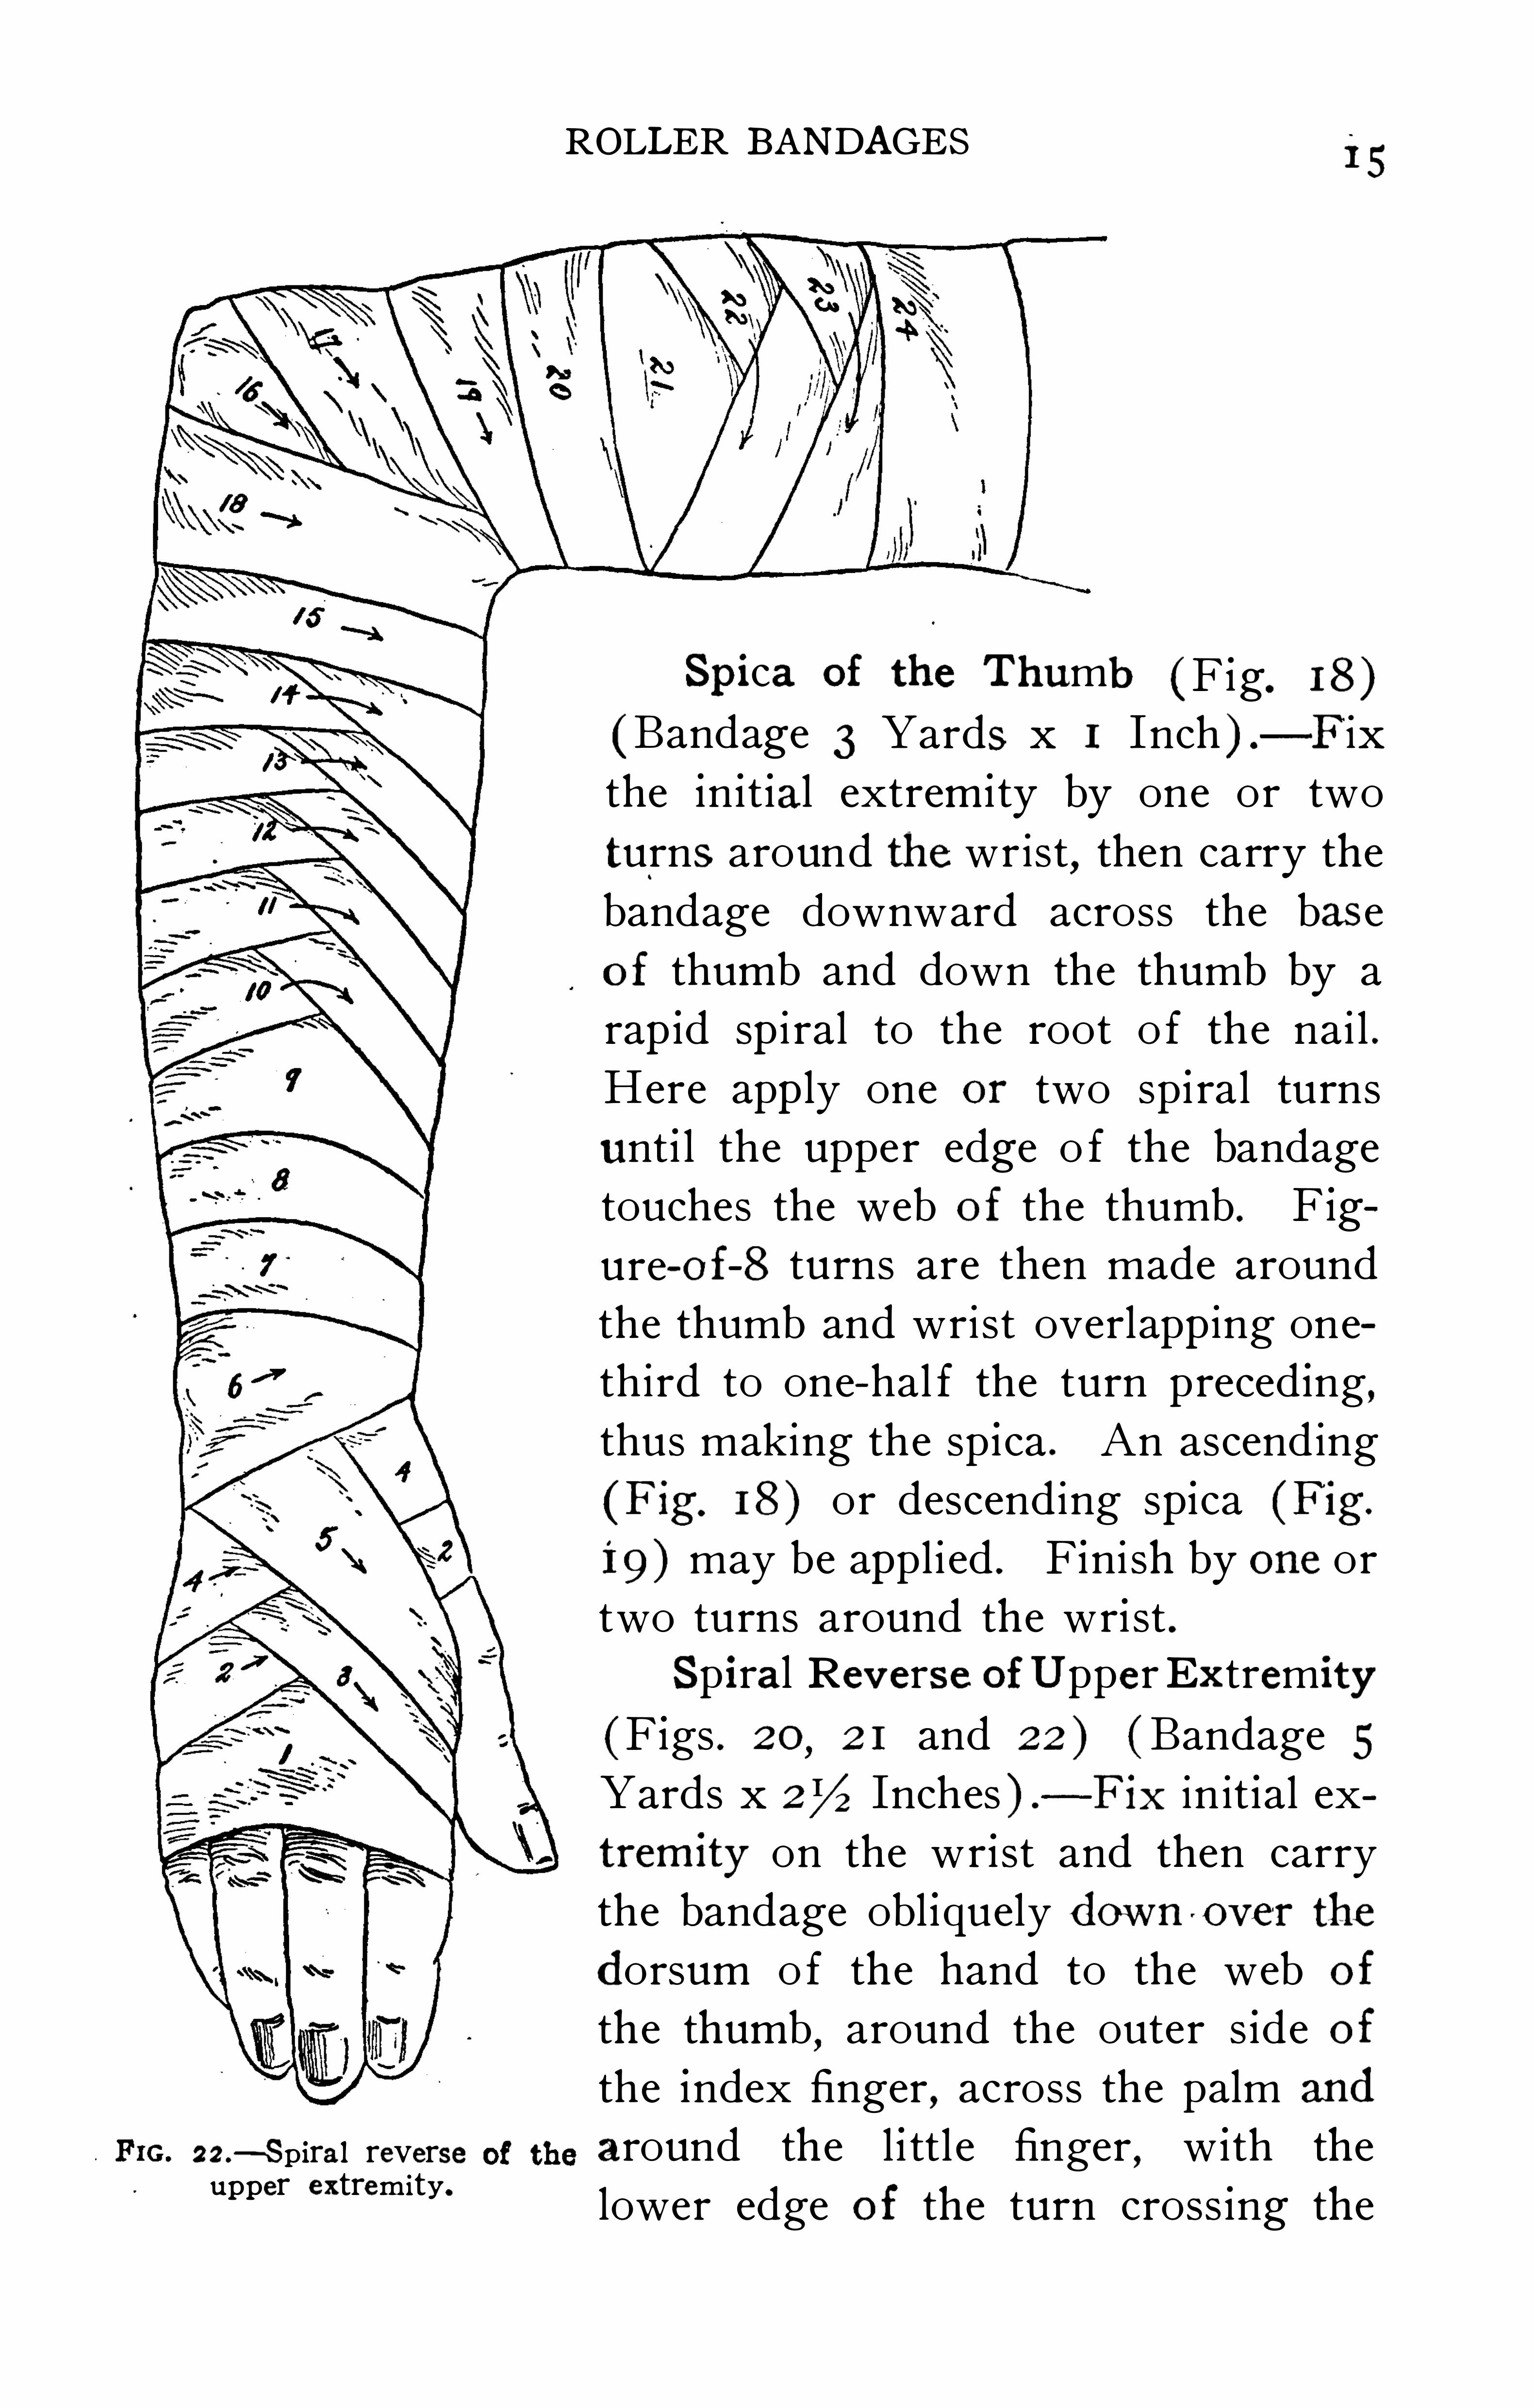
Spica of the Thumb (Fig, 18 )
(Bandage 3 Yards x 1 Inch ) .
-F ix
the in it ial extremi ty by one or two
turns around the wrist, then carry the
bandage downward across the base
of thumb and down the thumb by a
rapid sp i ral to the root o f the nai l .
Here app ly one or two sp i ral turns
unt i l the upper edge o f the bandage
touches the web of the thumb . Fig
ure-of-8 turns are then made around
the thumb and wrist overlapp ing one
third to one-hal f the turn preced ing,thus making the sp ica . An ascending
(F ig. 18 ) or descending spica (Fig.
19) may be appli ed . Fini sh by one or
two turns around the wri st .Spiral Reverse ofUpperEx tremity
(Figs . 20,2 1 and 22 ) ( Bandage 5
Yards x 2% Inches ) -Fix in it ial ex
tremity on the wr ist and then carry
the bandage obl iquely down 'over the
dorsum o f the hand to the web of
the thumb,around the outer s ide of
the index finger, across the palm and
around the l i ttl e finger , w ith the
lower edge of the turn cross ing the
I 6 PRACTICAL BANDAGING
second j o int of the ring finger. Make a circular turn at th i s
point and as the bandage crosses the l ittle finger the second
time,i t shou ld cover one-hal f the preceding turn . Then carry
obliquely upward across to and around the first j oint o f the
thumb . Cross ing the palmar sur face again to ulna S ide
another turn i s taken around the hand below the thumb,
overlapp ing one-hal f the prev ious turn . Now make one or
two figure-of—8 turns around the hand above and below the
thumb,unt i l the hand i s covered . Next carry the bandage
to the wrist and cover the forearm with spi ral or sp iral reverses as required unti l within four inches o f the elbow . F lex
the elbow and carry the bandage w ith its centre over the
po int of the elbow,and return to front of forearm covering
one-hal f or one- thi rd the last turn . The bandage is carried
fro-m here across the front of the elbow and.
uparound thelower part of arm overlapping one-hal f of the turn cover ing
the elbow tip. The next turn passes around the upper fore
arm covering in the lower edge of the elbow turn . Proceed
from here on up the arm with sp i ral reverse turns as requi red .
F ini sh with one or two ci rcular turns .
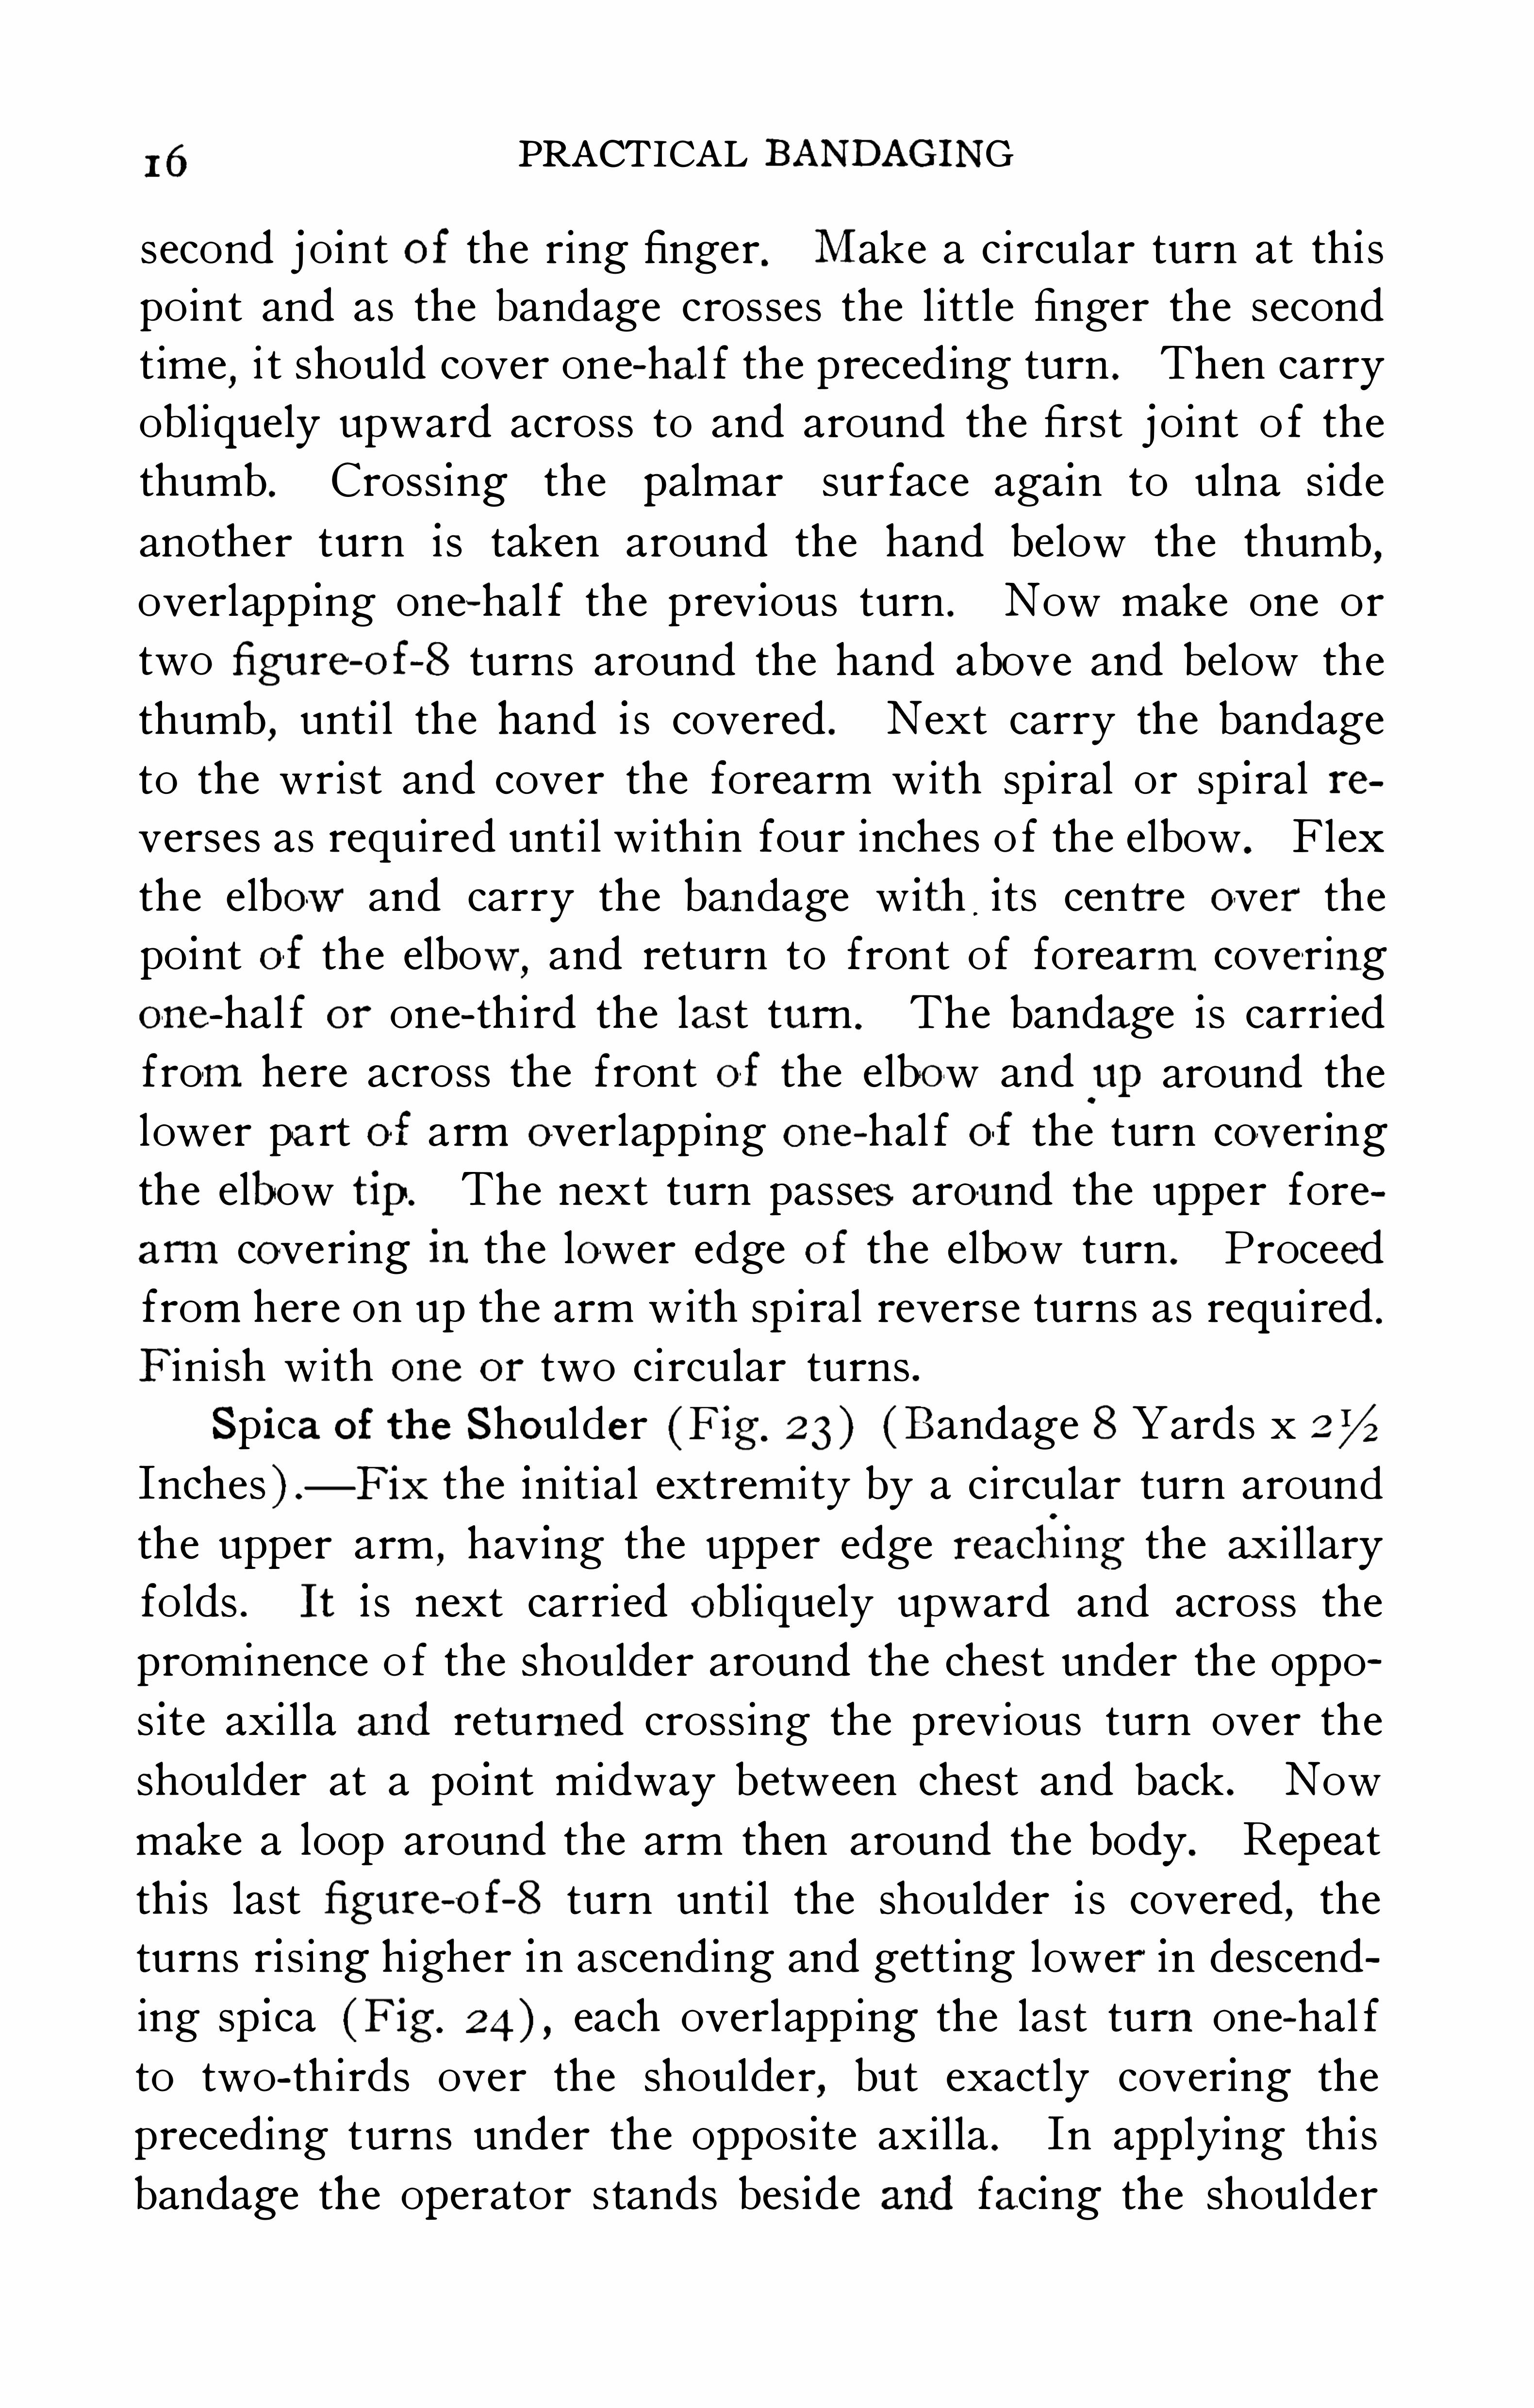
Spica of the Shoulder (F ig. 23) (Bandage 8 Yards x
Inches ) .
— Fix the init ial extremity by a circular turn around
the upper arm,hav ing the upper edge reacliing the ax i l lary
folds . It i s next carried obliquely upward and across the
prominence o f the shoulder around the chest under the oppo
s ite axi lla and retur ned cross ing the previous turn over the
shoulder at a po int midway between chest and back . Now
make a loop around the arm then around the body. Repeat
th is last figure-of-S turn unti l the shoulder i s covered, the
turns ri s ing higher in ascending and gett ing lower in descend
ing sp ica (Fig. each overlapping the last turn one-hal f
to two-thirds over the shoulder, but exactly covering the
preceding turns under the oppos ite axilla . In applying th is
bandage the operator stands bes ide and facing the shoulder
ROLLER BANDAGES 1 7
that i s be ing bandaged . To bandage the le ft shoulder fix
the in it ial extremity from be fore backward h igh up on the
arm by one or two c ircular turn s then pass ing backwardsand upwards over the shoulder t ip and around the back . I t i s
much more secure to fix your sp ica bandage of the shoulder
by a sp ica loop beginn ing well away from the shou lder and
100ping the arm as do the subsequent turns (Fig. Here
the in it ial extremi ty l ies hidden under turn ( I ) posteriorly .
F IG. 23.— Spica of the shoulder. FIG . 24.
— Spica loops of the shoulder.
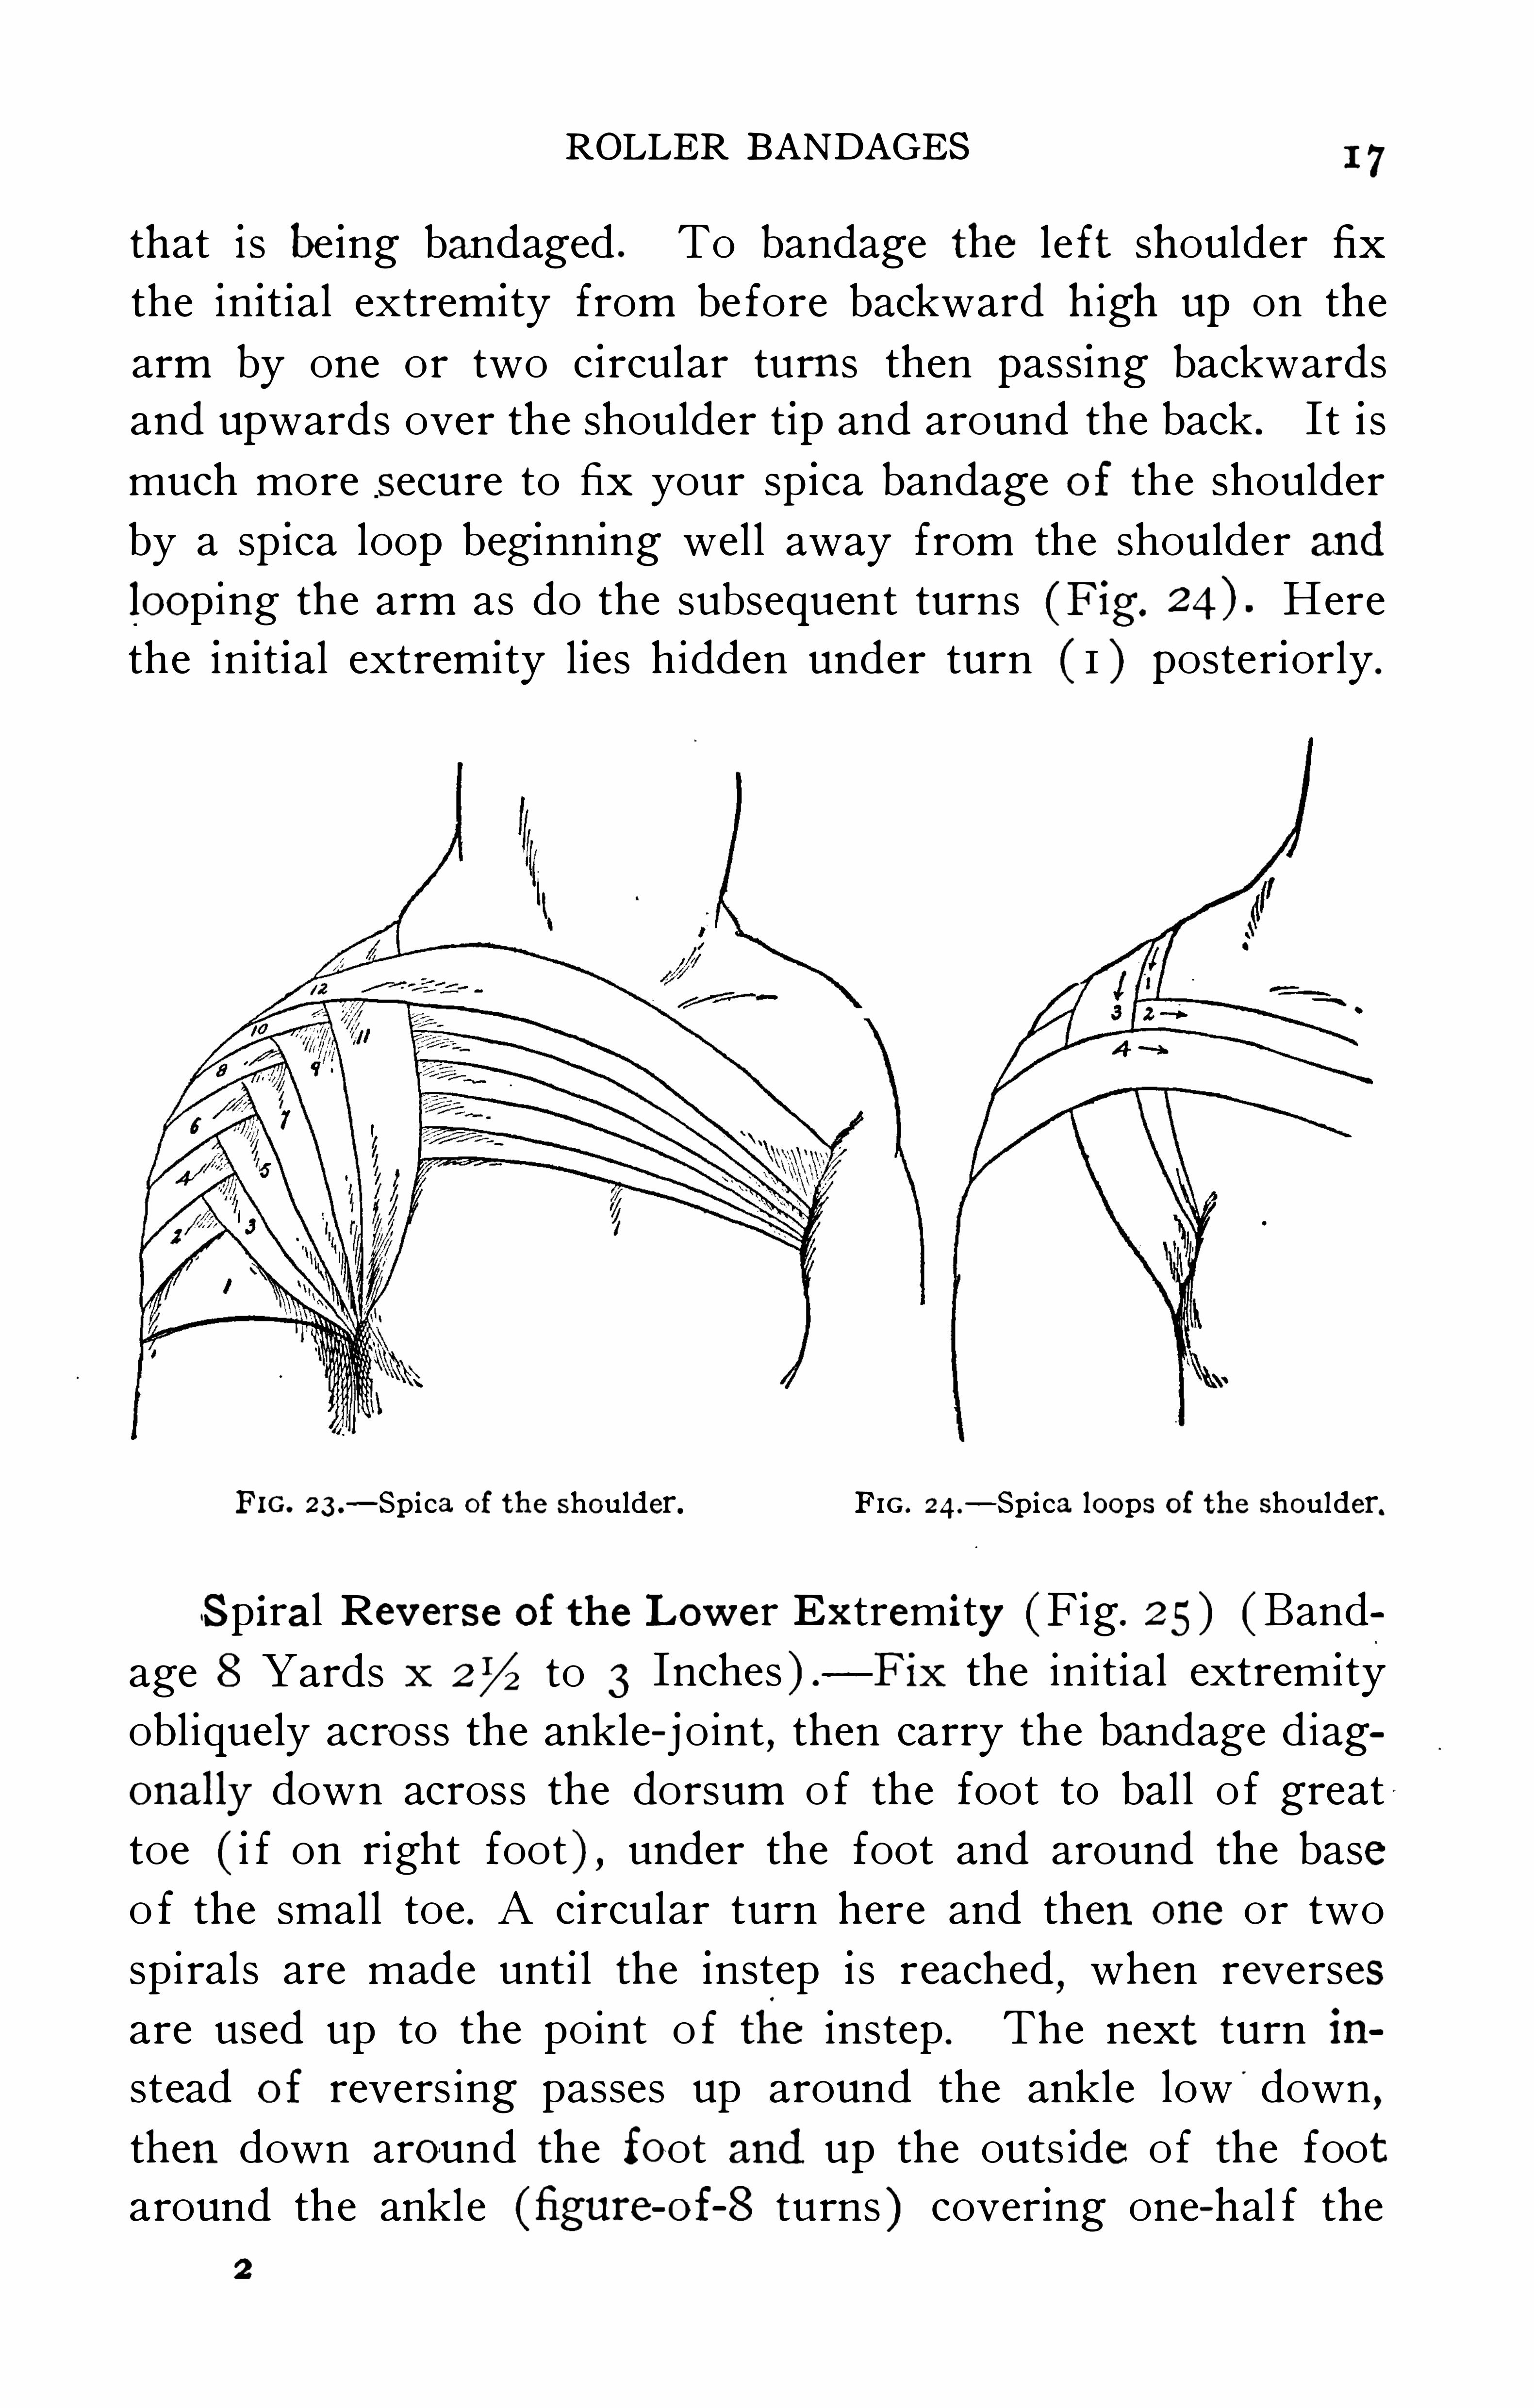
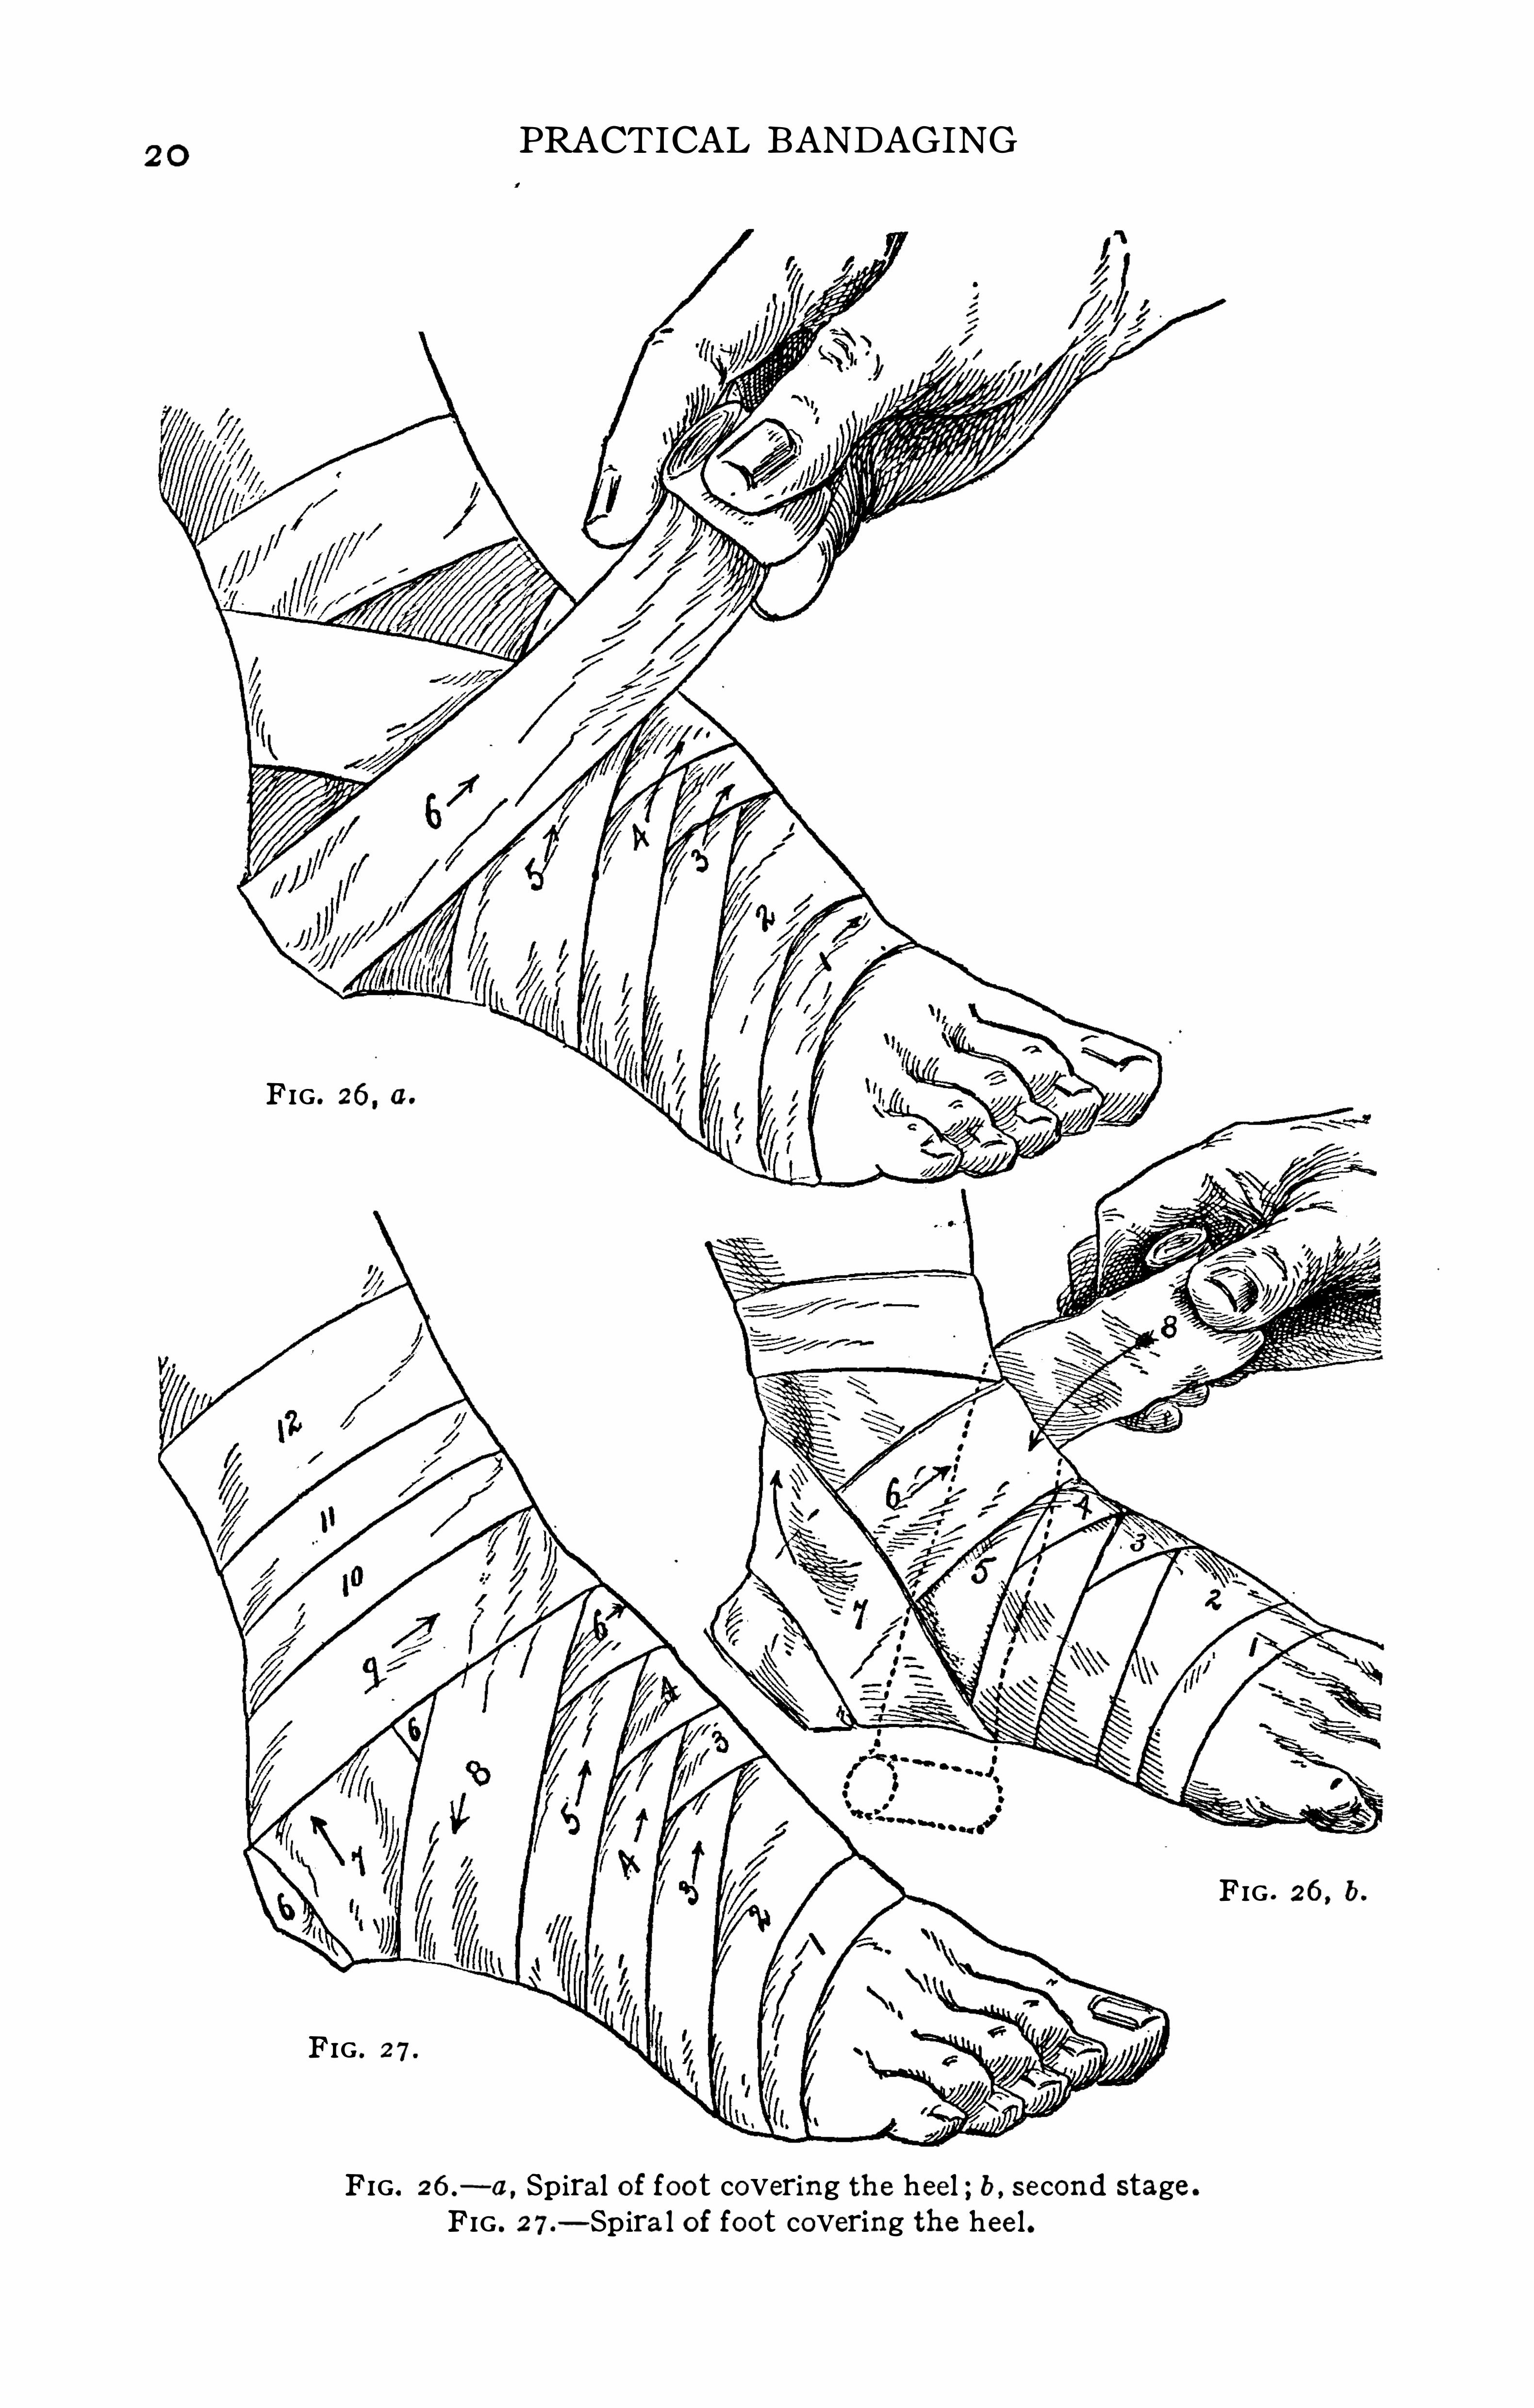
Spiral Reverse of the Low er Ex tremity (Fig. 25) (Band
age 8 Yards x 2% to 3 Inches ) .
— Fix the in it ial extrem ity
obliquely across the ankle- j o int , then carry the bandage diag
onal ly down across the dorsum o f the foot to bal l o f great
toe ( i f on right foot ) , under the foot and around the base
o f the small toe . A circular turn here and then one or two
spi rals are made unt i l the instep i s reached,when reverses
are used up to the point o f the instep . The next turn in
stead oi revers ing passes up around the ankle low'
down,
then down around the foot and up the outs ide of the foot
around the ankle (figure-of-S turns ) cover ing one-hal f the
2

PRACTICAL BANDAGING
FIG . 25 .
— Spiral reverse of lower. extremity .
20PRACTICAL BANDAGING
FIG . 26 , 0 .
FIG . 27.
FIG . 26 .— a,
Spiral of foot covering the heel " b , second stage .
FIG . 27.— Spiral of foot covering the heel .
FIG . 26 ,b .
ROLLER BANDAGES2 I
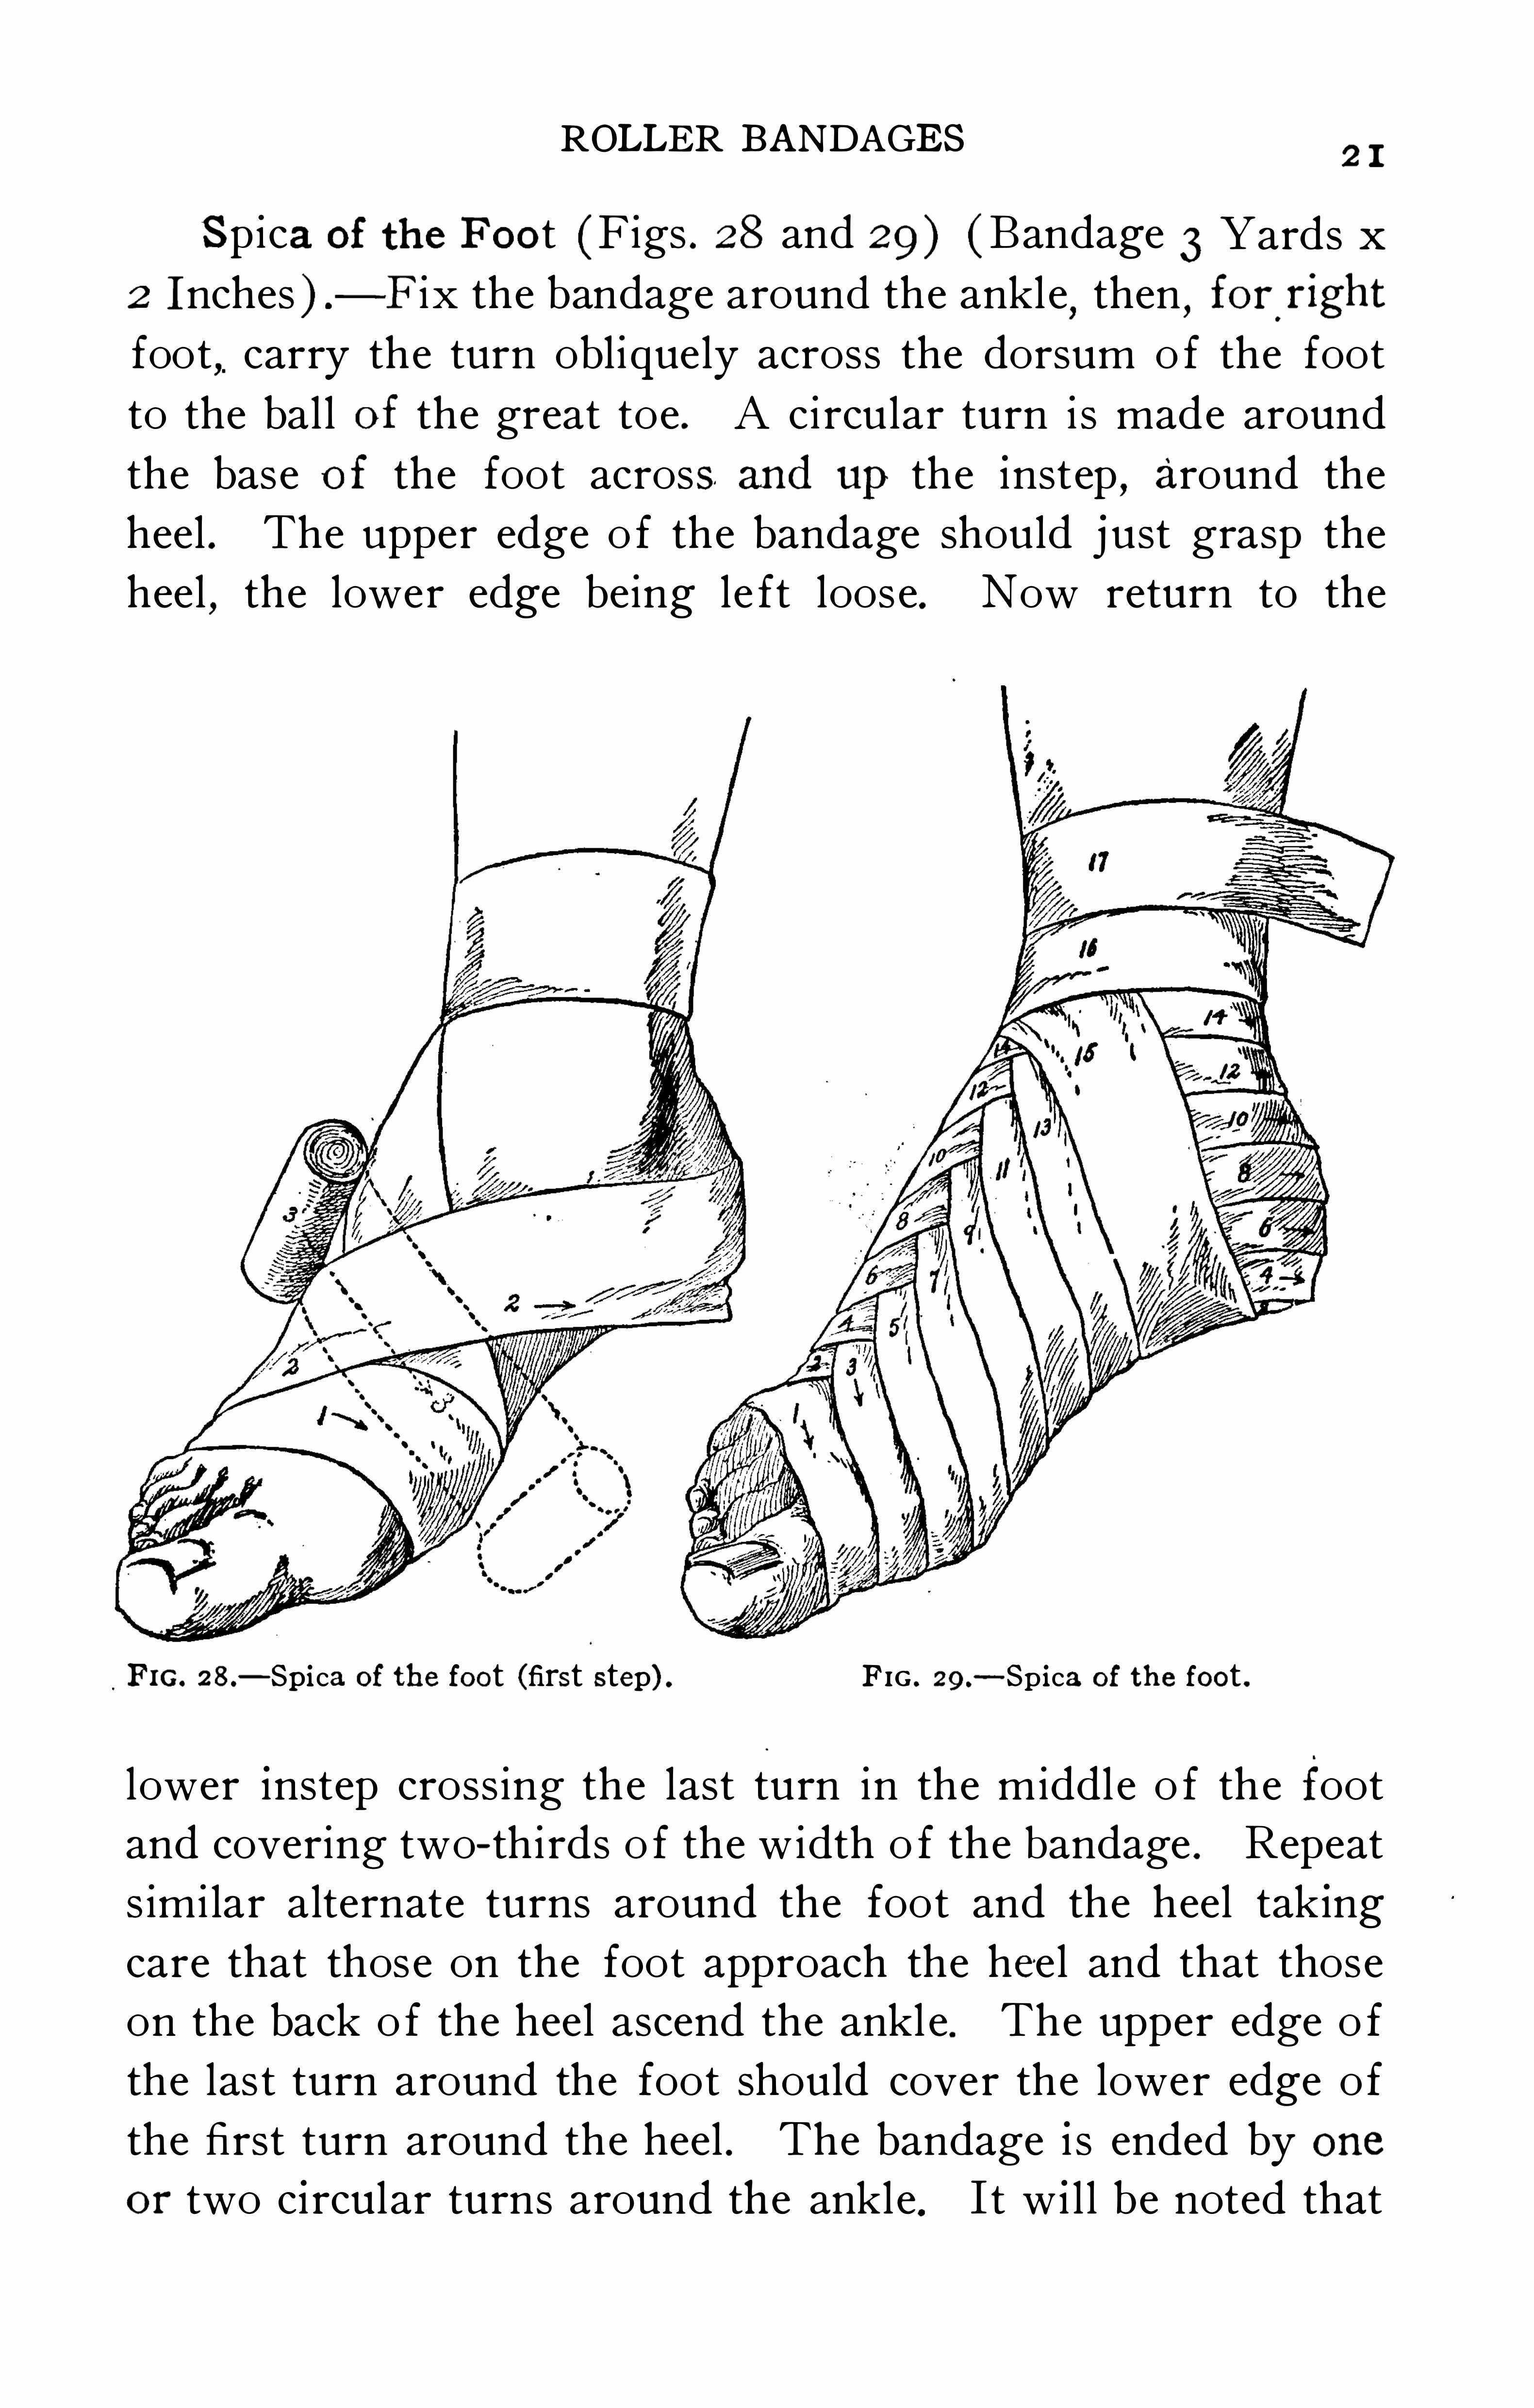
Spica of the Foot (F igs . 28 and 29) (Bandage 3 Yards x
2 Inches ) -F ix the bandage around the ankle,then
,for
o
right
foot,carry the turn obliquely across the dorsum o f the foot
to the bal l of the great toe . A ci rcular turn i s made around
the base of the foot across and upthe instep , around theheel . The upper edge o f the bandage should j ust grasp the
heel,the lower edge being le ft loose. Now return to the
F IG. 28 .— Spica of the foot (first step) . FIG . 29.
— Spica of the foot .
lower instep cross ing the last turn in the middle o f the foot
and covering two- thi rds o f the width o f the bandage . Repeat
s imi lar alternate turns around the foot and the heel tak ing
care that those on the foot approach the heel and that those
on the back o f the heel ascend the ankl e . The upper edge o f
the las t turn around the foot should cover the lower edge o f
the first turn around the heel . The bandage i s ended by one
or two circular turns around the ankle. I t w i l l be noted that
2 2 PRACTICAL BANDAGING
the last one or two turns cross ing under the foot have one
edge loose . This can be avoided by revers ing the bandage onthe s ide o f the foot be fore going up the instep . To
_
bandage
the left foot,a fter fixing the bandage around the ankle in the
above manner,direct the next down across the instep to the
F IG. 30.
— Figu’re-of—8 of the l eg (method
base of the l ittl e toe and then make a ci rcular turn around the
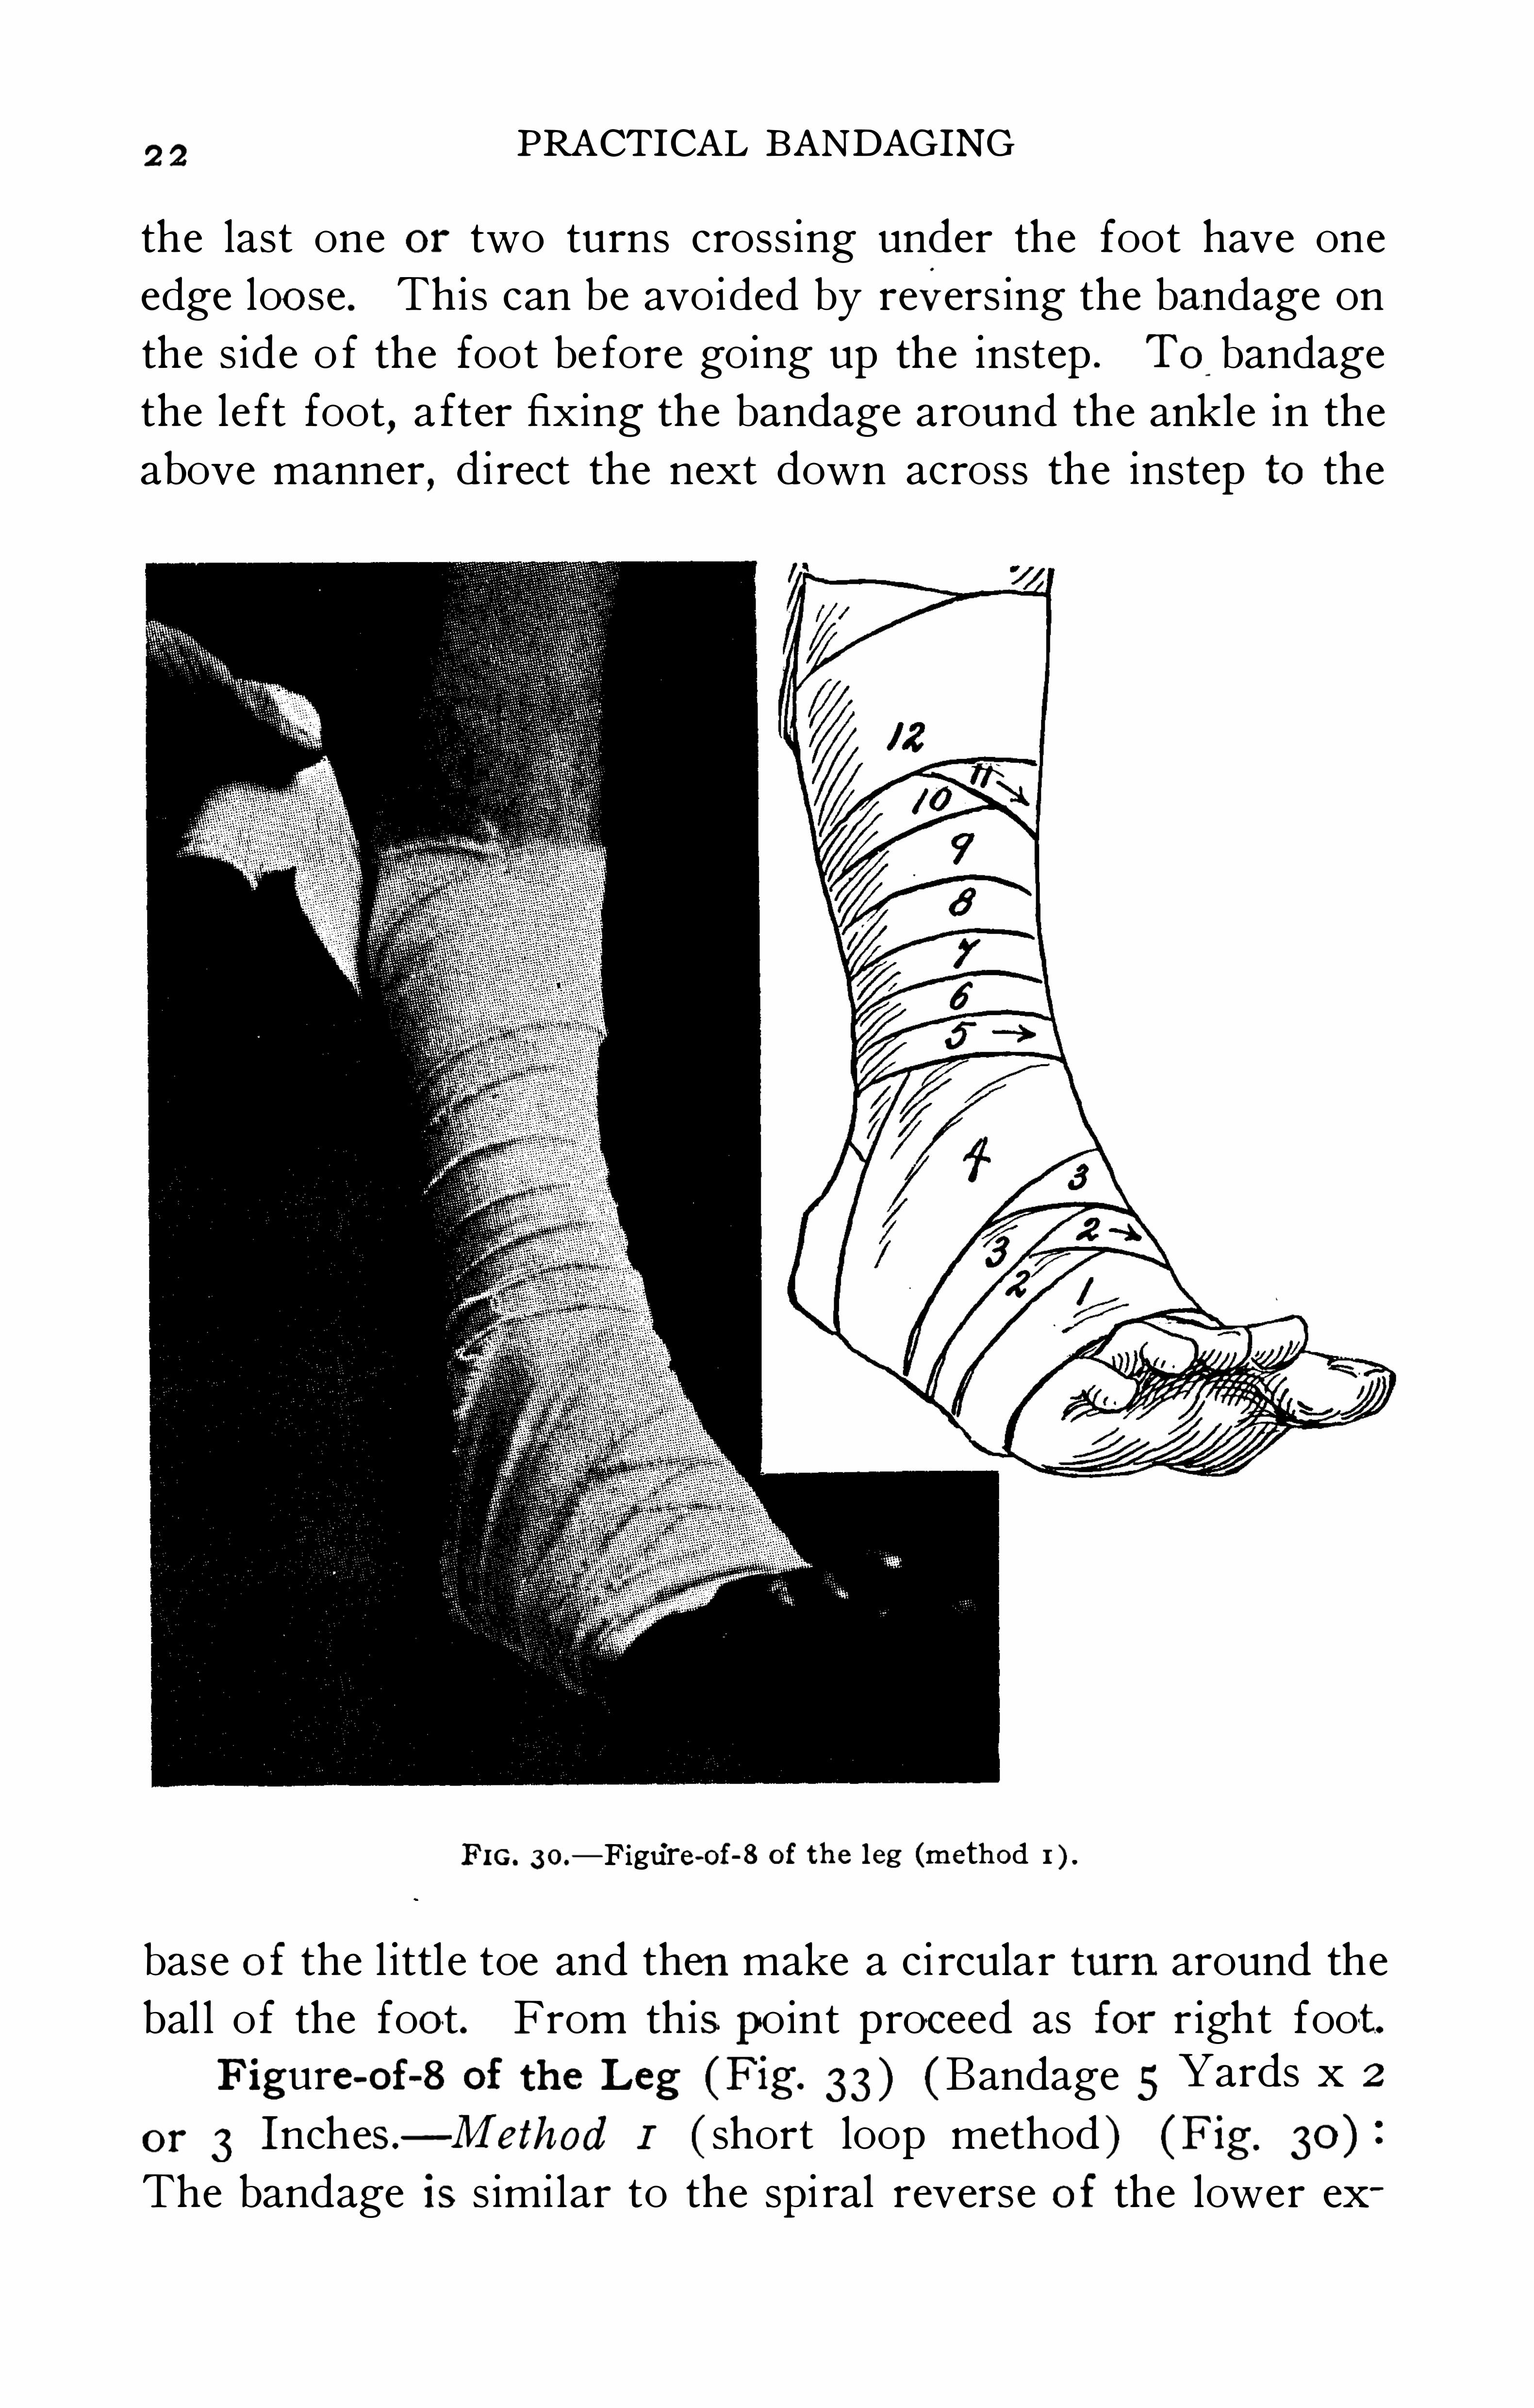
bal l of the foot. From thispoint proceed as for r ight foo-t.F igure-of—S of the Leg (Fig. 33) (Bandage 5 Yards x 2
or 3 Inches — Method I ( short loop method ) (Fig. 30 )The bandage is s imi lar to the spi ral reverse of the lower ex
ROLLER BANDAGES2 3
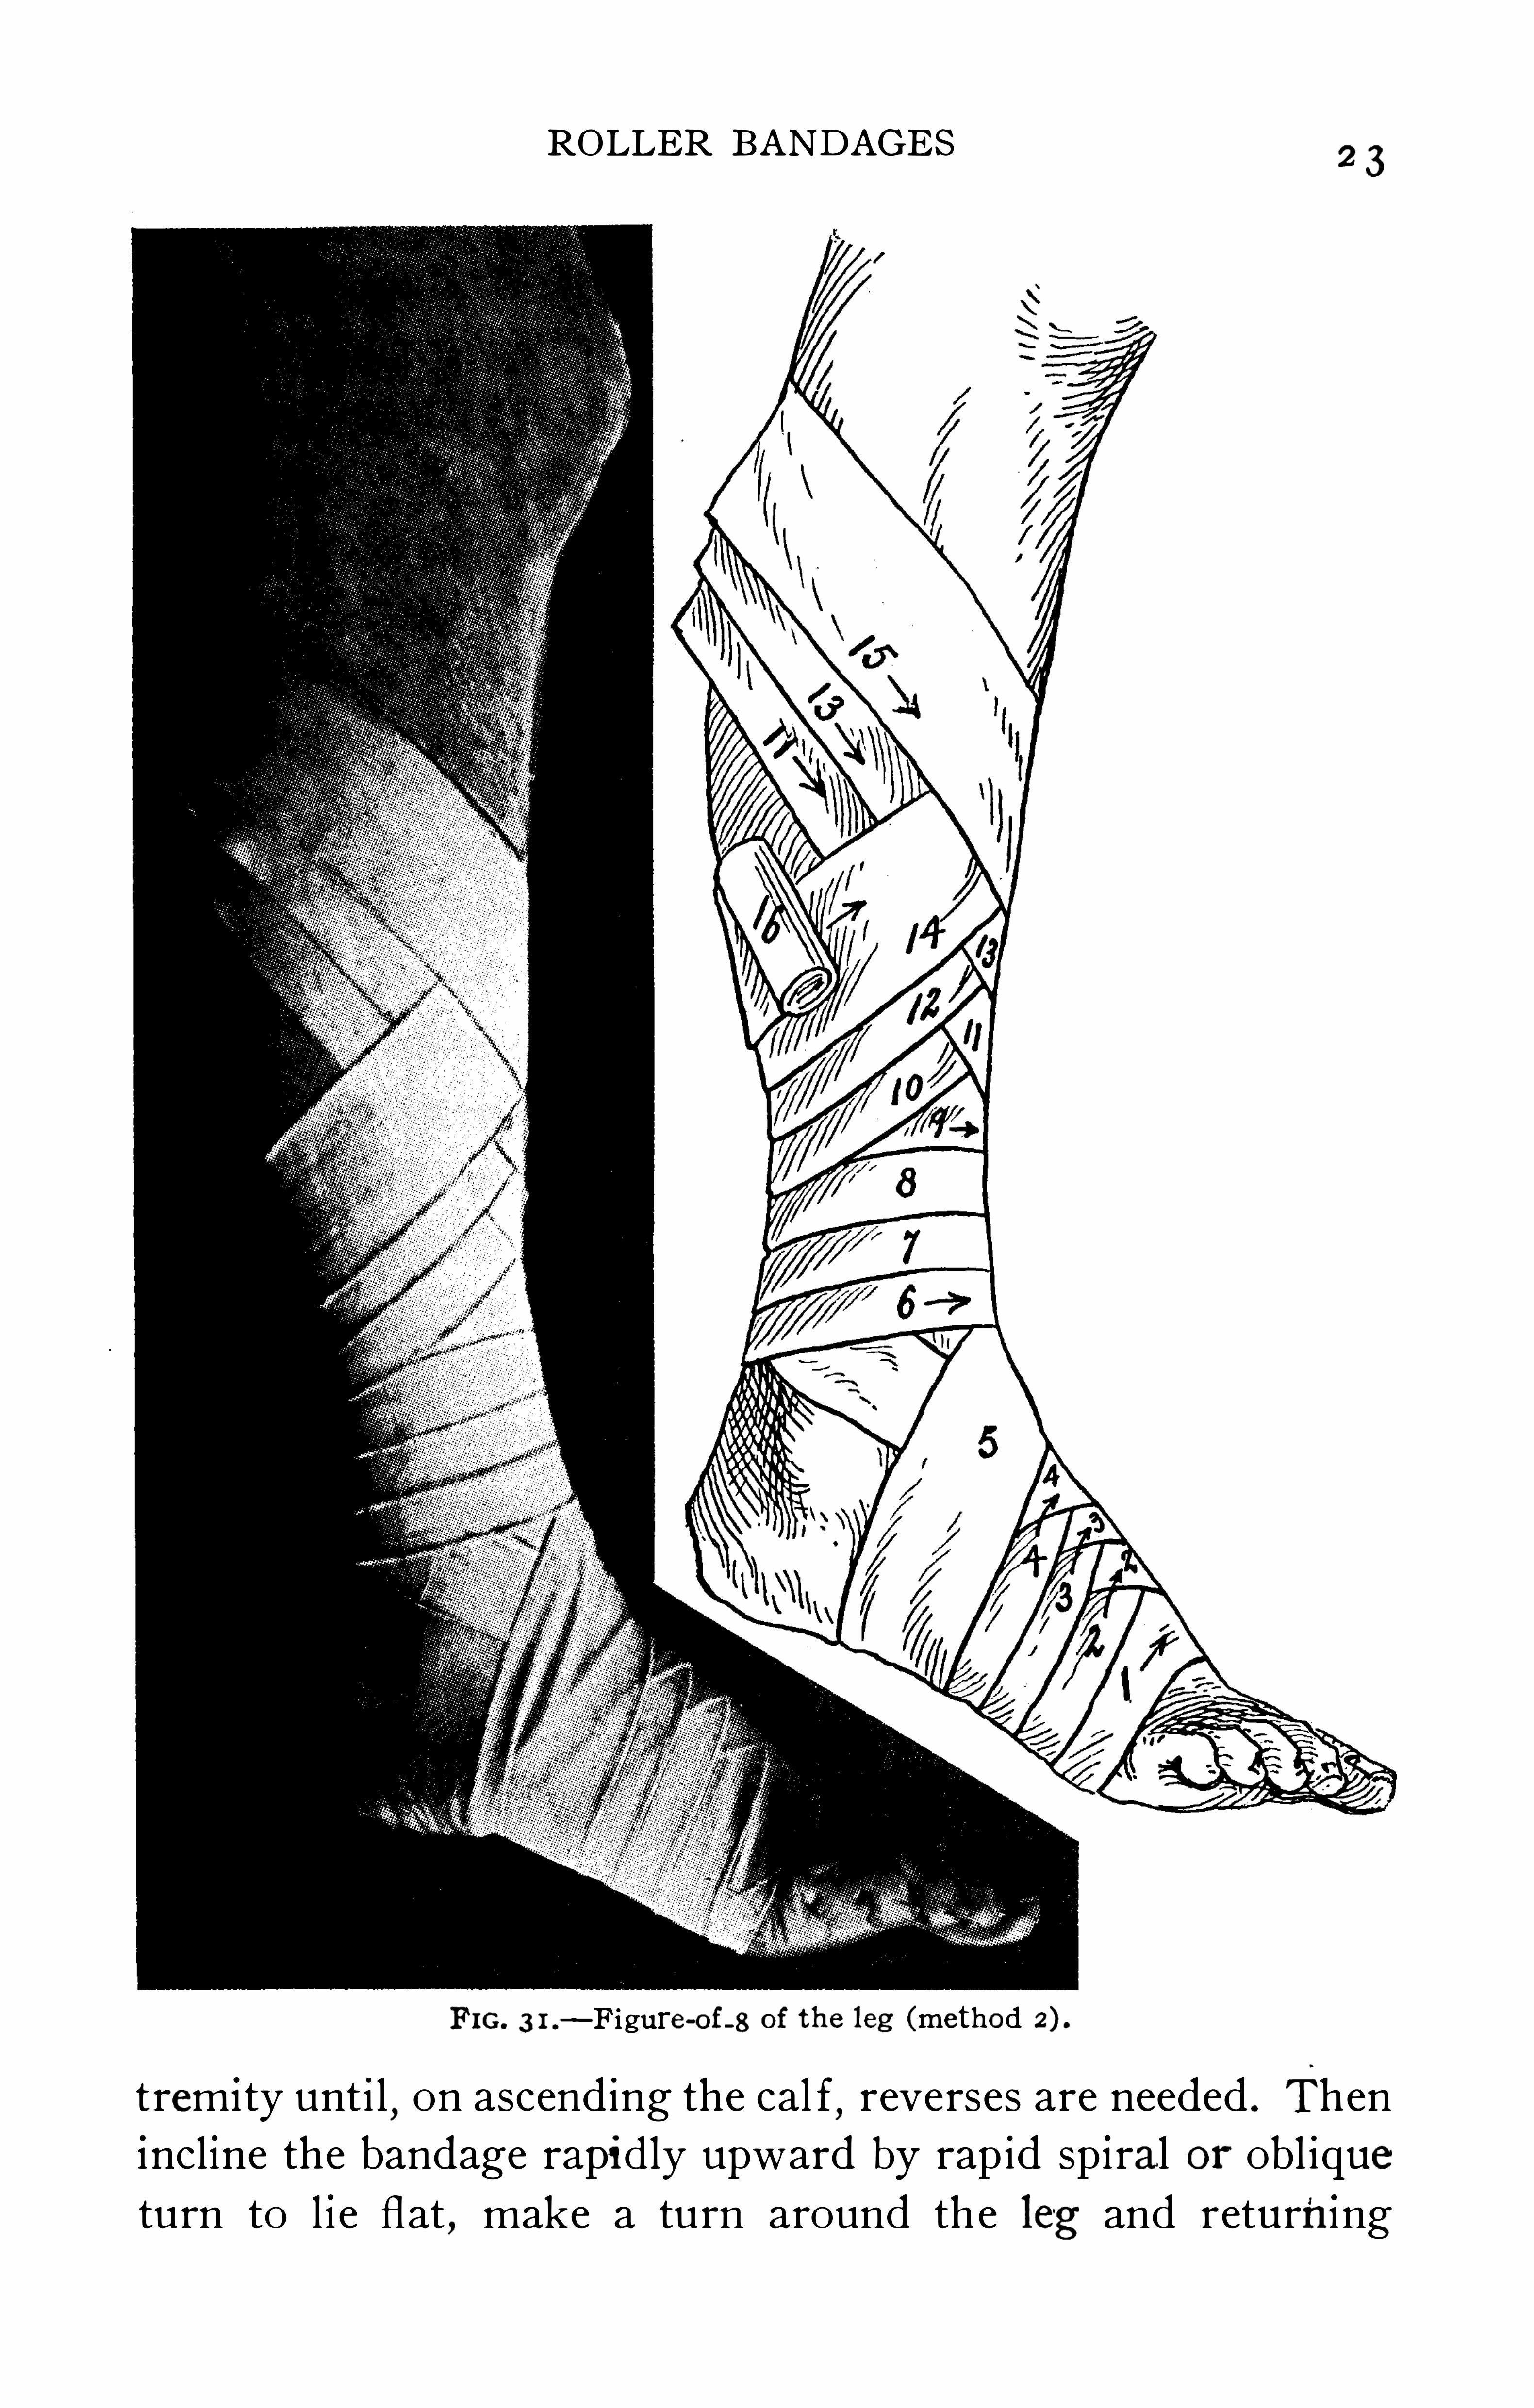
FIG. 3 1 .— F igure-oi—8 of the l eg (method
trom i ty unti l,on ascending the cal f
,reverses are needed . Then
incl ine the bandage rapid ly upward by rap id sp iral or obl ique
turn to l ie flat , make a turn around the leg and returning
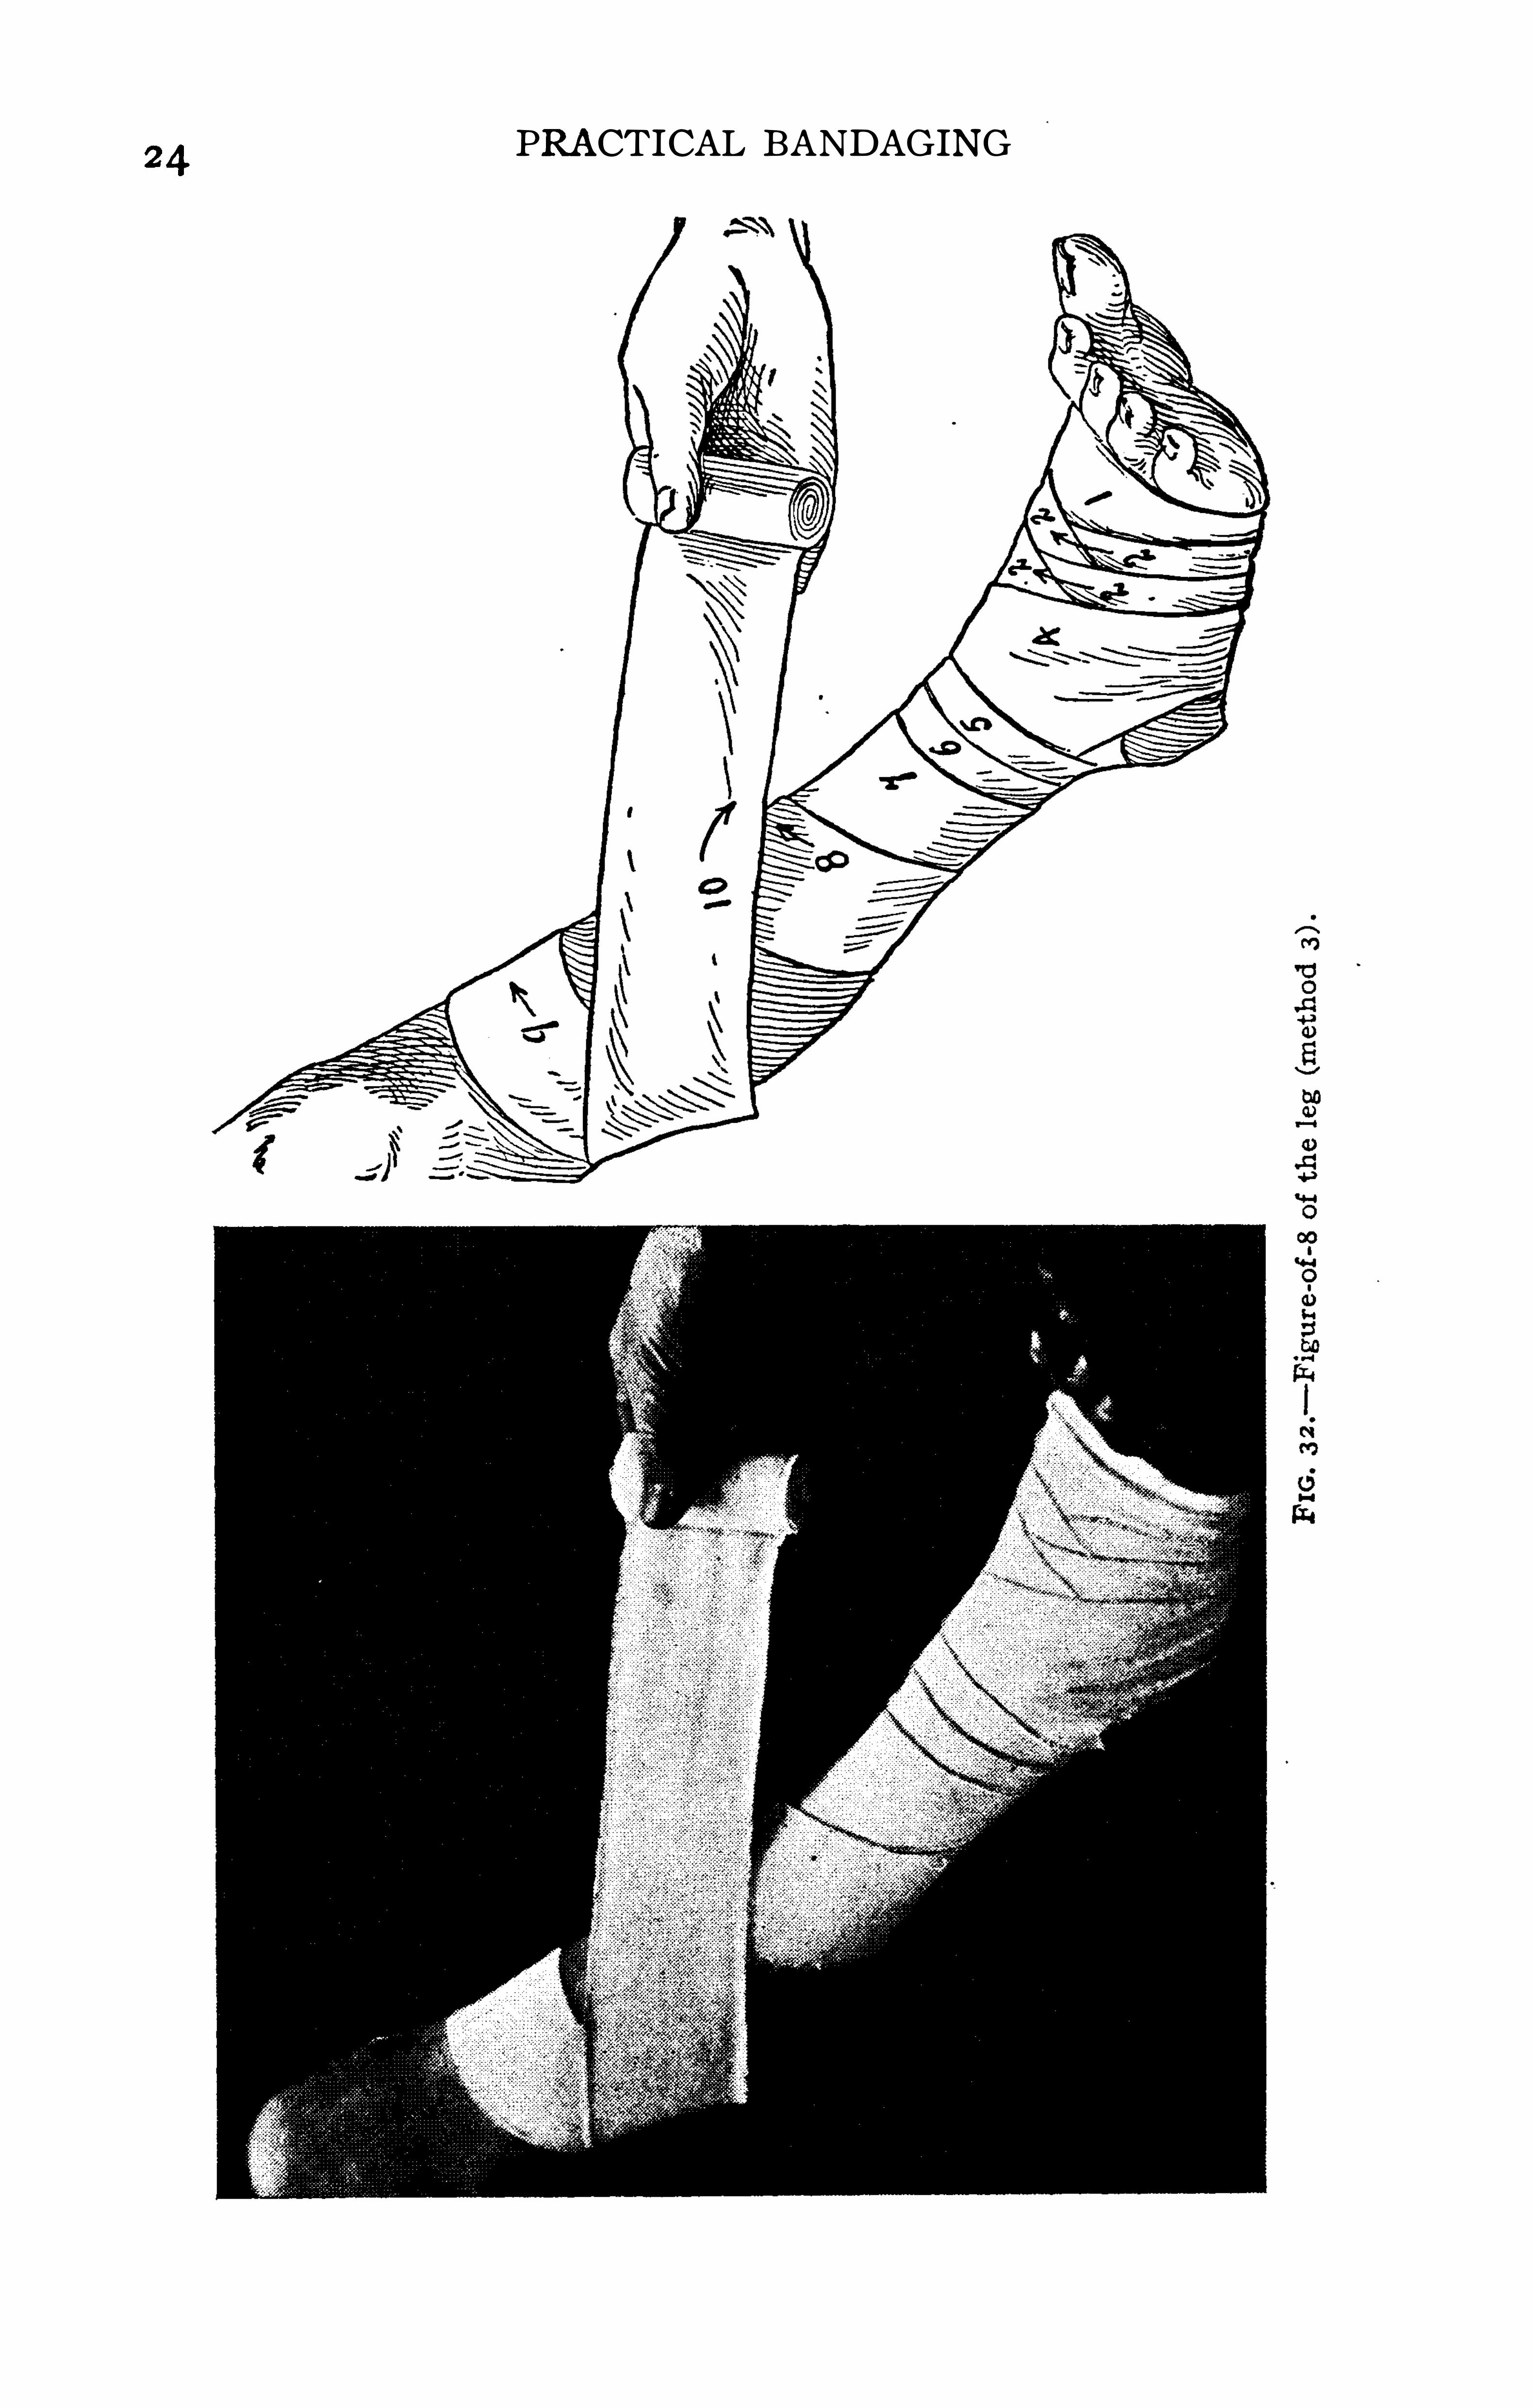
PRACTICAL BANDAGING
ROLLER BANDAGES25
in downward d irect ion to front o f leg, cross the first turn
j ust outs ide the crest o f the t ibia . Success ive s imi lar turns
of the figure—of-S
' var iety are made overlapp ing one-hal f o f
each prev ious turn as the bandage ascends the leg. I t w i l l
be noted that there i s a gap posterior between the two loops
o f the 8 and that the lower edge of the upper loop does not
l i e flat . Both o f these de fects are covered by the ascend ing
turns as they ascend the leg. Complete the bandage by two
c ircular turns above the cal f .
Method 2 ( long loop method ) (Fig. Thi s makes
us e of a large loop below and a small loop above when start
ing the figure-of—S turns
,both approaching the place o f
greatest d iameter where two c i rcular turns end the bandage .
Method 3 (F ig. 32 ) L ikew i se s im i lar to the sp i ral re
verse unt i l the increased d iameter of the cal f demands re
verses . Then a long loop o f the figure 8 carr ies the bandage
above the greatest diameter o f the cal f where a ci rcular turn
passes d irectly around the leg above the cal f and then de
scends,cross ing the long loop j ust outs ide the crest o f the
tibia to pass across the lower leg in a short loop . There
turns are repeated,each large loop cover ing one-hal f the last
turn and each circu lar turn pass ing above the greatest
d iameter o f the cal f .
The figure-of—S o f the leg i s a very popu lar bandage and
reasonably so,for i t reta ins i ts p lace better than any other
leg bandage . The increased amount o f bandage necessary
for its appl icat ion is its only obj ection . Al l three methods
give the same appearance when completed (F ig.
Spica of the Groin (Figs . 34 and 35) (Bandage 8 Yardsx 3 Inches ) .
-The in i tial extremi ty i s fixed by two c i rcular
turns high up around the th igh . I f the r ight gro in i s to be
bandaged,from the outer sur face o f the th igh the bandage i s
carr ied d iagonally acros s the gro in just above the pubi s and
around the crest of the i l iac (hip ) bone of the le ft s ide ,
26 PRACTICAL BANDAGING
FIG . 33.
— Figure-of-8 of the l eg.
thence across the lower back , between the right i l iac (h ip )crest and trochanter . From here the turn passes obliquely
downward and crosses the first ascending turn,about the
middle of the gro in . Apply three or four o f these figure-oi-S
turns,each turn covering about one-hal f the previous turn
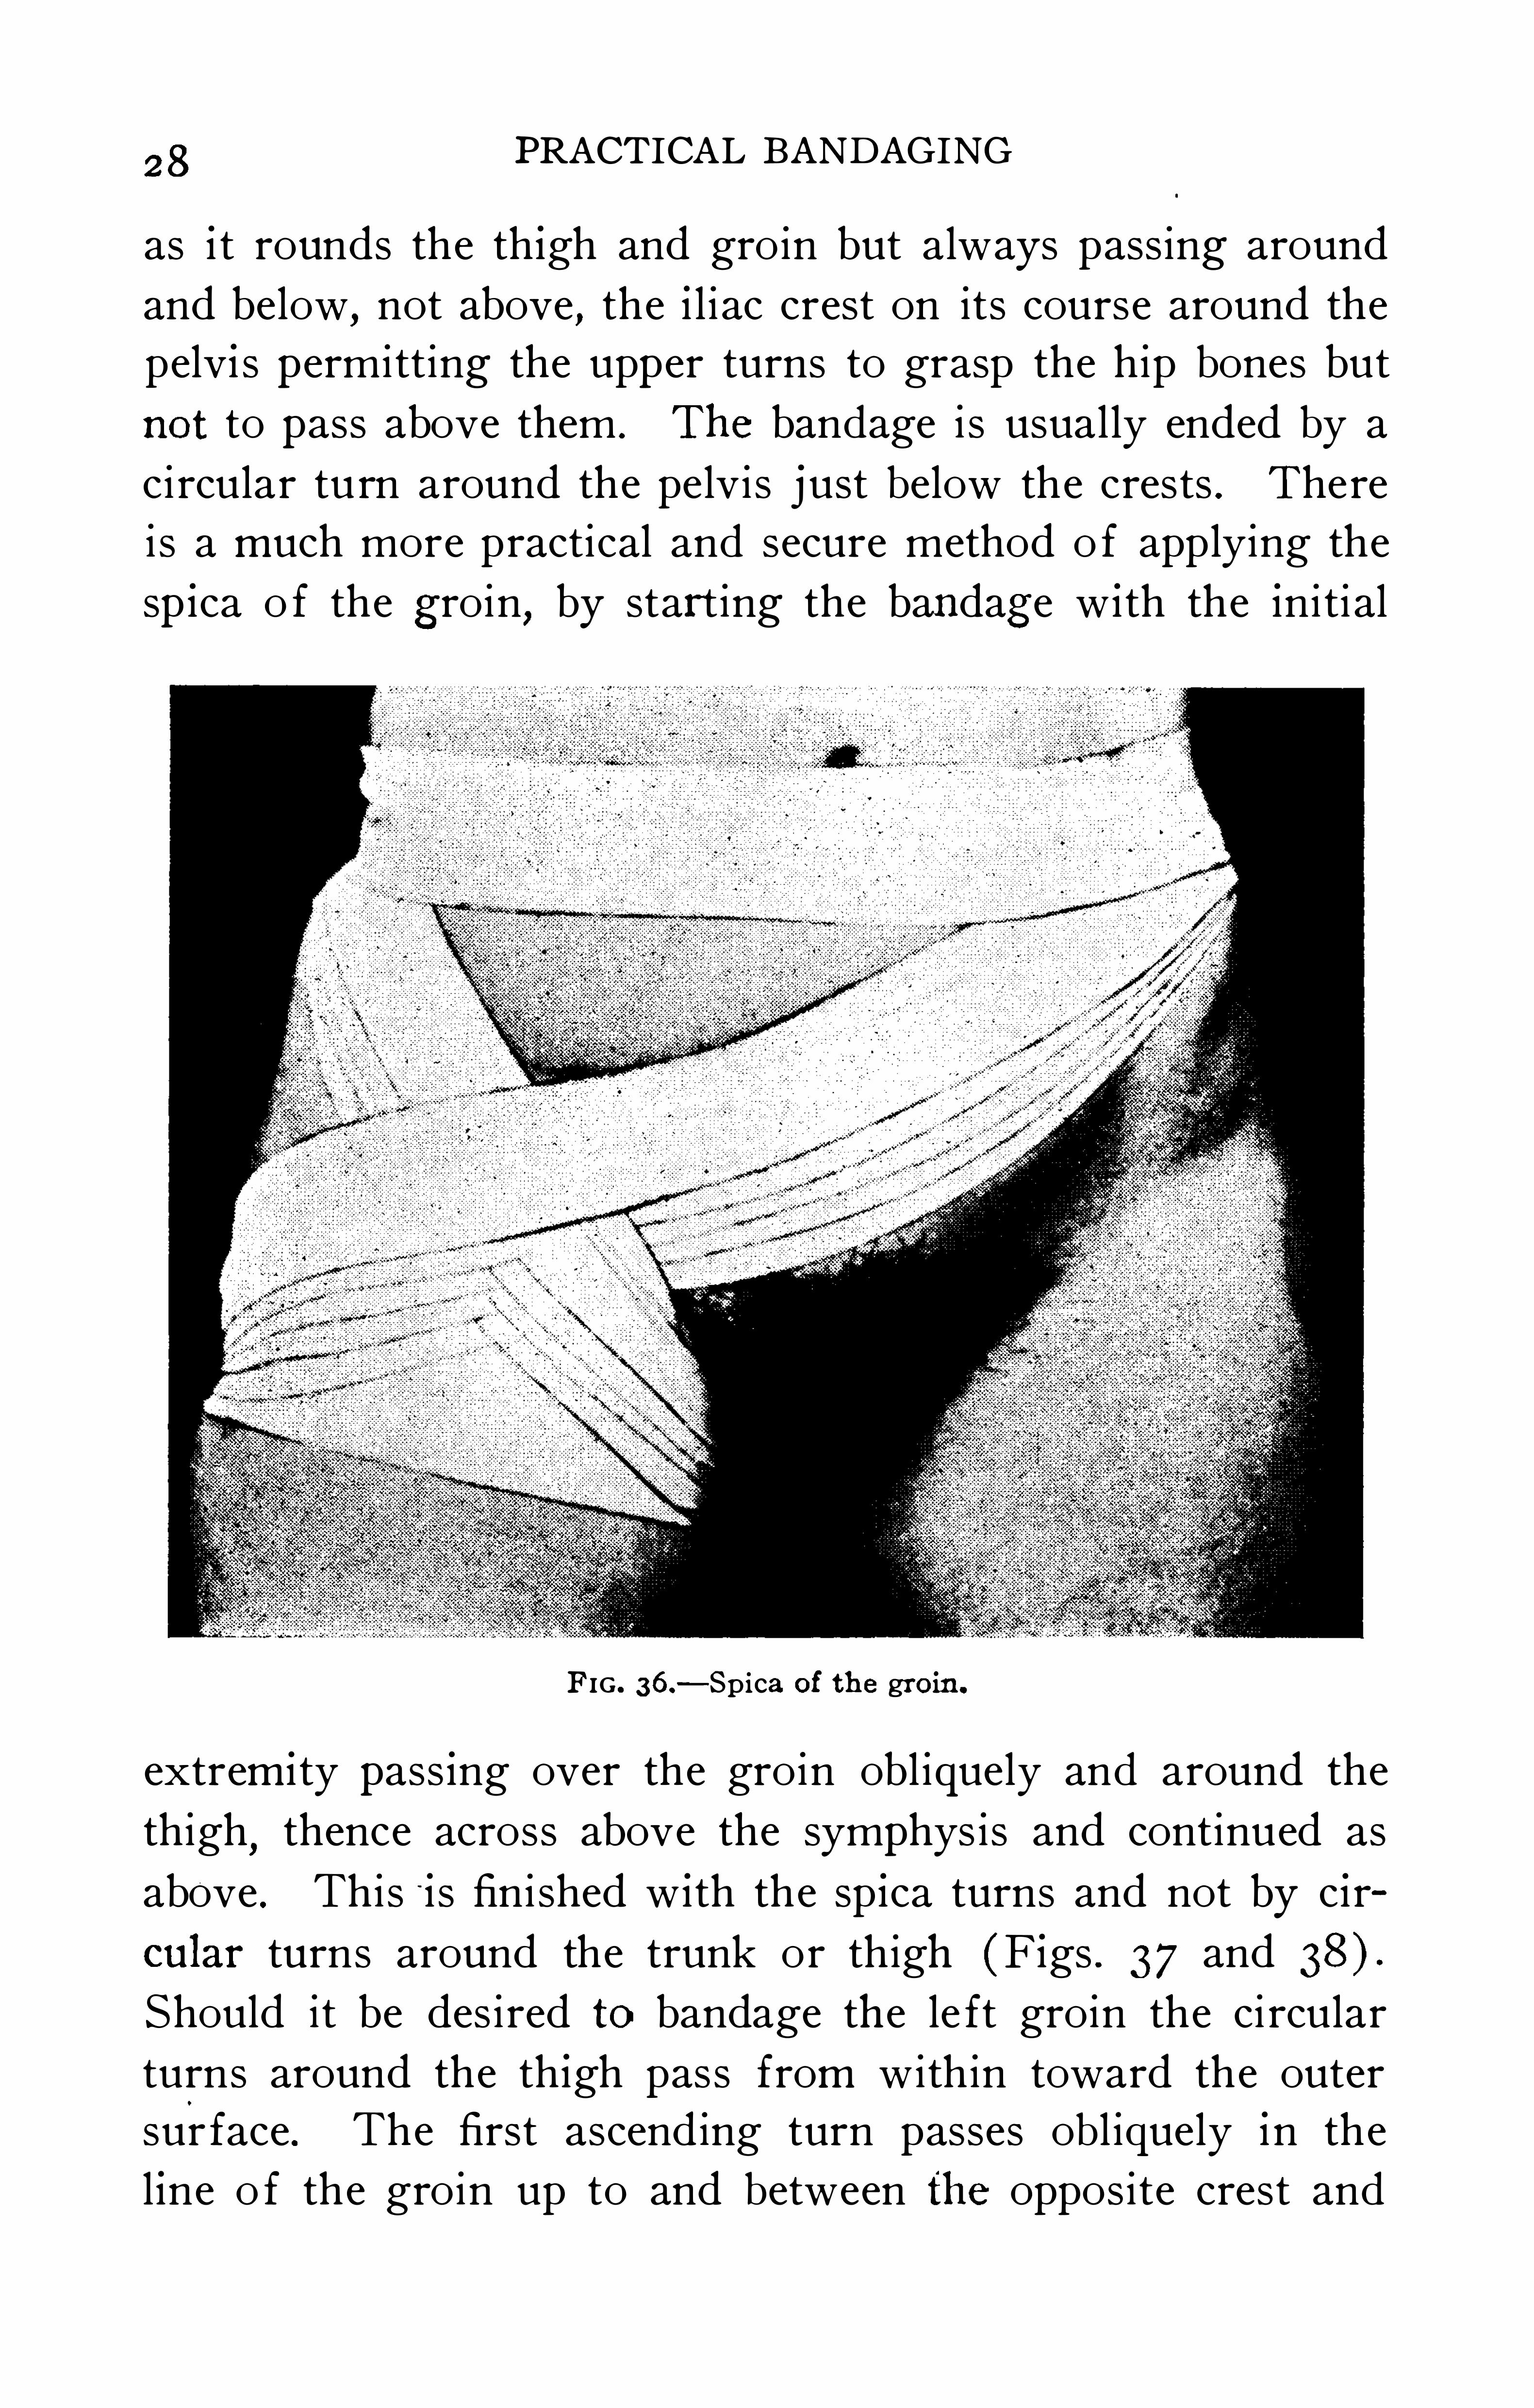
28 PRACTICAL BANDAGING
as i t rounds the th igh and groin but always passing around
and below,not above
,the i l i ac crest on its course around the
pelvi s permitting the upper turns to grasp the hip bones but
not to pass above them . The bandage i s usually ended by a
ci rcular turn around the pelvi s j ust below the crests . There
i s a much more practical and secure method o f applying the
spica o f the groin, by starting the bandage w i th the initi al
FIG . 36.— Sp ica of the groin .
extremi ty pass ing over the groin obl iquely and around the
thigh,thence across above the symphys is and continued as
above . This ‘ is fini shed w ith the sp ica turns and not by c ir
cular turns around the trunk or thigh (Figs . 37 and
Should it be des ired to bandage the le ft groin the ci rcular
turns around the th igh pass from within toward the outer
sur face . The first ascending turn passes obl iquely in the
l ine o f the groin up to and between the opposite crest and
ROLLER BANDAGES 29
the trochanter . The remain ing turns are exactly s imi lar to
the ones appli ed for the right gro in .
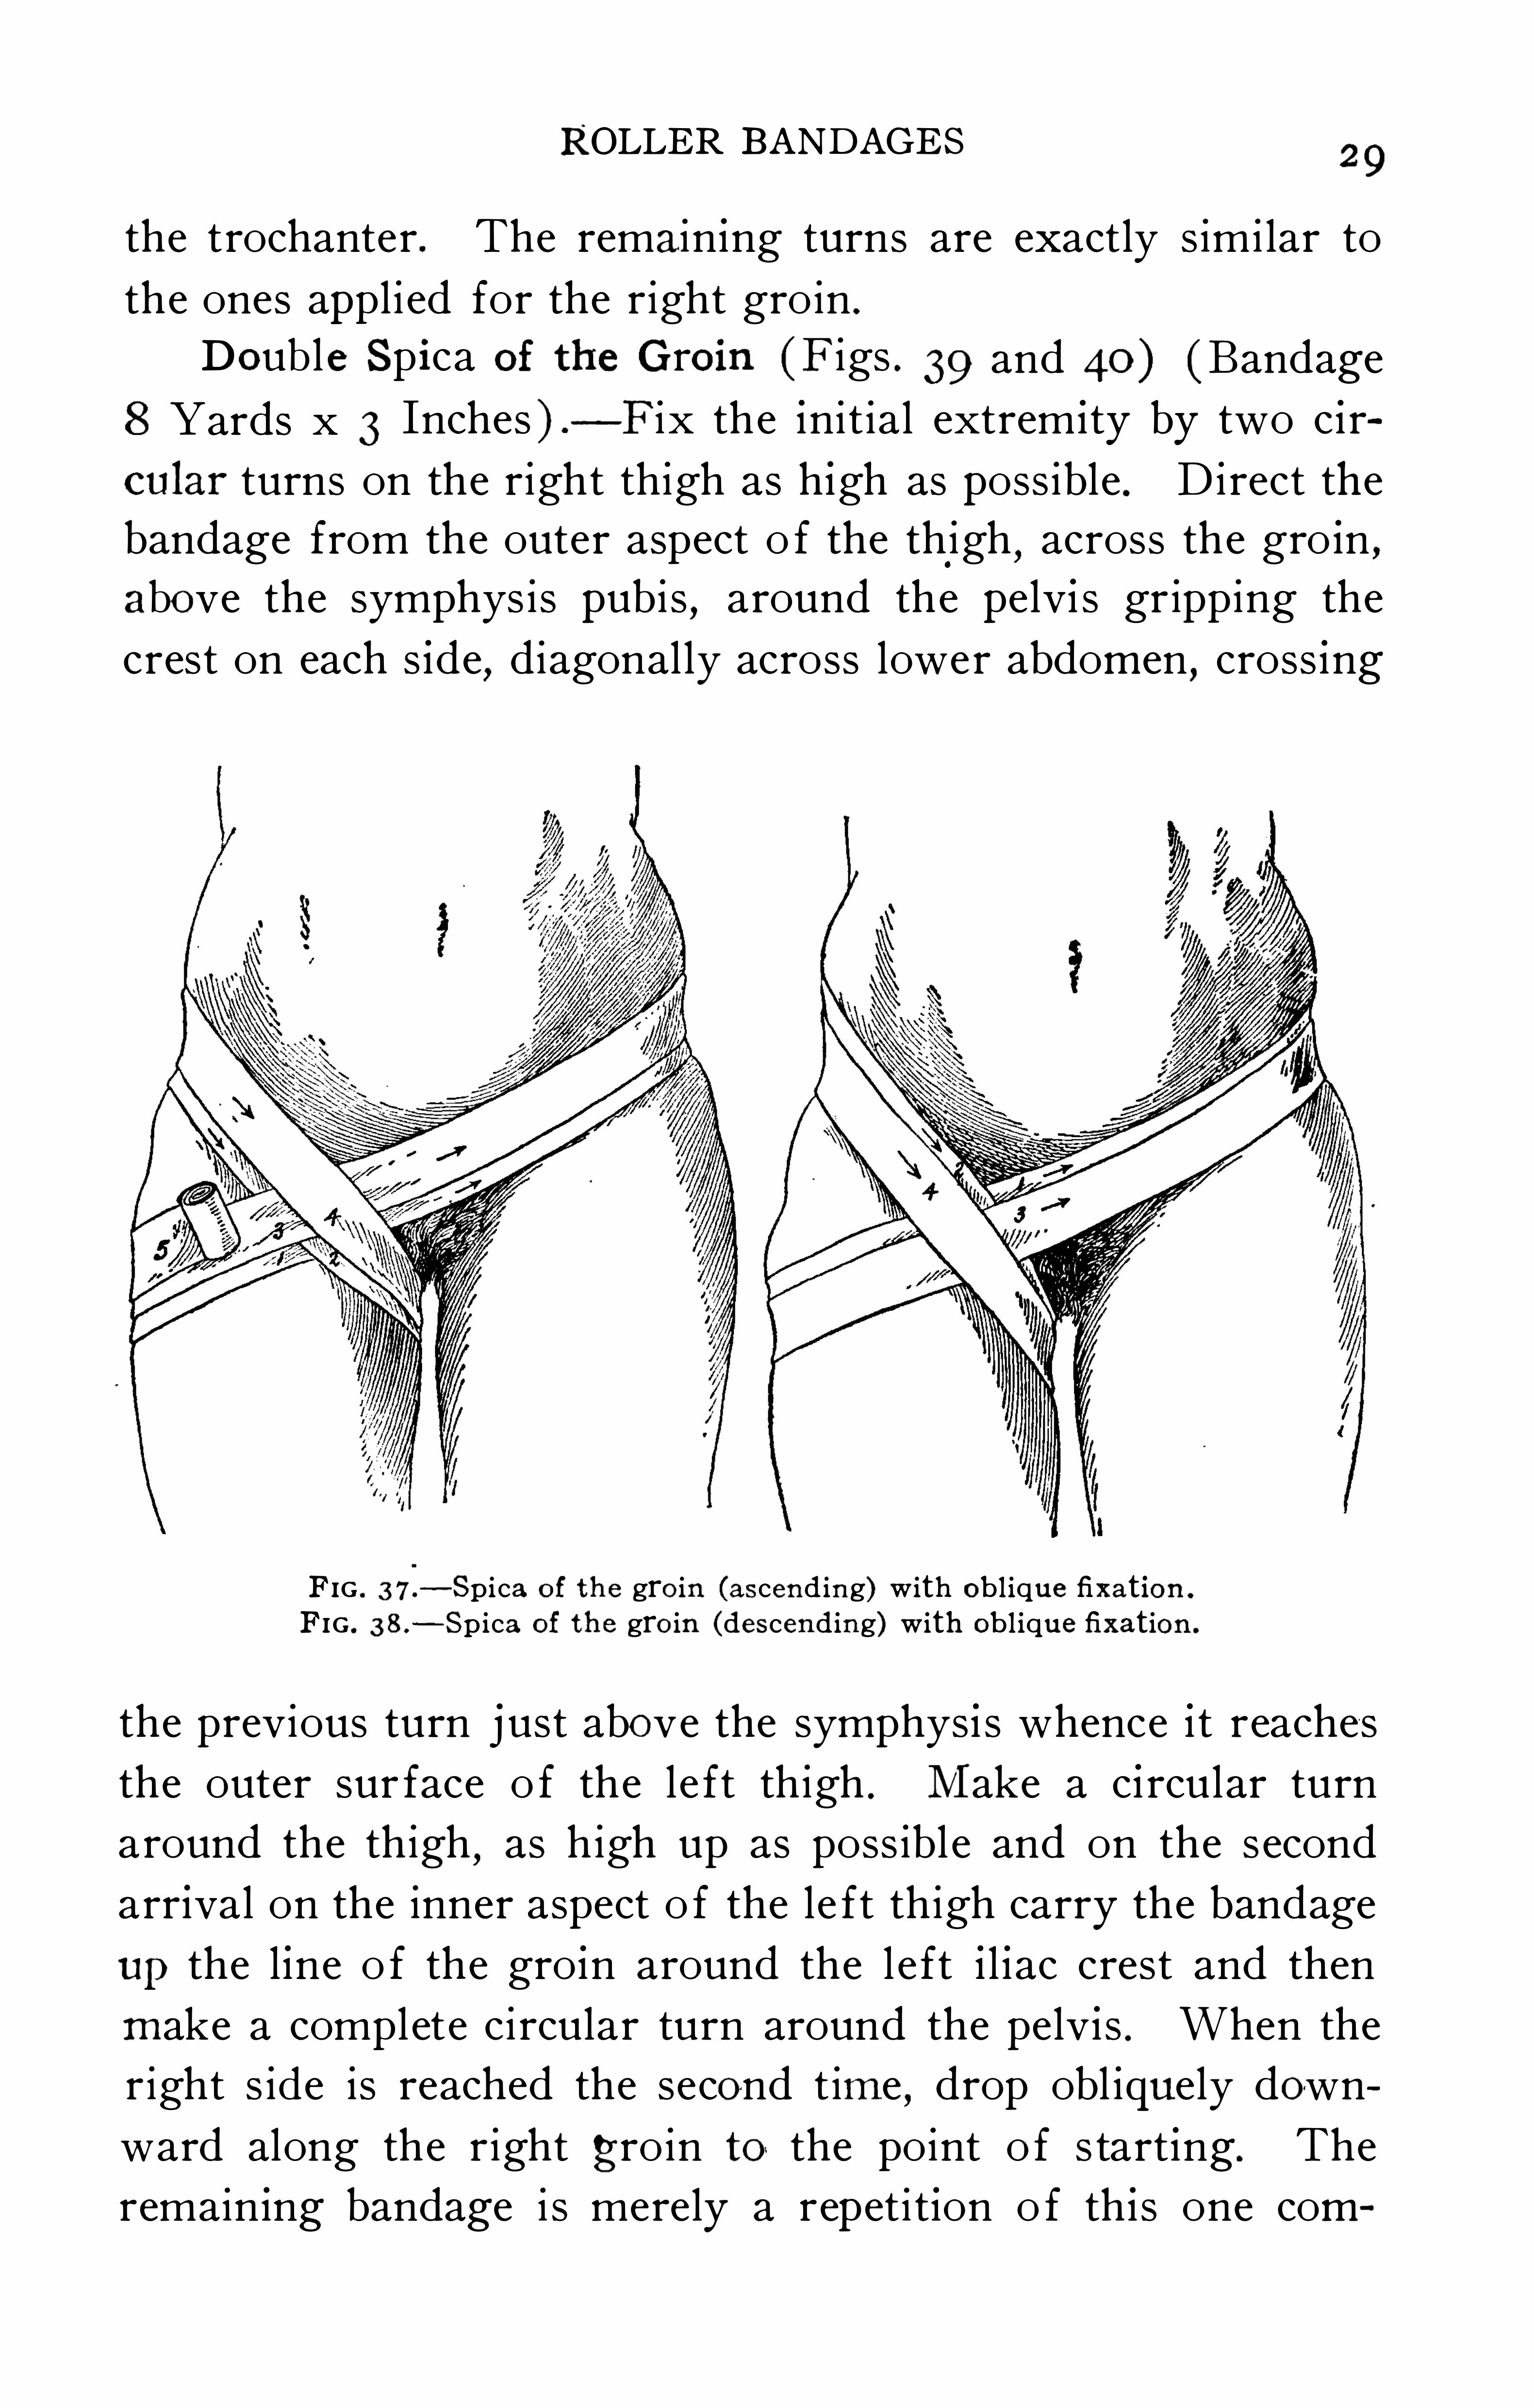
Doub le Spica of the Groin (F igs . 39 and 40 ) (Bandage
8 Yards x 3 Inches ) .
— F ix the init ial extrem ity by two c ir
cular turns on the right thigh as h igh as poss ible . D i rect the
bandage from the outer aspect o f the thigh,across the gro in ,
above the symphys is pubis , around the pelvi s gr ipping the
crest on each s ide,diagonal ly across lower abdomen
,cross ing
FIG . 37: —Sp ica of the groin (ascending) w ith ob l ique fixation .
FIG . 38 .
— Sp ica of the groin (descending) with ob l ique fixation .
the previous turn j ust above the symphys i s whence i t reaches
the outer sur face o f the le ft thigh . Make a ci rcular turn
around the thigh,as high up as poss ibl e and on the second
arr ival on the inner aspect o f the le ft thigh carry the bandage
upthe l ine o f the gro in around the l eft i l iac crest and thenmake a complete ci rcular turn around the pelv is . When the
r ight s ide is reached the second time,drop obl iquely down
ward along the right gro in to the point o f s tart ing. The
remain ing bandage i s merely a repeti tion o f th is one com
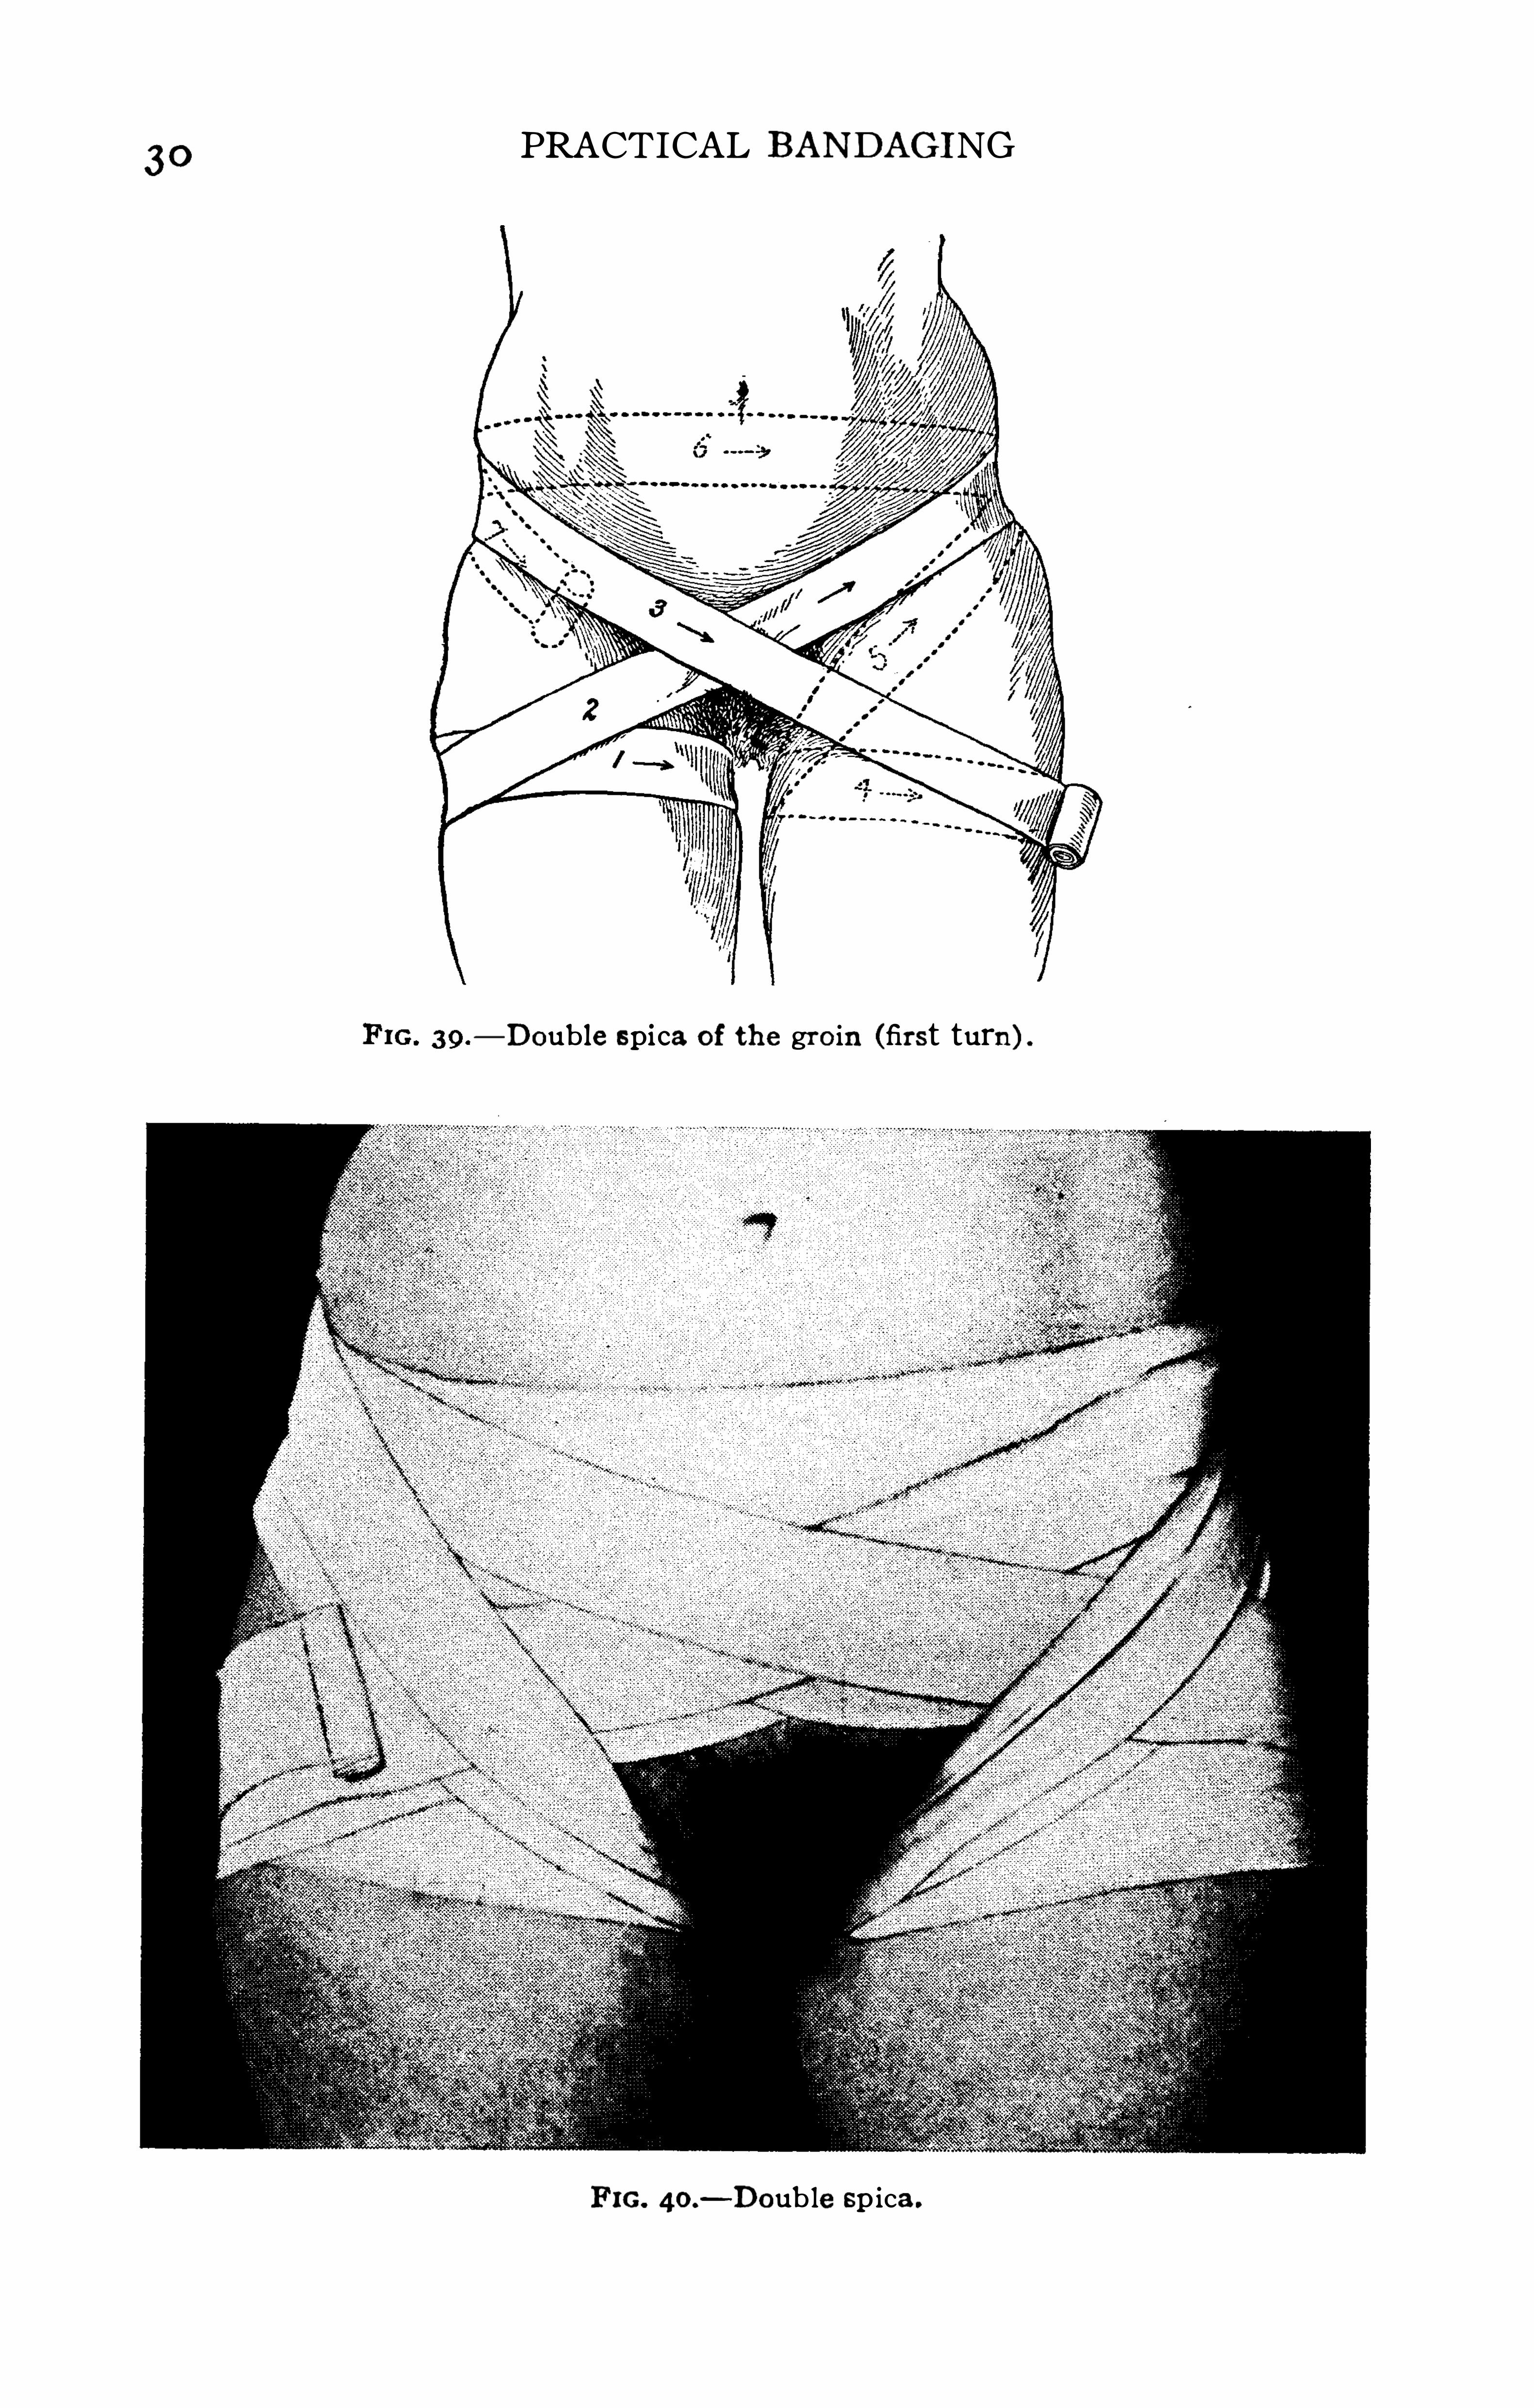
30PRACTICAL BANDAGING
— Double spica of the groin (first turn) .
F IG. 40.— Doub le spica.
ROLLER BANDAGES3I
plete turn, cover ing about one-hal f each prev ious turn . When
the bandage i s completed there wi l l be noted three sp icas "one in each gro in and one over the symphys i s . This bandage,as wel l
,can be appl ied
'
w i th the same modifications as are
made in the s ingle spica o f the gro in,namely, omiss ion of the
horizontal turns around the pelvis and th igh . Here too,th is
spica bandage may be either ascend ing or descend ing.
Crossed Bandage of the Perineum (F igs . 4 1 , 42 and 43)
(Bandage 8 Yards x 3 Inches ) .
—S tart the bandage cross ing
the lower abdomen and le ft gro in diagonally,passing behind
1
F IG. 41 .— Crossed bandage of perineum F IG . 42 .
— Crossed bandage of(first turn) . perineum .
and wel l up on the le ft th igh,cross ing the perineum to right
groin From here carry the roller along the l ine o f the
right groin around the i l iac ( hip bone ) cres ts , d iagonallyacross the abdomen ( 2 ) and around the poster ior aspect ofthe thigh h igh up . From here the bandage crosses the first
turn in thepe rineum proceed ing up the l ine of the le ft groin(3) around the le ft hip, grasp ing the crest o f the h ip bone ,across the back around the r ight h ip crest d iagonally across
the abdomen to pass around the outer and posterior as
pect of the th igh high ufi,thus. completing one enti re turn
.I t
should be not iced that the in it ial extremity,E
,is covered by
32PRACTICAL BANDAGING
turn 4 as it cros ses the abdomen in the same d i rect ion .Cross
ing the per ineum. d i rect the bandage,overlapping two-th i rds
the width of the prev ious turns,along the right gro in
around right crest,around the back and le ft crest
,diagonally
across. the abdomen around the outs ide of the right
thigh, posteriorly, to cros s the per ineum. Now pass up the
F IG. 43.— Crossed bandage of the perineum.
l ine of the left groin around the left hip across the
back around the r ight hip down across the abdomen
around the outs ide of the le ft thigh poster iorly and across the
per ineum. Pas s ing up the right gro in continue around
back to le ft s ide etc.,unti l a sufficient number of turns
are app l ied . The bandage should show four ser ies of spicas
as seen in the i l lustrat ions .
ROLLER BANDAGES33
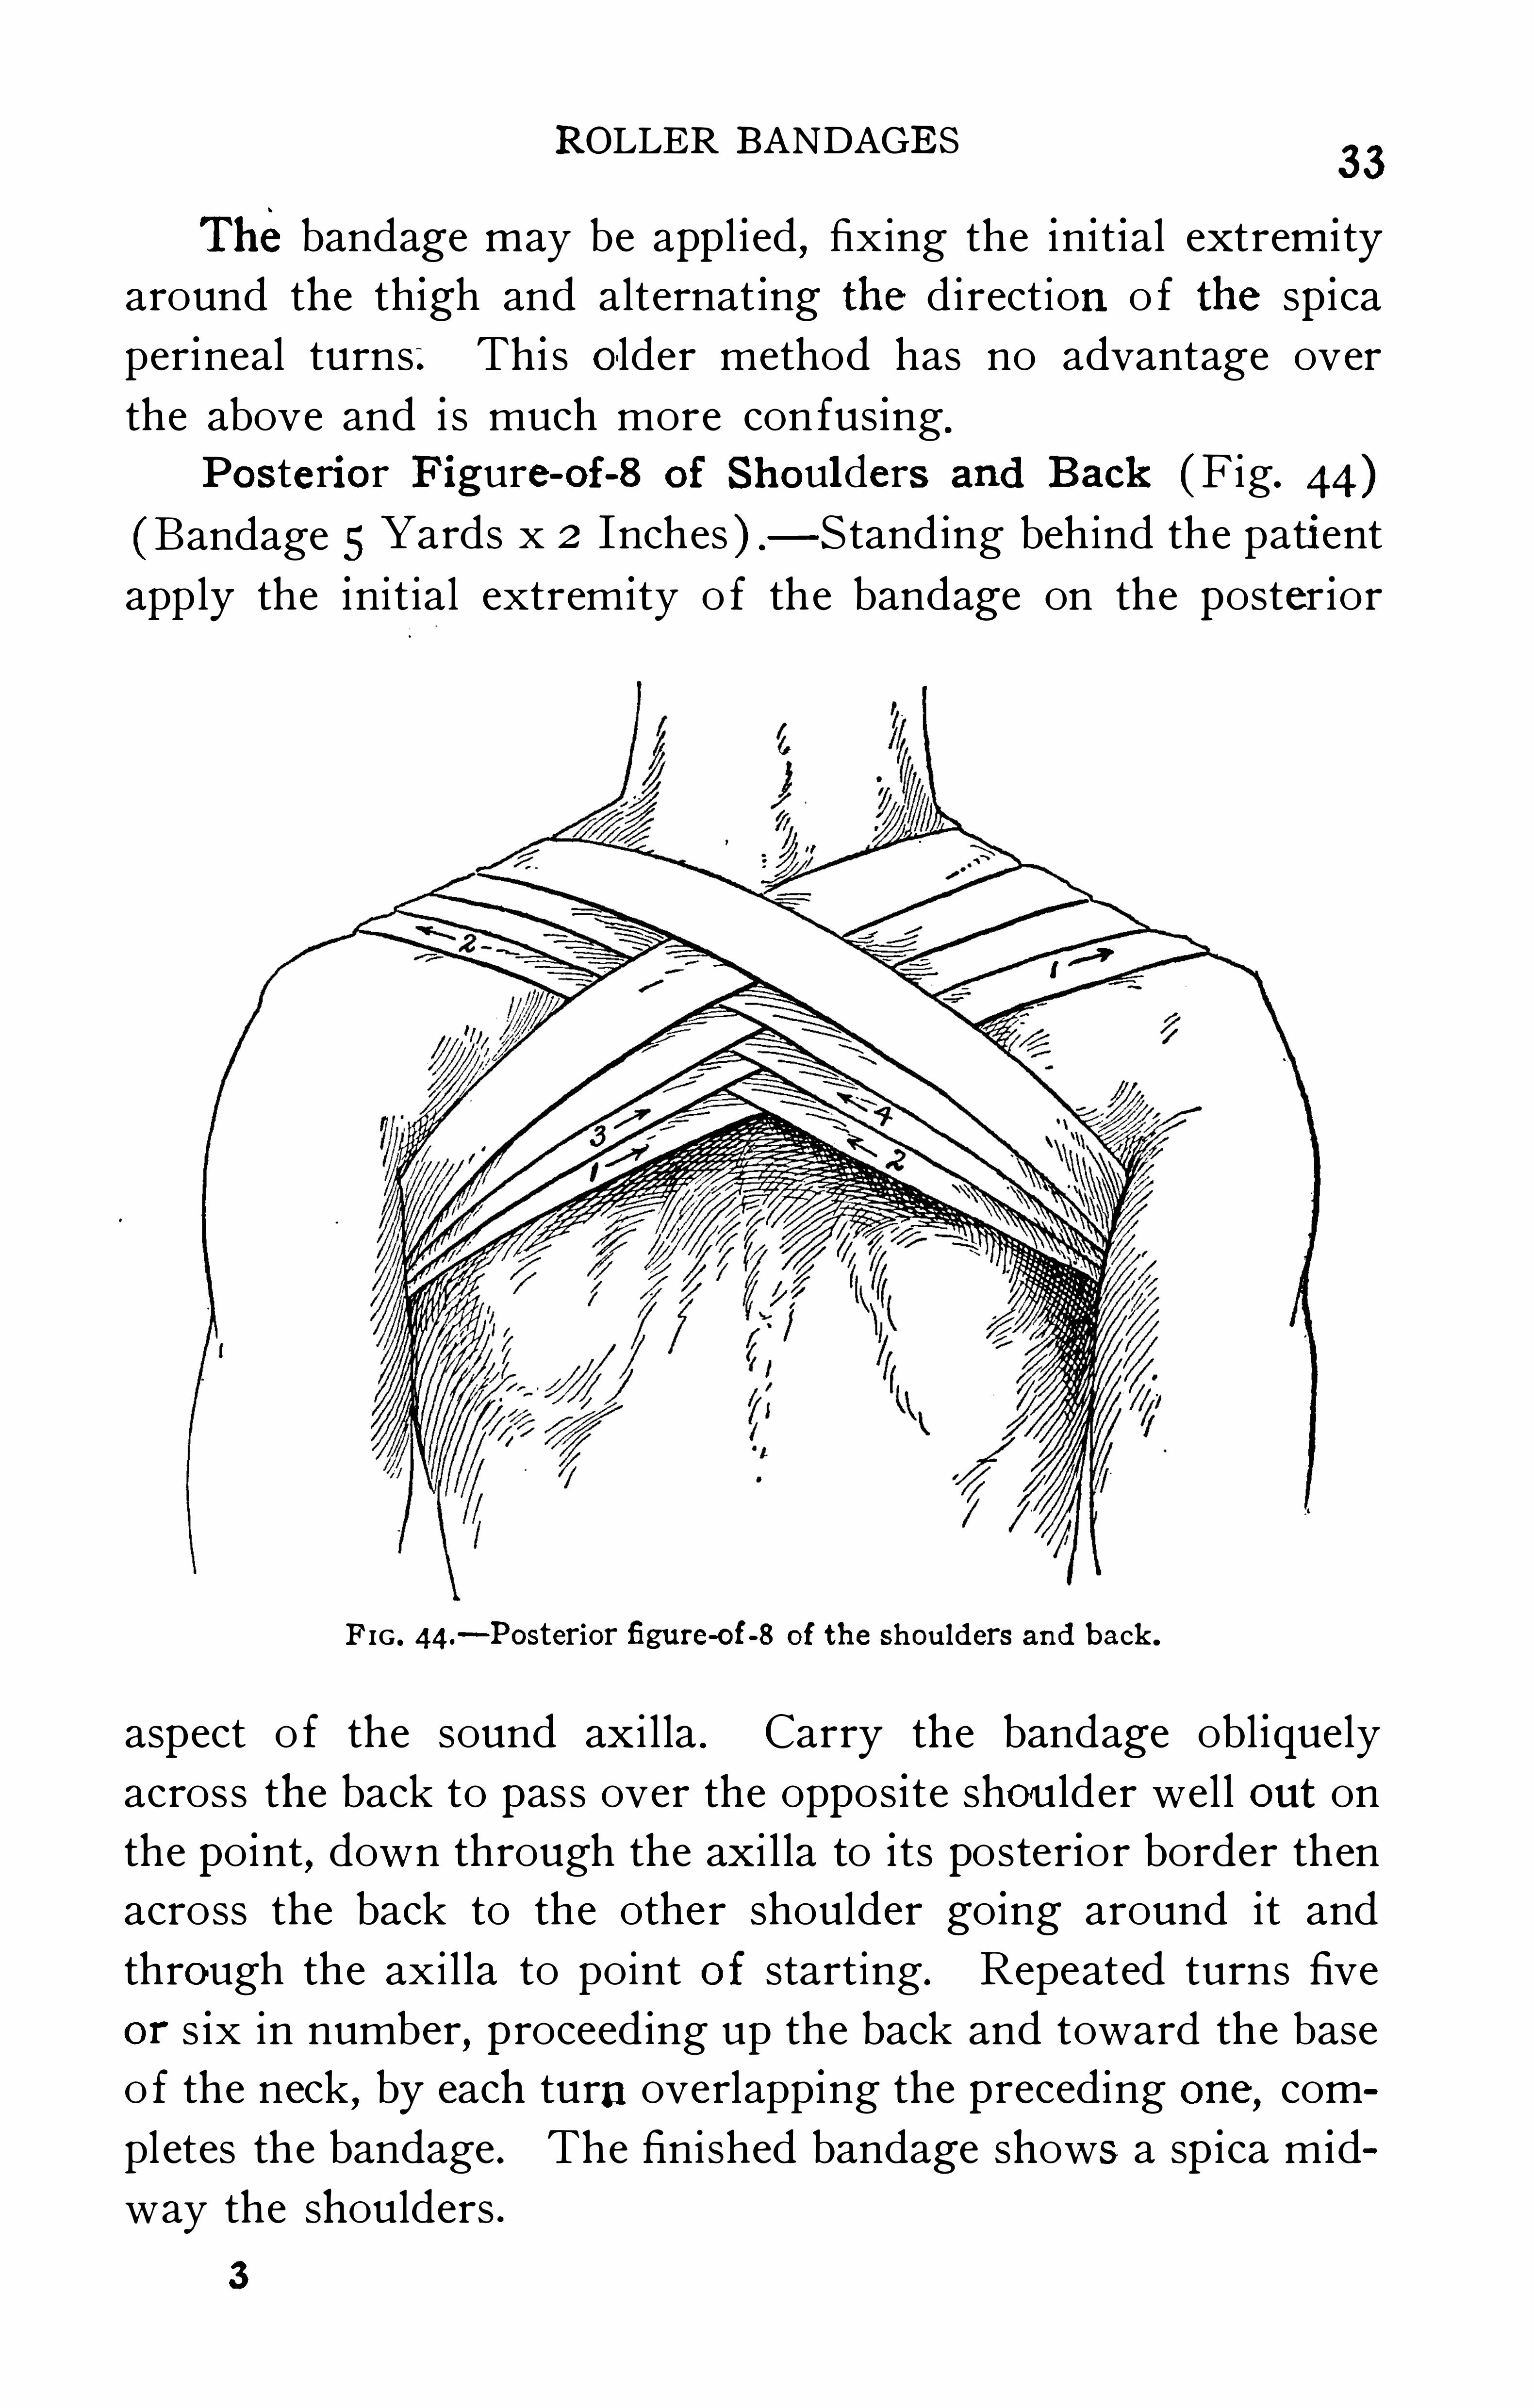
Thebandage may be app l ied , fixing the in i t ial extremi ty
around the thigh and alternat ing the direction o f the spica
per ineal turns : Th i s older method has no advantage over
the above and i s much more con fus ing.
Posterior Figure-oi—S of Shoul ders and Back (F ig. 44)
(Bandage 5 Yards x 2 Inches ) — S tanding behind the patient
apply the init ial extrem ity o f the bandage on the poster ior
FIG . 44.—Posterior figure-of-B of the shoulders and back .
aspect o f the sound ax i l la . Carry the bandage obl iquely
across the back to pass over the oppos i te shou lder wel l out on
the po int, down through the ax i l la to i ts poster ior border then
across the back to the other shoulder go ing around it and
through the axi l la to point of starting . Repeated turns five
or s ix in number,proceeding up the back and toward the base
o f the neck,by each turn overlapp ing the preceding one, com
pletes the bandage . The finished bandage shows a spica m id
way the shou lders .
3
34PRACTICAL BANDAGING
AnteriorFigure-oi-B of Shoul ders and Chest — This band
age is s imi lar to the above, d iffer ing only i n that it is app l ied
anteriorly over the chest rather than poster iorly over the
back .
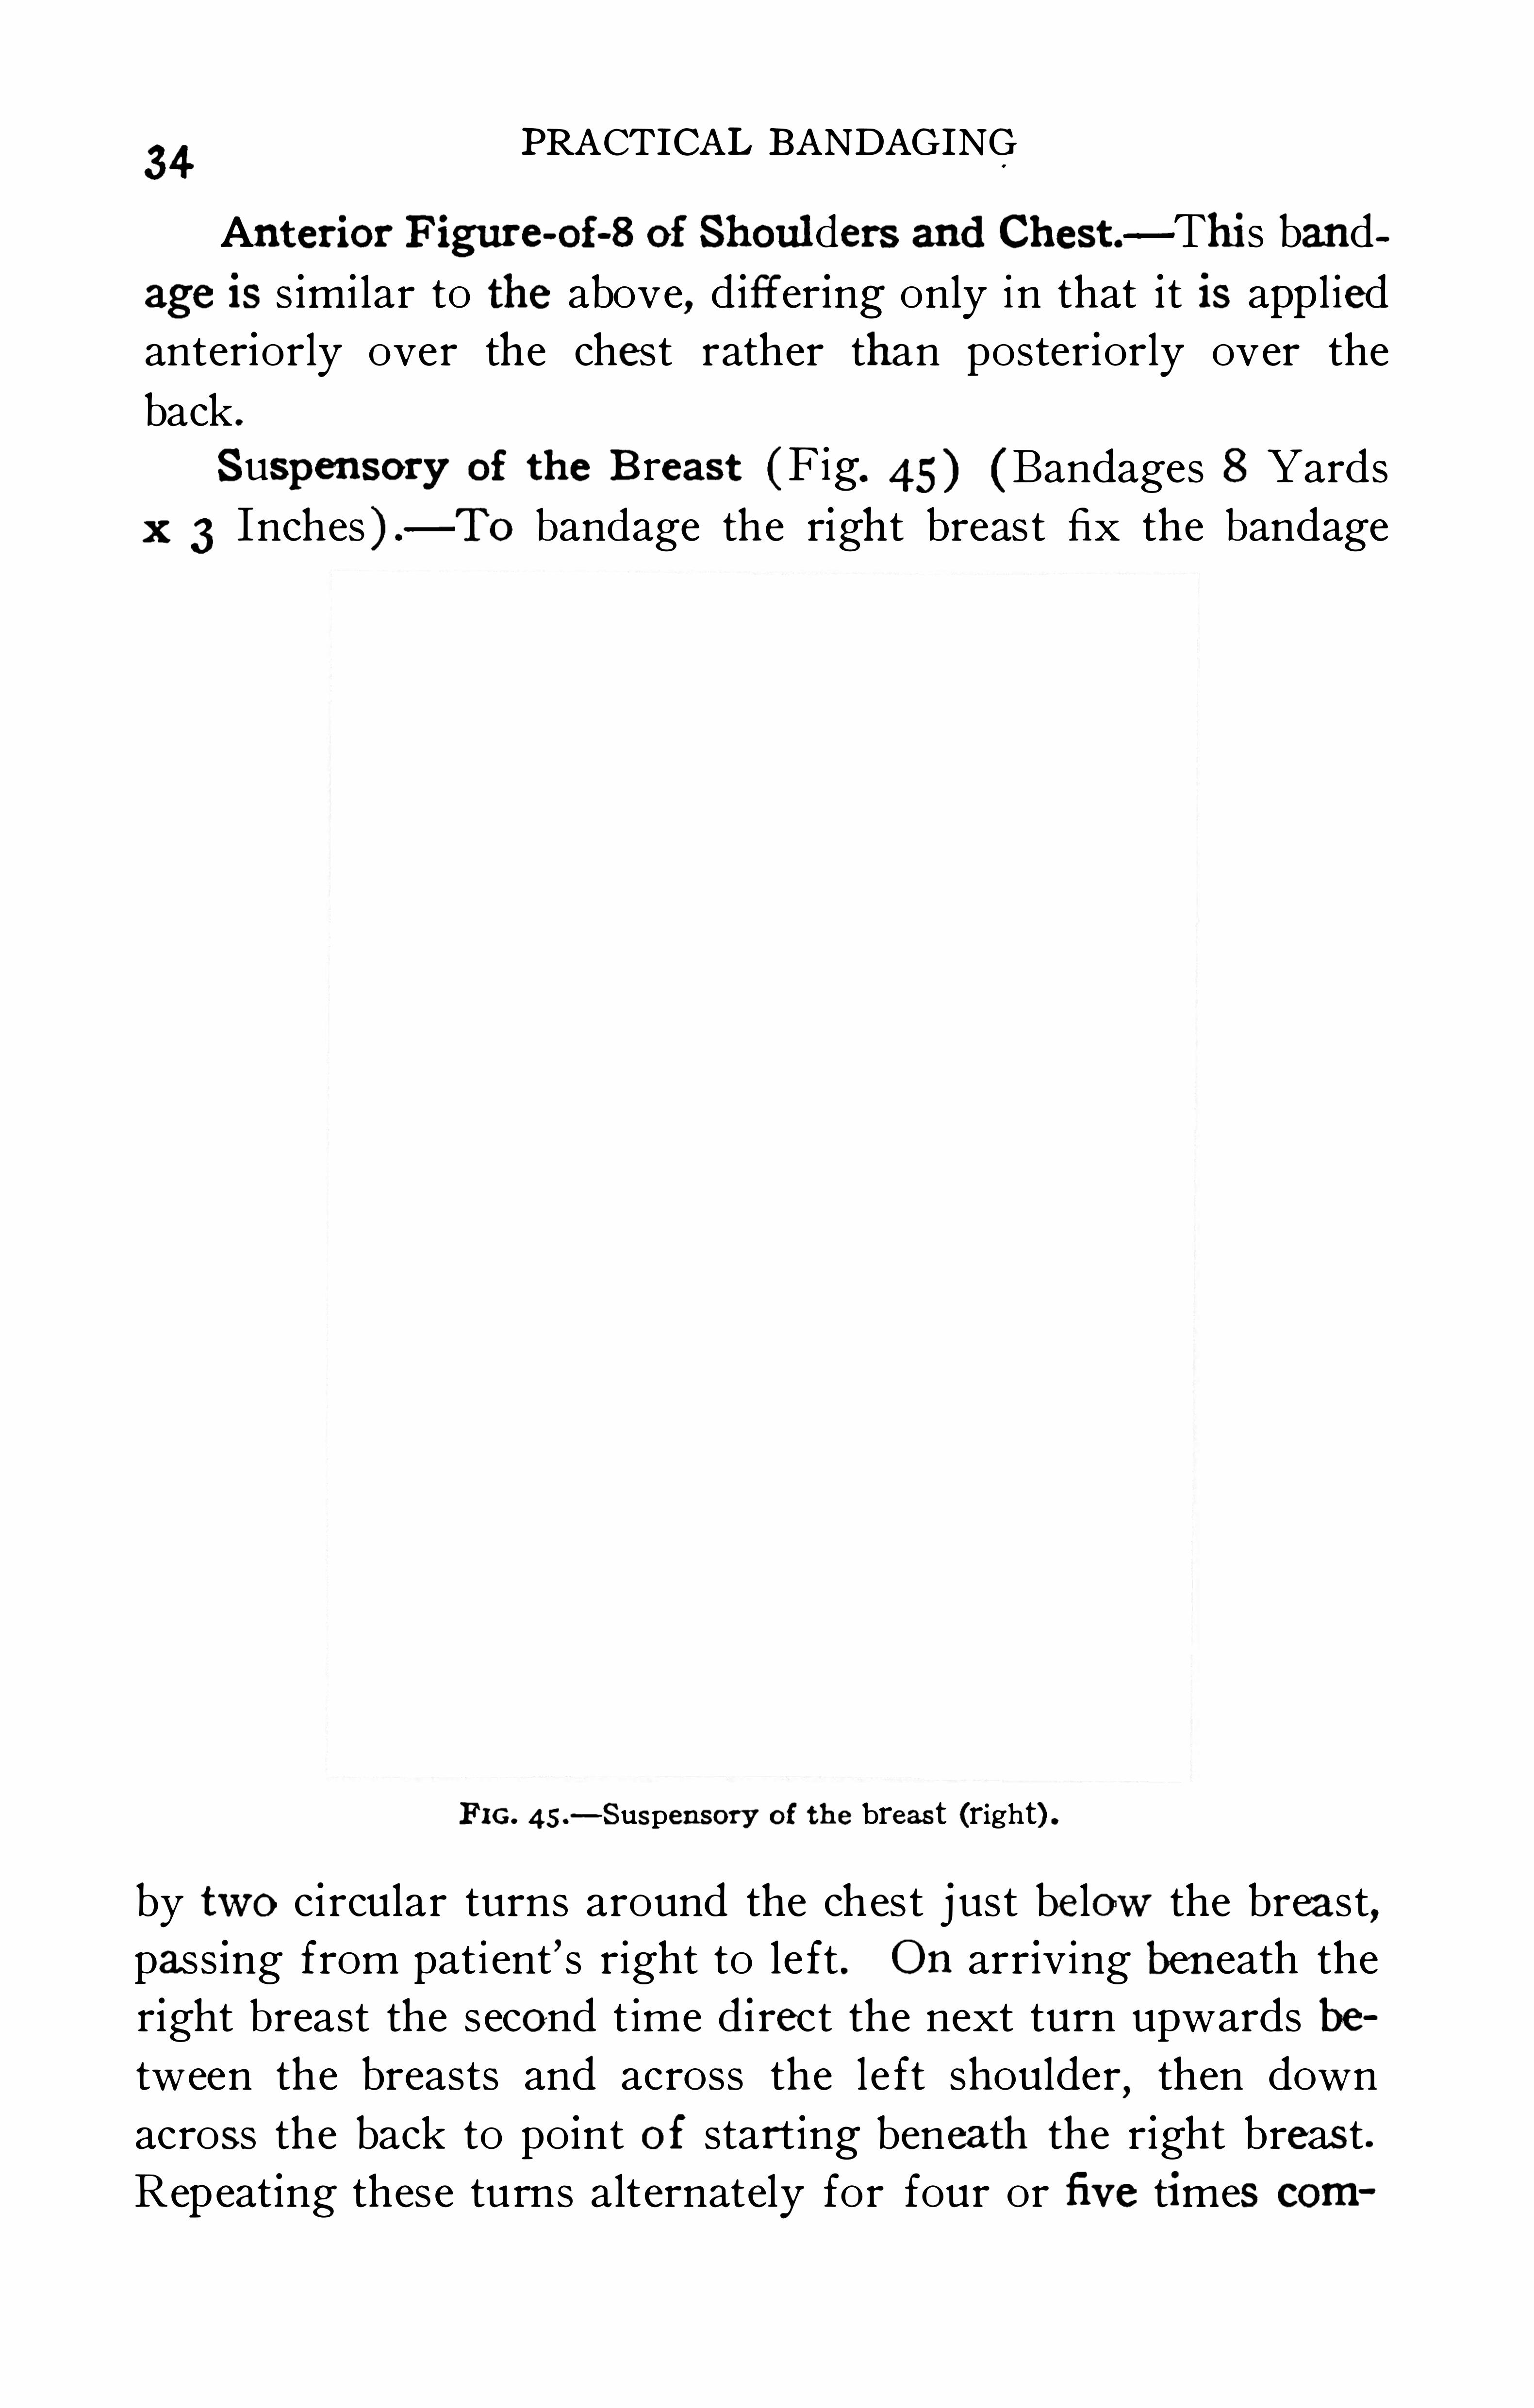
Suspensory of the B reast (F ig. 45) (Bandages 8 Yards
x 3 Inches ) .
— To bandage the right breast fix the bandage
F IG. 45 .— Suspensory of the breas t (right) .
by two c ircular turns around the chest j ust be low the breast,pass ing from pati ent’s right to left . On arr iving beneath the
right breast the second t ime d irect the next turn upwards be
tween the breasts and across the le ft shoulder,then down
across the back to po int of start ing benea th the r ight breas t .
Repeat ing these turns alternately for four or five times com
36PRACTICAL BANDAGING
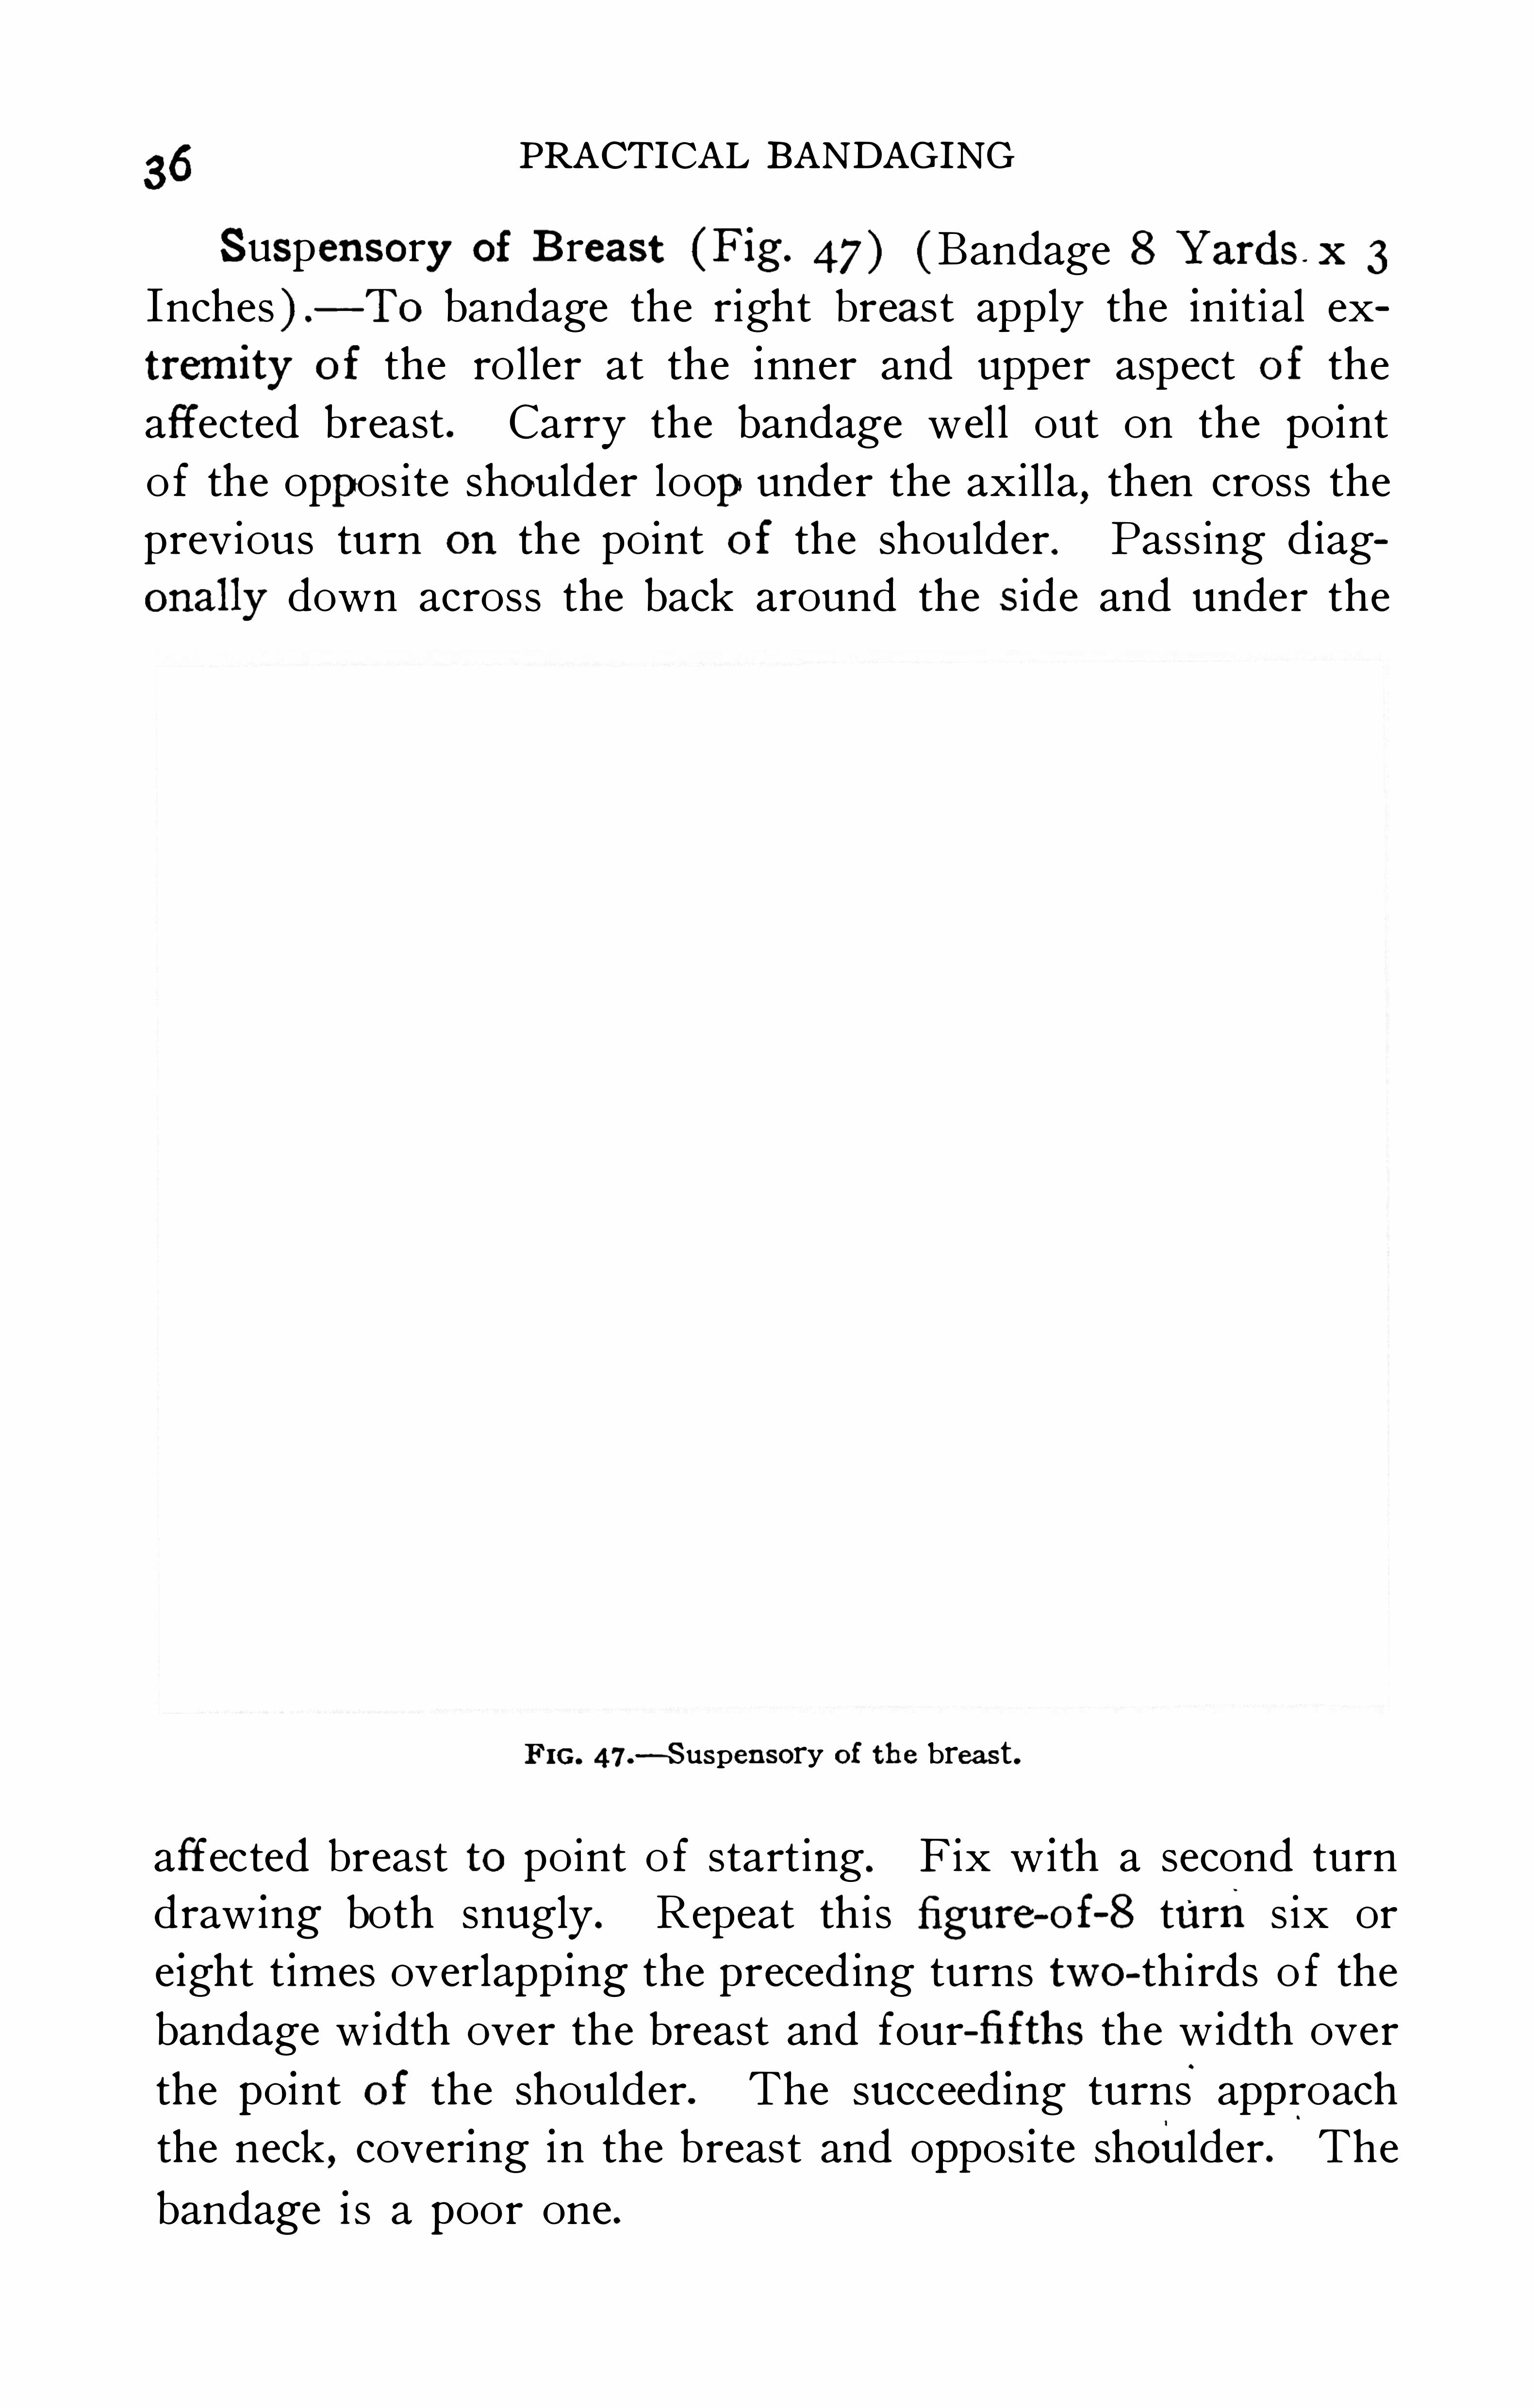
Suspensory of B reast (Fig. 47) (Bandage 8 Yards x 3
Inches ) .
— To bandage the right breast apply the initial ex
tremity of the roller at the inner and upper aspect of the
affected breast . Carry the bandage wel l out on the po int
of the oppos ite shoulder loopunder the axilla, then cross theprevious turn on the point of the shoulder . Pass ing diag
onal ly down across the back around the s ide and under the
F IG. 47.—Suspensory of the breast .
affected breast to point o f starting . F ix w ith a second turndraw ing both snugly . Repeat thi s figure
-of-S turn s ix or
e ight t imes overlapp ing the preceding turns two-thirds o f the
bandage w idth over the breast and four-fi fths the w idth over
the point of the shoulder. The succeed ing turns.
approach
the neck,covering in the breast and oppos i te shoulder. The
bandage i s a poor one .
ROLLER BANDAGES37
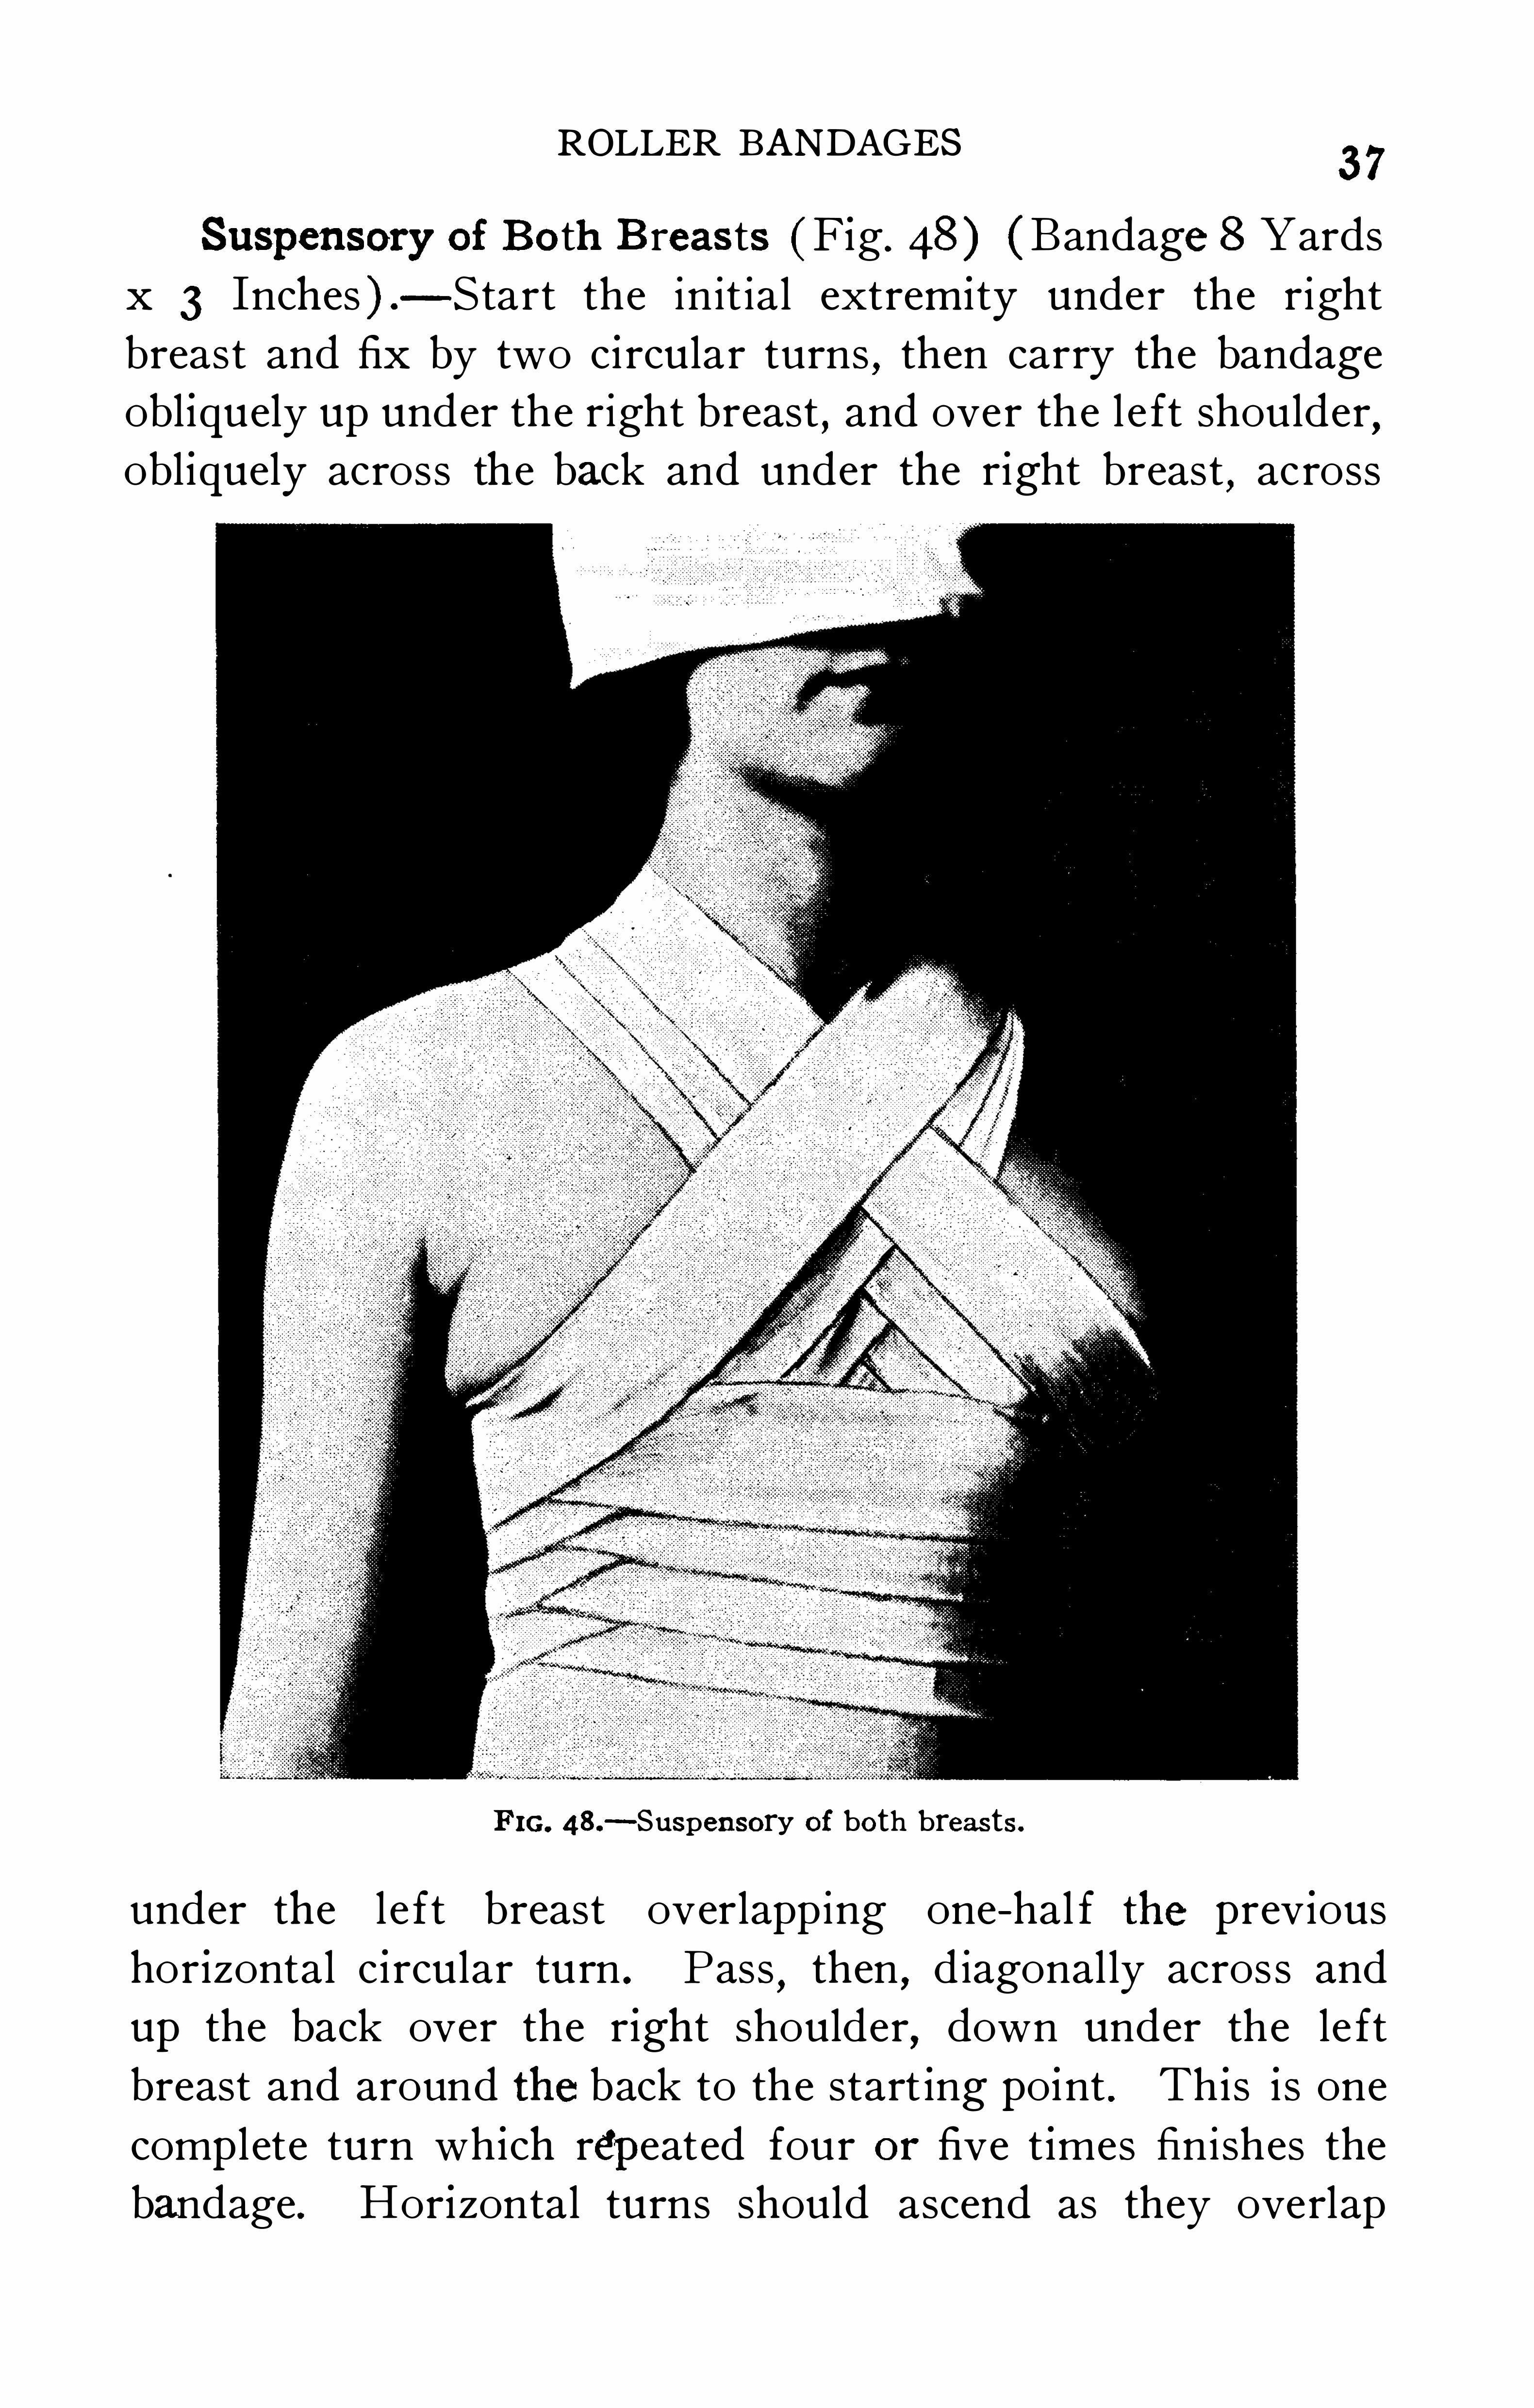
Suspensory of Both B reas ts (Fig . 48 ) ( Bandage 8 Yards
x 3 Inches ) .
-S tart the init ial extremity under the right
breast and fix by two c ircu lar turns , then carry the bandage
obl iquely up under the right breast,and over the l e ft shoulder
,
obl iquely across the back and under the r ight breast,across
F IG. 48 .— Suspensory of both breas ts .
under the le ft breast overlapping one-hal f the prev ious
hor izontal c ircu lar turn . Pass,then
,diagonal ly acros s and
up the back over the r ight shoulder,down under the le ft
breast and around the back to the start ing po int . Th is is one
comp l ete turn wh ich repeated four or five t imes finishes the
bandage . Hor i zontal turns should ascend as they overlap
38PRACTICAL BANDAGING
and oblique turns should advance outward and upward on the
breasts as they overlap .
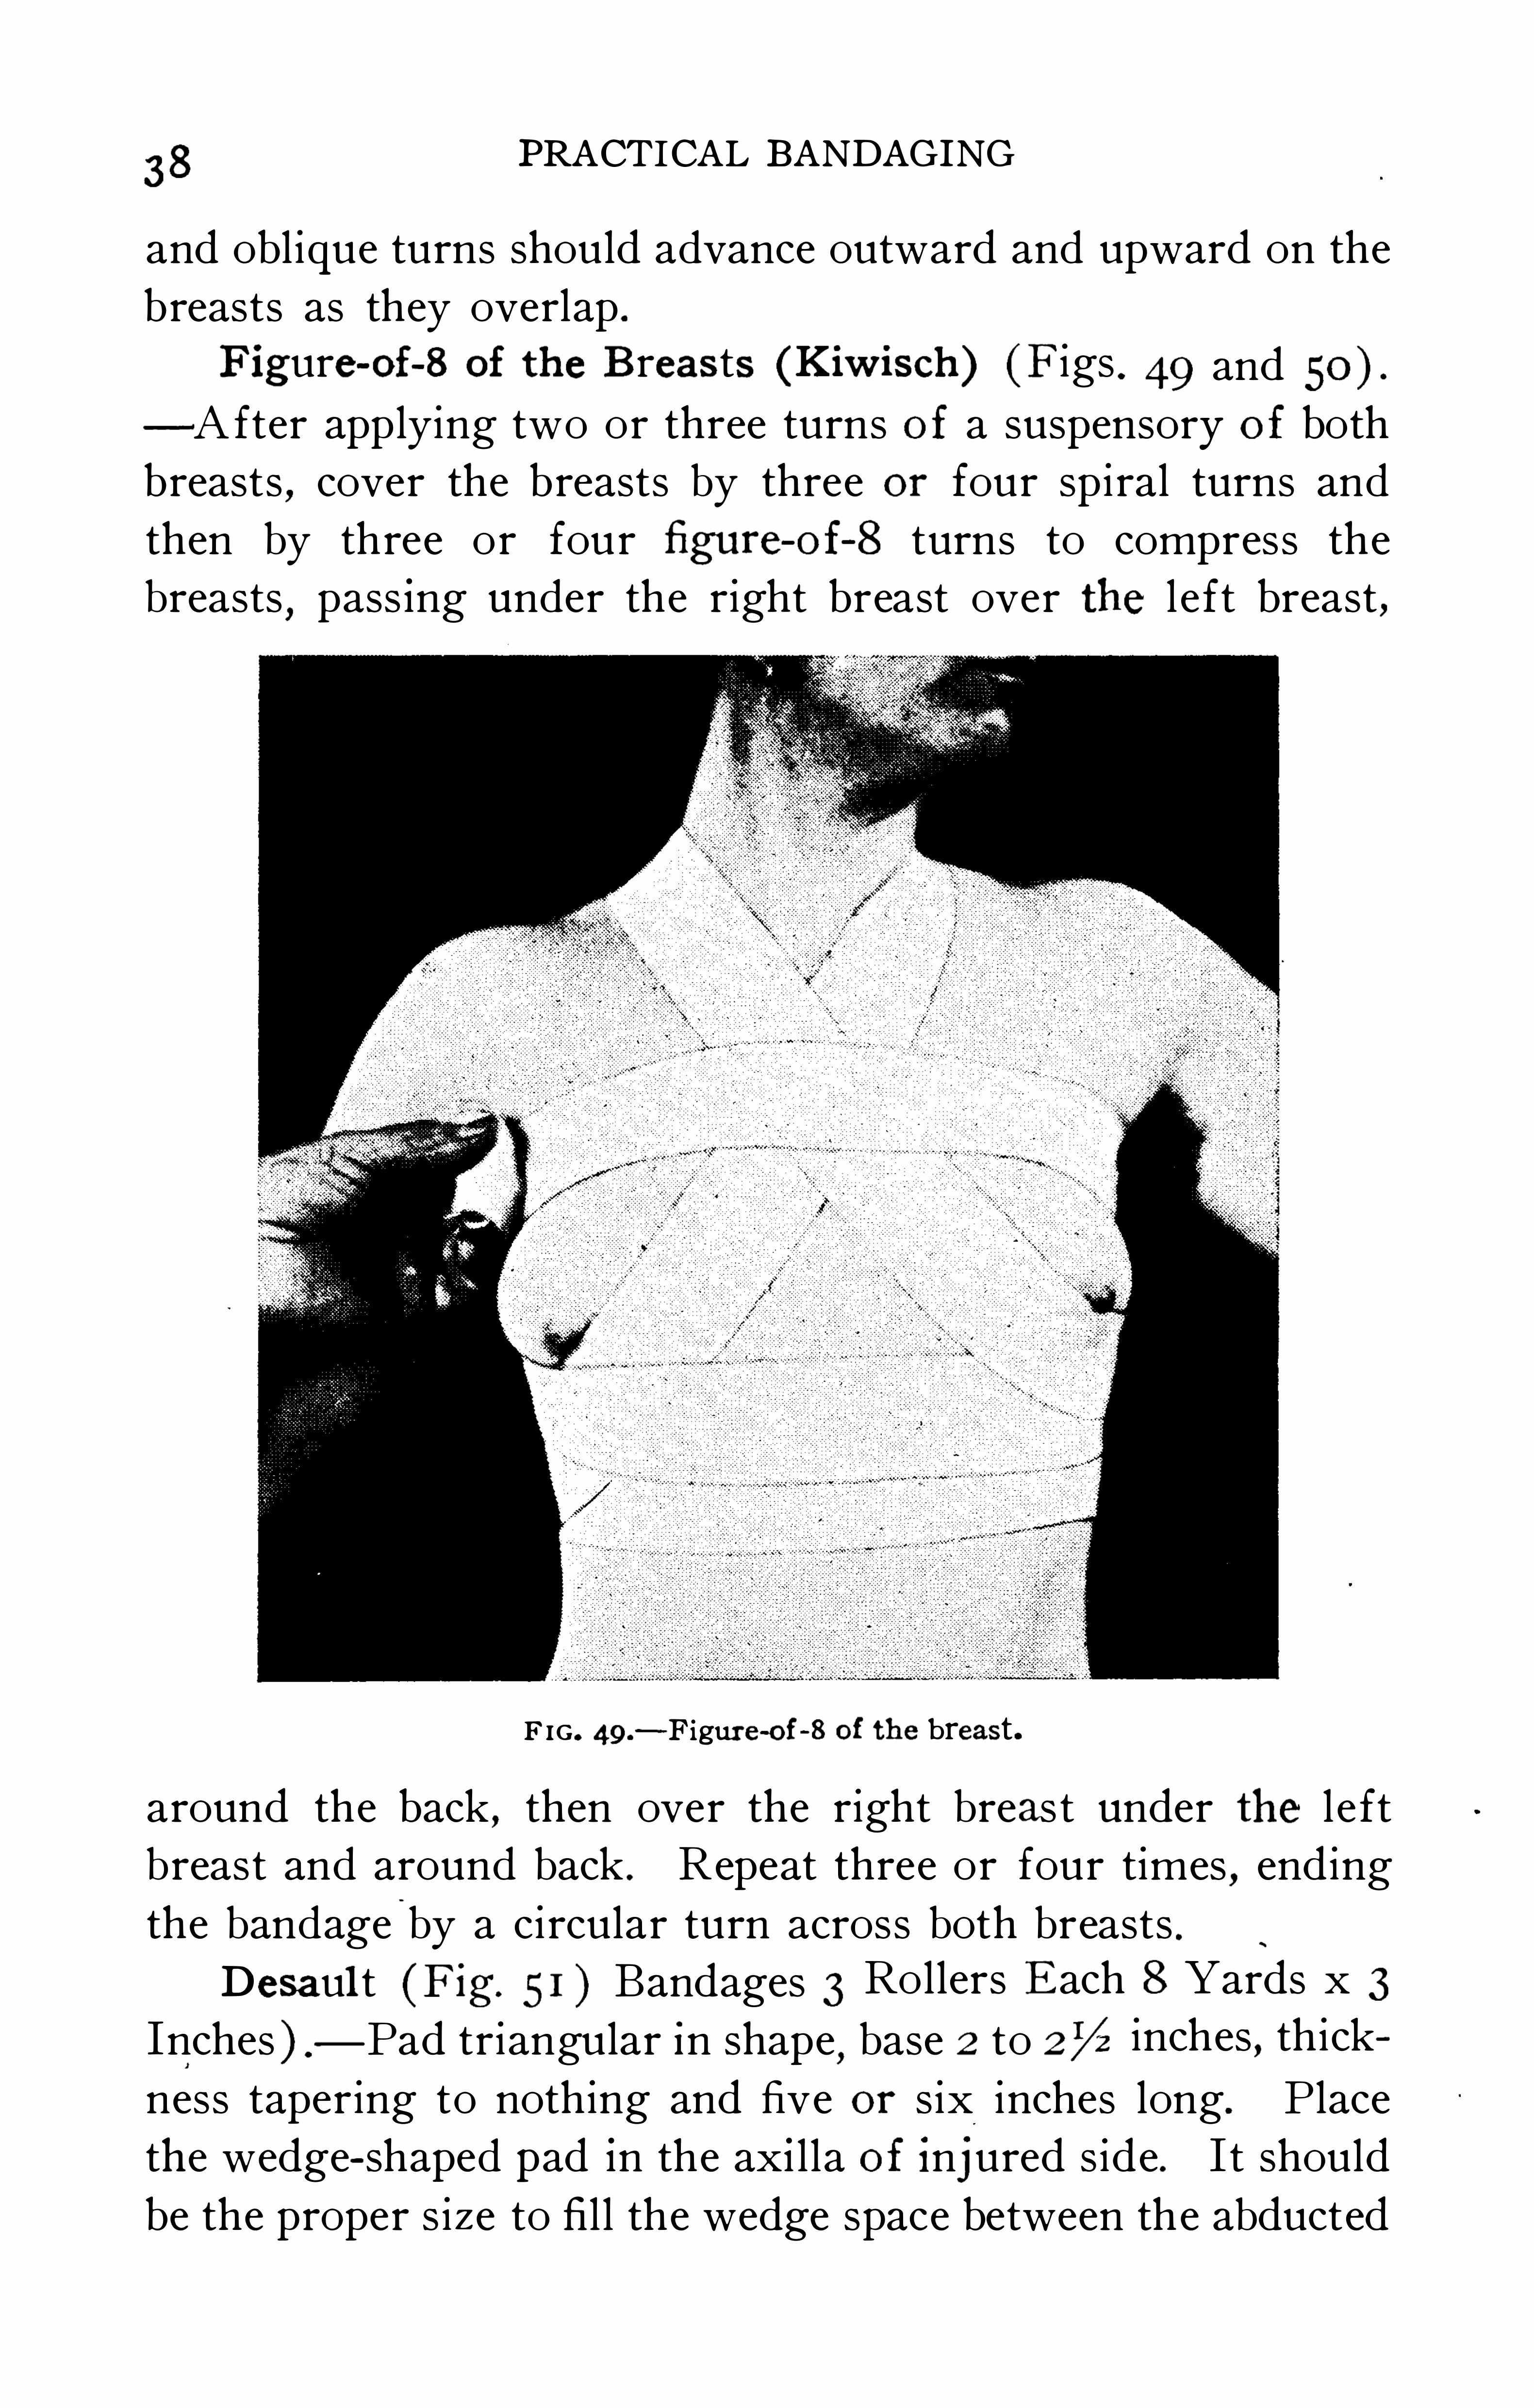
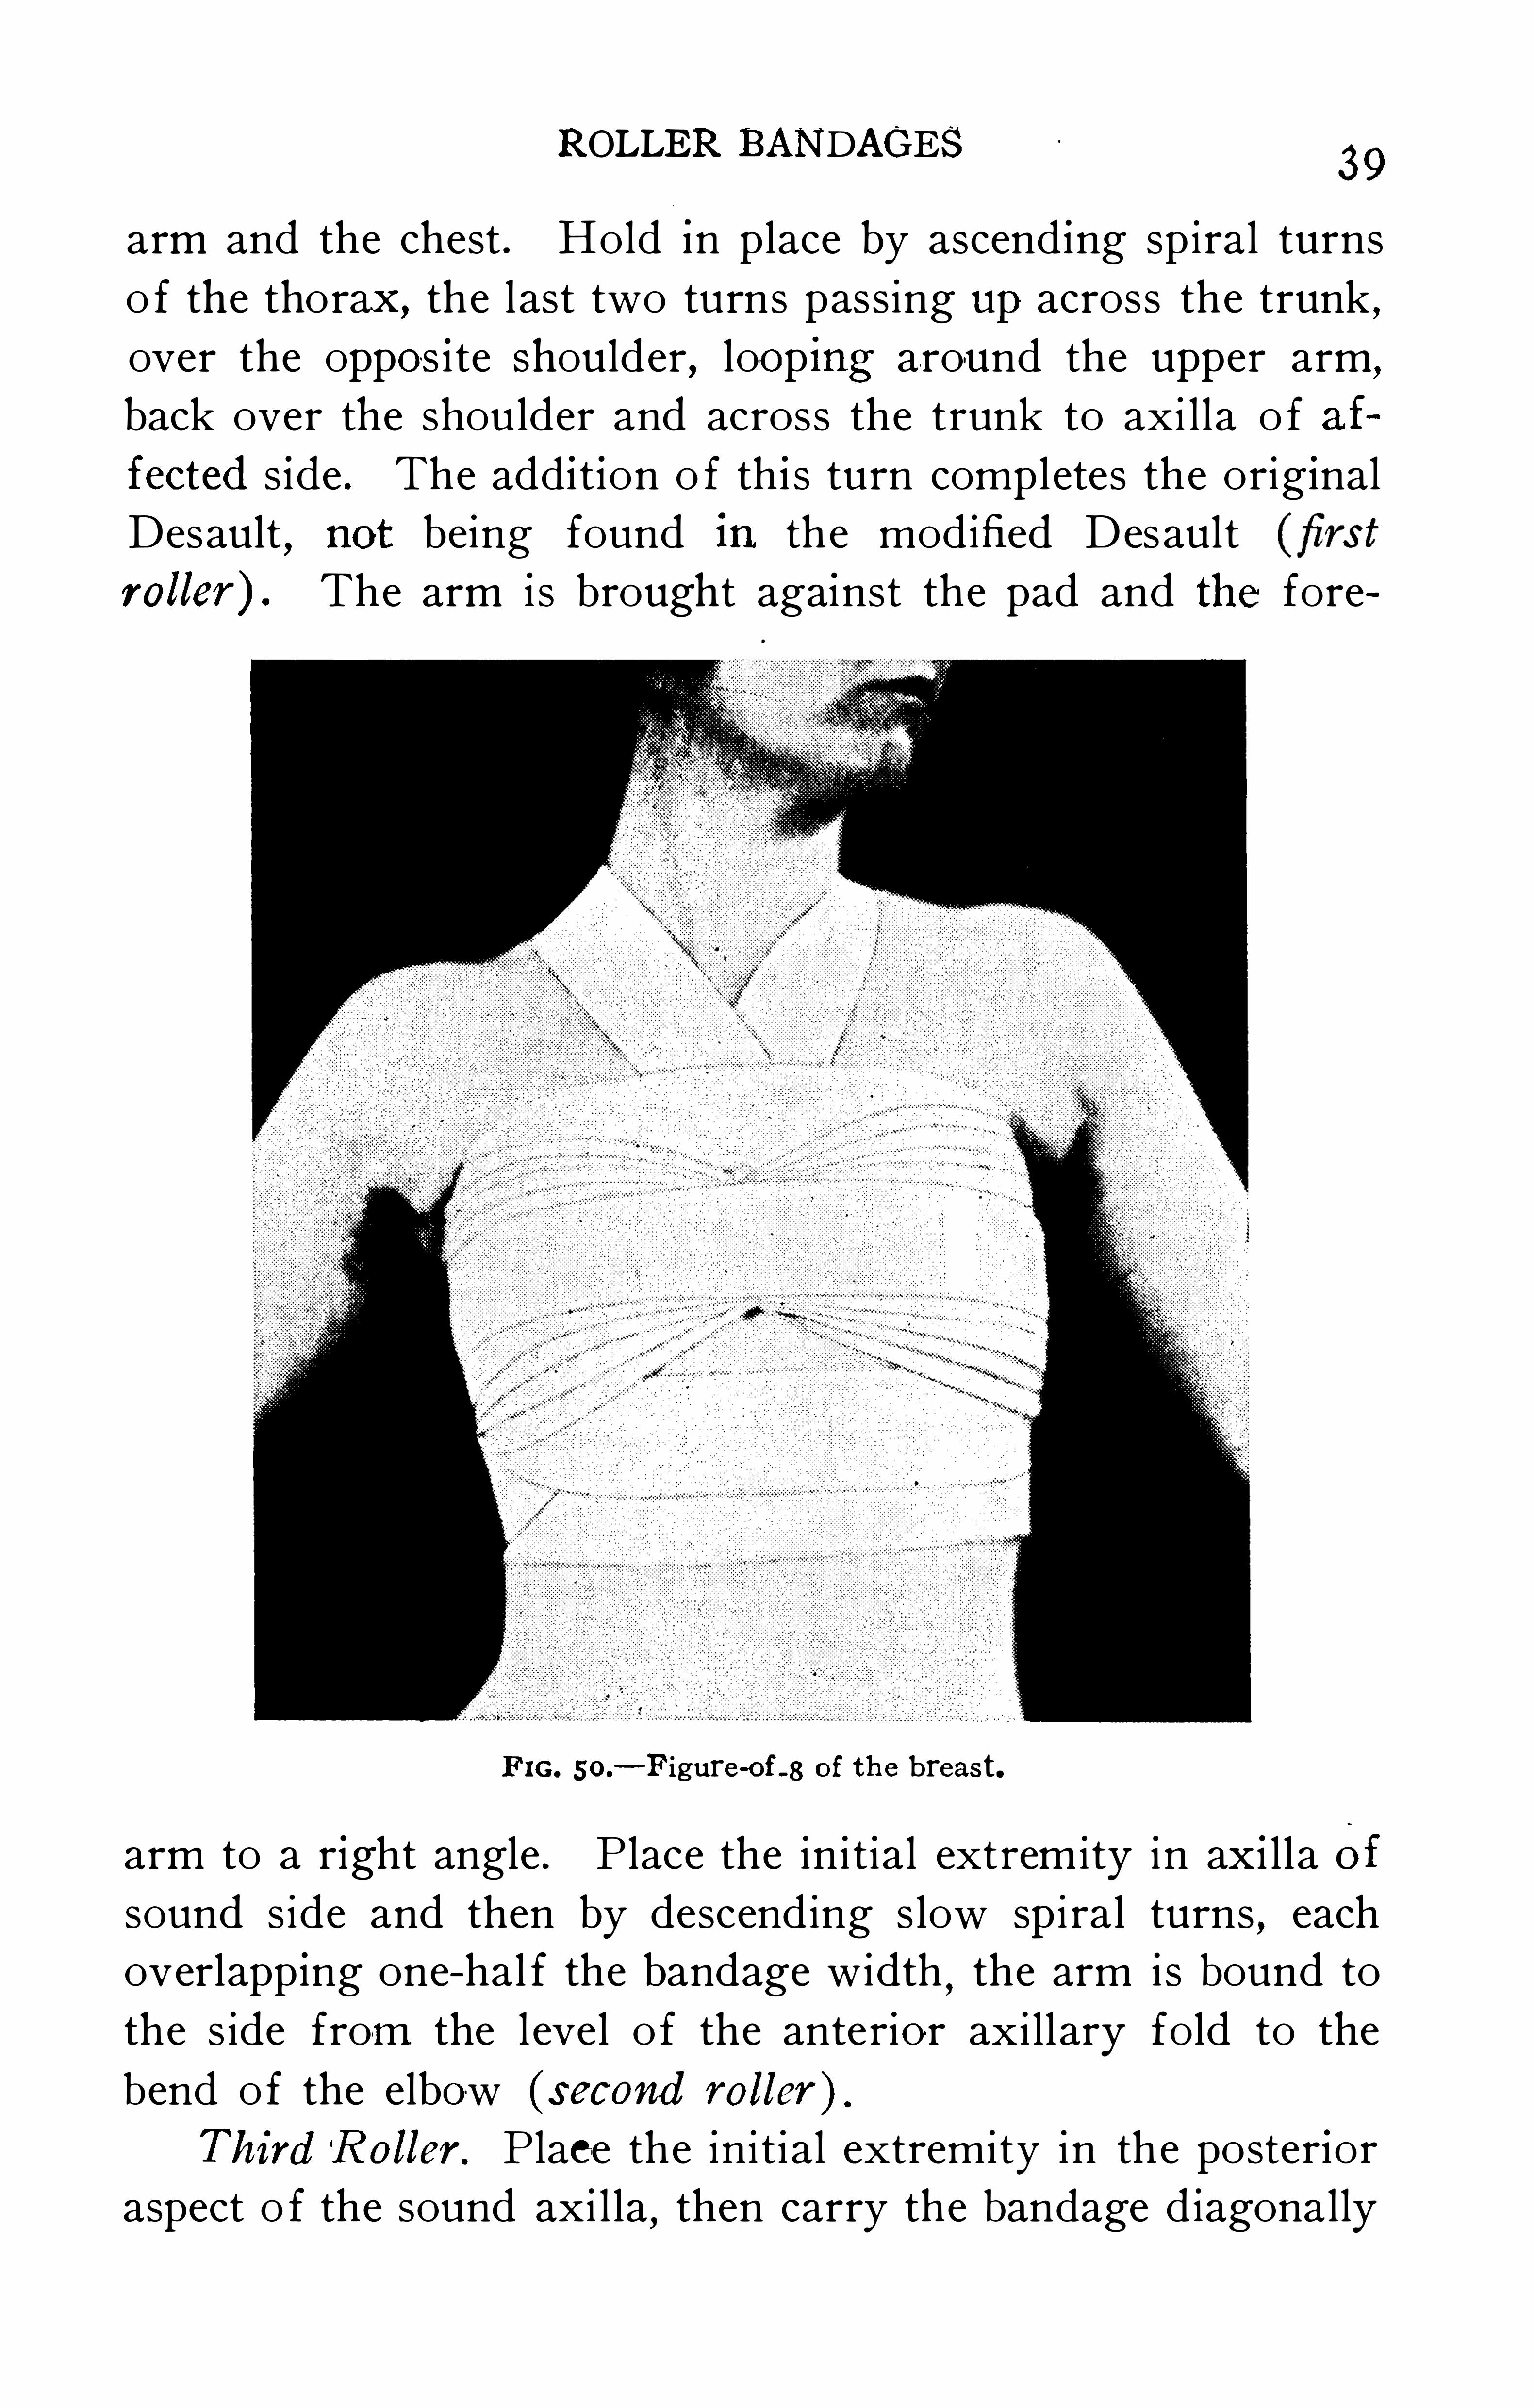
Figure-oi—8 of the B reas ts (Kiw isch ) (F igs . 49 and-A fter applying two or three turns of a suspensory of both
breasts,cover the breasts by three or four spiral turns and
then by three or four figure-of-S turns to compress the
breasts,pass ing under the right breast over the l eft breast ,
F IG. 49.—F igure-oi—8 of the breast.
around the back,then over the right breas t under the l e ft
breast and around back . Repeat three or four times , ending
the bandage by a circular turn across both breasts .
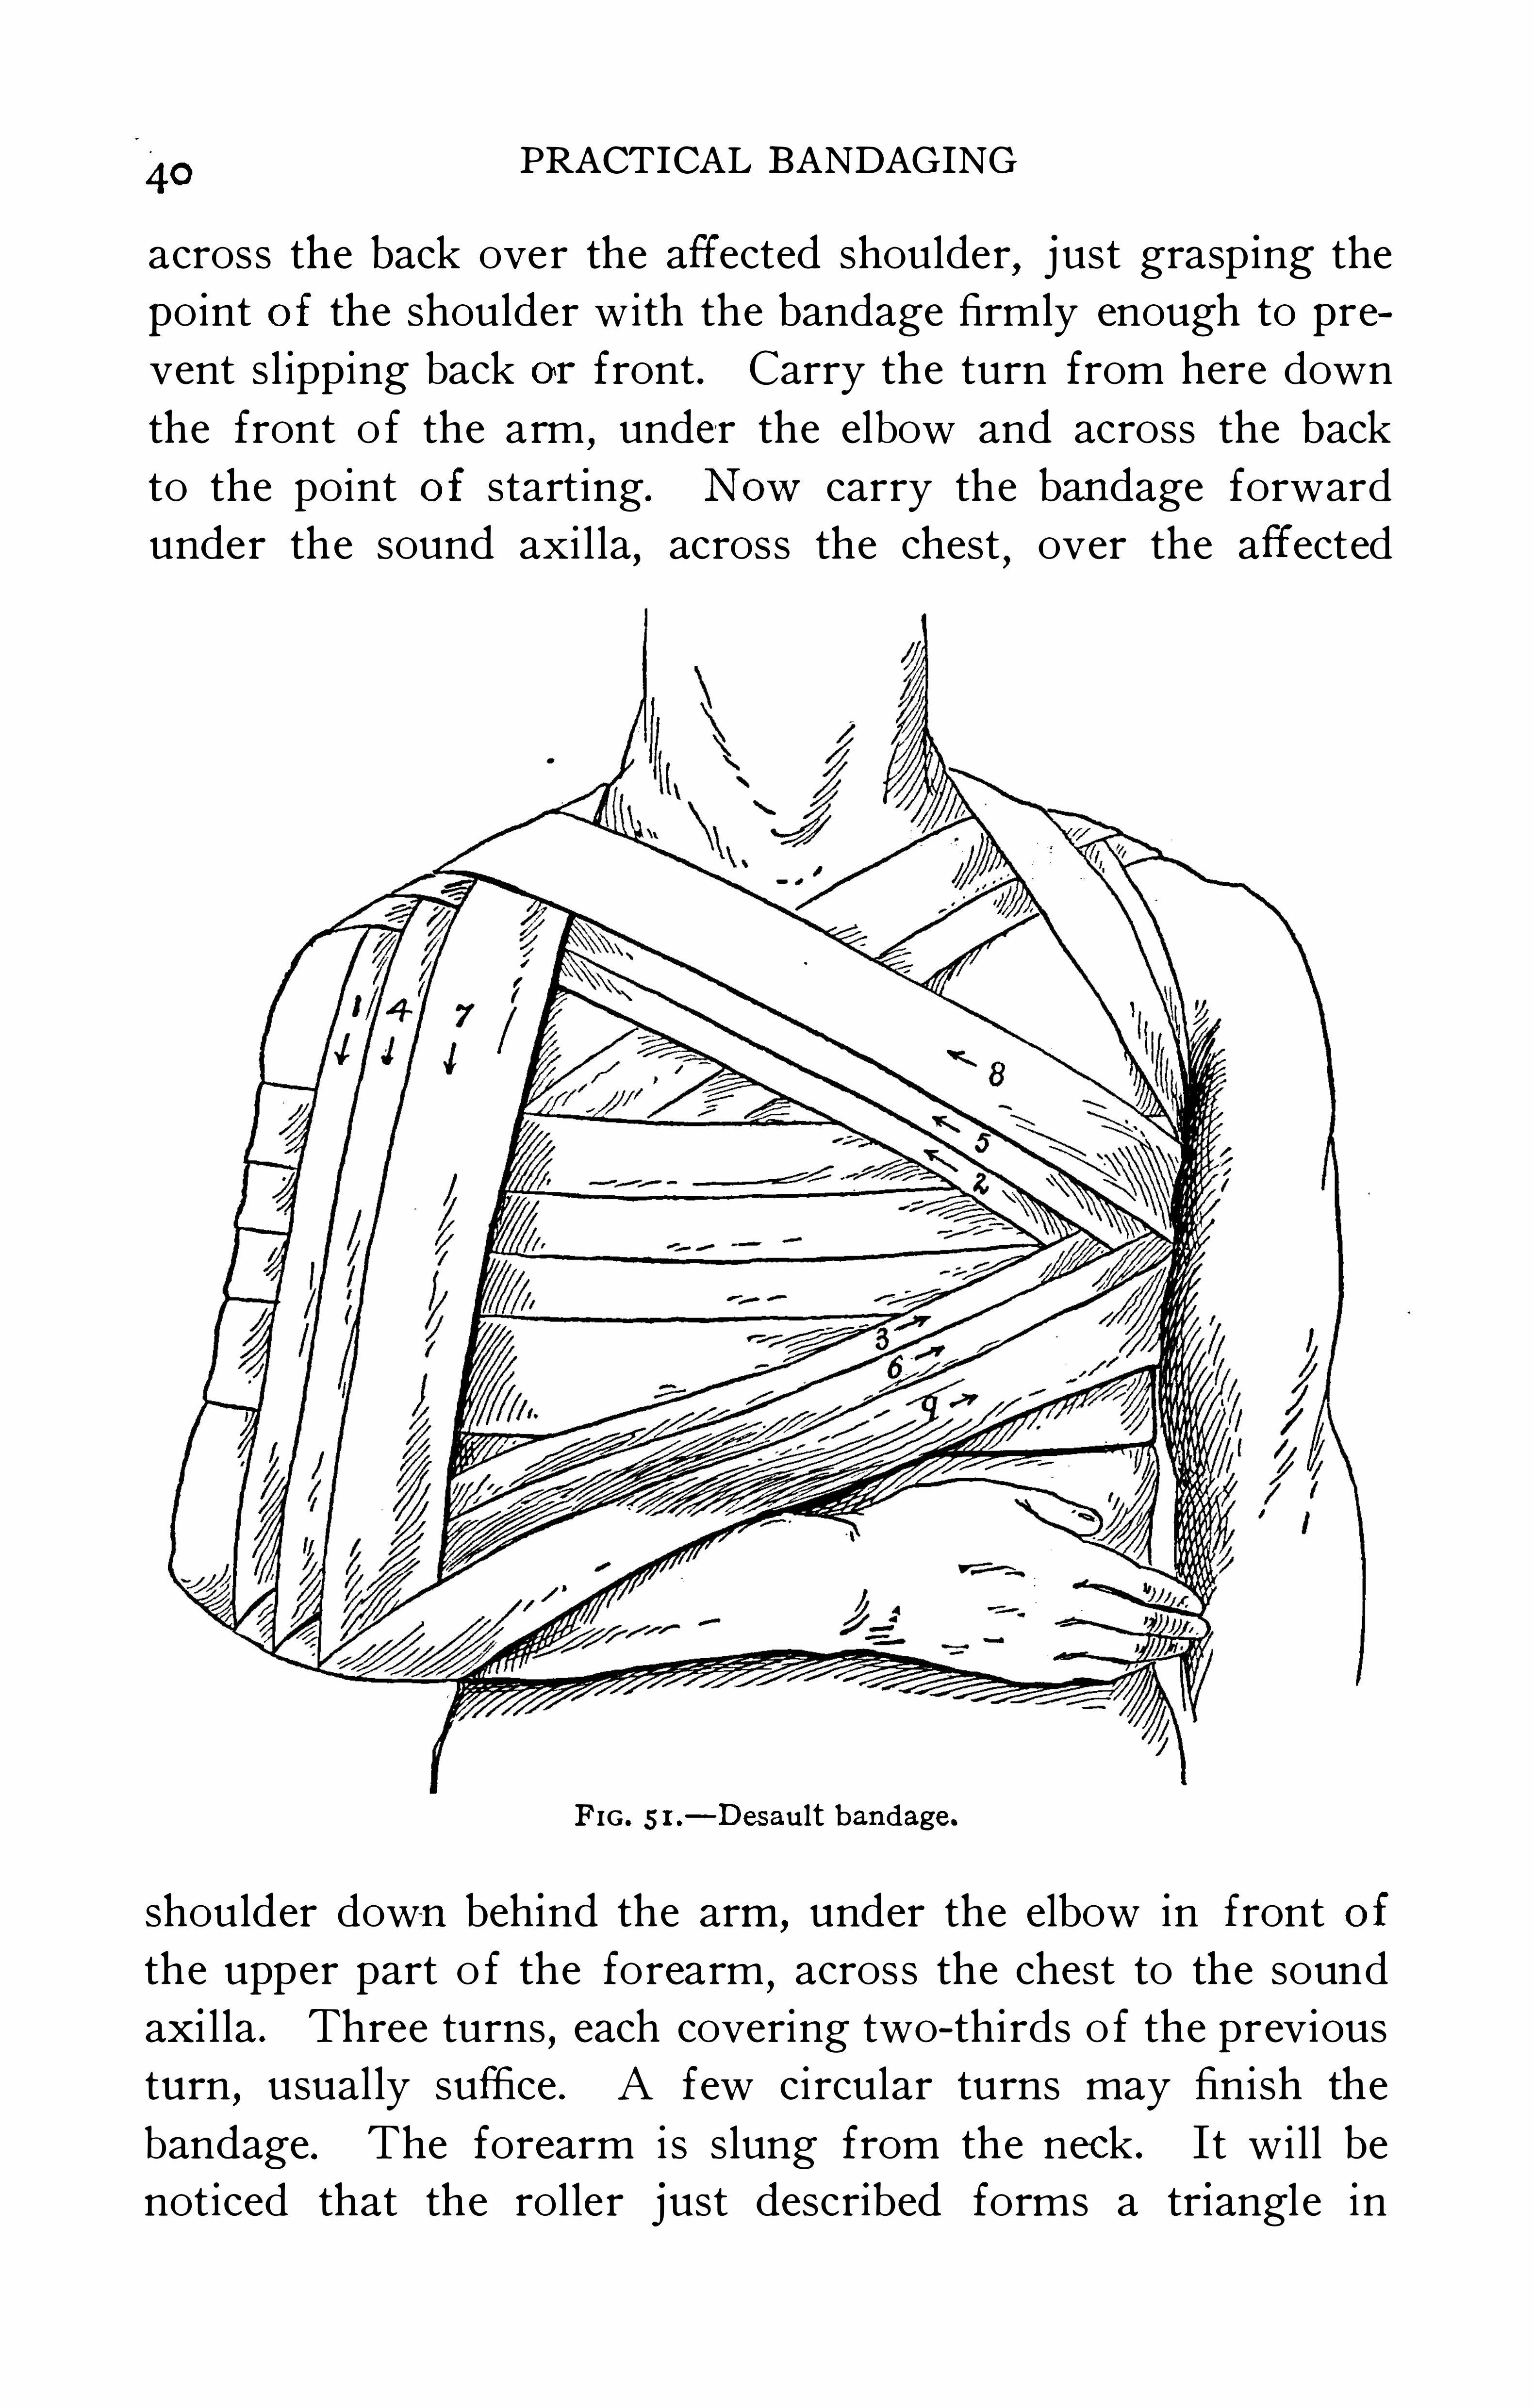
Desaul t (F ig. 51 ) Bandages 3 Rollers E ach 8 Yards x 3Inches ) — Pad triangular In shape
,base 2 to 2/2 inches , thick
ness tapering to nothing and five or s ix inches long. P lace
the wedge-shaped pad in the axi l la of inj ured s ide . I t should
be the proper s ize to fi l l the wedge space between the abducted
ROLLER BANDAGES39
arm and the chest . Hold In place by ascend ing sp iral turns
o f the thorax,the last two turns passing upacross the trunk ,
over the oppos i te Shou lder, loopn around the upper arm,
back over the shoulder and across the trunk to axi lla o f af
fected s ide . The addi t ion o f th i s turn completes the orig inal
Desault,not being found in the modified Desaul t
rol ler) . The arm i s brought against the pad and the fore
F IG. 50.
-F igure-of-8 of the breast.
arm to a right angle . P lace the ini tial extrem i ty in axi l la Of
sound side and then by descending s low sp i ral turns,each
overlapp ing one-hal f the bandage width,the arm is bound to
the s ide fro-m the level o f the anterior axi llary fold to the
bend o f the elbow (second rol ler) .
Third R ol ler. P lace the ini tial extremity in the poster ior
aspect o f the sound axi l la,then carry the bandage diagonally
40PRACTICAL BANDAGING
across the back over the affected shoulder,just grasp ing the
point of the shoulder with the bandage firmly enough to pre
vent s l ipping back or front . Carry the turn from here down
the front o f the arm,under the elbow and across the back
to the point of start ing. Now carry the bandage forward
under the sound axi l la,across the chest
,over the affected
FIG . 5 1 .— Desault bandage.
shoulder down behind the arm,under the elbow in front of
the upper part o f the forearm,across the chest to the sound
axi l la . Three turns,each covering two-thirds o f the previous
turn , usual ly suffice . A few circular turns may finish the
bandage . The forearm i s slung from the neck . It wi l l be
noticed that the roller just described forms a triangle in
ROLLER BANDAGES41
front and in back . Its d irection o f appl icat ion can read i ly be
remembered by the use o f the key A . S . E . ,each letter rep
resenting one of the three, ax i l la, shoulder , elbow . The
original Desault i s. composed o f three rol lers but the modified
bandage i s the one most popu la r at the present day .
F IG. 52.— Davis bandage.
The modified Desault om its the first rol ler,ret ain ing the
second and third roller in detai l .
Davis Bandage (Fig . 52 ) (Bandage 8 Yards x 2%Inches ) .
—F ix the initial extremity by passing two or three
ci rcular turns around'the lower chest and right arm
,from
pati ent’
s right to le ft . On arriving beh ind the affected elbow
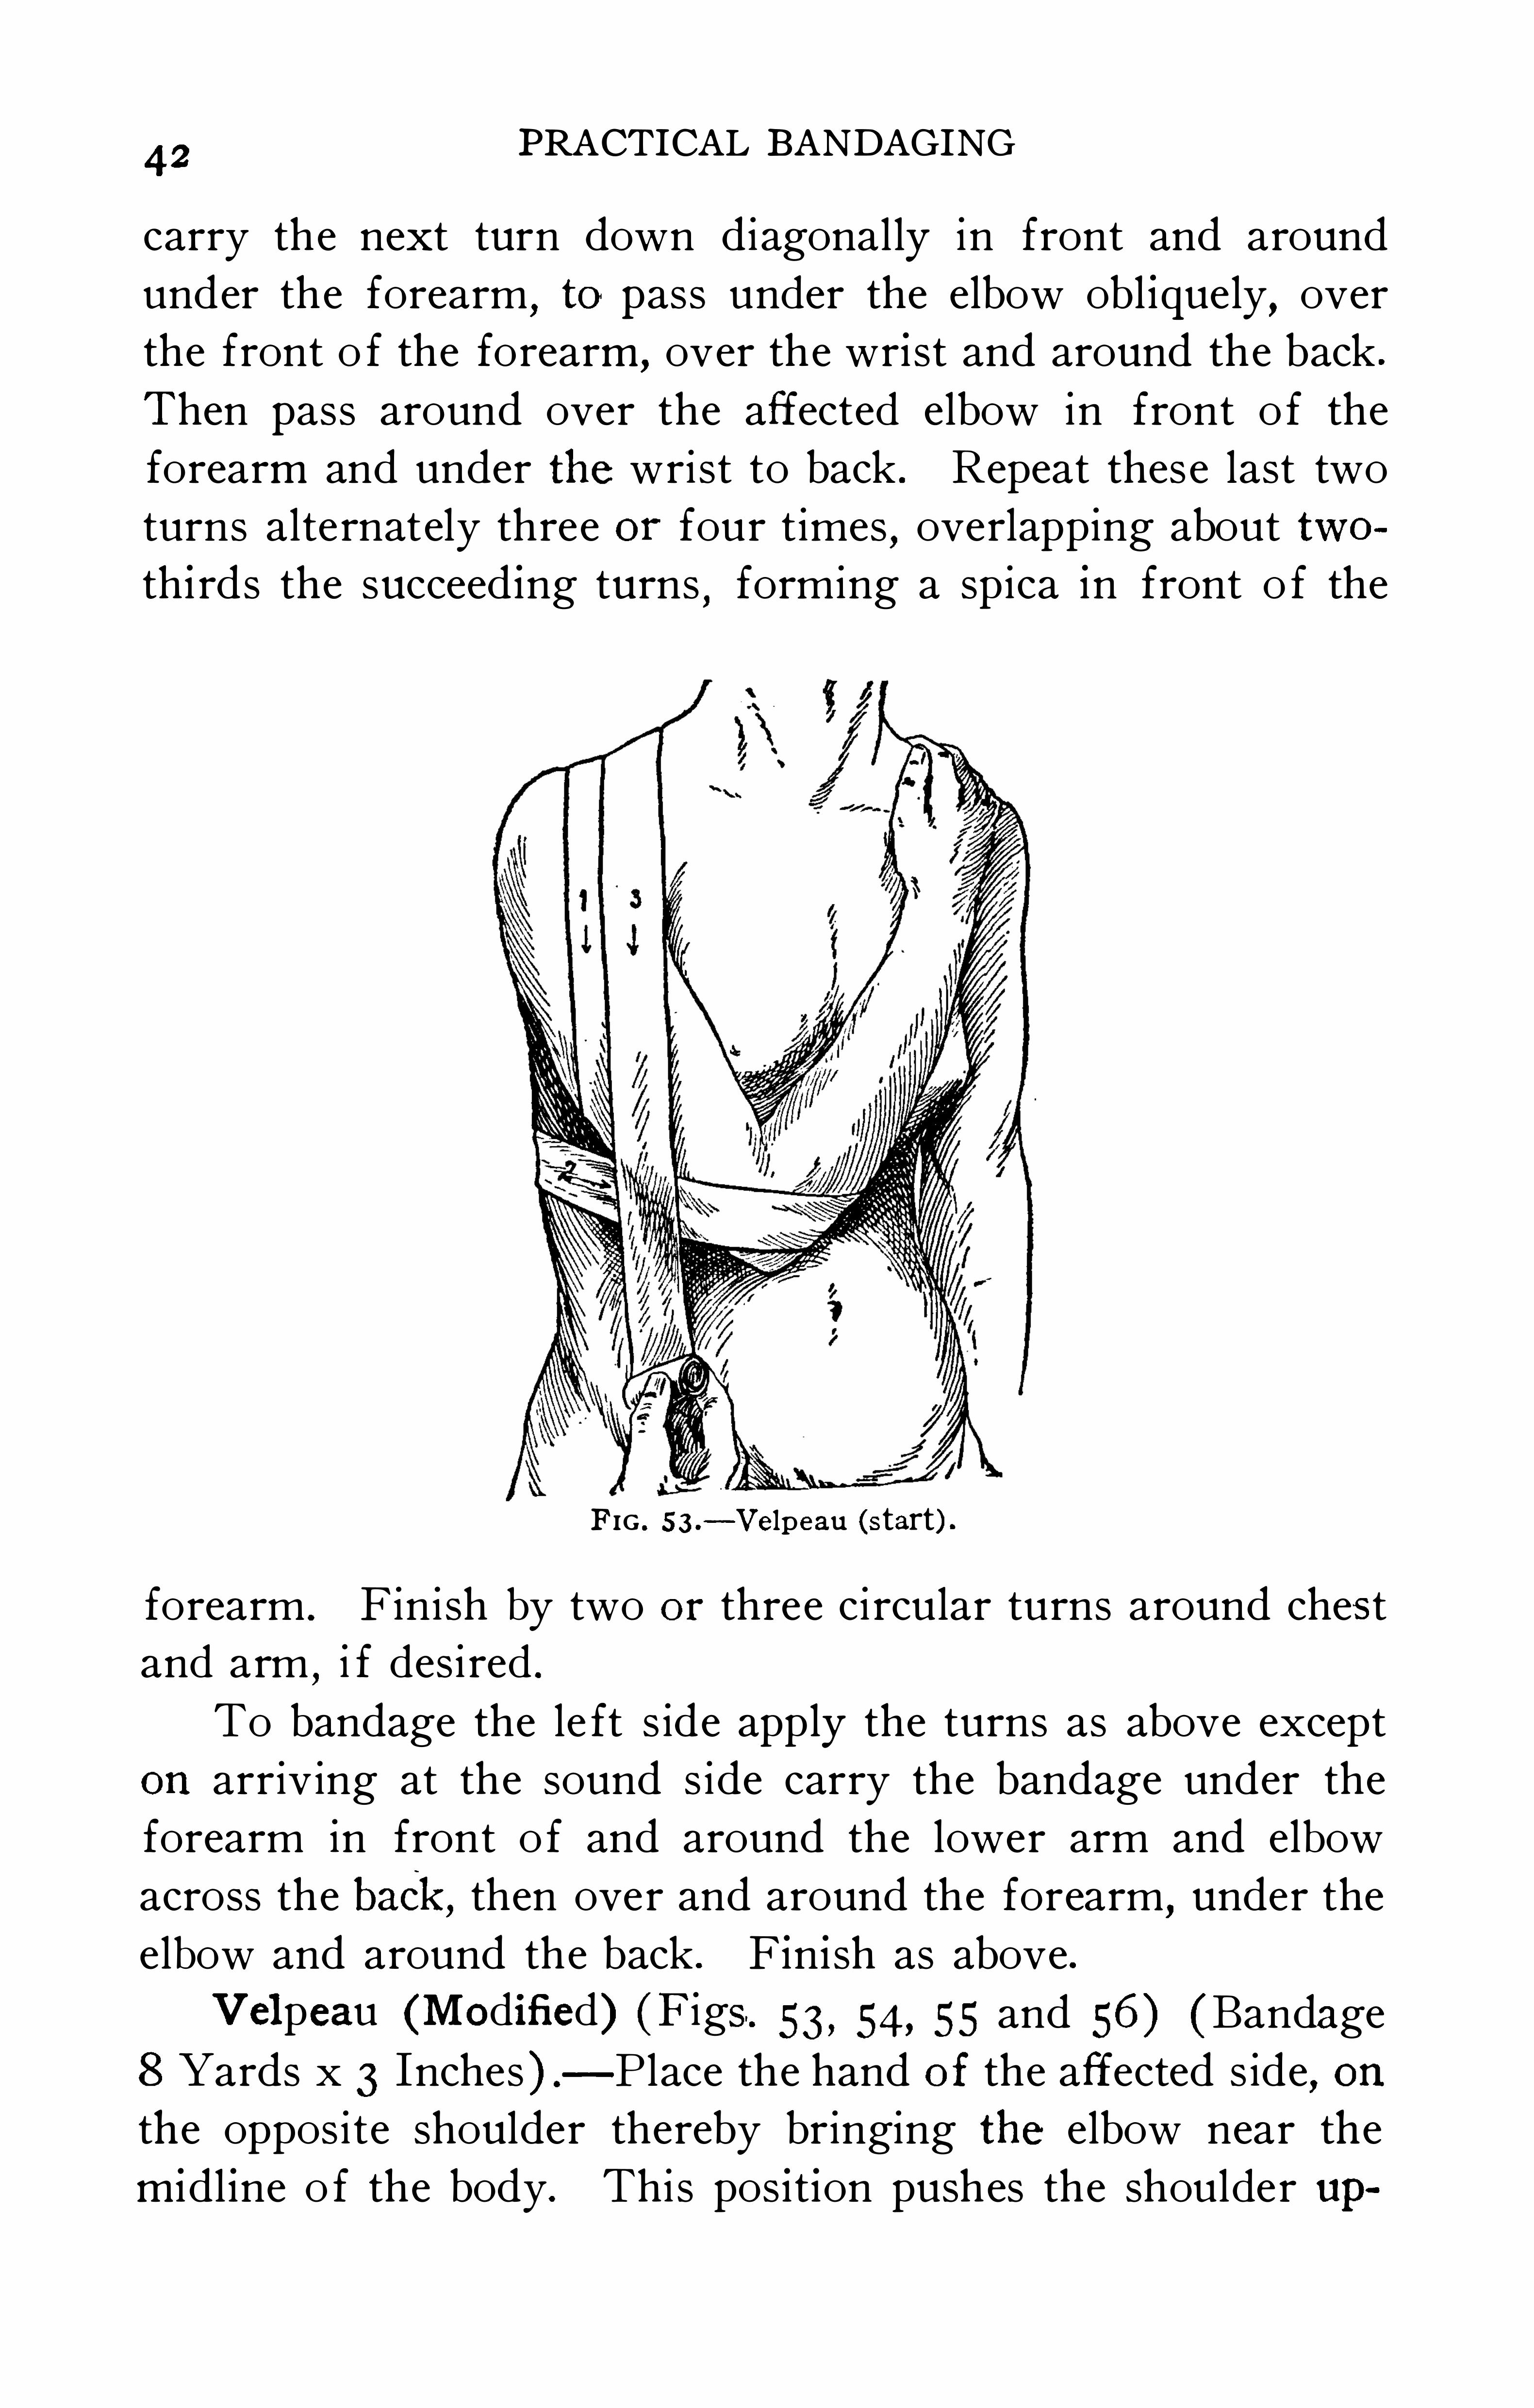
42PRACTICAL BANDAGING
carry the next turn down diagonally in front and around
under the forearm,to pass under the elbow obl iquely
,over
the front o f the forearm, over the wrist and around the back .
Then pass around over the affected elbow in front o f the
forearm and under the wrist to back . Repeat these last two
turns alternately three or four times,overlapping about two
th i rds the succeed ing turns,forming a spica in front o f the
FIG . 53.
— Velpeau (s tart) .
forearm . F ini sh by two or three ci rcular turns around ches t
and arm,i f desi red .
To bandage the le ft s ide apply the turns as above except
on arriv ing at the sound s ide carry the bandage under the
forearm in front o f and around the lower arm and elbow
across the baCk,then over and around the forearm, under the
elbow and around the back . Fin ish as above .V el peau (Modified) (F igs . 53, 54, 55 and 56) (Bandage
8 Yards x 3 Inches ) — P lace the hand of the affected s ide,on
the oppos i te shoulder thereby bringing the elbow near the
midl ine o f the body. This pos ition pushes the shoulder up
44PRACTICAL BANDAGING
vertical turns overlap two-thirds approaching the neck and
elbow but not pass ing over the point o f the elbow . The
hor izontal turns overlap one-hal f the previous turns and are
continued as high on the chest as the axi l lary folds wi ll al low .
Another mod ificat ion o f the Velpeau i s described as fol
FIG . 55 .— Ve lpeau (s ide view) .
lows (Fig. 57) With the upper extremity in the same
pos ition as above,fix the bandage by spi ral turns around the
arm and thorax " when the roller reaches the axi l la o f the
well s ide i t passes up across the back , over the shoulder well
out on the the front Of the arm,under the elbow ,
up the back of the arm ,over the tip of the shoulder and
ROLLER BANDAGES
FIG . 56.
— Velpeau (posteriorview) .
FIG. 57.-Velpeau modified.
46PRACTICAL BANDAGING
across the chest to the point o f start ing . Repeated turns
overlapping upward and inward accompl ish the bandage .
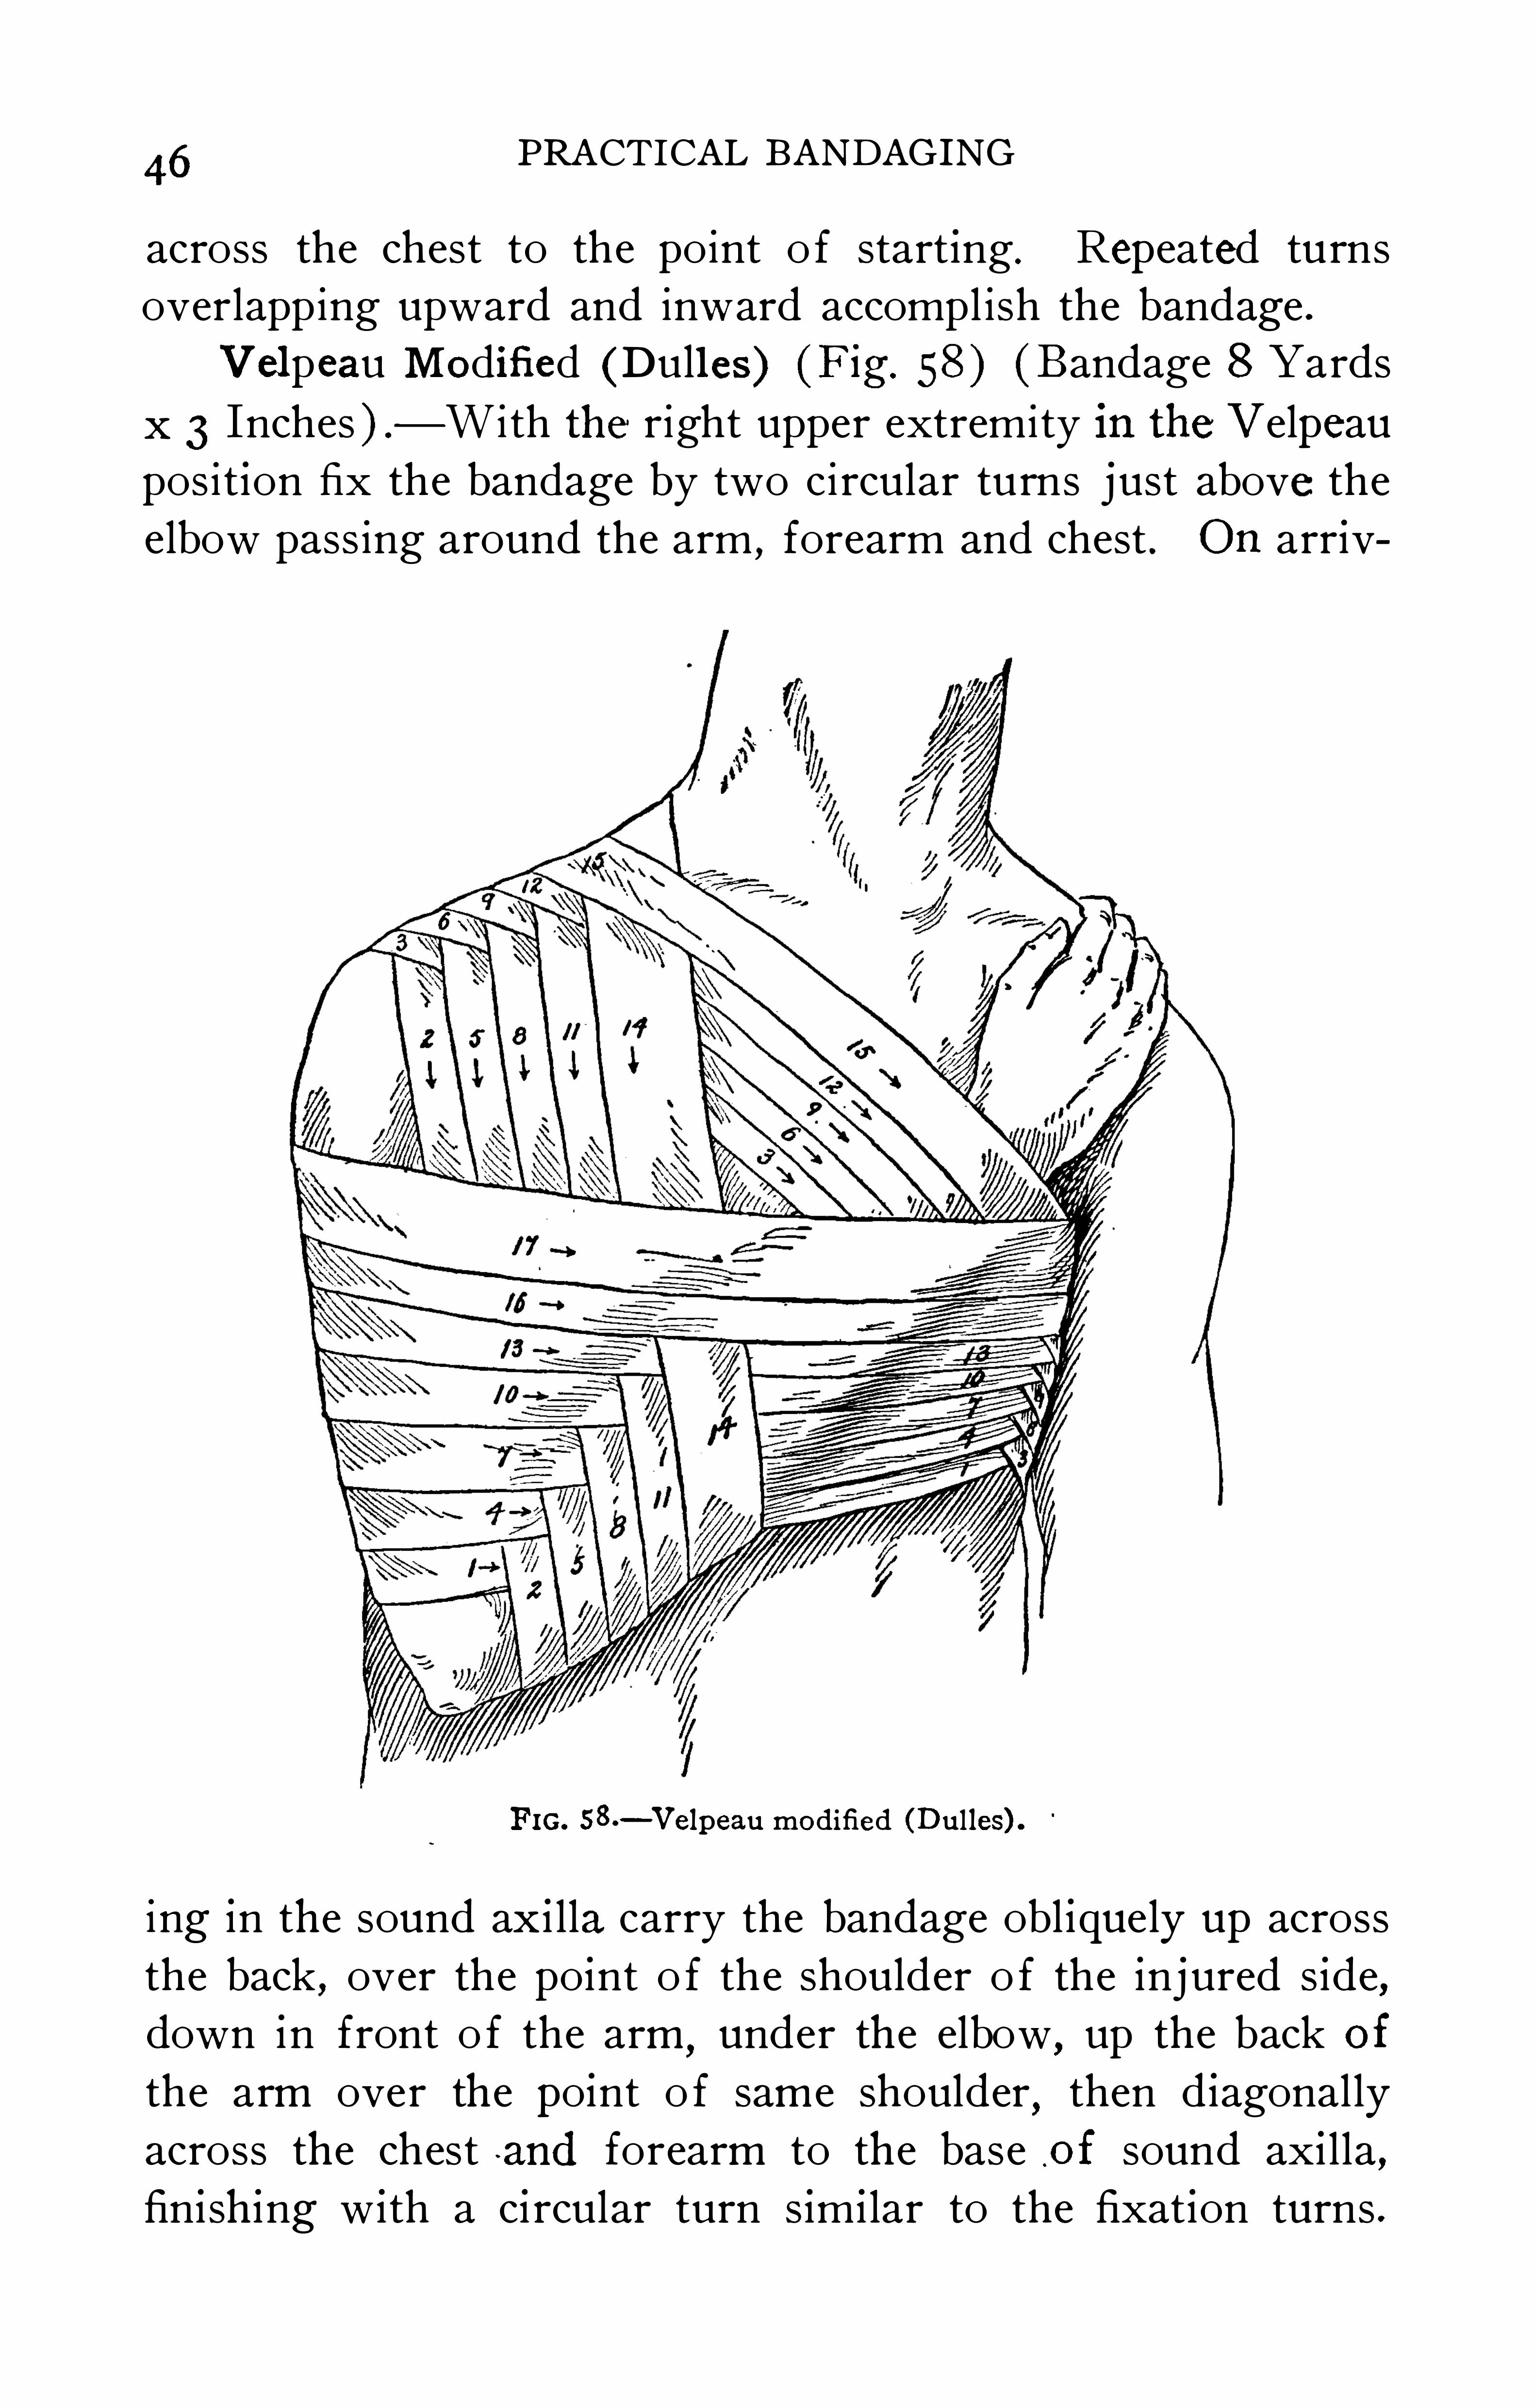
Vel peau Modifi ed (Dull es ) (Fig. 58 ) (Bandage 8 Yards
x 3 Inches ) — With the right upper extremity in the V elpeau
posit ion fix the bandage by two circular turns just above the
elbow pass ing around the arm , forearm and chest . On arriv
F IG. s8.— Velpeau modified (Dulles) .
ing in the sound axi l la carry the bandage obl iquely up across
the back , over the po int o f the shoulder o f the injured s ide,down in front o f the arm
,under the elbow
,up the back of
the arm over the po int o f same shoulder,then d iagonally
across the chest and forearm to the base .of sound axi l la,
finishing w ith a ci rcular turn s im i lar to the fixat ion turns .
ROLLER BANDAGES47
Repetition of these turns five or s ix times overlapping about
two-thi rds o f each succeeding turn complete the bandage
bringing the last turn well up in the ax i l la, close to the neck ,
and hal f-way up the forearm .
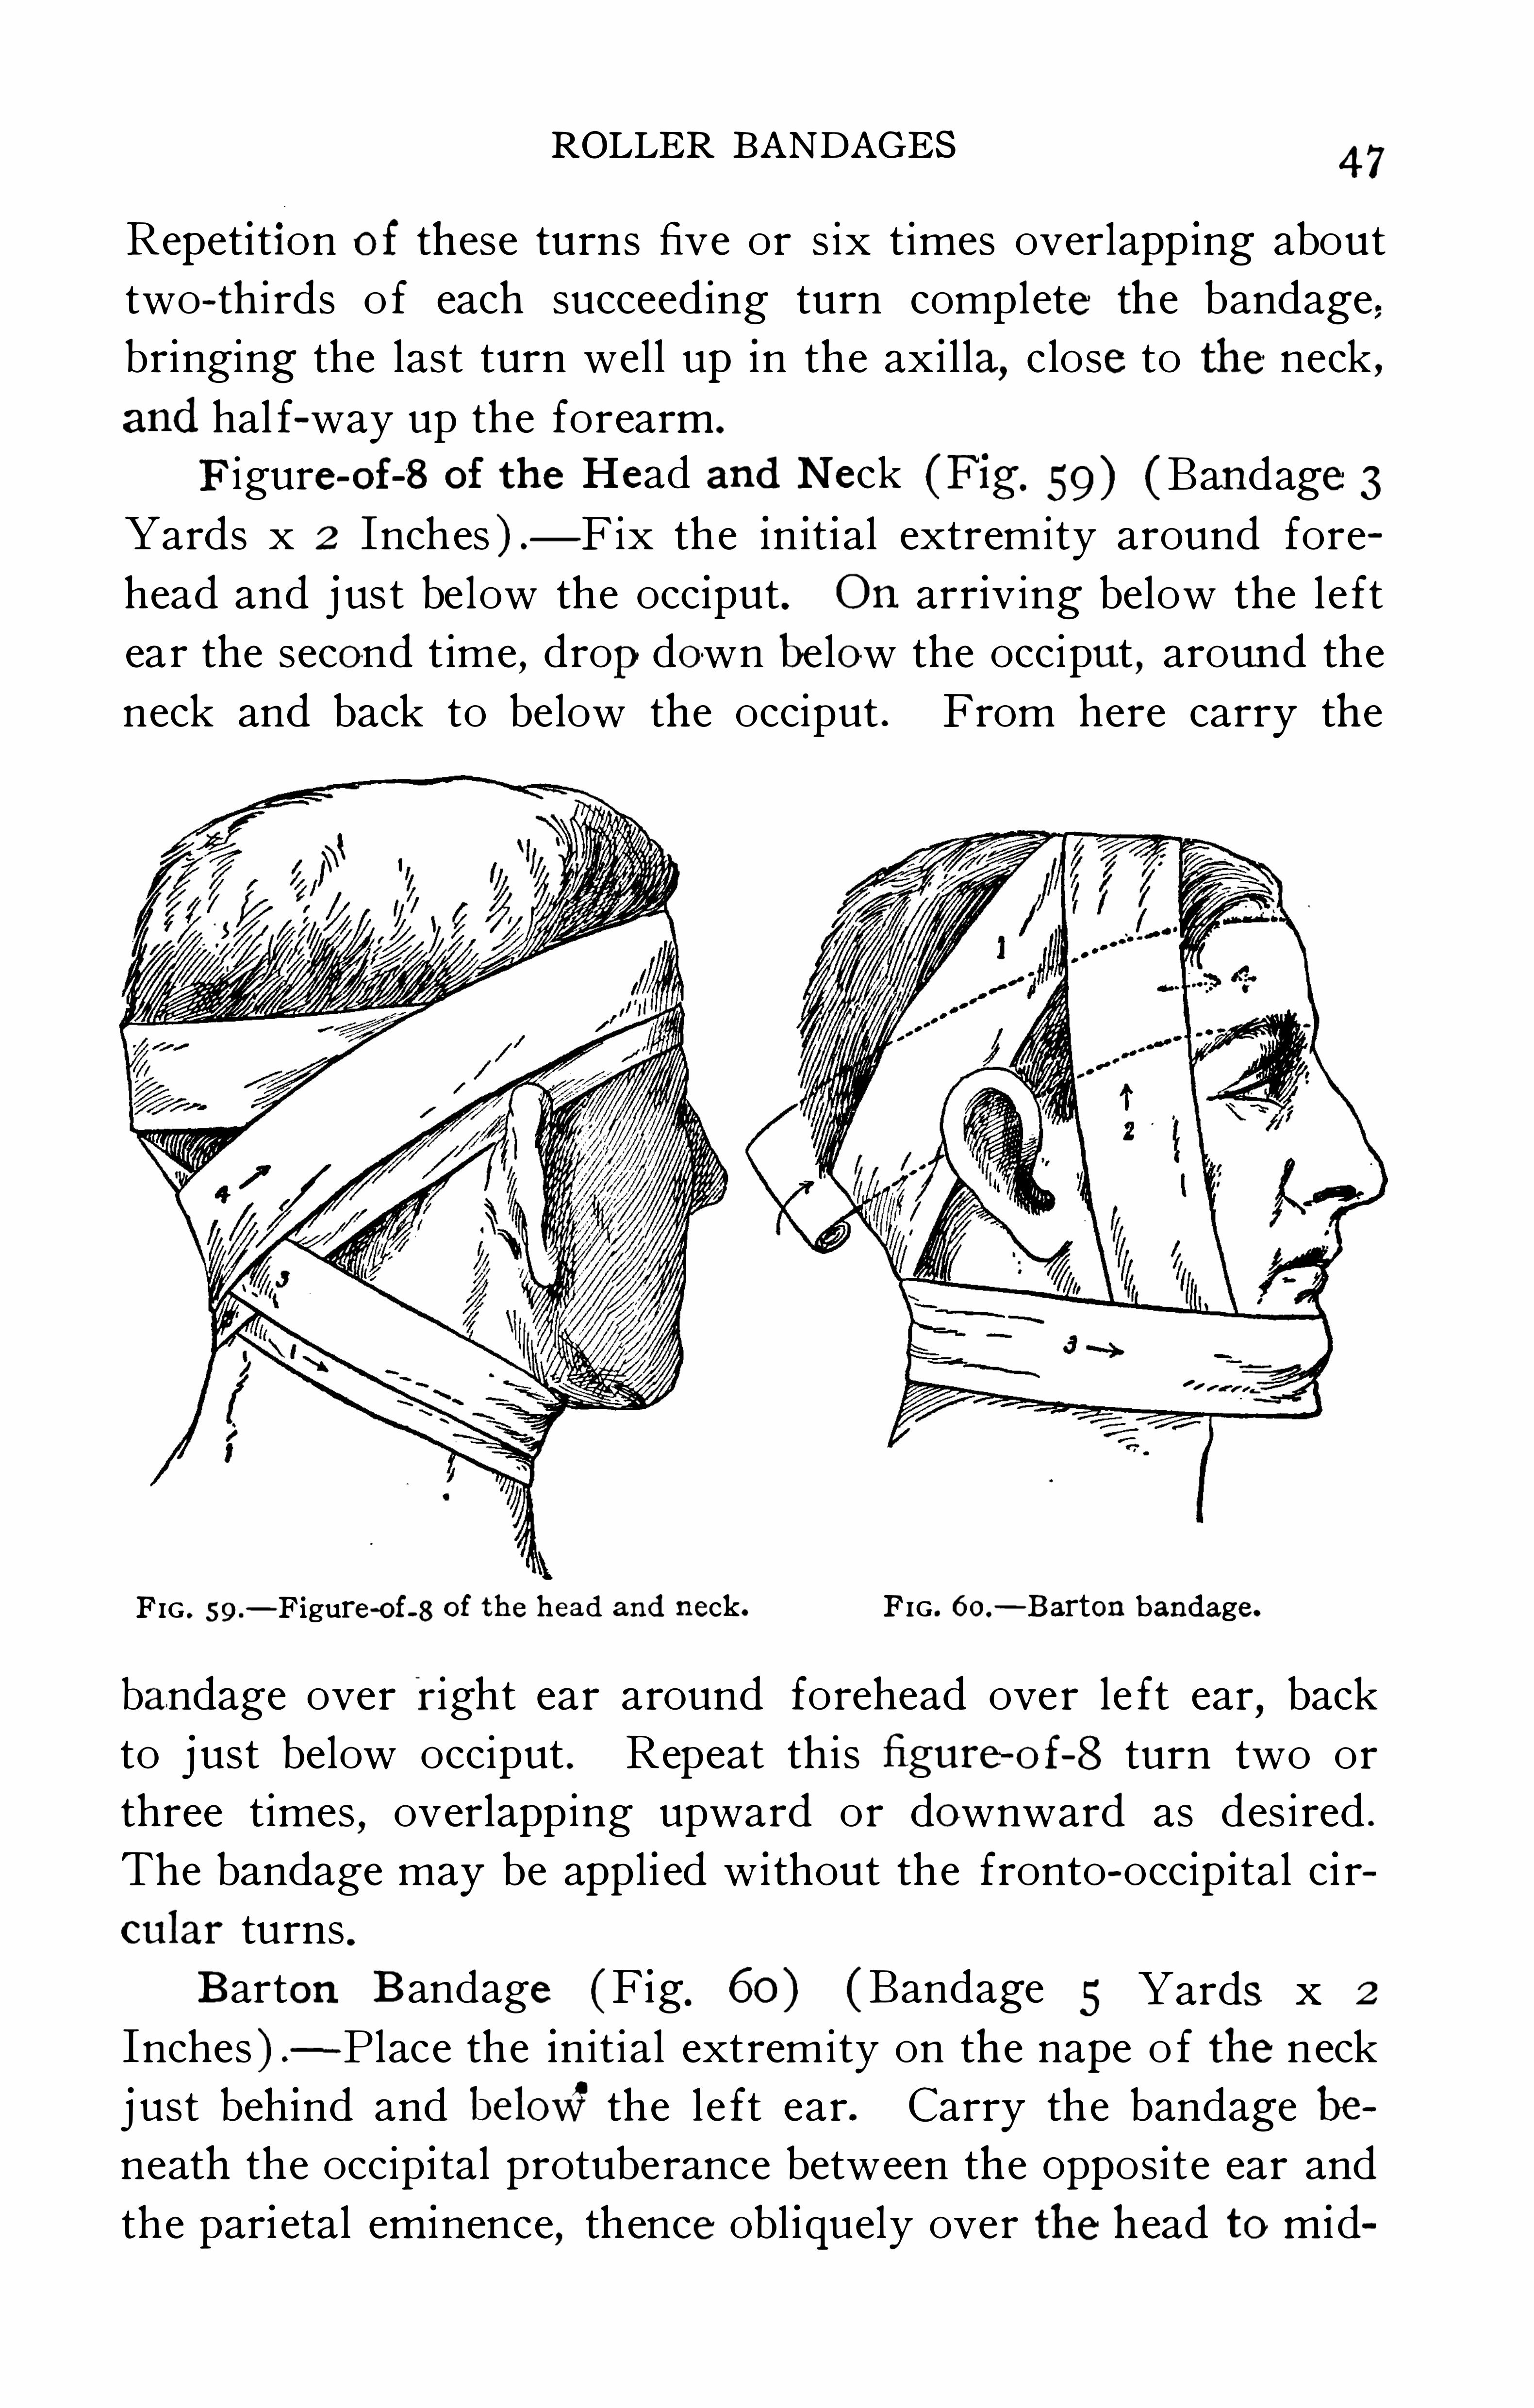
F igure-of—8 of the Head and Neck (Fig. 59) ( Bandage 3Yards x 2 Inches ) .
— F ix the in it ial extremity around fore
head and j us t below the occiput . On arr iving below the le ft
ear the second time , dropdown below the occiput , around theneck and back to below the occiput . From here carry the
FIG . 59.
— Figure-oi-8 of the head and neck. FIG . 60.
— Barton bandage.
bandage over right ear around forehead over le ft ear,back
to j ust below occiput . Repeat thi s figure—oi-8 turn two or
three times , overlapping upward or downward as des ired .
The bandage may be appl i ed w i thout the fronto-occip i tal c i r
cular turns .B arton B andage (Fig. 60) ( Bandage 5 Yards x 2
Inches ) -P lace the init ial extremity on the nape o f the neck
j ust beh ind and belovsi the le ft ear. Carry the bandage be
neath the occip i tal protuberance between the Oppos i te ear and
the parietal eminence, thence obl iquely over the head to mid
43PRACTICAL BANDAGING
l ine anter ior to the h ighest po int o f scalp . From here pass
down the left s ide o f the head and face under the chin up
bes ide the face, cross ing the previous turn in the m iddle l ine
on top o f the head . I t i s next carr ied between the left
par ietal eminence and ear to po int o f starting, when a turn
i s made hori zontally around front o f the chin . Three such
complete turns usually suffice,each exactly cover ing the last .
A modified Barton ( see dotted l ine ) i s described start
ing w i th two c i rcular occipi to frontal turns,then pass ing from
FIG . 6 1 .
— Gibson bandage.
occiput down under the ear around the chin and back to occi
pital protuberance F rom here the bandage i s s imilar to the
original Barton . E xcept that two more occip ito frontalturns complete i t .
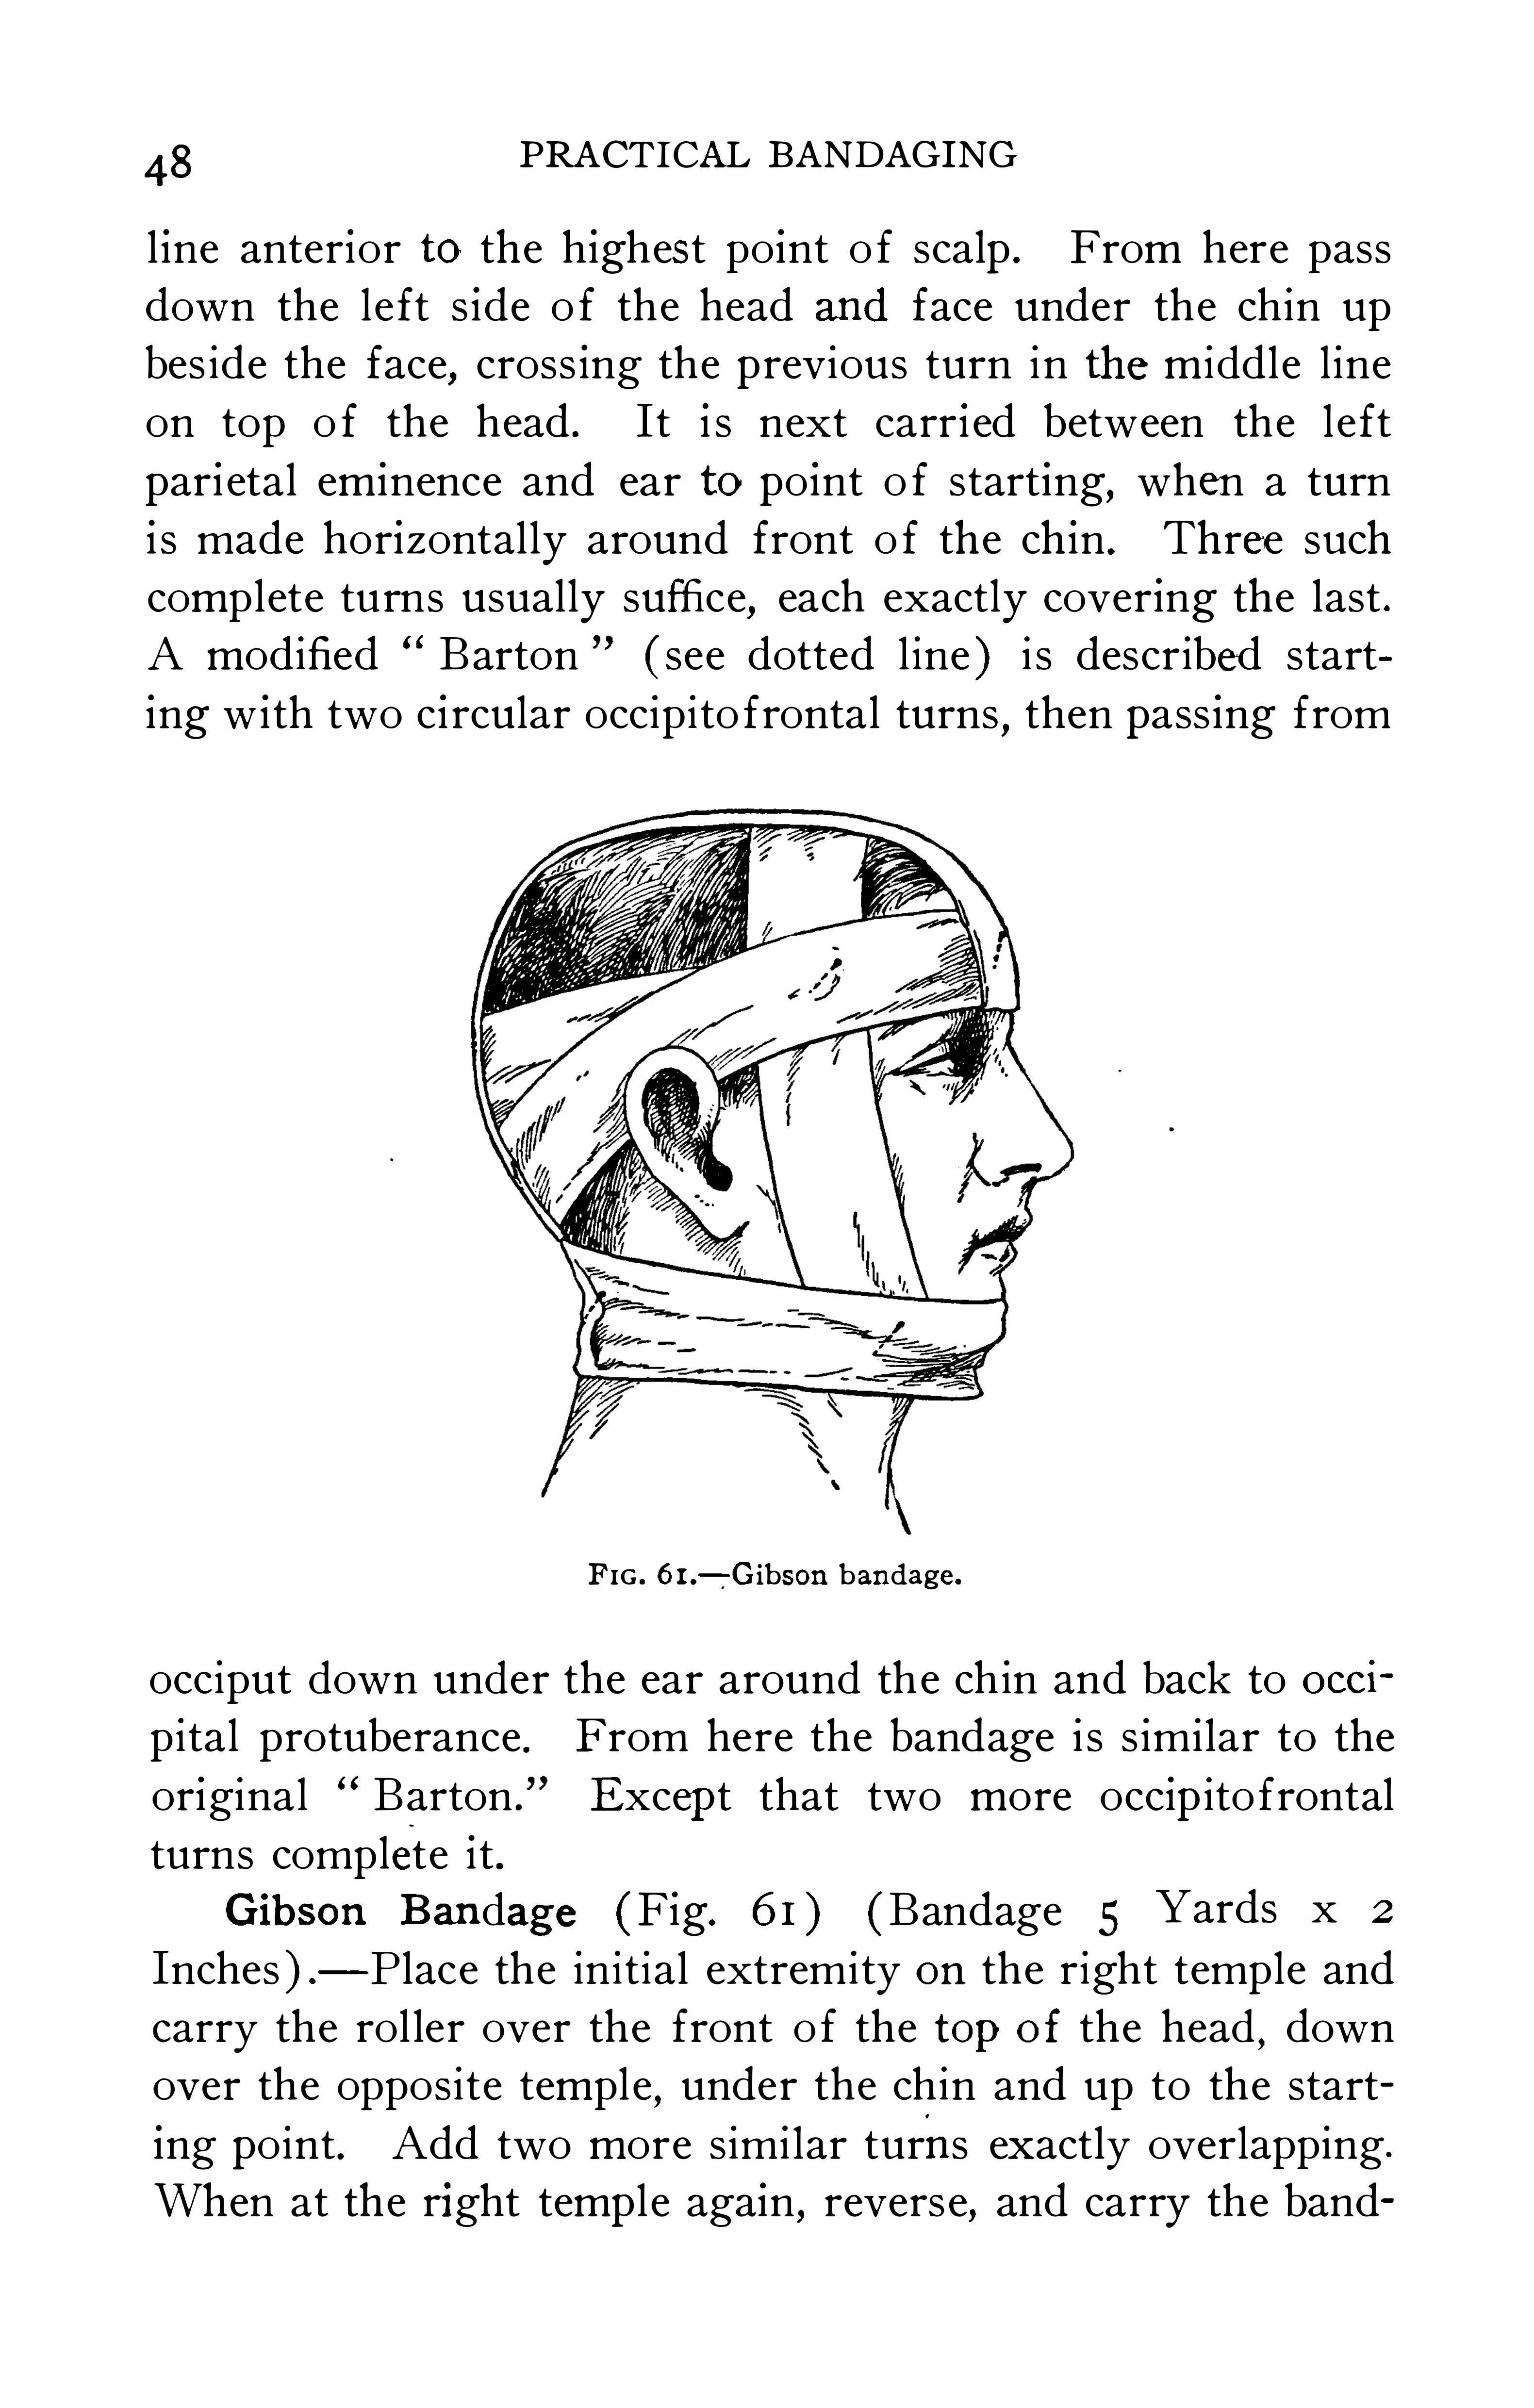
Gib son Bandage (Fig. 6 1 ) (Bandage 5 Yards x 2
Inches ) .
— P lace the initial extremity on the right temple and
carry the rol ler over the front o f the topof the head , down
over the opposite temple,under the chin and up to the start
ing point . Add two more simi lar turns exactly overlapping.
When at the right temp l e again , reverse, and carry the band
ROLLER BANDAGES49
age around the head and forehead , just above the ears . Re
peat thi s turn twice . F rom a pos ition above the r ight ear
carry the bandage poster ior,under the occip ital protuberance
and then around the anter ior aspect o f the chin . Repeat thi sturn tw ice . Return ing to the nape o f the neck a reverse is
made and the bandage carr ied over the centre o f the head to
end on the horizontal turns in the centre o f the forehead .
P in all intersect ions . Thi s -bandage I S poor and seldom used .
F IG. 62 .
— Ob l ique of the j aw (reverse s ide) . F IG. 63.-Ob l ique of the j aw (right s ide) .
Ob l ique of the Jaw (F igs . 62 and 63) (Bandage 5 Yardsx 2 Inches ) —
"
To bandage the right s ide o f the j aw,place the
initial extremity on the right temp l e and carry the bandage
by two ci rcular turns from be fore backward around the head
and forehead above the ears . On the thi rd arr ival over the
tuberance, around under the j aw and up the right s ide of theface , having the anterior edge o f the bandage just posterior to
the outer angle o f the dye. Thence i t i s carri ed over the head
and down back o f the le ft ear,under the j aw and aga in upthe
right s ide of the face posterior to the first turn and over
5°PRACTICAL BANDAGING
lapp ing i t one-hal f on the affected s ide and exactly covering
the previous turn on the sound.
s ide . Repeat two or three
t imes and,on arrival above the le ft ear, reverse the bandage
and carry around the head in circular turns immed iately over
the fixation turns . Instead o f reversing above the le ft ear
the las t turn may be carri ed under the chin , below the right
ear,around under the occiput
,ending in ci rcular turns over
lapping the fixation turns . The bandage of the le ft s ide
FIG . 64.
— Doub le ob lique of the j aw.
o f the j aw is started over the le ft temple and carr ied back
ward in ci rcular turns . From this point the bandages are
identical .
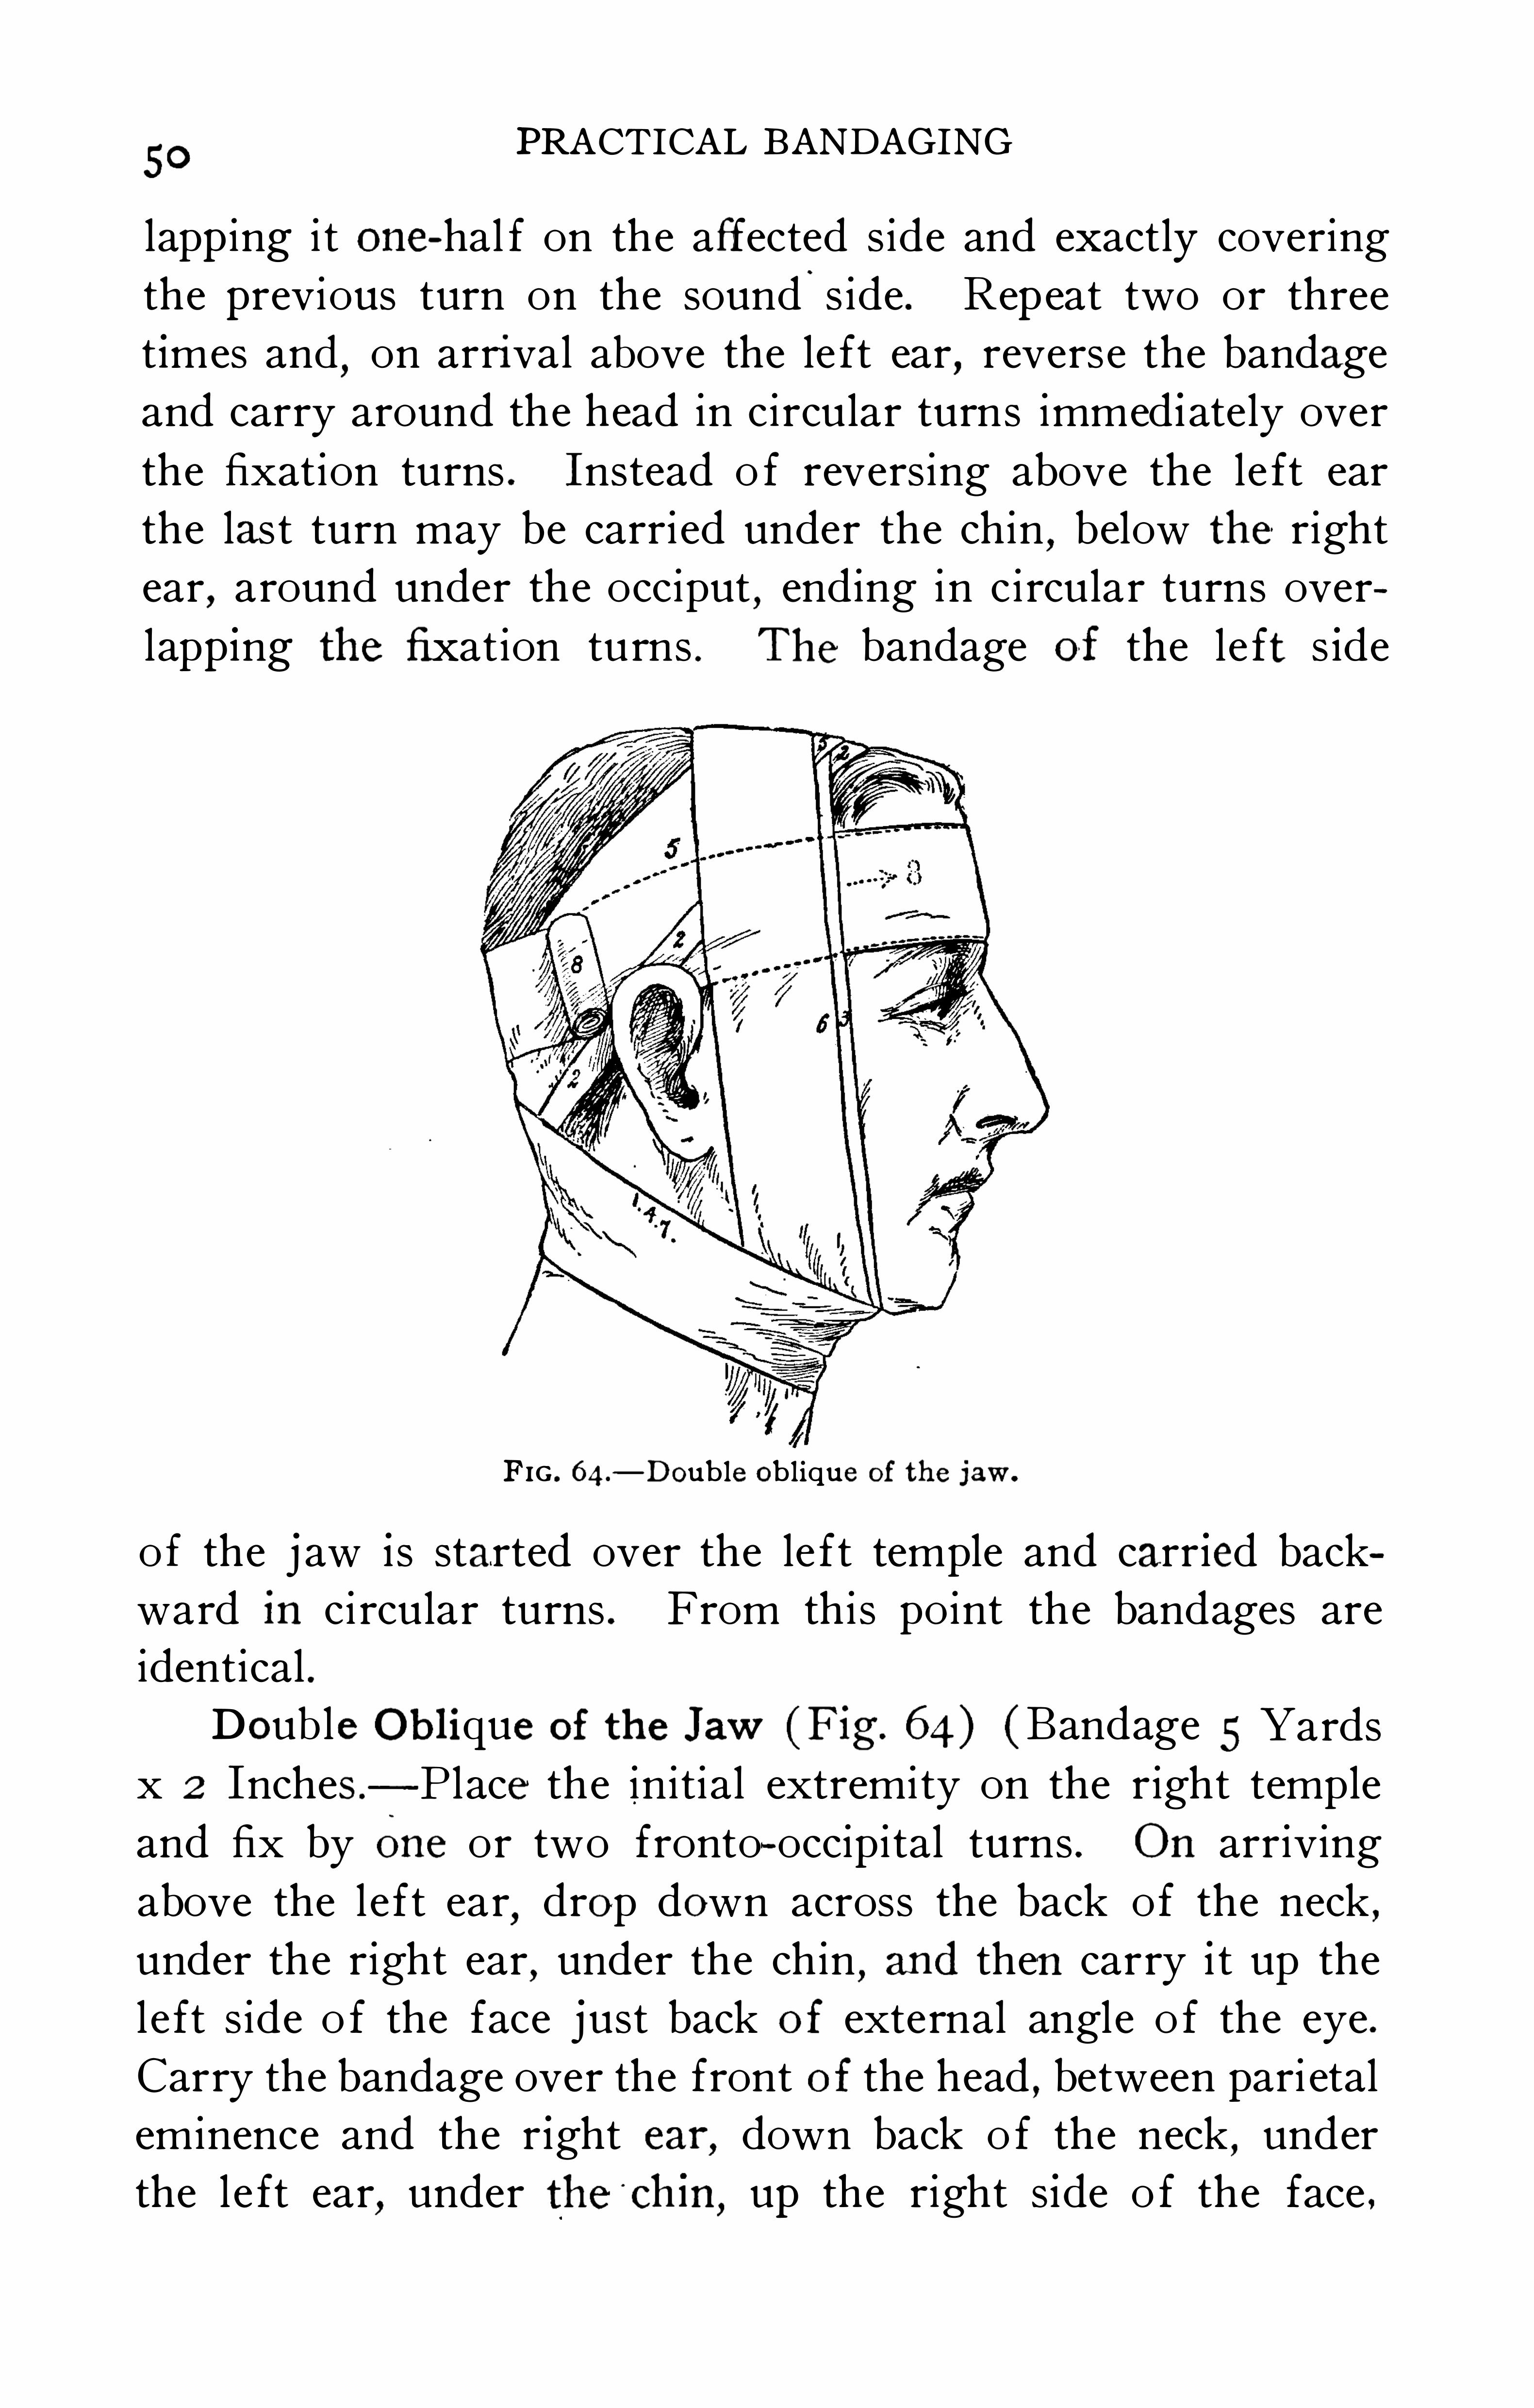
Doub le Ob l ique of the Jaw (Fig. 64) (Bandage 5 Yards
x 2 Inches — P lace the initial extremity on the right temple
and fix by One or two fronto~ occipi tal turns . On arriving
above the left ear,drop down across the back of the neck ,
under the right ear,under the chin
,and then carry i t up the
left s ide o f the face just back of external angle o f the eye .
Carry the bandage over the front of the head , between pari etal
eminence and the r ight car, down back o f the neck , under
the le ft ear,under the
’
chin,up the right s ide o f the face .
52 PRACTICAL BANDAGING
unti l the scalp i s covered,when the bandage i s completed by
two circular turns . In the appl i cation o f the recurrent turns ,the turns must o f necess i ty be held front and back unti l the
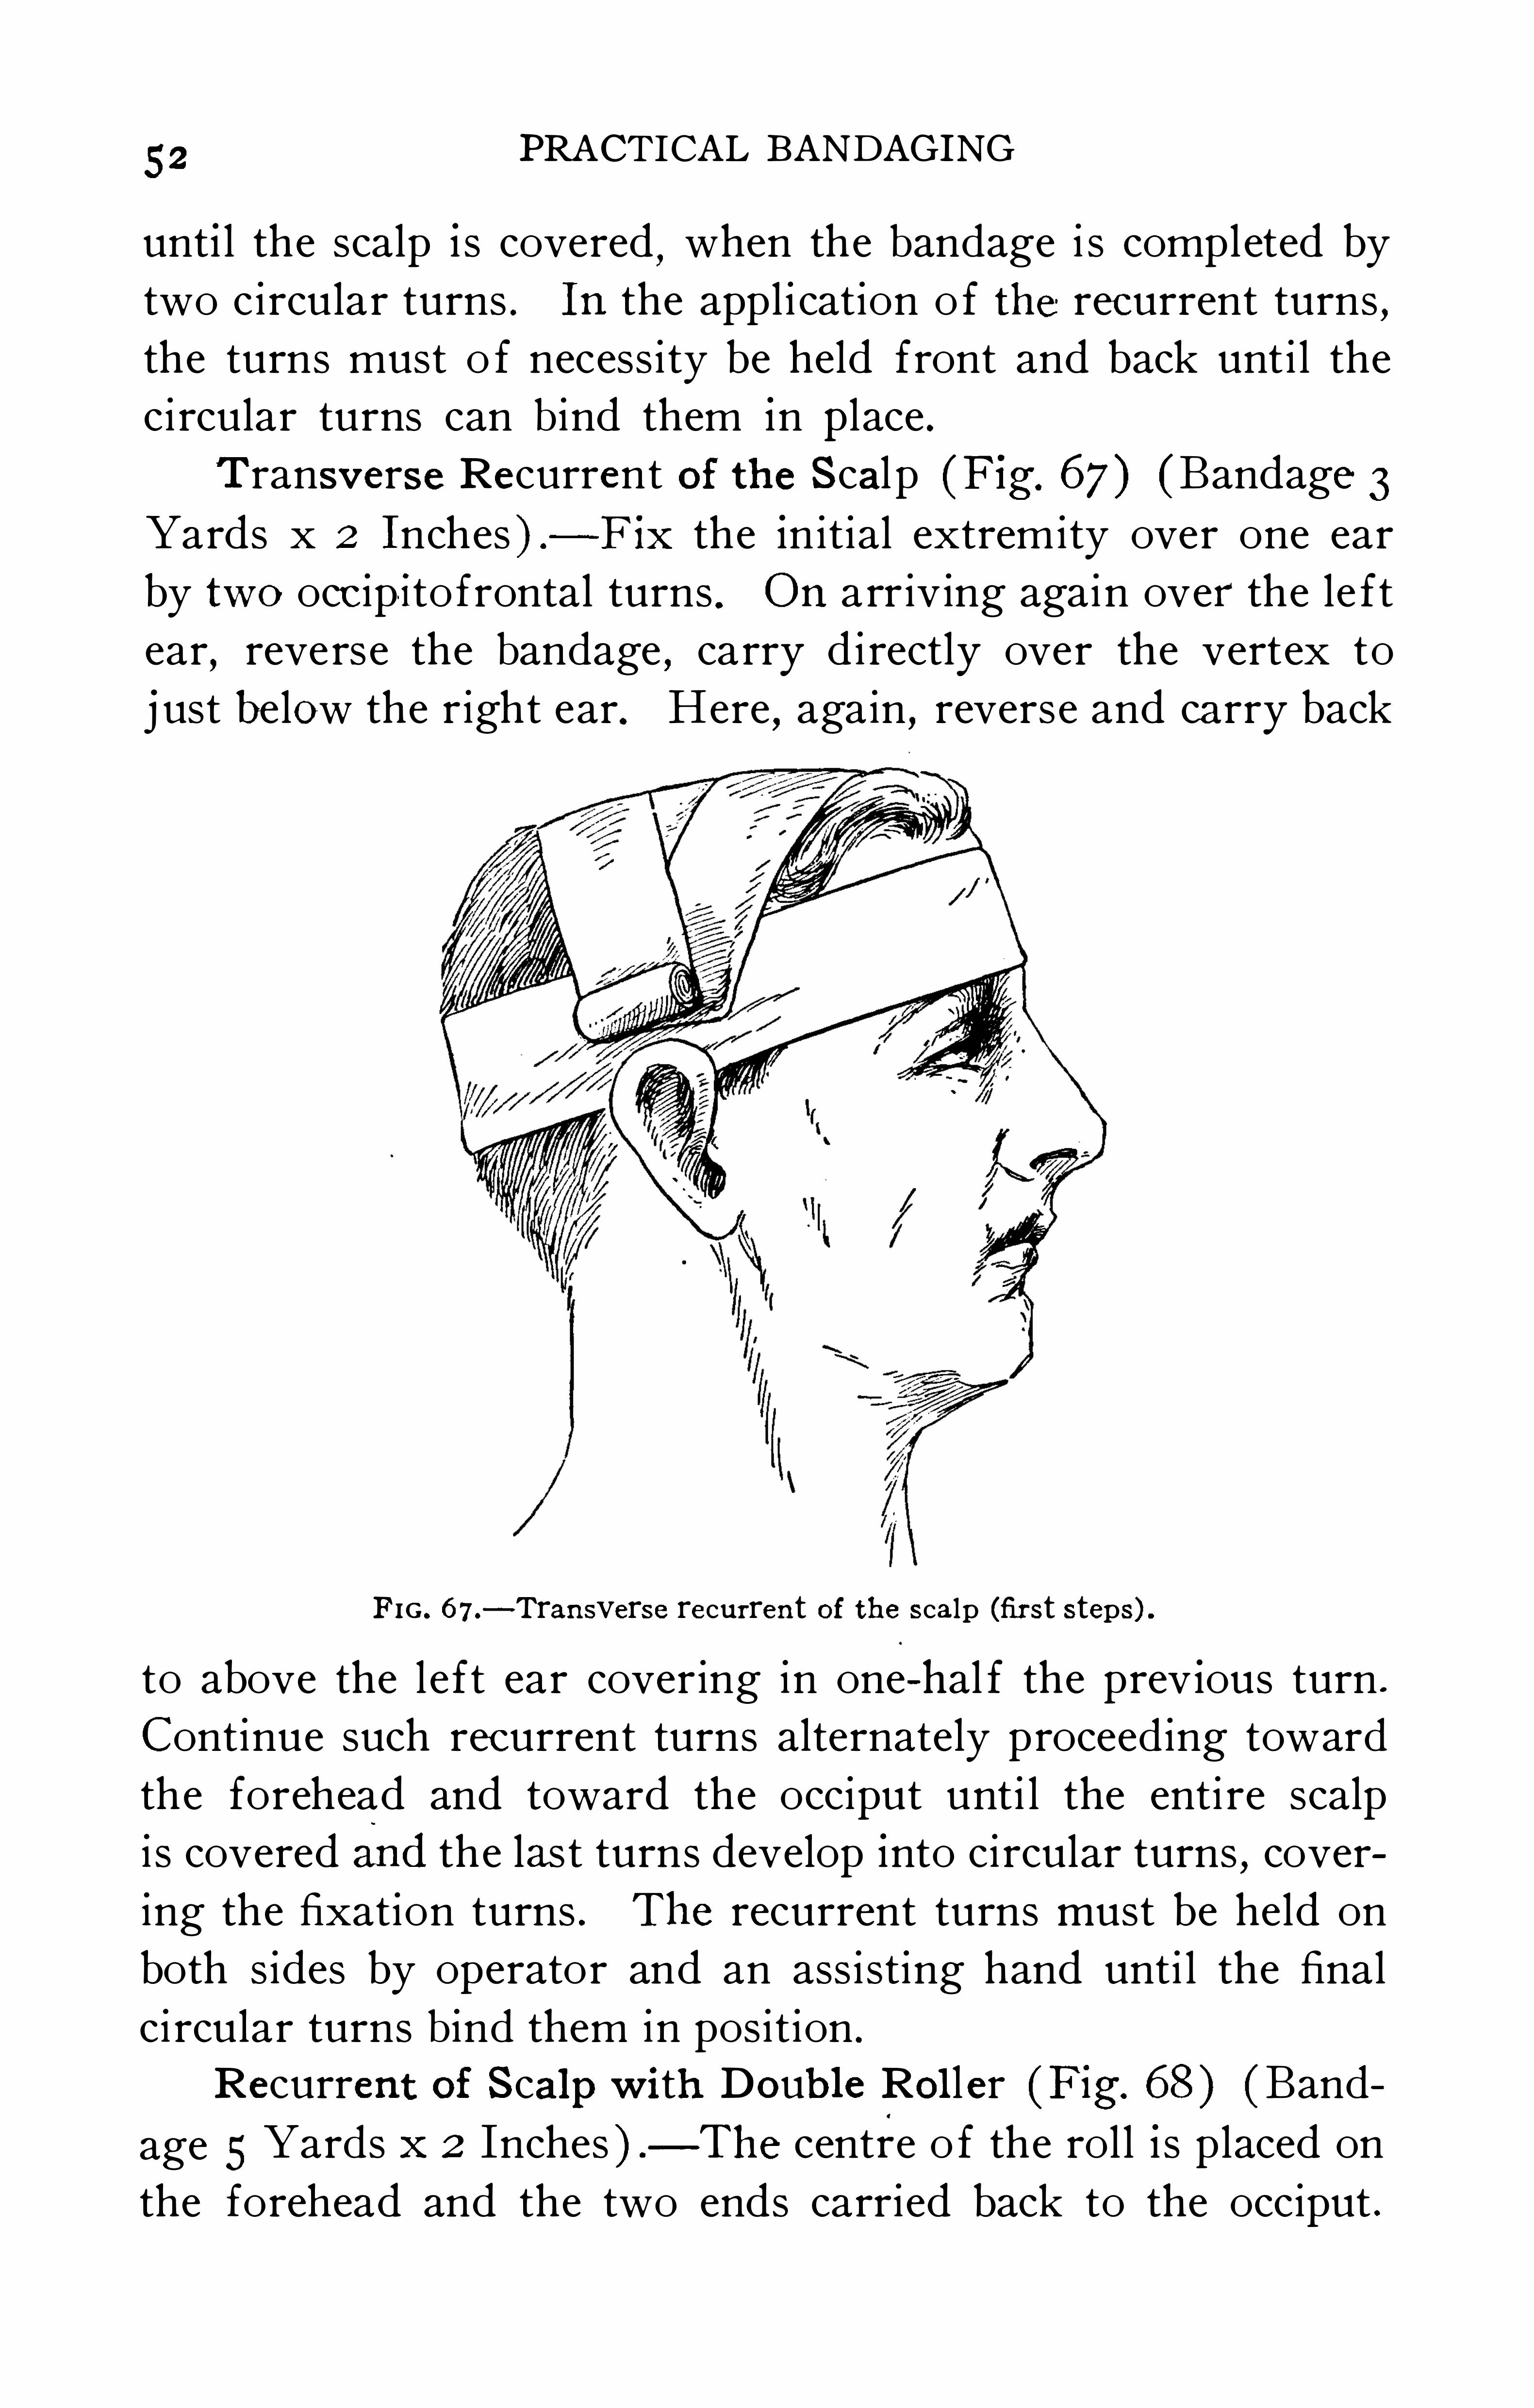
ci rcular turns can b ind them in p lace .Transverse Recurrent of the Scal p (Fig. 67) (Bandage 3
Yards x 2 Inches ) .
-F ix the initial extremity over one ear
by two occipito frontal turns . On arr iv ing again over the le ft
ear,reverse the bandage , carry di rectly over the vertex to
j ust below the right ear. Here,again
,reverse and carry back
FIG . 67.-Transverse recurrent of the scalp (first steps) .
to above the left ear covering in one-hal f the prev ious turn .
Continue such recurrent turns alternately proceed ing toward
the forehead and toward the occiput unti l the enti re scalp
i s covered and the las t turns develop into ci rcular turns , covering the fixation turns . The recurrent turns must be held on
both s ides by operator and an ass i sting hand unti l the final
ci rcular turns b ind them in position .
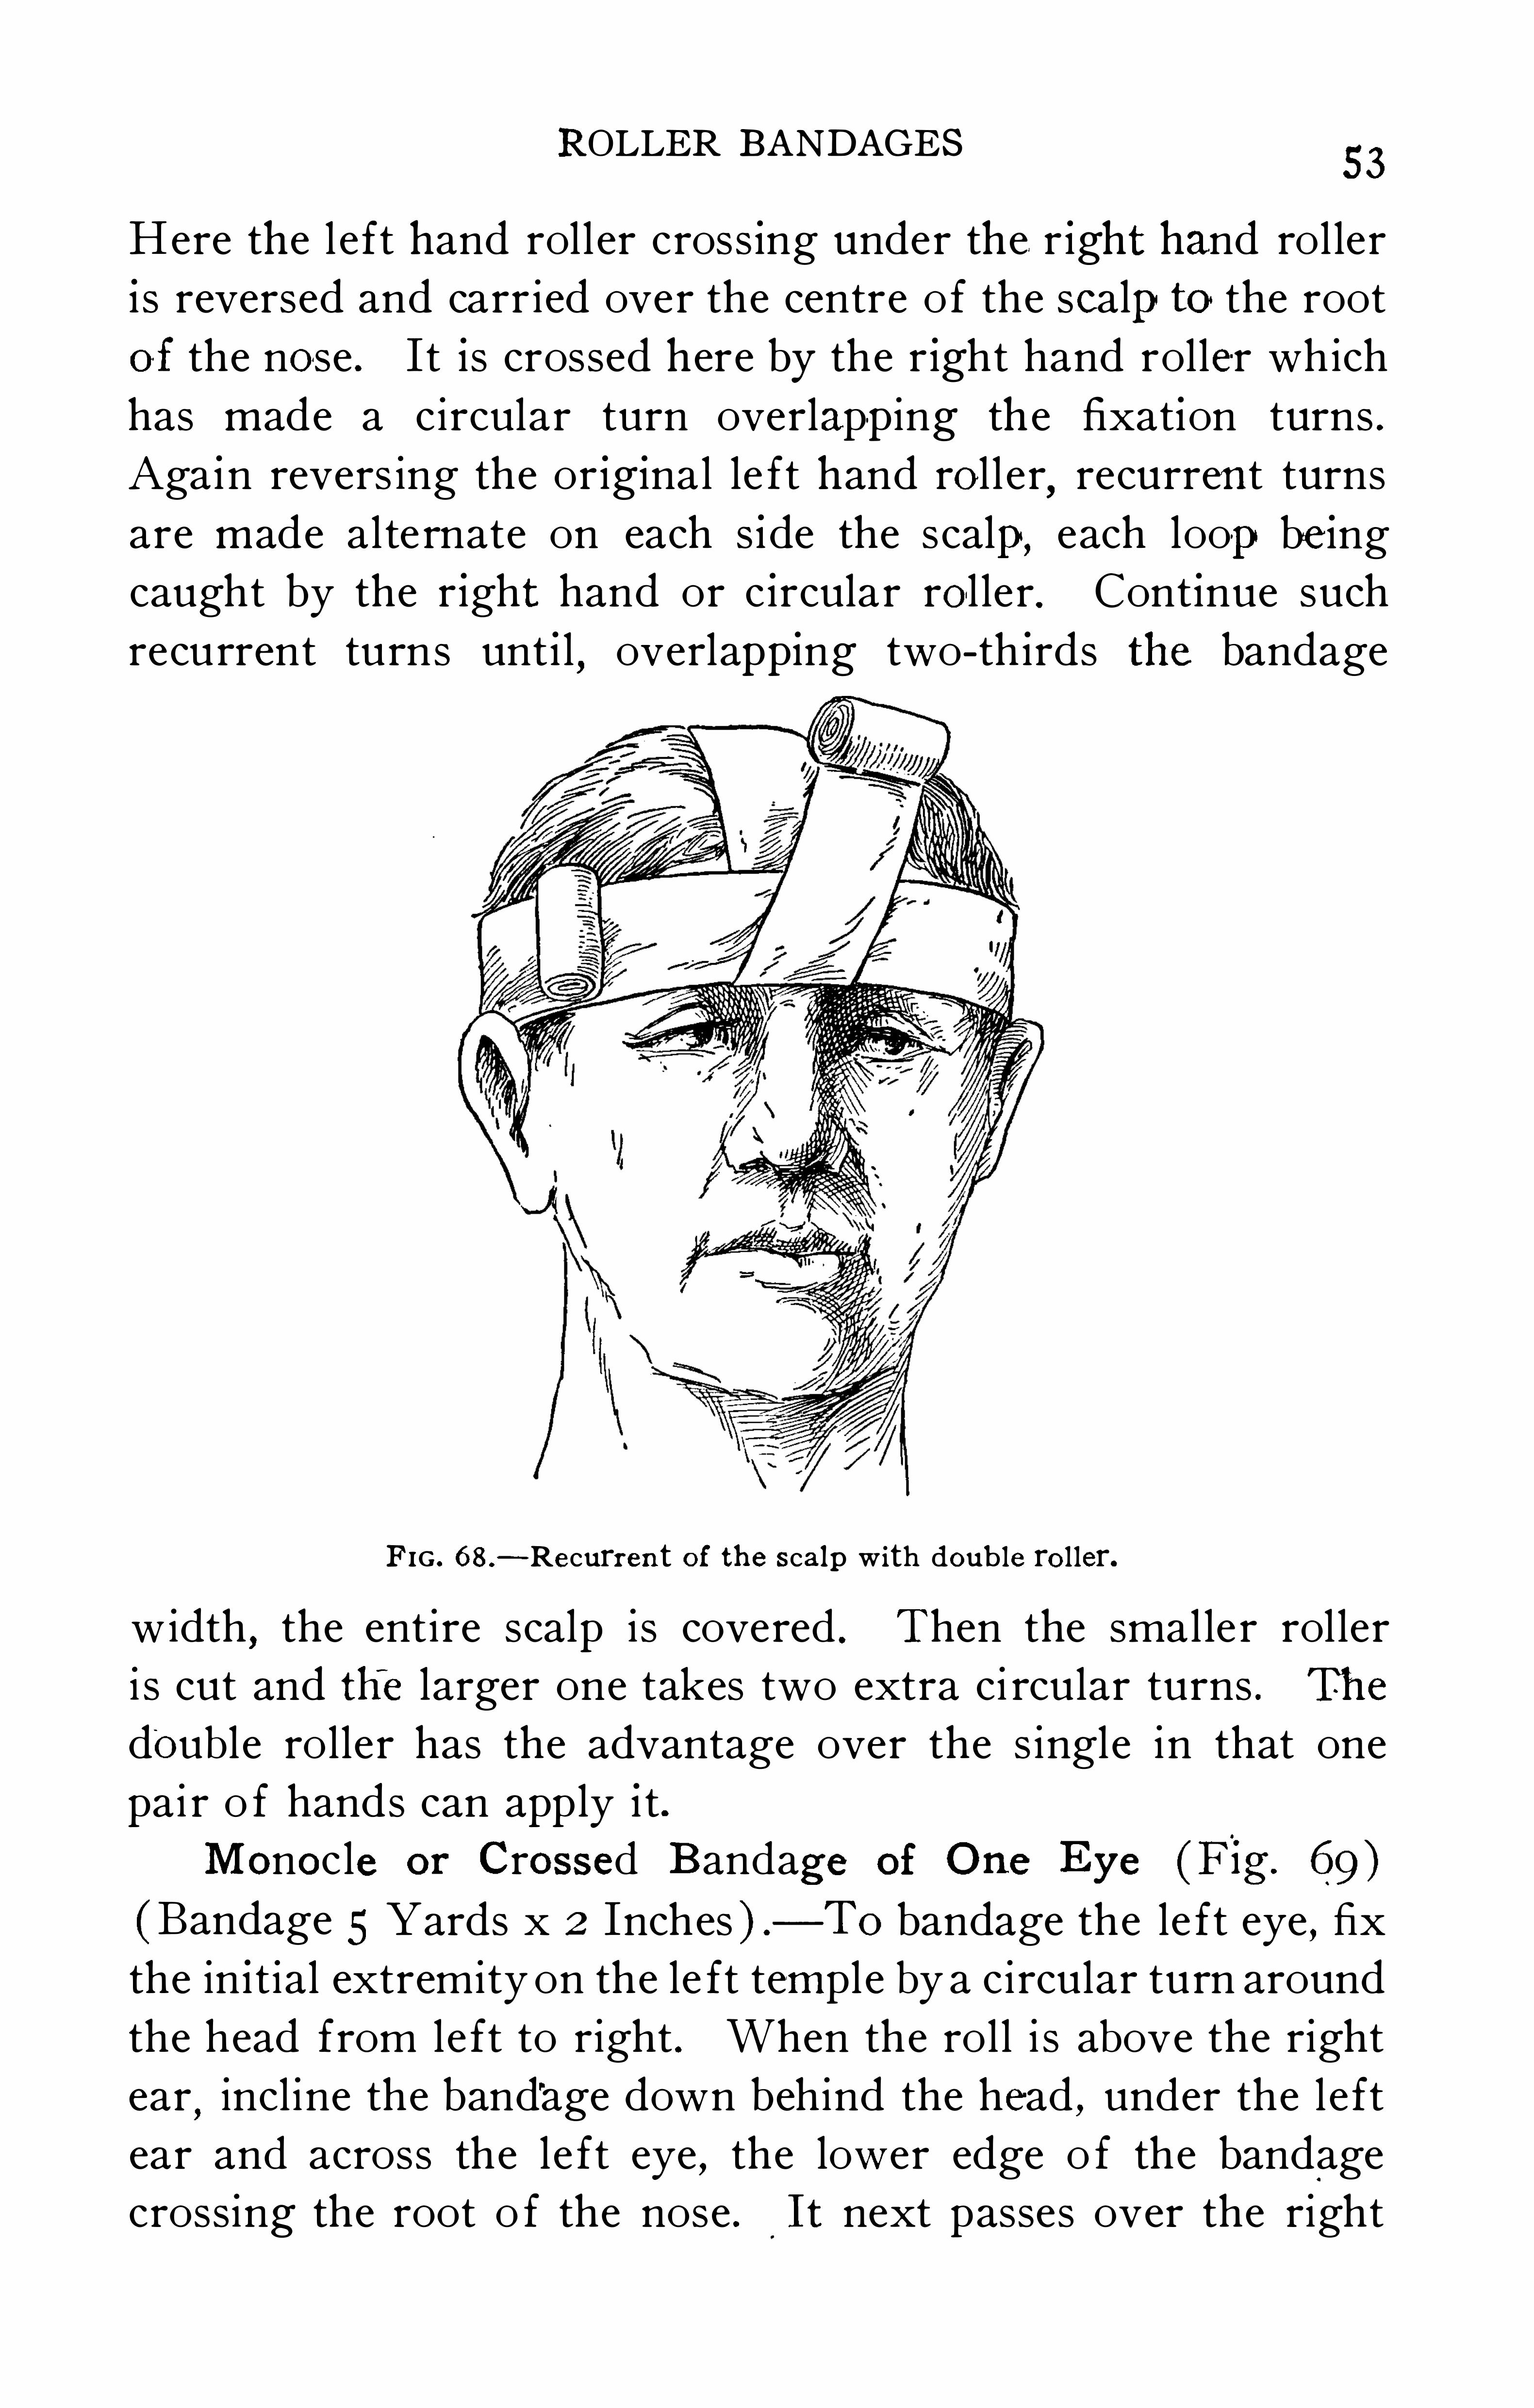
Recurrent of Scalpw ith Doub l e Rol ler (Fig. 68 ) (Band
age 5 Yards x 2 Inches ) — The centre o f the rol l i s placed onthe forehead and the two ends carried back to the occiput .
ROLLER BANDAGES53
H ere the l eft hand roll er cross ing under the. r ight hand rol ler
is reversed and carr ied over the centre of the scalpto the rootof the nose . I t is crossed here by the r ight hand roller which
has made a circular turn overlap-p ing the fixation turns .
Aga in revers ing the or iginal le ft hand rol l er,recurrent turns
are made alte rnate on each s ide the scalp, each loo-pbe ingcaught by the r ight hand or c ircular rol ler . Cont inue such
recurrent turns unt i l,overlapping two- th irds the bandage
FIG . 68 .
-Recurrent of the scalp w ith doub le rol ler.
width , the entire scalp is covered . Then the smalle r roller
i s cut and the larger one takes two extra ci rcular turns . The
doubl e roller has the advantage over the s ingle in that one
pai r o f hands can apply i t .Monocle or Crossed B andage of One E ye (F ig. 69)
(Bandage 5 Yards x 2 Inches ) .
— To bandage the le ft eye , fix
the in i tial extremity on the le ft temple by a circular turn around
the head from left to right . When the rol l i s above the right
ear,incl ine the band‘age down behind the head , under the left
ear and across the le ft eye,the lower edge o f the bandage
crossing the root o f the nose . It next passes over the right
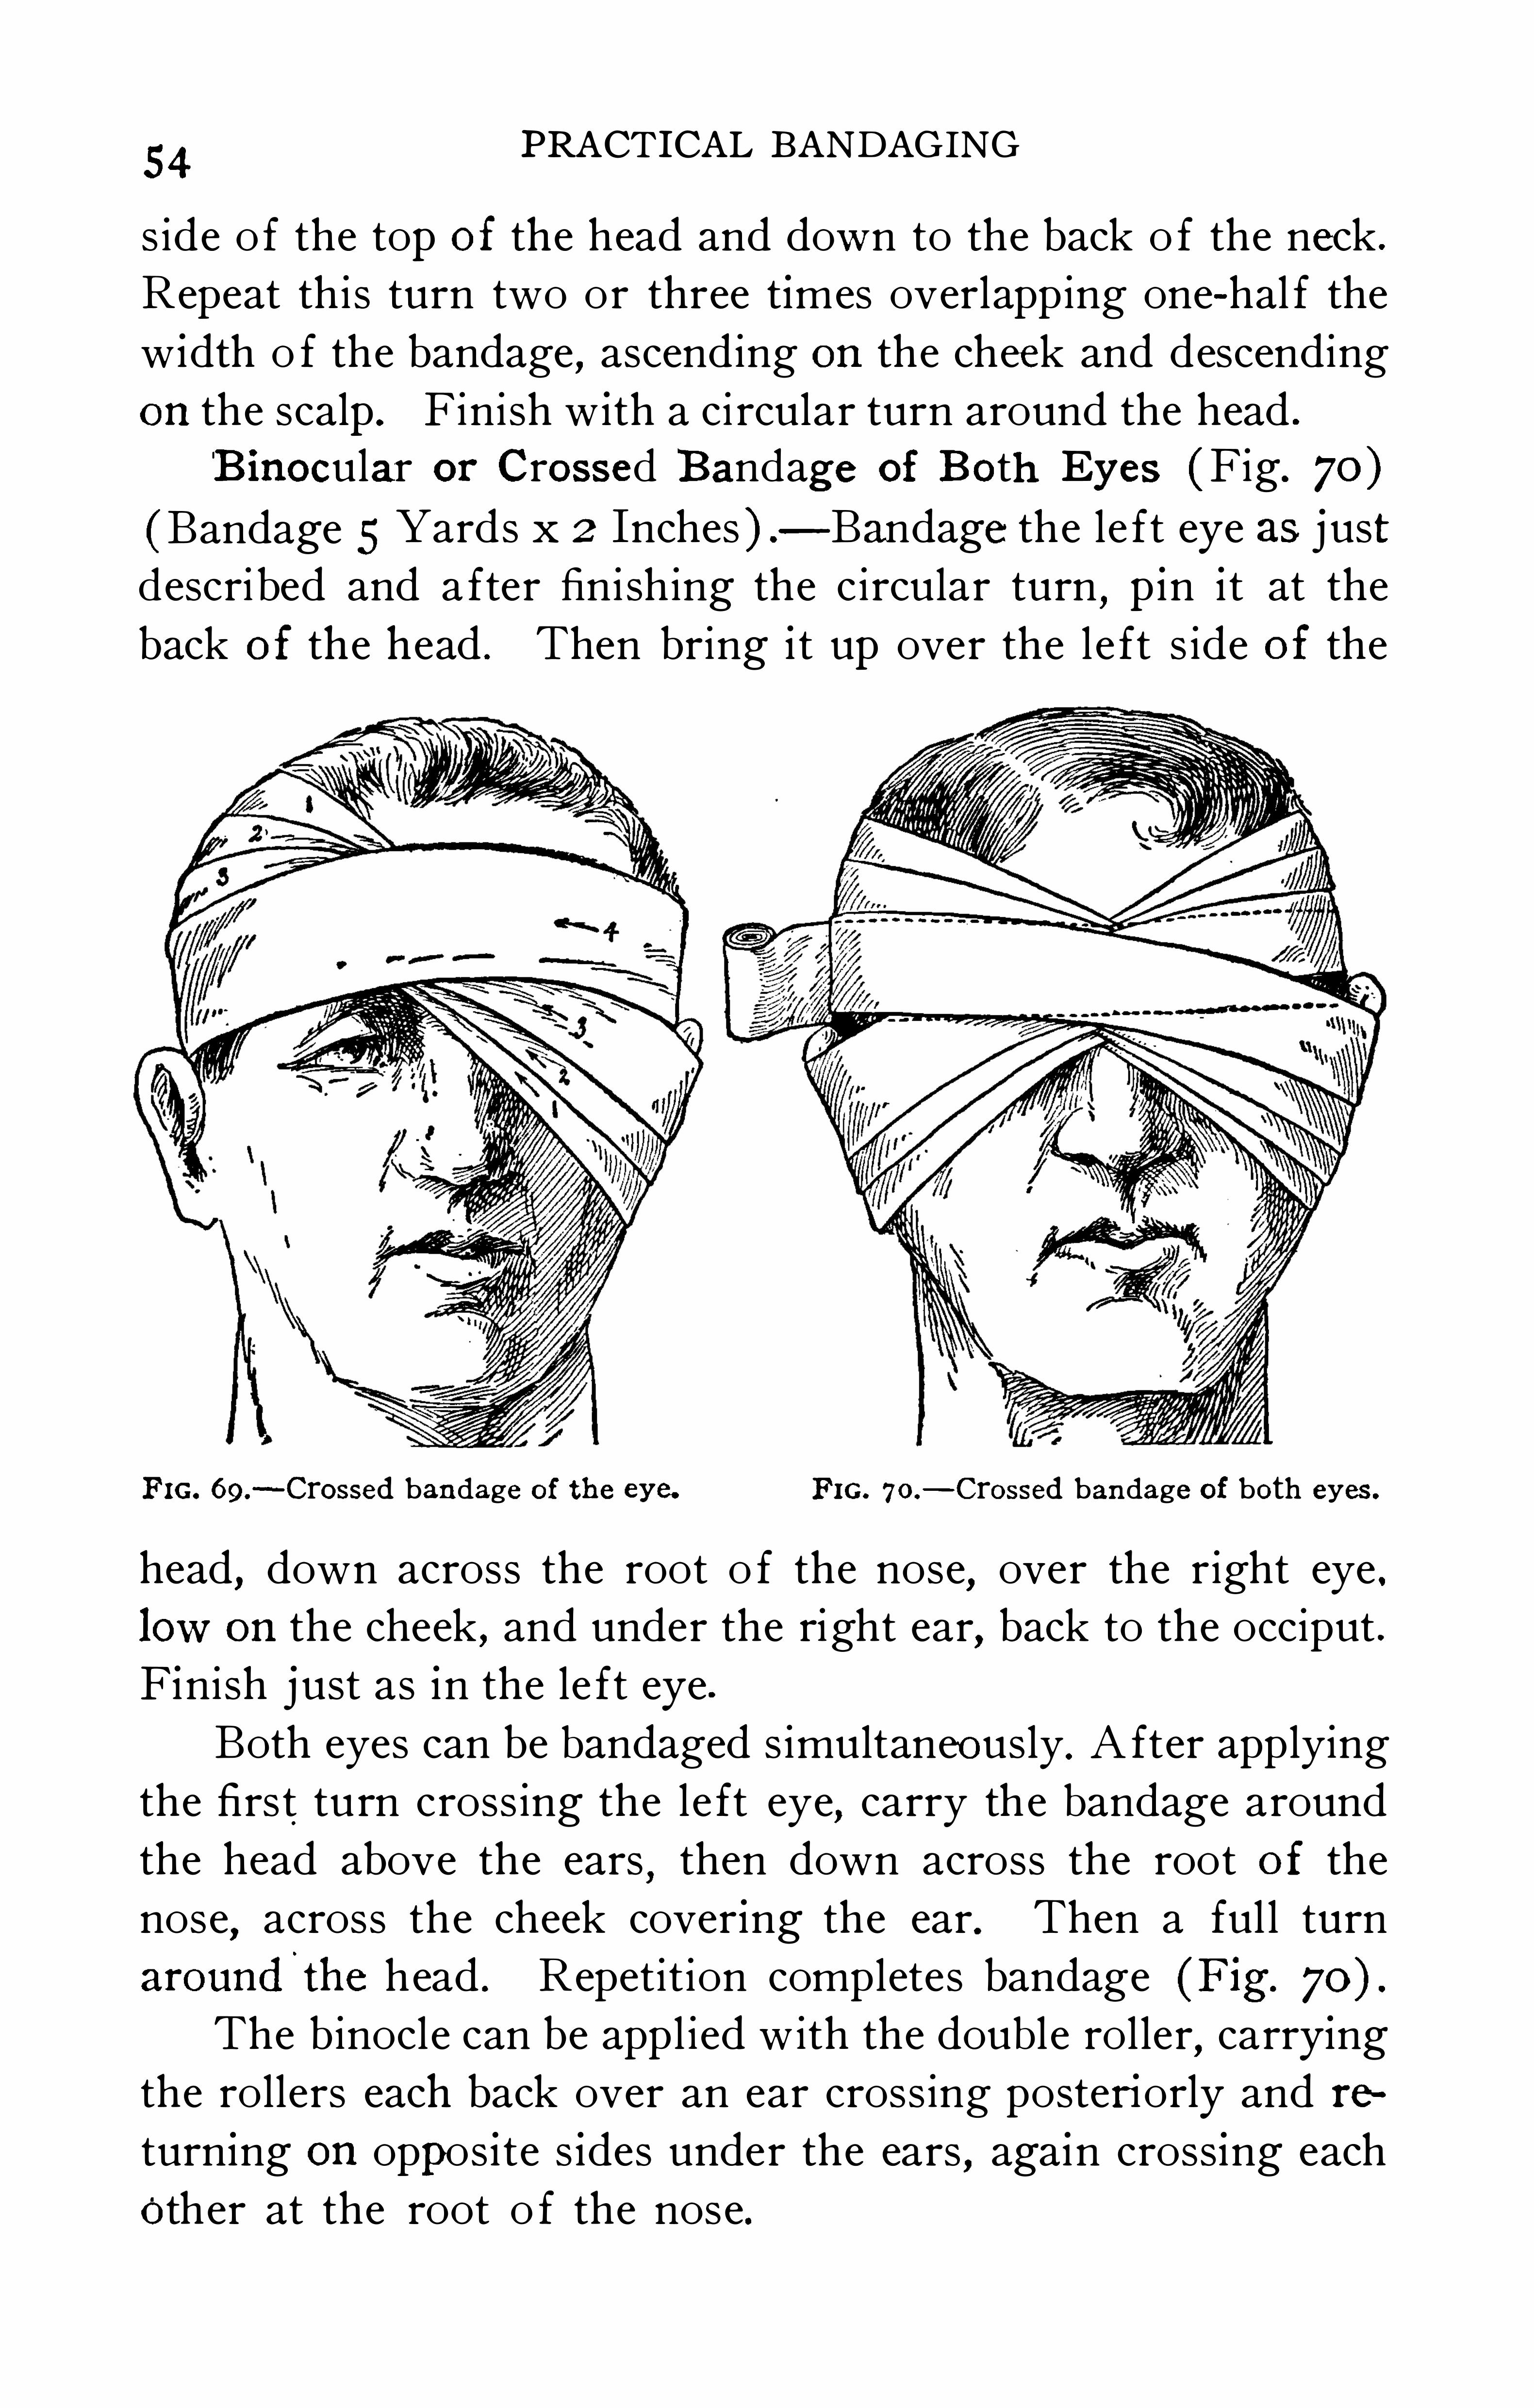
54PRACTICAL BANDAGING
s ide o f the top of the head and down to the back o f the neck .
Repeat thi s turn two or three times overlapping one-hal f the
w idth o f the bandage , ascending on the cheek and descending
on the scalp . F inish w ith a ci rcular turn around the head .
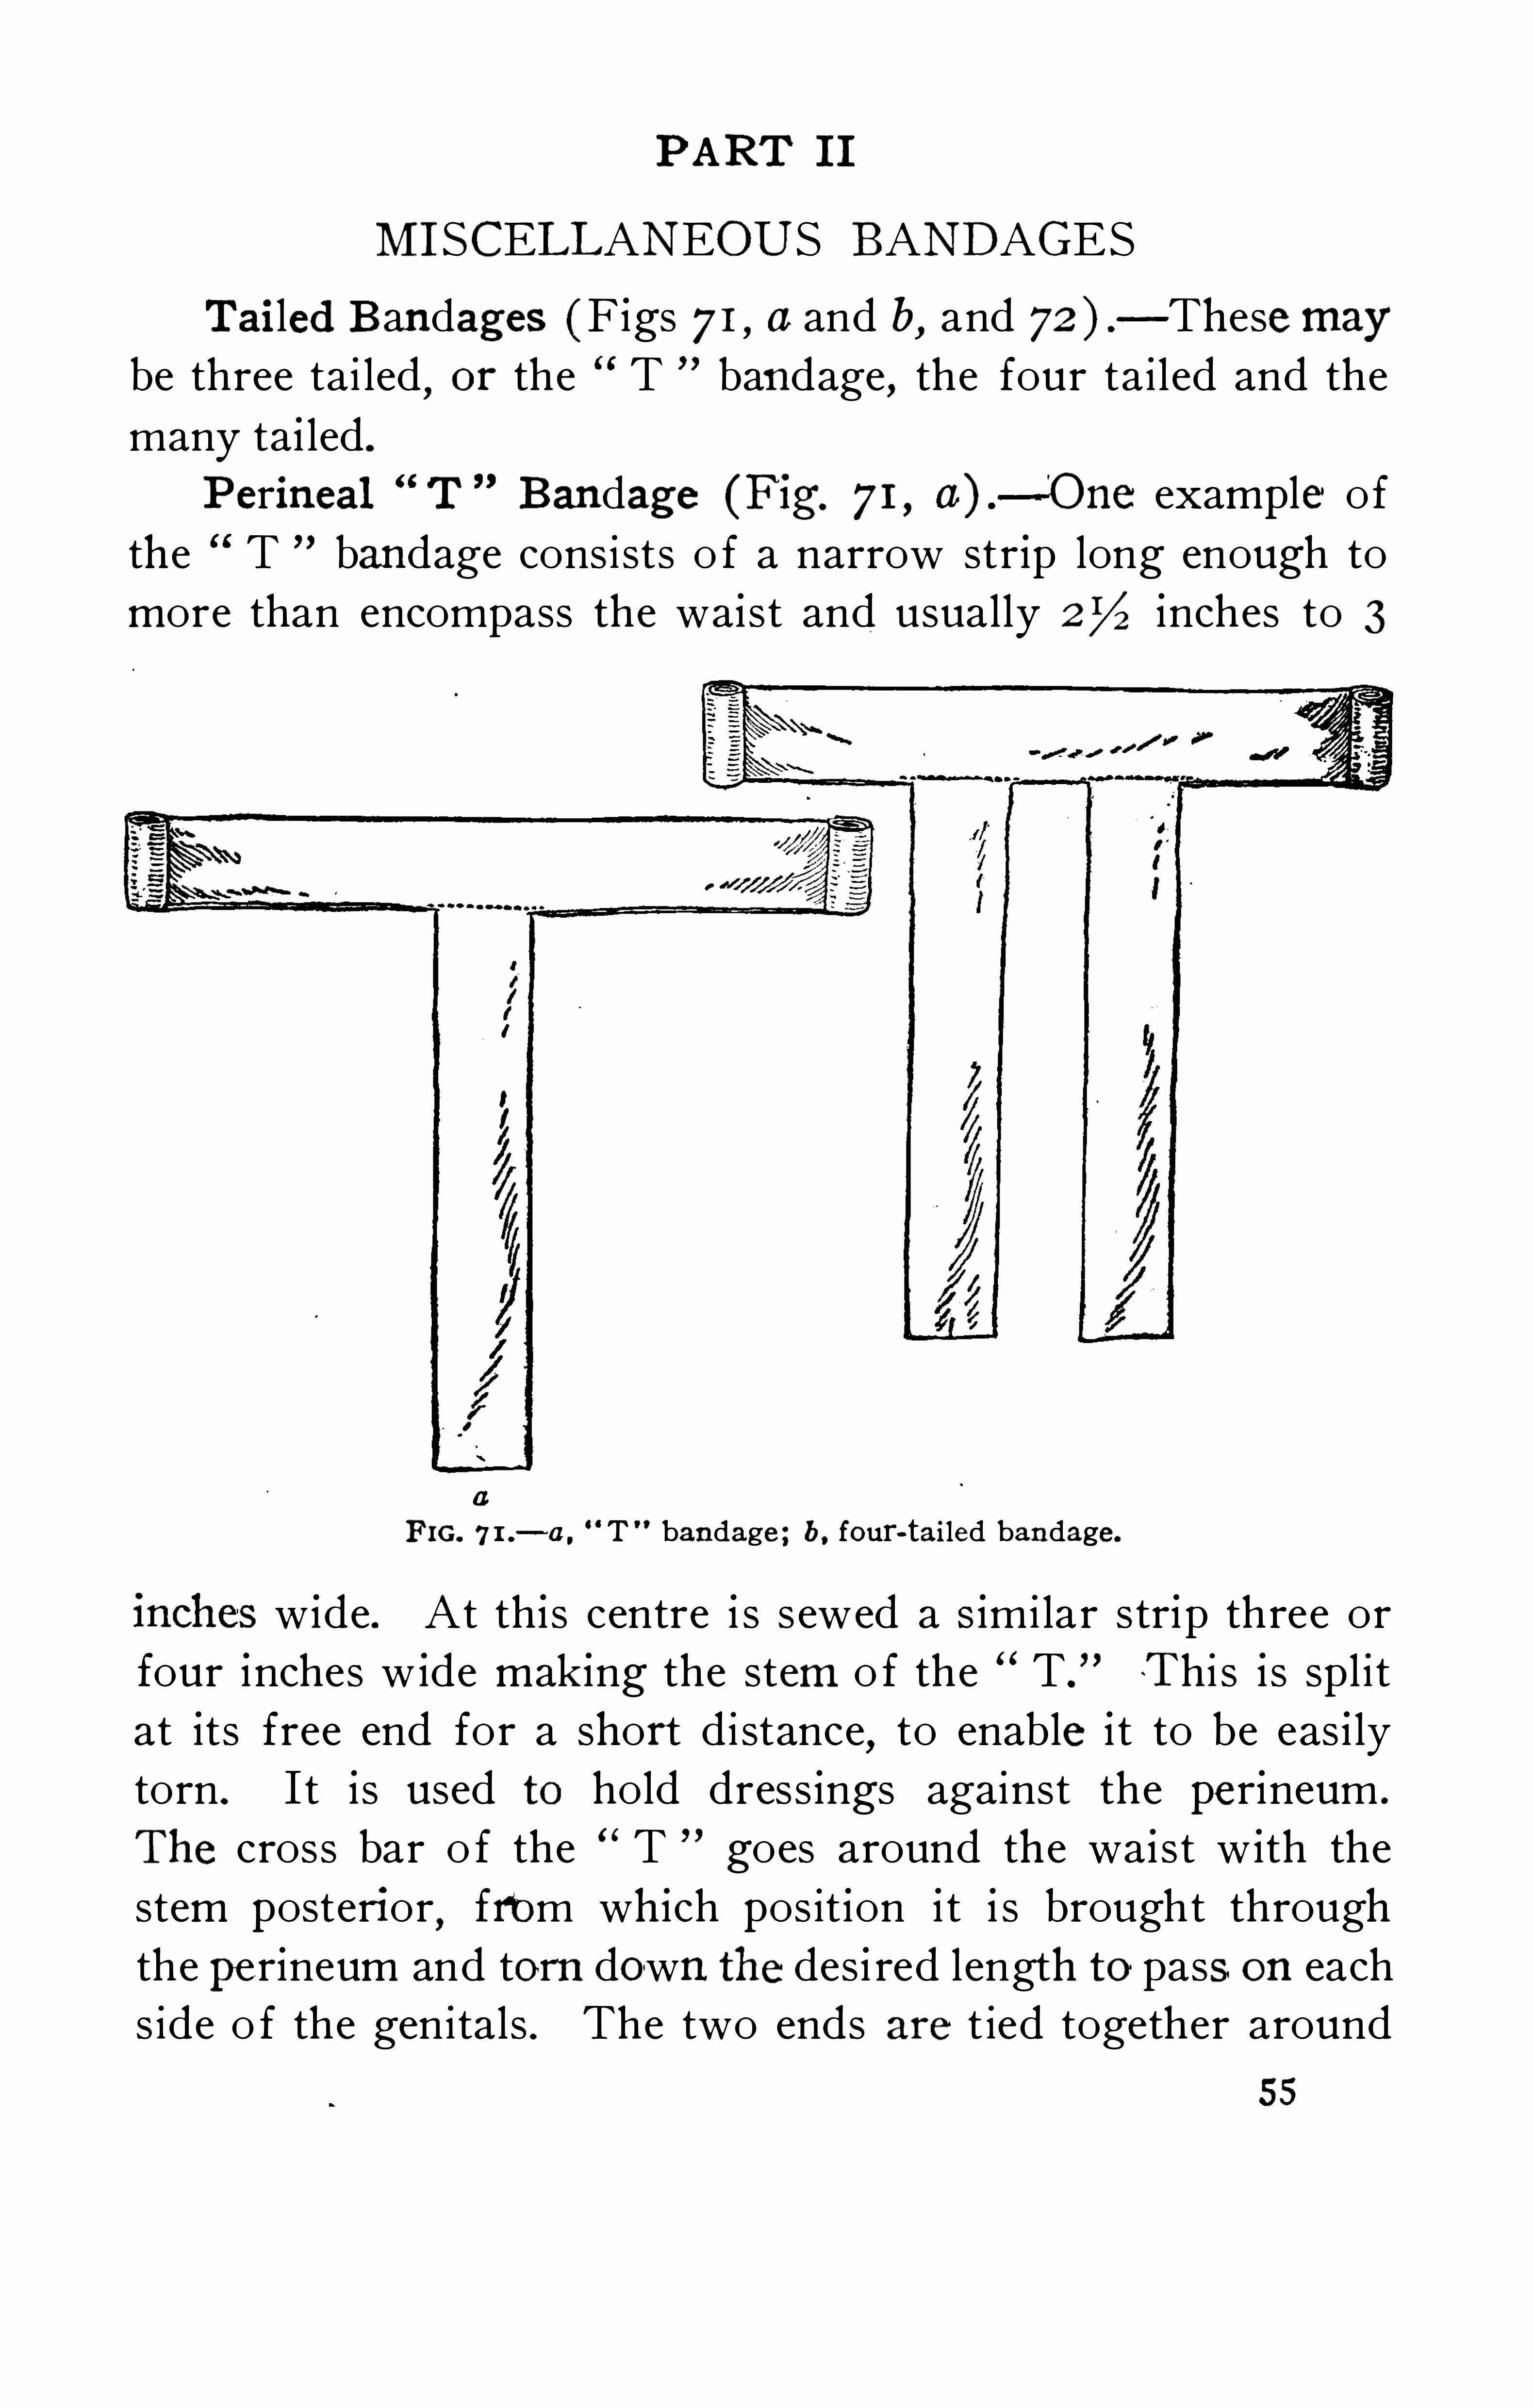
B inocular or Crossed Bandage of Both Eyes (F ig. 70 )
(Bandage 5 Yards x 2 Inches ) — Bandage the le ft eye as j ust
descri bed and a fter fini shing the circular turn,pin i t at the
back of the head . Then bring i t up over the le ft s ide of the
F IG. 69.-Crossed bandage of the eye. F IG. 70.
— Crossed bandage of both eyes .
head, down across the root o f the nose, over the right eye .low on the cheek , and under the right ear, back to the occiput .
Finish just as in the le ft eye .
Both eyes can be bandaged s imultaneously. A fter applying
the first turn cross ing the le ft eye,carry the bandage around
the head above the ears,then down across the root of the
nose,across the cheek cover ing the ear. Then a ful l turn
aroundi
the head . Repetit ion completes bandage (Fig.
The binocle can be appl ied with the doubl e rol ler,carrying
the rollers each back over an ear cross ing posteriorly and re
turning on oppos i te s ides under the ears , again cross ing eachOther at the root o f the nose.
P ART I I
MISCELLANEOU S BANDAGES
Tailed B andages (Figs 71 , a and b, and 72 ) —Thesemaybe three tai led
,or the T bandage, the four tai led and the
many tai led .
P erineal T Bandage (Fig. 71 , a) .
—'
One example of
the T bandage consi sts o f a narrow str ip long enough to
more than encompass the waist and usually 2% inches to 3
F IG. 71 .— a. T bandage " b , four-tai led bandage.
w ide . At th is centre i s s ewed a S imilar strip three or
four inches w ide mak ing the stem o f the T .
"
Thi s is spl i t
at its free end for a short di stance,to enable i t to be eas i ly
torn . I t is used to hold dress ings against the perineum .
The cross bar o f the “ T goes around the wa i s t w ith the
stem posterior,from which pos it ion i t i s brought through
theperineum and torn down the des i red length to pass on eachs ide o f the genitals . The two ends are t ied together around
55
56PRACTICAL BANDAGING
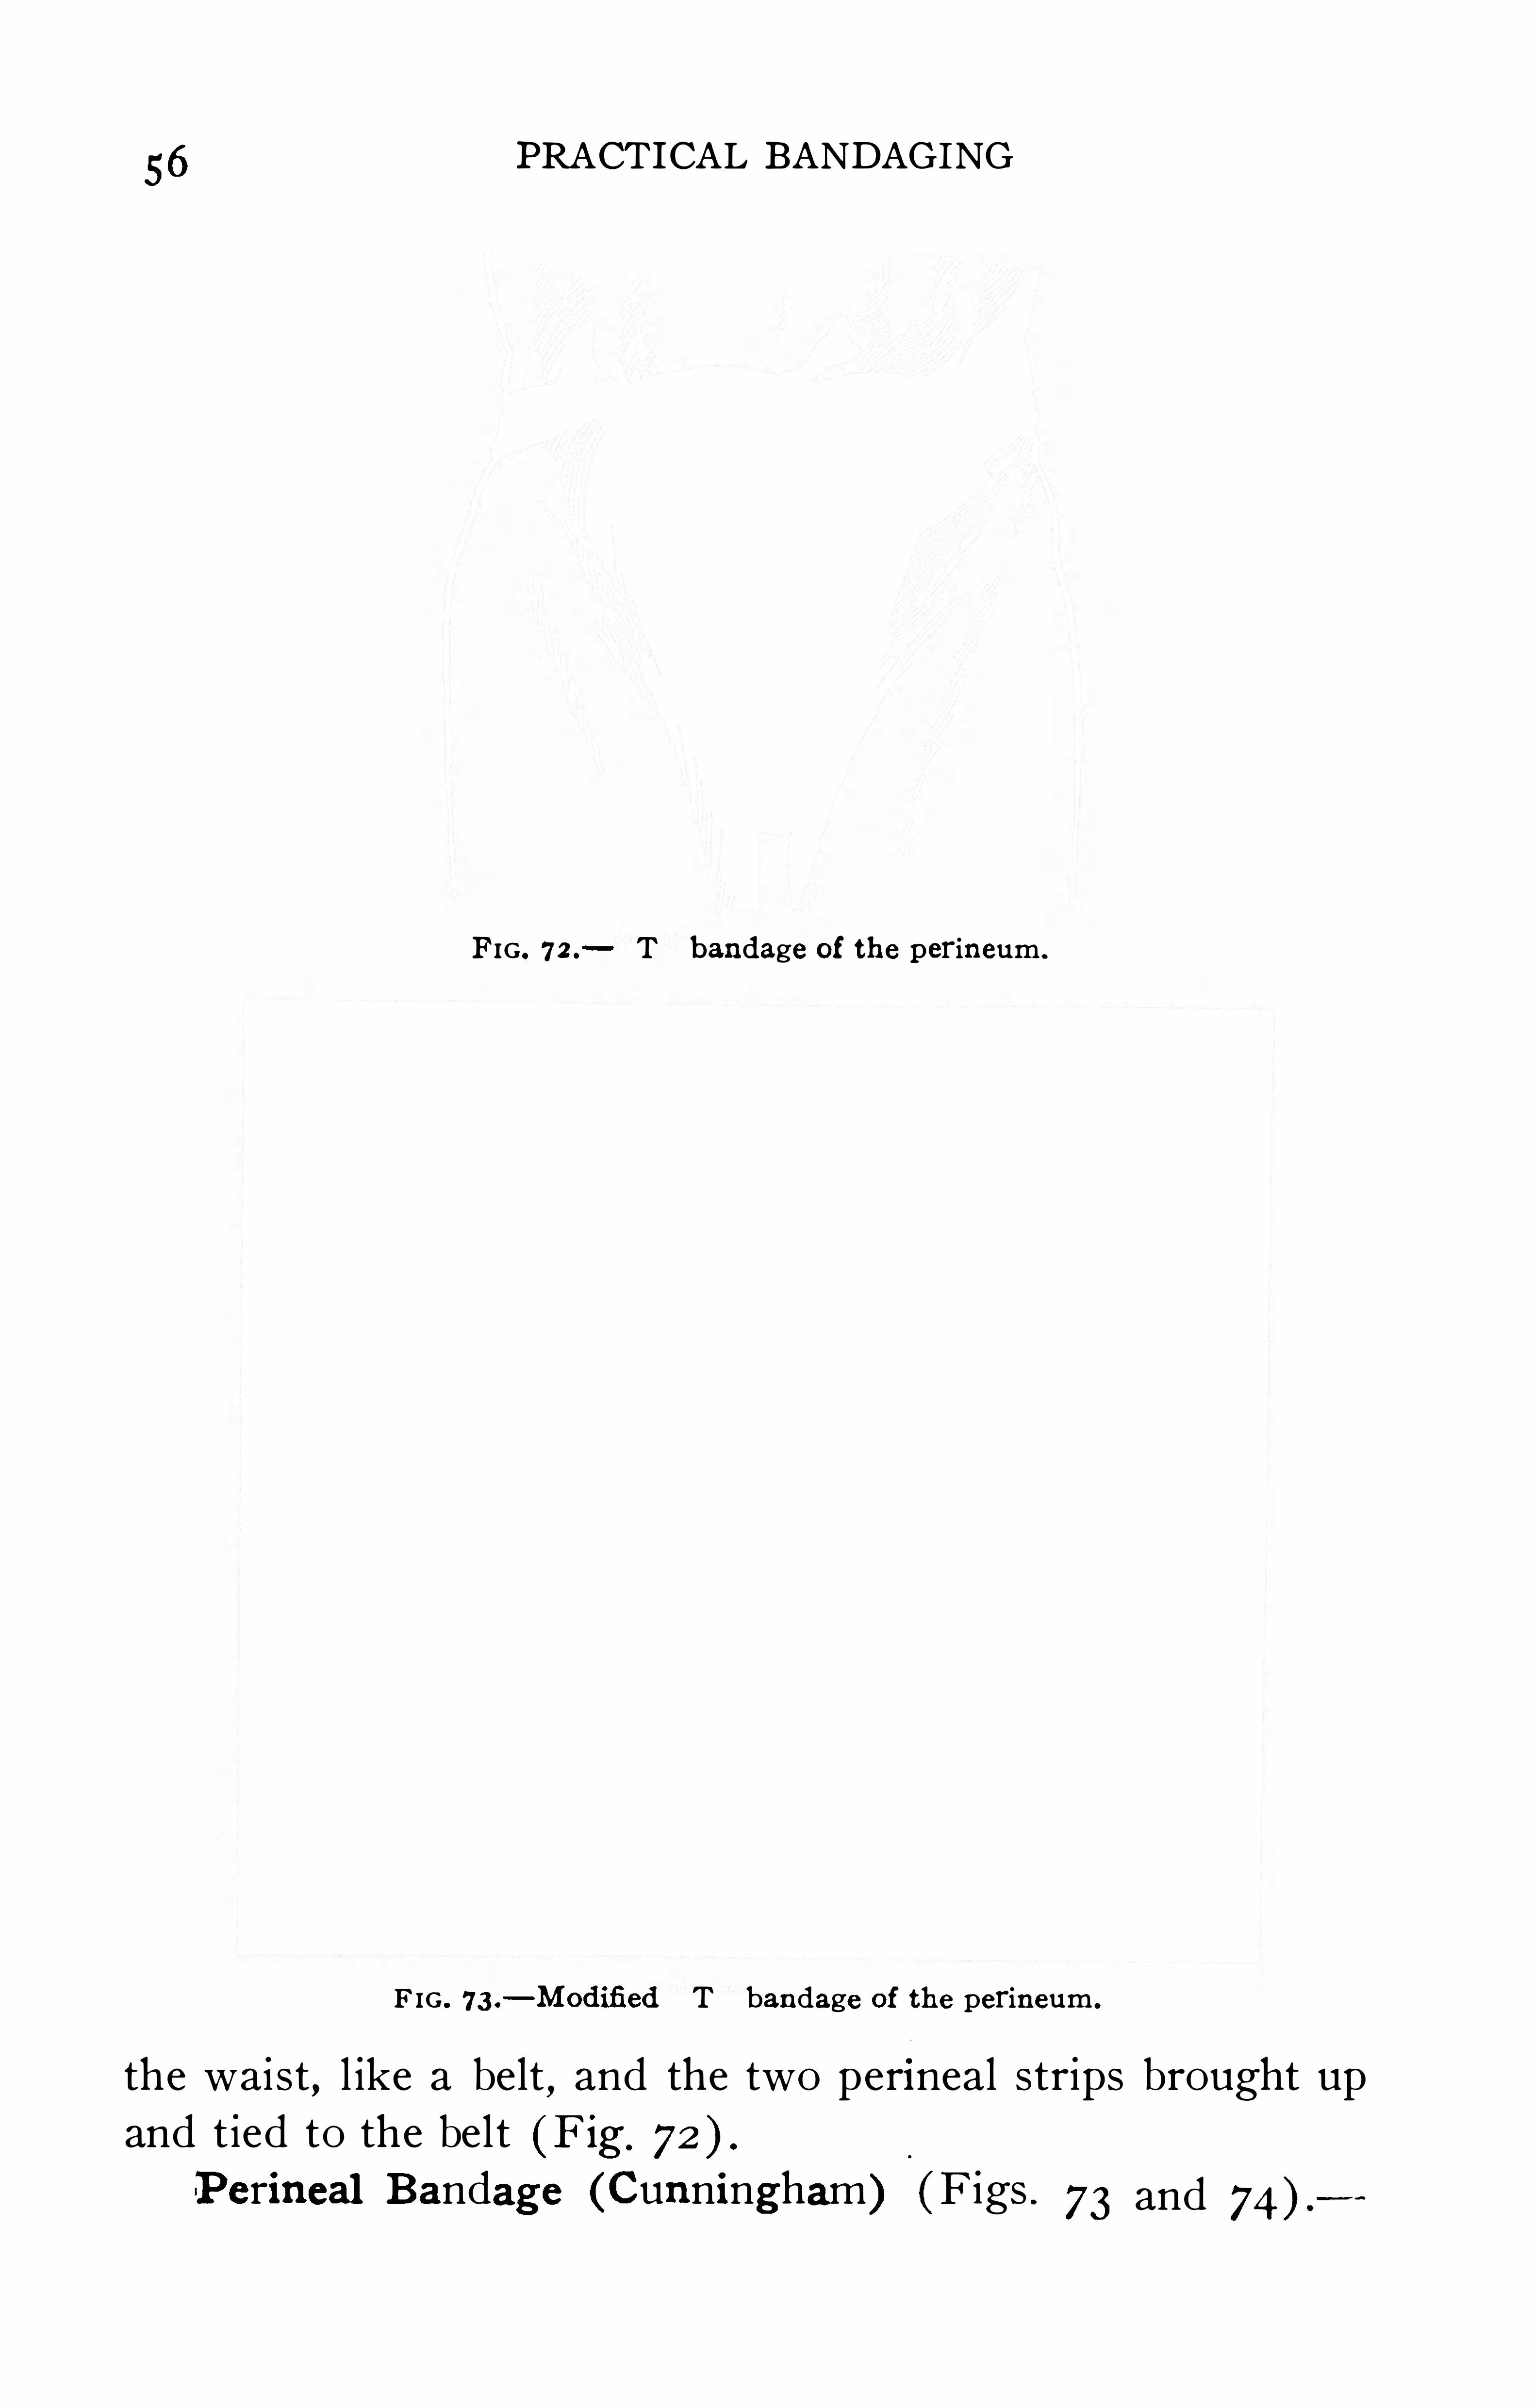
FIG. 72 . T bandage of the perineum .
F IG . 73.— Modifi ed T bandage of the perineum .
the waist, l ike a belt , and the two perineal strips brought upand t ied to the belt (F ig .
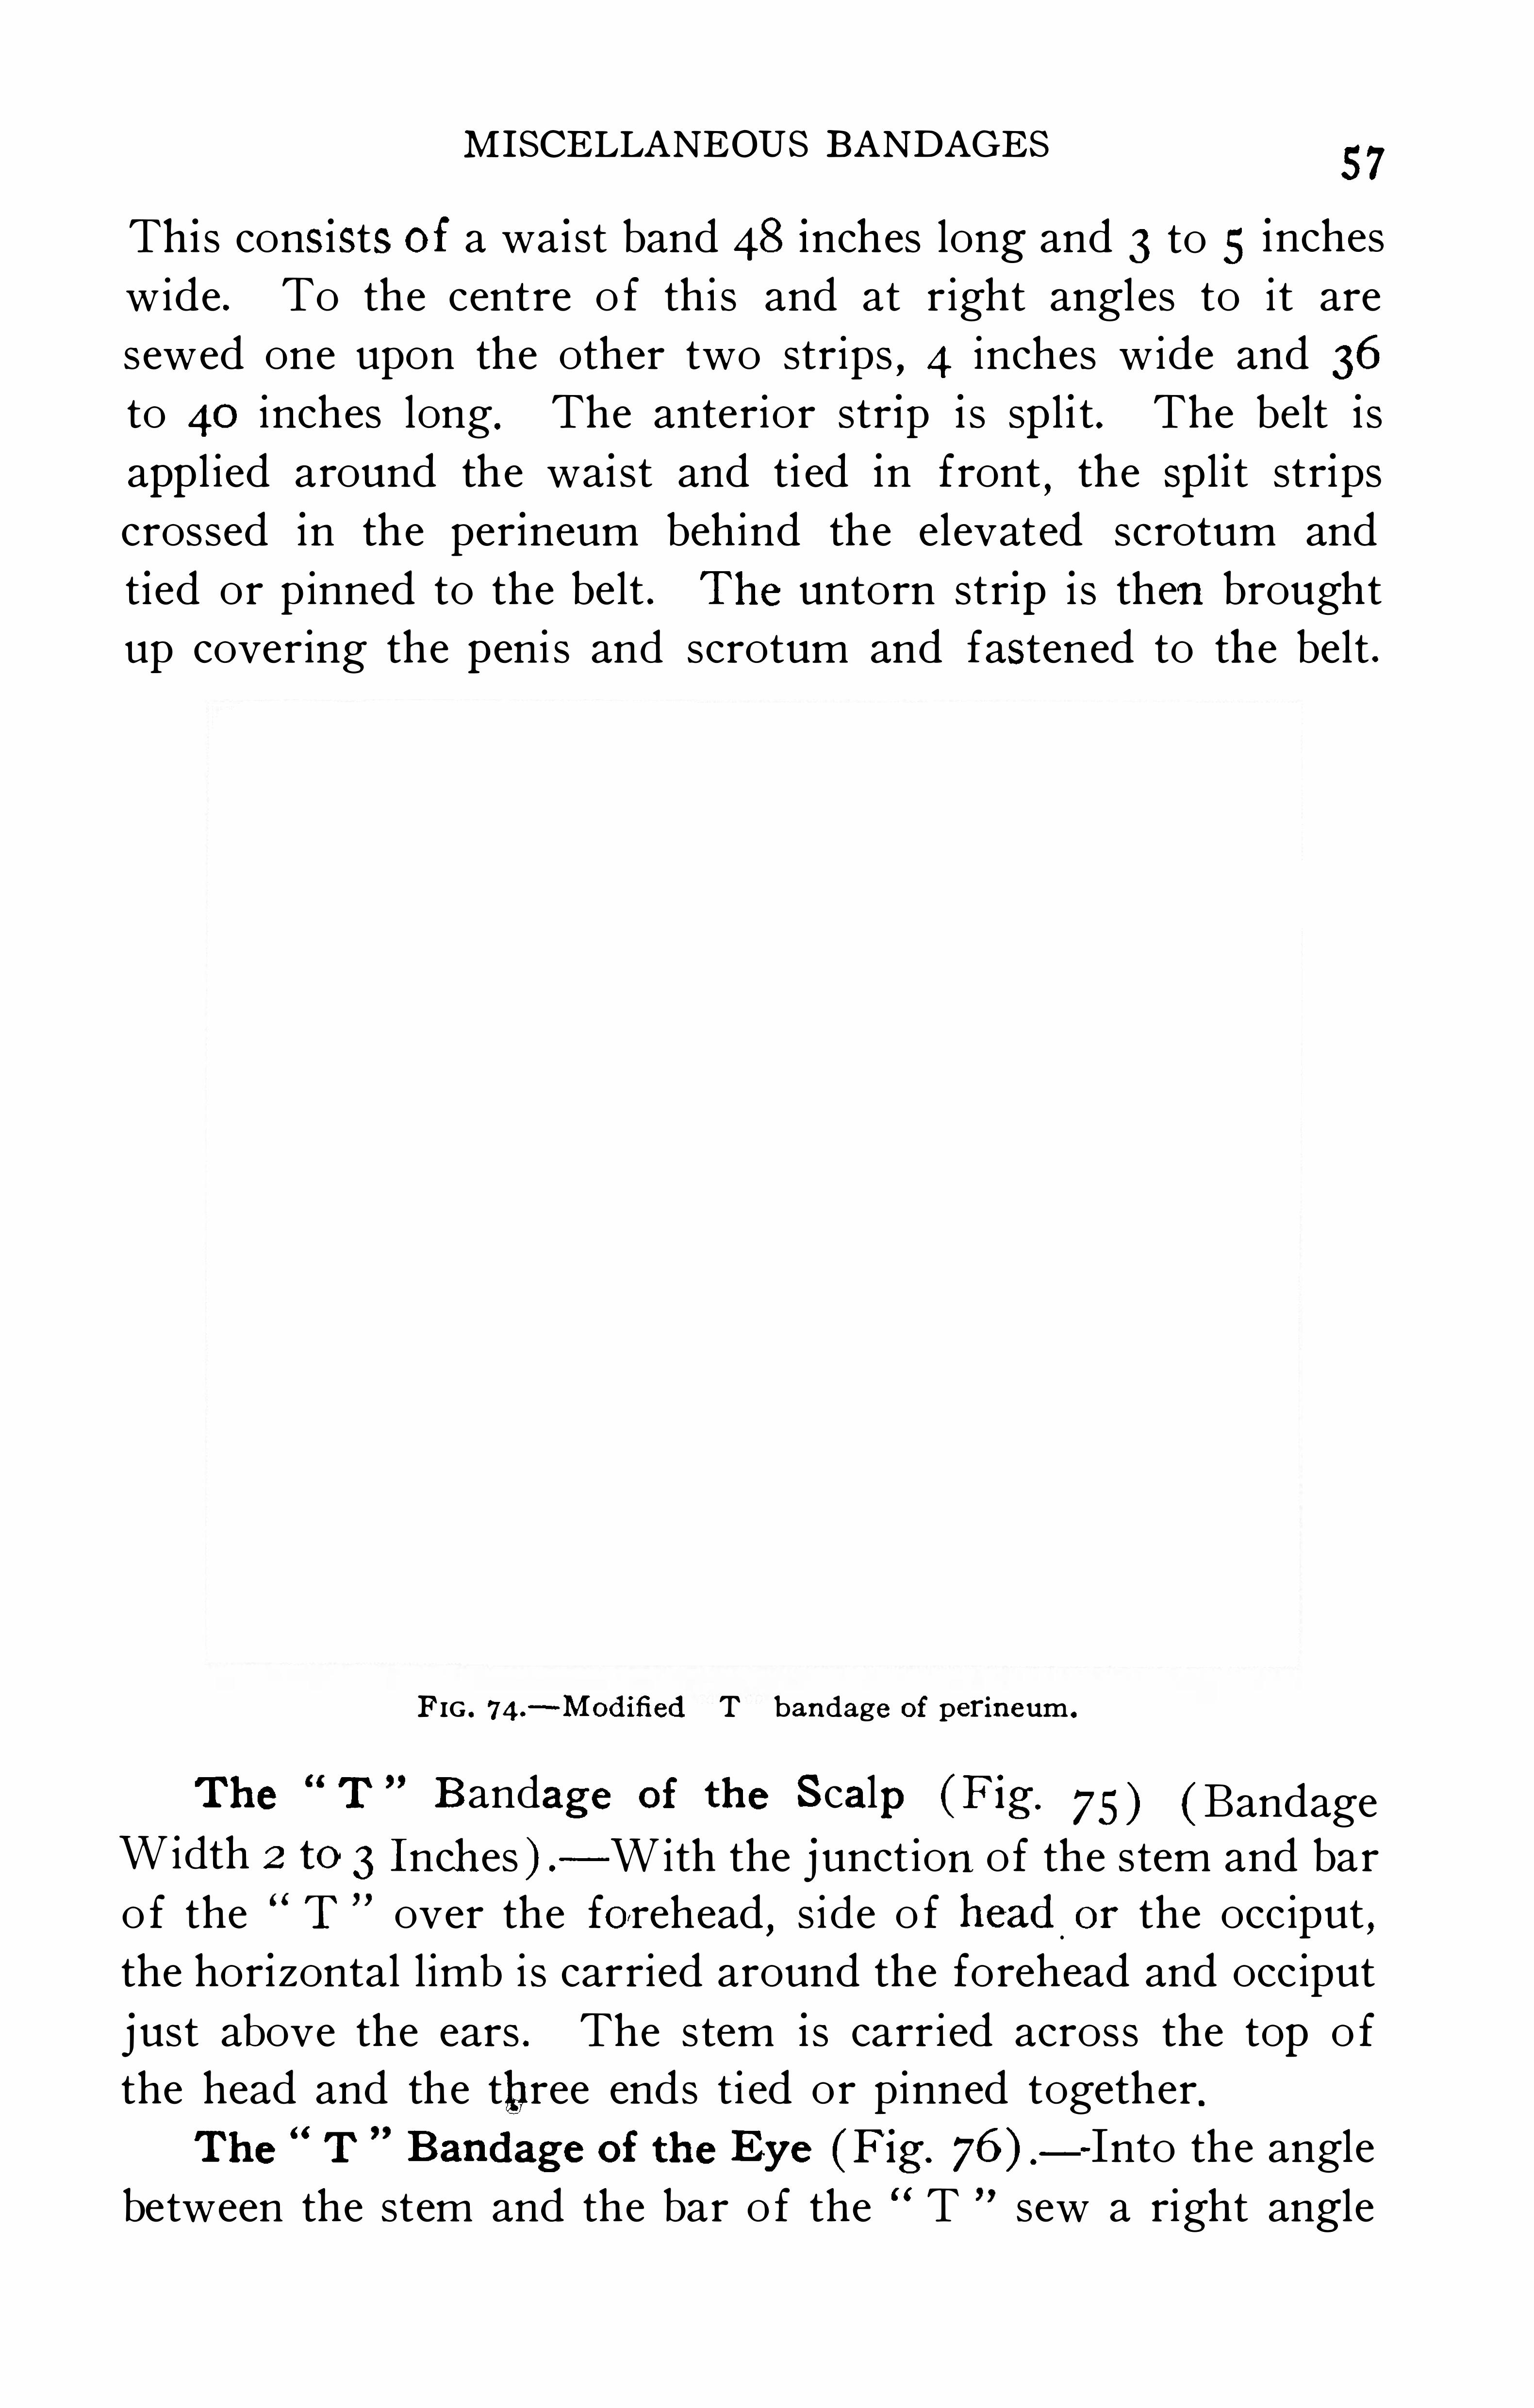
P erineal Bandage (Cunningham) (F igs . 73 and
M ISCELLANEOUS BANDAGES57
Thi s consists of a wa ist band 48 inches long and 3 to 5 inches
wide . To the centre o f thi s and at right angles to i t are
sewed one upon the other two strips, 4 inches wide and 36
to 40 inches long . The anterior str ip i s sp l i t . The belt is
app l ied around the wai st and t i ed in front,the Sp l i t strips
crossed in the per ineum behind the elevated scrotum and
t ied or p inned to the belt . The untorn strip i s then brought
up covering the peni s and scrotum and fastened to the belt .
FIG . 74 .—Modifi ed T bandage of perineum .
The T B andage of the Scalp(Fig . 75 ) ( BandageWidth 2 to 3 Inches ) — With the junct ion of the stem and bar
o f the T over the forehead,s ide o f head or the occiput
,
the hor i zontal l imb i s carried around the forehead and occiput
just above the ears . The stem i s carr ied across the top o f
the head and the three ends ti ed or pinned together.The T Bandage of the E ye (F ig. 76 ) -Into the angle
between the stem and the bar o f the T sew a right angle
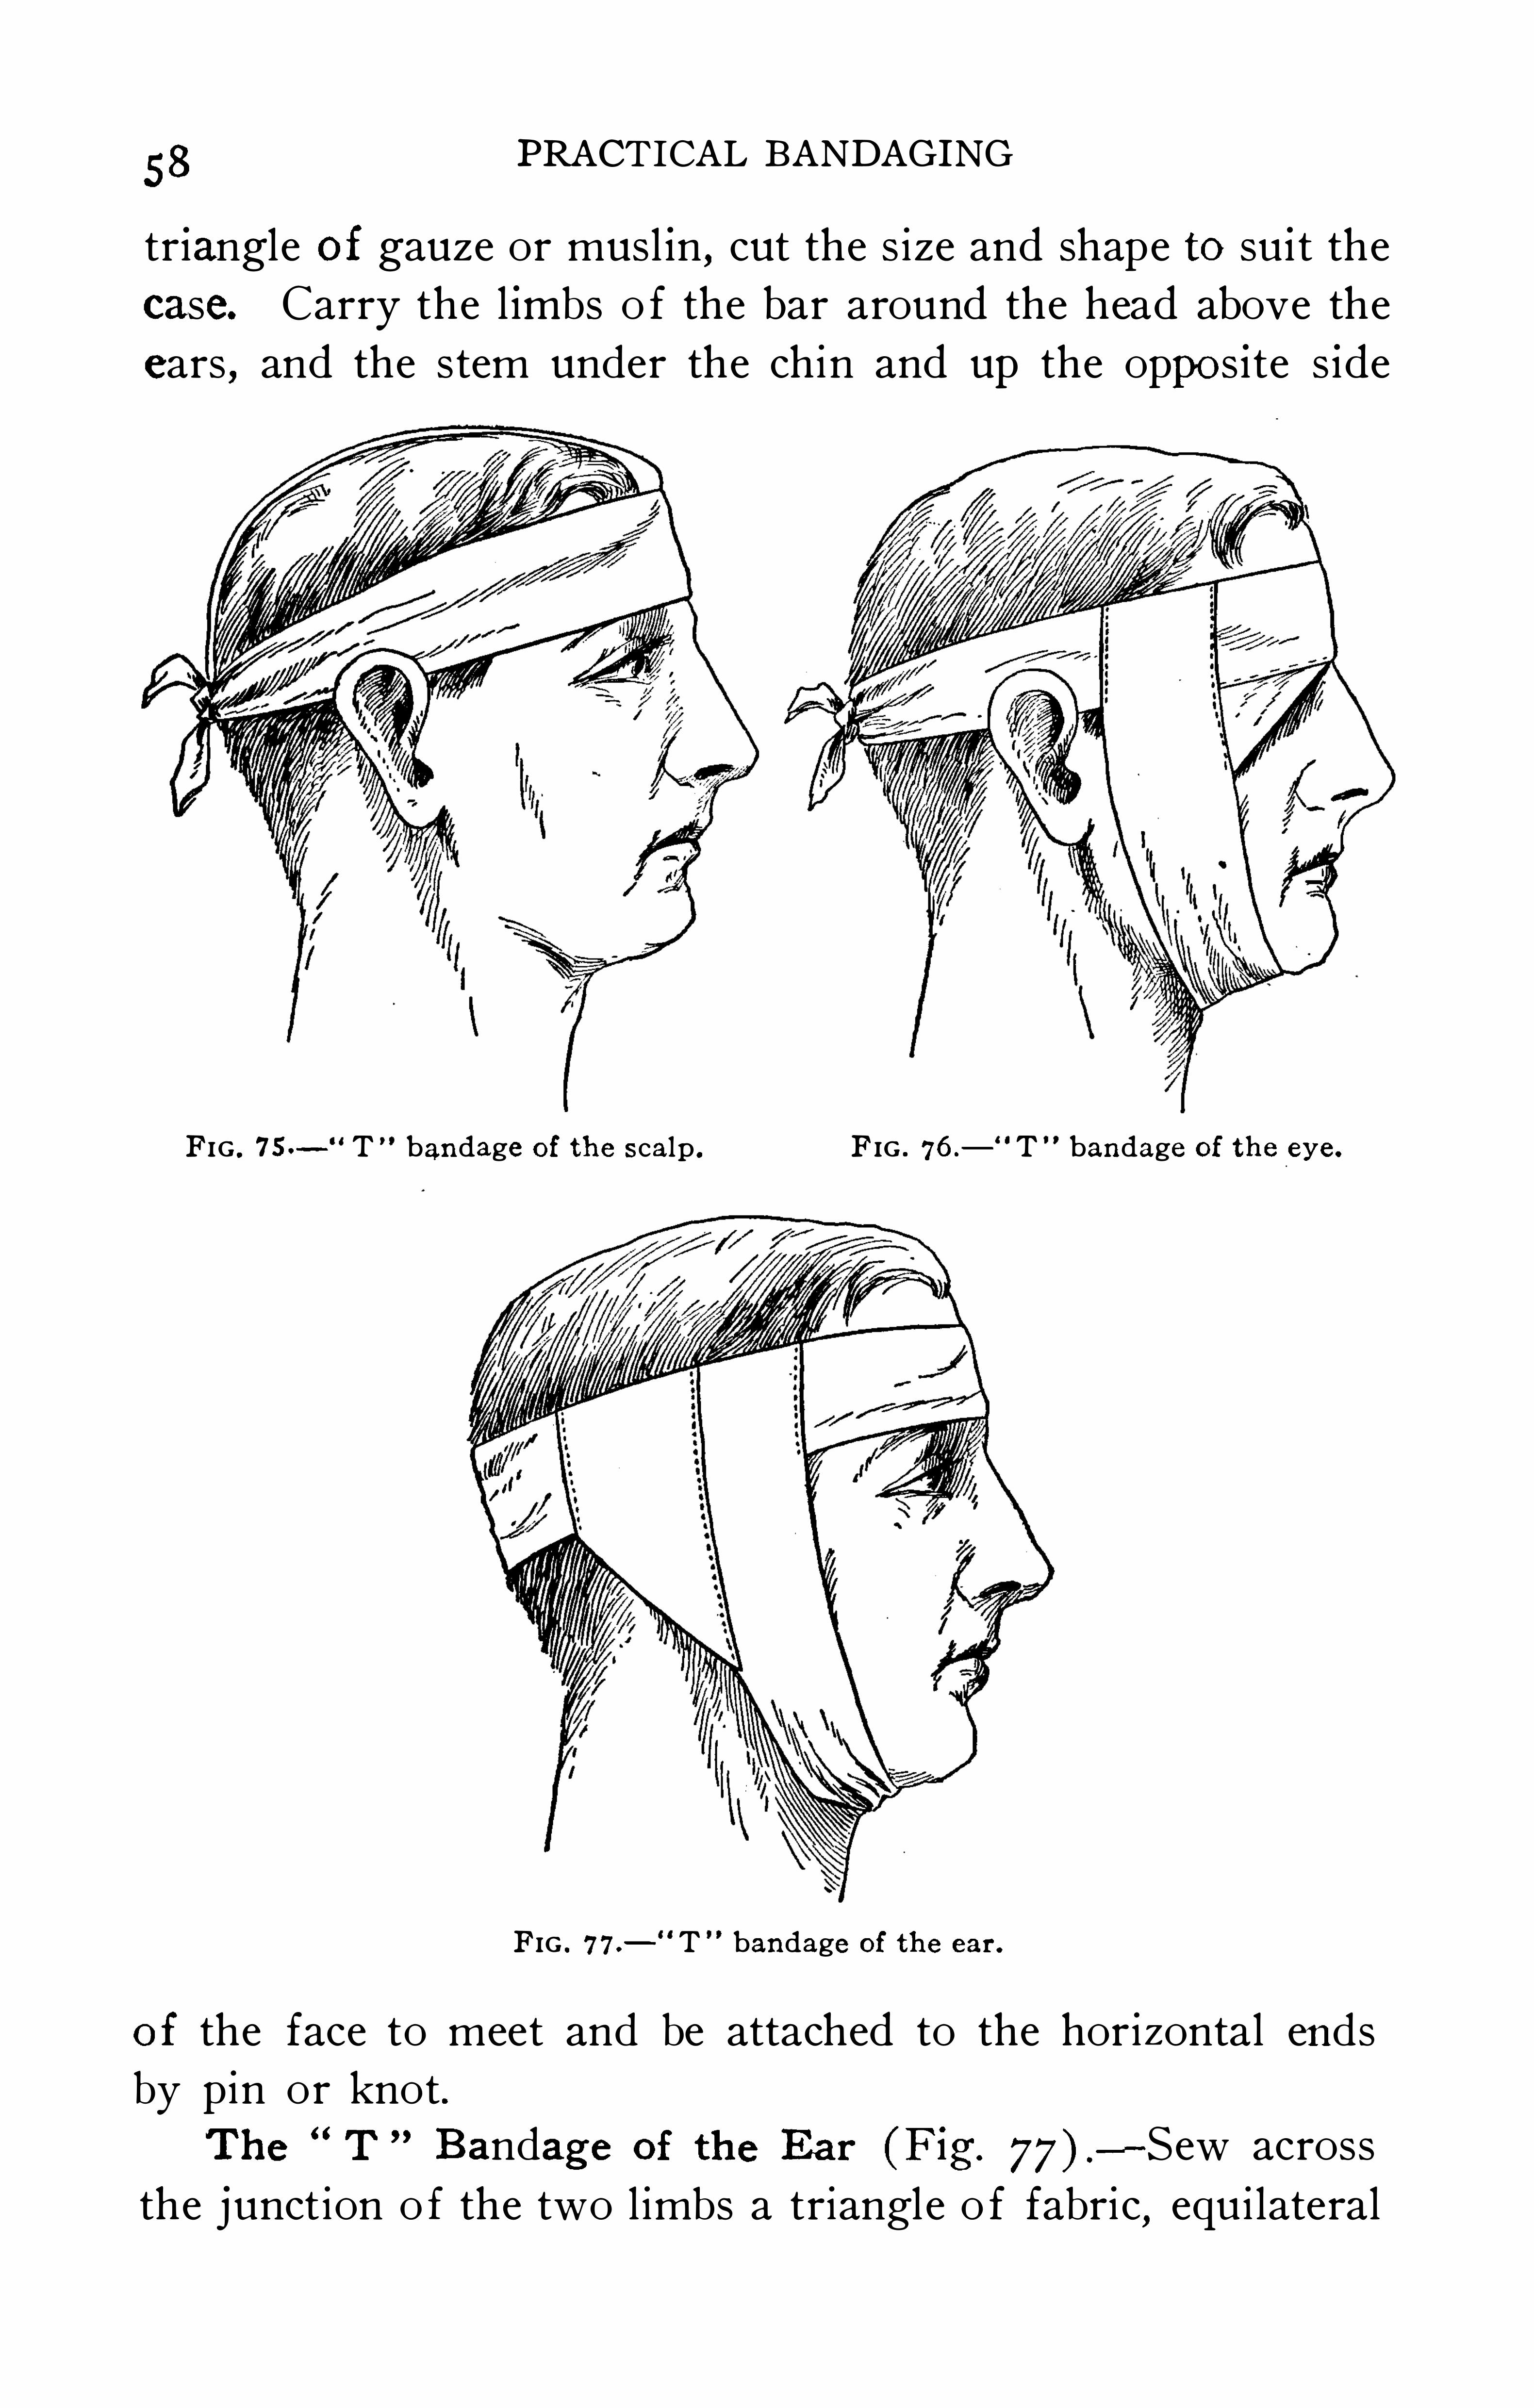
53PRACTICAL BANDAGING
tr iangle of gauze or musl in , cut the s ize and shape to su i t the
case. Carry the l imbs o f the bar around the head above the
ears , and the stem under the chin and up the oppos ite s ide
FIG . 7s. T bandage of the scalp . FIG . 76 . T bandage of the eye .
FIG . 77. T bandage of the ear.
of the face to meet and be attached to the horizontal ends
by pin or knot .The T
"
Bandage of the E ar (F ig.
- Sew across
the junct ion o f the two l imbs a triangle o f fabric,equi lateral
60 PRACTICAL BANDAGING
centre of one edge,two strips" two inches wide and twelve
inches long,are sewn one on each side o f the centre .
The
wide strip passes around the chest well up in the axil la and
the two strips pass over the shoulders and are attached to the
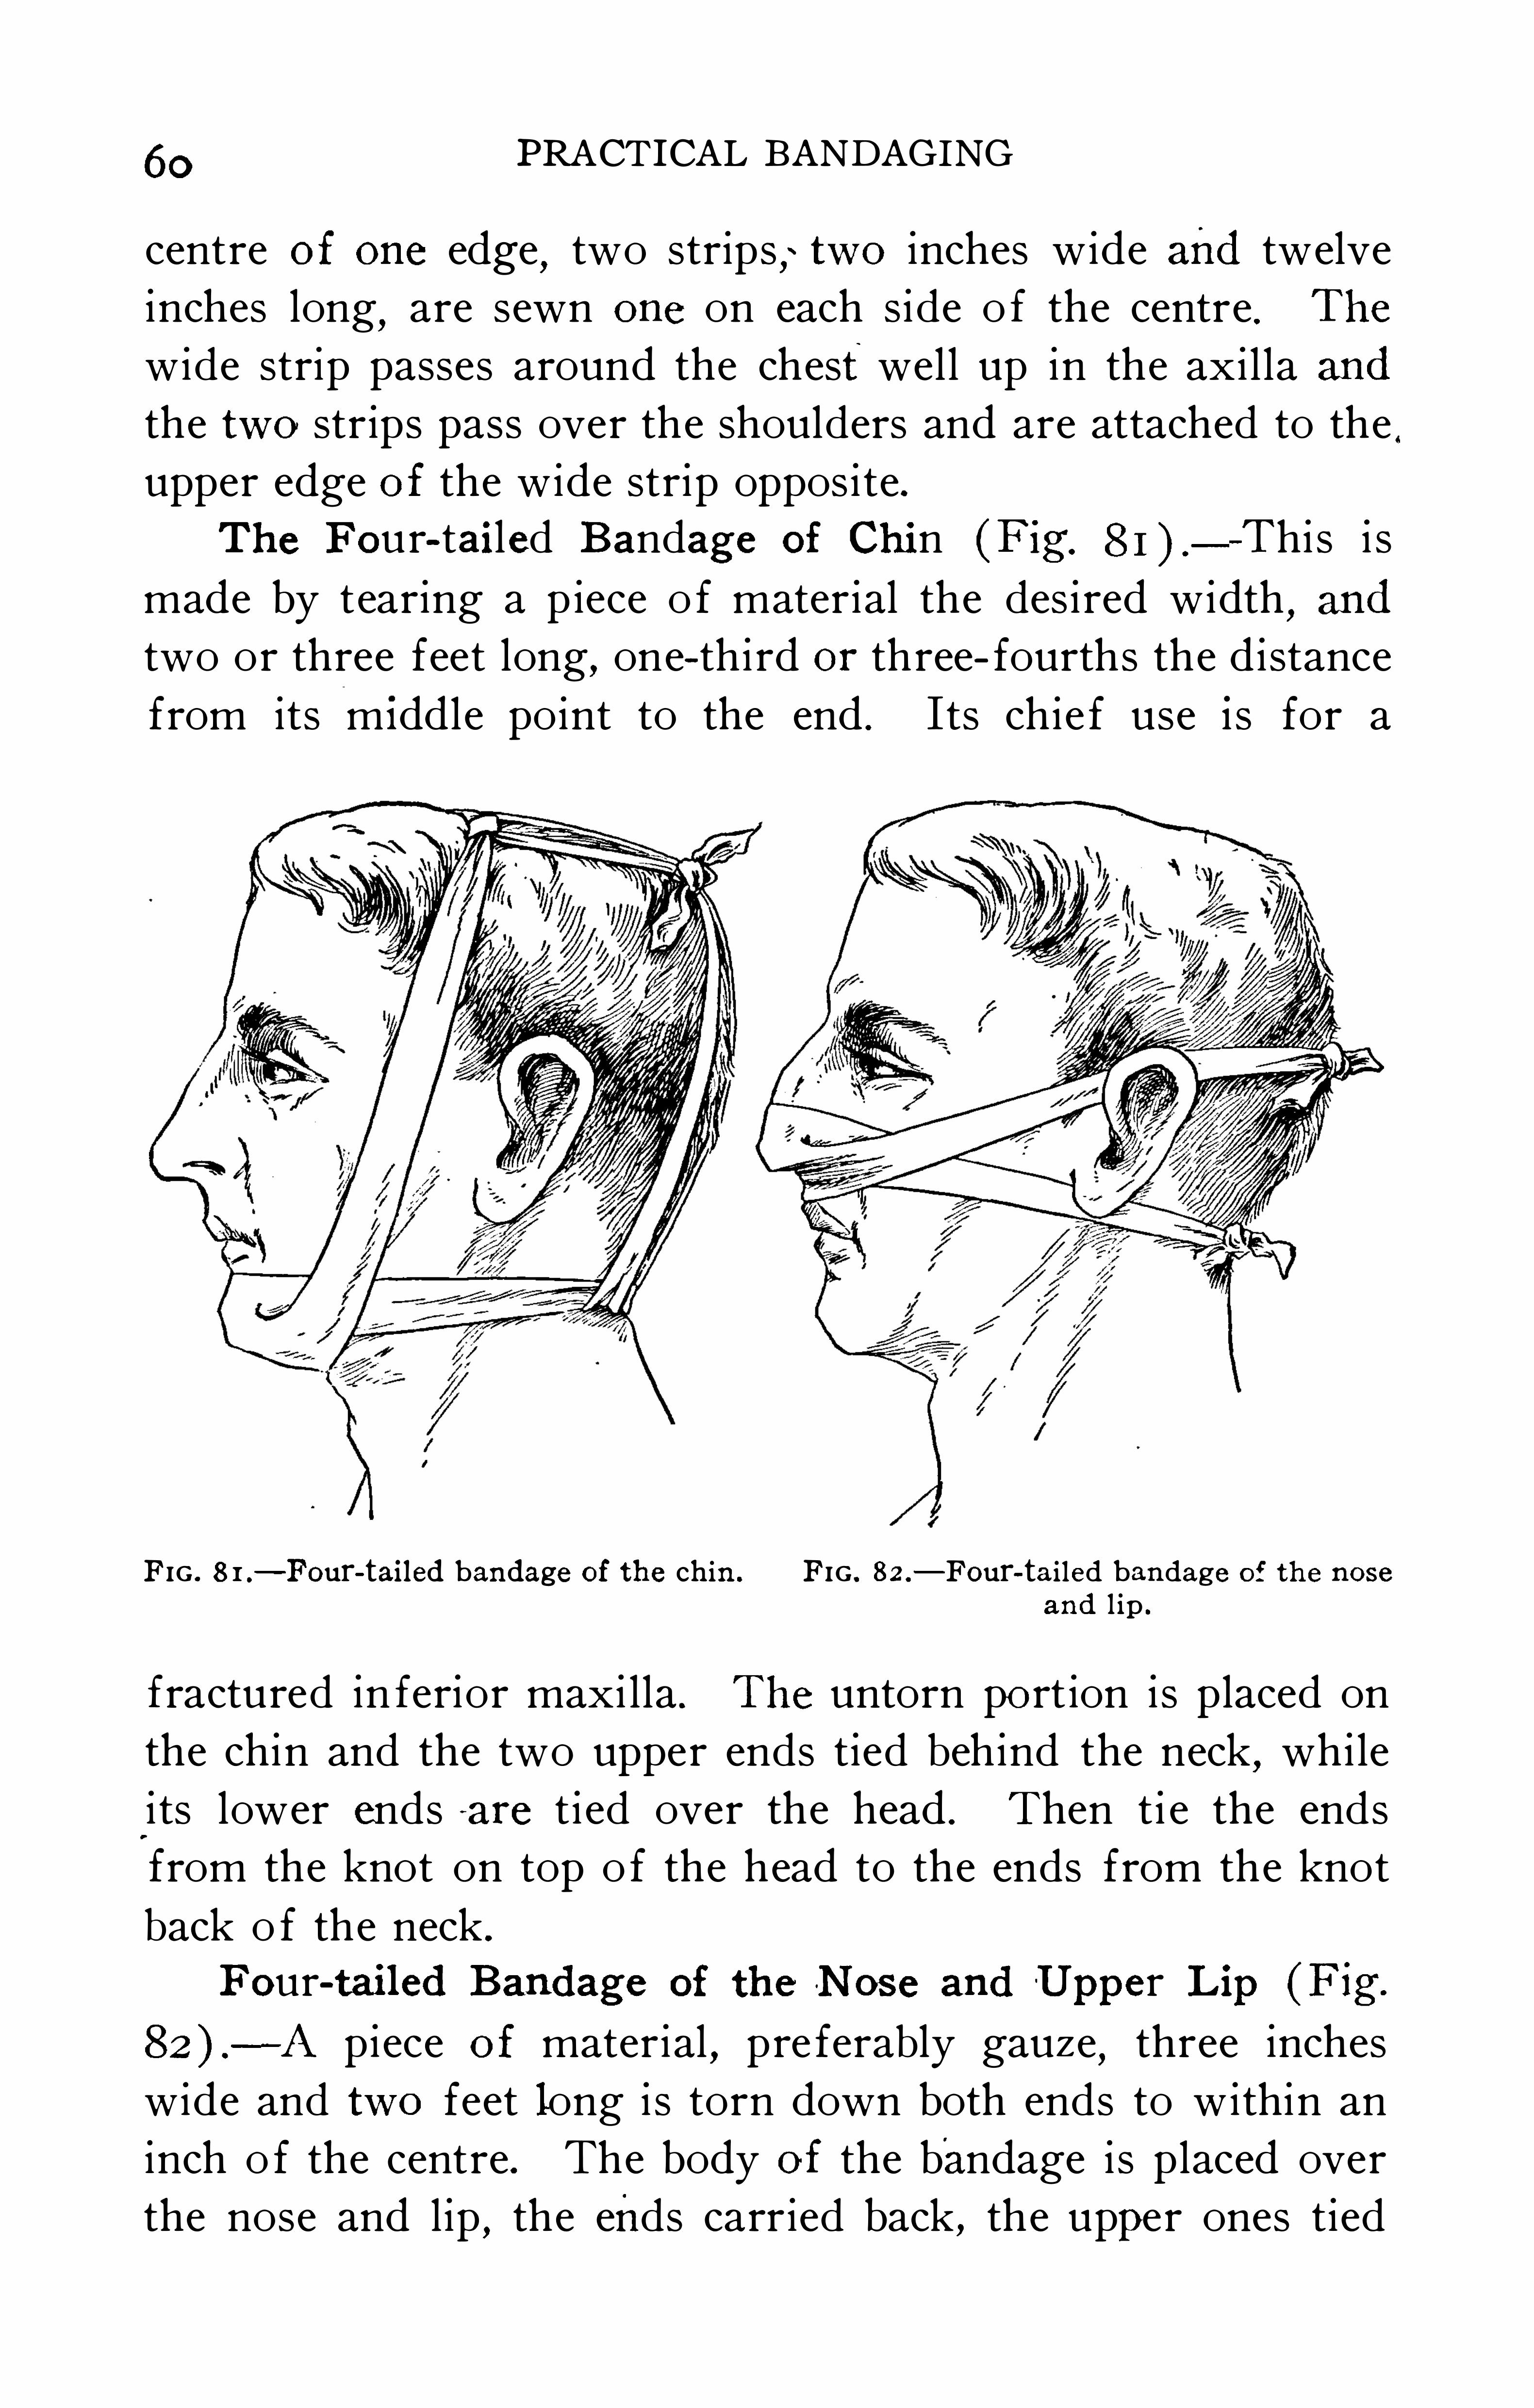
upper edge of the wide strip oppos i te .The Four-tailed Bandage of Chin (F ig.
—Thi s i s
made by tearing a p iece o f material the des ired width,and
two or three feet long,one-thi rd or three- fourths the distance
from its m iddle point to the end . Its chie f use i s for a
FIG . 8 1 .— Four-tailed bandage of the chin . FIG . 82 .
— Four-tailed bandage of the nose
and l ip .
fractured in ferior maxi lla . The untorn port ion is placed on
the chin and the two upper ends tied behind the neck,while
i ts lower ends a re t i ed over the head . Then ti e the ends
from the knot on top o f the head to the ends from the knot
back o f the neck .
Four-tail ed Bandage of the Nose and Upper Lip(F ig.
—A piece of material , pre ferably gauze, three inches
wide and two feet long i s torn down both ends to within an
inch o f the centre . The body of the bandage is placed over
the nose and lip,the ends carried back , the upper ones tied
M ISCELLANEOUS BANDAGES 6 1
at the back o f the neck and the lower ones tied back'
of the
head .
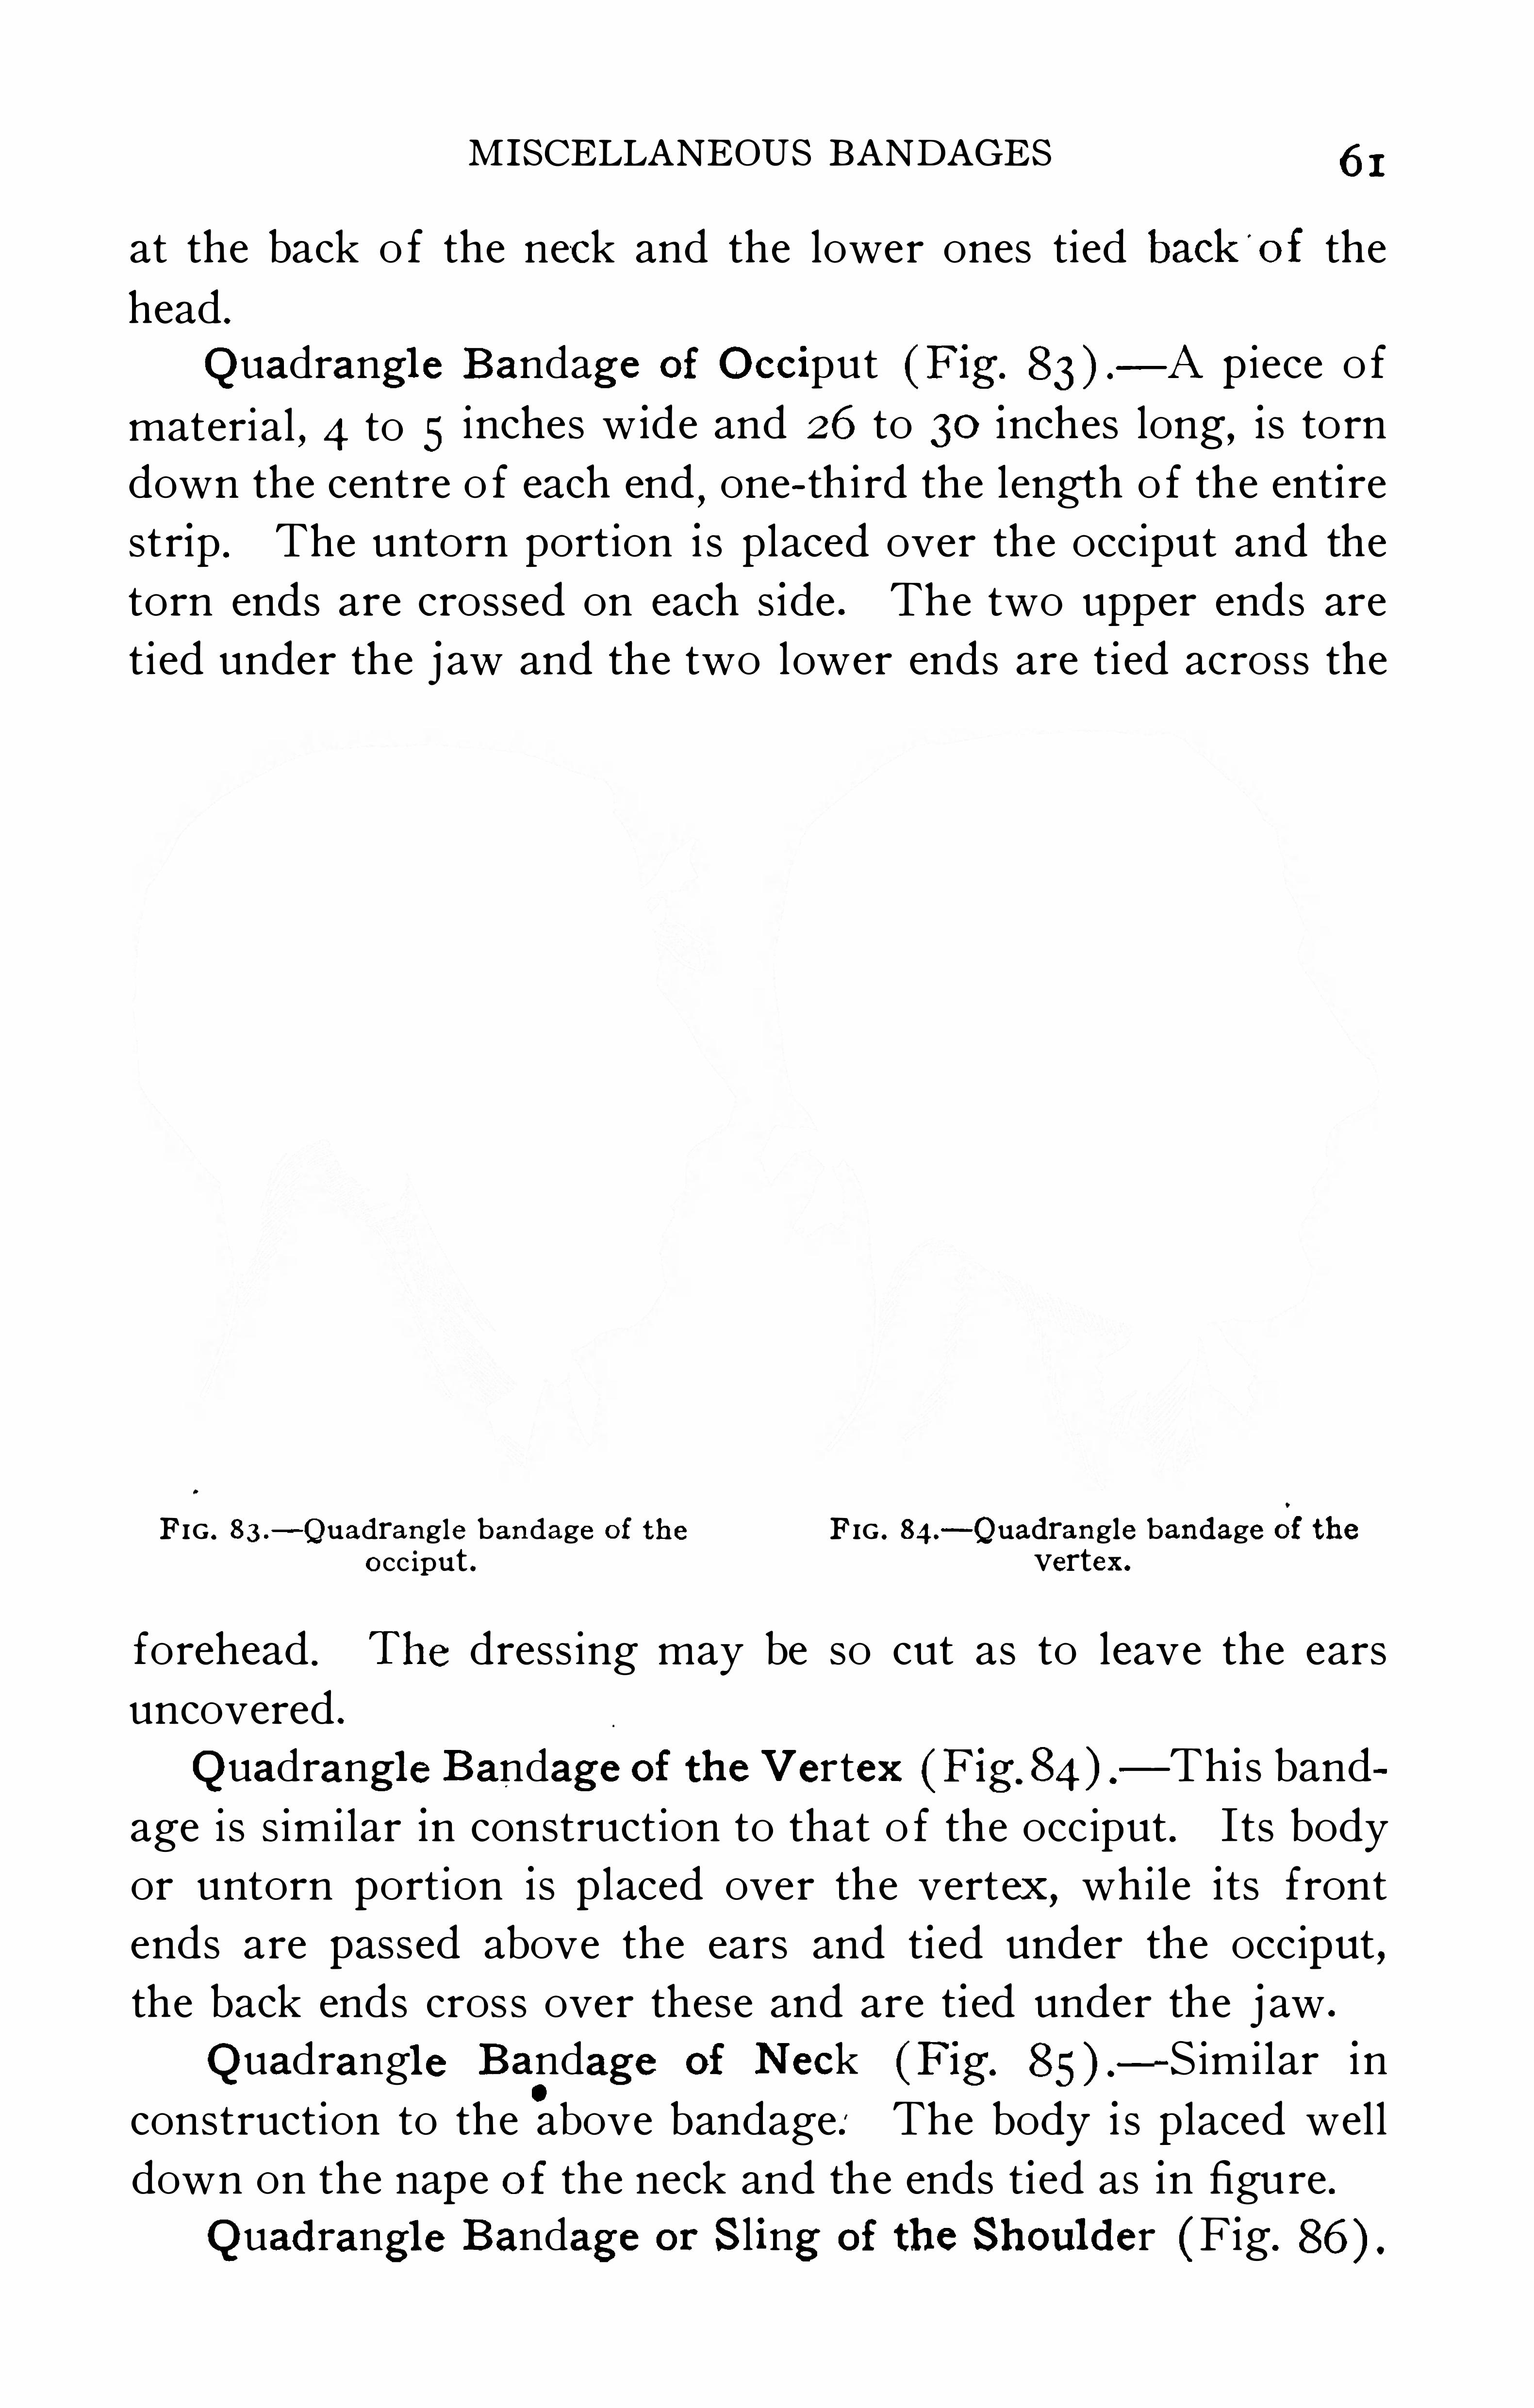
" uadrangl e Bandage of Occiput (F ig.
— A p iece o f
material , 4 to 5 inches w ide and 26 to 30 inches long, is torn
down the centre o f each end,one- th i rd the length o f the ent ire
strip . The untorn portion i s placed over the occiput and the
torn ends are crossed on each s ide . The two upper ends are
tied under the j aw and the two lower ends are ti ed across the
FIG . 83 .
-" uadrangle bandage of the FIG . 84.
—" uadrangle bandage of theocc iput . vertex .
forehead . The dress ing may be so cut as to leave the ears
uncovered .
" uadrangl e Bandage of the V ertex (Fig 84) — Th i s band
age is s imi lar in construction to that o f the occiput . I ts body
or untorn portion is p laced over the vertex,while i ts front
ends are passed above the ears and t ied under the occiput ,the back ends cros s over these and are t ied under the j aw .
" uadrangl e Bandage of Neck (Fig.
—S im i lar in
construction to the.
above bandage : The body i s placed well
down on the nape of the neck and the ends t ied as in figure .
" uadrangl e Bandage or Sling of the Shoul der (Fig.
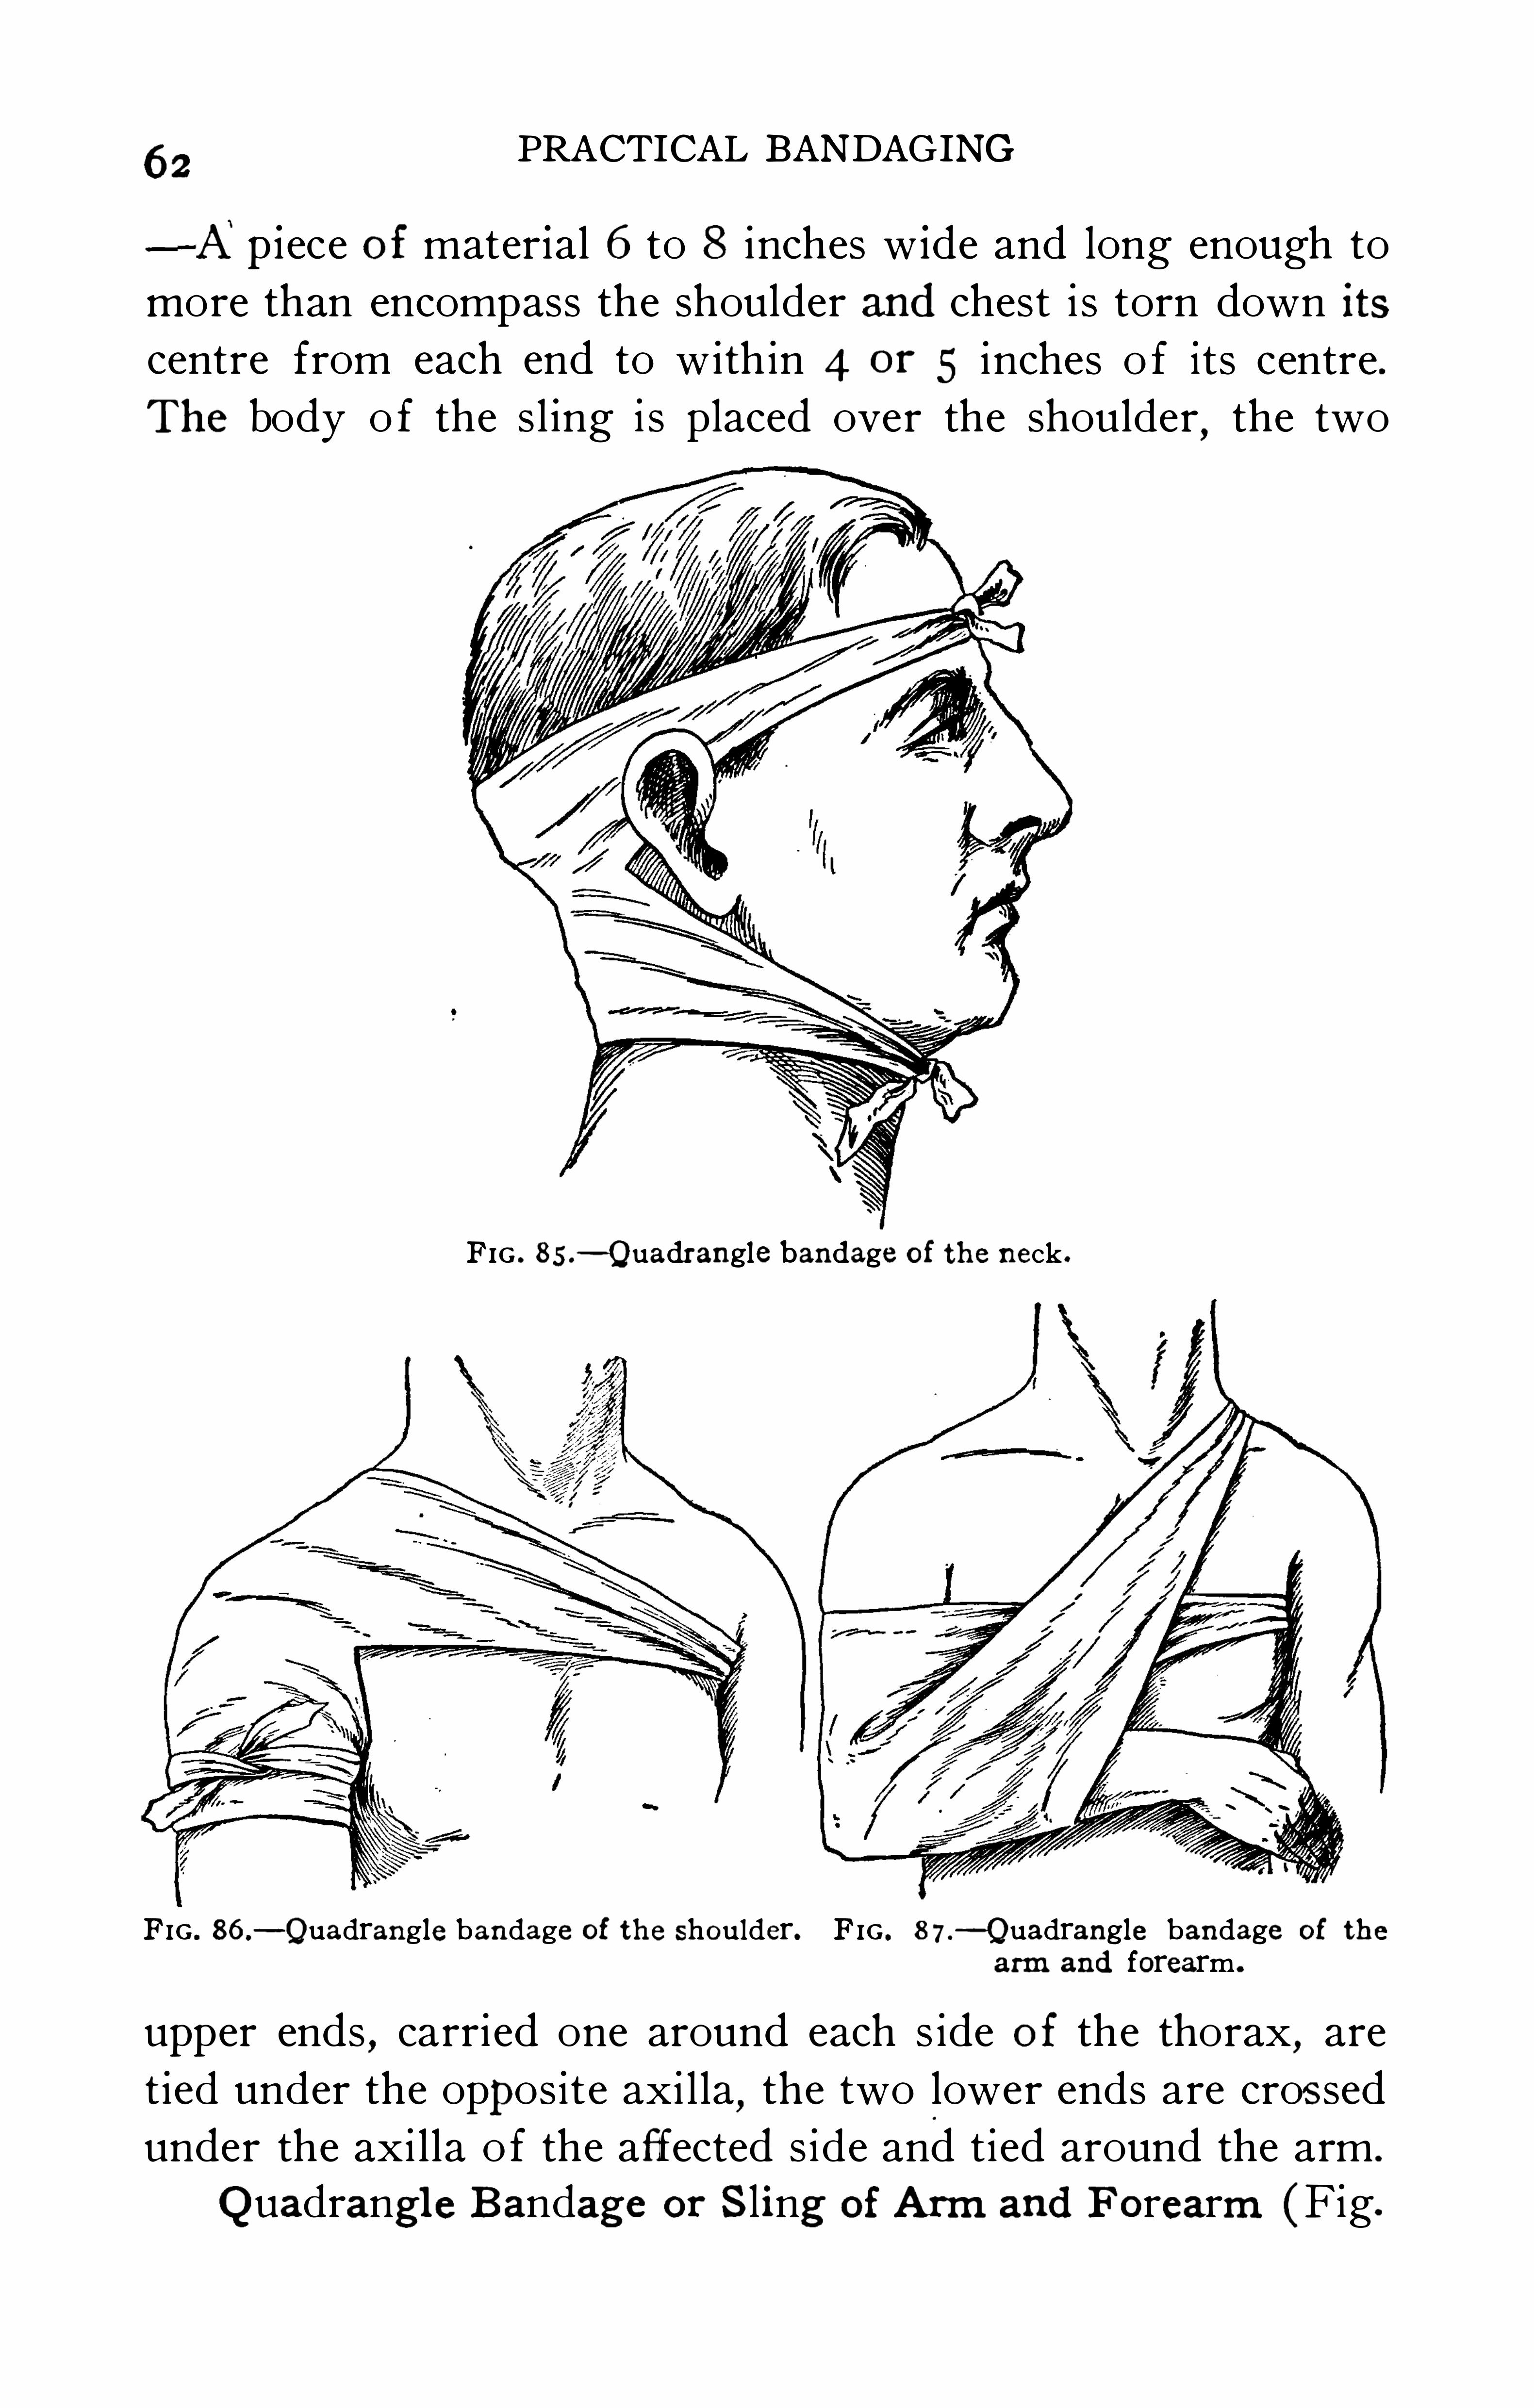
62 PRACTICAL BANDAGING
—A piece of mater ial 6 to 8 inches w ide and long enough to
more than encompass the shoulder and chest i s torn down itscentre from each end to with in 4 or 5 inches o f its centre .
The body o f the s l ing i s placed over the shoulder , the two
FIG . 85 .
- " uadrangle bandage of the neck .
FIG . 86 .— " uadrangle bandage of the shoulder. FIG . 8 7.
— " uadrangle bandage of the
arm and forearm .
upper ends,carried one around each s ide of the thorax, are
tied under the opposite axi l la, the two lower ends are cros sedunder the axi lla o f the affected s ide and tied around the arm .
" uadrangl e Bandage or Sling of Arm and F orearm (Fig.
MISCELLANEOUS BANDAGES 63
— A piece o f mater ial , 10 to 1 2 inches w ide, is prepared
as.in the s l ing o f the shoulder . A s l i t i s cut in the centre
o f the body to rece ive the po int o f the elbow . The upper
ends pass di rectly around the trunk and are fastened under
the oppos i te arm . The low er ends are carried d iagonally
across the trunk and fastened over the oppos i te shoulder.
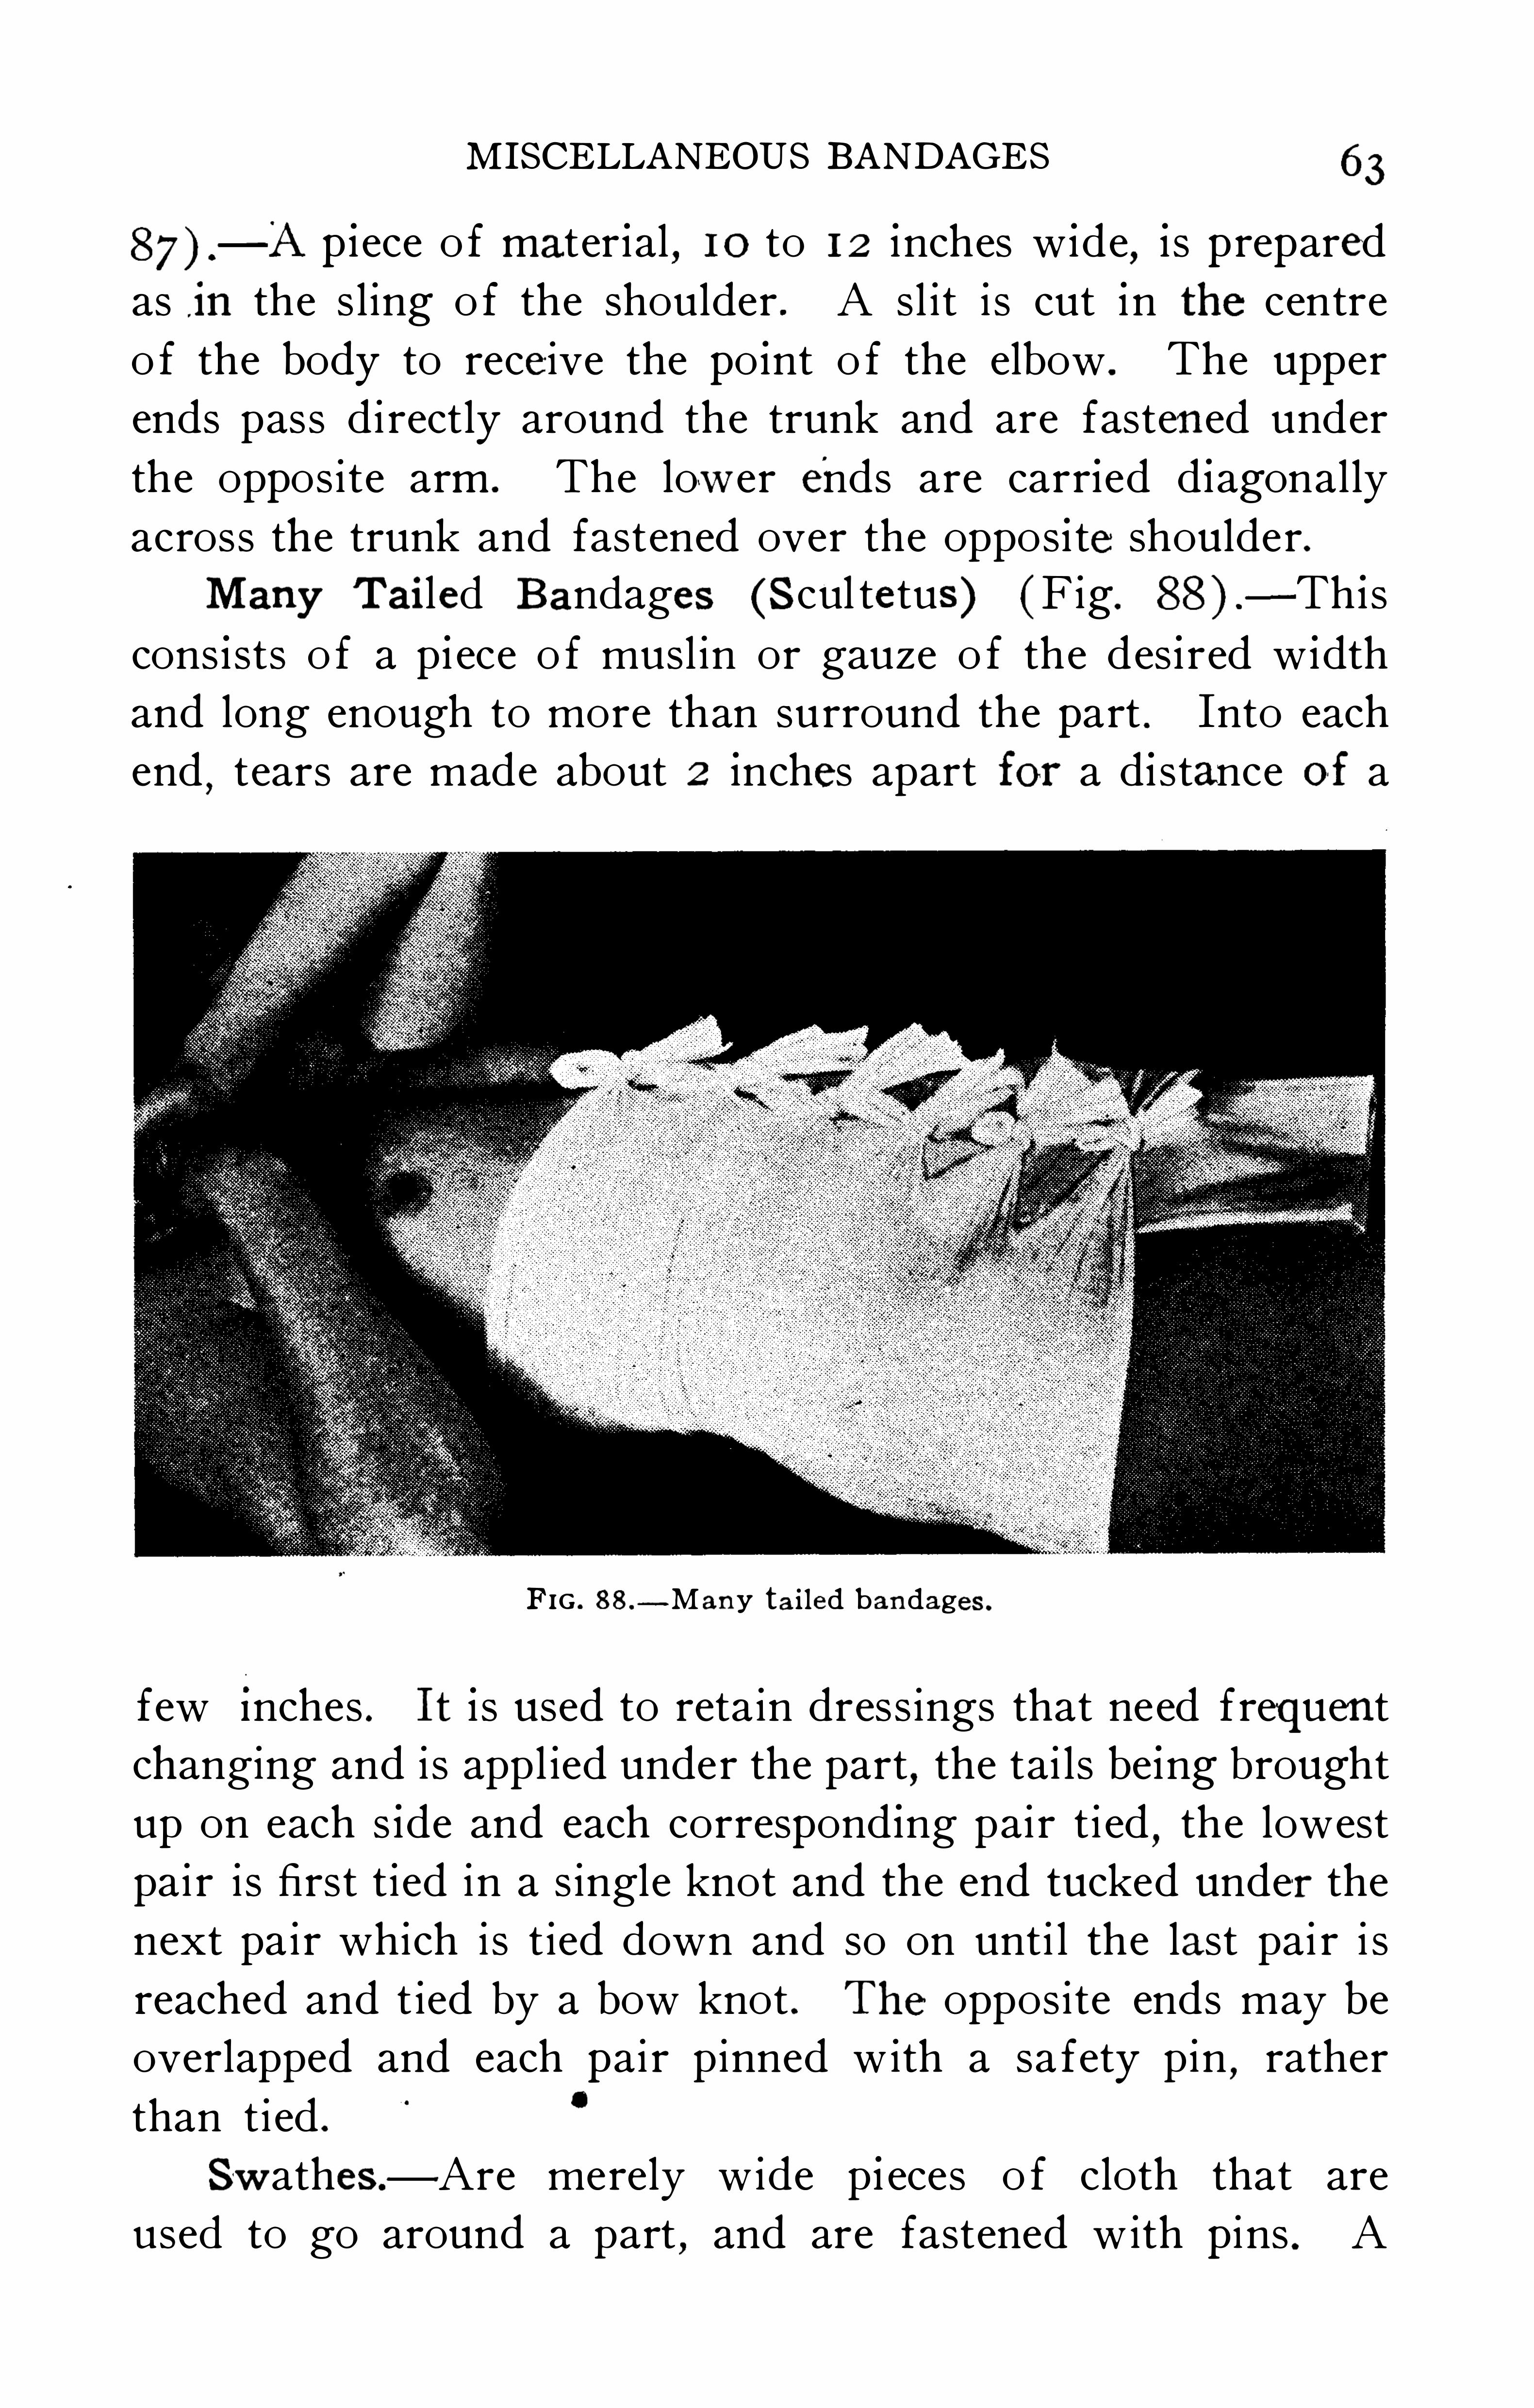
Many Tailed Bandages (Scul tetus ) (F ig.
—Th is
cons ists o f a p i ece o f musl in or gauze o f the des ired w idth
and long enough to more than surround the part . Into each
end,tears are made about 2 inches apart for a d i stance of a
FIG . 8 8 .—Many tailed bandages .
few Inches . It is used to reta in dress ings that need frequent
changing and is appl ied under the part , the tai ls be ing brought
up on each s ide and each correspond ing pair t i ed,the lowest
pai r i s first tied in a s ingle knot and the end tucked under the
next pa i r which is t ied down and so on unti l the last pai r i s
reached and t ied by a bow knot . The opposite ends may be
overlapped and each pai r pinned with a sa fety pin , rather
than ti ed .
Sw athes .— Are merely wide p i eces o f cloth that are
used to go around a part , and are fastened with p ins . A

64PRACTICAL BANDAGING
common swathe i s used to retain an upper extremity in theacutely fl exed pos it ion (F ig. 89) A piece of cotton or gauze,the w idth o f the shoulder from bas e o f neck to acromion and
long enough to make a figure-of—8 around the flexed elbow
and body,i s passed hori zontally between the flexed elbow and
body,with its midd le oppos ite the elbow . The front end i s
FIG . 89.
— Swathe .
now carr ied up around the forearm and over the shoulder of
the affected s ide, diagonally across the back and under the
axi lla o f the oppos ite s ide . Here i t i s p inned to the other
end which has been brought over in front o f the flexed
extrem ity.The latter end is continued as a circle about the
thorax posteriorly and is pinned to the part surround ing the
flexed arm.Th i s dress ing i s a very excellent one for use in
MISCELLANEOUS BANDAGES 65
fractures and injuries in and immed iately around the elbow
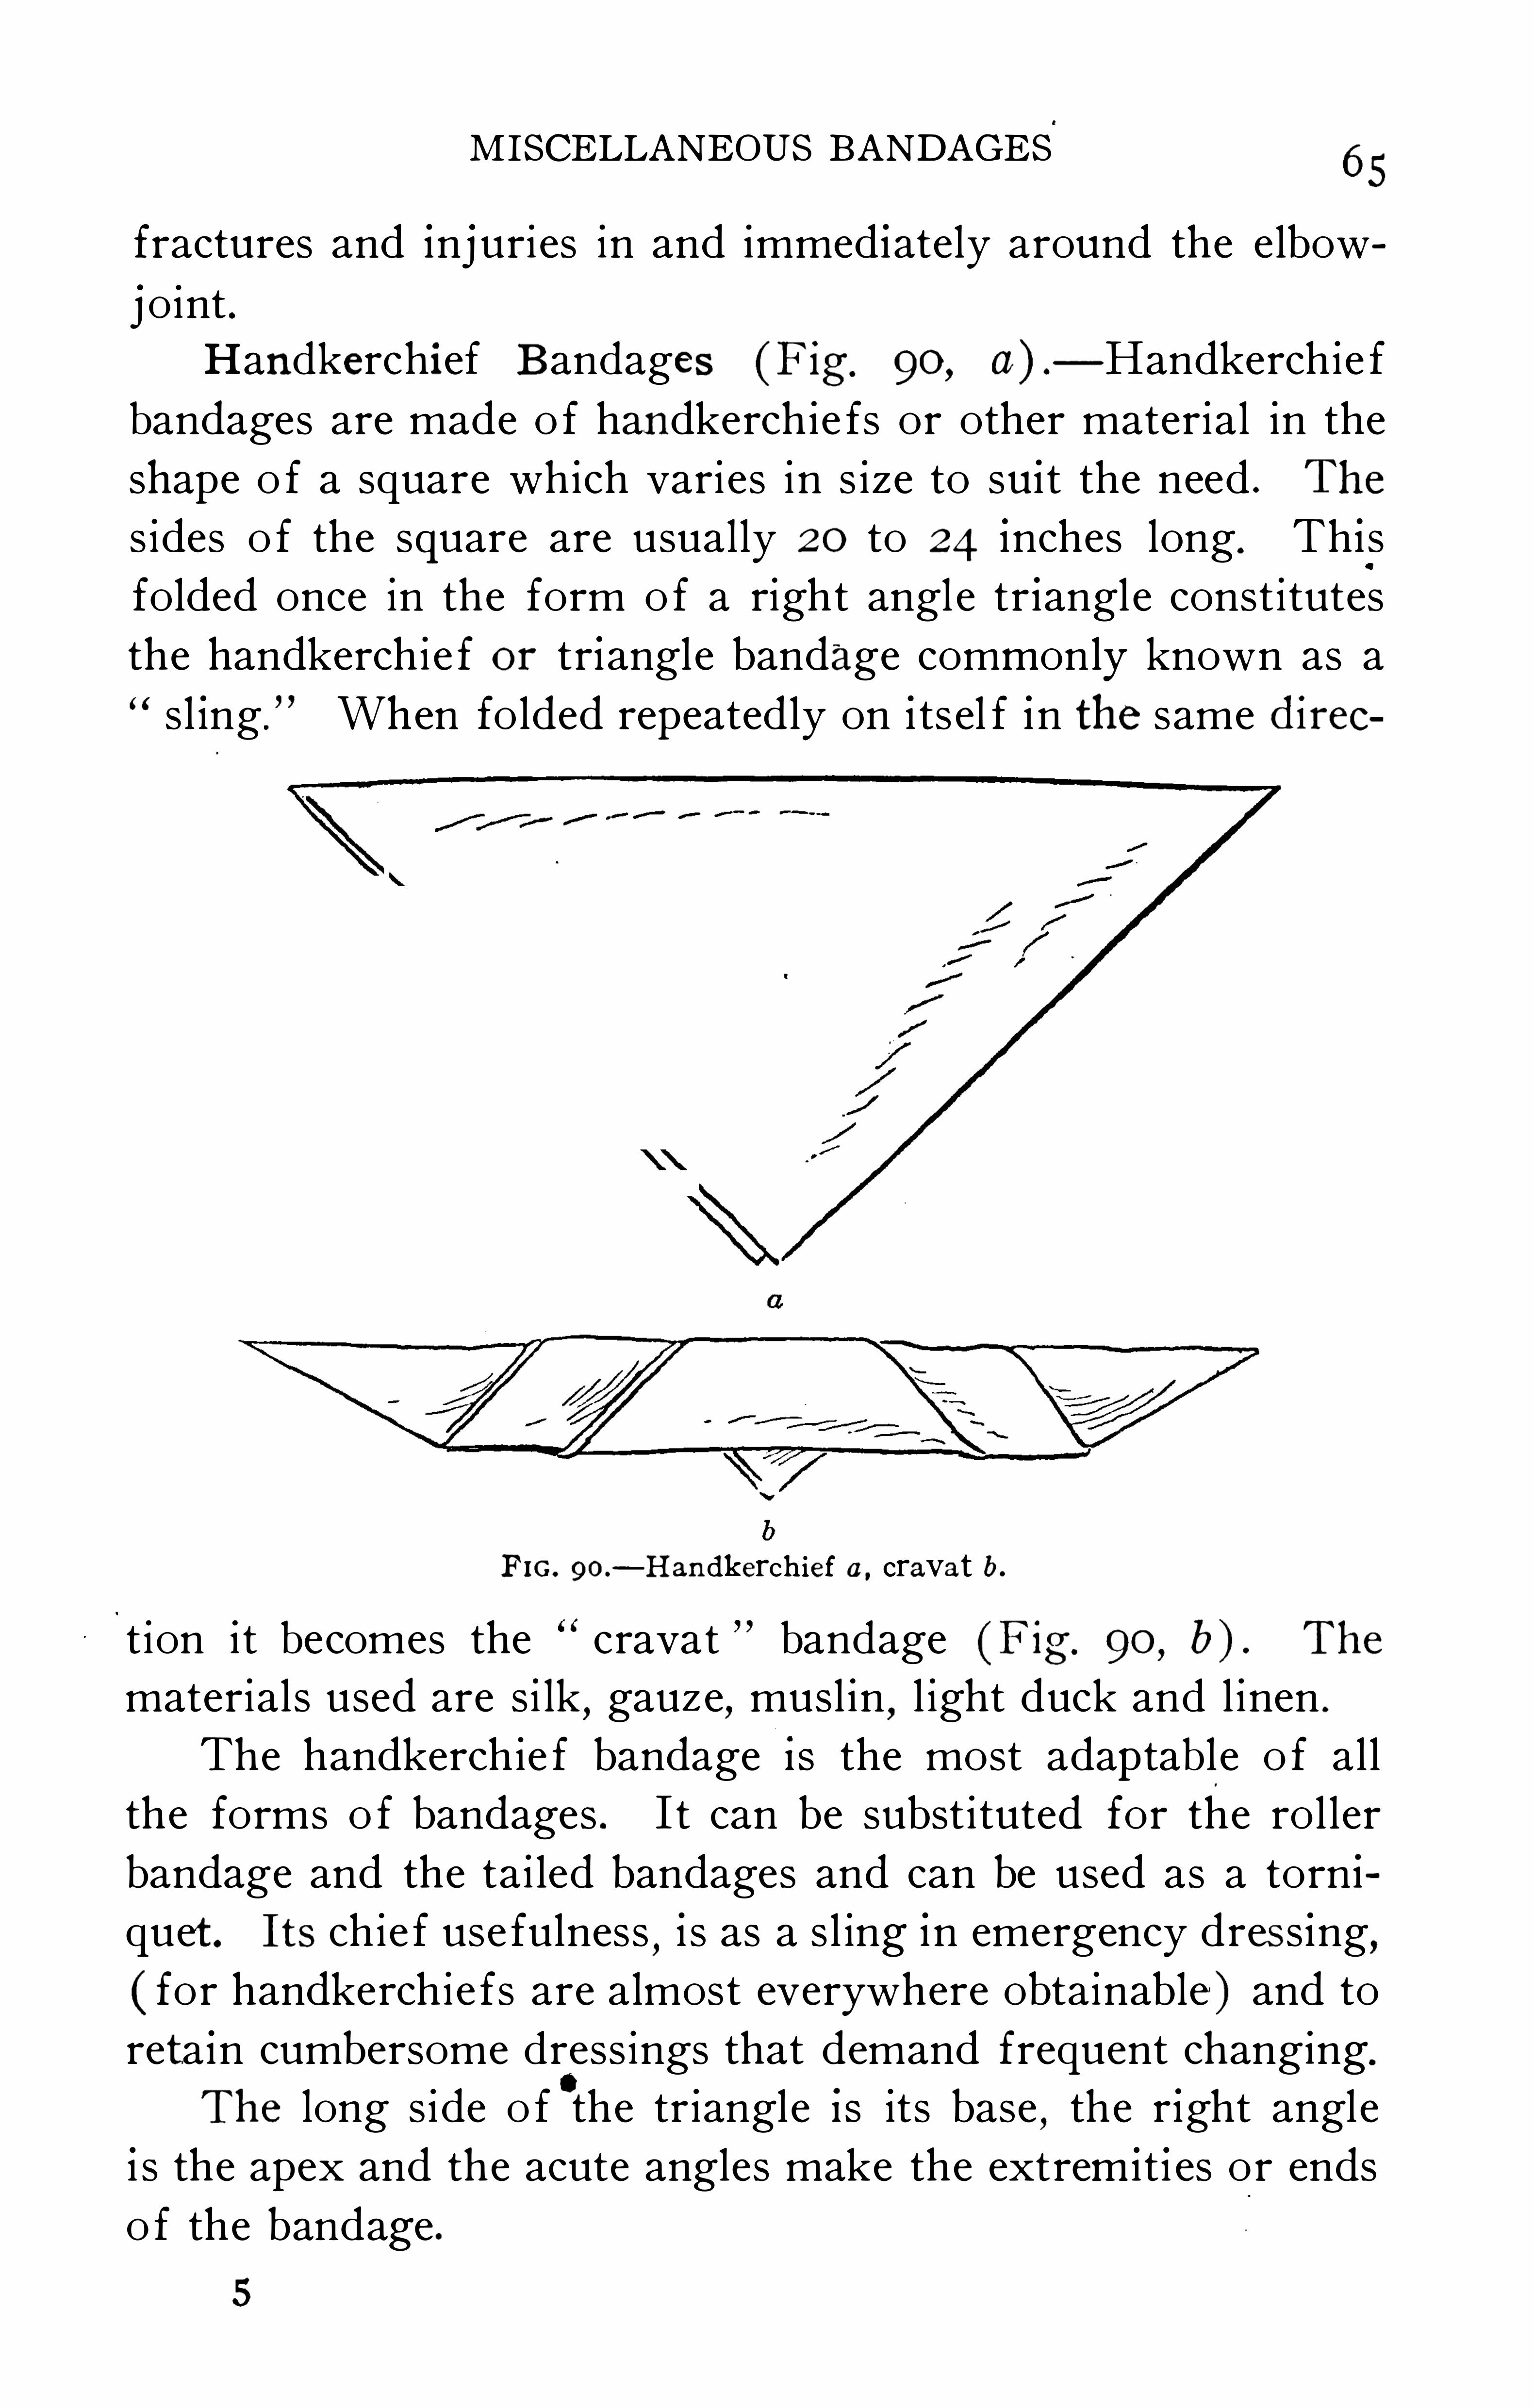
joint .Handkerchief B andages (F ig. 90,
a) .
— Handkerchie f
bandages are made o f handkerchie fs or other material in the
shape o f a square which varies in s ize to sui t the need . The
s ides o f the square are usually 20 to 24 inches long. Th is
folded once in the form o f a right angle tr iangle constitutes
the handkerchie f or triangle bandage commonly known as a
sl ing .
" When folded repeatedly on i ts el f in the same direc
F IG. 90.
— Handkerchief a , cravat b.
t ion it becomes the cravat bandage (Fig. 90 ,b ) . The
materials used are si lk,gauze
,musl in
,l ight duck and l inen .
The handkerchie f bandage I S the most adaptabl e o f al l
the forms o f bandages . I t can be substituted for the rol ler
bandage and the tai led bandages and can be used as a torn i
quet . Its chie f use fulness,i s as a s l ing in emergency dres s ing
,
( for handkerchie fs are almost everywhere obtainable ) and to
reta in cumbersome dress ings that demand frequent changing.
The long side o f the triangle I S its base,the r ight angle
i s the apex and the acute angles make the extremit i es or ends
o f the bandage .
5
66 PRACTICAL BANDAGING
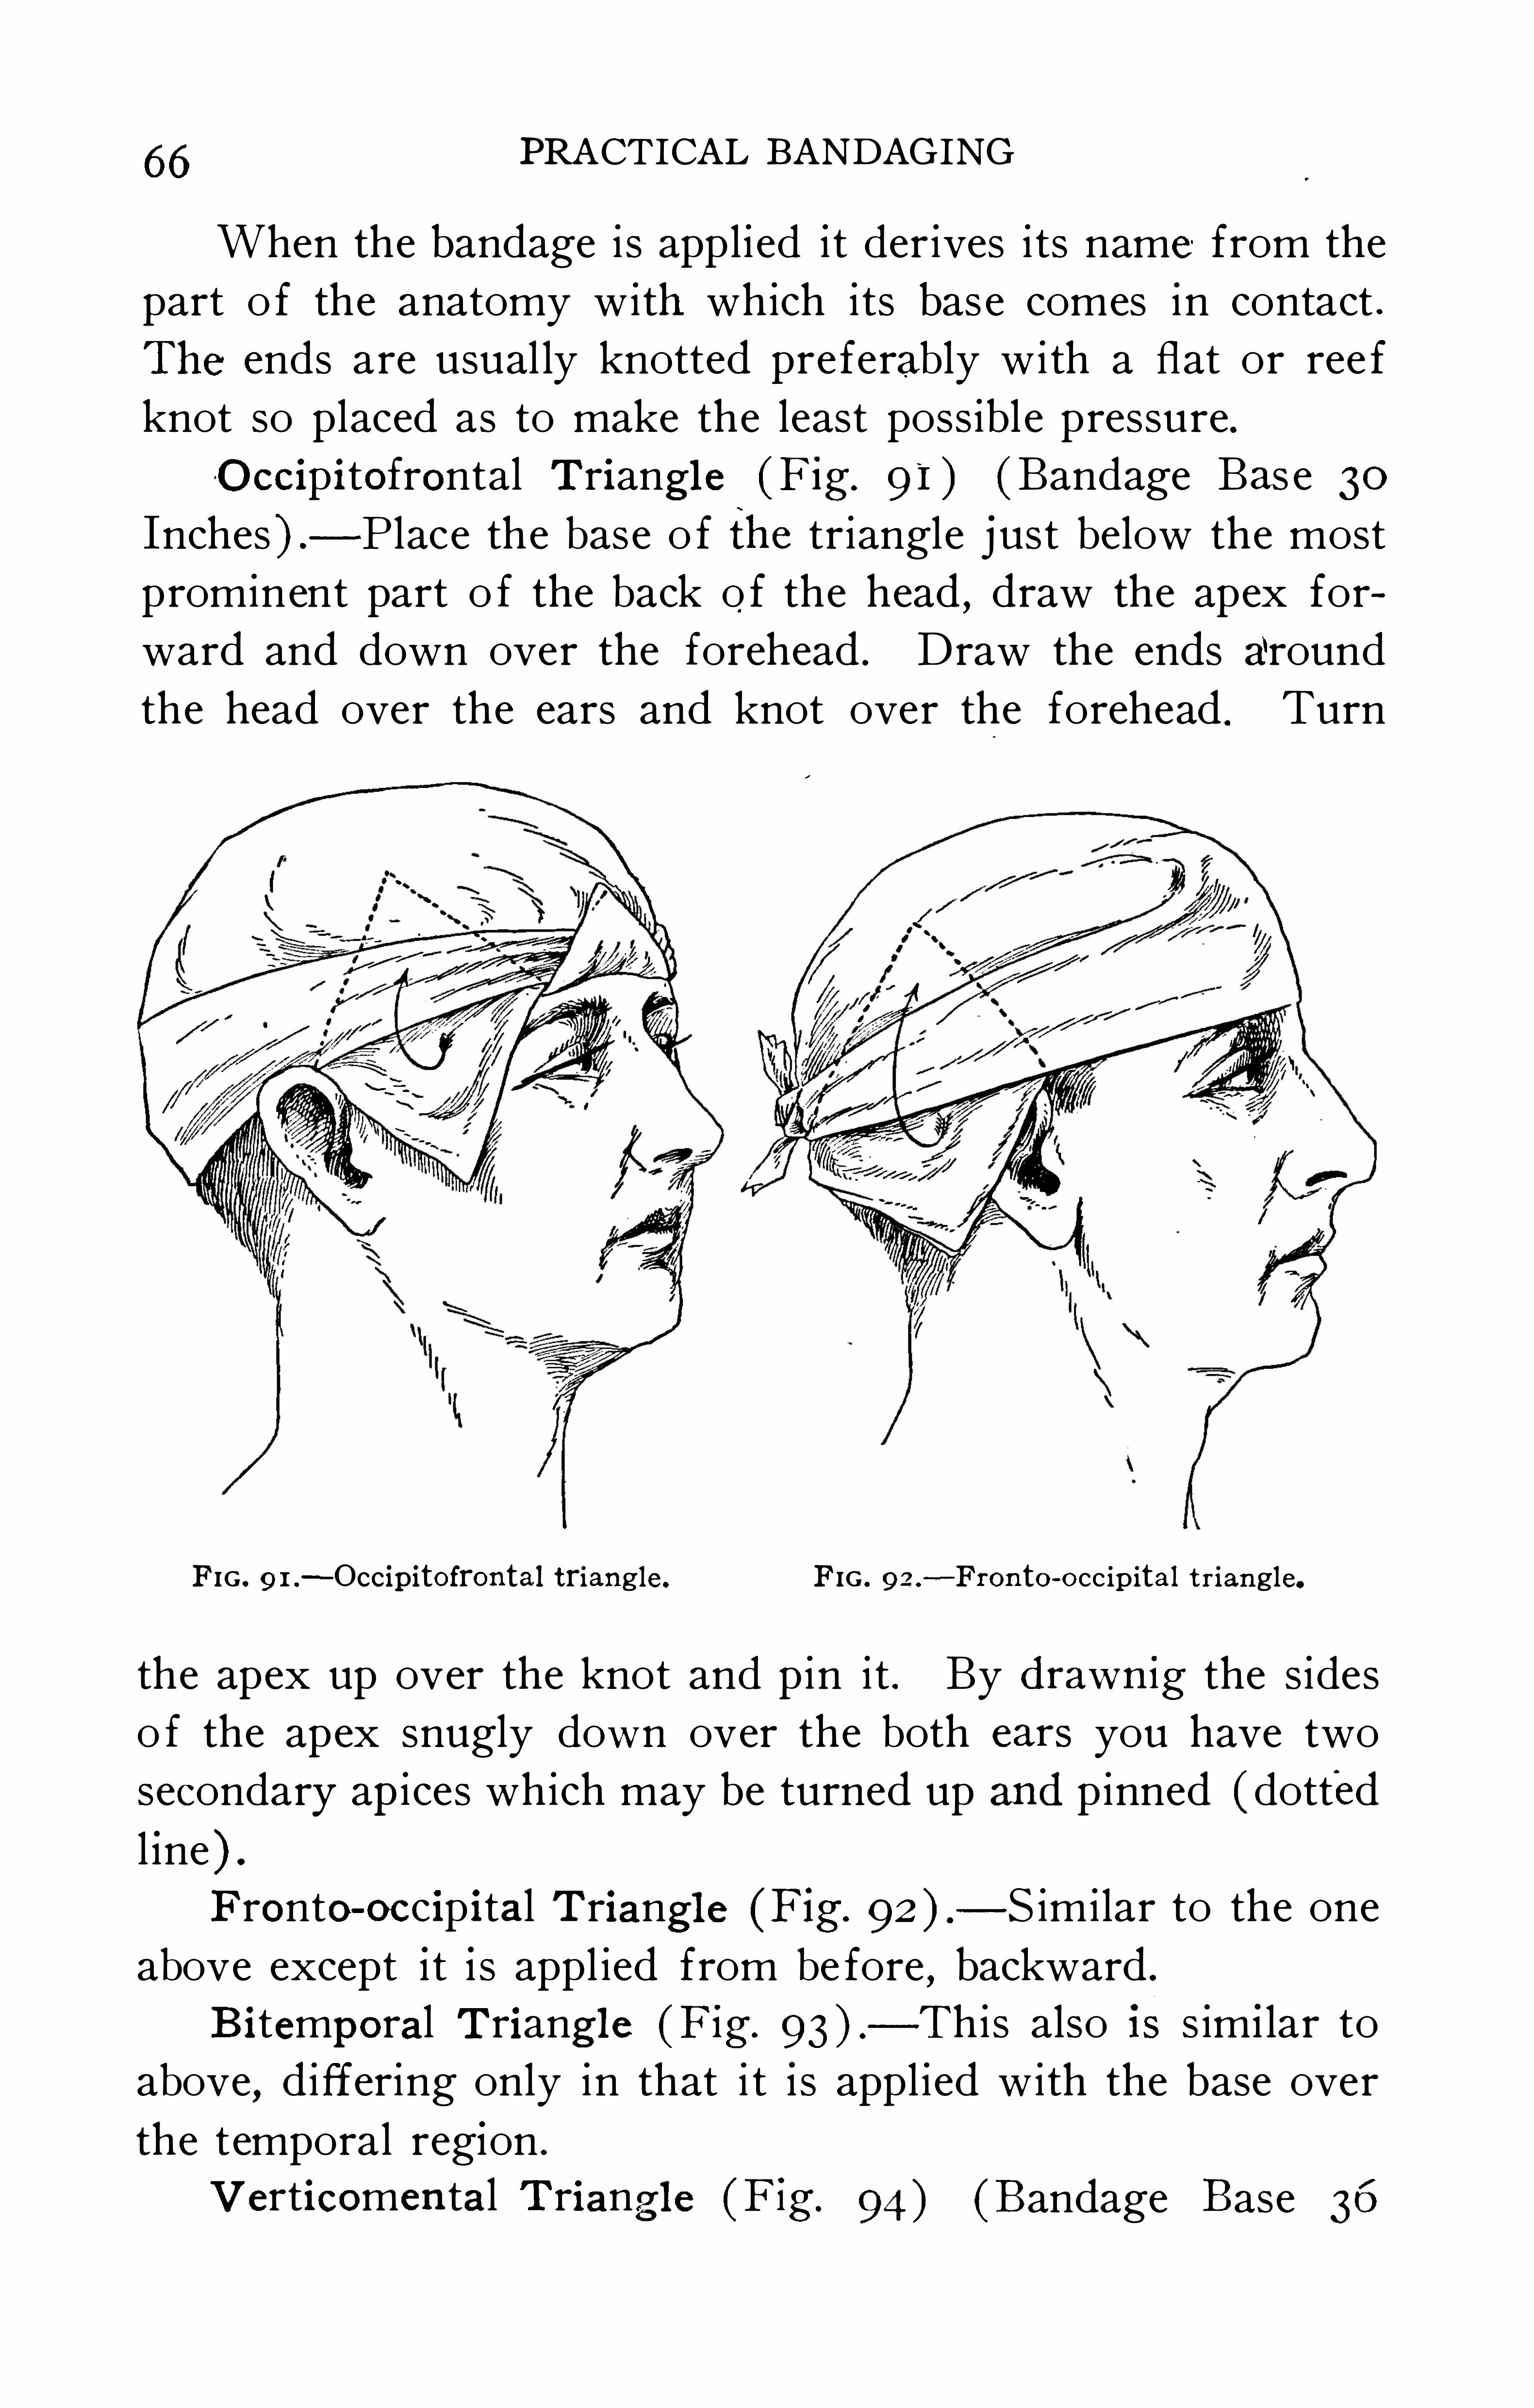
When the bandage is applied i t derives i ts name from the
part o f the anatomy with which its bas e comes in contact .
The ends are usual ly knotted preferably with a flat or ree f
knot so placed as to make the least possible pressure.O ccipitofrontal Triangl e (Fig. 91 ) (Bandage Bas e 30
Inches ) .
-P lace the base o f the triangle just below the most
prominent part o f the back o f the head , draw the apex for
ward and down over the forehead . Draw the ends around
the head over the ears and knot over the forehead . Turn
FIG . 9 1 .
—Occipitofrontal triangle . FIG . 92 .
—Fronto-occ ip ita1 triangle.
the apex up over the knot and pin it . By drawnig the sides
o f the apex snugly down over the both cars you have two
secondary ap i ces which may be turned up and pinned ( dotted
l ine ) .
P ronto-occipital Triangl e (Fig.
— S imilar to the one
above except i t i s appl ied from be fore,backward .
B itemporal Triangl e (Fig.
— This also 18 s im i lar to
above,differing only in that i t is appl ied with the base over
the temporal region .
V erticomen tal Triangl e (F ig. 94 ) (Bandage Base 36
68 PRACTICAL BANDAGING
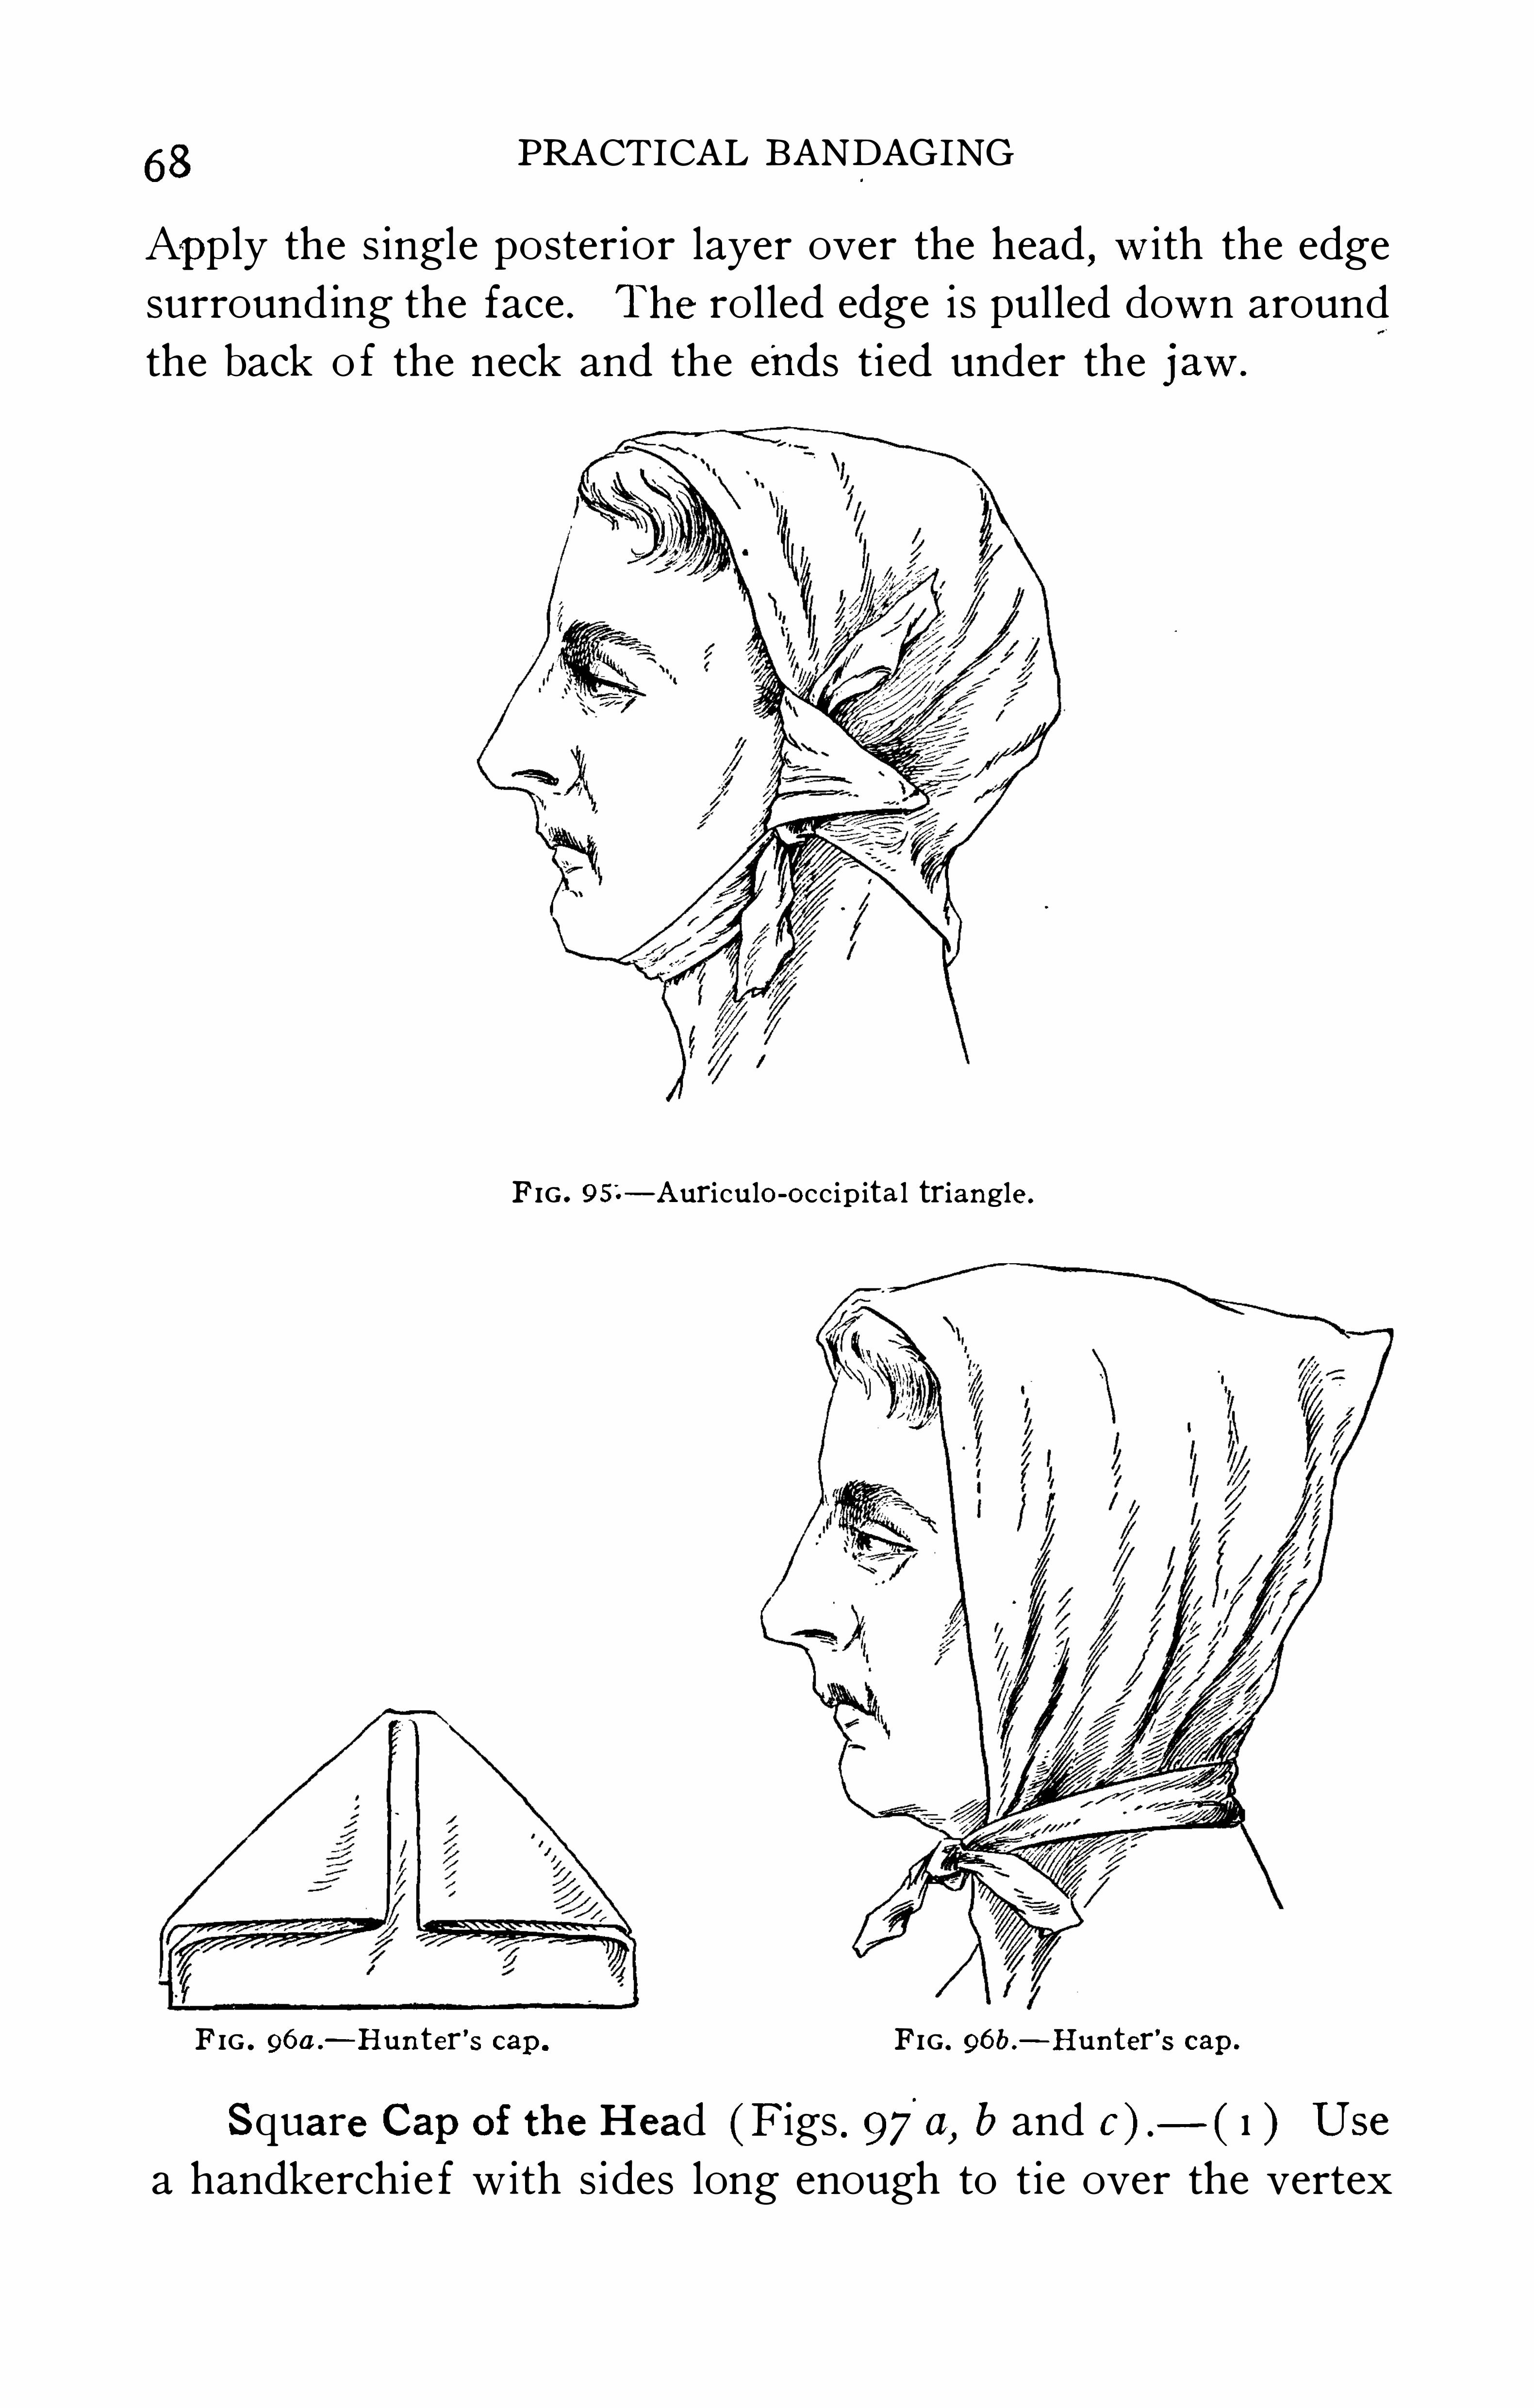
Apply the s ingle posterior layer over the head , w i th the edgesurround ing the face . The rolled edge is pulled down around
the back o f the neck and the ends ti ed under the j aw .
FIG . osz— Auriculo-occ ip ita l triangle .
FIG . 96a .
— Hunter's cap. FIG . 96b .
—Hunter's cap.
Square Capof the Head (F igs 97a, b and c) . I ) Use
a handkerchie f with sides long enough to tie over the vertex
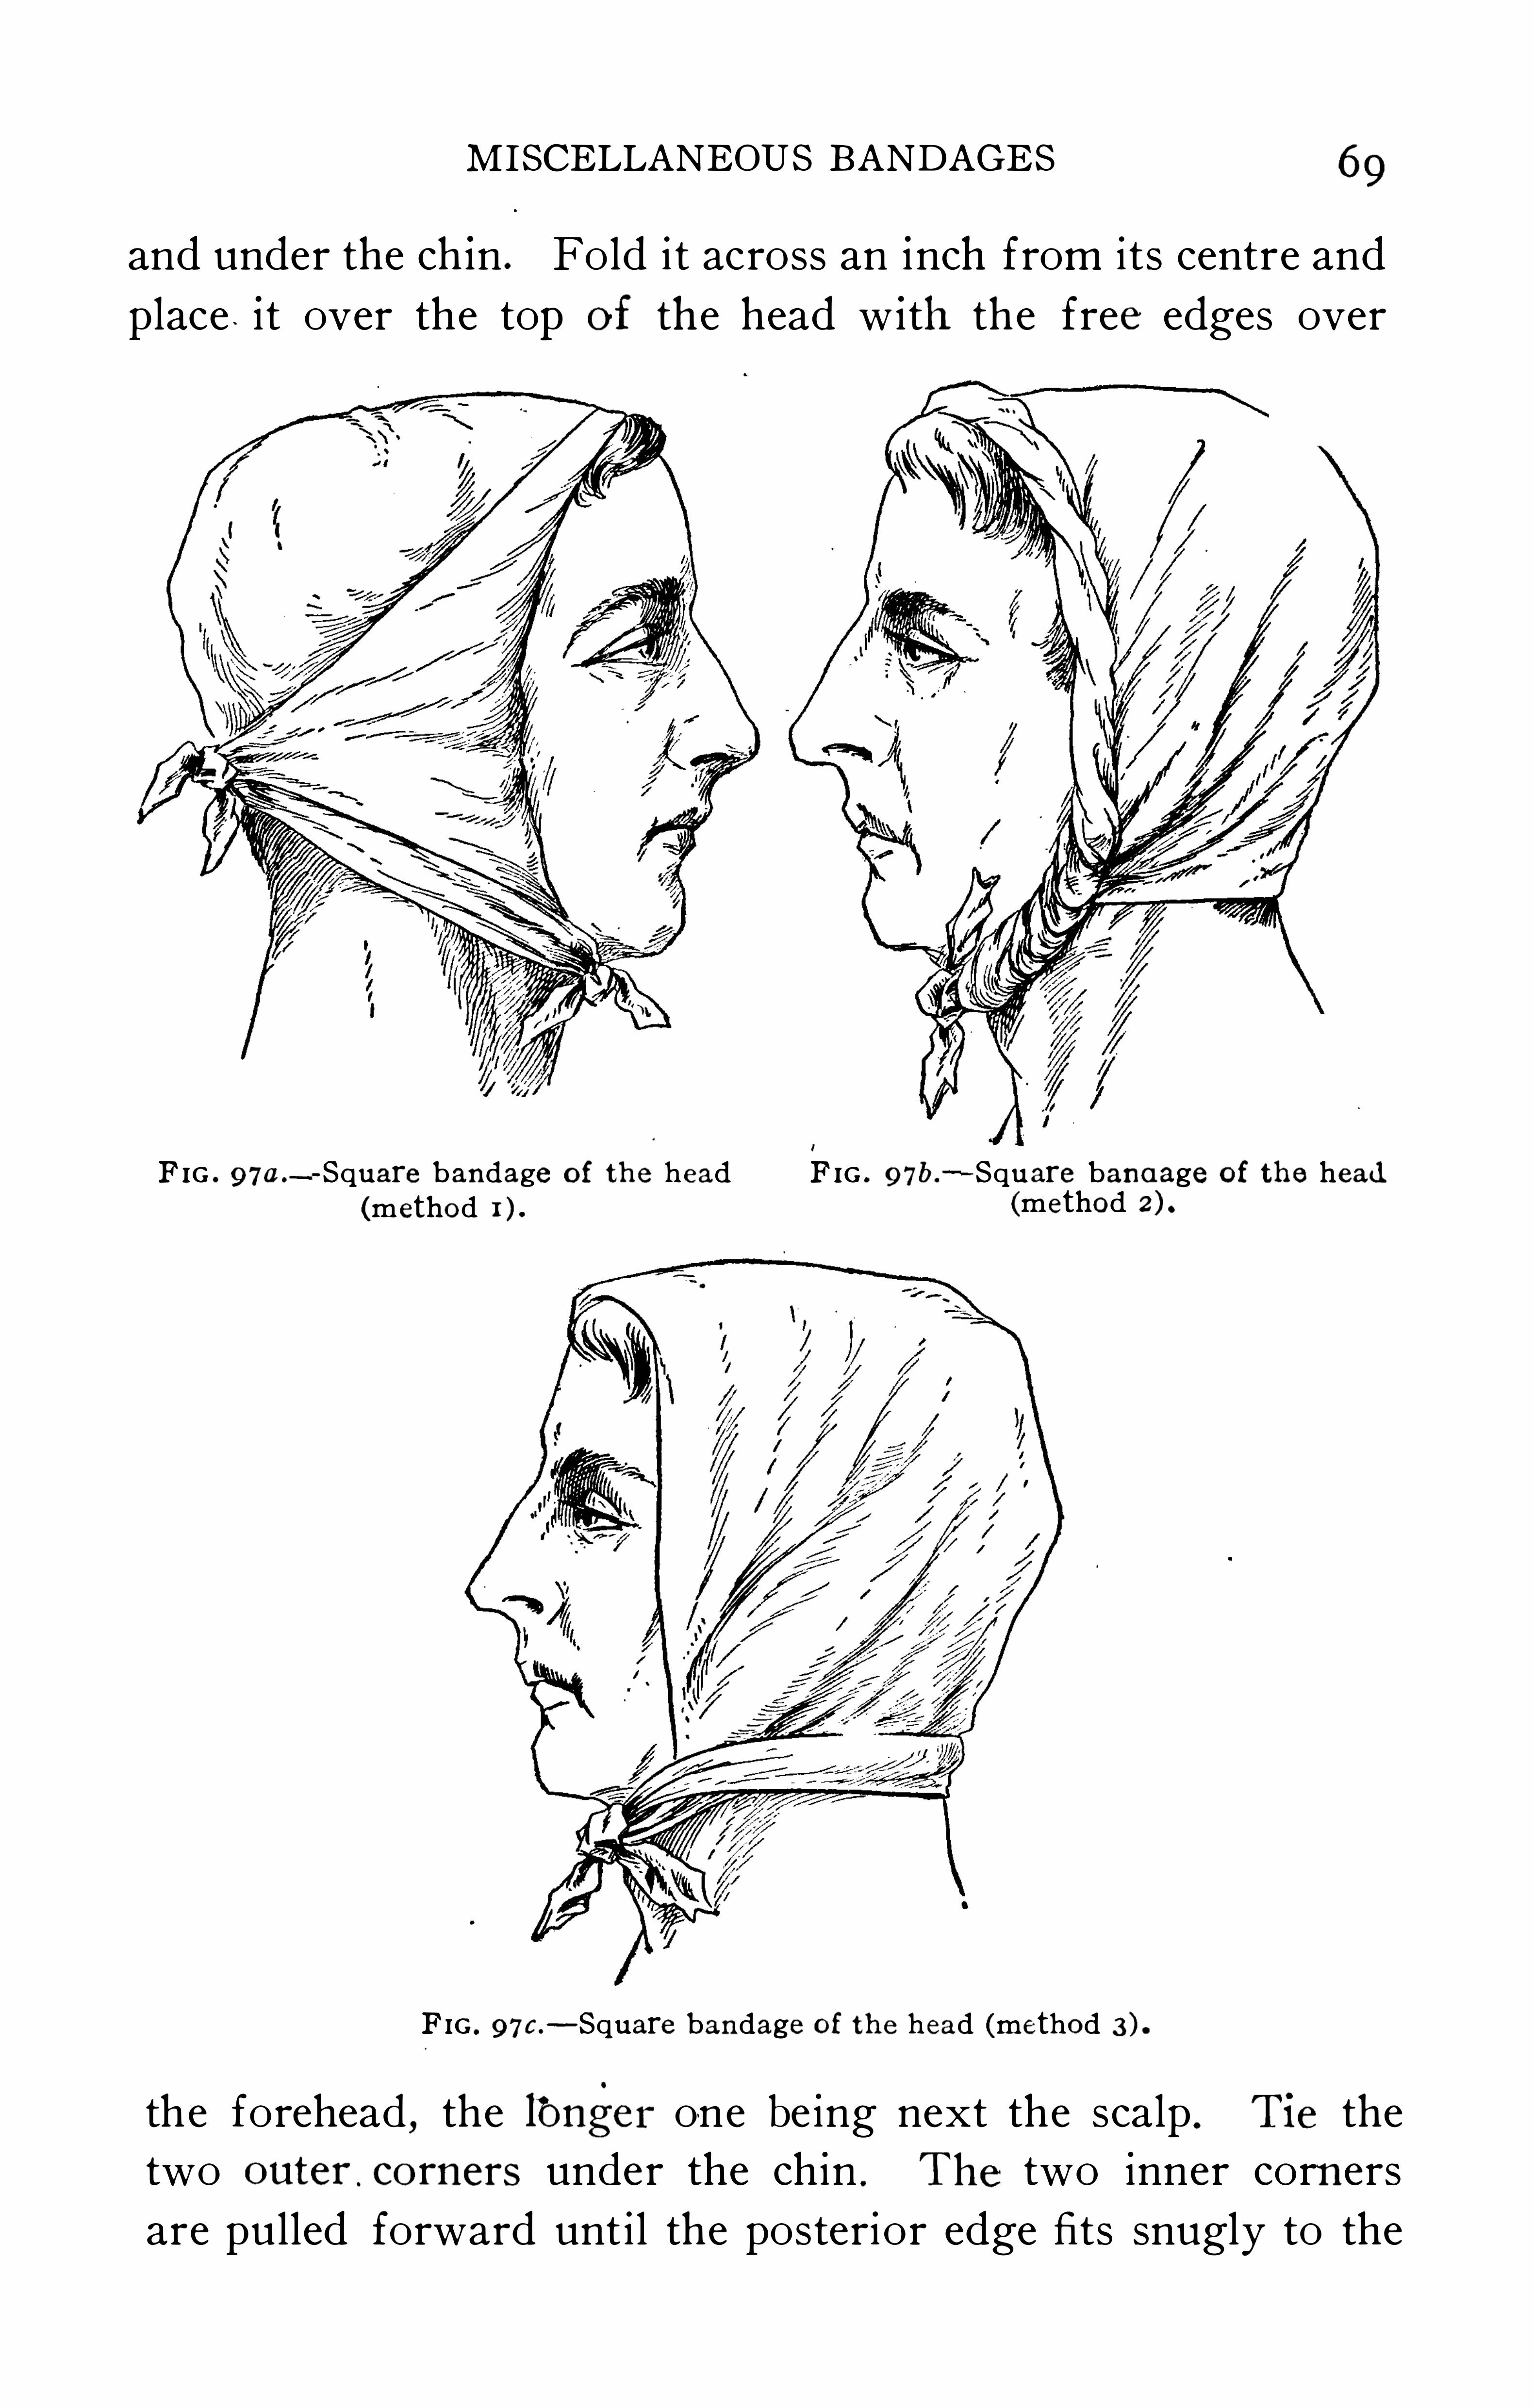
M ISCELLANEOUS BANDAGES 69
and under the ch in . Fold i t across an inch from i ts centre and
place.it over the top of the head w ith the free edges over
F IG. 97a .
—Square bandage of the head F IG . 97b .
—Square band age of the head(method (method
FIG . 97c.
-Square bandage of the head (method
the forehead , the lbnger one be ing next the scalp . Tie the
two outer. corners under the chin . The two inner corners
are pulled forward unt i l the posterior edge fits snugly to the
70PRACTICAL BANDAGING
back of the neck . Fold the two corners back'
one on each
s ide o f the head , in the form of tr iangles , and pin or t ie .
(2 ) S imi lar square and placed as the one above . The
free ends are twisted unti l the dress ing is snug and then ti ed
together under the ch in .
3) L ikewise s imilar to the one above except that the
two anterior corners are ti ed together and the two posterior
corners are t ied together .Pos terior Triangle of Shoulders (F ig. 98 ) (Handkerchie f
w ith Base 40 to 42 Inches Long ) .
— Apply the centre o f the
FIG . 98 .- Posterior triangle of the shoulders . F IG . 99.
— Thoracicoscapular triangle.
base back o f the neck , allow ing the apex to drop down be
tween the shoulders . The ends are crossed over the chest and
carri ed under the axi l lae and fastened together over the apex
which i s turned up and pinned on i tsel f .
The Thoracicoscapular Triangl e (Fig.
— P lace the
base o f a large triangle low down on the chest with apex
thrown over the des ired shoulder. Carry the extremi ti es
around the chest and fasten together over the apex which is
turned up and pinned back upon itsel f . The excess o f free
edge on one s ide o f the triangle i s lapped and pinned .
Byspl itting the apex and carrying one over each shoulder
M ISCELLANEOUS BANDAGES7r
the bandage can be made to serve double duty. The slack
on each can be taken up and pinned .
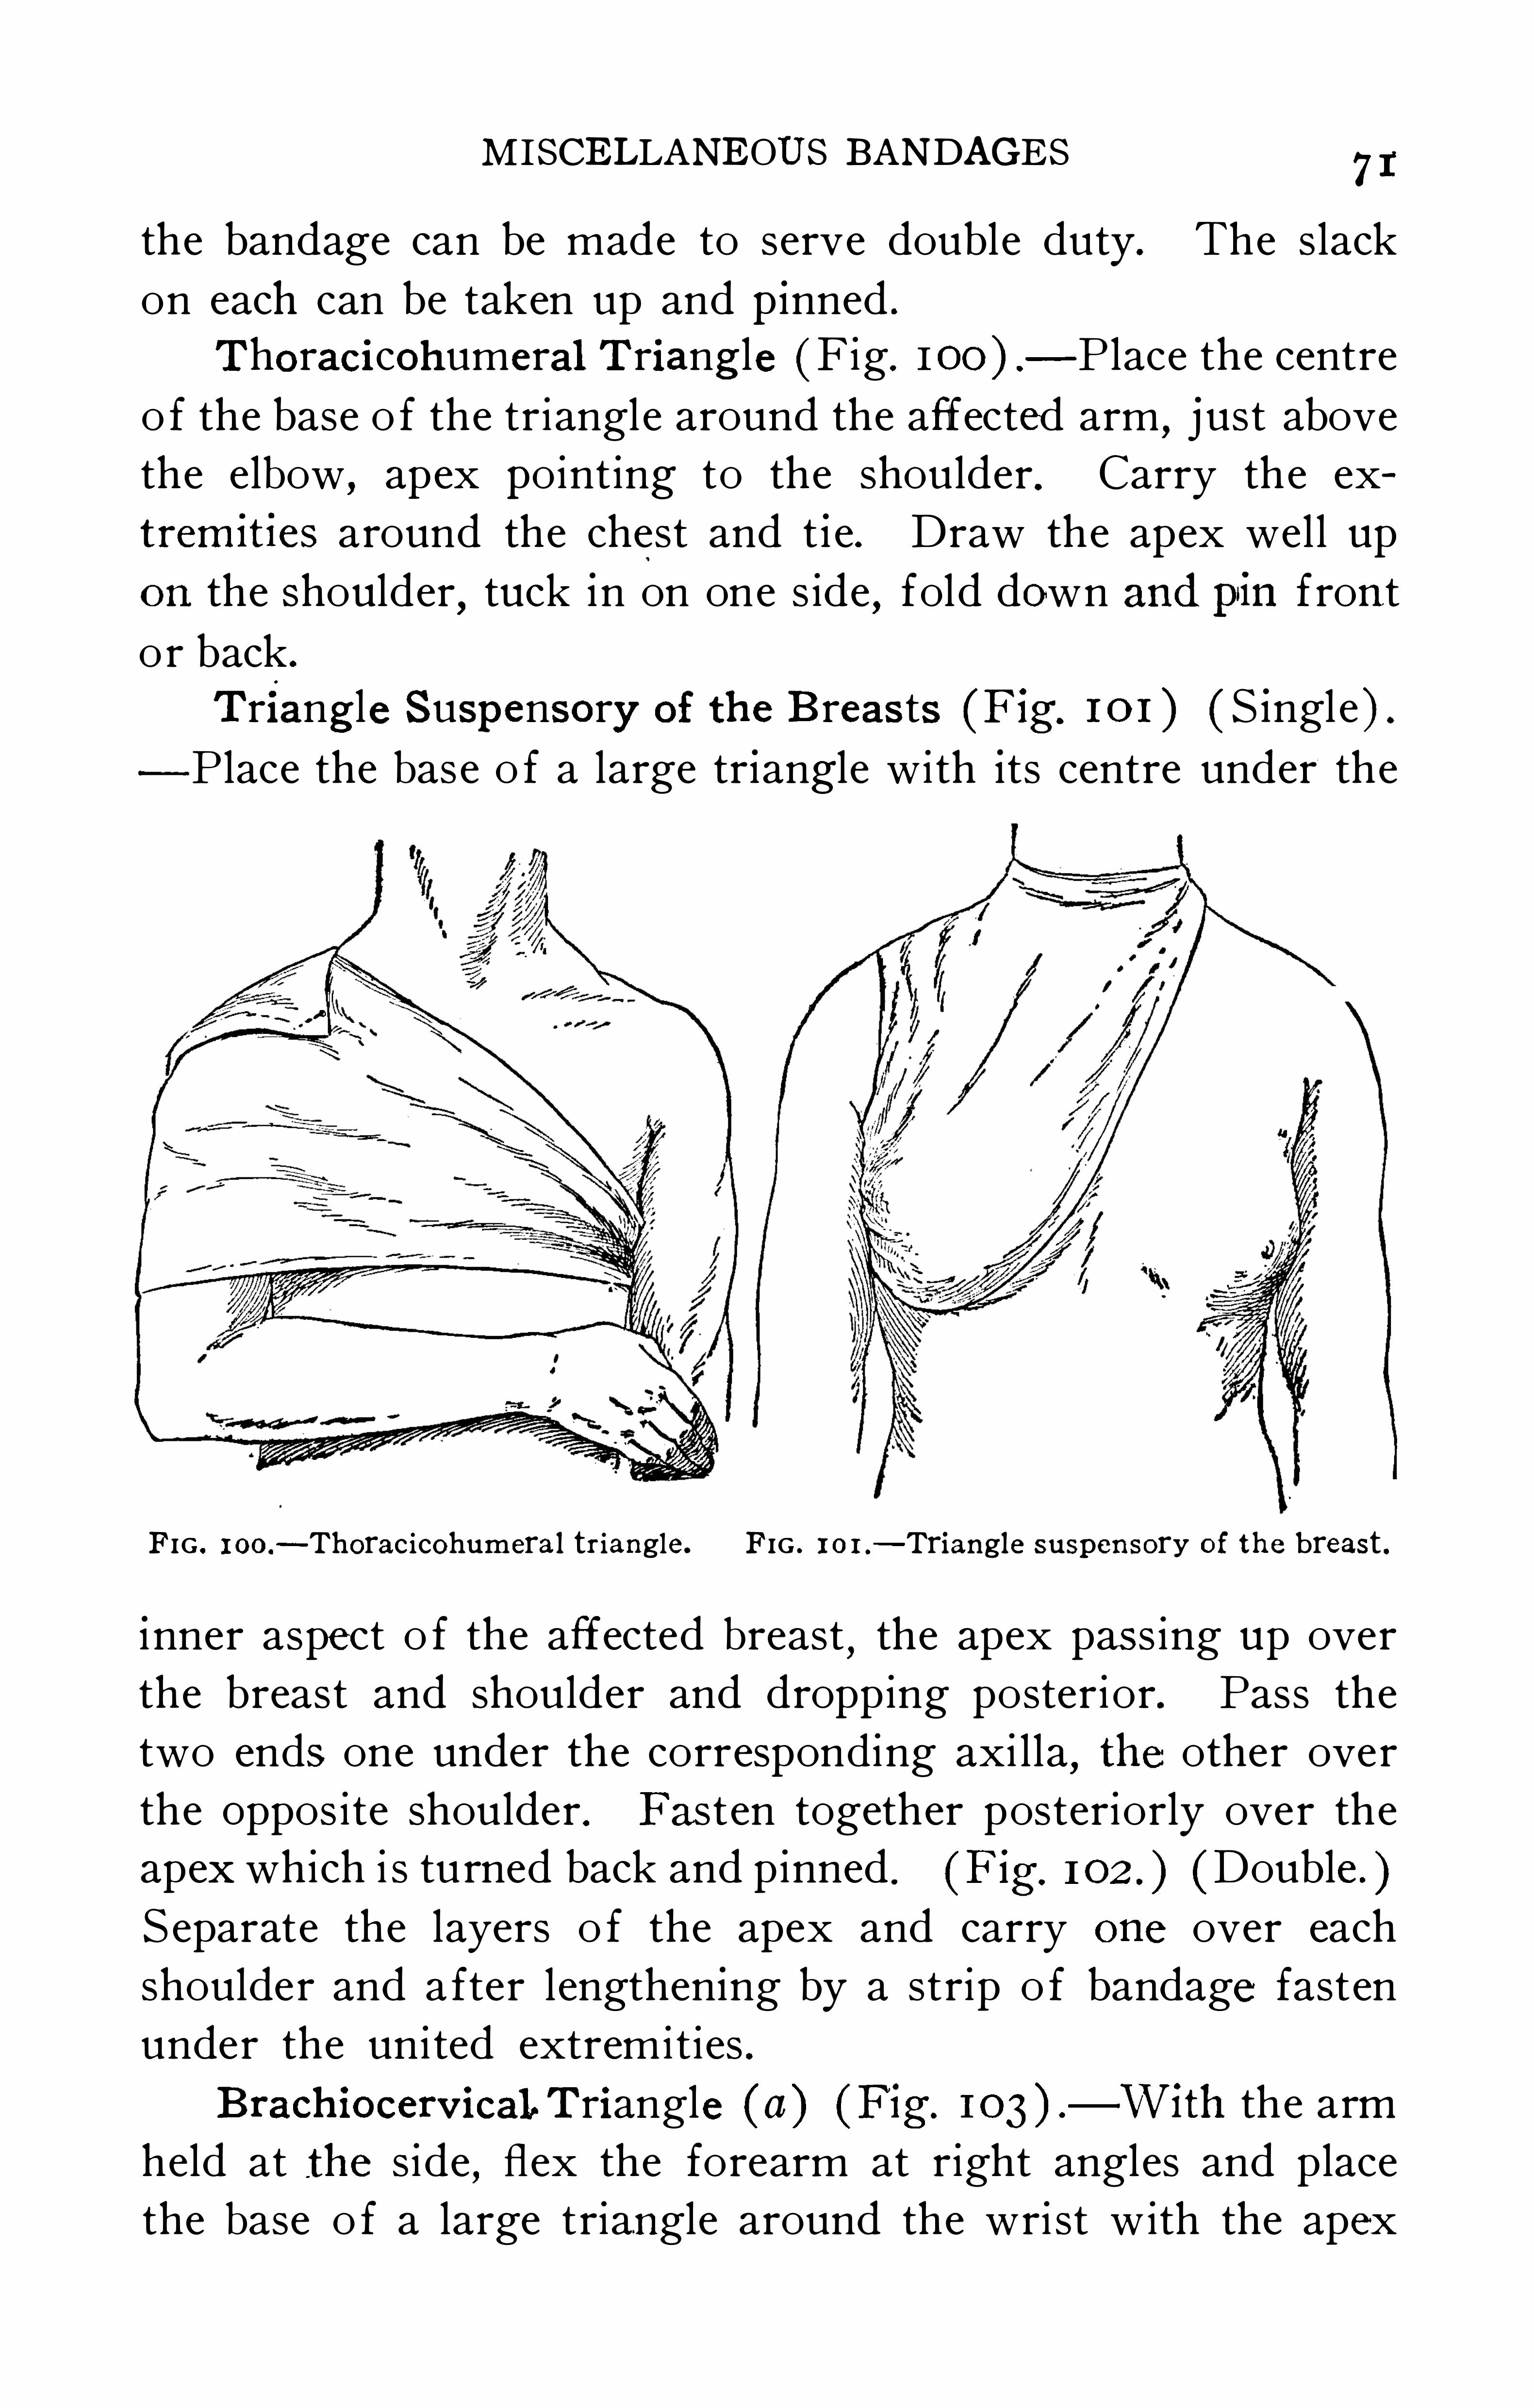
Thoracicohumeral Triang le (F ig. 100 ) — P lace the centre
o f the base o f the triangle around the affected arm , j ust above
the elbow,apex pointing to the shoulder. Carry the ex
tremities around the chest and t ie . Draw the apex well up
on the Shoulder,tuck in on one s ide
,fold down andpin f ront
o r back .
Triangle Suspensory of the B reas ts (F ig. 10 1 ) ( S ingle )P lace the base o f a large tr iangle with its centre under the
FIG . 100.— Thorac icohumeral triangle. FIG . 1 0 1 .
— Triangle suspensory of the breast .
inner aspect o f the affected breast,the apex pas s ing up over
the breast and shoulder and dropping posterior. Pass the
two ends one under the correspond ing axi lla , the other over
the Oppos ite shoulder . Fasten together posteriorly over the
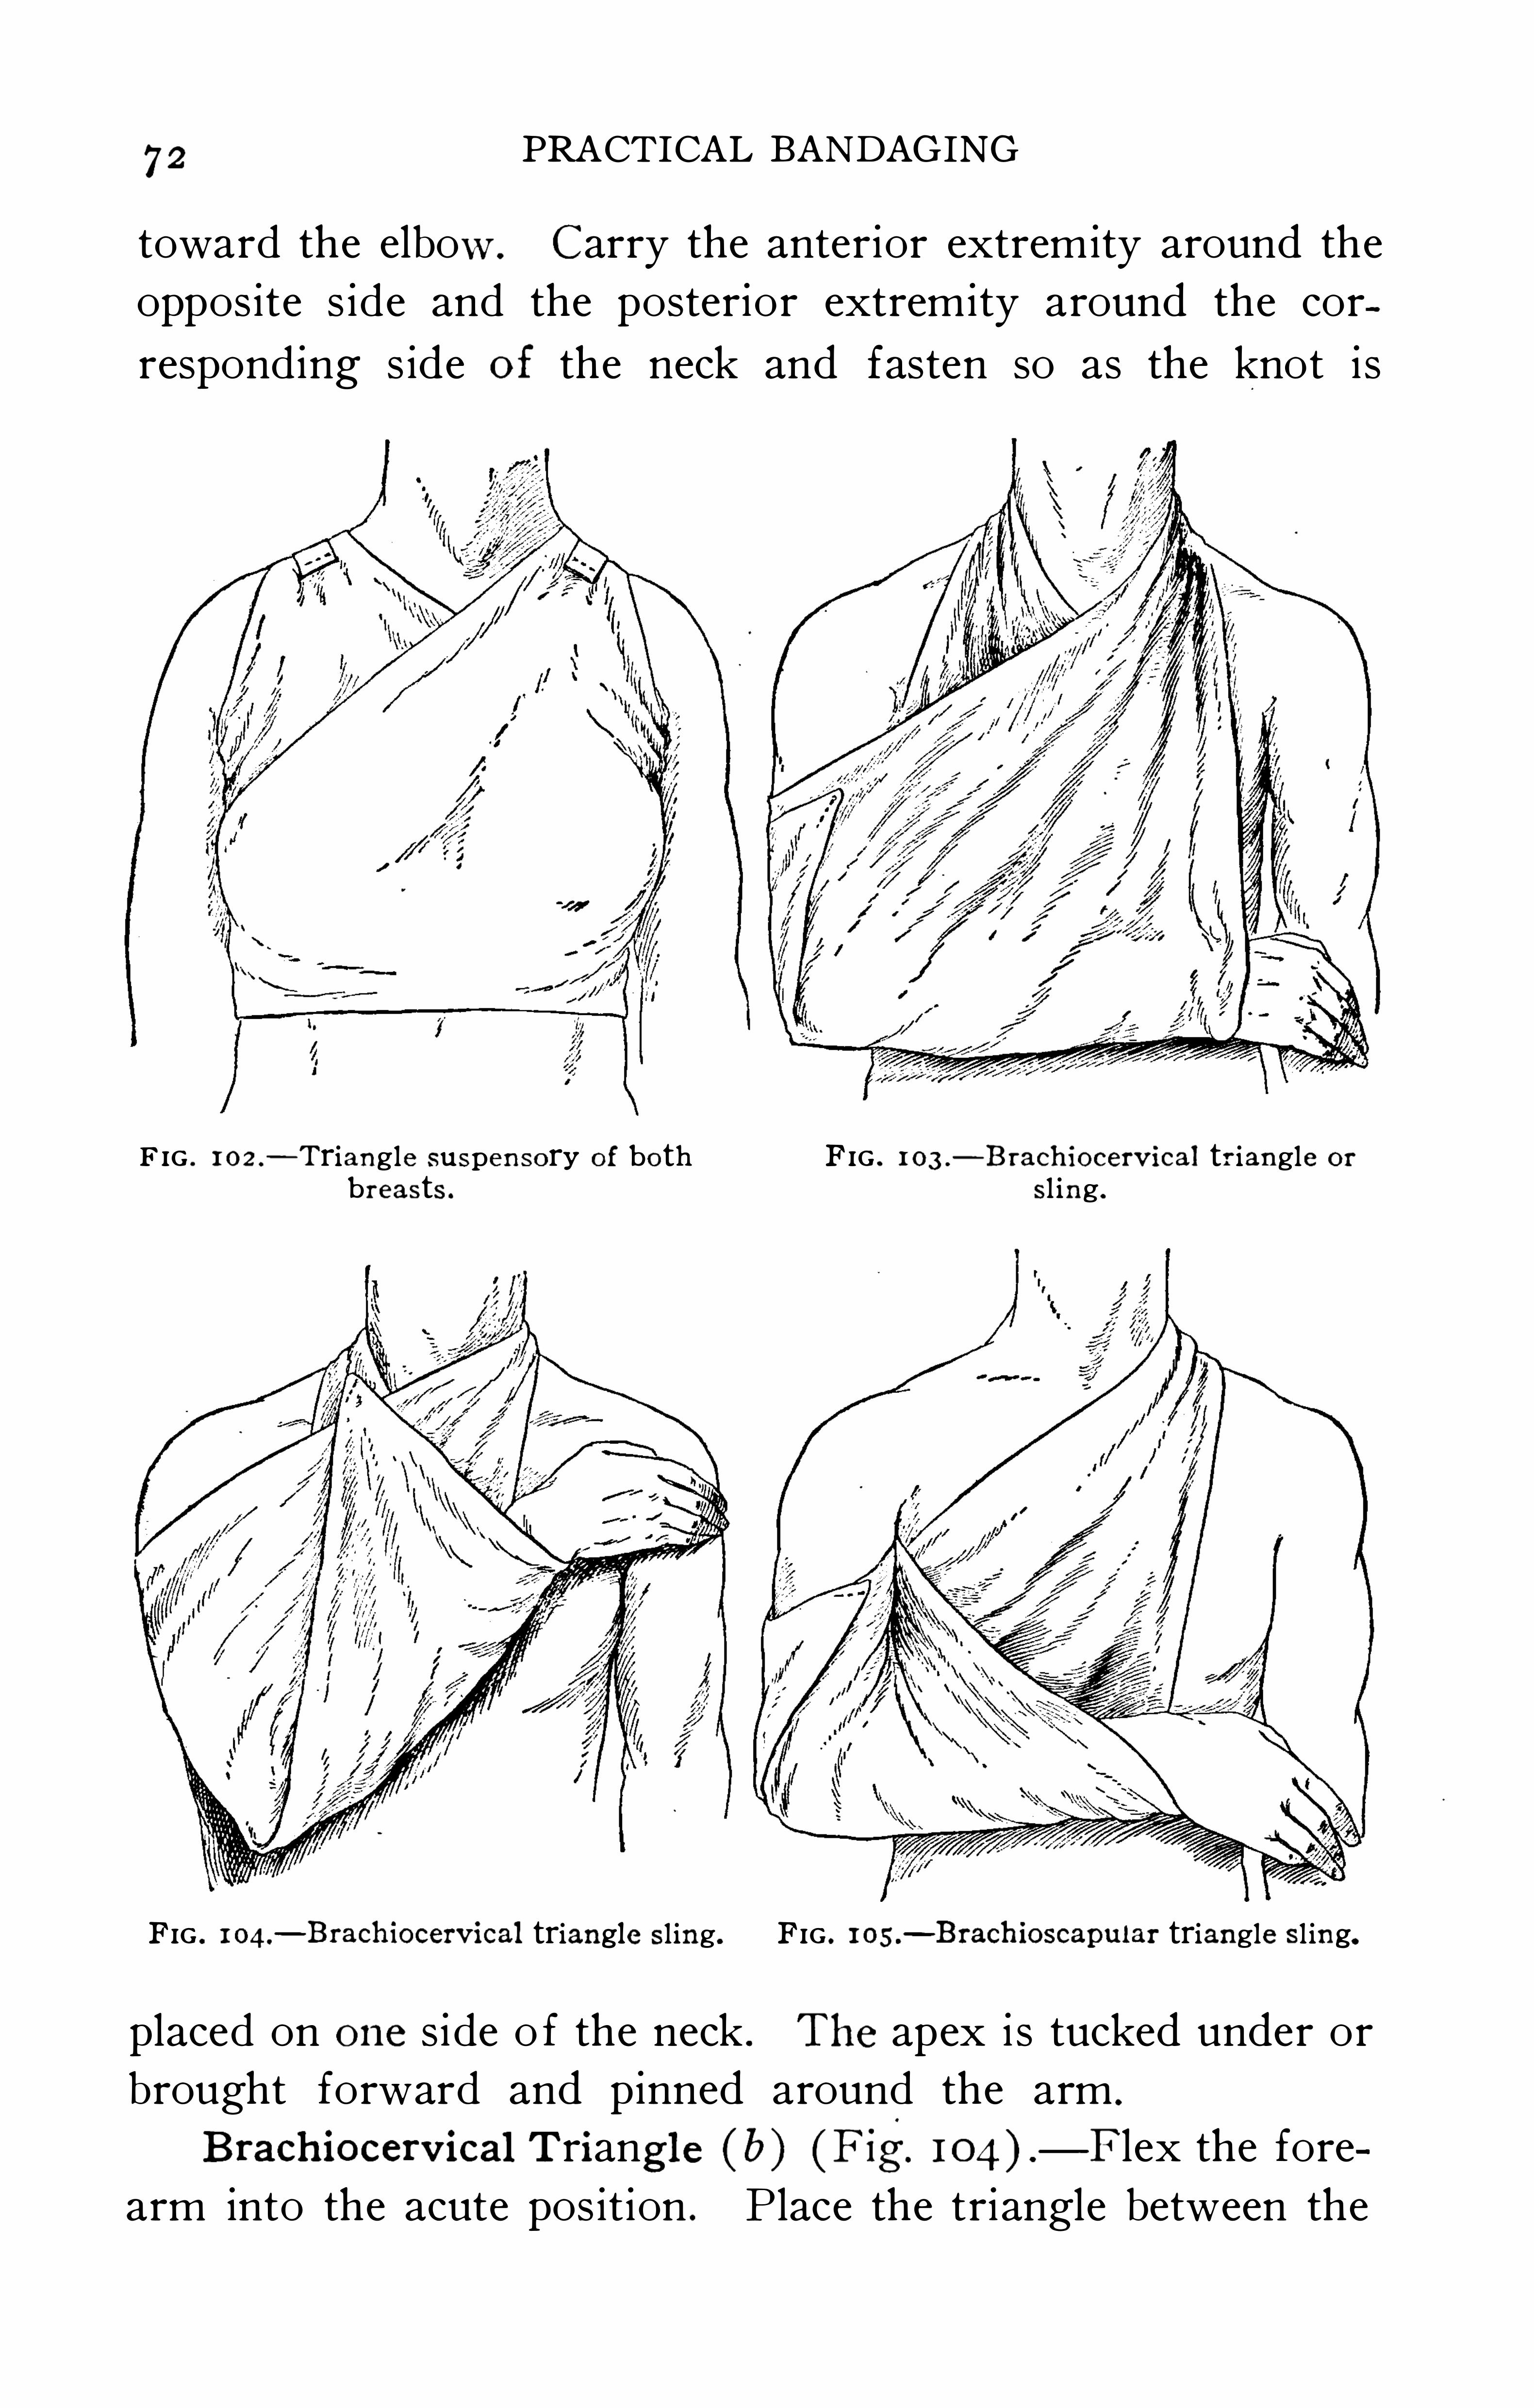
apex which i s turned back and pinned . (F ig. (Double )S eparate the layers o f the apex and carry one over each
shoulder and after lengthening by a strip o f bandage fasten
under the uni ted extremities .B rachiocervical.Triangle (a) (Fig. I O3) .
— VVith the arm
held at the s ide , flex the forearm at right angles and place
the base o f a large triangle around the wri st with the apex
72 PRACTICAL BANDAGING
toward the elbow . Carry the anterior extremity around the
oppos ite s ide and the posterior extremity around the cor
respond ing s ide of the neck and fasten so as the knot i s
F IG . 1 02 .
— Triangle suspensory of both FIG . 1 03 .
— Brachiocervical triangle or
breasts . sl ing .
FIG . 1 04.
— Brachiocervical triangle s l ing. FIG . 1 05 .— Brachioscapu1ar triangle s l ing.
placed on one s ide o f the neck . The apex i s tucked under or
brought forward and pinned around the arm .
Brachiocervical Triangl e ( b ) (F ig. F lex the fore
arm into the acute pos ition . P lace the triangle between the
M ISCELLANEOUS BANDAGES73
arm and the chest with the base pass ing diagonal ly across
the axi lla o f the affected s ide and the apex hanging down
over the chest . The upper extremity passes over the shoulder
o f the inj ured s ide . Bring the lower extremity around the
outs ide of the arm and elbow and carry i t over the sound
shoulder to be t ied to the upper extremity posteriorly . The
apex i s brought up around the forearm and pinned h igh up
on the upper extremity.
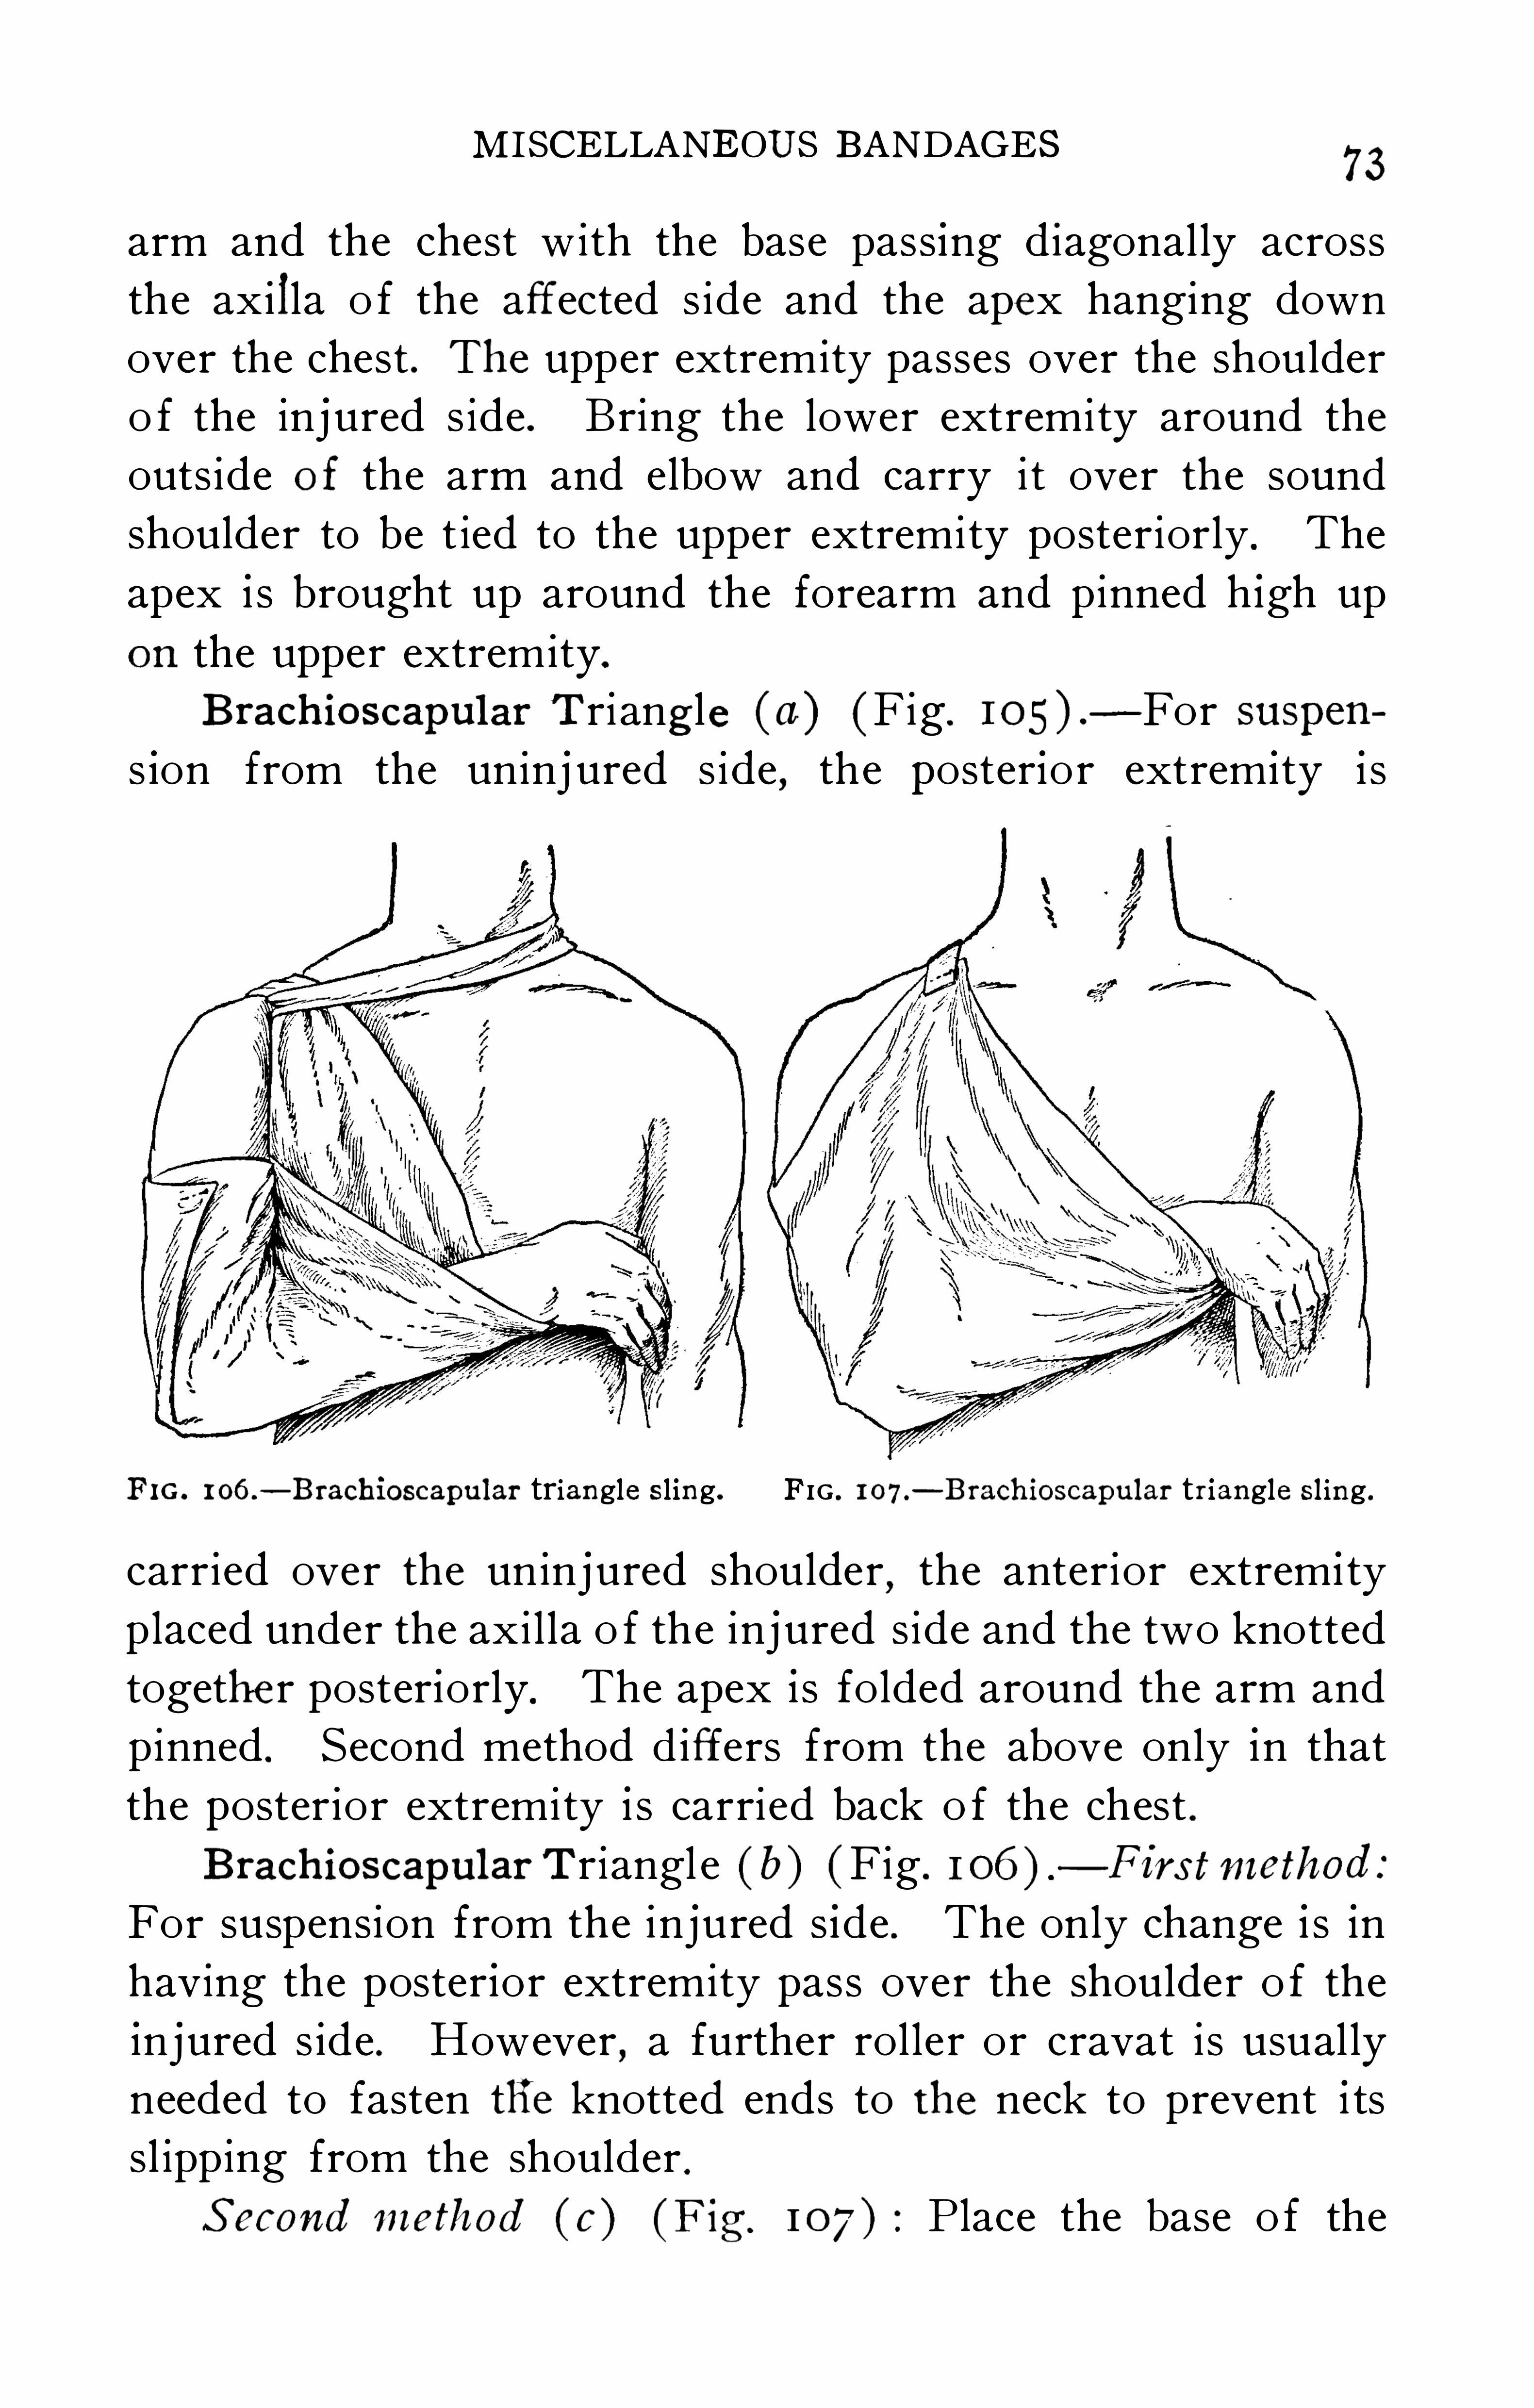
Brachioscapul ar Triangle (a) (F ig. I O5) .
—For suspens ion from the uninj ured s ide , the posterior extrem ity i s
F IG . 1 06 .— Brachioscapular triangle s ling. FIG . 1 07.
— Brachioscapular triangle s l ing .
carried over the uninjured shoulder,the anterior extrem i ty
placed under the axi l la o f the inj ured s ide and the two knotted
together posteriorly. The apex is folded around the arm and
pinned . Second method d iffers from the above only in that
the posterior extremity i s carried back o f the chest .Brachioscapul arTriangl e ( b ) (F ig .
— F irs tmethod :
For suspension from the injured s ide . The only change i s in
having the poster ior extremity pass over the shoulder o f the
injured s ide . However,a further roller or cravat i s usual ly
needed to fasten tlie knotted ends to the neck to prevent i ts
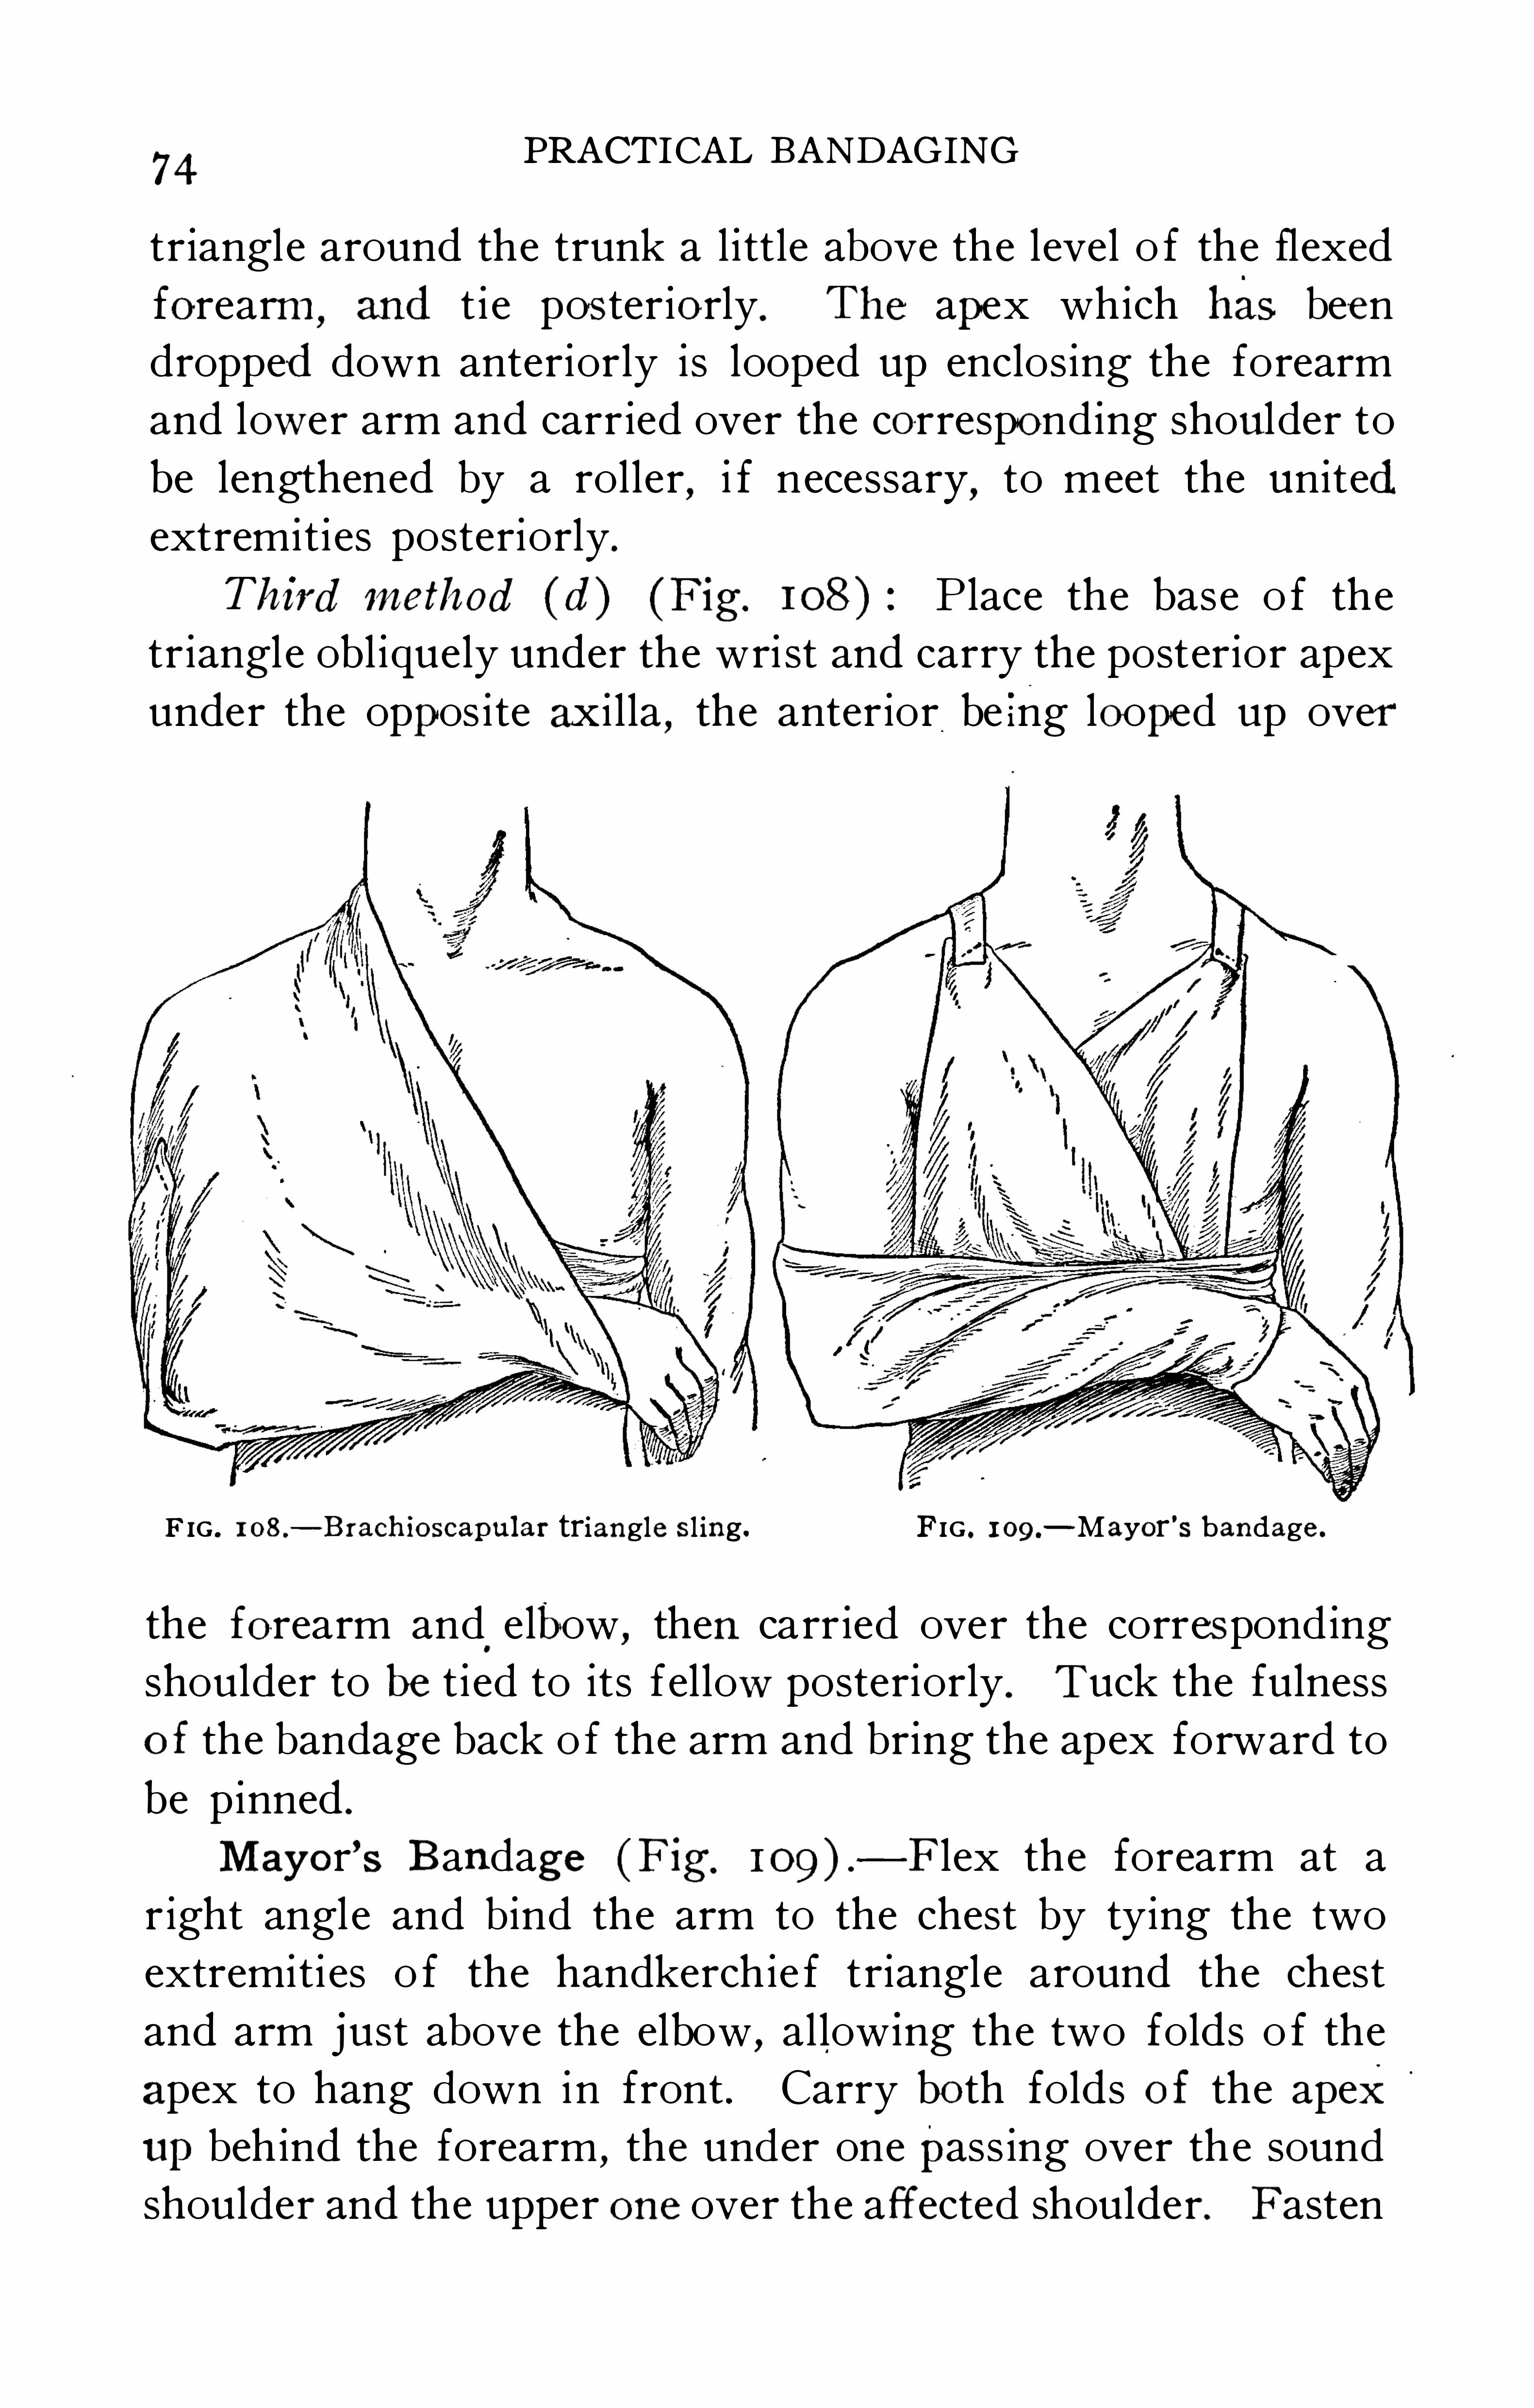
sl ipping from the shoulder .Second method ( c) (F ig. P lace the base o f the
74PRACTICAL BANDAGING
triangle around the trunk a little above the level o f the flexed
forearm,and t i e pos teriorly. The apex which has been
dropped down anteriorly is looped up enclosing the forearm
and lower arm and carr ied over the correspond ing shoulder to
be lengthened by a roller,i f necessary
,to meet the united
extremities posteriorly.
Third method (d ) (Fig. P lace the base o f the
triangle obl iquely under the wri st and carry the posterior apex
under the oppos ite ax i l la , the anterior be ing looped up over
F IG . 1 08 .
— Brachioscapular triangle s l ing. FIG . 1 09.— Mayor’s bandage .
the forearm and.
elbow ,then carr ied over the correspond ing
shoulder to be t i ed to its fellow posteriorly . Tuck the fulness
of the bandage back o f the arm and bring the apex forward to
be pinned .
Mayor’s B andage (Fig.
— F lex the forearm at a
r ight angle and b ind the arm to the chest by tying the two
extremiti es o f the handkerchie f triangle around the chest
and arm just above the elbow , allow ing the two folds o f the
apex to hang down in front . Carry both folds of the apex
upbehind the forearm ,the under onepass ing over the sound
shoulder and the upper one over the affected shoulder. Fasten
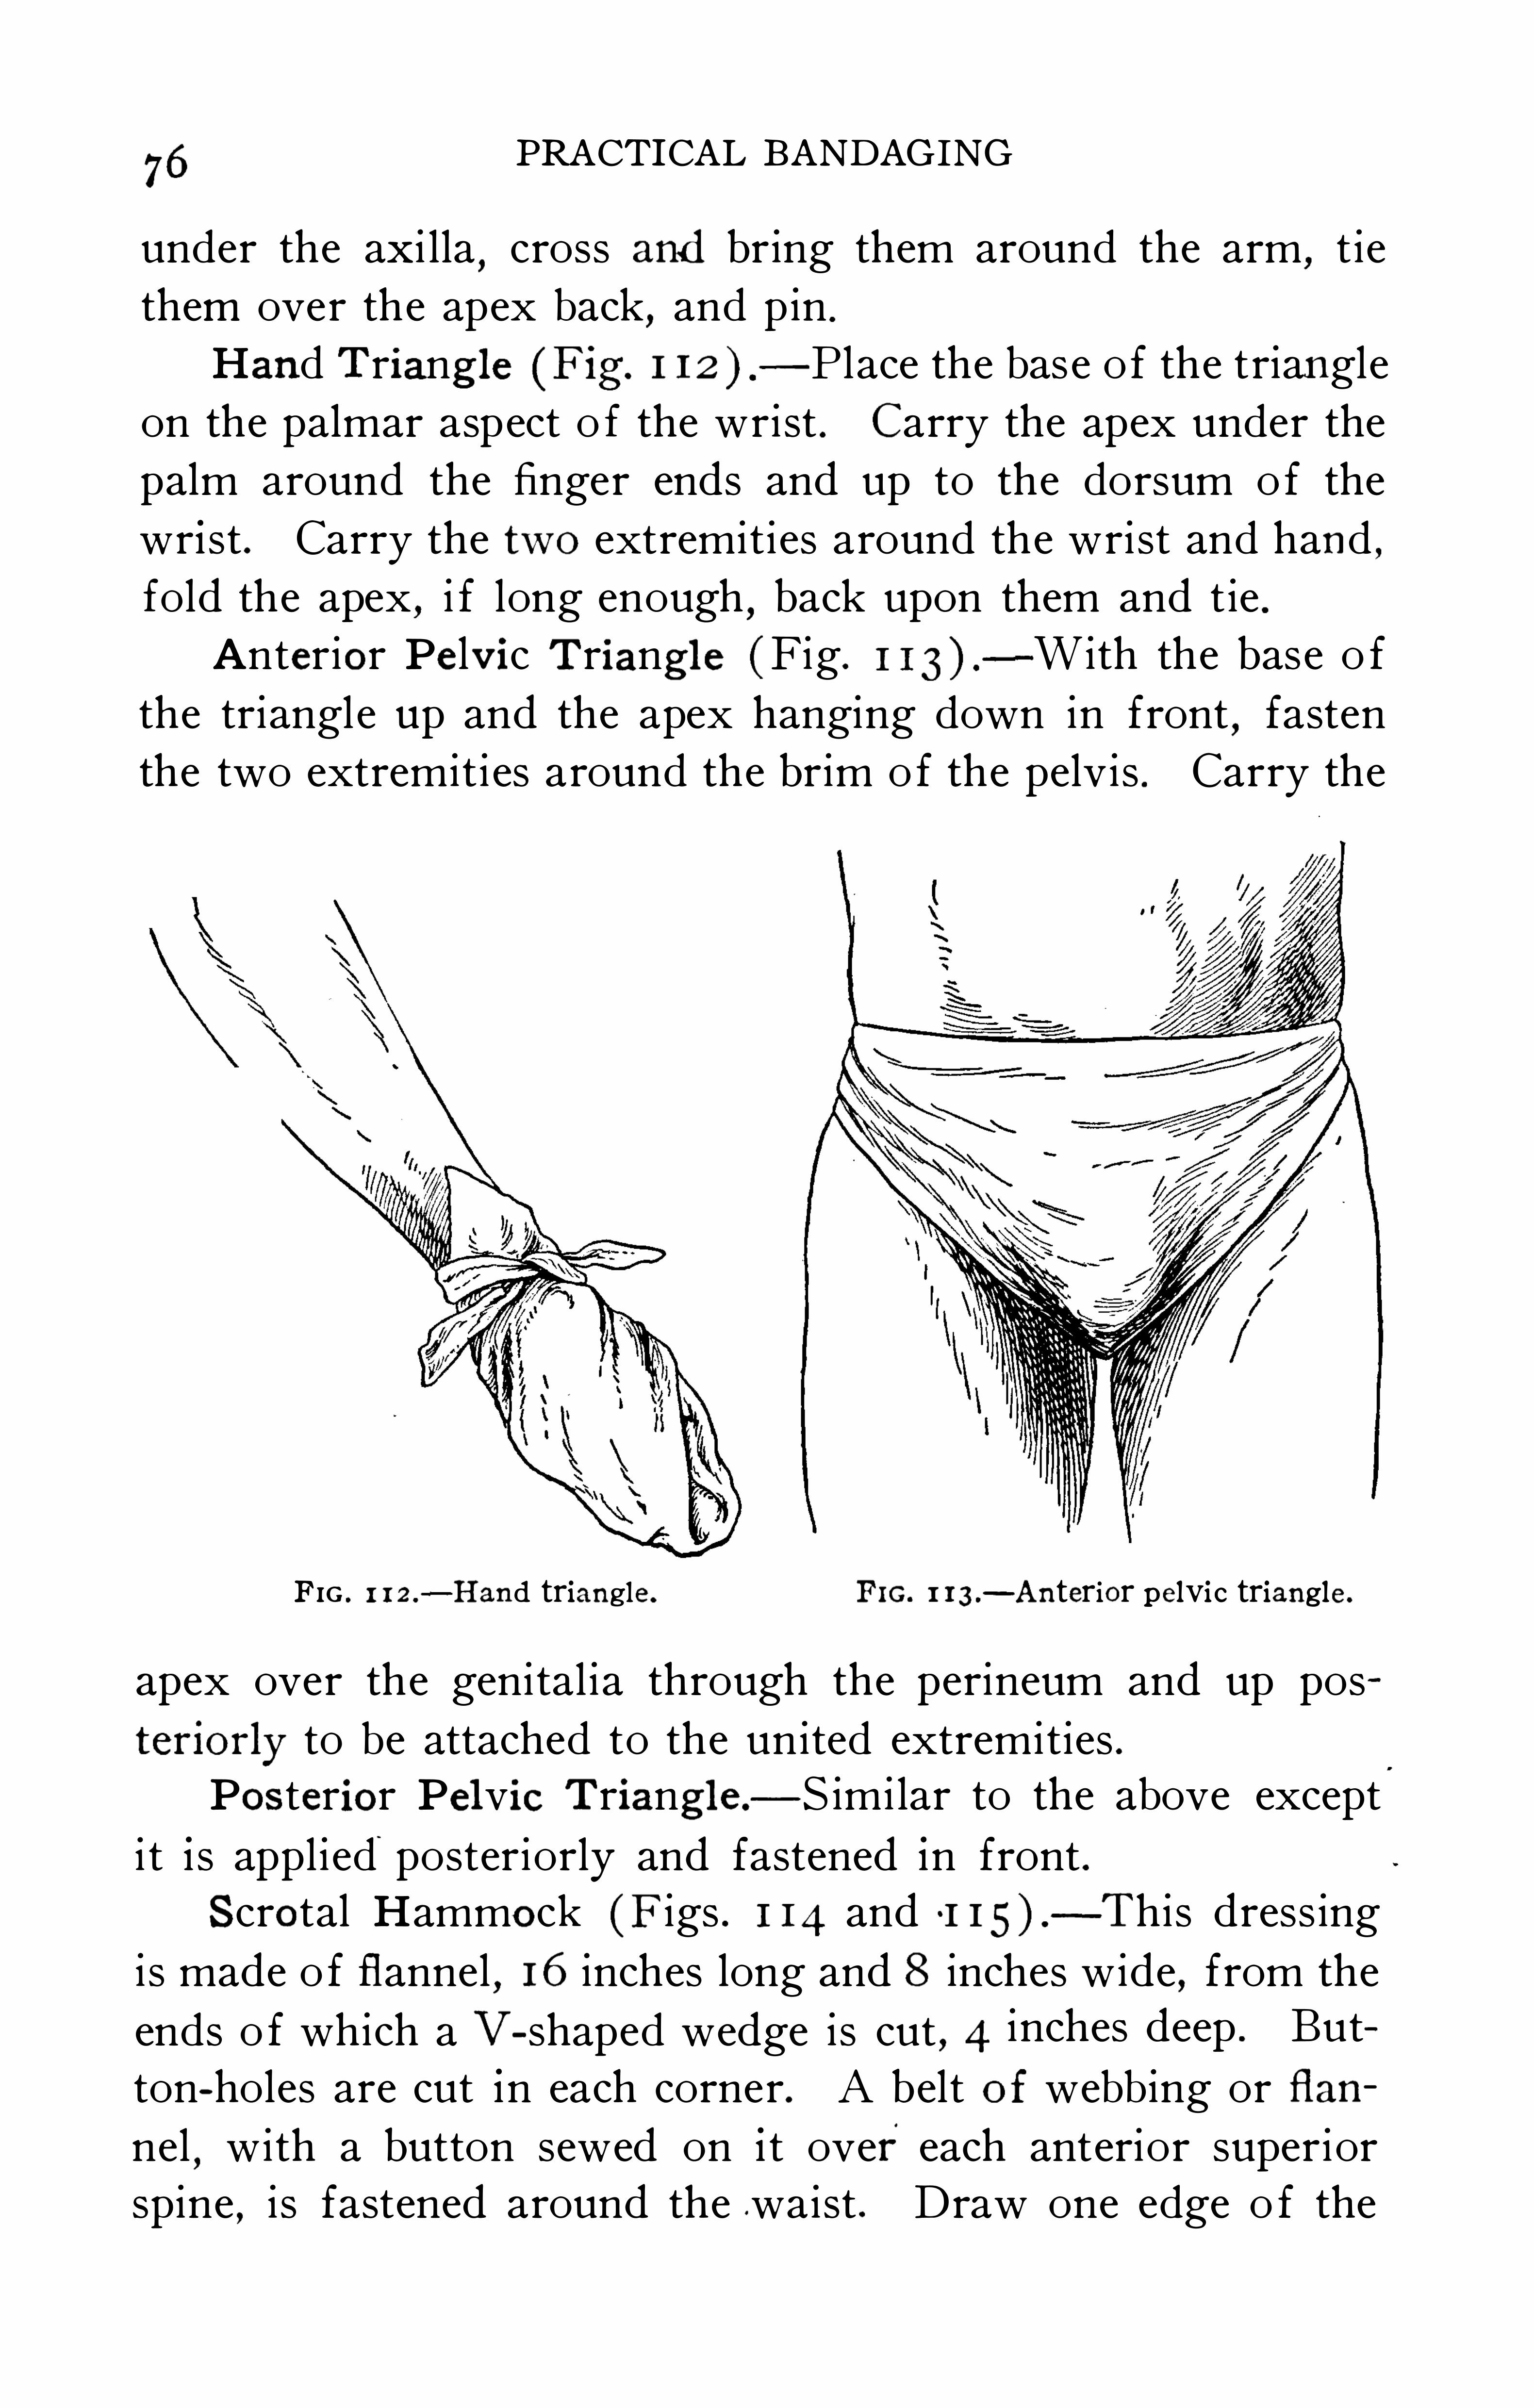
76PRACTICAL BANDAGING
under the ax i l la,cross and bring them around the arm
,t ie
them over the apex back,and pin .
Hand Triang l e (F ig. 1 12 ) — P lace the base o f the triangle
on the palmar aspect o f the wrist . Carry the apex under the
palm around the finger ends and up to the dorsum o f the
wrist . Carry the two extremities around the wrist and hand ,
fold the apex,i f long enough
,back upon them and tie .
Anterior Pelvic Triangl e (Fig.
-With the base o f
the triangle up and the apex hanging down in front,fasten
the two extremiti es around the brim o f the pelvis . Carry the
FIG . 1 1 2 .
—Hand triangle . F IG. 1 13.— Anterior pelvic triangle .
apex over the genital ia through the perineum and up pos
teriorly to be attached to the united extremities .
Pos terior Pel vic Triangl e — S imi lar to the above except
i t i s applied“
posteriorly and fastened in front .
Scrotal Hammock (F igs . 1 14 and —This dress ing
is made o f fl annel,16 inches long and 8 inches wide , from the
ends o f which a V-shaped wedge is cut , 4 inches deep . But
ton-holes are cut in each corner. A belt of webb ing or flan
nel,with a button sewed on i t overeach anterior superior
spine,i s fastened around the .waist . Draw one edge o f the
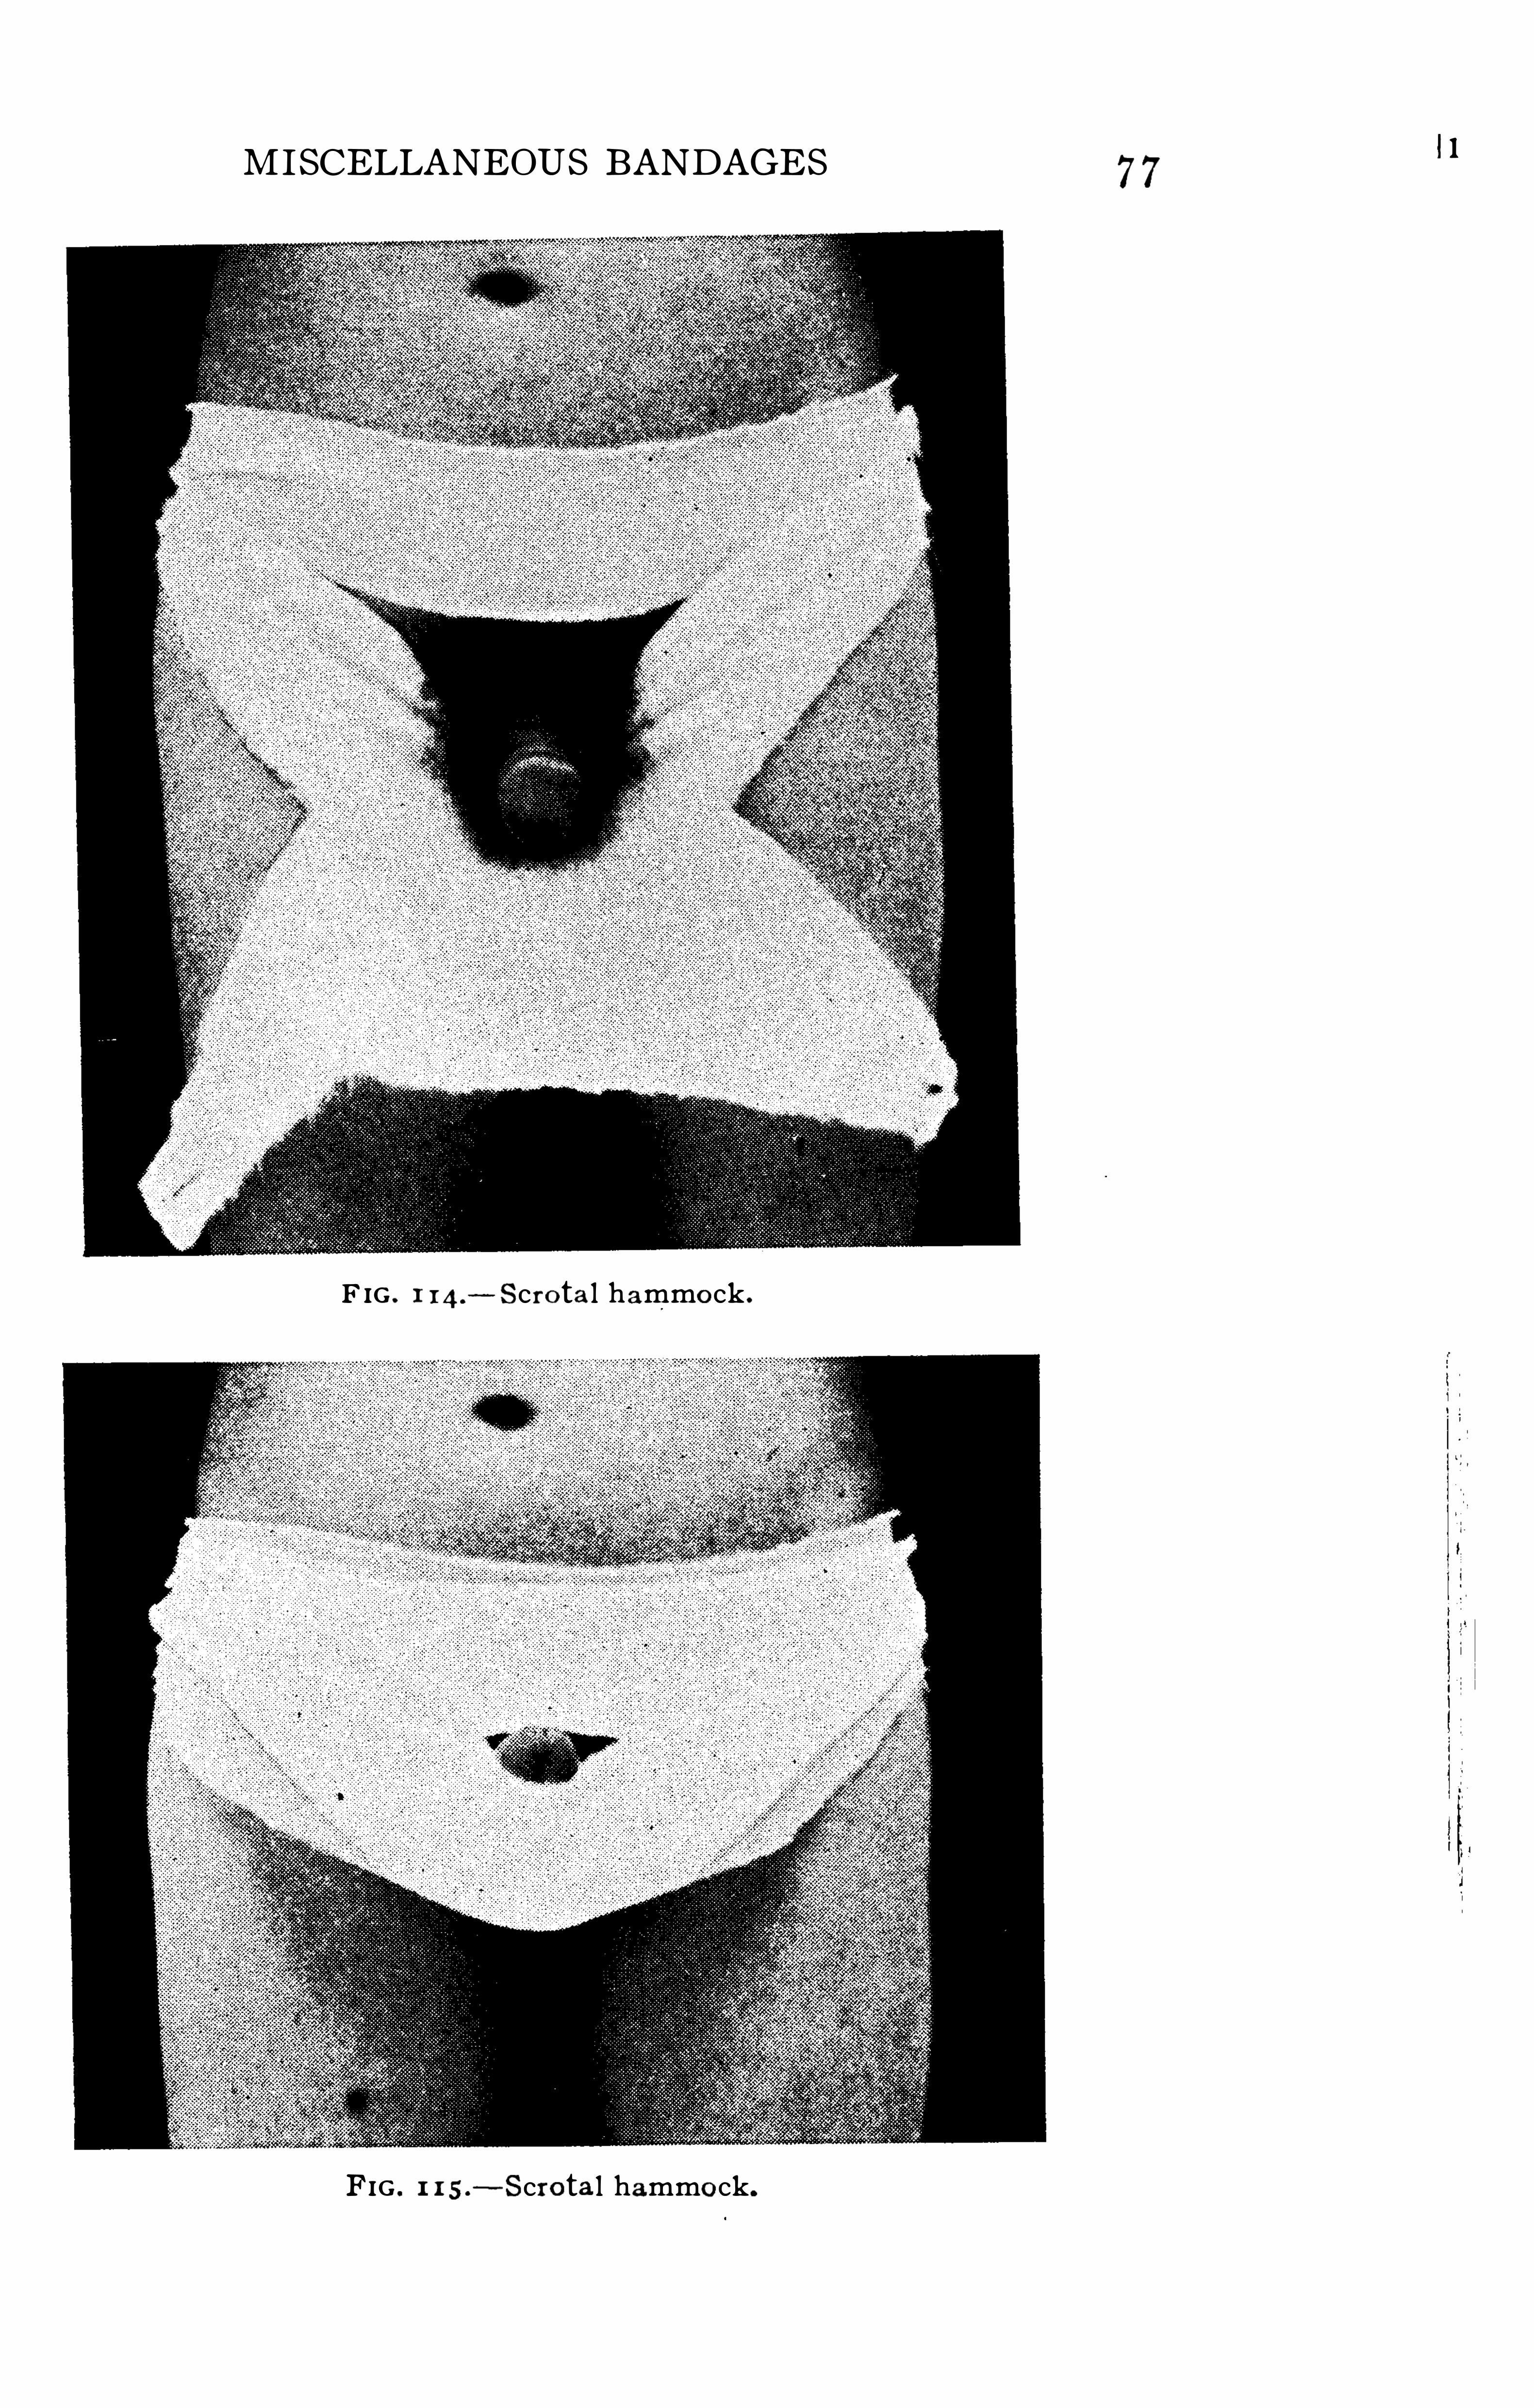
MISCELLANEOUS BANDAGES
F IG . 1 Scrotal hammock .
FIG . 1 1 5 .
—Scrotal hammock.
77II
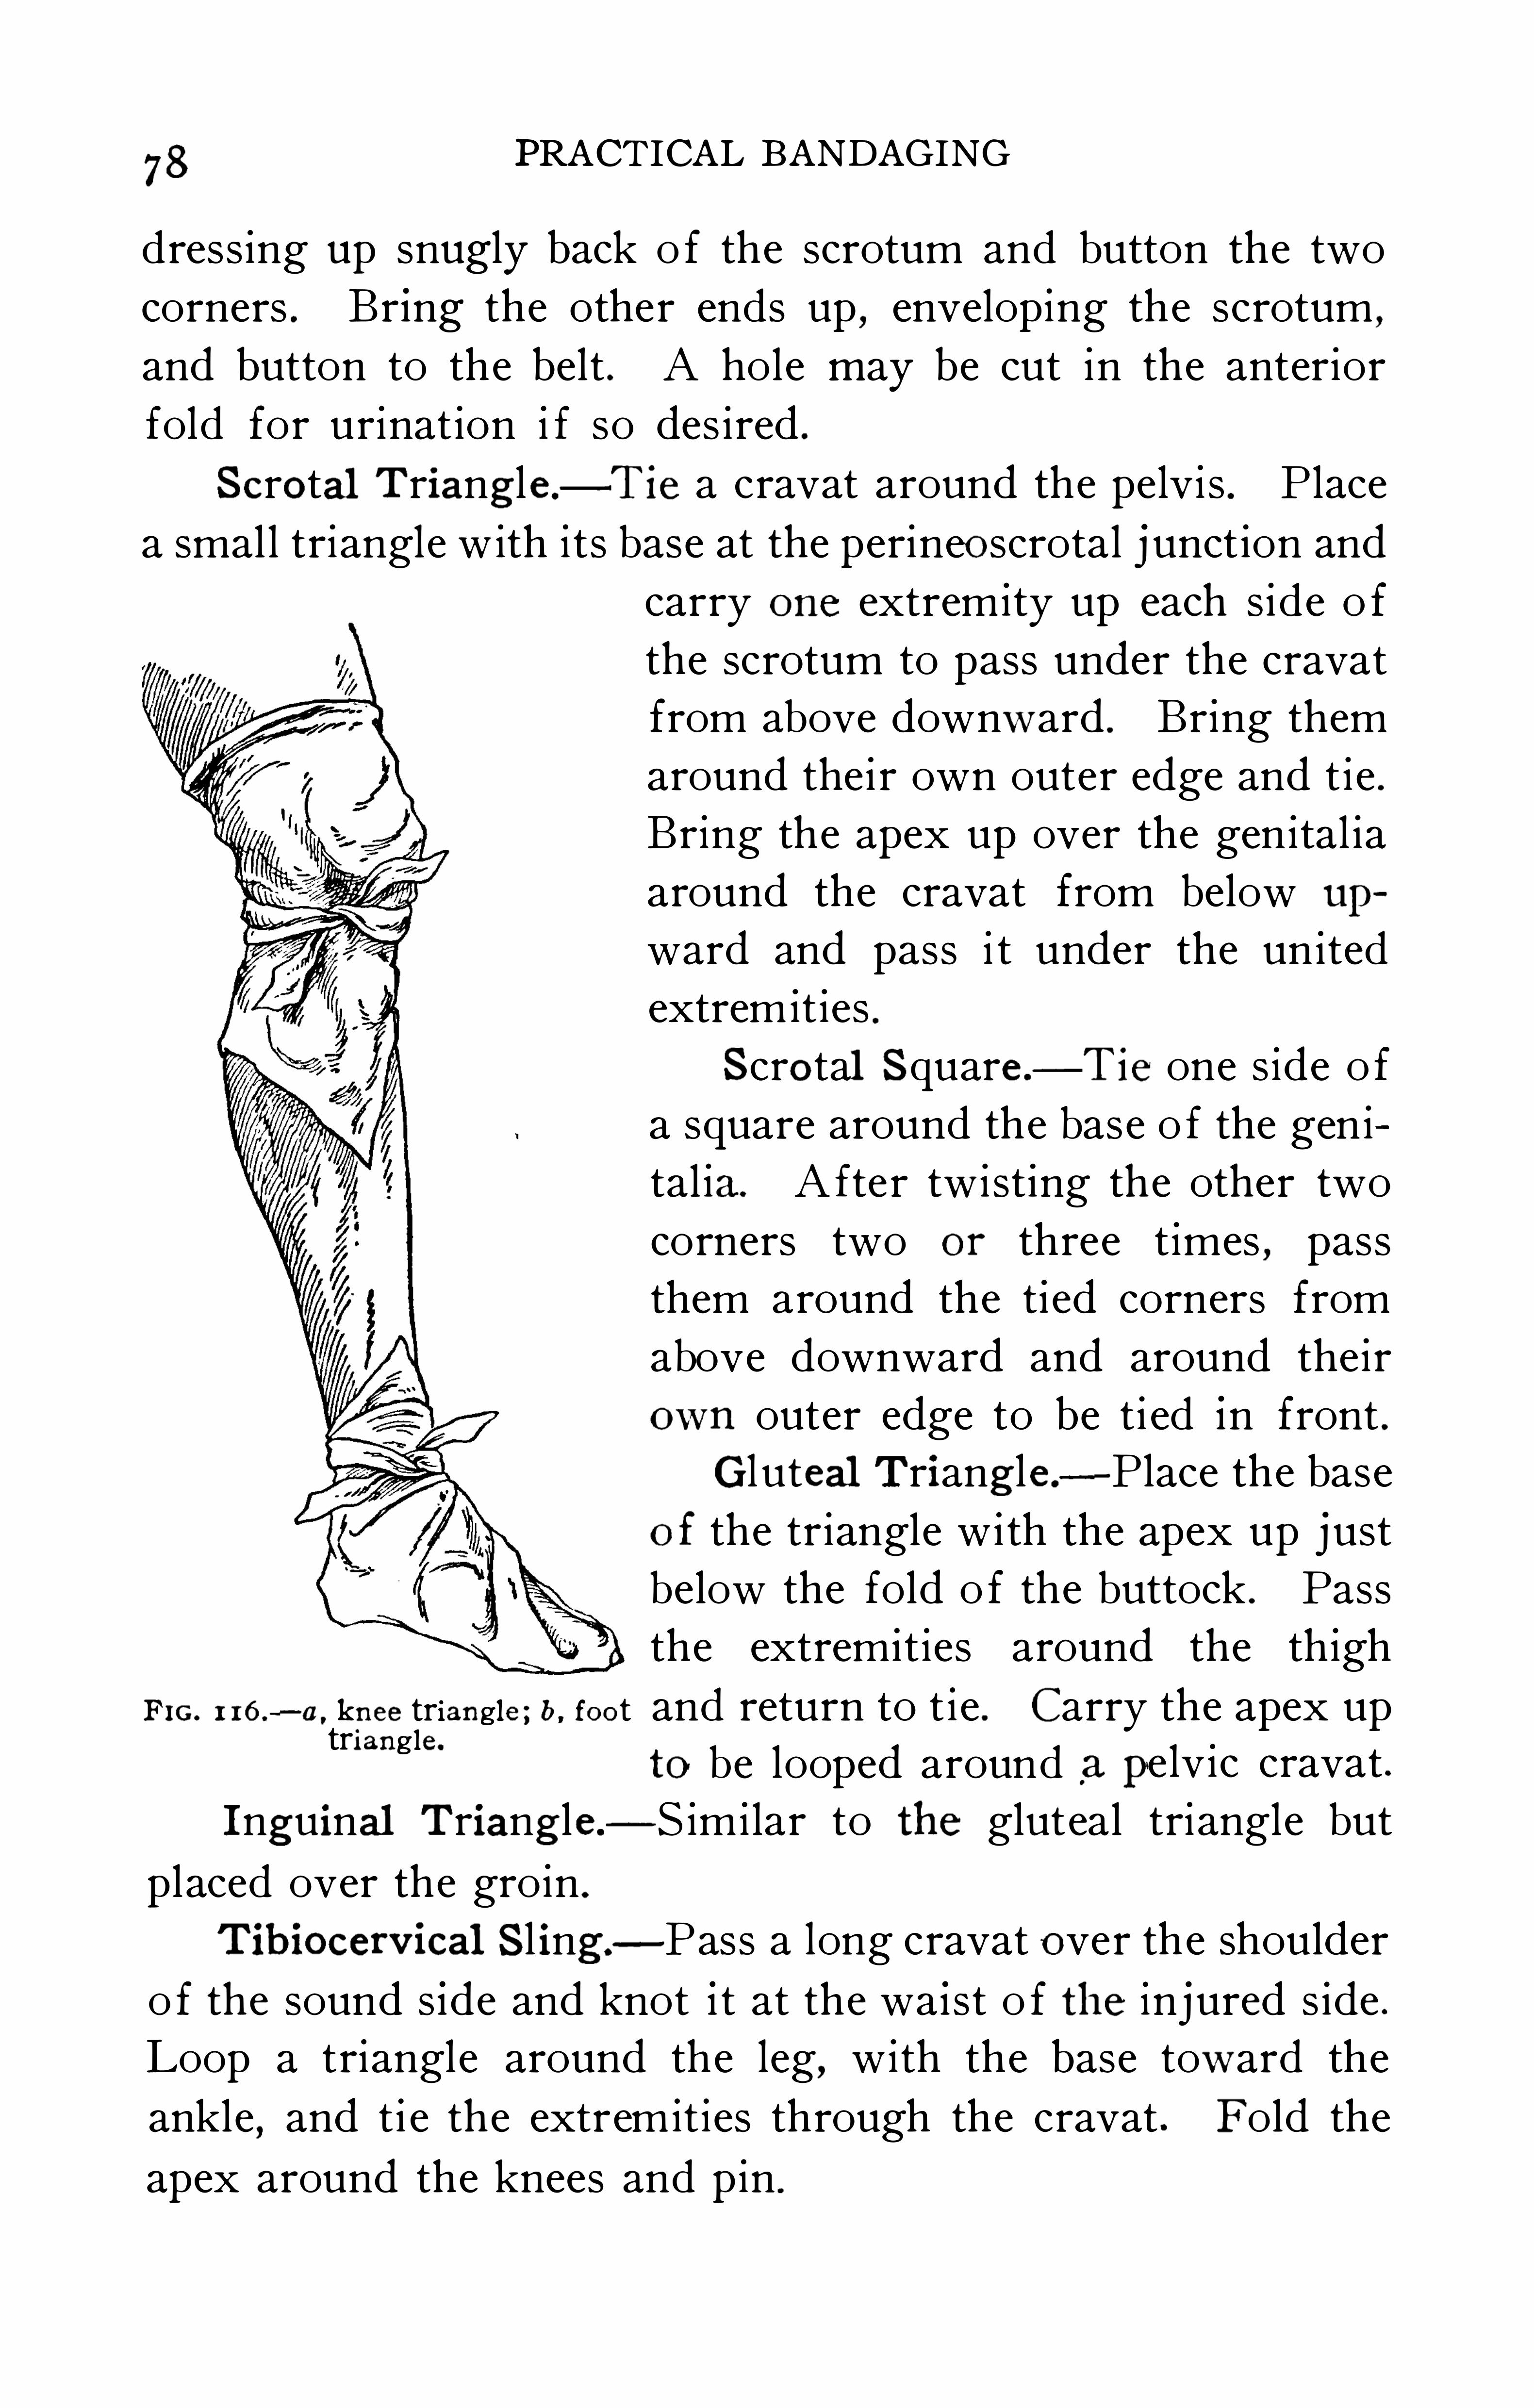
78PRACTICAL BANDAGING
dress ing up snugly back o f the scrotum and button the two
corners . Br ing the other ends up,enveloping the scrotum
,
and button to the belt . A hole may be cut in the anterior
fold for urinat ion i f so des ired .
Scrotal Triangle — Tie a cravat around the pelvi s . P lace
a small triangle w ith its base at the perineoscrotal j unct ion and
carry one extremity up each side o f
the scrotum to pass under the cravat
from above downward . Bring them
around thei r own outer edge and tie .
Bring the apex up over the genital ia
around the cravat from below upward and pass i t under the united
extremities .Scrotal Square — Tie one s ide o f
a square around the base o f the geni
tal ia. A fter twisting the other two
corners two or three times , pass
them around the tied corners from
above downward and around their
own outer edge to be ti ed in front .Gl uteal Triangle .
-P lace the base
of the triangle with the apex up just
below the fold o f the buttock . Pass
the extremities around the thigh
Fm. 1 1 6 .
— a ,knee triangle " b ,
foot and return to t ie . Carry the apex uptriangle'
to be looped around,
apelvic cravat .Inguinal Triangle — S imilar to the gluteal triangle but
placed over the groin .
Tib iocervical Sling — Pass a long cravat over the shoulder
o f the sound s ide and knot i t at the wa ist o f the injured s ide .
Loop a triangle around the leg, with the base toward the
ankle,and ti e the extremities through the cravat . Fold the
apex around the knees and pin .
M ISCELLANEOUS BANDAGES79
Knee Triangle (F ig. I I 6 ) .
— With the base above the
patel la and apex hanging down anteriorly, pass the ex tremities around the l imb , cross , and return below the patel la,tying them over the apex . Turn the apex upand pin it .
Foot Triangl e (F ig.
—With the centre o f the base
o f the triangle back o f the ankle,the apex i s carried under
the sole,over the toe s and instep to front o f ankle . The
extremit ies enci rcle the ankl e, confining the apex beneath
them .
Cravats .—The appl ication o f cravats is so very s imple
that i t is not deemed necessary to expla in in detai l . The
bandage i s a very use ful one to retain temporary dress ings ,in emergency or first aid work and sometimes as a temporary
tourniquet . It is'
appl ied in the des i red pos it ion , wrappedaround the part
,and the ends pinned or ti ed together . Its
commonest use i s as a wr ist s l ing. The centre o f the body
o f the cravat i s looped under the wri st and the two ends
carried one around each side o f the neck and t i ed together ,pre ferabl y in front . I t is sometimes used to s l ing the lower
extremi ty around the wa ist or neck .
When used as a tourniquet i t is passed around the part
between the heart and the wound , and i ts ends t ied together
so that the cravat i s loose enough to allow o f the introduct ion
and the tw i st ing o f a lever in the shape o f the hand , or a
st i ck of some sort .

P ART I I I
ELASTIC BANDAGES
There are three types o f rubber bandages (F igs . 1 17 a'
,b
and c) : ( I ) Martin’
s bandage, ( 2 ) elast ic webb ing band
age, 3) E smarch tourn iquet, and (4) Unna’s dress ing.
Martin’s Rubb er Bandage — Th i s i s a strip o f rubber
varying in width from 2 to 4 inches and in lengt h from 3 to
FIG . 1 1 7a.— Rubber bandage. FIG . 1 1 7b .
— E lastic fabric bandage .
F IG. I I 7c.
— E smarch tourn iquet .
5 yards . It has attached to one end two tapes by which the
bandage i s secured . In applying the bandage,no reverses are
used and very l ittle tens ion i s appl ied . It i s pre ferable to
have a gauze or fl annel bandage or stockinette next the skin
to absorb the mo isture . The dress ing should be kept free from
all o intments , oi ls , ether, etc .,which are harmful to rubber .
80
ELASTIC BANDAGES 8 1
I t should be removed at leas t once in 24 hours to al low it to
dry out . It i s appl ied without reverses .
Elas tic W ebb ing — Th i s i s an improvement over,and has
none o f the d isagreeable features of the Martin bandage . It
i s made o f a rubber or elast ic network covered w i th a fabric
o f cotton or s i lk . I t i s used in the same way as the Mart in
bandage,except that i t demands no gauze or flannel next the
sk in . It possesses the dist inct advantage o f permi tting
evaporat ion o f perspirat ion . No reverses are used in i ts
appl icat ion .
Esmarch Tub e or Tourniquet .— Th is i s a rubber strap
about 1 to 1% inches wide,
inch th ick and 5 to 6 feet long ,with a hook on one end and a cha in on the other . Its ch ie f
use i s as a means o f preventing hemorrhage from wounds in
the extremities . It i s not properly a bandage . When appl ied
as a tourniquet,the part should be elevated for I O minutes
be fore appl ication . With a turn or two o f bandage beneath
it,apply the tourn iquet on a stretch unt i l the pulse d isappears
below it . Have the turns overlap each other and hook the
ends .
El as tic F ab ric B andage — Thi s elast ic bandage i s made
ent i rely o f cotton woven in a manner to allow stretching
almost equal to that of .rubber . It possesses al l the advantages
and qual iti es o f a bandage interwoven with rubber,yet i s
l ighter, more durable, perm its evaporat ion , may be washed
repeatedly, and has no odor. I t i s readi ly ster i l ized and can
be kept indefinitely. In i ts app l icat ion reverses are un
necessary .
Unna’s Dressing — Th i s dress ing i s composed o f layers
o f gauze bandage soaked with a paste (Unna ) composed o f
gelat ine,I 5 parts "glycerin , 1 5 parts " z inc oxide, 30 parts " and
water, 40 parts . This paste when cold has a gummy elast ic ity ,
but when heated over a water bath,i t becomes l iqu id . Appli
cation : Heat the Unna paste over a water bath unti l i t is
6
8 2 PRACTICAL BANDAGINO
l iquid but not hot enough to burn the skin . Paint it w i th
a brush on the skin o f the part to be dressed . Cover with a
layer o f gauze bandage. Repeated alternate layers of gauze
and paste to the number o f three or four complete the dress
ing. The dress ing is al lowed to dry out and i s then covered
with a dry gauze bandage,dusted with talc or varnished .
I f des irab le,fenestra may be cut in the dres s ing to permit
o f attent ion to underlying cond i t ions .The Unna dress ing makes an excellent substitute for
rubber bandages used as support to the lower leg,as in
varicose condi tions . I t gives excellent support,i s cheap ,
allows o f care o f ulceration through opening in i t, may be le ft
on from days to weeks in some cases and also seems to have
some medicinal effect on the eczematous condition which so
often exists . Drugs such as resorcin , boric acid and carbol ic
acid in small proport ions are sometimes added.
84PRACTICAL BANDAGING
The s trips should always be cut,never torn . Be fore apply ing
a strip, i t must be heated. This may be done by laying it on
the steri l izer or autoclave or by passing i t over a flame,ad
hesive sur face down , unti l the l ight yellow color of the back
ing changes to a deeper yellow . It i s very important that the
ends of the strips be well warmed (Fig.
Various weight materials are used as back ing for the
adhes ive,the heaviest being mole skin . This mole skin ad
hesive i s used for the making o f extens ion dress ings , sup
portive be l ts , etc.
F IG. 1 1 8 .
— Heating adh es ive plaster.
I singlass Pl as ter .— This plaster i s a gelatine adhes ive
plas ter , spread on different weight backings . It i s to—day
manu factured under steri le precautions . It needs wetting
be fore applying and i f i t i s appl ied near an open wound i t
should be moistened with an antiseptic solution . Court
plaster is merely is inglass spread on various colored cloths .
General Considerations : ZO and rubber adhes ive are
appl i ed at room temperature although a l ittl e warmth in
creases thei r adhes ive qual it ies . When tearing the adhesive
ADHESIVE DRESSINGS 85
rol l into str ips i t i s better to first separate the back ing of web
b ing for hal f an inch or so across the ent i re w idth o f the roll .
In s tart ing the webbing, be carefu l not to allow the extreme
corner of the adhes ive to fold upon i ts adhes ive surface and
adhere causing the ends to curl up a fter appl ication . Should
th i s occur it i s best to cut the end off rather than separate i t .
With a pai r o f sci ssors,make cuts along the freed edge ,
d istant from each other the width o f the str ip desi red , and
tear down the requi red length . Never attempt to tear ad
hesive p laster across i ts w idth but always in the d i rection
o f its long threads .B e fore attempt ing to app ly adhes ive the operato r should
remove h i s gloves and free hi s hands of powder or moisture .
The part to be dressed must be shaved and freed from al l
soap and mo isture by the appl ication o f alcohol , ether or
benzine . In the appl icat ion o f the adhes ive strips care must
be taken that the skin i s not folded or creased between thestr ips , as thi s causes discom fort and destruction o f the ep i
dermis result ing in ulcerat ion . When conven i ent the ad
hesive dress ing should be covered w i th a snug gauze bandage,wh ich causes the adhes ive to adhere more firmly
,as wel l as
giv ing additional support.
The manner o f the removal o f adhes ive from the sk in i s
very important . I f i t i s to be removed dry,free the ends
and draw i t s lowly back upon itsel f,gently press ing the sk in
down away from the adhes ive sur face (Fig. This
method causes l ittl e d i scom fort . Another dry and more
rap id method i s to free an end and then w ith a quick j erk
remove the plaster . Th i s somet imes carr ies the outer layer
o f the sk in with i t .
For removal w ith the help o f solut ions,ether
,alcohol
,
benz ine,gasol ine and turpentine may be used . The best
resul t i s obtained,i f end o f adhes ive str ipis turned up and
the solution appl ied to its under sur face with cotton or gauze .
86 PRACTICAL BANDAGING
Adhes ive once removed from the skin after being in
place more than a few moments,can never be used again
with any degree o f sat is faction,S ince i t fai ls to stick tightly
Res in plaster wi l l adhere again i f reheated .
When the adhes ive i s le ft on for some days , it causes
a dermat it is which i s characterized by the formation o f
pustules and an i tching sensation . This i s minimal under
res in plaster or“20 per forated sheets . Del icate skin ,
especially that o f an in fant in warm weather,does not tolerate
adhes ive plaster for any length of t ime.
FIG . 1 19.— Removing adhes ive strips.
fAbdomen (F igs . 1 20 a,b,c and d —Adhes ive plaster ,
ZO,on _mole skin pre ferably, 7 inches wide and long
enough to a l itt le more than enci rcle the patient’
s waist . The
plaster i s folded lengthwise with ends meeting and cut in a
curved line from lower corner o f the fold to an inch o f the
upper corner o f the two ends . This gives 3 p ieces , I , 2 , 3.
The pati ent should be in the dorsal pos it ion with the h ipsslightly elevated
,when the plaster is applied . NO . 1 piece i s
appl ied with its long straight s ide pass ing around the wrist
88 PRACTICAL BANDAGING
three inches long . P lace an umbi l ical button,a coin or a
circle o f gauze, inch thick and o f sufficient s ize to easi ly
cover the umb i l icus , on the centre o f the long strip . P lace
the centre o f the short strip over this,with its adhes ive sur
face facing the adhes ive sur face oi the long piece . With the
abdomen relaxed,accomplished best by elevation o f pelvi s ,
with the herni a reduced apply the button over the orifice .
F IG. 1 20 c.
— Rose b inder (posterior V iew) . F 1 G. 1 20 d .— Rose b inder (an terior V iew)
D raw .the abdominal skin forward and carry the ends o f
the strap backward and sl ightly upward, applying them
snugly .
Shoulder (Sayre Dressing) .— Prepare two strips of ad
hesive plaster two or three inches wide, long enough to en
compass the chest one and a hal f times . A collar o f gauze
or l ine a shade wider than the adhes ive strip i s placed aroundthe arm of the affected s ide . Looping one end o f one o f the
ADHES IVE DRESSINGS 89
str ips around the collar, w i th the adhes ive s ide toward the
chest,drawing the arm backward , the other end i s carried
straight across the back and around the chest . Draw the
elbow forward and place the hand o f the affected s ide on
the oppos i te shoulder. Having cut a hole in the centre o f
the second Strip for the elbow , p lace this hole over the
elbow . Then stand ing on the oppos ite s ide o f the pat ient,
F IG . 1 2 1 .— Sayre dress ing modified .
draw the two extremities taut in the l ine o f the forearm .
Carry the posterior extremity diagonally across the back and
around the oppos ite shoulder,the anter ior strip up the fore
arm and over opposite shoulder . This,the original Sayre
dress ing,has the
Slisadvantages o f a low placed imprisoned
hand,which becomes very uncomfortabl e due to pressure
on the knuckles and fingers .Sayre Mod ified ( F ig,
— Dress ings,the same as the
90PRACTICAL BANDAGING
Sayre except the anterior strap pass ing from the affected
elbow to the opposite shoulder has sl its cut to enable the
fingers to come through . A small gauze pad i s placed on the
dorsum of the hand and two or three thicknesses o f gauze
between the forearm and chest . With the hand of the af
fected s ide placed wel l up over the opposite clavicle the ad
heswe strapi s appl ied as seen in Fig. 12 1 .
FIG . 1 22 .
— Acromioelavicular support .
Acromiocl avicular Join t (F ig.
— Cut an adhes ive
strip two inches w ide and five feet long. Fashion a pad o f
14 to 16 thicknesses o f gauz e 2 inches square with a hole cut
in i ts centre . With the arm o f the affected shoulder bes idethe chest and the forearm
’
flex ed at right angles , loop the
centre o f the adhes ive strip under the elbow about 1 inch from
the tip . P lace the pad over the outer end o f the collar bone
and whi le an assi stant presses down on the pad and up on
the elbow ,cross the two ends o f the adhes ive over the pad ,
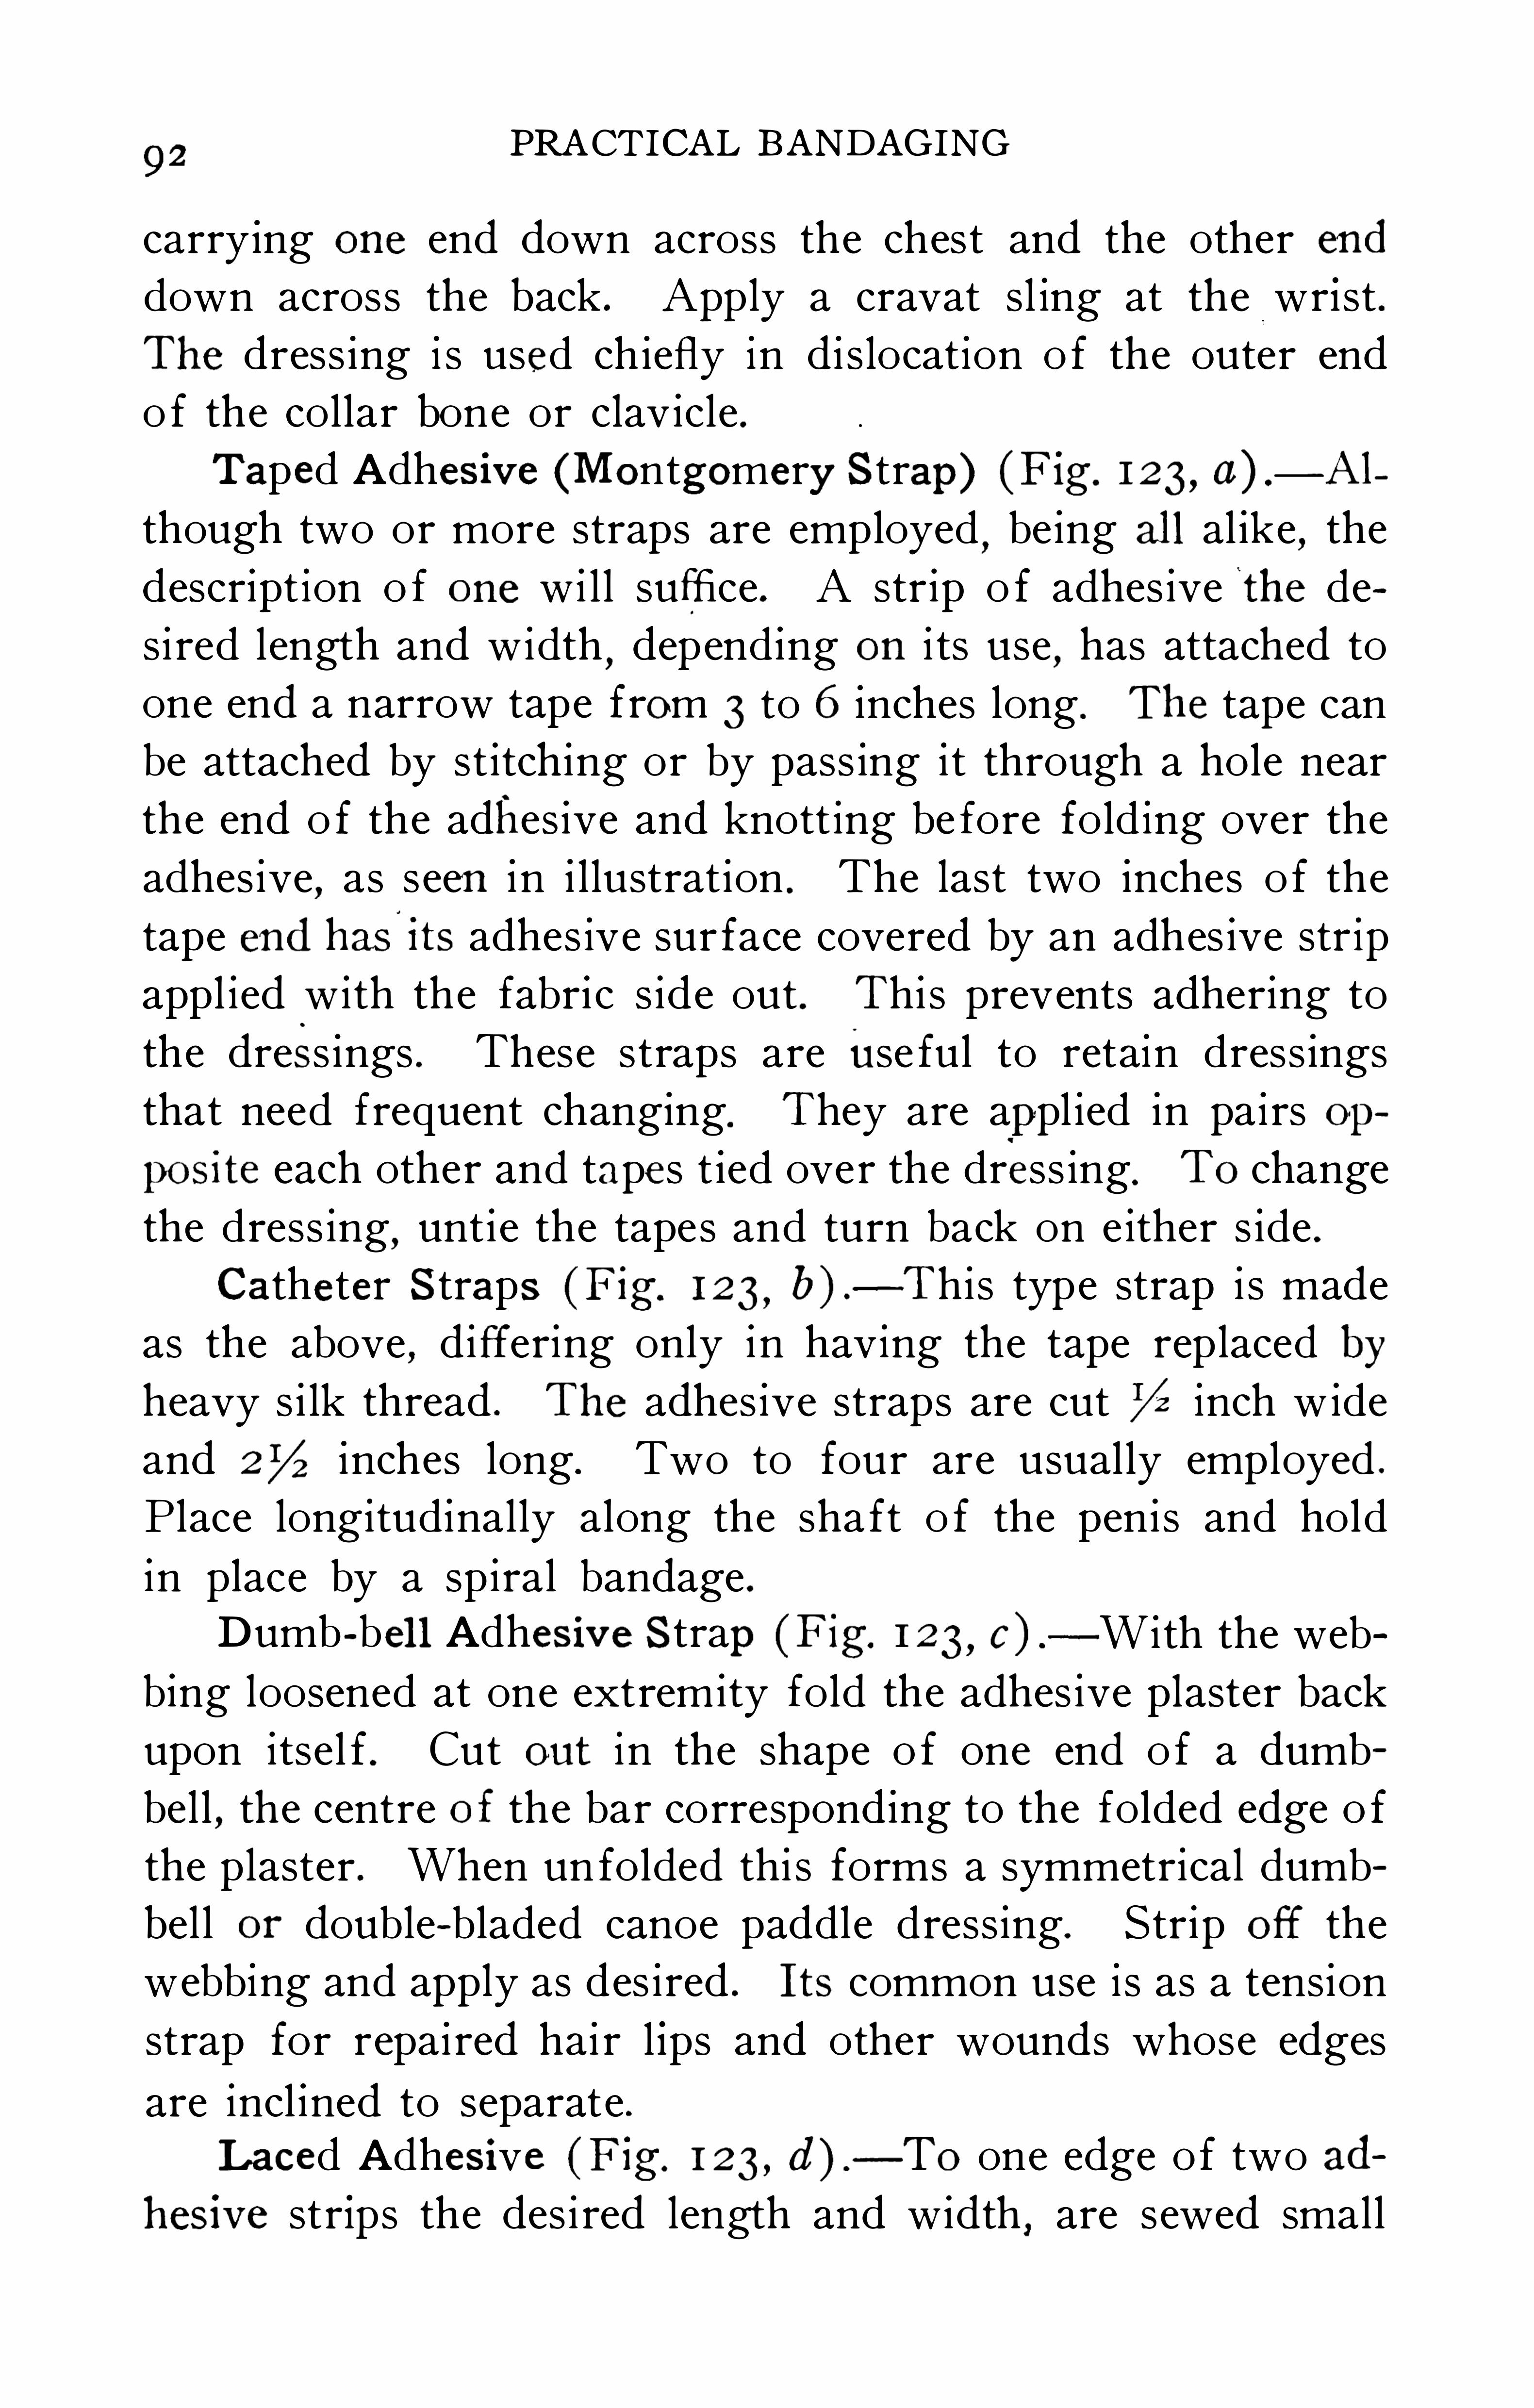
92PRACTICAL BANDAGING
carrying one end down across the chest and the other end
down across the back . Apply a cravat sl ing at the wrist .The dress ing i s used chiefly in di s location o f the outer end
o f the collar bone or clavicle .
Taped Adhesive (Montgomery Strap) (F ig. 1 23, a) . A1
though two or more straps are employed,being al l al ike, the
descript ion o f one wi ll suffice . A strip o f adhes ive the de
si red length and width,depend ing on i ts use
,has attached to
one end a narrow tape from 3 to 6 inches long . The tape can
be attached by stitch ing or by pass ing it through a hole near
the end o f the adhes ive and knott ing be fore fold ing over the
adhes ive,as seen in i l lustration . The last two inches o f the
tape end has‘
its adhes ive sur face covered by an adhes ive str ip
appl ied with the fabri c s ide out . Thi s prevents adhering to
the dress ings . These straps are Use ful to retain dress ings
that need frequent changing. They are appl ied in pairs opposite each other and tapes t ied over the dress ing. To change
the dress ing,untie the tapes and turn back on e ither s ide .
Catheter Straps (F ig. 123,b ) .
—This type strap i s made
as the above,differing only in having the tape replaced by
heavy s i lk thread . The adhes ive straps are cut 72 inch wide
and 2% inches long . Two to four are usually employed .
P lace longitud inally along the shaft o f the penis and hold
in place by a spiral bandage .Dumb-bel l Adhesive Strap(F ig. 1 23, c) —With the web
b ing loosened at one extremity fold the adhes ive plaster back
upon itsel f . Cut out in the shape o f one end o f a dumb
bel l,the centre of the bar corresponding to the folded edge o f
the plaster . When un folded thi s forms a symmetrical dumb
bel l or double—bladed canoe paddle dress ing. Strip off the
webbing and apply as des ired . Its common use i s as a tension
strap for repai red hai r l ips and other wounds whose edges
are incl ined to separate .
Laced Adhesive (F ig. 1 23, d — To one edge o f two ad
hesive strips the des i red length and width , are sewed small
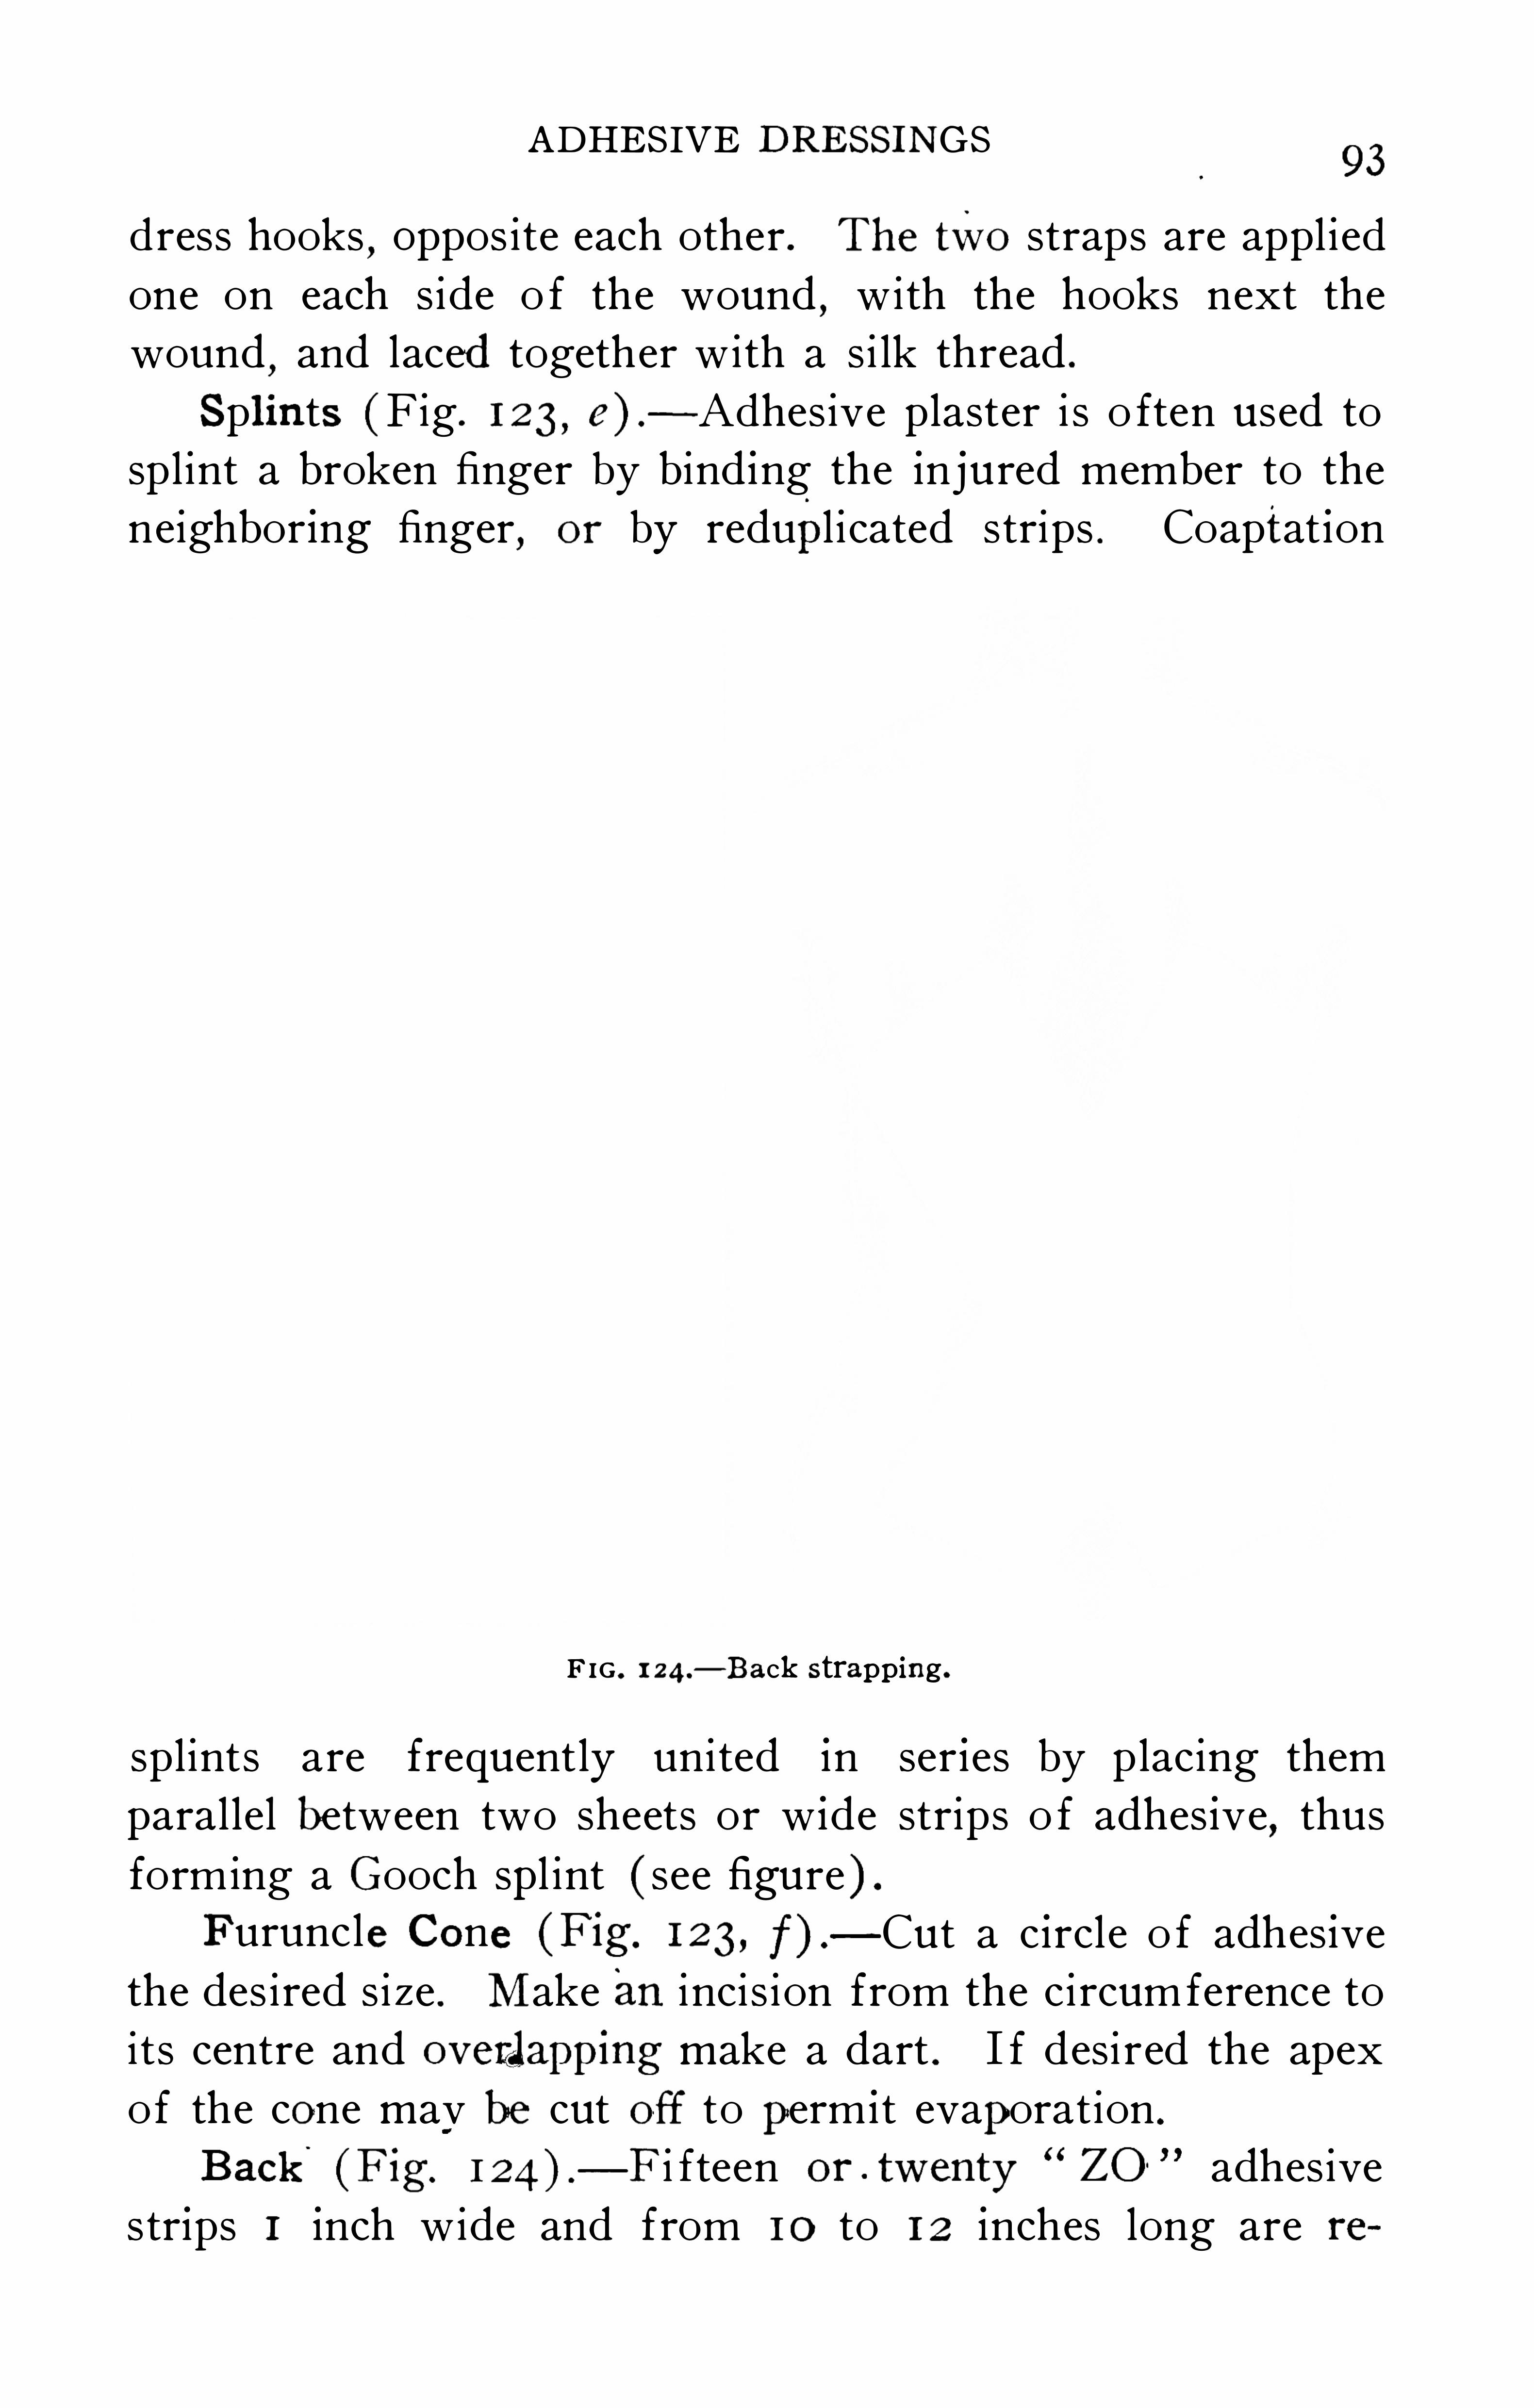
ADHESIVE DRE SSINGS93
dress hooks,Oppos ite each other . The two straps are appl ied
one on each s ide o f the wound,with the hooks next the
wound,and laced together with a s i lk thread .
Spl ints (F ig . 1 23,e ) .
—Adhes ive plaster i s o ften used to
spl int a broken finger by bind ing the injured member to the
neighbor ing finger, or by redupl i cated strips . Coaptat ion
F IG . 1 24.
— Back strapping .
splints are frequently united in ser ies by placing them
parallel between two sheets or w ide strips o f adhes ive,thus
forming a Gooch spl int ( see figure ) .
Furuncle Cone (Fig. 1 23, f) .
— Cut a c ircle o f adhes ive
the des ired s i ze . Make an inci s ion from the ci rcumference to
its centre and oveialapping make a dart . I f desi red the apex
of the cone mav be cut off toperm i t evaporation .
Back (Fig.
— F i fteen or . twenty ZO' adhes ive
strips 1 inch wide and from 10 to 1 2 inches long are re
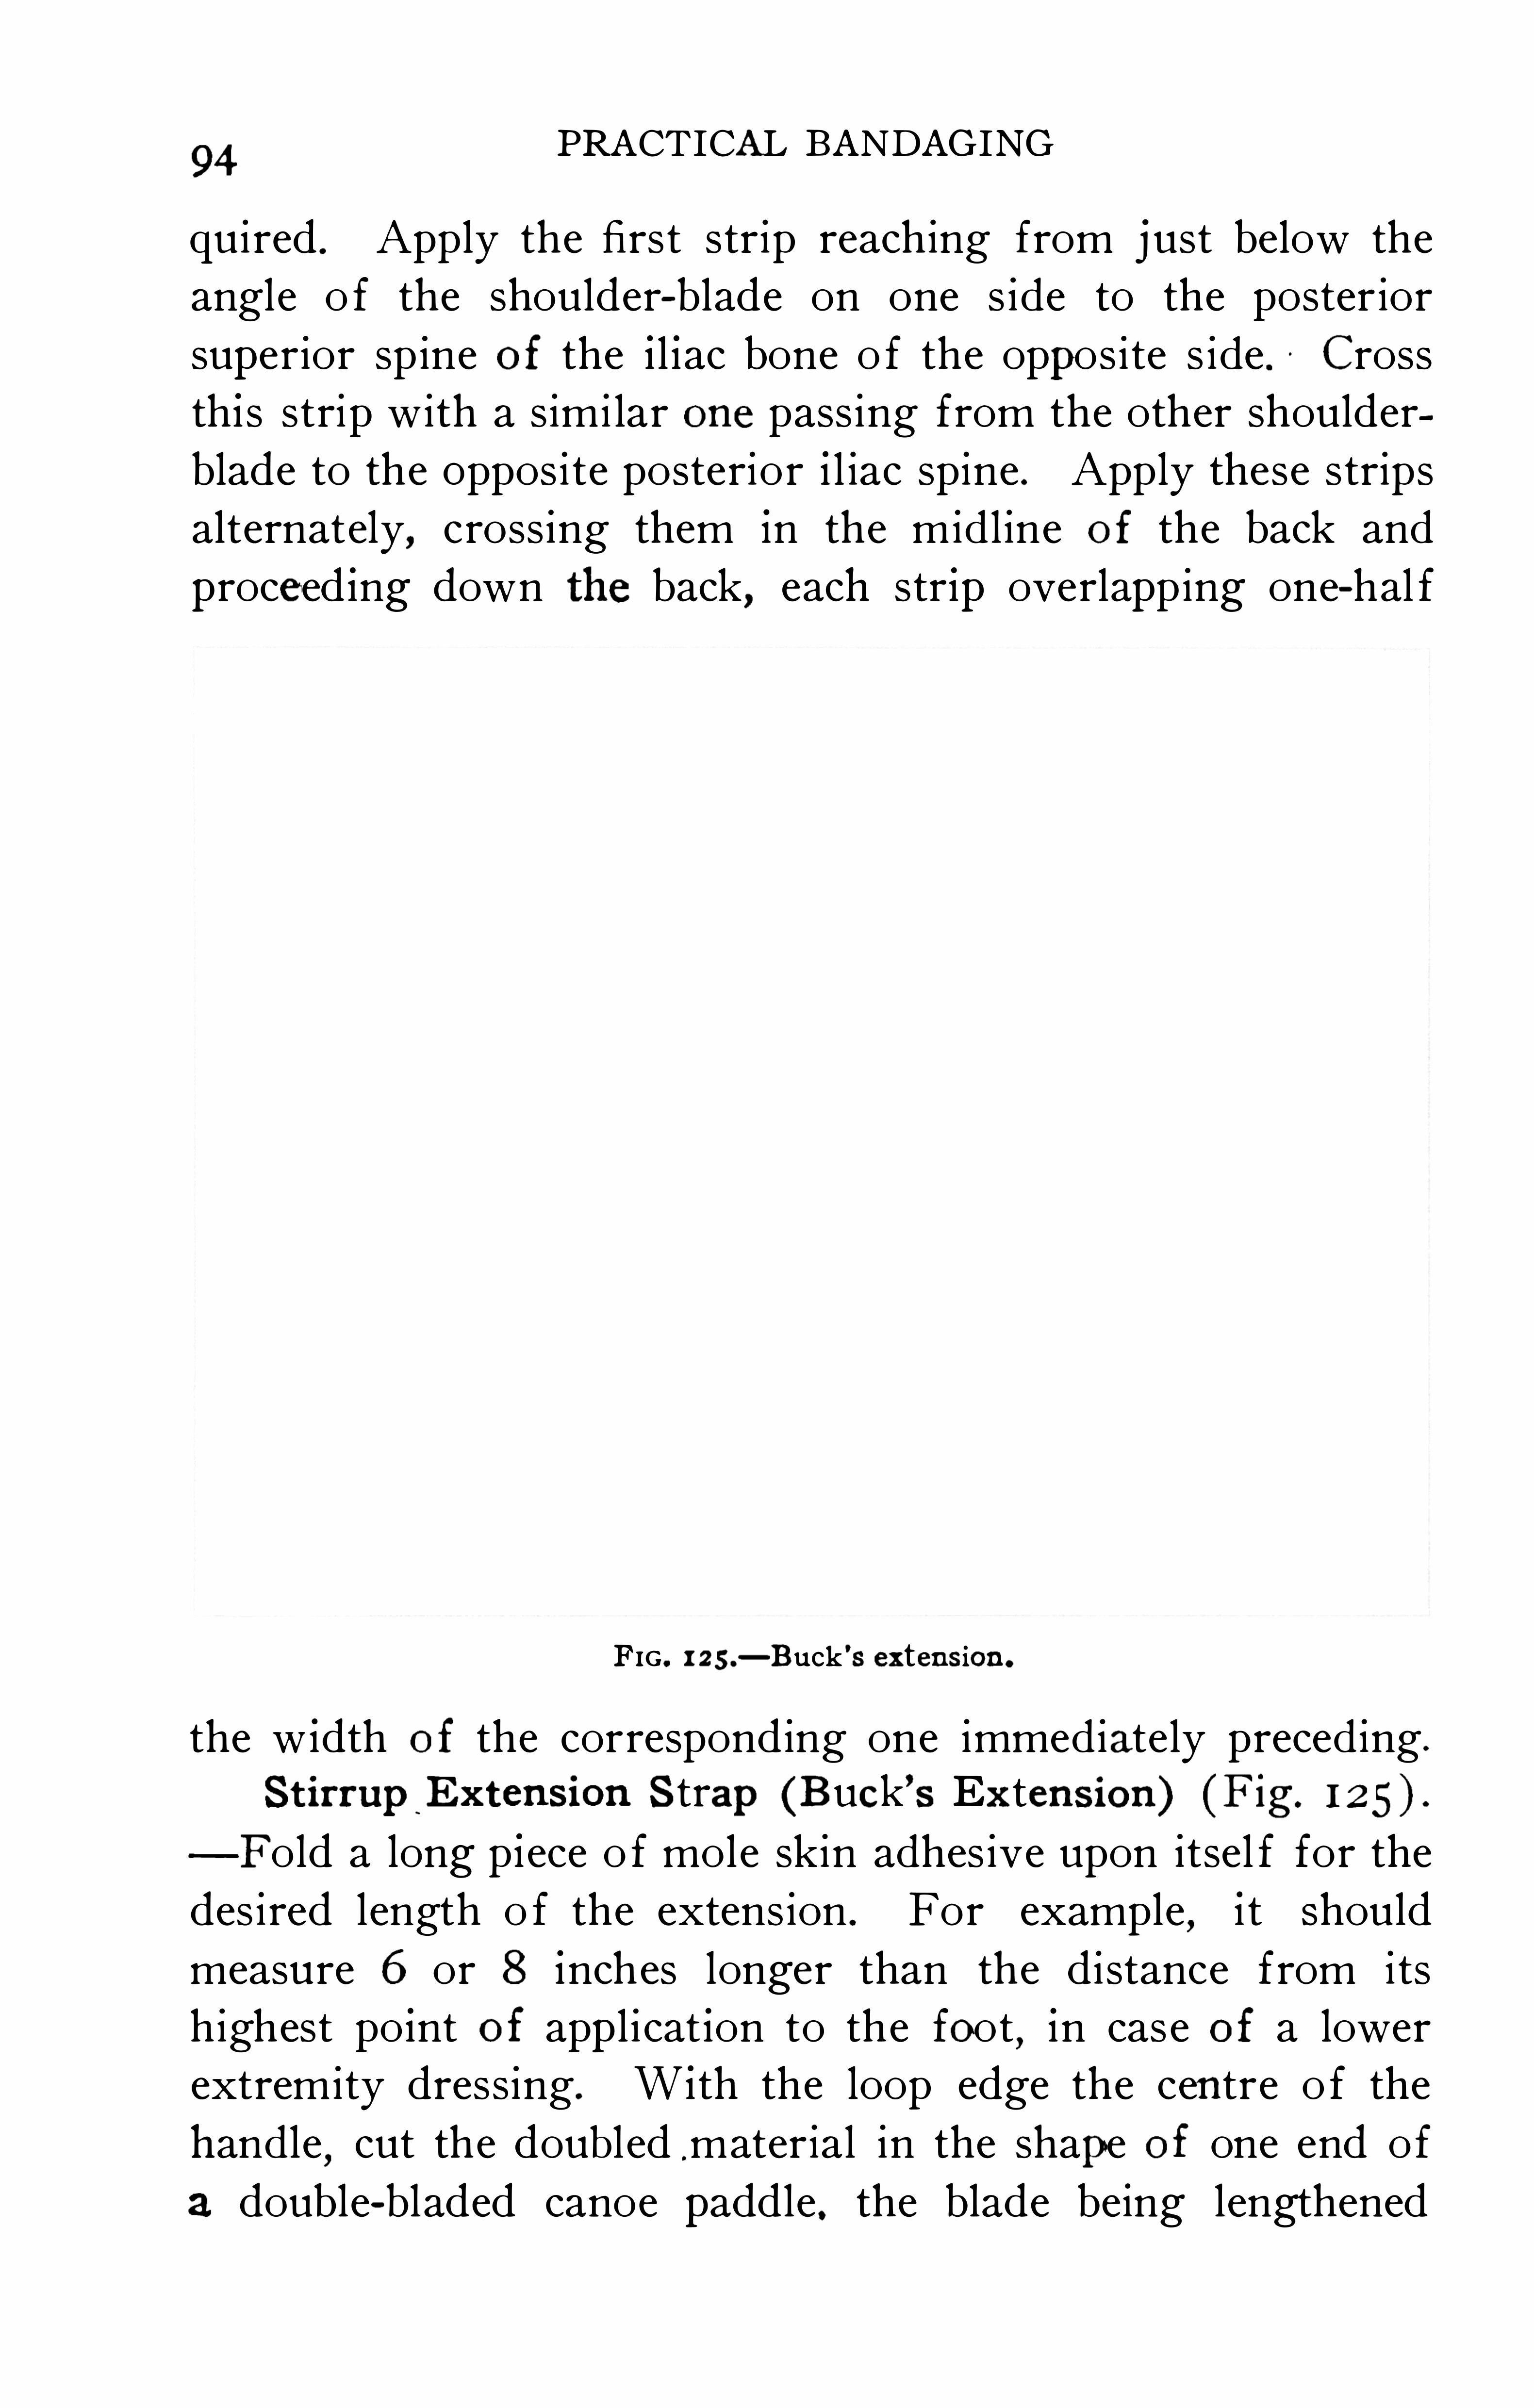
94PRACTICAL BANDAGING
quired . Apply the first strip reaching from just below the
angle o f the shoulder-blade on one s ide to the poster ior
superior sp ine of the i l iac bone o f the oppos ite s ide . Cross
this strip with a simi lar one pass ing from the other shoulder
blade to the Opposite posterior i l iac spine . Apply these strips
alternately, crossing them in the mid l ine of the back and
proceed ing down the back, each str ip overlapping one-hal f
FIG. 1 25 .— Buck’
s extens ion.
the w idth of the corresponding one immed iately preced ing .
StirrupE x tension Strap(B uck’s Ex tension) (F ig.
— Fold a long p iece o f mole skin adhes ive upon itsel f for the
des ired length o f the extens ion . For example , i t Should
measure 6 or 8 inches longer than the distance from its
highest po int of app l i cat ion to the foot, in case of a lower
extremity dressing. W ith the loop edge the centre o f the
handle,cut the doubl ed
.material in the shape of one end of
a double-bladed canoe paddle. the blade being lengthened
96PRACTICAL BANDAGING
tens ion on the end correspond ing to the s ide o f the strainedl igament . A short strip i s next appl ied to the posterior aspect
o f the heel as low down as poss ible and each end i s appl ied on
one s ide o f the foot as near the plantar sur face as poss ible .
The strapping is continued by alternating first a long str ip
up the leg, then a shorterstrip down the foot . E ach strip
overlaps about one-hal f the width o f the previous one . The
leg strips approach the front o f the leg and the foo t strips
ascend the foot . E xtend ing up the midd le o f the dorsum of
the foot and ankle there should be a space at least three
quarters o f an inch w ide le ft free o f plaster,in order to
obviate any possibi l i ty o f inter ference with the circulat ion .
Occas ionally a few circular strips are appl ied around the
instep for add i tional support . Cover the enti re dress ing with
a few turns o f gauze bandage to retain it for a few hours
unti l the plaster adheres .
Another method o f strapping the ankle i s by us ing s ix
or eight pieces of adhesive 1 inch wide and 18 inches long.
To fix the internal l igament,start the first piece on the dorsum
o f the foot " pass outward around the outer edge , beneath the
instep,up the inner s ide diagonally
,and up the ankle an
teriorly,cross ing to the outer s ide o f the cal f . Apply all
the strips in the same manner , each overlapping about one
hal f the previous one . To spl int the external l igament, re
verse the direction of the strips , start ing on the outer s ide o f
the foot then around under the instep and up the inner s ide o f
the l eg. Thes e dress ings are used very o ften as supportive
measures in the treatment of sprains o f the ankle and tarsus .Ches t (Fig . I 27) .
— For fractured ribs have s ix or eight
adhesive ZO str ips , 3 inches wide and long enough to
reach from the spine to the sternum . Have the patient stand
or l ie w ith the affected s ide toward the surgeon and with the
hand o f the same s ide on hi s head . The other shoulder should
be against the wall or someth ing sol id,i f patient i s in stand
ing pos it ion . App ly the end of the strip firmly at the spinal
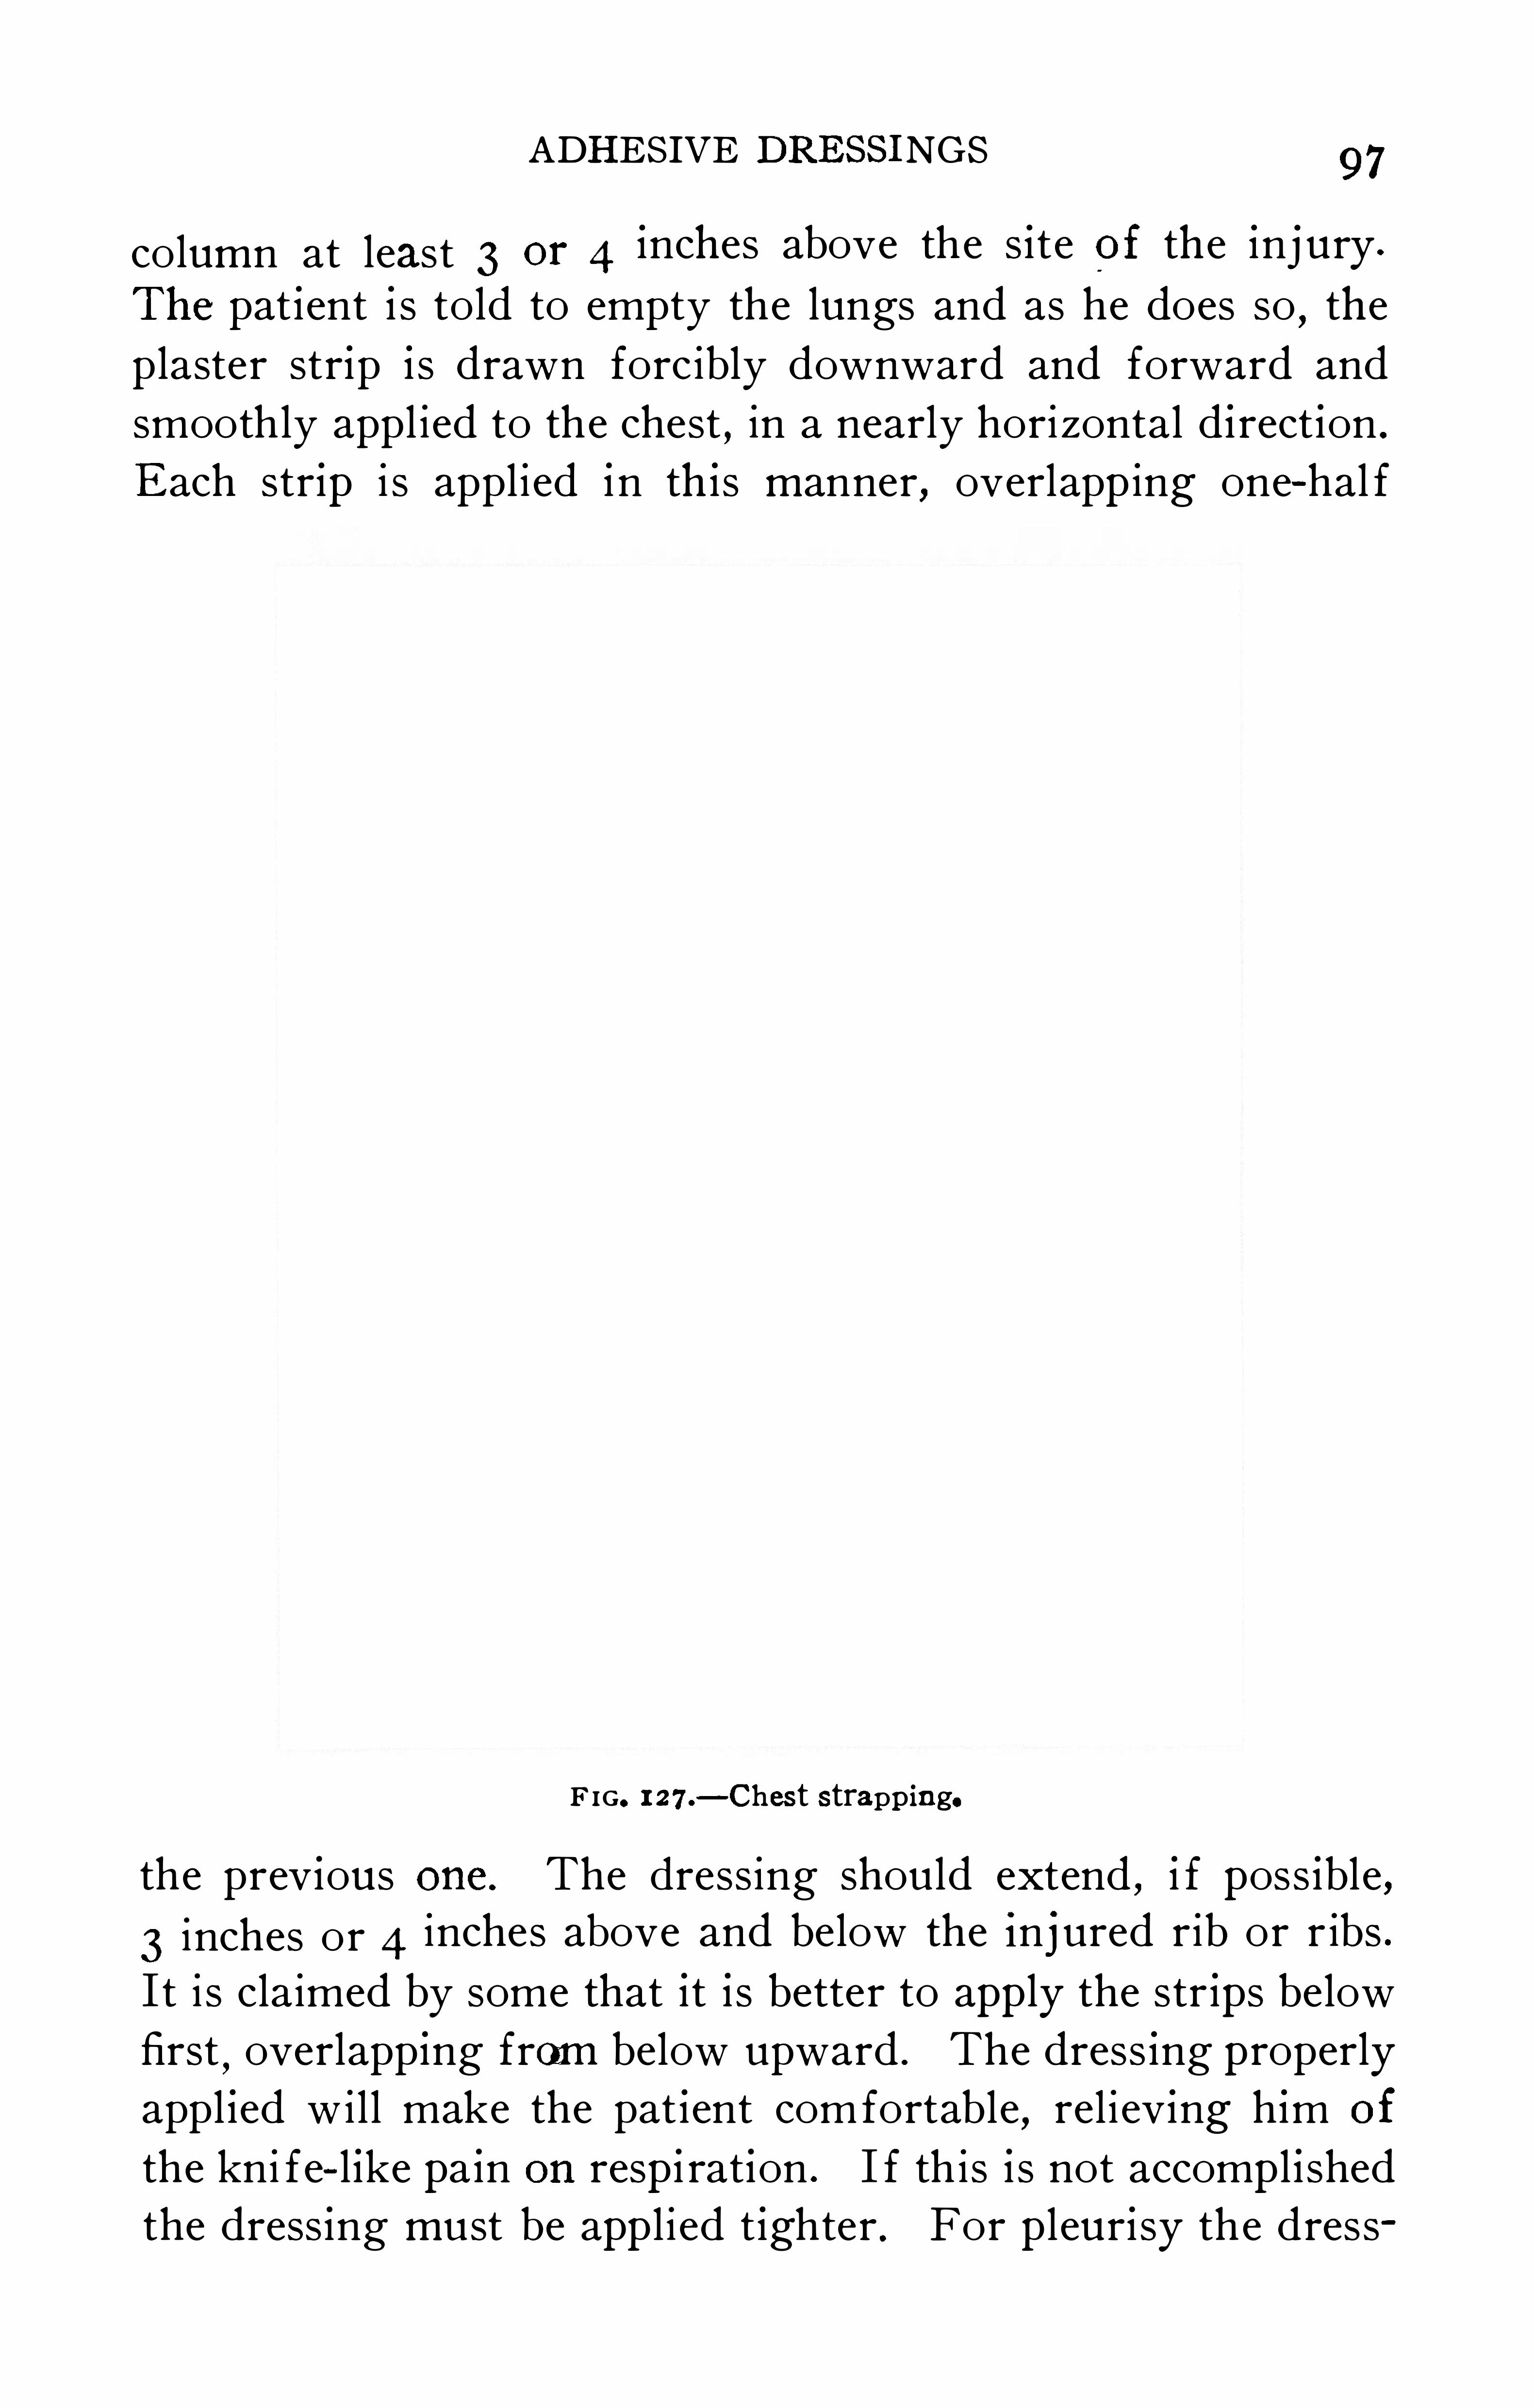
ADHESIVE DRE SSINGS 97
column at least 3 or 4 inches above the s ite of the injury .
The pat ient i s told to empty the lungs and as he does so , the
plaster strip i s drawn forcibly downward and forward and
smoothly appl ied to the chest , in a nearly horizontal d irect ion .
E ach str ip i s applied in this manner, overlapp ing one-hal f
F IG. 1 27.— Ches t strapping.
the prev ious one. The dress ing should extend , i f poss ible,
3 inches or 4 inches above and below the in j ured rib or r ibs .
I t i s claimed by some that it is better to app ly the str ips below
first,overlapp ing from below upward . The dress ing properly
appl ied wil l make the pat ient comfortable , rel i ev ing h im of
the kni fe- l ike pa in on respi ration . I f th is i s not accomp l ished
the dress ing must be app l i ed t ighter . For p leur isy the dress
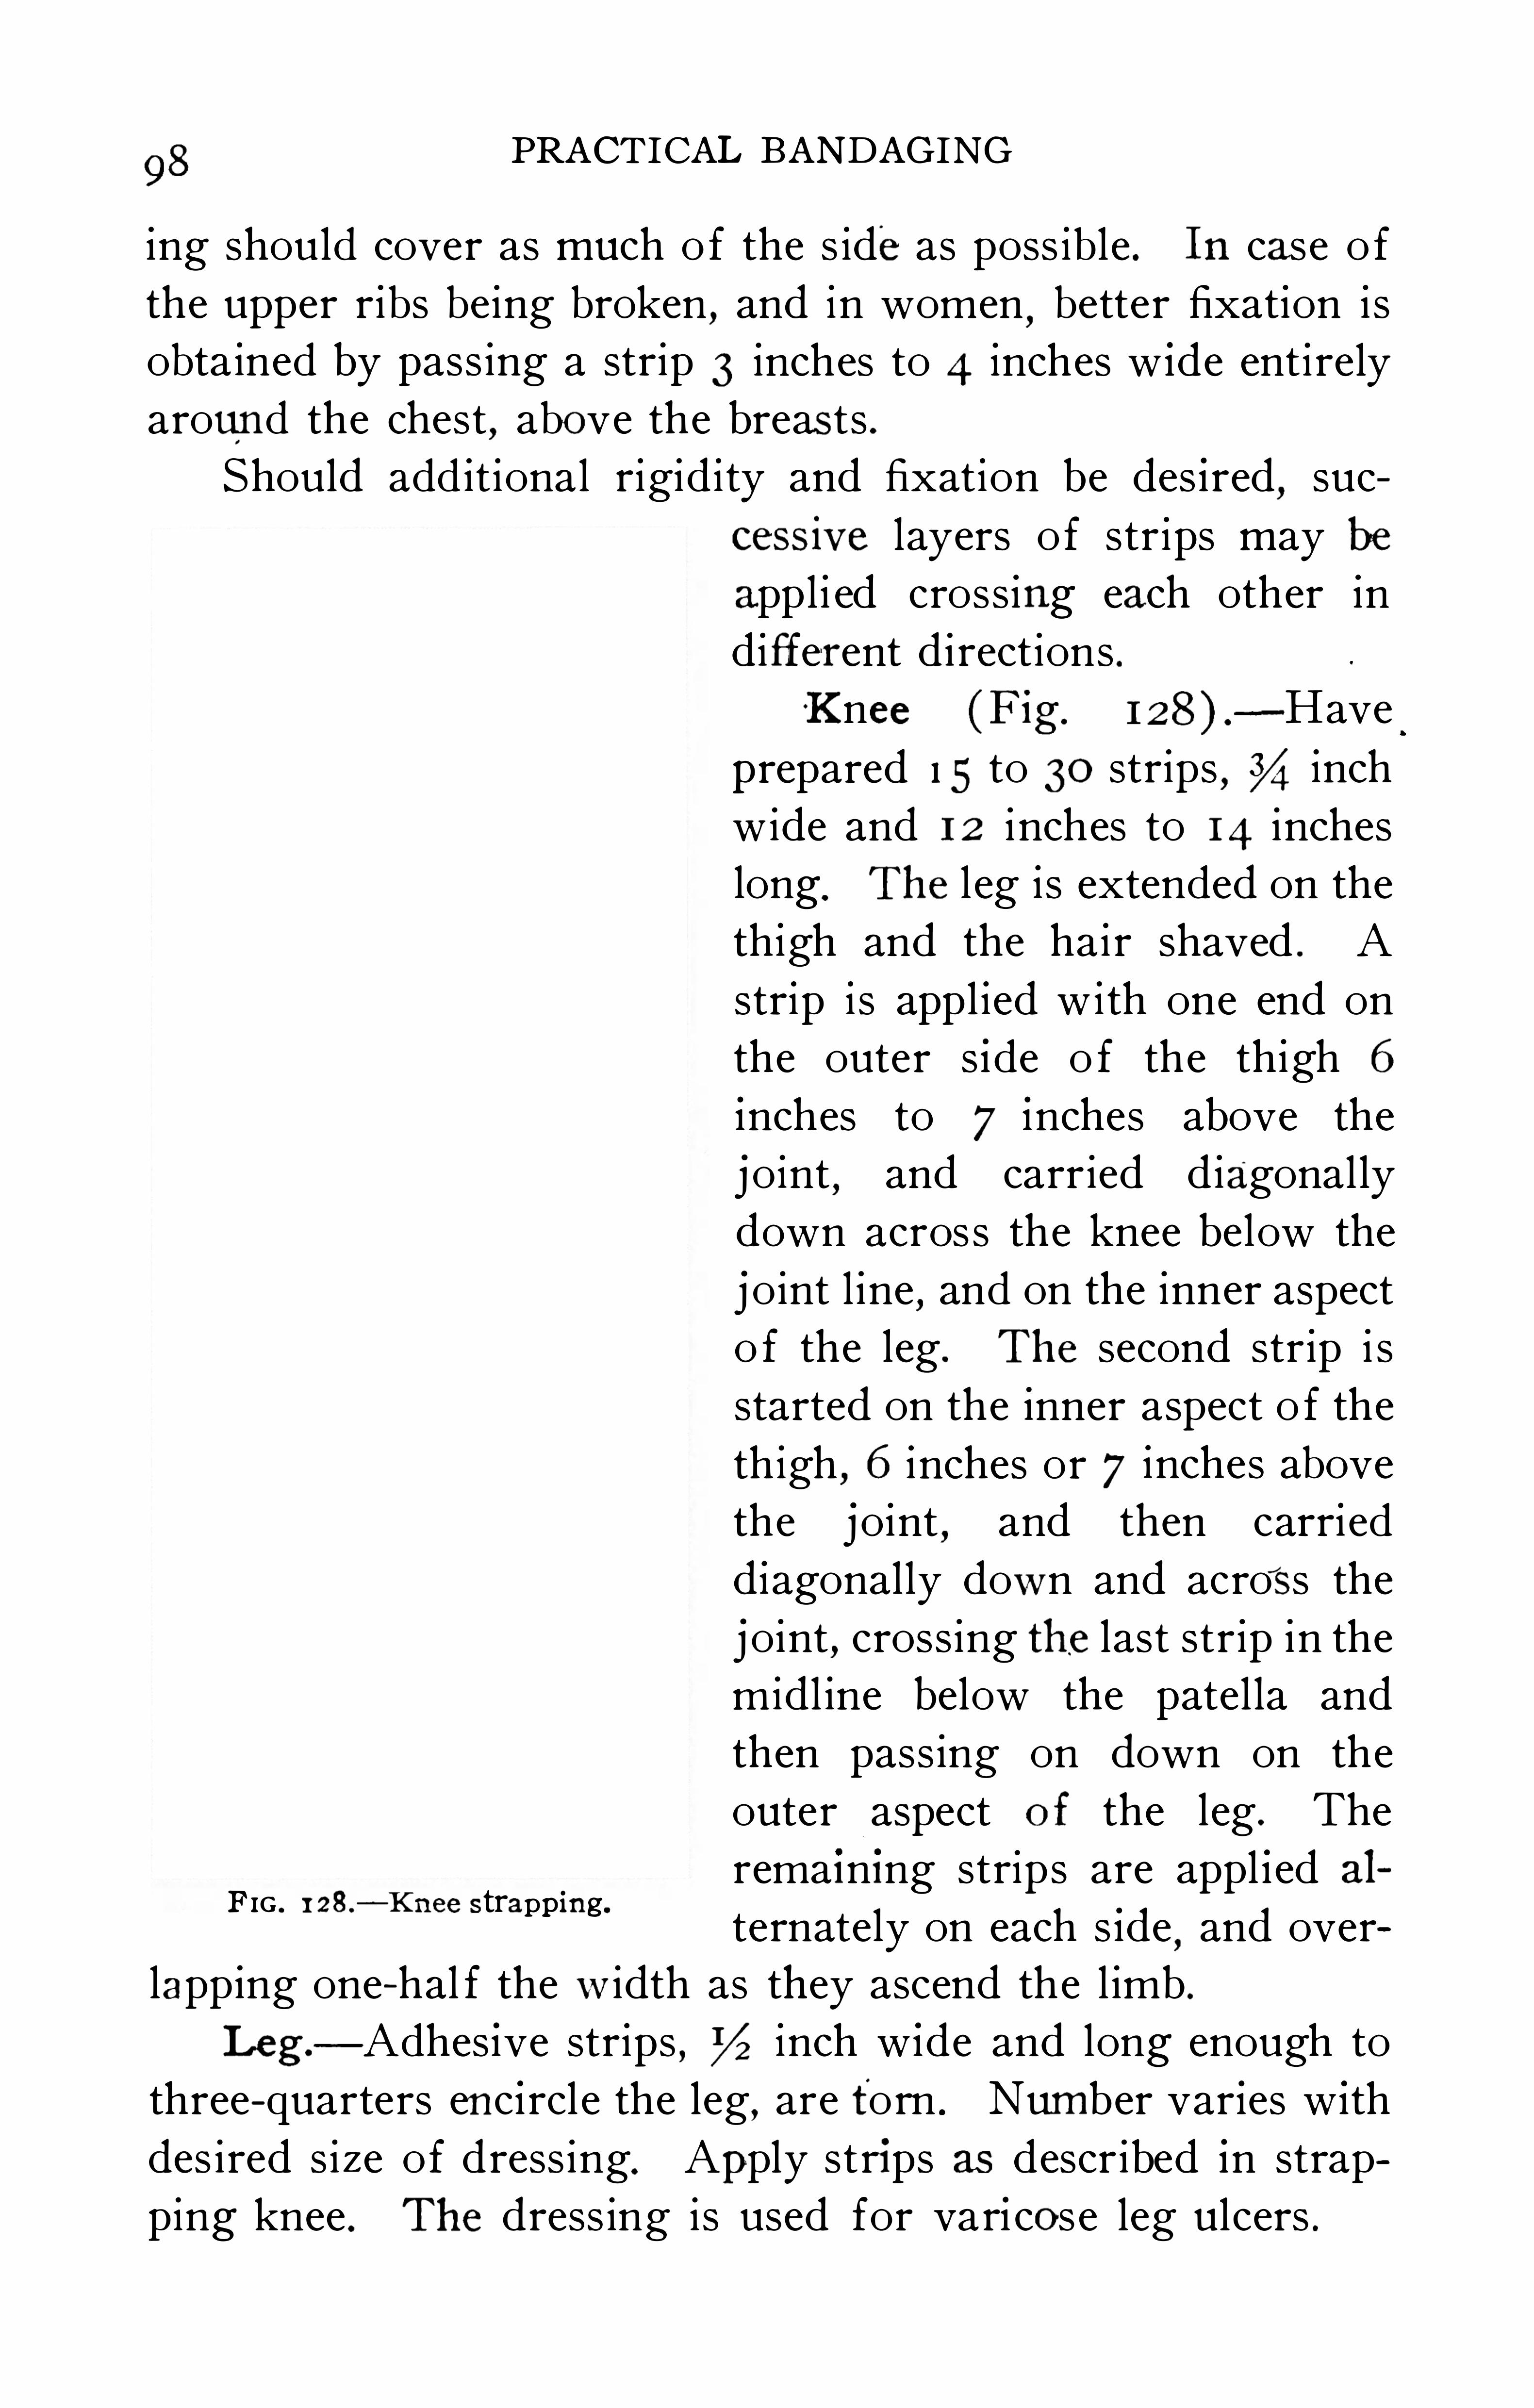
98PRACTICAL BANDAGING
ing should cover as much o f the s ide as poss ible . In case o f
the upper ribs being broken , and in women , better fixation is
obta ined by pass ing a strip 3 inches to 4 inches w ide entirely
around the chest, above the breas ts .
Should add it ional rigidity and fixation be des ired,suc
FIG . 1 28 .
— Knee strapping.
cessive layers o f strips may be
appli ed crossing each other in
different directions .Knee (Fig.
—Have
prepared I 5 to 30 strips , inch
wide and 1 2 inches to 14 inches
long. The l eg is extended on the
thigh and the hair shaved . A
strip i s appl ied with one end on
the outer s i de o f the thigh 6
inches to 7 inches above the
j oint,and carried diagonally
down acros s the knee below the
j oint l ine,and on the inner aspect
o f the leg . The second strip i s
started on the inner aspect o f the
thigh , 6 inches or 7 inches above
the joint,and then carried
diagonally down and acros s the
j oint , crossing the last strip in the
midl ine below the patel la and
then pass ing on down on the
outer aspect of the leg . The
remaining strips are appl ied al
ternately on each s ide,and over
lapping one-hal f the w idth as they ascend the l imb .
Leg — Adhes ive strips , inch w ide and long enough to
three-quarters encircle the leg,are torn . Number var ies w ith
des ired s ize of dress ing. Apply strips as described in strapping knee . The dress ing is used for vari cos e leg ulcers .
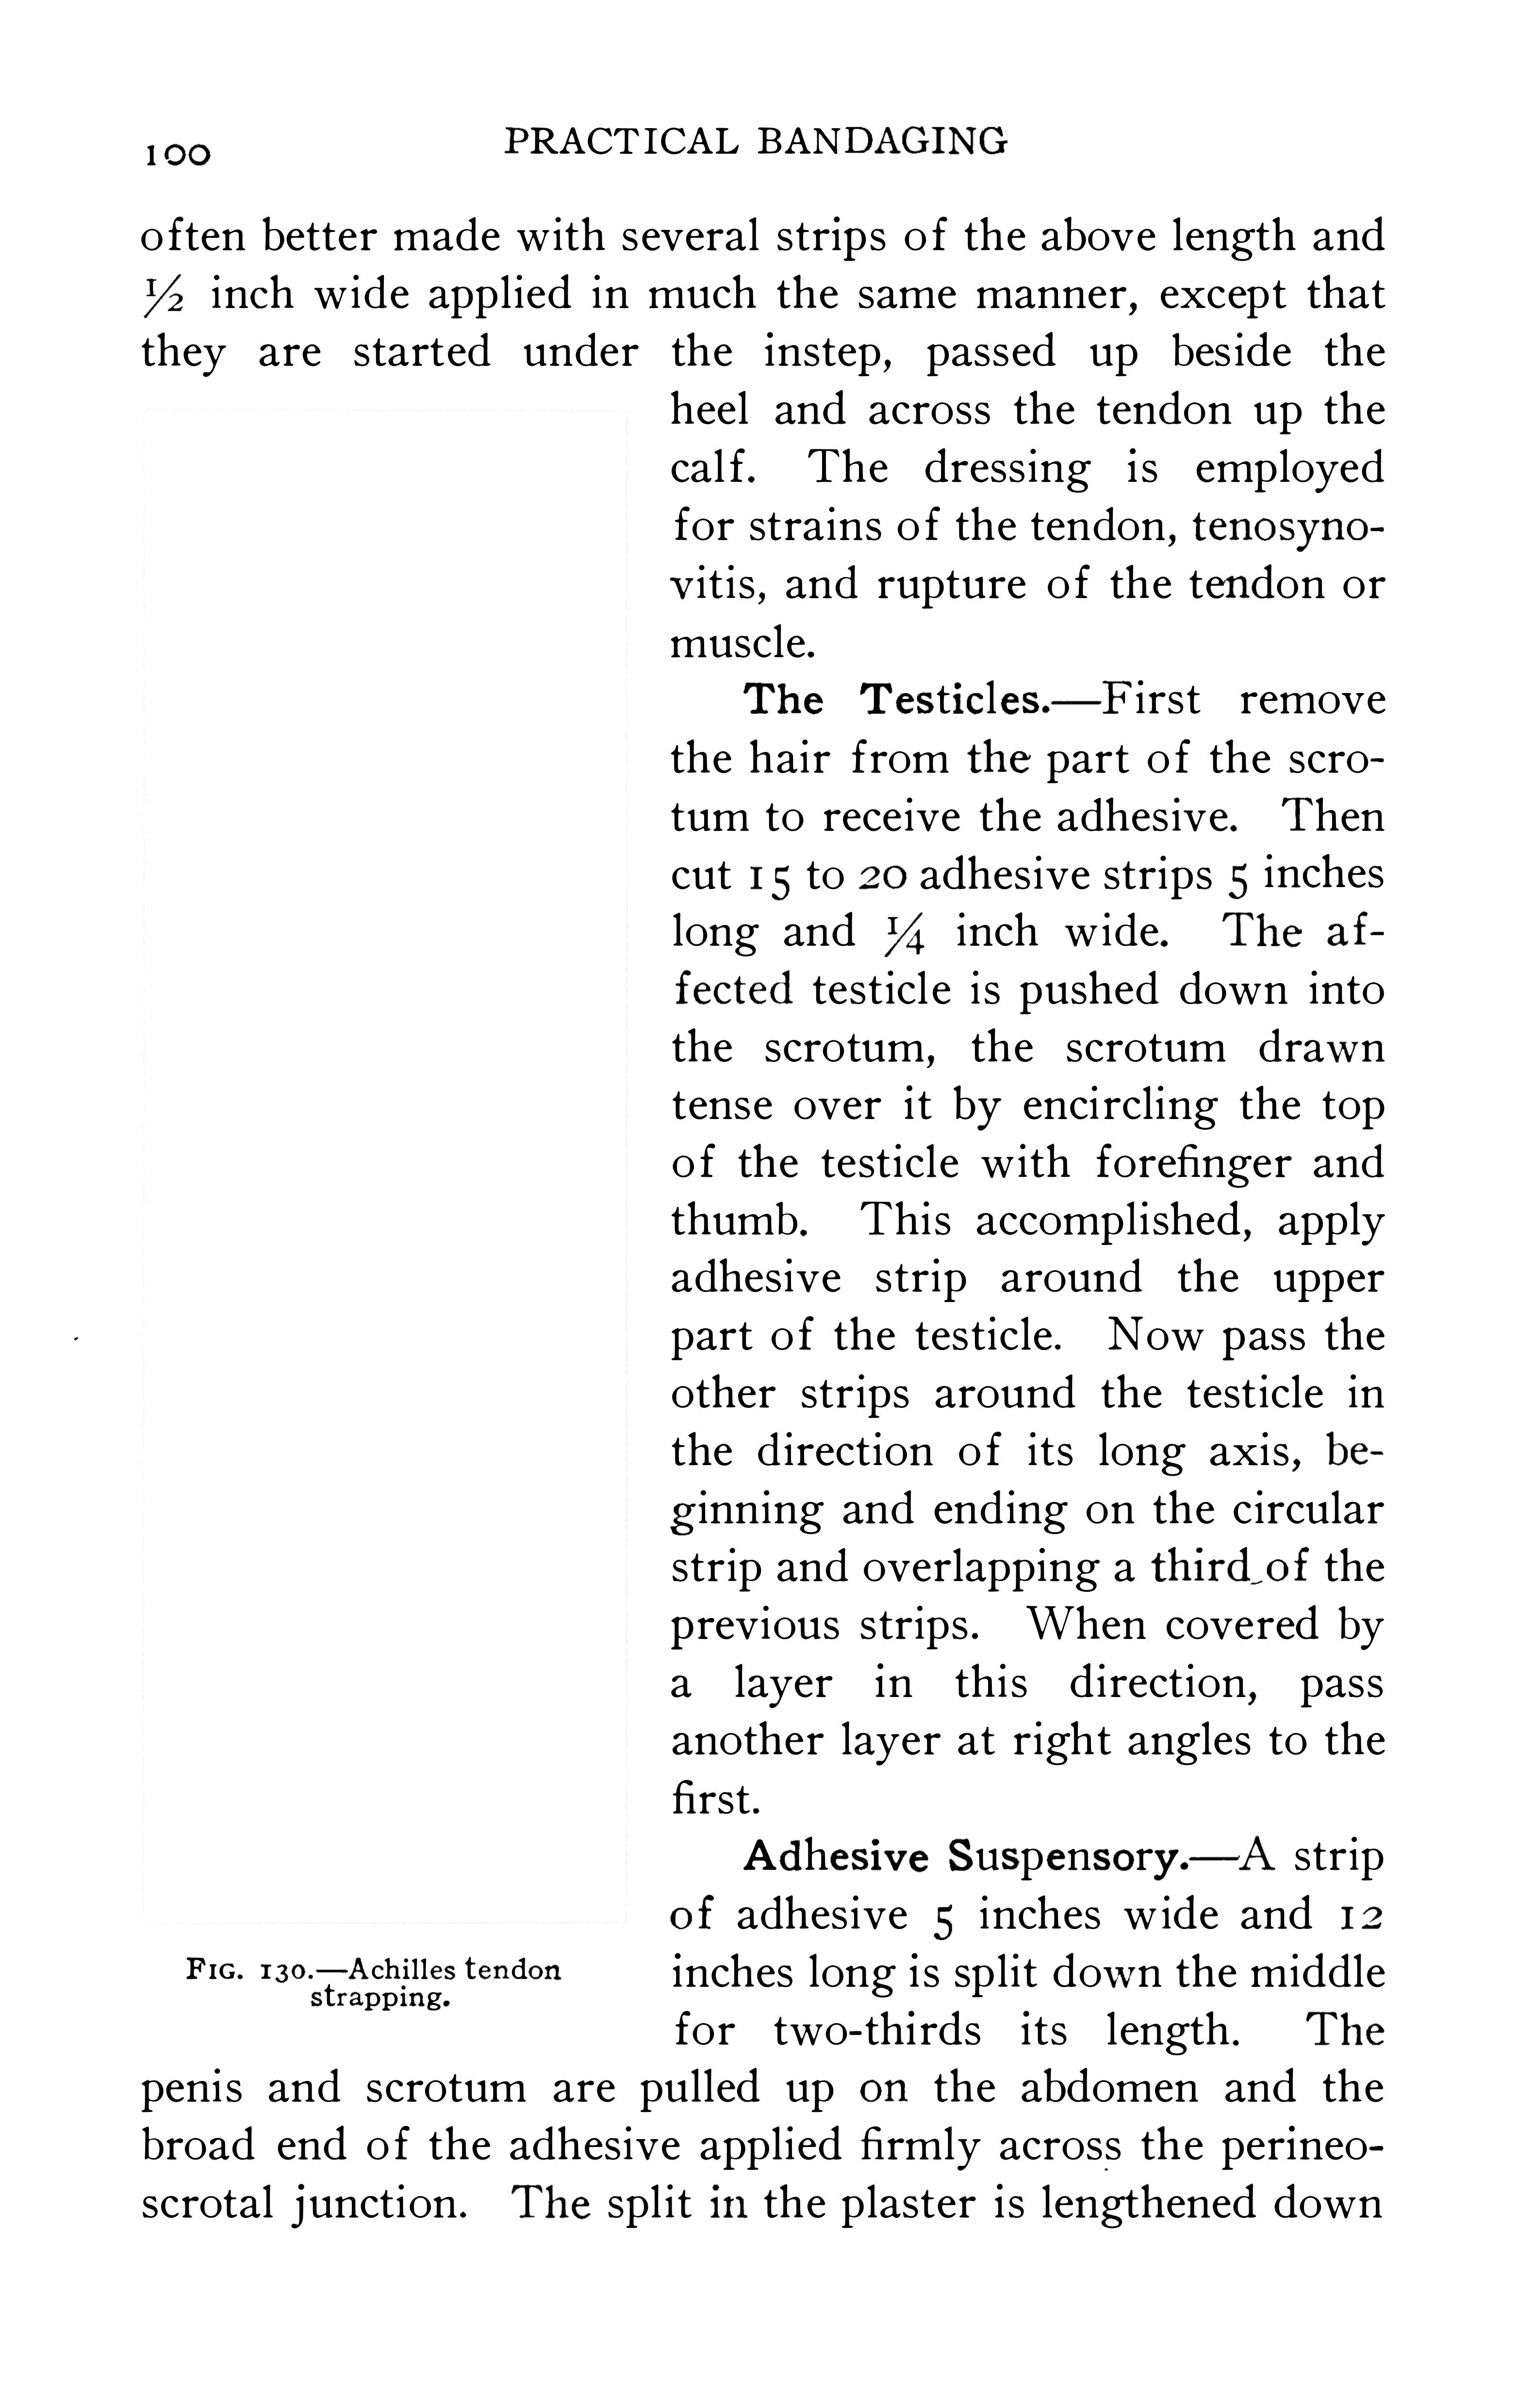
I 00 FRACTICAL BANDAGING
o ften better made with several strips o f the above length and
V2 inch wide appl ied in much the same manner, except that
they are started under the instep,passed up bes ide the
FIG . 1 30 .
— Achil les tendonstrapp ing.
heel and across the tendon up the
cal f . The dress ing i s employed
for strains o f the tendon , tenosyno
V i t i s , and rupture o f the tendon or
muscle .The Tes ticles .
— F i rst remove
the hair from the part o f the scro
tum to receive the adhes ive . Then
cut 1 5 to 20 adhes ive strips 5 inches
long and inch wide. The af
fected test icl e i s pushed down into
the scrotum,the scrotum drawn
tense over i t by enci rcling the top
o f the testicle with forefinger and
thumb . This accompli shed , apply
adhesive strip around the upper
part o f the testicle . Now pass the
other str ips around the test icle in
the d irection o f its long axis , be
g inning and end ing on the circular
strip and overlapping a third,of the
previous strips . When covered by
a layer in thi s direction,pass
another layer at right angles to the
first .Adhesive Suspensory .
— A strip
of adhes ive 5 inches w ide and 1 2
inches long i s spl it down the middle
for two- thi rds i ts length . The
peni s and scrotum are pulled up on the abdomen and the
broad end o f the adhesive applied firmly across the perineo
scrotal j unction . The spl it iii the plaster i s lengthened down
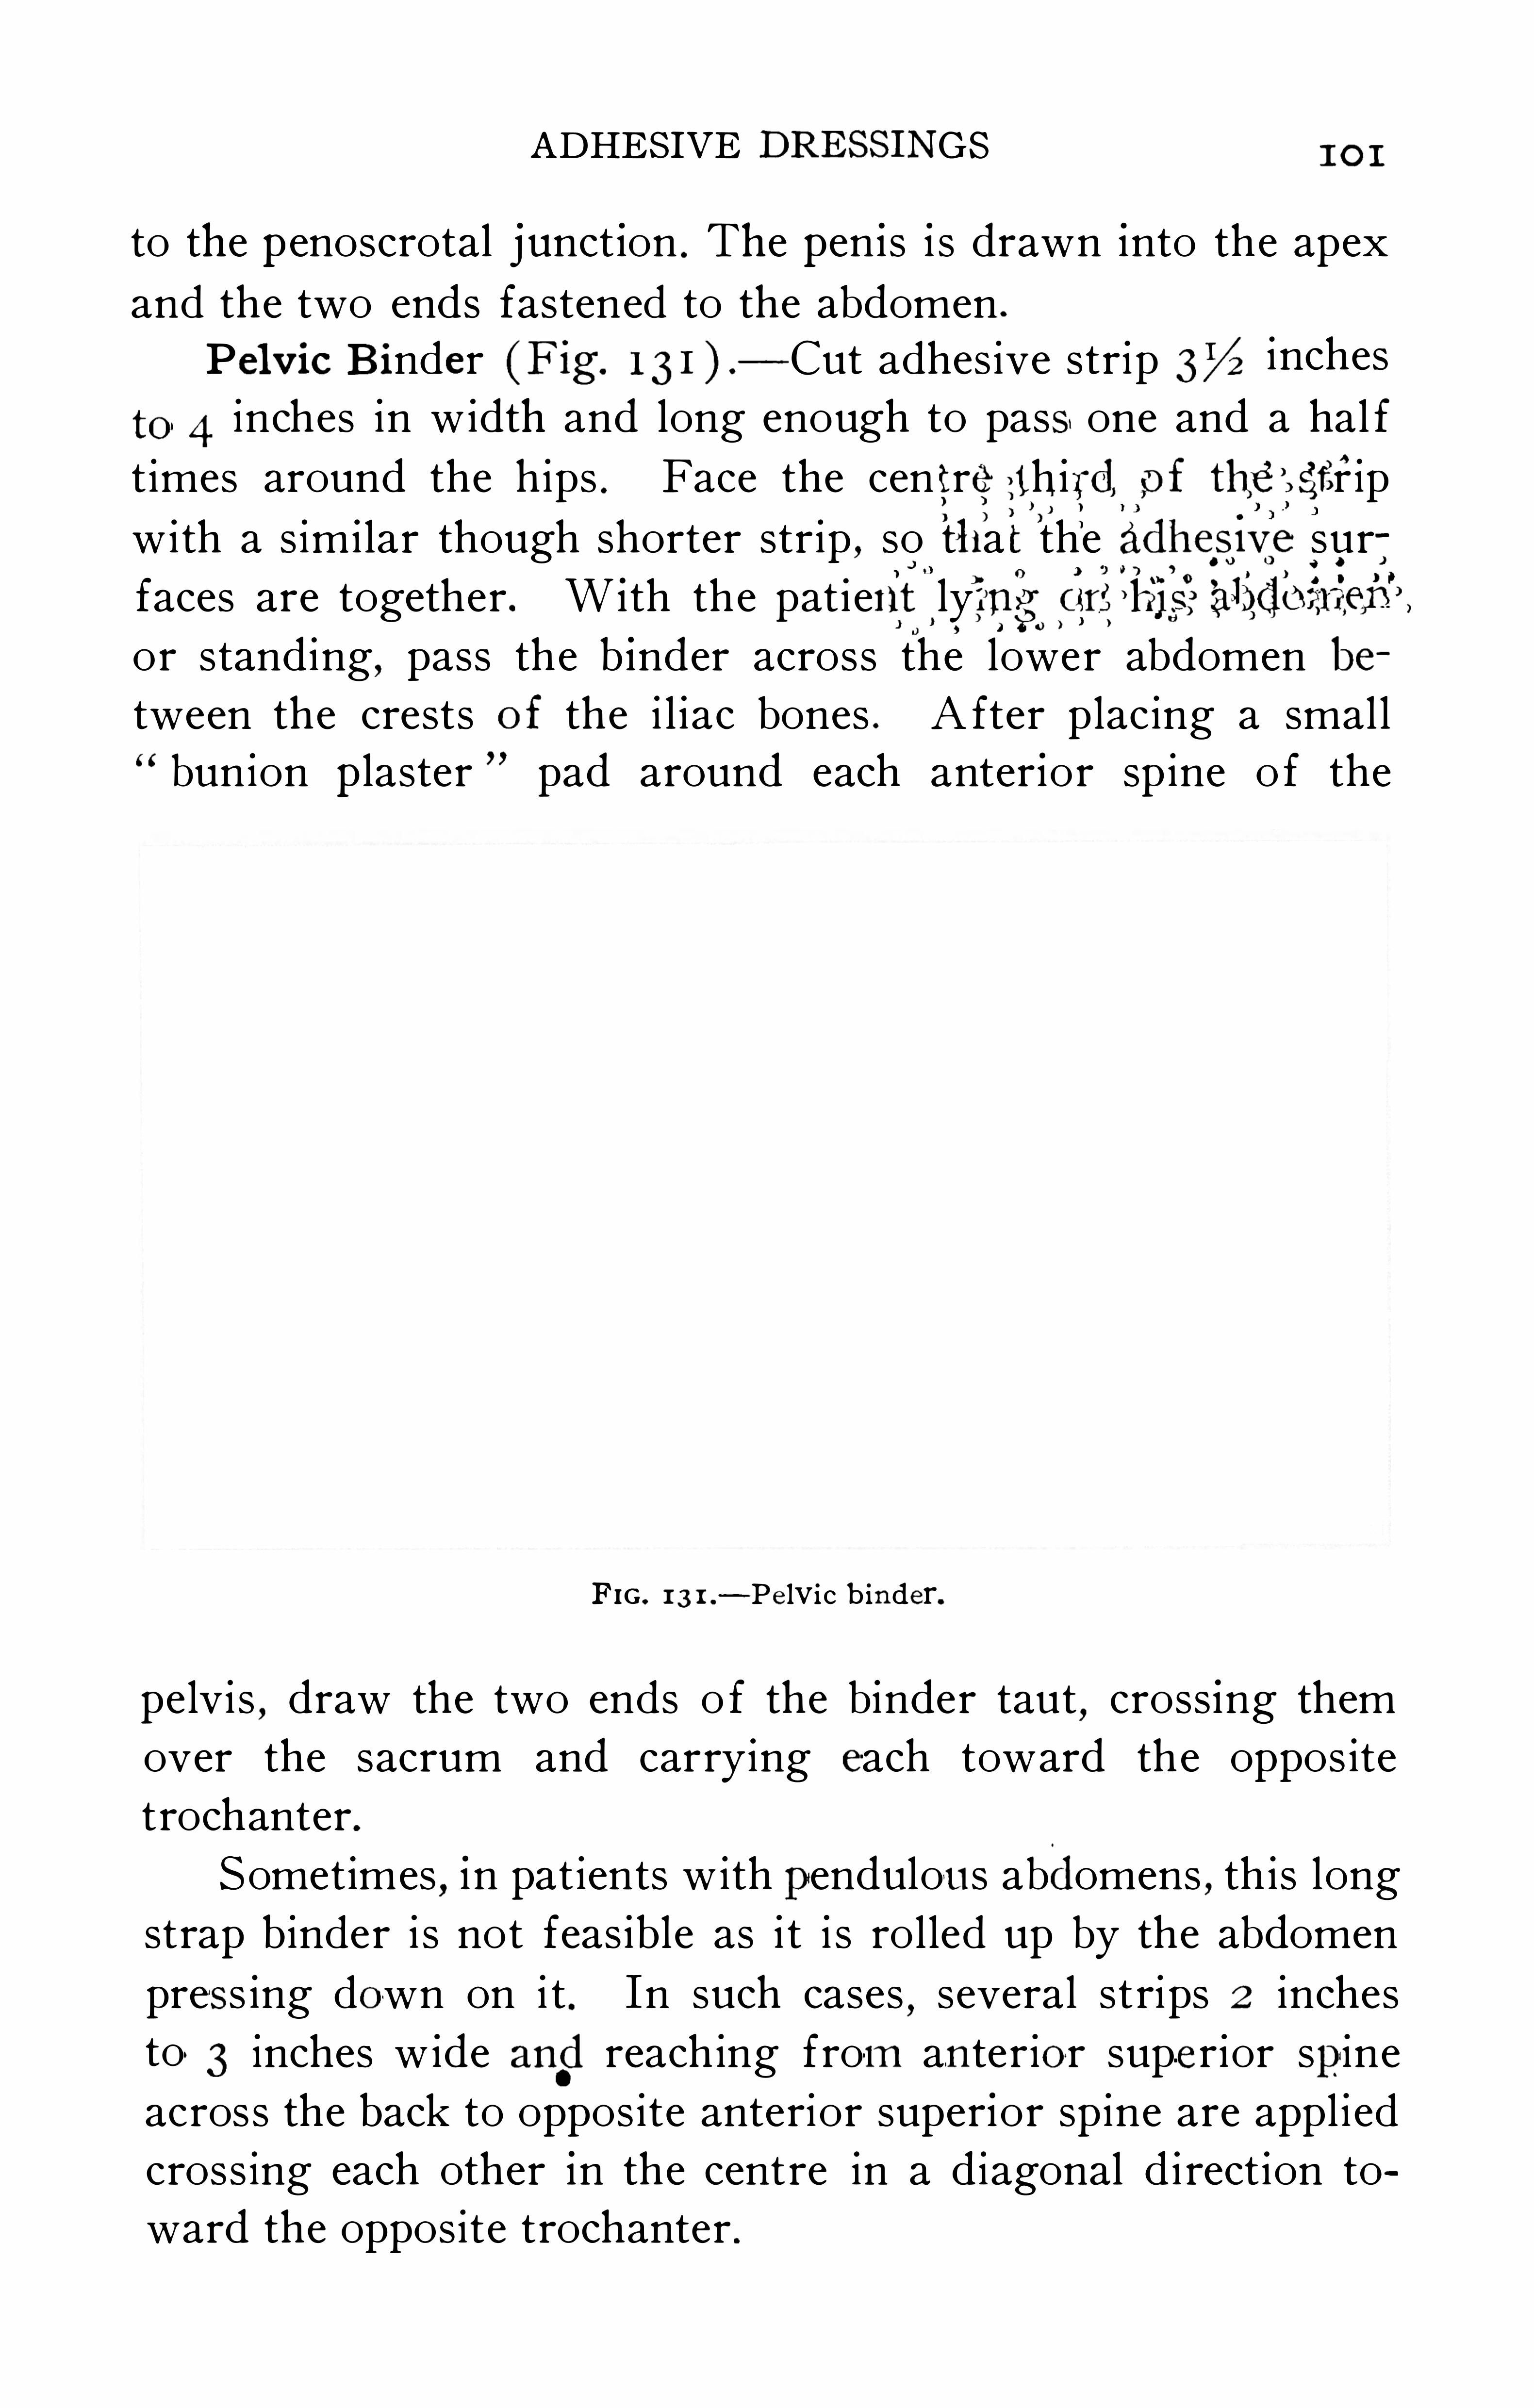
ADHESIVE DRE SSINGS 1 0 I
to the penoscrotal junct ion . The pen is i s drawn into the apex
and the two ends fastened to the abdomen .
Pel vic Binder (F ig.
—Cut adhes ive strip 3% inches
to 4 inches in width and long enough to pass one and a hal f
t imes around the hips . Face the cen tre third ,of the Str ip
with a s imilar though shorter strip , so tha t the adheswe sur0 0 0 0 0 )
faces are together . W ith the patient lying Fifihis"alidbiiien" ,
or standing,pass the b inder across the lower abdomen be
tween the crests of the i l iac bones . A fter placing a small“ bunion p laster " pad around each anter ior sp ine o f the
FIG . 1 3 1 .
—Pe lvic b inder.
pelvi s,draw the two ends o f the binder taut
,cross ing them
over the sacrum and carrying each toward the oppos ite
trochanter .
Sometimes,in pat ients withpendulou s abdomens , th is long
strap binder i s not feas ible as i t i s rol led up by the abdomen
pres s ing down on i t . In such cases,several st rips 2 inches
to"
3 inches w ide and reaching fro-m anterior supe rior spine
across the back to oppos ite anterior superior spine are appl ied
cross ing each other in the centre in a diagonal d i rect ion to
ward the opposite trochanter .
P ART v
PLASTE R: OF-PARIS OR GYP SUM BANDAGES
C C C C CC
eral Co’nSiderations .
— P laster dress ings are used for
extended period o f time . Less com
mon fixation dressings are s i l icate o f soda and starch dress
ing . The material used for the bandage i s unwashed crino
l ine . This i s cut in strips the desi red width and the meshfi l led with fresh plaster o f Pari s
,dry and free from lumps .
F IG. 132 .
—Making p laster bandages .
A much qu icker way i s to spread the entire width of the
crinol ine with the plaster , and , a fter roll ing it , cut i t the de
s i red lengt hs by the use of a saw and mitre box (F ig.
The plaster,i f exposed to damp air
,will become air slaked
and then the cast wi l l crumbl e apart . To avoid thi s bake in anoven all plaster that has been in stock for some time . Spread
the plaster on the unrolled bandage a fter which the bandage
102
154 PRACTICAL BANDAGING
immersed one at a t ime in the warm water as needed and
allowed to remain stand ing on end unti l the ai r bubbles haveceased to rise from the roller . The bandage must not be
FIG . 133.— Method of squeez ing water from bandage.
and the excess water squeezed out by a twist ing motion. To
obviate loss o f p laster in submerging, .each bandage may be
wrapped in~fi lter paper or Japanese paper napk ins . With
wrapper st i l l on, the bandage i s removed from the water andsqueezed . The water escapes but not the plas ter. The part to
be bandaged i s held by an ass istant,two
,i f necessary
,in the
exact pos it ion ult imately des i red . In applying the plaster
bandage the principles of an ordinary bandage are used,w ith
few except ions . The plaster bandage i s never pulled taut "
PLASTER-OF -PARIS OR GYPSUM BANDAGES1 05
nor reverses used in the first layer or two,for as the bandage
does not sl ip,the change in direct ion i s accompl ished by the
folding o f a dart in the in ferior edge, and then using short
figure-of—8 turns . The turns should overlap about one-hal f
the prev ious turns and the loose borders in any turn are
smoothed back w ith the thumb and finger as darts which
readi ly adhere and stay in place . An excellent fin i sh can be
given the dress ing by turn ing back cuff- l ike fash ion,the ends
o f the flannel bandage,wadding
,or tr icot used , and holding
i t in place by the final turns o f the plaster bandage,catch ing
the free edge . While the cast i s st i l l pl iabl e i t may be molded
to fit the contour o f the part . This i s a dangerous procedure
except in sk i l led hands as pressure po ints are l ikely to be
produced .
The discarded p laster in the bas in should not be poured
down the waste,as i t w i l l harden and close the drain p ipe .
In order to rein force a cast,use i s made o f str ips o f box
wood , card-board , gutta percha , t in and z inc , bent to fi t the
part,and covered in by the plaster bandage (F ig. 145,
a) .
At t imes the re in forcement is made by s imply redupl icating
several turns o f the bandage o f a recurrent nature,each ap
pl ied on the preceding ones and smoothed down . To give
add it i onal support and strength , a cream of plaste r (gypsum ) , made by mixing the plaster w ith water , i s appl ied bythe hands in a thin layer between the succeed ing turns . The
plaster cream i s mixed as fol lows : The des i red amount o f
cold water i s p laced in a bas in and dry plaster powder i s
dusted by hand into the water unti l the solut ion i s saturated ,which is ind i cated by the plaster floating on the water . When
thispo int i s reached st i r with the hand unti l the plaster has acreamy cons i stency . A strong obj ect ion to the use o f thi s
cream between the layers , i s the increased weight added to the
cast , and at the same time rendering i t more bri ttl e . F inal ly ,the completed cast i s covered with thi s gypsum cream , which
1 06 PRACTICAL BANDAGING
i s smoothed off w ith a wet cloth . Thi s when dried gives
a gloss that is especial ly des irabl e in cases where urine i s
l iable to come in contact w ith the cas t . A coating or varnish
may be appl ied,after the cast has thoroughly dried . Great
care must be. exerci sed during the appl ication and a fterward ,unti l setting has occurred
,that the l imb i s held in the one
posi t ion des ired,and that the cast i s not indented by fingers
or other pressure . A fter 10 to 20 minutes when the cast
has begun to harden,the l imb may be rested on a so ft pi l low
for its ful l length . Free access o f the ai r to the plaster i s
necessary, as i t takes from 20 to 24 hours to dry out thor
oughly . When a hot a i r apparatus i s at hand the cast may be
baked for hal f an hour. Immediately a fter the completion
o f the bandage,the ci rculation o f the part distal to the band
age should be examined, a part be ing le ft exposed for thi s
purpose . Should the cast be too t ight as shown by discolored ,
cold,numb or t ingl ing extremities , i t should be cut through
longi tud inally,whi le st i l l moi st
,and any underlying con
stricting band of wadding or bandage cut through . Follow
this with’
e levation o f the part, and i t wi l l seldom be necessary
to remove the enti re cast.Method of Removing a P l as ter Cas t — While the cast i s
yet mois t a groove is cut with a sharp kni fe, longitud inally ,to within an inch o f each end . The sensation readi ly
,
ini
parted to the hand when the kni fe cuts through upon the
flannel bandage or wadding, tel ls one when the cast i s d ivided .
A Gigl i or chain saw may be placed , F ig. 134,at the time
o f appl icat ion,under the p laster bandage in the desi red pos i
t ion and later the plaster cut by a sawing motion and the
s ides pulled apart as in Fig. 135. An additional sa feguard
against poss ible injury to the underlying parts. i s the appl ica
tion o f a z inc strip,or an oi led rubber tub ing placed under the
plaster bandage,i n the l ine o f incis ion
,i ts ends protruding to
ind icate where to cut . A simi lar l ine o f incis ion on the
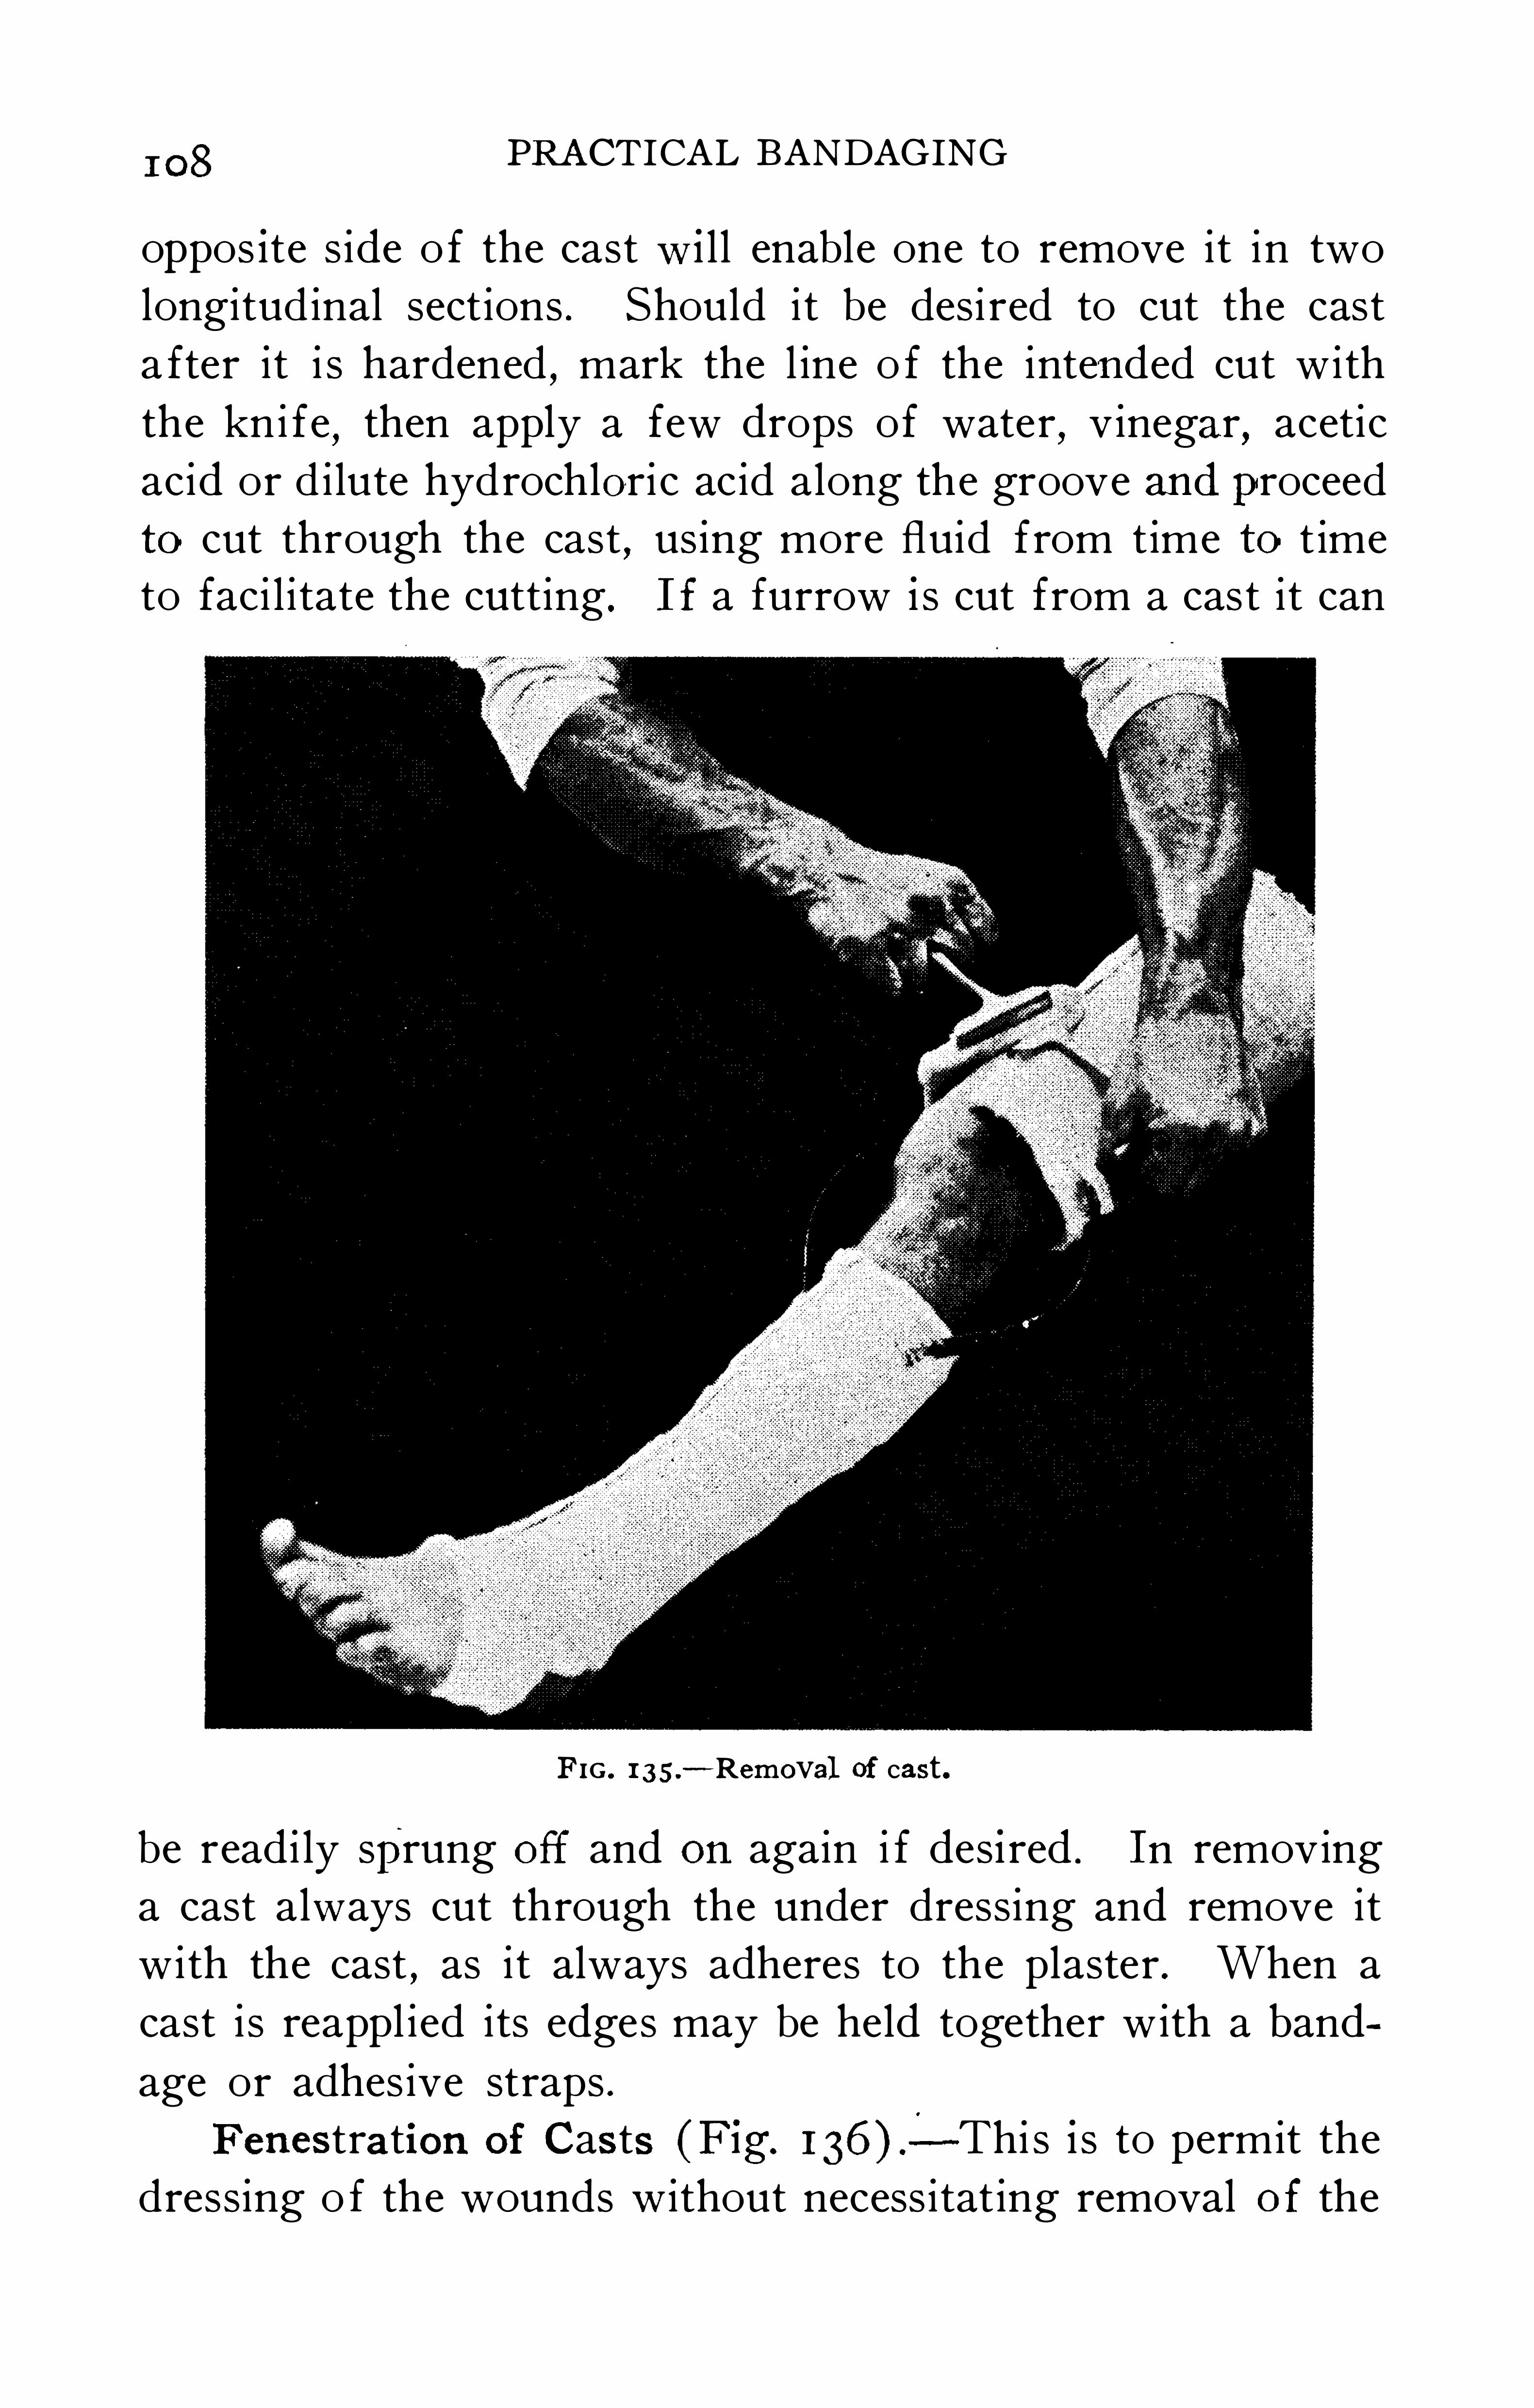
I 08 PRACTICAL BANDAGING
oppos ite s ide o f the cast w i l l enable one to remove it in two
longitud inal sect ions . Should i t be desi red to cut the cast
a fter it i s hardened,mark the l ine o f the intended cut with
the kn i fe,then apply a few drops of water
,vinegar
,acetic
acid or d i lute hydrochlori c acid along the groove andproceedto cut through the cast , using more fluid from time to t imeto faci l i tate the cutting . I f a furrow i s cut from a cast it can
FIG . 1 35 .
— Removal of cast.
be readi ly sprung off and on again i f des ired . In removing
a cast always cut through the under dressing and remove it
with the cast,as i t always adheres to the plaster . When a
cast i s reappl ied i ts edges may be held together with a band
age or adhes ive straps .F enes tration of Cas ts (Fig.
-Thi s i s to permit the
dressing o f the wounds w i thout necess itat ing removal of the
PLASTER-OF-PARIS OR GYPSUM BANDAGES1 09
cast . The s ite o f the wound should be accurately determ ined
by measurement be fore the part i s bandaged . The gauze
dress ing over the wound should be the s ize and shape o f the
des i red fenestra or window . A fter marking out on the sti l l
damp plaster the outl ines o f the opening,the window i s cut
out with a sharp kni fe , j ust as in remov ing a cast . The rough
edges o f the cast are covered w ith rad iating strips o f adhes ive ,shel lac
,gutta percha tissue
,or o i led s i lk . A s econd method
o f fenestration i s to place a pi l l box top,a glas s
,or graduate
over the wound and carry the turns o f the p laster around
FIG . 136.
— Fenestration of cast.
th i s . A th ird method is to cut two p ieces o f blott ing paper
the s i ze and shape o f the des ired opening, pass a p in through
the centre o f one and place over the wound,al lowing the
pin to st ick up . Apply the p laster around the p in,then when
ready to cut out the window,place the second p i ece o f blotter
w ith the pin through its centre, and cut out around it .
Amb ulatory Cas ts — Thi s manner o f fracture dress ing i s
applicabl e to fracture o f the leg and ankle where there i s no
need for ex tensiop, or , when the patient must be around eventhough unab le to use two crutches
,because o f d isabi l ity o f
one arm . The upper l im i t of the cast should be above theknee
,for fractures above the m iddle o f the leg
,and only up
I I 0 PRACTICAL BANDAGING
to the t ib ial tuberos iti es in lower fractures . The cast must
be especially heavy at the knee and ankle and the sole o f the
foot , to prevent cracking from weight . It tran s fers the
weight from the tuberos iti es of the t ibia to the ground or
floor . Between the sole o f the feet and the cast a thick pad
o f cotton i s interposed to give
cushion support to the foot . Thickpadd ing is necessary also around
and under the tib ial tuberos it ies .
This dress ing is sometimes used
in cases o f delayed union,the
theory be ing that the sl ight mo
t ion at the s ite o f fracture will
stimulate callus formation .
Segmented or B racket Cas ts
(Fig.
— When it i s desi red
to have access to wounds o f j o ints
or wounds extend ing around a
large part o f the circumference o f
the extremity,the part i s bridged
over by bands o f metal , the ex
tremities of which are incorporated in the segments of plasterabove and below . Sufficient curva
t ion i s given the strips to allow‘
for the des ired ministrat ions to
the parts .
F IG . I 37.
— Segmented or bracketed Pl as ter Spl intS.— These may
cast : be made from plaster bandages .folded repeated ly one on the other
,and applied sti l l
wet and molded to the part . Cut from lint,patterns o f the
spl int you des i re , care being taken that the l int i s cut so that
when appl ied on each side o f the l imb the soft s ide i s nextthe skin . Make the pattern sl ightly larger than you wish the
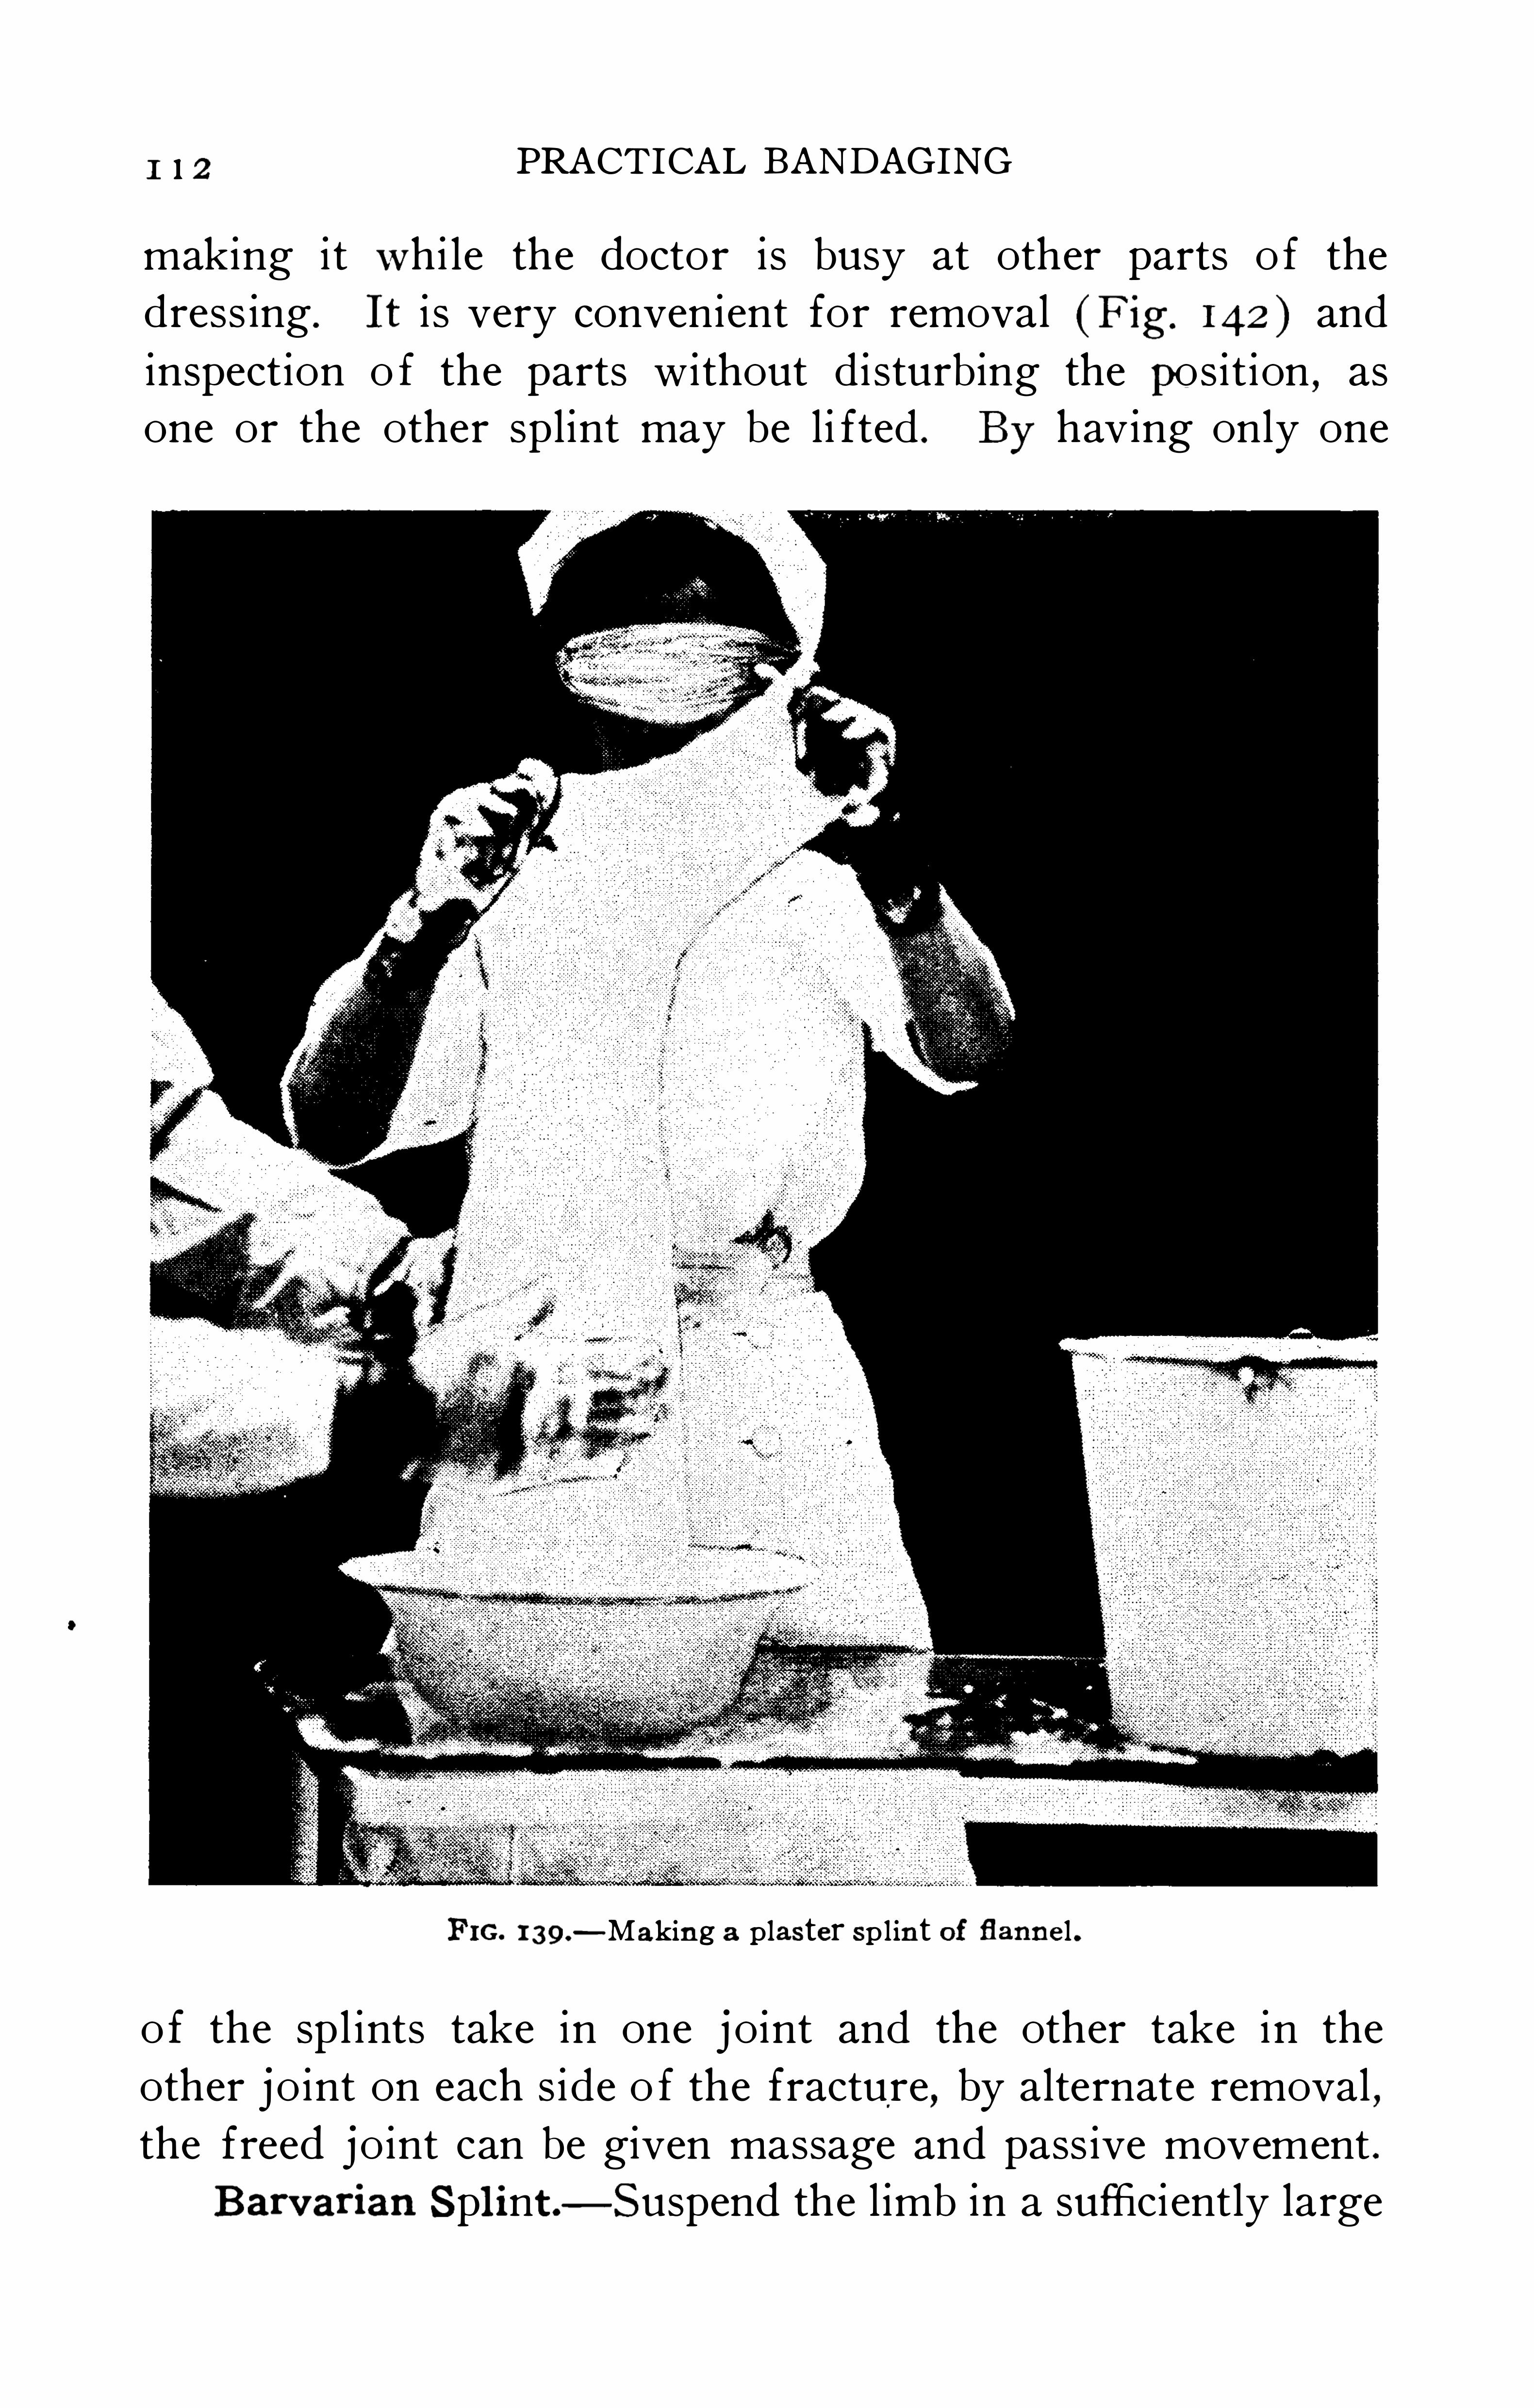
1 I 2 PRACTICAL BANDAGING
making it whi le the doctor is busy at other parts o f the
dress ing . It i s very convenient for removal ( F ig . 142 ) and
inspection o f the parts without d i sturb ing the position , asone or the other splint may be li fted . By having only one
F IG. 1 39.— Making a plaster Sp l int of flanne l .
o f the spl ints take in one j oint and the other take in the
other j o int on each s ide o f the fracture, by alternate removal ,the freed joint can be given massage and pass ive movement .
Barvarian Spl int — Suspend the l imb in a sufficiently large
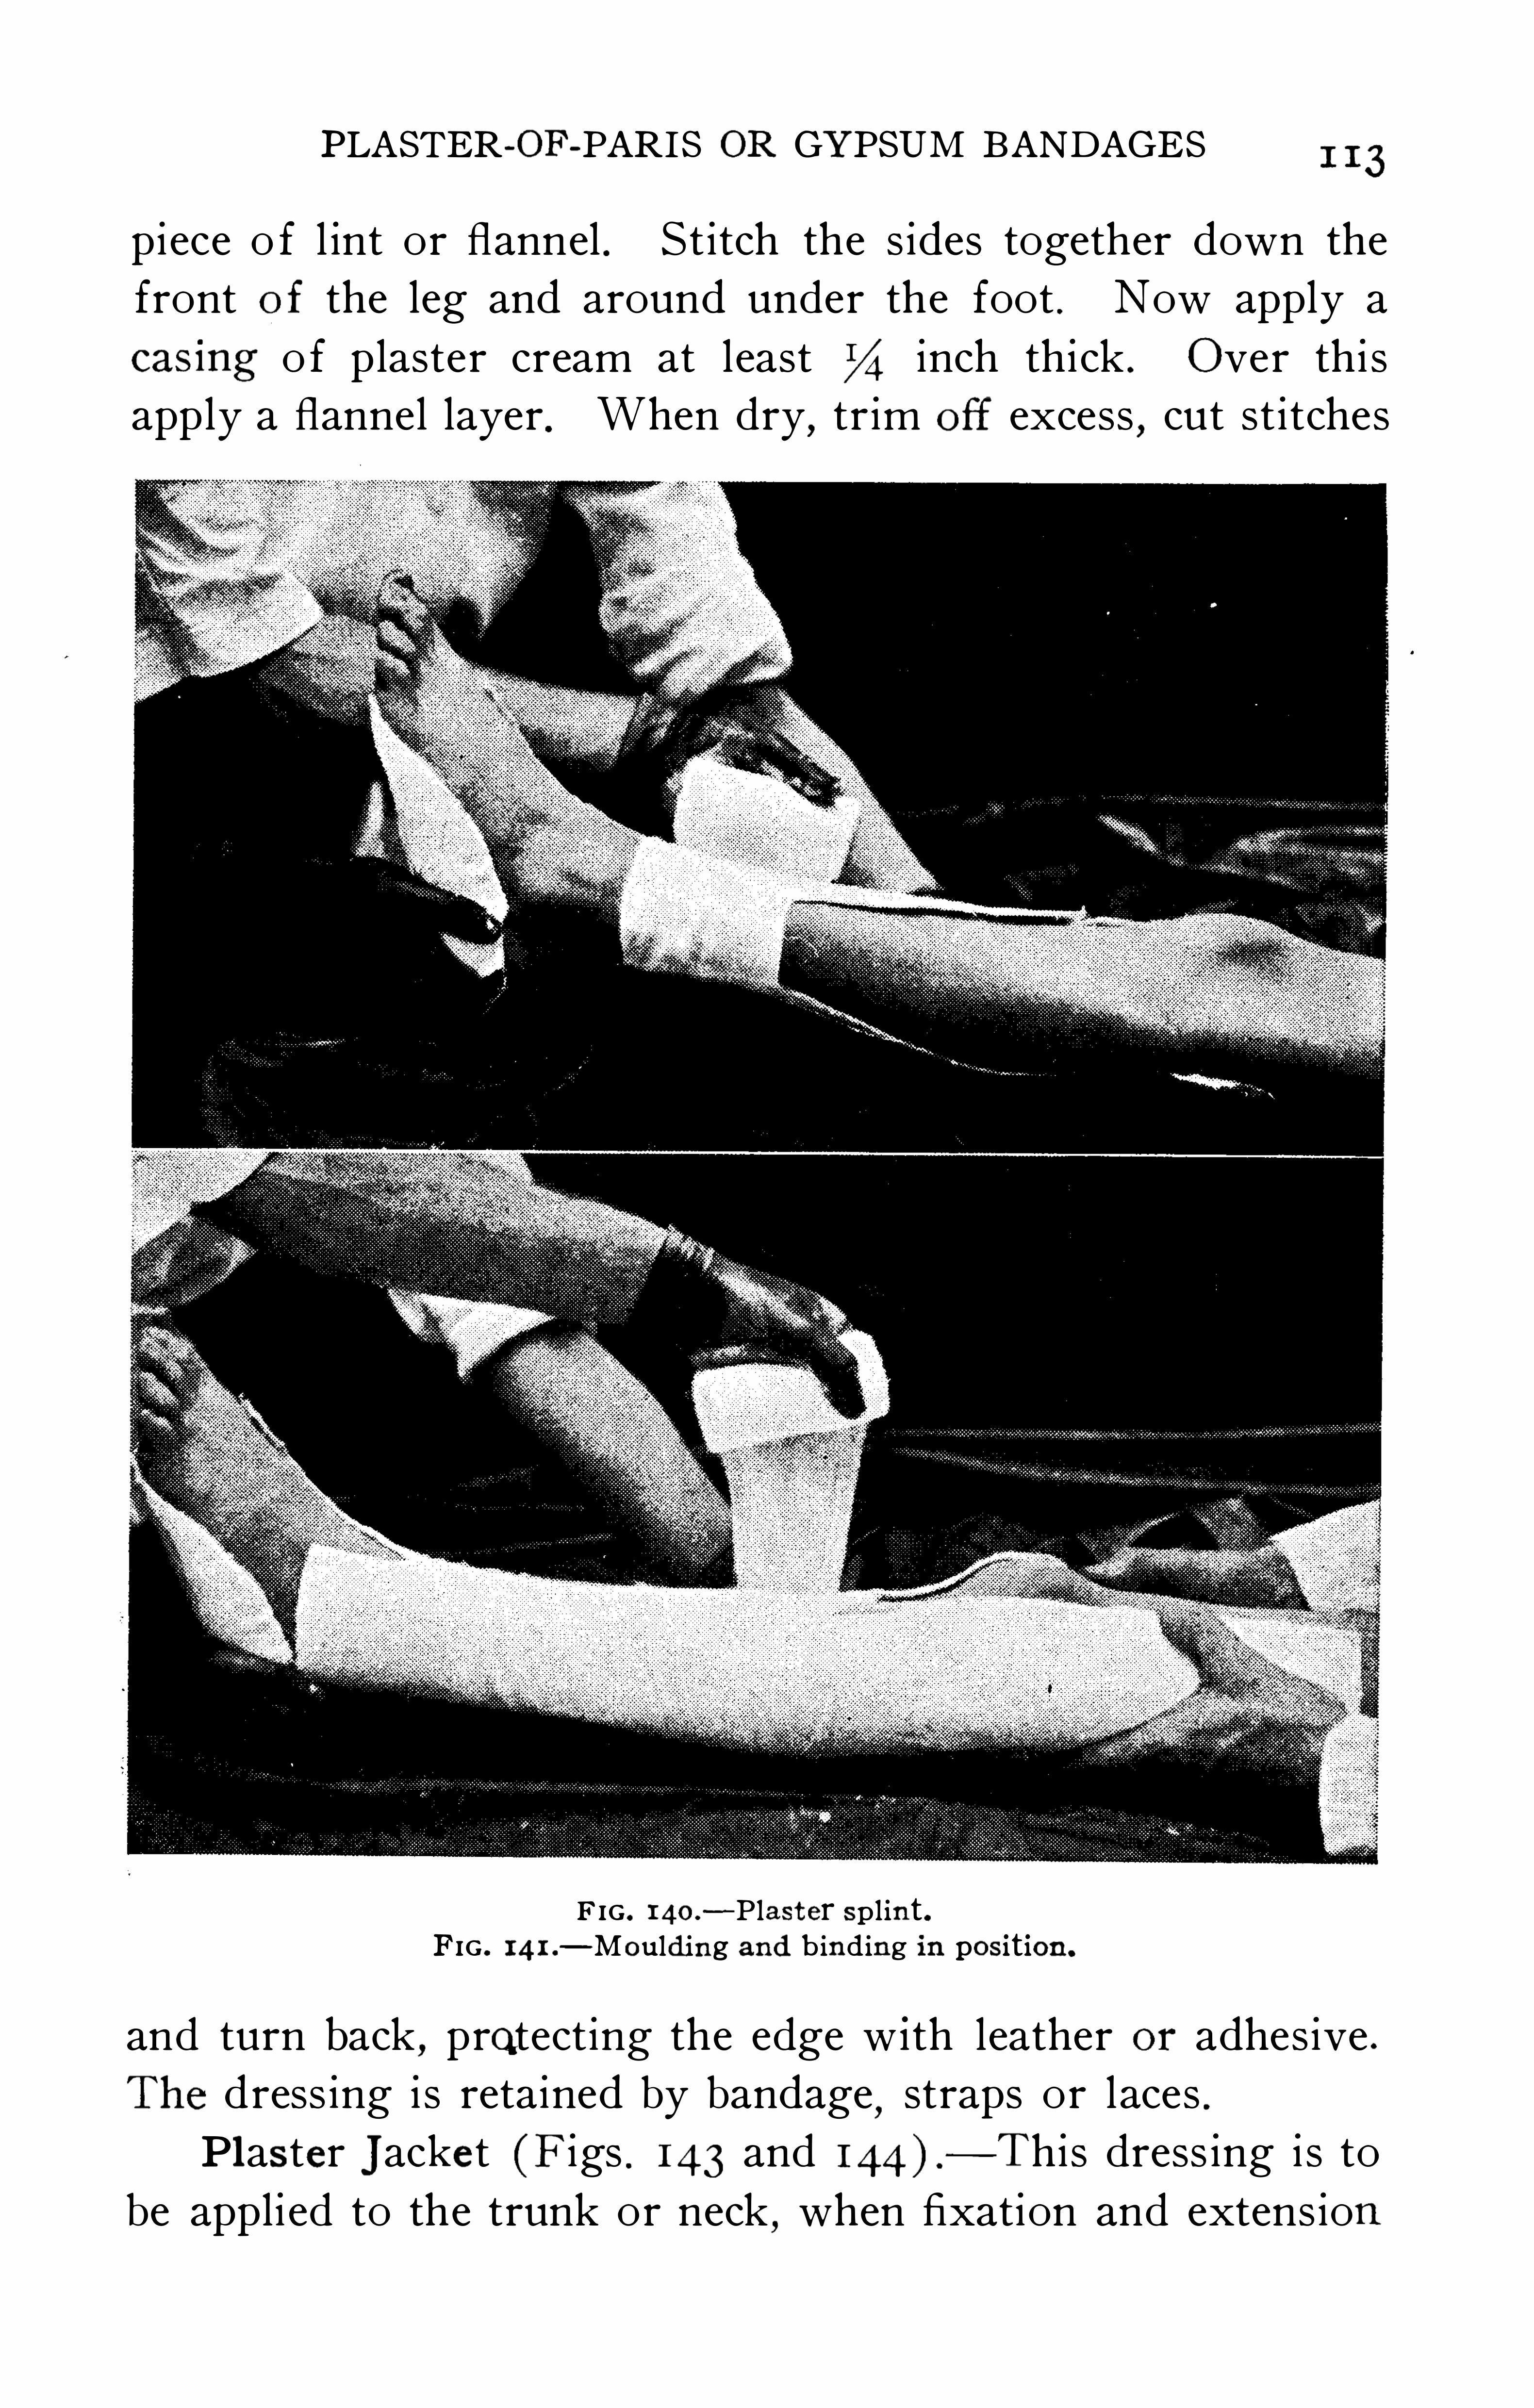
PLASTER-OF-PARIS OR GYPSUM BANDAGES 1 13
piece o f l int or flannel . S t itch the s ides together down the
front of the leg and around under the foot . Now apply a
casmg o f plaster cream at least inch thick . Over thi s
apply a flannel layer . When dry , tr im off excess,cut st itches
F IG . 1 4o.
—Plast er sp l int .FIG . I 4 I .
— Mould ing and b inding in pos ition .
and turn back , protecting the edge w ith leather or adhes ive .
The dress ing i s retained by bandage,straps or laces
.
Pl as ter Jacket (F igs . 143 and — This dress ing i s to
be appli ed to the trunk or neck,when fixation and extens ion

PRACTICAL BANDAGING
F IG . 1 42 .
— P las t er sp l in t s removed .
F IG. 143 .
— Pat ien t suspended for appl i F IG. I 44.— P laster j acket .
cation of p las ter-of-Paris j acket .
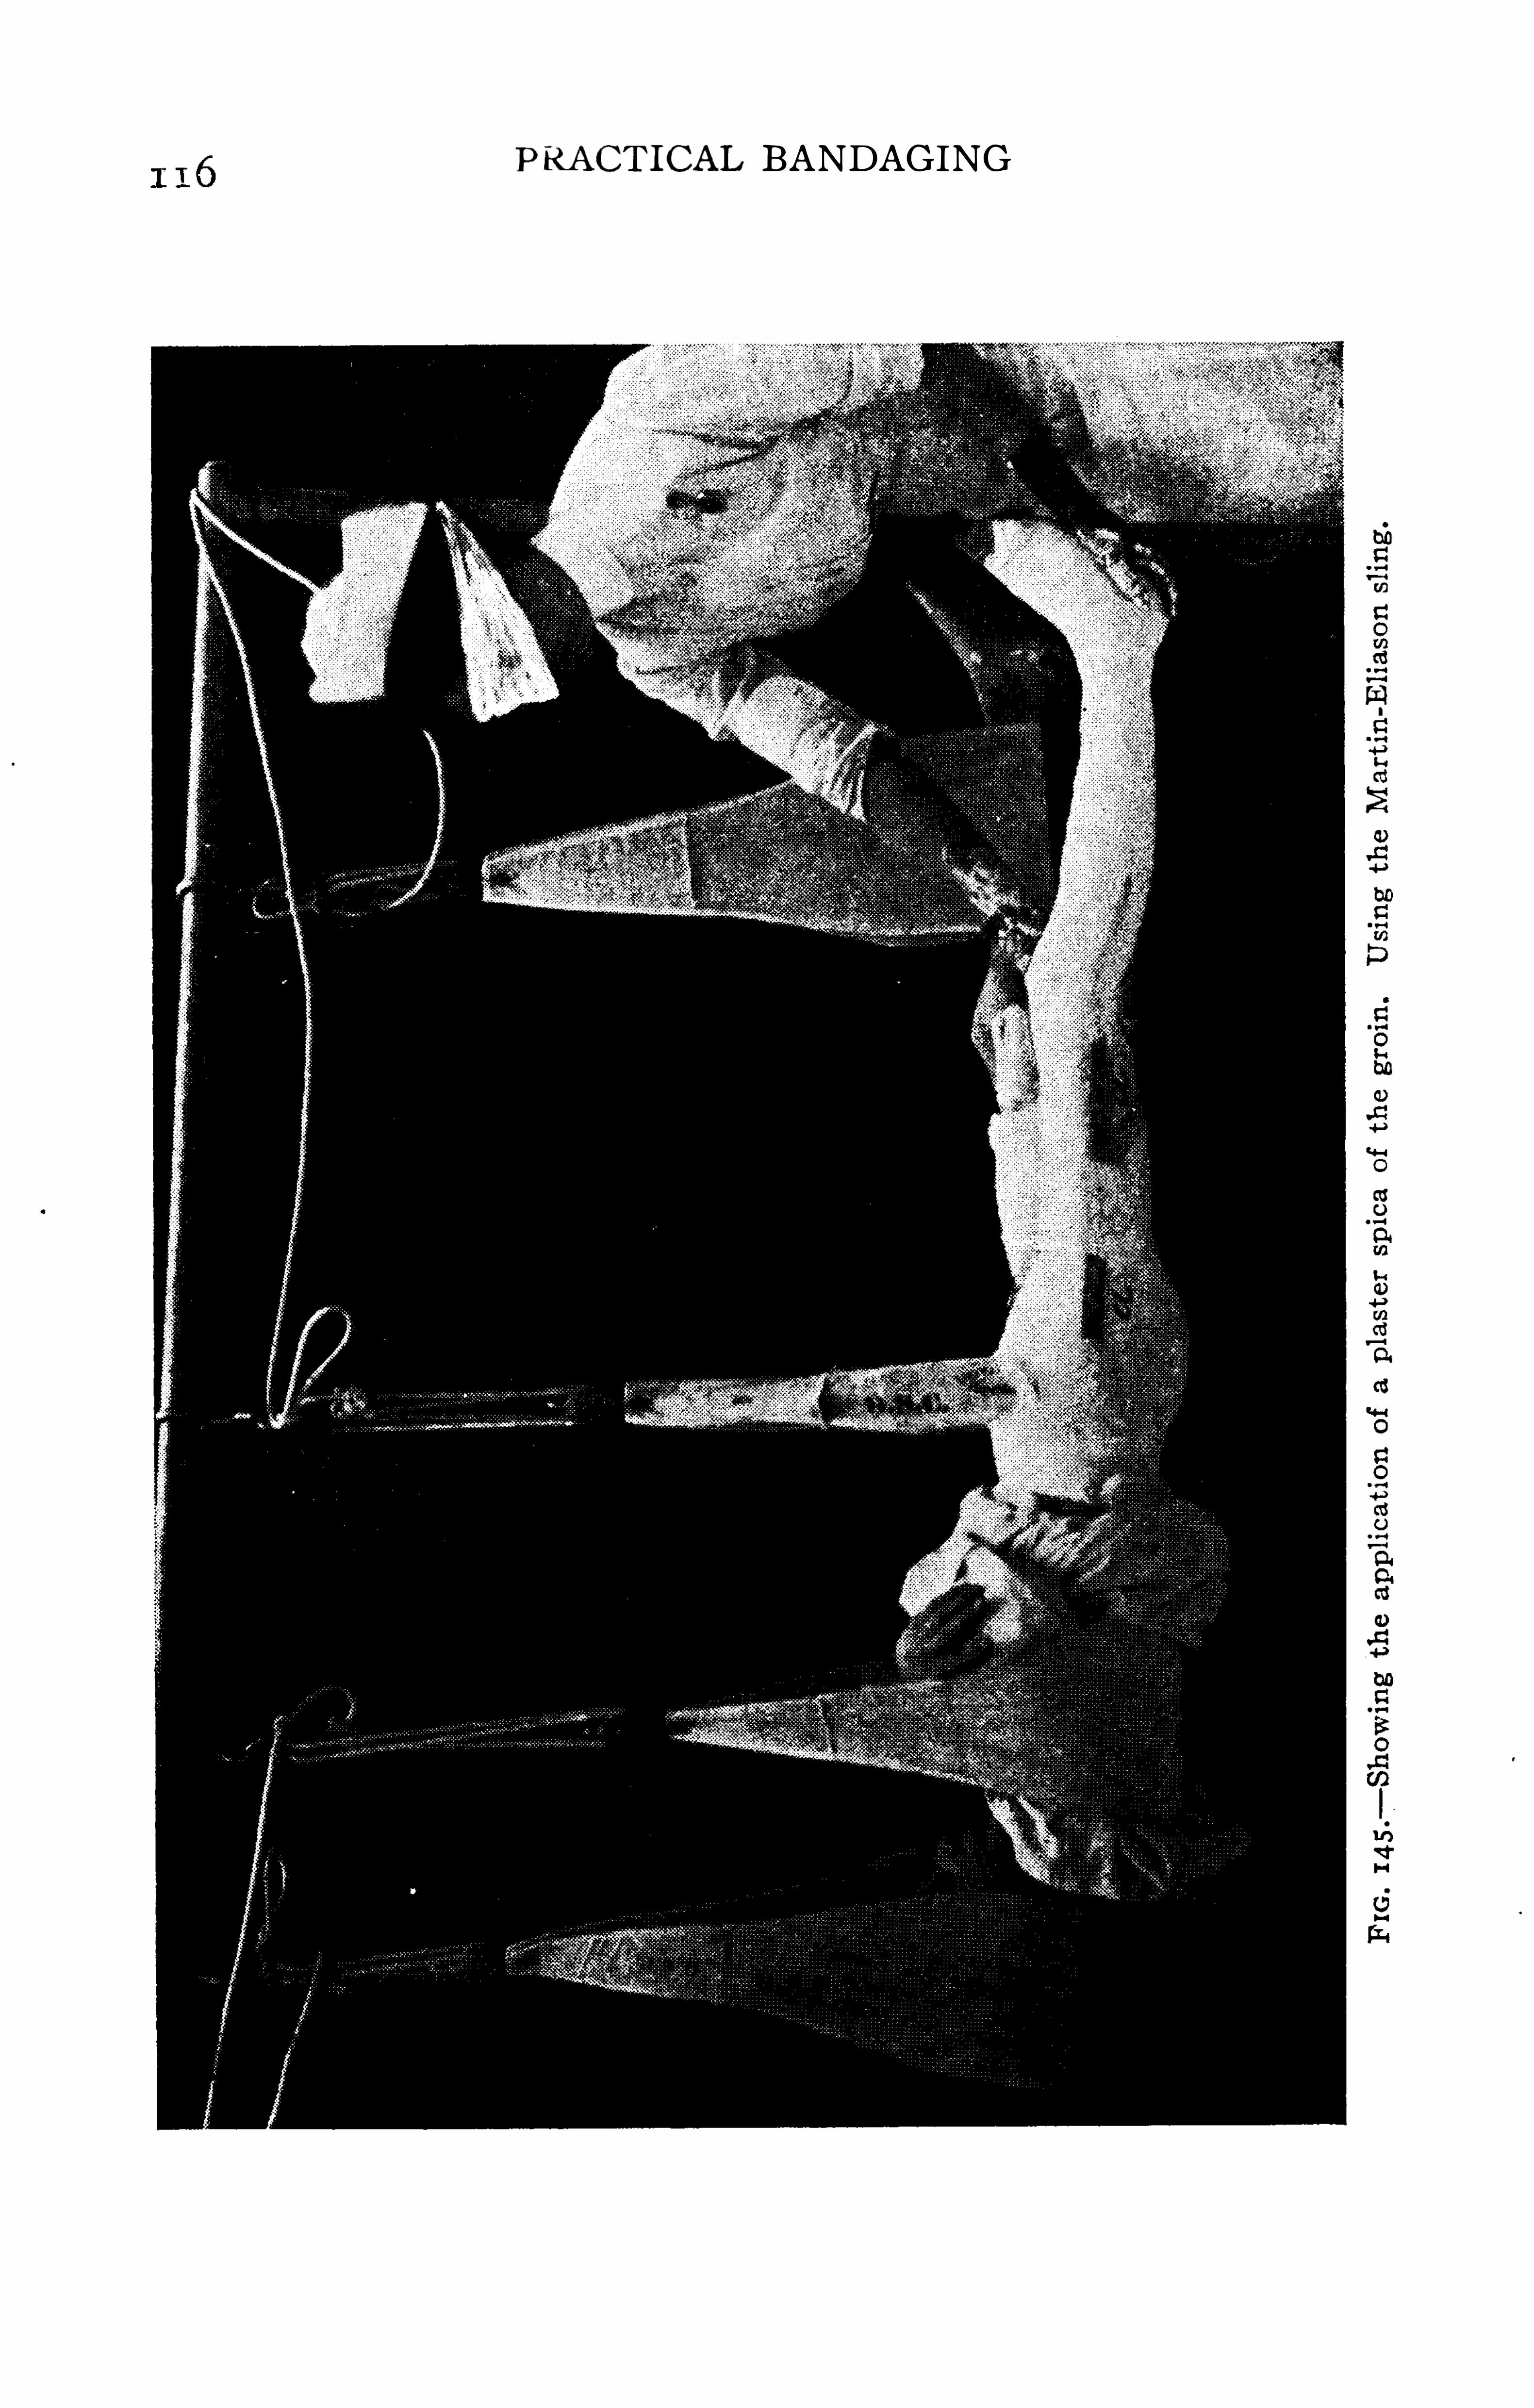
P RACTICAL BANDAGING
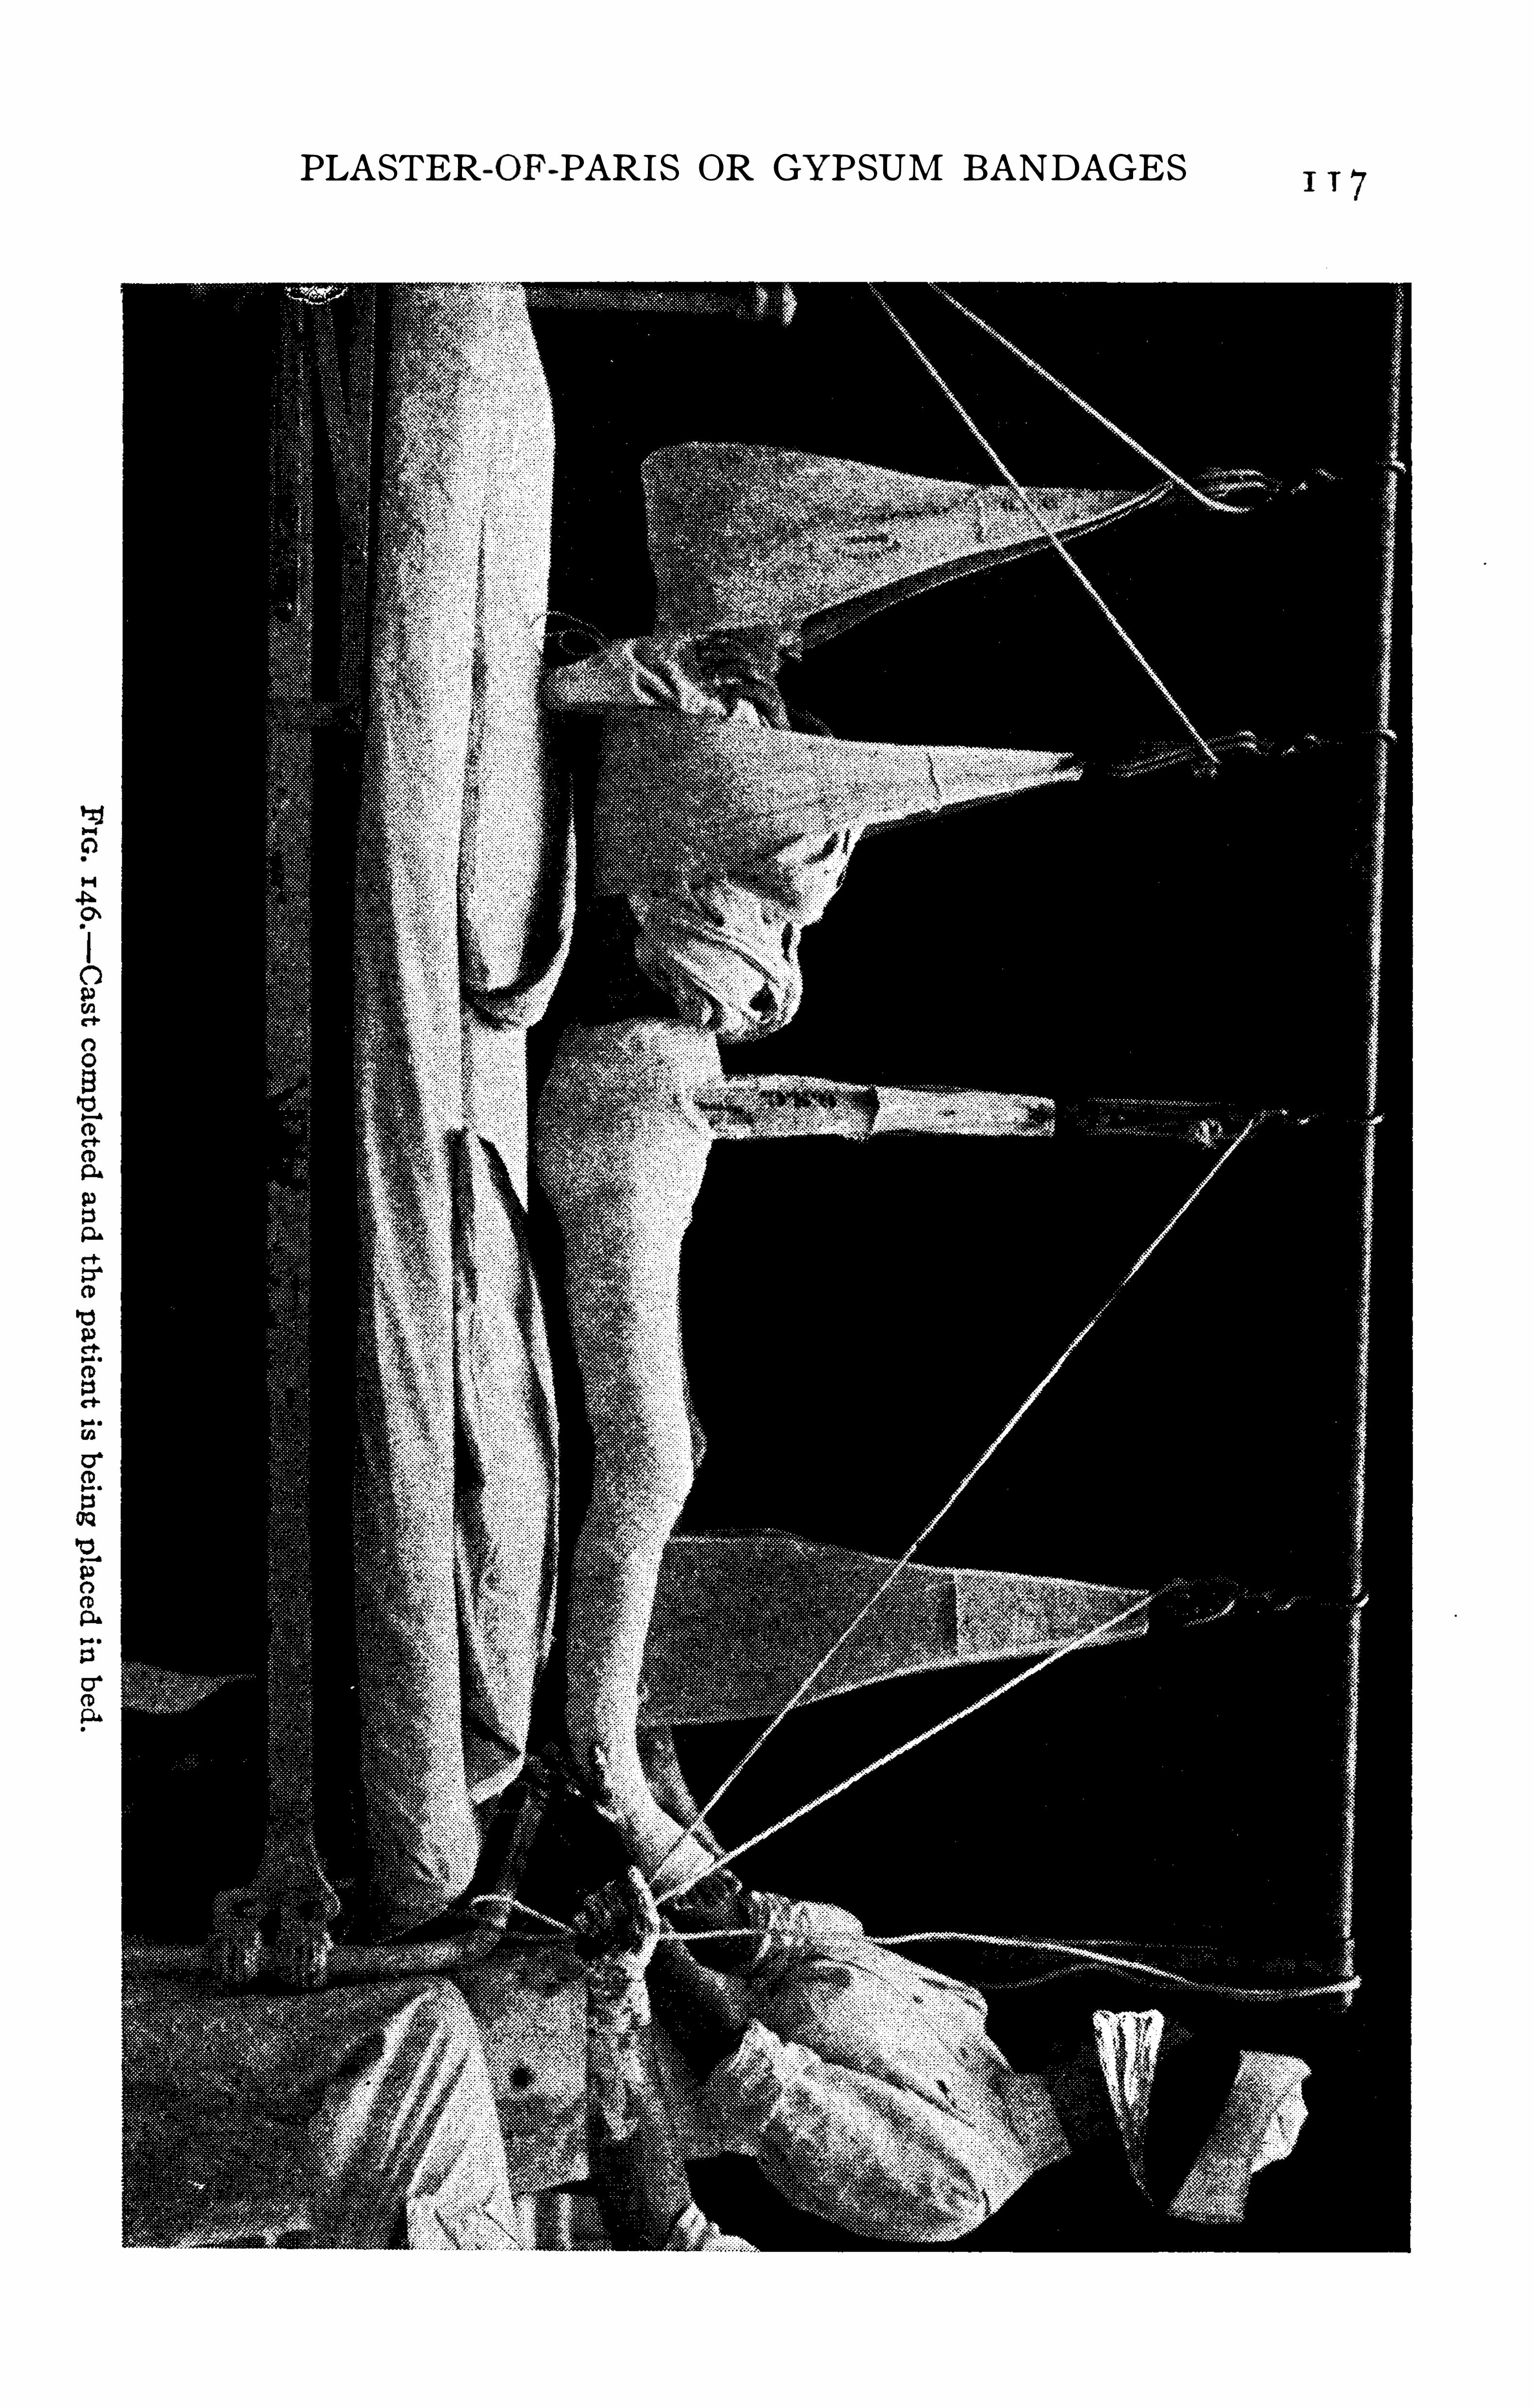
PLASTER-DE -PARIS OR GYPSUM BANDAGES
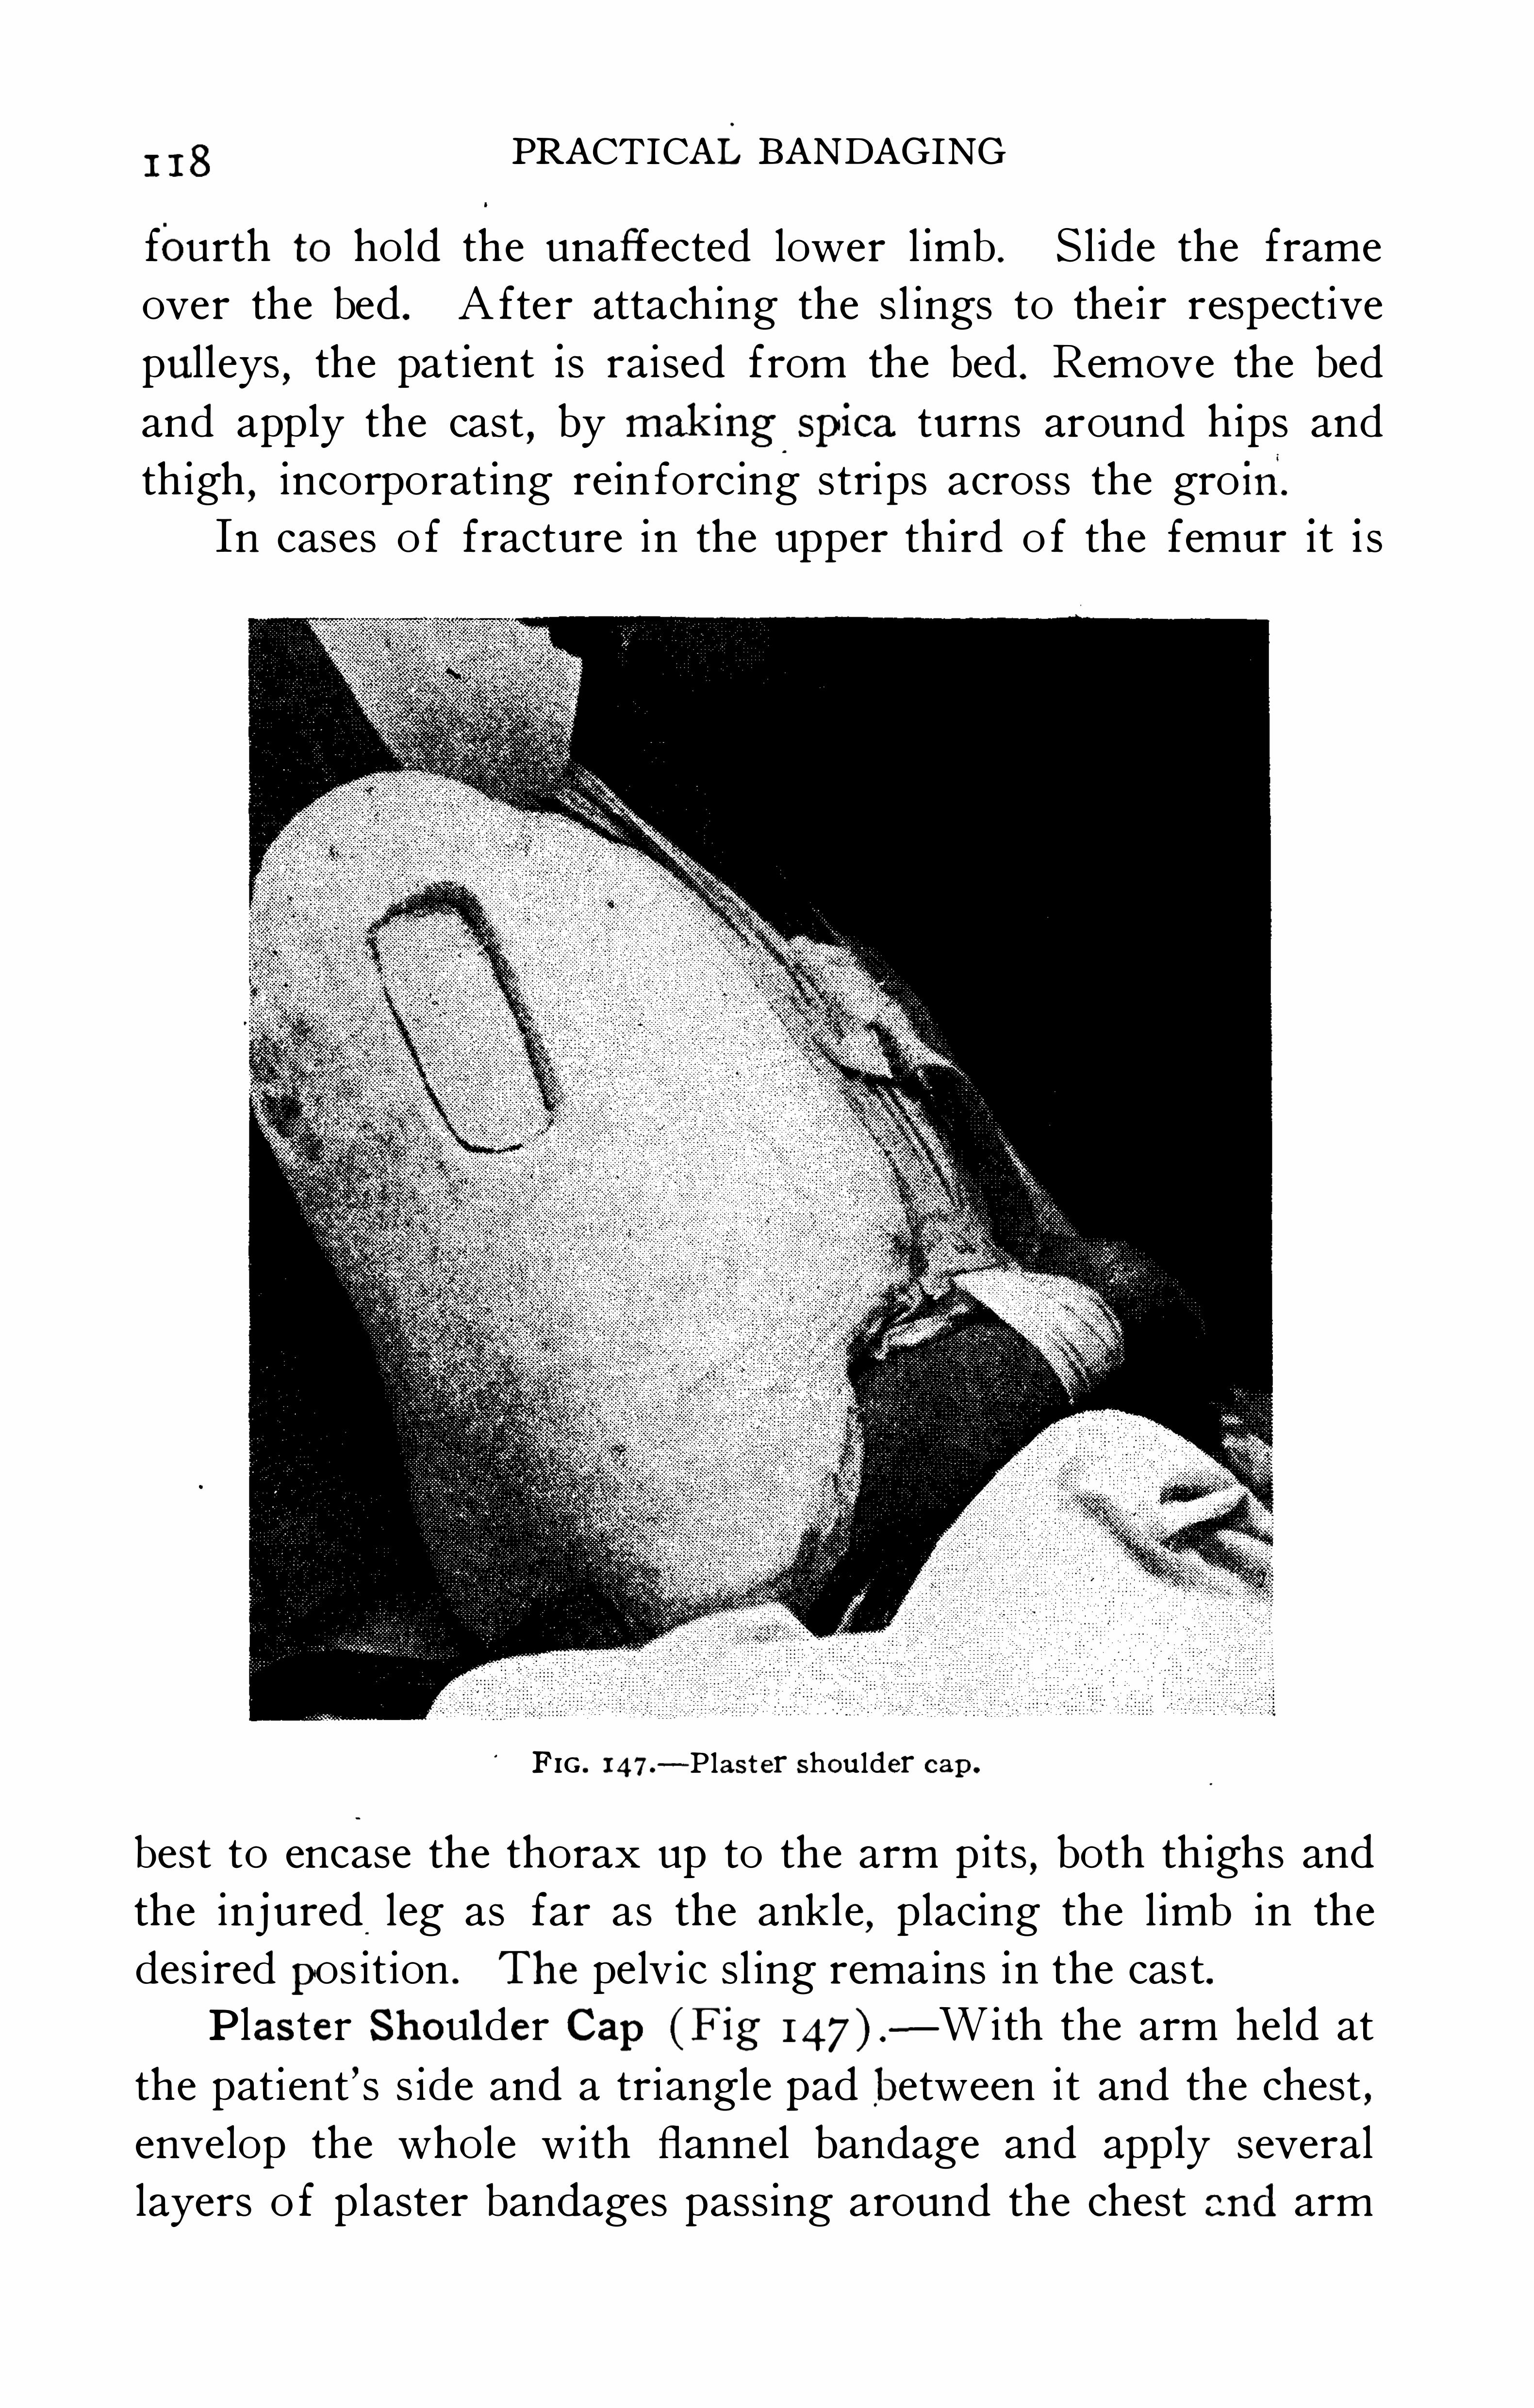
I 13 PRACTICALBANDAGING
fourth to hold the unaffected lower l imb . S l ide the frame
over the bed . A fte r attaching the s l ings to their respective
pul leys,the pat ient is raised from the bed . Remove the bed
and apply the cast,by making spica turns around hips and
thigh,incorporat ing rein forcing strips across the grom.
In cases o f fracture in the upper third o f the femur it i s
FIG . 147.-P last er shoulder cap.
best to encase the thorax up to the arm pits , both thighs and
the injured leg as far as the ank le,placing the l imb in the
des iredpos it ion . The pelv ic sl ing remains in the cas t.
Plas ter Shoul der Cap(F ig —With the arm held at
the patient’s s ide and a triangle pad between it and the chest ,envelop the whole with flannel bandage and apply several
layers o f plaster bandages passing around the chest and arm
I 2O PRACTICAL BANDAGING
gauze or crinol ine bandage,immerse i t in the starch fluid
unti l i t i s wel l saturated , then apply as you would a plaster
of-Pari s bandage . Probab ly a much neater way is to apply
the bandage dry and then paint it with the l iquid starch . As
many layers as desi red are appl ied,reen forced , i f necessary,
by strips o f metal,card-board
,etc .
Care must be taken in the application o f starch dress ing
that due al lowance be made for any shrinkage that may occur .
The two obj ections to the dressing are its lack o f strengt h
and the long time it takes to get dry and hard,24 to 36 hours
usually being necessary.
INDE "
Abdomen, 86
A chi l les tendon, 99A cromioclav icu lar j oint , 90A dhes ive d ress ings, 83—
101
laced , 92p laster , De La Cour’s , 83Janus , 83surgeon’
s , 8320
n
,83
strap, dumb -bel l , 92suspensory, I OOtaped (Montgomery strap ) , 92
Ambu latory casts , 109Ankle
, 95Anter ior figure
-of-8 of shou lderand chest , 34
pelv i c tr iang le, 76App l icat ion of p laster cast , Io3 -
Io6
A rm and forearm , quad rang lebandage or s l ing of
,62
Aur icu lo-occ ip ital tr iang le, 67
Back , 93Bandage , Barton , 47
of buttock , “ T ,
"
59of chin
,four- tai led , 60
c ircular , 6c ircu lar turns of
, 5crossed , of per ineum, 31
Dav is, 41 , 42
Desau lt , 38 -
41
of ear, T ,
"
58
of elast ic fabr ic , 8 1end ing, 6of eye ,
“ T , 57figure
- Of’ S, 19' 33) 34,
38, 42four- tai led
,of nose and uppe r
l ip, 60gauntlet , 12G ibson, 48
of groin,T
, 59Mayor’s , 74modificat ion of Mayor’s , 75monocle or crossed, of one eye ,
S3ob l ique fixat ion of, 5
of j aw , 49
Bandage, of occ iput , quadrangle ,
61
per ineal ( Cunn ingham ) , 56per ineal T ,
"
55requis ites of, 5of scalp , “ T
, 57spica, 17, 31
sp iral,6
reverse , 7starch , 1 19, 120Velpeau (mod ified ) , 42
—46
Du l les, 46
Bandages , demigauntlet , 12
e last ic , 2 , 80— 82
handkerchie f , 65how to rol l , 3mater ial compos ing , 1
method of holding , 4miscel laneous, 55—
79p laster-of-Par is, or gypsum ,
102r-l 2o
preparat ion of, 2
purposes of, Irol led by hand , 4by mach ine, 3
rol ler ,starting , 5tai led
, 55Barton bandage , 47
mod ified , 48Bavar ian sp l int, 1 12
B inder , pelv ic, 101Rose, 87
B inocu lar or crossed bandage o f
both eyes , 54B itemporal t r iangle
,66
Brachiocervical tr iangle ( a and
b ) , 71 , 72Brachioscapu lar t r iangle (a and
b ) , 73, 74B reast , suspensory of, 34, 36
B reasts,
8
figure-of—8 of (Kiwisch ) ,
3suspensory of both , 37t r iangle of, 71
Buck’s extens ion ,
st irrup extens ionstrap , 94
Bu ttock, T bandage of, 59
12 1
1 2 2
Cap, p laster shou lder, 1 18Cast
,p laster , app l icat ion of, 103
106method of remov ing, 106108
Casts , ambu latory , 109fenestrat ion of, 108
segmented or bracket, 1 10
Catheter straps, 92Chest , 96—
98
doub le “ T of, 59Chin
,four - tai led bandage of, 60
Cone,furuncle, 93
Cons iderat ions , general, 84—86, 102Cravats
, 79Cr inol ine or tar latan,
2
Crossed bandage of per ineum , 31
or b inocu lar , of both eyes,54
or monocle, of one eye,
53Cunn ingham,
per ineal bandage, 56
Dav is bandage , 41 , 42De La Cour’s adhes ive p laster , 83Demigauntlet bandages, 12
Desau lt, 38—41
Doub le ob l ique of j aw , 50
rol ler, recurrent of scalp w ith ,52
sp ica of groin ,29
“ T of chest , 59D ress ing, inguinal , 99
Sayre, shou lder, 88Unna
’s,8 1
,82
Dress ings , adhes ive, 83—101
Du l les (Ve lpeau mod ified ) , 46Dumb-bel l adhes ive strap
, 92
E ar, T bandage of, 58
E last ic bandage, 80—82
fab r ic bandage, 8 1webb ing, 8 1
E ye , monocle or crossed bandageof one, 53T bandage of
, 57Eyes
,both, b inocu lar or crossed
bandage of, 54Esmarch tube or tourniquet, 8 1
Fabr ic bandage, e last ic, 8 1Fenestrat ion of casts , 108
F igure-oi—8 of breasts (Kiwisch ) ,38
of head and neck, 47
INDE "
Hand tr iang le, 76
Handkerchie f bandages,65
Hammock, scrotal
,
" 6
Head and neck, figure-of-8 of, 47
square capof, 68—70
tr iangle of, 67
Inguinal dress ing, 99
tr iangle, 78
I s inglass p laster, 84
Laced adhes ive, 92Leg, 98
figure-of-8 of, 22
—25
short loop method , 22long loop method , 25method-3, 25
F igure-oi-8 of leg, 22-25short loop method , 22long loop method
,25
method-3, 25of shou lder and back
, posterior, 33
and chest,anter ior , 34
F inger , r ing, 10
sp iral of, 10
reverse of, 10, 1 1
F lanne l,2
Foot, spiral of, cover ing hee l , 19, 20tr iangle, 79
Four- tai led bandage of chin, 60
of,nose and upper l ip
, 60Fronto-occ ip ital tr iangle, 66Furuncle cone
, 93
Gauntlet bandage,12
Gauze,2
General cons iderat ions, 84
— 86,102
Gibson bandage, 48
Gluteal tr iangle, 78Groin, T " bandage of
, 59Gypsum, or p laster-of—Par i s bandages, 102
—120
Jacket, p laster, I 13— 1 15Janus adhes ive p laster , 83Jaw, doub le ob l ique of, 50
ob l ique of, 49
.Joint, acromioclav1cular, 90
Kiwisch,figure
-of-8 of breasts , 38Knee , 98
tr iangle, 79

1 24INDE"
Spiral of foot cover ing heel, 19,20
reverse of upper extremity, 14,15
of lower extremity, 17, 18,22
Sp l int, Bavar ian,1 12
Sp l ints , 93p laster
,1 10
—1 12
Square capof head , 68—70
scrotal , 78S tarch bandage , 1 19, 120
S tart ing bandages , 5S t irrup extens ion strap (Buck’
s
extens ion ) , 94Strap (Buck
’
s extens ion ) , 94dumb -be l l adhes ive , 92Montgomery, taped adhes ive,92
S traps , catheter , 92Surgeon’
s adhes ive p laster , 83Suspensory
,adhes ive , 100
of breast , 34, 36of both ’ b reasts , 37tr iangle, of b reasts, 71
Swathes , 635 65
Tai led bandages , 55Taped adhes ive (Montgomerystrap ) , 92T " bandage of buttock, 59
of ear, 58
of eye, 57of groin, 59of scalp , 57
Test icles , 100
Thorac icohumeral tr iangle, 71
Thoracicoscapular tr iang le, 70Tibiocervical s l ing, 78Tourn iquet , 79, 8 1T ransverse recurrent of scalp
, 52
T r iangle ,anter ior pe lv ic , 76
aur icu lo-occ ip ital,67
bitemporal , 66
Tr iang le, brachiocervical (a andb ) , 71 , 72
brachioscapular (a and b ) , 73,74foot
, 79f ronto-occip ital
, 66gluteal
, 78
hand, 76
of head, 67
inguinal , 78knee
, 79occ ip itof rontal
, 66poster ior pe lv ic
, 76scrotal , 78shou lder
, 75of shou lders , poster ior , 70suspensory of breasts
, 71thorac icohumeral
, 71thoracicoscapular, 70vert icomental , 66
Tube or tourn iquet, E smarch , 8 1
Turns , c ircu lar, 9, 16,17, 19, 2 1 ,
25, 28, 29, 34, 35, 37, 42 , 46Turns, figure-of-8, 9, 15, 16, 17
25, 36, 38, 47fundamental , 6hor izontal
, 31 , 35, 37, 43, 44ob l ique
, 35recurrent
, 9sp iral , 38, 39
or sp iral reverse, 19vert ical
, 43, 44
9
Umbi l icus, 87
Unna’s dress ing
, 81 , 82
Ve lpeau (modified ) , 42—46
Du l les, 46
Vertex , quad rangle bandage of,Vert icomental tr iangle, 66
Webb ing, e last ic, 81
ZO adhes ive p laster, 83


Tms B OOK IS DUE ON THE LAST DATESTAMZP E D B E LOW
INITIAL F INE OF 25 CE NTSB E ASSESSED FOR FA ILURE TO RETURNB OOK ON THE DATE DU E . THE P ENALTYINCREASE TO 5 0 C ENTS ON THE FOURTH
AND TO ON THE S EV ENTH DAY
DU E .
B IO LO GY LIB RARY
LD 21— 10m ( 4028 )