
penang hill gallery@edgecliff rooftop kiosk leasing application ...
Upload
khangminh22Category
view
4download
0
Loan Origination User Guide
Oracle Financial Services Lending and LeasingRelease 14.11.0.0.0
Part No. F40454-01
May 2021

Loan Origination User GuideMay 2021Oracle Financial Services Software Limited
Oracle Park
Off Western Express HighwayGoregaon (East)Mumbai, Maharashtra 400 063 IndiaWorldwide Inquiries:Phone: +91 22 6718 3000Fax:+91 22 6718 3001https://www.oracle.com/industries/financial-services/index.html
Copyright © 2007, 2021, Oracle and/or its affiliates. All rights reserved.
Oracle and Java are registered trademarks of Oracle and/or its affiliates. Other names may be trademarks of their respective owners.
U.S. GOVERNMENT END USERS: Oracle programs, including any operating system, integrated software, any programs installed on the hardware, and/or documentation, delivered to U.S. Government end users are "commercial computer software" pursuant to the applicable Federal Acquisition Regulation and agency-specific supplemental regulations. As such, use, duplication, disclosure, modification, and adaptation of the programs, including any operating system, integrated software, any programs installed on the hardware, and/or documentation, shall be subject to license terms and license restrictions applicable to the programs. No other rights are granted to the U.S. Government.
This software or hardware is developed for general use in a variety of information management applications. It is not developed or intended for use in any inherently dangerous applications, including applications that may create a risk of personal injury. If you use this software or hardware in dangerous applications, then you shall be responsible to take all appropriate failsafe, backup, redundancy, and other measures to ensure its safe use. Oracle Corporation and its affiliates disclaim any liability for any damages caused by use of this software or hardware in dangerous applications.
This software and related documentation are provided under a license agreement containing restrictions on use and disclosure and are protected by intellectual property laws. Except as expressly permitted in your license agreement or allowed by law, you may not use, copy, reproduce, translate, broadcast, modify, license, transmit, distribute, exhibit, perform, publish or display any part, in any form, or by any means. Reverse engineering, disassembly, or decompilation of this software, unless required by law for interoperability, is prohibited.The information contained herein is subject to change without notice and is not warranted to be error-free. If you find any errors, please report them to us in writing.
This software or hardware and documentation may provide access to or information on content, products and services from third parties. Oracle Corporation and its affiliates are not responsible for and expressly disclaim all warranties of any kind with respect to third-party content, products, and services. Oracle Corporation and its affiliates will not be responsible for any loss, costs, or damages incurred due to your access to or use of third-party content, products, or services.
Send Us Your Comments
Oracle Financial Services Lending and Leasing User Documentation
Oracle welcomes customers' comments and suggestions on the quality and usefulness of this document. Your feedback is important, and helps us to best meet your needs as a user of our products. For example:
Are the implementation steps correct and complete?
Did you understand the context of the procedures?
Did you find any errors in the information?
Does the structure of the information help you with your tasks?
Do you need different information or graphics? If so, where, and in what format?
Are the examples correct? Do you need more examples?
If you find any errors or have any other suggestions for improvement, then please tell us your name, the name of the company who has licensed our products, the title and part number of the documentation and the chapter, section, and page number (if available).
Note: Before sending us your comments, you might like to check that you have the latest version of the document and if any concerns are already addressed. To do this, access the Oracle Documentation available at www.docs.oracle.com which contains the most current Documentation Library plus all documents revised or released recently.
Send your comments using the electronic mail address: [email protected]
Please give your name, address, electronic mail address, and telephone number (optional).
If you need assistance with Oracle software, then please contact your support representative or Oracle Support Services.
If you require training or instruction in using Oracle software, then please contact your Oracle local office and inquire about our Oracle University offerings. A list of Oracle offices is available on our Web site at www.oracle.com.
Table of Contents
1. Navigation ................................................................................................ 1-11.1 Audience.................................................................................................................. 1-1
1.2 Conventions Used ................................................................................................... 1-1
1.3 Logging In................................................................................................................ 1-1
1.4 Template and Navigation......................................................................................... 1-2
1.4.1 Home Screen.............................................................................................. 1-2
1.4.2 Screens .................................................................................................... 1-11
1.5 Common Operations ............................................................................................. 1-12
1.5.1 Basic Operations ...................................................................................... 1-12
1.5.2 Basic Actions ............................................................................................ 1-13
1.5.3 Personalization Options............................................................................ 1-14
1.5.4 De-supported Special characters ............................................................. 1-17
1.5.5 Skip Zip Code Validation .......................................................................... 1-17
1.5.6 Export data to Excel ................................................................................. 1-18
1.6 Keyboard Compatibility.......................................................................................... 1-19
1.6.1 Keyboard Compatibility............................................................................. 1-19
1.7 Tool Tips................................................................................................................ 1-20
1.8 Accessibility ........................................................................................................... 1-20
1.8.1 Understanding Accessibility...................................................................... 1-20
1.8.2 Application Accessibility Preferences ....................................................... 1-20
1.8.3 Documentation Accessibility Preferences ................................................ 1-20
2. Search Function ....................................................................................... 2-12.1 Search Criteria......................................................................................................... 2-1
2.2 Searching for an Application.................................................................................... 2-6
2.2.1 Search/Task tab ......................................................................................... 2-6
2.2.2 Quick Search section.................................................................................. 2-8
2.3 Searching for an Account and Customer............................................................... 2-12
2.3.1 Quick Search section................................................................................ 2-14
2.3.2 Search Using Customer Details ............................................................... 2-15
2.3.3 Search Using Account Details .................................................................. 2-17
2.3.4 Search Using Business Details ................................................................ 2-19
3. Dashboards .............................................................................................. 3-13.1 Introduction.............................................................................................................. 3-1
3.2 Dashboards ............................................................................................................. 3-1
3.3 User Productivity ..................................................................................................... 3-2
3.3.1 Viewing Underwriting/Funding tasks .......................................................... 3-2
3.4 System Monitor........................................................................................................ 3-4
3.4.1 Monitoring Batch Jobs ................................................................................ 3-4
3.4.2 Monitoring Jobs .......................................................................................... 3-7
3.4.3 Monitoring Services .................................................................................... 3-9
3.4.4 Database Server Log Files ....................................................................... 3-10
3.4.5 Monitoring Users ...................................................................................... 3-11
3.4.6 Monitoring JMS Queues ........................................................................... 3-12
3.4.7 Monitoring Events..................................................................................... 3-15
3.5 Producer Analysis.................................................................................................. 3-17
3.6 Process Files ......................................................................................................... 3-19

3.6.1 Incoming Process File .............................................................................. 3-20
3.6.2 Proration of Future Account Dues ............................................................ 3-21
3.6.3 Outgoing Process File .............................................................................. 3-22
4. Sales Lead ................................................................................................ 4-14.1 Introduction.............................................................................................................. 4-1
4.2 Lead Entry ............................................................................................................... 4-1
4.2.1 Telecoms Sub Tab ..................................................................................... 4-3
4.2.2 Comments sub tab ..................................................................................... 4-3
4.2.3 Documents sub tab..................................................................................... 4-4
4.2.4 Requests sub tab........................................................................................ 4-4
4.3 Follow-Up tab .......................................................................................................... 4-4
4.4 Maintenance tab ...................................................................................................... 4-6
5. Simple Application Entry ........................................................................ 5-15.1 Introduction.............................................................................................................. 5-1
5.2 Entering a Credit Application ................................................................................... 5-1
5.2.1 Pre-qualifying an Application ...................................................................... 5-3
5.3 Applicants Tab......................................................................................................... 5-3
5.4 Business Tab........................................................................................................... 5-4
5.5 Request Tab ............................................................................................................ 5-5
5.6 Collateral Tab .......................................................................................................... 5-6
5.7 Comments Tab ........................................................................................................ 5-8
5.8 Tracking Tab............................................................................................................ 5-9
5.9 Verification Tab...................................................................................................... 5-10
5.9.1 Application Entry using Fax-In.................................................................. 5-11
5.10 Review Request .................................................................................................... 5-12
6. Application Entry ..................................................................................... 6-16.1 Introduction.............................................................................................................. 6-1
6.2 Entering a Credit Application ................................................................................... 6-1
6.3 Applicants Tab......................................................................................................... 6-3
6.4 Business Applicants Tab ......................................................................................... 6-4
6.5 Request Tab ............................................................................................................ 6-5
6.6 Master Account tab.................................................................................................. 6-6
6.7 Bureau Tab.............................................................................................................. 6-7
6.8 Collateral Tab .......................................................................................................... 6-7
6.9 Comments Tab ........................................................................................................ 6-9
6.10 Tracking Tab............................................................................................................ 6-9
6.11 Document Tab ....................................................................................................... 6-10
6.11.1 Document Sub Tab................................................................................... 6-10
6.12 Verification Tab...................................................................................................... 6-11
6.13 Tools tab................................................................................................................ 6-11
6.13.1 Application Entry using Fax-In.................................................................. 6-12
6.14 Review Request .................................................................................................... 6-12
7. Underwriting ............................................................................................. 7-17.1 Introduction.............................................................................................................. 7-1
7.2 Underwriting Screen - an overview.......................................................................... 7-1
7.3 Loading an Application on the Underwriting screen ................................................ 7-2
7.3.1 Applications ................................................................................................ 7-2
7.3.2 Changing the Status of the Application ...................................................... 7-4
7.3.3 Rehashing an Application........................................................................... 7-5

7.3.4 Aging an Application................................................................................... 7-5
7.4 Summary Tab .......................................................................................................... 7-5
7.5 Applicant Tab........................................................................................................... 7-7
7.5.1 Address Sub Tab...................................................................................... 7-11
7.5.2 Employments Sub Tab ............................................................................. 7-14
7.5.3 Telecoms Sub Tab ................................................................................... 7-16
7.5.4 Summary Sub Tab.................................................................................... 7-17
7.5.5 Credit Score Sub Tab ............................................................................... 7-23
7.5.6 Duplicate Applicant Sub Tab .................................................................... 7-23
7.5.7 Existing Account Sub Tab ........................................................................ 7-24
7.5.8 Tracking Attributes Sub Tab ..................................................................... 7-25
7.5.9 Customer Search Tab .............................................................................. 7-26
7.6 Business Tab......................................................................................................... 7-26
7.6.1 Address Sub Tab...................................................................................... 7-28
7.6.2 Telecoms Sub Tab ................................................................................... 7-29
7.6.3 Financials Sub Tab................................................................................... 7-30
7.6.4 Liabilities Sub Tab .................................................................................... 7-30
7.6.5 Partners Sub Tab ..................................................................................... 7-31
7.6.6 Affiliates Sub Tab ..................................................................................... 7-32
7.6.7 Other Details Sub Tab .............................................................................. 7-33
7.7 Request Tab .......................................................................................................... 7-36
7.7.1 Itemization Sub Tab.................................................................................. 7-37
7.7.2 Trade-In Sub Tab ..................................................................................... 7-38
7.7.3 Subvention Sub Tab ................................................................................. 7-39
7.8 Decision Tab.......................................................................................................... 7-39
7.8.1 System Recommendation ........................................................................ 7-42
7.8.2 Stipulations Sub Tab ................................................................................ 7-43
7.8.3 Itemization Sub Tab.................................................................................. 7-45
7.8.4 Trade-In Sub Tab ..................................................................................... 7-45
7.8.5 Rate Schedule Sub Tab ........................................................................... 7-46
7.8.6 Subvention Sub Tab ................................................................................. 7-47
7.8.7 Compensation Sub Tab............................................................................ 7-48
7.8.8 Multiple Offers sub tab.............................................................................. 7-49
7.9 Customer Credit Limit tab...................................................................................... 7-50
7.10 Master Account tab................................................................................................ 7-53
7.11 Bureau Tab............................................................................................................ 7-54
7.11.1 Printing the Credit Bureau Data as a Text/PDF Report ............................ 7-60
7.11.2 Requesting a Credit Bureau Report Manually .......................................... 7-60
7.12 Collateral Tab ........................................................................................................ 7-61
7.12.1 Valuations Sub Tab .................................................................................. 7-69
7.12.2 Tracking Sub Tab ..................................................................................... 7-70
7.12.3 Vacation Ownership tab ........................................................................... 7-71
7.12.4 Seller Tab ................................................................................................. 7-73
7.13 Comments Tab ...................................................................................................... 7-75
7.14 Tracking Tab.......................................................................................................... 7-76
7.14.1 Field Investigation Sub Tab ...................................................................... 7-77
7.15 Document Tab ....................................................................................................... 7-78
7.15.1 Checklist Sub Tab .................................................................................... 7-80
7.16 Verification Tab...................................................................................................... 7-81
7.16.1 Edit Sub Tab............................................................................................. 7-81

7.16.2 Audits Sub Tab ......................................................................................... 7-82
7.16.3 History Sub Tab........................................................................................ 7-82
7.17 Correspondence Tab............................................................................................. 7-83
7.17.1 Correspondence Sub Tab ........................................................................ 7-83
7.17.2 Letters Sub Tab ........................................................................................ 7-86
7.18 Tools Tab............................................................................................................... 7-88
7.19 Review Request .................................................................................................... 7-88
7.19.1 Filter and View Review Requests............................................................. 7-89
7.19.2 Create and Send Review Request ........................................................... 7-92
7.19.3 Reviewing a Request................................................................................ 7-94
7.19.4 Responding to Review Request ............................................................... 7-94
7.19.5 Reassign Review Request ....................................................................... 7-95
7.19.6 E-mailing Review Request ....................................................................... 7-96
7.19.7 Closing Review Request .......................................................................... 7-97
7.19.8 Complete Review Request ....................................................................... 7-97
8. Funding ..................................................................................................... 8-18.1 Introduction.............................................................................................................. 8-1
8.2 Funding (an overview) ............................................................................................. 8-1
8.3 Funding Screen’s Master Screen ............................................................................ 8-2
8.4 Summary Tab .......................................................................................................... 8-4
8.5 Applicants Tab......................................................................................................... 8-4
8.6 Business tab ............................................................................................................ 8-5
8.7 Request Tab ............................................................................................................ 8-6
8.8 Decision Tab............................................................................................................ 8-6
8.9 Customer Credit Limit tab........................................................................................ 8-7
8.10 Master Account tab.................................................................................................. 8-8
8.11 Bureau Tab.............................................................................................................. 8-8
8.12 Contract Tab............................................................................................................ 8-9
8.12.1 Contract (2) Sub Tab ................................................................................ 8-20
8.12.2 Repayment Sub Tab................................................................................. 8-23
8.12.3 Itemizations Sub Tab................................................................................ 8-25
8.12.4 Trade-In Sub Tab ..................................................................................... 8-27
8.12.5 Subvention Sub Tab ................................................................................. 8-28
8.12.6 Insurance Sub Tab ................................................................................... 8-29
8.12.7 ESC Sub Tab............................................................................................ 8-30
8.12.8 Escrow Sub Tab ....................................................................................... 8-32
8.12.9 Compensation Sub Tab............................................................................ 8-33
8.12.10 Proceeds Sub Tab................................................................................... 8-34
8.12.11 Disbursement Sub Tab............................................................................ 8-35
8.12.12 Fee Sub Tab............................................................................................ 8-37
8.12.13 ACH Sub Tab .......................................................................................... 8-37
8.12.14 Coupon Sub Tab ..................................................................................... 8-39
8.12.15 References Sub Tab................................................................................ 8-39
8.12.16 Real Estate Sub Tab ............................................................................... 8-41
8.12.17 PDC Sub Tab .......................................................................................... 8-41
8.13 Collateral tab ......................................................................................................... 8-43
8.14 Comments Tab ...................................................................................................... 8-45
8.15 Tracking Tab.......................................................................................................... 8-46
8.16 Document tab ........................................................................................................ 8-46
8.17 Verification Tab...................................................................................................... 8-47

8.18 Correspondence Tab............................................................................................. 8-48
8.19 Escrow Analysis Tab ............................................................................................. 8-49
8.20 Tool Tab ................................................................................................................ 8-52
8.21 Review Request .................................................................................................... 8-52
9. Tools ......................................................................................................... 9-19.1 Loan Calculator ....................................................................................................... 9-1
9.1.1 Parameters ................................................................................................. 9-1
9.1.2 Repayment Options.................................................................................... 9-6
9.1.3 Amortization Schedule................................................................................ 9-8
9.1.4 Printing a Quote.......................................................................................... 9-8
9.1.5 Copy Calculation to Contract or Decision tab............................................. 9-9
9.2 Vehicle Evaluator..................................................................................................... 9-9
9.2.1 Attributes Tab ........................................................................................... 9-11
10. Application Retrieval ............................................................................. 10-110.1 Introduction............................................................................................................ 10-1
10.2 Archiving / Purging ................................................................................................ 10-1
10.3 Retrieving an Archived Application........................................................................ 10-2
11. Scenario Analysis .................................................................................. 11-111.1 Introduction............................................................................................................ 11-1
11.1.1 View an Existing Scenario Analysis.......................................................... 11-1
11.1.2 Generating Scenario Analysis .................................................................. 11-2
11.1.3 Auto Suggest Pricing for the Scenario Analysis ....................................... 11-3
11.1.4 Creating an Amortized Schedule for the Scenario Analysis ..................... 11-4
11.1.5 Creating an Application from the Scenario Analysis................................. 11-4
11.1.6 Generating a quote from the scenario analysis ........................................ 11-4
11.2 Viewing Information from Scenario Analysis ......................................................... 11-4
11.2.1 Subvention Sub Tab ................................................................................. 11-5
11.2.2 Compensation Sub Tab............................................................................ 11-5
12. Application Documents ......................................................................... 12-112.1 Introduction............................................................................................................ 12-1
12.2 Application Document screen................................................................................ 12-1
12.2.1 Attaching a Document to an Application from a server ............................ 12-2
12.2.2 Attaching a Document to an Application from a Client Machine............... 12-3
12.2.3 Copying a Document ................................................................................ 12-4
12.2.4 Moving a Document.................................................................................. 12-4
12.2.5 Viewing a Document Attached to an Application...................................... 12-5
12.3 Document Tracking section ................................................................................... 12-6
12.3.1 Locating an Application Document ........................................................... 12-6
12.3.2 Viewing a Document Attached to an Application...................................... 12-6
13. Image Maintenance ................................................................................ 13-114. Oracle Financial Services Lending and Leasing Reports .................. 14-1
14.1 Number of Credit Applications Entered by User.................................................... 14-1
14.2 Collateral Tracking Log.......................................................................................... 14-2
14.3 Credit Bureau Report............................................................................................. 14-3
14.4 Account Payable (Origination)............................................................................... 14-3
14.5 Number of Credit Application Images by Status.................................................... 14-4
14.6 Dealer Reserve Report.......................................................................................... 14-5
14.7 Batch Job Report................................................................................................... 14-5
14.8 User Report and Access by Responsibility............................................................ 14-6
14.9 Transactional Access by Responsibility ................................................................ 14-6
14.10 Front End Access by Responsibility ...................................................................... 14-7
14.11 Underwriting Status by Month and Producer Loan................................................ 14-8
14.12 Underwriting Status By Month and Underwriter Loan ........................................... 14-8
14.13 Underwriting Status By Month Loan ...................................................................... 14-9
14.14 Funded Contracts Loan ......................................................................................... 14-9
14.15 Pre Funding Contracts Loan................................................................................ 14-10
15. Producer ................................................................................................. 15-115.1 Producer Details tab .............................................................................................. 15-2
15.1.1 Producer Details tab Extensibility ............................................................. 15-2
15.1.2 Payment Details ....................................................................................... 15-6
15.1.3 Compensation Plan .................................................................................. 15-8
15.1.4 Subvention................................................................................................ 15-8
15.1.5 Transactions ............................................................................................. 15-9
15.1.6 Holdback/Loss Reserve............................................................................ 15-9
15.1.7 Tracking Attributes.................................................................................... 15-9
15.1.8 Contacts ................................................................................................. 15-10
15.1.9 Comments .............................................................................................. 15-11
15.1.10 Summary ............................................................................................... 15-11
15.1.11 Title Status Summary ............................................................................ 15-11
15.2 Search Tab .......................................................................................................... 15-12
16. Vendors .................................................................................................. 16-116.1 Vendors tab ........................................................................................................... 16-1
16.1.1 Payment Details ....................................................................................... 16-3
16.1.2 Vendor Groups ......................................................................................... 16-5
16.1.3 Tracking Attributes.................................................................................... 16-5
16.1.4 Comments ................................................................................................ 16-6
16.2 Assignment Allocation ........................................................................................... 16-6
16.2.1 Vendor Assignment Criteria...................................................................... 16-6
16.2.2 Vendor Assignment Allocation.................................................................. 16-7
16.3 Work Orders Tab ................................................................................................... 16-8
16.3.1 Services.................................................................................................. 16-11
16.3.2 Work Order History................................................................................. 16-11
16.3.3 Tracking Attributes.................................................................................. 16-12
16.4 Follow-up Tab...................................................................................................... 16-12
16.4.1 Assigned Services .................................................................................. 16-14
16.5 Invoices Tab ........................................................................................................ 16-14
16.5.1 Auto Validate Invoice.............................................................................. 16-16
16.5.2 Invoice Details sub tab ........................................................................... 16-16
16.5.3 Accept/Reject Invoice details.................................................................. 16-17
16.5.4 Payment Schedules sub tab................................................................... 16-18
16.5.5 Related Invoice/Work Order Details sub tab .......................................... 16-18
16.5.6 Tracking Attributes sub tab..................................................................... 16-19
16.5.7 Business Rules....................................................................................... 16-19
16.6 Search tab ........................................................................................................... 16-21
Appendix A: Rounding Amounts and Rate Attributes..................................A-1Appendix B: Payment Amount Conversions................................................B-1Appendix C: Generic Recovery Interface (GRI).............................................C-1
C.1 Introduction...................................................................................................................C-1

C.1.1 Pre-requisites ................................................................................................C-1
C.2 Create Case .................................................................................................................C-2
C.3 Update Case ................................................................................................................C-3
C.4 Case Comments...........................................................................................................C-5
C.5 Hold Case.....................................................................................................................C-6
C.6 Reopen Case ...............................................................................................................C-7
C.7 Reassign Case .............................................................................................................C-9
C.8 Close Case.................................................................................................................C-10
C.9 Case Updates Received via FireHose WebService ...................................................C-12
C.10 Case Repossession .................................................................................................C-13
C.11 Case Invoice.............................................................................................................C-14
1. Navigation
This document provides an overview of the basic template, navigation, common operations that can be performed, and keyboard short cuts available in Oracle Financial Services Lending and Leasing. Since this section details the general options available in the User Interface, some or all the parts of this section are applicable to you as per access provisions & licensing.
The document is organized into below topics:
Logging In
Template and Navigation
Common Operations
Hot Keys
Note
The application can be best viewed in 1280 x 1024 screen resolution.
1.1 Audience
This document is intended to all Prospective Users who would be working on the application.
1.2 Conventions Used
1.3 Logging In
The pre-requisites to log into the system are a valid user ID and a password, defined by the system administrator in Administration > User screen.
You can login to the system using a valid user ID and a password defined by the system administrator, in Administration > User screen. A User ID is disabled automatically by the system if it is inactive for a specified number of days.
Term Refers to
The system/application Oracle Financial Services Lending and Leasing
Mnemonic The underlined character of the tab or button
1-1
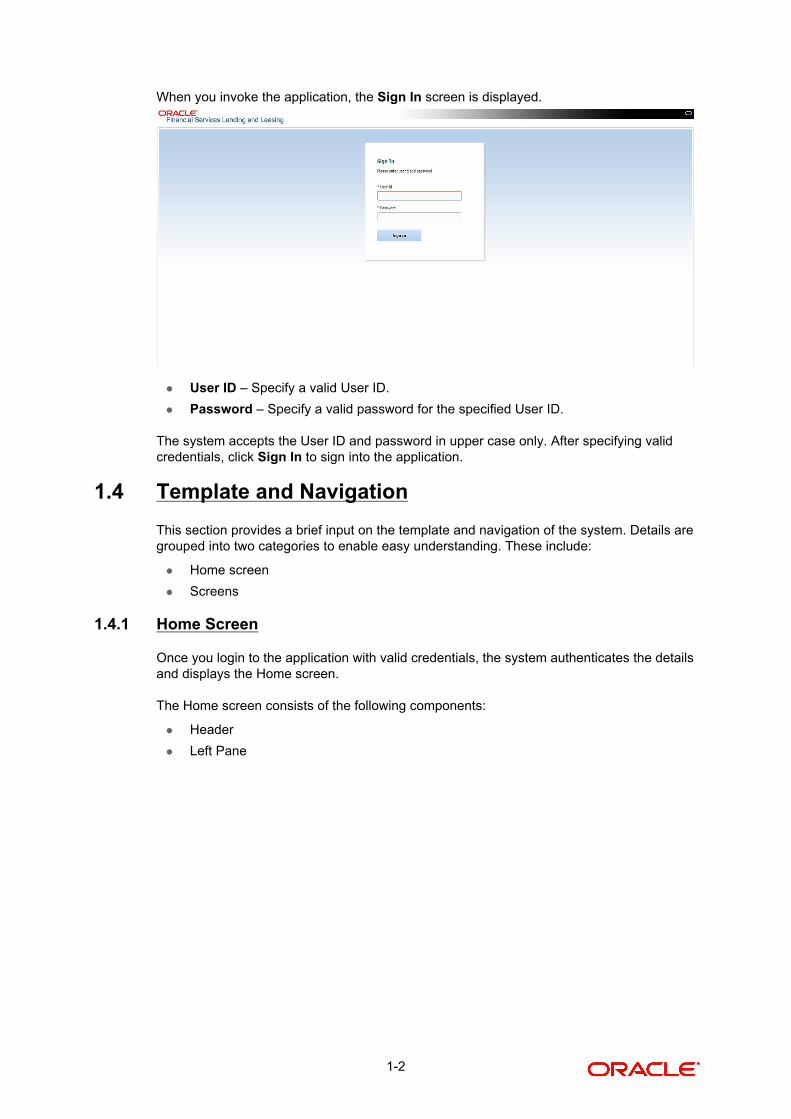
When you invoke the application, the Sign In screen is displayed.
User ID – Specify a valid User ID.
Password – Specify a valid password for the specified User ID.
The system accepts the User ID and password in upper case only. After specifying valid credentials, click Sign In to sign into the application.
1.4 Template and Navigation
This section provides a brief input on the template and navigation of the system. Details are grouped into two categories to enable easy understanding. These include:
Home screen
Screens
1.4.1 Home Screen
Once you login to the application with valid credentials, the system authenticates the details and displays the Home screen.
The Home screen consists of the following components:
Header
Left Pane
1-2

Right Pane/Work Area
You can view the application version details and copyright information by clicking About link at the right bottom corner of the screen.
Header
In the Header, system displays the following:
User ID that you have currently logged/Signed in. Click the adjoining drop-down arrow, the system displays the following options:
– Change Password – Click to change the current password.
1-3
Specify the current password in the Current Password field and a valid password, you wish to maintain as a new password, in the New Password field. Re-enter the password in Confirm Password field and click Submit to change the password.
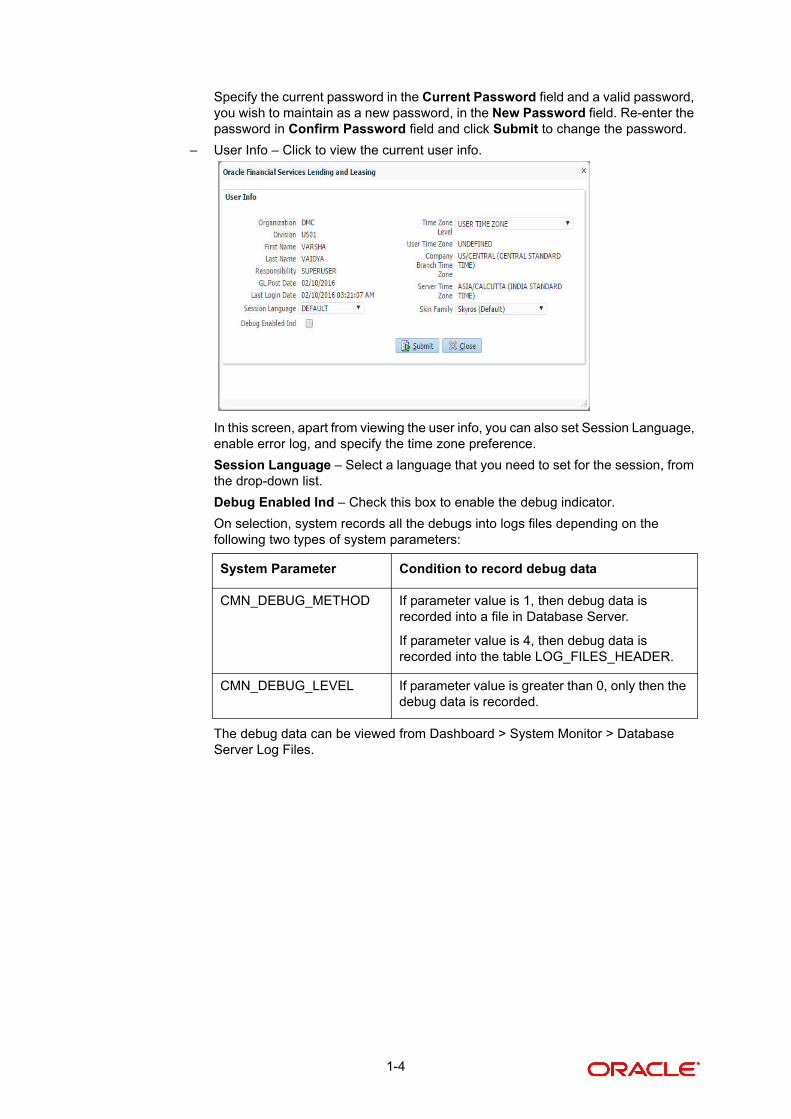
– User Info – Click to view the current user info.
In this screen, apart from viewing the user info, you can also set Session Language, enable error log, and specify the time zone preference.
Session Language – Select a language that you need to set for the session, from the drop-down list.
Debug Enabled Ind – Check this box to enable the debug indicator.
On selection, system records all the debugs into logs files depending on the following two types of system parameters:
The debug data can be viewed from Dashboard > System Monitor > Database Server Log Files.
System Parameter Condition to record debug data
CMN_DEBUG_METHOD If parameter value is 1, then debug data is recorded into a file in Database Server.
If parameter value is 4, then debug data is recorded into the table LOG_FILES_HEADER.
CMN_DEBUG_LEVEL If parameter value is greater than 0, only then the debug data is recorded.
1-4

You can click on List Files button to view the list of logged files.
Click on Show File button to view the selected file contents in the ‘File Content’ section. You can also click Download File button to extract a copy of debug details.
Time Zone Level - Select the time zone preference as User/Company Branch/Application Server Time Zone from the adjoining options list.
For more details on time zone selection, refer to Time Zone Preference section of this user manual.
Click Submit to save the changes or Close to close the screen without changes.
Accessibility – Click the link to view accessibility features of the system.
Refer accessibility document for further details.
NextGenUI - This is Next Generation User Interface option which is an enhanced interface provided in OFSLL using the Oracle JavaScript Extension Toolkit (Oracle JET) frame work. This is an additional interface supported from OFSLL to the existing system and both intended to coexist in the system till further updates.
This option is enabled only if the corresponding system parameter is enabled in the base system as configured by your system administrator. For more information, refer to ‘Appendix - Oracle JET Interface’ section in Servicing guide.
Sign Out – Click the link to sign off from the application. You can also click on icon to sign off from the application.
1-5

Left Window
In the left pane, system lists and provides drop-down links for various modules available in the product. Click to expand the Module Master Tabs and to collapse them.
To open a screen, navigate to Module Master Tab to which the screen belongs, expand the tabs, and click the screen link you wish to open.
Menu Search in Left Window
In the left window you can make use of the search option to directly search and open the screen that you are familiar with, and avoid multiple steps of navigation from the LHS menu.
The Search box in the LHS facilitates for an intuitive search of required screens in Oracle Financial Services Lending and Leasing. For example, on typing the first letter of the screen, the search box displays a list of all available screens starting with the letter entered in alphabetical order. You can click on the required screen and press ‘Enter’. The screen is displayed in the main window/work area.
When there are multiple matches with same screen name, you can filter the results through the module from which the screen is accessed which is indicated in angular brackets. For example typing 'VEN' displays the following options for selection - Vendors(Collections), Vendors(Origination), Vendors(Servicing), Vendors(Setup System). For subsequent search, you need to clear the data in the search field.
1-6

Right Window
The Right Window can also be termed as work area. When you click the screen link on left pane, system displays the corresponding screen in the right pane.
You can open a maximum of 15 screens at a go. Once the maximum limit is reached, the system displays an error message.
Each active screen is displayed as a tab at the top of right pane, across its width. To view a screen, click the screen tab. You can identify the active screen with its white background. Also, operation on any of the screen will not affect the data in other screens.
You can also open multiple Applications at the same time as separate tabs in the right window, provided your system administrator has enabled the option 'Mac_Multi_tab_Ind' = 'Y’ in MENU_ACCESS table.
Having this option enabled you can view and update a maximum of 15 Applications in parallel tabs and Oracle Financial Services Lending and Leasing renders dynamic data across all the opened tabs.
However, this option is restricted only to the following screens in Origination Module Master Tab. In the Left Menu of Origination Module Master Tab, you can open multiple applications by clicking on the following links. Each successive click, opens a new Origination tab.
Simple Application Entry
Application Entry
Underwriting
1-7
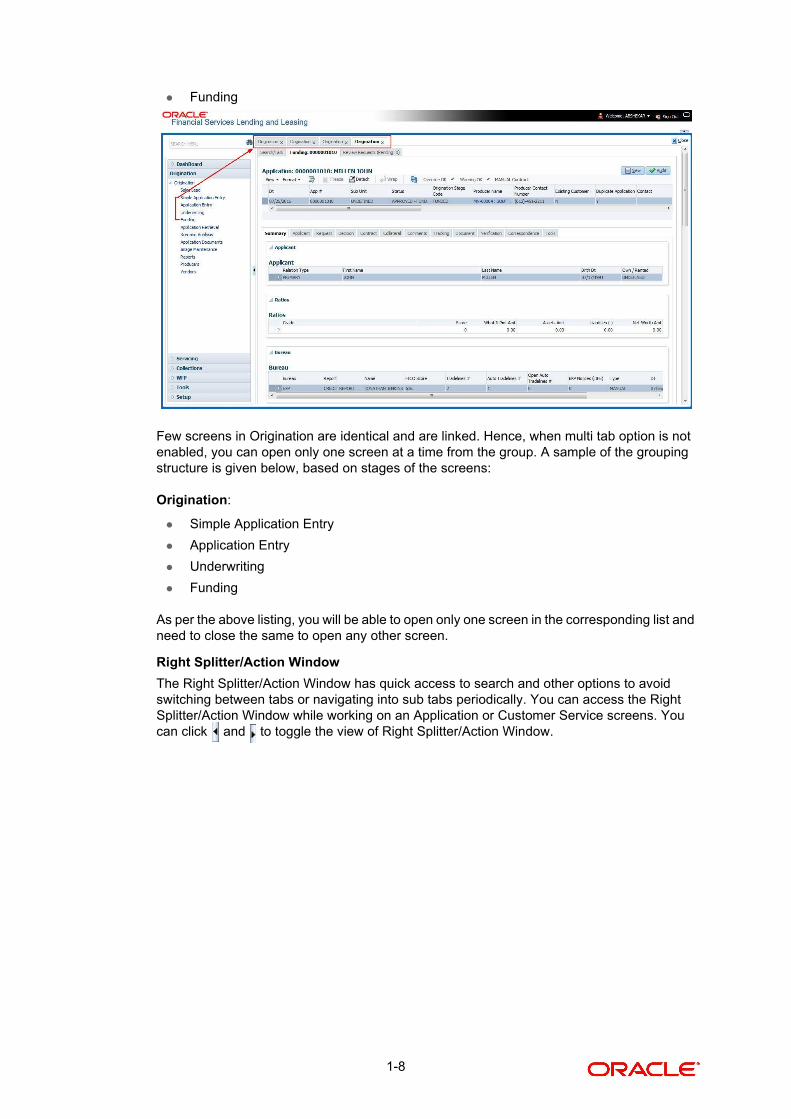
Funding
Few screens in Origination are identical and are linked. Hence, when multi tab option is not enabled, you can open only one screen at a time from the group. A sample of the grouping structure is given below, based on stages of the screens:
Origination:
Simple Application Entry
Application Entry
Underwriting
Funding
As per the above listing, you will be able to open only one screen in the corresponding list and need to close the same to open any other screen.
Right Splitter/Action Window
The Right Splitter/Action Window has quick access to search and other options to avoid switching between tabs or navigating into sub tabs periodically. You can access the Right Splitter/Action Window while working on an Application or Customer Service screens. You can click and to toggle the view of Right Splitter/Action Window.
1-8

Origination Screens
In Origination > Application screens, you can use the Right Splitter/Action Window to do the following:
Use Quick Search to search for an application based on application number, last 4 digits of SSN (SSN of the primary applicant) or identification number. If multiple applications or accounts are found during ‘Identification #’ search, the system displays an error message as “Multiple Matches found for the Identification #, Please use normal Search”.
Summary section displays critical information that has to be referred repeatedly during origination like – DTI, PTI, Book Value, Grade, FICO Score, Approved Advance, Rate and Term.
Use Change Status section to change the application status to next level. If the application edit status is restricted, then the ‘Change Status’ will be read-only.
Use Add Comment section to post an alert or comment during Underwriting and Funding stages.
For detailed information on the above options, refer to respective sections in the document.
Servicing and Collection Screens
In Servicing and Collection > Customer Service screens, you can use the Right Splitter/Action Window to do the following:
1-9

Use Quick Search to search for an account based on account number, or customer Id, or last 4 digits of SSN (SSN of the primary applicant) or identification number. If multiple applications or accounts are found during ‘Identification #’ search, the system displays an error message as “Multiple Matches found for the Identification #, Please use normal Search”. You can also select the Queue Condition and Auto Run options during search. Clicking ‘Next Account’ button opens the subsequent account listed in search and clicking ‘Filtered Account’ opens the subsequent account fetched during a queue search and listed in Queue Assignment section.
Use Add Comment section to post an alert or comment based on Type and Sub Type.
Use Add Call Activity section to post all types of call activities including promise to pay, account conditions and so on, irrespective of the screen you are working on. This is similar to the option available in ‘Call Activities sub tab’ under Customer Service tab.
For detailed information on the above options, refer to respective sections in the document.
The height of Header and width of the Left and Right Panes do not change, with resizing of application screen.
The system facilitates toggling Header and Left and Right Panes of the home screen to increase the visible area of the screens. Click to toggle upper pane and to toggle left pane. To un-toggle click and respectively.
1.4.1.1 Time Zone Preference
You can select any of the following three time zones from the User Info screen:
Application Server Time Zone
Company Branch Time Zone
User Time Zone
The time zones set up at each of these levels are displayed in the user info screen. However, data is always stored in the application server time zone and based on the user preference of time zone, the display time would be User or Company or Application Server time zone. Any time zone related changes done at UI does not impact the other time bound activities which are dependant on database time.
Application Server Time Zone (Server Time Zone)
The Application Server Time Zone by default is the Production Server Time Zone. Selecting this time zone will have all date and time fields defined as per the time stored in application server. There is no offset in time if both storage (database server) and display (application server) are in the same time zone.
1-10

Company Branch Time Zone (Organization - Division Time Zone)
This is the Company time zone and is setup at the organization - division definition level. The various divisions defined under an organization can be set up with different time zones depending on geographical locations. This time can be modified as per requirement.
To modify the Company Branch Time Zone:
Navigate to Setup > Administration > User > Organization and select the company or division listed under 'Division Definition'.
In the Display Formats tab, select Time Zone and click ‘Edit’.
In the Format field, select the required time zone from the adjoining options list and click ‘Save’.
If 'Company Branch Time Zone' is selected as the time zone in User Info screen, then on save, all the time and date fields are automatically updated with the time zone of the company branch.
User Time Zone
User Time Zone or User Preference Time Zone can be set up at the User Level in the User Definition screen. Various Users under same divisions defined under an organization can be set up with different time zones depending on geographical locations.
To modify the User Time Zone:
Navigate to Setup > Administration > User > Users.
Select the required User record listed in “User Definition” section and click Edit.
In the Time Zone field, select the required time zone from the adjoining options list and click Save.
If 'User Time Zone' is selected as the time zone in User Info screen, then on save, all the time and date fields are automatically updated with the current updated time.
1.4.2 Screens
Details in few main screens are grouped into different sections. These sections are displayed as tabs, horizontally within the screen. In turn, details in few of these tabs are again grouped horizontally. The details are displayed when you click the tab under which they are grouped. As similar to the main screen tabs, you can identify the active tab with its white background.
For example, Customer Service main screen has four main tabs. When you click on ‘Customer Service’ tab, the corresponding tabs are displayed.
You can click to view the hidden tabs, if any.
1-11

1.5 Common Operations
Some of the operations are common to most of the screens. These are grouped into three categories, based on their features.
Basic Operations
Basic Actions
Personalization Options
De-supported Special characters
Skip Zip Code Validation
Export data to Excel
1.5.1 Basic Operations
All the screens contain buttons to perform all or few of the basic operations. The four basic operations available are:
Add
Edit
View
Audit
When you click any of the operation tabs, system displays the corresponding records inline, below the respective setup tables.
The table below gives a snapshot of them:
Basic Operation Description
Add Click to add a new record. When you click Add, the system displays a new record enabling you to specify the required data. It is mandatory to specify details for the fields marked with ‘*’ symbol.
Edit Click to edit an existing record. Select the record you want to edit and click ‘Edit’. The system displays an existing record in editable mode. Edit the required details.
View Click to view an existing record. Select the record you want to view and click ‘View’. The system displays the record details in display mode.
Audit Click to view audit info. If an audit is set for a field, then the system tracks the changes for that field. Select the record for which you want to view the audit info and click ‘Audit’. The system displays the details tracked for that field.
Close Click to close a screen or a record. When you try to close an unsaved, modified record, then the system alerts you with an error message. You can click ‘Yes’ to continue and ‘No’ to save the record.
1-12
1.5.2 Basic Actions
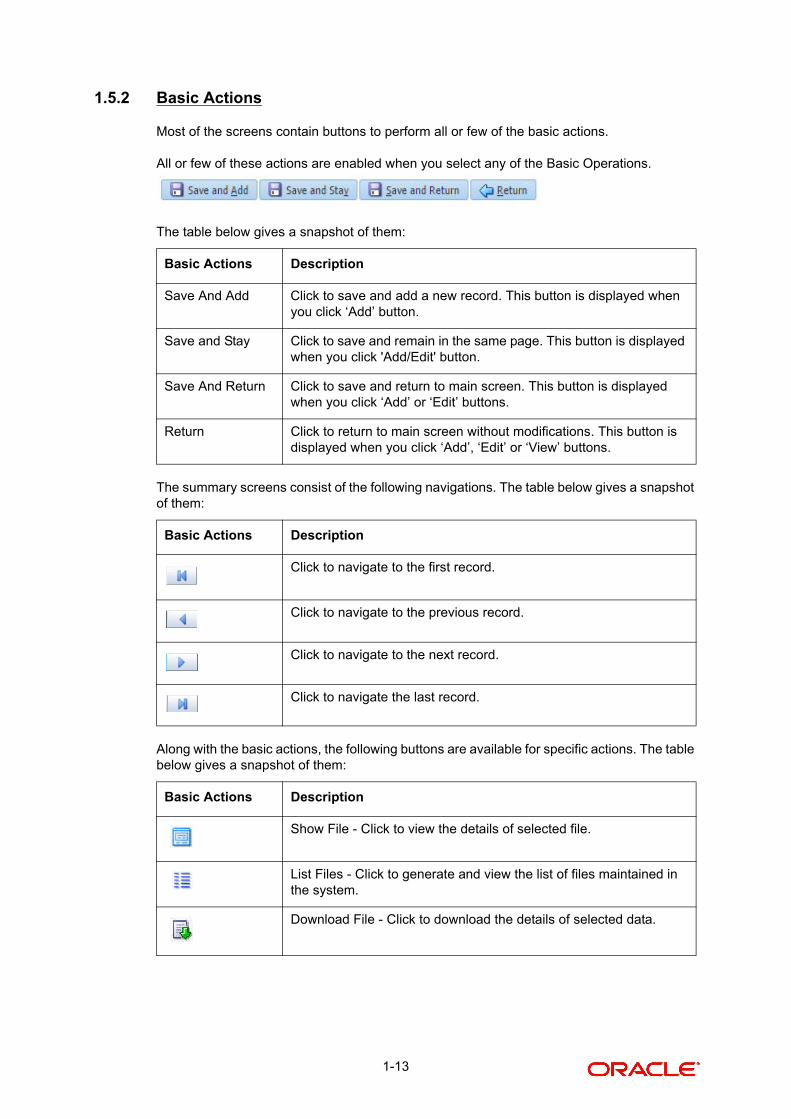
Most of the screens contain buttons to perform all or few of the basic actions.
All or few of these actions are enabled when you select any of the Basic Operations.
The table below gives a snapshot of them:
The summary screens consist of the following navigations. The table below gives a snapshot of them:
Along with the basic actions, the following buttons are available for specific actions. The table below gives a snapshot of them:
Basic Actions Description
Save And Add Click to save and add a new record. This button is displayed when you click ‘Add’ button.
Save and Stay Click to save and remain in the same page. This button is displayed when you click 'Add/Edit' button.
Save And Return Click to save and return to main screen. This button is displayed when you click ‘Add’ or ‘Edit’ buttons.
Return Click to return to main screen without modifications. This button is displayed when you click ‘Add’, ‘Edit’ or ‘View’ buttons.
Basic Actions Description
Click to navigate to the first record.
Click to navigate to the previous record.
Click to navigate to the next record.
Click to navigate the last record.
Basic Actions Description
Show File - Click to view the details of selected file.
List Files - Click to generate and view the list of files maintained in the system.
Download File - Click to download the details of selected data.
1-13
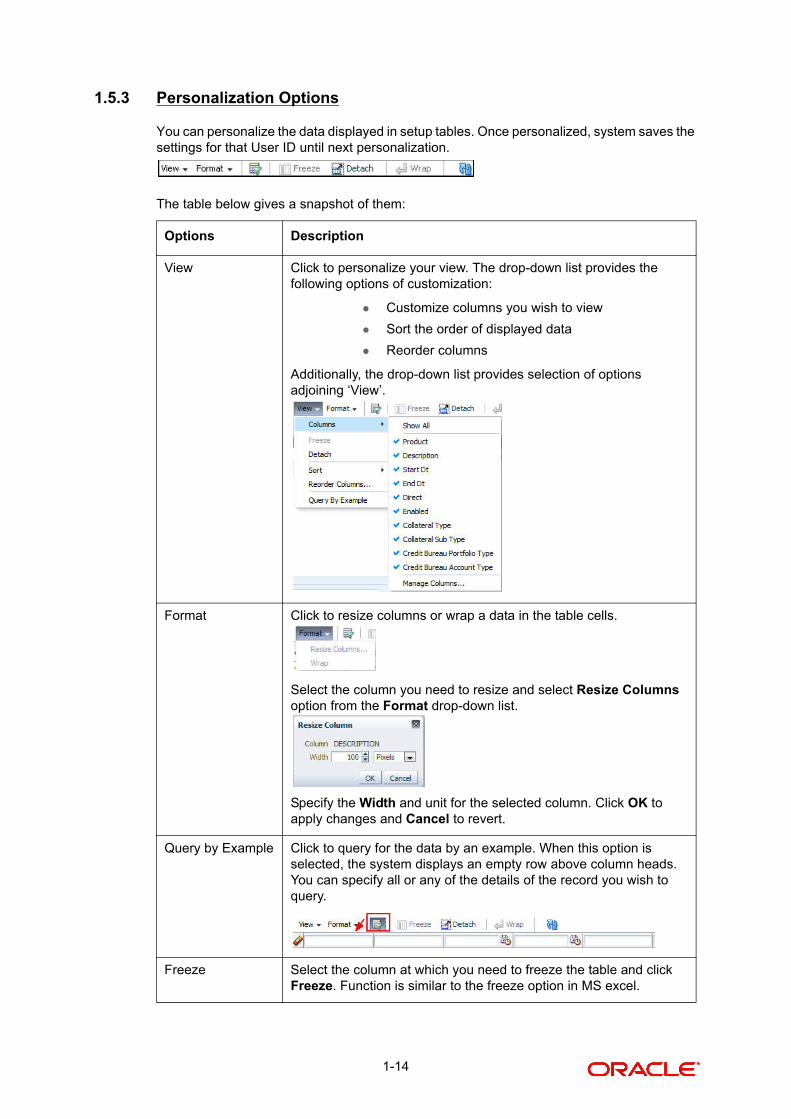
1.5.3 Personalization Options
You can personalize the data displayed in setup tables. Once personalized, system saves the settings for that User ID until next personalization.
The table below gives a snapshot of them:
Options Description
View Click to personalize your view. The drop-down list provides the following options of customization:
Customize columns you wish to view
Sort the order of displayed data
Reorder columns
Additionally, the drop-down list provides selection of options adjoining ‘View’.
Format Click to resize columns or wrap a data in the table cells.
Select the column you need to resize and select Resize Columns option from the Format drop-down list.
Specify the Width and unit for the selected column. Click OK to apply changes and Cancel to revert.
Query by Example Click to query for the data by an example. When this option is selected, the system displays an empty row above column heads. You can specify all or any of the details of the record you wish to query.
Freeze Select the column at which you need to freeze the table and click Freeze. Function is similar to the freeze option in MS excel.
1-14
Print option in Customer Service screen
The Print button option in Customer Service/Collection screen facilitates you to print the contents on the screen as is without scroll bars. This button is available along with other options in the Action block. Clicking on this provides a browser print functionality and a new tab is opened where the print content is displayed.
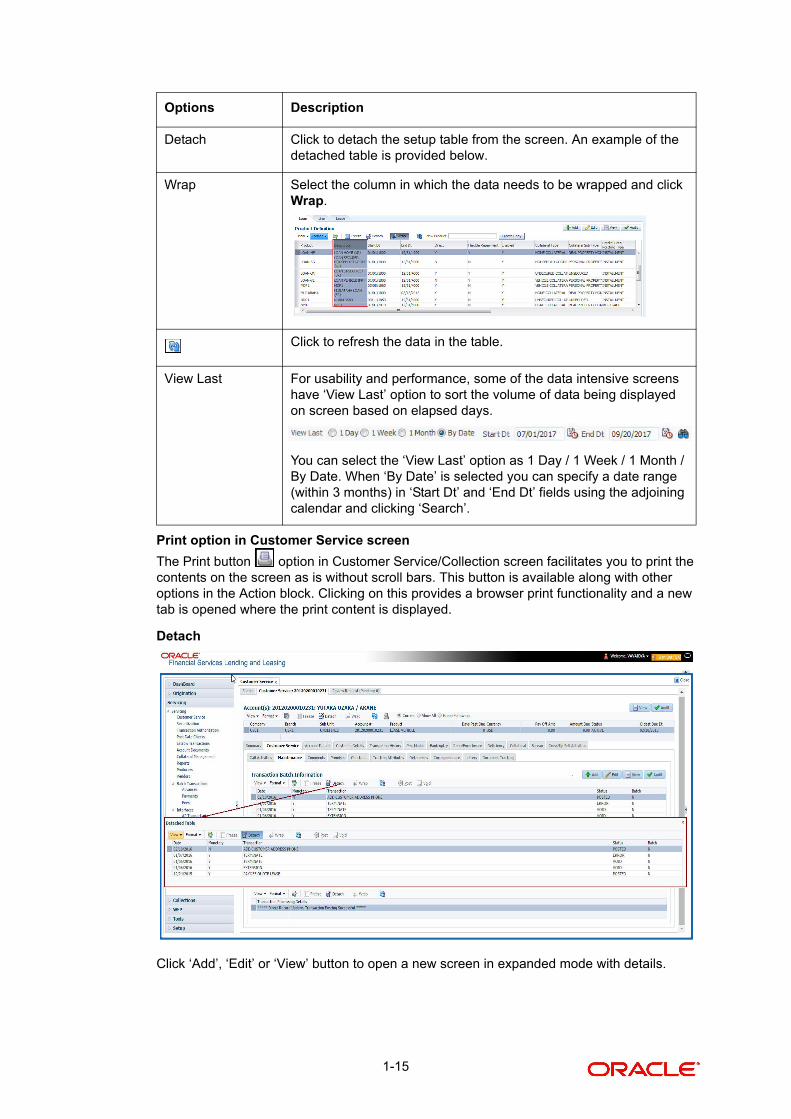
Detach
Click ‘Add’, ‘Edit’ or ‘View’ button to open a new screen in expanded mode with details.
Detach Click to detach the setup table from the screen. An example of the detached table is provided below.
Wrap Select the column in which the data needs to be wrapped and click Wrap.
Click to refresh the data in the table.
View Last For usability and performance, some of the data intensive screens have ‘View Last’ option to sort the volume of data being displayed on screen based on elapsed days.
You can select the ‘View Last’ option as 1 Day / 1 Week / 1 Month / By Date. When ‘By Date’ is selected you can specify a date range (within 3 months) in ‘Start Dt’ and ‘End Dt’ fields using the adjoining calendar and clicking ‘Search’.
Options Description
1-15

Drop-down List
The system provides an option to select the required data from LOV, for few fields. You can either select the record from list or enter first alphabet of the value you want. When you provide the alphabet, system limits the selection to the values starting with the specified alphabet. These lists are grouped into two types:
Drop-down list – Provides the selection option. You can either select a record from the list or enter first alphabet of the required value.
Combo drop-down list – The LOV contains huge data and provides both selection and search option. These drop-down arrows are smaller in size, when compared to normal drop-down arrows, thus enabling easy identification.
Click the arrow button available before ‘Search’ to toggle the search options.
The search criteria are provided below the ‘Match’ field. These criteria vary based on the Field for which the search is executed.
Buttons/Menu Do this
Basic Click ‘Basic’ for normal search.
Advanced Click ‘Advanced’ for advanced search. In this mode, you can select the search option from drop-down list adjoining the search criteria. Selected record will be highlighted (Hover to select).
Match Select ‘All’ to display results exactly matching the specified characters. Select ‘Any’ to display results matching any of the specified characters.
Search Click to search for values based on the specified search criteria. The search results are displayed below with the details in respective columns.
Reset Click to reset the search criteria.
Add Fields Click to add additional fields to search criteria.
1-16

Also, the system remembers your recent search options and demarcates them from the actual ones.
Comments
In all the user input screens wherever comments are accepted, the system allows an input of 4000 characters of information in the comment(s) field.
1.5.4 De-supported Special characters
OFSLL ‘does not’ support the following special characters while accepting data through UI, web service and file upload process.
< > { } | \ ^ [ ] `
Hence, ensure that the same is not used while processing any input data in the system.
1.5.5 Skip Zip Code Validation
While accepting data for interdependent fields through User Interface, OFSLL validates and auto-populates the values for subsequent fields based on previous selection.
Accordingly, when a specific ‘Country’ is selected from drop-down list which is populated based on COUNTRY_CD (COUNTRY CODE) lookup code, OFSLL validates and populates the list of corresponding zip codes maintained in Zip Code setup.
However, in case the zip code validation is to be skipped for a specific Country, then define the Sub Code as NO_ZIP_VAL against the COUNTRY_CD in lookups screen as indicated below:
1-17

On Selecting that particular Country from drop-down in any of the UI screen, only the default value ‘0000000000’ is available for Zip field drop-down list. On selecting the same, the City and State fields are set as UNDEFINED.
Note
Skipping zip code validation has significant impact in the system since the change impacts all the UI screens - Setup screens, Origination, Servicing and Collection module screens, Interface, Customer Credit Limit, Collateral Management, and so on. Hence it is recom-mended to be done with careful consideration and OFSLL is not responsible for any im-pact/mismatch resulting out of this change.
1.5.6 Export data to Excel
While working on any of the screens in User Interface, OFSLL provides a flexibility to Export the data that is displayed on screen to an Excel file. This helps to download and view the data offline especially with data intensive screens.
Clicking ‘Export to Excel’ option provides option to save the data to .xls file.
However, ‘Export to Excel’ option is currently available only to following screens and is also access controlled depending on configuration defined in setup.
Queues/Search Results - Origination, Servicing, and Collections
Account Information
Balances
Call Activities
Maintenance
Promises
Due Date History
Collateral
1-18
Tracking Attributes
Condition Details / Condition / Queue History
In additional, OFSLL displays the total count of records fetched from database. The count is displayed in the right bottom corner of records table. However, note that this is not the total count of all the records in the database but only the records which are fetched based on specific selection. For example, if there are 50,000 records in database and UI is fetching 1,000 records, then the count is displayed as 1,000.
1.6 Keyboard Compatibility
The system facilitates keyboard compatibility. You can perform most of your tasks using keyboard short cuts also termed as ‘Hot Keys’. These hot keys are single keyboards or a combination of keyboards. The available options are listed below:
1. Shift + Alt + mnemonic to activate buttons in the screen. For example, to open ‘Accessibility’ screen, press ‘Shift + Alt + y’.
2. Tab for forward navigation in the application. Shift + Tab for backward navigation in the application. When the required link/tab/button/field is highlighted, press enter on the keyboard to edit.
3. Space bar to check or uncheck ‘Check Box’.
4. Arrow Keys to hover within the drop-down list.
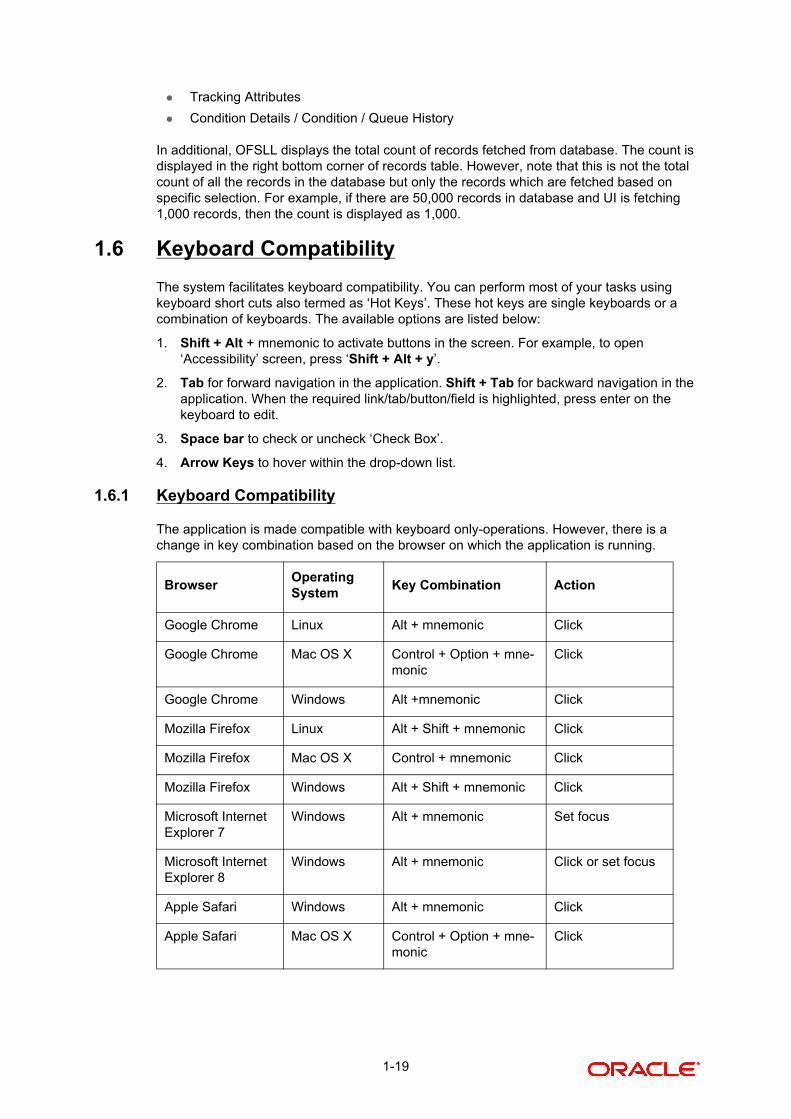
1.6.1 Keyboard Compatibility
The application is made compatible with keyboard only-operations. However, there is a change in key combination based on the browser on which the application is running.
BrowserOperating System
Key Combination Action
Google Chrome Linux Alt + mnemonic Click
Google Chrome Mac OS X Control + Option + mne-monic
Click
Google Chrome Windows Alt +mnemonic Click
Mozilla Firefox Linux Alt + Shift + mnemonic Click
Mozilla Firefox Mac OS X Control + mnemonic Click
Mozilla Firefox Windows Alt + Shift + mnemonic Click
Microsoft Internet Explorer 7
Windows Alt + mnemonic Set focus
Microsoft Internet Explorer 8
Windows Alt + mnemonic Click or set focus
Apple Safari Windows Alt + mnemonic Click
Apple Safari Mac OS X Control + Option + mne-monic
Click
1-19

Also, one can use the following keyboard shortcuts in order to increase or decrease the zoom level.
1.7 Tool Tips
The system is facilitated with tool tip option. When the cursor is moved to any of the field in the screen, a popup is displayed with a tip on the action to be performed.
1.8 Accessibility
1.8.1 Understanding Accessibility
Accessibility is making the application usable for multiple user groups, which includes users with physical challenges. One of the most important reasons to make the application accessible is to provide them the opportunity to work. The four main categories of disabilities are visual, hearing, mobility and cognitive.
A person with disability might encounter one or more barriers that can be eliminated or minimized by making the electronic information user-friendly and approachable.
1.8.2 Application Accessibility Preferences
Oracle Financial Services Lending and Leasing is facilitated with the feature of Accessibility to make the application more usable for the people who are differently abled.
By default, the following accessibility options are provided and there is no need to define special accessibility preference in the application:
The application user interface contents are readily accessible for all types of users without the need to select special accessibility modes.
The components within the user interface are optimized for use with a screen reader by default.
The contents are zoomable by default, eliminating the need for an application large fonts mode.
The user interface components auto-detect if operating system (OS) is set to high contrast mode and automatically render content that is compatible with OS high contrast, eliminating the need for an application high contrast mode.
Note that, Oracle Financial Services Lending and Leasing application user interface is built on Oracle Application Development Framework (ADF) and the default accessibility feature supported by ADF are made available. For additional information, refer to ADF documentation on accessibility preferences.
1.8.3 Documentation Accessibility Preferences
Apart from assigning the logical sequence and organizing topics, the following techniques are used to enhance the accessibility of documentation.
Shortcut Action
Ctrl++ To increase zoom level.
Ctrl+- To decrease zoom level.
Ctrl+0 To set zoom level to default level.
1-20

Addition of text equivalent to all graphics
Usage of standard fonts and avoiding shadow or reversed text
Usage of strong foreground and background color contrast
Color usages as per Oracle Accessibility guidelines have been ensured
Usage of styles and formatting elements
Documentation in simple language to ensure easy understanding
Including accurate and effective navigational features, such as cross-reference, tables of content and bookmarks as appropriate
1-21

2. Search Function
Oracle Financial Services Lending and Leasing allows you to search for an account, customer or application using specific search criteria. Since this section details the general search options available in the User Interface, some or all the parts of this section are applicable to you as per access provisions & licensing. The following sections explain the Search options in detail.
2.1 Search Criteria
Search criteria has a list of parameters which enables to query the application / account from the database by providing one or more parameter values. There are 15 parameters whose values can be specified in combination with comparison operators which are described in the table below. The Reset button enables to clear the comparison values for a fresh search. Apart from this, Search can also be performed using wild card characters.
Description Example Expression
LESS THAN APPLICATION DATE < 01/22/2002
Result: The system searches for all applications created before Jan. 22, 2002.
LESS THAN OR EQUAL TO
APPLICATION DATE <= 01/22/2002
Result: The system searches for all applications created on or before Jan. 22, 2002.
EQUAL APPLICANT SSN = 111-22-3333
Result: The system searches for all applications with applicant social security number 111-22-3333.
NOT EQUAL
APPLICANT SSN <> 111-22-3333
Result: The system searches for all applications except those with an applicant whose social security number is 111-22-3333.
2-1

Using Wildcard Characters
Wildcard characters can only be used with the operator LIKE and NOT LIKE.
% (percent) represents any number of characters, including no characters.
GREATER THAN
APPLICATION DATE > 01/22/2002
Result: The system searches for all applications created after Jan. 22, 2002.
GREATER THAN
OR EQUAL
APPLICATION DATE >= 01/22/2002
Result: The system searches for all applications created on or after Jan. 22, 2002
IN ACCOUNT NUMBER IN (‘20001000012512’, ‘20010100012645’, ‘20010300012817’)
IN is used with values that are within parenthesis.
Result: The system searches for the applications with the account num-bers of ‘20001000012512’, ‘20010100012645’, and ‘20010300012817’.)
NOT IN ACCOUNT NUMBER NOT IN (‘20001000012512’, ‘20010100012645’, ‘20010300012817’)
NOT IN is used with values that are within parenthesis.
Result: The system searches for all applications except those with the account numbers of ‘20001000012512’, ‘20010100012645’, and ‘20010300012817’.)
IS VIN IS NULL
IS is only used with a value of “NULL”. It enables you to search for crite-ria that has no value; that is, fields where no information is present.
Result: The system searches for all applications without a vehicle iden-tification number.
IS NOT VIN IS NOT NULL
IS NOT is only used with a value of “NULL”. It enables you to search for criteria that has any value; that is, fields where information is present.
Result: The system searches for all accounts with a VIN, vehicle identi-fication number.
LIKE ASSET TYPE LIKE VEH%
LIKE enables you to search for close matches using wildcard charac-ters.
Result: The system searches for all applications with asset type begin-ning with the characters “veh” such as “vehicle car” or “vehicle van.”
NOT LIKE ASSET TYPE NOT LIKE VEH%
NOT LIKE enables you to search for close matches using wildcard characters.
Result: The system searches for all applications with asset type other than those starting with the characters “veh.”
Description Example Expression
2-2
_ (underline) represents any single character.
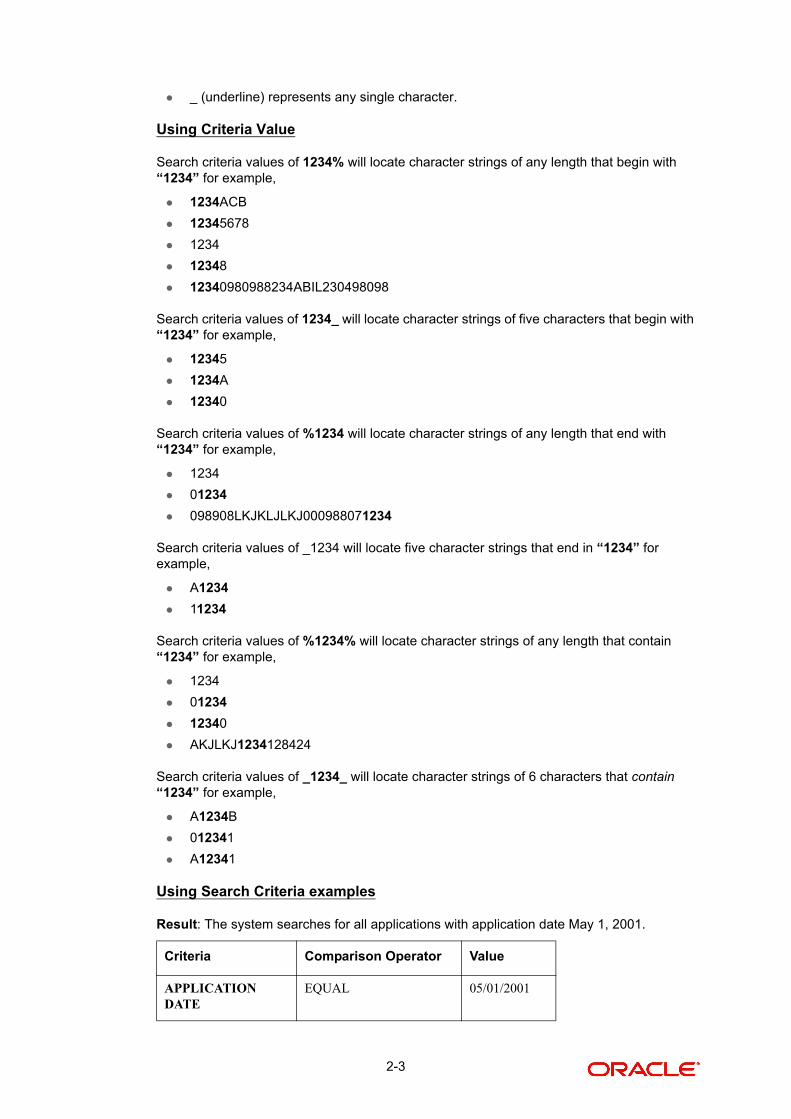
Using Criteria Value
Search criteria values of 1234% will locate character strings of any length that begin with “1234” for example,
1234ACB
12345678
1234
12348
12340980988234ABIL230498098
Search criteria values of 1234_ will locate character strings of five characters that begin with “1234” for example,
12345
1234A
12340
Search criteria values of %1234 will locate character strings of any length that end with “1234” for example,
1234
01234
098908LKJKLJLKJ000988071234
Search criteria values of _1234 will locate five character strings that end in “1234” for example,
A1234
11234
Search criteria values of %1234% will locate character strings of any length that contain “1234” for example,
1234
01234
12340
AKJLKJ1234128424
Search criteria values of _1234_ will locate character strings of 6 characters that contain “1234” for example,
A1234B
012341
A12341
Using Search Criteria examples
Result: The system searches for all applications with application date May 1, 2001.
Criteria Comparison Operator Value
APPLICATION DATE
EQUAL 05/01/2001
2-3
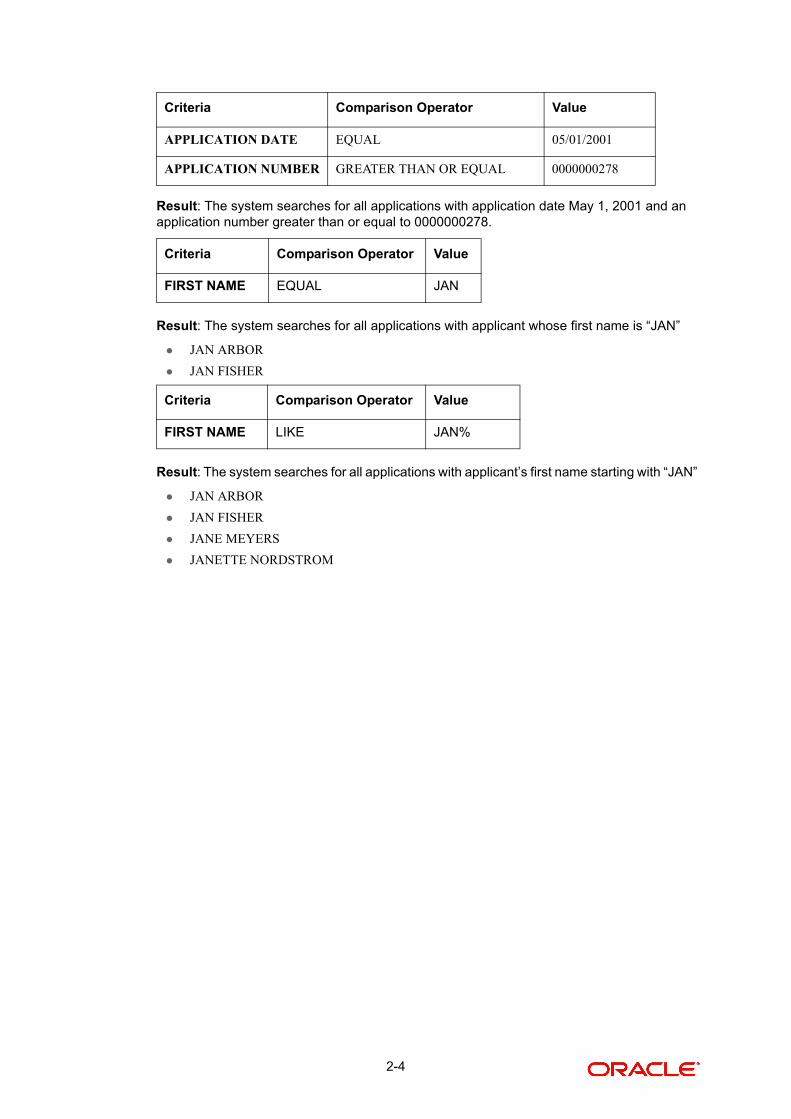
Result: The system searches for all applications with application date May 1, 2001 and an application number greater than or equal to 0000000278.
Result: The system searches for all applications with applicant whose first name is “JAN”
JAN ARBOR
JAN FISHER
Result: The system searches for all applications with applicant’s first name starting with “JAN”
JAN ARBOR
JAN FISHER
JANE MEYERS
JANETTE NORDSTROM
Criteria Comparison Operator Value
APPLICATION DATE EQUAL 05/01/2001
APPLICATION NUMBER GREATER THAN OR EQUAL 0000000278
Criteria Comparison Operator Value
FIRST NAME EQUAL JAN
Criteria Comparison Operator Value
FIRST NAME LIKE JAN%
2-4
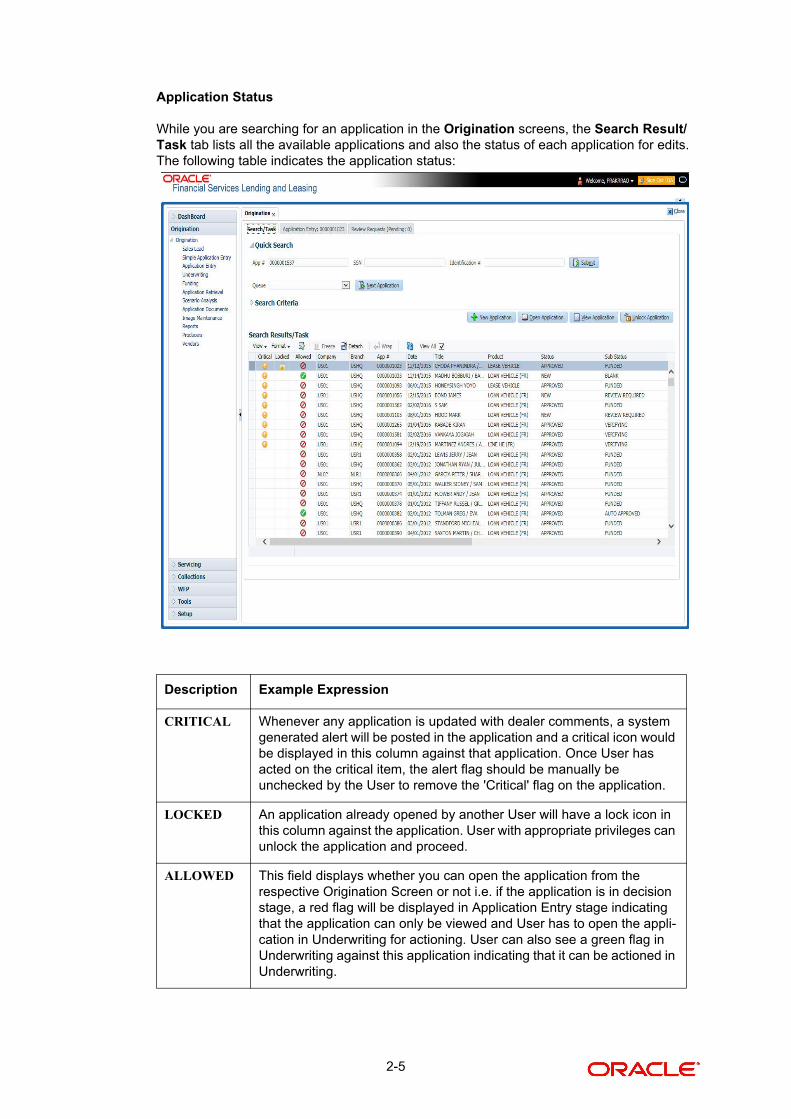
Application Status
While you are searching for an application in the Origination screens, the Search Result/Task tab lists all the available applications and also the status of each application for edits. The following table indicates the application status:
Description Example Expression
CRITICAL Whenever any application is updated with dealer comments, a system generated alert will be posted in the application and a critical icon would be displayed in this column against that application. Once User has acted on the critical item, the alert flag should be manually be unchecked by the User to remove the 'Critical' flag on the application.
LOCKED An application already opened by another User will have a lock icon in this column against the application. User with appropriate privileges can unlock the application and proceed.
ALLOWED This field displays whether you can open the application from the respective Origination Screen or not i.e. if the application is in decision stage, a red flag will be displayed in Application Entry stage indicating that the application can only be viewed and User has to open the appli-cation in Underwriting for actioning. User can also see a green flag in Underwriting against this application indicating that it can be actioned in Underwriting.
2-5

2.2 Searching for an Application
Oracle Financial Services Lending and Leasing allows you to search and retrieve a particular application.
During application entry, queues can be created based on your user id and your user responsibility. You can view the assigned queues in the Origination screen of DashBoard.
In each stage of application, the queue name to which the selected application is assigned, appears in Queue name field in Result screen.
You can begin processing the applications in the order in which they are listed. Select the record and click Submit.
2.2.1 Search/Task tab
To view the Search/Task screen during Loan origination
1. On the Oracle Financial Services Lending and Leasing Application home screen, click the Origination master tab.
2-6

Depending on the task to be performed and the link clicked, the respective screen opens in the Search Results/Task screen.
2. Click the Search Criteria tab.
The search tab enables you to locate an application using a broad range of search criteria.
During Loan origination, the results are sorted according to the priority of application and application identification number. However you can sort the records using any criteria.
If you try to open an application which is already opened by another user, system displays an alert message indicating “Application is locked by <User Name> Phone <phone number>”.
The Search Results/Task screen.
3. On the Results screen, select the application you want to load and click Open Application.
2-7

The system loads the application on the respective screen.
You are now ready to begin work on the application.
2.2.2 Quick Search section
Quick Search enables to search for an application using any one of the following values - Application Number, SSN, Identification Number or Queue.
To load an application using the Quick Search section:
1. On the Oracle Financial Services Lending and Leasing Application home screen, click the Origination master tab.
2. In the Quick Search section’s App # field, specify the application number you want to load and click Submit.
You can also load the application by specifying the last 4 digits of the SSN Number. System retrieves only those applications where the searched SSN is of the Primary Applicant. If multiple matches are found, system displays an error message as ‘Multiple Matches found for the SSN, Please use normal Search’.
2-8

Note
Search cannot be performed using wild card characters in the Quick Search section.
The system loads the selected application.
To load an application from a queue during application entry
1. On the Oracle Financial Services Lending and Leasing Application home screen, click the Origination master tab.
2. In the Quick Search section’s Queue field, select the queue you want to work with and click Next Application.
2.2.2.1 Other Features on the Results screen
The Results screen on the Applications screen has below listed common features (these features are not present on the Result screen on Customer Service screen):
What is it? What does it do?
View All If you select View All check box, all applications in the system acces-sible with your user id appear in the Results screen under search sec-tion.
Queue Name field
This display only field indicates the queue in which the selected appli-cation is currently in. (This in normally related to one or more of the following, based on setup: producer, state, or status.)
Secured box Indicates that the selected application is secured (that is, that the applicant is an employee of the organization) and may only be loaded by authorized users.
Copy Applica-tion button
Creates a copy of the selected application. This feature is usually used when an applicant has submitted a previous application or when an applicant submits a second application and you don’t want to retype the information.
New Applica-tion
Opens a screen where a user can create a new application by provid-ing required details.
2-9
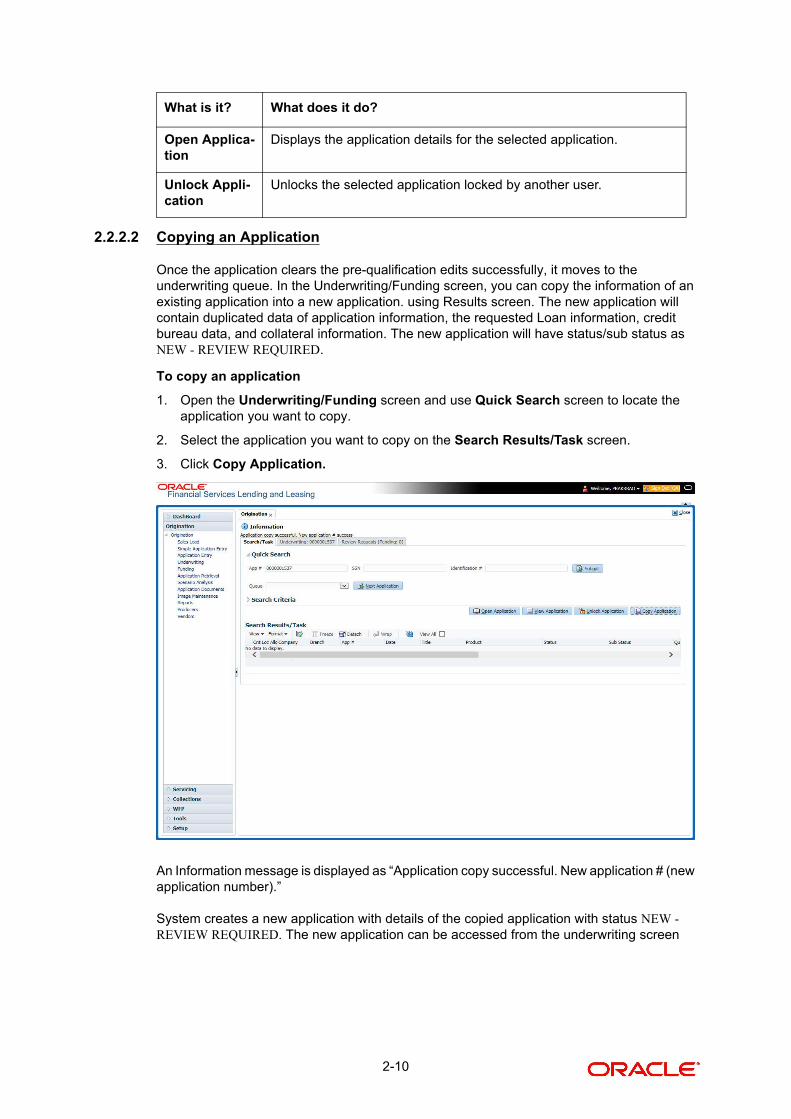
2.2.2.2 Copying an Application
Once the application clears the pre-qualification edits successfully, it moves to the underwriting queue. In the Underwriting/Funding screen, you can copy the information of an existing application into a new application. using Results screen. The new application will contain duplicated data of application information, the requested Loan information, credit bureau data, and collateral information. The new application will have status/sub status as NEW - REVIEW REQUIRED.
To copy an application
1. Open the Underwriting/Funding screen and use Quick Search screen to locate the application you want to copy.
2. Select the application you want to copy on the Search Results/Task screen.
3. Click Copy Application.
An Information message is displayed as “Application copy successful. New application # (new application number).”
System creates a new application with details of the copied application with status NEW - REVIEW REQUIRED. The new application can be accessed from the underwriting screen
Open Applica-tion
Displays the application details for the selected application.
Unlock Appli-cation
Unlocks the selected application locked by another user.
What is it? What does it do?
2-10
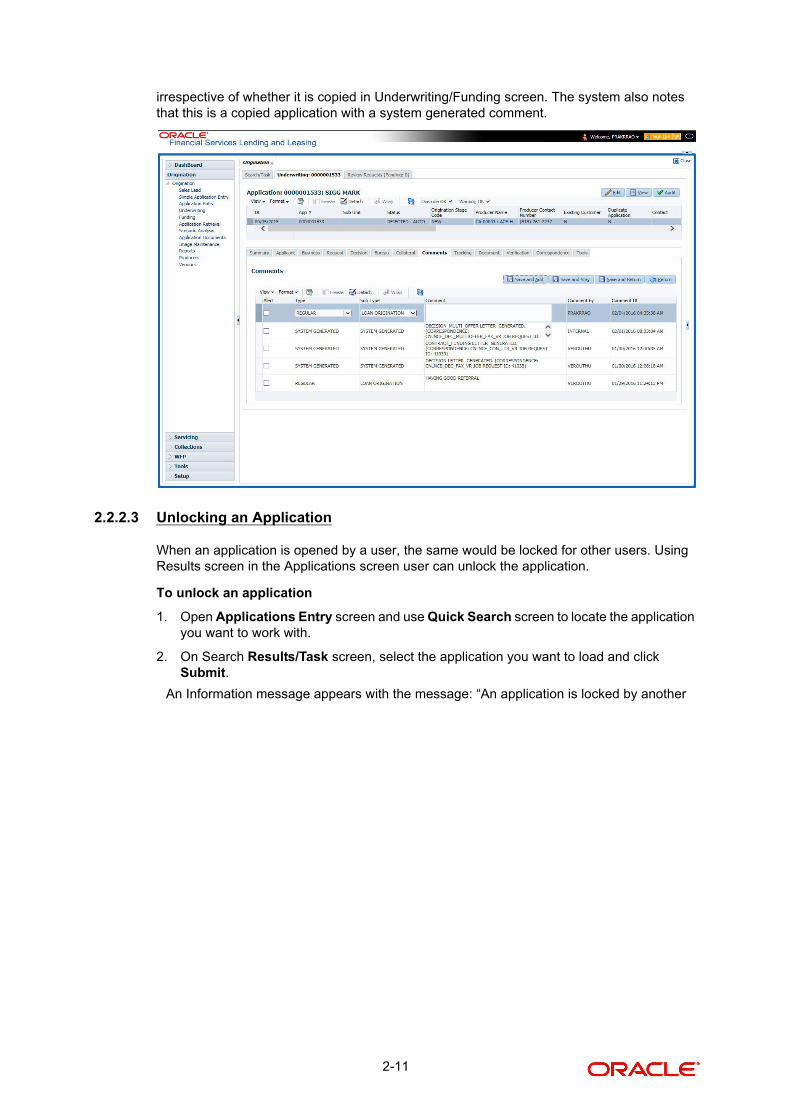
irrespective of whether it is copied in Underwriting/Funding screen. The system also notes that this is a copied application with a system generated comment.
2.2.2.3 Unlocking an Application
When an application is opened by a user, the same would be locked for other users. Using Results screen in the Applications screen user can unlock the application.
To unlock an application
1. Open Applications Entry screen and use Quick Search screen to locate the application you want to work with.
2. On Search Results/Task screen, select the application you want to load and click Submit.
An Information message appears with the message: “An application is locked by another
2-11

user.”
3. Click Unlock Application.
4. Click Open Application. The system loads application on the Underwriting screen.
2.2.2.4 View Application
The View Application button is available in all origination screens (Application Entry, Underwriting and Funding). You can view a selected application in the search results by clicking on the View Application button even when the application is locked by another User.
The application will be opened in ‘View Mode’ only and no edits are allowed. However in Tools sub tab, the 'Initialize' and 'Calculate' buttons will be enabled allowing you to use the calculator options.
2.3 Searching for an Account and Customer
You can search or retrieve a particular account or customer through Customer Service screen. The search tab available in the screen enables you to locate an account or customer using a broad range of search criteria.
To view the Search screen during Loan servicing
1. On the Oracle Financial Services Lending and Leasing Application home screen, click the Servicing master tab.
2. If you want to perform a customer service task on the application, click Customer Service link.
2-12

Depending on the link clicked, Customer Service screen appears, opening at Results screen.
Note
Oracle Financial Services Lending and Leasing does not display the financial details of se-cured accounts if the logged-in user is not authorized. Though the search display the re-sults, the fields such as Status, Delinquency Days, Amount Due, and Outstanding Balance are masked with ‘xxxxx’ and clicking on the same displays an error message indicating ‘Cannot open secured account’.
3. Click the Search Criteria tab.
Using the Search tab
1. Create a search criteria by specifying the required details in Comparison Operator and Value columns.
2. Click Search. System displays all accounts that meet the search criteria in the Results tab.
3. On the Search Results/Task screen, select the account you want to load and click Open Account.
2-13

The system loads account on Customer Service screen.
2.3.1 Quick Search section
The Quick Search section in Customer Service screen enables you to load accounts using any one of the fields Account Number, Customer Id, SSN, Identification #, or Queue/Condition.
To load an account using the Quick Search section
1. On the Oracle Financial Services Lending and Leasing Application home screen, click the Servicing master tab.
2. If you want to perform customer service task on the application, click Customer Service.
2-14

3. In the Quick Search section’s Acc#/Customer Id/SSN/Identification # fields, specify the corresponding Account number, or Customer Id, or last four digits of SSN or complete SSN in the respective fields and click Submit.
4. You can also search for accounts which are mapped to a particular Queue or Condition by selecting the same from ‘Queue/ Condition’ drop-down list and clicking ‘Next Account’ button. Clicking ‘Filtered Account’ opens the subsequent account fetched during a queue search and listed in Queue Assignment section.
5. When the request to access an application comes from an external system, user needs to check ‘Auto Run’ and click ‘Next’ button. System displays the customer service screen for the respective Account.
To load an account from a queue
In the Quick Search section’s Queue field, select the queue you want to work with and click Next Account.
2.3.2 Search Using Customer Details
There are different ways to search a customer account using the customer details.
To search for and load the customer details with the Search screen
On the Oracle Financial Services Lending and Leasing home screen, click Servicing > Servicing > Customer Service > Search Criteria
2-15

Select Customer as a search option.
1. On Search Criteria screen, use Comparison Operator and Value columns to create a search criteria to find the account using customer details. You can click Reset Criteria at any time to clear the Comparison Operator and Value columns.
2. Click Search.
The system locates and displays all the accounts that meet your search criteria on Search Results screen.
3. On the Search Results screen, view the following information for each account:
In this field: View this:
Company The company of the account.
Branch The branch of the account
Account # The account number
Product The Loan product of the account.
2-16

Also the ‘Customer Details’ section below displays the Customer Information along with Addresses, Telecoms, Employments, and Tracking Attributes. You can click ‘View’ to display the details in each section.
4. On the Search Results screen, select the customer you want to retrieve. The system displays all the accounts pertaining to that customer Id. Select an account and click Open Account.
The system displays the account details on Customer Service tab.
2.3.3 Search Using Account Details
To search for and load an account using the Search screen
On the Oracle Financial Services Lending and Leasing home screen, click Servicing > Servicing > Customer Service > Search Criteria
1. Select Account as a search option.
2. On the Criteria screen, use the Comparison Operator and Value columns to create a search criteria to find an account. You can click Reset Criteria at any time to clear the Comparison Operator and Value columns.
Currency The currency in which the account is operated.
Pay Off Amt The total pay off amount on the account.
Amount Due The total amount due on the account.
Status The status of the account.
Oldest Due Dt The oldest payment due date on the account.
Type The type of account.
In this field: View this:
2-17

3. Click Search. The system locates and displays all the accounts that meet your search criteria on Results screen.
4. On the Search Results screen, view the following information for each account:
5. On the Results screen, select the application you want to retrieve and click Open Account.
In this field: View this:
Company The company of the account.
Branch The branch of the account
Account # The account number
Date The date the account was created.
Title The primary and other applicant(s) attached to the account.
Product The Loan product of the account.
Status The status of the account.
Delinquency days The number of days the account has been delinquent.
Amount Due The total amount due for the account.
Outstanding Balance The total outstanding balance for the account.
Producer The producer of the account.
Secured If selected, indicates the account is secured and may only be loaded by authorized users.
2-18

The system loads the account under the tab
You are now ready to begin work on the account.
You can view the accounts pending for your review by selecting Receiver in the Review Request tab.
2.3.4 Search Using Business Details
To search and load an account with specific business using the Search screen
On the Oracle Financial Services Lending and Leasing home screen, click Servicing > Servicing > Customer Service > Search Criteria
1. Select Business as the search option.
2. On the Criteria screen, use the Comparison Operator and Value columns to create a search criteria to find the business type. You can click Reset Criteria at any time to clear the Comparison Operator and Value columns.
2-19
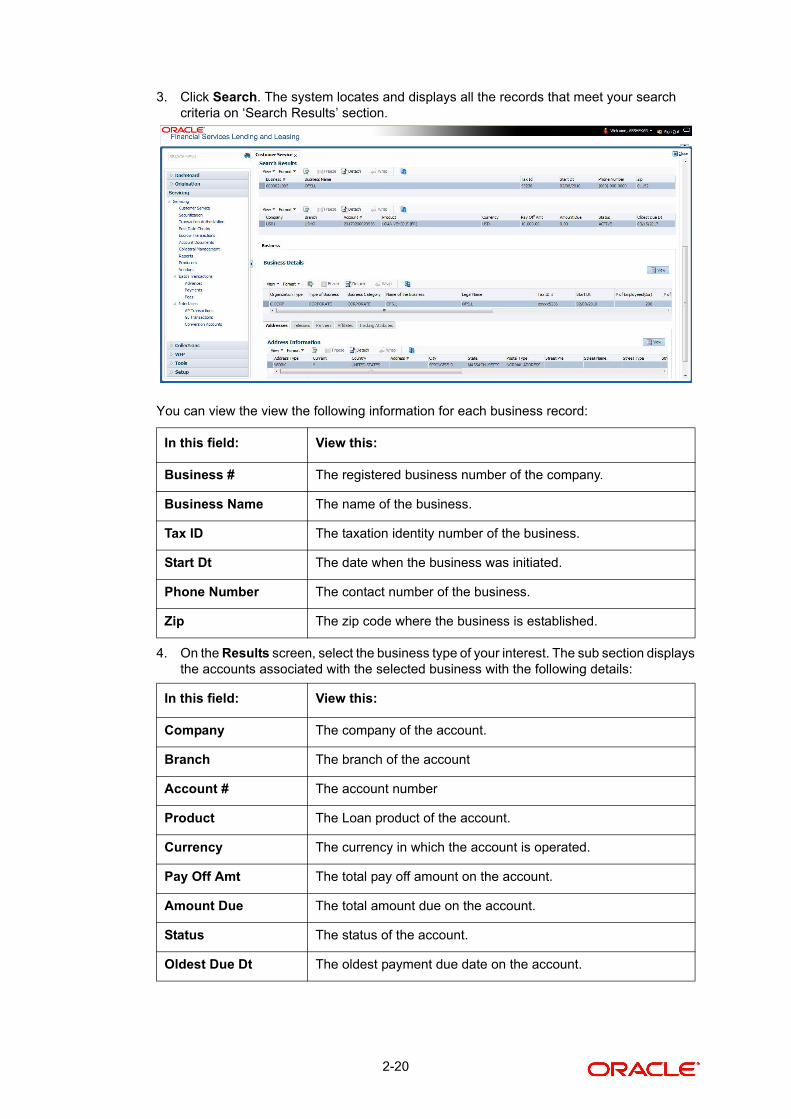
3. Click Search. The system locates and displays all the records that meet your search criteria on ‘Search Results’ section.
You can view the view the following information for each business record:
4. On the Results screen, select the business type of your interest. The sub section displays the accounts associated with the selected business with the following details:
In this field: View this:
Business # The registered business number of the company.
Business Name The name of the business.
Tax ID The taxation identity number of the business.
Start Dt The date when the business was initiated.
Phone Number The contact number of the business.
Zip The zip code where the business is established.
In this field: View this:
Company The company of the account.
Branch The branch of the account
Account # The account number
Product The Loan product of the account.
Currency The currency in which the account is operated.
Pay Off Amt The total pay off amount on the account.
Amount Due The total amount due on the account.
Status The status of the account.
Oldest Due Dt The oldest payment due date on the account.
2-20

Also the ‘Business’ section below displays the Business Details along with Addresses, Telecoms, Partners, Affiliates and Tracking Attributes. You can click ‘View’ to display the details in each section.
5. Select the required account and click Open Account. The system loads the account associated with the business type in the tab
2-21

3. Dashboards
3.1 Introduction
This document is designed to help acquaint you with the features of Dashboard, on the landing screen of Oracle Financial Services Lending and Leasing. Information from multiple products is integrated and displayed as Dashboard on home screen of the application.
This manual explains the functionality of Dashboard facility and various Dashboards present in the system. Since this section details the general dashboard options available in the User Interface, some or all the parts of this section are applicable to you as per access provisions & licensing. Besides providing these details, the manual also provides a brief description of other features associated with Dashboard link. The Dashboard main Menu further provides links to the following screens:
Dashboard
Users Productivity
System Monitor
Producer Analysis
3.2 Dashboards
Dashboards are the tiny windows displayed on landing screen of the Application. Dashboard renders quick and crisp information of specific transactions or tasks mapped to the ‘User Role’, who logs on to the system.
The system facilitates integration of Information from different levels and displays it as Dashboard on home screen, also called the landing screen of the application.
Navigating to Dashboards
Click Dashboard > Dashboard > Dashboard.
Features
Following are the features of Dashboard:
3-1

The system organizes Dashboards to provide comprehensive and consolidate snapshot in tiny windows, to access information easily. Thus, helping to; analyze, monitor and make better decisions which in turn help save time and cost.
The screen is designed to display six Dashboards, distributed in two rows with three Dashboards per row, without scroll bars.
The height and width of all Dashboards are fixed; however, you can expand or collapse the Dashboards. Click the arrow heads at the top left corner of the Dashboard windows to expand or collapse the dashboard windows.
Each section in Dashboard is hyperlinked to home screen of the respective section. The main screen will present descriptive information of details shown in Dashboard only.
Each window in the dashboard is provided with a Refresh button and clicking on the same would fetch the latest status of the dashboard being viewed.
3.3 User Productivity
Oracle Financial Services Lending and Leasing User Productivity screen is a supervisor feature that allows you to monitor the daily performances of users completing Loan origination and servicing tasks.
These tasks are categorized as underwriting funding tasks (loan origination).The system updates these details on daily basis.
Using the User Productivity screen, you can review the following daily tallies:
Number of applications entered, by user
Number of underwriting decisions (approved, rejected, conditioned, or withdrawn), by user
Number of funding decisions (verified or funded), by user
Number of applications entered, by queue
This chapter explains how to use the User Productivity screen to view this information.
Navigating to User Productivity Screen
1. On the Oracle Financial Services Lending and Leasing home screen, click Dashboard > Dashboard > User Productivity.
2. The system displays the User Productivity screen. You can view the tasks related to:
Underwriting/Funding
Customer Service/Collection
3.3.1 Viewing Underwriting/Funding tasks
Daily tallies from the
Collector Activity
3.3.1.1 Collector Activity
The Collector Activity screen displays the number of accounts worked and call activities by collector for the day. It also displays details regarding calls and total number of calls per queue.
3-2

To use the Collector Activity
1. Click Dashboard > Dashboard > User Productivity > Collector Activity. The details on this screen are grouped into two:
Users
Activity Details
2. In the Users section, you can view the following information.
A brief description of the fields is given below:
3. In the Activity Details section, you can view information for the selected user. A brief description of the fields is given below:
Field: View this:
User Displays the user code.
Name Displays the user name.
Accounts Displays the number of accounts worked.
Call Activities Displays the number of call activities.
Field: View this:
Queue Name Displays the queue name.
Left Messages Displays the left message activity count.
Promise To Pay Displays the promise to pay activity count.
No Answer Displays the no answer activity count.
Other Displays the other activity count.
3-3
3.4 System Monitor
The System Monitor screen is the one stop place to check all the activities in and around the system. It maintains the progress of;
Batch Jobs
Jobs
Services
Database Server Log Files
Users
Navigating to System Monitor
On the Oracle Financial Services Lending and Leasing home screen, click Dashboard > Dashboard > System Monitor.
3.4.1 Monitoring Batch Jobs
The system tracks the success of each batch process on the Batch Job. If either a set of batch jobs or specific batch job should fail, you can resubmit it on this screen and review the results in Request Details section.
The Monitor Batch Jobs screen is only a display screen that contains the following sections:
Batch Job Sets
Batch Jobs
Batch Jobs Threads
Request Details
Request Results
To Monitor Batch Job
1. Click Dashboard > Dashboard > System Monitor > Batch Jobs.
Total Displays the total activity count.
Field: View this:
3-4

2. In the Batch Job Sets section, you can view the following information
A brief description of the fields is given below:
To resubmit a batch job set
Whenever a batch job set fails, it is best to resubmit it after correcting the errors that caused the failure. Resubmitting a set causes system to re-perform the batch job set and dependent batch jobs.
In the Batch Job Sets section, choose the batch job set to resubmit (only a batch job set with a status of FAILED can be resubmitted), then click Resubmit Job Set button.
Field: View this:
Set Code Displays the code for batch job set.
Job Set Description Displays the description for batch job set.
Status Displays the job set status.
Frequency Code Displays the frequency at which the job set is to be executed.
Frequency Value Displays the value of frequency code chosen for the job set.
Start Time Displays the start time for the job set.
Enabled Displays if the job set is enabled or not.
Critical Displays if this job set is critical or not.
Last Run Dt Displays the date of last run of the job set.
Next Run Dt Displays the next run date for job set.
Parent Displays the preceding job set.
Dependency Displays the type of dependency on predecessor.
3-5

The Batch Job screen also allows you to resubmit jobs which are in READY or COMPLETED or FAILED status if you have access key privileges define for your user responsibility. If provisioned, then a ‘Force Re-Submit Job Set’ button is available instead of ‘Resubmit Job Set’ button to resubmit the jobs with above status.
The Batch Jobs section lists the batch jobs within a job set. The status, threads, commit count, dependencies, enabled indicator and the holiday and weekend runtime indicators are shown for each job.
A brief description of the fields is given below:
To resubmit a batch job
Whenever a batch job fails, it is best to resubmit it after correcting the errors that caused failure. Resubmitting a set will cause system to re-perform the batch job.
In the Batch Jobs section, choose the batch job to resubmit (only a batch job with a status of FAILED can be resubmitted), then choose Resubmit Job Set.
The Batch Job Threads section displays the status of individual threads.
A brief description of the fields is given below:
Field: View this:
Seq Displays the batch job sequence number.
Job Type Displays the batch job request type.
Job Code Displays the batch job request code.
Status Displays the job status.
Job Description Displays the batch job description.
Threads Displays the number of threads used by the job.
Commit Count Displays the number of rows after which auto-commit is triggered.
Errors Allowed Displays the number of errors allowed.
Weekend Displays if the batch job will execute job on weekend or not.
Holiday Displays if the batch job will execute job on a holiday or not.
Enabled Displays if the job is enabled or not.
Parent Displays the preceding job.
Dependency Displays the type of dependency on predecessor.
Command Displays the command line for the job.
Rollback Segment Displays the rollback segment for job.
Field: View this:
Thread Displays the name of thread.
3-6

The Request Details section displays the status and runtimes for each time the selected job ran.
A brief description of the fields is given below:
If a particular job requires that a result message be created, then that message appears in the Request Results section. A message is usually created in the event of an error.
A brief description of the fields is given below:
3.4.2 Monitoring Jobs
The Monitor Jobs screen provides another view of monitoring all system processes, including credit bureau requests and payment posting. This screen displays the data in reverse chronological order of the Run Start Date/Time, whereas the Monitor Batch Jobs screen provides the historical data about each job and job set.
Status Displays the status of thread.
Errors Displays the number of errors in the thread.
Records Displays the number of records in the thread.
Trace Level Displays the SQL trace level (0, 1, 4, 8, 12).
Enabled Displays if the job thread is enabled or not.
Field: View this:
Request Type Displays the job request type.
Status Displays the job request status.
Start Dt Displays the job request is valid from this date and time.
End Dt Displays the job request is valid till this date.
Run Start Dt Displays the date and time on when the job run started.
Run End Dt Displays the date and time at which the job run ended.
Process Dt Displays the transaction is posted with this General Ledger effec-tive date.
Description Displays the job request description.
Field: View this:
Request Results Displays the result of job request.
Description Displays the result details.
Field: View this:
3-7
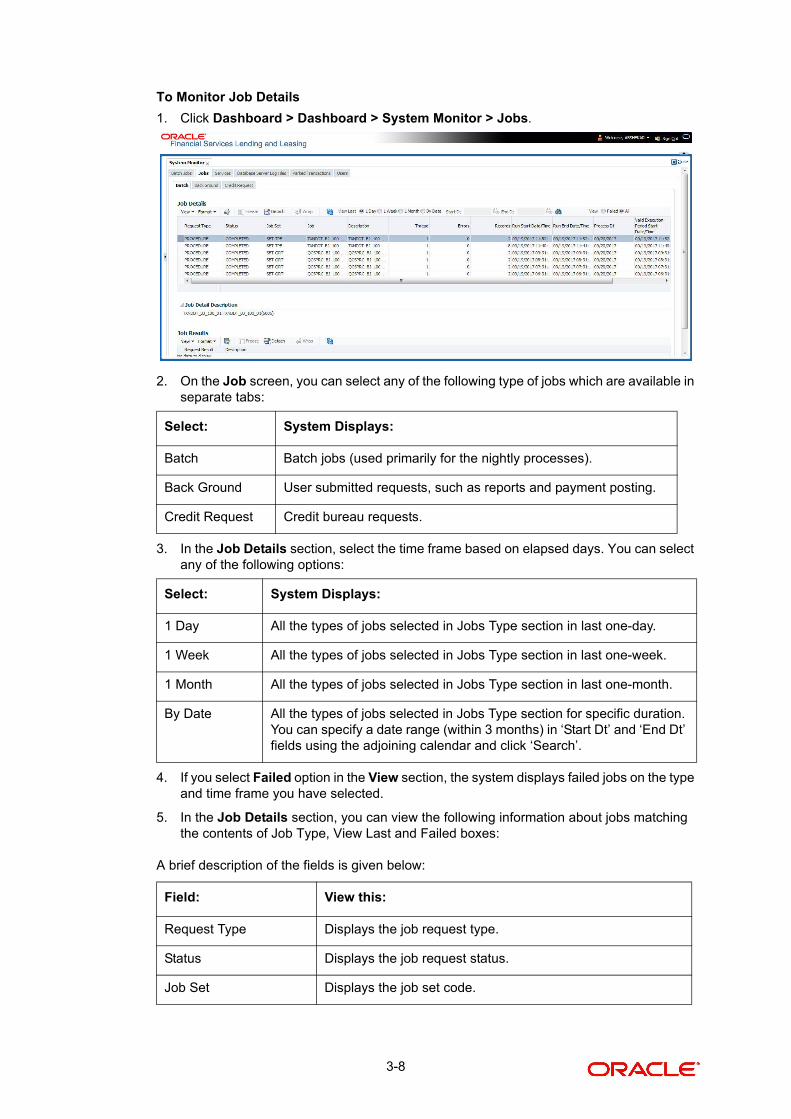
To Monitor Job Details
1. Click Dashboard > Dashboard > System Monitor > Jobs.
2. On the Job screen, you can select any of the following type of jobs which are available in separate tabs:
3. In the Job Details section, select the time frame based on elapsed days. You can select any of the following options:
4. If you select Failed option in the View section, the system displays failed jobs on the type and time frame you have selected.
5. In the Job Details section, you can view the following information about jobs matching the contents of Job Type, View Last and Failed boxes:
A brief description of the fields is given below:
Select: System Displays:
Batch Batch jobs (used primarily for the nightly processes).
Back Ground User submitted requests, such as reports and payment posting.
Credit Request Credit bureau requests.
Select: System Displays:
1 Day All the types of jobs selected in Jobs Type section in last one-day.
1 Week All the types of jobs selected in Jobs Type section in last one-week.
1 Month All the types of jobs selected in Jobs Type section in last one-month.
By Date All the types of jobs selected in Jobs Type section for specific duration. You can specify a date range (within 3 months) in ‘Start Dt’ and ‘End Dt’ fields using the adjoining calendar and click ‘Search’.
Field: View this:
Request Type Displays the job request type.
Status Displays the job request status.
Job Set Displays the job set code.
3-8

6. In the Job Results section, you can view the following information about the Job selected in Job Details section:
A brief description of the fields is given below:
3.4.3 Monitoring Services
The Services screen allows you to track and maintain the system’s processing services, including credit bureaus, fax-in and batch job scheduler. The system administrator can start or stop the service on this screen using the action buttons respectively.
To stop, start or refresh a processing service
1. Click Dashboard > Dashboard >System Monitor > Services.
Job Displays the job description.
Thread Displays the job thread.
Errors Displays the number of errors.
Records Displays the number of records processed by the job.
Run Start Date/Time Displays the job run start date time.
Run End Date/Time Displays the job run end date time.
Description Displays the job request description.
Process Dt Displays the job process date.
Valid Execution Period
Start Date/Time Displays the job start date/time.
End Date/Time Displays the job end date time.
Field: View this:
Request Type Displays the job request type.
Description Displays the job request description.
Field: View this:
3-9
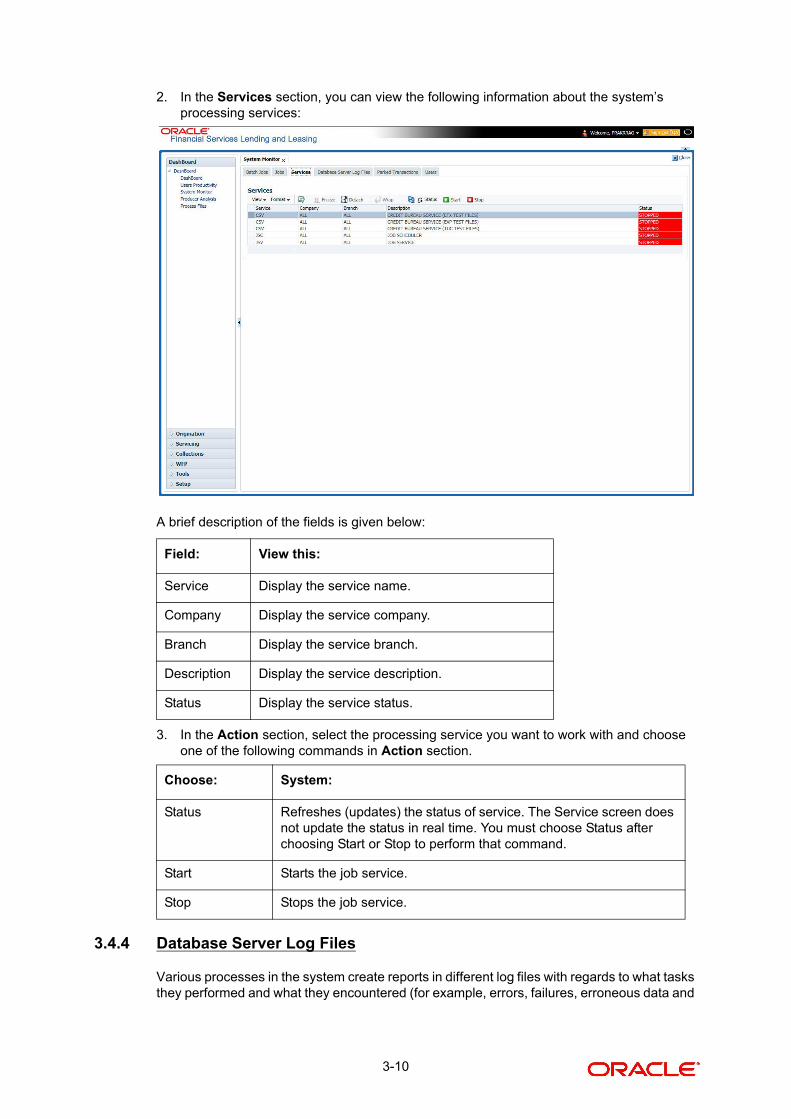
2. In the Services section, you can view the following information about the system’s processing services:
A brief description of the fields is given below:
3. In the Action section, select the processing service you want to work with and choose one of the following commands in Action section.
3.4.4 Database Server Log Files
Various processes in the system create reports in different log files with regards to what tasks they performed and what they encountered (for example, errors, failures, erroneous data and
Field: View this:
Service Display the service name.
Company Display the service company.
Branch Display the service branch.
Description Display the service description.
Status Display the service status.
Choose: System:
Status Refreshes (updates) the status of service. The Service screen does not update the status in real time. You must choose Status after choosing Start or Stop to perform that command.
Start Starts the job service.
Stop Stops the job service.
3-10
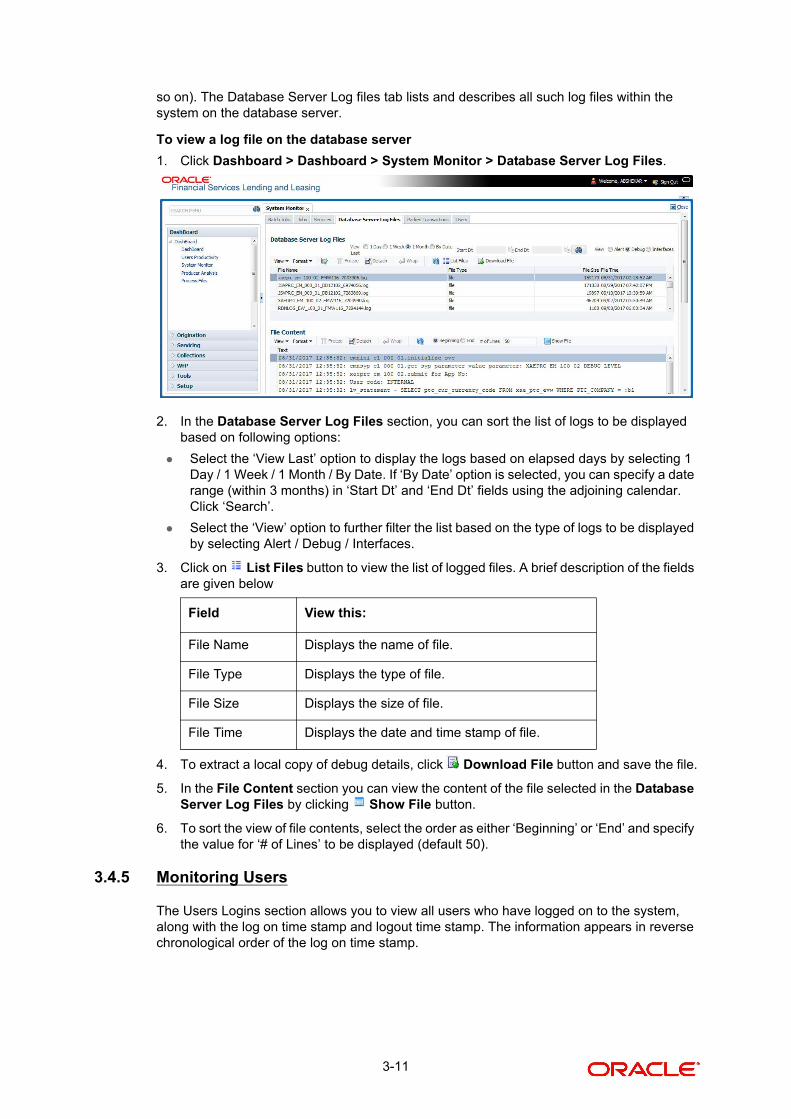
so on). The Database Server Log files tab lists and describes all such log files within the system on the database server.
To view a log file on the database server
1. Click Dashboard > Dashboard > System Monitor > Database Server Log Files.
2. In the Database Server Log Files section, you can sort the list of logs to be displayed based on following options:
Select the ‘View Last’ option to display the logs based on elapsed days by selecting 1 Day / 1 Week / 1 Month / By Date. If ‘By Date’ option is selected, you can specify a date range (within 3 months) in ‘Start Dt’ and ‘End Dt’ fields using the adjoining calendar. Click ‘Search’.
Select the ‘View’ option to further filter the list based on the type of logs to be displayed by selecting Alert / Debug / Interfaces.
3. Click on List Files button to view the list of logged files. A brief description of the fields are given below
4. To extract a local copy of debug details, click Download File button and save the file.
5. In the File Content section you can view the content of the file selected in the Database Server Log Files by clicking Show File button.
6. To sort the view of file contents, select the order as either ‘Beginning’ or ‘End’ and specify the value for ‘# of Lines’ to be displayed (default 50).
3.4.5 Monitoring Users
The Users Logins section allows you to view all users who have logged on to the system, along with the log on time stamp and logout time stamp. The information appears in reverse chronological order of the log on time stamp.
Field View this:
File Name Displays the name of file.
File Type Displays the type of file.
File Size Displays the size of file.
File Time Displays the date and time stamp of file.
3-11

To monitor users who have logged on to the system
1. Click Dashboard > Dashboard >System Monitor > Users.
2. In the User Logins section, sort the list of records to be displayed based on elapsed days by selecting 1 Day / 1 Week / 1 Month / By Date. If ‘By Date’ option is selected, you can specify a date range (within 3 months) in ‘Start Dt’ and ‘End Dt’ fields using the adjoining calendar. Click ‘Search’.
A brief description of the fields is given below:
3.4.6 Monitoring JMS Queues
OFSLL uses MDB infrastructure as an interface for asynchronous communication with third-party integrated applications and all the outgoing communications through all the interfaces are tracked in ‘JMS Queues’ tab.
The ‘JMS Queues’ tab in System Monitor screen facilitates as a dashboard to monitor the status of all the configured MDB (Message-Driven Bean) queues and provides a statistics of the total messages / requests that are sent from OFSLL to external system along with their status.
The ‘JMS Queues’ tab has the following sub tabs:
Status sub tab - to view the last status of configured MDB
Messages sub tab
– To view the list of configured interfaces and total messages triggered to the interface.
– To view the status of response for the message received from the interface.
– To ‘Re-submit’ failed messages.
Field: View this:
User Displays the user ID.
User Name Displays the user name.
Details Displays the details.
Login Date and Time Displays the login date time for the user.
Logout Date and Time Displays the logout date time for the user.
3-12

To view the status of all the configured MDB
1. Click Dashboard > Dashboard > System Monitor > JMS Queues. The Status sub tab is displayed by default.
2. In the ‘Status’ section, you can view the following details of configured MDB:
3. In the ‘Status’ section, select the required service for which you need the status and click Click button. On clicking, a dummy ping is sent to the interfaced server and status in ‘Last Updated Status’ column is updated as ‘SUBMITTED’.
4. Click (refresh) button, to fetch the latest status and the response received is updated in ‘Last Updated Status’ column.
Field View this:
Service Displays the name of the message service suffixed by MDB to differentiate the different MDB services.
Description Displays the description or abbreviated name of MDB inter-face.
Last Updated Status Displays the status of MDB interface. Following are the status displayed:
• UNKNOWN - indicates that no MDB infrastructure is con-nected or status ping message is not sent to that MDB.
• SUBMITTED - indicates that a dummy ping message is sent to MDB.
• RUNNING - indicates that the message is consumed by MDB infrastructure.
• STOPPED - indicates if MDB infrastructure is down.
3-13

To view the messages triggered to all configured MDB1. Click Dashboard > Dashboard > System Monitor > JMS Queues > Messages tab.
2. In the ‘Messages’ section, filter the list of messages using the following options:
– Select the required Company from the drop-down list to view JMS message at company level. The list is populated only with those Company Definitions to which you have been provisioned access. By default, ‘ALL’ is selected.
– Select the ‘View Last’ option to display the messages based on elapsed days by selecting 1 Day (default) / 1 Week / 1 Month / By Date. If ‘By Date’ option is selected, you can specify a date range (within 3 months) in ‘Start Dt’ and ‘End Dt’ fields using the adjoining calendar.
3. The ‘Messages’ section displays the list of configured interfaces and the total of messages exchanged between OFSLL and MDB in Submitted, Completed, Failed and Resubmitted status. Click (refresh) button to update the latest status.
4. In the ‘Messages’ section, you can view the following details:
To ‘Re-submit’ failed messages1. Click Dashboard > Dashboard > System Monitor > JMS Queues > Messages tab.
2. In the ‘Messages’ section, select the required MDB interface.
Field View this:
Service Displays the name of the message service suffixed by MDB to differentiate the different MDB services.
Description Displays the description or abbreviated name of MDB inter-face.
Submitted Displays the total count of requests submitted.
Completed Displays the total count of requests completed.
Failed Displays the total count of requests failed.
Resubmitted Displays the total count of only those requests which are failed and resubmitted again for processing.
3-14

3. The ‘Message Details’ section below displays the list of messages sent to the interface with the following details:
4. In the ‘Message Details’ section, select the message in ‘Failed’ status. Click (refresh) button to update the latest status.
5. (Optional) You can click ‘View’ to display the selected record in ‘Message Details’ section.
6. Click Re-submit. The details are triggered again for processing and the ‘Resubmitted’ counter in ‘Messages’ section is updated along with other counters.
Response Message Details
This section is enabled if Events or Webhook type of MDB service is selected in Message section and displays the request Message Details that is propagated to external system for the posted event action.
To view ‘Response Message Details’ of an Event1. Select the required record from the Message Details section and click ‘Show File’.
The first 50 characters of the request in json format is displayed since the default preference selected is ‘Beginning’ in View option and ‘# of Characters’ is set to 50.
2. You can customize the preference using View Option (Beginning / End) and specifying the number of characters to be displayed.
3. Also you can click ‘Show All’ to display the complete request.
3.4.7 Monitoring Events
The Events screen is a dashboard to view all the Events triggered in the system. In the Events screen you can view the latest status of all the processed events and ‘Re-submit’ only failed events for re-processing. However, this is a display-only field and does not allow to modify the defined event action parameters.
The Events screen has the following sections:
Event Actions
Action Parameters
In the ‘View Options’ section, you can filter and view the list of Events based on following Status:
Field View this:
Message ID View the system generated MDB message ID
Request Type View the message request type
Request SubType View the message request sub type
Message Type View the message identifier
Status View the message processing status
Response This column data is displayed only for Webhook MDB.
View the HTTP Header received as response during Web-hook event action invocation.
Message Content View the message content
Time View the message time stamp
3-15
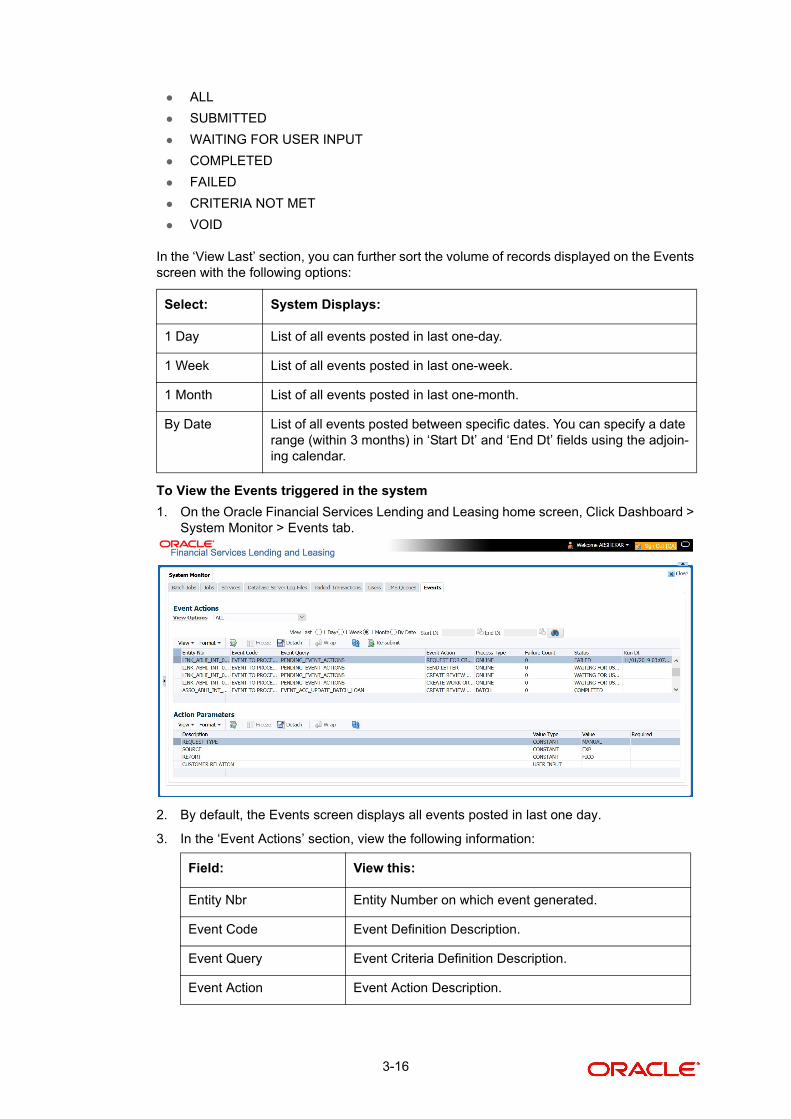
ALL
SUBMITTED
WAITING FOR USER INPUT
COMPLETED
FAILED
CRITERIA NOT MET
VOID
In the ‘View Last’ section, you can further sort the volume of records displayed on the Events screen with the following options:
To View the Events triggered in the system
1. On the Oracle Financial Services Lending and Leasing home screen, Click Dashboard > System Monitor > Events tab.
2. By default, the Events screen displays all events posted in last one day.
3. In the ‘Event Actions’ section, view the following information:
Select: System Displays:
1 Day List of all events posted in last one-day.
1 Week List of all events posted in last one-week.
1 Month List of all events posted in last one-month.
By Date List of all events posted between specific dates. You can specify a date range (within 3 months) in ‘Start Dt’ and ‘End Dt’ fields using the adjoin-ing calendar.
Field: View this:
Entity Nbr Entity Number on which event generated.
Event Code Event Definition Description.
Event Query Event Criteria Definition Description.
Event Action Event Action Description.
3-16
4. In the ‘Action Parameters’ section, view the following information:
Re-submit Failed Events
In the Events screen you can filter and re-submit only the ‘FAILED status Online Event Actions’ for processing. An Event is marked with ‘Failed’ status when the same could not be processed in the system due to setup/infrastructure issues. This is an additional option to re-process the event actions. On resubmitting an event, the Failure Count against the record is incremented by 1.
However, ‘Resubmit’ option is not allowed for Webhook and SEND JMS MESSAGE actions since the same functionality is available in JMS Queues.
In the ‘Event Actions’ section, select the required event record listed with status FAILED and click ‘RE-submit’. On triggering the event, the ‘Run Dt’ column is updated with Event Action Generation Date and Time. Click ‘Refresh’ to fetch the latest status.
3.5 Producer Analysis
The Producer analysis screen enables you to view and know the status of all applications sourced by different Producers.
Process Type Event processing type as either Online/Batch fetched from EVENT_PROCESS_TYPE_CD lookup.
Failure Count Number of times the event processing has failed.
Status Event action with following execution status:
CRITERIA NOT MET
SUBMITTED
VOID
COMPLETED
FAILED
ALL
WAITING FOR USER INPUT
Run Dt Event Action Generation Date and Time.
Field: View this:
Description Event Action Parameter Description.
Value Type Event Action Input Parameter Type.
Value Value defined for the event action.
Required Y/N indicating if the Action Parameter is mandatory.
Field: View this:
3-17
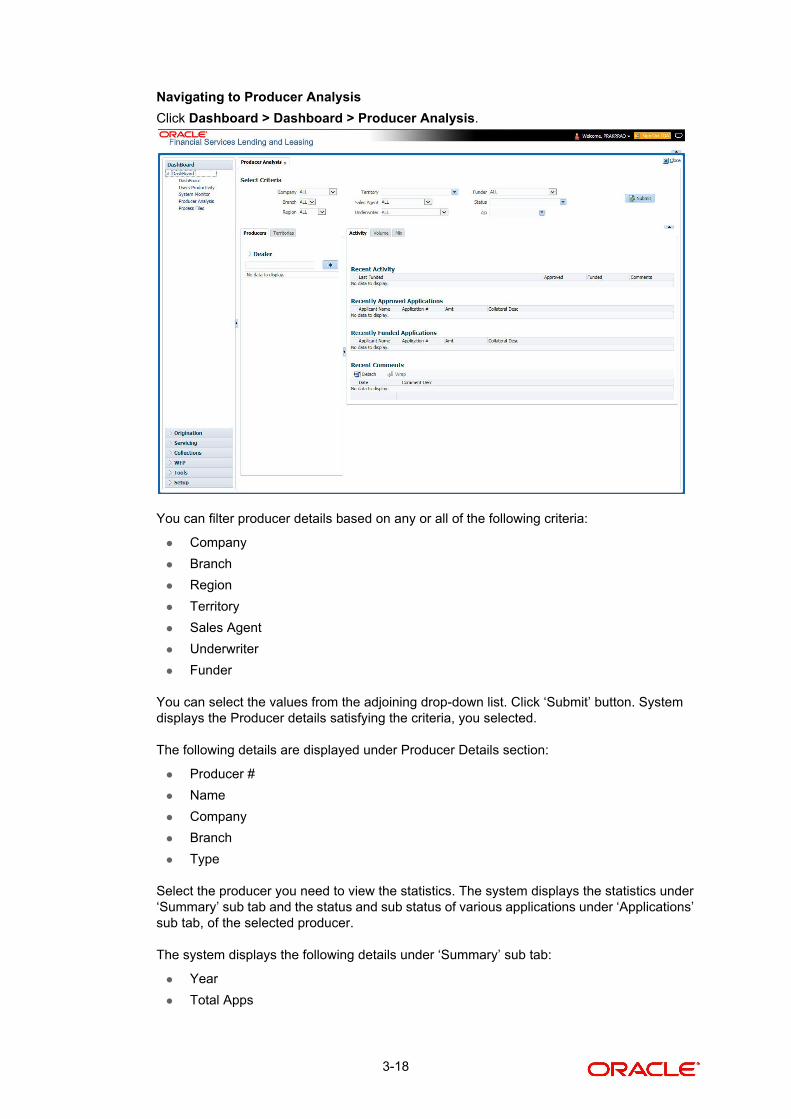
Navigating to Producer Analysis
Click Dashboard > Dashboard > Producer Analysis.
You can filter producer details based on any or all of the following criteria:
Company
Branch
Region
Territory
Sales Agent
Underwriter
Funder
You can select the values from the adjoining drop-down list. Click ‘Submit’ button. System displays the Producer details satisfying the criteria, you selected.
The following details are displayed under Producer Details section:
Producer #
Name
Company
Branch
Type
Select the producer you need to view the statistics. The system displays the statistics under ‘Summary’ sub tab and the status and sub status of various applications under ‘Applications’ sub tab, of the selected producer.
The system displays the following details under ‘Summary’ sub tab:
Year
Total Apps
3-18

Approved
Conditioned
Rejected
Withdrawn
Funded
Amount
The system displays the following details under ‘Applications’ sub tab:
Company
Branch
App #
Date
Title
Product
Status
Sub Status
3.6 Process Files
The Process files screen allows you to view the incoming and outgoing files exchanged between OFSLL and other interfaced systems for processing and also perform a bulk upload of required files.
The Process files interface also provide information on the type of files uploaded along with other attributes. In-order to facilitate the process files handling, the following parameters has to be enabled in Setup > Administration > System > System Parameters screen. For more information on enabling system parameters, refer to ‘System Parameters’ section in Setup Guides.
CMN_FILE_PROCESS_TO_LOB
On enabling the above parameter, system stores the incoming / outgoing documents in the relevant tables and not in the file system.
UIX_INCOMING_FILE_PATH
UIX_OUTGOING_FILE_PATH
On enabling the above two parameters, the incoming and outgoing file path of application server need to be defined to the required folder path by updating the ‘Parameter Value’ which by default is ‘SETME’. (For example: /tmp)
If both the parameter ‘CMN_FILE_PROCESS_TO_LOB’ and ‘OUTBOUND_CALL_Q’ are enabled (status ='Y'), system automatically handles upload/download of files from Weblogic configured process files.
Depending on the CLOB parameter option, if set to ‘Y’ the incoming/outgoing file directories are to be manually created in Web Logic server. For details of directories, refer to ‘Creating Application Home directory’ section in Database Installation Guide.
3-19

3.6.1 Incoming Process File
The incoming process file screen displays the list of files being shared from an external system along with other attributes such as directory path, file name, type, size, date and status. You can select the file required and upload it into the system for immediate processing.
View the list Incoming Process File
1. Click Dashboard > Process Files > Incoming Process File.
2. In the Incoming Process File section, click List Files. System displays the list of incoming files.
A brief description of the fields is given below:
Upload Incoming Process File
1. Click Dashboard > Process Files > Incoming Process File.
2. In the Incoming Process File section, click List Files. System displays the list of incoming files. You can click to refresh the grid data.
3. In the Company drop-down list, select the portfolio company. Based on the Company selected, system processes Incoming files. If the company is selected is ALL, system processes the upload file related to any company.
Field: Description:
Select All Select this option to select all the listed files.
Directory Name View the directory path where incoming file is stored.
File Name View the name of the file.
File Type View the type of incoming file. The file type is auto populated based on ODD (Output Data Definition) details maintained for the specific file type in INCOMING_FILE_TYPE_CD lookup.
File Size(bytes) View the size of incoming file.
File Date View the date and time when the incoming file was placed in the directory.
Status View the status of the file.
3-20
However, the Company list is populated only with those Company Definitions to which you have been provisioned access. This company is considered if system is setup to process batch jobs at Company level. For more information, refer to ‘Appendix - Company Level GL Date Configuration’ section.
4. Select the check box adjacent to the required file and click Upload. You can also click Select All check box to perform a bulk upload of all the listed files.
The uploaded files are listed in below ‘Uploaded Files’ section and the status of the files are changed from ‘Generated’ to ‘Uploaded’. In case of a processing error, the status of the file is indicated as ‘Processed Error’.
3.6.1.1 Uploaded Files
The uploaded files section displays the list of incoming files uploaded into the system. You can sort and view the list of files depending on the number of days based on Last 1 Day / 2 Days / 5 Days / All Days. You can click to refresh the grid data.
On selection, you can view the following information:
In the Uploaded Files section, you can do the following:
Click Download Bad Data to download the list of uploaded files which had processing errors due to bad data.
Click Download Log Data to download a log of all the files uploaded.
Sort the list of uploaded files based on specific company by selecting the same from ‘Company’ drop-down list.
3.6.2 Proration of Future Account Dues
OFSLL has a facility to derive future dated dues on an account using the input file processing mechanism. This helps to view the future dues on accounts in bulk even before posting on the account and without generating a mock statement on the account.
Similar to other input files processing, the required Account numbers and ‘Due Dates’ on which the due is to be calculated are to be added as individual record in the file and uploaded into the system by placing in input folder path. For more information on this process, refer to above section.
The Input file is processed in the system on running the batch job IADPRC_BJ_100_01 (ACCOUNT DUES FILE UPLOAD) in SET-IFP batch job set and to the location as per the system parameter CMN_FILE_PROCESS_TO_LOB value.
Using an internal function, system calculates the future dated due for the specific Account(s) and stores the computed values in database table. The same has to be queried to view the details. The due amount returned by this function is the regular bill amount calculated without
Field: Description:
File Name View the name of file uploaded.
File Type View the type of file uploaded.
File Dt View the date and time when the file was uploaded.
Status View the status of upload.
User View the login ID of User who performed the file upload.
3-21
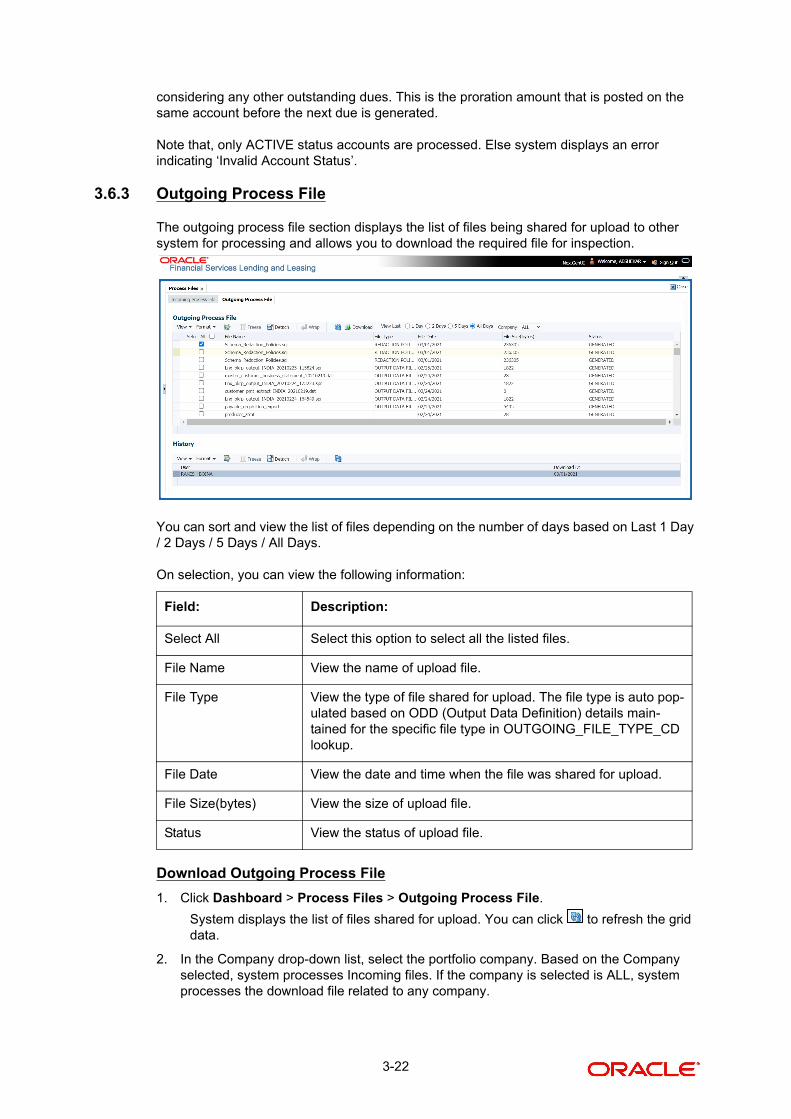
considering any other outstanding dues. This is the proration amount that is posted on the same account before the next due is generated.
Note that, only ACTIVE status accounts are processed. Else system displays an error indicating ‘Invalid Account Status’.
3.6.3 Outgoing Process File
The outgoing process file section displays the list of files being shared for upload to other system for processing and allows you to download the required file for inspection.
You can sort and view the list of files depending on the number of days based on Last 1 Day / 2 Days / 5 Days / All Days.
On selection, you can view the following information:
Download Outgoing Process File
1. Click Dashboard > Process Files > Outgoing Process File.
System displays the list of files shared for upload. You can click to refresh the grid data.
2. In the Company drop-down list, select the portfolio company. Based on the Company selected, system processes Incoming files. If the company is selected is ALL, system processes the download file related to any company.
Field: Description:
Select All Select this option to select all the listed files.
File Name View the name of upload file.
File Type View the type of file shared for upload. The file type is auto pop-ulated based on ODD (Output Data Definition) details main-tained for the specific file type in OUTGOING_FILE_TYPE_CD lookup.
File Date View the date and time when the file was shared for upload.
File Size(bytes) View the size of upload file.
Status View the status of upload file.
3-22

However, the Company list is populated only with those Company Definitions to which you have been provisioned access. This company is considered if system is setup to process batch jobs at Company level. For more information, refer to ‘Appendix - Company Level GL Date Configuration’ section.
3. Select the check box adjacent to the required file and click Download. You can also click Select All check box to download all the listed files.
History
The history section displays the following details:
Field: Description:
User View the login ID of User who downloaded the file.
Download Dt View the date and time when the file was downloaded.
3-23

4. Sales Lead
4.1 Introduction
The Sales Lead screen enables you to record information gathered during a sales query or a call from a potential borrower. A sales representative can then use Sales Lead screen to follow-up with the borrower. This is not a mandatory screen. You can always begin Loan origination process directly using the Application Entry screen Information on Sales Lead screen can be attached to the Application Entry screen as optional information. Attaching a lead to an application can help the sales department analyze the effectiveness of following-up with prospective borrowers. Once a lead is attached to an application from the Sales Lead screen, the system changes its status to COMPLETED.
4.2 Lead Entry
The Lead Entry screen enables you to record information regarding prospective borrowers from a sales query or a call to be used in a follow-up call. The initial status for the lead can be set as NEW or FOLLOW-UP.
To Navigate to Lead Entry screen
1. On the Oracle financial Services Lending and Leasing Application home screen, clickOrigination > Origination > Sales Lead.
2. On the Sales Lead screen, click Lead Entry tab.
3. In the Lead Entry screen, perform any of the Basic Operations mentioned in Navigation chapter.
A brief description of the fields is given below:
4-1

Applicant Information
Applicant Information Section
Address Section
Field Do this
Lead # View the sales lead number.
Lead Date View the sales lead date. System defaults the current date.
Company Select the company name.
Branch Select the branch name.
First Name Specify the applicant’s first name.
Last Name Specify the applicant’s last name.
Birth Dt Specify the birth date.
Channel Select the channel of the sales lead.
Source Select the source of the sales lead.
Field Do this
Type Select the address type.
Postal Type Select the postal address type.
Address # Specify the address.
Street Pre Select the street prefix (directional).
Street Name Specify the street name.
Street Type Select the street type.
Street Post Select the street postfix (directional).
Apt # Specify the apartment number.
Address 1 Specify the first address line.
Address 2 Specify the second address line.
City Specify the city.
State Select the state.
Zip Select the zip code.
Note: For non US country, you have to enter zip code.
Country Select the country code.
Email Specify the e-mail address.
Alternate Email
Specify the alternate e-mail address.
4-2

4. Perform any of the Basic Actions mentioned in Navigation chapter.
4.2.1 Telecoms Sub Tab
The Telecoms sub tab records phone numbers for the sales lead.
1. Click Telecoms sub tab available on Sales Lead screen.
2. You can perform any of the Basic Operations mentioned in Navigation chapter.
A brief description of the fields is given below:
3. Perform any of the Basic Actions mentioned in Navigation chapter.
4.2.2 Comments sub tab
The Comments sub tab records any comments regarding the sales lead.
1. Click Comments sub tab available on Sales Lead screen.
2. You can perform any of the Basic Operations mentioned in Navigation chapter.
A brief description of the fields is given below:
3. Perform any of the Basic Actions mentioned in Navigation chapter.
Assigned By View the user code creating the sale lead.
Status Select the status for the sale lead.
Status Dt View the last sales lead status change date.
Follow-up Dt Specify the sales lead follow-up date.
Field Do this
Telecom Type
Select the type of telecommunications device
Phone Specify the phone number
Current Select the Current check box to indicate the phone number is in service.
Field Do this
Type Select the comment type.
Sub Type Select the comment sub type.
Comment Specify the comment.
Comment Dt View the date when comment was entered and saved.
Comment By View the user id of the person who entered and saved the comment.
Field Do this
4-3

4.2.3 Documents sub tab
The Documents sub tab needs to be completed if:
The customer had requested any documents
Any document has been sent to the customer during sales lead entry.
1. Click Documents sub tab available on Sales Lead screen.
2. You can perform any of the Basic Operations mentioned in Navigation chapter.
A brief description of the fields is given below:
3. Perform any of the Basic Actions mentioned in Navigation chapter.
4.2.4 Requests sub tab
The Requests sub tab records product the customer is interested in and the requested amount for each product.
1. Click Requests sub tab available on Sales Lead screen.
2. You can perform any of the Basic Operations mentioned in Navigation chapter.
A brief description of the fields is given below:
3. Perform any of the Basic Actions mentioned in Navigation chapter.
4.3 Follow-Up tab
The Follow-Up tab enables you to update customer information based on sales lead follow-ups with customer.
Field Do this
Document Type
Select the document type.
Sub Type Select the document sub type.
Documents Specify the document.
Document Dt View the date when document was entered and saved.
Document By View user id of the person who entered and saved the document.
Field: Do this:
Product Specify the requested product as Loan.
Requested Amount
Specify the requested amount.
4-4

1. On the Sales Lead screen, click Follow-Up tab.
2. In the Status field, click:
– New to view all leads on the Follow-Up screen with status of NEW.
-or-
– Follow Up to view all leads on the Follow-Up screen with status of FOLLOW UP.
-or-
– All to view all leads on Follow-Up screen.
3. In the Assigned field, click:
– Assigned By to view all leads on the Follow-Up screen assigned to the current user.
-or-
– All to view all leads on the Follow-Up screen assigned to any user.
4. You can perform any of the Basic Operations mentioned in Navigation chapter.
A brief description of the fields is given below:
Field Do this
Company View the company name of sales lead.
Branch View the branch name of the sales lead.
Followup Dt Select the follow-up date of the sales lead.
Lead # View the sales lead number.
Lead Date View the creation date of the sales lead.
Name View the applicant’s name.
Assigned by View the user assigned to the sales lead.
4-5

5. Perform any of the Basic Actions mentioned in Navigation chapter.
4.4 Maintenance tab
The Maintenance tab enables you to attach a sales lead to a different or missed application or change status of lead as NEW.
To attach a sales lead to an application
1. On the Sales Lead screen, click Maintenance tab.
You can view the following information:
2. Select the sales lead you want to attach to the application and click Attach to an Application button.
3. You can view the following details of application attached to the lead:
Status Select the status of the sales lead.
Status Dt View the last sales lead status change date.
Field View this
Lead # View the sales lead number.
Last Name View the last name of the sales lead.
First Name View the first name of the sales lead.
Status View the status of the sales lead.
Company View the company of the sales lead.
Branch View the branch of the sales lead.
Days of Inac-tivity
View the number of days of inactivity regarding the sales lead.
Field View this
Priority The priority of the sales lead.
Field Do this
4-6

If the wrong sales lead was attached to an application, detach it from the existing application by clicking Change to New Status, then attach it to the correct application clicking Attach to an Application, completing the App # field, and clicking Post.
Application # The application number of the sales lead.
Date The date of the application.
Title The title of the application.
Product The product of the application.
Status The status of the application.
Producer The producer of the application.
Field View this
4-7

5. Simple Application Entry
5.1 Introduction
The first step in the Loan origination process is entering credit application data into Oracle Financial Services Lending and Leasing Application. The Simple Application Entry screen enables you to specify information from the credit application into the system and request a credit bureau report.
This chapter explains how to use the Applications screen to specify and validate a credit application.
5.2 Entering a Credit Application
There are four main steps in entering an application
1. Select product type and producer at the top of the Application screen in the Applications section. The product defines the type of credit application: Loan as well as any collateral, such as vehicles or homes, associated with the Loan. When you save the application, system activates the links on Applications screen that are associated with the product, streamlining the application process. The producer is the dealer supplying the application. When selected, the status of the Producer is displayed along with Producer Name.
2. Enter information regarding the primary applicant, such as name, social security number, address, place of employment and financial assets and liabilities. Enter this same information for any other applicants, such as co-signers or joint applicants, if they exist. System displays the error message as “The Application does not exist” if the provided details does not match with any application details.
3. Enter information about the requested credit for the Loan such as Loan amount and number of terms.
4. Enter information about the collateral.
You can also enter credit application data into Oracle Financial Services Lending and Leasing Application using the Fax-In container. For more details, refer to ‘Application Entry using Fax-In’ section.
Once the basic details are entered, the user has to check whether the application pre qualifies or not. Once the pre-qualified edits are satisfied, click Submit in the Application screen.
When finished, Oracle Financial Services Lending and Leasing checks the application for completeness using a predefined set of edits. These edits search for errors and warnings based on your system setup. Status change of the application can be determined by the credit bureau and scoring model of the application. The prescreening checks ensure that automatic credit bureau reports are pulled only for applications which meet set criteria, thus saving cost.
After an application clears the edits check, click Process Application in the Applications section. The system begins the processes of prescreening the application and pulling a credit bureau while you can begin entering the next application in your queue.
To enter a new application
1. Click Origination > Origination > Simple Application Entry.
5-1

2. The Simple Application Entry screen appears, opened at the Search link’s Results screen.
The Recreate Instance button appears only when the BPEL parameter is YES.
3. In the Results tab’s Quick Search section, click New Application. The Search link’s Applications Entry screen opens at the Simple Application Entry tab.
For field description refer Applications of the Underwriting chapter:
5-2
Pre-fill applicant information from Sales Lead
You can pre-fill the applicant information if the same applicant details are already captured as a prospect in the Sales Lead screen. To do so, select the sales lead number in the drop-down of ‘Lead #’ field and save the Application details. The ‘Copy Lead Details’ button is enabled in the Applicant section below. Click on it to auto populate the Applicant details.
5.2.1 Pre-qualifying an Application
After entering the basic details of the applicant like identification and demographic details along with the address, employment, assets, liabilities and other income information and requested details, the user has to check whether the application pre-qualifies or not by clicking Pre-qualify Application button. This is governed by a set of Pre-qualification edits.
If pre-qualified edits are satisfied, the status is changed to NEW-PREQUALIFY APPROVED and user can modify or update any further details in the Application Entry screen.
If the edits are not satisfied, application will be pushed to REJECTED APPLICATIONS queue with a status update to REJECTED-PREQUALIFY REJECTED. You can also view rejected pre-qualification in the Underwriting screen.
When specific services listed in Dashboard -> System Monitor -> Services tab are 'stopped', the application status will display 'NEW PRE-SCREEN APPROVED' and user will not be able to change the status manually to move it to Underwriting queue. In such cases, services should be started post which the application is processed automatically by the system and falls in the appropriate queue as per work flow.
5.3 Applicants Tab
Using the information supplied on application, complete Applicants tab details and the following sub tab details:
Address
Employments
Telecoms
Financials
Liabilities
Other Incomes
Summary
Credit Scores
Duplicate Applicant
Existing Accounts.
The system uses information on Financial and Liabilities sub tabs to determine the applicant’s net worth. The system uses information on Employments tab and Other Incomes sub tab to calculate applicant’s debt-to-income ratio.
Note the following while completing frequency fields:
Biweekly in the system means ‘once every two weeks’ and not ‘twice a week’.
Bimonthly in the system means ‘once every two months’ and not ‘twice a month’.
For more information, refer appendix Payment Amount Conversion.
5-3
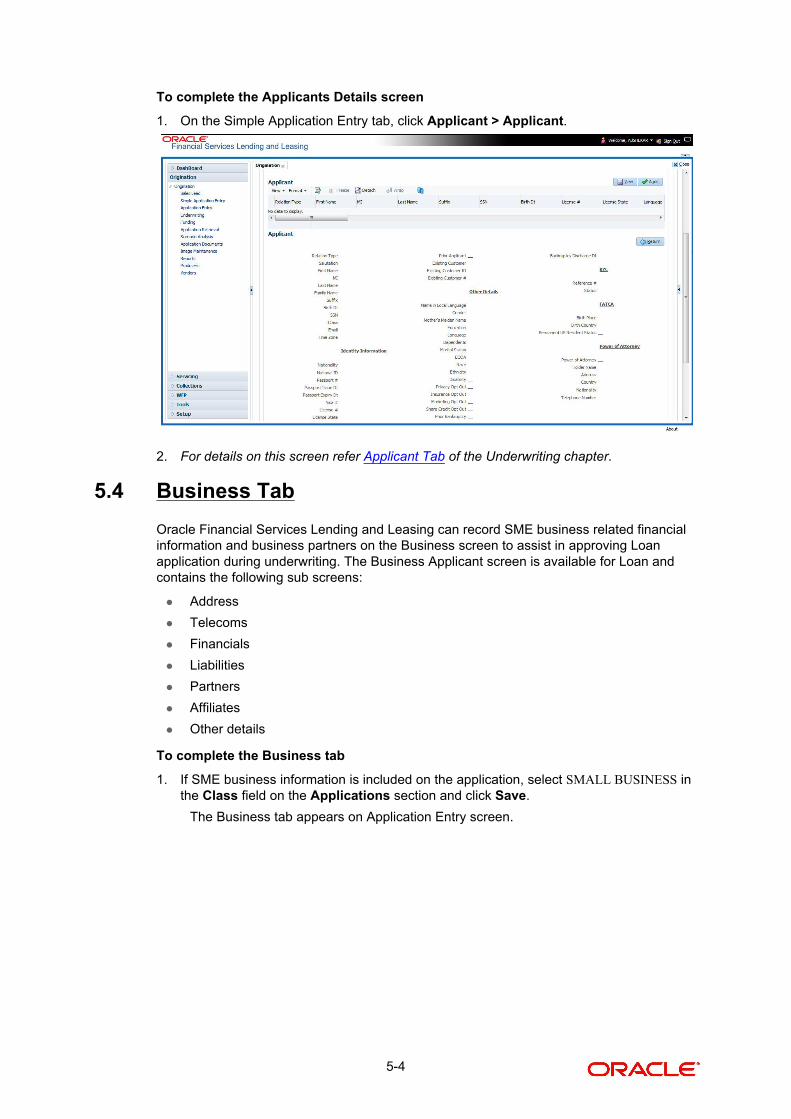
To complete the Applicants Details screen
1. On the Simple Application Entry tab, click Applicant > Applicant.
2. For details on this screen refer Applicant Tab of the Underwriting chapter.
5.4 Business Tab
Oracle Financial Services Lending and Leasing can record SME business related financial information and business partners on the Business screen to assist in approving Loan application during underwriting. The Business Applicant screen is available for Loan and contains the following sub screens:
Address
Telecoms
Financials
Liabilities
Partners
Affiliates
Other details
To complete the Business tab
1. If SME business information is included on the application, select SMALL BUSINESS in the Class field on the Applications section and click Save.
The Business tab appears on Application Entry screen.
5-4

2. On the Application Entry screen, click Business.
For details on this screen, refer Business Tab of Underwriting chapter.
5.5 Request Tab
Depending on the type of product you select, the following screen will be available from Requested tab
To complete Request tab:
5-5
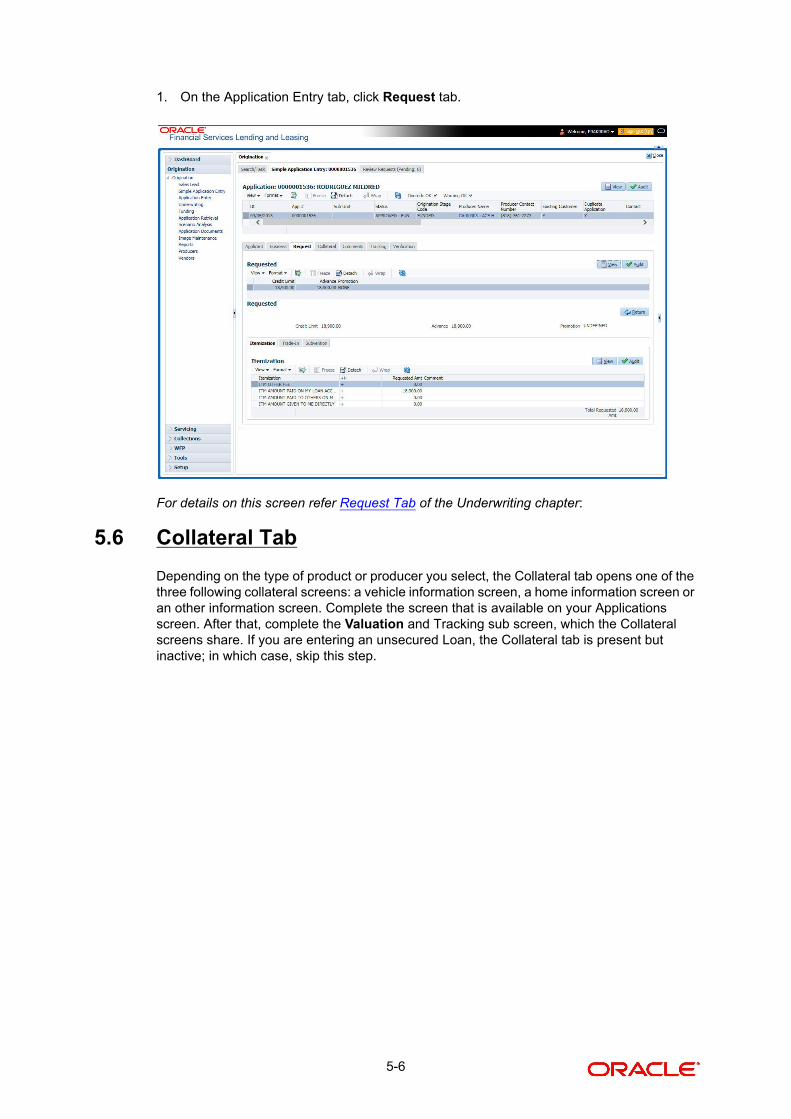
1. On the Application Entry tab, click Request tab.
For details on this screen refer Request Tab of the Underwriting chapter:
5.6 Collateral Tab
Depending on the type of product or producer you select, the Collateral tab opens one of the three following collateral screens: a vehicle information screen, a home information screen or an other information screen. Complete the screen that is available on your Applications screen. After that, complete the Valuation and Tracking sub screen, which the Collateral screens share. If you are entering an unsecured Loan, the Collateral tab is present but inactive; in which case, skip this step.
5-6

To enter vehicle information from the Collateral tab
1. On the Application Entry link bar, click Collateral.
To enter home information from the Collateral tab
1. On the Application Entry tab, click Collateral sub tab.
5-7
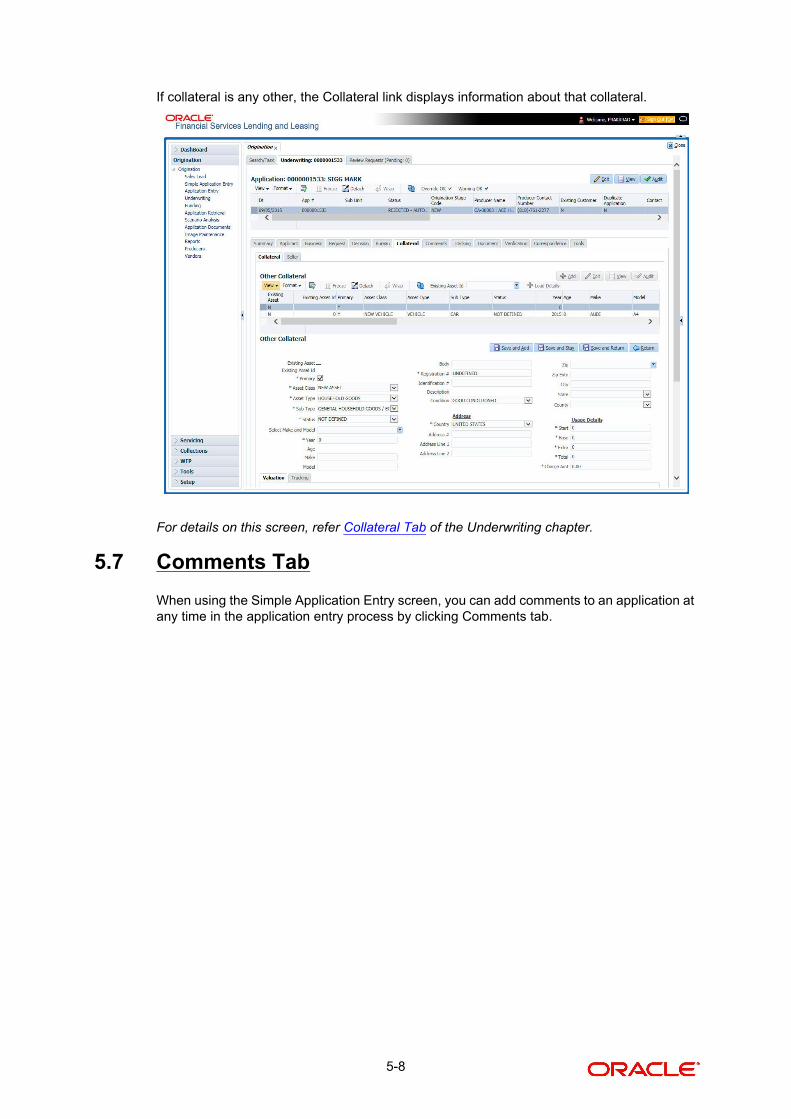
If collateral is any other, the Collateral link displays information about that collateral.
For details on this screen, refer Collateral Tab of the Underwriting chapter.
5.7 Comments Tab
When using the Simple Application Entry screen, you can add comments to an application at any time in the application entry process by clicking Comments tab.
5-8

To complete the Comments tab
1. On the Application Entry tab, click comments.
For details on this screen, refer Comments Tab of the Underwriting chapter.
5.8 Tracking Tab
The Tracking tab enables you to record further information associated with the application. What items you choose to track are setup during implementation.
5-9

To track attributes
1. On the application entry screen, click the Tracking tab.
For details on this screen, refer Tracking Tab of the Underwriting chapter
5.9 Verification Tab
Oracle Financial Services Lending and Leasing can be configured to automatically validate portions of an application when you attempt to change its status. The results of this data check appear on the Verification link’s Edit screen as an Error, a Warning or an Override.
If it is an Error, the system will not allow you to change application’s status and approve Loan until you fix all the errors.
If it is a Warning, the system enables you to change an application’s status without correcting the matter. While you should still investigate the problem, Warning messages are of a lesser importance than Error messages.
If it is an Override, the system displays a dialog box informing you that an override is needed; your responsibility level does not have the authority required to process this step. (Choose Yes on the dialog box to move the application to the queue of the user with the required authority.)
To validate a credit application
1. Enter all the information associated with the application on the Application Entry screen.
5-10

2. When you are finished entering data, on the Application Entry tab, click Verification sub tab, then click the Edits sub tab.
For details on this screen, refer Verification Tab of the Underwriting chapter.
5.9.1 Application Entry using Fax-In
You can enter credit application data into Oracle Financial Services Lending and Leasing Application using the Fax-In image functionality using the Fax-In container. Once the all the images are loaded into the system using the steps mentioned in ‘Entering a Credit Application’ section, you can view those images in the Fax-In container and perform data entry concurrently.
The Fax-In container option is a simple image holder which is available to the user on clicking the ‘New Application’ button. The option is available only if has been enabled in the system settings by the administrator.
If you are the administrator, you can enable/disable this feature to the users in the access screen. However, you can view the availability of this feature by navigating to Main Menu > Setup > Administration > User > Access screen. Select Screen tab and in the Security Access Definition section, the status of “ACCESS TO MENU IMAGE MAINTAINENCE” flag defines the availability of this feature. If the flag is set to ‘Y’ then the Fax-In container is available in Application Entry screen.
The image container displays the image with the header information stored in the tables loaded as a part of the loading process. You can navigate through the pictures using the navigation buttons (First, Previous, Next and Last) available on the top right.
After entering the Application details, you need to select the Image check box placed on the top of Fax Image container. By doing so the system will automatically associate the current image with the application and save it along with the other application details. Also the image will no longer be available in the container since the container only holds those images which are not associated with any application.
5-11

5.10 Review Request
The Review Request tab facilitates to flag an Application for the attention of another Oracle Financial Services Lending and Leasing user and ask for review / feedback. It allows the system users to send and receive requests (including e-mail) commenting on a specific account or application. The Review Request tab supports iterative review of selected Application and also to process the review with multiple reviewers.
For detailed information on using this feature, refer to ‘Review Request’ section in Underwriting chapter of the document.
5-12

6. Application Entry
6.1 Introduction
The first step in the Loan origination process is entering credit application data into Oracle Financial Services Lending and Leasing Application. The Application Entry screen enables you to specify information from credit application into the system and request a credit bureau report.
This chapter explains how to use the Applications screen to specify and validate a credit application.
6.2 Entering a Credit Application
There are four main steps in entering an application
1. Select product type and producer at the top of the Application screen in Applications section. The product defines the type of credit application: Loan as well as any collateral, such as vehicles or homes, associated with the Loan. When you save the application, system activates the links on Applications screen that are associated with the product, streamlining the application process. The producer is the dealer supplying the application. When selected, the status of the Producer is displayed along with Producer Name.
2. Enter information regarding the primary applicant, such as name, social security number, address, place of employment and financial assets and liabilities. Enter this same information for any other applicants, such as co-signers or joint applicants, if they exist.System displays the error message as “The Application does not exist” if the provided details does not match with any application details.
3. Enter information about the requested credit for the Loan such as Loan amount and number of terms.
4. Enter information about the collateral.
You can also enter credit application data into Oracle Financial Services Lending and Leasing Application using the Fax-In container. For more details, refer to ‘Application Entry using Fax-In’ section.
Once the basic details are entered, the user has to check whether the application pre qualifies or not. Once the pre-qualified edits are satisfied, click Submit in the Application screen. Pre-qualification edits can be viewed from the 'Verification' sub tab.
When finished, Oracle Financial Services Lending and Leasing checks the application for completeness using a predefined set of edits. These edits search for errors and warnings based on your system setup. Status change of the application can be determined by credit bureau and scoring model of the application. The prescreening checks ensure that automatic credit bureau reports are pulled only for applications which meet set criteria, thus saving cost.
After an application clears the edits check, click Process Application in the Applications section. The system begins the processes of prescreening the application and pulling a credit bureau while you can begin entering the next application in your queue.
Credit Application via External Interface
You can also load credit applications created in external system into Oracle Financial Services Lending and Leasing for further processing.
6-1

OFSLL integrating with external system facilitates to transfer the pre-populated credit application data into the system through an xml file. Such credit applications are categorized in OFSLL as either 'eCONTRACT/DEALER CONTRACT in the actions section. However, OFSLL generated credit applications are marked as MANUAL CONTRACT.
Once a credit application is successfully validated and loaded in Application Entry screen, a response is sent back from OFSLL to the external system. Similarly, all subsequent status changes initiated in OFSLL are updated to the external system. All communications between OFSLL and external systems are recorded into a log and is accessible through Dashboard > System Monitor > Database Server Log Files screen. Also the ‘Comments’ screen facilitates to exchange information regarding credit application processing between OFSLL and external system as comments, provided the comment Sub Type is selected as 'OUTBOUND TO INTERFACE' for such communications.
Hence effectively you can by-pass the need to re-create the application in OFSLL and helps in faster processing of credit applications and decision making.
To enter a new application
1. Click Origination > Origination > Application Entry.
2. The Application Entry screen appears, opened at the Search link’s Results screen.
The Recreate Instance button appears only when the BPEL parameter is YES.
6-2
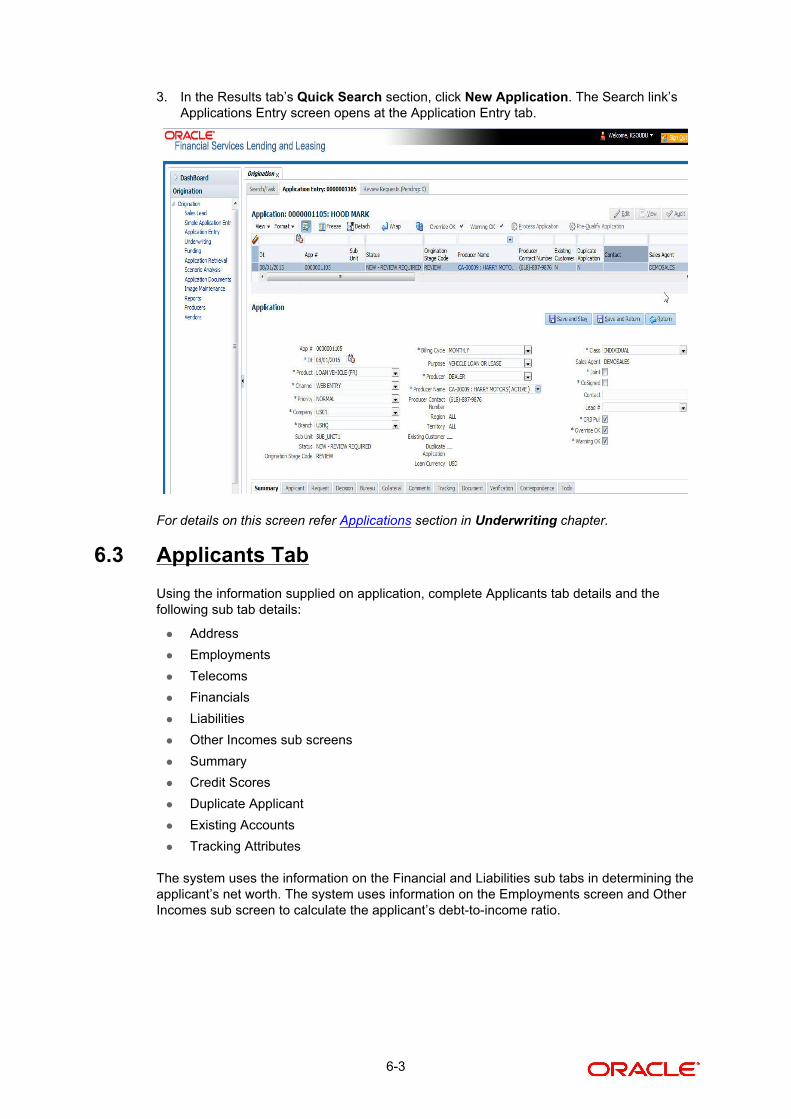
3. In the Results tab’s Quick Search section, click New Application. The Search link’s Applications Entry screen opens at the Application Entry tab.
For details on this screen refer Applications section in Underwriting chapter.
6.3 Applicants Tab
Using the information supplied on application, complete Applicants tab details and the following sub tab details:
Address
Employments
Telecoms
Financials
Liabilities
Other Incomes sub screens
Summary
Credit Scores
Duplicate Applicant
Existing Accounts
Tracking Attributes
The system uses the information on the Financial and Liabilities sub tabs in determining the applicant’s net worth. The system uses information on the Employments screen and Other Incomes sub screen to calculate the applicant’s debt-to-income ratio.
6-3

To complete the Applicants Details screen
1. On the Application Entry tab, click Applicant > Applicant.
For details on this screen refer Applicant Tab section in Underwriting chapter.
6.4 Business Applicants Tab
Oracle Financial Services Lending and Leasing can record SME business related financial information and business partners on the Business screen to assist in approving the Loan application during underwriting. The Business Applicant screen is available for Loan and contains the following sub screens:
Address
Telecoms
Financials
Liabilities
Partners
Affiliates
Other details
To complete the Business Applicant screen
1. If SME business information is included on the application, select SMALL BUSINESS inClass field on Applications section and click Save.
The Business tab appears on the Application Entry screen.
6-4

2. On the Application Entry screen, click Business.
For details on this screen refer Business Tab section in Underwriting chapter.
6.5 Request Tab
Depending on the type of product you select, the following screen will be available from Requested link
To complete the request tab:
6-5
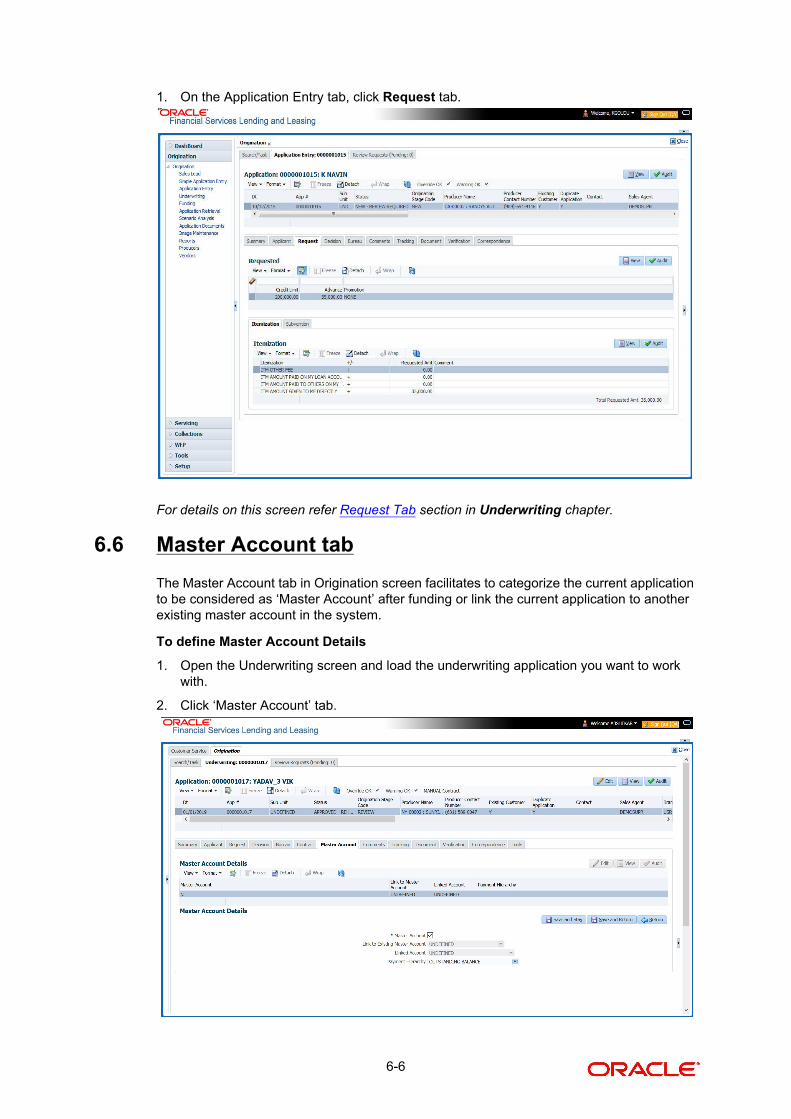
1. On the Application Entry tab, click Request tab.
For details on this screen refer Request Tab section in Underwriting chapter.
6.6 Master Account tab
The Master Account tab in Origination screen facilitates to categorize the current application to be considered as ‘Master Account’ after funding or link the current application to another existing master account in the system.
To define Master Account Details
1. Open the Underwriting screen and load the underwriting application you want to work with.
2. Click ‘Master Account’ tab.
6-6

For details on this screen refer Master Account tab section in Underwriting chapter.
6.7 Bureau Tab
The Bureau tab displays credit report (if pulled) for an applicant. If there is a need for another pull for any applicant, it can be done here manually using the New Request section.
To verify the credit bureau data using the Bureau tab
1. Open the Application Entry screen and load the application you want to work with.
2. Click Bureau
For details on this screen refer Bureau Tab section in Underwriting chapter.
6.8 Collateral Tab
Depending on the type of product or producer you select, the Collateral tab opens one of the three following collateral screen: a vehicle information screen, a home information screen or an other information screen. Complete the screen that is available on your Applications screen. After that, complete the Valuation and Tracking sub screen, which the Collateral link’s screens share. If you are entering an unsecured Loan, the Collateral link is present but inactive; in which case, skip this step.
To enter vehicle information from the Collateral tab
6-7
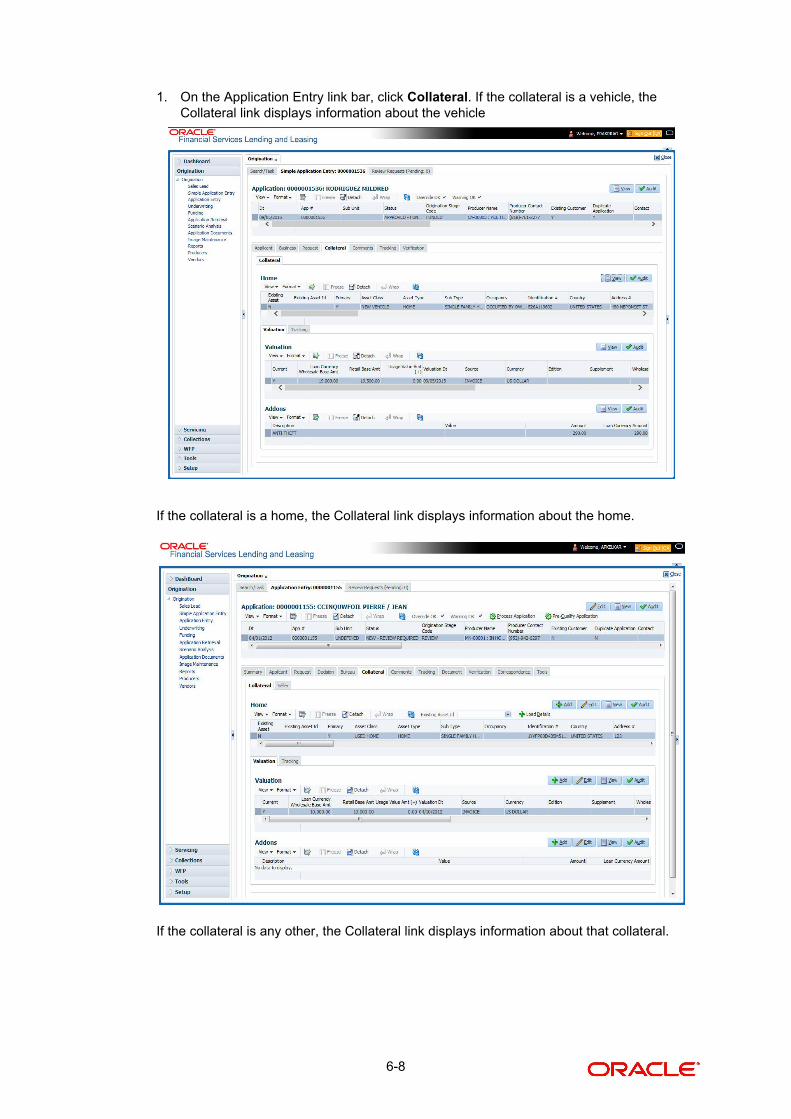
1. On the Application Entry link bar, click Collateral. If the collateral is a vehicle, the Collateral link displays information about the vehicle
If the collateral is a home, the Collateral link displays information about the home.
If the collateral is any other, the Collateral link displays information about that collateral.
6-8
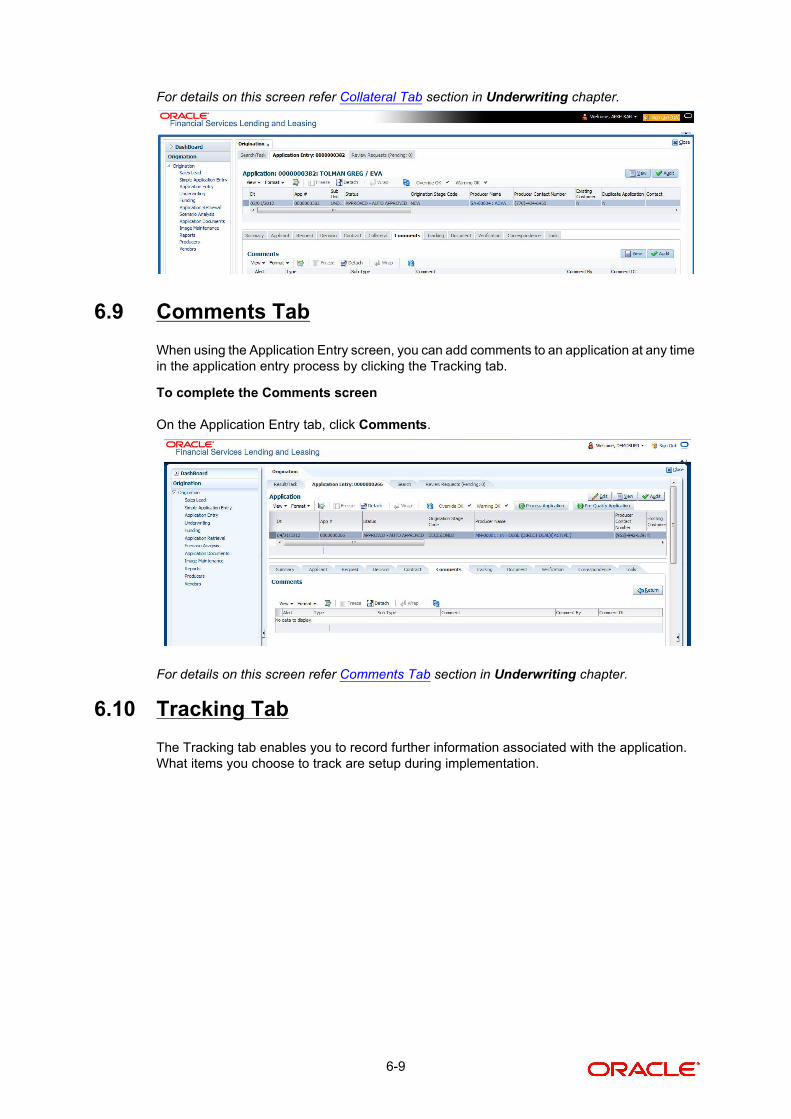
For details on this screen refer Collateral Tab section in Underwriting chapter.
6.9 Comments Tab
When using the Application Entry screen, you can add comments to an application at any time in the application entry process by clicking the Tracking tab.
To complete the Comments screen
On the Application Entry tab, click Comments.
For details on this screen refer Comments Tab section in Underwriting chapter.
6.10 Tracking Tab
The Tracking tab enables you to record further information associated with the application. What items you choose to track are setup during implementation.
6-9

To track attributes
1. On the application entry screen, click Tracking tab.
For details on this screen refer Tracking Tab section in Underwriting chapter.
6.11 Document Tab
6.11.1 Document Sub Tab
Application Entry’s Documents screen enables you to view Application Documents and Application Documents Details.
For details on this screen refer Document Tab section in Underwriting chapter.
6-10

6.12 Verification Tab
Oracle Financial Services Lending and Leasing can be configured to automatically validate portions of an application when you attempt to change its status. The results of this data check appear on the Verification link’s Edit screen as an Error, a Warning or an Override.
If it is an Error, the system will not allow you change the application’s status and approve the Loan until you fix all the errors.
If it is a Warning, the system enables you to change an application’s status without correcting the matter. While you should still investigate the problem, Warning messages are of a lesser importance than Error messages.
If it is an Override, the system displays a dialog box informing you that an override is needed; your responsibility level does not have the authority required to process this step. (Choose Yes on the dialog box to move application to queue of the user with required authority.)
To validate a credit application
1. Enter all the information associated with the application on the Application Entry screen.
2. When you are finished entering data, on the Application Entry tab, click Verification sub tab, then click the Edits sub tab.
For details on this screen refer Verification Tab section in Underwriting chapter.
6.13 Tools tab
The Tools tab calculates the payment amount, term, interest rate, Loan amount, amortization schedule and allows for the printing of a report.
For detailed information on using the tools, refer Tools chapter.
6-11

6.13.1 Application Entry using Fax-In
You can enter credit application data into Oracle Financial Services Lending and Leasing Application using the Fax-In image functionality using the Fax-In container. Once the all the images are loaded into the system using the steps mentioned in ‘Entering a Credit Application’ section, you can view those images in the Fax-In container and perform data entry concurrently.
The Fax-In container option is a simple image holder which is available to the user on clicking the ‘New Application’ button. The option is available only if has been enabled in the system settings by the administrator.
If you are the administrator, you can enable/disable this feature to the users in the access screen. However, you can view the availability of this feature by navigating to Main Menu > Setup > Administration > User > Access screen. Select Screen tab and in the Security Access Definition section, the status of “ACCESS TO MENU IMAGE MAINTAINENCE” flag defines the availability of this feature. If the flag is set to ‘Y’ then the Fax-In container is available in Application Entry screen.
The image container displays the image with the header information stored in the tables loaded as a part of the loading process. You can navigate through the pictures using the navigation buttons (First, Previous, Next and Last) available on the top right.
After entering the Application details, you need to select the Image check box placed on the top of Fax Image container. By doing so the system will automatically associate the current image with the application and save it along with the other application details. Also the image will no longer be available in the container since the container only holds those images which are not associated with any application.
6.14 Review Request
The Review Request tab facilitates to flag an Application for the attention of another Oracle Financial Services Lending and Leasing user and ask for review / feedback. It allows the system users to send and receive requests (including e-mail) commenting on a specific account or application. The Review Request tab supports iterative review of selected Application and also to process the review with multiple reviewers.
For detailed information on using this feature, refer to ‘Review Request’ section in Underwriting chapter of the document.
6-12

7. Underwriting
7.1 Introduction
Underwriting is the next step after application entry in Loan origination cycle. At the beginning of underwriting process, the application has been entered into Oracle Financial Services Lending and Leasing, receiving an application number. The application, then passes through the initial prescreening checks, and receives a credit bureau report. (Credit bureau pulls are based upon zip code setup.) The system assigns it a custom credit score and based on this, the application automatically updates its status and sent to the appropriate queue. In doing so, one of three things happen to the application:
The application passes all the prescreening requirements and is automatically approved based on the auto-decisioning process. The system, then, automatically notifies the producer with a decision fax. You can use the Underwriting screen to view the application and decision information and proceed to funding.
The application fails the prescreening requirements and is automatically rejected based on the auto-decisioning process. Again, the system notifies the producer with a decision fax. You can use the Underwriting screen to view application and decision information. Also, you can rehash the application.
The application receives a status requiring a manual review and is sent to the underwriting queue. It is now up to the underwriter to verify data and manually change the status of application using Underwriting screen.
This chapter explains how to use the Underwriting screen to complete the following tasks:
Loading an application on the Underwriting screen
Verifying the applicant information
Verifying the credit bureau data
Calculating and validate the debt-to-income ratios
Requesting a credit bureau report manually
Adding comments and tracking attributes
Making a decision about an application
Verifying the edits
Rehashing an application
Ageing an application.
Review Requests
7.2 Underwriting Screen - an overview
The underwriting process follows these basic steps:
Opening the Underwriting screen and loading the application you want to work with.
Viewing and verifying information about the applicant supplied during application entry.
Viewing information from the credit bureau report.
Viewing and verifying information regarding the collateral, if present.
Viewing and verifying information regarding the trade-ins, if present.
Calculating and validating the debt-to-income ratios.
Selecting the pricing for the application.
7-1

Specifying information regarding stipulations, itemizations, check lists, and rate schedules (variable rate Loan only), if required. (The checklist can be configured to display a list of tasks to follow when using the Underwriting screen.)
Making a decision on the Loan (APPROVE, REJECT, or CONDITION).
Performing an edits check to verify the information on Underwriting screen.
Viewing errors and warnings from the edits check and make the required corrections to the data.
Changing the status of the application.
7.3 Loading an Application on the Underwriting screen
The first step in the underwriting process is to load the application you want to work with. For details about using the Loading an application, refer Searching for an Application in the chapter Search Function.
7.3.1 Applications
The Underwriting screen’s Applications section appears at the top of the screen opened from Underwriting master tab. The screen displays the application number and name on the header and contains information such as application purpose, product and producer.
In this section, you can perform any of the Basic Operations mentioned in Navigation chapter
A brief description of the fields is given below:
Field: View this:
App # The application number
Dt The application date
Product The Loan product of the application.
Channel How the application information was received.
Priority The priority of the application.
Company The company of the application.
7-2

Branch The branch of the company.
Sub Unit View the Sub Unit associated with the company/branch combination. System automatically displays the Sub Unit mapped in Setup > User > Companies > Branch Definition screen.
Status The status of the application.
Origination Stage Code The origination stage code of the application.
Billing Cycle The billing cycle of the application. System displays the applicable billing cycle by default based on the product and the calculation method defined at Setup > Products screen. The editable nature of billing cycle is controlled by the system parameter UIX_BILL_CYCLE_AL-LOWED_IND. However, for Rent Factor type of lease cal-culation, only ‘Monthly’ is applicable and system displays an error on save if any other value is selected.
Purpose The purpose of the application.
Producer The producer type and producer of the application.
The Producer drop-down list displays all the Producers maintained in lookup code PRO_TYPE_CD (PRODUCER TYPE CODES).
Since the Company and Branch of the account and Pro-ducer need not be the same, you can select any Producer across all branches of the company to which the account belongs. This implies that a common Producer belonging to a company can be specified to accounts which belong to different branches but the same company.
Producer Name The name of the producer of the application. The Producer Name is displayed as a hyperlink and clicking on the same will open ‘Producers’ page with details of the producer.
Producer Contact Num-ber
The system displays the contact number of the producer.
Region The region of the producer.
Territory The territory of the producer.
Existing Customer Indicates if the customer is an existing customer.
Duplicate Application Indicates if the application is a duplicate application.
Loan Currency The Loan currency of the application.
Class The class of the application.
Sales Agent The sales agent of the application.
Contract Type The type of application. ‘Manual’ indicates OFSLL gener-ated application, where as ‘eContract/Dealer’ indicates that application is generated from external system.
Field: View this:
7-3

3. Perform any of the Basic Actions mentioned in Navigation chapter.
7.3.2 Changing the Status of the Application
You can use underwriting screen’s Applications master screen to change the status and sub status of the application.
To change the status of the application
1. On the Underwriting form’s Application master screen, change the status of application to either APPROVED, CONDITIONED, or REJECTED in the Status field and click Save.
The system checks the information on the Underwriting form using guidelines established during implementation.
The system finds an error based on these guidelines, a Warning message appears stating “Validation Error exist, Unable to Change the status. Please check the Edits.”
2. Click the Verification link and begin verifying edits on the Edits screen (For more information, see the Verification link section in this chapter.)
During status change:
Joint If selected, indicates this is a joint application.
Cosigned If selected, indicates this is a co-signed application.
Contact The contact of the application.
Lead # The lead number will appear in the list only if a lead is already created using the Sales Lead link.
CRB Pull Check this box to pull an initial credit bureau report, after the application passes the pre screen edits. Uncheck the box, if you want to enter an application without pulling a credit report. To use a previously pulled credit bureau report, uncheck this box and specify the Bureau and Bureau Reorder # fields on the Primary Applicant screen.
Override Ok Check this box to ignore the overrides.
If the application has been marked as ‘Override OK’ then the system would allow you to change the application sta-tus even when override condition exists.
Warning Ok Check this box to ignore the warnings.
If the application has been marked as ‘Warning OK’ then the system would allow you to change the application sta-tus even when warning exists.
Proxy for Underwriter If you are acting as a proxy for an Underwriter, then you can select the Underwriter’s name from the adjoining options list. The list displays all the associated Underwrit-ers, Underwriting Supervisors, and Underwriting Manag-ers.
However, this is not mandatory and can be used while auctioning an application on behalf of another underwriter.
Field: View this:
7-4

If there is an error in the edit, system displays an error message as ‘Errors exist. Cannot change status. Please Verify Edits.’ and previous status is retained.
If there is an edit which requires override, the system displays an override message as ‘Override Required. Do you want to continue?’
– If you select ‘Yes’, the system will continue with OVERRIDE_REQUIRED processing by changing the status.
– If you select ‘No’, the system will change the status back to old status.
During status change, if there is a warning in the edit, the system displays an error message as ‘Warning Exists. Do you want to continue?’.
If you select ‘Yes’, the system will continue processing by changing the status.
If you select ‘No’, the system will change the status back to old status.
7.3.3 Rehashing an Application
Once the application moves to status of APPROVED, REJECTED, or CONDITIONED status, you cannot amend the information. However, you can amend the application, by changing the sub status of the application to REHASHING.
To Rehash the Application
1. Open the Underwriting screen and load the application you want to change with the APPROVED, REJECTED, or CONDITIONED status.
2. In the Applications master section, select REHASHING in the Sub Status field and click Save.
After you enter the information required in the application, you can change the status to APPROVED, REJECTED, CONDITIONED, or WITHDRAWN. (For more information, refer Decision Tab section in this chapter.)
Once the status is changed to Approved, Rejected, conditioned, or Withdrawn, you cannot make further changes to the information on the Decision tab.
7.3.4 Aging an Application
The Underwriting screen can be configured so that applications will be moved to a separate queue after a certain amount of time. (This time frame is determined in setup). This applications receive a sub status of AGED APPLICATION. This housekeeping function allows you to keep your system free of stagnant application by moving them into an archive.
7.4 Summary Tab
The summary screen provides a unified view of the application details without navigating to the respective screens/ sub-tabs.
Using this screen, you can view the following details in their respective sections:
Super Summary
Applicant
Ratios
Bureau
Checklist
Collateral
Trade-In
Requested
7-5

Approved
Decision Itemizations
Decision History
Comments
Stipulations/Adverse Actions
To view the Super Summary
1. Open the Underwriting screen and load the application you want to work with.
2. Click Summary tab. By default the system opens the summary tab. Expand the Super Summary section.
The Super Summary tab provides a snapshot of all relevant details in a single screen and contains details of Applicant, Employment, Ratios, Bureau, Requested financials, Decision updates, Contract updates and Primary Collateral details. You need not have to navigate to each of these tabs for specific information on the application. Also clicking on the hyperlinks of Address, Employment, Ratios, and Trade-In helps you to directly navigate to respective tab(s),
During the Underwriting and Funding stages, 'verified' button is displayed just below the address and employment details for each of the applicants. This would be enabled only when the Verified by and Verified Dt in the respective tabs are blank. You can verify the details from the Super Summary tab. Clicking on Verified will do the following:
1. System will copy the stated values to Actual values.
2. System will stamp the “Verified By” as 'User Name' and 'Verified Date' as 'Current GL Date' for the respective applicant.
3. If 'Verified Details' are already updated in tab or if the details are stamped, this button will be disabled.
4. 'Verified' button will be available when 'Actual Amount' equal to ZERO or 'Verified By' or 'Verified Date' is NULL.
You need not navigate to Address and Employment tab for verifying applicant details.
Decision details will be displayed when application has Origination Stage as “Review, Decisioned, Contract or Funded”. In case an application is Rehashed, only Decision
7-6

information will be displayed and Contract information will not be displayed. Contract details will be displayed when application has Origination Stage as “Contract or Funded”.
The system displays the collateral details maintained in the collateral tab on click of navigation button under the headings Primary Collateral and Secondary Collateral. Collateral details for Unsecured loan also will be displayed if they are maintained.
All the trade-in details, if any, maintained in the application would be displayed on click of Navigation button.
7.5 Applicant Tab
Having selected and loaded an application, you can view the information about applicant in the Applicants tab. This is information that was recorded on the Application Entry screen or gathered during the credit pull. You can edit data from the Application Entry screen at anytime in the following steps. Remember to save your work with each change. Information from the credit bureau pull is available to view only.
Using the information supplied on the application, complete the Applicants tab details and the following sub tab details:
Address
Employments
Telecoms
Summary
Credit Scores
Duplicate Applicant
Existing Accounts.
Tracking Attributes
Primary Applicant details are required for SME applications also. The system uses information on the Financial and Liabilities sub tabs in determining the applicant’s net worth. The system uses information on the Employments screen and Other Incomes sub screen to calculate the applicant’s debt-to-income ratio.
To verify applicant information on the Underwriting screen
1. Open the Underwriting screen and load the underwriting application you want to work with.
2. Click Applicants tab.
7-7

3. In this section, you can perform any of the Basic Operations mentioned in Navigation chapter
A brief description of the fields is given below:
Field Do this
Relation Type Select the relationship type from the adjoining drop-down list. For example, primary, spouse, secondary, or cosigner.
Salutation Select the salutation from the adjoining drop-down list.
First Name Specify the applicant’s first name.
MI Specify the applicant’s middle name.
Last Name Specify the applicant’s last name.
Family Name Specify the applicant’s family name.
Suffix Select the name suffix/generation from the adjoining drop-down list.
Birth Dt Specify the applicant’s date of birth.
SSN Specify the applicant’s social security number.
Class Select the classification of the applicant from the adjoining drop-down list. For example, NORMAL or EMPLOYEE. The system uses this information to restrict access to the database by recognizing employ-ees as ‘secured applications’.
You can create a SME (Small Medium Enterprise) application by selecting SMALL BUSINESS. When you select SMALL BUSINESS and save your entry, the Business Applicants link on the Applicants link is available. (required).
Email Specify the personal Email ID of the applicant.
7-8
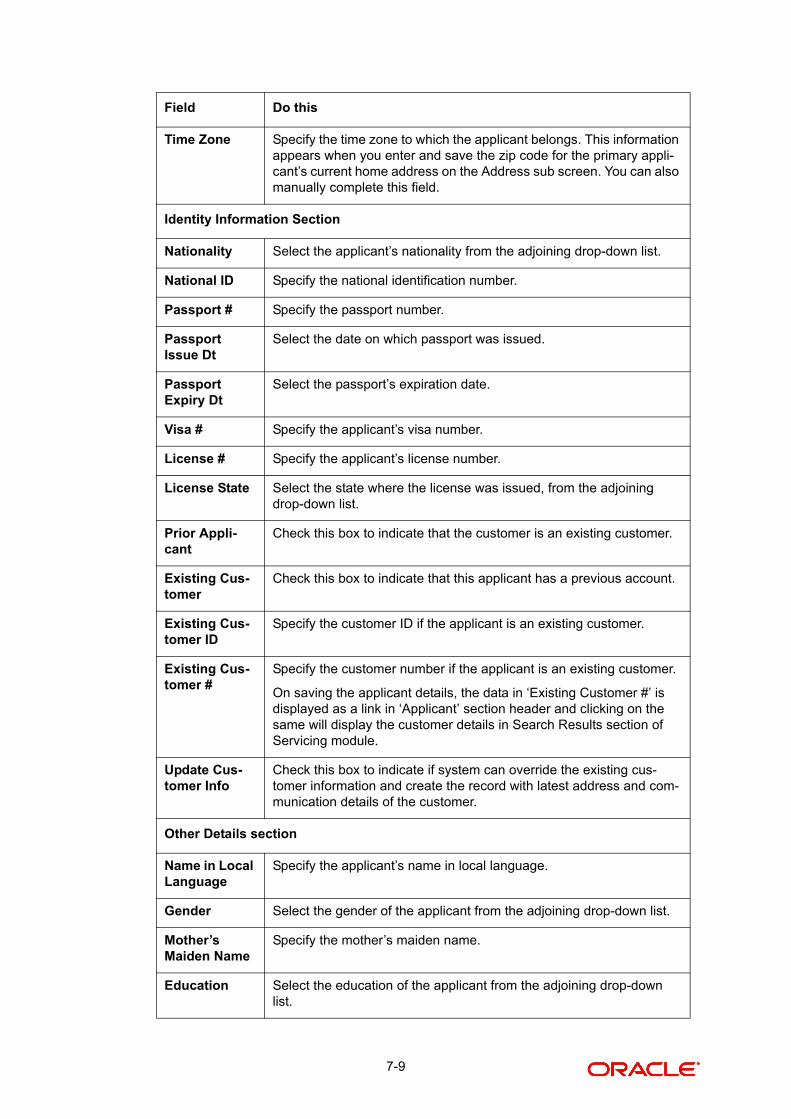
Time Zone Specify the time zone to which the applicant belongs. This information appears when you enter and save the zip code for the primary appli-cant’s current home address on the Address sub screen. You can also manually complete this field.
Identity Information Section
Nationality Select the applicant’s nationality from the adjoining drop-down list.
National ID Specify the national identification number.
Passport # Specify the passport number.
Passport Issue Dt
Select the date on which passport was issued.
Passport Expiry Dt
Select the passport’s expiration date.
Visa # Specify the applicant’s visa number.
License # Specify the applicant’s license number.
License State Select the state where the license was issued, from the adjoining drop-down list.
Prior Appli-cant
Check this box to indicate that the customer is an existing customer.
Existing Cus-tomer
Check this box to indicate that this applicant has a previous account.
Existing Cus-tomer ID
Specify the customer ID if the applicant is an existing customer.
Existing Cus-tomer #
Specify the customer number if the applicant is an existing customer.
On saving the applicant details, the data in ‘Existing Customer #’ is displayed as a link in ‘Applicant’ section header and clicking on the same will display the customer details in Search Results section of Servicing module.
Update Cus-tomer Info
Check this box to indicate if system can override the existing cus-tomer information and create the record with latest address and com-munication details of the customer.
Other Details section
Name in Local Language
Specify the applicant’s name in local language.
Gender Select the gender of the applicant from the adjoining drop-down list.
Mother’s Maiden Name
Specify the mother’s maiden name.
Education Select the education of the applicant from the adjoining drop-down list.
Field Do this
7-9

Language Select the applicant’s native language from the adjoining drop-down list.
Dependents Specify the number of dependents.
Marital Status Select the marital status of the applicant from the adjoining drop-down list.
ECOA Select the ECOA (Equal Credit Opportunity Act) code, from the adjoining drop-down list. This defines the various possibilities on who is liable; individual, joint, cosigner and so on.
Race Select the applicant’s race from the adjoining drop-down list.
Ethnicity Select the applicant’s ethnicity from the adjoining drop-down list. This is the information the Home Mortgage Disclosure Act requires to be reported.
Disability Check this box if the application has a disability.
Privacy Opt Out
Check this box to indicate that the applicant has elected to refrain from the non-public sharing of information.
Insurance Opt Out
Check this box to indicate that the applicant has elected to refrain from insurance related inquiries.
Marketing Opt Out
Check this box to indicate that the applicant has elected to refrain from marketing related inquiries.
Share Credit Opt Out
Check this box to indicate that the applicant has elected to refrain from financial information and share credit related inquiries.
Prior Bank-ruptcy
Check this box if prior bankruptcy exists.
Bankruptcy Discharge Dt
Enter the discharge date of prior bankruptcy (if one exists).
Payment Hier-archy
Select the required Hierarchy Definition to be used for payment appro-priation from the drop-down list. The list is populated with all the pre-defined and enabled hierarchy definitions maintained Setup > Admin-istration > Users > Payment Hierarchy screen.
The Hierarchy Definition selected here is propagated to Servicing > Customer/Business details. If an existing hierarchy is modified and the ‘Update Customer/Business info’ option is enabled, then the Pay-ment Hierarchy in Servicing > Customer / Business details are also updated.
KYC Section
Reference # Specify the reference number.
Status Select the status of the applicant from the adjoining drop-down list.
FATCA Section
Birth Place Specify the birth place of the applicant.
Field Do this
7-10

4. Perform any of the Basic Actions mentioned in Navigation chapter.
5. You can verify the personal information about the applicant. Two check boxes indicate if this is an existing customer or a prior applicant. The Existing Customer field enables you to select the existing customer.
7.5.1 Address Sub Tab
You can specify more than one address for each applicant, such as a home address, second home address, and vacation home address. However, at least one must be marked as current. Also, only one address can be selected as the mailing address, and that address must be marked as current. Finally, while you can have more than one Home type address, only one can be marked as current.
To complete the Address sub tab
1. Click Address sub tab.
2. In this section, you can perform any of the Basic Operations mentioned in Navigation chapter.
Birth Country Select the country of birth of the applicant.
Permanent US Resident Sta-tus
Check this box if the applicant has permanent US resident status.
Power of Attorney Section
Power of Attorney
Check this box if you hold a power of attorney.
Holder Name Specify the holder name of the power of attorney.
Address Specify the address of the holder.
Country Specify the country of the power of attorney holder.
Nationality Specify the nationality of the power of attorney holder.
Telephone Number
Specify the telephone number of the power of attorney holder.
Military Service - this section can be used to capture applicant’s Active Military Duty details and can be validated with applicant Bureau Details.
Active Mili-tary Duty
Check this box to indicate if applicant is on Active Military Duty.
Effective Dt Select the date from when the applicant is on Active Military duty using adjoining calendar.
Order Ref # Specify the Order Reference number which indicates the applicant’s Active Military duty service.
Release Dt Select the date from when the applicant was released from Active Mil-itary duty using adjoining calendar.
Field Do this
7-11

Based on the country chosen in the address tab, the fields for capturing the address will vary.
A brief description of the fields is given below:
Field Do this
Address Type Select the type of address from the adjoining option list.
Current Check this box if this is a current address.
The mailing address must be marked as current.
Confirmed Check this box if the address is the confirmed one
Mailing Check this box if this is the mailing address. Only one address entry can be marked as the mailing address.
Permission to Call
Check this box if customer has provided permission to contact through the specified phone number.
Atleast one phone number per application should have the permis-sion to call (flagged as 'Y') for the successful pre-qualification of the application. Else, an error message is displayed.
Permission to Text
Check this box if customer has provided permission to contact through text message.
Country Select the country of mailing address from the adjoining drop-down list.
Address Details section
Postal Type Select the postal address type from the adjoining drop-down list.
Address # Specify the address number of the mailing address
Street Pre Select the street prefix (directional) from the adjoining drop-down list.
Street Name Specify street name.
Street Type Select the street type from the adjoining drop-down list.
Street Post Select the street postfix (directional) from the adjoining drop-down list.
Apt # Specify the apartment number.
Address Line 1
Specify the first address line.
Address Line 2
Specify the second address line.
Address Line 3
Specify the third address line.
Zip Select the zip code from the adjoining drop-down list.
For non US country, you have to enter zip code.
7-12
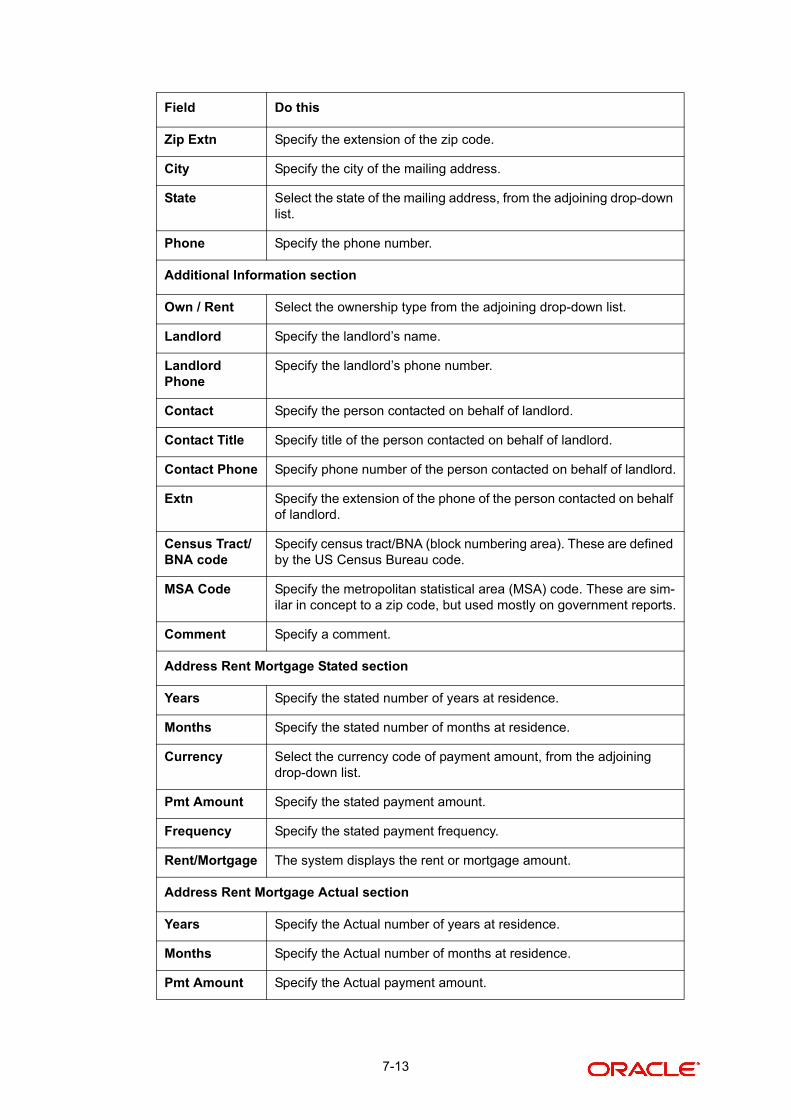
Zip Extn Specify the extension of the zip code.
City Specify the city of the mailing address.
State Select the state of the mailing address, from the adjoining drop-down list.
Phone Specify the phone number.
Additional Information section
Own / Rent Select the ownership type from the adjoining drop-down list.
Landlord Specify the landlord’s name.
Landlord Phone
Specify the landlord’s phone number.
Contact Specify the person contacted on behalf of landlord.
Contact Title Specify title of the person contacted on behalf of landlord.
Contact Phone Specify phone number of the person contacted on behalf of landlord.
Extn Specify the extension of the phone of the person contacted on behalf of landlord.
Census Tract/BNA code
Specify census tract/BNA (block numbering area). These are defined by the US Census Bureau code.
MSA Code Specify the metropolitan statistical area (MSA) code. These are sim-ilar in concept to a zip code, but used mostly on government reports.
Comment Specify a comment.
Address Rent Mortgage Stated section
Years Specify the stated number of years at residence.
Months Specify the stated number of months at residence.
Currency Select the currency code of payment amount, from the adjoining drop-down list.
Pmt Amount Specify the stated payment amount.
Frequency Specify the stated payment frequency.
Rent/Mortgage The system displays the rent or mortgage amount.
Address Rent Mortgage Actual section
Years Specify the Actual number of years at residence.
Months Specify the Actual number of months at residence.
Pmt Amount Specify the Actual payment amount.
Field Do this
7-13

3. Perform any of the Basic Actions mentioned in Navigation chapter.
4. If there are more than one addresses associated with the applicant, click Save And Add on the Address sub screen and add address details.
7.5.2 Employments Sub Tab
Use the Employment sub screen to record employment information about the applicant. You can have more than one entry.
To complete the Employments sub tab
1. Click Employments sub tab
2. Perform any of the Basic Operations mentioned in Navigation chapter.
A brief description of the fields is given below:
Frequency Specify the Actual payment frequency.
Rent/Mortgage The system displays the rent or mortgage amount.
Verified Section
Verified By The name of the verifier.
Verified Dt The date of verification.
Field: Do this:
Current Check this box if this is the current employment.
Permission to Call Check this box if customer has provided permission to contact through the specified phone number.
Atleast one phone number per application should have the permission to call (flagged as 'Y') for the successful pre-quali-fication of the application. Else, an error message is dis-played.
Permission to Text
Check this box if customer has provided permission to contact through text message.
Type Select the address type from the adjoining drop-down list.
Employer Specify the employer’s name.
Occupation Select the occupation from the adjoining drop-down list.
Title Specify the title.
Department Specify the department of the employer.
Employee ID Specify the employee identification.
Employer Address section
Country Select the country from the adjoining drop-down list.
Field Do this
7-14

Address # Specify the building number.
Address Line 1 Specify the first address line.
Address Line 2 Specify the second address line.
Zip Select the zip code from the adjoining drop-down list.
For non US country, you have to enter zip code.
Zip Extn Specify the zip code extension.
City Specify the city.
State Select the state from the adjoining drop-down list.
Additional Information section
Phone Specify the work phone number.
Extn Specify phone extension.
Contact Specify the person contacted on behalf of the employer.
Contact Title Specify title of the person contacted on behalf of the employer.
Contact Phone Specify phone number of the person contacted on behalf of the employer.
Contact Extn Specify the extension of the phone of the person contacted on behalf of the employer.
Comment Specify a comment.
Employment Details Stated section
Years Specify the stated number of years with the employer.
Months Specify the stated number of months with the employer.
Pay Day Select the stated payment day of the month using the adjoin-ing calendar. Ensure that the date selected is greater than or equal to current system date.
Frequency Select the stated payment frequency from the adjoining drop-down list.
Currency Select the currency code from the adjoining drop-down list
Income Amt Specify the stated income.
Salary View the salary of the customer.
Employment Details Actual section
Years Specify the Actual number of years with the employer.
Months Specify the Actual number of months with the employer.
Field: Do this:
7-15
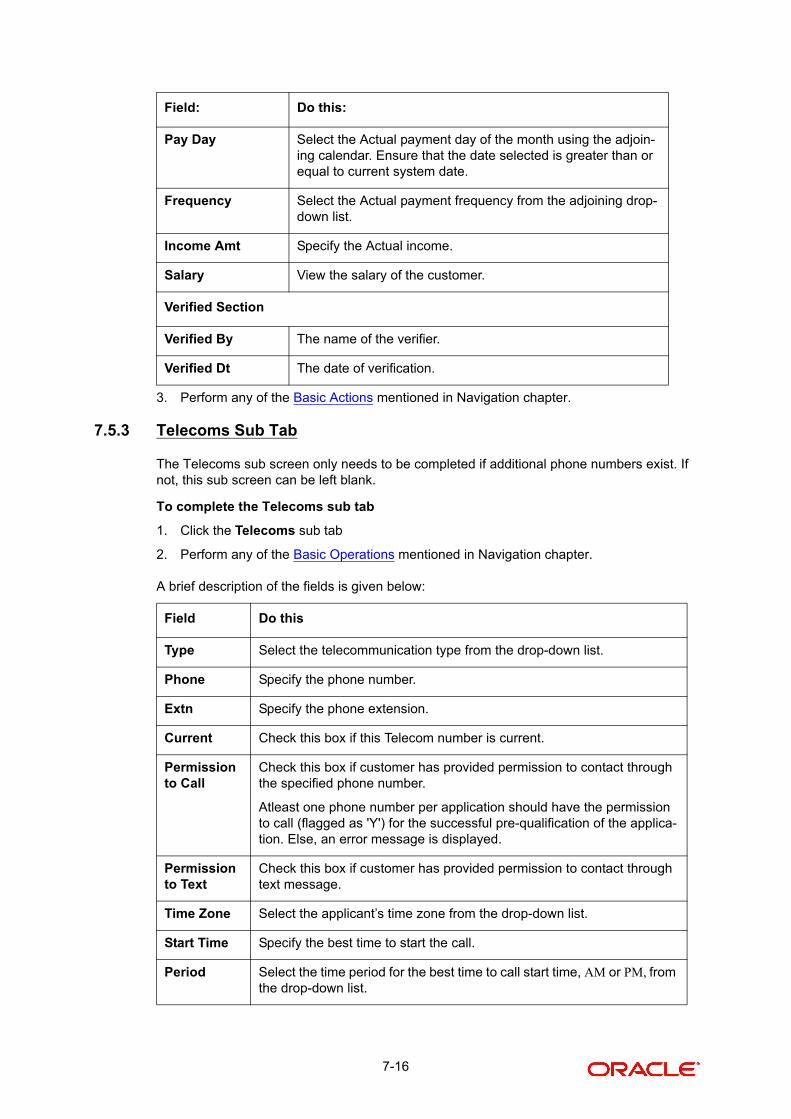
3. Perform any of the Basic Actions mentioned in Navigation chapter.
7.5.3 Telecoms Sub Tab
The Telecoms sub screen only needs to be completed if additional phone numbers exist. If not, this sub screen can be left blank.
To complete the Telecoms sub tab
1. Click the Telecoms sub tab
2. Perform any of the Basic Operations mentioned in Navigation chapter.
A brief description of the fields is given below:
Pay Day Select the Actual payment day of the month using the adjoin-ing calendar. Ensure that the date selected is greater than or equal to current system date.
Frequency Select the Actual payment frequency from the adjoining drop-down list.
Income Amt Specify the Actual income.
Salary View the salary of the customer.
Verified Section
Verified By The name of the verifier.
Verified Dt The date of verification.
Field Do this
Type Select the telecommunication type from the drop-down list.
Phone Specify the phone number.
Extn Specify the phone extension.
Current Check this box if this Telecom number is current.
Permission to Call
Check this box if customer has provided permission to contact through the specified phone number.
Atleast one phone number per application should have the permission to call (flagged as 'Y') for the successful pre-qualification of the applica-tion. Else, an error message is displayed.
Permission to Text
Check this box if customer has provided permission to contact through text message.
Time Zone Select the applicant’s time zone from the drop-down list.
Start Time Specify the best time to start the call.
Period Select the time period for the best time to call start time, AM or PM, from the drop-down list.
Field: Do this:
7-16

3. Perform any of the Basic Actions mentioned in Navigation chapter.
7.5.4 Summary Sub Tab
The system calculates debt ratios in the Ratios section on the Summary sub screen (Applicants link) using the data in the Incomes and Liabilities sections. Information in the Incomes section comes from the Employments sub screen and the Other Incomes sub screen during application entry. The information in the Liabilities section comes from the Address sub screen, the Liabilities sub screen during application entry, and the credit bureau pull.
To View Summary sub tab
1. Click the Summary sub tab.
2. Perform any of the Basic Operations mentioned in Navigation chapter.
A brief description of the fields is given below:
Best day to call
Select the preferred day of the week to contact the customer from the drop-down list.
End Time Specify the best time to end the call.
Period Select the time period for the best time to call end time, AM or PM, from the drop-down list.
Field Do this
What if Pmt Amt Specify the payment amount you want to use in the ratios.
Score View the credit score for the application
Grade View the credit grade for the application
Totals
Monthly Income- Stated Amt
The stated monthly income.
Monthly Debt- Stated Amt
The stated monthly liability.
Monthly Income- Actual Amt
The actual monthly income.
Monthly Debt- Actual Amt
The actual monthly liability.
Assets Amt - Liabilities Amt
The net worth amount.
Ratios
Debt - Stated Before (%) The debt amount stated before.
Debt - Stated After (%) The debt amount stated after.
Debt - Actual Before (%) The actual debt amount before.
Field Do this
7-17
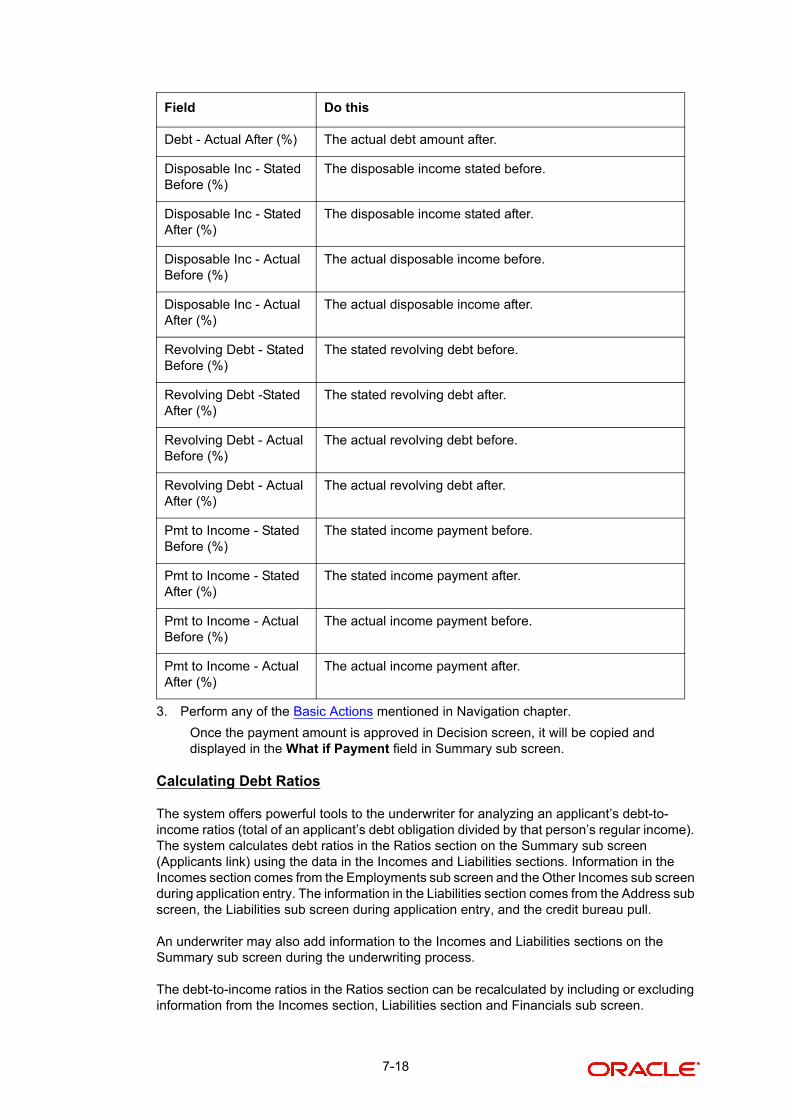
3. Perform any of the Basic Actions mentioned in Navigation chapter.
Once the payment amount is approved in Decision screen, it will be copied and displayed in the What if Payment field in Summary sub screen.
Calculating Debt Ratios
The system offers powerful tools to the underwriter for analyzing an applicant’s debt-to-income ratios (total of an applicant’s debt obligation divided by that person’s regular income). The system calculates debt ratios in the Ratios section on the Summary sub screen (Applicants link) using the data in the Incomes and Liabilities sections. Information in the Incomes section comes from the Employments sub screen and the Other Incomes sub screen during application entry. The information in the Liabilities section comes from the Address sub screen, the Liabilities sub screen during application entry, and the credit bureau pull.
An underwriter may also add information to the Incomes and Liabilities sections on the Summary sub screen during the underwriting process.
The debt-to-income ratios in the Ratios section can be recalculated by including or excluding information from the Incomes section, Liabilities section and Financials sub screen.
Debt - Actual After (%) The actual debt amount after.
Disposable Inc - Stated Before (%)
The disposable income stated before.
Disposable Inc - Stated After (%)
The disposable income stated after.
Disposable Inc - Actual Before (%)
The actual disposable income before.
Disposable Inc - Actual After (%)
The actual disposable income after.
Revolving Debt - Stated Before (%)
The stated revolving debt before.
Revolving Debt -Stated After (%)
The stated revolving debt after.
Revolving Debt - Actual Before (%)
The actual revolving debt before.
Revolving Debt - Actual After (%)
The actual revolving debt after.
Pmt to Income - Stated Before (%)
The stated income payment before.
Pmt to Income - Stated After (%)
The stated income payment after.
Pmt to Income - Actual Before (%)
The actual income payment before.
Pmt to Income - Actual After (%)
The actual income payment after.
Field Do this
7-18

To calculate debt ratios
1. Open the Underwriting screen and load the application you want to work with.
2. In the Underwriting link bar, click Applicants.
3. On the Applicants Details screen, select the applicant you want to work with and click Show in the Details column.
4. Click Summary sub tab.
5. On the Summary sub screen, view the display only data in the Totals section.
6. In the What if Pmt Amt field, enter the payment amount you want to use in the ratios. Once the payment amount is approved in Decision screen, it will be copied in the What if Payment field and the ratios are updated accordingly.
Whenever you modify the ‘What If pmt Amt’ field, system automatically calculates the below ratio's:
– Stated Before DTI - if liabilities, stated income or applicant financials are updated.
– Stated After DTI - if decision payment amount, liabilities, stated income or applicant financials are updated.
– Actual Before DTI - if liabilities, actual income or applicant financials are updated.
– Actual After DTI - if decision payment amount, liabilities, actual income or applicant financials are updated.
– Stated PTI - if decision payment amount, stated income or applicant financials are updated.
– Actual PTI - if decision payment amount, liabilities, actual income or applicant financials are updated.
7.5.4.1 Financials Sub Tab
The Financials sub screen only needs to be completed if financial assets exist on the application. If not, this sub screen can be left blank.
To complete the Financials sub tab
The Financials sub screen only needs to be completed if financial assets exist on the application. If not, this sub screen can be left blank.
1. Click Financials sub tab.
2. Perform any of the Basic Operations mentioned in Navigation chapter.
Field: View this:
Monthly Income (Stated) The stated monthly income.
Monthly Income (Actual) The actual monthly income.
Monthly Debt (Stated) The stated monthly liability.
Monthly Debt (Actual) The actual monthly liability.
Assets The assets.
Liabilities The liabilities.
Net-Worth The net-worth.
7-19

A brief description of the fields is given below:
3. Perform any of the Basic Actions mentioned in Navigation chapter.
7.5.4.2 Liabilities Sub Tab
All the liabilities of the applicant that are entered during application entry are displayed in this tab. For example: Rent. In addition, if you need to record additional liabilities for an applicant the same can be done in this tab. Also any liability information of the applicant received through credit pull will be displayed under 'Credit Bureau Data' in Liabilities sub tab.
To complete the Liabilities sub tab
1. Click Liabilities sub tab.
2. Perform any of the Basic Operations mentioned in Navigation chapter.
A brief description of the fields is given below:
Field Do this
Type Select financial type from the drop-down list. For example, liquid assets, retirement assets, and so on.
Source Specify source; for example, stocks, 401K, rent received, and so on.
Account # Specify the account number.
Currency Select the currency code from the drop-down list.
Loan Cur-rency Amount
View the Loan currency amount.
Amount Specify amount.
Include Check this box to indicate that the Asset is included.
Comment Specify comment, if any.
Field Do this
Include Check this box to indicate that the liability is included.
Liability Type Select the liability type from the adjoining drop-down list.
Currency Select the currency code from the adjoining drop-down list.
Amount Specify the liability amount.
Loan Currency Amount
View the Loan currency amount.
Frequency Select the frequency from the adjoining drop-down list.
Account Type Specify the account type.
Account Balance Specify the account balance.
Loan View the Loan currency amount.
Comment Specify a comment, if any.
7-20

3. Perform any of the Basic Actions mentioned in Navigation chapter.
4. The Dedupe Liabilities button removes duplicate (“de-dupes”) liabilities that may be present from subsequent (manual) credit bureau pulls for nonspousal joint applications
7.5.4.3 Other Incomes Sub Tab
The Other Incomes sub tab only needs to be completed if other incomes exist on the application. If not, this sub screen can be left blank.
To complete the Other Incomes sub tab
1. Click the Other Incomes sub tab.
2. Perform any of the Basic Operations mentioned in Navigation chapter.
Credit Bureau Data
Bureau View the name of credit Bureau.
Open Dt View the opening date of credit account.
Pmt Manner View the mode of payment.
Account # View the account number.
Status View the current status of credit account.
Account Type View the type of account maintained.
Creditor's Name View the name of the Creditor.
Subscriber # View the Subscriber number.
ECOA View the ECOA (Equal Credit Opportunity Act) code.
Term View the term of credit.
Credit Limit View the total credit limit amount.
High Balance View the high balance amount if any.
Past Due Amt View the total past due amount if any.
30 View the number of delinquency days.
60 View the number of delinquency days.
90 View the number of delinquency days.
Field Do this
7-21

A brief description of the fields is given below:
3. Perform any of the Basic Actions mentioned in Navigation chapter.
7.5.4.4 Rescoring a Credit Bureau Report Manually
Any manually pulled credit bureau reports can be used to rescore an application.
To manually rescore a credit bureau report
1. Open Underwriting screen and load the underwriting application you want to work with.
2. Click Applicants.
3. On the Applicants Details screen, select the applicant you want to work with and click View.
4. Click the Credit Scores sub tab.
Field Do this
Type Select the income type from the adjoining drop-down list.
Note: In case, the other income of the applicant is from Employment, then the details of Actual Amount specified in the Employments Sub Tab is auto populated. Also if the income is verified in the Employments Sub Tab, then Verified By and Verified Dt details are auto populated. You can also verify the details here using the current system date.
Currency Select the currency from the adjoining drop-down list.
Stated Amount Specify the monthly stated income.
Frequency Select the income frequency from the adjoining drop-down list.
Loan Currency Amount Stated
View the Loan currency amount stated.
Comment Specify a comment, if any.
Include By default the include check box is selected indicating that the other income details are included. You can deselect the same if not required.
When Include check box is selected system automatically adds the ‘Loan Currency Amount Stated’ and ‘Loan Currency Amount Actual’ details to Applicant > Summary Tab. Also system calculates the DTI and PTI ratio's based on ‘Actual Amount’ specified.
Actual Amount Specify the actual monthly income amount.
Loan Currency Amount Actual
View the actual Loan currency amount.
Verified By The Verified By field is auto populated with the logged in user name only after the record has been verified and saved.
Verified Dt You can verify the record by selecting the current system date from the adjoining calendar icon.
Note: System displays an error message if any other dates is selected apart from current system date.
7-22

5. In the Rescore Applicant section, select in the Credit Report ID field, the bureau report you want to use to rescore the applicant.
6. Click Rescore.
The system displays the new information in the Credit Scores and Parameters sections. This new score automatically appears in the System Recommendation section on the Decision link.
7.5.5 Credit Score Sub Tab
You can view the credit score based on the system’s internal scoring models in Credit Scores sub tab.
To View Credit Scores sub tab
1. Click the Credit Scores sub tab.
You can view the following details:
Credit Score
– Model
– Bureau
– Credit Report ID
– Credit Grade
– Score
– Current
Parameters
– Parameters
– Value
– Score
Note
If you select No Bureau in the Credit Bureau Report ID field and click Rescore, the best match internal scoring is used for rescoring the applicant without credit bureau report.
7.5.6 Duplicate Applicant Sub Tab
Click De-dupe Applicants to display the existing customer details of the applicant. While reviewing the de-dupe results, if the current applicant's credentials are exactly matching with an existing customer record, you can attach the current application to the existing customer. The same can be done by just keying in the customer ID in the applicants tab and clicking save.
In case a particular customer has more than one account, on clicking De-dupe Applicants the system displays only one account in ‘Duplicate’ sub tab. However, you can view all the accounts held by customer in 'Existing accounts' sub tab.
To View duplicate applicant’s details, click Duplicate Applicant sub tab. In this section you can view the duplicate applicant’s details.
7-23

A brief description of the fields is given below:
7.5.7 Existing Account Sub Tab
The Existing Account Sub Tab displays the applicant's details, if it has been previously maintained in the system. Also along with the applicant's details, the account number of the applicant is displayed as a hyperlink. Clicking on the hyperlink will display the respective account details through the Customer Service screen of Servicing module.
In case you do not see a hyperlink associated with the account number, then you might have restricted access to the Servicing module. You can request your system administrator to navigate to Setup > User > Access screen, and enable the ‘ACCESS TO SERCOLL UCS CUSTOMER SERVICE TAB’ option in Security Access Definition section available in the 'Screen' tab. For more information, on defining user privileges, refer to ‘3.3.2 Screen’ section in Setup guide.
View the following details:
Field Do this
Source Type View the source type of the duplicate applicant
Applicant Id/ Cus Id View the applicant ID if the source type is applicant and the customer ID if the source type is customer.
Application # View the application number of the existing applicant details for the respective records.
Days since last appli-cation
View the total number of days elapsed since the last applica-tion date. System auto calculates this value as ‘Current sys-tem date (minus) Last application date’.
ID View the applicant ID
First Name View the first name of the duplicate applicant
Middle Name View the middle name of the duplicate applicant
Last Name View the last name of the duplicate applicant
Date of Birth View the date of birth of the duplicate applicant
CIF View the CIF no of the duplicate applicant
SSN # / National ID View the national ID or SSN number of the duplicate appli-cant
Driving License # View the driving license number of the duplicate applicant
City View the city of the duplicate applicant
State View the state of the duplicate applicant
Zip View the zip of the duplicate applicant
Field: View this:
Account # The account number.
7-24

7.5.8 Tracking Attributes Sub Tab
You can add tracking attribute information to an application at any time in the underwriting process by using the Tracking Attribute tab.
The Tracking tab enables you to record further information associated with the application. What items you choose to track are setup during implementation.
To track attributes
1. Click Tracking Attributes sub tab.
2. Select the item you want to track.
3. Click Edit to edit the following information:
4. Save changes you made to the account.
7.5.8.1 Create Tracking
1. Click Create Tracking, the system loads the tracking parameters.
If you want to reduce the list of parameters, select a sub-attribute in the Sub Attribute box.
If your system has been configured to use the Sub Code field, only attributes in a particular group appear in the Parameter display.
2. Specify the requested parameter in the Value field and click Save.
Title The account title.
Relation The customer relationship.
Product The Loan product.
Payoff Amount The payoff amount.
Amount Due The delinquent amount due.
Oldest Due Dt The due date.
Status The account status.
Company The company.
Branch The branch.
Total Pay Off Amt The payoff amount.
Total Amt Due The total due amount.
Field Do this
Sub-Parameter View the sub-parameter
Parameter View the parameter.
Value Specify the information about the corresponding Value field.
Field: View this:
7-25

7.5.9 Customer Search Tab
While creating an application for an existing customer, you can retrieve and copy the customer details into the new application by using the Customer Search section of the Simple Application Entry screen.
You can modify only the address, employment, financial details and not the demographic and identification details.
To copy the Customer Details
1. On the Underwriting screen, click Applicants tab.
2. Click Customer Search tab.
3. In the Search Criteria screen, use the Comparison Operator and Values columns to create the search criteria you want to use to find a customer.
4. Click the Search button.
The system locates and displays all the customer details that meet your search criteria in the Search Results section.
Select Reset Criteria at any time to clear the Comparison Operator and Values columns on the Criteria screen.
5. In the Search Results section, select a customer you want to load.
6. Select the relation type and click Copy Customer Details.
7.6 Business Tab
Oracle Financial Services Lending and Leasing can record SME business related financial information and business partners on the Business section to assist in approving the Loan application during underwriting. The Business Applicant screen is available and contains the following sub screens:
Address
Telecoms
Financials
Liabilities
Partners
Affiliates
Other details
If there are no business information associated with the application, the Business Applicant tab is unavailable.
To complete the Business tab
1. If SME business information is included on the application, select SMALL BUSINESS in the Class field on the Applications section and click Save.
The Business tab appears on the Underwriting screen.
7-26
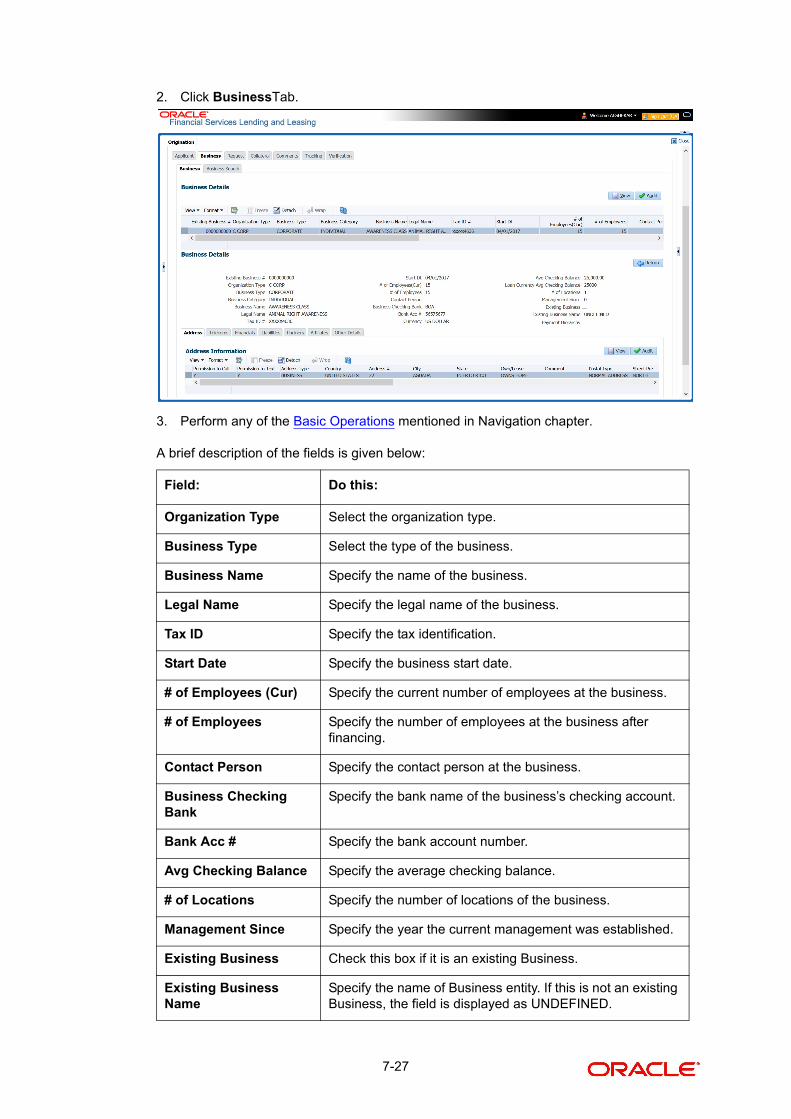
2. Click BusinessTab.
3. Perform any of the Basic Operations mentioned in Navigation chapter.
A brief description of the fields is given below:
Field: Do this:
Organization Type Select the organization type.
Business Type Select the type of the business.
Business Name Specify the name of the business.
Legal Name Specify the legal name of the business.
Tax ID Specify the tax identification.
Start Date Specify the business start date.
# of Employees (Cur) Specify the current number of employees at the business.
# of Employees Specify the number of employees at the business after financing.
Contact Person Specify the contact person at the business.
Business Checking Bank
Specify the bank name of the business’s checking account.
Bank Acc # Specify the bank account number.
Avg Checking Balance Specify the average checking balance.
# of Locations Specify the number of locations of the business.
Management Since Specify the year the current management was established.
Existing Business Check this box if it is an existing Business.
Existing Business Name
Specify the name of Business entity. If this is not an existing Business, the field is displayed as UNDEFINED.
7-27
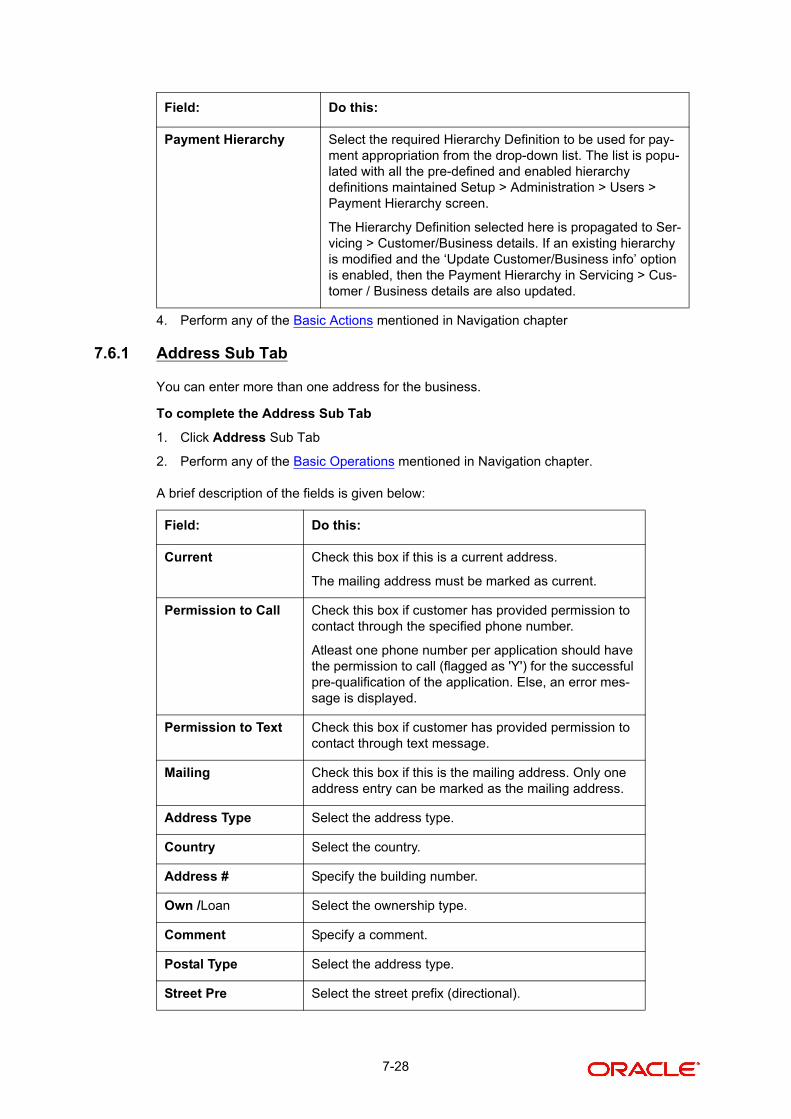
4. Perform any of the Basic Actions mentioned in Navigation chapter
7.6.1 Address Sub Tab
You can enter more than one address for the business.
To complete the Address Sub Tab
1. Click Address Sub Tab
2. Perform any of the Basic Operations mentioned in Navigation chapter.
A brief description of the fields is given below:
Payment Hierarchy Select the required Hierarchy Definition to be used for pay-ment appropriation from the drop-down list. The list is popu-lated with all the pre-defined and enabled hierarchy definitions maintained Setup > Administration > Users > Payment Hierarchy screen.
The Hierarchy Definition selected here is propagated to Ser-vicing > Customer/Business details. If an existing hierarchy is modified and the ‘Update Customer/Business info’ option is enabled, then the Payment Hierarchy in Servicing > Cus-tomer / Business details are also updated.
Field: Do this:
Current Check this box if this is a current address.
The mailing address must be marked as current.
Permission to Call Check this box if customer has provided permission to contact through the specified phone number.
Atleast one phone number per application should have the permission to call (flagged as 'Y') for the successful pre-qualification of the application. Else, an error mes-sage is displayed.
Permission to Text Check this box if customer has provided permission to contact through text message.
Mailing Check this box if this is the mailing address. Only one address entry can be marked as the mailing address.
Address Type Select the address type.
Country Select the country.
Address # Specify the building number.
Own /Loan Select the ownership type.
Comment Specify a comment.
Postal Type Select the address type.
Street Pre Select the street prefix (directional).
Field: Do this:
7-28

3. Perform any of the Basic Actions mentioned in Navigation chapter
4. If there are more than one addresses associated with business, click Save And Add and add the address details.
7.6.2 Telecoms Sub Tab
The Business tab’s Telecoms sub tab needs to be completed, if additional phone numbers for the business exist. If not, this sub tab can be ignored.
To complete the Telecoms sub tab
1. Click Telecoms sub tab.
2. Perform any of the Basic Operations mentioned in Navigation chapter.
A brief description of the fields is given below:
Street Name Specify street name
Street Type Select the street type.
Street Post Select the street postfix (directional).
Apt # Specify the apartment number.
Address Line 1 Specify the first address line.
Address Line 2 Specify the second address line.
Zip Select the zip code.
For non US country, you have to enter zip code.
Zip Extn Specify the zip extension.
City Specify the city.
State Select the state.
Phone Specify the phone number.
Field: Do this:
Permission to Call
Check this box if customer has provided permission to contact through the specified phone number.
Atleast one phone number per application should have the permission to call (flagged as 'Y') for the suc-cessful pre-qualification of the application. Else, an error message is displayed.
Permission to Text
Check this box if customer has provided permission to contact through text message.
Type Select the telecommunication type.
Phone Specify the phone number.
Extn Specify the phone extension.
Field: Do this:
7-29

3. Perform any of the Basic Actions mentioned in Navigation chapter.
7.6.3 Financials Sub Tab
The Business tab’s Financials sub screen only needs to be completed if financial assets exist on the application for the business. If not, this sub screen can be left blank.
To complete the Financials sub tab
1. Click the Financials sub tab.
2. Perform any of the Basic Operations mentioned in Navigation chapter.
A brief description of the fields is given below:
3. Perform any of the Basic Actions mentioned in Navigation chapter.
7.6.4 Liabilities Sub Tab
The Business Applicant link’s Liabilities sub screen only needs to be completed if financial liabilities exist on the application for the business. If not, this sub screen can be left blank.
To complete the Liabilities sub tab
1. Click Liabilities sub tab.
2. Perform any of the Basic Operations mentioned in Navigation chapter.
A brief description of the fields is given below:
Current If selected, indicates that this is a current telecom.
Field: Do this:
Type Select financial type; for example, liquid assets, retirement assets, and so on.
Source Specify source; for example, stocks, 401K, rent received, and so on.
Currency Select the currency of the asset.
Amount Specify amount.
Loan Currency Amount
The system displays the Loan currency amount
Comment Specify comment, if any.
Include Check this box to include this record in calculations on the Other Details sub section.
Field: Do this:
Type Select the liability type.
Currency Select the currency.
Loan Currency Amount The system displays the Loan currency amount
Field: Do this:
7-30

3. Perform any of the Basic Actions mentioned in Navigation chapter.
7.6.5 Partners Sub Tab
You can enter more than one partner for the business.
To complete the Partners sub tab
1. Click Partners sub tab
2. Perform any of the Basic Operations mentioned in Navigation chapter.
A brief description of the fields is given below:
Amount Specify the liability amount.
Frequency Select the frequency.
Account Type Specify the account type.
Loan Currency Account Balances
The system displays available Loan currency account balance.
Account Balance Specify the account balance.
Comment Specify comments, if any.
Include Check this box to include this record in calculations on the Other Details sub screen.
Field: Do this:
Permission to Call
Check this box if customer has provided permission to contact through the specified phone number.
Atleast one phone number per application should have the permis-sion to call (flagged as 'Y') for the successful pre-qualification of the application. Else, an error message is displayed.
Permission to Text
Check this box if customer has provided permission to contact through text message.
First Name Specify the partner’s first name.
MI Select the partner’s middle name.
Last Name Specify the partner’s last name.
Suffix Specify the partner’s suffix.
SSN # Specify the partner’s social security number.
Birth Dt Specify the partner’s birth date.
Birth Place Specify the partner’s birth place.
Title Select the partner’s title.
Ownership (%) Specify the percentage of ownership held by the customer.
Field: Do this:
7-31

3. Perform any of the Basic Actions mentioned in Navigation chapter.
7.6.6 Affiliates Sub Tab
You can enter more than one affiliate for the business.
To complete the Affiliates sub tab
1. Choose Affiliates sub tab.
2. Perform any of the Basic Operations mentioned in Navigation chapter.
A brief description of the fields is given below:
Net worth Specify the partner’s net worth.
Gross Income Specify the partner’s gross income.
Language Specify the partner’s language.
Nationality Specify the partner’s nationality.
Country Select the partner’s country code.
Address # Specify the partner’s address number.
Address Line 1 Specify the partner’s first address.
Address Line 2 Specify the partner’s second address line.
Zip Select the partner’s zip code.
For non-US country, you have to enter zip code.
Zip Extn Specify the partner’s zip extension.
City Specify the partner’s city.
State Select the partner’s state.
Phone Specify the partner’s phone number.
Extn Specify the partner’s phone extension.
Email Specify the partner’s email.
Field: Do this:
Organization Type
Select the affiliate’s organization type
Legal Name Specify the affiliate’s legal name
Business Name Specify the affiliate’s business name
Tax ID Specify the affiliate’s tax identification
Ownership (%) Specify the affiliate’s percentage of ownership
# of Employees Specify the affiliate’s number of employees
Field: Do this:
7-32

3. Perform any of the Basic Actions mentioned in Navigation chapter.
7.6.7 Other Details Sub Tab
The Other Details sub screen records information regarding monetary amounts associated with the business such as profits, sales, and expenses.
To complete the Other Details sub tab
1. Click Other Details sub tab.
2. Click Edit.
3. Verify financial details as well as assets and liabilities linked to the business.
A brief description of the fields is given below:
NAICS CODE Specify the affiliate’s North American Industry Classification System code.
Country Select the affiliate’s country code.
Address # Specify the affiliate’s address number.
Address Line 1 Specify the affiliate’s first address line.
Address Line 2 Specify the affiliate’s second address line.
Zip Select the affiliate’s zip code.
For non US country, you have to enter zip code.
Zip Extension Specify the affiliate’s zip extension.
City Specify the affiliate’s city.
State Select the affiliate’s state.
Field: Do this:
Other Details section
Currency Select the currency.
Business Type Select the type of business.
Analysis Frequency Select the analysis frequency.
Loan Currency Gross Margin Factor
The system displays the Loan currency business’s gross margin factor
Gross Margin Factor Specify the business’s gross margin.
Organization Type Select the type of organization.
Loan Currency Income The system displays the Loan currency business income amount.
Income Specify the business’s income amount.
Field: Do this:
7-33

Loan Currency Collec-tion Average
Specify the Loan currency collection average.
Collection Average Specify the collection average.
LoanCurrency Proj Coll Avg Annual
Specify the Loancurrency annual projected collection aver-age.
Proj. Coll.Avg.Annual Specify the annual projected collection average.
LoanCurrency Book List Specify the Loancurrency business booklist.
Book List Specify the business booklist.
LoanCurrency Turn Over
Specify the Loancurrency turnover amount.
Turn Over Specify the turnover amount.
LoanCurrency Capital Amount
Specify the Loancurrency capital amount.
Capital Amt Specify the capital amount.
LoanCurrency Earned Surplus
Specify the Loancurrency earned surplus amount.
Earned Surplus Specify the earned surplus amount.
LoanCurrency Gross Profit
Specify the Loancurrency gross profit amount.
Gross Profit Specify the gross profit amount.
LoanCurrency Net Profit Specify the Loancurrency net profit amount.
Net Profit Specify the net profit amount.
LoanCurrency Working Capital
Specify the Loancurrency working capital amount.
Working Capital Specify the working capital amount.
LoanCurrency Annual Sales
Specify the Loancurrency annual sales amount.
Annual Sales Specify the annual sales amount.
LoanCurrency Pro-jected Sales
Specify the Loancurrency projected sales amount.
Projected Sales Specify the projected sales amount.
LoanCurrency Equity Specify the Loancurrency equity amount.
Equity Specify the equity amount.
Open Delq Specify the open delinquency amount.
Field: Do this:
7-34
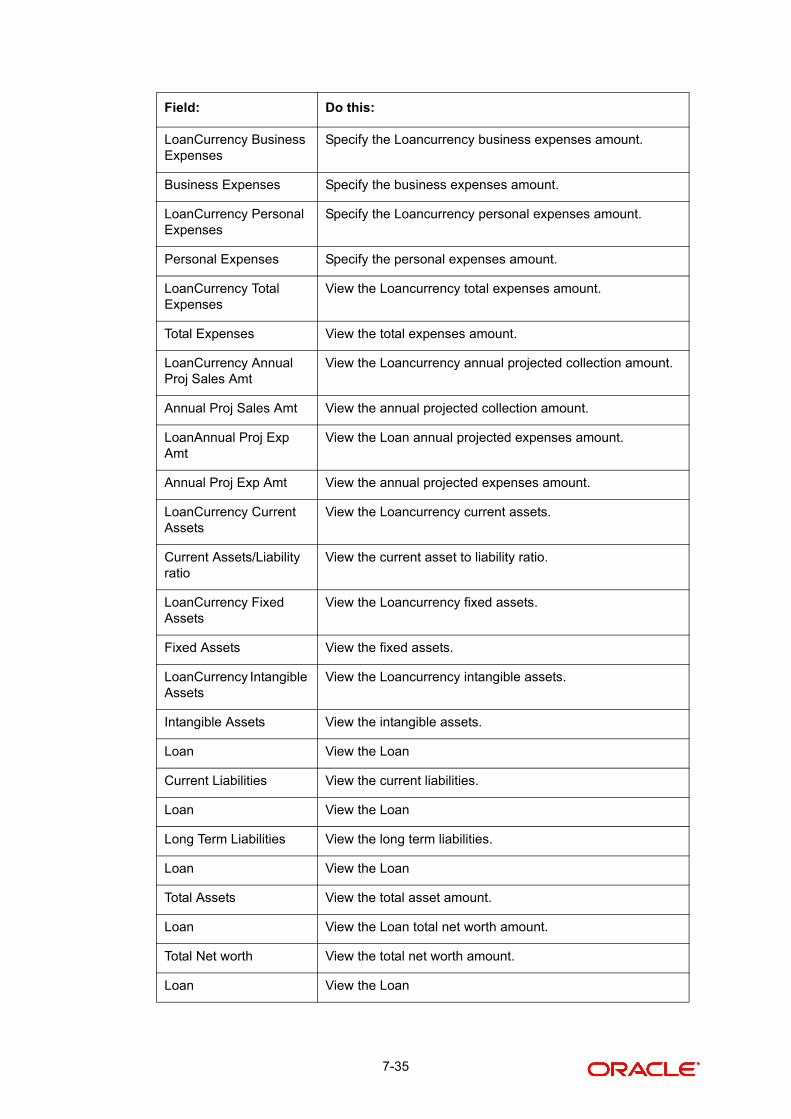
LoanCurrency Business Expenses
Specify the Loancurrency business expenses amount.
Business Expenses Specify the business expenses amount.
LoanCurrency Personal Expenses
Specify the Loancurrency personal expenses amount.
Personal Expenses Specify the personal expenses amount.
LoanCurrency Total Expenses
View the Loancurrency total expenses amount.
Total Expenses View the total expenses amount.
LoanCurrency Annual Proj Sales Amt
View the Loancurrency annual projected collection amount.
Annual Proj Sales Amt View the annual projected collection amount.
LoanAnnual Proj Exp Amt
View the Loan annual projected expenses amount.
Annual Proj Exp Amt View the annual projected expenses amount.
LoanCurrency Current Assets
View the Loancurrency current assets.
Current Assets/Liability ratio
View the current asset to liability ratio.
LoanCurrency Fixed Assets
View the Loancurrency fixed assets.
Fixed Assets View the fixed assets.
LoanCurrency Intangible Assets
View the Loancurrency intangible assets.
Intangible Assets View the intangible assets.
Loan View the Loan
Current Liabilities View the current liabilities.
Loan View the Loan
Long Term Liabilities View the long term liabilities.
Loan View the Loan
Total Assets View the total asset amount.
Loan View the Loan total net worth amount.
Total Net worth View the total net worth amount.
Loan View the Loan
Field: Do this:
7-35

7.7 Request Tab
In the Request tab you can define the required Loan parameters and calculate Payment, Interest Rate, Term and Loan Amount using the quick calculator. By default, system calculates for monthly repayment term basis. The payment frequency can be changed only in the Underwriting tab during decisioning.
To complete Request section:
1. On the Application Entry tab, click Request tab.
2. Perform any of the Basic Operations mentioned in Navigation chapter.
A brief description of the fields are given below:
Total Liability View the total liability amount.
Debt Net worth Ratio View the debt to net worth ratio.
Current Assets/Liability ratio
View the current asset to liability ratio.
Signatures
Title 1-4 Specify the title.
Signature1-4 Specify the signature.
Field Do this
Requested Advance Amt Specify the requested advance amount
Pmt Amt Specify the requested payment amount.
Term Specify the requested term (number of payments).
Requested Rate Specify the requested rate of interest.
Down Pmt% Specify the down payment percentage
Field: Do this:
7-36

3. Perform any of the Basic Actions mentioned in Navigation chapter.
4. In the ‘Requested’ section, there is a drop-down list adjacent to the ‘Calculate’ button with following options to auto calculate different Loan parameters based on the data provided. Select the record you want to work with and from the drop-down option, select the option you want system to calculate:
– CALCULATE PAYMENT
– CALCULATE INTEREST RATE
– CALCULATE TERM
– CALCULATE LOAN AMOUNT
5. Click Calculate. The system displays the requested calculation in the respective field.
7.7.1 Itemization Sub Tab
The Itemizations sub tab enables you to add or verify any itemized amounts associated with the application. The list of itemizations is determined by the product you select in the master screen during the application entry process. The Itemizations sub screen displays an itemization record of the amount financed, such as the cash price, cash down payment, trade-in, unpaid cash price balance and so on. Information that was entered on the Itemization sub screen during the application entry process will appear in the Requested Amt column. Information that you enter as an underwriter in the Approved Amt column will appear in the Itemizations sub tab on the Underwriting screen.
Application request details need to be essentially entered in the itemization sub tab for pre-screening to be successful. Else, the system displays error and application would not proceed to the next level in work flow. The details of down payment, trade-in, insurance, fees etc. and the total sale price are recorded under itemization.
To add or view itemizations
1. Open the Underwriting screen and load the underwriting application you want to work with.
2. Click Request > Itemizations sub tab.
3. Perform any of the Basic Operations mentioned in Navigation chapter.
A brief description of the fields is given below:
Down Pmt Specify the down payment amount
Approx Prc Specify the approximate cash price
Promotion Select the promotion type from the drop-down list.
Balloon Amt Specify the balloon amount.
Signing Dt Specify the signing date
Probable Delivery Dt Specify the probable delivery date.
Field: Do this:
Itemization View the itemization.
Field Do this
7-37

4. Perform any of the Basic Actions mentioned in Navigation chapter.
7.7.2 Trade-In Sub Tab
The Trade-In sub screen enables you to add or verify any trade-ins associated with the application. If there is any information regarding an itemized trade-in, use the Trade-In sub screen to enter the details in the system. (This sub screen might already contain information supplied during the application entry process.)
To complete the Trade-In sub screen
1. Open the Underwriting screen and load the underwriting application you want to work with.
2. Click Request > Trade-In.
3. Perform any of the Basic Operations mentioned in Navigation chapter.
A brief description of the fields is given below:
+/- View whether the itemized amount is added or subtracted from the Loan amount.
Requested Amt Specify the requested amount.
Comment Specify a comment.
Field: Do this:
Trade-In
Asset Type Select the asset type.
Asset Sub Type Select the asset sub-type.
Year Specify the year of the asset.
Make Specify the make of the asset.
Model Specify the model of the asset.
Body Specify the body of the asset.
Identification # Specify the identification number.
Description View the asset description.
Valuation
Wholesale Amt Specify the wholesale value.
Base Retail Amt Specify the retail value.
Addons Amt (+) Specify the add ons value.
Pay Off Amt (-) Specify the payoff amount.
Total Amt = View the total value.
Valuation Dt Specify the valuation date.
Field: Do this:
7-38
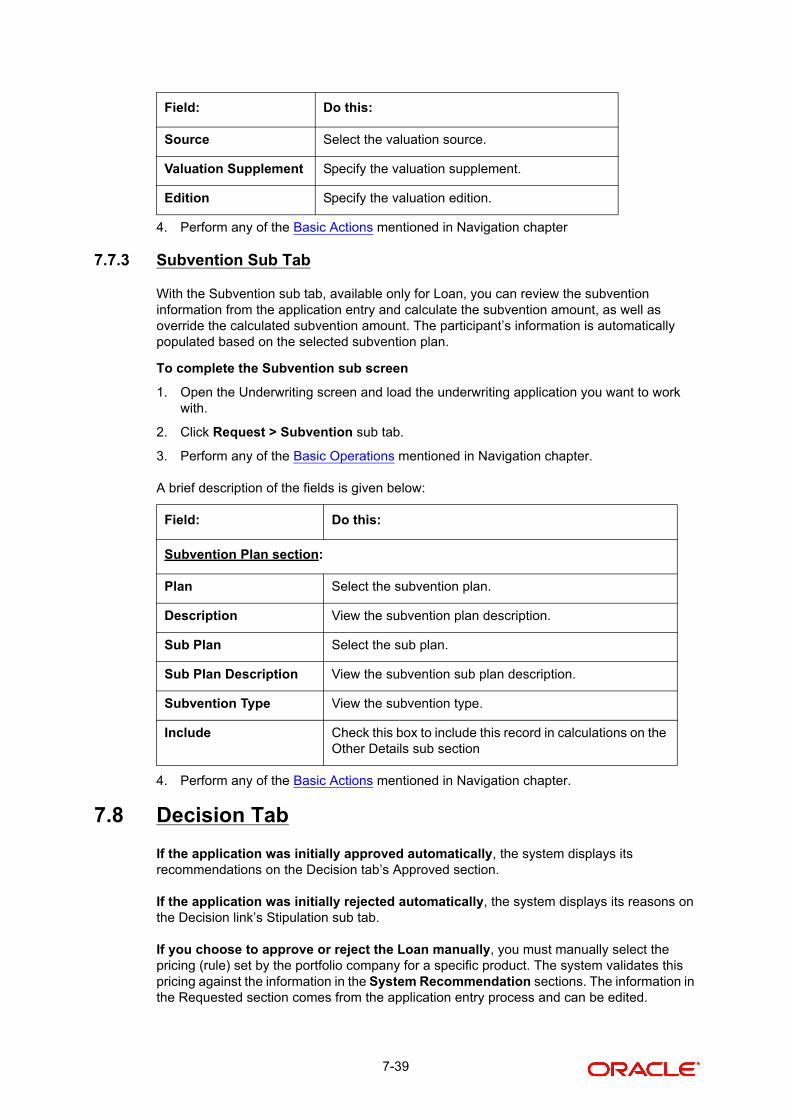
4. Perform any of the Basic Actions mentioned in Navigation chapter
7.7.3 Subvention Sub Tab
With the Subvention sub tab, available only for Loan, you can review the subvention information from the application entry and calculate the subvention amount, as well as override the calculated subvention amount. The participant’s information is automatically populated based on the selected subvention plan.
To complete the Subvention sub screen
1. Open the Underwriting screen and load the underwriting application you want to work with.
2. Click Request > Subvention sub tab.
3. Perform any of the Basic Operations mentioned in Navigation chapter.
A brief description of the fields is given below:
4. Perform any of the Basic Actions mentioned in Navigation chapter.
7.8 Decision Tab
If the application was initially approved automatically, the system displays its recommendations on the Decision tab’s Approved section.
If the application was initially rejected automatically, the system displays its reasons on the Decision link’s Stipulation sub tab.
If you choose to approve or reject the Loan manually, you must manually select the pricing (rule) set by the portfolio company for a specific product. The system validates this pricing against the information in the System Recommendation sections. The information in the Requested section comes from the application entry process and can be edited.
Source Select the valuation source.
Valuation Supplement Specify the valuation supplement.
Edition Specify the valuation edition.
Field: Do this:
Subvention Plan section:
Plan Select the subvention plan.
Description View the subvention plan description.
Sub Plan Select the sub plan.
Sub Plan Description View the subvention sub plan description.
Subvention Type View the subvention type.
Include Check this box to include this record in calculations on the Other Details sub section
Field: Do this:
7-39
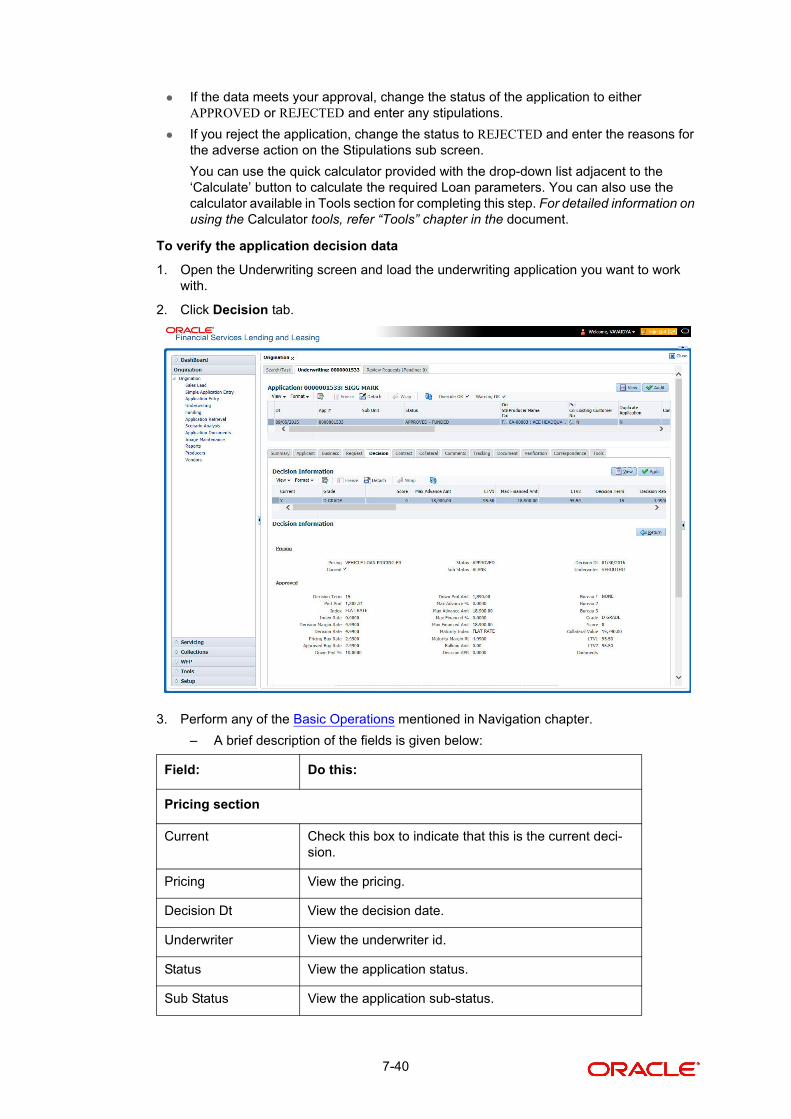
If the data meets your approval, change the status of the application to either APPROVED or REJECTED and enter any stipulations.
If you reject the application, change the status to REJECTED and enter the reasons for the adverse action on the Stipulations sub screen.
You can use the quick calculator provided with the drop-down list adjacent to the ‘Calculate’ button to calculate the required Loan parameters. You can also use the calculator available in Tools section for completing this step. For detailed information on using the Calculator tools, refer “Tools” chapter in the document.
To verify the application decision data
1. Open the Underwriting screen and load the underwriting application you want to work with.
2. Click Decision tab.
3. Perform any of the Basic Operations mentioned in Navigation chapter.
– A brief description of the fields is given below:
Field: Do this:
Pricing section
Current Check this box to indicate that this is the current deci-sion.
Pricing View the pricing.
Decision Dt View the decision date.
Underwriter View the underwriter id.
Status View the application status.
Sub Status View the application sub-status.
7-40
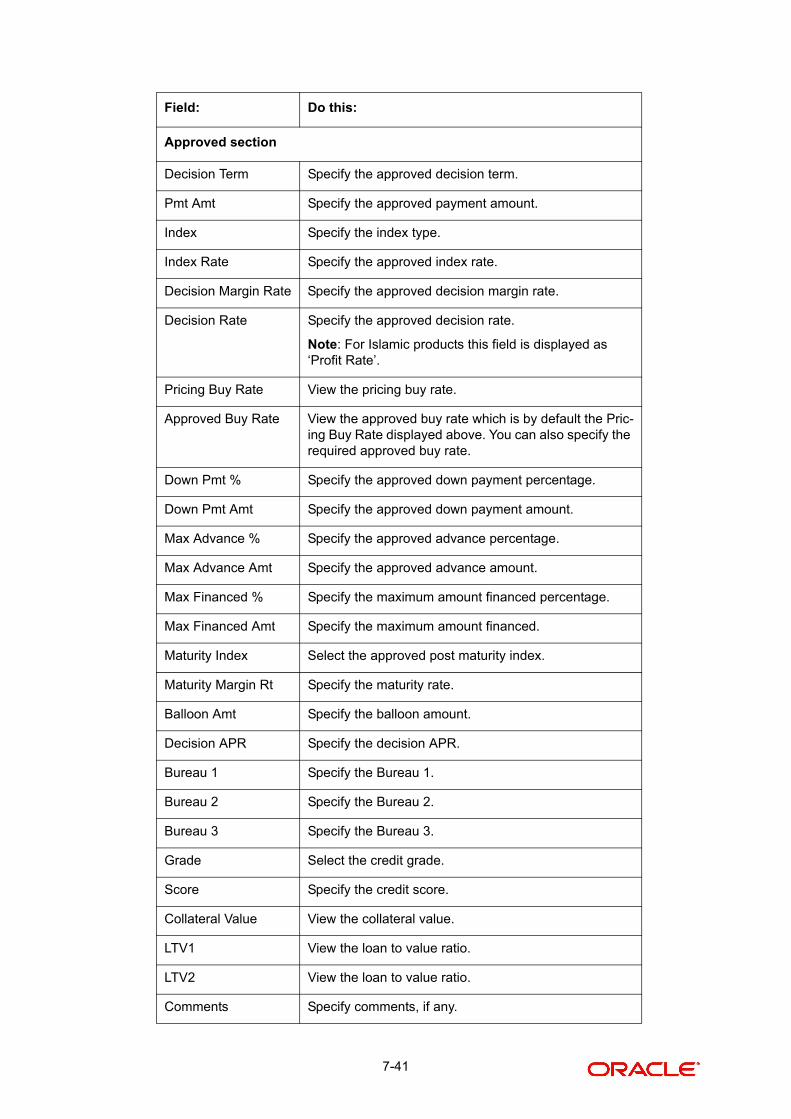
Approved section
Decision Term Specify the approved decision term.
Pmt Amt Specify the approved payment amount.
Index Specify the index type.
Index Rate Specify the approved index rate.
Decision Margin Rate Specify the approved decision margin rate.
Decision Rate Specify the approved decision rate.
Note: For Islamic products this field is displayed as ‘Profit Rate’.
Pricing Buy Rate View the pricing buy rate.
Approved Buy Rate View the approved buy rate which is by default the Pric-ing Buy Rate displayed above. You can also specify the required approved buy rate.
Down Pmt % Specify the approved down payment percentage.
Down Pmt Amt Specify the approved down payment amount.
Max Advance % Specify the approved advance percentage.
Max Advance Amt Specify the approved advance amount.
Max Financed % Specify the maximum amount financed percentage.
Max Financed Amt Specify the maximum amount financed.
Maturity Index Select the approved post maturity index.
Maturity Margin Rt Specify the maturity rate.
Balloon Amt Specify the balloon amount.
Decision APR Specify the decision APR.
Bureau 1 Specify the Bureau 1.
Bureau 2 Specify the Bureau 2.
Bureau 3 Specify the Bureau 3.
Grade Select the credit grade.
Score Specify the credit score.
Collateral Value View the collateral value.
LTV1 View the loan to value ratio.
LTV2 View the loan to value ratio.
Comments Specify comments, if any.
Field: Do this:
7-41

4. Perform any of the Basic Actions mentioned in Navigation chapter.
5. Click Select Pricing.
The system determines the best pricing match of all enabled Loan pricing strings in the Setup menu and displays the results in the Pricing and Approved sections.
6. Quick Calculate
In the ‘Decision Information’ section, there is a drop-down list adjacent to the ‘Calculate’ button with following options to auto calculate different Loan decision parameters based on the data provided. Select the required option from the drop-down list and click ‘Calculate’:
– CALCULATE PAYMENT
– CALCULATE INTEREST RATE
– CALCULATE TERM
– CALCULATE LOAN AMOUNT
The system displays the requested calculation in the respective field.
7. Re-Score
A 'Re-Score' button is available next to 'Calculate'. Whenever any sensitive Financial or Collateral information is amended in the Application, OFSLL displays a warning message 'Scoring sensitive information is changed. Re-score the application'. You need to click on Re-Score to re-validate the grade and pricing accordingly.
The display of the warning message to Re-score the application can be controlled using the respective System parameter. If the defined System Parameter is flagged 'Y', only then the message is displayed.
If you are underwriting a Loan, record the following information on the Decision tab:
8. If you are approving the application, complete the Approved section with the values you want to approve as an underwriter. You can update the default values that appeared when you selected the pricing string in step 3. (The system calculator may be of use when completing this section. For more information, refer the Tools chapter).
9. Click Calculate. The system displays the decision calculation in the respective field.
7.8.1 System Recommendation
The System Recommendation sub screen displays the system generated Score, Decision and Grade. You will also be able to view the request details of the application under 'Requested' section itself.
A brief description of the fields in System Recommendation section are given below:
A brief description of the fields in Requested section are given below:
Field: Do this:
Score View the system recommended score.
Decision View the system recommended decision.
Grade View the system recommended grade.
Field Do this
Requested Advance Amt View the requested advance amount
Pmt Amt View the requested payment amount.
7-42

7.8.2 Stipulations Sub Tab
The Stipulations sub screen allows to add any stipulations or reasons for adverse action you want to attach to the application. Stipulations are items that need to be addressed before the Loan can be funded.
If the application was automatically rejected during the application entry edits, the system displays the automatically generated adverse action codes in this sub screen. If the application is manually rejected by the Underwriter due to adverse action reasons received from bureau or otherwise, the same can be recorded for each of the applicant.
In addition, you can enter comments against specific stipulations as required. Whenever a Stipulation is marked as 'Not Applicable' it becomes mandatory to specify the reason in comments field. Else, system prompts for the reason while processing the application.
To add or view stipulations or reasons for adverse action
1. Open the Underwriting screen and load the underwriting application you want to work with.
2. Click Decision > Stipulations sub tab.
3. Perform any of the Basic Operations mentioned in Navigation chapter.
A brief description of the fields is given below.
Term View the requested term (number of payments).
Requested Rate View the requested rate of interest.
Down Pmt% View the down payment percentage
Down Pmt View the down payment amount
Approx Prc View the approximate cash price
Promotion View the promotion type from the drop-down list.
Balloon Amt View the balloon amount.
Signing Dt View the signing date
Probable Delivery Dt View the probable delivery date.
Field: Do this:
Type Select the reason type. Type can be Stipulation Reasons or Adverse Action Reasons and Adverse Action Reasons can also be those received from Bureau.
Name The system displays all applicant’s name in the drop down list. You can select the name of the applicant for whom adverse action reason needs to be recorded. In case the stipulation reason is at the appli-cation level, then select ALL.
Code Select the reason.
Description Specify the required description.
Field Do this
7-43

4. Perform any of the Basic Actions mentioned in Navigation chapter.
If your system is set up to manually load predefined stipulations, click the Load Stipulations button (For more information, refer the following section, Loading Stipulations.)
7.8.2.1 Add Multiple
The system enables you to add multiple records to stipulations using the 'Add Multiple' option.
To add multiple stipulations
1. Click the drop down list adjacent to the 'Add Multiple' button.
2. Select the check box against to the required stipulations. You can also select ’All’ to load all the available stipulations.
3. Click Add Multiple.
4. If required, you can perform any of the Basic Actions mentioned in Navigation chapter.
7.8.2.2 Copying Stipulations
The system enables you to automatically transfer stipulations from previous decisions on the Stipulations sub screen with the Copy Stipulations button. This is particularly useful when you are rehashing an application and want to use the same stipulations as those in place for the previous decision.
7.8.2.3 Loading Stipulations
The system supports the automatic generation of default stipulations on the Underwriting screen’s Stipulations sub screen. The default stipulations can be maintained by company, branch, product, state, application status and application sub-status. When the application status changes (either manually and automatically), the system populates the maintained stipulations with a Stips Satisfied indicator of ‘No’. You can review and update the stipulations accordingly.
You have the option to manually load predefined stipulations by clicking the Load Stipulations button on the Stipulation screen.
To load predefined stipulations
1. Open the Underwriting screen and load the underwriting application you want to work with.
2. Click Decision > Stipulations.
3. Click Load Stipulations. The system loads the default stipulations on the Stipulations sub screen.
4. Use the Yes/No/NA buttons in the Stips Satisfied column to indicate if you verified the stipulation(s) in the Type field.
Stips Satisfied Use the Yes/No/NA buttons to indicate if you verified the stipula-tion(s) in the Type field
Comment Specify the comment.
Verified By The system updates the user ID of the person who verified the details
Verified Dt The system updates the date when the details are verified.
Field: Do this:
7-44

5. Click Save on the Stipulations sub screen.
7.8.3 Itemization Sub Tab
The Itemizations sub screen enables you to add or verify any itemized amounts associated with the application. The list of itemizations is determined by the product you selected in the master screen during the application entry process. The Itemizations sub screen displays an itemization record of the amount financed, such as the cash price, cash down payment, trade-in, unpaid cash price balance and so on. Information that was entered on the Itemization sub screen during the application entry process will appear in the Requested Amt column. Information that you enter as an underwriter in the Approved Amt column will appear in the Itemizations sub screen on the Underwriting screen.
To add or view itemizations
1. Open the Underwriting screen and load the underwriting application you want to work with.
2. Click Decision > Itemizations sub tab.
3. Perform any of the Basic Operations mentioned in Navigation chapter.
A brief description of the fields is given below:
4. Perform any of the Basic Actions mentioned in Navigation chapter.
7.8.4 Trade-In Sub Tab
The Trade-In sub screen enables you to add or verify any trade-ins associated with the application. If there is any information regarding an itemized trade-in, use the Trade-In sub screen to enter the details in the system. (This sub screen might already contain information supplied during the application entry process.)
To complete the Trade-In sub screen
1. Open the Underwriting screen and load the underwriting application you want to work with.
2. Click Decision > Trade-In sub tab.
3. Perform any of the Basic Operations mentioned in Navigation chapter.
Field: Do this:
Itemization View the itemization.
+/- View whether the itemized amount is added or subtracted from the Loan amount.
Requested Amt Specify the requested amount.
Approved Amt Specify the approved amount.
Discount Rate Specify the discount rate.
Comment Specify a comment.
7-45

A brief description of the fields is given below:
4. Perform any of the Basic Actions mentioned in Navigation chapter.
7.8.5 Rate Schedule Sub Tab
The Rate Schedule sub screen is only available for variable rate Loan and displays the rate adjustment frequency information based on product setup.
To view the Rate Schedule sub screen
1. Open the Underwriting screen and load the underwriting application you want to work with.
2. Click Decision > Rate Schedule sub tab. Click View.
Field: Do this:
Trade-in section
Asset Type Select the asset type.
Asset Sub Type Select the asset sub-type.
Year Specify the year of the asset.
Make Specify the make of the asset.
Model Specify the model of the asset.
Identification # Specify the identification number.
Body Specify the body of the asset.
Description View the asset description.
Valuation section
Wholesale Amt Specify the wholesale value.
Base Retail Amt Specify the retail value.
Addons Amt (+) Specify the add ons value.
Payoff Amt (-) Specify the payoff amount.
Total Amt = View the total value.
Valuation Dt Specify the valuation date.
Source Select the valuation source.
Valuation Supple-ment
Specify the valuation supplement.
Edition Specify the valuation edition.
7-46

A brief description of the fields is given below:
7.8.6 Subvention Sub Tab
With the Subvention sub tab, available only for Loan, you can review the subvention information from the application entry and calculate the subvention amount, as well as override the calculated subvention amount. The participant’s information is automatically populated based on the selected subvention plan.
To complete the Subvention sub tab
1. Open the Underwriting screen and load the underwriting application you want to work with.
2. Click Decision > Subvention sub tab.
3. Perform any of the Basic Operations mentioned in Navigation chapter.
A brief description of the fields is given below:
4. Perform any of the Basic Actions mentioned in Navigation chapter.
5. In Subvention Detail section, perform any of the Basic Operations mentioned in Navigation chapter.
A brief description of the fields is given below.
Field: View this:
Seq The rate adjustment sequence number.
Adjustment Frequency Type The rate adjustment frequency type.
Period The rate adjustment period for the frequency.
# of Adjustments The number of rate adjustments for the frequency.
Field: Do this:
Plan Select the subvention plan.
Description View the subvention plan description.
Sub Plan Select the sub plan.
Sub Plan Description View the subvention sub plan description.
Subvention Type View the subvention type.
Include Check this box to include this record in calculations on the Other Details sub section
Subvention Detail section:
Participant View the participant.
Participant Type View the participant type.
Collection Method View the collection method.
Rate View the subvention rate.
7-47
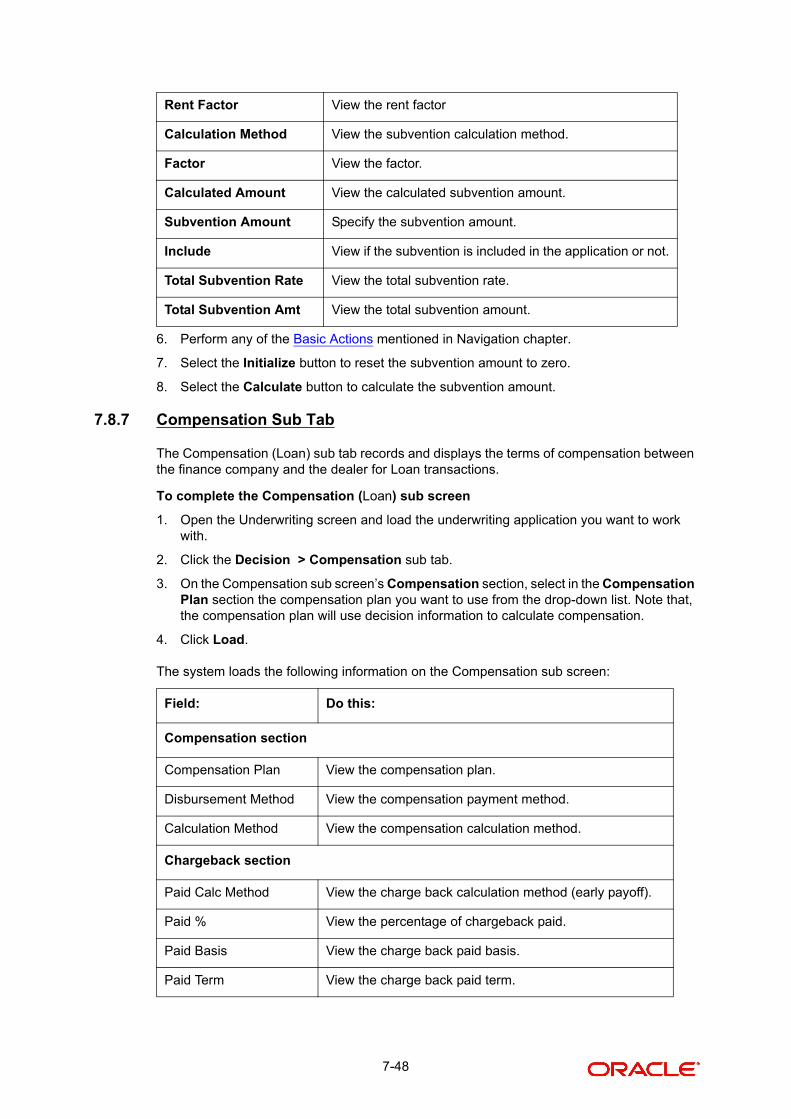
6. Perform any of the Basic Actions mentioned in Navigation chapter.
7. Select the Initialize button to reset the subvention amount to zero.
8. Select the Calculate button to calculate the subvention amount.
7.8.7 Compensation Sub Tab
The Compensation (Loan) sub tab records and displays the terms of compensation between the finance company and the dealer for Loan transactions.
To complete the Compensation (Loan) sub screen
1. Open the Underwriting screen and load the underwriting application you want to work with.
2. Click the Decision > Compensation sub tab.
3. On the Compensation sub screen’s Compensation section, select in the Compensation Plan section the compensation plan you want to use from the drop-down list. Note that, the compensation plan will use decision information to calculate compensation.
4. Click Load.
The system loads the following information on the Compensation sub screen:
Rent Factor View the rent factor
Calculation Method View the subvention calculation method.
Factor View the factor.
Calculated Amount View the calculated subvention amount.
Subvention Amount Specify the subvention amount.
Include View if the subvention is included in the application or not.
Total Subvention Rate View the total subvention rate.
Total Subvention Amt View the total subvention amount.
Field: Do this:
Compensation section
Compensation Plan View the compensation plan.
Disbursement Method View the compensation payment method.
Calculation Method View the compensation calculation method.
Chargeback section
Paid Calc Method View the charge back calculation method (early payoff).
Paid % View the percentage of chargeback paid.
Paid Basis View the charge back paid basis.
Paid Term View the charge back paid term.
7-48
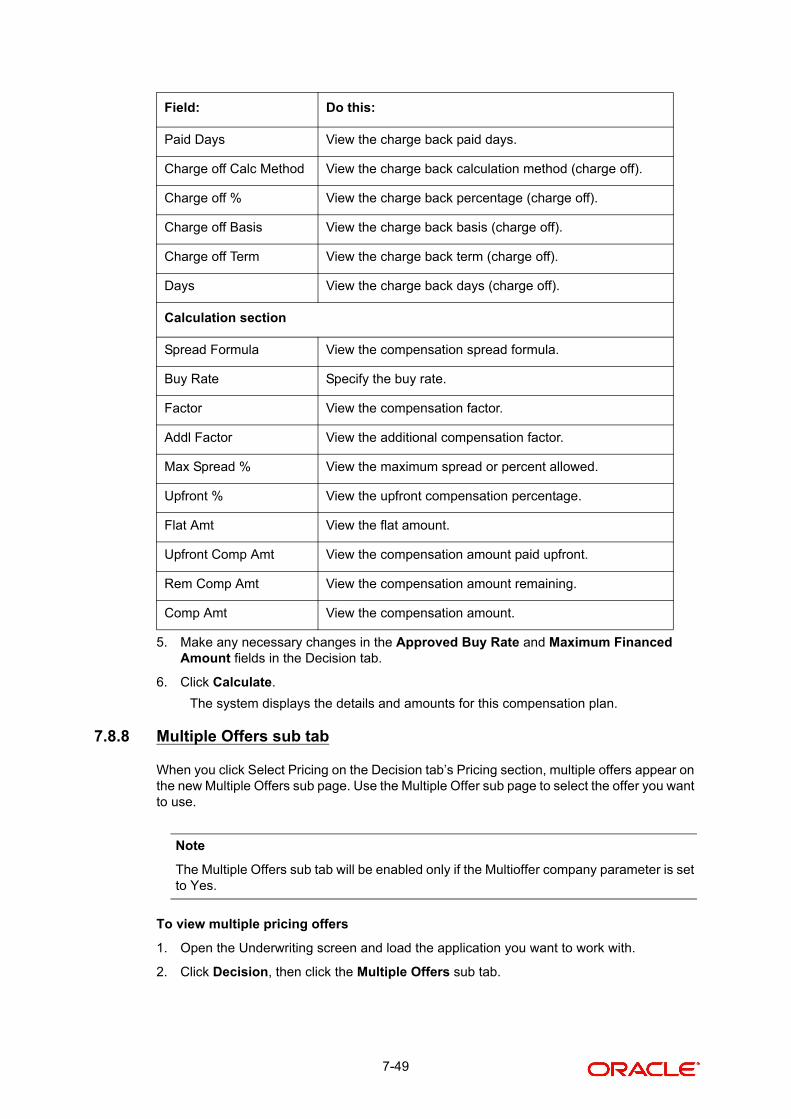
5. Make any necessary changes in the Approved Buy Rate and Maximum Financed Amount fields in the Decision tab.
6. Click Calculate.
The system displays the details and amounts for this compensation plan.
7.8.8 Multiple Offers sub tab
When you click Select Pricing on the Decision tab’s Pricing section, multiple offers appear on the new Multiple Offers sub page. Use the Multiple Offer sub page to select the offer you want to use.
Note
The Multiple Offers sub tab will be enabled only if the Multioffer company parameter is set to Yes.
To view multiple pricing offers
1. Open the Underwriting screen and load the application you want to work with.
2. Click Decision, then click the Multiple Offers sub tab.
Paid Days View the charge back paid days.
Charge off Calc Method View the charge back calculation method (charge off).
Charge off % View the charge back percentage (charge off).
Charge off Basis View the charge back basis (charge off).
Charge off Term View the charge back term (charge off).
Days View the charge back days (charge off).
Calculation section
Spread Formula View the compensation spread formula.
Buy Rate Specify the buy rate.
Factor View the compensation factor.
Addl Factor View the additional compensation factor.
Max Spread % View the maximum spread or percent allowed.
Upfront % View the upfront compensation percentage.
Flat Amt View the flat amount.
Upfront Comp Amt View the compensation amount paid upfront.
Rem Comp Amt View the compensation amount remaining.
Comp Amt View the compensation amount.
Field: Do this:
7-49

3. If you are underwriting a Loan, view the following information on the Multiple Offers sub:
4. On the Multiple Offers sub tab, select the offer once the application is move to Approved status.
7.9 Customer Credit Limit tab
This tab is available only if the selected product has the ‘Customer Credit Limit’ check box in selected in Products setup screen (Setup > Products > Products).
Customer Credit limit in general refers to the maximum amount of credit that a financial institution can extend to a prospective customer which can then be leveraged by an underwriter while funding an application.
In Oracle Financial Services Lending and Leasing, you can define the Customer Credit Limit during underwriting stage based on the customer credit worthiness or historical customer data. Using this limit, applications can be funded up to the credit limit amount allowed. However, application funding with or without customer credit limit is controlled based on the setup and applications can still be funded with the normal process when a particular customer is not allocated with any credit limit.
A customer credit limit facilitates for quick decisioning by an underwriter and also facilitates for auto approval of accounts on-boarded from external system with basic validations. While approving, underwriter has to ensure that the sum of utilizations should always be equal to the financed amount which can be distributed within applicants primary / secondary or business categories.
A minimum of one application has to be funded to define customer credit limit for funding subsequent applications and the defined information is updated into credit limit details. A credit limit once defined can further be increased from servicing module by posting the required transaction which is referenced in origination module during application funding.
Field: Do this:
Pricing View the pricing.
Term Specify the approved term.
Rate Specify the approved rate.
Pmt Amt Specify the approved payment amount.
Index View the approved index.
Index Rate View the approved index rate.
Margin Rate Specify the approved margin.
Maturity Index Specify the approved maturity index.
Maturity Rate Specify the approved maturity rate.
Accepted If selected, indicates that the pricing is accepted. Only one of the current pricings can be accepted.
Current If selected, indicates that the pricing is current.
Note: All the available pricings are selected as current.
7-50

On receiving a payment, the amount is reinstated to the credit limit balance which can be re-used while funding next application. Similarly, the credit limit balance is also updated when account is moved to VOID status. On reversing a payment, the Total Utilization of credit limit is increased by the principal portion of the payment and decreased with the Available Amt field. Also, the Suspended and Hold amount fields are increased and decrease based on the respective transactions posted.
When two applications are being funded simultaneously (i.e. moving application to ‘Approved Funded’ status), the utilization amount will be considered for first application while the second one will be on HOLD since there could be a difference in the available credit limit after funding. In such a case, you need to re-hash the application, fetch the details in Origination > Decision tab, (if required) increase credit limit from servicing module, and then proceed for funding.
While processing applications using Customer Credit Limit, the ‘Update Customer Info’ (check box in applicant tab) and ‘Link to Existing Customer’ (check box in contract tab) are selected by default for all the existing customers. This is to ensure the application details are propagated to customer accounts.
On funding a new application for an existing customer using customer credit limit, the details are updated into the existing customer details in the Servicing module. Also, while posting any monetary transaction that results in increase of account maturity date, system auto validates if the same is within the 'Customer Credit Limit Expiry date' of any one or all of the customer(s) who contributed for funding the Account. In case it is greater, system displays an error indicating that the resulting Maturity date is greater than 'Customer Credit Limit Expiry date' and does not allow to post the transaction.
To define Credit Limit Details
1. Open Underwriting screen and load the underwriting application you want to work with.
2. Click ‘Customer Credit Limit’ tab.
3. Perform any of the Basic Operations mentioned in Navigation chapter. A brief description of the fields are given below:
Field: Do this:
Relation Type View the relationship type. This field is pre-populated with details from Applicant tab.
Customer # / Busi-ness #
This field is displayed blank for new customer/business and for an existing customer/business, the details are populated from Servicing > Customer Service > Customer details.
7-51

4. Perform any of the Basic Actions mentioned in Navigation chapter.
Name View the customer name. This field is pre-populated with details from Applicant tab.
Max Limit Specify the value of maximum credit limit amount that can be provided to the customer.
For new customer/business, the amount is pre-populated based on selected pricing in Decision tab for new applicant/business. However, you can override the amount by entering the required value.
Total Utilized Amt View the total credit limit amount utilized for previously funded applications.
Available Amt View the available credit limit amount on the account which is the difference of Max Limit - (Hold + Total Utilized + Sus-pended) amount.
Hold Amt View the credit limit amount on hold which is based on the Hold transaction posted in servicing.
Suspended Amt View the credit limit amount suspended which is based on suspended transaction posted in servicing.
Grade Select the required grade from the drop-down list. There is no validation performed on the selected grade and can be selected based on customer credit worthiness.
Max Late Charge Specify the maximum late charge amount.
Limit Expiry Select the credit limit expiry date from the adjoining calendar. The expiry date is validated if application is being funded based on customer credit limit.
Limit Next Renewal Select the date on which the credit limit has to be renewed from the adjoining calendar.
Application Utilization section - This section allows you to define the portion (either percentage or amount) of credit limit utilization against the financed amount.
For example,
if the amount financed it 10,000 $ and percentage of Utilization for Primary is 80% then Utilized amount should be 10,000*0.8 = 8000 $.
Similarly, if the percentage of Utilization for Spouse is 20% the Utilized amount should be 10,000*0.2 = 2000 $.
Note: On specifying either percentage or amount of utilization, the other field is auto calculated based on financed amount.
% of Utilization Specify the percentage of credit limit utilization allowed against each applicant (Customer and business) added to the application.
Utilization Amt Specify the amount of credit limit utilization allowed against each applicant (Customer and business) added to the appli-cation.
Field: Do this:
7-52
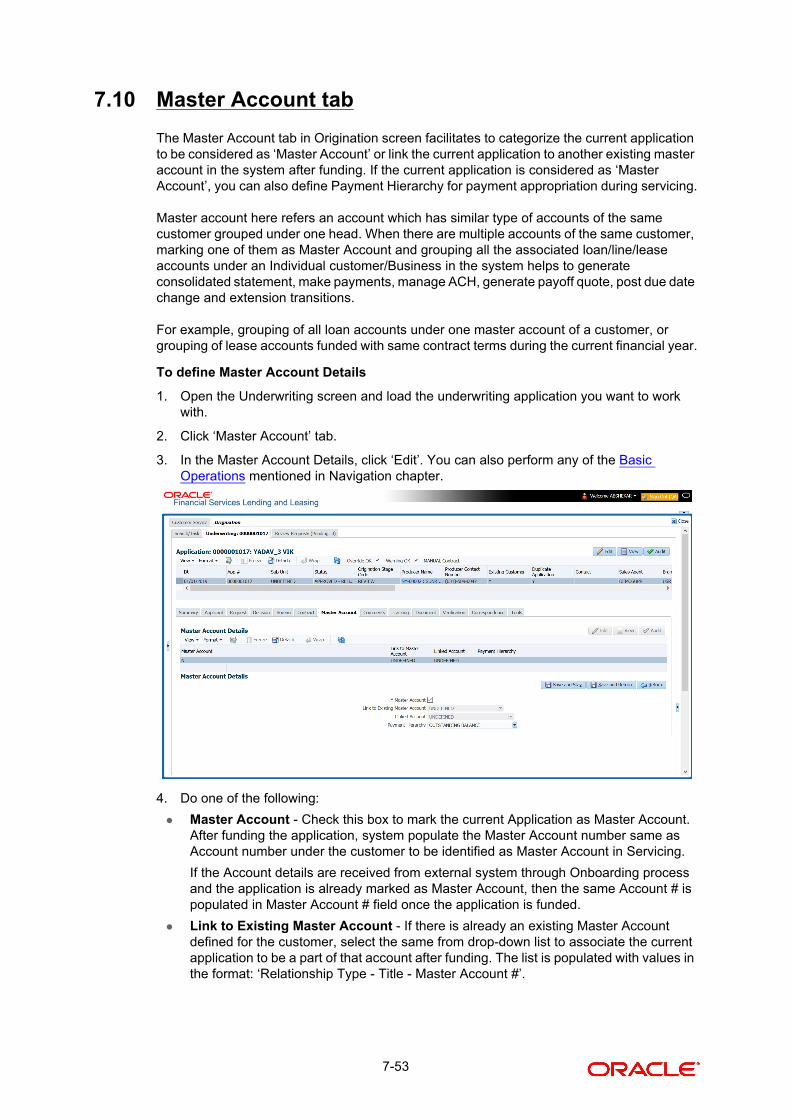
7.10 Master Account tab
The Master Account tab in Origination screen facilitates to categorize the current application to be considered as ‘Master Account’ or link the current application to another existing master account in the system after funding. If the current application is considered as ‘Master Account’, you can also define Payment Hierarchy for payment appropriation during servicing.
Master account here refers an account which has similar type of accounts of the same customer grouped under one head. When there are multiple accounts of the same customer, marking one of them as Master Account and grouping all the associated loan/line/lease accounts under an Individual customer/Business in the system helps to generate consolidated statement, make payments, manage ACH, generate payoff quote, post due date change and extension transitions.
For example, grouping of all loan accounts under one master account of a customer, or grouping of lease accounts funded with same contract terms during the current financial year.
To define Master Account Details
1. Open the Underwriting screen and load the underwriting application you want to work with.
2. Click ‘Master Account’ tab.
3. In the Master Account Details, click ‘Edit’. You can also perform any of the Basic Operations mentioned in Navigation chapter.
4. Do one of the following:
Master Account - Check this box to mark the current Application as Master Account. After funding the application, system populate the Master Account number same as Account number under the customer to be identified as Master Account in Servicing.
If the Account details are received from external system through Onboarding process and the application is already marked as Master Account, then the same Account # is populated in Master Account # field once the application is funded.
Link to Existing Master Account - If there is already an existing Master Account defined for the customer, select the same from drop-down list to associate the current application to be a part of that account after funding. The list is populated with values in the format: ‘Relationship Type - Title - Master Account #’.
7-53
Linked Account - If there is an account to be linked to the current application to have one-to-one mapping, select the same from drop-down list. The accounts are listed in format ‘Customer ID - Title - Account #’.
– The list is populated with those Accounts which are associated with Customer (i.e. added as an applicant) and the ‘Link to Existing Customer’ option is checked.
– However, this list does not include Master Accounts and accounts which are already associated with other Accounts (i.e. already linked to some other account).
On funding the application, both the accounts (newly created and existing) are interlinked and system updates the ‘Linked Account’ field with Account # respectively.
Note
If account is created using ‘Account Onboarding Service’, the ‘LinkedAccountXrefNumber’ element available under ‘ApplicationData’ parent element, can be used to indicate Linked Account Xref number to link to Associated Account if both Master and Associated Ac-counts are in a single payload.
System performs the following edits before linking the accounts:
– Ensure that the Billing Cycle and Due day of current application is same as the Linked Account Billing Cycle and Due Day. However this is not validated if both accounts are of ‘Same Billing Cycle’.
– If the current application is to be linked to a Master Account, ensure that the ‘Product/Funding Type’ of both current application and Master Account are same and also belongs to same ‘Company’.
– The Current and Linked Account belongs to same Company.
Payment Hierarchy - The field is enabled only on selecting the above ‘Master Account’ check box. Select the required Hierarchy Definition to be used for payment appropriation from the drop-down list. The list is populated with all the pre-defined and enabled hierarchy definitions maintained Setup > Administration > Users > Payment Hierarchy screen. The Hierarchy Definition selected here is propagated to Customer Service > Account Details > Additional Details section.
5. Perform any of the Basic Actions mentioned in Navigation chapter.
7.11 Bureau Tab
The Bureau tab displays the credit report (if pulled) for an applicant. If there is a need for another pull for any applicant, it can be done here manually using the New Request section.
If there are any adverse comments received from the Bureau, system displays them under 'Exceptions/ Comments' section against the specific Bureau record to alert the User. Following are some of the reasons:
1. Application Indicates Potential Fraud
2. Bureau Indicates Social Security Number Variance
3. Duplicate Application Exists
4. Bureau Indicates a Possible Current Delinquency
5. Bureau Indicates Bankruptcy
6. Bureau Indicates Consumer Statement
7. Bureau Indicates a Possible Repossession
8. Bureau Reports OFAC hit
9. Bureau Reports Applicant as Deceased
7-54

10. Potential Delinquencies for Auto Loans in Past 12 Months
11. Customer Rate (APR) Exceeds the State Usury Rate
12. Open Consumer Credit Counselling
The reasons will also be displayed in the Summary tab in 'Bureau' details under 'Exceptions /Comments' section.
To verify the credit bureau data using the Bureau tab
1. Open the Underwriting screen and load the underwriting application you want to work with.
2. Click Bureau.
3. In the Bureau Details section, view the following information:
Field: View:
Type The credit bureau request type.
Bureau The credit bureau.
# The credit bureau request number.
Status The status of credit bureau request.
Dt The credit bureau request date.
Report The credit bureau report type.
Credit Bureau Reorder#
The credit bureau reorder number.
App Ind If selected, indicates that a bureau was pulled for an application.
7-55
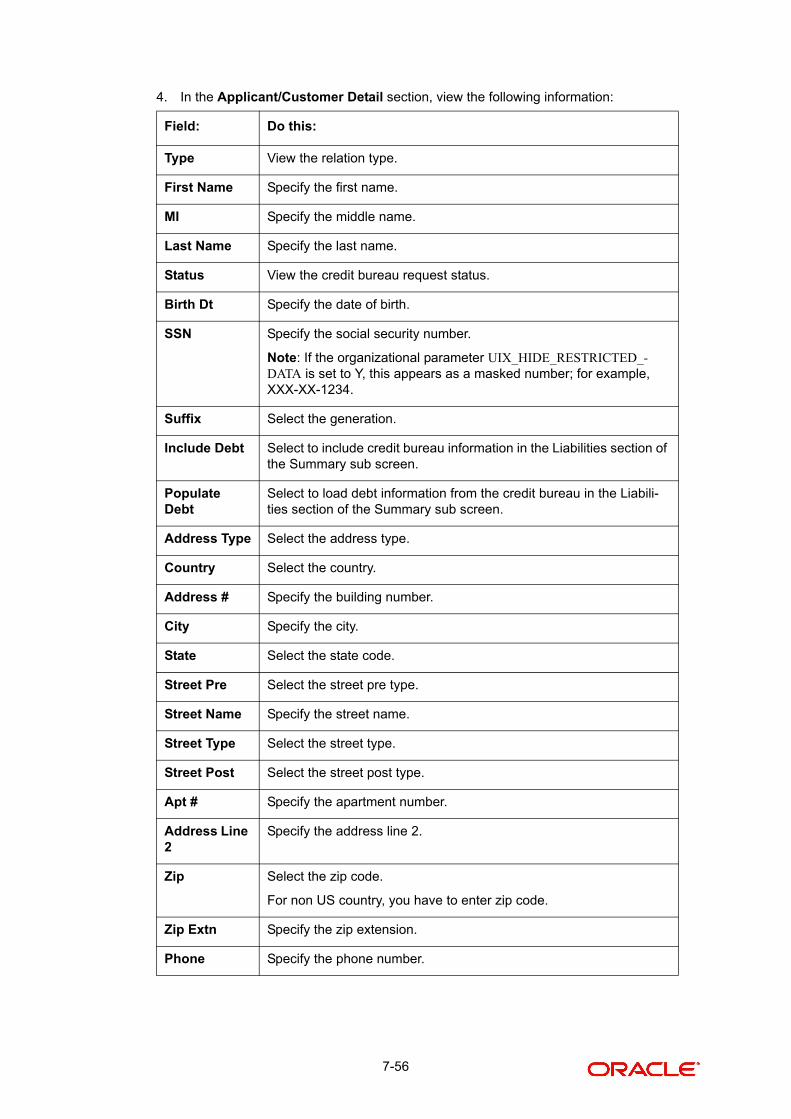
4. In the Applicant/Customer Detail section, view the following information:
Field: Do this:
Type View the relation type.
First Name Specify the first name.
MI Specify the middle name.
Last Name Specify the last name.
Status View the credit bureau request status.
Birth Dt Specify the date of birth.
SSN Specify the social security number.
Note: If the organizational parameter UIX_HIDE_RESTRICTED_-DATA is set to Y, this appears as a masked number; for example, XXX-XX-1234.
Suffix Select the generation.
Include Debt Select to include credit bureau information in the Liabilities section of the Summary sub screen.
Populate Debt
Select to load debt information from the credit bureau in the Liabili-ties section of the Summary sub screen.
Address Type Select the address type.
Country Select the country.
Address # Specify the building number.
City Specify the city.
State Select the state code.
Street Pre Select the street pre type.
Street Name Specify the street name.
Street Type Select the street type.
Street Post Select the street post type.
Apt # Specify the apartment number.
Address Line 2
Specify the address line 2.
Zip Select the zip code.
For non US country, you have to enter zip code.
Zip Extn Specify the zip extension.
Phone Specify the phone number.
7-56
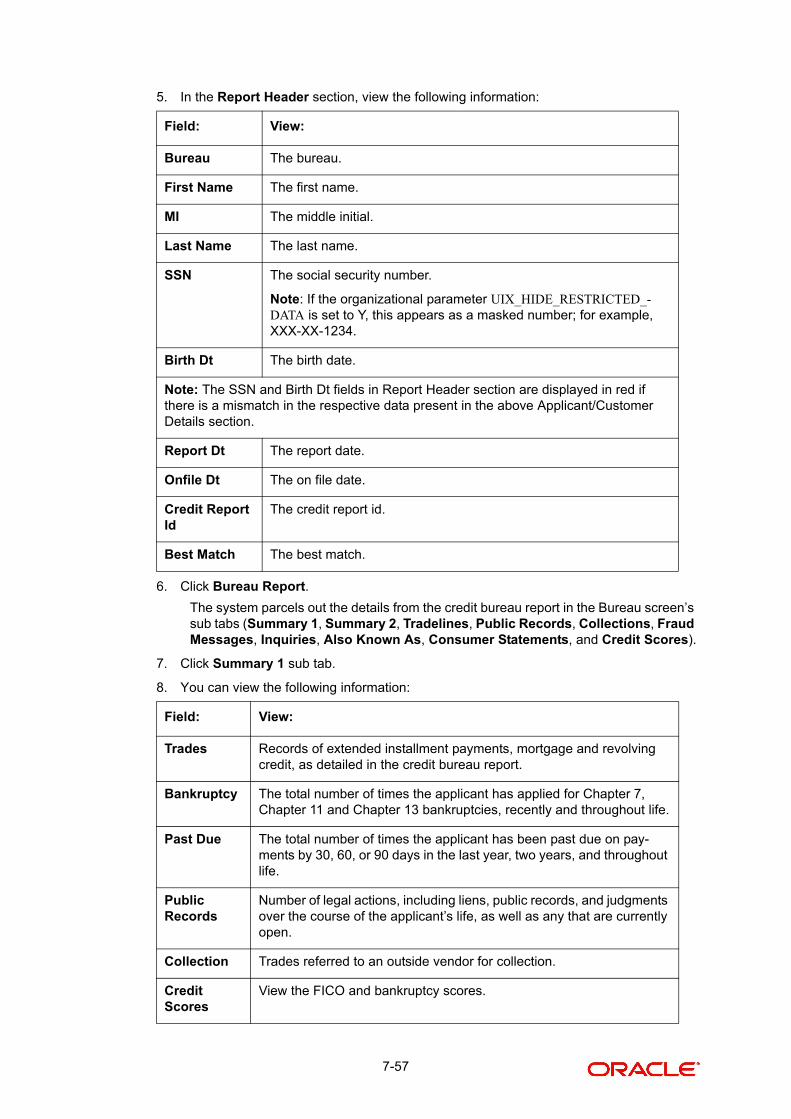
5. In the Report Header section, view the following information:
6. Click Bureau Report.
The system parcels out the details from the credit bureau report in the Bureau screen’s sub tabs (Summary 1, Summary 2, Tradelines, Public Records, Collections, Fraud Messages, Inquiries, Also Known As, Consumer Statements, and Credit Scores).
7. Click Summary 1 sub tab.
8. You can view the following information:
Field: View:
Bureau The bureau.
First Name The first name.
MI The middle initial.
Last Name The last name.
SSN The social security number.
Note: If the organizational parameter UIX_HIDE_RESTRICTED_-DATA is set to Y, this appears as a masked number; for example, XXX-XX-1234.
Birth Dt The birth date.
Note: The SSN and Birth Dt fields in Report Header section are displayed in red if there is a mismatch in the respective data present in the above Applicant/Customer Details section.
Report Dt The report date.
Onfile Dt The on file date.
Credit Report Id
The credit report id.
Best Match The best match.
Field: View:
Trades Records of extended installment payments, mortgage and revolving credit, as detailed in the credit bureau report.
Bankruptcy The total number of times the applicant has applied for Chapter 7, Chapter 11 and Chapter 13 bankruptcies, recently and throughout life.
Past Due The total number of times the applicant has been past due on pay-ments by 30, 60, or 90 days in the last year, two years, and throughout life.
Public Records
Number of legal actions, including liens, public records, and judgments over the course of the applicant’s life, as well as any that are currently open.
Collection Trades referred to an outside vendor for collection.
Credit Scores
View the FICO and bankruptcy scores.
7-57
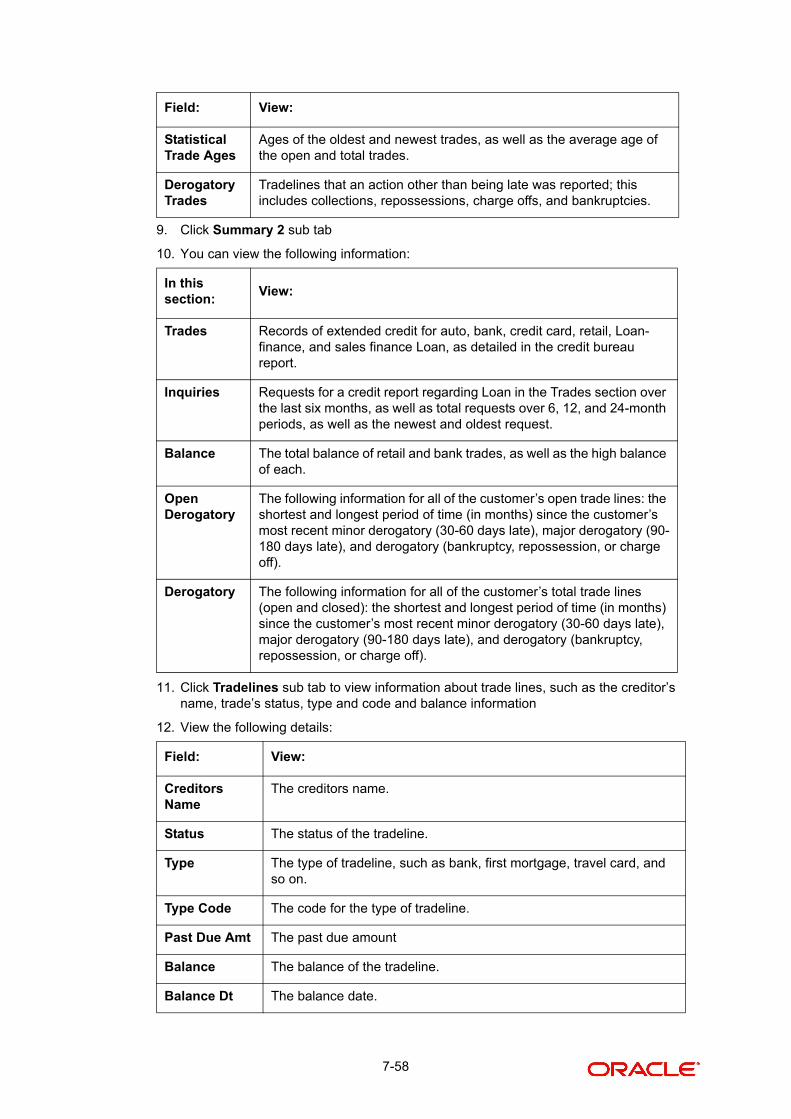
9. Click Summary 2 sub tab
10. You can view the following information:
11. Click Tradelines sub tab to view information about trade lines, such as the creditor’s name, trade’s status, type and code and balance information
12. View the following details:
Statistical Trade Ages
Ages of the oldest and newest trades, as well as the average age of the open and total trades.
Derogatory Trades
Tradelines that an action other than being late was reported; this includes collections, repossessions, charge offs, and bankruptcies.
In this section:
View:
Trades Records of extended credit for auto, bank, credit card, retail, Loan-finance, and sales finance Loan, as detailed in the credit bureau report.
Inquiries Requests for a credit report regarding Loan in the Trades section over the last six months, as well as total requests over 6, 12, and 24-month periods, as well as the newest and oldest request.
Balance The total balance of retail and bank trades, as well as the high balance of each.
Open Derogatory
The following information for all of the customer’s open trade lines: the shortest and longest period of time (in months) since the customer’s most recent minor derogatory (30-60 days late), major derogatory (90-180 days late), and derogatory (bankruptcy, repossession, or charge off).
Derogatory The following information for all of the customer’s total trade lines (open and closed): the shortest and longest period of time (in months) since the customer’s most recent minor derogatory (30-60 days late), major derogatory (90-180 days late), and derogatory (bankruptcy, repossession, or charge off).
Field: View:
Creditors Name
The creditors name.
Status The status of the tradeline.
Type The type of tradeline, such as bank, first mortgage, travel card, and so on.
Type Code The code for the type of tradeline.
Past Due Amt The past due amount
Balance The balance of the tradeline.
Balance Dt The balance date.
Field: View:
7-58

13. Click the Public Records sub tab to view information about public records, including each one’s type, status, and amount, as well as the date the record was filed and resolved
14. View the following details:
15. Click the Fraud Messages sub screen to view information about fraudulent attempts to use the applicant’s credit.
16. Click the Inquiries sub screen to view all the credit reports for the applicant in reverse chronological order
Open Dt The date the tradeline was opened.
History Dt The trade line’s history date.
History Data The trade line’s history data.
30 The number of times the tradeline was 30 days past due.
60 The number of times the tradeline was 60 days past due.
90 The number of times the tradeline was 90 days past due.
Creditors Subscriber #
The creditor’s subscriber number.
Mop The method of payment.
Account # The account number.
Credit Limit The credit limit.
Term Pmt Amt The term payment amount.
High Balance The high balance of the tradeline.
Reported Dt The reported date.
Duplicate If selected, the tradeline is a duplicate.
Special Exclu-sion
If selected, the tradeline is a special exclusion.
Field: View:
Record Type
The record type.
Status The status.
Amount The amount.
Filed Dt The filed date.
Satisfied Dt The satisfied date.
Field: View:
7-59

17. View the following details:
18. Click the Also Known As sub screen to view other names used by the applicant.
19. Click the Consumer Statements sub screen to view statements that the applicant has issued to the credit bureau.
20. Click the Credit Scores sub screen to view the score model, the score factor, and the score returned from the credit bureau report.
7.11.1 Printing the Credit Bureau Data as a Text/PDF Report
To print the credit bureau data as a text or PDF report
1. Open the Underwriting screen and load the underwriting application you want to work with.
2. In the Underwriting screen, click Bureau.
3. In the Bureau Report tab, the system displays the report in text format. You can also view the report in PDF format by selecting ‘PDF’ option as View Report.
Note
Google Chrome does not support search functionality in the PDF format of the report. Hence you have to enable the ad-hoc plug-in in chrome to use the search facility.
4. In the Print Report section, click Print Report to send the information to the default printer.
7.11.2 Requesting a Credit Bureau Report Manually
The Credit Bureau Summary screen enables you to manually request a credit pull. Information from a manual credit pull can be used to validate an application.
To manually request a credit bureau report
1. Open the Underwriting screen and load the underwriting application you want to work with.
2. Click Bureau tab.
3. In the Bureau Details section click Add.
Field: View:
Inquirer Name The inquirer’s name.
Inquirer Subscriber #
The inquirer’s subscriber number.
Inquirer Industry Code
The inquirer’s industry code.
Inquiry Dt The inquiry date.
Rate Shopping If selected, the inquiry concerned rate shopping.
Duplicate If selected, if the inquiry was a duplicate.
7-60

4. Specify the following information:
5. Click Create Request.
The system displays this information in the Bureau Details section.
Note
If you are requesting a report from Experian Credit Bureau for Premier Attribute Consumer report, you can do so without impacting the consumer FICO score. To facilitate the same, the ‘Soft Pull’ check box is to be selected in Bureau Details section. This option is available only when the system parameter ‘EXP_PA_SOFT_PULL_IND’ is enabled in the System Parameters screen and Bureau is selected as ‘EXP’ with Report as ‘PREMIER ATTRIB-UTE’ in the Bureau Details section.
6. Select Include Debt and Populate Debt in the Applicant/Customer Detail section to populate the Liability section on the Applicants link’s Summary sub screen with data from the credit bureau pull.
7. If you want to receive a copy of a previously pulled credit bureau report, enter the credit bureau reorder number in the Credit Bureau Reorder # field on the Bureau Details section. This enables you to receive a previously pulled credit report.
8. In the New Request section, click Submit Request.
The system displays the latest status of the currently requested bureau report in the Bureau Details section. When the report pull process is complete, the Status field in the Bureau Details section changes from PENDING to COMPLETED.
7.12 Collateral Tab
Having selected and loaded an application, you can view the information about the collateral of the Loan.
The Collateral link opens screens with information regarding any collateral associated with an application. Depending on the type of Loan, collateral can be a vehicle, home or something such as major household appliances. The Collateral tab is unavailable if this is an unsecured Loan.
To verify information about the collateral
1. Open the Underwriting screen and load the application you want to verify.
2. Click the Collateral tab.
Depending on the type of collateral, information about the vehicle, home, or other type of collateral appears.
If you are entering an unsecured Loan, the Collateral link is present but inactive; in which case, skip this step.
Field: Do this:
Applicant Select the applicant.
Spouse Select the applicant’s spouse (if applicable).
Bureau Select the credit bureau.
Report Select the credit bureau report type.
7-61
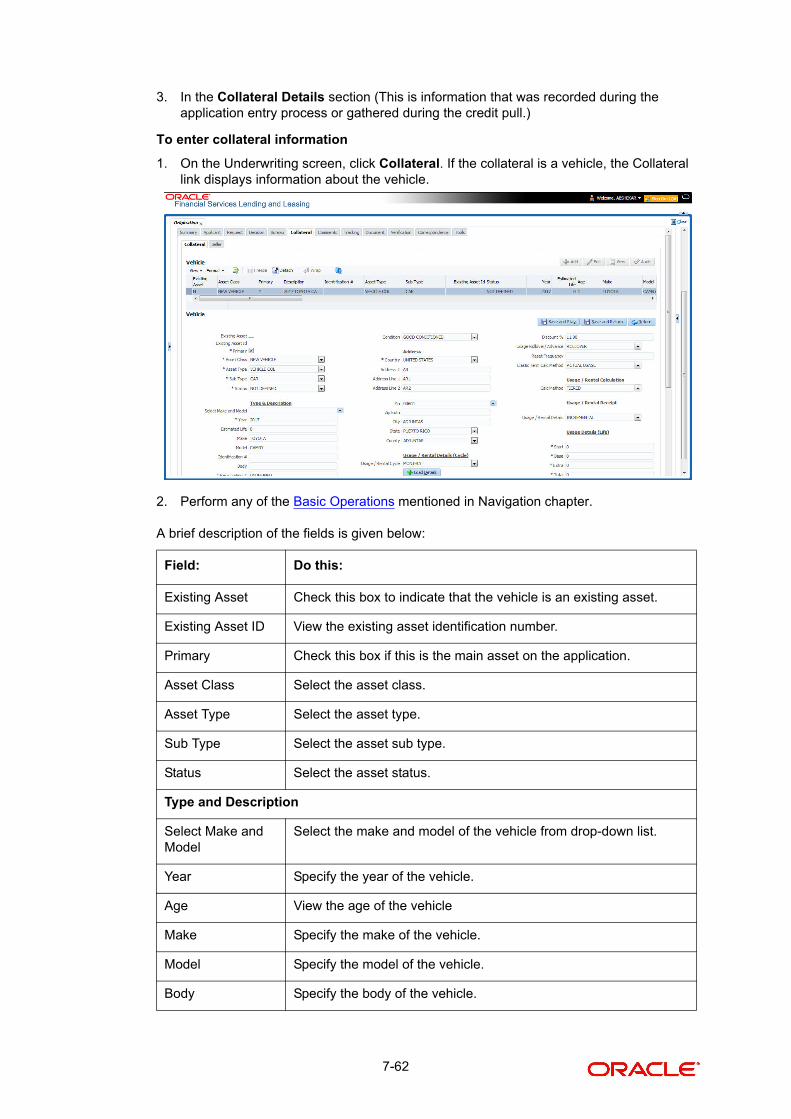
3. In the Collateral Details section (This is information that was recorded during the application entry process or gathered during the credit pull.)
To enter collateral information
1. On the Underwriting screen, click Collateral. If the collateral is a vehicle, the Collateral link displays information about the vehicle.
2. Perform any of the Basic Operations mentioned in Navigation chapter.
A brief description of the fields is given below:
Field: Do this:
Existing Asset Check this box to indicate that the vehicle is an existing asset.
Existing Asset ID View the existing asset identification number.
Primary Check this box if this is the main asset on the application.
Asset Class Select the asset class.
Asset Type Select the asset type.
Sub Type Select the asset sub type.
Status Select the asset status.
Type and Description
Select Make and Model
Select the make and model of the vehicle from drop-down list.
Year Specify the year of the vehicle.
Age View the age of the vehicle
Make Specify the make of the vehicle.
Model Specify the model of the vehicle.
Body Specify the body of the vehicle.
7-62

3. Perform any of the Basic Actions mentioned in Navigation chapter.
Interface with VINTEK (If interface is installed)
Using the Vintek interface, the system retrieves the year, make, model and body of the vehicle when you choose Vehicle Details. This time saving feature reduces data entry errors. Using the VIN entered in the Identification Number field, the system populates following fields in the Type & Description section:
Year
Make
Model
Body
If the Vintek interface is unable to retrieve information based on the VIN entered in the Identification Number field, the system displays an error message.
Registration # Specify the vehicle registration number.
Identification # Specify the vehicle identification number.
Description View the vehicle description.
Condition Select the vehicle condition.
Address
Country Select the country.
Address # Specify the apartment number.
Address Line 1 Specify the first address line.
Address Line 2 Specify the second address line.
Zip Select the zip code.
For non US country, you have to enter zip code.
Zip Extn Specify the zip extension.
City Specify the city.
State Select the state.
County Select the county.
Usage Details
The details maintained in this section is used to calculate ‘EXCESS USAGE FEE’ in pay-off quote and termination transactions.
Start View/specify the start unit of asset usage.
Base View/specify the base units.
Extra View/specify the extra usage units.
Total View/specify the total usage units.
Field: Do this:
7-63

If the collateral is a home, the Collateral link displays information about the home.
1. Perform any of the Basic Operations mentioned in Navigation chapter.
A brief description of the fields is given below:
Field: Do this:
Existing Asset Indicates that the vehicle is an existing asset.
Existing Asset ID View the existing asset identification number.
Primary Select if this is the main asset on the application.
Asset Class Select the asset class.
Asset Type Select the asset type.
Sub Type Select the asset sub type.
Occupancy Select owner occupancy type.
Identification # Specify the vehicle identification number.
Address section
Country Select the country.
Address # Specify the home number.
Address Line 1 Specify the first address line.
Address Line 2 Specify the second address line.
State Specify the state.
County Select the county.
Zip Select the zip code.
For non US country, you have to enter zip code.
7-64

Zip Extn Specify the zip extension.
City Specify the city.
Type and Description
Census Tract/BNA Code
Specify census tract/BNA (block numbering area) code.
MSA Code Specify the metropolitan statistical area (MSA) code.
GEO Code Specify the geographical code for the property.
Condition Select the condition of the home.
Description Specify a description of the home.
Select Make and Model
Select the make and model from the drop-down list
Year Specify the year when the property was built.
Age View the age of the home.
Make Specify the make of the home.
Model Specify the model of the home.
Width Specify the asset width.
Length Specify the asset length.
Area Specify the area of the collateral
PO# Specify the asset purchase order number.
Legal Description Specify the legal description.
Lot Specify the asset lot.
Sub Division Specify the asset sub division.
Parcel ID Specify the parcel id of the home.
Metes-Bounds Check this box to indicate the home is considered Metes-Bounds.
Flood Zone Check this box to indicate the home is in a flood zone.
1098 Not Required Check this box to indicate that the home does not require 1098
Deed Details
Construction per-mit Dt
Specify the date on when the construction is permitted.
Deed Dt Specify the date on when the deed is issued
Deed Place Of Issue
Specify the place where the deed is issued.
Field: Do this:
7-65

2. Perform any of the Basic Actions mentioned in Navigation chapter.
Consolidate Points at Master
If ‘Consolidate Points at Master’ option is checked, system consolidates the asset level points at Master Account of the associated account provided the following conditions are satisfied:
The same ‘Points Consolidation Type’ is selected for associated account.
The status of asset is ACTIVE.
The status of account is available and enabled in ACC_STATUS_POINT_CONS_CD lookup type.
The asset expiry date is greater than GL date (asset is not expired).
Points consolidation is done in following scenarios:
Properties Bound-ary from East
Specify the boundary of the property from the east side.
North Specify the boundary of the property from the north side.
West Specify the boundary of the property from the west side.
South Specify the boundary of the property from the south side.
Vacation Ownership Details
Billling Check this box to indicate if the asset is considered for billing.
Due Amt Account Type
Select one of the following account type from the drop-down list to indicate on which account this asset is to be considered for billing.
- Current Account
- Linked Account
- Master Account
Note: If ‘Billing’ option is checked and the Due Amt Account Type is selected as Current/Linked/Master Account, then the billing batch job posts the transactions based on Asset Billing Rate setup in Current account / Linked Account of current Account / Master Account of current Account respectively.
Trade Eligible This check box is selected by default and indicates that the asset is eligible for trade.
If checked (Trade Eligible = Y) then Asset Status is marked as INACTIVE during Trade. If unchecked (Trade Eligible = N) Asset status is marked as ACTIVE.
Consolidate Points at Master
Check this box to indicate that point can be consolidated at mas-ter account level. Refer to ‘Consolidate Points at Master’ section for more details.
Points Consolida-tion Type
Select the type of points consolidation option from drop-down list. This field is used to identify the assets at Associated accounts to consolidate the points.
Field: Do this:
7-66

When new account is added under a Master Account by UI, Funding process, API, Onboarding, Multi Account onboarding, and/or Master Account Maintenance Transaction.
Account Status Change
During Current Account Level Asset Maintenance updates.
– Collateral POST/PUT/GET Web Services
– Collateral Create/Update File uploads
– Collateral Maintenance from UI
– Add New Asset Transaction
– Substitution of asset Transaction
To ‘Consolidate Points at Master’, following validations and update options are provided:
Lookup code ‘Account Statuses for Points Consolidation’ determines which Accounts with which status are to be considered for point's consolidation.
Batch job which updates the consolidated points at Master Account level only if the ‘Expiration Date of Asset’ of Actual Asset at associated account is less than the GL date. This batch job is scheduled to run before the billing batch job to update the actual points that needs to be considered for Billing.
‘Points’ are maintained at actual asset level and any changes done at Master account level asset points does not flow down to the Actual Asset.
In case of an update at Master Account level Asset Point's and subsequently any change in actual asset at current account, system recalculates the points and overrides the points at master account.
If the collateral is any other, the Collateral link displays information about that collateral.
3. Perform any of the Basic Operations mentioned in Navigation chapter.
7-67

A brief description of the fields is given below:
Field: Do this:
Existing Asset Check this box to indicate that the vehicle is an existing asset.
Existing Asset ID View the existing asset identification number.
Primary Check this box if this is the main asset on the application.
Asset Class Select the asset class.
Asset Type Select the asset type.
Sub Type Select the asset sub type.
Status Select the asset status.
Select Make and Model
Select the make and model of the vehicle from drop-down list.
Year Specify the year of the vehicle.
Age View the age of the vehicle
Make Specify the make of the vehicle.
Model Specify the model of the vehicle.
Body Specify the body of the vehicle.
Registration # Specify the vehicle registration number.
Identification # Specify the vehicle identification number.
Description View the vehicle description.
Condition Select the vehicle condition.
Address
Country Select the country.
Address # Specify the apartment number.
Address Line 1 Specify the first address line.
Address Line 2 Specify the second address line.
State Select the state.
Zip Select the zip code.
For non US country, you have to enter zip code.
Zip Extn Specify the zip extension.
City Specify the city.
County Select the county.
7-68

4. Perform any of the Basic Actions mentioned in Navigation chapter.
7.12.1 Valuations Sub Tab
The Valuation sub tab contains information about the value of the asset. The Values section enables you specify the value of the asset. The Addons section records information about any add ons associated with the collateral.
To complete the Valuations sub tab
1. Click the Valuations sub tab.
2. Perform any of the Basic Operations mentioned in Navigation chapter.
A brief description of the fields is given below:
Usage Details
The details maintained in this section is used to calculate ‘EXCESS USAGE FEE’ in pay-off quote and termination transactions.
Start View/specify the start unit of asset usage.
Base View/specify the base units.
Extra View/specify the extra usage units.
Total View/specify the total usage units.
Field: Do this:
Value section
Current Select if this is the current valuation.
Valuation Dt Specify the valuation date.
Source Select the valuation source.
Currency Select the currency based on which the valuation is to be done.
Edition Specify the valuation edition.
Supplement Specify the valuation supplement.
Whole Sale
Loan Currency Wholesale Base Amt
Specify the Loan currency wholesale value.
Wholesale-Base Amt
Specify the wholesale value.
Usage Specify the usage value; that is, the monetary effect that the current mileage has on the value of the vehicle.
Retail
Field: Do this:
7-69
3. Perform any of the Basic Actions mentioned in Navigation chapter.
4. In the Addons Section, perform any of the Basic Operations mentioned in Navigation chapter.
A brief description of the fields is given below:
5. Perform any of the Basic Actions mentioned in Navigation chapter.
Complete the Addons/Attributes, Value, and Amt fields for each of the asset’s add-ons and attributes on the application.
7.12.2 Tracking Sub Tab
The Tracking sub screen enables you to record further information associated with the collateral. What items you choose to track are setup during implementation.
To track attributes for the collateral
1. Click Tracking sub tab
2. On the Tracking sub screen, click Load Details.
Retail Base Amt
Specify the retail value.
Addons Amt (+) View the add-ons value.
Usage Value Amt (+)
Specify the usage. This pertains to Loan and usually is entered as the current mileage on the vehicle.
Total Value Amt (=)
View the total value.
LoanCurrency Retail Base Amt
View the Loancurrency retail value.
LoanAddons Amt(+)
View the Loan addons.
Loan Currency Usage Value Amt (+)
View the Loan currency usage value.
Loan Currency Total Value Amt (=)
View the Loan total value.
Field: Do this:
Description Select the description for the attribute.
Value Specify the value of the attribute.
Amount Specify the add-on amount.
Loan Currency Amount
Specify Loan currency amount.
Field: Do this:
7-70
3. In the Tracking Items section, select the item you want to track.
4. Perform any of the Basic Operations mentioned in Navigation chapter.
A brief description of the fields is given below:
5. Perform any of the Basic Actions mentioned in Navigation chapter.
6. Complete the Tracking Item Details section by entering information about a parameter in the corresponding the Value field.
7.12.3 Vacation Ownership tab
In the Vacation Ownership sub tab you can capture and maintain ‘Timeshare’ specific collateral details of an account. This tab is displayed only for ‘Home’ collateral and allows to maintain only one record for the selected account.
In Vacation Ownership or Timeshare industry, ‘points’ represent monetary equivalent value and in a points-based timeshare ownership system, members/owners use the allotted points to exchange/trade collaterals. OFSLL uses these points for Asst Billing calculations while deriving the transaction amount as detailed in Setup > Asset Billing Rate screen.
Also in Vacation Ownership or Timeshare industry, ‘Tiers’ are used to classify a membership into different levels based on total points at Master Accounts. Each level of membership offers more perks than previous level. OFSLL supports points-based ‘Tier Calculation’ at Master Account level using the Formula parameters in Setup > User Defined Parameters screen.
Data in Vacation Ownership tab can also be populated from the following options:
Create and Update Collateral Upload files
Application Update Service
To maintain Vacation Ownership Elements for an account1. Click Vacation Ownership sub tab
2. Perform any of the Basic Operations mentioned in Navigation chapter.
3. In the Vacation Ownership Elements section, view or edit the following information:
Field: Do this:
Tracking Item View the tracking type
Disposition Select the disposition.
Start Dt Specify the tracking start date.
End Dt Specify the tracking end date.
Follow up Dt Specify the next follow-up date.
Enabled Select to track the information from the start date in the Start Dt field.
Comment Specify any comments regarding the tracking item.
In this field: View this:
Club Name Select the Club Name from the drop-down list.
Points Specify the points up to two decimal digit.
7-71

Billing Points View the auto populated billing points.
If the Asset Usage Type Sub Code is selected as FULL, this field is populated with total Points available in Points field.
If the Asset Usage Type Sub Code is selected as HALF, this field is populated with total Points/2 available in Points field.
First Year Proration Select the check box for first year proration.
Resort Identifier Select the Resort Identifier from the drop-down list.
Association Id Select the Association Id from the drop-down list.
Building Select the Building from the drop-down list.
Room/Unit Type Select the Room/Unit Type from the drop-down list.
Unit Select the Unit from the drop-down list.
Week Select the Week from the drop-down list.
Site of Inventory Select the Site of Inventory from the drop-down list.
Phase Number Select the Phase Number from the drop-down list.
Usage Type Select the Usage Type from the drop-down list.
Usage Start Date Select the Usage Start Date from adjoining calendar.
Plus Membership Type
Check this box to indicate Plus Membership Type.
PR Marking Check this box to indicate PR Marking.
Signature Grand Father
Check this box to indicate Signature Grand Father.
Club Indicator Check this box to indicate Club Indicator.
Expiration Date of Asset
Select the Expiration Date of Asset from adjoining calendar.
This date is used for ‘Tier Calculation’ and Point Consolida-tion in the system.
Asset Travel Date Select the Asset Travel Date from adjoining calendar.
Resale Indicator Check this box to indicate Resale.
On disabling this check box system considers Asset Billing Points and Grand Father Points for ‘Tier Calculation’ using formula Parameters.
Grand Father Points Specify the Grand Father Points.
These points are used for ‘Tier Calculation’ in the system using formula parameters.
In this field: View this:
7-72

4. Perform any of the Basic Actions mentioned in Navigation chapter.
Tier Calculation
Based on the value defined for Expiration Date of Asset, Resale Indicator, and Grand Father Points, OFSLL supports the following types of ‘Tier’ calculations at Master Account level using pre-defined formula parameters in Setup > User defined Parameters screen.
7.12.3.1 Tracking Attributes sub tab
The Tracking Attributes screen enables you to link information to collateral that is not tracked by default in the system. These attributes are loaded when user loads the tracking attributes from Collateral > Collateral (Home) >Tracking tab.
To maintain the Tracking Attributes1. Click Tracking Attributes sub tab
2. Perform any of the Basic Operations mentioned in Navigation chapter.
3. Complete Tracking section by entering the requested parameter in the Value field.
4. Save the changes.
7.12.4 Seller Tab
The Collateral link’s Seller Details tab enables you to enter the seller details of the collateral of the Loan.
To enter the Seller details
1. Click the Seller Details tab.
Additional Attributes - This section consists of additional 15 configurable fields as indicated below
5 check boxes - Membership 1-5 Opt
5 drop-down lists - Other Attribute 1-5
5 Calendar fields - Other Attribute 5-10
Type Formula Parameter Calculation
Total Tier points at the Master account
$ASE_TIER_POINTS Sum of Asset Billing Points where ‘Resale Indicator’ is ‘N’ and ‘Expiration Date of Asset’ is ‘greater than’ GL Date.
Total Grand Father Points at the Mas-ter Account
$ASE_GRAND_FA-THER_POINTS
Sum of Grandfather Points where ‘Resale Indicator’ is ‘N’ and ‘Expiration Date of Asset’ is ‘greater than’ GL Date.
Note: For a non Master Account, system uses Master Account # to pick-up all Associated Accounts.
In this field: View this:
7-73

2. Perform any of the Basic Operations mentioned in Navigation chapter.
A brief description of the fields is given below:
Field: Do this
Seller Information section
Seller Type Select the seller type.
Seller Name Specify the seller name
Nationality Select the seller’s nationality.
National ID/Reg #
Specify the national identification number or registration number.
Authorized Signatory
Specify the authorized signatory of the seller.
Seller Address section
Mailing Select if this is the mailing address. Only one address entry can be marked as the mailing address.
Current Select if this is a current address. The mailing address must be marked as current.
Country Select the country code.
Address # Specify the address number.
Address Line 1
Specify the first address line.
7-74

3. Perform any of the Basic Actions mentioned in Navigation chapter.
7.13 Comments Tab
When using the Underwriting screen, you can add/delete comments to an application at any time in the underwriting process by using the Comments screen.
Whenever an application is decisioned by a proxy user, a system generated comment with timestamp is inserted in the comments tab in the format ‘<User 1> actioned as proxy for Underwriter <User2>’. Here, User 1 refers to the logged in user who has acted on behalf of User2, who is the concerned Underwriter. The concerned Underwriter’s name will also be selected in Application section > 'Proxy for Underwriter' field.
To add comments
1. Click Comments tab.
Address Line 2
Specify the second address line.
State Select the state.
Zip Select the zip code.
For non US country, you have to enter zip code.
Zip Extn Select the zip extension.
City Specify the city.
Phone Specify the telephone number.
Extn Select the telephone extension.
Field: Do this
7-75

2. Perform any of the Basic Operations mentioned in Navigation chapter.
A brief description of the fields is given below:
3. Perform any of the Basic Actions mentioned in Navigation chapter.
7.13.0.1 Deleting Comment(s)
You can delete ‘REGULAR’ type comments displayed in the Comments sub tab.
To delete a comment
1. Select the row which consists of the comment and click Delete from the actions.
2. Click ‘Yes’ to confirm delete in the warning message displayed.
7.14 Tracking Tab
When using the Underwriting screen, you can add tracking attribute information to an application at any time in the underwriting process by using the Tracking Attributes screen.
Field: Do this:
Alert Check this box to make the comment appear on the Customer Service screen Alert section
Type Select the type of comment you are adding.
Sub Type Select the sub type of comment you are adding.
Comment Specify your comment.
Comment By The system displays your user ID.
Comment Dt The system displays commented date and time stamp.
7-76
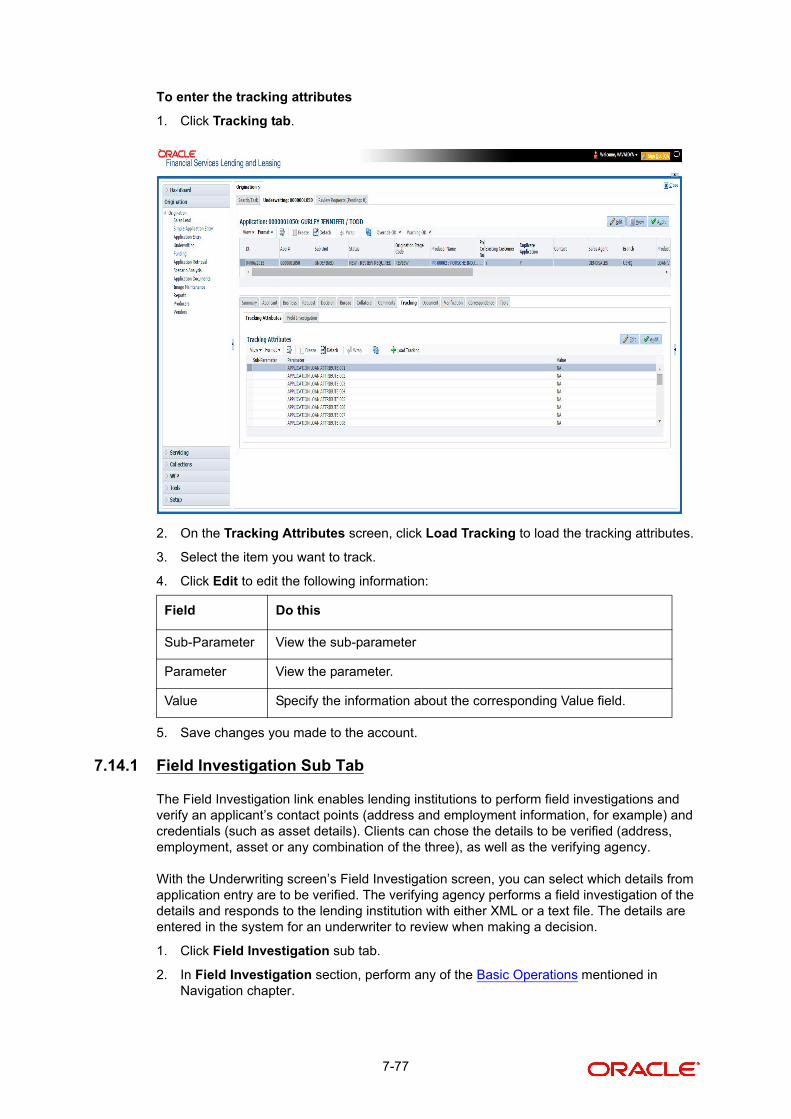
To enter the tracking attributes
1. Click Tracking tab.
2. On the Tracking Attributes screen, click Load Tracking to load the tracking attributes.
3. Select the item you want to track.
4. Click Edit to edit the following information:
5. Save changes you made to the account.
7.14.1 Field Investigation Sub Tab
The Field Investigation link enables lending institutions to perform field investigations and verify an applicant’s contact points (address and employment information, for example) and credentials (such as asset details). Clients can chose the details to be verified (address, employment, asset or any combination of the three), as well as the verifying agency.
With the Underwriting screen’s Field Investigation screen, you can select which details from application entry are to be verified. The verifying agency performs a field investigation of the details and responds to the lending institution with either XML or a text file. The details are entered in the system for an underwriter to review when making a decision.
1. Click Field Investigation sub tab.
2. In Field Investigation section, perform any of the Basic Operations mentioned in Navigation chapter.
Field Do this
Sub-Parameter View the sub-parameter
Parameter View the parameter.
Value Specify the information about the corresponding Value field.
7-77

A brief description of the fields is given below:
3. Perform any of the Basic Actions mentioned in Navigation chapter.
4. In Verification Details section, perform any of the Basic Operations mentioned in Navigation chapter.
A brief description of the fields is given below:
5. Perform any of the Basic Actions mentioned in Navigation chapter.
7.15 Document Tab
The Document tab allows you to view documents attached to the application in the form of GIF files, PDF files, DOC files, XLS files and TXT files and add comments regarding a selected.
For more information, see the chapter Document Management in this User Guide.
Field Do this
Applicant Select the applicant from the adjoining drop-down list
Verification Type Select the verification type from the adjoining drop-down list.
Verification Agency Select the verification agency from the adjoining drop-down list.
Status Select the status from the adjoining drop-down list.
Spoke to Specify the name of the person applicant spoke to
Call Dt Specify the call date
# of Attempts Specify the number of attempts made.
Result Select the result from the adjoining drop-down list
Field Do this
Verification Match Check the box if the verification has matched.
Remarks Specify remarks, if any
7-78

To view a document attached
1. Click Document tab.
2. In the Application Document section, perform any of the Basic Operations mentioned in Navigation chapter.
A brief description of the fields is given below.
Field: Do this:
Document Type View the document type.
Comment Specify any comments regarding the document.
Field: View this:
Document Sub Type
The document sub type.
Version The version. (Version numbers will be incremental by batch job, first version will start with 1.0.)
Page # The page number.
Document File Type
The document file type.
Tracking # The tracking number of the document.
Docket # The docket number of the document.
Location The location of the of the document.
Received Dt The effective date of the document.
7-79

3. Perform any of the Basic Actions mentioned in Navigation chapter.
4. Click View Document.
The system opens a browser to display the actual document (which browser appears depends on what type of document you selected and what browsers are set up to work in conjunction with your system).
7.15.1 Checklist Sub Tab
The Checklist sub tab enables you to view tasks performed during the underwriting process.
To view the underwriting Checklist screen
1. Click Document > Checklist.
2. If the Checklist section is empty, click Load Checklist in the Checklist section.
3. In the Checklist Actions section, click Regular sub tab.
4. In Checklist Actions section, complete the tasks listed in the Checklist Action column.
5. Use the Yes/No/NA buttons in the Yes No NA column to indicate whether you completed the task or not.
6. Use the Comment field to add remarks regarding any of the tasks, if you choose.
7. When you are finished completing the tasks, choose Complete in the Checklist section.
8. Click Save.
9. In the Checklist Actions section, click the Documents sub tab
10. In the Documents section, select the record you want to work with and click View in the Details column.
11. In the Documents section, view the following information:
Effective Dt The effective date of the document.
Expiry Dt The expiration date of the document.
Comment Any comments regarding the document.
Field: Do this:
Action View the action to be performed.
Document Type View the document type.
Document Sub Type
View the document sub type.
Status Select the status of the action.
Response Use the Yes/No/NA buttons to indicate whether or not you completed the task.
Comment Specify comment.
Field: View this:
7-80
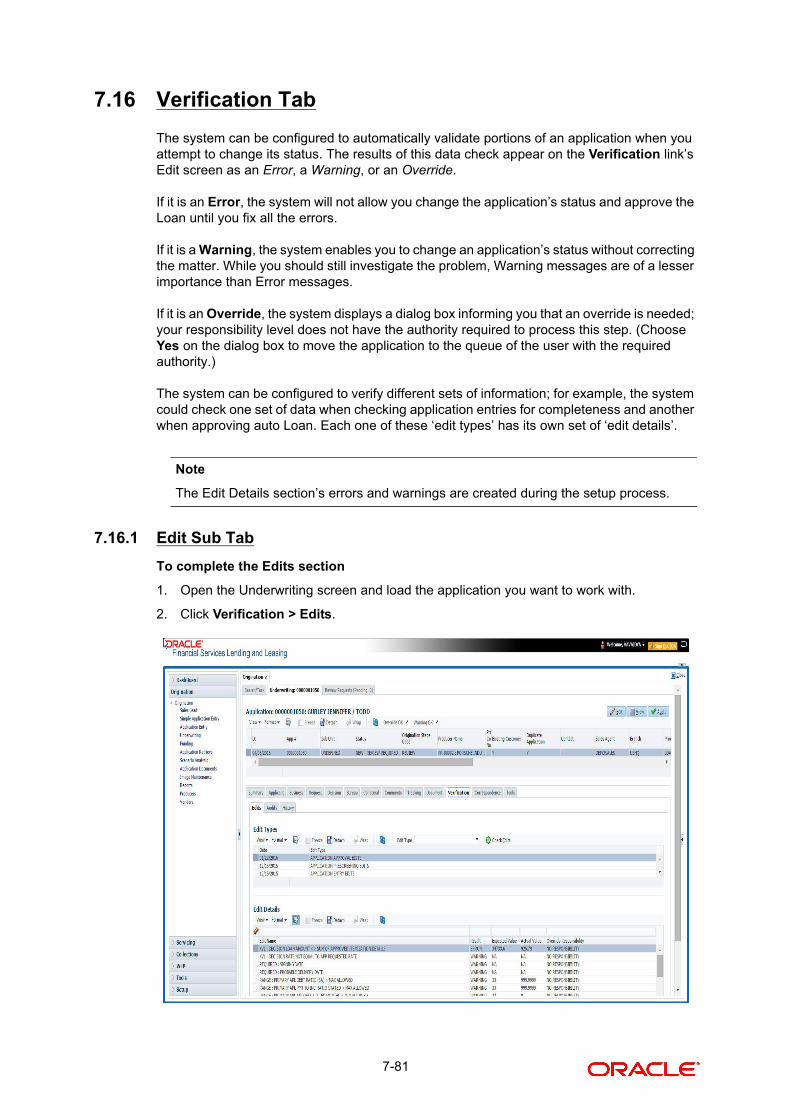
7.16 Verification Tab
The system can be configured to automatically validate portions of an application when you attempt to change its status. The results of this data check appear on the Verification link’s Edit screen as an Error, a Warning, or an Override.
If it is an Error, the system will not allow you change the application’s status and approve the Loan until you fix all the errors.
If it is a Warning, the system enables you to change an application’s status without correcting the matter. While you should still investigate the problem, Warning messages are of a lesser importance than Error messages.
If it is an Override, the system displays a dialog box informing you that an override is needed; your responsibility level does not have the authority required to process this step. (Choose Yes on the dialog box to move the application to the queue of the user with the required authority.)
The system can be configured to verify different sets of information; for example, the system could check one set of data when checking application entries for completeness and another when approving auto Loan. Each one of these ‘edit types’ has its own set of ‘edit details’.
Note
The Edit Details section’s errors and warnings are created during the setup process.
7.16.1 Edit Sub Tab
To complete the Edits section
1. Open the Underwriting screen and load the application you want to work with.
2. Click Verification > Edits.
7-81

3. In the Edits screen’s Edit Type section, select the type of edit you want to verify.
4. Click Check Edits.
The system checks the data for the verification process selected in the Edit Type section and displays the results in the Edit Details section.
The Edit Details section contains the following display only information:
5. In the Edit Details section, view the verification results and begin making corrections on the Underwriting screen. Remember, edits resulting in ERROR must be corrected. Edits resulting in WARNING can be by passed.
The system begins processing the credit application.
7.16.2 Audits Sub Tab
The Audits screen is a display only screen that enables you track changes to the contents of predetermined fields (which fields are determined during set up). For example, the Audits screen can be configured to monitor when the contents of the Status and Sub Status is changed. The Audits screen lists the field that was changed, who made the change, when the change was made, and the old and new values in the field.
To view the Audits
1. Open the Underwriting screen and load the application you want to work with.
2. Click Verification > Audits.
3. In the Audit Details section, view the following display only information:
7.16.3 History Sub Tab
You can track the time it took a user to complete each stage of the application process with the History section. It displays:
The date and time when an application changed status / sub status
Field: View this:
Edit Name The edit.
Result The result.
Expected Value The expected value.
Actual Value The actual value.
Override Responsibility The override responsibility, if an override is required.
Field: View:
Record Id The record identifier for the record changed.
Field The field which was changed.
Old Value The old value of the column which was changed.
New Value The new value of the column which was changed.
Changed By The user code who made the change.
Changed Date
The date and time when the change was made.
7-82
The user who changed the status / sub status
The elapsed time of how long an application was in a particular status / sub status.
1. To view the History Open the Underwriting screen and load the application you want to work with.
2. Click Verification > HistoryIn the Application Status History section, view the following display only information:
7.17 Correspondence Tab
Ad-hoc correspondence enables you to include information from applications in document templates you create yourself without manually transferring the data. Ad-hoc documents can be generated as either Microsoft Word or PDF files.
Ad-hoc correspondence can be viewed on the Correspondence link’s Correspondence screen when you have opened an account. The screen enables you to generate a new letter or view a previously generated letter.
7.17.1 Correspondence Sub Tab
To generate an ad hoc correspondence
1. Open the Underwriting screen and load the application you want to work with.
Field: View this:
Status The application status.
Sub Status The application sub status.
User The user name.
Start Dt The date and time when the application moved to that status.
End Dt The date and time when the application moved from that sta-tus.
Elapsed Time
The elapsed time between the status change.
7-83

2. Click Correspondence > Correspondence.
3. Perform any of the Basic Operations mentioned in Navigation chapter.
A brief description of the fields is given below:
4. Perform any of the Basic Actions mentioned in Navigation chapter.
The Documents section displays all the types of documents available for the type of correspondence you selected.
5. In the Documents section, view the following information for each document:
6. In the Documents section, select the correspondence you want to view.
Field: Do this:
Correspondence Select the correspondence you want to generated.
ID System displays the correspondence ID.
Date System displays the correspondence generation date.
Field: View this:
Document ID The document ID.
Document The document description.
Recipient The recipient description.
E-Form Source The e-form source.
Source Type The source type.
Selected If selected, indicates that this document is selected to be included in the correspondence.
Generated If selected, indicates that the system generated the document.
7-84

7. The Document Elements section displays the elements the system used to generate the correspondence. You view the following information:
Click All to view all elements in the correspondence.
- or -
Click User Defined, to view user-defined elements in the correspondence.
8. In the Document Elements section, click User Defined and complete the Content fields for the Document Element fields you want to include in the correspondence.
9. In the Document Elements section, click Save.
10. In the Documents section, click Generate.
The system ‘locks’ the information included in the correspondence and prevents it from being changed.
11. In the Document Elements section, click View.
The system displays a PDF of the ad hoc correspondence.
7.17.1.1 Recipient Details Sub Tab
The recipient details sub tab facilitates you to send ad-hoc correspondence to Applicants, Customers, Producers, and Others as either Fax or Email.
To add recipient details
1. Open the Underwriting screen and load the application you want to work with.
2. Click Correspondence > Recipient Details.
3. Perform any of the Basic Operations mentioned in Navigation chapter.
A brief description of the fields is given below:
Field: Do this:
Element Type View the element type.
Element View the element description.
Content Specify/view the value of the element.
Field: Do this:
Recipient Select the recipient from the drop-down list. The list displays the following options:
- Applicant
- Customer
- Producer
- Others
Note: Based on the type of recipient selected the other corre-spondence options are displayed for selection.
7-85
4. In the Recipient Details section, click Save.
5. Click Send to FAX/Email the correspondence details to the specified recipients.
System validates the correspondence details and generates a PDF document through BI Publisher with the Correspondence details. The same is emailed to the specified recipient as an attachment and a system generated comment is updated in ‘Comments’ Tab. The correspondence consists of following header details::
7.17.2 Letters Sub Tab
The Letters link enables you to generate letters using predefined letter templates for Loan.
Letters can be sent in hard copy or Email / Fax. Among the two options provided for each of these options, you can select the required mode for sending letters.
When 'Letters' option is selected the correspondences generated are displayed in a table below with a button 'View Letter'.
When 'Fax' radio button is selected, the correspondence table displays all correspondence including those in Fax or email formats in the table below.
In addition to the above, a section for recording 'Recipient details' opens below. On clicking 'Add' you can specify recipient details, Mode, Type, provide comments and Save the same.
Mode Select the mode of correspondence from the drop-down list. The list displays the following options:
- Fax
Note: When the recipient is selected as ‘Applicant’, the Mode is defaulted to Email.
Type Based on the recipient selected, the following type of correspond-ence is listed for selection:
- When the recipient is selected as Applicant, you can select the ‘Applicant Type’ from the drop-down list and ‘Type’ as either EMAIL/ADHOC. The ‘Mode’ is defaulted as ‘Email’.
- When the recipient is selected as Customer / Producer, you can select the ‘Mode’ as either FAX/EMAIL and ‘Type’ as FAX/ADHOC or EMAIL/ADHOC respectively.
- When the recipient is selected as Others, you can select the ‘Mode’ as either FAX/EMAIL and ‘Type’ as ADHOC only.
FAX/Email Specify the FAX/Email details for correspondence.
Comments Specify additional information as comments.
AlertType & Subtype
CommentComment By
Comment Date
N System Generated
<Type> <Correspondence type> sent to <Recipient Type> through < Mode> to <'Email' id>
Logged in user
Current System date with time stamp
Field: Do this:
7-86

Comments captured will be appended to Fax / Email sent to recipient. You will then need to click on the 'Send' in the action block for email / fax to be sent from OFSLL. In case the correspondence generation is dependent on any job run, then on click of 'Send' system displays an error message "Fax / Letter not generated. Please try sending later”; else event successful message is displayed.
On the Underwriting screen, these predefined correspondences are as follows:
Decision Letter
Adverse Action Letter
Adverse Conditional Letter
To generate letters on the Underwriting screen
1. Open the Underwriting screen and load the application you want to work with.
2. Click Correspondence > Letters.
3. In the Letters screen, select the type of letter you want to generate, and click View Letter.
UNDERWRITING:
– If you select Decision Fax, and click View Letter, the system displays the decision letter.
The predefined Decision letter is automatically sent after an application receives a status of APPROVED, REJECTED, or CONDITIONED on the Underwriting screen.
The Decision fax/e-mail is available for Loan(fixed and variable rate).
– If you click Adverse Action, and click View Letter, the system displays the adverse action letter.
The predefined LoanAdverse Action letter is automatically sent to the producer after a configurable number of days when an application receives a status of REJECTED on the Underwriting screen.
The Adverse Action letter is available for Loan(fixed and variable rate).
– If you click Conditional Adverse Action, and click View Letter, the system displays the adverse conditional letter.
The predefined Conditional Adverse Action letter is automatically sent to the producer a configurable number of days after an application receives a status of CONDITIONED on the Underwriting screen.
The Conditional Adverse Action letter is available for Loan(fixed and variable rate).
4. In the Recipient Details section, you can send the ad-hoc correspondence. You can specify the following details:
Field: Do this:
Recipient Select the recipient from the drop-down list. The list displays the following options:
- Applicant
- Customer
- Producer
- Others
Note: Based on the type of recipient selected the other corre-spondence options are displayed for selection.
7-87

5. In the Recipient Details section, click Save.
6. Click Send to FAX/Email the correspondence details to the specified recipients.
System validates the correspondence details and generates a PDF document through BI Publisher with the Correspondence details. The same is emailed to the specified recipient as an attachment and a system generated comment is updated in ‘Comments’ Tab. The correspondence consists of following header details:
7.18 Tools Tab
The Tools tab calculates the payment amount, term, interest rate, Loan amount, amortization schedule and allows for the printing of a report.
For detailed information on using the tools, refer “Tools” chapter in the document.
7.19 Review Request
The Review Requests screen is primarily a work flow tool used to flag an Application for the attention of another Oracle Financial Services Lending and Leasing user and ask for review / feedback. It allows the system users to send and receive requests (including e-mail) commenting on a specific Application. The Review Request tab supports iterative review of selected Application and also to process the review with multiple reviewers.
Mode Select the mode of correspondence from the drop-down list. The list displays the following options:
- Fax
Note: When the recipient is selected as ‘Applicant’, the Mode is defaulted to Email.
Type Based on the recipient selected, the following type of correspond-ence is listed for selection:
- When the recipient is selected as Applicant, you can select the ‘Applicant Type’ from the drop-down list and ‘Type’ as either EMAIL/ADHOC. The ‘Mode’ is defaulted as ‘Email’.
- When the recipient is selected as Customer / Producer, you can select the ‘Mode’ as either FAX/EMAIL and ‘Type’ as FAX/ADHOC or EMAIL/ADHOC respectively.
- When the recipient is selected as Others, you can select the ‘Mode’ as either FAX/EMAIL and ‘Type’ as ADHOC only.
FAX/Email Specify the FAX/Email details for correspondence.
Comments Specify additional information as comments.
AlertType & Subtype
CommentComment By
Comment Date
N System Generated
<Type> <Correspondence type> sent to <Recipient Type> through < Mode> to <'Email' id>
Logged in user
Current System date with time stamp
Field: Do this:
7-88

In this chapter, you will learn how to compete the following tasks:
Filter and View Review Requests
Create and Send Review Request
Reviewing a Request
Responding to Review Request
Reassign Review Request
E-mailing Review Request
Closing Review Request
Complete Review Request
Note
To complete the above mentioned tasks for an Application Review Request, use Review Request tab available in the Origination (Application Entry, Underwriting and Funding) screens.
7.19.1 Filter and View Review Requests
The Review Requests tab contains the following sections:
Query Section
Action Section
Email Section
Comment History Section
Query Section
The Query section enables you to filter records based on User and type of review requests using any of the following options:
The ‘User’ drop-down lists your User ID along with your Supervisor ID if the same has been defined in User Definition screen (Setup > Administration > User > Users). If you are the supervisor, you can view all your subordinates User ID’s along with yours for selection.
On selecting a particular User ID from the list, system displays all the requests which are created, reviewed, closed and completed by that user.
You can further filter the review request based on the following:
Query Options
Descriptions
Originator Displays the records of all the active review requests created by the selected User.
Receiver Displays the records of all the active review requests received by the selected User.
Both Displays all the review requests records created as well as reviewed by the selected User with the status other than ‘CLOSED’ and ‘COM-PLETED’.
7-89
Action Section
The Action section enables you to Send (create), Respond, Close, or Complete the review request.
Email Section
The Email section enables you to send an email to either originator or receiver of the review request if an email setup is configured. However, note that a review request cannot be responded or replied back from email recipient.
The ‘Review Requests’ section in Origination screen displays the following information for each record:
View All Displays all the review requests records created as well as reviewed by the selected User with all the statuses.
Forwarded Only
Displays all the review requests records which are forwarded by the selected User to another user for review.
Action Options Descriptions
Open Applica-tion
Displays the Application Entry screen with the Application details assigned for review.
Send Request Sends a review request to another Oracle Financial Services Lend-ing and Leasing user.
Send Response Sends a response to a review request received from another Ora-cle Financial Services Lending and Leasing user.
Close Request Changes the status of review request to CLOSED and can be viewed by selecting ‘View All’ option in the ‘Query’ section.
Complete Request
Changes the status of review request to COMPLETED and can be viewed by selecting ‘View All’ option in the ‘Query’ section.
Remove Filter Removes the selected filters applied to narrow the view of review request. The option is available when a review request is accessed from DashBoard > My Pending Review Requests section.
Email Options
Descriptions
Originator Sends an email of review request information to the person listed in the Originator column on Review Request page.
Receiver Sends an email of review request to the person listed in the Receiver column on Review Request page.
Fields Descriptions
Request # View the system generated review request number. The same can be used to query and track the review requests.
Query Options
Descriptions
7-90
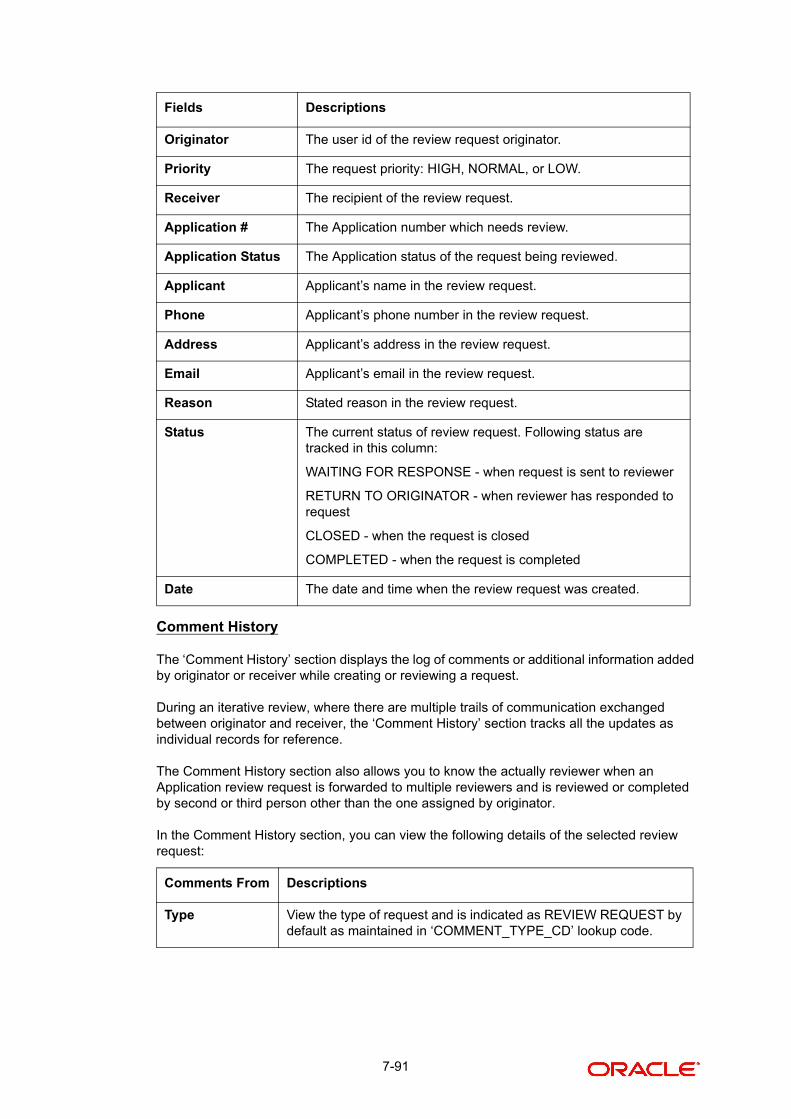
Comment History
The ‘Comment History’ section displays the log of comments or additional information added by originator or receiver while creating or reviewing a request.
During an iterative review, where there are multiple trails of communication exchanged between originator and receiver, the ‘Comment History’ section tracks all the updates as individual records for reference.
The Comment History section also allows you to know the actually reviewer when an Application review request is forwarded to multiple reviewers and is reviewed or completed by second or third person other than the one assigned by originator.
In the Comment History section, you can view the following details of the selected review request:
Originator The user id of the review request originator.
Priority The request priority: HIGH, NORMAL, or LOW.
Receiver The recipient of the review request.
Application # The Application number which needs review.
Application Status The Application status of the request being reviewed.
Applicant Applicant’s name in the review request.
Phone Applicant’s phone number in the review request.
Address Applicant’s address in the review request.
Email Applicant’s email in the review request.
Reason Stated reason in the review request.
Status The current status of review request. Following status are tracked in this column:
WAITING FOR RESPONSE - when request is sent to reviewer
RETURN TO ORIGINATOR - when reviewer has responded to request
CLOSED - when the request is closed
COMPLETED - when the request is completed
Date The date and time when the review request was created.
Comments From Descriptions
Type View the type of request and is indicated as REVIEW REQUEST by default as maintained in ‘COMMENT_TYPE_CD’ lookup code.
Fields Descriptions
7-91

7.19.2 Create and Send Review Request
The review request tab primarily allows you to flag an Application for the attention of another OFSLL user through a request asking for review / feedback. While doing so, you can either choose to send it to the reviewer immediately on creating the request or only create the request and later send for review.
To Create and Send Review Request
1. On the Oracle Financial Services Lending and Leasing Application home page, click Origination > Simple Application Entry / Application Entry / Underwriting / Funding screen and select ‘Review Requests’ tab.
2. In the Review Requests section, select ‘Originator’.
3. Click ‘ADD’. You can also perform any of the Basic Operations mentioned in Navigation chapter. A brief description of the fields are given below:
Sub Type View the sub type of request which can be ORIGINATOR, RECEIVER, or SYSTEM GENERATED as maintained in COM-MENT_SUB_TYPE_CD lookup code.
Note: The sub type ‘SYSTEM GENERATED’ is automatically posted by the system when the review request is forwarded to another user by the assigned reviewer. The same is also updated with a com-ment in the next column.
Comment View the Originator’s or Reviewer’s comment.
SYSTEM GENERATED comments are posted in the format - REVIEW REQUEST: <Request #> FORWADED FROM <first assigned user id> TO <next assigned user id>.
Comment By View the user who has posted the comment.
SYSTEM GENERATED comments are marked as ‘INTERNAL’.
Comment Dt View the Date and time when the comment was posted.
In this field: View this:
Request # View the system generated request number.
Comments From Descriptions
7-92
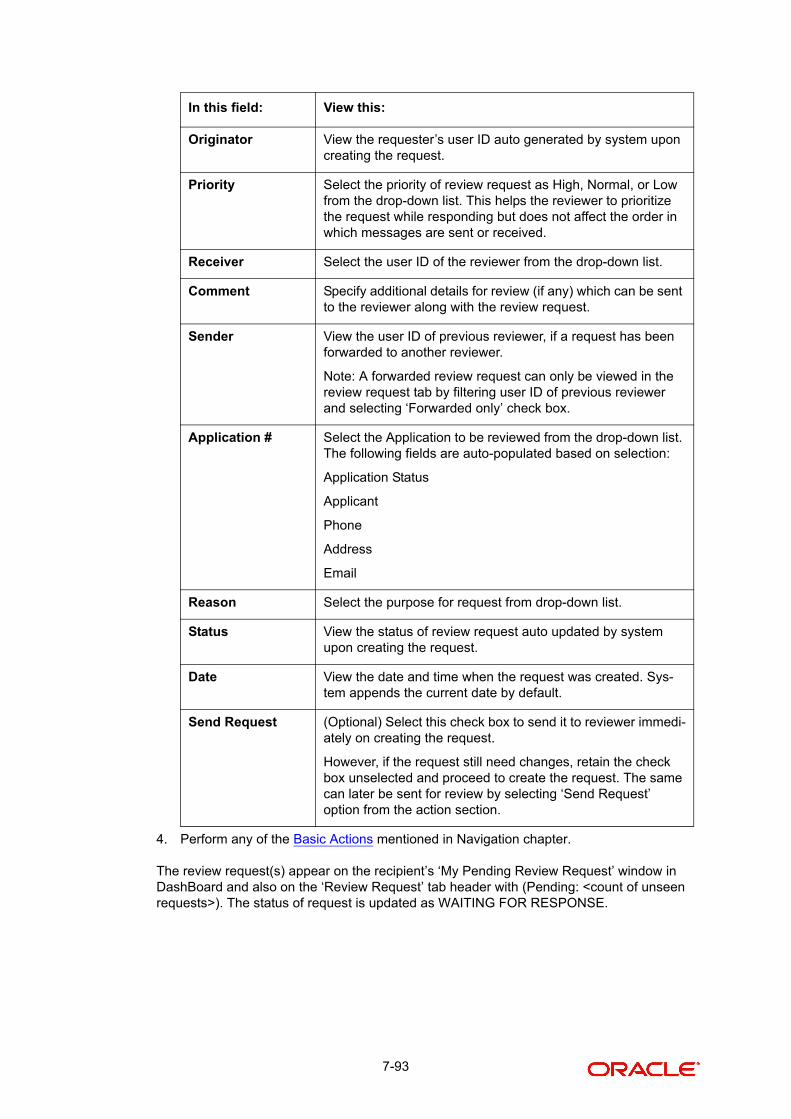
4. Perform any of the Basic Actions mentioned in Navigation chapter.
The review request(s) appear on the recipient’s ‘My Pending Review Request’ window in DashBoard and also on the ‘Review Request’ tab header with (Pending: <count of unseen requests>). The status of request is updated as WAITING FOR RESPONSE.
Originator View the requester’s user ID auto generated by system upon creating the request.
Priority Select the priority of review request as High, Normal, or Low from the drop-down list. This helps the reviewer to prioritize the request while responding but does not affect the order in which messages are sent or received.
Receiver Select the user ID of the reviewer from the drop-down list.
Comment Specify additional details for review (if any) which can be sent to the reviewer along with the review request.
Sender View the user ID of previous reviewer, if a request has been forwarded to another reviewer.
Note: A forwarded review request can only be viewed in the review request tab by filtering user ID of previous reviewer and selecting ‘Forwarded only’ check box.
Application # Select the Application to be reviewed from the drop-down list. The following fields are auto-populated based on selection:
Application Status
Applicant
Phone
Address
Reason Select the purpose for request from drop-down list.
Status View the status of review request auto updated by system upon creating the request.
Date View the date and time when the request was created. Sys-tem appends the current date by default.
Send Request (Optional) Select this check box to send it to reviewer immedi-ately on creating the request.
However, if the request still need changes, retain the check box unselected and proceed to create the request. The same can later be sent for review by selecting ‘Send Request’ option from the action section.
In this field: View this:
7-93

7.19.3 Reviewing a Request
When you receive a review request, the system notifies you by creating an entry in ‘My Pending Review Requests By Priority’ section in DashBoard with the number of unseen messages. Clicking on the Application # link opens the Review Request tab.
To review requests
1. On the Oracle Financial Services Lending and Leasing Application home page, click Origination > Simple Application Entry / Application Entry / Underwriting / Funding screen and select ‘Review Requests’ tab.
2. In the Query section, click ‘Receiver’. System displays all open review request you have received.
3. Click ‘Open Application’. The Application details are displayed in Application Entry > Summary tab.
4. Review the details in particular to the details specified in the comment (if any).
7.19.4 Responding to Review Request
On completing the review, you can Send Response detailing the feedback of your review. It is ideally recommended to send a response back to the originator by providing your views on the review as a comment. The details are recorded in the ‘Comment History’ section as reference.
7-94

However, system also allows your forward the same request to another reviewer in case of additional clarifications.
To respond to review request
1. On the Oracle Financial Services Lending and Leasing Application home page, click Origination > Simple Application Entry / Application Entry / Underwriting / Funding screen and select ‘Review Requests’ tab.
2. In the Query section, click ‘Receiver’. System displays all open review request you have received.
3. In the Review Request section, select the record that you have reviewed.Click ‘Edit’.
Specify your review response in the ‘Comment’ field. Select the ‘Send Request’ check box to send the review response immediately to originator. In case of any further changes, retain the check box unselected and save the details. The response is not sent and the same can later be sent to originator by selecting the record and clicking on ‘Send Response’ option from the action section.
The details are updated in Review Request tab and status of request is updated as RETURN TO ORIGINATOR.
7.19.5 Reassign Review Request
While reviewing a request, system also facilitates you to reassign (i.e. forward) the review request to another user for review. In such a case, you become the ‘Sender’ and the assigned user will be the reviewer of the request. The request can further move to other reviewers if required.
When the request is reassigned or forwarded to another reviewer, the actual originator can still track the status of request by selecting user ID in Query section. As a ‘Sender’, you can view the reassigned review requests by selecting the ‘Forwarded Only’ check box in Query section. Also, on reassigning or forwarding a review request, system automatically posts a comment in ‘Comment History’ section in the format - REVIEW REQUEST: <Request #> FORWADED FROM <first assigned user id> TO <next assigned user id> with Sub Type as ‘SYSTEM GENERATED’ and Comment By as ‘INTERNAL’.
Note
It is recommended to limit the reassignment of review request since tracking the request status becomes difficult.
7-95

To reassign review request
1. On the Oracle Financial Services Lending and Leasing Application home page, click Origination > Simple Application Entry / Application Entry / Underwriting / Funding screen and select ‘Review Requests’ tab.
2. In the Query section, click ‘Receiver’. System displays all open review request you have received.
3. In the Review Request section, select the record that you have reviewed and click Edit.
4. Select the required reviewer from ‘Receiver’ drop down list.
5. (Optional) Specify the reason for reassignment in the ‘Comment’ field. The same is tracked in ‘Comment History’ section.
6. Select the ‘Send Request’ check box to reassign review request immediately on update. In case of any further changes, retain the check box unselected and save the details. The reassignment can later be completed by selecting the record and clicking on ‘Send Response’ option from the action section.
The details are updated in Review Request tab and status of request is updated as WAITING FOR RESPONSE.
7.19.6 E-mailing Review Request
While system updates ‘My Pending Review Requests By Priority ‘section in the DashBoard to notify you about the new requests, you can also e-mail a review request to both the originator and a receiver, as applicable. The system will use e-mail address recorded for both the originator and receiver in Setup > Administration > User > User Definition section.
To e-mail a review request
1. On the Oracle Financial Services Lending and Leasing Application home page, click Origination > Simple Application Entry / Application Entry / Underwriting / Funding screen and select ‘Review Requests’ tab.
2. In ‘Email’ section, click ‘Originator’ to send the message to the person listed in Originator field.
-or-
3. Click ‘Receiver’ to send it to the person listed in the Receiver field.
The system emails the details of selected record to e-mail address recorded in user setup.
7-96

7.19.7 Closing Review Request
You can close a review request you created at anytime, regardless of status. However, you can only close review requests that have your user id in the Originator field. When you close a review request, the system removes it from Review Request tab.
To close a review request
1. On the Oracle Financial Services Lending and Leasing Application home page, click Origination > Simple Application Entry / Application Entry / Underwriting / Funding screen and select ‘Review Requests’ tab.
2. Select the request you want to close in the Review Request section.
3. In the Action section, click ‘Close Request’.
The system assigns the request as CLOSED and removes it from your Review Request record. The closed review requests can be reviewed anytime by selecting ‘View All’ in the Query section.
7.19.8 Complete Review Request
When a particular review request has completed the review process from reviewer with required changes and confirmation, the same can be marked as ‘COMPLETE’ in the Review Request tab. However, you can complete a request only if you are the originator of the request. When you complete a review request, system removes it from Review Request tab.
To complete a review request
1. On the Oracle Financial Services Lending and Leasing Application home page, click Origination > Simple Application Entry / Application Entry / Underwriting / Funding screen and select ‘Review Requests’ tab.
2. Select the request you want to close in the Review Request section.
3. In the Action section, click ‘Complete Request’.
The system assigns the request as ‘COMPLETED’ and removes it from your Review Request record. The completed review requests can be reviewed anytime by selecting ‘View All’ in the Query section.
7-97

8. Funding
8.1 Introduction
At this stage of the Loan origination process, the application has been entered into Oracle Financial Services Lending and Leasing and approved manually by an underwriter or by the system. The next step is to view and complete the contract information and make a funding decision to finance or reject the application. This is accomplished by using the Funding screen.
This chapter explains how to:
Load an application on the Funding screen
Change the status of the application to begin funding process
Verify the applicant information
View the credit pull and underwriting information
Verify the collateral
Add comments and tracking attributes
Complete the Contract screens
View an application’s contract edits
Audit changed fields and status history
Change the status at the end of the funding process.
8.2 Funding (an overview)
In Oracle Financial Services Lending and Leasing, the funding process follows these basic steps:
1. Open the Funding screen and load the application you want to work with.
2. In the Funding screen’s Applications master screen, Change the status of the application to APPROVED - VERIFYING.
3. Using the Funding screen’s Applicants link, view and verify information about the applicant (data recorded from the Application Entry screen). This includes verifying the applicant’s actual address and employment information.
4. Using the Funding screen’s Decision link, view and verify information supplied during the credit bureau pull and underwriting process. This is display only information and cannot be edited.
5. Using the Funding screen’s Collateral link, view and verify information regarding the collateral for the application.
6. Using the Funding screen’s Contract link, complete the truth-in-lending information.
7. In the Funding screen’s the Applications master screen, change the status to FINAL DOCUMENT CHECK.
8. Using the Funding screen’s Verification link, view any errors and warnings that prevent the status change.
9. Make changes to the application data that correct the errors until you can change the status.
When the system changes the status of the application to FINAL DOCUMENT CHECK, it sends the application to a supervisor or Loan officer queue where it is viewed and verified.
8-1

After this, the application’s status is changed to APPROVED - VERIFIED. If the supervisor/ Loan officer decides to fund the Loan, he or she will change status of the application to APPROVED - FUNDED.
Loading an Application on the Funding screen
The first step in the funding process is to open the Applications form and manually or automatically load the application you want to work with. You can manually select an application using the Search tab’s Criteria and Results screens. If your system is configured to load applications based on work queues, use the Queue field in the Quick Search section.
Refer the chapter Searching for Application for more information on the following:
Using Search Criteria screen
Using Quick Search section
Using Result screen
Loading an application
Funding non OFSLL Loan Applications
Oracle Financial Services Lending and Leasing can readily process credit contracts generated from external system for funding. You can load the credit applications data received from external system into OFSLL through the 'Application Entry' screen and proceed with funding. For more information, refer 'Entering a Credit Application' section.
Once the application is processed or approved through OFSLL funding screen, the external system is intimated with the decision. Those applications can still be processed further in external system itself to validate the contract against approved credit. If agreed, the signed contract documents can be distributed in electronic format to OFSLL for funding. Once Credit Contract is distributed, the ‘Contract Type’ is automatically changed to eContract/Dealer in OFSLL and notified to the user.
All communications between OFSLL and external systems are recorded into a log and is accessible through Dashboard > System Monitor > Database Server Log Files screen. Also the ‘Comments’ screen facilitates to exchange information regarding credit contract processing between OFSLL and external system as comments, provided the comment Sub Type is selected as 'OUTBOUND TO INTERFACE' for such communications.
In addition, OFSLL also supports revoking of funded credit contracts worked through external interface by reversing the active transaction in Customer Service > Transaction History > Transaction tab. Whereby the application/account status is changed to 'Void' and subsequently categorized as FLAT CANCEL (indicating as fraud application and funding is withdrawn) or UNWIND (when application still has errors and allowed to update/rectify details and resubmit for funding).
Overall, this process minimizes the application processing time and fastens the funding process.
8.3 Funding Screen’s Master Screen
The Funding screen’s master screen displays information from the Application Entry and Underwriting screens, such as the application number, product and producer. It also contains
8-2

the Status field that allows you to change the status/sub status of the application and begin the funding process.
For details on this screen refer Applications section in Underwriting chapter.
After opening the Funding screen and loading the application you want to work with, you must change its status to APPROVED - VERIFYING before you can begin the funding process. This allows you to begin working with the application.
To change the status and begin work on the application on the Funding screen
1. Open the Funding screen and load application you want to verify.
2. In the Funding screen’s Applications master screen, use the Status field to select APPROVED - VERIFYING.
3. Click Save on the Funding screen.
You can now begin making changes to the application.
Funding an Application
After you have verified the application, entered the contract information and completed the contract edits, the application is ready to be funded. Applications can be approved automatically or manually. To manually fund an application, change the status to APPROVED - FUNDED.
After an application is funded, the Loan origination cycle is over. The system moves the application to the Loan servicing module (Customer Service form) where it receives an account number. The system also automatically creates a check requisition for the funded account.
Funding tasks
1. Load the application on the Funding form
2. Change the status and initiate Funding process
3. Verify the applicant information
8-3
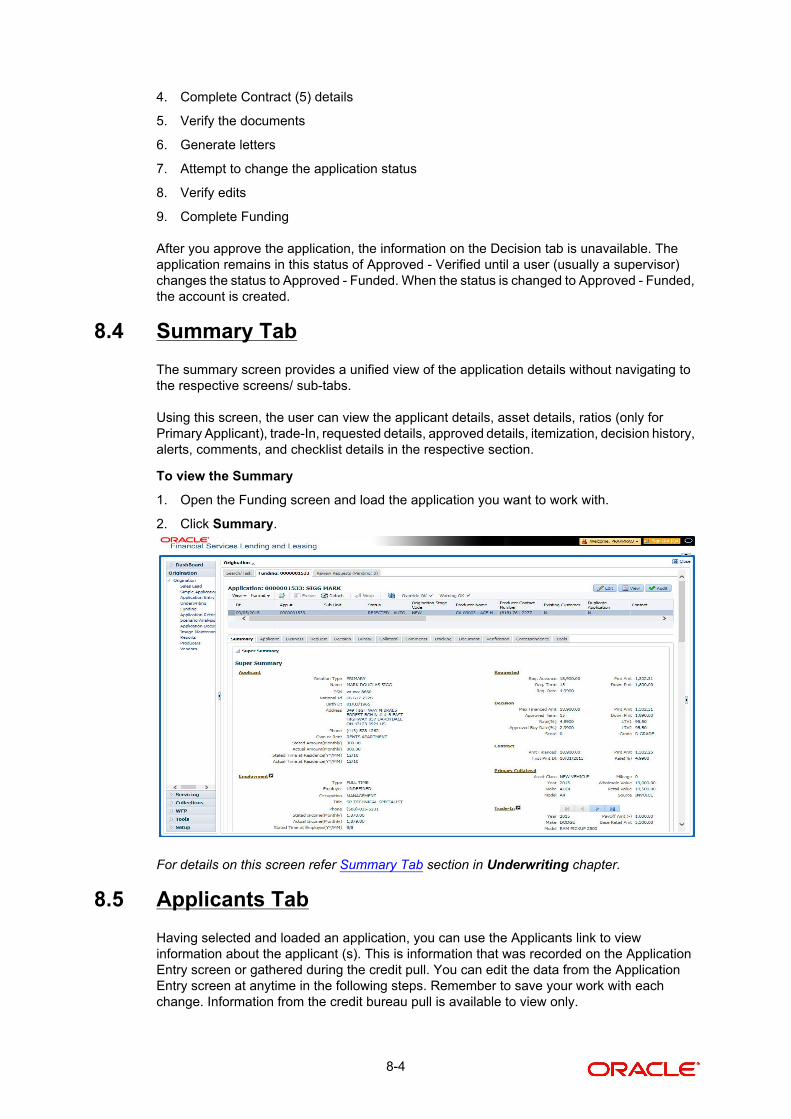
4. Complete Contract (5) details
5. Verify the documents
6. Generate letters
7. Attempt to change the application status
8. Verify edits
9. Complete Funding
After you approve the application, the information on the Decision tab is unavailable. The application remains in this status of Approved - Verified until a user (usually a supervisor) changes the status to Approved - Funded. When the status is changed to Approved - Funded, the account is created.
8.4 Summary Tab
The summary screen provides a unified view of the application details without navigating to the respective screens/ sub-tabs.
Using this screen, the user can view the applicant details, asset details, ratios (only for Primary Applicant), trade-In, requested details, approved details, itemization, decision history, alerts, comments, and checklist details in the respective section.
To view the Summary
1. Open the Funding screen and load the application you want to work with.
2. Click Summary.
For details on this screen refer Summary Tab section in Underwriting chapter.
8.5 Applicants Tab
Having selected and loaded an application, you can use the Applicants link to view information about the applicant (s). This is information that was recorded on the Application Entry screen or gathered during the credit pull. You can edit the data from the Application Entry screen at anytime in the following steps. Remember to save your work with each change. Information from the credit bureau pull is available to view only.
8-4

To verify information about an applicant
1. Open the Funding screen and load the application you want to work with.
2. In the Funding tab, click Applicants.
3. In the Applicants Details section, select the applicant you want to verify and click Edit.
For details on this screen refer Applicant Tab section in Underwriting chapter.
8.6 Business tab
If this application is an SME Loan (defined in the Applications section Class field as SMALL BUSINESS), the Business Applicant link appears on the Funding link bar. This link displays the small business information recorded on the application entry process. You can edit the Funding screen at anytime in the following steps. Remember to save your work with each change.
If there is no business information associated with the application, the Business Applicant link is unavailable.
For more information about the individual fields in this section, see the Application Entry chapter.
To verify business information from the Business Applicant link
1. Open the Funding screen and load the application you want to work with.
2. Click Business Applicant.
For details on this screen refer Business Tab section in Underwriting chapter.
8-5

8.7 Request Tab
System displays the calculated Payment, Interest Rate, Term and Loan Amount in the Request tab.
For details on this screen refer Request Tab section in Underwriting chapter.
8.8 Decision Tab
With the Decision tab, the system displays information gathered during the underwriting process. Depending on the type of application you are working with, system displays Loan information. On Clicking Calculate, the user can calculate the Loan amount, rate, term, and payment.
8-6

The fields on the Decision screens and sub screens are described in detail in the Underwriting chapter.
For details on this screen refer Decision Tab section in Underwriting chapter.
8.9 Customer Credit Limit tab
This tab displays the customer credit limit details captured during the underwriting process and is validated during application funding. Depending on the type of application you are working with, system displays Loan information.
For details on this tab, refer Customer Credit Limit tab section in Underwriting chapter.
8-7

8.10 Master Account tab
The Master Account tab in Origination screen facilitates to categorize the current application to be considered as ‘Master Account’ after funding or link the current application to another existing master account in the system.
To define Master Account Details
1. Open the Underwriting screen and load the underwriting application you want to work with.
2. Click ‘Master Account’ tab.
For details on this screen refer Master Account tab section in Underwriting chapter.
8.11 Bureau Tab
The Bureau tab displays the credit report (if pulled) for an applicant. If there is a need for another pull for any applicant, it can be done here manually using the New Request section.
To verify the credit bureau data using the Bureau tab
1. Open the Funding screen and load the underwriting application you want to work with.
8-8

2. Click Bureau
For details on this screen refer Bureau Tab section in Underwriting chapter.
8.12 Contract Tab
The screens associated with the Contract link are the core of the funding process. They allow you to perform the important task of completing the truth-in-lending details. These screens include information mandated by Regulation Z; information about the financed amount, the payment schedule, the total of these payments, the finance charge, the resulting annual percentage rate (calculated according to Federal/Central bank guidelines; that is, within 125% of the Treasury OCC calculated APR) for the conventional Loan, and internal rate of return for Islamic Loan. Use the Loan packet to supply the required information.
In completing the truth-in-lending details on the Contract link, you will enter Loan information. The truth-in-lending details must be completed before a Loan can be funded.
The tabs opened from the Contract link share the following sub tabs:
Contract (2)
Repayment
Itemizations
Trade-In
Subvention
Insurances
ESC
Escrow
Compensation
Proceeds
Disbursement
8-9

Fees
ACH
Coupons
PDC
References
Real Estate
You can use the quick calculator provided with the drop-down list adjacent to the ‘Calculate’ button to calculate the required Loan parameters. You can also use the calculator available in Tools section for completing this step. For detailed information on using the Calculator tools, refer “Tools” chapter in the document.
While working with the Contract tab for Loan applications, you can either enter the contract details manually or make use of the ‘Suggest’ option which auto populates the contract and payment details.
On clicking the ‘Suggest’ option,
System loads the details of 1st instrument available in Instrument drop-down list.
Updates the contract date as current GL post date using which all the payment calculations are done.
Populates decision level contract parameters and ‘Verified By’ field with User Code.
Calculates the payment amount.
Since in one click all the required contract information is populated to fund the application, this option helps to improve operational efficiency. But however, this option is not available if the contact instrument is already loaded.
To enter the contract details
1. Open the Funding screen and load the application you want to work with.
2. On the Funding screen, click the Contract tab.
If the application you opened is for a Islamic Loan, the Loan screen appears.
3. Using the information in the contract packet, complete the Contract section.
(The system calculator may used when completing this section. For more information, see the Tools chapter.)
8-10

4. In this section, you can perform any of the Basic Operations mentioned in Navigation chapter.
A brief description of the fields is given below:
Field: Do this:
Contract section
Contract Rcvd Dt Specify the contract received date.
Contract Dt Specify the contract date.
Instrument Select the required instrument from the drop down list and click on Load Instrument Details.
Amt Financed Specify the amount financed: the Loan amount applied minus the prepaid finance charges. Prepaid finance charges can be found on the Good Faith Estimate/Settlement (HUD-1 or 1A). For exam-ple, if the borrower’s note is for $100,000 and the prepaid finance charge total is $5,000, the amount financed would be $95,000. The amount financed is the figure on which the annual percent-age rate (APR) is based.
Loan Term Specify the term/number of payments.
Index Select the index.
Index Rate View the index rate.
Contract Margin Rate
Specify the margin rate.
Contract Rate View the interest rate.
The following 3 fields - Regulatory Name, Regulatory Rate, and Contract Imputed Rate are displayed only if the ‘Imputed Interest’ check box is selected in Contract Setup (i.e. Setup > Administration > Products > Contract screen).
The value in these fields are automatically populated from setup on selecting a ‘Instru-ment’ with imputed interest and clicking on ‘Load Details’.
Regulatory Name The regulatory name is populated with the value defined in Setup > Administration > Products > Regulatory Rates screen.
Regulatory Rate The regulatory rate is populated on loading an instrument with the ‘Interest Rate’ defined for that definition in Setup > Administration > Products > Regulatory Rates screen
Note: If there are no matching records with regulatory rate, the Edits (underlying rules) validation fails (if Edits are enabled) and system does not allow to save the contract information.
8-11
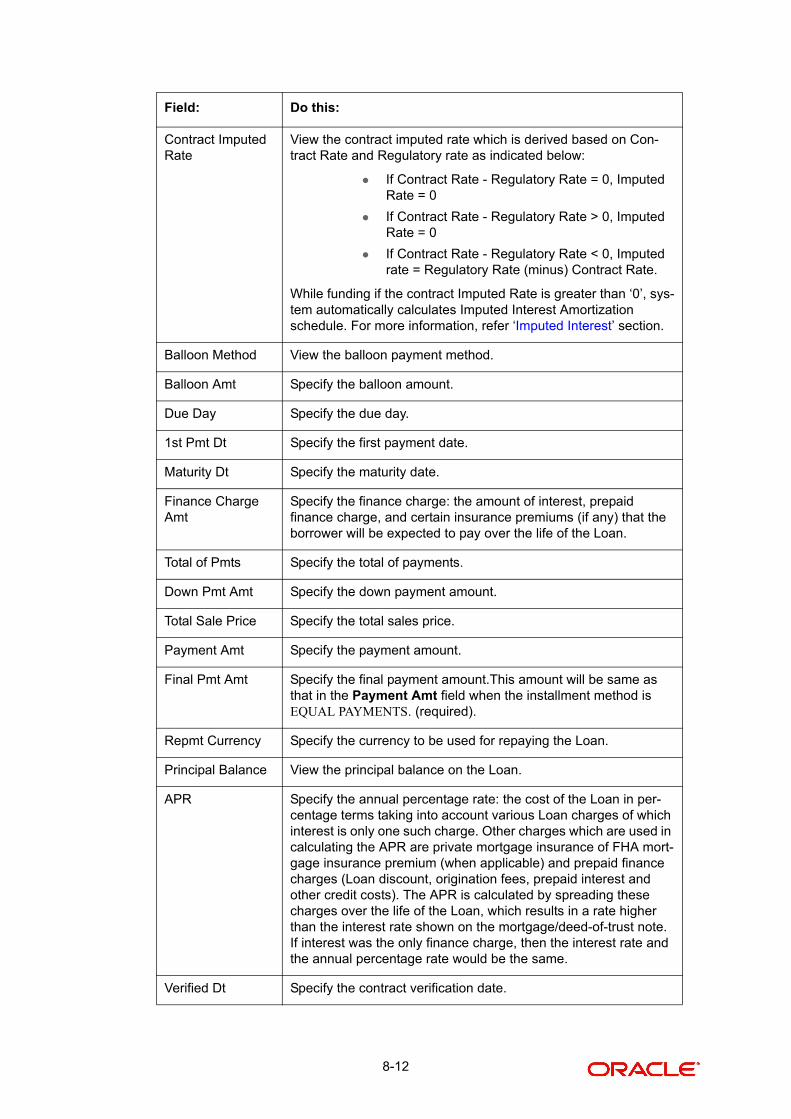
Contract Imputed Rate
View the contract imputed rate which is derived based on Con-tract Rate and Regulatory rate as indicated below:
If Contract Rate - Regulatory Rate = 0, Imputed Rate = 0
If Contract Rate - Regulatory Rate > 0, Imputed Rate = 0
If Contract Rate - Regulatory Rate < 0, Imputed rate = Regulatory Rate (minus) Contract Rate.
While funding if the contract Imputed Rate is greater than ‘0’, sys-tem automatically calculates Imputed Interest Amortization schedule. For more information, refer ‘Imputed Interest’ section.
Balloon Method View the balloon payment method.
Balloon Amt Specify the balloon amount.
Due Day Specify the due day.
1st Pmt Dt Specify the first payment date.
Maturity Dt Specify the maturity date.
Finance Charge Amt
Specify the finance charge: the amount of interest, prepaid finance charge, and certain insurance premiums (if any) that the borrower will be expected to pay over the life of the Loan.
Total of Pmts Specify the total of payments.
Down Pmt Amt Specify the down payment amount.
Total Sale Price Specify the total sales price.
Payment Amt Specify the payment amount.
Final Pmt Amt Specify the final payment amount.This amount will be same as that in the Payment Amt field when the installment method is EQUAL PAYMENTS. (required).
Repmt Currency Specify the currency to be used for repaying the Loan.
Principal Balance View the principal balance on the Loan.
APR Specify the annual percentage rate: the cost of the Loan in per-centage terms taking into account various Loan charges of which interest is only one such charge. Other charges which are used in calculating the APR are private mortgage insurance of FHA mort-gage insurance premium (when applicable) and prepaid finance charges (Loan discount, origination fees, prepaid interest and other credit costs). The APR is calculated by spreading these charges over the life of the Loan, which results in a rate higher than the interest rate shown on the mortgage/deed-of-trust note. If interest was the only finance charge, then the interest rate and the annual percentage rate would be the same.
Verified Dt Specify the contract verification date.
Field: Do this:
8-12

Verified By View the user id who verified the contract.
Signing Dt Select the signing date on when the documents is signed.
Probable Delivery Dt
Select the probably delivery date.
Note: For Islamic products the following additional fields will be displayed.
Residual Income View the residual income for the residual days.
Residual Days View the number of residual days.
IRR View the interest rate of return.
Profit Rate View the profit rate (display only).
Instrument Details – An instrument is a contract with specific rules tied to it. An instru-ment associated with the application indicates OFSLL of the type of contract being used for the approved loan. Items defined in the contract are “locked in” when you select the instrument from drop down list and click on "Load Instrument Details". These values cannot be changed on the funding screen.
Any changes to the instrument in account will be handled by monetary/non-monetary transactions.
The system loads all the rules established by the company that are required at the time of funding; for example, the accrual method, billing method, type of billing, tolerance, due dates, extensions and so on.
Accrual Method View the accrual calculation method.
Start Dt Basis View the accrual start basis.
Base Method View the accrual base method.
Bill Method View the billing method.
Bill Type View the billing type.
Time Counting Method
View the time counting method.
Installment Method
View the installment methods.
Calendar Method View the Calendar Method.
Start Days View the accrual start days.
Stop Accrual Days View the accrual stop days.
Field: Do this:
8-13

ACH Fee Ind Indicates that the ACH fee should be applied or not. Depending on the status of check box, the ACH fee is applied based follow-ing conditions
- When the check box is selected and the fee amount is ZERO, system will not apply the ACH fee.
- When the check box is selected and the fee amount is BLANK, system will apply the ACH fee from Contract setup.
- When the check box is selected and the fee amount is specified, system will apply the specified amount and overrides the ACH fee amount mentioned in Contract Setup.
- When the check box is not selected, system will apply the ACH fee amount mentioned in Contract Setup.
Capitalization section
This section displays the capitalization parameters pre-defined at Setup > Contract screen and allows you to modify only the ‘Grace Days’ value for balance capitalization.
CapitalizeIf selected, indicates that the capitalization of balances is enabled while funding the application.
Frequency
View the capitalization frequency defined at Contract level.
After funding, all the account balances are capitalized to principal in the same frequency except for ‘Balance Frequency’ where different frequency may be defined for each balance type.
Capitalization Start Basis
View the capitalization start date as either Contract Date or First Payment Date on which capitalization next date is calculated.
Grace Days
View or Modify the grace days allowed in the frequency (minimum 0, maximum 31) before capitalizing the balances to account. This is also the deciding factor for executing the capitalization batch job which is based on Capitalization Frequency + Grace Days.
However, note that Grace Days are not accounted for Month End type of capitalization frequency and is ignored even if specified.
Cap Tolerance Amt
View the capitalization tolerance amount which is the minimum amount to qualify for capitalization.
Promotion Details – If applicable, enter information regarding any promotion associ-ated with the application in the Promotion section
Promotion Select the promotion.
Type View the promotion type.
Dlq Days View the delinquency days.
Period Type View the period type.
Period View the promotion period.
Tolerance Amt View the tolerance amount (displays only).
Field: Do this:
8-14
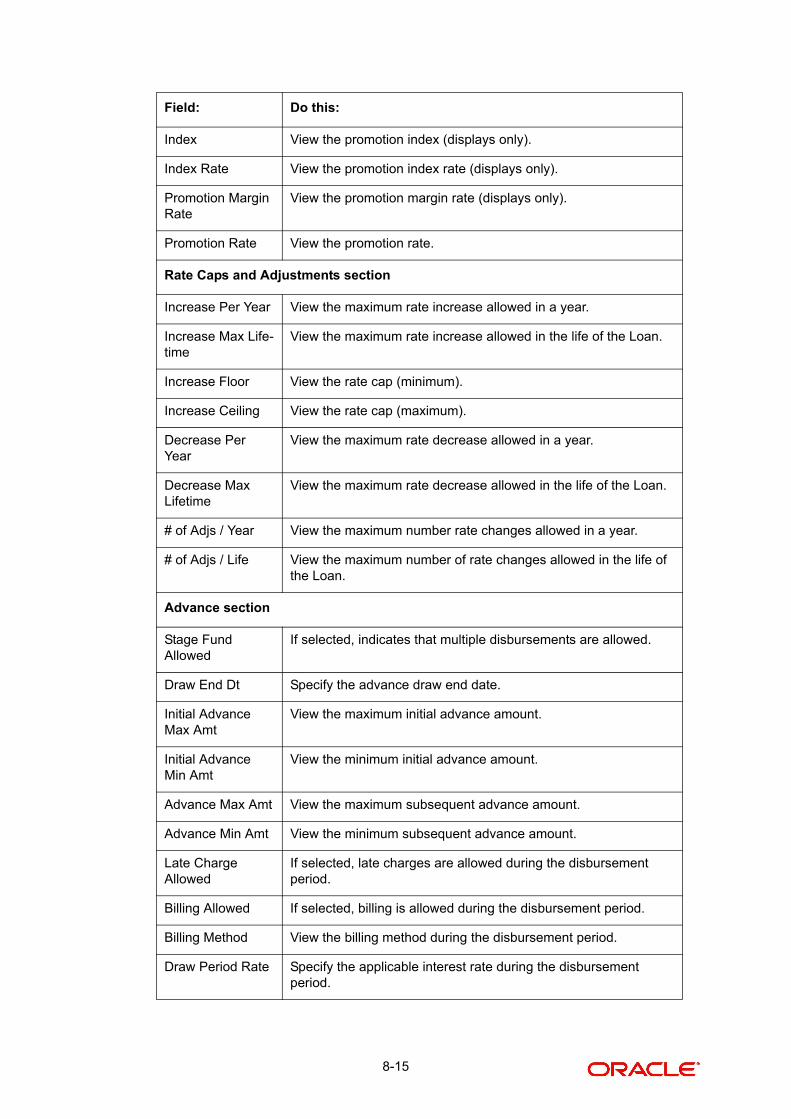
Index View the promotion index (displays only).
Index Rate View the promotion index rate (displays only).
Promotion Margin Rate
View the promotion margin rate (displays only).
Promotion Rate View the promotion rate.
Rate Caps and Adjustments section
Increase Per Year View the maximum rate increase allowed in a year.
Increase Max Life-time
View the maximum rate increase allowed in the life of the Loan.
Increase Floor View the rate cap (minimum).
Increase Ceiling View the rate cap (maximum).
Decrease Per Year
View the maximum rate decrease allowed in a year.
Decrease Max Lifetime
View the maximum rate decrease allowed in the life of the Loan.
# of Adjs / Year View the maximum number rate changes allowed in a year.
# of Adjs / Life View the maximum number of rate changes allowed in the life of the Loan.
Advance section
Stage Fund Allowed
If selected, indicates that multiple disbursements are allowed.
Draw End Dt Specify the advance draw end date.
Initial Advance Max Amt
View the maximum initial advance amount.
Initial Advance Min Amt
View the minimum initial advance amount.
Advance Max Amt View the maximum subsequent advance amount.
Advance Min Amt View the minimum subsequent advance amount.
Late Charge Allowed
If selected, late charges are allowed during the disbursement period.
Billing Allowed If selected, billing is allowed during the disbursement period.
Billing Method View the billing method during the disbursement period.
Draw Period Rate Specify the applicable interest rate during the disbursement period.
Field: Do this:
8-15
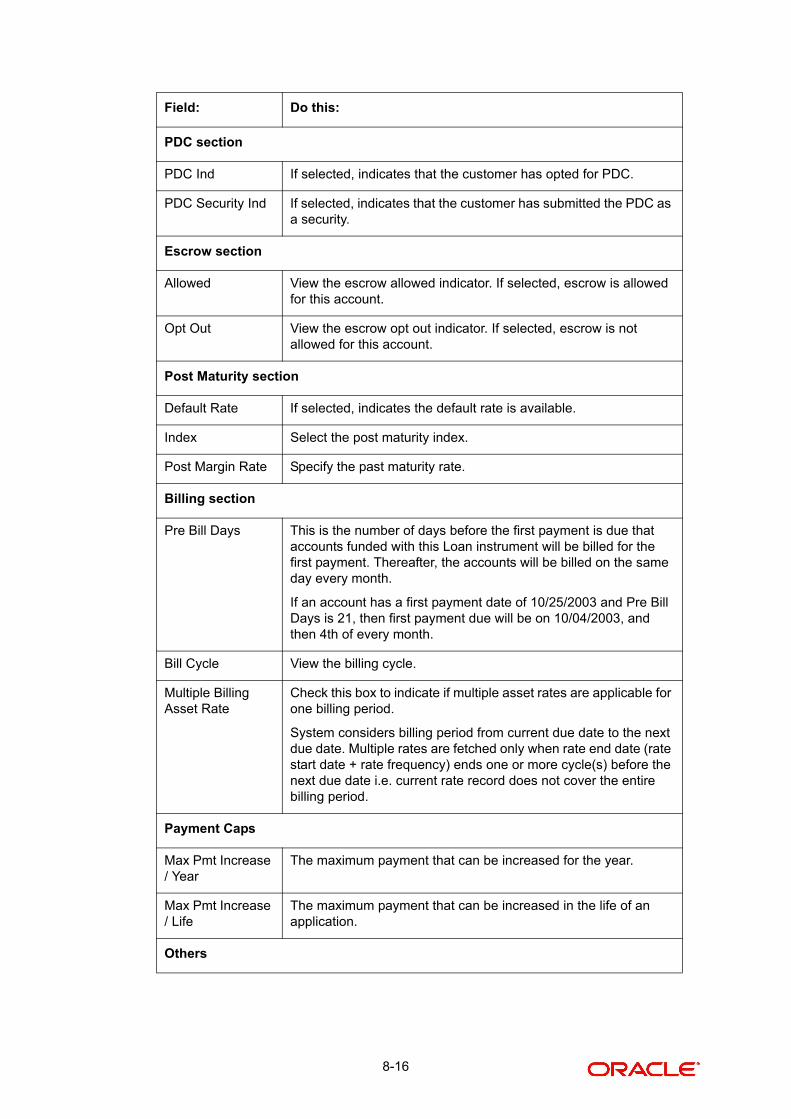
PDC section
PDC Ind If selected, indicates that the customer has opted for PDC.
PDC Security Ind If selected, indicates that the customer has submitted the PDC as a security.
Escrow section
Allowed View the escrow allowed indicator. If selected, escrow is allowed for this account.
Opt Out View the escrow opt out indicator. If selected, escrow is not allowed for this account.
Post Maturity section
Default Rate If selected, indicates the default rate is available.
Index Select the post maturity index.
Post Margin Rate Specify the past maturity rate.
Billing section
Pre Bill Days This is the number of days before the first payment is due that accounts funded with this Loan instrument will be billed for the first payment. Thereafter, the accounts will be billed on the same day every month.
If an account has a first payment date of 10/25/2003 and Pre Bill Days is 21, then first payment due will be on 10/04/2003, and then 4th of every month.
Bill Cycle View the billing cycle.
Multiple Billing Asset Rate
Check this box to indicate if multiple asset rates are applicable for one billing period.
System considers billing period from current due date to the next due date. Multiple rates are fetched only when rate end date (rate start date + rate frequency) ends one or more cycle(s) before the next due date i.e. current rate record does not cover the entire billing period.
Payment Caps
Max Pmt Increase / Year
The maximum payment that can be increased for the year.
Max Pmt Increase / Life
The maximum payment that can be increased in the life of an application.
Others
Field: Do this:
8-16
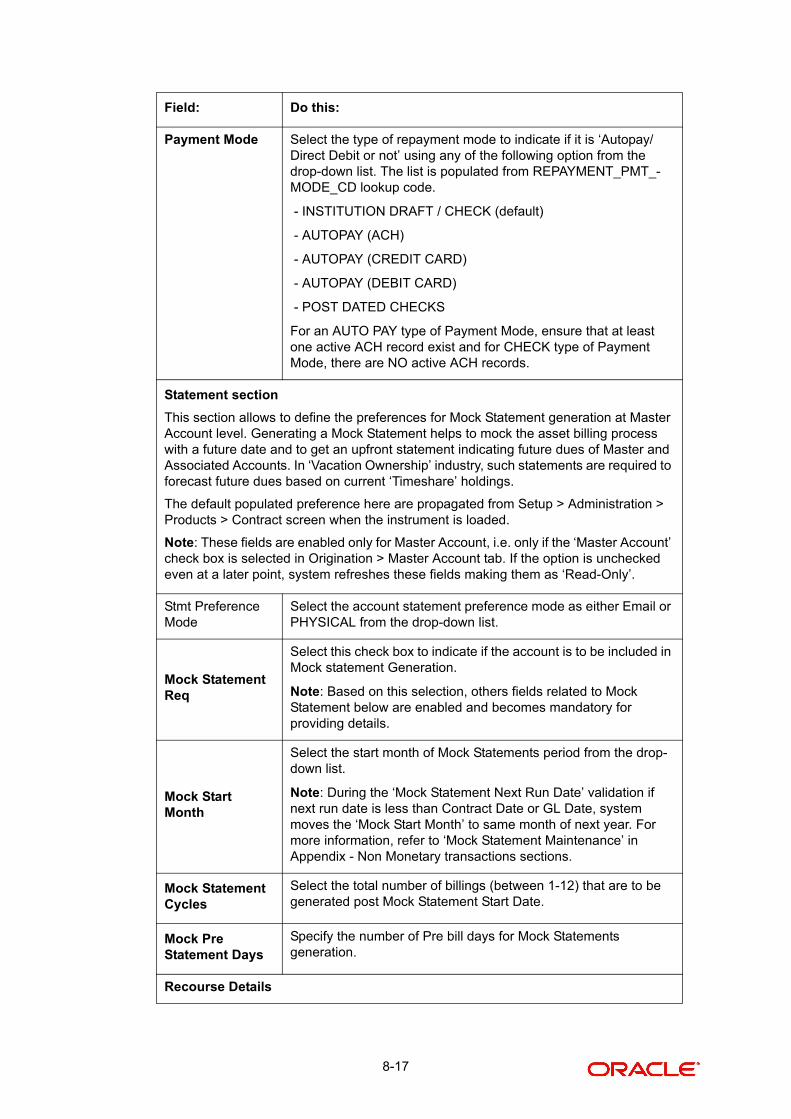
Payment Mode Select the type of repayment mode to indicate if it is ‘Autopay/Direct Debit or not’ using any of the following option from the drop-down list. The list is populated from REPAYMENT_PMT_-MODE_CD lookup code.
- INSTITUTION DRAFT / CHECK (default)
- AUTOPAY (ACH)
- AUTOPAY (CREDIT CARD)
- AUTOPAY (DEBIT CARD)
- POST DATED CHECKS
For an AUTO PAY type of Payment Mode, ensure that at least one active ACH record exist and for CHECK type of Payment Mode, there are NO active ACH records.
Statement section
This section allows to define the preferences for Mock Statement generation at Master Account level. Generating a Mock Statement helps to mock the asset billing process with a future date and to get an upfront statement indicating future dues of Master and Associated Accounts. In ‘Vacation Ownership’ industry, such statements are required to forecast future dues based on current ‘Timeshare’ holdings.
The default populated preference here are propagated from Setup > Administration > Products > Contract screen when the instrument is loaded.
Note: These fields are enabled only for Master Account, i.e. only if the ‘Master Account’ check box is selected in Origination > Master Account tab. If the option is unchecked even at a later point, system refreshes these fields making them as ‘Read-Only’.
Stmt Preference Mode
Select the account statement preference mode as either Email or PHYSICAL from the drop-down list.
Mock Statement Req
Select this check box to indicate if the account is to be included in Mock statement Generation.
Note: Based on this selection, others fields related to Mock Statement below are enabled and becomes mandatory for providing details.
Mock Start Month
Select the start month of Mock Statements period from the drop-down list.
Note: During the ‘Mock Statement Next Run Date’ validation if next run date is less than Contract Date or GL Date, system moves the ‘Mock Start Month’ to same month of next year. For more information, refer to ‘Mock Statement Maintenance’ in Appendix - Non Monetary transactions sections.
Mock Statement Cycles
Select the total number of billings (between 1-12) that are to be generated post Mock Statement Start Date.
Mock Pre Statement Days
Specify the number of Pre bill days for Mock Statements generation.
Recourse Details
Field: Do this:
8-17

5. Perform any of the Basic Actions mentioned in Navigation chapter.
6. Quick Calculate
In the ‘Contract Information’ section, there is a drop-down list adjacent to the ‘Calculate’ button with following options to auto calculate different Loan parameters based on the data provided. Select the required option from the drop-down list and click ‘Calculate’:
– CALCULATE PAYMENT
– CALCULATE INTEREST RATE
– CALCULATE TERM
– CALCULATE LOAN AMOUNT
The system displays the requested calculation in the respective field.
7. Click Calculate. The system displays the calculation in the respective field.
Imputed Interest
Imputed interest is the difference of interest rate arising when the regulatory rate offered is less than the contract rate (i.e. market rate). As per the tax regulations, if the stated (regulatory rate) and market (contract) interest rates are substantially different, it is necessary to record the transaction using an interest rate that more closely accords with the market rate.
Hence, for a loan with imputed interest rate, along with repayment schedule which consist of EMI, Principal, Interest and Outstanding Balance, there is also ‘Imputed Interest Amortization
Recourse View the recourse indicator. If selected, it indicates that there is a recourse associated with the Loan and the following recourse details can be specified.
Recourse Type Select the recourse type as either 'Partial' or 'Full' from the drop-down list.
Recourse Rea-son
Depending on the type of recourse selected, you can select the following type of recourse reason from the drop-down list.
For recourse type as 'Partial', system defaults the recourse rea-son as ‘Partial’.
For recourse type as 'Full', you can select one of the following options:
- Fraud
- Titles
- Fraud and Titles
- Full
- Full and Titles
Recourse Max % Specify the maximum percentage of recourse allowed. Ensure that the specified amount does not exceed 100% or the amount defined at Contract.
Note: You can specify the recourse either in percentage or as flat amount in the below field.
Recourse Amt If ‘Recourse Max %’ is not specified, you can specify a flat amount to be allowed for recourse.
Field: Do this:
8-18
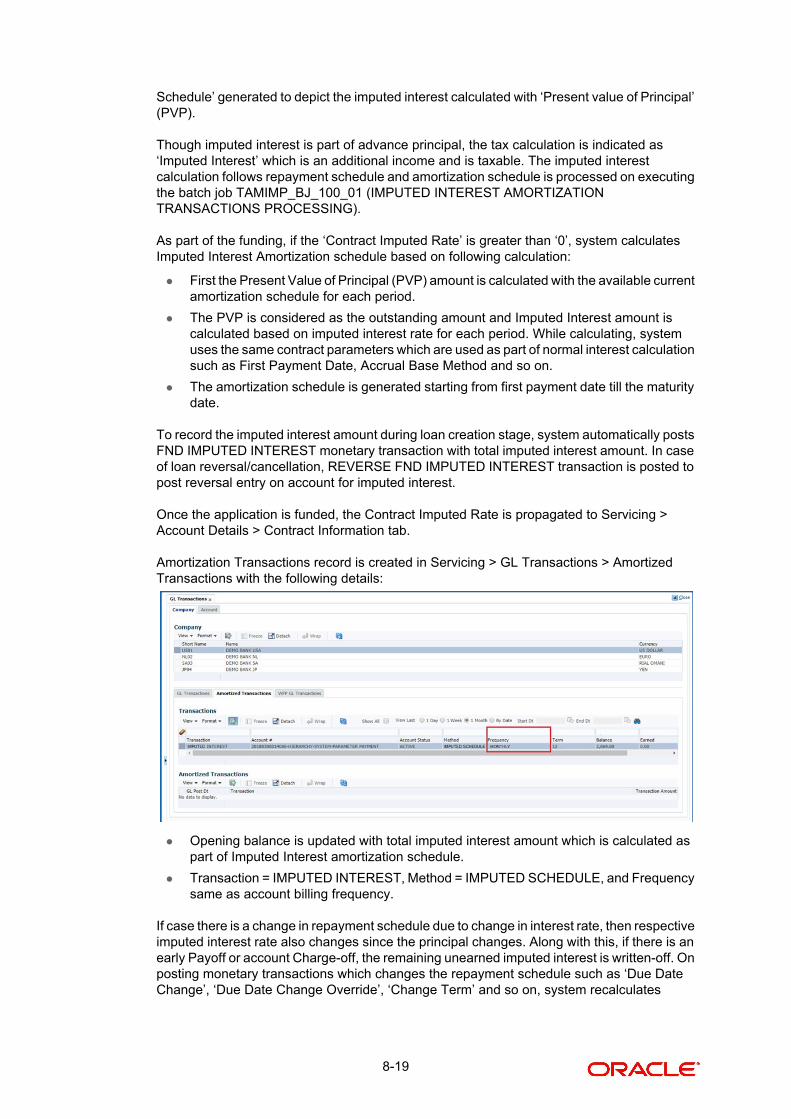
Schedule’ generated to depict the imputed interest calculated with ‘Present value of Principal’ (PVP).
Though imputed interest is part of advance principal, the tax calculation is indicated as ‘Imputed Interest’ which is an additional income and is taxable. The imputed interest calculation follows repayment schedule and amortization schedule is processed on executing the batch job TAMIMP_BJ_100_01 (IMPUTED INTEREST AMORTIZATION TRANSACTIONS PROCESSING).
As part of the funding, if the ‘Contract Imputed Rate’ is greater than ‘0’, system calculates Imputed Interest Amortization schedule based on following calculation:
First the Present Value of Principal (PVP) amount is calculated with the available current amortization schedule for each period.
The PVP is considered as the outstanding amount and Imputed Interest amount is calculated based on imputed interest rate for each period. While calculating, system uses the same contract parameters which are used as part of normal interest calculation such as First Payment Date, Accrual Base Method and so on.
The amortization schedule is generated starting from first payment date till the maturity date.
To record the imputed interest amount during loan creation stage, system automatically posts FND IMPUTED INTEREST monetary transaction with total imputed interest amount. In case of loan reversal/cancellation, REVERSE FND IMPUTED INTEREST transaction is posted to post reversal entry on account for imputed interest.
Once the application is funded, the Contract Imputed Rate is propagated to Servicing > Account Details > Contract Information tab.
Amortization Transactions record is created in Servicing > GL Transactions > Amortized Transactions with the following details:
Opening balance is updated with total imputed interest amount which is calculated as part of Imputed Interest amortization schedule.
Transaction = IMPUTED INTEREST, Method = IMPUTED SCHEDULE, and Frequency same as account billing frequency.
If case there is a change in repayment schedule due to change in interest rate, then respective imputed interest rate also changes since the principal changes. Along with this, if there is an early Payoff or account Charge-off, the remaining unearned imputed interest is written-off. On posting monetary transactions which changes the repayment schedule such as ‘Due Date Change’, ‘Due Date Change Override’, ‘Change Term’ and so on, system recalculates
8-19

imputed interest amortization schedule along with repayment schedule and posts an Imputed Interest amortization adjustment transaction.
In above cases, system posts the following adjustments/write-off and reversal transactions automatically on loan account to basically write-off some amount:
IMPUTED INTEREST AMORTIZE and IMPUTED REVERSE INTEREST AMORTIZE
IMPUTED INTEREST AMORTIZE WRITE-OFF and IMPUTED REVERSE INTEREST AMORTIZE WRITE-OFF
IMPUTED INTEREST AMORTIZE ADJUSTMENT MINUS and IMPUTED INTEREST AMORTIZE ADJUSTMENT MINUS REVERSE
IMPUTED INTEREST AMORTIZE ADJUSTMENT PLUS and IMPUTED INTEREST AMORTIZE ADJUSTMENT PLUS REVERSE
System automatically creates imputed interest related transaction/journal entries at the time of processing of the following transactions of loan account.
Loan creation
Monthly amortization
Early loan payoff
Account Charge-off
Reversals of loan creation, loan payoff/charge-off
8.12.1 Contract (2) Sub Tab
The Contract sub screen records the application’s servicing branch and collector. It also displays additional information regarding the contract not covered on the Loan screen, such as the tolerance, delinquencies, due dates, billings, and extensions.
To complete the Contract sub tab
1. Open the Funding screen and load the application you want to work with.
2. Click the Contract > Contract sub tab.
3. In this section, you can perform any of the Basic Operations mentioned in Navigation chapter.
A brief description of the fields is given below:
Field: Do this:
Servicing Branch Select the servicing branch for the contract.
Collector Select the collector for the contract.
Funder If you are acting as a proxy for a Funder, then you can select the Funder’s name from the adjoining options list. The list displays all the associated Funders, Funding Supervisors, and Funding Managers.
However, this is not mandatory and can be used while auc-tioning an application on behalf of another Funder.
Misc section
8-20

Statement Consolida-tion
By default this check box is selected indicating that system generates consolidated billing statement at Master Account level along with details of all the associated accounts with same Billing cycle and due day.
You can uncheck this option to generate billing statement to only current account.
After funding, the option selected here is propagated to Ser-vicing > Account Details and Contract (2) tabs.
For more information, refer to Master Account tab section.
Link To Existing Cus-tomer
Select to link the application to the existing customer.
Anniversary Period View the anniversary term.
Default Pmt Spread View the spread.
HMDA section
Lien Status Select the lien status.
HOEPA Select the home owner equity protection act (HOEPA) code.
Rate Spread Specify the rate spread. You can calculate this spread from a tool on the Home Mortgage Disclosure Act (HMDA) website.
Others section
1st Pmt Deduction View the first payment deduction indicator. If selected, the first payment deduction is in use.
Days View the first payment deduction days.
1st Pmt Refund View the first payment refund indicator. If selected, the first payment refund is in use.
Days View the first payment refund days.
Pre-Pmt Penalty View the prepayment penalty indicator. If selected, a prepay-ment penalty can be applied.
% of Term for Penalty View the prepayment penalty percentage of term.
Pay Off Fee View the payoff fee indicator. If selected, a payoff fee can be applied to the Loan.
Rebate section
Rebate Method View the rebate calculation method.
Rebate Term Method View the rebate term method.
Rebate Min Fin Chg Method
View the rebate minimum finance charge calculation method.
Field: Do this:
8-21

Rebate Min Fin Chg Value
View the minimum finance charge value.
Acquisition Charge Amt
View the acquisition charge amount.
Tolerance section - This section displays the tolerance details as defined in Setup > Products > Contract screen.
Refund Allowed View the refund allowed indicator. If selected, the refund pol-icies in this section are in use.
Refund Tolerance View the refund tolerance amount.
Pmt Tolerance Amt View the payment tolerance amount.
Pmt Tolerance% View the payment tolerance percentage.
Promise Tolerance Amt
View the ‘Promise to Pay’ tolerance amount.
Promise Tolerance % View the ‘Promise to Pay’ tolerance percentage.
Writeoff Tolerance View the write-off tolerance amount.
Delinquency section
Late Charge Grace Days
View the late charge grace days.
Delq Grace Days View the delinquency grace days.
Delq Category Method
View the delinquency category method.
Time Bar Years View the total number of years allowed to contact the customer starting from the first payment date as defined in Setup > Products > Contract screen.
Cycle Based Fees - If the ‘Cycle Based Fees’ assessment is enabled for the selected instrument, the details of the defined parameters in Setup > Contract screen are propagated into this section. On funding the application, system automatically calculates the late charges at individual account level based on threshold value. For more information, refer to Setup > Contract details.
Cycle Based Collection Late Fee
If selected, indicates that Cycle Based Collection Late Fee is assessed on the account.
Cycle Based Late Fee
If selected, indicates that Cycle Based Late Fee is assessed on the account.
Cycle Based Collection Late Fee Grace Days
Indicates the number of grace days allowed before cycle based fee is assessed on the account.
Cycle Based Late Fee Grace Days
Indicates the number of grace days allowed before cycle based late fee is assessed on the account.
Field: Do this:
8-22

4. Perform any of the Basic Actions mentioned in Navigation chapter.
8.12.2 Repayment Sub Tab
The Repayment sub screen records the application’s advance information, repayment schedule, and skipped repayment months for variable rate Loan.
To complete the Repayment sub tab
1. Open the Funding screen and load the application you want to work with.
2. Click the Contract > Repayment sub tab.
Due Date section
Max Due Day Change Days
View the maximum due days.
Min Due Day View the minimum due day.
Max Due Day View the maximum due day.
Max Due Day Change Year
View the maximum due day changes allowed (year).
Max Due Day Change Life
View the maximum due day changes allowed (life).
Fee Consolidation - This section displays the status of Fee Consolidation indicators propagated from Setup > Contract screen. If enabled, indicates that system is allowed to consolidate that particular late fee at Master Account level.
Late Charge at Master Account
If selected, indicates that system is allowed to consolidate the late charge assessment at master account level.
Cycle Based Collection Late Fee at Master Account
If selected, indicates that system is allowed to consolidate the cycle based collection late fee assessment at master account level.
Cycle Based Late Fee at Master Account
If selected, indicates that system is allowed to consolidate the cycle based late fee assessment at master account level.
Extension section
Max Extn Period / Year
View the maximum extension allowed (year).
Max Extn Period / Life View the maximum extension allowed (life).
Max # Extn / Year View the maximum number of extensions allowed (year).
Max # Extn / Life View the maximum number of extensions allowed (life).
Minimum # Payments View the minimum number of payments.
Extension Gap in Months
View the extension gap in months.
Field: Do this:
8-23

3. In this section, you can perform any of the Basic Operations mentioned in Navigation chapter.
A brief description of the fields is given below:
4. Perform any of the Basic Actions mentioned in Navigation chapter.
Field: Do this:
Repayment section:
Flexible Repay-ment Allowed
If this display only check box is selected, then the flexible repay-ment functionality is set up and allowed for this application's prod-uct type.
Type Select the flexible repayment schedule you want to use from the following: SKIP PERIOD, USER DEFINED, UNDEFINED.
If you select the repayment schedule type of SKIP PERIOD, you then select the months for which borrower won't make any pay-ments in the Skip Months section.
If you select the repayment schedule type of USER DEFINED, you then enter the repayment schedule requested by borrower in the Schedule section; for example, $300.00 for first 12 months, $350.00 for next 18 months, and so on.
Note: The borrower may not provide a complete repayment sched-ule with the contract. Provisions are available with the system to compute the repayment schedule for remaining periods at a later time, if borrower provides partial repayment schedule.
Skip Months section
Jan If selected, indicates that repayment is skipped for January.
Feb If selected, indicates that repayment is skipped for February.
Mar If selected, indicates that repayment is skipped for March.
Apr If selected, indicates that repayment is skipped for April.
May If selected, indicates that repayment is skipped for May.
Jun If selected, indicates that repayment is skipped for June.
Jul If selected, indicates that repayment is skipped for July.
Aug If selected, indicates that repayment is skipped for August.
Sep If selected, indicates that repayment is skipped for September.
Oct If selected, indicates that repayment is skipped for October.
Nov If selected, indicates that repayment is skipped for November.
Dec If selected, indicates that repayment is skipped for December.
Extendable Balloon section
Max Term Specify maximum number of payments.
8-24

5. In the Repayment Schedule section, click View.
6. View the following information:
7. In the Payment Change Schedule section, click View.
8. View the following information:
8.12.3 Itemizations Sub Tab
The system lists the distribution of the Loan proceeds on the Itemizations sub screen when you choose Select Instrument on the Contract link. It lists amounts paid to the borrower directly, amount paid to the borrower’s account, and amount’s given on the borrower’ behalf to third parties. Itemizations are categorized according to advances, finance fees, prepaid fees, producers or escrows. If you have entered itemization amounts during application entry or underwriting, you will see these values in the Amount or Approved Amt columns.
The Itemizations sub screen offers the option of computing the values for itemization according to a itemization formula associated with the selected instrument based on system setup.
If you require any new itemizations, you can add them using the Setup menu Products command. (For more information, see the Products chapter in the Setup Guide.)
To complete the Itemizations
1. Open the Funding screen and load the application you want to work with.
2. Click the Contract > Itemizations sub tab.
Repayment Schedule section
Note: Complete the Schedule section only if you have entered USER DEFINED in the Repayment section’s Type field. Click Add to make new entries.
Seq Specify the sequence number of the repayment schedule.
Pmt Amt Specify the repayment amount borrower agreed to pay during the schedule.
# of Pmts Specify the number of payments borrower agreed to pay for stated repayment amount during this schedule.
Generated If selected, indicates that the schedule is system generated.
Enabled If selected, indicates that the schedule is enabled.
Payment Change Schedule section
Seq Specify the payment sequence number.
Option Type Select the option type.
Frequency Specify the payment change frequency.
Period Specify the period.
# of Adj Specify the number of adjustments.
Value Specify the adjustment value.
8-25

3. In this section, you can perform any of the Basic Operations mentioned in Navigation chapter.
A brief description of the fields is given below:
4. Choose the option button for the type of itemization you want to use: Advance, Financed Fees, Pre-Paid Fees, Producer or Escrow.
5. In the Amount column, enter the amount corresponding with what is listed in the Itemization column.
6. If the Itemization Formula field contains an entry other than UNDEFINED, you can choose Compute to auto-compute the value in the Amount field using a predefined itemization formula.
Itemization formulas are created on the Product Setup screen’s Origination Fees screens. (For more information, see the Org. Fees tab section of the Products chapter in the Setup Guide.)
To ensure you create the correct computed value, choose Compute after entering values for all base itemizations; that is, values of all such itemizations with an Itemization Formula of UNDEFINED.
You can also manually enter amounts for auto-computed itemizations.
If you click Initialize, the system sets the values of auto-computed itemizations to 0 (zero).
7. If you choose, use the Comment field to add remarks.
8. Perform any of the Basic Actions mentioned in Navigation chapter.
Field: Do this:
Itemization View the itemization.
+/- View whether the itemization is added or subtracted.
Amount View the amount.
Approved Amt View the approved amount. This is information recorded on the Underwriting screen.
Discount Rate Specify the discount rate.
Tax View whether the itemization is taxable (Sales) if box is selected.
Slr View the seller payment.
Itemization Formula
View the itemization type.
Itemization Type
View the itemization type.
Prefunding Status
View the prefunding status.
Pmt Dt View the payment date.
Pmt Ref # View the payment reference number.
Comment Specify additional comments, if any.
8-26
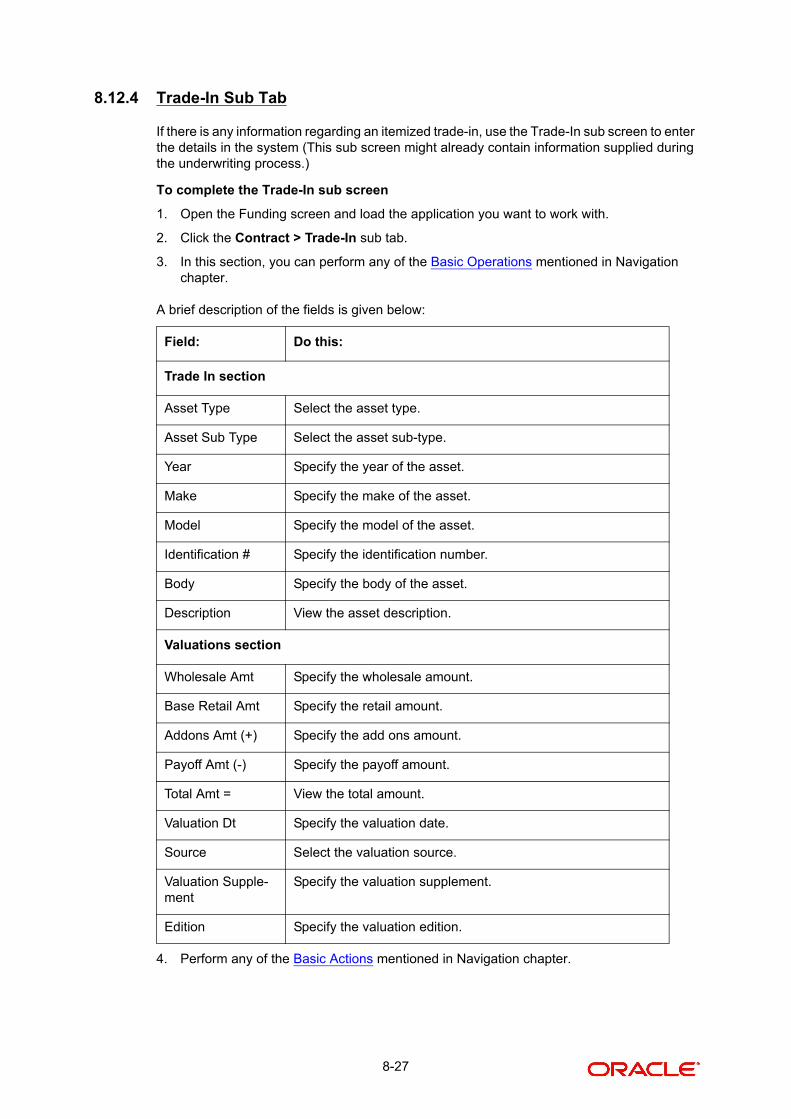
8.12.4 Trade-In Sub Tab
If there is any information regarding an itemized trade-in, use the Trade-In sub screen to enter the details in the system (This sub screen might already contain information supplied during the underwriting process.)
To complete the Trade-In sub screen
1. Open the Funding screen and load the application you want to work with.
2. Click the Contract > Trade-In sub tab.
3. In this section, you can perform any of the Basic Operations mentioned in Navigation chapter.
A brief description of the fields is given below:
4. Perform any of the Basic Actions mentioned in Navigation chapter.
Field: Do this:
Trade In section
Asset Type Select the asset type.
Asset Sub Type Select the asset sub-type.
Year Specify the year of the asset.
Make Specify the make of the asset.
Model Specify the model of the asset.
Identification # Specify the identification number.
Body Specify the body of the asset.
Description View the asset description.
Valuations section
Wholesale Amt Specify the wholesale amount.
Base Retail Amt Specify the retail amount.
Addons Amt (+) Specify the add ons amount.
Payoff Amt (-) Specify the payoff amount.
Total Amt = View the total amount.
Valuation Dt Specify the valuation date.
Source Select the valuation source.
Valuation Supple-ment
Specify the valuation supplement.
Edition Specify the valuation edition.
8-27

8.12.5 Subvention Sub Tab
With the Subvention sub screen, you can enter the subvention information and calculate the subvention amount, as well as override the calculated subvention amount. The participant’s information is automatically populated based on the selected subvention plan.
To use the Subventions sub screen
1. Open the Funding screen and load the application you want to work with.
2. Click the Contract > Subventions sub tab.
3. In this section, you can perform any of the Basic Operations mentioned in Navigation chapter.
4. A brief description of the fields is given below:
5. Click View in the Subvention Details section.
View the following:
Field: Do this:
Subvention section:
Plan Select the subvention plan code.
Description View the subvention plan description
Sub Plan Select the sub plan.
Sub Plan Description Select the subvention sub plan.
Subvention Type View the subvention type
Subvention Amount View the subvention amount for the plan.
Include If selected, indicates that the subvention is included.
Participants section:
Participant View the participant.
Participant Type View the participant type
Collection Method View the collection method.
Rate View the subvention rate.
Rent Factor View the subvention rent factor.
Calculation Method View the subvention calculation method.
Factor View the factor.
Calculated Amount View the calculated subvention amount.
Subvention Amount Specify the subvention amount.
Total Subvention Rate View the total subvention rate.
8-28

6. Click Initialize to reset the subvention amount to zero.
7. Click Calculate to calculate the subvention amount.
8. Perform any of the Basic Actions mentioned in Navigation chapter.
8.12.6 Insurance Sub Tab
If there is any information regarding an itemized insurance amount, enter the details on the Insurance sub screen. The Insurance sub screen also enables you to calculate the commission if there is a commission rule defined during Contract setup.
To complete the Insurance sub tab
1. Open the Funding screen and load the application you want to work with.
2. Click the Contract > Insurance sub tab.
3. In this section, you can perform any of the Basic Operations mentioned in Navigation chapter.
A brief description of the fields is given below:
Total Subvention Amount
View the total subvention amount.
Include If selected, indicates that the subvention is included.
Field: Do this:
Insurance Plan Select the insurance plan associated with the financed insurance product.
Insurance Type View the insurance type associated with the insurance plan.
Sub Type Select the insurance sub type offered under the insurance plan.
Insurance Com-pany
Specify the insurance company associated with the insurance plan. The system populates the default insurance plan defined during product setup.
Policy # Specify the insurance policy number.
Effective Dt Specify the insurance effective date.
Term Specify the insurance term.
Expiry Dt Specify the insurance expiry date.
Commission Rule View the insurance premium amount.
Premium Amt Specify the insurance premium amount.
Commission Amt View the insurance commission amount.
Phone Specify the insurance company’s primary phone number.
Extn Specify the insurance company’s primary phone extension.
Phone Specify the insurance company’s alternate phone number.
Extn Specify the insurance company’s alternate phone extension.
8-29
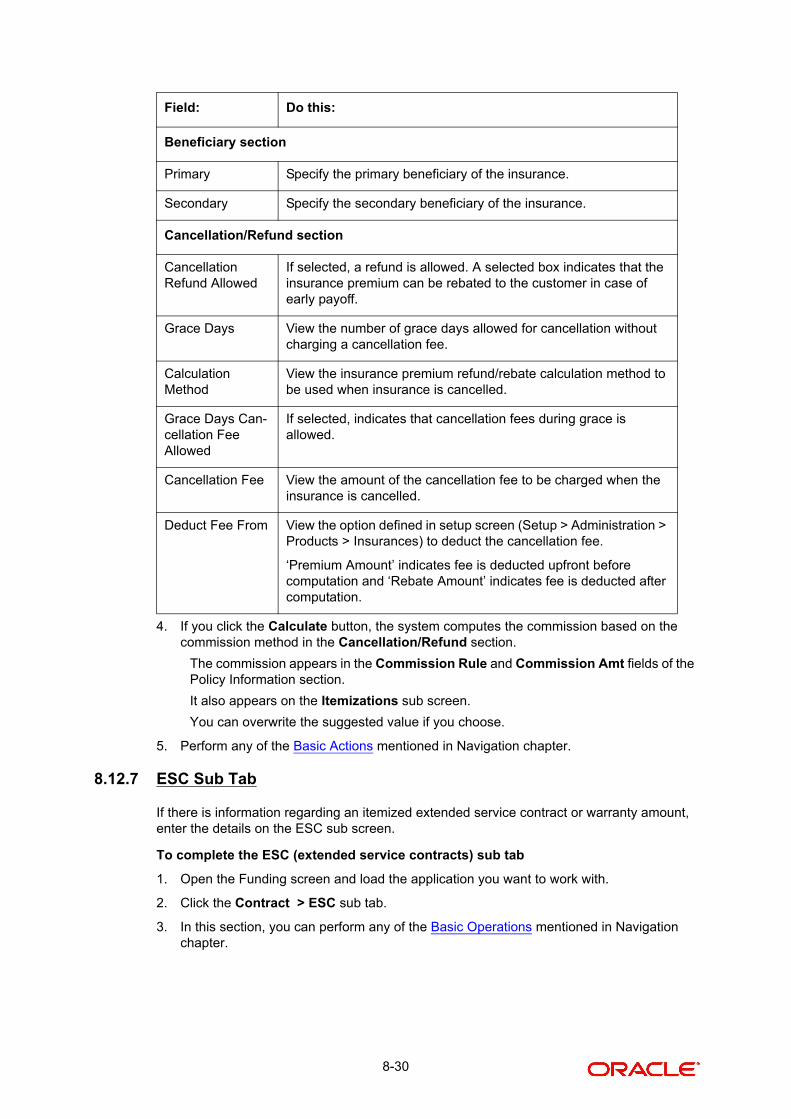
4. If you click the Calculate button, the system computes the commission based on the commission method in the Cancellation/Refund section.
The commission appears in the Commission Rule and Commission Amt fields of the Policy Information section.
It also appears on the Itemizations sub screen.
You can overwrite the suggested value if you choose.
5. Perform any of the Basic Actions mentioned in Navigation chapter.
8.12.7 ESC Sub Tab
If there is information regarding an itemized extended service contract or warranty amount, enter the details on the ESC sub screen.
To complete the ESC (extended service contracts) sub tab
1. Open the Funding screen and load the application you want to work with.
2. Click the Contract > ESC sub tab.
3. In this section, you can perform any of the Basic Operations mentioned in Navigation chapter.
Beneficiary section
Primary Specify the primary beneficiary of the insurance.
Secondary Specify the secondary beneficiary of the insurance.
Cancellation/Refund section
Cancellation Refund Allowed
If selected, a refund is allowed. A selected box indicates that the insurance premium can be rebated to the customer in case of early payoff.
Grace Days View the number of grace days allowed for cancellation without charging a cancellation fee.
Calculation Method
View the insurance premium refund/rebate calculation method to be used when insurance is cancelled.
Grace Days Can-cellation Fee Allowed
If selected, indicates that cancellation fees during grace is allowed.
Cancellation Fee View the amount of the cancellation fee to be charged when the insurance is cancelled.
Deduct Fee From View the option defined in setup screen (Setup > Administration > Products > Insurances) to deduct the cancellation fee.
‘Premium Amount’ indicates fee is deducted upfront before computation and ‘Rebate Amount’ indicates fee is deducted after computation.
Field: Do this:
8-30

4. A brief description of the fields is given below:
5. In the Cancellation/Refund section, view the following information.
– If the Allowed box is selected, a refund is allowed. A selected box indicates that the ESC premium can be rebated to the customer in case of early payoff.
– The Method field displays the refund method.
6. If you click the Calculate button, the system computes the commission based on the commission method in the Cancellation/Refund section.
The commission appears in the Commission Rule and Commission Amt fields of the Warranty Information section.
It also appears on the Itemizations sub screen.
You can overwrite the suggested value if you choose.
7. Perform any of the Basic Actions mentioned in Navigation chapter.
Field: Do this:
Warranty Information section
Service Con-tract
View the extended service contract type.
Policy # Specify the ESC number.
Effective Date Specify the ESC effective date.
Term Specify the ESC term.
Expiration Dt Specify the ESC expiry date.
Premium Amt View the ESC premium amount
Commission Amt
View the commission amount.
Commission Rule
View the commission rule.
Warranty Company
Specify the ESC company’s name.
Comment Specify comment if any.
Phone No Specify the ESC company’s primary phone number.
Extn Specify the ESC company’s primary phone extension.
Phone No Specify the ESC company’s alternate phone number.
Extn Specify the ESC company’s alternate phone extension.
Cancellation/Refund
Allowed Check this box to allow cancellation/refund.
Method Specify the method of cancellation/refund.
8-31

8.12.8 Escrow Sub Tab
If there is escrow information selected on the Itemization sub screen, enter information about it on the Escrow sub screen. The Escrow sub screen records escrow details regarding disbursement, insurance, and property tax -- information that is parsed to the Customer Service screen on the Customer Service (2) master tab, where it is available for maintenance.
This sub tab is available if escrow is allowed for the instrument selected on the Loan screen.
The Escrow Analysis screen enables you to view and perform the initial escrow analysis. You can perform multiple analyses; however, the system records only the most recent analysis.
To complete the Escrow sub screen
1. Open the Funding screen and load the application you want to work with.
2. Click the Contract > Escrow sub tab.
3. The Escrow Information section displays information regarding the escrow recorded on the Itemization sub screen. In this section, you can perform any of the Basic Operations mentioned in Navigation chapter.
A brief description of the fields is given below:
4. Select the Opt Out box only if you want to ignore this particular escrow.
5. In the Disbursement section, enter the following information:
Field: View:
Escrow The escrow itemization code and description.
Escrow Type The escrow type.
Escrow Sub Type The escrow sub type.
Advance Amt The amount that’s been approved for the Item in the itemiza-tion screen under the escrow.
Required Escrow If selected, indicates that this is mandatory itemization and customer can not opt out of this escrow item.
Cushion Allowed If selected, indicates that cushion is allowed.
Field: Do this:
Rule Select disbursement rule.
Yearly Amt Specify yearly disbursement amount.
Account # Specify reference account number for vendor.
Note: If the organizational parameter UIX_HIDE_RESTRICTED_-DATA is set to Y, this appears as a masked number; for example, XXXXX1234.
Vendor Specify the vendor name.
Maturity Dt Specify the maturity date, if one exists.
8-32

6. If this escrow involves an insurance, use the Insurance section to enter the following information:
7. If this escrow involves a tax, use the Tax section to enter the following information:
8. Perform any of the Basic Actions mentioned in Navigation chapter.
8.12.9 Compensation Sub Tab
The Compensation (Loan) sub tab records and displays the terms of compensation between the finance company and the dealer for Loan transactions.
To complete the Compensation (Loan) sub screen
1. Open the Funding screen from the Origination master tab’s Funding bar link and load the application you want to work with.
2. Click the Contract > Compensation sub tab.
3. On the Compensation sub screen’s Compensation section, select in the Compensation Plan section the compensation plan you want to use.
4. Click Load.
The system loads the following information on the Compensation sub screen:
Field: Do this:
Coverage Type Specify the coverage type.
Coverage Term Specify the coverage term.
Policy # Specify the policy number.
Coverage Amt Specify the coverage amount.
Effective Dt Specify the effective date.
Expiration Dt Specify the expiration date.
Field: Do this:
Property Tax Type Specify property tax code.
Comment Specify a comment.
Field: Do this:
Compensation section
Compensation Plan View the compensation plan.
Disbursement Method View the compensation payment method.
Calculation Method View the compensation calculation method.
Chargeback section
Paid Calc Method View the charge back calculation method (early payoff).
Paid % View the percentage of chargeback paid.
8-33

5. Make any necessary changes in the Buy Rate field.
6. Click Calculate.
The system displays the details and amounts for this compensation plan.
8.12.10 Proceeds Sub Tab
The Proceeds sub screen displays the payment amount due to the dealer, based on the Compensation and Itemization sub screens. It is a view only sub screen, though you can record comments.
To use the Proceeds
1. Open the Funding screen and load the application you want to work with.
2. Click the Contract > Proceeds sub tab.
3. In this section, you can perform any of the Basic Operations mentioned in Navigation chapter.
Paid Basis View the charge back paid basis.
Paid Term View the charge back paid term.
Paid Days View the charge back paid days.
Charge off Calc Method View the charge back calculation method (charge off).
Charge off % View the charge back percentage (charge off).
Charge off Basis View the charge back basis (charge off).
Charge off Term View the charge back term (charge off).
Days View the charge back days (charge off).
Calculation section
Spread Formula View the compensation spread formula.
Buy Rate Specify the buy rate.
Factor View the compensation factor.
Addl Factor View the additional compensation factor.
Max Spread % View the maximum spread or percent allowed.
Upfront % View the upfront compensation percentage.
Flat Amt View the flat amount.
Upfront Comp Amt View the compensation amount paid upfront.
Rem Comp Amt View the compensation amount remaining.
Comp Amt View the compensation amount.
Field: Do this:
8-34

A brief description of the fields is given below:
4. Perform any of the Basic Actions mentioned in Navigation chapter.
8.12.11 Disbursement Sub Tab
The Disbursement sub screen records how the Loan payment is disbursed and records payments to third parties such as the Department of Motor Vehicles. This sub screen needs to be completed if there is an itemized disbursement.
To complete the Disbursement sub screen
1. Open the Funding screen and load the application you want to work with.
2. Click the Contract > Disbursement sub tab.
3. In this section, you can perform any of the Basic Operations mentioned in Navigation chapter.
A brief description of the fields is given below:
Field: Do this:
Itemization View the proceed itemization.
+/- View whether the itemization is added to or subtracted from the total proceeds.
Amount Specify the amount.
Currency Specify the currency of the proceed.
Comment Specify a comment.
Total Amount View the total amount.
Field: Do this:
Disbursement section
Validate Payee Check this box to validate payee.
Description View the disbursement description.
Number Specify the disbursement party’s number.
Payment Mode Select the payment mode.
Name Specify the company name.
Account # Specify the account number.
Note: If the organizational parameter UIX_HIDE_RESTRICTED_-DATA is set to Y, this appears as a masked number; for example, XXXXX1234.
Amount View the payment amount.
Currency Specify the currency.
ACH Account Type
Specify the account type.
8-35

4. Perform any of the Basic Actions mentioned in Navigation chapter.
Disbursement tab will display the records only if a third party itemization is maintained during contract setup.
Account # Specify the ACH account number.
Note: If the organizational parameter UIX_HIDE_RESTRICTED_-DATA is set to Y, this appears as a masked number; for example, XXXXX1234.
ACH Bank Specify the bank number.
ACH Routing # Specify the routing number.
BIC Select the Business Identifier Code from the drop-down list. The list displays the BIC codes defined in the system.
IBAN Specify the IBAN (International Bank Account Number). IBAN is used for identifying bank accounts across national borders with a minimal of risk of propagating transcription errors.
Ensure that value entered satisfies the check-digit validation based on modulo 97. On save, system automatically validates the IBAN number length based on country code, characters, white spaces, and checksum. Validation is also done during posting non-monetary transaction (ACH Maintenance).
You can maintain the IBAN length and other details required as per the country code in the user defined table (Setup > Adminis-tration > System > User Defined Tables).
Note: IBAN for 'NL' country code (IBAN_FORMAT_NL) is defined by default with length of IBAN as 18.
Comment Specify a comment.
Country Select the country.
Address Line 1 Specify the address line 1.
Address Line 2 Specify the address line 2.
Zip Specify the zip code.
For non US country, you have to enter zip code.
City Specify the city.
State Select the state.
Phone 1 Specify the primary phone number.
Extn Specify the primary phone extension.
Phone 2 Specify the alternate phone number.
Extn Specify the alternate phone extension.
Field: Do this:
8-36
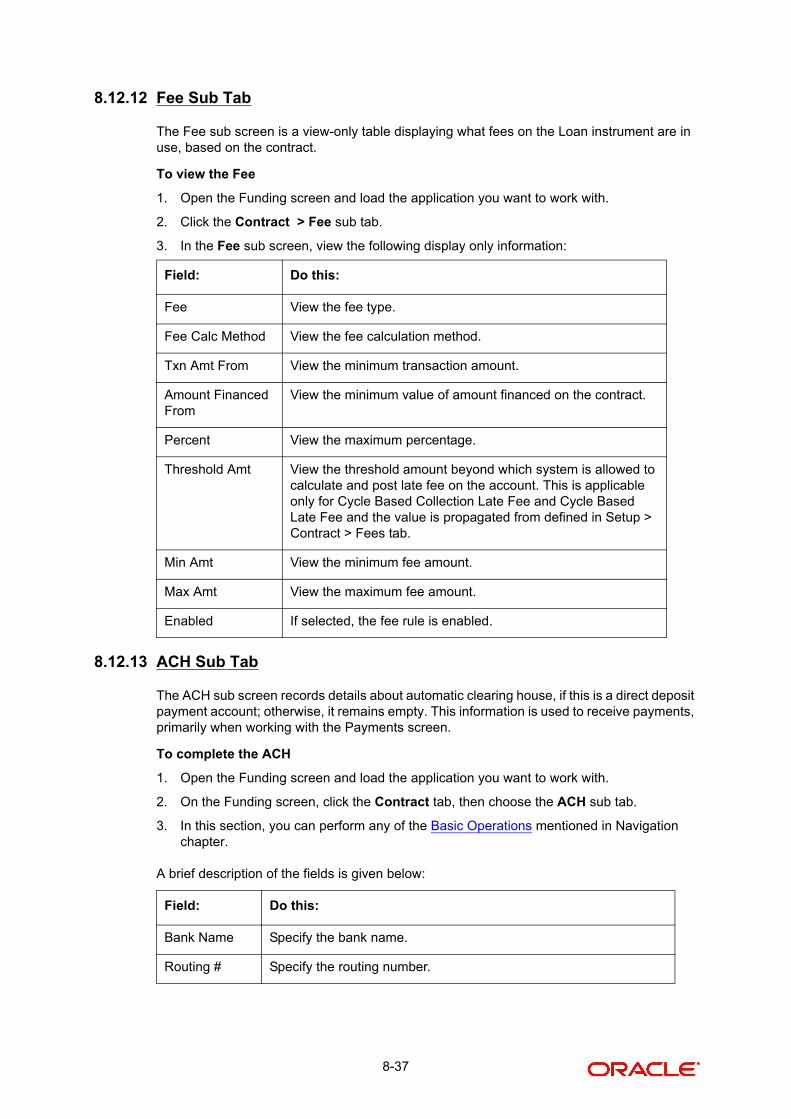
8.12.12 Fee Sub Tab
The Fee sub screen is a view-only table displaying what fees on the Loan instrument are in use, based on the contract.
To view the Fee
1. Open the Funding screen and load the application you want to work with.
2. Click the Contract > Fee sub tab.
3. In the Fee sub screen, view the following display only information:
8.12.13 ACH Sub Tab
The ACH sub screen records details about automatic clearing house, if this is a direct deposit payment account; otherwise, it remains empty. This information is used to receive payments, primarily when working with the Payments screen.
To complete the ACH
1. Open the Funding screen and load the application you want to work with.
2. On the Funding screen, click the Contract tab, then choose the ACH sub tab.
3. In this section, you can perform any of the Basic Operations mentioned in Navigation chapter.
A brief description of the fields is given below:
Field: Do this:
Fee View the fee type.
Fee Calc Method View the fee calculation method.
Txn Amt From View the minimum transaction amount.
Amount Financed From
View the minimum value of amount financed on the contract.
Percent View the maximum percentage.
Threshold Amt View the threshold amount beyond which system is allowed to calculate and post late fee on the account. This is applicable only for Cycle Based Collection Late Fee and Cycle Based Late Fee and the value is propagated from defined in Setup > Contract > Fees tab.
Min Amt View the minimum fee amount.
Max Amt View the maximum fee amount.
Enabled If selected, the fee rule is enabled.
Field: Do this:
Bank Name Specify the bank name.
Routing # Specify the routing number.
8-37

Payment Mode
For an active Recurring ACH record, the payment mode selected in Contract tab is automatically populated. If not, select the type of repayment mode to indicate the type of ‘Autopay/Direct Debit’ using any of the following option from the drop-down list. The list is popu-lated from REPAYMENT_PMT_MODE_CD lookup code.
- AUTOPAY (ACH)
- AUTOPAY (CREDIT CARD)
- AUTOPAY (DEBIT CARD)
For an AUTO PAY type of Payment Mode, ensure that at least one active ACH record exist and for CHECK type of Payment Mode, there are NO active ACH records.
Status Select the required ACH status from the drop down list. By default, the ACTIVE status is selected.
Default By default, this check box is selected indicating that the current ACH is the default one. If not, you need to uncheck the same.
Start Dt Specify the ACH start date. By default the first payment date of the contract is auto populated and can be edited.
End Dt Specify the ACH end date.
Account Type Select the account type.
Account # Specify the account number. Note: If the organizational parameter UIX_HIDE_RESTRICTED_DATA is set to Y, this appears as a masked number; for example, XXXXX1234.
BIC Select the Business Identifier Code from the drop-down list. The list displays the BIC codes defined in the system.
IBAN Specify the IBAN (International Bank Account Number). IBAN is used for identifying bank accounts across national borders with a minimal of risk of propagating transcription errors.
Ensure that value entered satisfies the check-digit validation based on modulo 97. On save, system automatically validates the IBAN number length based on country code, characters, white spaces, and checksum. Validation is also done during posting non-monetary transaction (ACH Maintenance).
You can maintain the IBAN length and other details required as per the country code in the user defined table (Setup > Administration > System > User Defined Tables).
Note: IBAN for 'NL' country code (IBAN_FORMAT_NL) is defined by default with length of IBAN as 18.
Pmt Day Specify the payment day. By default the payment due day specified for the contract is auto populated and can be edited.
Pmt Amt Specify the payment amount. By default the payment amount decided for the contract is auto populated and can be edited.
Note: If the payment amount is specified as ZERO, system will automatically consider the EMI amount.
Field: Do this:
8-38
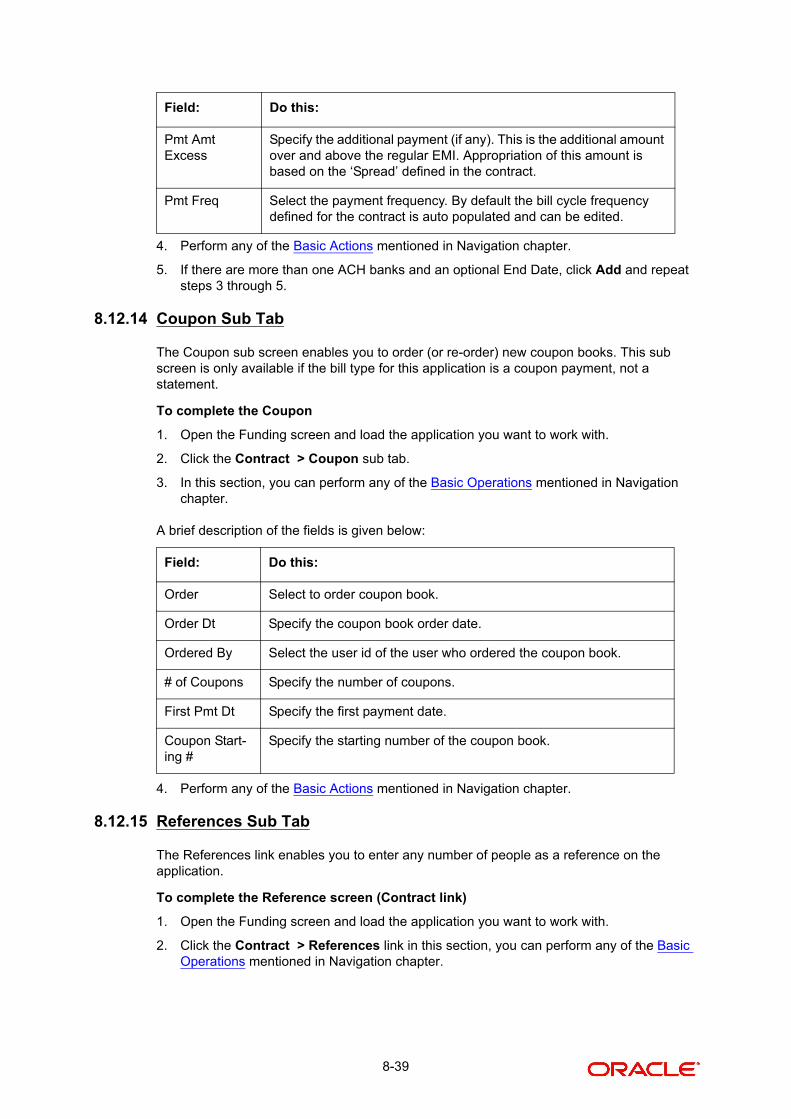
4. Perform any of the Basic Actions mentioned in Navigation chapter.
5. If there are more than one ACH banks and an optional End Date, click Add and repeat steps 3 through 5.
8.12.14 Coupon Sub Tab
The Coupon sub screen enables you to order (or re-order) new coupon books. This sub screen is only available if the bill type for this application is a coupon payment, not a statement.
To complete the Coupon
1. Open the Funding screen and load the application you want to work with.
2. Click the Contract > Coupon sub tab.
3. In this section, you can perform any of the Basic Operations mentioned in Navigation chapter.
A brief description of the fields is given below:
4. Perform any of the Basic Actions mentioned in Navigation chapter.
8.12.15 References Sub Tab
The References link enables you to enter any number of people as a reference on the application.
To complete the Reference screen (Contract link)
1. Open the Funding screen and load the application you want to work with.
2. Click the Contract > References link in this section, you can perform any of the Basic Operations mentioned in Navigation chapter.
Pmt Amt Excess
Specify the additional payment (if any). This is the additional amount over and above the regular EMI. Appropriation of this amount is based on the ‘Spread’ defined in the contract.
Pmt Freq Select the payment frequency. By default the bill cycle frequency defined for the contract is auto populated and can be edited.
Field: Do this:
Order Select to order coupon book.
Order Dt Specify the coupon book order date.
Ordered By Select the user id of the user who ordered the coupon book.
# of Coupons Specify the number of coupons.
First Pmt Dt Specify the first payment date.
Coupon Start-ing #
Specify the starting number of the coupon book.
Field: Do this:
8-39

A brief description of the fields is given below:
Field: Do this:
Relationship Select the reference type.
Name Specify the reference name.
Status Select the status of the reference from the drop-down list.
Years Specify the number of years.
Months Specify the number of months.
Comment Specify a comment.
Country Select the country.
Address Line 1
Specify the address line 1.
Address Line 2
Specify the address line 2.
State Select the state.
Zip Select the zip code.
For non US country, you have to enter zip code.
Zip Extn Specify the zip extension.
City Specify the city.
Phone 1 Specify the reference’s primary phone number.
Extn Specify the reference’s primary phone extension.
Permission to call
Check this box if customer has provided permission to contact through the specified phone number.
When selected, system auto validates this option against the phone number specified. Atleast one phone number should have the per-mission to call for successful pre-qualification of the application. Else, an error message is displayed.
Permission to Text
Check this box if customer has provided permission to contact through text message.
Phone 2 Specify the reference’s secondary phone number.
Extn Specify the reference’s secondary phone extension.
Permission to call
Check this box if customer has provided permission to contact through the specified phone number.
When selected, system auto validates this option against the phone number specified. Atleast one phone number should have the per-mission to call for successful pre-qualification of the application. Else, an error message is displayed.
8-40

3. Perform any of the Basic Actions mentioned in Navigation chapter.
If you want to add another reference, click Add and repeat steps 3 and 4.
8.12.16 Real Estate Sub Tab
The Real Estate Fields screen records additional information regarding manufactured home Loan.
To complete the Real Estate Fields screen
1. Open the Funding screen and load the application you want to work with.
2. Click the Contract > Real Estate.
3. In this section, you can perform any of the Basic Operations mentioned in Navigation chapter.
A brief description of the fields is given below:
4. Perform any of the Basic Actions mentioned in Navigation chapter.
8.12.17 PDC Sub Tab
The PDC sub screen displays any post dated checks associated with the contract.
To complete the PDC
1. Open the Funding screen and load the application you want to work with.
2. Click the Contract > PDC sub tab.
3. In this section, you can perform any of the Basic Operations mentioned in Navigation chapter.
Permission to Text
Check this box if customer has provided permission to contact through text message.
Field: Do this:
Note Transmittal Number Specify the note transmittal number.
Deed Transmittal Number Specify the deeding transmittal number.
Cancel/Cashout Transmittal Number
Specify the deeding cancel/cash out transmittal number.
Deed Input Date Specify the deed input date.
Deed Recording Date Specify the deed recording date.
Deeding Book Number Specify the deeding book number.
ConDeeding Page Number Specify the condeeding page number.
Mortgage Recording Date Specify the mortgage recording date.
Mortgage Book Number Specify the mortgage book number.
Mortgage Page Number Specify the mortgage page number.
Field: Do this:
8-41
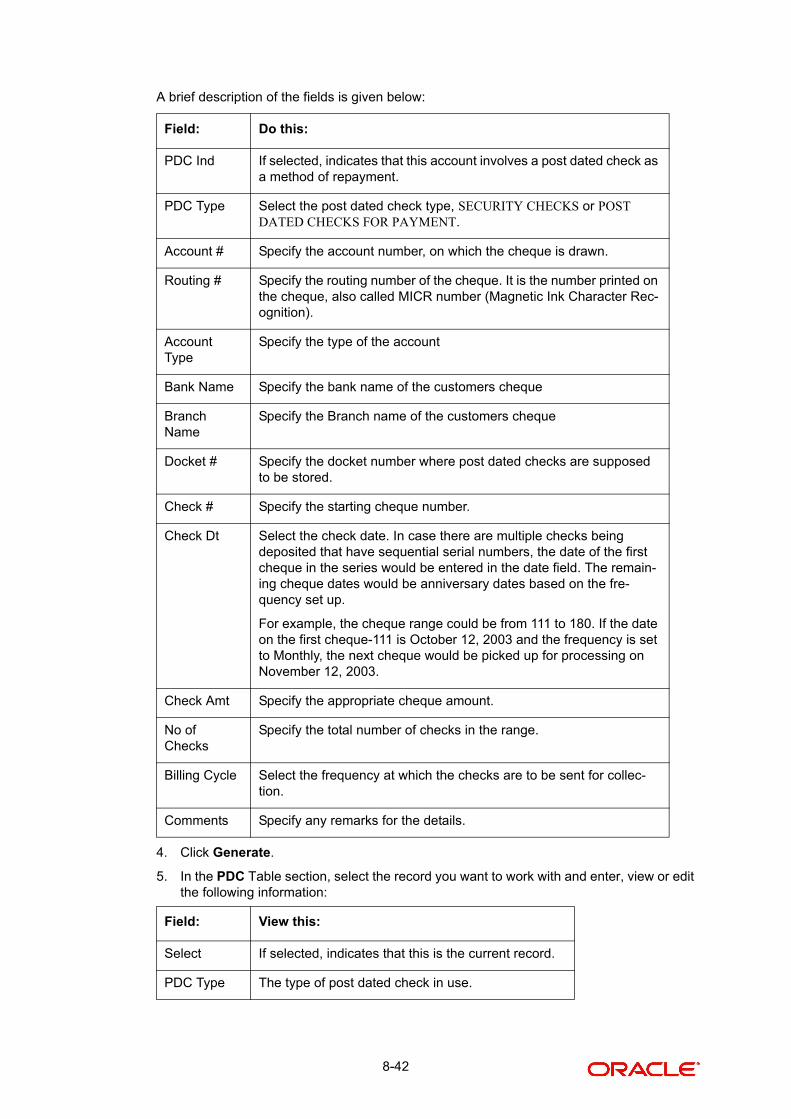
A brief description of the fields is given below:
4. Click Generate.
5. In the PDC Table section, select the record you want to work with and enter, view or edit the following information:
Field: Do this:
PDC Ind If selected, indicates that this account involves a post dated check as a method of repayment.
PDC Type Select the post dated check type, SECURITY CHECKS or POST DATED CHECKS FOR PAYMENT.
Account # Specify the account number, on which the cheque is drawn.
Routing # Specify the routing number of the cheque. It is the number printed on the cheque, also called MICR number (Magnetic Ink Character Rec-ognition).
Account Type
Specify the type of the account
Bank Name Specify the bank name of the customers cheque
Branch Name
Specify the Branch name of the customers cheque
Docket # Specify the docket number where post dated checks are supposed to be stored.
Check # Specify the starting cheque number.
Check Dt Select the check date. In case there are multiple checks being deposited that have sequential serial numbers, the date of the first cheque in the series would be entered in the date field. The remain-ing cheque dates would be anniversary dates based on the fre-quency set up.
For example, the cheque range could be from 111 to 180. If the date on the first cheque-111 is October 12, 2003 and the frequency is set to Monthly, the next cheque would be picked up for processing on November 12, 2003.
Check Amt Specify the appropriate cheque amount.
No of Checks
Specify the total number of checks in the range.
Billing Cycle Select the frequency at which the checks are to be sent for collec-tion.
Comments Specify any remarks for the details.
Field: View this:
Select If selected, indicates that this is the current record.
PDC Type The type of post dated check in use.
8-42

6. Perform any of the Basic Actions mentioned in Navigation chapter.
8.13 Collateral tab
Having selected and loaded an application, you can view the information about the collateral of the Loan.
The Collateral link opens screens with information regarding any collateral associated with an account. Depending on the type of Loan, collateral can be a vehicle, home, or something else, such as major household appliances. The Collateral link is unavailable if this is an unsecured Loan.
A detailed explanation of the fields found on the Collateral link’s screens and sub screens can be found in the Application Entry chapter.
To verify information about the collateral
1. Open the Funding screen and load the application you want to work with.
2. Click the Collateral link.
Depending on the type of collateral, information about the vehicle, home or other type of collateral appears.
3. Verify the information regarding the collateral and its sub screens. (This is information that was recorded during the application entry process or gathered during the credit pull.)
Account # The account number of the post dated check.
Bank Name The bank name of the post dated check.
Check # The check number of the post dated check.
Status The status of the post dated check.
Check Dt The check date of the post dated check.
Check Amt The check amount of the post dated check.
Account Type
The account type of the post dated check.
Field: View this:
8-43

If the collateral is a vehicle, the Collateral link displays information about the vehicle.
If the collateral is a home, the Collateral link displays information about the home.
8-44

If the collateral is anything other than a vehicle or home, the Collateral link displays information about the other type of collateral.
For details on this screen refer Collateral Tab section in Underwriting chapter.
8.14 Comments Tab
When using the Underwriting screen, you can add comments to an application at any time in the underwriting process by using the Comments screen.
Whenever an application is funded by a proxy user, a system generated comment with timestamp is inserted in the comments tab in the format ‘<User 1> actioned as proxy for Funder <User2>’. Here, User 1 refers to the logged in user who has acted on behalf of User2, who is the concerned Funder. The concerned Funder’s name will also be selected in Contract Tab > 'Funder' field.
To add comments to an application
1. Open the Funding screen and load the application you want to work with.
8-45

2. Click Comments.
For details on this screen refer Comments Tab section in Underwriting chapter.
8.15 Tracking Tab
When using the Funding screen, you can add tracking attribute information to an application at any time in the underwriting process by using the Tracking Attributes screen.
To enter the tracking attributes for an application
1. Open the Funding screen and load the application you want to work with.
2. Click the Tracking tab.
For details on this screen refer Tracking Tab section in Underwriting chapter.
8.16 Document tab
The Document Maintenance link allows you to view documents attached to an application in the form of GIF files, PDF files, DOC files, XLS files, and TXT files and add comments regarding a selected document.
For more information, see the chapter Document Management in this User Guide.
To view a document attached with an application
1. Open the Funding screen and load the application you want to work with.
8-46

2. Click Document.
For details on this screen refer Document Tab section in Underwriting chapter.
8.17 Verification Tab
The system can be configured to automatically validate portions of an application when you attempt to change its status. The results of this data check appear on the Verification link’s Edit screen as an Error, a Warning or an Override.
If it is an Error, the system will not allow you change the application’s status and approve the Loan until you fix all the errors.
If it is a Warning, the system enables you to change an application’s status without correcting the matter. While you should still investigate the problem, Warning messages are of a lesser importance than Error messages.
If it is an Override, the system displays a dialog box informing you that an override is needed; your responsibility level does not have the authority required to process this step. (Choose Yes on the dialog box to move the application to the queue of the user with the required authority.)
The system can be configured to verify different sets of information; for example, the system could check one set of data when checking application entries for completeness and another when approving auto Loan. Each one of these “edit types” has its own set of “edit details.”
Note
The Edit Details section’s errors and warnings are created during the setup process.
To complete the Verification tab
1. Open the Funding screen and load the application you want to work with.
8-47
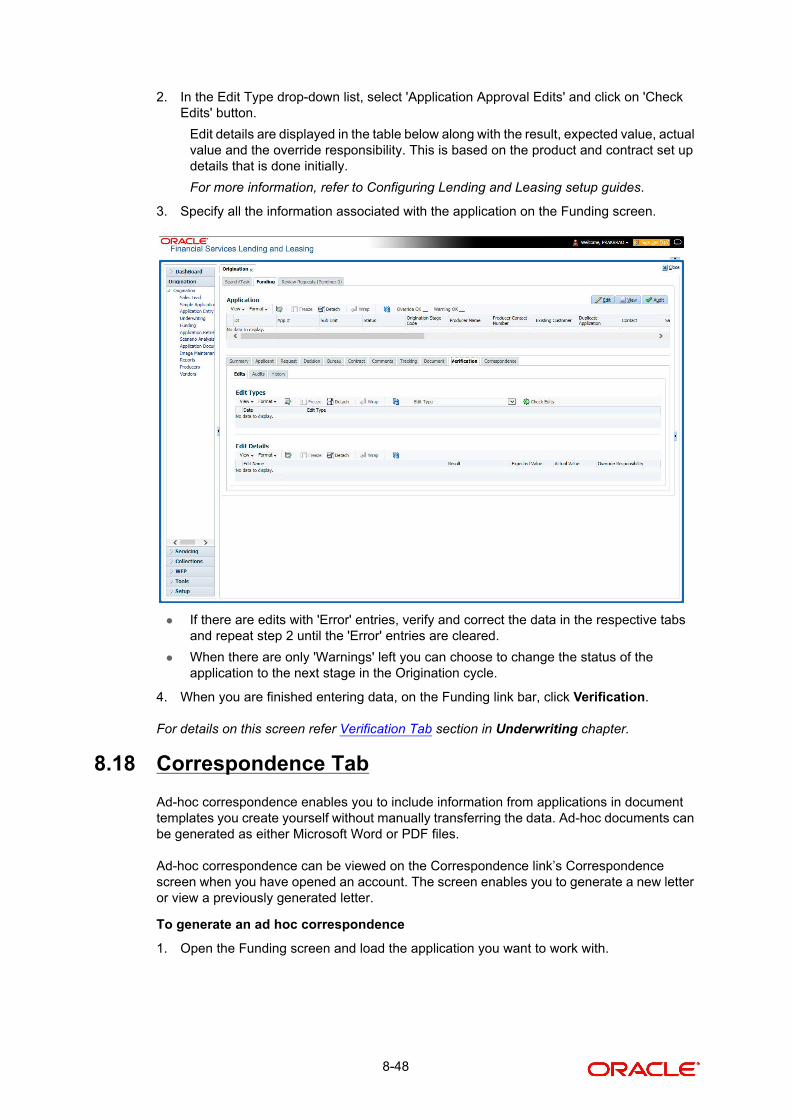
2. In the Edit Type drop-down list, select 'Application Approval Edits' and click on 'Check Edits' button.
Edit details are displayed in the table below along with the result, expected value, actual value and the override responsibility. This is based on the product and contract set up details that is done initially.
For more information, refer to Configuring Lending and Leasing setup guides.
3. Specify all the information associated with the application on the Funding screen.
If there are edits with 'Error' entries, verify and correct the data in the respective tabs and repeat step 2 until the 'Error' entries are cleared.
When there are only 'Warnings' left you can choose to change the status of the application to the next stage in the Origination cycle.
4. When you are finished entering data, on the Funding link bar, click Verification.
For details on this screen refer Verification Tab section in Underwriting chapter.
8.18 Correspondence Tab
Ad-hoc correspondence enables you to include information from applications in document templates you create yourself without manually transferring the data. Ad-hoc documents can be generated as either Microsoft Word or PDF files.
Ad-hoc correspondence can be viewed on the Correspondence link’s Correspondence screen when you have opened an account. The screen enables you to generate a new letter or view a previously generated letter.
To generate an ad hoc correspondence
1. Open the Funding screen and load the application you want to work with.
8-48

2. Click Correspondence.
For details on this screen refer Correspondence Tab section in Underwriting chapter.
8.19 Escrow Analysis Tab
If escrow is allowed for the selected instrument, the Escrow Analysis link is available on the Contract drop-down link. This screen enables you to view and perform the initial escrow analysis. When you are satisfied with the analysis, complete the Approval Dt field in the Approval section and save your entry.
The escrow payment for the Loan account starts on the 1st date of the Loan payment month. The disbursement happens on the 10th of the month (as per the disbursement rules). The escrow analysis lasts for a year (12 months) irrespective of the Loan term.
You can perform multiple analysis; however, the Escrow Analysis screen only records the last analysis performed. No record of any earlier analysis is currently available.
To complete the Escrow Analysis screen
1. Open the Funding screen and load the application you want to work with.
8-49

2. On the Funding screen, Click Escrow Analysis tab.
3. In the Escrow Analysis section, view or enter the following information:
4. Click Analyze.
5. Information on the Analysis Details screen is based on expected cash flow from contract and escrow disbursement setup. Payments received appear before escrow disbursement in any given month. Click View in Escrow Analysis section.
6. In the following section, enter, view, or edit the following information:
Field: View:
Escrow The escrow item.
Disbursement Rule The escrow disbursement rule.
Yearly Amt The escrow disbursement yearly amount.
Field: View:
Parameters section
Date The date.
From Dt The FROM date for the escrow activity.
To Dt The TO date for the escrow activity.
Opening Bal (Act) The opening balance actual amount.
Opening Bal (Est) The opening balance estimated amount.
Calculation: cushion amount + low required balance
Cushion Type The cushion type.
8-50

7. Click View in the Analysis Details section.
8. On the Analysis Details sub screen, view the following information:
Information on the Analysis Details sub screen is based on expected cash flow from contract and escrow disbursement setup. Payments received appear before escrow disbursement in any given month.
9. If you want to re-analyze the escrow analysis, change the escrow information on the Contract link’s screen and sub screens.
Cushion Value The cushion value.
Cushion Amt The cushion amount.
Calculation: as per the shortage /cushion Rule maintenance
Results section
Std Pmt Amt The standard payment amount.
Escrow Pmt Amt (+) The escrow payment amount.
Calculation: Yearly Amount/12.
Spread Pmt Amt (+) The spread payment amount.
Calculation: Surplus amount / 12
Other Pmt Amt (+) The other payment amount.
New Pmt Amt = The new payment amount.
Calculation: standard payment amount + escrow payment amount + spread payment amount + other payment amount
Surplus section
Surplus /<Shortage Amt>
The surplus shortage amount.
Calculation: escrow account balance - opening balance
Refund Amt The refund amount.
Field: View:
Txn Dt The transaction date.
Transaction The escrow transaction.
Vendor The vendor name.
Txn Amt The amount of the transaction.
Balance Amt (Est) The estimated amount of balance.
Balance Amt (Act) The actual amount of balance.
Field: View:
8-51
If you want to approve the escrow analysis, complete the following information fields on the Approval section:
10. Click Save on the Funding screen.
8.20 Tool Tab
The Tools tab calculates the payment amount, term, interest rate, Loan amount, amortization schedule and allows for the printing of a report.
For detailed information on using the tools, refer “Tools” chapter in the document.
8.21 Review Request
The Review Request tab facilitates to flag an Application for the attention of another Oracle Financial Services Lending and Leasing user and ask for review / feedback. It allows the system users to send and receive requests (including e-mail) commenting on a specific account or application. The Review Request tab supports iterative review of selected Application and also to process the review with multiple reviewers.
For detailed information on using this feature, refer to ‘Review Request’ section in Underwriting chapter of the document.
Field: View:
Approval section
Approval Dt The approval date.
Approved By The person who approved the Loan.
8-52
9. Tools
Depending on the type of product you are working with during origination, the Tools screens enable you to calculate Loan and Vehicle value details.
Tools in the main menu are standalone and information calculated using them can only be viewed. They cannot be copied to the application / contract.
Whereas, Tools that appear as a sub-tab in Underwriting and Funding Tabs, allows you to import the contract values, do necessary calculations and copy the calculated values to the respective Contract / Decision tabs.
9.1 Loan Calculator
The Loan Calculator screen facilitates you to calculate various parameters. You can also define flexible repayment options, and generate amortization schedules.
This screen is similar to the Loan Calculator screen opened from Underwriting or Funding screens; however, calculators opened from Tools master tab are standalone and do not link calculations or loan information to any specific application.
9.1.1 Parameters
The Parameters section allows you to calculate the payment amount, term, interest rate, loan amount, and blended rate. You can also generate a quote based on the details specified.
In the Parameters section, you can select the following parameters:
Calculate Payment
Calculate Interest Rate
Calculate Term
Calculate Loan Amount
Calculate Blended Rate
9.1.1.1 Calculating Payments
The Calculate Payment option on Loan Calculator screen calculates the standard payment based on information you provide, such as the amount financed, terms, interest rate and finance fee. You can click Initialize in Loan Calculator screen to clear (or ‘refresh’) the Loan Calculator screen at any time.
9-1

To calculate a loan payment
1. Click Tools > Tools > Loan Calculator.
2. Click Initialize and maintain the following fields.
Field: Do this:
Loan Details Section
Product Category Select the category as Standard for conventional loan product and Islamic for the Islamic loan product.
Contract Dt Specify the contract date. The system displays current date as the default value.
First Pmt Dt Specify the first payment date. The system displays the date one month from today as default value.
Loan Term Specify the number of payments.
Maturity Dt System automatically displays the maturity date based on the val-ues entered for first payment date, term and billing cycle (i.e. Maturity Date = First Payment Date + Term (based on billing cycle).
Amt Financed Specify the amount financed.
Pre Paid Fees Specify the prepaid fees, if any exist.
Financed Fees Specify the financed fees, if any exist.
Loan Amt View the estimated loan amount: amount financed plus the pre-paid fees.
Balloon Pmt Amt Specify the balloon payment amount, if any exist.
9-2

Payment/Finance Charge
Pmt Amt View the payment amount.
Interest Amt View the profit amount.
Finance Charge View the finance charged.
Total of Pmts View the payment amount.
Final Pmt Amount View the final payment amount.
Calculator Options
Billing Cycle Select the payment frequency.
System supports ‘Biennial’ (once every 2 years) and Triennial (once every 3 years) type of billing cycles. Based on BILL_CY-CLE_CD lookup, the billing cycle ‘frequency’ can be defined.
During ‘Term’ calculation, the 'Rate' field is always considered as per Year only. System displays an error to refine the input data if the calculation for Biennial term goes beyond 15 years and Trien-nial term goes beyond 10 years. For additional considerations of Biennial and Triennial term calculations (if any), refer to product release notes available at OTN library.
Balloon Method Select the balloon method.
Accrual Base Method
Select the accrual base.
Time Counting Method
Select the time counting method.
Installment Method Select the installment method: EQUAL PAYMENTS or FINAL PAYMENT DIFFERS. For more information, see the Installment method section in this chapter.
Bill Method Select the billing method as either LEVEL, PERCENTAGE OF PRINCIPAL PLUS INTEREST, INTEREST ONLY, FIXED PRINCI-PAL PLUS INTEREST, PERCENTAGE OF OUTSTANDING BAL-ANCE.
Calendar Method Select the calendar method as ‘Hijri’ or ‘Gregorian’ for this loan contract. This field will be enabled only if the product category is selected as Islamic.
Accrual Start Dt Basis
Select to define the start date from when the interest accrual is to be calculated for this loan instrument. If Effective Date is selected, then the interest is calculated from Contract date and if Payment Date is selected then the interest is calculated on basis of (first payment date minus one billing cycle).
This field will be enabled only if the product category is selected as Islamic.
Field: Do this:
9-3

3. Specify the required information and click Calculate.The system computes the standard loan payments with the details specified.
Installment Methods
Equal Payments: If you select Equal Payment option, then the repayment amount will be equal for all installments including the final installment.
Final Payment Differs: If you select Final Payment Differs option, then the final repayment amount may be slightly more or less than the outstanding loan amount due to precise rounding calculations. The final payment amount will be equal to the outstanding loan amount.
When completing Frequency fields, note the following:
Biweekly in the system means ‘once every two weeks’ and not ‘twice a week’.
Bimonthly in the system means ‘once every two months’ and not ‘twice a month’.
For more information on frequency, see ‘Appendix B: Payment Amount Conversions’ section.
9.1.1.2 Calculating Interest Rates
The Calculate Interest Rate option back-calculates the interest rate and APR using the amount financed, standard payment and terms. It also provides the amortization schedule of the loan.
To calculate an Interest Rate
1. Click Loan Calculator tab.
2. In the Parameters section, select Calculate Interest Rate.
3. Specify the required information. (Refer the section Calculating Loan Payment in this chapter for more information.)
4. After you specify all the required information click calculate.The system computes the payment change schedule.
You can perform the following activities when the Interest Rate is calculated:
Accrual Start Days Select the actual date from when to start interest accrual
for loans is to be calculated. This field will be enabled only if the product category is selected as Islamic.
Rate
Rate Specify the interest rate.
Note: For Islamic products this field is displayed as ‘Profit Rate’.
APR View the system calculated the Annual Percentage Rate.
First Period section
Calendar Days View the number of calendar days between contract date and the first payment date. The calendar days will differ based on the cal-endar method selected.
Interest View the profit accrued for the calendar days.
Field: Do this:
9-4
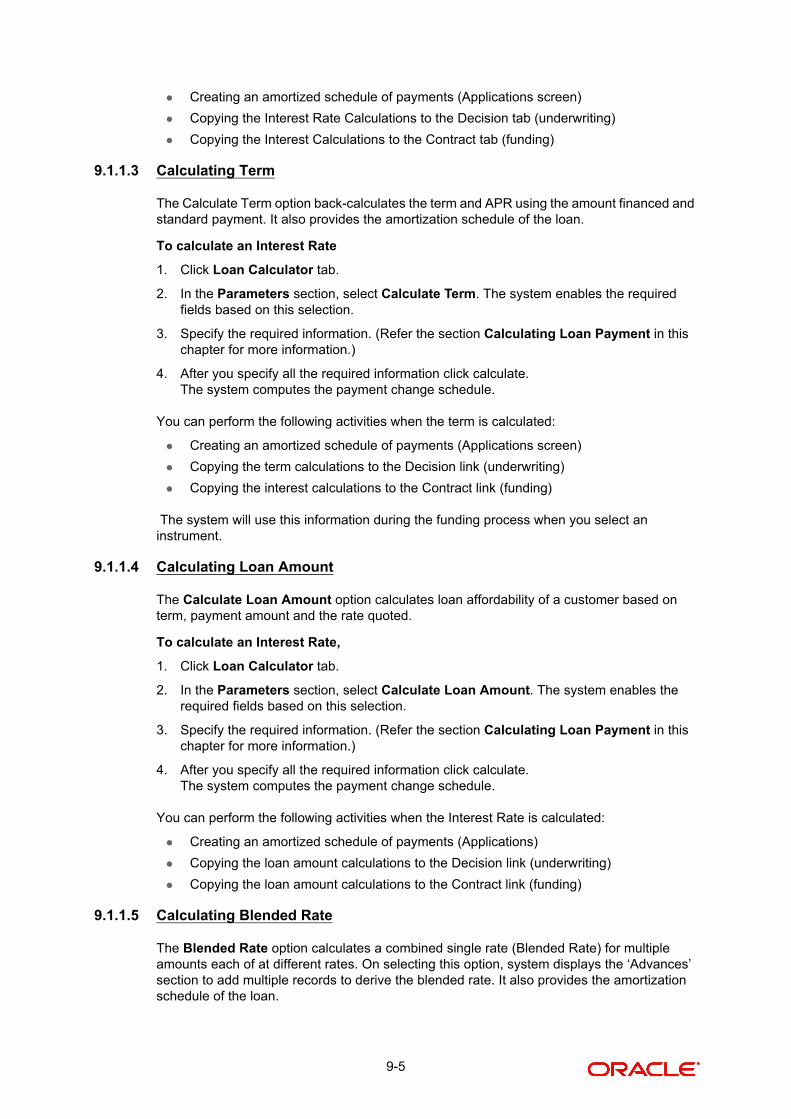
Creating an amortized schedule of payments (Applications screen)
Copying the Interest Rate Calculations to the Decision tab (underwriting)
Copying the Interest Calculations to the Contract tab (funding)
9.1.1.3 Calculating Term
The Calculate Term option back-calculates the term and APR using the amount financed and standard payment. It also provides the amortization schedule of the loan.
To calculate an Interest Rate
1. Click Loan Calculator tab.
2. In the Parameters section, select Calculate Term. The system enables the required fields based on this selection.
3. Specify the required information. (Refer the section Calculating Loan Payment in this chapter for more information.)
4. After you specify all the required information click calculate.The system computes the payment change schedule.
You can perform the following activities when the term is calculated:
Creating an amortized schedule of payments (Applications screen)
Copying the term calculations to the Decision link (underwriting)
Copying the interest calculations to the Contract link (funding)
The system will use this information during the funding process when you select an instrument.
9.1.1.4 Calculating Loan Amount
The Calculate Loan Amount option calculates loan affordability of a customer based on term, payment amount and the rate quoted.
To calculate an Interest Rate,
1. Click Loan Calculator tab.
2. In the Parameters section, select Calculate Loan Amount. The system enables the required fields based on this selection.
3. Specify the required information. (Refer the section Calculating Loan Payment in this chapter for more information.)
4. After you specify all the required information click calculate.The system computes the payment change schedule.
You can perform the following activities when the Interest Rate is calculated:
Creating an amortized schedule of payments (Applications)
Copying the loan amount calculations to the Decision link (underwriting)
Copying the loan amount calculations to the Contract link (funding)
9.1.1.5 Calculating Blended Rate
The Blended Rate option calculates a combined single rate (Blended Rate) for multiple amounts each of at different rates. On selecting this option, system displays the ‘Advances’ section to add multiple records to derive the blended rate. It also provides the amortization schedule of the loan.
9-5

To calculate an Blended Rate,
1. Click Loan Calculator tab.
2. In the Parameters section, select Calculate Calculate Blended Rate. The system enables the Advances section.
3. Click Add and maintain the following details:
4. Perform any of the Basic Actions mentioned in Navigation chapter.
5. Specify the required information. (Refer the section Calculating Loan Payment in this chapter for more information.)
6. After you specify all the required information click calculate.The system computes the blended rate of contracts.
You can perform the following activities when the Blended Rate is calculated:
Creating an amortized schedule of payments (Applications)
Copying the loan amount calculations to the Decision link (underwriting)
Copying the loan amount calculations to the Contract link (funding)
9.1.2 Repayment Options
If the calculation involves flexible repayment options, you can include the same through the following options:
Field Do this:
Amt Financed Specify the financed amount.
PrePaid Fees Specify the pre-paid fees.
Financed Fees Specify the financed fees.
Balloon Pmt Amt Specify the balloon payment amount.
Rate Specify the rate.
Payment Amt The system displays the calculated payment amount on clicking ‘Calculate’ button.
Interest Amt The system displays the calculated interest amount on clicking ‘Calculate’ button.
Action Click add button to add next contract details.
Option Description
Flexible Repay-ment Allowed
Select the check box to include a flexible repayment schedule in cal-culation. On selection, the following sections are enabled.
REPAYMENT SCHEDULE
PAYMENT CHANGE SCHEDULE
RATE SCHEDULE
Based on the selection of repayment type in the subsequent field, any or all of the above sections are enabled to define the required flexible repayment schedules.
9-6
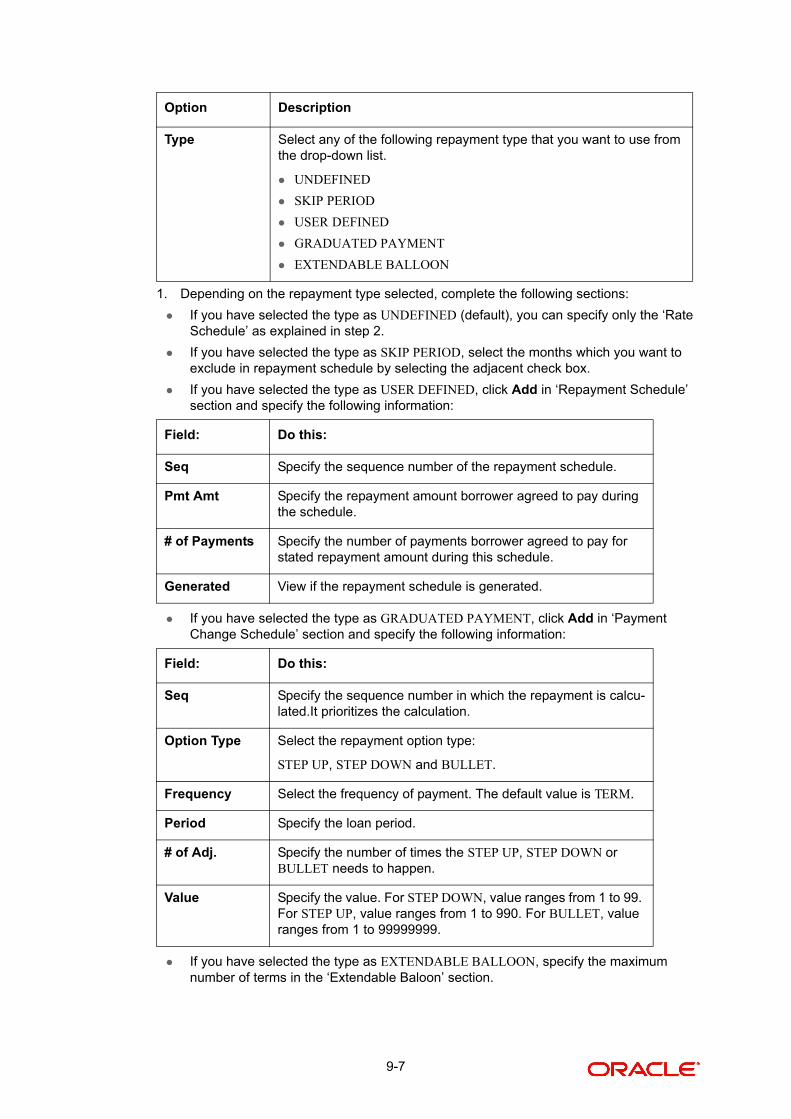
1. Depending on the repayment type selected, complete the following sections:
If you have selected the type as UNDEFINED (default), you can specify only the ‘Rate Schedule’ as explained in step 2.
If you have selected the type as SKIP PERIOD, select the months which you want to exclude in repayment schedule by selecting the adjacent check box.
If you have selected the type as USER DEFINED, click Add in ‘Repayment Schedule’ section and specify the following information:
If you have selected the type as GRADUATED PAYMENT, click Add in ‘Payment Change Schedule’ section and specify the following information:
If you have selected the type as EXTENDABLE BALLOON, specify the maximum number of terms in the ‘Extendable Baloon’ section.
Type Select any of the following repayment type that you want to use from the drop-down list.
UNDEFINED
SKIP PERIOD
USER DEFINED
GRADUATED PAYMENT
EXTENDABLE BALLOON
Field: Do this:
Seq Specify the sequence number of the repayment schedule.
Pmt Amt Specify the repayment amount borrower agreed to pay during the schedule.
# of Payments Specify the number of payments borrower agreed to pay for stated repayment amount during this schedule.
Generated View if the repayment schedule is generated.
Field: Do this:
Seq Specify the sequence number in which the repayment is calcu-lated.It prioritizes the calculation.
Option Type Select the repayment option type:
STEP UP, STEP DOWN and BULLET.
Frequency Select the frequency of payment. The default value is TERM.
Period Specify the loan period.
# of Adj. Specify the number of times the STEP UP, STEP DOWN or BULLET needs to happen.
Value Specify the value. For STEP DOWN, value ranges from 1 to 99. For STEP UP, value ranges from 1 to 990. For BULLET, value ranges from 1 to 99999999.
Option Description
9-7
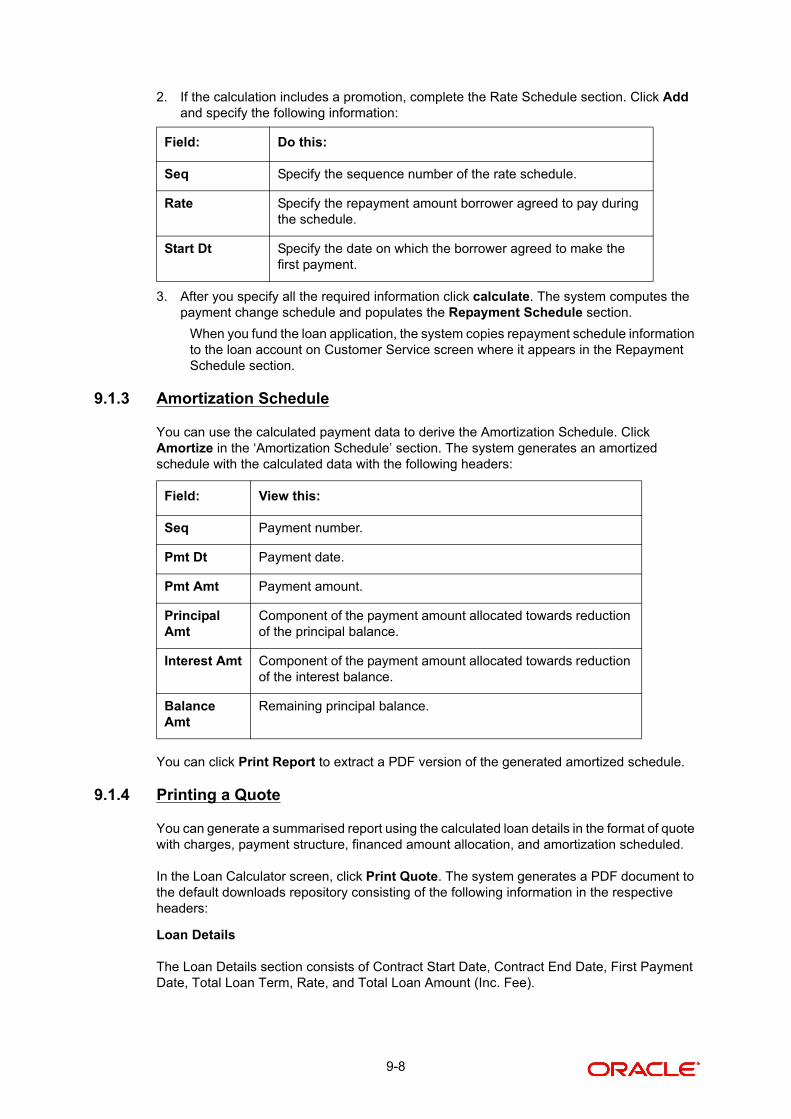
2. If the calculation includes a promotion, complete the Rate Schedule section. Click Add and specify the following information:
3. After you specify all the required information click calculate. The system computes the payment change schedule and populates the Repayment Schedule section.
When you fund the loan application, the system copies repayment schedule information to the loan account on Customer Service screen where it appears in the Repayment Schedule section.
9.1.3 Amortization Schedule
You can use the calculated payment data to derive the Amortization Schedule. Click Amortize in the ‘Amortization Schedule’ section. The system generates an amortized schedule with the calculated data with the following headers:
You can click Print Report to extract a PDF version of the generated amortized schedule.
9.1.4 Printing a Quote
You can generate a summarised report using the calculated loan details in the format of quote with charges, payment structure, financed amount allocation, and amortization scheduled.
In the Loan Calculator screen, click Print Quote. The system generates a PDF document to the default downloads repository consisting of the following information in the respective headers:
Loan Details
The Loan Details section consists of Contract Start Date, Contract End Date, First Payment Date, Total Loan Term, Rate, and Total Loan Amount (Inc. Fee).
Field: Do this:
Seq Specify the sequence number of the rate schedule.
Rate Specify the repayment amount borrower agreed to pay during the schedule.
Start Dt Specify the date on which the borrower agreed to make the first payment.
Field: View this:
Seq Payment number.
Pmt Dt Payment date.
Pmt Amt Payment amount.
Principal Amt
Component of the payment amount allocated towards reduction of the principal balance.
Interest Amt Component of the payment amount allocated towards reduction of the interest balance.
Balance Amt
Remaining principal balance.
9-8

Payment/Finance Charge
The Payment/Finance Charge section consists of Total Interest Amount, Finance Charge, Total Of Payments, and Balloon Payment Amount.
Payment Structure
The Payment Structure section consists of details based on the number of payments, billing cycle followed and the payment amount. The payment structure repeats based on the flexible repayment options defined.
Financed Amount Allocation
The Financed Amount Allocation section consists of total amount that can be financed at the specified rate. If there are multiple records included to derive blended rate, then the Financed Amount Allocation varies based on the total number records.
Amortization Schedule
The Amortization Schedule section consists of records in tabular format with the following details:
Pmt No.
Payment Date
Scheduled Payment
Principal
Interest
Ending Balance
9.1.5 Copy Calculation to Contract or Decision tab
Depending on the screen from where you have accessed the tools sub tab, you can copy the calculated values to either Contract or Decision tab. If you are in Underwriting stage, you can copy the values to decision tab. Similarly during Funding stage, you can copy the values to contract tab.
1. Click Initialize and reset the calculator.
2. Click Import values. System displays basic values entered in previous tabs.
3. Select one of the following option “Calculate Payment / Interest Rate / Term / Loan Amount” and click Calculate. System displays calculated values based on selection.
Click Copy to Contract/Decision. The calculated details are copied to the respective fields in Contract/Decision tab.
9.2 Vehicle Evaluator
The Vehicle Evaluator screen allows you to calculate the value of a vehicle. You can use the Vehicle Evaluator screen to calculate the value of either a vehicle you are entering as the new collateral or vehicle currently listed as the application’s collateral.
The Vehicle Evaluator screen can be cleared or refreshed at any time by clicking Clear.
9-9

To calculate a vehicle value
1. On the Oracle Financial Services Lending and Leasing home screen, click Tools > Tools > Vehicle Evaluator
2. In the Vehicle Evaluator section, use Asset field to select the vehicle you want to appraise. This can be either NEW COLLATERAL or a vehicle entered on the Collateral link.
3. In the Vehicle Evaluator section, click Initialize. The system completes Valuation Source, Period and Region fields.
4. If needed, you can change the default contents of the fields in Vehicle Evaluator.
5. If you selected a vehicle from the Collateral link in step 3, information from the Vehicle section appears in Vehicle section in Vehicle Evaluator screen.
6. If you selected NEW COLLATERAL in step 3, complete the Identification #
-or-
Complete the fields in the Vehicle section.
7. In the Vehicle Evaluator section, click Evaluate.
– If you have specified the vehicle identification number, system searches for the value of that vehicle with that identification number, then completes Vehicle Evaluator screen with information about that exact match.
– If you completed the Vehicle section, system searches for the value of a vehicle matching that description.
– In either case, the system displays following information about the vehicle:
– In the Vehicle section, view the returned information:
Field: View this:
Year The asset year.
Make The asset make.
Model The asset model.
Body The asset body style.
Usage The asset usage or current mileage.
Weight The asset weight.
9-10

In the Valuation (Total Value) block, view the returned information:
In the Base and Attribute Value section, view the returned information:
9.2.1 Attributes Tab
In the Attributes section, view the following information:
If you want to re-calculate the values using other data in Total Value and Base and Attribute Value section, do the following:
Make the required changes to the desired parameters fields in Vehicle Evaluator and Vehicle sections.
In the Vehicle Evaluator section, click Recalculate.
The system updates the values in Total Value and Base and Attribute Value sections.
If you choose, use Attributes section to select or clear the Selected box for attributes of the vehicle. This automatically updates the values in Total Value and Base and Attribute Value
Field: View this:
MSRP Manufacturer’s suggested retail price value of the asset.
Total Total value of the asset.
Usage Adjusted usage value of the asset.
Field: View this:
Base Retail Total retail value of the asset.
Base Loan Base loan value of the asset.
Base Trade Base trade value of the asset.
Retail Retail value of the asset attributes.
Loan Loan value of the asset attributes.
Trade Base trade value of the asset attributes.
Field: View this:
Attribute Asset attribute.
Retail Attribute retail value.
Loan Attribute loan value.
Trade Attribute trade value.
Standard Standard indicator. If selected, indicates that the attribute is a standard.
Package Incl
If selected, indicates that the attribute is inclusive.
Selected If selected, indicates that the attribute is selected.
9-11

sections. (Note: Attribute amounts within brackets reduce the amount in Totals field in the Total Value section.)
To copy the calculated value to the Collateral link
You can copy the calculated value to Collateral link only if you have accessed the tools tab either from Underwriting or Funding Tab. Accessing Tools from the main menu does not support this option.
1. Complete the following steps in the section To calculate a vehicle value.
2. In the Vehicle Evaluator screen, click Copy to Asset.
The system uses calculations on the Vehicle Evaluator screen to complete Valuation sub screen on Collateral link. Any pre-existing collateral is no longer the primary collateral.
9-12

10. Application Retrieval
10.1 Introduction
The Oracle Financial Services Lending and Leasing system includes archiving and retrieving feature that provides you with the capability to archive old data and store it in a different table.
10.2 Archiving / Purging
The system batch process runs the purge / archive feature based on the system parameter setup. The system archives the following items:
Applications and related data
General ledger data
Securitization related data
Producers
Producer transactions
Account statements
Vendor assignments
Vendor invoices.
The system purges the following items:
Job request data
User logins
Output data dump related data.
In the system, archiving is a two-way process:
1. All the archived data is moved and stored in O tables.
2. The archived data in the O tables is then moved and stored into OO tables.
You may set the “default days” for the archive feature by setting the following system parameters on the Administration screen. The parameters marked with _O are the items moved from O to OO tables. The other parameters are the items moved to O tables.
ParameterDefault Days
Description
PAP_ARCHIVE_DAYS 999 PURGE DAYS FOR APPLICATIONS LEVEL 1: PUR_APP_STATUS_CD IS USED TO DECIDE APPLICATIONS WITH WHAT STATUS ARE PURGED
PAP_OARCHIVE_DAYS 999 PURGE DAYS FOR APPLICATIONS LEVEL 2
PGL_ARCHIVE_DAYS 999 PURGE DAYS FOR GL LEVEL 1: NO OF DAYS AFTER THE GL TXN WAS CRE-ATED
PGL_OARCHIVE_DAYS 999 PURGE DAYS FOR GL LEVEL 2
10-1
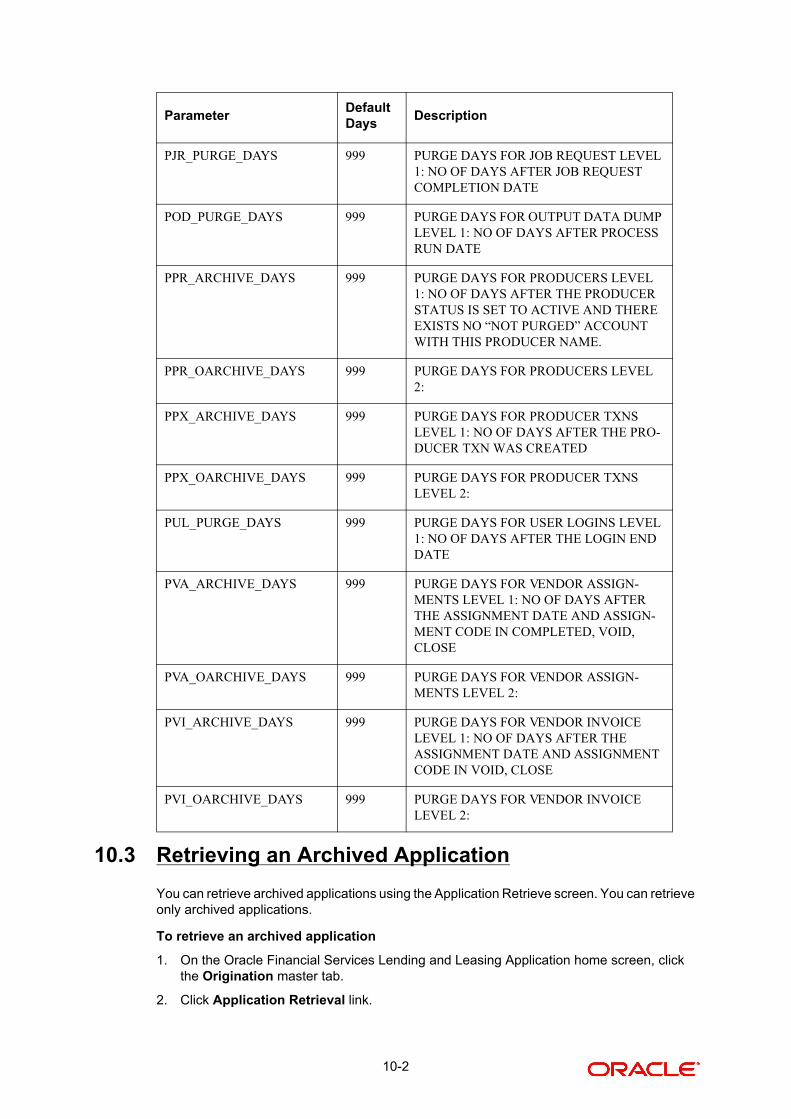
10.3 Retrieving an Archived Application
You can retrieve archived applications using the Application Retrieve screen. You can retrieve only archived applications.
To retrieve an archived application
1. On the Oracle Financial Services Lending and Leasing Application home screen, click the Origination master tab.
2. Click Application Retrieval link.
PJR_PURGE_DAYS 999 PURGE DAYS FOR JOB REQUEST LEVEL 1: NO OF DAYS AFTER JOB REQUEST COMPLETION DATE
POD_PURGE_DAYS 999 PURGE DAYS FOR OUTPUT DATA DUMP LEVEL 1: NO OF DAYS AFTER PROCESS RUN DATE
PPR_ARCHIVE_DAYS 999 PURGE DAYS FOR PRODUCERS LEVEL 1: NO OF DAYS AFTER THE PRODUCER STATUS IS SET TO ACTIVE AND THERE EXISTS NO “NOT PURGED” ACCOUNT WITH THIS PRODUCER NAME.
PPR_OARCHIVE_DAYS 999 PURGE DAYS FOR PRODUCERS LEVEL 2:
PPX_ARCHIVE_DAYS 999 PURGE DAYS FOR PRODUCER TXNS LEVEL 1: NO OF DAYS AFTER THE PRO-DUCER TXN WAS CREATED
PPX_OARCHIVE_DAYS 999 PURGE DAYS FOR PRODUCER TXNS LEVEL 2:
PUL_PURGE_DAYS 999 PURGE DAYS FOR USER LOGINS LEVEL 1: NO OF DAYS AFTER THE LOGIN END DATE
PVA_ARCHIVE_DAYS 999 PURGE DAYS FOR VENDOR ASSIGN-MENTS LEVEL 1: NO OF DAYS AFTER THE ASSIGNMENT DATE AND ASSIGN-MENT CODE IN COMPLETED, VOID, CLOSE
PVA_OARCHIVE_DAYS 999 PURGE DAYS FOR VENDOR ASSIGN-MENTS LEVEL 2:
PVI_ARCHIVE_DAYS 999 PURGE DAYS FOR VENDOR INVOICE LEVEL 1: NO OF DAYS AFTER THE ASSIGNMENT DATE AND ASSIGNMENT CODE IN VOID, CLOSE
PVI_OARCHIVE_DAYS 999 PURGE DAYS FOR VENDOR INVOICE LEVEL 2:
ParameterDefault Days
Description
10-2

The system opens Application retrieval Search screen.
3. Use the Comparison Operator and Values fields to create the search criteria you want to use to find an application.
For more information about creating search criteria, see Searching for an Application chapter of this User Guide.
4. Click Search.
The system locates and displays all the applications that meet your search criteria on the Results screen.
Applications are sorted by priority and application number.
5. Select the application you want to work with and click Retrieve.
The system loads the application in the Applications screen.
You are now ready to begin work on the application.
Field: View this:
Company The company of the application.
Branch The branch of the application.
App# The application number.
Date The date of the application.
Title The title (applicant name) of the application.
Product The product of the application.
Status The status of the application.
Sub Status The sub status of the application.
Producer The producer of the application.
10-3
11. Scenario Analysis
11.1 Introduction
With the Scenario Analysis screen, you can simulate the customer’s Loan request Loan amount, rate and create a mock proposal in Loan with your lending policies.
You can use scenario analysis screen to complete the following tasks:
View an Existing Scenario Analysis
Generating Scenario Analysis
Auto Suggest Pricing for the Scenario Analysis
Creating an Amortized Schedule for the Scenario Analysis
Creating an Application from the Scenario Analysis
Generating a quote from the scenario analysis
Note
Depending on the product licensed, you can view either Loan or Lease Calculator details. If you have licensed both, then you are provided with an option in Scenario Analysis screen to select the required Product Type.
11.1.1 View an Existing Scenario Analysis
You can view a previously generated scenario analysis by inquiring through the identification code.
To view an existing scenario analysis
1. Click Origination > Origination > Scenario Analysis. The Scenario Analysis screen is displayed in the main window.
2. Select the ‘Product Type’ as either Loan or Lease clicking on the adjacent radio button.
3. In the Inquiry Id field, you can either specify the identification code of a previously generated scenario analysis, or select the identification code from the adjacent drop-down list.
4. Click Show Details.
11-1

11.1.2 Generating Scenario Analysis
To generate a scenario analysis
1. Click Origination > Origination > Scenario Analysis. The Scenario Analysis screen is displayed in the main window.
2. Click Add and complete the following Parameters. You can click Initialize to clear (or ‘refresh’) the screen details at any time.
Field Do this:
Inquiry Id View the inquiry identification code.
Application # View the application number.
Company Select the company from the drop-down list.
Branch Select the branch from the drop-down list.
Product Select the product from the drop-down list.
Agreement Type View the agreement type auto populated based on the product selected.
First Name View/specify the first name.
Last Name View/specify the last name.
Phone Specify the phone number of the applicant.
Email Specify the email address of the applicant.
Producer Type Select the producer type associated with the product from the drop-down list.
11-2

3. In the Loan Calculator section, you can specify the details of various Parameters, Repayment Options, and Amortization Schedule.
For detailed field information, refer to Loan Calculator section in Tools chapter.
4. After you have specified all the required details, click Calculate.The system computes the standard payments with the details specified.
5. Perform any of the Basic Actions mentioned in Navigation chapter.
The system auto assigns an identification code to your calculations on the Scenario Analysis screen.
11.1.3 Auto Suggest Pricing for the Scenario Analysis
The Scenario Analysis screen provides an option to calculate and display the Pricing based on previously generated scenario analysis details.
1. In the Scenario Analysis section, specify the required information to generate scenario analysis and save the details. (Refer section Generating Scenario Analysis).
2. click Suggest. The system displays the Pricing details.
Producer Name Select the producer associated with the product from the drop-down list.
Producer Contact Number
View the producer contact number.
Region View the region where the producer belongs.
Territory View the territory where the producer belongs.
Requested Amt Specify the requested advance amount.
Term Specify the requested term (number of payments).
State Select the state code.
Asset Class View the asset class.
Asset Type View/select the asset type.
Asset Sub type View/select the asset sub type.
Make Specify the make of the vehicle.
Model Specify the model of the vehicle.
Promotion Select the requested promotion.
Pricing View the pricing if applicable.
Billing Cycle Select the billing cycle schedule.
Instrument Select the instrument.
Field Do this:
11-3

11.1.4 Creating an Amortized Schedule for the Scenario Analysis
You can create the amortized schedule for the selected scenario analysis, The system computes the and displays the amortized schedule under Amortization Schedule tab
To create an amortized schedule for the scenario analysis
1. Specify the required information to generate scenario analysis. (Refer section Generating Scenario Analysis)
2. Click Amortization Schedule tab and then click Amortize.
The system uses the calculated payment data to complete the Amortization Schedule section and displays the following information:
11.1.5 Creating an Application from the Scenario Analysis
To create an application from the scenario analysis
1. Specify the required information to generate scenario analysis. (Refer section Generating Scenario Analysis)
2. Click Create App.
11.1.6 Generating a quote from the scenario analysis
You can generate a summarised report using the calculated details in the format of quote.
After you have specified all the required information to generate scenario analysis, (Refer section Generating Scenario Analysis), click Print Quote.
For detailed information, refer to Printing a Quote section in Tools chapter.
11.2 Viewing Information from Scenario Analysis
The system assigns the information on the Scenario Analysis screen an application number. You can open this application on the Application Entry screen and view information from the Scenario Analysis screen at the following locations:
The Application screen
The Request tab
The Collateral tab
Underwriting
Field View this:
Seq Payment number.
Pmt Dt Payment date.
Pmt Amt Payment amount.
Principal Amt Component of the payment amount allocated towards reduction of the principal balance.
Interest Amt Component of the payment amount allocated towards reduction of the interest balance.
Balance Amt Remaining principal balance.
11-4

In the Underwriting screen, the Decision link’s Pricing and Approved sections display the details from the Scenario Analysis screen. You can modify the price chosen in the Scenario Analysis screen and re-price the application. If application has been repriced, the comments regarding the multiple offers on the Comment screen should be manually updated before approving the application.
11.2.1 Subvention Sub Tab
In the Subvention sub tab you can review the subvention information from the application entry and calculate the subvention amount, as well as override the calculated subvention amount. The participant’s information is automatically populated based on the selected subvention plan.
The calculated Subvention details of the application created from Scenario Analysis is populated to Origination > Request > Subvention tab.
To complete the Subvention sub screen
1. Click Origination > Origination > Scenario Analysis > Subvention sub tab.
2. Perform any of the Basic Operations mentioned in Navigation chapter.
A brief description of the fields is given below:
3. Perform any of the Basic Actions mentioned in Navigation chapter.
11.2.2 Compensation Sub Tab
The Compensation (Loan) sub tab records and displays the terms of compensation between the finance company and the dealer for Loan transactions.
Note the following:
The computations in the Compensation sub tab refers to the 'Requested Amt' in Scenario Analysis tab.
The 'Buy Rate' is referred from selected ‘Pricing’ definition in Scenario Analysis section.
The 'Request Rate' is referred from the ‘Rate from' field of selected 'Pricing' definition in Scenario analysis section.
The calculated Compensation details of the application created from Scenario Analysis is populated to Origination > Underwriting >Decision tab.
Field: Do this:
Subvention Plan section:
Plan Select the subvention plan.
Description View the subvention plan description.
Sub Plan Code Select the sub plan code from the drop-down list.
Sub Plan Description View the subvention sub plan description.
Subvention Type View the subvention type.
Include Check this box to include this record in calculations on the Other Details sub section
11-5

To complete the Compensation (Loan) sub screen
1. Click Origination > Origination > Scenario Analysis > Compensation sub tab. System load the compensation plan details.
Note that, the compensation plan will use application information to calculate compensation.
The system loads the following information on the Compensation sub screen:
Field: Do this:
Compensation section
Compensation Plan View the compensation plan.
Disbursement Method View the compensation payment method.
Calculation Method View the compensation calculation method.
Chargeback section
Paid Calc Method View the charge back calculation method (early payoff).
Paid % View the charge back percentage (early payoff).
Paid Basis View the charge back basis (early payoff).
Paid Term View the charge back term (early payoff).
Paid Days View the charge back days (early payoff).
Chg Off Calc Method View the charge back calculation method (charge off).
Charge Off% View the charge back percentage (charge off).
Chg Off Basis View the charge back basis (charge off).
Chg off Term View the charge back term (charge off).
Chg off Days View the charge back days (charge off).
Calculation section
Spread Formula View the compensation spread formula.
Buy Rate View the approved buy rate.
Factor View the compensation factor.
Addl Factor View the additional compensation factor.
Max Spread % View the maximum spread or percent allowed.
Upfront % View the upfront compensation percentage.
Flat Amt View the flat amount.
Upfront Comp Amt View the compensation amount paid upfront.
Rem Comp Amt View the compensation amount remaining.
11-6
2. Perform any of the Basic Actions mentioned in Navigation chapter.
Comp Amt View the compensation amount.
Field: Do this:
11-7
12. Application Documents
12.1 Introduction
The Documents Maintenance screen allow for paperless storage of documents within Oracle Financial Services Lending and Leasing system. Initially with the applications during the Loan origination cycle and later with accounts during customer service.
This chapter explains how to use the Application Document screen to:
View an image
Search for an image
Split an image to more than one screen
Change the status of an image
Combine two images into a multiple screen image
Attach an image to an existing application
Print an image
Attach documents to applications and then view these documents in a browser.
It also explains how to use the Account Document Tracking screen to attach documents to accounts and then view these documents in a browser.
Application Document screen
The Application Document screen consists of “Document Maintenance” and “Document Details” sections.
Credit applications are often sent or faxed to financial institutions from producers (or ‘dealers’) on behalf of the customer. These credit applications, if received as fax, can be stored in the system as images. Frequently, more than one application is received in a single fax or a single application is received across multiple faxes. In such cases, the Application Document Tracking screen can help you organize and maintain your image collection.
The Application Document screen’s Document Maintenance screen allows you to upload documents to an application in the form of GIF files, PDF files, DOC files, XLS files, and TXT files. The Document Maintenance screen’s Document Details section allows you to view these documents.
12.2 Application Document screen
Oracle Financial Services Lending and Leasing supports the online attachment of document images to an application using the Application Documents screen’s Document Maintenance section. You can attach the documents from either a client machine or server. A default image directory can be maintained in the system using the system parameter: UIX_DEFAULT_IMAGE_PATH.
When you choose List File in the Select Document sub section in the Document Maintenance section, the system displays all available files in the selected directory in the Document Details section. You can use the Document Maintenance sub-section and Action sub-section to attach selected documents to a particular account.
12-1
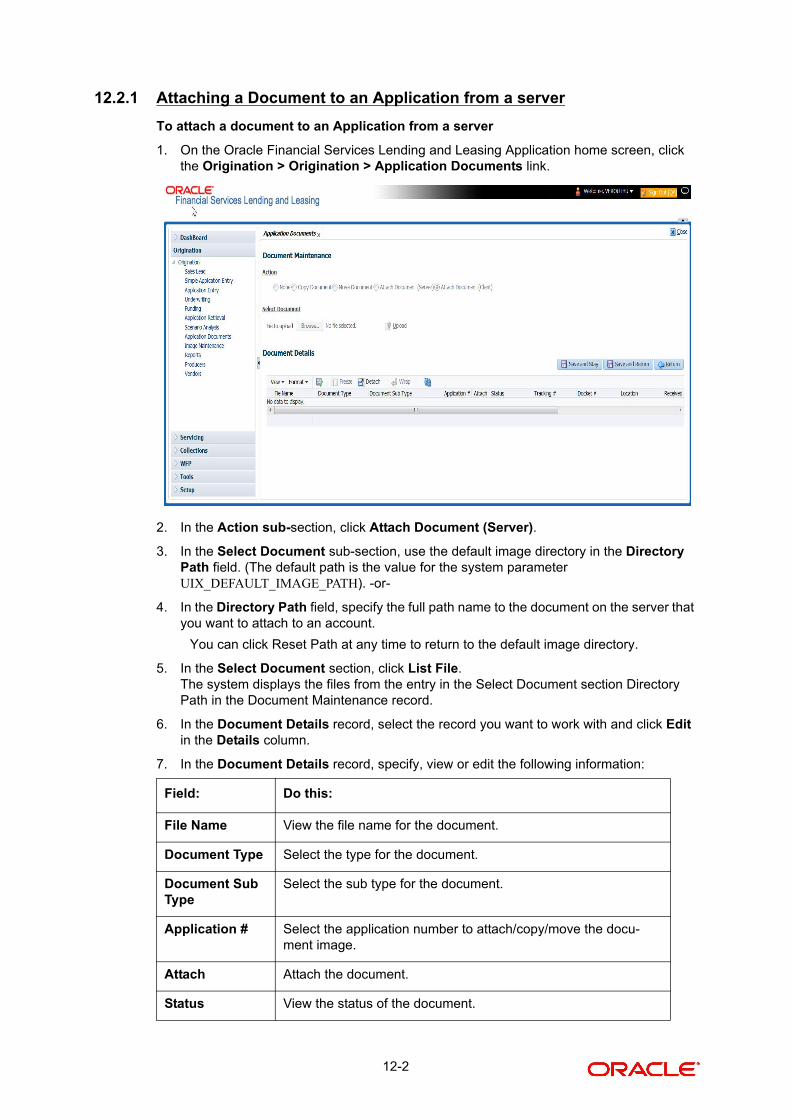
12.2.1 Attaching a Document to an Application from a server
To attach a document to an Application from a server
1. On the Oracle Financial Services Lending and Leasing Application home screen, click the Origination > Origination > Application Documents link.
2. In the Action sub-section, click Attach Document (Server).
3. In the Select Document sub-section, use the default image directory in the Directory Path field. (The default path is the value for the system parameter UIX_DEFAULT_IMAGE_PATH). -or-
4. In the Directory Path field, specify the full path name to the document on the server that you want to attach to an account.
You can click Reset Path at any time to return to the default image directory.
5. In the Select Document section, click List File.The system displays the files from the entry in the Select Document section Directory Path in the Document Maintenance record.
6. In the Document Details record, select the record you want to work with and click Edit in the Details column.
7. In the Document Details record, specify, view or edit the following information:
Field: Do this:
File Name View the file name for the document.
Document Type Select the type for the document.
Document Sub Type
Select the sub type for the document.
Application # Select the application number to attach/copy/move the docu-ment image.
Attach Attach the document.
Status View the status of the document.
12-2

8. Select the Attach check box to attach the file to the account.
9. Click Save And Return.
10. In the Action sub-section, click Post.The system attaches the document to the application.
You can view the document in a browser by clicking View Document in the Document Details section.
12.2.2 Attaching a Document to an Application from a Client Machine
To attach a document to an application from a client machine
1. On the Oracle Financial Services Lending and Leasing Application home screen, click the Origination master tab.
2. Click the Application Documents link.
3. In the Action sub-section, click Attach Document (Client).
4. In the Select Document section, click Browse in File to upload field.The system opens a Choose File to Upload dialog box.
5. In the Choose File to Upload dialog box, locate the document you want to attach to the account. You can select multiple files by holding the Ctrl or Shift key on your keyboard.
6. When you have located the document you want to attach to the account in the Open dialog box’s File name: field, click Open.
7. The selected files appear in the Select Document sub-section’s File to Upload field.
8. In the Select Document sub-section, click Upload.
9. In the Document Details record, select the file uploaded from your server and click Edit.
10. In the Document Details section, enter, view or edit the following information:
Tracking # Specify the tracking number of the document.
Docket # Specify the docket number of the document.
Location Specify the location of the document.
Received Dt View the document image received date.
Effective Dt Specify the effective date of the document.
Expiry Dt Specify the expiration date of the document.
Comment Specify any comments regarding the document.
Field: Do this:
File Name View the file name for the document.
Document Type Select the type for the document.
Document Sub Type Select the sub type for the document.
Application # Select the application number to attach/copy/move the docu-ment image.
Field: Do this:
12-3

11. Select the Attach check box to attach the file to the account.
12. Click Save And Return.
13. In the Action sub-section, click Post.The system attaches the document to the application.
You can view the document in a browser by choosing View Document in the Action section.
12.2.3 Copying a Document
The Action section’s Copy Document command copies the document image from one application to another application. This command has no impact on the source application or the source application’s document image.
To copy a document to an application from another application
1. On the Oracle Financial Services Lending and Leasing Application home screen, click the origination master tab.
2. Click the Application Documents link.
3. In the Action sub-section, click Copy Document.
4. In the Document Maintenance sub-section, use the Application # field to specify the application with the image you want to copy.
5. In the Document Maintenance sub-section, click Search. The system displays the files attached to that application in the Document Details section.
6. In the Document Details section, select the document you want to copy and click Edit.
7. In the Copy/Move App # field, specify the application number of the application to which you want to copy the document.
8. Click Save And Return.
9. In the Action sub-section, click Post.
12.2.4 Moving a Document
The Action section’s Move Document command moves an existing document image from one application to another application. This command detaches the document image from the source application and attach to second application.
Status View the status of the document.
Comment Specify any comments regarding the document.
Tracking # Specify the tracking number of the document.
Docket # Specify the docket number of the document.
Location Specify the location of the document.
Received Dt Specify the received date of the document.
Effective Dt Specify the effective date of the document.
Expiry Dt Specify the expiration date of the document.
Comments Specify any comments regarding the document.
Field: Do this:
12-4

To move a document to an application from another application
1. On the Oracle Financial Services Lending and Leasing Application home screen, click the Origination master tab.
2. Click the Application Documents link.
3. In the Action sub-section, click Move Document.
4. In the Document Maintenance sub-section, use the Application # field to specify the application with the image you want to move.
5. In the Document Maintenance sub-section, click Search.The system displays the files attached to that application in the Document Details sections.
6. In the Document Details section, select the document you want to move and click Edit.
7. In the Copy/Move App # field, specify the application number of the application to which you want to move the document.
8. Click Save And Return.
9. In the Action sub-section, click Post.
You can view the documents attached to a particular account by loading the application on the Customer Service screen, then clicking the Customer Service tab and then clicking on the Document Tracking sub tab.
12.2.5 Viewing a Document Attached to an Application
To view a document attached to an application
1. Using above method, load the application with the document you want to view.
2. In the Application Document section, click Edit.
3. View/edit the following display only information:
4. In the Application Document Details section, select the record you want to work with and click Edit.
5. In the Application Document Details section, view the following display only information:
Field: Do this:
Document Type View the document type.
Comment Specify any comments regarding the image.
Field: View this:
Document Sub Type
The document sub type.
Version The version number. (version numbers will be incremental by batch job, first version will start with 1.0).
Page # The page number.
Document File Type
The document file type.
Status The status.
12-5

6. Use the Application Document and Application Document Details sections to select the document you want to view.
– In multiple paged documents, choose 1 in Page # field on Application Document Details section to view all the pages in the document.
-or-
– Choose a specific page number to view only that page.
7. Click View Document.The system opens a browser to display the actual document (which browser appears depends on what type of document you selected and what browsers are set up to work in conjunction with your Oracle Financial Services Lending and Leasing system).
8. You can add comments to the Comments field in the Application Document and Application Document Details sections.
9. Click Save And Return.
12.3 Document Tracking section
You can view the documents attached to a particular application by loading the application on the Underwriting/Funding screen and then clicking on Document tab.
12.3.1 Locating an Application Document
To locate an account document
1. On the Oracle Financial Services Lending and Leasing Application home screen, click the Origination master tab.
2. Click the Underwriting/Funding link.
3. Select and open the application you want to work with.
4. Click Document sub tab.
The Account Document screen appears.
Information about the documents attached to the Application appears in the Application Documents and Application Document Details sections.
12.3.2 Viewing a Document Attached to an Application
To view a document attached to an account
1. Using the above method, load the account with the document you want to view.
2. In the Application Document section, click Edit.
Tracking # The tracking number of the image.
Docket # The docket number of the image.
Location The location of the of the image.
Received Dt The effective date of the image.
Effective Dt The effective date of the image.
Expiry Dt The expiration date of the image.
Comment Any comments regarding the image.
Field: View this:
12-6

3. View/edit the following display only information:
4. In the Application Document Details section, select the record you want to work with and click Edit.
5. In the Application Document Details section, view the following display only information:
6. Use the Application Document and Application Document Details section to select the document you want to view.
– In multiple paged documents, choose 1 in Page # field on Application Document Details section to view all the pages in the document.
-or-
– Choose a specific page number to view only that page.
7. Choose View Document.
The system opens a browser to display the actual document (which browser appears depends on what type of document you selected and what browsers are set up to work in conjunction with your system).
8. You can add comments to the Comments field in the Application Document and Application Document Details sections.
9. Click Save And Return.
Field: Do this:
Document Type View the document type.
Comment Specify any comments regarding the image.
Field: View this:
Document Sub Type The document sub type.
Version The version number (version numbers will be incremental by batch job, first version will start with 1.0).
Page # The page number.
Document File Type The document file type.
Status The status.
Tracking # The tracking number of the image.
Docket # The docket number of the image.
Location The location of the of the image.
Received Dt The effective date of the image.
Effective Dt The effective date of the image.
Expiry Dt The expiration date of the image.
Comment Any comments regarding the image.
12-7

13. Image Maintenance
You can view any image in the Oracle Financial Services Lending and Leasing system in the upper list box of the Image Maintenance link.
To view an image
1. On the Oracle Financial Services Lending and Leasing home screen, click Origination > Origination > Image Maintenance.
2. The Image Header section displays the images in the Oracle Financial Services Lending and Leasing system.
3. In the Image Header section, select the image you want to work with.
The Image Header section displays the following information for each image:
4. If an image is more than one page long, select the page you want to view in the Pages section and click on the page number to preview the image.
5. Select the required transpose type to change the appearance of the image.
Branch Branch
Select If selected, indicates that this is the current record.
Image Id The image identification number.
Fax Header The fax header.
Status The image status.
Pages The total number of pages of the image.
Company The company the image came from.
Branch The branch the image came from.
13-1

Splitting an Image
If an image is more than one page long, you can split it into two separate images using the Split Image button in the Action section. This option button is only available when an image contains more than one page. Also, you cannot split images with a status of “PROCESSED” or “SKIP.”
To split an image
1. On the Image Maintenance section Image Header section, select the multiple page image you want to split.
2. In the Action section, select Split Image.
The Pages and New Image Id fields appear in the Action block.
3. In the Pages block, select the page where you want to split the image.
The selected pages appear in the Pages field on the Action section.
You can select more than one page; however, you cannot select page # 1.
4. In the Action section, click Post.
Oracle Financial Services Lending and Leasing removes the selected pages and completes the New Image Id field with the image id of the new image.
The new image does not appear in the Image Header section after you click Post. However, if you refresh the Image Maintenance screen by closing and opening the screen, the new image id appears in the Image Header section and the change of page length in the original image is displayed.
Changing the Status of an Image
The Action section on the Image Maintenance screen allows you to change the status of the image.
The Image Maintenance screen uses the following statuses:
Only images with a status of Rush or New can be attached to an application or account.
To change the status of an image
1. On the Image Maintenance screen’s Image Header section, select the image whose status you want to change.
2. In the Action section, select Change Status.The Status field appears.
3. In the Status field, select the new status for the image.
Status: What is does:
RUSH Moves the image to the front of the queue of images to be pro-cessed.
NEW Places an image in a queue in the order of which it was received and allows you to process it as an application.
SKIP Makes the image unavailable for processing until the status is changed.
BAD Notes that the image is illegible and should be deleted.
PROCESSED Notes that the information on the image has been entered and is attached to an application or account.
13-2

4. In the Action section, click Post.
Oracle Financial Services Lending and Leasing changes the status of the image.
Attaching an Image to an Existing Image
You can combine two images to make one image. This is the reverse of splitting an image.
To combine images
1. On the Image Maintenance screen’s Image Header section, select the image to which you want to attach an existing image.
2. In the Action section, select Attach to an Image.
The Image Id field appears.
3. In the Image Id field, select the image id of the image to which you want to attach the selected image.
4. In the Action section, click Post.
Oracle Financial Services Lending and Leasing joins the two images: the Id of the image you selected in step 3 remains on the Image Header section. The image you selected in step 1 now appear as part of the remaining image.
Attaching an Image to an Existing Credit Application
You can attach one or more images to an existing credit application. To attach specific pages from a multiple page image to an application or account you have to split the image to isolate the pages you want to attach. You can then attach those pages and, if necessary, link pages of the original image back together.
To attach an image to an existing application image
1. On the Image Maintenance screen’s Image Header section, select the image you want to attach to an existing application.
2. In the Action section, select Attach to an Application. The App# field appears.
3. In the App # field, select the application number of the application to which you want to attach the image.
4. In the Action section, click Post.
Oracle Financial Services Lending and Leasing attaches the image to the application. You can view the image in the Image (8) master tab on the Underwriting and Funding forms.
Printing an Image
The Print Image button sends the selected image to a predefined printer.
To print an image
1. On the Image Maintenance screen’s Image Header section, select the image you want to print.
2. In the Action section, click Print Image.
13-3

14. Oracle Financial Services Lending and LeasingReports
During the day, or at the end of day, you may want to retrieve information on any of the several operations that were performed during the day in your financial institution. You can generate this information in the form of reports in Oracle Financial Services Lending and Leasing. You can specify the values in the Report Parameters section and generate a report using that information.
Navigation to Reports
On the Oracle Financial Services Lending and Leasing home page, click Origination > Origination > Reports.
14.1 Number of Credit Applications Entered by User
This application entry report lists the amount of credit applications entered by user.
Parameters:
Company/Branch
User Name
From MM/DD/YYYY
To MM/DD/YYYY
Report Format
14-1

Example of the Number of Credit Applications Entered by User report
14.2 Collateral Tracking Log
This servicing report lists collateral tracking details.
Parameters:
Company/Branch
Tracking Type
14-2

Example of the Collateral Tracking Log report
14.3 Credit Bureau Report
This report lists the credit bureau details.
Parameters:
Credit Request ID
Credit Request Detail
Report Format
Example for Credit Bureau report
14.4 Account Payable (Origination)
This report lists the payable accounts.
Parameters:
From MM/DD/YYYY
To MM/DD/YYYY
Report Format
14-3

Example for Origination Account payable report
14.5 Number of Credit Application Images by Status
This report lists the number of credit application images by status.
Parameters:
Company/Branch
From MM/DD/YYYY
To MM/DD/YYYY
Report Format
14-4
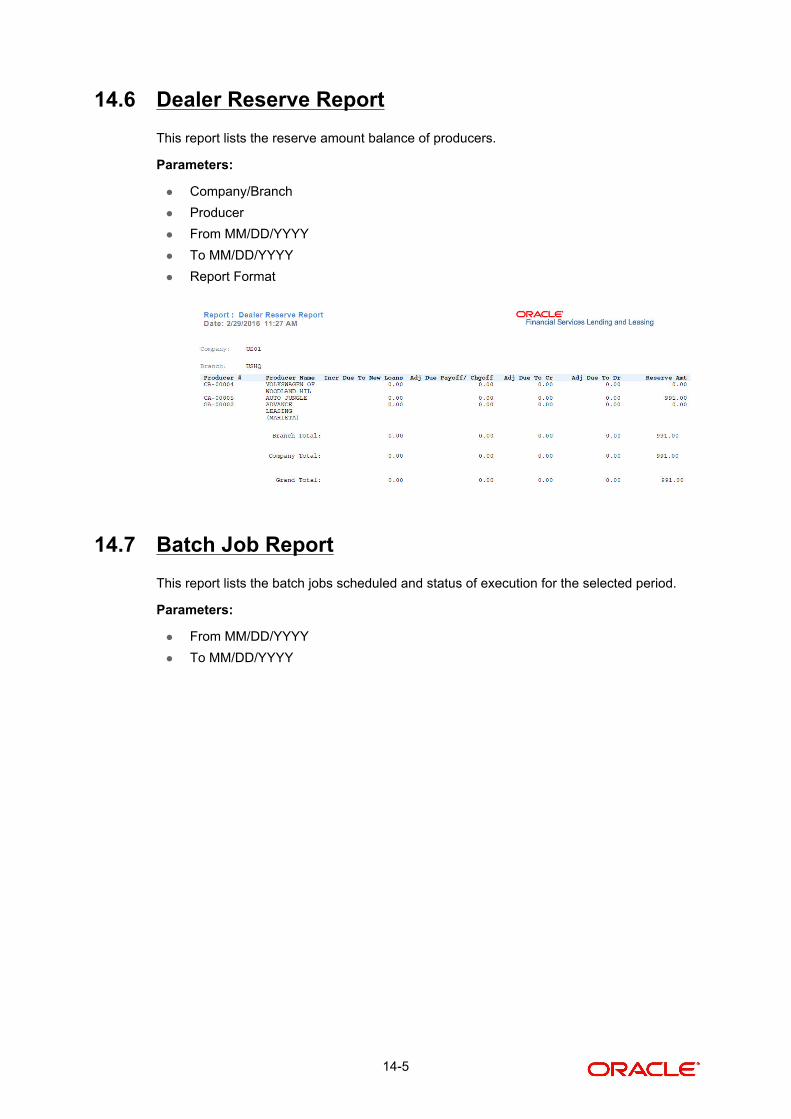
14.6 Dealer Reserve Report
This report lists the reserve amount balance of producers.
Parameters:
Company/Branch
Producer
From MM/DD/YYYY
To MM/DD/YYYY
Report Format
14.7 Batch Job Report
This report lists the batch jobs scheduled and status of execution for the selected period.
Parameters:
From MM/DD/YYYY
To MM/DD/YYYY
14-5

Report Format
14.8 User Report and Access by Responsibility
This report lists the users with their name, code, responsibility and active status for the selected period.
Parameters:
Report Format
14.9 Transactional Access by Responsibility
This report lists the transactional access to users with their Transaction Code, Transaction Description and access permission.
Parameters:
User Responsibility
14-6

Report Format
14.10 Front End Access by Responsibility
This report lists the front end screen access permissions depending on the user responsibility.
Parameters:
User Responsibility
Report Format
14-7
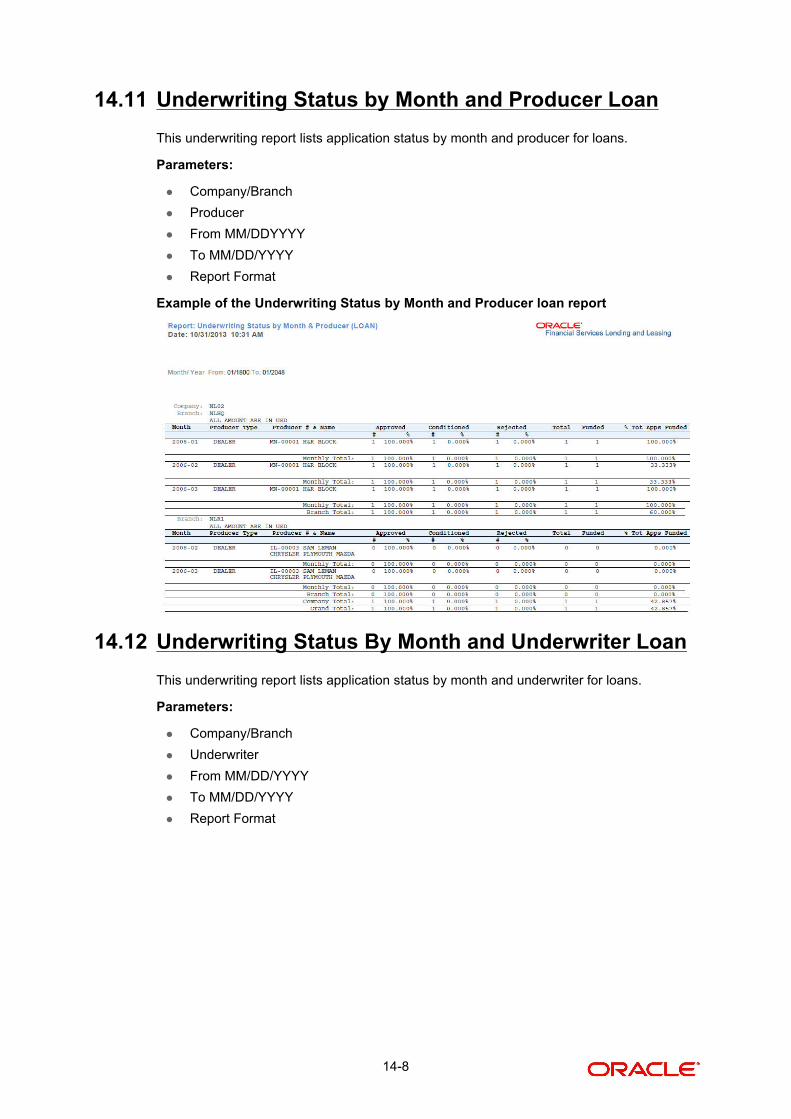
14.11 Underwriting Status by Month and Producer Loan
This underwriting report lists application status by month and producer for loans.
Parameters:
Company/Branch
Producer
From MM/DDYYYY
To MM/DD/YYYY
Report Format
Example of the Underwriting Status by Month and Producer loan report
14.12 Underwriting Status By Month and Underwriter Loan
This underwriting report lists application status by month and underwriter for loans.
Parameters:
Company/Branch
Underwriter
From MM/DD/YYYY
To MM/DD/YYYY
Report Format
14-8

Example of the Underwriting Status By Month and Underwriter Loan report
14.13 Underwriting Status By Month Loan
This underwriting report lists application status by the month for loans.
Parameters:
Company/Branch
From MM/DD/YYYY
To MM/DD/YYYY
Report Format
Example of the Underwriting Status By Month Loan report
14.14 Funded Contracts Loan
This funding report lists applications funded for loans.
Parameters:
Company/Branch
From MM/DD/YYYY
To MM/DD/YYYY
Producer
Report Format
14-9
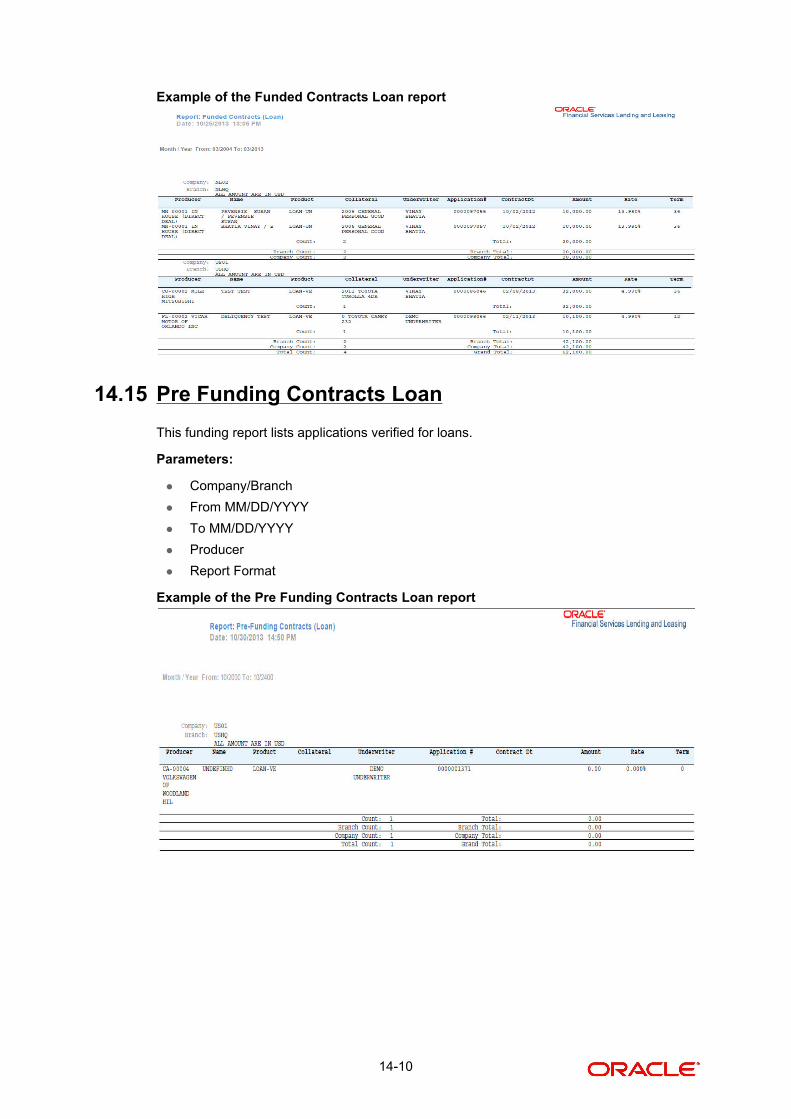
Example of the Funded Contracts Loan report
14.15 Pre Funding Contracts Loan
This funding report lists applications verified for loans.
Parameters:
Company/Branch
From MM/DD/YYYY
To MM/DD/YYYY
Producer
Report Format
Example of the Pre Funding Contracts Loan report
14-10
15. Producer
Oracle Financial Services Lending and Leasing is capable to create and service direct as well as indirect Loan. Indirect Loan are generated through Producer Entities like Dealerships and Agents. It is essential to create and maintain such entities to enable incentive tracking and business development achieved through each entity.
Applications are sent to financial institutions indirectly through producer entities like dealers or agents on behalf of a customer. Specifying Producer details is mandatory while creating a application since the system associates a credit application with the producer entity which sent it, on the Application Entry, Underwriting, and Funding screens. When the credit application is approved and funded, the system associates the account with the producer entity.
When the credit application is approved and funded, system associates account with the producer.
The following three different status are defined for Producer Entities in OFSLL:
Active: Only if Producer Status is Active, the application sourced through that Producer Entity can be funded.
Inactive: If the Producer Status is Inactive, the application sourced through that Producer Entity cannot be funded.
Temporary: If the Producer Status is Temporary, the application sourced through that Producer Entity can only be reviewed. However it cannot be funded.
The producers are paid for their participation, either:
Up front during funding
-or-
Up front on a monthly basis
-or-
When the interest is earned
-or-
When the payment is received from customer based on the set up compensation plans.
The Producer screen contains pages that enable you to maintain and administer producer compensation, compensation payments, charge back plans, and chargeback parameters.
While setting up Producer entities it is also essential to setup the Producer Cycles under 'Setup' in main menu. For more details, refer to Configuring Lending and Leasing guides.
While working with the Producer screen, you will primarily use the following sub tabs:
1. Payment Details
2. Tracking Attributes
3. Contracts
4. Comments
5. Summary
The Producers screen completed during setup, can be used to view and maintain producer details.
15-1

The ‘Producers’ screen consists of the following tabs:
Producer Details tab
Search tab
15.1 Producer Details tab
The Producer details screen allows you to record or edit basic information about the producer. You can set up dealers or producers for a company and branch. You can also set up a default underwriter and a default collector for a producer. The system uses this information in the origination work flow to select a queue.
The producer number, name, contact information, company and branch to which the producer is associated with, federal tax number, status, and license information can be stored in this screen.
15.1.1 Producer Details tab Extensibility
The Producer Details tab is a customizable tab in OFSLL in which you can enable new user defined fields (UDFs), disable /rename existing fields, allow or restrict access to UDFs, non-mandatory fields and also set the field as mandatory/non-mandatory for user input.
To facilitate such customizations, during product installation/upgrade there are additional 20 ‘Custom’ user defined fields provided by default along with ‘Base’ fields with the below combination in main Producer Details tab and its sub tabs.
10 free text fields - ‘User Defined Field Char’
5 numeric fields - ‘User Defined Field Num’
5 date fields - ‘User Defined Field Date’
The above user defined fields, also referred to as ‘User Defined Fields’ are to be basically enabled in Setup > Administration > User > Access > ‘Field Access Definition’ tab and access is to be provided in ‘Security User Access Definition Details’ sub tab for the field(s) to appear in Producer Details tab. The enabled fields can customized in the ‘Label Configuration’ tab available in Setup > Administration > System > Label Configuration screen.
For detailed information, refer to appropriate sections in Setup Guides.
Navigating to Producer Details
1. On the Oracle Financial Services Lending and Leasing home screen, click Origination > Origination > Producers > Producer Details.
15-2

2. The system displays the Producers screen.
To set up the Producer
1. In the Producer Details section, perform any of the Basic Operations mentioned in Navigation chapter.
A brief description of the fields is given below:
Note
Field names in the Producer Details section may vary depending on the customization and additional fields introduced. Populate the field details accordingly.
Field: Do this:
Producer # Based on the system setup, either:
Specify the producer number
-or-
The system generates producer number.
Producer will be activated on the next system date (current system date + 1) and not on the start date.
Old Producer # Specify the old producer number.
Name Specify the producer name.
Company Select the company from the drop-down list.
Branch Select the branch from the drop-down list.
Start Dt Select the producer start date by clicking on the adjoining Calendar icon.
15-3

End Dt Select the producer end date by clicking on the adjoining Calendar icon.
Contact Specify the producer contact.
Group Select the producer contact group from the drop-down list.
Grade Select the producer grade as per business processes from the drop-down list. The list consist of values which are used only for categorizing at the producer level and can be changed periodically as per business requirement.
Type* Select the producer type from the drop-down list. The Group and Type fields help in setting up the pricing schemes on Pricing screen.
Status Select the appropriate status from the drop-down list. The contents of this field can be linked to edits in Loan origination cycle so that only applications from Producers whose status is 'Active' can be funded.
Sales Agent Select the sales agent associated with this producer from the drop-down list.
Underwriter Select the default underwriter assigned to this producer from the drop-down list. Only users with a responsibility for an UNDERWRITER can be designated as underwriters for producers.
Funder Select the users with responsibility as Funding Specialist, from the drop-down list.
Collector Select the default collector or agent assigned to this producer from the drop-down list. (This will appear in the Collector field in Delinquency Information section of Account Details screen on the Customer Service screen).
Fed Tax # Specify the federal tax identification number. If the organizational parameter UIX_HIDE_RESTRICTED_DATA is set to Y, this appears as a masked number; for example, XXXXX1234.
Address section
Country Select the country code from the drop-down list.
Address Line 1 Specify address line 1
Address Line 2 Specify address line 2
Zip Select the zip code from the drop-down list.
Zip Extn Specify the extension of the zip code.
City Specify the city.
State Select the state from the drop-down list.
Permission to call
Check this box if customer has provided permission to contact through the specified phone number. When selected, system auto validates this option against the phone number specified.
Field: Do this:
15-4
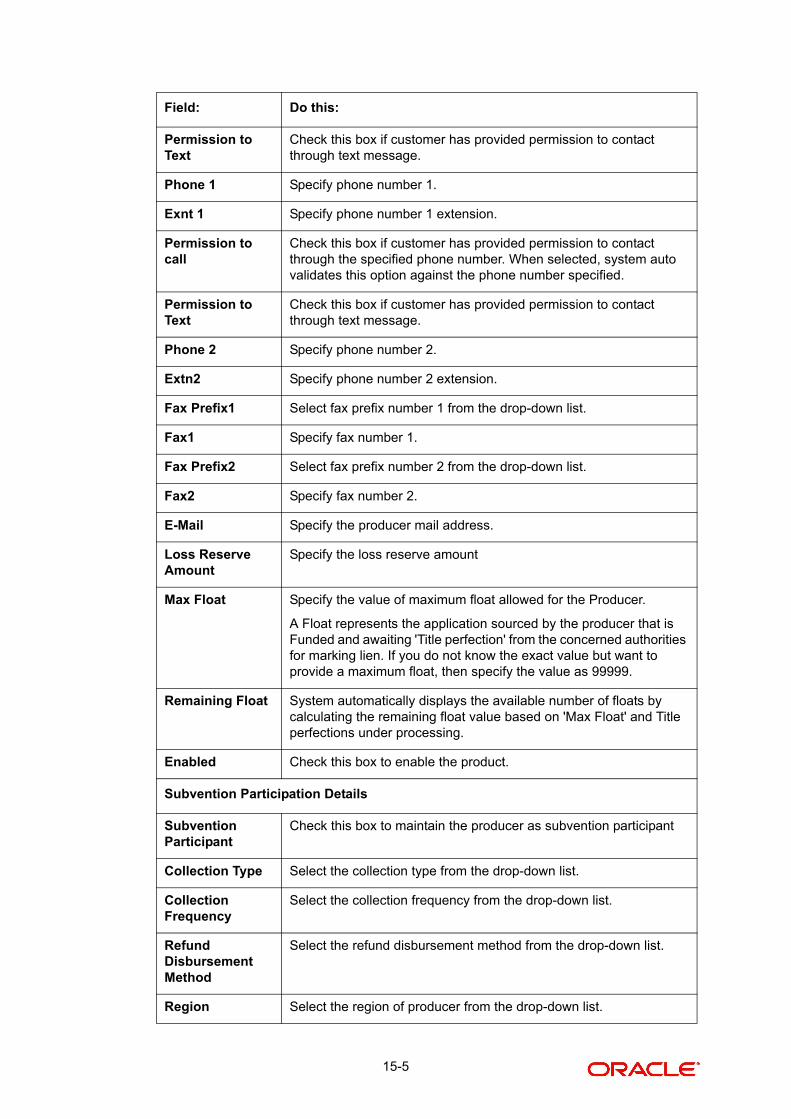
Permission to Text
Check this box if customer has provided permission to contact through text message.
Phone 1 Specify phone number 1.
Exnt 1 Specify phone number 1 extension.
Permission to call
Check this box if customer has provided permission to contact through the specified phone number. When selected, system auto validates this option against the phone number specified.
Permission to Text
Check this box if customer has provided permission to contact through text message.
Phone 2 Specify phone number 2.
Extn2 Specify phone number 2 extension.
Fax Prefix1 Select fax prefix number 1 from the drop-down list.
Fax1 Specify fax number 1.
Fax Prefix2 Select fax prefix number 2 from the drop-down list.
Fax2 Specify fax number 2.
E-Mail Specify the producer mail address.
Loss Reserve Amount
Specify the loss reserve amount
Max Float Specify the value of maximum float allowed for the Producer.
A Float represents the application sourced by the producer that is Funded and awaiting 'Title perfection' from the concerned authorities for marking lien. If you do not know the exact value but want to provide a maximum float, then specify the value as 99999.
Remaining Float System automatically displays the available number of floats by calculating the remaining float value based on 'Max Float' and Title perfections under processing.
Enabled Check this box to enable the product.
Subvention Participation Details
Subvention Participant
Check this box to maintain the producer as subvention participant
Collection Type Select the collection type from the drop-down list.
Collection Frequency
Select the collection frequency from the drop-down list.
Refund Disbursement Method
Select the refund disbursement method from the drop-down list.
Region Select the region of producer from the drop-down list.
Field: Do this:
15-5

2. Perform any of the Basic Actions mentioned in Navigation chapter.
Note
Oracle Financial Services Software recommends that you double-check the fax numbers (especially the 10 digit number) and email addresses you enter on this screen, since the system uses this information to send its system-generated underwriting decisions.
15.1.2 Payment Details
You can setup ACH as the payment mode for a dealer or producer on Payment Details sub screen. The Payment Details sub screen stores information regarding the payment mode, currency and producer’s bank details, such as bank’s name, routing number, account type, account number, BIC and IBAN. Once the details are updated the same has to be verified and approved in the payment details section before processing.
The dashboard of Oracle Financial Services Lending and Leasing displays all the producers whose payment details are either APPROVED or WAITING FOR APPROVAL in the ‘Producers Count By ACH Status’ section. You can click on the respective links to view the details in ‘Producers’ screen.
To complete the Payment Details
1. Click Origination > Origination > Producers > Payment Details.
2. In the Payment Details section, perform any of the Basic Operations mentioned in Navigation chapter.
A brief description of the fields is given below:
Territory Select the territory of producer from the drop-down list.
License Details
Valid From Specify the date from when the producer’s license is valid.
Valid To Specify the date till when the producer’s license is valid.
Field: Do this:
Pmt Mode Select the payment mode from the drop-down list.
Bank Specify the ACH bank name.
Start Dt Select ACH start date if payment mode is ACH. You can even select the date from adjoining Calendar icon.
Routing # Specify the ACH bank routing number.
Account Type Select the ACH bank account type from the drop-down list.
Account # Specify the ACH bank account number.
Currency View the currency of the Producer. System defaults the currency depending on the Company or Branch selected for the Producer.
Field: Do this:
15-6

Perform any of the Basic Actions mentioned in Navigation chapter.
To Approve Payment Details
You can verify and approve the producer payment details defined by another user in the Producers > Payment Details section. You can either directly select the required record in the ‘Producers’ screen or sort the list of payment details awaiting approval using the Dashboard.
Before you proceed, ensure that you have approval rights assigned to your login. Else, contact your system administrator.
1. To access the payment details to be approved, do one of the following:
Click Origination > Origination > Producers.
Click Dashboard and navigate to ‘Producer’ section. In the ‘Producers Count By ACH Status’ sub section, click WAITING FOR APPROVAL. The payment details are sorted accordingly and displayed in ‘Producers’ screen.
2. In the Producer Details section, select the required Producer. The payment details associated with the producer are displayed in the ‘Payment Details’ section.
3. In the ‘Payment Details’ section, click Approve Payment Detail.
BIC Select the Business Identifier Code from the drop-down list. The list displays the BIC codes defined in the system.
IBAN Specify the IBAN (International Bank Account Number). IBAN is used for identifying bank accounts across national borders with a minimal of risk of propagating transcription errors.
Ensure that value entered satisfies the check-digit validation based on modulo 97. On save, system automatically validates the IBAN number length based on country code, characters, white spaces, and checksum. Validation is also done during posting non-monetary transaction (ACH Maintenance).
You can maintain the IBAN length and other details required as per the country code in the user defined table (Setup > Administration > System > User Defined Tables).
Note: IBAN for 'NL' country code (IBAN_FORMAT_NL) is defined by default with length of IBAN as 18.
Disbursement Currency
Select the disbursement currency from the drop-down list. System defaults the currency depending on the Company or Branch selected for the Producer.
Approval Detail section - When the payment details are approved, system automatically populates the following fields with the approver details along with the status as ‘Approved’. However on subsequent update, the details are reset till further approval and status is changed to ‘Waiting for approval’.
Approved By View the user who has approved the payment details.
Approved Dt View the date and time when the payment details were approved.
Status View the status of producer payment details.
Field: Do this:
15-7

The payment details are approved and approver information is captured in Approval Detail section. Also on approval, the Dashboard counters in ‘Producers Count By ACH Status’ section are updated.
15.1.3 Compensation Plan
The Compensation Plan sub screen displays information related to compensation and chargeback for the producer. It displays summaries as well as account level information. The data is gathered from relevant applications and accounts in the system that are approved and funded.
A brief description of the fields in the Compensation Plan sub screen is given below:
1. In the Loss Reserve section, view the loss reserve amount.
You can view additional details of the Compensation Plan, Chargeback Methods, and Compensation/Chargeback Amounts in the sub screen.
15.1.4 Subvention
The Subvention sub screen displays information related to Subvention Receivables for the producer. It displays summaries as well as account level information.
In the Subvention Receivables section, you can view the following details. A brief description of the fields is given below:
Field: View this:
Account/Application The account/application number and title
Compensation Plan The compensation plan defined for the producer.
Upfront Amt The Upfront Amount defined for the producer.
Remaining Amt The remaining amount for the producer.
Total Amt The total amount defined for the producer.
Field: View this:
Subvention Participant The status of subvention participant.
Collection Type The collection type defined for the subvention.
Collection Frequency The collection frequency defined for the subvention.
Refund Disbursement Method The Refund Disbursement Method for the subvention.
Receivable Amt(Open) The outstanding receivable amount for the subvention.
Receivable Amt(Current) The current receivable amount for the subvention.
Received Amt The received amount for the subvention.
Netted Refund Amt The netted refund amount for the subvention.
Net Receivable Amt The net receivable amount for the subvention.
15-8

15.1.5 Transactions
The Transactions sub screen facilitates you to post the following types of transactions based on the selection in the action block.
All transactions relating to Payment to / from Producers, Disbursements transactions from Holdback / Reserve, adjust/add Recourse amount from/to dealer reserve can be posted by selecting ‘Others’ option in the action block.
Subvention Receivables / Payments and adjustments can be posted by selecting ‘Subvention’ option in the action block.
In the Transactions sub screen, you can sort the list of transactions to be displayed based on elapsed days by selecting the ‘View Last’ option as 1 Day / 1 Week / 1 Month / By Date. When ‘By Date’ is selected, you can specify a date range (within 3 months) in ‘Start Dt’ and ‘End Dt’ fields using the adjoining calendar and click ‘Search’.
Select ‘Others’ or ‘Subvention’ option, click Add and specify the following field information. A brief description of the fields is given below:
Click Post to post the transaction for processing.
15.1.6 Holdback/Loss Reserve
The Holdback/Loss Reserve sub screen displays information related to Proceed Holdback and Loss Reserve for the producer.
To view the Holdback/Loss Reserve
1. Click Producers > Holdback/Loss Reserve.
2. In the Proceed Holdback section, you can view the account and Holdback amount details.
In the Loss Reserve section, you can view Loss Reserve amount details.
15.1.7 Tracking Attributes
The Tracking Attributes sub screen allows you to link information to a producer who is not tracked in the system, by default, however is part of company’s business practices.
Payable Refund Amt The payable refund amount for the subvention.
Field: View this:
Effective Dt Select the Effective Date of the transaction from the calendar.
Transaction Select the transaction from the drop down list.
Amount Specify amount for the transaction.
Reference Specify the transaction reference.
Account # Select the account from the drop down list.
Account Title View the account title information.
Comment Specify additional details of the transaction if any.
Field: View this:
15-9
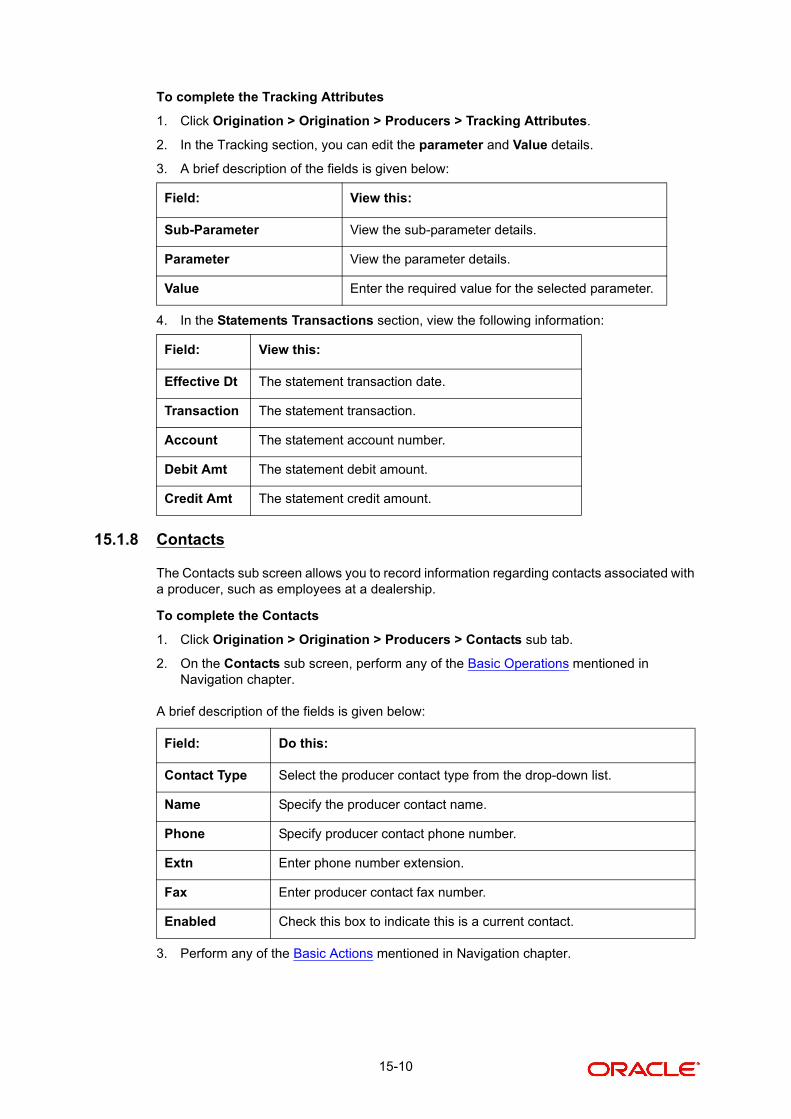
To complete the Tracking Attributes
1. Click Origination > Origination > Producers > Tracking Attributes.
2. In the Tracking section, you can edit the parameter and Value details.
3. A brief description of the fields is given below:
4. In the Statements Transactions section, view the following information:
15.1.8 Contacts
The Contacts sub screen allows you to record information regarding contacts associated with a producer, such as employees at a dealership.
To complete the Contacts
1. Click Origination > Origination > Producers > Contacts sub tab.
2. On the Contacts sub screen, perform any of the Basic Operations mentioned in Navigation chapter.
A brief description of the fields is given below:
3. Perform any of the Basic Actions mentioned in Navigation chapter.
Field: View this:
Sub-Parameter View the sub-parameter details.
Parameter View the parameter details.
Value Enter the required value for the selected parameter.
Field: View this:
Effective Dt The statement transaction date.
Transaction The statement transaction.
Account The statement account number.
Debit Amt The statement debit amount.
Credit Amt The statement credit amount.
Field: Do this:
Contact Type Select the producer contact type from the drop-down list.
Name Specify the producer contact name.
Phone Specify producer contact phone number.
Extn Enter phone number extension.
Fax Enter producer contact fax number.
Enabled Check this box to indicate this is a current contact.
15-10

15.1.9 Comments
The Comments sub screen allows you to view and enter comments regarding the producer.
To enter a comment on the Comments
1. Click Origination > Origination > Producers > Comments sub tab.
2. In the Comments section, perform any of the Basic Operations mentioned in Navigation chapter.
A brief description of the fields is given below:
3. Perform any of the Basic Actions mentioned in Navigation chapter.
15.1.10 Summary
The display only Summary sub screen allows you to view summary information regarding the producer.
To view summary on the Summary
1. Click Origination > Origination > Producers > Summary sub tab.
2. In the Summary section, view the following information.
A brief description of the fields is given below:
15.1.11 Title Status Summary
The Title Status Summary screen displays the various stages of titles of assets for applications sourced by the producer. The details are available for specific periods based on elapsed days like last 1 Day / 1 Week / 1 Month or by a specific date range.
Field: Do this:
Comment Enter comment.
Comment By Displays user id.
Comment Dt Displays comment date.
Field: View this:
Year Month The year and month.
Total Apps The application total status count.
Approved The application approved status count.
Conditioned The application conditioned status count.
Rejected The application rejected status count.
Withdrawn The application rejected status count.
Funded The application withdrawn status count.
Amount The application funded status total amount.
15-11
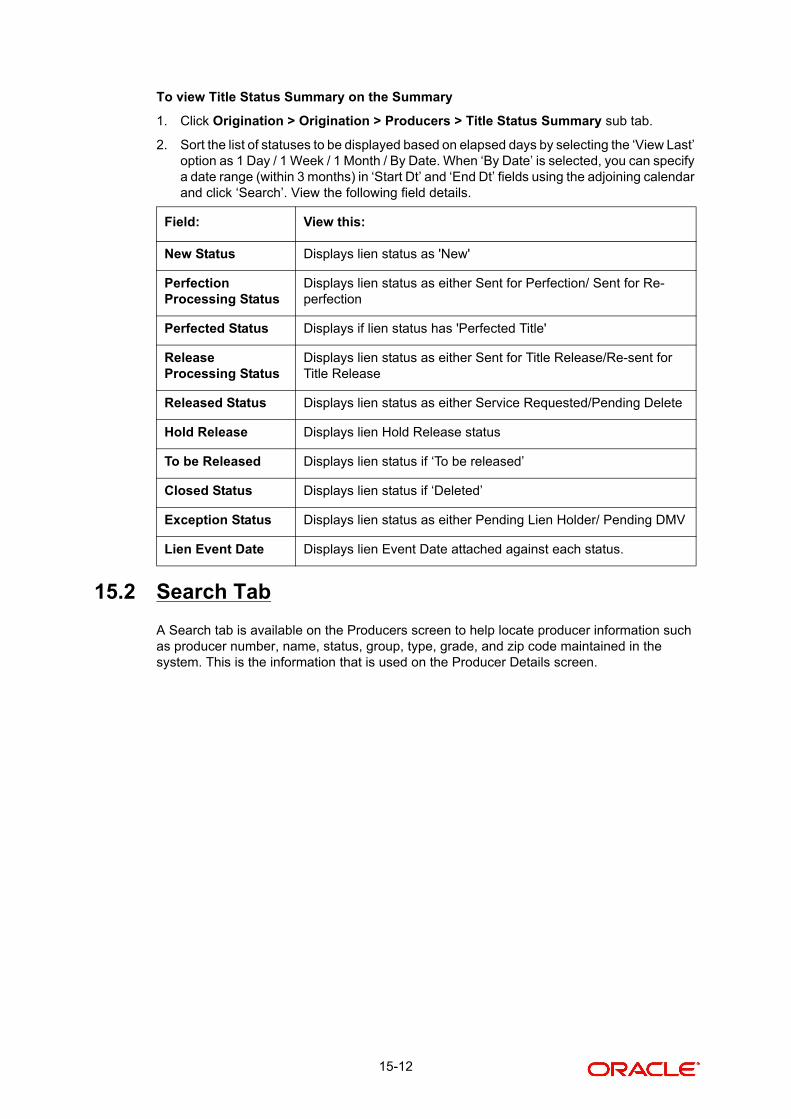
To view Title Status Summary on the Summary
1. Click Origination > Origination > Producers > Title Status Summary sub tab.
2. Sort the list of statuses to be displayed based on elapsed days by selecting the ‘View Last’ option as 1 Day / 1 Week / 1 Month / By Date. When ‘By Date’ is selected, you can specify a date range (within 3 months) in ‘Start Dt’ and ‘End Dt’ fields using the adjoining calendar and click ‘Search’. View the following field details.
15.2 Search Tab
A Search tab is available on the Producers screen to help locate producer information such as producer number, name, status, group, type, grade, and zip code maintained in the system. This is the information that is used on the Producer Details screen.
Field: View this:
New Status Displays lien status as 'New'
Perfection Processing Status
Displays lien status as either Sent for Perfection/ Sent for Re-perfection
Perfected Status Displays if lien status has 'Perfected Title'
Release Processing Status
Displays lien status as either Sent for Title Release/Re-sent for Title Release
Released Status Displays lien status as either Service Requested/Pending Delete
Hold Release Displays lien Hold Release status
To be Released Displays lien status if ‘To be released’
Closed Status Displays lien status if ‘Deleted’
Exception Status Displays lien status as either Pending Lien Holder/ Pending DMV
Lien Event Date Displays lien Event Date attached against each status.
15-12

To search for a producer
1. On the Oracle Financial Services Lending and Leasing home screen, click Origination > Origination > Producers > Search tab.
2. In the Search Criteria section, use Comparison Operator and Value columns to enter search criteria you want to use to locate a producer.
3. Click Search.
System displays the result in the ‘Search Results’ section at the bottom of the screen with the following details:
Producer #
Old Producer #
Name
Company
Branch
Start Dt
End Dt
Status
Contact
Group
Type
Grade
4. Select the required record and click ‘Open’. The details of only that particular Producer is displayed in ‘Producer Details’ tab. However, system displays the producer details only for authorized users based on access/permissions defined in setup.
Note
When a single producer record is opened from Search tab, the ‘Producer Details’ tab en-ables a ‘Remove Filter’ option. Clicking on the same removes the filter criteria and displays all the producer records maintained in the system.
15-13

You can click Reset Criteria at any time to clear Comparison Operator and Values columns on the Search Criteria section.
15-14
16. Vendors
During the life of an account, a financial institution might require the use of specialized services of a vendor for various purposes; for example, repossessing a vehicle, retaining an attorney for bankruptcy court proceedings or making field calls. With the system’s Vendors screen, you can:
Maintain vendor information
Maintain services offered by the vendor
Assign tasks to the vendors and subsequently track and process those tasks
Charge vendor expenses to customers
Enter and update invoices raised by the vendors
Post vendor transactions
Process vendor payments
Once an invoice has been presented for a service performed by a vendor, you can enter information on Vendor Management form and create a monetary transaction. You can then choose if the customer should pay any particular expense or not.
The Vendors screen allows you to set up vendor information. You can also use the copy feature to quickly create new vendors with the existing details. By default it will show current address but if the vendor receives escrow disbursement at an address which is different from current business address the information can be entered in Payment Details sub screen. Also, the Payment Details sub screen allows you to enter number of days prior to the due date by which payment to vendor must be processed.
Navigating to Vendor Detail Screen
1. On the Oracle Financial Services Lending and Leasing home screen, click Origination > Origination > Vendors.
2. The system displays the Vendor screen. The details are grouped under four tabs:
Vendors
Assignment Allocation
Work Orders
Follow-up
Invoices
Search
16.1 Vendors tab
1. Click Origination > Origination > Vendors > Vendors. The details in the screen are grouped into the following tabs:
Payment Details
Vendor Groups
Tracking Attributes
Comments
2. In the Origination > Origination > Vendors > Vendors > Vendor Details section, you can create or edit vendor details. While creating new, you can also use the copy feature to copy the existing details to new vendor. The copy option in the Vendor Details screen is controlled by the system defined parameter (UVN_VEN_NBR_SYS_GENERATED).
16-1

Based on the valued defined for the parameter in Setup > Administration > System > System Parameter screen, you can copy the existing vendor details in the following ways:
If the value of the parameter is set to ‘Y’ (default), specify a new name in ‘New Vendor Name’ field and click ‘Create Copy’.
If the value of the parameter is set to ‘N’, specify a vendor number in ‘New Vendor #’ field and click ‘Create Copy’.
3. Perform any of the Basic Operations mentioned in Navigation chapter.
A brief description of the fields is given below:
Field: Do this:
Enabled Check this box to enable the vendor.
Vendor # The vendor number is either editable (default) or auto generated depending on the system parameter defined at setup screen.
System auto generates the vendor number when the following sys-tem parameter is set to ‘Yes’ in Setup > Administration > System > System Parameter screen.
- Parameter: UVN_VEN_NBR_SYS_GENERATED
- Description: VENDOR NUMBER IS SYSTEM GENERATED
Channel Select the vendor channel from the drop-down list.
Old Vendor # Displays the old vendor number if exists.
Name Specify the vendor name.
Status Select the vendor status from the drop-down list.
Company Select the vendor portfolio company from the drop-down list.
Branch Select the vendor portfolio branch from the drop-down list.
Start Dt Specify the vendor start date. You can select data even from the adjacent Calendar icon.
End Dt Specify the vendor end date. You can select data even from the adjacent Calendar icon.
Contact Person Specify the vendor contact name.
16-2

4. Perform any of the Basic Actions mentioned in Navigation chapter.
16.1.1 Payment Details
Click Origination > Origination > Vendors > Vendors > Vendor Details > Payment Details. The Payment Details sub tab allows you to set up automatic clearing house information for vendors.
Fed Tax # If available, enter the vendor federal tax identification number. If the organizational parameter UIX_HIDE_RESTRICTED_DATA is set to Y, this appears as a masked number; for example, XXXXX1234.
Credit Days Specify the credit days for the vendor invoice. This number is used to check that Invoice Due Date is not more than the credit days from Invoice Date.
Permission to Call
Check this box if customer has provided permission to contact through the specified phone number. When selected, system auto validates this option against the phone number specified.
Permission to Text
Check this box if customer has provided permission to contact through text message.
Phone 1 Specify primary phone number.
Extn 1 Specify the primary phone extension.
Permission to Call
Check this box if customer has provided permission to contact through the specified phone number. When selected, system auto validates this option against the phone number specified.
Permission to Text
Check this box if customer has provided permission to contact through text message.
Phone 2 Specify alternate phone number.
Extn 2 Specify the alternate phone’s extension.
Fax Specify the fax number.
Fax 2 Specify the fax number 2.
Country Select the country code from the drop-down list.
Address # Specify the vendor address.
Address Line 1 Specify address line 1.
Address Line 2 Specify address line 2.
Zip Select the zip code from the drop-down list.
Zip Extn Specify the extension of the Zip code.
City Specify the city.
State Select the state from the drop-down list.
Email Specify the email address.
Field: Do this:
16-3

On the Payment Details sub tab, perform any of the Basic Operations mentioned in Navigation chapter.
A brief description of the fields is given below:
Field: Do this:
Remittance section
Country Select the country code from the drop-down list.
Address Line 1 Specify address line 1.
Address Line 2 Specify address line 2.
Zip Specify zip code from the drop-down list.
Zip Extn Specify extension of the zip code.
City Specify city.
State Select state from the drop-down list.
Pre-Process Days Specify the remittance pre-process days. This is the number of days prior to due date by which payment to the vendor must be processed.
Currency View the currency attached to vendor.
Payment Details section
Mode Select the mode of payment from the drop-down list.
Bank Specify the ACH bank.
Start Dt View ACH start date.
Routing # Specify the bank routing number.
Account Type Select the account type from the drop-down list.
Account # Specify the account number. If the organizational parameter UIX-_HIDE_RESTRICTED_DATA is set to ‘Y’, this appears as a masked number; for example, XXXXX1234.
BIC Select the Business Identifier Code from the drop-down list. The list displays the BIC codes defined in the system.
16-4
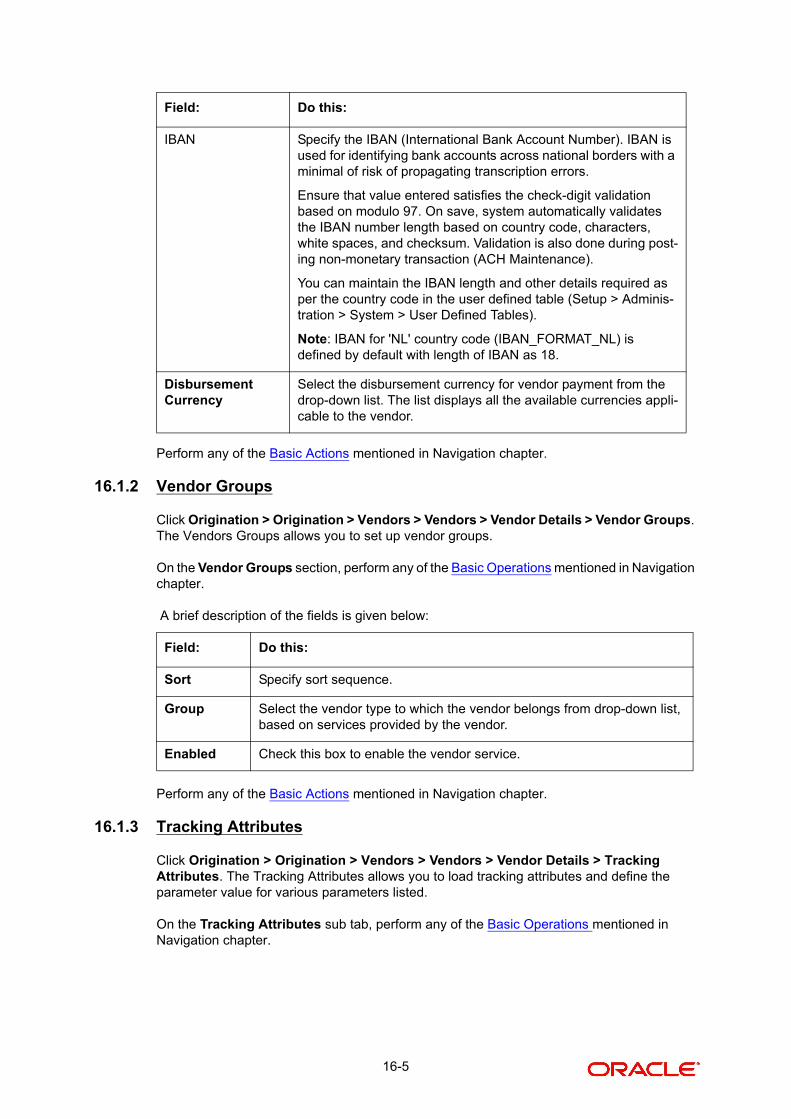
Perform any of the Basic Actions mentioned in Navigation chapter.
16.1.2 Vendor Groups
Click Origination > Origination > Vendors > Vendors > Vendor Details > Vendor Groups. The Vendors Groups allows you to set up vendor groups.
On the Vendor Groups section, perform any of the Basic Operations mentioned in Navigation chapter.
A brief description of the fields is given below:
Perform any of the Basic Actions mentioned in Navigation chapter.
16.1.3 Tracking Attributes
Click Origination > Origination > Vendors > Vendors > Vendor Details > Tracking Attributes. The Tracking Attributes allows you to load tracking attributes and define the parameter value for various parameters listed.
On the Tracking Attributes sub tab, perform any of the Basic Operations mentioned in Navigation chapter.
IBAN Specify the IBAN (International Bank Account Number). IBAN is used for identifying bank accounts across national borders with a minimal of risk of propagating transcription errors.
Ensure that value entered satisfies the check-digit validation based on modulo 97. On save, system automatically validates the IBAN number length based on country code, characters, white spaces, and checksum. Validation is also done during post-ing non-monetary transaction (ACH Maintenance).
You can maintain the IBAN length and other details required as per the country code in the user defined table (Setup > Adminis-tration > System > User Defined Tables).
Note: IBAN for 'NL' country code (IBAN_FORMAT_NL) is defined by default with length of IBAN as 18.
Disbursement Currency
Select the disbursement currency for vendor payment from the drop-down list. The list displays all the available currencies appli-cable to the vendor.
Field: Do this:
Sort Specify sort sequence.
Group Select the vendor type to which the vendor belongs from drop-down list, based on services provided by the vendor.
Enabled Check this box to enable the vendor service.
Field: Do this:
16-5

A brief description of the fields is given below:
Perform any of the Basic Actions mentioned in Navigation chapter.
16.1.4 Comments
Click Origination > Origination > Vendors > Vendors > Vendor Details > Comments. The Comments sub tab allows you to add comments and also view comments posted through AP interface.
On the Comments sub tab, perform any of the Basic Operations mentioned in Navigation chapter.
A brief description of the fields is given below:
Perform any of the Basic Actions mentioned in Navigation chapter.
16.2 Assignment Allocation
The Assignment Allocation tab allows you to define criteria for selecting a specific vendor to execute a work order. A criteria here refers to a combination of a Channel, Work Order Type, Company and Branch associated to a vendor. If the same combination or criteria is selected during work order creation, system selects a specific vendor or highest weighted vendor in the list by default for the work order.
Click Origination > Origination > Vendors > Assignment Allocation. The details are grouped under two sections:
Vendor Assignment Criteria
Vendor Assignment Allocation
16.2.1 Vendor Assignment Criteria
In the Vendor Assignment Criteria section, you can define the criteria used for vendor selection.
Field: Do this:
Sub-Param-eter
View the Sub-Parameter.
Parameter View the listed Parameter.
Value Specify the required parameter value. By default, NA is displayed.
Field: Do this:
Comment View or add the required comment.
Comment By
System automatically selects the logged in user details.
Comment Dt
System automatically displays the current date.
16-6

1. In the Origination > Origination > Vendors > Work Order > Assignment Allocation, perform any of the Basic Operations mentioned in Navigation chapter.
A brief description of the fields is given below:
2. Perform any of the Basic Actions mentioned in Navigation chapter.
16.2.2 Vendor Assignment Allocation
In the Vendor Assignment Allocation section, system fetches the list of vendors qualifying the combination of channel, work order, company and branch selected and allows you to define the weightage for each vendor in percentage.
By default, the allocated assignment percentage for each vendor is ‘0’. During subsequent update, the total of assignment percentage allocation for all vendors should be equal to ‘100’. A vendor with the highest weightage is selected by default during work order creation.
For ‘GENERIC AUCTION INTERFACE’ related Vendor Assignment Criteria, you can add vendors to the defined criteria from ‘Vendor Assignment Allocation’ section. For more information, refer to ‘Remarketing’ chapter in Collections User Guide.
Field: Do this:
Channel Select the OFSLL interfaced channel from the drop-down list.
If the channel is selected as ‘GENERIC RECOVERY INTERFACE’, the work order is processed through an external system. For more information, refer to Appendix chapter - ‘Generic Recovery Interface (GRI)’.
Work Order Type
Select the work order type from the drop-down list.
Repo Storage Country
This field is available only if the channel is selected as ‘GENERIC AUCTION INTERFACE’. Select the Country where the repossessed asset is currently stored from the drop-down list.
Repo Storage State
This field is available only if the channel is selected as ‘GENERIC AUCTION INTERFACE’. Select the State where the repossessed asset is currently stored from the drop-down list.
Company Select the Company from the drop-down list.
Branch Select the company’s Branch from the drop-down list.
Enabled Check this box to enable the vendor assignment criteria.
16-7

1. In the Origination > Origination > Vendors > Work Order > Assignment Allocation, perform any of the Basic Operations mentioned in Navigation chapter.
2. Perform any of the Basic Actions mentioned in Navigation chapter.
16.3 Work Orders Tab
The Work Orders link allows you to assign an account to a vendor for a service that the vendor provides, view the history of work order changes and define tracking attributes.
1. Click Origination > Origination > Vendors > Work Order. The details are grouped under three tabs:
Services
Work Order History
Tracking Attributes
2. In the Origination > Origination > Vendors > Work Order > Work Order, sort the list of work orders based on status using the ‘View Options’ drop down list. You can further sort the list of work orders based on elapsed days by selecting the ‘View Last’ option as 1 Day / 1 Week / 1 Month / By Date. When ‘By Date’ is selected you can specify a date range (within 3 months) in ‘Start Dt’ and ‘End Dt’ fields using the adjoining calendar and clicking ‘Search’.
3. Perform any of the Basic Operations mentioned in Navigation chapter.
Field: Do this:
Vendor # View the Vendor number. The same is either specified manually or system generated in the Vendors tab.
Name View the name of the vendor.
Assigned Cases View the total number of cases assigned to the vendor.
% Allocation View the percentage of total cases assigned to the vendor.
Assignment % Specify the percentage allocation value (out of 100) for each vendor. However, ensure that the total of all assignment % is equal to ‘100’.
16-8

A brief description of the fields is given below:
Field: Do this:
Work Order # Displays the work order number.
Case # Displays the case number received from third party vendor interface.
Channel Select the OFSLL interfaced channel from the drop-down list.
If the channel is selected as ‘GENERIC RECOVERY INTERFACE’, the work order is processed through an external system. For more information, refer to Appendix chapter - ‘Generic Recovery Interface (GRI)’.
Work Order Type
Select the work order type from the drop-down list.
Account Select account number for the work order from the drop-down list.
Company Displays the company name based on the account selected.
Branch Displays the branch based on the account selected.
Vendor Select vendor who will service the work order from the drop-down list. The list of vendors are displayed based on the selected Chan-nel, Work Order Type, and Account.
Override Rea-son
In case of vendor re-assignment, select the appropriate override reason for the selected Vendor.
Status Select the work order status from the drop-down list.
If the status is selected as ‘SEND TO GRI’, the work order is pro-cessed through an external system. For more information, refer to Appendix chapter - ‘Generic Recovery Interface (GRI)’.
Reason This field is enabled only if the status of work order is selected as PENDING ON HOLD, RLRELEASED, or PENDING CLOSE. You can select the appropriate reason from the drop-down list.
Collector Select the Collector from the drop-down list. The list displays all the users defined with ‘Collector’ responsibility.
Work Order Details section
Dt Displays the date when work order was created.
Status Dt Displays the last work order status-change date.
Currency Displays the vendor company currency based on the vendor selected.
Estimated Displays the estimated amount, which is the sum of all the services added to the work order.
Billed Displays amount billed by the vendor for the work order.
Paid Displays amount paid to the vendor for the work order.
Reference # Specify vendor reference details if any.
16-9

Assigned By Displays the user who created/assigned the work order to vendor.
Followup Dt Select the subsequent follow-up date from adjoining calendar.
Account Information section - System displays the following information depending on the account selected for the work order in ‘Work Order’ section.
Account Status Displays the status of the account.
Charged off Dt Displays the date when the account was charged off.
Due Amt Displays the due amount to be paid to the account.
Total Outstand-ing Balance
Displays either ‘Account outstanding principal balance’ for active accounts, or ‘Deficiency balance’ for charge-off accounts.
Total Due Displays the total of all dues pending on the account.
Due Dt Displays the last elapsed due date on the account.
Days Past Due Displays the total number of days elapsed past due date.
Service Address
Displays the combined details of Customer/Business, Address Type and Address based on the account selected. For Business account only business address is populated. You can also select the required service address from the drop-down list only while creating work order details (i.e. when status = New).
Note: When selecting the service address for an external interfaced channel (i.e. changing primary address), ensure to select the sec-ondary address only. Else, system displays an error message.
Collateral Details section - This section displays the asset details associated with the work order.
Collateral Description
System displays the primary collateral associated with the account by default. You can also select the collateral from the drop-down list. The list displays all the assets associated with the account.
Identification # Displays the identification number of the asset.
Year Displays the manufacturing year of the asset.
Make Displays the asset’s manufacturing company.
Model Displays the asset’s model.
Vendor Information section
Contact Specify the vendor contact for the work order.
Phone Specify the vendor contact phone for the work order.
Extn Specify the vendor contact phone extension for the work order.
Fax Specify the vendor contact fax for the work order.
Comment Specify any comments regarding the work order.
Field: Do this:
16-10

4. Perform any of the Basic Actions mentioned in Navigation chapter.
16.3.1 Services
In the Origination > Origination > Vendors > Work Order > Services, perform any of the Basic Operations mentioned in Navigation chapter.
Click ‘Load Services’ button in the Services section header to load all the services associated with the selected combination of ‘Work Order Type’ and ‘vendor (Vendor Group)’.
A brief description of the fields is given below:
Perform any of the Basic Actions mentioned in Navigation chapter.
16.3.2 Work Order History
The Work Order History sub tab displays the details of the selected work orders in the sequence of the changes done i.e. last change details appear as the first record.
Vendor Messages section - This section is displayed only when the selected channel is ‘GENERIC RECOVERY INTERFACE’ and allows you to add specific communication or instructions as a message to the vendor.
Vendor Msg Type
Select the type of vendor message from the drop-down list.
Vendor Msg Specify additional information that is to be communicated to the external interface.
Field: Do this:
Service # Specify an unique service number for the work order.
Service Select the service type from the drop-down list (required).
Currency System defaults the currency defined in work order which is the vendor currency.
Estimated System defaults the Estimated cost of the service offered by the vendor as defined in vendor administration setup screen (Setup > Administra-tion > System > Vendors > Vendor Fees > Vendor Service Fee Defini-tion).
However, you can also modify the estimated value to the required amount.
Billed Amt Displays amount billed by the vendor for the service.
Paid Amt Displays amount paid to the vendor for the service.
Status Select the status from the drop-down list.
Status Dt Displays the last service status change date.
Field: Do this:
16-11

In the Work Order History section, select the required work order and click View.
16.3.3 Tracking Attributes
Click Origination > Origination > Vendors > Work Order > Tracking Attributes. The Tracking Attributes allows you to load tracking attributes and define the parameter value for various parameters listed.
On the Tracking Attributes sub tab, perform any of the Basic Operations mentioned in Navigation chapter.
A brief description of the fields is given below:
Perform any of the Basic Actions mentioned in Navigation chapter.
16.4 Follow-up Tab
The Work Orders link lists the work orders that are not complete and hence require follow-up.
1. Click Origination > Origination > Vendors > Follow-up tab. The details are grouped into two:
Work Order Follow-up
Assigned Services
Field: Do this:
Sub-Param-eter
View the Sub-Parameter.
Parameter View the listed Parameter.
Value Specify the required parameter value. By default, NA is displayed.
16-12

2. In the Origination > Origination > Vendors > Follow-up > Work Order Follow-up, perform any of the Basic Operations mentioned in Navigation chapter except for creating a new record.
A brief description of the fields is given below:
Field: Do this:
Company Displays the vendor company.
Branch Displays the vendor branch.
Followup Dt Specify the next follow-up date. You can even select the date from adjoining Calendar icon.
Work Order # Displays the work order number.
Dt Displays the work order date.
Account Displays the account associated with the work order.
Vendor Displays the vendor associated with the work order.
Status Select the work order status from the drop-down list.
Status Dt Displays the last work order status change date.
Work Order section
Currency Displays the currency for the work order.
Estimated Displays the estimated amount, which is the sum of all the services added to the work order.
Billed Amt Displays amount billed by the vendor for the work order.
Paid Displays amount paid to the vendor for the work order.
16-13
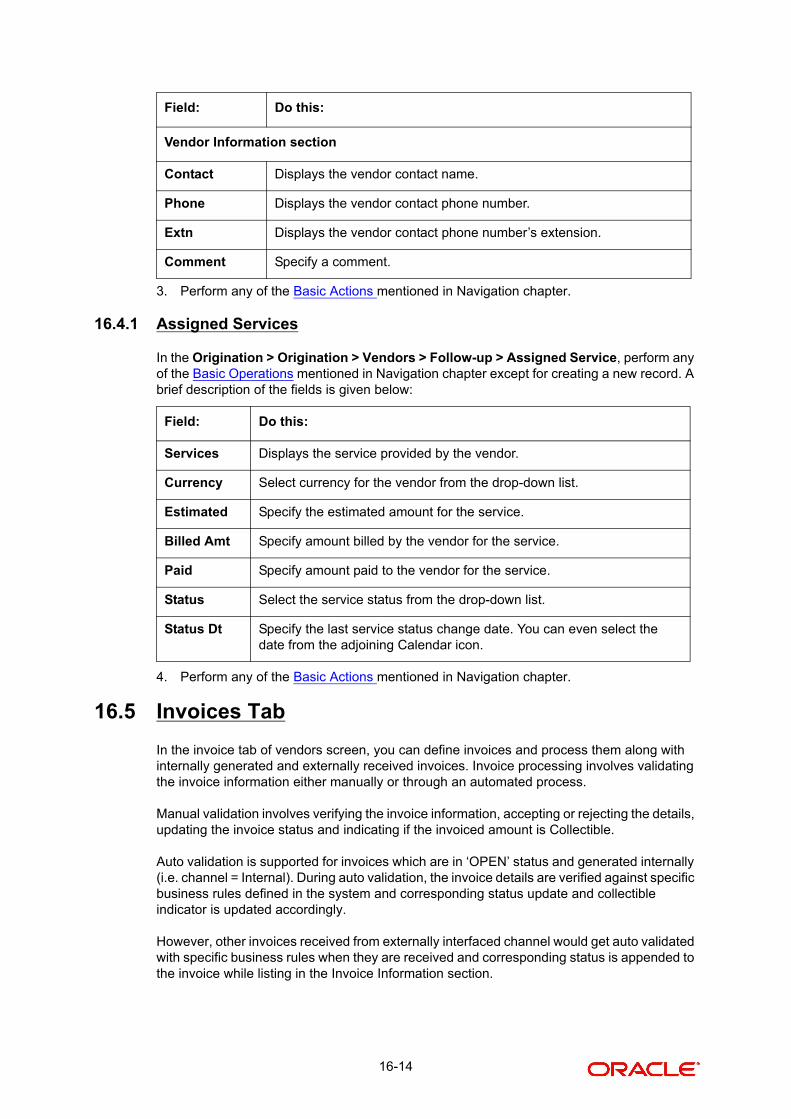
3. Perform any of the Basic Actions mentioned in Navigation chapter.
16.4.1 Assigned Services
In the Origination > Origination > Vendors > Follow-up > Assigned Service, perform any of the Basic Operations mentioned in Navigation chapter except for creating a new record. A brief description of the fields is given below:
4. Perform any of the Basic Actions mentioned in Navigation chapter.
16.5 Invoices Tab
In the invoice tab of vendors screen, you can define invoices and process them along with internally generated and externally received invoices. Invoice processing involves validating the invoice information either manually or through an automated process.
Manual validation involves verifying the invoice information, accepting or rejecting the details, updating the invoice status and indicating if the invoiced amount is Collectible.
Auto validation is supported for invoices which are in ‘OPEN’ status and generated internally (i.e. channel = Internal). During auto validation, the invoice details are verified against specific business rules defined in the system and corresponding status update and collectible indicator is updated accordingly.
However, other invoices received from externally interfaced channel would get auto validated with specific business rules when they are received and corresponding status is appended to the invoice while listing in the Invoice Information section.
Vendor Information section
Contact Displays the vendor contact name.
Phone Displays the vendor contact phone number.
Extn Displays the vendor contact phone number’s extension.
Comment Specify a comment.
Field: Do this:
Services Displays the service provided by the vendor.
Currency Select currency for the vendor from the drop-down list.
Estimated Specify the estimated amount for the service.
Billed Amt Specify amount billed by the vendor for the service.
Paid Specify amount paid to the vendor for the service.
Status Select the service status from the drop-down list.
Status Dt Specify the last service status change date. You can even select the date from the adjoining Calendar icon.
Field: Do this:
16-14

Post the validation, invoices may still have difference in estimated and invoiced amount. Such invoices are marked with status ‘FOR APPROVAL” and requires to be manually approved.
Further in the Invoices tab, you can define Tracking Attributes, Payment Schedules and view the Related Invoice/Work Orders (if any) in the system.
1. Click Origination > Origination > Vendors > Invoices tab. The details are grouped into following sections:
Details
– Payment Schedules sub tab
– Related Invoice/Work Orders sub tab
Tracking Attributes
2. In the Origination > Origination > Vendors > Invoices > Invoice Information, sort the list of invoice based on status using the ‘View Options’ drop down list. You can further sort the list of invoice based on elapsed days by selecting the ‘View Last’ option as 1 Day / 1 Week / 1 Month / By Date. When ‘By Date’ is selected you can specify a date range (within 3 months) in ‘Start Dt’ and ‘End Dt’ fields using the adjoining calendar and clicking ‘Search’.
3. Perform any of the Basic Operations mentioned in Navigation chapter.
A brief description of the fields is given below:
Field: Do this:
Vendor Select the vendor name for whom the invoice is to be created.
Company Displays the vendor portfolio company.
Branch Displays the vendor portfolio branch.
Invoice # Specify the invoice number.
The invoice number should be unique for every vendor. In case the Invoice # already exists for Vendor, system displays a warning message.
External Ref #
Specify the reference number which can be used for invoice tracking.
For invoice received from external system, this field is auto populated with the reference number generated in external interfaced system.
Invoice Dt Specify the invoice date. You can even select the date from the adjoining Calendar icon.
16-15

4. Perform any of the Basic Actions mentioned in Navigation chapter.
16.5.1 Auto Validate Invoice
You can auto validate the invoice details in the Invoice Information section for those invoice which are in ‘OPEN’ status. Auto validation with system defined business rules ensure that every approved invoice comply to required processing standards and helps to quickly proceed with further action.
1. In the Origination > Origination > Vendors > Invoices > Invoice Information, sort the list of invoice with status as ‘OPEN’ from the ‘View Options’ drop down list.
2. Select the required invoice form the list and click ‘Validate Invoice’ button on the Invoice Information section header.
The invoice details are validated and the status of the invoice is updated based on validation. For more information on validations, refer to ‘Business Rules’ section.
16.5.2 Invoice Details sub tab
1. In the Origination > Origination > Vendors > Invoices > Invoice Details, perform any of the Basic Operations mentioned in Navigation chapter.
A brief description of the fields is given below:
Due Date Select the due date. You can even select the date from the adjoining Calendar icon.
Status Select the invoice status from the drop-down list.
Details section
Status Dt Displays the last invoice status change date.
Address Displays the vendor address.
Currency Select the currency from the drop-down list.
Estimated Displays the total estimated amount of all the invoices defined in ‘Invoice Details’ sub tab.
Invoice Amt Displays the total invoice amount.
Agreed Amt Displays the total agreed amount.
Paid Amt Displays the total paid amount.
Channel Displays the Channel as ‘Internal’ for manually defined or internally gen-erated invoice and ‘Generic Recovery Interface (GRI)’ for externally gen-erated invoice.
Field: Do this:
Work Order Select the work order from the drop-down list. This list displays the gen-erated work orders. Each work order name is defined in the format which consists of work order number, account number, service number and service name.
Field: Do this:
16-16
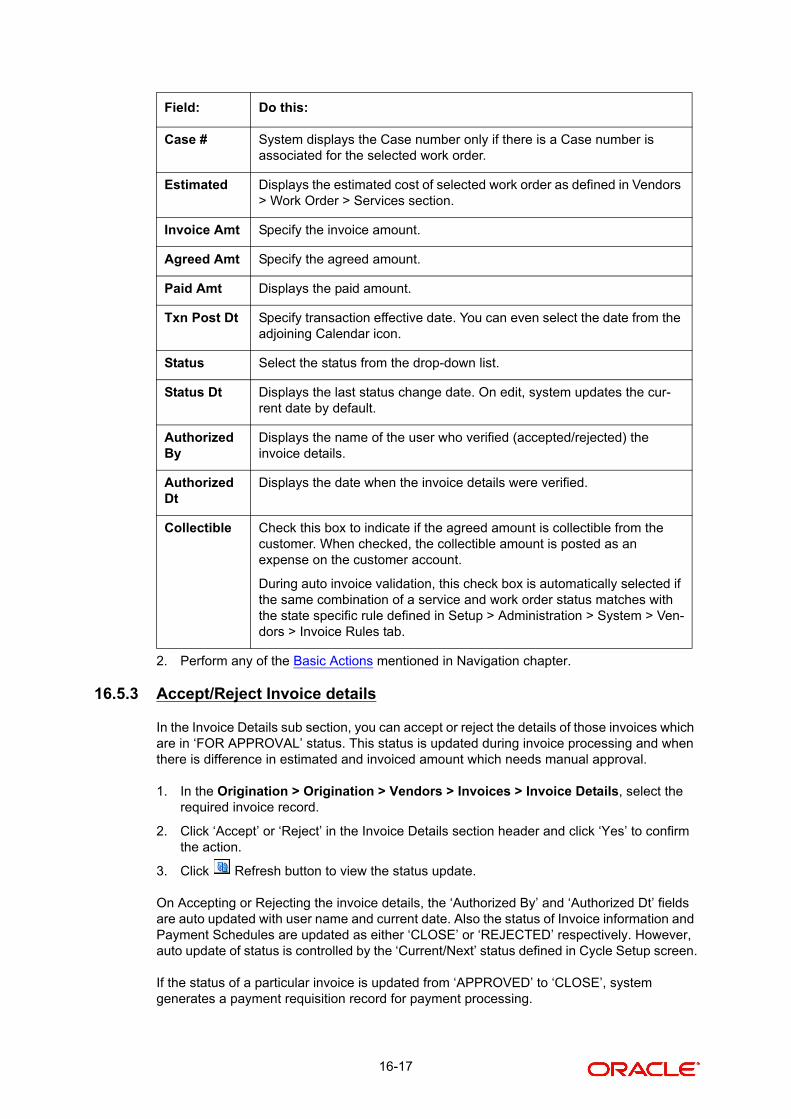
2. Perform any of the Basic Actions mentioned in Navigation chapter.
16.5.3 Accept/Reject Invoice details
In the Invoice Details sub section, you can accept or reject the details of those invoices which are in ‘FOR APPROVAL’ status. This status is updated during invoice processing and when there is difference in estimated and invoiced amount which needs manual approval.
1. In the Origination > Origination > Vendors > Invoices > Invoice Details, select the required invoice record.
2. Click ‘Accept’ or ‘Reject’ in the Invoice Details section header and click ‘Yes’ to confirm the action.
3. Click Refresh button to view the status update.
On Accepting or Rejecting the invoice details, the ‘Authorized By’ and ‘Authorized Dt’ fields are auto updated with user name and current date. Also the status of Invoice information and Payment Schedules are updated as either ‘CLOSE’ or ‘REJECTED’ respectively. However, auto update of status is controlled by the ‘Current/Next’ status defined in Cycle Setup screen.
If the status of a particular invoice is updated from ‘APPROVED’ to ‘CLOSE’, system generates a payment requisition record for payment processing.
Case # System displays the Case number only if there is a Case number is associated for the selected work order.
Estimated Displays the estimated cost of selected work order as defined in Vendors > Work Order > Services section.
Invoice Amt Specify the invoice amount.
Agreed Amt Specify the agreed amount.
Paid Amt Displays the paid amount.
Txn Post Dt Specify transaction effective date. You can even select the date from the adjoining Calendar icon.
Status Select the status from the drop-down list.
Status Dt Displays the last status change date. On edit, system updates the cur-rent date by default.
Authorized By
Displays the name of the user who verified (accepted/rejected) the invoice details.
Authorized Dt
Displays the date when the invoice details were verified.
Collectible Check this box to indicate if the agreed amount is collectible from the customer. When checked, the collectible amount is posted as an expense on the customer account.
During auto invoice validation, this check box is automatically selected if the same combination of a service and work order status matches with the state specific rule defined in Setup > Administration > System > Ven-dors > Invoice Rules tab.
Field: Do this:
16-17

16.5.4 Payment Schedules sub tab
1. In the Origination > Origination > Vendors > Invoices > Invoice Details > Payment Schedules, you can maintain the payment schedules information. Perform any of the Basic Operations mentioned in Navigation chapter.
A brief description of the fields is given below:
2. Perform any of the Basic Actions mentioned in Navigation chapter.
16.5.5 Related Invoice/Work Order Details sub tab
1. In the Origination > Origination > Vendors > Invoices > Invoice Details > Related Invoice/Work Order Details, view the following details.
A brief description of the fields is given below:
Field: Do this:
Currency System displays the vendor currency.
Payment Amt
Specify the actual payment amount for the invoice.
Status Select the payment status from the drop-down list.
Payment Dt Select the payment date from the adjoining calendar.
Payment Reference
(Optional) Specify reference details for the payment if any.
Payable Id View the auto-generated payable ID which is the requisition ID in the AP Transaction screen.
Payment Id View the Requisition ID generated during AP transaction.
Disburse-ment Cur-rency
View the vendor disbursement currency. However, you can select the vendor payment disbursement currency from the drop-down list.
Account Currency
View the currency of the account selected at in ‘Invoice Details’ sub tab.
Amount in Account Currency
View the Invoice Currency amount equivalent of the Account Currency. System displays the ‘Amount in Account Currency’ by converting Vendor Currency value to Account Currency and considering the exchange rate as per the scheduled payment date.
Field: Do this:
Invoice # View the invoice number for the work order.
Invoice Sta-tus
View the status of invoice generated for the work order.
Status Dt View the date on which the status of invoice is recorded.
Currency View the currency in which the invoice is generated.
16-18
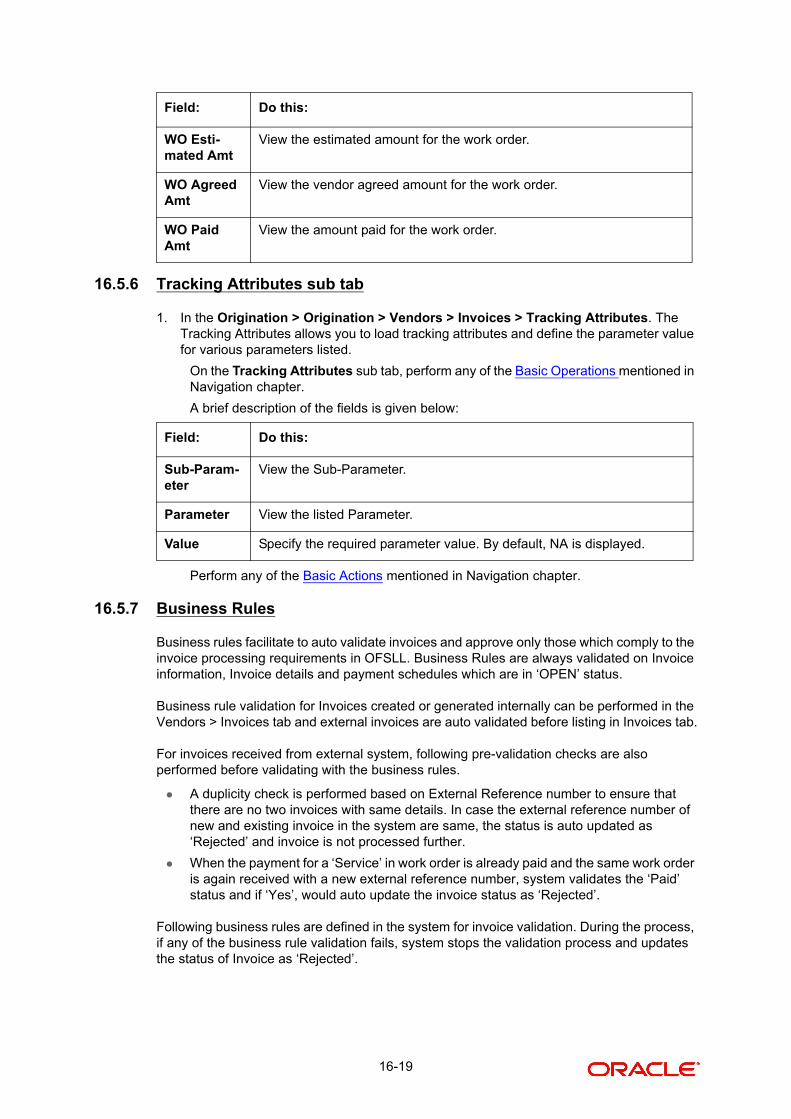
16.5.6 Tracking Attributes sub tab
1. In the Origination > Origination > Vendors > Invoices > Tracking Attributes. The Tracking Attributes allows you to load tracking attributes and define the parameter value for various parameters listed.
On the Tracking Attributes sub tab, perform any of the Basic Operations mentioned in Navigation chapter.
A brief description of the fields is given below:
Perform any of the Basic Actions mentioned in Navigation chapter.
16.5.7 Business Rules
Business rules facilitate to auto validate invoices and approve only those which comply to the invoice processing requirements in OFSLL. Business Rules are always validated on Invoice information, Invoice details and payment schedules which are in ‘OPEN’ status.
Business rule validation for Invoices created or generated internally can be performed in the Vendors > Invoices tab and external invoices are auto validated before listing in Invoices tab.
For invoices received from external system, following pre-validation checks are also performed before validating with the business rules.
A duplicity check is performed based on External Reference number to ensure that there are no two invoices with same details. In case the external reference number of new and existing invoice in the system are same, the status is auto updated as ‘Rejected’ and invoice is not processed further.
When the payment for a ‘Service’ in work order is already paid and the same work order is again received with a new external reference number, system validates the ‘Paid’ status and if ‘Yes’, would auto update the invoice status as ‘Rejected’.
Following business rules are defined in the system for invoice validation. During the process, if any of the business rule validation fails, system stops the validation process and updates the status of Invoice as ‘Rejected’.
WO Esti-mated Amt
View the estimated amount for the work order.
WO Agreed Amt
View the vendor agreed amount for the work order.
WO Paid Amt
View the amount paid for the work order.
Field: Do this:
Sub-Param-eter
View the Sub-Parameter.
Parameter View the listed Parameter.
Value Specify the required parameter value. By default, NA is displayed.
Field: Do this:
16-19

Rule 1
Every work order should have a specific closure status corresponding to the type of work order defined. Accordingly, an invoice generated for that work order should comply with any of the following combination of ‘Work order Type’ and ‘Work Order status’.
Rule 2
Validate invoice for the status of ‘Collectible’ check box in Vendors > Invoice tab > Invoice Details section.
During invoice processing, if the combination of Service, Work Order Status and State matches with any of the state specific rule defined in Setup > Administration > System > Vendors > Invoice Rules tab, the ‘Collectible’ check box is selected and invoice is allowed to process the next business rule.
In case the above combination does not exist in Invoice Rules tab, the ‘Collectible’ check box is NOT selected and the invoice is still allowed to process the next business rule.
Rule 3
Validate invoice based on Estimated and Invoiced amount and updated the corresponding status in Invoice Information, Invoice Details and Payment Schedules sections of Vendors screen.
If the Invoice Amount is ‘Less than or equal’ to Estimated amount, the invoice is approved and the status of Invoice Details and Payment Schedules is updated to ‘APPROVED’.
If the Invoice Amount is ‘greater than’ the Estimated amount, then the invoice needs manual approval and the status of Invoice Details and Payment Schedules is updated to ’FOR APPROVAL’.
An invoice status in Invoice Information section is auto updated to “APPROVED’ if both Invoice Details and Payment Schedules have the same status. Else, if status is rejected in
Work Order Type Work Order Status
Door Knock Completed
Involuntary Repossession Repossessed
Voluntary Repossession Repossessed
Impound Involuntary Repossessed
Impound Voluntary Repossessed
Involuntary Repossession Closed
Voluntary Repossession Closed
Impound Involuntary Closed
Impound Voluntary Closed
Skip Investigation Repossessed
Skip Investigation Closed
16-20

either of the sections, the status of invoice is also updated as ‘REJECTED’ in Invoice Information section without allowing further edits on the same.
16.6 Search tab
A Search tab is available on the Vendors screen to help locate the details of a Vendor, Workorder, and/or an Invoice information maintained in the system. This is the information that is used in the respective tabs of Vendors screen.
To search for a Vendor/Workorder/Invoice
1. On the Oracle Financial Services Lending and Leasing home screen, click Origination > Origination > Vendors > Search tab.
2. In the ‘Search Options’, select the option against Vendor or Workorder or Invoice.
3. In the ‘Search Criteria’ section, use ‘Comparison Operator’ and ‘Value’ columns to enter search criteria you want to use to locate a producer.
4. Click ‘Search’.
16-21
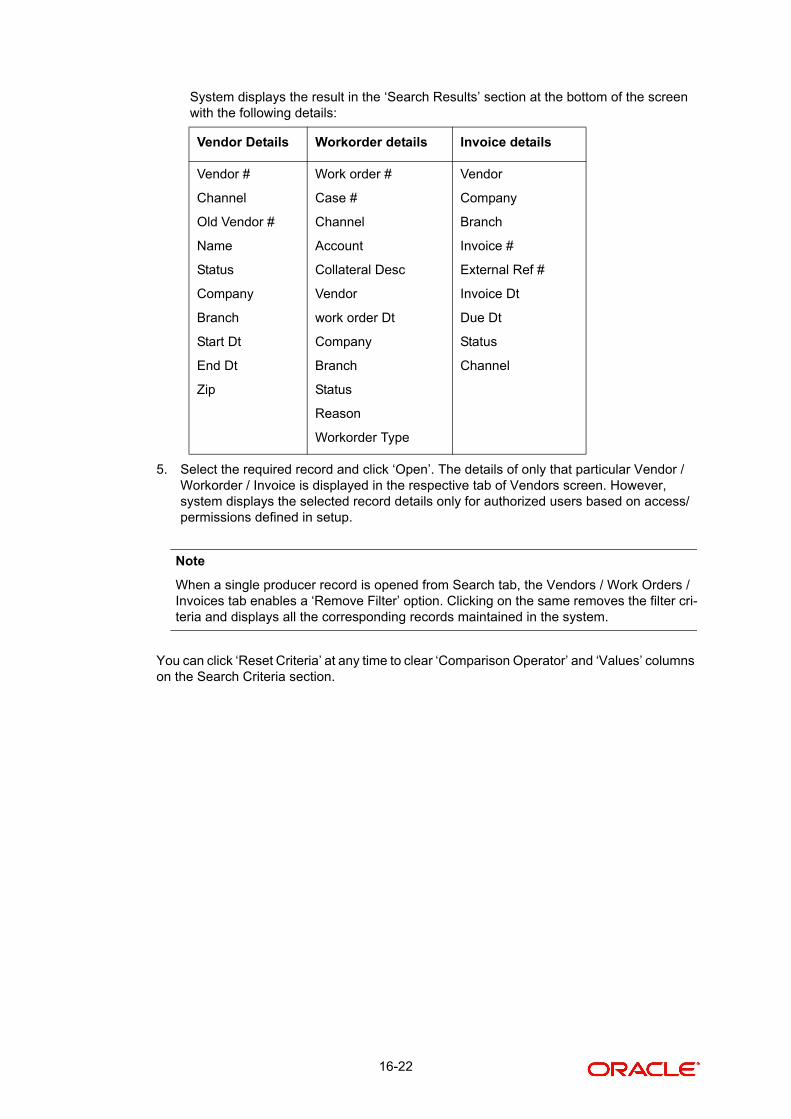
System displays the result in the ‘Search Results’ section at the bottom of the screen with the following details:
5. Select the required record and click ‘Open’. The details of only that particular Vendor / Workorder / Invoice is displayed in the respective tab of Vendors screen. However, system displays the selected record details only for authorized users based on access/permissions defined in setup.
Note
When a single producer record is opened from Search tab, the Vendors / Work Orders / Invoices tab enables a ‘Remove Filter’ option. Clicking on the same removes the filter cri-teria and displays all the corresponding records maintained in the system.
You can click ‘Reset Criteria’ at any time to clear ‘Comparison Operator’ and ‘Values’ columns on the Search Criteria section.
Vendor Details Workorder details Invoice details
Vendor #
Channel
Old Vendor #
Name
Status
Company
Branch
Start Dt
End Dt
Zip
Work order #
Case #
Channel
Account
Collateral Desc
Vendor
work order Dt
Company
Branch
Status
Reason
Workorder Type
Vendor
Company
Branch
Invoice #
External Ref #
Invoice Dt
Due Dt
Status
Channel
16-22

Appendix A:Rounding Amounts and Rate Attributes
Rounding Amounts
Generally in the lending industry, computed amounts (interest, fees, costs and so on) are rounded to the second decimal place. However, there are occasions where the rounding of the computed amounts has to be carried out using different methods. Oracle Financial Services Lending and Leasing supports the rounding, raising of or cutting off calculated amounts.
Rounding will increase the resulting amount to next number up to the second decimal, based on values of third decimal.
Raising will always increase the resulting amount to next number up to the second decimal.
Cutting off will always cut the number after the second decimal.
The system only rounds calculated amounts (calculated fees, calculated payment, and so on) and not user-entered amounts.
You can choose the rounding method you want to use by setting the parameter value for system parameter CMN_AMOUNT_ROUND_METHOD on the Administration form (Setup menu > Administration master tab > System drop-down link > System Parameters link > System tab).
You can choose the rounding factor you want to use by setting the parameter value for system parameter CMN_AMOUNT_ROUND_FACTOR on the Administration form. Currently, Oracle Financial Services Lending and Leasing supports rounding up to two decimals only.
Examples of how resulting amounts differ by RAISE, ROUND, and CUTOFF:
Example 1: Amount: 234.136
Example 2: Amount: 234.134
Example 3: Amount: 234.1319999
Method Result
Round 234.14
Raise 234.14
Cut off 234.13
Method Result
Round 234.13
Raise 234.14
Cut off 234.13
Method Result
Round 234.13
A-1

Rate Attributes
The system supports rounding of index rate to keep the rate calculation as simple as possible for the customers. The general practice is to round the rate to nearest eighth (1/8th) (to keep index rate in the multiple of 125) or fourth (1/4th) (to keep index rate in the multiple of 25). The system rounds only index rate and not the margin or final rate. You can define the index rounding method on the Product tab’s Product Definition screen for variable rate Loan.
Note
Index rounding does not apply to fixed rate Loan.
The system currently supports the following rounding of methods.
1. NO ROUNDING TO INDEX RATE
2. INDEX RATE ROUNDED TO NEAREST.25
3. INDEX RATE ROUNDED TO NEAREST.125
NO ROUNDING TO INDEX RATE:
Select this method for no rounding.
INDEX RATE ROUNDED TO NEAREST 0.25:
Select this method to round up to 1/4th (to keep the index rate in the multiple of 0.25).
Examples:
INDEX RATE ROUNDED TO NEAREST 0.125:
Select this method to round up to 1/8th (to keep the index rate in the multiple of 0.125).
Examples:
Raise 234.14
Cut off 234.13
Method Result
Current rate: 5.125
Round of rate: 5.25
Method Result
Current rate: 5.124
Round of rate: 5.00
Method Result
Method Result
A-2

Current rate: 5.325
Rate rounded to:
5.375
Method Result
Current rate: 5.312
Rate rounded to:
5.250
A-3

B-1
Appendix B: Payment Amount Conversions
The following table contains the calculations Oracle Financial Services Lending and Leasing uses to convert different payment frequencies (weekly, biweekly, semi monthly, and so on) to standard monthly values for instalment accounts.
Payment Frequency: Scheduled Monthly Income Amount:
D = Deferred Zero fill
P = Single payment Loan Zero fill
W = Weekly (due every week) Multiple by 4.33
B = Biweekly (due every two weeks) Multiple by 2.16
E = Semi-monthly (due twice a month) Multiple by 2
M = Monthly (due every month) As given
L = Bimonthly (due every two months) Divide by 2
Q = Quarterly (due every three months)
Divide by 3
T = Triannually (due every four months)
Divide by 4
S = Semi-annually (due twice a year) Divide by 6
Y = Annually (due every year) Divide by 12

Appendix C:Generic Recovery Interface (GRI)
C.1 Introduction
In general, a Generic Recovery Interface (GRI) is a platform to connect Oracle Financial Services Lending and Leasing (OFSLL) with any third party recovery system. This integration facilitates auto lending institutions to repossess non-performing assets and recover them through a network of third party vendor managed systems.
Accordingly, in an integrated system a particular account in OFSLL can be assigned to a vendor (third party) through GRI for recovery services. Depending on each stage of the process, OFSLL triggers appropriate web service requests to create and update the details into the third party system. Subsequently, the acknowledged details and case updates are retrieved into the corresponding work order(s) and account(s) in OFSLL.
Also the system parameter ‘GRI_WEBSERVICE_LOG_IND’ when enabled, logs all the GRI related web service communications between OFSLL and external interfaced system. The same can be viewed in Dashboard > System Monitor > Database Server Log Files tab by selecting ‘Interfaces’ view option.
Following type of web service requests are supported:
Create Case
Update Case
Case Comments
Hold Case
Reopen Case
Reassign Case
Close Case
Case Updates Received via FireHose WebService
Case Repossession
Case Invoice
C.1.1 Pre-requisites
Following are the pre-requisites while working with third party integrated system:
Ensure that 'Cycle' setup (Setup > Vendors> Cycles tab) is defined for the Work Order, where channel is selected as 'Generic Recovery Interface'. Also if the system is defined to automatically post any specific conditions on account, you need to maintain the Action and Result Code.
Ensure that Vendor Fees (Setup > Vendors > Vendor Fees tab) defaults the 'Estimated Amount'.
Ensure that the Work Order Types are mapped consistently and are in sync between OFSLL and third party system. The following table lists the Work Order Types maintained in the system.
Work Order Type Description
DRK DOOR KNOCK (GRI)
IIR IMPOUND INVOLUNTARY REPOSSESSION (GRI)
C-1
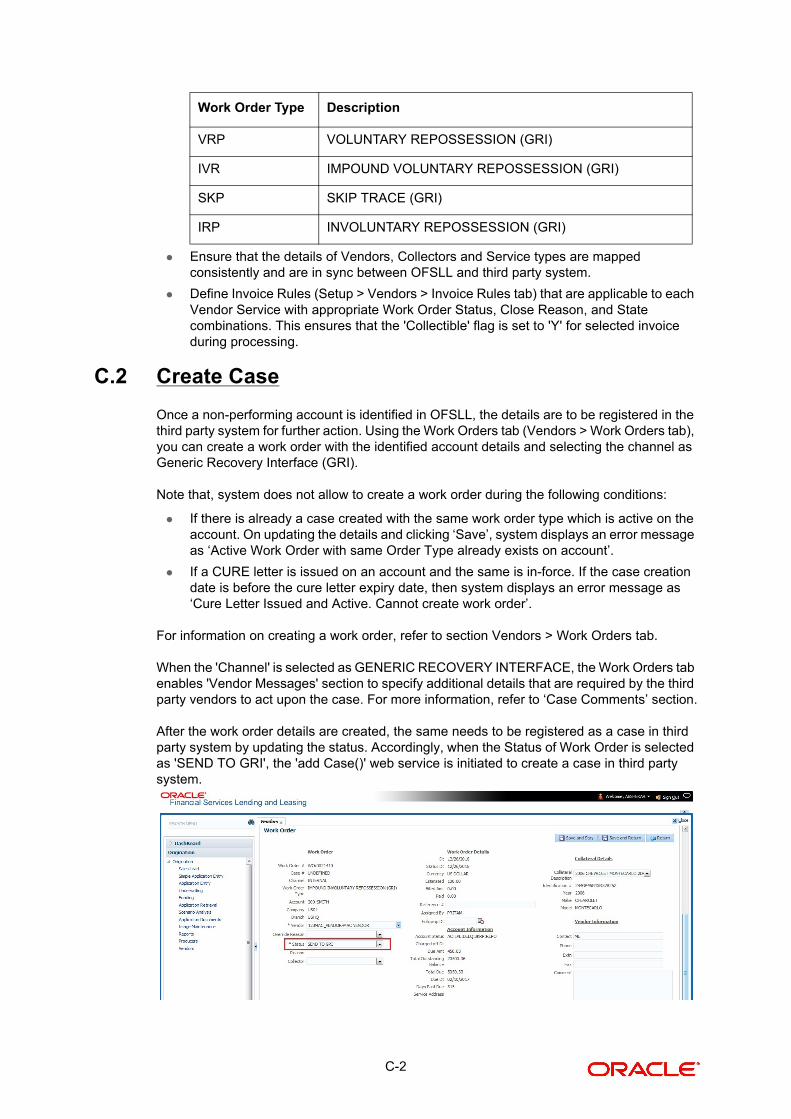
Ensure that the details of Vendors, Collectors and Service types are mapped consistently and are in sync between OFSLL and third party system.
Define Invoice Rules (Setup > Vendors > Invoice Rules tab) that are applicable to each Vendor Service with appropriate Work Order Status, Close Reason, and State combinations. This ensures that the 'Collectible' flag is set to 'Y' for selected invoice during processing.
C.2 Create Case
Once a non-performing account is identified in OFSLL, the details are to be registered in the third party system for further action. Using the Work Orders tab (Vendors > Work Orders tab), you can create a work order with the identified account details and selecting the channel as Generic Recovery Interface (GRI).
Note that, system does not allow to create a work order during the following conditions:
If there is already a case created with the same work order type which is active on the account. On updating the details and clicking ‘Save’, system displays an error message as ‘Active Work Order with same Order Type already exists on account’.
If a CURE letter is issued on an account and the same is in-force. If the case creation date is before the cure letter expiry date, then system displays an error message as ‘Cure Letter Issued and Active. Cannot create work order’.
For information on creating a work order, refer to section Vendors > Work Orders tab.
When the 'Channel' is selected as GENERIC RECOVERY INTERFACE, the Work Orders tab enables 'Vendor Messages' section to specify additional details that are required by the third party vendors to act upon the case. For more information, refer to ‘Case Comments’ section.
After the work order details are created, the same needs to be registered as a case in third party system by updating the status. Accordingly, when the Status of Work Order is selected as 'SEND TO GRI', the 'add Case()' web service is initiated to create a case in third party system.
VRP VOLUNTARY REPOSSESSION (GRI)
IVR IMPOUND VOLUNTARY REPOSSESSION (GRI)
SKP SKIP TRACE (GRI)
IRP INVOLUNTARY REPOSSESSION (GRI)
Work Order Type Description
C-2

The 'add Case()' web service request consists of the following Case details to be registered in third party system:
Primary Customer
Secondary Customer (Based on the sequence)
Address Details
Account Details
Collateral Details
When the web service request is successful, the response would contain the new case number created in third party system. The case # is then appended to the work order and the status is changed from 'SEND TO GRI' to 'ASSIGNED'. Also a comment is posted on the corresponding account in Customer Service > Comments tab, with the following details:
Type = SYSTEM GENERATED
Sub Type = INBOUND FROM INTERFACE
Comment = [Case No]: "NEW CASE CREATED"
Comment By = "INTERNAL"
Comment Dt = Comment Posted date
In case of an error in the web service response received from third party system, the status of work order is changed from 'SEND TO GRI' to 'GRI FAILED' and a comment is posted on the corresponding account in Customer Service > Comments tab, with the following details:
Type = SYSTEM GENERATED
Sub Type = INBOUND FROM INTERFACE
Comment = "<<Error Message>>"
Comment By = "INTERNAL"
Comment Dt = Comment Posted date
Note
Error in web service response can also arise when a work order type is not mapped be-tween the two systems and a case creation request is sent to third party system.
C.3 Update Case
Once the details of a work order has been registered as a case in third party system, there can be subsequent updates in the details of the mapped account arising due to mismatch in
C-3

account details, change in address, collateral and so on. These changes need to be incrementally updated into the third party system and are done through the following web services which are triggered when corresponding details are updated.
The update web service request consists of the modified field details that are to be updated in third party system.
If the web service request is successful, the modified details are updated into the case in third party system. Also a comment is posted on the corresponding account in Customer Service > Comments tab, with the following details:
Type = SYSTEM GENERATED
Sub Type = INBOUND FROM INTERFACE
Comment = “CASE NO: <<UPDATED ACCOUNT DETAILS ACCEPTED BY THIRD PARTY INTERFACE>>”
Comment By = “INTERNAL”
Comment Dt = Comment Posted date and time.
In case of an error in the web service response received from third party system, case details are not updated and the following details are posted as a comment against the account.
Type = SYSTEM GENERATED
Sub Type = INBOUND FROM INTERFACE
Comment = “CASE NO: <<UPDATED ACCOUNT DETAILS NOT UPDATED IN THIRD PARTY INTERFACE>>”
Comment By = “INTERNAL”
Comment Dt = Comment Posted date and time.
Web Service Type of change in mapped account
updateCaseAccountInfo() When Account details are updated.
updateCaseAddress() When Address details are updated.
updateCaseCollateral() When Collateral details are updated.
updateCaseDebtor() When Primary Customer details are updated.
updateCaseCosigner() When Secondary Customer details are updated.
Secondary Customer can also be the next customer type defined in the sequence.
C-4
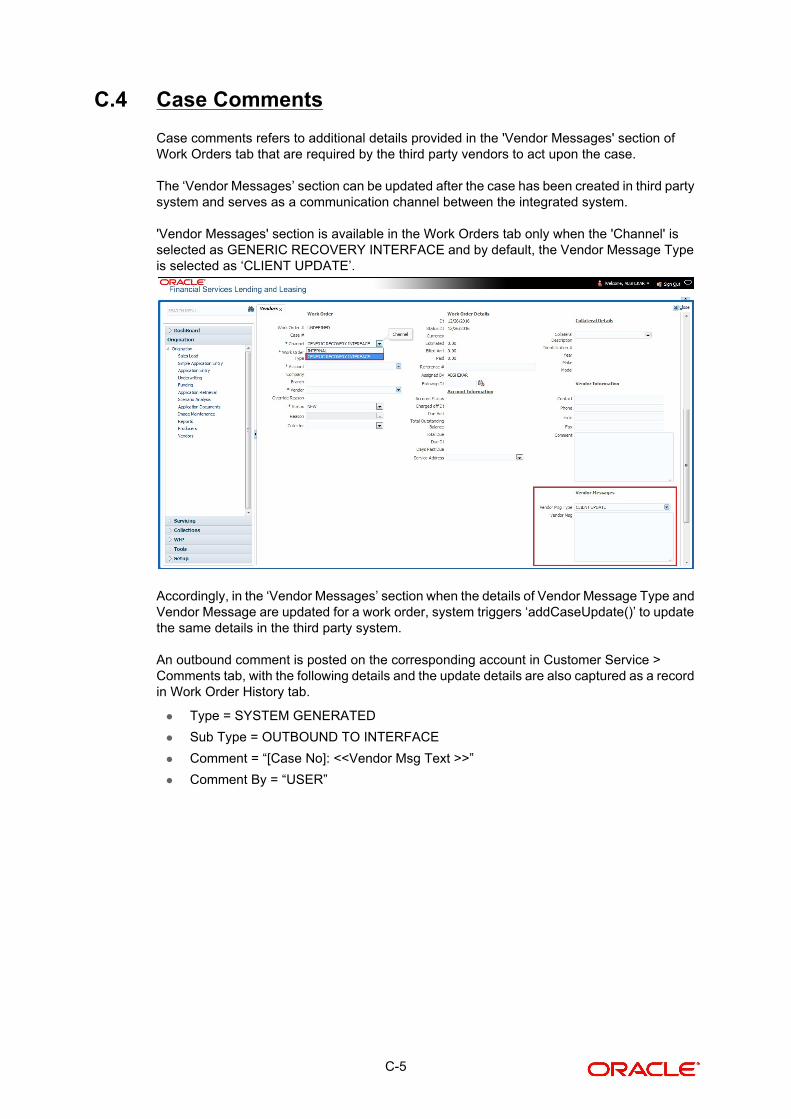
C.4 Case Comments
Case comments refers to additional details provided in the 'Vendor Messages' section of Work Orders tab that are required by the third party vendors to act upon the case.
The ‘Vendor Messages’ section can be updated after the case has been created in third party system and serves as a communication channel between the integrated system.
'Vendor Messages' section is available in the Work Orders tab only when the 'Channel' is selected as GENERIC RECOVERY INTERFACE and by default, the Vendor Message Type is selected as ‘CLIENT UPDATE’.
Accordingly, in the ‘Vendor Messages’ section when the details of Vendor Message Type and Vendor Message are updated for a work order, system triggers ‘addCaseUpdate()’ to update the same details in the third party system.
An outbound comment is posted on the corresponding account in Customer Service > Comments tab, with the following details and the update details are also captured as a record in Work Order History tab.
Type = SYSTEM GENERATED
Sub Type = OUTBOUND TO INTERFACE
Comment = “[Case No]: <<Vendor Msg Text >>”
Comment By = “USER”
C-5
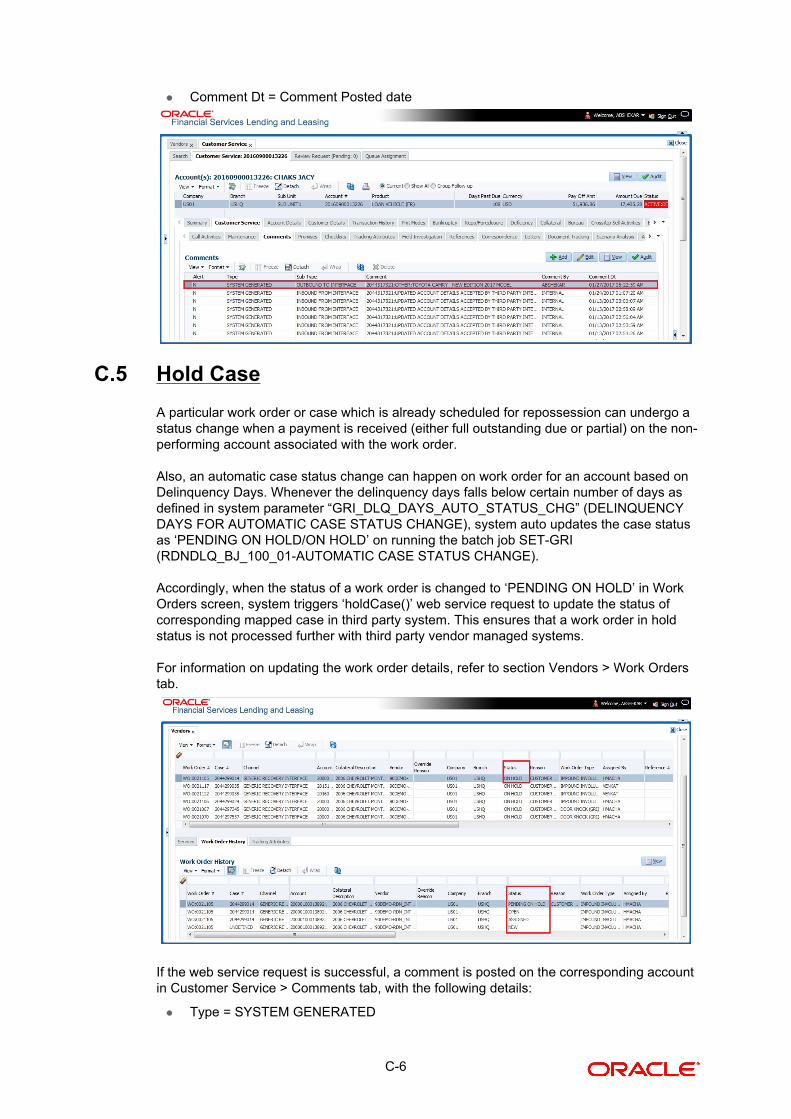
Comment Dt = Comment Posted date
C.5 Hold Case
A particular work order or case which is already scheduled for repossession can undergo a status change when a payment is received (either full outstanding due or partial) on the non-performing account associated with the work order.
Also, an automatic case status change can happen on work order for an account based on Delinquency Days. Whenever the delinquency days falls below certain number of days as defined in system parameter “GRI_DLQ_DAYS_AUTO_STATUS_CHG” (DELINQUENCY DAYS FOR AUTOMATIC CASE STATUS CHANGE), system auto updates the case status as ‘PENDING ON HOLD/ON HOLD’ on running the batch job SET-GRI (RDNDLQ_BJ_100_01-AUTOMATIC CASE STATUS CHANGE).
Accordingly, when the status of a work order is changed to ‘PENDING ON HOLD’ in Work Orders screen, system triggers ‘holdCase()’ web service request to update the status of corresponding mapped case in third party system. This ensures that a work order in hold status is not processed further with third party vendor managed systems.
For information on updating the work order details, refer to section Vendors > Work Orders tab.
If the web service request is successful, a comment is posted on the corresponding account in Customer Service > Comments tab, with the following details:
Type = SYSTEM GENERATED
C-6

Sub Type = INBOUND FROM INTERFACE
Comment = “CASE NO: <<CASE HOLD REQUEST ACCEPTED BY THIRD PARTY INTERFACE (Reference No)>>”
Comment By = “INTERNAL”
Comment Dt = Comment Posted date.
In case of an error in the web service response received from third party system, following details are posted as a comment against the account with an alert flag and the status of Work Order is not changed.
Alert = Y
Type = SYSTEM GENERATED
Sub Type = INBOUND FROM INTERFACE
Comment = “CASE NO: <<CASE HOLD REQUEST NOT UPDATED IN THIRD PARTY INTERFACE>>”
Comment By = “INTERNAL”
Comment Dt = Comment Posted date.
C.6 Reopen Case
When the status of a work order is updated from ‘ON HOLD’ to ‘RELEASED’ in Work Orders screen, system triggers ‘reopenCase()’ web service request to update the status of corresponding mapped case in third party system.
C-7

This ensures that a work order in hold status is processed further with third party vendor managed systems.
The processing update of REOPEN case request at the third party system is tracked separately through a FIREHOSE web service scheduled at specific interval using a batch process. For more information, refer ‘Case Updates Received via FireHose WebService’ section.
If the web service request is successful, a comment is posted on the corresponding account in Customer Service > Comments tab, with the following details:
Type = SYSTEM GENERATED
Sub Type = INBOUND FROM INTERFACE
Comment = “CASE NO: <<CASE REOPEN UPDATED IN THIRD PARTY INTERFACE>>”
Comment By = “INTERNAL”
Comment Dt = Comment Posted date
In case of an error in the web service response received from third party system, following details are posted as a comment against the account with an alert flag and the status of Work Order is not changed.
Alert = Y
Type = SYSTEM GENERATED
C-8
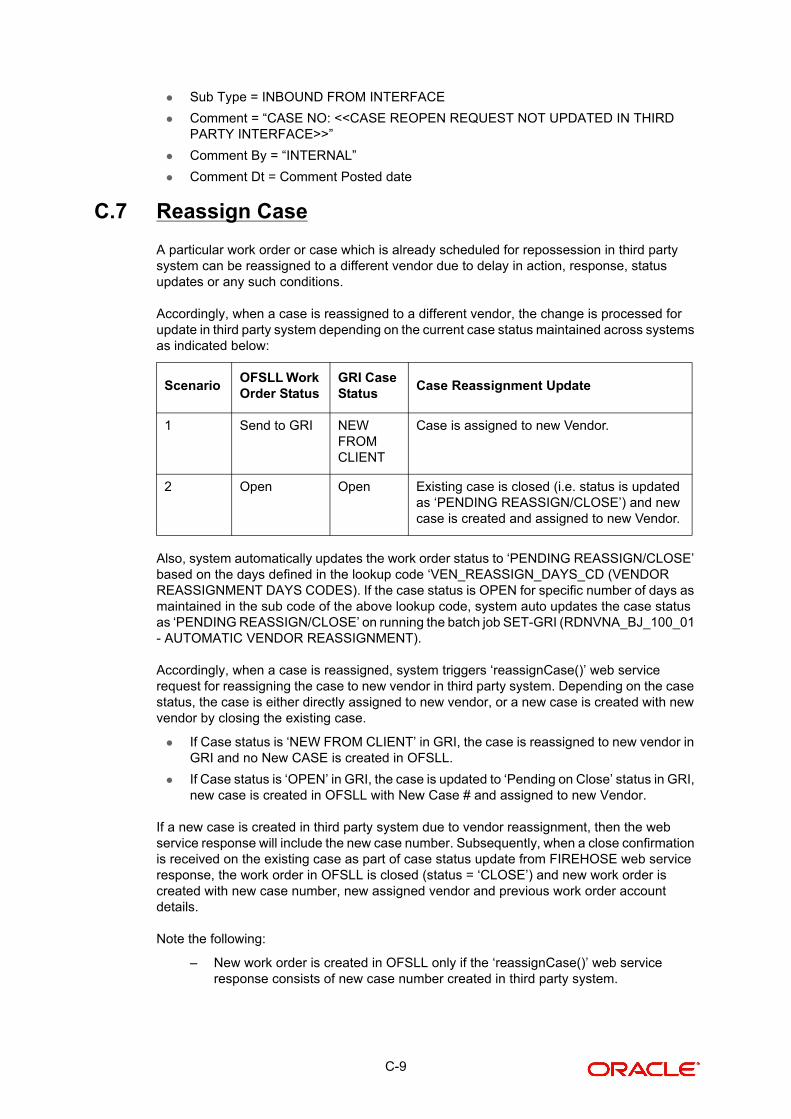
Sub Type = INBOUND FROM INTERFACE
Comment = “CASE NO: <<CASE REOPEN REQUEST NOT UPDATED IN THIRD PARTY INTERFACE>>”
Comment By = “INTERNAL”
Comment Dt = Comment Posted date
C.7 Reassign Case
A particular work order or case which is already scheduled for repossession in third party system can be reassigned to a different vendor due to delay in action, response, status updates or any such conditions.
Accordingly, when a case is reassigned to a different vendor, the change is processed for update in third party system depending on the current case status maintained across systems as indicated below:
Also, system automatically updates the work order status to ‘PENDING REASSIGN/CLOSE’ based on the days defined in the lookup code ‘VEN_REASSIGN_DAYS_CD (VENDOR REASSIGNMENT DAYS CODES). If the case status is OPEN for specific number of days as maintained in the sub code of the above lookup code, system auto updates the case status as ‘PENDING REASSIGN/CLOSE’ on running the batch job SET-GRI (RDNVNA_BJ_100_01 - AUTOMATIC VENDOR REASSIGNMENT).
Accordingly, when a case is reassigned, system triggers ‘reassignCase()’ web service request for reassigning the case to new vendor in third party system. Depending on the case status, the case is either directly assigned to new vendor, or a new case is created with new vendor by closing the existing case.
If Case status is ‘NEW FROM CLIENT’ in GRI, the case is reassigned to new vendor in GRI and no New CASE is created in OFSLL.
If Case status is ‘OPEN’ in GRI, the case is updated to ‘Pending on Close’ status in GRI, new case is created in OFSLL with New Case # and assigned to new Vendor.
If a new case is created in third party system due to vendor reassignment, then the web service response will include the new case number. Subsequently, when a close confirmation is received on the existing case as part of case status update from FIREHOSE web service response, the work order in OFSLL is closed (status = ‘CLOSE’) and new work order is created with new case number, new assigned vendor and previous work order account details.
Note the following:
– New work order is created in OFSLL only if the ‘reassignCase()’ web service response consists of new case number created in third party system.
ScenarioOFSLL Work Order Status
GRI Case Status
Case Reassignment Update
1 Send to GRI NEW FROM CLIENT
Case is assigned to new Vendor.
2 Open Open Existing case is closed (i.e. status is updated as ‘PENDING REASSIGN/CLOSE’) and new case is created and assigned to new Vendor.
C-9

– If the web service response is successful but does not contain a case #, then the case is directly assigned to new vendor in third party system.
A comment is posted on the corresponding account in Customer Service > Comments tab, with the following details:
Type = SYSTEM GENERATED
Sub Type = INBOUND FROM INTERFACE
Comment = NEW CASE NO: “<<CASE REASSIGNMENT REQUEST ACCEPTED BY THIRD PARTY INTERFACE >>”
Comment By = “INTERNAL”
Comment Dt = Comment Posted date
In case of an error in the web service response received from third party system, following details are posted as a comment against the account and the work status is not updated nor a new work order is created with new assigned vendor.
Type = SYSTEM GENERATED
Sub Type = INBOUND FROM INTERFACE
Comment = CASE NO: “<<CASE REASSIGNMENT REQUEST NOT UPDATED IN THIRD PARTY INTERFACE >>”
Comment By = “INTERNAL”
Comment Dt = Comment Posted date
C.8 Close Case
A particular work order or case which is already scheduled for repossession can be closed after validating the preceding status and subsequently a repossession may not be required on the account mapped to the work order.
Accordingly, when the status of a work order is changed to ‘PENDING CLOSE’ in Work Orders screen, system triggers ‘closeCase()’ web service request to update the status of
C-10

corresponding mapped case in third party system. This ensures that the work order is not processed further with third party vendor managed systems.
If the web service request is successful, a comment is posted on the corresponding account in Customer Service > Comments tab, with the following details:
Alert = N
Type = SYSTEM GENERATED
Sub Type = INBOUND FROM INTERFACE
Comment = CASE NO: “<<CASE CLOSE REQUEST ACCEPTED BY THIRD PARTY INTERFACE >>”
Comment By = “INTERNAL”
Comment Dt = Comment Posted date
In case of an error in the web service response received from third party system, following details are posted as a comment against the account with an alert flag and the status of Work Order is not changed.
Alert = Y
Type = SYSTEM GENERATED
Sub Type = INBOUND FROM INTERFACE
Comment = CASE NO: “<<CASE CLOSE REQUEST NOT UPDATED IN THIRD PARTY INTERFACE >>”
Comment By = “INTERNAL”
Comment Dt = Comment Posted date
C-11
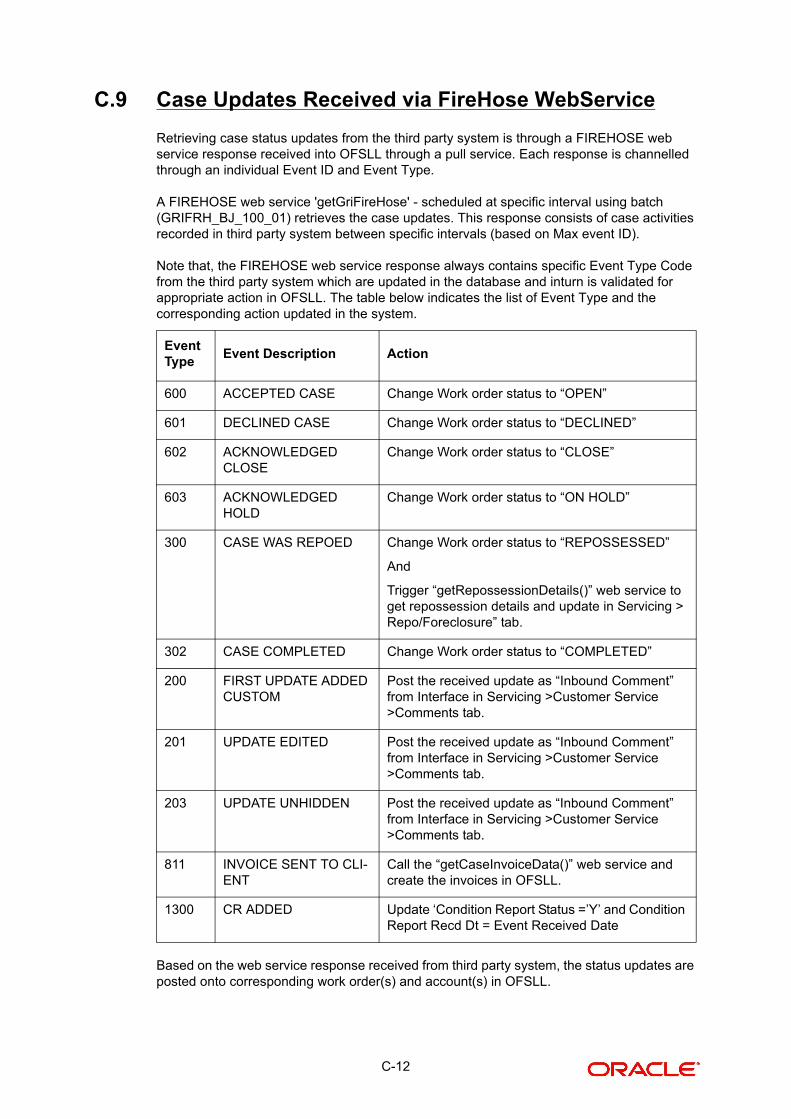
C.9 Case Updates Received via FireHose WebService
Retrieving case status updates from the third party system is through a FIREHOSE web service response received into OFSLL through a pull service. Each response is channelled through an individual Event ID and Event Type.
A FIREHOSE web service 'getGriFireHose' - scheduled at specific interval using batch (GRIFRH_BJ_100_01) retrieves the case updates. This response consists of case activities recorded in third party system between specific intervals (based on Max event ID).
Note that, the FIREHOSE web service response always contains specific Event Type Code from the third party system which are updated in the database and inturn is validated for appropriate action in OFSLL. The table below indicates the list of Event Type and the corresponding action updated in the system.
Based on the web service response received from third party system, the status updates are posted onto corresponding work order(s) and account(s) in OFSLL.
Event Type
Event Description Action
600 ACCEPTED CASE Change Work order status to “OPEN”
601 DECLINED CASE Change Work order status to “DECLINED”
602 ACKNOWLEDGED CLOSE
Change Work order status to “CLOSE”
603 ACKNOWLEDGED HOLD
Change Work order status to “ON HOLD”
300 CASE WAS REPOED Change Work order status to “REPOSSESSED”
And
Trigger “getRepossessionDetails()” web service to get repossession details and update in Servicing > Repo/Foreclosure” tab.
302 CASE COMPLETED Change Work order status to “COMPLETED”
200 FIRST UPDATE ADDED CUSTOM
Post the received update as “Inbound Comment” from Interface in Servicing >Customer Service >Comments tab.
201 UPDATE EDITED Post the received update as “Inbound Comment” from Interface in Servicing >Customer Service >Comments tab.
203 UPDATE UNHIDDEN Post the received update as “Inbound Comment” from Interface in Servicing >Customer Service >Comments tab.
811 INVOICE SENT TO CLI-ENT
Call the “getCaseInvoiceData()” web service and create the invoices in OFSLL.
1300 CR ADDED Update ‘Condition Report Status =’Y’ and Condition Report Recd Dt = Event Received Date
C-12

For example, if the FIREHOSE web service response consists of the Event Type ‘600’, it indicates that the case is accepted by the assigned vendor in third party system and status of the work order is to be updated to ‘OPEN’ in OFSLL. Also a comment is posted on the corresponding account in Customer Service > Comments tab, with the following details:
Type = SYSTEM GENERATED
Sub Type = INBOUND FROM INTERFACE
Comment = "[Case No]: <<[Vendor] ACCEPTED CASE>>"
Comment By = "INTERNAL"
Comment Dt = Comment Posted date and time
Note
Work order status change is permitted only if the previous status matches with the defined cycle setup (Setup > Products > Cycles). Else, update is not allowed and comment is post-ed on the account with the message ‘Work Order Status Update failed due to mismatch of previous status’.
C.10 Case Repossession
When a case has been repossessed, the status of the case is updated by the assigned vendor in third party system. The case status is then retrieved through a FIREHOSE web service scheduled at specific interval using a batch process.
On receiving the case status update as ‘REPOSSESSED’ (i.e. Event Type 300) from FIREHOSE web service response, system triggers ‘getRepossessionDetails()’ web service request to fetch the repossession details and update the status of corresponding mapped work order and account in OFSLL.
If the web service request is successful and repossession details are received as part of the response, the status of the work order is updated in Work Orders tab and a comment is posted on the corresponding account in Customer Service > Comments tab, with the following details:
Type = SYSTEM GENERATED
Sub Type = INBOUND FROM INTERFACE
Comment = “[Case No]: <<[Vendor]: REPO DETAILS RECEIVED FROM THIRD PARTY INTERFACE >>”
Comment By = “INTERNAL”
Comment Dt = Comment Posted date and time
C-13

The Repossession details are also updated in Repo/Foreclosure tab of Customer Service screen.
C.11 Case Invoice
When a case has been repossessed, an invoice with the actual cost incurred for repossession and the details of the asset repossessed are updated in the third party system by the assigned vendor.
Subsequently, when the case status update is received as ‘REPOSSESSED’ (i.e. Event Type 300) from FIREHOSE web service response, system triggers ‘getCaseInvoiceData()’ web service request to retrieve the invoice and asset details from the third party system.
If the web service request is successful and repossession details are received as part of the response, the details are updated in Vendors > Invoices tab and a comment is posted on the corresponding account in Customer Service > Comments tab, with the following details:
Type = SYSTEM GENERATED
Sub Type = INBOUND FROM INTERFACE
Comment = “[Case No]: <<[Vendor]: INVOICE RECEIVED FROM THIRD PARTY INTERFACE >>”
Comment By = “INTERNAL”
C-14

Comment Dt = Comment Posted date and time
The details of the invoice in the web service response are captured in Vendors > Invoice Information tab with invoice details and Payment Schedule. By default, the status of the invoice is ‘OPEN’ to update the payment details.
System auto validates the invoice details which are received from third party system with specific business rules before creating a record in the Invoice Information tab. Hence the ‘Validate Invoice’ button in the Information tab is disabled for invoice records from external channel (Generic Recovery Interface) and the details are marked as view only.
For more information on business rules and working with Invoices tab, refer to ‘Vendors’ chapter.
C-15
Copyright © 2022 FDOKUMEN