Oracle Financial Services Lending and Leasing
332
Lease Servicing User Guide Oracle Financial Services Lending and Leasing Release 14.1.0.0.0 March 2016
-
Upload
khangminh22 -
Category
Documents
-
view
3 -
download
0
Transcript of Oracle Financial Services Lending and Leasing
Lease Servicing User Guide
Oracle Financial Services Lending and LeasingRelease 14.1.0.0.0
March 2016
Lease Servicing User GuideMarch 2016Oracle Financial Services Software Limited
Oracle Park
Off Western Express HighwayGoregaon (East)Mumbai, Maharashtra 400 063 IndiaWorldwide Inquiries:Phone: +91 22 6718 3000Fax:+91 22 6718 3001www.oracle.com/financialservices/
Copyright © 2007, 2016, Oracle and/or its affiliates. All rights reserved.
Oracle and Java are registered trademarks of Oracle and/or its affiliates. Other names may be trademarks of their respective owners.
U.S. GOVERNMENT END USERS: Oracle programs, including any operating system, integrated software, any programs installed on the hardware, and/or documentation, delivered to U.S. Government end users are "commercial computer software" pursuant to the applicable Federal Acquisition Regulation and agency-specific supplemental regulations. As such, use, duplication, disclosure, modification, and adaptation of the programs, including any operating system, integrated software, any programs installed on the hardware, and/or documentation, shall be subject to license terms and license restrictions applicable to the programs. No other rights are granted to the U.S. Government.
This software or hardware is developed for general use in a variety of information management applications. It is not developed or intended for use in any inherently dangerous applications, including applications that may create a risk of personal injury. If you use this software or hardware in dangerous applications, then you shall be responsible to take all appropriate failsafe, backup, redundancy, and other measures to ensure its safe use. Oracle Corporation and its affiliates disclaim any liability for any damages caused by use of this software or hardware in dangerous applications.
This software and related documentation are provided under a license agreement containing restrictions on use and disclosure and are protected by intellectual property laws. Except as expressly permitted in your license agreement or allowed by law, you may not use, copy, reproduce, translate, broadcast, modify, license, transmit, distribute, exhibit, perform, publish or display any part, in any form, or by any means. Reverse engineering, disassembly, or decompilation of this software, unless required by law for interoperability, is prohibited.The information contained herein is subject to change without notice and is not warranted to be error-free. If you find any errors, please report them to us in writing.
This software or hardware and documentation may provide access to or information on content, products and services from third parties. Oracle Corporation and its affiliates are not responsible for and expressly disclaim all warranties of any kind with respect to third-party content, products, and services. Oracle Corporation and its affiliates will not be responsible for any loss, costs, or damages incurred due to your access to or use of third-party content, products, or services.
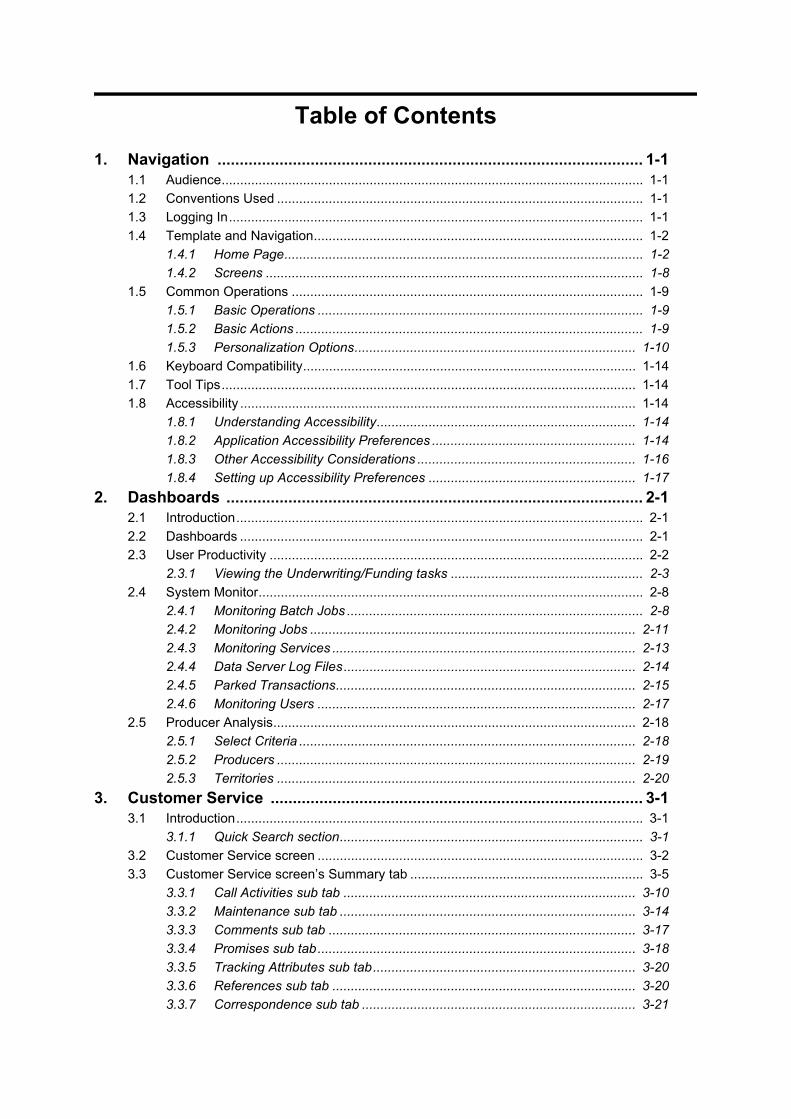
Table of Contents
1. Navigation ................................................................................................ 1-11.1 Audience.................................................................................................................. 1-1
1.2 Conventions Used ................................................................................................... 1-1
1.3 Logging In................................................................................................................ 1-1
1.4 Template and Navigation......................................................................................... 1-2
1.4.1 Home Page................................................................................................. 1-2
1.4.2 Screens ...................................................................................................... 1-8
1.5 Common Operations ............................................................................................... 1-9
1.5.1 Basic Operations ........................................................................................ 1-9
1.5.2 Basic Actions .............................................................................................. 1-9
1.5.3 Personalization Options............................................................................ 1-10
1.6 Keyboard Compatibility.......................................................................................... 1-14
1.7 Tool Tips................................................................................................................ 1-14
1.8 Accessibility ........................................................................................................... 1-14
1.8.1 Understanding Accessibility...................................................................... 1-14
1.8.2 Application Accessibility Preferences ....................................................... 1-14
1.8.3 Other Accessibility Considerations ........................................................... 1-16
1.8.4 Setting up Accessibility Preferences ........................................................ 1-17
2. Dashboards .............................................................................................. 2-12.1 Introduction.............................................................................................................. 2-1
2.2 Dashboards ............................................................................................................. 2-1
2.3 User Productivity ..................................................................................................... 2-2
2.3.1 Viewing the Underwriting/Funding tasks .................................................... 2-3
2.4 System Monitor........................................................................................................ 2-8
2.4.1 Monitoring Batch Jobs ................................................................................ 2-8
2.4.2 Monitoring Jobs ........................................................................................ 2-11
2.4.3 Monitoring Services .................................................................................. 2-13
2.4.4 Data Server Log Files............................................................................... 2-14
2.4.5 Parked Transactions................................................................................. 2-15
2.4.6 Monitoring Users ...................................................................................... 2-17
2.5 Producer Analysis.................................................................................................. 2-18
2.5.1 Select Criteria ........................................................................................... 2-18
2.5.2 Producers ................................................................................................. 2-19
2.5.3 Territories ................................................................................................. 2-20
3. Customer Service .................................................................................... 3-13.1 Introduction.............................................................................................................. 3-1
3.1.1 Quick Search section.................................................................................. 3-1
3.2 Customer Service screen ........................................................................................ 3-2
3.3 Customer Service screen’s Summary tab ............................................................... 3-5
3.3.1 Call Activities sub tab ............................................................................... 3-10
3.3.2 Maintenance sub tab ................................................................................ 3-14
3.3.3 Comments sub tab ................................................................................... 3-17
3.3.4 Promises sub tab...................................................................................... 3-18
3.3.5 Tracking Attributes sub tab....................................................................... 3-20
3.3.6 References sub tab .................................................................................. 3-20
3.3.7 Correspondence sub tab .......................................................................... 3-21
3.3.8 Letters sub tab.......................................................................................... 3-23
3.3.9 Document Tracking sub tab...................................................................... 3-24
3.4 Customer Service screen’s Account Details tab.................................................... 3-26
3.4.1 Account Details sub tab............................................................................ 3-26
3.4.2 Statements sub tab................................................................................... 3-28
3.4.3 Insurances sub tab ................................................................................... 3-29
3.4.4 Contract Information sub tab .................................................................... 3-32
3.4.5 Escrow sub tab ......................................................................................... 3-33
3.5 Customer Service screen’s Customer Details tab ................................................. 3-35
3.5.1 Customer sub tab ..................................................................................... 3-37
3.5.2 Business sub tab ...................................................................................... 3-39
3.6 Customer Service screen’s Transaction History tab.............................................. 3-43
3.6.1 Balances sub tab ...................................................................................... 3-43
3.6.2 Transactions sub tab ................................................................................ 3-46
3.6.3 Payment Rating sub tab ........................................................................... 3-48
3.6.4 Due Date History sub tab ......................................................................... 3-49
3.6.5 Repayment Schedule sub tab .................................................................. 3-50
3.6.6 Work Order sub tab .................................................................................. 3-51
3.7 Customer Service screen’s Pmt Modes tab .......................................................... 3-52
3.7.1 ACH sub tab ............................................................................................. 3-52
3.7.2 Coupon sub tab ........................................................................................ 3-55
3.7.3 Post Dated Checks sub tab ...................................................................... 3-55
3.7.4 Payment Arrangement sub tab................................................................. 3-56
3.8 Customer Service screen’s Bankruptcy tab........................................................... 3-58
3.9 Customer Service screen’s Repo/Foreclosure tab ................................................ 3-60
3.9.1 Repossession sub tab .............................................................................. 3-60
3.9.2 Foreclosure sub tab.................................................................................. 3-62
3.9.3 Analysis sub tab ....................................................................................... 3-63
3.10 Customer Service screen’s Deficiency tab ............................................................ 3-66
3.11 Customer Service screen’s Bureau tab ................................................................. 3-67
3.12 Customer Service screen’s Collateral tab ............................................................. 3-69
3.12.1 Valuation sub tab...................................................................................... 3-70
3.12.2 Tracking sub tab ....................................................................................... 3-71
3.12.3 Seller sub tab............................................................................................ 3-72
3.13 Review Request .................................................................................................... 3-72
3.13.1 Review Requests Tab .............................................................................. 3-73
4. Securitization ........................................................................................... 4-14.1 Pool Inquiry.............................................................................................................. 4-1
4.1.1 Inquiry......................................................................................................... 4-2
4.1.2 Criteria ........................................................................................................ 4-8
5. Transaction Authorization ...................................................................... 5-15.1 Customer Service screen ........................................................................................ 5-1
5.2 Transaction Authorization screen ............................................................................ 5-1
5.3 Authorization History tab ......................................................................................... 5-3
5.4 Review Request Tab ............................................................................................... 5-5
5.5 Review Request ...................................................................................................... 5-6
5.5.1 Review Requests Tab ................................................................................ 5-6
6. Post Dated Cheques (PDC) Management .............................................. 6-16.1 PDC Entry Tab ........................................................................................................ 6-1
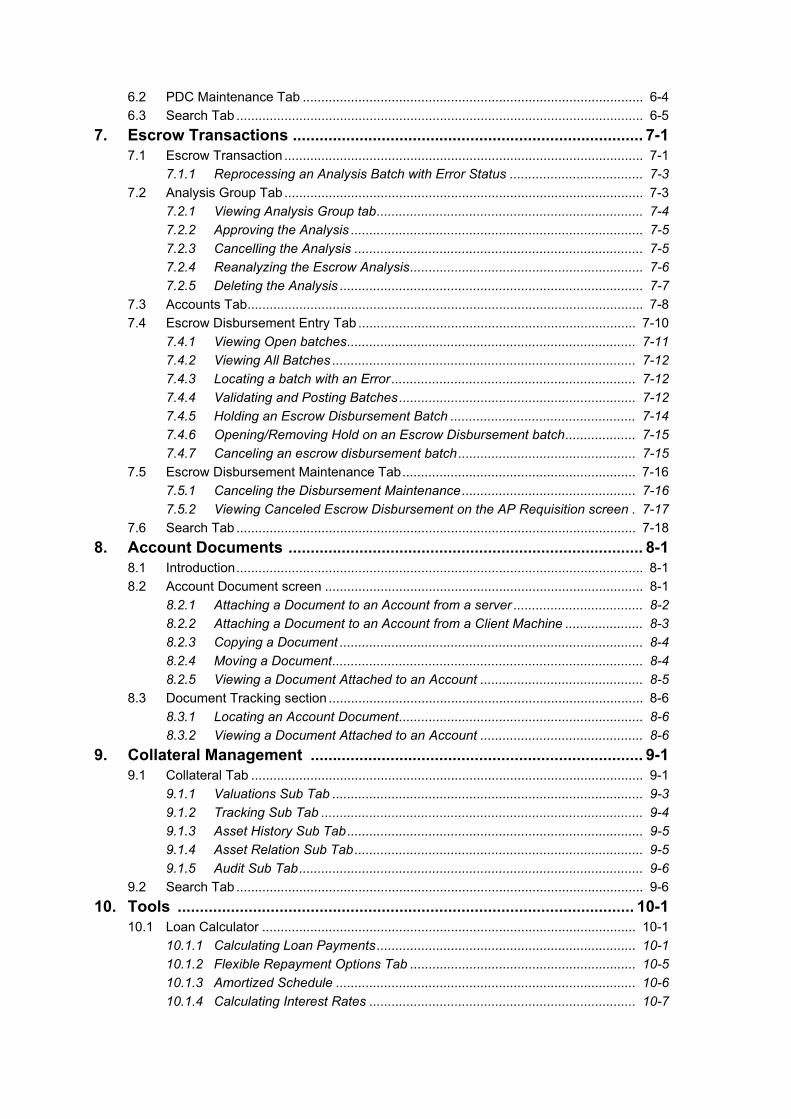
6.2 PDC Maintenance Tab ............................................................................................ 6-4
6.3 Search Tab .............................................................................................................. 6-5
7. Escrow Transactions ............................................................................... 7-17.1 Escrow Transaction ................................................................................................. 7-1
7.1.1 Reprocessing an Analysis Batch with Error Status .................................... 7-3
7.2 Analysis Group Tab ................................................................................................. 7-3
7.2.1 Viewing Analysis Group tab........................................................................ 7-4
7.2.2 Approving the Analysis ............................................................................... 7-5
7.2.3 Cancelling the Analysis .............................................................................. 7-5
7.2.4 Reanalyzing the Escrow Analysis............................................................... 7-6
7.2.5 Deleting the Analysis .................................................................................. 7-7
7.3 Accounts Tab........................................................................................................... 7-8
7.4 Escrow Disbursement Entry Tab ........................................................................... 7-10
7.4.1 Viewing Open batches.............................................................................. 7-11
7.4.2 Viewing All Batches .................................................................................. 7-12
7.4.3 Locating a batch with an Error.................................................................. 7-12
7.4.4 Validating and Posting Batches................................................................ 7-12
7.4.5 Holding an Escrow Disbursement Batch .................................................. 7-14
7.4.6 Opening/Removing Hold on an Escrow Disbursement batch................... 7-15
7.4.7 Canceling an escrow disbursement batch................................................ 7-15
7.5 Escrow Disbursement Maintenance Tab............................................................... 7-16
7.5.1 Canceling the Disbursement Maintenance............................................... 7-16
7.5.2 Viewing Canceled Escrow Disbursement on the AP Requisition screen . 7-17
7.6 Search Tab ............................................................................................................ 7-18
8. Account Documents ................................................................................ 8-18.1 Introduction.............................................................................................................. 8-1
8.2 Account Document screen ...................................................................................... 8-1
8.2.1 Attaching a Document to an Account from a server ................................... 8-2
8.2.2 Attaching a Document to an Account from a Client Machine ..................... 8-3
8.2.3 Copying a Document .................................................................................. 8-4
8.2.4 Moving a Document.................................................................................... 8-4
8.2.5 Viewing a Document Attached to an Account ............................................ 8-5
8.3 Document Tracking section ..................................................................................... 8-6
8.3.1 Locating an Account Document.................................................................. 8-6
8.3.2 Viewing a Document Attached to an Account ............................................ 8-6
9. Collateral Management ........................................................................... 9-19.1 Collateral Tab .......................................................................................................... 9-1
9.1.1 Valuations Sub Tab .................................................................................... 9-3
9.1.2 Tracking Sub Tab ....................................................................................... 9-4
9.1.3 Asset History Sub Tab................................................................................ 9-5
9.1.4 Asset Relation Sub Tab.............................................................................. 9-5
9.1.5 Audit Sub Tab............................................................................................. 9-6
9.2 Search Tab .............................................................................................................. 9-6
10. Tools ....................................................................................................... 10-110.1 Loan Calculator ..................................................................................................... 10-1
10.1.1 Calculating Loan Payments...................................................................... 10-1
10.1.2 Flexible Repayment Options Tab ............................................................. 10-5
10.1.3 Amortized Schedule ................................................................................. 10-6
10.1.4 Calculating Interest Rates ........................................................................ 10-7
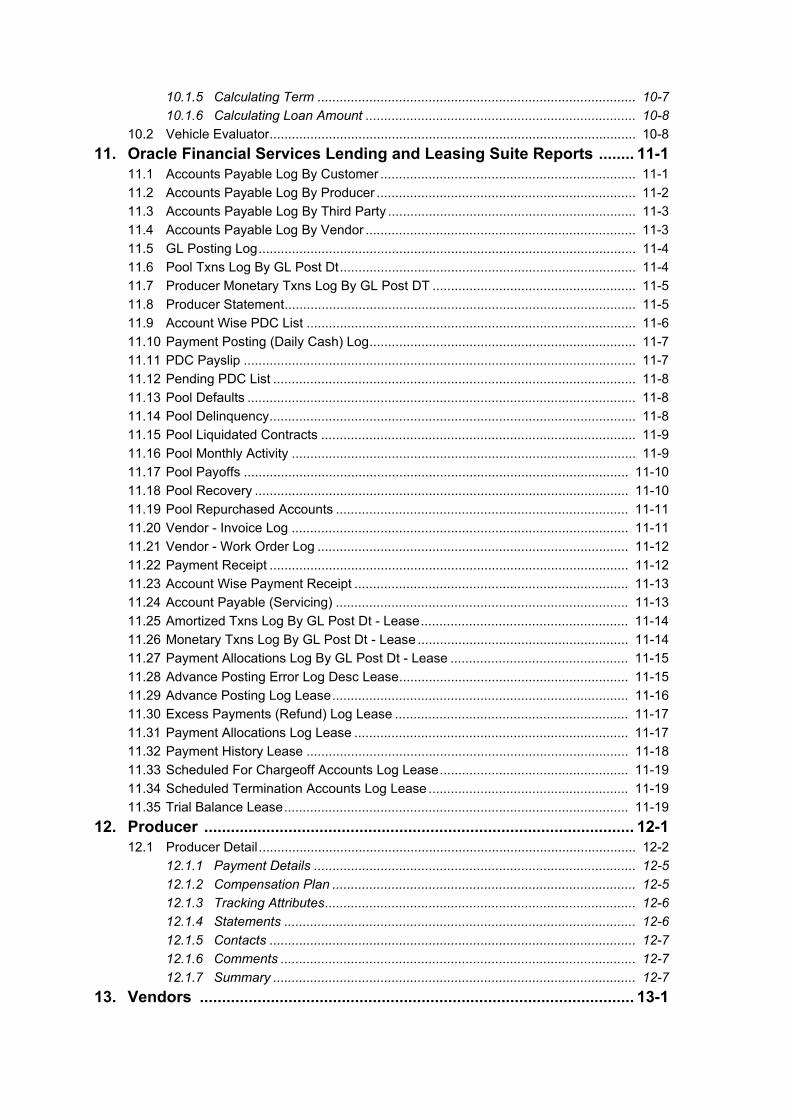
10.1.5 Calculating Term ...................................................................................... 10-7
10.1.6 Calculating Loan Amount ......................................................................... 10-8
10.2 Vehicle Evaluator................................................................................................... 10-8
11. Oracle Financial Services Lending and Leasing Suite Reports ........ 11-111.1 Accounts Payable Log By Customer ..................................................................... 11-1
11.2 Accounts Payable Log By Producer ...................................................................... 11-2
11.3 Accounts Payable Log By Third Party ................................................................... 11-3
11.4 Accounts Payable Log By Vendor ......................................................................... 11-3
11.5 GL Posting Log...................................................................................................... 11-4
11.6 Pool Txns Log By GL Post Dt................................................................................ 11-4
11.7 Producer Monetary Txns Log By GL Post DT ....................................................... 11-5
11.8 Producer Statement............................................................................................... 11-5
11.9 Account Wise PDC List ......................................................................................... 11-6
11.10 Payment Posting (Daily Cash) Log........................................................................ 11-7
11.11 PDC Payslip .......................................................................................................... 11-7
11.12 Pending PDC List .................................................................................................. 11-8
11.13 Pool Defaults ......................................................................................................... 11-8
11.14 Pool Delinquency................................................................................................... 11-8
11.15 Pool Liquidated Contracts ..................................................................................... 11-9
11.16 Pool Monthly Activity ............................................................................................. 11-9
11.17 Pool Payoffs ........................................................................................................ 11-10
11.18 Pool Recovery ..................................................................................................... 11-10
11.19 Pool Repurchased Accounts ............................................................................... 11-11
11.20 Vendor - Invoice Log ........................................................................................... 11-11
11.21 Vendor - Work Order Log .................................................................................... 11-12
11.22 Payment Receipt ................................................................................................. 11-12
11.23 Account Wise Payment Receipt .......................................................................... 11-13
11.24 Account Payable (Servicing) ............................................................................... 11-13
11.25 Amortized Txns Log By GL Post Dt - Lease........................................................ 11-14
11.26 Monetary Txns Log By GL Post Dt - Lease ......................................................... 11-14
11.27 Payment Allocations Log By GL Post Dt - Lease ................................................ 11-15
11.28 Advance Posting Error Log Desc Lease.............................................................. 11-15
11.29 Advance Posting Log Lease................................................................................ 11-16
11.30 Excess Payments (Refund) Log Lease ............................................................... 11-17
11.31 Payment Allocations Log Lease .......................................................................... 11-17
11.32 Payment History Lease ....................................................................................... 11-18
11.33 Scheduled For Chargeoff Accounts Log Lease................................................... 11-19
11.34 Scheduled Termination Accounts Log Lease ...................................................... 11-19
11.35 Trial Balance Lease............................................................................................. 11-19
12. Producer ................................................................................................. 12-112.1 Producer Detail...................................................................................................... 12-2
12.1.1 Payment Details ....................................................................................... 12-5
12.1.2 Compensation Plan .................................................................................. 12-5
12.1.3 Tracking Attributes.................................................................................... 12-6
12.1.4 Statements ............................................................................................... 12-6
12.1.5 Contacts ................................................................................................... 12-7
12.1.6 Comments ................................................................................................ 12-7
12.1.7 Summary .................................................................................................. 12-7
13. Vendors .................................................................................................. 13-1
13.1 Vendor Detail Page ............................................................................................... 13-1
13.1.1 Vendors tab .............................................................................................. 13-1
13.1.2 Work Orders Tab ...................................................................................... 13-4
13.1.3 Follow-up Tab........................................................................................... 13-6
13.1.4 Invoices Tab ............................................................................................. 13-8
14. Batch Transactions ............................................................................... 14-114.1 Introduction............................................................................................................ 14-1
14.2 Advances............................................................................................................... 14-1
14.2.1 Advance Entry Tab ................................................................................... 14-1
14.2.2 Advance Maintenance Tab....................................................................... 14-6
14.2.3 Search Tab ............................................................................................... 14-9
14.3 Payments............................................................................................................. 14-10
14.3.1 Lockbox Payments ................................................................................. 14-10
14.3.2 ACH Payments ....................................................................................... 14-10
14.3.3 Manual Entry .......................................................................................... 14-11
14.3.4 Payments Entry Tab ............................................................................... 14-11
14.3.5 Payment Maintenance Tab..................................................................... 14-17
14.3.6 Outbound Customer Extracts To Payment Agencies Batch................... 14-20
14.3.7 Search Tab ............................................................................................. 14-21
14.4 Fees..................................................................................................................... 14-22
14.4.1 Fees Tab ................................................................................................ 14-22
14.5 Search Page........................................................................................................ 14-26
15. Interface .................................................................................................. 15-115.1 Introduction............................................................................................................ 15-1
15.2 AP Transactions .................................................................................................... 15-1
15.3 GL Transactions .................................................................................................... 15-4
15.3.1 Amortized Transactions Tab..................................................................... 15-6
15.4 Account Conversion .............................................................................................. 15-7
15.4.1 Conversion of Account screen.................................................................. 15-7
15.4.2 Applicants Sub Tab ................................................................................. 15-9
15.4.3 Decision Tab............................................................................................. 15-9
15.4.4 Contract Tab........................................................................................... 15-10
15.4.5 Collateral Tab ......................................................................................... 15-10
15.4.6 Account Details Tab ............................................................................... 15-10
15.4.7 Account Details’ Sub Tabs ..................................................................... 15-13
15.4.8 Comment Tab......................................................................................... 15-17
15.4.9 Verification Tab....................................................................................... 15-17
15.4.10 Calculator Tab ....................................................................................... 15-18
15.4.11 Search Tab ............................................................................................ 15-18
Appendix A: Transaction Parameters ..........................................................A-1Appendix B: Payment Amount Conversions ...............................................B-1
1. Navigation
This document provides an overview on the basic template, navigation, common operations that can be performed and keyboard short cuts available in Oracle Financial Services Lending and Leasing. The document is organised into below topics:
Logging In
Template and Navigation
Common Operations
Hot Keys
Note
The application can be best viewed in 1280 x 1024 screen resolution.
1.1 Audience
This document is intended to all the Prospect Users who would be working on the application.
1.2 Conventions Used
1.3 Logging In
The pre-requisites to log into the system are a valid user ID and a password, defined by the system administrator in Administration -> User Page.
Note
If an User ID is inactive for a specified number of days, then the User ID is disabled auto-matically.
Term Refers to
The system/application Oracle Financial Services Lending and Leasing
Mnemonic The underlined character of the tab or button
1-1
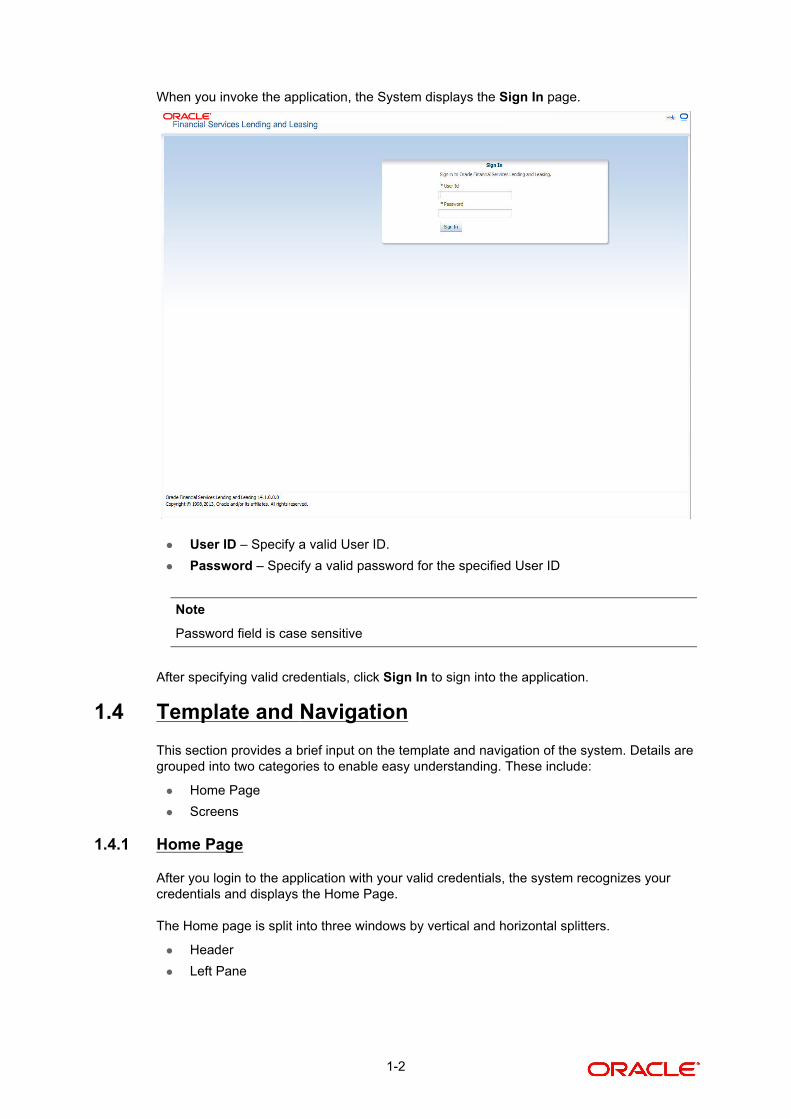
When you invoke the application, the System displays the Sign In page.
User ID – Specify a valid User ID.
Password – Specify a valid password for the specified User ID
Note
Password field is case sensitive
After specifying valid credentials, click Sign In to sign into the application.
1.4 Template and Navigation
This section provides a brief input on the template and navigation of the system. Details are grouped into two categories to enable easy understanding. These include:
Home Page
Screens
1.4.1 Home Page
After you login to the application with your valid credentials, the system recognizes your credentials and displays the Home Page.
The Home page is split into three windows by vertical and horizontal splitters.
Header
Left Pane
1-2
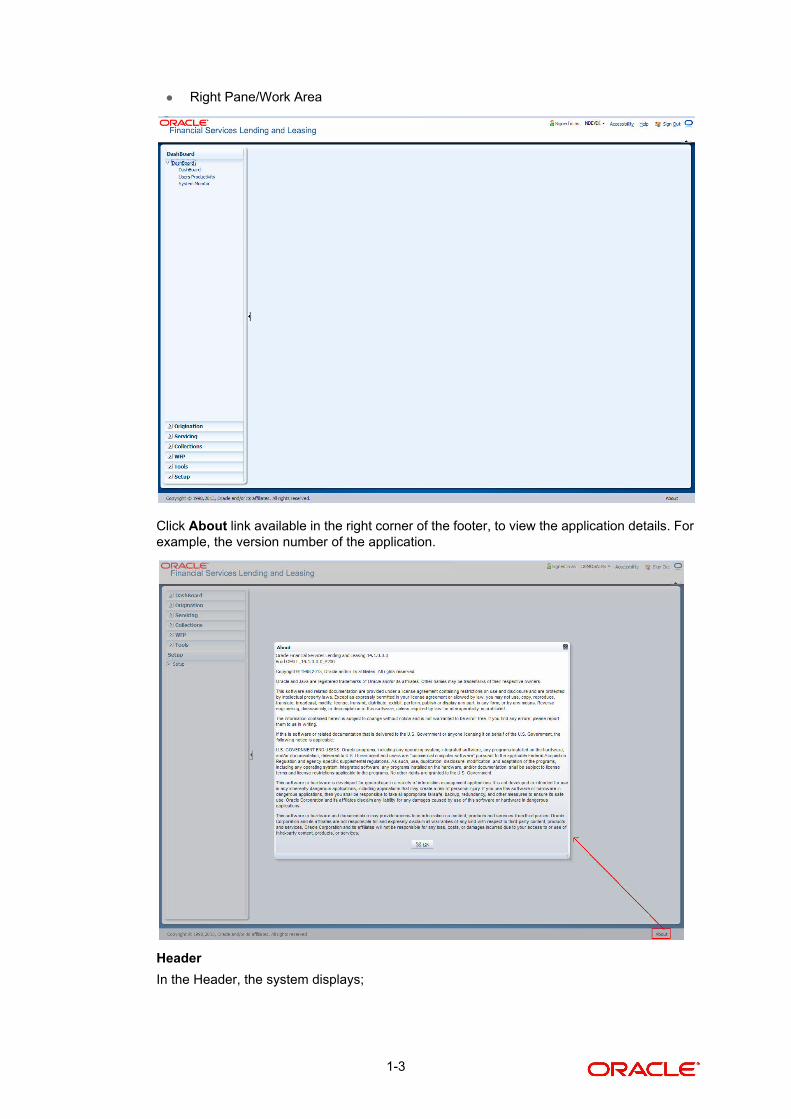
Right Pane/Work Area
Click About link available in the right corner of the footer, to view the application details. For example, the version number of the application.
Header
In the Header, the system displays;
1-3
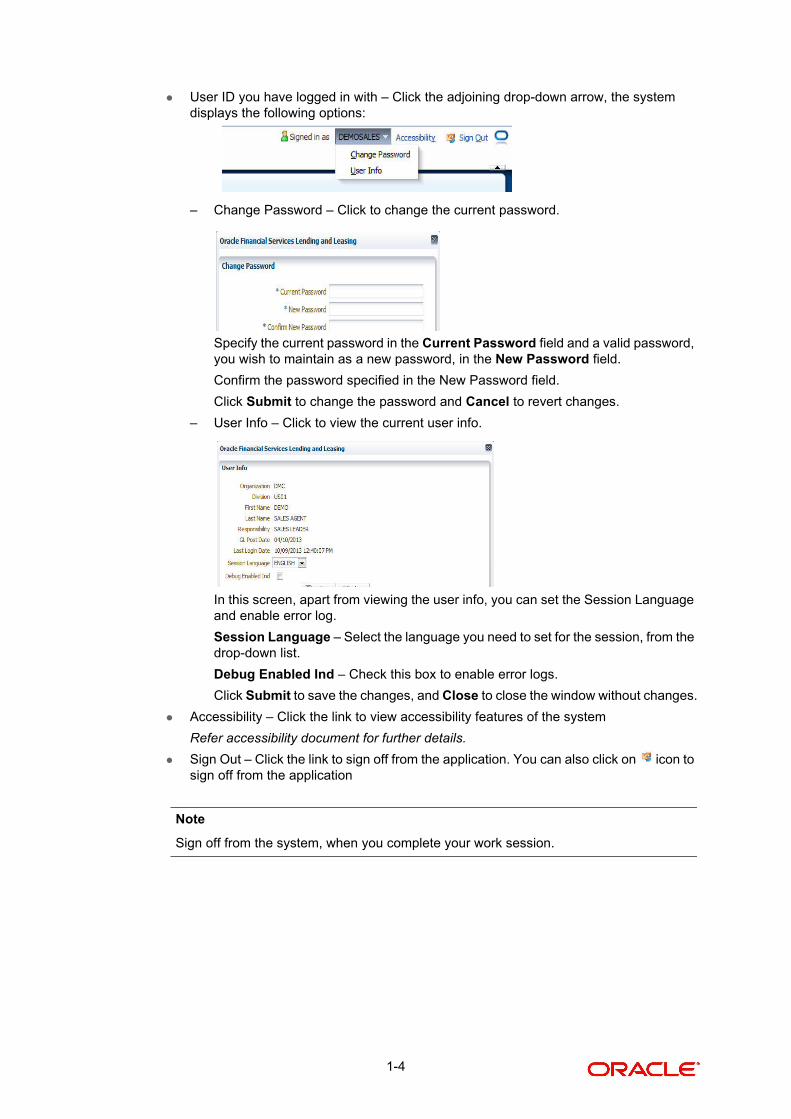
User ID you have logged in with – Click the adjoining drop-down arrow, the system displays the following options:
– Change Password – Click to change the current password.
Specify the current password in the Current Password field and a valid password, you wish to maintain as a new password, in the New Password field.
Confirm the password specified in the New Password field.
Click Submit to change the password and Cancel to revert changes.
– User Info – Click to view the current user info.
In this screen, apart from viewing the user info, you can set the Session Language and enable error log.
Session Language – Select the language you need to set for the session, from the drop-down list.
Debug Enabled Ind – Check this box to enable error logs.
Click Submit to save the changes, and Close to close the window without changes.
Accessibility – Click the link to view accessibility features of the system
Refer accessibility document for further details.
Sign Out – Click the link to sign off from the application. You can also click on icon to sign off from the application
Note
Sign off from the system, when you complete your work session.
1-4

Left Window
In the left pane, the system lists and provides drop-down links for the various modules available in the product. Click to expand the Module Master Tabs and to collapse them.
To open a screen, navigate to the Module Master Tab to which the screen belongs, expand the tabs and click the screen link you wish to open.
Right Window
The Right Window can also be termed as work area. When you click the screen link on the left pane, the system displays the corresponding screen in the right pane.
You can open a maximum of 15 screens at a go. Once the maximum limit is reached, the system displays an error message as “You have too many tabs open. You will need to close some tabs before opening new ones”. Click ‘OK’ to continue.
In origination, only one among the three screens namely, Application Entry, Underwriting, Funding can be opened at a time. If ‘Application Entry’ screen is open and you click on Underwriting or Funding, the system retains the same screen.
1-5
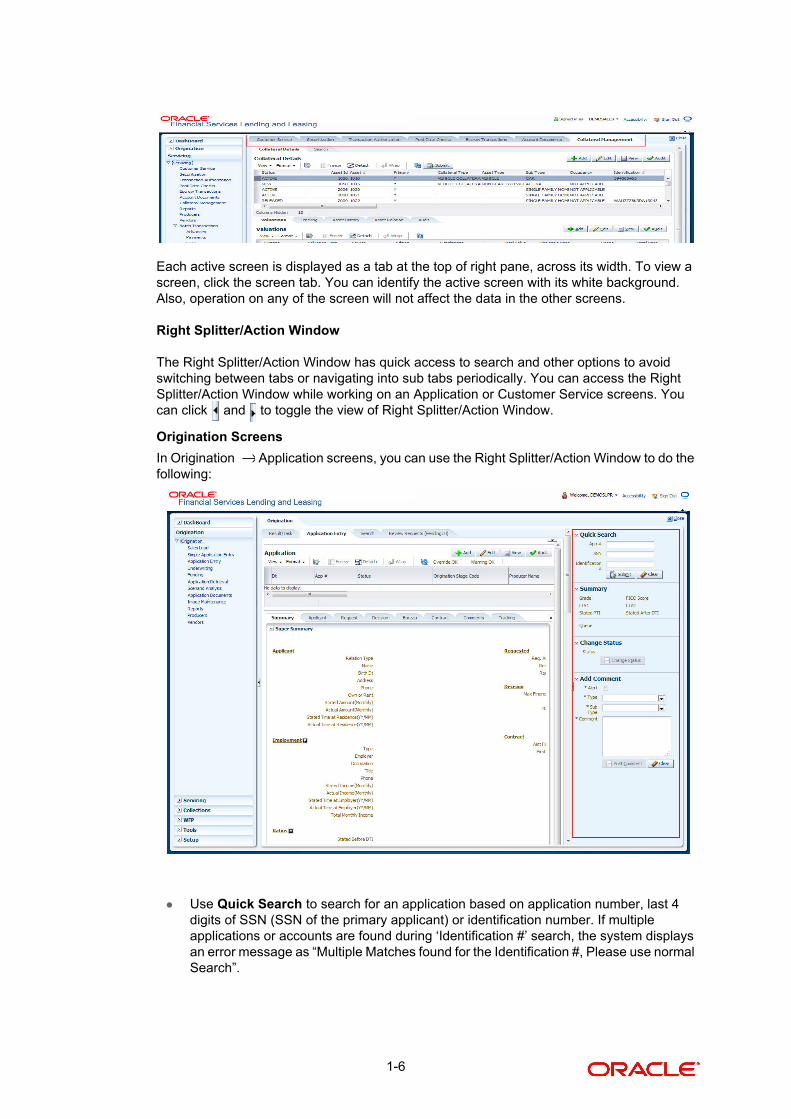
Each active screen is displayed as a tab at the top of right pane, across its width. To view a screen, click the screen tab. You can identify the active screen with its white background. Also, operation on any of the screen will not affect the data in the other screens.
Right Splitter/Action Window
The Right Splitter/Action Window has quick access to search and other options to avoid switching between tabs or navigating into sub tabs periodically. You can access the Right Splitter/Action Window while working on an Application or Customer Service screens. You can click and to toggle the view of Right Splitter/Action Window.
Origination Screens
In Origination Application screens, you can use the Right Splitter/Action Window to do the following:
Use Quick Search to search for an application based on application number, last 4 digits of SSN (SSN of the primary applicant) or identification number. If multiple applications or accounts are found during ‘Identification #’ search, the system displays an error message as “Multiple Matches found for the Identification #, Please use normal Search”.
→
1-6
Summary section displays critical information that has to be referred repeatedly during origination like – DTI, PTI, Book Value, Grade, FICO Score, Approved Advance, Rate and Term.
Use Change Status section to change the application status to next level. If the application edit status is restricted, then the ‘Change Status’ will be read-only.
Use Add Comment section to post an alert or comment during Underwriting and Funding stages.
For detailed information on the above options, refer to respective sections in the document.
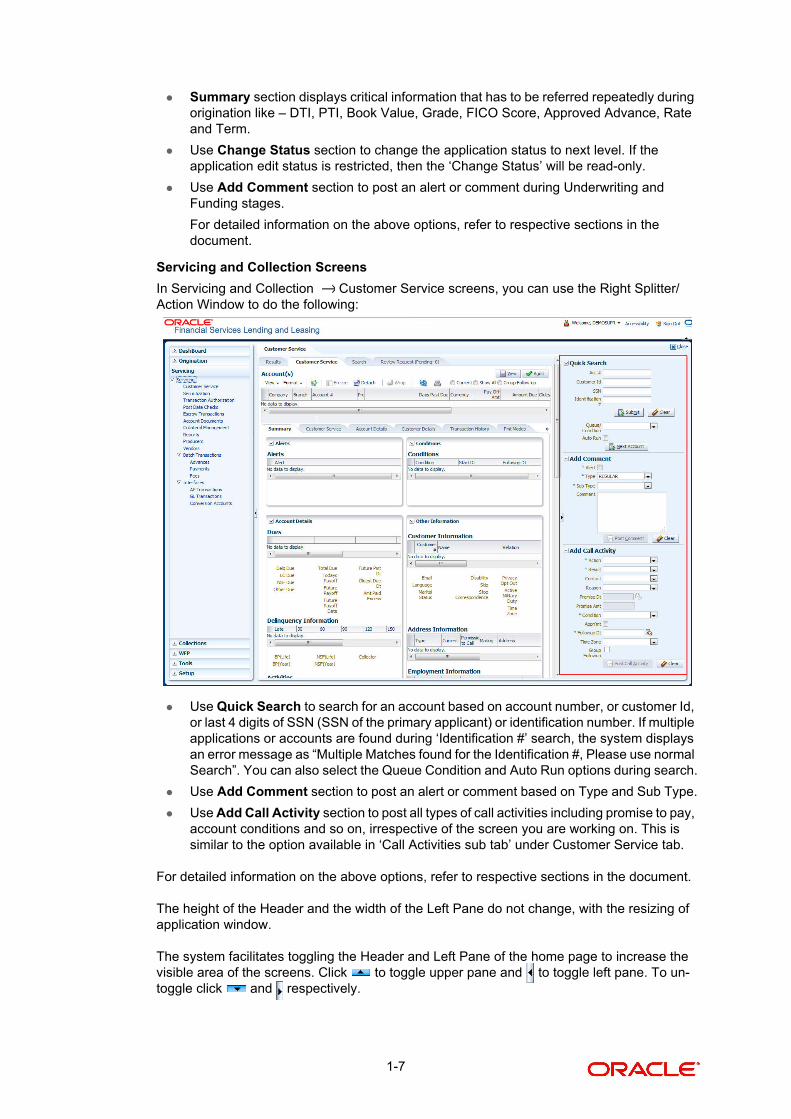
Servicing and Collection Screens
In Servicing and Collection Customer Service screens, you can use the Right Splitter/Action Window to do the following:
Use Quick Search to search for an account based on account number, or customer Id, or last 4 digits of SSN (SSN of the primary applicant) or identification number. If multiple applications or accounts are found during ‘Identification #’ search, the system displays an error message as “Multiple Matches found for the Identification #, Please use normal Search”. You can also select the Queue Condition and Auto Run options during search.
Use Add Comment section to post an alert or comment based on Type and Sub Type.
Use Add Call Activity section to post all types of call activities including promise to pay, account conditions and so on, irrespective of the screen you are working on. This is similar to the option available in ‘Call Activities sub tab’ under Customer Service tab.
For detailed information on the above options, refer to respective sections in the document.
The height of the Header and the width of the Left Pane do not change, with the resizing of application window.
The system facilitates toggling the Header and Left Pane of the home page to increase the visible area of the screens. Click to toggle upper pane and to toggle left pane. To un-toggle click and respectively.
→
1-7
Note
Few screens in Origination, Servicing and Collection are identical and are linked. Hence, you can open only one screen at a time from the group. A sample of the grouping structure is given below, based on the stages of the screens:
Origination:
– Simple Application Entry
– Application Entry
– Underwriting
– Funding
Collection:
– Collection
– Bankruptcy
– Repossession
– Deficiency
WFP:
– Producers
– Credit Lines
– Units
To get more clarity on the feature discussed above, consider Origination. If you have opened a screen any of the four screens listed above, say you have opened Application Entry, you cannot open any another screen. To open another screen, you need to close the Application Entry screen.
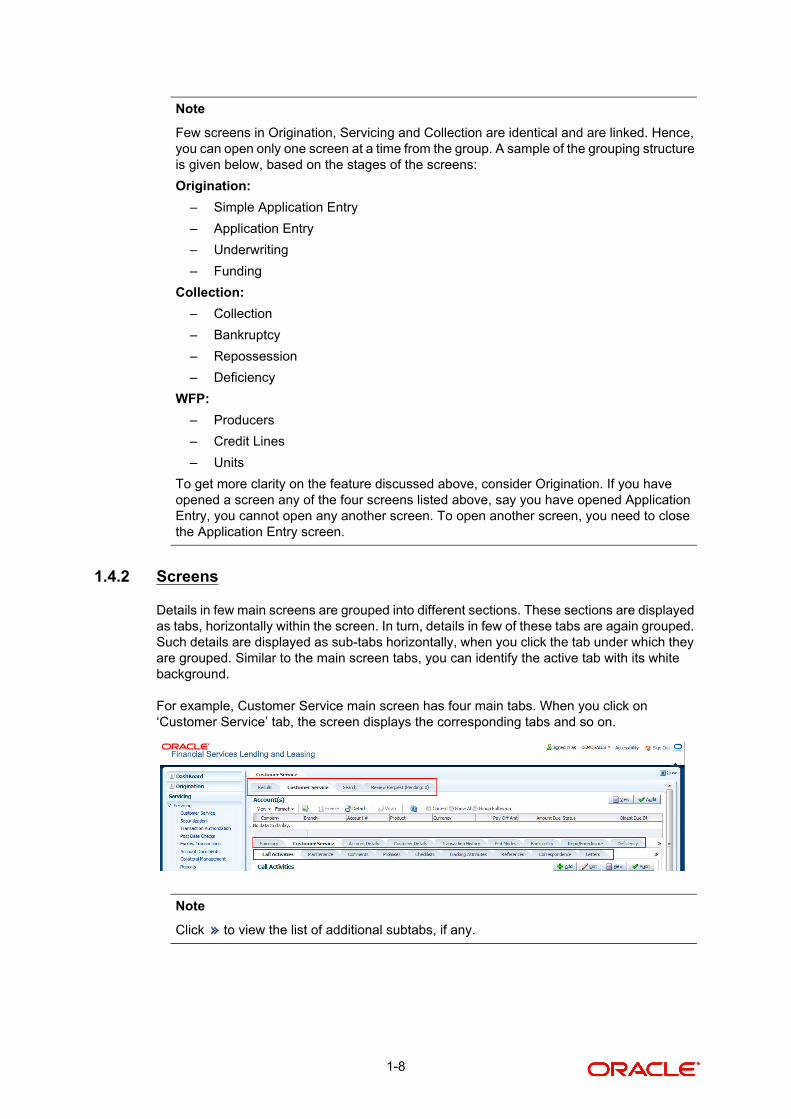
1.4.2 Screens
Details in few main screens are grouped into different sections. These sections are displayed as tabs, horizontally within the screen. In turn, details in few of these tabs are again grouped. Such details are displayed as sub-tabs horizontally, when you click the tab under which they are grouped. Similar to the main screen tabs, you can identify the active tab with its white background.
For example, Customer Service main screen has four main tabs. When you click on ‘Customer Service’ tab, the screen displays the corresponding tabs and so on.
Note
Click to view the list of additional subtabs, if any.
1-8
1.5 Common Operations
Some of the operations are common to most of the screens. These are grouped into three categories, based on their features.
Basic Operations
Basic Actions
Personalization Options
1.5.1 Basic Operations
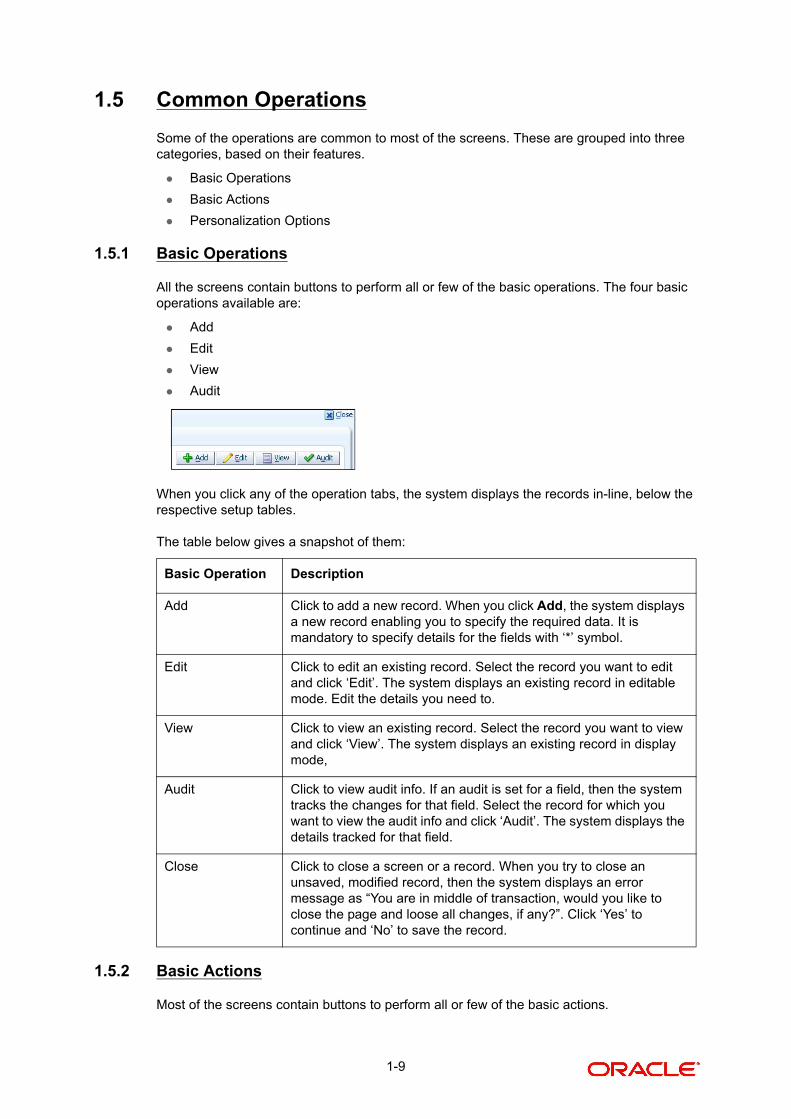
All the screens contain buttons to perform all or few of the basic operations. The four basic operations available are:
Add
Edit
View
Audit
When you click any of the operation tabs, the system displays the records in-line, below the respective setup tables.
The table below gives a snapshot of them:
1.5.2 Basic Actions
Most of the screens contain buttons to perform all or few of the basic actions.
Basic Operation Description
Add Click to add a new record. When you click Add, the system displays a new record enabling you to specify the required data. It is mandatory to specify details for the fields with ‘*’ symbol.
Edit Click to edit an existing record. Select the record you want to edit and click ‘Edit’. The system displays an existing record in editable mode. Edit the details you need to.
View Click to view an existing record. Select the record you want to view and click ‘View’. The system displays an existing record in display mode,
Audit Click to view audit info. If an audit is set for a field, then the system tracks the changes for that field. Select the record for which you want to view the audit info and click ‘Audit’. The system displays the details tracked for that field.
Close Click to close a screen or a record. When you try to close an unsaved, modified record, then the system displays an error message as “You are in middle of transaction, would you like to close the page and loose all changes, if any?”. Click ‘Yes’ to continue and ‘No’ to save the record.
1-9
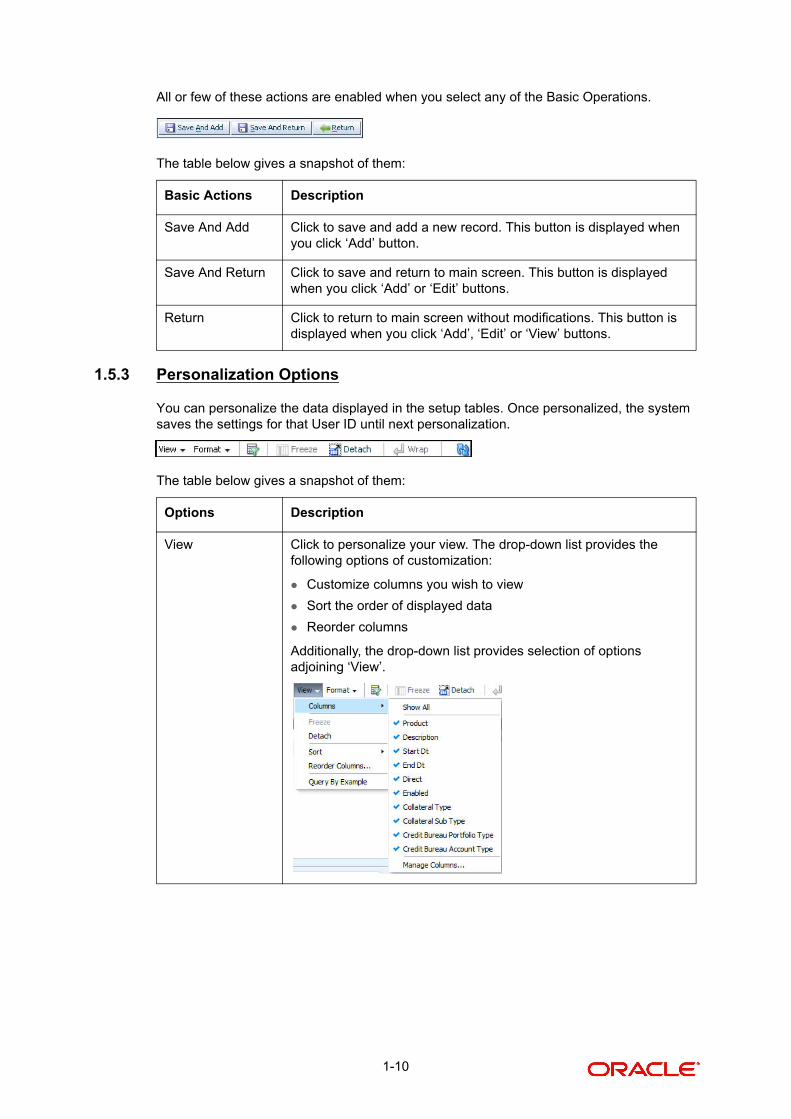
All or few of these actions are enabled when you select any of the Basic Operations.
The table below gives a snapshot of them:
1.5.3 Personalization Options
You can personalize the data displayed in the setup tables. Once personalized, the system saves the settings for that User ID until next personalization.
The table below gives a snapshot of them:
Basic Actions Description
Save And Add Click to save and add a new record. This button is displayed when you click ‘Add’ button.
Save And Return Click to save and return to main screen. This button is displayed when you click ‘Add’ or ‘Edit’ buttons.
Return Click to return to main screen without modifications. This button is displayed when you click ‘Add’, ‘Edit’ or ‘View’ buttons.
Options Description
View Click to personalize your view. The drop-down list provides the following options of customization:
Customize columns you wish to view
Sort the order of displayed data
Reorder columns
Additionally, the drop-down list provides selection of options adjoining ‘View’.
1-10
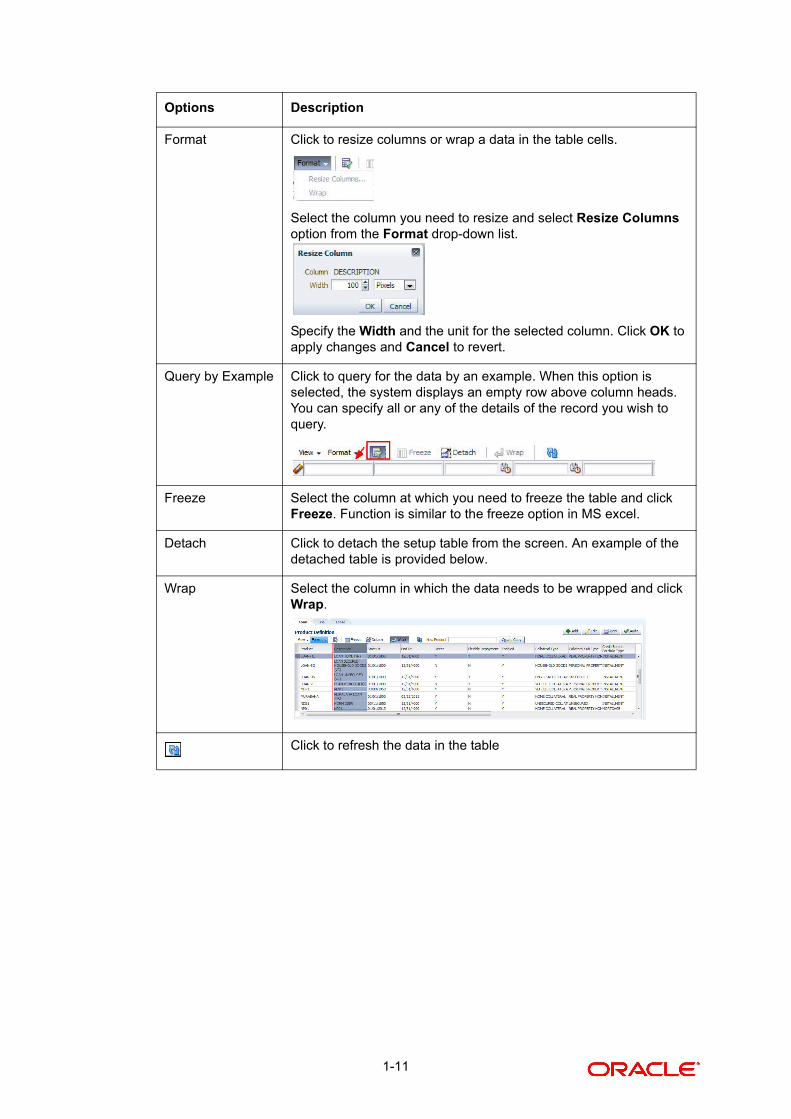
Format Click to resize columns or wrap a data in the table cells.
Select the column you need to resize and select Resize Columns option from the Format drop-down list.
Specify the Width and the unit for the selected column. Click OK to apply changes and Cancel to revert.
Query by Example Click to query for the data by an example. When this option is selected, the system displays an empty row above column heads. You can specify all or any of the details of the record you wish to query.
Freeze Select the column at which you need to freeze the table and click Freeze. Function is similar to the freeze option in MS excel.
Detach Click to detach the setup table from the screen. An example of the detached table is provided below.
Wrap Select the column in which the data needs to be wrapped and click Wrap.
Click to refresh the data in the table
Options Description
1-11
Note
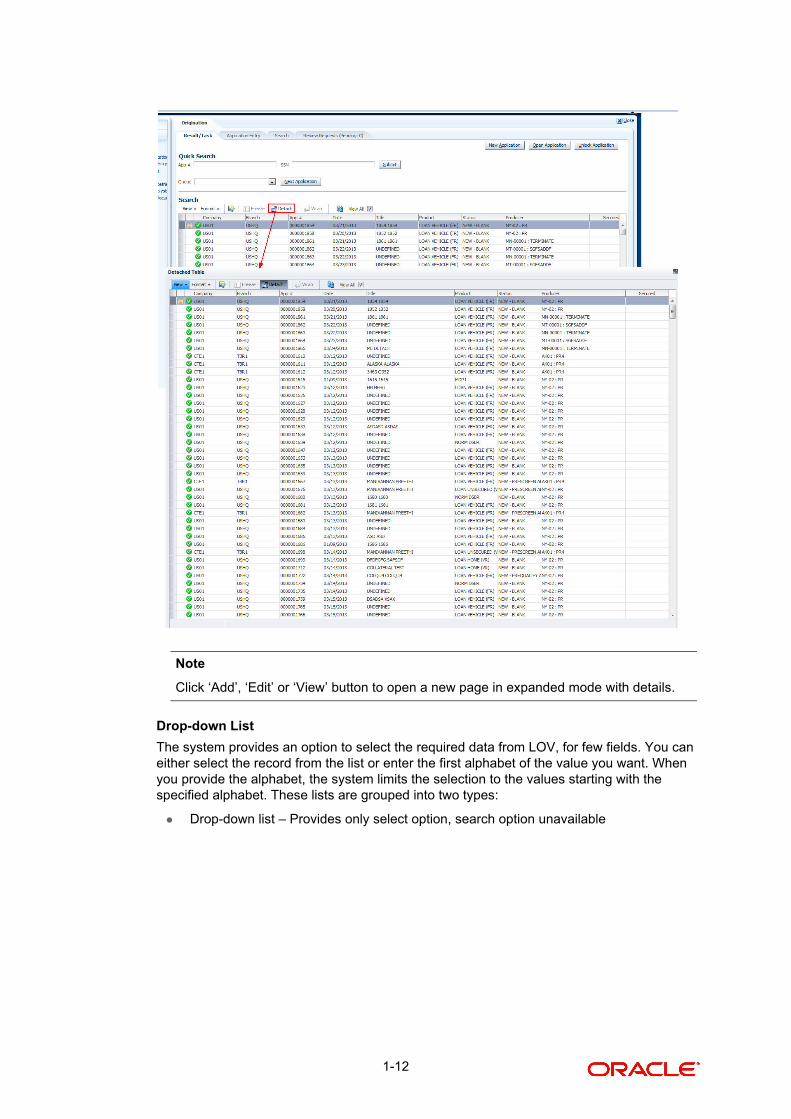
Click ‘Add’, ‘Edit’ or ‘View’ button to open a new page in expanded mode with details.
Drop-down List
The system provides an option to select the required data from LOV, for few fields. You can either select the record from the list or enter the first alphabet of the value you want. When you provide the alphabet, the system limits the selection to the values starting with the specified alphabet. These lists are grouped into two types:
Drop-down list – Provides only select option, search option unavailable
1-12
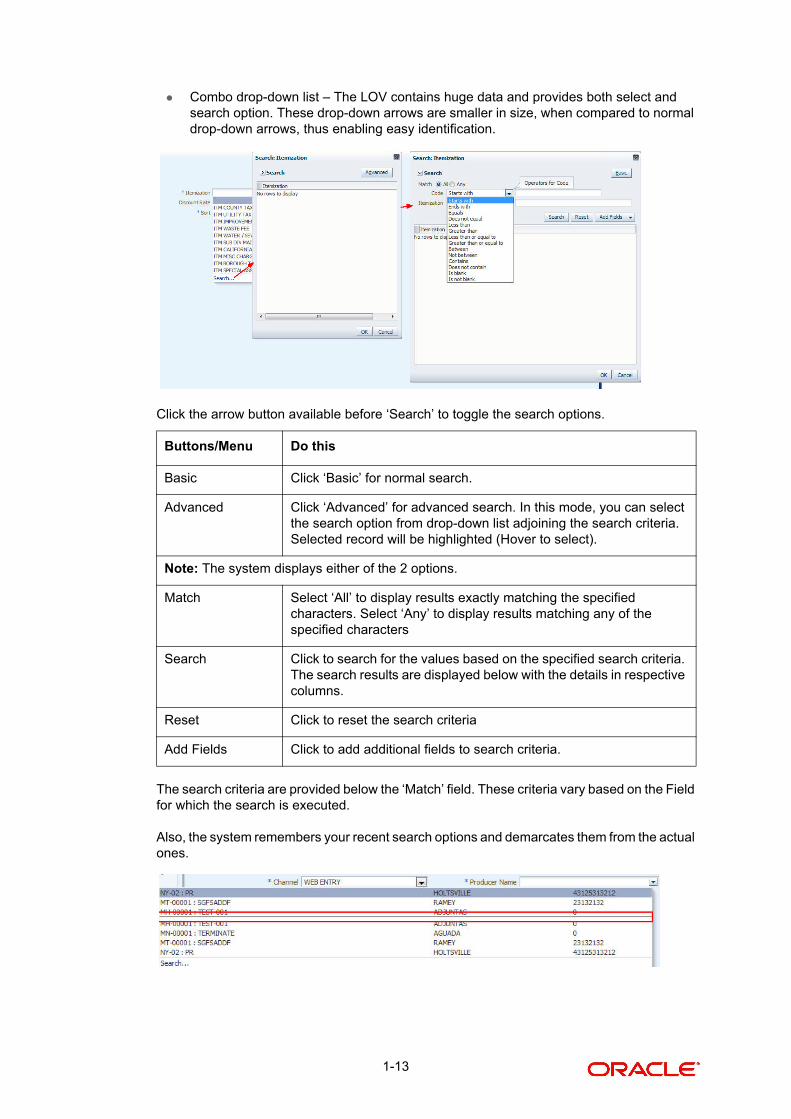
Combo drop-down list – The LOV contains huge data and provides both select and search option. These drop-down arrows are smaller in size, when compared to normal drop-down arrows, thus enabling easy identification.
Click the arrow button available before ‘Search’ to toggle the search options.
The search criteria are provided below the ‘Match’ field. These criteria vary based on the Field for which the search is executed.
Also, the system remembers your recent search options and demarcates them from the actual ones.
Buttons/Menu Do this
Basic Click ‘Basic’ for normal search.
Advanced Click ‘Advanced’ for advanced search. In this mode, you can select the search option from drop-down list adjoining the search criteria. Selected record will be highlighted (Hover to select).
Note: The system displays either of the 2 options.
Match Select ‘All’ to display results exactly matching the specified characters. Select ‘Any’ to display results matching any of the specified characters
Search Click to search for the values based on the specified search criteria. The search results are displayed below with the details in respective columns.
Reset Click to reset the search criteria
Add Fields Click to add additional fields to search criteria.
1-13
1.6 Keyboard Compatibility
The system facilitates keyboard compatibility. You can perform most of your tasks using keyboard short cuts also termed as ‘Hot Keys’. These hot keys are single keyboards or a combination of keyboards. The available options are listed below:
1. Shift + Alt + mnemonic to activate buttons on the screen. For example, to open ‘Accessibility’ window, press ‘Shift + Alt + y’.
2. Tab for forward navigation in the application. Shift + Tab for backward navigation in the application. When the required link/tab/button/field is highlighted, press enter on the keyboard to edit.
3. Space bar to check or uncheck ‘Check Box’.
4. Arrow Keys to hover within the drop-down list.
For further details on Keyboard Compatibility, refer ‘Section 1.8.3.2 Keyboard Compatibility’.
1.7 Tool Tips
The system is facilitated with tool tip option. When the cursor is moved to any of the field on the screen, a popup is displayed with a tip on the action to be performed.
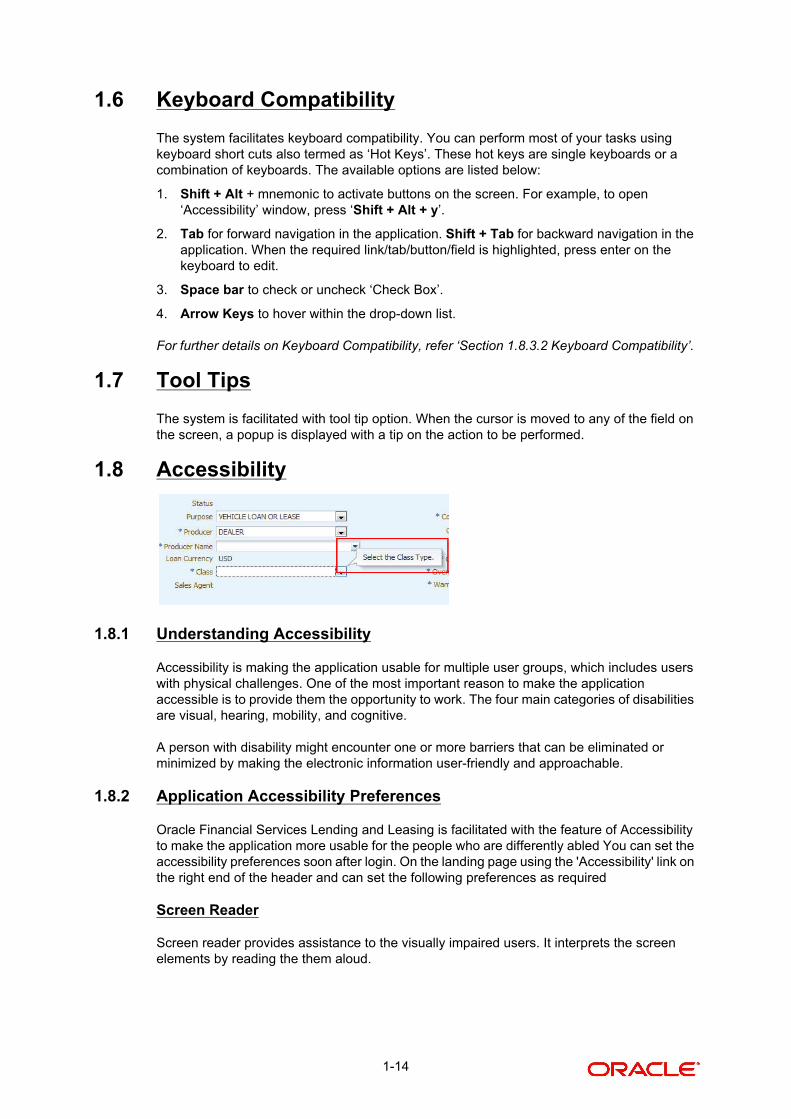
1.8 Accessibility
1.8.1 Understanding Accessibility
Accessibility is making the application usable for multiple user groups, which includes users with physical challenges. One of the most important reason to make the application accessible is to provide them the opportunity to work. The four main categories of disabilities are visual, hearing, mobility, and cognitive.
A person with disability might encounter one or more barriers that can be eliminated or minimized by making the electronic information user-friendly and approachable.
1.8.2 Application Accessibility Preferences
Oracle Financial Services Lending and Leasing is facilitated with the feature of Accessibility to make the application more usable for the people who are differently abled You can set the accessibility preferences soon after login. On the landing page using the 'Accessibility' link on the right end of the header and can set the following preferences as required
Screen Reader
Screen reader provides assistance to the visually impaired users. It interprets the screen elements by reading the them aloud.
1-14
High Contrast
High contrast feature increases the contrast level to make the screen more appealing for the reader with low vision.
Large Fonts
Large fonts feature enlarges the font size to ensure the clear display and appropriate spacing. This benefits the reader with low vision.
1.8.2.1 For Visual Challenges
The visual challenges varies widely, however it generally includes, blindness, low vision or colour blindness. To make the application more accessible, following features are provided.
Blindness:
In order to interpret the visual display information in the audible form, Screen reader compatibility is provided.
In places where Screen reader technology cannot obtain information from images, text equivalents for images are provided.
For Users with difficulty in using mouse, since it requires hand and eye coordination, Keyboard navigation is provided. Details of keyboard navigation is provided in ‘Section 1.8.3.2 Keyboard Compatibility’.
Low vision:
For Users who cannot view the content that has small font size and cannot be enlarged, Software magnifier to enlarge text and images beyond normal font enlargement is provided.
Also, there is no information presented using attributes such as depth, size, location, font etc.
For high contrast requirements Screen setting can be adjusted.
Color blindness:
Oracle Accessibility guidelines have been followed and hence accessibility issues relating to colour blindness are addressed.
Also, high contrast colours have been used to address difficulty in identifying shades of colours. For example, Black text in white background.
1.8.2.2 For Hearing Challenges
People with hearing challenges or hard of hearing might encounter problems accessing the information presented using sounds. Some application features minimize their concerns.
Visual representations of audible information is provided so that Users with this challenge do not miss information presented using audio.
1.8.2.3 For Age-related Challenges
Apart from the above, there can be aging issues like week eye-sight or hearing.
Issues related to week eyesight can be addressed through Application features for Visual Challenges provided in ‘Section 1.8.2.1 For Visual Challenges’.
1-15
Issues related to hearing can be addressed through Application features for hearing challenges provided in ‘Section 1.8.2.2 For Hearing Challenges’.
For Users who are less familiar with computers, the simplified user interface with easy navigation options, uniform layout and design and commonly used terminology in the application is of great advantage.
To address issues relating to understanding complex information, User manuals are provided for online help and tool tips at all required places are provided. In addition, system messages like error, warning or information helps you through.
1.8.3 Other Accessibility Considerations
1.8.3.1 Documentation Accessibility
Apart from assigning the logical sequence and organizing the topics, the following techniques are used to enhance the accessibility of the documentation.
Addition of text equivalent to all graphics
Usage of standard fonts and avoiding shadow or reversed text
Usage of strong foreground and background colour contrast
Color usages as per Oracle Accessibility guidelines have been ensured
Usage of styles and formatting elements
Documentation in simple language to ensure easy understanding
Including accurate and effective navigational features, such as cross-reference, tables of content, and bookmarks as appropriate
1.8.3.2 Keyboard Compatibility
The application is made compatible with keyboard only-operations. However, there is a change in the key combination based on the browser on which the application is running.
BrowserOperating System
Key Combination Action
Google Chrome Linux Alt + mnemonic Click
Google Chrome Mac OS X Control + Option + mne-monic
Click
Google Chrome Windows Alt +mnemonic Click
Mozilla Firefox Linux Alt + Shift + mnemonic Click
Mozilla Firefox Mac OS X Control + mnemonic Click
Mozilla Firefox Windows Alt + Shift + mnemonic Click
Microsoft Internet Explorer 7
Windows Alt + mnemonic Set focus
Microsoft Internet Explorer 8
Windows Alt + mnemonic Click or set focus
Apple Safari Windows Alt + mnemonic Click
1-16
Also, one can use the following keyboard shortcuts in order to increase or decrease the zoom level.
1.8.4 Setting up Accessibility Preferences
A user has an option to setup or change the accessibility preferences.
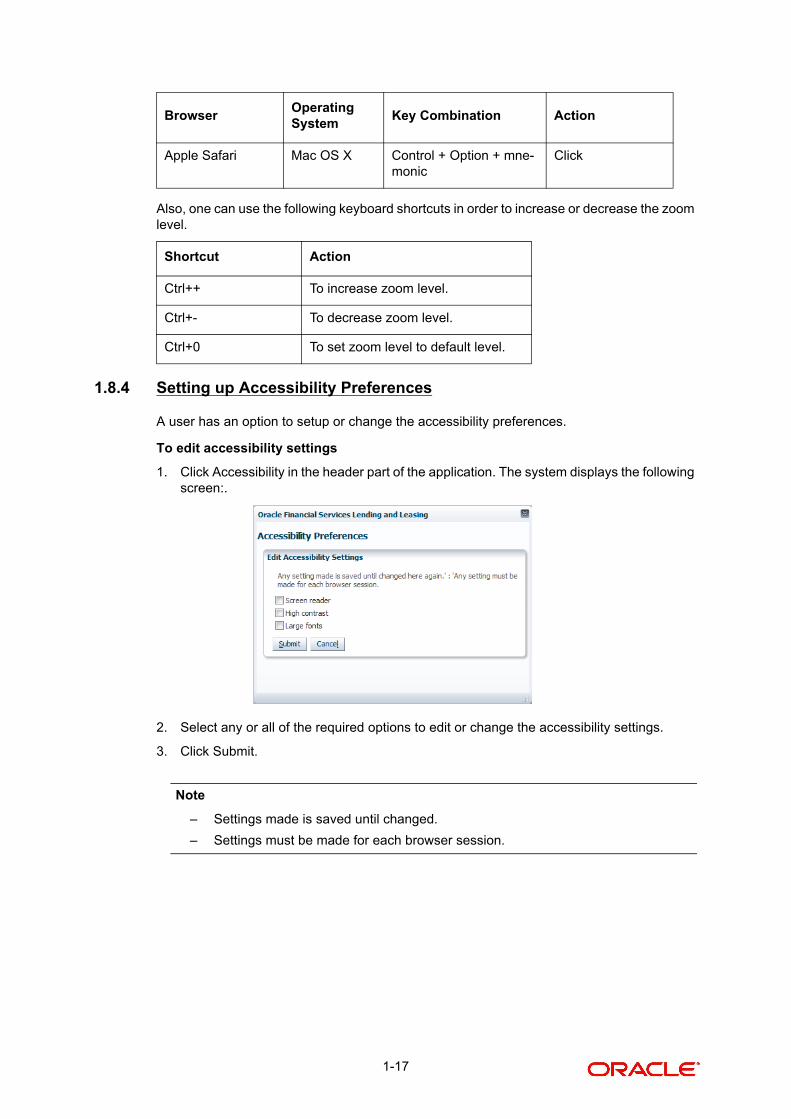
To edit accessibility settings
1. Click Accessibility in the header part of the application. The system displays the following screen:.
2. Select any or all of the required options to edit or change the accessibility settings.
3. Click Submit.
Note
– Settings made is saved until changed.
– Settings must be made for each browser session.
Apple Safari Mac OS X Control + Option + mne-monic
Click
Shortcut Action
Ctrl++ To increase zoom level.
Ctrl+- To decrease zoom level.
Ctrl+0 To set zoom level to default level.
BrowserOperating System
Key Combination Action
1-17
2. Dashboards
2.1 Introduction
This document is designed to help acquaint you with the features of Dashboard, on the landing page of Oracle Financial Services Lending and Leasing. Information from multiple products is integrated and displayed as Dashboard on the home page of the application.
This manual explains the functionality of Dashboard facility and the various Dashboards present in the system. Besides providing these details, the manual also provides a brief description of other features associated with Dashboard link. The Dashboard main Menu further provides links to the following screens:
Dashboard
Users Productivity
System Monitor
Producer Analysis
2.2 Dashboards
Dashboards are the tiny windows displayed on the landing page of the Application. Dashboard renders quick and crisp information of specific transactions or tasks mapped to the ‘User Role’, who logs on to the system.
The system facilitates integration of Information from different levels and displays it as Dashboard on the home page, also called the landing page of the application.
Navigating to Dashboards
Click Dashboard Dashboard Dashboard.→ →
2-1

Features
The following are the features of Dashboard:
The system organizes Dashboards to provide comprehensive and consolidate snapshot in tiny windows, to access information easily. Thus, helping to; analyze, monitor, and make better decisions which in turn help save time and cost.
The page is designed to display six Dashboards, distributed in two rows with three Dashboards per row, without scroll bars.
The height and width of all Dashboards are fixed; however, you can expand or collapse the Dashboards. Click the arrow heads at the top left corner of the Dashboard windows to expand or collapse the dashboard windows.
Each section in Dashboard is hyperlinked to the home screen of the respective section. The main screen will present descriptive information of details shown in Dashboard only.
Example
Above Dashboard displays the count of active Producers and Vendors. Click these links, the main screen of Producers or Vendors will display the list of all these Active records whose count is mentioned in the dashboard.
Similarly record displayed in Servicing section under ‘My Review Requests’ will open the specific account’s main screen, when clicked.
2.3 User Productivity
Oracle Financial Services Lending and Leasing User Productivity Setup window is a supervisor feature that allows you to monitor the daily performances of users completing loan origination and loan servicing tasks. These tasks are categorized as (loan origination) customer service/collection tasks (Loan servicing).
Note
The system updates this display only form every day.
Using the User Productivity Setup window, you can review the following daily tallies:
Number of accounts worked and call activities, by user
Number of accounts worked and call activities, by queue.
Number of applications entered, by user
Number of underwriting decisions (approved, rejected, conditioned, or withdrawn), by user
Number of funding decisions (verified or funded), by user
Number of applications entered, by queue
This chapter explains how to use the User Productivity Setup window to view this information.
Navigating to User Productivity Page
1. On the Oracle Financial Services Lending and Leasing home page, click Dashboard Dashboard User Productivity.
2. The system displays the User Productivity screen. You can view the tasks related to:
Underwriting/Funding
Customer Service/Collection
→ →
2-2
2.3.1 Viewing the Underwriting/Funding tasks
Daily tallies from the lease origination module appear on the pages opened from the following tabs on the User Productivity Screen:
Application Entry
Underwriting
Funding
Queues Status
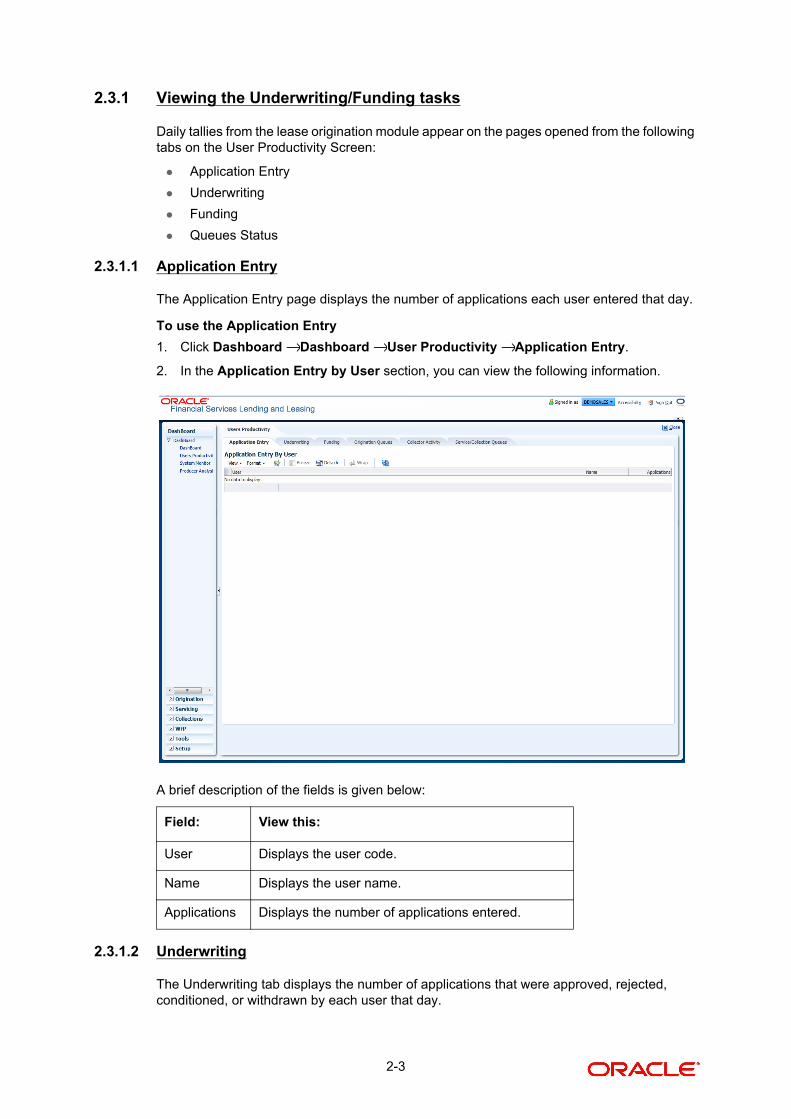
2.3.1.1 Application Entry
The Application Entry page displays the number of applications each user entered that day.
To use the Application Entry
1. Click Dashboard Dashboard User Productivity Application Entry.
2. In the Application Entry by User section, you can view the following information.
A brief description of the fields is given below:
2.3.1.2 Underwriting
The Underwriting tab displays the number of applications that were approved, rejected, conditioned, or withdrawn by each user that day.
Field: View this:
User Displays the user code.
Name Displays the user name.
Applications Displays the number of applications entered.
→ → →
2-3
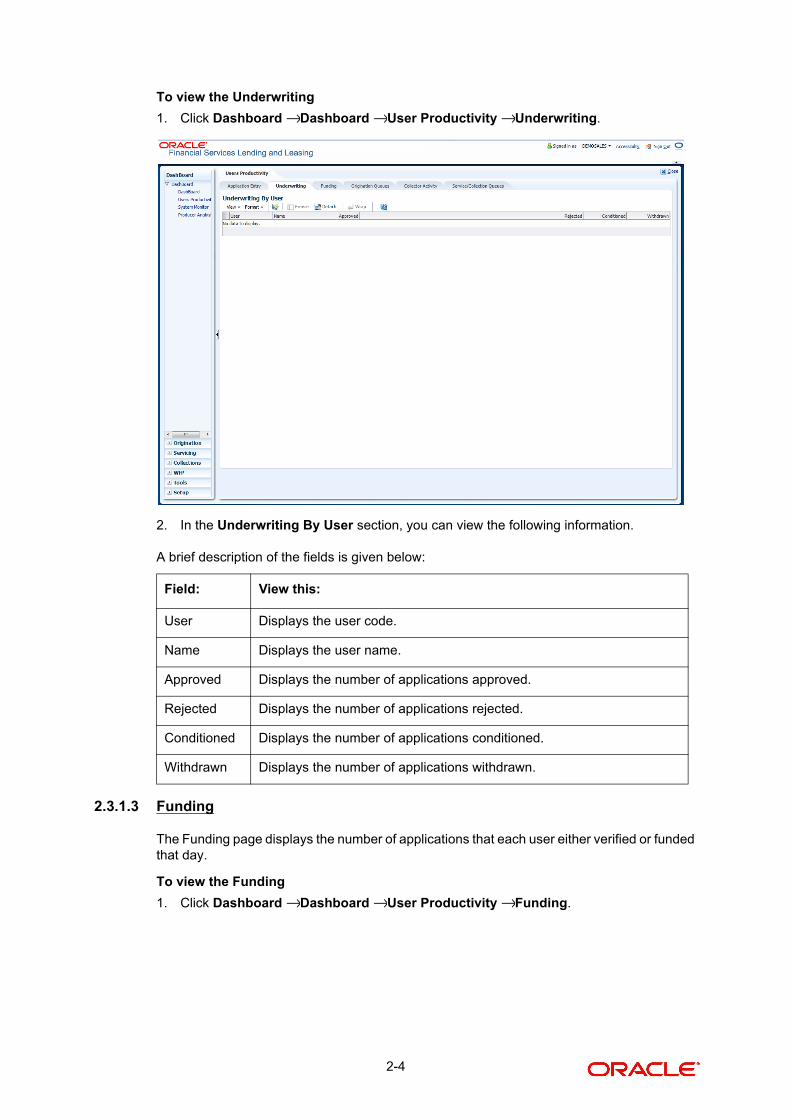
To view the Underwriting
1. Click Dashboard Dashboard User Productivity Underwriting.
2. In the Underwriting By User section, you can view the following information.
A brief description of the fields is given below:
2.3.1.3 Funding
The Funding page displays the number of applications that each user either verified or funded that day.
To view the Funding
1. Click Dashboard Dashboard User Productivity Funding.
Field: View this:
User Displays the user code.
Name Displays the user name.
Approved Displays the number of applications approved.
Rejected Displays the number of applications rejected.
Conditioned Displays the number of applications conditioned.
Withdrawn Displays the number of applications withdrawn.
→ → →
→ → →
2-4

2. In the Funding By User section, you can view the following information:
A brief description of the fields is given below:
2.3.1.4 Origination Queues
The Origination Queues page displays the number of applications worked by queue that day, as well as the users who worked the queue.
To view the Queues Status page
1. Click Dashboard Dashboard User Productivity Origination Queues tab. The details are grouped into two:
Origination Queues
Users
Field: View this:
User Displays the user code.
Name Displays the user name.
Verified Displays the number of applications verified.
Funded Displays the number of applications funded.
→ → →
2-5

2. In the Origination Queues section, you can view the following information.
A brief description of the fields is given below:
3. In the Users section, you can view the User related information. A brief description of the fields is given below:
Collector Activity
2.3.1.5 Collector Activity
The Collector Activity page displays the number of accounts worked and call activities by collector for the day. It also displays details regarding calls and total number of calls per queue.
To use the Collector Activity
1. Click Dashboard Dashboard User Productivity Collector Activity. The details on this screen are grouped into two:
Field: View this:
Company Displays the company.
Branch Displays the branch.
Queue Name Displays the queue name.
Applications Displays the number of applications in the queue.
Field: View this:
User Displays the user code.
Name Displays the user name.
→ → →
2-6
Users
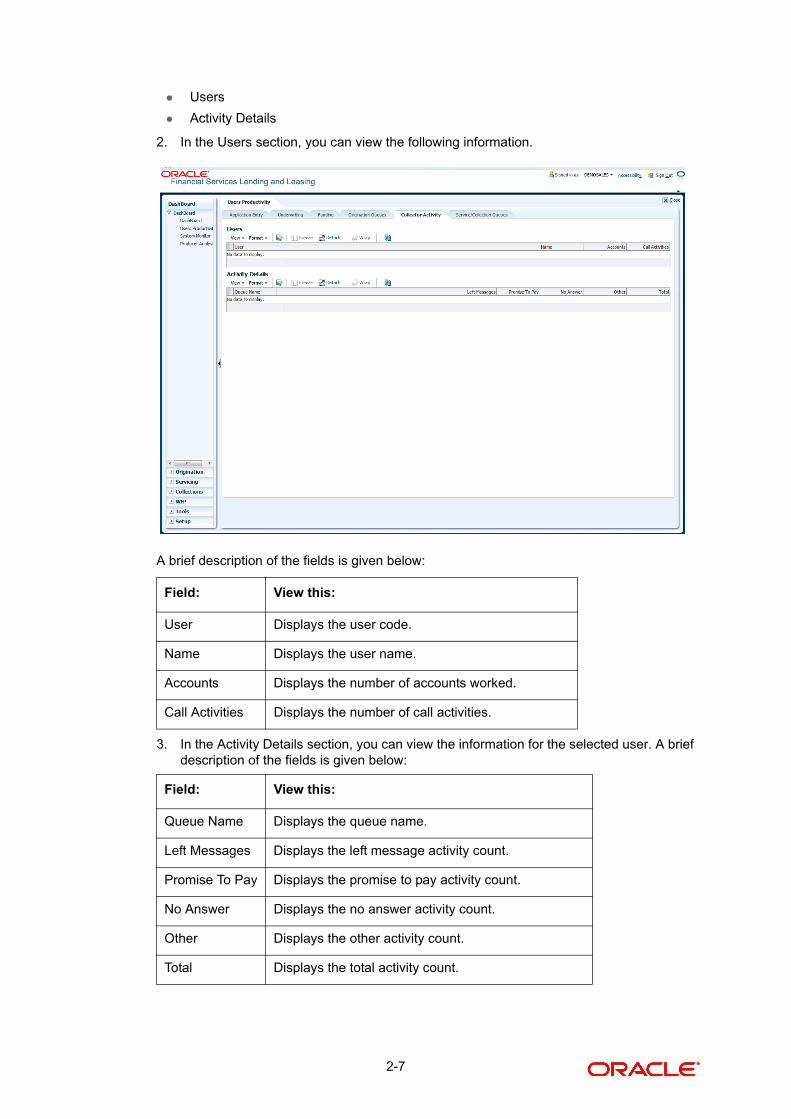
Activity Details
2. In the Users section, you can view the following information.
A brief description of the fields is given below:
3. In the Activity Details section, you can view the information for the selected user. A brief description of the fields is given below:
Field: View this:
User Displays the user code.
Name Displays the user name.
Accounts Displays the number of accounts worked.
Call Activities Displays the number of call activities.
Field: View this:
Queue Name Displays the queue name.
Left Messages Displays the left message activity count.
Promise To Pay Displays the promise to pay activity count.
No Answer Displays the no answer activity count.
Other Displays the other activity count.
Total Displays the total activity count.
2-7
2.4 System Monitor
The System Monitor page is the one stop place to check all the activities in and around the system. It maintains the progress of;
Batch Jobs
Jobs
Services
Database Server Log Files
Parked Transactions
Users
Navigating to System Monitor
1. On the Oracle Financial Services Lending and Leasing home page, click Dashboard Dashboard System Monitor.
2.4.1 Monitoring Batch Jobs
The system tracks the success of each batch process on the Batch Job. If either a set of batch jobs or specific batch job should fail, you can resubmit it on this page and review the results in the Request Details section.
The Monitor Batch Jobs page is only a display page that contains the following sections:
Batch Job Sets
Batch Jobs
Batch Jobs Threads
Request Details
Request Results
To Monitor Batch Job
1. Click Dashboard Dashboard System Monitor Batch Jobs.
→→
→ → →
2-8
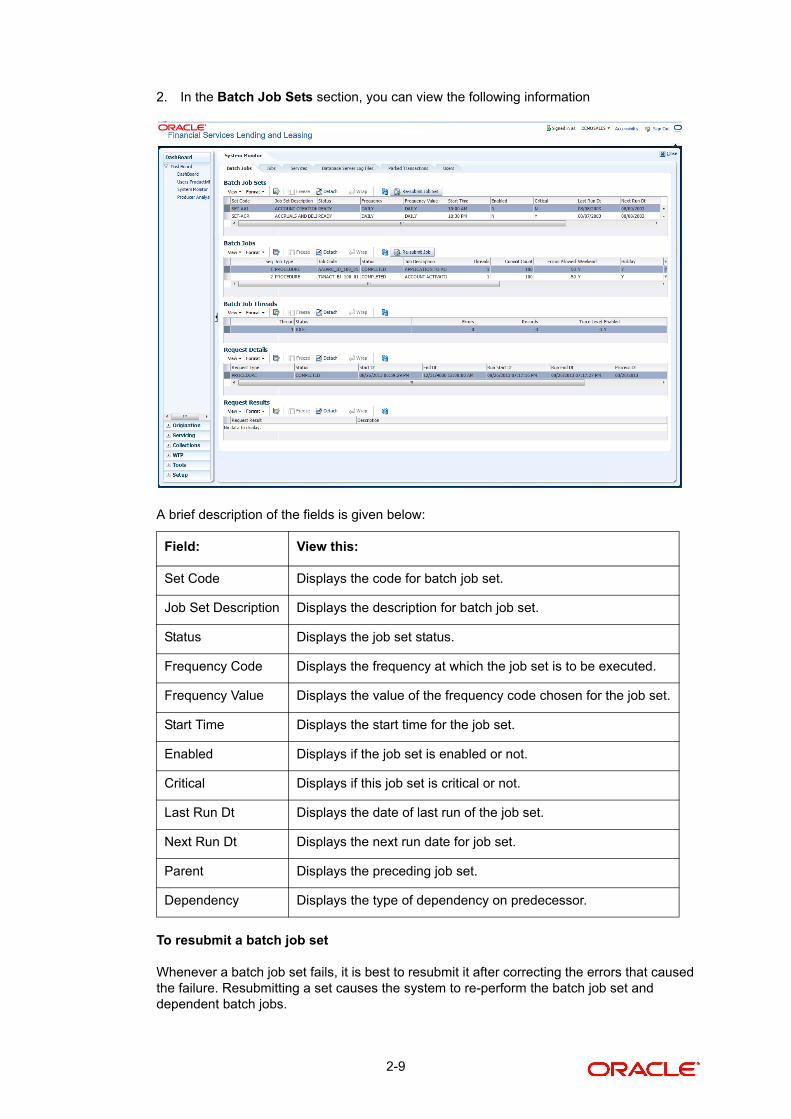
2. In the Batch Job Sets section, you can view the following information
A brief description of the fields is given below:
To resubmit a batch job set
Whenever a batch job set fails, it is best to resubmit it after correcting the errors that caused the failure. Resubmitting a set causes the system to re-perform the batch job set and dependent batch jobs.
Field: View this:
Set Code Displays the code for batch job set.
Job Set Description Displays the description for batch job set.
Status Displays the job set status.
Frequency Code Displays the frequency at which the job set is to be executed.
Frequency Value Displays the value of the frequency code chosen for the job set.
Start Time Displays the start time for the job set.
Enabled Displays if the job set is enabled or not.
Critical Displays if this job set is critical or not.
Last Run Dt Displays the date of last run of the job set.
Next Run Dt Displays the next run date for job set.
Parent Displays the preceding job set.
Dependency Displays the type of dependency on predecessor.
2-9
In the Batch Job Sets section, choose the batch job set to resubmit (only a batch job set with a status of FAILED can be resubmitted), then click Resubmit Job Set button.
The Batch Jobs section lists the batch jobs within a job set. The status, threads, commit count, dependencies, enabled indicator and the holiday and weekend runtime indicators are shown for each job.
A brief description of the fields is given below:
To resubmit a batch job
Whenever a batch job fails, it is best to resubmit it after correcting the errors that caused the failure. Resubmitting a set will cause the system to re-perform the batch job.
In the Batch Jobs section, choose the batch job to resubmit (only a batch job with a status of FAILED can be resubmitted), then choose Resubmit Job Set.
The Batch Job Threads section displays the status of the individual threads.
A brief description of the fields is given below:
Field: View this:
Seq Displays the batch job sequence number.
Job Type Displays the batch job request type.
Job Code Displays the batch job request code.
Status Displays the job status.
Job Description Displays the batch job description.
Threads Displays the number of threads used by the job.
Commit Count Displays the number of rows after which auto-commit is triggered.
Errors Allowed Displays the number of errors allowed.
Weekend Displays if the batch job will execute job on weekend or not.
Holiday Displays if the batch job will execute job on a holiday or not.
Enabled Displays if the job is enabled or not.
Parent Displays the preceding job.
Dependency Displays the type of dependency on predecessor.
Command Displays the command line for the job.
Rollback Segment Displays the rollback segment for job.
Field: View this:
Thread Displays the name of thread.
Status Displays the status of thread.
2-10

The Request Details section displays the status and the runtimes for each time the selected job ran.
A brief description of the fields is given below:
If a particular job requires that a result message be created, then that message appears in the Request Results section. A message is usually created in the event of an error.
A brief description of the fields is given below:
2.4.2 Monitoring Jobs
The Monitor Jobs page provides another view of monitoring all system processes, including credit bureau requests and payment posting. This page displays the data in reverse chronological order of the Run Start Date/Time, where as the Monitor Batch Jobs page provides the historical data about each job and job set.
To Monitor Job Details
1. Click Dashboard Dashboard System Monitor Jobs.
2. On the Job page, select the type of jobs you want to view in the Job Details section. You can select any of the following jobs:
Batch
Errors Displays the number of errors in the thread.
Records Displays the number of records in the thread.
Trace Level Displays the SQL trace level (0, 1, 4, 8, 12).
Enabled Displays if the job thread is enabled or not.
Field: View this:
Request Type Displays the job request type.
Status Displays the job request status.
Start Dt Displays the job request is valid from this date and time.
End Dt Displays the job request is valid till this date.
Run Start Dt Displays the date and time on when the job run started.
Run End Dt Displays the date and time at which the job run ended.
Process Dt Displays the transaction is posted with this General Ledger effec-tive date.
Description Displays the job request description.
Field: View this:
Request Results Displays the result of the job request.
Description Displays the result details.
Field: View this:
→ → →
2-11
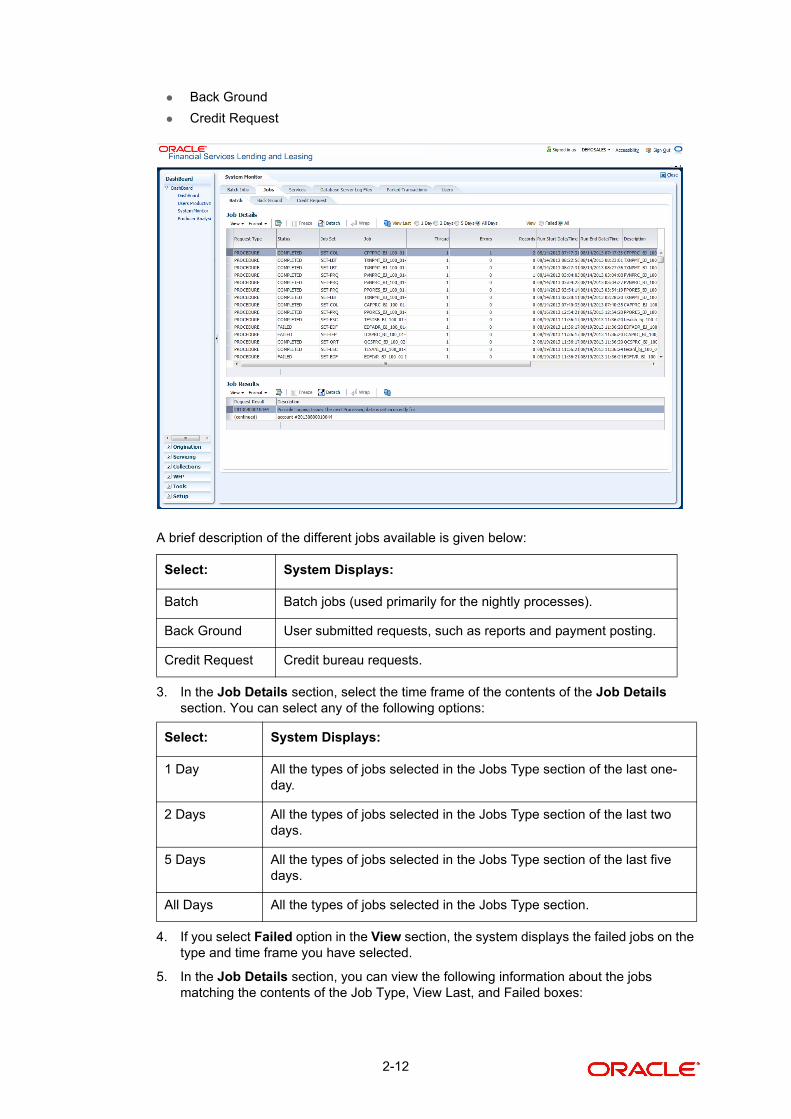
Back Ground
Credit Request
A brief description of the different jobs available is given below:
3. In the Job Details section, select the time frame of the contents of the Job Details section. You can select any of the following options:
4. If you select Failed option in the View section, the system displays the failed jobs on the type and time frame you have selected.
5. In the Job Details section, you can view the following information about the jobs matching the contents of the Job Type, View Last, and Failed boxes:
Select: System Displays:
Batch Batch jobs (used primarily for the nightly processes).
Back Ground User submitted requests, such as reports and payment posting.
Credit Request Credit bureau requests.
Select: System Displays:
1 Day All the types of jobs selected in the Jobs Type section of the last one-day.
2 Days All the types of jobs selected in the Jobs Type section of the last two days.
5 Days All the types of jobs selected in the Jobs Type section of the last five days.
All Days All the types of jobs selected in the Jobs Type section.
2-12
A brief description of the fields is given below:
6. In the Job Results section, you can view the following information about the Job selected in the Job Details section:
A brief description of the fields is given below:
2.4.3 Monitoring Services
The Services page allows you to track and maintain the system’s processing services, including credit bureaus, fax-in, and batch job scheduler. The system administrator can start or stop the service on this page using the action buttons respectively.
To stop, start, or refresh a processing service
1. Click Dashboard Dashboard System Monitor Services.
Field: View this:
Request Type Displays the job request type.
Status Displays the job request status.
Job Set Displays the job set code.
Job Displays the job description.
Thread Displays the job thread.
Errors Displays the number of errors.
Records Displays the number of records processed by the job.
Run Start Date/Time Displays the job run start date time.
Run End Date/Time Displays the job run end date time.
Description Displays the job request description.
Process Dt Displays the job process date.
Valid Execution Period
Start Date/Time Displays the job start date/time.
End Date/Time Displays the job end date time.
Field: View this:
Request Type Displays the job request type.
Description Displays the job request description.
→ → →
2-13
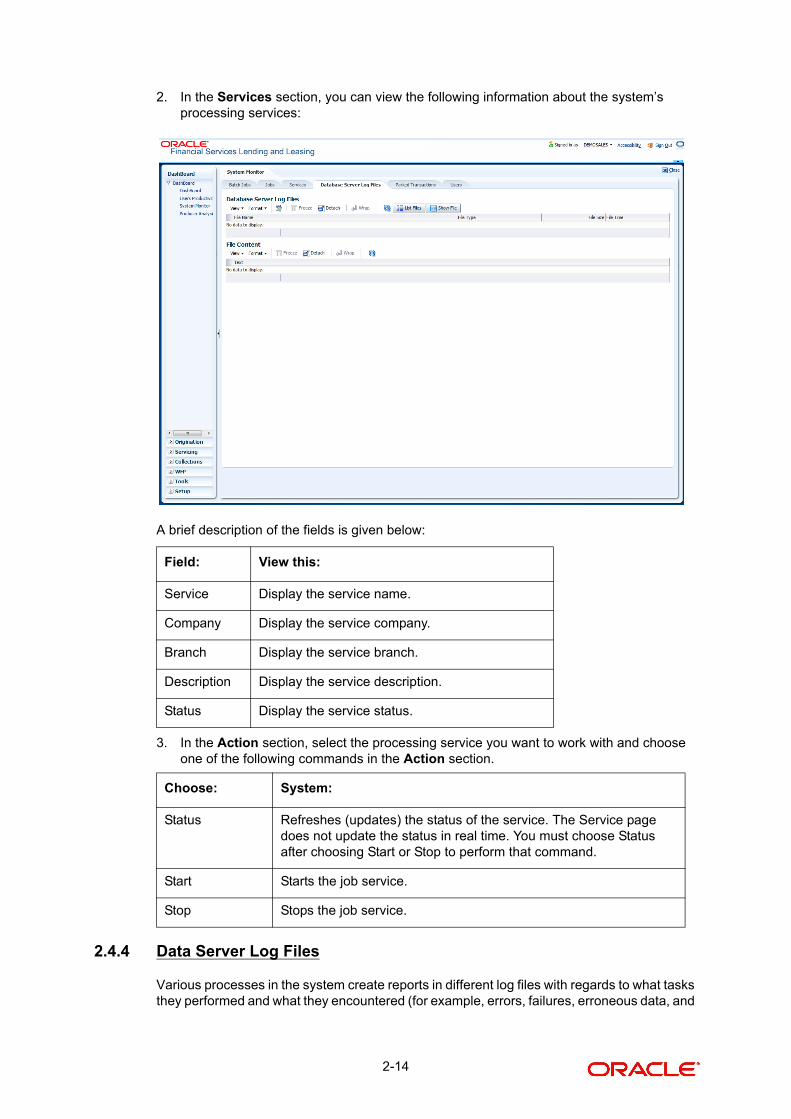
2. In the Services section, you can view the following information about the system’s processing services:
A brief description of the fields is given below:
3. In the Action section, select the processing service you want to work with and choose one of the following commands in the Action section.
2.4.4 Data Server Log Files
Various processes in the system create reports in different log files with regards to what tasks they performed and what they encountered (for example, errors, failures, erroneous data, and
Field: View this:
Service Display the service name.
Company Display the service company.
Branch Display the service branch.
Description Display the service description.
Status Display the service status.
Choose: System:
Status Refreshes (updates) the status of the service. The Service page does not update the status in real time. You must choose Status after choosing Start or Stop to perform that command.
Start Starts the job service.
Stop Stops the job service.
2-14
so on). The Database Server link lists and describes all such log files within the system on the database server.
To view a log file on the database server
1. Click Dashboard Dashboard System Monitor Database Server Log Files.
2. In the Database Server Log Files section, click List Files.
3. Then in the Database Server Log Files section, you can view the following information. A brief description of the fields is given below
4. In the File Content section you can view the content of the file selected in the Database Server Log Files.
5. Click Show File. A File Download - Security Warning dialog box is displayed with the confirmation message “Do you want to save this file?”
6. Click Save.
7. In the Save As dialog box, select the location you want to save the file and click Save.
2.4.5 Parked Transactions
Transactions which are posted when the end of the day (EOD) batch job process is running, receive a temporary status of HOLD. Once the EOD batch process is complete, the system posts the transactions on hold. These transactions can be thought of as “parked” transactions.
Field View this:
File Name Displays the name of the file.
File Type Displays the type of the file.
File Size Displays the size of the file.
File Time Displays the time stamp of the file.
→ → →
2-15
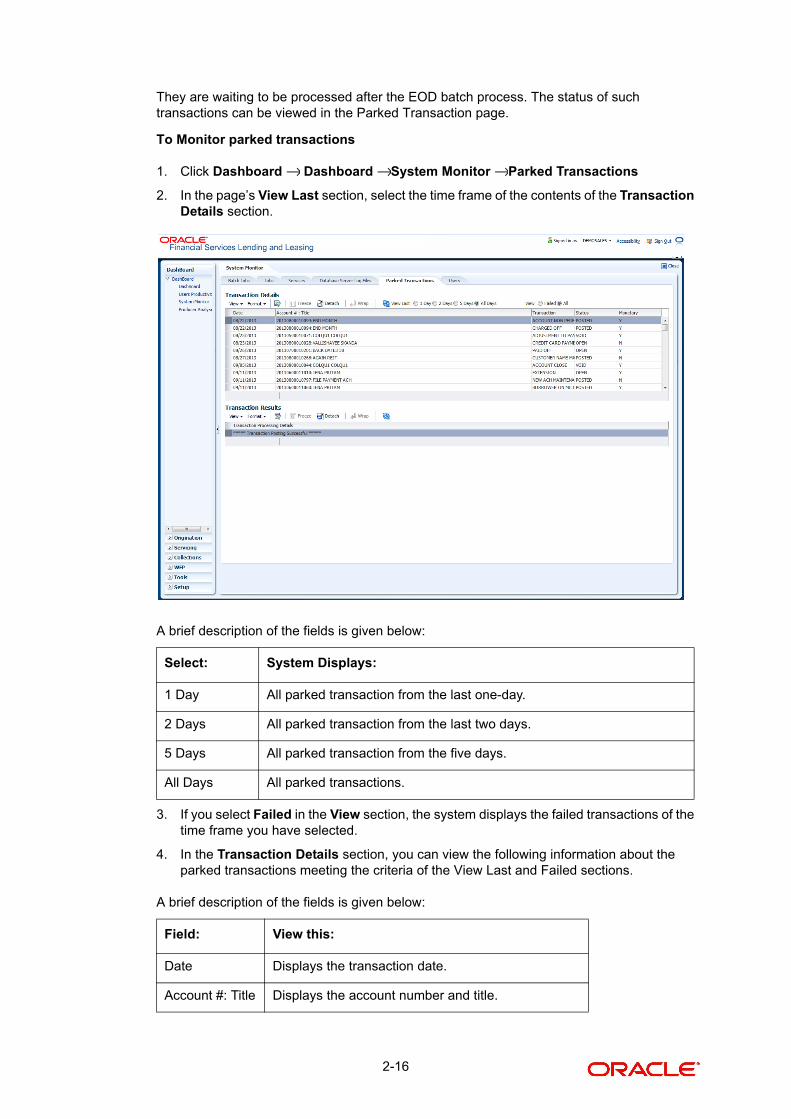
They are waiting to be processed after the EOD batch process. The status of such transactions can be viewed in the Parked Transaction page.
To Monitor parked transactions
1. Click Dashboard Dashboard System Monitor Parked Transactions
2. In the page’s View Last section, select the time frame of the contents of the Transaction Details section.
A brief description of the fields is given below:
3. If you select Failed in the View section, the system displays the failed transactions of the time frame you have selected.
4. In the Transaction Details section, you can view the following information about the parked transactions meeting the criteria of the View Last and Failed sections.
A brief description of the fields is given below:
Select: System Displays:
1 Day All parked transaction from the last one-day.
2 Days All parked transaction from the last two days.
5 Days All parked transaction from the five days.
All Days All parked transactions.
Field: View this:
Date Displays the transaction date.
Account #: Title Displays the account number and title.
→ → →
2-16

5. In the Transaction Results section, view the results of the transaction in the Transaction Processing Details field.
2.4.6 Monitoring Users
The Users Logins section allows you to view all users who have logged on to the system, along with the log on time stamp and logout time stamp. The information appears in reverse chronological order of the log on time stamp.
To monitor users who have logged on to the system
1. Click Dashboard Dashboard System Monitor Users.
2. In the User Logins section, you can view the following information
A brief description of the fields is given below:
Transaction Displays the transaction
Status Displays the status of the transaction
Monetary Displays if the transaction is a monetary transaction or not.
Field: View this:
User Displays the user ID.
User Name Displays the user name.
Details Displays the details.
Login Date and Time Displays the login date time for the user.
Field: View this:
→ → →
2-17
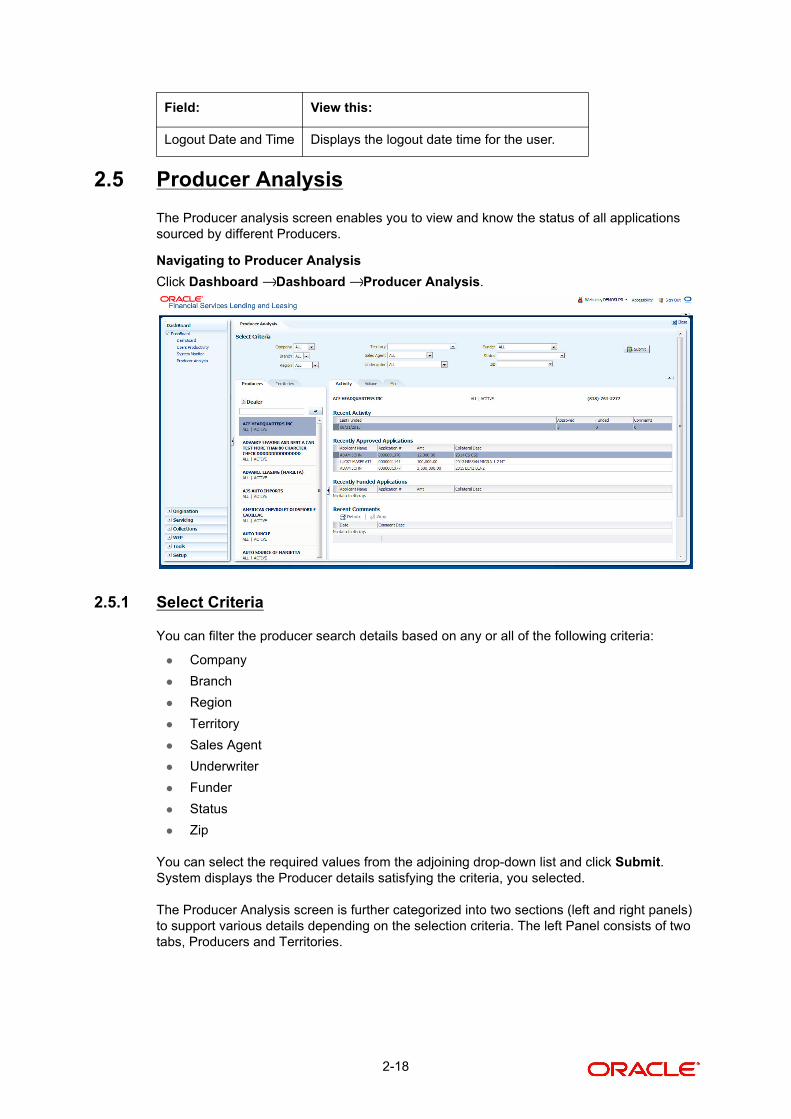
2.5 Producer Analysis
The Producer analysis screen enables you to view and know the status of all applications sourced by different Producers.
Navigating to Producer Analysis
Click Dashboard Dashboard Producer Analysis.
2.5.1 Select Criteria
You can filter the producer search details based on any or all of the following criteria:
Company
Branch
Region
Territory
Sales Agent
Underwriter
Funder
Status
Zip
You can select the required values from the adjoining drop-down list and click Submit. System displays the Producer details satisfying the criteria, you selected.
The Producer Analysis screen is further categorized into two sections (left and right panels) to support various details depending on the selection criteria. The left Panel consists of two tabs, Producers and Territories.
Logout Date and Time Displays the logout date time for the user.
Field: View this:
→ →
2-18
2.5.2 Producers
In the Producers Tab, you can use search option to search for a producer by name. Enter the producer name and click button. You can also search for all the producers maintained in the system by doing a blank search.
Based on criteria specified, all the matching records are listed in alphabetical order and the producers sales metrics for the first selected record (by default), is displayed in the right panel through following tabs. Also the current status of the producer and contact information is displayed on the top.
2.5.2.1 Activity Tab
The activity tab displays all the applications processed by the producer as per the following categorization.
Recent Activity
This section displays the following information:
Last Funded - Date on the which the recent application was funded.
Approved - Total number of applications approved, but not funded in last 30 days.
Funded - Total number of applications funded in last 30 days.
Comments - Total number of producer comments added in the last 30 days.
Recently Approved Applications
This section displays the first 10 credit applications which have been approved, but not funded in last 30 days along with their applicant name, application number, amount and collateral description details.
Recently Funded Applications
This section displays the first 10 credit applications which have been approved and funded in last 30 days along with their applicant name, application number, amount and collateral description details.
Recent Comments
This section displays the first 10 application comments of the total comments added in the last 6 months with their date and comment description.
2.5.2.2 Volume Tab
The volume tab provides a graphical (bar chart) representation of volume metrics.
Volume Metrics
You can filter the metrics data to be displayed based on Credit Amount or Units Sold by selecting Amt or Units radio button respectively.
The table in volume metrics section displays the following details:
Time Frame - This consists of the following two specific time frame of records.
– MONTH TO DATE: Indicates the total applications processed in the current month till date.
2-19
– CURRENT PACE: Indicates the speed at which the applications are being processed by calculating the total applications submitted against elapsed days of the month.
Submitted - Indicates the ratio of total requested amount per units (applications) submitted for processing.
Approved - Indicates the ratio of total financed amount per units (applications) approved but not funded.
Funded - Indicates the ratio of total contract amount financed per units (applications) funded.
You can further sort the display of metrics data based on applications submitted or approved or funded against time, i.e. MTD (month to date) or 6M (6 months) or 6Y (6 years). By default, “Submitted” and “6M” options are selected.
2.5.2.3 Mix Tab
The mix tab provides a graphical (bar chart) representation of mix of business metrics.
Mix of Business
You can filter the metrics data to be displayed based on Credit Request Percentage or Units Sold by selecting Percentage or Units radio button respectively.
The table in volume metrics section displays the following details:
Time Frame - This consists of the following two specific time frame of records.
– MONTH TO DATE: Indicates the total applications processed in the current month till date.
– PREVIOUS MONTH: Indicates the total applications processed in the previous month.
Tier 1 - Total of applications processed in first slab.
Tier 2 - Total of applications processed in second slab.
Tier 3 - Total of applications processed in third slab.
You can further sort the display of metrics data based MTD (month to date) or 6M (6 months) or 6Y (6 years) of which “6M” is selected by default.
2.5.3 Territories
On selecting the Territories Tab, you can view the territory-wise producer sales metrics. Depending on the territory selected in ‘Select Criteria’ section, all the matching records are listed in alphabetical order with the total amount funded for the particular territory from beginning of the month till date. If you have selected multiple territories in the search criteria, then the cumulative total of amount funded for all the selected territories are listed under ‘ALL’ categorization.
The producer sales metrics for the first selected record (by default), is displayed in the right panel through following tabs.
2.5.3.1 Portfolio
The portfolio tab provides a graphical (bar chart) representation of territory-wise business metrics in term of volume i.e. total amount funded against date.
2-20
Portfolio Information
You can filter the metrics data to be displayed based on total number of Actual (only funded applications) or Actual + In For Funding (both submitted and funded applications) by selecting the appropriate radio buttons.
The table in Portfolio Information section displays the following details:
Measurement - This consists of the following two specific records.
– MONTH TO DATE: Indicates the total applications processed in the current month till date.
– TARGET: Indicates the total number of applications expected to be processed by the producer.
Volume - Indicates the ratio of total amount funded to the total number of applications submitted.
Percentage - Indicates the ratio of total amount funded against the target volume expected.
You can further sort the display of metrics data based on Volume or Percentage against time, i.e. MTD (month to date) or 6M (6 months) or 6Y (6 years). By default, “Volume” and “MTD” options are selected.
2.5.3.2 Volume
The volume tab provides a graphical (bar chart) representation of territory-wise volume metrics.
For more information, refer to ‘Volume Tab’ explained in Producers section.
2.5.3.3 Mix
The mix tab provides a graphical (bar chart) representation of territory-wise mix of business metrics.
For more information, refer to ‘Mix Tab’ explained in Producers section.
2.5.3.4 Ratios
The ratios tab provides a territory-wise graphical (bar chart) representation of different ratios of applications being processed by producers.
Ratios
The table in ratios metrics section displays the following details:
Time Frame - This consists of the following two specific time frame of records.
– MONTH TO DATE: Indicates the number of applications being processed in the current month till date.
– PREVIOUS MONTH: Indicates the number of applications processed in the previous month.
Look to Book - Indicates the ratio of funded applications against the total submitted for processing.
Approval Ratio -Indicates the ratio of approved applications against the total submitted for processing.
Cashout Ratio - Indicates the ratio of funded applications against the total approved.
2-21

You can further sort the display of metrics data based on the above ratios - LTB (Look to Book) or Approval or Cashout against time, i.e. MTD (month to date) or 6M (6 months) or 6Y (6 years). By default, “LTB” and “6M” options are selected.
2.5.3.5 Producers
The producers tab provides a territory-wise graphical (bar chart) representation of producer metrics.
Producer Metrics
The table in producer metrics section displays the following details:
Time Frame - This consists of the following two specific time frame of records.
– MONTH TO DATE: Indicates the number of producers processing applications in the current month till date.
– PREVIOUS MONTH: Indicates the number of producers who have processed applications in the previous month.
Submitting - Indicates the number of producers with a minimum of one submitted application for processing.
Approving - Indicates the number of producers with a minimum of one approved application.
Funding - Indicates the number of producers with a minimum of one funded application.
You can further sort the display of metrics data based on producers who have submitted or approved or funded applications against time, i.e. MTD (month to date) or 6M (6 months) or 6Y (6 years). By default, “Submitted” and “6M” options are selected.
2-22
3. Customer Service
3.1 Introduction
After an application has cycled through the origination process, it becomes an account. Account maintenance and collections tasks can be performed with Oracle Financial Services Lending and Leasing’s Customer Service screen.
The Customer Service screen enables you to view and manage all customer information in a centralized location to ensure data integrity and provide better service. Oracle Financial Services Lending and Leasing provides online real-time information about the applicant(s), contract, account balances, dues, transactions, call activities, and comments. Oracle Financial Services Lending and Leasing also supports back-dating of financial transactions till the account’s opening date.
Activating an Account
An account is automatically activated when you fund the contract using the Funding main tab or convert from a legacy system. You cannot activate an account using the Customer Service screen.
Posting and Reversing Payments
A payment can be posted and reversed on the Payments screen. You cannot post and reverse the payment in Customer Service screen. (For more information, see the Payment Processing chapter.)
Account Mask
After an application completes the origination cycle and is funded or is ported into the system, it becomes an account and receives an account number.The system assigns account numbers using the following logic:
YYYYMMNNNNNNNX
where:
YYYYMM = contract date
NNNNNNN = serial number
X = check digit
The system sorts accounts using the NNNNNN portion only. That portion is referred to as the account ID.
3.1.1 Quick Search section
Conditions and Queues
During the Lease application process,applications had a status and sub status. Accounts do not have sub statuses; instead, accounts use conditions. Conditions further define the status of an account; for example: delinquent, bankruptcy, scheduled for charge off, Do Not Charge Off. Conditions can be applied automatically by the system based on set up, and manually by the system users using the Customer Service screen.
3-1
The system can assign accounts to specific users by way of queues. Queues are a workflow management tool that allow the users to work on accounts sequentially from a prioritized list, rather than having to manually search for and load them. Queues are created and sorted during nightly processing. Examples of customer service queues include due date change requests, delinquent accounts, deferment requests, and title and insurance follow-up.
Account conditions serve as default queues; that is, an account’s condition determines which queue the account is in.
In the following example, the account has a condition of DELIQUENT, noted in the Conditions section and Status field. The account was loaded from the delinquent queue, DELQ (D).
A queue can be associated with only one condition. In the following example, the Delinquent queue is associated with the Delinquent condition. However, an account can have more than one condition, so an account can be in more than one queue. Multiple queues can be created for a single condition. Account attributes (such as number of days delinquent and product code) can be used for assigning accounts to a queue and sorting accounts within a queue.
You can quickly load an account from a queue using the Next Account button in the Quick Search section.
3.2 Customer Service screen
Most pages on the Customer Service screen contain the Account(s) and Customer(s) sections as a header. The Account(s) section provides a quick overview of an account by displaying its company, branch, account number, product, payoff amount and amount due, status, and oldest due date. The information on the Customer Service screen always refers to the account selected in this section.
The Customer(s) section displays information about the customer(s) attached to the account. The information on the Customer Service screen always refers to the customer selected in this section.
To view account details in the Account(s) and Customer(s) sections, open the Customer Service screen and load the account you want to work with.
On the Customer Service screen’s Account(s) section, view the following information: The system filters and displays the information based on your selection:
Command Button:
Action Performed:
Current Displays the current search account only. It does not matter how that account was searched like using account search screen or selected a queue from drop-down and pressed ‘Next’ button or account num-ber was directly pasted in Acc# text box and pressed Submit button.
Note: This is the default option.
Show All Displays the related accounts based on current selected customer’s customer Id. To view the details of account number(s) other than current account, select the account in the Account(s) section and click Submit.
3-2
In the Account(s) section, click Viewto view the following information:
The system allows the quick search of an account through the Quick Search section in the right hand side of the screen irrespective of the screen on which you are working on. This is available in addition to the Quick Search section available in the Results tab.
For more details on Quick Search refer ‘Search Functions’ chapter.
Call Activity functionality can be performed using the Add Call Activity section in the right hand side of the screen irrespective of the screen you are working on. This is available in addition to the Call Activities sub tab available under Customer Service tab. This facilitates quick and easy reference.
Group Follow-up Displays the set of accounts that share the same account condition as the selected account and bear the same Customer Id. Other than having same account condition and Customer Id, the queue cur-rently selected should have the Group Follow-up Indicator enabled in queue setup and the follow-up date should fall in range of the organization level system parameter UCS_GROUP_FOLLOWUP_-DAYS.
In this field: View this:
Company The company of the account.
Branch The branch of the account.
Account # The account number.
Product The product for the account.
Currency The currency for the account.
Pay Off Amt The current payoff amount for the account.
Amount Due The current delinquent amount due for the account.
Status The account’s status.
Oldest Due Dt The oldest due date.
Command Button:
Action Performed:
3-3
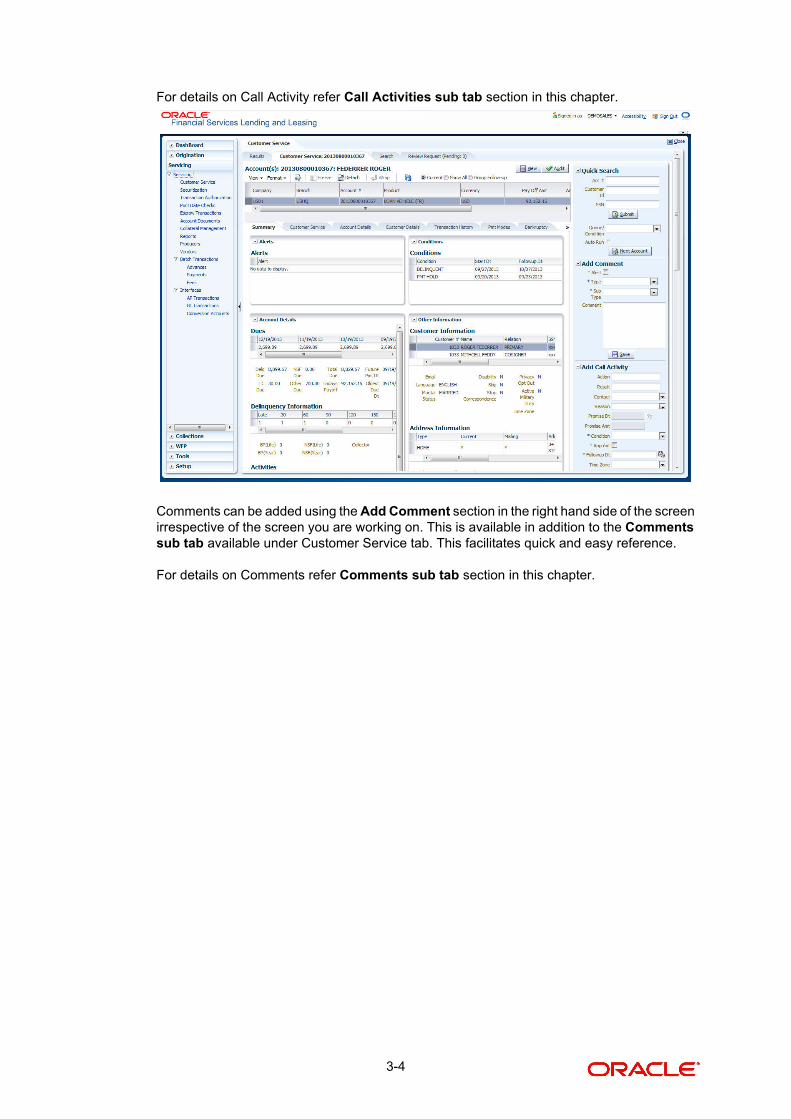
For details on Call Activity refer Call Activities sub tab section in this chapter.
Comments can be added using the Add Comment section in the right hand side of the screen irrespective of the screen you are working on. This is available in addition to the Comments sub tab available under Customer Service tab. This facilitates quick and easy reference.
For details on Comments refer Comments sub tab section in this chapter.
3-4
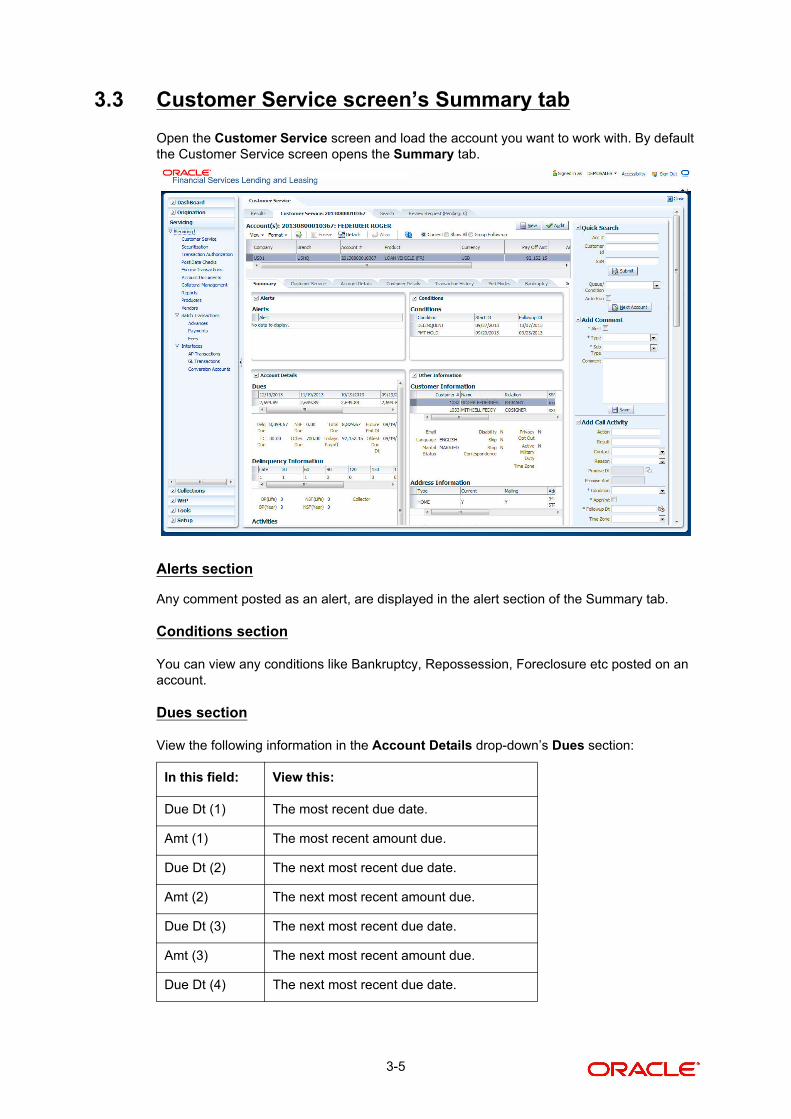
3.3 Customer Service screen’s Summary tab
Open the Customer Service screen and load the account you want to work with. By default the Customer Service screen opens the Summary tab.
Alerts section
Any comment posted as an alert, are displayed in the alert section of the Summary tab.
Conditions section
You can view any conditions like Bankruptcy, Repossession, Foreclosure etc posted on an account.
Dues section
View the following information in the Account Details drop-down’s Dues section:
In this field: View this:
Due Dt (1) The most recent due date.
Amt (1) The most recent amount due.
Due Dt (2) The next most recent due date.
Amt (2) The next most recent amount due.
Due Dt (3) The next most recent due date.
Amt (3) The next most recent amount due.
Due Dt (4) The next most recent due date.
3-5
Delinquency Information Section
View the following information in the Delinquency Information section:
Amt (4) The next most recent amount due.
Due Dt (5) The next most recent due date.
Amt (5) The next most recent amount due.
Delq Due The delinquent amount.
LC Due The late charges due.
NSF Due The nonsufficient funds fee due.
Other Due The other dues.
Total Due The total amount due.
Today’s Payoff The payoff (for today).
Future Pmt Dt The future payment date
Oldest Due Dt The due date
In this field: View this:
Late The number of times less than 30 days delinquent over the life of the account.
30 The number of times 30 days delinquent over the life of the account.
60 The number of times 60 days delinquent over the life of the account.
90 The number of times 90 days delinquent over the life of the account.
120 The number of times 120 days delinquent over the life of the account.
150 The number of times 150 days delinquent over the life of the account.
180 The number of times 180 days delinquent over the life of the account.
Category The delinquency category.
Days The number of days delinquent. A negative number in this fields denotes the number of days until a payment is due.
BP (Life) The number of broken promises over the life of the account.
BP (Year) The number of broken promises this year.
NSF (Life) The number of nonsufficient funds over the life of the account.
NSF (Year) The number of nonsufficient funds this year.
Collector The default collector working on the account.
In this field: View this:
3-6
Activities Section
View the following information in the Activities section:
Note
You can maintain the number of days in the system parameter ‘FUTURE_PAYOFF_-DAYS’ to generate the quote.
Due Date Change Section
You can view the following information under Due Date Change section.
In this field: View this:
Active Dt The date account was made active.
Last Activity Dt The date the most recent activity was performed on the account.
Due Day The due day for payment.
Last Pmt Amt The last payment amount.
Customer Grade The customer grade.
App# The application number from which this account was created.
Paid Off Dt The date the account was paid off.
Effective Dt The date account became effective.
Current Pmt The current payment amount.
Last Bill Amt The last bill amount.
Last Pmt Amt The last payment amount.
Chargeoff Dt Date account was charged off.
Military Duty If selected, indicates that at the time of billing, the customer was in active military duty and qualifies for rates in accordance with Ser-vice members Civil Relief Act (SCRA) of 2003.
Customer Score The customer score.
Behaviour Score The behaviour score.
Future Payoff Amount
The system displays the future payoff amount.
Future Payoff Date
The date for which the future payoff quote is provided.
Producer The channel and producer of the account.
In this Field: Do This:
Last Txn Dt The last date on which the due date was changed.
3-7
Extensions section
You can view the following extension details as per the conditions maintained in the contract.
Customer Information section
On the Customer Service screen’s Customer Information section, select the record you want to work with and view the following information:
Transaction Limit (Life)
The number of Due Date changes allowed during the life of an account.
Transaction Limit (Year)
The number of Due Date changes allowed for the account during a year.
In this Field: Do This:
Transaction Limit (Year)
The number of Extensions allowed for an account during a year.
Transaction Limit (Life)
The number of Extensions allowed during the life of an account
Last Txn Dt The date when last extension was made.
Extension Gap Remaining (Months)
The number of months remaining before you can post Extensions for an account.
In this field: View this:
Customer # Customer identification number (unique customer identifier).
Name Customer’s full name.
Relation Customer’s relationship to the account.
SSN Customer’s social security number.
Note: If the organizational parameter UIX_HIDE_RESTRICTED_DATA is set to Y, this appears as a masked number; for example, XXX-XX-1234.
Birth Dt Customer’s date of birth.
Gender Customer’s gender.
3-8
Customer Details section
Address Information section
Employment Information section
Collateral Information section
You can view the Collateral Information in this section:Customer Service screen’s Customer
In this field: View this:
Email Customer’s e-mail address.
Language Language spoken by the customer.
Marital Sta-tus
Customer’s martial status.
Disability Customer disability indicator If selected, this indicates that the customer is disabled.
Skip Customer’s skip indicator. If selected, this indicates that the customer is a skip debtor. This is selected using the Maintenance page.
Stop Corre-spondence
Stop correspondence indicator. If selected, Oracle Financial Services Lending and Leasing will not send correspondence to customer. This is selected using the Maintenance page.
Privacy Opt-Out
Privacy opt-out indicator. If selected, indicates that the applicant has elected to refrain from the non-public sharing of information (optional).
Time Zone Customer’s time zone.
In this field: View this:
Type Address type.
Current If selected, indicates that this is the current address.
Mailing If selected, indicates that this is the mailing address.
Phone Phone number.
Address Address details.
In this field: View this:
Type Address type.
Current If selected, indicates that this is the current address.
Employer Employer Details
Phone Phone number.
Address Address details.
In this field: View this:
3-9
Service tab
Open the Customer Service screen and load the account you want to work with. Click the Customer Service tab to view the sections under it.
3.3.1 Call Activities sub tab
The call activity section includes calls from the customer, calls you make regarding the account, or changes to the condition of the account. Entries in the Call Activities section are listed in reverse chronological order of follow-up date.
Note
Call activity action codes (Action field) and call activity results codes (Results field) are user-defined.
Each action and result has a code and description. The code for the call action and call result is what appears on the Call Activity sub page.
3.3.1.1 Recording a Call Activity
To record a call activity
1. Open the Customer Service screen and load the account you want to work with.
2. Click Customer Service sub tab and then click Call Activities tab under it. Click Add. The system displays the following screen.
3. You can complete the following optional fields:
Asset # The asset number of the collateral.
This is a hyper-link which when clicked takes you to the collateral man-agement screen with the relevant asset details.
Asset Class The asset class of the collateral.
Asset Type The type of collateral.
Sub Type The sub type of the collateral.
Year The year of manufacture of the collateral.
Description A brief description on the collateral.
3-10
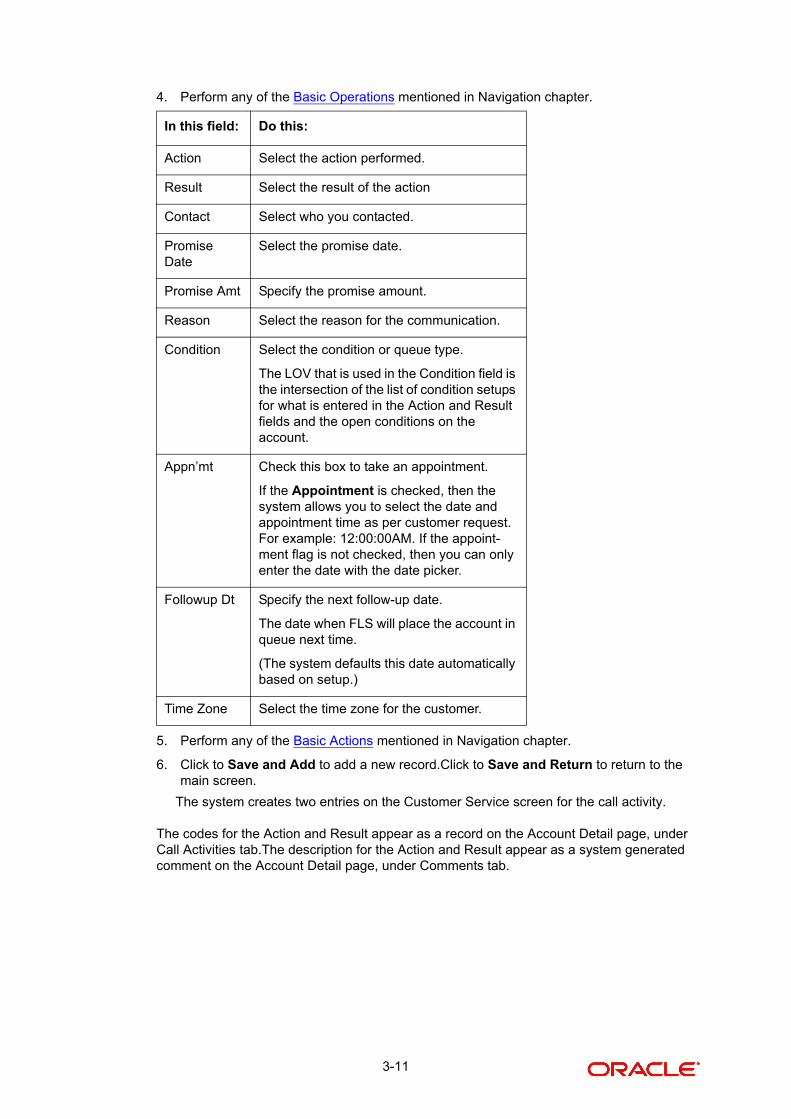
4. Perform any of the Basic Operations mentioned in Navigation chapter.
5. Perform any of the Basic Actions mentioned in Navigation chapter.
6. Click to Save and Add to add a new record.Click to Save and Return to return to the main screen.
The system creates two entries on the Customer Service screen for the call activity.
The codes for the Action and Result appear as a record on the Account Detail page, under Call Activities tab.The description for the Action and Result appear as a system generated comment on the Account Detail page, under Comments tab.
In this field: Do this:
Action Select the action performed.
Result Select the result of the action
Contact Select who you contacted.
Promise Date
Select the promise date.
Promise Amt Specify the promise amount.
Reason Select the reason for the communication.
Condition Select the condition or queue type.
The LOV that is used in the Condition field is the intersection of the list of condition setups for what is entered in the Action and Result fields and the open conditions on the account.
Appn’mt Check this box to take an appointment.
If the Appointment is checked, then the system allows you to select the date and appointment time as per customer request. For example: 12:00:00AM. If the appoint-ment flag is not checked, then you can only enter the date with the date picker.
Followup Dt Specify the next follow-up date.
The date when FLS will place the account in queue next time.
(The system defaults this date automatically based on setup.)
Time Zone Select the time zone for the customer.
3-11
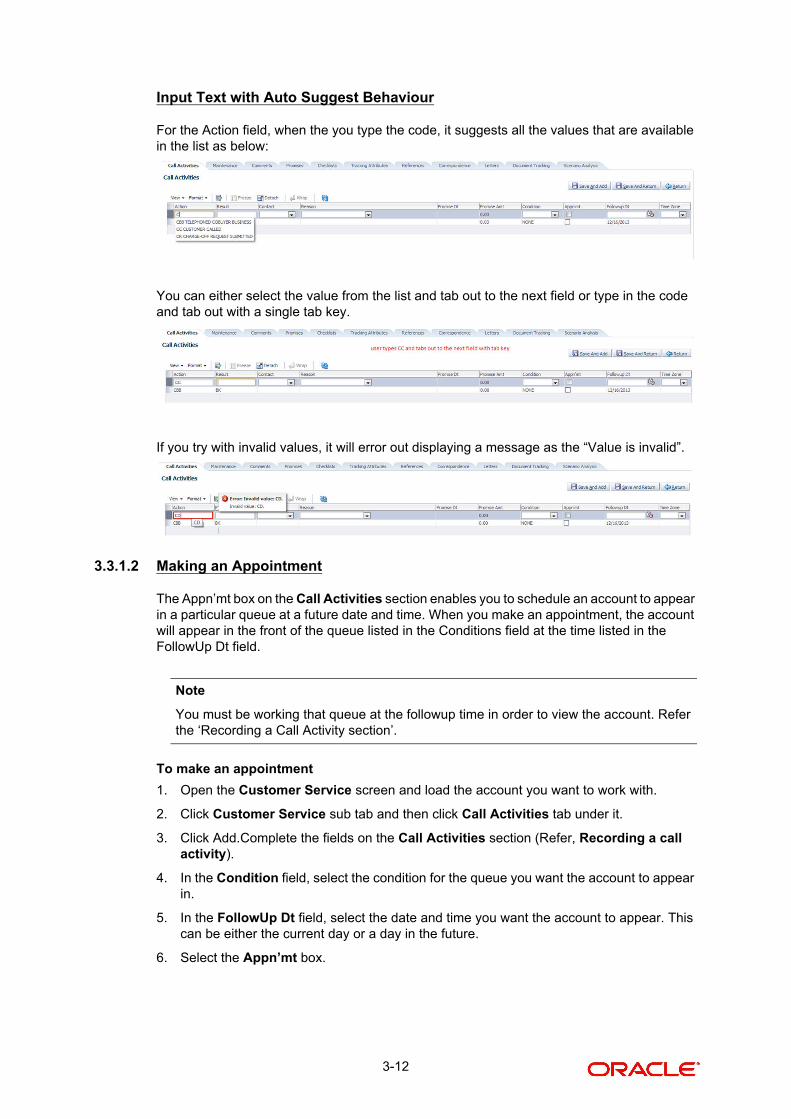
Input Text with Auto Suggest Behaviour
For the Action field, when the you type the code, it suggests all the values that are available in the list as below:
You can either select the value from the list and tab out to the next field or type in the code and tab out with a single tab key.
If you try with invalid values, it will error out displaying a message as the “Value is invalid”.
3.3.1.2 Making an Appointment
The Appn’mt box on the Call Activities section enables you to schedule an account to appear in a particular queue at a future date and time. When you make an appointment, the account will appear in the front of the queue listed in the Conditions field at the time listed in the FollowUp Dt field.
Note
You must be working that queue at the followup time in order to view the account. Refer the ‘Recording a Call Activity section’.
To make an appointment
1. Open the Customer Service screen and load the account you want to work with.
2. Click Customer Service sub tab and then click Call Activities tab under it.
3. Click Add.Complete the fields on the Call Activities section (Refer, Recording a call activity).
4. In the Condition field, select the condition for the queue you want the account to appear in.
5. In the FollowUp Dt field, select the date and time you want the account to appear. This can be either the current day or a day in the future.
6. Select the Appn’mt box.
3-12
Note
If account is not worked within the queue on day of the appointment, the nightly jobs will cancel the appointment. Also, if the account’s queue condition changes during the nightly batch jobs, the outstanding appointments are cancelled.
3.3.1.3 Canceling an Appointment
Using the Call Activities page, you can cancel an appointment for an account. The account will still appear in the queue on the follow up date, but no longer receive a priority.
To cancel an appointment
1. Open the Customer Service screen and load the account you want to work with.
2. Click Customer Service sub tab and then click Call Activities tab under it.
3. Click Add. The system displays the Call Activities page.If you need to change the time for the appointment, create a new entry on the account’s Call Activities section with the same condition, but enter a new followup date.If you need to cancel the appointment, create a new entry on the account’s Call Activities section with the same condition, but don’t check the Appointment check box.(To create a new entry, refer Recording a Call Activity section.)
4. Click Save.
3.3.1.4 Recording a Promise to Pay
If you record an action on the Call Activities page as a ‘promise to pay’, it appears as a record on the Account Details page’s Promises section. The Promises section enables you to quickly view these actions without searching for them individually.
To record a promise to pay
1. Open the Customer Service screen and load the account you want to work with.
2. Click Customer Service sub tab and then click Call Activities tab under it.
3. Click Add. The system displays the Call Activities page.In the Action field, select the action which is already performed, such as DC - DEALER CALLED
4. In the Result field, select a result involving a promise to pay, such as PP - PROMISE TO PAY.
5. You can complete the following optional fields:
6. In the Promise Dt field, record the date when the person you spoke with promises to make payment.
7. In the Promise Amt field, record the amount of the payment the person you spoke with promises to pay.
8. In the Condition field, select the condition or queue type.
9. In the Followup Dt field, enter the next follow-up date for the promise-to-pay or accept the default date.
In this field: Do this:
Contact Select the contact type. (Who was the person you communicated with?).
Reason Select the reason, as stated by the contacted person. (What is the reason for this contact?).
3-13
10. Click Save.
The system automatically notes this information as an entry on the Promises and Com-ments sub pages.
Note
If payment amount is within the tolerance limit, promise is considered to be kept. If the pay-ment amount is not within tolerance limit, promise is considered to be broken. During this validation, only percentage tolerance is considered and not the contract tolerance amount.
3.3.1.5 Canceling a Promise to Pay
Oracle Financial Services Lending and Leasing enables you to cancel promises to pay using the Account Detail’s page Call Activities section. You might do this when a customer informs you prior to the promise date that he or she cannot make the payment.
To cancel the existing promise to pay
1. Open the Customer Service screen and load the account you want to work with.
2. Click Customer Service sub tab and then click Call Activities tab under it.
3. Click Add. The system displays the Call Activities page.
4. Select the call activity entry for the promise to pay you want to cancel.
Click the Cancel box.The promise is marked as canceled and will not be considered when processing promises; in other words, it will not be counted as either satisfied or broken.
3.3.1.6 Posting Offline Call Activities
The system facilitates posting of offline call activities against an account.
To Post Offline Call Activities:
1. The source file is provided in CSV format (pre-determined for fields & size). Each field in the file is separated by a comma (,) and each line is separated by return (New Line).
2. A batch job Offline call activity posting, loads the provided flat file in the specified format and the system will process it line by line.
3. For each line, the system posts Call Action Code and the corresponding Call Result Code, for a given account number with SYSDATE.
4. The system will perform the respective call activities and sets the follow-up date as SYSDATE + Follow up Days (As provided in the feed file)
5. During offline call activity, you can specify comments, if any, in the comments field. The system defaults the comments received from the offline call activity in the comments section sub tab under Customer Service screen.
3.3.2 Maintenance sub tab
The Customer Service screen’s Maintenance page acts as a single command stations that enables you to post a wide array of monetary and nonmonetary transactions for any given account. Transaction available is based on the account’s Lease produce and the user’s responsibility. This section explains how to complete the following tasks:
Monetary tasks
Lease:
3-14
Apply, adjust, or waive servicing expenses
Adjust or waive late charges
Adjust or waive nonsufficient funds
Apply, adjust, or waive repossession expenses
Apply, adjust, or waive bankruptcy expenses
Apply or adjust phone pay fees
Change an index/margin rate
Apply, adjust, or cancel financed insurance
Payoff an account
Charge-off an account
Close an account
Change a due date
Note
‘Change ACH due date’ is optional. So, while posting a due date change transaction, you can choose whether to change the ACH due date or not.
If you select 'Yes' for ‘Change ACH due date’, then it changes the ACH due date and due date. If you select 'No', it changes only due date. By default, system sets 'No' for ‘Change ACH due date’ parameter.
When due date change transaction is being reversed, the original data for due date and Change ACH due date (if this was also changed) would be retained.
In the ACH Maintenance transaction, the ACH default Indicator gets set to ‘Y’ if the ACH date gets defaulted from the due date maintenance.Nonmonetary tasks
Lease:
Update a customer’s name
Maintain customer details
Mark a customer as a skipped debtor
Change a customer’s Privacy Opt-Out indicator
Stop correspondence
Modify financed insurance information
Start or stop an ACH
Reprint a statement (batch only)
Add or stop servicing of accounts with post dated checks as a repayment method
Re-order coupon books
The system enables you to post a monetary transaction immediately or submit it for nightly processing. The transaction is identified as either a ‘real-time’ or nightly batch transaction in Oracle Financial Services Lending and Leasing’s transaction setup codes. The system also enables you to cancel the future dated transactions or the transaction that have been submitted for nightly processing. All the activity on the account, including who performed it and a date and time stamp, is captured in the audit trail.
3-15
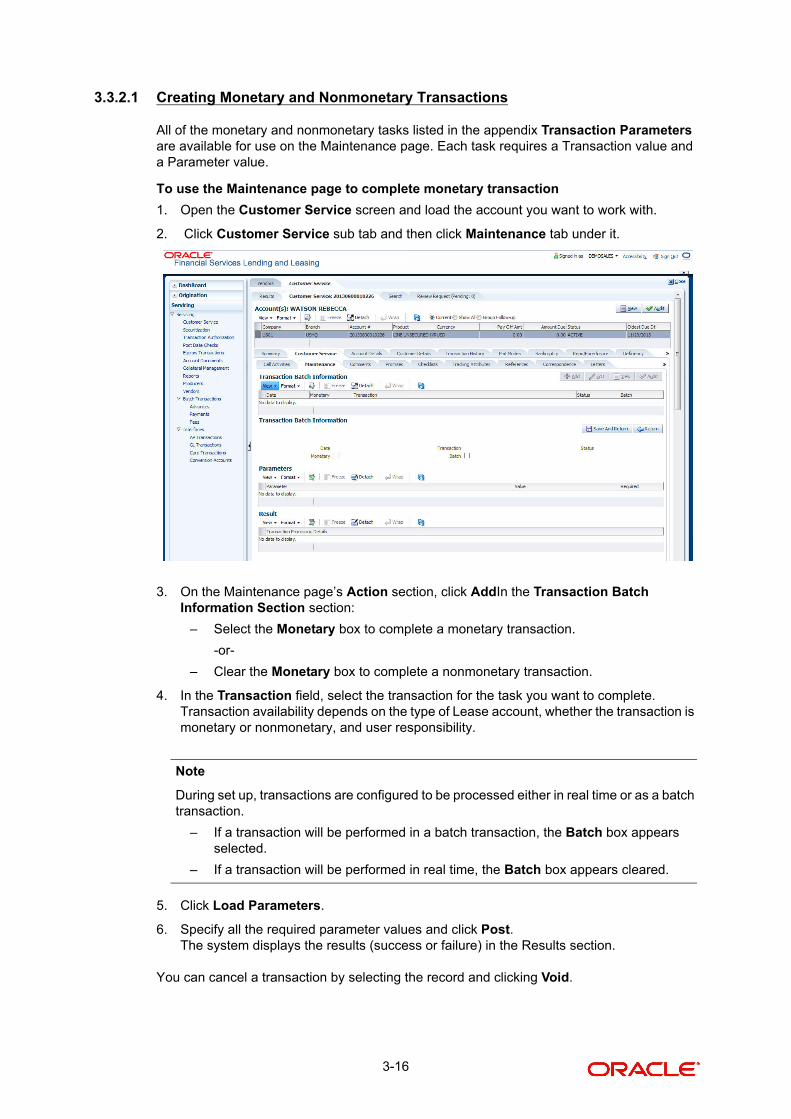
3.3.2.1 Creating Monetary and Nonmonetary Transactions
All of the monetary and nonmonetary tasks listed in the appendix Transaction Parameters are available for use on the Maintenance page. Each task requires a Transaction value and a Parameter value.
To use the Maintenance page to complete monetary transaction
1. Open the Customer Service screen and load the account you want to work with.
2. Click Customer Service sub tab and then click Maintenance tab under it.
3. On the Maintenance page’s Action section, click AddIn the Transaction Batch Information Section section:
– Select the Monetary box to complete a monetary transaction.
-or-
– Clear the Monetary box to complete a nonmonetary transaction.
4. In the Transaction field, select the transaction for the task you want to complete. Transaction availability depends on the type of Lease account, whether the transaction is monetary or nonmonetary, and user responsibility.
Note
During set up, transactions are configured to be processed either in real time or as a batch transaction.
– If a transaction will be performed in a batch transaction, the Batch box appears selected.
– If a transaction will be performed in real time, the Batch box appears cleared.
5. Click Load Parameters.
6. Specify all the required parameter values and click Post.The system displays the results (success or failure) in the Results section.
You can cancel a transaction by selecting the record and clicking Void.
3-16
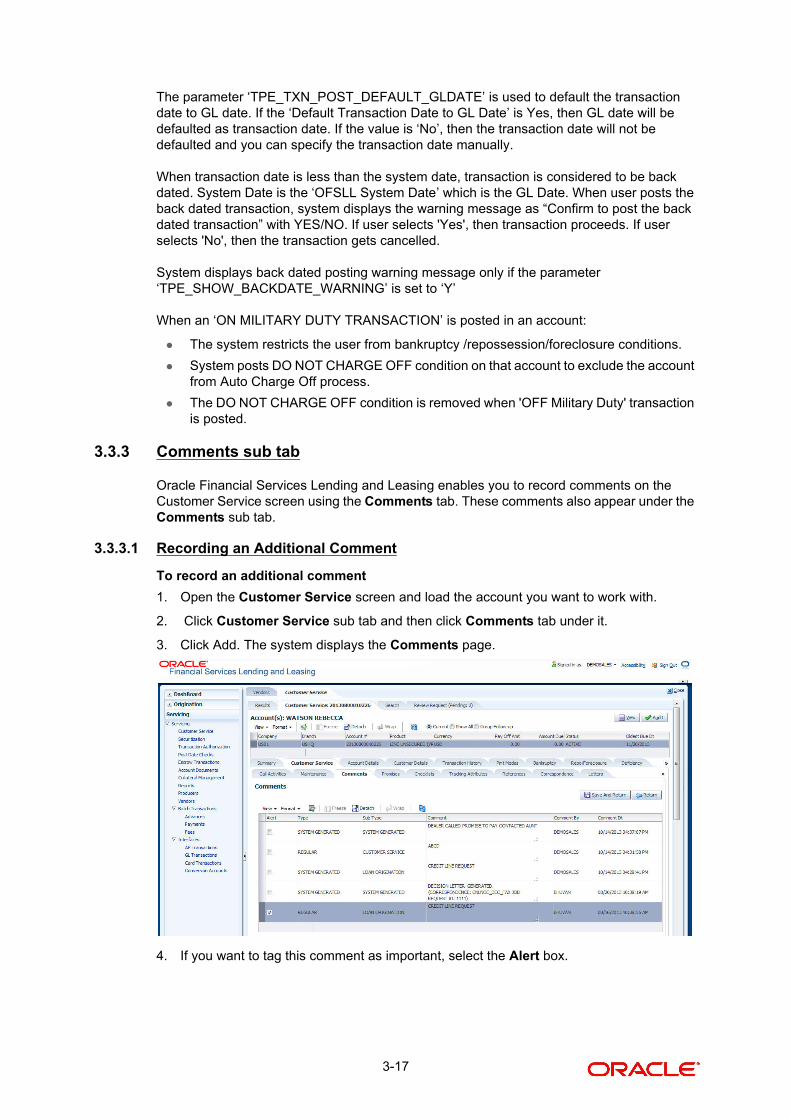
The parameter ‘TPE_TXN_POST_DEFAULT_GLDATE’ is used to default the transaction date to GL date. If the ‘Default Transaction Date to GL Date’ is Yes, then GL date will be defaulted as transaction date. If the value is ‘No’, then the transaction date will not be defaulted and you can specify the transaction date manually.
When transaction date is less than the system date, transaction is considered to be back dated. System Date is the ‘OFSLL System Date’ which is the GL Date. When user posts the back dated transaction, system displays the warning message as “Confirm to post the back dated transaction” with YES/NO. If user selects 'Yes', then transaction proceeds. If user selects 'No', then the transaction gets cancelled.
System displays back dated posting warning message only if the parameter ‘TPE_SHOW_BACKDATE_WARNING’ is set to ‘Y’
When an ‘ON MILITARY DUTY TRANSACTION’ is posted in an account:
The system restricts the user from bankruptcy /repossession/foreclosure conditions.
System posts DO NOT CHARGE OFF condition on that account to exclude the account from Auto Charge Off process.
The DO NOT CHARGE OFF condition is removed when 'OFF Military Duty' transaction is posted.
3.3.3 Comments sub tab
Oracle Financial Services Lending and Leasing enables you to record comments on the Customer Service screen using the Comments tab. These comments also appear under the Comments sub tab.
3.3.3.1 Recording an Additional Comment
To record an additional comment
1. Open the Customer Service screen and load the account you want to work with.
2. Click Customer Service sub tab and then click Comments tab under it.
3. Click Add. The system displays the Comments page.
4. If you want to tag this comment as important, select the Alert box.
3-17
Note
If you select the Alert box, the comment appears on the Customer Service screen’s Alerts section when you click Save.
5. In the Type field, select what type of comment you are adding.
6. In the Sub Type field, select what sub type of comment you are adding.
7. In the Comment field, specify your comment.
8. Click Save and Add to add a new record. Click Save and Return to return to the main screen.
Comments can be viewed under the Comments tab. View the following:
Note
If the Alert box is selected, the comment appears on the Customer Service window’s Alerts section.
3.3.4 Promises sub tab
The system automatically updates the promise to pay request information as an entry under the Promises sub tab.
If a call was recorded as a PROMISE TO PAY on the Call Activities section, it will appear under the Promises sub tab. The Promises sub tab enables you to quickly view details about the call and subsequent actions and displays the 25 most recent promises to pay.
If the system does not receive the promised amount before the promised time, it notes the broken promise on the Delinquency Information section of the Account Details page. View the following information in the Promises sub tab:Checklists sub tab
In this field: View this:
Alert If selected, Oracle Financial Services Lending and Leasing to recog-nizes this comment as an alert and displays it in the Customer Service window’s Alerts section.
Comment Date The date the comment was entered in the Add Comments section.
Comment By The user ID of the person who entered the comment in the Add Com-ments section.
Type The type of comment.
SubType The sub type of comment.
Comment The text message entered in the Add Comments section.
In this field: View this:
Promise Amt The amount promised.
Promise Dt The date the promise was made.
Taken By The user who took the promise.
3-18
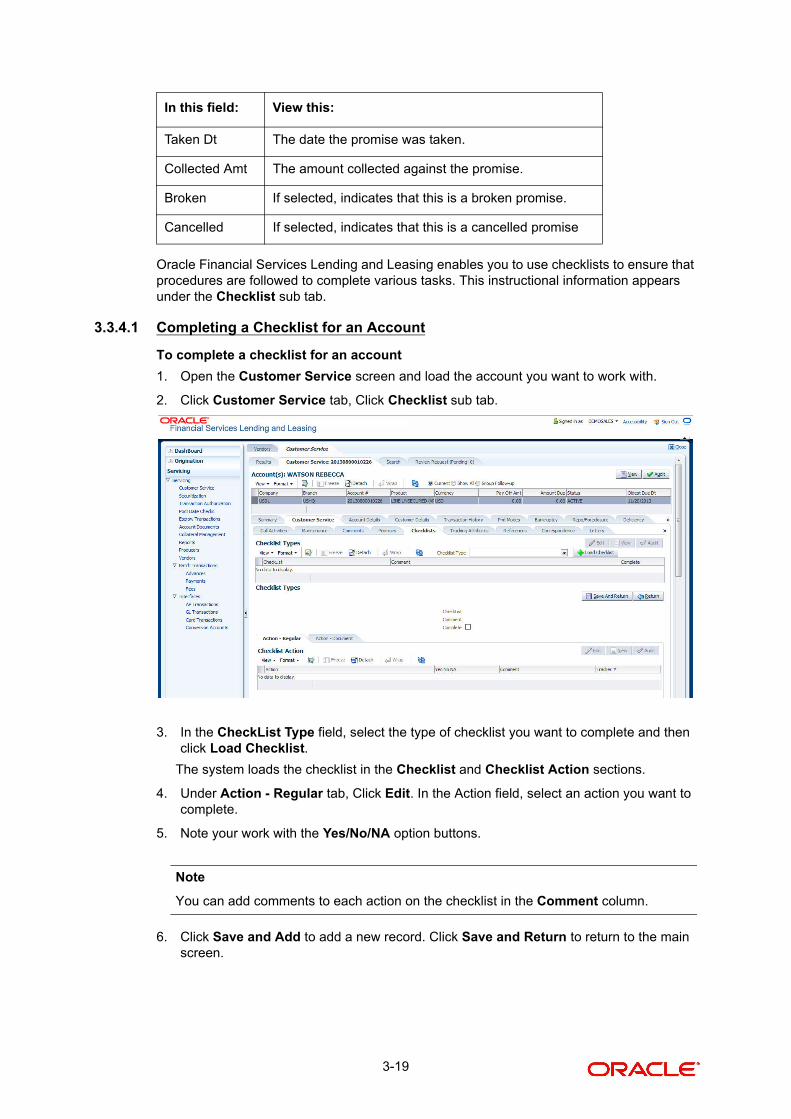
Oracle Financial Services Lending and Leasing enables you to use checklists to ensure that procedures are followed to complete various tasks. This instructional information appears under the Checklist sub tab.
3.3.4.1 Completing a Checklist for an Account
To complete a checklist for an account
1. Open the Customer Service screen and load the account you want to work with.
2. Click Customer Service tab, Click Checklist sub tab.
3. In the CheckList Type field, select the type of checklist you want to complete and then click Load Checklist.
The system loads the checklist in the Checklist and Checklist Action sections.
4. Under Action - Regular tab, Click Edit. In the Action field, select an action you want to complete.
5. Note your work with the Yes/No/NA option buttons.
Note
You can add comments to each action on the checklist in the Comment column.
6. Click Save and Add to add a new record. Click Save and Return to return to the main screen.
Taken Dt The date the promise was taken.
Collected Amt The amount collected against the promise.
Broken If selected, indicates that this is a broken promise.
Cancelled If selected, indicates that this is a cancelled promise
In this field: View this:
3-19
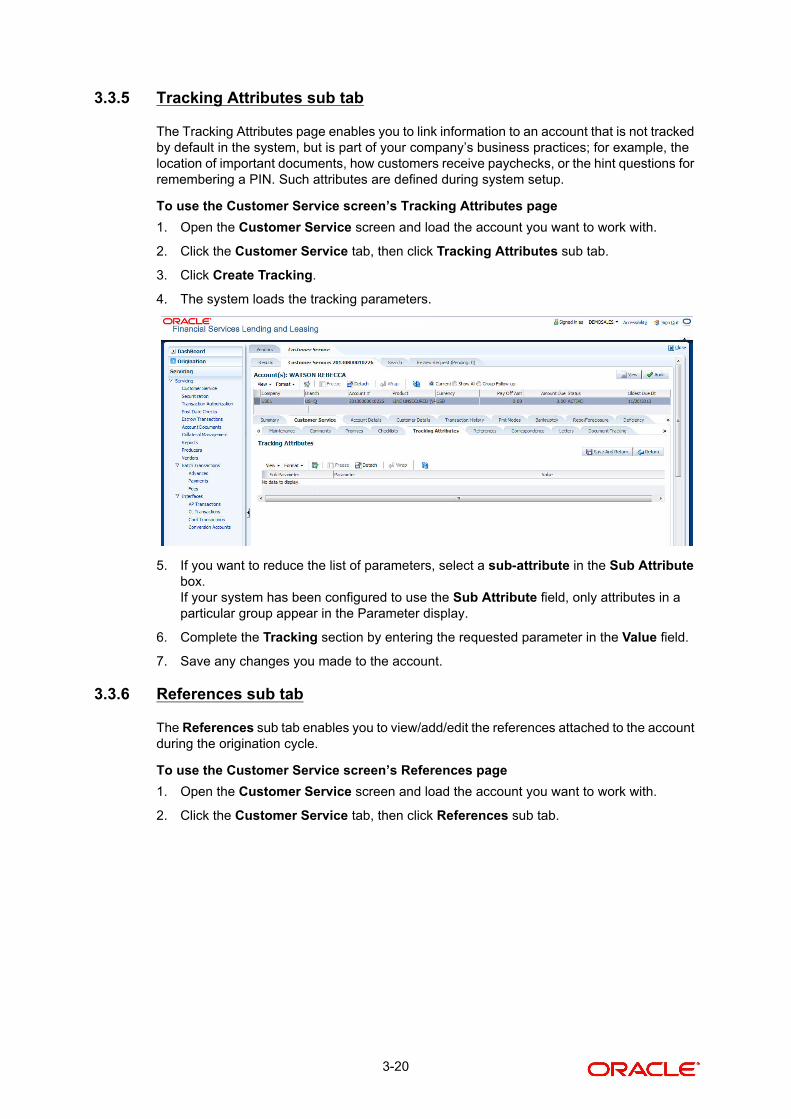
3.3.5 Tracking Attributes sub tab
The Tracking Attributes page enables you to link information to an account that is not tracked by default in the system, but is part of your company’s business practices; for example, the location of important documents, how customers receive paychecks, or the hint questions for remembering a PIN. Such attributes are defined during system setup.
To use the Customer Service screen’s Tracking Attributes page
1. Open the Customer Service screen and load the account you want to work with.
2. Click the Customer Service tab, then click Tracking Attributes sub tab.
3. Click Create Tracking.
4. The system loads the tracking parameters.
5. If you want to reduce the list of parameters, select a sub-attribute in the Sub Attribute box.If your system has been configured to use the Sub Attribute field, only attributes in a particular group appear in the Parameter display.
6. Complete the Tracking section by entering the requested parameter in the Value field.
7. Save any changes you made to the account.
3.3.6 References sub tab
The References sub tab enables you to view/add/edit the references attached to the account during the origination cycle.
To use the Customer Service screen’s References page
1. Open the Customer Service screen and load the account you want to work with.
2. Click the Customer Service tab, then click References sub tab.
3-20
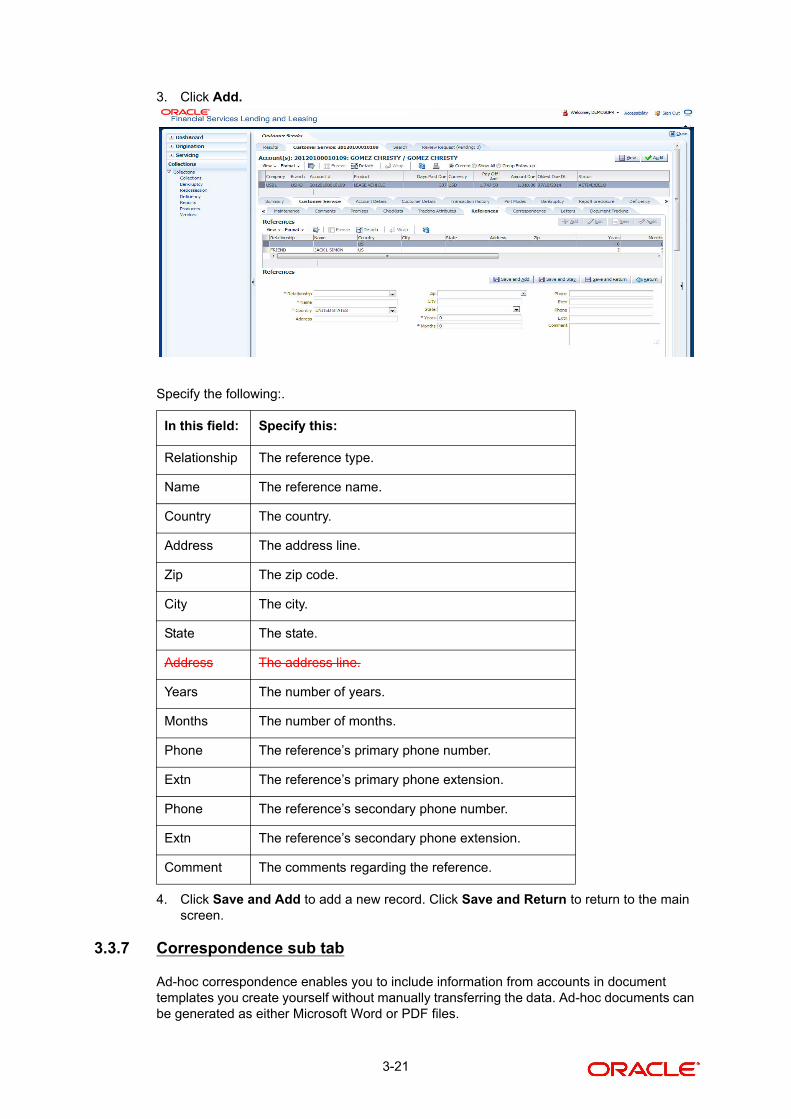
3. Click Add.
Specify the following:.
4. Click Save and Add to add a new record. Click Save and Return to return to the main screen.
3.3.7 Correspondence sub tab
Ad-hoc correspondence enables you to include information from accounts in document templates you create yourself without manually transferring the data. Ad-hoc documents can be generated as either Microsoft Word or PDF files.
In this field: Specify this:
Relationship The reference type.
Name The reference name.
Country The country.
Address The address line.
Zip The zip code.
City The city.
State The state.
Address The address line.
Years The number of years.
Months The number of months.
Phone The reference’s primary phone number.
Extn The reference’s primary phone extension.
Phone The reference’s secondary phone number.
Extn The reference’s secondary phone extension.
Comment The comments regarding the reference.
3-21
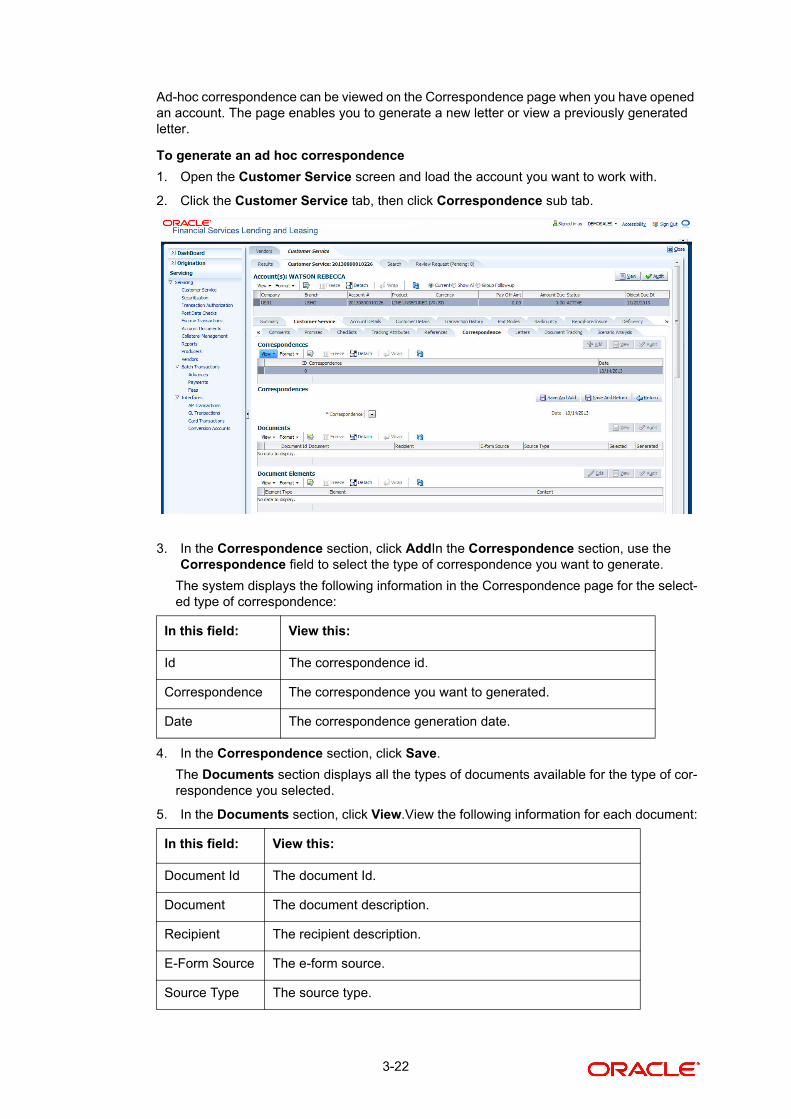
Ad-hoc correspondence can be viewed on the Correspondence page when you have opened an account. The page enables you to generate a new letter or view a previously generated letter.
To generate an ad hoc correspondence
1. Open the Customer Service screen and load the account you want to work with.
2. Click the Customer Service tab, then click Correspondence sub tab.
3. In the Correspondence section, click AddIn the Correspondence section, use the Correspondence field to select the type of correspondence you want to generate.
The system displays the following information in the Correspondence page for the select-ed type of correspondence:
4. In the Correspondence section, click Save.
The Documents section displays all the types of documents available for the type of cor-respondence you selected.
5. In the Documents section, click View.View the following information for each document:
In this field: View this:
Id The correspondence id.
Correspondence The correspondence you want to generated.
Date The correspondence generation date.
In this field: View this:
Document Id The document Id.
Document The document description.
Recipient The recipient description.
E-Form Source The e-form source.
Source Type The source type.
3-22
6. In the Documents section, select the correspondence you want to view.
7. The Document Elements section displays the elements the system used to generate the correspondence.
Click All to view all elements in the correspondence.
- or -
8. Click User Defined, to view user-defined elements in the correspondence. In the Document Elements section, view the following information:
9. In the Document Elements section, click User Defined and complete the Content fields for the Element fields you want to include in the correspondence.
10. In the Document Elements section, click Save.
11. In the Documents section, click View.
The system displays a PDF of the ad hoc correspondence.
3.3.8 Letters sub tab
The Oracle Financial Services Lending and Leasing Customer Service screen’s correspondence address matters regarding customer service and collections for accounts. They also enable financial organizations to manage bulk mailings. The Letters page enables you to create and view the following types of correspondence:
– PayOff quote letter
– PDC renewal letter
3.3.8.1 Servicing: Payoff Quote
The predefined Payoff Quote is sent if a payoff quote is requested for an account. Payoff quotes can be manually generated using the Maintenance page on the Customer Service window with the monetary Payoff Quote transaction.
To generate a payoff quote letter
1. Open the Customer Service screen and load the account you want to work with.
2. Click the Customer Service tab, then click Letters sub tab.
3. On the Letters section, select Payoff Quote Letter.
Generated If selected, indicates that Oracle Financial Services Lending and Leasing generated the document.
Selected If selected, indicates that this document is selected to be included in the correspondence.
In this field: Do this:
Element Type View the document element type.
Element View the element description.
Content Enter/view the value of the element.
In this field: View this:
3-23
4. Click View Letter to generate Payoff Quote Letter.
3.3.9 Document Tracking sub tab
You can view the documents attached to a particular account by loading the account on the Customer Service screen, then clicking the Document Tracking sub tab. You can also open the Document Tracking page and select from a list of all accounts with documents attached on the Document Tracking page.
To use the Document Tracking page
1. Open the Customer Service screen and load the account you want to work with.
2. Click the Customer Service tab, then click Document Tracking sub tab.
3-24
3. In the Documents section, select the document you want to view and view the following information:
4. In the Account Document Details section, select the document you want to view and click Show in the Details column.
5. In the Account Document Details section, click ViewView the following information:
6. Click View Document.
The system opens a File Download dialog box.
– Click Open to view the document in the browser window
-or-
– Click Save to download the document to a location of your choice.
7. If you want, add comments to the Comments field in the Documents and Account Document Details sections.
8. Save your entry.
In this field: Do this:
Document Type View the document type.
Comment Specify comment.
In this field: Do this:
Document Sub Type View the document sub type.
Version View the version.
Note: Version numbers will be incremental by batch job, first version will start with 1.0.
Page # View the page number.
Note: In multiple paged documents, choose 1 in the Page # field on the Account Document Details section to view the all the pages in the document.
Choose a specific page number to view only that page.
Document File Type View the document file type.
Status View the status of the document.
Tracking # View the tracking number of the document.
Location View the location of the document.
Effective Dt View the effective date of the document.
Docket # View the docket number of the document.
Received Dt View the received date of the document.
Expiry Dt View the expiration date of the document.
Comment Specify comment.
3-25
3.4 Customer Service screen’s Account Details tab
Open the Customer Service screen and load the account you want to work with. Click the Account Details tab to view the sections under it.
3.4.1 Account Details sub tab
Oracle Financial Services Lending and Leasing enables you to view account details using Account Details sub tab.
In the Account Information section lick View.
View the following:
In this field: View this:
Interest and Accruals section
Accrual Start Dt The accrual start date.
Last Accrual Dt The last accrual date
Stop Accrual If selected, indicates that the accrual has been stopped for the account.
Accrual Method The accrual method.
Base Method The base method.
Rebate Method The rebate method.
Index Type The index type.
Index Rate The current index rate.
Margin Rate The current margin rate.
Rate The current rate.
3-26
Rate Start of the Year The start rate of the year.
Last Rate Adj Dt The last rate adjust date.
# of Rate Adjs (Year) The number of due date changes (year).
# of Rate Adjs (Life) The number of due date changes (life).
Reschedule Method The reschedule method.
Reschedule Value The reschedule value.
Extn and Due Dates section
# of Extensions (Year) The number of times extensions granted (year).
# of Extensions (Life) The number of times extensions granted (life).
# of Extension Term (Year) The number of terms extensions granted (year).
# of Extension Term (Life) The number of terms extensions granted (life).
# of Due Day Changes (Year)
The number of due day changes allowed in a year.
# of Due Day Changes (Life)
The number of due day changes allowed in a life of an account.
Last Extn Dt The last extn date.
Due Day Change Dt The due day change date.
Additional Details section
Total Term The total term.
Paid Term The paid term.
Maturity Dt The maturity date.
Balloon Amt The balloon amount.
Advance Details section
Approved Amt The approved amount.
Consumed Amt The consumed.
Remaining Amt The remaining amount.
Last Advance Amt The last advance amount
Last Advance Dt The last advance date
Securitization Details
Pool Id The pool id.
In this field: View this:
3-27
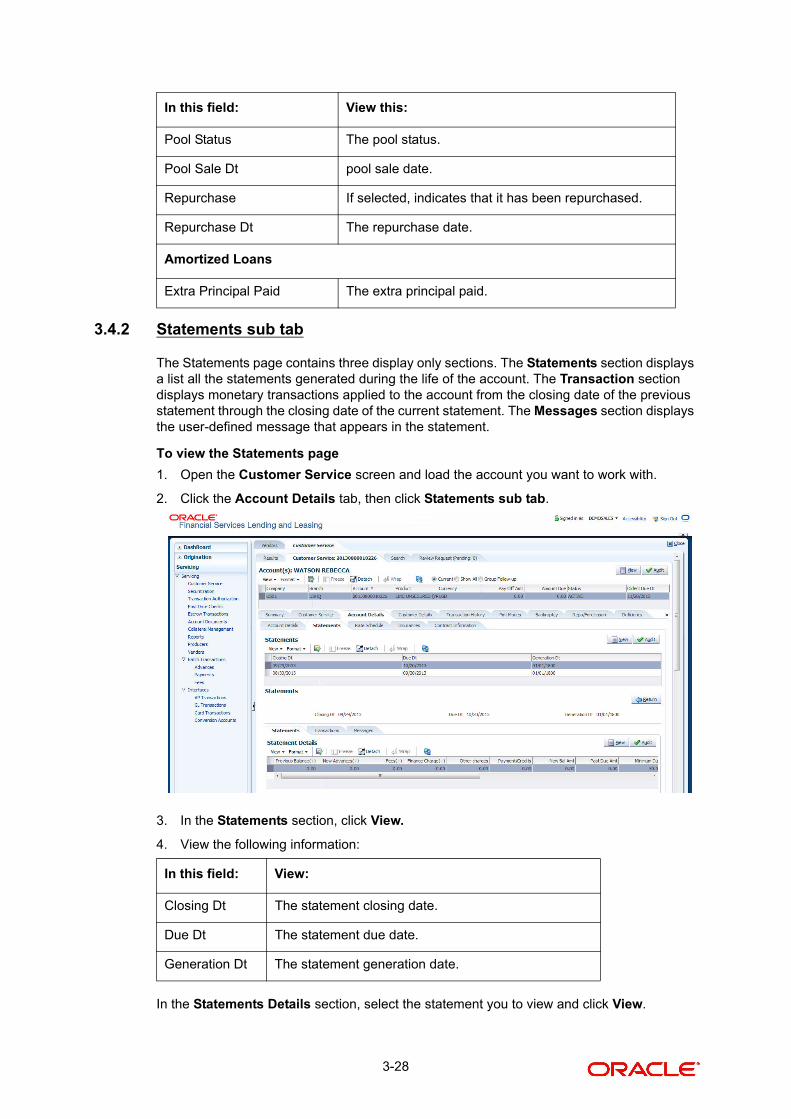
3.4.2 Statements sub tab
The Statements page contains three display only sections. The Statements section displays a list all the statements generated during the life of the account. The Transaction section displays monetary transactions applied to the account from the closing date of the previous statement through the closing date of the current statement. The Messages section displays the user-defined message that appears in the statement.
To view the Statements page
1. Open the Customer Service screen and load the account you want to work with.
2. Click the Account Details tab, then click Statements sub tab.
3. In the Statements section, click View.
4. View the following information:
In the Statements Details section, select the statement you to view and click View.
Pool Status The pool status.
Pool Sale Dt pool sale date.
Repurchase If selected, indicates that it has been repurchased.
Repurchase Dt The repurchase date.
Amortized Loans
Extra Principal Paid The extra principal paid.
In this field: View:
Closing Dt The statement closing date.
Due Dt The statement due date.
Generation Dt The statement generation date.
In this field: View this:
3-28
5. View the following:
6. Click Transactions sub tab and click View
7. View the following information:
Click Messages sub tab and click View.
8. View the following information:
3.4.3 Insurances sub tab
If insurance information was entered on the Funding screen during Lease origination, you can view the financed insurance information on the Customer Service screen’s Insurances page. The Insurances page displays the details of all financed insurances, including cancellation and refund information whenever applicable. It also displays the insurances that were financed after funding of the Leaseusing the Customer Service screen’s Maintenance page.
In this field: View:
Current Due (+) The current due.
Past Due (+) The past due amount.
Late Charge (+) The late charge due.
Other Charges (+) The other charges due.
Total Due = The total due.
Current Balance The current balance.
PayOff Dt The payoff date.
PayOff Amt The payoff amount.
Last Profit Rate Changed Date
The latest date on which the profit rate was changed.
Current Profit Rate The current profit rate.
Current Balance The current escrow balance.
Current Due The current escrow due.
Past Due The past due escrow amount.
In this field: View:
Txn Dt The transaction effective date.
Description The transaction.
Amount The transaction amount.
In this field: View:
Seq # The sequence number.
Message The message.
3-29
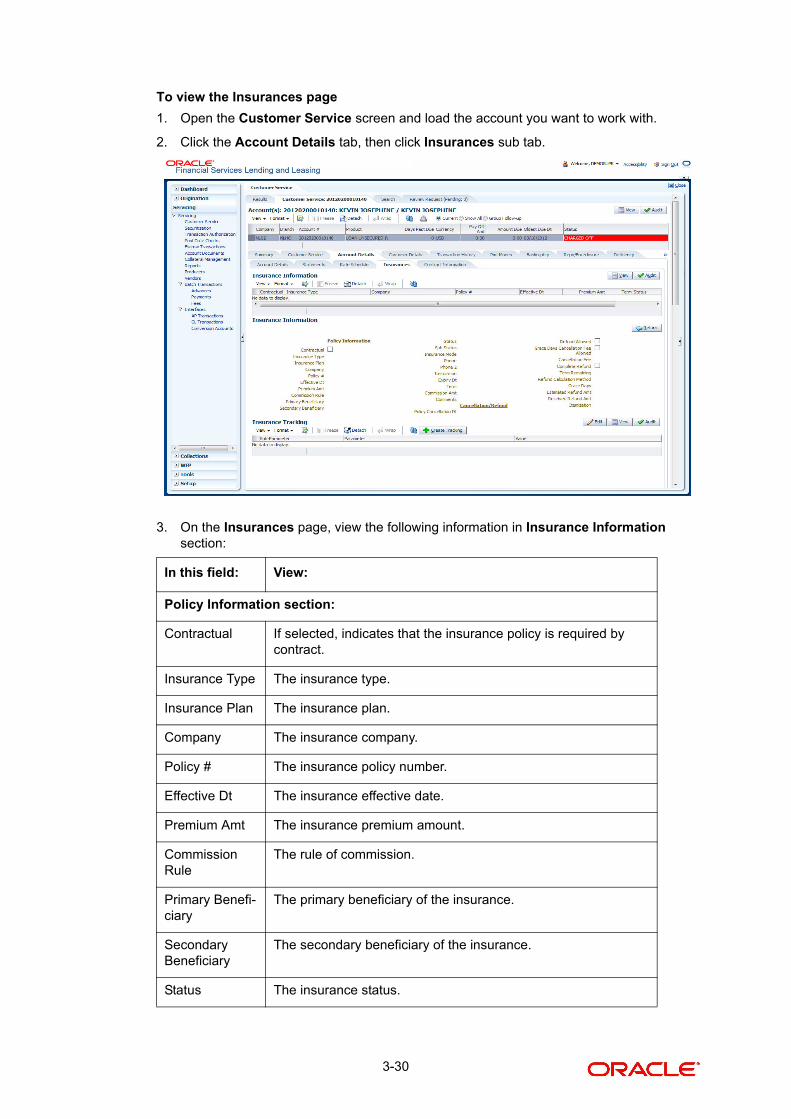
To view the Insurances page
1. Open the Customer Service screen and load the account you want to work with.
2. Click the Account Details tab, then click Insurances sub tab.
3. On the Insurances page, view the following information in Insurance Information section:
In this field: View:
Policy Information section:
Contractual If selected, indicates that the insurance policy is required by contract.
Insurance Type The insurance type.
Insurance Plan The insurance plan.
Company The insurance company.
Policy # The insurance policy number.
Effective Dt The insurance effective date.
Premium Amt The insurance premium amount.
Commission Rule
The rule of commission.
Primary Benefi-ciary
The primary beneficiary of the insurance.
Secondary Beneficiary
The secondary beneficiary of the insurance.
Status The insurance status.
3-30
:
4. In the Insurance Tracking section, click Create Tracking.
The system loads the insurance tracking parameters in the Insurance Tracking section.
Sub Status The sub status.
Insurance Mode
The insurance mode.
Phone The insurance company’s primary phone number.
Phone 2 The insurance company’s alternate phone number.
Itemization The contract itemization.
Expiry Dt The insurance expiry date.
Term The term.
Commission Amt
The insurance commission amount.
Comments The comments regarding the insurance policy.
In this field: View:
Cancellation/Refund section:
Policy Cancellation Dt The insurance cancellation date.
Refund Allowed If selected, a refund is allowed. A selected box indicates that the insurance premium can be rebated to the cus-tomer in case of early payoff.
Grace Days Cancella-tion Fee Allowed
If selected, indicates that cancellation fees during grace period is allowed.
Cancellation Fees View the amount of the cancellation fee to be charged when the insurance is cancelled.
Complete Refund If selected, a complete refund is allowed.
Term Remaining The remaining term on the insurance at cancellation.
Refund Calculartion Method
The refund calculation method.
Grace Days View the number of grace days allowed for cancellation without charging a cancellation fee.
Estimated Refund Amt The estimated insurance refund.
Received Refund Amt The insurance refund received.
Itemization The contract itemization.
In this field: View:
3-31
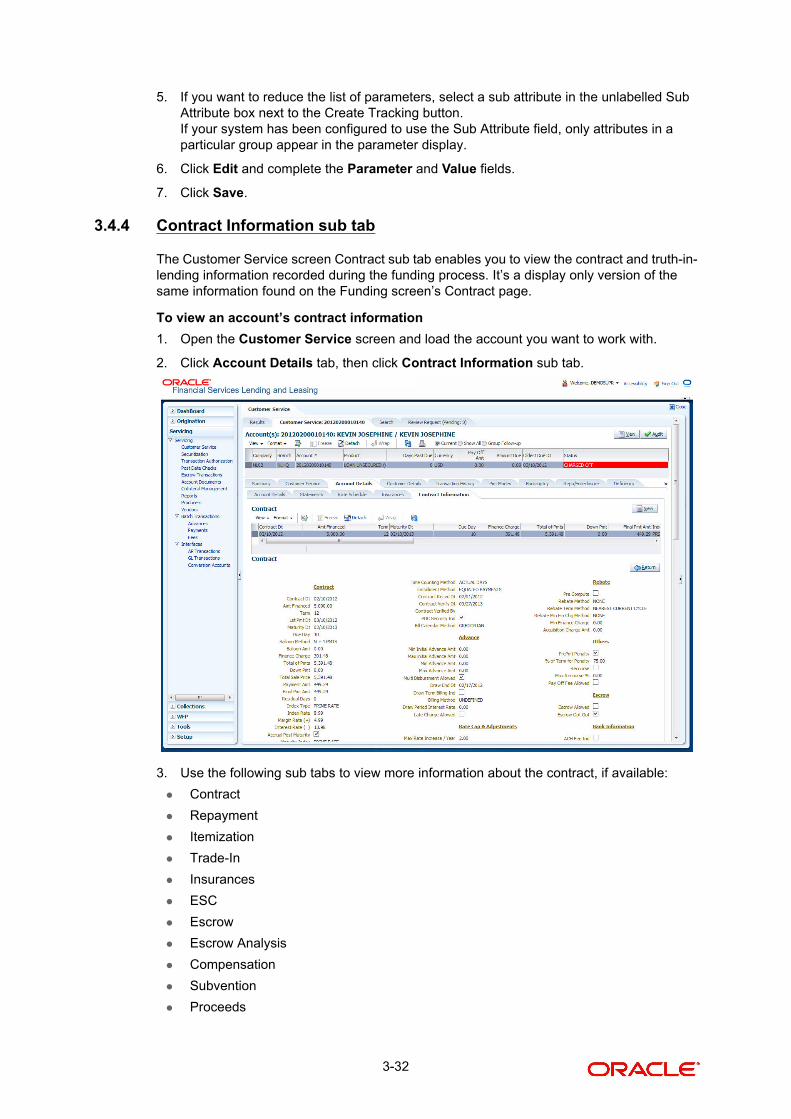
5. If you want to reduce the list of parameters, select a sub attribute in the unlabelled Sub Attribute box next to the Create Tracking button.If your system has been configured to use the Sub Attribute field, only attributes in a particular group appear in the parameter display.
6. Click Edit and complete the Parameter and Value fields.
7. Click Save.
3.4.4 Contract Information sub tab
The Customer Service screen Contract sub tab enables you to view the contract and truth-in-lending information recorded during the funding process. It’s a display only version of the same information found on the Funding screen’s Contract page.
To view an account’s contract information
1. Open the Customer Service screen and load the account you want to work with.
2. Click Account Details tab, then click Contract Information sub tab.
3. Use the following sub tabs to view more information about the contract, if available:
Contract
Repayment
Itemization
Trade-In
Insurances
ESC
Escrow
Escrow Analysis
Compensation
Subvention
Proceeds
3-32
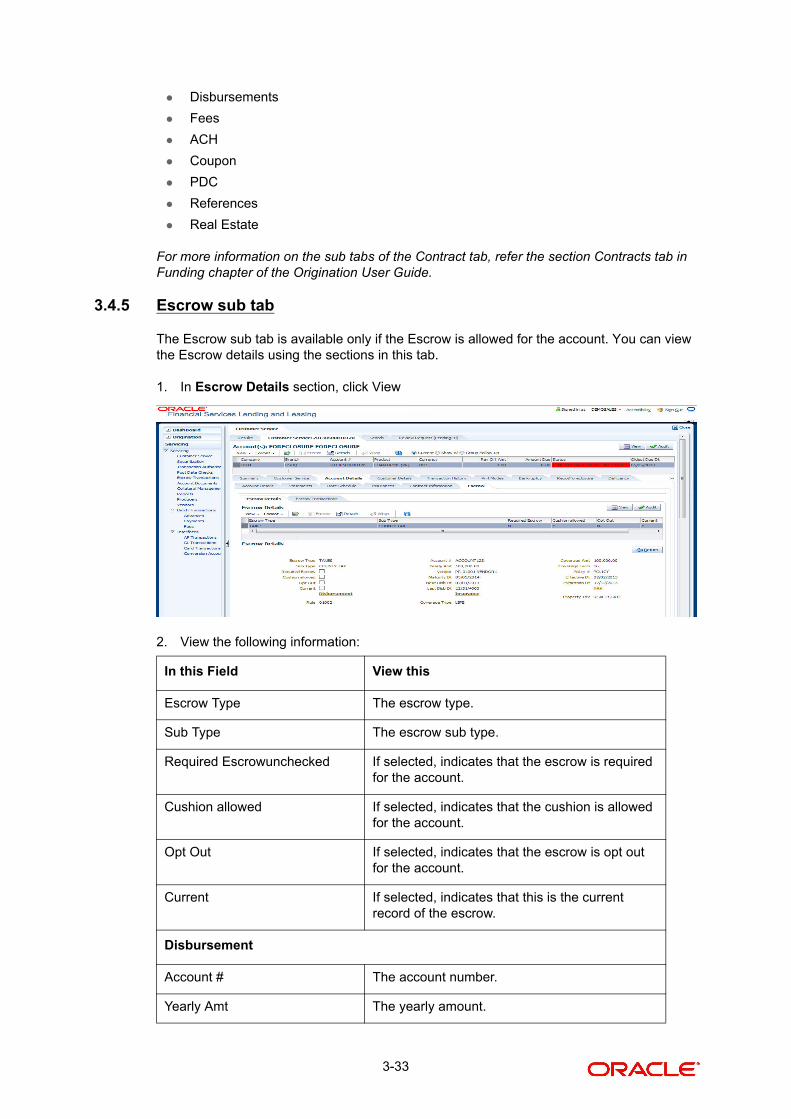
Disbursements
Fees
ACH
Coupon
PDC
References
Real Estate
For more information on the sub tabs of the Contract tab, refer the section Contracts tab in Funding chapter of the Origination User Guide.
3.4.5 Escrow sub tab
The Escrow sub tab is available only if the Escrow is allowed for the account. You can view the Escrow details using the sections in this tab.
1. In Escrow Details section, click View
2. View the following information:
In this Field View this
Escrow Type The escrow type.
Sub Type The escrow sub type.
Required Escrowunchecked If selected, indicates that the escrow is required for the account.
Cushion allowed If selected, indicates that the cushion is allowed for the account.
Opt Out If selected, indicates that the escrow is opt out for the account.
Current If selected, indicates that this is the current record of the escrow.
Disbursement
Account # The account number.
Yearly Amt The yearly amount.
3-33
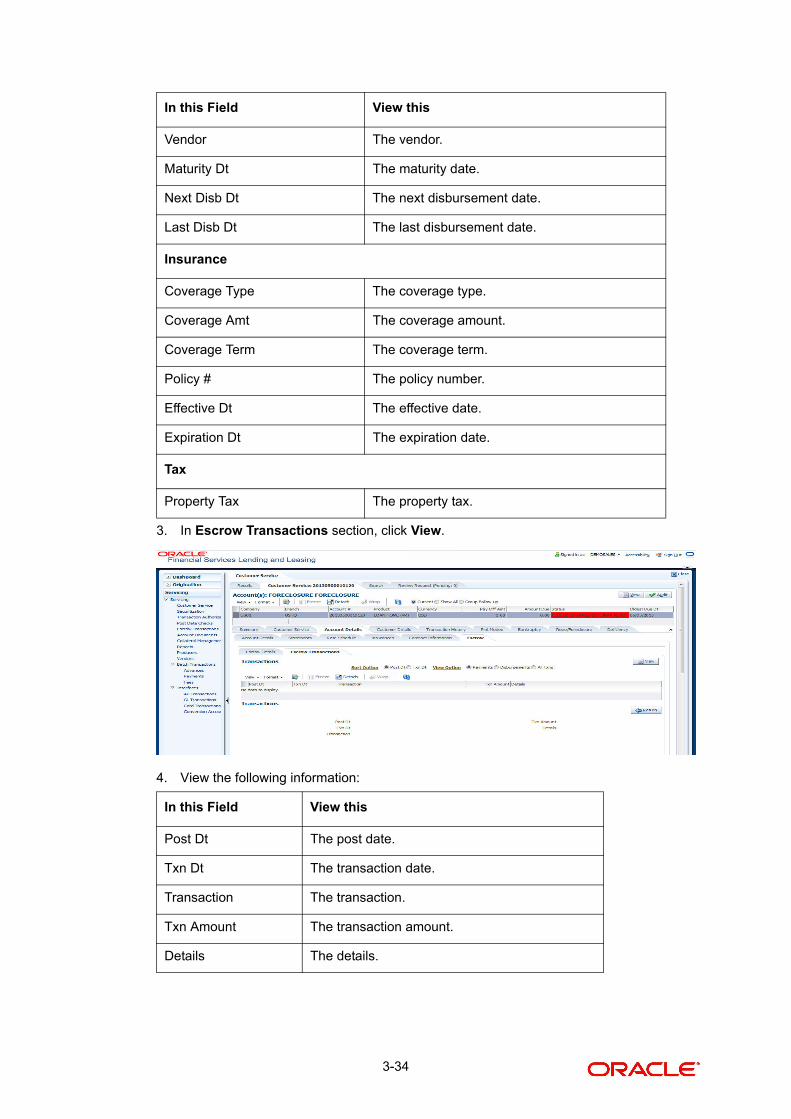
3. In Escrow Transactions section, click View.
4. View the following information:
Vendor The vendor.
Maturity Dt The maturity date.
Next Disb Dt The next disbursement date.
Last Disb Dt The last disbursement date.
Insurance
Coverage Type The coverage type.
Coverage Amt The coverage amount.
Coverage Term The coverage term.
Policy # The policy number.
Effective Dt The effective date.
Expiration Dt The expiration date.
Tax
Property Tax The property tax.
In this Field View this
Post Dt The post date.
Txn Dt The transaction date.
Transaction The transaction.
Txn Amount The transaction amount.
Details The details.
In this Field View this
3-34
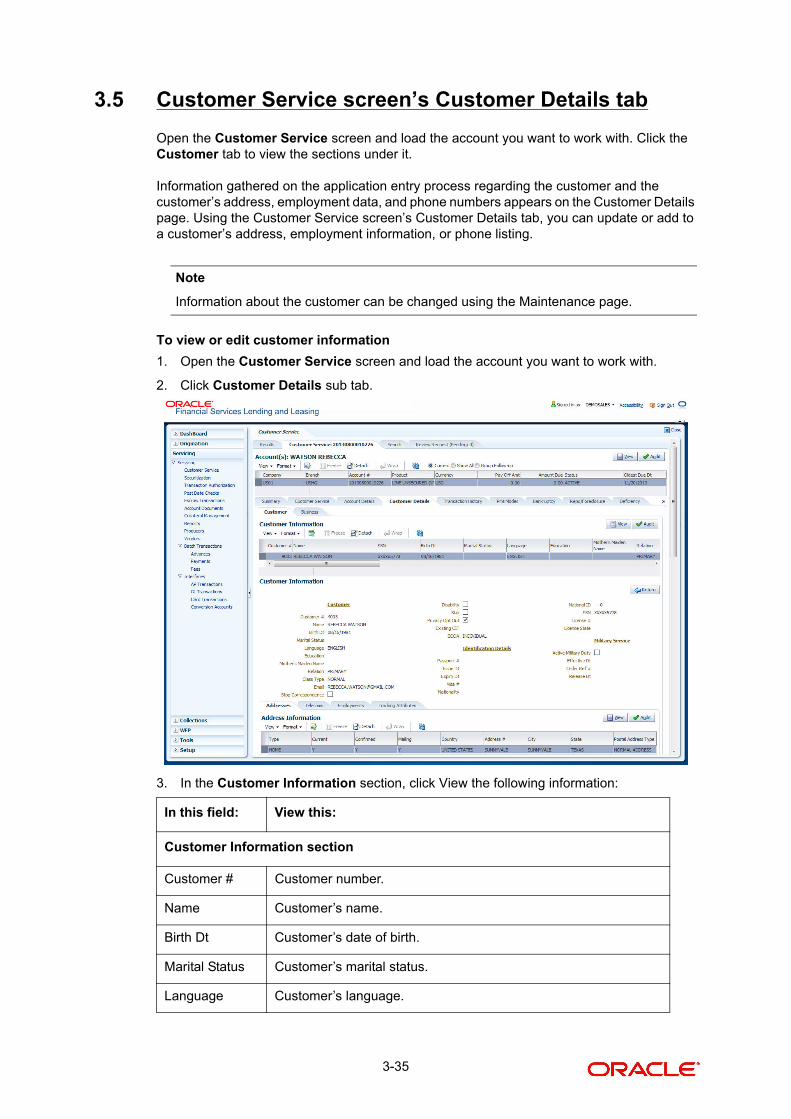
3.5 Customer Service screen’s Customer Details tab
Open the Customer Service screen and load the account you want to work with. Click the Customer tab to view the sections under it.
Information gathered on the application entry process regarding the customer and the customer’s address, employment data, and phone numbers appears on the Customer Details page. Using the Customer Service screen’s Customer Details tab, you can update or add to a customer’s address, employment information, or phone listing.
Note
Information about the customer can be changed using the Maintenance page.
To view or edit customer information
1. Open the Customer Service screen and load the account you want to work with.
2. Click Customer Details sub tab.
3. In the Customer Information section, click View the following information:
In this field: View this:
Customer Information section
Customer # Customer number.
Name Customer’s name.
Birth Dt Customer’s date of birth.
Marital Status Customer’s marital status.
Language Customer’s language.
3-35
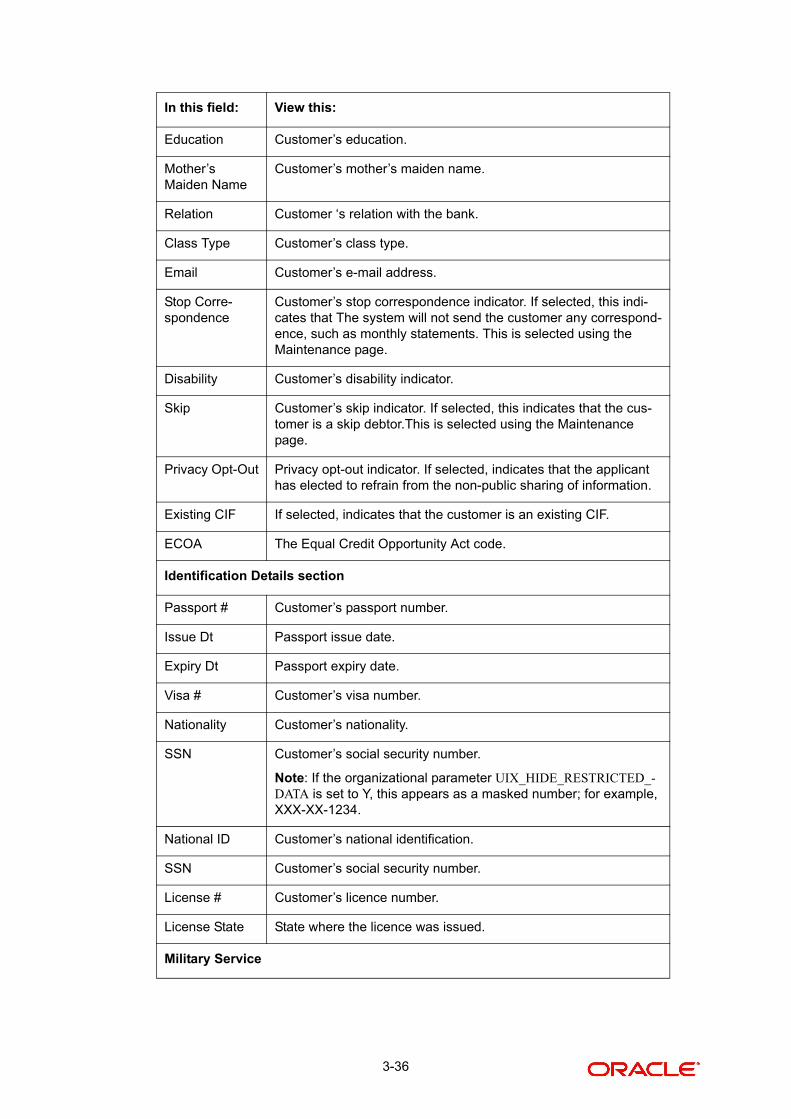
Education Customer’s education.
Mother’s Maiden Name
Customer’s mother’s maiden name.
Relation Customer ‘s relation with the bank.
Class Type Customer’s class type.
Email Customer’s e-mail address.
Stop Corre-spondence
Customer’s stop correspondence indicator. If selected, this indi-cates that The system will not send the customer any correspond-ence, such as monthly statements. This is selected using the Maintenance page.
Disability Customer’s disability indicator.
Skip Customer’s skip indicator. If selected, this indicates that the cus-tomer is a skip debtor.This is selected using the Maintenance page.
Privacy Opt-Out Privacy opt-out indicator. If selected, indicates that the applicant has elected to refrain from the non-public sharing of information.
Existing CIF If selected, indicates that the customer is an existing CIF.
ECOA The Equal Credit Opportunity Act code.
Identification Details section
Passport # Customer’s passport number.
Issue Dt Passport issue date.
Expiry Dt Passport expiry date.
Visa # Customer’s visa number.
Nationality Customer’s nationality.
SSN Customer’s social security number.
Note: If the organizational parameter UIX_HIDE_RESTRICTED_-DATA is set to Y, this appears as a masked number; for example, XXX-XX-1234.
National ID Customer’s national identification.
SSN Customer’s social security number.
License # Customer’s licence number.
License State State where the licence was issued.
Military Service
In this field: View this:
3-36
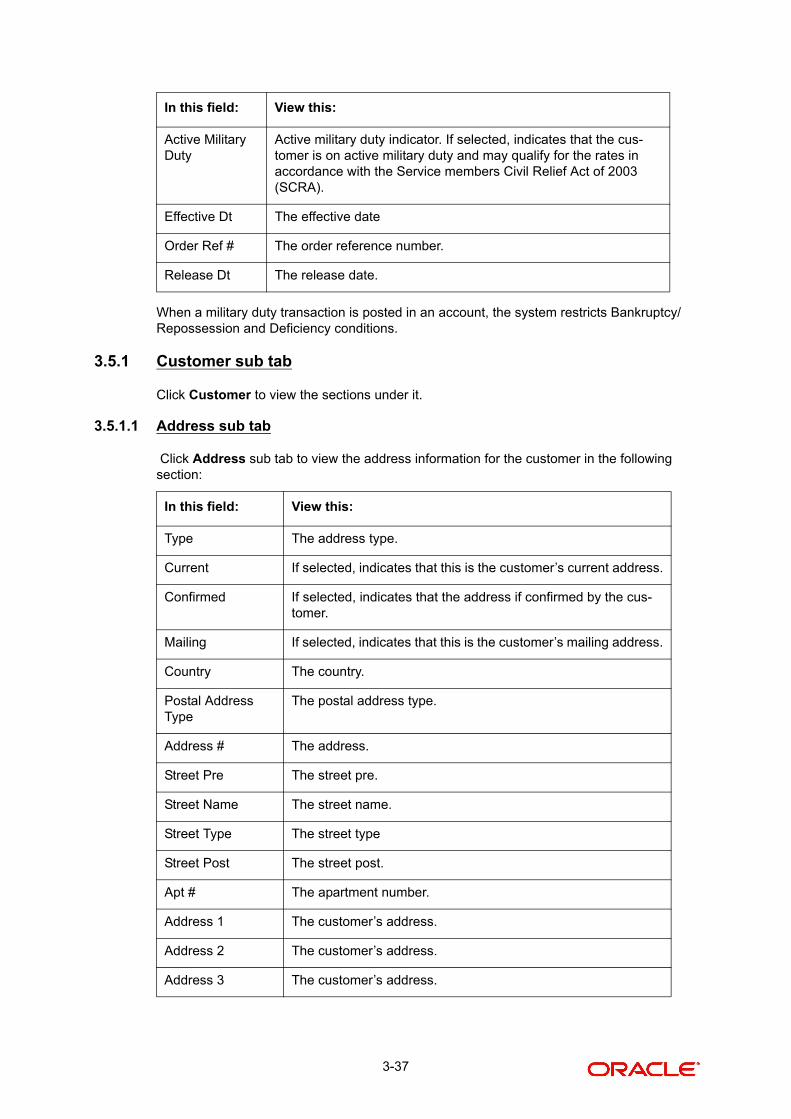
When a military duty transaction is posted in an account, the system restricts Bankruptcy/ Repossession and Deficiency conditions.
3.5.1 Customer sub tab
Click Customer to view the sections under it.
3.5.1.1 Address sub tab
Click Address sub tab to view the address information for the customer in the following section:
Active Military Duty
Active military duty indicator. If selected, indicates that the cus-tomer is on active military duty and may qualify for the rates in accordance with the Service members Civil Relief Act of 2003 (SCRA).
Effective Dt The effective date
Order Ref # The order reference number.
Release Dt The release date.
In this field: View this:
Type The address type.
Current If selected, indicates that this is the customer’s current address.
Confirmed If selected, indicates that the address if confirmed by the cus-tomer.
Mailing If selected, indicates that this is the customer’s mailing address.
Country The country.
Postal Address Type
The postal address type.
Address # The address.
Street Pre The street pre.
Street Name The street name.
Street Type The street type
Street Post The street post.
Apt # The apartment number.
Address 1 The customer’s address.
Address 2 The customer’s address.
Address 3 The customer’s address.
In this field: View this:
3-37
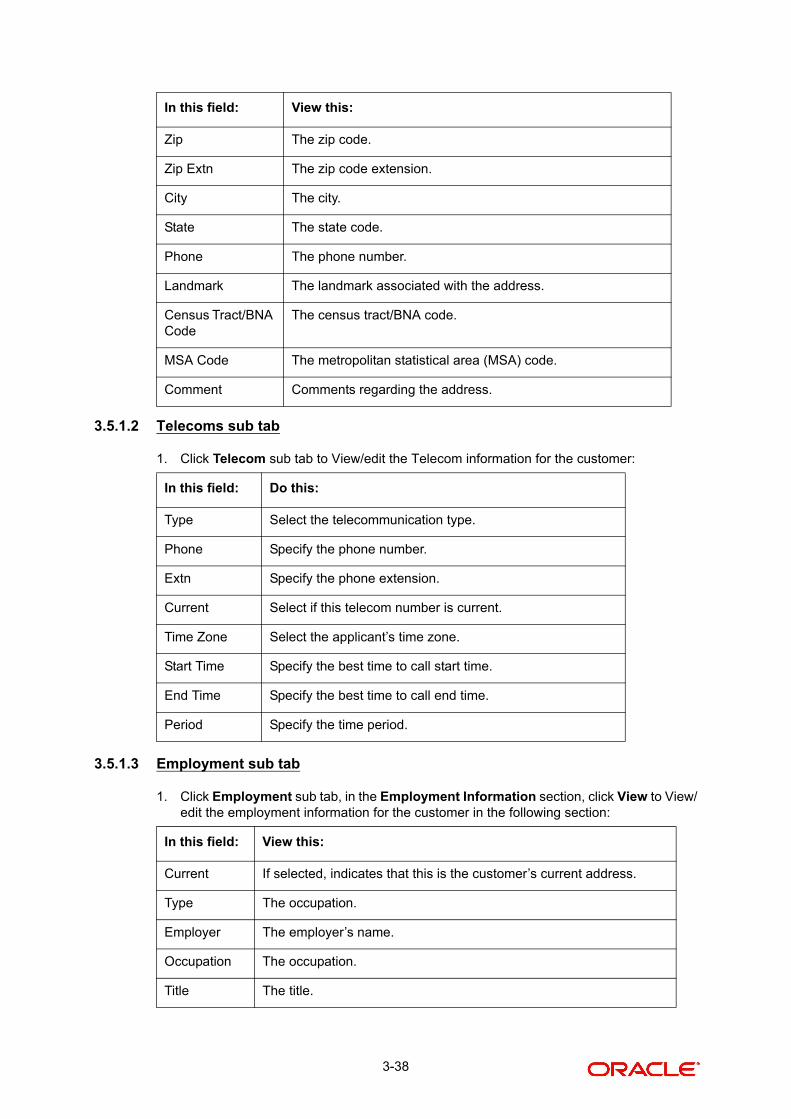
3.5.1.2 Telecoms sub tab
1. Click Telecom sub tab to View/edit the Telecom information for the customer:
3.5.1.3 Employment sub tab
1. Click Employment sub tab, in the Employment Information section, click View to View/edit the employment information for the customer in the following section:
Zip The zip code.
Zip Extn The zip code extension.
City The city.
State The state code.
Phone The phone number.
Landmark The landmark associated with the address.
Census Tract/BNA Code
The census tract/BNA code.
MSA Code The metropolitan statistical area (MSA) code.
Comment Comments regarding the address.
In this field: Do this:
Type Select the telecommunication type.
Phone Specify the phone number.
Extn Specify the phone extension.
Current Select if this telecom number is current.
Time Zone Select the applicant’s time zone.
Start Time Specify the best time to call start time.
End Time Specify the best time to call end time.
Period Specify the time period.
In this field: View this:
Current If selected, indicates that this is the customer’s current address.
Type The occupation.
Employer The employer’s name.
Occupation The occupation.
Title The title.
In this field: View this:
3-38
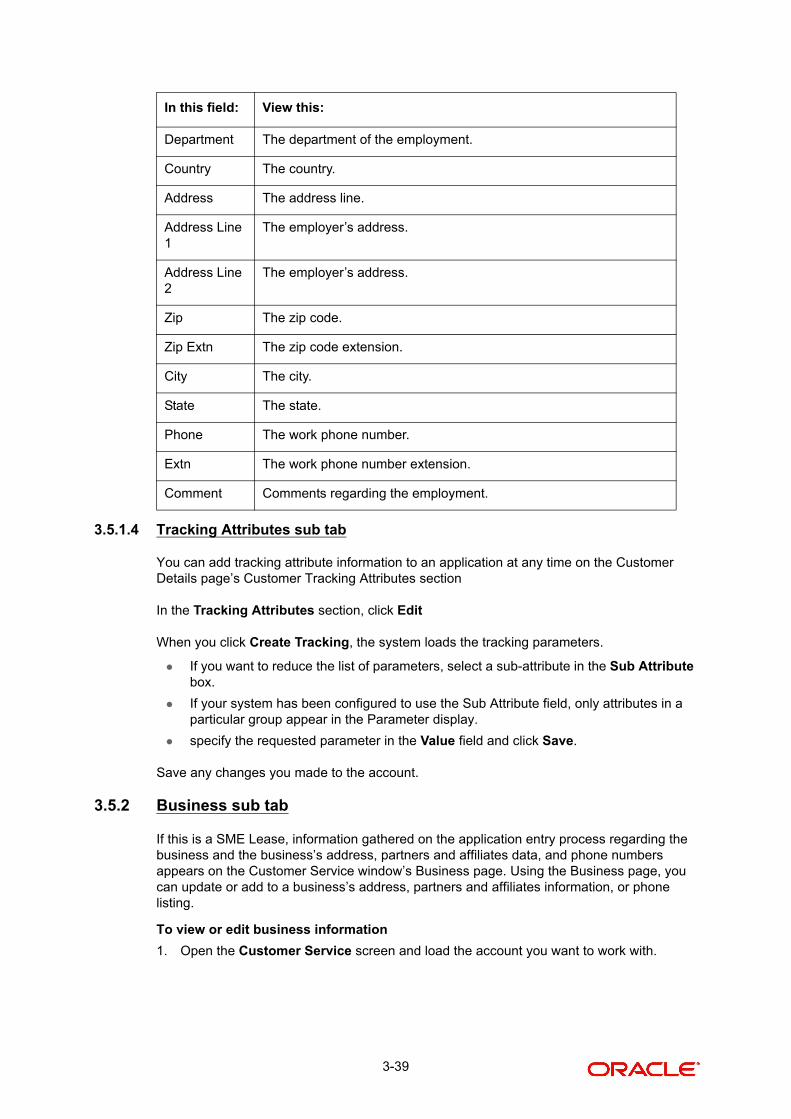
3.5.1.4 Tracking Attributes sub tab
You can add tracking attribute information to an application at any time on the Customer Details page’s Customer Tracking Attributes section
In the Tracking Attributes section, click Edit
When you click Create Tracking, the system loads the tracking parameters.
If you want to reduce the list of parameters, select a sub-attribute in the Sub Attribute box.
If your system has been configured to use the Sub Attribute field, only attributes in a particular group appear in the Parameter display.
specify the requested parameter in the Value field and click Save.
Save any changes you made to the account.
3.5.2 Business sub tab
If this is a SME Lease, information gathered on the application entry process regarding the business and the business’s address, partners and affiliates data, and phone numbers appears on the Customer Service window’s Business page. Using the Business page, you can update or add to a business’s address, partners and affiliates information, or phone listing.
To view or edit business information
1. Open the Customer Service screen and load the account you want to work with.
Department The department of the employment.
Country The country.
Address The address line.
Address Line 1
The employer’s address.
Address Line 2
The employer’s address.
Zip The zip code.
Zip Extn The zip code extension.
City The city.
State The state.
Phone The work phone number.
Extn The work phone number extension.
Comment Comments regarding the employment.
In this field: View this:
3-39
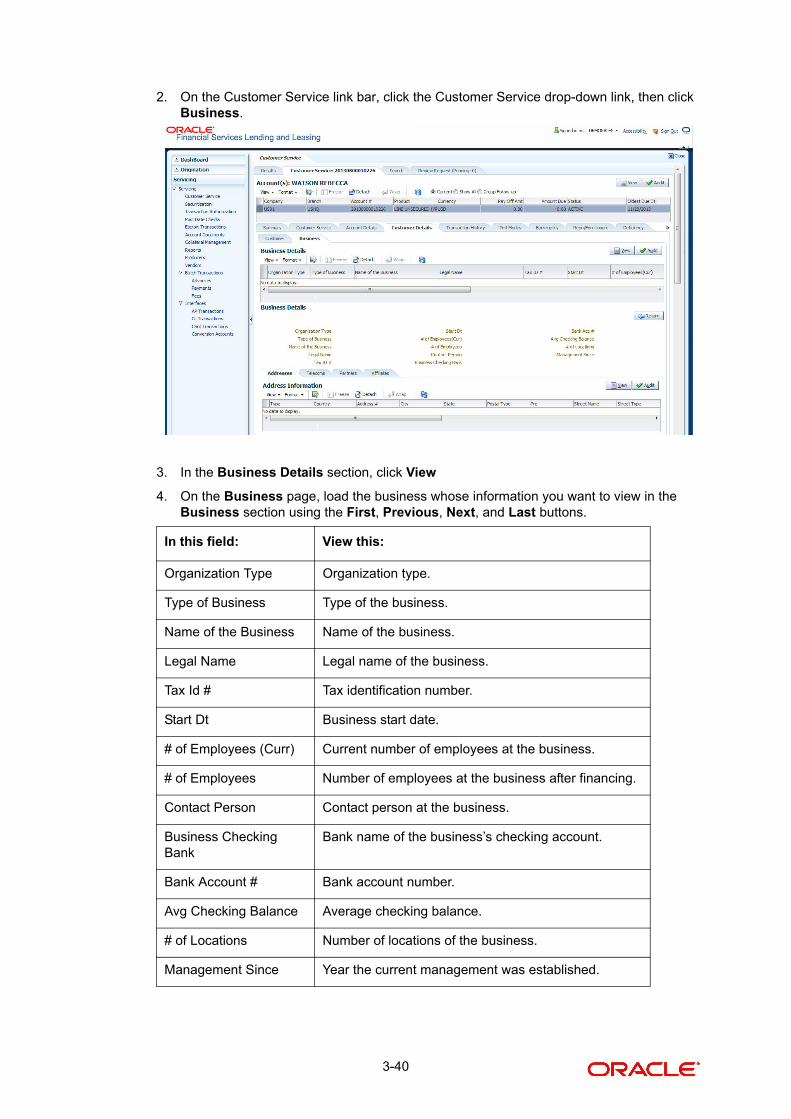
2. On the Customer Service link bar, click the Customer Service drop-down link, then click Business.
3. In the Business Details section, click View
4. On the Business page, load the business whose information you want to view in the Business section using the First, Previous, Next, and Last buttons.
In this field: View this:
Organization Type Organization type.
Type of Business Type of the business.
Name of the Business Name of the business.
Legal Name Legal name of the business.
Tax Id # Tax identification number.
Start Dt Business start date.
# of Employees (Curr) Current number of employees at the business.
# of Employees Number of employees at the business after financing.
Contact Person Contact person at the business.
Business Checking Bank
Bank name of the business’s checking account.
Bank Account # Bank account number.
Avg Checking Balance Average checking balance.
# of Locations Number of locations of the business.
Management Since Year the current management was established.
3-40
3.5.2.1 Addresses sub tab
Click Addresses sub tab and then click View.In the Address section, load the address information you want to view.
3.5.2.2 Telecom sub tab
Click Telecoms sub tab and then click View.In the Telecom section, view the following information:
In this field: View this:
Type Address type.
Country Country code.
Postal Type Postal type.
Address # Address number.
Pre Pre
Street Name Name of street.
Street Type Type of street.
Address Address.
Zip Zip code.
Zip Extn Zip extension.
City City.
State State.
Apt # Apartment number.
Phone Phone number.
Ownership Ownership type.
Comment Additional comments.
In this field: View this:
Telecom Type Telecommunication type.
Phone Phone number.
Ext Phone extension.
Current If selected, indicates that this is the current record.
3-41
3.5.2.3 Partners sub tab
Click Partners sub tab and then click View.:In the Partners section, load the business partner information you want to view or edit using the First, Previous, Next, and Last buttons.
3.5.2.4 Affiliates sub tab
Click Affiliates sub tab, in the Affiliates section, load the business affiliate information you want to view using the First, Previous, Next, and Last buttons.
In this field: View this:
First Name Partner’s first name.
MI Partner’s middle name.
Last Name Partner’s last name.
Suffix Partner’s suffix.
SSN Partner’s social security number.
Birth Dt Partner’s birth date.
Birth Place Partner’s birth place.
Director Ind If selected, indicates that the partner is the director of the business.
Networth Partner’s net worth.
Gross Income Partner’s gross income.
Language Partner’s language.
Nationality Partner’s nationality.
Title Partner’s title.
Ownership (%) Percentage of ownership held by the partner.
Email Partner’s e-mail.
Phone Partner’s phone.
Extn Partner’s phone extension.
In this field: View this:
Organization Type Affiliate’s organization type.
Legal Name Affiliate’s legal name.
Name of the Busi-ness
Affiliate’s business name.
Tax ID # Affiliate’s tax identification.
Ownership (%) Affiliate’s percentage of ownership.
# of Employees Affiliate’s number of employees.
3-42

3.6 Customer Service screen’s Transaction History tab
Open the Customer Service screen and load the account you want to work with. Click the Transaction History tab to view the sections under it.
3.6.1 Balances sub tab
Details of an account balance can be viewed on the Balances sub tab. It contains four action buttons in the Balance Group section:
Current Balance
Deficiency Balance
Non-Performing Balance
Terminate Balance.
Note
If the status of an account is ‘Charged Off’, then the system defaults to ‘Deficiency Bal-ance’ radio button.
Depending on which one you select, a different set of balance information appears. In all cases, the Balance page can be viewed in two transaction period modes:
ITD/CTD (Inception-to-date/Cycle-to-
YTD (year-to-date)
To view account balance information
1. Open the Customer Service screen and load the account you want to work with.
2. Click Transaction History tab, then click Balances sub tab
3. In the Balance Group section, select the balance you want to view.
NAICS CODE Affiliate’s North American Industry Classification System code.
In this field: View this:
3-43
Current Balance displays the current balances for accounts with an status of ACTIVE.
Deficiency Balance displays the current balances for accounts with an status of CHARGED OFF. If you click Deficiency Balance, the following information appears:
Non-Performing Balance displays the current balance for accounts with an status of NON-PERFORMING. Non-Performing accounts fall between CHARGED OFF accounts and ACTIVE accounts. These accounts are treated as active when dealing with the customer, but for accounting purposes are treated differently as they are expected to charge off in the future. Fee and interest balances are not expected to be collected in full and therefore are not recognized as income. If you click Non-Performing Balance, the following information appears:
In this field: View:
Balance Type The balance type.
Opening Balance The opening balance amount.
Posted The amount posted (in addition to the opening balance).
Paid Balance The amount paid.
Waived The amount waived.
Charged Off The amount charged off.
Adjusted (-) The amount adjusted (negative adjustments).
Adjusted (+) The amount adjusted (positive adjustments).
Balance The current (closing) balance.
In this field: View:
Balance Type The balance type.
Opening Deficiency The opening deficiency balance.
Chg off Posted The additional charged off amounts posted.
Recovery The amount of deficiency balance paid.
Deficiency Balance The current (closing) deficiency balance.
In this field: View:
Balance Type The balance type.
Opening Non-Performing The opening nonperforming balance.
Paid The amount of nonperforming balance paid.
Paid Excess The additional nonperforming amounts posted.
Waived The amount waived.
Adjusted (-) The amount adjusted (Negative adjustments).
Adjusted (+) The amount adjusted (Positive adjustments).
3-44
Terminate Balance displays the current balance for accounts with a status of TERMINATE. Selecting Terminate Balance option displays the following account details.
4. In the Txn Period Balance section, select how you want to view the balance:
Select ITD/CTD to view transactions by Inception-to-date /Cycle-to-date: line of credit
-or-
Select YTD to view the transactions by year to date.
5. View the following balance details at the bottom of the Account Balances page:
Balance The current (Closing) nonperforming balance.
In this field: View:
Balance Type The balance type.
Opening Balance The opening non performing balance.
Terminate The amount of non performing balance paid or terminated.
Waived The amount waived.
Charge Off The additional charged off amounts.
Adjusted (-) The amount adjusted (Negative adjustments).
Adjusted (+) The amount adjusted (Positive adjustments).
Balance The balance amount to terminate.
In this field: View:
Promotion Details section
Promotion The balance promotion.
Type The balance promotion type.
Rate The balance rate.
Term The balance term.
Start Dt The balance date.
End Dt The balance promotion end date.
Credit Insurance section
Insurance The balance insurance.
Status The balance insurance status.
Sub Type The balance insurance sub type.
In this field: View:
3-45
3.6.2 Transactions sub tab
The Transactions page displays all transactions that have occurred over the life of the account. Transactions can be sorted by when the transaction was created (Post Dt) or the effective date of transaction (Txn Dt). You can also choose to view all transactions or reverse certain transactions. This information comes from the payments and advances applied to the account, maintenance tasks, and nightly processes such as billing.
To view the transaction history of an account
1. Open the Customer Service screen and load the account you want to work with.
2. Click Transaction History tab, then click Transactions sub tab.(
3. In the View Options section, select the type of transactions in this account’s history you want to view on the Transactions page.
4. In the Sort Option section, choose Post Dt to sort the entries on in the Transactions section in order of when the transaction was made effective.
-or-
Select Txn Dt to sort the entries on in the Transactions section in order of when the trans-action was created.
5. In View Option section, click ViewView the following information:
If you select this: The system displays:
Good Payments All valid payments that were neither voided nor reversed.
All Payments All transaction involving payments.
Good Txns All transactions that were neither voided nor reversed.
All Txns All transactions.
In this field: View:
Transactions section
Post Dt The transaction posting date.
3-46
3.6.2.1 To Reverse (or Void) a Transaction
1. Open the Customer Service screen and load the account you want to work with.
2. On the Customer Service link bar, click the Customer Service drop-down link, then click Transactions.
3. In the Transactions section, select the transaction you want to reverse.
4. Click Reverse.
Note
Some transactions cannot be reversed. If a transaction cannot be reversed, the Reverse button will be dimmed when the transaction is selected.
If the Reverse button is unavailable, the transaction anniversary cannot be reversed.
Access to the Reverse button can be restricted by user responsibility and the account’s product type using the PAYMENT_REV transaction code (Super Group: ACCOUNT MONETARY TXN) on the Administration window.
(For more information, see the Txn Codes tab (Transaction Super Group page) section of the Administration (System) Setup chapter in the Oracle Financial Services Lending and Leasing Suite Setup Guide).
Txn Dt The transaction effective date.
Description The transaction details.
Currency The currency of the transaction.
Amount The transaction amount.
Details The transaction details.
Balance Amt The balance amount.
Note: This is the principal balance, not the total balance amount.
Payment Currency The payment currency.
Payment Amount The payment amount.
Payment Type The payment type.
Reference The reference number associated with the transaction.
Mode The mode of the transaction.
Reason The reason for the transaction.
Allocation Details
Txn The transaction allocation details.
Amt The transaction allocation amount.
In this field: View:
3-47
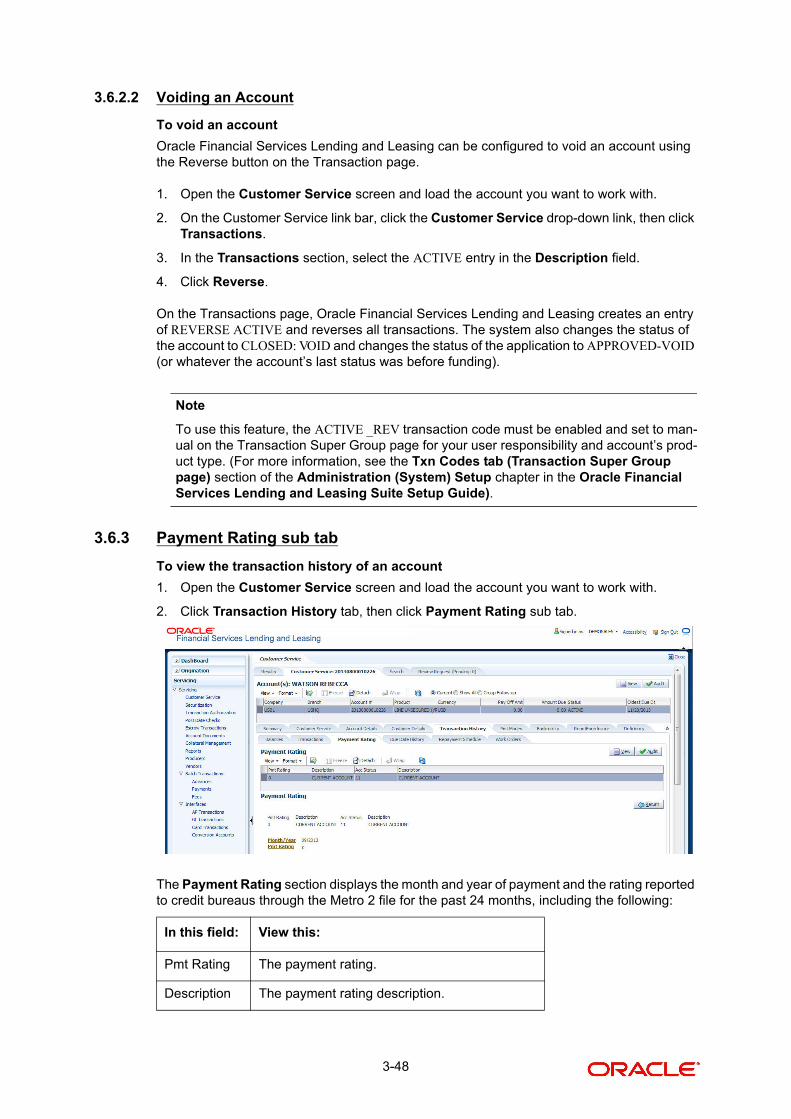
3.6.2.2 Voiding an Account
To void an account
Oracle Financial Services Lending and Leasing can be configured to void an account using the Reverse button on the Transaction page.
1. Open the Customer Service screen and load the account you want to work with.
2. On the Customer Service link bar, click the Customer Service drop-down link, then click Transactions.
3. In the Transactions section, select the ACTIVE entry in the Description field.
4. Click Reverse.
On the Transactions page, Oracle Financial Services Lending and Leasing creates an entry of REVERSE ACTIVE and reverses all transactions. The system also changes the status of the account to CLOSED: VOID and changes the status of the application to APPROVED-VOID (or whatever the account’s last status was before funding).
Note
To use this feature, the ACTIVE _REV transaction code must be enabled and set to man-ual on the Transaction Super Group page for your user responsibility and account’s prod-uct type. (For more information, see the Txn Codes tab (Transaction Super Group page) section of the Administration (System) Setup chapter in the Oracle Financial Services Lending and Leasing Suite Setup Guide).
3.6.3 Payment Rating sub tab
To view the transaction history of an account
1. Open the Customer Service screen and load the account you want to work with.
2. Click Transaction History tab, then click Payment Rating sub tab.
The Payment Rating section displays the month and year of payment and the rating reported to credit bureaus through the Metro 2 file for the past 24 months, including the following:
In this field: View this:
Pmt Rating The payment rating.
Description The payment rating description.
3-48
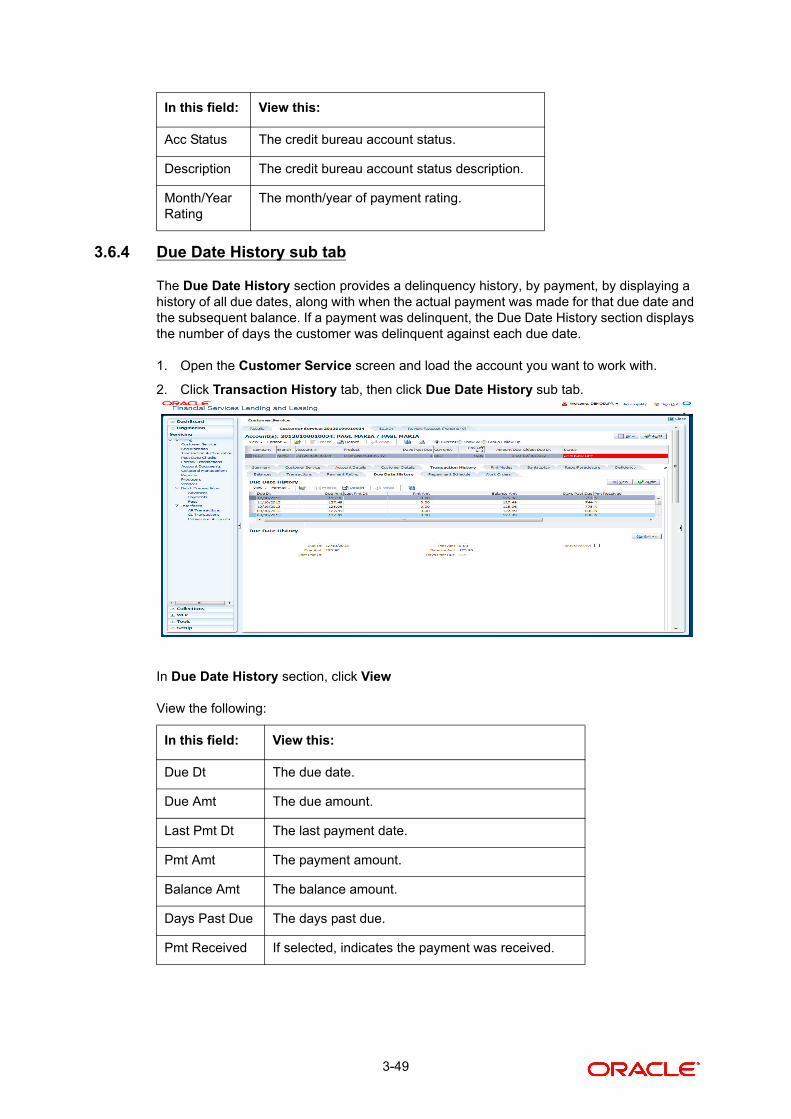
3.6.4 Due Date History sub tab
The Due Date History section provides a delinquency history, by payment, by displaying a history of all due dates, along with when the actual payment was made for that due date and the subsequent balance. If a payment was delinquent, the Due Date History section displays the number of days the customer was delinquent against each due date.
1. Open the Customer Service screen and load the account you want to work with.
2. Click Transaction History tab, then click Due Date History sub tab.
In Due Date History section, click View
View the following:
Acc Status The credit bureau account status.
Description The credit bureau account status description.
Month/Year Rating
The month/year of payment rating.
In this field: View this:
Due Dt The due date.
Due Amt The due amount.
Last Pmt Dt The last payment date.
Pmt Amt The payment amount.
Balance Amt The balance amount.
Days Past Due The days past due.
Pmt Received If selected, indicates the payment was received.
In this field: View this:
3-49
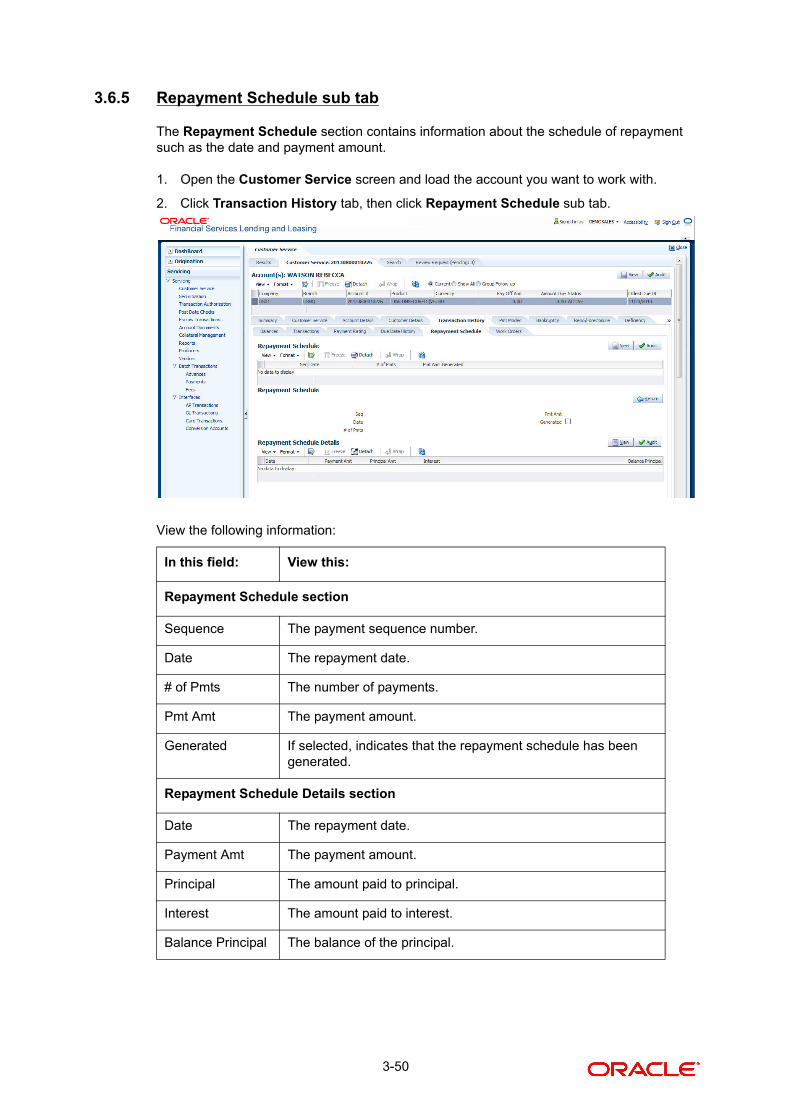
3.6.5 Repayment Schedule sub tab
The Repayment Schedule section contains information about the schedule of repayment such as the date and payment amount.
1. Open the Customer Service screen and load the account you want to work with.
2. Click Transaction History tab, then click Repayment Schedule sub tab.
View the following information:
In this field: View this:
Repayment Schedule section
Sequence The payment sequence number.
Date The repayment date.
# of Pmts The number of payments.
Pmt Amt The payment amount.
Generated If selected, indicates that the repayment schedule has been generated.
Repayment Schedule Details section
Date The repayment date.
Payment Amt The payment amount.
Principal The amount paid to principal.
Interest The amount paid to interest.
Balance Principal The balance of the principal.
3-50
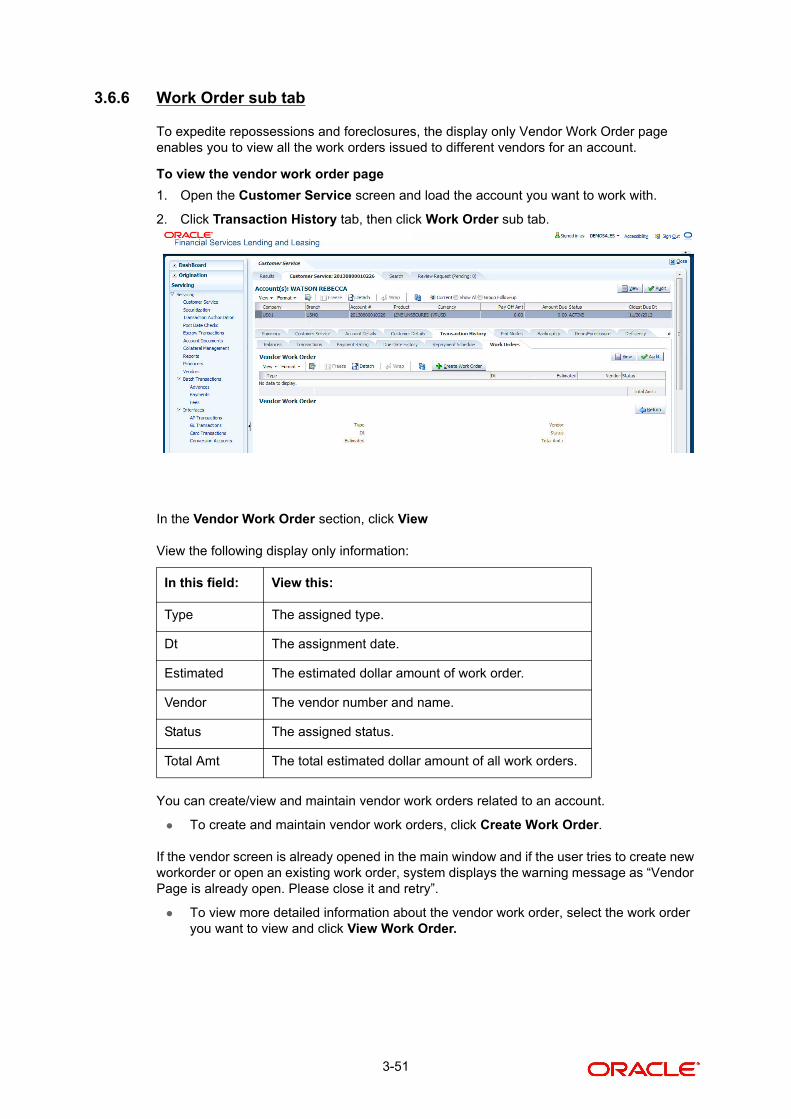
3.6.6 Work Order sub tab
To expedite repossessions and foreclosures, the display only Vendor Work Order page enables you to view all the work orders issued to different vendors for an account.
To view the vendor work order page
1. Open the Customer Service screen and load the account you want to work with.
2. Click Transaction History tab, then click Work Order sub tab.
In the Vendor Work Order section, click View
View the following display only information:
You can create/view and maintain vendor work orders related to an account.
To create and maintain vendor work orders, click Create Work Order.
If the vendor screen is already opened in the main window and if the user tries to create new workorder or open an existing work order, system displays the warning message as “Vendor Page is already open. Please close it and retry”.
To view more detailed information about the vendor work order, select the work order you want to view and click View Work Order.
In this field: View this:
Type The assigned type.
Dt The assignment date.
Estimated The estimated dollar amount of work order.
Vendor The vendor number and name.
Status The assigned status.
Total Amt The total estimated dollar amount of all work orders.
3-51
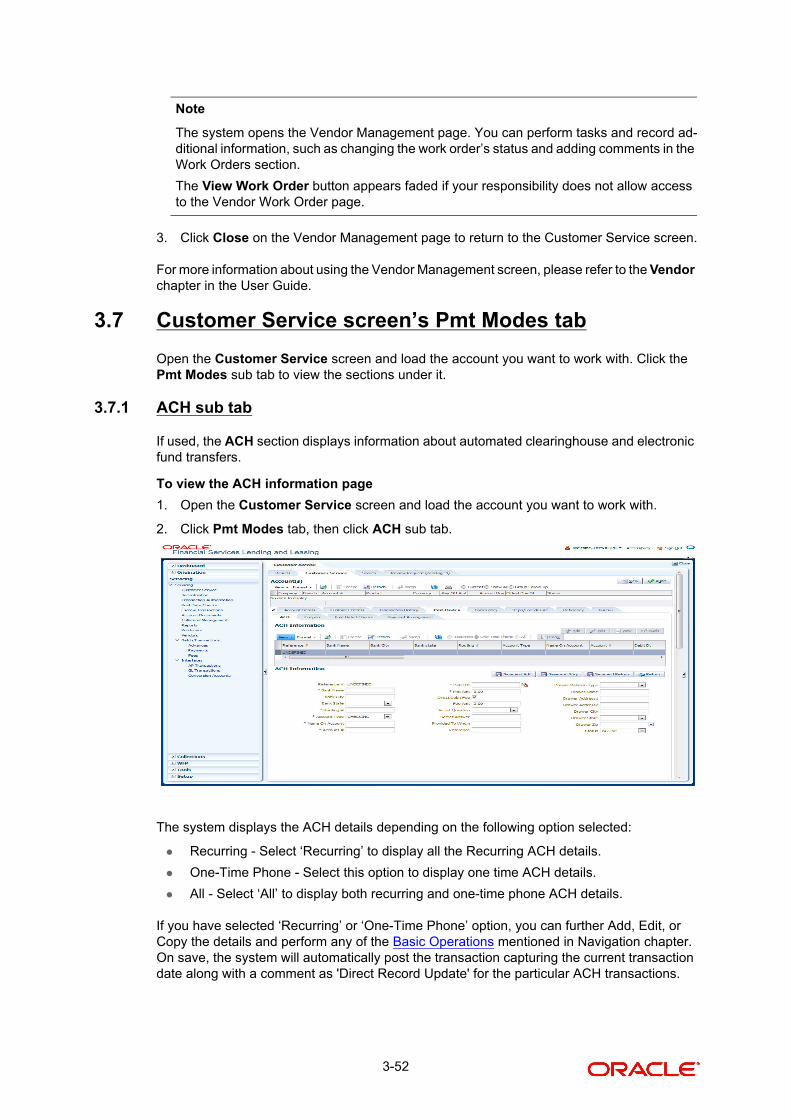
Note
The system opens the Vendor Management page. You can perform tasks and record ad-ditional information, such as changing the work order’s status and adding comments in the Work Orders section.
The View Work Order button appears faded if your responsibility does not allow access to the Vendor Work Order page.
3. Click Close on the Vendor Management page to return to the Customer Service screen.
For more information about using the Vendor Management screen, please refer to the Vendor chapter in the User Guide.
3.7 Customer Service screen’s Pmt Modes tab
Open the Customer Service screen and load the account you want to work with. Click the Pmt Modes sub tab to view the sections under it.
3.7.1 ACH sub tab
If used, the ACH section displays information about automated clearinghouse and electronic fund transfers.
To view the ACH information page
1. Open the Customer Service screen and load the account you want to work with.
2. Click Pmt Modes tab, then click ACH sub tab.
The system displays the ACH details depending on the following option selected:
Recurring - Select ‘Recurring’ to display all the Recurring ACH details.
One-Time Phone - Select this option to display one time ACH details.
All - Select ‘All’ to display both recurring and one-time phone ACH details.
If you have selected ‘Recurring’ or ‘One-Time Phone’ option, you can further Add, Edit, or Copy the details and perform any of the Basic Operations mentioned in Navigation chapter. On save, the system will automatically post the transaction capturing the current transaction date along with a comment as 'Direct Record Update' for the particular ACH transactions.
3-52

If you have selected ‘Recurring’ option, the following fields are displayed:
Note
This information can be edited using the Maintenance page and the nonmonetary trans-action ACH MAINTENANCE.
If you have selected ‘One-Time Phone’ or ‘All’ option, the following fields are displayed:
In this field: View this:
Bank Name The bank name.
Routing # The routing number.
Status The status of the account.
Start Dt The date the system began using ACH payments for this account
End Dt The ACH end date.
Default If selected indicates that this ACH is the default ACH for the account.
Account Type The type of account.
Account # The account number.
Note: If the organizational parameter UIX_HIDE_RESTRICTED_DATA is set to Y, this appears as a masked number; for example, XXXXX1234.
Pmt Day The payment day.
Pmt Amt The Payment amount.
Pmt Amt Excess
The excess payment.
Pmt Freq The payment frequency.
In this field: View this:
Reference # The unique reference number.
Bank Name The bank name.
Bank City The bank city.
Bank State List of available states.
Routing # The routing number.
Account Type The type of account.
Name On Account
The account name.
Account # The account number. If the organizational parameter UIX_HIDE_RE-STRICTED_DATA is set to Y, this appears as a masked number; for example, XXXXX1234.
3-53
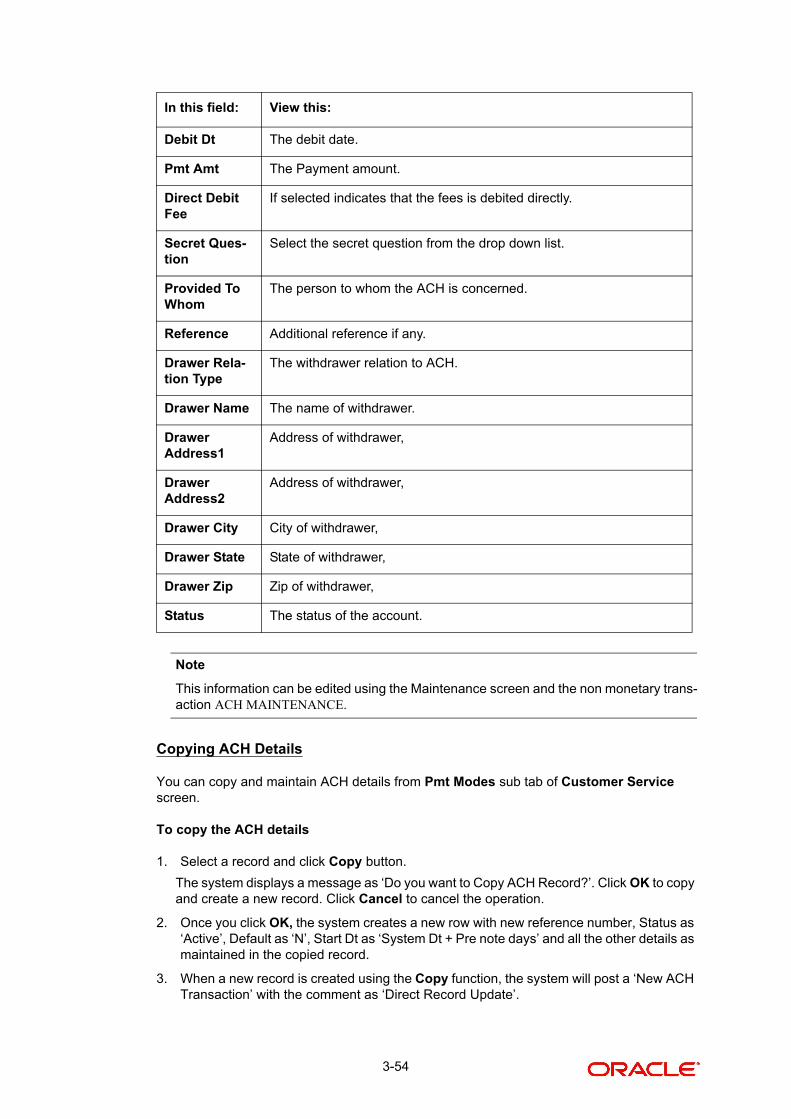
Note
This information can be edited using the Maintenance screen and the non monetary trans-action ACH MAINTENANCE.
Copying ACH Details
You can copy and maintain ACH details from Pmt Modes sub tab of Customer Service screen.
To copy the ACH details
1. Select a record and click Copy button.
The system displays a message as ‘Do you want to Copy ACH Record?’. Click OK to copy and create a new record. Click Cancel to cancel the operation.
2. Once you click OK, the system creates a new row with new reference number, Status as ‘Active’, Default as ‘N’, Start Dt as ‘System Dt + Pre note days’ and all the other details as maintained in the copied record.
3. When a new record is created using the Copy function, the system will post a ‘New ACH Transaction’ with the comment as ‘Direct Record Update’.
Debit Dt The debit date.
Pmt Amt The Payment amount.
Direct Debit Fee
If selected indicates that the fees is debited directly.
Secret Ques-tion
Select the secret question from the drop down list.
Provided To Whom
The person to whom the ACH is concerned.
Reference Additional reference if any.
Drawer Rela-tion Type
The withdrawer relation to ACH.
Drawer Name The name of withdrawer.
Drawer Address1
Address of withdrawer,
Drawer Address2
Address of withdrawer,
Drawer City City of withdrawer,
Drawer State State of withdrawer,
Drawer Zip Zip of withdrawer,
Status The status of the account.
In this field: View this:
3-54
4. If the user selects ‘All’ to display all the recurring and one-time phone ACH details, then the Copy button will be disabled.
3.7.2 Coupon sub tab
The Coupon section displays information regarding the coupons associated with the account.
To view the coupon page
1. Open the Customer Service screen and load the account you want to work with.
2. Click Pmt Modes tab, then click Coupon sub tab.
View the following:
3.7.3 Post Dated Checks sub tab
The Post Date Check section enables you to view any post dated check information for the account, if PDC is a method of repayment.
To view the post dated checks details page
1. Open the Customer Service screen and load the account you want to work with.
In this field: View this:
Order If the coupons are ordered for the selected account.
Coupon Start-ing #
The starting number of the coupon ordered for the cus-tomer.
Order Date The order date of the coupon.
# of Coupons The total number of coupons ordered for the customer.
Ordered By The person who ordered the coupons
3-55
2. Click Pmt Modes tab, then click Post Dated Checks sub tab.
View the following:
3.7.4 Payment Arrangement sub tab
The Payment Arrangement section enables you to define and calculate the payment amount for the account with status Charge-off.
To view the post dated checks details page
1. Open the Customer Service screen and load the account you want to work with.
In this field: View this:
Select If selected, indicates that this is the current record.
PDC Type The type of post dated check in use.
Status The status of the post dated check.
Check # The check number of the post dated check.
Check Dt The check date of the post dated check.
Check Amt The check amount of the post dated check.
Bank Name The bank name of the post dated check.
Account Type
The account type of the post dated check.
Account # The account number of the post dated check.
3-56
2. Click Pmt Modes tab, then click Payment Arrangement sub tab.
View the following information:
3. In the Payment Arrangement section, click View.View the following details:
4. In the Details section, click View.View the following details:
On Clicking DeActivate, the account will be deactivated.
In this field: Do this:
Frequency Displays the payment frequency.
Start Date Enter the start date from when the customer pays.
Terms Enter the number of payments.
In this field: Do this:
End Date View the end date of the payment.
Plan Amount View the payment amount which the customer plans to pay.
Outstanding Amount View the outstanding amount.
In this field: View this:
Date View the start date of the payment plan.
Frequency View the payment frequency.
Plan Amount View the planned payment amount.
Paid Amount View the paid amount.
Satisfied Ind Indicates that the customer done the payment arrangements.
Broken Ind Indicates that the customer did not make the payment arrangement.
Enabled Ind Indicates that the arrangement is active
3-57

To add a new payment rearrangement plan, previous plan has to be manually deactivated otherwise the system displays an error message. This condition applies to the payment arrangement previous plan even when the 'Broken Indicator' is selected.
Note
An alert message will be displayed in the Customer Service screen when the user tries to view the payment arrangement for account other than charged off status.
The Payment Arrangement section is enabled only when the Payment Arrangement Batch job is posted.
Only one Payment arrangement plan can exist at a time. If a schedule broken by the customer make another payment arrangement, the first payment arrangement has to be deactivated and only then, the other payment can be added.
3.8 Customer Service screen’s Bankruptcy tab
The Bankruptcy page enables you to record the details of a bankruptcy. This information usually is supplied from the customer or customer’s attorney. You can track each stage of the bankruptcy process based on its follow-up date and record information using the Details and Tracking sections.
As there are occasions when a borrower files bankruptcy more than once during the tenure of the Lease, you can record information for multiple bankruptcies. The Add button enables you to create a new bankruptcy record with different start and end dates. You can also use the Bankruptcy page to view the previous bankruptcy record using the Next and Previous buttons in the Detail section. The Current box in the Detail section indicates the current bankruptcy details.
To enter bankruptcy details for an account
1. Open the Customer Service screen and load the account you want to work with.
2. Click Bankruptcy tab.
3. In the Bankruptcy Details section, select the bankruptcy record you want to work with.
3-58
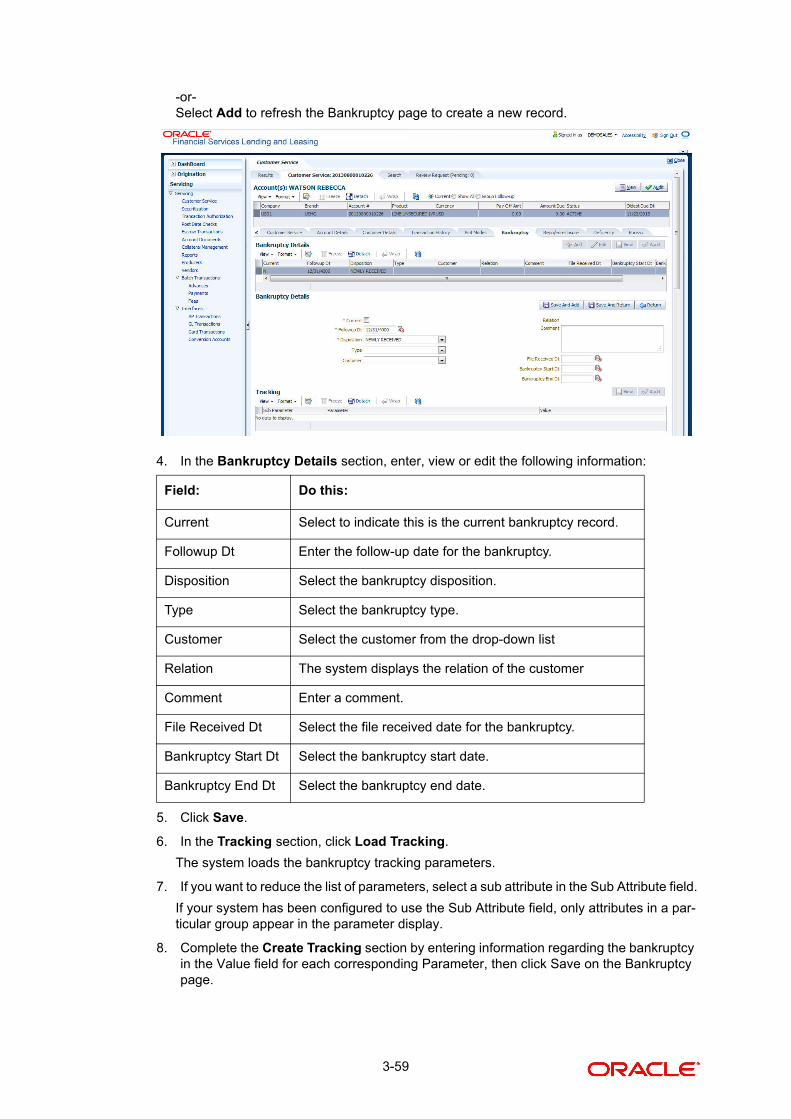
-or-Select Add to refresh the Bankruptcy page to create a new record.
4. In the Bankruptcy Details section, enter, view or edit the following information:
5. Click Save.
6. In the Tracking section, click Load Tracking.
The system loads the bankruptcy tracking parameters.
7. If you want to reduce the list of parameters, select a sub attribute in the Sub Attribute field.
If your system has been configured to use the Sub Attribute field, only attributes in a par-ticular group appear in the parameter display.
8. Complete the Create Tracking section by entering information regarding the bankruptcy in the Value field for each corresponding Parameter, then click Save on the Bankruptcy page.
Field: Do this:
Current Select to indicate this is the current bankruptcy record.
Followup Dt Enter the follow-up date for the bankruptcy.
Disposition Select the bankruptcy disposition.
Type Select the bankruptcy type.
Customer Select the customer from the drop-down list
Relation The system displays the relation of the customer
Comment Enter a comment.
File Received Dt Select the file received date for the bankruptcy.
Bankruptcy Start Dt Select the bankruptcy start date.
Bankruptcy End Dt Select the bankruptcy end date.
3-59
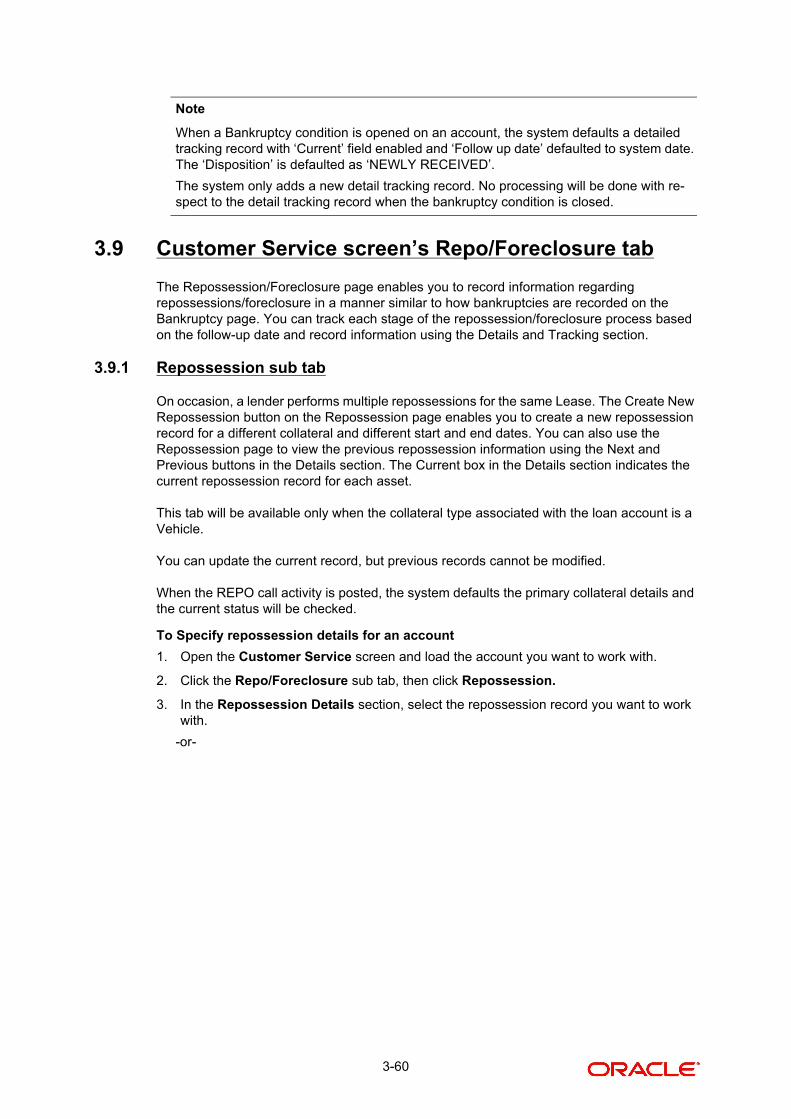
Note
When a Bankruptcy condition is opened on an account, the system defaults a detailed tracking record with ‘Current’ field enabled and ‘Follow up date’ defaulted to system date. The ‘Disposition’ is defaulted as ‘NEWLY RECEIVED’.
The system only adds a new detail tracking record. No processing will be done with re-spect to the detail tracking record when the bankruptcy condition is closed.
3.9 Customer Service screen’s Repo/Foreclosure tab
The Repossession/Foreclosure page enables you to record information regarding repossessions/foreclosure in a manner similar to how bankruptcies are recorded on the Bankruptcy page. You can track each stage of the repossession/foreclosure process based on the follow-up date and record information using the Details and Tracking section.
3.9.1 Repossession sub tab
On occasion, a lender performs multiple repossessions for the same Lease. The Create New Repossession button on the Repossession page enables you to create a new repossession record for a different collateral and different start and end dates. You can also use the Repossession page to view the previous repossession information using the Next and Previous buttons in the Details section. The Current box in the Details section indicates the current repossession record for each asset.
This tab will be available only when the collateral type associated with the loan account is a Vehicle.
You can update the current record, but previous records cannot be modified.
When the REPO call activity is posted, the system defaults the primary collateral details and the current status will be checked.
To Specify repossession details for an account
1. Open the Customer Service screen and load the account you want to work with.
2. Click the Repo/Foreclosure sub tab, then click Repossession.
3. In the Repossession Details section, select the repossession record you want to work with.
-or-
3-60
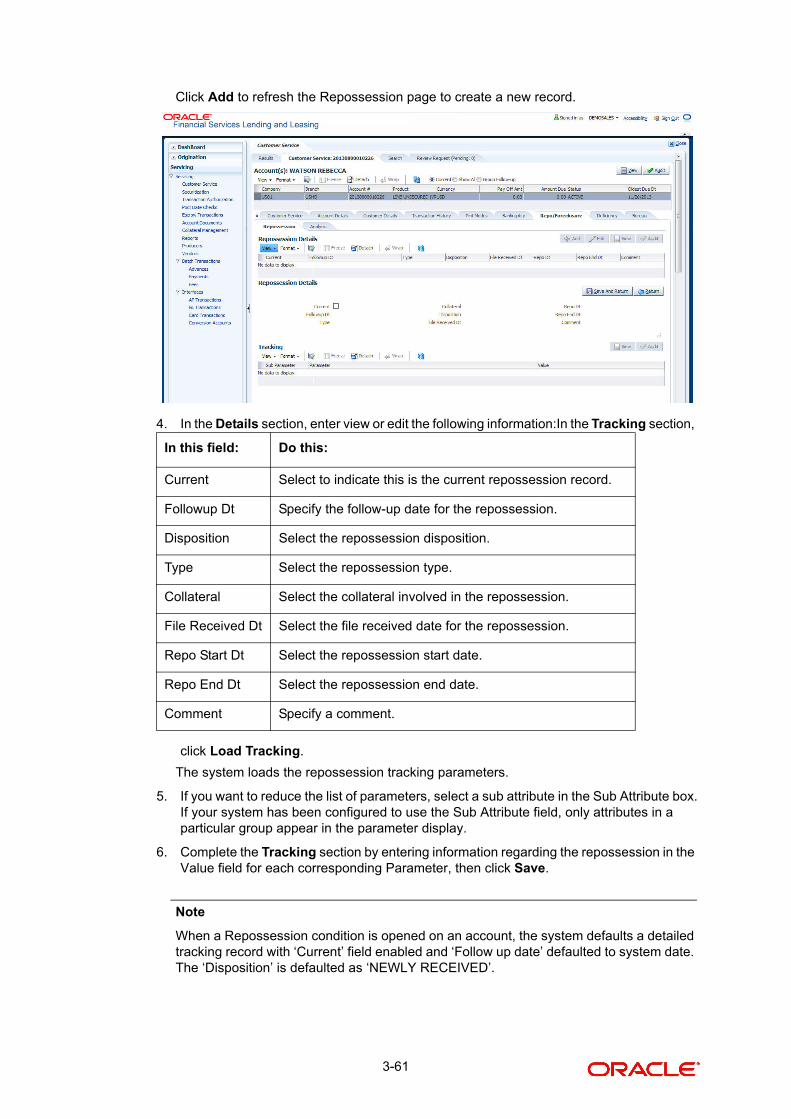
Click Add to refresh the Repossession page to create a new record.
4. In the Details section, enter view or edit the following information:In the Tracking section,
click Load Tracking.
The system loads the repossession tracking parameters.
5. If you want to reduce the list of parameters, select a sub attribute in the Sub Attribute box.If your system has been configured to use the Sub Attribute field, only attributes in a particular group appear in the parameter display.
6. Complete the Tracking section by entering information regarding the repossession in the Value field for each corresponding Parameter, then click Save.
Note
When a Repossession condition is opened on an account, the system defaults a detailed tracking record with ‘Current’ field enabled and ‘Follow up date’ defaulted to system date. The ‘Disposition’ is defaulted as ‘NEWLY RECEIVED’.
In this field: Do this:
Current Select to indicate this is the current repossession record.
Followup Dt Specify the follow-up date for the repossession.
Disposition Select the repossession disposition.
Type Select the repossession type.
Collateral Select the collateral involved in the repossession.
File Received Dt Select the file received date for the repossession.
Repo Start Dt Select the repossession start date.
Repo End Dt Select the repossession end date.
Comment Specify a comment.
3-61
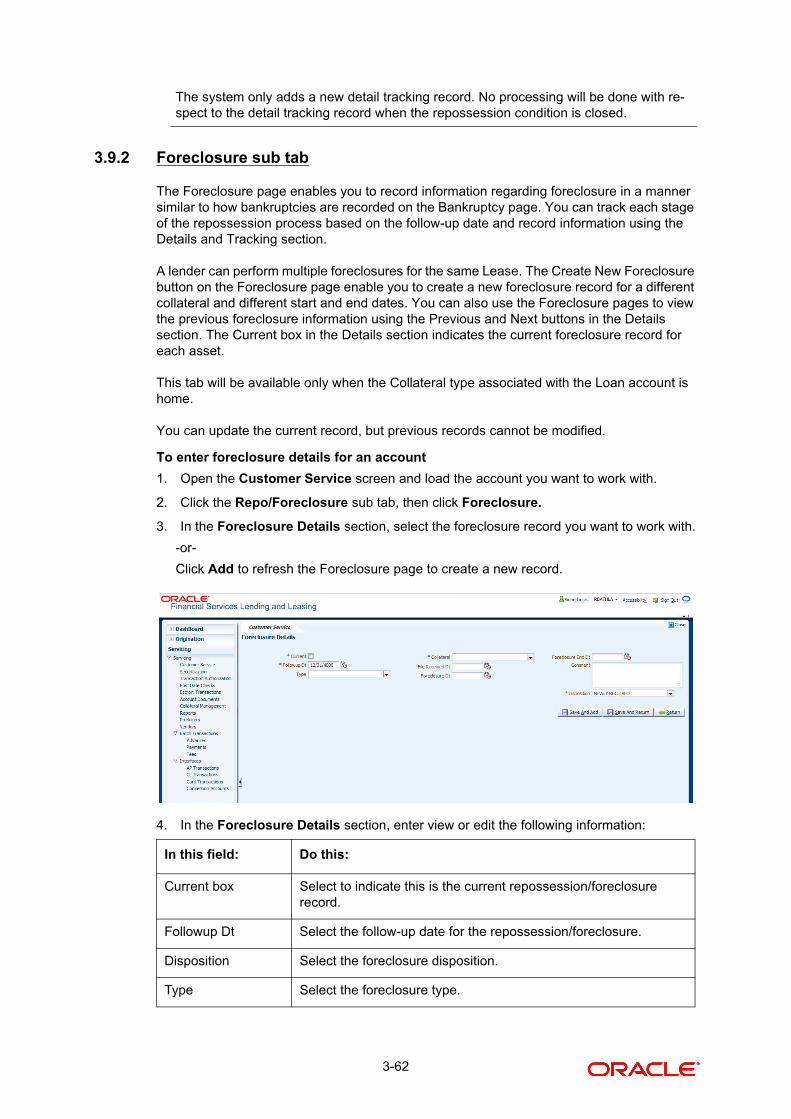
The system only adds a new detail tracking record. No processing will be done with re-spect to the detail tracking record when the repossession condition is closed.
3.9.2 Foreclosure sub tab
The Foreclosure page enables you to record information regarding foreclosure in a manner similar to how bankruptcies are recorded on the Bankruptcy page. You can track each stage of the repossession process based on the follow-up date and record information using the Details and Tracking section.
A lender can perform multiple foreclosures for the same Lease. The Create New Foreclosure button on the Foreclosure page enable you to create a new foreclosure record for a different collateral and different start and end dates. You can also use the Foreclosure pages to view the previous foreclosure information using the Previous and Next buttons in the Details section. The Current box in the Details section indicates the current foreclosure record for each asset.
This tab will be available only when the Collateral type associated with the Loan account is home.
You can update the current record, but previous records cannot be modified.
To enter foreclosure details for an account
1. Open the Customer Service screen and load the account you want to work with.
2. Click the Repo/Foreclosure sub tab, then click Foreclosure.
3. In the Foreclosure Details section, select the foreclosure record you want to work with.
-or-
Click Add to refresh the Foreclosure page to create a new record.
4. In the Foreclosure Details section, enter view or edit the following information:
In this field: Do this:
Current box Select to indicate this is the current repossession/foreclosure record.
Followup Dt Select the follow-up date for the repossession/foreclosure.
Disposition Select the foreclosure disposition.
Type Select the foreclosure type.
3-62
5. In the Tracking section, click Load Tracking.
The system loads the foreclosure tracking parameters.
6. If you want to reduce the list of parameters, select a sub attribute in the Sub Attribute box.If your system has been configured to use the Sub Attribute field, only attributes in a particular group appear in the parameter display.
7. Complete the Tracking section by entering information regarding the foreclosure in the Value field for each corresponding Parameter, then click Save.
3.9.3 Analysis sub tab
The Analysis page enables you to create and analyze possible scenarios for the remarketing and the sale of the asset. This enables you to calculate the possible gain or loss in the sale of an asset. Expenses already incurred on the asset are displayed on Expenses sub page. You can change the numbers if you expect more expenses by the time the asset is sold.
Note
You can have up to three Repo/Foreclosure and three Sales analyses on each Analysis page.
To complete a repossession/foreclosure analysis or sales analysis for an account
1. Open the Customer Service window and load the account you want to work with.
2. On the Customer Service link bar, click the Repo/Foreclosure drop-down link, then click Analysis
3. In the Analysis section, select the analysis record you want to work with and click Load.
-or-
Collateral Select the foreclosure asset.
File Received Dt Enter the file received date for the foreclosure.
Foreclosure Start Dt Enter the foreclosure start date.
Foreclosure End Dt Enter the foreclosure end date.
Comment Enter a comment.
In this field: Do this:
3-63
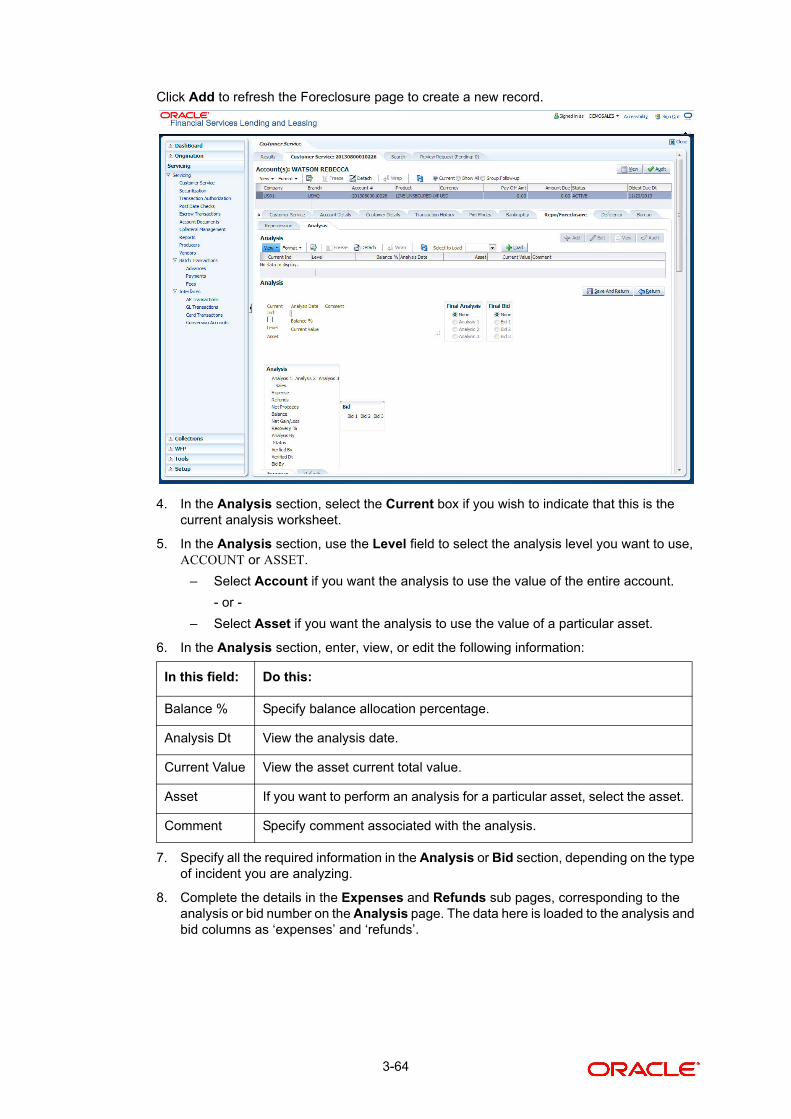
Click Add to refresh the Foreclosure page to create a new record.
4. In the Analysis section, select the Current box if you wish to indicate that this is the current analysis worksheet.
5. In the Analysis section, use the Level field to select the analysis level you want to use, ACCOUNT or ASSET.
– Select Account if you want the analysis to use the value of the entire account.
- or -
– Select Asset if you want the analysis to use the value of a particular asset.
6. In the Analysis section, enter, view, or edit the following information:
7. Specify all the required information in the Analysis or Bid section, depending on the type of incident you are analyzing.
8. Complete the details in the Expenses and Refunds sub pages, corresponding to the analysis or bid number on the Analysis page. The data here is loaded to the analysis and bid columns as ‘expenses’ and ‘refunds’.
In this field: Do this:
Balance % Specify balance allocation percentage.
Analysis Dt View the analysis date.
Current Value View the asset current total value.
Asset If you want to perform an analysis for a particular asset, select the asset.
Comment Specify comment associated with the analysis.
3-64
– To complete the Expenses sub page:
– To complete the Refunds sub page:
Select the Corresponding Analysis/Bid to Load the details Maintained in the Expense and Refund sections.
9. Repeat steps 4 to 8 with information regarding other repossession/foreclosure or sales analysis.
10. In the Status field, select the status of the analysis: APPROVED or REJECTED.
11. When you have decided which analysis or which sale bid you want to approve, select your choice in the either the Final Analysis or Final Bid section.
Note
You can approve only one analysis. Based on the Analysis approved on ‘Save And Return’ the Corresponding Radio button will be enabled in the Final section of the Analysis details.
12. Click Save.
In this field: Do this:
Expense Type Select the expense type.
Manual Indicates that the expense was entered manually.
Analysis1 Amt Specify the expense amount for analysis1.
Analysis2 Amt Specify the expense amount for analysis2.
Analysis3 Amt Specify the expense amount for analysis3.
Bid1 Amt Specify the expense amount for bid1.
Bid2 Amt Specify the expense amount for bid2.
Bid3 Amt Specify the expense amount for bid3.
In this field: Do this:
Refund Type Select the refund type.
Manual Indicates that the refund was entered manually.
Analysis1 Amt Specify the refund amount for analysis1.
Analysis2 Amt Specify the refund amount for analysis2.
Analysis3 Amt Specify the refund amount for analysis3.
Bid1 Amt Specify the refund amount for bid1.
Bid2 Amt Specify the refund amount for bid2.
Bid3 Amt Specify the refund amount for bid3.
3-65
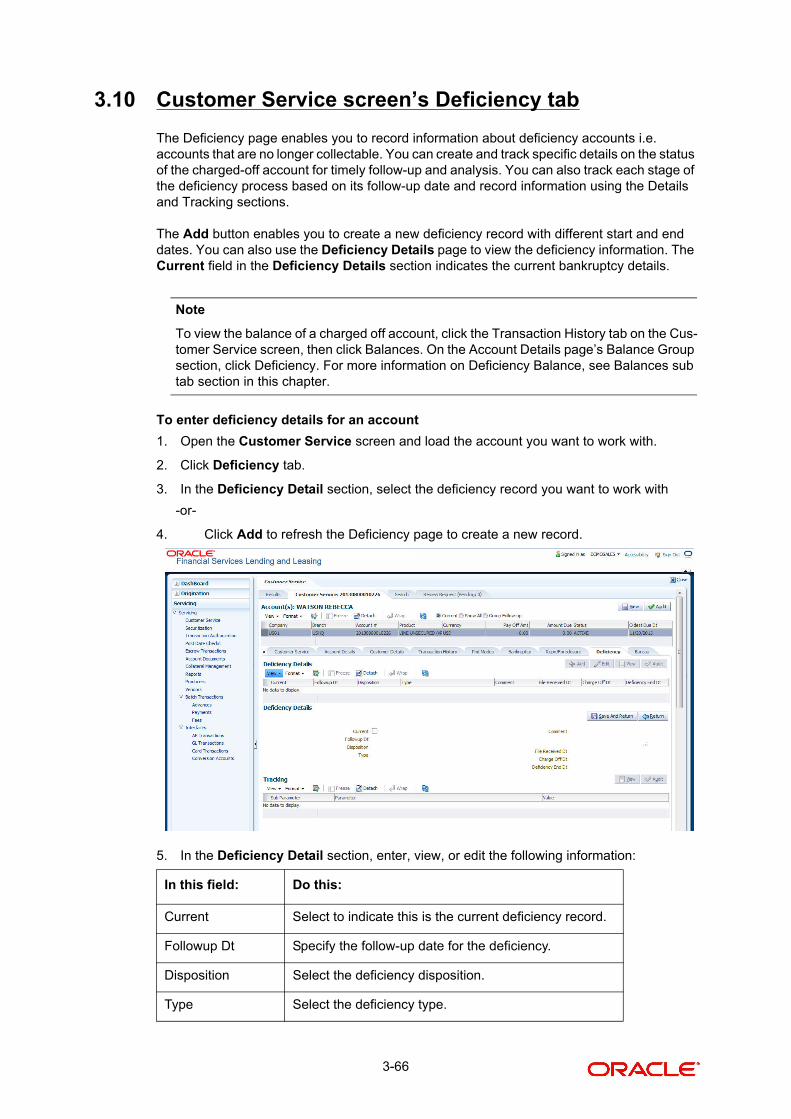
3.10 Customer Service screen’s Deficiency tab
The Deficiency page enables you to record information about deficiency accounts i.e. accounts that are no longer collectable. You can create and track specific details on the status of the charged-off account for timely follow-up and analysis. You can also track each stage of the deficiency process based on its follow-up date and record information using the Details and Tracking sections.
The Add button enables you to create a new deficiency record with different start and end dates. You can also use the Deficiency Details page to view the deficiency information. The Current field in the Deficiency Details section indicates the current bankruptcy details.
Note
To view the balance of a charged off account, click the Transaction History tab on the Cus-tomer Service screen, then click Balances. On the Account Details page’s Balance Group section, click Deficiency. For more information on Deficiency Balance, see Balances sub tab section in this chapter.
To enter deficiency details for an account
1. Open the Customer Service screen and load the account you want to work with.
2. Click Deficiency tab.
3. In the Deficiency Detail section, select the deficiency record you want to work with
-or-
4. Click Add to refresh the Deficiency page to create a new record.
5. In the Deficiency Detail section, enter, view, or edit the following information:
In this field: Do this:
Current Select to indicate this is the current deficiency record.
Followup Dt Specify the follow-up date for the deficiency.
Disposition Select the deficiency disposition.
Type Select the deficiency type.
3-66
6. Click Save.
7. In the Tracking section, click Load Tracking.
The system loads the deficiency tracking parameters that track actions taken to collect on the account.
8. If you want to reduce the list of parameters, select a sub attribute in the Sub Attribute field.
If your system has been configured to use the Sub Attribute field, only attributes in a par-ticular group appear in the parameter display.
9. Complete the Tracking section by entering information regarding the deficiency in the Value field for each corresponding Parameter, then click Save.
Note
When a Deficiency condition is opened on an account, the system defaults a detailed tracking record with ‘Current’ field enabled and ‘Follow up date’ defaulted to system date. The ‘Disposition’ is defaulted as ‘NEWLY RECEIVED’.
The system only adds a new detail tracking record. No processing will be done with re-spect to the detail tracking record when the deficiency condition is closed.
3.11 Customer Service screen’s Bureau tab
The Customer Service screen Bureau page enables you to view credit bureau reports associated with the account that were pulled during servicing for the account. You can also use the Bureau page to create and pull additional credit bureau reports and view the results as a text only file.
To view an existing credit bureau report
1. Open the Customer Service screen and load the account you want to work with.
Comment Specify a comment.
File Received Dt Specify the file received date for the deficiency.
Charge Off Dt Specify the deficiency start date.
Deficiency End Dt Specify the deficiency end date.
In this field: Do this:
3-67
2. On the Customer Service link bar, click Bureau.
3. In the View Report section:
Click Servicing to view credit reports generated with the Customer Service screen.
-or-Click Origination to view credit reports generated during Leaseorigination.
4. In the Bureau Details section, select the report you want to view.
The system displays the report as a text file in the Text Report section.
To request a manual credit bureau report
1. Open the Customer Service screen and load the account you want to work with.
2. On the Customer Service link bar, click Bureau.
3. Click Add to open New Request section.
4. Complete the following fields:
5. In the New Request section, click Create Request.
The system displays this information in the Bureau Details section and further information about the customer in Applicant/Customer Detail section.
6. If you want to receive a copy of a previously pulled credit bureau report, enter the credit bureau reorder number in the Credit Bureau Reorder # field on the Bureau Details section.
7. Click Save.
You can print the report by selecting the report and clicking on Print Report.
In this field: Do this:
Bureau Select the credit bureau.
Applicant Select the available applicant based on the selected bureau.
Spouse Select the applicant’s spouse.
Report Select the credit bureau report type.
3-68
3.12 Customer Service screen’s Collateral tab
The Collateral page displays information regarding any assets associated with an account. Collateral can be a vehicle, home, or something else, such as household goods. The Collateral page contains the Home and Seller sub tabs. To view the collateral details
1. Open the Customer Service screen and load the account you want to work with.
2. Click Collateral tab. The system displays the following screen:If the account’s collateral is a vehicle, the Collateral page opens at the Vehicle tab:
– If the account’s collateral is a home, the Collateral page opens at the Home tab:
3-69
– If the account’s collateral is neither a vehicle nor a home, the Collateral page opens at the Other Collateral:
Clicking on the Asset # in the Vehicle sub tab takes you to Collateral Management screen opening respective collateral. You can modify the details on Collateral management screen by clicking on ‘Edit’ and saving the record.
The system displays a warning message if the Collateral Management screen is already open.
3.12.1 Valuation sub tab
With the Valuation sub page, you can view the collateral or asset valuation for an account.
To view the collateral or asset valuation for an account
1. Open the Customer Service screen and load the account you want to work with.
2. Click Collateral tab and then Valuation.
3. Click the Valuation sub tab to view the following information:
In this field: View this:
Value section
Current Select if this is the current valuation.
Valuation Dt The valuation date.
Source The valuation source.
Edition The valuation edition.
Supplement The valuation supplement.
Wholesale Base The wholesale value.
3-70
Note
Assets can have exactly one current valuation.
3.12.2 Tracking sub tab
With the Tracking sub page, you can view collateral or asset tracking details to an account, such as the location of the title, liens, and insurance information.
To view the collateral or asset tracking for an account
1. Open the Customer Service screen and load the account you want to work with.
2. On the Customer Service link bar, click Collateral.
3. On the available page (Vehicle, Home, or Other), click the Tracking sub tab.
4. On the Tracking sub page, enter, view, or edit the following information:
Usage The usage. This pertains to Leases and usually is entered as the current mileage.
Retail Amt The retail amount.
Addons (+) The add-ons value.
Usage Value Amt (+)
The usage value; that is, the monetary effect that the current mile-age has on the value of the vehicle.
Total Value (=) The total value.
Addons section
Addons/Attributes Select the add-on/attribute.
Value The value of the attribute.
Amount The add-on amount.
In this field: View this:
Tracking Items section
Select If selected, indicates that this is the current record.
Tracking Item The tracking type.
Disposition The disposition.
Start Dt The tracking start date.
End Dt The tracking end date.
Followup Dt The next follow-up date.
Enabled Select to track the information from the start date in the Start Dt field.
Comment The comment.
In this field: View this:
3-71
3.12.3 Seller sub tab
The Collateral link’s Seller Details page enables you to view the seller details of the collateral of the Lease. You cannot edit or modify the details of the seller.
1. In Seller Details section, click View.
2. View the following:
3. In Seller Address section click View.
4. View the following:
3.13 Review Request
The Review Requests page is primarily a workflow tool used to flag an account or an application for the attention of another Oracle Financial Services Lending and Leasing user and ask for feedback. It allows the system users to send and receive requests (including e-mail) commenting on a specific account or application.
Tracking Items Details section
Parameter The parameter.
Value The tracking parameter value.
In this field: View this:
Seller Details
Seller Type The seller type.
Seller Name The seller name.
Nationality The nationality of the seller.
National Id The national Id of the seller.
Authorized Signatory The authorized signatory of the seller.
Seller Address
Mailing If selected, indicates that this address is the mailing address.
Current If selected, indicates that this address is the current address.
Country The seller’s country name.
Address The seller’s address.
City The seller’s city name.
State The seller’s state name.
In this field: View this:
3-72
In this chapter, you will learn how to compete the following tasks:
Reviewing a request
Sending a review request
Responding to a review request
E-mailing a Review Request
Closing a review request
Note
– You can complete the above tasks for an Account Review Request using the Review Request page in the Servicing master tab.
– To complete the above mentioned tasks for an Application Review Request, use the Review Request page available in the Origination master tab.
3.13.1 Review Requests Tab
The Review Requests page contains the following sections:
Query Section
Action Section
Email Section
Review request records
Comments Sections
Query Section
The Query section enables you to filter records based on any of the following:
Note
By default, records are displayed based on the priority levels. i.e. high, normal or low.
Query Options
Descriptions
Originator Displays the records of all the active review requests you created.
Receiver Displays the records of all the active review requests you received.
Both Displays all the review requests records you have created as well as received with the status other than ‘CLOSED’.
View All Displays all the review requests records you sent and received, both active and closed.
3-73
Action Section
The Action section enables you to send, respond or close the review request.
Email Section:
The Email section enables you to send an email to either the originator or the receiver of the review request.
Note
The email recipient cannot respond or reply to e-mails with the email system.
Comments Sections
The Comments section enables the originator or receiver to specify the additional information that needs to be sent with the request.
Action Options Descriptions
Open Application Opens the application details page to review the request. (if you open it from origination it’s application and if from servicing den account)
Send Request Sends a review request to another Oracle Financial Services Lend-ing and Leasing user.
Send Response Sends a response to a review request from another Oracle Finan-cial Services Lending and Leasing user.
Close Request Changes the status of the review request to CLOSED and removes its record from the Review Request page.
Note: You can view review requests with a CLOSED status by selecting ‘View All’ in the ‘Query’ section.
Email Options
Descriptions
Originator Sends an email of the review request information to the person listed in the Originator column on the Review Request page.
Receiver Sends an email of the review request to the person listed in the Receiver column on the Review Request page.
Comments From
Descriptions
Originator Comment
Displays comments specified by the originator of the review request at the time of creating a request.
Receiver Comment
Displays comments specified by the receiver of the review request at the time of reviewing a request.
3-74

3.13.1.1 Reviewing a Request
System displays the priority and the number of requests ready for review, if any, for your user id at My Pending Review Requests By Priority section in the Servicing DashBoard window.
To review requests
1. On the Oracle Financial Services Lending and Leasing application home page, click Servicing main tab and then click Servicing drop-down link. Click Customer Service link.The Customer Service window appears, opened at the Results tab.Under Customer Service screen, click the Review Requests tab.
2. In the Query section, click Receiver.
In the Review Request record, the system displays all open review request you have re-ceived.
3-75

3. In the Review Request record, select the record you want to view and click View.The following screen is displayed.
4. For the selected Review Request record, view the following information:
Note
If you click Open Account, system loads the account in the review request and displays the Account Details page.
3.13.1.2 Sending a Review Request
The Send Request button enables you to send a review request to another the system user. However, the Send Request button is enabled only if you have specified the receiver while creating a review request and have saved it.
To send a review request
1. On the Oracle Financial Services Lending and Leasing Application home page, click the Servicing main tab and then click Servicing drop-down link.Click Review Requests tab.
2. In theReview Requests page in the Query section, select Originator.
Fields Descriptions
Originator The user id of the request originator.
Priority The request priority: HIGH, NORMAL, or LOW.
Receiver The recipient of the request.
Account # The account number which needs review.
Reason The review reason.
Status The request status.
Date The date and time when the request was created.
Originator Comment The comment by the originator which creating a request.
Receiver Comment The comment by the receiver after reviewing a request.
3-76
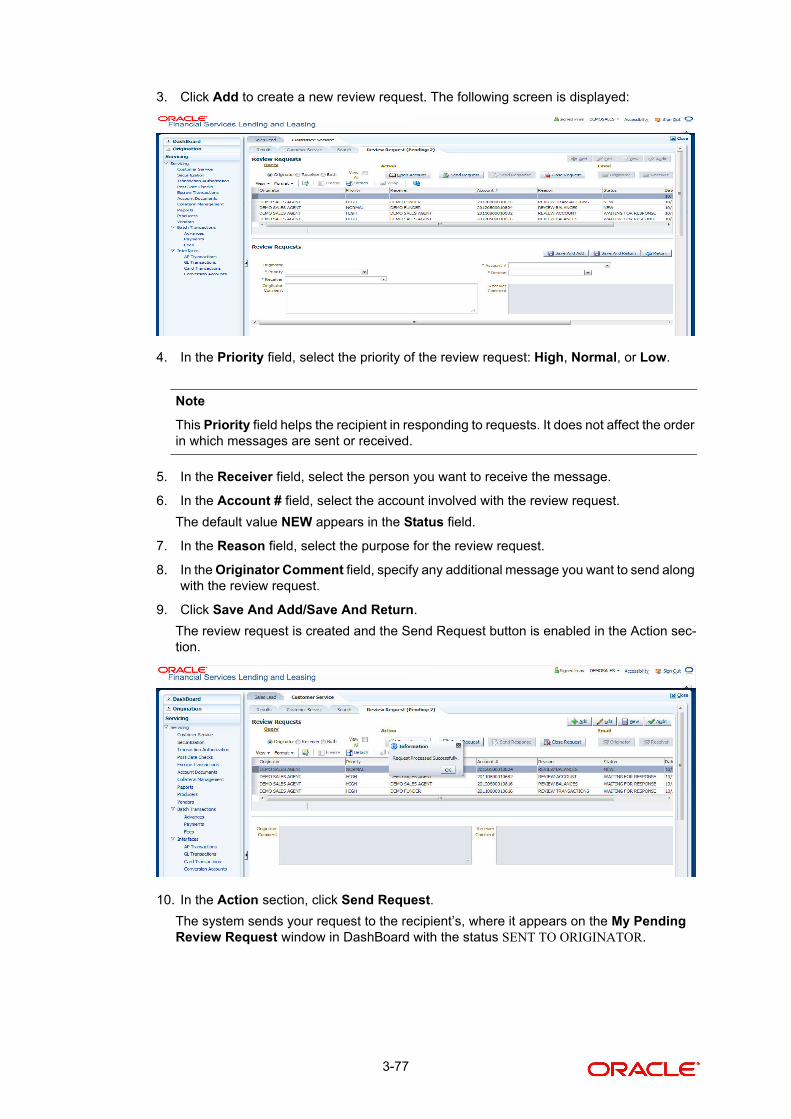
3. Click Add to create a new review request. The following screen is displayed:
4. In the Priority field, select the priority of the review request: High, Normal, or Low.
Note
This Priority field helps the recipient in responding to requests. It does not affect the order in which messages are sent or received.
5. In the Receiver field, select the person you want to receive the message.
6. In the Account # field, select the account involved with the review request.
The default value NEW appears in the Status field.
7. In the Reason field, select the purpose for the review request.
8. In the Originator Comment field, specify any additional message you want to send along with the review request.
9. Click Save And Add/Save And Return.
The review request is created and the Send Request button is enabled in the Action sec-tion.
10. In the Action section, click Send Request.
The system sends your request to the recipient’s, where it appears on the My Pending Review Request window in DashBoard with the status SENT TO ORIGINATOR.
3-77
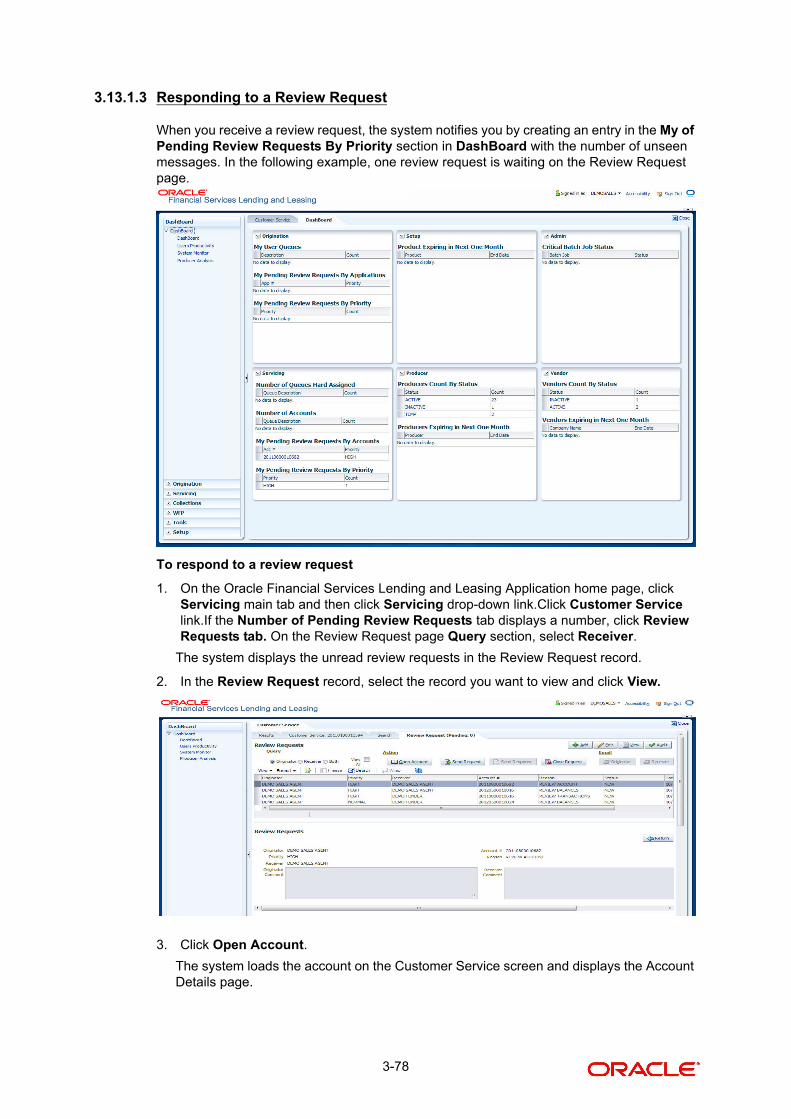
3.13.1.3 Responding to a Review Request
When you receive a review request, the system notifies you by creating an entry in the My of Pending Review Requests By Priority section in DashBoard with the number of unseen messages. In the following example, one review request is waiting on the Review Request page.
To respond to a review request
1. On the Oracle Financial Services Lending and Leasing Application home page, click Servicing main tab and then click Servicing drop-down link.Click Customer Service link.If the Number of Pending Review Requests tab displays a number, click Review Requests tab. On the Review Request page Query section, select Receiver.
The system displays the unread review requests in the Review Request record.
2. In the Review Request record, select the record you want to view and click View.
3. Click Open Account.
The system loads the account on the Customer Service screen and displays the Account Details page.
3-78
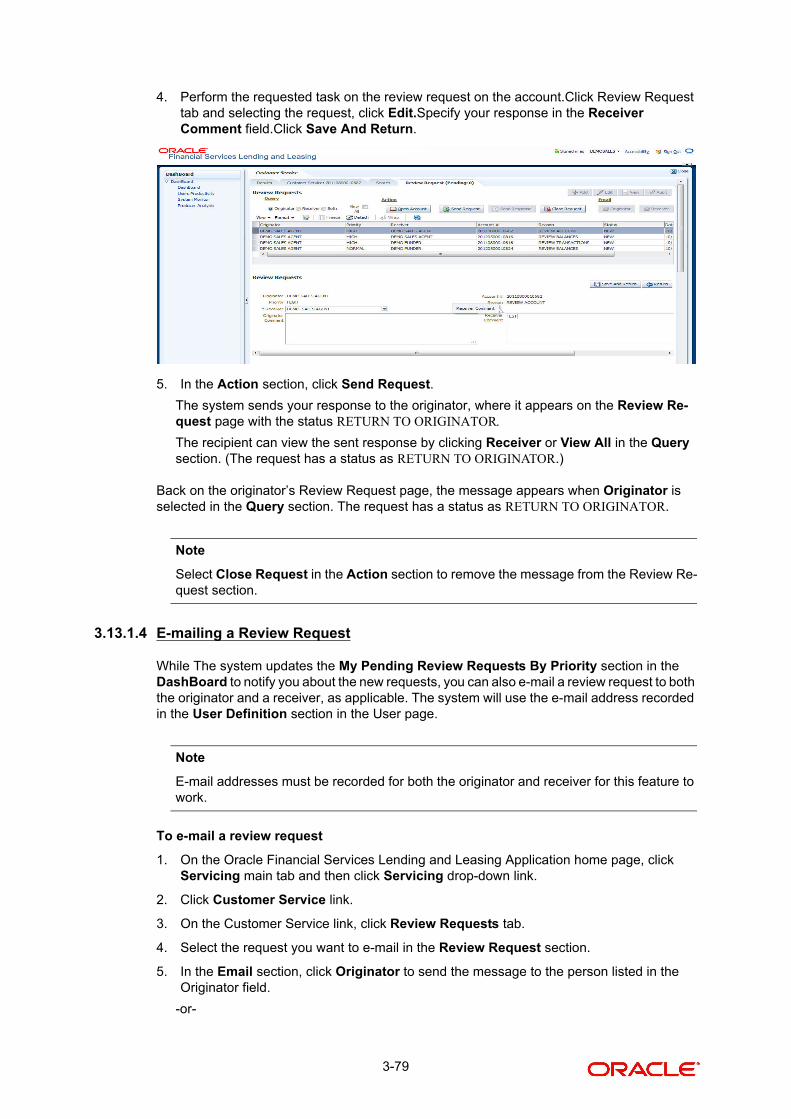
4. Perform the requested task on the review request on the account.Click Review Request tab and selecting the request, click Edit.Specify your response in the Receiver Comment field.Click Save And Return.
5. In the Action section, click Send Request.
The system sends your response to the originator, where it appears on the Review Re-quest page with the status RETURN TO ORIGINATOR.
The recipient can view the sent response by clicking Receiver or View All in the Query section. (The request has a status as RETURN TO ORIGINATOR.)
Back on the originator’s Review Request page, the message appears when Originator is selected in the Query section. The request has a status as RETURN TO ORIGINATOR.
Note
Select Close Request in the Action section to remove the message from the Review Re-quest section.
3.13.1.4 E-mailing a Review Request
While The system updates the My Pending Review Requests By Priority section in the DashBoard to notify you about the new requests, you can also e-mail a review request to both the originator and a receiver, as applicable. The system will use the e-mail address recorded in the User Definition section in the User page.
Note
E-mail addresses must be recorded for both the originator and receiver for this feature to work.
To e-mail a review request
1. On the Oracle Financial Services Lending and Leasing Application home page, click Servicing main tab and then click Servicing drop-down link.
2. Click Customer Service link.
3. On the Customer Service link, click Review Requests tab.
4. Select the request you want to e-mail in the Review Request section.
5. In the Email section, click Originator to send the message to the person listed in the Originator field.
-or-
3-79

Click Receiver to send it to the person listed in the Receiver field.
The system emails the details of the selected record to the e-mail address recorded in the user setup.
3.13.1.5 Closing a Review Request
You can close a review request you created at anytime, regardless of status. However, you can only close review requests that have your user id in the Originator field. When you close a review request, the system removes it from the Review Request record.
To close a review request
1. On the Oracle Financial Services Lending and Leasing Application home page, click Servicing main tab and then click Servicing drop-down link.
2. Click Customer Service link.
3. On the Customer Service link, click Review Requests tab.
4. Select the request you want to close in the Review Request section.
5. In the Action section, click Close Request.
The system assigns the request the status of CLOSED and removes it from your Review Request record.
Note
You can review closed accounts anytime by selecting View All in the Query section.
3-80
4. Securitization
With the Securitization Setup window, the system provides a powerful tool that enables financial institutions to create account pools, to track and manage portfolios.
The Securitization Setup window enables you to:
Query account information
Select accounts based on selection criteria
Create a pool of selected accounts for sale
Maintain the pools created and report transactions on these accounts
Report on investors
Repurchase pools or specific accounts from pools.
4.1 Pool Inquiry
The Pool Inquiry page enables you to enter and view pool related transactions. It can also be used to view various summaries related to the pool.
The Pool Inquiry page contains the following sub pages:
Pool Transactions
Pool Accounts
Product
Status
Rate
Delinquency
Term
4-1
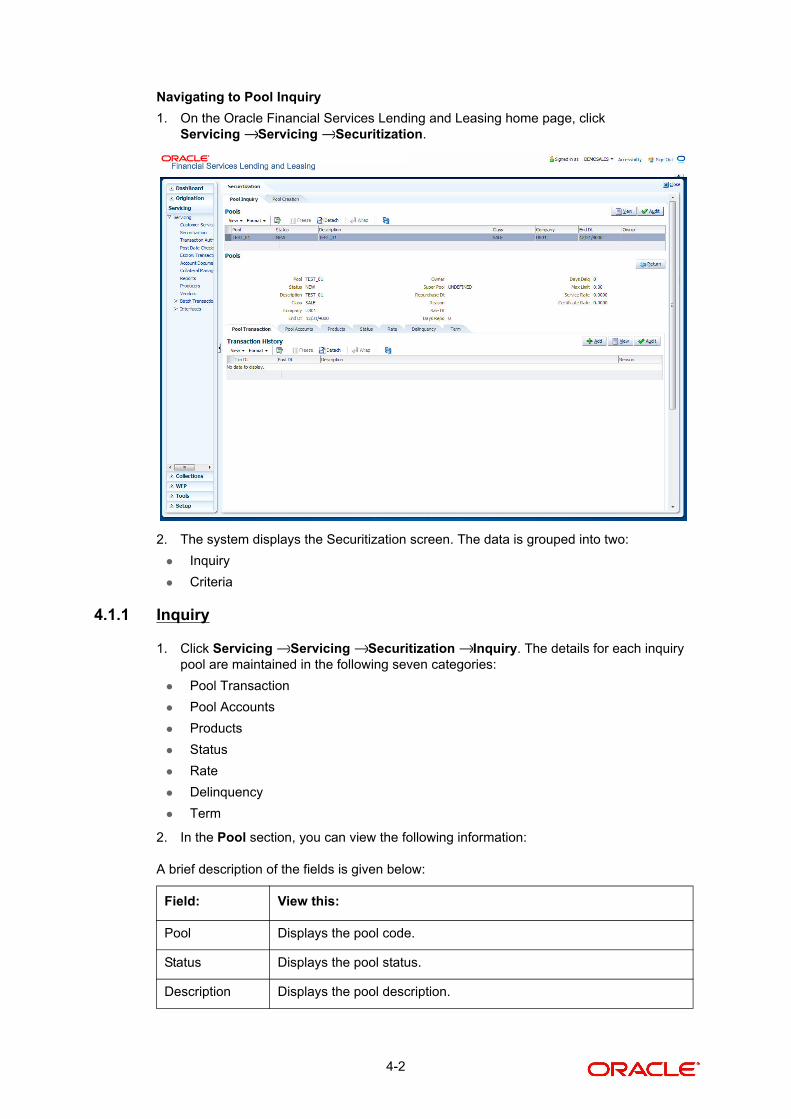
Navigating to Pool Inquiry
1. On the Oracle Financial Services Lending and Leasing home page, clickServicing Servicing Securitization.
2. The system displays the Securitization screen. The data is grouped into two:
Inquiry
Criteria
4.1.1 Inquiry
1. Click Servicing Servicing Securitization Inquiry. The details for each inquiry pool are maintained in the following seven categories:
Pool Transaction
Pool Accounts
Products
Status
Rate
Delinquency
Term
2. In the Pool section, you can view the following information:
A brief description of the fields is given below:
Field: View this:
Pool Displays the pool code.
Status Displays the pool status.
Description Displays the pool description.
→ →
→ → →
4-2
4.1.1.1 Pool Transactions
The Pool Transactions sub page enables you to view pool related transactions history, and well as enter a pool transaction.
To post Pool Transactions
1. In the Servicing Servicing Securitization Inquiry Pool section, select the record you want to work with.
2. Click Pool Transactions.
3. In the Transaction History section, click Add.
Class Displays the pool class from the drop-down list.
Company Displays the pool portfolio company from the drop-down list.
End Dt Displays the pool end date.
Owner Displays the pool owner.
Super Pool Displays the pool super pool code from the adjoining drop-down link.
Repurchase Dt Displays the pool re-purchase date.
Reason Displays the pool re-purchase reason.
Sale Dt Displays the pool sale date.
Days Repo Displays the number of days in repossession to liquidate.
Days Delq Displays the number of days in delinquency to liquidate.
Max Limit Displays the max limit of the pool.
Service Rate Displays the servicing rate for the pool.
Certificate Rate Displays the certificate rate for the pool This is the rate which will be payable to the investor who buys this pool and is entitled to its receivable stream.
Field: View this:
→ → → →
4-3
A brief description of the fields is given below:
4. Click Post. The Details appear in the Transaction History summary table.
5. Click Clear to clear the details
4.1.1.2 Pool Accounts
The Pool Accounts sub page enables you to view previous account related transactions, as well as enter a pool account transaction for the selected pool.
To post the Pool Accounts
1. In the Servicing Servicing Securitization Inquiry Pool section, select the record you want to work with.
2. Click the Pool Accounts. The details are grouped into two:
Accounts
Account Transactions
3. In the Accounts section, you can view the following information:
A brief description of the fields is given below:
Field: Do this:
Transaction Select the transaction from the following list:
ADD ACCOUNT -- Add an account to the pool externally.
CANCELLED -- Cancel the pool.
HELD FOR SALE -- Change the status of the pool to “HELD FOR SALE.”
OPEN -- Change the status of pool to “OPEN.”
RELEASED -- Change the status of the pool to “RELEASED” and clear all accounts related to the pool.
REPURCHASED -- Change the status of the pool to “REPURCHASED.”
SOLD -- Change the status of the pool to “SOLD.” (required).
Reason Enter the transaction reason (required).
Date Enter the transaction effective date (required).
Account Select the account to be added (optional).
Field: View this:
Account Displays the account number.
Account Status Displays the account status.
Sale Acc Status Displays the account status at the time of pool sale.
Dt Displays the pool sale date.
Sale Rate Displays the account interest rate at the time of the pool sale.
Balance Displays the account balance at the time of the pool sale.
→ → → →
4-4
4. In the Account Transactions section, click Add:
A brief description of the fields is given below:
5. Click Post. The Details appear in the Account Transaction summary table.
6. Click Clear to clear the details
4.1.1.3 Product
The Product sub page enables you to view summaries of various statistics of the products in the pool.
To view the Product details
1. In the Servicing Servicing Securitization Inquiry Pool section, select the record you want to work with.
2. Click the Product.
3. In the Product section, you can view the following information:
A brief description of the fields is given below:
4.1.1.4 Status
The Status sub page enables you to view summaries of various statistics of the status of the products in the pool.
Term Remaining Displays the account remaining terms at the time of the pool sale.
Field: Do this:
Transaction Select the transaction from the drop-down list.
Reason Specify the transaction reason.
Date Specify the transaction post date. You can even select the date from the adjoining Calendar icon.
Field: View this:
Product Displays the product.
Principal at Sale Displays the principal at sale amount.
Principal Paid Displays the principal paid amount.
Repurchase Balance Displays the principal repurchase balance amount.
Loss Amount Displays the loss amount.
Payahead Amount Displays the pay ahead amount. For any paid off accounts in the product summary, this field contains the sum of the amount that was applied to principal during the payoff payment allocation.
Current Balance Displays the current balance amount.
Field: View this:
→ → → →
4-5
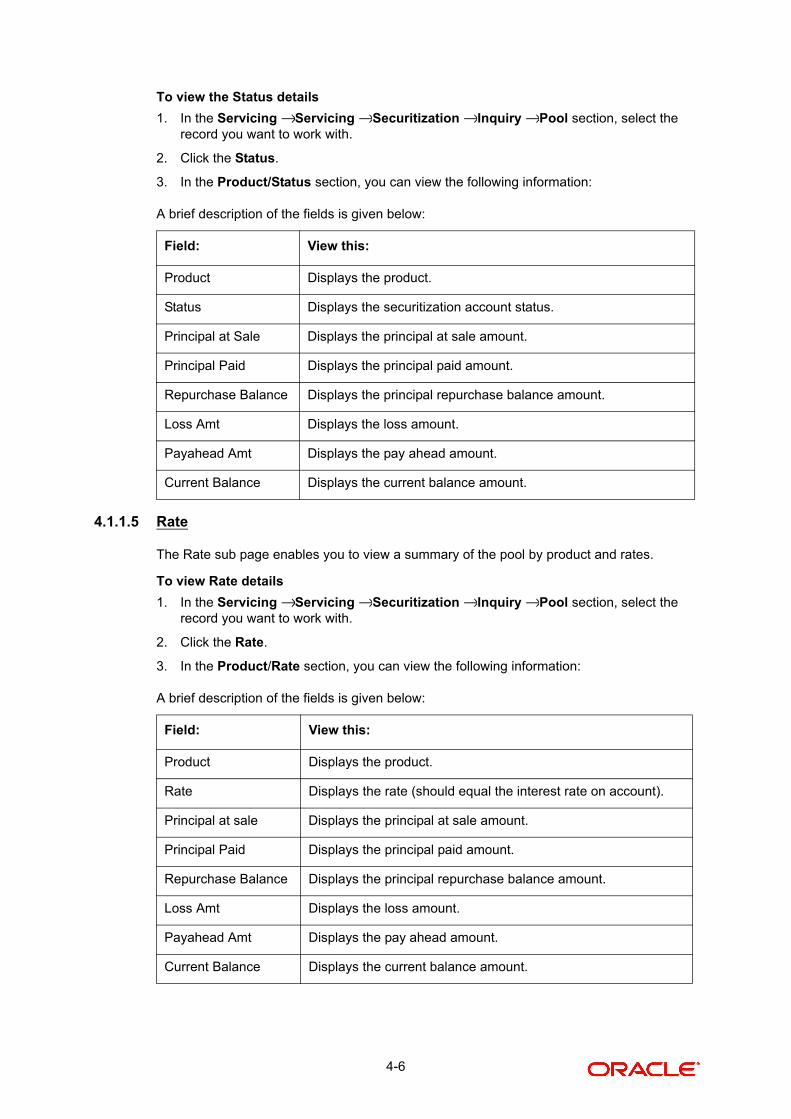
To view the Status details
1. In the Servicing Servicing Securitization Inquiry Pool section, select the record you want to work with.
2. Click the Status.
3. In the Product/Status section, you can view the following information:
A brief description of the fields is given below:
4.1.1.5 Rate
The Rate sub page enables you to view a summary of the pool by product and rates.
To view Rate details
1. In the Servicing Servicing Securitization Inquiry Pool section, select the record you want to work with.
2. Click the Rate.
3. In the Product/Rate section, you can view the following information:
A brief description of the fields is given below:
Field: View this:
Product Displays the product.
Status Displays the securitization account status.
Principal at Sale Displays the principal at sale amount.
Principal Paid Displays the principal paid amount.
Repurchase Balance Displays the principal repurchase balance amount.
Loss Amt Displays the loss amount.
Payahead Amt Displays the pay ahead amount.
Current Balance Displays the current balance amount.
Field: View this:
Product Displays the product.
Rate Displays the rate (should equal the interest rate on account).
Principal at sale Displays the principal at sale amount.
Principal Paid Displays the principal paid amount.
Repurchase Balance Displays the principal repurchase balance amount.
Loss Amt Displays the loss amount.
Payahead Amt Displays the pay ahead amount.
Current Balance Displays the current balance amount.
→ → → →
→ → → →
4-6
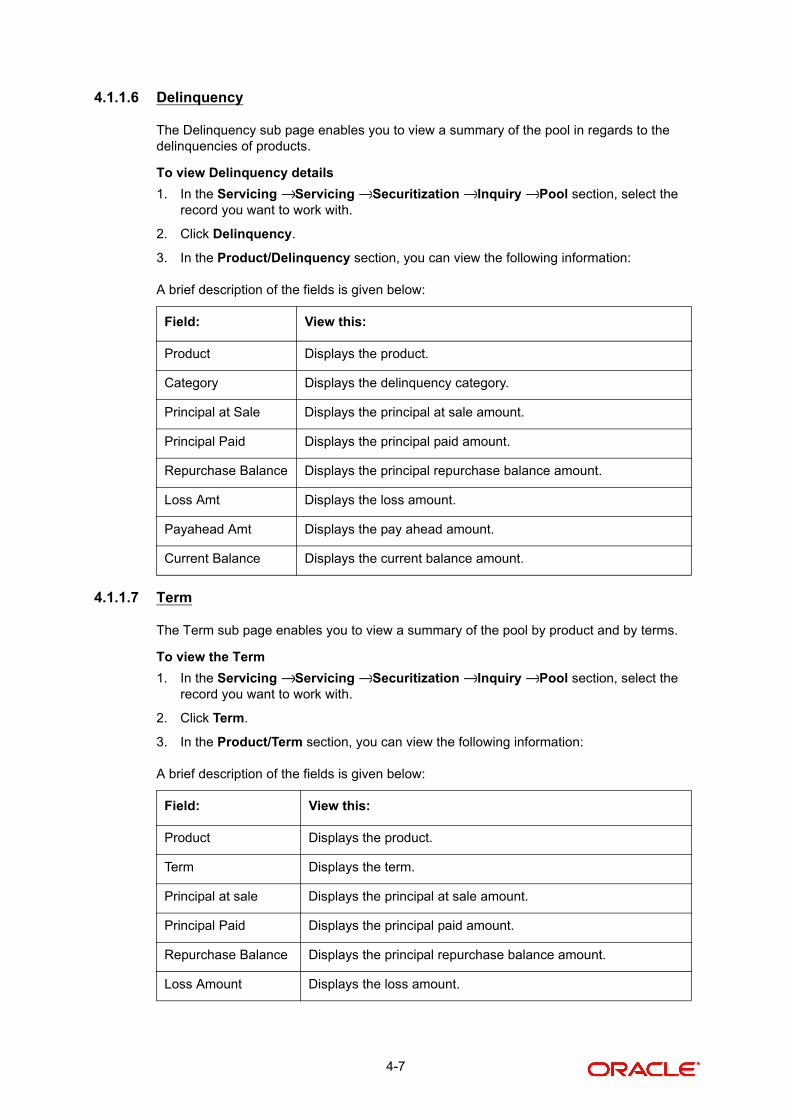
4.1.1.6 Delinquency
The Delinquency sub page enables you to view a summary of the pool in regards to the delinquencies of products.
To view Delinquency details
1. In the Servicing Servicing Securitization Inquiry Pool section, select the record you want to work with.
2. Click Delinquency.
3. In the Product/Delinquency section, you can view the following information:
A brief description of the fields is given below:
4.1.1.7 Term
The Term sub page enables you to view a summary of the pool by product and by terms.
To view the Term
1. In the Servicing Servicing Securitization Inquiry Pool section, select the record you want to work with.
2. Click Term.
3. In the Product/Term section, you can view the following information:
A brief description of the fields is given below:
Field: View this:
Product Displays the product.
Category Displays the delinquency category.
Principal at Sale Displays the principal at sale amount.
Principal Paid Displays the principal paid amount.
Repurchase Balance Displays the principal repurchase balance amount.
Loss Amt Displays the loss amount.
Payahead Amt Displays the pay ahead amount.
Current Balance Displays the current balance amount.
Field: View this:
Product Displays the product.
Term Displays the term.
Principal at sale Displays the principal at sale amount.
Principal Paid Displays the principal paid amount.
Repurchase Balance Displays the principal repurchase balance amount.
Loss Amount Displays the loss amount.
→ → → →
→ → → →
4-7
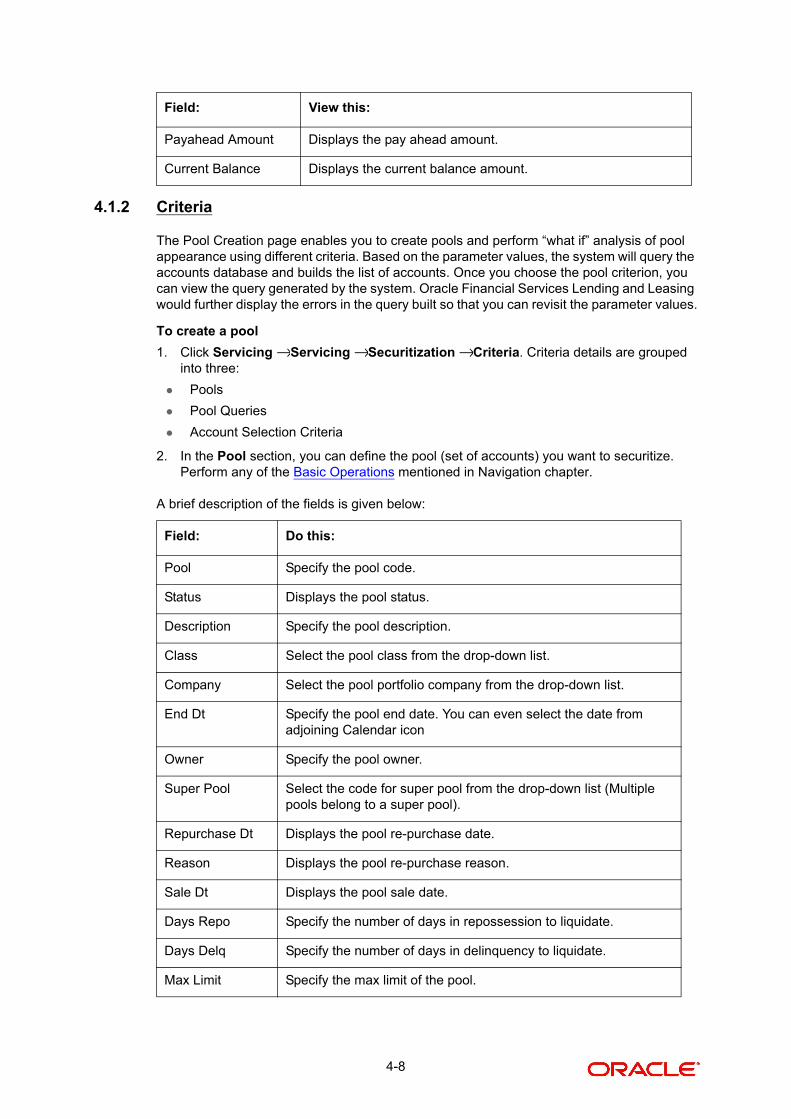
4.1.2 Criteria
The Pool Creation page enables you to create pools and perform “what if” analysis of pool appearance using different criteria. Based on the parameter values, the system will query the accounts database and builds the list of accounts. Once you choose the pool criterion, you can view the query generated by the system. Oracle Financial Services Lending and Leasing would further display the errors in the query built so that you can revisit the parameter values.
To create a pool
1. Click Servicing Servicing Securitization Criteria. Criteria details are grouped into three:
Pools
Pool Queries
Account Selection Criteria
2. In the Pool section, you can define the pool (set of accounts) you want to securitize. Perform any of the Basic Operations mentioned in Navigation chapter.
A brief description of the fields is given below:
Payahead Amount Displays the pay ahead amount.
Current Balance Displays the current balance amount.
Field: Do this:
Pool Specify the pool code.
Status Displays the pool status.
Description Specify the pool description.
Class Select the pool class from the drop-down list.
Company Select the pool portfolio company from the drop-down list.
End Dt Specify the pool end date. You can even select the date from adjoining Calendar icon
Owner Specify the pool owner.
Super Pool Select the code for super pool from the drop-down list (Multiple pools belong to a super pool).
Repurchase Dt Displays the pool re-purchase date.
Reason Displays the pool re-purchase reason.
Sale Dt Displays the pool sale date.
Days Repo Specify the number of days in repossession to liquidate.
Days Delq Specify the number of days in delinquency to liquidate.
Max Limit Specify the max limit of the pool.
Field: View this:
→ → →
4-8
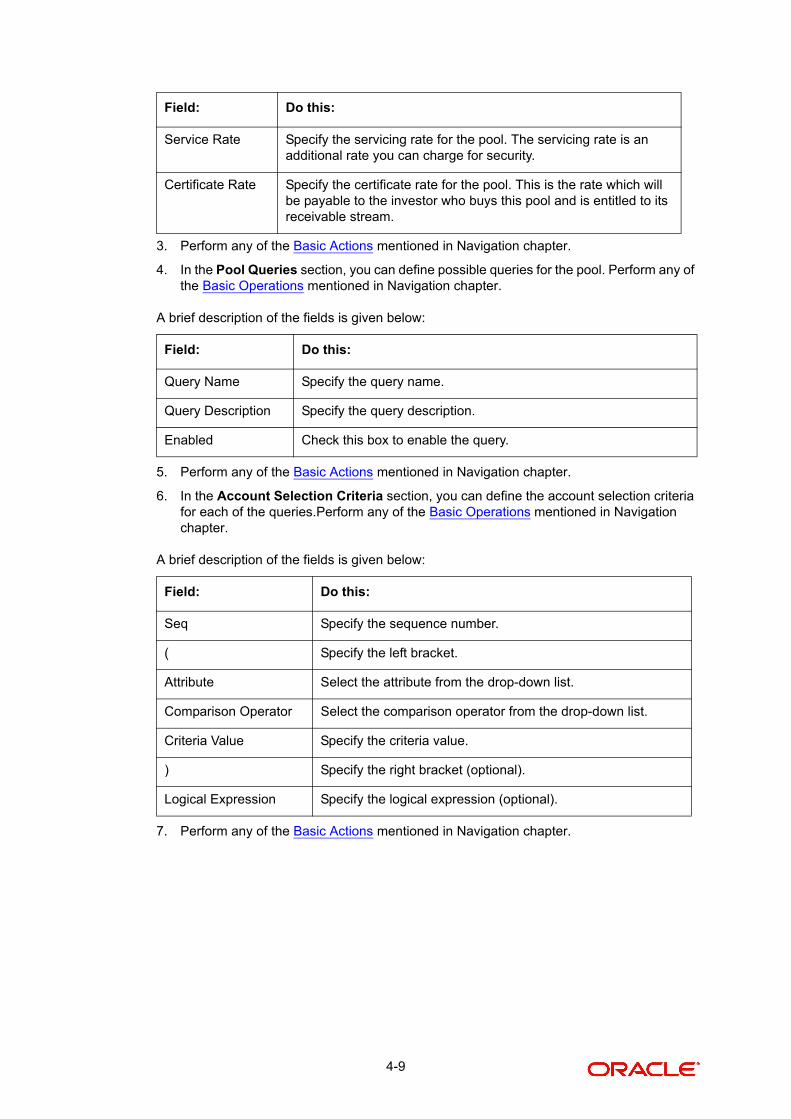
3. Perform any of the Basic Actions mentioned in Navigation chapter.
4. In the Pool Queries section, you can define possible queries for the pool. Perform any of the Basic Operations mentioned in Navigation chapter.
A brief description of the fields is given below:
5. Perform any of the Basic Actions mentioned in Navigation chapter.
6. In the Account Selection Criteria section, you can define the account selection criteria for each of the queries.Perform any of the Basic Operations mentioned in Navigation chapter.
A brief description of the fields is given below:
7. Perform any of the Basic Actions mentioned in Navigation chapter.
Service Rate Specify the servicing rate for the pool. The servicing rate is an additional rate you can charge for security.
Certificate Rate Specify the certificate rate for the pool. This is the rate which will be payable to the investor who buys this pool and is entitled to its receivable stream.
Field: Do this:
Query Name Specify the query name.
Query Description Specify the query description.
Enabled Check this box to enable the query.
Field: Do this:
Seq Specify the sequence number.
( Specify the left bracket.
Attribute Select the attribute from the drop-down list.
Comparison Operator Select the comparison operator from the drop-down list.
Criteria Value Specify the criteria value.
) Specify the right bracket (optional).
Logical Expression Specify the logical expression (optional).
Field: Do this:
4-9
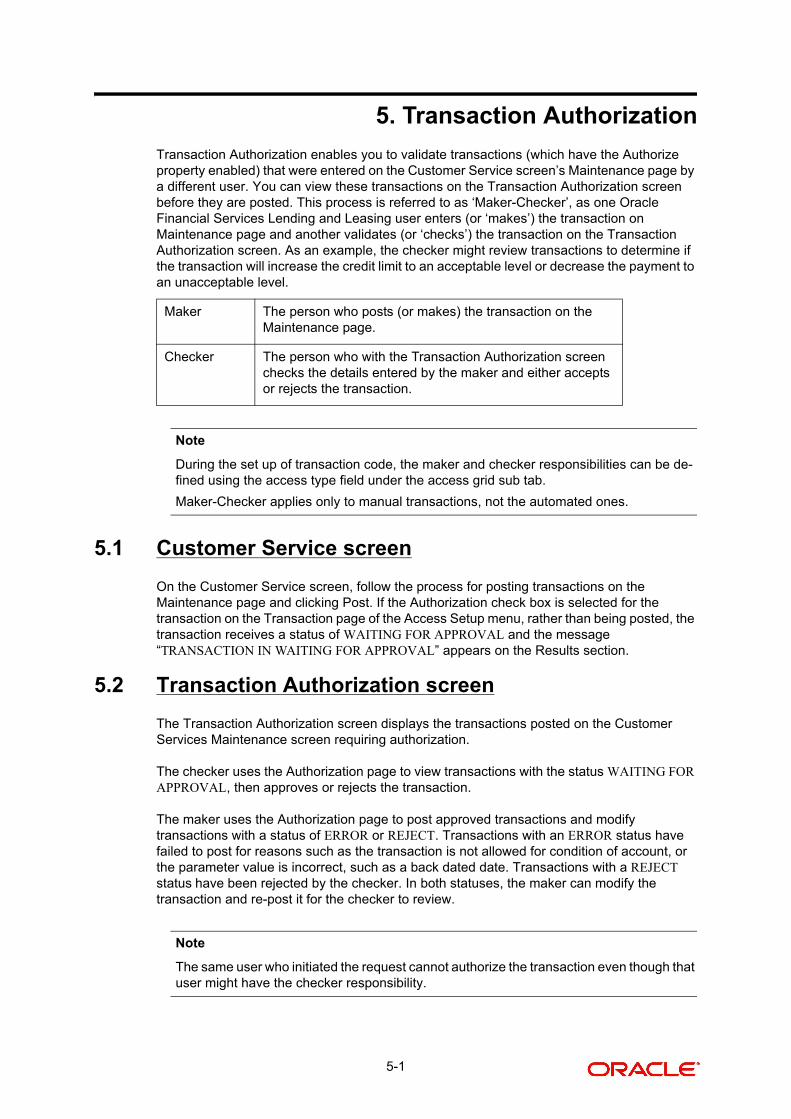
5. Transaction Authorization
Transaction Authorization enables you to validate transactions (which have the Authorize property enabled) that were entered on the Customer Service screen’s Maintenance page by a different user. You can view these transactions on the Transaction Authorization screen before they are posted. This process is referred to as ‘Maker-Checker’, as one Oracle Financial Services Lending and Leasing user enters (or ‘makes’) the transaction on Maintenance page and another validates (or ‘checks’) the transaction on the Transaction Authorization screen. As an example, the checker might review transactions to determine if the transaction will increase the credit limit to an acceptable level or decrease the payment to an unacceptable level.
Note
During the set up of transaction code, the maker and checker responsibilities can be de-fined using the access type field under the access grid sub tab.
Maker-Checker applies only to manual transactions, not the automated ones.
5.1 Customer Service screen
On the Customer Service screen, follow the process for posting transactions on the Maintenance page and clicking Post. If the Authorization check box is selected for the transaction on the Transaction page of the Access Setup menu, rather than being posted, the transaction receives a status of WAITING FOR APPROVAL and the message “TRANSACTION IN WAITING FOR APPROVAL” appears on the Results section.
5.2 Transaction Authorization screen
The Transaction Authorization screen displays the transactions posted on the Customer Services Maintenance screen requiring authorization.
The checker uses the Authorization page to view transactions with the status WAITING FOR APPROVAL, then approves or rejects the transaction.
The maker uses the Authorization page to post approved transactions and modify transactions with a status of ERROR or REJECT. Transactions with an ERROR status have failed to post for reasons such as the transaction is not allowed for condition of account, or the parameter value is incorrect, such as a back dated date. Transactions with a REJECT status have been rejected by the checker. In both statuses, the maker can modify the transaction and re-post it for the checker to review.
Note
The same user who initiated the request cannot authorize the transaction even though that user might have the checker responsibility.
Maker The person who posts (or makes) the transaction on the Maintenance page.
Checker The person who with the Transaction Authorization screen checks the details entered by the maker and either accepts or rejects the transaction.
5-1
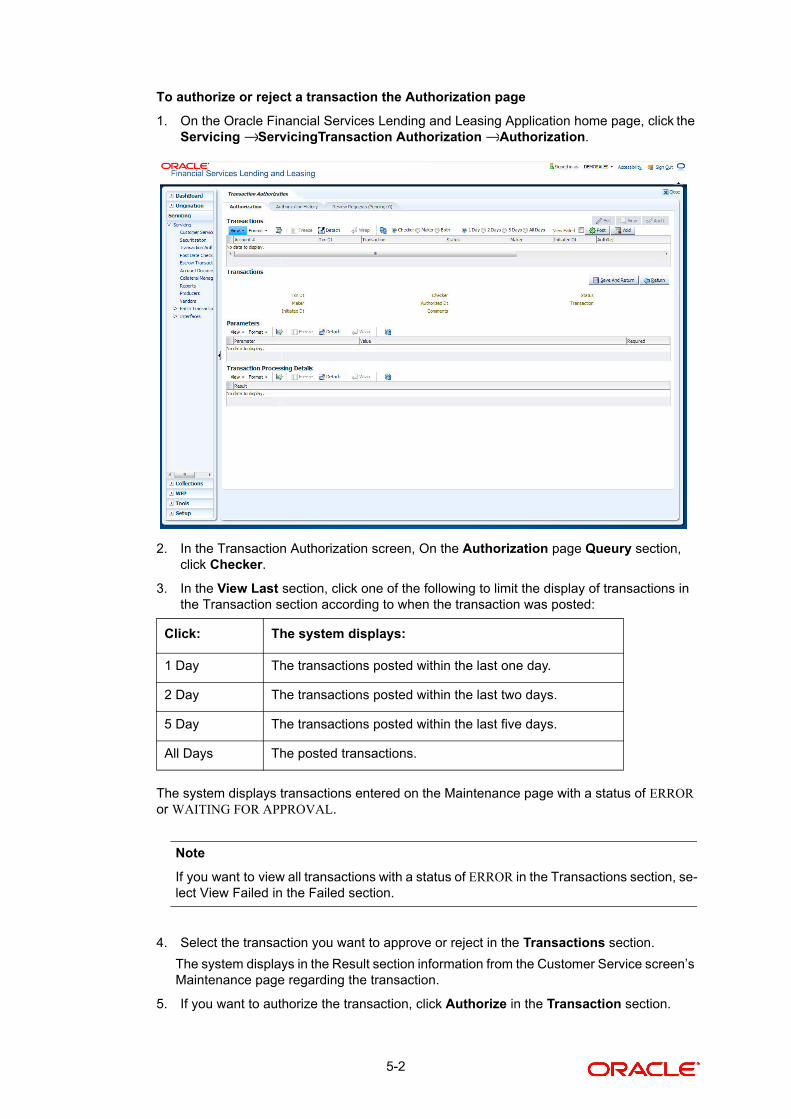
To authorize or reject a transaction the Authorization page
1. On the Oracle Financial Services Lending and Leasing Application home page, click the Servicing ServicingTransaction Authorization Authorization.
2. In the Transaction Authorization screen, On the Authorization page Queury section, click Checker.
3. In the View Last section, click one of the following to limit the display of transactions in the Transaction section according to when the transaction was posted:
The system displays transactions entered on the Maintenance page with a status of ERROR or WAITING FOR APPROVAL.
Note
If you want to view all transactions with a status of ERROR in the Transactions section, se-lect View Failed in the Failed section.
4. Select the transaction you want to approve or reject in the Transactions section.
The system displays in the Result section information from the Customer Service screen’s Maintenance page regarding the transaction.
5. If you want to authorize the transaction, click Authorize in the Transaction section.
Click: The system displays:
1 Day The transactions posted within the last one day.
2 Day The transactions posted within the last two days.
5 Day The transactions posted within the last five days.
All Days The posted transactions.
→ →
5-2
If you want to reject the transaction, click Reject in the Transaction section.
6. If you want to add a comment and your decision regarding the transaction, complete the Transaction section Comments field.
7. In the Action section, click Post.
Based on comment input, the system authorizes or rejects the transaction and removes it from the Transaction section.
You can view the transaction result on the Transaction Authorization screen’s Authoriza-tion History page.
The results of the decision can be viewed on the Customer Service screen’s Maintenance page.
The system user who posted the transaction on the Customer Service screen’s Mainte-nance page and received a WAITING FOR APPROVAL status can open the Authorization page, click Maker in the Query section and view all the transaction they posted that have a status of ERROR or REJECT.
If the transaction has a status of ERROR or REJECT, make the required changes to the original transaction on the Authorization page and click Post in the Action section.
If you click the Void in Action section, the system removes the transaction from the Transaction Authorization screen.
Note
If the transaction remains unauthorized beyond the number of days specified against the system parameter “MAX_VOID_TXN_AUTHORIZE_DAYS”, the transaction is marked as void. The daily batch job SET‐TPE (TXNVOD_BJ_100_01 ‐ TRANSACTION WAITING FOR AP‐PROVAL TO VOID) checks for inactivity of authorization transactions against this parame-ter.
5.3 Authorization History tab
The Authorization History page displays the all the transactions with a status of OPEN, VOID, ERROR, POSTED, WAITING FOR APPROVAL, and REJECT. Aged transactions will not be displayed. The Search Criteria section enables you to select the transactions you want to view in the Results section.
5-3
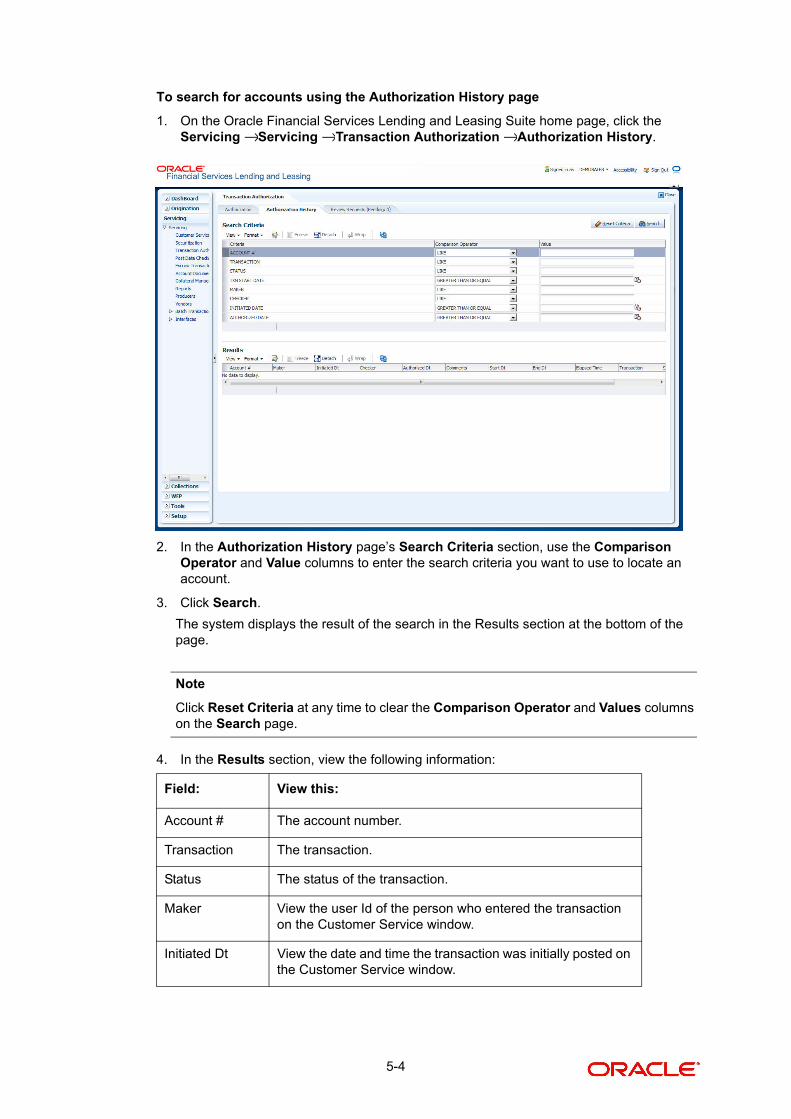
To search for accounts using the Authorization History page
1. On the Oracle Financial Services Lending and Leasing Suite home page, click the Servicing Servicing Transaction Authorization Authorization History.
2. In the Authorization History page’s Search Criteria section, use the Comparison Operator and Value columns to enter the search criteria you want to use to locate an account.
3. Click Search.
The system displays the result of the search in the Results section at the bottom of the page.
Note
Click Reset Criteria at any time to clear the Comparison Operator and Values columns on the Search page.
4. In the Results section, view the following information:
Field: View this:
Account # The account number.
Transaction The transaction.
Status The status of the transaction.
Maker View the user Id of the person who entered the transaction on the Customer Service window.
Initiated Dt View the date and time the transaction was initially posted on the Customer Service window.
→ → →
5-4
End of Day (EOD) processing
The Transaction Authorization page’s Authorization page employees the 24 x 7 accessibility feature. You can continue working with the Authorization page and post transactions even when end of day (EOD) batch process is running. When you post a transaction on the Transaction Authorization page’s Authorization page and the transaction posting is deferred or cannot be posted at the present time, “SYSTEM UNDER MAINTENANCE. TRANSACTION POSTING DEFERRED” appears in the Results section. If transaction posting is deferred, the system automatically posts the transactions once it completes batch processing.
5.4 Review Request Tab
The Review Requests page allows for effective communication between the Maker and Checker. The Transaction Authorization window’s Review Request page operates the same way as the existing Review Request page found on the Customer Service window. One difference is that the Transaction Authorization window’s Review Request page contains the Transaction field.
Note
Review requests created on the Transaction Authorization window can be viewed in the Customer Service window’s Review Request page. However, the Transaction Authoriza-tion window’s Review Request page will only display transaction authorization requests.
Checker View the user Id of the person who validated the transaction on the Authorization page.
Authorized Dt The authorized date.
Comments Any comment attached to the transaction.
Start Date The transaction start date.
End Date The transaction end date.
Elapsed Time The elapsed time of the transaction.
Field: View this:
5-5
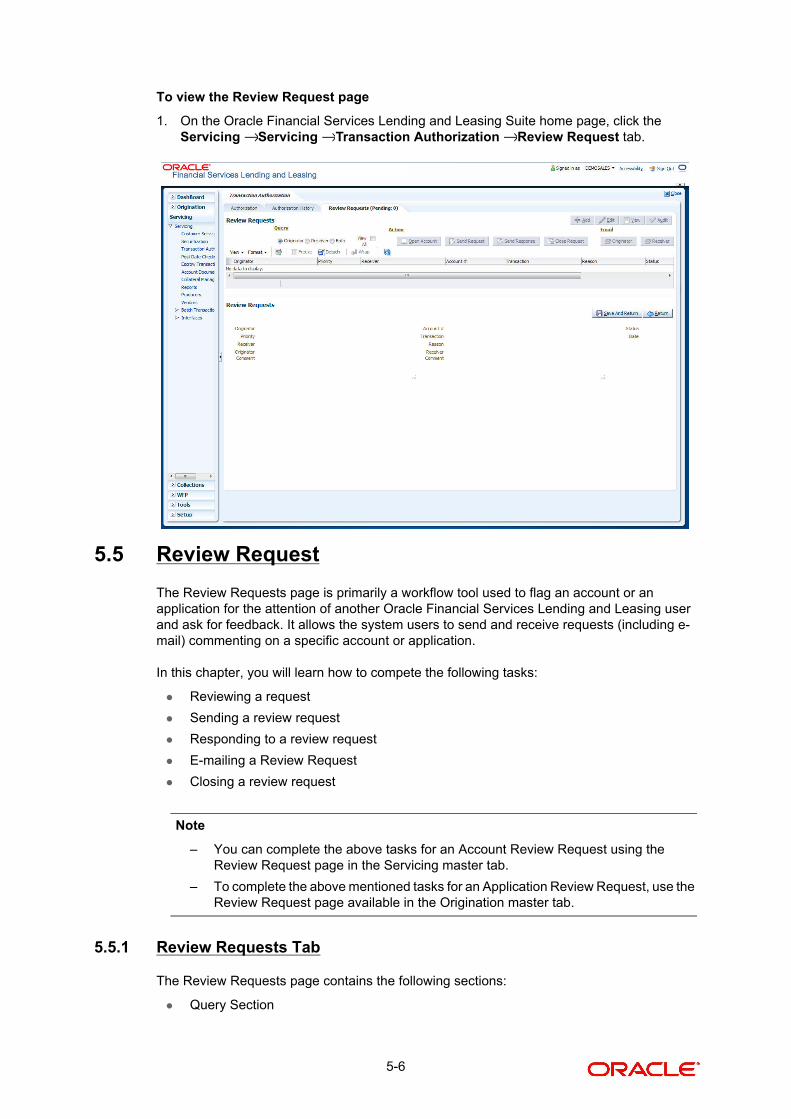
To view the Review Request page
1. On the Oracle Financial Services Lending and Leasing Suite home page, click the Servicing Servicing Transaction Authorization Review Request tab.
5.5 Review Request
The Review Requests page is primarily a workflow tool used to flag an account or an application for the attention of another Oracle Financial Services Lending and Leasing user and ask for feedback. It allows the system users to send and receive requests (including e-mail) commenting on a specific account or application.
In this chapter, you will learn how to compete the following tasks:
Reviewing a request
Sending a review request
Responding to a review request
E-mailing a Review Request
Closing a review request
Note
– You can complete the above tasks for an Account Review Request using the Review Request page in the Servicing master tab.
– To complete the above mentioned tasks for an Application Review Request, use the Review Request page available in the Origination master tab.
5.5.1 Review Requests Tab
The Review Requests page contains the following sections:
Query Section
→ → →
5-6
Action Section
Email Section
Review request records
Comments Sections
Query Section
The Query section enables you to filter records based on any of the following:
Note
By default, records are displayed based on the priority levels. i.e. high, normal or low.
Action Section
The Action section enables you to send, respond or close the review request.
Query Options
Descriptions
Originator Displays the records of all the active review requests you created.
Receiver Displays the records of all the active review requests you received.
Both Displays all the review requests records you have created as well as received with the status other than ‘CLOSED’.
View All Displays all the review requests records you sent and received, both active and closed.
Action Options Descriptions
Open Application Opens the application details page to review the request. (if you open it from origination it’s application and if from servicing den account)
Send Request Sends a review request to another Oracle Financial Services Lend-ing and Leasing user.
Send Response Sends a response to a review request from another Oracle Finan-cial Services Lending and Leasing user.
Close Request Changes the status of the review request to CLOSED and removes its record from the Review Request page.
Note: You can view review requests with a CLOSED status by selecting ‘View All’ in the ‘Query’ section.
5-7
Email Section:
The Email section enables you to send an email to either the originator or the receiver of the review request.
Note
The email recipient cannot respond or reply to e-mails with the email system.
Comments Sections
The Comments section enables the originator or receiver to specify the additional information that needs to be sent with the request.
Email Options
Descriptions
Originator Sends an email of the review request information to the person listed in the Originator column on the Review Request page.
Receiver Sends an email of the review request to the person listed in the Receiver column on the Review Request page.
Comments From
Descriptions
Originator Comment
Displays comments specified by the originator of the review request at the time of creating a request.
Receiver Comment
Displays comments specified by the receiver of the review request at the time of reviewing a request.
5-8
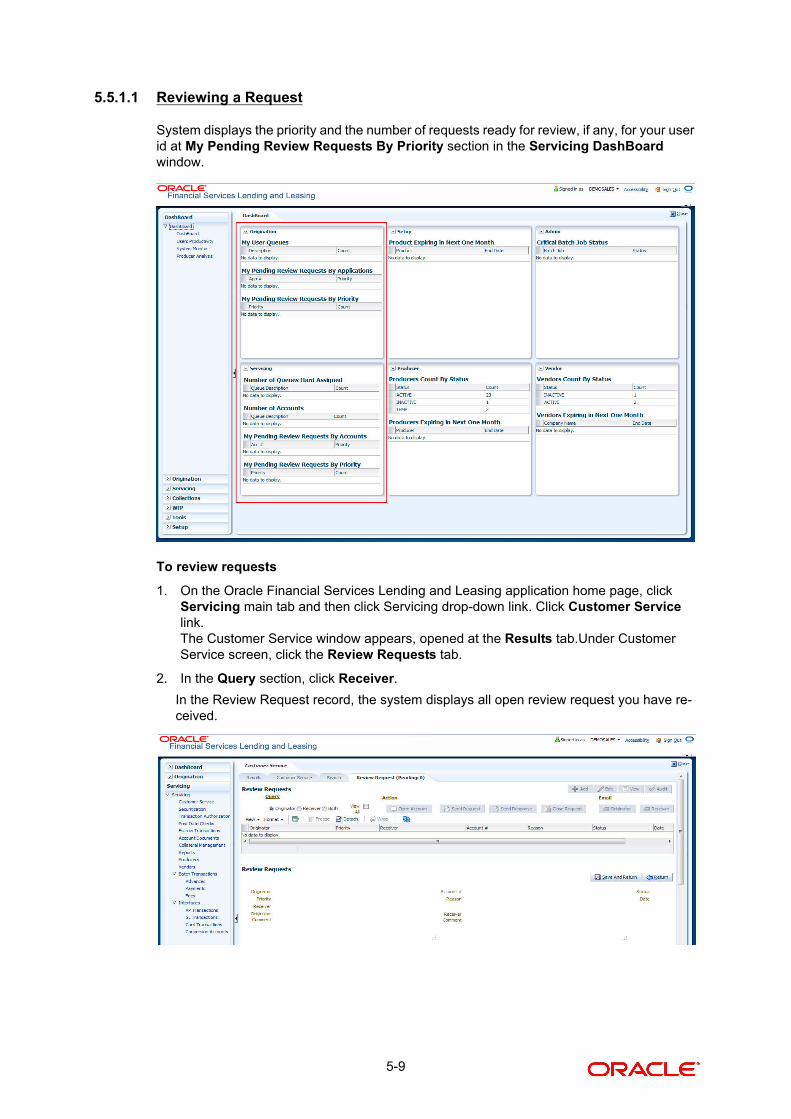
5.5.1.1 Reviewing a Request
System displays the priority and the number of requests ready for review, if any, for your user id at My Pending Review Requests By Priority section in the Servicing DashBoard window.
To review requests
1. On the Oracle Financial Services Lending and Leasing application home page, click Servicing main tab and then click Servicing drop-down link. Click Customer Service link.The Customer Service window appears, opened at the Results tab.Under Customer Service screen, click the Review Requests tab.
2. In the Query section, click Receiver.
In the Review Request record, the system displays all open review request you have re-ceived.
5-9
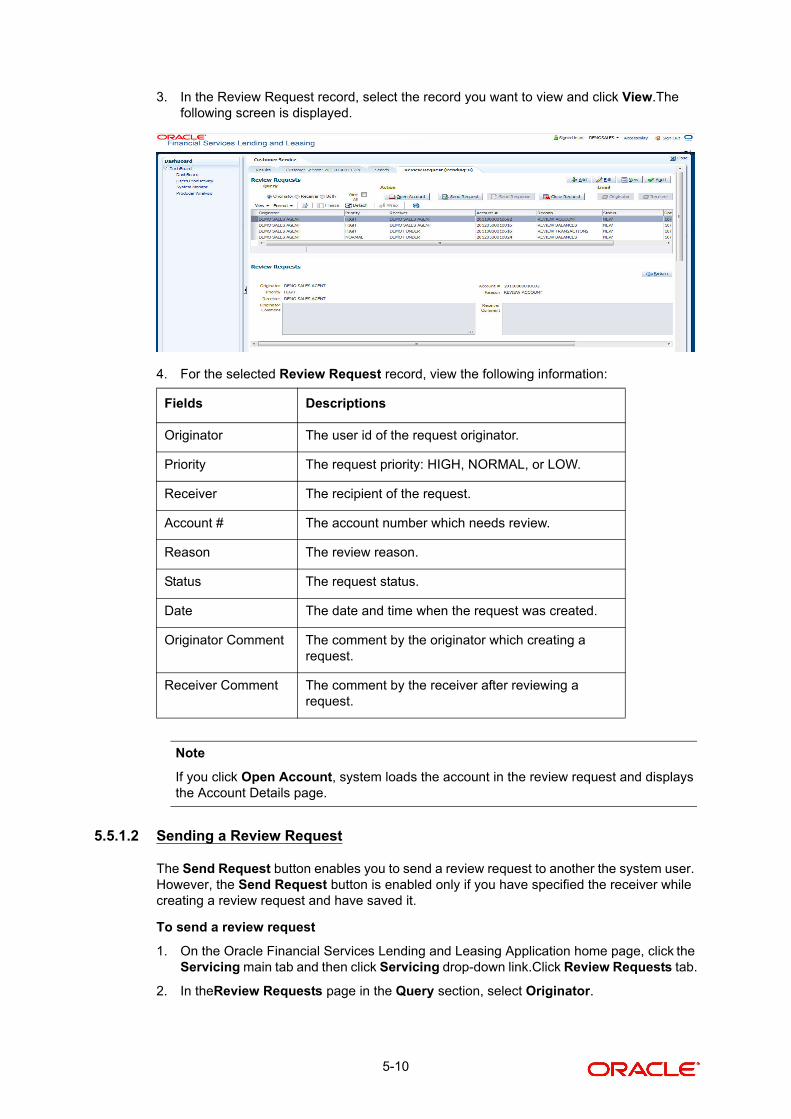
3. In the Review Request record, select the record you want to view and click View.The following screen is displayed.
4. For the selected Review Request record, view the following information:
Note
If you click Open Account, system loads the account in the review request and displays the Account Details page.
5.5.1.2 Sending a Review Request
The Send Request button enables you to send a review request to another the system user. However, the Send Request button is enabled only if you have specified the receiver while creating a review request and have saved it.
To send a review request
1. On the Oracle Financial Services Lending and Leasing Application home page, click the Servicing main tab and then click Servicing drop-down link.Click Review Requests tab.
2. In theReview Requests page in the Query section, select Originator.
Fields Descriptions
Originator The user id of the request originator.
Priority The request priority: HIGH, NORMAL, or LOW.
Receiver The recipient of the request.
Account # The account number which needs review.
Reason The review reason.
Status The request status.
Date The date and time when the request was created.
Originator Comment The comment by the originator which creating a request.
Receiver Comment The comment by the receiver after reviewing a request.
5-10
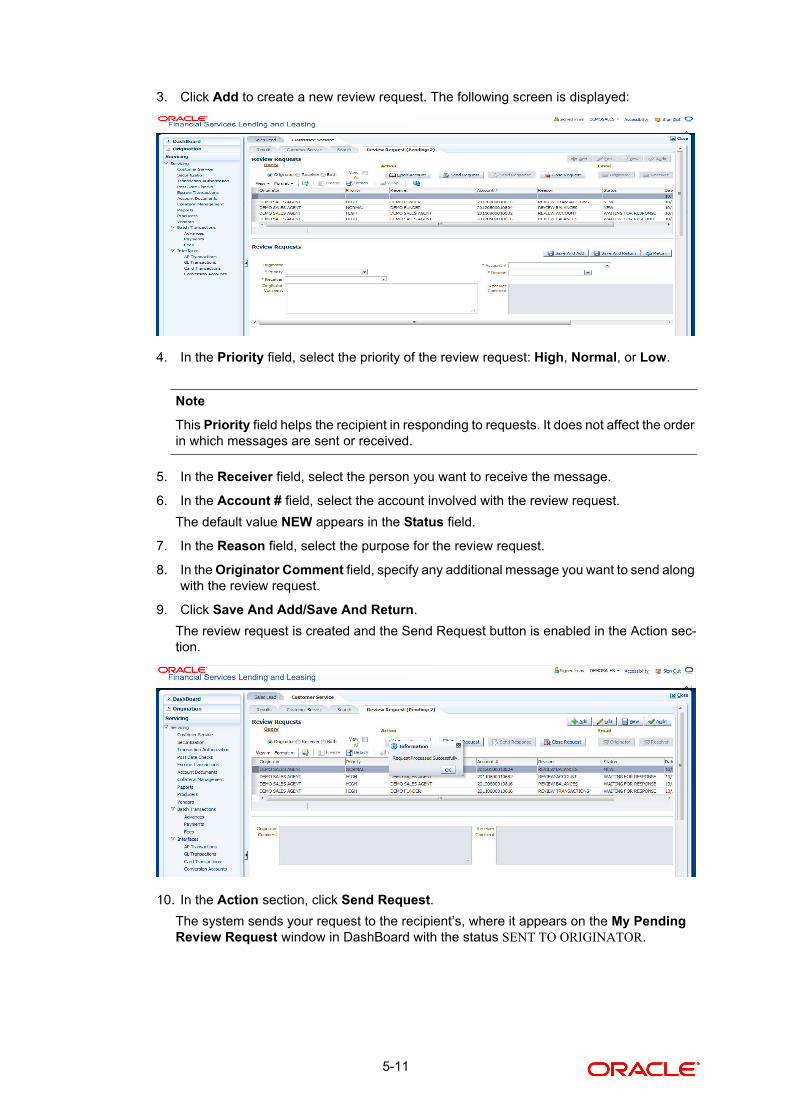
3. Click Add to create a new review request. The following screen is displayed:
4. In the Priority field, select the priority of the review request: High, Normal, or Low.
Note
This Priority field helps the recipient in responding to requests. It does not affect the order in which messages are sent or received.
5. In the Receiver field, select the person you want to receive the message.
6. In the Account # field, select the account involved with the review request.
The default value NEW appears in the Status field.
7. In the Reason field, select the purpose for the review request.
8. In the Originator Comment field, specify any additional message you want to send along with the review request.
9. Click Save And Add/Save And Return.
The review request is created and the Send Request button is enabled in the Action sec-tion.
10. In the Action section, click Send Request.
The system sends your request to the recipient’s, where it appears on the My Pending Review Request window in DashBoard with the status SENT TO ORIGINATOR.
5-11

5.5.1.3 Responding to a Review Request
When you receive a review request, the system notifies you by creating an entry in the My of Pending Review Requests By Priority section in DashBoard with the number of unseen messages. In the following example, one review request is waiting on the Review Request page.
To respond to a review request
1. On the Oracle Financial Services Lending and Leasing Application home page, click Servicing main tab and then click Servicing drop-down link.Click Customer Service link.If the Number of Pending Review Requests tab displays a number, click Review Requests tab. On the Review Request page Query section, select Receiver.
The system displays the unread review requests in the Review Request record.
2. In the Review Request record, select the record you want to view and click View.
3. Click Open Account.
The system loads the account on the Customer Service screen and displays the Account Details page.
5-12

4. Perform the requested task on the review request on the account.Click Review Request tab and selecting the request, click Edit.Specify your response in the Receiver Comment field.Click Save And Return.
5. In the Action section, click Send Request.
The system sends your response to the originator, where it appears on the Review Re-quest page with the status RETURN TO ORIGINATOR.
The recipient can view the sent response by clicking Receiver or View All in the Query section. (The request has a status as RETURN TO ORIGINATOR.)
Back on the originator’s Review Request page, the message appears when Originator is selected in the Query section. The request has a status as RETURN TO ORIGINATOR.
Note
Select Close Request in the Action section to remove the message from the Review Re-quest section.
5.5.1.4 E-mailing a Review Request
While The system updates the My Pending Review Requests By Priority section in the DashBoard to notify you about the new requests, you can also e-mail a review request to both the originator and a receiver, as applicable. The system will use the e-mail address recorded in the User Definition section in the User page.
Note
E-mail addresses must be recorded for both the originator and receiver for this feature to work.
To e-mail a review request
1. On the Oracle Financial Services Lending and Leasing Application home page, click Servicing main tab and then click Servicing drop-down link.
2. Click Customer Service link.
3. On the Customer Service link, click Review Requests tab.
4. Select the request you want to e-mail in the Review Request section.
5. In the Email section, click Originator to send the message to the person listed in the Originator field.
-or-
5-13
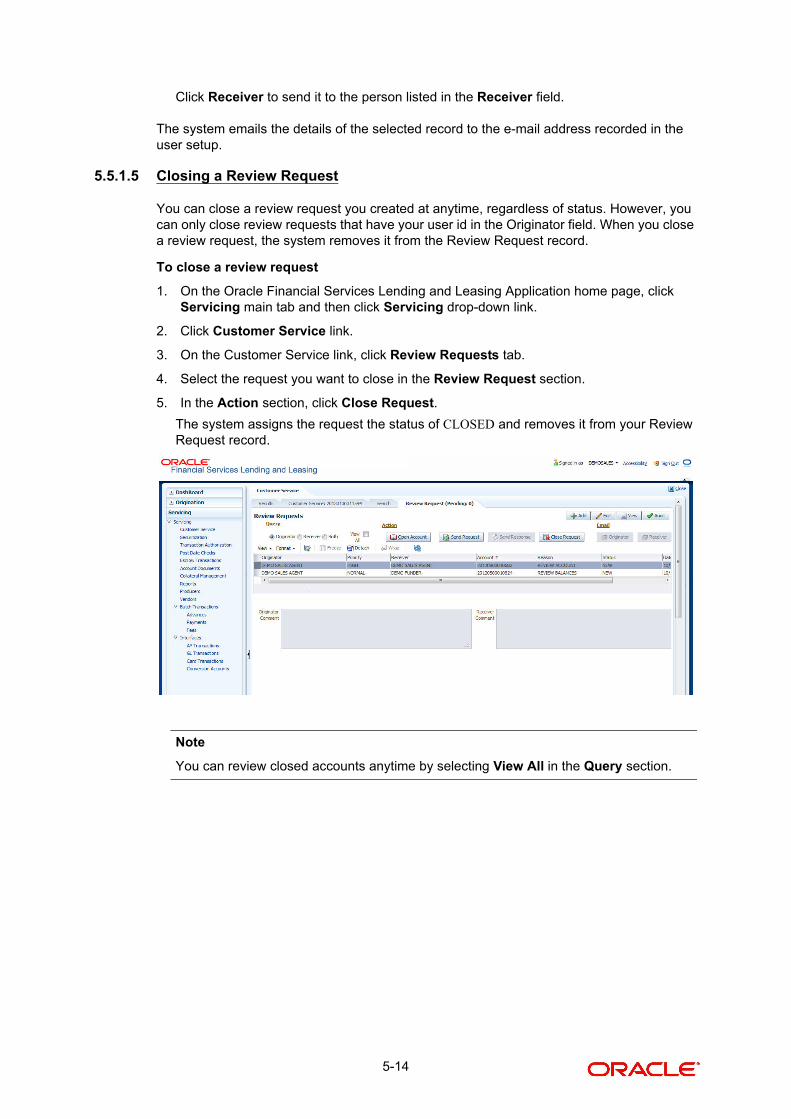
Click Receiver to send it to the person listed in the Receiver field.
The system emails the details of the selected record to the e-mail address recorded in the user setup.
5.5.1.5 Closing a Review Request
You can close a review request you created at anytime, regardless of status. However, you can only close review requests that have your user id in the Originator field. When you close a review request, the system removes it from the Review Request record.
To close a review request
1. On the Oracle Financial Services Lending and Leasing Application home page, click Servicing main tab and then click Servicing drop-down link.
2. Click Customer Service link.
3. On the Customer Service link, click Review Requests tab.
4. Select the request you want to close in the Review Request section.
5. In the Action section, click Close Request.
The system assigns the request the status of CLOSED and removes it from your Review Request record.
Note
You can review closed accounts anytime by selecting View All in the Query section.
5-14
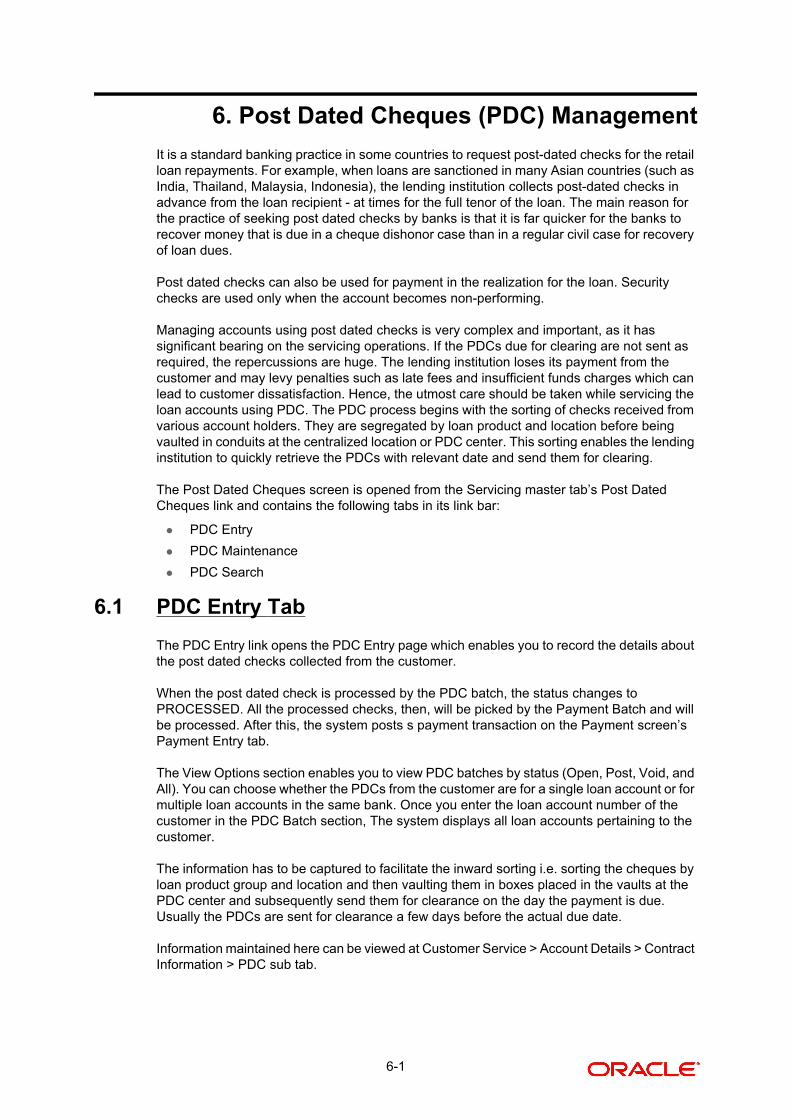
6. Post Dated Cheques (PDC) Management
It is a standard banking practice in some countries to request post-dated checks for the retail loan repayments. For example, when loans are sanctioned in many Asian countries (such as India, Thailand, Malaysia, Indonesia), the lending institution collects post-dated checks in advance from the loan recipient - at times for the full tenor of the loan. The main reason for the practice of seeking post dated checks by banks is that it is far quicker for the banks to recover money that is due in a cheque dishonor case than in a regular civil case for recovery of loan dues.
Post dated checks can also be used for payment in the realization for the loan. Security checks are used only when the account becomes non-performing.
Managing accounts using post dated checks is very complex and important, as it has significant bearing on the servicing operations. If the PDCs due for clearing are not sent as required, the repercussions are huge. The lending institution loses its payment from the customer and may levy penalties such as late fees and insufficient funds charges which can lead to customer dissatisfaction. Hence, the utmost care should be taken while servicing the loan accounts using PDC. The PDC process begins with the sorting of checks received from various account holders. They are segregated by loan product and location before being vaulted in conduits at the centralized location or PDC center. This sorting enables the lending institution to quickly retrieve the PDCs with relevant date and send them for clearing.
The Post Dated Cheques screen is opened from the Servicing master tab’s Post Dated Cheques link and contains the following tabs in its link bar:
PDC Entry
PDC Maintenance
PDC Search
6.1 PDC Entry Tab
The PDC Entry link opens the PDC Entry page which enables you to record the details about the post dated checks collected from the customer.
When the post dated check is processed by the PDC batch, the status changes to PROCESSED. All the processed checks, then, will be picked by the Payment Batch and will be processed. After this, the system posts s payment transaction on the Payment screen’s Payment Entry tab.
The View Options section enables you to view PDC batches by status (Open, Post, Void, and All). You can choose whether the PDCs from the customer are for a single loan account or for multiple loan accounts in the same bank. Once you enter the loan account number of the customer in the PDC Batch section, The system displays all loan accounts pertaining to the customer.
The information has to be captured to facilitate the inward sorting i.e. sorting the cheques by loan product group and location and then vaulting them in boxes placed in the vaults at the PDC center and subsequently send them for clearance on the day the payment is due. Usually the PDCs are sent for clearance a few days before the actual due date.
Information maintained here can be viewed at Customer Service > Account Details > Contract Information > PDC sub tab.
6-1
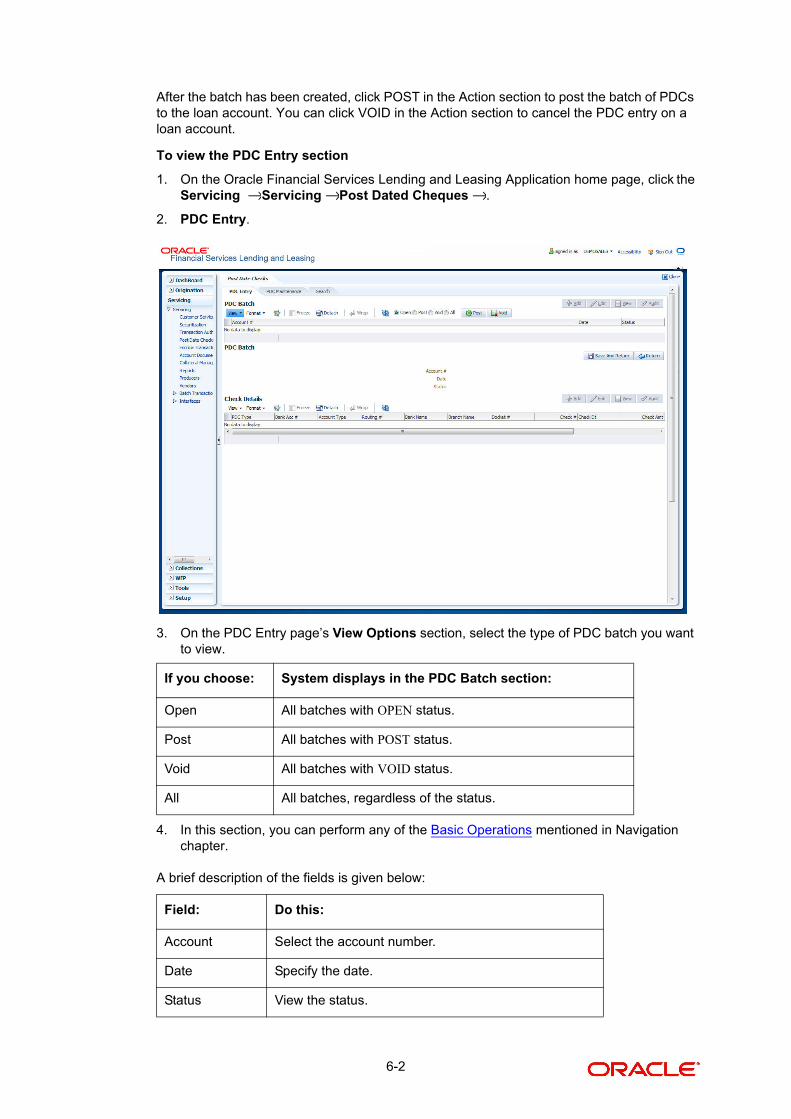
After the batch has been created, click POST in the Action section to post the batch of PDCs to the loan account. You can click VOID in the Action section to cancel the PDC entry on a loan account.
To view the PDC Entry section
1. On the Oracle Financial Services Lending and Leasing Application home page, click the Servicing Servicing Post Dated Cheques .
2. PDC Entry.
3. On the PDC Entry page’s View Options section, select the type of PDC batch you want to view.
4. In this section, you can perform any of the Basic Operations mentioned in Navigation chapter.
A brief description of the fields is given below:
If you choose: System displays in the PDC Batch section:
Open All batches with OPEN status.
Post All batches with POST status.
Void All batches with VOID status.
All All batches, regardless of the status.
Field: Do this:
Account Select the account number.
Date Specify the date.
Status View the status.
→ → →
6-2
5. Perform any of the Basic Actions mentioned in Navigation chapter.
6. In the Check Details section, you can perform any of the Basic Operations mentioned in Navigation chapter.
A brief description of the fields is given below:
Once the PDC batch is posted, an entry appears in the Post Dated Checks section on the Customer Service screen’s Payment Mode tab with the status of OPEN.
The status changes to PROCESSED when the post dated check is sent for clearance on the pre-processing day and the payment is received. At that time, a payment transaction is posted on the Payments screen’s Payment Entry page.
Field: Do this:
PDC Type Select the post dated check type, SECURITY CHECKS or POST DATED CHECKS FOR PAYMENT.
Bank Acc # Specify the account number, on which the cheque is drawn.
Routing # Specify the routing number of the cheque. It is the number printed on the cheque, also called MICR number (Magnetic Ink Character Rec-ognition).
Account Type
Specify the type of the account
Bank Name Specify the bank name of the customers cheque
Branch Name
Specify the Branch name of the customers cheque
Docket # Specify the docket number where post dated checks are supposed to be stored
Check # Specify the starting cheque number
Check Date Select the check date. In case there are multiple checks being deposited that have sequential serial numbers, the date of the first cheque in the series would be entered in the date field. The remain-ing cheque dates would be anniversary dates based on the fre-quency set up.
For example, the cheque range could be from 111 to 180. If the date on the first cheque-111 is October 12, 2003 and the frequency is set to Monthly, the next cheque would be picked up for processing on November 12, 2003.
Check Amt Specify the appropriate cheque amount.
# of Checks Specify the total number of checks in the range.
Billing Cycle Select the frequency at which the checks are to be sent for collection.
Comments Specify any remarks for the details.
6-3
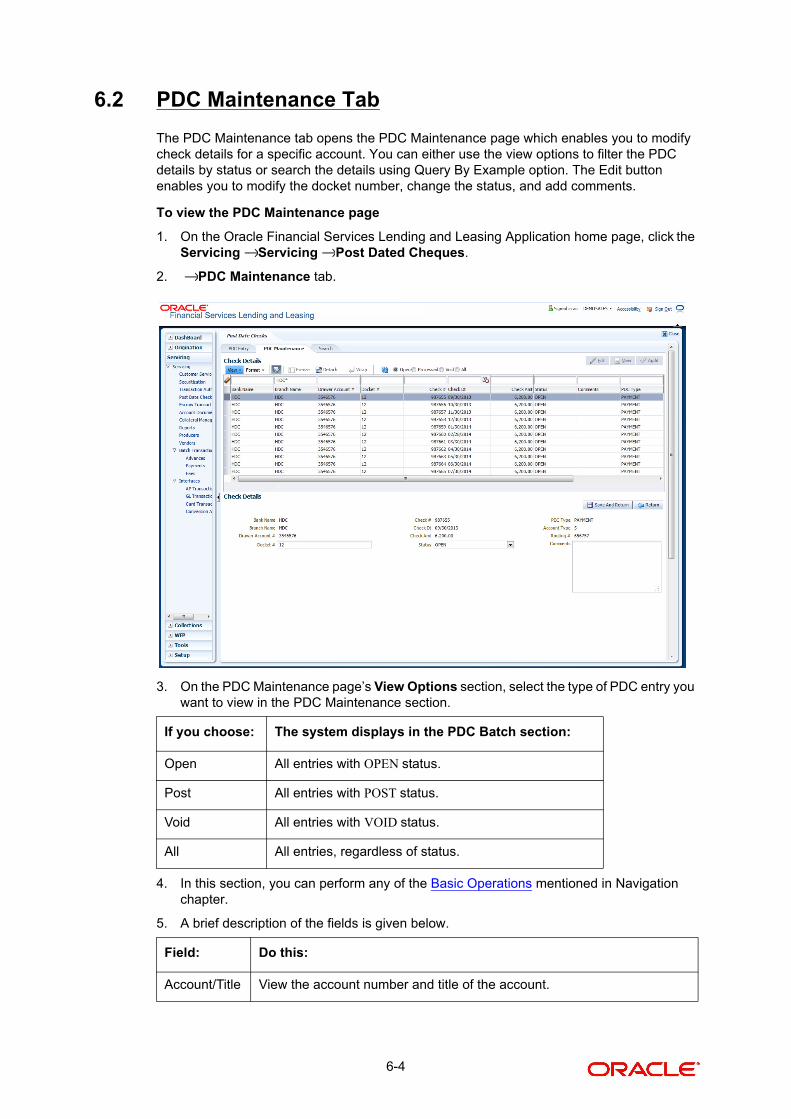
6.2 PDC Maintenance Tab
The PDC Maintenance tab opens the PDC Maintenance page which enables you to modify check details for a specific account. You can either use the view options to filter the PDC details by status or search the details using Query By Example option. The Edit button enables you to modify the docket number, change the status, and add comments.
To view the PDC Maintenance page
1. On the Oracle Financial Services Lending and Leasing Application home page, click the Servicing Servicing Post Dated Cheques.
2. PDC Maintenance tab.
3. On the PDC Maintenance page’s View Options section, select the type of PDC entry you want to view in the PDC Maintenance section.
4. In this section, you can perform any of the Basic Operations mentioned in Navigation chapter.
5. A brief description of the fields is given below.
If you choose: The system displays in the PDC Batch section:
Open All entries with OPEN status.
Post All entries with POST status.
Void All entries with VOID status.
All All entries, regardless of status.
Field: Do this:
Account/Title View the account number and title of the account.
→ →→
6-4
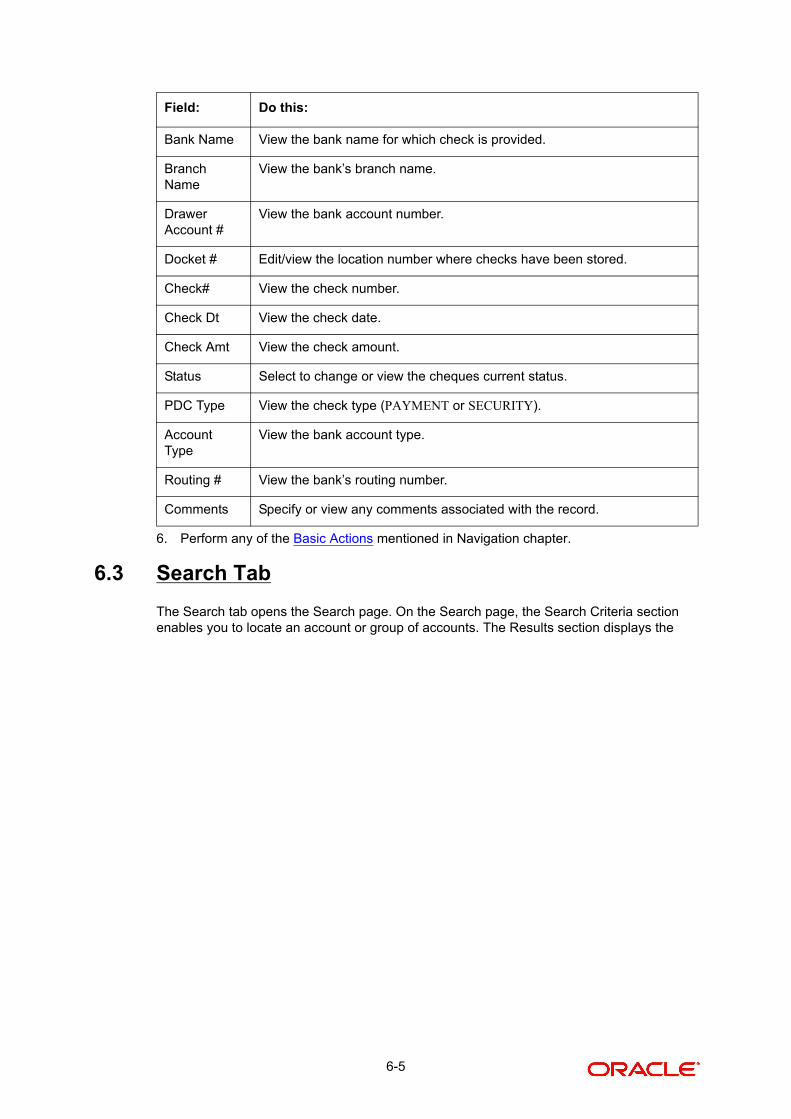
6. Perform any of the Basic Actions mentioned in Navigation chapter.
6.3 Search Tab
The Search tab opens the Search page. On the Search page, the Search Criteria section enables you to locate an account or group of accounts. The Results section displays the
Bank Name View the bank name for which check is provided.
Branch Name
View the bank’s branch name.
Drawer Account #
View the bank account number.
Docket # Edit/view the location number where checks have been stored.
Check# View the check number.
Check Dt View the check date.
Check Amt View the check amount.
Status Select to change or view the cheques current status.
PDC Type View the check type (PAYMENT or SECURITY).
Account Type
View the bank account type.
Routing # View the bank’s routing number.
Comments Specify or view any comments associated with the record.
Field: Do this:
6-5
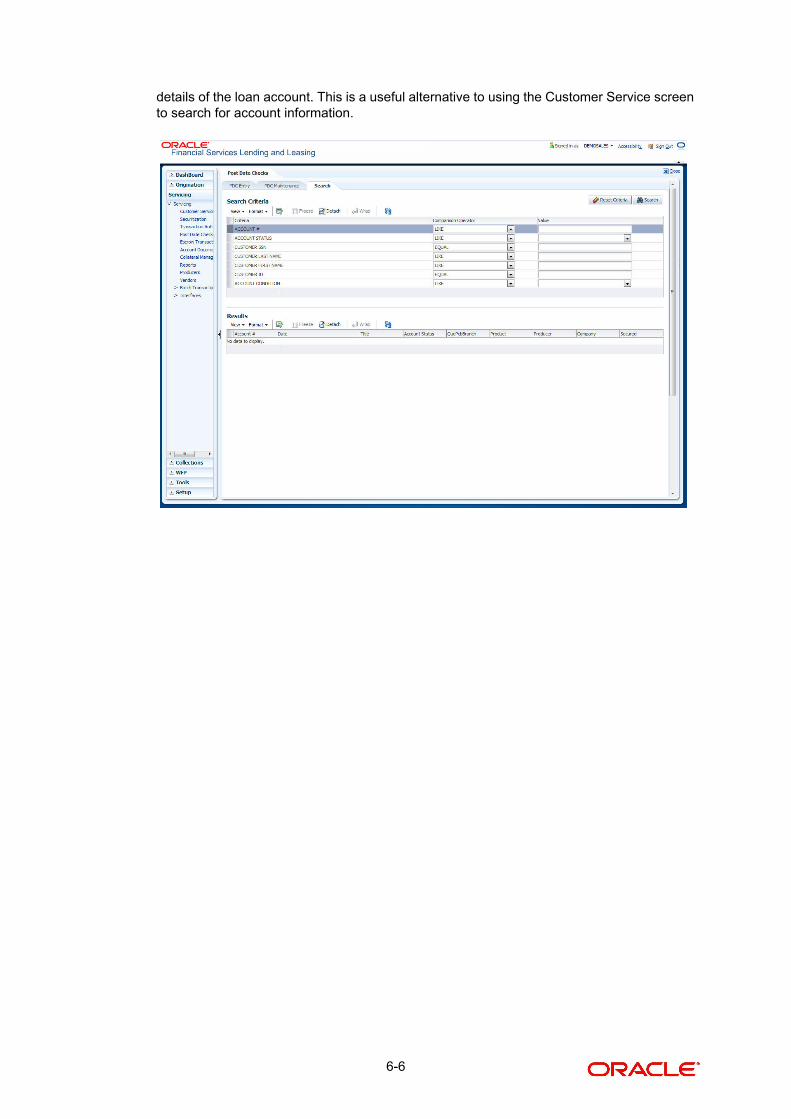
details of the loan account. This is a useful alternative to using the Customer Service screen to search for account information.
6-6
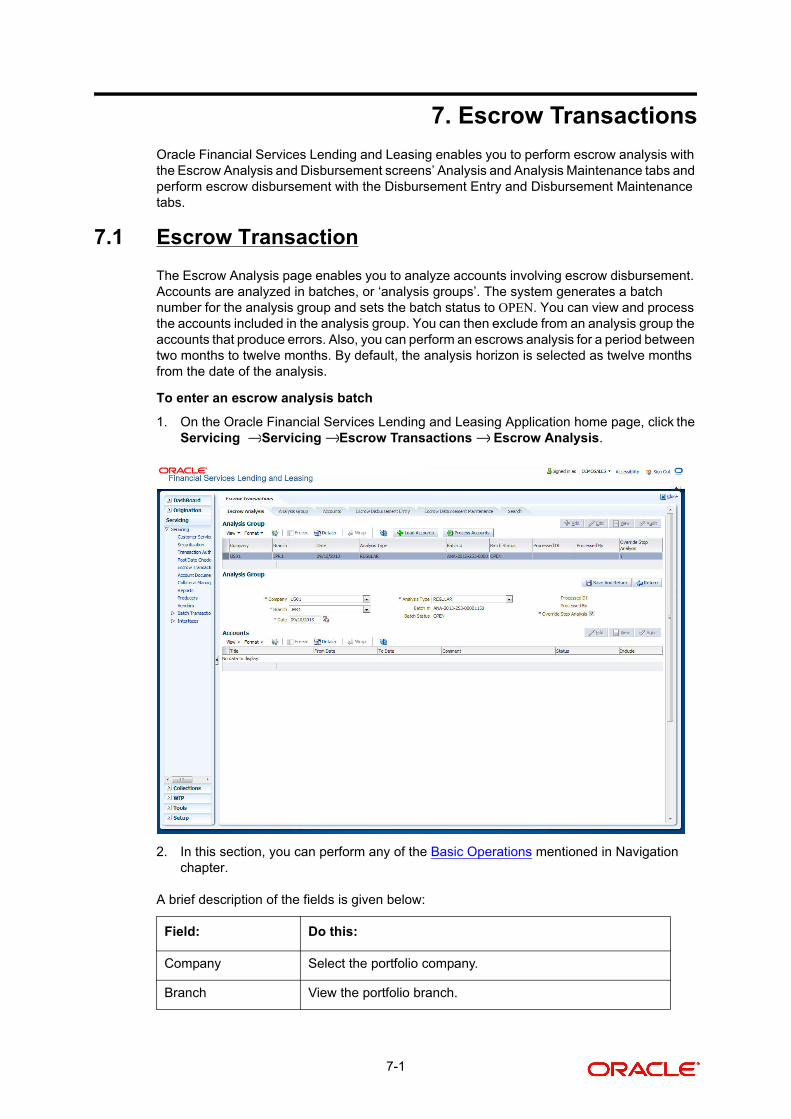
7. Escrow Transactions
Oracle Financial Services Lending and Leasing enables you to perform escrow analysis with the Escrow Analysis and Disbursement screens’ Analysis and Analysis Maintenance tabs and perform escrow disbursement with the Disbursement Entry and Disbursement Maintenance tabs.
7.1 Escrow Transaction
The Escrow Analysis page enables you to analyze accounts involving escrow disbursement. Accounts are analyzed in batches, or ‘analysis groups’. The system generates a batch number for the analysis group and sets the batch status to OPEN. You can view and process the accounts included in the analysis group. You can then exclude from an analysis group the accounts that produce errors. Also, you can perform an escrows analysis for a period between two months to twelve months. By default, the analysis horizon is selected as twelve months from the date of the analysis.
To enter an escrow analysis batch
1. On the Oracle Financial Services Lending and Leasing Application home page, click the Servicing Servicing Escrow Transactions Escrow Analysis.
2. In this section, you can perform any of the Basic Operations mentioned in Navigation chapter.
A brief description of the fields is given below:
Field: Do this:
Company Select the portfolio company.
Branch View the portfolio branch.
→ → →
7-1
3. If you select the Override Stop Analysis check box, the system ignores the Stop Escrow Analysis flag on the account.
4. Click Load Accounts.The system loads in the Accounts section the accounts from the search page that match the company and branch in the Analysis Group section.Load accounts button load the accounts which have the escrow required as Y and Opt out Indicator as N
5. Click Edit
6. Specify the following information.
7. Select the Include check box if you want to include the account in the analysis. Clear the Include check box if you want to remove the account in the analysis.
8. In the Action section, choose Process Accounts.
The system performs the analysis and changes the batch status to PROCESSING.
If the system successfully processes the batch, it changes the batch status to PRO-CESSED. The individual accounts will all have a status of NEW. The analysis group can now be viewed on the Escrow Analysis Maintenance page.
If the system is unable to process one or more individual accounts in the batch, it changes the batch status to ERRORED. One or more of the individual accounts will have status of ERROR in the Accounts section. The reason of the error appears in the Comment field.
Date Specify the batch date.
Analysis Type Select the analysis type. The analysis type (INITIAL ESCROW ANALYSIS DISCLOSURE, REGULAR, COMPLI-ANCE, and so on) is a list of user-defined values.
Batch # View the system generated batch number with a format of ANA-YYYY-DDD-SEQNUM.
Batch Status View the batch status.
Processed Dt View the user analysis process date.
Processed By View the user who processed the analysis.
Field: Do this:
Title View the account title.
From Date Specify the from date (start analysis from MM/DD/YYYY).
Note: From date has to be the first date of the month.
To Date Specify the to date (end analysis at MM/DD/YYYY).
Note: To date has to be the Last date of the Month.
Comment View the comment.
Status View the payment status.
Field: Do this:
7-2
7.1.1 Reprocessing an Analysis Batch with Error Status
To reprocess an analysis batch with a status of ERROR
1. On the Analysis Group section of the Escrow Analysis page, load the analysis group with the status of ERRORED.
2. In the Accounts section, click Edit and clear the Include box for the accounts with a status of ERROR, then click Save.
3. In the Action section, click Process Accounts.
The system performs the analysis and changes the batch status to PROCESSING.
4. The analysis group can now be viewed on the Escrow Analysis Maintenance (Analysis Group) page.
7.2 Analysis Group Tab
The Escrow Analysis Maintenance (Analysis Group) page enables you to review and maintain escrow analysis for each account in a selected analysis group (batch).
With the Escrow Analysis Group tab, you can:
Review the analysis results for a selected batch
Approve the analysis
Cancel the analysis.
An escrow analysis for a batch may retrieve more than one account. These accounts appear in the Escrow Analysis section, along with the:
Parameters used for the analysis
Results of the analysis (standard payment, along with additions or deductions and the resulting new payment)
Any surplus or shortage
Escrow items used for analysis and the disbursement rule
Analysis details, which lists all the escrow transactions.
The system then enables you to:
Reanalyze the account after making changes to the account on the Customer Service window if the status of the analysis is OPEN, ERROR, REVIEW or APPROVED.
Delete an analysis.
7-3
7.2.1 Viewing Analysis Group tab
To view the Analysis Group page
1. On the Oracle Financial Services Lending and Leasing Application home page, click the Servicing Servicing Escrow Transactions Analysis Group tab.
2. In the Escrow Analysis Group page’s Batch Group section, select the record you want to work with and click View.
3. In the Batch Group section, view the following display only information.
Field: View this:
Company The portfolio company.
Branch The portfolio branch.
Date The batch date.
Analysis Type The analysis type.
Batch # The system generated batch number.
Batch Status The batch status.
Override Stop Analysis Override stop analysis indicator.
Processed Dt The user analysis process date.
Processed By The user who processed the analysis.
Reviewed Dt The user analysis review date.
Reviewed By The user who reviewed the analysis.
Approved Dt The user analysis approved date.
→ → →
7-4
Reviewing the Analysis Result
To review the analysis results for a selected batch
1. On the Oracle Financial Services Lending and Leasing Application home page, click the Servicing Servicing Escrow Transactions Analysis Group tab.
2. In the Batch Group section on the Analysis Group screen, select the batch you want to review.
Note
A batch pending for review will have a status as PROCESSED.
3. In the Action section, click Review.
The system changes the Batch Status field to PROCESSING.
4. In the Batch Jobs section on the Analysis Group page, select the escrow analysis group you reviewed.
Note
The group will have a batch status of REVIEWED.
5. In the Batch Jobs section, click Execute Search.
7.2.2 Approving the Analysis
To approve the analysis
1. On the Oracle Financial Services Lending and Leasing Application home page, click the Servicing Servicing Escrow Transactions Analysis Group tab.
2. In the Batch Group Section on the Analysis Group page, select the batch with the status of REVIEWED you want to approve.
3. In the Action section, click Approve.
The system changes the Batch Status to PROCESSING.
4. In the Batch Jobs section, search for the escrow analysis group which now has a status of APPROVED.
7.2.3 Cancelling the Analysis
To cancel the analysis
1. On the Oracle Financial Services Lending and Leasing Application home page, click the Servicing Servicing Escrow Transactions Analysis Group tab.
2. In the Batch Group section on the Analysis Group page, select the batch you want to cancel.
3. In the Action section, select Cancel.
The system changes the Batch Status for the selected status group to PROCESSING.
4. In the Escrow Analysis Maintenance (Analysis Group), click Analysis.
Approved By The user who approved the analysis.
Field: View this:
→ → →
→ → →
→ → →
7-5
On the Escrow Analysis page, the batch you cancelled now has a status of CANCELLED in the Analysis Group section.
7.2.4 Reanalyzing the Escrow Analysis
To reanalyze escrow analysis
1. On the Oracle Financial Services Lending and Leasing Application home page, click the Servicing Servicing Escrow Transactions Analysis Group tab.
2. In the Batch Group section on the Analysis Group page, select the batch you want to reanalyze.
Note
You can only reanalyze an account if the status of the analysis batch is OPEN, ERROR, REVIEWED, or APPROVED.
3. On the Escrow Analysis page’s Parameters section, select the account you want to reanalyze and click View.
4. In the Parameters section on the Escrow Analysis section, view the following display only information:
Field: View this:
Date The date.
Account # The the account # and title.
From Dt The escrow activity from date.
To Dt The escrow activity to date.
Status The status of the analysis.
Opening Bal (Act) The opening balance actual amount.
Opening Bal (Est) The opening balance estimated amount.
Cushion Type The cushion type.
Cushion Value The cushion value.
Cushion Amt The cushion amount.
Results section
Std Pmt Amt The standard payment amount.
(+) Esc Pmt Amt The escrow payment amount.
(+) Spread Pmt Amt The spread payment amount.
(+) Other Pmt Amt The other payment amount.
= New Pmt Amt The new payment amount.
Surplus/Shortage section
Surplus/Shortage Amt The surplus shortage amount.
→ → →
7-6
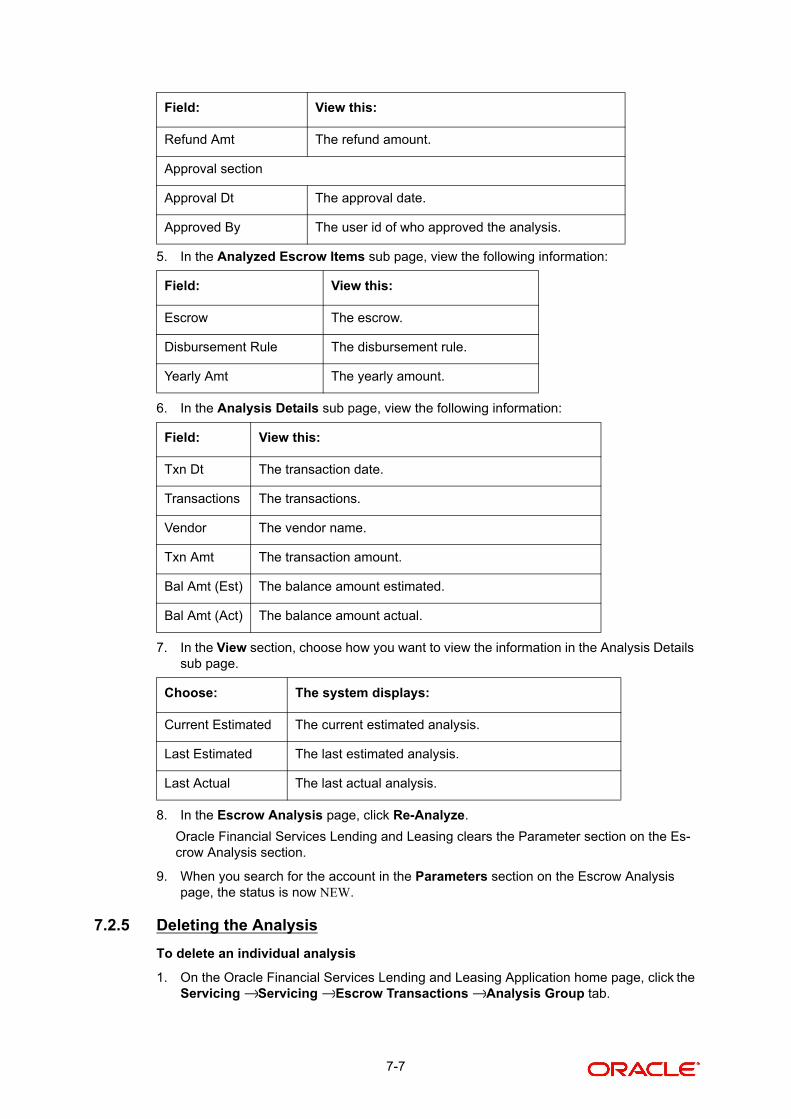
5. In the Analyzed Escrow Items sub page, view the following information:
6. In the Analysis Details sub page, view the following information:
7. In the View section, choose how you want to view the information in the Analysis Details sub page.
8. In the Escrow Analysis page, click Re-Analyze.
Oracle Financial Services Lending and Leasing clears the Parameter section on the Es-crow Analysis section.
9. When you search for the account in the Parameters section on the Escrow Analysis page, the status is now NEW.
7.2.5 Deleting the Analysis
To delete an individual analysis
1. On the Oracle Financial Services Lending and Leasing Application home page, click the Servicing Servicing Escrow Transactions Analysis Group tab.
Refund Amt The refund amount.
Approval section
Approval Dt The approval date.
Approved By The user id of who approved the analysis.
Field: View this:
Escrow The escrow.
Disbursement Rule The disbursement rule.
Yearly Amt The yearly amount.
Field: View this:
Txn Dt The transaction date.
Transactions The transactions.
Vendor The vendor name.
Txn Amt The transaction amount.
Bal Amt (Est) The balance amount estimated.
Bal Amt (Act) The balance amount actual.
Choose: The system displays:
Current Estimated The current estimated analysis.
Last Estimated The last estimated analysis.
Last Actual The last actual analysis.
Field: View this:
→ → →
7-7
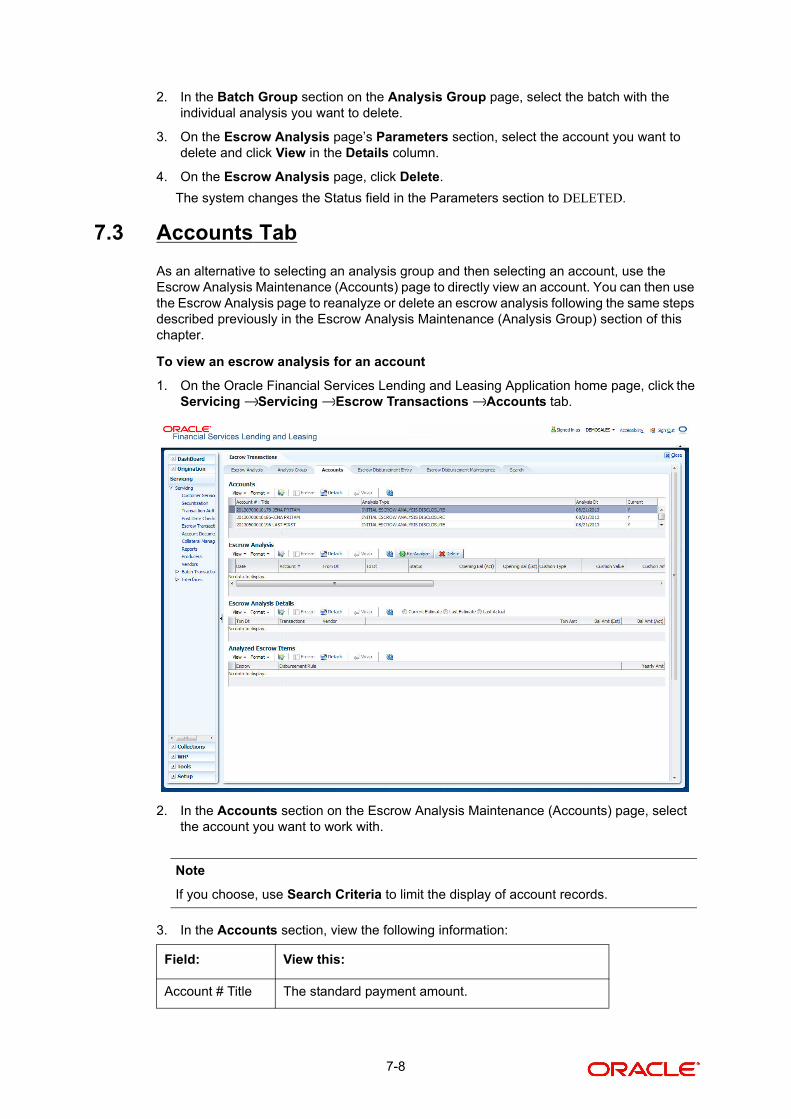
2. In the Batch Group section on the Analysis Group page, select the batch with the individual analysis you want to delete.
3. On the Escrow Analysis page’s Parameters section, select the account you want to delete and click View in the Details column.
4. On the Escrow Analysis page, click Delete.
The system changes the Status field in the Parameters section to DELETED.
7.3 Accounts Tab
As an alternative to selecting an analysis group and then selecting an account, use the Escrow Analysis Maintenance (Accounts) page to directly view an account. You can then use the Escrow Analysis page to reanalyze or delete an escrow analysis following the same steps described previously in the Escrow Analysis Maintenance (Analysis Group) section of this chapter.
To view an escrow analysis for an account
1. On the Oracle Financial Services Lending and Leasing Application home page, click the Servicing Servicing Escrow Transactions Accounts tab.
2. In the Accounts section on the Escrow Analysis Maintenance (Accounts) page, select the account you want to work with.
Note
If you choose, use Search Criteria to limit the display of account records.
3. In the Accounts section, view the following information:
Field: View this:
Account # Title The standard payment amount.
→ → →
7-8
4. On the Escrow Analysis page’s Parameters section, select the account you want to reanalyze and click View.
5. In the Parameters section on the Escrow Analysis page, view the following display only information:
Analysis Type The escrow payment amount.
Analysis Dt The spread payment amount.
Current If selected, indicates that the information is up-to-date.
Field: View this:
Date The date.
Account # The the account # and title.
From Dt The escrow activity from date.
To Dt The escrow activity to date.
Status The status of the analysis.
Opening Bal (Act) The opening balance actual amount.
Opening Bal (Est) The opening balance estimated amount.
Cushion Type The cushion type.
Cushion Value The cushion value.
Cushion Amt The cushion amount.
Results section
Std Pmt Amt The standard payment amount.
(+) Esc Pmt Amt The escrow payment amount.
(+) Spread Pmt Amt The spread payment amount.
(+) Other Pmt Amt The other payment amount.
= New Pmt Amt The new payment amount.
Surplus/Shortage section
Surplus/Shortage Amt
The surplus shortage amount.
Refund Amt The refund amount.
Approval section
Approval Dt The approval date.
Approved By The user id of who approved the analysis.
Field: View this:
7-9
6. Click the Analyzed Escrow Items sub tab.
7. In the Analyzed Escrow Items sub page, view the following information:
8. Click the Analysis Details sub tab.
9. In the Analysis Details sub page, view the following information:
10. In the View section, choose how you want to view the information in the Analysis Details sub page.
7.4 Escrow Disbursement Entry Tab
With the Escrow Disbursement Entry page, you can make payments on escrow from the system in the form of disbursement batches. Disbursement batches record the following information in the Disbursement Group section:
Company/branch of the account
Total dollar amount of disbursements
Total number of disbursements.
The Details section enables you record the following information for each escrow disbursement batch:
Account number
Transaction date
Disbursement amount
Escrow sub type.
Field: View this:
Escrow The escrow.
Disbursement Rule The disbursement rule.
Yearly Amt The yearly amount.
Field: View this:
Txn Dt The transaction date.
Transactions The transactions.
Vendor The vendor name.
Txn Amt The transaction amount.
Bal Amt (Est) The balance amount estimated.
Bal Amt (Act) The balance amount actual.
Choose: The system displays:
Current Estimated The current estimated analysis.
Last Estimated The last estimated analysis.
Last Actual The last actual analysis.
7-10
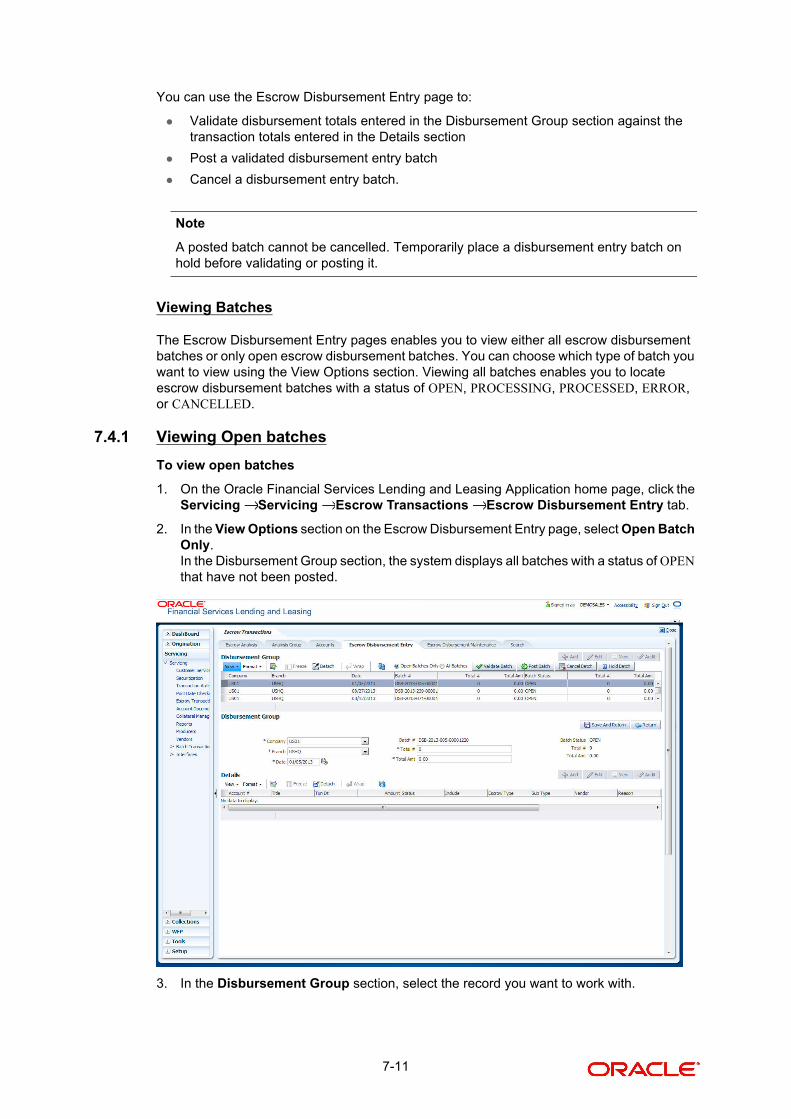
You can use the Escrow Disbursement Entry page to:
Validate disbursement totals entered in the Disbursement Group section against the transaction totals entered in the Details section
Post a validated disbursement entry batch
Cancel a disbursement entry batch.
Note
A posted batch cannot be cancelled. Temporarily place a disbursement entry batch on hold before validating or posting it.
Viewing Batches
The Escrow Disbursement Entry pages enables you to view either all escrow disbursement batches or only open escrow disbursement batches. You can choose which type of batch you want to view using the View Options section. Viewing all batches enables you to locate escrow disbursement batches with a status of OPEN, PROCESSING, PROCESSED, ERROR, or CANCELLED.
7.4.1 Viewing Open batches
To view open batches
1. On the Oracle Financial Services Lending and Leasing Application home page, click the Servicing Servicing Escrow Transactions Escrow Disbursement Entry tab.
2. In the View Options section on the Escrow Disbursement Entry page, select Open Batch Only.In the Disbursement Group section, the system displays all batches with a status of OPEN that have not been posted.
3. In the Disbursement Group section, select the record you want to work with.
→ → →
7-11
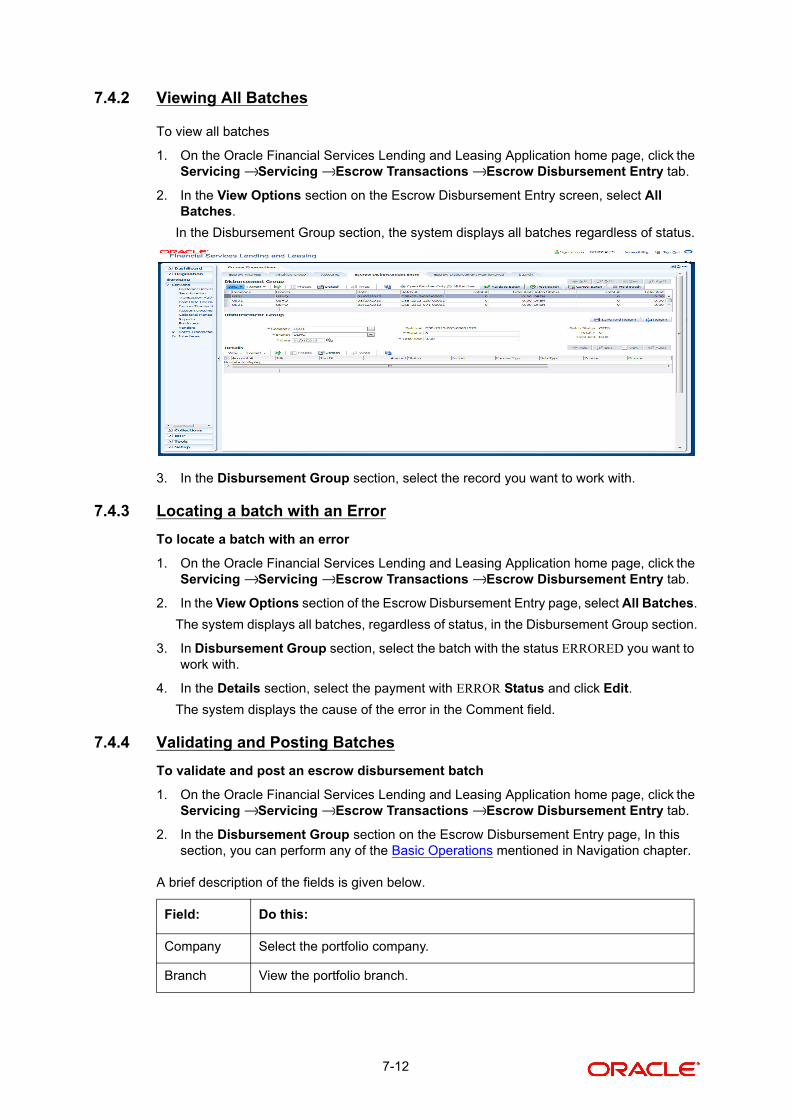
7.4.2 Viewing All Batches
To view all batches
1. On the Oracle Financial Services Lending and Leasing Application home page, click the Servicing Servicing Escrow Transactions Escrow Disbursement Entry tab.
2. In the View Options section on the Escrow Disbursement Entry screen, select All Batches.
In the Disbursement Group section, the system displays all batches regardless of status.
3. In the Disbursement Group section, select the record you want to work with.
7.4.3 Locating a batch with an Error
To locate a batch with an error
1. On the Oracle Financial Services Lending and Leasing Application home page, click the Servicing Servicing Escrow Transactions Escrow Disbursement Entry tab.
2. In the View Options section of the Escrow Disbursement Entry page, select All Batches.
The system displays all batches, regardless of status, in the Disbursement Group section.
3. In Disbursement Group section, select the batch with the status ERRORED you want to work with.
4. In the Details section, select the payment with ERROR Status and click Edit.
The system displays the cause of the error in the Comment field.
7.4.4 Validating and Posting Batches
To validate and post an escrow disbursement batch
1. On the Oracle Financial Services Lending and Leasing Application home page, click the Servicing Servicing Escrow Transactions Escrow Disbursement Entry tab.
2. In the Disbursement Group section on the Escrow Disbursement Entry page, In this section, you can perform any of the Basic Operations mentioned in Navigation chapter.
A brief description of the fields is given below.
Field: Do this:
Company Select the portfolio company.
Branch View the portfolio branch.
→ → →
→ → →
→ → →
7-12
3. Perform any of the Basic Actions mentioned in Navigation chapter.
The Details section records itemized information of the escrow disbursement batch. It en-ables you to make one payment for one account, or more than one payment to more than one account.
4. In the Details section, perform any of the Basic Operations mentioned in Navigation chapter.
A brief description of the fields is given below.:
5. In the Details section, perform any of the Basic Operations mentioned in Navigation chapter.
A brief description of the fields is given below.:
Date Enter batch date. Oracle Financial Services Lending and Leasing uses this date and the number of preprocess days (if in use) to determine when to disburse the payment.
Batch # View the system generated batch number with a format of DSB-YYYY-DDD-SEQNUM.
Total # Enter total number of disbursements in the batch.
Total Amt Enter total amount of disbursements in the batch.
Batch Status View batch status.
Total # View total number of actual disbursements in the batch.
Total Amt View total amount of actual advances in the batch.
Field: Do this:
Account # Specify the account number.
Title View the title.
Txn Dt Specify the disbursement date.
Amount Specify the disbursement amount.
Status View the status.
Include Select to indicate this is an active record.
Field: Do this:
Escrow Type Select the escrow type.
Sub Type View the escrow sub type.
Vendor View the vendor.
Reason Select the reason for the disbursement.
Pmt Mode Specify the payment mode for the disbursement.
Field: Do this:
7-13
6. Perform any of the Basic Actions mentioned in Navigation chapter.
The system updates the display only Total # and Total Amt fields in the Disbursement Group section to record the contents of the Details section.
Note
Before you can post a escrow disbursement batch on the Escrow Disbursement Entry page, the contents of the display only Total # and Total Amt fields must match the contents of the required Total # and Total Amt fields in the Disbursement Group section
7. In the Action section, click Validate Batch.
The system changes the escrow disbursement batch status from OPEN to PROCESSING and submits the batch to the job service. After the batch has been processed, Oracle Fi-nancial Services Lending and Leasing changes the its status to POSTED or ERRORED.
If an escrow disbursement batch has a status of ERRORED, the accounts in the Details section with the status of ERROR must be excluded from the Disbursement Group before the batch can be posted.
8. Clear the include box of any accounts in the Details section with a status of ERROR, then click Validate Batch again.
When an escrow disbursement batch has a status of PROCESSED, the Post Batch button in the Action section is available.
9. In the Action section, click Post Batch.
The system changes the status for the accounts in the Details section included in the es-crow disbursement batch to POSTED and creates an entry on the Disbursement Mainte-nance page.
The system also creates an entry for the escrow disbursement on the AP Requisitions page.
7.4.5 Holding an Escrow Disbursement Batch
Only escrow disbursement batches with the status of OPEN can be put on hold.
To hold an escrow disbursement batch
1. On the Oracle Financial Services Lending and Leasing Application home page, click the Servicing Servicing Escrow Transactions Escrow Disbursement Entry tab.
2. On the Escrow Disbursement Entry page, use the View Option section to select the batch you want to place on hold:
If the batch status is OPEN, click Open Batches Only in the View Options section.
If the batch status is ERROR, click All Batches in the View Options section.
3. Use the Disbursement Group section to select the escrow disbursement batch you want to hold.
4. In the Action section, click Hold Batch.
The system changes the escrow disbursement batch status from OPEN to HOLD.
Reference Specify the reference for the disbursement.
Comment Specify any comments regarding the disbursement.
Field: Do this:
→ → →
7-14
7.4.6 Opening/Removing Hold on an Escrow Disbursement batch
Only escrow disbursement batches with a status of HOLD can be opened.
To open or remove hold on an escrow disbursement batch
1. On the Oracle Financial Services Lending and Leasing Application home page, click the Servicing Servicing Escrow Transactions Escrow Disbursement Entry tab.
2. On the Escrow Payment Entry page, use the View Options section to select All Batches.
3. Use the Disbursement Group section to search for and select the escrow disbursement batch with the status of HOLD you want to open.
4. In the Action section, click Validate Batch.
The system changes the escrow disbursement batch status from OPEN to PROCESSING and submits the batch to the job service in the Disbursement Group section. After the batch has been processed, the system changes the its status to POSTED or ERRORED.
If an escrow disbursement batch has a status of ERRORED, the accounts in the Details section with the status of ERROR must be excluded from the Disbursement Group before the batch can be posted.
5. Clear the include box of any accounts in the Details section with a status of ERROR, then click Validate Batch again.
When an escrow disbursement batch has a status of PROCESSED, the Post Batch button in the Action section is available.
6. In the Action section, click Post Batch.
The system changes the status for the accounts in the Details section included in the es-crow disbursement batch to POSTED and creates an entry on the Disbursement Mainte-nance page.
7.4.7 Canceling an escrow disbursement batch
Only the escrow disbursement batches with the status of OPEN, PROCESSED, HOLD, or ERRORED can be canceled.
To cancel an escrow disbursement batch
1. On the Oracle Financial Services Lending and Leasing Application home page, click the Servicing master tab.
2. Click the Escrow Transactions link.
3. On Escrow Analysis screen, click the Escrow Disbursement Entry tab.
4. On the Escrow Disbursement Entry page, use the View Options section to select the escrow disbursement batch you want to cancel:
If the batch status is OPEN, click Open Batches Only in the View Options section.
If the batch status is PROCESSED, HOLD, or ERRORED, click All Batches in the View Options section.
5. Use the Disbursement Group section to select the escrow disbursement batch you want to cancel.
6. In the Action section, click Cancel Batch.
The system changes the Status field in the Details section to VOID.
When you refresh the Escrow Disbursement Entry page, the escrow disbursement batch that you canceled has a batch status of CANCELLED in the Disbursement Group section.
→ → →
7-15
7.5 Escrow Disbursement Maintenance Tab
The Disbursement Maintenance page enables you to cancel escrow disbursement transactions.
7.5.1 Canceling the Disbursement Maintenance
To cancel the disbursement maintenance
1. On the Oracle Financial Services Lending and Leasing Application home page, click the Servicing Servicing Escrow Transactions Escrow Disbursement Maintenance tab.
2. On the Disbursement Maintenance page’s Disbursements section, select the record you want to work with and click View
Note
You can use Search Criteria to limit the display of records.
3. In the Disbursements section, view the following display only information:
Field: View this:
Account # The account number.
Title The title.
Txn Dt The disbursement date.
Amount The amount.
Escrow Type The escrow type.
→ → →
7-16
4. Select the disbursement you want to void and click Void in the Action section.
The system changes the status of the escrow disbursement to VOID.
7.5.2 Viewing Canceled Escrow Disbursement on the AP Requisition screen
To view the canceled escrow disbursement on the AP Requisition page
1. On the Oracle Financial Services Lending and Leasing Application home page, click the Servicing Servicing Interfaces AP Transaction link.
2. On the Payee Type section of the AP Transactions page, select All.
Sub Type The sub type.
Status The status.
Include Include indicator.
Company The portfolio company.
Branch The portfolio branch.
Batch # The batch number.
Vendor The vendor.
Reason The reason.
Pmt Mode The payment mode.
Reference The reference.
Comment The comment.
Field: View this:
→ → →
7-17
3. On the Pmt Mode section, select All.
4. On the Status section, select Void.
5. On the AP Requisitions page, the system changes the escrow disbursement status to VOID.
7.6 Search Tab
The Search tab enables you to locate the accounts on which the escrow analysis is to be performed. You can select accounts for an escrow analysis using the following attributes in the Criteria column of the Search Criteria section.
Note
The client can configure this list to search on other account attributes, if desired.
To search for an account
1. On the Oracle Financial Services Lending and Leasing Application home page, click the Servicing Servicing Escrow Transactions Search.
2. In the Search page’s Search Criteria section, use the Comparison Operator and Value columns to enter the search criteria you want to use to locate an account.
3. Click Search and use criteria and comparison operator to search criteria:
The system displays the result of the search in the Results section at the bottom of the page.
Field: View this:
Account Specify the account number.
Account Status Select the account status.
Account State Select the state name where the account belongs.
Account Last Escrow Analysis Date
Select the date on which the escrow analysis was last performed on the account.
Escrow Analysis Required Indicator
YES: If selected, the system displays the accounts that require escrow analysis.
NO: If selected, the system displays the accounts that do not require escrow analysis.
Escrow Analysis Stopped Indicator
YES: If selected, the system displays the accounts with the escrow analysis is allowed
NO: If selected, the system displays the accounts with the escrow analysis is stopped.
Product Specify the product name.
Account Condition Select the account condition.
Field: View this:
Company The company.
Branch The branch.
→ → →
7-18
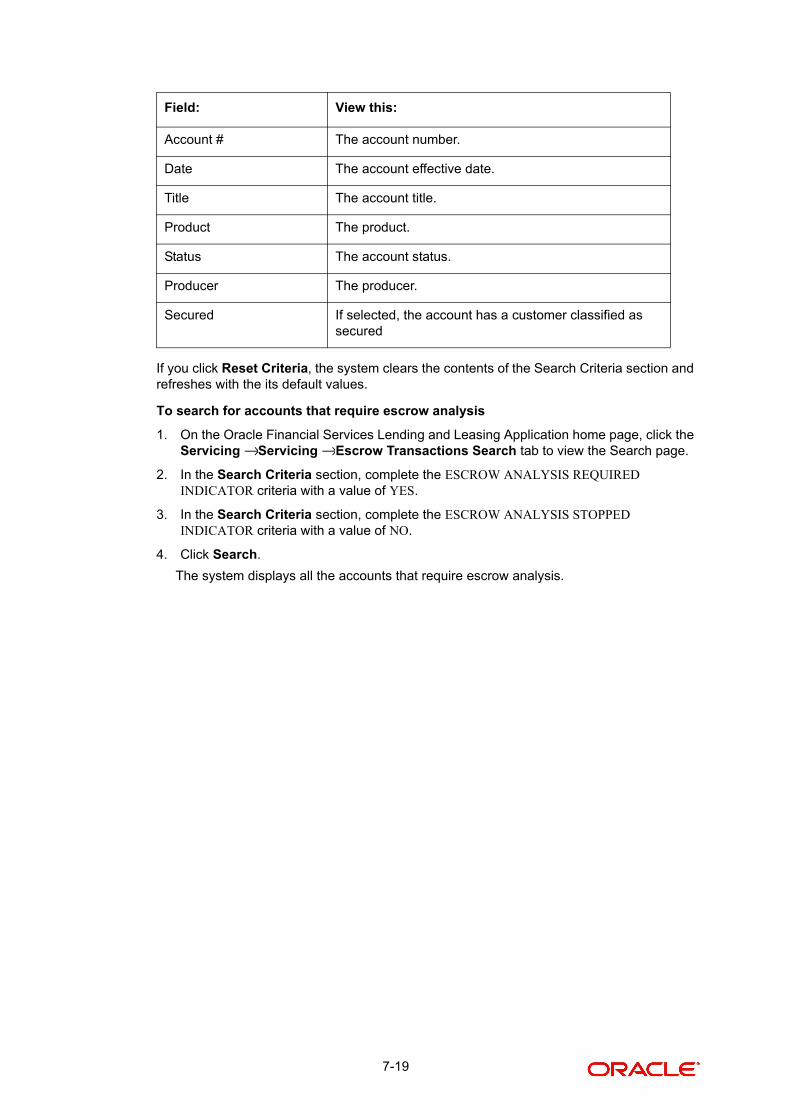
If you click Reset Criteria, the system clears the contents of the Search Criteria section and refreshes with the its default values.
To search for accounts that require escrow analysis
1. On the Oracle Financial Services Lending and Leasing Application home page, click the Servicing Servicing Escrow Transactions Search tab to view the Search page.
2. In the Search Criteria section, complete the ESCROW ANALYSIS REQUIRED INDICATOR criteria with a value of YES.
3. In the Search Criteria section, complete the ESCROW ANALYSIS STOPPED INDICATOR criteria with a value of NO.
4. Click Search.
The system displays all the accounts that require escrow analysis.
Account # The account number.
Date The account effective date.
Title The account title.
Product The product.
Status The account status.
Producer The producer.
Secured If selected, the account has a customer classified as secured
Field: View this:
→ →
7-19

8. Account Documents
8.1 Introduction
The Documents Maintenance screen Both allow for the paperless storage of documents within Oracle Financial Services Lending and Leasing system, the first with Accounts during the loan origination cycle and the later with accounts during customer service.
This chapter explains how use the Account Document section to:
View an image
Search for an image
Split an image of more than one page
Change the status of an image
Combine two images into a multiple page image
Attach an image to an existing Account
Print an image
Attach documents to Accounts and then view these documents in a browser.
It also explains how to use the Account Document Tracking page to attach documents to accounts and then view these documents in a browser.
Account Document screen
The Account Document page contains two sections: Document Maintenance and Document Details.
Credit Accounts are often sent or faxed to financial institutions from producers (or ‘dealers’) on behalf of the customer. These credit Accounts, if received as fax, can be stored in the system as images. Frequently, more than one Account is received in a single fax or a single Account is received across multiple faxes. In such cases, the Account Document Tracking page can help you organize and maintain your image collection.
The Account Document page’s Document Maintenance screen allows you to upload documents to an Account in the form of GIF files, PDF files, DOC files, XLS files, and TXT files. The Document Maintenance screen’s Document Details section allows you to view these documents.
8.2 Account Document screen
Oracle Financial Services Lending and Leasing supports the online attachment of document images to an Account using the Account Documents screen’s Document Maintenance section. You can attach the documents from either a client machine or server. A default image directory can be maintained in the system using the system parameter: UIX_DEFAULT_IMAGE_PATH.
When you choose List File in the Select Document sub section in the Document Maintenance section, the system displays all available files in the selected directory in the Document Details section. You can use the Document Maintenance sub-section and Action sub-section to attach selected documents to a particular account.
8-1
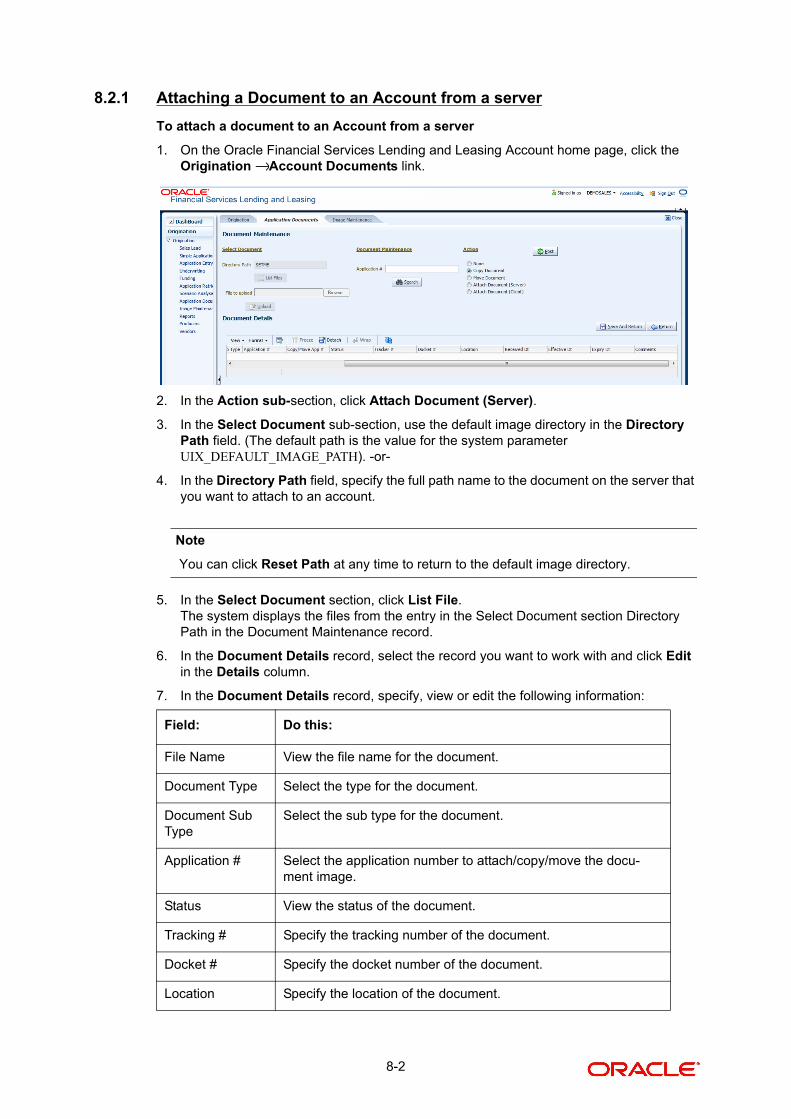
8.2.1 Attaching a Document to an Account from a server
To attach a document to an Account from a server
1. On the Oracle Financial Services Lending and Leasing Account home page, click the Origination Account Documents link.
2. In the Action sub-section, click Attach Document (Server).
3. In the Select Document sub-section, use the default image directory in the Directory Path field. (The default path is the value for the system parameter UIX_DEFAULT_IMAGE_PATH). -or-
4. In the Directory Path field, specify the full path name to the document on the server that you want to attach to an account.
Note
You can click Reset Path at any time to return to the default image directory.
5. In the Select Document section, click List File.The system displays the files from the entry in the Select Document section Directory Path in the Document Maintenance record.
6. In the Document Details record, select the record you want to work with and click Edit in the Details column.
7. In the Document Details record, specify, view or edit the following information:
Field: Do this:
File Name View the file name for the document.
Document Type Select the type for the document.
Document Sub Type
Select the sub type for the document.
Application # Select the application number to attach/copy/move the docu-ment image.
Status View the status of the document.
Tracking # Specify the tracking number of the document.
Docket # Specify the docket number of the document.
Location Specify the location of the document.
→
8-2
8. Select the Attach check box to attach the file to the account.
9. Click Save And Return.
10. In the Action sub-section, click Post.The system attaches the document to the Account.
You can view the document in a browser by clicking View Document in the Document Details section.
8.2.2 Attaching a Document to an Account from a Client Machine
To attach a document to an Account from a client machine
1. On the Oracle Financial Services Lending and Leasing Application home page, click the Origination master tab.
2. Click the Account Documents link.
3. In the Action sub-section, click Attach Document (Client).
4. In the Select Document section, click Browse in File to upload field.The system opens a Choose File to Upload dialog box.
5. In the Choose File to Upload dialog box, locate the document you want to attach to the account.
Note
You can select multiple files by holding the CTRL or SHIFT key on your keyboard.
6. When you have located the document you want to attach to the account in the Open dialog box’s File name: field, click Open.
7. The selected files appear in the Select Document sub-section’s File to Upload field.
8. In the Select Document sub-section, click Upload.
9. In the Document Details record, select the file uploaded from your server and click Edit.
10. In the Document Details section, enter, view or edit the following information:
Received Dt View the document image received date.
Effective Dt Specify the effective date of the document.
Expiry Dt Specify the expiration date of the document.
Comment Specify any comments regarding the document.
Field: Do this:
File Name View the file name for the document.
Document Type Select the type for the document.
Document Sub Type
Select the sub type for the document.
Application # Select the application number to attach/copy/move the docu-ment image.
Field: Do this:
8-3
11. Select the Attach check box to attach the file to the account.
12. Click Save And Return.
In the Action sub-section, click Post.The system attaches the document to the Account.
You can view the document in a browser by choosing View Document in the Action section.
8.2.3 Copying a Document
The Action section’s Copy Document command copies the document image from one Account to another Account. This command has no impact on the source Account or the source Account’s document image.
To copy a document to an Account from another Account
1. On the Oracle Financial Services Lending and Leasing Application home page, click the origination master tab.
Click the Account Documents link.
2. In the Action sub-section, click Copy Document.
3. In the Document Maintenance sub-section, use the Application # field to specify the Account with the image you want to copy.
4. In the Document Maintenance sub-section, click Search.The system displays the files attached to that Account in the Document Details section.
5. In the Document Details section, select the document you want to copy and click Edit.
6. In the Copy/Move App # field, specify the application number of the Account to which you want to copy the document.
7. Click Save And Return.
8. In the Action sub-section, click Post.
8.2.4 Moving a Document
The Action section’s Move Document command moves an existing document image from one Account to another Account. This command detaches the document image from the source Account and attach to second Account.
Status View the status of the document.
Comment Specify any comments regarding the document.
Tracking # Specify the tracking number of the document.
Docket # Specify the docket number of the document.
Location Specify the location of the document.
Received Dt Specify the received date of the document.
Effective Dt Specify the effective date of the document.
Expiry Dt Specify the expiration date of the document.
Comments Specify any comments regarding the document.
Field: Do this:
8-4

To move a document to an Account from another Account
1. On the Oracle Financial Services Lending and Leasing Application home page, click the Origination Origination Account Documents link.
2. In the Action sub-section, click Move Document.
3. In the Document Maintenance sub-section, use the Application # field to specify the Account with the image you want to move.
4. In the Document Maintenance sub-section, click Search.The system displays the files attached to that Account in the Document Details sections.
5. In the Document Details section, select the document you want to move and click Edit.
6. In the Copy/Move App # field, specify the application number of the Account to which you want to move the document.
7. Click Save And Return.
8. In the Action sub-section, click Post.
You can view the documents attached to a particular account by loading the application on the Customer Service screen, then clicking the Customer Service tab and then clicking on the Document Tracking sub tab.
8.2.5 Viewing a Document Attached to an Account
To view a document attached to an Account
1. Using above method, load the application with the document you want to view.
2. In the Application Document section, click Edit.
3. View/edit the following display only information:
4. In the Account Document Details section, select the record you want to work with and click Edit.
5. In the Account Document Details section, view the following display only information:
Field: Do this:
Document Type View the document type.
Comment Specify any comments regarding the image.
Field: View this:
Document Sub Type
The document sub type.
Version The version. (version numbers will be incremental by batch job, first version will start with 1.0).
Page # The page number.
Document File Type
The document file type.
Status The status.
Tracking # The tracking number of the image.
Docket # The docket number of the image.
→ →
8-5
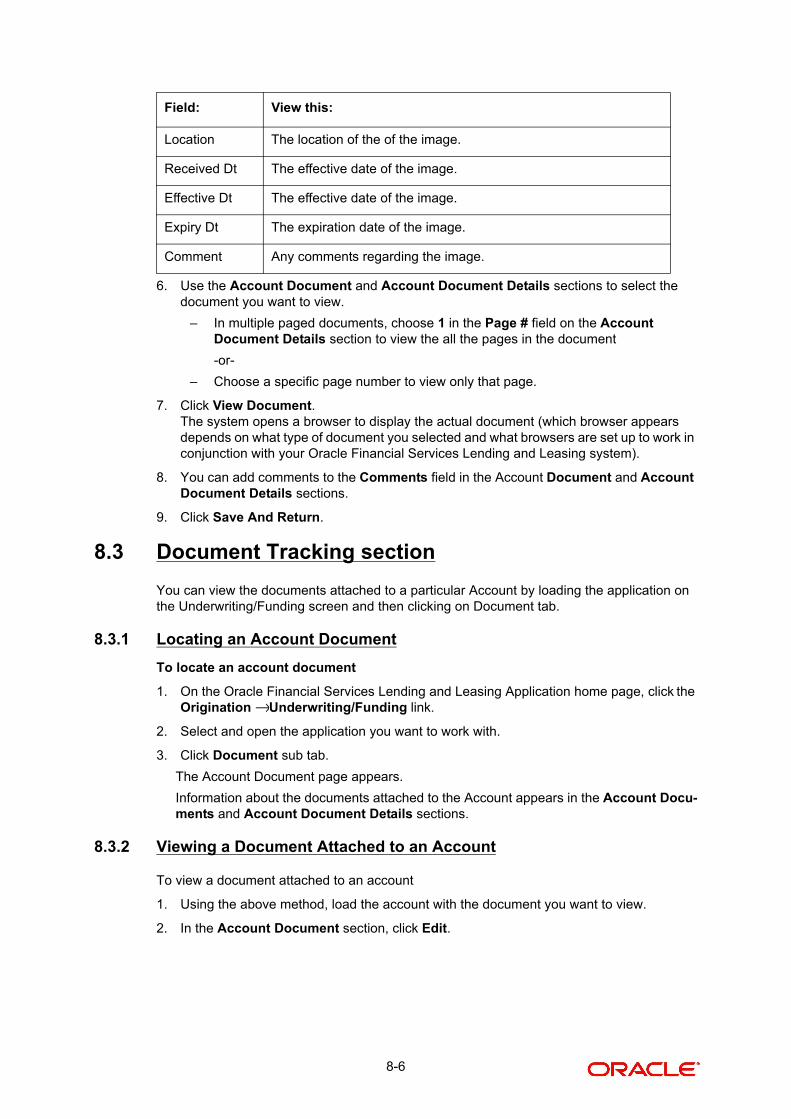
6. Use the Account Document and Account Document Details sections to select the document you want to view.
– In multiple paged documents, choose 1 in the Page # field on the Account Document Details section to view the all the pages in the document
-or-
– Choose a specific page number to view only that page.
7. Click View Document.The system opens a browser to display the actual document (which browser appears depends on what type of document you selected and what browsers are set up to work in conjunction with your Oracle Financial Services Lending and Leasing system).
8. You can add comments to the Comments field in the Account Document and Account Document Details sections.
9. Click Save And Return.
8.3 Document Tracking section
You can view the documents attached to a particular Account by loading the application on the Underwriting/Funding screen and then clicking on Document tab.
8.3.1 Locating an Account Document
To locate an account document
1. On the Oracle Financial Services Lending and Leasing Application home page, click the Origination Underwriting/Funding link.
2. Select and open the application you want to work with.
3. Click Document sub tab.
The Account Document page appears.
Information about the documents attached to the Account appears in the Account Docu-ments and Account Document Details sections.
8.3.2 Viewing a Document Attached to an Account
To view a document attached to an account
1. Using the above method, load the account with the document you want to view.
2. In the Account Document section, click Edit.
Location The location of the of the image.
Received Dt The effective date of the image.
Effective Dt The effective date of the image.
Expiry Dt The expiration date of the image.
Comment Any comments regarding the image.
Field: View this:
→
8-6
3. View/edit the following display only information:
4. In the Account Document Details section, select the record you want to work with and click Edit.
5. In the Account Document Details section, view the following display only information:
6. Use the Account Document and Account Document Details section to select the document you want to view.
– In multiple paged documents, choose 1 in the Page # field on the Account Document Details section to view the all the pages in the document
-or-
– Choose a specific page number to view only that page.
7. Choose View Document.
The system opens a browser to display the actual document (which browser appears de-pends on what type of document you selected and what browsers are set up to work in conjunction with your system).
8. You can add comments to the Comments field in the Account Document and Account Document Details sections.
9. Click Save And Return.
Field: Do this:
Document Type View the document type.
Comment Specify any comments regarding the image.
Field: View this:
Document Sub Type The document sub type.
Version The version. (version numbers will be incremental by batch job, first version will start with 1.0).
Page # The page number.
Document File Type The document file type.
Status The status.
Tracking # The tracking number of the image.
Docket # The docket number of the image.
Location The location of the of the image.
Received Dt The effective date of the image.
Effective Dt The effective date of the image.
Expiry Dt The expiration date of the image.
Comment Any comments regarding the image.
8-7
9. Collateral Management
Centralized Asset Management or Collateral Management System (CMS) enables the user to record a new collateral, valuate it, and re-evaluate the existing collateral.
A Collateral Management System is used to minimize the frauds which involve the same collateral being pledged for different loans and revaluating existing collateral manually or connecting to the VIN Interface.
The Collateral Details screen is opened from the Servicing Servicing Collateral Managementand contains the following tab:
Collateral
Search
9.1 Collateral Tab
Using the Collateral page, you can record a new collateral, view the valuation of collateral, and re-evaluate the existing collateral.
The collateral details can also be defined in the collateral page of Application Entry screen.
The system assigns collateral statuses and the following are the statuses:
Undefined- When the collateral is created for the first time.
New- When an undefined collateral/ asset gets validated, its status is changed to New. This collateral can only be used for Substitution in Servicing.
Inactive- When an application from released, sold or inventory status is attached to application it becomes Inactive.
Active- When the application gets funded, the inactive collateral gets associated with the account in Servicing and gets activated. The status of the collateral then becomes 'Active'.
Released- The loan collateral can move to "Released" when the collateral is no more attached to any account.
Substituted- When collateral with the status active is replaced with different collateral, the active status is changed to SUBSTITUTED.
→ →
9-1
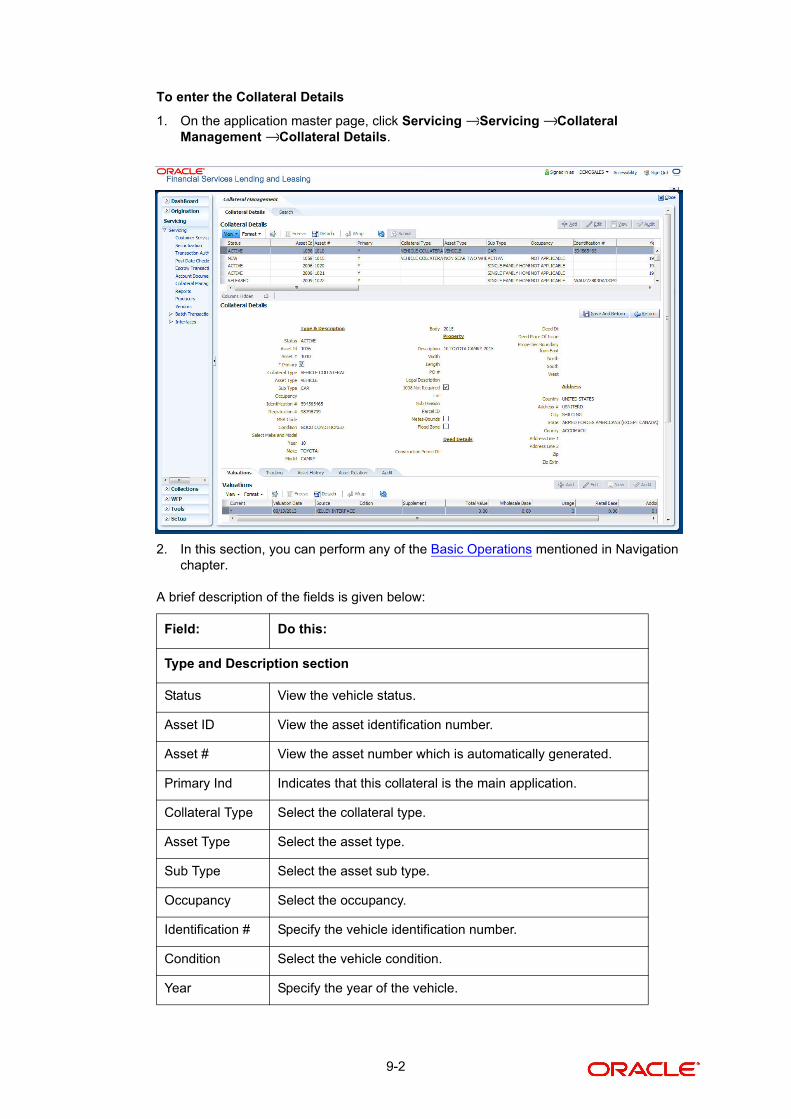
To enter the Collateral Details
1. On the application master page, click Servicing Servicing Collateral Management Collateral Details.
2. In this section, you can perform any of the Basic Operations mentioned in Navigation chapter.
A brief description of the fields is given below:
Field: Do this:
Type and Description section
Status View the vehicle status.
Asset ID View the asset identification number.
Asset # View the asset number which is automatically generated.
Primary Ind Indicates that this collateral is the main application.
Collateral Type Select the collateral type.
Asset Type Select the asset type.
Sub Type Select the asset sub type.
Occupancy Select the occupancy.
Identification # Specify the vehicle identification number.
Condition Select the vehicle condition.
Year Specify the year of the vehicle.
→ →→
9-2
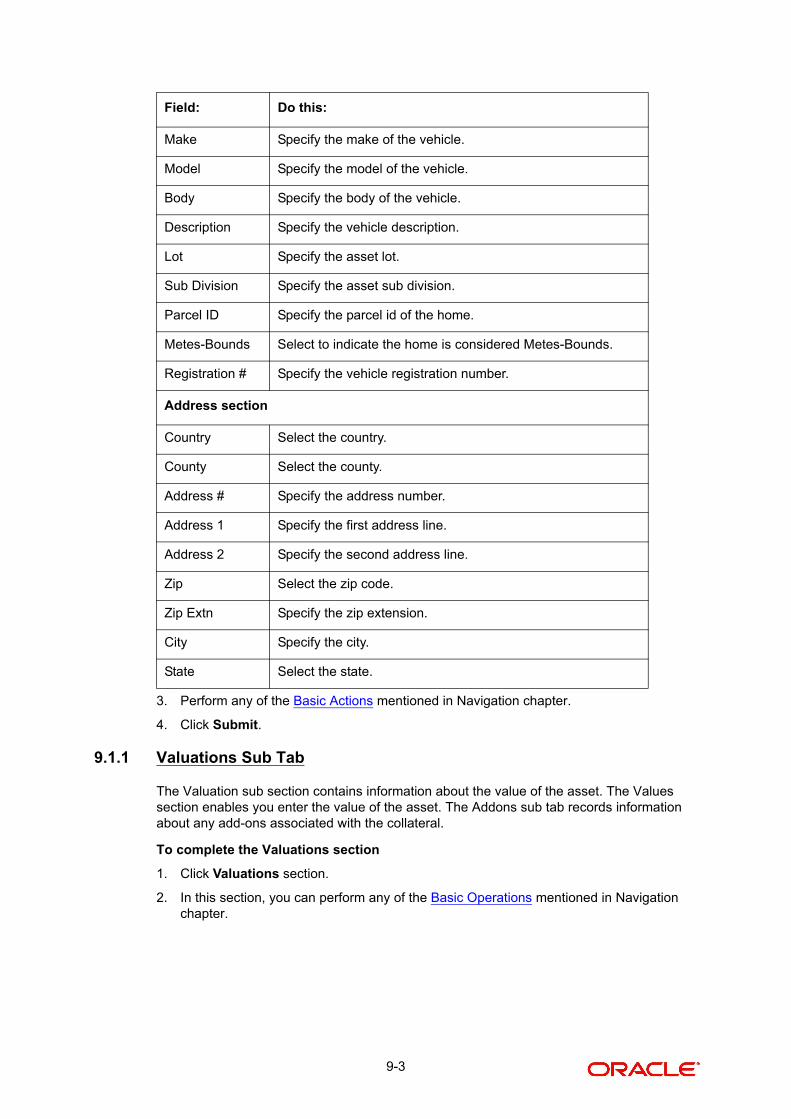
3. Perform any of the Basic Actions mentioned in Navigation chapter.
4. Click Submit.
9.1.1 Valuations Sub Tab
The Valuation sub section contains information about the value of the asset. The Values section enables you enter the value of the asset. The Addons sub tab records information about any add-ons associated with the collateral.
To complete the Valuations section
1. Click Valuations section.
2. In this section, you can perform any of the Basic Operations mentioned in Navigation chapter.
Make Specify the make of the vehicle.
Model Specify the model of the vehicle.
Body Specify the body of the vehicle.
Description Specify the vehicle description.
Lot Specify the asset lot.
Sub Division Specify the asset sub division.
Parcel ID Specify the parcel id of the home.
Metes-Bounds Select to indicate the home is considered Metes-Bounds.
Registration # Specify the vehicle registration number.
Address section
Country Select the country.
County Select the county.
Address # Specify the address number.
Address 1 Specify the first address line.
Address 2 Specify the second address line.
Zip Select the zip code.
Zip Extn Specify the zip extension.
City Specify the city.
State Select the state.
Field: Do this:
9-3
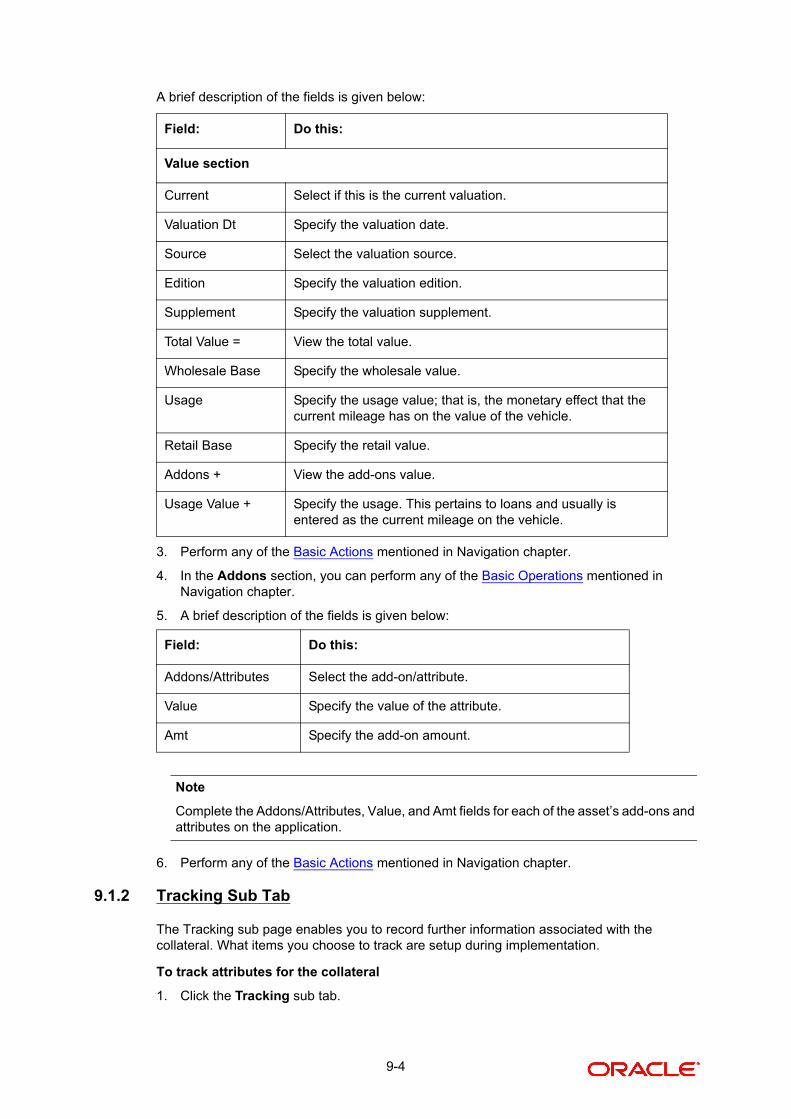
A brief description of the fields is given below:
3. Perform any of the Basic Actions mentioned in Navigation chapter.
4. In the Addons section, you can perform any of the Basic Operations mentioned in Navigation chapter.
5. A brief description of the fields is given below:
Note
Complete the Addons/Attributes, Value, and Amt fields for each of the asset’s add-ons and attributes on the application.
6. Perform any of the Basic Actions mentioned in Navigation chapter.
9.1.2 Tracking Sub Tab
The Tracking sub page enables you to record further information associated with the collateral. What items you choose to track are setup during implementation.
To track attributes for the collateral
1. Click the Tracking sub tab.
Field: Do this:
Value section
Current Select if this is the current valuation.
Valuation Dt Specify the valuation date.
Source Select the valuation source.
Edition Specify the valuation edition.
Supplement Specify the valuation supplement.
Total Value = View the total value.
Wholesale Base Specify the wholesale value.
Usage Specify the usage value; that is, the monetary effect that the current mileage has on the value of the vehicle.
Retail Base Specify the retail value.
Addons + View the add-ons value.
Usage Value + Specify the usage. This pertains to loans and usually is entered as the current mileage on the vehicle.
Field: Do this:
Addons/Attributes Select the add-on/attribute.
Value Specify the value of the attribute.
Amt Specify the add-on amount.
9-4
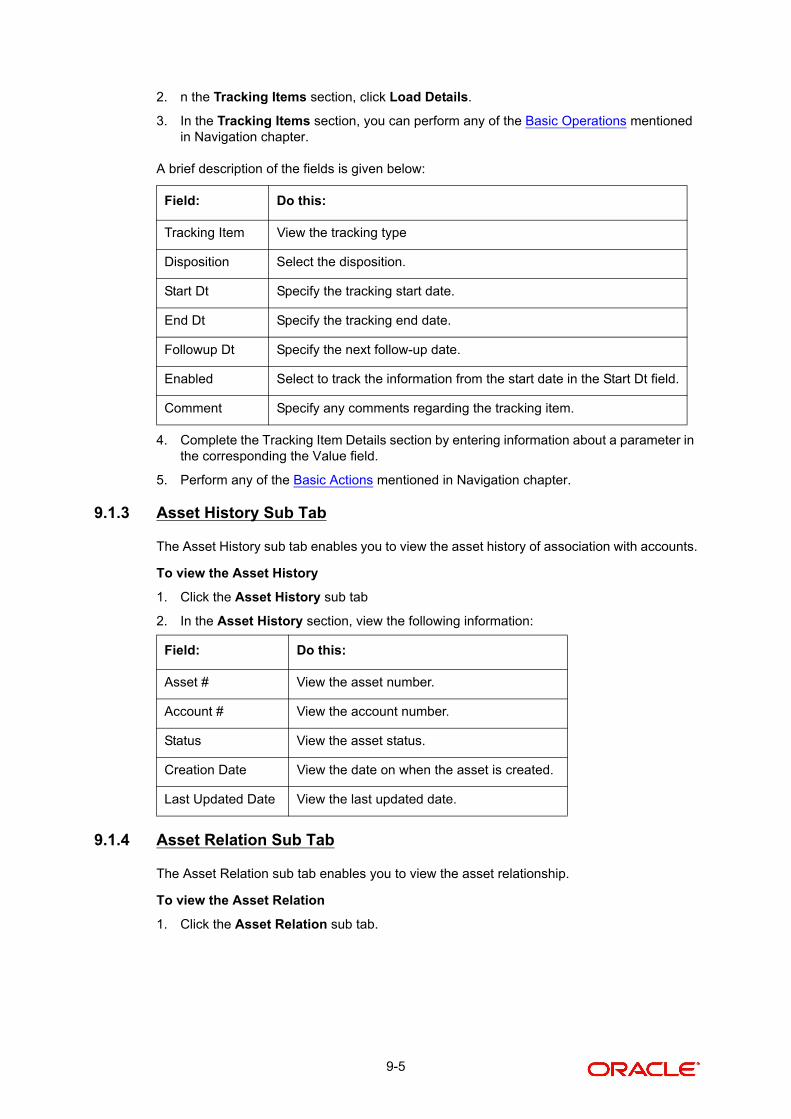
2. n the Tracking Items section, click Load Details.
3. In the Tracking Items section, you can perform any of the Basic Operations mentioned in Navigation chapter.
A brief description of the fields is given below:
4. Complete the Tracking Item Details section by entering information about a parameter in the corresponding the Value field.
5. Perform any of the Basic Actions mentioned in Navigation chapter.
9.1.3 Asset History Sub Tab
The Asset History sub tab enables you to view the asset history of association with accounts.
To view the Asset History
1. Click the Asset History sub tab
2. In the Asset History section, view the following information:
9.1.4 Asset Relation Sub Tab
The Asset Relation sub tab enables you to view the asset relationship.
To view the Asset Relation
1. Click the Asset Relation sub tab.
Field: Do this:
Tracking Item View the tracking type
Disposition Select the disposition.
Start Dt Specify the tracking start date.
End Dt Specify the tracking end date.
Followup Dt Specify the next follow-up date.
Enabled Select to track the information from the start date in the Start Dt field.
Comment Specify any comments regarding the tracking item.
Field: Do this:
Asset # View the asset number.
Account # View the account number.
Status View the asset status.
Creation Date View the date on when the asset is created.
Last Updated Date View the last updated date.
9-5
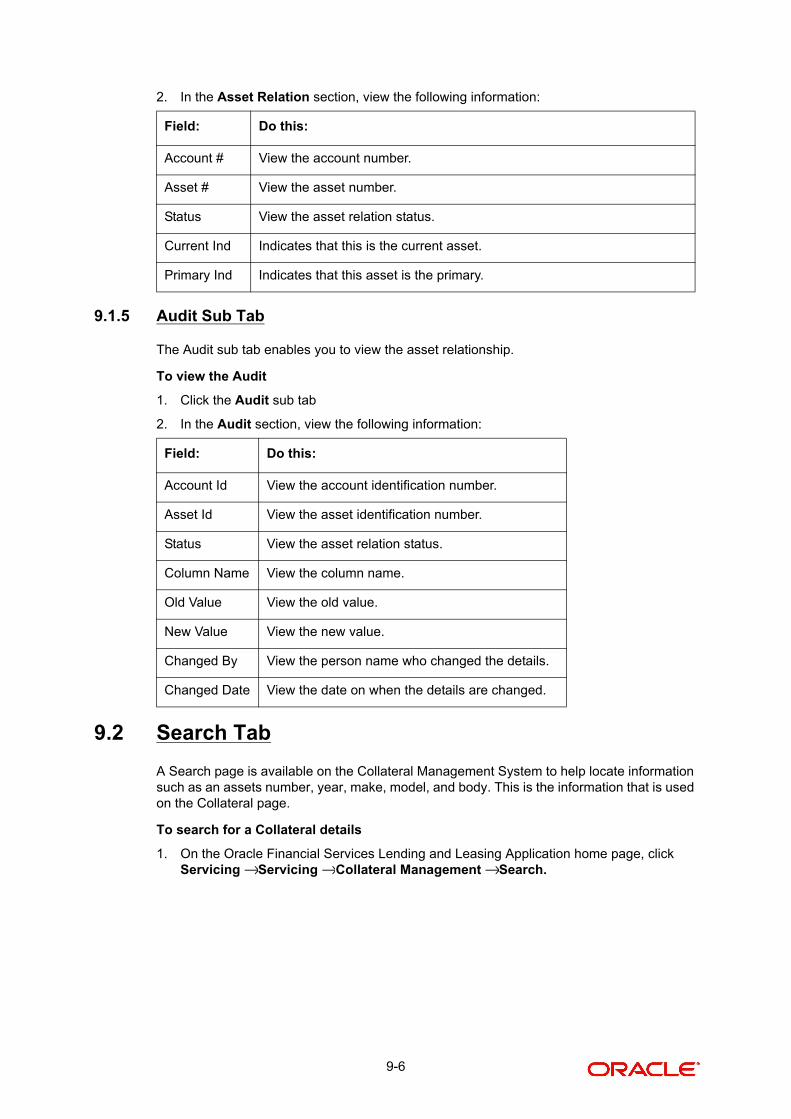
2. In the Asset Relation section, view the following information:
9.1.5 Audit Sub Tab
The Audit sub tab enables you to view the asset relationship.
To view the Audit
1. Click the Audit sub tab
2. In the Audit section, view the following information:
9.2 Search Tab
A Search page is available on the Collateral Management System to help locate information such as an assets number, year, make, model, and body. This is the information that is used on the Collateral page.
To search for a Collateral details
1. On the Oracle Financial Services Lending and Leasing Application home page, clickServicing Servicing Collateral Management Search.
Field: Do this:
Account # View the account number.
Asset # View the asset number.
Status View the asset relation status.
Current Ind Indicates that this is the current asset.
Primary Ind Indicates that this asset is the primary.
Field: Do this:
Account Id View the account identification number.
Asset Id View the asset identification number.
Status View the asset relation status.
Column Name View the column name.
Old Value View the old value.
New Value View the new value.
Changed By View the person name who changed the details.
Changed Date View the date on when the details are changed.
→ → →
9-6

2. The Collateral Management screen’s Search page appears.
3. In the Search Criteria section, use the Comparison Operator and Value columns to enter the search criteria you want to use to locate a collateral.
4. Click Search.
The system displays the result of the search in the Results page.
5. On the Results page, select the collateral you want to load and click Submit.
The system loads the collateral details on the Collateral Details screen.
9-7
10. Tools
Depending on the type of product you are working with during origination, the Tools screens enable you to calculate the following:
Payment
Interest Rate
Term
Loan Amount
Provided or Imported information can then be transferred to complete fields on the Request tab of the Underwriting section and on the Contract section of the Funding section.
10.1 Loan Calculator
The Loan Calculator page calculates the payment amount, term, interest rate, loan amount, amortization schedule and allows for the printing of a report. You can use the Loan Calculator section to view the amortization schedule of the loan.
This screen is similar to the Loan Calculator screen opened from Underwriting or Funding screens; however, calculators opened from Tools master tab are standalone and do not link calculations or loan information to any specific application.
Interest Rate
Term
Loan Amount
10.1.1 Calculating Loan Payments
The Calculate Payment mode on the Loan Calculator window’s Loan Calculator calculates the standard payment based on the information you provide, such as the amount financed, terms, and interest rate. The Calculate Payment mode calculates the standard payment based on the information you provide, such as the amount financed, terms, and interest rate.
Note
Click Initialize in Loan Calculator screen to clear (or ‘refresh’) the Loan Calculator screen at any time.
10-1
To calculate a loan payment
1. Click Tools Tools Loan Calculator.
2. In the Parameters section, select Calculate Payment.
3. Click Initialize and maintain the following fields.
Field: Do this:
Loan Details Section
Product Category Select the category as Standard for the conventional loan product and Islamic for the Islamic loan product. This field will be enabled only if the product is selected as IJARAH Home loans.
Contract Dt Specify the contract date. The system displays current date as the default value.
First Pmt Dt Specify the first payment date. The system displays the date one month from today as the default value.
Term Specify the number of payments.
Maturity Dt View the maturity date. This is always the term in the billing cycle added to the first payment date.
Amt Financed Specify the amount financed.
PrePaid Fees Specify the prepaid fees, if any exist.
Financed Fees Specify the financed fees, if any exist.
Loan Amt View the estimated loan amount: the amount financed plus the prepaid fees.
→ →
10-2
Balloon Pmt Amt Specify the balloon payment amount, if any exist.
Payment/Finance Charge
Pmt Amt View the payment amount.
Interest Amt View the profit amount.
Finance Charge View the finance charged.
Total of Pmts View the payment amount.
Final Pmt Amount View the final payment amount.
Calculator Options
Billing Cycle Select the payment frequency.
Balloon Method Select the balloon method.
Accrual Base Method Select the accrual base.
Time Counting Method
Select the time counting method.
Installment Method Select the installment method: EQUAL PAYMENTS or FINAL PAYMENT DIFFERS.
Note: For more information, see the Instalment method section in this chapter.
Bill Method Select the billing method as either LEVEL, PERCENTAGE OF PRINCIPAL PLUS INTEREST, INTEREST ONLY, FIXED PRINCI-PAL PLUS INTEREST, PERCENTAGE OF OUTSTANDING BAL-ANCE.
Calendar Method Select the calendar method as ‘Hijri’ or ‘Gregorian’ for this loan contract. This field will be enabled only if the product category is selected as Islamic.
Accrual Start Dt Basis
Select to define the start date from when the interest accrual is to be calculated for this loan instrument.This field will be enabled only if the product category is selected as Islamic.
Note:
If you select the Effective Date, then the interest is calculated from the Contract date.
If you select the Payment Date, then the interest is calculated based on (first payment date minus one billing cycle).
Accrual Start Days Select the actual date from when to start interest accrual
for loans is to be calculated. This field will be enabled only if the product category is selected as Islamic.
Rate
Field: Do this:
10-3
Instalment Methods
Equal Payments: If you select Equal Payment option, then the repayment amount will be equal for all installments including the final installment.
Final Payment Differs: If you select Final Payment Differs option, then the final repayment amount may be slightly more or less than the outstanding loan amount due to precise rounding calculations. The final payment amount will be equal to the outstanding loan amount.
If you select SKIP PERIOD, select the months where repayment needs to be skipped in the Skip Months section.
Note
When completing Frequency fields, please note the following:
– Biweekly in the system means ‘once every two weeks’ and not ‘twice a week’.
– Bimonthly in the system means ‘once every two months’ and not ‘twice a month’.
For more information, see the appendix Payment Amount Conversion.
Rate Specify the interest rate.
APR View the system calculated the Annual Percentage Rate.
First Period section
Calendar Days View the number of calendar days between the contract date and the first payment date. The calendar days will differ based on the calendar method selected.
Interest View the profit accrued for the calendar days.
Repayment Options section – If this calculation involves a Flexible Repayment Schedule, complete this section
Flexible Repayment Allowed
If selected, indicates that this calculation involves flexible repay-ment.
Type Select the flexible repayment schedule you want to use from the drop-down list. You can select one of the following:
SKIP PERIOD
USER DEFINED
UNDEFINED
GRADUATED PAYMENT
EXTENDABLE BALLOON
Extendable Balloon
Max Term Specify the maximum number of terms for the extendable balloon payment.
Field: Do this:
10-4
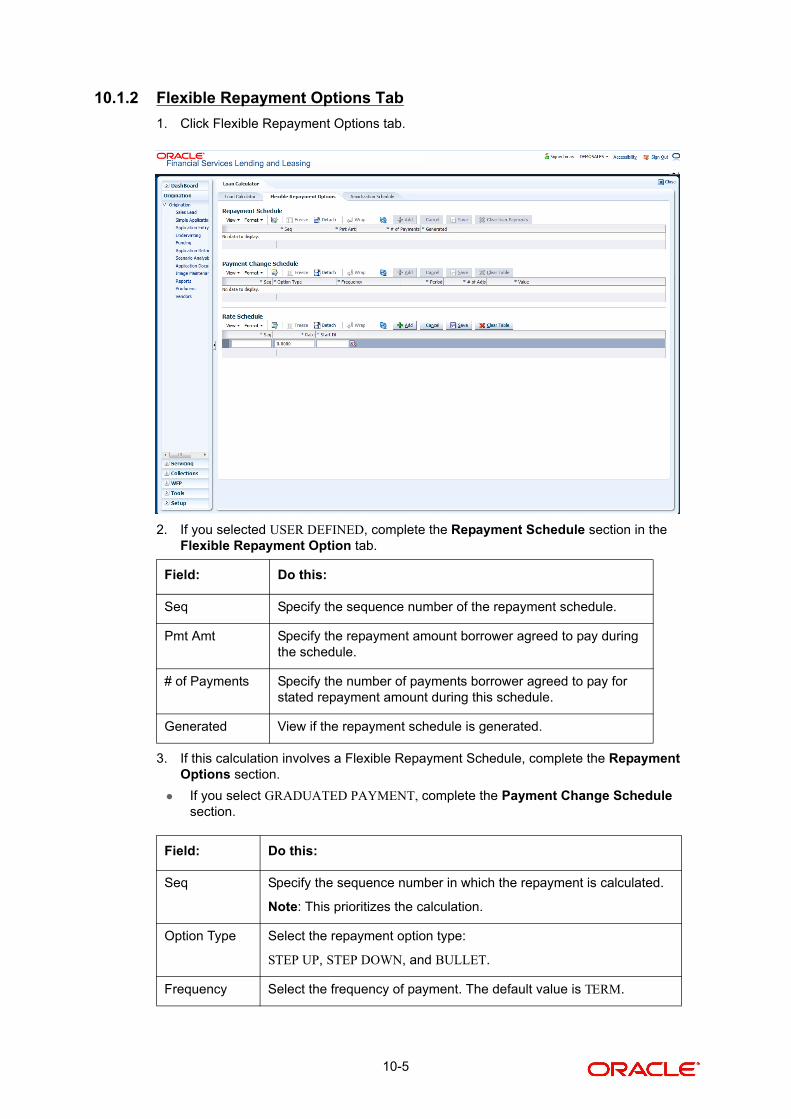
10.1.2 Flexible Repayment Options Tab
1. Click Flexible Repayment Options tab.
2. If you selected USER DEFINED, complete the Repayment Schedule section in the Flexible Repayment Option tab.
3. If this calculation involves a Flexible Repayment Schedule, complete the Repayment Options section.
If you select GRADUATED PAYMENT, complete the Payment Change Schedule section.
Field: Do this:
Seq Specify the sequence number of the repayment schedule.
Pmt Amt Specify the repayment amount borrower agreed to pay during the schedule.
# of Payments Specify the number of payments borrower agreed to pay for stated repayment amount during this schedule.
Generated View if the repayment schedule is generated.
Field: Do this:
Seq Specify the sequence number in which the repayment is calculated.
Note: This prioritizes the calculation.
Option Type Select the repayment option type:
STEP UP, STEP DOWN, and BULLET.
Frequency Select the frequency of payment. The default value is TERM.
10-5
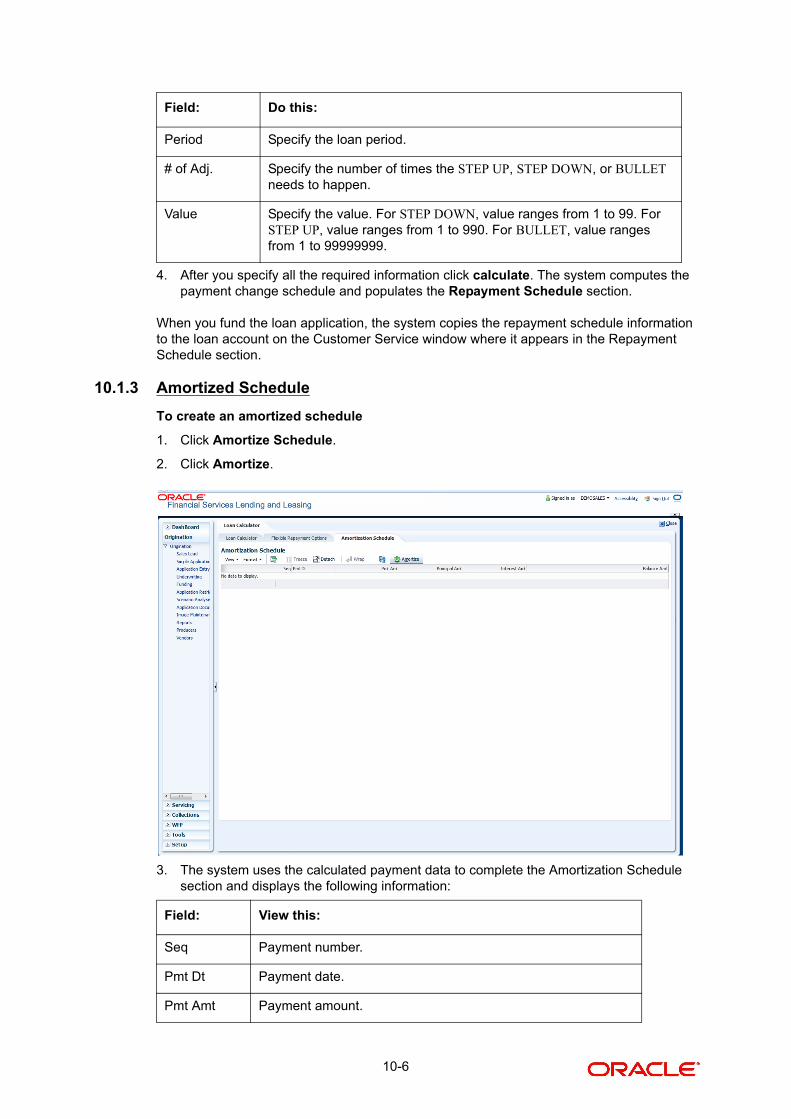
4. After you specify all the required information click calculate. The system computes the payment change schedule and populates the Repayment Schedule section.
When you fund the loan application, the system copies the repayment schedule information to the loan account on the Customer Service window where it appears in the Repayment Schedule section.
10.1.3 Amortized Schedule
To create an amortized schedule
1. Click Amortize Schedule.
2. Click Amortize.
3. The system uses the calculated payment data to complete the Amortization Schedule section and displays the following information:
Period Specify the loan period.
# of Adj. Specify the number of times the STEP UP, STEP DOWN, or BULLET needs to happen.
Value Specify the value. For STEP DOWN, value ranges from 1 to 99. For STEP UP, value ranges from 1 to 990. For BULLET, value ranges from 1 to 99999999.
Field: View this:
Seq Payment number.
Pmt Dt Payment date.
Pmt Amt Payment amount.
Field: Do this:
10-6
10.1.4 Calculating Interest Rates
The Calculate Interest Rate mode back-calculates the interest rate and the APR using the amount financed, standard payment, and terms. It also provides the amortization schedule of the loan.
To calculate an Interest Rate
1. Click Loan Calculator tab.
2. In the Parameters section, select Calculate Interest Rate.
3. Specify the required information. (Refer the section Calculating Loan Payment in this chapter for more information.)
4. After you specify all the required information click calculate.The system computes the payment change schedule.
You can perform the following activities when the Interest Rate is calculated:
Creating an amortized schedule of payments (Applications window)
Copying the Interest Rate Calculations to the Decision tab (underwriting)
Copying the Interest Calculations to the Contract tab (funding)
10.1.5 Calculating Term
The Calculate Term mode back-calculates the term and the APR using the amount financed and standard payment. It also provides the amortization schedule of the loan.
To calculate an Interest Rate
1. Click Loan Calculator tab.
2. In the Parameters section, select Calculate Term.
3. Specify the required information. (Refer the section Calculating Loan Payment in this chapter for more information.)
Note
Depending on the selected parameter, the system enables or disables the fields.
4. After you specify all the required information click calculate.The system computes the payment change schedule.
You can perform the following activities when the term is calculated:
Creating an amortized schedule of payments (Applications window)
Copying the term calculations to the Decision link (underwriting)
Copying the interest calculations to the Contract link (funding)
Principal Amt Component of the payment amount allocated towards reduction of the principal balance.
Interest Amt Component of the payment amount allocated towards reduction of the interest balance.
Balance Amt Remaining principal balance.
Field: View this:
10-7
The system will use this information during the funding process when you select an instrument.
10.1.6 Calculating Loan Amount
The Calculate Loan Amount calculates the loan affordability of a customer based on the term, payment amount, and the rate quoted.
To calculate an Interest Rate,
1. Click Loan Calculator tab.
2. In the Parameters section, select Calculate Loan Amount.
3. Specify the required information. (Refer the section Calculating Loan Payment in this chapter for more information.)
Note
Depending on the selected parameter, the system enables or disables the fields.
4. After you specify all the required information click calculate.The system computes the payment change schedule.
You can perform the following activities when the Interest Rate is calculated:
Creating an amortized schedule of payments (Applications)
Copying the loan amount calculations to the Decision link (underwriting)
Copying the loan amount calculations to the Contract link (funding)
The system calculates the Base Monthly Payment (=) field on the Lease Details section.
To calculate a rate/rent factor
1. In the Lease Calculator section, click Calculate Rate/Rent Factor, then click Initialize. You can refer to the above section for updating information in the required fields.
2. In the Lease Calculator section, click Calculate.
The system calculates the Rate field on the Lease Details section.
To calculate a residual percent
1. In the Lease Calculator section, click Calculate Residual Percent, then click Initialize. You can refer to the above section for updating information in the required fields.
2. In the Lease Calculator section, click Calculate.
The system calculates the Residual% field on the Lease Details section.
To calculate a gross capitalized cost
1. In the Lease Calculator section, click Calculate Gross Capitalized Cost, then click Initialize. You can refer to the above section for updating information in the required fields.
2. In the Lease Calculator section, click Calculate.
The system calculates the Gross Capitalized Cost field on the Lease Details section.
10.2 Vehicle Evaluator
The Vehicle Evaluator screen allows you to calculate the value of a vehicle.
10-8
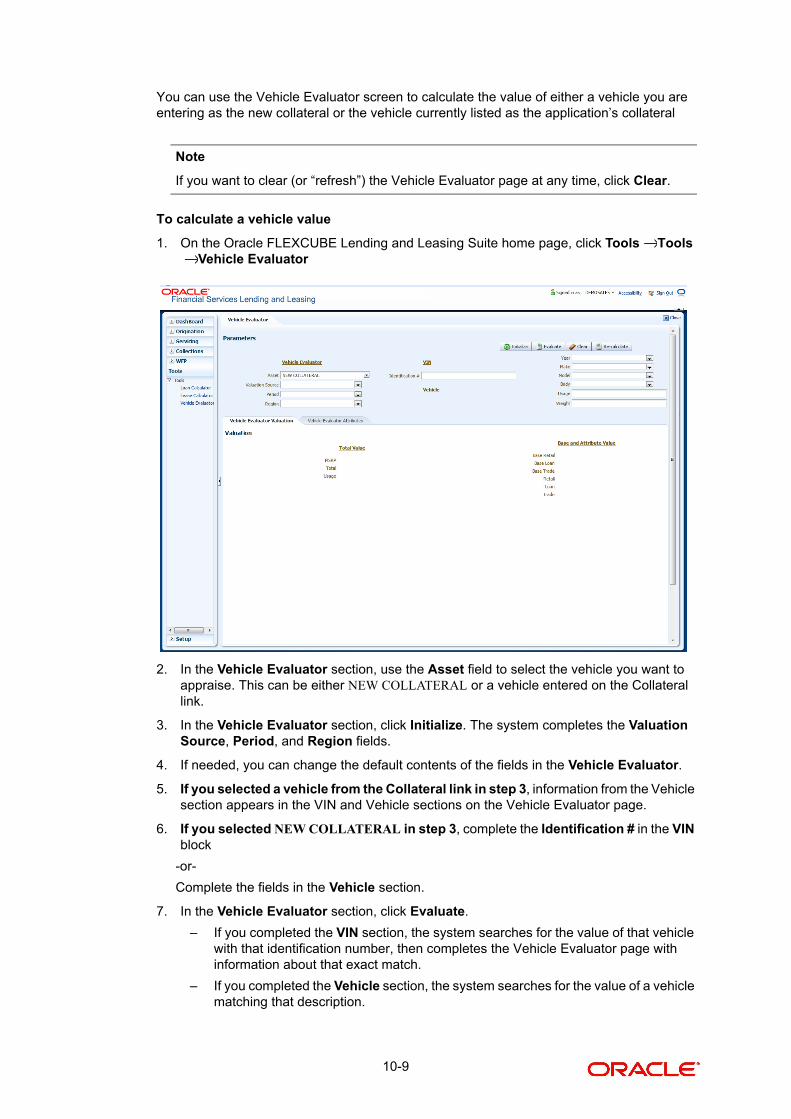
You can use the Vehicle Evaluator screen to calculate the value of either a vehicle you are entering as the new collateral or the vehicle currently listed as the application’s collateral
Note
If you want to clear (or “refresh”) the Vehicle Evaluator page at any time, click Clear.
To calculate a vehicle value
1. On the Oracle FLEXCUBE Lending and Leasing Suite home page, click Tools Tools Vehicle Evaluator
2. In the Vehicle Evaluator section, use the Asset field to select the vehicle you want to appraise. This can be either NEW COLLATERAL or a vehicle entered on the Collateral link.
3. In the Vehicle Evaluator section, click Initialize. The system completes the Valuation Source, Period, and Region fields.
4. If needed, you can change the default contents of the fields in the Vehicle Evaluator.
5. If you selected a vehicle from the Collateral link in step 3, information from the Vehicle section appears in the VIN and Vehicle sections on the Vehicle Evaluator page.
6. If you selected NEW COLLATERAL in step 3, complete the Identification # in the VIN block
-or-
Complete the fields in the Vehicle section.
7. In the Vehicle Evaluator section, click Evaluate.
– If you completed the VIN section, the system searches for the value of that vehicle with that identification number, then completes the Vehicle Evaluator page with information about that exact match.
– If you completed the Vehicle section, the system searches for the value of a vehicle matching that description.
→→
10-9
– In either case, the system displays the following information about the vehicle:
– In the Vehicle section, view the returned information:
In the Valuation (Total Value) block, view the returned information:
In the Base and Attribute Value section, view the returned information:
In the Attributes section, view the following information:.
Field: View this:
Year The asset year.
Make The asset make.
Model The asset model.
Body The asset body style.
Usage The asset usage or current mileage.
Weight The asset weight.
Field: View this:
MSRP Manufacturer’s suggested retail price value of the asset.
Total Total value of the asset.
Usage Adjusted usage value of the asset.
Field: View this:
Base Retail Total retail value of the asset.
Base Loan Base loan value of the asset.
Base Trade Base trade value of the asset.
Retail Retail value of the asset attributes.
Loan Loan value of the asset attributes.
Trade Base trade value of the asset attributes.
Field: View this:
Attribute Asset attribute.
Retail Attribute retail value.
Loan Attribute loan value.
Trade Attribute trade value.
Standard Standard indicator. If selected, indicates that the attribute is a standard.
Package Incl If selected, indicates that the attribute is inclusive.
10-10
Note
If you want to re-calculate the values in the Total Value and Base and Attribute Value section using other data, make changes to the desired fields in the Valuation Source field and VIN and Vehicle sections, then in the Vehicle Evaluator section, click Recalculate.
The system updates the values in the Total Value and Base and Attribute Value sec-tions.
8. If you choose, use the Attributes section to select or clear the Selected box for attributes of the vehicle. This automatically updates the values in the Total Value and Base and Attribute Value sections. (Note: Attribute amounts within brackets reduce the amount in the Totals field in the Total Value section.)
To copy the calculated value to the Collateral link
1. Complete the following steps in the section To calculate a vehicle value.
2. In the Vehicle Evaluator page, click Copy to Asset.
The system uses the calculations on the Vehicle Evaluator page to complete the Valuation sub page on the Collateral link. Any pre-existing collateral is no longer the primary collateral.
Selected If selected, indicates that the attribute is selected.
Field: View this:
10-11

11. Oracle Financial Services Lending and LeasingSuite Reports
During the day, or at the end of the day, you may want to retrieve information on any of the several operations that were performed during the day in your financial institution. You can generate this information in the form of reports in Oracle Financial Services Lending and Leasing. You can specify the values in the Report Parameters section and generate a report using that information.
Navigation to Reports
On the Oracle Financial Services Lending and Leasing home page, click Servicing Servicing Reports.
11.1 Accounts Payable Log By Customer
This servicing report lists accounts payables, sorted by customer.
Parameters:
Company/Branch
From MM/DD/YYYY
To MM/DD/YYYY
Report Format
→ →
11-1
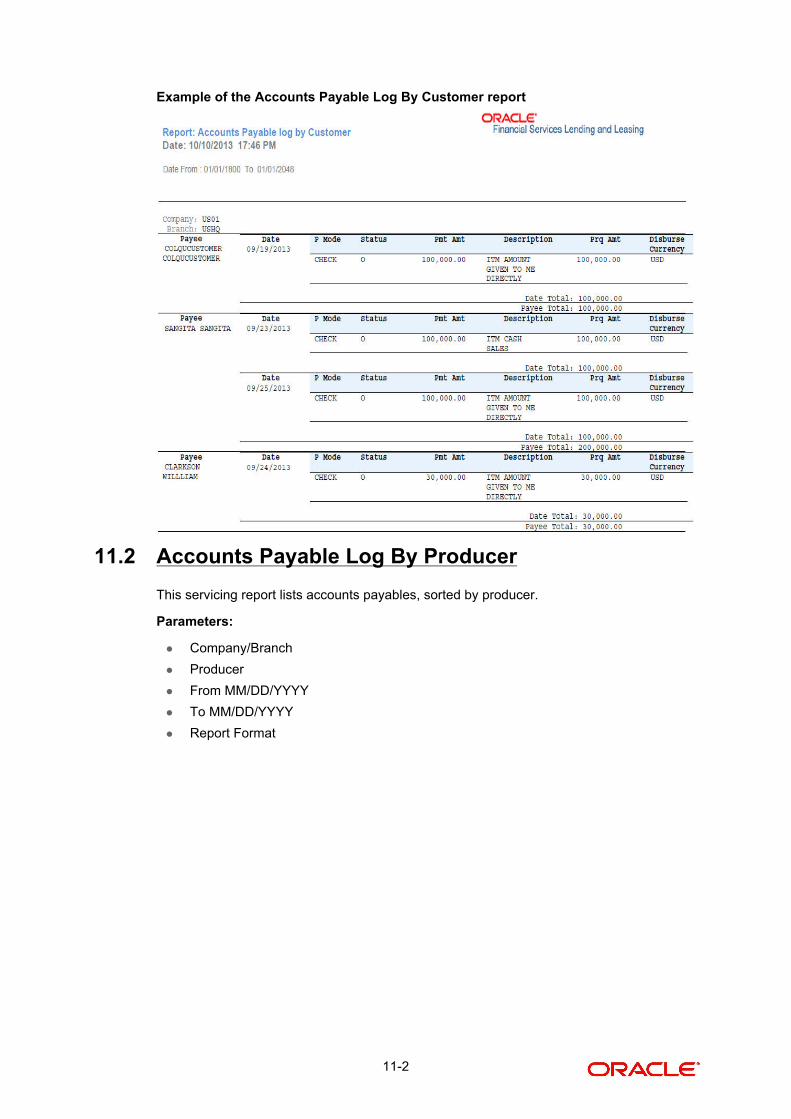
Example of the Accounts Payable Log By Customer report
11.2 Accounts Payable Log By Producer
This servicing report lists accounts payables, sorted by producer.
Parameters:
Company/Branch
Producer
From MM/DD/YYYY
To MM/DD/YYYY
Report Format
11-2
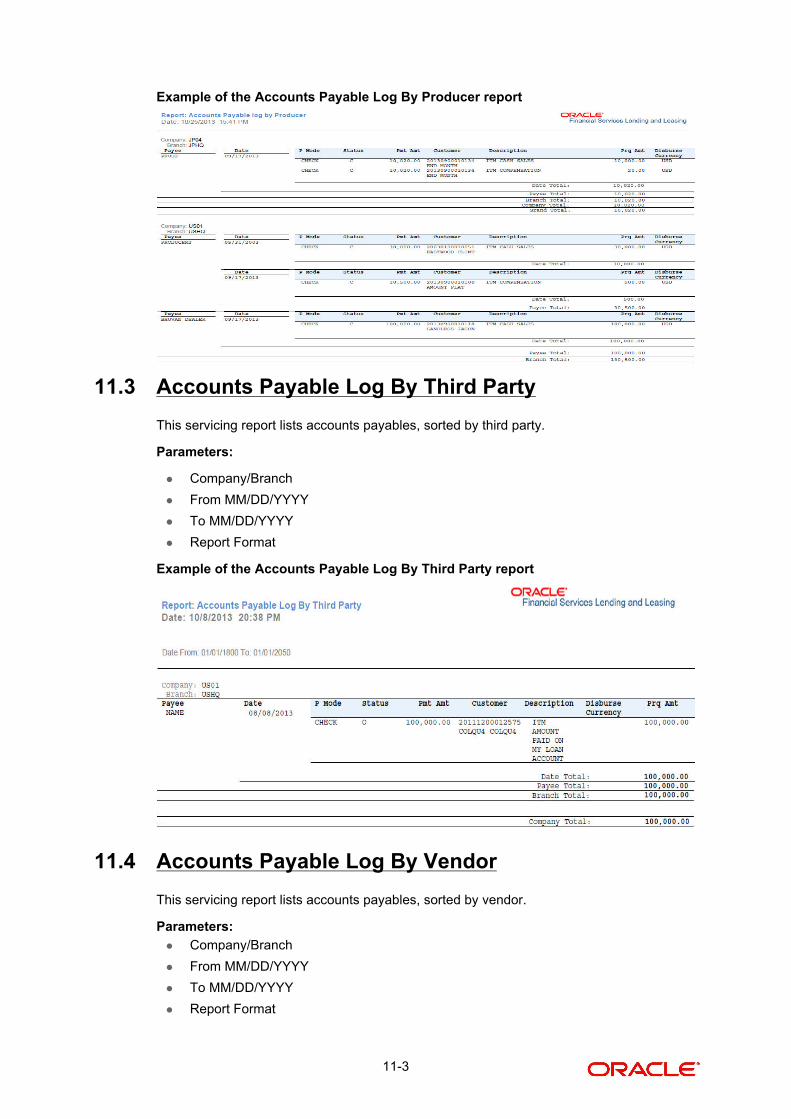
Example of the Accounts Payable Log By Producer report
11.3 Accounts Payable Log By Third Party
This servicing report lists accounts payables, sorted by third party.
Parameters:
Company/Branch
From MM/DD/YYYY
To MM/DD/YYYY
Report Format
Example of the Accounts Payable Log By Third Party report
11.4 Accounts Payable Log By Vendor
This servicing report lists accounts payables, sorted by vendor.
Parameters:
Company/Branch
From MM/DD/YYYY
To MM/DD/YYYY
Report Format
11-3
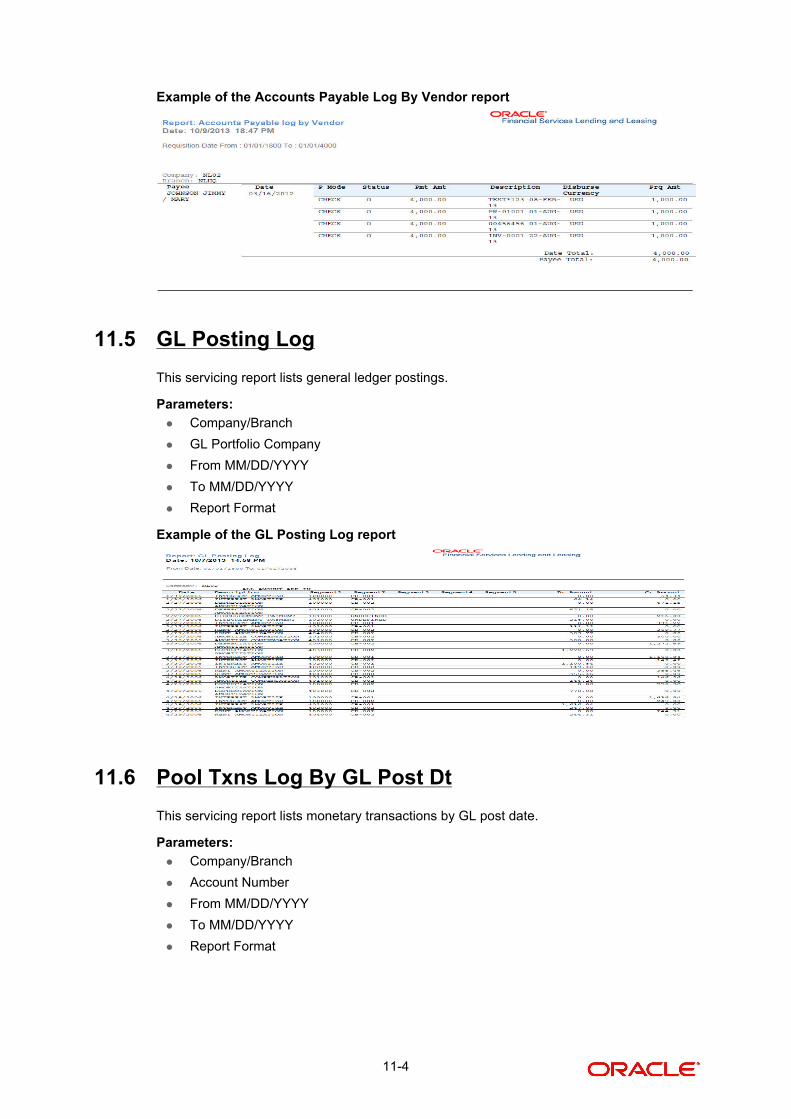
Example of the Accounts Payable Log By Vendor report
11.5 GL Posting Log
This servicing report lists general ledger postings.
Parameters:
Company/Branch
GL Portfolio Company
From MM/DD/YYYY
To MM/DD/YYYY
Report Format
Example of the GL Posting Log report
11.6 Pool Txns Log By GL Post Dt
This servicing report lists monetary transactions by GL post date.
Parameters:
Company/Branch
Account Number
From MM/DD/YYYY
To MM/DD/YYYY
Report Format
11-4
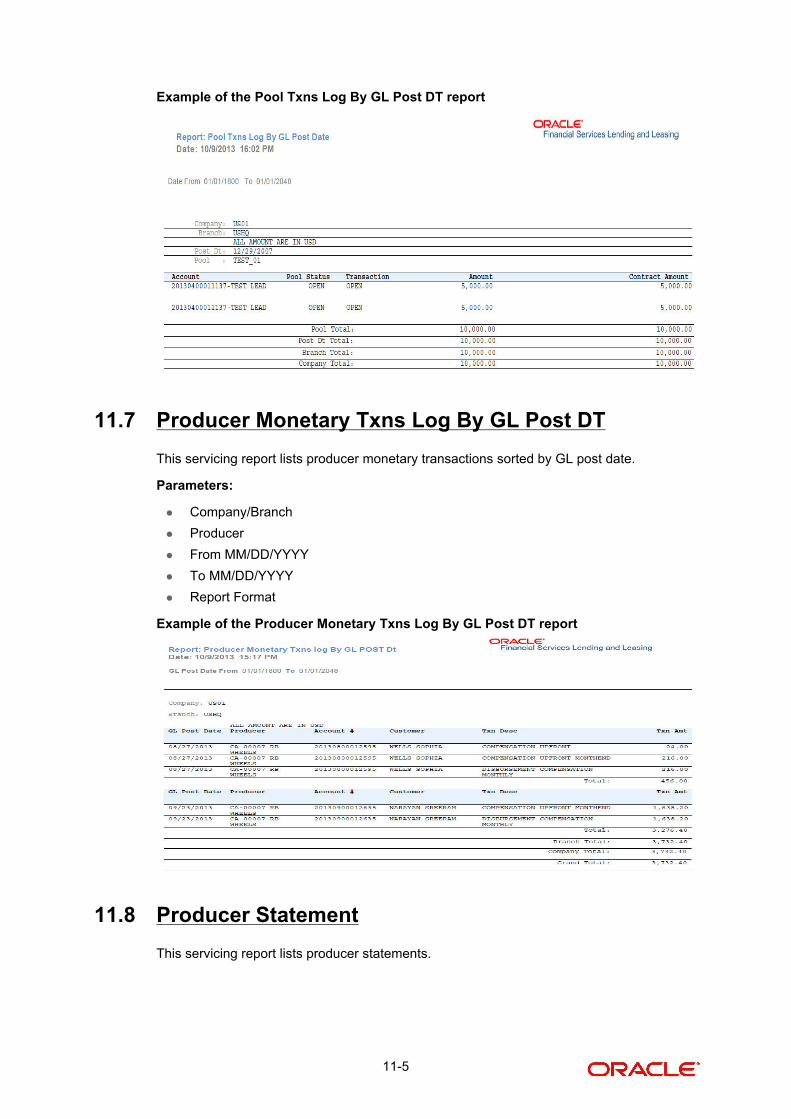
Example of the Pool Txns Log By GL Post DT report
11.7 Producer Monetary Txns Log By GL Post DT
This servicing report lists producer monetary transactions sorted by GL post date.
Parameters:
Company/Branch
Producer
From MM/DD/YYYY
To MM/DD/YYYY
Report Format
Example of the Producer Monetary Txns Log By GL Post DT report
11.8 Producer Statement
This servicing report lists producer statements.
11-5
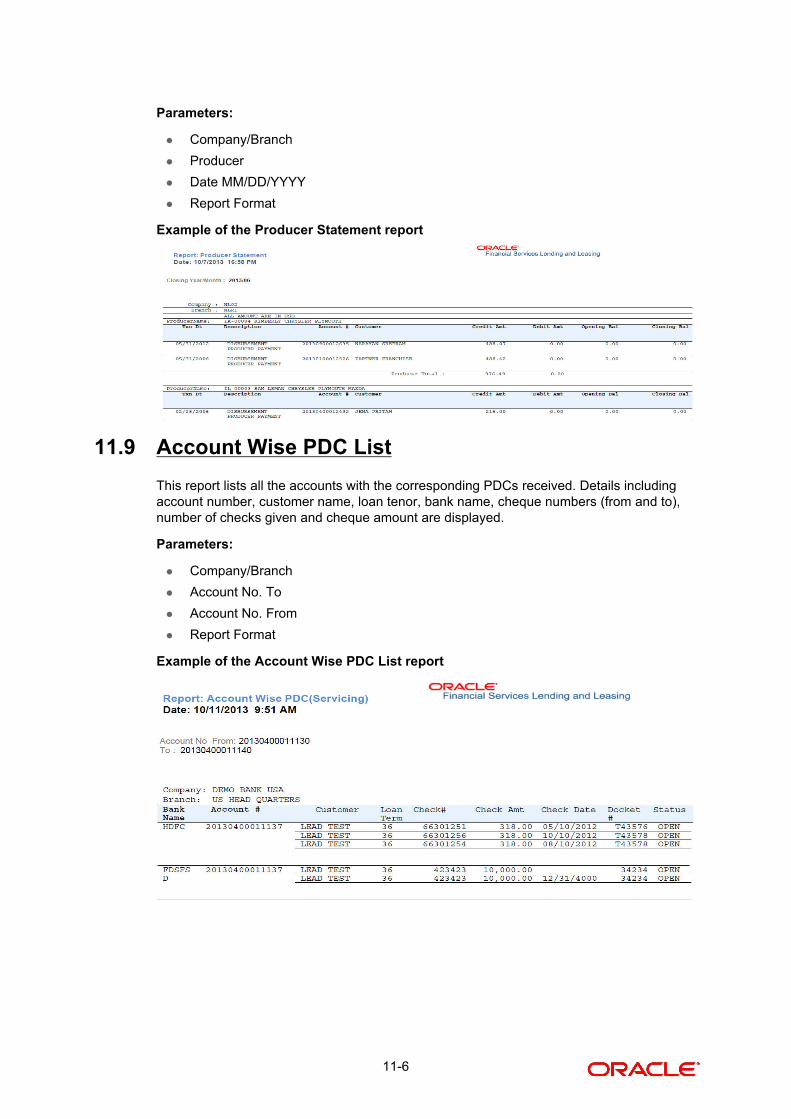
Parameters:
Company/Branch
Producer
Date MM/DD/YYYY
Report Format
Example of the Producer Statement report
11.9 Account Wise PDC List
This report lists all the accounts with the corresponding PDCs received. Details including account number, customer name, loan tenor, bank name, cheque numbers (from and to), number of checks given and cheque amount are displayed.
Parameters:
Company/Branch
Account No. To
Account No. From
Report Format
Example of the Account Wise PDC List report
11-6
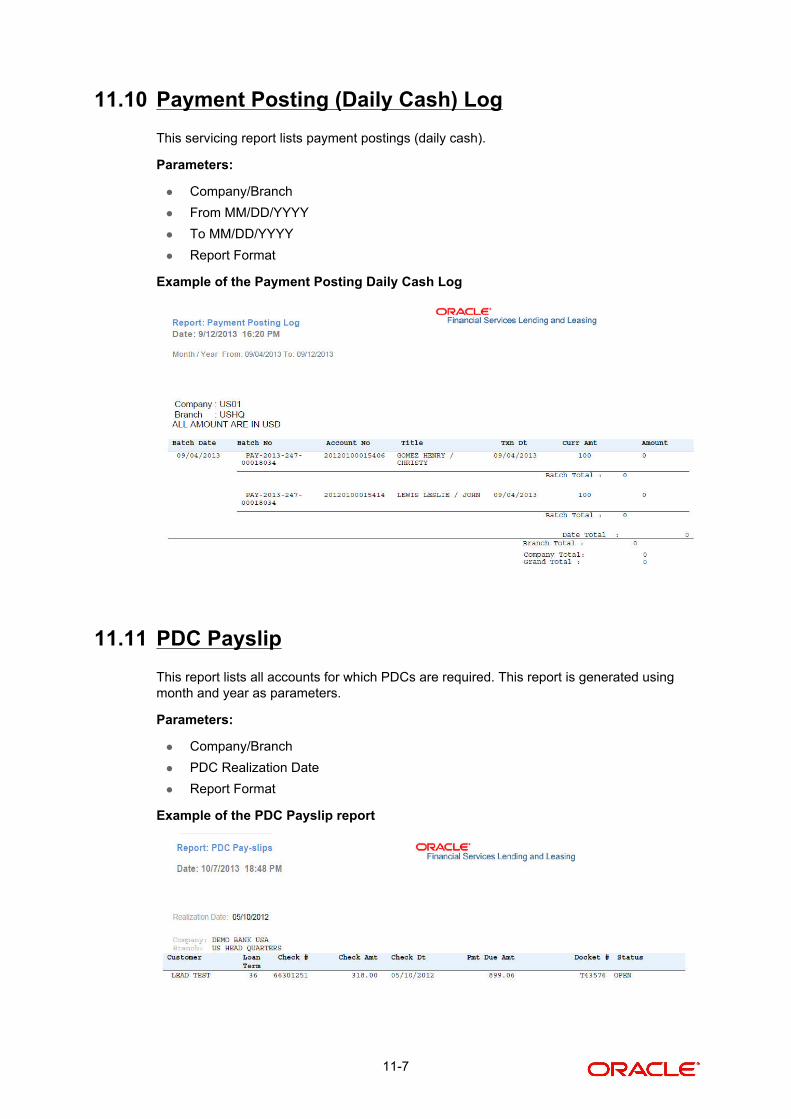
11.10 Payment Posting (Daily Cash) Log
This servicing report lists payment postings (daily cash).
Parameters:
Company/Branch
From MM/DD/YYYY
To MM/DD/YYYY
Report Format
Example of the Payment Posting Daily Cash Log
11.11 PDC Payslip
This report lists all accounts for which PDCs are required. This report is generated using month and year as parameters.
Parameters:
Company/Branch
PDC Realization Date
Report Format
Example of the PDC Payslip report
11-7
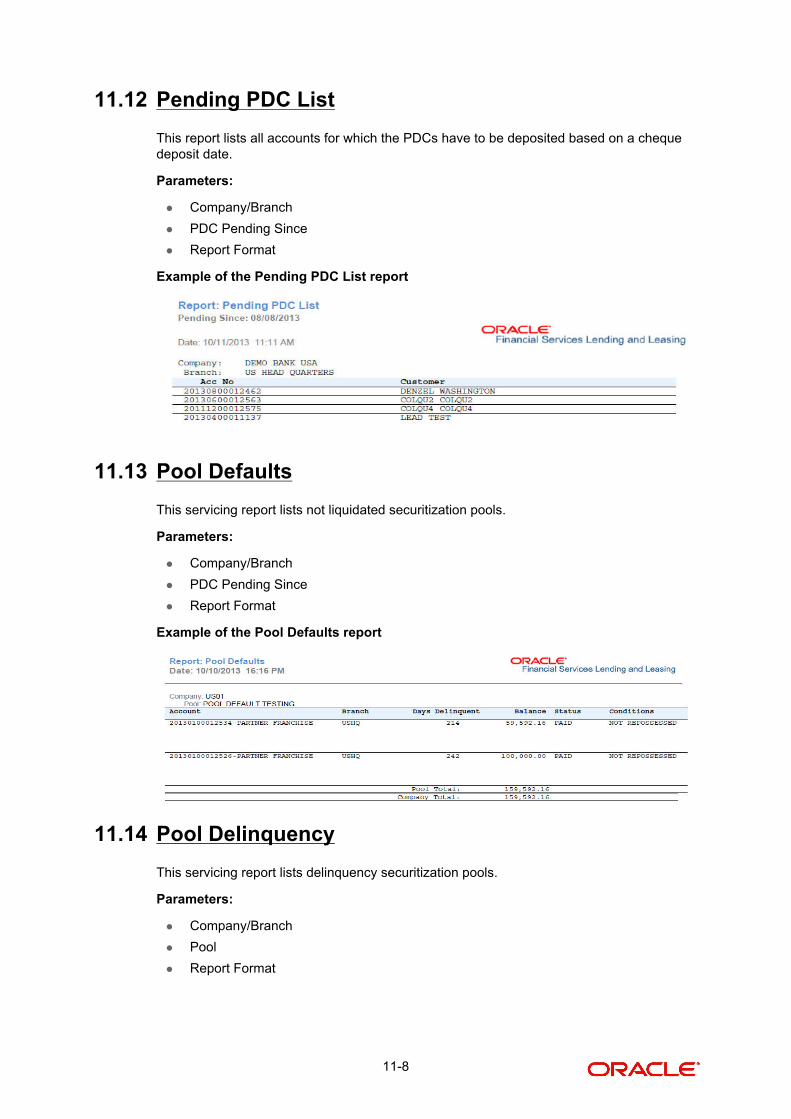
11.12 Pending PDC List
This report lists all accounts for which the PDCs have to be deposited based on a cheque deposit date.
Parameters:
Company/Branch
PDC Pending Since
Report Format
Example of the Pending PDC List report
11.13 Pool Defaults
This servicing report lists not liquidated securitization pools.
Parameters:
Company/Branch
PDC Pending Since
Report Format
Example of the Pool Defaults report
11.14 Pool Delinquency
This servicing report lists delinquency securitization pools.
Parameters:
Company/Branch
Pool
Report Format
11-8
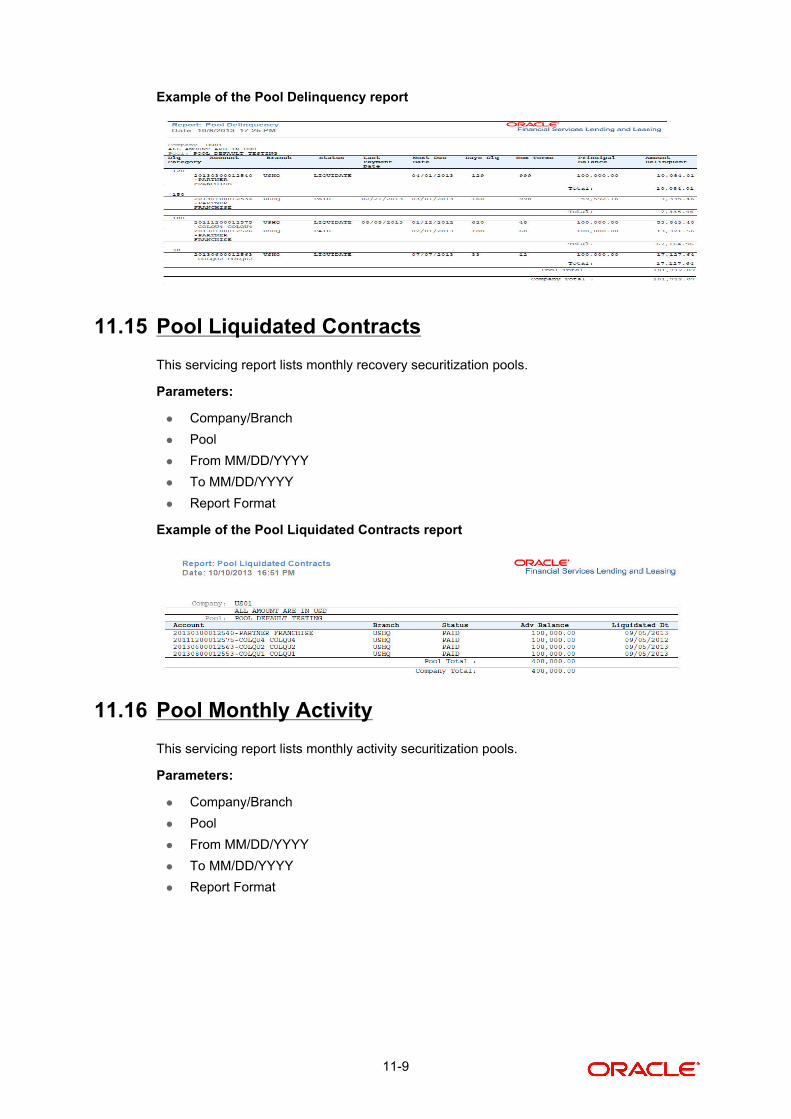
Example of the Pool Delinquency report
11.15 Pool Liquidated Contracts
This servicing report lists monthly recovery securitization pools.
Parameters:
Company/Branch
Pool
From MM/DD/YYYY
To MM/DD/YYYY
Report Format
Example of the Pool Liquidated Contracts report
11.16 Pool Monthly Activity
This servicing report lists monthly activity securitization pools.
Parameters:
Company/Branch
Pool
From MM/DD/YYYY
To MM/DD/YYYY
Report Format
11-9
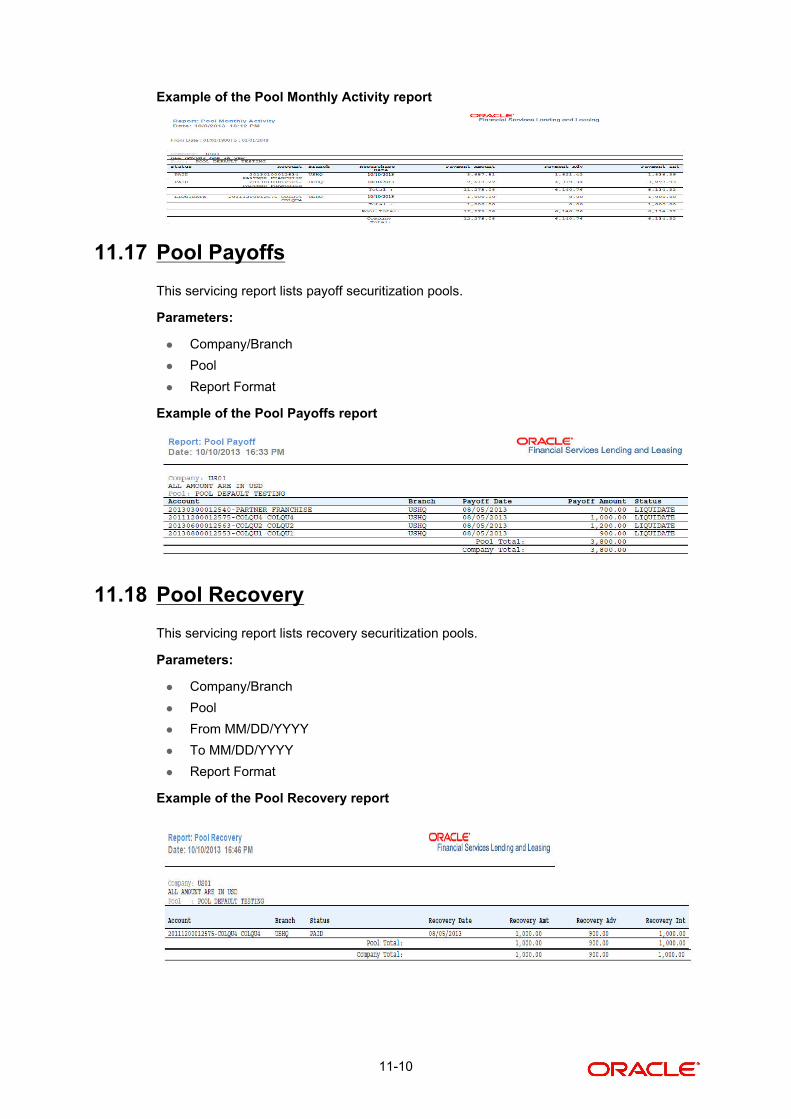
Example of the Pool Monthly Activity report
11.17 Pool Payoffs
This servicing report lists payoff securitization pools.
Parameters:
Company/Branch
Pool
Report Format
Example of the Pool Payoffs report
11.18 Pool Recovery
This servicing report lists recovery securitization pools.
Parameters:
Company/Branch
Pool
From MM/DD/YYYY
To MM/DD/YYYY
Report Format
Example of the Pool Recovery report
11-10
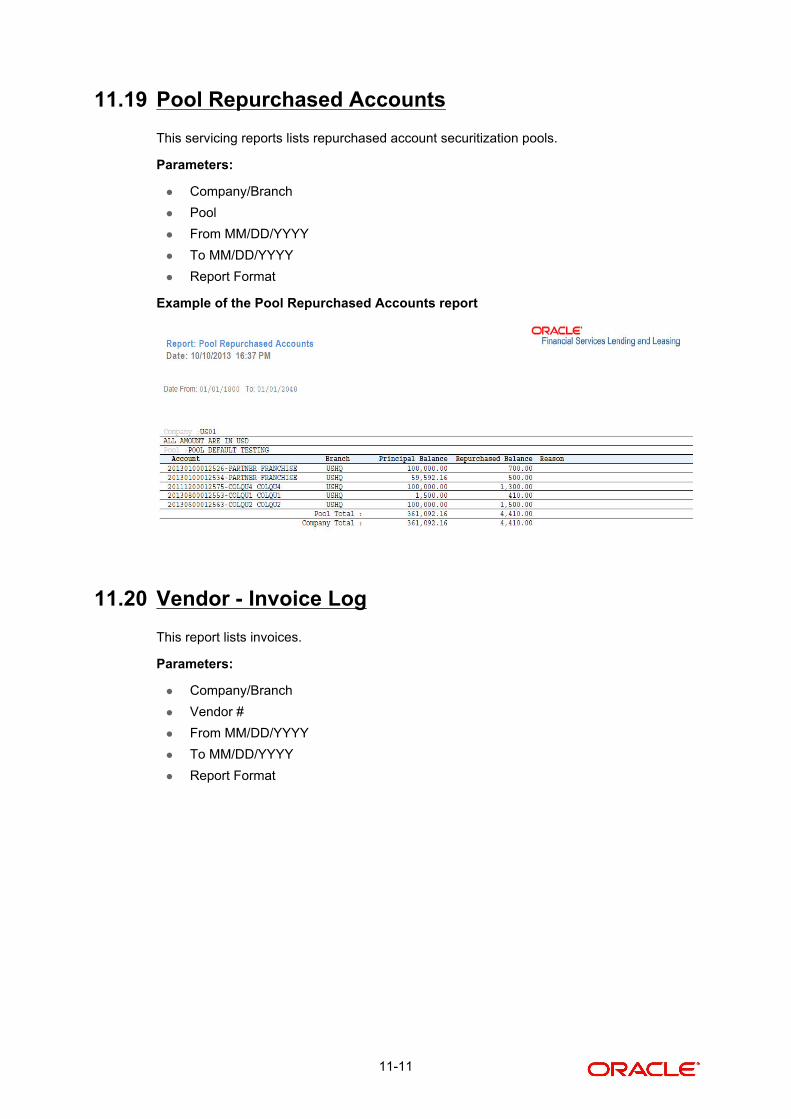
11.19 Pool Repurchased Accounts
This servicing reports lists repurchased account securitization pools.
Parameters:
Company/Branch
Pool
From MM/DD/YYYY
To MM/DD/YYYY
Report Format
Example of the Pool Repurchased Accounts report
11.20 Vendor - Invoice Log
This report lists invoices.
Parameters:
Company/Branch
Vendor #
From MM/DD/YYYY
To MM/DD/YYYY
Report Format
11-11
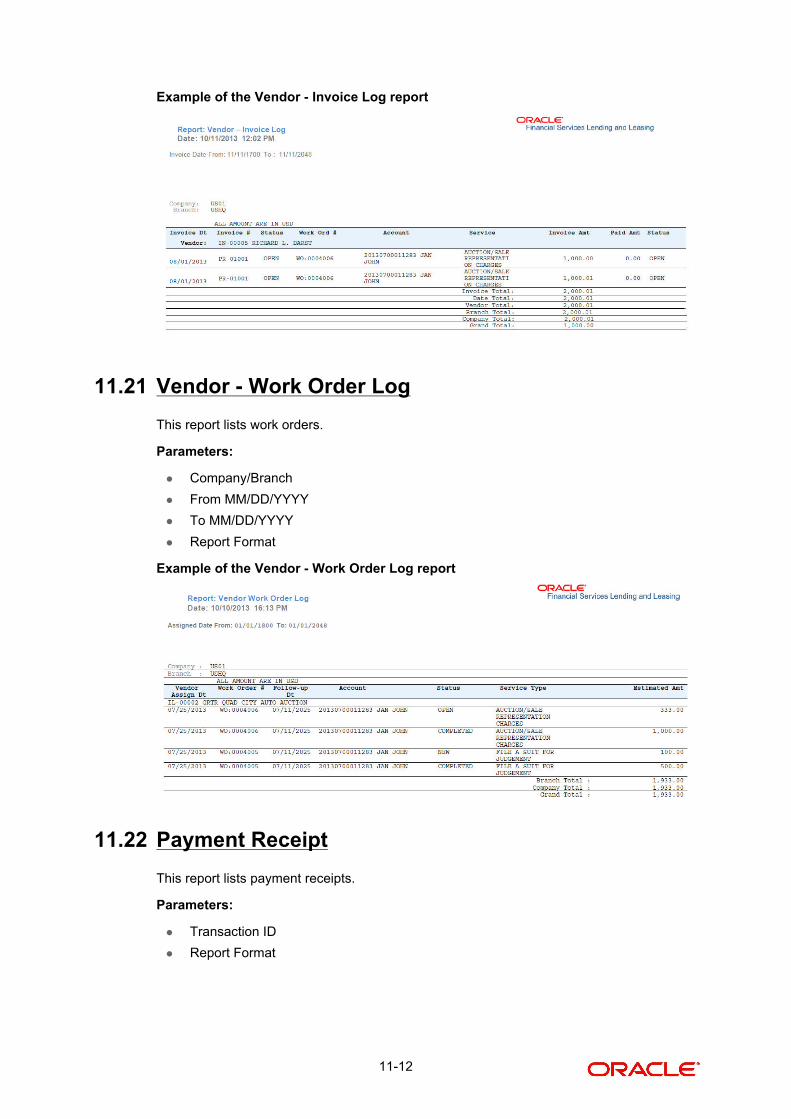
Example of the Vendor - Invoice Log report
11.21 Vendor - Work Order Log
This report lists work orders.
Parameters:
Company/Branch
From MM/DD/YYYY
To MM/DD/YYYY
Report Format
Example of the Vendor - Work Order Log report
11.22 Payment Receipt
This report lists payment receipts.
Parameters:
Transaction ID
Report Format
11-12
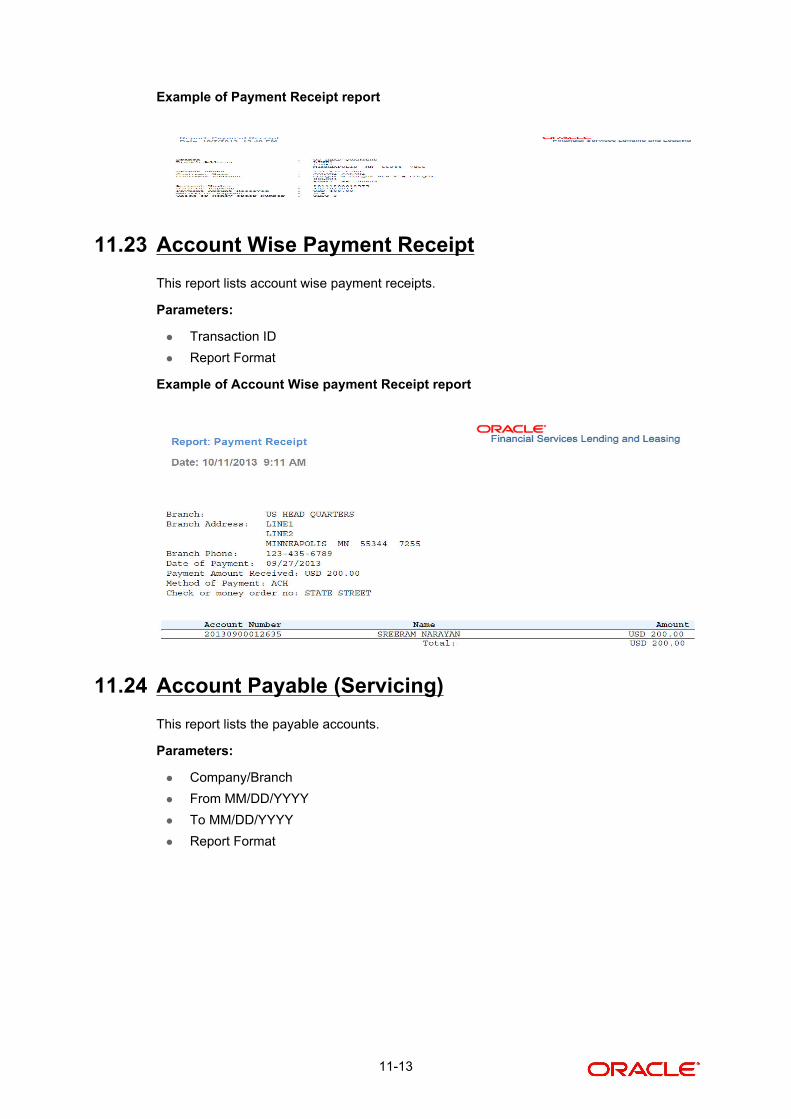
Example of Payment Receipt report
11.23 Account Wise Payment Receipt
This report lists account wise payment receipts.
Parameters:
Transaction ID
Report Format
Example of Account Wise payment Receipt report
11.24 Account Payable (Servicing)
This report lists the payable accounts.
Parameters:
Company/Branch
From MM/DD/YYYY
To MM/DD/YYYY
Report Format
11-13
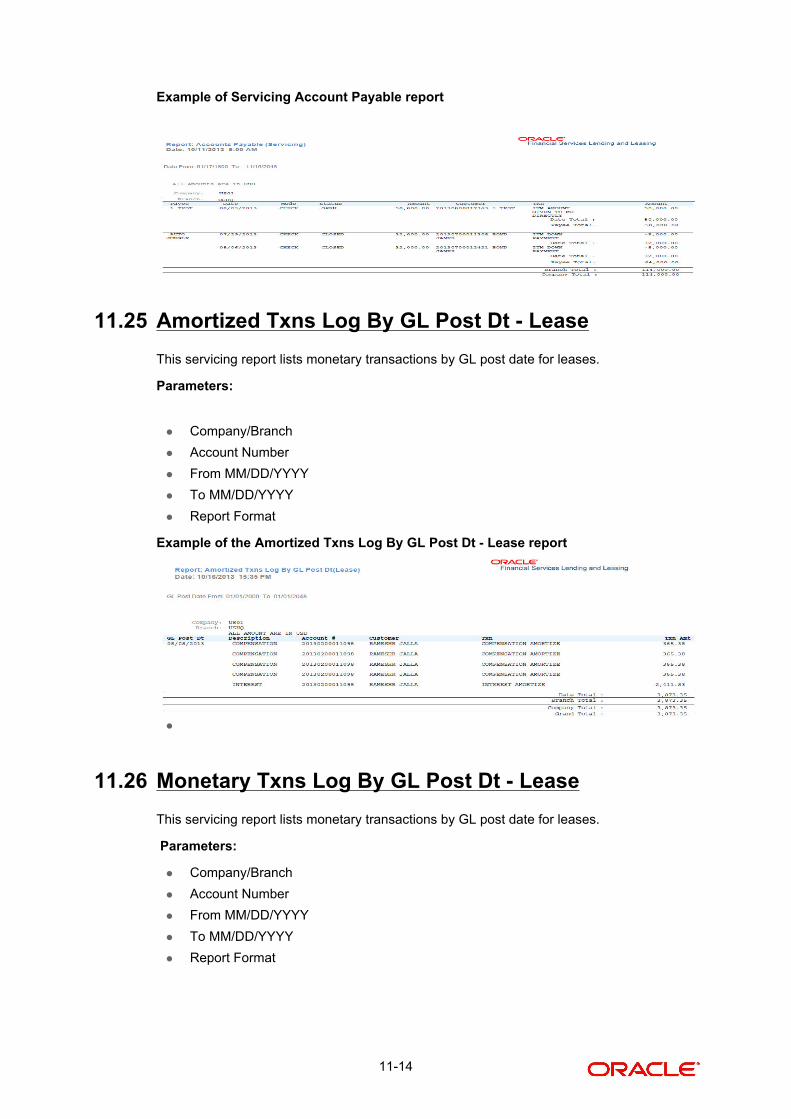
Example of Servicing Account Payable report
11.25 Amortized Txns Log By GL Post Dt - Lease
This servicing report lists monetary transactions by GL post date for leases.
Parameters:
Company/Branch
Account Number
From MM/DD/YYYY
To MM/DD/YYYY
Report Format
Example of the Amortized Txns Log By GL Post Dt - Lease report
11.26 Monetary Txns Log By GL Post Dt - Lease
This servicing report lists monetary transactions by GL post date for leases.
Parameters:
Company/Branch
Account Number
From MM/DD/YYYY
To MM/DD/YYYY
Report Format
11-14
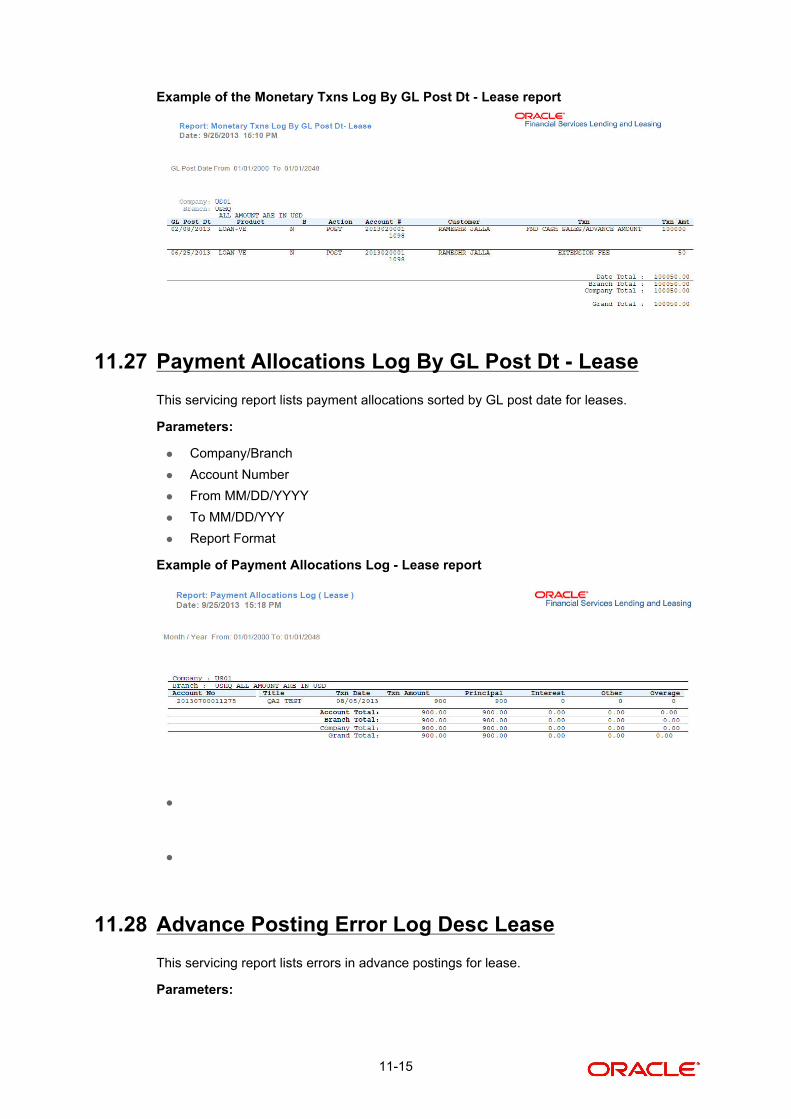
Example of the Monetary Txns Log By GL Post Dt - Lease report
11.27 Payment Allocations Log By GL Post Dt - Lease
This servicing report lists payment allocations sorted by GL post date for leases.
Parameters:
Company/Branch
Account Number
From MM/DD/YYYY
To MM/DD/YYY
Report Format
Example of Payment Allocations Log - Lease report
11.28 Advance Posting Error Log Desc Lease
This servicing report lists errors in advance postings for lease.
Parameters:
11-15
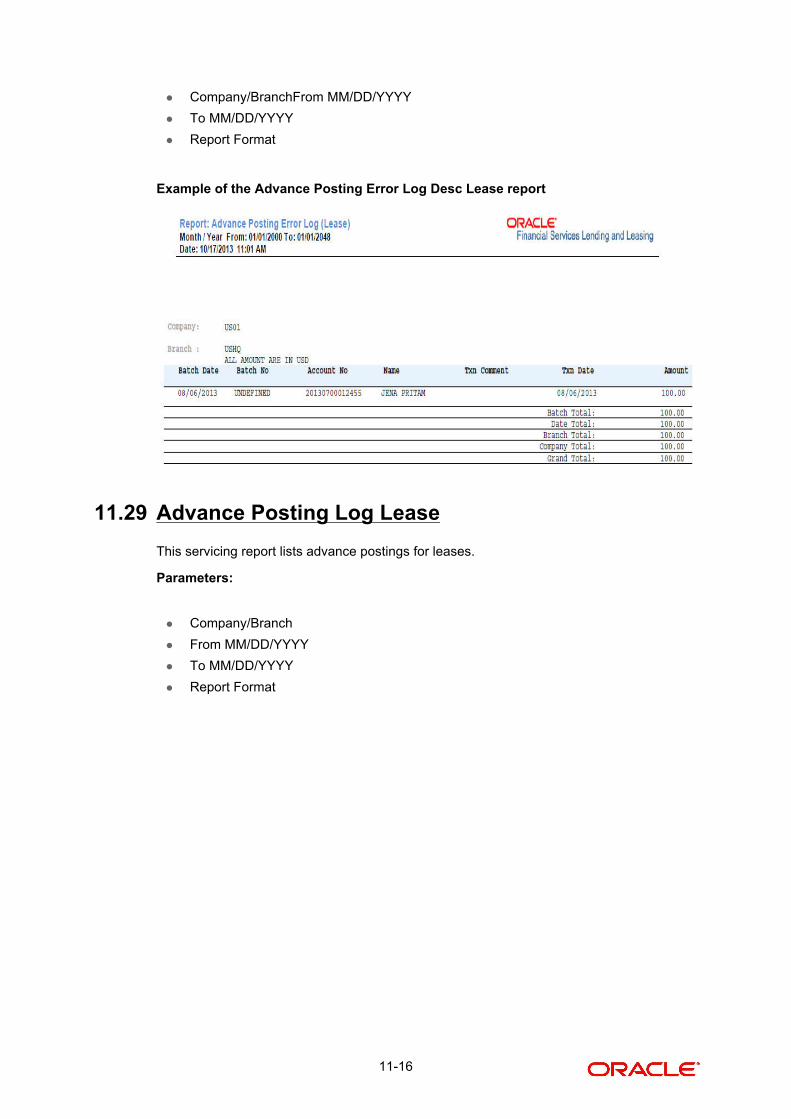
Company/BranchFrom MM/DD/YYYY
To MM/DD/YYYY
Report Format
Example of the Advance Posting Error Log Desc Lease report
11.29 Advance Posting Log Lease
This servicing report lists advance postings for leases.
Parameters:
Company/Branch
From MM/DD/YYYY
To MM/DD/YYYY
Report Format
11-16
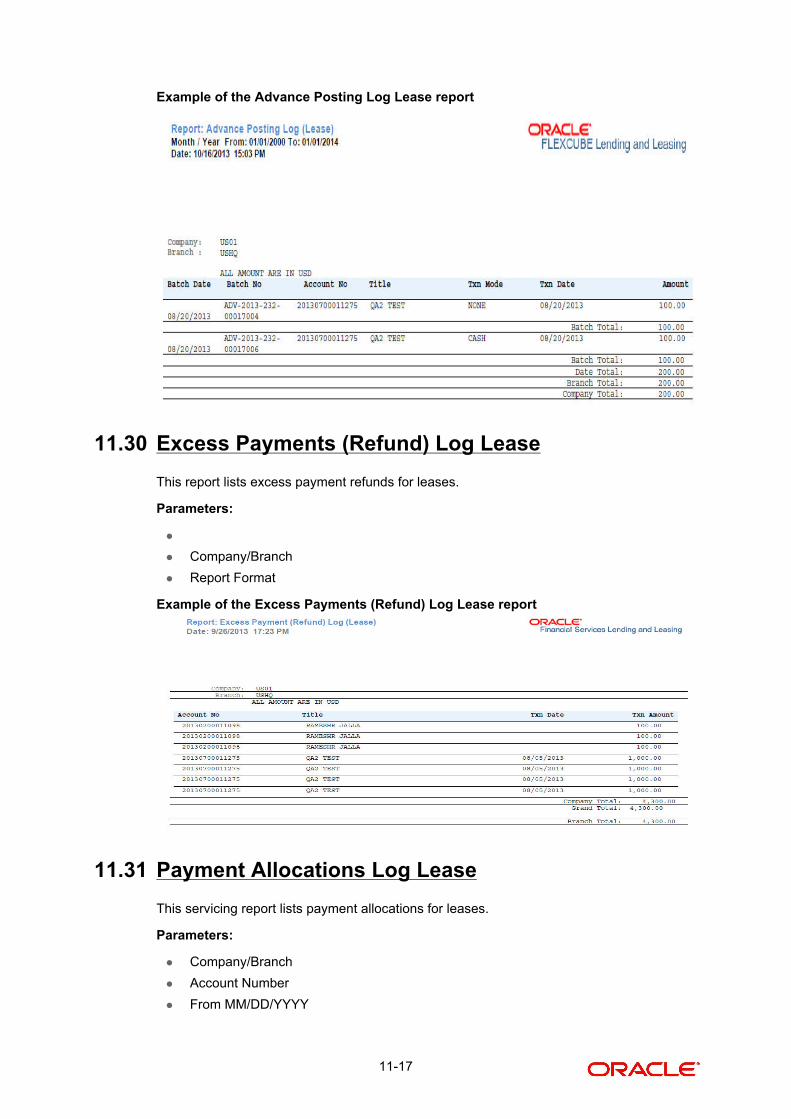
Example of the Advance Posting Log Lease report
11.30 Excess Payments (Refund) Log Lease
This report lists excess payment refunds for leases.
Parameters:
Company/Branch
Report Format
Example of the Excess Payments (Refund) Log Lease report
11.31 Payment Allocations Log Lease
This servicing report lists payment allocations for leases.
Parameters:
Company/Branch
Account Number
From MM/DD/YYYY
11-17
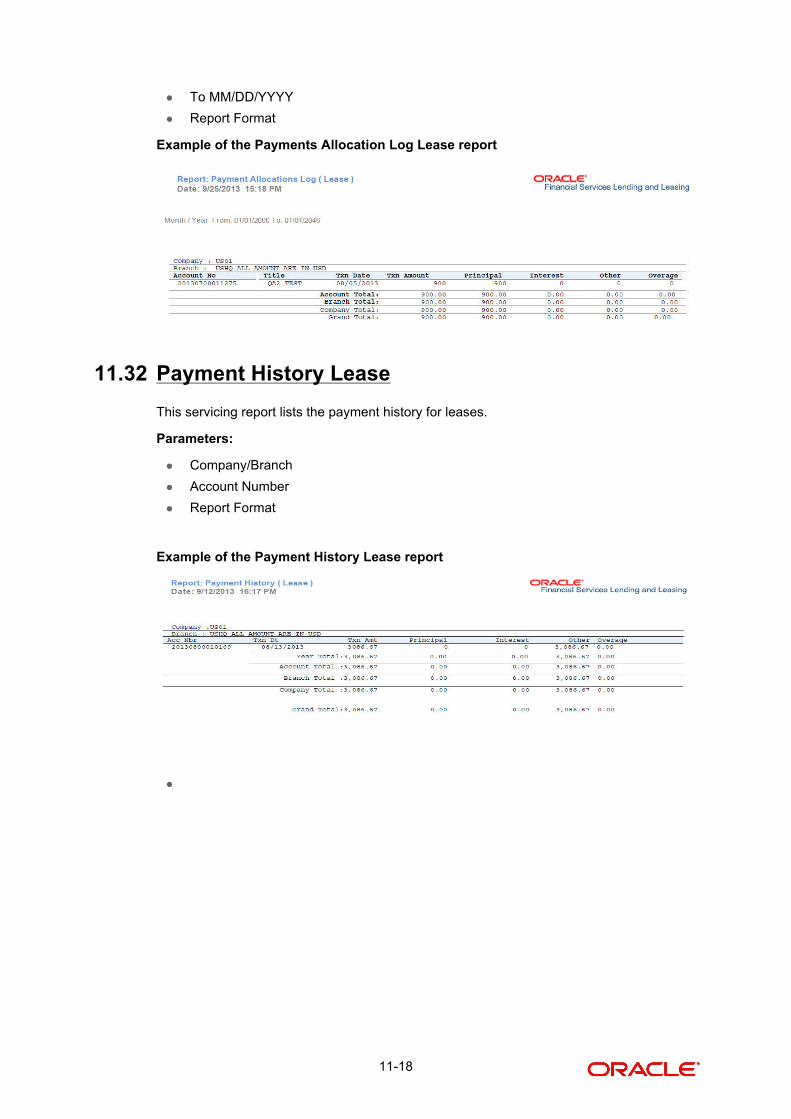
To MM/DD/YYYY
Report Format
Example of the Payments Allocation Log Lease report
11.32 Payment History Lease
This servicing report lists the payment history for leases.
Parameters:
Company/Branch
Account Number
Report Format
Example of the Payment History Lease report
11-18
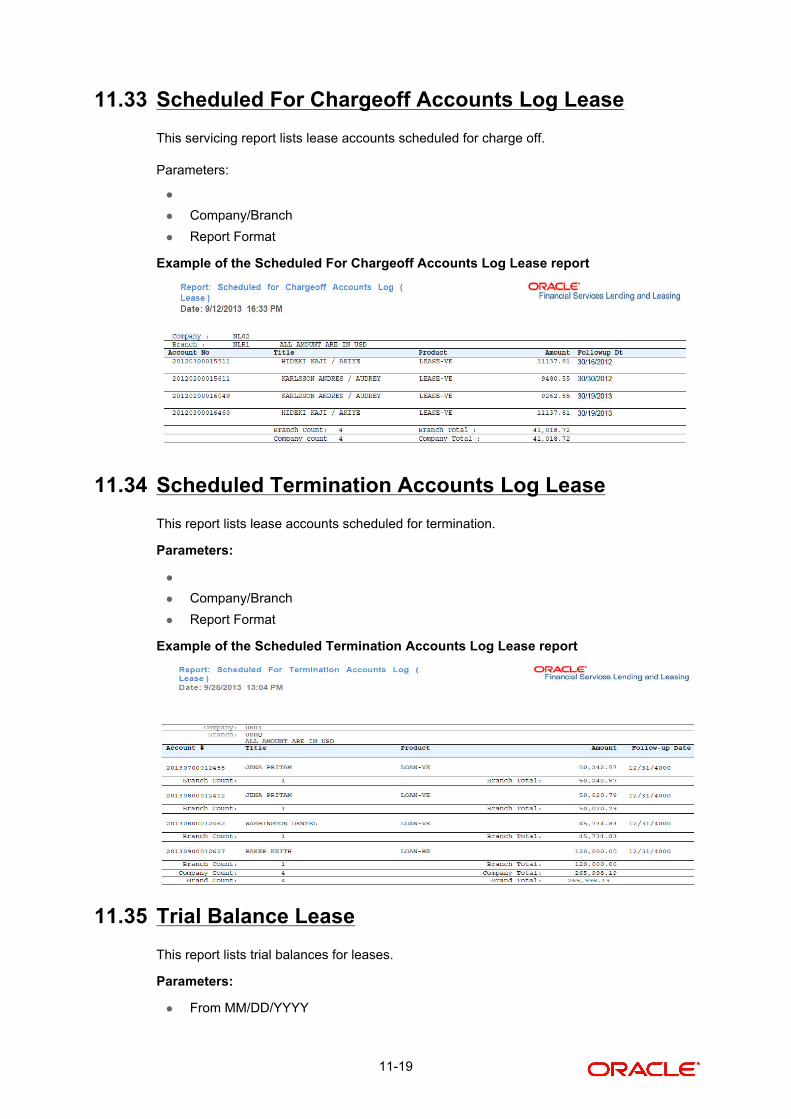
11.33 Scheduled For Chargeoff Accounts Log Lease
This servicing report lists lease accounts scheduled for charge off.
Parameters:
Company/Branch
Report Format
Example of the Scheduled For Chargeoff Accounts Log Lease report
11.34 Scheduled Termination Accounts Log Lease
This report lists lease accounts scheduled for termination.
Parameters:
Company/Branch
Report Format
Example of the Scheduled Termination Accounts Log Lease report
11.35 Trial Balance Lease
This report lists trial balances for leases.
Parameters:
From MM/DD/YYYY
11-19
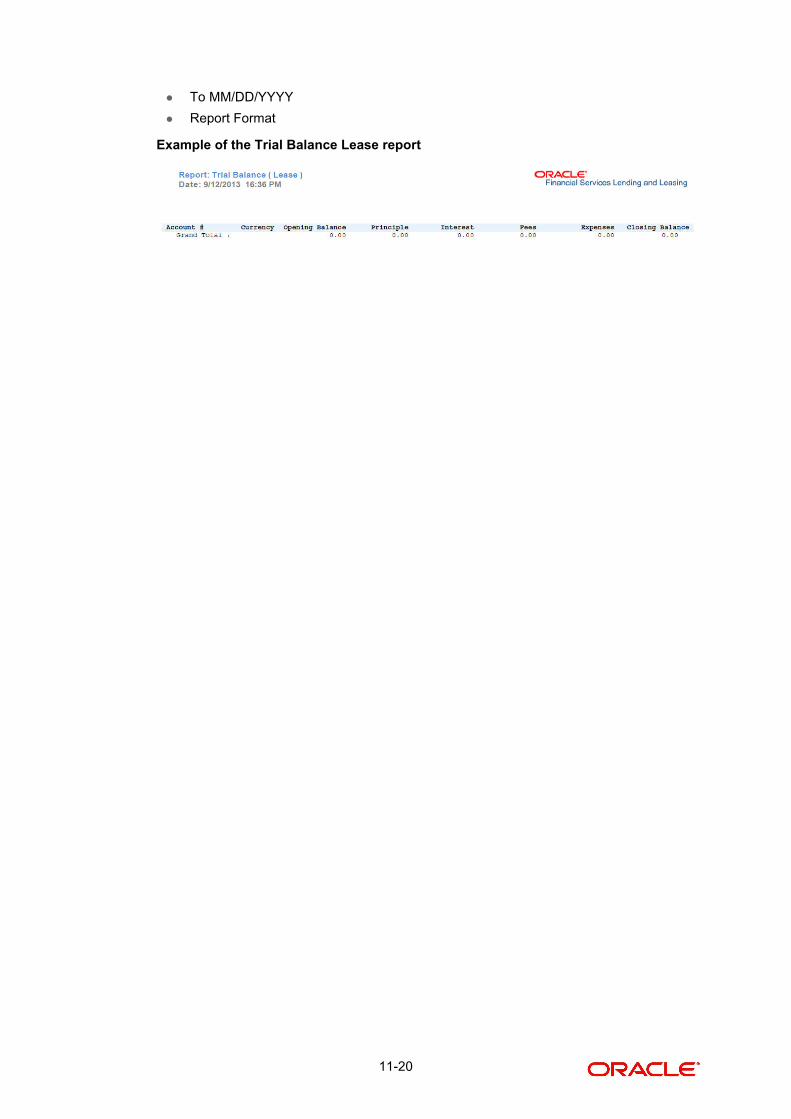
To MM/DD/YYYY
Report Format
Example of the Trial Balance Lease report
11-20
12. Producer
Oracle Financial Services Lending and Leasing can manage both direct and indirect loans. While direct loans are paid directly to the customer, indirect loans are paid through a third party. These third parties (dealerships, agents, and so on) are managed using the Producer Setup window.
Applications are sent to financial institutions indirectly through producers (or “dealers”) on behalf of the customer. The system associates a credit application with the producer who sent it, on the Application Entry, Underwriting, and Funding windows.
When the credit application is approved and funded, the system associates the account with the producer.
The system allows a variety of producers, such as dealers and agents. Producers can have three different statuses:
Active (producers can fund an application)
Inactive (producers cannot fund an application)
Temporary (producers can only review but cannot fund an application)
The producers are paid for their participation, either:
Up front during funding
-or-
Up front on a monthly basis
-or-
When the interest is earned
-or-
When the payment is received from the customer based on the set up compensation plans.
The Producer Setup window contains pages that enable you to maintain and administer producer compensation, compensation payments, charge back plans, and chargeback parameters.
While setting up the Producer Setup window, you will need to complete the Producer Cycles page under the Setup link, as well as the Producers Management page and Payment Details sub tabs on the Producer Details setup page.
While working with the Producer Setup page, you will primarily use the
1. Payment Details
2. Compensation
3. Subvention
4. Transactions
5. Tracking Attributes
6. Statements
7. Contracts
8. Comments
9. Summary
12-1
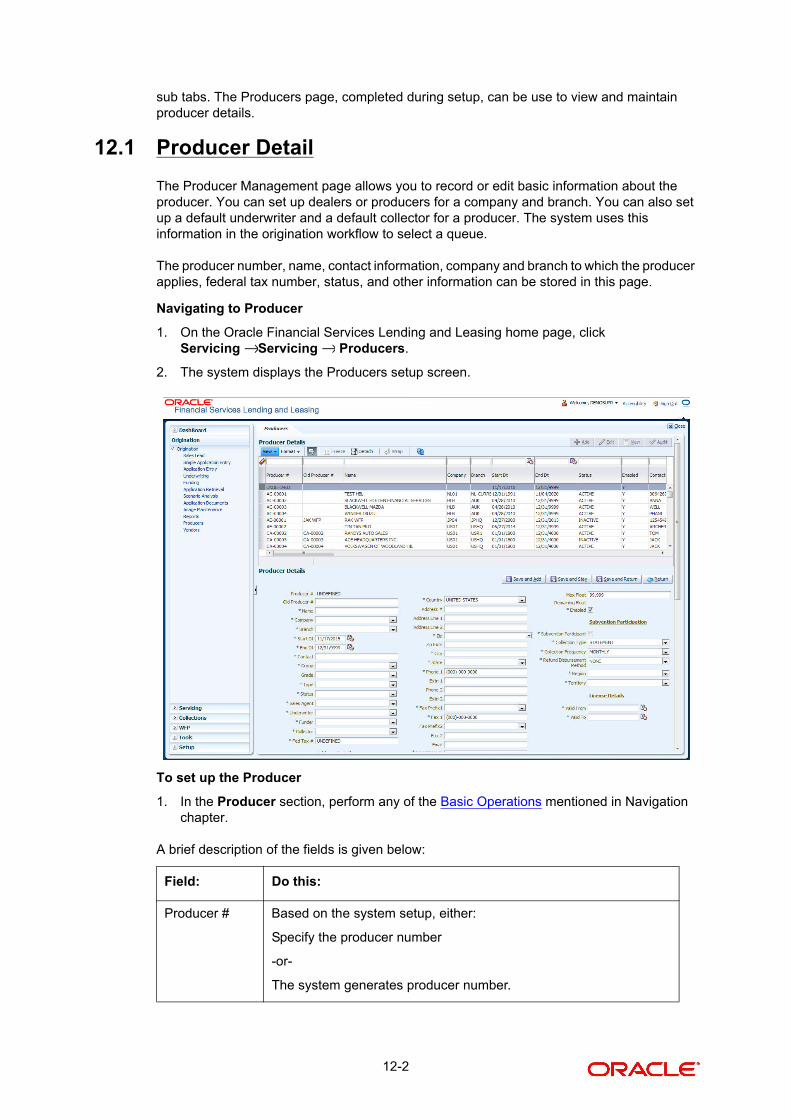
sub tabs. The Producers page, completed during setup, can be use to view and maintain producer details.
12.1 Producer Detail
The Producer Management page allows you to record or edit basic information about the producer. You can set up dealers or producers for a company and branch. You can also set up a default underwriter and a default collector for a producer. The system uses this information in the origination workflow to select a queue.
The producer number, name, contact information, company and branch to which the producer applies, federal tax number, status, and other information can be stored in this page.
Navigating to Producer
1. On the Oracle Financial Services Lending and Leasing home page, click Servicing Servicing Producers.
2. The system displays the Producers setup screen.
To set up the Producer
1. In the Producer section, perform any of the Basic Operations mentioned in Navigation chapter.
A brief description of the fields is given below:
Field: Do this:
Producer # Based on the system setup, either:
Specify the producer number
-or-
The system generates producer number.
→ →
12-2
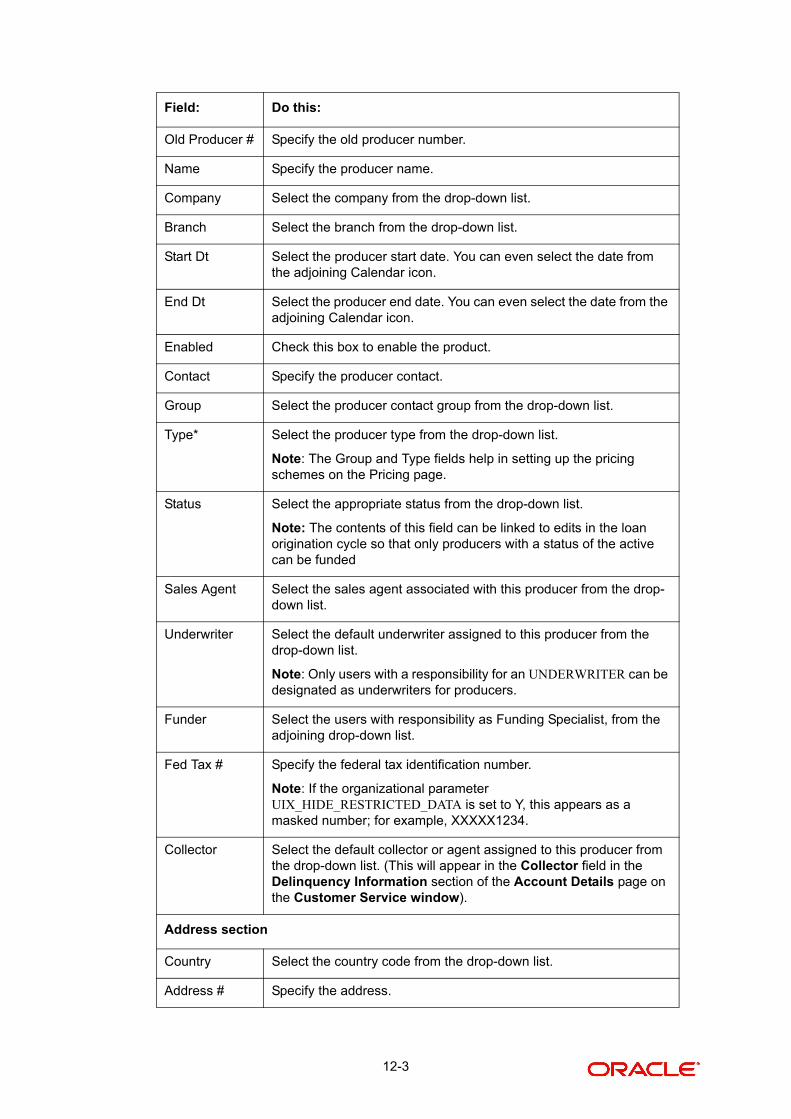
Old Producer # Specify the old producer number.
Name Specify the producer name.
Company Select the company from the drop-down list.
Branch Select the branch from the drop-down list.
Start Dt Select the producer start date. You can even select the date from the adjoining Calendar icon.
End Dt Select the producer end date. You can even select the date from the adjoining Calendar icon.
Enabled Check this box to enable the product.
Contact Specify the producer contact.
Group Select the producer contact group from the drop-down list.
Type* Select the producer type from the drop-down list.
Note: The Group and Type fields help in setting up the pricing schemes on the Pricing page.
Status Select the appropriate status from the drop-down list.
Note: The contents of this field can be linked to edits in the loan origination cycle so that only producers with a status of the active can be funded
Sales Agent Select the sales agent associated with this producer from the drop-down list.
Underwriter Select the default underwriter assigned to this producer from the drop-down list.
Note: Only users with a responsibility for an UNDERWRITER can be designated as underwriters for producers.
Funder Select the users with responsibility as Funding Specialist, from the adjoining drop-down list.
Fed Tax # Specify the federal tax identification number.
Note: If the organizational parameter UIX_HIDE_RESTRICTED_DATA is set to Y, this appears as a masked number; for example, XXXXX1234.
Collector Select the default collector or agent assigned to this producer from the drop-down list. (This will appear in the Collector field in the Delinquency Information section of the Account Details page on the Customer Service window).
Address section
Country Select the country code from the drop-down list.
Address # Specify the address.
Field: Do this:
12-3
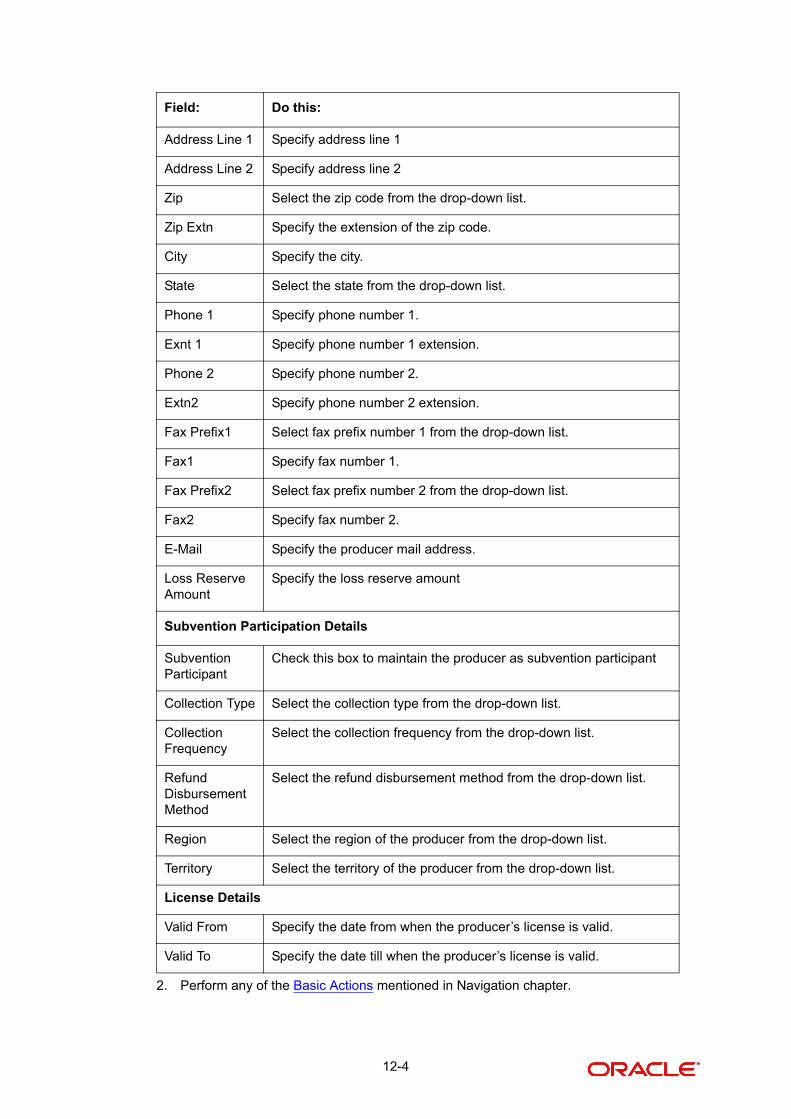
2. Perform any of the Basic Actions mentioned in Navigation chapter.
Address Line 1 Specify address line 1
Address Line 2 Specify address line 2
Zip Select the zip code from the drop-down list.
Zip Extn Specify the extension of the zip code.
City Specify the city.
State Select the state from the drop-down list.
Phone 1 Specify phone number 1.
Exnt 1 Specify phone number 1 extension.
Phone 2 Specify phone number 2.
Extn2 Specify phone number 2 extension.
Fax Prefix1 Select fax prefix number 1 from the drop-down list.
Fax1 Specify fax number 1.
Fax Prefix2 Select fax prefix number 2 from the drop-down list.
Fax2 Specify fax number 2.
E-Mail Specify the producer mail address.
Loss Reserve Amount
Specify the loss reserve amount
Subvention Participation Details
Subvention Participant
Check this box to maintain the producer as subvention participant
Collection Type Select the collection type from the drop-down list.
Collection Frequency
Select the collection frequency from the drop-down list.
Refund Disbursement Method
Select the refund disbursement method from the drop-down list.
Region Select the region of the producer from the drop-down list.
Territory Select the territory of the producer from the drop-down list.
License Details
Valid From Specify the date from when the producer’s license is valid.
Valid To Specify the date till when the producer’s license is valid.
Field: Do this:
12-4
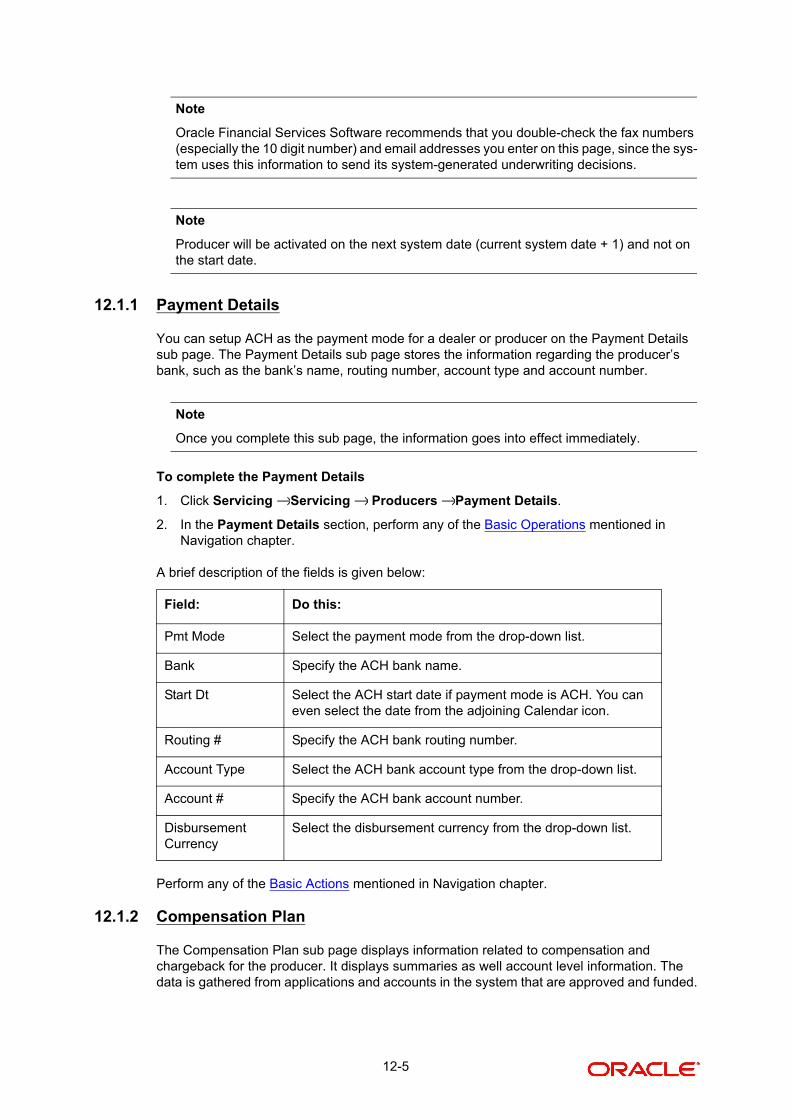
Note
Oracle Financial Services Software recommends that you double-check the fax numbers (especially the 10 digit number) and email addresses you enter on this page, since the sys-tem uses this information to send its system-generated underwriting decisions.
Note
Producer will be activated on the next system date (current system date + 1) and not on the start date.
12.1.1 Payment Details
You can setup ACH as the payment mode for a dealer or producer on the Payment Details sub page. The Payment Details sub page stores the information regarding the producer’s bank, such as the bank’s name, routing number, account type and account number.
Note
Once you complete this sub page, the information goes into effect immediately.
To complete the Payment Details
1. Click Servicing Servicing Producers Payment Details.
2. In the Payment Details section, perform any of the Basic Operations mentioned in Navigation chapter.
A brief description of the fields is given below:
Perform any of the Basic Actions mentioned in Navigation chapter.
12.1.2 Compensation Plan
The Compensation Plan sub page displays information related to compensation and chargeback for the producer. It displays summaries as well account level information. The data is gathered from applications and accounts in the system that are approved and funded.
Field: Do this:
Pmt Mode Select the payment mode from the drop-down list.
Bank Specify the ACH bank name.
Start Dt Select the ACH start date if payment mode is ACH. You can even select the date from the adjoining Calendar icon.
Routing # Specify the ACH bank routing number.
Account Type Select the ACH bank account type from the drop-down list.
Account # Specify the ACH bank account number.
Disbursement Currency
Select the disbursement currency from the drop-down list.
→ → →
12-5
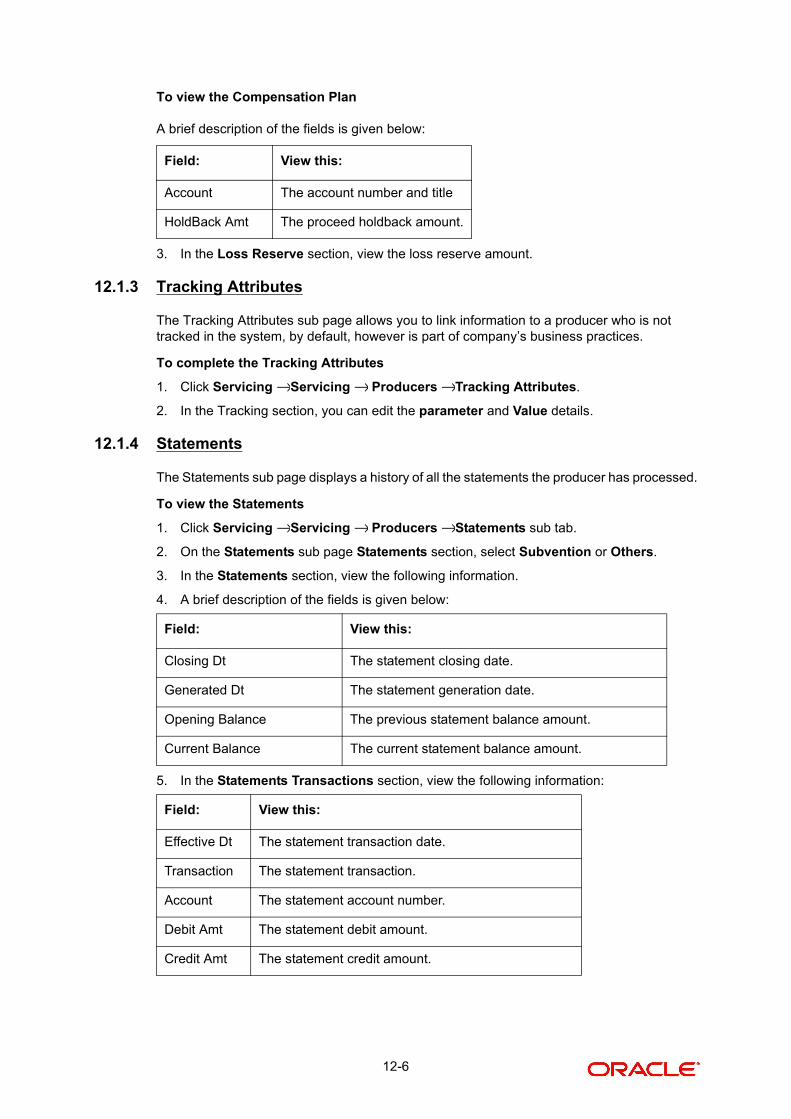
To view the Compensation Plan
A brief description of the fields is given below:
3. In the Loss Reserve section, view the loss reserve amount.
12.1.3 Tracking Attributes
The Tracking Attributes sub page allows you to link information to a producer who is not tracked in the system, by default, however is part of company’s business practices.
To complete the Tracking Attributes
1. Click Servicing Servicing Producers Tracking Attributes.
2. In the Tracking section, you can edit the parameter and Value details.
12.1.4 Statements
The Statements sub page displays a history of all the statements the producer has processed.
To view the Statements
1. Click Servicing Servicing Producers Statements sub tab.
2. On the Statements sub page Statements section, select Subvention or Others.
3. In the Statements section, view the following information.
4. A brief description of the fields is given below:
5. In the Statements Transactions section, view the following information:
Field: View this:
Account The account number and title
HoldBack Amt The proceed holdback amount.
Field: View this:
Closing Dt The statement closing date.
Generated Dt The statement generation date.
Opening Balance The previous statement balance amount.
Current Balance The current statement balance amount.
Field: View this:
Effective Dt The statement transaction date.
Transaction The statement transaction.
Account The statement account number.
Debit Amt The statement debit amount.
Credit Amt The statement credit amount.
→ → →
→ → →
12-6
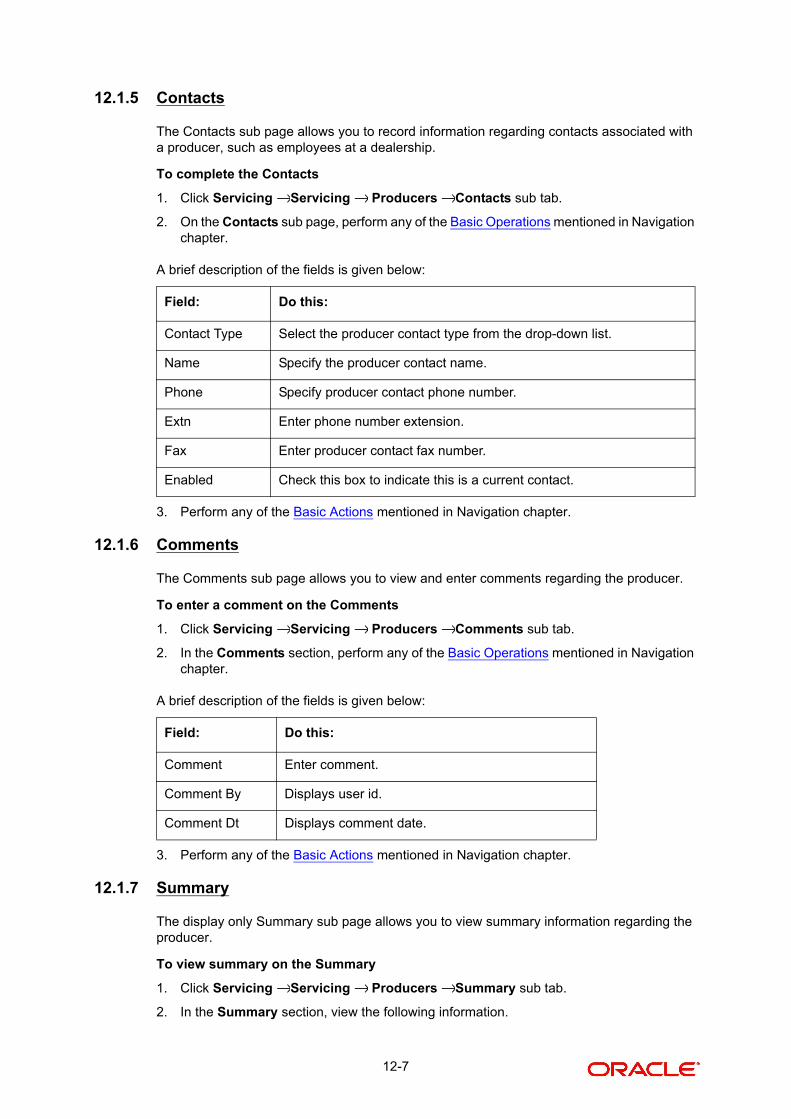
12.1.5 Contacts
The Contacts sub page allows you to record information regarding contacts associated with a producer, such as employees at a dealership.
To complete the Contacts
1. Click Servicing Servicing Producers Contacts sub tab.
2. On the Contacts sub page, perform any of the Basic Operations mentioned in Navigation chapter.
A brief description of the fields is given below:
3. Perform any of the Basic Actions mentioned in Navigation chapter.
12.1.6 Comments
The Comments sub page allows you to view and enter comments regarding the producer.
To enter a comment on the Comments
1. Click Servicing Servicing Producers Comments sub tab.
2. In the Comments section, perform any of the Basic Operations mentioned in Navigation chapter.
A brief description of the fields is given below:
3. Perform any of the Basic Actions mentioned in Navigation chapter.
12.1.7 Summary
The display only Summary sub page allows you to view summary information regarding the producer.
To view summary on the Summary
1. Click Servicing Servicing Producers Summary sub tab.
2. In the Summary section, view the following information.
Field: Do this:
Contact Type Select the producer contact type from the drop-down list.
Name Specify the producer contact name.
Phone Specify producer contact phone number.
Extn Enter phone number extension.
Fax Enter producer contact fax number.
Enabled Check this box to indicate this is a current contact.
Field: Do this:
Comment Enter comment.
Comment By Displays user id.
Comment Dt Displays comment date.
→ → →
→ → →
→ → →
12-7
A brief description of the fields is given below:
Field: View this:
YearMonth The year and month.
TotalApps The application total status count.
Approved The application approved status count.
Conditioned The application conditioned status count.
Rejected The application rejected status count.
Withdrawn The application rejected status count.
Funded The application withdrawn status count.
Amount The application funded status total amount.
12-8
13. Vendors
During the life of an account, a financial institution might require the use of specialized services of a vendor for various purposes; for example, repossessing a vehicle, retaining an attorney for bankruptcy court proceedings, or making field calls. With the system’s Vendors window, you can:
Maintain vendor information
Maintain services offered by the vendor
Assign tasks to the vendors and subsequently track and process those tasks
Charge vendor expenses to customers
Enter and update invoices raised by the vendors
Post vendor transactions
Process vendor payments.
Once an invoice has been presented for a service performed by a vendor, you can enter the information on the Vendor Management form and create a monetary transaction. You can then choose if the customer should pay any particular expense or not.
13.1 Vendor Detail Page
The Vendors page allows you to set up vendor information. If the vendor receives escrow disbursement at an address is different from the current business address, enter this information in the Payment Details sub page. Also, the Payment Details sub page allows you to enter the number of days prior to the due date by which the payment to the vendor must be processed.
Note
The contents of this section defaults to the vendor’s current address, but can be modified.
Navigating to Vendor Detail Page
1. On the Oracle Financial Services Lending and Leasing home page, click Servicing Servicing Vendors.
2. The system displays the Vendor screen. The details are grouped under four tabs:
Vendors
Work Orders
Follow-up
Invoices
13.1.1 Vendors tab
1. Click Servicing Servicing Vendors Vendors. The details in the screen are grouped into three:
Vendor Details
Payment Details
Vendor Groups
→ →
→ → →
13-1
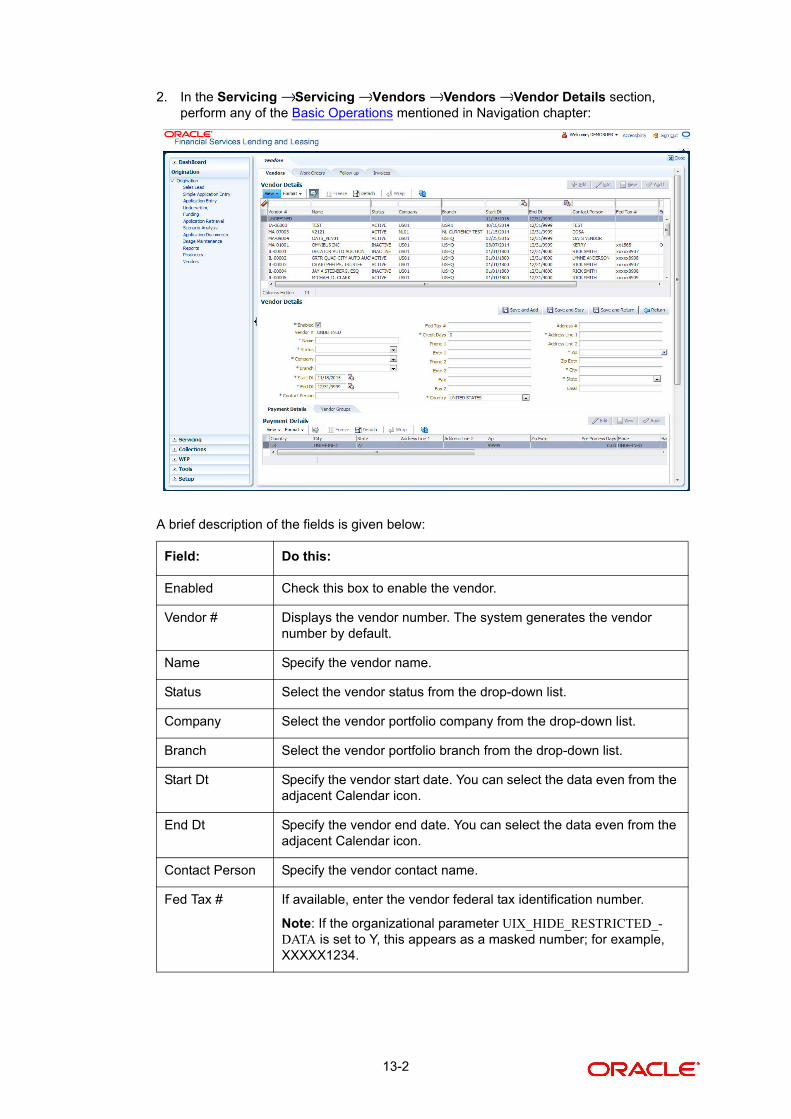
2. In the Servicing Servicing Vendors Vendors Vendor Details section, perform any of the Basic Operations mentioned in Navigation chapter:
A brief description of the fields is given below:
Field: Do this:
Enabled Check this box to enable the vendor.
Vendor # Displays the vendor number. The system generates the vendor number by default.
Name Specify the vendor name.
Status Select the vendor status from the drop-down list.
Company Select the vendor portfolio company from the drop-down list.
Branch Select the vendor portfolio branch from the drop-down list.
Start Dt Specify the vendor start date. You can select the data even from the adjacent Calendar icon.
End Dt Specify the vendor end date. You can select the data even from the adjacent Calendar icon.
Contact Person Specify the vendor contact name.
Fed Tax # If available, enter the vendor federal tax identification number.
Note: If the organizational parameter UIX_HIDE_RESTRICTED_-DATA is set to Y, this appears as a masked number; for example, XXXXX1234.
→ → → →
13-2
3. Perform any of the Basic Actions mentioned in Navigation chapter.
Click Servicing Servicing Vendors Vendors Vendor Details. The Payment Details sub tab allows you to set up automatic clearing house information for vendors.
4. On the Payment Details sub tab, perform any of the Basic Operations mentioned in Navigation chapter.
A brief description of the fields is given below:
Credit Days Specify the credit days for the vendor invoice. This number is used to check that the Invoice Due Date is not more than the credit days from the Invoice Date.
Phone 1 Specify phone number 1.
Extn 1 Specify the phone extension.
Phone 2 Specify phone number 2.
Extn 2 Specify the phone number 2.
Fax Specify the fax number.
Fax 2 Specify the fax number 2.
Country Select the country code from the drop-down list.
Address # Specify the address.
Address Line 1 Specify address line 1.
Address Line 2 Specify address line 2.
Zip Select the zip code from the drop-down list.
Zip Extn Specify the extension of the Zip code.
City Specify the city.
State Select the state from the drop-down list.
Email Specify the email address.
Field: Do this:
Remittance section
Country Select the country code from the drop-down list.
City Specify city.
St Select state from the drop-down list.
Address Line 1 Specify address line 1.
Address Line 2 Specify address line 2.
Zip Specify zip code from the drop-down list.
Field: Do this:
→ → → →
13-3
5. Perform any of the Basic Actions mentioned in Navigation chapter.
6. Click Servicing Servicing Vendors Vendors Vendor Details. The Vendors Groups allows you to set up vendor groups.
7. On the Vendor Groups section, perform any of the Basic Operations mentioned in Navigation chapter.
A brief description of the fields is given below:
8. Perform any of the Basic Actions mentioned in Navigation chapter.
13.1.2 Work Orders Tab
The Work Orders link allows you to assign an account to a vendor for a service that the vendor provides.
1. Click Servicing Servicing Vendors Work Order. The details are categorized into two:
Work Order
Services
Zip Extn Specify extension of the zip code.
Pre-Process Days Specify the remittance preprocess days. This is the number of days prior to the due date by which the payment to the vendor must be processed.
Payment Details section
Mode Select the mode of payment from the drop-down list.
Bank Specify the ACH bank.
Start Dt View ACH start date.
Routing # Specify the bank routing number.
Account Type Select the account type from the drop-down list.
Account # Specify the account number.
Note: If the organizational parameter UIX_HIDE_RESTRICTED_-DATA is set to ‘Y’, this appears as a masked number; for exam-ple, XXXXX1234.
Field: Do this:
Sort Specify sort sequence.
Group Select the vendor type to which the vendor belongs from the drop-down list, based on the services provided by the vendor.
Enabled Check this box to enable the vendor service.
Field: Do this:
→ → → →
→ → →
13-4
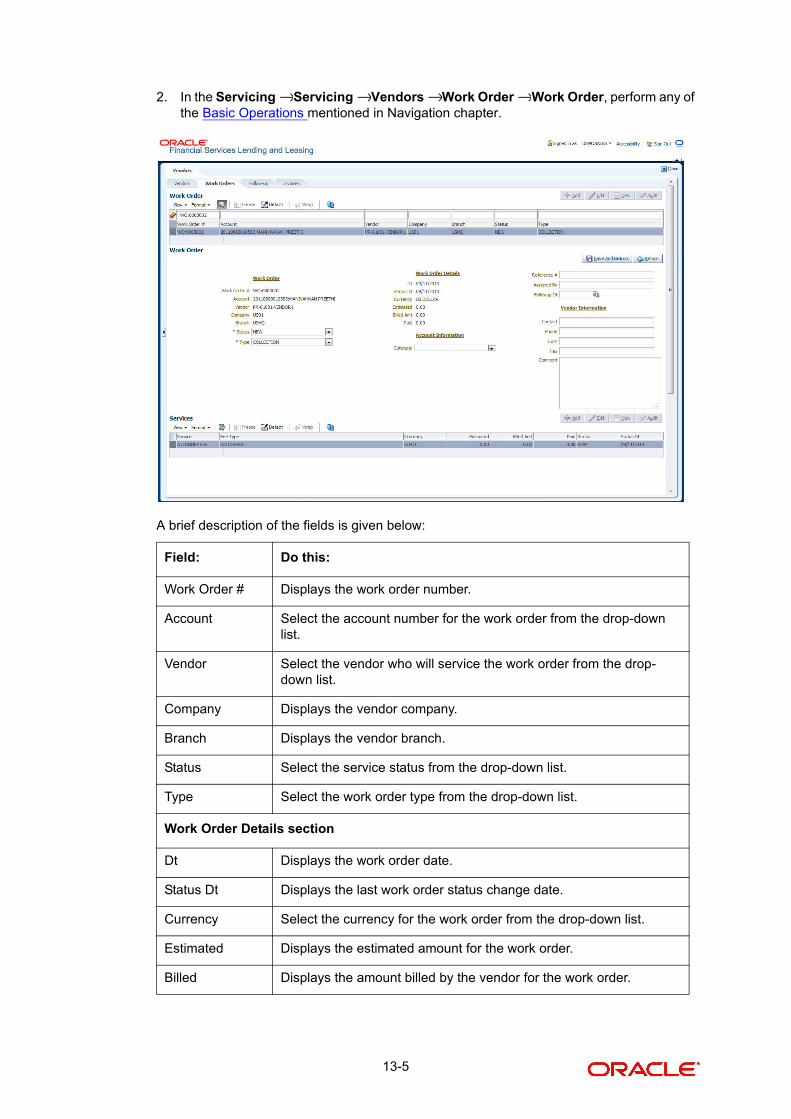
2. In the Servicing Servicing Vendors Work Order Work Order, perform any of the Basic Operations mentioned in Navigation chapter.
A brief description of the fields is given below:
Field: Do this:
Work Order # Displays the work order number.
Account Select the account number for the work order from the drop-down list.
Vendor Select the vendor who will service the work order from the drop-down list.
Company Displays the vendor company.
Branch Displays the vendor branch.
Status Select the service status from the drop-down list.
Type Select the work order type from the drop-down list.
Work Order Details section
Dt Displays the work order date.
Status Dt Displays the last work order status change date.
Currency Select the currency for the work order from the drop-down list.
Estimated Displays the estimated amount for the work order.
Billed Displays the amount billed by the vendor for the work order.
→ → → →
13-5
3. Perform any of the Basic Actions mentioned in Navigation chapter.
4. In the Servicing Servicing Vendors Work Order Services, perform any of the Basic Operations mentioned in Navigation chapter.
A brief description of the fields is given below:
5. Perform any of the Basic Actions mentioned in Navigation chapter.
13.1.3 Follow-up Tab
The Work Orders link lists the work orders that are not complete and hence require follow-up.
Paid Displays the amount paid to the vendor for the work order.
Account Information section
Collateral Select the asset associated with the work order from the drop-down list.
Reference # Specify the vendor reference.
Assigned By Specify the user who created the work order.
Followup Dt Specify the next follow-up date. You can even select from the adjoin-ing Calendar icon.
Vendor Information section
Contact Specify the vendor contact for the work order.
Phone Specify the vendor contact phone for the work order.
Extn Specify the vendor contact phone extension for the work order.
Fax Specify the vendor contact fax for the work order.
Comment Specify any comments regarding the work order.
Field: Do this:
Service Select the service type from the drop-down list.
Fee Type Select the vendor fee type from the drop-down list.
Currency Select the currency from the drop-down list.
Estimated Specify the estimated amount for the service.
Billed Displays the amount billed by the vendor for the service.
Paid Displays the amount paid to the vendor for the service.
Status Select the status from the drop-down list.
Status Dt Displays the last service status change date.
Field: Do this:
→ → → →
13-6
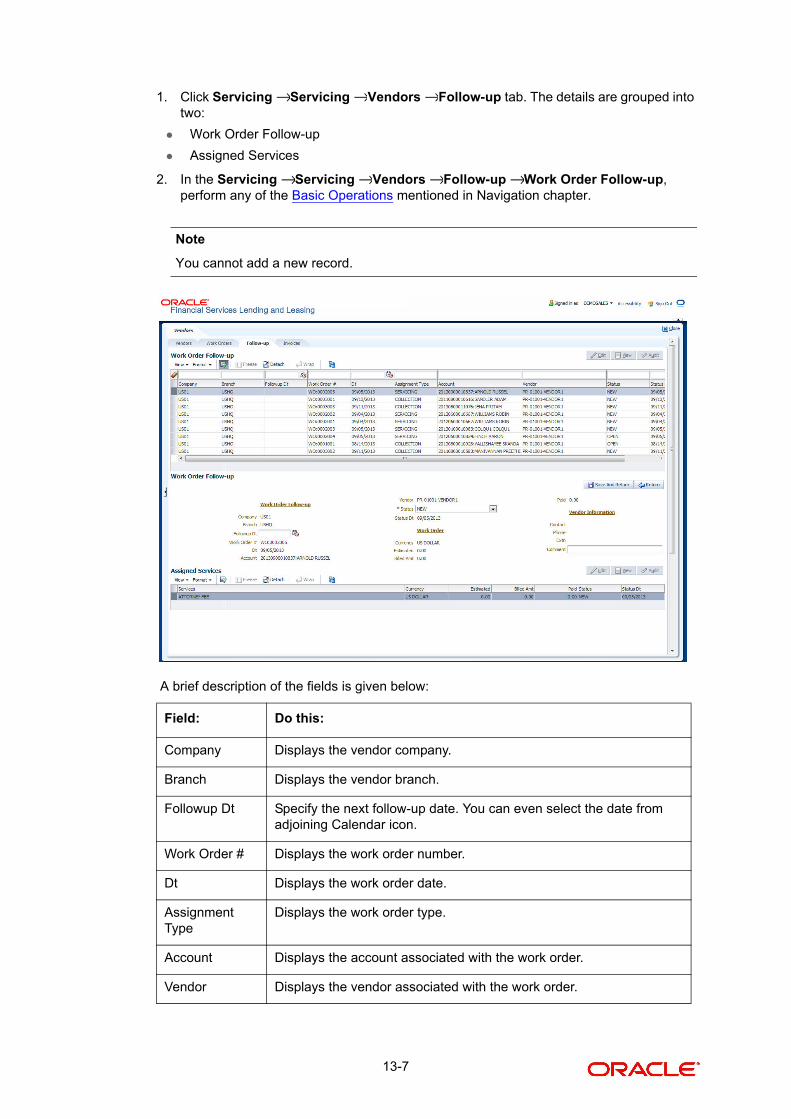
1. Click Servicing Servicing Vendors Follow-up tab. The details are grouped into two:
Work Order Follow-up
Assigned Services
2. In the Servicing Servicing Vendors Follow-up Work Order Follow-up, perform any of the Basic Operations mentioned in Navigation chapter.
Note
You cannot add a new record.
A brief description of the fields is given below:
Field: Do this:
Company Displays the vendor company.
Branch Displays the vendor branch.
Followup Dt Specify the next follow-up date. You can even select the date from adjoining Calendar icon.
Work Order # Displays the work order number.
Dt Displays the work order date.
Assignment Type
Displays the work order type.
Account Displays the account associated with the work order.
Vendor Displays the vendor associated with the work order.
→ → →
→ → → →
13-7
3. Perform any of the Basic Actions mentioned in Navigation chapter.
4. In the Servicing Servicing Vendors Follow-up Assigned Service, perform any of the Basic Operations mentioned in Navigation chapter.
Note
You cannot add a new record:
A brief description of the fields is given below:
5. Perform any of the Basic Actions mentioned in Navigation chapter.
13.1.4 Invoices Tab
1. Click Servicing Servicing Vendors Invoices tab. The details are grouped into four:
Invoice Information
Status Select the work order status from the drop-down list.
Status Dt Displays the last work order status change date.
Work Order section
Currency Displays the currency for the work order.
Estimated Displays the estimated amount for the work order.
Billed Displays the amount billed by the vendor for the work order.
Paid Displays the amount paid to the vendor for the work order.
Vendor Information section
Contact Displays the vendor contact name.
Phone Displays the vendor contact phone number.
Comment Specify a comment.
Field: Do this:
Services Displays the service provided by the vendor.
Currency Select the currency for the vendor from the drop-down list.
Estimated Specify the estimated amount for the service.
Billed Specify the amount billed by the vendor for the service.
Paid Specify the amount paid to the vendor for the service.
Status Select the service status from the drop-down list.
Status Dt Specify the last service status change date. You can even select the date from the adjoining Calendar icon.
Field: Do this:
→ → → →
→ → →
13-8
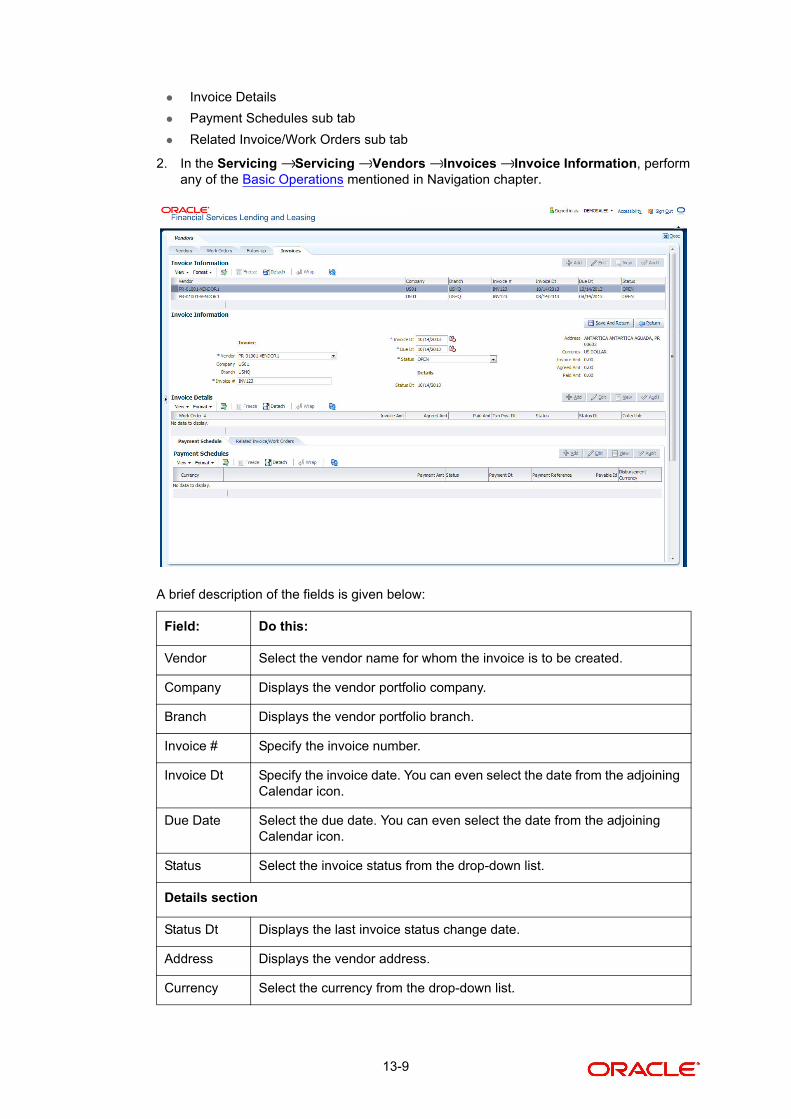
Invoice Details
Payment Schedules sub tab
Related Invoice/Work Orders sub tab
2. In the Servicing Servicing Vendors Invoices Invoice Information, perform any of the Basic Operations mentioned in Navigation chapter.
A brief description of the fields is given below:
Field: Do this:
Vendor Select the vendor name for whom the invoice is to be created.
Company Displays the vendor portfolio company.
Branch Displays the vendor portfolio branch.
Invoice # Specify the invoice number.
Invoice Dt Specify the invoice date. You can even select the date from the adjoining Calendar icon.
Due Date Select the due date. You can even select the date from the adjoining Calendar icon.
Status Select the invoice status from the drop-down list.
Details section
Status Dt Displays the last invoice status change date.
Address Displays the vendor address.
Currency Select the currency from the drop-down list.
→ → → →
13-9
3. Perform any of the Basic Actions mentioned in Navigation chapter.
Note
If the invoice number is not unique for the given vendor, system displays the warning mes-sage as “Invoice # already exists for the Vendor.”
4. In the Servicing Servicing Vendors Invoices Invoice Details, perform any of the Basic Operations mentioned in Navigation chapter.
A brief description of the fields is given below:
5. Perform any of the Basic Actions mentioned in Navigation chapter.
6. In the Servicing Servicing Vendors Invoices Payment Schedules, perform any of the Basic Operations mentioned in Navigation chapter.
A brief description of the fields is given below:
Invoice Amt Displays the total invoice amount.
Agreed Amt Displays the total agreed amount.
Paid Amt Displays the total paid amount.
Field: Do this:
Work Order Select the work order from the drop-down list.
Currency Select the currency from the drop-down list.
Invoice Amt Specify the invoice amount.
Agreed Amt Specify the agreed amount.
Paid Amt Displays the paid amount.
Txn Post Dt Specify transaction effective date. You can even select the date from the adjoining Calendar icon.
Status Select the status from the drop-down list.
Status Dt Displays the last status change date.
Collectible Check this box to collect the agreed amount from the customer.
Field: Do this:
Currency Select the currency from the drop-down list.
Payment Amt Specify the payment amount.
Status Select the payment status from the drop-down list.
Payment Dt Specify the payment date. You can even select the date from the adjoining Calendar icon.
Field: Do this:
→ → → →
→ → → →
13-10
7. Perform any of the Basic Actions mentioned in Navigation chapter.
8. In the Servicing Servicing Vendors Invoices Related Invoice/Work Order Details, perform any of the Basic Operations mentioned in Navigation chapter:
A brief description of the fields is given below:
9. Perform any of the Basic Actions mentioned in Navigation chapter.
Payment Ref-erence
Specify the payment reference.
Payable Id Specify the payable requisition Id.
Disbursement Currency
Select the currency from the drop-down list.
Field: View this:
Invoice # Displays the invoice number.
Invoice Status Displays the invoice status.
Status Dt Displays the invoice status date.
Currency Displays the currency.
WO Estimated Amt Displays the work order estimated amount.
WO Agreed Amt Displays the work order agreed amount.
WO Paid Amt Displays the work order paid amount.
WO Status Displays the work order status.
Field: Do this:
→ → → →
13-11
14. Batch Transactions
14.1 Introduction
This chapter discusses about the various batch transactions handled in the application. We can categorize them in to the following:
Advances
Payments
Fees
14.2 Advances
You can enter multiple advances to the account for the draws made by customers. Advances can be entered either by manual entry or batch upload.
Manual Entry
This screen uses the same concepts and has similar features as the Payment Entry page. An advance can be paid to one or more payees. The payee can be a standard payee that can be selected from a a predefined list of values or a non-standard payee. For non-standard payees, you must enter the details of the remittance.
Oracle Financial Services Lending and Leasing creates entries for the posted advances on the AP Transaction screen. These entries can be used to process the remittances.
Batch Upload
With the advance load process, a batch of advances can be loaded into Oracle Financial Services Lending and Leasing (similar to lockbox processing).
Using the Advance Entry page, you can enter and view a batch of advance transactions. You can then complete the following tasks:
Posting a batch
Reversing a batch
Placing a batch on hold
14.2.1 Advance Entry Tab
The Advance Entry tab enables you to view either all batches or only open batches. You can choose which batch you want to view using the View Options section. Viewing all batches enables you to locate batches with a status of OPEN, REVERSE, HOLD, ERROR, or POSTED.
14-1
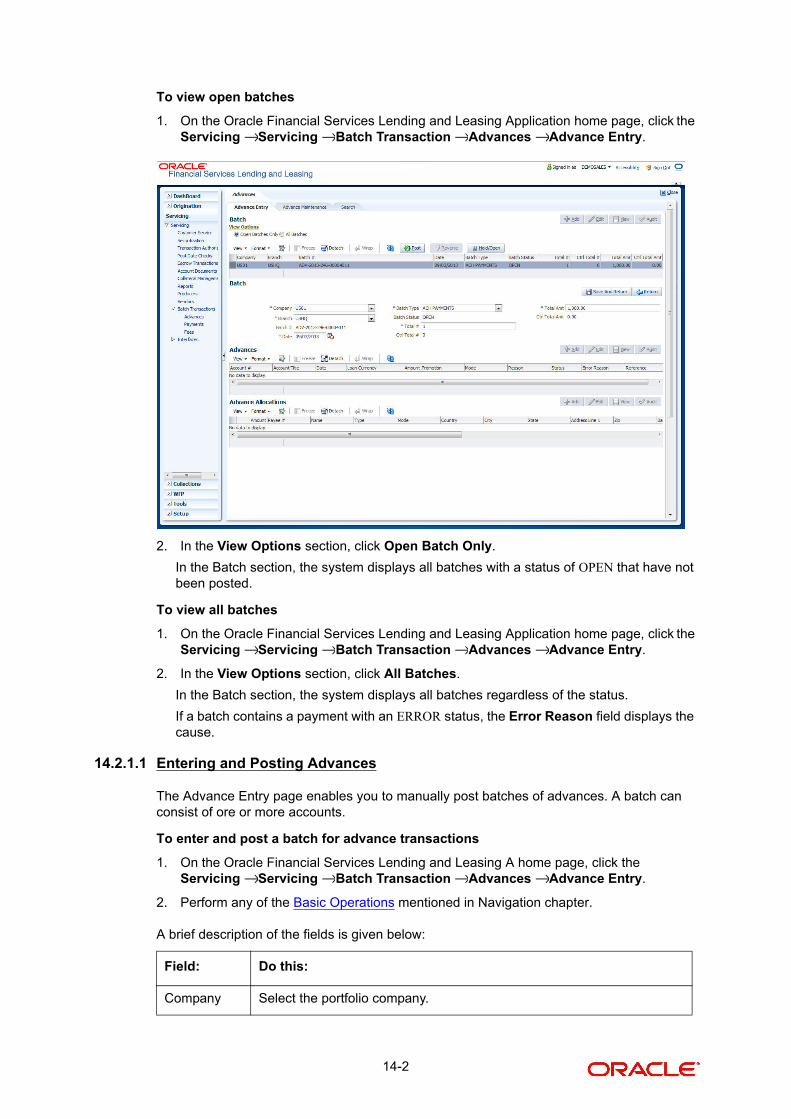
To view open batches
1. On the Oracle Financial Services Lending and Leasing Application home page, click the Servicing Servicing Batch Transaction Advances Advance Entry.
2. In the View Options section, click Open Batch Only.
In the Batch section, the system displays all batches with a status of OPEN that have not been posted.
To view all batches
1. On the Oracle Financial Services Lending and Leasing Application home page, click the Servicing Servicing Batch Transaction Advances Advance Entry.
2. In the View Options section, click All Batches.
In the Batch section, the system displays all batches regardless of the status.
If a batch contains a payment with an ERROR status, the Error Reason field displays the cause.
14.2.1.1 Entering and Posting Advances
The Advance Entry page enables you to manually post batches of advances. A batch can consist of ore or more accounts.
To enter and post a batch for advance transactions
1. On the Oracle Financial Services Lending and Leasing A home page, click the Servicing Servicing Batch Transaction Advances Advance Entry.
2. Perform any of the Basic Operations mentioned in Navigation chapter.
A brief description of the fields is given below:
Field: Do this:
Company Select the portfolio company.
→ → → →
→ → → →
→ → → →
14-2

3. Perform any of the Basic Actions mentioned in Navigation chapter.
4. In the Advances section, perform any of the Basic Operations mentioned in Navigation chapter.
A brief description of the fields is given below:
5. Perform any of the Basic Actions mentioned in Navigation chapter.
6. In the Advance Allocations section, perform any of the Basic Operations mentioned in Navigation chapter.
Branch Select the branch.
Date Specify the batch date.
Batch Type Select the batch type.
Total # Specify the total number of advances in the batch.
Total Amt Specify the total amount of advances in the batch.
Batch # View the batch number (system generated).
Batch Status View the batch status.
Ctrl Total # View the total number of advances in the batch (actual).
Ctrl Total Amt
View the total amount of advances in the batch (actual).
Field: Do this:
Account # Select the account number.
Account #: Title
View the account title.
Date Specify the advance effective date.
Loan Cur-rency
Select the loan currency.
Amount View the advance amount.
Promotion Select the promotion associated with advance.
Mode Select the advance mode.
Reason Select the reason for the advance.
Status View the advance status.
Reason View the reason for error.
Reference Specify any reference information (such as check number).
Field: Do this:
14-3
A brief description of the fields is given below:
7. Perform any of the Basic Actions mentioned in Navigation chapter.
The system updates the display only Total # and Total Amt fields in the Batch section to record the contents of the Advance section.
Note
Before you can post a batch transaction on the Advance Entry page, the contents of the display only Total # and Total Amt fields must match the contents of the required Total # and Total Amt fields. If not, the system displays an error message.
8. In the Action section, click Post.
Field: Do this:
Amount Specify the advance amount to be paid to this payee.
Validate Payee
View the validate payee indicator. If selected, indicates that the payee needs to be validated.
Payee Nbr Select the payee number.
Name Specify the payee name.
Type Select the payee type.
Mode Select the payee payment mode.
Country Select the country where the payee is located.
City Specify the city where the payee is located.
State Select the state where the payee is located.
Address Specify the address line 1 for the payee.
Zip Select the zip code where the payee is located.
Zip Exten-sion (unlabe-led)
Specify the zip extension where the payee is located.
Bank Name Specify the payee ACH bank name.
Routing # Specify the payee ACH bank routing number.
Account Type
Specify the payee ACH bank account type.
ACH Account #
Specify the payee ACH bank account number.
Account # Specify the customer account number with the payee.
Comment Specify a comments for this advance allocation.
Currency Specify the currency for disbursement.
14-4
The system changes the batch status from OPEN to PROCESSING and submits the batch to the job service. After the batch has been processed, the system changes the batch sta-tus to POSTED or ERROR.
The posted advances can be viewed on the Customer Service screen’s Transaction page.The system creates entries for the posted advances on the AP Transaction page. These entries can be used to process the remittances.
14.2.1.2 Holding a Batch of Payment Transactions
Only the batches with the status of OPEN can be put on hold.
To hold the batch of payments transactions
1. On the Oracle Financial Services Lending and Leasing Application home page, click the Servicing Servicing Batch Transaction Advances Advance Entry.
2. On the Advance Entry page, click Open Batches Only in the View Options section.
Details regarding the selected batch appear in the Advances section.
3. Use the Batch section to search for and select the batch you want to hold.
4. In the Action section, click Hold/Open.
The system changes the batch status from OPEN to HOLD.
14.2.1.3 Opening or Removing Hold on the Batch of Payment Transactions
Only the batches with a status of HOLD can be opened.
To open (or remove hold) on the batch of payments transactions
1. On the Oracle Financial Services Lending and Leasing Application home page, click the Servicing Servicing Batch Transaction Advances Advance Entry tab.
2. On the Advance Entry page, click All Batches in the View Options section.
Details regarding the selected batch appear in the Advances section.
3. Use the Batch section to search for and select the batch with the status of HOLD you want to open.
4. In the Action section, click Hold/Open.
The system changes the batch status from HOLD to OPEN.
14.2.1.4 Reversing a Batch of Payment Transactions
Note the following:
Only the batches with a status of POSTED can be reversed.
Only the batches with a status of HOLD can be opened.
To reverse the batch of payment transactions
Batches can be reversed in case of problems with the batch. This will reverse all advances that have been posted.
1. On the Oracle Financial Services Lending and Leasing Application home page, click the Servicing Servicing Batch Transaction Advances Advance Entry tab.
2. On the Advance Entry page, click All Batches in the View Options section.
Details regarding the selected batch appear in the Advances section.
→ → → →
→ → → →
→ → → →
14-5
3. Use the Batch section to search for and select the batch with the POSTED status you want to reverse.
4. In the Action section, click Reverse.
The system changes the batch status from POSTED to PROCESSING and submits the batch to the job service. After the batch has been processed, the system changes the batch status to REVERSE.
Note
You can verify the reversal using the Transaction page on the Customer Service screen for each account in the batch or by running the payment history report.
14.2.2 Advance Maintenance Tab
The Advance Maintenance tab on the Advances screen enables you to perform maintenance functions on individual advances that have been posted. The common functions are as follows:
In all cases, the system performs ’true backdating’ to post the transaction based upon the transaction date. Interest recalculations are automatic and all necessary transactions can be sent to the general ledger for automatic reconciliation.
Suspended advances
In case of advances that are not posted to accounts due to issues such as incorrect account condition, the advances are posted to suspense. You must process these advances using the work queue for suspense advances. This would typically involve identifying the correct amount or correcting problems with the account before attempting to re-post the advance. In this case, the advance is moved out of the suspense account and posted to the specified account.
Function: Purpose:
Modify enables you to modify advance attributes such as amount, account number, and date.
Reverse enables you to reverse the advance from the account completely.
14-6

To view advances
1. On the Oracle Financial Services Lending and Leasing Application home page, click the Servicing Servicing Batch Transaction Advances Advance Maintenance tab.
2. In the View Options section, select which advance you want to view:
The system displays the selected payments in the Advances section.
3. Perform any of the Basic Operations mentioned in Navigation chapter.
A brief description of the fields is given below:
Choose: View this:
Posted Posted advances.
Suspense Suspended advances. In cases of advances that have been posted to suspense, the Suspense work queue can be used to process them (similar to suspense payments).
All All advances.
Field: View this:
Account # Account number.
Title Account title.
Loan Currency Loan currency
Txn Date Advance effective date.
Txn Amount Advance amount.
→ → → →
14-7
4. Perform any of the Basic Actions mentioned in Navigation chapter.
14.2.2.1 Modifying/Correcting Advance Transactions
In some cases, an advance may be valid, but how it was posted was incorrect; for example, advance was posted to the wrong account, with the wrong date, or with incorrect spread data. The Advance Maintenance page enables you to correct such errors.
To modify/correct an individual advance transaction
1. On the Oracle Financial Services Lending and Leasing Application home page, click the Servicing Servicing Batch Transaction Advances Advance Maintenance.
2. In the View Options section, click Posted.
3. In the Advances section, select the advance you want to modify and click Edit.
4. In the Action section, click Modify.
5. In the Details section, update the fields with information about the advance you want to modify.
6. Click Save And Return.
The system modifies the original advance and posts the new advance.
14.2.2.2 Reversing Advance Transactions
To reverse an individual advance transaction
1. On the Oracle Financial Services Lending and Leasing Application home page, click the Servicing Servicing Batch Transaction Advances Advance Maintenance.
Mode Advance mode.
Reason Advance reason.
Reference Reference information for advance.
Status Advance status.
Company Portfolio company.
Branch Portfolio branch.
Batch # Batch number.
Batch Type Batch type.
Date Displays batch date.
Field: Do this:
Account #: Title Select account number.
Loan Currency Select the currency.
Amount Enter advance amount.
Txn Dt Enter advance effective date.
Reason Select the reason for error.
Field: View this:
→ → → →
→ → → →
14-8
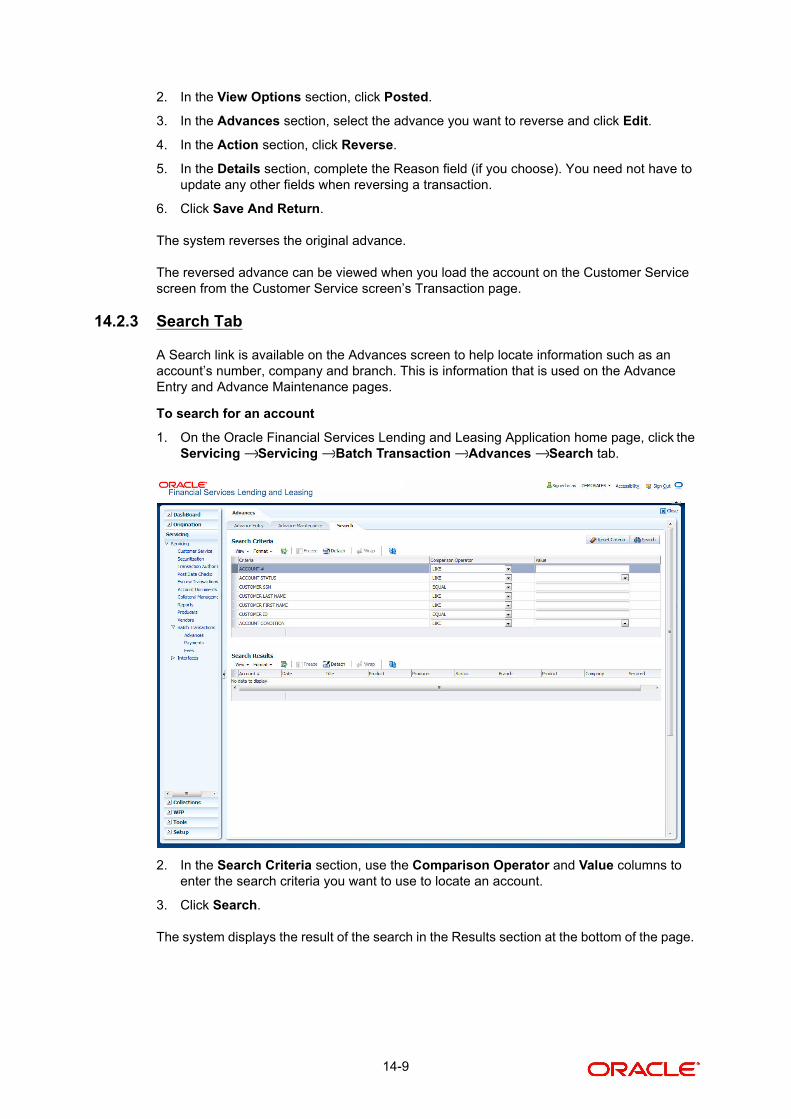
2. In the View Options section, click Posted.
3. In the Advances section, select the advance you want to reverse and click Edit.
4. In the Action section, click Reverse.
5. In the Details section, complete the Reason field (if you choose). You need not have to update any other fields when reversing a transaction.
6. Click Save And Return.
The system reverses the original advance.
The reversed advance can be viewed when you load the account on the Customer Service screen from the Customer Service screen’s Transaction page.
14.2.3 Search Tab
A Search link is available on the Advances screen to help locate information such as an account’s number, company and branch. This is information that is used on the Advance Entry and Advance Maintenance pages.
To search for an account
1. On the Oracle Financial Services Lending and Leasing Application home page, click the Servicing Servicing Batch Transaction Advances Search tab.
2. In the Search Criteria section, use the Comparison Operator and Value columns to enter the search criteria you want to use to locate an account.
3. Click Search.
The system displays the result of the search in the Results section at the bottom of the page.
→ → → →
14-9
Note
Click Reset Criteria at any time to clear the Comparison Operator and Values columns on the Search Criteria section.
14.3 Payments
Oracle Financial Services Lending and Leasing enables you to post payment transactions to accounts in a batch mode, either by manual entry or by using data files. These transactions can be posted in real-time or in batch mode.
This chapter explains how to use the Payments screen to complete the following tasks:
Posting a payment
Correcting a payment
Payments can be entered in Oracle Financial Services Lending and Leasing in a variety of ways:
Lockbox payments
ACH payments
Manual entry with the Payment Entry page
The manual entry option is useful in a low volume or a branch scenario when customers make payments in person or through the mail. The lockbox and ACH options allow for processing payments electronically without manual input.
14.3.1 Lockbox Payments
Oracle Financial Services Lending and Leasing can accept payments from lockboxes in the NACHA format. The NACHA format is an industry standard that can be used to post multiple batches of payments at one time. The Lockbox Load Batch Process can be configured to run at any time of the day and at multiple times if needed. All payments from the lockbox file are loaded into the system as batches. Any errors identified by the system during the load process are logged.
14.3.2 ACH Payments
Oracle Financial Services Lending and Leasing enables you to post directly from the ACH file that has been created for customer payments. This is controlled by the ACA_PAYMENT_AUTO_LOAD system parameter. If the parameter is set to Y, the system automatically creates payment batches for the payments in the ACH file and posts them on the day of payment.
Batch NSF Processing
Oracle Financial Services Lending and Leasing provides the upload of the rejected ACH ’Payment Request Files’ sent by the financial institution/lender to allow for improved NSF processing for all returned payments. This is done using a ‘Batch Mode’ process.
Oracle Financial Services Lending and Leasing supports the upload of payment files through lockbox uploads. In addition to the Payment file, the system also provides the upload of Pay-ment Return files through lockbox uploads. The system provides an upload of the ‘Entry Detail
14-10
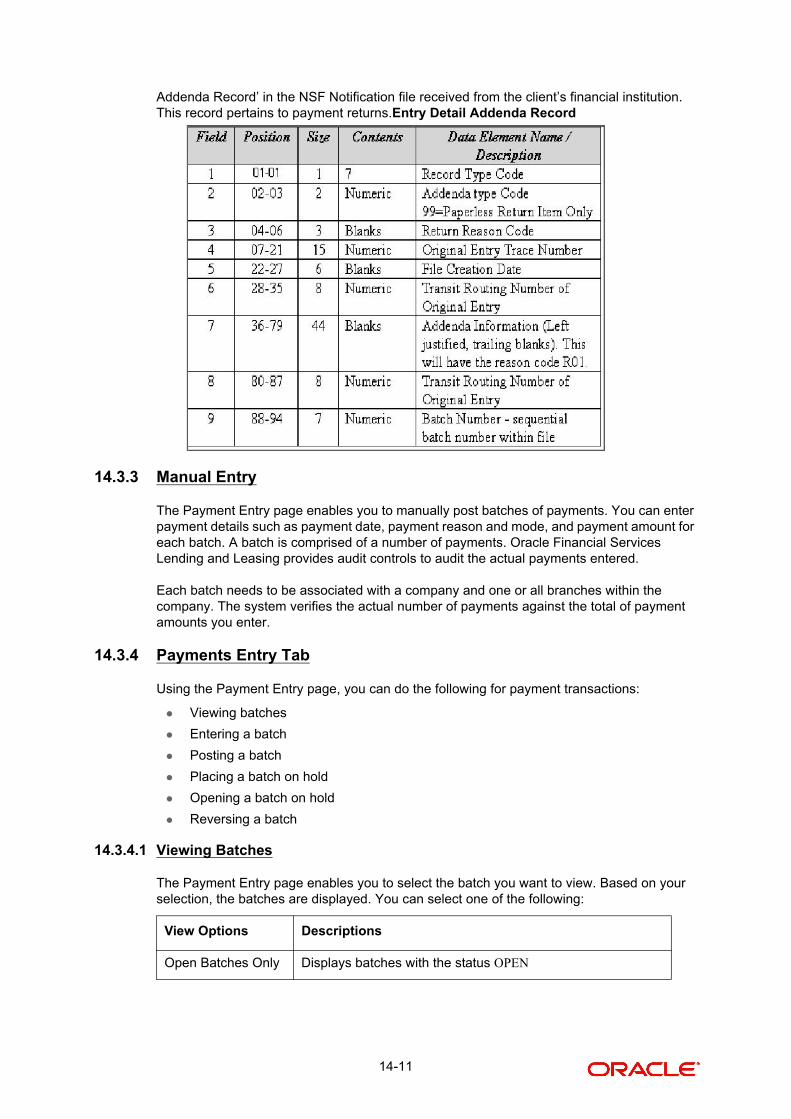
Addenda Record’ in the NSF Notification file received from the client’s financial institution. This record pertains to payment returns.Entry Detail Addenda Record
14.3.3 Manual Entry
The Payment Entry page enables you to manually post batches of payments. You can enter payment details such as payment date, payment reason and mode, and payment amount for each batch. A batch is comprised of a number of payments. Oracle Financial Services Lending and Leasing provides audit controls to audit the actual payments entered.
Each batch needs to be associated with a company and one or all branches within the company. The system verifies the actual number of payments against the total of payment amounts you enter.
14.3.4 Payments Entry Tab
Using the Payment Entry page, you can do the following for payment transactions:
Viewing batches
Entering a batch
Posting a batch
Placing a batch on hold
Opening a batch on hold
Reversing a batch
14.3.4.1 Viewing Batches
The Payment Entry page enables you to select the batch you want to view. Based on your selection, the batches are displayed. You can select one of the following:
View Options Descriptions
Open Batches Only Displays batches with the status OPEN
14-11
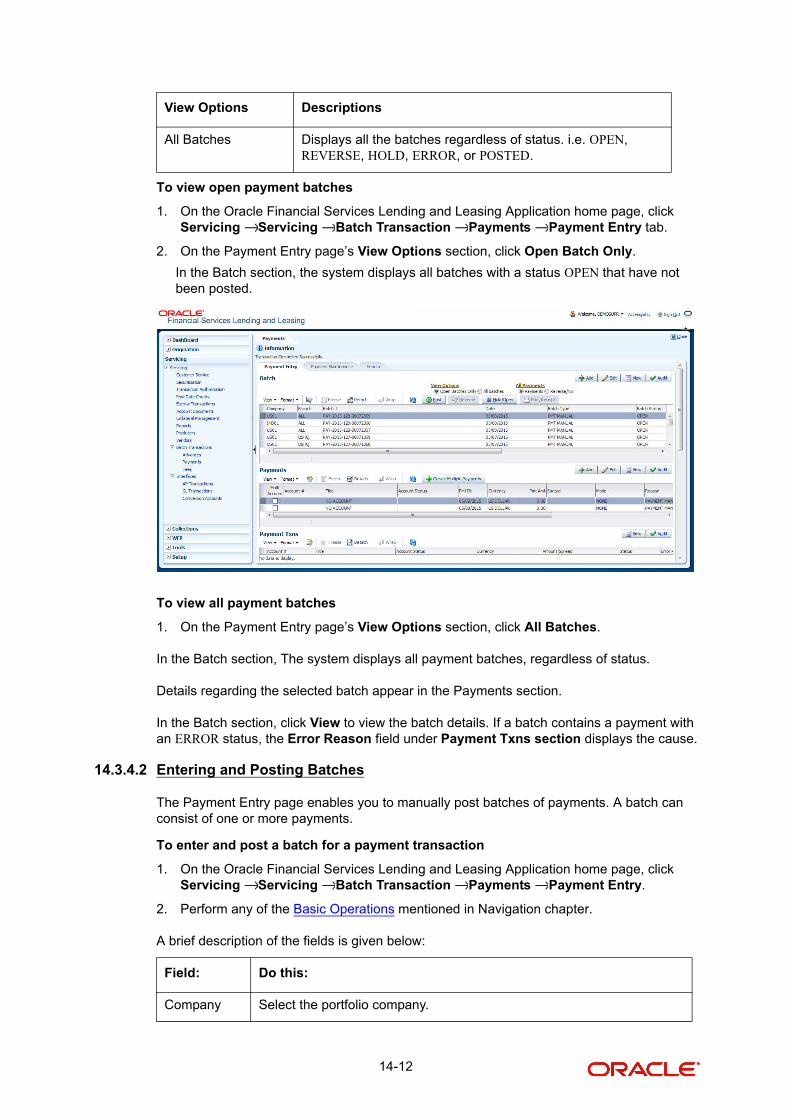
To view open payment batches
1. On the Oracle Financial Services Lending and Leasing Application home page, click Servicing Servicing Batch Transaction Payments Payment Entry tab.
2. On the Payment Entry page’s View Options section, click Open Batch Only.
In the Batch section, the system displays all batches with a status OPEN that have not been posted.
To view all payment batches
1. On the Payment Entry page’s View Options section, click All Batches.
In the Batch section, The system displays all payment batches, regardless of status.
Details regarding the selected batch appear in the Payments section.
In the Batch section, click View to view the batch details. If a batch contains a payment with an ERROR status, the Error Reason field under Payment Txns section displays the cause.
14.3.4.2 Entering and Posting Batches
The Payment Entry page enables you to manually post batches of payments. A batch can consist of one or more payments.
To enter and post a batch for a payment transaction
1. On the Oracle Financial Services Lending and Leasing Application home page, click Servicing Servicing Batch Transaction Payments Payment Entry.
2. Perform any of the Basic Operations mentioned in Navigation chapter.
A brief description of the fields is given below:
All Batches Displays all the batches regardless of status. i.e. OPEN, REVERSE, HOLD, ERROR, or POSTED.
Field: Do this:
Company Select the portfolio company.
View Options Descriptions
→ → → →
→ → → →
14-12
3. Perform any of the Basic Actions mentioned in Navigation chapter.
4. In the Batch section, view the following information:
The Payments section records itemized information of the batch payment. It enables you to make one payment to one account, or more than one payment to more than one account.
5. In the Payments section, perform any of the Basic Operations mentioned in Navigation chapter.
A brief description of the fields is given below:
Date Select the batch date, usually either today’s date or the date the batch was received as a whole.
Batch Type Select the batch type. Oracle Financial Services Lending and Leasing identifies each batch with a type signifying the type of payment batch it is; for example, mail, drop box, Western Union, walk in, and so on.
Total # Enter total number of payments in the batch.
Total Amt Enter total amount of payments in the batch.
Field: View this:
Batch # The batch number (system generated). The batch number format is PAY-YYYY-JJJ-SSSS, where YYYY is the year, JJJ is the Julian date, and SSSS is a sequential number. The system generates a new sequence for every different date, so the first batch of each day starts with SSSS = 0001.
Branch View the portfolio branch.
Batch Status The batch status.
Ctrl Total #* The total number of payments in the batch (actual). Note: This figure must match the figure in the required Total # field before a batch can be posted.
Ctrl Total Amt*
View the total amount of payments in the batch (actual). Note: This fig-ure must match the figure in the required Total Amt field before a batch can be posted.
Note: * These two fields update every time you save the itemized payment entries in the Payments section.
Field: Do this:
Pmt Date Select the payment effective date. This date must be less than or equal to the date recorded in the Batch section.
Currency Select the currency for the payment.
Pmt Amount Specify the payment amount.
Status View the payment status.
Mode View the payment mode.
Field: Do this:
14-13
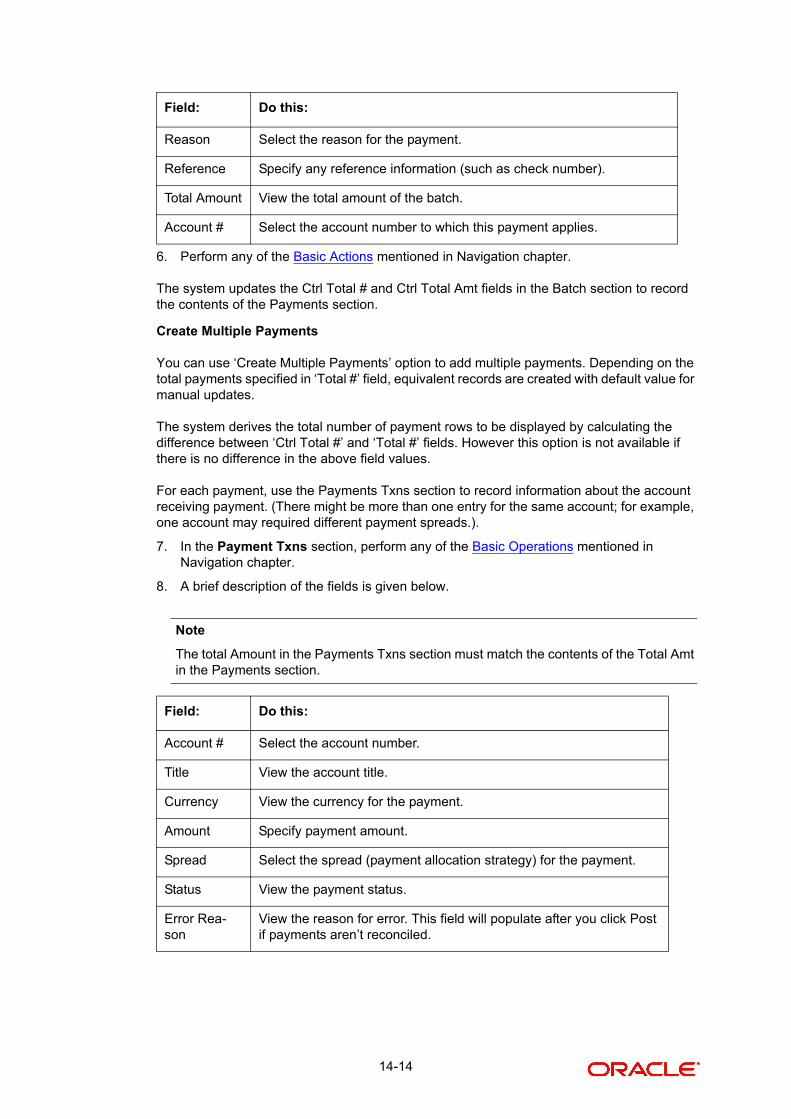
6. Perform any of the Basic Actions mentioned in Navigation chapter.
The system updates the Ctrl Total # and Ctrl Total Amt fields in the Batch section to record the contents of the Payments section.
Create Multiple Payments
You can use ‘Create Multiple Payments’ option to add multiple payments. Depending on the total payments specified in ‘Total #’ field, equivalent records are created with default value for manual updates.
The system derives the total number of payment rows to be displayed by calculating the difference between ‘Ctrl Total #’ and ‘Total #’ fields. However this option is not available if there is no difference in the above field values.
For each payment, use the Payments Txns section to record information about the account receiving payment. (There might be more than one entry for the same account; for example, one account may required different payment spreads.).
7. In the Payment Txns section, perform any of the Basic Operations mentioned in Navigation chapter.
8. A brief description of the fields is given below.
Note
The total Amount in the Payments Txns section must match the contents of the Total Amt in the Payments section.
Reason Select the reason for the payment.
Reference Specify any reference information (such as check number).
Total Amount View the total amount of the batch.
Account # Select the account number to which this payment applies.
Field: Do this:
Account # Select the account number.
Title View the account title.
Currency View the currency for the payment.
Amount Specify payment amount.
Spread Select the spread (payment allocation strategy) for the payment.
Status View the payment status.
Error Rea-son
View the reason for error. This field will populate after you click Post if payments aren’t reconciled.
Field: Do this:
14-14
Note
The user can view 0 as an account which is the suspense account to which unidentified payments and advances are posted.
9. Perform any of the Basic Actions mentioned in Navigation chapter.
Note
Before you can post a batch transaction on the Payment Entry page, the details of the Batch section’s display only Ctrl Total # and Ctrl Total Amt fields must match the details of the required Total # and Total Amt fields. In the example below, the batch is ready to post, as these figures match.
10. In the Action section, click Post.
The system changes the batch status from OPEN to PROCESSING and submits the batch to the job service. After the batch has been processed, the system changes the batch status to POSTED or ERROR.
Only a batch with a batch status of OPEN can be posted. The batch totals and control totals should match before you post the batch. If they do not and you click Post, the system displays the Error message as “Group control Totals not matching, Posting not allowed. The posted payments can be viewed on the Transactions page on the Customer Service window.
14.3.4.3 Holding a Batch of Payment Transactions
The Oracle Financial Services Lending and Leasing allows you to hold the posted batches if required. You can hold the batches only with the OPEN status.
To hold the batch of payments transactions
1. On the Oracle Financial Services Lending and Leasing Application home page, click Servicing Servicing Batch Transaction Payments Payment Entry.
2. On the Payment Entry page’s All Payments section, select Payments.
3. In the View Option section, select the batches you want to view:
– If the batch status is OPEN, click Open Batches Only in the View Options section.
– If the batch status is ERROR, click All Batches in the View Options section.
4. Select the batch you want to hold from the Batch section.
5. In the Action section, click Hold/Open.
The system changes the batch status from OPEN/ERROR to HOLD.
14.3.4.4 Removing Hold from the Batch of Payments Transactions
The system allows you to remove hold from the batch when required. You can remove hold from the batches only with the HOLD status.
To open or remove a hold on the batch of payments transactions
1. On the Oracle Financial Services Lending and Leasing Application home page, click the Servicing Servicing Batch Transaction Payments Payment Entry.
2. In the View Option section, select All Batches section
3. Select the batch you want to open from the Batch section.
4. In the Action section, click Hold/Open.
→ → → →
→ → → →
14-15
The system changes the batch status from HOLD to OPEN.
14.3.4.5 Reversing the Batch of Payment Transactions
The system allows you to reverse the batch of payment transactions. You can reverse batches only with POSTED status.
To reverse the batch of payments transactions
1. On the Oracle Financial Services Lending and Leasing Application home page, click the Servicing Servicing Batch Transaction Payments Payment Entry.
2. In the View Option section, select All Batches.
3. Select the batch you want to reverse from the Batch section.
4. In the Action section, click reverse.
The system changes the batch status from POSTED to PROCESSING and submits the batch to the job service. After the batch has been processed, the system changes the batch status to REversed.
Note
You can verify the reversal using the Transaction page on the Customer Service window’s Transactions page for each account in the batch or by running the payment history report (Reports master tab > Servicing drop-down link > Payment History.
14.3.4.6 Printing a Receipt
You can print receipts for walk-in payments using the Print Receipt button on the Payment Entry page’s Action section. Receipts can be printed before actually posting the payment. This enables you to create just the batch and leave it for end of the day processing, but also print the receipt for the customer.
To print a receipt of the payments transactions
1. On the Oracle Financial Services Lending and Leasing Application home page, click the Servicing Servicing Batch Transaction Payments Payment Entry.
2. In the Batch section, click Add and specify the required information regarding the payment for which you want to print a receipt. (Note: For more information, see the previous section in this chapter, Entering and Posting a Payment.)
3. Click Save.
4. In the Payment section, click Add and specify the required information regarding the payment for which you want to print a receipt. (Note: For more information, see the previous section in this chapter, Entering and Posting a Payment.)
5. Click Save.
6. In the Payment Txns section, click Add and specify the required information regarding the payment for which you want to print a receipt. (Note: For more information, see the previous section in this chapter, Entering and Posting a Payment.)
7. Click Save.
8. In the Action section, click Print Receipt.
The system sends the payment receipt directly to the printer based on the company level system parameter CMN_CMB_DEFAULT_PRINTER.
→ → → →
→ → → →
14-16
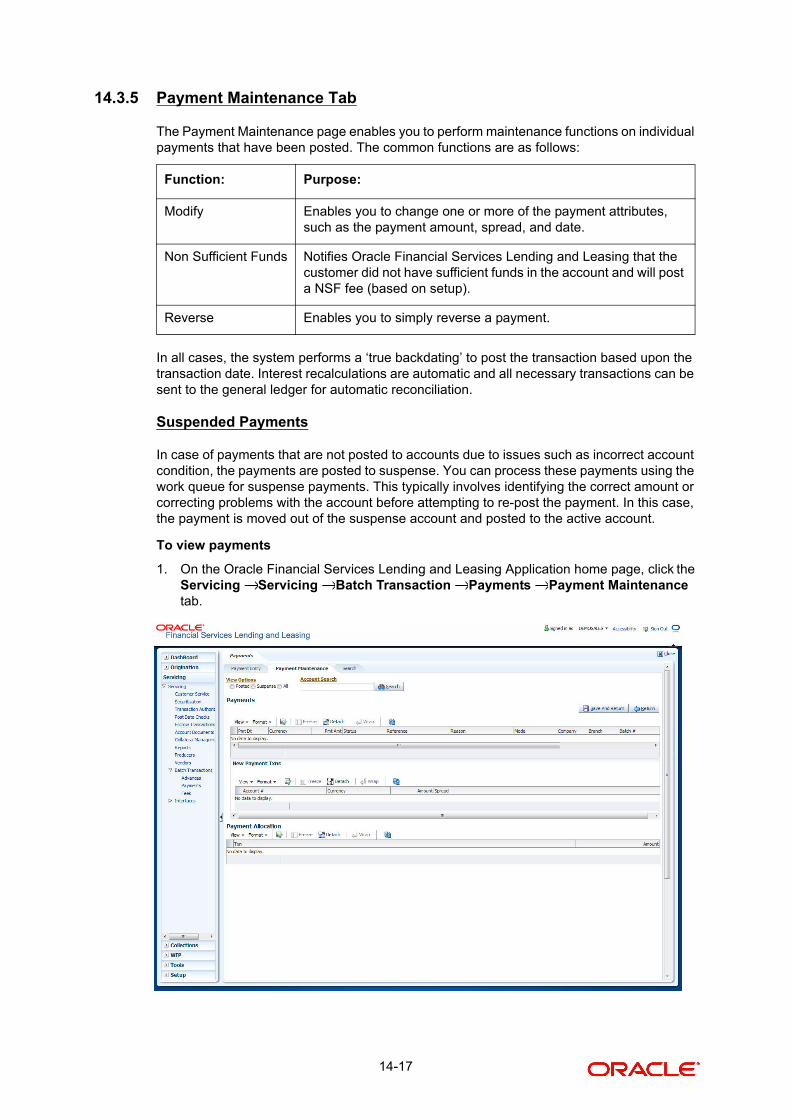
14.3.5 Payment Maintenance Tab
The Payment Maintenance page enables you to perform maintenance functions on individual payments that have been posted. The common functions are as follows:
In all cases, the system performs a ‘true backdating’ to post the transaction based upon the transaction date. Interest recalculations are automatic and all necessary transactions can be sent to the general ledger for automatic reconciliation.
Suspended Payments
In case of payments that are not posted to accounts due to issues such as incorrect account condition, the payments are posted to suspense. You can process these payments using the work queue for suspense payments. This typically involves identifying the correct amount or correcting problems with the account before attempting to re-post the payment. In this case, the payment is moved out of the suspense account and posted to the active account.
To view payments
1. On the Oracle Financial Services Lending and Leasing Application home page, click the Servicing Servicing Batch Transaction Payments Payment Maintenance tab.
Function: Purpose:
Modify Enables you to change one or more of the payment attributes, such as the payment amount, spread, and date.
Non Sufficient Funds Notifies Oracle Financial Services Lending and Leasing that the customer did not have sufficient funds in the account and will post a NSF fee (based on setup).
Reverse Enables you to simply reverse a payment.
→ → → →
14-17
2. In the View Options section, select which type of payment you want to load from the following list:
The system loads all payments from all accounts matching the selected view option.
3. In the Account Search section, use the Account # field and Search button to locate the account you want to work with.
4. Click Modify and then click Edit.
5. The system displays payments matching your search criteria in the Payments section.In the Payments section, enter, view, or edit the following information:
6. View the following information for the selected payment in the Payment Txns section:
Choose:In the Payments section, Oracle Financial Services Lending and Leasing displays:
Posted Posted payments.
Suspense Suspended payments. (Suspended payments are posted payments that haven’t been applied to accounts because of errors involving account numbers or the account itself, such as its status, spread issues, and so on.)
All All payments.
Field: Do this:
Pmt Date Specify the payment date.
Currency Specify the currency.
Pmt Amount Specify the payment amount.
Status View the status.
Reference View the payment reference.
Reason View the payment reason.
Mode View the payment mode.
NSF Fee Account # Select account number for NSF fee assessment.
Company The portfolio company.
Branch The portfolio branch.
Batch # The batch number.
Batch Type The batch type.
Date The batch date.
Field: View this:
Account # The account number.
Title The account title.
Currency The currency.
14-18
The Payment Allocation section details how the selected payment was applied against the account. This is useful in determining whether the payment was posted correctly or whether the spread or transaction date needs to be modified.
7. Select the payment transaction you want to modify in the Payment Txns section.
8. In the Payments section, click Modify.
9. Use the New Payment Txns section to make adjustments to the data.
10. In the New Payment Txns section, click Post.
11. Save your entry.
14.3.5.1 Modifying/Correcting Payment Transactions
In some cases, a payment may be valid, but how it was posted was incorrect; for example, payment was posted to the wrong account, with the wrong date, or with incorrect spread data. The Payment Maintenance page enables you to correct such errors.
To modify/correct an individual payment transaction
1. On the Oracle Financial Services Lending and Leasing Application home page, click the Servicing Servicing Batch Transaction Payments Payment Maintenance tab.
2. In the View Options section, select the type of payments you want to view: Posted, Suspense, or All.
3. In the Account Search section, use the Account # field and Search button to locate the account you want to work with
The system displays payments matching your search criteria in the Payments section.
4. In the Payments section, select the payment that you want to modify and click Modify.
5. In the Payments section, select the payment that you want to modify and click Modify.
6. In the New Payment Txns section, update the fields with information about the payment you want to modify.
7. In the New Payment Txns section, click Post.
The system modifies the original payment and posts the new payment.
The modified payment can be viewed on the Customer Service screen’s Transaction page.
Amount The payment amount.
Status The status of the payment.
Spread The spread (payment allocation strategy).
Field: Do this:
Account #: Title Select account number.
Currency Select the currency.
Txn Amt Specify amount.
Spread Select spread (payment allocation strategy).
Field: View this:
→ → → →
14-19

14.3.5.2 Reversing Payment Transactions
To reverse an individual payment transaction
1. On the Oracle Financial Services Lending and Leasing Application home page, click the Servicing Servicing Batch Transaction Payments Payment Maintenance tab.
2. In the View Options section, click Posted.
3. In the Account Search section, use the Account # field and Search button to locate the account you want to work with
The system displays payments matching your search criteria in the Payments section.
4. In the Payments section, select the payment that you want to reverse.
5. In the Payments section, click Reverse, then click Post.
The system reverses the original payment.
Note
The modified payment can be viewed on the Customer Service screen’s Transaction page.
Access to the Reverse button can be restricted by user responsibility and the account’s product type using the PAYMENT_REV transaction code (Super Group: ACCOUNT MONETARY TXN) on the Administration window. (For more information, see the Txn Codes page section in the Oracle Financial Services Lending and Leasing Suite Setup Guide).
14.3.5.3 Reversing Payment Transaction and Assessing NSF Fee
To reverse an individual payment transaction and assess NSF fee
1. On the Oracle Financial Services Lending and Leasing Application home page, click the Servicing Servicing Batch Transaction Payments Payment Maintenance tab.
2. In the View Options section, click Posted.
3. In the Account Search section, use the Account # field and Search button to locate the account you want to work with
The system displays payments matching your search criteria in the Payments section.
4. In the Payments section, select the payment that you want to reverse with an NSF fee.
5. In the Payments section, click Non Sufficient Funds, then click Post.
The system reverses the original payment and assesses the NSF fee.
The modified payment can be viewed on the Customer Service screen’s Transaction page.
14.3.6 Outbound Customer Extracts To Payment Agencies Batch
An outbound customer extract file can be generated and sent to multiple payment vendors like Moneygram, Quick Collect, SpeedPay from Western Union, Lockbox etc. Sharing this extract enables various outlets of these payment agencies to verify account’s existence in FI and proceed with payment processing.
After receiving the payment extract file, the vendor validates the customer details and sends a notification confirmation of Payment in NACHA format.
→ → → →
→ → → →
14-20
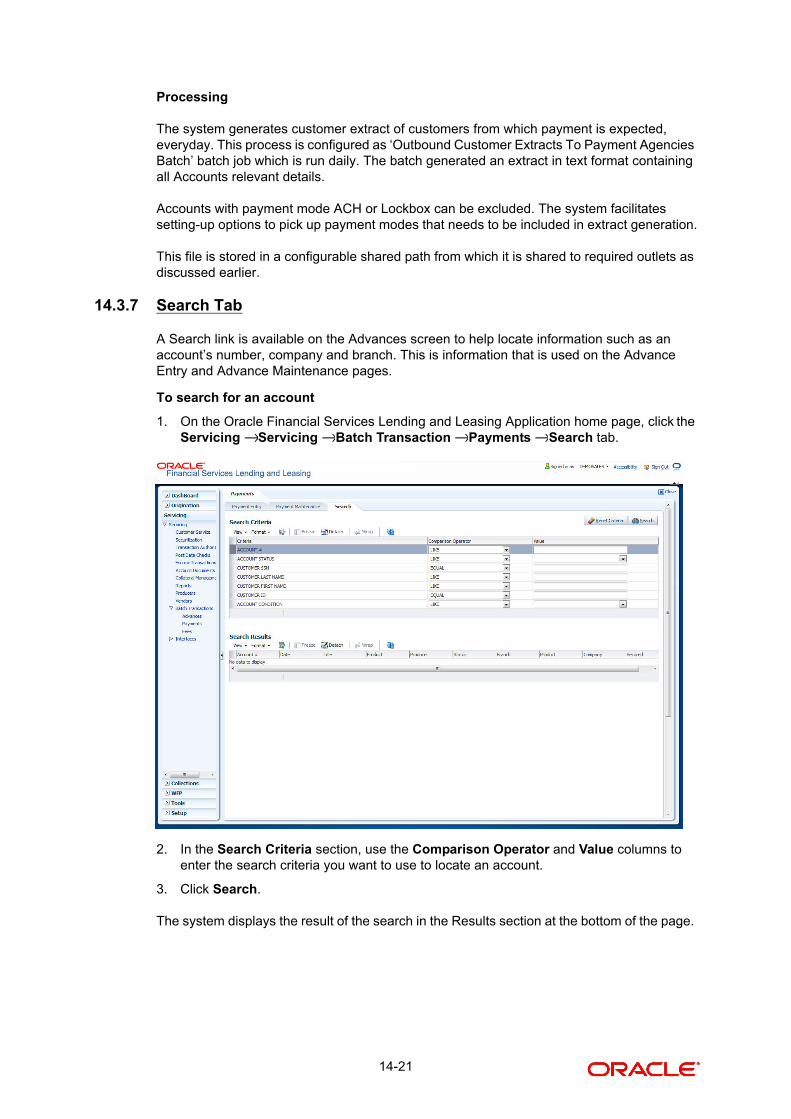
Processing
The system generates customer extract of customers from which payment is expected, everyday. This process is configured as ‘Outbound Customer Extracts To Payment Agencies Batch’ batch job which is run daily. The batch generated an extract in text format containing all Accounts relevant details.
Accounts with payment mode ACH or Lockbox can be excluded. The system facilitates setting-up options to pick up payment modes that needs to be included in extract generation.
This file is stored in a configurable shared path from which it is shared to required outlets as discussed earlier.
14.3.7 Search Tab
A Search link is available on the Advances screen to help locate information such as an account’s number, company and branch. This is information that is used on the Advance Entry and Advance Maintenance pages.
To search for an account
1. On the Oracle Financial Services Lending and Leasing Application home page, click the Servicing Servicing Batch Transaction Payments Search tab.
2. In the Search Criteria section, use the Comparison Operator and Value columns to enter the search criteria you want to use to locate an account.
3. Click Search.
The system displays the result of the search in the Results section at the bottom of the page.
→ → → →
14-21
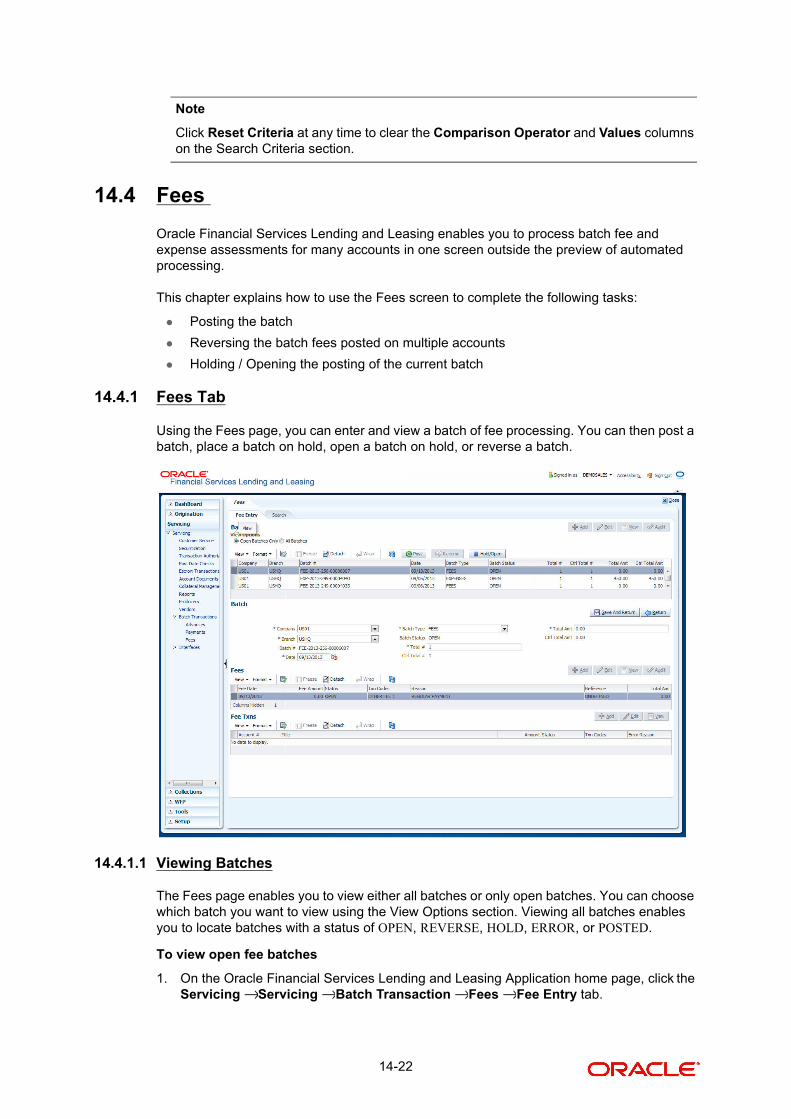
Note
Click Reset Criteria at any time to clear the Comparison Operator and Values columns on the Search Criteria section.
14.4 Fees
Oracle Financial Services Lending and Leasing enables you to process batch fee and expense assessments for many accounts in one screen outside the preview of automated processing.
This chapter explains how to use the Fees screen to complete the following tasks:
Posting the batch
Reversing the batch fees posted on multiple accounts
Holding / Opening the posting of the current batch
14.4.1 Fees Tab
Using the Fees page, you can enter and view a batch of fee processing. You can then post a batch, place a batch on hold, open a batch on hold, or reverse a batch.
14.4.1.1 Viewing Batches
The Fees page enables you to view either all batches or only open batches. You can choose which batch you want to view using the View Options section. Viewing all batches enables you to locate batches with a status of OPEN, REVERSE, HOLD, ERROR, or POSTED.
To view open fee batches
1. On the Oracle Financial Services Lending and Leasing Application home page, click the Servicing Servicing Batch Transaction Fees Fee Entry tab.→ → → →
14-22
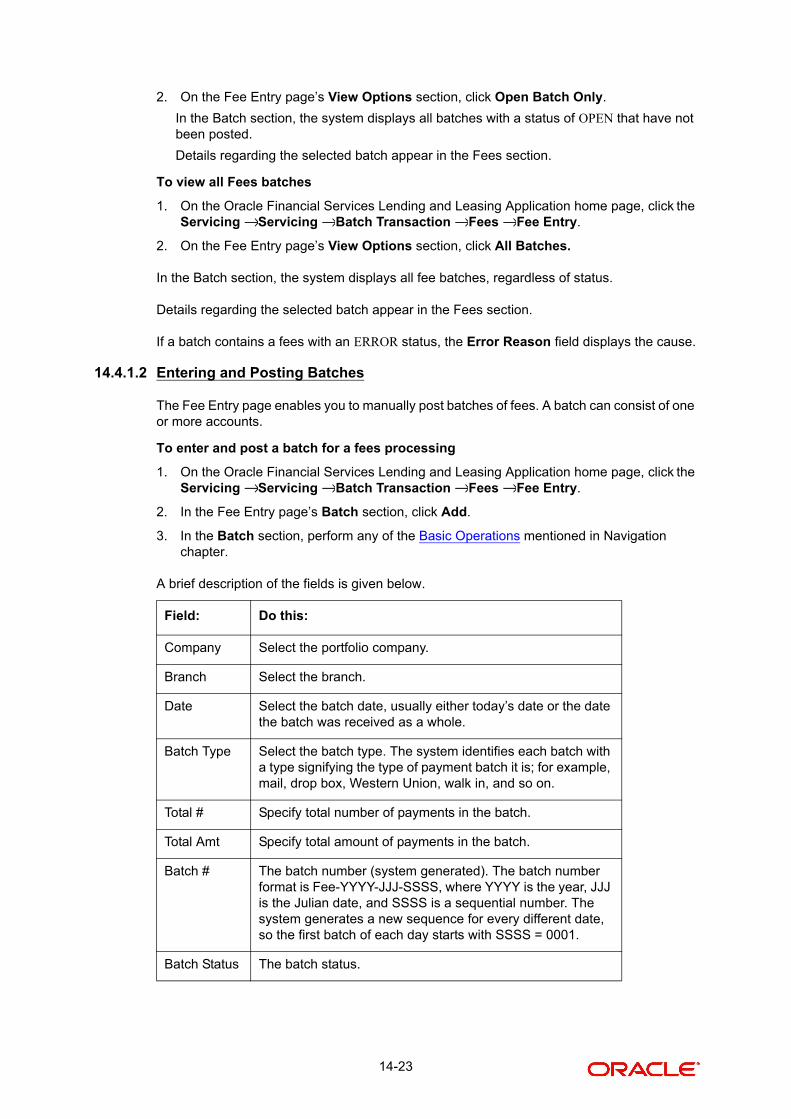
2. On the Fee Entry page’s View Options section, click Open Batch Only.
In the Batch section, the system displays all batches with a status of OPEN that have not been posted.
Details regarding the selected batch appear in the Fees section.
To view all Fees batches
1. On the Oracle Financial Services Lending and Leasing Application home page, click the Servicing Servicing Batch Transaction Fees Fee Entry.
2. On the Fee Entry page’s View Options section, click All Batches.
In the Batch section, the system displays all fee batches, regardless of status.
Details regarding the selected batch appear in the Fees section.
If a batch contains a fees with an ERROR status, the Error Reason field displays the cause.
14.4.1.2 Entering and Posting Batches
The Fee Entry page enables you to manually post batches of fees. A batch can consist of one or more accounts.
To enter and post a batch for a fees processing
1. On the Oracle Financial Services Lending and Leasing Application home page, click the Servicing Servicing Batch Transaction Fees Fee Entry.
2. In the Fee Entry page’s Batch section, click Add.
3. In the Batch section, perform any of the Basic Operations mentioned in Navigation chapter.
A brief description of the fields is given below.
Field: Do this:
Company Select the portfolio company.
Branch Select the branch.
Date Select the batch date, usually either today’s date or the date the batch was received as a whole.
Batch Type Select the batch type. The system identifies each batch with a type signifying the type of payment batch it is; for example, mail, drop box, Western Union, walk in, and so on.
Total # Specify total number of payments in the batch.
Total Amt Specify total amount of payments in the batch.
Batch # The batch number (system generated). The batch number format is Fee-YYYY-JJJ-SSSS, where YYYY is the year, JJJ is the Julian date, and SSSS is a sequential number. The system generates a new sequence for every different date, so the first batch of each day starts with SSSS = 0001.
Batch Status The batch status.
→ → → →
→ → → →
14-23
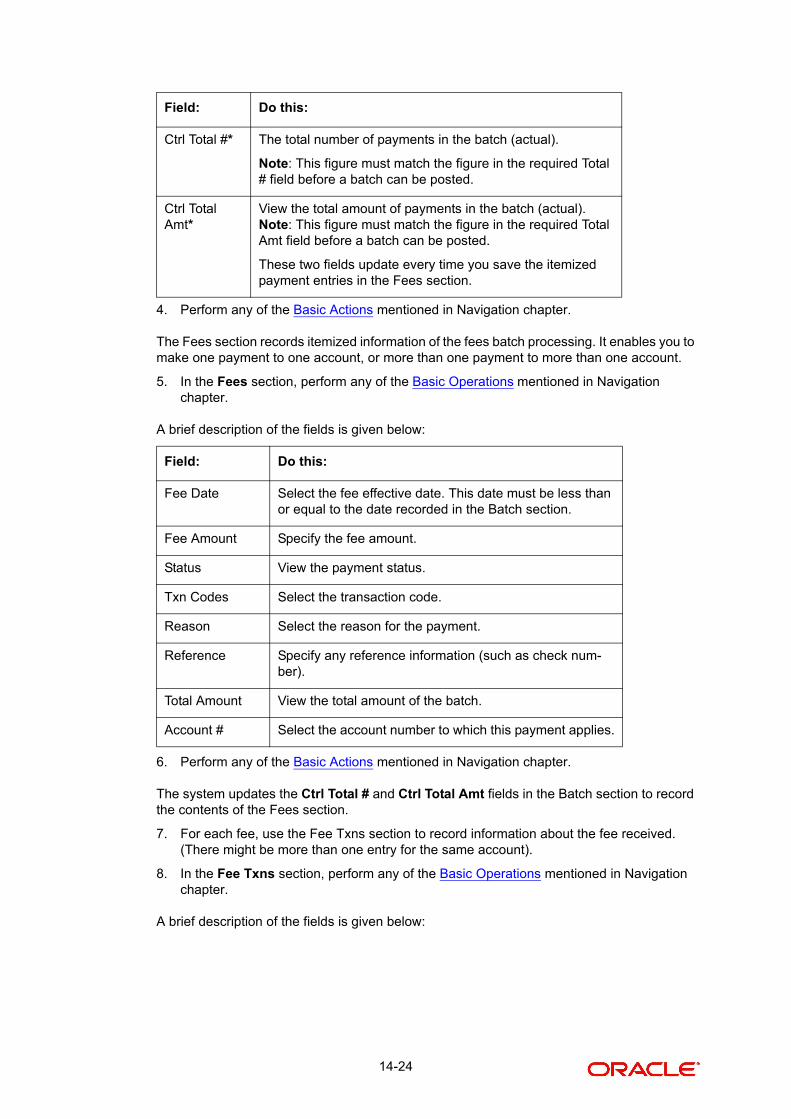
4. Perform any of the Basic Actions mentioned in Navigation chapter.
The Fees section records itemized information of the fees batch processing. It enables you to make one payment to one account, or more than one payment to more than one account.
5. In the Fees section, perform any of the Basic Operations mentioned in Navigation chapter.
A brief description of the fields is given below:
6. Perform any of the Basic Actions mentioned in Navigation chapter.
The system updates the Ctrl Total # and Ctrl Total Amt fields in the Batch section to record the contents of the Fees section.
7. For each fee, use the Fee Txns section to record information about the fee received. (There might be more than one entry for the same account).
8. In the Fee Txns section, perform any of the Basic Operations mentioned in Navigation chapter.
A brief description of the fields is given below:
Ctrl Total #* The total number of payments in the batch (actual).
Note: This figure must match the figure in the required Total # field before a batch can be posted.
Ctrl Total Amt*
View the total amount of payments in the batch (actual). Note: This figure must match the figure in the required Total Amt field before a batch can be posted.
These two fields update every time you save the itemized payment entries in the Fees section.
Field: Do this:
Fee Date Select the fee effective date. This date must be less than or equal to the date recorded in the Batch section.
Fee Amount Specify the fee amount.
Status View the payment status.
Txn Codes Select the transaction code.
Reason Select the reason for the payment.
Reference Specify any reference information (such as check num-ber).
Total Amount View the total amount of the batch.
Account # Select the account number to which this payment applies.
Field: Do this:
14-24
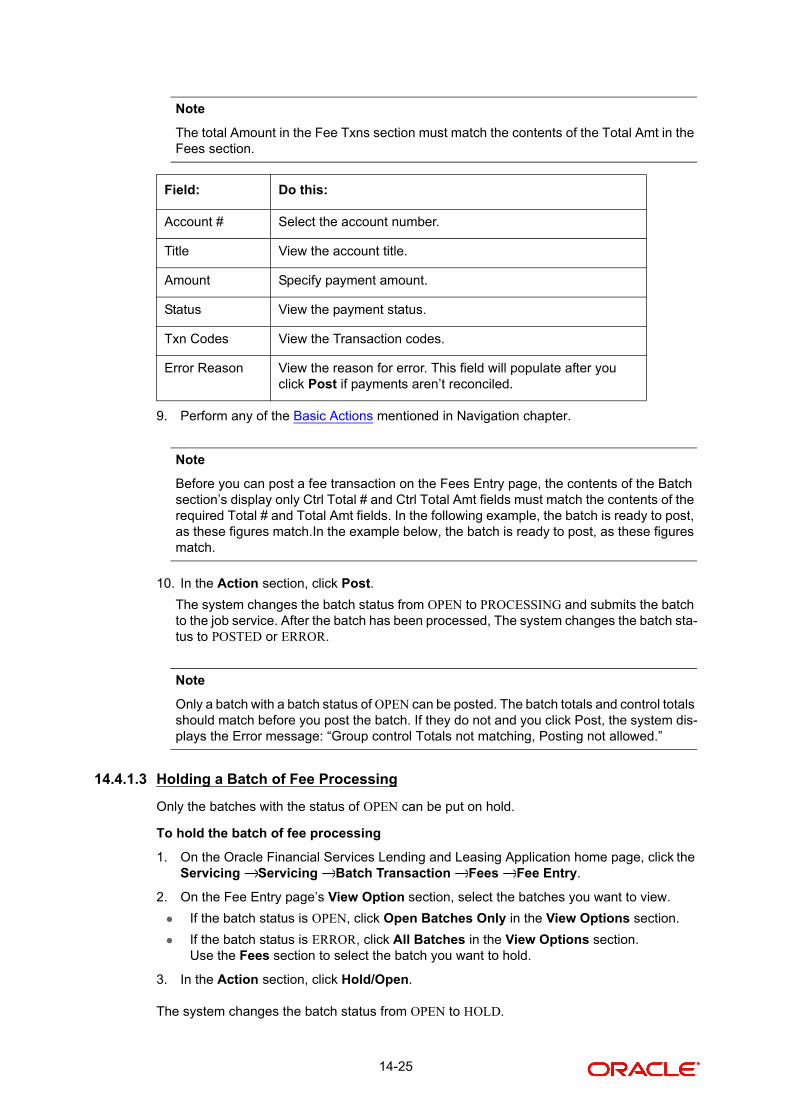
Note
The total Amount in the Fee Txns section must match the contents of the Total Amt in the Fees section.
9. Perform any of the Basic Actions mentioned in Navigation chapter.
Note
Before you can post a fee transaction on the Fees Entry page, the contents of the Batch section’s display only Ctrl Total # and Ctrl Total Amt fields must match the contents of the required Total # and Total Amt fields. In the following example, the batch is ready to post, as these figures match.In the example below, the batch is ready to post, as these figures match.
10. In the Action section, click Post.
The system changes the batch status from OPEN to PROCESSING and submits the batch to the job service. After the batch has been processed, The system changes the batch sta-tus to POSTED or ERROR.
Note
Only a batch with a batch status of OPEN can be posted. The batch totals and control totals should match before you post the batch. If they do not and you click Post, the system dis-plays the Error message: “Group control Totals not matching, Posting not allowed.”
14.4.1.3 Holding a Batch of Fee Processing
Only the batches with the status of OPEN can be put on hold.
To hold the batch of fee processing
1. On the Oracle Financial Services Lending and Leasing Application home page, click the Servicing Servicing Batch Transaction Fees Fee Entry.
2. On the Fee Entry page’s View Option section, select the batches you want to view.
If the batch status is OPEN, click Open Batches Only in the View Options section.
If the batch status is ERROR, click All Batches in the View Options section.Use the Fees section to select the batch you want to hold.
3. In the Action section, click Hold/Open.
The system changes the batch status from OPEN to HOLD.
Field: Do this:
Account # Select the account number.
Title View the account title.
Amount Specify payment amount.
Status View the payment status.
Txn Codes View the Transaction codes.
Error Reason View the reason for error. This field will populate after you click Post if payments aren’t reconciled.
→ → → →
14-25
14.4.1.4 Removing a Hold on the Batch of Fee Processing
The status HOLD can be removed for the batch with status HOLD.
To open (or remove hold) on the batch of fee processing
Note
Only the batches with a status of HOLD can be opened.
1. On the Oracle Financial Services Lending and Leasing Application home page, click the Servicing Servicing Batch Transaction Fees Fee Entry.
2. On the Fee Entry page’s View Option section, select the fees you want to view.
3. Use the Fees section to select the batch you want to open.
4. In the Action section, click Hold/Open.
The system changes the batch status from HOLD to OPEN.
14.4.1.5 Reversing the batch of Fee Processing
Only the batches with a status of POSTED can be reversed.
To reverse the batch of fee processing
1. On the Oracle Financial Services Lending and Leasing Application home page, click the Servicing Servicing Batch Transaction Fees Fee Entry.
2. On the Fee Entry page’s View Option section, select the batches you want to view.
3. Use the Fees section to select the batch you want to reverse.
4. In the Action section, click Reverse.
The system changes the batch status from POSTED to PROCESSING and submits the batch to the job service. After the batch has been processed, the system changes the batch status to REVERSED.
14.5 Search Page
A Search page is available on the Fees screen to help locate information such as an account’s number, customer name and company. This is information that is used on the Fees Entry page.
To search for an account
1. On the Oracle Financial Services Lending and Leasing Application home page, click the Servicing Servicing Batch Transaction Fees Search.
The Fees screen’s Search page appears.
2. In the Search Criteria section, use the Comparison Operator and Value columns to enter the search criteria you want to use to locate an account.
3. Click Search.
The system displays the result of the search in the Results section at the bottom of the page.
Note
Click Reset Criteria at any time to clear the Comparison Operator and Values columns on the Search Criteria section.
→ → → →
→ → → →
→ → → →
14-26
15. Interface
15.1 Introduction
This chapter discusses about the interfaces available in the application. the following interfaces are supported:
AP Transaction
GL Transaction
Card Transaction
Conversion Accounts
15.2 AP Transactions
The AP Transactions window enables you to view accounts payable in Oracle Financial Services Lending and Leasing and complete the following tasks:
View requisitions for all payees
Put a requisition on hold
Close a requisition
Cancel a requisition
The AP Transactions page displays information regarding advance payments, such as payee type, mode of payment, status, and other details.
To view requisitions for all payees
1. On the Oracle Financial Services Lending and Leasing Suite home page, Servicing Servicing Interfaces AP Transaction.
The AP Transactions window appears.
→ → →
15-1
The AP Transactions page contains three sets of option buttons, each in its own section: Payee Type, Pmt Mode, and Status. These option buttons allow you to narrow the range of the requisitions Oracle Financial Services Lending and Leasing displays.
The Payee Type section enables you to view requisitions according to whom the payment is made.
The Pmt Mode section enables you to view requisitions by how the payment is made.
The Status section enables you to view requisitions according to status.
2. Use the Payee Type, Pmt Mode, and Status buttons to the select the requisitions you want to view.
3. On the AP Transactions page’s Requisitions section, select the record you want to work with and click Show in the Details column.
4. In the Requisitions section, view the following information:
Choose: Oracle Financial Services Lending and Leasing displays:
All All payees.
Producer Producer payees.
Third Party Third party payees.
Vendor Vendor payees.
Customer Customer payees.
Choose: Oracle Financial Services Lending and Leasing displays:
All All requisitions.
Check Requisitions paid by check.
ACH Requisitions paid by ACH.
Choose: Oracle Financial Services Lending and Leasing displays:
All All requisitions.
Open Open requisitions.
Close Closed requisitions.
Hold Requisitions on hold.
Void Cancelled requisitions.
Field: Oracle Financial Services Lending and Leasing displays:
Select If selected, indicates this is the current record.
Company The AP transaction company
Branch The AP transaction branch.
Dt The AP transaction date.
15-2
5. In the Details section, view the following information:
Note
An Open transaction will not have a credit reference number, as it has not been entered or generated. (See the screen shot above.)
Closing a requisition
When the transactions are paid, the requisition should be closed. When you close a requisition, Oracle Financial Services Lending and Leasing changes its status to CLOSED and it cannot be paid again. Oracle Financial Services Lending and Leasing then generates the appropriate GL (general ledger) transactions.
To close a requisition
1. Open the AP Transaction window and use the Payee Type, Pmt Mode, and Status sections to load the requisition you want to close.
2. In the Requisition section, select the requisition you want to close.
3. In the Action section, click Close.
4. Complete the Check Ref # field with the check reference number and the Check Dt field when the check was issued.
5. In the Action section, click Save.
Status The AP transaction status (OPEN, CLOSE, HOLD, or VOID).
Payee Type The AP transaction payee type (PRODUCER, THIRD PARTY, VEN-DOR, or CUSTOMER).
Payee Name The AP transaction payee number and name.
Currency The AP transaction payment currency.
Amount The AP transaction payment amount.
Pmt Mode The AP transaction payment mode.
Disbursement Currency
The disbursement currency.
Address The AP transaction payment address.
Check Ref # The AP transaction check reference number.
Check Dt The AP transaction check date.
Ref Acc # The reference account number.
Field: Oracle Financial Services Lending and Leasing displays:
Effective Dt The transaction detail effective date.
Description The transaction detail description.
Amount The transaction detail payment amount.
Field: Oracle Financial Services Lending and Leasing displays:
15-3
6. In the Status section, click Close and view the account.
Putting a requisition on hold
To ensure that the requisition is not paid or closed, you can change its status to HOLD. When a requisition is on hold, it cannot be closed.
To put a requisition on hold
1. Open the AP Transaction window and use the Payee Type, Pmt Mode, and Status sections to load the requisition you want to close.
2. In the Requisition section, select the requisition you want to put on hold.
3. In the Action section, click Hold.
4. In the Action section, click Save.
5. In the Status section, choose Hold and view the account.
Voiding a requisition
Changing the status of a requisition to VOID cancels the requisition.
To void a requisition
1. Open the AP Transaction window and use the Payee Type, Pmt Mode, and Status sections to load the requisition you want to close.
2. In the Requisition section, select the requisition you want to void.
3. In the Action section, select Void.
4. In the Action section, click Save.
5. In the Status section, click Void and view the account.
15.3 GL Transactions
Oracle Financial Services Lending and Leasing allows you to view the details regarding general ledger entry as well as amortized transactions posted on a monthly basis. The system updates the GL transaction page nightly.
The GL Transactions screen contains the following tabs:
GL Transactions
Amortized Transactions
WFP GL Transactions
The GL Transactions screen is a display only page that allows you to view details regarding each general ledger entry and its corresponding details.
To view the GL Transactions page
1. On the Oracle Financial Services Lending and Leasing Application home page, Servicing Servicing Interfaces GL Transaction link.→ → →
15-4
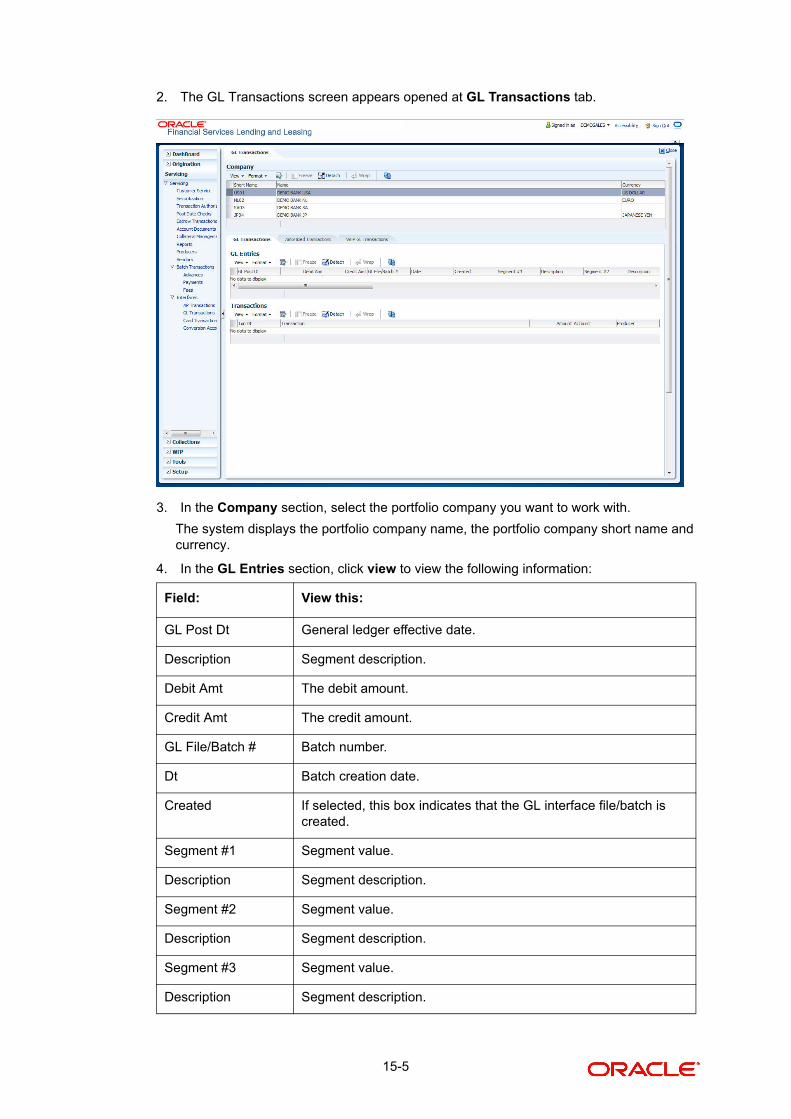
2. The GL Transactions screen appears opened at GL Transactions tab.
3. In the Company section, select the portfolio company you want to work with.
The system displays the portfolio company name, the portfolio company short name and currency.
4. In the GL Entries section, click view to view the following information:
Field: View this:
GL Post Dt General ledger effective date.
Description Segment description.
Debit Amt The debit amount.
Credit Amt The credit amount.
GL File/Batch # Batch number.
Dt Batch creation date.
Created If selected, this box indicates that the GL interface file/batch is created.
Segment #1 Segment value.
Description Segment description.
Segment #2 Segment value.
Description Segment description.
Segment #3 Segment value.
Description Segment description.
15-5

5. In the Transactions section, view the following information:
15.3.1 Amortized Transactions Tab
The Amortized Transactions page is another display only page. It allows you to view details of all amortized transactions posted on a monthly basis. The Transactions block displays the earned amount to date and the balance that remains to be earned for each amortized transaction.
To view the Amortized Transaction page
1. On Oracle Financial Services Lending and Leasing Application home page Servicing Servicing Interfaces GL Transaction Amortized Transactions In the Company section, select the portfolio company you want to view.
2. In the Transactions section, view the following information:
Segment #4 Segment value.
Description Segment description.
Segment #5 Segment value.
Description Segment description.
Segment #6 Segment value.
Description Segment description.
Segment #7 Segment value.
Description Segment description.
Segment #8 Segment value.
Description Segment description.
Segment #9 Segment value.
Description Segment description.
Segment #10 Segment value.
Field: View this:
Txn Dt The transaction effective date.
Transaction The description of transaction.
Amount The transaction amount.
Account The account.
Producer The producer.
Field: View this:
Transaction The transaction type.
Field: View this:
→ → → →
15-6
3. In the Amortized Transactions section, view the following information:
15.4 Account Conversion
Oracle Financial Services Lending and Leasing Open Interface module is designed to allow businesses to convert accounts (either approved or partially completed). At the end of the process, a new account is created in the system which can be viewed on the Customer Service. It also allows you to board new accounts. There are two methods to enter this information into the system; a data file upload and a manual data entry.
This chapter explains how to use Oracle Financial Services Lending and Leasing’s Account Conversion screen to complete the following tasks:
Record customer details (including employment and address information), contract information, and collateral information
Edits to verify the completeness of data with a Verification page.
15.4.1 Conversion of Account screen
In the Conversion Account screen, the first step in converting an account is to complete the account boarding (new/old) details.
IMPORTANT: The conversion process does not create the underlying general ledger (GL) entries at any time.
To complete the master block
1. Conversion Accounts.
Account # The account.
Account Status The account status.
Method The amortization calculation method.
Frequency The amortization frequency.
Term The term.
Balance The balance amount.
Earned The balance earned.
WrittenOff The balance write-off.
Field: View this:
GL Post Dt The GL post date.
Transaction Code The transaction code.
Transaction Amount The transaction amount.
Field: View this:
15-7
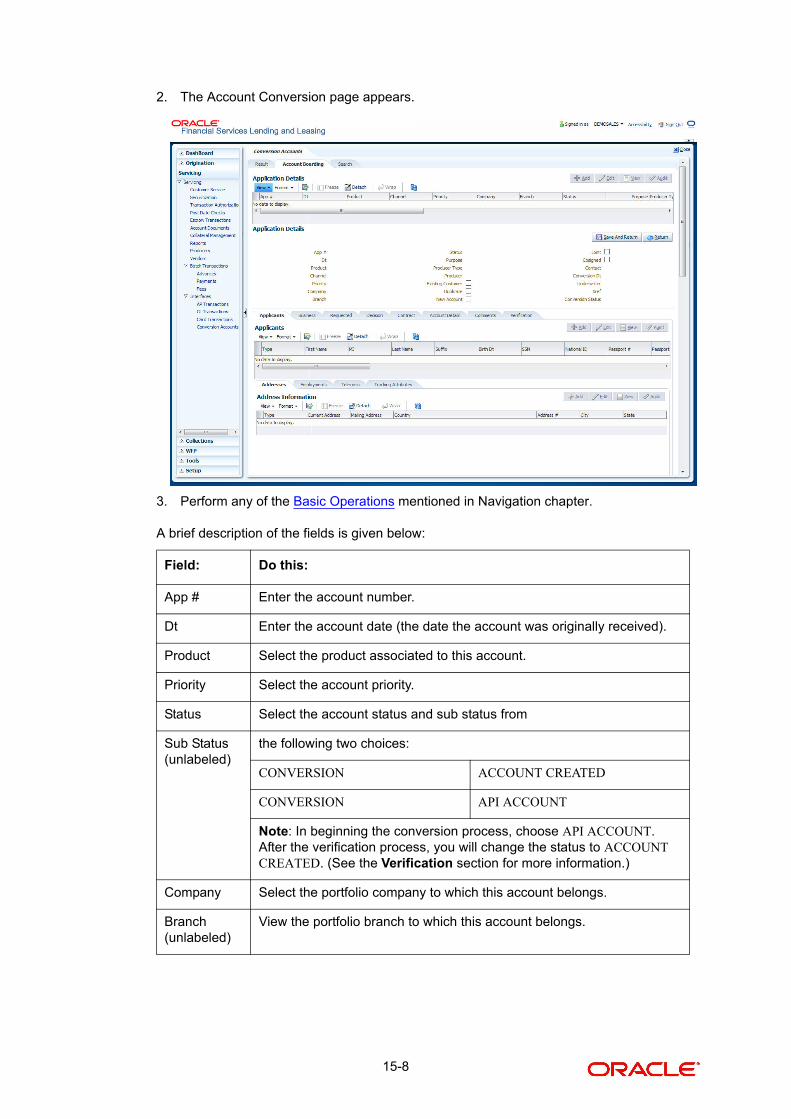
2. The Account Conversion page appears.
3. Perform any of the Basic Operations mentioned in Navigation chapter.
A brief description of the fields is given below:
Field: Do this:
App # Enter the account number.
Dt Enter the account date (the date the account was originally received).
Product Select the product associated to this account.
Priority Select the account priority.
Status Select the account status and sub status from
Sub Status (unlabeled)
the following two choices:
CONVERSION ACCOUNT CREATED
CONVERSION API ACCOUNT
Note: In beginning the conversion process, choose API ACCOUNT. After the verification process, you will change the status to ACCOUNT CREATED. (See the Verification section for more information.)
Company Select the portfolio company to which this account belongs.
Branch (unlabeled)
View the portfolio branch to which this account belongs.
15-8
4. Perform any of the Basic Actions mentioned in Navigation chapter.
15.4.2 Applicants Sub Tab
The Applicants master page allows you to record information regarding applicants associated with the account. In this section, you will use the information supplied on the application, complete the Primary Applicant page and sub pages (Address, Employments, Telecoms, and Financials sub pages). If this is a joint account, complete the Others page as well.
15.4.3 Decision Tab
On the Decision page, Oracle Financial Services Lending and Leasing system records information gathered during the underwriting process. Depending on the type of account you are working with, Oracle Financial Services Lending and Leasing will display the Loan page. These pages all share the following sub pages: Stipulations, Itemization (Conversion form only), and Checklist (Conversion form only).
For more detailed explanation of the fields found on the Decision page, please see the chapter Underwriting in this User Guide.
New Account Select box if account doesn’t exist in the legacy system.
IMPORTANT: Clear this box if the account transactions need to be con-verted. If this box is selected, data entered on the Transaction sub page of the Account master tab will not convert.
Conversion Dt
Enter the conversion date.
Joint Select if the account is joint.
Cos Select if the account is co-signed.
Purpose Select the purpose.
Existing Cus-tomer
Select if one of the applicants is an existing customer.
Dup Select if the account is a duplicate application.
Contact Enter the contact.
Channel Select the account channel.
Producer Type
Select the producer type.
Producer Select the producer.
Underwriter View the underwriter name.
Xref Enter the account number (if converting an existing account) or the account number (if you need to create an account for the funded appli-cation). This will help to reference back to the legacy system.
Conversion Status
View the status of the conversion.
Field: Do this:
15-9
15.4.4 Contract Tab
The Contract page allows you to perform the important task of completing the truth-In-lending details. These pages include information about the financed amount, the payment schedule, the total of these payments, the finance charge, and the resulting annual percentage rate. The truth-in-lending details must be completed before a loan can be funded.
In completing the truth-in-lending details on the Contract link, you will complete the either the Loan page.
The Loan page share the following sub pages:
Itemizations
Insurance
ESC
Escrow
Subvention
Proceeds
Disbursement
Fee
ACH
Coupon
PDC
15.4.5 Collateral Tab
The Collateral page allows you to record information regarding collateral associated with the account. Depending on the type of product or producer you selected, the Collateral link opens one of the three following collateral page: a vehicle information page, a home information page, or an other information page. Complete the page that is available on your Applications window.
These pages all share the following sub pages: Valuations and Tracking.
15.4.6 Account Details Tab
The Account Conversion Account’s page allows you to view and add comments regarding an account at any time.
To complete the Account Details section
1. Click Conversion AccountsAccounts link.
The Account page contains the following sub pages:
Transactions
ACH
Bankruptcy
Chargeoff
Compensation
Loan Details
LoC Details
Tracking Attributes
15-10
2. Perform any of the Basic Operations mentioned in Navigation chapter.
A brief description of the fields is given below:
3. Perform any of the Basic Actions mentioned in Navigation chapter.
4. In the Extensions block, perform any of the Basic Operations mentioned in Navigation chapter.
A brief description of the fields is given below:
Field: Do this:
Account# View the value entered in “Xref” field.
Status Select the account status.
Effective Dt Enter the effective date of the account.
Paid Off Dt Enter the paid off date of the PAID account.
Pool Enter the pool the account is in.
30 Enter the number of times 30 days delinquent over the life of the account.
60 Enter the number of times 60 days delinquent over the life of the account.
90 Enter the number of times 90 days delinquent over the life of the account.
120 Enter the number of times 120 days delinquent over the life of the account.
Next Due Dt Enter the Next Due date.
Last Pmt Amt
Enter the last payment amount.
Due Day Enter the due day of the account.
Last Activity Dt
Enter the date of last activity on the account.
Maturity Dt Enter the maturity date of the account.
Last Pmt Dt Enter the date the last payment was received.
Excess Amt Pd
Enter the amount paid that needs to be applied towards future due dates.
Field: Do this:
# of Extensions (Year)
Enter the number of times extensions granted (year).
# of Extensions (Life)
Enter the number of times extensions granted (life).
15-11
5. Perform any of the Basic Actions mentioned in Navigation chapter.
6. In the Due Dates block, perform any of the Basic Operations mentioned in Navigation chapter.
A brief description of the fields is given below:
7. Perform any of the Basic Actions mentioned in Navigation chapter.
8. In the Conditions block, perform any of the Basic Operations mentioned in Navigation chapter.
A brief description of the fields is given below.
# of Extension Term (Year)
Enter the number of terms extensions granted (year).
# of Extension Term (Life)
Enter the number of terms extensions granted (life).
Last Extn Dt View the last extension date.
Field: Do this:
Due Dt 1 Enter the latest due date for which the account is due.
Amt Due 1 Enter the amount due on the latest due date of the account.
Amt Paid 1 Enter the amount paid on the latest due date of the account.
Due Dt 2 Enter the (latest - 1) due date of the account.
Amt Due 2 Enter the amount due on the (latest -1) due date of the account.
Amt Paid 2 Enter the amount paid on the (latest - 1) due date of the account.
Due Dt 3 Enter the (latest - 2) due date of the account.
Amt Due 3 Enter the amount due on the (latest -2) due date of the account.
Amt Paid 3 Enter the amount paid on the (latest - 2) due date of the account.
Due Dt 4 Enter the (latest - 3) due date of the account.
Amt Due 4 Enter the amount due on the (latest -3) due date of the account.
Amt Paid 4 Enter the amount paid on the (latest - 3) due date of the account.
Due Dt 5 Enter the (latest - 4 cycle) due date of the account.
Amt Due 5 Enter the total due amount less the sum of the last 4 due amounts on the account.
Amt Paid 5 Enter the amount paid on the account till date less the value in paid buck-ets 1 through 4.
Field: Do this:
Condition View the condition.
Field: Do this:
15-12
9. Perform any of the Basic Actions mentioned in Navigation chapter.
15.4.7 Account Details’ Sub Tabs
To complete the Transactions sub page
1. Click Transactions sub tab.
2. Perform any of the Basic Operations mentioned in Navigation chapter.
A brief description of the fields is given below:
Start Dt View the start date.
Followup Dt View the next follow-up date.
Field: Do this:
Seq Enter the transaction sequence number.
Post Dt Enter the date of posting this transaction.
Dt Enter the effective date of this transaction.
Txn Enter the transaction code.
Balance Amt Enter the principal/advance (Note balance in case of PC) balance value after this transaction was executed.
Txn Amt Enter the amount involved in this transaction.
Reference Enter the reference for this transaction.
Mode Select the mode in which the transaction was performed.
Reason Select the reason code for this transaction.
Ext Amt Enter the part of the payment that was allocated towards the extension fee.
Mem Amt Enter the part of the payment that was allocated towards the member-ship fee.
Ovr Amt Enter the part of the payment that was allocated towards the over limit fee.
Fee Adv Enter the part of the payment that was allocated towards the advance transaction fee.
Pre-Payment Enter the part of the payment that was allocated towards the prepay-ment penalty.
Spread Code Enter the spread code used if this is a payment transaction.
Advance Enter the part of the payment that was allocated towards the advance balance.
Interest Enter the part of the payment that was allocated towards the interest bal-ance.
Field: Do this:
15-13
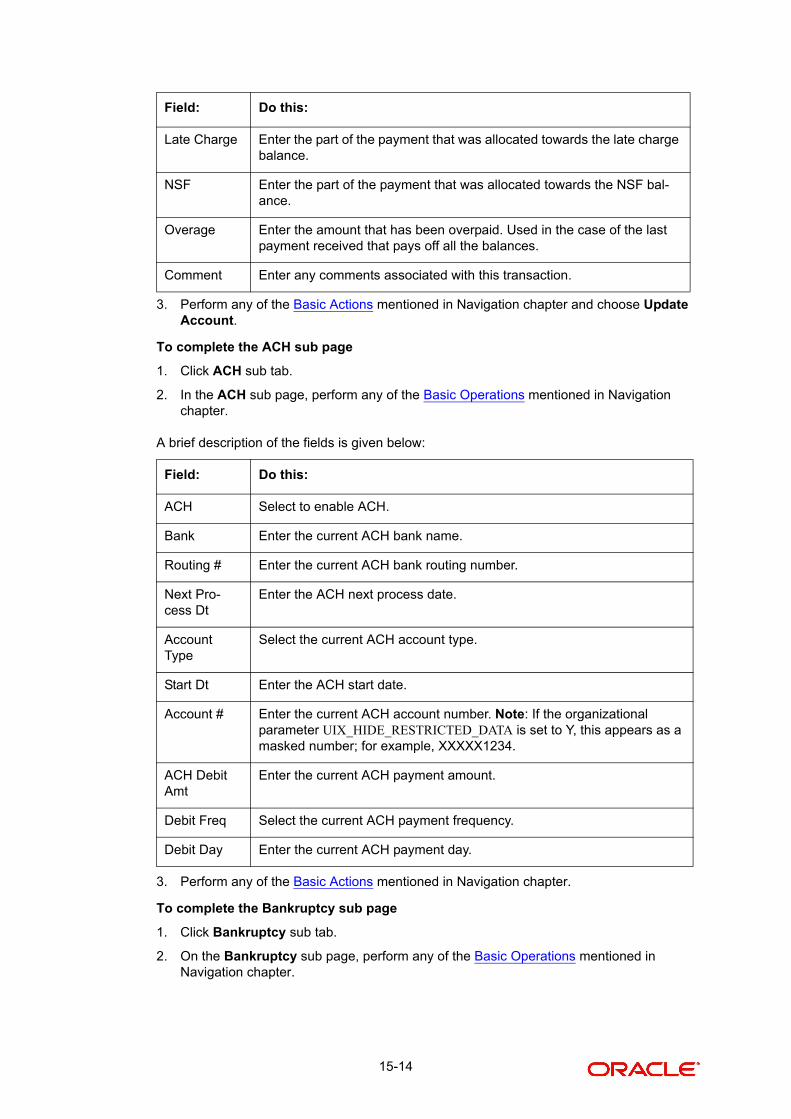
3. Perform any of the Basic Actions mentioned in Navigation chapter and choose Update Account.
To complete the ACH sub page
1. Click ACH sub tab.
2. In the ACH sub page, perform any of the Basic Operations mentioned in Navigation chapter.
A brief description of the fields is given below:
3. Perform any of the Basic Actions mentioned in Navigation chapter.
To complete the Bankruptcy sub page
1. Click Bankruptcy sub tab.
2. On the Bankruptcy sub page, perform any of the Basic Operations mentioned in Navigation chapter.
Late Charge Enter the part of the payment that was allocated towards the late charge balance.
NSF Enter the part of the payment that was allocated towards the NSF bal-ance.
Overage Enter the amount that has been overpaid. Used in the case of the last payment received that pays off all the balances.
Comment Enter any comments associated with this transaction.
Field: Do this:
ACH Select to enable ACH.
Bank Enter the current ACH bank name.
Routing # Enter the current ACH bank routing number.
Next Pro-cess Dt
Enter the ACH next process date.
Account Type
Select the current ACH account type.
Start Dt Enter the ACH start date.
Account # Enter the current ACH account number. Note: If the organizational parameter UIX_HIDE_RESTRICTED_DATA is set to Y, this appears as a masked number; for example, XXXXX1234.
ACH Debit Amt
Enter the current ACH payment amount.
Debit Freq Select the current ACH payment frequency.
Debit Day Enter the current ACH payment day.
Field: Do this:
15-14
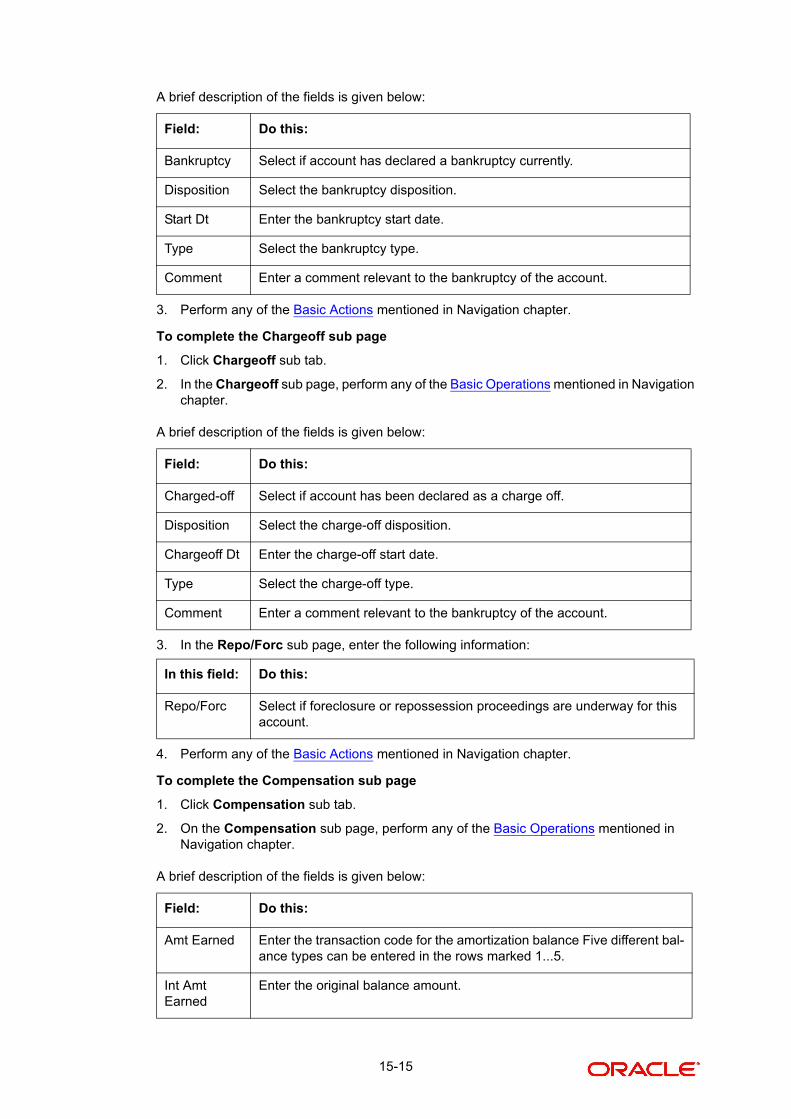
A brief description of the fields is given below:
3. Perform any of the Basic Actions mentioned in Navigation chapter.
To complete the Chargeoff sub page
1. Click Chargeoff sub tab.
2. In the Chargeoff sub page, perform any of the Basic Operations mentioned in Navigation chapter.
A brief description of the fields is given below:
3. In the Repo/Forc sub page, enter the following information:
4. Perform any of the Basic Actions mentioned in Navigation chapter.
To complete the Compensation sub page
1. Click Compensation sub tab.
2. On the Compensation sub page, perform any of the Basic Operations mentioned in Navigation chapter.
A brief description of the fields is given below:
Field: Do this:
Bankruptcy Select if account has declared a bankruptcy currently.
Disposition Select the bankruptcy disposition.
Start Dt Enter the bankruptcy start date.
Type Select the bankruptcy type.
Comment Enter a comment relevant to the bankruptcy of the account.
Field: Do this:
Charged-off Select if account has been declared as a charge off.
Disposition Select the charge-off disposition.
Chargeoff Dt Enter the charge-off start date.
Type Select the charge-off type.
Comment Enter a comment relevant to the bankruptcy of the account.
In this field: Do this:
Repo/Forc Select if foreclosure or repossession proceedings are underway for this account.
Field: Do this:
Amt Earned Enter the transaction code for the amortization balance Five different bal-ance types can be entered in the rows marked 1...5.
Int Amt Earned
Enter the original balance amount.
15-15
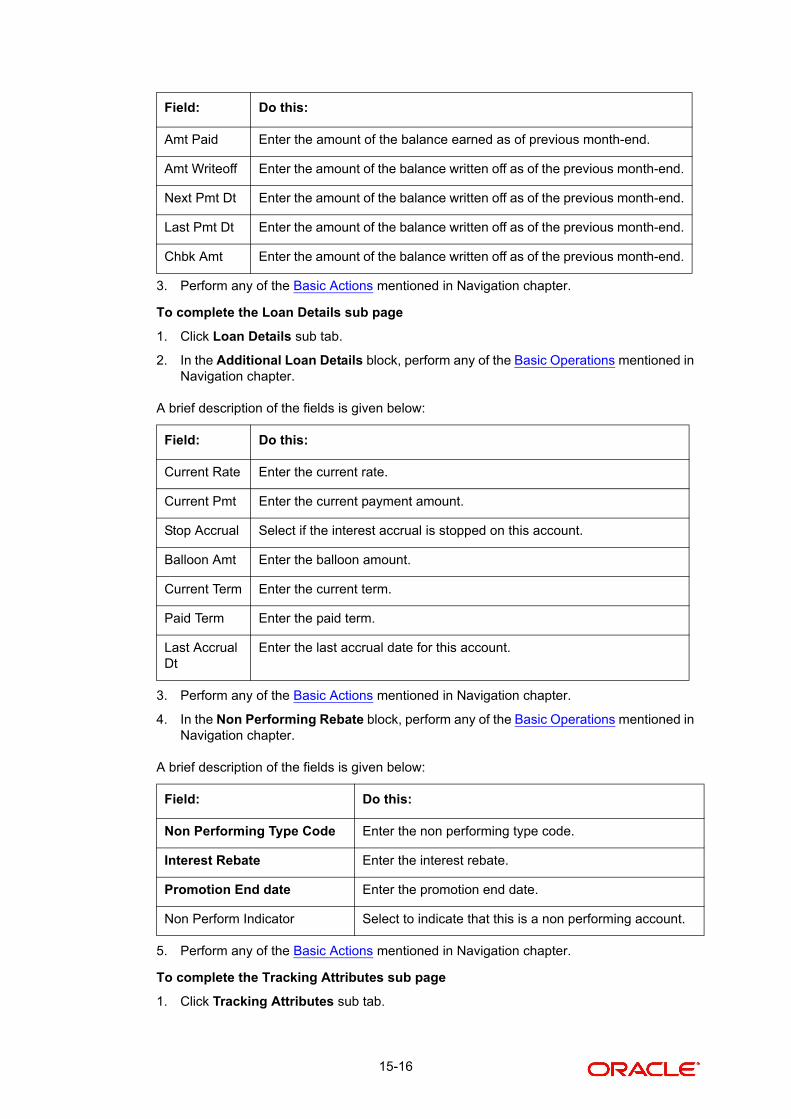
3. Perform any of the Basic Actions mentioned in Navigation chapter.
To complete the Loan Details sub page
1. Click Loan Details sub tab.
2. In the Additional Loan Details block, perform any of the Basic Operations mentioned in Navigation chapter.
A brief description of the fields is given below:
3. Perform any of the Basic Actions mentioned in Navigation chapter.
4. In the Non Performing Rebate block, perform any of the Basic Operations mentioned in Navigation chapter.
A brief description of the fields is given below:
5. Perform any of the Basic Actions mentioned in Navigation chapter.
To complete the Tracking Attributes sub page
1. Click Tracking Attributes sub tab.
Amt Paid Enter the amount of the balance earned as of previous month-end.
Amt Writeoff Enter the amount of the balance written off as of the previous month-end.
Next Pmt Dt Enter the amount of the balance written off as of the previous month-end.
Last Pmt Dt Enter the amount of the balance written off as of the previous month-end.
Chbk Amt Enter the amount of the balance written off as of the previous month-end.
Field: Do this:
Current Rate Enter the current rate.
Current Pmt Enter the current payment amount.
Stop Accrual Select if the interest accrual is stopped on this account.
Balloon Amt Enter the balloon amount.
Current Term Enter the current term.
Paid Term Enter the paid term.
Last Accrual Dt
Enter the last accrual date for this account.
Field: Do this:
Non Performing Type Code Enter the non performing type code.
Interest Rebate Enter the interest rebate.
Promotion End date Enter the promotion end date.
Non Perform Indicator Select to indicate that this is a non performing account.
Field: Do this:
15-16
2. Choose Create Tracking.
Oracle Financial Services Lending and Leasing loads all the Customer Service (2) account attributes tracking parameters.
3. Sub Attribute field, only attributes in a particular group appear in the Parameter display.
4. Complete the Tracking Details block by entering the requested parameter in the Value field.
5. Save any changes you made to the account.
15.4.8 Comment Tab
The Comments page allows you to view and add comments regarding an account at any time.
To add a comment
1. Click the Comment link
2. In the Type block, use the LOV to select the type of comment you are adding.
3. In the Sub Type block, use the LOV to select the sub type of comment you are adding.
4. In the Comments block, type your comment.
5. If you want Financial Services to recognize this comment as an alert, select Alert.
Note
If you select the Alert box, the comment appears on the Customer Service form’s Account Details page in the Comment sub page.
6. Save your entry.
15.4.9 Verification Tab
Oracle Financial Services Lending and Leasing can be configured to automatically validate portions of an application when you attempt to change its status. The results of this data check appear on the Verification (8) master tab’s Edit page as an ERROR, a WARNING, or an OVERRIDE.
If it is an Error, Oracle Financial Services Lending and Leasing will not allow you change the application's status and approve the loan until you fix all the errors.
If it is a Warning, Oracle Financial Services Lending and Leasing allows you to change an application’s status without correcting the matter. While you should still investigate the problem, Warning messages are of a lesser importance than Error messages.
If it is an Override, Oracle Financial Services Lending and Leasing displays a dialog box informing you that an override is needed; your responsibility level does not have the authority required to process this step. (Choose Yes on the dialog box to move the application to the queue of the user with the required authority.)
Oracle Financial Services Lending and Leasing can be configured to verify different sets of information; for example, Financial Services could check one set of data when checking application entries for completeness and another when approving auto loans. Each one of these “edit types” has its on set of “edit details.”
To verify the data required for decisioning the account
1. Click the Verification link, then choose the Edits tab.
2. In the Edit Type block, select the type of edit you want to verify.
15-17
Note
If the verification process you want to perform doesn’t appear in the Edit Type block, use the Edit Type field’s LOV to select and load it.
3. Choose Check Edits.
Financial Services checks the data for the verification process selected in the Edit Type block and displays the results in the Edit Details block.
4. In the Edit Details block, view the verification results and begin making corrections on the conversion form.
5. When you are finished correcting errors, change the status in the master block Status field from API ACCOUNT to ACCOUNT CREATED.
After entering the existing data and successfully changing the status of the account, the conversion process is over.
At this point the account information you entered in this module can be viewed on the Lending menu’s Customer Service form.
Note
New accounts, cannot be viewed in Financial Services at this point. They need to have the set-up run prior to account creation.
15.4.10 Calculator Tab
The Loan Calculator link is only available for the loan product. During the account conversion process, the Loan Calculator page can be used to complete the information.
To open the Loan Calculator page
1. Click the Calculator link
For more details about using the Loan Calculator page, refer Tools chapter.
15.4.11 Search Tab
The Account Conversion’s Search tab opens the Criteria page.
Loading an Application on the Account Conversion screen
The first step in the account conversion process is to load the application you want to work with using the Conversion Account screen’s Search link.
To load an application
1. On the Oracle Financial Services Lending and Leasing Application home page, click the Servicing master tab.
2. Click Interfaces drop-down link and then click Account Conversion link.
The Conversion Account screen appears, opened at the Search link’s Results page.
3. On the Results page, select the application you want to load and click Submit.
15-18

Note
You can click the Criteria tab and use the Criteria page it to limit or change the display of applications on the Results page.
The system loads the application on the Conversion Account screen.
15-19
Appendix A: Transaction Parameters
The Customer Service screen’s Maintenance sub tab enables you to post an array of monetary and nonmonetary transactions for any given account. The transactions that are available depend on the responsibility of the Oracle Financial Services Lending and Leasing user, the nature of the account, and whether the account is a loan.
Appendix A:This appendix catalogues the baseline transaction codes and parameters available on the Customer Service screen’s Maintenance sub tab. Instructions on how to use the Maintenance sub tab are located in the Customer Service chapter of this User Guide.
A.1 Loan Monetary Transactions
This section catalogues the transaction codes and parameters required to complete the following monetary tasks for loans:
Apply, adjust, or waive servicing expenses
Adjust or waive late charges
Adjust or waive nonsufficient funds
Apply, adjust, or waive repossession expenses
Apply, adjust, or waive bankruptcy expenses
Apply or adjust phone pay fees
Change an index/margin rate
Apply, adjust, or cancel financed insurance
Generate a payoff quote
Payoff an account
Charge-off an account
Close an account
Apply, adjust, or waive an extension fee
Change payment amount
Adjust or waive a prepayment penalty
Reschedule an escrow payment
Adjust or waive an escrow payment
Adjust or waive a payoff quote fee
Place an account in a nonperforming condition
Reverse a nonperforming condition
Reschedule precompute loan to interest bearing loan
Change profit rate
Refunding the payment
Non Refund GL
ACH Fee Maintenance
Adjust, charge-off, or waive the advance/principal balance
Adjust the interest balance
Stop interest accrual
Indicate a borrower as on or off active military duty
A-1
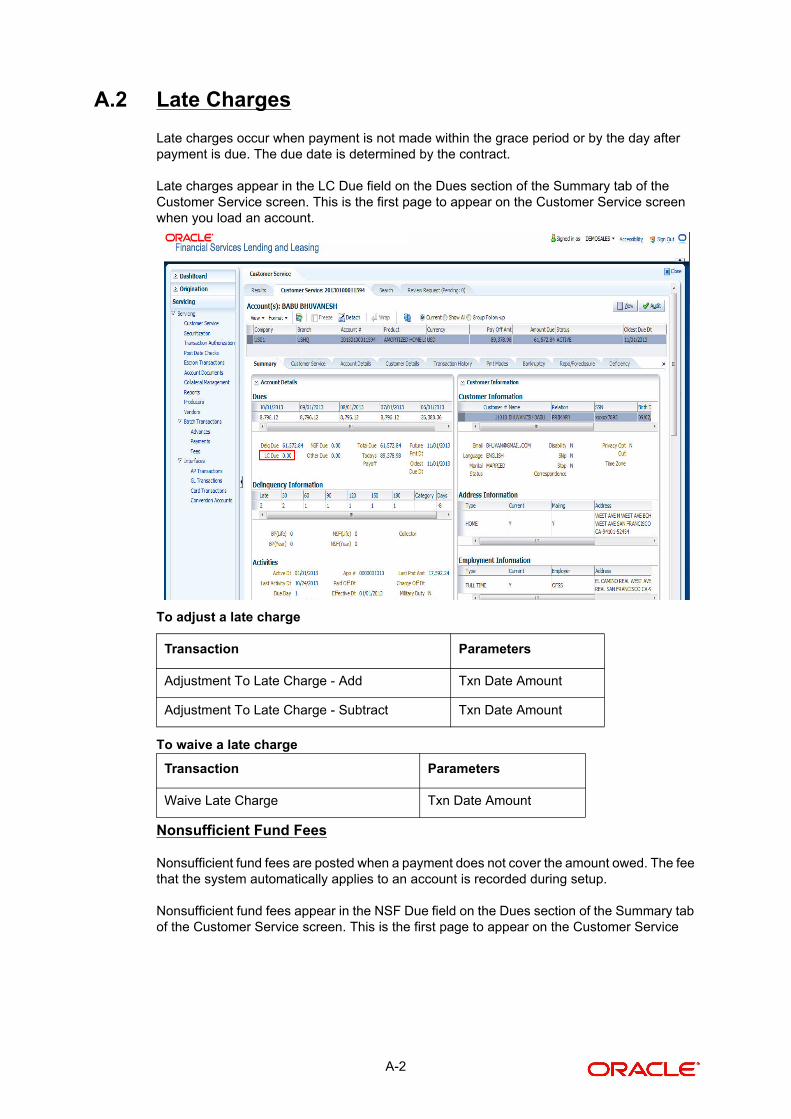
A.2 Late Charges
Late charges occur when payment is not made within the grace period or by the day after payment is due. The due date is determined by the contract.
Late charges appear in the LC Due field on the Dues section of the Summary tab of the Customer Service screen. This is the first page to appear on the Customer Service screen when you load an account.
To adjust a late charge
To waive a late charge
Nonsufficient Fund Fees
Nonsufficient fund fees are posted when a payment does not cover the amount owed. The fee that the system automatically applies to an account is recorded during setup.
Nonsufficient fund fees appear in the NSF Due field on the Dues section of the Summary tab of the Customer Service screen. This is the first page to appear on the Customer Service
Transaction Parameters
Adjustment To Late Charge - Add Txn Date Amount
Adjustment To Late Charge - Subtract Txn Date Amount
Transaction Parameters
Waive Late Charge Txn Date Amount
A-2
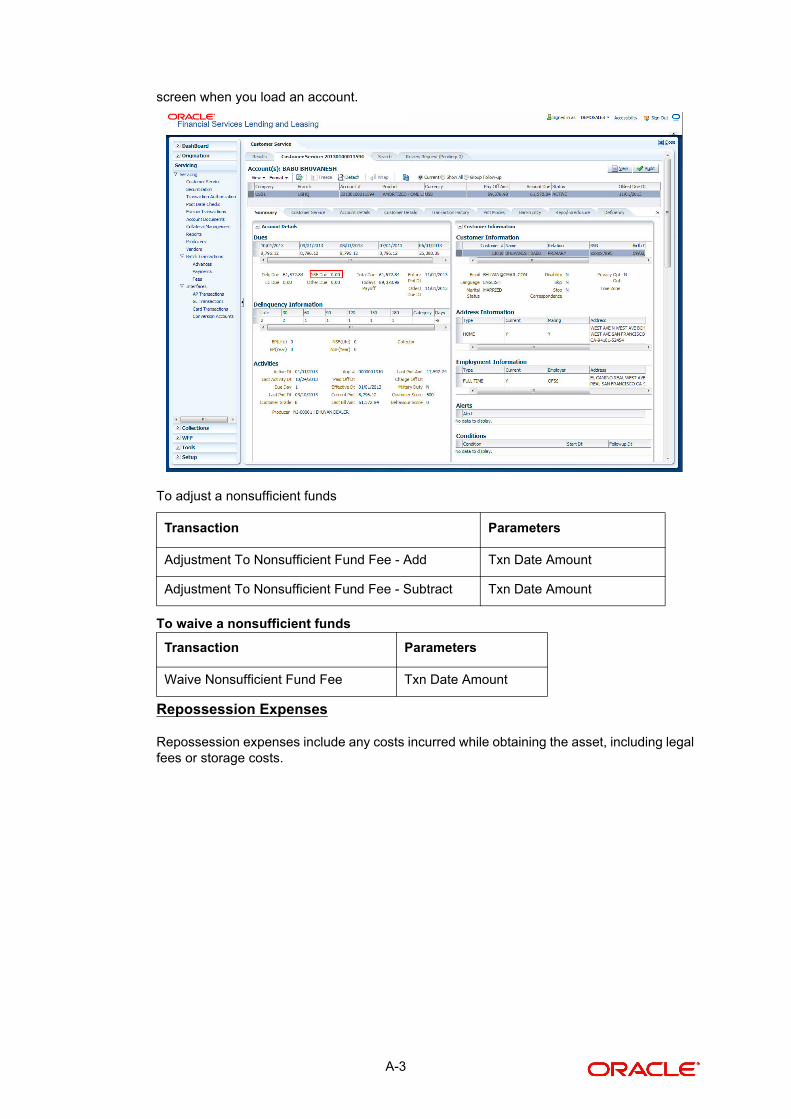
screen when you load an account.
To adjust a nonsufficient funds
To waive a nonsufficient funds
Repossession Expenses
Repossession expenses include any costs incurred while obtaining the asset, including legal fees or storage costs.
Transaction Parameters
Adjustment To Nonsufficient Fund Fee - Add Txn Date Amount
Adjustment To Nonsufficient Fund Fee - Subtract Txn Date Amount
Transaction Parameters
Waive Nonsufficient Fund Fee Txn Date Amount
A-3
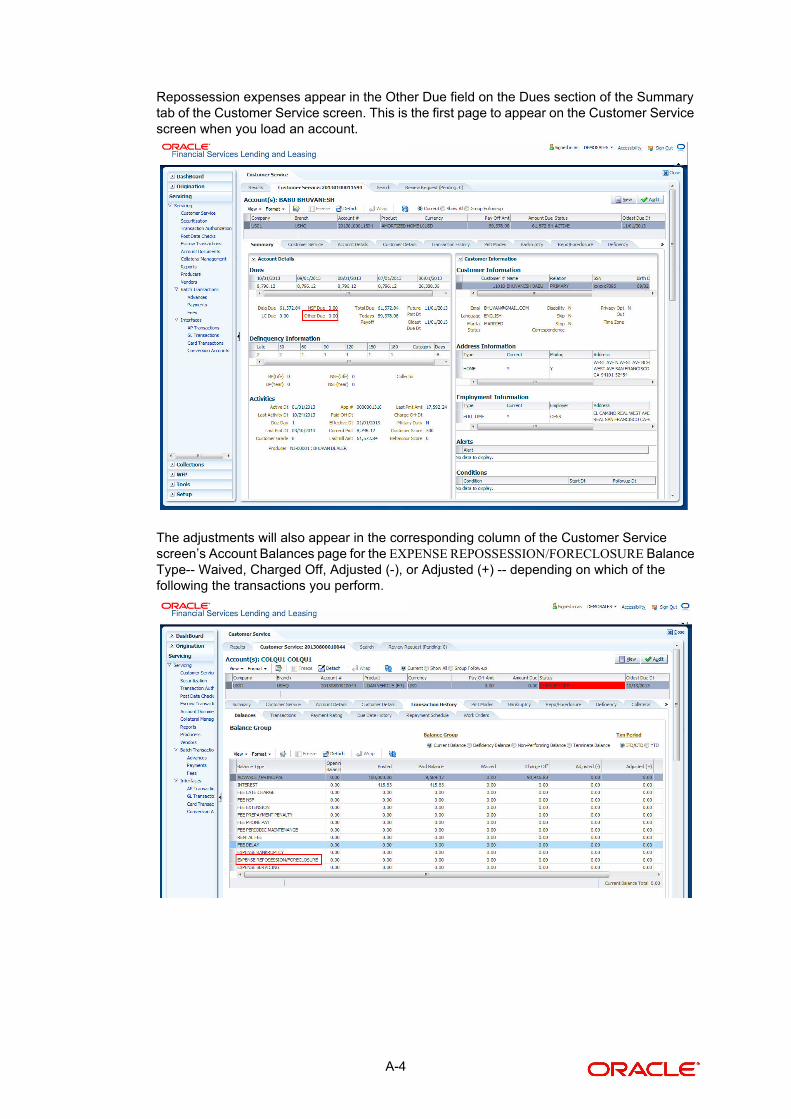
Repossession expenses appear in the Other Due field on the Dues section of the Summary tab of the Customer Service screen. This is the first page to appear on the Customer Service screen when you load an account.
The adjustments will also appear in the corresponding column of the Customer Service screen’s Account Balances page for the EXPENSE REPOSSESSION/FORECLOSURE Balance Type-- Waived, Charged Off, Adjusted (-), or Adjusted (+) -- depending on which of the following the transactions you perform.
A-4
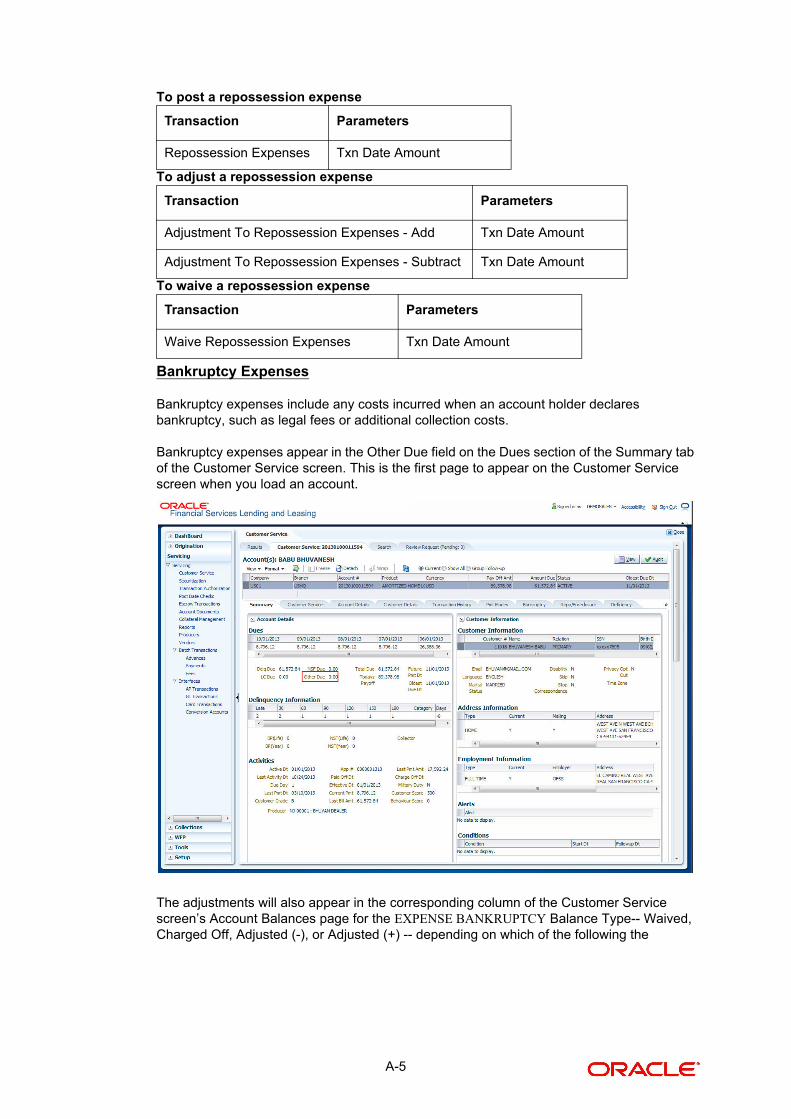
To post a repossession expense
To adjust a repossession expense
To waive a repossession expense
Bankruptcy Expenses
Bankruptcy expenses include any costs incurred when an account holder declares bankruptcy, such as legal fees or additional collection costs.
Bankruptcy expenses appear in the Other Due field on the Dues section of the Summary tab of the Customer Service screen. This is the first page to appear on the Customer Service screen when you load an account.
The adjustments will also appear in the corresponding column of the Customer Service screen’s Account Balances page for the EXPENSE BANKRUPTCY Balance Type-- Waived, Charged Off, Adjusted (-), or Adjusted (+) -- depending on which of the following the
Transaction Parameters
Repossession Expenses Txn Date Amount
Transaction Parameters
Adjustment To Repossession Expenses - Add Txn Date Amount
Adjustment To Repossession Expenses - Subtract Txn Date Amount
Transaction Parameters
Waive Repossession Expenses Txn Date Amount
A-5
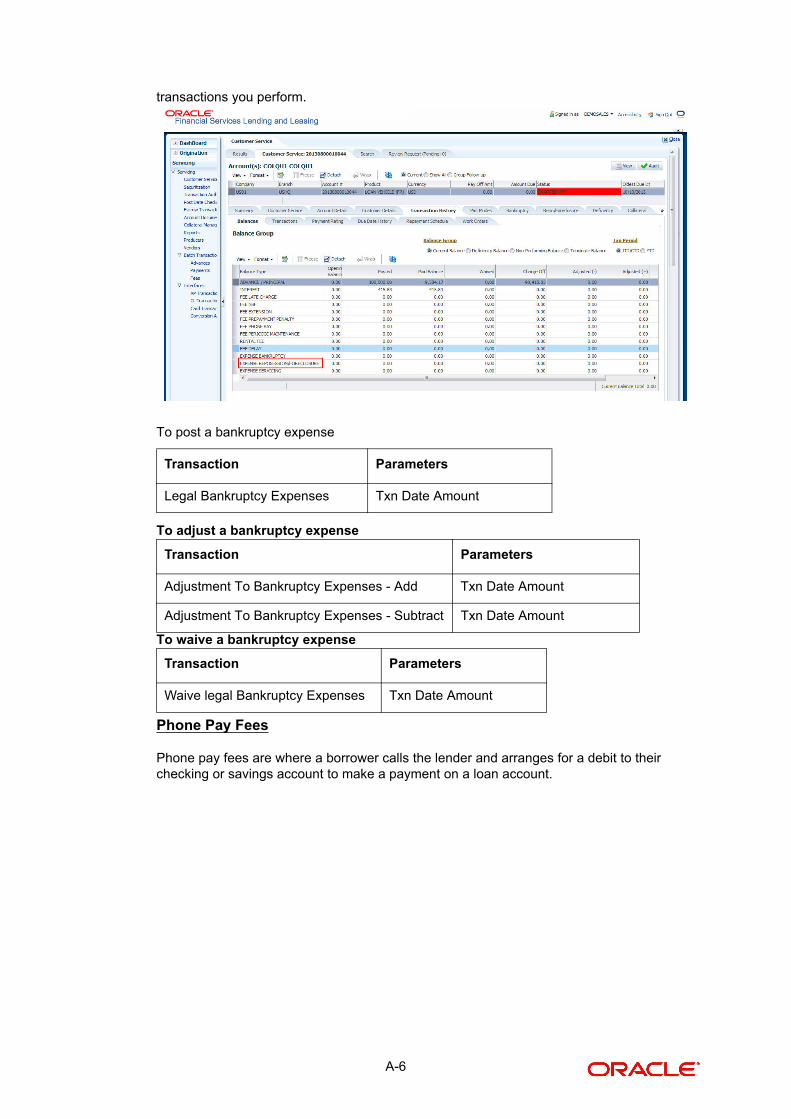
transactions you perform.
To post a bankruptcy expense
To adjust a bankruptcy expense
To waive a bankruptcy expense
Phone Pay Fees
Phone pay fees are where a borrower calls the lender and arranges for a debit to their checking or savings account to make a payment on a loan account.
Transaction Parameters
Legal Bankruptcy Expenses Txn Date Amount
Transaction Parameters
Adjustment To Bankruptcy Expenses - Add Txn Date Amount
Adjustment To Bankruptcy Expenses - Subtract Txn Date Amount
Transaction Parameters
Waive legal Bankruptcy Expenses Txn Date Amount
A-6
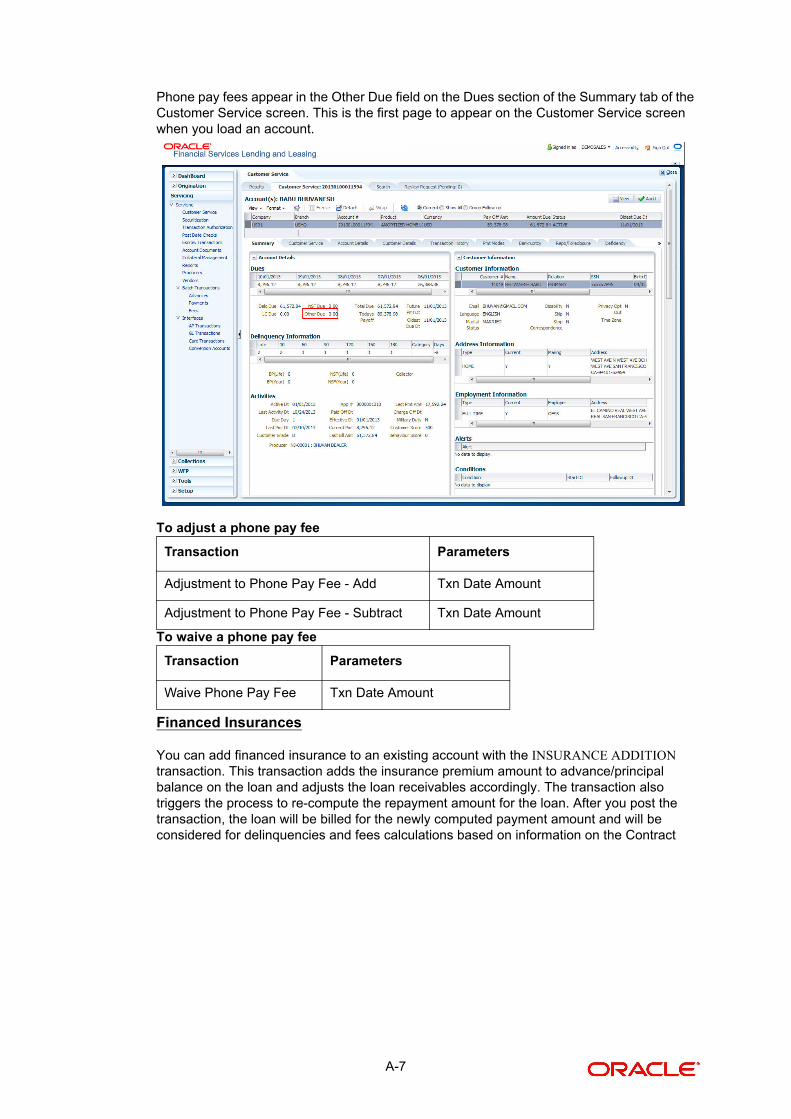
Phone pay fees appear in the Other Due field on the Dues section of the Summary tab of the Customer Service screen. This is the first page to appear on the Customer Service screen when you load an account.
To adjust a phone pay fee
To waive a phone pay fee
Financed Insurances
You can add financed insurance to an existing account with the INSURANCE ADDITION transaction. This transaction adds the insurance premium amount to advance/principal balance on the loan and adjusts the loan receivables accordingly. The transaction also triggers the process to re-compute the repayment amount for the loan. After you post the transaction, the loan will be billed for the newly computed payment amount and will be considered for delinquencies and fees calculations based on information on the Contract
Transaction Parameters
Adjustment to Phone Pay Fee - Add Txn Date Amount
Adjustment to Phone Pay Fee - Subtract Txn Date Amount
Transaction Parameters
Waive Phone Pay Fee Txn Date Amount
A-7
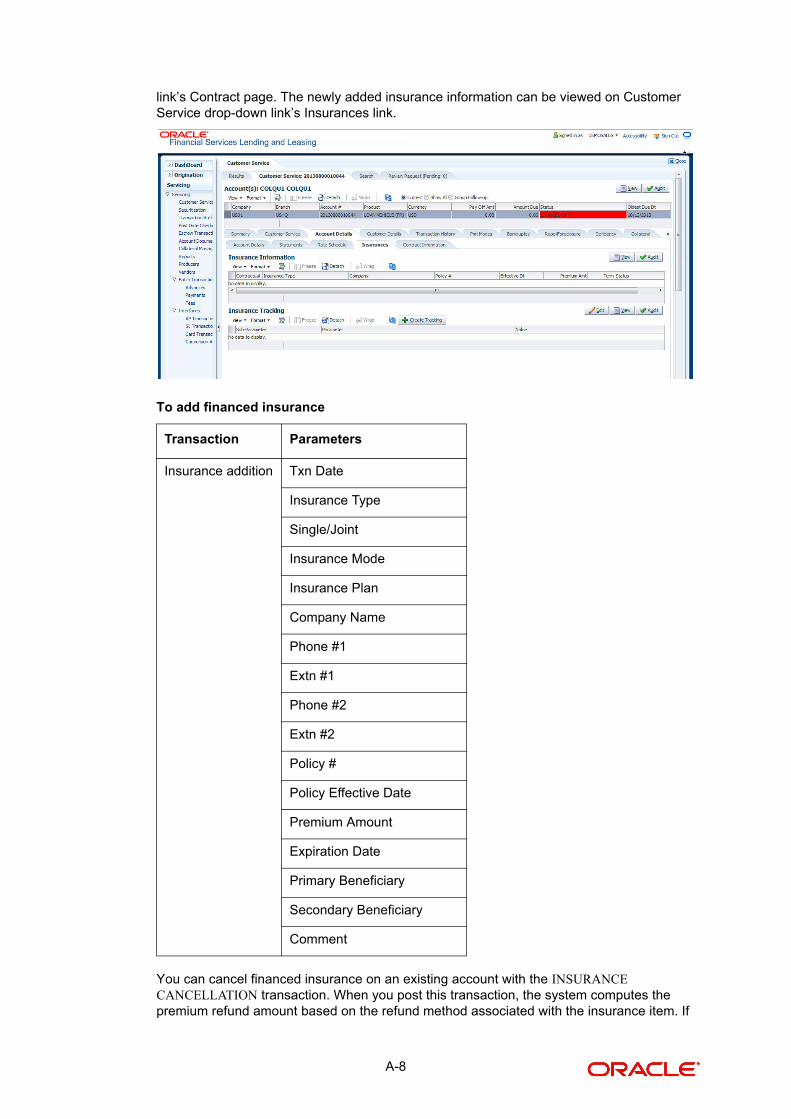
link’s Contract page. The newly added insurance information can be viewed on Customer Service drop-down link’s Insurances link.
To add financed insurance
You can cancel financed insurance on an existing account with the INSURANCE CANCELLATION transaction. When you post this transaction, the system computes the premium refund amount based on the refund method associated with the insurance item. If
Transaction Parameters
Insurance addition Txn Date
Insurance Type
Single/Joint
Insurance Mode
Insurance Plan
Company Name
Phone #1
Extn #1
Phone #2
Extn #2
Policy #
Policy Effective Date
Premium Amount
Expiration Date
Primary Beneficiary
Secondary Beneficiary
Comment
A-8
you enter a value for the PREMIUM AMOUNT parameter, the system overrides the calculated refund amount and adjusts the advance/principal balance and the loan receivables accordingly. The INSURANCE CANCELLATION transaction re-computes the repayment amount for the loan based on remaining balances. After posting the transaction, the loan will be billed for the newly computed payment amount according information on the Contract tab’s Contract sub tab. The insurance cancellation information can be viewed on the Contract link’s Insurances sub page.
To cancel a financed insurance
You may rectify possible errors resulting from incorrect information entered on the INSURANCE ADDITION transaction (such as an incorrect premium account) with the monetary transaction INSURANCE MODIFICATION.
When you post the INSURANCE MODIFICATION transaction, Oracle Financial Services Lending and Leasing re-computes the repayment amount using the new premium amount and adjusts the advance/principal balance on the loan and the loan receivables.
To modify financed insurance information
Index/Margin Rates
You can change the current index rate type and margin rate of a variable rate loan using the INDEX / MARGIN RATE CHANGE monetary transaction.
Transaction Parameters
Insurance Addition Txn Date
Insurance Type
Policy Effective Date
Insurance Refund Amount
Interest Refund Amount
Payment Amount
Cancellation Reason
Transaction Parameters
Insurance Modifications Txn Date
Insurance Type
Policy Effective Date
Premium Amount
A-9
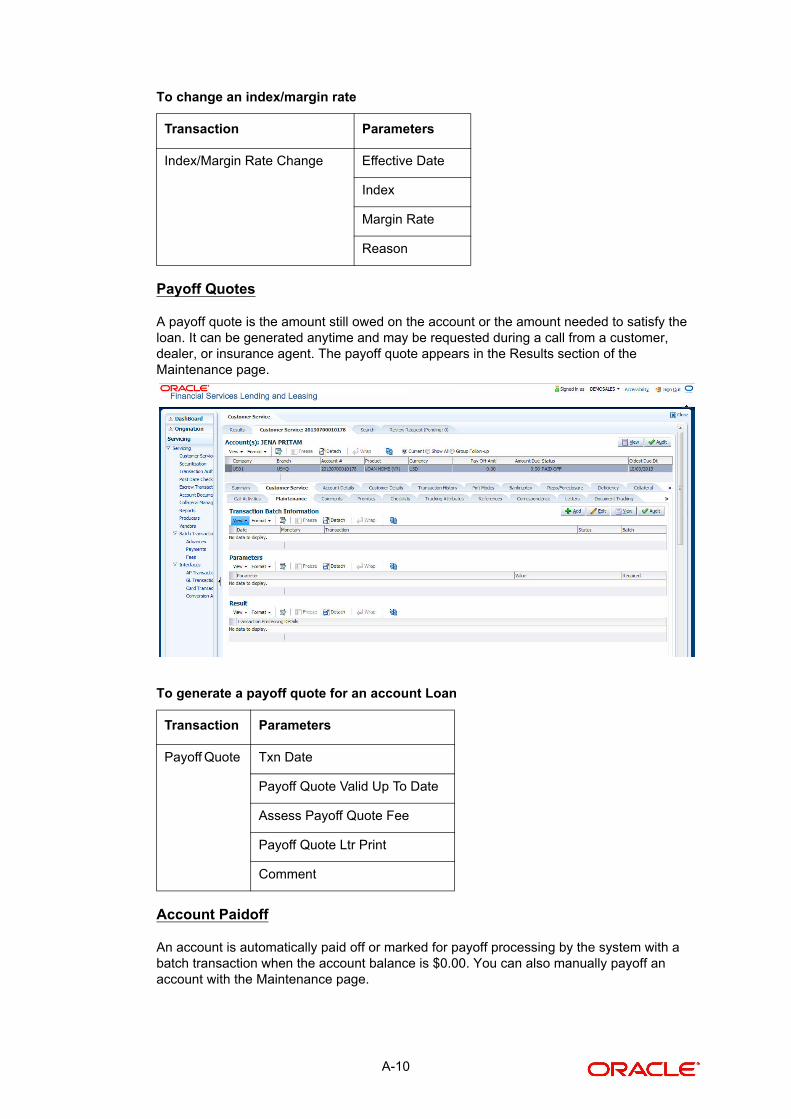
To change an index/margin rate
Payoff Quotes
A payoff quote is the amount still owed on the account or the amount needed to satisfy the loan. It can be generated anytime and may be requested during a call from a customer, dealer, or insurance agent. The payoff quote appears in the Results section of the Maintenance page.
To generate a payoff quote for an account Loan
Account Paidoff
An account is automatically paid off or marked for payoff processing by the system with a batch transaction when the account balance is $0.00. You can also manually payoff an account with the Maintenance page.
Transaction Parameters
Index/Margin Rate Change Effective Date
Index
Margin Rate
Reason
Transaction Parameters
Payoff Quote Txn Date
Payoff Quote Valid Up To Date
Assess Payoff Quote Fee
Payoff Quote Ltr Print
Comment
A-10
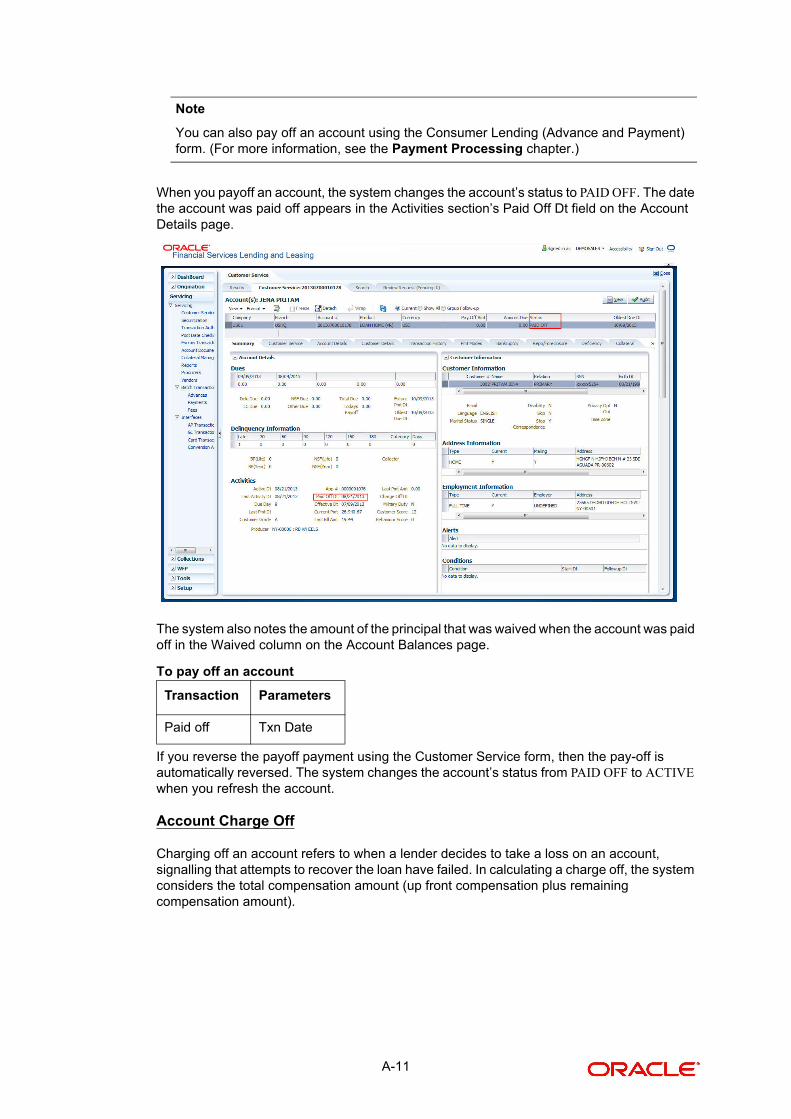
Note
You can also pay off an account using the Consumer Lending (Advance and Payment) form. (For more information, see the Payment Processing chapter.)
When you payoff an account, the system changes the account’s status to PAID OFF. The date the account was paid off appears in the Activities section’s Paid Off Dt field on the Account Details page.
The system also notes the amount of the principal that was waived when the account was paid off in the Waived column on the Account Balances page.
To pay off an account
If you reverse the payoff payment using the Customer Service form, then the pay-off is automatically reversed. The system changes the account’s status from PAID OFF to ACTIVE when you refresh the account.
Account Charge Off
Charging off an account refers to when a lender decides to take a loss on an account, signalling that attempts to recover the loan have failed. In calculating a charge off, the system considers the total compensation amount (up front compensation plus remaining compensation amount).
Transaction Parameters
Paid off Txn Date
A-11
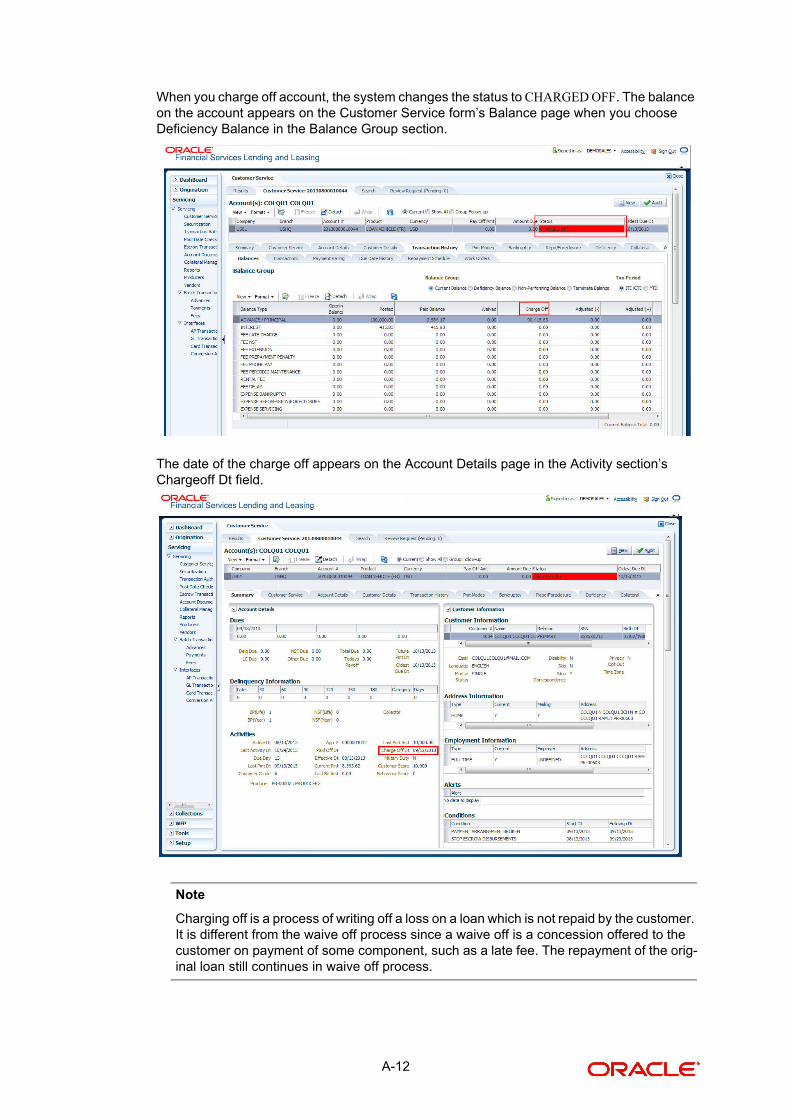
When you charge off account, the system changes the status to CHARGED OFF. The balance on the account appears on the Customer Service form’s Balance page when you choose Deficiency Balance in the Balance Group section.
The date of the charge off appears on the Account Details page in the Activity section’s Chargeoff Dt field.
Note
Charging off is a process of writing off a loss on a loan which is not repaid by the customer. It is different from the waive off process since a waive off is a concession offered to the customer on payment of some component, such as a late fee. The repayment of the orig-inal loan still continues in waive off process.
A-12
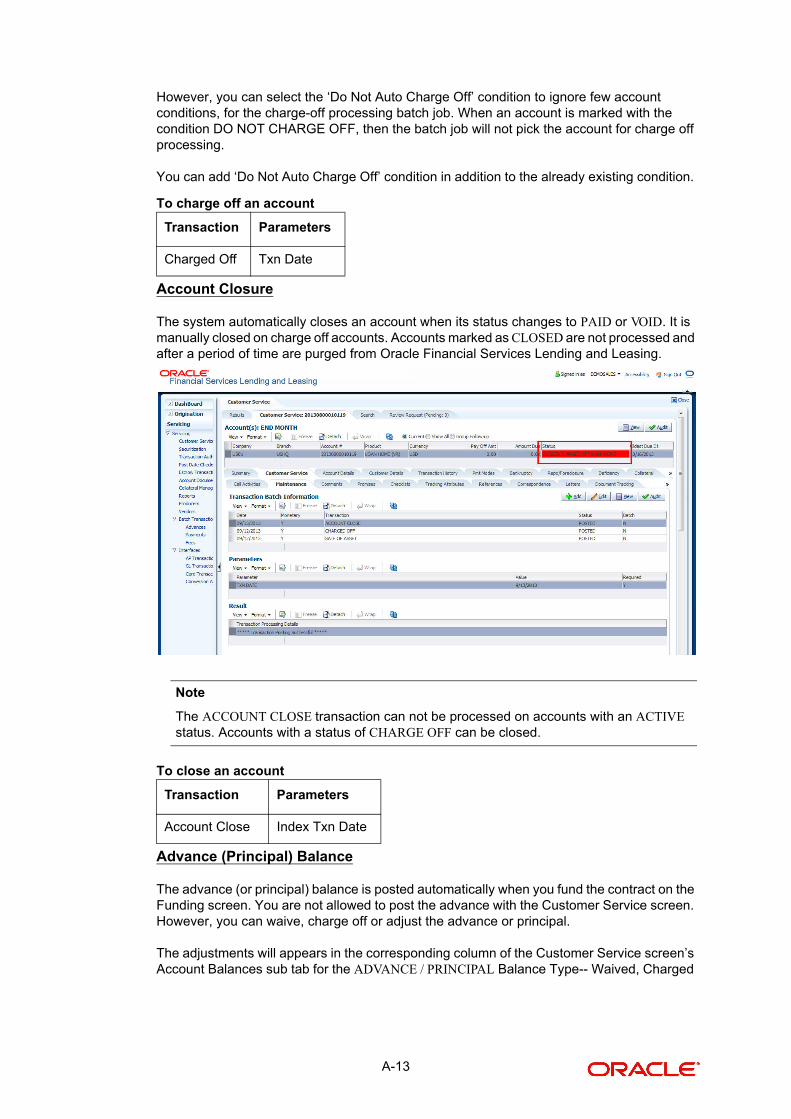
However, you can select the ‘Do Not Auto Charge Off’ condition to ignore few account conditions, for the charge-off processing batch job. When an account is marked with the condition DO NOT CHARGE OFF, then the batch job will not pick the account for charge off processing.
You can add ‘Do Not Auto Charge Off’ condition in addition to the already existing condition.
To charge off an account
Account Closure
The system automatically closes an account when its status changes to PAID or VOID. It is manually closed on charge off accounts. Accounts marked as CLOSED are not processed and after a period of time are purged from Oracle Financial Services Lending and Leasing.
Note
The ACCOUNT CLOSE transaction can not be processed on accounts with an ACTIVE status. Accounts with a status of CHARGE OFF can be closed.
To close an account
Advance (Principal) Balance
The advance (or principal) balance is posted automatically when you fund the contract on the Funding screen. You are not allowed to post the advance with the Customer Service screen. However, you can waive, charge off or adjust the advance or principal.
The adjustments will appears in the corresponding column of the Customer Service screen’s Account Balances sub tab for the ADVANCE / PRINCIPAL Balance Type-- Waived, Charged
Transaction Parameters
Charged Off Txn Date
Transaction Parameters
Account Close Index Txn Date
A-13
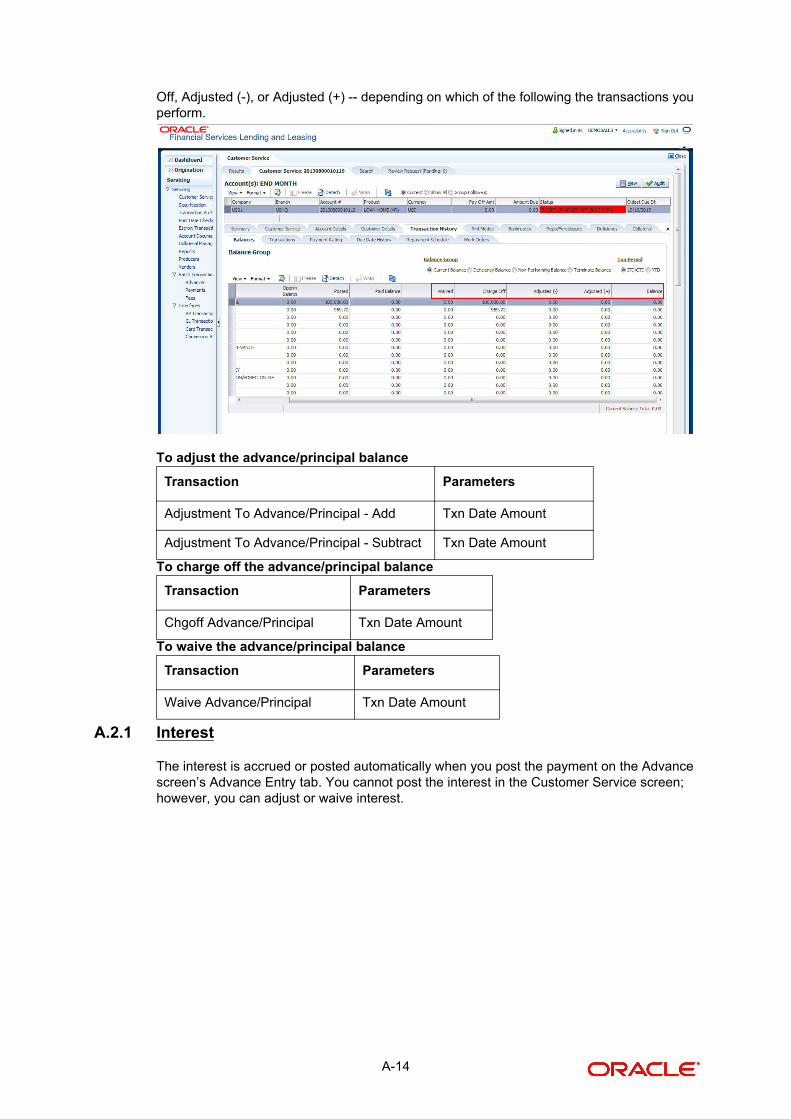
Off, Adjusted (-), or Adjusted (+) -- depending on which of the following the transactions you perform.
To adjust the advance/principal balance
To charge off the advance/principal balance
To waive the advance/principal balance
A.2.1 Interest
The interest is accrued or posted automatically when you post the payment on the Advance screen’s Advance Entry tab. You cannot post the interest in the Customer Service screen; however, you can adjust or waive interest.
Transaction Parameters
Adjustment To Advance/Principal - Add Txn Date Amount
Adjustment To Advance/Principal - Subtract Txn Date Amount
Transaction Parameters
Chgoff Advance/Principal Txn Date Amount
Transaction Parameters
Waive Advance/Principal Txn Date Amount
A-14
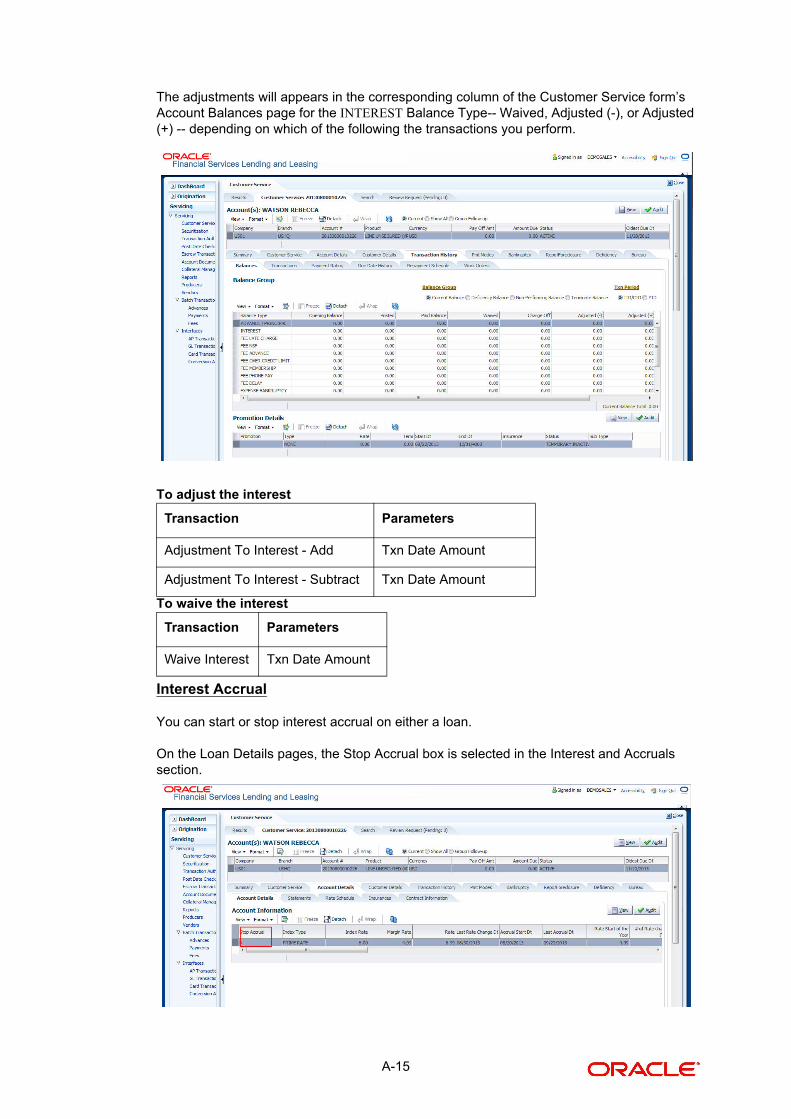
The adjustments will appears in the corresponding column of the Customer Service form’s Account Balances page for the INTEREST Balance Type-- Waived, Adjusted (-), or Adjusted (+) -- depending on which of the following the transactions you perform.
To adjust the interest
To waive the interest
Interest Accrual
You can start or stop interest accrual on either a loan.
On the Loan Details pages, the Stop Accrual box is selected in the Interest and Accruals section.
Transaction Parameters
Adjustment To Interest - Add Txn Date Amount
Adjustment To Interest - Subtract Txn Date Amount
Transaction Parameters
Waive Interest Txn Date Amount
A-15
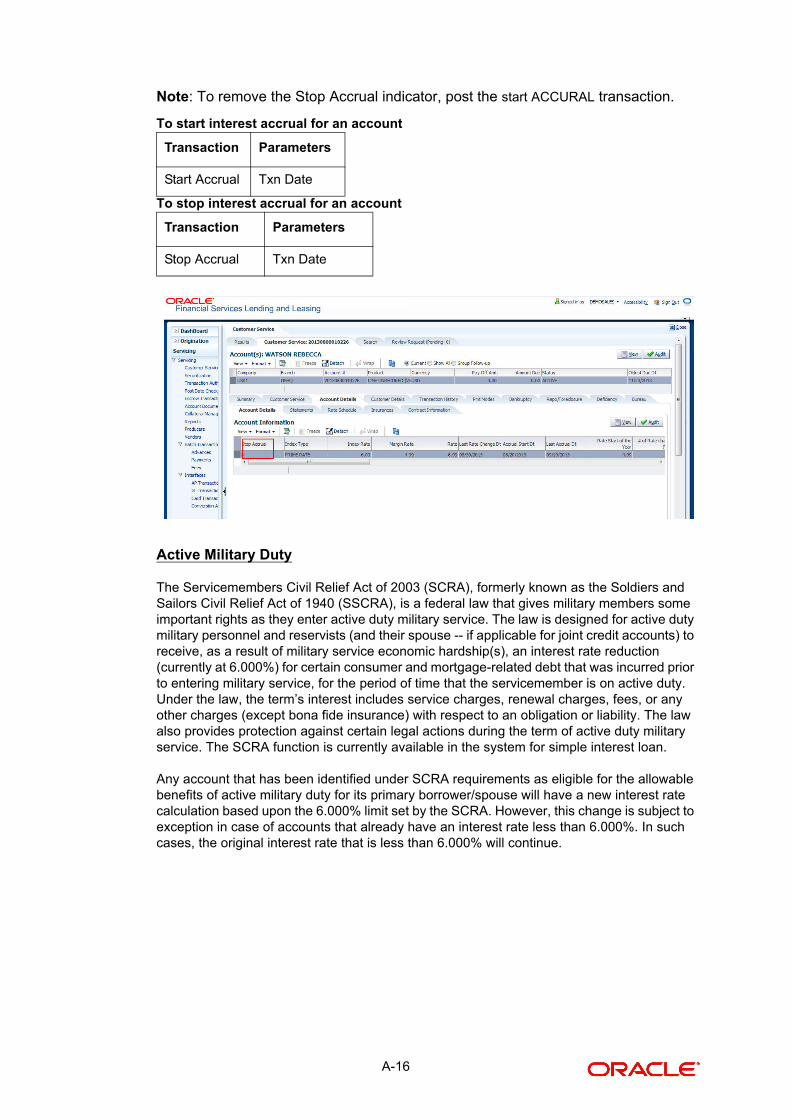
Note: To remove the Stop Accrual indicator, post the start ACCURAL transaction.
To start interest accrual for an account
To stop interest accrual for an account
Active Military Duty
The Servicemembers Civil Relief Act of 2003 (SCRA), formerly known as the Soldiers and Sailors Civil Relief Act of 1940 (SSCRA), is a federal law that gives military members some important rights as they enter active duty military service. The law is designed for active duty military personnel and reservists (and their spouse -- if applicable for joint credit accounts) to receive, as a result of military service economic hardship(s), an interest rate reduction (currently at 6.000%) for certain consumer and mortgage-related debt that was incurred prior to entering military service, for the period of time that the servicemember is on active duty. Under the law, the term’s interest includes service charges, renewal charges, fees, or any other charges (except bona fide insurance) with respect to an obligation or liability. The law also provides protection against certain legal actions during the term of active duty military service. The SCRA function is currently available in the system for simple interest loan.
Any account that has been identified under SCRA requirements as eligible for the allowable benefits of active military duty for its primary borrower/spouse will have a new interest rate calculation based upon the 6.000% limit set by the SCRA. However, this change is subject to exception in case of accounts that already have an interest rate less than 6.000%. In such cases, the original interest rate that is less than 6.000% will continue.
Transaction Parameters
Start Accrual Txn Date
Transaction Parameters
Stop Accrual Txn Date
A-16

To indicate that a borrower is on active military duty
After you post this transaction, the Military Duty box (Account Details page Activities section) and Active Military Duty box (Customer Details page Military Service section) are selected. Oracle Financial Services Lending and Leasing changes the condition of the account to ON ACTIVE DUTY. Details of the transaction appear in the Military Services section on the Customer Details page.
If the interest rate was greater the 6%, Oracle Financial Services Lending and Leasing will change the rate to 6% and adjust the payment accordingly. The CHANGE PAYMENT AMOUNT and RATE CHANGE transactions on the Transactions page.
To indicate that a borrower is no longer on active military duty
Transaction Parameters
Borrower On Military Duty Txn Date
Borrowers Relation With Account
Active Duty Order Reference
Transaction Parameters
Borrower off Military Duty Txn Date
Borrowers Relation With Account
A-17
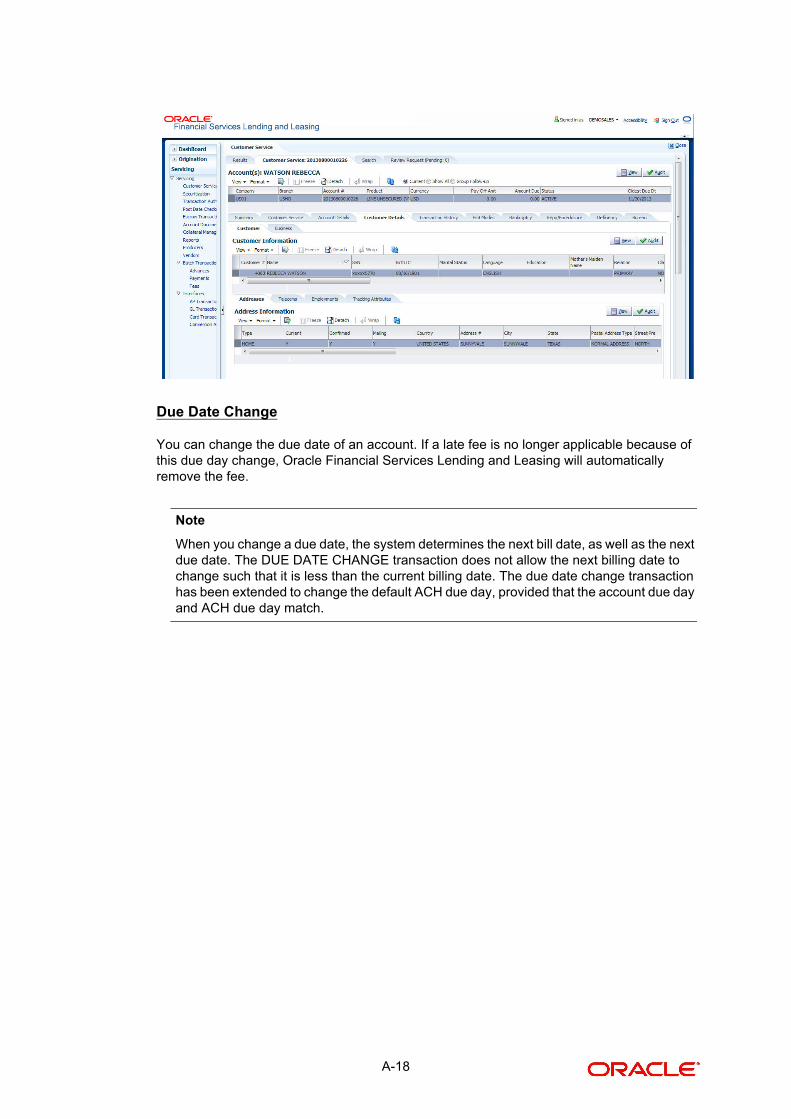
Due Date Change
You can change the due date of an account. If a late fee is no longer applicable because of this due day change, Oracle Financial Services Lending and Leasing will automatically remove the fee.
Note
When you change a due date, the system determines the next bill date, as well as the next due date. The DUE DATE CHANGE transaction does not allow the next billing date to change such that it is less than the current billing date. The due date change transaction has been extended to change the default ACH due day, provided that the account due day and ACH due day match.
A-18
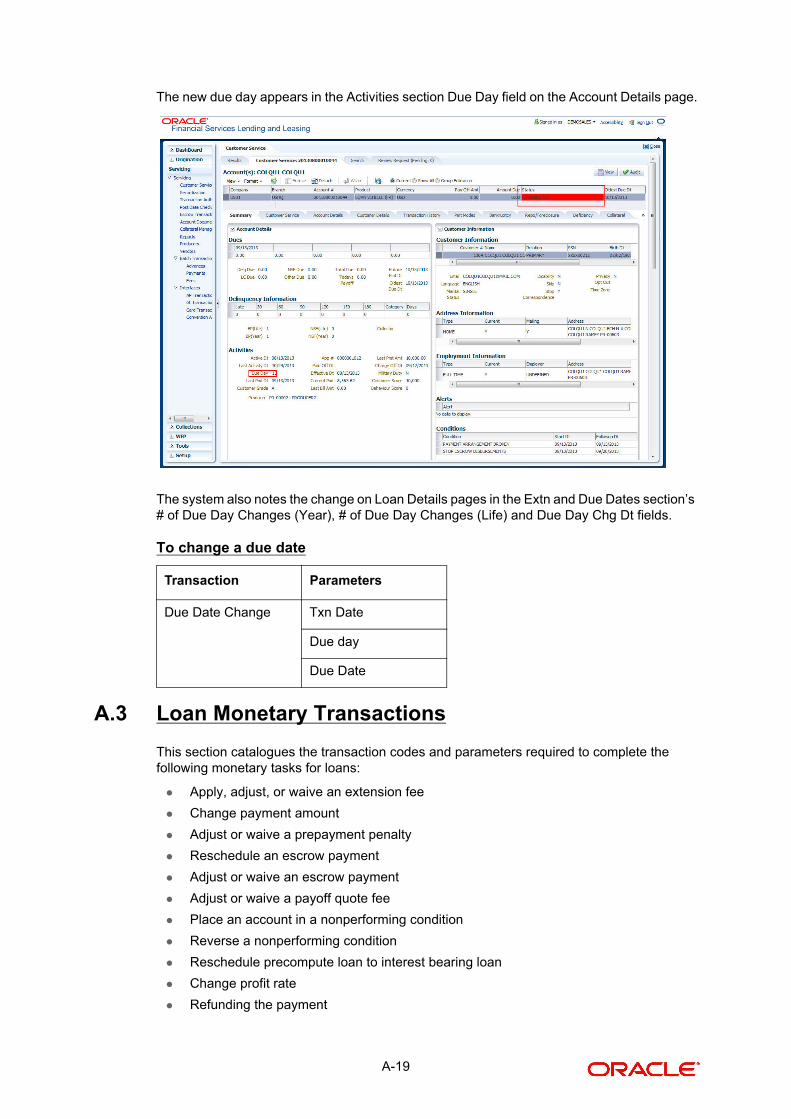
The new due day appears in the Activities section Due Day field on the Account Details page.
The system also notes the change on Loan Details pages in the Extn and Due Dates section’s # of Due Day Changes (Year), # of Due Day Changes (Life) and Due Day Chg Dt fields.
To change a due date
A.3 Loan Monetary Transactions
This section catalogues the transaction codes and parameters required to complete the following monetary tasks for loans:
Apply, adjust, or waive an extension fee
Change payment amount
Adjust or waive a prepayment penalty
Reschedule an escrow payment
Adjust or waive an escrow payment
Adjust or waive a payoff quote fee
Place an account in a nonperforming condition
Reverse a nonperforming condition
Reschedule precompute loan to interest bearing loan
Change profit rate
Refunding the payment
Transaction Parameters
Due Date Change Txn Date
Due day
Due Date
A-19
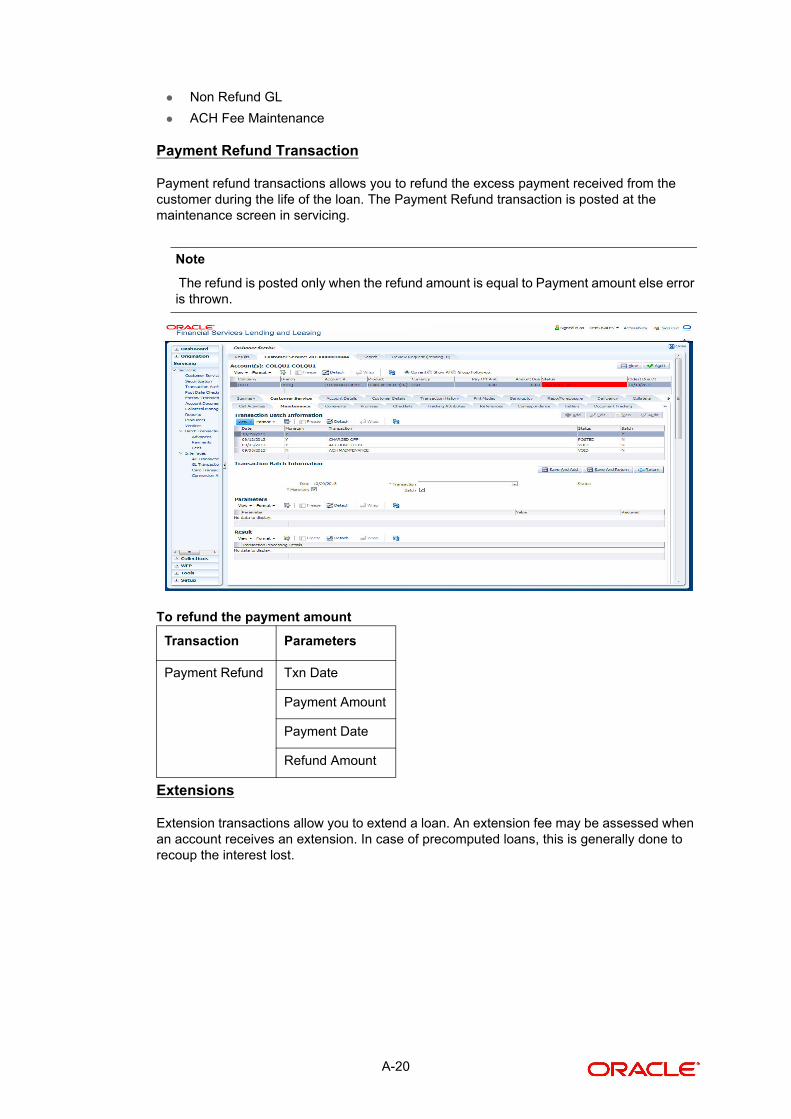
Non Refund GL
ACH Fee Maintenance
Payment Refund Transaction
Payment refund transactions allows you to refund the excess payment received from the customer during the life of the loan. The Payment Refund transaction is posted at the maintenance screen in servicing.
Note
The refund is posted only when the refund amount is equal to Payment amount else error is thrown.
To refund the payment amount
Extensions
Extension transactions allow you to extend a loan. An extension fee may be assessed when an account receives an extension. In case of precomputed loans, this is generally done to recoup the interest lost.
Transaction Parameters
Payment Refund Txn Date
Payment Amount
Payment Date
Refund Amount
A-20

The system adjusts the due date on the Dues section’s Oldest Due Dt field on the Account Details page to reflect the extension.
It also notes the change with an entry on the Loan Details page in the Extn and Due Dates section’s # of Extensions (Year), # of Extensions (Life), # of Extension Term (Year) # of Extension Term (Life) fields.
A-21
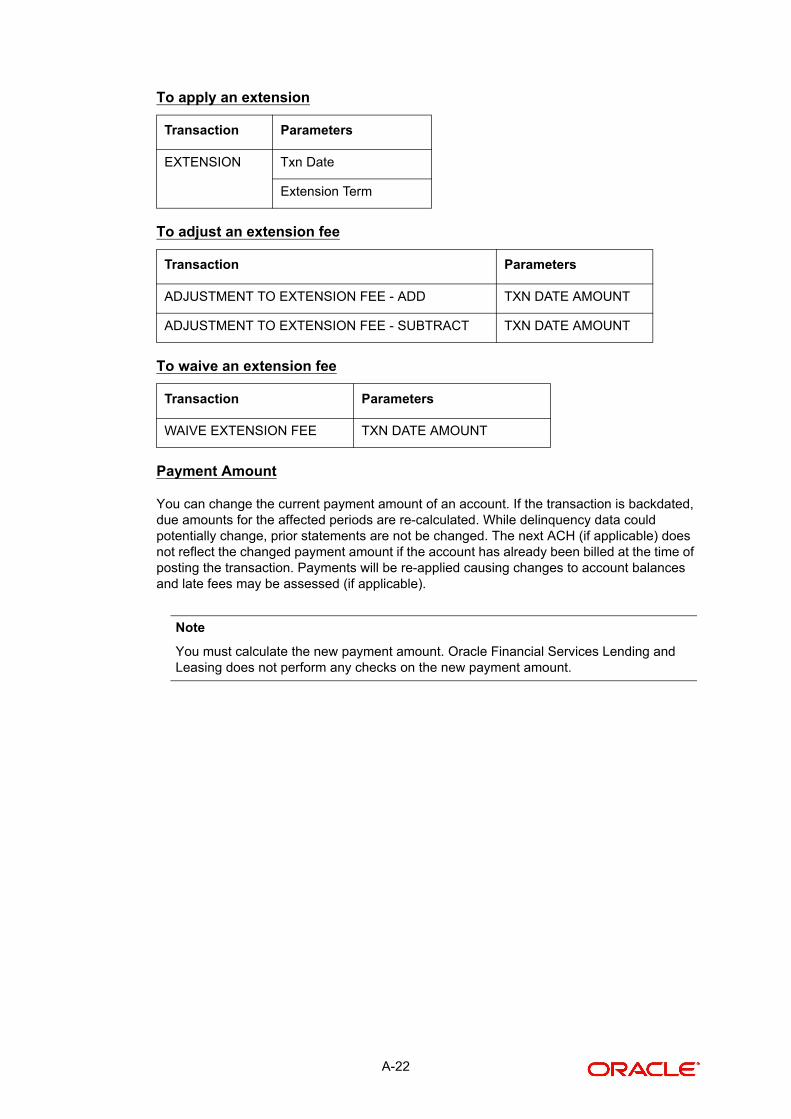
To apply an extension
To adjust an extension fee
To waive an extension fee
Payment Amount
You can change the current payment amount of an account. If the transaction is backdated, due amounts for the affected periods are re-calculated. While delinquency data could potentially change, prior statements are not be changed. The next ACH (if applicable) does not reflect the changed payment amount if the account has already been billed at the time of posting the transaction. Payments will be re-applied causing changes to account balances and late fees may be assessed (if applicable).
Note
You must calculate the new payment amount. Oracle Financial Services Lending and Leasing does not perform any checks on the new payment amount.
Transaction Parameters
EXTENSION Txn Date
Extension Term
Transaction Parameters
ADJUSTMENT TO EXTENSION FEE - ADD TXN DATE AMOUNT
ADJUSTMENT TO EXTENSION FEE - SUBTRACT TXN DATE AMOUNT
Transaction Parameters
WAIVE EXTENSION FEE TXN DATE AMOUNT
A-22
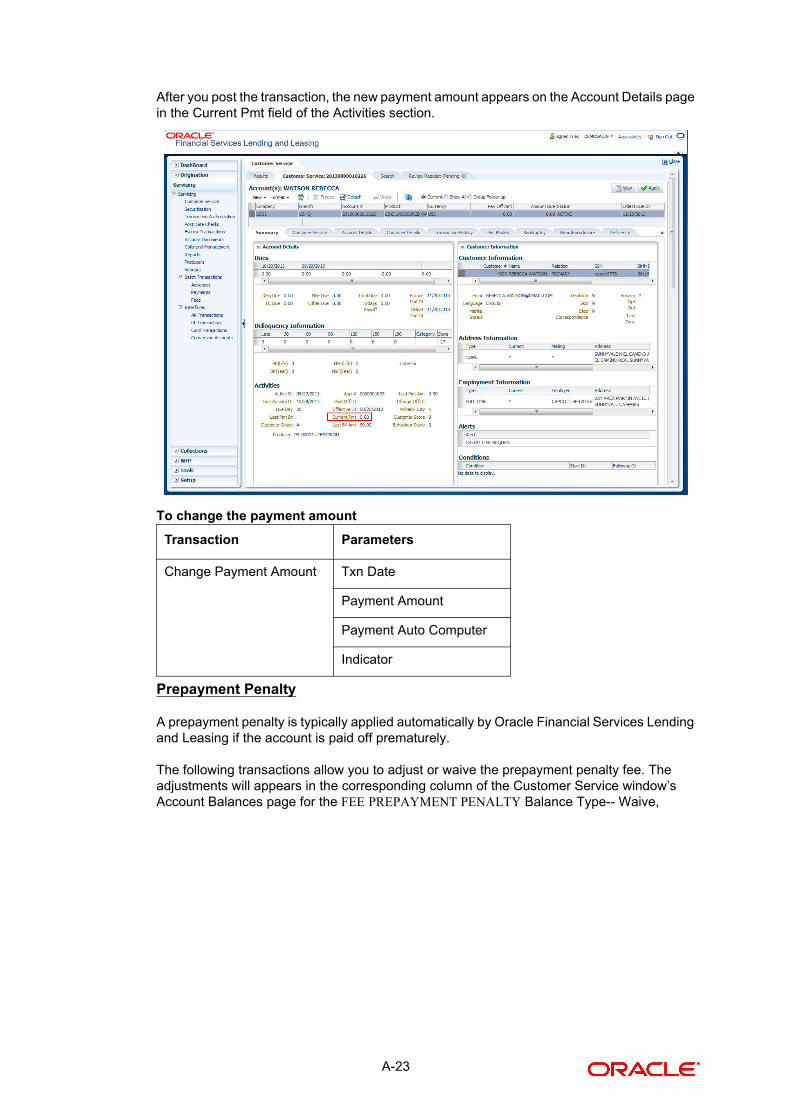
After you post the transaction, the new payment amount appears on the Account Details page in the Current Pmt field of the Activities section.
To change the payment amount
Prepayment Penalty
A prepayment penalty is typically applied automatically by Oracle Financial Services Lending and Leasing if the account is paid off prematurely.
The following transactions allow you to adjust or waive the prepayment penalty fee. The adjustments will appears in the corresponding column of the Customer Service window’s Account Balances page for the FEE PREPAYMENT PENALTY Balance Type-- Waive,
Transaction Parameters
Change Payment Amount Txn Date
Payment Amount
Payment Auto Computer
Indicator
A-23
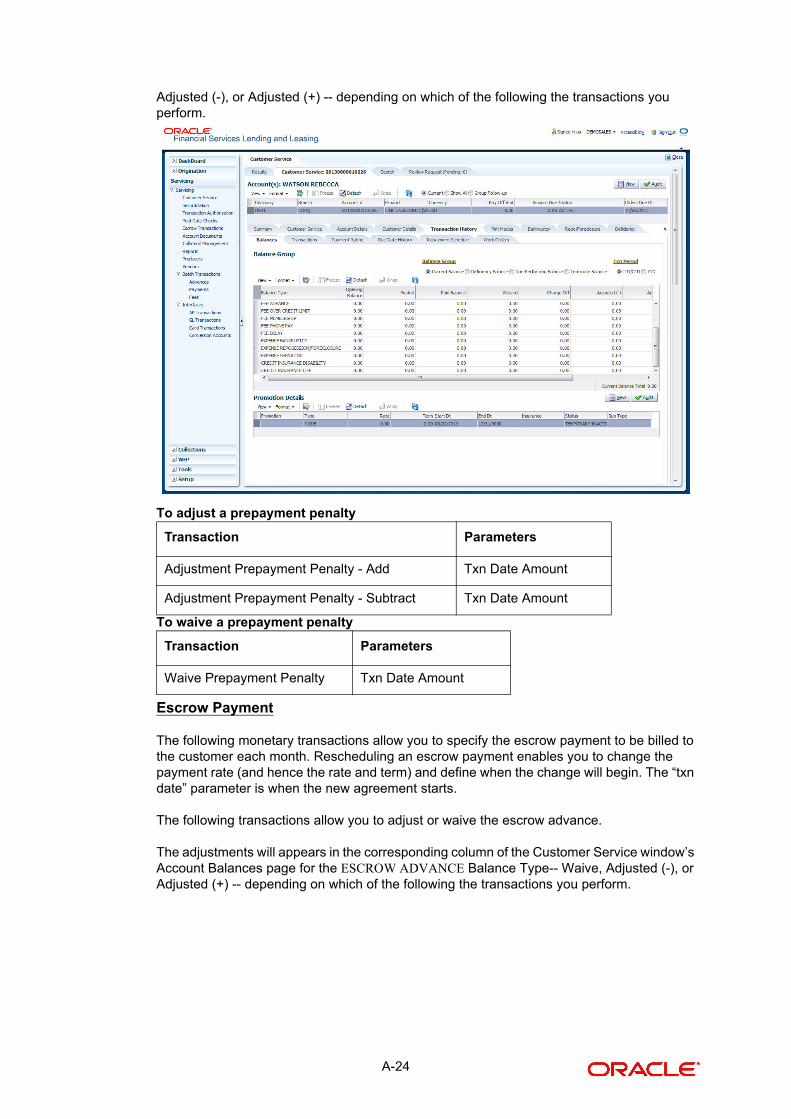
Adjusted (-), or Adjusted (+) -- depending on which of the following the transactions you perform.
To adjust a prepayment penalty
To waive a prepayment penalty
Escrow Payment
The following monetary transactions allow you to specify the escrow payment to be billed to the customer each month. Rescheduling an escrow payment enables you to change the payment rate (and hence the rate and term) and define when the change will begin. The “txn date” parameter is when the new agreement starts.
The following transactions allow you to adjust or waive the escrow advance.
The adjustments will appears in the corresponding column of the Customer Service window’s Account Balances page for the ESCROW ADVANCE Balance Type-- Waive, Adjusted (-), or Adjusted (+) -- depending on which of the following the transactions you perform.
Transaction Parameters
Adjustment Prepayment Penalty - Add Txn Date Amount
Adjustment Prepayment Penalty - Subtract Txn Date Amount
Transaction Parameters
Waive Prepayment Penalty Txn Date Amount
A-24
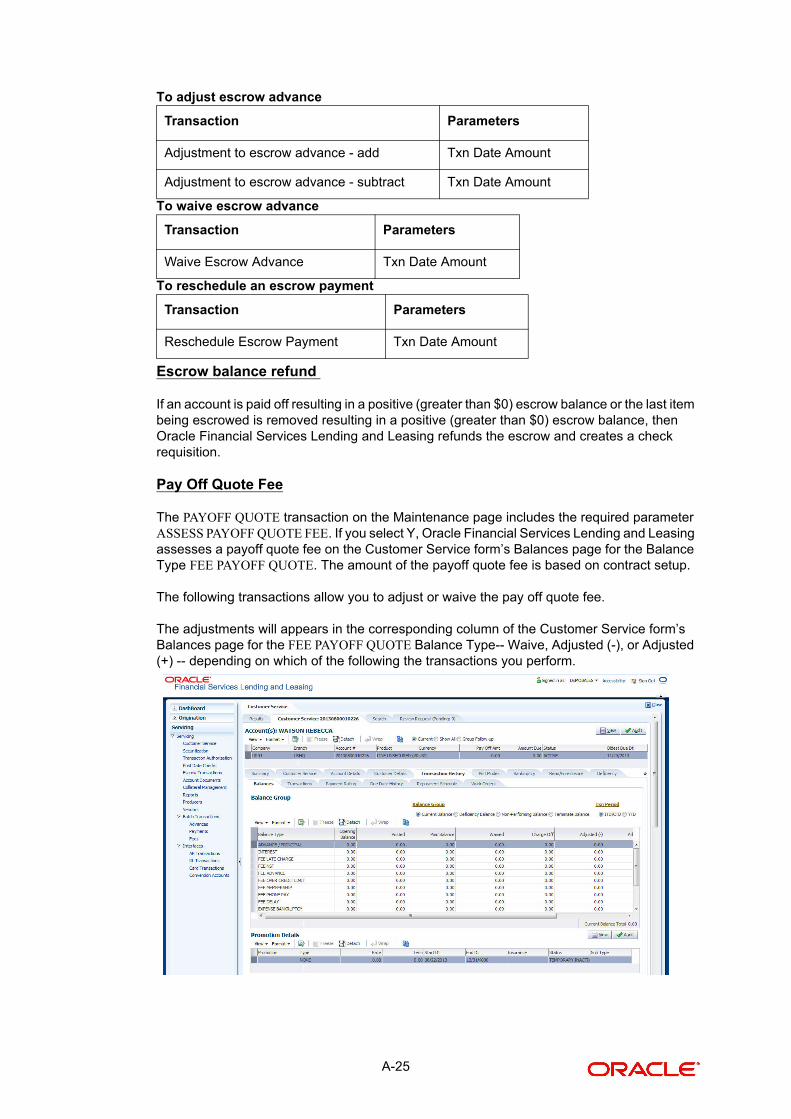
To adjust escrow advance
To waive escrow advance
To reschedule an escrow payment
Escrow balance refund
If an account is paid off resulting in a positive (greater than $0) escrow balance or the last item being escrowed is removed resulting in a positive (greater than $0) escrow balance, then Oracle Financial Services Lending and Leasing refunds the escrow and creates a check requisition.
Pay Off Quote Fee
The PAYOFF QUOTE transaction on the Maintenance page includes the required parameter ASSESS PAYOFF QUOTE FEE. If you select Y, Oracle Financial Services Lending and Leasing assesses a payoff quote fee on the Customer Service form’s Balances page for the Balance Type FEE PAYOFF QUOTE. The amount of the payoff quote fee is based on contract setup.
The following transactions allow you to adjust or waive the pay off quote fee.
The adjustments will appears in the corresponding column of the Customer Service form’s Balances page for the FEE PAYOFF QUOTE Balance Type-- Waive, Adjusted (-), or Adjusted (+) -- depending on which of the following the transactions you perform.
Transaction Parameters
Adjustment to escrow advance - add Txn Date Amount
Adjustment to escrow advance - subtract Txn Date Amount
Transaction Parameters
Waive Escrow Advance Txn Date Amount
Transaction Parameters
Reschedule Escrow Payment Txn Date Amount
A-25

To adjust a pay off quote fee
To waive a pay off quote fee
Nonperforming Accounts
Loan accounts can be placed in a nonperforming, or nonaccrual, condition. Once an account is set to a nonperforming condition, the system makes the following modifications and accounting entries:
After the transaction date, Oracle Financial Services Lending and Leasing assesses no late charge to this account.
Stops general ledger entries for interest accrual.
Transfers the existing principal balance on this account to the Non-Performing Balance Group on the Customer Service form’s Balance page.
Charges the unearned dealer compensation back to the dealer.
Treats payments posted to this account as it does with a normal account; however, the general ledger entries for allocation of these amounts towards principal and interest will go towards the nonperforming balance.
The system’s general ledger (GL) is set up for the above items. There will be no impact on the balances of the account (principal, interest, fee and expense) as a result of the above transactions.
To place an account in a nonperforming condition
The following transaction removes the nonperforming condition on an account and reverses the nonperforming transactions explained above. General ledger entries for interest accrual, stopped during nonaccrual stage, resume.
To reverse a nonperforming condition
Convert a Precomputed (PC) Loan into a Simple Interest (SI) Loan
When converting a precomputed loan into a simple interest loan, Oracle Financial Services Lending and Leasing assumes the following default values:
Accrual Calculation Method - interest bearing (simple interest)
Maturity Date - Computed from the term and next payment due date
Transaction Parameters
Adjustment to Payoff Quote Fee - Add Txn Date Amount
Adjustment to Payoff Quote Fee - Subtract Txn Date Amount
Transaction Parameters
Waive Payoff Quote Fee Txn Date Amount
Transaction Parameters
Account Non Performing Txn Date
Non Performing Description
Transaction Parameters
Resume Account Performing Txn Date
A-26
Monthly Payment Amount - Computed from the interest rate, new principal balance, accrual start date, and term.
All balances other than the Note balance are carried over to the simple interest loan.
The resulting ‘new’ simple interest loan will have the same account number with the details entered/computed above.
Caution: The converting a precomputed loan into a simple interest loan transaction can be performed only by closing the nonperforming condition.
To reschedule precompute loan to interest bearing loan
A.4 Loan Nonmonetary Transactions
This section catalogues the transaction codes and parameters required to complete the following nonmonetary tasks for loan:
Update a customer’s name
Maintain customer details
Mark a customer as a skipped debtor
Change a customer’s Privacy Opt-Out indicator
Stop correspondence
Modify financed insurance information
ACH Maintenance
Reprint a statement (batch only)
Add or stop servicing of accounts with post dated checks as a repayment method
Stop an ACH for an account
Add ACH bank
Cancel or adjust an ESC
Apply a refund payment to an ESC
Cancel insurance (or reverse the insurance cancellation)
Add new escrow insurance details
Add new escrow tax details
Change insurance annual disbursement
Change insurance disbursement plan
Change escrow indicators of insurance
Change insurance expiration date
Change insurance maturity date
Change tax annual disbursement
Change tax disbursement plan
Transaction Parameters
Reschedule Pre-Compute Loan To Interest Bearing Loan
Txn Date
Reschedule Payment Start Date
Amount
Rate
Term
A-27
Change escrow indicators of tax
Resume escrow analysis
Resume escrow disbursements
Stop escrow analysis
Stop escrow disbursements
Refund or adjust insurance
A.5 Customer Name Maintenance
You can update and change a customer’s name.
To update a customer’s name
The new details appear throughout the system; for example, in the Customer Service window’s Customer(s) section and Customer Details page’s Customer section.
A.6 Customer Details Maintenance
You can update and change the following details regarding a customer: social security number, marital status, disability indicator, driving license number, number of dependents, and email address.
Transaction Parameters
Customer Name Maintenance Txn Date
Relation Type Code
Customer First Name
Customer Middle Name
Customer Last Name
Customer Generation
Code
A-28
To change other details about a customer
The new details appear throughout the system.
‘Skipped’ Customers
When a customer cannot be located, the system enables you to mark that person as “skipped” (as in, “the person is a skipped debtor.”) Marking a customer as skipped indicates that the customer’s whereabouts are unknown.
Transaction Parameters
Customer Maintenance Txn Date
Relation Type Code
Customer SSN
Customer Marital Status Code
Customer Disability Indicator
Customer Driving License Number
Customer Number of Dependents
Customer Email Address 1
Customer Birth Date
Customer Gender Code
Customer Language Code
Customer Driving Licence State Code
Customer Time Zone
A-29
To mark a customer as “skipped”
The Skip box is selected on the Customer Service window’s Customer(s) section and Customer Details page’s Customer section.
Note
To remove the Skip indicator, follow the procedures above; however, type N in the CUS-TOMER SKIP INDICATOR parameter.
Privacy Opt-Out Indicator
You can change the customer’s Privacy Opt-Out indicator
Transaction Parameters
Customer Skip Txn Date
Relation Type Code
Customer Skip Indicator
A-30
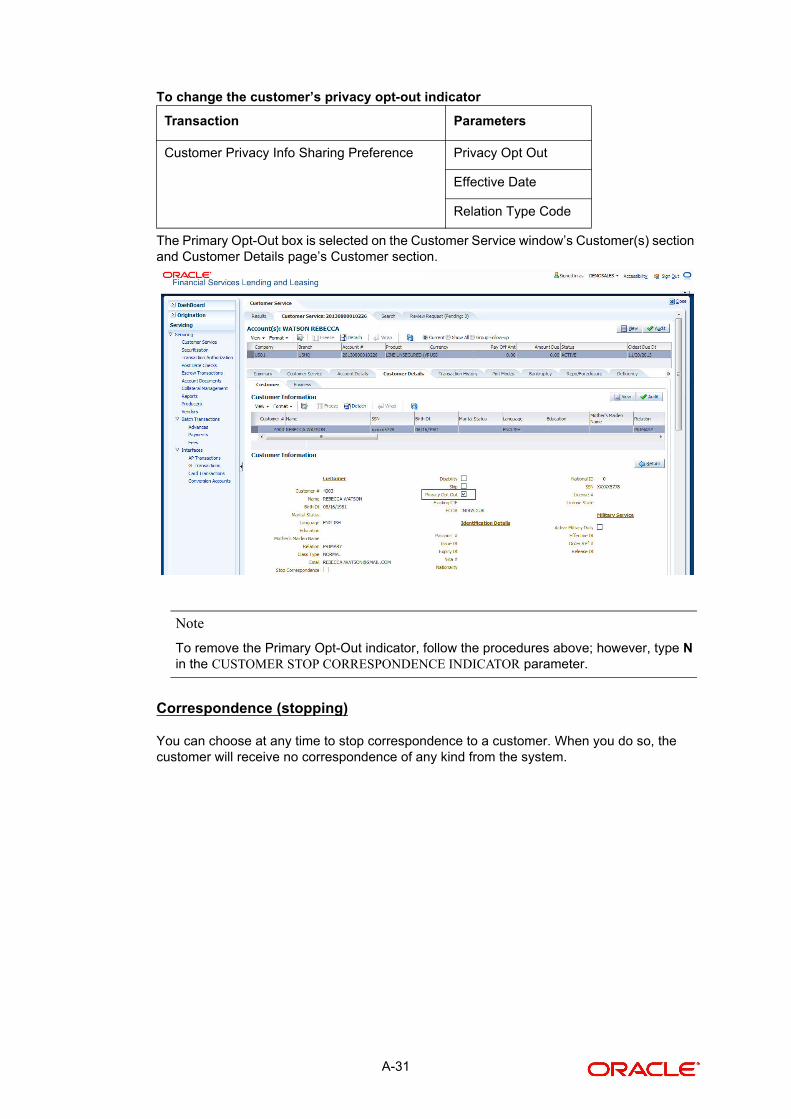
To change the customer’s privacy opt-out indicator
The Primary Opt-Out box is selected on the Customer Service window’s Customer(s) section and Customer Details page’s Customer section.
Note
To remove the Primary Opt-Out indicator, follow the procedures above; however, type N in the CUSTOMER STOP CORRESPONDENCE INDICATOR parameter.
Correspondence (stopping)
You can choose at any time to stop correspondence to a customer. When you do so, the customer will receive no correspondence of any kind from the system.
Transaction Parameters
Customer Privacy Info Sharing Preference Privacy Opt Out
Effective Date
Relation Type Code
A-31
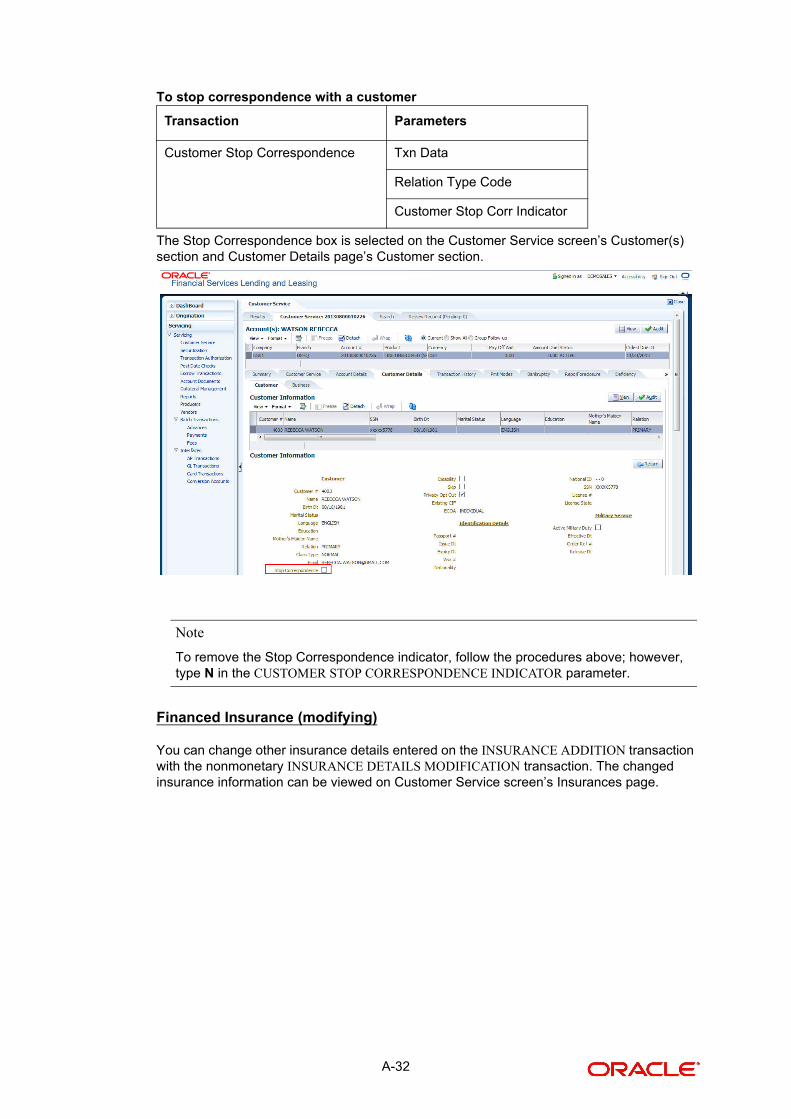
To stop correspondence with a customer
The Stop Correspondence box is selected on the Customer Service screen’s Customer(s) section and Customer Details page’s Customer section.
Note
To remove the Stop Correspondence indicator, follow the procedures above; however, type N in the CUSTOMER STOP CORRESPONDENCE INDICATOR parameter.
Financed Insurance (modifying)
You can change other insurance details entered on the INSURANCE ADDITION transaction with the nonmonetary INSURANCE DETAILS MODIFICATION transaction. The changed insurance information can be viewed on Customer Service screen’s Insurances page.
Transaction Parameters
Customer Stop Correspondence Txn Data
Relation Type Code
Customer Stop Corr Indicator
A-32
Note
Please contact your account manager for back porting this functionality on existing loan accounts.
ACH Maintenance
The ACH maintenance transaction is for updating the existing ACH Banks details and not to define a new Ach Bank. The transaction is effective provided the ACH account no, ACH routing no, account type are matching with the existing Ach Banks details. On successful posting, the confirmation number will be generated.
Transaction Parameters
Insurance Modification Txn Date
Effective Date
Insurance Type
Policy Effective Date Com-pany Name
Phone # 1
Extn # 1
Phone # 2
Extn # 2
Policy #
Expiration Date
Primary Beneficiary
Secondary Beneficiary
Refund Amount Received
Full Refund Received
Comment
A-33
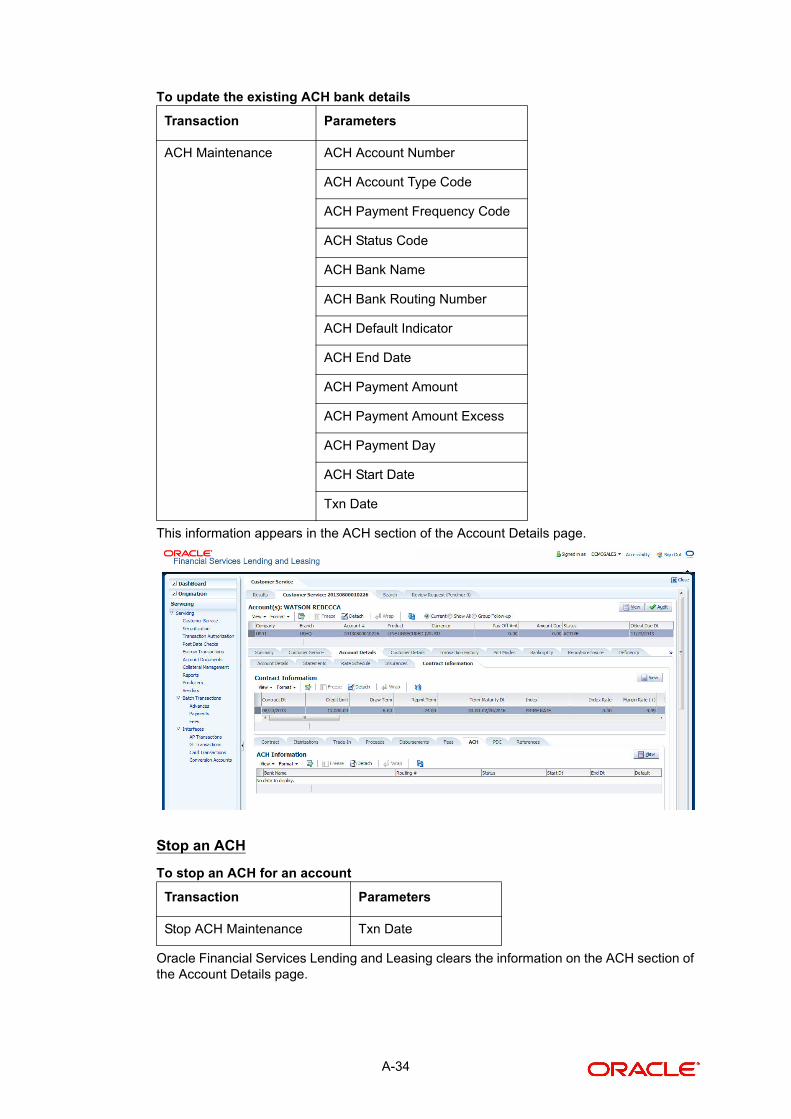
To update the existing ACH bank details
This information appears in the ACH section of the Account Details page.
Stop an ACH
To stop an ACH for an account
Oracle Financial Services Lending and Leasing clears the information on the ACH section of the Account Details page.
Transaction Parameters
ACH Maintenance ACH Account Number
ACH Account Type Code
ACH Payment Frequency Code
ACH Status Code
ACH Bank Name
ACH Bank Routing Number
ACH Default Indicator
ACH End Date
ACH Payment Amount
ACH Payment Amount Excess
ACH Payment Day
ACH Start Date
Txn Date
Transaction Parameters
Stop ACH Maintenance Txn Date
A-34
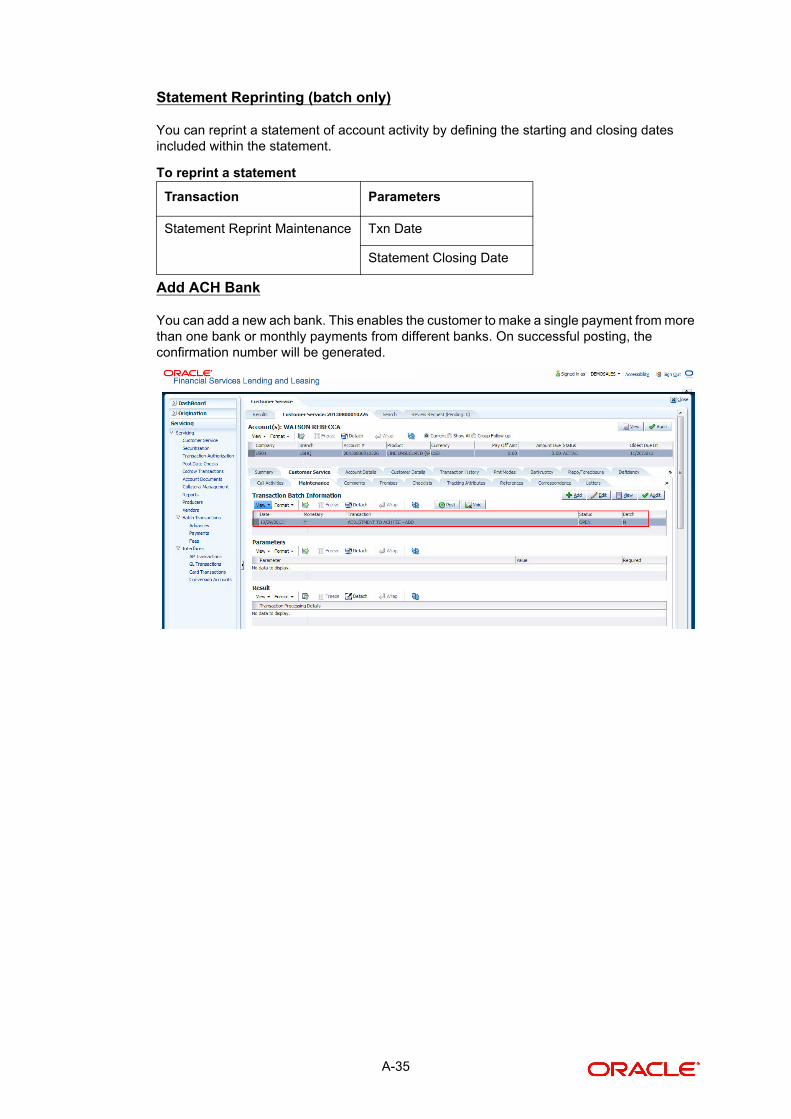
Statement Reprinting (batch only)
You can reprint a statement of account activity by defining the starting and closing dates included within the statement.
To reprint a statement
Add ACH Bank
You can add a new ach bank. This enables the customer to make a single payment from more than one bank or monthly payments from different banks. On successful posting, the confirmation number will be generated.
Transaction Parameters
Statement Reprint Maintenance Txn Date
Statement Closing Date
A-35
To add a new ACH bank
Post Dated Checks
You can add or stop servicing of accounts with PDC as a repayment method.
The POST DATED CHEQUE MAINTENANCE transaction enables you to switch an account to the post dated check method of repayment.
To add post dated checks as a method of repayment
Transaction Parameters
ADD ACH BANK ACH Account Number
ACH Account Type Code
ACH Payment Frequency Code
ACH Status Code
ACH Bank Name
ACH Bank Routing Number
ACH Default Indicator
ACH End Date
ACH Payment Amount
ACH Payment Amount Excess
Transaction Parameters
Post Dated Cheque Maintenance Txn Date
PDC Type
pdc Check Number
pdc Check Date
pdc No Of Checks
pdc Check Amount
pdc Bank Routing Number
pdc Account Type
pdc Account Number
pdc Bank Name
pdc Bank Branch Name
pdc Docket Code
pdc Comments
pdc Frequency
A-36
The STOP POST DATED CHEQUE MAINTENANCE transaction stops processing the payments on an account using Post dated checks. Once this transaction is posted, the status of all the PDCs attached to a loan account changes to VOID, indicating that the PDCs are of no use.
To stop post dated checks as a method of repayment
Coupon Book Maintenance (batch only)
In reordering coupon books, you will need supply the first date of new coupons, the new coupon start number, and the number of new coupons to order.
To re-order coupon book (batch only)
Note
To cancel the coupon book re-order before it is processed in the nightly batch, choose Void.
Extended Service Contract (ESC)
You can apply, cancel, or adjust a payment to an extended service contract.
Transaction Parameters
Stop Post Dated Cheque Maintenance Txn Date
Transaction Parameters
Coupon Book Maintenance Txn Date
Coupon First Payment Date
Coupon Start Number Coupon Count
A-37
To cancel or adjust an ESC
To apply a refund payment to an ESC
Note
A Warranty Refund transaction posted or reversed on the Maintenance page should be matched with a payment posting or reversal.
Transaction Parameters
Warranty Maintenance Txn Date
Insurance/Warranty Cancel Indicator
Insurance/Warranty Cancel Date
Insurance/Warranty Remaining Term
Insurance/Warranty Refund Amount Estimate
Insurance/Warranty Refund Amount Received
Insurance/Warranty
Full Refund Received Indicator
Insurance/Warranty Itemization Code
Transaction Parameters
Warranty Payment Maintenance Txn Date
Insurance/Warranty Refund Amount Received
Insurance/Warranty
Itemization Code
Insurance/Warranty Full Refund Received Indicator
A-38
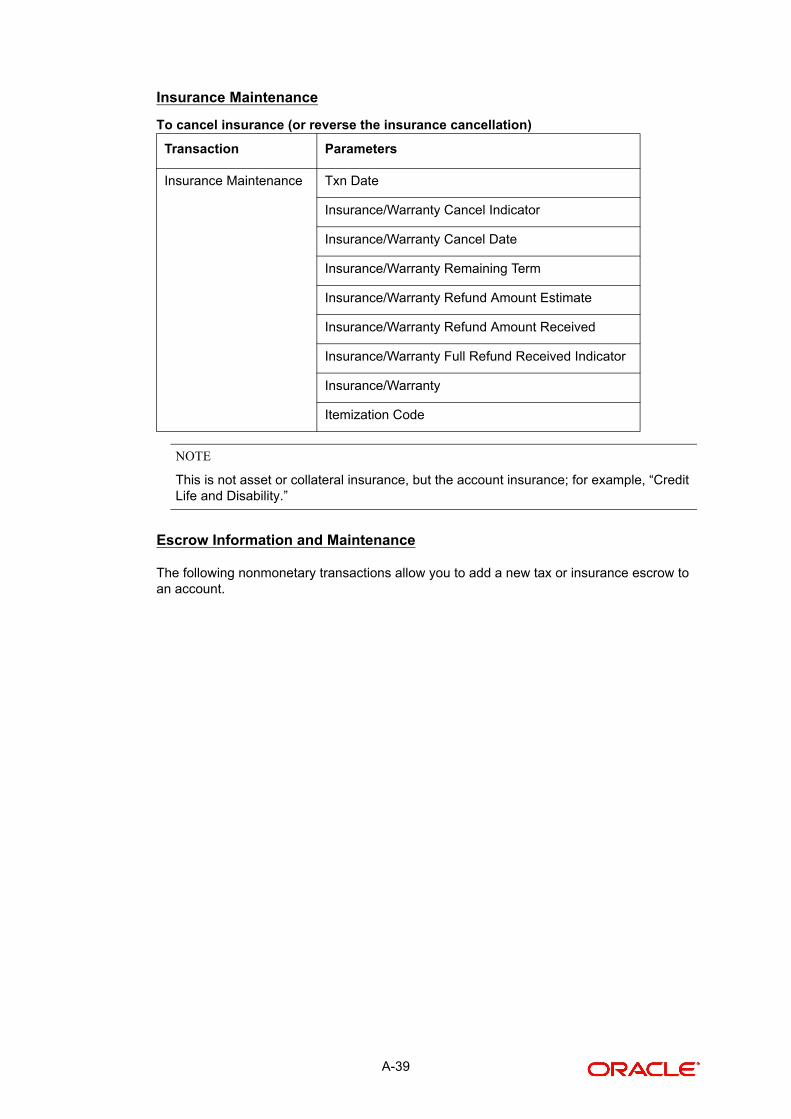
Insurance Maintenance
To cancel insurance (or reverse the insurance cancellation)
NOTE
This is not asset or collateral insurance, but the account insurance; for example, “Credit Life and Disability.”
Escrow Information and Maintenance
The following nonmonetary transactions allow you to add a new tax or insurance escrow to an account.
Transaction Parameters
Insurance Maintenance Txn Date
Insurance/Warranty Cancel Indicator
Insurance/Warranty Cancel Date
Insurance/Warranty Remaining Term
Insurance/Warranty Refund Amount Estimate
Insurance/Warranty Refund Amount Received
Insurance/Warranty Full Refund Received Indicator
Insurance/Warranty
Itemization Code
A-39
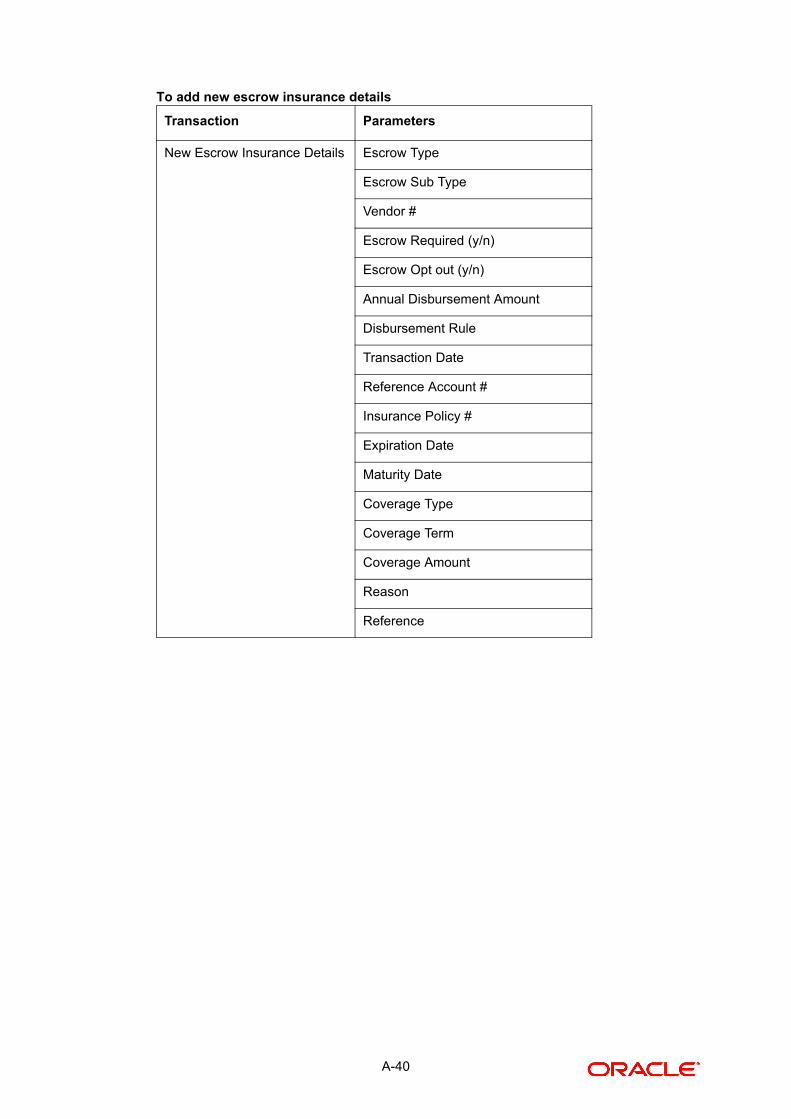
To add new escrow insurance details
Transaction Parameters
New Escrow Insurance Details Escrow Type
Escrow Sub Type
Vendor #
Escrow Required (y/n)
Escrow Opt out (y/n)
Annual Disbursement Amount
Disbursement Rule
Transaction Date
Reference Account #
Insurance Policy #
Expiration Date
Maturity Date
Coverage Type
Coverage Term
Coverage Amount
Reason
Reference
A-40
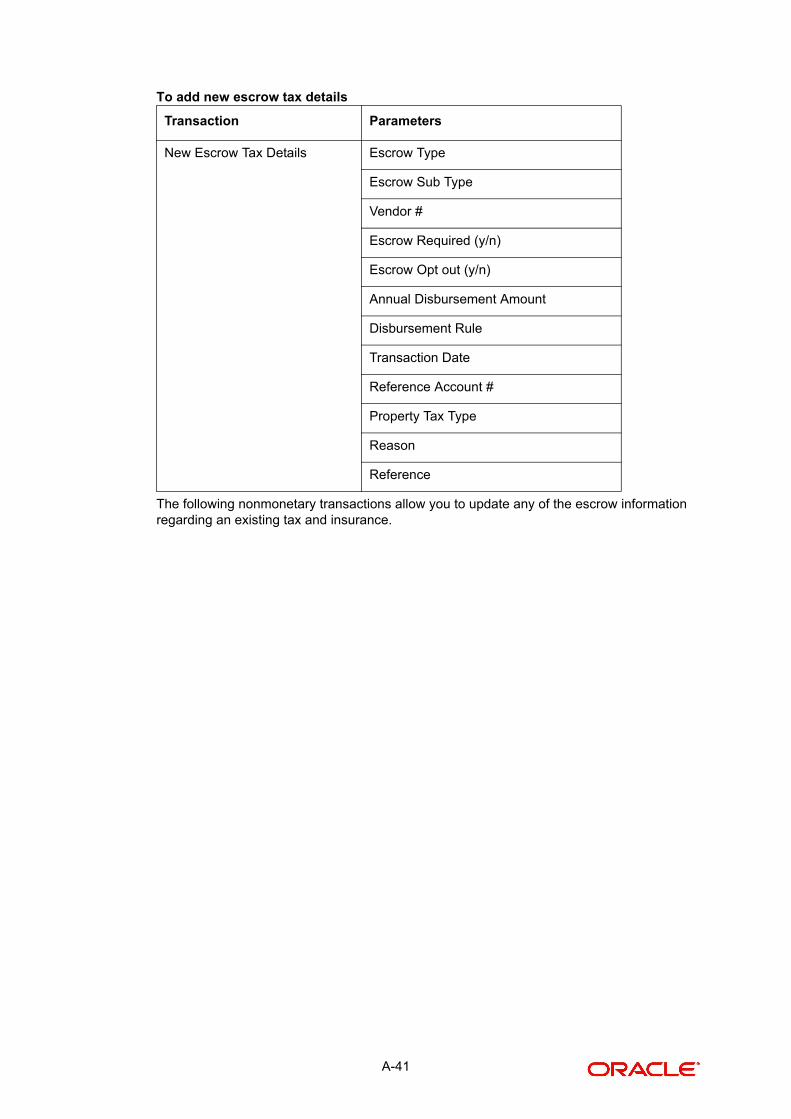
To add new escrow tax details
The following nonmonetary transactions allow you to update any of the escrow information regarding an existing tax and insurance.
Transaction Parameters
New Escrow Tax Details Escrow Type
Escrow Sub Type
Vendor #
Escrow Required (y/n)
Escrow Opt out (y/n)
Annual Disbursement Amount
Disbursement Rule
Transaction Date
Reference Account #
Property Tax Type
Reason
Reference
A-41
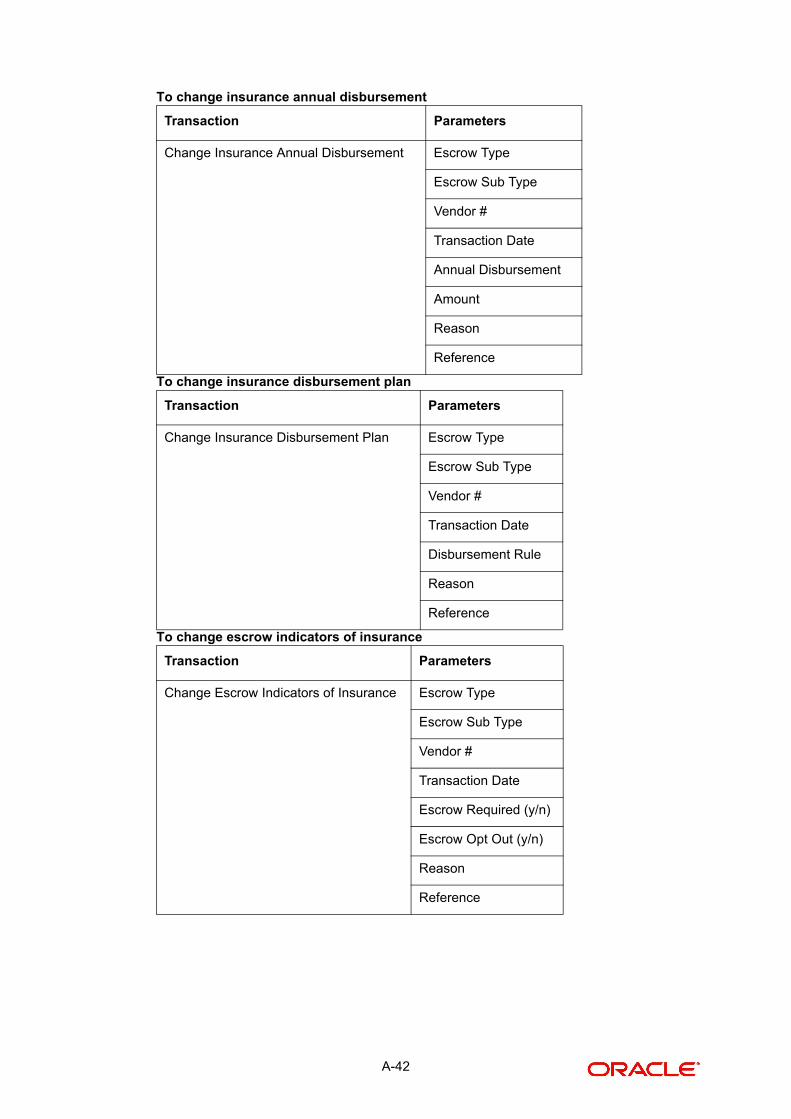
To change insurance annual disbursement
To change insurance disbursement plan
To change escrow indicators of insurance
Transaction Parameters
Change Insurance Annual Disbursement Escrow Type
Escrow Sub Type
Vendor #
Transaction Date
Annual Disbursement
Amount
Reason
Reference
Transaction Parameters
Change Insurance Disbursement Plan Escrow Type
Escrow Sub Type
Vendor #
Transaction Date
Disbursement Rule
Reason
Reference
Transaction Parameters
Change Escrow Indicators of Insurance Escrow Type
Escrow Sub Type
Vendor #
Transaction Date
Escrow Required (y/n)
Escrow Opt Out (y/n)
Reason
Reference
A-42
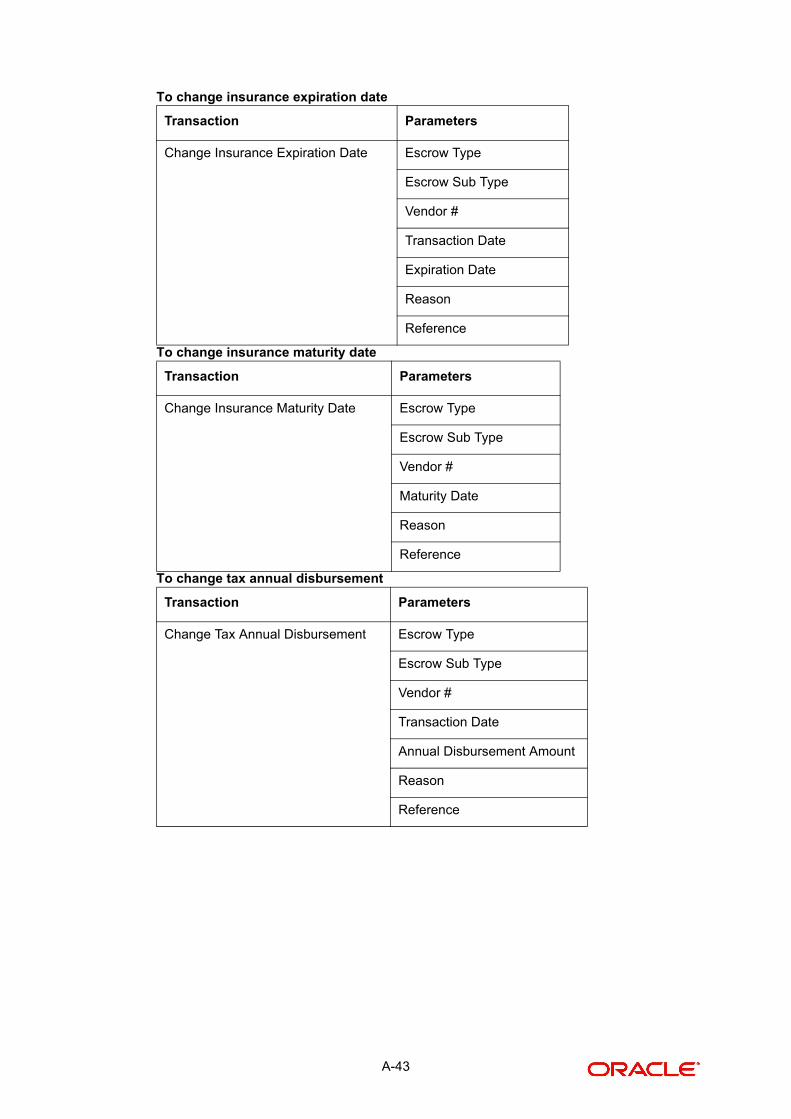
To change insurance expiration date
To change insurance maturity date
To change tax annual disbursement
Transaction Parameters
Change Insurance Expiration Date Escrow Type
Escrow Sub Type
Vendor #
Transaction Date
Expiration Date
Reason
Reference
Transaction Parameters
Change Insurance Maturity Date Escrow Type
Escrow Sub Type
Vendor #
Maturity Date
Reason
Reference
Transaction Parameters
Change Tax Annual Disbursement Escrow Type
Escrow Sub Type
Vendor #
Transaction Date
Annual Disbursement Amount
Reason
Reference
A-43
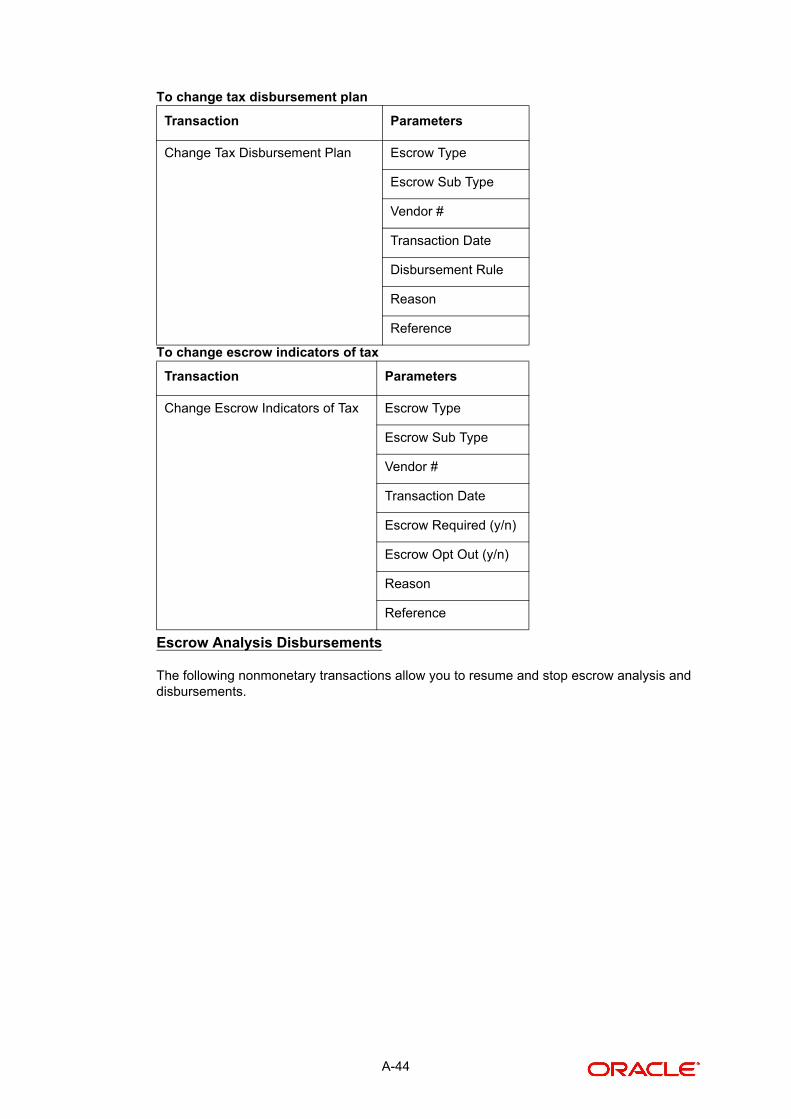
To change tax disbursement plan
To change escrow indicators of tax
Escrow Analysis Disbursements
The following nonmonetary transactions allow you to resume and stop escrow analysis and disbursements.
Transaction Parameters
Change Tax Disbursement Plan Escrow Type
Escrow Sub Type
Vendor #
Transaction Date
Disbursement Rule
Reason
Reference
Transaction Parameters
Change Escrow Indicators of Tax Escrow Type
Escrow Sub Type
Vendor #
Transaction Date
Escrow Required (y/n)
Escrow Opt Out (y/n)
Reason
Reference
A-44
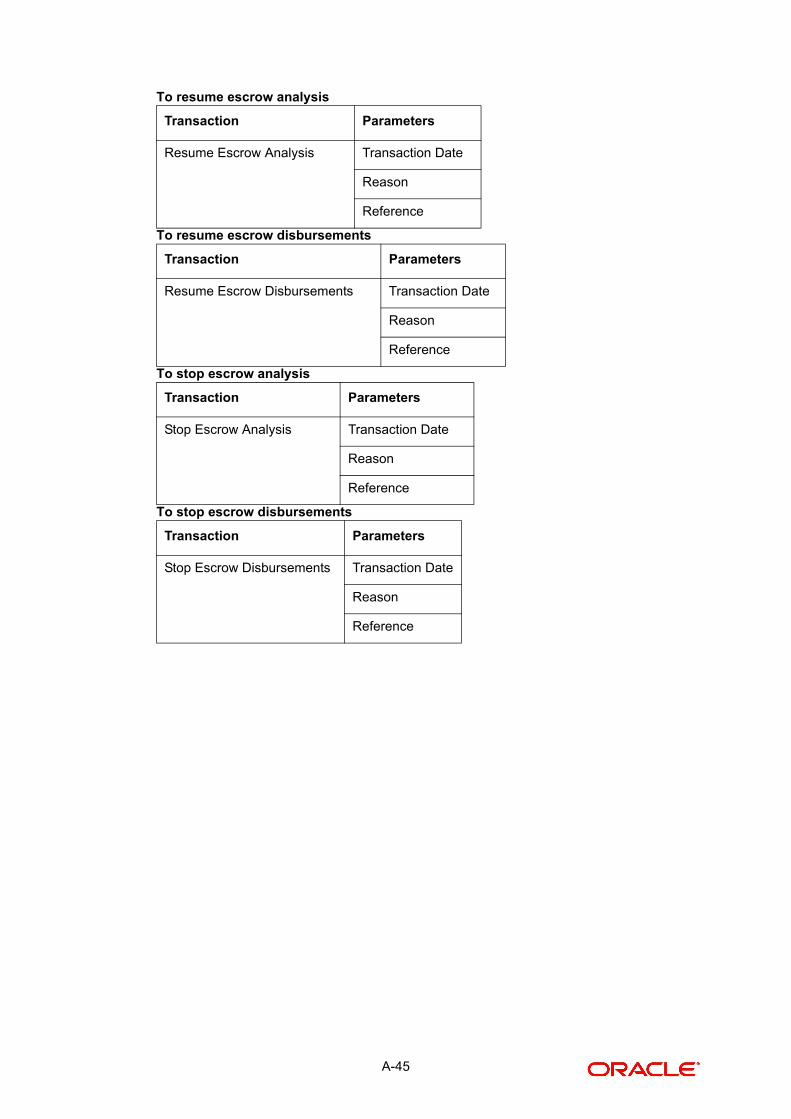
To resume escrow analysis
To resume escrow disbursements
To stop escrow analysis
To stop escrow disbursements
Transaction Parameters
Resume Escrow Analysis Transaction Date
Reason
Reference
Transaction Parameters
Resume Escrow Disbursements Transaction Date
Reason
Reference
Transaction Parameters
Stop Escrow Analysis Transaction Date
Reason
Reference
Transaction Parameters
Stop Escrow Disbursements Transaction Date
Reason
Reference
A-45
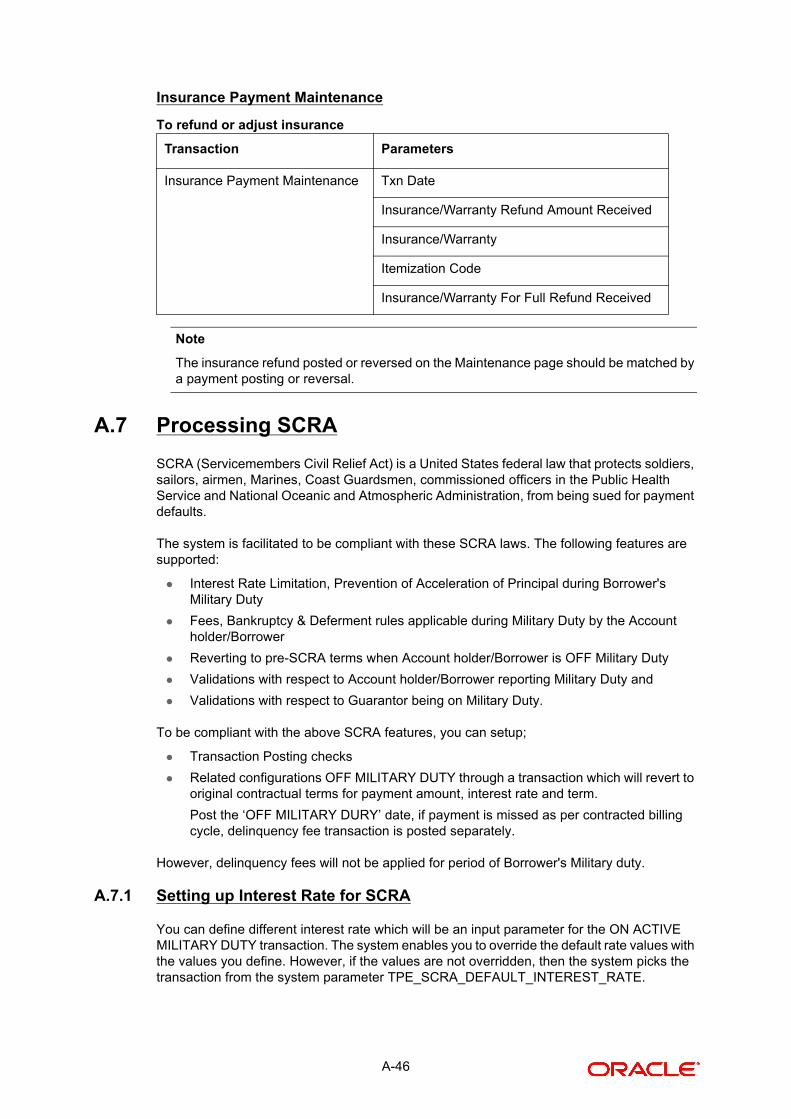
Insurance Payment Maintenance
To refund or adjust insurance
Note
The insurance refund posted or reversed on the Maintenance page should be matched by a payment posting or reversal.
A.7 Processing SCRA
SCRA (Servicemembers Civil Relief Act) is a United States federal law that protects soldiers, sailors, airmen, Marines, Coast Guardsmen, commissioned officers in the Public Health Service and National Oceanic and Atmospheric Administration, from being sued for payment defaults.
The system is facilitated to be compliant with these SCRA laws. The following features are supported:
Interest Rate Limitation, Prevention of Acceleration of Principal during Borrower's Military Duty
Fees, Bankruptcy & Deferment rules applicable during Military Duty by the Account holder/Borrower
Reverting to pre-SCRA terms when Account holder/Borrower is OFF Military Duty
Validations with respect to Account holder/Borrower reporting Military Duty and
Validations with respect to Guarantor being on Military Duty.
To be compliant with the above SCRA features, you can setup;
Transaction Posting checks
Related configurations OFF MILITARY DUTY through a transaction which will revert to original contractual terms for payment amount, interest rate and term.
Post the ‘OFF MILITARY DURY’ date, if payment is missed as per contracted billing cycle, delinquency fee transaction is posted separately.
However, delinquency fees will not be applied for period of Borrower's Military duty.
A.7.1 Setting up Interest Rate for SCRA
You can define different interest rate which will be an input parameter for the ON ACTIVE MILITARY DUTY transaction. The system enables you to override the default rate values with the values you define. However, if the values are not overridden, then the system picks the transaction from the system parameter TPE_SCRA_DEFAULT_INTEREST_RATE.
Transaction Parameters
Insurance Payment Maintenance Txn Date
Insurance/Warranty Refund Amount Received
Insurance/Warranty
Itemization Code
Insurance/Warranty For Full Refund Received
A-46
The system will apply the lowest rate between the contract and the system default interest rate. However, you can indicate to override the Rate with the one entered in the transaction input parameter.
Access to the transaction and availability of the Override and Rate parameters are setup in Transaction Codes Access Grid and Parameters, respectively.
When the transaction is under BORROWER ON ACTIVE MILITARY DUTY status, the system facilitates setting up and validating the following:
While posting the On Military Duty transaction, provides flexibility to choose the Fee to be applicable through the Fee Assessment Access Grid, based on the On Military Duty account condition created in the account.
You can not initiate Foreclosure / Repossession activities on active military duty accounts.
The monthly payment amount must not exceed the existing payment amount.
During deferment period, enables you to define 'NO Interest to be charged' by defining 'Stop Accrual' to the 'EXTENSION transaction' for the same terms of the Extension. A batch job re-starts the Interest Accrual, once the system posts comments for the same
Once the OFF MILITARY DUTY transaction is posted on the account, the system facilitates setting up and validating the following:
The contractual terms are returned once the SCRA condition is removed. That is, the payment amount, terms, and interest rate must revert to their pre-SCRA state. Thus, resulting in a balloon payment at the end of the loan.
To extend On Military Duty benefits, you can perform any of the following:
– OFF Military Duty transaction must not be posted
– If already posted, OFF Military Duty transaction must be REVERSED
– Close current Military Duty by posting the OFF transaction and then opening a new Duty period by posting the On Military Duty Transaction. Ensure not to overlap the periods.
A.8 Black Book Interface
The system performs collateral valuation for all the active accounts at a set frequency. However, valuation is not performed for collaterals with account status <ACTIVE> and Asset Status <ACTIVE> and <PRIMARY>.
The source for the above valuation is Black book or any other Collateral Evaluator agency. These valuation details are stored for each collateral in Collateral tables. If an account has multiple collaterals, then the valuation details must be stored for each collateral.
You can run ‘BLACK BOOK INTERFACE’ batch to perform valuation for active accounts and active collaterals. This batch job performs the following:
Validates for the current valuation in the Black Book interface tables and gets the latest valuation
After getting the valuation updates the collateral valuation with source as Source setup.
Loads Black Book values
Once the batch is run, black book values will load process to Oracle Valuation Section
A-47
Note
System date when this batch is run is saved as valuation date along with other valuation details.
A-48
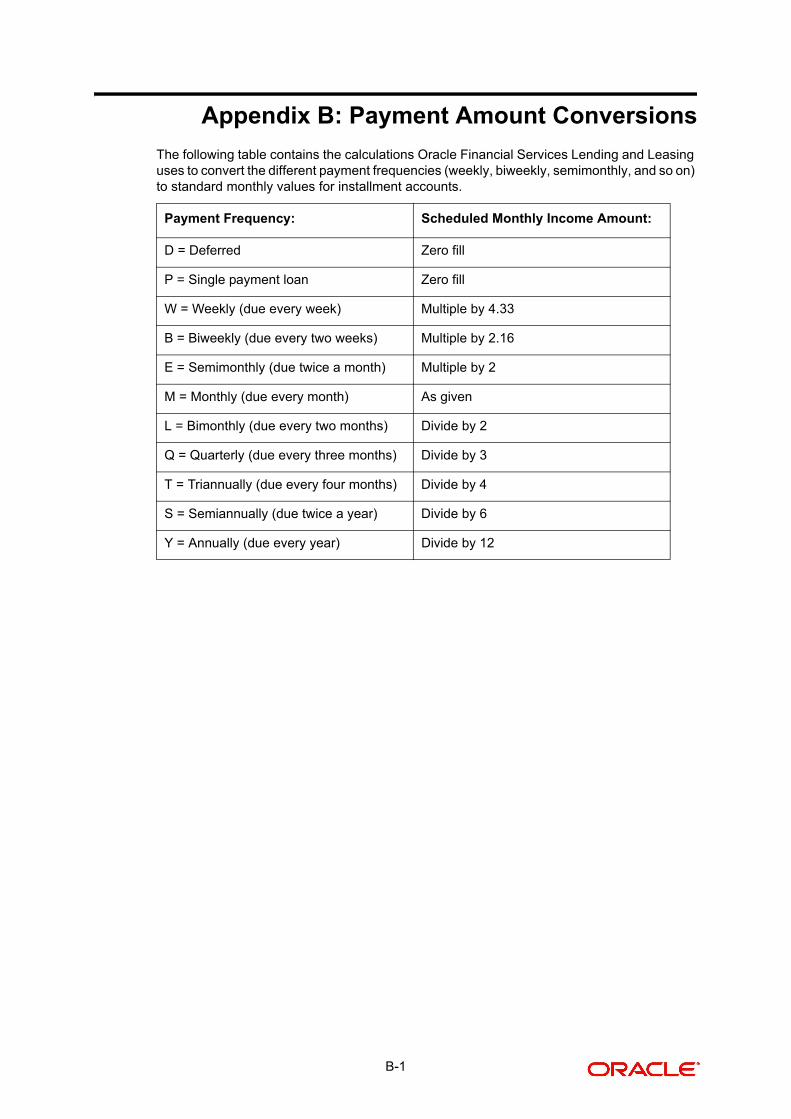
B-1
Appendix B: Payment Amount Conversions
The following table contains the calculations Oracle Financial Services Lending and Leasing uses to convert the different payment frequencies (weekly, biweekly, semimonthly, and so on) to standard monthly values for installment accounts.
Payment Frequency: Scheduled Monthly Income Amount:
D = Deferred Zero fill
P = Single payment loan Zero fill
W = Weekly (due every week) Multiple by 4.33
B = Biweekly (due every two weeks) Multiple by 2.16
E = Semimonthly (due twice a month) Multiple by 2
M = Monthly (due every month) As given
L = Bimonthly (due every two months) Divide by 2
Q = Quarterly (due every three months) Divide by 3
T = Triannually (due every four months) Divide by 4
S = Semiannually (due twice a year) Divide by 6
Y = Annually (due every year) Divide by 12