Media- NAV Evolution
298
Media- NAV Evolution
-
Upload
khangminh22 -
Category
Documents
-
view
3 -
download
0
Transcript of Media- NAV Evolution

Media- NAV Evolution
s R a s / lG / R c s n RR si et t
e f a en a e

1
Français ................................................................
English ..................................................................
................................................................... ةيبرعلا
F
ARA
GB


F.1
Précautions d’utilisation . . . . . . . . . . . . . . . . . . . . . . . . . . . . . . . . . . . . . . . . . . . . . . . . . . . . . . . . . . . F.3Généralités . . . . . . . . . . . . . . . . . . . . . . . . . . . . . . . . . . . . . . . . . . . . . . . . . . . . . . . . . . . . . . . . . . . . F.5
Description générale . . . . . . . . . . . . . . . . . . . . . . . . . . . . . . . . . . . . . . . . . . . . . . . . . . . . . . F.5Présentation des commandes . . . . . . . . . . . . . . . . . . . . . . . . . . . . . . . . . . . . . . . . . . . . . . . F.8Marche/Arrêt . . . . . . . . . . . . . . . . . . . . . . . . . . . . . . . . . . . . . . . . . . . . . . . . . . . . . . . . . . . . . F.16Fonctionnement et utilisation . . . . . . . . . . . . . . . . . . . . . . . . . . . . . . . . . . . . . . . . . . . . . . . . F.17Volume . . . . . . . . . . . . . . . . . . . . . . . . . . . . . . . . . . . . . . . . . . . . . . . . . . . . . . . . . . . . . . . . . F.20
Radio/AUX . . . . . . . . . . . . . . . . . . . . . . . . . . . . . . . . . . . . . . . . . . . . . . . . . . . . . . . . . . . . . . . . . . . . . F.21Écouter la radio . . . . . . . . . . . . . . . . . . . . . . . . . . . . . . . . . . . . . . . . . . . . . . . . . . . . . . . . . . F.21Sources audio auxiliaires . . . . . . . . . . . . . . . . . . . . . . . . . . . . . . . . . . . . . . . . . . . . . . . . . . . F.25Régler le son . . . . . . . . . . . . . . . . . . . . . . . . . . . . . . . . . . . . . . . . . . . . . . . . . . . . . . . . . . . . F.28
Vidéo . . . . . . . . . . . . . . . . . . . . . . . . . . . . . . . . . . . . . . . . . . . . . . . . . . . . . . . . . . . . . . . . . . . . . . . . . F.30Navigation . . . . . . . . . . . . . . . . . . . . . . . . . . . . . . . . . . . . . . . . . . . . . . . . . . . . . . . . . . . . . . . . . . . . . F.32
Le système de navigation . . . . . . . . . . . . . . . . . . . . . . . . . . . . . . . . . . . . . . . . . . . . . . . . . . . F.32Lire une carte . . . . . . . . . . . . . . . . . . . . . . . . . . . . . . . . . . . . . . . . . . . . . . . . . . . . . . . . . . . . F.33Entrer une destination . . . . . . . . . . . . . . . . . . . . . . . . . . . . . . . . . . . . . . . . . . . . . . . . . . . . . F.36Guidage . . . . . . . . . . . . . . . . . . . . . . . . . . . . . . . . . . . . . . . . . . . . . . . . . . . . . . . . . . . . . . . . F.42Réglages carte . . . . . . . . . . . . . . . . . . . . . . . . . . . . . . . . . . . . . . . . . . . . . . . . . . . . . . . . . . . F.48Gérer les favoris . . . . . . . . . . . . . . . . . . . . . . . . . . . . . . . . . . . . . . . . . . . . . . . . . . . . . . . . . . F.49Réglages de navigation . . . . . . . . . . . . . . . . . . . . . . . . . . . . . . . . . . . . . . . . . . . . . . . . . . . . F.51
Driving eco² . . . . . . . . . . . . . . . . . . . . . . . . . . . . . . . . . . . . . . . . . . . . . . . . . . . . . . . . . . . . . . . . . . . . F.554x4 infos . . . . . . . . . . . . . . . . . . . . . . . . . . . . . . . . . . . . . . . . . . . . . . . . . . . . . . . . . . . . . . . . . . . . . . F.56Appareil Bluetooth® . . . . . . . . . . . . . . . . . . . . . . . . . . . . . . . . . . . . . . . . . . . . . . . . . . . . . . . . . . . . . F.57
Appairer/désappairer des appareils Bluetooth® . . . . . . . . . . . . . . . . . . . . . . . . . . . . . . . . . F.57Connecter/déconnecter des appareils Bluetooth® . . . . . . . . . . . . . . . . . . . . . . . . . . . . . . . . F.61Utiliser la reconnaissance vocale . . . . . . . . . . . . . . . . . . . . . . . . . . . . . . . . . . . . . . . . . . . . . F.63
Android Auto™, CarPlay™ . . . . . . . . . . . . . . . . . . . . . . . . . . . . . . . . . . . . . . . . . . . . . . . . . . . . . . . . F.66Répertoire téléphonique . . . . . . . . . . . . . . . . . . . . . . . . . . . . . . . . . . . . . . . . . . . . . . . . . . . . F.70Émettre, recevoir un appel . . . . . . . . . . . . . . . . . . . . . . . . . . . . . . . . . . . . . . . . . . . . . . . . . . F.71

F.2
Démarrage du moteur à distance . . . . . . . . . . . . . . . . . . . . . . . . . . . . . . . . . . . . . . . . . . . . . . . . . . . F.74Caméra de recul . . . . . . . . . . . . . . . . . . . . . . . . . . . . . . . . . . . . . . . . . . . . . . . . . . . . . . . . . . . . . . . . F.77Caméra multivues . . . . . . . . . . . . . . . . . . . . . . . . . . . . . . . . . . . . . . . . . . . . . . . . . . . . . . . . . . . . . . . F.80Réglages système . . . . . . . . . . . . . . . . . . . . . . . . . . . . . . . . . . . . . . . . . . . . . . . . . . . . . . . . . . . . . . . F.82Mise à jour système. . . . . . . . . . . . . . . . . . . . . . . . . . . . . . . . . . . . . . . . . . . . . . . . . . . . . . . . . . . . . . F.85Anomalies de fonctionnement . . . . . . . . . . . . . . . . . . . . . . . . . . . . . . . . . . . . . . . . . . . . . . . . . . . . . . F.90

F.3
PRÉCAUTIONS D’UTILISATION (1/2)
Précautions concernant la manipulation du système– Manipulez les commandes (en façade ou au volant) et consultez les informations à l’écran lorsque les conditions de
circulation vous le permettent.– Réglez le volume sonore à un niveau modéré permettant d’entendre les bruits environnants.Précautions concernant la navigation– L’utilisation du système de navigation ne remplace en aucun cas la responsabilité ni la vigilance du conducteur lors de la
conduite du véhicule.– Selon les zones géographiques, la « carte » peut manquer d’informations sur les nouveautés du parcours. Soyez vigilant.
Dans tous les cas, le code de la route et les panneaux de signalisation routière sont toujours prioritaires sur les indications du système de navigation.
Précautions matérielles– Ne procédez à aucun démontage ou aucune modification du système afin d’éviter tout risque matériel et de brûlure.– En cas de dysfonctionnement et pour toute opération de démontage, veuillez contacter un représentant du constructeur.– N’insérez pas de corps étrangers dans le lecteur.– L’emploi de produits à base d’alcool et/ou l’aspersion directe d’un liquide est à proscrire.Précautions concernant le téléphone– Certaines lois réglementent l’usage du téléphone en voiture. Elles n’autorisent pas pour autant l’usage des systèmes télé-
phonie mains libres dans n’importe quelle situation de conduite : tout conducteur doit rester maître de sa conduite ;– Téléphoner en conduisant est un facteur de distraction et de risque important, cela pendant toutes les phases d’utilisation
(numérotation, communication, recherche d’une entrée dans le répertoire…).
Il est impératif de suivre les précautions ci-dessous lors de l’utilisation du système pour des raisons de sécurité ou de risques de dommages matériels. Respectez obligatoirement les lois en vigueur du pays dans lequel vous vous trouvez.

F.4
La description des modèles déclinés dans cette notice, a été établie à partir des caractéristiques connues à la date de concep-tion de ce document. La notice regroupe l’ensemble des fonctions existantes pour les modèles décrits. Leur présence dépend du modèle de l’équipement, des options choisies et du pays de commercialisation. De même, des fonctionna-lités devant apparaître en cours d’année peuvent être décrites dans ce document. Les écrans présents sur la notice sont non-contractuels.Selon la marque et le modèle de votre téléphone, certaines fonctions peuvent être partiellement ou totalement incompatibles avec le système multimédia de votre véhicule.Pour de plus amples informations, consultez un Représentant de la marque.
PRÉCAUTIONS D’UTILISATION (2/2)

F.5
DESCRIPTION GÉNÉRALE (1/3)IntroductionLe système multimédia de votre véhi-cule assure les fonctions suivantes :– radio RDS ;– radio DAB ;– gestion de sources audio auxiliaires ;– téléphone mains libres ;– reconnaissance vocale ;– aide à la navigation ;– informations sur le trafic routier ;– informations sur les zones de
vigilance ;– aide au stationnement (caméra de
recul ou caméra multivues) ;– la programmation de démarrage du
moteur à distance ;– informations sur l’inclinaison du véhi-
cule (4x4 infos) ;– informations sur votre style de
conduite et conseils de conduite afin d’optimiser votre consommation de carburant.
Fonctions radioLe système multimédia permet l’écoute des stations de radio FM (modulation de fréquence) DAB (diffusion audionu-mérique) et AM (modulation d’ampli-tude).Le système DAB permet d’obtenir un meilleur rendu sonore, d’accéder aux informations textuelles sur le pro-gramme en cours, etc.Le système RDS permet l’affichage du nom de certaines stations ou d’infor-mations diffusées par les stations radio FM :– informations sur l’état général du
trafic routier (TA) ;– message(s) d’urgence(s).
Fonction audio auxiliaireVous pouvez écouter votre baladeur audio directement sur les haut-parleurs de votre véhicule. Vous avez plusieurs possibilités pour connecter votre ba-ladeur, suivant le type d’appareil que vous possédez :– prise Jack 3,5 mm ;– USB audio ;– connexion Bluetooth®.Pour plus de précisions sur la liste des appareils compatibles, consultez un Représentant de la marque ou consul-tez le site internet du constructeur s’il en dispose.

F.6
DESCRIPTION GÉNÉRALE (2/3)Fonction téléphonie mains libresLe système de téléphonie mains libres Bluetooth® assure les fonctions sui-vantes en vous évitant d’avoir à mani-puler votre téléphone :– émettre/recevoir/suspendre un
appel ;– consulter la liste des contacts du ré-
pertoire du téléphone ;– consulter l’historique d’appels
passés depuis le système ;– appeler les secours.
Compatibilité des téléphonesCertains téléphones ne sont pas com-patibles avec le système mains libres, et ne permettent pas d’exploiter l’en-semble des fonctions offertes ou n’ap-portent pas une qualité acoustique op-timale.Pour plus de précisions sur la liste des téléphones compatibles, consultez un Représentant de la marque ou consul-tez le site internet du constructeur s’il en dispose.
Fonction aide à la navigationLe système de navigation détermine automatiquement la position géogra-phique du véhicule par la réception de signaux GPS.Il propose un itinéraire jusqu’à la desti-nation de votre choix grâce à sa carte routière. Enfin, il indique la route à suivre, pas à pas, grâce à l’écran de visualisation et aux messages vocaux.
Informations traficCette fonction vous informe en temps réel des conditions relatives au trafic.
Alertes de sécurité routière ou point d’alertesCe service vous permet de recevoir des alertes en temps réel, comme les alertes d’excès de vitesse ou la position des zones d’alerte de sécurité routière.
Fonction démarrage du moteur à distanceLorsque le véhicule en est équipé, cette fonction vous permet de program-mer le démarrage du moteur à distance afin de chauffer ou ventiler l’habitacle jusqu’à 24 heures avant l’utilisation du véhicule.
Driving eco2Le menu « Driving eco² » permet d’affi-cher en temps réel un score global qui reflète votre style de conduite.
Votre système téléphonie mains libres a seulement pour objet de faciliter la communication en diminuant les facteurs de risque sans les éliminer totalement. Respectez obligatoirement les lois en vigueur du pays dans lequel vous vous trouvez.

F.7
AffichagesÉcran des menus1 Zone de sélection de mode. Affiche le mode sélectionné. Quand
vous touchez la zone de sélection de mode, un menu déroulant apparaît.
2 Zone Table des matières. Affiche le contenu d’une rubrique de
menu et des informations afférentes.3 Zone information téléphonie. Si le système Bluetooth® est activé,
le niveau de réception et de batterie de l’appareil connecté est affiché.
4 Température extérieure.5 Zone Heure.6 Zone Menu : – affiche le menu inférieur du
mode ; – affiche le menu actuel en surli-
gné.7 Zone Accueil ou retour à la navigation. Suivant le mode dans lequel vous
vous trouvez, cette zone affiche : – le bouton Accueil : revient au
menu d’accueil ; – le bouton Précédent : revient à
l’écran précédent ; – le bouton Drapeau : revient à
l’écran de navigation.
8 Mode veille et affichage de l’horloge.9 Zone de sélection du démarrage du
moteur à distance.
Écran de navigation10 Mode carte (2D/3D et 2D Nord).11 Nom de la prochaine rue à prendre
sur votre itinéraire.12 Informations audio actuelles.13 Options de réglage d’itinéraire et de
carte.14 Guidage vocal On/Off.15 Informations trafic.
6
10 11
1213
DESCRIPTION GÉNÉRALE (3/3)
7
321
14
A l’écoute Liste Options Destination
4 5 8
Radio Média Tél
Driving eco2 Nav Réglage
Sombre
9
Déf. HeureMém
15

F.8
Les sélections d’écran s’effectuent d’une pression sur la partie souhaitée de l’écran.
PRÉSENTATION DES COMMANDES (1/8)
2 3A 41
7 5810
Destination
9
Façades du système
6 2
7 5810
Destination
9 6
1 3B

F.9
Façades du systèmePRÉSENTATION DES COMMANDES (2/8)
Les sélections d’écran s’effectuent d’une pression sur la partie souhaitée de l’écran.
2
3A4
7 5
1
810 9
Destination
6
2
3B
7 5
1
810 9
Destination
6

F.10
1516
11 12
19
12
17
16
18
19
12
17
16
18
AB
1516
11 12
PRÉSENTATION DES COMMANDES (3/8)
17 18
131313
14 14 14
14
13 13
14
12
16
C
D E
Commandes sous volant
17 18
13
14
12
16
F

F.11
PRÉSENTATION DES COMMANDES (4/8)
20
11 12
1516
13
14
G 17 18H
12
17 18
1916
13
14
J
12
13
14
1916
13
14
K
16 15
17 18

F.12
PRÉSENTATION DES COMMANDES (5/8)
21
Commandes au volant21 12
1314
151120
21 21

F.13
Fonction
1 Appui court : écran de veille ON / OFF.Appui long : redémarrage du système.
2, 13, 14 Régler le volume.
3A Prise USB.
3B Activer/désactiver la reconnaissance vocale de votre téléphone s’il est connecté au système multimédia.
4 Prise Jack 3,5 mm.
5 Accéder au média actuellement à l’écoute (FM / AM / DAB / USB / iPod® / Bluetooth® / AUX).
6 Accéder au menu « Navigation ».
7
Accéder au menu « Accueil ».
Téléphonie ou sources auxiliaires : sortir de l’écran actuel pour retourner vers l’écran de navigation (en cours) ou vers l’écran précédent.
8 Activer/désactiver le guidage vocal.
9 Changer le zoom de vue de carte.
10 Changer le mode de vue de carte (2D/3D/2D Nord).
11 Choisir la source audio (FM / AM / DAB / USB / iPod® / Bluetooth® / AUX).
PRÉSENTATION DES COMMANDES (6/8)

F.14
Fonction
12
À la réception d’un appel :– Appui court : décrocher l’appel ;– Appui long : refuser l’appel.Appui court pendant un appel : raccrocher.À l’écoute d’une source audio : couper/remettre le son (« Mute ») (uniquement pour les commandes C, D, E, F, H et J).Appui court : accès au menu « Tél » (uniquement pour les commandes A, B et G).Appui court : activer/désactiver la reconnaissance vocale de votre téléphone (uniquement pour la commande A).
13 Augmenter le volume de la source audio en cours d’écoute.
14 Diminuer le volume de la source audio en cours d’écoute.
13+14 Couper/remettre le son (« Mute ») (uniquement pour les commandes A, B et K).
15, 19Radio : changer le mode de lecture des stations radio (« Fréq », « Liste », « Mém »).Média (USB / iPod) : changer le mode de lecture du média en cours d’écoute (« Principale » ou « Liste »).
16
Molette arrière :– Radio : changer de mode radio (preset / liste / fréquence) ;– Média : avancer/reculer d’une piste.Appui court : valider une action (uniquement pour la commande C).
17 Changer de média (CD / USB / AUX).
PRÉSENTATION DES COMMANDES (7/8)

F.15
Fonction
18Appui court : changer de mode radio (FM / AM / DAB).Appui long : activer/désactiver la reconnaissance vocale de votre téléphone (uniquement pour la commande C, E et J).
20Couper/remettre le son de la radio.Mettre sur pause/en lecture la piste audio.Interrompre la voix de synthèse de la reconnaissance vocale.
21 Activer/désactiver la reconnaissance vocale de votre téléphone s’il est connecté au système multimédia.
PRÉSENTATION DES COMMANDES (8/8)

F.16
MARCHE/ARRÊT
MarcheLe système multimédia se met en marche automatiquement à la mise sous contact. Dans les autres cas, ap-puyez sur la touche A pour mettre en marche votre système multimédia.Contact coupé, vous pouvez utiliser votre système pendant vingt minutes. Appuyez sur la touche A pour faire fonctionner le système multimédia en-viron vingt minutes supplémentaires.
Écran de veilleLe mode écran de veille permet d’éteindre l’écran de visualisation.Dans ce mode, la radio ou le système de guidage ne fonctionne pas.L’écran de veille affiche l’heure et la température extérieure.Appuyez brièvement sur la touche A pour activer/désactiver l’écran de veille.
AA
ArrêtSuivant les applications en cours de fonctionnement, le système multimédia peut prendre quelques minutes pour s’éteindre après que le contact moteur soit coupé.Un appui long sur la touche A (jusqu’à l’apparition de l’écran noir) permet le redémarrage du système multimédia.
Par mesure de sécurité, en cas de température trop basse ou trop élevée à l’intérieur du véhicule, le système multimédia ne se mettra pas en marche ou s’arrêtera de fonctionner automatiquement. Attendez quelques instants que la température re-vienne à un niveau plus adéquat pour le bon fonctionnement du système multimédia.

F.17
FONCTIONNEMENT ET UTILISATION (1/3)– Avance/retour rapide (écran de lec-
ture média).Depuis le menu « Média » > « A l’écoute », des appuis longs sur le bouton « Avance/retour » rapide font avancer/reculer la lecture.
Ecran multimédia 1Appui court :– sélection d’option ;– exécution d’option (écran de lecture
média).Depuis le menu « Média » > « A l’écoute », une pression sur le bouton d’avance fait passer au titre suivant.
1 1
Appui long :– mémorisation d’élément (station de
radio par exemple).Depuis le menu « Radio » > « Fréq », un appui long sur le chiffre prépro-grammé mémorise la station de radio actuellement à l’écoute.– Défilement rapide.Des appuis longs sur les boutons de défilement vers le bas lancent un défi-lement (par page) accéléré.

F.18
FONCTIONNEMENT ET UTILISATION (2/3)
56
A
4
Audio : utiliser les commandes sous volantAppuyez sur la touche 5 pour changer de mode de recherche de station radio.Tournez la molette 6 pour changer de station (mouvement A).Appuyez sur 4 pour changer de source(USB, AUX, AM, FM, DAB, iPod® et Bluetooth®).
2
Options
Off
Off
Off
On
On
On
Rapide Court ÉcoCalcul de l’itinéraire
Autoroutes
Routes à péage
Routes à abonnement
Paramétrage de l’itinéraire
Retour au menu « Accueil »Le système revient directement au menu « Accueil » en cas d’appui long sur 2 ou d’appui court sur 3 où que vous soyez dans le système.
A l’écoute Liste OptionsMém
3

F.19
Utiliser un clavier alphabétiqueAu cours de la saisie d’une rubrique à l’aide d’un clavier alphabétique, choisissez chaque lettre à l’aide du clavier.Au cours de la saisie de chaque lettre, le système supprime la surbrillance de certaines lettres pour faciliter l’opération.Appuyez sur 7 pour effacer le dernier caractère saisi.Appuyez sur 8 pour afficher la liste des résultats.
Appuyez sur 9 pour utiliser des chiffres ou des symboles.Appuyez sur 10 pour changer de configuration de clavier.
7
910
Options
8
FONCTIONNEMENT ET UTILISATION (3/3)

F.20
VolumeAjustez le volume sonore à l’écoute des différents messages, sources, sonneries et communications téléphoniques :– en tournant ou en appuyant sur le
bouton 1 de la façade du système multimédia ;
– en appuyant sur la commande 13 ou 14 de la commande sous volant.
Pour régler cette fonction, reportez-vous au paragraphe « Préférences so-nores » du chapitre « Régler le son ».La source radio écoutée est interrom-pue à la réception d’informations rou-tières « TA », de bulletins d’informations ou d’un message d’avertissement.Nota : le volume sonore en cours de lecture n’est pas mémorisé au redé-marrage du système.
Coupure du sonPour couper le son, appuyez briève-ment sur le bouton 21 de la commande au volant, ou sur le bouton 3B de la façade multimédia ou sur la commande sous volant 12 (uniquement pour les commandes C, D, E, F, H et J) ou simultanément sur les boutons 13 et 14 de la commande sous volant (unique-ment pour les commandes A, B et K).L’icône « MUTE » s’affiche en haut de l’écran pour vous indiquer que le son est coupé.Pour reprendre l’écoute de la source audio en cours, appuyez brièvement sur le bouton 21 de la commande au volant, ou sur le bouton 3B de la façade multimédia ou sur la commande sous volant 12 (uniquement pour les commandes C, D, E, F, H et J) ou simultanément sur les boutons 13 et 14 de la commande sous volant (unique-ment pour les commandes A, B et K).Cette fonction est désactivée automatiquement lors d’une action sur le volume et lors de la diffusion d’un bulletin d’informations ou d’informa-tions routières.
Adaptation du volume en fonction de la vitesseLorsque cette fonction est activée, le volume audio et le volume de la navi-gation varient en fonction de la vitesse du véhicule.Pour activer et régler cette fonction, reportez-vous au paragraphe « Adaptation du volume en fonction de la vitesse » du chapitre « Régler le son ».
VOLUME
Réglez le volume sonore à un niveau modéré permettant d’entendre les bruits environnants.

F.21
ÉCOUTER LA RADIO (1/4)
Choisir une gamme d’ondesPour choisir une gamme d’ondes :– appuyez sur 1 ;– choisissez la gamme d’ondes
« FM », « AM » ou « DAB » souhai-tée par un appui sur la gamme choi-sie.
1
Fréq Liste Mém Options
69 8 45
2
7
Mode « Fréq »Ce mode permet de rechercher ma-nuellement ou automatiquement des stations de radio par balayage de la plage de fréquence sélectionnée. Sélectionnez le mode « Fréquence » en appuyant sur 7.Pour balayer la plage de fréquence :– avancez ou reculez en mode manuel
par palier de fréquence de 0,05Hz en appuyant successivement sur 4 ou 8 ;
– avancez ou reculez en mode automatique (recherche) jusqu’à la prochaine station par appui sur 3 ou 9.
Répétez l’opération à chaque arrêt de la recherche si nécessaire.Vous pouvez aussi actionner la molette de la commande sous volant pour passer à la prochaine station.Nota : pour revenir à l’écran d’accueil, appuyez sur le bouton 10.
Choisir une station de radio « FM », « AM » ou « DAB »Il existe différents modes pour sélec-tionner une station de radio.Après avoir sélectionné la gamme d’ondes, choisissez le mode en ap-puyant sur les onglets 5, 6 ou 7.Plusieurs modes de recherche vous sont proposés :– mode « Fréq » (onglet 7) ;– mode « Liste » (onglet 6) ;– mode « Mém » (onglet 5).Il est possible de changer ces modes à l’aide de la commande sous volant.Nota : le repère 2 vous indique la posi-tion de la radio actuellement à l’écoute dans votre liste de mémorisation.
10 3

F.22
ÉCOUTER LA RADIO (2/4)Appuyez sur une des touches de la zone A, pour choisir les stations mémorisées.Nota : pour revenir à l’écran d’accueil, appuyez sur le bouton 10.
Mémoriser une stationSélectionnez une station de radio en utilisant un des modes décrits précé-demment. Faites un appui long sur une des touches de la zone A.Vous pouvez mémoriser jusqu’à douze stations par gamme d’ondes.Nota : le symbole 15 vous indique la station actuellement à l’écoute.Le repère 16 vous indique le nombre de pages présentes dans cette rubrique.Pour passer à la page suivante, ap-puyez sur la touche 17.
A
Fréq Liste Mém Options
15
Les noms des stations de radio dont la fréquence n’utilise pas le système RDS, n’apparaissent pas à l’écran. Seule leur fréquence est indiquée et classée en fin de liste.
Mode « Mém »Sélectionnez le mode « Mém » en ap-puyant sur 18.Ce mode vous permet de rappeler à la demande, les stations que vous aurez préalablement mémorisées (consultez le paragraphe « Mémoriser une sta-tion » dans ce chapitre).
Mode « Liste »Sélectionnez le mode « Liste » en ap-puyant sur 14.Ce mode de fonctionnement permet de rechercher facilement une station dont vous connaissez le nom dans une liste classée par ordre alphabétique (en bande « FM » et « DAB » uniquement).Sélectionnez la station désirée en ap-puyant sur la zone 12.Appuyez sur 13 pour faire défiler toutes les stations.Nota : le symbole 11 vous indique la station actuellement à l’écoute.
12 1311
Fréq Liste Mém Options
14 1810
16 17

F.23
ÉCOUTER LA RADIO (3/4)« RDS »La fonction « RDS » permet l’écoute d’une station sans interruption lors d’un déplacement, en prenant en charge au-tomatiquement le passage d’une fré-quence à l’autre.Vous êtes informés du nom de la sta-tion en cours d’écoute, des messages textuels, des informations temporaires pendant l’émission d’un flash routier.Les informations routières sont généra-lement diffusées via « RDS ».Nota : toutes les stations de radio ne permettent pas ce suivi.De mauvaises conditions de réception peuvent parfois provoquer des chan-gements de fréquences intempestifs et désagréables. Désactivez alors le suivi de station.
19
« TA » (infos trafic)Lorsque cette fonction est activée, votre système multimédia permet la re-cherche et l’écoute automatique d’infor-mations routières dès leur diffusion par certaines stations de radio « FM » et « DAB ».Nota : la diffusion automatique des infos trafic est désactivée quand le système audio est réglé sur la gamme d’ondes « AM ».Les informations routières sont diffu-sées automatiquement et prioritaire-ment quelle que soit la source écoutée.Sélectionnez « On » pour activer cette fonction ou « Off » pour la désactiver.
Fréq Liste Mém Options
RDS
TA
Région
Infos
Off
Off
Off
Off
On
On
On
On
Réglages de la radioAffichez le menu des réglages par un appui sur 19. Vous pouvez activer ou désactiver des fonctions en appuyant sur « On » ou sur « Off » (le menu de configuration change selon la gamme d’ondes).Les fonctions disponibles sont les suivantes :– « RDS » ;– « TA »(infos trafic) ;– « Région » ;– « Infos » ;– « AM » ;– « DLS » ;– « Annonce » ;– « Màj liste ».

F.24
ÉCOUTER LA RADIO (4/4)« Infos »Lorsque cette fonction est activée, elle permet l’écoute automatique d’informa-tions dès leur diffusion par certaines stations de radio « FM » et « DAB ».Si vous sélectionnez ensuite d’autres sources, la diffusion du type de pro-gramme choisi interrompra la lecture des autres sources.Sélectionnez « On » pour activer cette fonction ou « Off » pour la désactiver.
« Région »La fréquence d’une station de radio « FM » peut changer selon la zone géo-graphique.Pour pouvoir rester à l’écoute d’une même station de radio tout en chan-geant de région, activez la fonction « Région » afin que votre système mul-timédia puisse suivre automatiquement les changements de fréquence.Nota : seule la station en cours d’écoute pourra suivre le changement de région.Nota : ce suivi est possible sur cer-taines stations de radio uniquement.Nota : « Région » est disponible uni-quement si la fonction « RDS » est activé.De mauvaises conditions de réception peuvent parfois provoquer des chan-gements de fréquences intempestifs et désagréables. Désactivez alors cette fonction.Sélectionnez « On » pour activer cette fonction ou « Off » pour la désactiver.
« AM »Vous pouvez activer ou désactiver la longueur d’ondes « AM ».Sélectionnez « On » pour activer cette fonction ou « Off » pour la désactiver.
« DLS »Certaines stations de radio diffusent des informations textuelles relatives au programme en cours d’écoute (par exemple le titre d’une chanson).
« Màj liste »Pour actualiser la liste des stations de radio et obtenir les plus récentes, ap-puyez sur « Démarrer ».Nota : de préférence, mettez à jour la liste « DAB » dès la première mise en marche de votre système.

F.25
SOURCES AUDIO AUXILIAIRES (1/3)Votre système possède deux types d’entrées auxiliaires :– avec branchement pour la connexion
d’une source audio externe ( lecteur MP3, baladeur audio, clé USB, téléphone…) ;
– avec Bluetooth® (baladeur audio Bluetooth®, téléphone Bluetooth®).
Pour connaître la position d’entrée, re-portez-vous au chapitre « Présentation des commandes ».
Principes de fonctionnement et branchementIl existe deux types de branchement :– une prise USB ;– une prise Jack.Connectez votre baladeur suivant le type d’appareil que vous possédez.Une fois le branchement d’une prise USB ou Jack effectué, le système détecte automatiquement la source auxiliaire.Nota : la clé USB utilisée doit être formatée au format FAT32 et doit avoir une capacité maximale de 32GB.
Sélectionner une source auxiliairePour sélectionner une source d’entrée, appuyez sur 1. Une liste des sources d’entrées dispo-nibles s’affiche instantanément :– USB : clé USB, lecteur MP3, télé-
phone... ;– iPod® : appareil avec iPod® intégré ;– BT : appareils Bluetooth® ;
– Vidéo : clé USB (fichier MP4) ;– AUX : prise Jack 3,5 mm.En mode navigation ou lors de l’écoute de la radio, sélectionnez votre source audio auxiliaire en appuyant sur la touche « Accueil » puis « MEDIA ».Le système reprend la dernière piste audio écoutée.
Manipulez le baladeur audio lorsque les conditions de circulation vous le permettent.Rangez le baladeur audio lorsque vous roulez (risque de projection en cas de freinage brutal).
Fréq Liste Options
1

F.26
SOURCES AUDIO AUXILIAIRES (2/3)Lecture aléatoireCette fonction vous permet de lire toutes les pistes de manière aléatoire. Appuyez sur 3 puis sur « On » ou « Off ».
Entrée auxiliaire : prise USB, Bluetooth®Connexion : USB et baladeur audio numérique portableConnectez la prise du baladeur audio à la prise de l’entrée USB du boîtier.Une fois la prise USB du baladeur numérique audio connectée, le menu « USB » s’affiche.Nota : certains types de baladeurs numériques peuvent ne pas être connectés.
Chargement avec le port USBUne fois la prise USB de votre baladeur connectée au port USB de l’appareil, vous pouvez bénéficier du chargement ou du maintien de charge de la batterie pendant son utilisation.Nota : certains appareils ne bénéficient pas du chargement ou du maintien de charge de la batterie lorsqu’ils sont connectés au port USB du système multimédia.
Connexion : iPod®Branchez la fiche de votre iPod® à l’entrée USB de l’appareil. Une fois la prise USB de votre iPod® connectée, le menu « iPod » s’affiche.
UtilisationSélectionnez « iPod » dans la liste dé-roulante 1, puis appuyez sur la liste de lecture ou la piste audio souhaitée à l’écran du système multimédia.Toutes les pistes audio de votre « iPod » peuvent être sélectionnées di-rectement sur l’écran du système mul-timédia.Nota : une fois connecté, vous n’avez plus la possibilité de commander directement votre « iPod ». Vous devez utiliser les touches de la façade de votre système.Nota : utilisez le câble iPod® pour une utilisation exclusive de l’iPod® lors du branchement de l’iPod® sur la prise USB.
Formats audioSeuls les formats MP3 et WMA sont re-connus par le système multimédia.
Lecture accéléréeMaintenez l’appui sur 2 pour l’avance ou le retour rapide. La lecture reprend lorsque la touche est relâchée.
RépéterCette fonction vous permet de répéter une ou toutes les pistes. Appuyez sur 3 puis sur « Off », « Piste », « Dossier » ou « Tout ».
1
3
A l’écoute Liste Options
2

F.27
Connexion : Bluetooth®Reportez-vous au chapitre « Connecter/déconnecter des appareils Bluetooth® ».Une fois le Bluetooth® connecté, le menu « BT » s’affiche.
UtilisationSélectionnez « BT » dans la liste dé-roulante 1, puis appuyez sur la liste de lecture ou la piste audio souhaitée à l’écran du système multimédia.Toutes les pistes audio de votre appa-reil Bluetooth® peuvent être sélection-nées directement sur l’écran du sys-tème multimédia.Nota : une fois connecté, vous n’avez plus la possibilité de commander di-rectement votre baladeur audio numé-rique. Vous devez utiliser les touches de la façade de votre système.
SOURCES AUDIO AUXILIAIRES (3/3)Entrée auxiliaire : prise JackConnexionConnectez la prise Jack du baladeur audio à la prise de l’entrée Jack.
UtilisationSélectionnez « AUX » dans la liste déroulante 1, puis sélectionnez la piste souhaitée sur votre baladeur. Aucune indication sur le nom de l’ar-tiste ou de piste ne s’affiche à l’écran du système.Pour sélectionner une piste, vous devez manipuler directement votre baladeur audio, véhicule à l’arrêt.Sélectionner une piste
Pour sélectionner une piste audio dans un dossier, appuyez sur « Liste » puis sélectionnez une piste A dans cette liste.Pour revenir au niveau précédent dans l’arborescence d’un dossier, appuyez sur 4.Par défaut, les albums sont classés par ordre alphabétique.Selon le type de baladeur numérique, vous pouvez affiner votre sélection par dossiers et fichiers.Nota : utilisez de préférence une connexion USB afin de faciliter la recherche de vos musiques.
1
Fréq Liste Options
La qualité du son provenant de l’entrée analogique (AUX) est normalement inférieure à la qualité du son des entrées numériques (USB, Bluetooth®).
A
4

F.28
RÉGLER LE SON (1/2)
Affichez le menu des réglages en appuyant sur « Accueil » > « Réglage ». Appuyez sur 2 pour accéder aux paramètres du son.Vous pouvez quitter le menu des r églages et revenir à la page d’accueil en appuyant sur 3.
Adaptation du volume en fonction de la vitesse (« Vol/Vitesse »)Quand la vitesse de votre véhicule dépasse 40 km/h, le niveau de volume augmente par rapport au niveau de volume original.Réglez le rapport volume/vitesse en appuyant sur un des boutons de la zone 1.Vous pouvez désactiver cette fonction en appuyant sur « Off ».
1
3 2
Audio Écran SystèmeConnectivité
Loudness
Préf. Sonores
Off
Off
On
Réglages audio
Vol/Vitesse
BAL/FAD
« Loudness »Appuyez sur « On » ou « Off » pour activer/désactiver la fonction loudness qui permet d’accentuer les graves et les aigus.

F.29
RÉGLER LE SON (2/2)
4
8 7 6
BAL/FAD
OK
Grave +3
Médium +0
Aigus -2
Répartition du son gauche/droite et avant/arrièreAppuyez sur 6 ou 8 pour régler la balance du son gauche/droite.Appuyez sur 4 ou 7 pour régler la balance du son avant/arrière.Après avoir réglé la balance, appuyez sur « OK » pour valider.
Graves, intermédiaires, aigusAppuyez sur les flèches 5 pour régler les graves, les moyens et les aigus.Une fois le réglage effectué, appuyez sur « OK » pour valider.
Préférences sonoresAffichez le menu des préférences sonores par un appui sur 9.Vous pouvez régler le volume de chaque son indépendamment :– « Audio » ;– « TA » ;– « Navigation » ;– « Tel » ;– « Sonnerie » (du téléphone).Pour cela, appuyez sur « + » ou « - ».Appuyez sur 11 pour réinitialiser toutes les préférences sonores.
Appuyez sur 10 pour passer à la page suivante.Appuyez sur 12 pour revenir à l’écran précédent.
Audio Écran SystèmeConnectivité
Loudness
Préf. Sonores
Off
Off
On
Réglages audio
Vol/Vitesse
BAL/FAD
9 12 1011
Audio
TA
Nav
Réinitialiser
5 5

F.30
VIDÉO (1/2)
Pendant la lecture d’une vidéo, vous pouvez :– appuyer sur 8 pour relancer la vidéo
depuis le début, appuyez de nou-veau sur 8 pour accéder à la vidéo précédente ;
– mettre sur pause en appuyant sur 7 ;– accéder à la vidéo suivante en ap-
puyant sur 6 ;– agir sur la barre de défilement 5
pour effectuer une avance ou un recul rapide ;
Mode « Liste »Appuyez sur l’onglet « Liste » 2 pour visualiser les vidéos disponibles. Sélectionnez la vidéo désirée en ap-puyant sur la zone 3. La vidéo sélec-tionnée se lance automatiquement.
Mode « A l’écoute »Appuyez sur l’onglet « A l’écoute » 4 pour visualiser la vidéo que vous avez sélectionnée.
Votre système vous permet de vision-ner des vidéos via une clé USB.Insérez la clé USB dans le lecteur de votre système multimédia.Depuis le menu « Media », sélection-nez le mode « Vidéo » 1.Nota : certains formats de vidéo peu-vent ne pas être lus par le système.Nota : la clé USB utilisée doit être formatée au format FAT32 et doit avoir une capacité minimale de 8GB et une capacité maximale de 32GB.Nota : les sources d’entrée décrites ci-dessus peuvent varier.
1
ListeA l’écoute Options ListeA l’écoute Options
Vidéo
24 3
ListeA l’écoute Options
8 7 6
5

F.31
VIDÉO (2/2)
Mode « Options »Appuyez sur l’onglet « Options » 12 pour :– accéder aux réglages de visualisa-
tion ;– obtenir des informations détaillées
sur la vidéo (titre, genre, date...).
– mettre la vidéo en plein écran en ap-puyant sur 9 ;
– régler la luminosité de l’écran en ap-puyant sur 10. Une barre de contrôle apparaît pour vous permettre d’ef-fectuer le réglage. Touchez l’écran en dehors de cette barre pour la faire disparaître et revenir à la lecture de la vidéo ;
– revenir au menu précédant en ap-puyant sur 11.
Liste ListeA l’écoute A l’écoute
Mode de visualisation
Information
Vue normale Plein écran
Options Options
1011 129
La lecture des vidéos est unique-ment possible véhicule à l’arrêt.

F.32
LE SYSTÈME DE NAVIGATIONLe système de navigationLe système de navigation détermine votre position et vous guide grâce aux informations :– du récepteur GPS ;– de la carte numérisée.
Le récepteur GPSLe système de navigation utilise les satellites GPS (Global Positioning System) en orbite autour de la Terre.Le récepteur GPS reçoit des signaux émis par plusieurs satellites. Le sys-tème peut alors localiser le véhicule.Nota : après un déplacement sans rou-lage sur longue distance (ferry, ferrou-tage), le système peut mettre plusieurs minutes pour retrouver un fonctionne-ment normal.
La carte numériséeLa carte numérisée contient des cartes routières et les plans des villes néces-saires au système.
Clé USB « Carte »Pour installer la version la plus récente, insérez votre clé USB dans un ordi-nateur connecté à internet. Reportez-vous au chapitre « Mise à jour carte ».Nota : la clé USB n’est pas fournie avec le système.Utilisez de préférence l’édition la plus récente.
Insérer la clé USBInsérez la clé USB dans la prise USB C de votre système multimédia ou de votre véhicule.
C
C
C

F.33
LIRE UNE CARTE (1/3)
Affichage de la cartePour afficher la carte autour de la position du véhicule, appuyez sur « Accueil » > « Nav ».Touchez l’écran carte.Pour vous déplacer dans la carte de navigation, faites-la glisser dans la direction souhaitée sur l’écran. Appuyez sur 1 pour revenir sur votre position actuelle.Appuyez sur 3 pour réaliser un zoom avant ou arrière.
Légende de la carte4 Options d’affichage de navigation.5 Accès aux différents modes
d’affichage :– mode 3D ;– mode 2D ;– mode 2D Nord (le haut de la carte
représente toujours le Nord).6 Nom de la prochaine route principale
ou information sur le prochain pan-neau de signalisation.
7 Itinéraire calculé par le système de navigation.
8 Distance et indication du prochain changement de direction.
9 Heure d’arrivée estimée.10 Média actuellement à l’écoute.11 Distance restant à parcourir jusqu’à
la destination.12 Position du véhicule sur la carte de
navigation.13 Activer/désactiver le guidage vocal.14 Info trafic. Appuyez sur cette zone
pour connaître les différents inci-dents présents sur votre parcours.
Position GPSCette fonction permet de connaître la localisation géographique de l’endroit sélectionné (adresse/longitude/lati-tude). Touchez l’endroit souhaité sur l’écran. Appuyez sur « Options » puis sur « Info » pour trouver l’emplacement exact de l’endroit sélectionné.
Symboles cartographiquesLe système de navigation utilise des symboles 2 pour l’affichage des points d’intérêt (POI). Reportez-vous au para-graphe « Afficher les points d’intérêts » du chapitre « Réglages carte ».
6 8
9111214
42 7
10
3
3
1 5
Options OK Destination
13

F.34
« Où suis-je ? »Cette fonction vous permet de vérifier les informations sur la position actuelle et de chercher un POI à proximité. Elle fonctionne quand le GPS est activé.Appuyez sur « Options » sur l’écran carte puis sur « Où suis-je? ».Cet écran comprend les informations suivantes :– latitude ;– longitude ;– altitude ; – numéro de rue ;– adresse actuelle.
LIRE UNE CARTE (2/3)
Informations paysAppuyez sur 15 puis sur « Infos par pays ».Cette fonction vous permet de visua-liser les informations pays selon votre position actuelle.Cet écran comporte les informations suivantes :– limitation de vitesse.Les limitations de vitesse des voies ra-pides sont affichées. L’unité affichée dépend des paramètres régionaux actifs. Si aucune donnée n’est dispo-nible, « -- » s’affiche à la place du ta-bleau et du chiffre.
15
– Code téléphonique du pays ;– numéro d’urgence ;– restrictions légales en vigueur dans
le pays :– taux d’alcool maximum autorisé dans le sang ;– gilet de sécurité obligatoire ;– extincteur obligatoire ;– obligation d’allumer les phares de tout temps ;– ampoules de rechange obliga-toires ;– trousse de secours obligatoire ;– triangle de présignalisation obli-gatoire ;– casque obligatoire pour les moto-cyclistes ;– chaînes à neige requises en hiver ;– chaînes à neige recommandées en hiver ;– pneus « neige » requis en hiver ;– pneus « neige » recommandés en hiver.
Options Aide proche
Où suis-je?
Latitude
Longitude
Altitude
Infos sur le pays : France
Taux maximal d’alcool dans le sang : 0.5 ‰
En ville Hors agglo. Voie rapide Autoroute
Indicatif téléphonique : +33Numéro d’urgence : 112
Position GPS actuelle
0 m
E2.49608°
N48.82995°

F.35
« Aide proche »Cette fonction vous permet de rechercher de l’aide à proximité de votre position actuelle.Appuyez sur 16 pour ouvrir un nouvel écran de recherche rapide.
LIRE UNE CARTE (3/3)
Informations sur cet écran :– services de réparation automobile ;– services médicaux et d’urgence ;– commissariats de police ;– stations-service.Pour rechercher une destination à partir de cet écran, reportez-vous au chapitre « Entrer une destination » et aux informations du point « Sélectionner des points d’intérêt (POI) ».
Aide proche
GaragePrès d’ici
Près d’ici
Près d’ici
Près d’iciPolice
Santé
Station-service
16
Options Aide proche
Où suis-je?
Latitude
Longitude
Altitude
Position GPS actuelle
0 m
E2.49608°
N48.82995°

F.36
ENTRER UNE DESTINATION (1/6)Menu de destinationAppuyez sur « Accueil » > « NAV » > « Destination » pour accéder au menu de destination.Le menu de destination propose différentes méthodes pour indiquer une destination :– saisir une adresse (complète ou
partielle) ;– sélectionner une adresse à partir de
« Lieux d’intérêt » ;– sélectionner une destination parmi
les destinations précédentes ;– sélectionner une adresse à partir des
destinations favorites ;– sélectionner une destination sur la
carte ;– sélectionner une latitude et une
longitude.
Saisir une adressePour saisir une adresse, appuyez sur 1.Cette rubrique vous permet la saisie de tout ou une partie de l’adresse : pays, ville, rue et numéro de rue.Nota : seules les adresses connues par le système dans la carte numérisée sont admises.
Lors de la première utilisation :– appuyez sur « Pays » ;– saisissez à l’aide du clavier le nom
du pays souhaité.Au cours de la saisie de l’adresse, le système supprime la surbrillance de certaines lettres pour faciliter la saisie.Le système peut suggérer plusieurs listes de pays si vous appuyez sur 2. Sélectionnez le pays souhaité dans les listes.– Procédez de la même manière pour
« Ville/Banlieue », « Rue », « Rue transversale » et « Numéro de rue ».
Nota : « Rue transversale » et « Numéro de rue » peuvent être activés après avoir sélectionné « Rue ».Nota : au moment de la saisie de la rue, il n’est pas nécessaire de mettre le type de voie (rue, avenue, boulevard…).Nota : le système conserve en mémoire les dernières adresses saisies. Une fois que vous avez entré une destination par adresse, à la prochaine utilisation, l’adresse précédente sera indiquée.
2
Options
Navigation
Adresse HistoriqueLieux d’intérêt
CoordonnéesChercher sur carte
Destination Itinéraire Options
Favoris
1

F.37
ENTRER UNE DESTINATION (2/6)
3 Recherche rapide de points d’intérêtLa fonction de recherche rapide vous permet de trouver rapidement un endroit.Appuyez sur un endroit de la carte pour rechercher des points d’intérêt. Suivant votre position, un ou plusieurs points 3 s’affichent à l’écran.Appuyez sur 4 puis sur « Lieux d’intérêt proches du curseur » pour afficher la liste des points d’intérêt avec les noms et la distance à partir de l’endroit sélectionné.
Rechercher des points d’intérêt à l’aide de catégories préprogramméesLa fonct ion de recherche préprogrammée vous permet de trouver rapidement les types de lieux les plus fréquemment sélectionnés.Appuyez sur « Accueil » > « NAV » > « Destination » > « Lieux d’intérêt » pour accéder aux catégories préprogrammées.
Sélectionner des points d’intérêt (POI)Vous pouvez sélectionner votre destination à partir des points d’intérêt.Vous pouvez trouver un endroit de différentes façons :– avec la fonction de recherche rapide,
vous pouvez rapidement trouver un endroit à proximité par son nom ;
– avec la fonction de recherche prédéfinie, vous pouvez trouver des types d’endroits fréquemment recherchés simplement grâce à quelques pressions sur l’écran ;
– vous pouvez chercher un endroit par sa catégorie.
Catégories (station-service/parking/restaurant)– Si un itinéraire actif existe, les
points d’intérêt « Station-service » et « Restaurant » sont recherchés le long de l’itinéraire. Le point d’intérêt « Parking » est recherché autour de la destination.
– Si aucun itinéraire n’est actif (pas de destination sélectionnée), ces points sont recherchés autour de la position actuelle.
– Si la position actuelle n’est pas non plus disponible (pas de signal GPS), ces points sont recherchés autour de la dernière position connue.
Options OK
Lieux d’intérêt
Recherche personnalisée
Station-service
Parking
Restaurant
Près d’ici
Près d’ici
Près d’ici
4

F.38
ENTRER UNE DESTINATION (3/6)
Rechercher des points d’intérêt par catégorieVous pouvez chercher des points d’intérêt par leur catégorie et sous-catégorie.Appuyez sur « Accueil » > « NAV » > « Destination » > « Lieux d’intérêt » > « Recherche personnalisée ». Sélectionnez la zone autour de laquelle l’endroit doit être recherché :– Appuyez sur « Dans une ville » pour
rechercher un endroit dans une ville/une banlieue sélectionnée (la liste des résultats sera classée selon la distance depuis le centre de la ville sélectionnée).
Où trouver des lieux d’intérêt ?
Dans une ville
Autour de ma position
À proximité de la destination
Sur l’itinéraire
– Appuyez sur « Sur l’itinéraire » pour rechercher le long de l’itinéraire actif et non autour d’un point donné. C’est utile quand vous voulez faire une étape avec seulement un détour minimal, par exemple si vous cherchez les prochaines stations-services ou les restaurants à proximité (la liste des résultats est classée selon la longueur du détour nécessaire).
– Appuyez sur « Autour de ma posi-tion » pour effectuer une recherche autour de la position actuelle, ou si celle-ci n’est pas disponible, autour de la dernière position connue (la liste des résultats est classée selon la distance depuis cette position).
– Appuyez sur « À proximité de la des-tination » pour chercher un endroit autour de la destination de l’itiné-raire actif (la liste des résultats est classée selon la distance depuis la destination).
Sélectionner une destination parmi les destinations précédentesAppuyez sur 5 pour trouver une destination que vous aviez précédemment définie.
5Navigation
Adresse HistoriqueLieux d’intérêt
CoordonnéesChercher sur carte
Destination Itinéraire
Favoris
Options

F.39
ENTRER UNE DESTINATION (4/6)Sélectionner une adresse dans les destinations favoritesVous pouvez trouver la destination dans les destinations favorites. Pour utiliser plus efficacement cette fonction, nous vous conseillons de mémoriser à l’avance vos destinations fréquentes.Dans un premier temps, mémorisez les destinations favorites en recherchant l’adresse. Reportez-vous au chapitre « Gérer les favoris ».Appuyez sur « Accueil » > « NAV » > « Destination » > « Favoris » pour afficher la liste des destinations favorites.
6 7
Sélectionner une destination sur la carteCette fonction vous permet de chercher une destination en faisant défiler la carte.– Appuyez sur « Accueil » > « NAV »
> « Destination » > « Chercher sur carte » pour sélectionner la destina-tion sur la carte ;
– ensuite, appuyez sur l’endroit de la carte que vous souhaitez définir comme destination. Le point 6 s’af-fiche ;
– appuyez sur 7 pour valider.
Saisir les coordonnées de la destinationCeci vous permet de rechercher une destination en entrant ses coordonnées.Appuyez sur « Accueil » > « NAV » > « Destination » > « Coordonnées ».Vous pouvez saisir les valeurs de latitude et de longitude dans un des formats suivants : degrés décimaux ; degrés et minutes décimaux ; ou degrés, minutes et secondes décimaux.Appuyez sur 8 puis sur UTM pour saisir les coordonnées au format UTM.
8
Options OK Options OK
Coordonnées
F.40
ENTRER UNE DESTINATION (5/6)
Valider la destinationPlusieurs choix sont possibles à l’écran avant de valider une destination :– « OK » ;– « Options ».Un décompte de 10 secondes démarre. Si pendant ce laps de temps vous ne faites aucune action, le guidage commencera automatiquement.
« OK »– S’il n’existe pas d’itinéraire actif
(aucune destination sélectionnée), appuyez sur 10 pour confirmer la destination comme nouvel itinéraire.
Trier la listeLes résultats d’une recherche de destination par point d’intérêt, histo-rique ou favoris peuvent être triés par nom et distance. Si un itinéraire actif existe, les résultats peuvent être triés par détour. Appuyez sur 9 pour les affi-cher sur la carte.
Trouver une destination par son nomSi vous sélectionnez une destination par point d’intérêt, historique ou favoris, vous pouvez effectuer une recherche de la destination dans la liste par son nom. Appuyez sur « Rechercher » et entrez le nom via le clavier.
10
Options Options OK
Itinéraire
Fermer
Lieux d’intérêt trouvés
Autres itinéraires
Simuler la navigation
Paramétrage de l’itinéraire
– S’il existe un itinéraire actif, vous pouvez sélectionner la destination comme nouvel itinéraire ou étape. Appuyez sur 10 puis sur « Nouvel itinéraire » ou « Étape ».
« Options »Avant la fin du décompte des 10 se-condes, les choix suivants apparais-sent à l’écran :
« Autres itinéraires »Appuyez sur 11 pour changer ou modifier l’itinéraire.
9
Options OK
11

F.41
ENTRER UNE DESTINATION (6/6)
« Trafic actuel »Cette fonction permet d’obtenir des informations sur les incidents de circulations signalés sur votre trajet ou à proximité de votre position. Pour y accéder appuyez sur 14 puis sélectionnez « Trafic actuel ».
17
19
16« Options »Après la fin du décompte des 10 se-condes, les choix suivants apparais-sent à l’écran :
« Ajouter aux favoris »Appuyez sur 17 pour enregistrer la destination sélectionnée dans les destinations favorites.
« Trafic actuel »Appuyez sur 16 pour obtenir des informations sur les incidents de circulations signalés sur votre trajet ou à proximité de votre position.
« Info »Appuyez sur 20 pour consulter l’adresse, la latitude, la longitude et le numéro de téléphone d’un point d’intérêt (actif uniquement après sélection d’un point d’intérêt).
« Retour au véhicule »Appuyez sur 19 pour revenir à la position actuelle du véhicule.Nota : Pour fermer la fenêtre « Options », appuyez sur 18.
Trafic actuel
Fermer
Ajouter aux Favoris
Retour au véhicule
Info
20« Itinéraire »Appuyez sur 12 pour visualiser en détail votre itinéraire. Reportez-vous au chapitre « Guidage ».
« Paramétrage de l’itinéraire »Appuyez sur 13 pour régler votre parcours suivant les routes et le mode d’itinéraire souhaités.
« Simuler la navigation »Appuyez sur 15 pour avoir une simulation de l’itinéraire que vous avez sélectionné. Reportez-vous au chapitre « Guidage ».
Itinéraire
Fermer
Autres itinéraires
Simuler la navigation
Paramétrage de l’itinéraire
Options OK
12 13
15 18
14

F.42
GUIDAGE (1/6)
Activer le guidageAppuyez sur 2 ou attendez dix secondes après avoir entré une desti-nation. Le guidage commence.Nota : à tout moment, vous pouvez interagir sur la carte en la faisant glisser dans la direction souhaitée ou en ap-puyant sur l’écran.
Écrans de guidageLe système propose plusieurs choix de carte de navigation.Appuyez sur 3 pour changer l’affichage de la carte et ouvrir le menu déroulant. Ensuite, sélectionnez parmi les diffé-rents affichages proposés :– 2D ;– 3D ;– 2D Nord.Vous pouvez aussi changer l’affichage de la carte en appuyant sur la boussole 1 sur la carte.
Mode plein écran (2D, 3D ou 2D Nord)Ce mode vous permet de visualiser la carte de navigation sur la totalité de l’écran.Les informations sur l’heure d’arrivée et la distance restante jusqu’à la destination sont indiquées en 5.L’indication du prochain changement de direction se situe en 4.
Destination
2
3
Destination
4
5
Options OK (10)
1

F.43
GUIDAGE (2/6)
Carte d’intersectionPendant un guidage, avant chaque changement de direction.
Itinéraire altérnatifLe système vous propose un itinéraire alternatif en cas d’accident ou de trafic dense sur votre parcours. Appuyez sur « Oui » ou « Non » selon votre choix.
Résumé du traficPendant le guidage, vous pouvez à tout moment avoir des informations sur le trafic en appuyant sur 6.
Vue jonctions d’autoroutePendant un guidage, avant chaque jonction d’autoroute, le système affiche une vue en trois dimensions de la jonc-tion.Nota : pour certaines jonctions, seule une flèche de guidage apparaît.Le système repasse en mode normal après le passage de la jonction.
Destination Radio
L’écran vous indique les différents événements apparents sur votre parcours. Le système vous indiquera le temps de retard que ces incidents ajoutent à votre parcours. Appuyez sur 8 pour modifier les paramètres d’affichage des évènements. Appuyez sur 10 pour utiliser un détour, sur 9 pour accéder aux options du trafic (reportez-vous au chapitre « Réglages de navigation ») ou sur 7 pour retourner à la navigation.Nota : les informations trafic dépendent de votre abonnement et de la réception du signal.
7 9 1086
Destination
Résumé du trafic
Aucun événement n’affecte votre itinéraireÉvénements importants
0
Retard total : 0 : 00
Événements de circulation:Routes barrées ou bloqués:Accident:Voies réservées:Autre:
0 DE 370 DE 160 DE 170 DE 260 DE 3
Liste d’événementsV-Trafic
Options Proposer Détour

F.44
Changer la langue du guidage vocalAppuyez sur « Accueil » > « NAV » > « Options » > « Réglage de la langue » pour changer la langue du guidage.Faites défiler la liste des langues en ap-puyant sur 12. Sélectionnez la langue souhaitée, puis appuyez sur 11 pour confirmer.Pour paramétrer le son du guidage vocale, reportez-vous au paragraphe « Préférences sonores » du chapitre « Régler le son ».
1211
Langue du guidage
OK
Ecouter la radio pendant le guidage vocalA l’écoute d’une station de radio au moment d’un guidage vocal et avant chaque changement de direction, le système coupe temporairement le son de la radio jusqu’au passage de l’inter-section.Vous pouvez accéder à l’écran d’écoute d’une station de radio pendant la navigation en appuyant sur 13. Pour retourner sur l’écran de navigation appuyez sur 14. Pour revenir au menu principal, restez appuyé pendant trois secondes environ sur 14.
GUIDAGE (3/6)
Fréq Liste MémDestination
1413
Détails sur l’itinéraireCette fonction vous permet de visuali-ser votre itinéraire.Appuyez sur « Accueil » > « NAV » > « Itinéraire » après avoir entré une destination.Six choix vous sont proposés :– « Modifier itinéraire » ;– « À éviter » ;– « Vue d’ensemble » ;– « Suppr Itinér. » ;– « Autres itinéraires » ;– « Itinéraire ».
Options

F.45
GUIDAGE (4/6)
« Simuler la navigation »Appuyez sur « Accueil » > « NAV » > « Itinéraire » > « Vue d’ensemble » > « Options » > « Simuler la navigation » pour simuler le parcours que vous allez effectuer jusqu’à la destination.– Appuyez sur 18 pour lancer ou
interrompre la simulation.– Appuyez sur 20 pour augmenter la
vitesse de la simulation.– Vous pouvez à tout instant quit-
ter la simulation du parcours en sélectionnant la touche 16.
– Pour passer à la manœuvre pré-cédente/suivante, appuyez sur 17 ou 19.
1716 18 19 2015
ItinéraireDestination
Avertissements Paramétrage de l’itinéraire
Paramètres de la carte
GPSFormat des coordonnées
Réglage de la langue
Navigation
Options
– les points et sections spéciaux de l’itinéraire (les péages, les routes payantes, les autoroutes...) ;
– les itinéraires alternatifs (par exemple : « Court », « Rapide », « Économique »).
Appuyez sur 15 pour afficher les options suivantes :– « Avertissements » ;– « Paramétrage de l’itinéraire » ;– « Paramètres de la carte » ;– « Réglage de la langue » ;– « Format des coordonnées » ;– « GPS » ;– « Mise à jour des cartes » ;– « Circulation ».Nota : pour plus d’informations, repor-tez-vous à la page suivante.
Aperçu de l’itinéraireAppuyez sur « Accueil » > « NAV » > « Itinéraire » > « Vue d’ensemble » pour obtenir une carte avec un aperçu de l’itinéraire actif.Les informations suivantes sont fournies :– le nom et/ou l’adresse de la
destination ;– la durée totale du trajet ;– la distance totale de l’itinéraire ;

F.46
Étapes et destinationAppuyez sur « Accueil » > « NAV » > « Itinéraire » > « Modifier itinéraire » pour modifier l’itinéraire en ajoutant, modifiant ou supprimant des étapes.Appuyez sur 21 pour ajouter des étapes puis sur 25 pour ajouter une nouvelle destination. Il existe différentes méthodes pour indiquer une destination : reportez-vous au chapitre « Entrer une destination ».– Appuyez sur 23 pour supprimer une
destination.– Appuyez sur 24 pour reclasser la
liste.– Appuyez sur 22 pour modifier
l’adresse de départ de l’itinéraire.
25 24
21
Options OK
23
Modifier itinéraire
Position GPS actuelle
22
GUIDAGE (5/6)
Itinéraires alternatifsCette rubrique vous permet de modifier la méthode de planification d’itinéraire.Trois modes sont disponibles vous per-mettant de modifier la méthode de pla-nification d’itinéraire :– « Rapide » ;– « Économique » ;– « Court ».Reportez-vous au paragraphe « Paramétrage de l’itinéraire » du chapitre « Réglages de navigation ».Appuyez sur « Accueil » > « NAV » > « Itinéraire » > « Autres itinéraires » puis sur A, B ou C pour confirmer le nouvel itinéraire. Appuyez sur 28 pour revenir à l’écran précédent.
DétoursAppuyez sur « Accueil » > « NAV » > « Itinéraire » > « À éviter » pour faire un détour. Appuyez sur une zone de la liste selon le détour souhaité.Pour changer de zone, appuyez sur 27.Confirmez le nouvel itinéraire en appuyant sur 26.
Annuler l’itinéraireVous pouvez à tout moment arrêter un guidage en cours.Appuyez sur « Accueil » > « NAV » > « Itinéraire » > « Suppr Itinér. » pour annuler l’itinéraire actif.
2726 28
OK
Autres itinéraires
Rapide
Économique
Court
Tronçon évitéItinéraire initialNouvel itinéraire
Longueur : -250 Temps : +0:06
A
B
C

F.47
Appuyez sur 29 pour trier les détails de l’itinéraire :– par résumé.
Affiche uniquement les éléments principaux du trajet (départ, destina-tion), la distance totale, le temps res-tant et l’heure d’arrivée.
– Par description standard.Affiche toutes les manœuvres et les détails des panneaux, les numéros des routes, les noms de rue et la dis-tance. Affiche également des infor-mations et des avertissements tels que les noms d’étapes entrés par le conducteur, les restrictions ( d’accès et de manœuvre), les préférences d’utilisateur ignorées...
– Par liste des routes.Détaille l’itinéraire en noms et numéros de routes. Affiche également leur longueur, la direction moyenne et le temps de trajet. Les éléments du trajet ne s’affichent pas dans ce mode.
Options
Itinéraire - Normal
« Itinéraire »Cette fonction vous permet de visualiser la feuille de route. Plusieurs détails du parcours apparaissent :– flèches de changement de direction ;– numéro de route ;– distance avant un embranchement.
« Paramètrage de l’itinéraire »Cette rubrique vous permet de choisir vos paramètres d’itinéraire. Reportez-vous au paragraphe « Paramétrage de l’itinéraire » du chapitre « Réglages de navigation ».
29
GUIDAGE (6/6)

F.48
RÉGLAGES CARTE
Depuis le menu de navigation, appuyez sur 2 puis sur 1 pour accéder au menu de réglage de carte.
Régler le mode d’affichageCette fonction vous permet de changer la vue de carte entre une vue en perspective 3D, une vue haut-bas 2D et une vue avec le nord toujours vers le haut.Appuyez sur « 3D », « 2D » ou « 2D Nord ».
Régler le point de vueCette fonction vous permet de régler le zoom de base et l’inclinaison. Appuyez sur le zoom souhaité entre les trois niveaux disponibles.
Vue autorouteCette fonction permet d’activer/désacti-ver la vue autoroute.Appuyez sur « On » pour activer la fonction ou sur « Off » pour la désac-tiver.
Afficher les points d’intérêtsVous pouvez choisir d’afficher certains points d’intérêt (visibles à l’échelle 100 m) sur la carte.Pour accéder directement à cette fonction, appuyez sur 3 pour afficher les points d’intérêt sur la carte :– hébergement ;– aéroport ;– automobile ;– affaires ;– café ou bar ;– ...Appuyez sur « On » ou « Off » pour afficher ou masquer les points d’intérêt.Saisissez le nom du point d’intérêt pour ouvrir la liste des sous-catégories.Nota : Dans les pays où la cartographie n’est pas disponible, vous pouvez désactiver la fonction navigation. Dans « Accueil » > « Réglage » > « Système », appuyez sur « Off » en face de « Navigation » pour désactiver la fonction navigation.
32
1
Off On
Paramètres de la carte
Point de vue
Vue autoroute
Marqueurs POI
Navigation
Avertissements Paramètres de la carte
Réglage de la langue
Format des coordonnées GPS
Destination Itinéraire Options
Mode d’affichage
Paramétrage de l’itinéraire

F.49
GÉRER LES FAVORIS (1/2)
Créer une entréeAppuyez sur « Accueil » > « Nav » « Destination » pour accéder au menu de destination. Vous disposez de plusieurs méthodes pour entrer une destination :– « Adresse » : reportez-vous au
paragraphe « Saisir une adresse » au chapitre « Entrer une destination ».
– « Lieux d’intérêt » : reportez-vous au paragraphe « Sélectionner des points d’intérêt (POI) » au chapitre « Entrer une destination ».
– « Historique » : reportez-vous au paragraphe « Sélectionner une destination parmi les destinations précédentes » au chapitre « Entrer une destination ».
– « Favoris » : accédez aux destinations que vous avez enregistré.
– « Chercher sur carte » : reportez-vous au paragraphe « Sélectionner une destination sur la carte » au chapitre « Entrer une destination ».
– « Coordonnées » : reportez-vous au paragraphe « Saisir les coordonnées de la destination » au chapitre « Entrer une destination ».
Dans tous les cas, une fois l’adresse validée, le système la localise sur la carte. Appuyez sur « Options » puis sur « Ajouter aux Favoris » pour ajouter la destination aux Favoris.Avant d’enregistrer une destination favorite, vous pouvez modifier son nom à l’aide du clavier numérique.
Trafic actuel
Fermer
Ajouter aux Favoris
Info
Navigation
Adresse Lieux d’intérêt Historique
Favoris Chercher sur carte Coordonnées
Destination Itinéraire Options
Retour au véhicule

F.50
GÉRER LES FAVORIS (2/2)
Trier la listeVous pouvez trier la liste des destinations favorites par nom, par distance ou encore toutes les afficher sur la carte. Appuyez sur « Options ».
Supprimer les destinations favoritesAppuyez sur la destination favorite que vous souhaitez supprimer. Appuyez sur « Options », « Supprimer un favori » et confirmez la suppression en appuyant sur « Supprimer ».
Pour effacer toutes les destinations fa-vorites, appuyez sur « Options » puis sur « Supprimer tout ». Confirmez cette suppression par un appui sur « Supprimer tout ».
Rechercher une destination favoriteCette fonction vous permet de rechercher une destination favorite dans la liste par son nom.Appuyez sur « Rechercher » et entrez le nom de la destination favorite à l’aide du clavier numérique.
Fermer
Options Rechercher
Supprimer tout
Tout afficher sur la carte
Tri par distance
Trier par nom

F.51
RÉGLAGES DE NAVIGATION (1/4)
L’onglet « Options » en bas du menu « Navigation » vous permet de changer l’affichage de la carte ou les paramètres de navigation.
« Avertissements »Cette rubrique vous permet de configurer des avertissements.
Alerte en cas d’excès de vitesseLes cartes peuvent contenir des informations sur les limites de vitesse des tronçons de route. Le système peut vous avertir si vous dépassez la limite actuelle.
Suivant région, ces informations peuvent être indisponibles ou ne pas être tout à fait correctes pour toutes les routes de la carte.Les types d’alerte suivants sont disponibles :– avertissement sonore : vous recevez
un avertissement non-verbal quand vous dépassez la limitation de vi-tesse autorisée ;
– avertissement visuel : la vitesse limite actuelle s’affiche et clignote en rouge sur la carte quand vous la dé-passez.
Appuyez sur « On » ou « Off » pour activer ou désactiver l’avertissement.
Vitesse limitée toujours visibleActivez ou désactivez l’affichage de la limitation de vitesse de la portion de route empruntée en appuyant sur « On » ou « Off ».
Avertissements de point d’alerteQuand le conducteur traverse une zone de vigilance accrue, un signal d’avertissement visuel apparaît à l’écran accompagné d’un signal sonore. Ces zones de danger correspondent à des portions de route sur lesquelles les conducteurs doivent être plus prudents. Elles peuvent être permanentes ou temporaires.Vous pouvez activer ou désactiver cette fonction.
Distance de pré-alerteVous pouvez choisir une distance entre plusieurs choix à laquelle vous souhaitez être alerté d’une zone de danger accrue.
Off
Off
Off
On
On
On
Alert. si excès vitesse
Afficher limite vitesse
Points d’alerte
AvertissementsNavigation
Avertissements Paramétrage de l’itinéraire
Paramètres de la carte
Réglage de la langue
Format des coordonnées GPS
Destination Itinéraire Options
Distance pré-alerte 0 m 200 m 500 m
Dans certains pays, télécharger et activer l’option des zones de danger est illicite et peut constituer une in-fraction à la règlementation.

F.52
RÉGLAGES DE NAVIGATION (2/4)
– « Éco » : ce mode offre un com-promis entre les modes rapide et court. Il vous permet de gagner une certaine distance en roulant un peu plus longtemps. L’itinéraire calculé sera probablement plus court que la solution rapide, mais pas beaucoup plus lent.
« Autoroutes »Vous pouvez vouloir éviter les autoroutes quand vous conduisez une voiture lente ou remorquez un autre véhicule.
« Paramétrage de l’itinéraire »Cette fonction vous permet de définir la manière dont les itinéraires sont calcu-lés.
« Calcul de l’itinéraire »Ce système vous propose trois critères de calcul d’itinéraire :– « Rapide » : indique un itinéraire
rapide si vous pouvez rouler à la vi-tesse limite ou presque sur toutes les routes ;
– « Court » : indique un itinéraire court pour minimiser la distance à parcourir ;
« Routes à abonnement »Vous pouvez autoriser ou non l’utilisation de routes dont l’usage re-quiert l’achat d’une autorisation spé-ciale pour une certaine période.
« Routes à péage »Vous pouvez autoriser ou non l’utilisation de routes à péage.
« Ferries »Vous pouvez autoriser ou non l’utilisation de tous types de ferries, bateaux et trains.
« Covoiturage »Cette fonction vous permet de visualiser les routes destinées uniquement au covoiturage.
« Chemins de terre »Vous pouvez autoriser ou non l’utilisation de chemins de terre.
Off
Off
On
On
Rapide Court ÉcoCalcul de l’itinéraire
Autoroutes
Routes à péage
Routes à abonnement
Paramétrage de l’itinéraireNavigation
Avertissements Paramétrage de l’itinéraire
Paramètres de la carte
Réglage de la langue
Format des coordonnées GPS
Destination Itinéraire Options
OnOff
Options
Pour des raisons de sécu-rité, effectuez ces opéra-tions véhicule à l’arrêt.

F.53
RÉGLAGES DE NAVIGATION (3/4)
« Format des coordonnées »Cette fonction vous permet de modifier le format des coordonnées.Ce système offre trois types de format.
« Paramètres de la carte »Reportez-vous au chapitre « Réglages carte ».
« Réglage de la langue »Cette fonction permet de modifier la langue du guidage vocal. Reportez-vous au chapitre « Guidage » de ce manuel.
GPSCette fonction vous permet de contrôler le statut des satellites GPS.Appuyez sur « GPS » pour afficher les informations GPS (écran A).
Format des coordonnées Informations GPS
Satellites disponibles : 6
Précision: HAUTE Temps UTC GPS : 17:11:45
A
Navigation
Avertissements Paramétrage de l’itinéraire
Paramètres de la carte
Réglage de la langue
Format des coordonnées GPS
Destination Itinéraire Options
DD.DDDDD
DD MM.MMM
DD MM SS.S
Précautions concernant la navigationL’utilisation du système de navigation ne remplace en
aucun cas la responsabilité ni la vigilance du conducteur lors de la conduite du véhicule.

F.54
RÉGLAGES DE NAVIGATION (4/4)
« Mise à jour des cartes »Cette fonction vous permet de contrôler les dates de vos dernières mises à jour effectuées.
« Circulation »Cette fonction vous permet d’activer ou de désactiver l’« info trafic », la signalisa-tion des différents types d’événements et de gérer des alternatives d’itinéraires en cas d’accidents ou de bouchons.
« Info trafic »Vous pouvez activer ou désactiver l’affichage des alertes des différents incidents qui se trouvent sur votre itinéraire.
« Détour »Cette fonction permet de vous faire gagner du temps lorsqu’un incident survient sur votre parcours en vous proposant un itinéraire alternatif.Le système multimédia vous propose de choisir un temps au-dessus duquel il vous est proposé un nouvel itinéraire avec détour pour gagner du temps.
Paramètres de trafic
Info trafic
Détour
Types d’évènements
Off On
« Types d’événements »Cette fonction vous permet de choisir des types d’événements à afficher pen-dant la navigation :– « Tous les événements » ;– « Événements de circulation » ;– « Routes barrées ou bloquées » ;– « Accident » ;– ...
Navigation
Mise à jour des cartes Circulation
Destination Itinéraire Options
Paramètres de détour
5 minutes
Suggérer un détour si itin. calculé fait gagner au moins :
Conf. itinéraire proposé ? Off On
Pour des raisons de sécu-rité, effectuez ces opéra-tions véhicule à l’arrêt.

F.55
DRIVING ECO²
« Eco-score »Ce menu vous permet d’obtenir une note globale sur 100. Plus la note est élevée, meilleure est votre performance d’éco-conducteur.– Performance moyenne d’accéléra-
tion (zone A) ;– performance moyenne de change-
ment de vitesses (zone B) ;– performance moyenne d’anticipation
au freinage (zone C).
« Bilan trajet »Ce menu permet de visualiser les données enregistrées lors de votre dernier parcours :– « Conso moy. » ;– « Vitesse moyenne » ;– « Distance sans conso. ».Nota : vous pouvez réinitialiser les don-nées en appuyant sur 1.
Accéder au menu Driving eco²Depuis le menu principal, appuyez sur « Véhicule » puis sur « Driving eco² ».Le menu « Driving eco² » permet d’accéder aux informations suivantes :– « Bilan trajet » ;– « Eco-score » ;– « Eco-conseils ».
« Eco-conseils »Ce menu évalue votre style de conduite et vous donne les conseils les plus adaptés pour optimiser votre consom-mation de carburant.
Accélération
Driving eco2
Eco-conseils
A
CB Levier
Anticipation
Eco-scoreBilan trajet
Driving eco2
Conso moy.
Vitesse moyenne
Distance sans conso
Eco-conseilsEco-scoreBilan trajet Eco-conseilsEco-scoreBilan trajet
Généralités
Ne laissez jamais tourner le moteur au ralenti : roulez aussitôt le moteur démarré.
1Driving eco2

F.56
4X4 INFOS
Accéder au menu « 4x4 infos »Depuis le menu principal, appuyez sur « Véhicule » puis sur « 4x4 infos ».La fonction « 4x4 infos » permet :– d’obtenir l’inclinaison latérale (roulis)
en degrés de votre véhicule en temps réel (zone A) ;
– d’obtenir l’affichage du cap de votre véhicule via une boussole (zone B) ;
4x4 infos
A B C
– d’obtenir l’inclinaison horizontale (tangage) en degrés de votre véhi-cule en temps réel (zone C).
Nota : les valeurs d’inclinaison affi-chées à l’écran peuvent différer d’un à trois degrés avec la réalité.Nota : l’affichage est rafraîchi toutes les secondes environ.

F.57
Appairer un nouveau téléphone Bluetooth®Pour utiliser votre système mains libres, vous devez appairer votre mobile Bluetooth® au véhicule lors de la pre-mière utilisation.L’appairage permet au système de reconnaître et de mémoriser un té-léphone Bluetooth®. Vous pouvez appairer jusqu’à cinq téléphones, mais un seul peut être connecté à la fois au système mains libres.L’appairage s’effectue soit directement via le système multimédia, soit via votre téléphone.Assurez-vous que le système et votre téléphone sont allumés et que le Bluetooth® de votre téléphone est activé, visible et identifiable des autres appareils (reportez-vous à la notice de votre téléphone pour des informations complémentaires).
APPAIRER, DÉSAPPAIRER DES APPAREILS BLUETOOTH® (1/4)
Audio Écran Connectivité Système
Connectivité Réglage
Afficher les périphériques Bluetooth
Rechercher des périphériques Bluetooth
Autorisation de périphérique externe
Modifier le mot de passe
Suivant la marque et le modèle de votre téléphone, les fonctions mains libres peuvent être partiellement ou totalement incompatibles avec le système de votre véhicule.
Appairer un téléphone Bluetooth® depuis le système multimédia– Activez la connexion Bluetooth® de
votre téléphone ;– appuyez sur « Réglage » >
« Connectivité » > « Rechercher des périphériques Bluetooth » ;
– assurez-vous que votre télé-phone soit actif et visible sur le lien Bluetooth® ;
– sélectionnez votre téléphone dans la liste des périphériques trouvés par le système ;
– un message s’affiche à l’écran de votre téléphone.
Pour plus de précisions sur la liste des téléphones compatibles, consul-tez le site https://easyconnect.renault.com.
Pour des raisons de sécu-rité, effectuez ces opéra-tions véhicule à l’arrêt.

F.58
Suivant le téléphone, le système peut vous demander de confirmer le trans-fert du répertoire téléphonique et de l’historique des appels vers le système multimédia lors de l’appairage.Acceptez le partage pour retrouver ces informations sur votre système multi-média. Vous pouvez aussi autoriser le partage automatique du répertoire télé-phonique et de l’historique des appels pour que le système les transfère auto-matiquement lors de vos prochains ap-pairages.Nota : la mémoire de votre système multimédia étant limitée, il est possible que tous vos contacts ne soient pas im-portés.
APPAIRER, DÉSAPPAIRER DES APPAREILS BLUETOOTH® (2/4)Suivant le téléphone, appuyez sur « Jumeler », « Appairer » ou « Se connecter » pour autoriser l’appairage.– Suivant le téléphone, composez sur
votre clavier téléphonique le code af-fiché à l’écran du système multimé-dia ;
– un second message apparaît à l’écran de votre téléphone vous pro-posant l’appairage automatique au système multimédia lors de vos pro-chaines utilisations. Acceptez cette autorisation pour ne plus recommen-cer ces étapes.
Votre téléphone est désormais appairé à votre système multimédia.Nota : le temps d’appairage varie en fonction de la marque et du modèle de votre téléphone.Si l’appairage échoue, renouvelez l’opération. Si votre téléphone n’est pas visible par le système lorsqu’il re-cherche des périphériques Bluetooth®, consultez la notice d’utilisation de votre téléphone.

F.59
Un message apparaît à l’écran de votre téléphone pour vous indiquer que ce-lui-ci est désormais appairé au système multimédia Media Nav Evolution.Nota : le temps d’appairage varie en fonction de la marque et du modèle de votre téléphone.Si l’appairage échoue, renouvelez l’opération.
APPAIRER, DÉSAPPAIRER DES APPAREILS BLUETOOTH® (3/4)Appairer un téléphone Bluetooth® au système multimédia depuis le téléphone– Activez la connexion Bluetooth® de
votre téléphone et du système ;– sur le Media Nav Evolution,
depuis le menu principal, appuyez sur « Réglage » > « Connectivité » > « Autorisation de périphérique ex-terne ». Vous rendrez ainsi le sys-tème visible aux autres téléphones Bluetooth® ;
– un message apparaît à l’écran affi-chant un mot de passe et le temps restant pendant lequel le système reste visible ;
– depuis votre téléphone, affichez la liste des appareils Bluetooth® dispo-nibles ;
– sélectionnez le système multimé-dia « Media Nav Evolution » parmi les appareils disponibles pendant le temps imparti et, suivant le télé-phone, composez le mot de passe affiché à l’écran du système sur votre clavier téléphonique.
Lors de l’allumage du système « Media Nav Evolution », le dernier appareil appairé sera automatique-ment connecté au système.
Votre système mains libres a seulement pour objet de faciliter la communication en diminuant les facteurs de
risque sans les éliminer totalement. Respectez obligatoirement les lois en vigueur du pays dans lequel vous vous trouvez.

F.60
Désappairer un téléphone Bluetooth® du système Media Nav EvolutionLe désappairage permet de supprimer un téléphone de la mémoire du sys-tème mains libres.Depuis le menu principal, appuyez sur « Réglage » > « Connectivité » puis sur « Afficher les périphériques Bluetooth ». Appuyez sur l’icône « corbeille » 1 en face du nom du téléphone que vous souhaitez supprimer de la liste. Validez votre choix en appuyant « OK ».
Désappairer tous les téléphones Bluetooth® du système Media Nav EvolutionVous pouvez également supprimer tous les téléphones préalablement appairés de la mémoire du système mains libres. Depuis le menu principal, appuyez sur « Réglage » > « Connectivité » > « Afficher les périphériques Bluetooth » puis sur « Options » et sur « Supprimer tout ». Confirmez la suppression de tous les téléphones appairés en ap-puyant sur « OK ».
Audio Écran Connectivité Système
Afficher les périphériques Bluetooth
Rechercher des périphériques Bluetooth
Autorisation de périphérique externe
Modifier le mot de passe
Périphériques Bluetooth
Info 2_3Gr
Seungyeon_VU2
Seungyeon_3
1
« Modifier le mot de passe »Vous pouvez personnaliser le mot de passe à quatre chiffres du système autorisant l’appairage des téléphones Bluetooth®.Depuis le menu principal, appuyez sur « Réglage » > « Bluetooth » > « Modifier le mot de passe ».
Options
« Smartphone »Cette fonction disponible en deuxième page du menu « Connectivité » vous permet d’accéder à une aide à l’ac-tivation et au fonctionnement de la commande vocale (reportez-vous au chapitre « Utilisation de la commande vocale »).
APPAIRER, DÉSAPPAIRER DES APPAREILS BLUETOOTH® (4/4)
Connectivité Réglage

F.61
CONNECTER, DÉCONNECTER DES APPAREILS BLUETOOTH® (1/2)Nota : si une communication est en cours au moment de la connexion, elle est transférée automatiquement sur les haut-parleurs du véhicule.Nota : De préférence, acceptez et au-torisez l’intégralité des messages appa-raissant sur votre téléphone lors de son appairage avec le système pour que la reconnaissance automatique des ap-pareils se fassent sans encombre.
Connexion manuelleDepuis le menu principal, effectuez les manipulations suivantes :– appuyez sur « Tél » ;– appuyez sur « Afficher les périphé-
riques Bluetooth » ;– sélectionnez le nom du téléphone
que vous souhaitez connecter.Votre téléphone est connecté au sys-tème multimédia.
Échec de connexionEn cas d’échec de la connexion, veuillez vérifier que :– votre appareil est allumé ;– l’appareil est configuré pour accep-
ter la demande de connexion auto-matique du système ;
– la batterie de votre appareil n’est pas déchargée ;
– votre appareil a préalablement été appairé au système mains libres ;
– la fonction Bluetooth® de votre ap-pareil et du système est activée.
Nota : L’utilisation prolongée de votre système mains libres décharge plus ra-pidement la batterie de votre appareil.
Connecter un téléphone Bluetooth® appairéAucun téléphone ne peut être connecté au système de téléphonie mains libres s’il n’a pas été appairé au pré-alable. Reportez-vous au chapitre « Appairer/désappairer des appareils Bluetooth® ».Votre téléphone doit être connecté au système de téléphonie mains libres pour accéder à toutes ses fonctions.
Connexion automatiqueDès la mise en marche du système, le système de téléphonie mains libres re-cherche les téléphones préalablement appairés présents à proximité (cette re-cherche peut prendre une minute). Il se connectera automatiquement au der-nier téléphone connecté si :– la connexion Bluetooth® du télé-
phone est activée ;– vous avez au préalable autorisé, lors
de l’appairage, la connexion automa-tique de votre téléphone au système.

F.62
CONNECTER, DÉCONNECTER DES APPAREILS BLUETOOTH® (2/2)
Déconnecter un téléphone connectéPour déconnecter un téléphone du Media Nav Evolution, appuyez sur le nom de votre appareil. La petite en-coche 1 disparaît.Si vous êtes en communication au moment de la déconnexion de votre téléphone, la communication est automatiquement transférée sur votre téléphone.
Info 2_3Gr
Seungyeon_VU2
Seungyeon_3
Changer de téléphone connectéVous pouvez à tout moment connecter ou déconnecter un appareil Bluetooth®.Depuis le menu principal appuyez sur « Téléphone », puis sur « Réglages » et sur « Liste des appareils ».Appuyez sur l’appareil à connecter et confirmez en appuyant sur « OK ».Une petite encoche 1 apparaît en face du nom de votre téléphone pour vous indiquer que la connexion a bien été établie.
Options
Périphériques Bluetooth
1

F.63
UTILISER LA RECONNAISSANCE VOCALE (1/3)PrésentationVotre système multimédia vous permet d’utiliser certaines fonctions et appli-cations du système multimédia et de votre téléphone avec la voix. Cela vous permet d’utiliser votre téléphone tout en gardant les mains sur le volant.Nota : la position du bouton de reconnaissance vocale varie (com-mande au volant, commande sous volant ou sur la façade de votre sys-tème multimédia).Nota : lors de l’utilisation de la recon-naissance vocale, la langue définie sur votre téléphone sera la langue utilisée par votre système.Nota : un message s’affiche à l’écran du système multimédia si votre smart-phone ne dispose pas de la reconnais-sance vocale.
Activation de la reconnaissance vocale du téléphone avec le système multimédiaPour activer le système de reconnaissance vocale de votre télé-phone vous devez :– capter la 3G, 4G ou le Wifi avec votre
smartphone ;– activer le Bluetooth® de votre
smartphone et le rendre visible aux autres appareils (reportez-vous à la notice d’utilisation de votre télé-phone) ;
– appairer et connecter votre smartphone au système multi-média (reportez-vous au chapitre « Appairer, désappairer les appareils Bluetooth® »).
Faites un appui long sur le bouton de reconnaissance vocale de votre vé-hicule pour l’activer.
Nota : le repère 1 du menu « Réglages » > « Connectivité » puis « Afficher les périphériques Bluetooth », vous indique que la reconnaissance vocale de votre smartphone est com-patible avec votre système multimédia.
1
Options
Périphériques Bluetooth
Info 2_3Gr

F.64
UTILISER LA RECONNAISSANCE VOCALE (2/3)
Un signal sonore ainsi que l’affichage de l’écran A vous indiquent que la reconnaissance vocale est active.Parlez à voix haute et intelligible.Nota : le système de reconnaissance vocale de votre smartphone vous permet seulement d’utiliser certaines fonctions de votre téléphone. Il ne vous permet pas d’interagir avec les autres fonctionnalités de votre système mul-timédia tels que la radio, le Driving eco2...
Smartphone
Annuler
A
Annuler
2
Smartphone
3
B
UtilisationUne fois activée, pour relancer le sys-tème de reconnaissance vocale, faites un appui court sur la commande au volant, sur la commande sous volant, sur le bouton de la façade de votre sys-tème multimédia, ou un appui sur la touche 2 sur l’écran de votre système multimédia.A tout moment, vous pouvez revenir au menu principal en appuyant sur 3.
SmartphoneMédiaRadio
Driving eco 2 Nav Réglages
Déf. Heure
Sombre
4
Pour revenir à l’écran B depuis le menu principal de votre système multimédia appuyez sur 4.Nota : lors de l’utilisation de la reconnaissance vocale, les fonctions « Média » et « Radio » sont indispo-nibles et inaccessibles depuis le menu principal de votre système multimédia.

F.65
UTILISER LA RECONNAISSANCE VOCALE (3/3)
DésactivationFaites un appui sur la touche 2 sur l’écran B ou faites un appui long sur le bouton de reconnaissance vocale de votre véhicule. Un signal sonore vous indique que la reconnaissance vocale est désactivée.
La reconnaissance vocale n’est pas prise en charge sur ce périphérique Bluetooth
Sombre
OK
Smartphone
5
Smartphone
Connectivité Réglage
Audio Écran Connectivité Système
6
AideVous pouvez obtenir une aide supplémentaire sur le fonctionnement et les conditions d’utilisation du système de reconnaissance vocale. Pour cela appuyez sur « Accueil » > « Réglages » > « Connectivité ». Sélectionnez la deu-xième page en appuyant sur 6 puis ap-puyez sur 5.Cette fonction est présentée sous forme d’écrans vous expliquant l’utilisa-tion de la reconnaissance vocale ainsi que :– les conditions d’utilisation ;– les téléphones compatibles ;
Smartphone
Ouverture/Fermeture: Réalisez un appui court ou long.
Attendez le signal sonore pour parler.
Pour parler à nouveau, réalisez un appui court.
Pour fermer, réalisez un appui long.
– l’activation et la désactivation de la fonction à l’aide du bouton de recon-naissance vocale de votre véhi-cule ;
– la méthode pour interagir avec l’écran ;
– les fonctions disponibles ;– l’étendue des fonctions.

F.66
ANDROID AUTO™, CARPLAY™ (1/4)Android Auto™Présentation« Android Auto™ » est une application téléchargeable (depuis la plateforme de téléchargement d’applications de votre smartphone) vous permettant d’utiliser certaines applications de votre téléphone depuis l’écran de votre sys-tème multimédia.Nota : pour savoir si votre smart-phone est compatible avec l’application « Android Auto™ », consultez le site of-ficiel du système d’exploitation de votre téléphone.Nota : l’application « Android Auto™ » fonctionne uniquement si votre smart-phone est branché sur le port USB de votre véhicule et le service SIRI activé. L’application « Android Auto™ » doit être apparente depuis le bouton 1 du menu principal.
Première utilisationBranchez votre téléphone au port USB de votre système multimédia :– acceptez les requêtes sur votre
smartphone afin de pouvoir utiliser l’application « Android Auto™ » ;
– validez en appuyant sur « Accepter » sur votre téléphone.
L’application « Android Auto™ » se lance sur le système multimédia.Si la manipulation décrite ci-dessus échoue, renouvelez l’opération.
Depuis le menu « Réglages » > « connectivité », vous pouvez à tout moment gérer les appareils connectés à votre système multimédia.Nota : la première connexion à « Android Auto™ » s’effectue véhicule à l’arrêt uniquement afin d’activer la re-connaissance vocale du système mul-timédia.
1
Android Auto
TélMédiaRadio
Driving eco 2 Nav Réglages
Connectivité Réglage
Voir la liste des appareils Smartphone
Audio Écran Connectivité Système
Afficher les périphériques Bluetooth
Rechercher les périphériques Bluetooth
Tutoriel sur l’intégration du smartphone
L’utilisation d’un câble USB réfé-rencé par le fabricant du téléphone est recommandée pour le bon fonc-tionnement de l’application.

F.67
ANDROID AUTO™, CARPLAY™ (2/4)CarPlay™Présentation« CarPlay™ » est un service natif dis-ponible sur votre smartphone vous per-mettant d’utiliser certaines applications de votre téléphone depuis l’écran de votre système multimédia.Nota : si votre smartphone ne dispose pas du service « CarPlay™ », consul-tez le site officiel du système d’exploita-tion de votre téléphone.Nota : le service « CarPlay™ » fonc-tionne uniquement si votre smartphone est branché sur le port USB de votre véhicule et le service SIRI activé. Le service « CarPlay™ » doit être appa-rente depuis le bouton 2 du menu prin-cipal.
2
CarPlay
TélMédiaRadio
Driving eco 2 Nav Réglages
Connectivité Réglage
Voir la liste des appareils Smartphone
Audio Écran Connectivité Système
Afficher les périphériques Bluetooth
Rechercher les périphériques Bluetooth
Tutoriel sur l’intégration du smartphone
Depuis le menu « Réglages » > « connectivité », vous avez accès à un tutoriel explicatif sur l’intégration de votre Smartphone sur le système mul-timédia.
L’utilisation d’un câble USB réfé-rencé par le fabricant du téléphone est recommandée pour le bon fonc-tionnement de l’application.
Première utilisationBranchez votre téléphone au port USB de votre système multimédia.Le service « CarPlay™ » se lance sur le système multimédia.Si la manipulation décrite ci-dessus échoue, renouvelez l’opération.

F.68
3
ANDROID AUTO™, CARPLAY™ (3/4)
Lorsque l’application « Android Auto™ » ou le service « CarPlay™ » est activé, vous pouvez utiliser le bouton de recon-naissance vocale de votre véhicule afin d’utiliser certaines fonctions de votre smartphone à la voix. Pour cela, ef-fectuez un appui sur le bouton 3 sur le volant de votre véhicule (pour plus d’in-formations, reportez-vous au chapitre « Utiliser la reconnaissance vocale »).
Nota : lorsque vous utilisez « Android Auto™ » ou « CarPlay™ », vous pouvez accéder aux applications de navigation et de musique de votre smartphone. Ces applications se substitueront aux applications similaires intégrées de votre système multimédia Media Nav Evolution déjà lancées. Ainsi, une seule navigation celle d’« Android Auto™ » / « CarPlay™ » ou celle intégrée à votre système multimédia peut être utilisée.Nota : lorsque vous utilisez l’applica-tion « Android Auto™ » ou le service « CarPlay™ », certaines fonctions de votre système multimédia continue-ront à être exécutées en tâche de fond. Par exemple si vous lancez « Android Auto™ » ou « CarPlay™ » et utilisez la navigation de votre smartphone alors que la radio du système multimédia est en cours d’écoute, elle continuera à être diffusée.
Lorsque vous utilisez l’applica-tion « Android Auto™ » ou le ser-vice « CarPlay™ », le transfert de données cellulaires nécessaire à son fonctionnement peut engen-drer des coûts supplémentaires non compris dans votre abonnement téléphonique.

F.69
ANDROID AUTO™, CARPLAY™ (4/4)
3
Revenir à l’interface Media Nav EvolutionPour retourner à l’interface Media Nav Evolution :– appuyez sur le bouton « Home » de
la façade de votre système multimé-dia ou de la commande centrale ;
ou– appuyez sur le bouton 3 sur l’écran
du système multimédia suivant « Android Auto™ » ou « CarPlay™ ».
3
Les fonctionnalités de l’applica-tion « Android Auto™ » et du ser-vice « Carplay™ » dépendent de la marque et du modèle de votre téléphone. Pour plus d’informa-tions, consultez le site internet du constructeur s’il en dispose.

F.70
Depuis le menu « Téléphone », ap-puyez sur 1 pour faire défiler la liste des menus puis sur « Répertoire » pour accéder au répertoire téléphonique du système.
Utiliser le répertoire téléphoniqueVous pouvez utiliser les entrées de répertoire téléphonique enregistrées dans la mémoire du téléphone.
Il est recommandé de s’ar-rêter pour saisir un numéro ou pour rechercher un contact.
RÉPERTOIRE TÉLÉPHONIQUEAprès avoir connecté votre système et votre téléphone Bluetooth® via la tech-nologie sans fil Bluetooth®, les numé-ros du répertoire de votre téléphone sont transférés dans celui du système si les contacts sont dans la mémoire té-léphone de votre appareil.Nota : sur certains téléphones, le système peut vous demander de confirmer le transfert du répertoire du téléphone vers le système lors de l’ap-pairage.
Appeler un numéro du répertoireAprès avoir trouvé le contact que vous souhaitez appeler dans le répertoire, sélectionnez le numéro que vous sou-haitez appeler pour lancer l’appel.
Rechercher un contact dans le répertoireAppuyez sur 2 puis saisissez le nom ou le prénom du contact à rechercher à l’aide du clavier numérique.
1
2
Répertoire
Rechercher par nom
Adam Smith
Vincent Casse
Car Repair Hugo
Dr. Brown
Suivant la marque et le modèle de votre téléphone, le transfert de vos contacts dans le système multimé-dia peut ne pas fonctionner.

F.71
Émettre un appel depuis le répertoireTéléphone connecté, depuis le menu « Téléphone », sélectionnez « Répertoire » dans le menu dérou-lant 1.Sélectionnez le contact (ou le numéro approprié si le contact possède plusieurs numéros). L’appel se lance automatiquement après appui sur le numéro du contact.Nota : vous pouvez émettre un appel depuis le système multimédia à l’aide de la reconnaissance vocale de votre smartphone. Reportez-vous au chapitre « Utiliser la reconnaissance vocale ».
Appuyez sur 1 pour faire défiler la liste puis sur « Listes d’appels ».Appuyez sur 6 pour accéder à la liste de tous les appels.Appuyez sur 5 pour accéder à la liste des appels émis.Appuyez sur 4 pour accéder à la liste des appels reçus.Appuyez sur 3 pour accéder à la liste des appels en absence.Nota : le repère 2 vous indique le nombre d’appels manqués.Pour chacune des listes, les contacts sont affichés du plus récent au plus ancien. Sélectionnez un contact pour lancer l’appel.
ÉMETTRE, RECEVOIR UN APPEL (1/3)
1
6 5 4 3
Listes d’appels
Tout
Appeler un numéro depuis l’historique des appelsVous pouvez utiliser la liste des appels enregistrée dans la mémoire du téléphone pour lancer un appel.Après avoir connecté votre appareil et votre téléphone Bluetooth® via la technologie sans fil Bluetooth®, les nu-méros des listes « tous les appels », « appels émis », « appels reçus » et « appels en absence » de votre télé-phone sont automatiquement transfé-rés dans la liste des appels de votre système multimédia.
2
Fermer
Adam Smith

F.72
ÉMETTRE, RECEVOIR UN APPEL (2/3)
8
Composer
7
Composer un numéroAppuyez sur 1 pour faire défiler la liste puis sur « Composer » pour un numéro d’appel.Appuyez sur les touches numérotées pour composer un numéro, puis sur 7 pour lancer l’appel.Pour effacer un numéro, appuyez sur 8. Un appui long sur 8 permet d’effacer tous les chiffres en une seule fois.
Il est recommandé de s’ar-rêter pour saisir un numéro ou pour rechercher un contact.
1
Appel entrant
Accepter Rejeter
Recevoir un appelÀ la réception d’un appel, un message s’affiche à l’écran du système multimé-dia avec les informations suivantes sur le contact appelant :– le nom du contact (si son numéro est
présent dans votre répertoire) ;– le numéro du contact appelant ;– « Numéro inconnu » (si le numéro ne
peut être visualisé).Nota : lorsque le message d’un appel entrant apparaît à l’écran pendant la navigation, acceptez ou rejetez l’appel pour revenir à l’écran de navigation.
Nota : vous pouvez décrocher ou refu-ser un appel entrant en appuyant sur le bouton de la commande sous volant de votre véhicule.

F.73
13 12 11 10
Composer
9
14
ÉMETTRE, RECEVOIR UN APPEL (3/3)
En cours de communicationEn cours de communication vous pouvez :– désactiver le micro en appuyant
sur 12 ;– activer le micro en appuyant sur 13 ;– raccrocher en appuyant sur 9 ;– entendre le son via le haut-parleur
du téléphone en appuyant sur 11 ;
– entendre le son via le haut-parleur du véhicule en appuyant sur 10 ;
– appuyer sur 14 pour revenir à l’écran précédent (de navigation par exemple) ou à l’écran d’accueil.

F.74
– manœuvrez les commandes de ré-glage de l’air conditionné en fonc-tion de la température souhaitée dans l’habitacle lors du redémarrage moteur, puis sur le mode dégivrage (reportez-vous au chapitre 2 de la notice du véhicule) ;
DÉMARRAGE DU MOTEUR À DISTANCE (1/3)
Démarr. du moteur à distance
Attention : Ne pas garer le véhicule en milieu confiné
Démarrage auto.
Voiture prête pour
Réveil toutes les 2 heures
La voiture sera prête dans 0 heure et 0 min.
Off On
Off On
Modifier
OKDéf. Heure
Sombre
Radio Média Tél
RéglageNavDriving eco2
1
2A
4
Définir l’heure de départ
Démarr. du moteur à distance
OK
Lorsque le véhicule en est équipé, cette fonction permet de programmer le dé-marrage du moteur à distance afin de chauffer ou ventiler l’habitacle jusqu’à 24h00 heures avant l’utilisation du vé-hicule.Réglez le niveau de confort thermique souhaité (température, dégivrage) avant de programmer la fonction. La configuration et la programmation se font via l’afficheur multimédia.
Programmation de l’heure de départ de la fonction– Contact mis, appuyez sur la touche 1
depuis le menu principal. L’écran A apparaît ;
– sélectionnez la touche « On » sur la ligne « Démarrage auto » pour acti-ver la fonction ;
– définissez l’heure de départ à la-quelle vous souhaitez utiliser votre véhicule et partir en appuyant sur la touche 2 ;
– appuyez sur les flèches « haut » et « bas » pour faire défiler les heures et les minutes jusqu’à l’heure souhai-tée ;
– appuyez sur « OK » pour valider. Le repère 4 vous indique le temps res-tant avant l’heure souhaitée d’utilisa-tion du véhicule ;
– appuyez sur « OK » 3 pour valider et finaliser la programmation ;
Pour une activation du démarrage à distance par programmation, vous devez choisir une heure au mini-mum supérieur de quinze minutes par rapport à l’heure affichée par le système multimédia.
3

F.75
11:05 AM
DÉMARRAGE DU MOTEUR À DISTANCE (2/3)
– coupez le contact.Au verrouillage de votre véhicule, deux clignotements suivi de l’allumage pen-dant environ trois secondes des feux de détresse et des répétiteurs latéraux vous indique que la programmation a bien été prise en compte. Le démarrage du moteur à distance fonctionne si :– le levier est en position neutre (point
mort) pour les véhicules à boîte de vitesses manuelle ou robotisée ;
– le levier est en position P pour les vé-hicules à boîte de vitesses automa-tique ;
– le contact est coupé ;– tous les ouvrants (capot avant,
portes, coffre) sont fermés et ver-rouillés lorsque vous quittez le véhi-cule.
Nota : éteignez impérativement votre système multimédia lorsque vous quittez votre véhicule afin que le démarrage du moteur à distance puisse s’effectuer.
« Réveil toutes les 2 heures »Cette fonction permet à votre véhicule de démarrer automatiquement toutes les deux heures en fonction de la tem-pérature moteur.
Démarr. du moteur à distance
Attention : Ne pas garer le véhicule en milieu confiné
Démarrage auto.
Voiture prête pour
Réveil toutes les 2 heures
La voiture sera prête dans 0 heure et 0 min.
Off On
Off On
Modifier
OK
Pour activer cette fonction, appuyez sur la touche « On » 5.Nota : le système de ventilation doit être arrêté afin que la fonction « Réveil toutes les 2 heures » puisse s’activer.Lorsque cette fonction est activée, le système de ventilation ne s’activera pas lors des quatre premiers démar-rages s’ils ont lieu.Par grand froid, le véhicule démarrera automatiquement et restera allumé pendant environ dix minutes puis s’éteindra. Si la température moteur ne nécessite pas de redémarrage, le véhicule ne dé-marrera pas automatiquement lors des quatre premiers réveils et se remet-tra en veille pendant deux heures. Le moteur sera redémarré si la tempéra-ture moteur est trop basse.Dans tous les cas, le dernier démar-rage aura lieu.Environ quinze minutes avant l’heure programmée, le moteur démarre et reste allumé environ dix minutes.Nota : le repère 6 vous rappelle l’heure de départ du véhicule que vous avez préalablement renseignée.
Sombre
Radio Média Tél
RéglageNavDriving eco2
65

F.76
Ne stationnez pas et ne faites pas tourner le moteur dans des endroits où des substances ou des maté-
riaux combustibles tels que l’herbe ou des feuilles peuvent venir en contact avec un système d’échap-pement chaud.
DÉMARRAGE DU MOTEUR À DISTANCE (3/3)
En conditions extrêmes, le démarrage à distance par programmation peut ne pas fonc-tionner.
Particularité des véhicules équi-pés de la fonction « Réveil toutes les 2 heures »Il est impératif de rouler au moins 10 minutes entre chaque utilisation de la fonction. Risque de dégrada-tion de l’huile moteur.
Responsabilité du conducteur lors du stationnement ou arrêt du véhicule
Ne quittez jamais votre véhicule en y laissant un enfant, un adulte non autonome ou un animal même pour une courte durée. En effet, ceux-ci pourraient se mettre en danger ou mettre en danger d’autres per-sonnes, par exemple en démarrant le moteur, en actionnant des équi-pements comme les lève-vitres ou encore en verrouillant les portes… De plus, par temps chaud et/ou en-soleillé, sachez que la température intérieure de l’habitacle monte très rapidement.RISQUE DE MORT OU BLESSURES GRAVES.
N’utilisez pas la fonction de démarrage du moteur à dis-tance ou sa programmation lorsque :
– le véhicule est dans un garage ou un milieu confiné.Risque d’intoxication ou d’as-phyxie par émissions de gaz d’échappement.
– le véhicule est recouvert d’une housse de protection.Risque d’incendie.
– le capot moteur est ouvert ou avant son ouverture.Risque de brûlures et de bles-sures graves.
Suivant pays, l’utilisation de la fonction démarrage à distance ou de sa programmation peut être interdite par la législation et/ou les réglementations en vigueur.Avant l’utilisation de cette fonc-tion, vérifier la législation et/ou les réglementations du pays en vigueur.
Selon véhicule, assurez-vous d’avoir désactivé les consomma-teurs (tels que : essuie-vitres, éclai-rage extérieur, radio, sièges chauf-fants, volant chauffant...) et d’avoir débranché tous les accessoires avant de quitter le véhicule.

F.77
FonctionnementAu passage de la marche arrière (et jusqu’à cinq secondes environ après le passage sur un autre rapport), une vue de l’environnement à l’arrière du véhicule s’affiche sur l’écran du sys-tème multimédia accompagné du ga-barit, d’une silhouette du véhicule et de signaux sonores.Des détecteurs à ultrasons, implantés sur votre véhicule « mesurent » la dis-tance entre le véhicule et un obstacle.Lorsque la zone rouge est atteinte, aidez-vous de la représentation du bouclier pour vous arrêter précisément.Nota : pour plus d’informations sur l’uti-lisation de l’assistance au stationne-ment, consultez la notice d’utilisation de votre véhicule.Nota : veillez à ce que la caméra de recul ne soit pas occultée (saletés, boue, neige…).Nota : après le déclenchement de la marche arrière, l’écran multimédia continue de vous présenter une vue de l’environnement à l’arrière du véhicule durant quelques secondes.
CAMÉRA DE RECUL (1/3)
Activation/désactivationCaméra de reculVous pouvez activer/désactiver la caméra de recul. Pour cela, depuis le menu principal sélectionnez « Réglage » > « Écran » puis ap-puyez sur la touche « Assist. stationne-ment » 1.
Assistance au stationnementCe menu vous permet d’activer/désac-tiver la caméra de recul et de paramé-trer la « Détection d’obstacles ».
Réglages écran
Luminosité Faible Moy Élevée
AutoMode Carte Jour Nuit
Sombre ClairArrière-plan
Assist. stationnement
Audio Écran Connectivité Système
Assist. stationnement
Caméra de recul Off On
Détection d’obstacles
1

F.78
CAMÉRA DE RECUL (2/3)
Détection d’obstaclesVous pouvez activer ou désactiver in-dépendamment les capteurs avant et arrière de votre véhicule. Sélectionnez « On » pour activer le ou les capteurs désirés ou « Off » pour le ou les dé-sactiver.
Réglages sonVous pouvez activer/désactiver l’alerte sonore, sélectionner plusieurs sonori-tés et régler le volume des détecteurs d’obstacles.
Réglages de l’imageVous pouvez régler les paramètres de l’affichage depuis le bouton 2.Ce menu vous permet d’activer/désac-tiver les gabarits 3 indiquant la distance derrière le véhicule et régler les para-mètres écran .Appuyez sur « + » ou « - » pour régler le contraste 4, la luminosité 5 et les couleurs 6.
2
Regardez dans toutes les directions
OnOff
Regardez dans toutes les directions
3
56 4
Off
Off
Off
On
On
On
Détection d’obstacles
Capteur avant
Capteur arrière
Alerte sonore
Type de son 1 2 3

F.79
CAMÉRA DE RECUL (3/3)
Cette fonction est une aide supplémentaire. Elle ne peut donc, en aucun cas, remplacer la vigilance, ni la
responsabilité du conducteur.Le conducteur doit toujours être at-tentif aux événements soudains qui peuvent intervenir durant la conduite : veillez donc toujours à ce qu’il n’y ait pas d’obstacles mobiles, trop petits ou trop fins (tels qu’un enfant, un animal, une poussette, un vélo, une pierre, un piquet…) dans la zone d’angle mort lors de la manœuvre.
L’écran représente une image inversée.Le gabarit est une représentation projetée sur sol plat, cette information est à ignorer lorsqu’elle se superpose à un objet vertical ou posé au sol.Les objets qui apparaissent sur le bord de l’écran peuvent être déformés.En cas de trop forte lumino-sité (neige, véhicule au soleil…), la vision de la caméra peut être perturbée.

F.80
CAMÉRA MULTIVUES (1/2)PrésentationLe véhicule est équipé de quatre ca-méras implantées à l’avant, dans les rétroviseurs latéraux et à l’arrière du véhicule vous offrant ainsi une aide supplémentaire lors des manœuvres difficiles.Nota : veillez à ce que les caméras ne soient pas occultées (saletés, boue, neige…).
FonctionnementAu passage de la marche arrière, la caméra transmet une vue de l’environ-nement arrière du véhicule sur l’écran multimédia.Vous avez aussi la possibilité de choisir la vue à afficher sur l’écran multimédia en passant en mode manuel.
Activation / DésactivationLe système est activé lorsque le véhi-cule roule à une vitesse inférieure à 20 km/h environ. À une vitesse supérieure, le système est désactivé.Le système peut aussi être activé en appuyant sur le bouton d’activation situé dans votre véhicule. Pour plus d’informations, reportez-vous au cha-pitre « caméra multivues » de la notice d’utilisation de votre véhicule.
Cette fonction est une aide supplémentaire. Elle ne peut donc, en aucun cas, remplacer la vigilance, ni la
responsabilité du conducteur.Le conducteur doit toujours être at-tentif aux événements soudains qui peuvent intervenir durant la conduite : veillez donc toujours à ce qu’il n’y ait pas d’obstacles mo-biles (tels qu’un enfant, un animal, une poussette, un vélo…) ou un obstacle trop petit ou trop fin (pierre de taille moyenne, piquet très fin…) lors de la manœuvre.
Nota : pour plus d’informations sur le choix des modes automatique ou manuel, consultez la notice d’utilisation de votre véhicule.

F.81
CAMÉRA MULTIVUES (2/2)
RéglagesAppuyez sur 7 pour faire apparaître la liste des réglages.Activez ou désactivez l’affichage des gabarits en appuyant sur 5 ou 6.Appuyez sur « + » ou « - » pour régler le contraste 8, la luminosité 9 et les cou-leurs 10.
5 6
7
8910
OFF
Regardez dans toutes les directions
ON
Choix caméraPour activer la vue caméra souhaitée, sélectionnez celle-ci sur l’écran multi-média:– 1 vue de l’environnement arrière ;– 2 vue de l’environnement avant ;– 3 vue de l’environnement latéral
droite;– 4 vue de l’environnement latéral
gauche.
1
2
3
4

F.82
RÉGLAGES SYSTÈME (1/3)
Pour accéder aux paramètres de réglages du système multimédia, depuis l’écran d’ac-cueil, appuyez sur « Réglages » puis sélec-tionnez une rubrique en bas de l’écran.
Réglages audioReportez-vous au chapitre « Régler le son ».
Réglages de l’écran« Luminosité »Vous pouvez régler la luminosité de l’écran suivant vos préférences. Trois modes vous sont proposés :– « Faible » ;– « Moy. » (Moyen) ;– « Elevée ».
« Mode carte »Pour améliorer la visibilité de l’écran de navi-gation de jour ou de nuit, vous pouvez chan-ger la combinaison des couleurs de la carte.– « Auto » : le GPS affiche l’écran carte. Le
passage en mode diurne ou nocturne est automatique en fonction de l’allumage des feux.
– « Jour » : l’écran de carte s’affiche toujo-urs avec des couleurs lumineuses.
– « Nuit » : l’écran carte s’affiche toujours avec des couleurs sombres.
« CLIM. Info »Cette fonction vous permet d’activer/désac-tiver l’affichage des informations de climati-sation lors de modifications de réglage.
« Arrière-plan »Cette fonction vous permet de choisir entre un mode d’affichage sombre ou clair.
« Assist. stationnement »Cette fonction vous permet d’activer/désac-tiver la caméra de recul ainsi que les capte-urs avant et/ou arrière.
Réglages Bluetooth®Reportez-vous au chapitre « Appairer/dé-sappairer des appareils Bluetooth® ».
Réglages écran
Luminosité
Mode Carte
Audio Écran Connectivité Système
Faible Moy. Elevée
Auto Jour Nuit
CLIM. Info Off On
Arrière-plan Sombre Clair

F.83
RÉGLAGES SYSTÈME (2/3)« Horloge »Cette fonction vous permet de choisir le format d’affichage de l’heure (« 12h » ou « 24h »).Nota : l’heure est paramétrée de manière automatique par le GPS. Dans ce cas, il est nécessaire d’avoir la cartographie du pays dans lequel vous vous trouvez pour avoir l’heure locale.Pour modifier l’heure manuellement, appu-yez sur « Horloge/Unités », puis sélection-nez « Réglage de l’heure ».
« Unités »Cette fonction vous permet de définir l’unité de distance affichée sur votre système mul-timédia. Vous pouvez choisir entre « km » et « mls ».Nota : les réglages de votre système multi-média ne sont pas pris en compte sur l’affi-chage du tableau de bord de votre véhicule. Pour plus d’informations sur les réglages d’affichage du tableau de bord, consultez la notice d’utilisation de votre véhicule.
Réglage du système« Langue »Cette fonction vous permet de changer la langue utilisée dans le système et la langue du guidage vocal.Pour changer la langue, sélectionnez la langue souhaitée et validez votre choix en appuyant sur « OK ».
« Réglages d’usine »Cette fonction vous permet de réinitialiser divers paramètres de réglages par défaut.– Tout : réinitialise tous les « Réglages d’u-
sine » par défaut.– Téléphone : réinitialise tous les para-
mètres liés au téléphone.– Navigation : réinitialise tous les para-
mètres liés à la navigation.– Audio/Média/Radio/Système : réinitialise
tous les paramètres liés au son, au média et à la radio.
« Navigation »Cette fonction vous permet d’activer ou dé-sactiver la navigation du système.
« Version du système »Cette fonction vous permet de contrôler la version du système.
Audio Écran Connectivité Système
Réglages système
Langue
Horloge/Unités
Réglages d’usine
Navigation Off On

F.84
RÉGLAGES SYSTÈME (3/3)
Code de sécuritéVotre système audio est protégé par un code de sécurité (fourni par le Représentant de la marque). Il permet de verrouiller électroniqu-ement le système audio lorsque l’alimenta-tion est coupée (batterie déconnectée, sys-tème débranché, fusible fondu…).Pour faire fonctionner le système audio, vous devez introduire le code secret com-posé de quatre chiffres.Notez ce code et gardez-le dans un endroit sûr. Si vous le perdez, adressez-vous au Représentant du constructeur.
Introduction du codeLe message « CODE » suivi de quatre em-placements vides et d’un clavier numérique s’affichent.Entrez le code correspondant à l’aide du cla-vier numérique, puis appuyez sur la touche « OK » pour valider.
Erreur d’introduction du codeEn cas d’erreur dans l’introduction du code, le message « PIN non valide : le système est verrouillé » s’affiche.Après un temps d’attente d’une minute, re-composez le code.Le temps d’attente est doublé à chaque no-uvelle erreur.

F.85
MISE À JOUR SYSTÈME (1/5)
Au démarrage de la navigation, le sys-tème multimédia vous propose de mettre à jour votre cartographie. Ce rappel apparaît deux fois par an pen-dant sept ans. Vous pouvez :– sélectionnez « Plus tard », le rappel
apparaîtra au prochain démarrage de la navigation ;
– sélectionnez « Fermer », le rappel n’apparaîtra plus ;
– sélectionnez « Plus », le système affiche le menu « Mise à jour des cartes ».
Mettre à jour votre système multimédia et la cartographie.Afin de mettre à jour votre système multimédia et sa cartographie, munis-sez-vous d’une clé USB, d’un ordina-teur connecté à Internet et suivez dans l’ordre les étapes décrites ci-après.
Installation du logicielInstaller Naviextras Toolbox sur votre ordinateur en quelques clics. La Toolbox est téléchargeable sur le site du constructeur.Après le téléchargement du fichier d’installation depuis le site Internet Naviextras.com, il suffit de double-cli-quer sur le fichier pour lancer l’instal-lation.Suivez les instructions affichées à l’écran.
Pour une planification précise de votre itinéraire, veuillez utiliser les cartes les plus récentes
Pour en savoir plus, rendez-vous dans le menu « Mise à jour de cartes » ou cliquez sur « Plus »
Recherchez les mises à jour de cartes sur naviextras.com
PLus tard Fermer Plus

F.86
Les écrans présents sur la notice sont non-contractuels.
Dans certains pays, télécharger et activer l’option des zones à risques est illicite et peut constituer une in-fraction à la réglementation.
Garantie d’actualisation de carteAprès la livraison de votre véhicule neuf, vous disposez d’un délai maximum de 90 jours pour mettre à jour la cartographie gratuitement. Au-delà, les mises à jour sont payantes.
Création et connexion à un compte utilisateurPour vous connecter, cliquez sur l’icône « Not logged in » dans la barre d’outils située dans la zone supérieure de la page ou cliquez sur le bouton « Connexion » de l’écran principal de la Toolbox. Si vous n’êtes pas inscrit sur le site Internet Naviextras.com, vous pouvez le faire facilement depuis la Toolbox en cliquant sur le bouton « Register » de la page de connexion.
MISE À JOUR SYSTÈME (2/5)

F.87
MISE À JOUR SYSTÈME (3/5)Une empreinte de votre système de navigation est installée sur la clé USB qui servira à la Toolbox pour enregistrer votre système sur votre profil utilisateur et qui permettra à la Toolbox d’identifier les mises à jour disponibles pour votre système de navigation.Lorsque la procédure d’enregistre-ment des données est terminée, vous pouvez retirer la clé USB du système multimédia.
Connexion à la ToolboxLancez le logiciel Naviextras Toolbox et assurez-vous que votre ordinateur est connecté à Internet.Connectez la clé USB précédemment utilisée sur votre système multimédia sur votre ordinateur.Si votre abonnement vous le permet et si la Toolbox trouve votre système dans la liste des systèmes pris en charge, l’écran d’accueil apparaît pour vous permettre de vous connecter à votre compte Naviextras.
Nota : la clé USB n’est pas fournie avec le système.Nota : la clé USB utilisée doit être formatée au format FAT32 et doit avoir une capacité minimale de 4GB et une capacité maximale de 32GB.Nota : pour enregistrer les données du système sur la clé USB, démarrez le véhicule et ne coupez pas le moteur pendant le chargement des données.Nota : n’effectuez plus aucune mani-pulation sur votre système multimédia pendant la procédure.
Mise à jour
Fermer
Contenu
Options
Enregistrement du système sur une clé USBPour enregistrer votre système multi-média sur votre profil d’utilisateur, vous devez d’abord insérer une clé USB vide dans le système multimédia pour créer une empreinte. Pour cela :– branchez votre clé USB dans la prise
USB de votre système multimédia ;– sélectionnez le menu « Navigation »
depuis le menu principal ;– sélectionnez le menu « Options » ;– sélectionnez le menu « Mise à jour
des cartes » sur la deuxième page du menu « Options » ;
– appuyez sur la touche « Options » en bas de l’écran ;
– sélectionnez la fonction « Mise à jour » sur l’écran de votre système multimédia.
Nota : pour insérer la clé USB dans votre système multimédia, reportez-vous au paragraphe « Insérer la clé USB » du chapitre « Le système de na-vigation ».

F.88
– les mises à jour et les extras gratuits que vous avez ajoutés à la file d’ins-tallation à partir du catalogue ;
– les mises à jour système (si une ver-sion plus récente est disponible) ;
– les mises à jour gratuites spéciales.Toutes les mises à jour disponibles sont indiquées par région sous forme de liste et sur un planisphère.Par défaut, tous les articles concernant toutes les régions sont sélectionnés en vue de leur installation. Si vous choisissez d’omettre momentanément une région, décochez la case au début de la ligne du tableau la concernant. Après avoir passé en revue le tableau, cliquez sur le bouton « Installer » situé dans la zone inférieure de l’écran pour lancer la procédure d’installation.La Toolbox commence à procéder au téléchargement et à l’installa-tion des mises à jour sélectionnées. Veuillez patienter jusqu’à la récep-tion du message annonçant la fin de l’opération.
Téléchargement des produits depuis la Toolbox vers la clé USBUn fois connecté à votre compte Naviextras Toolbox et votre clé USB in-sérée sur votre ordinateur, vous pouvez acquérir des applications, services et contenus gratuits ou payants en sé-lectionnant ceux que vous souhaitez installer sur votre système multimédia depuis le menu « Catalogue » dans la barre de menu située dans la zone gauche du logiciel Toolbox.
Mises à jour depuis la Toolbox vers la clé USBVeuillez cliquer sur le menu « mise à jour » dans la barre de menu située dans la zone gauche du logiciel Toolbox.Le menu des mises à jour affiche un écran indiquant toutes les mises à jour disponibles, dont :– les articles que vous avez acquis,
mais pas encore installés (mises à jour ou extras) ;
MISE À JOUR SYSTÈME (4/5)
Dans certains pays, télé-charger et activer l’option des alertes radars est illicite et peut constituer une in-
fraction à la réglementation.
Veuillez ne pas retirer la clé USB du système ni le désactiver pendant une mise à jour.
La Toolbox vous avertit si les ar-ticles sélectionnés dépassent la ca-pacité maximale du système multi-média. Dans ce cas, vous pouvez sélectionner les articles à installer ou à supprimer du système afin de respecter cette limite de stockage.Même lorsque des articles sont sup-primés du système, vous en conser-vez la propriété et pouvez les instal-ler ultérieurement gratuitement.
Nota : le temps de téléchargement de l’application peut varier en fonction de la taille de l’application et selon la qua-lité de réception sur le réseau mobile.

F.89
L’écran A s’affiche automatiquement une fois la clé USB branchée :– appuyez sur 1 pour lancer la mise à
jour ;– appuyez sur 2 pour revenir à l’écran
précédent.Lorsque vous appuyez sur la touche 1, la procédure de mise à jour se lance. N’effectuez plus aucune manipulation pendant la procédure de mise à jour de votre système.
Mise à jour système et cartographieLorsque la procédure d’installation est terminée, la clé USB peut être retirée de l’ordinateur. Insérez la clé USB dans la prise USB du système multimédia de votre véhicule.Nota : pour mettre à jour la cartogra-phie, démarrez le véhicule et ne coupez pas le moteur pendant le chargement des données.Lorsque le système multimédia est actif, il identifie automatiquement les mises à jour disponibles sur la clé USB et pro-pose de mettre le système ou la car-tographie à jour selon les mises à jour disponibles sur la clé USB. N’éteignez pas votre système multimédia pendant l’installation de la mise à jour.Nota : le téléchargement et l’instal-lation d’une mise à jour système sont possibles uniquement si une version plus récente existe.
MISE À JOUR SYSTÈME (5/5)
A
1 2
Etes vous prêt à commencer la mise à jour de votre appareil ?
Oui Annuler
Lorsque la mise à jour est terminée, le système multimédia redémarre avec toutes les nouvelles fonctionnalités mises à jour.
LicencePour obtenir les codes source GPL, LGPL, MPL et autres licences open source contenues dans ce pro-duit, merci de visiter le site http://opensource.lge.com.En complément des codes source, tous les termes de licence visés, exclusions de garantie et mentions de copyright sont disponibles pour téléchargement.LG Electronics vous fournira égale-ment les codes en Open source sur un CD-ROM contre paiement des frais qui couvrent les coûts de distribution (tels que le coût des médias, d’expédition et de manutention) sur demande par courriel à [email protected] offre est valable pour trois ans à compter de la date à laquelle vous avez acheté le produit.
En cas d’interruption involontaire de la mise à jour, reprenez le processus depuis le début.
Le système multimédia peut automatiquement redémarrer pendant la procédure de mise à jour. Attendez que l’écran de la radio s’affiche.

F.90
ANOMALIES DE FONCTIONNEMENT (1/5)
SystèmeDescription Causes Solutions
Aucune image ne s’affiche. L’écran est en veille. Vérifiez que l’écran n’est pas en veille.
Le système est arrêté. La température à l’intérieur du véhicule est trop basse ou est trop élevée.
Le véhicule est éteint. Redémarrez votre véhicule.
Aucun son n’est audible.
Le volume est au minimum ou la fonction muet est activée.
Augmentez le volume ou désactivez la fonction muet.
La source du système sélectionnée n’est pas correcte.
Vérifiez la source du système sélection-née et assurez-vous que la source de sortie est le système multimédia.
Aucun son n’est émis par le haut-parleur gauche, droit, avant ou arrière.
Les paramètres balance ou fader sont in-corrects.
Réglez le son balance ou fader correc-tement.
L’heure affichée n’est pas correcte. Le réglage de l’heure est réglé sur « Auto » et le système ne perçoit plus de signal GPS.
Avec « Navigation » : Déplacez votre vé-hicule jusqu’à recevoir un signal GPS.
Sans « Navigation » : Reportez-vous au chapitre « Réglages systèmes » pour le réglage de l’heure.

F.91
ANOMALIES DE FONCTIONNEMENT (2/5)
NavigationDescription Causes Solutions
Aucun son n’est audible. Le volume du menu « NAV » est au mi-nimum ou la fonction muet est activée.
Augmentez le volume (« Options » du menu « NAV ») ou désactivez la fonction muet.Le volume en mode GPS peut être réglé pendant la voix du guidage.
La position du véhicule sur l’écran ne correspond pas à son emplacement réel.
Mauvaise localisation du véhicule due à la réception GPS.
Déplacez le véhicule jusqu’à obtenir une bonne réception des signaux GPS.
Les indications fournies à l’écran ne cor-respondent pas à la réalité.
La version du système est obsolète. Procurez-vous la dernière version du système.
Certaines rubriques de menu sont indis-ponibles.
En fonction de la commande en cours, certaines rubriques sont indisponibles.
Le guidage vocal est indisponible. Le système de navigation ne prend pas en compte l’intersection.Le guidage vocal est désactivé.
Augmentez le volume.Vérifiez que le guidage vocal est activé.
Le guidage vocal ne correspond pas à la réalité.
Le guidage vocal peut varier en fonction de l’environnement.
Conduisez en fonction des conditions réelles.
L’itinéraire proposé ne débute ou ne se termine pas à la destination souhaitée.
La destination n’est pas reconnue par le système.
Entrez une route proche de la destination souhaitée.

F.92
TéléphoneDescription Causes Solutions
Aucun son et aucune sonnerie n’est au-dible.
Le téléphone portable n’est pas branché ou connecté au système.Le volume est au minimum ou la fonction muet est activée.
Vérifiez que le téléphone portable soit branché ou connecté au système.Augmentez le volume de la sonnerie ou désactivez la fonction muet.Vérifiez la source du système sélection-née et assurez-vous que la source de sortie est bien le système multimédia.
Impossibilité d’émettre un appel. Le téléphone portable n’est pas branché ou connecté au système.Le verrouillage du clavier de téléphone est activé.
Vérifiez que le téléphone portable soit branché ou connecté au système.Déverrouillez le clavier de téléphone.
Plusieurs sources audio ont été éjectées en cours de fonctionnement.
Redémarrez le système multimédia en effectuant un appui long (jusqu’à l’ex-tinction de l’écran) sur le bouton Marche/Arrêt.
ANOMALIES DE FONCTIONNEMENT (3/5)

F.93
MédiaDescription Causes Solutions
Aucun son n’est audible. Le volume est au minimum ou la fonction muet est activée.
Augmentez le volume ou désactivez la fonction muet.
La source audio n’est pas branchée ou connectée au système.
Vérifiez la source du système sélection-née et assurez-vous que la source de sortie est le système multimédia.
Aucune source audio externe (lecteur MP3, baladeur audio, clé USB, télé-phone…) est reconnue par le système multimédia.
Plusieurs sources audio ont été éjectées en cours de fonctionnement.
Redémarrez le système multimédia en effectuant un appui long (jusqu’à l’ex-tinction de l’écran) sur le bouton Marche/Arrêt.
Android Auto™/CarPlay™ ne se lance pas sur le système multimédia.
Android Auto™/CarPlay™ n’est pas configuré correctement sur le smart-phone.
Consultez le site internet du constructeur de votre smartphone pour la configura-tion.
Le câble USB n’est pas compatible pour le transfert des données.
Utilisez un câble USB référencé par le fabricant du téléphone pour le bon fonc-tionnement de l’application.
En cours de fonctionnement, la source audio n’est plus reconnue par le système multimédia.
Redémarrez le système multimédia en effectuant un appui long (jusqu’à l’ex-tinction de l’écran) sur le bouton Marche/Arrêt.Problème de fonctionnement de la source
audio (Déconnection Reconnaissance Vocale sous SIRI/CarPlay™/Android Auto™, Lecteur MP3, baladeur audio, té-léphone…).
ANOMALIES DE FONCTIONNEMENT (4/5)

F.94
ANOMALIES DE FONCTIONNEMENT (5/5)
MédiaDescription Causes Solutions
Problème de fonctionnement Android Auto™/CarPlay™.
Votre smartphone n’est plus compatible suite à une mise à jour de l’application Android Auto™/CarPlay™.
Revenez à la version précédente, ou consultez les réglages de l’application Android Auto™/CarPlay™ de la marque de votre smartphone.
Problème de fonctionnement avec les applications nécessitant la géolocalisa-tion.
Le réseau est indisponible.La géolocalisation n’est pas activée sur votre téléphone.
Déplacez-vous jusqu’à obtenir une bonne réception d’antenne.Activez la géolocalisation de votre télé-phone.

F.95
INDEX ALPHABÉTIQUE (1/3)4x4 infos ......................................................................F.5, F.56
Aaigus ........................................................................F.28 – F.29anomalies de fonctionnement....................... F.16, F.90 → F.94appairer un téléphone............................................F.57 → F.60appeler.....................................................................F.70 – F.71arrêt ................................................................................... F.16ARTIST .............................................................................. F.26AUX
prise auxiliaire ................................................................ F.5AUX .......................................................................F.25 → F.27
Bbaladeur audio Bluetooth®
appairer ........................................................................ F.26désappairer .................................................................. F.26
BALANCE .......................................................................... F.28BASS ................................................................................. F.28Bluetooth® .................................................... F.57 → F.61, F.70
Ccaméra de recul .............................................. F.5, F.77 → F.79caméra multivues .............................................F.5, F.80 – F.81caméra de recul
paramètres ................................................................... F.82carnet d’adresses ...........................................F.39, F.49 – F.50carte
affichage ........................................ F.13 → F.15, F.33, F.48carte numérisée ........................................................... F.32échelle ......................................................................... F.33réglages ...............................................................F.48, F.51
clavier numérique .............................................................. F.19clé USB.............................................. F.30 – F.31, F.85 → F.89code de sécurité ................................................................ F.84commande sous volant...................................................... F.21
commande vocale .................................................F.63 → F.65commandes .................................................... F.8 → F.15, F.18composer un numéro......................................................... F.72connecter un téléphone ..................................................... F.61connexion Bluetooth .......................................................... F.61consommation de carburant .............................................. F.55coupure du son .................................................................. F.20
Ddéconnecter un téléphone ................................................. F.62décrocher un appel ....................................................F.14, F.72démarrage du moteur à distance..........F.5 → F.7, F.74 → F.76désappairer un téléphone .................................................. F.60destination ........................F.36 → F.41, F.39, F.46, F.49 – F.50destination spéciale
adresse en favoris ....................................................... F.39détour ........................................................................F.46, F.54
EECO conduite .................................................................... F.55économies de carburant .................................................... F.55écran
affichages de navigation ......................... F.7, F.42 → F.47écran navigation ..............................................F.42 → F.47menu .............................................................................. F.7réglages ....................................................................... F.48veille .....................................................................F.13, F.16
étape.................................................................................. F.46
Ffaçades et commandes au volant ............................F.8 → F.15favori
ajouter .......................................................................... F.41supprimer ..................................................................... F.50
fonctions ....................................................................F.5 → F.7

F.96
INDEX ALPHABÉTIQUE (2/3)Ggamme d’ondes .....................................................F.21 → F.24GPS
récepteur ..............................................................F.32, F.53réception ...................................................................... F.32
graves ................................................................................ F.29guidage
activation ...................................................................... F.42carte .................................................................F.42 → F.47vocal ...........................................F.13 → F.15, F.42 → F.47
Hheure ................................................................................. F.83
affichage ...................................................................... F.83historique des appels......................................................... F.71
Iinfos trafic ........................................F.5 → F.7, F.23, F.41, F.54itinéraire détaillé ...............................................F.41, F.44, F.47
Llangue
modifier ........................................................................ F.83langues .............................................................................. F.83
Mmarche............................................................................... F.16média .....................................................................F.13 → F.15mémoriser une station radio .............................................. F.22MENU ................................................................................ F.13menu de destination ..............................................F.36 → F.41mode 3D/2D ...................................................................... F.42mode LIST/LISTE .............................................................. F.22mode MANU/MANUEL ...................................................... F.21mode MEMO ..................................................................... F.22MP3 ................................................................................... F.25
Nnuméroter .......................................................................... F.72
Pparamétrage ...................................................................... F.47POI ............................................................... F.35 → F.41, F.48point d’intérêt ....................................... F.34, F.36 → F.41, F.48position véhicule ................................................................ F.33précautions d’utilisation ....................................................... F.3prise Jack .............................................. F.5, F.13, F.25 → F.27prise USB ......F.5, F.13, F.25 → F.27, F.30 – F.31, F.85 → F.89
Rraccrocher un appel ........................................................... F.14radio...........................................F.5, F.13 → F.15, F.21 → F.24RDS ..................................................................................... F.5recevoir un appel ............................................................... F.72recherche accélérée .......................................................... F.25reconnaissance vocale ..............F.14 – F.15, F.63 → F.65, F.68réglages ..............F.13 → F.15, F.23, F.52 → F.54, F.82 → F.84réglages audio
réglages son ....................................................F.13 → F.15réglages navigation
réglages itinéraire ..............................................F.40 – F.41réglages
audio .........................................................F.28 – F.29, F.82luminosité ..................................................................... F.82répartition du son arrière / avant .................................. F.29répartition du son gauche / droite ................................ F.29
répertoire ........................................................................... F.70
Ssaisir une adresse ............................................................. F.36sélectionner
piste ............................................................................. F.27

F.97
INDEX ALPHABÉTIQUE (3/3)source
audio ................................................................F.13 → F.15source auxiliaire.....................................................F.25 → F.27station radio ...........................................................F.21 → F.24symboles cartographiques................................................. F.33système
mise à jour .......................................................F.85 → F.89
Ttéléphone ............................................................................. F.6
Uunité de distance ............................................................... F.83USB .......................................................................F.85 → F.89
Vvalider une destination.............................................F.40 – F.41vidéos ......................................................................F.30 – F.31volume .......................................................... F.13 → F.15, F.20volume : adapté à la vitesse ......................................F.20, F.28volume communication ...................................................... F.20volume sonnerie ................................................................ F.29
WWMA .................................................................................. F.25

F.98

GB.1
User precautions . . . . . . . . . . . . . . . . . . . . . . . . . . . . . . . . . . . . . . . . . . . . . . . . . . . . . . . . . . . . . . . . GB.3General information . . . . . . . . . . . . . . . . . . . . . . . . . . . . . . . . . . . . . . . . . . . . . . . . . . . . . . . . . . . . . . GB.5
General description . . . . . . . . . . . . . . . . . . . . . . . . . . . . . . . . . . . . . . . . . . . . . . . . . . . . . . . GB.5Introduction to the controls . . . . . . . . . . . . . . . . . . . . . . . . . . . . . . . . . . . . . . . . . . . . . . . . . . GB.8Switch on/off . . . . . . . . . . . . . . . . . . . . . . . . . . . . . . . . . . . . . . . . . . . . . . . . . . . . . . . . . . . . . GB.16Operate and use . . . . . . . . . . . . . . . . . . . . . . . . . . . . . . . . . . . . . . . . . . . . . . . . . . . . . . . . . . GB.17Volume . . . . . . . . . . . . . . . . . . . . . . . . . . . . . . . . . . . . . . . . . . . . . . . . . . . . . . . . . . . . . . . . . GB.20
Radio/AUX . . . . . . . . . . . . . . . . . . . . . . . . . . . . . . . . . . . . . . . . . . . . . . . . . . . . . . . . . . . . . . . . . . . . . GB.21Listen to the radio . . . . . . . . . . . . . . . . . . . . . . . . . . . . . . . . . . . . . . . . . . . . . . . . . . . . . . . . . GB.21Auxiliary audio sources . . . . . . . . . . . . . . . . . . . . . . . . . . . . . . . . . . . . . . . . . . . . . . . . . . . . GB.25Audio setting . . . . . . . . . . . . . . . . . . . . . . . . . . . . . . . . . . . . . . . . . . . . . . . . . . . . . . . . . . . . . GB.28
Video . . . . . . . . . . . . . . . . . . . . . . . . . . . . . . . . . . . . . . . . . . . . . . . . . . . . . . . . . . . . . . . . . . . . . . . . . GB.30Navigation . . . . . . . . . . . . . . . . . . . . . . . . . . . . . . . . . . . . . . . . . . . . . . . . . . . . . . . . . . . . . . . . . . . . . GB.32
The navigation system . . . . . . . . . . . . . . . . . . . . . . . . . . . . . . . . . . . . . . . . . . . . . . . . . . . . . GB.32Reading a map . . . . . . . . . . . . . . . . . . . . . . . . . . . . . . . . . . . . . . . . . . . . . . . . . . . . . . . . . . . GB.33Enter a destination . . . . . . . . . . . . . . . . . . . . . . . . . . . . . . . . . . . . . . . . . . . . . . . . . . . . . . . . GB.36Guidance . . . . . . . . . . . . . . . . . . . . . . . . . . . . . . . . . . . . . . . . . . . . . . . . . . . . . . . . . . . . . . . GB.42Map settings . . . . . . . . . . . . . . . . . . . . . . . . . . . . . . . . . . . . . . . . . . . . . . . . . . . . . . . . . . . . . GB.48Managing the favourites . . . . . . . . . . . . . . . . . . . . . . . . . . . . . . . . . . . . . . . . . . . . . . . . . . . . GB.49Navigation settings . . . . . . . . . . . . . . . . . . . . . . . . . . . . . . . . . . . . . . . . . . . . . . . . . . . . . . . . GB.51
Eco² driving . . . . . . . . . . . . . . . . . . . . . . . . . . . . . . . . . . . . . . . . . . . . . . . . . . . . . . . . . . . . . . . . . . . . GB.554x4 info . . . . . . . . . . . . . . . . . . . . . . . . . . . . . . . . . . . . . . . . . . . . . . . . . . . . . . . . . . . . . . . . . . . . . . . GB.56Bluetooth® device . . . . . . . . . . . . . . . . . . . . . . . . . . . . . . . . . . . . . . . . . . . . . . . . . . . . . . . . . . . . . . . GB.57
Pairing/unpairing Bluetooth® devices . . . . . . . . . . . . . . . . . . . . . . . . . . . . . . . . . . . . . . . . . GB.57Connecting/disconnecting Bluetooth® devices . . . . . . . . . . . . . . . . . . . . . . . . . . . . . . . . . . GB.61Using voice recognition . . . . . . . . . . . . . . . . . . . . . . . . . . . . . . . . . . . . . . . . . . . . . . . . . . . . GB.63
Android Auto™, CarPlay™ . . . . . . . . . . . . . . . . . . . . . . . . . . . . . . . . . . . . . . . . . . . . . . . . . . . . . . . . GB.66Phonebook . . . . . . . . . . . . . . . . . . . . . . . . . . . . . . . . . . . . . . . . . . . . . . . . . . . . . . . . . . . . . . GB.70Making, receiving a call . . . . . . . . . . . . . . . . . . . . . . . . . . . . . . . . . . . . . . . . . . . . . . . . . . . . GB.71

GB.2
Remote engine start-up . . . . . . . . . . . . . . . . . . . . . . . . . . . . . . . . . . . . . . . . . . . . . . . . . . . . . . . . . . . GB.74Reversing camera . . . . . . . . . . . . . . . . . . . . . . . . . . . . . . . . . . . . . . . . . . . . . . . . . . . . . . . . . . . . . . . GB.77Multi-view camera . . . . . . . . . . . . . . . . . . . . . . . . . . . . . . . . . . . . . . . . . . . . . . . . . . . . . . . . . . . . . . . GB.80System settings . . . . . . . . . . . . . . . . . . . . . . . . . . . . . . . . . . . . . . . . . . . . . . . . . . . . . . . . . . . . . . . . . GB.82Updating the system . . . . . . . . . . . . . . . . . . . . . . . . . . . . . . . . . . . . . . . . . . . . . . . . . . . . . . . . . . . . . GB.85Operating faults . . . . . . . . . . . . . . . . . . . . . . . . . . . . . . . . . . . . . . . . . . . . . . . . . . . . . . . . . . . . . . . . . GB.90

GB.3
PRECAUTIONS DURING USE (1/2)
Precautions when operating the system– Operate the controls (on the dash or near the steering wheel) and read the information on the screen only when road
conditions allow.– Set the volume to a reasonable level so that outside noise can be heard.Precautions regarding navigation– Use of the navigation system does not in any way replace the responsibility or vigilance of the driver when driving the vehi-
cle.– Depending on the geographical area, the map may not have the latest information on new roads. Be alert. In all cases, Road
Traffic Regulations and road signs always take precedence over the directions of the navigation system.Precautions concerning the equipment– Do not attempt to dismantle or modify the system, as there is a risk of damage to equipment and fire.– Contact a representative of the manufacturer in the event of malfunction and for all operations involving disassembly.– Do not insert foreign bodies into the player.– Do not use products containing alcohol and/or spray fluids on the area.Precautions when using the phone– There are laws which govern the use of phones in vehicles. They do not necessarily authorise the use of hands-free phone
systems under all driving conditions: drivers must be in control of their vehicles at all times;– Using a phone whilst driving is a significant distraction and risk factor during all stages of use (dialling, communicating,
searching for a number in the handset memory, etc.).
It is essential to follow the precautions below when using the system, both in the interest of safety and to prevent material damage. You must always comply with the laws of the country in which you are travelling.

GB.4
The description of the models given in this manual is based on the specifications at the time of writing. This manual covers all existing functions for the models described. Whether or not they are fitted depends on the equipment model, op-tions selected and the country where they are sold. This manual may also contain information about functions to be introduced later in the model year. The screens shown in the user manual are not contractual.Depending on the make and model of your telephone, some functions may be partially or completely incompatible with your vehicle’s multimedia system.For more details, please consult an Authorised Dealer.
PRECAUTIONS DURING USE (2/2)

GB.5
GENERAL DESCRIPTION (1/3)IntroductionYour vehicle’s multimedia system per-forms the following functions:– RDS radio;– DAB radio;– management of auxiliary audio
sources;– Hands-free phone;– voice recognition;– navigation assistance;– road traffic information;– information on areas for particular
care;– Parking distance control (Rear view
camera or Multi-view camera);– remote engine start-up program-
ming;– Information on the incline of the vehi-
cle (4x4 information);– information on your driving style and
driving advice in order to optimise your fuel consumption.
Radio functionsThe multimedia system can be used to listen to FM (frequency modulation), DAB (digital audio) and AM(amplitude modulation) radio.The DAB system allows better sound reproduction and access to text infor-mation about the current programme etc.The RDS system makes it possible to display the name of some stations or messages sent by FM stations to be displayed:– general traffic information (TA);– emergency message(s).
Auxiliary audio functionYou can listen to your personal stereo directly through your vehicle’s speak-ers. There are several ways of connect-ing your personal stereo, depending on the type of device you have:– 3.5 mm Jack socket;– USB audio;– Bluetooth® connection.For more information on the list of com-patible devices, please contact an au-thorised dealer or visit the manufactur-er’s website if available.

GB.6
GENERAL DESCRIPTION (2/3)Hands-free phone functionThe Bluetooth® hands-free system provides the following features without having to handle your phone:– send/receive/suspend a call;– consult the list of contacts from the
phone memory;– access the call logs for calls which
have come through the system;– dial emergency numbers.
Telephone compatibilitySome phones are not compatible with the hands-free system, and do not enable you to use all of the available functions or do not provide the best possible sound quality.For more information on compatible phones, contact an authorised dealer or visit the manufacturer’s website if available.
Navigation assistance functionThe navigation system automatically calculates the geographical position of the vehicle by receiving GPS signals.It suggests a route to your chosen des-tination using its road map. Finally, it in-dicates the route to take, step by step, using the display screen and voice messages.
Traffic informationThis function keeps you informed about traffic conditions in real time.
Road safety alerts or alert pointsThis service allows you to receive alerts in real time, such as excess speed alerts or the position of road safety alert areas.
Remote engine start-up functionWhen fitted, this function lets you pro-gramme the engine to start remotely, in order to heat or ventilate the passen-ger compartment up to 24 hours before using the vehicle.
Driving eco2The “Driving eco²” menu displays a real-time overall score that reflects your driving style.
Your hands-free phone system is only intended to facilitate communication by reducing the risk factors, without remov-ing them completely. You must always comply with the laws of the country in which you are travelling.

GB.7
DisplaysMenu screen1 Mode selection area. Displays the selected mode. When
the mode selection area is touched, a drop-down menu will appear.
2 Table of contents area. Shows the contents of a menu item
and related information.3 Telephone information area. If the Bluetooth® system is activated,
the reception and battery level of the connected device will be displayed.
4 Exterior temperature.5 Time area.6 Menu area: – display subordinate menu of
mode; – shows current menu as high-
lighted.7 Area Home or return to navigation. Depending on the mode you are in,
this area displays: – the Home button: goes back to
the home menu; – the Back button: goes back to the
previous screen; – the Flag button: return to the navi-
gation screen.
8 Mode standby and clock display9 Remote engine start selection area.
Navigation screen10 Map mode (2D/3D and 2D North).11 Name of the next street to take on
your route.12 Current audio information.13 Options for route and map setting.14 Voice guidance On/Off.15 Traffic information.
6
10 11
1213
GENERAL DESCRIPTION (3/3)
7
321
14
Player List Options Destination
4 5 8
Radio Media Phone
Driving eco2 Nav Setting
Dark
9
Set TimePresets
15

GB.8
Screen selections are made by touching the desired selection on the screen.
INTRODUCTION TO THE CONTROLS (1/8)
2 3A 41
7 5810
Destination
9
System panels
6 2
7 5810
Destination
9 6
1 3B

GB.9
System panelsINTRODUCTION TO THE CONTROLS (2/8)
Screen selections are made by touching the desired selection on the screen.
2
3A4
7 5
1
810 9
Destination
6
2
3B
7 5
1
810 9
Destination
6

GB.10
1516
11 12
19
12
17
16
18
19
12
17
16
18
AB
1516
11 12
INTRODUCTION TO THE CONTROLS (3/8)
17 18
131313
14 14 14
14
13 13
14
12
16
C
D E
Steering column controls
17 18
13
14
12
16
F

GB.11
INTRODUCTION TO THE CONTROLS (4/8)
20
11 12
1516
13
14
G 17 18H
12
17 18
1916
13
14
J
12
13
14
1916
13
14
K
16 15
17 18

GB.12
INTRODUCTION TO THE CONTROLS (5/8)
21
Steering column controls21 12
1314
151120
21 21

GB.13
Function
1 Tap: standby screen ON / OFF.Long press: restarts the system.
2, 13, 14 Adjust the volume.
3A USB. connection
3B Activate/deactivate voice recognition on your smartphone if it is connected to the multimedia system.
4 3.5 mm Jack socket.
5 Access the media currently playing (FM/AM/DAB/USB/iPod®/Bluetooth®/AUX).
6 Access the “Navigation” menu.
7
Access the “Home” menu.
Phone or auxiliary sources: exit the current window to return to the navigation screen (current) or to the previous screen.
8 Mute/unmute the voice guidance.
9 Change the map zoom.
10 Change the map view mode (2D/3D/2D North).
11 Choose audio source (FM/AM/DAB/USB/iPod®/Bluetooth®/AUX).
INTRODUCTION TO THE CONTROLS (6/8)

GB.14
Function
12
When receiving a call:– Short press: answer the call;– Long press: reject the call.Brief press during a call: end call.When listening to an audio source: mute/unmute the sound (only for controls C, D, E, F, H and J).Short press: access to the “Phone” menu (only for controls A, B and G).Tap: activate/deactivate your smartphone voice recognition (only for control A).
13 Increase the volume of the audio source currently in use.
14 Decrease the volume of the audio source currently in use.
13+14 Mute/unmute the sound (only for controls A, B and K);
15, 19Radio: change radio station play mode (“Main”, “List”, “Presets”).Media (USB / iPod): change play mode for the media currently playing (“Main” or “List”).
16
Rear dial:– Radio: change radio mode (preset/list/frequency);– Media: previous/next track.Tap: confirm an action (only for control C).
17 Change media (CD/USB/AUX).
INTRODUCTION TO THE CONTROLS (7/8)

GB.15
Function
18 Tap: change radio mode (FM /AM /DAB).Press and hold: activate/deactivate your smartphone voice recognition (only for control C, E and J).
20Radio mute on/off.Pause/play an audio track.Interrupt the voice recognition voice synthesizer.
21 Activate/deactivate voice recognition on your smartphone if it is connected to the multimedia system.
INTRODUCTION TO THE CONTROLS (8/8)

GB.16
ON/OFF SWITCH
Switching onThe multimedia system switches on au-tomatically when the ignition is switched on. In other cases, press button A to switch on the multimedia system.With the ignition off, you can use the system for twenty minutes. Press the A button to make the multimedia system operate for about twenty more minutes.
Standby screenThe standby clock mode allows the dis-play screen to be switched off.When in standby clock mode, the radio or guidance system does not operate.The standby screen displays the time and exterior temperature.Briefly press A to activate/deactivate the standby screen.
AA
Switching offThe multimedia system may take a few minutes to turn off after the ignition is switched off depending on the applica-tions in operation.Press and hold the A button (until a black screen appears) to restart the multimedia system.
For safety reasons, if the temperature is too low or too high inside the vehicle, the multimedia system will not start or will switch off automatically. Wait a few moments for the temperature to return to a more suitable level for the multimedia system to operate properly.

GB.17
OPERATE AND USE (1/3)– fast-forward or rewind (Media play-
ing screen).From the “Media” > “Player” menu, pressing and holding the “Fast forward/rewind” button fast forwards/rewinds the track playing.
Multimedia screen 1Tap (short press):– Item selection;– Item execution (Media playing
screen).From the “Media” > “Player” menu, pressing the next button switches to the next title.
1 1
Press and Hold (long press):– saving an item (radio station for ex-
ample).From the “Radio” > “Main” menu, press-ing and holding the preset number stores the radio station currently play-ing.– Fast scroll.When touching with long presses the list down buttons, scroll (per page) with acceleration.

GB.18
OPERATE AND USE (2/3)
56
A
4
Audio: using the steering column controlsPress button 5 to change the radio sta-tion search mode.Rotate wheel 6 to change the station (movement A).Press 4 to change the source(USB, AUX, AM, FM, DAB, iPod® and Bluetooth®).
2
Options
Off
Off
Off
On
On
On
Fast Short EcoRoute planning method
Motorways
Per-use Toll
Period Charge
Route settings
Return to the “Home” menu.The system goes directly to the “Home” menu if you press and hold 2 or briefly press 3 wherever you are in the system.
Player List OptionsPresets
3

GB.19
Using an alphabetical keyboardWhen entering a heading using an al-phabetical keyboard, choose each letter using the keypad.When choosing each letter, the system will remove the brightness of certain let-ters to help entering them.Press 7 to delete the last character en-tered.Press 8 to display the list of results.
Press 9 to use numbers or symbols.Press 10 to change the keyboard con-figuration.
7
910
Options
8
OPERATE AND USE (3/3)

GB.20
VolumeAdjust the sound level when listening to the different sources, messages, ring-tones and phone communications:– by turning or pressing button 1 on
the front panel of the multimedia system;
– by pressing control 13 or 14 on the steering column control.
To adjust this function, please refer to the information on “Audio preferences” in the section on “Audio settings”.The radio source being listened to is in-terrupted when “TA” traffic information, news bulletins or a warning message is received.Note: the volume set during playback is not stored for the next system restart.
MuteTo mute the sound, tap button 21 on the steering wheel control or 3B on the multimedia screen or on the steer-ing column control 12 (only for con-trols C, D, E, F, H and J) or simulta-neously press buttons 13 and 14 on the steering column control (only for con-trols A, B and K).The “MUTE” icon is displayed at the top of the screen to indicate that the sound is switched off.To continue listening to the audio source, tap button 21 on the steering wheel control or 3B on the multimedia screen or on the steering column con-trol 12 (only for controls C, D, E, F, H and J) or simultaneously press but-tons 13 and 14 on the steering column control (only for controls A, B and K).This function is deactivated automati-cally when the volume control is used or when a news or road traffic bulletin is broadcast.
Volume adjustment according to speedWhen this function is activated, the audio and navigation volume will vary according to the vehicle speed.To activate and adjust this function, please refer to the information on “Speed dependent volume control” of the section on “Audio settings”.
VOLUME
Set the volume to a reason-able level so that outside noise can be heard.

GB.21
LISTENING TO THE RADIO (1/4)
Selecting a wavelengthTo choose a waveband:– press 1;– choose the waveband “FM”, “AM” or
“DAB” by pressing on the required band.
1
Main List Presets Options
69 8 45
2
7
“Main” modeThis mode allows stations to be searched for either manually or au-tomatically by scanning the se-lected range of frequencies. Select “Frequency” mode by pressing 7.To scan the frequency range:– move up and down through the fre-
quencies in steps of 0.05 Hz by re-peatedly pressing 4 or 8;
– automatically go to the next station by pressing 3 or 9;
Repeat the operation each time the search stops if necessary.You can also move the control knob on the steering column control to move to the next station.Note: to go back to the welcome screen, press the 10 button.
Choose a radio station “FM”, “AM” or “DAB”.There are different modes for choosing a radio station.After having selected the wavelength, select the mode by pressing tabs 5, 6 or 7.Several search methods are provided:– “Main” mode (tab 7);– “List” mode (tab 6);– “Presets” mode (tab 5).These modes can be changed using the steering column control.Note: the 2 marker indicates the posi-tion in your saved list of the radio sta-tion currently playing.
10 3

GB.22
LISTENING TO THE RADIO (2/4)Press one of the buttons in zone A to choose the saved stations.Note: to go back to the welcome screen, press the 10 button.
Storing a stationSelect a radio station by using one of the modes described above. Press and hold one of the buttons on the zone A.You can save up to twelve stations per waveband.Note: the 15 symbol indicates the sta-tion you are currently listening to.Marker 16 indicates the number of pages in this section.To move to the next page, press button 17.
A
Main List Presets Options
15
The names of the radio stations that do not use RDS will not appear on the screen. Only their frequency is dis-played and sorted at the end of the list.
“Presets” modeSelect “Presets” mode by pressing 18.This mode allows you to recall on demand those stations which you have already stored (refer to information on “Saving a station” in this section).
“List” modeSelect “List” mode by pressing 14.This operating mode allows you to find a station easily by name from an alpha-betical list (on “FM” and “DAB” only).Select the station required by pressing zone 12.Press 13 to scroll through all the sta-tions.Note: the 11 symbol indicates the sta-tion you are currently listening to.
12 1311
Main List Presets Options
14 1810
16 17

GB.23
LISTENING TO THE RADIO (3/4)“RDS”The “RDS” function makes it possible to listen to a station without interruption during a journey by dealing automati-cally with changes in frequency.You are notified of the radio station you are listening to in text form as well as traffic information and messages throughout your journey.Traffic information is generally sent via “RDS”.Note: not all radio stations offer this possibility.Poor reception can sometimes cause erratic and annoying changes in fre-quency. In this case you should deac-tivate the automatic frequency retuning.
19
“TA” (traffic information)When this feature is activated, your multimedia system looks for and plays traffic bulletins automatically as new re-ports are issued by some radio stations “FM” and “DAB”.Note: The automatic broadcasting of traffic information is deactivated when the audio system is set to the “AM” band.Traffic information is broadcast au-tomatically and has priority over the source being listened to at the time.Select “On” to activate this function or “Off” to deactivate it.
Main List Presets Options
RDS
TA
Region
News
Off
Off
Off
Off
On
On
On
On
Radio settingsDisplay the settings menu by press-ing 19. You can activate or deactivate functions by pressing “On” or “Off” (the setting menu varies depending on the waveband).The available functions are as follows:– “RDS”;– “TA” (traffic information);– “Region”;– “News”;– “AM”;– “DLS”;– “Announcement”;– “Update List”.

GB.24
LISTENING TO THE RADIO (4/4)“News”When this function is activated, it is pos-sible to automatically listen to news as it is broadcast by certain “FM” or “DAB” radio stations.If you then select the other sources, when a broadcast of the selected pro-gramme type is made, it will interrupt the other sources.Select “On” to activate this function or “Off” to deactivate it.
“Region”The frequency of an “FM” radio station may change depending on the geo-graphical area.In order to keep listening to the same radio station when changing region, ac-tivate the “Region” function so that your multimedia system can automatically retune the frequency.Note: only the station currently playing is able to follow a change of region.Note: this is only available for certain radio stations.Note: “Region” is available only if the “RDS” function is activated.Poor reception can sometimes cause erratic and annoying changes in fre-quency. In this case you should deac-tivate this function.Select “On” to activate this function or “Off” to deactivate it.
“AM”You can activate or deactivate the “AM” band.Select “On” to activate this function or “Off” to deactivate it.
“DLS”Some radio stations broadcast text in-formation relating to the programme being aired (the title of a track, for ex-ample).
“Update List”To update the list of stations and obtain the most recent ones, press “Start”.Note: preferably update the “DAB” list as soon as your system is switched on.

GB.25
AUXILIARY AUDIO SOURCES (1/3)Your system has two types of auxiliary inputs:– for connecting an external audio
source (MP3 player, portable music player, USB key, phone, etc).
– with Bluetooth® (Bluetooth® audio player, Bluetooth® phone).
To find the input position, please refer to the section on “Introduction to the controls”.
Operating and connection principlesThere are two types of connections:– a USB socket;– a Jack socket.Connect your portable audio player, de-pending on the type of device.Once you have connected a USB socket or jack, the system automati-cally detects the auxiliary source.Note: the USB key used must be for-matted to FAT32 format and have a maximum capacity of 32GB.
Selecting an auxiliary sourceTo select an input source, press 1.A list of available input sources is dis-played instantly:– USB: USB key, MP3 player, tele-
phone, etc. ;– iPod®: device with integrated iPod®;– BT: Bluetooth® devices;
– Video: USB flash drive (MP4 file);– AUX: 3.5 mm jack.In navigation mode or when listen-ing to the radio, select your auxiliary audio source by pressing “Home”, then “Media”.The system starts playing the last audio track played.
Only handle the portable audio player when traffic conditions permit.Store the portable audio player safely while driving (risk of being thrown in the event of sudden braking).
Main List Options
1

GB.26
AUXILIARY AUDIO SOURCES (2/3)ShuffleThis function lets you play all songs in shuffle mode. Press 3 and then press “On” or “Off”.
Auxiliary input: USB socket, Bluetooth®Connection: USB and portable digital audio playerConnect the socket of your portable audio player to the USB input on the unit.Once the USB socket of the digital por-table audio player is connected, the “USB” menu is displayed.Note: Some types of portable digital player may not be able to be connected.
Charging with the USB portOnce your player’s USB socket is connected to the USB port of the unit, you can charge or maintain the battery during use.Note: some devices do not recharge or maintain battery charge level when they are connected to the USB port on the multimedia system.
Connection: iPod®Connect the socket of your iPod® to the USB input on the unit. Once the USB socket of your iPod® is connected, the “iPod” menu is displayed.
UseSelect “iPod” from the drop-down list 1, then press on the playback list or the desired audio track on the multimedia system screen.All audio tracks on your “iPod” can be selected directly on the multimedia system screen.Note: Once connected, you will no longer be able to control the audio di-rectly from your “iPod”. You must use the keys on the system’s front panel.Note: Use the iPod® cable for exclu-sive use of an iPod® when connecting an iPod® to the USB socket.
Audio formatsOnly MP3 and WMA formats are recog-nised by the multimedia system.
Fast windingLong press 2 to fast forward or rewind. Playback resumes when the button is released.
RepeatThis function enables you to repeat one or all tracks. Press 3, then “Off”, “Track”, “Folder” or “All”.
1
3
Player List Options
2

GB.27
Connection: Bluetooth®Refer to the section on “Connecting/disconnecting Bluetooth® devices”. Once Bluetooth® is connected, the “BT” menu is displayed.
UseSelect “BT” from the drop-down list 1, then press on the playback list or the desired audio track on the multimedia system screen.All the audio tracks on your Bluetooth® device can be selected directly from the multimedia system screen.Note: Once connected, you can no longer directly control your portable dig-ital audio player. You must use the keys on the system’s front panel.
AUXILIARY AUDIO SOURCES (3/3)Auxiliary input: jackConnectionConnect the jack of your portable audio player to the jack input.
UseSelect “AUX” from the drop-down list 1, then select the desired track on your music player. No indication of the name of the artist or the track is displayed on the system’s screen.Select tracks directly on your portable player when the vehicle is stationary.
Selecting a trackTo select an audio track within a folder, press “List”, then select a track A from this list.To go back to the previous level in the folder hierarchy, press 4.By default, albums are listed in alpha-betical order.Depending on the type of digital port-able audio player, you can refine your selection by using folders or files.Note: it is best to use a USB connec-tion for easier music searches.
1
Main List Options
The sound quality from the ana-logue input (AUX) will usually be lower than the sound quality from digital inputs (USB, Bluetooth®).
A
4

GB.28
AUDIO SETTINGS (1/2)
Display the settings menu by pressing “Home” > “Setting”. Press 2 to access the audio settings.You can leave the settings menu and return to the welcome page by press-ing 3.
Volume adjustment according to speed (“Vol/Speed”)When the speed of your vehicle is more than (40 km/h) 25 mph, the volume level outputs higher than original volume level.Adjust the volume/speed ratio by press-ing one of the buttons in zone 1.You can deactivate this function by pressing “Off”.
1
3 2
Audio Display SystemConnectivity
Loudness
Sound
Off
Off
On
Audio Settings
Vol/Speed
BAL/FAD
“Loudness”Press “On” or “Off” to activate/deacti-vate the loudness function, which ac-centuates the bass and treble.

GB.29
AUDIO SETTINGS (2/2)
4
8 7 6
BAL/FAD
Ok
Bass +3
Mid +0
Treble -2
Right/left and front/rear balanceTap 6 or 8 to adjust the sound the left/right balance.Tap 4 or 7 to adjust the sound the front/rear balance.After setting balance, press “Ok” to confirm.
Bass, Mid, TreblePress the 5 arrows to adjust the bass, medium and treble.Once the adjustments have been made, press “Ok” to confirm.
Audio preferencesDisplay the audio preferences menu by pressing 9.You can adjust the volume of each sound independently.– “Audio”;– “TA”;– “Navigation”;– “Phone”;– “Ring” (telephone).To do this, press “+” or “-”.Press 11 to reset all the audio prefer-ences.
Press 10 to move to the next page.Tap 12 to go back to previous screen.
Audio Display SystemConnectivity
Loudness
Sound
Off
Off
On
Audio Settings
Vol/Speed
BAL/FAD
9 12 1011
Audio
AT
Nav
Reset to defaults
5 5

GB.30
VIDEO (1/2)
When playing a video, you can:– press 8 to restart the video from the
beginning, press 8 again to access the previous video;
– pause by pressing 7;– access the next video by pressing 6– use the scroll bar 5 to move up and
down rapidly;
“List” modePress the “List” tab 2 to view the videos available. Select the video you would like to view by pressing the area 3. The selected video is played automatically.
“Player” modePress the “Player” tab 4 to view the se-lected video.
Your system enables you to view videos via USB flash drive.Insert your USB flash drive into the mul-timedia system.From the “Media” menu, select “Video” mode 1.Note: some video formats may not be readable by the system.Note: the USB key used must be for-matted to FAT32 format and have a minimum capacity of 8GB and a maxi-mum capacity of 32GB.Note: the input sources described above may vary.
1
ListPlayer Options ListPlayer Options
Video
24 3
ListPlayer Options
8 7 6
5

GB.31
VIDEO (2/2)
“Options” modePress the “Options” tab 12 to:– access the playback settings;– view detailed video information (title,
type, date, etc.).
– view the video in full screen by press-ing 9;
– adjust the brightness of the screen by pressing 10. A control bar will appear for you to perform the adjust-ment. Touch the screen outside this bar to make it disappear and con-tinue the video playback;
– return to the previous menu by press-ing 11.
List ListPlayer Player
View mode
information
Fit Full
Options Options
1011 129
Video playback is only possible when the vehicle is stationary.

GB.32
THE NAVIGATION SYSTEMThe navigation systemThe navigation system calculates your position and guides you by using data:– from the GPS receiver;– from the digital map.
The GPS receiverThe navigation system uses GPS (Global Positioning System) satellites orbiting the Earth.The GPS receiver receives signals transmitted from several satellites. The system can then locate the position of the vehicle.Note: after moving a long distance without driving (ferry, rail freight), the system may take several minutes to adjust before retuning to normal opera-tion.
The digital mapThe digital map contains the road maps and town maps that the system re-quires.
“Map” USB keyInstall the most recent version by in-serting your USB key into a computer that is connected to the Internet. Refer to the section on “Map update”.Note: USB key is not supplied with the system.If possible, always use the most recent version.
Insert the USB keyConnect your USB flash drive into the USB socket C on your multimedia system or your vehicle.
C
C
C

GB.33
READ A MAP (1/3)
Displaying the mapTo display the map around the current vehicle position, press “Home” > “Nav”.Touch the map screen.To move around the navigation map, drag the desired direction on the screen. Press 1 to return to your cur-rent position.Press 3 to zoom in or out.
Map key4 Navigation display options.5 Access different display modes:– 3D mode;– 2D mode;– 2D North mode (the top of the map
always faces north).6 Name of the next major road or road
sign information.7 Route calculated by the navigation
system.8 Distance to and direction of next
change of direction.
9 Estimated time of arrival.10 Media currently playing.11 Distance remaining to the destina-
tion.12 Location of the vehicle on the navi-
gation map.13 Mute/unmute the voice guidance.14 Traffic information. Press this area to
find out about the different incidents present on your route.
Position GPSThis function makes it possible to find out the geographical location of the se-lected position (Address/latitude/longi-tude). Touch desired position on the screen. Press “Options” and then press “News” to find out the exact location of the se-lected position.
Map iconsThe navigation system uses symbols 2 to display points of interest (POI). Refer to the information on “Displaying points of interest” in the section on “Map set-tings”.
6 8
9111214
42 7
10
3
3
1 5
Options Ok Destination
13

GB.34
“Where Am I?”This function allows you to check infor-mation about the current position and to search for POI nearby. It operates when GPS is activated.Press “Options” on the map screen then “Where Am I?”.This screen includes the following infor-mation:– Latitude;– Longitude;– Altitude; – house number;– Current address.
READ A MAP (2/3)
Country informationPress 15 then “Country Info”.This function allows you to view country information depending on your current position.This screen includes the following infor-mation:– speed limit.Speed limits are displayed for major roads. Displayed unit depends on active regional settings. If no data is available, then “--” is shown instead of table and number.
15
– Phone country code;– emergency number;– legal Restrictions effective in the
country:– maximum permitted blood alcohol level;– high-visibility vest required;– fire extinguisher required;– headlights must be on at all times;– spare bulbs required;– first aid kit required;– warning triangle required;– helmets required for motorcy-clists;– snow chains required in winter;– snow chains recommended in winter;– winter tyres required in winter;– winter tyres recommended in winter.
Options Help Nearby
Where Am I?
Latitude
Longitude
Altitude
Country information : France
Maximum blood alcohol content: 0.5 ‰
Within Towns
Countryside Fast road Motorway
Phone country code : +33Emergency number : 112
Current GPS position
0 m
E2.49608°
N48.82995°

GB.35
« Help Nearby »This function allows you to search for assistance near your current position.Press 16 to open a new screen for the quick search.
READ A MAP (3/3)
Information on this screen:– car repair services;– medical and emergency services;– police stations;– petrol stations.To search for a destination from this screen, please refer to the section on “Entering a destination” and the infor-mation on “Selecting points of interest (POI)”.
Help Nearby
Car repairAround here
Around here
Around here
Around herePolice
Health
Service station
16
Options Help Nearby
Where Am I?
Latitude
Longitude
Altitude
Current GPS position
0 m
E2.49608°
N48.82995°

GB.36
ENTERING A DESTINATION (1/6)Destination menuPress “Home” > “Nav” > “Destination” to access the destination menu.The destination menu offers several methods to enter a destination:– enter an address (complete or par-
tial);– select an address from “Points of in-
terest”;– select a destination from the previ-
ous destinations;– select an address from the
Favourites;– select for destination by using the
map;– select a latitude and longitude.
Entering an addressTo enter an address, press 1.This item allows you to enter all or part of the address: country, town, street and house number.Note: only addresses known to the system through the digital map are au-thorised.
When using for the first time:– press “Country”;– enter the name of the country re-
quired using the keypad.When entering the address the system will remove the brightness of certain let-ters to help enter the address.The system may suggest several coun-try lists by pressing 2. Select the re-quired country in the lists.– Do the same for “Town/Area”,
“Street”, “Cross street” and “Street number”.
Note: “Cross street” and “Street number” can be activated after select-ing “Street”.Note: when entering the street, it is not necessary to specify the type of road (street, avenue, boulevard, etc.).Note: The system stores previous ad-dresses in its memory. Once you have entered a destination by address, that address will be displayed when the device is next used.
2
Options
Navigation
Address HistoryPoints of interest
CoordinateFind on map
Destination Route Options
Favourites
1

GB.37
ENTERING A DESTINATION (2/6)
3 Quick search for points of interestThe quick search feature lets you quickly find a place.Press the map somewhere to search for points of interest. Depending on your position, one or more 3 points will be displayed on the screen.Press 4 and then “Points of interest around cursor” to show the list of points of interest with names and distance from the place selected.
Searching for points of interest using preset categoriesThe preset search feature lets you quickly find the most frequently se-lected types of places.Press “Home” > “Nav” > “Destination” > “Points of interest” to access preset categories.
Select from the “Points of interest” (POI)You can select your destination from the points of interest.You can find a place in different ways:– with the quick search feature, you
can quickly find a nearby place by its name;
– with the preset search feature, you can find frequently searched types of places with only a few touches of the screen;
– you can search for a place by its cat-egory.
Categories(petrol station/parking/restaurant)– If an active route exists, the points
of interest “Petrol station” and “Restaurant” are searched for along the route. Point of interest “Parking” is searched around the destination.
– If there is no active route (destination is not selected), they are searched around the current position.
– If the current position is not avail-able either (no GPS signal), they are searched around the last known po-sition.
Options OK
Points of interest
Custom search
Petrol station
Parking
Restaurant
Around here
Around here
Around here
4

GB.38
ENTERING A DESTINATION (3/6)
Searching for Points of Interest by categoryYou can search for points of interest by their categories and subcategories.Press “Home” > “Nav” > “Destination” > “Points of interest” > “Custom search”. Select the area around which the place should be searched for:– Press “In a Town” to search for a
place within a selected town/suburb (the result list will be ordered by the distance from the centre of the se-lected city/town).
Where to find points of interest?
In a Town
Around my position
Vicinity of the des-tination
Along Route
– Press “Along Route” to search along the active route, and not around a given point. This is useful when you search for a later stopover that re-sults in a minimal detour only, such as searching for nearby petrol sta-tions or restaurants (the result list will be ranked by the length of the neces-sary detour).
– Press “Around my position” to search around the current position or if it is not available, around the last known position (the result list will be ordered by the distance from this position).
– Press “Vicinity of the destination” to search for a place around the desti-nation of the active route (the result list will be ordered by the distance from the destination).
Selecting a destination from the previous destinationsPress 5 to find a destination you have previously defined.
5Navigation
Address HistoryPoints of interest
CoordinateFind on map
Destination Route
Favourites
Options

GB.39
ENTERING A DESTINATION (4/6)Selecting an address from the FavouritesYou can find the destination to a loca-tion stored in the Favourites. To utilize this function more effectively, we rec-ommend that you save destinations to which you often travel in advance.Firstly, save the favourite destinations by searching for the address. Please refer to the section on “Managing fa-vourites”.Press “Home” > “Nav” > “Destination” > “Favourites” to display the list of fav-ourite destinations.
6 7
Selecting for destination by using the mapThis allows you search for a destination by scrolling the map.– Press “Home” > “Nav” > “Destination”
> “Find on map” to select the destina-tion on the map.
– Then press on the location on the map that you want to select as your destination. Point 6 is displayed;
– press 7 to confirm.
Entering the coordinate of the destinationThis allows you search for a destination by entering its coordinate.Press “Home” > “Nav” > “Destination” > “Coordinate”.You can enter the latitude and longitude values in any of the following formats: decimal degrees; degrees and decimal minutes; or degrees, minutes and deci-mal seconds.Press 8 and then UTM to enter the co-ordinates in UTM format.
8
Options OK Options OK
Coordinate

GB.40
ENTERING A DESTINATION (5/6)
Confirming the destinationThere are several possible options before confirming a destination:– “OK”;– “Options”.A 10 second countdown will start. If you perform no action during this time, guid-ance will begin automatically.
“OK”– If there is no active route (destination
is not selected), press 10 to confirm the destination as a new route.
Sorting the listThe result of searching a destination by point of interest, history and favourites can be sorted by name and distance. If an active route exists, they can be sorted by detour. Press 9 to display the map on the screen.
Finding a destination by namesIn case of selecting a destination by point of interest, history or favourites, you can search for destination in the list by their names. Press “Find” and enter the name using the keypad.
10
Options Options OK
Itinerary
Close
Points of interest found
Alternative routes
Simulate navigation
Route settings
– If an active route exists, you can select the destination as a new route or stage. Press 10 and then press “New route” or “Waypoint”.
“Options”Before the 10 second countdown ends, the following choices will appear on the screen:
“Alternative routes”Press 11 to change or modify the route.
9
Options OK
11

GB.41
ENTERING A DESTINATION (6/6)
“Current traffic”This function enables you to obtain in-formation on traffic incidents over the course of your trip, or in your immediate vicinity. To access this, press 14 then select “Current traffic”.
17
19
16“Options”At the end of the 10 second count-down, the following choices appear on the screen:
“Add to favourites”Press 17 to save the selected destina-tion in your favourite destinations.
“Current traffic”Press 16 to obtain information about traffic incidents flagged on your route or in your immediate vicinity.
“News”Press 20 to view the address, latitude, longitude and telephone number of a point of interest (only activated after se-lecting a point of interest).
“Back to car”Press 19 to return to the current vehicle position.Note: To close the “Options” window, press 18.
Current traffic
Close
Add to Favourites
Back to car
News
20“Itinerary”Press 12 to view a breakdown of your route. Please refer to the section on “Guidance”.
“Route settings”Press 13 to adjust your route depending on the desired roads and route mode.
“Simulate navigation”Press 15 to view of simulation of the route you have selected. Please refer to the section on “Guidance”.
Itinerary
Close
Alternative routes
Simulate navigation
Route settings
Options OK
12 13
15 18
14

GB.42
GUIDANCE (1/6)
Activating guidancePress 2 or wait 10 seconds after enter-ing a destination. Guidance will begin.Note: You can interact with the map at any time by sliding it in the desired di-rection or by pressing the screen.
Guidance screensThe system will offer several different navigation maps.Press 3 to change the map display and open the drop-down menu. Then select one of the different displays:– 2D;– 3D;– 2D North.You can also change the map display by pressing the compass 1 on the map.
Full-screen mode (2D, 3D or 2D North)This mode allows you to view the navi-gation map on the entire screen.The information on the arrival time and the distance remaining to the destina-tion are indicated in 5.The indication for the next change of di-rection is located in 4.
Destination
2
3
Destination
4
5
Options Ok (10)
1

GB.43
GUIDANCE (2/6)
Intersection mapDuring guidance, before each change of direction.
Alternative routeThe system offers an alternative route in the event of an accident or heavy traffic along the planned route. Press “Yes” or “No” as required.
Traffic summaryDuring guidance, you can get traffic in-formation at any time by pressing 6.
Motorway junction viewDuring guidance, before each motor-way junction, the system will display a three-dimensional view of the junction.Note: for some junctions, only a small turn arrow will appear on the map.The system will switch back to normal mode after you have passed the junc-tion.
Destination Radio
The screen gives you various events appearing on your route. The system will let you know the length of the delays caused by these incidents on your trip. Press 8 to change the event display settings. Press 10 to make a detour, 9 to access traffic options (please refer to the section on “Navigation settings”) or 7 to return to navigation.Note: traffic information depends on your subscription and on signal recep-tion.
7 9 1086
Destination
Traffic summary
There are no events affecting your route.Significant events:
0
All delay: 0 : 00
Flow events:Closure and blockAccidentLane restrictionOther:
0 OF 370 OF 160 OF 170 OF 260 OF 3
Event listV-Trafic
Options Offer detour

GB.44
Changing voice guidance languagePress “Home” > “Nav” > “Options” > “Setting” to change the language of the voice guidance.Scroll the language list by pressing 12. Select the desired language and press 11 to confirm.To set the voice guidance sound, please refer to the information on “Audio pref-erences” in the section on “Audio set-tings”.
1211
Voice language
Ok
Listening to the radio during voice guidanceWhile listening to a radio station during voice guidance and before each change of direction, the system will temporarily cut the sound of the radio until you pass the junction.You can access the radio station lis-tening screen during navigation by pressing 13. To return to the naviga-tion screen, press 14. To return to the main menu, keep 14 pressed down for around three seconds.
GUIDANCE (3/6)
Main List PresetsDestination
1413
Route informationThis function allows you to view your route.Press “Home” > “Nav” > “Itinerary” after entering a destination.Six choices will be given:– “Edit route”;– “To avoid”;– “Overview”;– “Cancel Route”;– “Alternative routes”;– “Itinerary”.
Options

GB.45
GUIDANCE (4/6)
“Simulate navigation”Press “Home” > “Nav“ > “Itinerary“ > “Overview“ > “Options“ > “Simulate navigation“ to simulate the route you will take to the destination.– Start or pause the simulation by
pressing 18.– Press 20 to increase the speed of the
simulation.– You can leave the route simulation at
any given moment by pressing 16.– To move to the previous/next ma-
noeuvre, press 17 or 19.
1716 18 19 2015
ItineraryDestination
Warnings Route settings Map settings
GPSCoordinate format
Voice settings
Navigation
Options
– the special points and sections of the route (e.g. toll gates, toll roads, mo-torways, etc.);
– alternative routes (e.g.: “Short” , “Fast” , “Economical”).
Press 15 to display the following op-tions:– “Warnings”;– “Route settings”;– “Map settings”;– “Voice settings”;– “Coordinate format”;– “GPS";– “Map Update”;– “Traffic”.NB: for further information, please see overleaf.
Route overviewPress “Home” > “Nav” > “Itinerary” > “Overview” to get a map with an over-view of the active route.The following information will be given:– the name and/or address of the des-
tination;– The total time of the route;– The total distance of the route;

GB.46
Edit routePress “Home” > “Nav” > “Itinerary” > “Edit route” to change the route by adding, modifying or deleting steps.Press 21 to add steps and 25 to add a new destination. It offers several methods to enter a destination. see the “Entering a destination” section.– Press 23 to delete a destination.– Press 24 to reorder the list.– Press 22 to change the route depar-
ture address.
25 24
21
Options Ok
23
Edit route
Current GPS position
22
GUIDANCE (5/6)
Route AlternativesThis section enables you to change the route planning method. Three modes are available, enabling you to change the route planning method.– « Fast » ;– “Economical”;– « Short ».Please refer to the information on “Route settings” in the section entitled “Navigation settings”.Press “Home” > “Nav” > “Itinerary” > “Alternative routes” then A, B or C to confirm the new route. Tap 28 to go back to previous screen.
AvoidancesPress “Home” > “Nav” > “Itinerary” > “To avoid” to make a detour. Press an area of the list depending on the de-sired detour.To change the area, press 27.Confirm the new route by pressing 26.
Cancel the routeAt any given moment, you can stop the guidance.Press “Home” > “Nav” > “Itinerary” > “Cancel Route” to cancel the active route.
2726 28
Ok
Alternative routes
Fast
Economical;
Short
Avoided sectionOriginal routeNew route
Length: -250 Time +0:06
A
B
C

GB.47
Press 29 to sort the route details:– by summary.
Only showing the main elements of the trip (start, destination) the total distance, remaining time and arrival time.
– By standard description.It shows all the manoeuvres and their signpost information, route num-bers, street name and distance. Also showing information and warnings, such as route section names entered by the driver, restrictions (access and manoeuvre restrictions), ignored user preferences, etc.
– By road list.Detail of the route by road names and numbers. It also shows their length, average direction and travel time information. Elements of the trip are not shown in this mode.
Options
Itinerary - Normal
« Itinerary »This function makes it possible to view the route plan. Several details of the route will appear:– direction-change arrows;– road number;– distance before a fork.
« Route settings »This item enables you to choose your route settings. Please refer to the infor-mation on “Route settings” in the sec-tion entitled “Navigation settings”.
29
GUIDANCE (6/6)

GB.48
MAP SETTINGS
From the navigation menu, press 2 then 1 to access the map adjustment menu.
Adjusting view modeThis function allows you to switch the map view between a 3D, view and a 2D top-down view, and a view with north always facing upwards.Press “3D”, “2D” or “2D North”.
Adjusting viewpointThis function allows you to adjust the basic zoom and tilt levels to your needs. Press the required zoom from three available levels.
Motorway ViewThis function allows you to activate or deactivate motorway view.Press “On” to activate the function or “Off” to deactivate it.
Display points of interestYou can select certain points of interest (visible at 100 m scale) to be displayed on the map.To access this function directly, press 3 to display the points of interest on the map:– accommodation;– airport;– automobile;– business;– café or bar;– etc.Press “On” or “Off” to show or hide the points of interest.Tap the name of the point of interest to open the list of its subcategories.Note: in countries for which maps are not available, you can deactivate the navigation function. In “Home” > “Setting” > “System”, press “Off” oppo-site “Navigation” to deactivate the navi-gation function.
32
1
Off On
Map settings
Viewpoint
Motorway view
POI markers
Navigation
Warnings Map settings
Voice settings Coordinate format GPS
Destination Itinerary Options
View mode
Route settings
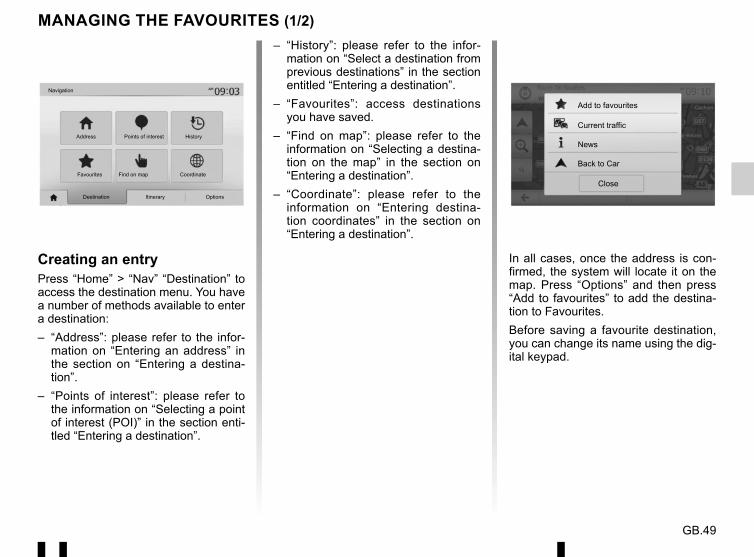
GB.49
MANAGING THE FAVOURITES (1/2)
Creating an entryPress “Home” > “Nav” “Destination” to access the destination menu. You have a number of methods available to enter a destination:– “Address”: please refer to the infor-
mation on “Entering an address” in the section on “Entering a destina-tion”.
– “Points of interest”: please refer to the information on “Selecting a point of interest (POI)” in the section enti-tled “Entering a destination”.
– “History”: please refer to the infor-mation on “Select a destination from previous destinations” in the section entitled “Entering a destination”.
– “Favourites”: access destinations you have saved.
– “Find on map”: please refer to the information on “Selecting a destina-tion on the map” in the section on “Entering a destination”.
– “Coordinate”: please refer to the information on “Entering destina-tion coordinates” in the section on “Entering a destination”.
In all cases, once the address is con- firmed, the system will locate it on the map. Press “Options” and then press “Add to favourites” to add the destina-tion to Favourites.Before saving a favourite destination, you can change its name using the dig-ital keypad.
Current traffic
Close
Add to favourites
News
Navigation
Address Points of interest History
Favourites Find on map Coordinate
Destination Itinerary Options
Back to Car

GB.50
MANAGING THE FAVOURITES (2/2)
Sorting the listThe result of saved favourites can be sorted by name, distance, or all shown on a map. Press “Options”.
Deleting the favouritesPress the favourite you want to delete. Press “Options”, “Delete favourite” and confirm the deletion by pressing Delete.
To delete all favourites, press “Options” and then press “Delete all”. Confirm this deletion by pressing “Delete all”.
Searching the favouriteThis function allows you to search the favourite destination in the list by name.Press “Find” and enter the name of the favourite destination using the digital keypad.Close
Options Find
Delete All
Show All on Map
Sort by distance
Sort by Name

GB.51
NAVIGATION SETTINGS (1/4)
The “Options” tab at the bottom of the “Navigation” menu enables you to change the map display or the naviga-tion settings.
« Warnings »This item allows you to set up warnings.
Warning in the event of excess speedMaps may contain information about the speed limits of the road segments. The system is able to warn you if you exceed the current limit.
This information may not be available for your region, or may not be fully cor-rect for all roads on the map.The following warning types are avail-able:– beep: you receive a non-verbal warn-
ing when you exceed the speed limit;– visual warning: the current speed
limit is shown flashing in red on the map when you exceed it.
Press “On” or “Off” to activate or deacti-vate the warning.
Speed limit always visibleActivate or deactivate the speed limit display for the section of road taken by pressing “On” or “Off”.
Alert point warningsWhen the driver crosses the increased care area, a visual warning signal ap-pears on the screen, along with a beep. These hazardous areas are sections of road on which drivers should take extra care. They can be permanent or tem-porary. You can activate or deactivate this function.
Pre-alert distanceYou can choose a distance from a number of choices, to give the distance at which you wish to be notified of a hazardous area.
Off
Off
Off
On
On
On
Warn when speeding
Show speed limit
Alert points
WarningsNavigation
Warnings Route settings Map settings
Voice Settings Coordinate format GPS
Destination Itinerary Options
Pre-alert distance 0 m 200 m 500 m
In certain countries it is illegal to download and activate the warning areas and this could lead to pros-ecution.

GB.52
NAVIGATION SETTINGS (2/4)
– “Eco”: this mode produces a compro-mise between fast and short routing modes. If you can save a certain dis-tance by travelling for slightly longer time in exchange, it will do just that. The resulting route might be shorter than the fast variant, but not signifi-cantly slower.
“Motorways”You might need to avoid motorways when you are driving a slow car or you are towing another vehicle.
“Route settings”This function allows you to set how routes will be calculated.
“Route planning method”This system offers three criteria for cal-culating a route:– “Fast”: gives a quick route if you can
travel at or near the speed limit on all roads;
– “Short”: gives a short route to mini-mise the distance to travel;
“Period charge”You can authorise or refuse authorisa-tion for roads requiring the purchase of special authorisation for a certain period.
“Per-use toll”You can authorise or refuse authorisa-tion for the use of toll roads.
“Ferries”You can authorise or refuse authorisa-tion for all types of ferries, boats and trains.
“Carpool/HOV”This function enables you to view roads only intended for two drivers sharing.
“Unpaved roads”You can authorise or refuse authorisa-tion for the use of off-road tracks.
Off
Off
On
On
Fast Short EcoRoute planning method
Motorways
Per-use Toll
Period Charge
Route SettingsNavigation
Warnings Route settings Map settings
Voice Settings Coordinate format GPS
Destination Itinerary Options
OnOff
Options
For safety reasons, carry out these operations when the vehicle is stationary.

GB.53
NAVIGATION SETTINGS (3/4)
“Coordinate format”This function allows you to change the format of coordinate.This system offers three types of format.
“Map settings”Refer to the information in the section on “Map settings”.
“Voice settings”This function allows you to change the language of voice guidance. Please refer to the section on “Guidance” in this manual.
GPSThis function allows you to check the status of GPS satellites.Press “GPS” to see the GPS informa-tion (screen A).
Coordinate Format GPS Information
Available satellites : 6
Accuracy: HIGH GPS UTC time : 17:11:45
A
Navigation
Warnings Route settings Map settings
Voice Settings Coordinate format GPS
Destination Itinerary Options
DD.DDDDD
DD MM.MMM
DD MM SS.S
Precautions regarding navigationUse of the navigation system does not in any way
replace the responsibility or vigi-lance of the driver when driving the vehicle.

GB.54
NAVIGATION SETTINGS (4/4)
“Map Update”This function enables you to check the dates of your last updates.
“Traffic”This function enables you to activate or deactivate “Traffic info”, the flagging of different events and to manage alterna-tive routes in the event of accidents or traffic jams.
“Traffic info”You an activate or deactivate warnings for different incidents occurring along your route.
“Detour”This function allows you to save time when an incident occurs on your trip, by offering you an alternative route.The multimedia system will offer you to choose a time after which a new route is suggested to you with a detour to save time.
Traffic settings
Traffic info
Detour
Event types
Off On
“Event types”This function enables you to choose the types of events to be displayed during navigation:– “All events”;– “Flow events”;– “Closure and block”;– “Accident”;– ...
Navigation
Map Update Traffic
Destination Itinerary Options
Traffic detour settings
5 minutes
Offer detour if the calculated route saves more than:
Confirm offered route? Off On
For safety reasons, carry out these operations when the vehicle is stationary.
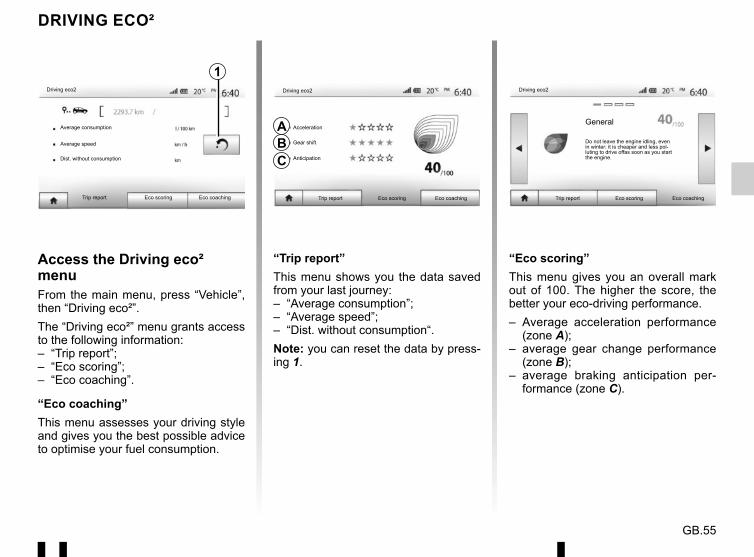
GB.55
DRIVING ECO²
“Eco scoring”This menu gives you an overall mark out of 100. The higher the score, the better your eco-driving performance.– Average acceleration performance
(zone A);– average gear change performance
(zone B);– average braking anticipation per-
formance (zone C).
“Trip report”This menu shows you the data saved from your last journey:– “Average consumption”;– “Average speed”;– “Dist. without consumption“.Note: you can reset the data by press-ing 1.
Access the Driving eco² menuFrom the main menu, press “Vehicle”, then “Driving eco²”.The “Driving eco²” menu grants access to the following information:– “Trip report”;– “Eco scoring”;– “Eco coaching”.
“Eco coaching”This menu assesses your driving style and gives you the best possible advice to optimise your fuel consumption.
Acceleration
Driving eco2
Eco coaching
A
CB Gear shift
Anticipation
Eco scoringTrip report
Driving eco2
Average consumption
Average speed
Dist. without consumption
Eco coachingEco scoringTrip report Eco coachingEco scoringTrip report
General
Do not leave the engine idling, even in winter: it is cheaper and less pol-luting to drive offas soon as you start the engine.
1Driving eco2

GB.56
4X4 INFO
Access the “4x4 info” menu.From the main menu, press “Vehicle”, then “4x4 info”.The “4x4 info” function enables you to view your vehicle’s:– Wheel camber (drive) in degrees, in
real-time (area A);– Course, using a compass (area B);
4x4 info
A B C
– Horizontal angle (pitch) in degrees, in real-time (area C).
Note: The values showing the angle displayed on the screen may differ from reality by one to three degrees.Note: The display is refreshed every second approximately.

GB.57
Pairing another phone Bluetooth®To use your hands-free phone system, you must pair your Bluetooth® mobile to your vehicle before using it for the first time.Pairing will enable the system to recog-nise and store a Bluetooth® phone. You can pair up to five smartphones, but only one at a time can be connected to the hands-free system.Pairing is carried out directly via the multimedia system or via your phone.Ensure that the system and your smart-phone are switched on and make sure that the Bluetooth® on your smart-phone is activated, visible and identi-fiable to other devices (please refer to the instructions for your phone for fur-ther information).
PAIRING, UNPAIRING BLUETOOTH® DEVICES (1/4)
Audio Display Connectivity System
Connectivity Settings
View Bluetooth device list
Search for Bluetooth device
External device authorization
Change Password
Depending on the brand and model of your phone, the hands-free func-tions may be partially or fully incom-patible with your vehicle system.
Pairing a Bluetooth® telephone from the multimedia system– Activate your phone’s Bluetooth®
connection;– press “Setting” > “Connectivity” >
“Search for Bluetooth device”;– make sure your phone is activated
and visible on the Bluetooth® link;– select your phone from the list of de-
vices found by the system;– A message is displayed on your
phone screen.
For a list of compatible telephones, consult the https://easyconnect.renault.com site.
For safety reasons, carry out these operations when the vehicle is stationary.

GB.58
Depending on the type of phone, the system may prompt you to confirm the transfer of the phonebook and call log to the multimedia system during pair-ing.Accept sharing to find this information on your multimedia system. You can also authorise automatic sharing of the phonebook and call logs for the system to transfer them automatically during your next pairings.Note: your multimedia system memory is restricted and it is possible that all your contacts may not be imported.
PAIRING, UNPAIRING BLUETOOTH® DEVICES (2/4)Depending on the phone, press “Twin”, “Pair” or “Connect” to authorise the pairing.– Depending on the phone, enter the
code displayed on the multimedia system screen on your telephone keypad;
– A second message appears on your phone screen offering to automati-cally pair to the multimedia system for future uses. Accept this authori-sation to avoid the need to redo all these steps.
Your smartphone is now paired to your multimedia system.Note: the pairing time varies based on the brand and model of your phone.If pairing fails, redo the operation. If your phone is not visible by the system while searching for Bluetooth® devices then please consult your telephone manual.

GB.59
A message appears on your telephone screen to notify you that it is now paired with the Media Nav Evolution multime-dia system.Note: the pairing time varies based on the brand and model of your phone.If pairing fails, redo the operation.
PAIRING, UNPAIRING BLUETOOTH® DEVICES (3/4)Pairing a Bluetooth® telephone to the multimedia system from the phone– Activate the Bluetooth® connection
of your phone and the system;– on the Media Nav Evolution, from
the main menu, press “Setting” > “Connectivity” > “External device au-thorization”. You thereby make the system visible to other Bluetooth® phones;
– a message appears on the screen displaying a password and the time left during which the system remains visible;
– from your telephone, display a list of available Bluetooth® devices;
– Select the “Media Nav Evolution” multimedia system from the avail-able devices during the time given and, depending on the smartphone, enter the password displayed on the system screen on your telephone keypad.
When switching on the “Media Nav Evolution” system, the last paired device will be automatically con-nected to the system.
Your hands-free system is only intended to facilitate communication by reducing the risk factors, without re-
moving them completely. You must always comply with the laws of the country in which you are travelling.

GB.60
Unpairing a Bluetooth® phone from the Media Nav Evolution systemUnpairing erases a phone from the hands-free system memory.From the main menu, press “Setting” > “Connectivity”, then “View Bluetooth device list”. Press the “recycle bin” icon 1 opposite the name of the smart-phone you wish to delete from the list. Confirm your choice by pressing “Ok”.
Unpairing all Bluetooth® phones from the Media Nav Evolution systemYou can also delete all phones pre-viously paired from the hands-free system memory. From the main menu, press “Setting” > “Connectivity” > “View Bluetooth device list” then “Options” and “Delete all”. Confirm the deletion of all paired telephones by pressing “Ok”.
Audio Display Connectivity System
View Bluetooth device list
Search for Bluetooth device
External device authorization
Change passkey
Bluetooth Devices
Info 2_3Gr
Seungyeon_VU2
Seungyeon_3
1
“Change passkey”You can customise the four-digit pass-word for the system authorising the pairing of Bluetooth® phones.From the main menu, press “Setting” > “Bluetooth” > “Change passkey”.
Options
“Smartphone”This function available on the second page of the “Connectivity” menu en-ables you to access assistance with activating and operating voice controls (please refer to the section on “Using voice controls”).
PAIRING, UNPAIRING BLUETOOTH® DEVICES (4/4)
Connectivity Settings

GB.61
CONNECTING, DISCONNECTING BLUETOOTH® DEVICES (1/2)Note: If a call is in progress at the time the connection is made, it is automa-tically transferred to the vehicle spea-kers.Note: you are recommended to accept and authorise all messages which appear on your telephone while pairing with the system so that the automatic device recognition operates smoothly.
Manual connectionFrom the main menu, carry out the fol-lowing operations:– press “Phone”;– press “View Bluetooth device list”;– select the name of the telephone to
which you wish to connect.Your telephone is connected to the mul-timedia system.
Connection failureIf connection fails, check that:– your device is switched on;– the device is configured to accept
the system’s automatic connection request;
– your device battery is not flat;– your device has been paired to the
hands-free system;– the Bluetooth® for your device and
the system are activated.Note: Using your hands-free system for prolonged periods of time will discharge your device’s battery more quickly.
Connecting a Bluetooth® paired phoneNo phone can be connected to the hands-free phone system if it has not first been paired. Please refer to the section entitled “Pairing/unpairing Bluetooth® devices”.Your phone must be connected to the hands-free phone system in order to use all its functions.
Automatic connectionOnce the system is switched on, the hands-free phone system will search for any paired phones present in the vi-cinity (the search may take a minute). It automatically connects to the last connected phone if:– the Bluetooth® connection of the te-
lephone has been activated;– at the time of pairing, you previously
authorised automatic connection for your telephone to the system.

GB.62
CONNECTING, DISCONNECTING BLUETOOTH® DEVICES (2/2)
Disconnecting a connected telephoneTo disconnect a telephone from Media Nav Evolution, press the name of your device. The small marker 1 will disap-pear.If a call is in progress when the phone is disconnected, the call will automatically switch to your phone.
Info 2_3Gr
Seungyeon_VU2
Seungyeon_3
Changing a connected telephoneYou can connect or disconnect a Bluetooth® device at any time.From the main menu, press “Media device”, then “Settings” and “List of de-vices”.Select the device to be connected and confirm by pressing “Ok”.A small marker 1 will appear opposite your telephone name to indicate that the connection has been made.
Options
Bluetooth Devices
1

GB.63
USING VOICE RECOGNITION (1/3)IntroductionYour multimedia system enables you to use certain functions on the multi-media system and on your phone via voice recognition. This enables you to use your telephone while keeping your hands on the steering wheel.Note: the position of the voice recog-nition button may vary (steering wheel control, steering column control or mul-timedia system screen).Note: When using voice recognition, the language set on your telephone will be the language used by your system.Note: a message is displayed on the multimedia system using if your smart-phone does not have voice recognition.
Activating the phone's voice recognition with the multimedia systemTo activate your phone’s voice recogni-tion system you should:– get a 3G, 4G or Wifi connection with
your smartphone;– activate the Bluetooth® on your
smartphone and make it visible to other devices (please refer to your telephone manual for instructions);
– pair and connect your smartphone to the multimedia system (please refer to the section on “Pairing, unpairing Bluetooth® devices”).
Press and hold the voice recognition button in order to activate.
Note: the mark 1 on the “Settings” > “Connectivity” then “View Bluetooth device list” menu indicates that your smartphone voice recognition is com-patible with the multimedia system.
1
Options
Bluetooth Devices
Info 2_3Gr

GB.64
USING VOICE RECOGNITION (2/3)
A beep sounds and the display on screen A indicates that voice recogni-tion is activated.Speak loudly and clearly.Note: your smartphone’s voice recog-nition system only enables you to use certain functions of your telephone. It does not enable you to interact with the other functions of your multimedia system such as the radio, the Driving eco2 etc.
Smartphone
Cancel
A
Cancel
2
Smartphone
3
B
UseOnce activated, to restart the voice rec-ognition system, tap on the steering wheel control, on the steering column control or on your multimedia system, or on the 2 button on your multimedia system screen.You can go back to the main menu at any time by pressing 3.
SmartphoneMediaRadio
Driving eco 2 Nav Settings
Set Time
Dark
4
To return to screen B press 4 in the main menu of your multimedia system.Note: when using voice recognition, the “Media” and “Radio” functions will not be available or accessible from the main menu of your multimedia system.

GB.65
USING VOICE RECOGNITION (3/3)
DeactivationPress button 2 on the B screen or press and hold the voice recognition button in your vehicle. An audible signal indicates that voice recognition is deac-tivated.
Voice Recognition not supported on this Bluetooth device
Dark
Ok
Smartphone
5
Smartphone
Connectivity Settings
Audio Display Connectivity System
6
HelpYou can get additional help on the oper-ation and usage conditions of the voice recognition system. To do so, press “Home” > “Settings” > “Connectivity”. Select the second page by pressing 6, then press 5.This function is presented in the form of screens explaining how to use voice recognition, alongside the:– conditions of use;– compatible telephones;
Smartphone
Open/Close with command: Make a short or a long press.
Wait for the signal tone to start speaking.
To speak once more, make a short press.
To close, make a long press.
– the activation and deactivation of the function using the voice recognition button in your vehicle;
– method for interacting with the screen;
– available functions;– extent of the functions.

GB.66
ANDROID AUTO™, CARPLAY™ (1/4)Android Auto™Introduction“Android Auto™” is an application that can be downloaded (from the applica-tion download platform on your smart-phone) enabling you to use some ap-plications and functions on your phone from your multimedia system screen.Note: to find out if your smartphone is compatible with the “Android Auto™” app, consult the official website for your phone's operating system.Note: the “Android Auto™” application will only operate if your smartphone is connected to your vehicle's “USB” port and the SIRI service is activated. The “Android Auto™” application should be available from the 1 button in the main menu.
First useConnect your phone to your multimedia system’s USB port:– accept the requests on your smart-
phone in order to use the “Android Auto™" application;
– Confirm by pressing “Accept” on your phone.
The “Android Auto™” application is launched on the multimedia system.If the procedure described above fails, repeat the operation.
You can manage the devices connected to your multimedia system at any time via “Settings” > “Connectivity Settings”.Note: the first connection with “Android Auto™” is made when the vehicle is stopped for the sole purpose of activat-ing the multimedia system voice recog-nition.
1
Android Auto
PhoneMediaRadio
Driving eco 2 Nav Settings
Connectivity Settings
See the list of Smartphone devices
Audio Display Connectivity System
Display Bluetooth devices
Search for Bluetooth devices
Tutorial on Smartphone connectivity
The use of USB cables recom-mended by the phone manufacturer are advisable for correct functioning of the application.

GB.67
ANDROID AUTO™, CARPLAY™ (2/4)CarPlay™Introduction“CarPlay™" is a native service availa-ble on your smartphone which enables you to use some applications on your phone from your multimedia system screen.Note: if your smartphone is not equipped with the “CarPlay™” serv-ice, consult the official website for your phone's operating system.Note: the “CarPlay™” service will only work if your smartphone is connected to your vehicle's USB port and if the SIRI service is activated. The "CarPlay™” service should be available from the 2 button in the main menu.
2
CarPlay
PhoneMediaRadio
Driving eco 2 Nav Settings
Connectivity Settings
See the list of Smartphone devices
Audio Display Connectivity System
Display Bluetooth devices
Search for Bluetooth devices
Tutorial on Smartphone connectivity
You can access a tutorial on smart-phone connectivity to your multimedia system via “Settings” > “Connectivity Settings”.
The use of USB cables recom-mended by the phone manufacturer are advisable for correct functioning of the application.
First useConnect your phone to your multimedia system’s USB port.The CarPlay™ service is launched on the multimedia system.If the procedure described above fails, repeat the operation.

GB.68
3
ANDROID AUTO™, CARPLAY™ (3/4)
Once the “Android Auto™” application or the "CarPlay™” service is activated, you can use the voice recognition button in your vehicle to activate some of your smartphone functions by voice. To do this, press button 3 on the steer-ing wheel of your vehicle (for more in-formation, refer to the section on “Using voice recognition”).
Note: when you use “Android Auto™” or “CarPlay™”, you can access your smartphone's navigation and music ap-plications. These applications will re-place similar applications integrated in your multimedia system Media Nav Evolution which are already running. For example, only one navigation appli-cation, “Android Auto™”/“CarPlay™”, or the application integrated into your multimedia system can be used.Note: when you are using the “Android Auto™" application or the "CarPlay™" service, certain functions of your mul-timedia system will continue to be car-ried out in the background. For ex-ample if you start "Android Auto™" or "CarPlay™" and use the navigation on your smartphone while the radio on the multimedia system is currently playing, the radio will continue to be broadcast.
When you use the “Android Auto™" application or the "CarPlay™" serv-ice, the transfer of cellular data re-quired for it to operate may lead to additional costs not included in your phone plan.

GB.69
ANDROID AUTO™, CARPLAY™ (4/4)
3
Returning to the Media Nav Evolution interfaceTo return to the Media Nav Evolution in-terface:– press the “Home” button on the front
panel of your multimedia system or on the central control;
or– press button 3 on the multimedia
system screen according to “Android Auto™” or “CarPlay™”.
3
The functions of the “Android Auto™" application and the "Carplay™" service depend on the make and model of your telephone. For further information, please refer to the manufacturer's website if there is one.

GB.70
From the “Phone device” menu, press 1 to scroll through the list of menus and then “Phone Book” to access the system telephone directory.
Using your Phone BookYou can use the Phone Book entries stored on the memory of phone.
It is recommended that you stop your vehicle before en-tering a number or search-ing for a contact.
PHONE BOOKAfter connecting your system and your Bluetooth® phone using Bluetooth® wireless technology, your phonebook numbers are automatically transfer-red into the system if the contacts are stored in the telephone memory of your device.Note: On some phones, the system may ask you to confirm the transfer of the phonebook to the system during pairing.
Calling a number in the Phone BookAfter finding the contact in the pho-nebook you want to call, select the number to place the call.
Searching for a contact in the phonebookPress 2 then enter the surname or first name of the contact you are seeking, using the digital keypad.
1
2
Phone Book
Search by Name
Adam Smith
Vincent Casse
Car Repair Hugo
Dr. Brown
Depending on the make and model of your phone, transferring your contacts to the multimedia system may not work.

GB.71
Making a call from the phonebookWith the telephone connected, from the “Phone device” menu, select “Phone Book” from drop-down menu “1”.Select the contact (or the suitable number of the contact has more than one). The call is made automatically by pressing the contact’s number.Note: you can make a call from the multimedia system using the voice re-cognition from your smartphone. Refer to the Section entitled “Using voice re-cognition”.
Press 1 to scroll the list and then press “Calling Lists”.Press 6 to access to the list of All Calls.Press 5 to access the list of Outgoing Calls.Press 4 to access the list of Incoming Calls.Press 3 to access the list of Missed Calls.Note: The marker 2 indicates the number of missed calls.For each list, the contacts are listed from the most recent to the oldest. Select a contact to make the call.
MAKING, RECEIVING A CALL (1/3)
1
6 5 4 3
Calling Lists
All
Dialling a number from the call historyYou can use the call list stored on the phone memory to make a call.After connecting your unit and Bluetooth® phone via Bluetooth® wi-reless technology, the numbers in your phone's “All Calls”, “Outgoing Calls”, “Incoming Calls”, and “Missed Calls” lists are transferred automatically into the call list on your multimedia system.
2
Close
Adam Smith

GB.72
MAKING, RECEIVING A CALL (2/3)
8
Dial
7
Entering a numberPress 1 to scroll through the list, then “Dial” for the call number.Press the numbered buttons to dial the number, then press 7 to place the call.To delete a number, press 8. Press and hold 8 to delete all the numbers at once.
It is recommended that you stop your vehicle before en-tering a number or search-ing for a contact.
1
Incoming call
Agree Reject
Receiving a callWhen receiving a call, a message is displayed on the multimedia system screen with the following information on the caller:– the name of the contact (if the
number is present in the phonebook list);
– caller’s number;– “Unknown Number” (if the number
cannot be viewed).Note: when the incoming call message appears on the screen during naviga-tion, accept or reject the call to return to the navigation screen.
Note: you can answer or reject an in-coming call by pressing the button on your vehicle’s steering column.

GB.73
13 12 11 10
Dial
9
14
MAKING, RECEIVING A CALL (3/3)
During a callDuring a call you can:– switch the microphone off by press-
ing 12;– switch the microphone on by press-
ing 13;– hang up by pressing 9;– hear sound through the phone spea-
ker by pressing 11;
– hear sound through the vehicle spea-ker by pressing 10;
– press 14 to return to the previous screen (the navigation screen, for example) or the welcome screen.

GB.74
– adjust the air-conditioning controls to the desired temperature in the pas-senger compartment when starting up the engine, then set to de-icing mode (please see Section 2 of the vehicle manual);
REMOTE ENGINE START-UP (1/3)
Remote Engine Start
Warning: Never park your vehicle in an enclosed room
Automatic Start
Car Ready for
Wake up every 2 hours
Car will be ready in 0 hours & 0 minutes
Off On
Off On
Change
OkSet Time
Dark
Radio Media Phone
SettingNavDriving eco2
1
2A
4
Departure Time Set
Remote Engine Start
Ok
When fitted, this function lets you pro-gramme the engine to start remotely, in order to heat or ventilate the passen-ger compartment up to 24 hours before using the vehicle.Adjust the heating level required (tem-perature, de-icing) before programming the function. Configuration and pro-gramming are done via the multimedia display.
Setting the start time for the function– Switch on the ignition, then press 1
from the main menu. Screen A is dis-played;
– select the “On” button on the “Automatic Start” line to activate the function;
– set the start time when you wish to use your vehicle by pressing button 2;
– press on the “up” and “down” arrows to scroll through the hours and min-utes until you get the desired time;
– press “Ok” to confirm. The 4 marker shows you the time left before the time you wished to use the vehicle;
– press “Ok” 3 to confirm and finalise the programming; To activate remote start-up by pro-
gramming, you must select a time at least fifteen minutes later than the time displayed by the multimedia system.
3

GB.75
11:05 AM
REMOTE ENGINE START-UP (2/3)
– turn off the ignition.When locking your vehicle, two flashes, then the hazard warning lights and in-dicator lights switching on for approxi-mately three seconds indicate that the programming has been taken into ac-count. The remote engine start-up operates if:– the lever is in neutral for vehicles
with a manual or sequential gearbox;– the lever is in position P for vehicles
with an automatic gearbox;
– the ignition is switched off;– all the opening elements (bonnet,
doors, boot) are closed and locked when you leave the vehicle.
Note: you must switch off your multi-media system when you leave your ve-hicle for remote engine start-up to work.
“Wake up every 2 hours”This function enables your vehicle to start automatically every two hours de-pending on the engine temperature.
Remote Engine Start
Warning: Never park your vehicle in an enclosed room
Automatic Start
Car Ready for
Wake up every 2 hours
Car will be ready in 0 hours & 0 minutes
Off On
Off On
Change
Ok
To activate this function, press the “On” button 5.Note: the ventilation system must be off for the “Wake up every 2 hours” function to activate.When this function is activated, the ven-tilation system will not activate during the first four start-ups, if they happen.In very cold conditions, the vehicle will start automatically and will stay on for approximately ten minutes before switching off. If the engine temperature does not re-quire a restart, the vehicle will not start automatically during the first four reac-tivation times and will return to standby for two hours. The engine will be re-started if the engine temperature is too low.In all cases, the last start-up will happen.Approximately fifteen minutes before the programmed time, the engine starts and remains on for about ten minutes.Note: the marker 6 reminds you of the vehicle start time that you have already set.
Dark
Radio Media Phone
SettingNavDriving eco2
65

GB.76
Do not park the vehicle or run the engine in locations where combustible sub-stances or materials such
as grass or leaves can come into contact with the hot exhaust system.
REMOTE ENGINE START-UP (3/3)
In extreme conditions, the remote start-up by programming may not work.
Special feature on vehicles equipped with the “Wake up every 2 hours” function.It is imperative that the vehicle is driven for at least 10 minutes be-tween each use of the function. Risk of engine oil wear.
Driver’s responsibility when parking or stopping the vehicleNever leave an animal,
child or adult who is not self-suffi-cient alone on your vehicle, even for a short time. They may put them-selves or others at risk, for example by starting the engine, switching on equipment such as the electric win-dows or by locking the doors etc. Also, in hot and/or sunny weather, please remember that the tempera-ture inside the passenger compart-ment increases very quickly.RISK OF DEATH OR SERIOUS INJURY.
Do not use the engine remote start-up function or its programming when:– the vehicle is in a garage
or in a confined space.Risk of poisoning or suffoca-tion by exhaust gas emissions.
– the vehicle is covered with a pro-tective cover.Fire hazard.
– the bonnet is open or before it opens.Risk of burns or serious injury.
Depending on the country, the use of the remote starting func-tion or its programming can be prohibited by the legislation and/or the regulations in force.Before using this function, check the legislation and/or the regula-tions for the country in force.
Depending on the vehicle, please ensure that consumers such as the wipers, exterior lights, radio, heated seats, heated steering wheel, etc. are disabled and all accessories are disconnected before leaving the ve-hicle.

GB.77
OperationShifting into reverse gear (and up to approximately five seconds after shift-ing to another gear), a view of the sur-roundings to the rear of the vehicle is displayed on the multimedia system screen accompanied by the guide, a silhouette of the vehicle and beeps.Ultrasonic sensors installed in your ve-hicle “measure” the distance between the vehicle and an obstacle.When the red zone is reached, use the bumper image to stop accurately.Note: for more information on using parking assistance, please see your owner’s handbook.Note: Make sure that the reversing camera is not obscured (by dirt, mud, snow, etc.).Nota: once the reverse gear is en-gaged, the multimedia screen displays the view of the scene to the rear of the vehicle for several seconds.
REVERSING CAMERA (1/3)
Activation/deactivationReversing cameraYou can activate/deactivate the revers-ing camera. To do this from the main menu select “Setting” > “Display” then press button “Parking assistance” 1.
Parking assistanceThis menu allows you to activate/deac-tivate the reversing camera and set up “Obstacle detection”.
Display Settings
Brightness Low Mid. High
AutoMap Mode Day Night
Dark LightBackground
Parking assistance
Audio Display Connectivity System
Parking assistance
Rear view camera Off On
Obstacle detection
1

GB.78
REVERSING CAMERA (2/3)
Obstacle detectionYou can independently activate or de-activate the front and rear sensors of your vehicle. Select “On” to activate the desired sensor(s) or “Off” to deactivate it/them.
Sound settingsYou can activate/deactivate the audio alert and select from several sounds as well as adjust the volume of the obsta-cle sensors.
Display settingsYou can access the display settings with the 2 button.This menu allows you to activate/dis-able the guides 3 indicating the dis-tance behind the vehicle and adjust the screen settings.Press “+” or “-” to set the contrast 4, brightness 5 and colours 6.
2
Look in all directions
OnOff
Look in all directions
3
56 4
Off
Off
Off
On
On
On
Obstacle detection
Front sensor
Rear sensor
Audible warning
Sound type 1 2 3

GB.79
REVERSING CAMERA (3/3)
This function is an additional aid. It cannot, therefore, under any circum-stances replace the vigilance or the
responsibility of the driver.The driver should always be ready for sudden incidents while driv-ing: always ensure that there are no small, narrow moving obstacles (such as a child, animal, pushchair, bicycle, stone, post, etc.) in the blind spot when manoeuvring.
The screen shows a reverse image.The gauges are a representation projected onto flat ground. This in-formation must not be taken into account when superimposed on a vertical object or an object on the ground.Objects which appear on the edge of the screen may be deformed.In very bright light (snow, vehicle in sunshine, etc.), the camera vision may be adversely affected.

GB.80
MULTI-VIEW CAMERA (1/2)IntroductionThe vehicle is fitted with four cameras fitted at the front, in the side door mir-rors and at the rear of the vehicle to offer you additional aid during difficult manoeuvres.Note: Make sure that the cameras are not obscured (by dirt, mud, snow, etc.).
OperationWhen the reverse gear is engaged, the rear view camera displays the area to the rear of the vehicle on the multime-dia screen.You also have the option of choosing the view to be displayed on the multi-media screen by changing to manual mode.
Activation/deactivationThe system is activated when the ve-hicle is travelling at a speed below ap-proximately 12 mph (20 km/h). When the vehicle exceeds this speed the system is deactivated.The system can also be activated by pressing the activation button in your vehicle. For further information, please refer to the “Multi-view camera” section in the Driver’s Handbook.
This function is an additional aid. It cannot, therefore, under any circumstances replace the vigilance or the
responsibility of the driver.The driver should always pay atten-tion to sudden incidents during driv-ing: always ensure that there are no moving obstacles (such as a child, animal, pram, bicycle, etc.) or small, narrow objects such as stones or posts in your path when manoeu-vring.
Note: For more information on choos-ing Automatic or Manual mode, please refer to your vehicle’s Driver’s Handbook.

GB.81
MULTI-VIEW CAMERA (2/2)
SettingsPress 7 to display a list of settings.Activate or deactivate the display of Guides by pressing 5 or 6.Press “+” or “-” to set the contrast 8, brightness 9 and colours 10.
5 6
7
8910
Off
Look in all directions
On
Camera choiceTo activate the desired camera view, select this one on the multimedia screen:– 1 Rear area view;– 2 Front area view;– 3 Right-hand side area view;– 4 Left-hand side area view.
1
2
3
4

GB.82
SYSTEM SETTINGS (1/3)
To access the multimedia system settings from the welcome screen, press “Setting”, then select a section at the bottom of the screen.
Audio settingsPlease refer to the section on “Audio set-tings”.
Display settings“Brightness”You can set the brightness of the screen to your liking. You have the option of three modes:– “Low”;– “Mid.” (Medium);– “High”.
“Map Mode”To improve the visibility of the navigation screen between day and night, you can change the combination of the colours of the map.– “Auto”: the map screen is displayed by
GPS. The switch to daytime or night-time running lights is automatic, depending on whether the headlights are on.
– “Day”: The map screen is always dis-played with bright colours.
– “Night”: the map screen is always dis-played using darker colours.
«AC Info»This function activates/deactivates the dis-play of air conditioning information when ad-justing settings.
«Background»This function enables you to choose be-tween a dark or light display mode.
“Parking assistance”This function allows you to activate/disable the reversing camera, as well as the front and/or rear sensors.
Bluetooth® settingsRefer to the section entitled “Pairing/unpair-ing Bluetooth® devices”.
Display Settings
Brightness
Map Mode
Audio Display Connectivity System
Low Mid. High
Auto Day Night
AC Info Off On
Background Dark Light

GB.83
SYSTEM SETTINGS (2/3)“Clock”This function allows you to set the time format between the “12h” and “24h” clocks.Note: The time is set automatically by GPS. You will need the maps for the country in which you are currently located to get the local time.To change the time manually, press“Clock/Units”, then select “Time Setting”.
“Units”This function allows you to set the unit of dis-tance displayed on your multimedia system. You can change the unit between the “km” and “mls”.Note: the settings for your multimedia system do not affect your vehicle’s instru-ment panel display. For further information on the instrument panel display settings, please see the vehicle user manual.
System setting“Language”This function allows you to change the lan-guage used in the system and voice guid-ance language.To change the language, select the desired language and confirm your choice by press-ing “Ok”.
“Factory Settings”This function allows you to reset various set-tings to the default settings.– All: resets all “Factory Settings” to default
settings.– Phone: Initializes all the settings related
with phone.– Navigation: Initializes all the settings re-
lated with navigation.– Audio/Media/Radio/System: Initialises
all the settings related with Audio, Media and Radio.
“Navigation”This function enables you to activate or de-activate the system navigation.
“System Version”This function allows you to check the version of system.
Audio Display Connectivity System
System Settings
Language
Clock/Units
Factory Settings
Navigation Off On

GB.84
SYSTEM SETTINGS (3/3)
Security codeYour audio system is protected by a secu-rity code (supplied by the Approved Dealer). This is used to electronically lock the audio system when the power is cut (battery dis-connected, system disconnected, fuse blown etc.).To operate the audio system, you must enter the secret four-digit code.Make a note of the code and keep it in a safe place. Contact one of the manufacturer’s agents if you lose it.
Entering the codeThe message “CODE” followed by four empty spaces and a numerical keypad are displayed.Enter the corresponding code using the dig-ital keypad, then press “OK” to confirm.
Entering the code incorrectlyIf the code is entered incorrectly, the mes-sage “Incorrect PIN The system is locked” is displayed.Wait one minute and then re-enter the code.Each time the code is entered incorrectly, the time required before the code can be re-entered is doubled.

GB.85
UPDATING THE SYSTEM (1/5)
When navigation is started, the mul-timedia system offers to update your map. This reminder appears twice a year for seven years. You can:– select “Later” and the reminder will
appear the next time Navigation is activated;
– select “Close” and the reminder will no longer appear;
– select “More” and the system dis-plays the “Map Update” menu.
Update your multimedia system and map.To update your multimedia system and its map, you will need a USB key, a computer connected to the Internet. Proceed as follows.
Installing the softwareInstall Naviextras Toolbox in a few clicks on your computer. The Toolbox can be downloaded from the manufac-turer's website.After downloading the installation file from the website Naviextras.com, simply double-click the file to start the installation.Follow the instructions shown on the screen.
For a specific planning of your route, please use the most recent maps.
To find out more, access the “Update maps” menu or click “More”.
Search for map updates on naviextras.com
Later Close More

GB.86
The screens shown in the user manual are not contractual.
In certain countries it is illegal to download and activate the warning areas and this may lead to prosecu-tion.
Latest map guaranteeOnce your new vehicle has been deliv-ered, you will have a maximum of 90 days in which to update the map for free. Once this time has elapsed, you will need to pay for updates.
Creating and connecting to a user accountTo log in, click on the “Not logged in” icon in the toolbar at the top of the page or click the “Log in” button on the main screen of the Toolbox. If you are not registered on the website Naviextras.com, you can do this from the Toolbox by clicking on “Register” on the log-in page.
UPDATING THE SYSTEM (2/5)

GB.87
UPDATING THE SYSTEM (3/5)This installs a fingerprint of your nav-igation system on the USB key which will be used by the Toolbox to save your system in your user profile and to let the Toolbox determine which updates are available for your navigation system.When the process of data recording is finished, you may remove the USB key from the multimedia system.
Connect to the ToolboxRun the Naviextras Toolbox software and make sure your computer is con-nected to the Internet.Connect the USB key previously used on your multimedia system to your computer.If your subscription allows it, and if Toolbox finds your system on the list of supported systems, the welcome screen appears to enable you to con-nect to your Naviextras account.
Note: the USB key is not provided with the system.Note: The USB key used must be for-matted to FAT32 format and have a minimum capacity of 4GB and a maxi-mum capacity of 32GB.Note: to register the system data on the USB key, start the vehicle and do not switch off the engine while data is loading.Note: do not use any of the multimedia system functions during the procedure.
Update
Close
Content
Options
Saving the system on a USB keyTo save your multimedia system in your user profile, first connect an empty USB key to the multimedia system to create a fingerprint. To do this:– connect your USB flash drive to
the USB socket on your multimedia system;
– from the main menu, select the “Navigation” menu;
– select the “Options” menu;– select the “Map Update” menu from
the second page of the “Options” menu;
– press the “Options” button at the bottom of the screen;
– select the “Update” function on your multimedia system screen.
Note: to insert the USB key into your multimedia system, refer to the infor-mation on “Inserting the USB key” in the “Navigation system” section.

GB.88
– free updates and extras that you added to the installation file from the catalogue;
– system updates (if a newer version is available);
– special free updates.The list shows all available updates by region in a list and on a world map.By default, all items belonging to all regions are selected for installation. If you decide to skip a region for now, un-check the checkbox at the beginning of its table row. After reviewing the table, click “Install” at the bottom of the screen to start the installation process.The Toolbox starts to download and in-stall the selected updates. Please wait until you see the message indicating the update has finished.
Downloading products from the Toolbox to the USB keyOnce connected to your Naviextras Toolbox account, and with your USB flash drive connected to your compu-ter, you can obtain free or paid apps, services and content by selecting those you wish to install in your multimedia system from the “Catalogue” menu in the menu bar on the left hand side of the Toolbox screen.
Updates from Toolbox to the USBkeyClick on the “Update” menu in the menu bar on the left-hand side of the Toolbox screen.The updates menu opens a screen showing all available updates, includ-ing:– items that you have purchased but
not yet installed (updates or extras);
UPDATING THE SYSTEM (4/5)
In certain countries it is il-legal to download and ac-tivate the speed camera warnings and this could
lead to prosecution.
Please neither remove the USB key from the system, nor shut the system down while update is in progress.
The Toolbox warns you if the se-lected items exceed the maximum capacity of the multimedia system. In this case, you can select which items can be installed or removed in the system so that it does not exceed the storage limit.Even if items are removed in the system, you still have ownership of items and can install them later for free.
Note: the download time for the appli-cation can vary depending on the size of the application and on the reception quality on the mobile network.

GB.89
The A screen is displayed automati-cally once the USB flash drive is con-nected:– press 1 to run the update;– previous 2 to go back to the previous
screen.When you press the button 1, the update procedure is launched. Do not use any of the system functions during the update procedure.
Updating the system and mapWhen the installation process is com-pleted, the USB key can be removed from the computer. Connect the USB key to the USB port of the vehicle mul-timedia system.Note: to update maps, start the vehicle and do not switch off the engine while data is loading.When the multimedia system is turned on, it automatically identifies the avail-able updates on the USB key, and offers to update the system or map from the updates found on the USB key. Do not switch off your multimedia system while the update is being installed.Note: downloading and installing a system update is only possible if there is a newer version available.
UPDATING THE SYSTEM (5/5)
A
1 2
Are you ready to start updating your device?
Yes Cancel
When the update is completed, the multimedia system restarts with all new and up-to-date functionality.
LicenceTo obtain the GPL, LGPL, MPL and other open source licence source codes in this product, please visit the http://opensource.lge.com website.As well as the source code all the terms of the licence, warranty exclusions and copyright details are available for download.LG Electronics will also provide you with Open Source code on a CD-ROM against payment of distribution costs (such as media, shipping and han-dling costs) on request by post to [email protected] offer is valid for three years as of the date on which you purchased the product.
If the update is accidentally inter-rupted, restart the process from the beginning.
The multimedia system might restart automatically during the update process. Please wait for the radio screen to be displayed.

GB.90
OPERATING FAULTS (1/5)
SystemDescription Causes Solutions
No image is displayed. The screen is on standby. Ensure that the screen is not on standby.
The system is deactivated. The interior temperature of the vehicle is too low or too high.
The vehicle is switched off. Restart your vehicle.
No sound can be heard.
The volume is set to minimum or mute. Increase the volume or deactivate mute.
The selected system source is not cor-rect.
Check the selected system source and make sure the output source is the multi-media system.
No sound comes from the left, right, front or rear speakers.
The balance or fader settings are incor-rect.
Adjust the sound balance or fader cor-rectly.
The displayed time is not correct. The time setting is set to “Auto” and the system is no longer receiving a GPS signal.
With “Navigation”: move the vehicle until you receive a GPS signal.
Without “Navigation”: refer to the “System Settings” section to set the time.

GB.91
OPERATING FAULTS (2/5)
NavigationDescription Causes Solutions
No sound can be heard. The volume on the “Nav” menu is muted or set to minimum.
Increase the volume (“Options” in the “Nav” menu) or deactivate the mute func-tion.The volume in GPS mode can be ad-justed during voice guidance.
The location of the vehicle on the screen does not correspond to its actual loca-tion.
Incorrect positioning of the vehicle caused by GPS reception.
Move the vehicle until reception of the GPS signal is improved.
The directions on the screen do not cor-respond to the actual road.
The version of sytem is out of date. Obtain the latest version of the system.
Certain items on the menu are not avail-able.
Depending on the current command, some items will be unavailable.
Voice guidance is unavailable. The navigation system does not include the intersection.Voice guidance is deactivated.
Increase the volume.Ensure voice guidance is activated.
The directions of the voice guidance do not correspond to your exact location.
The voice guidance may vary according to the environment.
Drive according to the actual conditions.
The suggested route does not start or end at the required destination.
The destination is not yet recognised by the system.
Enter a road near to the required desti-nation.

GB.92
PhoneDescription Causes Solutions
No sounds or ringtone can be heard. The mobile phone is not connected to the system.The volume is set to minimum or mute.
Check that the mobile phone is switched on or connected to the system.Increase the ringtone volume or deacti-vate the mute function.Check the selected system source and make sure the output source is the multi-media system.
Impossible to make a call. The mobile phone is not connected to the system.The phone keypad has been locked.
Check that the mobile phone is switched on or connected to the system.Unlock the phone keypad.
Several audio sources are ejected during operation.
Restart the multimedia system by press-ing and holding the on/off button (until the screen turns off).
OPERATING FAULTS (3/5)

GB.93
MediaDescription Causes Solutions
No sound can be heard. The volume is set to minimum or mute. Increase the volume or deactivate mute.
The audio source is not switched on or connected to the system.
Check the selected system source and make sure the output source is the multi-media system.
No external audio source (MP3 player, portable audio player, USB key or tele-phone etc) is recognised by the multime-dia system.
Several audio sources are ejected during operation.
Restart the multimedia system by press-ing and holding the on/off button (until the screen turns off).
Android Auto™/CarPlay™ does not start on the multimedia system.
Android Auto™/CarPlay™ is not config-ured correctly on your smartphone.
Visit the manufacturer’s website for your smartphone for configuration informa-tion.
The USB cable is not compatible for data transfer.
Use a USB cable recommended by the telephone manufacturer for correct func-tioning of the application.
The audio source is no longer recog-nised by the multimedia system during operation.
Restart the multimedia system by press-ing and holding the on/off button (until the screen turns off).
Audio source operation fault (voice recognition disconnected under SIRI/CarPlay™/Android Auto™, MP3 player, portable audio player or phone, etc.).
OPERATING FAULTS (4/5)

GB.94
OPERATING FAULTS (5/5)
MediaDescription Causes Solutions
Android Auto™/CarPlay™ operation fault.
Your smartphone is no longer compat-ible following an update to the Android Auto™/CarPlay™ application.
Downgrade to the previous version or refer to the Android Auto™/CarPlay™ settings for your smartphone brand.
Operational fault with geo-tracking appli-cations.
The network is unavailable.Geo-tracking is not activated on your phone.
Find a location with a strong signal re-ception.Activate geo-tracking on your telephone.

GB.95
ALPHABETICAL INDEX (1/3)33D/2D mode ...................................................................GB.42
44x4 info .................................................................GB.5, GB.56
Aaddress book ........................................GB.39, GB.49 – GB.50answering a call ..................................................GB.14, GB.72ARTIST ...........................................................................GB.26audio settings
sound settings ........................................... GB.13 → GB.15AUX
auxiliary socket ...........................................................GB.5AUX ................................................................ GB.25 → GB.27auxiliary source............................................... GB.25 → GB.27
BBALANCE .......................................................................GB.28BASS ..............................................................................GB.28bass ................................................................................GB.29Bluetooth connection ......................................................GB.61Bluetooth® ..........................................GB.57 → GB.61, GB.70Bluetooth® portable audio player
pairing .......................................................................GB.26unpairing ...................................................................GB.26
Ccall ....................................................................GB.70 – GB.71call history.......................................................................GB.71call volume......................................................................GB.20clock
display .......................................................................GB.83clock ...............................................................................GB.83confirm a destination ........................................GB.40 – GB.41connect a telephone .......................................................GB.61
contacts list .....................................................................GB.70controls .................................................GB.8 → GB.15, GB.18
Ddestination ... GB.36 → GB.41, GB.39, GB.46, GB.49 – GB.50destination menu ............................................ GB.36 → GB.41detailed route ..........................................GB.41, GB.44, GB.47detour .................................................................GB.46, GB.54dialling ............................................................................GB.72dialling a number ............................................................GB.72disconnect a telephone...................................................GB.62distance units..................................................................GB.83
EECO driving ....................................................................GB.55ending a call ...................................................................GB.14entering an address ........................................................GB.36
Ffascias and steering wheel controls.................. GB.8 → GB.15fast winding.....................................................................GB.25favourite
add ............................................................................GB.41delete ........................................................................GB.50
fuel consumption ............................................................GB.55fuel economy ..................................................................GB.55functions ............................................................. GB.5 → GB.7
GGPS
receiver .........................................................GB.32, GB.53reception ...................................................................GB.32
guidanceactivation ...................................................................GB.42map ........................................................... GB.42 → GB.47voice ............................. GB.13 → GB.15, GB.42 → GB.47

GB.96
ALPHABETICAL INDEX (2/3)JJack socket .........................................GB.13, GB.25 → GB.27
Llanguage
change ......................................................................GB.83languages .......................................................................GB.83LIST mode ......................................................................GB.22
MMANU mode ...................................................................GB.21map
digitised map .............................................................GB.32display ...............................GB.13 → GB.15, GB.33, GB.48scale .........................................................................GB.33settings .........................................................GB.48, GB.51
map symbols ..................................................................GB.33media .............................................................. GB.13 → GB.15MEMO mode ..................................................................GB.22MENU .............................................................................GB.13MP3 ................................................................................GB.25multi-view camera...................................GB.5, GB.80 – GB.81mute................................................................................GB.20
Nnavigation settings
route settings ..............................................GB.40 – GB.41numeric keypad ..............................................................GB.19
Ooperating faults ...................................GB.16, GB.90 → GB.94operation.........................................................................GB.16
Ppairing a telephone ......................................... GB.57 → GB.60POI .....................................................GB.35 → GB.41, GB.48
point of interest .......................GB.34, GB.36 → GB.41, GB.48precautions during use .....................................................GB.3
Rradio..........................GB.5, GB.13 → GB.15, GB.21 → GB.24radio station .................................................... GB.21 → GB.24range of wavelengths ..................................... GB.21 → GB.24RDS ..................................................................................GB.5rear view camera ..................................GB.5, GB.77 → GB.79receiving a call ................................................................GB.72remote engine start-up ........... GB.5 → GB.7, GB.74 → GB.76reversing camera
parameters ................................................................GB.82ringtone volume ..............................................................GB.29
Sscreen
menu ...........................................................................GB.7monitor ..........................................................GB.13, GB.16navigation display .........................GB.7, GB.42 → GB.47navigation screen ...................................... GB.42 → GB.47settings .....................................................................GB.48
security code ..................................................................GB.84select
track ..........................................................................GB.27setting .............................................................................GB.47settings
audio ...............................................GB.28 – GB.29, GB.82balance .....................................................................GB.29brightness .................................................................GB.82fader ..........................................................................GB.29
settings ..................GB.13 → GB.15, GB.23, GB.52 → GB.54, GB.82 → GB.84source
audio ......................................................... GB.13 → GB.15

GB.97
ALPHABETICAL INDEX (3/3)specific destination
address in favourites .................................................GB.39stage ...............................................................................GB.46steering wheel controls ...................................................GB.21storing a radio station .....................................................GB.22switching off ....................................................................GB.16system
update ....................................................... GB.85 → GB.89
Ttelephone ..........................................................................GB.6traffic information ............GB.5 → GB.7, GB.23, GB.41, GB.54treble.................................................................GB.28 – GB.29
Uunpairing a telephone .....................................................GB.60USB ................................................................ GB.85 → GB.89USB key................................GB.30 – GB.31, GB.85 → GB.89USB socket ... GB.5, GB.13, GB.25 → GB.27, GB.30 – GB.31, GB.85 → GB.89
Vvehicle position ...............................................................GB.33videos ...............................................................GB.30 – GB.31voice control ................................................... GB.63 → GB.65voice recognition.......GB.14 – GB.15, GB.63 → GB.65, GB.68volume ................................................GB.13 → GB.15, GB.20volume: adapted to speed ..................................GB.20, GB.28
WWMA ...............................................................................GB.25

GB.98

ARA–۹۸

ARA–۹۷
الفهرس األبجدي (۳/۳)۲٦.ARA ................................................................. قم بالمزاوجة۲۷.ARA → ۲٥.ARA .................................................... مصدر إضافي٦۰.ARA → ٥۷.ARA .................................................... مطابقة الهاتف٥٤.ARA ,٤۱.ARA ,۲۳.ARA ,۷.ARA → ٥.ARA .......... معلومات المرور۸۹.ARA → ۸٥.ARA ,۳۱.ARA – ۳۰.ARA .......................USB مفتاح
مفضل٤۱.ARA .........................................................................إضافة٥۰.ARA ..........................................................................حذف۳۱.ARA – ۳۰.ARA ...................................................... مقاطع الفيديو۲۷.ARA → ۲٥.ARA ,۱۳.ARA .......................................Jack مقبس ,۲۷.ARA → ۲٥.ARA ,۱۳.ARA ,٥.ARA ..........................USB مقبس
۸۹.ARA → ۸٥.ARA ,۳۱.ARA – ۳۰.ARA۲٥.ARA ...................................................................... MP۳ ملفات
ننظام
۸۹.ARA → ۸٥.ARA ....................................................... تحديث
ووجهة محددة
۳۹.ARA ..........................................................العنوان بالمفضالت۸۳.ARA .......................................................................وحدة المسافة۲۷.ARA → ۲٥.ARA ..................................................... AUX وصلة٤۲.ARA ....................................................................۲D/۳D وضع۲۲.ARA ........................................................... LIST/LISTE وضع۲۱.ARA ................................................... MANU/MANUEL وضع۲۲.ARA ...................................................................MEMO وضع۳۳.ARA ...................................................................... وضع السيارة۷.ARA → ٥.ARA ...............................................................وظائف

ARA–۹٦
الفهرس األبجدي (۳/۲)٤۸.ARA ,٤۱.ARA → ۳٥.ARA ................................................ بيان۲٦.ARA ...................................................................ARTIST بيان۲۸.ARA ...................................................................... BASS بيان٥.ARA .......................................................................... RDS بيان۲٥.ARA .......................................................................WMA بيان
ت٥٤.ARA ,٤٦.ARA ................................................................تحويلة۲۲.ARA ............................................................. تخزين محطة الراديو۷۲.ARA ............................................................................... ترقيم۳٦.ARA ......................................................................تسجيل عنوان٦۱.ARA .....................................................................توصيل الهاتف
ح۲۹.ARA – ۲۸.ARA ................................................................. حاد
د٥۰.ARA – ٤۹.ARA ,۳۹.ARA ........................................ دفتر العناوين۸۱.ARA – ۸۰.ARA ,٥.ARA ................................... دوربين ديد چندگانه
ر۷۲.ARA ,۱٤.ARA .............................................رفع السماعة لطلب رقم۳۳.ARA .................................................................... رموز خرائطية۲۱.ARA .................................................... زر التحكم تحت عجلة القيادة
س۷۱.ARA ....................................................................سجل المكالمات
ششاشة
۱٦.ARA ,۱۳.ARA ....................................................... االستعداد٤۸.ARA ...............................................................أوضاع الضبط٤۷.ARA → ٤۲.ARA ,۷.ARA ................................. بيانات المالحة٤۷.ARA → ٤۲.ARA ............................................... شاشة المالحة۷.ARA ............................................................................ قائمة۲۰.ARA ,۱٥.ARA → ۱۳.ARA ....................................... شدة الصوت
۲۸.ARA ,۲۰.ARA .................................. شدة الصوت: متوافق مع السرعة۲۰.ARA ...............................................................شدة صوت االتصال۲۹.ARA ................................................................شدة صوت الجرس
ع٥٥.ARA ........................................................ عمليات التوفير في الوقود۱۸.ARA ,۱٥.ARA → ۸.ARA .......................................عناصر التحكم
ف٦۰.ARA ................................................................فصل مطابقة هاتف٦۲.ARA ........................................................................ فصل هاتف
ق۱۳.ARA ................................................................................قائمة٤۱.ARA → ۳٦.ARA ...................................................... قائمة الوجهة۲۰.ARA .......................................................................قطع الصوت٥٥.ARA ..................................................................... قيادة اقتصادية
ككاميرا الرجوع إلى الخلف
۸۲.ARA ........................................................................... القيم۷۹.ARA → ۷۷.ARA ,٥.ARA ..........................كاميرا الرجوع إلى الخلف۲۹.ARA ................................................................................ كبير۸٤.ARA ......................................................................... كود األمان
ل۱٥.ARA → ۸.ARA ....................................لوحات وأزرار التحكم بالمقود۱۹.ARA ................................................................ لوحة مفاتيح رقمية
م۲٤.ARA → ۲۱.ARA ................................................. مجموعة موجات۲٤.ARA → ۲۱.ARA ...................................................... محطة راديو٤٦.ARA .............................................................................. مرحلة٤۷.ARA ,٤٤.ARA ,٤۱.ARA ........................................... مسار مفصل
مشغل الملفات الصوتية ذو تقنية بلوتوث®۲٦.ARA .................................................................... قم بالفصل

ARA–۹٥
الفهرس األبجدي (۳/۱)A
AUX٥.ARA ...................................................................مقبس إضافي
U۸۹.ARA → ۸٥.ARA .............................................................USB
ا۲۸.ARA ............................................................................... اتزان۷۱.ARA – ۷۰.ARA ...............................................................اتصل۳.ARA .................................................................احتياطات االستخدام
اختر۲۷.ARA ..........................................................................مسار۹٤.ARA → ۹۰.ARA ,۱٦.ARA ..................................اختالالت التشغيل۷۲.ARA ...................................................................... استالم مكالمة٥٥.ARA .................................................................... استهالك الوقود٥٦.ARA ,٥.ARA ........................................................ ٤xاطالعات ٤۷۲.ARA ...................................................................... االتصال برقم٦۱.ARA .......................Bluetooth االتصال عن طريق التكنولوجيا الالسلكية٤۸.ARA ,٤۱.ARA → ۳٦.ARA ,۳٤.ARA ...........................االهتمامات
البطاقة۳۲.ARA ............................................................... البطاقة الرقمية٤۸.ARA ,۳۳.ARA ,۱٥.ARA → ۱۳.ARA ............................البيان٥۱.ARA ,٤۸.ARA .................................................أوضاع الضبط۳۳.ARA ........................................................................ مقياس٦٥.ARA → ٦۳.ARA ................................................... التحكم الصوتي۱٦.ARA .............................................................................التشغيل
التعديالت الصوتية۱٥.ARA → ۱۳.ARA ............................................إعدادات الصوت٦۸.ARA ,٦٥.ARA → ٦۳.ARA ,۱٥.ARA – ۱٤.ARA .....التعرف الصوتي۷۰.ARA ,٦۱.ARA → ٥۷.ARA ........... ®Bluetooth التكنولوجيا الالسلكية۲٤.ARA → ۲۱.ARA ,۱٥.ARA → ۱۳.ARA ,٥.ARA ................الراديو
الساعة۸۳.ARA ..........................................................................البيان۸۳.ARA ..............................................................................الساعة۷۰.ARA .............................................................................. السجل
٤۷.ARA ..............................................................................الضبط۸۳.ARA .............................................................................. اللغات
اللغة۸۳.ARA ......................................................................... تعديل
المصدر۱٥.ARA → ۱۳.ARA ......................................................الصوت
GPS النظام العالمي لتحديد الموقع۳۲.ARA ....................................................................... استقبال٥۳.ARA ,۳۲.ARA ...................................................جهاز استقبال٦.ARA ................................................................................الهاتف٥۰.ARA – ٤۹.ARA ,٤٦.ARA ,۳۹.ARA ,٤۱.ARA → ۳٦.ARA . الوجهة۱٥.ARA → ۱۳.ARA ........................................................... الوسائط
إ٤۱.ARA – ٤۰.ARA ........................................................ إتاحة وجهة
إرشاد٤۷.ARA → ٤۲.ARA ....................................................... البطاقة٤۲.ARA ..........................................................................تفعيل٤۷.ARA → ٤۲.ARA ,۱٥.ARA → ۱۳.ARA .......................صوتي
إعدادات المالحة٤۱.ARA – ٤۰.ARA .......................................... إعدادات خط السير۱٤.ARA ........................................................................إنهاء مكالمة۱٦.ARA ...............................................................................إيقاف
أأوضاع الضبط
۲۹.ARA ................................................... توزيع الصوت خلفا/أماما۲۹.ARA .................................................. توزيع الصوت يسارا/يمينا۸۲.ARA ................................................................. شدة اإلضاءة۸۲.ARA ,۲۹.ARA – ۲۸.ARA ..........................................صوتي ,٥٤.ARA → ٥۲.ARA ,۲۳.ARA ,۱٥.ARA → ۱۳.ARA ....أوضاع الضبط
۸٤.ARA → ۸۲.ARA
ب۲٥.ARA .........................................................................بحث سريع۷٦.ARA → ۷٤.ARA ,۷.ARA → ٥.ARA .........بدء تشغيل المحرك عن بعد

ARA–۹٤
خلل في التشغيل (٥/٥)الوسائط
الحلولاألسبابشرح.Android Auto™/CarPlay™ لم يعد هاتفك الذكي مناسبا التباع أحد التحديثات التي حدث عطل في تشغيل
.Android Auto™/CarPlay™ تجرى على التطبيقالرجوع إلى اإلصدار السابق أو العودة إلى إعدادات بالعالمة الخاصة Android Auto™/CarPlay™
التجارية لهاتفك الذكي.
الشبكة غير متوفرة.حدث عطل وظيفي في تطبيقات التتبع الجغرافي.التتبع الجغرافي غير مفعل على هاتفك.
اعثر على موقع به استقبال إشارة قوي.قم بتفعيل التتبع الجغرافي على هاتفك.

ARA–۹۳
الوسائطالحلولاألسبابشرح
ارفع شدة الصوت أو قم بتعطيل خاصية كتم الصوت.الصوت منخفض جدا أو خاصية كتم الصوت مفعلة.ال يمكن سماع صوت.
تحقق من مصدر النظام المحدد وتأكد من أن مصدر مصدر الصوت غير مشغل أو متصل بالنظام.اإلخراج هو نظام الوسائط المتعددة.
التعرف على مصدر صوت خارجي (مشغل يتم لم الموسيقى MP3، أو مشغل صوتي محمول أو، مفتاح USB أو هاتف، أو غير ذلك) من قبل نظام الوسائط
المتعددة.
أعد تشغيل نظام الوسائط المتعددة عن طريق الضغط يتم إصدار العديد من مصادر الصوت خالل التشغيل.مع االستمرار على زر التشغيل/إيقاف التشغيل (حتى
يتم إيقاف تشغيل الشاشة).
نظام في Android Auto™/CarPlay™ يعمل ال الوسائط المتعددة.
لم يتم تكوين ™Android Auto™/CarPlay بصورة صحيحة على هاتفك الذكي.
الذكي لهاتفك المصنعة الشركة بزيارة موقع تفضل للحصول على معلومات التكوين.
استخدم كابل USB الذي أوصت به الشركة المصنعة ال يناسب الكابل USB عملية نقل البيانات.للهاتف من أجل تشغيل التطبيق بطريقة صحيحة.
على مصدر يتعرف المتعددة الوسائط نظام يعد لم الصوت أثناء التشغيل.
أعد تشغيل نظام الوسائط المتعددة عن طريق الضغط مع االستمرار على زر التشغيل/إيقاف التشغيل (حتى
يتم إيقاف تشغيل الشاشة).فصل (تم الصوت مصدر تشغيل في عطل حدث /SIRI/CarPlay™ في الصوتي التعرف عملية أو ، MP3 الموسيقى مشغل أو ،Android Auto™المشغل الصوتي المحمول له، أو الهاتف الذي يقوم
بتشغيله أو ما إلى ذلك).
أعطال التشغيل (٥/٤)

ARA–۹۲
Téléphoneالحلولاألسبابشرح
الهاتف الجوال غير مقترن أو متصل بالنظام.ال يمكن سماع صوت أو نغمة.الصوت منخفض جدا أو خاصية كتم الصوت مفعلة.
تحقق من أن الهاتف الجوال مشغل أو متصل بالنظام.
ارفع شدة الصوت أو قم بتعطيل خاصية كتم الصوت.تحقق من مصدر النظام المحدد وتأكد من أن مصدر
اإلخراج هو نظام الوسائط المتعددة.
الهاتف الجوال غير مقترن أو متصل بالنظام.تعذر إجراء مكالمة.قفل لوحة مفاتيح الهاتف مفعل.
تحقق من أن الهاتف الجوال مشغل أو متصل بالنظام.فتح قفل لوحة مفاتيح الهاتف.
أعد تشغيل نظام الوسائط المتعددة عن طريق الضغط يتم إصدار العديد من مصادر الصوت خالل التشغيل.مع االستمرار على زر التشغيل/إيقاف التشغيل (حتى
يتم إيقاف تشغيل الشاشة).
أعطال التشغيل (۳/٥)

ARA–۹۱
أعطال التشغيل (۲/٥)المالحة
الحلولاألسبابشرحيتم كتم الصوت في القائمة «التنقل» أو ضبطه على ال يمكن سماع صوت.
الحد األدنى. du menu («خيارات» الصوت شدة ارفع
«التنقل») أو قم بتعطيل خاصية كتم الصوت.التوجيه أثناء GPS الصوت في وضع تعديل يمكن
الصوتي.
موقعها مع الشاشة على السيارة موضع يتوافق ال الحقيقي.
.GPS حرك السيارة من مكانها حتى تستقبل اإلشارات بشكل سوء تحديد موضع السيارة بسبب االستقبال.GPS أفضل
مع الشاشة على المتوافرة المؤشرات تتوافق ال الواقع.
احصل على النسخة األحدث من النظام.نسخة إصدار النظام قديمة.
وفقا لألمر الحالي، تكون بعض األقسام غير متاحة.بعض أقسام القائمة غير متاحة.
ال يأخذ نظام المالحة التقاطع في االعتبار.التوجيه الصوتي غير متاح.التوجيه الصوتي غير مفعل.
زيادة حجم الصوت.تأكد أن خاصية التوجيه الصوتي مفعلة.
القيادة وفقا للظروف الواقعية.يمكن أن يتنوع التوجيه الصوتي وفقا للبيئة المحيطة.ال يتوافق التوجيه الصوتي مع الواقع.
ال يبدأ أو ال ينتهي خط المسار المقترح عن الوجهة المطلوبة.
أدخل طريق قريب من الوجهة المطلوبة.ال يمكن للنظام التعرف على الوجهة.

ARA–۹۰
أعطال التشغيل (۱/٥)النظام
الحلولاألسبابشرحتحقق أن الشاشة ليست في وضع التوقف.الشاشة في وضع التوقف.ال تعرض أي صورة.
تكون درجة الحرارة داخل السيارة منخفضة جدا أو عندما يتوقف النظاممرتفعة جدا.
أعد تشغيل سيارتك.تم إيقاف تشغيل السيارة.
ال يمكن سماع صوت.
ارفع شدة الصوت أو قم بتعطيل خاصية كتم الصوت.الصوت منخفض جدا أو خاصية كتم الصوت مفعلة.
تحقق من مصدر النظام المحدد وتأكد من أن مصدر مصدر النظام المحدد غير صحيح.اإلخراج هو نظام الوسائط المتعددة.
ال يصدر أي صوت من المكبر األيسر أو األيمن أو األمامي أو الخلفي.
قم بضبط الصوت balance أو fader بشكل صحيح.المعايير balance أو fader غير صحيحة.
لم الوقت المعروض غير صحيح. الوقت على «تلقائي» والنظام إعدادات تم ضبط .GPS يعد يستقبل إشارة
تستقبل حتى السيارة حرك «المالحة»: باستخدام .GPS إشارة
من دون استخدام «المالحة»: راجع قسم «إعدادات النظام» لضبط الوقت.

ARA–۸۹
يتم عرض شاشة A تلقائيا بمجرد توصيل محرك :USB أقراص
اضغط على 1 لبدء التحديث؛ –2 السابق للرجوع إلى الشاشة السابقة. –
إجراءات تشغيل يتم الزر 1، على الضغط عند تحديث عملية أثناء عمليات بأي تقم ال التحديث.
نظامك.
تحديث النظام والخرائط USB عند اكتمال عملية التثبيت، يمكن إزالة مفتاحمنفذ في USB مفتاح بتوصيل قم الكمبيوتر. من
USB الخاص بنظام الوسائط المتعددة للسيارة.السيارة وال بإدارة قم الخرائط، لتحديث مالحظة:
تقم بإيقاف تشغيل المحرك أثناء تحميل البيانات.عند تشغيل نظام الوسائط المتعددة، فإنه يقوم تلقائيا بتحديد التحديثات المتاحة في مفتاح USB ويعرض طلب تحديث النظام أو الخريطة من التحديثات التي بإيقاف تقم مفتاح USB. ال العثور عليها على تم تشغيل نظام الوسائط المتعددة أثناء تثبيت التحديث.مالحظة: يكون تنزيل وتثبيت تحديثات النظام ممكن
فقط إذا كان هناك إصدار جديد متاح.
تحديث النظام (٥/٥)
A
1 2
هل أنت جاهز لبدء تحديث جهازك؟
نعم إلغاء
عند اكتمال التحديث، تتم إعادة تشغيل نظام الوسائط المتعددة بجميع الوظائف الجديدة وبأخر تحديث.
الترخيص ،GPL، LGPL األكواد مصادر على للحصول المصدر مفتوحة األخرى والتراخيص MPLhttp:// الواردة في هذا المنتج، يرجى زيارة الموقع
.opensource.lge.comشروط كافة األكواد، مصادر إلى باإلضافة الضمان موانع عليها، المنصوص الترخيص متاحة تكون والنشر التأليف حقوق وإشعارات
للتحميل.أيضا بتزويدك تقوم LG Electronicsوسوف مقابل CD-ROM على المصدر مفتوحة باألكواد دفع الرسوم التي تغطي تكاليف التوزيع (مثل تكلفة الوسائط، الشحن والمناولة) بناء على طلب بالبريد
[email protected] إلىمن ابتداء سنوات ثالث لمدة متاح العرض هذا
تاريخ شراء المنتج.
التحديث، لعملية الإلرادي االنقطاع حال في أعد الخطوات منذ البداية. قد تتم إعادة تشغيل نظام الوسائط المتعددة أثناء عملية التحديث. انتظر حتى تظهر شاشة الراديو.

ARA–۸۸
قمت التي واإلضافات المجانية التحديثات –بإضافتها لملف التثبيت من الكتالوج؛
تحديثات النظام (في حالة توفر إصدار أحدث)؛ –تحديثات مجانية خاصة. –
جميع التحديثات المتاحة محددة بالمنطقة على شكل قائمة وعلى خريطة العالم.
لجميع العناصر كافة تحديد يتم افتراضي، بشكل المناطق من أجل تثثبيتها. إذا أردت تجاهل منطقة معينة بشكل مؤقت، قم بإلغاء تحديد المربع الموجود بعد االطالع بها. الخاص الجدول بداية سطر في على االجدول، انقر على زر «التثبيت»الموجود في
الجزء األسفل من الشاشة لبدء عملية التثبيت.يبدأ Toolbox في تنزيل وتثبيت التحديثات المحددة. بانتهاء تفيد رسالة استقبال لحين االنتظار رجاء
العملية.
تنزيل المنتجات من Toolbox إلى مفتاح USB
Naviextras Toolbox بحساب االتصال بمجرد USB أقراص محرك وباستخدام بك، الخاص يمكنك الكمبيوتر، بجهاز المتصل بك الخاص مدفوعة أو مجانية تطبيقات على الحصول باإلضافة إلى خدمات ومحتويات عن طريق تحديد المتعددة الوسائط تثبيتها على نظام تريد التي تلك القائمة من قائمة «الكتالوج» الموجودة في شريط
.Toolbox على الجانب األيسر من شاشة
USB إلى مفتاح Toolbox التحديثات منالقائمة على انقر فوق قائمة «تحديث» في شريط
.Toolbox الجانب األيسر من شاشةتفتح قائمة التحديثات شاشة تظهر جميع التحديثات
المتاحة، بما في ذلك:العناصر التي حصلت عليها، ولكن لم يتم تثبيتها –
بعد (تحديثات أو إضافات)؛
تحديث النظام (٥/٤)
تحميل يعتبر البلدان، بعض فى الخاصة التنبيهات خيار وتفعيل ويمثل مشروع غير بالرادارات
خرقا للقانون.
أو النظام من USB ذاكرة عدم سحب رجاء إيقافها أثناء عملية التحديث.
المختارة العناصر كانت إذا Toolbox ينبهك الوسائط نظام لسعة األقصى الحد تتجاوز اختيار يمكنك الحالة، هذه في المتعددة. النظام من إلغاءها أو تثبيتها المراد العناصر
لتناسب الحد المسموح للتخزين.حتى عندما تتم إزالة عناصر من النظام، يمكنك وقت في تثبيتها وتستطيع بملكيتها االحتفاظ
الحق مجانا.
التطبيق تنزيل وقت يختلف أن يمكن مالحظة: الهاتف استقبال شبكة التطبيق وجودة حسب حجم
الجوال.

ARA–۸۷
تحديث النظام (۳/٥)المالحة لنظام تثبيت بصمة إصبع إلى يؤدي ذلك قبل من سيستخدم والذي USB مفتاح في لديك المستخدم تعريف بملف نظامك لحفظ Toolboxأي بتحديد Toolbox لـ يسمح وكذلك بك الخاص
التحديثات متوفرة لنظام المالحة لديك.إزالة يمكن البيانات، تسجيل عملية اكتمال عند
مفتاح USB من نظام الوسائط المتعددة.
Toolbox التوصيل بـقم بتشغيل برنامج Naviextras Toolbox وتأكد من
اتصال الكمبيوتر باإلنترنت.بنظام مسبقا المستخدم USB مفتاح بتوصيل قم
الوسائط المتعددة بجهاز الكمبيوتر.إذا كان اشتراكك يسمح، وإذا عثر Toolbox على فستظهر المدعومة، األنظمة قائمة في نظامك بحساب االتصال من لتمكنك الترحيب شاشة لك
Naviextras الخاص بك.
مالحظة: مفتاح USB غير متوفر في النظام.يتم أن يجب المستخدمة USB مالحظة:ذاكرة تهيئتها على شكل FAT32 ويجب أن تكون ذو سعة
.32GB 4 وسعة بحد أقصىGB بحد أدنى ،USB مالحظة: لتسجيل بيانات النظام على مفتاحالمحرك تشغيل بإيقاف تقم السيارة وال بإدارة قم
أثناء تحميل البيانات.مالحظة: ال تستخدم أي من وظائف نظام الوسائط
المتعددة أثناء هذه العملية.
تحديث
إغالق
المحتوى
خيارات
USB حفظ النظام في مفتاحلحفظ نظام الوسائط المتعددة الخاص بك في ملف مفتاح بتوصيل أوال قم لديك، المستخدم تعريف إلنشاء المتعددة الوسائط نظام في فارغ USB
بصمة إصبع. للقيام بذلك:بمقبس USB األقراص محرك بتوصيل قم –
USB بنظام الوسائط المتعددة الخاص بك؛من القائمة الرئيسية، حدد قائمة «المالحة»؛ –
حدد قائمة «خيارات»؛ –من واإلضافات» «التحديثات قائمة حدد –
الصفحة الثانية لقائمة «خيارات»؛أسفل الموجود «خيارات» الزر على اضغط –
الشاشة؛حدد وظيفة «تحديث» على شاشة نظام الوسائط –
المتعددة.الوسائط نظام في USB مفتاح إلدخال مالحظة: "إدخال في الواردة المعلومات راجع المتعددة،
مفتاح USB" في فصل "نظام المالحة".

ARA–۸٦
غير االستخدام نشرة في الموجودة الشاشات تعاقدية.
مناطق خيار تنزيل يعد البلدان، بعض في التحذير وتفعيله أمرا غير مشروع وقد يعرضك
ذلك للمساءلة القانونية.
ضمان تحديث الخريطةبعد تسلم سيارتك الجديدة، يكون لديك مهلة زمنية أقصاها ۹۰ يوما لتحديث الخرائط مجانا. وبانتهاء
تلك المدة، ستكون التحديثات مدفوعة األجر.
إنشاء حساب مستخدم واالتصال به Not logged» رمز فوق انقر الدخول، لتسجيل انقر أو الصفحة أعلى األدوات شريط في «inفوق زر «تسجيل الدخول» على الشاشة الرئيسية الويب موقع في مسجل تكن لم إذا .Toolbox لـ Toolbox يمكنك القيام بذلك من ،Naviextras.comصفحة في «Register» فوق النقر طريق عن
تسجيل الدخول.
تحديث النظام (۲/٥)

ARA–۸٥
تحديث النظام (۱/٥)
عند بدء تشغيل نظام المالحة، يعرض نظام الوسائط هذا يظهر لديك. الخريطة تحديث طلب المتعددة التذكير مرتين في السنة لمدة سبع سنوات. ويمكنك:حدد «الحقا»، وسيظهر التذكير في المرة التالية –
التي يتم فيها تنشيط نظام المالحة؛حدد «إغالق»، ولن يظهر التذكير بعد ذلك؛ –
قائمة النظام وسيعرض «المزيد»، حدد –«التحديثات واإلضافات».
تحديث نظام الوسائط المتعددة والخريطة.لتحديث نظام الوسائط المتعددة والخريطة الخاصة كمبيوتر وجهاز ،USB مفتاح إلى ستحتاج به،
متصل باإلنترنت. اتبع الخطوات التالية.
تنصيب البرنامجتثبيت Naviextras Toolbox على جهاز الكمبيوتر Toolbox من تنزيل يمكن نقرات. من خالل عدة
موقع ويب الشركة المصنعة.الويب موقع من التثبيت ملف تنزيل بعد Naviextras.com، ببساطة انقر نقرا مزدوجا على
الملف لبدء التثبيت.اتبع التعليمات الظاهرة على الشاشة.
للحصول على تخطيط معين لمسارك، يرجى استخدام أحدث الخرائط.
لمعرفة المزيد، قم بالوصول إلى قائمة «تحديث الخرائط» أو النقر فوق «المزيد».
naviextras. البحث عن تحديثات الخريطة علىcom
الحقا إغالق More

ARA–۸٤
إعدادات النظام (۳/۳)كود (رمز) األمان
نظام الصوت الخاص بك محمي برمز حماية (يتم توفيره بواسطة الوكيل المعتمد). وهو يتيح تأمين اإلمداد قطع عند كهربائيا الصوتي النظام قفل مفصول، النظام موصلة، غير البطارية (مثال:
مصهر تالف…)لتشغيل النظام الصوتي، يجب ادخال رمز الحماية
المكون من اربع ارقام.قم بتدوين هذا الكود واحفظه في مكان آمن في حالة
فقدانه، يجب عليك التوجه إلى ممثل الصانع.
إدخال الكوديتم عرض الرسالة «CODE» (الرمز) متبوعة
بأربع مساحات فارغة ولوحة مفاتيح رقمية.المفاتيح لوحة باستخدام المتوافق الرمز أدخل الرقمية، ثم اضغط على «OK» (موافق) للتأكيد.
خطأ في إدخال الكوديتم غير صحيح، إدخاله تم الذي الرمز كان إذا Incorrect PIN The» الرسالة عرض
.«system is lockedانتظر لمدة دقيقة واحدة ثم أعد إدخال الكود.
ومع كل مرة خطأ جديدة يتم مضاعفة مدة االنتظار.

ARA–۸۳
إعدادات النظام (۳/۲)«الساعة»
تمكنك هذه الخاصية من االختيار بين نسق الساعة .«۲٤h»۱۲» وh»
آلية من خالل مالحظة: يتم ضبط الساعة بطريقة تكون أن الضروري من الحالة، هذه في .GPSعلى للحصول بها المتواجد البلد خرائط لديك
التوقيت المحلي.«الساعة/ على اضغط يدويا، الساعة لضبط
الوحدات»، ثم اختر «ضبط الوقت».
«الوحدات»المسافة وحدة ضبط الخاصية هذه لك تتيح يمكنك المتعددة. الوسائط نظام على المعروضة
االختيار بين «كم» و«ميل».مالحظة: ال تؤثر إعدادات نظام الوسائط المتعددة على شاشة لوحة أجهزة القياس الخاصة بسيارتك. للحصول على مزيد من المعلومات حول إعدادات على االطالع يرجى القياس، أجهزة لوحة شاشة
دليل مستخدم السيارة.
ضبط النظام«اللغة»
في المستخدمة اللغة تغيير الخاصية هذه لك تتيح النظام ولغة التوجيه الصوتي.
بتأكيد وقم المرغوبة اللغة اختر اللغة، لتغيير اختيارك بالضغط على «موافق».
«ضوابط شركة التصنيع»اإلعدادات تثبيت إعادة من الخاصية هذه تمكنك
المختلفة إلى الوضع االفتراضي.إعادة ضبط جميع «ضوابط يعمل على الكل: –
شركة التصنيع» إلى اإلعدادات االفتراضية.الهاتف: إعادة تعيين اإلعدادات المتعلقة بالهاتف –المتعلقة اإلعدادات تعيين إعادة المالحة: –
بالمالحة.تعيين إعادة صوت/وسائط/راديو/نظام: –اإلعدادات المتعلقة بالصوت، الوسائط والراديو.
«المالحة»تسمح هذه الوظيفة بتمكينك من تنشيط نظام المالحة
أو تعطيله.
«إصدار النظام»تتيح لك هذه الخاصية التعرف على نسخة إصدار
النظام.
الصوت الشاشة إمكانية االتصال النظام
ضوابط النظام
اللغة
الساعة/الوحدات
ضوابط شركة التصنيع
المالحة إيقاف تشغيل

ARA–۸۲
إعدادات النظام (۳/۱)
المتعددة من الوسائط نظام إعدادات إلى للوصول الشاشة الرئيسية، اضغط على «الضبط»، ثم اختر
الجزء الموجود أسفل الشاشة.
إعدادات الصوتراجع فصل «إعدادات الصوت».
ضبط الشاشة«سطوع»
إلعدادات وفقا الشاشة سطوع ضبط تستطيع المفضلة. يتم اقتراح ثالثة أوضاع:
«منخفض»; –«الوسائط» (متوسط)؛ –
«مرتفع». –
« وضع الخريطة »نهارا، أو ليال المالحة سواء لتحسين رؤية شاشة
يمكنك تغيير نظام األلوان على الخريطة.«تلقائي»: يعرض نظام GPS شاشة الخريطة. –الليلية أو النهارية إلى وضع اإلضاءة االنتقال
يتم بشكل آلي تبعا إلضاءة المصابيح.الخريطة شاشة يتم عرض ما دائما «نهار»: –
بألوان زاهية.الخريطة شاشة عرض يتم ما دائما «ليل»: –
بألوان داكنة.
«AC معلومات»تتيح لك هذه الخاصية تفيعل/تعطيل ظهور معلمات
مكيف الهواء أثناء ضبط مفتاح التحكم.
«الخلفية»تتيح لك هذه الخاصية اختيار وضع العرض المعتم
أو الواضح.
«المساعدة في الركن»تتيح لك هذه الوظيفة إمكانية تنشيط/تعطيل كاميرا المستشعرات إلى باإلضافة للخلف، الرجوع
األمامية و/أو الخلفية.
Bluetooth® إعداداتأجهزة اقتران «اقتران/فصل الفصل راجع
.«Bluetooth®
ضوابط الشاشة
سطوع
نهار
الصوت الشاشة إمكانية االتصال النظام
منخفض الوسائط مرتفع
تلقائي نهار ليل
AC معلومات إيقاف تشغيل
الخلفية داكن المصباح

ARA–۸۱
كاميرا ذات طرق عرض متعددة (۲/۲)
اإلعداداتاضغط على 7 لعرض قائمة اإلعدادات.
بالضغط اإلرشادات تنشيط/تعطيل عرض يمكنك على 5 أو 6.
اضغط على «+" أو "-" لضبط التباين 8والسطوع 9 واأللوان 10.
5 6
7
8910
إيقاف
انظر في كل االتجاهات
تشغيل
اختيار الكاميرالتنشيط طريقة عرض الكاميرا المطلوبة، حدد هذا
االختيار في شاشة الوسائط المتعددة.1 عرض المنطقة الخلفية؛ –
2 عرض المنطقة األمامية؛ –3 عرض المنطقة الجانبية اليمنى؛ –
4 عرض المنطقة الجانبية اليسرى. –
1
2
3
4

ARA–۸۰
كاميرا ذات طرق عرض متعددة (۲/۱)المقدمة
مرايا وفي مقدمتها في بكاميرات السيارة تتمتع لتقديم منها الخلفي الجانب وفي الجانبية األبواب
مساعدات إضافية لك أثناء المناورات الصعبة.مالحظة: تأكد من عدم وجود عائق أمام الكاميرات
(بواسطة األتربة، الطين، الثلج، وما إلى ذلك).
العملعند تعشيق ترس الرجوع للخلف، تعرض كاميرا شاشة في السيارة خلف المنطقة الخلفية الرؤية
الوسائط المتعددة.المطلوب العرض طريقة اختيار أيضا يمكنك المتعددة الوسائط شاشة على للعرض استخدامها
من خالل التغيير إلى الوضع اليدوي.
تنشيط/إلغاء التنشيطيتم تنشيط النظام تلقائيا عندما تسير السيارة بسرعة تتجاوز وعندما تقريبا. كم/ساعة ۲۰ من أقل
السيارة هذه السرعة، يتم تعطيل النظام.يمكن أيضا تنشيط النظام بالضغط على زر التنشيط المعلومات، في سيارتك. للحصول على مزيد من عرض طرق ذات « كاميرا قسم الرجوع يرجى
متعددة » في دليل السائق.
مساعدة عن عبارة الوظيفة هذه من حال بأي يمكنها فال إضافية. األحوال أن تحل محل يقظة السائق
ومسؤوليتهعلى السائق أن يظل منتبها لألحداث المفاجئة عدم من دائما تأكد القيادة: أثناء تقع قد التي (مثال المناورة أثناء متحركة عوائق وجود أو دراجة...) أطفال، عربة حيوان، طفل، وتد الحجم، متوسط (حجر جدا عائق صغير
رفيع جدا...).
مالحظة: لمزيد من المعلومات حول اختيار الوضع اليدوي أو األوتوماتيكي، يرجى الرجوع إلى دليل
السائق الخاص بسيارتك.

ARA–۷۹
كاميرا الرجوع للخلف (۳/۳)
أنواع من نوع الخاصية هذه تعد بأي يمكنها فال التكميلية. المساعدة حال من األحوال أن تحل محل يقظة
السائق ومسؤوليته.دائما واالستعداد االنتباه السائق على ينبغي للحوادث المفاجئة أثناء القيادة: مع التأكد دائما من عدم وجود أي عقبات متحركة صغيرة أو ضئيلة الحجم (مثل طفل أو حيوان أو الكرسي أو حاجز أو حجر دراجة أو باليد يدفع الذي إجراء عند العمياء البقعة في ذلك) نحو أو
المناورة.
تقدم الشاشة صورة معكوسة.العياران هما تمثيل مسقط على أرض مسطحة، اإلسقاط يتم عندما المعلومة هذه تجاهل ويتم
على شيء رأسي أو موضوع على األرض.األشياء التي تظهر على حافة الشاشة يمكن أن
تظهر مشوهة.أو الجليد، (بسبب الشديدة اإلضاءة حالة في إلى وما الشمس، مواجهة في السيارة وجود الكاميرا بصورة تتأثر صورة أن يمكن ذلك)
سلبية.

ARA–۷۸
كاميرا الرجوع للخلف (۳/۲)
اكتشاف العوائقوالخلفية األمامية المستشعرات تفعيل يمكنك حدد مستقل. بصورة تفعيلها إلغاء أو بالسيارة (المستشعرات) المستشعر لتنشيط «تشغيل»
المطلوبة أو «إيقاف» إللغاء تنشيطه/تنشيطها.
إعدادات الصوتالصوتي والتحديد التنبيه تفعيل تفعيل/إلغاء يمكنك من بين عدة أصوات باإلضافة إلى ضبط مستوى
صوت مستشعرات العوائق.
ضبط الشاشةبالضغط العرض إعدادات إلى الوصول يمكنك
على الزر 2.تتيح لك هذه القائمة تفعيل/إلغاء تفعيل الموجهات 3 باإلشارة إلى المسافة خلف السيارة وضبط إعدادات
الشاشة.لضبط «- » أو «+ » على اضغط
التباين 4والسطوع 5 واأللوان 6.
2
انظر في كل االتجاهات
إيقافتشغيل
انظر في كل االتجاهات
3
56 4
إيقاف
إيقاف
إيقاف
تشغيل
تشغيل
تشغيل
اكتشاف العوائق
المستشعر األمامي
المستشعر الخلفي
آلة التنبيه الصوتية
نوع الصوت 1 2 3

ARA–۷۷
التشغيل(وحتى للخلف الرجوع ترس إلى االنتقال عند يتم آخر)، لترس االنتقال بعد تقريبا ثوان خمس السيارة على الموجود خلف المكان عرض منظر بالدليل مصحوبا المتعددة الوسائط نظام شاشة
وصورة ظلية للسيارة وصافرات.في المركبة الصوتية فوق المستشعرات تعمل وأي السيارة بين المسافة «قياس» على سيارتك
عائق.استعن الحمراء، المنطقة إلى الوصول يتم عندما
بالمصدم لتقف بشكل دقيق.استخدام نظام المعلومات عن لمزيد من مالحظة: مالك دليل راجع السيارة ، صف على المساعدة
السيارة.غير للخلف الرجوع كاميرا أن تأكد ملحوظة:
محجوبة (اتساخات، وحل، جليد، إلخ).مالحظة: بمجرد تعشيق ترس الرجوع إلى الخلف، تعرض شاشة الوسائط المتعددة منظر الجهة الخلفية
للسيارة لعدة ثوان.
كاميرا الرجوع للخلف (۳/۱)
تنشيط/إلغاء التنشيطكاميرا الرجوع إلى الخلف
يمكنك تنشيط/إلغاء تنشيط كاميرا الرجوع للخلف. الرئيسية، حدد «الضبط» القائمة إلجراء ذلك من > «الشاشة»، ثم اضغط على الزر «المساعدة في
الركن» 1.
نظام المساعدة على صف السيارةتتيح لك هذه القائمة اختيار تفعيل/إلغاء تفعيل كاميرا
الرجوع إلى الخلف وتعيين «اكتشاف العوائق».
النظام
المساعدة في الركن
كاميرا خلفية إيقاف تشغيل
اكتشاف العوائق
ضوابط الشاشة
سطوع منخفض الوسائط مرتفع
نهارتلقائي نهار ليل
داكن الخلفيةالمصباح
المساعدة في الركن
الصوت الشاشة إمكانية االتصال
1

ARA–۷٦
ال توقف السيارة وال تترك المحرك مواد فيها تتواجد أماكن في دائرا وأوراق كالعشب لالشتعال قابلة نظام تالمس أن يمكن التي الشجر
العادم الساخن.
بدء تشغيل المحرك عن بعد (۳/۳)
بدء تعمل وظيفة قد ال القاسية، الظروف في التشغيل عن بعد بواسطة البرمجة.
بوظيفة المجهزة السيارات في خاصة ميزة «تنشيط كل ساعتين».
على دقائق ۱۰ لمدة السيارة قيادة من بد ال األقل بين كل استخدام للوظيفة. مخاطرة تلف
زيت المحرك.
مسؤولية السائق أثناء صف السيارة أو توقفها
ال تترك أبدا سيارتك وبداخلها طفل أو شخص بالغ غير مستقل أو حيوان حياتهم يعرضوا قد قصيرة. لفترة ولو حتى المثال، سبيل على للخطر، اآلخرين وحياة عند بدء المحرك أو تشغيل المعدات مثل النافذة الكهربائية أو عند قفل األبواب، وما إلى ذلك. أيضا، في الطقس الحار و/أو المشمس، يرجى تذكر أن درجة الحرارة داخل مقصورة الركاب
تزداد بسرعة كبيرة.خطر التعرض للموت أو إلصابات خطيرة.
تشغيل بدء خاصية تستخدم ال المحرك عن بعد أو برمجته عندما:
في أو جراج في السيارة تكون –مكان مقفول.
انبعاثات بسبب االختناق أو التسمم خطر غازات العادم.
السيارة مغطاة بجراب الحماية. –خطر وقوع حريق.
غطاء حيز المحرك مفتوحا أو قبل فتحه. –خطر التعرض للحروق أو إلصابات بالغة.
بدء خاصية استخدام حظر يمكن للبلد، تبعا وفقا برمجتها أو بعد عن المحرك تشغيل
للقانون و/أو اللوائح السارية.قبل استخدام هذه الخاصية، راجع القوانين و/
أو اللوائح السارية بالبلد المعني.
حسب طراز السيارة، يرجى التأكد من تعطيل الماسحات مثل للتيار المستهلكة األدوات والمصابيح الخارجية والراديو والمقاعد المدفأة والتأكد ذلك إلى وما المدفأة، القيادة وعجلة ترك قبل الملحقات جميع فصل من كذلك
السيارة.

ARA–۷٥
بدء تشغيل المحرك عن بعد (۲/۳)
قم بإيقاف تشغيل اإلشعال. –تشغيل يتم ثم يظهر وميضان، قفل سيارتك، عند أضواء التحذير من الخطأ وإشارات تغيير االتجاه البرمجة أن إلى يشير تقريبا مما ثوان لمدة ثالث
أخذت في االعتبار. يعمل بدء تشغيل المحرك عن بعد إذا:
(النقطة المحايد الوضع على التعشيق ذراع –الحركة ناقل ذات للسيارات بالنسبة الميتة)
اليدوي أو األوتوماتيكي؛ذراع التعشيق في الوضع P بالنسبة للسيارات –
ذات ناقل الحركة األوتوماتيكي.
اإلشعال مطفأ؛ –حيز األبواب، األمامي، (الغطاء المنافذ كافة –
األمتعة) محكمي الغلق عندما تغادر السيارة.الوسائط نظام تشغيل إيقاف يجب مالحظة: بدء تعمل وظيفة لكي ترك سيارتك عند المتعددة
تشغيل المحرك عن بعد.
«تنشيط كل ساعتين»تلقائية تبدأ بصورة الوظيفة لسيارتك أن تتيح هذه
كل ساعتين وفقا لدرجة حرارة المحرك.
لتنشيط هذه الوظيفة، اضغط على الزر «تشغيل» 5.مالحظة: يجب إيقاف تشغيل نظام التهوية لكي يتم
تنشيط وظيفة «تنشيط كل ساعتين».عند تنشيط هذه الوظيفة، ال يتم تنشيط نظام التهوية
خالل أول أربع مرات بدء تشغيل، إذا حدثت.في حالة البرد القارس، سوف تبدأ السيارة بصورة عشر حوالي خالل مضاءة تظل وسوف تلقائية
دقائق ثم ستنطفئ. إعادة تستلزم ال المحرك حرارة درجة كانت إذا تشغيل، فلن تبدأ السيارة بصورة تلقائية خالل أول إلى وضع تعود تنشيط وسوف إعادة أربع مرات االستعداد لمدة ساعتين. سيتم إعادة تشغيل المحرك
إذا كانت درجة حرارته منخفضة جدا.في جميع الحاالت، يحدث ذلك في مرة بدء التشغيل
األخيرة.يبدأ المحرك ويظل قيد التشغيل لمدة حوالي عشر دقائق، قبل الوقت الذي تم برمجته عليه بما يقرب
من خمس عشرة دقيقة.تشغيل بدء بوقت العالمة 6 تذكرك مالحظة:
السيارة الذي قمت بضبطه بالفعل.
11:05 AM
داكن
الراديو الوسائط الهاتف
Driving eco۲التنقلالضبط
6
بدء تشغيل المحرك عن بعد
تحذير : ال تركن السيارة في غرفة مقفلة
بدء تشغيل تلقائي
السيارة جاهزة
تنشيط كل ساعتين
ستكون السيارة جاهزة في غضون ۰ ساعات و۰ دقائق
إيقاف تشغيل
إيقاف تشغيل
تغيير
موافق
5

ARA–۷٤
إلى الهواء مكيف في التحكم أزرار اضبط –الركاب المطلوبة من مقصورة الحرارة درجة عند بدء تشغيل المحرك، ثم اضبطه على وضع إذابة الجليد (يرجى الرجوع إلى القسم ۲ بدليل
السيارة)؛
بدء تشغيل المحرك عن بعد (۱/۳)
ضبط الوقت
داكن
الراديو الوسائط الهاتف
Driving eco۲التنقلالضبط
1
تم ضبط وقت المغادرة
بدء تشغيل المحرك عن بعد
موافق
لك تتيح النظام، بهذا السيارة مجهزة تكون عندما تشغيله لبدء المحرك برمجة إمكانية الوظيفة هذه عن بعد، بغية تبريد أو تدفئة مقصورة الراكب لمدة
تصل إلى ۲٤ ساعة قبل استخدام السيارة.الحرارة، (درجة المطلوب التدفئة اضبط مستوى التهيئة تكتمل الوظيفة. برمجة قبل الجليد) إذابة
والبرمجة عبر شاشة الوسائط المتعددة.
برمجة ساعة االنطالق الخاصة بهذه الوظيفةمن على 1 اضغط ثم اإلشعال، بتشغيل قم –
القائمة الرئيسية. تظهر الشاشة A؛
الموجود على خط «بدء الزر «تشغيل» حدد –تشغيل تلقائي» لتنشيط الوظيفة؛
في ترغب التي االنطالق ساعة بتحديد قم –على بالضغط وانطلق فيها سيارتك استخدام
الزر 2؛«أسفل» و «أعلى» األسهم على اضغط –الستعراض الساعات والدقائق إلى أن تصل إلى
الساعة المرغوبة؛لك تعرض للتأكيد. «موافق» على اضغط –الذي الوقت على المتبقي الوقت العالمة 4
ترغب فيه استخدام السيارة؛اضغط على «موافق 3» لتأكيد وإنهاء البرمجة؛ –
لتنشيط وظيفة بدء التشغيل عن بعد عن طريق البرمجة، يجب عليك تحديد خمس عشرة دقيقة نظام على المعروض الوقت بعد األقل على
الوسائط المتعددة.
بدء تشغيل المحرك عن بعد
تحذير : ال تركن السيارة في غرفة مقفلة
بدء تشغيل تلقائي
السيارة جاهزة
تنشيط كل ساعتين
ستكون السيارة جاهزة في غضون ۰ ساعات و۰ دقائق
إيقاف تشغيل
إيقاف تشغيل
تغيير
موافق
2A
4 3

ARA–۷۳
13 12 11 10
االتصال
9
14
إجراء وتلقي مكالمة (۳/۳)
أثناء االتصالأثناء االتصال يمكنكم:
إيقاف تشغيل الميكرفون بالضغط على 12؛ –تشغيل الميكرفون بالضغط على 13؛ –ضع السماعة بالضغط على الزر 9؛ –
في الصوت مكبر خالل من الصوت سماع –الهاتف عن طريق الضغط على 11؛
في الصوت مكبر خالل من الصوت سماع –السيارة عن طريق الضغط على 10؛
السابقة الشاشة إلى للعودة على 14 اضغط –شاشة أو المثال) سبيل على المالحة (شاشة
االستقبال.

ARA–۷۲
إجراء وتلقي مكالمة (۳/۲)
كتابة رقمعلى ثم القائمة الستعراض على 1 اضغط
«االتصال» لرقم االتصال.اضغط على األرقام لكتابة الرقم المطلوب، ثم «7»
إلجراء المكالمة.تسمح ضغطة طويلة رقم، اضغط على 8. لمسح
على 8 بمسح جميع األرقام مرة واحدة.
يوصي بإيقاف السيارة لكتابة رقم أو للبحث عن اسم في هاتفك.
8
االتصال
71
مكالمة واردة
أوافق رفض
تلقي مكالمةعند استقبال مكالمة، تظهر رسالة على نظام شاشة نظام الوسائط المتعددة بالمعلومات التالية عن الرقم
المتصل:دليل في الرقم تسجيل حال (في المتصل اسم –
هاتفك)؛رقم المتصل؛ –
«رقم غير معروف» (إذا تعذرت رؤية الرقم). –مالحظة: عندما تظهر رسالة المكالمة الواردة على المكالمة ارفض أو اقبل المالحة، أثناء الشاشة
للعودة إلى شاشة المالحة.
مالحظة: يمكنك قبول مكالمة واردة أو رفضها من خالل الضغط على الزر الموجود في عمود التوجيه
الخاص بالسيارة.

ARA–۷۱
إصدار مكالمة من خالل دليل الهاتفبينما الهاتف متصال، من القائمة «جهاز الهاتف»،
اختر«دليل الهاتف» من القائمة المنسدلة 1له االسم كان إذا المقترن الرقم (أو االسم اختر العديد من األرقام). سيتم تشغيل المكالمة تلقائيا بعد
الضغط على رقم اإلتصال.الوسائط نظام مكالمة من إجراء يمكنك مالحظة: من الصوتي التعرف نظام باستخدام المتعددة التعرف «استخدام باب إلى ارجع الذكي. هاتفك
الصوتي».
اضغط على 1 لالستعراض القائمة ثم على «قائمة المكالمات».
اضغط على 6 للدخول إلى قائمة كل المكالمات.المكالمات قائمة إلى للدخول على 5 اضغط
الصادرة.اضغط على 4 للدخول إلى قائمة المكالمات الواردة.اضغط على 3 للدخول إلى قائمة المكالمات الفائتة.
المكالمات عدد تشير.إلى العالمة 2 مالحظة: الفائته.
من األسماء/األرقام تعرض القوائم، من لكل األحدث إلى األقدم. حدد اسم إلجراء مكالمة.
إجراء وتلقي مكالمة (۳/۱)
اتصل برقم من سجل المكالماتتستطيع استخدام سجل المكالمات المخزنة في ذاكرة
الهاتف لبدء االتصال.عن Bluetooth® وهاتفك جهازك توصيل بعد أرقام فإن الالسلكية، Bluetooth® تقنية طريق سجل المكالمات «كلها» و«الصادرة» و«الواردة» إلى سجل تلقائيا نقلها يتم هاتفك في و«الفائتة"»
المكالمات بنظام الوسائط المتعددة.
1
6 5 4 3
قائمة المكالمات
الكل
2
إغالق
Adam Smith

ARA–۷۰
من القائمة جهاز الهاتف اضغط على 1 الستعراض إلى للدخول الهاتف» ثم على «دليل القوائم قائمة
دليل تليفون النظام.
استخدام دليل الهاتففي المسجلة الهاتف دليل بيانات استخدام تستطيع
ذاكرة الهاتف.
يوصي بإيقاف السيارة لكتابة رقم أو للبحث عن اسم في هاتفك.
دليل الهاتفعبر Bluetooth® وهاتفك نظامك اتصال بعد التقنية الالسلكية ®Bluetooth، يتم نقل أرقام دليل الهاتف الخاصة بهاتفك إلى دليل الهاتف النظام إذا كانت األسماء موجودة في ذاكرة الهاتف بجهازك.
يطلب أن يمكن الهواتف، بعض في مالحظة: منك النظام تأكيد نقل دليل الهاتف إلى النظام أثناء
االقتران.
استدعاء رقم هاتف من الدليلبعد الوصول لالسم الذي تريد االتصال به في دليل
الهاتف، اختار الرقم الذي ترغب االتصال به.
البحث عن جهة اتصال في دليل الهاتفالبحث عنه المراد االسم أدخل ثم اضغط على 2
باستخدام لوحة المفاتيح الرقمية.
1
2
دليل الهاتف
البحث بحسب االسم
آدم سميث
فنسنت كاس
كار ريبير هيجود. براون
تبعا للماركة وموديل الهاتف، ال يتم تشغيل نقل األسماء في نظام الملتيمديا.

ARA–٦۹
(٤/٤) ANDROID AUTO™, CARPLAY™
3
Media Nav Evolution العودة إلى واجهة:Media Nav Evolution للعودة إلى واجهة
باللوحة الرئيسية» «الشاشة زر على اضغط –المتعددة أو على وحدة األمامية لنظام الوسائط
التحكم المركزية.أو
الوسائط الزر 3 على شاشة نظام اضغط على –أو «Android Auto™» لـ وفقا المتعددة
.«CarPlay™»
3
«Android Auto™» تطبيق وظائف تعتمد الهاتف إصدار على «Carplay™» وخدمة إضافية، معلومات على للحصول وطرازه. المصنعة الشركة موقع إلى الرجوع يرجى
على الويب إن وجد.

ARA–٦۸
3
(٤/۳) ANDROID AUTO™, CARPLAY™
بمجرد تنشيط تطبيق «™Android Auto» أو خدمة «™CarPlay»، يمكنك استخدام زر التعرف على الصوت في سيارتك لتنشيط بعض وظائف الهاتف للقيام بهذا، الذكي الخاص بك من خالل الصوت. اضغط على زر 3 بعجلة القيادة لسيارتك (للحصول على مزيد من المعلومات، ارجع إلى قسم «استخدام
خاصية التعرف على الصوت»).
«Android Auto™» استخدام حالة في مالحظة: إلى تطبيقات الوصول يمكنك ،«CarPlay™» أوالمالحة والموسيقى على الهاتف الذكي. ستحل هذه في المدمجة المشابهة التطبيقات محل التطبيقات نظام الوسائط المتعددة Media Nav Evolution التي تعمل بالفعل. على سبيل المثال، ال يمكن استخدام Android» تطبيق أو واحد مالحة تطبيق إال ™Auto™»/«CarPlay»، أو التطبيق المدمج داخل
نظام الوسائط المتعددة. Android» تطبيق استخدام حالة في مالحظة: ™Auto» أو خدمة «™CarPlay»، ستستمر بعض في العمل في المتعددة الوسائط لنظام الوظائف تشغيل بدء حالة في المثال، سبيل على الخلفية. «CarPlay™» أو «Android Auto™» تطبيق واستخدام المالحة على الهاتف الذكي أثناء تشغيل الراديو على نظام الوسائط المتعددة حاليا، سيستمر
بث الراديو.
أو «Android Auto™» تطبيق استخدام عند البيانات نقل يؤدي قد ،«CarPlay™» خدمةتكاليف تحمل إلى للتشغيل المطلوبة الخلوية
إضافية غير مضمنة في خطة الهاتف.

ARA–٦۷
(٤/۲) ANDROID AUTO™, CARPLAY™
CarPlay™
المقدمة«™CarPlay» هو تطبيق أصلي متاح على الهاتف على التطبيقات بعض استخدام من يمكنك الذكي
الهاتف من شاشة نظام الوسائط المتعددة.بخدمة مجهزا الذكي هاتفك يكن لم إذا مالحظة: «™CarPlay"، فارجع إلى الموقع الرسمي الخاص
بنظام تشغيل هاتفك.إذا إال «CarPlay™» الخدمة تعمل لن مالحظة: الخاص USB بمنفذ متصال الذكي هاتفك كان بسيارتك وكانت خدمة SIRI مفعلة. يجب أن تكون الخدمة «™CarPlay» متاحة من خالل الزر 2 في
القائمة الرئيسية.2
CarPlay
الراديوالوسائطالهاتف
۲ Driving eco التنقل اإلعدادات
إمكانية االتصال الضبط
راجع قائمة أجهزة الهاتف الذكي
الصوت الشاشة إمكانية االتصال النظام
Bluetooth عرض أجهزة
Bluetooth البحث عن أجهزة
البرنامج التعليمي حول إمكانية اتصال الهاتف الذكي
اتصال تعليمي حول برنامج إلى الوصول يمكنك الخاص بك المتعددة الوسائط بنظام الذكي الهاتف عبر «اإلعدادات» > «إمكانية االتصال الضبط».
التي أوصت USB كابالت استخدام يستحسن أجل من وذلك للهاتف المصنعة الشركة بها
تشغيل التطبيق بطريقة صحيحة.
االستخدام األولبنظام الخاص USB بمنفذ هاتفك بتوصيل قم
الوسائط المتعددة.الوسائط نظام تشغيل خدمة ™CarPlay على يتم
المتعددة.في حالة فشل اإلجراء الموضح أعاله، كرر عملية
التشغيل.

ARA–٦٦
(٤/۱) ANDROID AUTO™, CARPLAY™
Android Auto™
المقدمةيعد «™Android Auto» تطبيقا يمكن تنزيله (من هاتفك على التطبيقات لتنزيل األساسي النظام الذكي) والذي يمكنك من استخدام بعض التطبيقات الوسائط نظام شاشة من هاتفك على والوظائف
المتعددة.متوافقا الذكي إذا كان هاتفك ما لمعرفة مالحظة: بالرجوع مع تطبيق «™Android Auto»، تفضل
إلى الموقع الرسمي الخاص بنظام تشغيل هاتفك. «Android Auto™» التطبيق يعمل لن مالحظة: «USB» بمنفذ متصال الذكي هاتفك كان إذا إال الخاص بسيارتك وكانت خدمة SIRI مفعلة. يجب متاحا من «Android Auto™» التطبيق أن يكون
خالل الزر 1 في القائمة الرئيسية.االستخدام األول
بنظام الخاص USB بمنفذ هاتفك بتوصيل قم الوسائط المتعددة لديك:
يجب قبول الطلبات في هاتفك الذكي الستخدام –تطبيق «™Android Auto»؛
قم بالتأكيد بالضغط على «قبول» على هاتفك. –يتم تشغيل التطبيق «™Android Auto» على نظام
الوسائط المتعددة.في حالة فشل اإلجراء الموضح أعاله، كرر عملية
التشغيل.
الوسائط بنظام المتصلة األجهزة إدارة يمكنك < «اإلعدادات» عبر وقت أي في المتعددة
«إمكانية االتصال الضبط». Android» مالحظة: سيتم إجراء أول توصيل معتفعيل السيارة بغرض إيقاف يتم ™Auto» عندما الوسائط بنظام الصوت على التعرف وظيفة
المتعددة فقط.
1
الراديوالوسائطالهاتف
۲ Driving eco التنقل اإلعدادات
إمكانية االتصال الضبط
راجع قائمة أجهزة الهاتف الذكي
الصوت الشاشة إمكانية االتصال النظام
Bluetooth عرض أجهزة
Bluetooth البحث عن أجهزة
البرنامج التعليمي حول إمكانية اتصال الهاتف الذكي
أوصت التي USB كابالت استخدام يستحسن أجل من وذلك للهاتف المصنعة الشركة بها
تشغيل التطبيق بطريقة صحيحة.
AndroidAuto

ARA–٦٥
استخدام التعرف على الصوت (۳/۳)
إيقاف التنشيطأو اضغط مع B الزر 2 على شاشة اضغط على الصوت على التعرف زر على االستمرار تم أنه إلى الصوتية اإلشارة وتشير سيارتك. في
إلغاء تنشيط خاصية التعرف على الصوت.
إن ميزة التعرف على الصوت غير معتمدةعلى جهاز Bluetooth هذا
داكن
موافق
الهاتف الذكي
النظام
5
الهاتف الذكي
إمكانية االتصال الضبط
الصوت الشاشة إمكانية االتصال
6
تعليماتبشأن إضافية مساعدة على الحصول يمكنك التشغيل وشروط االستخدام الخاصة بنظام التعريف «الصفحة على اضغط بذلك، للقيام الصوتي. الرئيسية» > «اإلعدادات» > «إمكانية االتصال». الضغط ثم على 6، بالضغط الثانية الصفحة حدد
على 5.هذه الخاصية مقدمة على شكل شاشات تشرح لك
استخدام التعريف الصوتي كما يلي:شروط االستخدام؛ –الهواتف المتوافقة؛ –
الهاتف الذكي
فتح/إغالق بواسطة أمر: ضغط ضغطة قصيرة أو مطولة
انتظر إنطالق نغمة اإلشارة لتبدأ بالتكلم.
للتكلم مرة بعد، اضغط مطوال.
لإلغالق، اضغط مطوال.
زر باستخدام وتعطيلها الوظيفة بتنشيط قم –التعرف على الصوت في سيارتك؛
طريقة التفاعل مع الشاشة؛ –الوظائف المتاحة؛ –
نطاق الوظائف. –

ARA–٦٤
استخدام التعرف على الصوت (۳/۲)
على A وعرض صوتية إشارة إصدار يشير الشاشة إلى أن وظيفة التعرف على الصوت نشطة.
تحدث بصوت عال وواضح.الصوت على التعرف نظام يمكنك مالحظة: معينة استخدام وظائف الذكي من بهاتفك الخاص بهاتفك. وال يتيح لك التفاعل مع الوظائف األخرى Driving الراديو، مثل المتعددة، الوسائط لنظام
eco2، وما إلى ذلك.
الهاتف الذكي
إلغاء
A
إلغاء
2
الهاتف الذكي
3
B
االستخدامعلى التعرف نظام تشغيل إلعادة التنشيط، بعد الصوت، انقر فوق وحدة التحكم في عجلة القيادة، على أو التوجيه عمود في التحكم وحدة على أو الموجود زر 2 على أو المتعددة، الوسائط نظام
على شاشة نظام الوسائط المتعددة الخاص بك.وقت أي في الرئيسية القائمة إلى العودة يمكنك
بالضغط على 3.
الراديوالوسائطالهاتف الذكي
۲ Driving eco التنقل اإلعدادات
ضبط الوقت
داكن
4
لنظام الرئيسية القائمة من ،B شاشة إلى للعودة الوسائط المتعددة اضغط على 4.
مالحظة: عند استخدام وظيفة التعرف على الصوت، غير و«الراديو» «الوسائط» الوظيفتان تصبح القائمة عبر إليهما الوصول يمكن ال أو متاحتين
الرئيسية لنظام الوسائط المتعددة.

ARA–٦۳
استخدام التعرف على الصوت (۳/۱)العرض
يتيح لك نظام الوسائط المتعددة الخاص بك استخدام المتعددة وعلى الوسائط نظام معينة على وظائف على التعرف طريق عن بك الخاص الهاتف الصوت. هذا األمر يسمح لك باستخدام هاتفك مع
إبقاء يديك على عجلة القيادة.على التعرف زر موضع يختلف قد مالحظة: الصوت (قد يكون في وحدة التحكم في عجلة القيادة أو التحكم في عمود التوجيه أو شاشة نظام الوسائط
المتعددة ).الصوتي، سوف التعريف استخدام أثناء مالحظة: تكون اللغة العرفة على هاتفك هي اللغة المستخدمة
من قبل النظام.الوسائط نظام على رسالة يتم عرض مالحظة: وظيفة يدعم ال الذكي هاتفك كان إذا المتعددة
التعرف على الصوت.
تنشيط التعرف على الصوت بالهاتف باستخدام نظام الوسائط المتعددة
لتنشيط نظام التعريف الصوتي بهاتفك يتعين عليك:قم بالتقاط 3G، 4G أو Wifi مع هاتفك الذكي؛ –
تنشيط ®Bluetooth على هاتفك الذكي وإظهاره –دليل إلى الرجوع (يرجى األخرى لألجهزة
هاتفك لالطالع على اإلرشادات)؛قم بإقران هاتفك الذكي وتوصيله بنظام الوسائط –«إقران القسم إلى الرجوع (يرجى المتعددة
أجهزة ®Bluetooth وإلغاء إقرانها»).على التعرف زر على االستمرار مع اضغط
الصوت من أجل تفعيله.
قائمة في الموجودة العالمة 1 تشير مالحظة: < االتصال» «إمكانية < «اإلعدادات» أن إلى أجهزة» قائمة «Bluetoothعرض وظيفة التعرف على الصوت بهاتفك الذكي متوافقة
مع نظام الوسائط المتعددة.
1
خيارات
Bluetooth أجهزة
۳Gr_۲ Info

ARA–٦۲
(۲/۲) BLUETOOTH® توصيل، فصل أجهزة
فصل هاتف متصللفصل هاتف من Media Nav Evolution، اضغط
على اسم جهازك. تختفي العالمة الصغيرة 1.إذا كنت متصال في مرحلة لحظة فصل هاتفك، يتم
نقل االتصال تلقائيا على هاتفك.
تغيير الهاتف المتصل بهيمكنك االتصال/فصل االتصال ألي جهاز في أي
.Bluetooth® وقت«جهاز على اضغط الرئيسية، القائمة خالل من «قائمة وعلى «اإلعدادات» على ثم الوسائط»،
األجهزة».المراد توصيله بالضغط على الجهاز اضغط على
«موافق».تظهر عالمة صغيرة 1 أمام اسم هاتفك لتخبرك بأن
االتصال قد تم.
Info 2_3Gr
Seungyeon_VU2
Seungyeon_3
خيارات
Bluetooth أجهزة
1

ARA–٦۱
(۲/۱) BLUETOOTH® توصيل، فصل أجهزةمالحظة: إذا كان االتصال جاري أثناء الوصلة، يتم
تحويله تلقائيا إلى مبكر الصوت في السيارة.الرسائل جميع على بالموافقة نوصيك مالحظة: بالنظام االقتران أثناء هاتفك على تظهر التي على التلقائي التعرف يعمل حتى بها والسماح
الجهاز بسالسة.
التوصيل اليدويمن القائمة األساسية، قم بعمل الخطوات التالية:
اضغط على «الهاتف»؛ –قائمة «Bluetoothعرض على اضغط –
أجهزة »؛حدد اسم الهاتف الذي ترغب االتصال به. –
هاتفك متصل بنظام الملتيمديا.
فشل التوصيلفي حالة فشل التوصيل، برجاء التحقق من أن:
جهازك مضاء؛ –الجهاز معد لقبول طلب التوصيل بالنظام تلقائيا؛ –
بطارية الجهاز ليست فارغة؛ –تم اقتران هاتفك مسبقا بنظام حر اليدين؛ –
جهازك في Bluetooth® خاصية تفعيل تم –والنظام؛
اليدين لنظام حر الممتد يفرغ االستخدام مالحظة: بطارية جهازك بصورة أسرع.
االتصال بهاتف ®Bluetooth مقترنغير الهاتفي بالنظام هاتف أي لوصل يمكن ال للفصل ارجع مسبقا. تطبيقه يتم لم إن اليدوي،
«اقتران/فصل اقتران أجهزة بلوتوث®».يجب أن يكون هاتفكم موصى بالنظام الهاتفي غير
اليدوي للوصول إلى كل وظائفه.
وصل آليمع أول بدء تشغيل النظام، يبحث نظام المهاتفة حر على الموجودة آنفا المقترنة الهواتف على اليدين مقربة (قد يستغرق هذا البحث دقيقة). سوف يتصل
بصورة تلقائية بآخر هاتف متصل إذا:بالهاتف الخاص Bluetooth® اتصال كان –
نشطا؛باالتصال االقتران، أثناء بالسماح سابقا، قمت –
التلقائي لهاتفك بالنظام.

ARA–٦۰
إلغاء إقران هاتف ®Bluetooth من نظام Media Nav Evolution
ذاكرة من الهاتف محو على اإلقران إلغاء يعمل نظام حر اليدين.
«الضبط» على اضغط الرئيسية، القائمة من Bluetooth» ثم االتصال»، «إمكانية <«سلة رمز على اضغط أجهزة». قائمة عرض الذي الذكي الهاتف السم المواجه المهمالت» 1 تريد حذفه من القائمة. قم بتأكيد اختيارك بالضغط
على «موافق».
Bluetooth® إلغاء إقران جميع هواتفMedia Nav Evolution من نظام
إقرانها التي الهواتف جميع حذف أيضا يمكنك القائمة من اليدين. حر نظام ذاكرة من مسبقا «إمكانية < «الضبط» على اضغط الرئيسية، االتصال» > «Bluetoothعرض قائمة أجهزة» حذف بتأكيد قم الكل». و«حذف «خيارات» ثم
جميع الهواتف المقترنة بالضغط على «موافق».
«تغيير مفتاح المرور»أربعة من المكونة مرور كلمة تخصيص يمكنك أرقام الخاصة بالسماح للنظام باإلقران مع هواتف
.Bluetooth®
< «الضبط» على اضغط الرئيسية، القائمة من «Bluetooth» > «تغيير مفتاح المرور».
Bluetooth أجهزة
Info 2_3Gr
Seungyeon_VU2
Seungyeon_3
1
خيارات
«الهاتف الذكي»قائمة الثانية من الصفحة الوظيفة متوفرة في هذه «إمكانية االتصال» والتي تمكنك من الوصول إلى المساعدة بتفعيل خاصية التحكم الصوتي وتشغيلها (يرجى الرجوع إلى قسم «استخدام خاصية التحكم
الصوتي»).
(٤/٤) BLUETOOTH® إقران وإلغاء إقران أجهزة
الصوت الشاشة إمكانية االتصال
Bluetoothعرض قائمة أجهزة
Bluetooth البحث عن جهاز
المصادقة على األجهزة الخارجية
تغيير مفتاح المرور
إمكانية االتصال الضبط
النظام

ARA–٥۹
تظهر رسالة على شاشة هاتفك لتخبرك بأن هاتفك Media Nav أصبح مقترنا بنظام الوسائط المتعددة
.Evolution
العالمة حسب اإلقران وقت يختلف مالحظة: التجارية لهاتفك وطرازه.
إذا فشل االقتران، كرر هذه العملية.
(٤/۳) BLUETOOTH® إقران وإلغاء إقران أجهزةإقران ®Bluetooth الهاتف بنظام الوسائط
المتعددة من الهاتفأو بتنشيط توصيل ®Bluetooth من هاتفك قم –
من النظام؛القائمة من ،Media Nav Evolution من –الرئيسية، اضغط على «الضبط» > «إمكانية األجهزة على «المصادقة < االتصال» لهواتف مرئيا النظام تجعل بذلك الخارجية».
®Bluetooth األخرى؛
تظهر رسالة على الشاشة وتعرض كلمة مرور –والوقت المتبقي الستمرار ظهور النظام.
أجهزة قائمة بإظهار قم المحمول، هاتفك من –®Bluetooth المتاحة؛
Media Nav» المتعددة الوسائط نظام حدد – Evolution» من األجهزة المتوفرة أثناء الوقت المحدد، ووفقا لهاتفك الذكي، أدخل كلمة المرور المعروضة على شاشة النظام على لوحة مفاتيح
الهاتف.
،«Media Nav Evolution» عند تشغيل نظامتلقائيا المقترن األخير الجهاز توصيل سيتم
بالنظام.
حر نظام من الوحيد الغرض إن تيسير هو بك الخاص اليدين الخطر عوامل تقليل مع االتصال تراعى كاملة. منها التخلص دون تتواجد الذي البلد السارية في القوانين إلزاميا
فيه.

ARA–٥۸
قد يطلب منك النظام تأكيد نقل دليل الهاتف وسجل المكالمات إلى نظام الوسائط المتعددة أثناء اإلقران
وذلك حسب نوع الهاتف.قم بقبول المشاركة للعثور هذه المعلومات على نظام بالمشاركة السماح يمكنك كما المتعددة. الوسائط إلى المكالمات الهاتف وسجل لدليل األوتوماتيكية اإلقران عمليات أثناء أوتوماتيكيا لنقلها النظام
التالية.مالحظة: ذاكرة نظام الوسائط المتعددة ذاكرة مقيدة وقد ال يمكن استيراد جميع جهات االتصال الخاصة
بك.
(٤/۲) BLUETOOTH® إقران وإلغاء إقران أجهزةاضغط على «ازدواج» أو «اقتران» أو «اتصال»
للسماح باالقتران وذلك حسب الهاتف.نظام شاشة على المعروض الرمز أدخل –الهاتف مفاتيح لوحة على المتعددة الوسائط
وذلك حسب الهاتف؛تقترح هاتفك شاشة على ثانية رسالة تظهر –المتعددة الوسائط بنظام التلقائي االقتران الترخيص هذا اقبل المستقبلية. لالستخدامات
حتى ال تقوم بهذه الخطوات مرة أخرى.
هاتفك الذكي اآلن مقترن بنظام الوسائط المتعددة.العالمة حسب اإلقران وقت يختلف مالحظة:
التجارية لهاتفك وطرازه.يكن لم إذا العملية. هذه كرر االقتران، فشل إذا البحث عملية أثناء النظام بواسطة مرئيا هاتفك عن أجهزة ®Bluetooth فيرجى الرجوع إلى دليل
هاتفك.

ARA–٥۷
إقران هاتف ®Bluetooth آخرإقران يجب اليدين، حر المهاتفة نظام الستخدام قبل بالسيارة Bluetooth® المحمول هاتفك
االستخدام األول.يعمل اإلقران على تمكين النظام من التعرف على حتى إقران يمكنك وتخزينه. Bluetooth® هاتف إال توصيل يمكن ال ولكن ذكية، هواتف خمسة
هاتف واحد فقط في كل مرة بنظام حر.الوسائط نظام عبر إما مباشرة اإلقران تنفيذ يتم
المتعددة أو عبر هاتفك.تأكد من تشغيل النظام والهاتف الذكي لديك وتأكد نشطة الذكي بهاتفك Bluetooth® وظيفة أن من األخرى األجهزة على للتعرف وقابلة ومرئية (الرجاء الرجوع إلى تعليمات هاتفك للحصول على
مزيد من المعلومات).
(٤/۱) BLUETOOTH® إقران وإلغاء إقران أجهزة
الصوت الشاشة إمكانية االتصال
إمكانية االتصال الضبط
Bluetoothعرض قائمة أجهزة
Bluetooth البحث عن جهاز
المصادقة على األجهزة الخارجية
تغيير كلمة المرور
حسب العالمة التجارية لهاتفك أو طرازه، فقد أو جزئي بشكل اليدين حر وظيفة تتوافق ال
كلي مع نظام سيارتك.
إقران تليفون ®Bluetooth من نظام الوسائط المتعددة
– قم بتنشيط وصلة ®Bluetooth الخاص بهاتفك؛اضغط على «الضبط» > «إمكانية االتصال» –
> «Bluetooth البحث عن جهاز»؛توصيل في ومرئي مفعل هاتفك أن من تأكد –
®Bluetooth؛قائمة من بإقترانه ستقوم الذي الهاتف حدد –
األجهزة المتنقلة التى يعثر عليها النظام؛يتم عرض رسالة على شاشة الهاتف. –
للحصول على قائمة بالهواتف المتوافقة، ارجع https://easyconnect.renault. موقع إلى
.com
من أجل سالمتك، قم بهذه اإلجراءات والسيارة متوقفة تماما.
النظام

ARA–٥٦
٤Xمعلومات سيارة ٤
الوصول إلى قائمة «معلومات سيارة .«٤x٤
ثم «مركبة»، على اضغط الرئيسية، القائمة من .«٤xمعلومات سيارة ٤»
لك وظيفة «معلومات سيارة ٤x٤» عرض تتيح العناصر التالية من سيارتك:
الوقت في بالدرجات، (القيادة) العجلة تقوس –الحقيقي (منطقة A)؛
المسار، باستخدام بوصلة (منطقة B)؛ –
٤xمعلومات سيارة ٤
A B C
الزاوية األفقية (االنحدار) بالدرجات، في الوقت –.(C منطقة) الحقيقي
على المعروضة الزاوية قيم تختلف قد مالحظة: الشاشة عن الحقيقة بمقدار ثالث درجات.
مالحظة: يتم تحديث الشاشة كل ثانية تقريبا.

ARA–٥٥
DRIVING ECO²
«Eco عالمة وضع»القائمة الحصول على مالحظة عامة تتيح لك هذه خاصة مالحظة أفضل على عالوة .۱۰۰ من
باألداء خالل القيادة االقتصادية.متوسط أداء التسارع (منطقة A)؛ –
متوسط أداء تغيير التروس (منطقة B)؛ –.(C منطقة) متوسط أداء توقع الكبح –
«تقرير حول الرحلة»تمكنك هذه القائمة من مشاهدة البيانات المسجلة فيما
يتعلق بخط سيرك األخير:«معدل االستهالك»؛ –
«معدل السرعة»؛ –«المسافة من دون استهالك». –
بالضغط البيانات ضبط إعادة يمكنك مالحظة: على 1.
Driving eco² الوصول إلى قائمةمن خالل القائمة الرئيسية، اضغط على «مركبة»،
.«Driving eco²» ثم علىبالوصول «Driving eco²» القائمة تسمح
للمعلومات التالية:«تقرير حول الرحلة» ; –; «Eco عالمة وضع» –.«Eco تدريب وضع» –
«Eco تدريب وضع»هذه القائمة لتقييم أسلوب القيادة الخاص بك وتعطيك الوقود استهالك لتحسين مالئمة األكثر النصيحة
الخاص بك.
التسريع
Driving eco۲
Eco تدريب وضع
A
CB تغيير السرعة
التوقع
Eco تقرير حول الرحلةعالمة وضع
Driving eco۲
معدل االستهالك
معدل السرعة
المسافة من دون استهالك
Eco تدريب وضعEco تقرير حول الرحلةعالمة وضع
1
Eco تدريب وضعEco تقرير حول الرحلةعالمة وضع
عام
ال تترك المحرك في وضع الخمول، حتى في فصل الشتاء: إن انطالق المركبة حالما يبدأ تشغيل المحرك يعتبر أمرا موفرا أكثر للمال وأقل تلوث للبيئة.
Driving eco۲

ARA–٥٤
ضبط المالحة (٤/٤)
«التحديثات واإلضافات»التحديثات تواريخ مراقبة الخاصية هذه لك تتيح
التي قمت بعملها.
«االزدحام»تنشيط إلغاء أو تنشيط الخاصية هذه لك تتيح لألنماط اإلشارة المرور»، حركة «معلومات المختلفة لألحداث وإدارة المسارات البديلة في حالة
الحوادث أو اإلختناقات المرورية.
«معلومات حركة المرور»التحذيرات عرض تفعيل إلغاء أو تفعيل يمكنك
للحوادث المختلفة التي توجد أثناء خط سيرك.
«تجنب»أثناء الوقت من االستفادة الخاصية هذه لك تتيح وقوع حادث طارئ أثناء مسيرتك وذلك من خالل
اقتراح مسار بديل.سيقترح عليك نظام الوسائط المتعددة اختيار الوقت الالزم القتراح مسار جديد عليك مع المسار البديل
لكسب الوقت.
إعدادات المرور
معلومات حركة المرور
تجنب
أنواع الحدث
إيقاف تشغيل
«أنواع الحدث»التي األحداث أنماط اختيار الخاصية هذه تتيح
تعرض خالل المالحة:«كافة األحداث» ; –«أحداث التدفق» ; –
«اإلغالق والحجب» ; –«حادث» ; –
... –
المالحة
التحديثات واإلضافات االزدحام
الوجهة خط الرحلة خيارات
إعدادات منعطف المرور
٥ دقائق
عرض المنعطف إذا كان المسار المحسوب يوفر أكثر من:
تأكيد المسار المقترح؟ إيقاف تشغيل
من أجل سالمتك، قم بهذه اإلجراءات والسيارة متوقفة تماما.

ARA–٥۳
ضبط المالحة (۳/٤)
«تنسيق اإلحداثي»تتيح لك هذه الخاصية تعديل صيغ اإلحداثيات.
يقدم هذا النظام ثالثة أنواع من الصيغ.
«إعدادات خريطة»راجع فصل «ضبط الخريطة».
«إعدادات الصوت»الصوتي. التوجيه لغة تعديل الخاصية هذه تتيح
راجع فصل «اإلرشاد » من هذا الدليل.
GPS
األقمار حالة في التحكم الخاصية هذه لك تتيح .GPS الصناعية لتحديد المواقع
GPS معلومات لعرض GPS على اضغط .(A شاشة)
GPS معلومات
األقمار الصناعية المتوفرة : ٦
الدقة: مرتفع ۱۷:۱۱:٤٥ : GPS UTC وقت
A
المالحة
تحذيرات إعدادات المسار إعدادات خريطة
إعدادات الصوت تنسيق اإلحداثيGPS
الوجهة خط الرحلة خيارات
تنسيق اإلحداثي
DD.DDDDD
DD MM.MMM
DD MM SS.S
تدابير احترازية خاصة بالمالحةبأي المالحة يلغي استخدام نظام ال مسؤوليتهم السيارة قائد عن حال
للتنبه أثناء قيادة السيارة.

ARA–٥۲
ضبط المالحة (۲/٤)
«اقتصادي»: هذا الوضع يقدم حال وسطا بين –مسافة توفير لك يتيح وسريعة. قصيرة طرق المحتمل من قليال. أطول لفترة بالسير معينة الحل من أقصر المحسوب المسار يكون أن
السريع، ولكنه أبطئ قليال.
«الطرق السريعة»قد ترغب في تجنب الطرق السريعة إذا كنت تقود
سيارة بطيئة أو تجر سيارة أخرى.
«إعدادات المسار»تتيح لك هذه الخاصية تحديد الطريقة التي تتم بها
حساب المسارات.
«أسلوب تخطيط المسار»يقترح عليك النظام ۳ معايير لحساب خط المسار:
سريع طريق وجود إلى يشير «سريع»: –األقصى الحد إلى تصل أن تستطيع كنت إذا
للسرعة على الطرق كلها تقريبا؛قصير طريق وجود إلى يشير «قصير»: –
لتقليص مسافة الذهاب؛
«طريق برسوم»يمكن أن يسمح أو ال يسمح باستخدام الطرق التي يتطلب استخدامها شراء تصريح خاص خالل فترة
معينة.
«طريق برسوم مرور»يمكن أن يسمح أو ال يسمح باستخدام الطرق ذات
الرسوم.
«العبارات»أنواع كل باستخدام يسمح ال أو يسمح أن يمكن
العبارات، القوارب والقطارات.
«سيارات ركوب جماعي»تتيح هذه الخاصية عرض الطرق المخصصة فقط
لمرافقي الطريق.
«طرق غير ممهدة»الطرق باستخدام يسمح ال أو يسمح أن يمكن
الترابية.
المالحة
تحذيرات إعدادات المسار إعدادات خريطة
إعدادات الصوت تنسيق اإلحداثيGPS
الوجهة خط الرحلة خيارات
إيقاف
إيقاف
تشغيل
تشغيل
سريع قصير أسلوب تخطيط المساراالقتصادية
الطرق السريعة
طريق برسوم مرور
طريق برسوم
إعدادات المسار
إيقافتشغيل
خيارات
من أجل سالمتك، قم بهذه اإلجراءات والسيارة متوقفة تماما.

ARA–٥۱
ضبط المالحة (۱/٤)
يتيح «المالحة» قائمة أسفل التبويب «خيارات» لك تغيير عرض الخريطة أو إعدادات المالحة.
«تحذيرات»يمكنك هذا القسم من ضبط التحذيرات.
تحذير في حالة تجاوز السرعةحدود حول معلومات على الخرائط تحتوي قد أن للنظام يمكن الطرق. لقطاعات السرعات
يحذرك عند تجاوز الحد الحالي.
قد أو المعلومات هذه تتوافر ال قد للمنطقة، تبعا بالنسبة لكافة الطرق على ال تكون صحيحة تماما
الخريطة.أنواع التنبيه التالية متوفرة:
تتلقى المحددة السرعة تتجاوز عندما صافرة: –تحذيرا غير لفظي؛
للسرعة األقصى الحد يظهر بصري: تحذير –عند الخريطة على باألحمر ويضيء الحالية
تجاوزه.اضغط على «تشغيل» أو «إيقاف» لتفعيل/تعطيل
التحذير.
حدود السرعة مرئية دائماحد عرض شاشة عرض تنشيط إلغاء أو تنشيط عليه من خالل تسير الذي الطريق لقسم السرعة
الضغط على «تشغيل» أو «إيقاف».
تحذيرات من نقطة الخطرعندما يعبر السائق منطقة يقظة حادة، تظهر إشارة تحذير مرئية على الشاشة يصاحبها إشارة صوتية. مناطق الخطر هذه تتماثل مع أجزاء الطريق والتي عليها يجب على السائق أن يتوخى الحذر الشديد. ربما تكون دائمة أو مؤقتة. يمكنك تنشيط أو إلغاء
تنشيط هذه الخاصية.
مسافة ما قبل التحذيرالخيارات العديد من بين اختيار مسافة من يمكنك
التي تود أن تحذرك من منطقة الخطر الحاد.
المالحة
تحذيرات إعدادات المسار إعدادات خريطة
إعدادات الصوت تنسيق اإلحداثيGPS
الوجهة خط الرحلة خيارات
إيقاف
إيقاف
إيقاف
تشغيل
تشغيل
تشغيل
تحذير عند السرعة
إظهار حد السرعة
نقاط التنبيه
تحذيرات
مسافة ما قبل التنبيه m ۰ m ۲۰۰ m ٥۰۰
وتفعيل خيار تحميل يعتبر البلدان، فى بعض يمثل أن ويمكن مشروع الخطرغير مناطق
خرقا للقانون.

ARA–٥۰
إدارة المفضلة (۲/۲)
ترتيب القائمةتستطيع ترتيب قائمة الوجهات المفضلة باالسم أو اضغط الخريطة. على كلها عرضها أو المسافة
على «خيارات».
حذف الوجهات المفضلةحذفها. تريد التي المفضلة الوجهة على اضغط مفضل» مكان على «خيارات»، «حذف اضغط
وقم بتأكيد الحذف بالضغط على «حذف».
على اضغط المفضلة، الوجهات كافة لمسح الحذف أكد الكل». «حذف على ثم «خيارات»
بالضغط على «حذف الكل».
البحث عن وجهة مفضلةتتيح لك هذه الخاصية البحث عن وجهة مفضلة من
القائمة عن طريق اسمها.اضغط على «بحث» وأدخل اسم الوجهة المفضلة
باستخدام لوحة المفاتيح الرقمية. إغالق
خيارات بحث
حذف الكل
عرض الكل على الخريطة
فرز حسب المسافة
فرز حسب االسم

ARA–٤۹
إدارة المفضلة (۲/۱)
إدخال بياناتاضغط على «Home» > «التنقل» «الوجهة» طرق عدة لديك الوجهة. القائمة إلى للوصول
للوصول إلى وجهة:الفقرة «إدخال عنوان» إلى ارجع «عنوان»: –
من الباب «إدخال وجهة».«مواضع االهتمام»: ارجع إلى الفقرة «إدخال –«إدخال الباب من (POI) االهتمام» نقاط
وجهة».
«المحفوظات» ارجع إلى الفقرة «تحديد وجهة –«إدخال الفصل من السابقة» الوجهات من
وجهة».«المفضلة»: الوصول إلى الوجهات المسجلة. –
الفقرة «حدد إلى ارجع الخريطة» «بحث في –«إدخال الباب من الخريطة» على وجهة
وجهة».بيانات «حدد الفقرة إلى ارجع «إحداثي» –
الوجهة» من الباب «إدخال وجهة».
العنوان، على التأكيد بمجرد األحوال، جميع في الخريطة. اضغط مكانها على بتحديد النظام يقوم للمفضلة» «إضافة على ثم «خيارات» على
إلضافة الوجهة إلى المفضلة.اسمها تعديل يمكنك مفضلة، وجهة تسجيل قبل
بمساعدة لوحة المفاتيح الرقمية.
المالحة
عنوان مواضع االهتمام المحفوظات
المفضلة بحث في الخريطة إحداثي
الوجهة خط الرحلة خيارات
حركة المرور الحالية
إغالق
إضافة للمفضلة
News
عودة للسيارة

ARA–٤۸
إعدادات الخريطة
على 1 ثم على 2 اضغط المالحة، قائمة من للوصول إلى قائمة إعدادات الخريطة.
ضبط وضع العرضبين الخريطة عرض تغيير الخاصية هذه تتيح 2D أعلى-أسفل وعرض 3D, منظوري عرض
وعرض مع الشمال دائما نحو األعلى.اضغط على «3D»، «2D» أو «2D شمال».
ضبط العرضتتيح لك هذه الخاصية ضبط تكبير القاعدة والميل. مستويات الثالثة بين المراد الزوم على اضغط
المتاحة.
عرض الطريق السريعالطريق بتفعيل/تعطيل عرض الخاصية هذه تتيح
السريع.على أو الخاصية لتنشيط «تشغيل» على اضغط
«إيقاف» اللغاء التفعيل.
عرض النقاط الهامة(التي الهامة النقاط بعض عرض اختيار يمكنك يمكن رؤيتها على مقياس ۱۰۰ متر) على الخريطة.للدخول مباشرة إلى هذه الخاصية، اضغط على 3
لعرض النقاط الهامة على الخريطة:اإلقامة؛ –المطار؛ –سيارة؛ –
األمتعة؛ –مقهى أو بار؛ –
... –أو لعرض «إيقاف» أو «تشغيل» على اضغط
إخفاء النقاط الهامة.أدخل اسم النقطة الهامة لفتح قائمة الفئات الفرعية.
خرائط، بها تتوفر ال التي البلدان في مالحظة: يمكنك إلغاء تنشيط وظيفة المالحة. في «الصفحة اضغط «النظام»، < «الضبط» < الرئيسية» وظيفة تنشيط إللغاء «المالحة» أمام «إيقاف»
المالحة.
3
إيقاف تشغيل
إعدادات خريطة
النقطة المركزية
عرض طرق سريعة
عالمة المكان
وضع العرض
2
1المالحة
تحذيرات إعدادات خريطة
إعدادات الصوت تنسيق اإلحداثي GPS
الوجهة خط الرحلة خيارات
إعدادات المسار

ARA–٤۷
اضغط على 29 لفرز تفاصيل المسار:بالملخص. –
يعرض فقط العناصر األساسية للرحلة (اإلقالع، الوجهة) والمسافة الكلية، الوقت المتبقي وساعة
الوصول.بالوصف القياسي. –
اإلشارات، وتفاصيل المناورات كل يعرض والمسافة. الشوارع وأسماء الطرق، وأرقام أسماء أيضا معلومات وتحذيرات مثل يعرض المراحل المدخلة من قبل السائق، قيود (الدخول
والمناورة)، تفضيالت المستخدم المتجاهلة...عن طريق قائمة الطرق. –
تفاصيل المسار بأسماء وأرقام الطرق. يعرض أيضا طول المسار، واالتجاه المتوسط والوقت عناصر يتم عرض ال الرحلة. تستغرقه الذي
الرحلة في هذا الوضع.
«خط الرحلة»تمكنك هذا الخاصية من مشاهدة خريطة الطريق.
تظهر العديد من تفاصيل الطريق:أسهم تغيير االتجاه، –
رقم الطريق، –مسافة قبل تفريعة. –
«إعدادات المسار»ارجع المسار. معالم اختيار القسم من هذا يمكنك الباب «إعدادات من المسار» الفقرة «إعداد إلى
المالحة».
خيارات
خط الرحلة - عادي
29
اإلرشاد (٦/٦)

ARA–٤٦
المراحل والوجهةاضغط «الصفحة الرئيسية» > «التنقل» > «خط عن المسار لتغيير المسار» «تعديل < الرحلة»
طريق إضافة أو تعديل أو حذف خطوات.اضغط على 21 إلضافة مراحل سير ثم على 25 لتحديد مختلفة يوجد طرق جديدة. وجهة إلضافة
وجهة: راجع الفصل «إدخال وجهة».اضغط على 23 لحذف وجهة. –
اضغط على 24 إلعادة ترتيب القائمة. –اضغط على 22 لتعديل عنوان انطالق المسيرة. –
25 24
21
خيارات موافق
23
تعديل المسار
موضع GPS الحالي
22
اإلرشاد (٦/٥)
مسارات بديلةيتيح لك هذا الباب تعديل طريقة التخطيط للمسار. طريقة تعديل لك تسمح متاحة ثالث طرق هناك
تخطيط المسار:«سريع» ; –
«اقتصادي»؛ –«قصير». –
الباب من المسار» «إعداد الفقرة إلى ارجع «إعدادات المالحة».
اضغط «الصفحة الرئيسية» > «التنقل» > «خط C أو B أو A الرحلة» > «طرق المسارات» ثمإلى للعودة الجديد. اضغط على 28 المسار لتأكيد
الشاشة السابقة.
مسارات بديلةاضغط «الصفحة الرئيسية» > «التنقل» > «خط بديل. مسار إلنشاء تجنبها» «يتم < الرحلة» البديل للمسار القائمة وفقا اضغط على منطقة من
المراد.لتغيير منطقة، اضغط على 27.
قم بتأكيد المسار الجديد بالضغط على 26.
إلغاء المساريمكنك في أي وقت إيقاف التوجيه الحالي.
اضغط «الصفحة الرئيسية» > «التنقل» > «خط الرحلة» > «حذف المسار» إللغاء المسار النشط.
2726
موافق
قسم تم تفاديهالمسار األصليمسار جديد
الطول: -۲٥۰ الوقت +۰:۰٦
28
طرق المسارات
سريع
اقتصادي
قصير
A
B
C

ARA–٤٥
اإلرشاد (٦/٤)
«محاكاة المالحة»الرئيسية» > «التنقل» > اضغط على «الصفحة «خط الرحلة» > «نظرة عامة» > «خيارات» > «محاكاة المالحة» لمحاكاة المسار الذي تسير فيه
إلى الوجهة.اضغط على 18 لبدء أو إيقاف المحاكاة. –اضغط على 20 لزيادة سرعة المحاكاة. –
الطريق محاكاة مغادرة وقت أي في يمكنك –بتحديد الزر 16.
بالضغط السابق/التالي اإلجراء تخطي يمكنك –على 17 أو 19.
1716 18 19 20 15
الوجهةخط الرحلة
تحذيرات إعدادات المسار إعدادات خريطة
GPSإعدادات الصوتتنسيق اإلحداثي
المالحة
خيارات
(على السير بخط الخاصة واألقسام النقاط –سبيل المثال: نقاط تحصيل الرسوم، طرق ذات
رسوم، طرق سريعة...) ; » المثال: سبيل (على البديلة المسارات –
قصير»، «سريع»، «اقتصادي»).اضغط على 15 لعرض النقاط التالية:
«تحذيرات» ; –«إعدادات المسار»; –«إعدادات خريطة»; –«إعدادات الصوت»; –«تنسيق اإلحداثي»; –
;«GPS» –«التحديثات واإلضافات»; –
«االزدحام». –الصفحة راجع المعلومات، من لمزيد ملحوظة:
التالية.
نظرة عامة على خط السيراضغط «الصفحة الرئيسية» > «التنقل» > «خط الرحلة» > «نظرة عامة» للحصول على خريطة
مع لمحة عامة عن المسار النشط.سيتم توفير المعلومات التالية:اسم و/أو عنوان الوجهة؛ –
الزمن الكلي للرحلة؛ –– المسافة الكلية لخط السير؛

ARA–٤٤
تغيير لغة التوجيه الصوتي < «التنقل» < الرئيسية» «الصفحة اضغط التوجيه لغة لتغيير «الضبط» < «خيارات»
الصوتي.على 12. بالضغط اللغات قائمة باستعراض قم
اختر اللغة المرادة، ثم اضغط على 11 للتأكيد.راجع الصوتي، التوجيه صوت إعدادات لضبط الفصل «ضبط الفقرة «المفضالت الصوتية» من
الصوت».
1211
لغة الصوت
موافق
االستماع للراديو من خالل توجيه الصوت.
عند استماع لمحطة راديو في وقت التوجيه الصوتي بقطع صوت النظام يقوم لالتجاه، تغيير وقبل كل
الراديو بصورة مؤقتة إلى أن يتم تمرير التقاطع.محطة إلى االستماع شاشة إلى الوصول يمكنك الراديو أثناء المالحة بالضغط على 13. للعودة إلى شاشة المالحة، اضغط على 14. للعودة إلى القائمة لمدة ثالث الضغط على 14 في استمر الرئيسية،
ثوان تقريبا.
اإلرشاد (۳/٦)
رئيسية القائمة ضبط مسبق
14
الوجهة
13
تفاصيل عن خط السيرتتيح هذه الخاصية عرض خط سيرك.
اضغط «الصفحة الرئيسية» > «التنقل» > «خط الرحلة» بعد إدخال وجهة.
هناك ستة اختيارات يتم اقتراحها عليك:«تعديل المسار»; –
«يتم تجنبها»؛ –«نظرة عامة»; –
«حذف المسار»; –«طرق المسارات»; –
«خط الرحلة». –
خيارات

ARA–٤۳
اإلرشاد (۲/٦)
خريطة التقاطعأثناء التوجيه، قبل أي تغيير لالتجاه.
طريق بديلوجود حالة في بديل طريق النظام عليك يقترح مسيرتك. على طارئ مروري اختناق أو حادث
اضغط على «نعم» أو «ال» لتأكيد اختيارك.
ملخص المعلومات المروريةالحصول على أي وقت يمكنك ف التوجيه، أثناء
المعلومات المرورية بالضغط على 6.
عرض تقاطعات الطرق السريعةالسيار، للطريق وصلة كل قبل التوجيه، أثناء
يعرض النظام مشهد ثالثي األبعاد للوصلة.مالحظة: بالنسبة لبعض التقاطعات، يظهر فقط سهم
توجيه.يعود النظام تلقائيا إلى الوضع الطبيعي بعد عبور
التقاطع.
الوجهة الراديو
في الظاهرة المختلفة األحداث الشاشة لك تبين مسيرتك. سوف يبين لك النظام وقت التأخير الذي تضيفه هذه الحوادث على مسيرتك. اضغط على 8 لتعديل إعدادات عرض األحداث. اضغط على 10 لالنعطاف، أو 9 للوصول إلى الخيارات المرورية للعودة أو 7 المالحة») الفصل «إعدادات (راجع
إلى المالحة.على المرور حركة معلومات تعتمد مالحظة:
اشتراكك وعلى استقبال اإلشارة.
6
الوجهة
7 9 108
موجز المرور
ال توجد أحداث تؤثر على المسار.األحداث الهامة:
۰
إجمالي التأخير: ۰۰ : ۰
أحداث التدفق:اإلغالق والحجبحادثقيود الحاراتغير ذلك
۰ من ۳۷۰ من ۱٦۰ من ۱۷۰ من ۲٦۰ من ۳
قائمة األحداثV-Trafic
خيارات عرض تجنب

ARA–٤۲
اإلرشاد (۱/٦)
تفعيل التوجيهاضغط على 2 أو انتظر ۱۰ ثوان بعد إدخال وجهة.
يبدأ التوجيه.مالحظة: في أي وقت، يمكنك التفاعل مع البطاقة من خالل زلقها في االتجاه المرغوب أو بالضغط
على الشاشة.
شاشات التوجيهيقترح النظام عدة خيارات لخريطة المالحة.
فتح أو الخريطة عرض لتغيير على 3 اضغط القائمة المنسدلة. بعد ذلك، اختر من بين العروض
المقترحة:; 2D –;3D –
2D شمال. –يمكنك أيضا تغيير عرض الخريطة بالضغط على
البوصلة 1 على الخريطة.
وضع الشاشة الكاملة (2D، 3D أو 2D شمال)يمكنك هذا الوضع من مشاهدة خريطة المالحة على
الشاشة بأكملها.يشار إلى المعلومات بشأن ساعة الوصول والمسافة
المتبقة حتى الوجهة في 5.يقع تحديد التغيير القادم لالتجاه في 4.
3
الوجهةالوجهة
4
5 2
خيارات موافق (۱۰)
1

ARA–٤۱
إدخال وجهة (٦/٦)
«حركة المرور الحالية»المعلومات بالحصول على الخاصية لك هذه تتيح بشأن حوادث السير الطارئة على طريق مسيرتك أو على مقربة من موضعك. للوصول إليها، اضغط
على 14 ثم اختر «حركة المرور الحالية».
«خيارات»بعد نهاية العد التنازلي للعشر ثواني، االختيارات
التالية تظهر على الشاشة:
«إضافة للمفضلة»في المحددة الوجهة لتخزين على 17 اضغط
الوجهات المفضلة.
«حركة المرور الحالية»بشأن المعلومات على للحصول على 16 اضغط حوادث السير الطارئة على طريق مسيرتك أو على
مقربة من موضعك.
«News»اضغط على 20 لمعرفة العنوان، خطوط العرض وخطوط الطول ورقم هاتف النقطة المعنية (يكون
نشط فقط بعد تحديد النقطة المعنية).
«عودة للسيارة»اضغط على 19 للعودة إلى الوضع الحالي للسيارة.اضغط «خيارات»، النافذة لغلق مالحظة:
على 18.
«خط الرحلة»بالتفصيل مسيرتك لعرض على 12 اضغط
وبطريقة تصويرية. راجع فصل «اإلرشاد ».
«إعدادات المسار»اضغط على 13 لضبط مسارك تبعا للطرق المرادة
ونمط المسيرة المرغوبة.
«محاكاة المالحة»للمسيرة محاكاة على للحصول على 15 اضغط
التي قم باختيارها. راجع فصل «اإلرشاد ».
17
19
16
حركة المرور الحالية
إغالق
إضافة للمفضلة
عودة للسيارة
News
20 18
خط الرحلة
إغالق
طرق المسارات
محاكاة المالحة
إعدادات المسار
خيارات موافق
12 13
15
14

ARA–٤۰
إدخال وجهة (٦/٥)
التأكيد على الوجهةعدة اختيارات متاحة على الشاشة قبل التأكيد على
الوجهة:«موافق» ; –«خيارات». –
بأي تقم لم إذا ثواني. ۱۰ من التنازلي العد يبدأ فعل خالل هذا الوقت، سوف يبدأ التوجيه بصورة
تلقائية.
«موافق»في حالة عدم وجود مسار نشط (لم يتم تحديد أي –مسار)، اضغط على 10 لتأكيد الوجهة كمسار
جديد.
ترتيب القائمةيمكن فرز نتائج البحث عن وجهة باستخدام نقطة عند والمسافة. باالسم التاريخ أو المفضلة هامة، للمسار وفقا النتائج فرز يتم نشط، مسار وجود على الخريطة لعرض على 9 اضغط البديل.
الشاشة.
إيجاد وجهة عن طريق اسمهاالتاريخ هامة، نقطة إذا حددت وجهة عن طريق في الوجهة عن البحث تستطيع أوالمفضلة، الخريطة من خالل اسمها. اضغط على بحث وقم
بإدخال االسم من خالل لوحة المفاتيح.
10
خيارات موافق
تحديد تستطيع نشط، مسار وجود حالة في –أو مرحلة جديدة. اضغط الوجهة كمسار جديد «نقطة أو جديد» «مسار على ثم على 10
عبور».
«خيارات»في نهاية العد التنازلي للعشر ثواني، االختيارات
التالية تظهر على الشاشة:
«طرق المسارات»اضغط على 11 لتغيير أو تعديل المسيرة.
خيارات
مواضع االهتمام التي تم العثور عليها
9
خط الرحلة
إغالق
طرق المسارات
محاكاة المالحة
إعدادات المسار
خيارات موافق
11

ARA–۳۹
إدخال وجهة (٦/٤)تحديد عنوان من الوجهات المفضلة
المفضلة. الوجهات من الوجهة إيجاد تستطيع فعالية، أكثر نحو على الخاصية هذه الستخدام ينصح بالتخزين المسبق للوجهات التي تذهب إليها
كثيرا.بالبحث المفضلة الوجهات بتخزين قم البداية، في
عن العنوان. راجع الفصل «إدارة المفضالت».اضغط على «االستقبال» > «التنقل» > «الوجهة»
> «المفضلة» لعرض قائمة الوجهات المفضلة.
حدد وجهة على الخريطةعن وجهة عن البحث من الخاصية هذه تمكنك
طريق التنقل في الخريطة. < «التنقل» < «االستقبال» على اضغط –لتحديد الخريطة» في «بحث < «الوجهة»
وجهة على الخريطة؛المكان في الخريطة على اضغط ذلك، بعد –
المراد تحديده كوجهة. تظهر النقطة 6؛اضغط على 7 للتأكيد. –
إدخال إحداثيات الوجهةإدخال البحث عن وجهة عن طريق يتيح لك ذلك
إحداثياتها.اضغط على «االستقبال» > «التنقل» > «الوجهة»
> «إحداثي».بالصيغ والعرض الطول خط قيم إدخال يمكنك التالية: درجات عشرية؛ درجات ودقائق عشرية؛
أو درجات، ودقائق وثوان عشرية.اإلحداثيات ثم على UTM إلدخال اضغط على 8
.UTM بالصيغة
6 7خيارات موافق
8خيارات موافق
إحداثي

ARA–۳۸
إدخال وجهة (۳/٦)
البحث عن نقاط هامة عن طريق الفئةيمكنك البحث عن نقاط هامة عن طريق فئتها وفئتها
الفرعية.اضغط على «االستقبال» > «التنقل» > «الوجهة»
> «مواضع االهتمام» > «بحث مخصص». حدد المنطقة التي يتم البحث عن مكان فيها:
اضغط على «في مدينة» للبحث عن مكان في –قائمة تصنيف (وسيتم محددة ضاحية مدينة/ النتائج وفقا للمسافة من وسط المدينة المحددة).
أين تجد مواضع االهتمام؟
في مدينة
حول موقعي على مقربة من الوجهة
بطول المسار
اضغط على «بطول المسار» للبحث على طول –يفيد معينة. نقطة حول وليس النشط المسار من مرحلة في بسيطا تغييرا تريد عندما ذلك تبحث كنت إذا المثال سبيل على السير، خط عن محطات الوقود المقبلة أو المطاعم القريبة من المسافة لبعد وفقا النتائج قائمة فرز (يتم
االنعطاف المراد).اضغط على «حول موقعي» إلجراء بحث حول –الموقع، حول يتوفر لم إذا أو الحالي، الموقع آخر موقع (يتم فرز النتائج وفقا للمسافة من هذا
الموقع).اضغط على «على مقربة من الوجهة» للبحث –(يتم النشطة المسيرة وجهة حول مكان عن تصنيف قائمة النتائج وفق المسافة من الوجهة).
حدد وجهة من بين الوجهات السابقةاضغط على 5 إليجاد وجهة سبق تعريفها من قبل.
5المالحة
عنوان مواضع االهتمامالمحفوظات
بحث في الخريطةإحداثي
الوجهة خط الرحلة
المفضلة
خيارات

ARA–۳۷
إدخال وجهة (۲/٦)البحث السريع عن نقاط هامة
تتيح لك خاصية البحث السريع إيجاد منطقة بسرعة.النقاط للبحث عن اضغط على مكان في الخريطة النقاط 3 العديد من أو نقطة واحدة تظهر الهامة.
على الشاشة تبعا لموضعك.حول االهتمام «مواضع على ثم على 4 اضغط باألسماء النقاط قائمة لعرض المؤشر» مكان
والمسافة من المكان المختار.
البحث عن نقاط هامة بمساعدة الفئات المعدة مسبقا
تتيح لك خاصية البحث المعد مسبقا أن تجد سريعا أنواع األماكن التي تم تحديدها بشكل متكرر.
اضغط على «االستقبال» > «التنقل» > «الوجهة» > «مواضع االهتمام» للوصول إلى الفئات المعدة
مسبقا.
(POI) تحديد النقاط الهامةتستطيع تحديد وجهتك من خالل النقاط الهامة.
يمكنك إيجاد مكان بطرق مختلفة:العثور يمكنك السريع، البحث خاصية مع –
بسرعة على مكان قريب من خالل اسمه؛مع خاصية البحث المحدد مسبقا، تستطيع إيجاد –عن فقط متكرر بشكل عنها البحث ثم أماكن
طريق عدة ضغطات على الشاشة؛تستطيع البحث عن مكان من خالل فئته. –
الفئات (محطة خدمة/موقف/مطعم) إذا كانت هناك مسيرة نشطة موجودة، فإن نقاط –سيتم «مطعم» و بنزين» «محطة االهتمام البحث عنها على طول المسيرة. نقطة االهتمام «مكان انتظار» يتم البحث عنها حول الوجهة.
في حالة عدم وجود مسار نشط (ال يوجد وجهة –محددة)، يتم البحث عن هذه النقاط حول الموقع
الحالي.يوجد (ال متوفر غير الحالي الوضع كان إذا –إشارة GPS)، يتم البحث عن هذه النقاط حول
آخر موقع معروف.
مواضع االهتمام
بحث مخصص
محطة بنزين
مكان انتظار
مطعم
حول هذا المكان
حول هذا المكان
حول هذا المكان
3
خيارات موافق
4

ARA–۳٦
إدخال وجهة (۱/٦)قائمة الوجهة
اضغط على «االستقبال» > «التنقل» > «الوجهة» للوصول إلى قائمة الوجهة.
تقترح قائمة «الوجهة» طرق مختلفة لإلشارة إلى وجهة:
إدخال عنوان (كامال أو جزئيا)؛ –اختر عنوانا من «مواضع االهتمام»؛ –حدد وجهة من بين الوجهات السابقة؛ –اختر عنوانا من الوجهات المفضلة؛ –
حدد وجهة على الخريطة؛ –حدد خط طول وخط عرض. –
إدخال عنوانإلدخال عنوان، اضغط على 1.
يمكنك هذا القسم من إدخال العنوان بالكامل أو جزء منه: البلد والمدينة والشارع ورقم الشارع.
عليها يتعرف التي العناوين فقط يقبل مالحظة: النظام في البطاقة الرقمية.
عند االستخدام ألول مرة:اضغط على «الدولة»؛ –
أدخل اسم البلد المراد بمساعدة لوحة المفاتيح. –إضاءة بإلغاء النظام يقوم العنوان، إدخال أثناء
بعض الحروف لتسهيل اإلدخال.قمت إذا للبالد قوائم عدة النظام يتقرح أن يمكن
بالضغط على 2. حدد البلد المراد من القوائم.«المدينة/ لـ بالنسبة الشيء نفس افعل –الضاحية»، «الشارع»، « شارع مستقيم» و
«رقم الشارع».
مالحظة: «شارع مستقيم» و «رقم الشارع» يمكن تنشيطهم بعد تحديد «الشارع».
ملحوظة: عند إدخال اسم الشارع، ال يلزم موضع نوع الطريق (شارع، ميدان، طريق...)
مالحظة: يحتفظ النظام فى ذاكرته بآخر عناوين تم العنوان، باستخدام وجهة إدخالك بمجرد إدخالها. العنوان عرض يتم سوف القادم، االستخدام في
السابق.
2
خيارات خيارات
المالحة
عنوان مواضع االهتمامالمحفوظات
بحث في الخريطةإحداثي
الوجهة خط الرحلة
المفضلة
1

ARA–۳٥
« طوارئ قريبة »من قريبة مساعدة البحث عن الخاصية هذه تتيح
موقعك الحالي.اضغط على 16 لفتح شاشة بحث سريع جديدة.
قراءة خريطة (۳/۳)
معلومات على هذه الشاشة:خدمات إصالح السيارات؛ –
خدمات طبية وطوارئ؛ –أقسام الشرطة؛ –
محطات الخدمة. –الفصل راجع الشاشة، هذه من للبحث عن وجهة مهمة نقاط «تحديد ومعلومات وجهة» «إدخال
.«(POI)
طوارئ قريبة
إصالح سياراتحول هذا المكان
حول هذا المكان
حول هذا المكان
حول هذا المكانالشرطة
رعاية صحية
محطة الخدمات
16
خيارات طوارئ قريبة
أين أنا؟
خط العرض
خط الطول
االرتفاع
موضع GPS الحاليm ۰
E۲٫٤۹٦۰۸
رقم ٤۸٫۸۲۹۹٥

ARA–۳٤
«أين أنا؟»حول المعلومات من التحقق الخاصية هذه تتيح POI الهامة النقاط عن والبحث الحالي الموقع
المجاورة. تعمل عندما يكون نظام GPS متصل.ثم الخريطة شاشة على «خيارات» على اضغط
على«أين أنا؟».تحتوي هذه الشاشة على المعلومات التالية:
خط العرض؛ –خط الطول؛ –االرتفاع؛ –
رقم الشارع؛ –العنوان الحالي. –
قراءة خريطة (۳/۲)
معلومات الدولةاضغط على 15 ثم على «معلومات الدولة».
المتعلقة البلد الخاصية عرض معلومات تتيح هذه بموقعك الحالي.
تحتوي هذه الشاشة على المعلومات التالية:حد السرعة. –
السريعة. الطرق في السرعات يتم عرض حدود تعتمد الوحدات المعروضة على اإلعدادت المحلية النشطة. في حالة عدم توفر أية بيانات، يظهر «--
»بدال من الجدول والرقم.
الكود الهاتفي الدولة؛ –أرقام الطوارئ؛ –
القيود القانونية المعمول بها في الدولة: –بها المسموح الكحول لنسبة األقصى الحد –
في الدم؛سترة األمان إلزامية؛ –
طفاية الحريق إلزامية؛ –تشغيل المصابيح األمامية إجباري في كافة –
األوقات؛اللمبات البديلة إلزامية؛ –أدوات األمان إلزامية؛ –مثلث التحذير إجباري؛ –
الخوذة إجبارية لراكبي الدرجات البخارية؛ –سالسل الجليد ضرورية في الشتاء؛ –
ينصح بسالسل الجليد في الشتاء؛ –إطارات الجليد ضرورية في الشتاء؛ –
ينصح بإطارات الجليد في الشتاء؛ –
: Franceمعلومات الدولة
أقصى حد لمحتوى الكحول بالدم: ۰٫٥ ‰
في المدينة الريف الطريق السريع طريق سريع
رمز هاتف الدولة : +۳۳رقم الطوارئ : ۱۱۲
15
خيارات طوارئ قريبة
أين أنا؟
خط العرض
خط الطول
االرتفاع
موضع GPS الحاليm ۰
E۲٫٤۹٦۰۸
رقم ٤۸٫۸۲۹۹٥

ARA–۳۳
قراءة خريطة (۳/۱)
عرض الخريطةلعرض خريطة حول موقع السيارة الحالي، اضغط
على «الصفحة الرئيسية» > «التنقل».المس شاشة الخريطة.
االتجاه في حركها المالحة، خريطة داخل للتنقل إلى للعودة على 1 اضغط الشاشة. على المراد
موضعك الحالي.األمامي الزوم إلى للوصول على 3 اضغط
والخلفي.
مفتاح الخريطةخيارات عرض المالحة. 4
الوصول إلى صيغ العرض المختلفة: 5وضع 3D؛ –وضع 2D؛ –
دائما يمثل البطاقة (أعلى شمال 2D وضع –الشمال).
عن معلومة أو القريب الرئيسي الطريق اسم 6أقرب لوحة إرشادية.
يتم حساب المسار بواسطة نظام المالحة. 7مسافة وبيان تغيير االتجاه القادم. 8
ساعة الوصول المتوقعة. 910 الميديا الحالية التي تستمع إليها.
المسافة المتبقية حتى الوجهة 1112 موقع السيارة على خريطة المالحة.
13 تفعيل/تعطيل التوجيه الصوتي.المنطقة هذه على اضغط الطريق. 14 معلومات بشأن الموجودة المختلفة المؤشرات لمعرفة
مسيرتك.
GPS موضعتتيح هذه الخاصية معرفة الموقع الجغرافي للمنطقة
المختارة (العنوان/ خط الطول/خط العرض). المس المنطقة المرادة على الخريطة. اضغط على الموقع لمعرفة «News» على ثم «خيارات»
الدقيق للمكان المحدد.
رموز الخرائطالنقاط لعرض رموزا 2 المالحة نظام يستخدم النقاط «عرض فقرة إلى ارجع .(POI) الهامة
الهامة» من الباب «إعدادات الخريطة».
2
3
1
خيارات موافق
6 8
9111214
4 7
10
3 5
الوجهة
13

ARA–۳۲
نظام المالحةنظام المالحة
بفضل ويوجهك موقعك المالحة نظام يحدد معلومات:
جهاز استقبال GPS لتحديد المواقع؛ –من الخريطة الرقمية. –
GPS جهاز استقباللنظام الصناعية األقمار المالحة نظام يستخدم GPS (نظام تحديد المواقع العالمي في مدار حول
األرض.إشارات مرسلة من GPS استقبال يستقبل جهاز أقمار صناعية عديدة. يمكن إذا للنظام تحديد موقع
السيارة.مسافات على السير دون التحرك بعد مالحظة: طويلة (معدية، حاملة سيارات)، قد يستغرق النظام
عدة دقائق ليعود لعمله الطبيعي.
الخريطة الرقميةوخرائط طرق خرائط الرقمية الخريطة تحتوي
المدن الالزمة للنظام.
ذاكرة USB «الخريطة»في USB ذاكرة أدخل األحدث، النسخة لتثبيت فصل راجع باإلنترنت. متصل كمبيوتر جهاز
«تحديث الخريطة».مالحظة: ذاكرة USB ال تكون مرفقة مع النظام.
استخدم تفضيالت التحرير األحدث.
USB أدخل ذاكرةقم بتوصيل محرك أقراص USB المحمول بمقبس
USB C بنظام الوسائط المتعددة أو سيارتك.
C
C
C

ARA–۳۱
الفيديو (۲/۲)
وضع «خيارات»من «خيارات» 12 التبويب عالمة على اضغط
أجل:الوصول إلى إعدادات التشغيل؛ –
الفيديو مقطع حول مفصلة معلومات عرض –(العنوان والنوع والتاريخ وما إلى ذلك.)
الكاملة الشاشة وضع في الفيديو بعرض قم –بالضغط على 9؛
على 10. بالضغط الشاشة سطوع اضبط –سيظهر شريط تحكم للقيام بعملية الضبط. المس ومتابعة إلخفائه الشريط هذا خارج الشاشة
تشغيل الفيديو؛قم بالعودة إلى القائمة السابقة عن طريق الضغط –
على 11.
المشغلالقائمة
وضع العرض
معلومات
مالئم ملء الشاشة
خيارات
12
المشغلالقائمة خيارات
1011 9
ال يكون قراءة ملفات الفيديو متاحا إال إذا كانت السيارة متوقفة.

ARA–۳۰
الفيديو (۲/۱)
أثناء قراءة ملف الفيديو، بإمكانك:اضغط على 8 إلعادة تشغيل الفيديو من بدايته، –إلى للوصول أخرى مرة على 8 اضغط أو
الفيديو السابق؛اإليقاف المؤقت بالضغط على 7؛ –
بالضغط التالي الفيديو مقطع إلى الوصول –على 6
أعلى إلى لالنتقال التمرير 5 شريط – استخدم وإلى أسفل بسرعة؛
وضع «القائمة»لعرض «القائمة» 2 التبويب اضغط على عالمة مقاطع الفيديو المتاحة. حدد الفيديو الذي ترغب في عرضه بالضغط على المنطقة 3. يتم تشغيل الفيديو
المحدد تلقائيا.
وضع «المشغل»اضغط على عالمة التبويب «المشغل» 4 لعرض
الفيديو المحدد.
الفيديو النظام الخاص بك مشاهدة مقاطع يتيح لك .USB عبر محرك أقراص
الوسائط نظام في USB أقراص محرك أدخل المتعددة.
من قائمة «الوسائط»، حدد وضع «الفيديو» 1.قابلة الفيديو تنسيقات تكون بعض قد ال مالحظة:
للقراءة من قبل النظام.المستخدم على USB مفتاح تهيئة يجب مالحظة: للسعة 8GB وحد أدنى التنسيق FAT32 ولديه حد
.32GB أقصى للسعةالموصوفة اإلدخال مصادر تتفاوت قد مالحظة:
أعاله.
1
المشغلالقائمة المشغلالقائمةخيارات خيارات
الفيديو
24 3
خيارات المشغلالقائمة
8 7 6
5

ARA–۲۹
ضبط الصوت (۲/۲)
توزيع الصوت إلى اليسار/اليمين واألمام/الخلفاضغط على 6 أو 8 لضبط توازن الصوت شمال/
يمين.اضغط على 4 أو 7 لضبط توازن الصوت أمامي/
خلفي.بعد ضبط التوازن، اضغط على «موافق» للتأكيد.
منخفض، متوسط، مرتفعالجهير صوت لضبط األسهم 5 على اضغط
والصوت المتوسط وصوت الطنين الثالثي.«موافق» على اضغط الضبط، من االنتهاء بعد
للتأكيد.
المفضالت الصوتيةعرض قائمة التفضيالت الصوتية بالضغط على 9.بصورة صوت لكل الصوت حجم ضبط يمكنك
مستقلة:«الصوت»; –
;«TA» –«المالحة»; –«الهاتف»؛ –
«الرنين» (للهاتف). –إلجراء ذلك، اضغط على «+» أو «-».
التفضيالت جميع تعيين إلعادة على 11 اضغط الصوتية.
اضغط على 10 لالنتقال إلى الصفحة التالية.اضغط على 12 للعودة إلى الشاشة السابقة.
الصوت الشاشة إمكانية االتصالالنظام
الصوت العالي
الصوت
إيقاف
إيقاف
تشغيل
ضوابط الصوت
سرعة/حجم صوت
BAL/FAD
912 1011
الصوت
TA
التنقل
عودة لإلعدادات االفتراضية
4
8 7 6
BAL/FAD
موافق
جهير +۳
متوسط +۰
طنين ثالثي -۲5 5

ARA–۲۸
ضبط الصوت (۲/۱)
الضغط على اإلعدادات عن طريق قائمة عرض «الصفحة الرئيسية» > «الضبط». اضغط على 2
للوصول إلى إعدادات الصوت.يمكنك مغادرة قائمة اإلعدادات والعودة إلى صفحة
االستقبال بالضغط على 3.
ضبط حجم صوت وفقا للسرعة («سرعة/حجم صوت»)
فإن كم/ساعة، تتجاوز سرعة سيارتك ٤۰ عندما الصوت إلى مستوى نسبة يزداد الصوت مستوى
األصلي.اضبط نسبة الصوت/السرعة بالضغط في واحد من
أزرار المنطقة 1.يمكنك إبطال هذه الوظيفة بالضغط على «إيقاف».
1
3 2
الصوت الشاشة إمكانية االتصالالنظام
الصوت العالي
الصوت
إيقاف
إيقاف
تشغيل
ضوابط الصوت
سرعة/حجم صوت
BAL/FAD
«الصوت العالي»لتنشيط/إلغاء أو «إيقاف» اضغط على «تشغيل» بزيادة تسمح التي الصوت ارتفاع تنشيط خاصية
حدة الصوت

ARA–۲۷
Bluetooth® :التوصيلأجهزة توصيل «توصيل/إلغاء القسم راجع ®Bluetooth». بمجرد توصيل ®Bluetooth تظهر
.«BT» القائمة
االستخدامحدد «BT» من القائمة المنسدلة 1، ثم اضغط على على المطلوب الصوتي المسار أو التشغيل قائمة
شاشة نظام الوسائط المتعددة. Bluetooth® بـ الخاصة الصوتية الملفات جميع شاشة على من مباشرة بصورة اختيارها يمكن
نظام الملتيميديا.مالحظة: بمجرد توصيله، ليس لديك إمكانية إدخال األوامر مباشرة إلى مشغل الصوت الرقمي. يجب
استخدام مفاتيح واجهة النظام.
مصادر الصوت اإلضافية (۳/۳)Jack مدخل إضافي: مقبس
التوصيلوصل قابس Jack لمشغل الصوت بمقبس مدخل
.Jack
االستخدامحدد ثم المنسدلة 1، القائمة من «AUX» حدد الخاص الموسيقى مشغل على المطلوب المسار بك. ال تعرض شاشة النظام أي ذكر السم الفنان أو
للمقطوعة الموسيقية.الختيار ملف، يجب تشغيل جهاز االستماع الصوتي
مباشرة، وتكون المركبة متوقفة.
اختيار مسارعلى اضغط مجلد، في الصوتي الملف الختيار
«القائمة» الختيار الملف A من هذه القائمة.المجلد، هيكل في السابق المستوى إلى للعودة
اضغط على 4.الترتيب بحسب األلبومات تنظيم يتم ، افتراضيا
األبجدي.تركز أن تستطيع الرقمي، المشغل لنوع تبعا
اختيارك عن طريق المجلدات والملفات.مالحظة: من األفضل استخدام اتصال USB لسهولة
عمليات البحث عن الموسيقى.
المماثل المدخل من الصادر الصوت جودة جودة من أقل طبيعية بصورة تكون (AUX).(USB, Bluetooth®) صوت المداخل الرقمية
1
رئيسية القائمة خيارات
A
4

ARA–۲٦
مصادر الصوت اإلضافية (۳/۲)تشغيل عشوائي
المسارات كافة تشغيل الخاصية هذه لك تتيح بطريقة عشوائية. اضغط على 3 ثم على «تشغيل»
أو «إيقاف».
USB, Bluetooth® مدخل إضافي: مقبسالتوصيل: USB وجهاز الرديو الرقمي المتنقل
بمقبس الصوتي االستماع جهاز مقبس وصل المدخل الـUSB للعلبة.
الصوت لمشغل USB قابس توصيل بمجرد .«USB» الرقمي، تظهر القائمة
المشغالت أنواع بعض توصيل مالحظة: اليمكن الرقمية.
USB تحميل واجهة الجهازالخاص USB بمنفذ USB مقبس توصيل بمجرد البطارية المحافظة على أو يمكنك شحن بالوحدة،
أثناء االستخدام.أو شحنها إعادة يتم ال األجهزة بعض مالحظة: المحافظة على مستوى شحن البطارية عندما تكون
متصلة بمنفذ USB بنظام الوسائط المتعددة.
iPod® :التوصيل USB مدخل في iPod® الـ قابس بتوصيل قم USB قابس توصيل بمجرد بالجهاز. الخاص
.«iPod» تظهر القائمة ،iPod® الخاص بـ
االستخدامثم اضغط المنسدلة 1، القائمة اختر «iPod» من على قائمة القراءة أو القائمة الصوتية المرغوبة في
شاشة نظام الملتيميديا.جميع الملفات الصوتية الخاصة بـ «iPod» يمكن نظام شاشة على من مباشرة بصورة اختيارها
الملتيميديا.إمكانية لديك ليس توصيله، بمجرد مالحظة: إدخال األوامر مباشرة إلى مشغل الصوت الرقمي
«iPod». يجب استخدام مفاتيح واجهة النظام.ملحوظة: استخدام الكابل العادي ®iPod الستخدام بشكل حصري®iPod عند توصيل جهاز المشغل
.USB بالموصل iPod®الرديو الرقمي المتنقل
تنسيقات الصوتفقط WMAو MP3 التنسيقات على التعرف يتم
بواسطة نظام الوسائط المتعددة.
تشغيل سريعاستمر في الضغط على الزر 2 من أجل التقديم أو
اإلرجاع السريع. يعود التشغيل عند ترك المفتاح.
التكرارتتيح لك هذه الخاصية تكرار ملف أو جميع الملفات. «المسار»، «إيقاف»، على ثم على 3 اضغط
«الحافظة» أو «الكل».
1
3
المشغل القائمة خيارات
2

ARA–۲٥
مصادر الصوت اإلضافية (۳/۱)يمتلك نظامك نمطين من المداخل اإلضافية:
الصوتي بالمصدر للتوصيل التفريع مع –الملفات مشغل ،MP3 (قاريء الخارجي
الصوتية، ذاكرة USB، التليفون...)؛الصوتية الملفات (مشغل Bluetooth® مع –
.(Bluetooth® هاتف ،Bluetooth®
لتتعرف على وضع الدخول، يرجى الرجوع لفصل «عرض أزرار التحكم».
مبادئ التشغيل والتفريعيوجد نوعين من التوصيالت:
مقبس USB؛ –.Jack مقبس –
الذي الجهاز نوع بحسب االستماع، جهاز ربط تملكونه.
يكتشف ،Jack أو USB مقبس توصيل بمجرد النظام تلقائيا المصدر اإلضافي.
المستخدم USB المفتاح تنسيق يجب مالحظة: .32GB وتكون سعته القصوى FAT32 بتنسيق
حدد المصدر اإلضافيالختيار مصدر إدخال، اضغط على 1.
تظهر قائمة بالمصادر المدخلة المتوفرة في الحال:والهاتف، ،MP3 ومشغل ،USB مفتاح :USB –
وما إلى ذلك؛®iPod: يندمج ®iPod المشغل مع ؛ –
BT: أجهزة ®Bluetooth؛ –
الفيديو: محرك أقراص USB (ملف MP4)؛ –AUX: مقبس جاك ۳٫٥ مليمتر. –
الراديو، إلى أثناء االستماع أو المالحة في وضع حدد مصدر الصوت اإلضافي بالضغط على المفتاح
«االستقبال» أو «الوسائط».يعيد النظام آخر مقطوعة صوتية كنت تستمع إليها.
استخدم مشغل الصوت عندما تكون ظروف السير مواتية.ضع في مكان آمن مشغل الصوت أثناء السير (لتجنب سقوطه عند التوقف القاسي).
رئيسية القائمة خيارات
1

ARA–۲٤
االستماع إلى الراديو (٤/٤)«أخبار»
حين يتم تنشيط هذه الخاصية، فإنها تتيح االستماع التلقائي إلى األخبار بمجرد نشرها بواسطة بعض
.«DAB» أو «FM» محطات الراديوإذا حددت بعد ذلك مصدرا آخرا، سيقطع بث نوع
البرنامج المختار مشغل المصادر األخرى.«إيقاف» أو الوظيفة هذه لتنشيط حدد «تشغيل»
إللغاء تنشيطها.
«المنطقة»قد يتغير تردد إحدى محطات الراديو «FM» وفقا
للمنطقة الجغرافية.لكي تستمع إلى محطة الراديو عند تغيير المنطقة قم بتنشيط وظيفة «المنطقة» لذا فيمكن لنظام الوسائط
لديك بإعادة توليف التردد تلقائيا.مالحظة: يمكن للمحطة التي يتم تشغيلها حاليا فقط
اتباع التغيير الحادث في المنطقة.راديو لمحطات فقط متاحا هذا يكون مالحظة:
معينة.مالحظة: ال يتوفر «المنطقة» إال عند تنشيط وظيفة
."RDS»إلى أحيانا تؤدي قد السيئة االستقبال ظروف تغيرات مفاجئة وغير مرغوبة في التردد أبطل إذا
هذه الوظيفة.«إيقاف» أو الوظيفة هذه لتنشيط حدد «تشغيل»
إللغاء تنشيطها.
« AM ».«AM» يمكنك تنشيط أو إلغاء تنشيط نطاق
«إيقاف» أو الوظيفة هذه لتنشيط حدد «تشغيل» إللغاء تنشيطها.
«DLS»بعض محطات الراديو تبث معلومات نصية تتعلق بالبرنامج الذي يذاع في الوقت الراهن (على سبيل
المثال، عنوان المسار).
«تحديث قائمة»لتحديث قائمة المحطات والحصول على المحطات
األحدث، قم بالضغط على «البدء».مالحظة: يفضل تحديث قائمة «DAB» فور تشغيل
النظام.

ARA–۲۳
االستماع إلى الراديو (۳/٤)«RDS»
تتيح وظيفة «RDS» االستماع إلى إحدى المحطات التعامل طريق عن الرحلة أثناء المقاطعة دون
تلقائيا مع التغيرات في التردد.يتم إخطارك بمحطة الراديو التي تستمع إليها على هيئة رسالة نصية، باإلضافة إلى معلومات المرور
والرسائل طوال رحلتك.عبر عامة بصورة المرور معلومات إرسال يتم
.«RDS»هذه الراديو محطات جميع توفر ال مالحظة:
اإلمكانية.إلى أحيانا تؤدي قد السيئة االستقبال ظروف عندها التردد في مرغوبة وغير مفاجئة تغيرات
يجب تعطيل متابعة المحطات.
« TA» (المعلومات المرورية)الوسائط نظام يبحث الميزة، هذه تنشيط عند تلقائيا ويشغلها المرورية النشرات عن المتعددة عند إصدار تقارير جديدة بواسطة بعض محطات
.«DAB»و «FM» الراديومالحظة:البث التلقائي لمعلومات المرور يكون غير باقة على الصوتي النظام ضبط يتم عندما مفعل
.«AM» الموجاتيتم بث معلومات المرور بصورة آلية وأولية مهما
كان مصدر االستماع.«إيقاف» أو الوظيفة هذه لتنشيط حدد «تشغيل»
إللغاء تنشيطها. 19
رئيسية القائمة ضبط مسبق خيارات
RDSTAالمنطقة
أخبار
إيقاف
إيقاف
إيقاف
إيقاف
تشغيل
تشغيل
تشغيل
تشغيل
ضبط الراديوالرقم 19. على بالضغط التعديالت قائمة عرض على بالضغط الوظائف إيقاف أو تفعيل تستطيع «تشغيل» أو على «إيقاف» (تتغير قائمة اإلعدادات
تبعا للنطاق الموجي).الوظائف المتاحة هي التالية:
; «RDS» –«TA»(المعلومات المرورية)؛ –
«المنطقة» ; –«أخبار» ; –; «AM» –
; «DLS» –«إعالن»؛ –
«تحديث قائمة». –

ARA–۲۲
االستماع إلى الراديو (۲/٤)المنطقة A الختيار أزرار من واحد اضغط على
المحطات المخزنة.مالحظة: للرجوع إلى شاشة الترحيب، اضغط على
الزر 10.
حفظ المحطةحدد محطة راديو باستخدام أحد األوضاع المذكورة سابقا. قم بالضغط مع االستمرار على أحد أزرار
.A المنطقةنطاق لكل محطة عشرة اثنتي حتى حفظ يمكنك
موجي.مالحظة: يشير الرمز 15 إلى المحطة التي تستمع
إليها حاليا.الموجودة في الصفحات العالمة 16 عدد تبين لك
هذا الباب.لالنتقال إلى الصفحة التالية، اضغط على الزر 17.
التي الراديو أسماء محطات الشاشة في تظهر ال تردداتها تحديد يتم فقط .RDS نظام تستخدم ال
وتصنف في نهاية القائمة.
وضع «ضبط مسبق»الضغط طريق عن مسبق» «ضبط وضع حدد
على 18.الطلب عن استدعاء من الوضع هذا يمكنك الفقرة إلى (ارجع مسبقا حفظتها التي المحطات
«حفظ محطة» في هذا الباب).
وضع «القائمة»حدد وضع «القائمة» عن طريق الضغط على 14.يسمح وضع التشغيل هذا بالبحث بسهولة عن محطة تعرف اسمها في القائمة المصنفة بالترتيب األبجدي
(في نطاق «FM»و «DAB» فقط).على بالضغط المرادة المحطة باختيار قم
المنطقة 12.اضغط على 13 للمرور عبر جميع المحطات.
مالحظة: يشير الرمز 11 إلى المحطة التي تستمع إليها حاليا.
12 1311
رئيسية القائمة ضبط مسبق خيارات
14
A
رئيسية القائمة ضبط مسبق خيارات
15
1810
16 17

ARA–۲۱
االستماع إلى الراديو (۱/٤)
اختيار النطاق الموجيالختيار سلسلة من الموجات:
اضغط على 1؛ – «AM» أو «FM» اختر النطاق الموجي المطلوب –النطاق على الضغط خالل من «DAB» أو
المطلوب.
وضع «رئيسية»أوتوماتيكيا عن أو يدويا البحث الوضع هذا يتيح الموجي النطاق مسح خالل من الراديو محطات المحدد. قم بتحديد وضع «تردد» بالضغط على 7.
للقيام بمسح النطاق الموجي:الترددات عبر أسفل وإلى أعلى إلى انتقل –بدرجات قدر كل منها ۰٫۰٥ هرتز عن طريق
الضغط المتتالي على 4 أو 8؛ قم بالتقديم أو اإلرجاع عبر النظام األوتوماتيكي –(البحث) حتى المحطة التالية عن طريق الضغط
على 3 أو 9.لزم إذا البحث في توقف كل عند العمليات كرر
األمر.يمكن أيضا تحريك مقبض التحكم الموجود بوحدة التحكم في عمود القيادة لالنتقال إلى المحطة التالية.مالحظة: للرجوع إلى شاشة الترحيب، اضغط على
الزر 10.
إختيار محطة إذاعية «FM»، «AM» أو «DAB»
توجد أوضاع مختلفة الختيار محطة راديو.بالضغط الوضع حدد الموجي، الطول تحديد بعد
على عالمات التبويب 5 ، أو 6 ، أو 7.يتم توفير طرق بحث عديدة:
الوضع «رئيسية» (عالمة التبويب 7)؛ –وضع «القائمة»، (تبويب 6)؛ –
وضع «ضبط مسبق»، (تبويب 5). –يمكن يغيير هذه األنماط من خالل االستعانة بعنصر
التحكم الموجود بالمقود.القائمة في الوضع إلى عالمة 2 تشير مالحظة:
المحفوظة لمحطة الراديو التي تعمل حاليا.
1
رئيسية القائمة ضبط مسبق خيارات
69 8 45
2
710 3

ARA–۲۰
الصوتاضبط حجم الصوت عند سماع رسائل، مصادر،
نغمات، واتصاالت هاتفية مختلفة:باللوحة الموجود الزر 1 تدوير خالل من –الضغط أو المتعددة الوسائط لنظام األمامية
عليه؛على أو 14 التحكم 13 عنصر على بالضغط –
وحدة التحكم في عمود القيادة.«المفضالت الفقرة راجع الخاصية، هذه لضبط
الصوتية» من الفصل «ضبط الصوت».تتم مقاطعة مصدر الراديو الذي يتم االستماع إليه أو نشرات األخبار المرور استقبال معلومات عند
.«TA» أو رسالة تحذير لـتم الذي الصوت مستوى تخزين يتم لم مالحظة: ضبطه أثناء التشغيل في المرة التالية إلعادة تشغيل
النظام.
انقطاع الصوتالموجود الزر 21 على اضغط الصوت، لكتم الموجود 3B أو القيادة عجلة في التحكم بوحدة التحكم في وحدة أو المتعددة الوسائط على شاشة في عمود التوجيه 12 (فقط لعناصر التحكم C، وD، وE، وF، وH وJ) أو اضغط في آن واحد على التوجيه التحكم في عمود الزرين 13 و14 بوحدة
.(Kو Bو ،A فقط لعناصر التحكم)الشاشة لإلشارة أعلى األيقونة «كتم» يتم عرض
إلى أنه تم إيقاف الصوت.اضغط الصوت، مصدر إلى االستماع لمواصلة عجلة في التحكم بوحدة الموجود الزر 21 على أو المتعددة الوسائط شاشة على 3B أو القيادة الموجود بوحدة التحكم في عمود التوجيه 12 (فقط أو (Jو Hو ،Fو ،Eو ،Dو ،C التحكم لعناصر اضغط في آن واحد على الزرين 13 و14 بوحدة ،A التحكم في عمود التوجيه (فقط لعناصر التحكم
.(Kو Bوتلقائيا عند تطبيق ضبط على تعطل هذه الخاصية أو معلومات نشرة نشر أثناء أو الصوت حجم
معلومات عن مسار القيادة.
ضبط حجم صوت وفقا للسرعةالصوت حجم يتنوع الخاصية، هذه تفعيل أثناء
ونظام المالحة وفقا لسرعة السيارة.الفقرة إلى ارجع الخاصية، هذه وضبط لتفعيل الباب من للسرعة» وفقا الصوت حجم «ضبط
«إعدادات الصوت».
حجم الصوت
المستوى إلى الصوت حجم اضبط الذي يمكن معه سماع ما يدور من
أصوات خارج السيارة.

ARA–۱۹
استخدام لوحة مفاتيح أبجديةمفاتيح لوحة باستخدام األقسام أحد اختيار خالل
أبجدية ، حدد كل حرف باستخدام لوحة المفاتيح.بإلغاء إضاءة النظام يقوم إدخال كل حرف، أثناء
بعض الحروف لتسهيل العملية.اضغط على 7 لحذف الحرف األخير المدخل.
اضغظ على 8 لعرض قائمة النتائج.
اضغط على 9 الستخدام األرقام أو الرموز.اضغط على 10 لتغيير تكوين لوحة المفاتيح.
7
910
خيارات
8
التشغيل واالستخدام ( ۳/۳)

ARA–۱۸
التشغيل واالستخدام ( ۳/۲)
56
A
4
الصوت: استخدام عناصر التحكم في عمود القيادة
اضغط على الزر 5 لتغيير وضع البحث عن محطة راديو.
.(A حركة) أدر المؤشر 6 لتغيير المحطةاضغط على 4 لتغيير المصدر
، iPod®و ،DABو ،FMو ،AMو ،AUXو ،USB).(Bluetooth®و
2
خيارات
إيقاف
إيقاف
إيقاف
تشغيل
تشغيل
تشغيل
سريع قصير أسلوب تخطيط المساراالقتصادية
الطرق السريعة
طريق برسوم مرور
طريق برسوم
إعدادات المسار
الوصول إلى «القائمة الرئيسية»إذا الرئيسية» «القائمة إلى مباشرة النظام ينتقل ضغطت مع االستمرار على 2 أو ضغطت بإيجاز
على 3 من أي مكان في النظام.
المشغل القائمة ضبط مسبقخيارات
3

ARA–۱۷
التشغيل واالستخدام ( ۳/۱)– تقديم/إرجاع سريع (شاشة مشغل الوسائط).
من قائمة «الوسائط» > «المشغل»، يؤدي الضغط مع االستمرار على الزر « تقديم/إرجاع سريع» إلى
تقديم/إرجاع المقطع الصوتي الذي يعمل حاليا.
شاشة الوسائط المتعددة 1ضغطة قصيرة:تحديد خيار؛ –
– تنفيذ خيار (شاشة مشغل الوسائط).من قائمة «الوسائط» > «المشغل»، بضغطة على
الزر التالي يتم االنتقال إلى العنوان التالي.
11
ضغطة طويلة:سبيل على راديو (محطة العناصر أحد حفظ –
المثال).من قائمة «الراديو» > «رئيسية»، يؤدي الضغط مع االستمرار على الرقم المحدد مسبقا إلى تخزين
محطة الراديو التي تعمل حاليا.استعراض سريع. –
نحو االستعراض أزرار الطويلة على الضغطات األسفل، تطلق االستعراض السريع (بالصفحة).

ARA–۱٦
تشغيل/إيقاف
تشغيلبمجرد تشغيل تلقائيا المتعددة الوسائط نظام يعمل A السيارة. في الحاالت األخرى، اضغط على الزر
لتشغيل نظام الوسائط المتعددة.توقف محرك السيارة، يمكنك استخدام نظامك خالل عشرون دقيقة. اضغط على الزر A لتشغيل نظام الوسائط المتعددة لمدة حوالي عشرين دقيقة إضافية.
شاشة التوقفشاشة تشغيل بإيقاف التوقف شاشة وضع يسمح
العرض.في هذه الوضع، ال يعمل الراديو أو نظام التوجيه.
الحرارة ودرجة الساعة التوقف شاشة تعرض الخارجية.
شاشة لتنشيط/لتعطيل A الزر على لوهلة اضغط التوقف.
A A
االيقافدقائق بضع المتعددة الوسائط نظام يستغرق قد التطبيقات حسب اإلشعال إيقاف بعد يتوقف لكي
قيد التشغيل.تظهر (حتى A الزر على االستمرار مع اضغط شاشة سوداء) إلعادة تشغيل نظام الوسائط المتعددة.
ألسباب تتعلق بالسالمة، إذا كانت درجة الحرارة منخفضة أو مرتفعة للغاية داخل السيارة، فلن يعمل نظام الوسائط المتعددة أو سيتم إيقاف تشغيله تلقائيا. انتظر للحظات حتى تعود درجة الحرارة إلى مستوى مناسب أكثر وذلك لكي يعمل نظام الوسائط المتعددة بصورة صحيحة.

ARA–۱٥
الخواص
18.(FM /AM /DAB) ضغطة: تغيير وضع الراديو.(J و E و ،C فقط لعناصر التحكم) ضغطة مستمرة: تنشيط/إلغاء تنشيط وظيفة التعرف على الصوت في هاتفك الذكي
20فصل/إعادة تشغيل صوت الراديو.
الوضع على إيقاف مؤقت/جاري قراءة الملف الصوتي.ر صوت الخاص بالتعرف الصوتي. قم بمقاطعة مصد
تنشيط/إلغاء تنشيط وظيفة التعرف على الصوت لهاتفك الذكي إذا كان متصال بنظام الوسائط المتعددة.21
عرض أزرار التحكم (۸/۸)

ARA–۱٤
الخواص
12
عند تلقي مكالمة:الضغط لفترة قصيرة: للرد على المكالمة؛ –
الضغط لفترة طويلة: لرفض المكالمة. –ضغطة وجيزة أثناء المكالمة: إنهاء المكالمة.
.(Jو Hو ،Fو ،Eو ،Dو ،C فقط لعناصر التحكم) عند االستماع إلى مصدر صوتي: كتم الصوت/إلغاء كتم الصوتضغطة قصيرة: الوصول إلى قائمة «الهاتف» (لعناصر التحكم A، وB، وG فقط).
.(A فقط لعناصر التحكم) ضغطة: تنشيط/إلغاء تنشيط وظيفة التعرف على الصوت في هاتفك الذكي
زيادة مستوى صوت المصدر المستخدم حاليا.13
خفض مستوى صوت المصدر المستخدم حاليا.14
كتم الصوت/إلغاء كتم الصوت (لعناصر التحكم وB، وA، وK فقط)؛14+13
19 ,15راديو: تغيير وضع تشغيل محطة راديو («رئيسية»، «القائمة»، «ضبط مسبق»).
الوسائط ((USB/iPod: تغيير وضع التشغيل للوسائط التي تعمل حاليا («الرئيسية» أو «القائمة»).
16
االتصال الخلفي:الراديو: تغيير وضع الراديو (الضبط المسبق/القائمة/التردد)؛ –
الوسائط: لالنتقال إلى المسار السابق/التالي. –.(C فقط لعنصر التحكم) ضغطة: تأكيد إجراء
17.(CD/USB/AUX) تغيير الوسائط
عرض أزرار التحكم (۸/۷)

ARA–۱۳
الخواص
1.ON / OFF ضغطة: شاشة التوقفالضغط لفترة طويلة: يتم إعادة تشغيل النظام.
ضبط حجم الصوت.2, 13, 14
3AUSB. مقبس
3B.تنشيط/إلغاء تنشيط وظيفة التعرف على الصوت لهاتفك الذكي إذا كان متصال بنظام الوسائط المتعددة
مقبس Jack ۳٫٥ ملم.4
5.(FM/AM/DAB/USB/iPod®/Bluetooth®/AUX) الوصول إلى الوسائط التي تعمل حاليا
الوصول إلى قائمة «المالحة».6
7
الوصول إلى «القائمة الرئيسية».
هاتف أو مصادر إضافية: الخروج من القائمة الحالية للعودة إلى شاشة المالحة (الحالية) أو إلى الشاشة السابقة.
تفعيل/تعطيل التوجيه الصوتي.8
تغيير زوم رؤية الخريطة.9
تغيير نظام عرض الخريطة (2D/3D/2D شمال).10
11.(FM/AM/DAB/USB/iPod®/Bluetooth®/AUX) اختيار مصدر الصوت
عرض أزرار التحكم (٦/۸)

ARA–۱۲
عرض أزرار التحكم (٥/۸)
21
21األزرار بالجزء السفلي للمقود
21
12
1314
151120
21

ARA–۱۱
عرض أزرار التحكم (٤/۸)
20
13
14
11 12
1516
G
12
13
14
17 18
1916
J
12
13
14
17 18H
1916
13
14
K
16 15
17 18

ARA–۱۰
1516
11 12
19
12
17
16
18
A
عرض أزرار التحكم (۸/۳)
1313
14
B
1516
11 12
13
14
14
13
12
17 18
14
16
C
D
19
17
16
18
13
14
E
األزرار بالجزء السفلي للمقود
16
17 18F
13
14
12 12

ARA–۹
لوحات تحكم النظامعرض أزرار التحكم (۸/۲)
يتم إجراء تحديدات الشاشة بالضغط على الجزء المراد من الشاشة.
2
3A4
7 5
1
810 9
الوجهة
6
2
3B
7 5
1
810 9
الوجهة
6

ARA–۸
يتم إجراء تحديدات الشاشة بالضغط على الجزء المراد من الشاشة.
عرض أزرار التحكم (۸/۱)
2 3A 41
7 5810
الوجهة
9
لوحات تحكم النظام
6 2
7 5810
الوجهة
9 6
1 3B

ARA–۷
شاشة العرضشاشة القوائم
1 منطقة تحديد الوضع.يعرض الوضع المحدد. عند لمس مجال تحديد
الوضع، سوف تظهر قائمة منسدلة.2 منطقة جدول المحتويات.
والمعلومات القائمة عنصر محتويات تعرض ذات الصلة.
3 منطقة معلومات الهاتف.عند تفعيل نظام ®Bluetooth، سيظهر مستوى
االستقبال والبطارية الخاص بالجهاز المتصل.
4 درجة الحرارة الخارجية.5 منطقة الساعة.6 قائمة المنطقة:
– عرض القائمة الثانوية للوضع؛ – عرض القائمة الحالية كما هو موضح.
7 منطقة االستقبال أو العودة إلى المالحة.تبعا للنمط الذي توجد فيه، هذه المنطقة تظهر:
القائمة – زر الصفحة الرئيسية: الرجوع إلى الرئيسية؛
– زر الرجوع: الرجوع إلى الشاشة السابقة؛ – زر العلم: العودة إلى شاشة المالحة .
8 وضع شاشة التوقف وإظهار الساعة.9 منطقة تحديد بدء تشغيل المحرك عن بعد.
شاشة المالحة10 نظام الخرائط (2D/3D و 2D شمال).
في به مررت الذي السابق الشارع اسم 11مسيرتك.
12 المعلومات الصوتية الحالية.13 خيارات ضبط المسار والخريطة.
.ON/OFF 14 التوجيه الصوتي15 معلومات المرور.
وصف عام (۳/۳)8
الراديو الوسائط الهاتف
Driving eco2 التنقل الضبط
داكن
9
ضبط الوقت
67
321
المشغل القائمة خيارات
4 5
ضبط مسبق
10 11
121314
الوجهة
15

ARA–٦
وصف عام (۳/۲)خواص المهاتفة حر اليدين
اليدين حر الهاتفية االتصاالت نظام يوفر إلى الحاجة دون التالية الوظائف Bluetooth®
حمل هاتفك:إرسال/استقبال/تعليق مكالمة؛ –
دليل من االتصال جهات قائمة إلى ارجع –الهاتف؛
يمكنك الوصول إلى سجالت المكالمات الواردة –عبر النظام؛
اتصال الطوارئ . –
توافق الهواتفالتشغيل نظام مع تتوافق ال التي الهواتف بعض الحر، ال تسمح باستغالل جميع الوظائف المتوفرة،
أو ال توفر جودة صوتية مثلى.لمزيد من التفاصيل حول قائمة الهواتف المتوافقة، استشر ممثل العالمة التجارية أو ارجع إلى الموقع
اإللكتروني للشركة المصنعة إن كان متوافرا.
خواص تعليمات المالحةالجغرافي الموضع تلقائيا المالحة نظام يحدد
.GPS للسيارة بواسطة استقبال إشاراتبفضل اختيارك يقترح خط مسار حتى وجهة من خريطة الطريق الخاصة به: في النهاية، يشير إلى بفضل بخطوة، خطوة اتباعها، الواجب الطريق
شاشة الرؤية والرسائل الصوتية.
معلومات المرورالظروف الفعلي الوقت في الخاصية هذه تخبرك
المتعلقة بالحركة المرورية.
تحذيرات األمان على الطريق أو نقاط التحذيرات
تتيح لك هذه الخدمة استقبال التحذيرات في الوقت أو موضع السرعة تجاوز تحذيرات مثل الفعلي،
مناطق التحذير الخاصة باألمان على الطريق.
وظيفة بدء تشغيل المحرك عن بعد.لك تتيح النظام، بهذا السيارة مجهزة تكون عندما تشغيله لبدء المحرك برمجة إمكانية الوظيفة هذه عن بعد، بغية تبريد أو تدفئة مقصورة الراكب لمدة
تصل إلى ۲٤ ساعة قبل استخدام السيارة.
القيادة االقتصادية ۲الدرجة القائمة «Driving eco²» عرض لك تتيح اإلجمالية التي تعكس نمط قيادتك في الوقت الفعلي.
إن الغرض الوحيد من نظام المهاتفة حر اليدين الخاص بك هو تيسير االتصال مع تقليل عوامل الخطر دون التخلص منها كاملة. تراعى إلزاميا القوانين السارية في البلد الذي تتواجد فيه.

ARA–٥
وصف عام (۳/۱)المقدمة
يوفر النظام متعدد الوسائط في سياراتك الوظائف التالية:
– راديو RDS؛– راديو DAB؛
إدارة مصادر الصوت اإلضافية؛ –هاتف حر اليدين؛ –التعرف الصوتي؛ –تعليمات المالحة؛ –
معلومات المرور على الطريق ؛ –معلومات عن مناطق االنتباه؛ –
(كاميرا السيارة صف على المساعدة – نظام ذات طرق عرض أو كاميرا للخلف الرجوع
متعددة )؛برمجة بدء تشغيل المحرك عن بعد؛ –
الدفع (معلومات السيارة ميل حول معلومات –الرباعي ٤x٤)؛
من القيادة ونصائح القيادة نمط عن معلومات –أجل تحسين استهالكك للوقود.
Fonctions radioلالستماع المتعددة الوسائط نظام استخدام يمكن DABالتردد)، و (تعديل FM الراديو إلى محطات
(الصوت الرقمي)، و AM(تعديل السعة).يتيح نظام DAB الحصول على أفضل جودة صوتية البرنامج حول النصية المعلومات إلى والوصول
الحالي وما إلى ذلك.يسمح نظام RDS بعرض اسم بعض المحطات أو المطلوب FM بواسطة محطات المرسلة الرسائل
عرضها:الطريق لمسار العامة الحالة حول معلومات –
(TA)؛رسالة (رسائل) الطوارئ. –
وظيفة إضافية للراديوالصوتية الملفات مشغل إلى االستماع يمكنك مباشرة عبر سماعات السيارة. لديك عدة خيارات الخاص الصوتية الملفات مشغل ربط من لتتمكن
بك، ويتوقف خيارك على نوع جهازك:مقبس جاك ۳٫٥ مليمتر؛ –
USB أوديو؛ –.Bluetooth® رابط –
لمزيد من التفاصيل حول قائمة الهواتف المتوافقة، استشر ممثل العالمة التجارية أو ارجع إلى الموقع
اإللكتروني للشركة المصنعة إن كان متوافرا.

ARA–٤
الوظائف الكتيب على مجموعة يحتوي هذا الكتيب. التي توفرت وقت إعداد هذا التقنية إلى الخصائص الكتيب استنادا المذكورة في هذا الموديالت تم شرح الموجودة للموديالت المشار إليها. ويرتبط وجودها بموديل التجهيزات، والخيارات، والبلد المستورد. كما أن عددا من الوظائف التي ستضاف خالل العام قد يرد
شرحها في هذا الكتيب. الشاشات الموجودة في نشرة االستخدام غير تعاقدية.حسب العالمة التجارية لهاتفك وطرازه، قد ال تتوافق بعض الوظائف بشكل جزئي أو كلي مع نظام الوسائط المتعددة بسيارتك.
يرجى استشارة موزع معتمد، للحصول على مزيد من التفاصيل.
احتياطات االستخدام (۲/۲)

ARA–۳
احتياطات االستخدام (۲/۱)
االحتياطات الالزمة المتعلقة بالتالعب بالنظام– اضغط على أزرار التحكم (بلوحة التحكم أو بالمقود) واتبع التعليمات الموجودة على الشاشة عندما تسمح ظروف السير بذلك.
اضبط شدة الصوت إلى مستوى معتدل يمكنك من سماع ما يدور من أصوات خارج السيارة. –تدابير احترازية خاصة بالمالحة
إن استخدام نظام المالحة ال يحل بأي حال من األحوال محل مسئولية قائد السيارة أو يقظته أثناء قيادة السيارة. –وفقا للمنطقة الجغرافية، قد ال تحتوي الخريطة على أحدث المعلومات حول الطرق الجديدة. كن منتبها. في جميع األحوال، تكون األولوية لكود الطريق ولوحات –
اإلشارات عند مؤشرات نظام المالحة.التدابير االحترازية الخاصة باألجهزة
ال تجري أي خلع ألحد المكونات أو تعديل بالنظام لتجنب خطر أي تلف مادي أو حروق. –في حالة حدوث أي عطل وللقيام بأي تفكيك يرجى االتصال بأحد ممثلي الصانع. –
ال تقم بإدخال أي جسم غريب داخل المشغل. –ال تستخدم المنتجات التي تحتوي على الكحول و/أو سوائل الرش األخرى على المنطقة. –
تدابير احترازية خاصة بالهاتفتنظم بعض القوانين استخدام الهاتف في السيارة. فهي ال تسمح باستخدام أنظمة الهاتف حرة اليدين في كل أوقات القيادة: يجب أن يظل قائد السيارة هو المتحكم –
في القيادة؛تعد المهاتفة أثناء القيادة أحد عوامل التشتت والمخاطر الكبيرة، وذلك أثناء جميع مراحل االستخدام (كتابة الرقم، االستصال، البحث عن اسم في الدليل...). –
من الضروري اتباع االحتياطات المذكورة أدناه أثناء استخدام النظام وذلك لدواعي السالمة أو لتجنب مخاطر تلف األجهزة. تراعى إلزاميا القوانين السارية في البلد الذي تتواجد فيه.

ARA–۲
۷۰.ARA . . . . . . . . . . . . . . . . . . . . . . . . . . . . . . . . . . . . . . . . . . . . . . . . . . . . . . . . . . .دليل الهاتف۷۱.ARA . . . . . . . . . . . . . . . . . . . . . . . . . . . . . . . . . . . . . . . . . . . . . . . . . . . . . . إجراء وتلقي مكالمة۷٤.ARA . . . . . . . . . . . . . . . . . . . . . . . . . . . . . . . . . . . . . . . . . . . . . . . . . . . . . . . بدء تشغيل المحرك عن بعد۷۷.ARA . . . . . . . . . . . . . . . . . . . . . . . . . . . . . . . . . . . . . . . . . . . . . . . . . . . . . . . . كاميرا الرجوع إلى الخلف۸۰.ARA . . . . . . . . . . . . . . . . . . . . . . . . . . . . . . . . . . . . . . . . . . . . . . . . . . . . كاميرا ذات طرق عرض متعددة۸۲.ARA . . . . . . . . . . . . . . . . . . . . . . . . . . . . . . . . . . . . . . . . . . . . . . . . . . . . . . . . . . . . . . . . ضبط النظام۸٥.ARA . . . . . . . . . . . . . . . . . . . . . . . . . . . . . . . . . . . . . . . . . . . . . . . . . . . . . . . . . . . . . . . تحديث النظام۹۰.ARA . . . . . . . . . . . . . . . . . . . . . . . . . . . . . . . . . . . . . . . . . . . . . . . . . . . . . . . . . . . . . .خلل في التشغيل

ARA–۱
۳.ARA . . . . . . . . . . . . . . . . . . . . . . . . . . . . . . . . . . . . . . . . . . . . . . . . . . . . . . . . . . . احتياطات االستخدام٥.ARA . . . . . . . . . . . . . . . . . . . . . . . . . . . . . . . . . . . . . . . . . . . . . . . . . . . . . . . . . . . . . . . خواص عامة٥.ARA وصف عام . . . . . . . . . . . . . . . . . . . . . . . . . . . . . . . . . . . . . . . . . . . . . . . . . . . . . . . . . . . ۸.ARA . . . . . . . . . . . . . . . . . . . . . . . . . . . . . . . . . . . . . . . . . . . . . . . . . . . . . . . . . عرض األوامر۱٦.ARA . . . . . . . . . . . . . . . . . . . . . . . . . . . . . . . . . . . . . . . . . . . . . . . . . . . . . . . . . . تشغيل/إيقاف۱۷.ARA . . . . . . . . . . . . . . . . . . . . . . . . . . . . . . . . . . . . . . . . . . . . . . . . . . . . . . .التشغيل واالستخدام۲۰.ARA . . . . . . . . . . . . . . . . . . . . . . . . . . . . . . . . . . . . . . . . . . . . . . . . . . . . . . . . . . شدة الصوت۲۱.ARA . . . . . . . . . . . . . . . . . . . . . . . . . . . . . . . . . . . . . . . . . . . . . . . . . . . . . . . . . . . . . .AUX / الراديو۲۱.ARA . . . . . . . . . . . . . . . . . . . . . . . . . . . . . . . . . . . . . . . . . . . . . . . . . . . . . . االستماع إلى الراديو۲٥.ARA . . . . . . . . . . . . . . . . . . . . . . . . . . . . . . . . . . . . . . . . . . . . . . . . . . . مصادر الصوت اإلضافية۲۸.ARA . . . . . . . . . . . . . . . . . . . . . . . . . . . . . . . . . . . . . . . . . . . . . . . . . . . . . . . . . ضبط الصوت۳۰.ARA . . . . . . . . . . . . . . . . . . . . . . . . . . . . . . . . . . . . . . . . . . . . . . . . . . . . . . . . . . . . . . . . مقطع فيديو۳۲.ARA . . . . . . . . . . . . . . . . . . . . . . . . . . . . . . . . . . . . . . . . . . . . . . . . . . . . . . . . . . . . . . . . . . المالحة۳۲.ARA . . . . . . . . . . . . . . . . . . . . . . . . . . . . . . . . . . . . . . . . . . . . . . . . . . . . . . . . . . نظام المالحة۳۳.ARA . . . . . . . . . . . . . . . . . . . . . . . . . . . . . . . . . . . . . . . . . . . . . . . . . . . . . . . . . . قراءة خريطة۳٦.ARA . . . . . . . . . . . . . . . . . . . . . . . . . . . . . . . . . . . . . . . . . . . . . . . . . . . . . . . . . . إدخال وجهة٤۲.ARA . . . . . . . . . . . . . . . . . . . . . . . . . . . . . . . . . . . . . . . . . . . . . . . . . . . . . . . . . . . . . التوجيه٤۸.ARA . . . . . . . . . . . . . . . . . . . . . . . . . . . . . . . . . . . . . . . . . . . . . . . . . . . . . . . إعدادات الخريطة٤۹.ARA . . . . . . . . . . . . . . . . . . . . . . . . . . . . . . . . . . . . . . . . . . . . . . . . . . . . . . . . . .إدارة المفضلة٥۱.ARA . . . . . . . . . . . . . . . . . . . . . . . . . . . . . . . . . . . . . . . . . . . . . . . . . . . . . . . . إعدادات المالحة٥٥.ARA . . . . . . . . . . . . . . . . . . . . . . . . . . . . . . . . . . . . . . . . . . . . . . . . . . . . . . . . . . . . ²القيادة االقتصادية٥٦.ARA . . . . . . . . . . . . . . . . . . . . . . . . . . . . . . . . . . . . . . . . . . . . . . . . . . .(٤x٤) معلومات عن الدفع الرباعي٥۷.ARA . . . . . . . . . . . . . . . . . . . . . . . . . . . . . . . . . . . . . . . . . . . . . . . . . . . . . . . . . . ®Bluetooth جهاز٥۷.ARA . . . . . . . . . . . . . . . . . . . . . . . . . . . . . . . . . . . . . . . . . . Bluetooth® إقران/إلغاء إقران أجهزة٦۱.ARA . . . . . . . . . . . . . . . . . . . . . . . . . . . . . . . . . . . . . . . Bluetooth® االتصال/قطع االتصال بأجهزة٦۳.ARA . . . . . . . . . . . . . . . . . . . . . . . . . . . . . . . . . . . . . . . . . . . . استخدام خاصية التعرف على الصوت٦٦.ARA . . . . . . . . . . . . . . . . . . . . . . . . . . . . . . . . . . . . . . . . . . . . . . . . . ™Android Auto™, CarPlay

( https://easyconnect.renault.com )
Renault s.a.s. société paR actions simplifiée au capital de 533 941 113 € / 13/15, quai le Gallo 92100 BouloGne/BillancouRt R.c.s. nanteRRe 780 129 987 — siRet 780 129 987 03591 / tél. : 0810 40 50 60
NX 1332-3 – 25 91 080 13R – 05/2019 – edition fRa/enG/aRe
à259108013Ríïëä XG