Logan Medallist 3. Making Stratigraphy Respectable: From Stamp ...
Upload
khangminh22Category
view
1download
0
Creative Matboard Craft Projectsto Enhance Your Home
••••••by Eileen L. Hull����
❀MATBOARDMagic

Matboard Magicby Eileen L. Hull
© 2008 Logan Graphic Products, Inc.,Wauconda, ILAll rights reserved.Printed in the United States of AmericaBookMasters, Inc.Ashland, Ohio
ISBN 0-9749683-1-5
Translations or reproductions of any partof this work, beyond that permitted bythe International Copyright Act, withoutthe permission of the copyright owner, isunlawful. Please request permission orfurther information from the PermissionsDepartment at BookMasters, Inc. 30Amberwood Parkway, P.O. Box 388,Ashland, OH 44805 USA Telephone 800-537-6727, fax 419-281-0200,www.bookmasters.com
The information and suggestions in thisbook are offered in good faith, butwithout guarantee, since the techniquesof individuals are beyond our control. Werecommend the user determine, forher/his own purposes, the suitability ofall materials and suggestions mentioned.Logan Graphic Products, Inc., BookMastersand Eileen Hull, both individually andcombined, disclaim all responsibility forloss or damage resulting from the use ofthe information furnished herein.
CreditsPhotography: Rick Casarra
Design & Layout: Connie Miley Cook
Proofreading: Annalise Raziq
Project Design: Eileen L. Hull

Matboard Magic 3
✎About the Author
Find a job you love and you'll never work a day in your life.
ConfuciusNever was this quote more true than for professional crafter Eileen Hull.(Having raised four children while her husband was in the military, Eileenmight argue this point.) However, her professional crafting career leavesmany green with envy. Her ingenuity, resourcefulness and creativity haveallowed her to make a career out of her hobby and passion–paper crafting.
Eileen is a freelance designer, specializing in three-dimensional artwork.She has owned and operated her own business, Paperwork, Etc. for twenty-five years. She continues to promote matboard crafts and recycling thriftstore finds into new and useful items. Her work has appeared inmagazines, including Crafts ‘n Things, PaperWorks, CardMaker andCreative Home Arts. She has also contributed projects to other books,including 101 Paper-Craft Gift Ideas, Altered Art and Holiday Paper Fun.She is a member of the Craft and Hobby Association, WashingtonCalligrapher’s Guild, and Dulles Women’s Networking Group. ✎
About the Author
Photo
court
esy
of
Hay
war
d H
ull

Acknowledgements
Matboard Magic 4
❤Acknowledgements
...and of course to all the crafters who findinspiration within these pages!
Eileen L. Hull
Our sincerethanks toCrescent®
Cardboard forgenerously
donating all ofthe matboard
used throughoutthis book.
❤

��
❀MATBOARDMagic
Time Difficulty
3 hrs. Advanced
Keep it simple...or challenge yourself!
Each featured project has adifficulty and time indicator. Notsure where your skills are? Start
easy and work up to morechallenging projects.
ContentsIntroduction ...............................................................7
Chapter 1 Tools and Techniques...........................11
Chapter 2 Say it With Stripes and Stamps ............21Desk Blotter with Random Stripes........22 AdvancedCurvy Can Wraps.................................24 IntermediateMemo Holder ......................................26 Easy
Chapter 3 Dress Up Your Dresser.........................29Jewelry Box .........................................29 AdvancedFrame Wall Caddy................................34 IntermediateMatboard Photo Frame ........................36 Easy
Chapter 4 Make Wedding Memories with Embellishments ...................................37Wedding Keepsake ..............................37 AdvancedWedding File Box Organizer.................40 IntermediateGuestbook...........................................42 Easy
Chapter 5 Deck the Halls with Texture and Embossing...........................................45Tree and Gifts Centerpiece...................45 IntermediateSnowman Box .....................................48 EasyFestive Cards and Storage Box ............49 Intermediate
Chapter 6 Matboard as Art ..................................51Photo Mosaic.......................................52 IntermediateBaby Collage .......................................55 EasyGroovy Friend .....................................57 Intermediate
Chapter 7 Ideas for Inspiration ............................60
Conclusion................................................................66
Sources .....................................................................67

Introduction
Versatile and sturdy,matboard is theperfect material for 3-D craft projects likethese. Use your ownimagination forlimitless possibilities!
Matboard Magic 6
��
��

Matboard Magic 7
✍Introduction
matboard- (mat’ boord) n. 1. A heavy fiber,paper-like board used to protect artwork. Itenhances and showcases the subject beingframed and is usually acid free or pH treated. 2. Athick paperboard used to add dimension toframed artwork; available in a wide variety ofcolors and textures. 3. The most versatile paperever created. 4. Provides a beautiful surface forstamping, stenciling, embossing and many othercrafting techniques. 5. Can be used to createthree-dimensional boxes, totes and books. 6.Looks great when embellished with glitter, metal,buttons, ribbon, chalks, ink, texture paste…
Come on, you know you’ve seen it around! I am sure that everyone reading this book hassome familiarity with matboard…perhaps youhad your child’s artwork immortalized underglass by a local craft shop, or you bought a pre-cut mat to display a collection of family photos.Surely everyone has had the pleasant experienceof sitting at the dentist’s office gazing at thematted artwork while waiting to be seen…thefact is, matboard is everywhere!
In my “Framing 101” class, we learned that thepurpose of matting is to complement theartwork. Well, I believe it’s time to look at thisproduct with new eyes. There is no reason why abeautiful sheet of sturdy paper board like thisshould be used as a two-dimensional window tosurround artwork, when IT can actually BE theartwork! With some fun tools and a piece ofmatboard, I will share my secret tricks of thetrade with you on how to cut, score anddecorate the matboard to create beautiful andunique three-dimensional pieces for you to share(or keep...)
Introduction
TOP TEN REASONS TO LOVE MATBOARD:10. It doesn’t talk back
9. It’s inexpensive
8. Comes in a huge assortment of colors andtextures
7. Readily available
6. Large size means you can build large projects
5. Great weight for mailing
4. Too thick to give paper cuts
3. Old product used in a new way
2. The texture is just right for stamping
1. It’s easy to score!

Introduction
Buying a mat cutter is a great investment. Withwhat you would spend to mat and frame a picturein a custom frame shop, you can BUY the wholecutting system and have it to use on many projectsto come. I can’t tell you how many dollars I havesaved by matting photos, artwork, cross stitch andmany other projects myself. The tools are easy touse and well worth the small investment.
Here’s how it all began…
I learned to use a mat cutter on a military postwhere family members had access to the artsand crafts center. At that time, I was doing a lotof cross stitch and couldn’t afford to haveeverything matted and framed professionally.Having four small children at home, the centerwas sometimes a more enjoyable place to bethan our house on bath night so I’d try and getover when I could. When we later moved to theWashington, DC area, the nearest arts and craftscenter was 45 minutes away. That’s when Irealized I had gotten too used to having accessto a mat cutter. I researched them and decided totake the plunge and buy one of my own. Thepurchase of my Logan 700 Simplex mat cutterwas one of the best purchases I have ever made.I built a business around it, designing andselling matted artwork related to military life.After a while, my studio began to pile up with
Where can I buy matboard?
Many of the large chain stores carry matboard,especially those with in- store matting andframing services. You can buy it by the sheet orhave it cut to size (for a price!). The specialtymats are not always available at these stores butthe basics are there.
Art supply stores usually carry a fairly extensiveselection and what they don’t have in stock, theycan order for you.
Matting and framing studios are another sourceof matboard. I have had good luck working withsome local shops. Many prints that they framehave large inside pieces that are cut from themiddle of a mat (called fall-out). They reusethem when possible but most of the time, haveto recycle or throw them out because they don’thave room to store it all. I asked if I could buysome and we struck a deal. It helped the storeowner because he didn’t have to clear it out andwas making money on something he would justhave thrown out. I was happy to get a goodprice on a big selection of board. The downsideto that is you don’t necessarily get to choosewhat colors you get. You could always use boardlike that to practice on, or paint it and make itthe color you want!
Another option is mail order. The prices andselection are good but shipping costs add up. Asfor me, I do buy through the mail and nothingmakes me happier than seeing the deliverydriver huffing and puffing up my path with a bigold box of matboard!
With the huge photography and scrapbookingtrends still on the upswing, I expect matboard’spopularity to increase as people discover how easyit is to work with and how nice it is to have acustom matting studio in the comfort of your home.
Your matboard projects are only as great as thecutting tools you use. In this book, you willbecome familiar with the Logan mat cuttingsystem. Instructions on straight and beveledcuts, how to score to the perfect depth for nicecrisp folds and how to cut a single mat areincluded.
Above: Author Eileen Hull cutting a bevel matusing the Logan 301-S Compact Mat Cutter
Matboard Magic 8

Introduction
There are several different grades:
• standard—composed of processed woodpulp that will eventually discolor and breakdown. However, it easy to find and comesin a wide array of colors. For the purposeof the projects in this book, this is probablya very good choice for most designs.
• conservation—made of cotton or morepurified wood pulp and lasts longer thanthe standard without breaking down.
• rag—museum quality board made fromcompressed cotton pulp. The most expensiveand has the least variety, but will last a goodlong time without breaking down.
• The standard size sheet is 32” x 40”, whichallows you to create large pieces of artworkwithout any problem. Most boards arearchival and “green,” having beenprocessed without harsh chemicals oradditives. The cotton used to make it is anannually renewable resource.
• Chipboard is unsuitable for framingpurposes because it is acidic and shouldnot lay against the artwork. The texture isuneven and it is prone to fading.
scraps of matboard too beautiful for the trash!The colors were so pretty–surely there had to bea use for it. I started to play around with it,cutting here, scoring and bending there. To mydelight, three dimensional designs began toemerge. A little purse, a box to hold mymagazines, a stationery folder… With a littleglue, a rubber band strategically employed tohold things together and some funembellishments, I had a great time making allkinds of boxes, books and totes.
Confession time
My name is Eileen Hull and I am a paper addict.My friend buys shoes, my sister buys fabric…well, I buy paper. The good (and bad) thing is itis widely available. Everywhere you look, there’spaper. From the scrapbook stores to officesupply outlets to drugstores to expensiveboutiques, there is paper–ready, willing andwaiting to be bought. Colors, textures, finishes,different shapes and patterns all combine tocreate a feast for your eyes and hands. And whoknows when the urge to create will strike? Apalette of paper is necessary to have on hand sothat the projects can flow when they will.
So I buy paper, and my absolute favorite kind ismatboard. Once you get your hands on a pieceof this, you will never go back to chip board. Inmy opinion, matboard is the ultimate in paperbecause it is sturdy, smooth, available in manycolors, fabrics and finishes, inexpensive andfeels so substantial.
Matboard Magic 9
Introduction
the book and run with them to create 3-D boxesand books in your own colors and style. Embellishwith supplies you already have on hand. Makethem for your family and friends, for gifts, forspecial occasions or just for the fun of it.
As you go through the book, you will see thateach project has been rated for skill level. Don’tbe put off by this–some of them are ratedadvanced just because of the time it takes to dothem or the number of steps involved, notbecause they are exceptionally hard. You can doit. Give it a try today!
I would like to show you how I created the projectsfound in this book. Believe me, if there was awrong way to do something, I did it. I’d like tospare you my mistakes and share the tips andtechniques that I have learned along the way.
Get comfy on the couch, page through thesebeautiful projects and decide which one youwant to try first! Any of these projects can bechanged to reflect your personality, your colors,your style. Get started now! And mostimportantly, have fun… ❦
I hope you will try these projects and go on tocreate your own beautiful works of art. Re-do aroom in new colors! Make boxes to organizeyour desk, hold mail, store photos, or holdbusiness cards. Sort your jewelry in a dressercaddy with removable bins and and store yourpieces in a wall storage frame to hold necklacesand bracelets, as well as earrings and pins.Frames and stationery boxes make great giftsfor everyone you know.
Every new couple would love to have a beautifulwedding keepsake created just for them. Andwhat bride doesn’t need a little organization withall the details to keep track of? A wedding guestbook is a great way to start memories of marriedlife together. But don’t put it away in the closetafter the wedding. Keep it in your entry hall andhave visitors sign in. At Christmas, add pagesand keep track of who you sent cards to.
Add some extra zip to your next holiday partywhen you set a table with this easy tree andpackages centerpiece. Make a snowman andkeep him out until the snow goes away. A box ofcards is a great gift at any time of year.
Try your hand at cutting a beveled mat andframe your family photos.
In this book, you will learn how to make awedding remembrance and guest book, placecards, jewelry box and organizers, photo frames,desk accessories, home décor for your holidaydinner table, card and gift boxes, and how to matartwork. There are projects for all ages andinterests to create. Take ideas from the pages in
Matboard Magic 10

Matboard Magic 11
✄Chapter 1: Tools and Techniques
Iconfess that this is the section of the bookthat I usually skip… and then wind up comingback to when I finally admit I can’t figure itout on my own and need help. Whenever youread this, take your time and practice the
techniques. A quality project is sure to follow!
Make sure you also read the complete anddetailed instructions provided with yourequipment. For more information on theproducts, visit the web sites of themanufacturers that are located in the Sourcesection. The following is a brief overview of thetools and how they can be used.
Ideas for laying out your work space are alsoprovided, as well as tools to keep on hand. As weall know, good tools can make or break the project.
Tools:
Logan 301-S Mat Cutter
This mat cutter is a workhorse. The best thingabout it is the stable straight edge andmeasuring guide. Since my mat cutter is in themiddle of my studio, I use it all the time forscoring, cutting, and trimming down stacks ofpaper, in addition to my mat cutting andconstruction projects.
This set is a great value and includes the cuttingboard, straight cutting head, bevel cutting head,slip sheet, blades and instructional DVD.
Cutting your board down to size is a breeze.Using the guide rail, place your straight cuttinghead into the track and pull toward you forperfectly straight 90–degree cuts in seconds. It’sso much better using this than a mat knife–youget nice straight cuts in only one pass. Set themat guide for board widths up to 4 ¼”. If youneed a wider piece, mark where you want to cutwith ruler and T-square, remove the mat guideand hold the board steady with your left handwhile cutting with the right.
To use the bevel cutting head, first mark the matopening on the back side of the matboard. This
Tools andTechniques
Parallel Mat Guide
Guide Rail
Straight CuttingHead
Bevel Cutting Head
Logan 301-SCompact Mat Cutter

Chapter 1: Tools and Techniques
Logan 500 Mat Knife
There are manyversions of the “mat” or“craft” knife. For me, itcomes down tocomfort and what feelsbest in my hand. Manyof the pencil-styleknives with roundbarrels and very sharp tips work great for detailsand tight curves. However, I prefer the Loganmat knife for most projects in this book. Thehandle has a solid base that doesn’t twist aroundin your hand and is very comfortable whenscoring or cutting. The mat knife has a roundedcorner under where the blade rests. I use thatrounded part to rest on the board, slowlyengaging the blade exactly where I want it andproviding great control.
Logan 270 Blades
Blade changing is quick and easy onany Logan system. Make sure tochange blades frequently. For a fewcents per blade, it’s worth having afresh blade for perfect cuts.
An economical feature of the 270 blade is that itis the replacement blade for both the straightand bevel cutters, and also the mat knife. Thatmeans you can buy a pack of 100 and use theblades interchangeably with all of your tools.Plus, the blades are reversible so you get doublethe usage from each blade. It also is handy fortrimming stubborn corners that won’t pop out.Take the blade and slide it in the corner at thesame angle it is cut at and gently continue thecut until the piece falls out.
can be done quickly and easily by setting themat width on the parallel mat guide. Then justinsert the matboard under the guide rail and upagainst the mat guide. Draw a pencil line alongthe length of the board, rotate the mat 90degress and repeat for all sides. Next, hook thebevel cutting head onto the guide rail and alignthe start and stop indicator line with the pencilline closest to you. With your thumb, push theblade into the mat and slide the cutting headforward until the start and stop indicator reachesthe upper pencil line. Retract the blade, rotatethe board and repeat for the remaining sides.
The size ofthis cutter isanotheradvantage. Allthe projects inthe book canbe completedusing thistool. Unlessyou arematting largepieces of art,you probablywon’t need
anything bigger than 29”. I recommend keepingit set up all the time and you will see how oftenyou go over and use it. If you are challenged forspace, it packs up into the box and stores easily.
Matboard Magic 12
❀Designer Tip Here’s one of my favorite tricks! When scoringa stack of cardstock in half, adjust the matguide for desired measurement (up to 4 ½”) ofscoring line. Butt the stack of cards up underthe mat guide and against the guide rail. Withan embossing stylus, press firmly against theside of the mat guide and score down themiddle of the card. Before removing, bend thepaper up to a 90–degree angle and fingerpress against the metal guide. Remove topcard and repeat for the remainder of the stack.This method ensures quick, precise and sharpcreases every time! ❦
Logan 500 Mat Knife
Aligning the start and stop indicatorusing the bevel cutting head of theLogan 301-S Mat Cutting System ❀
Designer Tip Recycle your blades! They are great forscraping windows after painting, getting intocracks to clean, scraping off stubborn pricestickers, trimming caulk edges, and cuttingarticles and coupons out of the newspaper.Be careful though–they are very sharp! ❦

✄
Chapter 1: Tools and Techniques
T-square
The T-square is very useful in squaring up edgesto 90-degree angles. The “T” part of the tool laysalong the edge of the board with the armextending perpendicular down the length of theboard. If the arm lines up with the rest of theboard, you have a square corner. If not, use thearm to mark a straight line and then move toyour mat cutter and trim off uneven edges.
Embossing Stylus
There are several versions of these toolsavailable. This tool is used for scoring or dryembossing. The tip is used to press the outlineof a stencil onto paper, thereby leaving a raisedimpression of the design on the other side.
The barrel may be made from wood, plastic ormetal. Some are single-ended, some are double.The size of the tip varies from very fine to wide.
The Logan 4-Way Stylus is different because notonly is it double-ended, but it has two extra tipsincluded that store inthe metal barrel. Oneof the tips is a metalpiercing tool for usein pergamano, orpaper piercing.
Sandpaper/Emery Board
These items are indispensible to have aroundyour work space. The sandpaper is great fordistressing matboard edges to give that shabbychic look. If you are working with a rough bladeand have some tears after cutting, they areeasily sanded down with sandpaper or an emeryboard. I use the sandpaper for larger projectsand the emery board for fine or small areas.Keep a supply of coarse to fine papers in yourstudio. Both products are often available in thedollar stores.
Matboard Magic 13
Designer Tip How to make a sanding block
Cut a long 2” strip of foam board with yourstraight cutter. Further cut down to 2” x 3”pieces. Stack together about 4-5 layers offoam board and tape together. With your tapegun, lay several lines of double-sided tapedown on the block. Cut a piece of sandpaperto wrap around the block and trim excesspaper. Magic! This is just the right size to holdin your hand and distress edges of matboard.Make several and use one each for dark,medium and light colors. ❦
ATG Tape Gun
This tool issomething I useevery day of my life!The tape gun wasdesigned for use inmatting. It is a handheld double-sidedtape dispenser.
I use it to wrap gifts,for card-making andother paper crafts,for use around thehouse, office and
school. Probably the hardest thing to figure outis how to change the tape roll, and that’s not toohard. I have given these as Christmas gifts tomy favorite people over the years and they arenow big fans too.

Chapter 1: Tools and Techniques
bunch of unfinished projects sitting on it!), thatis where I’ll cut fabric using my rotary cutter, layout designs, set eyelets, assemble parts, glue,cut, etc. When the mat gets dirty or full of fabricthreads, I just take my bottle of glass cleaner,spray it down and wipe off. Then on to the nextproject!
Glue
There are so many glues out there, it’s hard tofigure out which to use for what! For the projectsin this book, I am looking for certain qualities ina glue. I want a product that dries quickly andclear. One that is repositionable is a plus, so youcan fix up those little accidents. A strong bond isalso desired.
Beacon’s Zip Dry Paper Glue is my favorite to use inworking with dimensional matboard. It has all thequalities listed above. Experiment with what youhave on hand and see what works best for you.
Glue Gun
Although I have been working with a glue gunfor years, it still scares me a little. I have beenburned countless times. The glue dries yellowand leaves all those strings everywhere. The tipis big and it’s hard to get into tight spaces whenworking on some of the projects in the book. Butthere is no substitute for its staying power!Sometimes you need a very strong bond andthat’s what the glue gun provides. Considerusing this if your project requires parts to bepermanently attached.
Spray Adhesive
Spray adhesive is very handy when attachingtwo layers of paper together. I use it to adherevellum to matboard or paper since it doesn’tleave any marks like tape does. You can spraythe back of a piece of scrapbook paper, lay it onmatboard and then cut a mat. Voila! You willhave a custom mat with perfect beveled edges injust the colors and design you want to surroundyour artwork.
Pencil
Believe it or not, I have a favorite pencil! I use amechanical pencil with the plastic barrel thatcomes with about nine lead refills inside. Yousimply rotate the lead for a nice sharp tip everytime. And no messy sharpening!
Eraser
My preference in erasers is the kind that lookslike a pen with a plastic barrel. The white erasertip always does a great job of removing straypencil lines, some scratches, smudges, chalks,and assorted messes. Refills are available forpurchase–always a nice benefit…
Cork-Backed Metal Ruler
A good straightedge is a very important tool.Not only is it used for measuring, but the metalside provides a great guideline for scoringmatboard and paper. The cork backing helpsprevent the ruler from slipping when pressure isapplied against it. Metal is good because it willstand up to the blade of the mat knife against itand not cut into it. Plastic and wood rulers aregood for some things but when you are workingwith a sharp metal blade, it will cut them up inno time.
Self-Healing Mat
A large self-healingmat is kept under mywork area andfunctions there verywell. A self-healingmat stands up to alot of abuse. The one I have is large–30” x 36”,made of plastic and has 1” grid lines, whichhelps when checking for square corners. Thebest part is you can use your mat knife to trimboard, a rotary cutter for fabric, or any othertype of blade and the mat will not come apart orshow damage.
Since my mat cutting area is probably thebiggest open surface I have (when I don’t have a
Matboard Magic 14

Chapter 1: Tools and Techniques
Workable Fixative
This spray protects the surface you have beenworking on. Some mediums smudge and thisprevents that from happening.
I address envelopes in calligraphy for my clients.Since some inks aren’t permanent, I spray themwith this after I’ve finished them. Using chalksfor a soft accent are a favorite technique ofmine, but often they rub off if not set. A quickspray of this works great. If you are usingpigment ink on a stamping project, this productspeeds the drying time. Overall, I like to use thison items that I know will be getting a lot of wear.With a barely wet sponge, you can wipe offfingerprints and marks from matboard afterspraying with this without damaging the project.
Rubber Bands
Collect an assortment of sizes and widths. Theseare used to temporarily hold the sides of the boxesand designs together while the glue is setting.
Scrap matboard to practice on!
Please please PLEASE practice before you cutinto the board you are using for your project. Iguarantee you will be glad you did.
Above: Using rubber bands to hold a boxtogether while the glue sets
Matboard Magic 15
❀Designer Tip Gift wrapping goes so much faster when youget an assembly line going using your matcutter. Line up the roll of wrapping paper tothe size needed and just zip down the edgewith your straight cutter–an even cut everytime and no tearing like when you try thatwith scissors! Keep all other necessities closeby–scissors tape, tags and pens. Soon thestack of beautifully wrapped gifts mountsquickly. ❦
✄

Chapter 1: Tools and Techniques
BEVEL CUTTING
How to cut a single beveled mat:Always place a slip sheet of scrap matboard onthe cutting board and underneath the mat youare cutting to stabilize the blade.
Place the board to be cut under the guide railand on top of the backing sheet. Set the matguide to the desired width and tighten knobs.
Measure and mark your cutting lines on the backside of the matboard. Turn the mat on all foursides and draw a line down the side where thecut should go making sure to show where linesintersect.
With the blade retracted,set the bevel cutter intothe guide rail. Line up thewhite line seen on theright side of the cutterwith the measurementspenciled on the back of themat. Ease the blade intothe board.
Push the cutter forward to make a smooth andeven bevel cut. Retract the blade when the whiteline and end point meet.
Repeat on all four sides. The inside windowshould just pop out when the fourth side is cut.
Techniques
To complete the projects in the following pages,some practice of new techniques and equipmentmay be required. They are not difficult but don’tbe discouraged if it doesn’t come out perfectlythe first time. It gets easier every time you doit... much like everything else in life...
STRAIGHT CUTTING
Using the Logan Mat KnifePress knife straight downinto board and run bladealong line or ruler 2-3 timesuntil you cut through matboard. Maintain steadypressure. Don’t try to cut all the way through inone pass. NOTE: Use the Logan Mat Knife withthe 301-S Mat Cutter (as shown) or with anysuitable straight edge.
Using the Logan Straight Cutting HeadPlace the groove of the cutting tool into theridge running along the edge of the mat guide.Mark desired cutting lines on the wrong side.Line up on the guide railand pull cutter firmlytoward you. With your lefthand, hold the board so itdoesn’t shift while cutting.
SCORING
Measure board and markdesired scoring lines inpencil. Press mat knifedown firmly (but not TOOfirmly) and go over scoringline once or twice witheven pressure. The goal is to cut a little morethan halfway through the board. It is better to betentative at first until you get the hang of this.The board should bend cleanly and without toomuch pressure. As you experiment, you will getthe feel of the board. However, when cuttingdifferent textures and finishes, make sure toalways cut a practice piece first since some ofthe specialized matboards are thicker and takemore passes to score cleanly.
Above: A bevel cut mat created using the Logan301-S Mat Cutting System
Matboard Magic 16
Chapter 1: Tools and Techniques
bandage tape from the inside before assembling!
DAMAGE CONTROL:
• If you have not scored through the boarddeeply enough, it will be difficult to bend.Take your knife and go over your lineagain.
• If you have scored too deeply, you mayhave cut through the board. If so, patchwith clear bandage tape from the insidebefore assembling. Even if you chop a sideoff, all is not lost!
• Ragged edges are eliminated by inserting afresh blade.
• If corners don’t meet, your angle may be alittle off. The next time you cut, make surethe matboard is square using a t-square.
• If paper is separating from the board whenyou try to bend it, then it's not scoreddeeply enough.
• If the project is bending in the oppositedirection than you want, it means youscored the board on the wrong side.
• Ragged edges? Use an emery board orsandpaper to file down.
• Use a razor blade to trim bevel corners thatare not quite cut all the way through.
• Suede, linen, denim and fabric mats maybe likely to fray. Use a razor blade to trimstray threads.
SETTING UP YOUR WORKSPACE
My mat cutter is set up in my studio all the time,ready and waiting for any mat cuttingemergency. It sets on two dressers of the sameheight and rests on a tabletop placed on thedressers. Under the tabletop and in between thedressers I store my matboard. It stands up and issorted by color. I use the boxes they come in tohold each color. Although this works fairly well, Iam always looking for a better way to protectthe board from moisture and warping. My studiois in the basement so I keep a dehumidifiergoing nearby.
For more information on mat cutting...
Take a trip to the library and take out some bookson the subject. There are very cool cuts and stylesto be explored here, as well as tips on proportionand color. Learn what your equipment can do foryou and try some new ideas. See page 72 for otherLogan books on mat cutting and framing.
MORE TIPS
Always use a sharp new blade. Be very carefulwhen cutting. These projects are notrecommended for children under 16. Makesure you measure, mark and cut very carefully.Even being 1/16th of an inch off can mess upthe whole design. Before cutting/scoring on theproject, make sure to practice on a scrap ofmatboard. If you have not scored deeplyenough, it will be difficult to bend. Take yourknife and go over your line again. If you havescored too deeply, you may have cut through theboard. Lucky you are using your practice piece! Ifyou do make a mistake and cut all the waythrough the board, you can patch with clear
Matboard Magic 17
❀Designer Tip When matting a project with asymmetricalwindows, remember that the openings thatyou pencil on the back of the mat will be thereverse from what you see on the front whenyou cut it.
Because I have made this mistake so manytimes, I have devised a way to prevent it. Icut the shape of each window from a pieceof paper and spray with a light coat of sprayadhesive. I lay the paper windows (adhesiveside on top) on scrap mat the size of the matI am cutting and arrange to my liking. Wheneverything is in position, I take the mat I amcutting and place the back side on top of thearrangement. The spray adhesive allows thepaper to stick in place and I know which wayit’s supposed to go. I can mark the windowsand know that they are going to wind upwhere they are supposed to. It is a little extrawork but beats messing up a mat! ❦

Chapter 1: Tools and Techniques
Window- opening cut into mat
Wrong side- back of matboard, usually white
BASIC BOX CONSTRUCTION
Determine the size of desired box, includingheight, width and depth. Draw a rough sketch,
inserting your dimensions, on graph paper. Drawdotted lines or use another color to designatelines to be scored.
Following the pattern, lightly pencil your cuttingand scoring lines on the right side of thematboard. After scoring, test your cuts byfolding them to a 90-degree angle. Turn theboard over to the wrong side. You should seewhere you have scored by a fold line. Coverthese scoring lines using clear tape. This willreinforce your seams and strengthen your box.
After you have finished with all cutting andscoring, assemble the box. If you are going toadd eyelets, punch holes, cut slits, stencil,stamp, paint or anything else, do this work whilethe box is flat. Erase any pencil lines with awhite eraser. Hold box together with a rubberband. Using Zip Dry Paper Glue, reinforcecorners with lines of glue for an extra strong
The dresser drawers are used to hold supplies:spare blades, tape for the ATG gun, framingpoints, etc. The table is large enough toaccommodate a whole sheet of matboard. A bigself-healing mat with a grid lays on the work area.A yardstick and T-square are hanging on the sideof the dresser. My tape gun is close at hand.
Initially, I had a problem with my mat cutterslipping a little on the slick table surface. I tooka piece of foam shelf liner and adhered it to thebase of the cutter and now it stays perfectly inplace with no slipping!
I found early on that it’s easier on the back toraise the height of the equipment to about 38”off the ground, which is a little higher than mosttables. Of course, it depends on how tall youare. Just make sure you are comfortable.
VOCABULARY
Archival—a material having a neutral or slightlyalkaline pH; it should also have good agingproperties.
Backing board—board that supports artworkbehind a window mat.
Fall-out—piece of matboard that “falls out” ofthe window when a mat is cut
Flaw board—board that is dented, scratched orflawed in manufacturing. Often used for backing or as a slip sheet.
Overcut—this happens when you don’t end thecut where you should.
Rabbet—edge on the back of the frame whereartwork is inserted
Right side—the colored or patterned side of theboard
Score—cut with a sharp blade about halfwaythrough the matboard. The object of scoring isto weaken the fibers of the board so it bends inhalf
Slip Sheet—scrap matboard that is placed undermatboard that is being cut, for both bevel andstraight cutting. The slip sheet protects tablesurfaces as well as preserves the cutting blade
Matboard Magic 18
5” 5”9 3/4”
5”
4”
5”

✄
Chapter 1: Tools and Techniques
• Want white? Use the back side of the board.
• You are working with the most versatilepaper product of the century!
Gluing Choices
There several factors that will affect the type ofglue you will use in a project. One is how thedesign will be used. Is it a box that will beopened over and over again? Is it a design thatwill remain in place once set?
I like Zip Dry Paper Glue by Beacon. It driesclearly and quickly. If you get more on theproject than you want, you can rub it off likerubber cement. It won’t leave dirty marks or tearthe paper.
For heavy duty jobs, I recommend using a gluegun. You have to work fast but the glue doeshold very well. Sometimes I use the Zip Dry firstto position the board and then when that driesand everything is in place, I use the glue gun ontop of it.
If you need to glue large areas or adhere twosheets of paper or fabric together, the bestchoice would probably be spray adhesive. If youmake a mistake, you can still lift up andreposition if you do it right away.
box. Let set for 30 minutes. Embellish the box asyou desire!
BE CREATIVE!
• Add embellishments of all kinds—papers,fibers, fabric, ribbon, eyelets, brads, metal.
• Matboard can be distressed by rubbingwith sandpaper or emery board.
• You can use a brass stencil and pressimage into matboard with a stylus, thendry brush over image with stamp pad inkon stencil brush for a soft effect. Mat canbe painted, textured and stenciled.
• You can decoupage paper over it, inside it,cover with fabric, or use it to tie up thebox.
• Use rubber bands for closures, buttons,rivets or brads.
• Use the squares you have cut from cornersas tiles to accent the box with letters andwords or save them for another project.
• Stamp on matboard to personalize orcustomize.
• Apply appliqués, crystals or glitter tosparkle up a box.
• Monograms are huge. Add stickers, stencilsor stamps to any project to make it morepersonalized.
• Working on a large project and need paperlarger than standard scrapbooking paper?Use good quality gift wrap or wallpaperinstead.
LITTLE KNOWN MAT FACTS:
• Matboard can be cut with scissors (but aprofessional mat cutting tool is easier andmore precise!).
• You can use hole punches that don’t have alot of angles (round are best).
• You can stencil on suede for a beautifullyshaded effect.
• If you have a color board you don’t like,paint it!
Get creative with embellishments! Beads,buttons, glitter, sequins, lace, ribbons, stencils,etc. make great enhancements.
Matboard Magic 19

Chapter 1: Say it with Stripes and Stamps
Matboard Magic 20
❀❀
❀❀
❀

Matboard Magic 21
❀ Cutting and scoring techniques are thefocus of this chapter. These featuredtechniques add a lot of pizzazz to thedesk set, yet are easy to do. Theblotter is composed of a single sheet
of matboard set in the middle and two stripedborders going down each side. The slightly “offkilter” stripes going down the sides are created
by a cutting and stacking technique,and are made in assembly line fashion.The pencil and tool caddies are piecesof decorated matboard wrappedaround recycled soup cans. The wrapeffect is achieved by scoring every ½”to allow the matboard to bend aroundthe can. This technique can be usedwith other shapes also. The noteholder is a basic box. You will see thisshape everywhere you look—whetherit’s packaging, storage, décor or fun.Now you will be able to make yourown boxes in whatever colors anddimensions you’d like!
The craft technique used to accent thedesk set is rubber stamping. Stampsand inks work beautifully on thematboard surface. Watermark ink is agreat way to get the look of subtle
texture. To me, it is magic to watch the imageemerge after stamping the design with this clearpad. The design comes out a little bit darkerthan the paper, whatever color the backgroundmay be. It gives a very soft effect that is greatfor backgrounds and creating some texture onplain paper. Magic. I’m telling you. ❦
Say it withStripes and
Stamps
In a world wherecomputers areour main sourceof writtencommunication,sometimes it’s nice to sit down, take pen in handand compose a handwritten letter. When themood strikes to write, nothing sets the stagebetter than a pretty, well-organized desk. Thedesk set in this chapter is sure to inspire greatcorrespondence. The pink and brown colors set aquiet and reflective mood. If you have to watchyour balance dwindle while paying bills, at leastyou’ll have something nice to look at…
Chapter 2: Say it with Stripes and Stamps

Chapter 2: Say it with Stripes and Stamps
3. Cut a piece of freezer paperabout 10” x 20”. Lay three orfour lines of double-sidedtape down the 20” length offreezer paper. Lay thematboard strips in a columnover the tape lines,alternating colors andkeeping the edges tightlybutted together. (Diagram 2)Press the strips down firmlywhen you have anarrangement that pleasesyou. You should have a longrow of pink and brownrandomly sized stripesadhered to the freezer paper.
4. Mark the center of thestripe and cut the whole strip down themiddle, creating two rows of strips measuring16” x 3”, trimming as necessary. Set aside.
Blotter middle:
1. Cut a piece of matboard that is 16” x 18”.(Read Maximizing Your Mat! tips beforecutting).
2. With stamps and watermark ink, randomlystamp around the edges. Allow to dry for 20- 30 minutes.
Project:
Desk Blotter with Random Stripes
Technique: Striping
You will need:
• Crescent #1644 - Azalea
• Crescent #1097 - Fudge
• Logan 301-S Compact Mat Cutter withstraight cutting head
• 4-5 coordinating flower rubber stamps-small to medium sizes
• Watermark stamp pad
• 2 coordinating ribbons – narrow andmedium widths
• Freezer paper
• Clear adhesive tape
• Double-sided tape
• Logan Mat Knife
• Contact paper – 20” x 20”
• Digital photo & paper protectant spray
Stripes:
1. Cut two lengths of pink and brown strips ofmatboard, eachmeasuring 1 ½” wide x32” long. Divide 32”length into four 8”strips. You should have eight strips ofeach color, measuring 11/2” x 8”.
2. Place the narrow end ofthe strip at the top ofthe mat cutter, and setat a very slight angle.(Diagram 1) With matknife, cut off a verysmall triangular strip(1/2” or less). The long sides should NOT beparallel. Cut each strip in a similar manner.
Matboard Magic 22
Diagram 1
Diagram 2
Above: Randomly sized strips are created bycutting matboard strips at an angle.
Time Difficulty
3 hrs. Advanced

❀
❀
Chapter 2: Say it with Stripes and Stamps
Assembly:
1. Take the two strips of pink and brown stripesand place them on either side of the largeblotter piece. Turn all pieces over andrearrange them so all edges are tightly buttedtogether. Temporarily secure with scotch tape.
2. Carefully cover entire back of blotter withcontact paper, smoothing it down flat as yougo. Trim edges with mat knife. Turn blotterover to right side.
3. Spray top of blotter with several coats ofprotectant spray to protect it from spills, dirtand oils. Allow to dry.
4. Cut two pieces of ribbon 18” long. Cover theseams where the boards meet with ribbon.Secure ends of ribbon to the back of theblotter.
Something Extra: With a ¼” hole punch, punch pink and whitecircles from scrap paper. Dot them with glue and add randomly in the middle of the flowers to give a little extra dimension. ❦
Additional Ideas
Now that you know how to make slightly offkilter stripes, regular straight ones should be apiece of cake! Repeat all steps as you did withthe random stripes and eliminate the step ofshaving off the small thin triangle. You shouldhave 1 ½” rectangular strips that line up in aneat, straight row. Line up 6 alternating rowsand cut down further into 1 ½” strips, creatinga checkerboard effect. (Diagram 3) Arrangethese as desired for a different border effect.�
Designer Tip Add any accents that you may wish to makethis a beautiful and unique place to write aletter. Just remember to keep the surface fairlyflat or you may be writing over some speedbumps! You may want to cut another layer ofmatboard and adhere it under the decoratedtop layer to anchor all sections together. ❦
Matboard Magic 23
Diagram 3
Line up strips inalternating colorsand cut as shown.
Slide the strips tocreate a checkerboardpattern

❀
Chapter 2: Say it with Stripes and Stamps
Matboard Magic 24
Project:
Curvy Can Wraps
Technique: Wrapping Around Curves
You will need:
• Crescent #1644 - Azalea
• Crescent #1097 - Fudge
• Logan 301-S Compact Mat Cutter
• 2 tin cans – small and medium sizes
• Tape measure
• Logan Mat Knife
• Ruler
• Pencil
• Rubber stamps
• Watermark stamp pad
• Strips of pink and brown paper scraps
• 2 lengths of coordinating ribbons – narrowand medium widths
• Double stick tape
• Digital photo & paper protectant spray
• T-square
1. With a tape measure, measure thecircumference and height of each can. Cutmatboard to exact size.
2. With stamps and ink, randomly stamp front ofmatboard on colored (right) side. Let dry 20minutes.
3. On the right side of your board, measure andmark lightly in pencil every ½”. Take the pieceof board and place on your mat cutter. Usinga T-square as a guide to keep your linesparallel, position pencil mark along cuttingedge. With your mat knife, lightly score online until blade cuts through board abouthalfway (see Tools and Techniqueschapter). Repeat cut on remaining lines.
4. Spray board with protectant spray to protectagainst scuffing or moisture.
5. Wrap scored board around can and trim anyexcess. Apply double-sided tape on wrong sideabout every 3“, making to sure include all edges.Press firmly around can and press to secure.
6. Measure around can and cut a strip ofcoordinating paper to size, adding 1” extralength for overlap. Place band around can andadhere with tape. On top of paper band, tieribbon in knot and trim edges. Repeat withother can.
❀Designer’s Tip When covering a container, consider the size ofthe item and width of the scoring marks. If youare covering a large container, you may decideto score every 1”. A wider circumferencecreates a gentler curve so you will not need toscore as closely as for a smaller container. On atall skinny vase, you might want to increasethe frequency of scores to every ¼”. Whenchoosing a container to wrap, make sure thewalls are all parallel. Slanted or angledcontainers will not work with this technique. ❦
Time Difficulty
1 hr. Intermediate

❀
❀Maximizing Your Mat!Matboard is sold by the sheet. A regular sheet measures 32” x 40”. When working on projects thatinvolve large pieces of board, try to figure out the best way to cut your matboard. Sit down with acalculator or sheet of graph paper and calculate where to make cuts that will produce the leastwaste. Not only is it very irritating to find hat you have cut a piece the wrong size, but if you havemade a mistake in your initial layout, you may not have enough board left to complete your project.And that’s really irritating!
For example, let’s look at the blotter project. Themeasurements for the large middle piece are 16” x 18”.Since a sheet of matboard is 32” wide, the number 16should ring a bell! 16 is half of 32! We know that we canget 2 pieces from that 32” if we cut 18” from the longside of the board and 16” going up. That means weneed to make a lengthwise cut on our full sheet at 18”.That leaves a piece 18” x 32”. This is cut in half againand leaves 2 pieces, each measuring 16” x 18”.(Diagram 4) Of course it does not always work outexactly, but a good general rule is to leave the biggestpossible piece of the sheet that you can. ❦ Diagram 4
Chapter 2: Say it with Stripes and Stamps
Designer’s TipOne of the many wonderful qualities ofmatboard is that there is no fraying, seamallowances or unfinished edges to worryabout. You can cut exactly what you measure.However, when working on a large piece, Iusually do allow for a little extra board just tobe safe. Trimming down afterwards is not abig deal and it’s better to have too much thantoo little. ❦
Additional Ideas
These can wraps are quick and easy to make.Cans and jars can be covered and coordinatedfor use all around the house. In my studio, I usemason jars to hold my paintbrushes, scissors,rulers, colored pencils and markers. They lookso pretty lined up that I am inspired to craft!
For entertaining, I purchased a case of roundmason jars. When I host an event, I makesleeves for them (like little slipcovers!) to matchthe theme of the party. Instead of taping themdirectly to the glass, they are secured inside thesleeve with tape so they are easy to slide onand off. The jar can then be filled with flowers,plants, flags, pinwheels, candles or other itemsto coordinate with the occasion, and used ascenterpieces.
Give one to a friend with flowers from yourgarden to brighten her day. Stamp a messageand her name on the sleeve to personalize. Fora dinner party, use the jar with a single floweras a unique place card. Make a candle wrap fora wedding reception with the bride and groom’snames hanging from a tag and embellish withpearls.�
Matboard Magic 25

❀
Chapter 2: Say it with Stripes and Stamps
2. After the diagram is sketched, you may wantto lay the memo pad on top of the pattern justto double check that you have measuredcorrectly. Cut matboard to size of outerdimensions.
3. With rubber stamps and watermark ink pad,stamp randomly around the edge of thesquare. Spray with sealer to protect the box.
4. Referring to the sketch, mark scoring lines onthe front of the matboard. Lay the board on themat cutter, right (colored) side up, and use theguide on the top perpendicular bar to line upeach side in the same position. This will ensurethat all sides are exactly the same size. Cut thecorner blocks away with the mat knife.
5. Fold the sides of the box upright. Wrap ribbonaround the outside of the box to estimate howmuch ribbon you will need. Allow a little extrafor the knot and cut.
6. Take both ends of the ribbon and wrap aroundthe outside back of the box. Thread ribboninside the 2 sides and back out the front ofthe box. Both ends should meet in the front.Tie in a knot and trim edges.
7. With paper glue, adhere all corners inside thebox, laying a fairly thick coat over cornersand ribbon. Wrap a rubber band around theoutside of the box to keep the shape. Allow todry for 20 minutes.
8. With watermark ink pad, stamp initial on memosheets to personalize. Insert memo pad.
Project:
Memo Holder
Technique: Basic Open BoxConstruction
You will need:
• Matboard in pink or brown
• Logan 301-S Compact Mat Cutter
• Logan 500 Mat Knife
• Square memo pad
• Rubber stamps
• Watermark ink
• Ribbon
• Paper glue
• Rubber band
• Digital photo & paper protectant spray
1. Measure length, width and height of memo padyou wish to make a box for. Sketch out thedimensions on graph paper and draw a pattern.First, mark the bottom of the box in the middleof the page (Diagram 5). Then add the heightand width of each side. The corner squares willbe cut off as the box comes together.
Matboard Magic 26
Diagram 5
Time Difficulty
1 hr. Easy

Chapter 2: Say it with Stripes and Stamps
Additional Ideas!
Make extra boxes in various sizes and colors tohold different desk accessories—paper clips,rubber bands, business cards, binder clips, pre-inked stamps, address labels, postage stamps,etc. These could all be lined up at the top of theblotter close at hand. These boxes are alsogreat for holding rings and earrings. Make a setto match your bedroom. This box is also agreat addition at parties to hold small favors orcandies. Use at each guest’s place and writetheir name on the box to serve as a place card.These boxes are so quick and easy toassemble, you could make a set and use toorganize your junk drawer—everyone has oneof those! Separate all those little items youknow you will need someday…
This box is quite versatile and once you make afew, you will be looking for reasons to makemore! They can be embellished in so manyother ways. �
Matboard Magic 27
❀Designer’s Tip It takes a while to train your brain to think “3-D.”That’s why I am a big fan of sketching. Wheneverything is laid out on paper, I can see if thereis an obvious mistake. It also helps, whencalculating measurements, to see each piece inperspective. It is very important to measure, cutand score very consistently. It makes adifference when the final pieces have to bealigned. If you are 1/16th of an inch off,mistakes in cutting will show. ❦
❀
Use the basic open boxconstruction technique tomake a cute basket like theone shown below.

Chapter 3: Dress Up Your Dresser!
Matboard Magic 28
❖
❖
❖
Matboard Magic 29
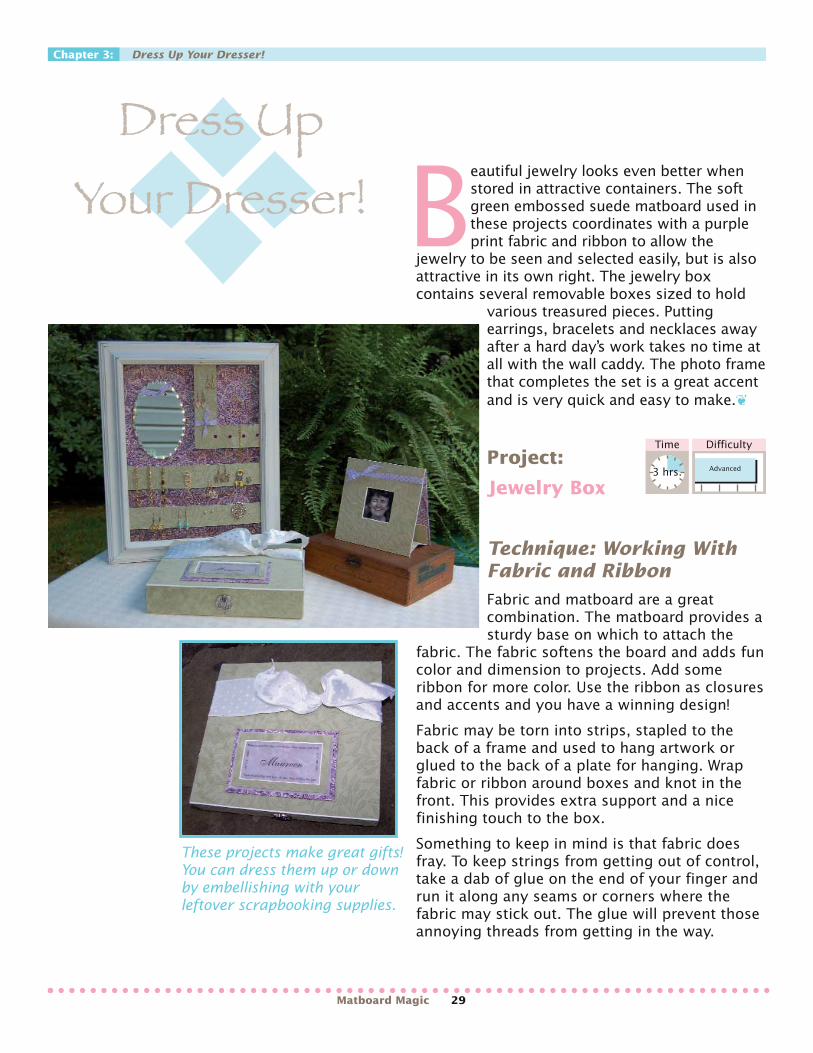
❖Chapter 3: Dress Up Your Dresser!
Beautiful jewelry looks even better whenstored in attractive containers. The softgreen embossed suede matboard used inthese projects coordinates with a purpleprint fabric and ribbon to allow the
jewelry to be seen and selected easily, but is alsoattractive in its own right. The jewelry boxcontains several removable boxes sized to hold
various treasured pieces. Puttingearrings, bracelets and necklaces awayafter a hard day’s work takes no time atall with the wall caddy. The photo framethat completes the set is a great accentand is very quick and easy to make.❦
Project:
Jewelry Box
Technique: Working WithFabric and RibbonFabric and matboard are a greatcombination. The matboard provides asturdy base on which to attach the
fabric. The fabric softens the board and adds funcolor and dimension to projects. Add someribbon for more color. Use the ribbon as closuresand accents and you have a winning design!
Fabric may be torn into strips, stapled to theback of a frame and used to hang artwork orglued to the back of a plate for hanging. Wrapfabric or ribbon around boxes and knot in thefront. This provides extra support and a nicefinishing touch to the box.
Something to keep in mind is that fabric doesfray. To keep strings from getting out of control,take a dab of glue on the end of your finger andrun it along any seams or corners where thefabric may stick out. The glue will prevent thoseannoying threads from getting in the way.
Dress UpYour Dresser!
These projects make great gifts!You can dress them up or downby embellishing with yourleftover scrapbooking supplies.
Time Difficulty
3 hrs. Advanced

Chapter 3: Dress Up Your Dresser!
You will need:
• Logan 301-S Compact Mat Cutter
• Logan 500 Mat Knife
• Crescent # 9713428 Asparagus Foliageembossed matboard
• Crescent # 9560 Easter Egg matboard
• Glue
• Double-sided tape
• 1 yard coordinating cotton print fabric (asmall, allover print is best—stripes or checks may be more difficult to line up)
• Spray adhesive
• 1/8” hole punch
• Tape gun
• Vellum
• Large decorative button with shank
• Ribbon
• Foam tape strips
Instructions:
CUT embossedasparagus foliagematboard:
• 13 1/4” x 22 1/4”
1. Mark off scoring lines of jewelry box lightlyon the RIGHT side of the board. (Diagram 1)
2. Score matboard on RIGHT side referring topattern and techniques in Designer Tips.Bend and fold box to make sure seams alignand that all scoring lines have been cutenough to bend cleanly.
3. Iron fabric. Trim to cover jewelry box patternplus 1” extra all around.
4. Lay a row of double-sided tape all around theedges of the box. Over tape, apply a layer of sprayadhesive to the WRONG side of jewelry box.
5. Lay fabric over matboard WRONG sidestogether. Smooth fabric over mat.
1 3/4”
8 1/2”
1 3/4”
8 1/2”
1 3/4”
1 3/4” 9 3/4” 1 3/4”
Matboard Magic 30
❀Designer’s Tip When working with suede or fabric matboard,be aware that the top layer of the matboard isthicker than regular matboard. You will eitherhave to press harder or make more passeswith the mat knife than you do with regularboard to totally cut or score the board. Also,when working with an embossed board and aregular board, keep in mind that they are 2different thicknesses, so measurements mustbe adjusted accordingly.
Another item to remember is that suedematboard does not adhere well to itself due tothe nap of the fabric covering. If you need toglue it, use a heavy-duty glue or all-purposeglue.
The jewelry box is somewhat time-consumingbut by the time you finish it, you’ll be able tomake an open box in your sleep! ❦
Diagram 1

Chapter 3: Dress Up Your Dresser!
6. Place box fabric side down on cutting mat.Trim edges of fabric with mat knife or rotarycutter.
7. On front bottom flap, take button and markposition of shank. Make sure that the shankis going up and down. With a ¼” hole punch,punch through matboard and fabric. Placebutton in hole, feeding the button shank tothe inside of the box. Trim a very slim scrapof matboard and secure the shank on theback by threading it through. Glue mat scrapto fabric on inside of box, leaving a littlespace between button and box lid toaccommodate flap.
8. On top front flap, mark position of shankhole and punch out. With mat knife, cut anotch from hole down to bottom of flap. Thewidth of the notch should be wide enoughto accommodate the button shank. Thenotch will slip into the button shank to closebox securely.
9. Fold matboard up into box shape. Dab asmall amount of glue over the fabric liningaround the top edge of the box to preventunwanted threads from sticking up.
10. Cut a 20” length of wide ribbon, wraparound lid and knot in front.
11. Embellish further as desired.
Jewelry Box Inserts
Cut:
• Small Green Box: 2 pc. 5” x 5”
• Large Green Box: 1 pc. 3 ½” x 9 ½”
• Small Purple Box: 2 pc. 5” x 5”
• Medium Purple Box: 2 pc. 2 ¼” x 4 ½”
SMALL BOX:
1. Score the jewelry box on the WRONG (white)sides of board so the color is on the inside ofbox. (See Diagram 2)
2. Trim off the corners with mat knife.
Above: Fabric applied to the wrongside of the matboard.
Matboard Magic 31
Inset: Score thebox from theback side tomake boxes.
1 1/2”
2”
1 1/2”
2”
1 1/2”
1 1/2”
2” box
9 3/4”
1 1/2”
4 1/2”
1 1/2”
1 1/2”
2 1/4” x 4 1/2”
box
2 1/2”
1 1/2”
1 1/2” 3 1/2”
3 1/2” x 9 3/4” box
Diagram 2

Chapter 3: Dress Up Your Dresser!
3. Cut a small scrap of ribbon (1 ½”) and fold inhalf. Place both ends of ribbon centered neartop on inside of box. Punch small holethrough all 3 layers. Insert brad or eyelet tosecure.
4. Fold up into box shape. Wrap with rubberband to keep in place while gluing.
5. Glue box where corners meet. Set aside todry, keeping rubber bands in place.
MEDIUM BOX:
1. Follow same directions assmall box.
LARGE BOX:
1. Follow above to Step 2.Mark two slits on long sidesof the box, each 1 ¼” fromthe end of the box. Ribbonwill be slipped through tohold necklaces in place. Cutslits with craft knife. Cuttwo 8” lengths of ribbon.Thread from back to front ofbox and tie in knot.
2. Fold up into box shape.Wrap with rubber band tokeep in place while gluing.
3. Glue box where corners meet. Set aside todry, keeping rubber bands in place.
TOP EMBELLISHMENT:
CUT Green matboard with outer dimensions:
• 4” x 6”
1. Mark a 1” border all around. Followingdirections for cutting a beveled mat inChapter 1 (p. 16), cut a 2” x 4” window.Trim ½” off each side of mat, creating asmaller border. (Diagram 3)
2. On the computer, lay out alabel/title/verse in a 2” x 4” text box. Printout on vellum.
Matboard Magic 32
Above: Rubber bands hold boxestogether while the glue setsLeft: The assembled open boxBelow: Top embellishment
Diagram 3
6”
4”
4” 2”

Chapter 3: Dress Up Your Dresser!
Additional Ideas!
Besides a jewelry box, this beautiful organizercan be used to store small craft items, buttons,beads, pins, coins, mementos, or pressedflowers. Customize your box sizes to fit itemsyou’d like to store in this pretty place. Use ribbonloops to remove drawers from box. This wouldmake a great pen case for the calligrapher. Thepens could be stored in the long drawer and inkcartridges, nibs and erasers could each have theirown tiny box. Colors can be coordinated as a giftfor that special person for any occasion: wedding,Mother’s Day, birthday, or just thinking of you. �
Matboard Magic 33
❀Designer’s Tip I am a big fan of my tape gun. I use it often inplace of, or in conjunction with, spray adhesive.I don’t like to wait at all. The tape gun instantlydispenses double-sided tape, providing a fairlystrong and quick bond. I first purchased minefor use in matting. Ithas become myfavorite tool to givemy crafting friendsand family. It’s great foradhering items whencard-making, matting,working on scrapbookpages, three-dimensional projects,and photos. ❦
3. Lay a line of glue on theback of the small mat.Center thin mat overprinted vellum label andpress into place. Letvellum extend beyond the mat. Trim evenlywith a small border of vellum showing.
4. Turn mat over. Put a line of foam tape allaround the bottom of the mat and peel offadhesive backing.
5. Cut a 5 ½” x 3 ½” solid piece of scrap mat forbackground. With tape gun, tape edges ofmat and criss-cross in the middle.
6. Cut a piece of fabric 6 ½” x 4 ½”. Centerfabric on scrap mat. Smooth and press down.Turn mat over and lay another line of tapearound all edges. Wrap excess fabric aroundback and press into tape.
7. Turn piece over. This is the base for the smallmatted frame.
8. Position mat piece over fabric and adherefoam backing to fabric backing.
9. Center entire piece on main jewelry box.
Technique: Thin MatsWhen you want to cut a mat thinner than 7/8”,there are two ways to do it. Write the innerdimensions you want and add 2” to each side. Cuta piece of board to size, mark a 1” border and cutyour beveled window. Don’t worry that it’s too big.
Plan A: You can trim 1” off each side leavingyou with a 3” x 5” mat that’s ½” wide!
Plan B: The other way to achieve this is to cutanother mat inside the one you’ve alreadycut. After you cut your original window,simply move the mat another ½” down onthe mat cutter and make a pencil mark.
Cut another beveledmat and you will nowhave 2 mats: thesmaller inner one witha thin mat that youoriginally wanted andthen one a little larger.What a deal!

❖
Chapter 3: Dress Up Your Dresser!
Project:
Frame Wall Caddy
You will need:
• Frame without glass – 11” x 14” (flat backpreferable)
• Foam core to cover back of frame
• Crescent # 9713428 Asparagus Foliageembossed matboard
• Fabric to match matboard—1/2 yd
• Spray paint
• Sprayadhesive
• Mat knife
• Straight cutter
• Oval mirror
• Brads
• 1/8” and 1/16”hole punches
• Graph paper
• Upholsteryand thumb tacks
• Logan 4-Way Stylus
MEASURE:
back of frame inset
back of frame
CUT:
• foam core to cover entire back of frame
• 2 mat strips to go across short side offrame 1 ½” wide x width plus 1”
• 1 mat piece for corner (see Diagram 4)
Instructions:
1. Spray frame in desired color. When dry, sandoff paint randomly for a distressed look.
2. With straight cutter, cut a piece of foam coreto fit back of frame.
3. Press fabric.
4. Apply heavycoat of sprayadhesive toone side offoam core.
5. Lay fabric overfoam core andsmooth outbubbles andwrinkles.
6. Lay foam piecefabric sidedown on self healing mat and trim fabricedges using the mat knife or rotary cutter.
7. To make earring hangers and necklacenotches from matboard pieces, refer toDiagram 4.
8. Take mat strip and lay across back of frame.Make a pencil mark where mat lines up with
Matboard Magic 34
Time Difficulty
2 hrs. Intermediate
1 3/4”
12”
1/2”
1 3/4” 3/8”
3/8”
1 3/4”
Diagram 4
Cut the following:
2 pieces - 1 3/4” x 12”
1 piece - 5 1/2” x 12”
o = hole
x = brad

❀Designer’s Tip Always be on the lookout in thrift stores forframes without glass. They are often of nicequality and priced very inexpensively. Ialways check frames for certain things. Hereare my do’s and don’ts:
• Only buy real wood frames—the plastic/composite ones do not hold up well.
• Small nicks and dents are acceptablebecause I usually spray paint mine anddistress them in some way, so a little flawwill not even be noticed. If you are usingthe frame for a more formal project andDO mind dents, sometimes they can besanded or puttied and then spray painted.
• Check to make sure the corners are squareand tight. ❦
Chapter 3: Dress Up Your Dresser!
lip of frame. Add ½” to each side and trim.Score on RIGHT side of mat where strip willlay in frame and fold ½” remaining stripbehind.
9. On WRONG side of strip, mark off every ½”on top left side for 4”. Make notches with1/8” hole punch for hanging necklaces.(Diagram 4)
10. Cut a piece of ¼” graph paper and place overthe front of the strip. With the Logan 4-WayStylus piercing tip, mark off holes as seen inpattern. Punch holes out with1/16” holepunch.
11. Repeat for other strip.
12. Cut six 1 ½” foam core squares. Tape themtogether and place in the lower left cornerof the large corner mat for support. Securewith glue or double–sided tape to the backof the mat. The height will depend on thedepth of the frame you select so you mayneed more or less than 6 pieces.
13. Turn frame over and position strips and matin place. Secure in place with a staple gun orthumb tacks. Refer to photo for placement.Include stack of foam core in corner.
14. Place mirror on fabric covered foam backingwhere desired. Mark 2 holes on top forribbon placement. Poke holes through fabricand foam core with embossing stylus tool.Thread ribbon through holes and tie on top.
15. Center foam core backing over frame. Tackin place with upholstery tacks and hammer.
16. Add ribbon hanger to back, tacking in place.
Additional Ideas!
Use these frames to make a mosaic serving tray. Paint one in your child’s school colors and use asa rotating gallery for your child’s artwork. Insert foam core and cover with fabric and you have acustom bulletin board. Mat and frame a collection of old silver plated spoons and hang in thekitchen. For a dramatic display, spray paint a group of frames in cool colors and hang withoutartwork in them. �
Matboard Magic 35
❀Designer’s Tip Use a piece of sand paper or emery boardto sand away any rough spots or jaggededges that may be left. Make sure to checkyour blade frequently to make sure it’ssharp. When you start seeing torn paper onthe edge of your board, that’s usually theproblem! Sanding away the top layer ofpaper to expose the white board below isalso a great way to get that shabby chiclook. Rub inks around the edges of theproject to distress further. ❦
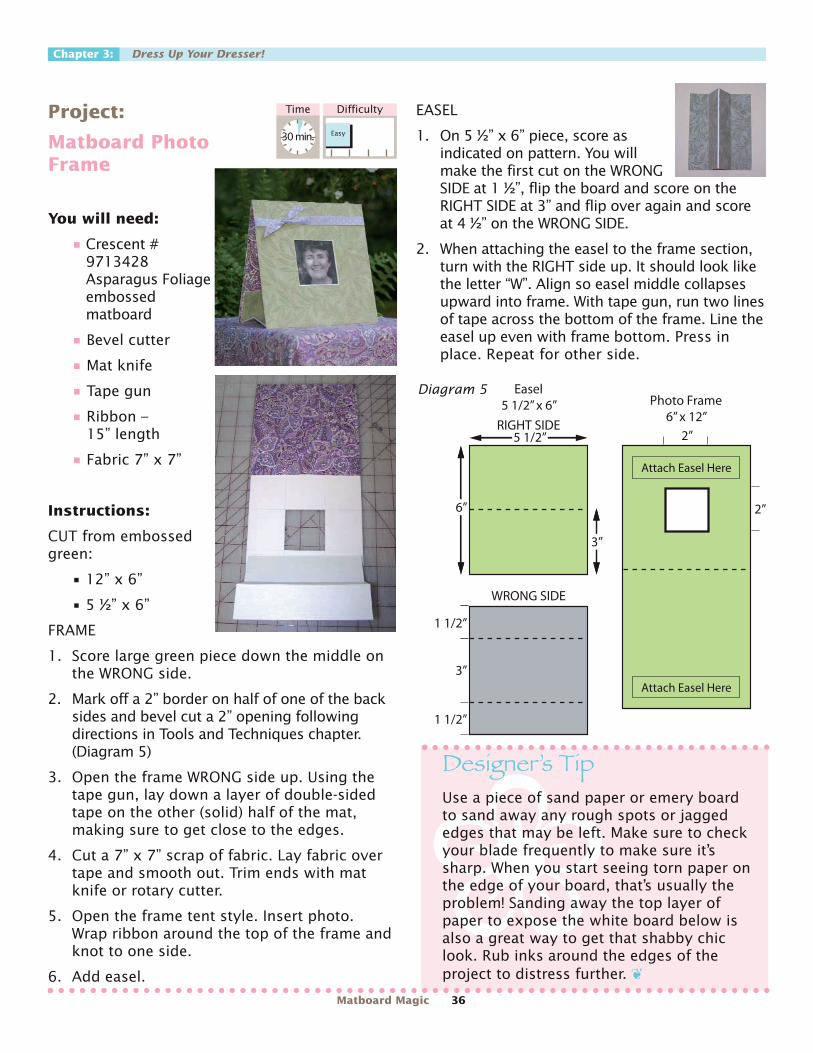
Chapter 3: Dress Up Your Dresser!
EASEL
1. On 5 ½” x 6” piece, score asindicated on pattern. You willmake the first cut on the WRONGSIDE at 1 ½”, flip the board and score on theRIGHT SIDE at 3” and flip over again and scoreat 4 ½” on the WRONG SIDE.
2. When attaching the easel to the frame section,turn with the RIGHT side up. It should look likethe letter “W”. Align so easel middle collapsesupward into frame. With tape gun, run two linesof tape across the bottom of the frame. Line theeasel up even with frame bottom. Press inplace. Repeat for other side.
Project:
Matboard PhotoFrame
You will need:
• Crescent #9713428Asparagus Foliageembossedmatboard
• Bevel cutter
• Mat knife
• Tape gun
• Ribbon –15” length
• Fabric 7” x 7”
Instructions:
CUT from embossedgreen:
• 12” x 6”
• 5 ½” x 6”
FRAME
1. Score large green piece down the middle onthe WRONG side.
2. Mark off a 2” border on half of one of the backsides and bevel cut a 2” opening followingdirections in Tools and Techniques chapter.(Diagram 5)
3. Open the frame WRONG side up. Using thetape gun, lay down a layer of double-sidedtape on the other (solid) half of the mat,making sure to get close to the edges.
4. Cut a 7” x 7” scrap of fabric. Lay fabric overtape and smooth out. Trim ends with matknife or rotary cutter.
5. Open the frame tent style. Insert photo.Wrap ribbon around the top of the frame andknot to one side.
6. Add easel.
1 1/2”
6”
3”
5 1/2”RIGHT SIDE
Attach Easel Here
WRONG SIDE
Easel5 1/2” x 6”
2”
3”
1 1/2”
Photo Frame6” x 12”
Attach Easel Here
2”
Time Difficulty
30 min. Easy
Diagram 5
Matboard Magic 36

Matboard Magic 37
�Chapter 4: Make Wedding Memories with Embellishments
Embossed white matboard teams with a coolaqua to lend a trendy yet romantic weddingstyle. The first project is a unique framedwedding keepsake—a great gift for thelucky couple. A wedding organizer file box
helps the bride to keep her wedding on track, anda guest book completes the set.❦
Project:
Wedding Keepsake
Technique: ScoringMatboard to Follow aCurve
You will need:
• Crescent # 9225305embossed white acanthus
• Crescent 1646 sky blue
• 12” x 12” shadow boxframe
• Pencil
• Ruler
• Compass
• Patterned paper
• Glue
• White texture paste
• Aqua craft paint to mix inpaste
• Glue gun
• Pearls, beads and findingsin different sizes, shapesand colors
• Clear beading thread
• Cake decorating bags, tipsand accessories
• Tag punch or template
Make WeddingMemories with
Embellishments
You can create these beautiful, personalized wedding keepsakesthat the happy couple will treasure for years to come.
Time Difficulty
3 hrs. Advanced

Chapter 4: Make Wedding Memories with Embellishments
5. TOP LAYER: Add the couple’s last initial. Thecake in photo has an “H” pin found in a thriftstore mounted on a small scrap of matboard.If you don’t happen to have something likethat, other options including stickers,appliqués, chipboard or wooden letters maybe adhered to a scrap of matboard or directlyto the cake.
6. In a small bowl, mix a few drops of paint intoseveral tablespoons of texture paste. Stir andadd paint until desired frosting color isachieved. Put paste in cake decorating bag.Follow use instructions, replacing "frosting"with "faux frosting!"
7. Ice cake to your liking. If decorating the bottomof the layer, place on wax paper and applydecoration. Allow to dry for several hours.When dry, remove wax paper gently frombottom of cake and addto the stack of layers.
8. Lay frame on top ofmatboard and center.Place cake onmatboard and lightlymark in pencil lineswhere cake should go(Diagram 3). When alllayers are in place,affix cake to board with glue gun.
Instructions:
CUT using aqua matboard
• 1 piece to size of back of frame
• 3 ovals, cut in half, in aqua (Diagram 1)
CUT using white embossed board:
• 2 ½” x 5”
• 2 ½” x 7”
• 2 ½” x 9”
1. SCORE on FRONT SIDE of three white boardsevery ½”, creating a long segmented piece ofscored board. Fold the two end sections under.On 7” section, punch five evenly spaced, smallholes near top to accommodate beading thatwill be strung on this layer. (Diagram 2)
2. Starting on one end, ease rounded part ofhalf oval, RIGHT side up, to inside tops ofsegmented boards. Repeat with bottompiece. Glue together, giving the cake shape.
3. BOTTOM LAYER: Wrap a 1 ½” length of aquaribbon around largest layer of cake and knot inthe middle front of layer. Trim ends of ribbon.
4. MIDDLE LAYER: Cut an 18” section of invisiblebeading thread. Knot end and bring through thefront left side. Create a desirable pattern ofpearls/beads and lay out one section onbeading mat. String them on thread. Bring endof thread through the next hole and knotbehind. In same hole, bring thread back to frontand string another section of beads. Repeattwice more. Knot thread behind final hole andtrim. Add additional sequins, flowers,rhinestones or desired trims to fill in gapswhere beads end.
Large Layer7” wide x 1 3/4” deep (cut oval 3 1/2” wide and cut in half )
Medium Layer5” wide x 1 1/2” deep (cut oval 3” wide and cut in half )
Small Layer3” wide x 1 1/4” deep (cut oval 2 1/2” wide and cut in half )
Matboard Magic 38
Diagram 1
Diagram 2
Diagram 3

❀
Chapter 4: Make Wedding Memories with Embellishments
9. Lay frame behind artwork. Draw a light pencilline ½” in from outer edges of the aqua board.Arrange trim to your liking and adhere overmark with quick dry glue. Trim off edges.
10. Print couple’s name, date and place of marriageon cardstock and punch out with tag punch.Mount on cardstock and trim. Set eyelets ontags for hanging. Loop ends through ribbonand secure through button shanks. Trim endsof ribbon. Glue in place where desired.
11. Add other touches to the piece that you mayhave, including wedding invitation orphotos. Using glue gun, adhere entire pieceto back of frame. Add sawtooth hanger.
Other ideas!
Use the pattern for the wedding cake tocelebrate someone’s special birthday or amilestone anniversary. Coordinate the colorsto suit the occasion—silver for a 25thanniversary or gold for a 50th. Add blackcandles to the top as a joke for someonegoing "over the hill," etc. Add memorabiliayou have saved to personalize thisshadowbox, such as ticket stubs, cards, orconcert or show programs. �
Matboard Magic 39
�Designer’s Tip The embossed board does well with stampinks and chalks. I like to take a stencil brushand brush on my favorite stamp ink color.With the brush, lightly go over the embossedsurface. The pattern will stand out more withthe soft shading. Or be bold—take the wholestamp pad and press it down directly on theembossed board. The full strength ink willgive another look. You can also just ink theedges for another effect. ❦

Chapter 4: Make Wedding Memories with Embellishments
1. Score board on right side referring to pattern.Cut off excess corners (Diagram 4).
2. Trace a curved object (I used a ribbon reel) onthe front corners of the lid flaps and trim offwith mat knife (Diagram 5).
3. With square punch or mat knife, make slit forribbon on both sides of box.
4. Mark holes on lid flap. Punch holes. Line upflap with the back of box and mark holes.Punch out.
5. Place lid flap on top of box, matching holes.Use double-sided tape to adhere lid to box.Reinforce with brads or eyelets.
6. Fold up the box and align the sides to meetat 90-degree angles. Run a heavy line of glueup and down inside corners of box whereboards meet. Wrap box with several rubberbands to hold in position while glue dries.
Project:
Wedding File Box Organizer
Technique: Box Construction
You will need:
• Crescent # 9225305 white embossedacanthus matboard
• Crescent # 1646 aqua matboard
• Logan 500 Mat Knife
• Heart brads
• Large flat eyelets
• Hole punch tool
• 1 yd. each of two coordinating ribbons
• Scrap paper in coordinating colors
• Square hole punch
• Adhesive foam strips
• 1” magnet tape 16” length
• Tape gun
Instructions:
CUT from white embossed matboard:
• 19 ¾” x 14”
• 9 ¾” x 8”
CUT 12 pieces from aqua matboard
• 9 ½” x 4 ½”
• Cut aqua 5” x 8” for label
5” 5”9 3/4”back
front
5”
4”
5”
Diagram 4Wedding Organizer Pattern - 9 1/2” x 5” x 4 1/2”Score on dotted lines. Cut/punch on solid lines.
Matboard Magic 40
9 3/4”
2 1/4”
4 1/4”
1 1/2”
Diagram 5Wedding Organizer Lid Pattern
Time Difficulty
2 hrs. Intermediate
Chapter 4: Make Wedding Memories with Embellishments
Matboard Magic 41
Diagram 6Mat Accent for WeddingOrganizerMark off 2 1/4” and bevelcut WRONG side facing up. Flip to RIGHT side, markmat at 1 3/4” and bevel cut.
�
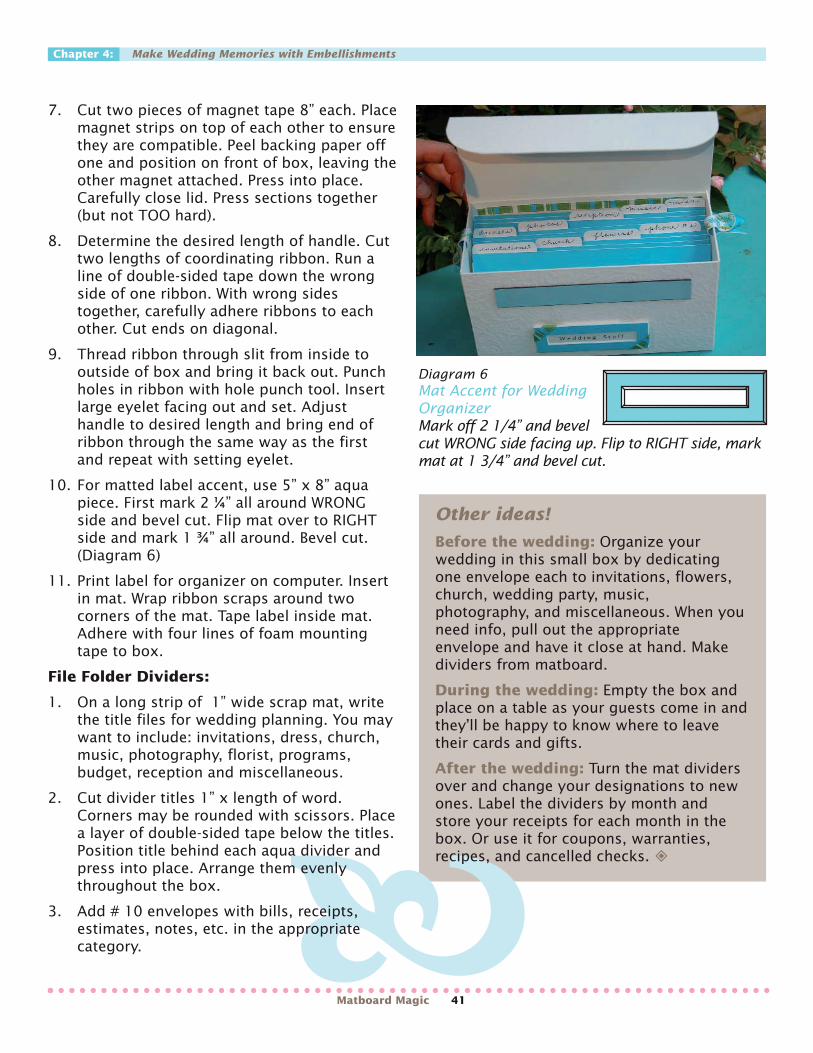
7. Cut two pieces of magnet tape 8” each. Placemagnet strips on top of each other to ensurethey are compatible. Peel backing paper offone and position on front of box, leaving theother magnet attached. Press into place.Carefully close lid. Press sections together(but not TOO hard).
8. Determine the desired length of handle. Cuttwo lengths of coordinating ribbon. Run aline of double-sided tape down the wrongside of one ribbon. With wrong sidestogether, carefully adhere ribbons to eachother. Cut ends on diagonal.
9. Thread ribbon through slit from inside tooutside of box and bring it back out. Punchholes in ribbon with hole punch tool. Insertlarge eyelet facing out and set. Adjusthandle to desired length and bring end ofribbon through the same way as the firstand repeat with setting eyelet.
10. For matted label accent, use 5” x 8” aquapiece. First mark 2 ¼” all around WRONGside and bevel cut. Flip mat over to RIGHTside and mark 1 ¾” all around. Bevel cut.(Diagram 6)
11. Print label for organizer on computer. Insertin mat. Wrap ribbon scraps around twocorners of the mat. Tape label inside mat.Adhere with four lines of foam mountingtape to box.
File Folder Dividers:
1. On a long strip of 1” wide scrap mat, writethe title files for wedding planning. You maywant to include: invitations, dress, church,music, photography, florist, programs,budget, reception and miscellaneous.
2. Cut divider titles 1” x length of word.Corners may be rounded with scissors. Placea layer of double-sided tape below the titles.Position title behind each aqua divider andpress into place. Arrange them evenlythroughout the box.
3. Add # 10 envelopes with bills, receipts,estimates, notes, etc. in the appropriatecategory.
Other ideas!
Before the wedding: Organize yourwedding in this small box by dedicatingone envelope each to invitations, flowers,church, wedding party, music,photography, and miscellaneous. When youneed info, pull out the appropriateenvelope and have it close at hand. Makedividers from matboard.
During the wedding: Empty the box andplace on a table as your guests come in andthey’ll be happy to know where to leavetheir cards and gifts.
After the wedding: Turn the mat dividersover and change your designations to newones. Label the dividers by month andstore your receipts for each month in thebox. Or use it for coupons, warranties,recipes, and cancelled checks. �

Chapter 4: Make Wedding Memories with Embellishments
6. Copy the pattern in this book or come upwith your own label for the front. Trim thelabel and mount with foam tape on the frontof the guest book. Shade or ink edges withaqua stamp pad if desired.
Technique: Using the Mat KnifeScissors are great but there is nothing like thecontrol you can get with a good sharp cuttingtool. You’ll need the Logan Mat Knife with afresh blade and a piece of glass. Wrap maskingtape around the edges of the glass to protectyour fingers. The knifewill cut many types ofmaterials—paper, Mylar,matboard, acetate andtransparencies andphotos.
Place item to be trimmedon top of the glass. Start cutting from the topleft side of the design and move the design asyou go. Make the knife an extension of yourarm and keep consistent pressure. Hold thedesign in place with your non-cutting hand.Move artwork slowly as you cut. Keep yourhand straight and don’t twist your wrist.Practice following simple shapes and lines.
HINT: Do not drink a big cup of coffee beforeattempting this. �
Project:
Guestbook
You will need:
• Crescent # 9225305 white embossedacanthus matboard
• 1/8” hole punch
• Paper for inside of book—lined orscrapbook paper
• White spray paint
• ¾” loose leaf binder rings
• Clip art
• Mat knife
• Aqua dye stamp pad
• Workable Fixative
Instructions:
CUT 2 pieces of white embossed matboard:
• 8 ½” x 8 ½”
CUT about 25 sheets of paper for inside of guest book
• 8” x 8”
1. Rub an aqua dye ink stamp pad over theentire surface of the embossed matboard,making sure to cover all areas equally. Repeaton second board.
2. Mark positions for three holes going downthe left side of the white board with which tobind book. Punch holes out of one board.Using that as a pattern, place wrong sidestogether and punch holes in second board.
3. Spray paint loose leaf binder rings white.
4. Spray both sides of covers with fixative fromto seal the cover and protect from rain ormessy fingers.
5. Assemble book and join together withpainted binder rings. Another option—wraprings with ribbon and trim ends.
Matboard Magic 42
Time Difficulty
30 min. Easy

Chapter 4: Make Wedding Memories with Embellishments
❀Designer’s Tip You will have scrap left over from the variouscorners and strips trimmed off. This is a fairlyexpensive board—use up those scraps!
The scraps often come in sets of two or four ofthe same size, since the outer corners are notused in the designs. It is so quick and easy tomake a small book or photo display with these.Bind them with loose leaf rings, punch holes inthe sides and tie with ribbon or just take a fewbinder clips and use them to hold your quickbook, photo album or card together. ❦
Other ideas!
This beautiful book will encourage yourguests to wax poetic as they inscribe theirwell wishes on your wedding day. After thewedding, place this book on a table in yourentry hall to sign in visitors that you havethroughout your married life. Keep a diaryof your first year of marriage. Make one inpastels for your friend’s new baby and letthem record their baby’s “first’s” (bottle,tooth, lock of hair, steps, etc.). A green andred book can be used to record yourChristmas card list or party planning ideas.Use the extra scraps to make place cardfolders, menu stands, tags, and tiny framesfor favors. �
Matboard Magic 43
Use leftovermat scraps tomake placecards like theone shownhere.

Chapter 5: Deck the Halls with Texture and Embossing
Matboard Magic 44
❄
✳
❅
❆❅

❄
Matboard Magic 45
❅Chapter 5: Deck the Halls with Texture and Embossing
The techniques used in this chapter arenice touches to add to most any paperproject. Texturizing with paste addsdepth and dimension to a projectwithout distracting from other
techniques that may be used at the same time.Dry embossing is so easy and quick, yet adds asubtle twist to a design. ❦
Project:
Tree and Gifts Centerpiece
You will need:
• Crescent Shamrock
• #7111 green suedematboard
• #1711 black walnut
• Crescent scraps of
• #9577 stop
• #SRM3364 green apple
• #9802 white art
• #8006 brushed silver
• #SRM3370 cornflower(colors you have onhand may besubstituted)
• Logan Mat knife
• Ruler
• Pencil
• White texture paste
• Glue gun
• Clear bandage tape
• Embellishments for boxes—use what you have!
Deck the Hallswith Texture and
Embossing
✳❅
Time Difficulty
3 hrs. Intermediate
❆

Chapter 5: Deck the Halls with Texture and Embossing
Instructions for trees:
1. Cut three trees from green suede matboard.(see Diagram 1)
2. Score on lines indicated in patterns (on frontside of board), creating three joined triangles.Fold together. Glue inside seams togetherusing a glue gun.
3. Cut three tree trunks from black walnut matboard.Bend on score lines. On WRONG side, run a lengthof clear bandage tape down one side. Position sotwo sides meet and press tape inplace to secure both ends.Reinforce with glue gun.
4. Place trunk inside tree andglue together.
5. Decorate trees with beads,garland or dab texture paste on assnow or leave plain.
6. Purchase wooden star cut out. Affix toothpick toback of star with glue gun. Dab star with whitetexture paste on both sides and cover glue andtoothpick. Insert star on top of tree throughsmall gap where tree is joined.
Instructions for packages:
1. Cut 15 boxes in assorted colors—five large,five medium and five small. (Diagram 2)
2. Trim off corners and fold up into box. Decorateboxes before assembling (see Techniquessection). Glue corners of boxes and close lids.
3. Place decorated boxes under trees.
4. Set up on holiday table with mirror tiles, fauxsnow and greenery.
Techniques:
Now you have 15 little boxes! See if you can decorateeach one in a unique way. Here are some ideas:
1. Use glitter to highlight the gift boxes. Run aline of glue around the edges of the box andsprinkle with ultra fine or glass glitter.
2. Glue buttons on the lid.
3. Tie up with ribbon or metallic thread.
1”
1”
Small3” x 4”
1” 1”
1”
2”
Diagram 2Cut 5 each inassorted colorsSmall: 3” x 4”Medium 6” x 8”Large: 7” x 8”
Large
12”
6”
Small
6”
5 1/2”
Medium
9”
5 1/2”
Matboard Magic 46
Diagram 1
Tree Trunk8” x 6”
Score every 1/2” - Make 3
8”
6”

Chapter 5: Deck the Halls with Texture and Embossing
Other ideas!
This arrangement may be used as acenterpiece for a holiday meal orparty. Then place it on your mantelafter the party. Start a new traditionby putting it up each year as one ofyour favorite decorations. Surroundthe tree and pile of gifts with
heirloom Santas. A string of soft whitelights completes the scene.
Use the trees and boxes as an Adventcalendar. Make 10 additional boxes andmark each one with a number from 1-25.Put a tiny treasure in each box, a quotefrom Scripture or your favorite poem. Openone each day as Christmas approaches.
This centerpiece could last all winter if youmake additional boxes. On Valentine’s Day,use the trees and red and white boxes to setthe table for a romantic dinner for two.Wouldn’t this be the perfect setting topresent your loved one with a special pieceof jewelry or engagement ring? Add strandsof white berries, hearts and chocolate toadd to the table.
For St. Patrick’s Day, leave the green boxesunder the tree and add some shamrocks andgold coins. Use this centerpiece when you havefriends over for corned beef and cabbage!
At Easter time, add pastel eggs, Easter grassand bunnies along with boxes you havealready made and see what the Easterbunny thinks… �
4. Stamp box with small holiday rubber stampsto decorate.
5. Stencil words of holiday cheer.
6. Doodle a message with markers.
7. Dab on texture paste to look like snow.
8. Add a small piece of greenery and a jinglebell.
9. Punch snowflakes from patterned paper andattach to the top of the box.
10. Place somerepositionablereinforcement dots onthe box and stencilaround them. Removeafter painting.
11. Paint a holly leaf on thebox.
12. Cover the box withpaper and wrap like apresent.
13. Add pearls and beads.
14. Accent with metal embellishments.
15. Decorate with stickers.
16. Cover with felt designs.
17. Monogram with initials.
18. Apply a layer of glue or double-sided tapeand press microbeads on top to secure.
19. Paint them if you don’t have a good selectionof scraps on hand.
20. Apply hot fix crystals.
Matboard Magic 47
❀Designer’s Tip If your boxes do not line up exactly, gluethem as best you can and wrap with fibersor ribbon. No one will know the difference!Make sure to measure right on the next one.Another way to camouflage a little gap hereor there is to fill the space in with texturepaste or glue and glitter. This project is anexcellent way to practice your box makingtechnique. ❦

❅
Chapter 5: Deck the Halls with Texture and Embossing
and glue open bottom to 4”black square hat brim.
6. Snowman may be gluedtogether or left separate tostack as nesting boxes forstorage.
Other ideas!
Adapt this idea for other seasons: a pile ofpumpkins for Halloween, a stack of babygifts for a shower, a three-tiered weddingcake, you get the idea… and tie the boxes upwith a coordinating ribbon. �
Project:
Snowman Box
You will need:
• Crescent:
• Porcelain # 754
• Raven #1577
• Logan Mat knife
• Clear bandagetape
• Glue gun
• Carrot for nose
• Black snaps oreyelets for eyesand buttons
• Ribbon, fabricor fleece forscarf
• Twigs for arms
Instructions:
1. Cut three pieces of white board: 6” x 6”, 9” x9” and 12” x 12” (see Diagram 3).
2. Cut two pieces of black: 5” x 5” and 4” x 4”.
3. After cutting and scoring three white boards,trim away corners and fold up into boxes. Adddecorative trims as desired—eyelets for eyes &buttons, scarf, twigs for arms, and carrotnose. Make sure to do the eyelet setting andother work before folding up the box. If youare using twigs for arms, punch holes wheredesired. You may want to stabilize the twigarms by inserting a piece of florist’s foamsnugly inside box. When you insert the twigs,the foam will keep them in place. Glue insidecorners to form sturdy box.
4. Place open end of box on top of next largerone and stack from smallest to largest.
5. For hat, cut 5” black square following cuttingand scoring directions for box. Fold into box
Matboard Magic 48
❀Designer’s Tip The snowman would be a great addition toyour winter centerpiece or he can standalone. Place him on a mirror tile and addfake snow. Leave sitting on your entrywaytable to greet visitors as they enter yourhome. ❦
4” 4” 4”
4”
4”
4”
12”
12”
❆Time Difficulty
45 min. Easy
Diagram 3
Dimensions for large (12” x 12”) boxshown. Adjust cut and score lines formedium (9” x 9”) and small (6” x 6”) boxes

Chapter 5: Deck the Halls with Texture and Embossing
Instructions:
1. Cut one piece of blue mat 11” x 9 1/2”. Cut andscore according to pattern (Diagram 4). Cut flapfrom white embossed paper (Diagram 5).
2. Trim off excess corners.
3. Place brass stencil where artwork is desired.Make sure it is facing the right direction oncebox is assembled.
4. With embossing stylus, press tip firmly intoopenings of template. You may need asmaller stylus tip depending on the pattern.Make sure all lines in the design areembossed and remove stencil.
5. Load ink dabber with white ink and lightlyswirl ink over where you have justembossed. The ink will stay on the surfaceand the embossed lines will be more visible.
6. See tips on next page to make your owndouble sided paper. Cut paper for flap.
7. Mark position of brads on inside of box andpunch small holes. Lay box on flap as a guideand pencil in where holes should go. Punchholes. Lay a line of double-sided tape downthe length of the box flap. Lay paper on top
Project:
Festive Cards and Storage Box
You will need:
• Crescent
• #SRM3370 Cornflower Blue
• White embossed paper
• Coordinating patterned paper
• Logan:
• Mat knife
• Art Deckle 4-Way Stylus
• Art Deckle ruler
• Ruler
• Pencil
• White texture paste
• Soap
• Brass embossing template—winter theme
• White ink pad
• Small ink dabber
• 1/16” hole punch
• Snowflake brads
• Corner rounder
• 2 pieces of magnet tape 1” x 6”
• Spray adhesive
• Double-sided tape
• Ribbon
Matboard Magic 49
❅
✳❆
Time Difficulty
1 hr. Intermediate
Make a set of cards for yourself or as a hostess gift for ahandmade reminder of your thoughtfulness.

❀Designer’s Tip Before pressing down through stencil, rub tipof stylus in soap to allow stylus to glide overmatboard.
Double-sided patterned paper is not alwaysavailable in the color and texture you’d like.Not a problem—you can make your own!Simply select the two papers you’d like.Spray wrong sides of both papers with sprayadhesive. Carefully align them and presstogether. Voila! Double-sided paper! ❦
Chapter 5: Deck the Halls with Texture and Embossing
of flap, lining up holes. Press down tosecure. Set brads so snowflake is on theoutside top of the box.
8. Punch rectangular hole in top sides of boxfor ribbon handle. Cut length of ribbon andthread through openings. Lay a 7” line oftape down the back middle of the ribbon.Adhere ribbon to top flap of box, coveringbacks of brads. Pull ribbon through holes insides and tie on the outside.
9. Cut two 6” strips of magnet tape and facemagnetic sides together. Peel off one layerof adhesive and place magnet wheredesired. Remove backing from the otherpiece of magnet and carefully line up wheredesired. Press in place.
Instructions for cards:
1. Cut white textured cardstock 7” x 10” andfold in half to create a 5” x 7” card. WithLogan Art Deckle ruler, tear ½” off bottom ofcard. Ink edges with blue ink.
2. Cut a 4” x 6” piece of patterned paper.Position and center brass template onpatterned paper. With flat knife, spread whitetexture paste over stencil making sure tocover all openings. Carefully lift stencil offand allow to dry for 1 hour.
3. Write message in pencil at bottom of card.Adhere to white card with tape gun.
4. Make a set for everyone! When set iscomplete, tie with matching ribbon.
1” 1”
1”
5 1/2”
3 1/2”
7 1/2”
1”
11”
9 1/2”
Matboard Magic 50
Other ideas!
Cards are not just for Christmas or holidays.Get a stack of supplies, set aside an eveningand make birthday gifts for all of yourfriends and family. Who doesn’t appreciatepersonalized handmade cards in a beautifulbox to match?
Make a set in school colors for your son ordaughter going off to college. Include an addressbook with all of their family addresses, emailsand phone numbers. Don’t forget to includestamps and return address labels. This mayincrease your chance of hearing from them! �
Diagram 4
1”
Holiday Card Box Lid7 1/5” x 4”
3 1/2”
4”
7 1/2”
Diagram 5

Matboard Magic 51
�Chapter 6: Matboard as Art
The traditional function of matting is tosurround artwork with empty spaceallowing the viewer’s eye to focus andcome to rest on what lies inside thewindow.
Although it is very tempting to embellish with allof the fun supplies available these days, a littlerestraint should be shown when decoratingmats. It’s very easy to take out the stamp padand decorate every square inch. Often, the matcan be prettier than the artwork! But sometimesyou need to give your eyes a rest and allowthem to take in the beauty of a simplephotograph of a flower, a child’s face, or acrayon drawing created for you by your littleone. Just keep it in mind…
Certainly, a mat cutter is the optimum choice forworking on any of the projects in the book, butmost of them can be accomplished with carefulmeasurement, a T-square, pencil, cork-backedmetal ruler (cork backing prevents the ruler fromslipping when pressure is applied), and a sharpmat knife.
For in-depth instruction on mat cutting, Irecommend reading, “Basic Mat Cutting” byVivian C. Kistler. There is also a very good DVDavailable which demonstrates the use of theLogan system step by step. It is included withthe 301-S Compact Mat Cutting kit. ❦
Matboard as Art
Matboard ismore than just aborder in thischapter! Framedart goes 3-D inthese fun anddecorative wallhangingprojects.

Chapter 6: Matboard as Art
5. Cut the piece of fallout from the beveled matdown to 10” x 10”. Start laying tiles out onthe fallout in a pleasing arrangement. Placethe tiles next to each other leaving about1/8” or so in between tiles. Intersperse thephotos throughout the design.
6. When you have an arrangement that you like,add foam tape to the back of each tile andpress into place. On each photo tile, add twolayers of foam tape. This will give dimensionto the arrangement. When tile composition iscomplete, adhere foam tape strips to back of10” x 10” tiled piece.
7. Remove adhesive strips. Place tiled sectioninto penciled marks. When lined up squarely,press down to secure to backing board.
8. Place beveled mat, then shadow box sectioninto frame. With masking tape, securebackground board to frame.
9. Place on easel to display or add eye hooks andwire on the back sides of frame and hang!
Project:
Photo Mosaic
You will need:
• Crescent
• # 9908 Cambridge for outside mat (16” x 16”) and artwork base (18” x 18”)
• 36 pieces of scrap board in various colorscut into 1 ½” squares
• Logan:
• Mat knife
• 301-S Mat Cutter
• 16” x 16” frame without glass
• Spray paint
• Foam tape
• Tape gun
• Spray adhesive
• Black and white photos cropped and sizedto 1 ½”
Instructions:
CUT Matboard as indicated above.
Spray paint frame if desired.
1. On 18” square board, score 1” on all sides onthe WRONG side. Make sure to measure therabbet, or inside recess of the frame, verycarefully and work from that measurement.
2. Trim off excess corners and bend 1” bordersup 90 degrees to form a shadow box.
3. With 16” square mat, measure and mark a 2 ½” border all around on the WRONG sideand bevel cut the mat. Follow directions inTools and Techniques section.
4. Lay the 2 ½” beveled mat inside of thebackground. Lightly pencil marks to showboundaries where the artwork should becontained.
As your family expands, you can easily updatethis photo collage with the newest members’pictures. This project is a great way to use smallamounts of leftover matboard!
2 1/2”
16”
Matboard Magic 52
Time Difficulty
1.5 hrs. Intermediate
Diagram 1

�Chapter 6: Matboard as Art
Matboard Magic 53
❀Designer’s Tip I found this frame at a thrift store for $1.Often you can find really good deals onbeautiful frames that are just missing theglass. Snap them up when you see them anduse them to display dimensional artwork.With a quick coat of spray paint, you have afresh new masterpiece. Buy several andpaint them the same color and you have awhole new wall arrangement!
Frame your children’s first pair of shoes, anold sterling silver spoon or a piece ofvintage clothing or lace. Make sure to usethe right adhesive for the job. Because youare not restricted by having to stay insidethe glass, anything goes! ❦
Techniques: Retroframing
Retroframing is a process of fitting artworkinto a frame you already have. Matting is themedium that blends the two disparate piecesinto one cohesive piece of art. Of course, afew conditions must be met:
1. The artwork must be smaller than the frame.
2. You must have a good attitude, probablysome spray paint and a bit of creativity.
3. Accept that if it doesn’t work out, at leastit was a good try and you probably learnedwhat not to do the next time.
Choose matboard that works with the art andthe frame, if that is possible. If that is nothappening, the easiest thing to change is thecolor of the frame, since the artwork is themain focus, not the frame. I recommendmatting to complement the artwork, not theroom it will be hung in. The matted and framedartwork should stand on its own wherever it isplaced. However, a safe choice for frame or matcolor is white, off-white or black. It’s hard to gowrong with that. But if you really want theartwork to pop, be brave and mat in color.Don’t discount colors until you put the mat up
to the artwork and try it. You will know whenyou see what you like. Go for it!
OK, so let’s do this… The measurements givenare for the frame used in the design. Feel freeto change them to accommodate the frameyou are working with. Starting with the outerframe measurements, work your way in to themiddle. For example, in the sample, therabbet measures 16” square.
For a frame that size, a 2 1/2” to 3” bordersurrounding the artwork is recommended.Anything less would be out of proportion andlook insignificant. (However, you could gowider for a cool effect. A very large borderdraws your attention to the artwork containedwithin, making it appear prominent and ofvalue.)
Going with a 2 ½ ” border all around, the areaavailable for your artwork is 11” (16” outsideminus 2 ½” border x 2 [each side] = 5), and16 minus 5= 11”). In that 11”, you need toleave room in between tiles and a little morebetween mat and tiles. I like the look of 6 tilesgoing across and down. 11” divided by 6 = 17/8” so if the tile is cut 1 ½”, that’s plenty ofroom left over for the borders. �

Chapter 6: Matboard as Art
Techniques: Mats and frames
In selecting items to mat, think about whetheryou will be framing with or without glass.Objects that will surpass the height of one or twolayers of a mat window (about 1/8”) will pushagainst the glass or cause the backing board tobow out. Such a piece will need either to berecessed (as in a shadow box) or framed withoutglass. A frame without glass will require dustingand may not be practical for items of value,leaving them open to damage, such as moistureor dirt. Place pieces out of direct sunlight asanything will fade when exposed to this.
Artwork can be framed professionally or quiteinexpensively… if you are willing to work alittle. Many frames in good condition may befound at thrift stores, garage sales or in yourown home. A coat of paint is often all that isrequired to give new life to an outdated frame.Dents and scratches can be sanded out and anew color sprayed on in a matter of minutes. Ifyou are lucky enough to find a nice customwood frame without glass for a few dollars, it’sstill well worth a small investment for customcut glass. Standard size glass can also bepurchased at craft stores.
I like to spray paint larger frames in my latestfavorite color and hang them on the wall.Inside I place smaller photos and mementos fora wall arrangement. Or corkboard could be
inserted, backed with foam core and used as abulletin board.
Another really inexpensive (notice I’m tryingnot to use the word cheap because that implieslow quality, which this is not) way to frame isby using clear acrylic box frames.
Create your own shadowbox by measuring theexact dimensions of the inside of the box frame.Score matboard along all four sides the samedepth as the frame. Cut on the wrong side so thecolor appears on the inside and then mat 3Dobjects inside. Use to frame a graduating senior’stassel or a baby spoon birth announcement for anew baby. Acrylic is prone to scratch easily, sonormally I buy them new as opposed tosecondhand. A plastic saw tooth tab hanger is allthat is needed to hang the project as long as it’sfairly light. Keep your eyes out and pick up a fewframes when you see a good deal. With a littleplanning, you can usually mat creatively and fitthe artwork to the frame.
Once you get the hang of cutting mats, you willalways be anticipating your next project. Whenyou have all the supplies right there at yourfingertips, it’s so quick and easy to pick up aproject, mat it, frame it and hang it in an evening.I have saved my family many dollars in the giftdepartment. And everyone appreciates ahandmade or personalized present. �
Other ideas!
Using the techniquedescribed in thephoto mosaicproject, show theprogress of yourchild’s growth fromkindergarten to 8thgrade. Or fill with photos of your child’sfriends. Maybe you don’t live near family—takepictures the next time you are home, inserttheir photos in a frame like this and play “Whois this relative?” with your children. All will bedelighted at the next visit when the kidsrecognize Aunt Catherine and Cousin Bobby!
Consider matting collections in the same color tovisually group them and really pack a punch.Some items, beyond the traditional artwork,photographs and needlework, that may be mattedare: coins, military ribbons and medals, stamps,matchbooks, ticket stubs, bottle caps, shells, quiltblocks, silverware, and dried flowers.
Every year at the holidays, I create mattedpostage stamp ornaments using the holidaystamp for that year. On the back is a short recapof what’s been happening at our house in the lastyear. So it’s a card, ornament and letter all in one!It’s also nice to go into the homes of our friendsand family and see the series of our family’sornaments hanging on their Christmas tree.�
Matboard Magic 54

�
Chapter 6: Matboard as Art
Project:
Baby Collage
You will need:
• 11” x 14” frame with glass
• Crescent # 1577 raven black
• Color photos
• Text created by computer, by hand ordigitally inserted into photos
• Spray adhesive
• Sandpaper
• Foam tape
• Embellishments—metal, paper punches,eyelets
• Eyelet setter
• Hole punch
• Glue
• Tape gun
Instructions:
1. Select photos you would like to use in layout.
2. On 11” x 14” black matboard, lay the photosout in an arrangement that you like. Allowabout ¼” to ½” additional around each photofor mat border. Select three or four backgroundcolors that blend well with the photos. Usingspray adhesive on the back of the photos, maton scrap mat in desired colors, leaving a smallborder of color behind photo.
3. Position photos on black mat. At this point,determine whether you would like to addadditional embellishments, such astext/journaling, title, memorabilia, eyelets,punches or stickers. If so, figure out whereyou want them in the layout.
4. With foam tape, adhere photos where you’dlike them.
5. Fill in with other items as desired and adhereto backing. (If you are adding eyelets or
Matboard Magic 55
Using digital photos, you can add text onto yourimages before printing them.
Time Difficulty
2 hrs. Easy

Chapter 6: Matboard as Art
anything dimensional, you will probably wantto do that before the photos are put on toallow room to work).
6. Make sure all artwork is the same heightwhen you lay it in the frame.
7. Clean glass and insert in frame. Lay photoboard into frame and place backing boardbehind. Staple or use framers points to secureback of frame. Finish back with backing paperand add saw tooth hanger on back.
Matboard makes a great surface for scrappingpages. Why not hang your pages on the wall forall to enjoy?
Matboard Magic 56
❀Designer’s Tip The time spent measuring to cut actualbeveled windows for a finished piece like thiswould take forever! You get almost the sameeffect in a lot less time by matting each photoon a background color and mounting it on topof the backing board. The black backgroundgives depth to the arrangement. I inked theedges of each backing mat white for a furtherillusion of depth.
For a less formal layout, turn the photos atangles to each other. This arrangement doestake up a little more room but less time to lineup. Feel free to add embellishments andjournaling that help to tell the story of yourdesign. ❦
�Other ideas!
This project is fun because you can put it togethervery quickly. With photos, a frame, embellishmentson hand and a little time to yourself, you couldwhip up one of these in no time.
Some ideas for themes might include: first dayof school, first year of life, birthday parties(young and old), retirement celebrations, fun atthe beach, military ceremonies, familygatherings at Thanksgiving (think about it—there are your family’s gifts for Christmas!),
holiday cookie exchanges, your special pet,memories of a loved one, or any event you wantto remember.
A framed collage of the seaside town in NJ wouldbe a perfect thank you for the friends who lentyou their beach house for a weekend getaway.There are many people who do nice things for us.Use your creativity and take some time to thankthem in return for their kindnesses—it means somuch more than a gift card! �

Chapter 6: Matboard as Art
glitter, crystal, eyelet or button, as desired.
8. This mat may be framed or an easel backingcan be added to stand it up.
Project:
Groovy Friend
You will need:
• Logan 301-S and bevel cutting head
• Logan Groovy Mouse
• Crescent #4851
• Flower punches (medium and small)
• Scrapbook paper/vellum
• Glue
• Double-sided tape
• Foam board scraps
• Quote lettered by computer or hand to fitin window of mat
• Embellishments (I used flat backed crystals)
Instructions:
1. Cut denim matboard to 5” x 7”.
2. Cut an opening measuring 1 ½” x 5”. SeeDiagram 2.
3. Follow directions for use of the Groovy Mouse.Freehand cut a gently curving line for the vine.Carefully line up the mouse and cut leavesalong the vines. If you are feeling especiallyadventurous, cut some veins in the leaves.
4. From foam board scraps, trim strips:
2 measuring ¾” x 4 ½”
1 measuring ¾” x 5”
1 measuring 2” x 5”
5 Apply double-sided tape with tape gun to theback of the mat. Place foam board strips onback of mat.
6. Print quote. Center in the window andadhere to back of mat behind foam board.
7. Punch flowers from scrapbook paper incoordinating colors. Glue on to the mat fillingin spaces where there are no leaves. Glueaccent to the flower centers—a bead, mirror,
Matboard Magic 57
7”
1 1/2”
5”
Diagram 2
Time Difficulty
1.5 hrs. Intermediate

Chapter 6: Matboard as Art
choice because it’s heavy and comes in the perfectwidth for most items I frame. For larger pieces, Iuse sturdy gift wrap. You can recycle old calendars,cards, gift bags or posters. Scrapbooking paper isgreat for this too. Allover prints are easier to workwith than stripes, checks or anything with straightlines in them.
I like to tie in the backing to the framed artwork.For example, a birth announcement might featurepink ticking wallpaper on the back, a weddingwatercolor uses some beautiful embossed giftwrap, candy cane wrapping paper backing mattedChristmas photo ornaments…
You get the idea- be creative and use what youhave on hand. You’ll be surprised what you comeup with.
The dust cover is also where I write my message tothe recipient. If the piece is one I have done for hire,a label with my contact information is included.
Saw tooth hangers that nail directly into the frameare my choice for hanging small pieces of artwork.The larger and heavier pieces can be hung byattaching two screw eyes to the sides of the frameabout 1/3 of the way down from the top. Take alength of picture hanging wire and thread throughboth screw eyes several times, keeping wire fairlytaut. Twist wire together to finish. Wire should notbe seen from the front of the frame. ❦
Designer Tips: On dust coversYou may not think this is important, but to me, afinished back perfectly completes the piece youhave framed. When I’m done matting and framinga piece, I add a dust cover to the back. This notonly looks professional but it protects artworkfrom dust, smoke, or whatever else is floatingaround in the air that can degrade your artwork!
There are a few ways to do this. The following wasthe first method I learned. It’s a little messy butfinishes nicely. Thoroughly wet a piece of brownkraft paper (like a paper bag) cut about an inchlarger all around than the frame. Run a line of gluealong the back of the frame. Place the paper ontop, smoothing out any air bubbles, and let it dry.Trim the edges off by turning the frame over andcarefully running a mat knife right along the frameedge. Cut on a self-healing mat of course! Thepaper will dry tight to the frame back.
The other method I use is a little quicker.
Trim the paper down to just a little smaller thanthe frame. Run a line of double-sided tape closeto the outer edge of the frame back. Lay thepaper on one end of the frame back and ease andsmooth paper down the rest of the frame. Trimexcess paper if necessary.
Honestly, brown kraft paper? Boring! There are somany colorful papers available that work just aswell and look a lot nicer. Wallpaper is a good
Matboard Magic 58
Use foam board scraps to elevate the matboardfor extra dimension. Adhere the scraps to theback using the tape gun.
Add die cuts, beads and other embellishments, orwhatever else you have on hand. Use yourimagination and resourcefulness for a custom look.

Chapter 6: Matboard as Art
Other ideas!
The Groovy Mouse is a great tool fromLogan. What it does is cut a v-groove intoyour matboard. There are a few ways youcan use it. The mouse has a slot on the sideso you can slip it over the guide rail of themat cutter, engage the blade and pull downfor a perfectly straight cut. OR you canfreehand cut whatever design you like.Another option is to combine the two—first,freehand cut a design and then use thestraight cutter to enclose the design with aborder cut. Gentle curves and lines work bestbut after a little practice you will want toexperiment further. Make sure to read theinstructions before use—those blades areSHARP! Take some time to work with this tooland see all the possibilities. I like using thistechnique and adding accents. That way, ifthe leaf I cut is less than perfect, I can hidethe mistake with a flower or otherembellishment. And the point of doing allthis is to have fun, right? No pressure…
Is that groovy or what?
Above: The Logan Groovy Mouse, and samplemats showing the variety of styles possible withthis groovy tool. Below: Design possibilities withGroovy Mouse...courtesy of Logan GraphicProducts.
Matboard Magic 59
�
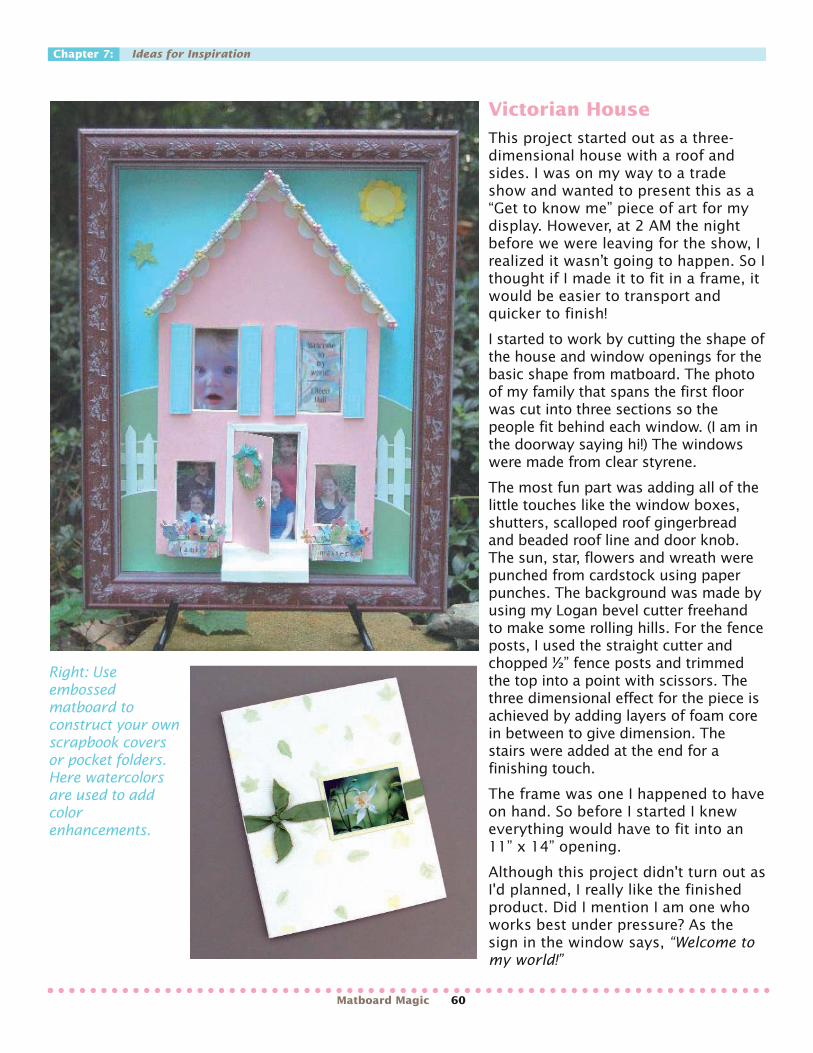
Chapter 7: Ideas for Inspiration
Right: Useembossedmatboard toconstruct your ownscrapbook coversor pocket folders.Here watercolorsare used to addcolorenhancements.
Matboard Magic 60
Victorian HouseThis project started out as a three-dimensional house with a roof andsides. I was on my way to a tradeshow and wanted to present this as a“Get to know me” piece of art for mydisplay. However, at 2 AM the nightbefore we were leaving for the show, Irealized it wasn’t going to happen. So Ithought if I made it to fit in a frame, itwould be easier to transport andquicker to finish!
I started to work by cutting the shape ofthe house and window openings for thebasic shape from matboard. The photoof my family that spans the first floorwas cut into three sections so thepeople fit behind each window. (I am inthe doorway saying hi!) The windowswere made from clear styrene.
The most fun part was adding all of thelittle touches like the window boxes,shutters, scalloped roof gingerbreadand beaded roof line and door knob.The sun, star, flowers and wreath werepunched from cardstock using paperpunches. The background was made byusing my Logan bevel cutter freehandto make some rolling hills. For the fenceposts, I used the straight cutter andchopped ½” fence posts and trimmedthe top into a point with scissors. Thethree dimensional effect for the piece isachieved by adding layers of foam corein between to give dimension. Thestairs were added at the end for afinishing touch.
The frame was one I happened to haveon hand. So before I started I kneweverything would have to fit into an11” x 14” opening.
Although this project didn't turn out asI'd planned, I really like the finishedproduct. Did I mention I am one whoworks best under pressure? As thesign in the window says, “Welcome tomy world!”

Matboard Magic 61
❊Chapter 7: Ideas for Inspiration
Now that you understand basicmatboard construction techniques, letyour own imagination inspire you!Here are more ideas that build on thecutting, joining, and embellishing
techniques described in previous chapters.Almost anything you can imagine you can buildwith matboard. So get inspired and buildsomething to enhance your home or give as agift. Author’s warning: this is a seriouslyaddictive hobby!
Ideas forInspiration
Holiday Card Gift Box,Beach Themed StorageBoxes and Photo Album

Chapter 7: Ideas for Inspiration
No baking required for these beautiful creations!Using matboard with beads, texture paste,stencils and other embellshments, these projectsmake a great centerpiece or display.
Matboard Magic 62
❊

Chapter 7: Ideas for Inspiration
At left: a silverware box headed for the trashis repurposed as a bead box. Enhanced withmatboard cut-outs on the lid, plus beads andribbon around the rim.
Matboard Magic 63
At right: Another cute idea for adesk set, including blotter withtied-on important phonenumbers (simply replace the tagwhen the numbers change), plusmemo notepad holder, pencaddy and decorative noteholder.
At left: Mat board isstamped and scored tocreate this attractiveand useful note holder.Hang one on therefrigerator or near thephone for thoseimportant lists andmessages. ❊

Chapter 7: Ideas for Inspiration
More fun ideas! Clockwise from thetop: Another folder idea, Lockerorganizer, and monogrammedmemory box.
Matboard Magic 64
❊

Chapter 7: Ideas for Inspiration
Clockwise from top: Clever matboardlayering creates this framed holidaydoor art; CD covers for storage or asgift wrap; Another spin on the holidaycard box theme shown here withembossed snowmen.
Matboard Magic 65
❊

Matboard Magic 66
�Conclusion
Ihope you have found something in this bookthat you can use on your creative journey.Even for someone who has never worked withany of these tools, most of the projects arevery easy to construct. With a little patience
and practice, you can be designing projects ofyour own. I can’t stress enough that once youlearn the basics of mat cutting and becomefamiliar with the tools, you will be free to makewhatever you want! The projects in this book arejust a small sample of what can be done andhopefully will give you ideas to start with.
If you are a card maker, a box to put yourhandmade cards in is a great project to startwith. For scrap bookers, a matted and framedlayout is a perfect showcase for that page thatyou spent five hours working on.
Whatever your background or skill, I hope thatyou will give the techniques described in thisbook a try. I can only say that I have spent manyhappy hours in my studio cutting, scoring andembellishing. The tools and supplies availabletoday are amazing. I don’t know about you but Ihave a lot of gadgets, paper, beads, glitter,stamps, punches and paint. When there is anopportunity to use them on quick and funprojects, I’m so happy to have them on hand andfind the perfect place to add them.
Thanks for reading and happy crafting!
Conclusion

Matboard Magic 67
Sources
✆Foam Tape Strips
Therm O Web Adhesives
• Sticky Strips® Foam Tape
770 Glenn AvenueWheeling, IL 60090 ph. 847-520-5200 www.ThermoWeb.com
Glitter
Art Institute Glitter, Inc.™
• Vintage Glass Glitter (used on gift boxes inDeck the Halls, Chapter 5)
www.artglitter.com
Glue
Beacon Adhesives
• Zip Dry Paper Glue
Customer Service: 1-800-865-7238www.beaconcreates.com
Mat Cutting Tools
Logan Graphic Products, Inc.
• 301-S Compact Mat Cutter with straightand bevel cutting heads
• A1303 Art Deckle 4-Way Stylus
• 500 Mat Knife
• 707 Groovy Mouse
1100 Brown StreetWauconda, IL 60084 USAph. 847-526-5515toll free 800-331-6232www.logangraphic.com
Matboard
Crescent® Cardboard Company, Inc.
www.crescentcardboard.com
Paper
Die Cuts With A View
www.diecutswithaview.com
Ribbon
Berwick Offray LLC
For a complete list of retailers, visit:
www.Offray.com
Spray Finishes
Krylon®
• Krylon® Workable Fixatif
Used throughout the book to set chalks,markers and computer printed surfaces toprevent smudging when touched
• Krylon® Spray Adhesive
Used throughout the book to adherepaper to paper
• Krylon® Interior-Exterior Paint- Almond #1506
Paint used on frame in the jewelry wallhanger
• Krylon® Preserve It!®
Protect projects being handled from dirt,oils, moisture in desk set and throughoutbook
• Krylon® Matte Finish
Spray on any project that will be used ona regular basis to protect from theelements and everyday wear and tear toextend the life of the item
www.Krylon.com1-800-4KRYLON(1-800-457-9566)
SourcesHere is a list of my preferred products and their suppliers.

Sources
Stamping Supplies
Tsukineko®
• VersaMark® Ink (used in Desk Set chapter tostamp flowers)
www.tsukineko.com
Stencil Supplies
Dreamweaver Stencils
• Embossing paste (used in Wedding chapterto ice cake)
1335 Cindee LaneColton, CA 92324Phone: 909-824-8343Email: [email protected]
Threads, Decorative
Kreinik Mfg. Co., Inc.
• Metallic threads (used in Holiday chapter towrap matboard boxes)
1-800-537-2166www.kreinik.com
Matboard Magic 68
Copyright © 2022 FDOKUMEN