
MANUAL ON RICE CULTIVATION - JICA
163
Republic of Mozambique Ministry of Agriculture National Directorate of Agricultural Extension August 2014 Japan International Cooperation Agency (JICA) August 2014 - First Edition - M M M A A A N N N U U U A A A L L L O O O N N N R R R I I I C C C E E E C C C U U U L L L T T T I I I V V V A A A T T T I I I O O O N N N PROMPAC The project for Rice Productivity Improvement in Chokwe Irrigation Scheme
-
Upload
khangminh22 -
Category
Documents
-
view
5 -
download
0
Transcript of MANUAL ON RICE CULTIVATION - JICA

Republic of Mozambique Ministry of Agriculture
National Directorate of Agricultural Extension
August 2014
Japan International Cooperation Agency (JICA)
August 2014 - First Edition -
MMMAAANNNUUUAAALLL
OOONNN RRRIIICCCEEE CCCUUULLLTTTIIIVVVAAATTTIIIOOONNN
PROMPAC The project for Rice Productivity Improvement
in Chokwe Irrigation Scheme

Preface
This manual has been prepared based on a project implementation in Chokwe irrigation
scheme in Gaza province. The project for “Rice Productivity Improvement in Chokwe
Irrigation Scheme (PROMPAC)” has been implemented from February 2011 to October
2014 as project phase 2 after the project phase 1 named “Integrated Agricultural
Development Project for Small Scale Farmers in Chokwe Irrigation Scheme” from 2007 to
2010.
The improved techniques are developed through experiments and verifications at project
sites in Chokwe irrigation scheme by considering their environment and economical
conditions. Therefore the techniques are very much suitable for Chokwe farmers and the
difference from Chokwe should be considered if you would like to disseminate it to other
areas. The significant differences of improved techniques from conventional techniques are
(1) Spacing of transplanting method, (2) Water management techniques in the first 30 days
of direct sowing techniques and (3) Fertilizer application methods in rice cultivation
techniques. The farmers’ group management including revolving fund activities and
participatory water management and maintenance of irrigation facilities by farmers are
included in this manual to develop integrated rice cultivation in Chokwe irrigation scheme.
This manual is developed for extension agents, researchers and advanced farmers.
Furthermore, more detail information is available in project progress report and work
completion report, and also the poster material is available for more concrete information.
We hope this manual helps you to understand the techniques and promote better rice
cultivation.
Mr. Kiyoshi Masubuchi Chief advisor of PROMPAC
August 2014

Acknowledgement
I would like to express our special thanks of gratitude to JICA and DNEA, Ministry of
Agriculture as well as DPA Gaza who gave us the opportunity to execute this project, which
also helped us in doing experiment of techniques and we received so many information
about new techniques and experiences. Secondly I would also like to thank farmers and
extension agents who helped a lot in investigation and actual implementation within the
limited time. Thank you again to all who helped us to implement the project and create this
manual. Mr. Inacio Mateus Mugabe
Director of SDAE Chokwe / Project manager of PROMPAC August, 2014
Messages
The cooperation in the Chokwe Irrigation Scheme between two countries through JICA
and MINAG for almost a decade has brought the development and improvement
techniques for irrigated rice cultivation among the specialists, community people and
related organizations for increasing rice production and productivity.
This manual is prepared and edited covering the techniques of broader areas related to
rice cultivation with both methodologies of transplanting and direct-seeding. Although
we JICA are planning to provide all necessary support in developing new project in the
area of rice cultivation, we hope that the knowledge gained from this project will
continue to expand for more people and to whole Gaza province and Mozambique in a
sustainable manner.
We appreciate a lot for the cooperation provided by the Mozambican counterpart and
we hope that a continuous and lasting harmonious relationship between two countries
will contribute to the poverty reduction for the benefit of the people of Mozambique.
Mr. Katsuyoshi SUDO Representante residente de JICA Mozambique office
August 2014

INDEX Preface Acknowledgement Messages
CHAPTER 1 Rice Cultivation Techniques 1. Rice Cultivation in Chokwe ····························································· 1
1.1. Rice Production in Mozambique and Chokwe ············································· 11.2. Weather conditions and suitable season for rice cultivation in Chokwe ············ 21.3. Traditional rice cultivation techniques of Chokwe irrigation scheme ················· 3
1.3.1. Rice production of small scale farmer 1.3.2. Traditional rice cultivation techniques
1.4. Productivity of varieties widely cultivated in Chokwe ···································· 4
2. Basic knowledge of grain yield ························································ 6
3. Rice Cultivation Techniques of transplanting ······································ 73.1. Seed bed preparation method of semi-wet type nursery bed ·························· 7
3.1.1. Seed bed style and preparation method 3.1.2. Seed requirement and purity 3.1.3. Pre-treatment of seed 3.1.4. Seed bed preparation method and sowing
3.2. Seed bed preparation method and sowing of dry seed bed style···················· 11 3.2.1. Seed bed area, seed requirement and seed selection. 3.2.2. Seed bed preparation, sowing and irrigation method. 3.2.3. Irrigation Method 3.2.4. Seed bed management and nursery period
3.3. Main paddy field preparation ·································································· 14 3.3.1. Plowing and clod crushing 3.3.2. Internal irrigation canal and plotting the field 3.3.3. Puddling and leveling by power tiller
3.4. Transplanting ······················································································ 19 3.4.1. Planting density 3.4.2. Number of seedlings per hill. 3.4.3. Transplanting depth
3.5. Fertilizer application ············································································· 21 3.6. Paddy field management ······································································· 23
3.6.1. Weeding 3.6.2. Water management
4. Dry direct sowing cultivation method ··············································· 254.1. Seed preparation and pretreatment ························································· 25
4.1.1. Seed procurement 4.1.2. Removing awn and impurities from seeds 4.1.3. Floating seed selection / drying the seeds
4.2. Applicable seed volume ········································································ 25 4.3. Main Paddy Field Preparation ································································ 26
4.3.1. Weeding, removing residues of previous crop, rough plowing 4.3.2 Internal irrigation / drainage canals and plotting to the longer side of the field 4.3.3 Clod crushing by chisel plow as well as rotary
4.4. Seeding ····························································································· 28

4.4.1. Seeding by manual row seeder 4.4.2. Establishing small plots parallel to the shorter side of the field
4.5. Irrigation ···························································································· 30 4.5.1. Method of the first irrigation soon after the seeding 4.5.2. Method of the second irrigation and onwards
4.6. Weeding ···························································································· 30 4.6.1. Optimum weeding time 4.6.2. Use of herbicide
4.7. Flood Irrigation ···················································································· 31 4.8. Fertilizer Application ············································································· 31
4.8.1. Applicable volume of fertilizer 4.8.2. Application of nitrogenous fertilizer
5. Harvesting ················································································· 335.1. Optimum harvesting time is very important for ensuring good quality of rice. ···· 335.2. Threshing and drying ············································································ 335.3. Rice milling ························································································· 33
6. Self-seed production ···································································· 34
CHAPTER 2 The management of Farmers’ group 1. Establishment of Farming Support Groups : FSG ····························· 36
1.1. What are Farming Support Groups? ························································ 361.2. FSG Establishment Procedures ······························································ 36
2. Establishment and Management of Demonstration Fields ···················· 402.1. What are demonstration fields? ······························································ 40
2.1.1. Selection of Demonstration Field Location 2.1.2. Tractor procurement for plowing 2.1.3. Procurement of seeds 2.1.4. Procurement of fertilizer 2.1.5. Procurement of herbicide
3. Management of the Farming Revolving Fund ···································· 443.1. What is the farming revolving fund? ························································· 44
3.1.1. Preparation of the farming revolving fund 3.1.2. Calculation of Expenditures 3.1.3. Calculation of the repayment amount 3.1.4. Collect the farming revolving fund 3.1.5. Creating bank accounts for managing the fund
4. Book Keeping ············································································ 484.1. Management of Accounting Books ·························································· 484.2. Why is it necessary? ············································································ 48
5. The purpose of the Farmers' management group for rice milling machine 505.1. What is the Farmers’ management group for rice milling machine? ················ 53
6. Members and their roles played by the members of the Farmers’ Management
Group for Rice Milling Machine ·························································· 54 6.1. President ··························································································· 54 6.2. Accountant ························································································· 54 6.3. Assistant Administrator ·········································································· 54 6.4. Operator ···························································································· 55 6.5. Assistant operator ················································································ 55
6.6. Auditor (appointed by the IA) ·································································· 55 6.7. Extension staff as technical supervisor of the group ···································· 55
7. Responsibility of the farmers’ management group for rice milling machine567.1. The group offers the service of rice milling to members as well as non-members ofIrrigation Association. ················································································· 56
7.1.1. Users 7.1.2. Milling procedures 7.1.3. Fees 7.1.4. Check and record the payment 7.1.5. Manage the money
7.2. Operation of the milling machine and its maintenance ································· 57 7.2.1. Maintenance of the milling machine
7.3. Reserve fund for maintenance cost ························································· 58 7.3.1. Maintenance Cost
7.4. Holding Regular Meeting ······································································· 58 7.4.1. Regular meeting
7.5. Report the activities of the farmers’ management group for rice milling machine at the IA general meeting ················································································ 58
7.5.1. Report at the IA general assembly
8. The right of farmers' management group for rice milling machine ·········· 608.1. Salary ································································································ 608.2. Setting up a working office and a meeting space ········································ 60
9. Management of the Accounting Books ············································· 619.1. What is book keeping? ·········································································· 619.2. Why is it necessary? ············································································ 61
CHAPTER 3 Participatory water management and maintenance of irrigation facilities 1. Present Conditions ······································································ 63
1.1. Chokwe Irrigation Scheme ····································································· 631.1.1. Target area in the Manual 1.1.2. Target user of the Manual
2. Maintenance of Irrigation and Drainage Facility for Improved Water
Management ················································································· 66 2.1. Tertiary Irrigation Canal ········································································· 66 2.2. Water distribution in field block or field lot ················································· 67 2.3. Tertiary Drainage Canal········································································· 68
2.3.1. Difference between rice field level and tertiary drainage canal bed level 2.3.2. Profile of tertiary drainage canal
2.4. Drainage in field block or field lot ····························································· 71
3. Simple Leveling ·········································································· 733.1. Purpose ····························································································· 733.2. Tool and cost ······················································································ 743.3. Basic consideration ·············································································· 75
3.3.1. Temporary Bench Mark (TBM) 3.3.2. Plan, profile and cross section
3.4. Measurement and record ······································································ 77 3.4.1. Measurement 3.4.2. Basic cares
3.4.3. Recording 3.4.4. Calculation
3.5. Results ······························································································ 82 3.5.1. D5 Area 3.5.2. D6 area 3.5.3. D11 area 3.5.4. D12 area 3.5.5. R1 area 3.5.6. R3 area
3.6. Countermeasures ················································································ 87
Appendix
1. Fabrication of Manual seeder2. The management of farmers’ group (Examples of book keeping)
The project member Contact

CHAPTER 1 Rice Cultivation Techniques

CHAPTER1 : Rice Cultivation Techniques
- 1 -
1. Rice Cultivation in Chokwe
1.1. Rice Production in Mozambique and Chokwe
In the past five years in Mozambique the area planted to rice was 170,000 ha/year and production was 120,000 t/yr (average yield of paddy is 0.8-1.6 t/ha). With the increase in demand for rice (25 kg/capita/year) the rice self sufficiency percentage dropped drastically (24.7% in 2004) and more than 300,000 tons of rice was imported to compensate. Rice is the second staple food next to maize. From the food security standpoint, self-sufficiency should be achieved immediately.
The Chokwe Irrigation Scheme (CIS), situated along the Limpopo River in Chokwe District, Gaza Province, is the largest irrigation scheme in the country. Irrigated area is 26,000 ha. The CIS used to be the country’s granary, which at its highest capacity; it produced more than 50,000 tons of rice. Today, rice production in the CIS is only about one tenth of the above mentioned production due to many factors: civil war in the 80’s, change of the economic system after independence, and the flood of the Limpopo River in year 2000. The change of cultivation area of major crops in CIS from 2001 to 2007 is shown in figure1.1.
Soil and weather conditions of the region causes difficulties for the establishment of dry field direct sowing rice cultivation in Chokwe irrigation scheme. The soil condition of the project area is characterized by small soil particles of alluvial soil from Limpopo River and special irrigation method “bleeding irrigation” is indispensable in order to ensure a safe germination and seedling establishment. The improvement of irrigation will not be enough to ensure seedling establishment and improvement of land preparation, field layout, sowing method and bird scaring are required.
Weather condition and high solar radiation in Chokwe are favorable factors for high production of rice once improved cultivation techniques are introduced. However, the average yield of transplanting rice cultivation ranges from 3 to 4 t/ha and that of direct sowing is around 2 to 3 t/ha. In upper stream of Chokwe irrigation scheme, transplanting is widely practiced and direct sowing in the middle and lower stream.
Technical components of traditional transplanting are; transplanting old aged single seedling per hill, no fertilizer application, no weeding and harvesting at over matured stage which are main causes of low productivity.
In case of direct sowing cultivation, broadcasting is commonly practiced and poor germination and poor seedling establishment cause low production of panicle per unit area. Poor germination and poor seedling establishment are mainly because of soil condition, alluvial soil of Limpopo River, land preparation of paddy field, seed sowing method and irrigation after sowing seed.

CHAPTER1 : Rice Cultivation Techniques
- 2 -
Figure 1.1: Rive cultivation in Chokwe irrigation scheme 2001/02 to 2006/07. Source: SDAE, Chokwe District, Extension Department.
1.2. Weather conditions and suitable season for ric e cultivation in Chokwe
The weather conditions of Chokwe are extremely excellent for paddy cultivation compared with those in Asian countries. The dominant position point of weather in rice cultivation season is: very abundant amount of solar-radiation; big daily temperature range; small precipitation; low relative humidity through the whole growth period.
Figure 1.2: Weather conditions (1997/2006) and crop cultivation in Chokwe Source: Chokwe Agricultural Experimental Station
0
1000
2000
3000
1 2 3 4 5 6
Company and big farmer
Small scale farmer
Un
it: h
a
01/02 02/03 03/04 04/05 05/06 06/07 Year
60
65
70
75
80
85
10
15
20
25
30
35
0
20
40
60
80
100
120
140
Aug. Sept. Oct. Nov. Dec. Jan. Feb. Mar. April May June July
80
70
60
120
80
40
0
Mea
n,
max
. an
d
m
in.
tem
per
atu
re
( ℃)
Re
lati
ve
h
um
idit
y(%
)
Pre
cip
itat
ion
(mm
)
Rice cult ivat ion season (Nov.~~~~May)
Dry season’s f ield crops cult ivat ion season (May ~~~~Oct.)
Main field growth period period
Harvesting period
Aug. Sept. Oct. Nov. Dec. Jan. Feb. Mar. Apri l May June July
| | 1 | | | | | | | | | | |
Nursery period
30
20
10 Tem
pe
ratu
ra M
ed
ia,
ma
x. e
min
(oC
) H
um
ida
de
re
lati
ve (
%)
Pre
cip
ita
ção
(
mm
)
Época de cultivo de arroz (Nov. ~~~~
Maio ) Epoca de cultivo das culturas de época seca (May ~~~~Oct.)
Principal peiodo de crescimento
Periodo de
Periodo de

CHAPTER1 : Rice Cultivation Techniques
- 3 -
1.3. Traditional rice cultivation techniques of Cho kwe irrigation scheme
1.3.1. Rice production of small scale farmer
Results of the survey on rice production of transplanting cultivation indicates that company/contact farmer and research station obtain 4.7 and 4.9 t/ha of grain yield respectively, but small scale farmer can produce only 3.4 t/ha. The biggest cause of low yield in farmers’ field is small panicle number per unit area and low spikelet number per panicle. On the other hand, there is no big difference in filled spikelet percentage and weight of 1,000 grains between small scale farmers and company/contact farmers and research station. Respect to direct sowing rice cultivation, the average yield of farmers was 2.9 t/ha while yield obtained in EAC experimental field was 4.7 t/ha. Analysis of yield components indicates that significant difference of filled spikelet percentage and 1000 grain weight between farmer’s traditional technique and improved technique. The causes of low yield of farmer’s practice are outbreak of weak tillerings due to delay in nitrogen application, low light receiving intensity due to mutual shading by excessive seed rate (150 kg/ha), delay in nitrogen top dressing and weeding, and poor water management at late growth stage.
1.3.2. Traditional rice cultivation techniques
Traditional farmer’s cultivation techniques are not adequate for higher yield production. This is due to the many problems and defects inherent to the current rice cultivation technique. Those problems and defects are summarized as follows; [Seeds] � Use of many varietal mixture; no pure seed is used. � Many weed seeds are mixed with paddy seeds. � Many empty and imperfectly ripened grains are mixed. [Seed pre-treatment, Seed bed and nursing of transp lanting cultivation] � No seed pre-treatment, such as seed selection, soaking and incubation, is carried
out. � Absence of sufficient seed bed area for healthy seedling nursing. � Nursery bed style is not suitable for bringing up quality seedlings. � Nursery period is too long. � Many weeds in the seed bed. � Germination percentage is low due to seeding with dry seed bed style. � Too much bird attack due to imperfect covering after seed sowing. � Water management during nursing period is not good. � Nursery bed preparation is very rough. [Main paddy field preparation] Transplanting � In case previous crops stay in the field, 1st plowing can’t start at proper time. � Plowing by tractor is very sloppy and there remain many un-plowed spots.

CHAPTER1 : Rice Cultivation Techniques
- 4 -
� Insufficient weed control due to tillering stage of rice plant. � Puddling and leveling work are not done. Direct sowing Uneven plowing depth (difference reaches up 30cm) Inadequate soil clos crushing due to uneven plowing depth and crop residue left in the field Soil movement of field surface Uneven leveling of field [Transplanting/sowing] Transplanting � Old age seedlings are used. � Low planting density. � Single seedling transplanting per hill. � Deep transplanting (5-7 cm). Direct sowing � Mixture of different varieties � Excessive amount seed (100 to 150kg/ha: 61% of farmer, 150 to 200kg/ha: 36% of
farmer) � Deep placement of seed (more than 5 cm depth) due to uneven plowing by disk plow � Seed picking by bird (poor coverage of seed) [Fertilization] � Most of farmers do not apply any kind of fertilizer. � Even in case of fertilizer applied, application timing is not appropriate. [Field management] � No proper weeding practiced � Inadequate timing of herbicide application in direct sowing due to poor seedling
establishment
[Water control] � There is no water control in accordance with growth period. � Inadequate first irrigation after direct sowing causing poor germination due to water
standing in the field. [Harvesting and post-harvest] � No optimum harvesting time and a lot of harvest losses
1.4. Productivity of varieties widely cultivated in Chokwe
Productivity of three widely cultivated varieties in Chokwe was examined in 2008/09 and the maximum yield obtained was 9.4 t/ha in Limpopo variety, followed by 7.7 t/ha in IR 64 and the lowest yield was 6.8 t/ha in ITA 312. Some new varieties were evaluated in 2013 and 2014 and results obtained are summarized as follow.
CHAPTER1 : Rice Cultivation Techniques
- 5 -
� No significant difference in yield of five varieties except Vembe � Alvorada and ITA312 high tillering capacity � IRGA409 high number of spikelet per panicle and low number in Vembe � Heavy grain weight in Macassane and Vembe � High thresh ability in Alvorada and Macassane and low thresh ability in Vembe � Early maturity in Vembe and about 2 weeks difference among 5 varieties
VarietyYield
(ton/ha)Panicle per
hillSpikelet per
panicleFilled spikelet
(%)1000 grainweight (g)
Shattering(%)
Number ofdays toheading
Alvorada 6.1 17.1 94.6 76.7 25.3 24.6 108Farox 5.1 14.6 99.9 88.3 25.8 19.6 93IRGA 409 5.3 14.6 104.9 90.9 23.6 19.4 99ITA 312 6.3 17.2 100.8 87.8 22.7 21.0 104Macassane 6.1 14.8 98.4 89.1 28.0 22.1 100Vembe 2.8 15.4 72.9 78.2 26.6 6.0 73

CHAPTER1 : Rice Cultivation Techniques
- 6 -
2. Basic knowledge of grain yield
The paddy yield is constituted by four yield components, namely (a) Panicle number per unit area, (b) Grain number per panicle, (c) Ripening percentage, and (d) 1,000 grains weight as shown below; To increase the paddy yield, these four yield components need to be “lifted up”; but each component is determined at a different stage/period during the total rice growth stage. On the other hand, some components are influenced by the varietal characteristics strongly, such as 1,000 grains weight and grain number per panicle. The easiest component for effective lifting up” in order to increase yield is the panicle number per unit area. Determination time of each component is shown in figure 1.3. 0 10 20 30 40 50 60 70 80 90 100 110 120 130 | | | | | | | | | | | | | | Days after seeding Figure 1.3: Time of determination of each yield component.
Tra
nsp
lan
ting
Ma
xim
um
till
eri
ng
sta
ge
Hea
din
g s
tag
e
Be
gin
nin
g o
f R
ed
uct
ion
Div
isio
n s
tag
e
Tillering stage
So
win
g se
ed
Pan
icle
initi
atio
n
sta
ge
Fo
rma
tio
n o
f g
rain
in
pad
dy
pla
nt
Ripening stage
Panicle number per unit area
Grain number per panicle Ripening %
1,000 grains weight
Variety: Limpopo Total growth duration: 125
Har
vest
ing
sta
ge

CHAPTER1 : Rice Cultivation Techniques
- 7 -
3. Rice Cultivation Techniques of transplanting
The most important factors in rice cultivation are a) cultivation season, b) main land preparation, c) nursing healthy seedling, d) transplanting and fertilizer application and e) main field management including water control. It is conceivable that obtaining 10 t/ha paddy yield in farmer’s field is not a dream if new cultivation techniques and practices are introduced. Now, let us express the improved technology of rice cultivation in accordance with cultivation order.
3.1. Seed bed preparation method of semi-wet type n ursery bed
3.1.1. Seed bed style and preparation method
The raising of seedling is the first step in rice cultivation. Japanese farmer says that the quality of seedlings is generally responsible for 50% of rice yield. 1) Seed bed style A rectangular shaped and semi-wetted seed bed is recommendable. According to experiment results, high quality and heavy dry matter seedlings are obtained in a “Semi-wet type seed bed”. Heavier seedling will have shorter setting period after transplanting, and more number of tillers during tillering period than seedling from wet and/or dry seed bed. 2) Seed bed area. A seed bed area of 400 m2 to 500 m2 is necessary for each 1 ha of paddy field (The seed bed area includes ditch.)
Figure 1.4: Optimum seed bed area per 1ha of main paddy field. According to experiment results, the seedlings become shorter and smaller if seed bed area narrows to less than 400 m2 against 1 ha of main paddy field.
3.1.2. Seed requirement and purity
1) Seed requirement for 1 ha of main paddy field. Seed required for 1 ha of main filed is 55 kg to 60 kg. However, seed requirement vary with germination percentage. If germination percentage is less than 90% add 10% of seed i.e. 80% of germination percentage, seed required for 1 ha will be 60 kg to 65 kg.
1 ha of main paddy field
10,000 ㎡㎡㎡㎡
150 m
66.6 m
20 m
20 m 400m2
25 m
20 m 500m2

CHAPTER1 : Rice Cultivation Techniques
- 8 -
2) Seed germination test Place wet cloth to a shallow and large dish and put 100 selected seed. After placing seed cover seed by wet cloth and wait for 3-4 days. The number of germinated seed is the germination rate. Cloth must be wet during the process of seed germination test.
Figure 1.5: Seed germination test
3.1.3. Pre-treatment of seed
The procedure of the seed pre-treatment is as follows: 1) Specific gravity selection. The specific gravity selection of seed by water must be done before soaking. The specific gravity selection of seed by water must be done before soaking. Figure 1.6: Method of specific gravity selections by flash water. 2) Seed soaking and incubation. Soaking the seed into water for about 24-30 hours, and Seed incubation is about 12-18 hours. During incubation process there is need for careful checking of the germination condition.
No germinated seed
Steps in pre-treatment of seed are; (1) First of all, prepare bucket, fill it with water. (2) Put the seed into water. Fully mature seeds sink and immature or not fully mature seed float. Use only the soaked grains for seed. (3) Afterwards these seeds are put into water for about 24-30 hours for sufficient water absorption. (4) After soaking, take the seed to incubation spot for about 12 to 18 hours. Seed incubation will need careful checking for germination.
Use only depressed grains for seed
Floating grain is discarded

CHAPTER1 : Rice Cultivation Techniques
- 9 -
Figure 1.7: Method of seed soaking and incubation, and good germination condition.
3.1.4. Seed bed preparation method and sowing
1) Preparation method of seed bed Procedure of nursery bed preparation is shown below; Figure 1.8: Process of seed bed preparation.
①①①① ②②②② ③③③③ ①①①① Not well germinated yet.
②②②② Good condition for sowing.
③③③③ Over germinated and not good.
Seed soaking 24-30 hours
Seed incubation 12-18 hours
Cover by plastic sheet
◎◎◎◎ ×××× ××××
30 cm
② Plowing
①①①① Measure necessary area. 400~500m2/1 ha
③ Harrowing
④ Bed preparation
120 cm
⑤Clod crashing, leveling and removing grass are carr ied out
under dry condition
⑥Put water and carry out final leveling very carefully
⑦⑦⑦⑦ Ready for seed sowing!
* The ditch soi l must be placed on the beds and the beds must be fla t and leveled.

CHAPTER1 : Rice Cultivation Techniques
- 10 -
Measuring the seed bed area Making seed bed and ditch
Leveling under dry condition Final leveling after putting water. Photos 1.1: Seed bed preparation work
2) Seed sowing The seed sowing process is shown below;
Figure 1.9: Process of sowing seed to nursery bed and covering method
Sowing uniformly Seed into bed soil by lightly holding down with the palm as shown in photo. below
Cover 2-3 mm with soft and muddy soil from ditch.
Muddy soil Then, you can get good ger mination!
* Give water every morning for up to 1 week for securing smooth germination.
CHAPTER1 : Rice Cultivation Techniques
- 11 -
Sowing seed Tapping and covering work by hand.
Photos 1.2: Seeding and covering work.
3.2. Seed bed preparation method and sowing of dry seed bed style
According to the dry seed bed style method, a large volume of seed (approximately 100kg) are scattered in a relatively small size of field (1/50-1/100 for paddy field). Unfortunately, there is inadequate protective covering for the seeds. This allows for a significant level of seed consumption by birds. The bed preparation is also inadequate. There are many cases where soil clods larger than 10cm diameter still remain in bed at the time of seeding. Under these circumstances, seeds will drop in between such clods and would not be able to germinate. Moreover, a destruction of aggregated structure occurs after the first irrigation as the bed is completely covered with water. The germination rate becomes even lower accordingly. Therefore, the improved semi-dry seed bed style method is suggested along with the semi-irrigated bed method. Here, the size of the paddy is to be 1ha. So the sufficient volume of seed and the appropriate size for the nursery bed are indicated.
3.2.1. Seed bed area, seed requirement and seed sel ection
3.2.2. Seed bed preparation, sowing and irrigation method
1) Measurement for the appropriate size of the bed The bed area should be measured appropriately and marked using a rope, after the plowing. It is ideal to have the bed area of 1/30 of the paddy, which is 330 ㎡ , in order to provide an agreeable growing condition.
Figure 1.10: Seed bed area
Nursery area and seed requirement
Main paddy field 1 ha (10,000 m2)
Nursery area 330 to 200 m2 (1/30 to 1/50 of main field)
Seed rate 60 kg
200~~~~330m2 10mmmm
20m~m~m~m~33m

CHAPTER1 : Rice Cultivation Techniques
- 12 -
2) Establishment of the outer ridge The ridge is made by the soil scooped just inside and to outside of the roped boundary. This scooped area will be the furrow and the irrigation canal.
Figure 1.11: Boundary preparation 3) Next, the furrow irrigation as well as drainage canals will be established inside the bed, 30cm wide and 20cm deep at the center.
Figure 1.12: Irrigation furrow 4) Clod crushing Clods of the bed should be crushed as finely as possible and the surface to be leveled.
Figure 1.13: Soil clod crushing 5) Seeding Pre-treated seeds should be scaled and the designated volume of such seeds should be sown equally spread.
Figure 1.14: Seed sowing
Boundary
Drainage Water intake
Irr igation furrow
Water intake
Drainage
Soil clod of sur face area for seed bed should be less than 4cm of diameter and seed bed must be well leveled
Soil clod of irrigation furrow is also well crushed for covering seeds
Seed sown
CHAPTER1 : Rice Cultivation Techniques
- 13 -
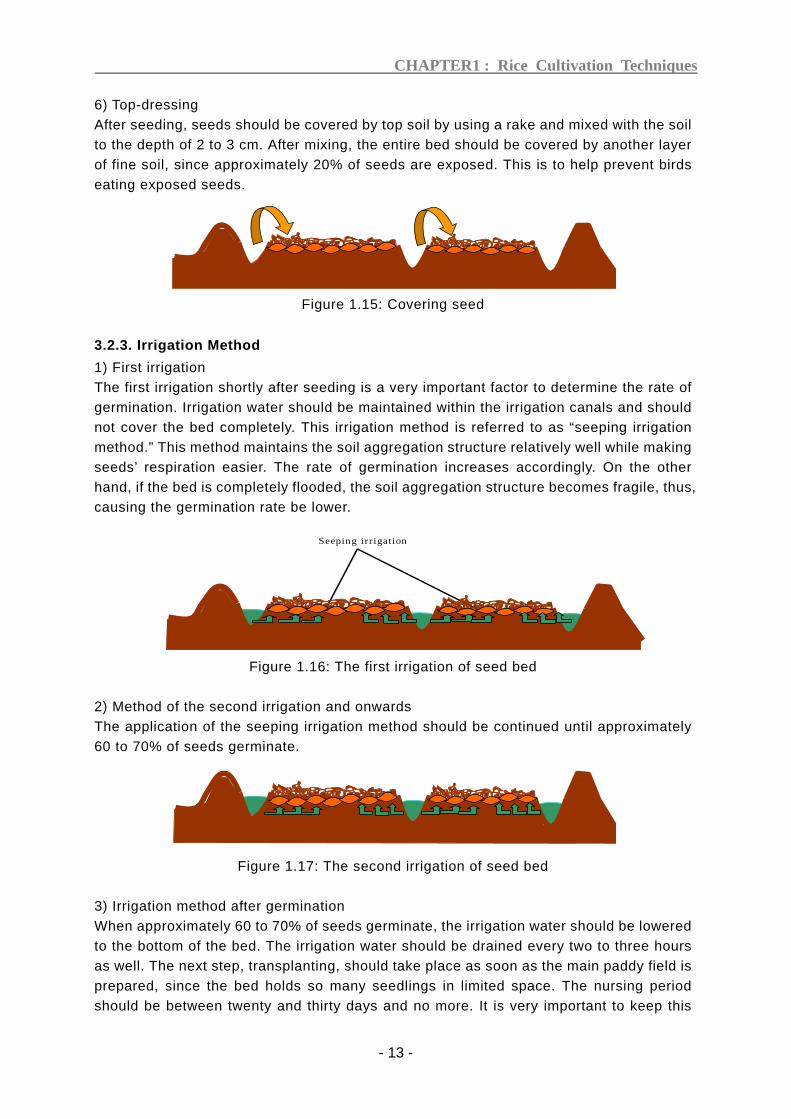
6) Top-dressing After seeding, seeds should be covered by top soil by using a rake and mixed with the soil to the depth of 2 to 3 cm. After mixing, the entire bed should be covered by another layer of fine soil, since approximately 20% of seeds are exposed. This is to help prevent birds eating exposed seeds.
Figure 1.15: Covering seed
3.2.3. Irrigation Method
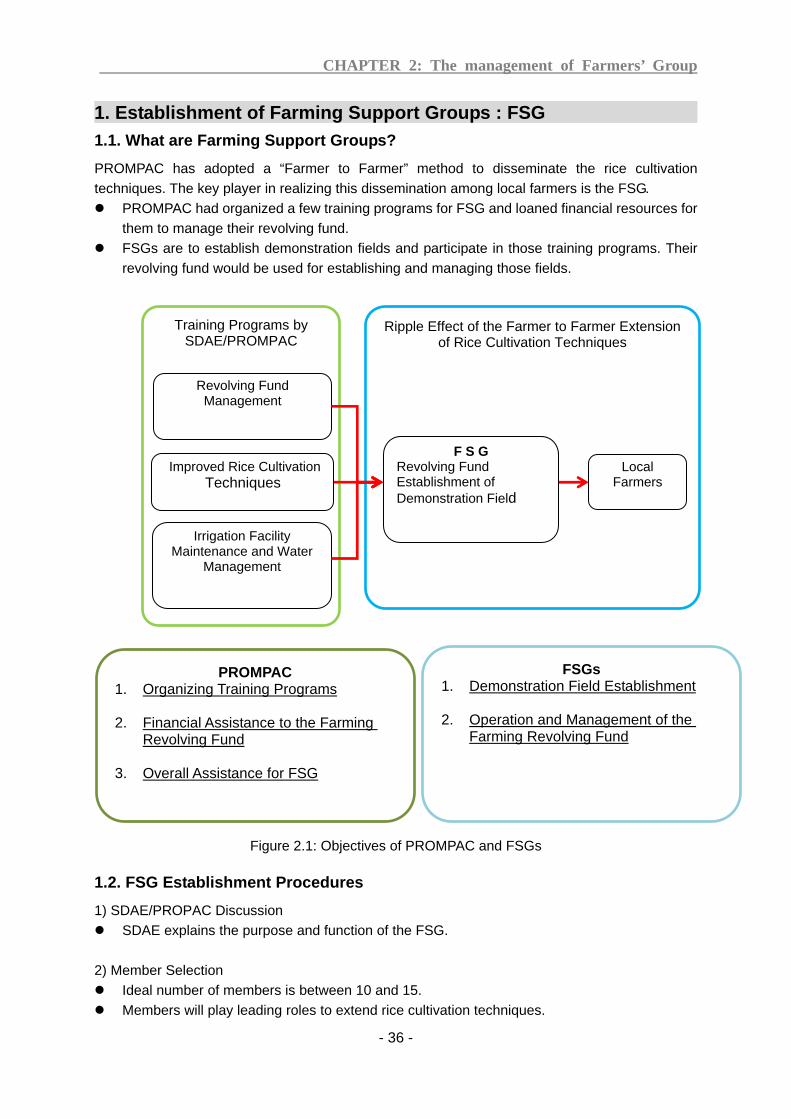
1) First irrigation The first irrigation shortly after seeding is a very important factor to determine the rate of germination. Irrigation water should be maintained within the irrigation canals and should not cover the bed completely. This irrigation method is referred to as “seeping irrigation method.” This method maintains the soil aggregation structure relatively well while making seeds’ respiration easier. The rate of germination increases accordingly. On the other hand, if the bed is completely flooded, the soil aggregation structure becomes fragile, thus, causing the germination rate be lower.
Figure 1.16: The first irrigation of seed bed
2) Method of the second irrigation and onwards The application of the seeping irrigation method should be continued until approximately 60 to 70% of seeds germinate.
Figure 1.17: The second irrigation of seed bed 3) Irrigation method after germination When approximately 60 to 70% of seeds germinate, the irrigation water should be lowered to the bottom of the bed. The irrigation water should be drained every two to three hours as well. The next step, transplanting, should take place as soon as the main paddy field is prepared, since the bed holds so many seedlings in limited space. The nursing period should be between twenty and thirty days and no more. It is very important to keep this
Seeping irr igation

CHAPTER1 : Rice Cultivation Techniques
- 14 -
duration time in mind.
Figure 1.18: Seed bed irrigation after germination of seed 3.2.4. Seed bed management and nursery period 1) Seed bed weeding Weeding work is needed from time to time during nursery period if weed comes out. If no weeding is practiced, many grass come out, seedling becomes small and tiny and establishment period after transplanting takes too long which finally results in reduced number of tiller number and panicle. 2) Urea top-dressing to seed bed If leaf color becomes yellow at middle stage, apply urea 3-5 g per m2 (400m2=2 kg, 500 m2=2.5 kg). But, don’t apply urea later than after half of nursing period.
Figure 1.19: Optimum time for urea top-dressing to seed bed.
3) Water management of seed bed � Just after seeding up to 7 days: Every morning, give water at about 1-2 cm height
from the bed surface � 7-14days: Give water every 2-3 days using the same method as above. � 15days-transplanting time: Give water every 4-5 days, and give sufficient water 1
or 2 days before seedling uprooting work start. 4) Nursery period Nursery period is very important for ensuring large and healthy tillers as well as big panicle size and large panicle number per unit area. Nursing duration must be between 21days and 30 days. Nursing duration of more than 30 days will usually cause un-seasonal sprouting of panicles just after transplanting, small panicle size and less panicle number per unit area.
3.3. Main paddy field preparation
The main paddy field for this project begins with the rough plowing process at the field where there is no previous crop. It is usually done in the rain in October and November. The rough plowing is done by the large scale tractor (75-120hp) along with a disc plow.
| | | | | | | | | | | | | | | | | | | | | | | | |
0 1 2 3 14 5 6 7 8 9 10 11 12 13 14 15 16 17 18 19 20 21 22 23 24 Days after seeding
Seeding Germination Apply 3-5 g of urea per m2 .
Transplant ing time.

CHAPTER1 : Rice Cultivation Techniques
- 15 -
Nevertheless, the field was not evenly plowed everywhere, leaving some parts unplowed. Furthermore, in the fields, where vegetables or maize were previously produced, the harvesting of these crops usually means a delay in the plowing for rice cultivation. Preparation cannot start until the middle to the end of November. The seed bed is established from the mid-October to the beginning of November at a corner of the main paddy field or of the previously cultivated field, near to the access to the irrigation water. Still, an excessive volume of seeds are applied to a very limited space (1/70 to 1/100 to the main field) under dry conditions. As has been already pointed out after the first phase, the field preparation is a very important factor to determine the growing environment for rice seedlings. The quality of the field has a direct influence to the quality of the plants and their yield. This paper is an addition to the method of main field preparation with the use of a cultivator (a power tiller and a rotary) and a tractor (a tractor and chisel plow, a rotary), which were both donated during the second phase.
3.3.1. Plowing and clod crushing
There were a few beneficial facts recognized in plowing using a disc plow, a chisel plow and a rotary. ・Soil clods are better crushed and easily done with the use a chisel plow followed by a rotary. ・This decreased the efficiency of plowing by about 30%. ・The chisel plow maintains the even depth of plowing. ・By using both a chisel plow and a rotary, the horizontal soil movement is reduced. ・The work efficiency of a disc plow and a chisel plow is about the same. (It is 2.0-2.5hr/ha
for a disc plow and 3.0hr/ha for a chisel plow.) ・For the crushing performance, it is better to use a rotary than a disc harrow, even though
the working efficiency of using a rotary is 2.0-2.5hr/ha and is not as good as that of using a disc harrow of 1.0-1.5hr/ha.
Plowing field (previous crop of maize) Plowing filed (no previous crop)

CHAPTER1 : Rice Cultivation Techniques
- 16 -
Traditional puddling and leveling Well prepared field
Photos 1.3: Land preparation
Plowing by chisel plow Plowing by rotary (crashing soil clod)
Photos 1.4: Land preparation by chisel plow and rotary
3.3.2. Internal irrigation canal and plotting the f ield
After establishing the irrigation furrow canals, the next task is to divide the field and make
Soil condition after single rotary plowing and soil clod of 4 cm
Soil condition after double rotary plowing and soil clod of less than4 cm

CHAPTER1 : Rice Cultivation Techniques
- 17 -
small plots. Here, the shorter side of the field is dealt with first. Considering inclination of the field, one plot should not be higher or lower more than 5cm from the plot next to it. Say, for example the longer side of this field is 100m, a method of plotting water intake and drain outlet should be done by using the table below as a reference.
Having the field divided into small plots helps to manage the field, such as weed control and fertilizer application. It is generally very effective to minimize the weed when the field is completely covered by irrigation water soon after the completion of the transplanting process. The difference in the level position of each plot, where irrigation water would not suffocate the plants by completely flooding them, should be less than 3cm, no more than 5cm. Please keep in mind that it is highly recommended to use hands to finish the plotting process by moving soil from the lower plot to the higher plot, as it is usually the case that plowing by a tractor with a disc plow is not good enough.
Figure 1.20: Well plotted field
3.3.3. Puddling and leveling by power tiller
The purposes of puddling and leveling the field are to eliminate the nitrogenous fertilizer caused by the decreased water requirement rate, to increase the effects of fertilizer application, to promote the growth roots and to minimize the growth of weed at the beginning of the plant growth stage through flooding the field, etc. One of the most serious issues to be concerned with is the extremely large water requirement rate
Difference of level in water intake and drain outlet
Number of small plots Difference of level in the small plot
25 cm 5 to 8 5 cm to 3.1 cm
50cm 10 to 15 5 cm to 3.3 cm
75 cm 15 to 20 5 cm to 3.8 cm
120
41.6
Irrigation canal
Internal irrigation canal

CHAPTER1 : Rice Cultivation Techniques
- 18 -
(approximately 40mm/day) often occurs between the transplanting and the beginning of the tillering stage. The change of the underground water level of the target region shows that the underground water level is the lowest during the time of land preparation to the beginning of the transplanting period. The level would gradually increase. By February, in lowland area, the field will be completely covered by water. This flooded condition will remain until April/May. The water requirement rate is the largest at the time of transplanting lasting to the effective tillering period, which is presumed to be the cause of draining of the added nitrogenous fertilizer. Unfortunately, this phenomenon is making it very difficult to obtain sufficient number of panicles per unit area, resulting in having the unfavorable yield. This proves the importance of the adequate “puddling and leveling” to minimize the drain of nitrogenous fertilizer and to secure the sufficient number of panicle per unit area. What makes it easier to do the puddling and leveling is the power tiller. A performance test result proved its favorable performance and work efficiency. It was found to be possible to complete puddling a 0.1ha of field by the power tiller within about two hours average, after plowing, clod crushing and introducing the water. The duration of the leveling process may be influenced by the field inclination.
Figure 1.21: Annual precipitation and change of presumptive underground water level.
0
20
40
60
80
100
120
140
160
7月 8月 9月 10月 11月 12月 1月 2月 3月 4月 5月 6月
Pre
cip
itatio
n(
mm)
Presumption underground water
Local rice cultivation season
Growth duration of Limpopo variety
Field →
level
July Aug. Sept. Oct . Nov. Dec. Jan. Feb. Mar. Apli l May June

CHAPTER1 : Rice Cultivation Techniques
- 19 -
3.4. Transplanting
3.4.1. Planting density
The recommended planting density should be of 30 hills per m2 (hill to hill’s space: about 18cm between two neighbor hills). To obtain more grain yield, increasing seedling population per unit area is very effective and quick.
Figure 1.22: Image of 30 hills per m2.
Figure 1.23: Effect of planting density on grain yield
The following technique can be pointed out for increasing panicle number per unit area; Related technique for increasing the “panicle number per unit area”
Leveling of paddy field: Perform Puddling and leveling well. � Planting density: 30 hills/m2. � Urea application: Apply urea 2 - 3 bags (100 – 150 kg) /ha. � Urea split application: 2 times top-dressing 7-10 and 15-20 days after
18cm
18cm
18cm
18cm
1 m
1 m
0
2
4
6
8
10
D 10 D 20 D 30 D 40
3 .7 t / ha
5 .7 t / ha
7 .2 t / ha
8 .3 t / ha
5 25 25 25 2 %%%%
2 .0 t .2 .0 t .2 .0 t .2 .0 t .
2 62 62 62 6 %%%%
1.5 t .1.5 t .1.5 t .1.5 t .
16161616 %%%%
1.1 t .1.1 t .1.1 t .1.1 t .
Gra
in
Gra
in
Gra
in
Gra
in Y
ield
Yie
ldY
ield
Yie
ld (
t/
ha
)(t/
ha
)(t/
ha
)(t/
ha
)
10 hills/m2 20 hills/m2 30 hills/m 2 40 hills/m2
Number of hills per m2
I nc r ea sedIncr ea sedIncr ea sedIncr ea sed
i nc r eai nc r eai nc r eai nc r ea sedsedsedsed
I nc r ea sedInc r ea sedInc r ea sedInc r ea sed

CHAPTER1 : Rice Cultivation Techniques
- 20 -
transplanting. � Use young seedlings: Strict observance of nursing duration of 21 – 28 days. � Puddling and leveling: Strict enforcement of puddling and leveling.
Related technique for obtaining the optimum “grain number per panicle” � Top-dressing just before the Reduction Division Stage.: 20-18 days before
heading (see cultivation calendar). � Use young seedling.
3.4.2. Number of seedlings per hill
The effect of number of seedling per hill was examined at Experimental Field in Research Station during 2007/08. The highest yield was obtained in 6seedlings/hill but there was no significant difference among 3 seedlings/hill, 6 seedlings/hill and 9 seedlings/hill and yield of 1 seedling/hill was significantly lower than other seedling density. It can be concluded that optimum seedling number per hill is 4 to 6 seedlings per hill. Figure 1.24: Difference of paddy yield by different seedling number per hill treatments.
3.4.3. Transplanting depth
Shallow transplanting is also an important factor for improving tiller outbreak during the effective tillering period. If transplanting has been correctly executed, i.e. in shallow depth, tiller outbreak is smooth from the rooting (setting) period (about 7 days after transplanting). By the contrary, if transplanting is carried out as deeply as 8-10 cm into soil, first few roots will come out from the bottom, then other roots will come out from upper node near soil surface. If this occurs, rooting period will take more than 2 weeks, and tiller outbreak will also delay and tiller number will be smaller.
01
234
567
89
1 2 3 4
01
234
567
89
1 2 3 4
4.5 t / ha
Gra
in y
ield
(t/
ha
)
7.8 t / ha
8.7 t / ha 8.6 t / ha
75%
11%
1 seedling 3 seedlings 6 seedlings 9 seedlings per hill per hill per hill per hill

CHAPTER1 : Rice Cultivation Techniques
- 21 -
Figure 1.25: Comparison of shallow and deep transplanting. In shallowly transplanted hill, new roots come out just after transplanting. But, deeply transplanted hill needs more days to complete the setting period, because in deeply transplanted seedlings secondary rooting occurs from upper node. This means that effective tillering period becomes shorter which eventually reduces tiller (panicle) number per unit area.
3.5. Fertilizer application
Today, high yielding rice variety has been widely introduced in this area. In case of cultivation of high yielding variety such as IT 312, IR 64 or Limpopo, nitrogenous fertilizer application is indispensable. Indeed, some times paddy yield is lower in high yielding variety compared with local variety if no fertilizer is applied. Fertilizer application is a crucial practice that allows for full appearance of the varietal characteristics. The minimum quantity of urea needed is 2 to 3 bags per ha, if one expects to get high effect, 1 bag of urea cannot be expected to provide high nitrogen effect.
Figure 1.26: Effect of nitrogen application on grain yield
Shallow transplanting About 2~~~~ 3 cm depth
Deep transplanting About 8~~~~ 10 cm depth
Secondary rooting
0
1
2
3
4
5
6
7
8
9
N 0 N 30 N 60 N 90 No Urea Urea 70 kg Urea 130 kg Urea 200 kg applied /ha /ha /ha
5 .6 t / ha
3 .8 t / ha
8 .7 t / ha
7 .4 t / ha
114%
32%
17%
Gra
in y
ield
(t/
ha
)

CHAPTER1 : Rice Cultivation Techniques
- 22 -
Finally, since urea application is crucial for obtaining higher paddy yield, we can recommend that 2 to 3 bags per ha be applied. Related technique to increase grain yield are as follows; � Good puddling and leveling of main paddy field = Good land preparation, � Seeding and transplanting at optimum time, � Using young and healthy seedlings of 21 to 28 days. � Planting density with 30 hills per m2, � 4-6 seedlings per hill, � Shallow transplanting, � Perform the weeding during the tillering stage, � Optimum quantity fertilizer application of Apply urea 2 to 3 bags (100 – 150 kg)
/ha. � Optimum fertilizer split application of 3 times top-dressing;
1st: 7 to 10 days after transplanting: 2nd: 15 to 20 days after transplanting: 3rd: 20 to 18 days before heading:
Split application method of nitrogen is the best way to minimize the loss of applied Urea due to vertical movement of water in paddy field. Instead of apply basal nitrogen; total amount of Urea (100 kg to 150 kg) is split in 3 times to assure high yielding. Following are recommended method of split application of Urea.
Note: SA1: SA1 (Basal 50% + 1st Topdressing 25% + 3rd Topdressing 25%), SA2: SA 2 (1st Topdressing 50% + 2nd Topdressing 25% + 3rd Topdressing 25%) SA3: SA 3 (1st Topdressing 70% + 3rd topdressing 30%).
Figure 1.27: Effect of split application of Urea on grain yield
Split application Kg of urea/ha Time of application
1st top dressing 40 – 50 7 to 10 days after transplanting
2nd top dressing 25 - 30 14 to 20 days after transplanting
3rd top dressing 20 - 25 18 to 20 days before heading
5
6
7
SA 1 SA 2 SA 3SA 1 SA 2 SA 3 Treatment
5 .9 t / ha5 .9 t / ha5 .9 t / ha5 .9 t / ha
7 .3 t / ha7 .3 t / ha7 .3 t / ha7 .3 t / ha
6666 ....1111 t / hat / hat / hat / ha
P
ad
dy
yie
ld (
t/h
a)

CHAPTER1 : Rice Cultivation Techniques
- 23 -
Note: SA1: SA1 (Basal 50% + 1st Topdressing 25% + 3rd Topdressing 25%), SA2: SA 2 (1st Topdressing 50% + 2nd Topdressing 25% + 3rd Topdressing 25%) SA3: SA 3 (1st Topdressing 70% + 3rd topdressing 30%).
Figure 1.28: Split application of Urea
3.6. Paddy field management
3.6.1. Weeding Weeding work is very important especially up to Maximum Tiller Number Stage about 30 to 40 days after transplanting. During this period, the panicle number per unit area is determined which has strong effect on paddy yield. Therefore, weeding during tillering stage is very important work. If there are many weeds during tillering stage, absorption of nitrogen by rice plant is hindered and photosynthesis is also reduced, and finally panicle number per unit area is lower. 3.6.2. Water management It is important that deep water (4-6 cm) be maintained during the whole rooting stage, i.e., up to 7 to 10 days after transplanting. Deep water will also be needed during the last half of the growth stage, i.e. from the end of the Reduction Division Stage to the Milky Stage, which, in case of Limpopo variety is around 25th of Feb.-15th of March. From maximum tiller number stage to the beginning of the Reduction Division Stage intermittent irrigation can be recommended
▲ ▲ ▲ Ba s a l 1s t To p d r es s i ng 2 nd To p d r es s i ng 3 r d -5 - 4 - 3 -2 -1 0 +1 +2 +3 +4 +5 +6 +7 +8 +9 +10 +11 +12 +13 +14 +15 +16 +17 +18 +19 +20 +21
Days before and after transplanting RDS SASASASA 1111 ▲ ▲ ● SA 2SA 2SA 2SA 2 ▲ ▲ ● SA 3SA 3SA 3SA 3 ▲ ●
Note. ▲ shows time of urea application. RDS: Reduction Division Stage (18-20 days before heading) .
Land p
rep
aratio
n
Transpla
ntin
g
←←←←Rooting per iod →←→←→←→← Effect ive t i llering period →→→→

CHAPTER1 : Rice Cultivation Techniques
- 24 -
Figure 1.29: Water control method in total growth period.
T
ran
spla
nti
ng
E
nd
of
sett
ing
per
iod
M
axim
um
til
ler
nu
mb
er s
tag
e N
eck
-no
de
dif
fere
nti
atio
n s
tag
e
Hea
din
g s
tag
e
Har
ves
tin
g s
tag
e
Beg
inn
ing
of
Red
uct
ion
D
ivis
ion
sta
ge
D
ee
p w
ate
r 1
0 c
m
Shallow water 2-3cm Intermittent irrigation
Deep water then drain at middle ofRipening Stage
Tillering Stage
Effective t i l lering
Non ef fec t ive t i l ler ing per iod.
10 cm 2-3 cm

CHAPTER1 : Rice Cultivation Techniques
- 25 -
4. Dry direct sowing cultivation method
4.1. Seed preparation and pretreatment
4.1.1. Seed procurement Pure seeds can be purchased through the experimental station or local shops which deal with seeds. However, seeds bought at local shops may have a considerable amount of impurities among pure seeds, while the experimental station should offer pure seeds only. Of course the seeds collected by farmers’ own fields are also fine for use (See “Rice Transplanting Cultivation Manual” for seed collection procedures). Approximately 130 to 140kg of seeds before selection process should be secured for every one ha of field. 4.1.2. Removing awn and impurities from seeds Since it is often the case to find impurities among purchased seeds, seeds should be selected by the wind selection method, after awn of seeds are removed by an awner or being treaded within a tightly sealed bag. This process should be done properly in order to maximize the performance of the manual seeder. 4.1.3. Floating seed selection / drying the seeds The paddy without awn should be selected by the gravity selection method (figure 1.30). After the selection, seeds should be dried in shades and be made ready for use as selected seeds. The gravity selection is to select fully matured seeds, which would sink to the bottom of a container. Those selected seed now needs to be dried in shades for twenty-four hours, spreading on a clean cloth, etc. It is important to mix them from time to time during the drying stage, in order to dry them evenly. Dried seed should be kept in a bag etc. until the seeding time.
Figure 1.30: Seed selection by specific gravity of tap water
4.2. Applicable seed volume
(1) Volume of selected seed per ha of field After removing awn, wind/gravity selected and dried seed should be weighed. The appropriate volume of selected (purchased, wind/gravity selected) seed for 1ha of field is between 100 and 120kg. (2) Determining the appropriate volume of seed The recommended volume of selected seed per ha of field is between 100 and 120kg. However, the final volume to be applied should be determined with a consideration of their germination test result.
Empty grain
Filled grain (used for seed)
Fresh water
Seed (befor selection)

CHAPTER1 : Rice Cultivation Techniques
- 26 -
Germination percentage 100% : 120kg/ha 〃 90% : 132kg/ha 〃 80% : 144kg/ha 〃 70% : 156kg/ha 〃 60% : 168kg/ha At least 150 germinated as well as established seedlings are indispensable for a field of 1m2, in order to practice the direct sowing method. If possible, it is even better to have 200. When various field management procedures, such as fertilizer application, water management, weeding etc., are practiced, if 200 selected seeds are available, a good yield like 6 to 8t/ha may become a reality. Indeed, the most important technical factor when practicing the direct sowing method is to secure a good number of germinated and established seedlings per unit area. For a case of transplanting, the number of hills per unit area is almost guaranteed by using established seedlings. Therefore, it can be said that the yield of direct sowing depends on the result of germinating and establishing the rice plants.
4.3. Main Paddy Field Preparation
4.3.1. Weeding, removing residues of previous crop, rough plowing
The rough plowing of the field, where maize or other vegetables were cultivated previously, begins by the mid-October, after harvesting previous crops. The residues of previous crops and/or weed will tangle to the furrow cut of the manual seeder, preventing the seeder to cover the seeds with soil well enough. If such residues and weeds remain in the field, they would reduce the effect of nitrogenous fertilizer as they themselves would adsorb the nitrogen until they are completely rotten. Rice seedling require nitrogen especially during the tillering stage, so the first and second nitrogen application are crucial for guaranteeing enough panicle numbers per unit area. Applied nitrogen would dissolved into soil (at the time of the mid- to final growing stage of rice plants), after the residues are completely decomposed, and would be adsorbed by rice plants. Therefore, the residues of previous crops and weeds should definitely be removed from the main field.
Figure 1.31: Extraction of weed and crop residues and plowing
4.3.2 Internal irrigation / drainage canals and plo tting to the longer side of the field
After the rough plowing and unt i l or at the t ime of clod crushing by disc harrow takes place, the internal irr igation as well as drainage canals should be establ ished, being plotted paral lel to the longer side of the f ield.
Weed and crop residue are taken out of the field
Water intake
Drain outlet

CHAPTER1 : Rice Cultivation Techniques
- 27 -
Figure 1.32: Furrow irr igation canal and ridge making in f ield 4.3.3 Clod crushing by chisel plow as well as rotar y The dry season cultivation (maize and other vegetables) should be managed so that their harvest can be started by the beginning of or middle of October. Then, the first rough plowing can take place by the middle of October. Clod crushing should be proceeded by disc harrow after a couple of rainy occasions. Clod crushing is most effective if practiced by fast revolving rotary after a couple of raining and drying occasions. One of the indications that the field is ready for seeding by manual seeder is the size of clod becomes less than 4 to 5 cm diameter (figure 1.33. and Photos 1.6). Clod crushing should be done thoroughly twice by tractor and rotary, then seeding can be done by manual seeder. After two times of plowing by tractor and rotary cultivation, seed sowing by manual seeder
Figure 1.33: After harrowing soil clod crushing (clod size less than 4cm)
Photos 1.5: Soil clod crushing by rotary Photos 1.6: Crushed soil clod after two times by
rotary cultivation (no soil clod of more than 4 cm)
Water intake
Drain outlet
Boundary
Internal furrow for irrigation and drainage
Internal furrows are prepared depending on the degree of gradient of short side of the field
Drain outlet
Water intake
Internal furrow for irrigation and drainage

CHAPTER1 : Rice Cultivation Techniques
- 28 -
4.4. Seeding
4.4.1. Seeding by manual row seeder Selected seeds of 100 to 120kg are sown by the seeder. The seeder can also cover the seed with soil; nevertheless, it is recommended to have one person walking behind the seeder to cover any exposed seeds casually by foot.
Seeding by farmers Seeding by farmers
Modification to the curresnt coverage Seed replacement
At 20 days after seeding by manual Harvest stage (Verification field in D12) seeder (Verification field in D12)
Photos 1.7: Seeding by manual seeder

CHAPTER1 : Rice Cultivation Techniques
- 29 -
4.4.2. Establishing small plots parallel to the sho rter side of the field After sowing, the field should be plotted, first parallel to the shorter side of the field. The difference in plot levels should be kept within 10cm, by considering the inclination of the land. Say the longer side of the field stretches 50m, a plotting method of water intake and drainage outlet is; Level difference of water intake and drainage outlet : # of plots : level difference of plots
Level difference 25cm: 5~ 8 plots: level difference 5~3.1cm 〃 50cm:10~15 plots: 〃 5~3.3cm 〃 75cm:15~20 plots: 〃 5~3.8cm To plot the field is quite influential to the percentage of germination and plant establishment as well as weed occurrence and the effect of fertilizer. After the end of plant establishment stage (3 to 3.5 leaf stage, approximately 5 to 7cm of plant height), it is effective to minimize weed occurrence by flooding the field. The level difference between small plots should be kept within 10cm so that the plant would not be under the water. Those small plots can be made manually by removing soil from lower level to higher level of the field, after the sowing. The furrow made by this process would serve as canals for seeping irrigation.
Figure 1.34: Plot demarcation and furrow irrigation canal after sowing seed
Water intake
Drain
Ridges along with short side
After sowing seed, r idges of short s ide is prepared to spl i t demarcated plot and in i t iate i r r igat ion
Demarcated
Soil is lifted up from lower plot to higher plot. Furrow created is used for irrigation
Furrow for irrigation
Demarcated

CHAPTER1 : Rice Cultivation Techniques
- 30 -
4.5. Irrigation
4.5.1. Method of the first irrigation soon after th e seeding
The first irrigation soon after the sowing is so important that it can influence the germination. The “seeping irrigation” makes it possible to have high germination percentage. Just enough irrigation water can be introduced to small plots, where close attention can be paid, so that the field are not going to be flooded. The irrigation channel should be moved to the next plot when 90% of the soil of the previous plot become blackish with seeped water. The aggregation structure can be maintained relatively well in this way where germination can be encouraged.
Figure 1.35: Irrigation of field by furrow irrigation canal
4.5.2. Method of the second irrigation and onwards The second irr igation should be dealt with by paying close attention to the soil condit ion. I t is optimum timing to apply the second irr igation when soil clod is whit ish, dried and possibly even cracked. The seeping irr igation should be continued unti l the completion of germination and plant establ ishment.
4.6. Weeding
4.6.1. Optimum weeding time
Weeding should be done twice during the f irst half of the t i l ler ing stage and three more t imes in 70 to 80 days after sowing. The f i rst weeding is spraying herbicide but the second and third weeding should be done manually. The weeding by applying herbicide may be very effective i f done twice: once soon after sowing as well as the f irst i rr igation and at the t ime of the end of plant establ ishment stage, and another one at the t ime of approximately twenty to twenty-f ive days after sowing (please refer the cult ivat ion calendar). 4.6.2. Use of herbicide Weeding is one of the most important technical aspects of the direct sowing method, along with land preparation and irr igat ion. Weed growth would cause the competit ion with rice seedlings, result ing a small number of panicles per unit area. At the mid-growing stage, the effect of weeds can overshadow the plant photosynthesis process and reduce the maturity percentage as well as the weight of a thousand grains. In recent years, herbicide has become available and more possible to obtain also in Chokwe. They have been applied widely.
Furrow irrigation canal

CHAPTER1 : Rice Cultivation Techniques
- 31 -
Currently four types of herbicide are available in Chokwe: MCPA, Propanil, Basagran and Ronster. Those herbicide should be di luted by water and be made as a solution: 3 l i ters of herbicide to 200 l i ters of water, per ha of f ield. This solution should be sprayed to the f ield soon after the f irst i rr igation ( just before rice germination). The second weeding solution is a mixture of twelve l i ters of propani l and three l i ters of MCPA (or the same amount of basagran) with two hundred l i ters of water. This second solution should be sprayed to the f ield at t ime of 20 to 25 days after the germination. The effect is maximized when those solutions are sprayed at the recommended t iming and evenly across the f ield.
4.7. Flood Irrigation
After the plant establishment, the growing process would proceed to the 3.5 to 4 leaf stage. The flood irrigation should be applied when the plant height reaches to 5 to 7cm. If the field is not sufficiently covered with water, weed will grow. So it is important to cover the field with water at an early stage of the end of plant establishment stage.
4.8. Fertilizer Application
4.8.1. Applicable volume of fertilizer
The optimum fertilizer dose is two to three bags of urea (100 to 150kg) per ha of field. 4.8.2. Application of nitrogenous fertilizer There are two crucial factors to raise the yield. One is the number of panicles per hill and another is the number of paddies per panicle. The nitrogenous fertilizer should be applied at the beginning of the growing stage, in order to increase the number of panicle per hill. It is highly recommended to apply the fertilizer three times at different stages.
First application:35% of the entire dose (52.5kg of urea), 4 to 5 leaf stage(about
20 to 25 days after sowing) Second application:35% of the entire dose (52.5kg of urea), 30 to 35 days after sowing (10 days after the first fertilizer application) Third application:remaining 30% (45kg of urea), 65 to 70 days after sowing (30 to
35 days after the second fertilizer application)
++++ ++++
Propanil 12 little
MCPA 3 little (same quantity of Basagran can be used)
Water 200 lit. of water
Mix
Spray evenly

CHAPTER1 : Rice Cultivation Techniques
- 32 -
Figure 1.36: Time of Urea application
| | |||| | | | | |||| | | | | |||| | | | | |||| | | | | |||| | | | | |||| | | | | |||| | | | | |||| | | | | |||| | |
0 5 10 15 20 25 30 35 40
1st urea top-dressing
See
ding
1st
irri
gatio
n
Days after sowing Ending stage of seedling
establishment
2nd urea top-dressing
Germination

CHAPTER1 : Rice Cultivation Techniques
- 33 -
5. Harvesting
5.1. Optimum harvesting time is very important for ensuring good quality of rice.
It is internationally recognized that optimum harvesting stage is when grain panicles are 80% fully mature as shown below. When harvest occurs at this stage, high quality rice is produced with minimum harvesting loss. Passed the optimum harvesting stage, harvesting loss due mainly to rice grain cracking will increase day after day. Moreover, if harvesting work waits until all grains become yellowish, rice quality will rapidly decrease and harvesting losses will be higher. If after the optimum harvesting time, rice is kept long time in fields in standing condition, grain cracking (upper half of panicle) even in high quality rice producing grains will occur. Rice cracking and cracked rice percentage will become higher and milling ratio will also be substantially reduced. 5.2. Threshing and drying
If harvesting and threshing are carried out under rainy condition, water content in paddy grain may be more than 15 % as moisture ; There is need for quickly drying it in the sunshine up to less than 15%. If it is kept in a bag with high moisture, rice quality decreases as rice color changes to yellow, mold outbreaks may occur and some time germination, depending on variety (on variety dormancy). 5.3. Rice milling
The rice milling percentage and rice quality are strongly related with moisture contents of paddy grain. Milling testing result with different grain moisture contents and husking and milling ratio indicated that best milling ratio is obtained between 15 to 13 % of grain moisture content.

CHAPTER1 : Rice Cultivation Techniques
- 34 -
6. Self-seed production
The farmer is doing home seed production mainly in rice producing countries, and never buys seeds so frequently. Rice varietal characteristics do not change under normal cultivation condition in several years. So, home seed production can be recommended in this area with following procedure: Step 1: Seed and seed pre-treatment � Use pure variety seeds at first. � Strict enforcement of seed pre-treatment, seed selection work is especially
important. Step 2: Nursing � Nursing by improved semi-dry bed style method. � Nursing technique should follow improved method as above. � During nursing period, extract the different shaped and taller seedlings � Nursing duration must be respected: 21 to 30 days
Step 3: Transplanting � Transplanting with normal cultivation method with 4-6 seedlings per hill, 30 hills per
m2 and shallow transplanting. Step 4: Field management and fertilizer doses � Weeding must be done from time to time and mixing weed and seed must be
avoided. � Fertilizer doses and water management are the same as for normal cultivation.
Step 5: Extraction of the different mixed varieties � This extraction work of different mixed varieties is crucial for seed production.
Extraction work needs to be performed at least 4 times during the total rice growth period as shown below (figure 1.37): during nursery stage, during tillering stage, during panicle initiation stage, and during ripening stage. The point of identification of different varieties at each extraction is that 1st and 2nd is height and leaf color of rice plant, 3rd is mainly height of rice plant, and 4th is maturity condition.

CHAPTER1 : Rice Cultivation Techniques
- 35 -
In case of Limpopo Variety: Total growth duration: 125 days
Figure 1.37: The extraction timing in total growth stage of rice.
� How to identify the mixed different varieties?� Plant height.� Leaf blade width and color.� Timing of ripening.
Step 6: Time of seed collection and method
The best period for practicing seed collection is when 80% of panicle is fully ripened. The big head (panicle)-selection method is used to collect only big and healthy panicles as shown below. The quantity of seed needed per ha is 80-90 kg at panicle collection time under condition of 18% of grain moisture.
Step 7: Drying and threshing
� The grain moisture percentage just after panicles collection is around 18% or above,and there is need for fast drying in the sunshine in order to decrease grain moisturedown to 13% or even lower. Then, thresh, and keep it in a cool and well ventilatedplace.
| | | | | | | | | | | | | |
25
No
v.
5 D
ec
.
1 5 D
ec
.
25
De
c.
4 Ja
n.
14
Ja
n.
24
Ja
n.
3 F
eb
.
23
Fe
b.
13
Fe
b.
5 M
ar.
1 5 M
ar.
25
Ma
r.
4 A
pri
l.
▲▲ ▲ ▲▲▲▲
Se
ed
ing
Tra
nsp
lan
tin
g
Ma
xim
um
til
ler
Be
gin
nin
g o
f N
ec
k
No
de
dif
fere
nti
ati
on
st
ag
e
Be
gin
nin
g o
fR
ed
uc
tio
n
Div
isio
n s
tag
e
He
ad
ing
sta
ge
Ha
rve
stin
g s
tag
e
Nursing stage
Tillering stage
1st extraction 2nd extraction 3rd extraction
4th extraction

CHAPTER 2 The management of Farmers’ group
CHAPTER 2: The management of Farmers’ Group
- 36 -
1. Establishment of Farming Support Groups : FSG1.1. What are Farming Support Groups?
PROMPAC has adopted a “Farmer to Farmer” method to disseminate the rice cultivation techniques. The key player in realizing this dissemination among local farmers is the FSG. � PROMPAC had organized a few training programs for FSG and loaned financial resources for
them to manage their revolving fund.� FSGs are to establish demonstration fields and participate in those training programs. Their
revolving fund would be used for establishing and managing those fields.
Figure 2.1: Objectives of PROMPAC and FSGs
1.2. FSG Establishment Procedures
1) SDAE/PROPAC Discussion� SDAE explains the purpose and function of the FSG.
2) Member Selection� Ideal number of members is between 10 and 15.� Members will play leading roles to extend rice cultivation techniques.
PROMPAC 1. Organizing Training Programs
2. Financial Assistance to the FarmingRevolving Fund
3. Overall Assistance for FSG
FSGs 1. Demonstration Field Establishment
2. Operation and Management of theFarming Revolving Fund
Ripple Effect of the Farmer to Farmer Extension of Rice Cultivation Techniques
Training Programs by SDAE/PROMPAC
F S G Revolving Fund Establishment of Demonstration Field
Local Farmers
Revolving Fund Management
Irrigation Facility Maintenance and Water
Management
Improved Rice Cultivation Techniques

CHAPTER 2: The management of Farmers’ Group
- 37 -
� Members must be enthusiastic and participate proactively in rice cultivation.
3) Appointment of Executive Members � President, vice-president and accountant should be appointed among members.
� FSG is responsible for the personnel appointment. � Executive members must be literate.
①President � Chief Executive of FSG
� Represents FSG � Holds and presides meetings � Acts as a signatory to checks and accounting papers, along with the accountant � Acts as a liaison between SDAE and extension officers, etc.
②Vice-president � Assistant to the President
� Acts as a proxy in the President’s absence � Executes missions instructed by the President
③Accountant � Manager of the farming revolving fund
� Collects farming revolving finance � Prepares cash at time of payment � Keep books � Deposits / withdraws money (deals with the bank) � Acts as a signatory to checks and accounting papers, along with the President � Prepares monthly reports
④Chief of Production (Additional) 4) Preparation of the Member List � Makes the Member List including information such as (1) Full Name, (2) Residential Address,
(3) Irrigation Area and (4) Contact Telephone Number.
5) Sign to the Agreement Between SDAE/PROMPAC and FSG � Exchanges the Agreement between SDAE and FSG
� Execution of training programs as well as loans for the farming revolving fund should proceed under this agreement.

CHAPTER 2: The management of Farmers’ Group
- 38 -
An Example of Agreement Agreement between the Project for Rice Productivity Improvement in Chokwe irrigation scheme (PROMPAC) and selected group of farmers in D5 of irrigators associations in season 2011/12. Objective of Agreement The purpose of this memorandum is for the PROMPAC and the group of farmers selected from D5, in relation to the activities that will be implemented by the PROMPAC to achieve the following results : A) Disseminating improved transplanting rice cultivation technology, focused to small scale farmers; B) Strengthen the activities of the Farming Support Groups (FSGs) in the area of the demonstration fields; increased the annual income of rice farmers in the region targeted by the Chokwe Irrigation System Content of the agreement 1. The PROMPAC drew up the general plan of activities based on the Record of Discussion (R / D) and Project Design Matrix (PDM) , the results of the baseline survey (baseline survey) analysis and technical studies of the Chokwe irrigation system. Technology transfer from farmer to farmer will be maximized with the dissemination of transplanting rice cultivation techniques to the target area of D5. In the plan, the PROMPAC decided to provide technical and financial assistance to establish demonstration farms by selected farmer groups, known as Farming Support Group (FSG) under the supervision of the area extension agent. The plan contains the activities as described below: 1) Assist in organizing and conducting training for FSG on rice production, and support the activities of FSG. a) Establishment of FSG in Water Users Association in the area of establishment of demonstration fields, b) Conduct training related to agricultural activities c) Support the activities of the Farming Support Groups 2) Assist in the establishment of demonstration field on rice transplantation techniques with the initiative of the leaders of extension, extension agent and farmer leaders. For implementation: (A) Finance The PROMPAC, through FSG, will provide a source of credit costs by 1 ha mentioned below. Cost of land preparation (plowing) 2.200 Mt / ha (Harrowing: Mt 1.100 x 2) 2.200 Mt / ha Sub total: 4.400 Mt / ha Cost of fertilizer (2 bags of urea / ha) Mt 1.550 x 2t=Mt.3.100 / ha

CHAPTER 2: The management of Farmers’ Group
- 39 -
Cost seed Mt 60kg/ha, x Mt. 17/kg / ha= Mt1.020/ha Total cost per hectare is 8.520 Mt / ha (B) Technical Support: The extension agent will be responsible for technical support related to the establishment and monitoring of demonstration field following the recommendations of "Manual of Rice Cultivation and transplantation of rice" developed by the previous project. (C) Repayments of loans by farmers The farmers / members who received credit would reimburse to the FSG with 10% interest per season at the end of the rice cultivation season. (D) Supply of Credit Administration Refunds will be administered by the FSG as a source of credit for the following season. The extension agent will oversee and assist in the administration of the fund, but the members of FSG have at the end a common responsibility over the administration of credit. 3) Assistance and training of farmers on improved transplanting rice cultivation techniques with initiative extension leaders (Training of farmers by extension workers and leaders extension, technology transplant rice) 4) Assistance and training of farmers on maintenance of irrigation facility and management of irrigation water use. (Training for farmers on maintenance and management of irrigation facilities, and water management at the farm level.) 2. In the above aforementioned assistance assumes that members of FSG, once FSG understand the contents of this agreement, accept and agree to work hard. Still, it is expected that members of FSG agree to implement the recommendations or proposals to be made by PROMPAC for the smooth implementation of the activities. 3. In case of any problem arising between FSG and PROMPAC during the execution of this Agreement, there shall be mutual consultations between PROMPAC and FSG in finding solutions to solving the problem 4. In case of problems remain between PROMPAC and FSG in the execution of the agreement, SDAE, EAC and HICEP will be requested to arbitrate and help solve the conflict. 5th. Regardless of consultations and arbitration referred to in paragraphs 3 and 4, if the FSG does not accept or show interest in implementing the recommendations given by PROMPAC, the project could unilaterally take action to tell FSG rupture of this Agreement. Chokwe, November 22, 2011

CHAPTER 2: The management of Farmers’ Group
- 40 -
2. Establishment and Management of Demonstration Fields2.1. What are demonstration fields?
The demonstration fields will be established with the cooperation of PROMPAC and FSGs. � The purpose of these fields is to demonstrate and extend the rice cultivation techniques.
� PROMPAC organizes training programs for the purpose of improving rice cultivationtechniques.
� FSG members play a proactive role to extend those techniques to local farmers.
Figure 2.2: Functions of demonstration fields
2.1.1. Selection of Demonstration Field Location Reasonable Fields � Fields good for irrigation intake and drainage outlet
� Check the condition of the tertiary irrigation and drainage canals� Accessible Fields� Fields without salt damage
� Check the saline condition of the soil
Size of demonstration field per one farm household � Transplanting farm: smaller than 0.5ha� Direct Sowing farm : smaller than 2ha
� The larger the fields become, the harder the management becomes.
Recommended Size for demonstration fields per one FSG � 1 Ramal (13-16 ha)
2.1.2. Tractor procurement for plowing � PROMPAC has assisted the plowing, harrowing and plotting
� Plowing: 1 time� Harrowing: 2 times� Plotting: 1 time
� FSG procures a tractor(s) for plowing, harrowing and plotting.
Conducting of trainings and OJT
� Transplanting Techniques
� Direct Sowing Techniques
� Water Management
� Maintenance and
Management of Irrigation
Facilities
Local Farmers
Demonstration Fields
• participation• observation
Extension

CHAPTER 2: The management of Farmers’ Group
- 41 -
� It is easier for a group to procure a tractor(s) than an individual. � This is a benefit to form a group.
� It is necessary for FSG to make a clear agreement in advance with the operator, regarding the following points. � Price, payment method � Location of the fields � Duration of working time
� FSG members need to check the degree of surface level of the field, before paying for it. The fields must be leveled with clod adequately crushed and generally in a good condition. 2.1.3. Procurement of seeds � PROMPAC provided the following.
� Transplanting : 1ha: 60kg � Direct Sowing : 1ha: 150kg
� Above is the indicated sufficient seed amount. Calculation of necessary seed amount � Transplanting
� Necessary seed amount for a field of 0.5ha is: 60kg×0.5ha=30kg
� Direct Sowing
� Necessary seed amount for a field of 2.5ha is: 150kg×2.5ha=375kg
2.1.4. Procurement of fertilizer � PROMPAC provided 100kg/ha of fertilizer for target fields.
Calculation of Necessary seed amount
� Necessary amount of fertilizer for a field of 0.5ha is:
100kg×0.5ha=50kg � Necessary amount of fertilizer for a field of 2.5ha is:
100kg×2.5ha=250kg
60kg Necessary
seed amount Field Area
150kg Necessary
seed amount Field Area
100kg Necessary seed
amount Field Area

CHAPTER 2: The management of Farmers’ Group
- 42 -
� PROMPAC recommends to apply fertilizer on three separate occasions.
2.1.5. Procurement of herbicide � PROMPAC recommends to spray herbicide to those fields sown by direct sowing.
� PROMANIL : 1ha: 10L � MCPA: 1ha: 3L � Water: 1ha: 200L
� Herbicide application should be applied at the time of the 4 to 5 leaf stage.
First applicat ion Timing
• At 4 to 5 leaf stage time Amount
• 35kg/ha or 1/3 of total
Second application Timing
• 15 to 20 days after first Amount
• 35kg/ha or 1/3 of total
Third application Timing
• 30 to 35 days after second Amount
• 30kg/ha or 1/3 of total
Fertilizer can be divided into three to apply, if it is difficult to scale exactly.
PROPANIL 10L
MCPA 3L
Water 200L

CHAPTER 2: The management of Farmers’ Group
- 43 -
Calculation of necessary herbicide amount � PROPANIL
� Necessary PROPANIL amount for a field of 2ha is: 10L×2ha=20L
� MCPA
� Necessary MCPA amount for a field of 2ha is: 3L×2ha=6L
� Water
� Necessary amount of water for a field of 2ha is: 200L×2ha=400L
10L Necessary PROPANIL
amount Field Area
3L Necessary MCPA
amount Field Area
200L Necessary Water
amount Field Area

CHAPTER 2: The management of Farmers’ Group
- 44 -
3. Management of the Farming Revolving Fund3.1. What is the farming revolving fund?
� PROMPAC offers financial assistance to members to do plowing, harrowing, and buy seed,fertilizer and herbicide (herbicide is only for direct sowing) so that FSG members would beable to establish demonstration fields relatively easely.� The financial assistance from PROMPAC is only given once, at the beginning.
� Members are required to repay the borrowed amount to FSG with interest.� FSG deposits the farming revolving fund to the bank account for the next cropping year.� Members return the money not for PROMPAC but for themselves.
Figure 2.3: Functions of revolving funds
3.1.1. Preparation of the farming revolving fund (1) FSG holds a meeting(s) to confirm the following points.
� Cash balance and account balance � Members status of repayment (who finished the payment and who has not)
(2) FSG should discuss how to deal with members who have not completed the repayment of the farming revolving fund. For example:
� FSG would not offer another loan until the repayment is completed. � Other members pay off the amount on behalf of the member in question.
� Necessary expenditures should be agreed.� Plowing
The accountant should bring the book and explain all accounting related information to the members.
Revolving Fund • Plow• Harrow• Seeds• Herbicide• Fertilizer
Refund revolving fund
FSG keeps in bank accountRice
Cultivation

CHAPTER 2: The management of Farmers’ Group
- 45 -
� Harrowing � Plotting � Seeds � Fertilizer � Herbicide
� Necessary repayment amounts should be agreed.
� Repayment should include the interest specified on the agreement. � Any discussions and decision making processes should be done in the presence of all the
members. 3.1.2. Calculation of Expenditures Necessary expenditures should be calculated as follows. The amount of expenditures per 1ha is specified on the agreement. The expenditure for a field of 1.5ha is as follows. Expenditures per 1ha
� Plowing: 2,300Mt � Harrowing: 2,300Mt � Plotting : 750Mt � Seeds: 150kg/ha×17Mt=2,550Mt � Fertilizer: 2bags/ha×1,550Mt=3,100Mt � Herbicide: 2,320Mt
Necessary expenditures are as follows. � Plowing 2,300Mt×1.5ha=3,450Mt � Harrowing 2,300Mt×1.5ha=3,450Mt � Plotting 750Mt×1.5ha=1,125Mt � Seeds 2,550Mt×1.5ha=3,825Mt � Fertilizer 3,100Mt×1.5ha=4,650Mt
Expenditure per 1ha
Necessary expenditure
amount
Field Area
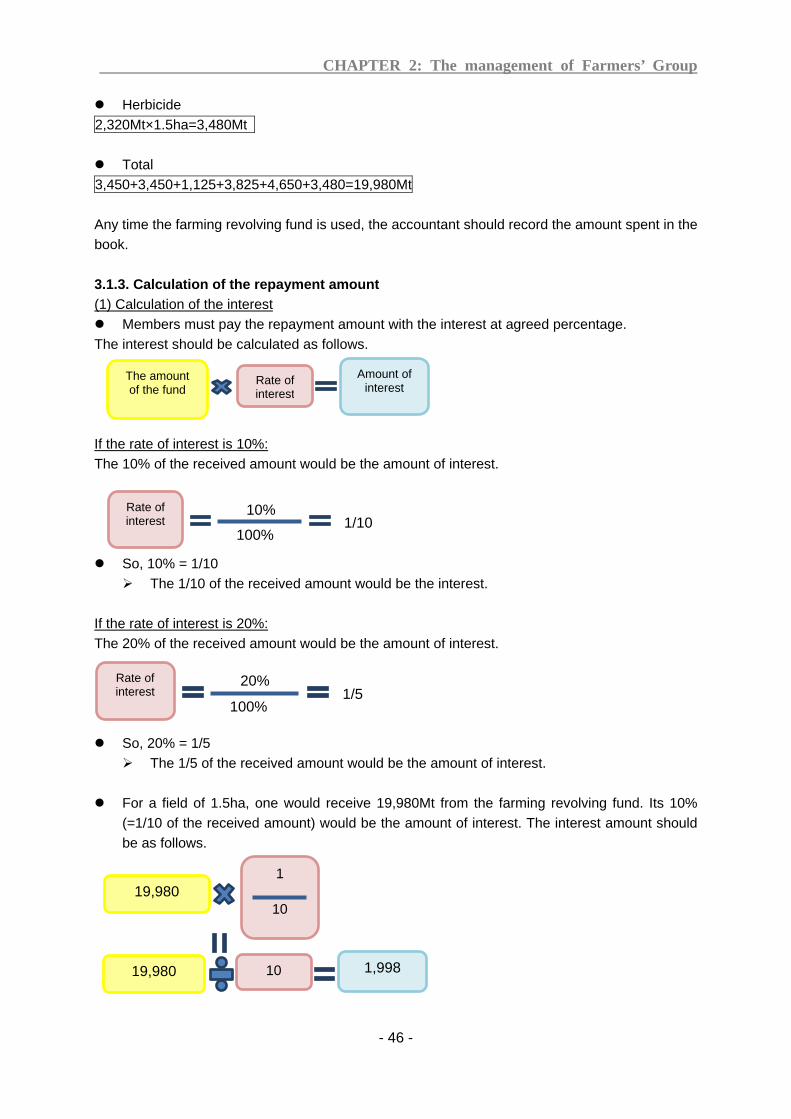
CHAPTER 2: The management of Farmers’ Group
- 46 -
� Herbicide2,320Mt×1.5ha=3,480Mt
� Total3,450+3,450+1,125+3,825+4,650+3,480=19,980Mt
Any time the farming revolving fund is used, the accountant should record the amount spent in the book.
3.1.3. Calculation of the repayment amount (1) Calculation of the interest � Members must pay the repayment amount with the interest at agreed percentage.The interest should be calculated as follows.
If the rate of interest is 10%: The 10% of the received amount would be the amount of interest.
� So, 10% = 1/10� The 1/10 of the received amount would be the interest.
If the rate of interest is 20%: The 20% of the received amount would be the amount of interest.
� So, 20% = 1/5� The 1/5 of the received amount would be the amount of interest.
� For a field of 1.5ha, one would receive 19,980Mt from the farming revolving fund. Its 10%(=1/10 of the received amount) would be the amount of interest. The interest amount shouldbe as follows.
Rate of interest
10%
100% 1/10
Rate of interest
20%
100% 1/5
The amount of the fund
Amount of interest
Rate of interest
19,980 1
10
19,980 1,998 10

CHAPTER 2: The management of Farmers’ Group
- 47 -
(2) Calculation of the total amount of repayment The amount of payment is calculated as follows.
Therefore, the amount of repayment should be as follows. 19,980Mt+1,998Mt=21,978Mt
3.1.4. Collect the farming revolving fund � FSG is to hold a meeting after harvest to confirm any matters concerned with repayment of
the fund.� Amount of repayment� Term of repayment
� The accountant is the responsible personnel to manage the revolving fund.� The accountant should record the received amount in the book immediately after
receiving any money. � FSG should hold meetings even during the payout period, in order to share among the
members the state of fund repayments.
3.1.5. Creating bank accounts for managing the fund � Each FSG should make its own bank account to manage the farming revolving fund.� Bank checks should be made to have a double signatory: the president and the accountant
� The collected money should be deposited into bank as soon as possible.Cash should not be kept in one’s hands too long. There is always a possibility of losing or using this money.
The amount of the fund received
Total amount of repayment
Amount of interest
� President and the accountant must agree on payment� This is to prevent abuse of funds, which may be possible if only one person is in charge of
the fund.

CHAPTER 2: The management of Farmers’ Group
- 48 -
4. Book Keeping Year: Month:
Date Purpose Cash account Bank account
Remarks Received Paid Balance Received Paid Balance
4.1. Management of Accounting Books � It is to record the handlings of the farming revolving fund.
� Record every instance of money coming in and out. 4.2. Why is it necessary? � To clearly understand who has and who has not completed the repayment to the fund. � To clearly note the purpose and the amount that the fund was used for. � To avoid building doubts among members by making the books transparent. Therefore, it is necessary to record the following points. � Dates � Purpose of the money, from whom, to whom � Received amount, paid amount � Number of receipt, signature of person who paid the money, etc. The book has three sections: cash account, bank account and individual farmer’s account.
Cash account This section is to keep track of cash flow. Receiving Cash 1. Recovery of the revolving fund 2. Cash withdrawn from the bank account Cash Expenditure 1. Expenditures of plowing, seeds, fertilizer and herbicide.

CHAPTER 2: The management of Farmers’ Group
- 49 -
Bank account This section is to keep track of deposits to and withdrawals from bank accounts. Deposit 1. Deposit cash into the bank account Withdrawal 1. Withdraw cash from the bank account
Individual farmer’s account This section is to keep track of each member’s revolving fund. Farming Revolving Fund 1. The spent amount 2. The amount of repayment 3. The amount repaid
CHAPTER 2: The management of Farmers’ Group
- 50 -
5. The purpose of the Farmers' management group for rice milling machine
� PROMPAC supported the group to draw up a set of internal rules of the farmers’
management group for rice milling machine. This manual explains matters related to their activities and provides rules to be uesed as a reference by the group.
Internal rules (examples)
INTERNAL REGULATION OF FARMERS’ MANEGEMENT GROUP FO R RICE MILLING MACHINE OF D11
1. OBJECTIVES The management of rice milling machine was entrusted with the Water Users’ Association (WUA) of D11 by SDAE through a contract agreed to June 27, 2012, between the Director of SDAE (District Service for Economic Activities, Chókwe) and the president of IA of D11. However, this rice milling machine is run by a farmers’ management group of rice milling machine selected from WUA of D11. This regulation not only defines the functions and roles of the farmers’ management group of rice milling machine regarding the operation and maintenance of the rice milling machine but also clarifies on the management of funds generated from rice milling activities. II. FORM OF ORGANIZATION 1. Functions and roles of farmers' management group of rice milling machine (1) Member As a rule, members will play the roles referenced below and are selected once a year in the General Assembly and its terms of subscriptions are renewable. 1. President 2. Accountant 3. Assistant Administrator 4. Operator 5. Assistant Operator 6. Auditor (Appointed by WUA) (2) Farmers' management group of rice milling machine The group is entrusted by the WUA to operate the rice milling machine to help members of the WUA of D11. (3) Roles of farmers' management group of rice milling machine Through the effective operations of the milling machine and management of funds, the group will provide milling service for the members of WUA.

CHAPTER 2: The management of Farmers’ Group
- 51 -
2. Role of members of the farmers’ management group of rice milling machine 1) President � Plans, directs and controls the activities through consultation with other members and
extension staff. 2) Accountant � Record all revenue and expenditures to the account book related to the operation of the rice
milling machine. � Deposit and withdraw cash with approval of the president. 3) Assistant Administrator � Record daily operation and maintenance of the rice milling machine. � Manage daily activities such as revenues, expenditures in relation to the daily operation of the
machine. � Keep record of meetings 4) Operator � Operate and maintain the rice milling machine. � Weigh paddy rice brought by customer � Clean paddy rice before starting milling 5) Assistant Operator � Support Operator � 6) Auditor (appointed by the WUA) � The auditor is appointed by the WUA and � Attend regular meetings to verify and audit the accounts of the farmers’ management group of
rice milling machine. � Verify and approve the annual accounts prepared for the general assembly. 7) Extension staff as technical supervisor of the group � Extension staff is not member of the group. � Participate in any meetings of the farmers’ management group for rice milling machine and
provides necessary technical advice to the group in relation to operation, maintenance management and financial affairs.
� 3. Terms of the members The terms of the members of the farmers’ management group for rice milling machine is one year. All members should be approved by the General Assembly of WUA of D11. ⅢⅢⅢⅢ Obligations of farmers’ management group for rice milling machine 1. Provide milling services for both members and no n-members of WUA of D11. 1. Users (customer) Users need to request milling to the Assistant Administrator. Assistant Administrator and Operator will check the condition of paddy and remove unnecessary object such as stones, metals, and

CHAPTER 2: The management of Farmers’ Group
- 52 -
grass seeds together with the user and if it is acceptable conditions, the operator will start milling. The users must comply with the payment of the amount stipulated for milling before starting milling. Only cash will be accepted. 2. Price 1) Rice Milling Members of IA: xxMt/kg Non-member of IA: xxMt/kg 2) Rice bran (for sale) Members of IA: xxMt/kg Non-member of IA: xxMt/kg 3. Control and record of the payment The assistant Administrator must keep daily records of the operation of the rice milling machine based on the hours of operation, amount of milling, money received and expenses such as fuel, oil, salary and so on. The Assistant Administrator is entrusted with the control of daily work and passes all receipts to accountant every two working days. 4. Control money on accountant of the association to avoid risks The Assistant Administrator must maintain daily activities of revenues and expenditures in the register while the accountant must verify and control the income and expenditure every week. Accountant is also deposit money into the bank account of the farmers’ management group for rice milling machine once a week or twice to avoid the risk of theft. 2. Operate and maintain milling machine 1. Daily and periodic maintenance of the rice milling machine The Operator as well as the Assistant Operator must make a daily inspection of the rice milling machine before starting the operation. The amount of oil, diesel and water remaining, condition of oil and diesel and condition of the straps etc. are to be inspected based on inspection sheet attached to the machine. Any defects or failures occurring during the inspection should be reported to the extension staff through the President. If these defects or failures are difficult to manage, the president or extension staff should report immediately to the Director of SDAE for taking necessary measures. 3. Saving maintenance cost Farmers` management group must save 2,000 Mt every month for the purpose of maintenance of the rice milling machine. 4. Hold Regular Meetings The Farmers’ Management Group of Rice Milling Machine will hold a meeting every month in order to review the milling activities (milling amount), to check account book (income, expenditure, balance) with auditor and to discuss any problems to be solved. 5. Report activities of the Farmers’ Management Group for Rice Milling Machine to Genera l Assembly of IA of D11 and get approval.

CHAPTER 2: The management of Farmers’ Group
- 53 -
Items to be reported and approved are as described below; 1. Submit milling amount, income, expenditure and balance to be approved. 2. Milling price 3. Remuneration to members 4. Approve members of Farmers’ Management Group for Rice Milling Machine. 5. Discuss any problems to be solved ⅣⅣⅣⅣ. Rights of Farmers’ management group for rice mil ling machine 1. Remuneration The members of the farmers’ management group for rice milling machine will perform their duties with a symbolic compensation based on the amount which is approved by the general assembly of IA D11 as indicated below: Manager ................................................. .................................... xxx MT/month Accountant ................................................. ............................ xxx MT/month Assistant administrative ................................................ ......... xxx MT/month Operator ................................................. ............................. xxx MT/month Operator Assistant ................................................ ................. xxx MT/month 2. Allocation of office and meeting place The office for the farmers’ management group for rice milling machine can be allocated where the machine is installed and all meetings are held in that place 5.1. What is the Farmers’ management group for rice milling machine? � IA commissions the group with the rice milling operation, as the group members are also
members of IA. � The group provides the rice milling service and manages the operation of the rice milling
machine and its finance efficiently.
Figure 2.4: Functions of farmers’ management group for rice milling machine
Irrigation Association
Member
Member
Member
Member
Member
Farmers’
Management
Group for Rice
Milling Machine
Milling Service
Fee
Commission

CHAPTER 2: The management of Farmers’ Group
- 54 -
6. Members and their roles played by the members of the Farmers’ Management Group for Rice Milling Machine
Figure 2.5: structure of farmers’ management group for rice milling machine 6.1. President
� The president draws plans up, directs and supervises activities of the group, in cooperation with other members as well as extension staff. � The president has the responsibility of activities done by the group in general. � The president must be literate.
6.2. Accountant
� The accountant records all of the revenues as well as expenditure related to the operation of the milling machine. � The accountant must be able to calculate.
� It is necessary to have the president’s agreement for any deposits to and withdrawals from the bank account. � The group needs to open its own bank account(s). � The president and the accountant should be co-signatory to the bank cheques.
6.3. Assistant Administrator
� The assistant administrator records daily operations and manages the maintenance of the milling machine(s). � The assistant administrator should be literate and able to calculate.
� The assistant administrator manages daily revenue and expenditure of the milling services. � Operation time, milled rice amount, revenue amount, expenses for fuel and oil, etc. are to
be maintained in a written record every day. � The assistant administrator is to be responsible for daily operations. � Any receipts should be handed to the accountant every other day.
� The assistant administrator takes the minutes of meetings. � The following information should be noted.
Irrigation Association
Farmers’ Management Group for Rice Milling Machine
Appointment
President
Accountant
Assistant Administrator
Assistant Operator
Operator Auditor
Advice
Extension Staff

CHAPTER 2: The management of Farmers’ Group
- 55 -
� Date, meeting place � Names of attendees � Agenda � Discussion details � Discussion results (what were agreed/decided)
6.4. Operator
� The operator operates the milling machine and takes care of its maintenance. � The operator should be mechanically competent.
� The operator weighs the paddy brought in by members. � The operator washes the paddy before milling. Any impurities, such as gravel or metal bits,
should be removed before milling, since they may cause a malfunction in the machine. 6.5. Assistant operator
� The assistant operator assists the operator. � The assistant operator should also be technically competent.
6.6. Auditor (appointed by the IA)
� The auditor should be appointed by the IA. � The auditor attends all the meetings of the farmers’ management group for rice milling
machine, checks the book and audits the accounting of the group. � Checks the accounting report made ready for general meetings. 6.7. Extension staff as technical supervisor of the group
� Extension staffs are not the members of the group. � Extension staff attends all the meetings of the group and offers advice on a number of their
activities including the operation, management and maintenance of the milling machine, as well as the accounting issues.

CHAPTER 2: The management of Farmers’ Group
- 56 -
7. Responsibility of the farmers’ management group for rice milling machine 7.1. The group offers the service of rice milling t o members as well as non-members of Irrigation Association.
7.1.1. Users � Not only IA members but also non-members can receive the service.
� The group is set up for IA members to get the benefits from the activity, but non-members are also able to receive the service.
7.1.2. Milling procedures 1. Anyone who wishes to have the service needs to apply to the assistant administrator. 2. The assistant administrator and the operator together check the paddy that is brought in, prior
to the operation. � Any impurities such as stones and metal objects should be removed, as they may cause
possible damage to the milling machine. Users remove impurities with the operator. 3. After removing impurities, the assistant administrator will weigh the paddy and calculate the
fee. 4. Users will need to pay the fee to the assistant administrator, before the milling begins. Only
cash is accepted. 5. After paying the fee, the operator begins the milling. 7.1.3. Fees � Milling
� IA members: xxMt/kg � Non-members: xxMt/kg
� Paddy (sales)
� IA members: xxMt/kg � Non-members: xxt/kg
7.1.4. Check and record the payment
The assistant administrator � Is responsible for managing daily work and operations. � Records the milling machine operation on daily basis.
� All of the necessary information, such as operation hour, paddy amount, receiving money, paying money for fuel or salary, etc., should be noted and recorded.
� Hands over all of the receipts to the accountant every other day. 7.1.5. Manage the money The assistant administrator � Records revenue and expenditure on daily basis. The accountant � Checks revenue and expenditure on weekly basis. � Makes the deposit to the group’s bank every week. It is to avoid losing money and also money
being stolen.
� If fees for the IA members are low.
� This is one of the merits that the group is made within IA.

CHAPTER 2: The management of Farmers’ Group
- 57 -
7.2. Operation of the milling machine and its maint enance
7.2.1. Maintenance of the milling machine � It is necessary for the operator together with the assistant operator to check the milling
machine before operating it every day. The following points must be checked every time.
Daily Check � Engine
� Fuel level � Engine oil level � Cooling water level � Water and/or engine oil leakage � V-belt tension check and adjustment � Tightening of nuts and bolts
� Rice milling machine � V-belt tension check and adjustment � Tightening of nuts and bolts
Every 50 hours � Rice milling machine
� Grease � Gear oil
Every 100 hours
� Engine � Change engine oil � Clean engine oil strainer � Clean air cleaner element � Change air cleaner oil
Every 300 hours � Engine
� Clean fuel filter element � Rice milling machine
� Refill gear oil Every 600 hours � Engine
(ア) Change fuel filter element
� The operator needs to record operation hours. This would be helpful to predict the timing for the maintenance works, such as changing the oil.
� The president should report to extension staff any problems and issues that arise during the maintenance.
� If the above mentioned problems and issues are too difficult to solve among members of the group, either the president or extension staff should report to SDAE director promptly.

CHAPTER 2: The management of Farmers’ Group
- 58 -
7.3. Reserve fund for maintenance cost
7.3.1. Maintenance Cost � The farmers’ management group for rice milling machine should have a reserve fund of 2,000
Mt for monthly maintenance cost. � The milling machine(s) will most definitely require maintenance repairs in the future. � An estimated maintenance cost should be considered as essential.
7.4. Holding Regular Meeting
7.4.1. Regular meeting � A periodic meeting should be held every month.
� To check milling business (milled rice amount) � To check the book with the auditor (revenue, expenditure and balance)
� Assistant administrator takes the minutes of the regular meetings. � It is preferable for extension staff to attend those meetings. 7.5. Report the activities of the farmers’ manageme nt group for rice milling machine at the IA general meeting
7.5.1. Report at the IA general assembly � The group was established as an affiliated organization of the Irrigation Association (IA).
� The group is responsible to explain IA about their activities. Merit of being accountable to IA � Explanation about the group activities will earn trust of IA members, while increasing its
transparency. � IA members would become to acknowledge the activities of the group well.
� Everyone would become acknowledged about the group and its activities. � It is well expected that accountability will reinforce the activities of the group.
If not being accountable… � It may be possible for IA members to have a misguided belief or misunderstanding that only
the management group members should be merited from their activities. � IA would not be able to acknowledge the merit of having the group within IA.
Items to be reported and approved at the General Meeting � Milling operation reports
� Amount of milled rice, income, expenditure, balance � Salary amount for the group members � Milling fees � Members of the group � Other problems and concerns to be solved

CHAPTER 2: The management of Farmers’ Group
- 59 -
Figure 2.6: Relationships between General Assmbly and farmers’ managemenrt group for rice milling mashine
Irrigation Association
General Meeting
The Farmers’ Management Group for Rice Milling Machine
Report
Approval
Items to be reported
• Rice milling operation
• Amount of milled rice, revenues,
expenditures and balance
• Salary details to management
group members
• Milling fees
• Members of the farmers’
management group for rice milling
machine
• Other problems and issues
Earn trust and increase the transparency
IA would acknowledge

CHAPTER 2: The management of Farmers’ Group
- 60 -
8. The right of farmers' management group for rice milling machine 8.1. Salary
� The farmers’ management group for rice milling machine approves its members or who becomes a member at the general meeting, and approved members should pursue their tasks and receive modest remuneration. � President: xxMt/month � Accountant: xxMt/month � Assistant Administrative: xxMt/month � Operator: xxMt/month � Assistant Operator: xxMt/month � Auditor: xxMt/month
� The following matters are the most important. � If IA members fully see and understand the merits of the farmers’ management group for
rice milling machine, they will show respect towards the activities of the group and appreciate to receive the remuneration.
� Showing the accountability will make IA members understand about the merits of the group.
� If the group fails to earn the understanding of IA members, the group may not be able to continue its activities.
8.2. Setting up a working office and a meeting spac e
� The working office should be located at where the milling machine is installed. Meetings and other gatherings should take place at this working office.
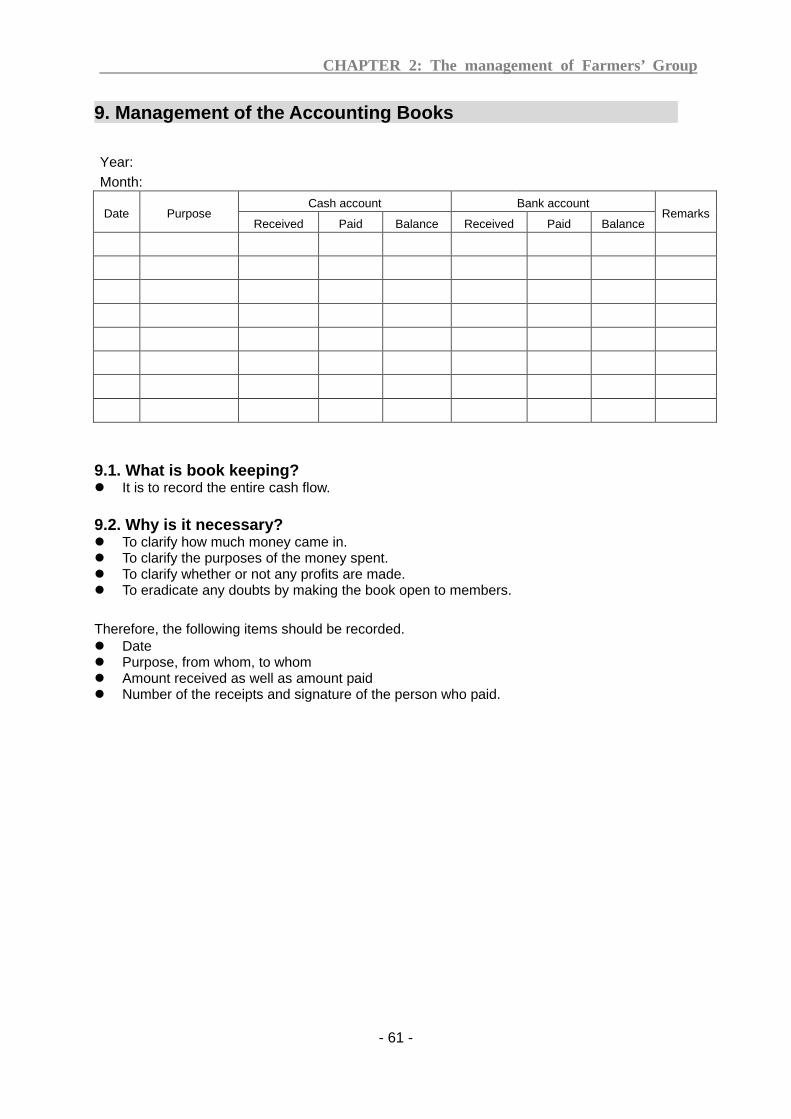
CHAPTER 2: The management of Farmers’ Group
- 61 -
9. Management of the Accounting Books
Year: Month:
Date Purpose Cash account Bank account
Remarks Received Paid Balance Received Paid Balance
9.1. What is book keeping? � It is to record the entire cash flow. 9.2. Why is it necessary? � To clarify how much money came in. � To clarify the purposes of the money spent. � To clarify whether or not any profits are made. � To eradicate any doubts by making the book open to members. Therefore, the following items should be recorded. � Date � Purpose, from whom, to whom � Amount received as well as amount paid � Number of the receipts and signature of the person who paid.

CHAPTER 2: The management of Farmers’ Group
- 62 -
The book has two parts: cash account and bank account.
Cash account It is to record the entire cash flow. Receiving Cash (4 items) 1. Milling fees 2. Paddy sales revenue 3. Cash withdrawn from the account 4. Others Spending Cash (4 items) 1. Milling machine operation
� Fuel, oil, filters, etc. 2. Maintenance of the milling machine
� Spare parts � Repairs
3. Labor costs � Remuneration/Salary
4. Others � Travel expenses, etc.
Bank account It is to record deposits to and withdrawals from the bank account. Deposit (1 item) 1. Deposit cash to the bank account Withdrawal (1 item) 1. Withdraw cash from the bank account

CHAPTER 3 Participatory water management and maintenance of irrigation facilities

CHAPTER 3: Participatory water management and maintenance of irrigation facilities
- 63 -
1. Present Conditions
1.1. Chokwe Irrigation Scheme
In the Basic Design Study in 2001 by JICA, command area of Chokwe Irrigation Scheme (CIS) was 26,030 ha. Sowed area in recent 10 years from 2004/05 to 2013/14 is 7,150 ha or 28% in average. Harvested areas from 2008/09 to 2011/12 were more than 90 % of sowed area (93% of sowed area), but was 35% in 2012/13 due to damage by large flood. The lowest rate of sowed area in the period was 8% in 2005/06 due to drought.
Figure 3.1: Command area of Chokwe Irrigation Scheme (CIS)
In Figure 4.2 of the Base Line Survey in 2011 by JICA, farmers ranked bad or poor drainage as the most serious problem of the irrigation system. It is confirmed again in the Project area through interview to farmers from 2012 to 2014. It is noted that problem of insufficient irrigation water may increase as irrigation area increase from now on. An example of relation between drainage condition and rice yield is presented in figures below.

CHAPTER 3: Participatory water management and maintenance of irrigation facilities
- 64 -
Paddy Yield (t/ha)
Paddy Yield
2.5
Road
Tertiary Drain
Note: Above field block is simplified from Figure 4.1.5
0 500 1000 m
Approximate distance from Secondary Drain V43S (m)
Seco
ndar
y D
rain
V43
S
Ass
ocia
tion
plo
t
Ver
ific
atio
n pl
ot
1.6 1.5 1.5 2.0 2.2 1.8 3.3 2.7 3.1 2.7 3.3
Road
Figure 3.2: Rice yield by distance in D11 Demonstration Field of 2012/13
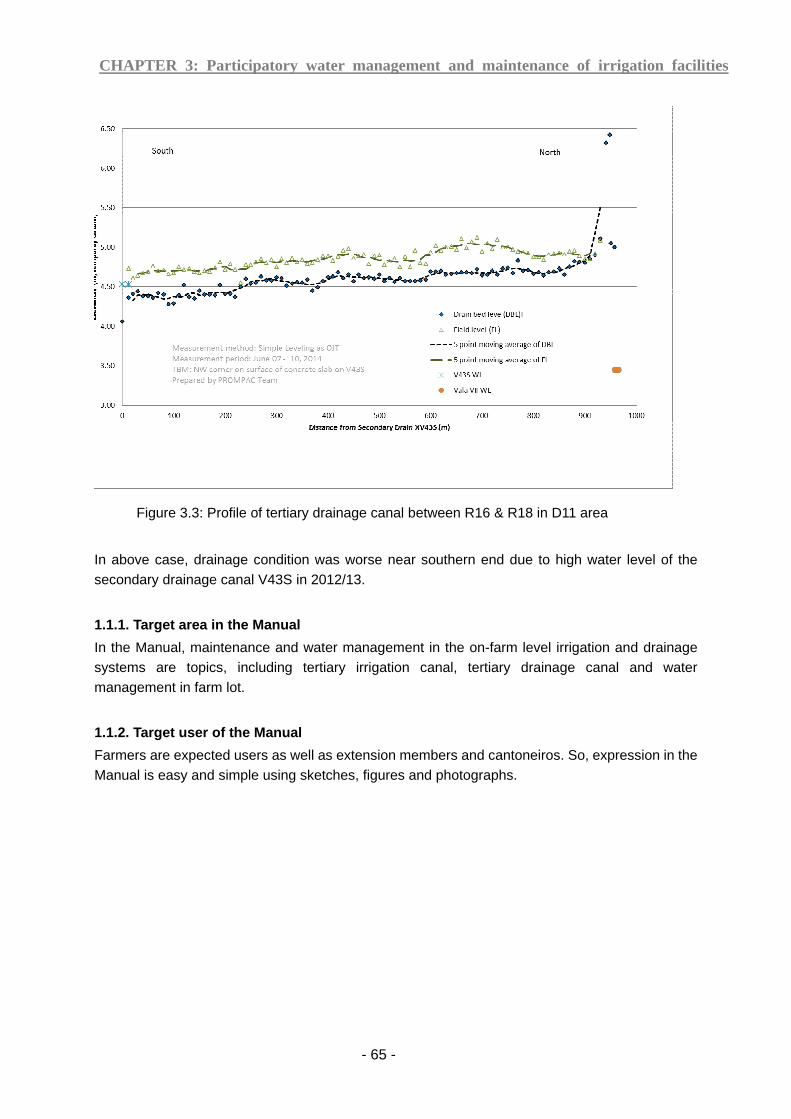
CHAPTER 3: Participatory water management and maintenance of irrigation facilities
- 65 -
Figure 3.3: Profile of tertiary drainage canal between R16 & R18 in D11 area
In above case, drainage condition was worse near southern end due to high water level of the secondary drainage canal V43S in 2012/13.
1.1.1. Target area in the Manual
In the Manual, maintenance and water management in the on-farm level irrigation and drainage systems are topics, including tertiary irrigation canal, tertiary drainage canal and water management in farm lot.
1.1.2. Target user of the Manual
Farmers are expected users as well as extension members and cantoneiros. So, expression in the Manual is easy and simple using sketches, figures and photographs.

CHAPTER 3: Participatory water management and maintenance of irrigation facilities
- 66 -
2. Maintenance of Irrigation and Drainage Facility for Improved Water Management
2.1. Tertiary Irrigation Canal
Tertiary irrigation canals were originally constructed as reinforced concrte flume called caleira. A part of the caleiras are utilized at present and earth canals are also widely used. One of the serious interruption of the system is fall or missing of caleira and its support particularly at drain crossing. Replacement of caleira may need that of support.
Photos 3.1: Caleira and support rehabilitation (R14 TC in D11 in 2013)

CHAPTER 3: Participatory water management and maintenance of irrigation facilities
- 67 -
Photos 3.2: Replacement by PVC pipes for 2 spans (R12 in D11 area in 2013)
Photos 3.3: Minor repair by cement mortar
2.2. Water distribution in field block or field lot (Ramal or cantera)
According to observation by the consultant team in the rainy season, lot (cantera, approx. 250m2) to lot water distribution method is usually selected, but water supply shifting is often not smoothly performed particularly after farmers leave from field. On farm water management is observed rather extensive and excess water remains sometimes in the field. Cantera to cantera water supply may be adjusted automatically to certain extent using temporary low and small weir made by soil, wooden plate, or something like these. Farmers are expected to
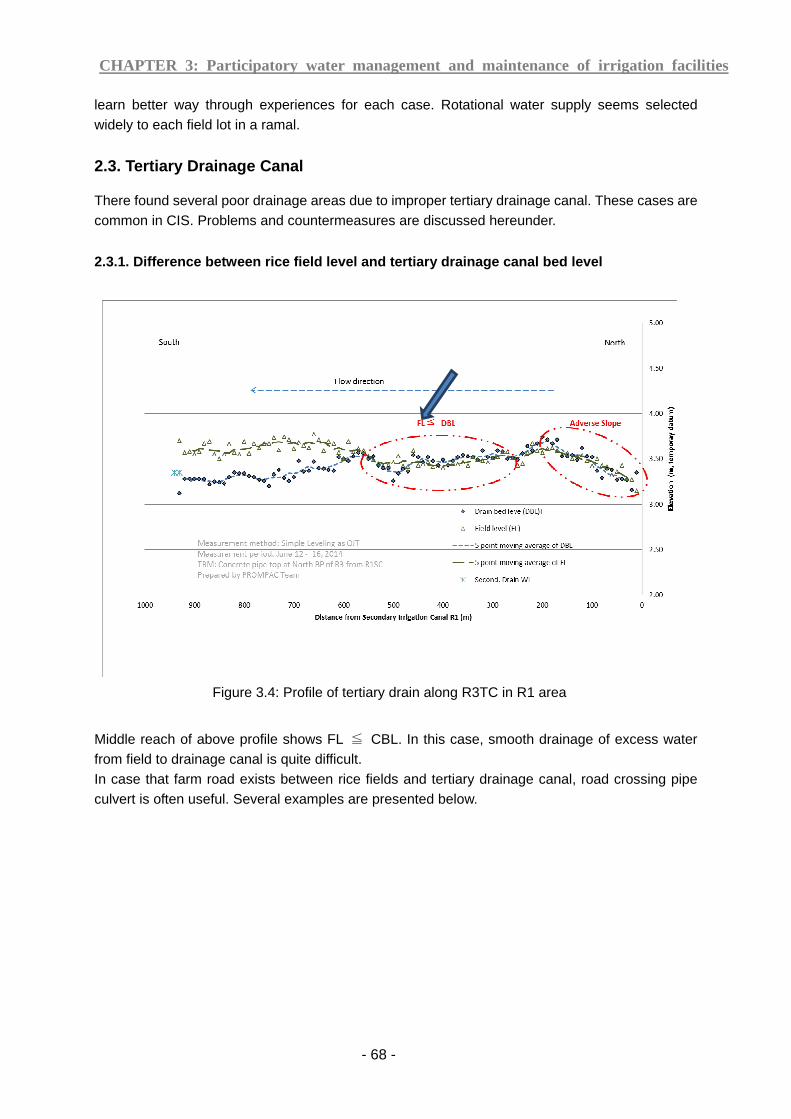
CHAPTER 3: Participatory water management and maintenance of irrigation facilities
- 68 -
learn better way through experiences for each case. Rotational water supply seems selected widely to each field lot in a ramal.
2.3. Tertiary Drainage Canal
There found several poor drainage areas due to improper tertiary drainage canal. These cases are common in CIS. Problems and countermeasures are discussed hereunder.
2.3.1. Difference between rice field level and tertiary drainage canal bed level
Figure 3.4: Profile of tertiary drain along R3TC in R1 area
Middle reach of above profile shows FL ≦ CBL. In this case, smooth drainage of excess water from field to drainage canal is quite difficult. In case that farm road exists between rice fields and tertiary drainage canal, road crossing pipe culvert is often useful. Several examples are presented below.

CHAPTER 3: Participatory water management and maintenance of irrigation facilities
- 69 -
Tertiary Cross Drain Field
Drain PVCP φ160 Drain
L = 6,000 mm Box
1.00
0.40 0.39
0.60 0.45 0.55
0.52 0.70
0.62
Figure Profile of Proposed Cross Drain in OJT in 2013
0.30
Figure 3.5: Road crossing pipe culvert
Photos 3.4 (1) Drainage improvement works including pipe culverts
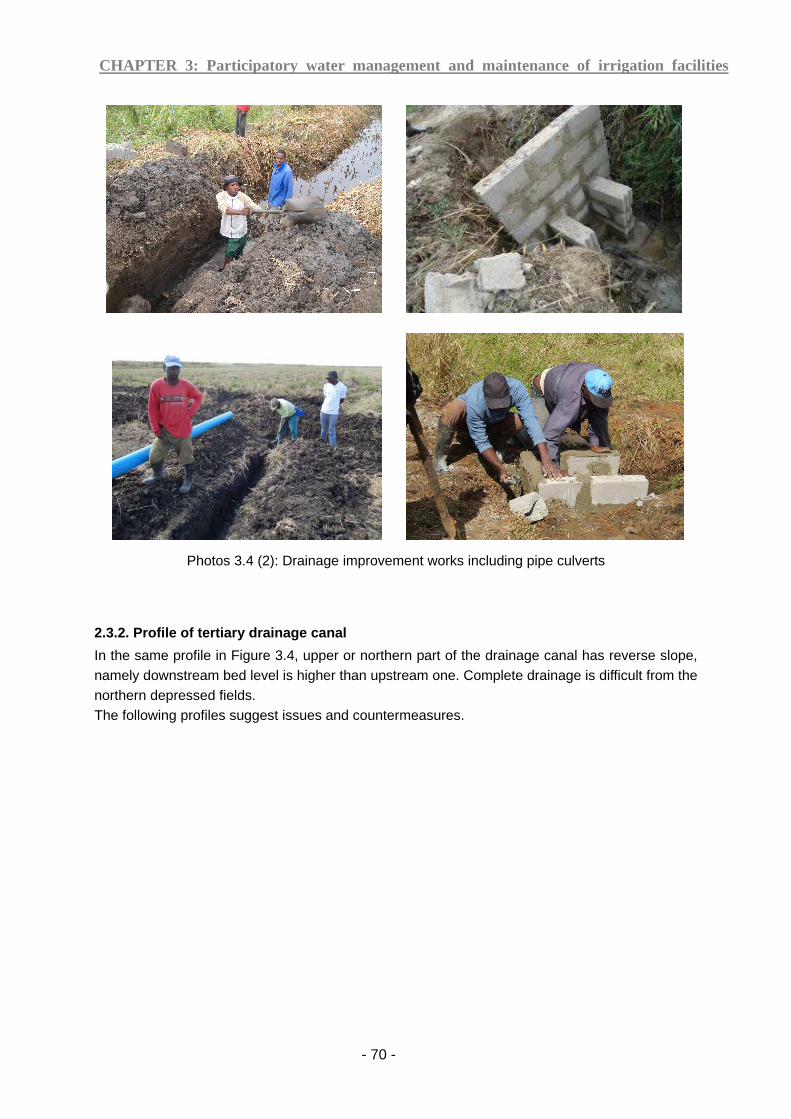
CHAPTER 3: Participatory water management and maintenance of irrigation facilities
- 70 -
Photos 3.4 (2): Drainage improvement works including pipe culverts
2.3.2. Profile of tertiary drainage canal
In the same profile in Figure 3.4, upper or northern part of the drainage canal has reverse slope, namely downstream bed level is higher than upstream one. Complete drainage is difficult from the northern depressed fields. The following profiles suggest issues and countermeasures.

CHAPTER 3: Participatory water management and maintenance of irrigation facilities
- 71 -
Figure 3.6: Profile of tertiary drainage canal along Ramal 7 in D12 area
Figure 3.7: Profile of Tertiary Drain and its candidate route in D5B area
2.4. Drainage in field block or field lot (Ramal or cantera) Quaternary drainage canal or temporary field drain may be effective in many field blocks. In figure below, difference of the highest and lowest ground levels is 0.40 m. The ramal are divided

CHAPTER 3: Participatory water management and maintenance of irrigation facilities
- 72 -
into canteras for rice cropping in such condition. In R3 area some parts are eroded and lowered, and other parts are filled with sediment and heighted by the flood in 2013. To improve this undulation, move of soil is desirable.
3.83 3.81 3.83 3.83 3.86 3.82 3.68 3.69 3.66 3.67 3.65 3.68 3.60
3.83 3.88 3.88 3.86 3.85 3.81 3.73 3.71 3.68 3.65 3.64 3.60 3.71
3.91 3.95 4.00 3.97 3.96 3.88 3.81 3.82 3.78 3.74 3.71 3.73 3.78
3.90 3.85 3.90 3.89 3.94 3.86 3.81 3.81 3.80 3.71 3.69 3.74 3.78
3.91 3.90 3.98 3.88 3.95 3.87 3.80 3.81 3.74 3.72 3.66 3.77 3.82
3.90 3.95 3.96 3.83 3.96 3.90 3.85 3.80 3.80 3.78 3.71 3.82 3.88
3.9
3.9
3.83.7
3.6
3.7
4.0
Average 3.81
Figure 3.8: R3 area contour map
Max.
4.00 m
Min.
3.60 m
Ave.
3.81 m

CHAPTER 3: Participatory water management and maintenance of irrigation facilities
- 73 -
3. Simple Leveling
3.1. Purpose
Simple leveling is usable to know elevation difference ( ∆) or ground level gap in rice field and between rice field and drainage canal bed. It can also be applied to prepare profile or longitudinal section of canal.
(1)
DrainRice Field
Rice Field Surface
Drain Bed
Water Surface
Figure 3.9: Main target of Simple Leveling

CHAPTER 3: Participatory water management and maintenance of irrigation facilities
- 74 -
3.2. Tool and cost
(a) Flexible tube D=6mm L=5m (b) Visible bottle (used)
(c) Simple scale L=2.5 m (d) Water, tape, stake, etc.
Photos 3.5: Simple and low cost tools for simple leveling
Tools were prepared in Chokwe, using available materials in Chokwe. (a) Flexible tube Transparent plastic tube of 6 mm diameter was used. The tube of D=10 mm is also available, but the former was found better with less air mixture. Gas pipe was purchased and tried, but was not selected, because inside water and air cannot be seen, it is heavier to hold, and it is more expensive. (b) Visible bottle Used PET bottles of 0.5 liter were selected. Those of 1.5 liter were tried and found larger and heavier with water to carry. They were corrugated bottles, but plain bottles may be easier to see water level. (c) Simple scale Plastic light bars were used as simple scale with manually marked every 1 cm readings by oily ink pens (for example, red: 10cm, blue: 5cm and black:1cm). They are not strong and required to be treated carefully. Any other similar bars are usable. (d) Water, tape, stake, etc. Water can be contained and transported in the PET bottles.

CHAPTER 3: Participatory water management and maintenance of irrigation facilities
- 75 -
Measurement tape or rope with a fixed length was employed for the profile survey of tertiary drainage canal and spot survey with mesh on rice field. Both 50m measurement tape and a 10 (ten) m rope were prepared. Combination of 10 m rope and 5 m convex is useful, practical and cheaper. Stakes were used for spot survey on rice field to show mesh lines. To connect two tubes, short tube with a little larger or smaller diameter was used as a joint. The joint was protected by vinyl tape for water tightness. To connect tube and PET bottle, a hole was made in the center of cap of the bottle. The tube end was inserted through the hole, and then it was fixed with glue for water tightness. (e) Cost estimate Required cost for a set in Chokwe is estimated as follows.
Table 3.1: Cost estimate for a set of simple leveling
Material item Spec./size Quantity Unit Unit Price
(MT)
Amount
(MT)
Flexible transparent
plastic tube
D 6mm, L=5m 3 piece 180 540
PET bottle 0.5 liter, used 2 bottle 0 0
Bar for scale L=2.5 m 3 bar 100 300
Oily color pen Red, blue & black 1 set-hour 5 5
PET bottle 1.5 liter, used 3 bottle 0 0
convex 5 m 1 no. 100 100
rope 10 m 1 no. 5 5
wooden stake 50 cm long 10 no. 5 50
Vinyl tape, glue &
others
L.S. 50 50
Total 1050
(PROMPAC, Consultant Team)
Estimated total cost of 1,050 MT is not small amount for the farmers, but is much lower than the topographic survey equipment. To measure drainage canal bed elevation at 10 m pitch, length of the flexible tube was decided at 15 m. If shorter tube length is sufficient, the tube cost can be reduced. If simple staff is made using abandoned wooden bar, the cost may be 0.
3.3. Basic consideration
3.3.1. Temporary Bench Mark (TBM)
Elevation (EL) difference is measured by simple leveling. However, absolute elevation based on some authorized datum such as mean sea level, is not measured when there is no authorized bench mark (BM).

CHAPTER 3: Participatory water management and maintenance of irrigation facilities
- 76 -
In CIS, on farm level simple leveling is usually conducted without BM near the site. In this case, temporary BM (TBM) is selected to get relative elevation. Roughly speaking, ground elevation in CIS is mostly from 20 to 40 meters above mean sea level (mamsl) according to information from Google Earth.
BMBMBMBM
EL= dEL= dEL= dEL= d
LandLandLandLand
SeaSeaSeaSea
dddd
EL=0EL=0EL=0EL=0 Mean Sea LevelMean Sea LevelMean Sea LevelMean Sea Level High TideHigh TideHigh TideHigh Tide
Low TideLow TideLow TideLow Tide
Figure 3.10: Elevation (EL) in “masl” and bench mark (BM) example
TBM is usually placed at stable and easily recognized position, such as concrete structure, metal surface and so on. Some of the TBMs selected in OJT simple leveling in 2014 in PROMPAC can be seen in photographs below. Temporary elevation of TBM is set 5.00 m in OJT leveling in 2014.
Photos 3.6: Examples of TBM
3.3.2. Plan, profile and cross section
Measurement results are expressed as plan (Figure 3.8), profile (Figures 3.3, 4, 6 and 7) and
cross section to understand the condition easily.
TBM TBM

CHAPTER 3: Participatory water management and maintenance of irrigation facilities
- 77 -
3.4. Measurement and record
3.4.1. Measurement
Measurement can be done as photos below.
Photos 3.7: Simple Leveling as OJT in June 2014

CHAPTER 3: Participatory water management and maintenance of irrigation facilities
- 78 -
Difference of elevation (∆) is measured as illustrated below.
= ?
0.5 m
0.5 m
1.5 m
1.0 m
2.0 m
1.0 m
2.5 m
1.5 m
2.5 m
2.0 m
Level
1.5 m
1.0 m
1.5 m = 1.0 m + Δ
Δ = 0.5 m
Simple Staff
0.5 m
0.5 m
1.5 m
1.0 m
2.0 m
1.0 m
2.5 m
1.5 m
2.5 m
2.0 m
Level
Figure 3.11: Simple Leveling in use of simple level and simple staff
In above case, ∆= difference of staff readings = 1.50 – 1.00 = 0.50 m.

CHAPTER 3: Participatory water management and maintenance of irrigation facilities
- 79 -
Through trial and error method, it is decided that one bottle should be fixed at constant height for quicker measurement. For profile leveling, water level is kept at1.50 m in general at base point. The base point is such point that already EL can be known by calculation. Next point is such point of which EL is to be measured based on the base point EL. Distance between the points are decided 10 m in the OJT. It needs certain time before water levels of two bottles become equal. Adjustment of height of the bottles is required at the both points for time saving.
Figure 3.12: Adjustment of the bottle heights for water to be leveled
3.4.2. Basic cares
Before measurement - Check should be done whether all the necessary tools and recording sheets are prepared
or not. If not, lack of tool should be supplemented. Treatment of the tools - The tools should be treated gently, since they are fragile. - The tube should not be trampled. Water filling to the tube - Water should be supplied gently from one of the bottles to avoid air mixture in the tube as
much as possible. - Air bubbles in the tube should be removed as much as possible. Water supply from
another bottle may be effective to send out air bubbles. - Before measurement, it should be confirmed that water level in both bottles move up or
down according to the difference of water levels. Simple staff setting

CHAPTER 3: Participatory water management and maintenance of irrigation facilities
- 80 -
- Location of next point should be appropriately selected, namely at representative height in the rice field, bottom of tertiary drainage canal, and so on.
- After placed, the staff must keep the same level, even though it is turned. - The staff must be kept without receiving outer pressure. Staff holder must not lean
against the staff not to sink it down to soft soil. - The staff should stand straight and vertical. - The staff should stand properly but not upside-down. Reading water level - Next point bottle should start at expected height to save time. The expected height can
be obtained by checking by eye, trend, and so on. - Water level should be read from horizontal direction, but not upward nor downward. - Before reading, water level stability must be carefully monitored. Observers must wait at
least 20-30 seconds to judge WL is stable or not. - In water level reading, careless mistakes must be avoided. Two or more observers
should read the same water level. After the measurement - Contained water in tube should be drained slowly and gently through one of the bottles.
Flow direction should be constant to avoid remaining water in fragments in tube as much as possible.
- The tube should be circularized smoothly without tube twist.
3.4.3. Recording
Table 3.2 is selected and employed sheet after trial and error. A top dark shaded cell is for tentative elevation of TBM. Shaded cells are filled with measured values at site. Blank cells are filled through calculation. In the column of remarks, notes should be written. The notes include TBM with its structure, drain filled with straw, undulating field just after ploughing with point location, unseen drain, soil bund, and so on.

CHAPTER 3: Participatory water management and maintenance of irrigation facilities
- 81 -
Table 3.2: Simple Leveling Record Sheet
Simple Leveling Record Sheet
Place: Recorder:
Date/Time: Recorder:
Accumulated Base Point Next Point Next Point
No. Distance on drain bed on drain bed on field Remarks
(m) H (m) WL (m) H (m) EL (m) H (m) EL (m)
0
1
2
3
4
5
6
7
8
9
10
11
12
13
14
15
16
17
18
19
20
21
22
23
24
25
26
27
28
29
30
31
32
33
34
35
36
37
38
39
40
41
42
43
44
45
46
47
48
49
50prepared by PROMPAC Consultant Team

CHAPTER 3: Participatory water management and maintenance of irrigation facilities
- 82 -
Table 3.3: Sample recorded and calculated sheet for simple leveling
Simple Leveling Record Sheet
Place: R1, along and east of R3TC Recorder: Calvin
Date/Time: June 12-16, 2014 Recorder: Kurauchi
Accumulated Base Point Next Point Next Point
No. Distance on drain bed on drain bed on field Remarks
(m) H (m) WL (m) H (m) EL (m) H (m) EL (m)
0 0 0.50 5.50 5.005.005.005.00 TBMTBMTBMTBM
1 10 1.00 4.80 1.70 3.80 Irrigation C.
2 10 1.50 4.85 1.45 3.35 1.65 3.15
3 20 1.50 4.66 1.69 3.16 1.39 3.27
4 30 1.50 4.77 1.39 3.27 1.49 3.28
5 40 1.50 4.78 1.49 3.28 1.35 3.43
6 50 1.50 4.77 1.51 3.27 1.41 3.36
7 60 1.50 4.88 1.39 3.38 1.56 3.32
8 70 1.50 4.89 1.49 3.39 1.48 3.41
9 80 1.50 4.79 1.60 3.29 1.36 3.43
10 90 1.50 4.87 1.42 3.37 1.37 3.50
11 100 1.50 5.02 1.35 3.52 1.60 3.42
12
13
①
⑤④③②
⑦⑥
<a>
<d>
<c><b><e>
⑨⑬ ⑧⑫ ⑪⑩
⑭ ⑱⑰⑯ ⑮ ⑲
(i) (ii) (iii) (iv)
3.4.4. Calculation
A cycle of the calculation is as shown below. <a> Firstly, known ELa is the starting point as base point, either EL of TBM or drainage canal bed level. (3.27 m in Table 3.3) <b> Water level is kept at 1.50 m or some other constant height. <c> WL = ELa +1.50 at base point (3.27 + 1.50 =4.77) <d> At next point with usual distance of 10 m, water level is adjusted to stable condition and staff height is read Hd. (1.39 m) <e> WL – Hd = ELe (4.77 – 1.39 = 3.38 m)
3.5. Results
3.5.1. D5 Area
Simple leveling was carried out along R20 of D5 Secondary Irrigation Canal (SC) and along rectangular route to D5B-SC as shown in Figure 3.13. Profile of former case is illustrated in Figure 3.14. Difference of west side field level and bed level of tertiary drainage canal (partly filled with soil or cannot be seen) or its route is little and insufficient. For drainage improvement, three options may be considered. One is construction and deepening of tertiary drain. Another is construction of road crossing pipe culverts from field to the secondary drain. The third is combination of the first and second methods. Anyway, it is necessary to study drainage system in the area up to Primary Drainage Canal No.2 (Vala II) for study of the countermeasures.

CHAPTER 3: Participatory water management and maintenance of irrigation facilities
- 83 -
Figure 3.13: Simple Leveling and drainage improvement works in D5 area in 2014
Figure 3.14: Profile of Route of Tertiary Drainage Canal along R20 TC in D5 area

CHAPTER 3: Participatory water management and maintenance of irrigation facilities
- 84 -
On the latter case in D5B area, profile is presented in Figure 3.7 in above 2 (3) (b). As seen in following photos, drainage condition is poor at place to place. Based on exchange of ideas with farmers’ group, the tertiary drainage canal (actually used as dual purpose canal) was ploughed by a tractor as illustrated in Figure 3.13. In addition, three pipe culverts were constructed for easy irrigation and drainage water flows.
WL field ≒ WL drain (May 15) No water on field : Water in drain (June 20)
Photos 3.8: Drainage condition before and after harvest in D5B area
If farmers wish to drain stagnant water after harvest, tertiary drainage canal should be dug by tractor to northern direction in parallel with original tertiary irrigation canal of caleiras. By that, drainage condition during rice cropping also expected to be better. If farmers sometimes want to store water in the drainage canal, simple gate should be provided or farmers may control by soil or sand bags.
3.5.2. D6 area
Selected alignment is along R13 tertiary irrigation canal as in Figure 3.15. The tertiary drain is intermittent. Difference of field and drain bed is little or nearly zero. Since land slope is rather steep at around 1/250 as can be seen in Figure 3.16, drainage can be effective, if tertiary drainage canal be dug properly. The drainage canal was one of the six tertiary drainage canals cleared and cleaned in 2012. At the downstream end, pipe culvert was constructed in 2012 to connect Main Drainage Canal No.2 (Vala II).

CHAPTER 3: Participatory water management and maintenance of irrigation facilities
- 85 -
Figure 3.15: Simple Leveling in D6 area in 2014
Figure 3.16: Profile of tertiary drainage canal route along R13 TC from D6 SC

CHAPTER 3: Participatory water management and maintenance of irrigation facilities
- 86 -
3.5.3. D11 area Simple leveling was performed along the tertiary drainage canal located east side of demonstration farms in 2012. The drain is between R16 and R18 tertiary irrigation canals as presented in figure below. Profile of the tertiary drainage canal is in Figure 3.3.
Figure 3.17: Simple Leveling as OJT in 2014 in D11, D12 and R1 areas
3.5.4. D12 area
Location of simple leveling is as shown in Figure 3.17. The profile is seen in Figure 3.6. As farmers talk, there is a slight but clear peak in the middle.
3.5.5. R1 area
Location is illustrated in Figure 3.17. The profile is presented in Figure 3.4. Tertiary drainage canals were constructed recently as a portion of rehabilitation project. The drainage canal does not function well and sometimes flood water comes from downstream. Causes of such problems can be understood by the profile.
3.5.6. R3 area
It is informed that tertiary drainage canal is well functional but flood in 2013 eroded a part of field and sedimented on another part. In a field lot, level gap is large and undulation occurred. Therefore, profile of the drain is made only for short distance and spot leveling was conducted in a field lot. The contour map is in Figure 3.8.
R1 area
D11 area
D12 area

CHAPTER 3: Participatory water management and maintenance of irrigation facilities
- 87 -
3.6. Countermeasures
Recommendable countermeasures for each area are summarized below.
Table 3.4: Problem and countermeasure
Area Problem Countermeasure
D5 R20 Poor drainage Survey of secondary drain and check of the system
D5B Poor drainage/irrigation water Dig tertiary drain by tractor and manpower
D6 Poor drainage against heavy rainfall
Dig tertiary drain by livestock and manpower
D11 Stagnant water ponding Prepare profile of secondary drain and try to lower its water level
D12 Depression in the middle of ramal
Excavate drain bed downstream of the depressed portion
R1 Poor drainage and back water intrusion from downstream secondary drain
Survey of SD and its system Excavate drain bed Change depressed field to fish pond Heighten low field by excavated soil
R3 Large level gap in ramal Cut soil in higher part and move it to lower part

Appendix
1. Fabrication of Manual seeder
2. The management of farmers’ group (Examples of book keeping)

No. Item Page
Overview of Row Seeder
List of Parts
List of Required Tools
1
Wheel
2
Axle
3
Cylinder (seed drum)
4
Seed Flow Control Plate
5
Lid (seed inlet)
6
Side Plate for the Cylinder (seed drum)
7
Chassis
8
Handle
9
Frame
10
Soil Covering Chain
11
Painting, Adjustment for Seed Outlet
Fabrication Manual for Man-Power Drawn 4-Row Paddy Seeder(Bran)
Contents
Appendix1: Fabrication of Manual Seeder
Appendeix1-1

【Overview of Row Seeder】
※ The "4. Seed Flow Control Plate" is installed inside of the "3.Cylinder(Seed drum)," so it is not shown this image.
Appendix1: Fabrication of Manual Seeder
Appendeix1-2

No. Name
Specification
(mm)
Unit Price
(Mt.)
Q'ty
(1 seeder)
Price
(Mt./seeder)
Required for
1 Round Steel Pipe internal diameter 17、external diameter 675 1250mm 141 2. Axle
2
Round Steel Pipe internal diameter 22、external
diameter 26、length 6000 900 3570mm 536
1. Wheel (Hub), 7. Chassis、
8. Handle
3
Square Steel Pipe 20 X 20、length 6000
275 3000mm 138 8. Handle
4
Round PVC Pipe internal diameter 22、external diameter
195 240mm 8 2. Axle
5
Reinforcing Bar external diameter 6、length 6000
100 200mm 3 7. Chassis
6
Reinforcing Bar external diameter 10, 6000
long
152 14586mm 370
1. Wheel, 9. Frame
7
Metal Sheet 1000 X 2000, 0.4 thick
968 1.03 sq m 499 3. Cylinder (seed drum)
8
Metal Sheet 1000 X 2000, 1.5 thick
1000 0.15 sq m 75
3. Cylinder (seed drum) 9. Frame
(furrow cutting plate)
9
Hose Band around φ30
40 12 480
7. Chassis & 9. Frame attachment,
2. Axle & 3. Cylinder (seed drum)
attachment
10
Aluminum Rivet φ3.2 X 13 (50/bag)
75 About 100 150 3. Cylinder (seed drum)
11
Hinge There should be a distance of around 40mm between rivet holes.
30 4 120 3. Cylinder (seed drum)
12
Hexagonal Bolt M6X30
100 2 200 8. Handle
13
Hexagonal Nut M6
30 2 60 8. Handle
14
Hexagonal Bolt M8X50
100 1 100 7. Chassis
15
Hexagonal Nut M8
30 2 60 7. Chassis
16
Steel Chain φ8
150/m 4000mm 600 10. Soil Covering Chain
17
Wire around Φ2.0
10/mApproximately 3m 30 10. Soil Covering Chain
18
Paint (Oil Base) White(500ml/can)
280 1 280 7. Chassis, 8. Handle, 9. Frame, etc.
19
Paint (Oil Base) Brown(500ml/can)
280 1 280 3. Cylinder (seed drum)
20
Paint Thinner 500ml/can
200 1 200 For painting
21
Paint Brush Large
220 1 220 For painting
22
Paint Brush Small
220 1 220 For painting
4768
approximately 3000
7768
【List of Parts for Man-power Drawn 4-Row Paddy Seeder】
Total (costs of parts)
Welding Fees
Grand Total
Appendix1: Fabrication of Manual Seeder
Appendeix1- 3

No. Photo Image Name Remarks
1
11
1
Long-nose Pliers
For precision work, such as piercing a hole for the
axle on the side of the seed drum as well as to
connect the soil covering chain to other parts.
2
22
2
Vice-grip Pliers
For fixing together parts, when determining the
bending places on the metal sheet of the seed drum
as well as holding parts for welding, etc.
3
33
3
Water-pump Pliers
For holding large parts. The jaws of these pliers are
adjustable.
4
44
4
Side cutting Pliers
For working on metal sheet. Used also to cut wires.
5
55
5
Metal Shears
For cutting the 0.4mm thick metal sheet of the seed
drum.
6
66
6
Pipe Wrench
For holding round and square steel pipes, and used
when bending.
【List of Required Tools】
7
77
7
Hacksaw
For cutting metal pipes as well as chain links. Be
careful of the sharp blade.
8
88
8
Flat-head
Screwdriver
For tightening a hose band, etc.
9
99
9
File (flat, round,
square)
For filing rough edges of metal sheet, metal pipes and
PVC pipes. Handle with care, it is easy to break or
blunt the file.
10
1010
10
Hammer
For hammering metal sheet of the seed drum or
flattening the head of rivets etc.
11
1111
11
Chisel
For marking the bending points when making the seed
flow controle plate, handles, etc.
12
1212
12
Centerpunch
For punching metal sheet to decide drill position.
13
1313
13
Riveter
Aluminum Rivet=
φ3.2 X 13
For riveting metal sheet to fix each side. Use the
appropriate size of nose piece for the rivet size.
Appendix1: Fabrication of Manual Seeder
Appendeix1-4

No. Photo Image Name Remarks
【List of Required Tools】
14
1414
14
Tape Measure
For measuring length.
15
1515
15
Ruler
For measuring the length and drawing the plan for
rivet, etc.
16
1616
16
Vernier Calipers
For measuring the length in minutes (inner or outer
diameter of round steel pipes and thickness of the
metal sheet).
17
1717
17
Protractor
For measuring bending angles.
18
1818
18
Marker
For drawing cutting lines as well as bending lines and
marking other places.
19
1919
19
Bench vice
For holding materials such as when making the furrow
sheet as well as when bending the materials to make
the frame, etc.
20
2020
20
Reamer
(size here is Φ4~
22㎜)
For expanding the diameter of a hole, when no larger
diameter of a drill is available.
21
2121
21
Electric Drill &
Drill bit for metal=
3,4,7,9㎜
For drilling to pierce a hole. Unplug the drill when the
drill bit is being changed. Be careful not to lose or
misplace the chuck for the drill. (This is the part
indicated by the yellow box in the picture on the left.)
22
2222
22
Electric Grinder
Cutting Disk
Grinding Disk
For cutting or grinding. Unplug the grinder when the
disc is being changed. Be careful not to lose or
misplace the wheel nut spanner. (This is the part
indicated by the yellow box in the picture on the left.)
Appendix1: Fabrication of Manual Seeder
Appendeix1-5

No. Photo Image Name Remarks
【List of Required Tools】
23
2323
23
Extention cable drum
(50m)
For use with the electric drill and grinder. Uncoil
completely when using as there is a fire hazard
caused by the heated coil of the electric wire.
24
2424
24
Paint & Brush
Shake the paint can well before use. Mix through the
paint from the bottom of the can with a clean stick,
after opening the lid. Avoid using tree branches since
it may contaminate the color of the paint.
Used brushes should be washed thoroughly, using the
paint thinner and dried.
25
2525
25
Paint Thinner
For diluting the paint as well as washing off the paint
from the paint brush. Keep fire sources away, since it
is highly flammable. Tighten the cap firmly after use.
Empty PET Bottle
For rinsing paint brushes after use.
26
2626
26
27
2727
27
Lubricant
For lubricating frictional parts, such as axle, etc.
28
2828
28
Scales
(approximately 1kg
Mx.)
For weighing the appropriate volume of seed for the
row seeder.
29
2929
29
Bowl, plate, etc.
For containing and weighing the appropriate volume of
seed for the row seeder.
30
3030
30
Bluesheet
For spreading to catch seeds when weighing the
appropriate volume of seed for the row seeder.
Appendix1: Fabrication of Manual Seeder
Appendeix1-6

No
NoNo
No Picture
PicturePicture
Picture Description
DescriptionDescription
Description Size (mm)
Size (mm)Size (mm)
Size (mm) Tools
ToolsTools
Tools Q'ty of Products
Q'ty of ProductsQ'ty of Products
Q'ty of Products
1111
above cut sheet metal
above cut sheet metalabove cut sheet metal
above cut sheet metal
●Manufacturing process for
the wheel
①Cut the reinforced steel
bars.
②Mark the points where the
reinforced bars should be
bent. There should be a
distance of 50mm between
these marked points.
●Reinforcing bars
length=1885
diameter=10
●Electric grinder
(cutting disk), or
hacksaw
●Marker pen
●2
2222
above cut sheet metal
above cut sheet metalabove cut sheet metal
above cut sheet metal
①Reinforcing bars should
go into the holes of the jig
and be bent at each of the
marks, in order to make a
circle of 600mm diameter.
※The ridges on the
reinforcing bars should be
facing upward and
downward while each bend
is made.(Otherwise, the
accuracy of overall form
may be impaired.)
●Diameter=600 ●Jig (The coupling
mechanism of a
tractor that is no
longer in use can be
utilized for this
purpose.)
●2
1. Wheel
3333
above cut sheet metal
above cut sheet metalabove cut sheet metal
above cut sheet metal
①Draw a circle (600mm
radius) on a plywood sheet.
※Refer to "6. Cylinder
(seed drum) Side -1."
②Place the bent circular
form on to the drawing, and
adjust using the pipe
wrench, until the circular
form matches exactly with
the drawing and everything
lies flat on the plywood
sheet.
●Diameter=600 ●Pipe wrench
●Marker pen
●Wire
●Nail
●2
Appendix1: Fabrication of Manual Seeder
Appendeix1-7
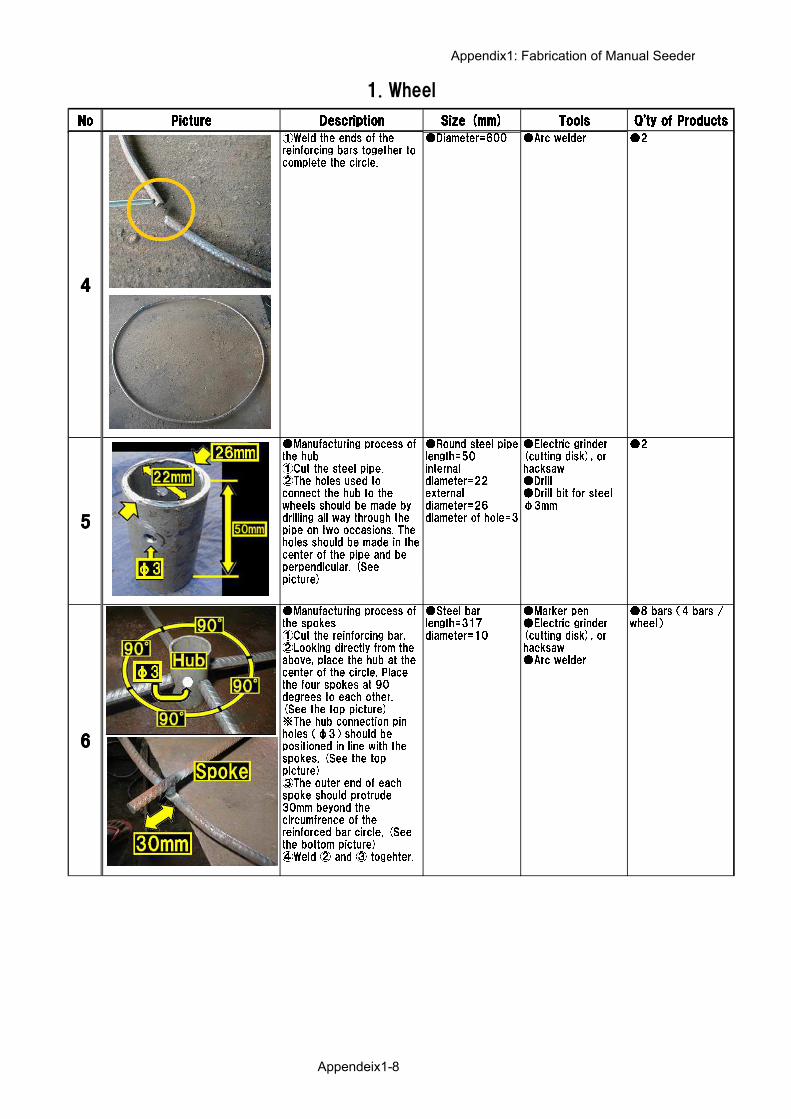
No
NoNo
No Picture
PicturePicture
Picture Description
DescriptionDescription
Description Size (mm)
Size (mm)Size (mm)
Size (mm) Tools
ToolsTools
Tools Q'ty of Products
Q'ty of ProductsQ'ty of Products
Q'ty of Products
1. Wheel
4444
ハブ切断とタップ写真
ハブ切断とタップ写真ハブ切断とタップ写真
ハブ切断とタップ写真
①Weld the ends of the
reinforcing bars together to
complete the circle.
●Diameter=600 ●Arc welder ●2
5555
●Manufacturing process of
the hub
①Cut the steel pipe.
②The holes used to
connect the hub to the
wheels should be made by
drilling all way through the
pipe on two occasions. The
holes should be made in the
center of the pipe and be
perpendicular. (See
picture)
●Round steel pipe
length=50
internal
diameter=22
external
diameter=26
diameter of hole=3
●Electric grinder
(cutting disk), or
hacksaw
●Drill
●Drill bit for steel
φ3mm
●2
picture)
6666
ハブ切断とタップ写真
ハブ切断とタップ写真ハブ切断とタップ写真
ハブ切断とタップ写真
●Manufacturing process of
the spokes
①Cut the reinforcing bar.
②Looking directly from the
above, place the hub at the
center of the circle. Place
the four spokes at 90
degrees to each other.
(See the top picture)
※The hub connection pin
holes (φ3) should be
positioned in line with the
spokes. (See the top
picture)
③The outer end of each
spoke should protrude
30mm beyond the
circumfrence of the
reinforced bar circle. (See
the bottom picture)
④Weld ② and ③ togehter.
●Steel bar
length=317
diameter=10
●Marker pen
●Electric grinder
(cutting disk), or
hacksaw
●Arc welder
●8 bars (4 bars /
wheel)
Appendix1: Fabrication of Manual Seeder
Appendeix1-8

No
NoNo
No Picture
PicturePicture
Picture Description
DescriptionDescription
Description Size (mm)
Size (mm)Size (mm)
Size (mm) Tools
ToolsTools
Tools Q'ty of Products
Q'ty of ProductsQ'ty of Products
Q'ty of Products
1. Wheel
7777
7
77
7
●Manufacturing process of
the spikes
①Cut the reinforcing bars.
②Place two spikes
equidistantly between each
of the spokes. (interval
angle should be 30
degrees)
③Weld spikes to the wheel.
●Steel bar
length=30
diameter=10
●Marker pen
●Electric grinder
(cutting disk), or
hacksawa
●Arc welder
●16 bars (8 bars /
wheel)
8888
Completed wheel ●Diameter=600 ●2
Appendix1: Fabrication of Manual Seeder
Appendeix1-9

No
NoNo
No Picture
PicturePicture
Picture Description
DescriptionDescription
Description Size (mm)
Size (mm)Size (mm)
Size (mm) Tools
ToolsTools
Tools Q'ty of Products
Q'ty of ProductsQ'ty of Products
Q'ty of Products
1
above cut sheet metal
above cut sheet metalabove cut sheet metal
above cut sheet metal
2
①Cut one round steel pipe.
②Cut four PVC pipes.
③Slide the PVC pipe(②)
sections over the length of
the round steel pipe. (see
the figure 1)
④Make a 3mm hole, 80mm
from each end of the round
steel pipe.
●Ruler
●Electric grinder
(cutting disk), or
hacksaw
●Flat file
●Hammer
●Centerpunch
●Drill
●Drill bit for steelφ
●1
2. Axle
steel pipe. ●Drill bit for steelφ
3mm
Appendix1: Fabrication of Manual Seeder
Appendeix1-10

No
NoNo
No Picture
PicturePicture
Picture Description
DescriptionDescription
Description Size (mm)
Size (mm)Size (mm)
Size (mm) Tools
ToolsTools
Tools Q'ty of Products
Q'ty of ProductsQ'ty of Products
Q'ty of Products
1
A
<
<<
<See 1B.
See 1B.See 1B.
See 1B.>
>>
>
●The black dots (・) are the
precise points to be centerpunched
and then drilled.
●The 140mm diagnal line is the
position for the "4. Seed flow
control plate."
・The positions of the holes for the
seed flow control plate should be
approximately as shown on the
diagram 1B. (It does not have to be
absolutely exact, as this will not
adversely affect the flow of the
seed.)
・The fin should be positioned
towards the side of the dotted line.
①It is possible to duplicate
the positioning of all holes in
the second sheet by placing
the first sheet on top of the
second sheet, and using the
centerpunch to mark the
holes on the second sheet.
●Steel plate
350 X 815
thickness=0.4
●Ruler (approx.
500mm)
●Marker pen
●Tape measure (3
m)
●Metal shears
●Centerpunch
●Hammer
●2
1
B
3. Cylinder (seed drum)
2222
●Cut a section away for the
doorway for the seed inlet.
①Mark eight points to
create two rectangular
areas, one inside (yellow
part) the other, using either
a centerpunch or a nail.
These points should be
positioned as according to
the diagram. (The eight
points are shown in the
diagram on the left.)
②Drill a 4mm hole at each
of these eight
centerpunched positions.
(Those eight points are the
red points shown in the
diagram on the left.)
③Cut the yellow rectangular
section away (as shown on
the left) by using a chisel
●Metal shears
●Drill bit for steel
φ4mm
●Chisel
●Metal undersheet
or thick steel plate
●Centerpunch or
nail
●2 sections to be
cut away (1 setion /
sheet)
Appendix1: Fabrication of Manual Seeder
Appendeix1-11

No
NoNo
No Picture
PicturePicture
Picture Description
DescriptionDescription
Description Size (mm)
Size (mm)Size (mm)
Size (mm) Tools
ToolsTools
Tools Q'ty of Products
Q'ty of ProductsQ'ty of Products
Q'ty of Products
3. Cylinder (seed drum)
3333
①The sections between
internal and external
rectangles should be bent
back 180 degrees (as in
the diagram on the left).
※The four sections are
marked in the yellow in the
diagram on the left.
●Pliers ●8 positions {4
positions/cylinder
(seed drum)}
4444
①After bending 180
degrees, the rim of the
rectangle should be
hammered flat all around.
●Hammer
●Metal undersheet,
or thick steel plate
●8 positions{4
positions/cylinder
(seed drum)}
5555
●Bending the sheet into the
cylinderical form.
①In order to create a
cylinder, a folded lip should
be created at each end of
the rectangler plate. The lip
is made by folding over a
narrow strip at the shorter
ends of the rectangle.
Please refer to the pictures
on the left.
●Hammer
●Bench vice
●L-shaped angle
bar
(approx. 1inch X
1inch)
●4 positions{2
positions/cylinder
(seed drum)}
Appendix1: Fabrication of Manual Seeder
Appendeix1-12

No
NoNo
No Picture
PicturePicture
Picture Description
DescriptionDescription
Description Size (mm)
Size (mm)Size (mm)
Size (mm) Tools
ToolsTools
Tools Q'ty of Products
Q'ty of ProductsQ'ty of Products
Q'ty of Products
3. Cylinder (seed drum)
6666
①The two folded ends of
the rectangle should be
connected accordingly and
hammered together to
secure the join. A round bar
should be placed underneath
the connecting section when
hammering together.
●Hammer
●Round bar
(approx. φ100)
●2
7777
①Centerpunch the points
where holes should be
drilled. ※Please refer to the
picture 8.
②Drill the holes.
●Centerpunch
●Drill
●Drill bit for steel
φ4mm
●8 positions{4
positions/cylinder
(seed drum)}
8888
①Place the nose of the
riveter against the cylinder,
place a hand right
underneath the pisition of
the riveter, make sure there
is no gap between the nose
of the riveter and the metal
plate and rivet at four
indicated positions.
The locations and
the distances
between reveting
points are as
shown in the
picture on the left.
●Rivet=
φ3.2 X 13
●Riveter ●8 rivets{4
rivets/cylinder(seed
drum)}
9999
●Installation of the hinges
for the seed inlet door.
①Centerpunch the positions
for the holes.
②Drill the holes at the
centerpunched positions.
●Hammer
●Centerpunch
●Drill
●Drill bit for steel
φ4mm
●Wooden block
●8 holes{(4
holes/cylinder (seed
drum)}
Appendix1: Fabrication of Manual Seeder
Appendeix1-13
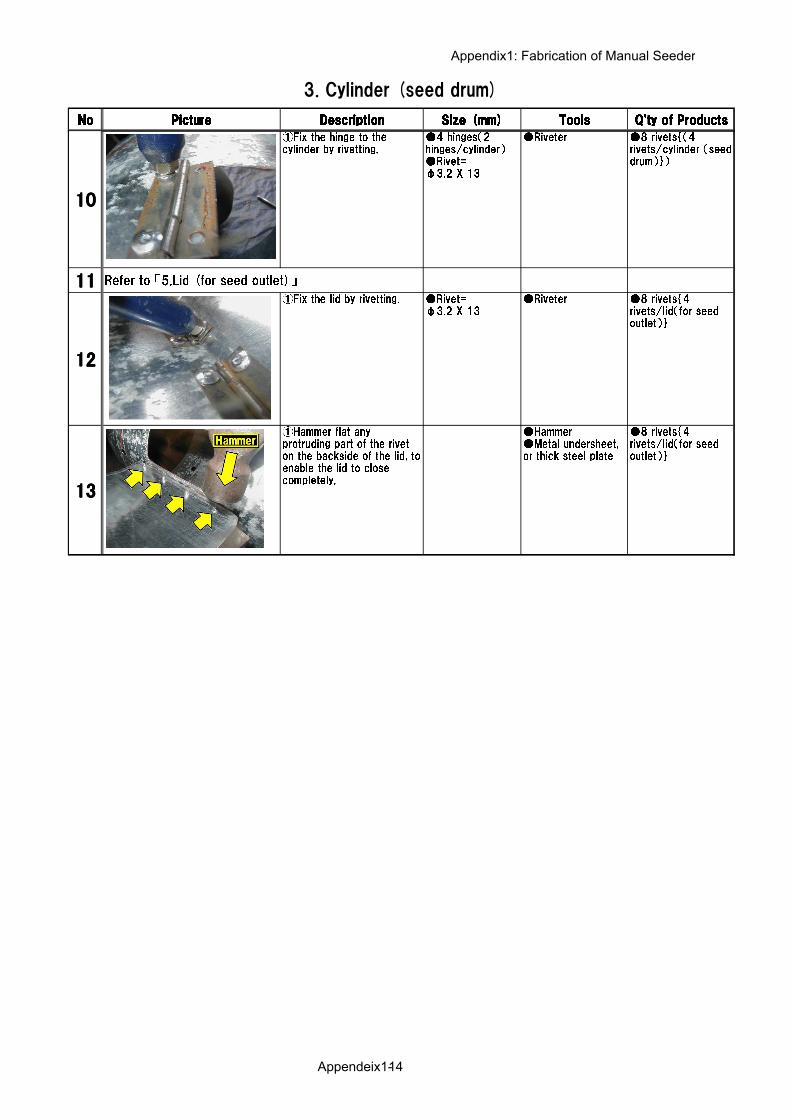
No
NoNo
No Picture
PicturePicture
Picture Description
DescriptionDescription
Description Size (mm)
Size (mm)Size (mm)
Size (mm) Tools
ToolsTools
Tools Q'ty of Products
Q'ty of ProductsQ'ty of Products
Q'ty of Products
3. Cylinder (seed drum)
10101010
①Fix the hinge to the
cylinder by rivetting.
●4 hinges(2
hinges/cylinder)
●Rivet=
φ3.2 X 13
●Riveter ●8 rivets{(4
rivets/cylinder (seed
drum)})
11111111 Refer to 「5.Lid (for seed outlet)」
12121212
①Fix the lid by rivetting. ●Rivet=
φ3.2 X 13
●Riveter ●8 rivets{4
rivets/lid(for seed
outlet)}
13131313
①Hammer flat any
protruding part of the rivet
on the backside of the lid, to
enable the lid to close
completely.
●Hammer
●Metal undersheet,
or thick steel plate
●8 rivets{4
rivets/lid(for seed
outlet)}
Appendix1: Fabrication of Manual Seeder
Appendeix1-14

No
NoNo
No Picture
PicturePicture
Picture Description
DescriptionDescription
Description Size (mm)
Size (mm)Size (mm)
Size (mm) Tools
ToolsTools
Tools Q'ty of Products
Q'ty of ProductsQ'ty of Products
Q'ty of Products
1111
※ This part is rather small,
so some cut away sections,
like the ones leftover from
the making of the cylinder,
should be used to maximize
the limited materials.
●Metal sheet=70
X 200
thickness=0.4
●Ruler
●Metal Shears
●8 sheets
{4sheet/cylinder
(seed drum) }
2222
①Nine incisions are to be
made to make ten fins on
the seed flow control plate.
② Centerpunch two
positions on the sheet of the
seed flow control plate.
③ Drill two 4mm hinge
holes.
●Size of a fin=
35 X 20
●Metal Shears
●Centerpunch
●Drill
●Drill bit for metals
φ4mm
●8 sheets {4
sheets/cylinder
(seed drum) }
3333
① Chisel the "seed flow
control plate" gently on the
extension line of incision to
make it flexible and to fit the
inner surface of the cylinder
(seed drum).
※Pay attention not to cut
off the fins by chiseling too
hard.
●Size of bend =
35 X 20
●Chisel
●Hammer
●Metal undersheet
or thick steel plate
●8 sheets {4
sheet/cylinder
(seed drum) }
①Bend the "seed flow
control plate" at an angle of
90 degrees between fins
●Marker
●Drill
●Drill bit for steel
●8 sheets {4
sheet/cylinder
(seed drum) }
4. Seed Flow Control Plate
4444
90 degrees between fins
and the face of the holes
(L-shaped yellow arrows).
②Apply the "seed flow
control plate" to the inner
side of the "cylinder (seed
drum)" and determine the
bend of the plate. Make two
marks for the rivets. Drill two
4mm rivet holes.
●Drill bit for steel
φ4mm
●Hammer
●Vice-grip pliers
●Same length and
L-shaped metal
sheet
(approx. 1 inch X
approx. 1 inch)
(seed drum) }
5555
①Rivet the "seed flow
control plate" to the inside
of the cylinder (seed drum).
※The rivet direction should
be referred to "3. Cylinder
(seed drum) 1A, 1B."
●Rivet=
φ3.2 X 13
●Riveter
●Rivet
●8 sheets {4
sheet/cylinder
(seed drum)}
Appendix1: Fabrication of Manual Seeder
Appendeix1-15

No
NoNo
No Picture
PicturePicture
Picture Description
DescriptionDescription
Description Size (mm)
Size (mm)Size (mm)
Size (mm) Tools
ToolsTools
Tools Q'ty of Products
Q'ty of ProductsQ'ty of Products
Q'ty of Products
1111
①Seed outlet(refer to 3-
3)Likewise, a 5mm rim
should be bent around the
four sides of the lid using
the pliers.
② Bent sides should be
flattened completely (180
degrees bend) by using the
hammer.
● Metal sheet =
140 X 160
thickness =0.4
●Ruler
●Metal shears
●Pliers
●Hammer
●Anvil or thick steel
plate
●2 metal sheets
2222
① The lid material should
be pressed tightly against
the column by both hands,
creating a curved surface,
so that the lid will be
shaped to fit to the cylinder
tightly when being attached.
※Mark the rivet hole
positions with a marker pen.
● Marker pen
● Column, used in
the "3. Cylinder
(seed drum) -6"
●2 sheets
① Centerpunch four points,
two for each hinge
(hinge/Rivet holes =
40mm).
●Ruler
●Marker pen
●Centerpunch
●Hammer
●2 sheets
5.Lid (seed inlet)
3333
40mm).
② Drill 4mm holes where
the centerpunch points are
made.
※ Drill holes on a wooden
block.
●Hammer
●Drill
●Drill bits for steel
φ4mm
●Wooden block
Appendix1: Fabrication of Manual Seeder
Appendeix1-16

No
NoNo
No Picture
PicturePicture
Picture Description
DescriptionDescription
Description Size (mm)
Size (mm)Size (mm)
Size (mm) Tools
ToolsTools
Tools Q'ty of Products
Q'ty of ProductsQ'ty of Products
Q'ty of Products
5.Lid (seed inlet)
4444
ハブ切断とタップ写真
● Manufacturing process
for the lock of the lid
① Measure and draw to
size, lines on the metal
sheet.
② Centerpunch rivet hole
points (six in total).
③ Drill 4mm holes at each
centerpunched position.
※Drilling should be done on
a wooden block.
●Metal sheet =
20 X 50
thickness =1.5
●Ruler
●Marker pen
●Centerpunch
●Hammer
●Drill
●Drill bit for steel
φ4mm
●Metal shears
●6 sheets{3
sheets/lid(seed
outlet)}
5555
ハブ切断とタップ写真
● Manufacturing process
for the lock of the lid
④ Cut out strips for the lid
lock using the metal shears.
⑤ Cut along the yellow line
to make six strips of metal.
⑥Hammer flat those six
strips.
⑦Attach these to the
cylinder (seed drum).
● metal sheet =
20 X 50
thickness =1.5
●Metal shears
●Hammer
●Metal undersheet
or thick steel plate
●6 sheets {3
sheets / lid (seed
outlet) }
6666
Appendix1: Fabrication of Manual Seeder
Appendeix1-17
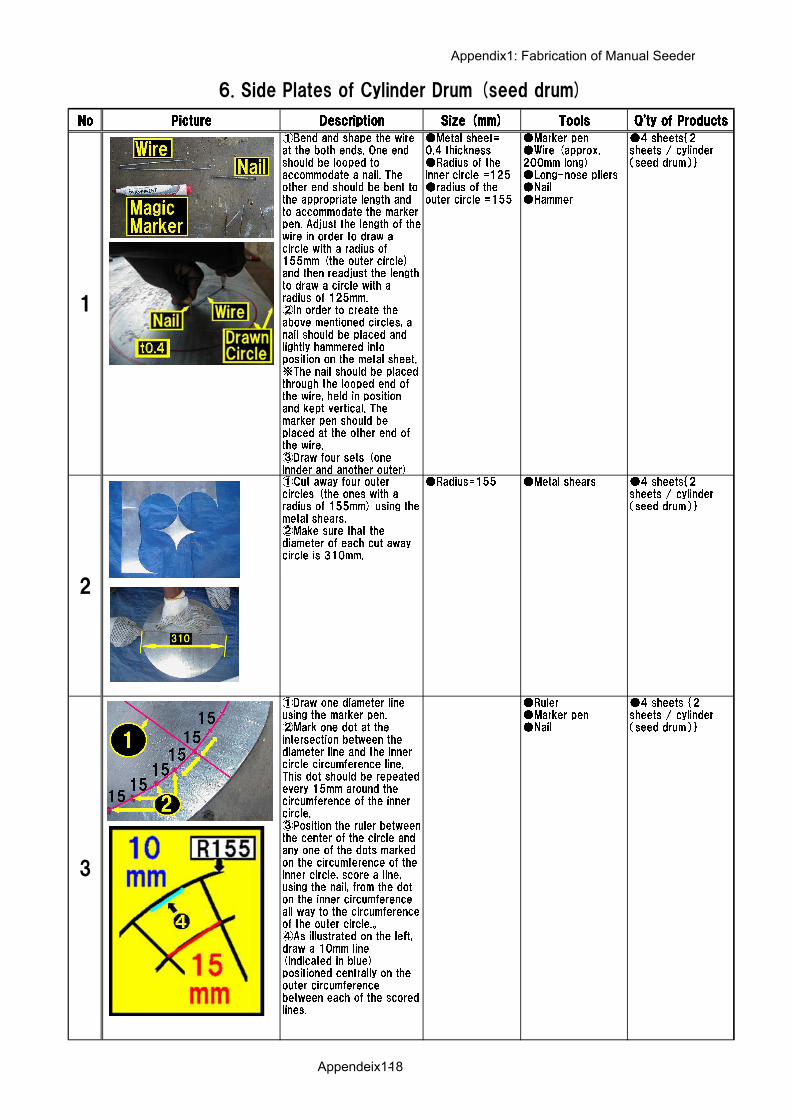
No
NoNo
No Picture
PicturePicture
Picture Description
DescriptionDescription
Description Size (mm)
Size (mm)Size (mm)
Size (mm) Tools
ToolsTools
Tools Q'ty of Products
Q'ty of ProductsQ'ty of Products
Q'ty of Products
1
above cut sheet metal
①Bend and shape the wire
at the both ends. One end
should be looped to
accommodate a nail. The
other end should be bent to
the appropriate length and
to accommodate the marker
pen. Adjust the length of the
wire in order to draw a
circle with a radius of
155mm (the outer circle)
and then readjust the length
to draw a circle with a
radius of 125mm.
②In order to create the
above mentioned circles, a
nail should be placed and
lightly hammered into
position on the metal sheet.
※The nail should be placed
through the looped end of
the wire, held in position
and kept vertical. The
marker pen should be
placed at the other end of
the wire.
③Draw four sets (one
innder and another outer)
●Metal sheet=
0.4 thickness
●Radius of the
inner circle =125
●radius of the
outer circle =155
●Marker pen
●Wire (approx.
200mm long)
●Long-nose pliers
●Nail
●Hammer
●4 sheets{2
sheets / cylinder
(seed drum)}
2
above cut sheet metal
①Cut away four outer
circles (the ones with a
radius of 155mm) using the
metal shears.
②Make sure that the
diameter of each cut away
circle is 310mm.
●Radius=155 ●Metal shears ●4 sheets{2
sheets / cylinder
(seed drum)}
6. Side Plates of Cylinder Drum (seed drum)
2
3
ハブ切断とタップ写真
①Draw one diameter line
using the marker pen.
②Mark one dot at the
intersection between the
diameter line and the inner
circle circumference line.
This dot should be repeated
every 15mm around the
circumference of the inner
circle.
③Position the ruler between
the center of the circle and
any one of the dots marked
on the circumference of the
inner circle, score a line,
using the nail, from the dot
on the inner circumference
all way to the circumference
of the outer circle.。
④As illustrated on the left,
draw a 10mm line
(indicated in blue)
positioned centrally on the
outer circumference
between each of the scored
lines.
●Ruler
●Marker pen
●Nail
●4 sheets {2
sheets / cylinder
(seed drum)}
Appendix1: Fabrication of Manual Seeder
Appendeix1-18
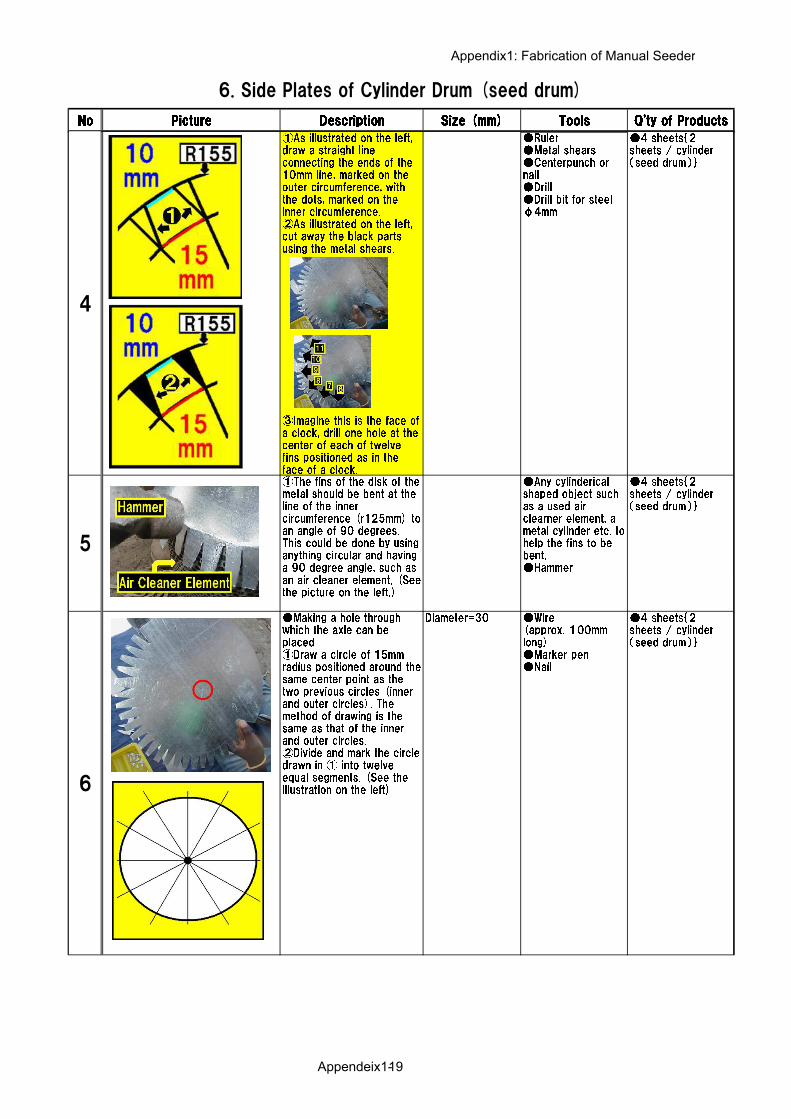
No
NoNo
No Picture
PicturePicture
Picture Description
DescriptionDescription
Description Size (mm)
Size (mm)Size (mm)
Size (mm) Tools
ToolsTools
Tools Q'ty of Products
Q'ty of ProductsQ'ty of Products
Q'ty of Products
6. Side Plates of Cylinder Drum (seed drum)
4
①As illustrated on the left,
draw a straight line
connecting the ends of the
10mm line, marked on the
outer circumference, with
the dots, marked on the
inner circumference.
②As illustrated on the left,
cut away the black parts
using the metal shears.
③Imagine this is the face of
a clock, drill one hole at the
center of each of twelve
fins positioned as in the
face of a clock.
●Ruler
●Metal shears
●Centerpunch or
nail
●Drill
●Drill bit for steel
φ4mm
●4 sheets{2
sheets / cylinder
(seed drum)}
5
①The fins of the disk of the
metal should be bent at the
line of the inner
circumference (r125mm) to
an angle of 90 degrees.
This could be done by using
anything circular and having
a 90 degree angle, such as
an air cleaner element. (See
●Any cylinderical
shaped object such
as a used air
clearner element, a
metal cylinder etc. to
help the fins to be
bent.
●Hammer
●4 sheets{2
sheets / cylinder
(seed drum)}
an air cleaner element. (See
the picture on the left.)
6
●Making a hole through
which the axle can be
placed
①Draw a circle of 15mm
radius positioned around the
same center point as the
two previous circles (inner
and outer circles). The
method of drawing is the
same as that of the inner
and outer circles.
②Divide and mark the circle
drawn in ① into twelve
equal segments. (See the
illustration on the left)
Diameter=30 ●Wire
(approx. 100mm
long)
●Marker pen
●Nail
●4 sheets{2
sheets / cylinder
(seed drum)}
Appendix1: Fabrication of Manual Seeder
Appendeix1-19

No
NoNo
No Picture
PicturePicture
Picture Description
DescriptionDescription
Description Size (mm)
Size (mm)Size (mm)
Size (mm) Tools
ToolsTools
Tools Q'ty of Products
Q'ty of ProductsQ'ty of Products
Q'ty of Products
6. Side Plates of Cylinder Drum (seed drum)
7
①Cut along the marked
lines of each of the twelve
divided segments. (Picture)
※Use a metal undersheet
as when used for the seed
inlet preparation.
Diameter=30 ●Chisel
●Hammer
●Metal undersheet
or thick steel plate
●4 sheets{2
sheets / cylinder
(seed drum)}
8
①Prise open the cut
sections, using the long-
nose pliers, so that each of
the sections are pointing
upwards. (See the picture
on the left.)
②This is the completed
hole for the axle. (See the
picture on the left.)
Diameter=30 ●Long-nose pliers ●4 sheets {2
sheets / cylinder
(seed drum)}
9
ハブ切断とタップ写真
①Place the side plates onto
the cylinder ends and rivet
at the twelve drilled points,
as shown on the left.
●Aluminum rivet
φ3.2 X 13
●Centerpunch
●Drill
●Drill bit for steel
φ4mm
●Riveter
●4 sheets{2
sheets / cylinder
(seed drum)}
Appendix1: Fabrication of Manual Seeder
Appendeix1-20

No
NoNo
No Picture
PicturePicture
Picture Description
DescriptionDescription
Description Size (mm)
Size (mm)Size (mm)
Size (mm) Tools
ToolsTools
Tools Q'ty of Products
Q'ty of ProductsQ'ty of Products
Q'ty of Products
6. Side Plates of Cylinder Drum (seed drum)
10
<Refer to the picture 11 shown
below.>
①The axles, made in 「2.
Axle」, should be placed
within the two cylinder
drums.
②Decide or determine the
distance between the two
cylinder drums. See a
picture「2.Axle-1」.
③Stablize them by using
four hose bands.
●Hose band
approx.φ30
●Tape measure
●Screw driver
(minus)
●4 sheets{2
sheets / cylinder
(seed drum)}
11
ハブ切断とタップ写真
Appendix1: Fabrication of Manual Seeder
Appendeix1-21

No
NoNo
No Picture
PicturePicture
Picture Description
DescriptionDescription
Description Size (mm)
Size (mm)Size (mm)
Size (mm) Tools
ToolsTools
Tools Q'ty of Products
Q'ty of ProductsQ'ty of Products
Q'ty of Products
1
①Cut the round steel pipe
for the main chassis section.
②Mark ten bending points
between 450mm and
550mm from the both ends
of the bar. (two locations)
●length =2120
●internal diameter
=22
●external
diameter =26
●Marker pen
●Tape measure
●Electric grinder
(cutting disk), or
hacksaw
●1
2
①Put the round steel pipe
into the hole of the bending
jig.
②Place one of the marks
against the edge of the hole
of the bending jig.
③Use the pipe wrench to
bend the bar at the mark.
Bend by increments at each
mark until an arch of 90
degree has been created.
●length of bent
arch =100
●Jig (The coupling
mechanism of a
tractor that is no
longer in use can be
utilized for this
purpose.)
●Pipe Wrench
●2 locations / steel
pipe
3
①The length of the bent
arch is 100mm.
●2 locations / steel
pipe
7. Chassis
4
●Manufacturing of the
secondary chassis section
①Cut the secondary chassis
section length that will hold
the bolt. This bolt will allow
the handle height to be
adjusted.
②Mark a line for a bending
point at the center of the
bar, 340mm from the both
ends.
●length =680
●external
diameter =26
●external
diameter =22
●Maker pen
●Tape measure
●Electric grinder
(cutting disk), or
hacksaw
●1 / steel pipe
5
①Put the secondary chassis
section into the hole of the
bending jig.
②Bend the bar at the
marked point to the angle of
90 degrees.
●Jig (The coupling
mechanism of a
tractor that is no
longer in use can be
utilized for this
purpose.)
●Pipe Wrench
●1 location / steel
pipe
Appendix1: Fabrication of Manual Seeder
Appendeix1-22
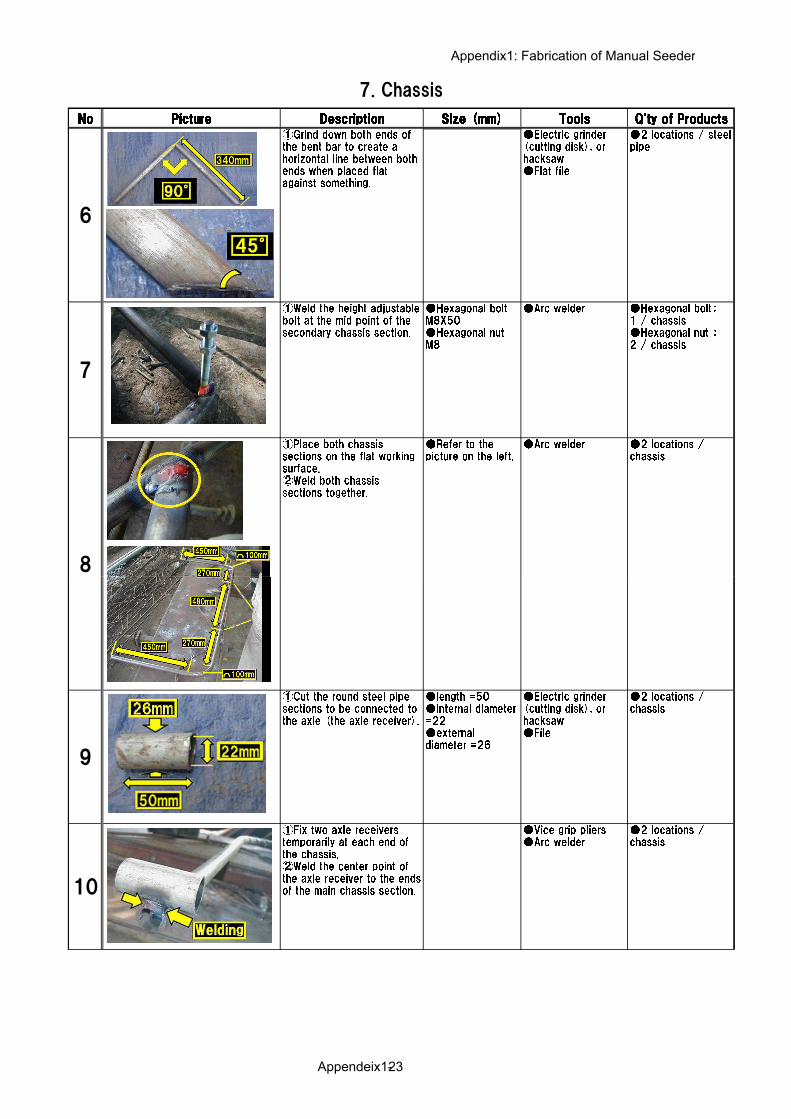
No
NoNo
No Picture
PicturePicture
Picture Description
DescriptionDescription
Description Size (mm)
Size (mm)Size (mm)
Size (mm) Tools
ToolsTools
Tools Q'ty of Products
Q'ty of ProductsQ'ty of Products
Q'ty of Products
7. Chassis
6
①Grind down both ends of
the bent bar to create a
horizontal line between both
ends when placed flat
against something.
●Electric grinder
(cutting disk), or
hacksaw
●Flat file
●2 locations / steel
pipe
7
①Weld the height adjustable
bolt at the mid point of the
secondary chassis section.
●Hexagonal bolt
M8X50
●Hexagonal nut
M8
●Arc welder ●Hexagonal bolt:
1 / chassis
●Hexagonal nut :
2 / chassis
8
①Place both chassis
sections on the flat working
surface.
②Weld both chassis
sections together.
●Refer to the
picture on the left.
●Arc welder ●2 locations /
chassis
9
①Cut the round steel pipe
sections to be connected to
the axle (the axle receiver).
●length =50
●internal diameter
=22
●external
diameter =26
●Electric grinder
(cutting disk), or
hacksaw
●File
●2 locations /
chassis
10
①Fix two axle receivers
temporarily at each end of
the chassis.
②Weld the center point of
the axle receiver to the ends
of the main chassis section.
●Vice grip pliers
●Arc welder
●2 locations /
chassis
Appendix1: Fabrication of Manual Seeder
Appendeix1-23

No
NoNo
No Picture
PicturePicture
Picture Description
DescriptionDescription
Description Size (mm)
Size (mm)Size (mm)
Size (mm) Tools
ToolsTools
Tools Q'ty of Products
Q'ty of ProductsQ'ty of Products
Q'ty of Products
7. Chassis
11
①Cut the reinforcing steel
bar to be used as a hook for
the handle.
②Bend at the center of the
bar to create a 90 degree
angle.
<Reinforcing bar
>
●length =100
●external
diameter =6
●Bench vice
●Hammer
●Electric grinder
(cutting disk),or
hacksaw
●2 locations /
chassis
12
①To connect the reinforcing
steel bar and the chassis
section, weld all around the
end point of the reinforcing
steel bar. The reinforcing
steel bar should stand 90
degrees from the main
chassis section, with the top
bent part pisitioned parallel
to the main chassis section.
●Arc welder ●2 locations /
chassis
Appendix1: Fabrication of Manual Seeder
Appendeix1-24

No
NoNo
No Picture
PicturePicture
Picture Description
DescriptionDescription
Description Size (mm)
Size (mm)Size (mm)
Size (mm) Tools
ToolsTools
Tools Q'ty of Products
Q'ty of ProductsQ'ty of Products
Q'ty of Products
1
above cut sheet metal
●1
2
above cut sheet metal
①Cut the square steel pipe
(The material for the
handle).
②Process two locations in
order to create two 90
degree bends. Arc distance
= 100mm/ (See the picture
on the left.)
※Hammer and imprinted
<Square steel
pipe>
20 X 20
length =3000
●Electric grinder
(cutting disk), or
hacksaw
●Hammer
●Hexagonal steel
bar (such as the
handle of the cold
chisel)
●two 90 degree
arcs / handle
8. Handle
2 ※Hammer and imprinted
dent using the hexagonal
steel bar. Make five dents
for one arc.
3
above cut sheet metal
①The process of bending
the handle should be done
using the jig and the pipe
wrench.
※In order to create an even
bend, the third dent, as
shown on the picture above,
should be dealt with first.
●Jig (The coupling
mechanism of a
tractor that is no
longer in use can be
utilized for this
purpose.)
●Pipe wrench
●two 90 degree
arcs / handle
Appendix1: Fabrication of Manual Seeder
Appendeix1-25

No
NoNo
No Picture
PicturePicture
Picture Description
DescriptionDescription
Description Size (mm)
Size (mm)Size (mm)
Size (mm) Tools
ToolsTools
Tools Q'ty of Products
Q'ty of ProductsQ'ty of Products
Q'ty of Products
8. Handle
4
①Bend the square steel
pipe at each end by 10
degrees, to create an angle
of 170 degrees, by using
the jig. (Bend along the face
of the steel pipe)
●Jig (The coupling
mechanism of a
tractor that is no
longer in use can be
utilized for this
purpose.)
●Protractor
●two 170 degree
angle bends /
handle
5
ハブ切断とタップ写真
①Drill a hole at each end of
the square steel pipe, 30mm
from the end, in order to
create a hole to connect a
handle to the chassis.
(There should be a total of
four holes, two at each
end.)
②In the event that the drill
holes are not large enough,
use the reamer to widen the
holes. (see picture below)
●Electric drill
●Drill bit for steel
φ7, or reamer
●4 holes / handle
6
●Processing the reinforcing
material for the handle.
①Cut the round steel pipe.
(This is used as the
reinforcing material for the
handle.)
length =560
external diameter
=26
●Electric grinder
(cutting disk), or
hacksaw
●1
Appendix1: Fabrication of Manual Seeder
Appendeix1-26

No
NoNo
No Picture
PicturePicture
Picture Description
DescriptionDescription
Description Size (mm)
Size (mm)Size (mm)
Size (mm) Tools
ToolsTools
Tools Q'ty of Products
Q'ty of ProductsQ'ty of Products
Q'ty of Products
8. Handle
7
ハブ切断とタップ写真
①Flatten the ends of the
round steel pipe using the
bench vice.
※Flatten both ends so that
they are horizontal to each
other.
②Hammer both ends flat,
while placed on the metal
undersheet of thick steel
plate.
③Drill a hole at the center
of each flattened end.
④Round the edges of the
flattened ends.
※Use an electric grinder or
a flat file.
<Round steel pipe
>
length =570
external diameter
=26
●Bench vice
●Metal undersheet,
or thick steel plate
●Hammer
●Centerpunch
●Electric drill
●Drill bit for steel
φ7mm
●Flat file
●2 holes / handle
reinforcement
8
①Create a hole to allow the
hexagonal bolt to be welded
to the handle, to connect the
round steel pipe (the
reinforcing material for the
handle) to the handle.
②Weld the bolt to the
handle. (Picture on the left.)
<Hexagonal bolt>
M6X30
●Centerpunch
●Hammer
●Drill
●Drill bit for steel
φ7mm
●2 holes / handle
reinforcement
9
e
●<Refer to "7.Chassis-7"
>
①Drill a hole at the center
of the reinforcing bar to
allow the bolt (M8X50),
that adjust the height of the
handle, to be placed through
the reinforcing bar.
②Position the bolt through
the hole of the reinforcing
bar.
●Centerpunch
●Hammer
●Drill
●Drill bit for steel
φ9mm, or reamer
●2 holes / handle
reinforcement
Appendix1: Fabrication of Manual Seeder
Appendeix1-27

No
NoNo
No Picture
PicturePicture
Picture Description
DescriptionDescription
Description Size (mm)
Size (mm)Size (mm)
Size (mm) Tools
ToolsTools
Tools Q'ty of Products
Q'ty of ProductsQ'ty of Products
Q'ty of Products
1
①Mark the cutting points
on the reinforcing bars.
②Mark the bending points
on the reinforcing bars.
③Cut the reinforcing bars
at the marked points.
<Reinforcing bar
A>
●length =1950
●external
diameter =10
<Reinforcing bar
B>
●length =820
●external
diameter =10
●Tape measure
●Marker pen
●Electric griner
(cutting disk), or
hacksaw
●Reinforcing bar A
=2/ row seeder
●Reinforcing bar B
=4/ row seeder
●Reinforcing bar C
=2/ row seeder
2
2
①Bend the reinforcing bars
at the marked points.
●Reinforcing bar
A= refer to the
picture on the left
●Bench vice ●six bending points
/ reinforcing bar A
3
3
①Bend the reinforcing bars
at the marked points.
●Reinforcing bar
B= refer to the
picture on the left
●Bench vice ●Two bending
points / reinforcing
bar B
9. Frame
4
●Process of manufacturing
of the furrow cutting
stabilization sheet
①Cut the steel sheet.
②Use the file to file down
any burrs.
③Place the central ridge
line of the reinforcing bar B
on the yellow dotted line as
shown in the illustration on
the left. The distance
<Furrow cutting
stabilization plate
>
●50X110、
thickness 1.5
●Grinder (cutting
disk, grinding disk)
●File
●Vice grip pliers
●Hammer
●4 sheets / row
seeder
5
①Position four reinforcing
bar B as shown in the
picture on the left.
②Weld the plate to the
reinforcing bars. (Weld at
four points on the front and
the back, as indicated by
yellow arrows.)
<Furrow cutting
stabilization sheet
>
●50X110、
thickness 1.5
●Vice grip pliers
●Arc welder
●4 sheets / row
seeder
6
above cut sheet metal
①Weld the reinforcing bar
C (Weld at four points as
indicated by the yellow
arrows.)
●Reinforcing bar
C= refer to the
picture on the left
●Arc welder ●2 sheets / row
seeder
Appendix1: Fabrication of Manual Seeder
Appendeix1-28

No
NoNo
No Picture
PicturePicture
Picture Description
DescriptionDescription
Description Size (mm)
Size (mm)Size (mm)
Size (mm) Tools
ToolsTools
Tools Q'ty of Products
Q'ty of ProductsQ'ty of Products
Q'ty of Products
9. Frame
7
●Process of manufacturing
the furrow cutter
①Draw the shape of the
furrow cutter.
②Cut the sheet.
③Smooth the edges of the
sheet.
<Furrow cutter>
●200X150、
thickness 1.5
●Ruler
●Protractor
●Centerpunch
●Hammer
●Electric grinder
(cutting disk)
●File
●4 sheets / row
seeder
8
①Fold in half the cut sheet
at the center line.
※Refer to "3. Cylinder
(seed drum)-5" for how to
bend
②Partially cut the folded
sheet to a depth of 36mm,
using the cutting disk,to
allow the furrow cutting
stabilization sheet to be
connected.
③Unfold the furrow cutter
as far as is necessary in
order that the partial cut
can fit into the central
space between the furrow
cutting stabilization sheet
and the reinforcing bar
frame.(See the picture
No.9)
<Furrow cutter>
●200X150、
thickness 1.5
●Hammer
●Vice-grip pliers
●Same length and
L-shaped metal
sheet
(approx. 1 inch X
approx. 1 inch)
●Metal undersheet
or thick steel plate
●Bench vice
●Electric grinder
(cutting disk), or
hacksaw
●File
●4 sheets / row
seeder
9
①Weld together the
connected sections. (The
furrow cutter should be
welded to the furrow cutting
stabilization sheet and the
reinforcing bar frame.)
(Weld inside as indicated
by the arrow and outside at
the points indicated in the
picture on the left.)
<Furrow cutter>
●200X150、
thickness 1.5
●Hammer
●Arc welder
●4 sheets / row
seeder
Appendix1: Fabrication of Manual Seeder
Appendeix1-29

No
NoNo
No Picture
PicturePicture
Picture Description
DescriptionDescription
Description Size (mm)
Size (mm)Size (mm)
Size (mm) Tools
ToolsTools
Tools Q'ty of Products
Q'ty of ProductsQ'ty of Products
Q'ty of Products
9. Frame
10
●Hose band
(approx. φ30,
eight necessary)
※Connect「7.
Chassis」and「8.
Frame」by the hose
band.
●Flat headed screw
driver
●2 sets / row
seeder
Appendix1: Fabrication of Manual Seeder
Appendeix1-30

No
NoNo
No Picture
PicturePicture
Picture Description
DescriptionDescription
Description Size (mm)
Size (mm)Size (mm)
Size (mm) Tools
ToolsTools
Tools Q'ty of Products
Q'ty of ProductsQ'ty of Products
Q'ty of Products
1
above cut sheet metal
●Cutting the chain
①Cut both ends of the
chain as shown in the
pictures on the left. (Four
chains will be created out of
eight chain lengths.)
※These are the four chains
to be welded to the main
body of the raw seeder.
●length =500 ●Marker pen
●Electric grinder
(cutting disk), or
hacksaw
●8 chains / raw
seeder
above cut sheet metal
①As shown in the picture
on the left, wire together
two chains by connecting
the end of one chain to the
third link of the other chain
that will be welded to the
main body of the raw
seeder.
②Weld the chains that were
<Wire>
length = approx.
3000
diameter = approx.
2.0
●Pliers
●Long-nose pliers
●Arc welder
●8 chains / raw
seeder
10. Soil Covering Chain
2
②Weld the chains that were
complereted in ① to the 9.
「Frame」.
Appendix1: Fabrication of Manual Seeder
Appendeix1-31

No
NoNo
No Picture
PicturePicture
Picture Description
DescriptionDescription
Description Size (mm)
Size (mm)Size (mm)
Size (mm) Tools
ToolsTools
Tools Q'ty of Products
Q'ty of ProductsQ'ty of Products
Q'ty of Products
10. Soil Covering Chain
3
above cut sheet metal
①Connect together 「Soil
Covering Chain」 and 9.
「Frame」.
●2 soil covering
chains / frame
●2 frames / raw
seeder
Appendix1: Fabrication of Manual Seeder
Appendeix1-32

No
NoNo
No Picture
PicturePicture
Picture Description
DescriptionDescription
Description Size (mm)
Size (mm)Size (mm)
Size (mm) Tools
ToolsTools
Tools Q'ty of Products
Q'ty of ProductsQ'ty of Products
Q'ty of Products
1
●Painting
①Shake the paint can
before opening. After
opening the can, use a
clean stick to stir the paint,
ensuring to scrape any
settled paint. It is preferable
not to use a wooden stick
as this may contaminate the
paint.
②Dilute the paint with the
paint thinner.
③Use the paint thinner to
clean the paint brush after
use, and leave to dry.
④The paint will require a
few days to dry. (two to
three days)
●Paint
●Paint thinner
●Paint brush
●Empty pet bottle
●1
2
●Seed outlet adjustment
(to be done on a wind free
day)
①Spread a blue sheet on a
level piece of ground.
②Introduce the seed rice
into both seed drums, filling
the seed drums to just
below the level of the axle
of the seed drum.
③Estimate the volume of
seed required for a 1ha
field by drawing the row
seeder over the top of the
blue sheet for a distance of
10m.
Make sure all four rows are
dispersing seeds
consistantly. Collect and
●Blue sheet
(approx. 5m X 12m)
●Vernier calipers
●Scale (1kg)
●Bowl, plate, etc.
●24 holes / row
seeder {12 holes /
cylinder (seed
drum)}
11. Painting, Adjustment for Seed Outlet
consistantly. Collect and
weigh all the dispersed
seeds from each row.
※In the event that any of
the seed rows have not
been dispersed consistantly,
the 4. 「seed row control
plate」 of that row should be
adjusted. Note the size of
the seed discharge holes
3
3
①The initial seed discharge
hole has a 12.0mm
diameter. The holes can be
enlarge up to 13.5mm.
※Do not enlarge the hole
beyond 13.5mm diameter,
as it is difficult to undo this
adjustment.
②Use the round file to file
down any burrs created
during the hole enlargement
process.
●Hole diameter
=13.5
●Vernier calipers
●Reamer
●Round file
●24 holes / row
seeder {12 holes /
cylinder (seed
drum)}
Appendix1: Fabrication of Manual Seeder
Appendeix1-33

Appendix 2: The management of farmers’ group (Examples of Book keeping)
Appendix 2-1
1. Book Keeping on daily basis (FSG) This section explains how to keep the book.
Example 1 : Receiving Cash
Say there are 2,000M in cash and 5,000Mt in a bank account. Today (15th May), the accountant
received 3,000Mt from Mugabe.
Step What to do Remarks
1 Record the date
Date
15-May.
2 Record the purpose � Received from who?
� Why was it received? (ie. Fund recovery)
Date Purpose
○○○ ○○○○
15-May. From Mr. Mugabe for
refunding revolving fund
3 Record the received
amount
� The received amount should be recorded under “Received”
of the “Cash account” section.
Cash account
Received Paid Balance
2,000
3,000
4 Calculate the balance � The present balance can be calculated to add the previous
balance and the received amount. Because there is cash
received, this cash should be added.
Cash account
Received Paid Balance
2,000
3,000 5,000
Previous
balance 2,000
Present
balance 5,000
Received
amount 3,000

Appendix 2: The management of farmers’ group (Examples of Book keeping)
Appendix 2-2
5 Write “Remarks“ � Ask the person who made the payment (Mugabe) to sign
under “Remarks.”
� This proves that Mugabe paid 3,000Mt, so it is very
important to do this.
Remarks
6 Write the balance of the
“Bank account”
There is no change for the balance of the “Bank account.” So
5,000 should be written under the balance.
The book should look like this after the accountant received 3,000Mt from Mugabe.
Date Purpose Cash account Bank account
Remarks Received Paid Balance Deposit Withdraw Balance
1-May
2,000 5,000 Balance from
previous month
15-May
From Mr. Mugabe for
refunding revolving
fund
3,000 5,000 5,000
Example 2 : Cash withdrawal from the bank
Next day (16th May), the accountant withdrew 2,200Mt from the bank account.
� In this case, it is required that the accountant record under two sections of the book: first
under the “Bank account” then under the “Cash account.”
First: Record the withdrawal amount of 2,200Mt unde r the “bank account.”
Step What to do Remarks
1 Record the date
Date
16-May.
2 Record the purpose Write “bank withdrawal”
Date Purpose
16-May. Bank withdrawal
3 Record the amount of
withdrawal
� The amount should be written under the “Withdraw” of the
“Bank account.”

Appendix 2: The management of farmers’ group (Examples of Book keeping)
Appendix 2-3
Bank account
Deposit Withdraw Balance
5,000
2,200
4 Calculate the balance � The balance is the remaining amount of the previous
balance subtracted by the amount of withdrawal.
� Because cash was withdrawn, the balance should be less
than before. In this case, subtraction should be done.
Bank account
Deposit Withdraw Balance
5,000
2,200 2,800
5 Write “Remarks” � If cash was withdrawn, the number of used bank check
should be noted.
Remarks
Check no: 223569
6 Write the balance of the
“Cash account”
� There is no change to the “cash account.” So, 5,000 should
be written under the balance.
Second : Record 2,200Mt withdrawn from the bank und er the “cash account.”
Step What to do Remarks
1 Record the date � Write the date of the withdrawal from the bank.
Date
16-May
2 Record the purpose � Write “Cash withdraw from bank.”
Date Purpose
16-May. Cash withdraw from bank
3 Record the amount of
the withdrawal
� Write the amount of withdrawal under the “Received” of the
“Cash account.”
Previous
balance
5,000
Present
balance
2,800
Amount
withdrawn
2,200

Appendix 2: The management of farmers’ group (Examples of Book keeping)
Appendix 2-4
Cash account Bank account
Received paid Balance Deposit Withdraw Balance
3,000 5,000 5,000
5,000 2,200 2,800
2,200
� The cash withdrawn from the bank is now written to the “cash
account.”
4 Calculate the balance � The present balance is the sum of the previous balance and
the amount received, so it should be added. It is the same
case as with the occasion when members repay to the fund.
�
Cash account Bank account
Received paid Balance Deposit Withdraw Balance
3,000 5,000 5,000
5,000 2,200 2,800
2,200 7,200
5 Write the balance to the
“Bank account”
� There is no change to the “bank account.” So 2,800 should
be written under the balance.
The book would look like this when cash of 2,200Mt is withdrawn.
Date Purpose Cash account Bank account
Remarks Received Paid Balance Deposit Withdraw Balance
1-May
2,000 5,000 Balance from
previous month
15-May
From Mr. Mugabe for
refunding revolving
fund
3,000 5,000 5,000
16-May
Cash withdrawal
from bank
5,000 2,200 2,800 Check no: 223569
16-May
Cash withdrawal
from bank
2,200 7,200 2,800
Previous
balance
5,000
Present
amount
7,200
Amount
received
2,200

Appendix 2: The management of farmers’ group (Examples of Book keeping)
Appendix 2-5
Example 3 : Cash payment
Say someone has 7,200Mt of cash now and 2,800Mt of deposit in his bank. He purchased paddy
seeds on May 17th. He paid 1,000Mt for six bags of seeds each.
Step What to do Remarks
1 Record the date
Date
17-May
2 Record the purpose � It is necessary to clearly write the following points.
� Purchased item ⇒ paddy seeds
� Unit price ⇒ 1,000Mt/bag
� Number of units ⇒6 bags
Date Purpose
17-May. 6 bags of paddy seeds,
1,000Mt/bag
3 Record the amount paid � Write the amount under the “paid” of the “Cash account.”
Cash account
Received Paid Balance
7,200
6,000
4 Calculate the balance � The present balance is the remaining amount after
subtracting the paid amount from the previous balance.
� Because money is paid, the balance of the cash account
would be less. So the subtraction should be done here.
Cash account
Received Paid Balance
7,200
6,000 1,200
5 Write “Remarks” � It is important to get receipts at any and every time and keep
Previous
balance
7,200
Present
amount
1,200
Paid amount
6,000

Appendix 2: The management of farmers’ group (Examples of Book keeping)
Appendix 2-6
those receipts. Those receipts provide proof of the
purchase.
� All of the receipts should be numbered in numerical order,
so that they can be recognizable, and should be kept safely.
Remarks
Reference No.: 001
6 Write the balance of the
“Bank account”
� There is no change to the bank account, so 2,800 should be
written under the balance.
The book would look like this after paddy seeds are purchased.
Date Purpose Cash account Bank account
Remarks Received Paid Balance Deposit Withdraw Balance
1-May
2,000 5,000 Balance from
previous month
15-May
From Mr. Mugabe for
refunding revolving
fund
3,000 5,000 5,000
16-May
Cash withdrawal
from bank
5,000 2,200 2,800 Check no: 223569
16-May
Cash withdrawal
from bank
2,200 7,200 2,800
17-May
Bought 6 sacks of
rice seed,
1,000Mt/sack
6,000 1,200 2,800 Reference No.: 001
Example 4 : Deposit to the bank account
Say, someone has 1,200Mt in cash now and 2,800Mt in his bank account. He deposits 1,000Mt on
May 18.
� In this case, book keeping requires a record to be shown under the two sections: first under
the “Cash account” and second under the “Bank account.”
� Book keeping procedures for depositing cash is the reverse equivalent of cash withdrawal.

Appendix 2: The management of farmers’ group (Examples of Book keeping)
Appendix 2-7
First : Record 1,000Mt under the “cash account”
Step What to do Remarks
1 Record the date
Date
18-May.
2 Record the purpose � Write “Deposit to the bank account”
Date Purpose
18-May. Deposit to the bank account
3 Record the deposit
amount
� Write the amount under the “Paid” column of the “Cash
account.”
Cash account
Received Paid Balance
1,200
1,000
4 Calculate the balance � The present balance would then be the remaining amount
after subtracting the paid amount from the previous balance.
� This calculation is the same when dealing with a cash
payment.
Cash account
Received Paid Balance
1,200
1,000 200
5 Write the balance of the
“Bank account”
� There is no change to the bank account, so 2,800 should be
written under the balance.
Second : Write the deposited amount, 1,000Mt, to th e bank account.
Step What to do Remarks
1 Record the date � Write the date of depositing cash to the bank
Date
18-May
2 Record the purpose � Write “Deposit to the bank account”
Previous
balance
1,200
Present
amount
200
Paid amount
1,000

Appendix 2: The management of farmers’ group (Examples of Book keeping)
Appendix 2-8
Date Purpose
18-May. Deposit to the bank account
3 Record the deposited
amount
� Write the deposited amount under the “Deposit” column of
the “Bank account.” The amount is the same with the one
written under the “Paid” of the “Cash account.”
Cash account Bank account
Received Paid Balance Deposit Withdraw Balance
6,000 1,200 2,800
1,000 200 2,800
1,000
4 Calculate the balance � The present balance is the added amount of the previous
balance and the deposited amount. Because cash is
received, it should be added.
� This is the same handling when cash is received.
Cash account Bank account
Received paid Balance Deposit Withdraw Balance
6,000 1,200 2,800
1,000 200 2,800
1,000 3,800
5 Write “Remarks” � The bank will issue a deposit slip when cash is deposited.
These slips should be numbered in numerical order and kept
safely.
Remarks
Reference No.: 002
6 Write the balance of the
“Cash account”
� There is no change to the balance of the cash account, so
200 should be written under the balance.
The book would look like this, after depositing 1,000Mt. to the bank.
Previous
balance
2,800
Present
balance
3,800
Deposited
amount
1,000

Appendix 2: The management of farmers’ group (Examples of Book keeping)
Appendix 2-9
Date Purpose Cash account Bank account
Remarks Received Paid Balance Deposit Withdraw Balance
1-May
2,000 5,000
Balance from
previous month
15-May
From Mr. Mugabe for
refunding revolving
fund
3,000 5,000 5,000
16-May Cash withdrawal
from bank 5,000 2,200 2,800 Check no: 223569
16-May Cash withdrawal
from bank 2,200 7,200 2,800
17-May
Bought 6 sacks of
rice seed,
1,000Mt/sack
6,000 1,200 2,800 Reference No,: 001
18-May Depositing money to
bank account 1,000 200 2,800
18-May Depositing money to
bank account 200 1,000 3,800 Reference No: 002
Example5. Monthly record
Year
Month
Item Cash account Bank Account
Income
(1) Balance from previous
month Mt
(1) Balance from previous
month Mt
(2) Amount received Mt (2) Amount Deposited Mt
(3) Total Mt (3) Total Mt
Expenditure (4) Amount of paid Mt (4) Amount of withdrew Mt
Balance (5) Balance Mt (5) Balance Mt
Balance of this month
MT.
Prepared by Approved by
Accountant President

Appendix 2: The management of farmers’ group (Examples of Book keeping)
Appendix 2-10
It is necessary to make a monthly report at the end of every month. This monthly report should be
approved by the President (and the auditor). Moreover, the information in this monthly report should be
given to all of the members.
The purpose of making such monthly reports are as follows.
This section explains the way to make such monthly reports, having the following book as an example.
Date Purpose Cash account Bank account
Remarks Received Paid Balance Deposit Withdraw Balance
1-May
2,000 5,000 Balance from
previous month
15-May
From Mr. Mugabe for
refunding revolving
fund
3,000 5,000 5,000
16-May
Cash withdrawal
from bank
5,000 2,200 2,800 Check no: 223569
16-May
Cash withdrawal
from bank
2,200 7,200 2,800
17-May
Bought 6 sacks of
rice seed,
1,000Mt/sack
6,000 1,200 2,800 Reference No.: 001
18-May Depositing money to
bank account 1,000 200 2,800
18-May Depositing money to
bank account 200 1,000 3,800 Reference No: 002
� To summarize monthly activities.
� To calculate all the income, the expenditures and the balance.
� To share the information among members.

Appendix 2: The management of farmers’ group (Examples of Book keeping)
Appendix 2-11
Step What to do Remarks
1 Record to the ”(1)
Balance from previous
month”
� Every month, the first line should show the balance brought
forward from the previous month.
Date Purpose Cash account Bank account
Remarks Received Paid Balance Deposit Withdraw Balance
1-May
2,000
5,000 Balance from
previous month
Year: 2013
Month: May
Item Cash account Bank Account
Income
(1) Balance from
previous month Mt 2,000
(1) Balance from previous
month Mt 5,000
(2) Amount received Mt (2) Amount Deposited Mt
(3) Total Mt (3) Total Mt
Expenditure (4) Amount of paid Mt (4) Amount of withdrew Mt
Balance (5) Balance Mt (5) Balance Mt

Appendix 2: The management of farmers’ group (Examples of Book keeping)
Appendix 2-12
Step What to do Remarks
2 Write “(2) Amount
received” in the Cash
Account and “(2)
Amount Deposited” in
the Bank Account
� Write all of the received amounts of the cash account
� 3,000+2,200=5,200
� Add all of deposited amounts of the bank account
� 1,000
Cash account Bank account
Received Paid Balance Deposit Withdraw Balance
2,000 5,000
3,000 5,000 5,000
5,000 2,200 2,800
2,200 7,200 2,800
6,000 1,200 2,800
1,000 200 2,800
200 1,000 3,800
Year: 2013
Month: May
Item Cash account Bank Account
Income
(1) Balance from
previous month Mt 2,000
(1) Balance from previous
month Mt 5,000
(2) Amount received Mt5,200 (2) Amount Deposited Mt1,000
(3) Total Mt (3) Total Mt
Expenditure (4) Amount of paid Mt (4) Amount of withdrew Mt
Balance (5) Balance Mt (5) Balance Mt

Appendix 2: The management of farmers’ group (Examples of Book keeping)
Appendix 2-13
Step What to do Remarks
3 Calculate the “(3) Total”
of the Cash account and
the bank account
� Add together and write the amount of “(1) Balance from
previous month “ and “(2) Amount received” of the Cash
Account
� 2,000+5,200=7,200
� Add together the amount of “(1) Balance from previous
month” and “(2) Amount Deposited” of the Bank Account.
� 5,000+1,000=6,000
� These would be the total incomes of the cash account and
bank account.
Year: 2013
Month: May
Item Cash account Bank Account
Income
(1) Balance from
previous month Mt 2,000
(1) Balance from
previous month Mt 5,000
(2) Amount
received Mt5,200 (2) Amount Deposited Mt1,000
(3) Total Mt7,200 (3) Total Mt6,000
Expenditure (4) Amount of paid Mt (4) Amount of
withdrew Mt
Balance (5) Balance Mt (5) Balance Mt

Appendix 2: The management of farmers’ group (Examples of Book keeping)
Appendix 2-14
Step What to do Remarks
4 Calculate the
expenditure
� All the amounts under the “Paid” column of the “Cash
account” should be added.
� 6,000+1,000=7,000
� Add all the amounts under the “Withdraw” column of the
“Bank account.”
� 2,200
Cash account Bank account
Received Paid Balance Deposit Withdraw Balance
2,000 5,000
3,000 5,000 5,000
5,000 2,200 2,800
2,200 7,200 2,800
6,000 1,200 2,800
1,000 200 2,800
200 1,000 3,800
Year: 2013
Month: May
Item Cash account Bank Account
Income
(1) Balance from
previous month Mt 2,000
(1) Balance from previous
month Mt 5,000
(2) Amount
received Mt5,200 (2) Amount Deposited Mt1,000
(3) Total Mt7,200 (3) Total Mt6,000
Expenditure (4) Amount of paid Mt7,000 (4) Amount of withdrew Mt2,200
Balance (5) Balance Mt (5) Balance Mt

Appendix 2: The management of farmers’ group (Examples of Book keeping)
Appendix 2-15
Step. What to do Remarks
5 Calculate the balance of
the cash account and
the bank account
� The balance will be: Total income – Expenditure.
� Cash account: 7,200-7,000=200
� Bank account: 6,000-2,200=3,800
Year: 2013
Month: May
Item Cash account Bank Account
Income
(1) Balance from
previous month Mt 2,000
(1) Balance from
previous month Mt 5,000
(2) Amount
received Mt5,200 (2) Amount Deposited Mt1,000
(3) Total Mt7,200 (3) Total Mt6,000
Expenditure (4) Amount of paid
Mt7,000 (4) Amount of
withdrew
Mt2,200
Balance (5) Balance
Mt200 (5) Balance
Mt3,800
Subtraction

Appendix 2: The management of farmers’ group (Examples of Book keeping)
Appendix 2-16
Step. What to do Remarks
6 Calculate the balance
for the month
� The balance for the month would be: the balance of cash
account + the balance of bank account.
Year
Month
Item Cash account Bank Account
Income
(1) Balance from previous
month Mt2,000
(1) Balance from previous
month Mt5,000
(2) Amount received Mt5,200 (2) Amount Deposited Mt1,000
(3) Total Mt7,200 (3) Total Mt6,000
Expenditure (4) Amount of paid
Mt7,000 (4) Amount of withdrew Mt2,200
Balance (5) Balance Mt200 (5) Balance Mt3,800
Balance of this month
MT. 4,000
Prepared by Approved by
Accountant President
� Both the President and the Accountant should sign off the monthly report. These monthly
reports must be given to all of the members.

Appendix 2: The management of farmers’ group (Examples of Book keeping)
Appendix 2-17
2. Manage the accounting book on a daily basis (Mil ling machine management group)
This section explains how to manage the book.
Example 1: Receiving Cash
There are 2,000Mt in cash and 5,000Mt in the bank account. Today, May 15, Mr. Mugabe brought
120kg of paddy to be milled.
Step Item Remarks
1 Write the date
Date
15-May.
2 Write the purpose � Name of the user who pays the fee
� Purpose for the fee (ie. milling fee for 120kg of paddy)
Date Purpose
○○○ ○○○○
15-May. From Mr. Mugabe for milling
120kg of paddy
3 Write the amount
received
� The received amount should be written under the “Received”
column of the “Cash account.”
� 2.5Mt/kg×120kg=300Mt
Cash account
Received Paid Balance
2,000
300
4 Calculate the balance � The present balance is the sum of the previous balance and
the received amount. Cash is received, so it should be
added.
Cash account
Received Paid Balance
2,000
300 5,000
5 Write “Remarks” � Request for the payer (Mr. Mugabe in this case) to sign
under the “Remarks.”
� This step is very important as this signature proves that Mr.
Mugabe has paid 300Mt.
Previous
balance
2,000
Present
balance
2,300
Received
amount
300
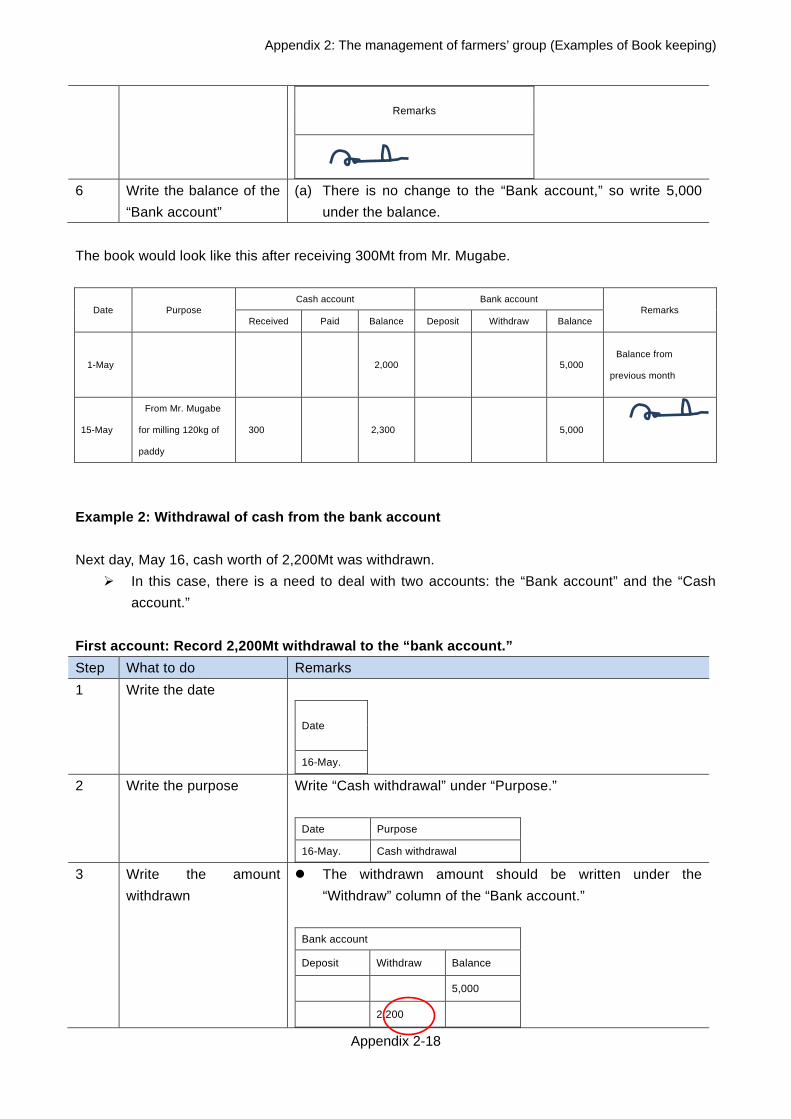
Appendix 2: The management of farmers’ group (Examples of Book keeping)
Appendix 2-18
Remarks
6 Write the balance of the
“Bank account”
(a) There is no change to the “Bank account,” so write 5,000
under the balance.
The book would look like this after receiving 300Mt from Mr. Mugabe.
Date Purpose Cash account Bank account
Remarks Received Paid Balance Deposit Withdraw Balance
1-May
2,000 5,000 Balance from
previous month
15-May
From Mr. Mugabe
for milling 120kg of
paddy
300 2,300 5,000
Example 2: Withdrawal of cash from the bank account
Next day, May 16, cash worth of 2,200Mt was withdrawn.
� In this case, there is a need to deal with two accounts: the “Bank account” and the “Cash
account.”
First account: Record 2,200Mt withdrawal to the “ba nk account.”
Step What to do Remarks
1 Write the date
Date
16-May.
2 Write the purpose Write “Cash withdrawal” under “Purpose.”
Date Purpose
16-May. Cash withdrawal
3 Write the amount
withdrawn
� The withdrawn amount should be written under the
“Withdraw” column of the “Bank account.”
Bank account
Deposit Withdraw Balance
5,000
2,200

Appendix 2: The management of farmers’ group (Examples of Book keeping)
Appendix 2-19
4 Calculate the balance � The balance is the previous balance subtracted by the
withdrawn amount.
� Because cash is withdrawn, the balance will be less. So in
this case, subtraction should be done.
Bank account
Deposit Withdraw Balance
5,000
2,200 2,800
5 Write “Remarks” � When cash is withdrawn, write a numerical number on the
check slip for a sorting purpose.
Remarks
Check no: 223569
6 Write the balance of the
“Cash account”
� There is no change to the cash account, so the balance
remains as 300. Write 300 under the balance.
Second account: The amount of cash, 2,200Mt, withdr awn from the bank account should be
recorded to the “cash account.”
Step What to do Remarks
1 Write the date � Write the date when the withdrawal was made.
Date
16-May.
2 Write the purpose � Write “Cash withdrawal from bank” under “Purpose.”
Date Purpose
16-May. Cash withdrawal from bank
3 Write the amount
withdrawn
� Write the amount withdrawn under the “Received” column of
the “Cash account.”
Previous
balance
5,000
Present
balance
2,800
Withdrawn
amount
2,200

Appendix 2: The management of farmers’ group (Examples of Book keeping)
Appendix 2-20
Cash account Bank account
Received paid Balance Deposit Withdraw Balance
300 2,300 5,000
2,300 2,200 2,800
2,200
� So this records the cash amount of withdrawal to the “cash
account.”
4 Calculate the balance � The present balance is a sum of the previous balance and
the received amount. Money is received, so it should be
added.
Cash account Bank account
Received paid Balance Deposit Withdraw Balance
300 2,300 5,000
2,300 2,200 2,800
2,200 4,500
5 Write the balance of the
“Bank account”
� There is no change to the “bank account.” So write 2,800
under the balance.
The book would look like this, after 2,200Mt is withdrawn.
Date Purpose Cash account Bank account
Remarks Received Paid Balance Deposit Withdraw Balance
1-May
2,000 5,000 Balance from
previous month
15-May
From Mr. Mugabe
for milling 120kg of
paddy
300 2,300 5,000
16-May
Cash withdrawal
from bank
2,300 2,200 2,800 Check no: 223569
16-May
Cash withdrawal
from bank
2,200 4,500 2,800
Previous
balance
2,300
Present
balance
4,500
Received
amount
2,200

Appendix 2: The management of farmers’ group (Examples of Book keeping)
Appendix 2-21
Example 3: Paying Cash
Now, there are 4,500Mt cash and 2,800Mt in the bank. A purchase was made on May 17 to get 20L of
diesel.
Step What to do Remarks
1 Write the date
Date
17-May.
2 Write the purpose � It is necessary to clearly write the following information.
� Purchased item ⇒ diesel
� Unit price ⇒ 37.9Mt/L
� Purchased number of unit ⇒ 20L
Date Purpose
17-May. Bought 20L of diesel
(37.9Mt/L)
3 Write the amount paid � The paid amount should be written under “paid” column of
the “Cash account.”
� 37.9Mt/L×20L=758Mt
Cash account
Received Paid Balance
4,500
758
4 Calculate the balance � The present balance is the difference between the previous
balance and the paid amount. So it should be: the “previous
balance” – the “paid amount.”
� Because money is paid, the balance of the cash account will
be less. Here, a subtraction should be done.
Cash account
Received Paid Balance
4,500
758 3,742
Previous
balance
4,500
Present
balance
3,742
Paid amount
758

Appendix 2: The management of farmers’ group (Examples of Book keeping)
Appendix 2-22
5 Write “Remarks” � The receipts should be issued every time under every
circumstance and keep safely. Those receipts will provide
proof of the purchase.
� Those receipts should be numbered numerically and kept
safely.
Remarks
Reference No.: 001
6 Write the balance of the
“Bank account”
� There is no change to the bank account. So write 2,800
under the balance.
The book will look like this after buying the diesel.
Date Purpose Cash account Bank account
Remarks Received Paid Balance Deposit Withdraw Balance
1-May
2,000 5,000
Balance from
previous month
15-May
From Mr. Mugabe
for milling 120kg of
paddy
300 2,300 5,000
16-May Cash withdrawal
from bank 2,300 2,200 2,800 Check no: 223569
16-May Cash withdrawal
from bank 2,200 4,500 2,800
17-May Bought 20L of diesel
(37.9Mt/L) 758 3,742 2,800 Reference No.: 001
Example 4: Deposit to the bank account
There are 3,742Mt in cash and 2,800Mt deposit in the bank account now. On May 18, 1,000Mt was
also deposited into the bank account.
� In this case, there is a need to deal with two accounts: first, the “Cash account” and second,
the “Bank account.”
� The procedure of recording deposits should be reverse for that of withdrawals.
The first account: Record 1,000Mt deposit to the ca sh account.
Step What to do Remarks
1 Write the date
Date
18-May.

Appendix 2: The management of farmers’ group (Examples of Book keeping)
Appendix 2-23
2 Write the purpose � Write “deposit to the bank account” under the “Purpose.”
Date Purpose
18-May. Depositing money to bank
account
3 Write the amount
deposited
� Write the amount deposited under “Paid” column of the
“Cash account.”
Cash account
Received Paid Balance
758 3,742
1,000
4 Calculate the balance � The present balance is the previous balance minus the paid
amount.
� It is the same calculation as when cash is paid.
Cash account
Received Paid Balance
758 3,742
1,000 2,742
5 Write the balance of
the “Bank account”
� There is no change to the bank account. So the balance
remains as 2,800.
The second account: Record 1,000Mt deposit to the b ank account.
Step What to do Remarks
1 Write the date � Write the date that the deposit was made.
Date
18-May.
2 Write the purpose � Write “deposit to the bank account” under purpose.
Date Purpose
18-May. Depositing money to bank
account
Previous
balance
3,742
Present
balance
2,742
Paid amount
1,000

Appendix 2: The management of farmers’ group (Examples of Book keeping)
Appendix 2-24
3 Write the amount
deposited
� Write the amount deposited under “Deposit” column of the
“Bank account.” The amount should be the same with the
one written under “Paid” column of the “Cash account.”
Cash account Bank account
Received Paid Balance Deposit Withdraw Balance
758 3,742 2,800
1,000 2,742 2,800
1,000
4 Calculate the balance � The present balance should be the sum of the previous
balance and the deposited amount. Cash is received, so it
should be added.
� This is the same case when cash is received.
Cash account Bank account
Received paid Balance Deposit Withdraw Balance
758 3,742 2,800
1,000 2,742 2,800
1,000 3,800
5 Write “Remarks” � When cash is deposited to a bank, the bank will issue a
deposit slip. This slip should be numbered numerically and
kept safely.
Remarks
Reference No.: 002
6 Write the balance of the
“Cash account”
� There is no change for the cash account. So write 2,742
under the balance.
After depositing 1,000Mt into the bank account, the book will look like this.
Date Purpose Cash account Bank account
Remarks Received Paid Balance Deposit Withdraw Balance
1-May
2,000 5,000
Balance from
previous month
15-May
From Mr. Mugabe
for milling 120kg of
paddy
300 2,300 5,000
16-May Cash withdrawal 2,300 2,200 2,800 Check no: 223569
Previous
balance
2,800
Present
balance
3,800
Deposited
amount
1,000
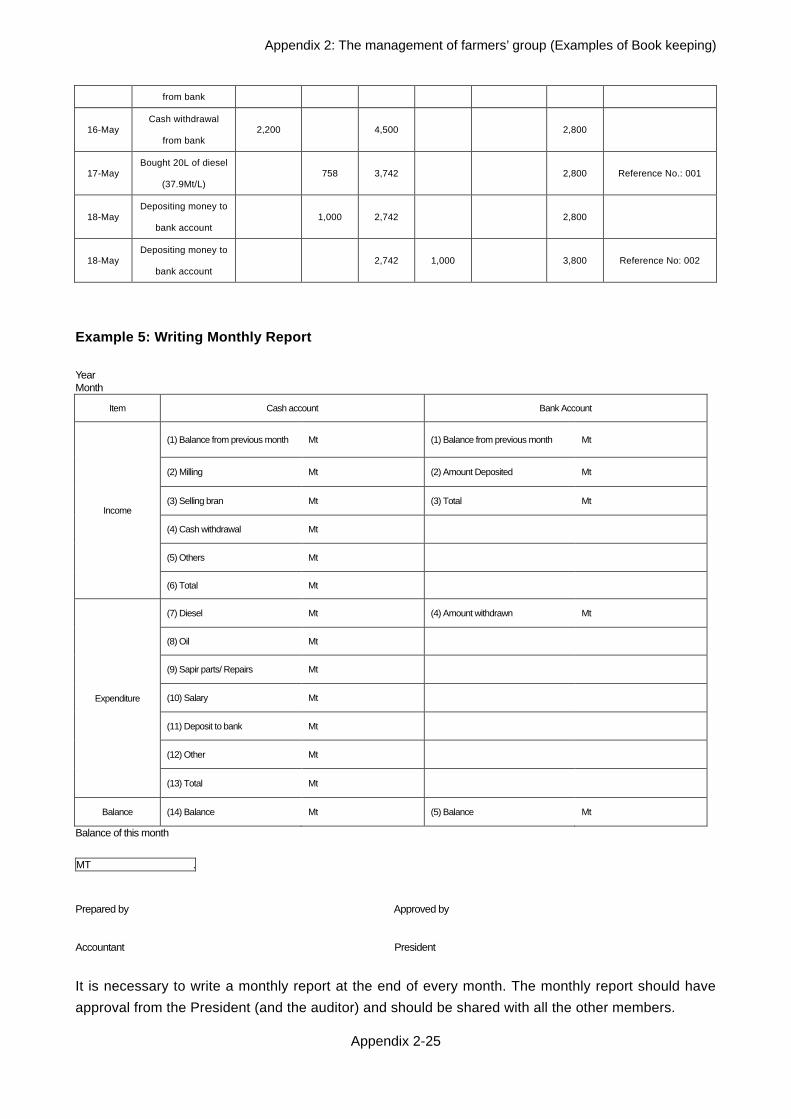
Appendix 2: The management of farmers’ group (Examples of Book keeping)
Appendix 2-25
from bank
16-May Cash withdrawal
from bank 2,200 4,500 2,800
17-May Bought 20L of diesel
(37.9Mt/L) 758 3,742 2,800 Reference No.: 001
18-May Depositing money to
bank account 1,000 2,742 2,800
18-May Depositing money to
bank account 2,742 1,000 3,800 Reference No: 002
Example 5: Writing Monthly Report
Year Month
Item Cash account Bank Account
Income
(1) Balance from previous month Mt (1) Balance from previous month Mt
(2) Milling Mt (2) Amount Deposited Mt
(3) Selling bran Mt (3) Total Mt
(4) Cash withdrawal Mt
(5) Others Mt
(6) Total Mt
Expenditure
(7) Diesel Mt (4) Amount withdrawn Mt
(8) Oil Mt
(9) Sapir parts/ Repairs Mt
(10) Salary Mt
(11) Deposit to bank Mt
(12) Other Mt
(13) Total Mt
Balance (14) Balance Mt (5) Balance Mt
Balance of this month
MT .
Prepared by Approved by
Accountant President
It is necessary to write a monthly report at the end of every month. The monthly report should have
approval from the President (and the auditor) and should be shared with all the other members.

Appendix 2: The management of farmers’ group (Examples of Book keeping)
Appendix 2-26
The purposes of such a monthly report is as follows.
This chapter explains the method of writing the monthly report, having the following book keeping as a
reference. The following is an example of book keeping of the month of May.
Date Purpose Cash account Bank account
Remarks Received Paid Balance Deposit Withdraw Balance
1-May
2,000 5,000
Balance from
previous month
15-May
From Mr. Mugabe
for milling 120kg of
paddy
300 2,300 5,000
16-May Cash withdrawal
from bank 2,300 2,200 2,800 Check no: 223569
16-May Cash withdrawal
from bank 2,200 4,500 2,800
17-May Bought 20L of diesel
(37.9Mt/L) 758 3,742 2,800 Reference No.: 001
18-May Depositing money to
bank account 1,000 2,742 2,800
18-May Depositing money to
bank account 2,742 1,000 3,800 Reference No: 002
19-May
From Mr. Mabunda
for milling 150kg of
paddy
375 3,117 3,800
19-May
From Mr. Sitoe for
milling 125kg of
paddy
312.50 3,429.50 3,800
22-May Bought 10L of Oil 1,200 2,229.5 3,800 Reference No: 003
22-May Bought spare parts 1,500 729.50 3,800 Reference No: 004
24-May
From Ms. Palmera
for milling 130kg of
paddy
325 1,054.50 3,800
25-May Cash withdrawal
from bank 1,054.50 1,500 2,300 Check no: 223570
25-May Cash withdrawal
from bank 1,500 2,554.50 2,300
26-May Sold 100kg of bran to 150 2,704.50 2,300
• It is to summarize the monthly activities.
• All of revenues, expenditures and balance of the month should be calculated.
• All the information are shared among all of the members.

Appendix 2: The management of farmers’ group (Examples of Book keeping)
Appendix 2-27
Mr. Chambal
31-May Paid salary
(operator) 1,000 1,704.50 2,300
31-May Paid salary
(President) 1,000 704,50 2,300
Step. What to do Remarks
1 Write the ”(1) Balance
from previous month”
Every month, the previous balance should be carried forward
and be written in the first row of the book of the next month.
Date Purpose Cash account Bank account
Remarks Received Paid Balance Deposit Withdraw Balance
1-May
2,000 5,000
Balance from
previous month
Year: 2013
Month: May
Item Cash account Bank Account
Income
(1) Balance from previous
month Mt 2,000
(1) Balance from previous
month Mt 5,000
(2) Milling Mt (2) Amount Deposited Mt
(3) Selling bran Mt (3) Total Mt
(4) Cash withdrawal Mt
(5) Others Mt
(6) Total Mt

Appendix 2: The management of farmers’ group (Examples of Book keeping)
Appendix 2-28
Step. What to do Remarks
2 Calculate the revenues
from the cash account
and the bank account.
Cash Account
� Add all of the revenues and write the result into the ”(2)
Milling.”
� 300+375+312.50+325=1,312.50
� Add all of the money earned by selling bran and write the
result into the “(3) Selling bran.”
� 150
� Add the amount of all of the withdrawals and write the result
into the ”(4) Cash withdrawal.”
� 2,200+1,500=3,700
� If there are other revenues, write that into the “(5) Others.”
� Add the figures from (1) to (5), and write the sum into the “(6)
Total.”
� 2,000+1,312.50+150+3,700
Bank Account
� Add all of the amount deposited to the bank, and write the
result into the ”(2) Amount of deposited.”
� 1,000
� Add (1) and (2), and writhe the sum into the “(3) Total.”
� 5,000+1,000=6,000
Year: 2013
Month: May
Item Cash account Bank Account
Income
(1) Balance from
previous month Mt 2,000
(1) Balance from
previous month Mt 5,000
(2) Milling Mt 1,312.50 (2) Amount
Deposited Mt1,000
(3) Selling bran Mt 150 (3) Total Mt6,000
(4) Cash withdrawal Mt 3,700
(5) Others Mt 0
(6) Total Mt 7,162.50

Appendix 2: The management of farmers’ group (Examples of Book keeping)
Appendix 2-29
Step. What to do Remarks
3 Calculate the
expenditures of the cash
account as well as the
bank account.
Cash account
� Add all the payments for diesel and write the sum under the
“(7) Diesel.”
� 758
� Add all the payments for buying oil and write the sum under
the “(8) Oil.”
� 1,200
� Add all the payments for spare parts and write the sum
under the “(8) Spare Parts.”
� 1,500
� Add all the remuneration and write the sum under the “(9)
Salary.”
� 1,000+1,000=2,000
� Add all the deposited amounts and write the sum under the
“(10) Deposit to bank.”
� 1,000
� If there are other expenditures, write that under the “(11)
Other.”
� Add amounts from (7) to (12) and write the sum under the
“(13) Total.”
Bank Account
• Add all of withdrawn amount and write the sum under the
“(4) Amount withdrawn.”
• 2,200+1,500=3,700
Expenditure
(7) Diesel Mt 758 (4) Amount
withdrawn Mt 3,700
(8) Oil Mt 1,200
(9) Spare parts/
Repairs Mt 1,500
(10) Salary Mt 2,000
(11) Deposit to bank Mt 1,000
(12) Other Mt 0
(13) Total Mt 6,458

Appendix 2: The management of farmers’ group (Examples of Book keeping)
Appendix 2-30
Step. What to do Remarks
4 Calculate balance for
both the “Cash account”
and the “Bank account”
Total Revenues – Total Expenditures = Balance
• Cash Account
� 7,162.50 – 6,458 = 704.50
� Bank Account
� 6,000 – 3,700 = 2,300
Item Cash account Bank Account
Income
(1) Balance from previous
month Mt 2,000
(1) Balance from previous
month Mt 5,000
(2) Milling Mt 1,312.50 (2) Amount Deposited Mt 1,000
(3) Selling bran Mt 150 (3) Total Mt 6,000
(4) Cash withdrawal Mt 3,700
(5) Others Mt 0
(6) Total Mt 7,162.50
Expenditure
(7) Diesel Mt 758 (4) Amount withdrawn Mt 3,700
(8) Oil Mt 1,200
(9) Spare parts/ Repairs Mt 1,500
(10) Salary Mt 2,000
(11) Deposit to bank Mt 1,000
(12) Other Mt 0
(13) Total Mt 6,458
Balance (14) Balance Mt 704.50
(5) Balance Mt 2,300

Appendix 2: The management of farmers’ group (Examples of Book keeping)
Appendix 2-31
Step. What to do Remarks
5 Calculate the balance
for the month
� The balance of the present month can be calculated by
addition: balance of the cash account + balance of the bank
account.
Item Cash account Bank Account
Income
(1) Balance from previous
month Mt 2,000
(1) Balance from previous
month Mt 5,000
(2) Milling Mt 1,312.50 (2) Amount Deposited Mt 1,000
(3) Selling bran Mt 150 (3) Total Mt 6,000
(4) Cash withdrawal Mt 3,700
(5) Others Mt 0
(6) Total Mt 7,162.50
Expenditure
(7) Diesel Mt 758 (4) Amount withdrawn Mt 3,700
(8) Oil Mt 1,200
(9) Spare parts/ Repairs Mt 1,500
(10) Salary Mt 2,000
(11) Deposit to bank Mt 1,000
(12) Other Mt 0
(13) Total Mt 6,458
Balance (14) Balance Mt 704.50 (5) Balance Mt 2,300
Balance of this month
MT. 3,004.50
Prepared by Approved by
Accountant President
• Both the President and the Accountant must sign off the monthly reports. Those monthly
reports must be shared among all of the members at general meetings.

The project implementation team
Name Organization / Role in PROMPAC
Inácio Mateus MUGABE (Mr.) SDAE / Project manager
Kiyoshi MASUBUCHI (Mr.) JICA / Chief Advisor & Rice Cultivation
Masahiro OTAKE (Mr.) JICA / Extension & Farmers Organization
Asako RIERA (Ms.) JICA / Coordination / Training
Jorge Junior de ALMEIDA (Mr.) SDAE / Extension
Arseino Fransisco LHAMINE (Mr.) SDAE / Extension
Jerinho Zacarias CUMBE (Mr.) SDAE / Extension
Baptista Acacio MACUACUA (Mr.) SDAE / Extension
Vania Dulce MACULA (Ms.) SDAE / Extension
Naoyoshi KAWANO (Mr.) JICA / Social Economic & marketing
Teruhisa NAMBA (Mr.) JICA / Agronomy (rice)
Olga Mario CHAGUALA (Ms.) EAC / Agronomy
Tomas Antonio MASSINGUE (Mr.) EAC / Agronomy
Toru HAMANAKA (Mr.) JICA / Agricultural Machinery and Equipment
Naftal Tristelio MACHAVA (Mr.) EAC / Agricultural Machinery and Equipment
Takashi KURAUCHI (Mr.) JICA / Irrigation & Water Management
Eduardo Cesar MULUANA (Mr.) HICEP / Irrigation & Water Management
Raul Abel CHAMBAL (Mr.) HICEP / Irrigation & Water Management
Calvino Andre CHANQUE (Mr.) EAC / Assistant
Avelino Samuel SITOE (Mr.) PROMPAC / Driver& Assistant
Sergio Amosse CUINICA (Mr.) PROMPAC / Driver & Assistant
Copy right National Directorate of Agricultural Extension, Ministry of Agriculture; DNEA,MINAG Provincial Directorate of Agriculture, Gaza; DPA Gaza District Services for Economic Activities; SDAE Chokwe Agricultural Research Station: EAC Chokwe Hydraulic Public Corporation; HICEP JICA Mozambique Office ********************************************************************************************************
Contact � District Services for Economic Activities; SDAEAddress: Av. of Trabalho C.P. No.5, Chokwe, Gaza province TEL: (258-28) 120166 � JICA Mozambique OfficeAddress: Av. 24 de Julho No. 7, 11 andar, Maputo, MOZAMBIQUE TEL:(258-21) 486357, 486358 FAX:(258-21) 486356 ********************************************************************************************************