Effects of Concentrated Ambient Particles and Diesel Engine ...
Upload
khangminh22Category
view
0download
0
CREATING POWER SOLUTIONS.
MANUALfor diesel engine
Hatz Diesel
3H50TI | 3H50TIC | 4H50TI | 4H50TIC
www.HATZ-DIESEL.com


3H50, 4H50 Table of contents
HATZ 3Manual
Table of contents
1 Notices ................................................................................................................. 5
2 General information ............................................................................................ 6
3 Safety ................................................................................................................... 73.1 General information ............................................................................................................. 73.1.1 Intended use and foreseeable misuse................................................................................. 73.1.2 Machine user or machine manufacturer obligations ............................................................ 83.1.3 Representation of safety notes ............................................................................................ 93.1.4 Meaning of safety symbols ................................................................................................ 103.2 Safety notes....................................................................................................................... 123.2.1 Operational safety.............................................................................................................. 123.2.2 Machine-specific safety instructions for operation ............................................................. 153.2.3 Machine-specific safety instructions for maintenance work............................................... 163.2.4 Electrical equipment .......................................................................................................... 183.3 Labels ................................................................................................................................ 19
4 Technical data ................................................................................................... 214.1 Engine information and filling quantities ............................................................................ 214.2 Engine type plate ............................................................................................................... 234.2.1 Engine serial number......................................................................................................... 244.3 Engine oil ........................................................................................................................... 244.4 Coolant .............................................................................................................................. 264.5 Fuel .................................................................................................................................... 30
5 Engine overview................................................................................................ 325.1 Designation of components ............................................................................................... 325.2 HATZ instrument box......................................................................................................... 42
6 Transport, assembly and commissioning ...................................................... 466.1 Transport ........................................................................................................................... 466.2 Installation notes................................................................................................................ 496.3 Preparations for commissioning ........................................................................................ 506.4 Filling engine oil (first filling)............................................................................................... 516.5 Filling the cooling system................................................................................................... 526.6 Starting the engine for the first time or after a fuel filter replacement ................................ 54
7 Operation and use............................................................................................. 587.1 Safety notes....................................................................................................................... 587.2 Performing tests................................................................................................................. 587.3 Starting the engine............................................................................................................. 597.4 Switching off the engine..................................................................................................... 617.5 Check the oil level.............................................................................................................. 637.6 Refueling............................................................................................................................ 65
8 Maintenance ...................................................................................................... 66

Table of contents 3H50, 4H50
4 HATZManual
8.1 General maintenance instructions ..................................................................................... 668.2 Maintenance work.............................................................................................................. 678.2.1 Maintenance plan .............................................................................................................. 678.2.2 Additional work on the Silent Pack .................................................................................... 698.2.3 Checking the intake area of the combustion air................................................................. 738.2.4 Checking the radiator fins for dirt accumulation................................................................. 758.2.5 Checking the cooling system ............................................................................................. 768.2.6 Changing the engine oil and oil filter.................................................................................. 798.2.7 Engine cleaning ................................................................................................................. 858.2.8 Checking the poly v belt..................................................................................................... 888.2.9 Checking and setting the belt tension................................................................................ 898.2.10 Replacing the poly v belts.................................................................................................. 938.2.11 Changing the oil separator of the crankcase ventilation .................................................... 978.2.12 Checking the screw connections ....................................................................................... 988.2.13 Draining the water separator ............................................................................................. 998.2.14 Changing the fuel prefilter................................................................................................ 1008.2.15 Changing the main fuel filter ............................................................................................ 1028.2.16 Servicing the air filter (optional) ....................................................................................... 1058.2.17 Changing coolant ............................................................................................................. 1078.2.18 Resetting the maintenance interval indicator................................................................... 110
9 Faults................................................................................................................ 1119.1 Troubleshooting ............................................................................................................... 1119.2 Flash code table for engine faults.................................................................................... 1149.3 Start support .................................................................................................................... 117
10 Storage and disposal...................................................................................... 12210.1 Storing the machine......................................................................................................... 12210.2 Disposing of the machine ................................................................................................ 124
11 Installation declaration ................................................................................... 125

3H50, 4H50 Notices
HATZ 5Manual
1 NoticesContact data
© 2017Motorenfabrik HATZErnst-Hatz-Straße 1694099 RuhstorfGermanyTel. +49 (0)8531 319-0Fax +49 (0)8531 [email protected] rights reserved!
CopyrightThe copyright for this manual rests entirely with Motorenfabrik HATZ, Ruh-storf.This manual may only be copied or distributed if written approval has beenreceived. This also applies to the copying or distribution of excerpts of thismanual. The same conditions apply to distribution of this manual to third par-ties in digital form.
Original manualThis manual has been translated into multiple languages.The German version is the original manual. All other language versions aretranslations of the original manual.

General information 3H50, 4H50
6 HATZManual
2 General informationInformation on the document
This manual was created with due care. It is exclusively intended to offer atechnical description of the machine and to provide instructions on commis-sioning, operating and maintaining the machine. When operating the ma-chine, the applicable standards and legal regulations as well as any in-houseregulations apply.Before commissioning, during operation and before maintenance work is be-gun on the machine, read this manual carefully and keep it close by forready access.
MachineThis manual describes the following machine.
Machine name HATZ diesel engine
Type number 3H50TI, 3H50TIC, 4H50TI, 4H50TIC
Customer serviceHave service work performed by qualified technicians only. We recommendthat you work with one of the over 500 HATZ service stations. Trained spe-cialists there will repair your machine with Hatz original spare parts andwith HATZ tools. The global HATZ service network is at your disposal to ad-vise you and supply you with spare parts. For the address of the Hatz ser-vice station nearest you, please see the enclosed spare parts list or visit usin the Internet at: www.hatz-diesel.comInstallation of unsuitable spare parts can lead to problems. We cannot ac-cept responsibility for direct damage or secondary damage that results fromthis.We therefore recommend the use of Hatz original spare parts. These partsare manufactured according to strict Hatz specifications and achieve maxi-mum operational reliability through their perfect fit and functionality. The or-der number can be found in the enclosed spare parts list or on the Internetat: www.hatz-diesel.com
Exclusion of liabilityThe manufacturer cannot be held responsible for personal injury, damage toproperty or damage to the machine itself caused by improper use, foresee-able misuse, or failure to follow or adequately follow the safety measuresand procedures described in this manual. This also applies to changes madeto the machine and the use of unsuitable spare parts.Modifications, which serve the technical improvements, are reserved
3H50, 4H50 Safety
HATZ 7Manual
3 Safety3.1 General information
IntroductionThis chapter contains the information you need to work safely with this ma-chine.To prevent accidents and damage to the machine, it is imperative that thesesafety instructions be followed.Read this chapter carefully before beginning work.
3.1.1 Intended use and foreseeable misuse
Intended useThe machine described in this manual fulfills the following functions:▪ Diesel engine intended for installation in a machine or for assembly with
other machines to form a machine. See chapter 11 Installation declaration,page 125.
This engine is intended exclusively for the purpose specified and tested bythe manufacturer of the machine in which the engine is installed.Any other use is not intended and therefore not permitted. Violations com-promise the safety of the personnel working with the machine. MotorenfabrikHATZ does not accept any liability for damage resulting from this.The operational safety of the machine is only guaranteed if it is used as in-tended.Use according to the intended purpose also includes observance of the in-structions in this Operator's Manual.
Foreseeable misuseThe following is considered to be foreseeable misuse:▪ Any use that varies from or extends beyond the uses specified above.▪ Failure to comply with the instructions given in this manual.▪ Failure to comply with the safety instructions.▪ Failure to immediately eliminate malfunctions that impact safety before
continuing work with the machine (working with the machine when it is notin perfect condition, either functionally or in terms of safety).
▪ Failure to perform the necessary inspection and maintenance work.▪ Any unauthorized modification of or removal of safety equipment.▪ Use of spare parts and accessories that are unsuitable or have not been
approved by HATZ.▪ Operation in flammable or hazardous environments.▪ Operation in closed-off or poorly ventilated rooms.

Safety 3H50, 4H50
8 HATZManual
▪ Installation of the machine in mobile equipment (e.g. vehicles, trailers) orin closed rooms without additional measures to handle supply air, extractair, and exhaust gas.
▪ Improper operation at variance with DIN 6271 and DIN ISO 8528 (climate,load, safety).
Residual risksResidual risks result during daily use and in association with maintenancework.These residual risks will be pointed out in chapter 3.2.2 Machine-specificsafety instructions for operation, page 15 and in chapter 3.2.3 Machine-specific safety instructions for maintenance work, page 16 as well as in thefurther contents of the manual, directly in front of the descriptions or operat-ing instructions concerned.
3.1.2 Machine user or machine manufacturer obligations
Machine manufacturer obligationsIf you have an engine that is not yet installed in a machine, it is imperativethat you follow the Assembly Instructions for HATZ Diesel Engines be-fore installing the engine. These assembly instructions contain important in-formation on how to safely install the engine and are available at your near-est HATZ service station.It is prohibited to start the engine before it is fully installed.In addition, please note that it is prohibited to start up the machine before ithas been determined that the machine into which this engine is installed ful-fills all safety-related requirements and legal regulations.
User obligationsThe operator is obliged to only operate the machine when it is in perfect con-dition. The operator must check the condition of the machine before use andensure that any defects are eliminated before it is taken into service. Run-ning the machine while identified defects exist is not permitted. The usermust also ensure that all persons who work on the machine are familiar withthe contents of this manual.
Obligations of the operating and maintenance personnelPersonnel assigned with operating and maintaining the machine must haveread and understood this manual or must possess the qualifications neces-sary for working with this equipment, acquired in training/instructional cour-ses. No one may work with the machine without the necessary qualifications,even if for just a brief period.The operating personnel must not be under the influence of drugs, medica-tion or alcohol.All work performed on the machine must be in compliance with the informa-tion provided in this manual.

3H50, 4H50 Safety
HATZ 9Manual
Storing this manualThis manual is an integral component of the machine (also when beingsold). It must be stored in the direct vicinity of the machine and be accessi-ble to personnel at all times.
3.1.3 Representation of safety notes
OverviewThis machine has been designed and built according to state-of-the-art tech-nology and the recognized safety standards. Despite these precautions,risks exist when operating the machine and during maintenance work.These risks are identified in this manual by means of safety notes.The safety notes precede the related description or operating step.
Structure of the safety notesThe safety notes consist of:▪ Danger symbol▪ signal word▪ Description of danger▪ Possible consequences▪ Preventative measures
General danger symbol
The general danger symbol is used to identify the danger of personal injury.

Safety 3H50, 4H50
10 HATZManual
Signal wordsSignal words identify the magnitude of the risk and the seriousness of thepossible injuries:
Danger symbol/signal word
Meaning
DANGER
This signal word is used to indicate imminentlydangerous situations which, if not avoided, willlead to serious injury or death.
WARNINGThis signal word is used to indicate potentiallydangerous situations which, if not avoided, maylead to serious injury or death.
CAUTIONThis signal word is used to indicate potentiallydangerous situations which, if not avoided, maylead to minor or moderate injury.
CAUTION
This signal word, without a danger symbol, isused to indicate the risk of property damage.
NOTICEThis signal word indicates additional useful infor-mation, such as operating tips and cross refer-ences.
3.1.4 Meaning of safety symbols
Explanation of symbolsThe following table describes the meanings of the safety symbols used inthis manual.
Symbol Meaning
Smoking, fire, and open flames are prohibited!
Warning of personal injury!
Warning of hot surfaces!
Warning of flammable substances!

3H50, 4H50 Safety
HATZ 11Manual
Symbol Meaning
Warning of explosive substances!
Warning of toxic engine exhaust!
Warning of corrosive substances!
Warning of heavy loads!
Warning of environmental damage!
Comply with this manual or additional documentation fromother manufacturers or the carrier.
iAdditional information that is useful to the reader.

Safety 3H50, 4H50
12 HATZManual
3.2 Safety notes
3.2.1 Operational safety
IntroductionThis chapter contains all of the important safety instructions for personal pro-tection and for safe and reliable operation. Additional, task-related safety in-structions can be found at the beginning of each chapter.
DANGER
Danger to life, danger of injury or danger of property dam-age due to failure to comply with this manual and the safetyinstructions contained therein.▪ As the operator of the machine, you must ensure that all
people working on the machine are familiar with the contentof this manual.
▪ Before working on the machine, read this manual carefully,paying special attention to the safety notes.
▪ Fulfill all required safety conditions before working on themachine.
▪ Follow all general safety instructions as well as the specifictask-related safety instructions contained in the individualchapters.
Using the machine▪ Only operate the machine for the purposes described in chapter 3.1.1 In-
tended use and foreseeable misuse, page 7.
Compliance with other regulations▪ Adhere to the applicable accident prevention regulations of the trade asso-
ciations.▪ Comply with the regulations concerning the minimum safety and health re-
quirements for the use of work equipment by workers at work.▪ In addition, local safety, accident prevention and environmental regula-
tions also apply when operating the machine.
Personal protective equipmentDuring operation and maintenance of the machine, personal protectiveequipment must be available and must be used if necessary. The requiredpersonal protective equipment is specified in the descriptions of the operat-ing steps.

3H50, 4H50 Safety
HATZ 13Manual
Personal protectiveequipment
Pictogram Function
Safety shoes Safety shoes offer protectionagainst:▪ Slipping▪ Falling objects
Hearing protection Hearing protection offers protec-tion against ear injuries due toexcessive and constant noise.
Safety gloves Safety gloves protect the handsagainst injury, e.g. from batteryacid.
Safety goggles(with side protection)
Safety goggles protect the eyesfrom flying objects (e.g. dustparticles, spraying liquids, spray-ing acid).
Working clothes Wear close-fitting clothing. How-ever, it must not restrict thewearer's freedom of movement.
Warning labels and information signs on the machineThe warning labels and information signs on the machine must be followed(see chapter "Labels" 3.3 Labels, page 19).The warning labels and information signs must be kept legible and must bereplaced if necessary. For this purpose, contact your nearest HATZ servicestation.
Maintenance workMaintenance work that goes beyond the scope described in this manualmust only be performed by qualified technicians (see chapter 2 General in-formation, page 6).Independent maintenance work and constructional changes to the machine,especially to the safety equipment, are not permitted.
Safety equipmentSafety equipment must not be modified and must not be rendered ineffectiveduring normal operation.

Safety 3H50, 4H50
14 HATZManual
General safety instructions
DANGER
Danger to life and danger of injury due to failure to followthe warnings on the machine and in this manual.▪ Heed the warnings on the machine and in this manual.
WARNING
Danger of injury and danger of incorrect operation due toinadequate personnel qualifications.▪ The personnel must have read and understood this manual
or must possess the qualifications necessary for workingwith this equipment, acquired in training/instructional cour-ses.
▪ Only qualified personnel is permitted to operate and main-tain this machine.
▪ Failure to comply will cause the warranty to become void.
WARNING
Danger of injury from failure to follow the operating instruc-tions and from performing unauthorized tasks on the ma-chine.▪ Follow all instructions.▪ Do not perform activities for which no qualification is avail-
able. Contact properly trained personnel if necessary.
CAUTION
Danger of injury from overloading the body.Lifting the machine to transport it or to move it to another loca-tion can lead to injuries (of the back, for example).▪ Only lift the machine with a hoist (see chapter 6.1 Transport,
page 46).

3H50, 4H50 Safety
HATZ 15Manual
3.2.2 Machine-specific safety instructions for operation
IntroductionThe machine can pose residual risks during operation. To eliminate theserisks, all persons working on the machine must follow the general and ma-chine-specific safety instructions.If you have an engine that is not yet installed in a machine, it is imperativethat you follow the Assembly Instructions for HATZ Diesel Engines be-fore installing the engine.These assembly instructions contain important information on safe installa-tion.If the engine is installed in a machine or assembled with other machines toform a machine, it is prohibited to start the engine before it has been deter-mined that the newly created machine fulfills all safety-related requirementsand applicable legal regulations.
Safe operation▪ Before switching on the machine, ensure that no one can be injured when
the machine is started up.▪ During machine operation, ensure that unauthorized persons do not have
access to the area in which the machine has an impact.▪ Parts of the exhaust gas system and the surface of the engine become hot
during operation. Risk of injury from touching hot parts! Let the engine coolbefore maintenance.
▪ Do not refuel during operation.
Faults▪ Immediately eliminate faults that compromise safety.▪ Switch off the machine and do not take into service again until all faults
have been eliminated.
Safety instructions for operation
DANGER
Danger to life from inhaling exhaust gases.Toxic engine exhaust gases can lead to loss of consciousnessand even death in closed-off and poorly ventilated rooms.▪ Never operate the machine in closed-off or poorly ventilated
rooms.▪ Do not breathe in the exhaust gases.

Safety 3H50, 4H50
16 HATZManual
DANGER
Fire hazard from fuel.Leaked or spilled fuel can ignite on hot engine parts and causeserious burn injuries.▪ Only refuel when the engine is switched off.▪ Never refuel in the vicinity of open flames or sparks that can
cause ignition.▪ Do not smoke.▪ Do not spill fuel.
3.2.3 Machine-specific safety instructions for maintenance work
IntroductionThe machine can pose residual risks during maintenance. To eliminatethese risks, all persons working on the machine must follow the general andmachine-specific safety instructions.
Maintenance intervals▪ Strictly adhere to the maintenance intervals.▪ Check the safety equipment regularly to ensure it is in good condition and
functioning properly.▪ Check connections, cables and fasteners regularly to ensure they are in
good condition.
Maintenance workMaintenance work that goes beyond the scope described in this manualmust only be performed by qualified technicians. We recommend that youwork with one of the over 500 HATZ service stations.
Replacing parts▪ When replacing defective components, we recommend that you use gen-
uine HATZ original spare parts (see chapter 2 General information, page6).
▪ When disposing of parts that can no longer be used, do so in accordancewith local environmental regulations or send them to a recycling center.
Measures following maintenance and troubleshooting▪ Securely reconnect loose electrical connections; check that the electrical
components and equipment are functioning properly.▪ Check the entire machine for foreign bodies; remove any foreign bodies.

3H50, 4H50 Safety
HATZ 17Manual
Safety instructions for maintenance work
DANGER
Danger of explosion from flammable cleaning agents.Cleaning with benzene is an explosion hazard. It is highlyflammable, can become electrostatically charged, and can gen-erate an explosive gas/air mixture.▪ Use halogen-free, cold cleaners with a high flashpoint for
cleaning.▪ Comply with manufacturer's instructions.
WARNING
Danger of injury from compressed air and dust particles.Eye injuries may occur when cleaning with compressed air.▪ Wear safety goggles.
CAUTION
Danger of injury if maintenance instructions are not fol-lowed.▪ Only perform maintenance when the engine is switched off.▪ For engines with an electric starter:
Disconnect the negative battery terminal.Protect the starting key against unauthorized access.
CAUTION
Danger of burns.There is a danger of burns when working on a hot engine.▪ Let the engine cool before maintenance.

Safety 3H50, 4H50
18 HATZManual
3.2.4 Electrical equipment
Safety notes
DANGER
Danger to life, danger of injury or danger of property dam-age due to incorrect use of batteries.▪ Do not place tools or other metal objects on the battery.▪ Before performing work on the electrical equipment, always
disconnect the negative battery terminal.▪ Never swap the positive (+) and negative (–) battery termi-
nals.▪ When installing the battery, first connect the positive cable
and then the negative cable.▪ When removing the battery, first disconnect the negative
cable and then the positive cable.▪ It is imperative to prevent short circuits and mass contact of
current carrying cables.▪ If faults occur, check the cable connections for good con-
tact.
DANGER
Danger of explosion from flammable substances.There is a danger of explosion from flammable gases.▪ Keep batteries away from open flames and incendiary
sparks.▪ Do not smoke when working with batteries.
CAUTION
Danger of chemical burnsChemical burns can occur when using batteries for the electricaloperation.▪ Protect your eyes, skin, and clothing from corrosive battery
acid.▪ Immediately rinse areas affected by splashed acid with clear
water and consult a physician if necessary.

3H50, 4H50 Safety
HATZ 19Manual
NOTICE▪ The necessary wiring diagrams are included with the ma-
chine if it is equipped with electrical equipment. Additionalwiring diagrams can be requested when needed.
▪ We cannot be held liable for electrical equipment that is notdesigned according to HATZ wiring diagrams.
▪ Promptly replace faulty indicator lamps.▪ Do not pull out the starting key during operation.▪ Do not disconnect the battery while the machine is running. Resulting volt-
age peaks could destroy the electronic components.▪ When performing welding work on the machine, disconnect the battery
and place the ground clamp of the welding equipment as close as possibleto the welding area. Disconnect the plug connectors to the engine controlunit and to the voltage regulator of the three phase alternator.
3.3 Labels
Warning labels and information signs on the engine
Label Meaning
Engine specification TIC
0000 053 657 02
The engine may only be operatedwith fuel that is "EXTREMELY LOWIN SULFUR OR SULFUR-FREE".The fuel label is located close to thefuel cap. If there is no fuel tank in-stalled on the engine, the label mustbe applied permanently close to thefuel filler opening.
Engine specification Silent Pack
CAUTION!Danger of injury from rotating parts.▪ Only operate the engine when all
covers are installed.

Safety 3H50, 4H50
20 HATZManual
Warning labels and information signs on the battery (option)
Label Meaning
1 2 3
4 5 6
7
1.Fire, sparks, open flames andsmoking are prohibited: avoidcausing sparks when working withcables and electrical machines.Avoid short-circuits.
2.Follow the instructions on the bat-tery and in the battery user man-ual.
3.Keep children away from acid andbatteries.
4.Danger of explosion: A highly ex-plosive electrolytic gas is createdwhen batteries are charged.
5.Wear safety goggles when filling.6.Danger of chemical burns: Battery
acid is highly corrosive. Therefore,wear safety gloves and eye pro-tection. Do not tilt the battery; acidmay spill out of the vent openings.
7.Do not dispose of the battery withthe household trash.
8.Take the used battery to a collec-tion center.

3H50, 4H50 Technical data
HATZ 21Manual
4 Technical data4.1 Engine information and filling quantities
Type 3H50 4H50
Type Liquid-cooled four stroke diesel engine
Combustion system Direct injection
Number of cylinders 3 4
Bore/stroke mm 84 / 88 84 / 88
Displacement Liter 1.464 1.952
Engine oil capacity Approx.liters
5.0 1) 7.0 1)
Difference between the "max." and "min." marks
Approx.liters
0.8 1) 1.0 1)
Engine oil consumption(after running-in period)
Max. 0.5 % of fuel consumption, pertaining to full load
Engine oil pressure 2.5 bar to 4.5 bar
Coolant quantity Approx.liters
12.7 2) / 12.0 3) 13.2 2) / 12.5 3)
Sense of rotation Left (view toward flywheel)
Tappet clearance Automatic hydraulic valve adjustment (mainte-nance-free)
Max. perm. continuoussloping position 4)
HATZ radiator with integrated expansion tankexhaust low: 20°, radiator low: 20°, other parts: 30°
HATZ radiator with external expansion tankexhaust low: 20°, other parts: 30°
Battery capacity Max. 12 V – 110 Ah / 450 A as per DIN
24 V – 66 Ah / 300 A as per DIN1) These values are approximations only. The max. mark on the dipstick isdecisive in any case (see section 7.5 Check the oil level, page 63).2) HATZ radiator with integrated expansion tank.3) HATZ radiator with external expansion tank.4) Exceeding these limit values causes engine damage!

Technical data 3H50, 4H50
22 HATZManual
Engine specifications
Model Description
TI with turbocharger and charge air cooling.
TIC with turbocharger, charge air cooling, cooled exhaustgas recirculation (EGR) and diesel oxidation catalyst(DOC)
OPU Open Power Unit. Complete system with all components required forengine cooling.
Silent Pack Open Power Unit with noise and weather protectioncapsule.
Weights (without operating fluids)
Model
Standard OPU Silent Pack
Type Weight in kg
3H50 TI 186 * 215 –
3H50 TIC 207 * 236 –
4H50 TI 205 * 234 339
4H50 TIC 226 * 255 360
* with HATZ radiator.
Screw tightening torque
Designation Nm
Oil drain screw 50
Drain plug on the radiator 50
Screws for the breather cap of the crankcase ventilation 4

3H50, 4H50 Technical data
HATZ 23Manual
4.2 Engine type plate
120R-xxxxxx*xx24R-xxxxxx
EMISSION CONTROL INFORMATIONMOTORENFABRIK HATZ KG ¬ D-94099 RUHSTORF
GMBH+CO
Model: 4H50TIC – 162J
S/N: 1361014000001 Build: 03/2014
Power: 36.4kW @ 1800 RPM Constant
Displ: 1.95L
Eng.Fam: FHZXL1.95C50
Emission Control System: DDI, DOC, EGR, ECM, TC, CAC
Power Category: 19≤kW<37
ULTRA LOW SULFUR DIESEL FUEL ONLY.
THIS ENGINE COMPLIES WITH U.S. EPA AND CALIFORNIA REGULATIONSFOR THE MY2015 YEAR NONROAD DIESEL ENGINES.Use in Constant-Speed Applications only.
EU-Type: e1*97/68KA*2012/46*0801*00 (IIIA)
www.hatz-diesel.com
187_44_C_3B
120R xxxxxx*xx24R xxxxxxE1
8
9
10
11
The engine type plate is located on the crankcase and contains the followingengine information:
1 Model designation of the engine
2 Engine serial number
3 Serial rating (kW) at nominal speed (rpm)
4 Displacement (liters)
5 Information for US emission certification (EPA/CARB)
6 EU type approval
7 EU country of origin (Germany)
8 Model year (month/year)
9 ECE type approval numbers
10 Code for type plate variant
11 Barcode (engine serial number)
The following data must always be specified in case of queries and for spareparts orders:
1 Model designation
2 Engine serial number

Technical data 3H50, 4H50
24 HATZManual
4.2.1 Engine serial number
Breakdown of the engine serial number
133 11 15 123456
1 Engine type number
2 Engine serial number
3 Model year
4 Fabrication number (consecutive)
Engine type numberThe engine type number makes it possible to see if the engine is equippedwith a diesel oxidation catalyst (DOC). There are more stringent require-ments on engine oil and fuel quality for engines with DOC (see section 4.3Engine oil, page 24and section 4.5 Fuel, page 30. The following tableshows which engine types are equipped with DOC.
Engine type number Type number DOC
135 3H50TIC X
136 4H50TIC X
161 4H50TI
163 3H50TI
4.3 Engine oil
Oil qualityAll oil brands that meet at least one of the following specifications are suit-able:Engines with diesel oxidation catalyst (DOC)(for details, see section 4.2.1 Engine serial number, page 24).▪ ACEA E6 (recommended)▪ ACEA E9▪ ACEA C3 / C4 (HTHS ≥ 3.5 mPas)▪ API CJ-4

3H50, 4H50 Technical data
HATZ 25Manual
CAUTIONDamage to the diesel oxidation catalyst (DOC) from usingunsuitable engine oil.Unsuitable engine oil diminishes the functionality and service lifeof the catalytic converter.Only use engine oils with very low quantities of sulfate ash,phosphor and sulfur – so-called "low SAPS" oils which fulfill atleast one of the specifications mentioned above.
Engines without diesel oxidation catalyst (DOC)(for details, see section 4.2.1 Engine serial number, page 24).▪ ACEA E6, E7 or E9▪ ACEA C1, C2, C3 or C4▪ API CJ-4 or CI-4
Oil viscosity
Select the recommended viscosity depending on the ambient temperature inwhich the engine will be operated.
CAUTIONEngine damage from unsuitable engine oil.Unsuitable engine oil considerably reduces engine service life. Only use engine oil that fulfills the specifications stipulatedabove.

Technical data 3H50, 4H50
26 HATZManual
4.4 Coolant
IntroductionLiquid-cooled engines require a coolant specified by HATZ for engine cool-ing.Coolant is prepared in accordance with manufacturer's instructions, pleasecomply with the information on the packaging label.Radiator protection fluids give effective protection against corrosion andfreezing. In addition, the coolant boiling point is significantly raised and de-posits of lime in the cooling system are reduced.
Safety notes
CAUTION
Danger of damage to healthRadiator protection fluids are harmful to health.▪ Avoid contact to eyes and skin.▪ Store only in the sealed original container and in a place in-
accessible for unauthorized persons.▪ Comply with manufacturer's instructions.
CAUTION
Danger of environmental damage from spilled coolant.Coolant is water-polluting.▪ Do not allow it to enter the ground water, water bodies, or
sewage system.▪ Collect the coolant and dispose of it according to local envi-
ronmental regulations.
CAUTIONDanger of engine damage from radiator protection fluid.Use of a radiator protection fluid not approved by HATZ cancause engine damage.▪ If you have any questions, please contact your nearest
HATZ Service before commissioning the engine.

3H50, 4H50 Technical data
HATZ 27Manual
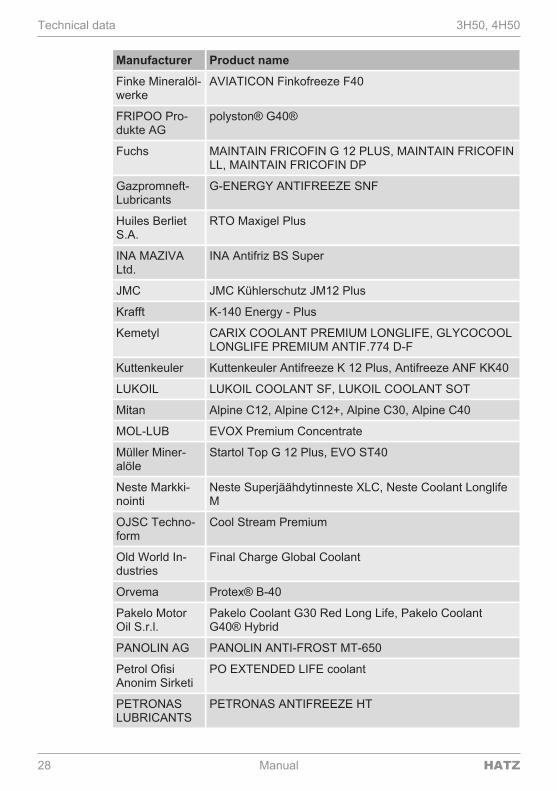
Recommended radiator coolant
Product name Container HATZ order no.
H50-Coolant 5 liters 0000 055 413 00
The H50-Coolant coolant concentrate is exactly matched to the require-ments of your HATZ diesel engine.
Alternative radiator protection fluidsIf H50-Coolant is not available, other radiator protection fluids are approvedby HATZ:
Manufacturer Product name
ARAL Aral Antifreeze Silikatfrei (silicate-free)
Arteco Havoline XLC (OF02), Havoline XLC+B
Auto-Teile-Ring Cartechnic Antifreeze CT 12 plus
Avia AVIA ANTIFREEZE NG
BASF Glysantin® G30®, Glysantin® G40®
BayWa AG TECTROL COOLPROTECT SI-OAT
Belgin MadeniYaglar Tic
LUBEX ANTIFREEZE G-12 PLUS
BP BP Procool
Bucher MOTOREX COOLANT M3.0 Concentrate, MOTOREXCOOLANT M4.0 Concentrate
Castrol Radicool SF, Radicool Si OAT
CCI LLC C521, LLC L415
CEPSA XTAR SUPER COOLANT Si-OAT
CHEMIA-BOMAR
Glidex Extra Premium
Chevron Caltex Delo XLC Antifreeze/Coolant – Concentrate,Chevron Delo XLC Antifreeze/Coolant – Concentrate,Havoline XLC Concentrate, Ursa ELC NF Concentrate,Texaco Havoline Xtended Life Coolant – Conc, CaltexExtended Life Coolant
CLASSIC CLASSIC KOLDA UE G30, CLASSIC KOLDA UE G40
ENI S.p.A. Eni Antifreeze Spezial 12++
Eurolub Radiator protection fluid D-30, PROCAR radiator protec-tion fluid silicate-free, radiator protection fluid D-40 SU-PER
Exxon Mobil Delvac ELC Coolant, Mobil Antifreeze Ultra
Technical data 3H50, 4H50
28 HATZManual
Manufacturer Product name
Finke Mineralöl-werke
AVIATICON Finkofreeze F40
FRIPOO Pro-dukte AG
polyston® G40®
Fuchs MAINTAIN FRICOFIN G 12 PLUS, MAINTAIN FRICOFINLL, MAINTAIN FRICOFIN DP
Gazpromneft-Lubricants
G-ENERGY ANTIFREEZE SNF
Huiles BerlietS.A.
RTO Maxigel Plus
INA MAZIVALtd.
INA Antifriz BS Super
JMC JMC Kühlerschutz JM12 Plus
Krafft K-140 Energy - Plus
Kemetyl CARIX COOLANT PREMIUM LONGLIFE, GLYCOCOOLLONGLIFE PREMIUM ANTIF.774 D-F
Kuttenkeuler Kuttenkeuler Antifreeze K 12 Plus, Antifreeze ANF KK40
LUKOIL LUKOIL COOLANT SF, LUKOIL COOLANT SOT
Mitan Alpine C12, Alpine C12+, Alpine C30, Alpine C40
MOL-LUB EVOX Premium Concentrate
Müller Miner-alöle
Startol Top G 12 Plus, EVO ST40
Neste Markki-nointi
Neste Superjäähdytinneste XLC, Neste Coolant LonglifeM
OJSC Techno-form
Cool Stream Premium
Old World In-dustries
Final Charge Global Coolant
Orvema Protex® B-40
Pakelo MotorOil S.r.l.
Pakelo Coolant G30 Red Long Life, Pakelo CoolantG40® Hybrid
PANOLIN AG PANOLIN ANTI-FROST MT-650
Petrol OfisiAnonim Sirketi
PO EXTENDED LIFE coolant
PETRONASLUBRICANTS
PETRONAS ANTIFREEZE HT
3H50, 4H50 Technical data
HATZ 29Manual
Manufacturer Product name
REPSOL LU-BRICANTES
REPSOL ANTI.REF.ORGANICO MAXIMUM QUALITY,REPSOL ANTICONGELANTE REF. ORGANICO Si-OAT
SMB POWER COOLING NG
Tedex Tedex Antifreeze OT LL
Total Total Glacelf Auto Supra, TOTAL GLACELF Si-OAT
Valvoline Zerex G 30, Zerex G 40-91
YORK SAS YORK 718, YORK 816
Preparation of the coolant
CAUTIONDanger of engine damage from incorrect radiator protectionfluid concentration.A too low radiator protection fluid concentration increases therisk of corrosion and also the risk of the cooling system freezing.A radiator protection fluid proportion of over 50 vol% degradesthe cooling action and also the protection against frost is re-duced. Therefore, serious engine damage may result from ex-ceeding or dropping below the radiator protection fluid concen-tration.
▪ The radiator protection fluid must be prepared according to manufacturer'sinstructions before pouring it into the cooling circuit. Comply with the infor-mation on the packaging label.
▪ If the radiator protection fluid has to be mixed with water, use only cleanwater that is not too hard. Drinking water with as low a content of salt, min-erals and suspended matter as possible is ideal. Demineralized or distilledwater is also ideal.

Technical data 3H50, 4H50
30 HATZManual
The following values must not be exceeded:
Water quality Max.
Water hardness (°dGH) 20
Water hardness (mmol/l) 3.6
Chloride content (ppm) 100
Sulfate content (ppm) 100
The coolant mixture ratio must not be below or exceed the following concen-tration:
Radiator protectionfluid
Water Frost-resistant to ap-prox.
min. 40 vol% 60 vol% -27 °C
max. 50 vol% 50 vol% -38 °C
NOTICE
iAs the corrosion and antifreeze concentration reduces with time,carry out an annual check with a commercially available an-tifreeze tester. If the concentration is too low, either:▪ drain part of the coolant and bring to the required frost
safety level by adding radiator protective fluid, or▪ replace the entire filling of coolant (see section 8.2.17
Changing coolant, page 107).
4.5 Fuel
Fuel typeAll types of diesel fuel that meet the minimum requirements of the followingspecifications are suitable:▪ Europe: EN 590▪ UK: BS 2869 A1 / A2▪ USA: ASTM D 975-09a 1-D S15 or 2-D S15▪ USA: ASTM D 975-09a 1-D or 2-D
(only suitable for engines without diesel oxidation catalyst - DOC)For details with regard to equipping with DOC, see chapter 4.2.1 Engineserial number, page 24
▪ Japan: JIS K 2204 (with a maximum HFRR value of 520 µm)
3H50, 4H50 Technical data
HATZ 31Manual
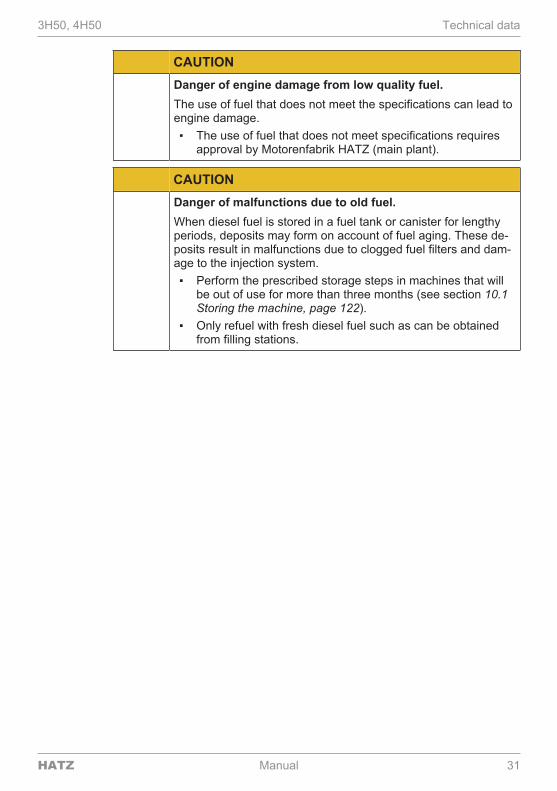
CAUTIONDanger of engine damage from low quality fuel.The use of fuel that does not meet the specifications can lead toengine damage.▪ The use of fuel that does not meet specifications requires
approval by Motorenfabrik HATZ (main plant).
CAUTIONDanger of malfunctions due to old fuel.When diesel fuel is stored in a fuel tank or canister for lengthyperiods, deposits may form on account of fuel aging. These de-posits result in malfunctions due to clogged fuel filters and dam-age to the injection system.▪ Perform the prescribed storage steps in machines that will
be out of use for more than three months (see section 10.1Storing the machine, page 122).
▪ Only refuel with fresh diesel fuel such as can be obtainedfrom filling stations.
Engine overview 3H50, 4H50
32 HATZManual
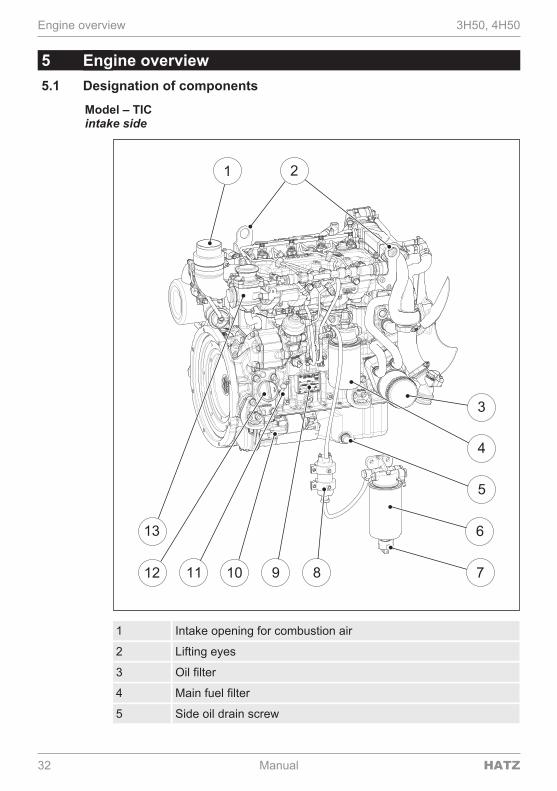
5 Engine overview5.1 Designation of components
Model – TICintake side
5
4
6
789101112
1 2
3
13
1 Intake opening for combustion air
2 Lifting eyes
3 Oil filter
4 Main fuel filter
5 Side oil drain screw

3H50, 4H50 Engine overview
HATZ 33Manual
6 Fuel prefilter
7 Drain plug with integrated water level sensor
8 Electric fuel pump
9 Engine type plate
10 Starter (low mounting position)
11 Dipstick
12 Oil filler plug, bottom
13 Crankcase ventilation

Engine overview 3H50, 4H50
34 HATZManual
Model – TICexhaust side
1
2
345679 810
1 Oil filler plug, top
2 Turbocharger
3 Engine foot
4 Diesel oxidation catalyst (DOC)
5 Exhaust outlet
6 Starter (high mounting position)
7 Three phase alternator
8 Oil drain screw, front
9 Poly v belt
10 Fan

3H50, 4H50 Engine overview
HATZ 35Manual
Model – OPUintake side
1 42 3 6
7
15 10111213
8
1416
17
5
5
9
NOTICE
iThe Open Power Unit (OPU) is a complete system which, in ad-dition to the engine, also includes all of the components requiredfor cooling.
1 Intake opening for combustion air
2 Rain cap

Engine overview 3H50, 4H50
36 HATZManual
3 Air filter (optional)
4 Dust discharge valve
5 Lifting eyes
6 Engine control unit
7 Plug holder with integrated relay, glow control unit and fuseholder
8 Oil filter
9 Main fuel filter
10 Fuel prefilter
11 Drain plug with integrated water level sensor
12 Side oil drain screw
13 Electric fuel pump
14 Engine type plate
15 Starter (low mounting position)
16 Dipstick
17 Oil filler plug, bottom
18 Vibration damper
19 Crankcase ventilation

3H50, 4H50 Engine overview
HATZ 37Manual
Model – OPUexhaust side
1 2 3
4
5
6
9 8 710
1 Radiator with integrated expansion tank
2 Sealing cap for coolant
3 Oil filler plug, top
4 Turbocharger
5 Diesel oxidation catalyst (DOC)
6 Exhaust outlet
7 Starter (high mounting position)
8 Three phase alternator
9 Belt guard (option)
10 Oil drain screw, front

Engine overview 3H50, 4H50
38 HATZManual
Encapsulated model – Silent Pack
1 42 3
6
5
7891011
NOTICE
iThe Silent Pack is an Open Power Unit (OPU) that is sur-rounded by a noise and weather protection capsule. The mainte-nance covers (4) and (6) can be removed for daily maintenancework. The individual maintenance positions are shown on thefigures of the OPU.
1 Intake opening for combustion air
2 Rain cap
3 Air filter (optional)
4 Top maintenance cover
5 Clamp-type fastener
6 Side maintenance cover
7 HATZ instrument box

3H50, 4H50 Engine overview
HATZ 39Manual
8 Speed adjustment
9 Engine type plate
10 Drain plug with integrated water level sensor
11 Fuel prefilter
Components of the electronic engine control unit
Pos. Designation Figure
1 Crankshaft speed sensor

Engine overview 3H50, 4H50
40 HATZManual
Pos. Designation Figure
2 Air filter differential pressure sensor
3 Rail pressure sensor
4 Rail pressure control valve
5 EGR valve
6 Coolant level sensor (integrated in external expan-sion tank)
7 Coolant level sensor (for radiator with integratedexpansion tank)
8 Coolant temperature sensor
9 Camshaft speed sensor
10 Ambient pressure sensor (integrated in the enginecontrol unit)

3H50, 4H50 Engine overview
HATZ 41Manual
Pos. Designation Figure
11 Charge air pressure and charge air temperaturesensor
12 Low fuel pressure and fuel temperature sensor
13 Water level sensor
14 Oil pressure and oil temperature sensor
15 Metering unit on the high pressure pump

Engine overview 3H50, 4H50
42 HATZManual
5.2 HATZ instrument box
Overview
II
I
0
1 Starting key
2 Pushbutton
3 Pre-glow indicator
4 Operating indicator
5 Charge control
6 Oil pressure indicator
7 Air filter service indicator
8 Engine temperature indicator
9 Maintenance interval indicator
10 Engine fault
11 - 14 Faults in the area of the exhaust emission after-treatment sys-tem (not activated)
Ignition lock
0 Off
I Operation
II Starting
IndicatorsThe function of all indicators is checked when the starting key is turned.They flash or light up for different times. If there is a fault, the applicable indi-cator does not go out after the engine start or it lights up again during opera-tion.

3H50, 4H50 Engine overview
HATZ 43Manual
Explanation of symbols
Symbol Meaning
PushbuttonThe pushbutton fulfills the following functions:▪ Request flashing code for troubleshooting.
If the "Engine fault" indicator lights or flashes, the relevantflashing code can be requested for fault diagnosis. To do so,proceed as follows:
– Turn the starting key to the "0" position and wait untilthe engine comes to a stop.
– After the engine has stopped, immediately turn thestarting key to the "1" position.
– After the pushbutton has been pressed (maximum2 seconds), the flashing code is output on the indicatorfor engine fault.For the flashing code table, see section 9.2 Flash codetable for engine faults, page 114.
▪ Reset the maintenance interval indicator.(see section 8.2.18 Resetting the maintenance interval indica-tor, page 110).
Warning and indicator lamps:
Pre-glow indicatorLights at temperatures below 30 °C. Start the engine when theindicator has gone out.
Operating indicatorLights up during operation when there is no engine fault.
Charge controlFault in the alternator or alternator charging circuit. The batteryis no longer charged. Eliminate the fault immediately.
Oil pressure indicatorEngine oil pressure too low. Danger of engine damage. Stop theengine immediately and check the oil level (see section 7.5Check the oil level, page 63).Contact HATZ Service if the oil level is correct.

Engine overview 3H50, 4H50
44 HATZManual
Symbol Meaning
Air filter service indicator▪ lights: Clean or renew the filter cartridge at the next opportu-
nity.▪ flashes + engine fault flashes: Immediately clean or replace
the filter cartridge.
For more information, see section 8.2.16 Servicing the air filter(optional), page 105.
Engine temperature indicator▪ lights: High coolant temperature. Operate engine at reduced
load.Stop the engine if the engine temperature indicator hasnot gone out after 5 minutes.
▪ lights + engine fault flashes: Coolant temperature is inad-missibly high. Switch off the engine immediately! Danger ofengine damage.
For details of troubleshooting, see section 9.1 Troubleshooting,page 111.
Maintenance interval indicatorThis indicator lights when the 500-hour maintenance visit is due.After completion of maintenance work, reset the maintenanceinterval indicator (see section 8.2.18 Resetting the maintenanceinterval indicator, page 110).
Engine faultThis indicator lights or flashes if there are engine faults. De-pending on the engine specification, the engine controller reactsas follows:▪ Emergency operation
The engine switches to emergency run function. In this situa-tion, the available engine torque is reduced and the speed lim-ited to max. 1900 rpm.
▪ Engine stopThe engine switches off automatically.
▪ Warning lampOnly the engine fault indicator calls attention to a fault.
A flashing code can be requested for fault diagnosis (see Push-button symbol).
Not activated.

3H50, 4H50 Engine overview
HATZ 45Manual
Symbol Meaning
Not activated.
Not activated.
Not activated.

Transport, assembly and commissioning 3H50, 4H50
46 HATZManual
6 Transport, assembly and commissioning6.1 Transport
Safety notes
WARNING
Danger of injury from improper lifting and transport.Danger of crushing from the engine falling or tipping.▪ The machine may only be lifted using the lifting points (1).▪ Before lifting the engine, check the lifting eyes for deforma-
tion. Lifting with deformed lifting eyes is not permitted.Re-new any deformed lifting eyes.
▪ Only use a suitable hoist with a sufficient carrying capacity.▪ Always use all lifting eyes for lifting.▪ Do not remain under suspended loads.
CAUTION
Only use the lifting eye for transporting the engine.Do not use for lifting the entire machine.
CAUTION
Danger of injury from overloading the body.Lifting the machine to transport it or to move it to another loca-tion can lead to injuries (of the back, for example).▪ Only lift the machine with a hoist.
NOTICEDanger of environmental damage from leaking fluid.If the machine is tilted, engine oil and fuel can run out.▪ Only transport the machine in an upright position.

3H50, 4H50 Transport, assembly and commissioning
HATZ 47Manual
Access to the lifting eyes with the Silent Pack
Safety note
CAUTIONDanger of engine damage due to foreign bodies.If the air intake hose is disconnected from the air filter, there is adanger that foreign bodies can enter the air intake hose. Theseare sucked in during operation and can lead to engine damageas a consequence.▪ Make sure that no dirt or other foreign bodies enter the air
intake hose.
Overview
1 Fixing screws for retaining plate
2 Hose clamp

Transport, assembly and commissioning 3H50, 4H50
48 HATZManual
3 Air intake hose
4 Air filter
5 Fixing screws for the top part of the capsule (18 pieces)
6 Top part of the capsule
Procedure
Step Activity
1 Unscrew the fixing screws (1).
2 Undo the hose clamp (2) and remove the air intake hose (3)from the air filter (4).
3 Unscrew the fixing screws (5).
4 Top part of the capsule
5 Mount all parts again after completing the transport activities.Do not forget:Tighten the hose clamp (2)!
Lifting points (engines with 2 lifting eyes)
min
. 780m
m
1 Lifting points

3H50, 4H50 Transport, assembly and commissioning
HATZ 49Manual
Lifting points (engines with 3 lifting eyes)
min
. 780m
m
1 Lifting points
Transport conditions▪ When transporting the machine, follow the safety instructions.▪ When transporting, follow the applicable safety and accident prevention
regulations of the trade associations.▪ After delivery, check the machine for completeness and transport damage.▪ Only transport the machine when it is switched off and has cooled down.▪ If you have questions on transporting the machine, please contact your
nearest HATZ service station. For contact data, see chapter 1 Impres-sum, page 5 or www.hatz-diesel.com.
6.2 Installation notesHATZ diesel engines are efficient, robust, and have a long service life.Therefore, they are usually installed in machines that are used for commer-cial purposes.The machine manufacturer must follow the applicable regulations regardingmachine safety – the engine is a part of a machine.Depending on the use and installation of the engine, it may be necessary forthe machine manufacturer and machine user to install safety equipment toprevent inappropriate use. Note the following:

Transport, assembly and commissioning 3H50, 4H50
50 HATZManual
▪ Parts of the exhaust gas system and the engine surface become hot dur-ing operation and may not be touched until they cool down after the en-gine is switched off.
▪ Incorrect cable connections and incorrect operation of the electrical equip-ment can lead to sparking and must be avoided.
▪ After the engine is installed in the machine, rotating parts must be pro-tected against contact. HATZ safety equipment is available for the belt drive of the cooling fan andalternator.
▪ Comply with all notices and warning labels on the engine and keep themin a legible condition. If a label should become detached or difficult toread, it must be replaced promptly. For this purpose, contact your nearestHATZ service station.
▪ Any improper modification of the engine will result in a loss of liability cov-erage for resulting damage.
Only regular maintenance, as specified in this manual, will maintain the op-erating readiness of the engine.The assembly instructions contain important information on how to safelyassemble the engine. They are available from any Hatz service station.If you have any questions, please contact your nearest HATZ service sta-tion before commissioning the engine.
6.3 Preparations for commissioning▪ Check the delivered parts for completeness, damage, and other noticeable
issues.▪ Ensure that the setup location is adequately ventilated.
DANGER
Danger to life from inhaling exhaust gases.Toxic engine exhaust gases can lead to loss of consciousnessand even death in closed-off and poorly ventilated rooms.▪ Never operate the machine in closed-off or poorly ventilated
rooms.▪ Do not breathe in the exhaust gases.

3H50, 4H50 Transport, assembly and commissioning
HATZ 51Manual
6.4 Filling engine oil (first filling)Engines are normally delivered without an engine oil filling.
Safety note
CAUTIONDanger of later engine damage.▪ Operating the engine with an oil level below the min. mark
or above the max. mark can lead to engine damage.▪ When checking the oil level, the engine must be horizontal
and have been switched off for a few minutes.
Overview
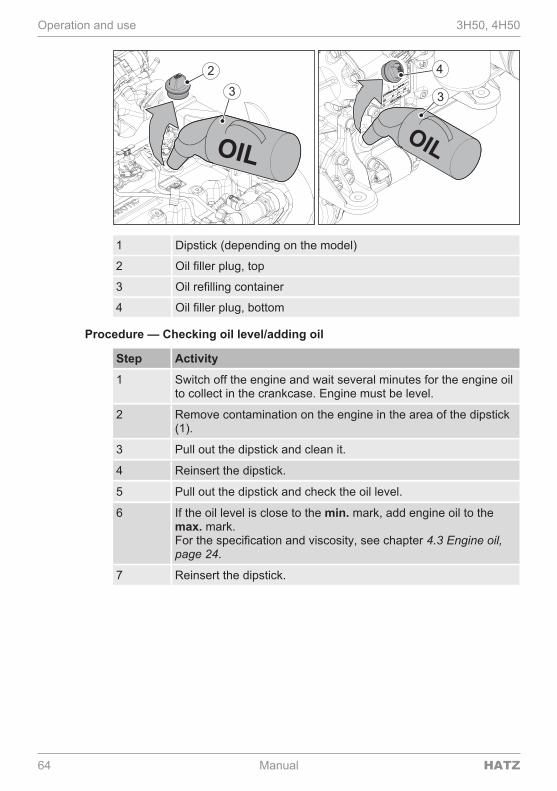
1 Dipstick (depending on the model)
2 Oil filler plug, top
3 Oil refilling container
4 Oil filler plug, bottom

Transport, assembly and commissioning 3H50, 4H50
52 HATZManual
Procedure
Step Activity
1 Pull out the dipstick (1) and clean it.
2 Depending on accessibility, unscrew oil filler plug (2) or (4).
3 Fill with engine oil.For the specification and viscosity, see section 4.3 Engine oil,page 24.For the filling quantity, see section 4.1 Engine information andfilling quantities, page 21.
4 Reinsert the dipstick.
5 Pull out the dipstick and check the oil level.
6 If required, top up the engine oil to the max. mark.
7 Reinsert the dipstick.
8 Screw in the oil filler plug.
6.5 Filling the cooling system
Safety notes
CAUTION
Danger of burns.There is a danger of burns when working on a hot cooling sys-tem. The cooling system is pressurized when the engine is hot.▪ Let the engine cool.▪ Wear safety gloves.
CAUTIONDanger of later engine damage.▪ Operating the engine with a coolant level below the MIN.
mark can lead to engine damage.▪ When checking the coolant level, the engine must be hori-
zontal and switched off.

3H50, 4H50 Transport, assembly and commissioning
HATZ 53Manual
Overview
External expansion tank
MAX
MIN
Integrated expansion tank
MAX
MIN
12
4
1 Expansion tank for coolant
2 Sealing cap
3 MAX - Maximum coolant level
4 MIN - Minimum coolant level
Procedure
Step Activity
1 Open the sealing cap (2).
HATZ radiator with integrated expansion tank
2 Top up the coolant to the edge (3) of the pipe section.For preparation of the coolant, see section 4.4 Coolant, page26.
HATZ radiator with external expansion tank
2 Top up the coolant to the MAX mark on the expansion tank. Forpreparation of the coolant, see section 4.4 Coolant, page 26.
3 Tighten the sealing cap (2) all the way by hand.
4 Start the engine (see chapter 7 Operation and use, page 58).
5 Warm up the engine until the coolant has reached a tempera-ture of approx. 85 °C. Above this temperature the coolant ispumped through the entire cooling system and forces out re-maining air bubbles.
6 Switch off the engine and let it cool down completely (see chap-ter 7 Operation and use, page 58).

Transport, assembly and commissioning 3H50, 4H50
54 HATZManual
Step Activity
7 Check the coolant level again. The coolant must be seen be-tween the MIN and MAX mark; for a warm engine the level canalso be slightly above the MAX mark.
8 Check the cooling system for leaks, retighten the hose clips ifnecessary (see section 8.2.5 Checking the cooling system, page76).
6.6 Starting the engine for the first time or after a fuel filter replacement
Safety notes
DANGER
Danger to life from inhaling exhaust gases.Toxic engine exhaust gases can lead to loss of consciousnessand even death in closed-off and poorly ventilated rooms.▪ Never operate the machine in closed-off or poorly ventilated
rooms.▪ Do not breathe in the exhaust gases.
CAUTION
Health hazard due to inhalation of flue gas.To protect exposed metal parts against corrosion, the parts con-cerned are coated with a protective wax. When the engine isstarted for the first time, this protective wax evaporates on hotcomponents. This can lead to the generation of smoke for a briefperiod.▪ Do not inhale flue gas.▪ Ensure sufficient ventilation.
CAUTIONDanger of engine damage from the use of starting fluid.▪ Engine damage from the use of starting fluid can lead to un-
controlled ignition.▪ Engine damage from uncontrolled ignition.▪ Never use starting fluid.

3H50, 4H50 Transport, assembly and commissioning
HATZ 55Manual
NOTICESee also starting instructions in the documentation for the com-plete machine.
Before startingBefore starting the engine, several tests need to be performed to ensure themachine is working properly.
Step Test
1 The machine is standing securely and on a level surface.
2 The installation location is adequately ventilated.
3 There is a sufficient amount of fuel in the fuel tank (see the chap-ter 7.6 Refueling, page 65).
4 There is a sufficient amount of engine oil in the engine housing(see the chapter 7.5 Check the oil level, page 63).
5 There is a sufficient amount of coolant in the expansion tank(see the chapter 8.2.5 Checking the cooling system, page 76).
6 Radiator and radiator hoses are free from leaks (see the chapter8.2.5 Checking the cooling system, page 76).
7 No persons are located in the danger zone of the engine or ma-chine.
8 All safety equipment is in place.
Overview — HATZ instrument boxes
II
I
0
1 Starting key
2 Pre-glow indicator

Transport, assembly and commissioning 3H50, 4H50
56 HATZManual
3 Operating indicator
4 Charge control
5 Oil pressure indicator
Ignition lock
0 Off
I Operation
II Start
NOTICEFor further details on the instrument box, see section 5.2 HATZinstrument box, page 42.
Procedure
NOTICE
i▪ Start for max. 20 seconds. If the engine is still not running
after that, turn the starting key back to position "0" and elimi-nate the cause (see section 9.1 Troubleshooting, page 111).
▪ Turn the starting key to position "0" every time you want tostart the engine. The starter protection module prevents thestarter from engaging while the engine is running and be-coming damaged.
Step Activity
Venting the fuel system
1 Insert the starting key all the way and turn to position "I".Depending on the model, the following indicators light up:▪ Pre-glow indicator (2)▪ Charge control (4)▪ Oil pressure indicator (5)
2 Leave the starting key at position "I" until you hear the electricalfuel feed pump switch off (approx. 30 seconds).
3 Turn the starting key back to position "0".Note:Carry out steps 2 and 3 several times to press the air out of thefuel system.

3H50, 4H50 Transport, assembly and commissioning
HATZ 57Manual
Step Activity
Starting the engine
4 Turn the starting key to position "I" again.
5 If the pre-glow indicator goes out, turn the starting key to posi-tion "II".
6 As soon as the engine is running, release the starting key.▪ The starting key springs back to position "I" and remains in
this position during operation.▪ The charge control (4) and oil pressure indicator (5) go out.▪ The operating indicator (3) lights up and signals that there is
no engine fault.
NOTICE
i▪ In case of irregularities, switch off the engine immediately.▪ Identify the fault and eliminate it.▪ For details of troubleshooting, see chapter 9.1 Trou-
bleshooting, page 111.

Operation and use 3H50, 4H50
58 HATZManual
7 Operation and use7.1 Safety notes
NOTICEComply with the safety chapter!Follow the basic safety instructions in chapter 3 Safety, page 7.
WARNING
Danger of injury from damage and defects on the machine.▪ Do not take the machine into service if damage has been lo-
calized and identified.▪ Replace faulty components.
WARNING
Danger of injury from failure to follow the operating instruc-tions and from performing unauthorized tasks on the ma-chine.▪ Define the responsibilities of the personnel taking the ma-
chine into service.▪ Replace faulty machine parts immediately.▪ Check the installation conditions when the machine is first
taken into service and after the machine has been inactivefor a lengthy period.
CAUTIONDanger of engine damage from low load operation.Operating the engine at no load or at very low load for an ex-tended period can impair the running characteristics of the en-gine.▪ Make sure that the engine load is at least 15 %.▪ Before switching off the engine following low load operation,
briefly operate it at a considerably higher load.
7.2 Performing tests
Before startingBefore starting the engine, several tests need to be performed to ensure themachine is working properly.

3H50, 4H50 Operation and use
HATZ 59Manual
Procedure
Step Test
1 The machine is standing securely and on a level surface.
2 The installation location is adequately ventilated.
3 There is a sufficient amount of fuel in the fuel tank (see the chap-ter 7.6 Refueling, page 65).
4 There is a sufficient amount of engine oil in the engine housing(see the chapter 7.5 Check the oil level, page 63).
5 There is a sufficient amount of coolant in the expansion tank(see the chapter 8.2.5 Checking the cooling system, page 76).
6 Radiator and radiator hoses are free from leaks (see the chapter8.2.5 Checking the cooling system, page 76).
7 No persons are located in the danger zone of the engine or ma-chine.
8 All safety equipment is in place.
7.3 Starting the engine
Safety notes
DANGER
Danger to life from inhaling exhaust gases.Toxic engine exhaust gases can lead to loss of consciousnessand even death in closed-off and poorly ventilated rooms.▪ Never operate the machine in closed-off or poorly ventilated
rooms.▪ Do not breathe in the exhaust gases.
CAUTIONDanger of engine damage from the use of starting fluid.▪ Engine damage from the use of starting fluid can lead to un-
controlled ignition.▪ Engine damage from uncontrolled ignition.▪ Never use starting fluid.
NOTICESee also starting instructions in the documentation for the com-plete machine.

Operation and use 3H50, 4H50
60 HATZManual
Overview — HATZ instrument boxes
II
I
0
1 Starting key
2 Pre-glow indicator
3 Operating indicator
4 Charge control
5 Oil pressure indicator
6 Engine temperature indicator
Ignition lock
0 Off
I Operation
II Start
NOTICEFor further details on the instrument box, see section 5.2 HATZinstrument box, page 42.
Procedure
NOTICE
i▪ Start for max. 20 seconds. If the engine is still not running
after that, turn the starting key back to position "0" and elimi-nate the cause (see section 9.1 Troubleshooting, page 111).
▪ Turn the starting key to position "0" every time you want tostart the engine. The starter protection module prevents thestarter from engaging while the engine is running and be-coming damaged.

3H50, 4H50 Operation and use
HATZ 61Manual
Step Activity
1 Insert the starting key all the way and turn to position "I".Depending on the model, the following indicators light up:▪ Pre-glow indicator (2)▪ Charge control (4)▪ Oil pressure indicator (5)
NOTE: If the optional engine temperature indicator (6) lights up,the coolant temperature is inadmissibly high. Do not start theengine; eliminate the cause.When the pre-glow indicator goes out, continue with step 2.
2 Turn the starting key to position "II".
3 As soon as the engine is running, release the starting key.▪ The starting key springs back to position "I" and remains in
this position during operation.▪ The charge control (4) and oil pressure indicator (5) go out.▪ The operating indicator (3) lights up and signals there is no
engine fault.
NOTICE
i▪ In case of irregularities, switch off the engine immediately.▪ Identify the fault and eliminate it.▪ For details of troubleshooting, see chapter 9.1 Trou-
bleshooting, page 111.
7.4 Switching off the engine
Safety notes
CAUTION
Danger of injury from unauthorized access.There is a danger of injury if unauthorized persons handle themachine.▪ Protect the starting key against unauthorized access during
breaks in operation or after completing work.

Operation and use 3H50, 4H50
62 HATZManual
CAUTIONDanger of engine damage from overheating.The switching off of the engine after high engine load or at highcooling liquid temperature (engine temperature indicator lightsup) can lead to engine damage due to heat accumulation.▪ Allow the engine to cool down for approx. 5 min at reduced
speed and load.
NOTICE
iDanger of exhaustive battery discharge.▪ When the machine is switched off, always turn the starting
key to position "0" or else the battery may become fully dis-charged.
NOTICESee also instructions in the documentation for the complete ma-chine.
Overview — HATZ instrument boxes
I
0
1 Starting key
Ignition lock
0 Off
I Operation

3H50, 4H50 Operation and use
HATZ 63Manual
Procedure
Step Activity
1 Turn the starting key (1) to position "0".The engine switches off.All indicator lamps go out after approx. 10 seconds.
2 Remove the starting key.
7.5 Check the oil level
Safety notes
CAUTION
Danger of burns.There is a danger of burns when working on a hot engine.▪ Wear safety gloves.
CAUTIONDanger of later engine damage.▪ Operating the engine with an oil level below the min. mark
or above the max. mark can lead to engine damage.▪ When checking the oil level, the engine must be horizontal
and have been switched off for a few minutes.
Overview
Operation and use 3H50, 4H50
64 HATZManual
1 Dipstick (depending on the model)
2 Oil filler plug, top
3 Oil refilling container
4 Oil filler plug, bottom
Procedure — Checking oil level/adding oil
Step Activity
1 Switch off the engine and wait several minutes for the engine oilto collect in the crankcase. Engine must be level.
2 Remove contamination on the engine in the area of the dipstick(1).
3 Pull out the dipstick and clean it.
4 Reinsert the dipstick.
5 Pull out the dipstick and check the oil level.
6 If the oil level is close to the min. mark, add engine oil to themax. mark.For the specification and viscosity, see chapter 4.3 Engine oil,page 24.
7 Reinsert the dipstick.

3H50, 4H50 Operation and use
HATZ 65Manual
7.6 RefuelingThis diesel engine is intended for installation in a machine or for assemblywith other machines to form a machine and does not have its own fuel tank.Follow the instructions from the manufacturer and comply with the followingsafety information.
Safety notes
DANGER
Fire hazard from fuel.Leaked or spilled fuel can ignite on hot engine parts and causeserious burn injuries.▪ Only refuel when the engine is switched off.▪ Never refuel in the vicinity of open flames or sparks that can
cause ignition.▪ Do not smoke.▪ Do not spill fuel.
CAUTION
Danger of environmental damage from spilled fuel.Do not overfill the fuel tank and do not spill fuel.▪ Collect any leaking fuel and dispose of it according to local
environmental regulations.
CAUTIONEngine damage from using low quality fuel.The use of fuel that does not meet the specifications can lead toengine damage.▪ Only use the fuel specified in chapter 4.5 Fuel, page 30.▪ The use of fuel that does not meet specifications requires
approval by Motorenfabrik HATZ (main plant).
NOTICE
iNever run the tank empty if possible, as otherwise air can enterthe fuel system. This can lead to damage to the injection sys-tem. If the tank runs dry nevertheless, the fuel system must bedrained prior to the next start (see section 6.6 Starting the en-gine for the first time or after a fuel filter replacement, page 54).

Maintenance 3H50, 4H50
66 HATZManual
8 Maintenance8.1 General maintenance instructions
Safety notes
WARNING
Danger of injury from failure to follow the operating instruc-tions and from performing unauthorized tasks on the ma-chine.▪ Follow all instructions.▪ Do not perform activities for which no qualification is avail-
able. Contact properly trained personnel if necessary.
NOTICEComply with the safety chapter!Follow the basic safety instructions in chapter 3 Safety, page 7.
▪ Maintenance tasks may only be performed by trained personnel.▪ Accident prevention measures must be in accordance with the local acci-
dent prevention regulations.▪ Perform setting and maintenance work at the specified intervals.▪ Replace faulty machine parts as soon as possible.▪ Always wear personal protection equipment.▪ Only use fully functional tools.▪ Installation of unsuitable spare parts can lead to problems. We cannot ac-
cept responsibility for direct damage or secondary damage that resultsfrom this.We therefore recommend the use of Hatz original spare parts.
▪ Closely adhere to the maintenance conditions prescribed in this manual.▪ Only make changes to the machine in agreement with the manufacturer.▪ Only perform maintenance work when the engine is stopped.▪ Protect the starting key from unauthorized access.▪ Disconnect the negative battery terminal before carrying out maintenance
work.▪ Adhere to legal regulations when handling and disposing of used oil, fil-
ters, coolants, and cleaning agents.▪ After completing maintenance work, check that all tools, bolts, aids, and
other objects are removed from the machine, and that all safety equipmenthas been replaced.

3H50, 4H50 Maintenance
HATZ 67Manual
▪ Before starting, ensure that no persons are located in the danger zone ofthe engine or machine.
Performance of maintenance workThe entire machine is designed to be maintenance friendly. Parts that re-quire maintenance are easily accessible.▪ Perform maintenance work faithfully at the specified intervals to prevent
premature wear of the machine.▪ Follow the notice and warning labels on the machine.▪ Always retighten screw connections loosened during maintenance work.▪ After the necessary maintenance and repair work is completed, perform a
function test (test run).▪ For maintenance work that is not listed and described in the maintenance
documentation, please contact your nearest HATZ service station.
8.2 Maintenance work
Safety note
CAUTION
Danger of injury if maintenance instructions are not fol-lowed.▪ Only perform maintenance when the engine is switched off.▪ Protect the starting key against unauthorized access.▪ Disconnect the negative terminal of the battery.▪ After the maintenance work is completed, ensure that all
tools have been removed from the machine.
8.2.1 Maintenance planIn new and generally overhauled engines, after 50 operating hours:▪ Change the engine oil and oil filter. See chapter 8.2.6 Changing the en-
gine oil and oil filter, page 79.▪ Check the screw connections (do not retighten the screws for attaching
the cylinder head). See section 8.2.12 Checking the screw connections,page 98.

Maintenance 3H50, 4H50
68 HATZManual
Symbol Maintenance in-terval
Maintenance activity/check Section
Every 8–15 oper-ating hours or ev-ery day beforestarting
Check the oil level. 7.5 Check the oillevel, page 63
Check the intake area of thecombustion air.
8.2.3 Checkingthe intake area ofthe combustionair, page 73
Check the radiator fins for dirtaccumulation.
8.2.4 Checkingthe radiator finsfor dirt accumula-tion, page 75
Check the cooling system 8.2.5 Checkingthe cooling sys-tem, page 76
500h
Every 500 operat-ing hours or every2 years
Change the engine oil and oilfilter1)
8.2.6 Changingthe engine oil andoil filter, page 79
Change the fuel prefilter1) 8.2.14 Changingthe fuel prefilter,
page 100
Replace the main fuel filter1) 8.2.15 Changingthe main fuel fil-
ter, page 102
Check the poly v belt1) 8.2.8 Checkingthe poly v belt,
page 88
Change the oil separator of thecrankcase ventilation1)
8.2.11 Changingthe oil separatorof the crankcaseventilation, page
97
Check the screw connections1) 8.2.12 Checkingthe screw con-nections, page98
Clean the engine1) 8.2.7 Enginecleaning, page
85
Every 500 operat-ing hours or whenindicated, at leastevery 2 years
Change the air filter cartridge 8.2.16 Servicingthe air filter (op-tional), page 105

3H50, 4H50 Maintenance
HATZ 69Manual
Symbol Maintenance in-terval
Maintenance activity/check Section
When indicated,at least every 2years
Drain the water separator1) 8.2.13 Drainingthe water separa-tor, page 99
Every 4 years Change the coolant 8.2.17 Changingcoolant, page 107
If necessary, butevery 3,000 oper-ating hours at thelatest
Replace the poly v belts 8.2.10 Replacingthe poly v belts,page 93
Every 4,000 oper-ating hours
Clean the entire exhaust gasrecirculation section (EGR pre-cooler, EGR valve, EGR maincooler as well as EGR mixingnozzle)(to be carried out by a trainedspecialist)
1) Maintenance according to maintenance interval or after 2 years dependingon which criteria is first.
8.2.2 Additional work on the Silent Pack
Safety notes
WARNING
Danger of injury from rotating parts.Touching the fans or poly v belts can lead to serious injury whenthe engine is running.▪ Only operate the engine when all covers are installed.
CAUTION
Danger of burns.There is a danger of burns when working on a hot engine.▪ Let the engine cool.▪ Wear safety gloves.

Maintenance 3H50, 4H50
70 HATZManual
CAUTIONDanger of engine damage due to foreign bodies.If the air intake hose is disconnected from the air filter, there is adanger that foreign bodies can enter the air intake hose. Theseare sucked in during operation and can lead to engine damageas a consequence.▪ Make sure that no dirt or other foreign bodies enter the air
intake hose.
Overview

3H50, 4H50 Maintenance
HATZ 71Manual
A Air intake hose
B Top part of the capsule
C Control side maintenance lid
D Top maintenance cover
E Side panel on exhaust gas side
F Access cover to the drain plug on the radiator
1 Fixing screws for retaining plate
2 Hose clamp
3 Air filter
4 Fastening screws for capsule fixing screws for the top part of thecapsule (18 pieces)
5 Clamp-type fasteners for control side maintenance cover
6 Clamp-type fasteners for top maintenance lid
7 Fixing screws for side panel (12 pieces)
8 Fixing screws for access lid (6 pieces)

Maintenance 3H50, 4H50
72 HATZManual
Access to the service pointsWith the Silent Pack, the engine is surrounded by a noise and weather pro-tection capsule. In order to access the respective service points, the compo-nents listed in the following must be disassembled beforehand:
Maintenance step Component disassem-bly
Check the oil level C
Check the intake area of the combustion air D
Check the cooling system A, B, C, E
Change the engine oil and oil filter C
Change the main fuel filter C
Check or replace the poly v belts A, B, E
Change the oil separator of the crankcase ventilation A, B
Checking the screw connections A, B, C, E
Cleaning the engine A, B, C, E
Change coolant D, F
Procedure
Step Activity
Remove the air intake hose (A) from the air filter
1 Unscrew the fixing screws (1).
2 Undo the hose clamp (2) and remove the air intake hose (A)from the air filter (3).
Remove the top part of the capsule (B)
1 Remove the air intake hose (A) from the air filter
2 Unscrew the fixing screws (4).
3 Remove the top part of the capsule (B)
Remove the control side maintenance cover (C)
1 Remove the maintenance cover after releasing the clamp-typefasteners (5).
Remove the top maintenance cover (D)
1 Remove the maintenance cover after releasing the clamp-typefasteners (6).

3H50, 4H50 Maintenance
HATZ 73Manual
Step Activity
Remove the side panel on the exhaust gas side (E)
1 Remove the top part of the capsule (B)
2 Unscrew the fixing screws (7).
3 Remove the side panel (E)
Remove the access cover (F) to the drain plug on the radiator
1 Unscrew the fixing screws (8).
2 Remove the access cover (F).
Assembly
1 Mount all parts again after the maintenance steps have beencompleted.Do not forget:If the air intake hose (A) has been disconnected from the air fil-ter, tighten the hose clamp (2) again!
8.2.3 Checking the intake area of the combustion air
Safety notes
CAUTION
Danger of burns.There is a danger of burns when working on a hot engine.▪ Let the engine cool.▪ Wear safety gloves.
NOTICE
iIn case of heavy contamination, shorten the maintenance inter-vals accordingly (see chapter 8.2.1 Maintenance plan, page 67).

Maintenance 3H50, 4H50
74 HATZManual
Overview (HATZ air filter)
3 4
1 Intake opening for combustion air
2 Dust discharge valve
3 Rubber lips OK
4 Rubber lips deformed
Procedure
Step Activity
1 Check the intake opening (1) for coarse contamination such asleaves, heavy dust deposits, etc., and clean if necessary.
2 Check that the dust discharge valve (2) is clear. Remove dustseals by pressing them together.
3H50, 4H50 Maintenance
HATZ 75Manual
Step Activity
3 Make sure that the rubber lips (3) run parallel to each other.The gap between the rubber lips must be a maximum of 2 mm.Deformed rubber lips (4) impair the function of the precleaner,thus shortening the maintenance interval of the air filter. Re-place the dust discharge valve if required.
8.2.4 Checking the radiator fins for dirt accumulation
Safety notes
CAUTION
Danger of burns.There is a danger of burns when working on a hot engine.▪ Let the engine cool.▪ Wear safety gloves.
CAUTION
Danger of injury.When working with compressed air, foreign bodies may fly intoyour eyes.▪ Wear safety goggles.▪ Never direct the compressed air jet toward people or toward
yourself.
CAUTIONDanger of engine damage from overheating.The engine temperature indicator lights up as soon as the en-gine becomes inadmissibly hot.▪ Switch off the engine and eliminate the cause.
NOTICE
iIn case of heavy contamination, shorten the maintenance inter-vals accordingly (see chapter 8.2.1 Maintenance plan, page 67).

Maintenance 3H50, 4H50
76 HATZManual
Overview
1 Radiator fins
Procedure
Step Activity
1 Check the radiator fins (1) for coarse contamination such asleaves, heavy dust deposits, etc., and clean if necessary (seethe chapter 8.2.7 Engine cleaning, page 85).
8.2.5 Checking the cooling system
Safety notes
CAUTION
Danger of scalding and risk of environmental damage dueto hot coolant.▪ Excessive coolant is blown off from the sealing cap on the
expansion tank. After topping up the cooling system nevermove parts of your body or face close to the sealing cap.
▪ Never top up coolant above the MAX - mark on the expan-sion tank.
▪ Never stop escaping coolant with your bare hands.
CAUTION
Danger of burns.There is a danger of burns when working on a hot engine.▪ Let the engine cool before maintenance.

3H50, 4H50 Maintenance
HATZ 77Manual
CAUTION
Danger of burns.There is a danger of burns when working on a hot cooling sys-tem. The cooling system is pressurized when the engine is hot.▪ Let the engine cool.▪ Wear safety gloves.
CAUTIONDanger of later engine damage.▪ Operating the engine with a coolant level below the MIN.
mark can lead to engine damage.▪ When checking the coolant level, the engine must be hori-
zontal and switched off.
Overview
External expansion tank
MAX
MIN
Integrated expansion tank
MAX
MIN
12
4
1 Expansion tank for coolant
2 Sealing cap
3 MAX - Maximum coolant level
4 MIN - Minimum coolant level
Procedure for checking the coolant level
Step Activity
1 The coolant must be between the MIN and MAX marks on aswitched-off and cooled-down engine. For a warm engine, thelevel can also be slightly above the MAX mark.

Maintenance 3H50, 4H50
78 HATZManual
Procedure for topping up coolant
Step Activity
1 Carefully open the sealing cap (2).
2 Top up prepared coolant to the MAX mark on the expansiontank. For the preparation of the coolant, see section 4.4 Coolant,page 26.
3 Tighten the sealing cap (2) all the way by hand.
Checking the cooling system for leaksCoolants losses are mostly caused by leaks in the cooling system.On a non-leaking cooling system, losses only occur when the coolant boilsand this then causes coolant to be pressed out of the cooling system at thesealing cap on the expansion tank. The cause of this can be contaminationin the area of the radiator fins (see the chapter 8.2.4 Checking the radiatorfins for dirt accumulation, page 75).
Overview
1 Hose clip
Procedure
Step Activity
1 Check the cooling system for leaks and rectify the cause imme-diately - in case of doubt consult HATZ Service for advice.
2 When hose connections are loose, retighten the hose clips (1).
3H50, 4H50 Maintenance
HATZ 79Manual
8.2.6 Changing the engine oil and oil filterThis chapter contains the following sections:▪ Changing the oil filter▪ Draining the engine oil▪ Filling the engine oil▪ Concluding the inspection work
Safety notes
CAUTION
Danger of burns.When working on the engine there is a danger of burns from hotoil.▪ Wear personal protective equipment (gloves).
CAUTION
Danger of environmental damage from spilled used oil.Used oil is water-polluting.▪ Do no allow it to enter the ground water, water bodies, or
sewage system.▪ Collect the used oil and dispose of it according to local envi-
ronmental regulations.
CAUTION
Danger of injuryProlonged contact with engine oil can lead to irritation of theskin.▪ Wear safety gloves.▪ If there is contact with the skin, thoroughly wash the af-
fected areas of the skin with soap and water.
CAUTIONDanger of later engine damage.▪ Operating the engine with an oil level below the min. mark
or above the max. mark can lead to engine damage.▪ When checking the oil level, the engine must be horizontal
and have been switched off for a few minutes.

Maintenance 3H50, 4H50
80 HATZManual
NOTICE
i▪ The engine must be level.▪ The engine must be switched off.▪ Only drain engine oil while it is warm.
Changing the oil filter
Overview – Horizontal attachment
1 Oil filter
2 Sealing surface
3 Gasket
Procedure
Step Activity
1 Keep a container ready for collecting the used oil.
2 Loosen the oil filter (1) with a strap wrench or similar and un-screw it.
3 Dispose of the old filter in accordance with local environmentalregulations.
4 Thoroughly clean the sealing surface (2).
5 Lightly oil the sealing lip (3) of the new oil filter.
6 Screw in the oil filter and tighten it by hand.

3H50, 4H50 Maintenance
HATZ 81Manual
Overview – Vertical attachment
1 Oil filter
2 Collar on the oil filter
3 Shaped element
4 Sealing surface
5 Gasket
6 Guard ring
Procedure
Step Activity
1 Loosen the oil filter (1) with a strap wrench or similar and un-screw it until the collar (2) of the oil filter is at the same level asthe shaped element (3).In this position, a valve releases the oil return into the crankcasewhich allows the oil filter to empty.
2 Fully unscrew the oil filter after a waiting period of approx. 30seconds.

Maintenance 3H50, 4H50
82 HATZManual
Step Activity
3 Dispose of the old filter in accordance with local environmentalregulations.
4 Thoroughly clean the shaped element (3) and sealing surface(4).
5 Lightly oil the sealing lip (5) of the new oil filter.
6 Screw in the oil filter and tighten it by hand.
7 Make sure that the guard ring (6) seats fully on the shaped ele-ment (3). The guard ring prevents dirt from accumulating be-tween the oil filter and shaped element.
Draining the engine oil
Overview – Model with oil drain screw
1 Oil drain screw (side)
2 Oil drain screw (front)
3 Gasket
Procedure
Step Activity
1 Keep a container ready for collecting the used oil. The containermust be large enough to hold the entire amount of engine oil.For the engine oil filling quantity, see section 4.1 Engine infor-mation and filling quantities, page 21.
2 Depending on accessibility, the engine oil can be drained at oildrain screw (1) or (2). Unscrew the oil drain screw and drain the used oil entirely.
3 Screw in the cleaned oil drain screw with the new gasket (3) andtighten. Tightening torque: 50 Nm.

3H50, 4H50 Maintenance
HATZ 83Manual
Overview – Model with oil drain valve
1 Screw plug for oil drain valve
2 Oil drain hose
Procedure
Step Activity
1 Keep a container ready for collecting the used oil. The containermust be large enough to hold the entire amount of engine oil.For the engine oil filling quantity, see section 4.1 Engine infor-mation and filling quantities, page 21.
2 Remove the screw plug (1).
3 Place the oil drain hose (2) on the drain valve and tighten byhand.▪ During tightening, the drain valve opens allowing the used oil
to drain.
4 Remove the drain hose and reattach the sealing screw.

Maintenance 3H50, 4H50
84 HATZManual
Filling the engine oil
Overview
1 Dipstick (depending on the model)
2 Oil filler plug, top
3 Oil refilling container
4 Oil filler plug, bottom
Procedure
Step Activity
1 Pull out the dipstick (1) and clean it.
2 Depending on accessibility, unscrew oil filler plug (2) or (4).
3 Fill with engine oil.For the specification and viscosity, see section 4.3 Engine oil,page 24.For the filling quantity, see section 4.1 Engine information andfilling quantities, page 21.

3H50, 4H50 Maintenance
HATZ 85Manual
Step Activity
4 Reinsert the dipstick.
5 Pull out the dipstick and check the oil level.
6 If required, top up the engine oil to the max. mark.
7 Reinsert the dipstick.
8 Screw in the oil filler plug.
Concluding the inspection work
Step Activity
1 Check the oil level after a short test run and correct if necessary.
2 Check the oil filter for tightness and retighten by hand if neces-sary.
8.2.7 Engine cleaning
Safety notes
DANGER
Danger of explosion from flammable cleaning agents.Cleaning with benzene is an explosion hazard. It is highlyflammable, can become electrostatically charged, and can gen-erate an explosive gas/air mixture.▪ Use halogen-free, cold cleaners with a high flashpoint for
cleaning.▪ Comply with manufacturer's instructions.
CAUTION
Danger of environmental pollution due to oil and cleaningagents.Oil and cleaning agents are hazardous to the environment.▪ Do no allow them to enter the ground water, water bodies,
or sewage system.▪ Only clean the machine at the washing area intended for
this.

Maintenance 3H50, 4H50
86 HATZManual
CAUTION
Danger of burns.There is a danger of burns when working on a hot engine.▪ Let the engine cool.▪ Wear safety gloves.
CAUTION
Danger of injury.When working with compressed air, foreign bodies may fly intoyour eyes.▪ Wear safety goggles.▪ Never direct the compressed air jet toward people or toward
yourself.
CAUTIONDanger of damage to the machine from incorrect enginecleaning.▪ Let the engine fully cool down before cleaning.▪ Do not use gasoline or acid-based cleaning agents.▪ The components of the electrical equipment are protected
against rain and spray water. Cleaning with a water jet ispermitted. When cleaning with a high pressure cleaner, en-sure a minimum distance of 100 cm between the high pres-sure nozzle and engine parts. Otherwise, engine parts canbe damaged.
▪ Never aim the water jet into the intake opening for combus-tion air or into the exhaust air pipe.
CAUTIONDamage to the radiator fins due to improper cleaning.▪ Never clean the radiator fins with a tool such as a spatula or
screwdriver. A reduction in radiator performance throughbent radiator fins or radiator leaks may be the result.

3H50, 4H50 Maintenance
HATZ 87Manual
NOTICE
iIn case of heavy contamination, shorten the maintenance inter-vals accordingly (see chapter 8.2.1 Maintenance plan, page 67).
Overview
1
2
3
1 Radiator fins
2 Direction of flow of the cooling air with suction fan
3 Direction of flow of the cooling air with forced-draught fan
Procedure
Step Activity
Cleaning in case of dry dirt contamination
1 Depending on the degree of contamination, clean the engine ei-ther with compressed air or with a water jet. On the radiator, firstwork against the direction of flow of the cooling air and then inthe direction of flow.
Cleaning wet or oily dirt contamination
1 Spray the entire area with a suitable cold cleaner according tothe manufacturer's instructions and then clean off with a waterjet. On the radiator, first work against the direction of flow of thecooling air and then in the direction of flow.
2 Identify the cause of the oiling and seal the leak.
After the cleaning
1 Let the engine run warm until it has completely dried to preventrust formation.

Maintenance 3H50, 4H50
88 HATZManual
8.2.8 Checking the poly v belt
Safety notes
CAUTION
Danger of burns.There is a danger of burns when working on a hot engine.▪ Let the engine cool before maintenance.
Preparation
Step Activity
1 Unscrew the optional belt guard (1). Unscrew the fixing screws(2) for this.
Check the poly v belt for damage.
Overview

3H50, 4H50 Maintenance
HATZ 89Manual
1 Pulley
2 Poly v belt
Damage to the poly v belt3 Transverse cracks on the rear
4 Fraying on the edges
5 Transverse cracks in multiple ribs
6 Broken ribs
Procedure
Step Activity
1 Check the poly v belt (2) for the following damage:▪ Transverse cracks on the rear of the belt.▪ Fraying on the side.▪ Accumulation of dirt between the ribs.▪ Oily dirt contamination.▪ Transverse cracks in multiple ribs.▪ Broken ribs.If one or more of these instances of damage are present, re-place the poly v belt immediately (see section 8.2.10 Replacingthe poly v belts, page 93).
2 Mount the belt guard again.
8.2.9 Checking and setting the belt tension
Model without A/C compressorThe following description only applies to engines without A/C compressor.For the model with A/C compressor, a belt tensioner with spring preload al-ways ensures the correct belt tension. The checking and setting of the belttension is omitted here. For details, see section 8.2.10 Replacing the poly vbelts, page 93, subsection Belt run.
Safety note
CAUTION
Danger of burns.There is a danger of burns when working on a hot engine.▪ Let the engine cool before maintenance.

Maintenance 3H50, 4H50
90 HATZManual
NOTICE
i▪ The cause of running noises of the poly v belt is mostly that
the pretension on the belt is too low.▪ Too low a belt pretension causes early wear of the poly v
belt. Regularly check the belt tension, retension the poly vbelt if required.
Preparation
Step Activity
1 Unscrew the optional belt guard (1). Unscrew the fixing screws(2) for this.
2 Check the poly v belt for damage (see section 8.2.8 Checkingthe poly v belt, page 88). Do not retension damaged belts, butreplace them immediately (see section 8.2.10 Replacing thepoly v belts, page 93).

3H50, 4H50 Maintenance
HATZ 91Manual
Overview
4
6
512
3
4
1 Alternator
2 Upper fixing screw on the generator
3 Lower fixing screw on the generator
4 "Facom DM.16" belt tension meter
5 Display on the belt tension meter
6 Measuring point for belt tension
Setting values for the belt tensionThe pretensioning force or the vibration frequency of the belt is decisive foradjustment of the belt tension. For this, we recommend the use of the DM.16belt tension meter from Facom or a frequency meter. If neither of these me-ters are available, please contact your nearest HATZ Service.

Maintenance 3H50, 4H50
92 HATZManual
Belt tension
Display (5) on the "Fa-com" belt tension me-ter
Vibration frequency(frequency meter)
New belt 210 Hz (+ 10 Hz)
Belt after maintenanceinterval
150 Hz (+ 10 Hz)
Minimum tension 125 Hz
Procedure
Step Activity
Checking the belt tension
1 Check the belt tension at the measuring point (6) in accordancewith the manual of the measuring device manufacturer and com-pare with the setting values for the belt tension. Adjust the belttension if required.
Setting the belt tension
1 Undo fixing screws (2) and (3).
2 Turn the generator (1) in the direction of the arrow, hold and - atthe same time - tighten the fixing screws of the generator in thisposition.
3 Check the belt tension again.
4 If necessary, correct the belt tension.

3H50, 4H50 Maintenance
HATZ 93Manual
8.2.10 Replacing the poly v beltsThis section contains the following subsections:▪ Belt run▪ Preparatory activities▪ Engine without A/C compressor▪ Engine with A/C compressor
Safety note
CAUTION
Danger of burns.There is a danger of burns when working on a hot engine.▪ Let the engine cool before maintenance.
Belt run
Engine without A/C compressor Engine with A/C compressor
1 Alternator
2 Water pump
3 Crankshaft
4 Poly v belt
5 Belt tensioner
6 A/C compressor
7 Pulley

Maintenance 3H50, 4H50
94 HATZManual
Preparatory activities
Overview
1 Belt guard
2 Fixing screws for the belt guard
3 Protective guard (left half)
4 Connecting screws, protective guard halves (top and bottom)
5 Fixing screws, protective guard (top and bottom)
Procedure
Step Activity
1 Unscrew the optional belt guard (1). Unscrew the fixing screws(2) for this.
2 Remove the left half of the optional protective guard (3) by un-screwing the screws (4) and (5) (at the top and bottom).

3H50, 4H50 Maintenance
HATZ 95Manual
Engine without A/C compressor
Overview
1 Alternator
2 Upper fixing screw on the generator
3 Lower fixing screw on the generator
4 Poly v belt
5 Fan blade
Procedure
Step Activity
1 Undo fixing screws (2) and (3).
2 Turn the generator (1) in the direction of the arrow to the stop.
3 Remove the loose poly v belt (4) from the pulley.
4 Carefully lift the poly v belt over a fan blade. Turn the fan furtherin the counterclockwise direction and lift the belt over the re-maining fan blades until it is completely free.
5 Check the pulley for perfect condition. If the grooves are brokenoff or bent, renew the damaged pulley.
6 Feed a new poly v belt over the fan blade in the same way fromthe radiator side.
7 Lay the poly v belt over the pulleys wheels and tension (see8.2.9 Checking and setting the belt tension, page 89).
8 Mount the protective guard and belt protection again.

Maintenance 3H50, 4H50
96 HATZManual
Engine with A/C compressor
Safety note
CAUTION
Danger of injury.The belt tensioner is under spring preload. When tensioning andrelieving, there is a danger of injury due to crushing or jammingon preloaded parts.▪ Carry out the work on the belt with particular caution.
Overview
1 Belt tensioner
2 Poly v belt
3 Fan blade
Procedure
Step Activity
1 Insert a 3/8" square key into the groove in the belt tensioner (1).
2 Turn the belt tensioner in the direction of the arrow, thus reliev-ing the tension of the poly v belt (2).
3 Remove the loose poly v belt from the pulley.
4 Slowly relieve the tension of the belt tensioner.
5 Carefully lift the poly v belt over a fan blade. Turn the fan furtherin the counterclockwise direction and lift the belt over the re-maining fan blades until it is completely free.

3H50, 4H50 Maintenance
HATZ 97Manual
Step Activity
6 Check the pulley, belt tensioner and pulley for perfect condition.If the grooves are broken off or bent, renew the damaged pulley.
7 Feed a new poly v belt over the fan blade in the same way fromthe radiator side.
8 Place the poly v belts on all pulleys, except the belt tensioners.Monitor the belt run.
9 Turn the belt tensioner in the direction of the arrow and lay onthe poly v belt.
10 Slowly relieve the belt tensioner.
11 Check that the poly v belt is correctly placed on the pulley.
12 Reassemble the protective guard and belt protection again.
8.2.11 Changing the oil separator of the crankcase ventilation
Safety note
CAUTION
Danger of burns.There is a danger of burns when working on a hot engine.▪ Let the engine cool before maintenance.
Overview
4
1 Mounting bolts (captive)
2 Breather cap
3 Oil separator cartridge
4 Vent hose

Maintenance 3H50, 4H50
98 HATZManual
Procedure
Step Activity
1 Release the four mounting bolts (1) on the breather cap (2).
2 Carefully lift the breather cap. If necessary, release the venthose (4).
3 Remove the used oil separator cartridge dispose of it accordingto local environmental regulations.
4 Wipe out the breather housing with a clean cleaning cloth. Makesure that dirt is not brought into the breather housing.
5 Insert a new oil separator cartridge.
6 Put on the breather cap and tighten the four mounting bolts(max. 4 Nm). If necessary, reattach the vent hose.
8.2.12 Checking the screw connections
Safety note
NOTICE
i▪ Only retighten loose screw connections.
Screw connections can be secured with thread locking ad-hesive or tightened to a defined torque. Retightening tightscrew connections can cause damage.
▪ The adjustment screws on the injection system are securedwith locking varnish and are not permitted to be tightened oradjusted.
▪ Do not retighten the screws for attaching the cylinder head.
Procedure
Step Activity
1 Check the condition of all screw connections and ensure thatthey are tight (for exceptions, see note).
2 Tighten any lose screw connections.

3H50, 4H50 Maintenance
HATZ 99Manual
8.2.13 Draining the water separator
Safety note
CAUTION
Danger of environmental damage from spilled fuel.When water is drained from the water separator, a small amountof fuel is drained as well.▪ Collect any escaped water/fuel mixture and dispose of it ac-
cording to local environmental regulations.
The fuel prefilter has a water separator. An electronic water level sensor sig-nals when the maximum permissible water level is reached in the water sep-arator. A corresponding flashing code is displayed on the instrument box.
Overview
1
2
3
4
5
1 Bleed screw
2 Drain plug with integrated water level sensor
3 Water level sensor connector
4 Drain socket for extension hose
5 Hose clip (for a fuel tank positioned low)
Procedure
Step Activity
1 Place a suitable container under the drain socket (4) of the drainplug (2).NOTE: In inaccessible locations, an extension hose can be con-nected to the drain socket on the drain plug.
2 Open the drain screw (2) and drain the water into the container.

Maintenance 3H50, 4H50
100 HATZManual
Step Activity
3 If not enough liquid escapes, undo the additional bleed screw(1).NOTE: If the fuel tank lies lower than the fuel prefilter, the fuelfeed line must be clamped off with a hose clip (5). Otherwisefuel will run back into the fuel tank after the drain plug has beenunscrewed.
4 As soon as fuel escapes, close the drain plug (2) and bleedscrew (1).NOTE: First water escapes then fuel. This can be seen by aclear separating line.
5 Release the fuel feed line if necessary.Dispose of the water/fuelmixture in accordance with the local environmental regulations.
8.2.14 Changing the fuel prefilter
Safety notes
DANGER
Fire hazard from fuelLeaked or spilled fuel can ignite on hot engine parts and causeserious burn injuries.▪ Do not spill fuel.▪ No open flames when working on the fuel system.▪ Do not smoke.
CAUTION
Danger of burns.There is a danger of burns when working on a hot engine.▪ Let the engine cool before maintenance.
CAUTION
Danger of injuryRepeated contact with diesel fuel can cause chapped andcracked skin.▪ Wear safety gloves.
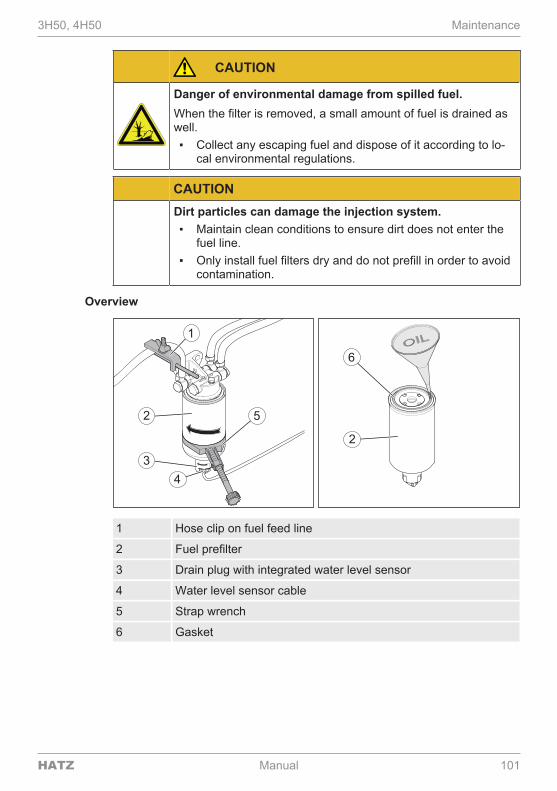
3H50, 4H50 Maintenance
HATZ 101Manual
CAUTION
Danger of environmental damage from spilled fuel.When the filter is removed, a small amount of fuel is drained aswell.▪ Collect any escaping fuel and dispose of it according to lo-
cal environmental regulations.
CAUTIONDirt particles can damage the injection system.▪ Maintain clean conditions to ensure dirt does not enter the
fuel line.▪ Only install fuel filters dry and do not prefill in order to avoid
contamination.
Overview
1 Hose clip on fuel feed line
2 Fuel prefilter
3 Drain plug with integrated water level sensor
4 Water level sensor cable
5 Strap wrench
6 Gasket
Maintenance 3H50, 4H50
102 HATZManual
Procedure
Step Activity
1 Lock the fuel supply line on the fuel prefilter.
2 Place a suitable container under the filter to collect emergingfuel.
3 Disconnect the water level sensor cable (4) from the drain plug(3).
4 Release the drain screw (3) and drain the fuel.
5 Unscrew the fuel prefilter. Completely unscrew the drain plugwith integrated water level sensor
6 Dispose of the used fuel prefilter according to local environmen-tal regulations.
7 Clean the drain plug with integrated water level sensor andlightly oil the sealing surfaces. Screw the drain plug into the newfuel prefilter.
8 Lightly oil the gasket (6) of the new fuel prefilter, fit the dry filterand tighten it by hand.
9 Release the fuel feed line and connect the cable of the waterlevel sensor.
10 Start the engine and perform a test run.NOTE: When starting the engine, adhere to the procedure in"6.6 Starting the engine for the first time or after a fuel filter re-placement, page 54".
11 After the test run, check the fuel prefilter and drain plug forleaks, tighten by hand if necessary.
8.2.15 Changing the main fuel filter
Safety notes
DANGER
Fire hazard from fuelLeaked or spilled fuel can ignite on hot engine parts and causeserious burn injuries.▪ Do not spill fuel.▪ No open flames when working on the fuel system.▪ Do not smoke.

3H50, 4H50 Maintenance
HATZ 103Manual
WARNING
Danger of injury due to fuel splashes.Fuel can exit under pressure when the main fuel filter is re-moved.▪ Carefully remove the main fuel filter.▪ Wear safety goggles.
CAUTION
Danger of burns.There is a danger of burns when working on a hot engine.▪ Let the engine cool before maintenance.
CAUTION
Danger of injuryRepeated contact with diesel fuel can cause chapped andcracked skin.▪ Wear safety gloves.
CAUTION
Danger of environmental damage from spilled fuel.When the filter is removed, a small amount of fuel is drained aswell.▪ Collect any escaping fuel and dispose of it according to lo-
cal environmental regulations.
CAUTIONDirt particles can damage the injection system.▪ Maintain clean conditions to ensure dirt does not enter the
fuel line.▪ Only install fuel filters dry and do not prefill in order to avoid
contamination.

Maintenance 3H50, 4H50
104 HATZManual
Overview
12
3
3
4
5
1 Fuel feed line
2 Hose clip
3 Main fuel filter
4 Strap wrench
5 Gasket
Procedure
Step Activity
1 Block the fuel feed line (1) using the hose clip (2).
2 Place a suitable container under the filter to collect emergingfuel.
3 Unscrew the main fuel filter (3) and dispose of it according to lo-cal environmental regulations.
4 Lightly oil the gasket (5) of the new main fuel filter.
5 Fit the filter and tighten it by hand.
6 Release the fuel feed line.
7 Start the engine and perform a test run.NOTE: When starting the engine, adhere to the procedure in"6.6 Starting the engine for the first time or after a fuel filter re-placement, page 54".
8 After the test run, check the main fuel filter for leaks and tightenby hand if necessary.

3H50, 4H50 Maintenance
HATZ 105Manual
8.2.16 Servicing the air filter (optional)
Safety notes
CAUTION
Danger of injury.When working with compressed air, foreign bodies may fly intoyour eyes.▪ Wear safety goggles.▪ Never direct the compressed air jet toward people or toward
yourself.
NOTICE
i▪ Change the filter elements when there is oily or damp dirt
contamination, cleaning is not possible.▪ Even minor damage in the areas of the sealing surface, filter
paper, or filter cartridge makes reuse impossible.▪ The filter cartridge may not be washed out or beaten out.▪ The filter cartridge may be blown out only in exceptional
cases. The pressure must not exceed 5 bar.
Overview
1 5 62 3
42
9
87 9

Maintenance 3H50, 4H50
106 HATZManual
1 Air filter housing
2 Retaining clips
3 Air filter cover
4 Dust discharge valve
5 Secondary filter
6 Primary filter
7 Air gun with extension tube (tip bent)
8 Lamp
9 Sealing surfaces
Replacing the primary/secondary filters
Step Activity
1 Open the retaining clips (2) and remove the air filter cover (3).
2 Pull out the primary filter (6) and either replace (recommended)or clean (see below).Replace or clean the primary filter according to the service inter-val indicator. The primary filter must be replaced every twoyears at the latest however, cleaning is no longer possible afterthis time.
3 Remove dirt adhering to the inside of the air filter housing (1), airfilter cover (3), and dust discharge valve (4).
4 Pull out and check the secondary filter (5), replace if required.The secondary filter can not be cleaned. The secondary filtermust be replaced after every fifth replacement of the primary fil-ter, though no later than every two years.
5 Carefully insert new filter elements.
6 Place the air filter cover on the air filter housing and lock all re-taining clips making sure that the dust discharge valve pointsvertically downwards.
Cleaning the primary filter
Step Activity
1 Blow out the primary filter (6) with dry compressed air from theinside to the outside until dust no longer emerges. Use an airgun with an extension tube (7) with the end bent by approx. 90°.The end of the extension tube must not touch the filter paper.
2 Check the sealing surfaces (9) of the filter cartridge for damage.

3H50, 4H50 Maintenance
HATZ 107Manual
Step Activity
3 Check the filter cartridge for tears or other damage in the filterpaper by holding it against the light at a slant or shining lightfrom a lamp (8) through it. In case of doubt, always replace theprimary filter.NOTE: The primary filter may only be cleaned once, then it mustbe replaced.
8.2.17 Changing coolantThis section contains the following subsections:▪ Draining the cooling system▪ Rinsing the cooling system▪ Filling the cooling system
Safety notes
CAUTION
Danger of scalding and risk of environmental damage dueto hot coolant.▪ Excessive coolant is blown off from the sealing cap on the
expansion tank. After topping up the cooling system nevermove parts of your body or face close to the sealing cap.
▪ Never top up coolant above the MAX - mark on the expan-sion tank.
▪ Never stop escaping coolant with your bare hands.
CAUTION
Danger of burns.There is a danger of burns when working on a hot cooling sys-tem. The cooling system is pressurized when the engine is hot.▪ Let the engine cool.▪ Wear safety gloves.

Maintenance 3H50, 4H50
108 HATZManual
CAUTION
Danger of environmental damage from spilled coolant.Coolant is water-polluting.▪ Do not allow it to enter the ground water, water bodies, or
sewage system.▪ Collect the coolant and dispose of it according to local envi-
ronmental regulations.
Overview
MAX
MIN
MAX
MIN
12
43
6
5
1 Expansion tank for coolant
2 Sealing cap
3 MAX - Maximum coolant level
4 MIN - Minimum coolant level
5 Drain plug on the radiator
6 Seal ring
7 Screw plug for drain valve
3H50, 4H50 Maintenance
HATZ 109Manual
8 Drain hose
Draining the cooling system
Step Activity
1 Provide a container to collect the used coolant. The containermust be large enough to hold the entire amount of oil. For theamount of coolant, see section 4.1 Engine information and fillingquantities, page 21.
2 Open the sealing cap (2) of the expansion tank (1).
Model with drain plug
3 Unscrew the drain plug (5) and drain the coolant into the con-tainer.
4 Screw in the drain plug (5) with a new gasket (6) and tighten.Tightening torque: 50 Nm.
Model with drain valve
3 Remove the screw plug (7). Then place the drain hose (8) onthe drain valve and screw tight by hand.▪ When tightening, the drain valve opens allowing the coolant to
drain.
4 Remove the drain hose and reattach the sealing screw.
Rinsing the cooling systemThe cooling system only needs to be rinsed if contaminants are detected inthe coolant.Contaminants can include:▪ Engine oil due to a defective cylinder head gasket (discoloration of the
coolant).▪ Corrosion due to used or unsuitable coolant (discoloration of the coolant).▪ Foreign bodies due to:
– Insufficient cleaning during repairs to the cooling system– Reuse of drained coolant
As contaminants in the coolant could be an indication of a larger problem,we recommend having the rinsing of the cooling system carried out bytrained specialist personnel.
Filling the cooling systemSee section 6.5 Filling the cooling system, page 52

Maintenance 3H50, 4H50
110 HATZManual
8.2.18 Resetting the maintenance interval indicatorAfter completion of maintenance work reset the maintenance interval indica-tor. The counter starts again at zero and indicates when the next larger ser-vice is due.
Overview – HATZ instrument boxes
I
0
1 Starting key
2 Pushbutton
Ignition lock
0 Off
I Operation
Procedure
Step Activity
1 The starting key is at position "0".▪ Press and hold down the button (2).
2 Turn the starting key from position "0" to position "I".
3 Release the button (2) after a wait time of at least 5 seconds butno longer than 10 seconds. The maintenance interval indicatoris now reset.
NOTICEIf a HATZ instrument box is not used:Comply with the instructions in the documentation for the com-plete machine.

3H50, 4H50 Faults
HATZ 111Manual
9 Faults9.1 Troubleshooting
General troubleshooting notesIf the cases listed below have been worked through but the fault continues topersist, please contact your nearest Hatz service station.
Indicator for engine fault on the HATZ instrument box is flashing.
Possible causes Remedy Chapter
Various errors in differ-ent assemblies.
Use the flash code table toidentify and eliminate errors.
9.2 Flash codetable for enginefaults, page 114
The engine does not start or does not start immediately, but can be turnedwith the starter.
Possible causes Remedy Chapter
Hydraulic load too high(especially with multi-ple hydraulic pumps).
Reduce the hydraulic load – ifpossible.
Insufficient compres-sion.
Contact HATZ Service.
Cylinder and/or pistonring wear.
Contact HATZ Service.
Fuel supply is interrupted:
The tank ran out of fuelduring operation.
Add fuel. 7.6 Refueling,page 65
Electrical fuel pump isnot working.
Check the cabling.
Fuel prefilter isclogged.
Change the fuel prefilter. 8.2.14 Changingthe fuel prefilter,page 100
Main fuel filter isclogged.
Change the main fuel filter. 8.2.15 Changingthe main fuel fil-ter, page 102
Faults 3H50, 4H50
112 HATZManual
At low temperatures (engine does not start)
Possible causes Remedy Chapter
Oil is too viscous andcauses a too lowstarter speed.
Change the engine oil and oilfilter. Add engine oil with a suitableviscosity class.
8.2.6 Changingthe engine oiland oil filter,page 79
Insufficiently chargedbattery.
Check the battery and contactthe service center if necessary.
3.2.4 Electricalequipment, page18
Machine is not uncou-pled.
If possible, separate the enginefrom the machine by uncou-pling it.
The starter does not switch on and the engine does not turn.
Possible causes Remedy Chapter
Irregularities in the electrical equipment:
Battery and/or othercable connections areincorrectly connected.
Check the electrical equipmentand its components or contactHatz service.
3.2.4 Electricalequipment, page18
Cable connections areloose and/or oxidized.
Battery is faulty and/ornot loaded.
Faulty starter.
Faulty relay, monitor-ing elements, etc.
Engine switches off spontaneously during operation.
Possible causes Remedy Chapter
The tank ran out of fuelduring operation.
Fill with fuel. 7.6 Refueling,page 65
Mechanical faults. Contact HATZ Service.
Electrical defects. Check wiring or contact HATZService.

3H50, 4H50 Faults
HATZ 113Manual
The engine loses power and speed.
Possible causes Remedy Chapter
Engine running due toa fault in the emer-gency run function (in-strument box sendsflashing signal).
Heed the flashing code table. 9.2 Flash codetable for enginefaults, page 114
Switch off the engine, wait atleast 1 minute, then restart theengine. (This deletes minor er-rors).
7.4 Switching offthe engine, page617.3 Starting theengine, page 59
The tank ran out of fuelduring operation.
Add fuel. 7.6 Refueling,page 65
The engine loses power and speed, and black smoke emerges from the ex-haust.
Possible causes Remedy Chapter
Dirty air filter unit. Check the degree of dirt con-tamination of the air filter, andclean or renew it if necessary.
8.2.16 Servicingthe air filter (op-tional), page 105
Turbocharger faulty orleaking hoses.
Check hoses or contact HATZService.
Injector not fully func-tional.
Contact HATZ Service.
Engine becomes very hot. The engine temperature indicator lights up.
Possible causes Remedy Chapter
Contamination in theentire area of the cool-ing air guides.
Clean the cooling air area.
Radiator fins dirty, orradiator blocked.
Clean the radiator fins, ensureair flow through radiator is nothindered.
8.2.7 Enginecleaning, page858.2.5 Checkingthe cooling sys-tem, page 76
Thermostat or waterpump faulty.
Contact HATZ Service.
Coolant level too low. Check the cooling system. 8.2.5 Checkingthe cooling sys-tem, page 76

Faults 3H50, 4H50
114 HATZManual
9.2 Flash code table for engine faultsWhen engine faults occur, a flashing signal is shown on the indicator lampfor "Engine fault" (see Explanation of symbols, chapter 5.2 HATZ instrumentbox, page 42). The table below shows the possible flashing signals, theirmeaning and measures for remedies.If the listed fault cases have been worked through but the fault continues topersist, please contact your nearest HATZ Service.The following graphic shows the setup of the flashing code of the flashingsignal 2 – 2:
Lamp ON
Lamp OFFStart signal
Pause Pause1st number short
2nd number long
If there are two or more faults, they can be displayed by pressing on thepushbutton again.
Flash code table
Flashing signal Possible causes Remedy Chapter
1 – 1Area affected:Monitoring of in-dicator and con-trol elements
Indicator(s) or ca-bling faulty.
Check the functionand cabling of theindicators.
Insufficient controlunit power supply.
Check the powersupply of the con-trol unit.
Other errors notspecified in moredetail.
1 – 2Area affected:Speed sensorsystem
Crankshaft orcamshaft sensorcabling faulty.
Check the cabling.

3H50, 4H50 Faults
HATZ 115Manual
Flashing signal Possible causes Remedy Chapter
1 – 3Area affected:Air supply
Air filter is dirty. Service the air fil-ter.
8.2.16 Ser-vicing theair filter (op-tional), page105
Charge air temper-ature after thecharge air coolertoo high.
Clean the radiatorfins.
8.2.7 En-gine clean-ing, page 85
Charge air sensor/air filter differentialpressure sensorcabling faulty.
Check the cabling.
1 – 4Area affected:Exhaust gas recir-culation (EGR)
Cabling for EGRvalve defective.
Check the cabling.
2 – 1Area affected:Low pressure fuelsystem
Maximum waterlevel in the waterseparator reached.
Drain water fromthe fuel prefilter.
8.2.13Draining thewater sepa-rator, page99
Fuel pressure toolow.
▪ Replace bothfuel filters.
▪ Check the fueltank level, refuelif required.
7.6 Refuel-ing, page 65
Fuel temperaturetoo high. This canbe caused by a lowlevel in the fueltank or a high en-gine load.
▪ Refuel.▪ Reduce the en-
gine load.
Cabling of the fuelpump defective.
Check the cabling.
2 – 2Area affected:High pressurefuel system
Sensor system (in-jectors, rail pres-sure sensor, pres-sure control valve,high pressurepump) cablingfaulty.
Check the cabling.

Faults 3H50, 4H50
116 HATZManual
Flashing signal Possible causes Remedy Chapter
2 – 3Area affected:Engine oil tem-perature/engineoil pressure
Engine oil pressuretoo high/too low.
▪ Check the oillevel, top up theengine oil if re-quired.
▪ Use engine oilwith a suitableviscosity.
7.5 Checkthe oil level,page 634.3 Engineoil, page 24
Engine oil temper-ature too high.
Check the hoses ofthe oil cooler (hosekinked).
Cabling of the sen-sor defective.
Check the cabling.
3 – 1Area affected:Liquid cooling
Coolant level toolow.
Top up coolant. 8.2.5Checkingthe coolingsystem,page 76
Coolant tempera-ture too high.
Clean the radiatorfins.
8.2.7 En-gine clean-ing, page 85
Coolant tempera-ture sensor cablingfaulty.
Check the cabling.
Coolant level sen-sor cabling defec-tive.
Check the cabling.
3 – 2Area affected:Pre-glow system
Glow plugs cablingfaulty.
Check the cabling.
One or multipleglow plugs faulty.
Contact HATZ Ser-vice.
Glow control unit(GCU) faulty.
Contact HATZ Ser-vice.

3H50, 4H50 Faults
HATZ 117Manual
9.3 Start support
Safety notes
DANGER
Danger of explosion due to the generation of sparks.When carrying out the start support, a battery can generate anexplosive gas mixture.▪ Avoid fire, sparks, open flames and smoking.▪ Avoid short-circuits.▪ Only connect battery terminals with identical polarity (see
Overview section).▪ Always observe the sequence described for connecting and
disconnecting the start support cable.▪ Do not place tools or other metal objects on the battery.
WARNING
Danger of chemical burns.Battery acid is highly corrosive and can cause eye and skin in-juries.▪ Wear safety goggles and safety gloves.

Faults 3H50, 4H50
118 HATZManual
WARNING
Danger of injury or property damage due to incorrectly car-ried out start support.If the instructions for the start support are not adhered to pre-cisely, there is a danger of explosion due to the generation ofsparks as well as a danger of chemical burns due to leaking bat-tery acid.▪ Observe the attached information and warning signs (see
section 3.3 Labels, page 19)▪ Do not use a charger unit with Boost function. Electrical
components could be destroyed due to overvoltage.▪ Use a suitable start support cable with insulated cable pli-
ers. Required line cross-section:▪ 12 volts min. 50 mm2
▪ 24 volts min. 35 mm2
▪ Never swap the positive (+) and negative (–) battery termi-nals (danger of short circuit).
▪ Make sure that the start support cables are laid in such away that they cannot be damaged by rotating parts or be-come disconnected from the battery terminals.
▪ A discharged battery and current emitting battery must havethe same voltage (12 volts). The battery capacity should beabout the same.
▪ A discharged battery can freeze even at temperatures just afew degrees below zero. If the battery is frozen or thawed,do not carry out a start support. Replace the battery.
Overview – 12 volt model
+-12 V
+-12 V

3H50, 4H50 Faults
HATZ 119Manual
BatteryA Discharged battery
B Current emitting battery
Red start support cable (positive (+) terminal)1 Clamp pliers on the positive (+) terminal of the discharged bat-
tery
2 Clamp pliers on the positive (+) terminal of the current emittingbattery
Black start support cable (negative (–) terminal)3 Clamp pliers on the negative (–) terminal of the current emitting
battery
4 Clamp pliers on the negative (–) terminal of the discharged bat-tery
Procedure – 12 volt model
Step Activity
1 A second battery (12 volts) or an external device with a 12 voltsystem can be used for the start support. See also the instruc-tions in the documentation for the external device.
2 Turn the starting key to position "0" on both machines.
3 Connect the batteries using the clamp pliers of the start supportcable in the sequence 1–2–3–4 (see Overview – 12 volt model).
4 Do not start the external device.
5 Start the machine with the discharged battery.
6 Let the engine run for several minutes.
7 Disconnect the start support cable in the sequence 4–3–2–1.

Faults 3H50, 4H50
120 HATZManual
Overview – 24 volt model
NOTICE
iThe 24 volt model is supplied with two 12 volt batteries that areconnected in series with a connection cable (C).
+-
+-
+-
+-12 V
12 V
12 V
12 V
BatterysA Discharged batteries
B Current emitting batteries
C Connection cable between the batteries
Red start support cable (positive (+) terminal)1 Clamp pliers on the positive (+) terminal of the discharged bat-
tery
2 Clamp pliers on the positive (+) terminal of the current emittingbattery
Black start support cable (negative (–) terminal)3 Clamp pliers on the negative (–) terminal of the current emitting
battery
4 Clamp pliers on the negative (–) terminal of the discharged bat-tery

3H50, 4H50 Faults
HATZ 121Manual
Procedure – 24 volt model
Step Activity
1 Either two batteries (12 volts) with connection cable (C) can beused for start support in accordance with Overview – 24 voltmodel or an external device with a 24 volt system. See also theinstructions in the documentation for the external device.
2 Turn the starting key to position "0" on both machines.
3 Connect the batteries using the clamp pliers of the start supportcable in the sequence 1–2–3–4 (see Overview – 24 volt model).
4 Do not start the external device.
5 Start the machine with the discharged battery.
6 Let the engine run for several minutes.
7 Disconnect the start support cable in the sequence 4–3–2–1.

Storage and disposal 3H50, 4H50
122 HATZManual
10 Storage and disposal10.1 Storing the machine
Safety notes
DANGER
Danger to life from inhaling exhaust gases.Toxic engine exhaust gases can lead to loss of consciousnessand even death in closed-off and poorly ventilated rooms.▪ Never operate the machine in closed-off or poorly ventilated
rooms.▪ Do not breathe in the exhaust gases.
DANGER
Fire hazard from fuel.Leaked or spilled fuel can ignite on hot engine parts and causeserious burn injuries.▪ Only refuel when the engine is switched off.▪ Never refuel in the vicinity of open flames or sparks that can
cause ignition.▪ Do not smoke.▪ Do not spill fuel.
CAUTION
Danger of environmental damage from spilled fuel.Do not overfill the fuel tank and do not spill fuel.▪ Collect any leaking fuel and dispose of it according to local
environmental regulations.
CAUTION
Danger of burns.There is a danger of burns when working on a hot cooling sys-tem. The cooling system is pressurized when the engine is hot.▪ Let the engine cool.▪ Wear safety gloves.

3H50, 4H50 Storage and disposal
HATZ 123Manual
NOTICEComply with the safety chapter!Follow the basic safety instructions in chapter 3 Safety, page 7.
Storing the machine for a lengthy periodTake the following measures if you intend to take the machine out of servicefor a lengthy period (3-12 months):
Step Activity
1 Drain the fuel tank until it is nearly empty and fill with FAME*-free fuel. Operate the engine for a few minutes so that onlyFAME-free fuel is still in the fuel system.
2 Change the engine oil and oil filter (see section 8.2.6 Changingthe engine oil and oil filter, page 79).
3 Replace the fuel prefilter and the main fuel filter (see section8.2.14 Changing the fuel prefilter, page 100 and 8.2.15 Chang-ing the main fuel filter, page 102.
4 Let the machine cool down.
5 Check the coolant level and concentration. Refill coolant if nec-essary (see section 8.2.5 Checking the cooling system, page76). If the concentration is too low, replace the coolant (see sec-tion 8.2.17 Changing coolant, page 107).
6 Remove the battery in accordance with the Operator's Manualfor the machine and store at ambient temperature. Comply withthe local regulations as well as the regulations of the batterymanufacturer for the storage of batteries.
7 Close and seal all engine openings (air intake openings, air out-let openings and the exhaust gas opening) so that no foreignbodies can enter, but a small amount of air can still be ex-changed. This avoids condensation.
8 After the machine has cooled down, cover it to protect it againstdust and store it in a dry and clean place.
*FAME = Fatty Acid Methyl Ester
Ambient conditions during storage▪ Max. permissible storage temperature: -25 °C to +60 °C▪ Max. permissible humidity: 70%▪ Protect the engine from direct sunlight

Storage and disposal 3H50, 4H50
124 HATZManual
Recommissioning
Step Activity
1 Remove all covers.
2 Check the cables, hoses and lines for cracks and leak tightness.
3 Check the engine oil level.
4 Check the coolant level.
5 Install the battery in accordance with the Operator's Manual forthe machine.
The brand new engine can normally be stored for up to 12 months. The pro-tection lasts up to approx. 6 months at very high humidity and in sea air.For storage periods of more than 12 months, please contact the nearestHATZ Service.
10.2 Disposing of the machine
Disposal informationDispose of the machine (including machine parts, engine oil, coolant, andfuel) according to the local disposal regulations and the environmental lawsin the country of use.Because of the danger of possible environmental damage, only permit anapproved specialist company to dispose of the machine.
NOTICEWhen the machine has reached the end of its lifecycle, ensurethat it is disposed of safely and properly, especially parts andsubstances that can be dangerous to the environment. Thesealso include fuel, coolant, lubricants, plastics, and batteries (ifpresent).▪ Do not dispose of the battery with the household trash.▪ Dispose of the battery at a collection point for possible recy-
cling.

3H50, 4H50 Installation declaration
HATZ 125Manual
11 Installation declarationExtended Declaration of Incorporation
EC Machinery Directive 2006/42/EC
The manufacturer: Motorenfabrik Hatz GmbH & Co.KGErnst-Hatz-Straße 16D-94099 Ruhstorf a. d. Rott
hereby declares that the incomplete machine: product description: Hatz diesel engineType designation and as of serial number:3H50TIC = 13510, 3H50TI = 163104H50TIC = 13610, 4H50TI = 16110
satisfies the following basic safety and health protection requirements in acc. with Annex I to the above-mentioned Directive.
- Annex I, General principles no. 1- Nr. 1.1.2., 1.1.3., 1.1.5., 1.2.1., 1.2.2., 1.2.3., 1.2.4.1., 1.2.4.2., 1.3.1., 1.3.2., 1.3.3., 1.3.4.,
1.3.7., 1.3.8.1., 1.4.1., 1.5.1., 1.5.2., 1.5.8., 1.5.9., 1.6.1., 1.6.2., 1.6.4., 1.7.
All relevant basic safety and health protection requirements down to the interfaces described in the manual for diesel enginein the enclosed data sheetsin the enclosed technical documents
have been complied with.
The special technical documents in acc. with Annex VII B of the Directive 2006/42/EC have been prepared.
Conformity with the provisions of the following, other EC Directives, i.e.- 2014/30/EU Electromagnetic Compatibility (EMC), dated 26.02.2014(was tested in association with a generator)
The following standards have been used (completely or partially):- EN 1679-1: 092011 - EN ISO 12100: 032011 - EN ISO 13857: 062008- EN 60204-1: 062007 - EN ISO 13849-1: 062016
The manual for diesel engine has been enclosed to the incomplete machine and the Assembly Instructions have been provided to the customer electronically together with the order confirmation.
Commissioning has been prohibited until it has been established, if applicable, that the machine into which the above-mentioned incomplete machine is to be incorporated, satisfies the provisions of the Machinery Directive.
Wolfgang Krautloher / see "Manufacturer"Name / address of EC documentation officer
03.07.2017 Krautloher / Directives official
Date Signature and information on the undersigned Signature

CREATING POWER SOLUTIONS.
Motorenfabrik Hatz GmbH & Co. KGErnst-Hatz-Str. 1694099 Ruhstorf a. d. RottDeutschlandTel. +49 8531 319-0Fax. +49 8531 [email protected]
0000 436 004 01 - 10.2017 - 0.1Printed in GermanyEN
Copyright © 2022 FDOKUMEN