Managing a Sourcing Event | NC eProcurement
28
NC eProcurement Managing a Sourcing Event 5/13/2021 Managing a Sourcing Event A Sourcing Event is the most important part of a Sourcing Project. It is where the Sourcing Agent can establish the bidding dates and time, as well as compile all pertinent information to which the vendors will need to respond, as guided by a template established by the State. Notification of this Event can then be posted in IPS, and interested vendors can follow a URL to respond electronically in a consistent format. Finally, responses can be reviewed, and a contract can be awarded. I. Create a Sourcing Event 1. Navigate to the ‘Documents’ tab of the Sourcing Project and click the down-arrow to the right of the document within the ‘Sourcing Event’ folder and click ‘Edit’ from the drop-down menu. Note: This document template will depend upon the selection made in the ‘Solicitation Vehicle’ field when creating the Sourcing Project. 2. The ‘Edit Event’ page will display. It is important to populate the ‘Title’ and ‘Description’ with pertinent information, keeping in mind that the ‘Title’ will be visible to vendors who choose to respond within the tool, and the ‘Description’ can be up to 120 characters and will be pasted in the IPS ‘Summary’ field to provide the vendor community its first idea of what goods or services are needed. Select ‘No’ for the ‘Test Event’ field and leave the other fields as is. ‘Currency,’ ‘Commodity,’ and ‘Departments’ will be pre-populated based on selections made when creating the Sourcing Project. Then click ‘OK.’ Click the down-arrow next to the pre-loaded Sourcing Event Template, then click ‘Edit’ in the dropdown menu.
-
Upload
khangminh22 -
Category
Documents
-
view
2 -
download
0
Transcript of Managing a Sourcing Event | NC eProcurement

NC eProcurement
Managing a Sourcing Event
5/13/2021 Managing a Sourcing Event
A Sourcing Event is the most important part of a Sourcing Project. It is where the Sourcing Agent can establish the bidding dates and time, as well as compile all pertinent information to which the vendors will need to respond, as guided by a template established by the State. Notification of this Event can then be posted in IPS, and interested vendors can follow a URL to respond electronically in a consistent format. Finally, responses can be reviewed, and a contract can be awarded.
I. Create a Sourcing Event
1. Navigate to the ‘Documents’ tab of the Sourcing Project and click the down-arrow to the right of the document within the ‘Sourcing Event’ folder and click ‘Edit’ from the drop-down menu.
Note: This document template will depend upon the selection made in the ‘Solicitation Vehicle’ field when creating the Sourcing Project.
2. The ‘Edit Event’ page will display. It is important to populate the ‘Title’ and ‘Description’ with pertinent information, keeping in mind that the ‘Title’ will be visible to vendors who choose to respond within the tool, and the ‘Description’ can be up to 120 characters and will be pasted in the IPS ‘Summary’ field to provide the vendor community its first idea of what goods or services are needed. Select ‘No’ for the ‘Test Event’ field and leave the other fields as is. ‘Currency,’ ‘Commodity,’ and ‘Departments’ will be pre-populated based on selections made when creating the Sourcing Project. Then click ‘OK.’
Click the down-arrow next to the pre-loaded Sourcing Event Template, then click ‘Edit’ in the dropdown menu.

NC eProcurement
Managing a Sourcing Event
5/13/2021 Managing a Sourcing Event 2
3. The ‘Event’ page will display and outline the four sections to be completed before publishing the Event: ‘Rules,’ ‘Suppliers,’ ‘Content,’ and ‘Summary.’ Notes:
• Users will skip section 2 for ‘Suppliers’ until after sections 3 and 4 have been completed and the Sourcing Event has been approved. The ‘Tasks’ tab outlines this process and more information is provided in this document below.
• The Event will be assigned a ‘Doc Number’ by the system immediately preceding the Event ‘Title’ entered on the previous page. This ‘Doc Number’ will be used as the IPS ‘Solicitation Number’ following the user’s entity numerical/character prefix (i.e., 13-82296023 or DPC-82296023 for Division of Purchase and Contract – This prefix should auto-populate in IPS).
It’s very important to be thoughtful and detailed when editing the ‘Title’ and adding a ‘Description.’ Vendors will see the contents of both fields. Click ‘OK’ when the edits are complete.
A system-generated ‘Doc Number’ displays before the ‘Title’ entered on the previous page and the four stages in the process to finalize the Event display on the left side.

NC eProcurement
Managing a Sourcing Event
5/13/2021 Managing a Sourcing Event 3
II. Setting Event ‘Rules’ The first of the four sections to edit and set are the Event ‘Rules.’ Most importantly, the rules section allows the Sourcing Agent to establish the ‘Timing Rules’ outlining when the bidding starts and stops. Many of the fields within the six sub-sections on this page are pre-populated, and it is advised that users leave them as is.
1. ‘Envelope Rules’ is the first subsection. The system will default the event to having one envelope and lists the ‘Project Owner’ as the user group with the ability to open the envelope. Envelopes are designed to conceal response information until after the ‘Due Date.’ It is advised that the user leaves the default as is, but if they would like a multiple envelope Event revealing different aspects of the response in layers, they can manually increase the number of envelopes up from one using the dropdown menu.
2. ‘Timing Rules’ is the next and most important section. There are two required fields that set when vendors can begin to respond with bids and when their bids are last due.
a. ‘Response start date’ defaults to ‘When I click the Publish button on the Summary
page,’ meaning that vendors can begin responding immediately once the Event is finalized by clicking ‘Publish.’ If the user would prefer to set a specific date in the future for when vendors can begin to respond, click ‘Schedule For the Future’ and set a specific date and time from the pickers.
b. ‘Due date’ sets the time when the bidding period is closed. It defaults to ‘Duration,’ where the user can select a time period in ‘minutes,’ ‘hours,’ or ‘days,’ or it can be switched to a ‘Fixed time’ where the user can set a specific closing date and time from the pickers. It is suggested that users set a ‘Fixed time’ closing date and time.
3. It is suggested that users leave all defaulted values as is for sections three through six. These four sections are ‘Bidding Rules,’ ‘Project Owner Actions,’ ‘Market Feedback,’ and ‘Message Board.’ When all Event ‘Rules’ have been set, click ‘Next.’
The number of envelopes defaults to one, and the ‘Project Owner’ is designated as the user with authorization to open it. It is suggested that the user accept the default value.
Set the ‘Timing Rules’ for the opening and closing dates for accepting bids.

NC eProcurement
Managing a Sourcing Event
5/13/2021 Managing a Sourcing Event 4
III. Updating the Sourcing Event Content The ‘Content’ section of the Event is where the user can share all information about the products or services they wish to receive bids on, as well as provide a framework of questions for vendors to answer to help the Sourcing Agent choose the most-deserving bidder to award the contract to. The State has created an extensive template in this section that complements the default Solicitation Document generated on the Sourcing Project, and it is advised that users follow the suggested outline. Although this section is the third out of four, users will temporarily skip section 2 for ‘Suppliers’ and complete this section after setting the Event ‘Rules’ in Section 1.
1. The ‘Content’ stage is divided into seven numerical sections, some of which have subsections:
1) Welcome to the State of North Carolina’s Sourcing Tool: A brief welcome message for vendors.
2) Instructions and How to Use the Sourcing Tool: Instructions and tips for vendors on how to provide a response within the tool.
3) Solicitation Document and Details: Users will upload their completed ‘Solicitation
Document’ in section 3.1. Vendors will find a pre-loaded template for submitting questions in section 3.2. If the user needs to respond with an ‘Addendum,’ they will post it here and it will become section 3.3.
4) Vendor Information: This section requires vendors provide their ‘Customer Number’ from
their NC eVP account.
5) Pricing Submittal: The user will upload a customized pricing response template that vendors will download, complete with the prices they are bidding on the requested products or services, and re-upload to the Event as an attachment.
6) Vendor Responses: This section has several default sub-sections consisting of general questions and information requested from the vendors by the State to accompany their pricing submittal. Some questions can be answered with free-text, while other fields provide the vendors with a drop-down menu or the ability to add an attachment. All questions are required to be answered by default.
7) Additional Questions to Vendor: Vendors can provide additional information such as a
further description of their qualifications or up to three references. Note: Section 7 will not display for ‘Goods’ Solicitations.
NC eProcurement
Managing a Sourcing Event
5/13/2021 Managing a Sourcing Event 5
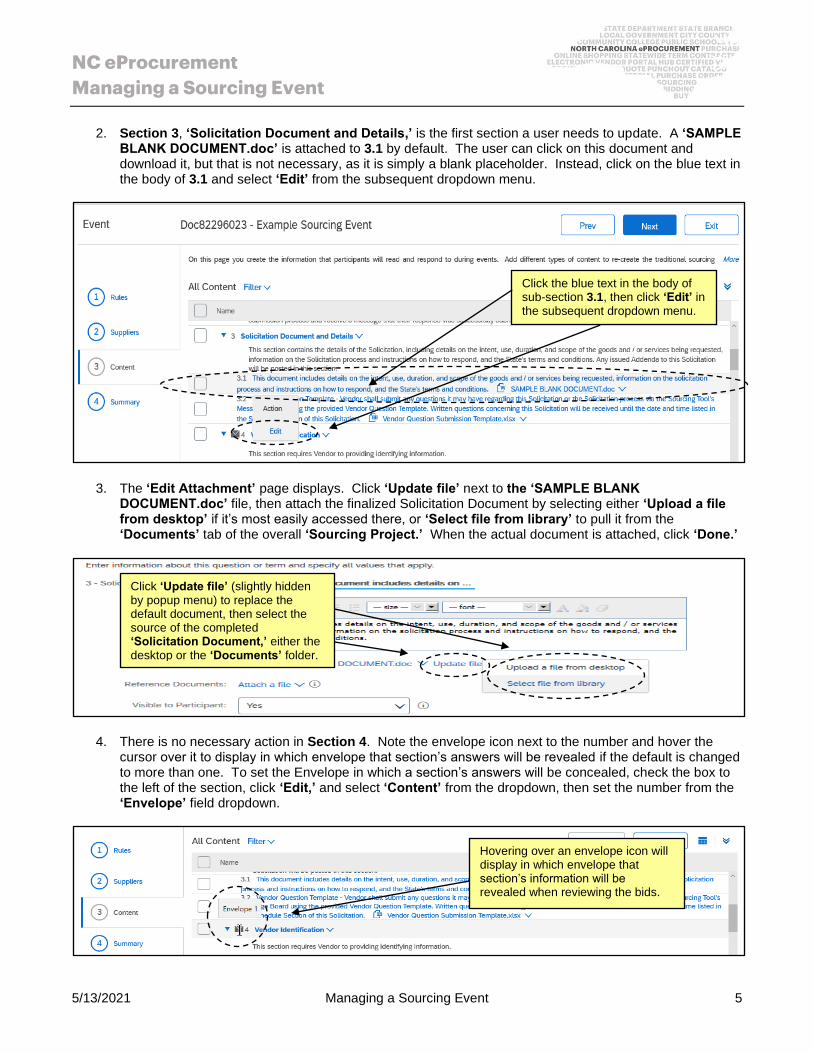
2. Section 3, ‘Solicitation Document and Details,’ is the first section a user needs to update. A ‘SAMPLE BLANK DOCUMENT.doc’ is attached to 3.1 by default. The user can click on this document and download it, but that is not necessary, as it is simply a blank placeholder. Instead, click on the blue text in the body of 3.1 and select ‘Edit’ from the subsequent dropdown menu.
3. The ‘Edit Attachment’ page displays. Click ‘Update file’ next to the ‘SAMPLE BLANK DOCUMENT.doc’ file, then attach the finalized Solicitation Document by selecting either ‘Upload a file from desktop’ if it’s most easily accessed there, or ‘Select file from library’ to pull it from the ‘Documents’ tab of the overall ‘Sourcing Project.’ When the actual document is attached, click ‘Done.’
4. There is no necessary action in Section 4. Note the envelope icon next to the number and hover the cursor over it to display in which envelope that section’s answers will be revealed if the default is changed to more than one. To set the Envelope in which a section’s answers will be concealed, check the box to the left of the section, click ‘Edit,’ and select ‘Content’ from the dropdown, then set the number from the ‘Envelope’ field dropdown.
Click the blue text in the body of sub-section 3.1, then click ‘Edit’ in the subsequent dropdown menu.
Click ‘Update file’ (slightly hidden by popup menu) to replace the default document, then select the source of the completed ‘Solicitation Document,’ either the desktop or the ‘Documents’ folder.
Hovering over an envelope icon will display in which envelope that section’s information will be revealed when reviewing the bids.

NC eProcurement
Managing a Sourcing Event
5/13/2021 Managing a Sourcing Event 6
5. In Section 5, Vendors will attach their pricing responses to the products or services being bid upon. The user must provide a template for vendors to populate. In 5.1, duplicate the steps performed in 3.1 by clicking on the blue text in the body and selecting ‘Edit’ from the dropdown menu.
6. Navigate to the ‘Reference Documents’ field and click the ‘Attach a file’ link. Add the Pricing Submittal template the vendor needs to fill out and click ‘Done.’ Vendors are instructed to download this template to fill out with their pricing and re-upload it for the user to review.
7. Users have the ability to add ‘Line Items’ directly into the ‘Content’ of the Event if they’d prefer vendors provide their pricing response directly into the tool as opposed to attaching it in a document. The benefits of this will be realized when the user compiles on response information for the bid tabulation. For further guidance on this process, please see the ‘Adding Special Content to a Sourcing Event’ job aid.
8. Section 6 contains numerous questions for vendors to answer accompanying their pricing submittal. By
default they are all required, however, if necessary, they can be edited or deleted, although users should be very careful when doing this.
9. To delete a question, check the box to the left of that question and click the ‘Delete’ button at the bottom of the ‘Content’ section. The question will be removed (it cannot be undeleted), and the subsection numbering below it will automatically adjust.
Check the box next to the subsection to be deleted and click the ‘Delete’ button at the bottom of the screen.
Click ‘Attach a file’ (slightly hidden by popup menu) next to the ‘Reference Documents’ field to upload a Pricing Submittal template for the vendors to fill out.

NC eProcurement
Managing a Sourcing Event
5/13/2021 Managing a Sourcing Event 7
10. To edit a question, check the box to the left of that question and click the ‘Edit’ button at the bottom of the ‘Content’ section. From the subsequent dropdown menu, click ‘Content.’
11. The ‘Edit Question’ page will display. It is advised that no edits be made to these questions. One potential field to change is the ‘Response Required?’ field. This field defaults to ‘Yes, Participant Required,’ but if the user would like to keep the question but not make it a mandatory one for the vendor, they can select ‘Not Required’ from the dropdown menu and click ‘Done.’
IV. Approving the Event Approving a Sourcing Event may not be necessary in all cases. If the user does not need their Event approved, they should skip this portion of the document and move to the next, which covers the ‘Suppliers’ section. If the user does need the Event approved, either internally or by P&C, they should follow the steps below and proceed to the ‘Suppliers’ section once approval has been granted.
1. When the user completes the ‘Content’ section and proceeds to the ‘Summary’ section, they will see that the ‘Publish’ button is greyed out and unable to be clicked. They will also notice a message letting them know that they must “create a Supplier Discovery Posting” before publishing becomes an option. This will happen when they return to Section 2, ‘Suppliers.’ If they need the Event approved, however, they will stop here.
After selecting ‘Edit’ next to a particular sub-section, the ‘Response Required?’ field can be altered so that question is no longer required by default.
On the ‘Summary’ section, users will note that the ‘Publish’ button is greyed out and a notice will be present noting that users must first create a Supplier Discovery Posting.

NC eProcurement
Managing a Sourcing Event
5/13/2021 Managing a Sourcing Event 8
2. At this point the user should click the ‘Exit’ button in the top right to save the Event. The ‘Confirm Edit Event Exit’ screen will display providing the user with various options. Clicking ‘return to project’ will save the Event as is and take the user to the originating Sourcing Project where they can begin the process to have the Event approved. The bottom option to ‘Create saved version’ will save the progress made as a separate version, and the screen will include instructions on how to undo any subsequent changes. The bottom option works if desired but is not advised.
3. Navigate to the ‘Tasks’ tab on the Sourcing Project and go to the ‘Gain Approval of Sourcing Event’ task in ‘Phase 04.’ Click on the task and select ‘View Task Details’ from the dropdown.
4. On the subsequent ‘Approval Task’ page, select a user or group to review and approve the Event from the dropdown under ‘Select Approvers.’ Click ‘Search more’ to find profiles that don’t immediately display. Who is chosen to approve should be guided by entity protocols. Multiple approvers can be selected by clicking ‘Add more’ after the first approver is selected. It is advised that the user also select a ‘Due Date’ because this will trigger a notification for the approver(s) in their ‘To Do’ portlet. When all approvers have been added, click the ‘Submit’ button at the bottom of the screen to send the approval request to the first approver.
Clicking ‘return to project’ will save the Event as is and take the user back to the originating Sourcing Project. The bottom option will save the progress made as a separate version and is not advised.
From the ‘Select Approvers’ dropdown, choose any approvers that need to review the Event (it could be the user themselves) and add a ‘Due Date,’ then click the ‘Submit’ button.

NC eProcurement
Managing a Sourcing Event
5/13/2021 Managing a Sourcing Event 9
5. On the ‘Tasks’ tab, the task status will display as ‘In Approval’ until it is completely approved, when it will automatically shift to ‘Approved.’ At this point the user should note the next task, ‘Create Supplier Research Posting and Publish Sourcing Event,’ which will be completed back on the Sourcing Event, that can be accessed by clicking on the task or by going through the ‘Documents’ tab. In either of these locations, the user should choose to ‘Edit’ the Event.
V. Creating a Supplier Research Posting in the ‘Suppliers’ Section After the Sourcing Event has been approved, the user will access the Event and choose to ‘Edit’ it. At this point they will be ready to go back to the section they previously skipped, section 2, the ‘Suppliers’ section. This section will ask the user to ‘Create a Supplier Research Posting.’ When all required information has been added to this section, the user will click the yellow ‘Publish on Ariba Discovery’ button at the bottom of the page. Once the Sourcing Event is later published, a URL will be available, and the user can copy and paste that URL in the ‘NCEP URL’ field within the IPS posting. Vendors wishing to respond to the solicitation will then follow that URL and respond withing this Sourcing Event. Additionally, this information, when published on ‘Ariba Discovery,’ will reach an audience of prospective bidders who may not currently be registered in IPS, thus expanding the pool of potential bidders.
1. Once the user clicks ‘Next’ in the ‘Rules’ section, the ‘Supplier’ section will display. In the ‘Create a Supplier Research Posting’ portion of the page, populate all relevant fields, including the six required fields, as noted by an asterisk (*). Some fields will be pre-populated based on information the user has already entered in the Sourcing Event, and other information will need to be added by at this point.
2. Posting Title*: The first field in the blue section of the screen will be pre-populated based on the information entered in the ‘Title’ field when first creating the Sourcing Event. Remember, this title will be public-facing.
3. Product and Service Categories*: This field is not pre-populated. It corresponds with the ‘Commodity’ field describing the nature of the solicitation in both the Sourcing Project and in the IPS posting. This selection will be used to alert ‘Ariba Discovery’ vendors of the bidding opportunity. To select a category, begin typing into the text box. The system will auto-fill with suggestions in the dropdown. Click on the option that best fits the solicitation.
When the final approver approves the Sourcing Event, a check will display next to the task, and the status will automatically flip to ‘Approved.’ The user will then transition to the next task by going back to the Sourcing Event.

NC eProcurement
Managing a Sourcing Event
5/13/2021 Managing a Sourcing Event 10
4. The selection will appear in a blue box below the field box.
5. Ship-to of Service Locations*: Type “North Carolina” in the text box, and from the dropdown choose the area that best matches the location of the user. This selection will be used to alert ‘Ariba Discovery’ vendors of the bidding opportunity. The selection will appear in a blue box below the field box.
Start typing in the text box and select the best auto-fill option from the dropdown.
Typing “North Carolina” in the text box will display more specific regional options in the dropdown that can be selected.

NC eProcurement
Managing a Sourcing Event
5/13/2021 Managing a Sourcing Event 11
6. Opportunity Amount*: Select a dollar amount range from the dropdown for what is the estimated value of the solicitation.
7. Contract Length: Enter the length of the contract in months. This field is not required.
8. Response Deadline*: This field will be pre-populated with the ‘Due Date’ set in the ‘Rules’ section. Note: The ‘Response Deadline’ field will show a default end time for the bidding ‘Due Date’ as 11:59 PM EST, and this cannot be edited. To make it clearer to the vendor what the actual bidding end time is, the user should add a note in the ‘Description’ stating the previously established, actual end time for the Sourcing Event and accentuate the note by enlarging, bolding, and highlighting the text if desired.
9. Award Date: If the user knows the date on which they intend to award the solicitation, they can enter it here, but this field is not required.
10. Description*: This field will be pre-populated based on the information entered in the ‘Description’ field when first creating the Sourcing Event. Note: As described in the above ‘Response Deadline’ bullet, the default end time for bidding ‘Due Dates’ in ‘Ariba Discovery’ is 11:59 PM EST and this cannot be edited. This field is where a user should add a note stating the actual end time that’s already been established in the Sourcing Event.
11. Attachments: There is no need to add any attachments to this page.
12. External Marketplace: This field is checked by default, however, it is advised the user uncheck this box.
13. Preference for Seller: This field is unchecked by default and it is advised the user leaves it as such.
14. Bid Requirement: This field is unchecked by default and it is advised the user leaves it as such.
15. Privacy Settings: This field is unchecked by default and it is advised the user leaves it as such.
16. When all fields have been populated, the user should click the ‘Publish on Ariba Discovery’ button at the bottom of the screen.
Add a note to the existing text regarding the actual end time for the ‘Due Date’ on the Sourcing project if it’s not 11:59 PM EST.

NC eProcurement
Managing a Sourcing Event
5/13/2021 Managing a Sourcing Event 12
VI. Summary Section and Publishing the Event When section 2 is completed, the user can return to the fourth and final ‘Summary’ section. This contains the summary of the first three sections and allows the user to review and edit before clicking ‘Publish’ to finalize the Event.
1. The ‘Overview’ information is at the top of the page, above the ‘Rules,’ ‘Suppliers,’ and ‘Content’ information in descending order. To edit any of the ‘Overview,’ click the ‘Actions’ button and select ‘Edit Overview’ from the dropdown menu. If any other sections need to be edited, click on that section on the left side of the screen.

NC eProcurement
Managing a Sourcing Event
5/13/2021 Managing a Sourcing Event 13
2. For a summary of the entire contents of the Event in the form of a MS Word document (which may be helpful to refer to when posting Event information to IPS), click the ‘Actions’ button and select ‘Print Event Information,’ and the system will generate an up-to-date, time-stamped document.
Note: Avoid clicking the ‘SAP Ariba Review’ button.
3. The user can now click the ‘Publish’ button to finalize the Event.
4. The ‘Event Published’ page displays, and the user will have the option go back to the Event by clicking 'Monitor’ or return to the overall Project.
To edit any information in the ‘Overview’ section, click the ‘Actions’ button and then click ‘Edit Overview.’ To edit any information from any other section, click the link to that section on the left side.
Click ‘Print Event Information’ for a MS Word version of the contents of the Event.
Click ‘Publish’ to finalize the Event.
Click ‘Monitor’ to return to the Event.

NC eProcurement
Managing a Sourcing Event
5/13/2021 Managing a Sourcing Event 14
5. Upon returning to the Event, the user will find seven tabs at the top of the screen. The ‘Overview’ tab is where the ‘Rules’ are summarized along with a ‘Version History’ section towards the bottom of the page. Other tabs are ‘Content,’ ‘Suppliers,’ ‘Discovery Suppliers,’ ‘Messages,’ ‘Log,’ and ‘Award,’ although the ‘Award’ tab can be ignored. Clicking the ‘Actions’ button will display several options including ‘Edit’ to make any necessary changes and ‘View Project’ to navigate directly back to the Sourcing Project within which this Event exists.
6. Based on the timing rules established, it may immediately be ‘Open’ to receive bids, as is the case below.
A clock will appear in the upper right counting down how much time is left until the bidding period is closed.
VII. Managing a Published Event and Responding to Vendor Questions Once the Event has been published, Phase 4 of the Sourcing Project will be complete, and the user should move on to Phase 5. The first task in Phase 5 is to ‘Post Sourcing Event Summary and Link to Sourcing Event on IPS.’ Posting the link within IPS will give vendors interested in responding the ability to access the Event via their Ariba Network accounts and a path to an electronic response. During the Event, if responders have any questions, they will submit them via the Event message board, and if necessary, the user can address those questions by posting an ‘Addendum’ in the Event before responders submit their final bids.
1. If the user is not already in the Event, go to the ‘Documents’ tab on the Sourcing Project, click on the Event document and select ‘Monitor’ from the dropdown menu.
Users can navigate between different tabs at the top of the screen. This is the ‘Overview’ tab.
The ‘Actions’ dropdown allows users to select options like ‘Edit’ and ‘View Project.’
From the ‘Documents’ tab on the Sourcing Project, click on the Event document and select ‘Monitor’ from the dropdown menu.
When the bidding goes live (based on timing rules), a countdown clock through the end of the bidding period appears, and the status goes to ‘Open.’
NC eProcurement
Managing a Sourcing Event
5/13/2021 Managing a Sourcing Event 15
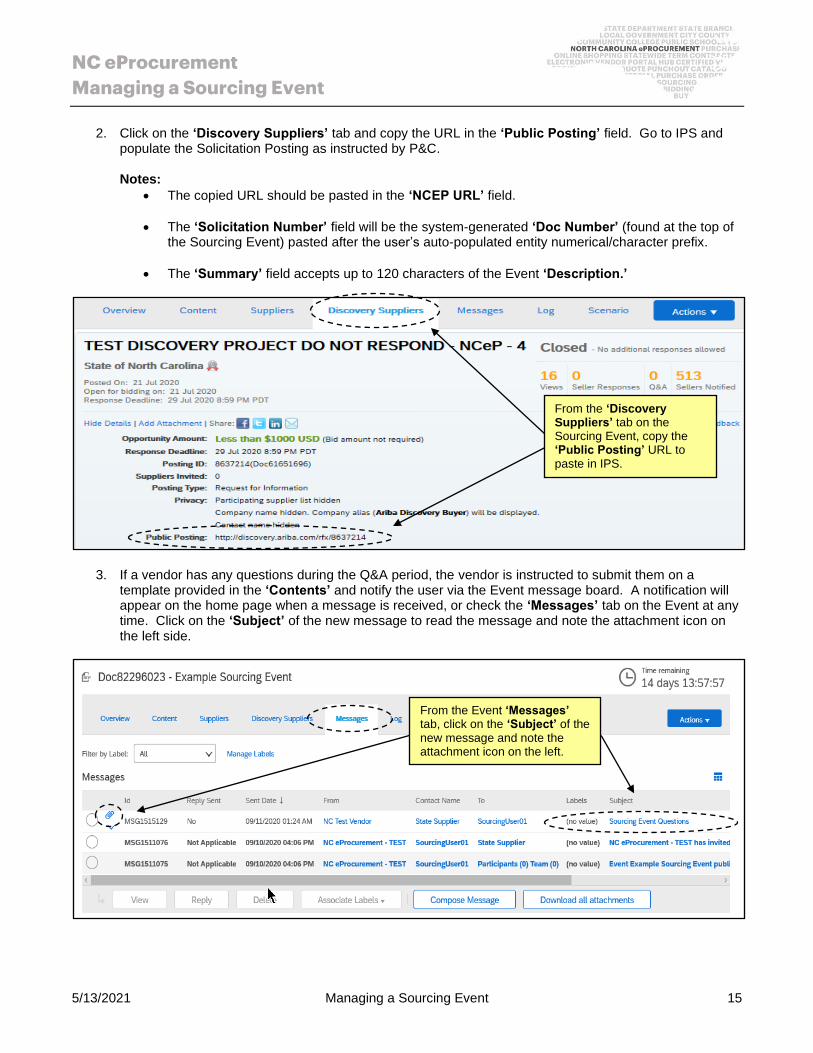
2. Click on the ‘Discovery Suppliers’ tab and copy the URL in the ‘Public Posting’ field. Go to IPS and populate the Solicitation Posting as instructed by P&C. Notes:
• The copied URL should be pasted in the ‘NCEP URL’ field.
• The ‘Solicitation Number’ field will be the system-generated ‘Doc Number’ (found at the top of the Sourcing Event) pasted after the user’s auto-populated entity numerical/character prefix.
• The ‘Summary’ field accepts up to 120 characters of the Event ‘Description.’
3. If a vendor has any questions during the Q&A period, the vendor is instructed to submit them on a template provided in the ‘Contents’ and notify the user via the Event message board. A notification will appear on the home page when a message is received, or check the ‘Messages’ tab on the Event at any time. Click on the ‘Subject’ of the new message to read the message and note the attachment icon on the left side.
From the Event ‘Messages’ tab, click on the ‘Subject’ of the new message and note the attachment icon on the left.
From the ‘Discovery Suppliers’ tab on the Sourcing Event, copy the ‘Public Posting’ URL to paste in IPS.

NC eProcurement
Managing a Sourcing Event
5/13/2021 Managing a Sourcing Event 16
4. The ‘View Message’ page will display, and the user can download the vendor’s question attachment document and read their message at the bottom of the page.
5. When the Q&A period is over and all vendor questions have been reviewed, the user may need to create an ‘Addendum’ to address the questions. From the ‘Documents’ tab on the Project, expand the ‘Sourcing Project Documents’ folder, then click on the ‘Addendum Document Template’ link and select ‘Download.’ Fill the document out, rename it, and save it back into the Project.
6. ‘Monitor’ the Event again from the Project’s ‘Documents’ tab, and then navigate to the Event ‘Content’ tab. Click the ‘Actions’ button in the top right and select ‘Edit’ from the dropdown menu.
Download the vendor’s attachment to view their questions and read their message at the bottom of the page.
Expand the ‘Sourcing Project Documents’ folder, then click on the ‘Addendum Document Template’ link and select ‘Download.’
Click the ‘Actions’ button (obscured by the dropdown menu) in the top right of the ‘Content’ tab, and then click ‘Edit.’

NC eProcurement
Managing a Sourcing Event
5/13/2021 Managing a Sourcing Event 17
7. Click the ‘Content’ link on the left side of the screen, click on the ‘Solicitation Document and Details’ link next to 3, and select ‘Attachment’ from the ‘Add’ dropdown menu.
8. The ‘Add Attachment’ page will display, and the attachment will automatically be assigned 3.3. Attach the completed ‘Addendum’ document in the ‘Attachment’ field. The name of the document will auto-populate the name of the new section. Add a ‘Description’ to let the vendors know this is where they can find the answers to their questions and click ‘Done.’ The newly added section 3.3 will now display with the ‘Addendum’ document attached for the vendors to review. Click ‘Next.’
In the ‘Content’ section, click on the ‘Solicitation Document and Details’ link and select ‘Attachment’ from the ‘Add’ dropdown menu.
A new section 3.3 is added with the ‘Addendum’ document attached for the vendors. Click ‘Next’ to finalize the addition.

NC eProcurement
Managing a Sourcing Event
5/13/2021 Managing a Sourcing Event 18
9. The ‘Pending Changes’ will display in the ‘Summary’ section where the user can review the change before finalizing it by clicking ‘Update’ in the top right.
10. A final review page will display giving the user four options for handling any responses that may have already been submitted by vendors. ‘Keep and email,’ ‘Keep, but do not email,’ ‘Do not keep, and email,’ and ‘Do not keep, and do not email.’ Select the option that makes the most sense given the situation per guidance from P&C and add a brief message in the box to let the vendors know that an ‘Addendum’ has been added. Click ‘Update Event’ to officially attach the ‘Addendum,’ and the user will be given the option to return to the Event or go the Project.
11. If the user selected one of the two options that end with “and email,” a new message will automatically post to the Event message board to notify internal responders of the ‘Addendum.’
Review the ‘Pending Changes’ and if correct, click ‘Update.’
Choose the best of the four options for handling any responses that have already been submitted, add a message to let the participants know an ‘Addendum’ was added, and click ‘Update Event.’

NC eProcurement
Managing a Sourcing Event
5/13/2021 Managing a Sourcing Event 19
VIII. Editing the Timing on a Published Event Sourcing Agents have the ability to change the timing on a published Event if necessary. Although it is not advised to reduce the amount of time vendors have to respond, there might be some scenarios where the timing needs to be extended, and there are two steps required, including updating the ‘Discovery Suppliers’ tab, before posting notice in IPS per P&C guidelines.
1. From the Event, click on the ‘Actions’ button in the top right. A popup menu will display and the ‘Timing’ options will be at the top. Click on ‘Extend Timing.’
2. On the subsequent ‘Extend Time’ page, note the current start and end times, and then set a new, later end time. The new end time can be extended by either adding a specific additional ‘Duration’ or by setting a new ‘Fixed time.’ Once that new time is set, click ‘OK.’
3. The user will be returned to the ‘Overview’ tab and the new end time will be reflected in both the countdown clock in the top right and the ‘Timing Rules’ section down the page.
Click the ‘Actions’ button (obscured in this image) and select ‘Extend Timing’ from the popup.
Select a new end time by either including an additional ‘Duration’ or setting a new ‘Fixed time.’ Click ‘OK’ when complete.

NC eProcurement
Managing a Sourcing Event
5/13/2021 Managing a Sourcing Event 20
4. The user should then navigate to the ‘Discovery Suppliers’ tab and click ‘Manage Posting.’
5. In the ‘Response Deadline’ field, set the new ‘Due Date’ to match the date updated during the ‘Extend Time’ step. Be sure to also update any text referring to the ‘Due Date’ in the ‘Description’ field.
Note: If the new date selected is less than five days from the current date, a warning message will appear to notify the user. No action is needed to override the message.
Navigate to the ‘Discovery Suppliers’ tab and click ‘Manage Posting.’
Set the new date in the ‘Response Deadline’ field to match the date of the extended timing, and be sure to also update any reference to that date in the ‘Description’ field.

NC eProcurement
Managing a Sourcing Event
5/13/2021 Managing a Sourcing Event 21
6. When all edits have been completed, click the ‘Update on Ariba Discovery’ button in the bottom right to finalize the changes so that the ‘NCEP URL’ link posted in IPS stays active for the duration of the extended event. Note: When a change is made to the timing of a published event, the Sourcing Agent should update IPS accordingly. Please refer to P&C’s guidance for specific instructions.
IX. Reviewing Responses and Requesting Clarification or a BAFO When the Event reaches the response due date, the event status becomes ‘Pending Selection.’ At this point the user can open the ‘Envelope’ to review the responses.
1. When the bidding is closed, the Event will go to a ‘Pending Selection’ status. At that time, the user can click the ‘Actions’ button in the top right (obscured by the popup menu in the image below) and select ‘Open Envelope’ to begin to review the bids.
When the Event goes to ‘Pending Selection’ status, the user can select ‘Open Envelope’ from the ‘Actions’ dropdown menu on any Event tab to begin reviewing the vendor responses.
Clicking ‘Update on Ariba Discovery’ will finalize the changes. If the new date selected is within 5 days of the current day, a warning message will display, but the user does not need to take any action.

NC eProcurement
Managing a Sourcing Event
5/13/2021 Managing a Sourcing Event 22
2. The ‘Open Envelope Confirmation’ page will display a list of the participating vendors. Click ‘Open Envelope’ to compare the responses.
3. Navigate to the ‘Content’ tab if not already there and scroll down to see the responses revealed to the right of Sections 4 through 7. The vendor’s name will display at the top of the column, and if there are several responses, the user will have to keep scrolling to the right to see them all.
Click the ‘Open Envelope’ button to see the concealed responses for the all vendors who responded.
On the ‘Content’ tab, the envelope icons are all open, and the vendor responses are now visible to the right of the questions. Note the vendor’s name at the top of the column. Only one set of responses is visible here, but scrolling to the right would show other vendor responses.
An automated email will be sent to participating vendors to alert them when the envelope has been opened. Uncheck the box to prevent this if desired.

NC eProcurement
Managing a Sourcing Event
5/13/2021 Managing a Sourcing Event 23
4. If the user manually set up the Event to contain multiple envelopes and had opened and reviewed the contents of ‘Envelope 1,’ they would click on the ‘Actions’ button again and select ‘Choose suppliers for next envelope’ from the dropdown menu.
5. The ‘Choose suppliers for next envelope’ page will display, and users can select for which vendors they’d like to see pricing information. It can be for all vendors, or they can choose to exclude certain vendors if the information they saw in ‘Envelope 1’ excluded them from moving on in the process. Check the boxes next to the vendors of interest and click the ‘Unseal Next Envelope’ button.
6. Back on the ‘Content’ tab, click the ‘Actions’ button and select ‘Open Envelope’ from the dropdown menu.
Click the ‘Actions’ button and select ‘Choose suppliers for next envelope’ from the dropdown.
Select the vendors for which to see the contents of ‘Envelope 2’ by checking the box next to their name (in this example only one vendor has been selected, but in most situations, multiple vendors will be chosen) and click ‘Unseal Next Envelope.’
Click the ‘Actions’ button again and select ‘Open Envelope’ to see the contents of ‘Envelope 2.’

NC eProcurement
Managing a Sourcing Event
5/13/2021 Managing a Sourcing Event 24
7. The ‘Open Envelope Confirmation’ page will display listing all participating vendors. Click ‘Open Envelope’ to compare the responses for the pricing information contained in ‘Envelope 2.’
8. On the ‘Content’ tab, ‘Envelope 2’ in Section 5 (for this example) is now open. On the right side the user will now see the Pricing Response documents the vendors uploaded that were previously concealed. Click on the attachment and select ‘Download this attachment’ from the popup to download and review the pricing submittals.
Note: There is an option in the ‘Actions’ dropdown menu to ‘Download All Supplier Attachments’ where users can mass-select vendors and sections and download everything all at once.
9. Before fully reviewing and evaluating all responses against each other, take the information gathered and create a ‘Preliminary Bid Tabulation with Vendor Name and Product ID Only’ and post that on IPS. Note: The ‘Report’ tab on the Event has a button called ‘Download Reports.’ Selecting ‘Question and Terms Report’ may help in providing all vendor response information in Excel format. If users included ‘Line Items’ in the Event ‘Content,’ the ‘Full Bid Data Report’ option provides a helpful Excel export of that information
Click the ‘Open Envelope’ button to see the ‘Envelope 2’ responses for the selected vendors.
‘Envelope 2’ is now open and the Vendor Pricing documents are now available for download. Click on the attachment and then click ‘Download this attachment.’

NC eProcurement
Managing a Sourcing Event
5/13/2021 Managing a Sourcing Event 25
10. While reviewing the vendor responses, it may be necessary to seek clarification with certain vendors or request a BAFO. This communication will be made through the Event message board. Navigate to the ‘Messages’ tab and click the ‘Compose Message’ button at the bottom of the screen.
11. On the ‘Compose New Message’ page, select the recipients of the message. Unlike adding an ‘Addendum’ where the audience is everyone, in a situation where the user is seeking clarification or a BAFO, the message will likely be directed to a smaller group of participants, if not just one. Click the radio button next to ‘Selected Participants,’ enter a more specific ‘Subject,’ and write an informative message in the body. Attach a ‘Request for Clarification’ form (the template for which can be found in the ‘Sourcing Project Documents’ folder on the ‘Documents’ tab of the Project). Then click ‘Select Participants’ to narrow down the recipient group.
12. The ‘Select Participant For Message’ popup will display, and the user can select to which vendor(s) the message should be sent; next, the user can click ‘OK,’ and then click ‘Send’ back on the ‘Compose New Message’ page. The new message will display on the ‘Messages’ tab, and the user will wait for a response from the selected vendor before making any more decisions.
Click ‘Compose Message’ at the bottom of the Event ‘Messages’ tab to initiate communication with vendors.
Select the radio button next to ‘Selected Participants’ to limit the recipients of the message. Once the ‘Subject’ and message have been updated, and the attachment has been added, click the ‘Select Participants’ button.
Select the specific vendor(s) to receive the message and click ‘OK.’
NC eProcurement
Managing a Sourcing Event
5/13/2021 Managing a Sourcing Event 26
13. If the user needs to request a BAFO from a specific vendor, the request will begin with a targeted message as demonstrated above, but the user should attach a ‘Request for BAFO’ form instead of a ‘Request for Clarification’ form. In a ‘Lite’ Sourcing Project, there is no ‘Task’ associated with requesting a BAFO (there is in a ‘Full’ Sourcing Project), but a ‘Request for BAFO Template’ document is available on the ‘Documents’ tab of the Project.
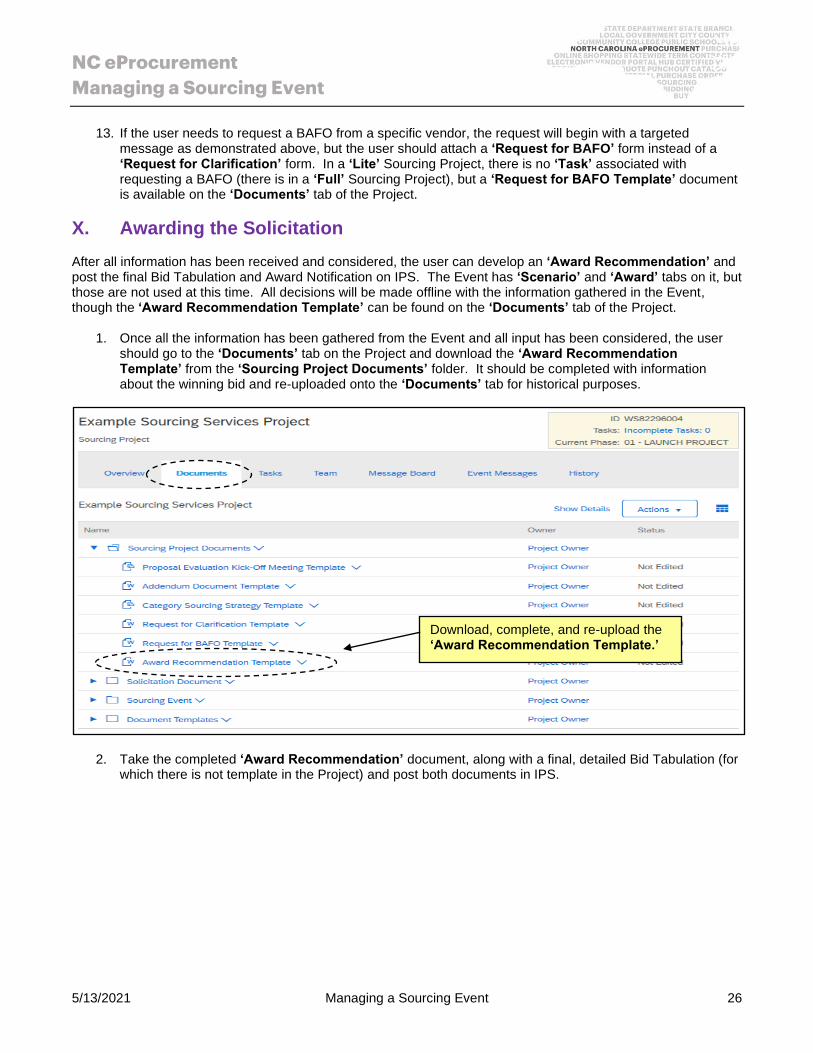
X. Awarding the Solicitation After all information has been received and considered, the user can develop an ‘Award Recommendation’ and post the final Bid Tabulation and Award Notification on IPS. The Event has ‘Scenario’ and ‘Award’ tabs on it, but those are not used at this time. All decisions will be made offline with the information gathered in the Event, though the ‘Award Recommendation Template’ can be found on the ‘Documents’ tab of the Project.
1. Once all the information has been gathered from the Event and all input has been considered, the user should go to the ‘Documents’ tab on the Project and download the ‘Award Recommendation Template’ from the ‘Sourcing Project Documents’ folder. It should be completed with information about the winning bid and re-uploaded onto the ‘Documents’ tab for historical purposes.
2. Take the completed ‘Award Recommendation’ document, along with a final, detailed Bid Tabulation (for which there is not template in the Project) and post both documents in IPS.
Download, complete, and re-upload the ‘Award Recommendation Template.’

NC eProcurement
Managing a Sourcing Event
5/13/2021 Managing a Sourcing Event 27
3. Now that solicitation has been awarded, return to the Event to close it. Even though an award has been issued, the status will still read ‘Pending Selection’ because the award was determined outside of the Event. To manually close the Event, click the ‘Actions’ button in the top right and select ‘Close Event.’
4. The ‘Close Event’ warning will display reminding the user that ‘Closed’ Events cannot be reopened, which is okay because they can still be accessed for important historical information. Click ‘OK.’
5. The Event status will update to ‘Completed.’ Now navigate back to the ‘Overview’ tab of the Project to mark that as ‘Completed,’ too. Click ‘Actions’ at the top of the ‘Overview’ tab and select ‘Edit Overview’ from the dropdown menu.
Select ‘Close Event’ from the ‘Actions’ dropdown to manually close the Event.
Click ‘OK’ to manually close the Event.
On the Project ‘Overview’ tab, click ‘Actions’ and select ‘Edit Overview.’

NC eProcurement
Managing a Sourcing Event
5/13/2021 Managing a Sourcing Event 28
6. On the next page, click the dropdown next to ‘Project State’ and select ‘Completed,’ then click ‘OK.’
7. The Status of both Project and Event will now reflect ‘Completed’ and will display as such in the ‘My Documents’ portal on the ‘Sourcing’ tab. The next step will be to create a ‘Contract Workspace’ from the completed Sourcing Project.
Click the dropdown arrow next to ‘Project State’ and select ‘Completed.’
Both the ‘Sourcing Project’ and ‘Sourcing Event’ display as ‘Completed’ in the user’s ‘My Documents’ portlet.