MALAR RIA - IRIS PAHO Home
125
MANUAL FOR THE MICROSCOPIC DIAGNOSIS OF MALAR RIA THIID EDITION PAN AMERICAN HEALTH ORGANIZATION Pan American Sanitary Bureau, Regional Office of the WORLD HEALTH ORGANIZATION 1968-
-
Upload
khangminh22 -
Category
Documents
-
view
4 -
download
0
Transcript of MALAR RIA - IRIS PAHO Home

MANUAL FOR
THE MICROSCOPIC DIAGNOSIS
OF
MALAR RIA
THIID EDITION
PAN AMERICAN HEALTH ORGANIZATION
Pan American Sanitary Bureau, Regional Office of the
WORLD HEALTH ORGANIZATION
1968-

Fie copyPan Americaun co aB
Liberar
MANUAL FOR
THE MICROSCOPIC DIAGNOSIS
OF
MALARIATHIRD EDITION
Scientific Publication No. 161 October 1968
PAN AMERICAN HEALTH ORGANIZATIONPan American Sanitary Bureau, Regional Office of the
WORLD HEALTH ORGANIZATION525 Twenty-Third St., N.W.
Washington, D.C. 20037

Prepared by:
DR. A. J. WALKER
Consultant in Parasitology
Malaria Eradication Program
(PAHO/WHO)
ii

CONTENTS
INTRODUCTION ...................................
Part I. The Malaria Parasite
1. The life cycle of the malaria parasite ............... 3
2. Behavior of the infections with P. falciparum and P.vivax in the liver of man ........................ 5
3. Blood in relation to the diagnosis of malaria ........ 10
4. General characteristics of Plasmodium species in theperipheral blood .............................. 15
5. Characteristics of individual species in the peripheralblood ....................................... 19
Part II. Preparation of Blood Slides
6. The making of thick blood films .................. 33
7. Theory of blood stains ......................... 35
8. Staining techniques-General . ............ . 40
9. Pre-treatment of thick blood films ................ 42
10. Staining techniques-Detail ..................... 45
Part III. Microscopic Examination
11. Microscopes .................................. 51
12. Illumination .................................. 55
13. Technique of microscopic examination ............ 60
14. Recording and reporting of results ................ 63
15. General procedures suggested for the orderly exam-ination of stained slides ........................ 65
16. Microscopic slides ............................. 66
Part IV. Laboratory Services
17. Laboratory services ........................... 81
18. Equipment .................................. 83
iii

Appendices:
The Ten "Deadly Sins" in Thick Film Microscopy ............ 90
1. Microscopy of malaria eradication .................... 91
2. The behavior of P. falciparum gametocytes ............ 93
3. Doughnut-shaped red blood cells ..................... 94
4. Diagrammatic outlines of parasites observed ............ 95
5. Template ........................................ 97
6. The staining phenomenon of Schaffner ................ 98
7. Shute's saline stain technique ........................ 99
8. Staining of thin blood smears ........................ 100
9. Restaining of thick blood films ....................... 102
10. Library of teaching slides ............................ 103
11. Plastic dropping bottle .............................. 104
12. Pencils used for marking in blood .................... 104
13. Humigraph ...................................... 105
14. How to tighten coarse adjustment of microscope ......... 106
15. Use of micro object markers ......................... 107
16. Immersion oil ..................................... 109
17. Types of microscope lamps .......................... 111
18. Rubber ear syringe ................................ 112
19. Maximum-Minimum thermometer .................... 113
20. "Photovolt" photoelectric exposuremeter ............... 114
21. Continuing review of microscopic equipment ............ 115
22. Definitions ....................................... 116
iv
INTRODUCTION
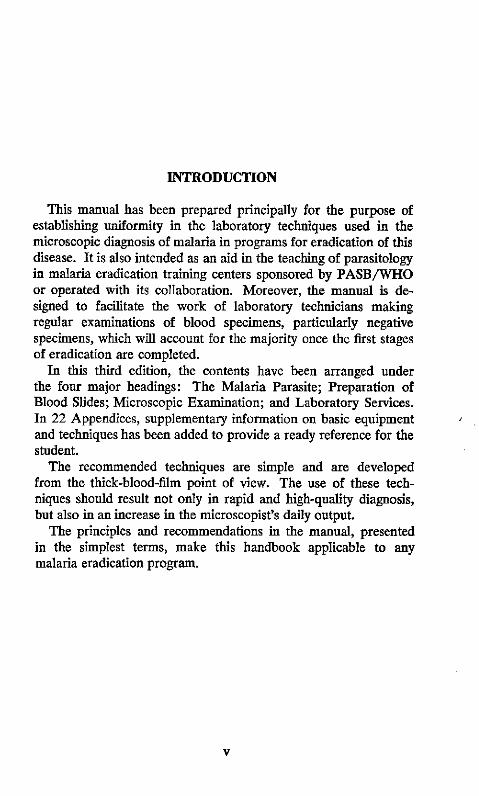
This manual has been prepared principally for the purpose ofestablishing uniformity in the laboratory techniques used in themicroscopic diagnosis of malaria in programs for eradication of thisdisease. It is also intended as an aid in the teaching of parasitologyin malaria eradication training centers sponsored by PASB/WHOor operated with its collaboration. Moreover, the manual is de-signed to facilitate the work of laboratory technicians makingregular examinations of blood specimens, particularly negativespecimens, which will account for the majority once the first stagesof eradication are completed.
In this third edition, the contents have been arranged underthe four major headings: The Malaria Parasite; Preparation ofBlood Slides; Microscopic Examination; and Laboratory Services.In 22 Appendices, supplementary information on basic equipmentand techniques has been added to provide a ready reference for thestudent.
The recommended techniques are simple and are developedfrom the thick-blood-film point of view. The use of these tech-niques should result not only in rapid and high-quality diagnosis,but also in an increase in the microscopist's daily output.
The principles and recommendations in the manual, presentedin the simplest terms, make this handbook applicable to anymalaria eradication program.
v

PART I
The Malaria Parasite


1. THE LIFE CYCLE OF
THEMALARIA PARASITE
A practical training aide for use in conjunction with this manualis the sound movie in color-The Life Cycle of the Malaria Para-site-edited by Prof. H. E. Shortt and distributed by the ImperialChemical Industries in both English and Spanish. It depicts clearlyand schematically the life cycle of the Plasmodium in the mosquitoand in man. The final part, showing the thin smear diagnosis ofP. vivax malaria, may be deleted as it predates the basic principlesused in this manual.
Another useful aide is the short, black-and-white sound moviein English (USPHS, No. M-138B, CDC, Atlanta, Georgia), pre-senting a cinematographic record of a mosquito in the actual actof biting the skin of a hamster's cheek. A final portion of this film,taken with phase microscopy, shows the exflagellation of the malegametocyte and the fertilization of a female by one of the micro-gametes. Thick blood films drying very slowly under suitabletemperature and humidity conditions can demonstrate partial andeven complete exflagellation. This is the major point of diagnosticsignificance contained in this film.
The female Anopheles mosquito is driven, by the urge to secureblood for the maturing of her already fertilized eggs, to bite awarm-blooded animal. If that animal is a man in whom an infec-tion with one of the species of the malaria parasite is well estab-lished, the blood will contain sexual forms of the parasite as wellas the asexual forms which are responsible for the symptoms ofthe disease.
These asexual forms, on reaching the mosquito's stomach,quickly die and are digested, but the sexual forms-gametocytes-escape from the human red blood cells ingested by the mosquito.The smaller male gametocyte soon develops spermatozoa-likemotile elements called microgametes (exflagellation), which detachthemselves from its residual body and actively move away in thesurrounding liquid of the mosquito's stomach. The larger femalegametocyte undergoes some maturation process which enables themotile microgamete to enter and move actively within the cyto-plasm of the female macrogamete.
3

4
Within a few hours, a fertilized ookinete has developed and hasmoved between the cells lining the mosquito's stomach, coming torest beneath the membrane separating the lining cells from thebody cavity of the mosquito. Here, the united nuclear materialbegins to divide in the large, highly refractile cell, which still con-tains the original pigment of the female gametocyte. The encystedookinete, now a spherical oocyst, becomes larger and larger, pene-trating farther into the cavity around the intestinal tract of themosquito. After two to three weeks the oocyst, distended bythousands of tiny hair-like structures, called sporozoites, each con-taining a tiny piece of chromatin, bursts and releases the maturesporozoites into the fluid-filled cavity of the mosquito. The currentof the body fluid carries the sporozoites forward into the thoraxof the mosquito. Once in contact with the salivary gland cells,they enter them and ultimately reach the salivary ducts with thesaliva.
The USPHS film, which shows the mosquito in feeding action,indicates that the proboscis probes the skin of its victim repeatedlyuntil it reaches the lumen of a capillary or venule. Saliva is releasedby the mosquito during the biting and sucking operations, and themalaria sporozoites are injected into the victim intravascularly, asif by a needle in a vein. By subinoculation they can be shown tocirculate up to 10 minutes, but rarely after 30 minutes. Since theentire amount of blood in the human body passes through the liverevery three minutes, in man it is relatively simple for numbers ofsporozoites to enter liver cells immediately adjacent to blood-filled liver sinusoids. Probably many are lost to phagocytes, butthose which are successful begin their liver multiplication imme-diately and this process lasts either 6, 8, 9, or 11 full days, depend-ing on the malaria species. The growing form in the cytoplasm ofa liver parenchymal cell expands and its nucleus divides repeatedlyuntil the large cyst-like, irregular-shaped, mature schizont ruptures.Numbers of the liver merozoites that result from this rupture findtheir way between neighboring liver cells to the nearest sinusoidthat contains the human red blood cells. Thus, the pre-erythrocyticstage is over and the disease-producing erythrocytic stage begins.At the end of each 48- or 72-hour period, many mature erythro-cytic schizonts rupture and numbers of tiny merozoites hasten toenter other red blood cells before they are captured by the phago-cytic monocytes and other cells.
5
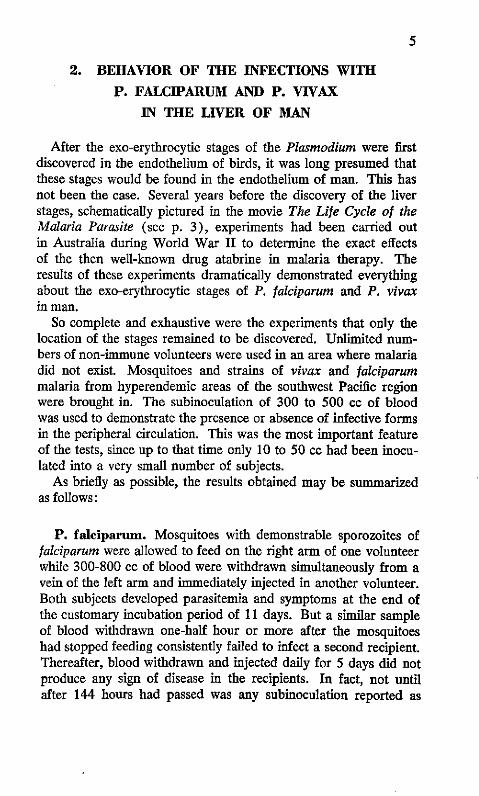
2. BEHAVIOR OF THE INFECTIONS WITHP. FALCIPARUM AND P. VIVAX
IN THE LIVER OF MAN
After the exo-erythrocytic stages of the Plasmodium were firstdiscovered in the endothelium of birds, it was long presumed thatthese stages would be found in the endothelium of man. This hasnot been the case. Several years before the discovery of the liverstages, schematically pictured in the movie The Life Cycle of theMalaria Parasite (see p. 3), experiments had been carried outin Australia during World War II to determine the exact effectsof the then well-known drug atabrine in malaria therapy. Theresults of these experiments dramatically demonstrated everythingabout the exo-erythrocytic stages of P. falciparum and P. vivaxin man.
So complete and exhaustive were the experiments that only thelocation of the stages remained to be discovered. Unlimited num-bers of non-immune volunteers were used in an area where malariadid not exist. Mosquitoes and strains of vivax and falciparummalaria from hyperendemic areas of the southwest Pacific regionwere brought in. The subinoculation of 300 to 500 cc of bloodwas used to demonstrate the presence or absence of infective formsin the peripheral circulation. This was the most important featureof the tests, since up to that time only 10 to 50 cc had been inocu-lated into a very small number of subjects.
As briefly as possible, the results obtained may be summarizedas follows:
P. falciparum. Mosquitoes with demonstrable sporozoites offalciparum were allowed to feed on the right arm of one volunteerwhile 300-800 cc of blood were withdrawn simultaneously from avein of the left arm and immediately injected in another volunteer.Both subjects developed parasitemia and symptoms at the end ofthe customary incubation period of 11 days. But a similar sampleof blood withdrawn one-half hour or more after the mosquitoeshad stopped feeding consistently failed to infect a second recipient.Thereafter, blood withdrawn and injected daily for 5 days did notproduce any sign of disease in the recipients. In fact, not untilafter 144 hours had passed was any subinoculation reported as

6
successful. This means that a period of 6* full days elapsed beforethe blood of the person bitten could induce a demonstrable infec-tion in another individual.
Daily subinoculations continued to be positive in the secondindividual until a curative amount of mepacrine had been taken orthe patient had developed sufficient immunity for a spontaneouscure. Once any of these cases became negative they remained so,but all were followed for one year.
On the other hand, the weekly subinoculations were always posi-tive from those cases that had received insufficient medication,although they remained symptom-free for several weeks or monthsbefore relapsing.
This demonstrated conclusively that there was a sharply definedperiod of 6 full days during which some type of development ofthe falciparum infection continued outside the peripheral circula-tion.
It was repeatedly demonstrated that an individual who received100 mg of mepacrine daily for 7 days previous to bites by falci-parum-infected mosquitoes, and for a minimum of 3 weeks there-after, never developed patent parasitemia or symptoms, althoughoccasionally subinoculations made on days 9 to 13 after treatmentwere positive. This was the first experimental proof that a drugcould completely eliminate the falciparum infection. It also demon-strated that 3x100 mg mepacrine tablets administered daily for 8days could produce a radical cure of this infection.
Although there were some cures of individual cases treated withquinine, this drug could not be depended upon to produce a cure offalciparum malaria in more than 50 per cent of the cases. Itsreported successes could well have been assisted by the develop-ment of a high degree of immunity. Proof of the correctness of thisobservation is the virtual disappearance of blackwater fever fromthose areas where mepacrine replaced quinine, either for suppres-sive or radical treatment.
P. vivax. Similar experiments were repeated for vivax malariawith equal success but with markedly different results. Vivax sub-inoculations on the 7th and 8th days were negative. Only when8 full days had elapsed did the recipients become infected, evenwhen simultaneously bitten by vivax-infected mosquitoes and
* talciparum-6 days; vivax-8 days; ovale-9 days; malariae-1 11 days.

7
falciparum-infected mosquitoes. Falciparum appeared on day 7 andday 8; day 9 produced both.
The blood of the vivax-infected person continued to be positivethroughout the duration of the primary attack of 3 to 5 weeks, oruntil curative treatment was given. It then became negative andweekly subinoculations for as long as 2 to 5 months completelyfailed to infect recipients. Not until near the time when a relapsemight normally occur did the first positive subinoculations appear.When a relapse, with its patent parasitemia and symptoms, sub-sided, subinoculations continued to be positive for a number ofdays and then became negative. They remained so until within afew days of the next relapse, if such occurred. With the dailyadministration of mepacrine, as indicated above, transient parasi-temias were not encountered as with falciparum, but even if theadministration was continued for 3 weeks after the biting, parasitesand symptoms usually appeared in the patient shortly after thedrug was discontinued. The curative treatment with mepacrine,which had proved so effective in falciparum, always controlled theprimary attack and eliminated the parasitemia, but the same treat-ment did not prevent the subsequent development of a relapse invivax infections.
The situation in patients infected by blood inoculation ratherthan by mosquito bites was quite different; these individuals re-ceived only the asexual erythrocytic forms. As long as these per-sisted in the blood, subinoculations were positive even though thenumber of parasites in the inoculum was submicroscopic. Thepatients with either falciparum or vivax were readily cured withsmaller amounts of drugs; once they became negative to subinocu-lation they continued to remain so. Such experiments showedbeyond -all possibility of doubt that there was a pre-erythrocyticstage in the falciparum infection of 6 days' duration, after whichtime it was apparently completely exhausted, and that once subse-quent asexual infection was eliminated the patient was completelycured.
In sporozoite-induced vivax, the pre-erythrocytic stage lasteda full 8 days. However, evidently it did not exhaust itself entirelybecause after a period when no circulating forms could be detectedin the blood, one or more renewals of parasitemia and clinicalactivity were frequently, though not constantly, encountered. Thisnever occurred when the infections were induced by injections ofblood. The deductions made from these experiments suggested theexistence of a hidden developmental stage which produced, in

8
falciparum, merozoites which infected only red blood cells andnothing else, whereas in vivax it was postulated that this hiddenstage produced merozoites infective not only to the red blood cellsbut also to some cells capable of maintaining them in a site thenunknown.
The marked difference in exo-erythrocytic behavior betweenfalciparum and vivax justifies the creation of a new genus: Lav-erania. Therefore, P. falciparum may ultimately be called L.falcipara.
The following points are based on a full understanding of theabove-described experiments:
1. Falciparum malaria is entirely curable by an adequate doseof blood schizontocides.
2. All vivax infections do not necessarily relapse; up to 30per cent do not.
3. Medication that will eradicate falciparum infection will noteliminate vivax relapses, which, if they occur, rarely if evercontinue to do so for more than 3 years.
4. Prolonged suppressive medication may also eradicate falci-parum, but vivax is prompt to appear clinically when medi-cation is discontinued.
Apparently, the suggestion to explore the liver for these hiddenstages originated in an observation made by Garnham in EastAfrica, where he had noted tiny vesicles on the surface of the liverof monkeys whose blood contained the gametocytes of Hepato-cystis kochi. These cysts, which were later shown to containnumerous merozoites, were never found in uninfected animals.
The liver stages were first demonstrated by Shortt and Garnhamin a monkey infected with P. cynomolgi and shortly thereafter in aninduced infection of P. vivax in man. The liver stage of P. falci-parum in man was demonstrated in England and in America sometime afterward. In 1953 P. ovale was shown to have an hepaticstage of 9 days' duration. In 1959 Bray found that the hepaticstage of P. malariae can last 11 days. In all four species the actualliver stages are similar in appearance. The youngest forms arefound in the cytoplasm of a single liver cell; the chromatin dividesby binary fission. At maturity, vivax, malariae, and ovale containhundreds of merozoites, whereas the falciparum liver schizont maycontain several thousand. The only damage to the liver is ap-parently a compression of a few adjacent cells, as no reactionarycellular infiltration is seen. When the schizont ruptures, naked
9
merozoites are extruded between adjacent liver cells until a liversinusoid containing red blood cells is encountered. At this pointthe erythrocytic stage begins.
Another monkey plasmodium, P. knowlesi, which has a 24-hourerythrocytic cycle and a pre-erythrocytic stage lasting 5½/2 days,has been used repeatedly to infect man artificially.
More than 100 successful infections of man with P. cynomolgiand other simian species of malaria have been studied in 1960-62.
DIAGRAM 1
SCHEMATIC DIAGRAM OF THE ROLE OF THE EXO-ERYTHROCYTIC STAGE IN THE PRIMARYATTACK AND RELAPSE OF VIVAX MALARIA
PRIMARY ATTACK WITHOUT RELAPSES
o 1 % RELAPSE
E _
5 .... .......... . . .
HEPATKICI e : * ."E R EE 4
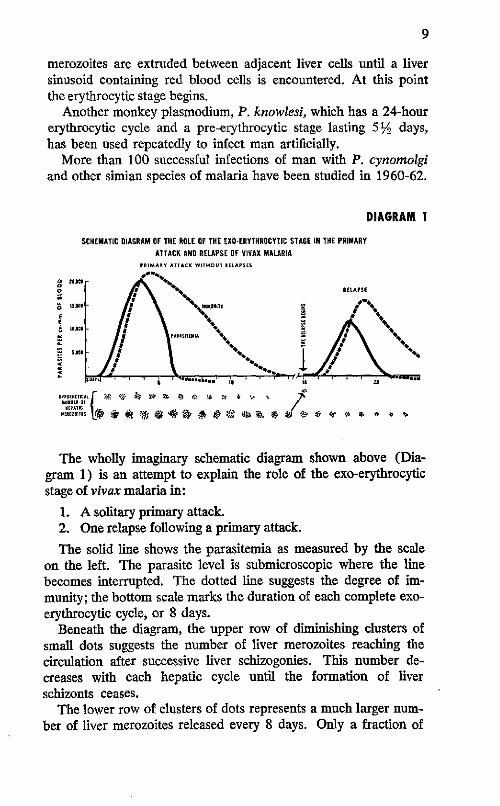
The wholly imaginary schematic diagram shown above (Dia-gram 1) is an attempt to explain the role of the exo-erythrocyticstage of vivax malaria in:
1. A solitary primary attack.2. One relapse following a primary attack.
The solid line shows the parasitemia as measured by the scaleon the left. The parasite level is submicroscopic where the linebecomes interrupted. The dotted line suggests the degree of im-munity; the bottom scale marks the duration of each complete exo-erythrocytic cycle, or 8 days.
Beneath the diagram, the upper row of diminishing clusters ofsmall dots suggests the number of liver merozoites reaching thecirculation after successive liver schizogonies. This number de-creases with each hepatic cycle until the formation of liverschizonts ceases.
The lower row of clusters of dots represents a much larger num-ber of liver merozoites released every 8 days. Only a fraction of

10
these are required to initiate the parasitemia of a relapse (as at theend of the 18th liver cycle), provided the immunity is so low thatthe progeny of the first erythrocytic schizogony escapes destructionand successfully invades new red blood cells. One must perhapsassume that the merozoites coming directly from the liver are un-affected by the immunity of the host; however, those produced bythe first and subsequent erythrocytic schizogonies undoubtedly aresusceptible to immunity already developed.
It may well be that the relapses derive from latent or very slowlygrowing liver schizonts. Latent development would explain alsothe delayed primary attacks of the so-called temperate climatevivax.
3. BLOOD IN RELATION TOTHE DIAGNOSIS OF MALARIA
Blood is the medium in which malaria parasites are found. Sinceit is the vehicle which brings the parasite into the microscopic fieldof vision of the person who is searching for it, it is highly desirableto know something about the blood itself.
Blood consists of a liquid called plasma, wherein are suspendedthe cellular elements (erythrocytes, leukocytes, blood platelets),which are developed in the bone marrow and released to theperipheral circulation as required.
Erythrocytes, or red blood cells, are biconcave discsl whichappear singly or in groups, or like rolls of coins called "rouleaux."When slight pressure is applied to fresh blood under a coverslip,they can be compressed or greatly distorted without injury. Theyare tawny yellow in color because of their hemoglobin-filled con-tents, in which parasites, if present, can be recognized only if theyare large enough to contain pigment. The examination of freshblood, therefore, is not practical. Red blood cells have a maxi-mum life of 120 days.
Erythrocytes are also derived from a type of bone marrow celland the early stages contain a nucleus. Just before these develop-ing erythrocytes are released into the circulation, the nucleus islost and these young red blood cells of varying size can contain
'See Diagram, Appendix 3, p. 94.

11
blue-staining elements (seen only with special staining in the thinsmear), variously described as reticulum (reticulocytes), poly-chromasia, and punctate basophilia, all of which disappear in 1-3days after the cells are released into the circulation. In thick bloodfilmsl not only blood platelets but bluish masses ranging from thesize of a small lymphocyte to a large spread-out polymorphonu-clear leucocyte can be seen in the otherwise clear spaces betweenthe leukocytes. These bluish masses are the remains of youngerythrocytes (reticulocytes). They vary in appearance from a finehaze, through mottled cloudiness, to dense blue dots of variablesize. Their numbers also vary from 1-3 per microscopic field innormal blood, to a countless number where a malaria or otherinfection has resulted in a severe anemia which has forced the bonemarrow to put out large numbers of cells before the red-cell matu-ration is complete.
Under changing conditions of their surroundings, the fresh redblood cells may alter their appearance greatly. In serum or in0.85 per cent solution of sodium chloride the smooth, round out-line of the cell is preserved. If the amount of salt is increased to1.5 per cent, the cell shows little protuberances of its outer sur-face, resembling those of a submarine contact mine. Such cellsare termed "crenated" and may even retain this appearance afterstaining. Too much or too little salt in the solution causes the cellsto rupture and to release their hemoglobin, and the solution waterbecomes and remains red.
Exposure to strong alcohols, application of heat, or the passageof time will "fix" the hemoglobin in the cells and dehemoglobini-zation will not occur. Hence the need to stain thick films as soonas possible after they are taken.
Leukocytes, or white blood cells, are transparent, highly re-fractile, and may show movement of their cytoplasm. In general,their nuclei should be rich blue-violet in color. They vary in sizeand shape, and the cytoplasm may be clear or granular, dependingon the type of cell. The life of a leukocyte is short-3-5 days only-so that the appearance of some of the polymorphonuclear typesvaries from compact, clear-cut, well-stained individuals to large,pale, irregular, and often distorted cells. Diagram 2 gives someexamples of the common leukocytes observed in the examinationof a thick blood film.
1 See Section 6, pp. 33-35.

12
DIAGRAM 2
LEUKOCYTES
POLYMORPHONUCLEAR LEUKOCYTES
EOSINOPHIL
SMALL LYMPHOCYTE
(
tiA
PLATELETS
o
MONOCYTE LARGE LYMPHOCYTE
,.i.o ,;,` - ,# .' .
·, .
CELL REMAINS
- :* 7:
ERYTHROCYTES
..·; . .l.

13
Blood platelets (Diagram 2) do not have a nucleus, originat-ing as they do from the cytoplasm of an enormous cell of the bonemarrow called a megakaryocyte. They should be recognized asseparate individuals and in groups. They are of different densitieson the same microscope slide but the color can range from pinkto violet (never blue) in different specimens. They vary in sizeand shape; in blood which has dried slowly or has been defi-brinated, they may resemble almost anything. If slides have beenlong delayed before staining, platelets may stain so deeply as tohide small parasites.
Detection of malaria parasites in the blood. If malariaparasites cannot be found on microscopic examination, this doesnot necessarily mean that they were not present at the momentthe blood was taken; possibly their numbers were too small to bedetected in ordinary examination. For example, in one instancein Ghana, women in a prenatal clinic were carefully followed bymeans of regular thick-blood-film examinations of 100 microscopicfields each. Gametocytes of P. falciparum were found in 7 percent. When 10 thick films were made simultaneously and ex-amined for 100 fields each, 20 per cent showed gametocytes. In-terestingly enough, 6 examinations were sufficient to encounter 18per cent positive cases and 4 further examinations produced only2 per cent more cases.
The only certain way to prove that a person has no malariaparasites in his blood is to inoculate 2-400 cc of blood into ahuman volunteer. If no parasitemia develops, the blood was nega-tive; if it does, the original infection was submicroscopic when theblood was drawn.
It should be appreciated as well that the blood of a normal,healthy, well-nourished individual can be quite different from thatof a person who has had malaria or some other debilitating illnessover a considerable period of time. Changes in the usual appear-ance of parasites may be produced by alterations in the shape ofthe red blood cells themselves, quite independent of the species ofmalaria infection.
Despite the way parasites appear in the dehemoglobinized thickblood film, malaria parasites are incapable of an independent ex-istence. Except for the briefest period when they are moving fromone cell to another, they are intracellular in red blood cells.
When whole blood is allowed to stand in a test tube, it coagu-lates as a result of the interaction of the platelets and elements of

14
the blood plasma which produce fibrin. When the sponge-likemass of fibrin, which entangles most of the red blood cells, con-tracts to form a clot, clear yellow serum separates out after stand-ing. Unless spread promptly, a drop of blood on a microscope slidewill clot in exactly the same fashion as in the test tube but withconsiderable change in the plasma; this affects the manner in whichthe preparation sticks to the slide. If the blood is stirred afterclotting begins, areas of different thickness and different concen-trations of cells are produced, which can easily be recognized byinspection with the low-power microscope objective. Streaks orclumps of leukocytes are seen instead of the even, regular distribu-tion of same in the promptly-spread preparation.
The liquid part of the blood contains such antibodies as areproduced by the body and provides liquid medium to keep cellsand parasites moist. Drying destroys both. The cellular portionprovides a variety of elements in the blood preparations which notonly give information about the patient but also aid in the appraisalof the quality of the preparation and its staining.
A drop of fresh blood placed on a slide, covered with a cover-slip, and illuminated with light greatly reduced by closure of theiris diaphragm of the microscope, may be examined under bothlow-power objective (10x) and the high power (43x). The oilimmersion objectivel may also be used if the cells are not movedby the focusing action.
Appearance of the Blood Elementsin a Well-Stained Thick Blood Film
Leukocytes. In general, the many-shaped nuclei of leukocytesshould be of a rich, blue-violet color, while the cytoplasm varieswith the type of cell. Neutrophiles have granules of different colorswhich are irregular in size, shape, and distribution. Staining ofinferior quality may make the cytoplasm so red that the uninitiatedmay make the error of classifying these cells as eosinophiles. Bycontrast, the cytoplasmic granules of the eosinophiles are so largeand regular in size, shape, and compactness that they can be recog-nized easily in the unstained state in which the nuclei cannot bedistinguished. The compact granules themselves are dark copper-red in color, inconspicuous rather than prominent and not bright-
1See Appendix 16, p. 109.

15
red to pink, which is the familiar color of eosin-stained tissue sec-tions. If one were to select a single feature which suggests inferiorquality of the staining, it could well be such an appearance ofthese granules.
Lymphocytes and monocytes (see Diagram 2, p. 12) haveonly a single mass of nuclear material. The small lymphocytesare extremely important to the microscopist because they serveas the unit for measuring size in the thick blood film, just as thered blood cell is similarly used in the thin blood smear. The smalllymphocyte is the most uniform cell in the blood and it measures8-10 microns. It probably survives in the blood stream about 100days. The cytoplasm of lymphocytes is pale blue, somewhat trans-parent, and sometimes it contains a few bright red granules.
Monocytes are, in the clinical sense, the most important cellsfor the patient and their numbers increase during the malaria in-fection. As active phagocytes, they are capable not only of takingup malaria pigment but even red blood cells containing maturemalaria schizonts. Their cytoplasm shows a fine blue-grey stromaand the nuclei have a more or less prominent cleft (Diagram 2).
4. GENERAL CHARACTERISTICS OF PLASMODIUMSPECIES IN THE PERIPHERAL BLOOD
Individual parasites vary in size, shape, and appearance exactlyas any multicelled animal.
Some individual forms of one species, namely, small gametocyte-like stages of P. vivax, may appear identical with larger stages ofP. malariae. In fact, the only form of the parasite that may beconsidered unique or typical is the P. falciparum gametocyte.
To achieve an accurate species diagnosis under microscopicexamination, it is necessary to have only a sufficient number ofdifferent examples of the parasite present to show the pattern ofvariation that is constant for each species. It will not suffice tomemorize a list of appearances which have been commonly ob-served in the thin blood smears of various species to which havebeen attributed specific characteristics that are not always valid.It is necessary that the examiner know the variations of forms

16
DIAGRAM 3
SCHEMATIC OUTLINEOF THE
ERYTHROCYTIC CYCLE IN MAN
* PIGMENT-\
' The cyclical development which every species goes through
whether observed in the blood or not
that are possible, not only in each of the different species but withdifferent conditions of the blood.
The examiner should always ask himself two questions witheach new parasitic form that comes into focus: (a) Is this trulya parasite? and (b) If so, does its appearance fit into the patternof variation that can be expected for the species suspected? (Dia-gram 3).
The answer to (a) is usually obtained by searching in the im-mediate vicinity for a parasite about which there is no doubt what-soever. The color and density of the chromatin is appraised, asis the appearance of the cytoplasm. If these are not similar in thenewly-found object, it is unlikely that it is a genuine organism.
Once it has been decided to consider the object a true parasite,the first question is: How many are present? The second: Doesits developmental stage fall within the range of development which,as learned by observation and experience, can be present at a cer-

17
tain point in the cycle of "X" species, or is this a stage that isnever present in the cycle of "X" species?
Owing to the fact that, for purposes of species diagnosis, thechecking of slides is mandatory, it has become important to know,once parasites are recognized, whether they are numerous or scanty.If they are numerous, it is likely that the diagnosis of the speciesis correct; when there are very few parasites confirmation may bedifficult. A system of symbols can give an approximation of thenumbers present.l
A minimum of 50 microscopic fields of a positive blood filmshould be covered before a definite diagnosis is made. If it is evi-dent that not all the forms pertain to "X" species, further exami-nation is necessary to confirm a suspicion that some specimens ofa second species are also present.
Broods.2 All species may have more than one brood of para-sites at the same time, as is demonstrated schematically in the filmby Shortt referred to on page 3. Although falciparum, vivax, andovale require 48 hours for maturation of the asexual erythrocyticforms, it is also possible, and not uncommon, for each to show adaily paroxysm. This daily paroxysm indicates the existence of twobroods of one of the foregoing species, or may reflect the presenceof three broods for malariae. Once the dominant brood is estab-lished, all others are suppressed.
Different broods arise from the liberation of liver merozoites atdifferent times in the primary attack of a mosquito-induced infec-tion. They may also appear spontaneously in a continuing infec-tion which has shown a regular single-brood periodicity for sometime. The infection need not be of sporozoite origin for the devel-opment of a second brood. Apparently, at the schizogony of asingle-brood infection (end of each 48-hour period), the majorityof the parasitized cells rupture within the same hour, and theremainder complete their division at various intervals before orafter the majority. If this takes place over a 5-hour period, insteadof one hour, and the majority rupture during the 3rd hour, some
'See Section 14, Recording and Reporting of Results, pp. 63-65.'Definition-Broods are unsynchronized population densities of the
parasites found in the peripheral blood which may result in abnormal(out-of-step) clinical symptoms of the patient. They are formed from varia-tion in the time of release of merozoites into the blood from the liver orfrom a natural difference in development which is exaggerated within fewcycles. They presumably could also result from a new infection by bitinginfectious mosquito (when the immunity is not already established).

18
DIAGRAM 4
THE ERYTHROCYTIC CYCLE IN MAN
t
o O o
(a~~~~~~~~~~(
3e
ce OH 4 808
aS I
i:
_ b ~ ~ ~ ~~~~~~~~~~~~ii
= S~~~~~~~~~~~~~~~~ii
H ~~~~~~~~~~~~~iS:<ia @ '' t~~~~~~~~~i@@
72 HOURS 48 HOURS

19
do not divide until 2 hours later. Those which began the schizo-gonic process did so 2 hours before the majority.
One cycle later, the offspring group which began schizogony isnow 4 hours ahead of the majority (the last groups complete theprocess 4 hours later). After enough cycles, there will be a con-siderable number of parasites matured 24 hours before and 24hours after the majority. Together, these may make up a sufficientnumber to produce another schizogony 24 hours in advance of theone caused by the majority, i.e., the dominant brood. Thus a newbrood is developed quite independently of the exo-erythrocyticstage.
Diagram 4 presents, in a condensed schematic manner, theerythrocytic cycle, as seen in the peripheral blood, of the threecommon species of malaria in man. It illustrates the three stages ofschizogony. At the top, merozoites are shown just after rupture ofthe mature schizont. These merozoites quickly enter the red cells(vivax on the right). Although stretching from the top to thebottom of the diagram, the cycle is a continuous one, and thesmallest form (shown at the top) is encountered immediately afterthe largest schizont ruptures (shown at the bottom). The diag-nosis of species will be greatly simplified if each parasite foundis mentally transferred to its appropriate position in this diagram-matic cycle. Gametocytes of the three species have a completelydifferent development, so their origin and growth is consideredapart from that of the asexual forms.
5. CHARACTERISTICS OF INDIVIDUAL SPECIESIN THE PERIPHERAL BLOOD
There are differences in the behavior of the individual speciesthat are responsible not only for the symptoms produced in thepatient but for the forms that are present in the blood as well.
P. falciparum. Apparently, when the falciparum merozoiteenters a red blood cell, its very presence produces some change inthe red blood cell itself, which might be described as a stickiness of itsexternal layer or membrane. It is certainly not due to any specificproperty of the cell, since falciparum merozoites enter young andold red blood cells indiscriminately, while vivax shows a preferencefor younger cells and malariae has an equally definite preferencefor old cells.

20
Diagram 5 shows the autopsy appearance of a fatal falciparuminfection. Perhaps it should first be explained that the well-knownappearance of parasites and parasitized cells, as seen in a well-stained blood smear, cannot be expected in tissue sections. Withthe customary hematoxylin and eosin staining the actual parasitesare rarely seen, but their presence is indicated by an amount ofpigment proportional to the size of the parasite during life.
DIAGRAM 5
A A-1
AUTOPSY APPEARANCE OF FATAL P. falciparum INFECTION
Chromatin and cytoplasm can be distinguished in material thathas been placed in the appropriate fixative promptly and stainedwith Tomlinson's stain.'
A survey of any tissue, particularly the brain, will demonstratethe frequency with which parasitized red blood cells are foundalong the walls of small blood vessels where both flow and pres-sure are low. In smaller vessels where there is little or no turbu-lence, these lightly-stuck parasitized red blood cells are not dis-lodged. Thus, a small venule may have its border completely linedwith parasitized red blood cells, while few if any red blood cellsshow the presence of parasites in the lumen of the vessel crowdedwith red blood cells (A of Diagram 5). Although A was first drawnin 1946 to help explain the phenomenon of stickiness, 8 serial
'Boyd, Mark F., ed.: Malariology. Philadelphia and London: W. B.Saunders Company, 1949, pp. 899-900.

21
sections from the brain of a fatal case of falciparum malaria whichoccurred in Costa Rica in 1959 showed the cross section of a smallvenule virtually identical with A, as shown in the reproduction ofphotomicrograph A-1.
More dramatically, the capillaries almost always show everysingle red blood cell having a spot of pigment which represents allthat is left of what was a parasite during life. What has taken placemay be understood if petechial hemorrhages from a ruptured capil-lary are found. Not one of the red blood cells making up the hem-orrhage will contain a parasite, because the parasitized cells inthese confined spaces are stuck to the endothelial lining (B). Withtheir well-known ability to accommodate themselves to a variety ofconstrictions and obstructions, the non-parasitized cells were ableto worm their way around the fixed cells (C) as long as somepressure existed and to escape through the opening which followedtoo severe damage to some of the lining cells. As long as theendothelium remains intact, hemorrhages are not encountered.
Death occurs not as the result of the existence of some toxicsubstance given off by the parasites, but rather from the inter-ference with the normal function of the vascular endothelium. Itis obvious that death occurs when the number of parasitized cellshas become so great that tissues depending on this vascular supplyfor their existence are deprived of essential oxygen, electrolytes,etc., especially if this condition exists in close relation to vital cen-ters. It is unlikely that death takes place at the time of schizogony,but rather just after a maximum number of newly-parasitized cellshave removed themselves from the circulating blood and arrangedthemselves over the surface of the vascular endothelium. It isprobable that the dramatic apparent improvement often noted insevere cerebral infections coincides with a schizogony which tem-porarily frees the endothelium of the cells which are clogging it.The increased number of infected cells resulting from this schizog-ony occupy so much more of the endothelium that the effect can-not be supported. Death therefore occurs probably 15 to 24 hoursafter that final schizogony.
In pathology it is most probable that the difference betweena fatal case of falciparum and a severe one which recovers is onlyone of degree. Although severe falciparum infections with highparasitemias are increasingly difficult to find, it is to be hoped thatif one does occur in a center equipped with the appropriate facili-ties, needle biopsies of the liver may be attempted for the purposeof demonstrating the pathological picture during life.

22
DIAGRAM 6P. falciparum
C5) e gI
From the foregoing, it is easy to understand why only the youngforms of the growing parasite are found in the peripheral blood.Only when shock develops can embolic phenomena be seen. Evi-dently, lack of muscle tone of the vessel walls enables the slightlystuck cells to move from their sites.
It is supposed that the growth and development of the falci-parum gametocytes take place in red blood cells similarly adherentto the endothelium lining, but with the maturation of the gameto-cytes and their elongation, the containing cell is liberated into thecirculation.
The characteristic high parasitemia is possible since these bloodvessels, whose lining is occupied by parasitized cells, are also fullof uninfected cells. Schizonts rupturing in their fixed position liber-ate merozoites, which are literally pressed against hundreds of cells.One or more merozoites quickly enter the nearest red blood cellregardless of whether the cell is young, old, or middle-aged.
In a primary attack of falciparum malaria, the parasitemia canbe seen about the 10th to 12th day, followed within 24 hours bythe appearance of symptoms. If the individual is ready for thedevelopment of gametocytes, these will not begin to appear until

23
8 to 10 days later. If untreated, ring forms and gametocytes maypersist together for several days or weeks until sufficient immunityis acquired to eliminate the asexual forms. No more gametocytesare produced when the asexual forms have disappeared, but thosealready present may continue to circulate from 2 to 4 weeks. (SeeAppendix 2, The Behavior of P. falciparum Gametocytes, p.93.)
The symbols F for rings only, F + g for rings with gametocytes,and Fg for gametocytes only,' accurately describe the blood find-ings of the three phases through which falciparum infection passes.
The student who begins to study species diagnosis should haveaccess to at least one dozen different bloods containing F andF + g. Each parasite should be studied carefully until the studenthas seen as many falciparum rings as possible. He should recog-nize the degree of variation to be encountered and should try tolearn the maximum size that can be attained by the growingfalciparum parasite that can be seen in the peripheral blood.
This alerts him to the fact that when larger than the maximumforms are found at any time, the infection is more likely to bevivax or malariae. The student will also know what are the smallestrings that can be seen. Falciparum rings are described as small,medium, and large. The nearer to the last schizogony that theblood is taken, the larger will be the proportion of tiny rings. Ifthe proportion of large rings is the greatest, it may be assumedthat the total number of parasites will diminish remarkably within6 hours. It should also be clear that where the infection involvesa single brood, parasites may be entirely absent from the blood forseveral hours, as can be seen in Diagram 4 (see p. 18). On theother hand, single-brood infections are unusual in semi-immunepopulations.
It is, of course, possible to have more than one falciparum broodat the same time, with the result that parasites are never absentfrom the peripheral blood, although their numbers may varyconsiderably.
P. vivax. The word vivax means lively and it accurately de-scribes the almost frenzied activity frequently exhibited by thisspecies. The vivax merozoite shows a distinct preference foryounger red blood cells, which are more elastic than the matureones; as a result they are able to enlarge to better accommodatethe growing parasite. However, since there is no stickiness of the
x See Section 14, Recording and Reporting of Results, p. 63.

24
DIAGRAM 7
P. vivax
o.Q V V
,o/u
host red cells as in the case of falciparum, the parasitized red bloodcells circulate freely at all times throughout the entire cycle orseries of erythrocytic cycles as schizogony takes place in the circu-lation. The period during which the liberated merozoites are seek-ing a new host cell is much longer than with falciparum. Eventhen, it probably does not exceed 5 minutes, and the number ofparasites lost by phagocytosis is much greater. Heavy parasitemiasare never as high as in falciparum. In their haste to find newhomes, the vivax merozoites may sometimes rush into a new celluntil one, two, three, or more have entered. As each divides, itis not uncommon to find more than one piece of chromatin in thenew parasites; the second chromatin piece is often smaller thanthe first. Although these relatively early parasites already appearto be undergoing division, such is not the case. The vivax parasitemoves throughout the entire newly-entered red blood cell, puttingout cytoplasmic pseudopodia that reach all parts of the cell. Thisresults in the appearance of bizarre forms so numerous and sovariable that it is hopeless to attempt to draw more than a fractionof them. Consequently, a large, irregular parasite may not berecognized completely in the thick blood film. The tiny threadsof cytoplasm connecting the individual fragments are frequently
25
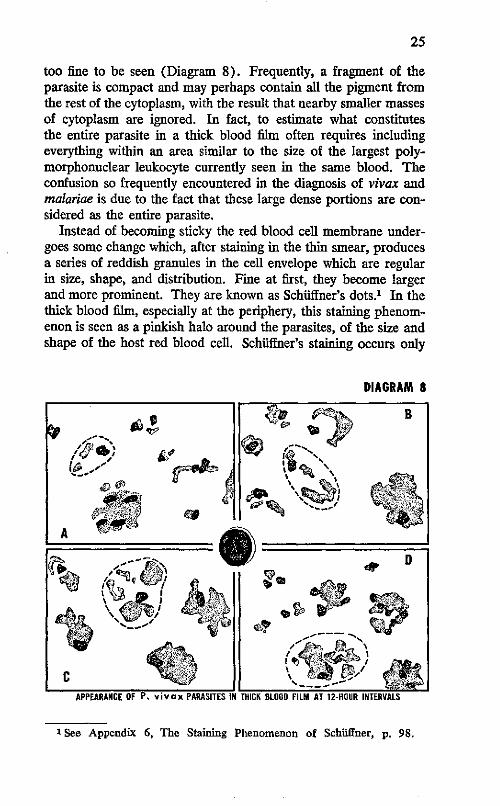
too fine to be seen (Diagram 8). Frequently, a fragment of theparasite is compact and may perhaps contain all the pigment fromthe rest of the cytoplasm, with the result that nearby smaller massesof cytoplasm are ignored. In fact, to estimate what constitutesthe entire parasite in a thick blood film often requires includingeverything within an area similar to the size of the largest poly-morphonuclear leukocyte currently seen in the same blood. Theconfusion so frequently encountered in the diagnosis of vivax andmalariae is due to the fact that these large dense portions are con-sidered as the entire parasite.
Instead of becoming sticky the red blood cell membrane under-goes some change which, after staining in the thin smear, producesa series of reddish granules in the cell envelope which are regularin size, shape, and distribution. Fine at first, they become largerand more prominent. They are known as Schuffner's dots.l In thethick blood film, especially at the periphery, this staining phenom-enon is seen as a pinkish halo around the parasites, of the size andshape of the host red blood cell. Schuffner's staining occurs only
DIAGRAM 8
1 See Appendix 6, The Staining Phenomenon of Schiiffner, p. 98.

26
in vivax and ovale infections. Advantage should be taken only ofits presence, not of its absence, since a certain degree of excellenceof staining is necessary to demonstrate this phenomenon. Onlysome of the routinely stained slides show these changes.
As the vivax parasite matures it becomes somewhat round andregular, and the full-grown adult pre-schizont looks so much likethe gametocyte that it is not easy to distinguish between them.The gametocytes appear very promptly as the parasitemia becomesestablished. Unlike falciparum, the vivax gametocytes appear inthe circulation when they are not fully developed and grow up inthe peripheral blood. These growing gametocytes, with compact,dense cytoplasm and frequently with considerable pigment, aresometimes confused with growing malariae parasites in the first halfof the cycle.
Also unlike falciparum, they do not continue to circulate for along period after a schizontocidal drug has been taken. They areas susceptible to it as are the schizonts. Vivax gametocytes neednever be confused with malariae gametocytes, because of thescarcity of the latter.
The proportion of the entire cycle found in a single drop ofblood may be as much as two thirds or as little as one fourth ofthe cycle. The number of merozoites in mature schizonts justbefore rupture usually falls between 14 and 24. When two broodsexist, all stages of the parasite may be encountered.
Since all stages of the parasite are commonly encountered in asingle blood specimen, it is superfluous to specify as trophozoites,schizonts, and gametocytes the parasite forms encountered in each.
The simple designation V (V=vivax) implies that all such formscan be present. Although it is sometimes claimed that only vivaxring forms may be found, this is rarely if ever the case, and care-ful examination will reveal numerous small irregular stages neverencountered in falciparum. If a careful search is made, it is mostlikely that advanced dividing forms will be encountered as well.
It should be stressed that falciparum dominates vivax and vivaxdominates rnalariae, but it is unusual to find any combination otherthan vivax accompanied by falciparum gametocytes. The so-calledmixed infections do not exist clinically, except for 24 to 48 hourswhen the two species present are fighting. Again-falciparumconsistently dominates vivax and vivax regularly dominatesmalariae, i.e., F> V> M. In the clinical sense, at least, a mixedinfection almost never occurs.

27
Some indication of the proportionate numbers would give atruer picture. The subordinate species may be indicated by en-closing its symbol in parentheses, e.g., +++F (17M),1 whichmeans that there are over 20 falciparum rings per microscopic fieldwith 17 malariae parasites per 100 fields.
P. malariae. The quartan infection as exemplified by P.malariae is usually present in regions where the other two speciesare found; ordinarily it subordinates itself to them and is thereforesometimes called a dry-season species. Because gametocytes areunusually scanty, transmission by mosquitoes in the laboratory israre. The pre-erythrocytic stage lasts 11 days and parasites canappear in the blood any time between the l9th and 30th days.The persistence of malariae infections is well known. One caseis believed to have continued for 52 years. Since modern schizon-tocidal drugs are very effective, it is unlikely that as many suchlong-term infections will be encountered in the future, as there havebeen in the past.
P. malariae infections differ from those of the two more impor-tant species in having side effects not encountered in the others,namely, some effect on the kidney and a loss of hemoglobin inexcess of that due solely to the rupture of parasitized cells. Incontrast to vivax, the malariae merozoite prefers older red bloodcells. This, coupled with its average schizogony of 8 to 12 divi-sions, results in a lower total parasitemia than in the case of vivax.The 50-per-cent increase in the time for its complete development,and the distinctly slower activity shown in comparison to vivax,result in early and increased production of pigment. Once withinthe cell, the quartan parasite remains relatively motionless. Thereare no extruding pseudopodia. Advanced pre-segmenting andsegmenting forms occasionally show considerable irregularity asthe result of the parasite's having entered a doughnut-shaped redblood cell. 2 The entire parasite is contained in the tubular peripheralportion of the biconcave discs of red blood cells containing lessthan normal amounts of hemoglobin. Similar forms are encounteredin vivax infections which have persisted long enough to decreasethe hematocrit and hemoglobin values. A lesser segment of thecycle is seen in a single drop of quartan blood than is the case invivax. Three broods exist when all stages of the cycle of malariaeare present in the same specimen of blood (Diagram 9).
1 See Section 14, pp. 63-65.2 See Appendix 3, p. 94.

28
DIAGRAM 9P. malariae
, N
From shortly after the termination of ring stages to actual matureschizonts, the general characteristic of the malariae parasite iscompactness, marked pigmentation, and uniformity and regularityof shape. A type of stippling also occurs, but its detection requiresa degree of technical excellence seldom achieved in routine prepa-rations.
It is not too uncommon to find 1 to 4 per cent of undoubtedquartan parasites persisting in an infection which is otherwisepatently falciparum or vivax. A common error resulting in anincorrect diagnosis of malariae is that which occurs when a bloodcontaining only gametocytes of falciparum dries so slowly that theparasite has time to round up. If these forms are somewhatnumerous, they will be miscalled quartan parasites.
However, true mixed infections do not occur frequently enoughto justify a separate column for them in report forms. The exist-ence of such a column implies a frequency which does not exist,suggests an importance which in fact is very minor, and favorscareless diagnosis and poorer staining standards. It is hoped that

29
the reports and the records thereof will reflect accurately the in-fections in the population rather than a stilted statement of para-sitological findings whose value is more academic than practical.
P. ovale. True ovale infections are exceedingly rare and asuspicion of ovale should not take up too much time of busymicroscopists in the Western Hemisphere. Prolonged vivax infec-tions, when the blood is sufficiently sub-standard, may go througha phase in which the containing red cells are deficient in hemo-globin. The resulting changes in the parasitized cells produce ap-pearances of vivax morphologically indistinguishable from trueovale. It is therefore hazardous to attempt a diagnosis of ovaleon morphological grounds alone. Only if the supposed ovale istransferred, either by needle or by mosquito, to another person,and the resulting new infection follows the ovale pattern, may anovale diagnosis be considered. If by chance the blood specimen istaken near the time of schizogony, repeated specimens may demon-strate non-vivax behavior.
P. ovale is found most frequently on the west coast of Africabut also occurs in East Africa, the Middle East, Malaya, Indo-nesia, and the Philippines. It resembles a quartan infection witha 48-hour cycle and Schiffner's dots are visible in the uninfectedportion of the red blood cell containing the parasite. In fact, ifthe staining is not good enough to show Schuffner's reddish colora-tion around the parasites in a thick film, as is frequently seen invivax infections, the species may not be recognized for what it is.Previously thought to be somewhat innocuous, some ovale strainshave shown a degree of severity equal to vivax.
The oval or fimbriated red blood cells containing the parasitesresponsible for the name given to the species, are not seen in thethin smear except where there is high humidity and when thesmear is promptly dried. Accessory chromatin dots are as fre-quent as in vivax.


PART II
Preparation of Blood Slides


6. THE MAKING OF THICK BLOOD FILMS
Clean slides are packaged in lots of 5, 10, or 15. The packageof 5 is probably more appropriate for field work (see Section 16,Microscopic Slides, p. 66). The end of the package is tornacross, exposing the ends of the slides (Diagram 10, fig. 1). Twoslides are withdrawn and placed on the outside of the package. Aclean, clear flat working area is sought. If no table, bench, or chairis available, a sturdy piece of cardboard may be used and shouldbe carried for this purpose. If the floor or other available surfaceis not flat, the cardboard may be held flat by a volunteer assistantfrom among the ever-present onlookers. It is useful to place asmooth piece of white paper under the slide when spreading theblood. Beginners should be provided with a template or guidelto the position on the slide of single or multiple thick ffims.
Blood is taken from the lobe of the ear, if the latter is fleshyenough, from the forefinger of the left hand, or, in the case ofinfants, from the large toe. The side, rather than the ball, of thefinger is punctured with a sharp, single-use or multiple-use sticker.Of the latter, the most commonly used are ordinary steel pen-nibs,of varying shapes, with half of the writing end broken off. Specialspring-type needles are seldom sharp enough and cause a discom-fort that is out of proportion to the magnitude of the operation.For continuous daily work, the Bard-Parker No. 11 blade meritsconsideration. The blunt top of the blade is stuck through theunder side of a small cork, which serves as a holder or handle.When not in use, the point should be inserted in the upper surfaceof the larger cork of a moderately wide-mouthed alcohol bottle of30 cc capacity, since the blade rusts excessively if left permanentlyin the alcohol. It can be kept completely clean and sharp if rubbedon fine (No. 0 or 00) emery paper before every day's work orwhen required (see Diagram 10, figs. 2, 3, and 4).
A piece of this emery paper 4 x 6 cm is placed around the bottlewith the emery surface to the glass, and held by string or rubberband, where it is constantly available (fig. 3). Ninety-five percent alcohol is kept in the bottle. When the blade is to be cleaned,the emery paper is laid over a package of slides or other firm,smooth surface and the end of the blade is rubbed against the
'See Appendix 5, pp. 97-98.
33

34
paper until all traces of dried blood, rust, etc., are removed andthe sharpness of the edge and point cannot be seen readily with-out a hand lens (fig. 4).
The skin to be punctured is wiped firmly with cotton or gauzemoistened with the alcohol to remove gross dirt and dried sweat,and is then wiped with dry cotton or gauze (fig. 7). Long-fiberedcotton is more desirable than the cheaper grades, which have muchmore lint. Gauze or loose-woven bandage cut in small pieces isby far the most satisfactory. The blade or pen is moistened withalcohol, wiped (fig. 6), and stuck lightly and quickly through theskin; the first drops are wiped away with dry gauze. When thefinger is being punctured, the operator grasps it with the fingersof his left hand in a constricting manner. After puncture, the tipof the finger is squeezed gently until the blood wells up in a spheri-cal drop on the dry skin (figs. 8, 9, and 10).
The edge of a clean slide is immediately pressed firmly againstthe forefinger of the operator (fig. 11) and the surface of the slideis lowered to the donor's finger until it touches the upper surfaceof the drop. The amount of blood taken will determine if anotherdrop is needed; if so, it is placed beside the first. The slide isquickly laid flat on any smooth, flat surface, preferably with awhite background, and the blood is spread (fig. 12) with the comerand first five millimeters of the long edge of a second slide until asquare or rectangular patch of approved thickness is obtained.
If more than one thick film is to be taken from the same person,when the skin has been wiped perfectly dry a fresh drop may bepicked up and spread directly from the comer of another cleanslide. To avoid transfer of bloods from drop to drop, the cornerused for spreading must be wiped clean immediately after use.
A thinner streak of blood or partial thin smear is made fromthe blood remaining at the site of puncture and is used for theidentification (figs. 13 and 14) which is written later with a softNo. 1 graphite or "film mark" pencill when the blood has dried.
Thick blood films are not made as thick as formerly, nor arethey stirred or defibrinated. Adequate density of a thick film is,of course, the maximum thickness after staining that can be seenthrough when examined under the oil immersion. This can beestimated by first making one film that is definitely too thick; it isspread insufficiently and the slide is turned perpendicularly or onits edge; a drop is immediately formed and runs to the dependentborder. With the next slide, a similar amount of blood is spread
1 See Appendix 12, Pencils Used for Marking in Blood, p. 104.

DIAGRAM 10PAOI / WHO
HOW TO MAKE A THICi IBLOOD FILM/y;~~~ X ~~Figure 3
Figure 1
Figure 6 Figure 2
Figure 15
Figure 16
MI:Figure 19
-- DUIM10111
INSTRUCTION
Figure 1 The package of new slides Is opened by tearing off one end of thewrapping paper. Slides should always be held at the edges, or the ends, be-tween the thumb and forefinger, to avoid touching the surfaces.
Figure2 Any clean, sharp-polnted blade can be used as a sticker. Thesticker shourd be inserted in the under side of a smali cork, and when not Inuse the point should be stuck In the upper surface of the larger cork of amoderately wide-mouthed alcohol bottle of 30 cc capacity, since the bladerusts excessively if left permanently in the alcohol.
Figure 3 A plece of emery paper is attached to the sticker bottle by means ofa rubber band;this paper is used to clean and sharpen the stickeras needed.
Figure 4 When sharpening the sticker, hold the emery paper over a packageof slides or other solid, flat surface.
Figure 5 Fill In all the required information on the "Notification of FeverCase" forms, taklng care to indicate the collaborator's post number and theserial number of the slide.
Figure 6 Wipe the blade of the sticker clean with a wad of gauze or absorb-ent cotton moistened with alcohol. Place the cork holding theclean sticker onthe table, on its side, in such a manner as to prevent the sticker's point fromtouching any surface or object.
Figure 7 Before puncture, clean the skin around the area selected wlth awad of gauze or absorbent cotton saturated with alcohol, after squeezing thewad lightly to remove excess alcohol.
Figure 8 Puncture the finger with a sharp stab of the sticker at the pointmarked "X".
Figure 9 The first drop of blood should be carefully wlped off with a plece ofdry gauze or cotton.
Figure 10 With a squeezing motion, another drop of blood is forced on to thesurface of the finger.
Figure 11 A clean silde Is held carefully at one end and the edge Is steadiedagainstthe forefinger of the operator's left hand, which is holdingthe donor'spunctured finger; the slide is then gently lowered to the donor's finger untilIts upper half contacts the upper portion of the blood drop and a part of thedrop adheres to the slide. Care should be taken to prevent the slide fromcoming in contact with the skin. If sufficient blood remains on the finger, asecond, smaller drop Is placed on the slide 1/4" below the first one, thuspreparing for the operation shown in fig. 13.
Figure 12 Place the slide face up on a sheet of paper and using about 1/4"of the lower edge of a second slide, spread the blood to form a square orrectangular smear, and immediately wipe blood from spreader slide.
Figure 13 With the same corner of the second slide, pick up some of theblood remaining on the finger.
Figure 14 Spread this blood, or the second drop mentioned in fig. 11, to beused to write on.
Figure 15 Wipe the donor's finger with a wad of cotton or gauze saturatedwith alcohol; if bleeding continues, hold a piece of dry cotton over the punc-ture point until bleeding stops.
Figure 16 To dry the blood smears, fan the slide with a plece of cardboarduntil the blood smear loses luster.
Figure 17 Using a No. 1 or a Dixon #2225, "Film Mark" pencil, write on thesecond of the two smears the collaborator's post number, the serial numberof the slide, and the date on which it was prepared.
Figure 18 When a large number of smears from different donors are to betaken at the same time, five transverse, narrow thick films may be placed onthe same slide. The drop of blood taken first may be streaked to the edge ofthe slide for identification. The number of the donor from whom this firstdrop was taken will serve to identify all smears on the same slide, and thatnumber is marked at the right edge of the first drop, or better still and Ifpossible, is written with a diamond-point pencil on the lower right corner ofthe slide. Such numbers will always end in 1 or 6.
Figure 19 One or two slides can be wrapped in the same identification slipso long as the smears they contain were taken from the same person. Alsothree or more slides from different persons may be placed together andpacked tightly in a slide wrapper. The identification slips are then wrappedaround the compact package.
____I _···_ II
-

35
wider and the slide is turned up again. If the drop forms quickly,it is spread still wider. This is repeated until the freshly-spreadblood no longer runs to the inferior border but merely appears tocrawl.
The finished thick film should occupy the inner half of the distaltwo thirds of the slide, and a free space of 1.5 cm should be leftat each end of the slide for easy manipulation while wet.
The place for writing the identification may be spread withblood that has remained slightly longer on the surface of the skin.If the malaria service has no particular key or symbol to identifythe donor, the latter's initials and the date may be printed plainlywith a soft pencil, using Roman numerals to indicate the month,viz.: P M B 17 XII 3 (for 17 December 1963). Only slides thatare made for permanent specimens require a digit for the decade.
Where the humidity is high, drying may be accelerated by briskfanning with a piece of cardboard (fig. 16). The inexpensiveHumigraphl is useful to show humidity changes which affect thedrying of slides.
Five transverse, narrow thick films from five different donorsmay be placed on the same slide if desired (fig. 18) and identifiedby symbol or number written with a No. 1 lead pencil at the loweredge of the first drop, or written with a diamond-point pencil inthe lower right comer of the slide. Also, to show which drop wastaken first, that blood may be streaked to the edge of the slide.
7. THEORY OF BLOOD STAINS
Blood staining has always been complicated by the inherentvariability of methylene blue. Virtually all blood stains are derivedoriginally from methylene blue processed in one of several ways.When it is understood that widely varying results can be obtainedeven when the same lots of methylene blue are used in identicalprocedures, it becomes obvious that the same variation occurs withGiemsa, Wright's, or Leishman's stains. In some instances thedifference may be so great that certain lots of stain may be useless.
In 1925 the Biological Stain Commission was created in the
'A. Daigger and Co., 159 West Kinzie Street, Chicago 10, Illinois (seeAppendix 13, p. 105).

36
U.S.A. to test each lot of stain for the purpose of eliminating thosethat were unsatisfactory. When acquiring U.S.-manufactured bloodstains, then, it is most desirable that they bear a certification num-ber from the Stain Commission, which assures that at least at thetime they were tested the results were satisfactory.
With regard to the Giemsa stain, which is of maximum utilityin malaria work, a number of laboratory workers still prepare theirstains from the original dye components used, often with surpris-ingly good results. However, except under exceptional circum-stances, the beginner is advised against attempting this not-always-successful method. Although there are many good-to-excellentGiemsa stains available in the world markets, it is not possible torecommend any given one with certainty. The safest procedurewould be to obtain small (1 to 5 grams) samples from at leastthree different sources. These should be extensively and repeatedlytested with the techniques and under the conditions of the locality.Only then should a large supply be requisitioned.
The foregoing may explain the almost total dependence of someof the early workers on individual brands or types of stains. Itmay also explain how some Giemsa stains may be satisfactory ifdissolved in one brand of pure methyl alcohol and distinctly lessso in another. The dissolved elements are evidently in such deli-cate chemical equilibrium that very slight changes of reaction mayproduce surprising results.
The basic constituent of a blood stain is some type of eosinateof methylene blue dissolved in either pure methyl alcohol or anequal proportion by weight of that alcohol and pure glycerin. Themethyl alcohol is ordinarily acetone-free, though not all acetone-free alcohols give satisfactory results. This alcoholic solution ofGiemsa stain is the only convenient form from which may be pre-pared the aqueous solution that actually does the simultaneousstaining of red, blue, and violet elements in blood. It is unlikelythat the dissolved elements stay in solution longer than 45 to 90minutes, by which time all the active staining elements are com-pletely precipitated out of solution. This is significant in two ways:(1) all Giemsa solutions should be prepared immediately beforeuse; and (2) if water contaminates the alcoholic stock solution,then valuable portions of the staining elements will be precipitatedout of this stock solution in proportion to the amount of waterpresent. The results following the repeated introduction of a wetpipette into the stock bottle may be disastrous. Watery contamina-tion of the stock alcoholic stain occurs most frequently and more

37
subtly because of the inherent ability of pure alcohol to take upmoisture. This may occur quite rapidly in the tropics, where thehumidity is high. This fact gave rise to the old general belief thatblood stains deteriorate in the tropics. Therefore, the screw capson bottles should be tightened at intervals and cork stoppers re-newed when their elasticity is lost. Ground-glass stoppers, if usedat all, should be cleaned every time they are put in the bottle, sincethe accumulation of dried stain may prevent the stoppers fromfitting properly.
To prevent the occurrence of this undetectable and continuousdamage to the Giemsa stain, it is advisable to use small workingbottles whose content will be sufficient for only one or two weeks.When no plastic dropping bottles are available, the old small testtube strapped to the work bottle may be used, but it is a poor sub-stitute. Small plastic bottles with a dropper opening and closedtightly by a screw cap, used for perfumes and some medicines,make ideal Giemsa work bottles.l Stock bottles are opened onlywhen it is necessary to replenish the working bottles.
The same precautions described for Giemsa stain should betaken with all other Romanowsky-type stains such as Wright'sand Leishman's, although glycerin is not ordinarily used. Theyare dissolved in pure methyl alcohol in the proportion of 0.15-0.18gm per 100 cc pure methyl alcohol, whereas Giemsa is mixed asfollows:
Giemsa powdered stain (certified) 0.75 gmPure methyl alcohol 65.0 ccPure glycerin 35.0 cc
In the absence of Giemsa, excellent results may sometimes beobtained by using the Wright's or Leishman's powders in the sameconcentration as Giemsa, and of course with the same technique.
To prepare the stains, it has long been recommended that theybe mixed in a mortar. Prolonged grinding with glycerin or methylalcohol, or both, is still routine procedure. In dry climates thiscan probably be done without risk, but exposure to moist atmos-phere is unduly prolonged with this method. Moreover, lumps ofmoistened stain powder invariably adhere to the sides of the mor-tar and the face of the pestle. In place of that method, the pro-cedure that has been used successfully for years is the one wherebythe dry powder is added directly to a bottle of convenient size,
1 See Appendix 11, Plastic Dropping Bottle, p. 104.

38
containing the proper amount of alcohol-glycerin mixture. A mini-mum of 50 scrupulously clean, solid glass beads of varying sizes,not to exceed 5 mm in diameter, are also added to the bottle. Thisbottle is shaken thoroughly at intervals, 6 to 10 times per day, fora minimum of three days. Small samples are then removed daily,filtered through medium-coarse filter paper, and tested with freshthick blood films. When all elements of the blood are seen in theirappropriate colors, enough stain is filtered into one or two workingbottles and the stain is then ready for use. The balance of thestain is stored, without filtering, until required. Because of thepossible variation of the individual ingredients, the stock bottleshould bear a large label carefully listing the name, lot number,and the amount of each of the ingredients, as well as the date ofpreparation.
It is repeated, for emphasis, that all liquid stain containers mustbe kept tightly stoppered at all times. If the foregoing directionsare carried out meticulously, it is usually found that instead ofdeteriorating with time, these stains improve, whether "in thetropics" or elsewhere.
Diluents. As only freshly prepared aqueous solutions of bloodstains give the well-known colors to the preparations, the diluentused assumes considerable importance. The following have beenused as diluents for blood stains at one time or another: waterfrom wells, springs, streams, rivers, and piped water supplies, alsodistilled water, rain water, and even double and triple distilledwater; and finally, the two most frequently used, buffered waterand neutralized water. When distilled water is temporarily inshort supply, the buffer salts may be added to tap water. Thiscombination should never replace the use of distilled water. Rainwater collected in a clean enamel or other smooth-surface con-tainer raised two feet above the ground is distilled water.
It should be noted that it is not possible to stipulate a reactionwhich will suit every stain. The ultimate test of the suitability orreaction of the diluent is the appearance of the blood seen throughthe microscope. Therefore, any combination which gives consist-ently good results should be used no matter how unorthodox itmay appear. In some areas where the ground water soaks downthrough forest and grassland, sand, hard clay, or rock, the tap watermay be highly satisfactory. On the other hand, where the water soaksthrough porous, chalky rock or limestone, it may be quite useless.Water which has acquired aerogenic bacteria, yeasts, or algae may

39
no longer be suitable, unless active boiling for 5 minutes and filter-ing or sedimentation restores its clarity. All waters that are nolonger crystal-clear should be discarded.
When buffer salts were first added to the diluting water, a dra-matic improvement in the quality of stained blood preparationswas noted at once. Generally speaking, the reaction of diluentswhich gave the improved results was close to the point of neutrality(pH 7.0). Experience has shown that no standard pH can bedepended upon with all types of stains and that the most suitablereaction for the stain in hand should be sought. In practice, therange is usually between pH 6.6 and 7.4, which, coincidentally, isthe range of the indicator phenol red.
Sodium phosphate (Na2HPO4) and potassium phosphate (KH2P0 4) are the buffer salts used generally. Because the crystallinesodium phosphate contains 12 molecules of water of crystalliza-tion, it soon becomes covered with white powder on exposure tothe air; exact weighing is no longer possible. A moist mass resultswhen mixed with other crystals. It is therefore imperative tospecify that the sodium monohydrogen phosphate be anhydrous;the monopotassium dihydrogen phosphate can thus be mixed withthe anhydrous sodium salt in any proportion and still remain in adry state. In practice, useful buffer solutions may be preparedrapidly by adding to each liter of distilled water one gram of amixture of the sodium and potassium salts in the proportion of6 to 5 or any other proportion that has been found satisfactory.Correct amounts of these salts are thoroughly mixed and groundin a mortar and the homogeneous powder is weighed out in lotsof one gram (or more) and placed into small well-stoppered tubes,or if for immediate use it may be folded in glassine papers or dis-solved in small amounts of water.
For the competent staining of thin blood smears, distilled waterappropriately neutralized for the occasion may be superior tobuffered waters. This is prepared by neutralizing it to an indi-cator phenol red with a weak alkali such as 0.2 per cent lithiumcarbonate. Repeatedly shaken (a minimum of 50 times) until thedesired color remains for at least 20 minutes, it may then be usedwith Wright's or Leishman's stains. This neutralized water is usednot only to dilute the alcoholic stain but also for the final washingof the slide. Buffers act as a kind of elastic chemical material toinactivate (within a limited range) varying amounts of acid andalkali. Neutralization, on the other hand, is a fixed chemical reac-tion allowing for no variations.

40
8. STAINING TECHNIQUES-GENERAL
Thin blood smears are prepared by spreading a very small dropof freshly exuded blood with the smooth, even, undamaged edgeof a new microscopic slide. The optimum thickness is a layer ofblood cells one cell thick; in contrast, the thick blood film maycontain 6 to 20 times as much blood spread over a roughly rec-tangular area 1.5 by 1.2 cm.
In the thin blood smear, a single layer of cells lies horizontallyon the surface of the glass. In the thick blood film there are manylayers of cells in their customary "rouleau" formation and the axisof an individual cell may be in any direction. The staining of theflat layer of cells in the thin blood smear is intended to demon-strate the maximum detail of the blood cells and their contents.These preparations are therefore "fixed" by the application of puremethyl alcohol in order that the hemoglobin may be retained inthe cells and so be affected by the stain. It is relatively easy tosee through a single layer of stained red blood cells.
If the red blood cells in the thick blood film were so "fixed" itwould be quite impossible to see anything, except perhaps at theextreme edges. It is therefore necessary to remove the hemoglobinfrom the red blood cells by one of various methods, separately orduring the staining process. In the past, weak solutions of hydro-chloric acid, distilled water, or various other mixtures were used toremove the hemoglobin before the blood stain was added. Thisfrequently resulted not only in complete lysis of the red blood cellsbut also lysis and distortion of the parasites, leukocytes, and otherelements of the blood. Later the practice was developed of havingthe dehemoglobinization take place in the stain solution.
The first step in the staining of thin blood smears is fixation,which is directly opposed to the principle of thick film staining.
Both time and heat tend to "flx" the hemoglobin in the redblood cells, whether in thin or thick preparations. Therefore, it isapparent that the more promptly the thick films are stained, themore complete the dehemoglobinization will be. The longer theyare allowed to remain without staining, the less clear the prepara-tions will be. Seven to 10 days in a moist, warm climate mayrender a thick blood film unsuitable for examination after staining.Thin blood smears, on the other hand, may present quite a goodappearance.

41
To show what would happen if thick films were "fixed," simplydrop pure methyl alcohol on the lower half of the thick bloodfilm held perpendicularly and expose to the usual staining techniquefor thick films.
Thick Films. The original thick film staining consisted offlooding a rather large thick drop with diluted methylene blue.As visibility in the central portion was virtually nil, it was thoughtthat examination would be easier if the blood were thoroughlystirred. There followed a long period when defibrinization wasconsidered imperative, although a little less blood in the dropwould have obtained the desired result. Since that time, Giemsastain has been virtually the only one used and the dilution of onedrop to 1 cc of distilled water has become customary. Slides withthick films were laid across glass rods and the diluted Giemsa stainwas poured on them and allowed to act for approximately onehour, after which they were ready for examination. Larger num-bers were stained on the edge or ends in rectangular or uprightstaining dishes.
In 1929 Barber and Komp placed the thick film at one extremityof the slide and separated the slides by a rather thick 1" squarepiece of cardboard at the other extremity. Groups of 25 andeven 50 slides could be stained simultaneously using these compactpackets placed upright in a dish of stain. The practice of placingthe thick blood film at the extreme end of the slide arose from thismethod. If a single, very heavy falciparum infection was presenton one of the slides in those packages, parasites might be trans-ferred occasionally to adjacent slides because of the debilitatedcharacter of the blood. Careful rinsing or use of a detergent mayprevent this.
Following Pampana's discovery of the dehemoglobinizing actionof isotonic solutions of methylene blue, Field originated his rapidstaining method for thick blood films used so extensively in WorldWar II. It consisted of a one- to three-second dip in Solution A(a mixture of methylene blue and phosphates), followed by briefwashing in distilled water, and a similar dip in Solution B (a mix-ture of eosin and phosphates). The rapidity of the method didnot allow time for thorough dehemoglobinization, but showed bothleukocytes and parasites brightly and clearly colored. A variationof this same stain was later developed in India and is known asthe J.S.B. stain.
During the 1920's a London manufacturer made a staining plate

42
slightly curved in such a manner that when a slide was invertedacross the curvature of this plate, a space not to exceed 3 mmin depth remained below the slide into which the stain was directed.Because of the particularly heavy weight of the hemoglobin mole-cule, this inverted position of the thick blood film permitted totaldehemoglobinization as compared to the other positions in whichthe slides had previously been stained. A one-second dip in amethylene blue phosphate preserved the cellular elements of theblood to a great extent without interfering with dehemoglobiniza-tion. When diluted Giemsa was run under the slide inverted onthe curved plate or on the reverse of a rectangular enamel pan, suchas shown in Diagram 12-E (p. 44), it was found that this bluestep permitted excellent staining after exposure of only 6 to 10minutes to the Giemsa solution.
The staining of the combined thick film-thin smear requiresthat the thin smear be separately "fixed" with methyl alcohol be-fore the whole slide is stained with some variation of the afore-mentioned techniques.
Thin blood smears alone may be stained with Giemsa stainfollowing previous fixation, or by any of the May-Grinwald,Wright's, or Leishman's stains whereby fixation is obtained by theapplication of the undiluted stain followed by the addition of thediluent.l
9. PRE-TREATMENT OF THICK BLOOD FILMS
Whenever it is expected that thick blood films will be long delayedin reaching the persons capable of using Giemsa stain properly,they may be "pre-treated." First, dip them for one second in theblue phosphate solution or simply pour the blue over the blood(Diagram 11, fig. 4). Second, prolong the rinse in buffered waterlonger than in the case of the complete staining technique, butonly until the margin of the thick film is faintly blue-gray. Donot attempt to wash until the red color disappears from every partof the drop. Third, drain the slides and dry with gentle heat, or inthe sun, to avoid fungus growth. Fourth, wrap in packets of 15slides or less and on the outside identify the contents with a soft
1 Further details of the staining of thin blood smears are given in Appen-dix 8, pp. 100-101.
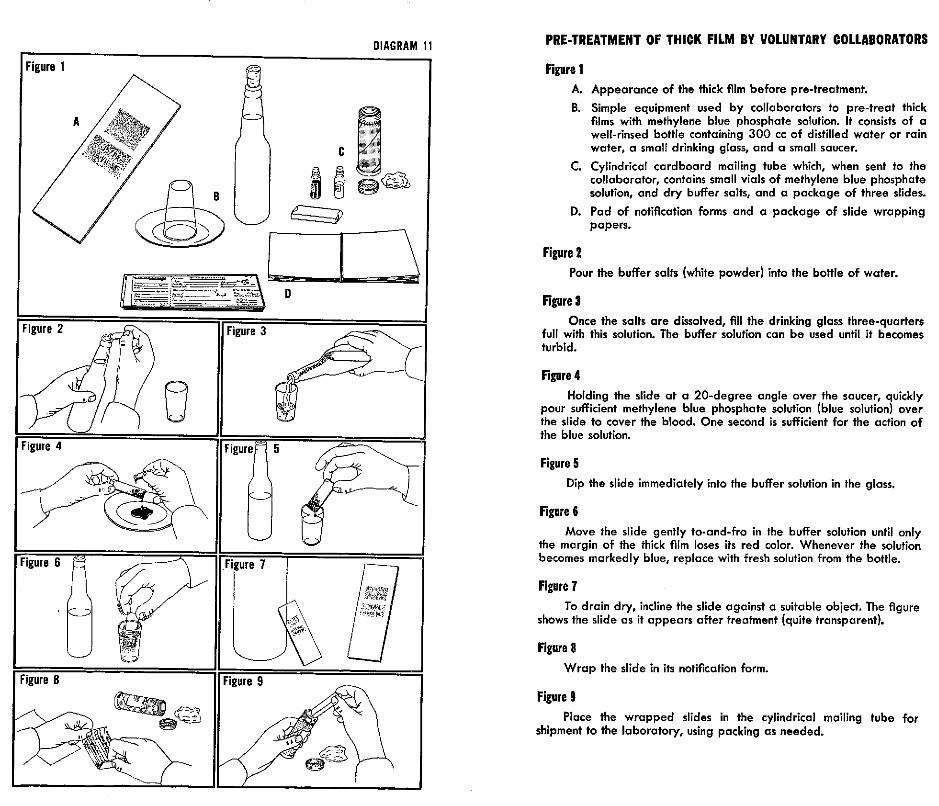
PRE-TREATMENT OF THICK FILM BY VOLUNTARY COLLABORATORS
Figure 1A. Appearance of the thick film before pre-treatment.
B. Simple equipment used by collaborators to pre-treat thickfilms with methylene blue phosphate solution. It consists of awell-rinsed bottle containing 300 cc of distilled water or rainwater, a small drinking glass, and a small saucer.
C. Cylindrical cardboard mailing tube which, when sent to thecollaborator, contains small vials of methylene blue phosphatesolution, and dry buffer salts, and a package of three slides.
D. Pad of notification forms and a package of slide wrappingpapers.
Figure 2Pour the buffer salts (white powder) into the bottle of water.
Figure 3Once the salts are dissolved, fill the drinking glass three-quarters
full with this solution. The buffer solution can be used until it becomesturbid.
Figure 4Holding the slide at a 20-degree angle over the saucer, quickly
pour sufficient methylene blue phosphate solution (blue solution) overthe slide to cover the blood. One second is sufficient for the action ofthe blue solution.
Figure 5Dip the slide immediately into the buffer solution in the glass.
Figure 6Move the slide gently to-and-fro in the buffer solution until only
the margin of the thick film loses its red color. Whenever the solutionbecomes markedly blue, replace with fresh solution from the bottle.
Figure 7To drain dry, incline the slide against a suitable object. The figure
shows the slide as it appears after treatment (quite transparent).
Figure 8Wrap the slide in its notification form.
Figure 9Place the wrapped slides in the cylindrical mailing tube for
shipment to the laboratory, using packing as needed.
DIAGRAM 11

43
pencil, always on the edges rather than on the flat side of the slides.Fifth, store in a dry place until they can be finally stained withfreshly prepared Giemsa solution. Since no further dehemoglobini-zation is possible, it serves no useful purpose to invert them. Fiveto 10 minutes with Giemsa is usually sufficient. Determine mini-mum time required by trial.
Diagram 11 shows how a small number of slides can be treatedin the home of a collaborator, and outlines each of the steps taken.For large numbers of slides, the steps can be reduced to thoseshown in Diagram 12 (A and B); the slides are gently moved to-and-fro in the second buffer water until only a trace of red colorremains.
Slides which have been poorly stained may be restained in avariety of ways, sometimes with considerable success. However,no single technique has yet been devised which gives generallysatisfactory results.
Plastic dropping bottles ranging from 30 cc to 150 cc capacity(see Appendix 11, p. 104) are available. Giemsa stain, whenplaced in them, is more completely protected from contaminationwith moisture than in any container requiring a separate pipettefor delivering the appropriate number of drops. Therefore, evalua-tion personnel can be equipped to stain slides in the field, and pre-treatment of slides need be done only by the collaborators. All thatis needed to equip evaluation personnel, beyond what has alreadybeen recommended, is a small additional supply of buffered water,and a clean surface with a depression, as shown in Diagram 12-E.All slides taken by evaluation personnel may thus be stained in thefield when a convenient number have been accumulated on a dailybasis or every other day. Such a step should provide the micros-copists with the best possible preparations for examination.
Commentary. The amount of stain powder required is onlyan average and the amount can be varied according to the resultsdesired. For example, if one Giemsa gives good results when dis-solved in a certain proportion with glycerin and alcohol, thesequantities can be used. When the alcoholic solution is too strongand the leukocytes are overstained, 5 to 6 drops in 10 cc of thediluent should be sufficient. However, it is better to dilute thestain with more alcohol-glycerin mixture in order to maintain theuniversal proportion of one drop of alcoholic solution to 1 cc ofbuffer solution.
Similarly, with the buffer solutions, attempts should be made to

DIAGRAM 12
BOITLES FOR SOLUTIONS CURVED PLATE FOR STAINING
F
RACK FOR DRYING SLIDES
44

45
find that proportion of salts which will give optimum results. Aseries of different amounts of the sodium and potassium phosphatesis made in the following proportions: 2:5, 4:5, 6:5, 8:5, and 10:5.1A number of preparations of the same blood are stained with thesame Giemsa using the buffer made with 1 gm of each of theseproportions to one liter of distilled water. Those proportions givingthe best results are used. The proportion 6:5 is probably the mostfrequently selected.
10. STAINING TECHNIQUES-DETAIL
Thick films were often stained with Giemsa solutions alone. Theslides were placed face upward across glass rods 5 cm apart andcarefully levelled; fresh Giemsa solution, one drop to 1 cc of dis-tilled or buffered water, was poured on the slides and allowed toact for 30 to 60 minutes. After being rinsed with the same diluent,the slides were drained and dried with heat.
Coplin jars and rectangular staining dishes held slides for stain-ing with Giemsa and the afore-mentioned blocks of slides werestained in the same manner.
Staining times may vary with each lot of stain and should be triedout carefully. Dehemoglobinization is not as complete with theField method (see p. 47) as with the methylene blue-Giemsatechnique, but the colors at the margin of the thick film are ap-proximately the same with the two methods.
Staining of Thick Blood Films (Walker)(Diagram 12)
1. Check carefully the identification of the specimen and be sureit is adequate. Use soft No. 1 graphite pencil for any additionsor corrections. Avoid grease pencils.
'The pH for mixtures as measured by Beckman Potentiometer:6.25->16.50- -%
H 6.90 - proportion of7.05 - % buffer salts7.10-%7.20 -1%

46
2. Dip for one second-no more-(count aloud "one-one-thousand") in the methylene blue phosphate solution. Tolessen the number of changes of buffer water after the dip inmethylene blue phosphate solution, the dependent end of theslide should be touched momentarily to a moist pad of plasticsponge that has been thoroughly wet and then squeezed out soas to remove the excess blue quickly.
3. Dip five times in buffer solution (made by adding one gramof the 6:5 phosphate mixture to one liter of distilled water),the same as is used for diluting the Giemsa. Use 2 wide-mouthglasses for more than 10 slides and change solution wheneverit becomes markedly blue. (Buffer salts may be added to tapwater when distilled water is temporarily unavailable.)
4. Place the slides upside down over the 2-3 mm depression of acurved stain plate or enamel pan.
5. Allow freshly prepared Giemsa solution (1 drop-1 cc buffersolution) to run under the slide until depression is filled. Re-move any bubbles which collect on or near the drop of blood.
6. Allow stain to act 6-10 minutes.7. Dip briefly in buffer solution to remove excess Giemsa.8. Drain and dry with heat.9. Examine under oil immersion.
Preparation of Various Solutionsfor Diagnosis of Malaria
1. Methylene blue phosphateMethylene blue, medicinal 1.0 gmDisodium monohydrogen phosphate anhydrous
(Na2HPO4) 3.0 gmMonopotassium dihydrogen phosphate
(KH 2PO4 ) 1.0 gm
These are thoroughly mixed in a dry mortar and one gramquantities are placed in small well-stoppered vials. The con-tents of one vial are dissolved in 250-350 cc distilled water orfiltered if necessary.
2. Giemsa stain, certified, liquid orGiemsa stain powdered, certified 0.75 gmPure methyl alcohol 65.0 ccPure glycerin 35.0 cc

47
Shake well in bottle with glass beads 6-10 times daily untilit is thoroughly mixed. Keep tightly stoppered at all times. IfGiemsa powder is not available, Wright's powder can be usedin the same proportion. No heating is required; use approxi-mately on the third day or as soon as daily trials with normalblood show it to be satisfactory. Filter only when necessary,each time plastic bottle is refilled.
3. Buffer water
Disodium monohydrogen phosphate anhydrous1
(Na2HPO4) 6.0 gmMonopotassium dihydrogen phosphate
(KH 2PO4) 5.0 gm
Mix thoroughly in mortar. 1 gm mixtureto 1,000 ml distilled water
4. Field's stain consists of two aqueous solutions:
Solution A:Methylene blue 0.8 gmAzure l=Azure A 0.5 gm
dissolve in 500 cc %5 bufferSolution B:
Eosin, yellow w.s. 1.0 gmdissolve in 500 cc % buffer
To stain, dip for one second (1-3 secs.) in Solution A; washgently in distilled or buffer water; dip for two seconds (1-4secs.) in Solution B; wash gently, drain, and dry.
5. Wright's stain, certified, liquid, or
Wright's stain powdered, certified 0.15-0.18 gmPure methyl alcohol 100 ml
Shake well in bottle with glass beads and keep tightly stopperedin small bottle. Filter only if necessary.
'Primary Sodium Phosphate:1.25g of Na2HPO. + 2H2 0 = Ig of Na~HPO anhydrous.
Sodium Phosphate Crystals:12.6g of Na2HPO, + 12Hf0 = 5g of Na2HPO4 anhydrous.2.5g of Na2HPO, + 12H20 = lg of Na2HPO 4 anhydrous.

PART III
Microscopic Examination


11. MICROSCOPES
Three kinds of microscopes are used in malaria eradicationprograms:
1. The compound microscope (monocular or binocular)2. The stereoscopic microscope3. The hand lens or loupe, with magnification of 2x to 10x
The loupe, considered primarily a tool of entomology, is ex-tremely useful for the examination of the various parts of thecompound microscope, such as worn screw threads, damaged rackand pinions, or hardened specks of oil and dirt on smooth or glasssurfaces. The stereoscopic microscope, standard equipment forevery malaria program, may also be used where greater magnifica-tion is desired. A 5x loupe is indispensable for the examinationof objectives whose clarity of detail is impaired.
Compound microscopes are supplied with either monocular orbinocular bodies. Some makersalso supply a monocular tube DAwith the latter.
Diagram 13 shows that themonocular body consists of asingle tube. It has long beencustomary, for reasons of com-fort, to incline or tilt the mo-nocular microscope on its baseso as to give an inclination tothe ocular, similar to that ofthe binoculars. In cases whereonly monoculars are available,it is desirable to supply in-clined monocular tubes. Ifthese have a 1.5x magnifica-tion, a proportionately lowerocular is indicated.
An inclined binocular body(Diagram 14) enables the ob-server to use the microscopefor prolonged periods withmuch less fatigue than with a
51

monocular. The same diagramshows that a considerableamount of additional opticalequipment is required to bringthe same image into both eyes.Not only is the total lightreaching the slide via mirrorand condenser divided in two,but every lens or prism in the
e ... binocular system reduces theamount reaching each eye. Itshould be clearly understood,then, that the amount of light
* which gives adequate results inthe monocular microscope maybe hopelessly inadequate forthe binocular.
) to igiii Again, where focusing of thefine adjustment is sufficientto obtain maximum resolutionin the monocular eyepiece, inthe binocular instrument anadditional focusing of the ad-justable ocular tube to match
the resolution of the ocular in the fixed tube must be carriedout before use. When these adjustments are properly made,a degree of resolution can be obtained which is not possible with amonocular instrument. Moreover, eyestrain is greatly reduced. Theuse of the binocular microscope is complicated by the extra weightof the binocular body, which has a tendency to slip down and getout of focus after some time.
Some binocular bodies, often of European manufacture, mayincrease the magnification of the image because of their complexprism-lens system, and they are accordingly marked 1.25x, 1.5x,1.6x, or even 2.5x. Unless they are so marked, the body magnifica-tion may be taken as lx.
There is no distinetion between the remaining features ofmonocular and binocular microscopes. Each has a revolving nose-piece containing 3 or 4 openings into which the customary objec-tives are inserted. The platform should have upon it, or in-corporated in it, some type of slide holder (mechanical stage)which can be moved mechanically and accurately backward and
52DIAGRAM 14

53
forward and from side to side. Since virtually all malaria workinvolves methodical searching, one cannot be sure that the samefields have not been inspected repeatedly unless a mechanical stageis used.
The upper surface of the top lens in the Abbe condenser canbe seen through the opening in the platform. When it is in position,it should be as near as possible to the under surface of the slide.The function of the condenser is to concentrate to a maximum, atthe upper surface of the slide, all the light reflected by the planemirror through the large lower component of the condenser. Themirror which is supported in position directly below the condenseris used to reflect comparatively parallel rays of light from the lightsource to the condenser. To obtain the maximum effect of thecondenser, only the plane mirror is used; the curved mirror is pro-vided only for operations in which the condenser is removed. Theparts of the microscope located below the slide are related to illu-mination and those above, to magnification and resolution.
The total magnification obtained in the compound microscopewhen the oil immersion objective (usually 90x to 100x) is usedmay vary from 450x to 1,500x, depending on the eyepieces(oculars) available. Experience has shown that increased magnifi-cation by the ocular beyond an optimum point decreases the clarityof detail or resolution obtained.
The usual objectives available on microscopes are the lowpower, or 10x, the "high dry," or 43x, and the oil immersion,usually 100x. The low power may be used to inspect the bloodpreparation for its position on the slide, general appearance andstaining, as well as the distribution of leukocytes. Little use hasbeen found for the 43x objective in malaria diagnosis and it may beeliminated. It may be substituted in the revolving nosepiece bysome type of object marker for the purpose of circling interestingmicroscopic objects for further examination. The total magnifica-tion is determined by combining the magnifications of the opticalelements involved-namely, ocular, body (if any), and objective.Technicians in training will appreciate more detail with an inter-mediate magnification of between 600x and 800x. After they haveacquired considerable experience, they may find that 500x magnifi-cation increases the speed of their work, usually because the in-creased amount of light more than compensates for the loss ofdetail due to decreased size. Also, 5x oculars may be used con-veniently with body magnification over lx. Other ocular magnifica-tions are 4.3x, 6x, 6.3x, 6.4x, 7x, 7.5x, 8x, and 10x. The latter is

54
too high for ordinary use with the oil immersion objective.In recent years it has been customary to treat all air-exposed
surfaces of lenses and prisms with a "coating,"' which compensatesfor the unequal wave length of the colors of the spectrum, andwhich results in a substantial reduction in the dissemination of light.Lenses and prisms so treated may then function adequately withconsiderably less light than those that are uncoated. When viewedwith incident light, coated surfaces may be distinguished by theappearance of a bluish-violet luster. This treatment on modernmicroscopes is becoming increasingly frequent. (See Section 12,Illumination.)
In warm, moist climates it is imperative that the microscopes bestored at night in a cabinet or cupboard fitted with light bulbs orother heating units so as to maintain the temperature between 29°
and 35 ° C. If the temperature is allowed to drop beyond thispoint, though it be higher than room temperature, it may actuallyaid the growth of fungus. This simple storage procedure, therefore,will prevent the development of fungal mycelium on the surface oflenses and prisms. It is preferable that the microscopes used dailynot be stored in their respective carrying cases. Wood dust iscommonly deposited on the prisms and upper surfaces of oil im-mersion objectives, causing impaired resolution. This dust, how-ever, can often be removed by a few blasts of air from an ordinary4-oz ear syringe.2
Sometimes, when the mass of the binocular body cools con-siderably below body temperature during the night, or when theinstrument has been out of use, the resolution, though good atfirst, may suddenly become impaired. When the warmth of theexaminer's face heats the air around the prisms in the binocularbody, there may be a sudden deposition of moisture on the coldsurfaces, which disappears as soon as the air and surface tempera-tures are equalized.
A disadvantage of inclined oculars in the tropics and elsewhereis that the eyelashes soon become laden with sweat and the greasethereon is transferred to the upper surface of the ocular. Frequentwashing of the face with soap and water will reduce this difficulty.Small pieces of Kleenex-type tissues should be used frequently toclean the exposed surface of the eyepiece lens.
'Anti-reflexion film.2See Appendix 18, p. 112.

55
12. ILLUMINATION
Microscopic objects on slides are found and examined with lightdirected through the condenser by the mirror. This light passesthrough the preparation until it reaches the oculars, and theseconvert the rays of light into a recognizable image. Such light iscalled "transmitted" light, whereas light such as that which permitsthe recognition of white bands on the palps of a mosquito with thesimple, stereoscopic microscope is "incident" light. Solid pigmentsof various colors of the spectrum appear in those colors in inci-dent light, but since they are solid, in transmitted light they merelyobstruct the passage of light and they appear as gray or black.
"White" light consists of all the colors of the spectrum as can bedemonstrated with a prism. Each color has a different wave length.When white light meets a glass surface, a certain proportion isreflected from the smooth surface. But it is not reflected as whitelight; each color is reflected at a different angle according to itsindividual wave length. The effect could be compared to a layer offine bubbles or foam on the surface of water through which onemight wish to look. Light passing into the water is obstructed bythis foam and much more light is required to show what is belowthe surface than if this foam did not exist. The coating of lenseswith an anti-reflexion film reduces to a minimum the confused re-flexion of different wave lengths and permits a smaller light sourceto work than is required when lenses are not so coated. An ultimatesaving of electricity can also be effected through the use of coatedlenses, even at an initial extra cost.
Binocular microscopes with their prisms, and often with addi-tional lenses, require an enormous amount of light as compared tothat required for the monocular microscope. The total availablelight is divided between the two eyepieces. At least twice theamount of light which is adequate for the monocular should beavailable to the binocular. A coated system in the binocular bodyis therefore a distinct advantage.
It is doubtful whether any other aspect of medicine demandssuch a high standard of microscopy as does the recognition of thesmall malaria parasites in a dehemoglobinized and stained thickblood film. Usually, tiny bacteria or other organisms are stainedone color and are easily distinguished in the contrasting color ofthe background. For malaria it is obligatory that the background

56
be as clear and white as possible so as to show up tiny objects 0.5to 2.0 microns in diameter which are stained both red and blue.
By comparison, the thin blood smear, with its single layer ofred blood cells lying fiat on the surface of the slide-larger thannormal because it has been spread on a very smooth surface-canbe viewed with minimal light and considerable detail can be recog-nized. For this reason the thin smear should never be used inevaluating the adequacy of the light and the quality of the image.A well-made and well-stained thick film should be kept at handfor this particular purpose.
The field-the oil immersion field-should be evenly illuminatedwith a blue-white light at all times. The microscope, lamp, andfilters should be arranged in such a way as to obtain the maximumamount of light possible, after which the light may be reduced tosuit the individual worker by using the iris diaphragm of the con-denser.
At one time it was thought that only daylight was the ideal lightfor the microscope of the period: a monocular. Benches werelocated at a window with northern exposure and the mirror wasset to reflect the light from white clouds. Under such conditions,daylight is still a good, though inconstant, source of illuminationfor a monocular microscope. For the binocular microscope, onlyelectricity provides a constant source of uniform light; when it isused, however, an additional factor must be taken into account:electric light is frequently quite yellow.
There are many different microscope lamps that are excellent formalaria work, as well as some that are not satisfactory. It shouldbe recognized that many of the high-quality microscope lamps arespecifically designed for microphotography. There is no need forsuch in malaria eradication programs and the utilization of simplerapparatus is entirely adequate.
Therefore, illuminators which depend on special types of lightbulbs should not even be considered, whereas those that can be usedwith bulbs obtainable in the local market should be. Also, lampswith special sockets should be converted whenever possible; "built-in" illuminators should not be purchased, but the usual mirrorsshould be ordered for those microscopes with built-in illuminationalready on hand.
It is not possible to utilize direct sunlight with the microscopebecause of the glare; it is equally impossible to use bulbs withtransparent glass. If the latter are provided, a ground-glass filter isobligatory, either incorporated in the lamp or placed directly be-

57
neath the condenser of the microscope. A thin, fine-ground glassis preferable for a low light source, whereas a thick, coarse-groundglass is required for a stronger source. Frequently the ground glasssupplied is so thick that it cuts off a great deal of light, to the pointwhere the light reaching the microscope is insufficient. Too often,the ground-glass filter is combined with a blue filter and togetherthey lower the available light below working level.
Some type of blue filter is essential in order to obtain the blue-white background for the competent inspection of leukocytes, para-sites, and platelets. Often the blue glass circles to be used as sub-stage filters are too blue for the light source; when combined witha ground-glass filter, the combination reduces light excessively.
One hundred-and-ten-volt light bulbs give off heat proportionateto their wattage, hence the use of transformers and special lowvoltage lamps is recommended. However, the heat from bulbs of100 watts or less can be tolerated with proper ventilation. Openor unshaded bulbs cannot be used because of the glare in the oper-ator's eyes or in the eyes of those around him.
The foregoing explanation refers only to the use of the oil im-mersion objectives, since many illuminators are quite satisfactoryfor pathology, stool, and urine examinations, etc., but do notproduce enough light for malaria work.
An example of good, adequate illumination for a monocularmicroscope is the ordinary blue, inside-frosted, "daylight" 60-wattbulb. If voltage is good, the 40-watt is preferable. This bulb, in aplain porcelain base and suitably screened on three sides, gives anabundant amount of blue-white light. No filters are required.
Approximately 150 watts are needed for a plain binocular micro-scope, but since the blue color and the degree of "pearling" are thesame as with the 60-watt bulb, the blue is insufficient for so muchlight and a further blue filter is required. Any 150-watt light givesoff too much heat to be of practical use. A lamp on which a seriesof filters are used usually has a special transparent bulb as a lightsource and should not be considered. The model A.H.T. Cat. No.6958, an old German design intended for dark-field illumination,is excellent for the purpose. The 200-watt transparent bulb andthe adjustable internal bracket are not required in malaria work,but the No. 6958-E, with 100-watt inside-frosted bulb is satisfac-tory. A regular 100-watt pearl bulb behind a water-filled 250-300 ccFlorence flask is quite adequate if the water is tinged with blue.A sufficient number of drops of "artificial daylight" solution (20per cent copper sulphate solution 9 cc + aniline blue 0.6 per cent-

58
1 cc) is added to the water in the flask to give the basic blue-whitebackground. Excess of blue is worse than insufficient blue becauseit reduces the light enormously. The water is changed as required.Slight turbidity can often be removed by the addition of a few dropsof strong acetic acid or ammonia.
The light source should be surrounded with some opaque ma-terial, except where it shines on the microscope's mirror. TheChalet type of illuminator (American Optical No. 361 without blueor frosted glass, $16.00) will control the glare and hold either the60-watt or the 100-watt bulb suspended from above. The blueflask may be supported on blocks in an appropriate position be-tween the lamp and the mirror.
DIAGRAM 15
The above installations may be improvised readily by using astrong dark cardboard (insulating paper), a plain porcelain base orsocket, and 10 feet of wire. As can be seen from Diagram 15, therelation of the brightest part of the bulb, the center of the sphericalflask which acts as a lens, the mirror, and the relative heights ofeach in relation to each other, are of the utmost importance ifoptimum results are to be obtained. A number of wood blocks 1-2cm thick may be used to obtain the proper height of lamp andflask.
An electronic light meter which measures the number of foot-candles of light reaching the eye is most useful in helping the stu-

59
dent obtain the maximum light. A valuable piece of equipment toaid both in the teaching of proper microscope illumination and indemonstrating accurately the actual amount of light reaching theeye, is the photoelectric exposure meter "Photovolt" (see Appendix20, p. 114).
The same principle as seen in Diagram 15 can be applied to ahomemade lamp, as represented on the left of Diagram 16, whichshows a scale drawing of a lamp shade which is held together bybrass paper clips. Two openings are used when two operators areseated opposite one another.
DIAGRAM 16ORYING THE MICROSCOPE SLIDE
PATTERN[~l~ 35/, J"J ~ 2"* 5/ó *2", 3,'5/ís" 8'
i ,
FOR TWO MICROSCOPES : 2, '
i 18" dOne-hundred-watt inside-frosted bulbs vary considerably not
only in size and shape (especially length), but also in the amountof light they give out and the degree of deterioration after use.Some inferior grades darken the interior surface of the pearl glassto such an extent that a loss of 30 per cent may occur. When theline voltage is lower than the specified voltage of the bulb by 10 ormore volts, a line voltage regulator may be required to obtain themaximum light.
Degrees of color blindness impair the work of microscopists.Prospective candidates should be given one of the color vision tests,for which American Optical H-R-R Pseudoisochromatic plates areexcellent.

60
13. TECHNIQUE OF MICROSCOPIC EXAMINATION
In order to avoid loss of time and prevent errors, the followingsteps, which may appear to be insignificant, should be learnedthoroughly before attempting to search for parasites:
1. Place a small drop of immersion oil near the edge of thethick blood film.
2. Check and record on the work sheet the identification ofthe slide, as well as any unusual appearance that may be present.
3. Set the slide between the open arms of the mechanical stageof the microscope and make certain that it is firmly placed againstthe movable bar of the stage. If this is not done, doubtful orsuspicious objects may be lost before they can be permanentlylocated by a circle made with a suitable object marker.l
4. Survey briefly the entire thick film with the 10x objectiveuntil a suitable area is found where the leukocytes are numerousand apparently well stained. If it proves difficult to locate such anarea, spread oil thinly over the entire stained area and survey againsystematically with the 10x objective.
5. When an acceptable area is located, place another dropof oil in the center of the illuminated area. Swing the 100x objec-tive into position. Holding one's head well to one side, and using thecoarse-adjustment screw, lower the objective into the oil until thetip barely touches the glass.
6. Place the eyes at the aperture of the ocular and continueto raise the body with the coarse adjustment until leukocytes comeinto view. Bring to the center of the field and into optimum focuswith the fine adjustment a well-stained polymorphonuclear leuko-cyte, preferably one with some platelets near it. Rotate the fineadjustment back and forth almost violently and rapidly through50 divisions on the shaft while the eyes view the field. If, duringthese movements, the leukocytes appear to move radially, evenslightly, in any direction, stop and adjust the mirror or its height, orthe distance from the light source, until the leukocytes appear tohover over the same spot as the result of a wide movement.
The clear areas or the field between the leukocytes should bewhite with a slightly bluish tinge. It is likely that the light will be
1 See Appendix 15, pp. 107-108.

61
less yellow and more abundant than before the adjustments weremade. If not, further alterations are in order until maximumillumination is obtained.
7. Next, clean the oculars thoroughly on their upper surfaceswith a small piece of Kleenex-type or equally fine tissue. Dustthat is on the outside of the lower lenses of the oculars, however,should be removed with a blast of air. Dust on the inner surfaceof the lower lens collects more slowly. Then adjust the oculars tothe exact, previously determined interpupillary distance on thescale, such as 68. The single adjustable ocular tube is moved up ordown until the resolution is equal in each eye.
8. Review the elements of normal blood described in Section 3,pp. 10-13. Make note of any deviation from the usual color andappearance.
9. Only when the normal blood elements appear in their propercolors can it be expected that any parasites present will appear intheir appropriate colors. Therefore, if the nuclei of leukocytes aretoo red in some area of the specimen, it is unlikely that any bluewill be detected in the cytoplasm of parasites. Or, if the leukocytesare too blue it is unlikely that the particles of chromatin will showmuch red color. It should not be overlooked, however, that occa-sionally where the staining of the cellular elements is pale or poor,parasites may continue to stand out clearly and distinctly forseveral weeks.
10. Acquire ability to recognize the appearance and color ofmalaria pigment as early as possible, because many suspiciousobjects, up to the size of a small lymphocyte or larger, may im-mediately be dismissed as not being parasites if no pigment can berecognized within them.
11. During all these operations, note automatically whether thecells and other elements inspected for color are also seen as good,clear-cut, and distinct images, i.e., whether the resolution rangesfrom excellent to good. If it does not, the cause should be correctedbefore continuing.
Once the above steps have been learned thoroughly, it is time toexamine the specimen. Since it is customary to search a minimumof 100 fields of the thick film before calling the blood negative, itwould be advisable to learn precisely what constitutes one practicalmicroscopic field.
Since few microscopic fields appear entirely fiat in the oil objec-tive, it is costly in terms of time to examine in detail every object inthe illuminated area. Any such object which requires careful exam-

62
ination should be moved to the center of the field where resolutionis maximum. Therefore, for searching purposes, the microscopicfield may be defined as that part of the illuminated area which isin as clear focus as something located in the exact center. This maysometimes include no more than two thirds of the illuminatedarea.
Once the usefulness of the exact center of the field is appreciated,any object under discussion may be moved there, so that crosslinesor pointers in the ocular are superfluous.
Beginning at one edge of the thick film, the slide is moved in azigzag fashion under the objective as rapidly as this central areacan be scanned. Each time a new area of the same size has beenobserved it is considered to be one microscopic field.
To compensate for the variable performance of individuals,the examination of a single specimen should be for a specific num-ber of fields rather than for a certain number of minutes. Super-vised novice workers have recorded from 39 to 215 fields examinedduring the same observation period. A thick blood film of approxi-mately 1.0 to 1.5 cm2 may contain 500 to 800. satisfactory micro-scopic fields. It is obvious that an extension of examination to in-clude the entire preparation can be done only under very specialcircumstances, such as in infection and drug test experiments.Where symptoms of a febrile patient are due to malaria, theparasites are usually readily found, that is, several per field. Whenthey are very infrequent they may be recorded as the number foundin 100 microscopic fields, e.g., 37/100, or simply 37 V (whenreferring to vivax).
If the observer has been examining slides with similar prepara-tions almost daily, the recognition of what is chromatin will beautomatic. But if the microscope has not been used for some daysit is well worth while to find several undoubted parasites in orderto be oriented as to the specific and characteristic density thatchromatin uniformly shows. A single parasite in a preparationshould be diagnosed with caution; at least three parasites shouldbe found. The search is no longer made for specific forms of theparasite; instead, as many definite parasites as can be seen in theexamination are checked as to the size of the smallest, the largest,and the majority (see Appendix 4, p. 95). It is suggested thata good positive slide be examined for at least 50 fields so thatevidence of a second infection will not be overlooked.
When it is desired to investigate any unusual parasitic appear-ances in the thick blood film, if the patient is available a thin smear

63
may be taken and examined in the hope of finding forms whichwill explain such unusual appearances-for example, the dough-nut-like appearance of early schizonts and pre-schizonts of bothP. vivax and P. malariae. Attempts to diagnose species with onlytwo or three parasites in the thin smear can be unwise.
14. RECORDING AND REPORTING OF RESULTS
In services devoted exclusively to malaria it can be a waste ofeffort to write Plasmodium, Plas., or P. every time reference ismade to any of the species. Adequate symbols or abbreviationstake up less space and constitute less work, viz., F, Fg, V, M.
If these are coupled with the intelligent use of approximatenumbers distributed under only four headings, it is possible torecord the exact picture of the blood findings.
It is therefore recommended that the abbreviation P. and theword "positive," which by itself means very little, be eliminated.The word "negative" has now been accepted to signify that noparasites have been encountered in 100 fields of the thick bloodfilm. When the report form has a space for showing the total num-ber of slides examined and the positives are recorded by meansof numerical reference, it is not necessary to write "neg." aftereach negative. A dot or check is sufficient to show that the slidehas been examined.
The falciparum infection is divided into three phases:
1. Rings alone = F2. Rings and gametocytes = F + g3. Gametocytes alone = Fg
No other explanation is needed.On the other hand, the gametocytes of the other three species
do not require any special mention except to remind the observerthat they may persist through several cycles and that old, fadedones may be encountered. Unlike falciparum, they require nospecial drug to remove them from the circulation. All the differentforms of the developmental cycle may be seen in the peripheralcirculation at some time during the 48 to 72 hours they requirefor the cycle, but they all disappear after a schizontocidal drug istaken.

64
"V is the only record required for all forms of vivax; M for allforms of malariae; Ov for ovale (not yet proven to exist in theWestern Hemisphere).
The important thing is some approximation of number of para-sites present. Not that high numbers can be interpreted as sug-gesting new or recent infections and low numbers as older, butsolely because species diagnosis is more likely to be correct whenmade from large numbers than when there are very few. Reviewof the slide becomes important in the case of scanty parasites.
The numbers can be recorded roughly as follows (the numericalvalues assigned to ++ and +++ are pure approximations):
Wheré parasites average 1 per field'= +2-20 per field = ++
21-200 per field = +++more than 200 = + + + +
When the number of parasites actually +counted in 100 fields lies between 40-60 -
.Any number less than 40 per 100 fields should be written infull, i.e.: 33
When recorded under only four column headings, these approxi-mations or actual numbers can be used for the exact diagnosis ofany possible combination of species, e.g.:
F FG V MN|++ 14 · e
I · 1+++1 o
.37 ++ ·
* 29 * ++
° * T 9

65
Three parasites per 100 fields is the largest permissible numberof parasites which can be found later by a second examiner (re-viewer) in a slide already reported as "negative." This may betaken as a baseline for errors. If no more than three are found,a simple notice of the finding is returned to the original examinerinstead of the "error in diagnosis" slip sent when the diagnosishas been wrong.
15. GENERAL PROCEDURES SUGGESTED FOR THE
ORDERLY EXAMINATION OF STAINED SLIDES
1. Adjust the seat to the proper height for the individualexaminer.
2. Remove all finger marks, dust, or oil from the entire micro-scope with a soft cloth or fine soft-type tissue paper. Makesure that the mechanical stage moves freely in both direc-tions. If it does not, remove and clean both the undersideof the stage and the platform. DO NOT OIL. Use vase-line on all dry movable surfaces.
3. Check the solution in the flask, which should be transparentand not too blue.
4. Close iris diaphragm slightly to use the 10x objective;always open when 100x is turned into position.
5. Use the left hand for the constant focusing of the fine ad-justment screw, and the right hand for changing fields withthe knobs of the mechanical stage. Constant focusing is amust with thick films.
6. Review the features of the blood (see p. 10) to facilitatethe evaluation of the quality of the stain and the recogni-tion of parasites if they are present.
7. When the examination of each slide has been completed,remove all oil and grease-pencil marks, if used, by wipinggently with tissue moistened with toluene. For large num-bers of slides it is preferable to use a 2-oz wide-mouth bottlefilled with toluene. First blot up the excess oil on the slidewith soft-type tissue paper; dip the slide in the toluenebottle; then wipe lightly with a small piece of dry tissue.

66
8. At the end of the work period, remove the last slide andturn the 10x objective until it is directly over the condenser.Lower this objective until checked by the automatic stop.Remove oil from the 100x objective.
9. Move mechanical stage to its center position.10. Cover the instrument with dust-protection cover and re-
turn it to its numbered position in the warm cabinet.
16. MICROSCOPIC SLIDES
These commonplace objects are so well known that most peopleseem to believe that they are pieces of glass of a standard length,breadth, thickness, and quality. This is not so. Slides from differ-ent manufacturers as well as from different countries vary slightlyin thickness,l length, and width.2 Before placing an order formicroscopic slides, a review should be made of what will be ex-pected of them. They will be exposed to washing and strenuouswiping; they will be carried distances under varying conditions,stored, and then distributed. Before receiving their specimens ofblood they may have been transported long distances by jeep, horse,boat, or afoot. They then bear blood samples which cost from afew cents to several dollars each to obtain. They will go throughmany hands before the specimen is finally examined, checked, andthen stored for further reference. They must remain intact through-out all this process. If these points are taken into account, it isunlikely that considerations of cheapness will outweigh the ad-vantages of a really good slide.
Should a large supply of previously used slides be the only onesavailable, they should be inspected one by one. Those showingeven a beginning of corrosion should be discarded and the re-mainder separated into groups of identical color, thickness, length,and width. Individual groups may then be washed and packagedin accordance with the directions appearing below.
One of the best available microscopic slides are Micro slides,noncorrosive, Red Label, Special, A.H.T. No. 7030. These arevery uniform and sturdy. Their thickness is 1.10-1.30 mm. Theyhave polished edges and slightly rounded corners; the long edge is
0.8-1.3 mm. Measure 10 slides in order to obtain average thickness.'77 x 27, 76 x 26, 76 x 25, 75 x 25, and 74 x 24 mm.

67
slightly bevelled (appreciably reducing the number of finger cutsduring wiping). The list price is $3.35 per gross. The No. 7030-C"clinical" slides are identical, lacking only the bevelled edge. Thelist price is $1.90-$2.85 per gross.
Several brands of "pre-cleaned" slides are on the market. If theycome near to the above specifications, prove to be clean enough foruse with Giemsa stain, and are completely grease-free, they may betried. Possibly they could be wiped out of 90 per cent alcohol andcould then become usable, but they are expensive.
The so-called "safety-grip" rough-edged slide is also thin, lessthan 1 mm. It is doubtful whether this slide could be cleaned ascompletely as a smooth-edged slide.
New slides which have never been used but which have beenstored for months under favorable conditions may show varyingdegrees of corrosion. If at all possible, these should not be usedfor blood work, but rather diverted to some other activity.
New slides are usually received in cardboard boxes which have asmall space remaining after 72 slides have been placed in them.When this space is filled with an adequate number of clean slides-usually 3 to 8-the full box becomes a convenient and satisfactoryunit for shipping or storage. For mailing, these boxes may be rein-forced with a single layer of corrugated cardboard and coveredwith a tough paper wrapping. All such cardboard boxes should besaved for this use.
The Cleaning of Microscope Slides
The staining of malaria and other parasites in blood is in realitya very delicate chemical reaction which is easily upset by contactwith dilute acids or alkalies, soaps, disinfectants, and absorbent ma-terials such as dried serum or sweat. A trace of fat or oil hindersthe penetration of the stain and is the most common cause ofblood washing off the slide in small flakes during staining.
For this reason there has not been as yet any "short cut" to theslide-cleaning routine. It is not enough that their surfaces behighly polished; they should also always be firmly wiped with aclean cloth until nothing is adhering to the glass. In fact, so muchpressure is exerted to achieve this end that novices frequentlybreak many slides when they are learning to wipe them properly.Well-cleaned slides also reduce the number of confusing artifactsthat may appear in any blood preparation.

68
The assumption that new slides from a freshly opened box arethe best that can be used is almost universal. This is by no meanstrue because new slides are often contaminated by chemicals dur-ing the polishing process and these are seldom removed by washingor prolonged soaking in clear water before being squeezed togetherto remove the excess water from large quantities of slides.
Staining dishes which will keep slides separated one from theother during the washing, soaking, and rinsing process are indis-pensable (Diagram 17). They have a loose-fitting cover and aregrooved to keep slides separated (A.H.T. No. 9194). Each workershould have a minimum of four available. One cover can serve forfour dishes piled one on top of the other.
Where the number of slides to be washed is so large that thestaining dishes are no longer practical, the slides should be dis-tributed in an empty basin in such a way that the water reaches allsurfaces (see Diagram 18).
DIAGRAM 18
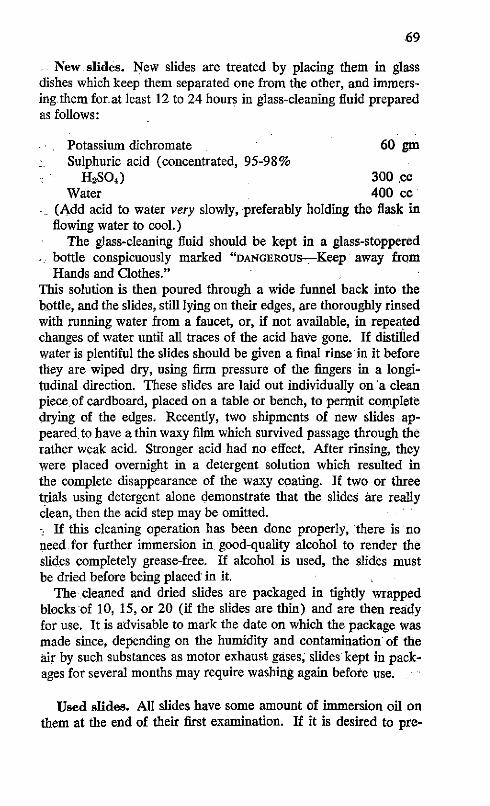
69
New slides. New slides are treated by placing them in glassdishes which keep them separated one from the other, and immers-ing them for at least 12 to 24 hours in glass-cleaning fluid preparedas follows:
Potassium dichromate 60 gm- Sulphuric acid (concentrated, 95-98%
H2 SO4) 300 ccWater 400 cc
(Add acid to water very slowly, preferably holding the flask inflowing water to cool.)
The glass-cleaning fluid should be kept in a glass-stoppered. bottle conspicuously marked "DANGEROUs--Keep away from
Hands and Clothes."This solution is then poured through a wide funnel back into thebottle, and the slides, still lying on their edges, are thoroughly rinsedwith running water from a faucet, or, if not available, in repeatedchanges of water until all traces of the acid have gone. If distilledwater is plentiful the slides should be given a final rinse in it beforethey are wiped dry, using firm pressure of the fingers in a longi-tudinal direction. These slides are laid out individually on a cleanpiece of cardboard, placed on a table or bench, to permit completedrying of the edges. Recently, two shipments of new slides ap-peared to have a thin waxy film which survived passage through therather weak acid. Stronger acid had no effect. After rinsing, theywere placed overnight in a detergent solution which resulted inthe complete disappearance of the waxy coating. If two or threetrials using detergent alone demonstrate that the slides are reallyclean, then the acid step may be omitted.- If this cleaning operation has been done properly, there is noneed for further immersion in good-quality alcohol to render theslides completely grease-free. If alcohol is used, the slides mustbe dried before being placed in it.
The cleaned and dried slides are packaged in tightly wrappedblocks of 10, 15, or 20 (if the slides are thin) and are then readyfor use. It is advisable to mark the date on which the package wasmade since, depending on the humidity and contamination of theair by such substances as motor exhaust gases; slides kept in pack-ages for several months may require washing again before use.
Used slides. All slides have some amount of immersion oil onthem at the end of their first examination. If it is desired to pre-

70
serve the slide for further examination, a few drops of good-qualitytoluene are allowed to drop on the slide, which is placed in a wooddrain block until dry. A better procedure is to dip them in a 2-ozwide-mouth bottle full of toluene to remove any oil that could notbe taken off by a brisk blotting with dry soft-type tissue. Slidesare then wrapped in onion skin paper 41/½ x 8Y2", and their iden-tification is written on the outside with a lead pencil. Stained thickfilms covered with oil are soon spoiled if left scattered about on thebench or exposed to sunlight.
For washing, provide a bowl of glass, enamel, or plastic (Dia-gram 18) at least 4" deep and one half filled with a strong solution(5 per cent) of soap or (1/2 per cent) detergent into which thediscarded slides are placed pending washing. Any of the labora-tory cleaning compounds similar to A.H.T. No. 3298 are less try-ing on the hands than commercial detergents of usual grades.Slides should never be kept soaking in shallow vessels such astrays or flat pans. These are almost always left to one side andforgotten and the slowly evaporating water or solution leaves cor-roded streaks across the surface of the slide which may be perma-nent. Slides should never remain more than three days in plainwater, which eventually becomes slimy with an unpleasant scum onthe surface. The slides in detergent or soap solution may be trans-ferred every two or three days to a larger and deeper storage vessel.If, while wet, they are passed between the thumb and forefinger,most of the stained blood and oil will be left behind in the oldcontainer. Such slides may be massed together for storage in weakdetergent solution, but for successful cleaning they should be sepa-rated individually or handled in the above-mentioned glass stainingdishes or jars.
In such jars they are placed under a stream of running waterfor one half hour, or 20 changes of water. New slides may beplaced in running water, gently rubbed between the fingers, andrinsed in running water for a further half hour.
Since used slides have been exposed to oil, it is often more diffi-cult to make them grease-free. After being wiped out of waterand allowed to dry thoroughly, they are placed in 90-95 per centalcohol; they are then wiped out of the alcohol with a fresh clothand packaged. Such alcohol may be used repeatedly if filteredeach time it is returned to the stock bottle.

71
Commentary. This cleaning process may seem to represent agreat deal of work, but to be convinced of the need for it, one hasonly to see a group of several slides prepared by a careless attend-ant and observe that only a ring of blood remains on the slide afterstaining, by which time the person from whom the smear wastaken may be 100 miles away.
The bacteriological practice of flaming slides before use is notessential and may indeed make slides more brittle and hasten cor-rosion. Boiling is also unnecessary.
Cleaned slides may be stored, until needed, in wide-mouth jars5 cm wide and 10 cm high, where they are submerged in 90-95per cent alcohol. They are wiped with special clean cloths usedfor glassware and then packaged for later use.
Importance of cleanliness of towels used for glassware.To obtain the condition of scrupulous cleanliness required forglassware, a generous supply of towels of suitable cotton materialwith as little lint as possible should be provided. The materialshould not be too thick or too thin and its initial content of dress-ing must be removed by repeated washing. Material such as In-dianhead is cut in pieces of 40 x 60 cm and the cut ends arehemmed. These towels should be used for no purpose other thandrying the glassware-never for the hands or face or for wipingthe bench or sink.
It should be understood that these cloths are rarely soiled whenused only for glassware. However, they should be washed fre-quently since the hands perspire constantly, to a greater or lesserdegree depending on the climate, and the perspiration is absorbedby the cloths.
Soiled towels are soaked in water and a good soap is thoroughlyrubbed over the whole surface and into the material, or the towelsmay be immersed in a strong solution of detergent and allowed tosoak for 15 to 30 minutes or overnight. After thorough agitationand strong rubbing on spots where dirt is visible, the towels arerinsed in repeated changes of water until all traces of soap or de-tergent are gone. Where distilled water is abundant, a final rinsein such water is advisable. Starch should never be used, and towelswashed by commercial laundries should always be well rinsedbefore use. Ironing is superfluous except when done to acceleratedrying.

72
DIAGRAM 19
IRREGULAR SLIDES
DIFFERENT TYPES OF EDGES
SELECTED SLIDES READY FOR PACKING
Packaging of clean slides. When used slides are washed andwiped dry, they should be separated into groups of equal size(length, width, thickness) and color before being made up intopackages of 5, 10, or 15 slides tightly wrapped in paper. Ifthese packages contain some slides which are not uniform, thepaper wrapper will soon be damaged. Diagram 19 shows the dif-ference between a block of selected and unselected slides.
It is not recommended that clean slides be stored in the conven-tional wooden slide boxes with 25, 50, or 100 slots. In these, eachslide is exposed to dust every time the container is opened., More-over, constant shaking produces wood dust and even glass dust.The larger boxes require extra reinforcement, particularly for trans-port or mailing and are bulky as well. One to three such boxesshould be kept in each central laboratory to hold reference andteaching slides' for ready reference.
'See Appendix 10, p. 103.
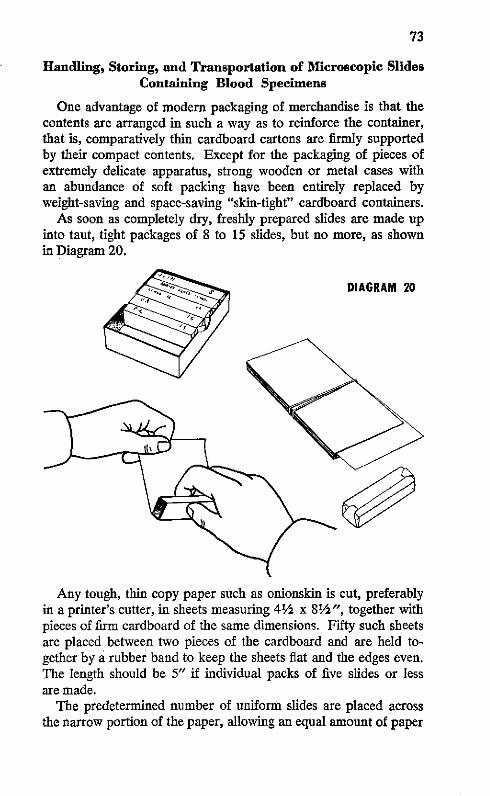
73
Handling, Storing, and Transportation of Microscopic SlidesContaining Blood Specimens
One advantage of modern packaging of merchandise is that thecontents are arranged in such a way as to reinforce the container,that is, comparatively thin cardboard cartons are firmly supportedby their compact contents. Except for the packaging of pieces ofextremely delicate apparatus, strong wooden or metal cases withan abundance of soft packing have been entirely replaced byweight-saving and space-saving "skin-tight" cardboard containers.
As soon as completely dry, freshly prepared slides are made upinto taut, tight packages of 8 to 15 slides, but no more, as shownin Diagram 20.
DIAGRAM 20
Any tough, thin copy paper such as onionskin is cut, preferablyin a printer's cutter, in sheets measuring 41/2 x 81/2", together withpieces of firm cardboard of the same dimensions. Fifty such sheetsare placed between two pieces of the cardboard and are held to-gether by a rubber band to keep the sheets fiat and the edges even.The length should be 5" if individual packs of five slides or lessare made.
The predetermined number of uniform slides are placed acrossthe narrow portion of the paper, allowing an equal amount of paper

74
to project beyond each end. The paper is turned back over threeedges of the block of slides and the distal portion of the paper isheld firmly so that the wrapping is completed by rolling the blockof slides as a unit toward the free end of the paper. The ends arethen neatly folded and compressed against the end of the pack.The importance of even edges will now be apparent, for the firmtight package can then stand upright.
Any attempt to introduce paper between the individual slidesdefeats the principle of packing. The method of rolling slides intoilet paper results in a loose package as compared to the aboveand is, in addition, tedious to roll and unroll. Slides containingblood smears will withstand transportation better if packaged inthe above-described manner because movement between slides isreduced to a minimum.
All necessary identification may be written with a soft pencil onthe "edge" side of these packages so that they need not be openedfor identification. (Packages of newly cleaned slides should alsobear the date when they were cleaned.) Such blocks or packagesof slides are stored in the empty cardboard boxes in which theywere received, either in the open box or in the lower half and thelid of the box. Small metal cooking pans 18 x 28 x 3.5 cm canbe used to hold as many packages of slides as can be convenientlyhandled, taking weight into account.
A slide carton full of such packages is the most compact, con-venient unit for handling and shipping slides. Only neatly-cut cor-rugated cardboard is needed to cover all sides, which are tightlytied with string before the carton is wrapped in tough wrappingpaper.
Single packages or less than a carton of slides may be packagedseparately, using appropriate widths of cardboard. Strips of cor-rugated cardboard are cut in varying widths with a Gem-typerazor blade in a razor-blade holder, or preferably with a heavypaper cutter. There are two sizes, approximatey 2.5 cm to 7.5 cmwide, with successive pieces each 0.5 cm wider than the previousones. The cardboard grooves are to be transverse and the lengthnot to exceed 60 cm. The pieces are then cut according to theindividual block or blocks of slides. Strips are applied alternatelyin each longitudinal axis and tied separately until sufficient cover-ing for the mass of glass has been applied (Diagram 21). Thewhole is finally covered with wrapping paper. Such packages canresist a single deliberate throw from a great height on metal, stone,or cement.

75
DIAGRAM 21
A traditional container used for mailing one or two slides onlyis the wooden Micro slide mailing case, reversible, A.H.T. 7056.Whether used in pairs or in series, they require only an outsidepaper wrapper. However, it is safer to apply a single layer of card-board to each side of these mailers, held in place by tough wrap-ping paper, than to rely solely on the wrapper.
It should always be remembered that the specimen of blood ona slide represents a considerable expenditure of time and effortas well as travel on the part of the collector. Everything possibleshould be done to ensure that this is not wasted through loss orbreakage of slides.
Adams two- or four-slide cardboard mailers, A-1615, can bevery useful to field workers for the purpose of protecting slidesfrom flies, etc., until dry, at which time the slides are incorporatedinto temporary packages.
Student or training slides may be quickly distributed and col-lected with Adams map-form slide trays for 20 slides A-1605.
An excellent 25-slide box made of polystyrene by the LaPineCo. (A. H. Thomas No. 7059-B) is suitable for the rapid handlingof teaching slides. There is more space between the slides thanin the common bakelite boxes and the polystyrene is less brittle.
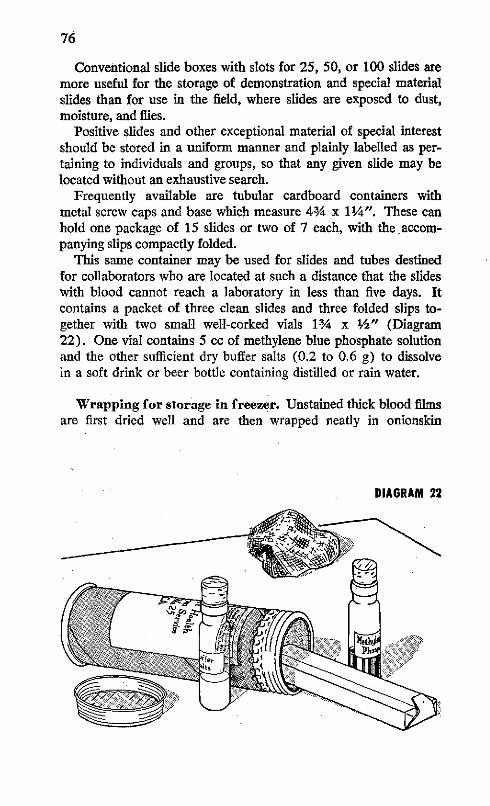
76
Conventional slide boxes with slots for 25, 50, or 100 slides aremore useful for the storage of demonstration and special materialslides than for use in the field, where slides are exposed to dust,moisture, and flies.
Positive slides and other exceptional material of special interestshould be stored in a uniform manner and plainly labelled as per-taining to individuals and groups, so that any given slide may belocated without an exhaustive search.
Frequently available are tubular cardboard containers withmetal screw caps and base which measure 43/4 x 1¼/4". These canhold one package of 15 slides or two of 7 each, with the accom-panying slips compactly folded.
This same container may be used for slides and tubes destinedfor collaborators who are located at such a distance that the slideswith blood cannot reach a laboratory in less than five days. Itcontains a packet of three clean slides and three folded slips to-gether with two small well-corked vials 13/4 x 2" (Diagram22). One vial contains 5 cc of methylene blue phosphate solutionand the other sufficient dry buffer salts (0.2 to 0.6 g) to dissolvein a soft drink or beer bottle containing distilled or rain water.
Wrapping for storage in freezer. Unstained thick blood filmsare first dried well and are then wrapped neatly in onionskin
DIAGRAM 22
-~iJ- rn~>! .~~~~~Y.

77
paper in packages not to exceed 15 per package. The folded endsare stuck down with a narrow 1/2" band of plastic tape 1" long.
Next, the package is wrapped in aluminum foil 9 x 42 2". Theends are smoothly moulded in place.
A concise description of the contents is typed on stiff white paperand placed over the edges of the slides for the final wrapping inwax paper 11 x 5", in such a way that the identification will showthrough. The folded ends are again held in place by short stripsof plastic tape.

PART IV
Laboratory Services


17. LABORATORY SERVICES
The purpose of a malaria diagnosis laboratory is to examinecompetently the maximum number of blood specimens as rapidlyas possible. In addition, the laboratory should be responsible foreverything that pertains to this specialized work.
It should always be borne in mind that the examination of ablood specimen for the presence of parasites is really a very poortest when the parasites are present in very low numbers. Therefore,a type of minimum examination should be adopted, such as 100microscopic fields per specimen, so that no undue amount of timeis lost in the useless scanning of negative bloods.
For a laboratory service to function satisfactorily, it is impor-tant that all supervisory personnel know exactly what is expectedof the microscopists and what their limitations are. The imme-diate "heads" of the laboratory will be obliged to undergo sufficienttechnical instruction in procedures so that each will be able todetect small deviations from the prescribed laboratory methods forthe purpose of correcting them before the over-all quality of thework is affected. One example of this is when a worker calls foror uses something from an unlabelled bottle, perhaps handed tohim by the cleaner or some other unskilled person.
Principles and practices must be determined in advance and allprocedures standardized whenever possible. Modifications whichgive better results may be thoroughly tested at the central labora-tory and adopted immediately after they have been proven satis-factory. Such rigid uniformity permits the rapid inspection ofequipment and practices and allows easy interchange of personnelfor temporary periods of observation, study, or relief.
Staff
Head of the laboratory service. An M.D. should be givenpreference for this post. He should be selected for aptitude andenergy, rather than for degrees and formal training.
He should devote his first month to actual practice of all labora-tory procedures; he should inspect in detail the quarters, fixtures,microscopes, lenses, and all other equipment in each laboratoryunder his supervision. He should appreciate the limitations of
81

82
this equipment. He should insist on a high degree of cleanlinessand should understand and remedy any difficulties that may beinvolved in attempting to maintain it. He should personally in-vestigate any failure of methods or materials and correct it him-self. He should be the key person in recruiting microscopists,laboratory aides, and collaborators.
Chief technician. Here again, aptitude and energy are moredesirable than diplomas and titles. This officer is responsible forthe central laboratory and for all diagnoses; he confirms all posi-tive slides and an occasional negative one; he supervises all recordsand reports, and also supervises the field laboratories.
Microscopists. The number of microscopists depends on themonthly work volume, based on a minimum of 75 thick film ex-aminations per microscopist per day, plus additional staff to relievethem during vacations and increased workload periods. Eachshould have his color vision tested before the training period.
Cleaners. This personnel should be well instructed in thespecial precautions to be taken in this type of work. Those show-ing spontaneous interest should be given the opportunity to domicroscope work as soon as they are familiar with the routine.
Clerical staff. This staff includes clerks, record keepers, andsecretaries, depending on the methods used in the particular serv-ice and on the work volume.
Training of Personnel
The training of personnel should not be limited to a formalintroductory course; it should be a continuing process. The stu-dent requires at least six months of bench work, examining rou-tine slides, if he is to become acquainted with the variable appear-ances of blood. The central laboratory can function as a trainingground or as an internship where technicians from outlying dis-tricts and private laboratories may rotate after learning the currentprocedures and modern viewpoints.
The approach should emphasize the thick blood film and ignorethe thin smear. The student should be encouraged to discontinueall mention of the old-time classical terms such as accolé, band,"mixed infections," and the like. He should learn current usageand precise diagnosis. The latter includes three separate phasesof P. falciparum. Instead of reports of "mixed infections," thedominant and subordinate species may be indicated clearly with

83
abbreviations (see Section 14, p. 63). Since the non-falciparumspecies show all the various stages of development in the periph-eral blood no matter when the blood is taken, and since theirgametocytes do not persist after the asexual forms are gone, itis pointless and pedantic to mention the presence of trophozoites,schizonts, and gametocytes when these are understood solely bythe letters V and M (for vivax and malariae).
The beginner should be exposed to only the best possible studymaterial until species diagnosis is thoroughly understood. Thequality of specimen slides may then gradually be reduced to thelevel of the poorest specimen sent in from the field.
Any attempt to combine thin blood smear appearances withthick film diagnosis results in confusion and should not be per-mitted. Instruction should be continuous until the worker hascomplete confidence in the thick film alone. For many people, thedetailed examination of several infections is most helpful. It pro-vides a firm basis for understanding that the individual parasitesare dynamic, growing, individual animals which react to their en-vironment as do any other animals and can vary greatly in appear-ance, but that the behavior of the infection as a whole has verydefinite patterns.
18. EQUIPMENT
Minimum Requirements, Quantity and Quality,Operation and Maintenance
For the establishment of a satisfactory laboratory, use is natu-rally made of buildings, rooms, or other quarters that are available.In practice, space is often set aside for entomological laboratorywork. Whenever possible, the diagnostic laboratory should bemaintained apart from all other activities because of the nature ofthe work and because a quiet environment is most desirable.
When the prevalence of malaria declines, the work becomesprogressively more tedious, because of the diminution in numberof positive bloods which stimulate the interest of the workers.Within limits, everything possible should be done for the comfortof those engaged in this rather tiring work.
In order to facilitate the identification of slides, it is essential tohave a large, well-ventilated and well-illuminated room. In warm,moist localities an electric fan, preferably in the ceiling, contributesto the success of the technical procedures as much as it does to

84
the physical comfort of the occupants. It goes without saying thatthe whole installation should be adequately screened. To protectmaterial before screening, fly control measures of all kinds shouldbe rigorously instituted. In humid climates, a "warm closet" shouldbe provided from the beginning, of a size adequate to store at nightthe number of microscopes in use. It should also be equipped withelectric bulbs or some other heating device to maintain a constanttemperature not to exceed 35°C. This will effectively prevent thegrowth of fungus on lenses or prisms.
Solidly constructed tables or benches should be ample in sizeand number. The edges of the tables should be well rounded toprotect the forearms of persons using microscopes. The surfaceshould be painted dull black. The height should be between 30"and 34", and a minimum width of 32" will permit the utilizationof most types of illuminators.
Specific laboratory furniture is neither essential nor desirable.A stable, solid, homemade table with a crossbar suitable for afootrest is often preferable to types of desks or benches designedspecifically for laboratory use.
In addition to furnishing a footrest and ample knee space, careshould be taken to provide chairs, stools, or other type of seatsthat can be adjusted to the user's height, such as block or swivelchairs; cushions can also be used. The purpose is to aid the pos-tural position so that fatigue will not occur earlier than need be.The provision of stools of different heights is usually satisfactory.
One or more sinks with running water are absolutely manda-tory, since the cleanliness of slides and all glassware used in rela-tion to staining procedures is of the utmost importance. A prac-tical dust-proof cabinet for glassware, bottles of stain, and otherreagents is most desirable, as are filing cabinets and a desk for thesecretarial and record-keeping work.
A separate small, firm table may be required if a good-qualitybalance or scale is used, in order to avoid the damage resultingfrom constant movement.
Provision should be made for a constant and adequate supplyof distilled water. It may be necessary to collect rain water in anappropriate manner and store it in a number of large glass con-tainers. The modern electric still provides abundant distilled waterof excellent quality. Demineralizers (cartridge de-ionizers) pro-vide water entirely suitable for blood staining in a much simplermanner than stills.
The following list shows the basic equipment required for a

85
single examiner. It may be increased according to the numberof microscopists contemplated.
List of Equipment for a Single Examiner
(Multiply by the number of examiners and students expected.)
1 clean binocular microscope with appropriate oculars for theparticular multiplication factor of its binocular body, viz.
Factor Eyepiece1.6x 4.5x1.5x 5x1.25x 6xlx = no factor 7x, 7.5x, 8x (maximum)
1 solid, smooth-working mechanical stage.1 plastic dust cover.1 light source to give abundant blue-white light.Built-in illuminators with transparent bulbs (special) and bulbs of
less than 25-watt capacity are inadequate. Thin ground-glassand pale blue filters for microscope and illuminator should besupplied. The American Optical Chalet-type Micro lamp, with-out the ground-glass and blue filters, may be combined with ablue water-filled Florence flask to give an excellent light if anordinary 100-watt pearl bulb is used in the Chalet lamp. Thefiat top of the lamp provides a warm plate for drying slides(A.H.T. No. 6958-E). A homemade lamp gives the same re-sults (Diagram 16, p. 59).
1 warming unit adequate to give a temperature up to 350 C in astorage cupboard, to protect prisms and enclosed microscopelenses from fungus in hot moist climates. A maximum-minimumthermometer (see Appendix 19, p. 113) is essential for thispurpose.
1 small bottle for Cargille's Type A, lower viscosity immersionoil or Crown oil (ordinary 20-cc applicator bottles, with glassrod applicator, $0.75 to $1.00 per dozen, are better than thosesupplied by optical companies).
2 towels for glassware, lint-free, 16 x 24".4 rectangular staining dishes 23/4 x 31 x 2" (Diagram 17, p.
68).2 soft (No. 1) lead pencils.1 package of 50 sheets best quality onionskin copy paper, 4½2 x
81/2" (held between cardboard of same size.)

86
1 pointed Bard-Parker blade in cork of square 2-oz bottle with3/4" mouth.
1 sheet 00 or 000 emery paper to maintain sticker bright, clean,and sharp.
1 package gauze wipes, small roll gauze or bandage, or, if un-available, a small roll of good-quality (long-fiber) absorbentcotton.
For Staining Purposes:
1 interval-timer, 1 min. to 2 hrs., with alarm continuous untilstopped.
1 120-cc wide-mouth bottle with methylene blue phosphate mix-ture.
2 small plastic glasses, with
perpendicular rather than inclined sides,
for buffer wash water.1 30-cc bottle (or plastic dropping bottle) filled with good Giemsa
stain.1 10-25 cc graduated (preferably plastic) test tube. (Test tubes
marked at 5, 10, and 15 cc work just as well.)1 curved staining plate or equivalent with 2-3 mm depression, or
1 white enamel rectangular basin (see Diagram 12-D and E,p. 44).
1 glass or plastic bottle to hold 500, 750, or 1,000 cc.1 bottle mixed phosphate salts of some previously selected pro-
portion such as 4/5; and 6 small tubes with corks to contain0.5, 0.75, or 1.0 gm of that mixture.
Blocks for the draining of slides are made in various sizes fromgood-quality, well-dried hardwood, /4-1" thick. Transverse sawcuts 1/4" deep and inclined at 110 ° are placed "1/2 apart. Thecuts should be sufficiently wide-1/20" minimum-to receivethicker slides. One 1 x 8" block will take a few slides, whileone 6 x 9" can hold 100.
1 package of paper towels.1 plastic box for 25 slides to hold demonstration thick blood films.1 Gem-type razor blade.

87
2 pieces ordinary package cardboard (corrugated). Sundry itemsfor carrying, drying, and packaging slides (string, brown wrap-ping paper).
Supplementary Items for aZone or Central Laboratory
1 spare oil immersion objective and 10 pairs of 7x or 7.5x ocularsif microscopes which lack intermediate oculars are to be used.
1 adjustable object marker to circle microscopic objects, for eachmicroscope (see Appendix 15, p. 107).
12-24 250-300 cc Florence flasks.1 AO Pseudoisochromatic color vision test.Wood blocks 1 cm and 2 cm thick-6-8 cm square (25 of each
thickness).Spare corks for all bottles.36 plastic dropping bottles (see Appendix 11, p. 104).1 30-60 cc dropping bottle for pure toluene for each three students.1 oblong enamel pan for staining, 14 x 10 x 3" for each three
students, or 12 curved plastic plates.1 pint Cargille or Crown oil (thinner grade).Giemsa-either 30 cc stock solution of a proven high grade Giemsa
or 4 x 5 gm bottles of a tested lot of Giemsa powder such asNational Aniline NGe 18.
3 x 1 lb bottles best quality acetone-free pure methyl alcohol,$2.00 each.
2 lbs best quality pure glycerin.1/2 lb solid glass beads, 5 or 6 mm in diameter.
Buffer Salts:
8 x 1/4 lb bottles anhydrous Na2HPO 4.1 lb fine powder or crystals KH2PO 4.10 grams methylene blue, medicinal or best available.1 2-liter bottle, polyethylene if possible, containing sulpho-chromic
mixture (potassium dichromate and sulfuric acid).1 7.5 cm enamel or glass funnel for pouring back sulpho-chromic
mixture from rectangular staining dishes.3 liters 90-95 per cent alcohol for wiping clean slides.Enamel or plastic basins for detergent solution to receive used
slides.1-2 enamel or plastic buckets.


APPENDICES

The Ten "Deadly Sins" in Thick Film Microscopy
1. POOR RESOLUTION
2. INADEQUATE ILLUMINATION
3. FAILURE TO MOVE THE FINE ADJUSTMENT CON-
STANTLY
4. PERMITTING ANY ADJUSTMENT OF THE ILLUMI-
NATING SYSTEM WHICH ALLOWS RADIAL MOVE-
MENT OF THE LEUKOCYTES
5. FAILURE TO FAMILIARIZE ONE'S SELF WITH THE
APPEARANCE OF LEUKOCYTES AND OTHER BLOOD
ELEMENTS WHICH ARE FOUND IN EACH PREPARA-
TION TO BE EXAMINED
6. WASTING TIME OBSERVING DOUBTFUL IMAGES OR
POORLY STAINED FIELDS
7. USING CONCAVE MIRROR
8. USING SLIDES, FLASKS, OR BOTTLES WITHOUT LABEL
OR IDENTIFICATION
9. FAILURE TO PROTECT ALCOHOLIC STAIN SOLUTIONS
FROM ACQUIRING WATER IN ANY MANNER
10. FAILURE TO LEAVE THE 10X OBJECTIVE IN THE
WORKING POSITION WHEN CARRYING OR STORING
THE MICROSCOPE
90

Appendix 1
MICROSCOPY OF MALARIA ERADICATION
The above diagram contains the essential points describedthroughout this manual for the modern diagnosis of malaria, basedwholly on a well-made, well-stained thick blood film.
In an eradication program it is mandatory to re-examine a por-tion of the total number of slides taken, viz., all the positive slidesand variable numbers of the negative slides. This involves the re-moval of oil from slides and the storing of all slides after the firstexamination.
Formerly, when a blood was declared "positive" the first ques-
91

92
tion asked was "What species is present?" Today that question is"How many parasites?" For if they are numerous the diagnosisof species is much more likely to be correct, whereas if the numberis scanty the diagnosis may be uncertain and usually the re-examin-ation is prolonged. More and more attention is being paid toscanty infections, for the discovery of a single case in a particulararea, today, can be more important than was the finding of a dozenor a hundred cases 20 years ago.
The diagram also attempts to show, by the use of abbreviations,how all blood findings may be fully but simply recorded.

Appendix 2
THE BEHAVIOR OF P. FALCIPARUM GAMETOCYTES
CASENO..1-
1 154111717 1 1
2 113167 34 0
3 59390 0
4 62 17 24 5E
- DAYS -- WEEKS-
O 01 o - . 1 128 43 8 2 0 -
0 0 - 0 ..- ...- .1 0 14 25 7 2 0 0
0- - -- --- - T- 2 98 22 48 4 300
1 oU ... 82 372 84 12 2 15 0
FIGURES = NUMBER OF GAMETOCYTES PER 100 THiCX FILO FIELDS
Three to five weeks before the above observations were made in1949, four small boys took unknown amounts of proguanil andquinine, probably only until their fever ceased. The first boy wasfound in a routine school survey and the others were later locatedin the same family.
Each of the children received 10 mg of iso-pentaquine on thefirst two days after the blood specimen was taken (indicated bythe small x's seen in the first two columns).
On day 12, Case No. 1 complained of symptoms and there werescanty rings in his blood. Case No. 4 had + F. On day 13, theyall received adequate amounts of amodiaquin as a single dose.
No further rings were seen in the subsequent 7 weekly examin-ations.
From this chart it may be deduced that:
1. Gametocytes rarely appear until the second week ofasexual parasitemia;
2. They disappear spontaneously after 5-7 weeks; or3. They disappear within 72 hours following the ingestion
of primaquine-type drugs.
It would seem from the foregoing that, in areas of reduced trans-mission, it is more important to give adequate amounts of schiz-ontocidal drugs on the first day of treatment, than a special drugagainst gametocytes later.
93

Appendix 3
DOUGHNUT-SHAPED RED BLOOD CELLS
A BAl-Normal red blood cell, face on and edgewise
BJ-Enlarged younger red blood cell in which thecentral portion is exceedingly thin. The parasite isrepresented as the central portion of the cell in A)and occupylng only the peripheral portion in BI.
The distorted appearance of well-grown parasites of P. vivaxand P. malariae, due to the type of cell in which they are containedwarrants a word of explanation.
The above schematic diagram endeavors to show the size andshape, in both front and side views, of normal red blood cells (A).The destruction of many red blood cells by repeated schizogoniescauses anemia which, as it becomes more marked, results in in-completely developed red blood cells reaching the circulation inincreasing numbers. Not infrequently, red cells, larger in size thanusual (B) show a marked constriction in their middle portion incontrast to normal cells. Instead of looking like thick biconcavediscs, they resemble inflated inner tire-tubes or the cake-like articleof U.S. diet known as the doughnut. Bluish cell-remains alone arealso encountered in similar shapes.
Evidently, the opposing cell membranes are so close togetherthat the hemoglobin and other contents are forced toward theperiphery. The resulting appearance, depending on the quantityof parasite material present, will look as represented by the shadingin (B).
The student should understand that the distortion of the para-site by the shape of the cell containing it, does not signify anycharacteristic behavior of either P. vivax or P. malariae.
94

Appendix 4
DIAGRAMMATIC OUTLINES OF PARASITES OBSERVED
The above diagram is used to help the student learn the variousdevelopmental forms of the parasite which can be present in thesame drop of blood. For use by the student, individual mimeo-graphed forms similar to Diagram A are supplied and one is com-pleted for each unknown blood examined until the student becomesproficient in representing the growth spread of each particularstudy slide examined.
The mimeograph form, measuring 7 x 2" and divided in threeequal parts, has a circle 5/1 6" in diameter near the top of the middlesquare to represent the size of a small lymphocyte. The identifica-tion of the specimen that is being observed is written in the smallrectangle at the top of the first square. When the examination iscompleted an approximation of the number of parasites presentand the identification of the species diagnosed are placed just be-low the rectangle.
To complete the examination, the student moves slowly overthe thick blood film until (depending on the number of parasitespresent) 30 to 300 parasites have been inspected with care. Then,after turning out the microscope lamp, he draws from memory, ina crudely schematic manner, four outlines to represent: (a) thesmallest parasite encountered (drawn in the first square); (b)two examples of the stage which is the most numerous (in thesecond square); (c) the largest of the growing forms seen (in thethird square). Only growing asexual forms are recorded. If it isdesired to note the presence of mature gametocytes, a miniaturedrawing of one of these may be placed in the top right-hand cornerof the third square.
95
IDENTITYSLDE
APPROX. NO.PARASITES SPECIES SIZE OF SMALL
LYMPHOCYTE
SMALLEST 2 MOST NUMEROUS LARGEST

-X\ldl+ V
3· 'F q a
D -iq67
Artistic drawings of individual parasites are definitely NOT
wanted. The important point is to make the drawings carefullyin proportion to the size of the circle representing a small lympho-cyte. After the size has been indicated, the position of the pieceor pieces of chromatin and their shape are represented. Two orthree small tiny circles may be used to signify the presence ofpigment.
To enable the student to acquire quickly some concept of sizein the microscope, he should be given the opportunity to see at
least one blood specimencontaining parasites with thecamera lucida. When prop-erly adjusted, this appara-tus, by means of the prism,projects to the paper beside
c -- \ . the microscope whatever ob-, ii5D r:L,' jects are to be seen in the
' |-" ¡ microscopic field. It is rela-tively simple to trace theoutlines of a small lympho-
cyte and parasites nearby. Diagrams 6-8 (see pages 22, 24, 25)were made in this manner.
96
B
C

Appendix 5
TEMPLATE
BOARD
STIFF CARDBOARO "L" SHAPE
Models, templates, or patterns-by whatever name they areknown-are indispensable for teaching people how to make good,uniform thick blood films with a streak of blood in which the iden-tification may be written with soft pencil.
An ordinary file folder is cut to a width of 6" and re-cut inthree to make three small folders each 3% x 6". From anotherpiece of stiff, firm, hard cardboard (such as a cardboard loose-leaffolder) an "L" is cut to measure 1%3/4" on the vertical arm and 3Y2"on the horizontal arm, with each arm measuring 3/8" wide. The"L" is then pasted on one of the cardboard folders 1" from thefold, as shown in the diagram, and is allowed to dry thoroughly.
A glass slide is then fitted into the "L" and the outlines of itstop border and end are drawn with a fine line on the cardboardfolder. At %3/4" from the left end of the slide a vertical line %/" isdrawn on the folder, equidistant from the top and bottom edgesof the slide. Depending on the size of the thick film desired, arectangle or square is then formed, as shown in the diagram. Oneeighth of an inch to the right, a larger rectangle is drawn, consist-ent in size for the number of identification letters or numbers tobe used or large enough for the initials of the subject and the date.
With these two outlines clearly marked on the folder, the be-ginner lays a clean slide in the angle of the "L" and notes whereon the slide the blood must touch to be to the left of the center ofthe first square or rectangle, which denotes the limits of the thickfilm. As far as he can, with the blood he has taken, he then quickly
97

98
spreads the blood on the slide within the limits of that drawing.The identification label is then written in the slide, in the spaceindicated by the rectangle on the right.
The outlines drawn on this template should be clean and sharp;this is not a drawing of what the finished slide should look like, buta device to ensure that uniform specimens are placed consistentlyin the same position on the slide.
Appendix 6
THE STAINING PHENOMENON OF SCHUFFNER
In well-stained thin blood smears of P. vivax and P. ovale,the red blood cells containing parasites show reddish granuleswhich have come to be known as Schiffner's dots, or stippling. Inthick blood films which are equally well stained, a pinkish halo inthe form of the containing red cell is frequently seen around theparasites. This is called Schiffner's staining, as definite dots arerarely distinguishable unless stained with Shute's saline technique.
No similar appearances are known to accompany the P. malariaeparasites in the thick film.
A pinkish halo or shadow of the containing red cell sometimesis seen in bloods containing P. falciparum rings. These thick filmsare usually overstained or show some variation of staining or evenfading.
In any case, the diagnosis is always based on the aggregation ofdevelopmental forms appearing simultaneously, not on the appear-ance of the stained red cell.

Appendix 7
SHUTE'S SALINE STAIN TECHNIQUE
Pampana (1938) was the first to show that Giemsa diluted withsaline gave better results than Giemsa diluted with distilled waterfor thick films.
In 1955, Shute accidentally diluted some Giemsa stain withnormal (0.85%) saline solution for the staining of thin smearsand was surprised at the excellence of the staining of the parasite,as well as of the stippling, when present. He soon found thatsimilar results were obtained with the thick film.
The dehemoglobinizing effect is apparently much more drasticthan when the usual buffer solutions are used, and seems to givebetter results with slides that have been left unstained for a longperiod. The remains of young red blood cells are not so promi-nent; the field is unusually clear and parasites are more easilylocated. Staining 30 minutes or more brings out individual Schuff-ner's granules clearly and distinctly.
It would appear that anyone unfamiliar with this type of stain-ing should immediately investigate the possibilities of using it underlocal conditions. Perhaps minor modifications could be found toreduce the staining time and the amount of Giemsa used. Obvi-ously, the principle has great advantages.
The directions as given in Shute's book* are as follows:
The stain is prepared in the following proportions:5-7 cc Giemsa stain to each 100 cc 0.85% NaCl [pH 7.0].Stain in the inverted position, in blocks of 25-50; or instaining dishes-30-60 minutes.Rinse with tap water, drain, and dry.Use stain repeatedly as long as results warrant.
It is not practical to prepare dry proportions of salt and the buf-fer salts because of the tiny amount of the latter required. Thefollowing pH readings were obtained by adding 1% disodiummonohydrogen phosphate to 500 cc normal saline:
0.85 cc-7.20.65 cc-7.10.4 cc-7.0
* Laboratory Technique for the Study of Malaria. Percy G. Shute andMarjorie E. Maryon. J. and A. Churchill Ltd., London, 2nd Ed. 1966.
99
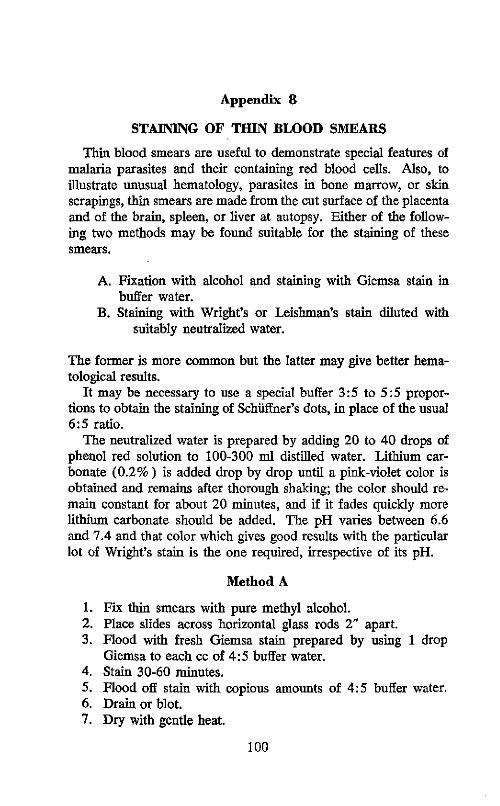
Appendix 8
STAINING OF THIN BLOOD SMEARS
Thin blood smears are useful to demonstrate special features ofmalaria parasites and their containing red blood cells. Also, toillustrate unusual hematology, parasites in bone marrow, or skinscrapings, thin smears are made from the cut surface of the placentaand of the brain, spleen, or liver at autopsy. Either of the follow-ing two methods may be found suitable for the staining of thesesmears.
A. Fixation with alcohol and staining with Giemsa stain inbuffer water.
B. Staining with Wright's or Leishman's stain diluted withsuitably neutralized water.
The former is more common but the latter may give better hema-tological results.
It may be necessary to use a special buffer 3:5 to 5:5 propor-tions to obtain the staining of Schuffner's dots, in place of the usual6:5 ratio.
The neutralized water is prepared by adding 20 to 40 drops ofphenol red solution to 100-300 ml distilled water. Lithium car-bonate (0.2%) is added drop by drop until a pink-violet color isobtained and remains after thorough shaking; the color should re-main constant for about 20 minutes, and if it fades quickly morelithium carbonate should be added. The pH varies between 6.6and 7.4 and that color which gives good results with the particularlot of Wright's stain is the one required, irrespective of its pH.
Method A
1. Fix thin smears with pure methyl alcohol.2. Place slides across horizontal glass rods 2" apart.3. Flood with fresh Giemsa stain prepared by using 1 drop
Giemsa to each cc of 4:5 buffer water.4. Stain 30-60 minutes.5. Flood off stain with copious amounts of 4:5 buffer water.6. Drain or blot.7. Dry with gentle heat.
100

101
Method B
1. Place slides across horizontal glass rods.2. Flood with undiluted Wright's or Leishman's stain.3. Add 1-2 volumes of neutralized water.4. Mix by gentle movement of rods. Do not blow.5. Flood off stain after 20-30 minutes with copious amounts
of the same diluent.6. Drain or blot.7. Dry with gentle heat.
Stained by either method, red blood cells are buff.Where thin blood smears are indicated, Clay-Adans "margin-
free" blood smear slides No. A-1463 are desirable as spreaderslides (see diagram).
"MARSIN-FREE" SLIDE

Appendix 9
RESTAINING OF THICK BLOOD FILMS
Some thick blood films fade more quickly than others. Even infreshly stained preparations, the examiner is advised to look inthe margin of the thick film for the best color contrast. Failure ofthe central part to stain may well be caused by the slower dryingof that portion because it is thick or because the humidity is high.Absorption of CO2 from the air continues as long as the blood ismoist and may be a possible cause of the lack of red color in thecenter of many thick films. Other factors, such as the cleanlinessof the slides, quality of the stain, suitability of the buffer water and,especially, the reaction of the mounting medium, must of coursebe considered.
Individual slides or groups of slides, and even whole sets ofteaching slides, have become useless in three months or less. Evi-dently, only Shute can prepare thick films which sometimes lastfor decades.
Hitherto, restaining rarely has been satisfactory. Only when thepreparations were excellently stained in the beginning are goodresults to be expected. Generally speaking, thick films which aremost carefully protected from light are less likely to fade.
The principle of restaining is to use dilute stains, stain for arelatively long time, and use buffers containing less of the dibasicsalt. It may be necessary to try buffer proportions of 3:5, 2:5, 1:5,and perhaps 0.1% potassium phosphate before a satisfactory re-sult is obtained. Considerable success has been obtained with agood Leishman powder made up in the same way as Giemsa stain(see p. 46), diluted to 1 drop to 3 cc or 4 cc of the selectedbuffer and allowed to act as many 10-minute periods as necessaryuntil no further improvement in the microscopic appearance canbe noted. If the slides are placed face upwards across staining rodsand flooded with the dilute stain, it will soon be apparent that thoseparts of the film which are more faded than others or are too redwill decolorize the liquid stain lying directly over them, in thesame pattern as on the thick film. Fresh stain should be addedand staining continued until no further decolorization can bedetected.
The fading of thin smears is seldom a problem, as it is wellknown that many retain their colors for years. Some method isneeded, however, to restain those areas with special fields thathave faded from hours of use as demonstrations.
102
Appendix 10
LIBRARY OF TEACHING SLIDES
While malaria infections are still fairly numerous, arrangementsshould be made to store sets of stained thick blood films. Thesecan be used for the training of the present staff of microscopistsand, with the aid of restaining, can continue to be used for thetraining of microscopists who will be required during the three-year surveillance period.
A good collection should consist of sets of 10-25 thick films,together with two thin smears of the same blood specimens takenat the same time. They should be carefully identified in a mannerwhich does not reveal the species present, and should be promptlystained, packaged, and stored in the dark until needed. One weekbefore they are to be used, clean cover-slips (No. 1) are appliedwith one of the newer resins dissolved in pure toluene. EuparalVert delays fading, but it is much harder to remove when the slidesare to be restained.
Sets of blood slides containing both numerous and scanty para-sites should be made of each of the three phases of P. falciparumand of bloods taken at three different times in the cycle of P. vivaxand of P. malariae. In instances where medicine has not alreadybeen given to the patient, it can often be postponed for 24 hoursto allow a second drop of blood to be taken and placed alongsidethe first 24 hours later. One set of normal blood specimens andone taken after all parasites have disappeared, to demonstratecell-remains, should be included.
Arrangements may be made with hospitals and active outpatientclinics, as well as with interested epidemiology inspectors and col-laborators, to prepare sets of slides from patients in whom theimmediate examination of the blood shows a pattern of infectionnot already included in the teaching collection. It is most advisableto supply packets of uniform, new, properly cleaned slides for thispurpose.
Some results of current investigations on the fading of teachingslides suggest that thick blood films which have been well stainedby Field's method may perhaps be used for many months beforehaving to be discarded because of fading. A proportion, at least,of each lot of slides destined for class instruction should be stainedby Field's method, in addition to those prepared with the usualmethylene blue-Giemsa method.
103

Appendix 11
PLASTIC DROPPING BOTTLE
a
With the plastic dropping bottles now available (ranging from30 cc to 150 cc capacity), the Giemsa stain is more completelyprotected from contamination with moisture than in any othercontainer which requires a separate pipette for delivering the ap-propriate number of drops.
Appendix 12
PENCILS USED FOR MARKING IN BLOOD
Although No. 1 or other soft graphite pencils are recommendedfor writing the label as soon as the blood is dry, a U.S. pencil,Dixon 2225 Film Mark, is excellent for writing in blood, as it hasno loose graphite dust that can spread through the adjacent partsof the thick film.
Grease-pencils are to be avoided, since much of the grease markmay float off when the slides are immersed during the stainingprocess. Moreover, if red or blue grease-pencils are used, somered or blue pigment may remain on the slide even after the oilis removed.
104

Appendix 13
HUMIGRAPH
|¡ IVEjj lloUiMITVY j
¡ A. DAIGGER & CO.Se l 15 1 , . H $11is..L
SU,.ri.o, 7.94:i
The Humigraph is a card with six black circles containing ma-terial capable of changing color from blue to pink and vice versa.The border of the card is a neutral grayish color which changes asthe humidity changes. The color of the rings is compared to theborder color for the purpose of gauging humidity.
The humidity percentage is read from the figure in the circlewhose color matches the border. Should one circle be more blueand the adjacent one more pink, the reading would be the lowerfigure plus 5.
The outside of the 70 circle can change to pink. When thisoccurs the humidity is 80% +, which will interfere with theprompt drying of the thick blood films.
105
E- pmH!iiFiiiii
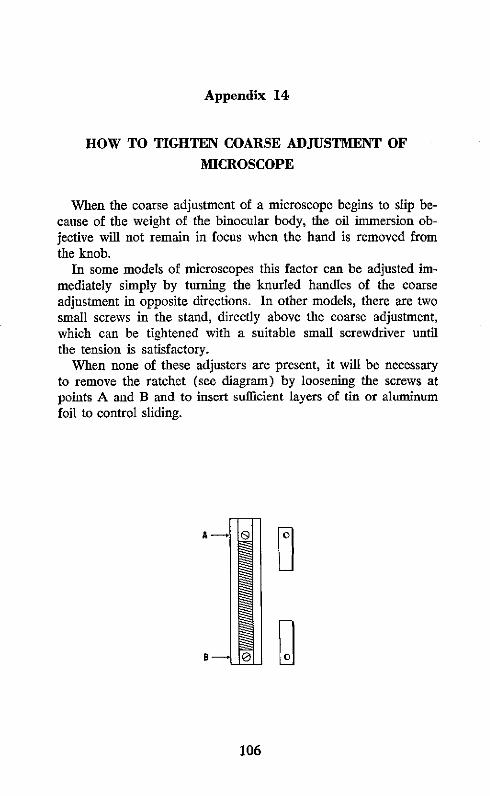
Appendix 14
HOW TO TIGHTEN COARSE ADJUSTMENT OF
MICROSCOPE
When the coarse adjustment of a microscope begins to slip be-cause of the weight of the binocular body, the oil immersion ob-jective will not remain in focus when the hand is removed fromthe knob.
In some models of microscopes this factor can be adjusted im-mediately simply by turning the knurled handles of the coarseadjustment in opposite directions. In other models, there are twosmall screws in the stand, directly above the coarse adjustment,which can be tightened with a suitable small screwdriver untilthe tension is satisfactory.
When none of these adjusters are present, it will be necessaryto remove the ratchet (see diagram) by loosening the screws atpoints A and B and to insert sufficient layers of tin or aluminumfoil to control sliding.
B A _ 0_
BO
106

Appendix 15
USE OF MICRO OBJECT MARKERS
A micro object marker, capable of making a circle at least assmall as the oil immersion field, should be available to each micro-scopist or, as a minimum, one should be provided for each groupof three working together. When properly used, the object markerscan save enormous amounts of reviewing time. Doubtful objectson the slide may be circled for referral to the central laboratory,and that laboratory may circle objects to be sent back to theoriginal examiner. The markers are used routinely in the case ofscanty infections.
Once the search for parasites begins, the microscopist shouldkeep a record of the number of fields examined. If the examinerdoes not find a parasite in the first 25 fields, he realizes that ifinfection is present it will be very scanty. It is not always easy todetermine the species-every parasite located helps-when theparasites are few in number.
The number of the field in which the first parasite is found isrecorded. The examiner, with eyes fixed on the parasite in thecenter of the field, first tests the firmness with which the slide fitsin the mechanical stage. If it is not firm, the correction of theslide's position is made without losing sight of the object to becircled. Finally, when the slide is firmly set, the examiner usesthe marker to circle the object-first with the tiny circle, and thenwith a much larger one to permit easy recognition.
If, for example, the first parasite was found in the 37th field,and two more are then found--one in the 61st and one in the93rd field-the findings are recorded as 37, 61, 93 °. The threesmall o's, placed vertically after these numbers, indicate that three
107

108
parasites have been circled and the circles can be located with the10x objective.
Once three bona fide parasites have been seen, the examinershould find enough parasites to make certain of the species, irre-spective of the number of fields. If unable to make a diagnosisafter 300 fields, because only seven parasites were found, heshould be allowed to place an interrogation after the most probablediagnosis, e.g., F?-or merely write 7p/3 0 0 § F, thereby givingthe reviewer a definite idea of the frequency of the parasites. Onone occasion, where a well-grown parasite was circled, the exam-ination of 2,000 more fields failed to show another parasite.

Appendix 16
IMMERSION OIL
The small drawing A represents a cross section of anoil immersion objective arranged to show that it has sixdifferent optical elements. The one which fills the pin-head sized aperture is the one that is most frequentlyand easily injured by external violence. It will be seenthat this tiny lens is spherical and has a very smallfocal distance. The 90-100x magnification is so great A
that proper resolution cannot be obtained unless theupper surface of the slide bearing the specimen is connected to theobjective by an adequate layer of oil which has the same indexof refraction as glass.
Drawings B and C show two types of working bottles for im-mersion oil, with bulbous tips on the glass applicators for easierapplication of the desired amount of oil. Since in these drawingsthe tips are surrounded by air, they can be seen clearly. DrawingsB1 and C1 show how the tips disappear if immersed in an oil ofsuitable refractive index.
B C Bt Ci
Since a number of modern synthetic immersion oils are available,the traditional cedarwood oil need never be used. That oil be-comes tacky very quickly and dries like varnish, holding eachparticle of sand and grit which comes in contact with it. In thatway it was responsible for much of the wear of the underside ofmechanical stages. Because of the tackiness, it was also difficultto remove cedarwood oil from the slide after examination.
Drawing D illustrates an old type of oil-xylene combinationbottle which is still used (the pyramidal bottle, shown in Drawing
109

110
E, is better). The narrow inner tube contained cedarwood oil,which was removed with a fine wire looped at the end; a drop ortwo of xylene was picked up on the end of the inner tube andtouched to the objective to aid in removing the sticky oil. Thisbottle hinders the rapid handling of slides and is therefore replacedas a work bottle by types B and C, with a simple wide-mouthedscrew cap, and type F, containing the more volatile toluene, intowhich the slide may be dipped after first removing the greater partof the oil by daubing with soft-type tissue or other absorbentpaper.
D F
There are a number of modern synthetic oils such as Crown,Mersol, some synthetic cedarwood oils, and Cargille or Shillaber'soil, which comes in two densities. Usually, the thicker oils slowdown the work of examination. Anisole or methyl benzoate, a fatsolvent, has been used because its refractive index is adequateand it is volatile. If it does not decolorize the thick films andthere ís no objection to its odor, it may be tried but is not recom-mended.
A satisfactory thin immersion oil may be prepared by mixing:
Liquid petrolatum USP or BP (heavy) or (Nujol)82 parts
1-bromonaphthalene 18 parts
The 1-bromonaphthalene can be obtained from Matheson, Cole-man and Bell, East Rutherford, New Jersey, USA.
To see that no oil remains after the dip in toluene, a piece oflightly held Kleenex-type tissue is drawn across the thick film whileit is still wet with toluene.

Appendix 17
TYPES OF MICROSCOPE LAMPS
Microscope lamp described under A.H.T. catalogue No. 6958-E
Type of pressure lamp which can be used in localities lackingelectricity, provided they are of 250 candle power or less. Theheat is intolerable with higher candle powers.
111

Appendix 18
RUBBER EAR SYRINGE
This rubber ear syringe, of only 4-oz capacity, canproduce a considerable blast of air. It is effectivein removing lint, threads of paper, and dry dustwhich has settled on the surfaces of microscopelenses and prisms.
112

Appendix 19
MAXIMUM-MINIMUM THERMOMETER
le ''
The reading of the maximum-minimum thermometer is self-evident. The indicators which show the highest point reached bythe columns of mercury may be brought in contact with the mer-cury by means of the small magnet seen at the top.
113

Appendix 20
"PHOTOVOLT" PHOTOELECTRIC EXPOSUREMETER
Model M-200 of Photovolt Corporation, 95 Madison Ave., NewYork 16, N. Y., has a delicate photoelectric cell which, with theswitch set at HI, registers fractions of a foot-candle on a scale onwhich 100 divisions equals 2 foot-candles. Readings may be re-corded in foot-candles or, more simply, as the number of di-visions the needle moves. It is advantageous to "zero" at 20 or30, where the needle moves more freely than when set at 0. Aspecial adapter to fit any eyepiece allows the light to be measuredat the level of the eye. Such readings average one division lowerthan when the adapter is not used.
The amount of light in a binocular microscope set up by theaverage microscopist varies between 1.5 and 4 divisions. It isusually possible to improve the reading by 4 divisions throughproper adjustment of all factors involved.
Invariably, students strive to obtain a higher numerical readingthan their neighbor. In achieving that, they improve their ownillumination.
114

Appendix 21
CONTINUING REVIEW OF MICROSCOPIC EQUIPMENT
Experience has shown that the only way to maintain a highdegree of cleanliness of the microscopes of the entire malaria pro-gram of any country is to have continuous inspection of themevery two to three months by a competent person.
This person should have, above all, an innate interest in bothmicroscopy and the thick blood film. In addition, he should beequipped with the following:
A spare oil immersion objective in perfect condition. It isused for comparison with the oil immersion lens thatis under inspection.
A selection of well-made and well-stained thick blood filmsto be used as test and demonstration slides.
Several pairs of eyepieces 5x, 6x, etc., to give a total mag-nification of 6-800x for the different makes of micro-scopes in use in that area.
1 hand lens (lupa) 5x, 2" focal distance.1 pear-shaped rubber ear syringe, 4-oz capacity.1 tube vaseline.2 sheets emery paper No. 00 or 000.1 set of screwdrivers, different sizes.1 set of tiny screwdrivers-dental or watchmaker.1 small pair regular pliers; possibly a pair of needle-point
pliers.1 oz very fine absorbent cotton.
24 wood applicators.
1 "Photovolt" lightmeter (useful but not mandatory).
115

Appendix 22
DEFINITIONS
Trophozoites
Schizonts
Mature schizonts
Merozoites
Erythrocytic
Exo-erythrocytic
Gametocytes
Sporozoites
Oocyst
Hematin
Chromatin
Cytoplasm
All undivided parasites. The youngest troph-ozoites are called "rings."
All adult asexual forms with two or moredivisions of nucleus.
Schizonts in which merozoites are completelyformed.
Result of segmentation of either a liver schiz-ont or an erythrocytic schizont. They maybe separated from or contained in theoriginal schizont.
Any stage of the parasite within red bloodcells.
Liver stages in man. Pre-erythrocytic whenderived from sporozoites (the only stageformed in P. falciparum infections); exo-erythrocytic if derived from other liverstages.
Sexual forms developing and reaching ma-turity while still in the same red blood cell.P. falciparum gametocytes are usuallycalled "crescents."
Forms infective for man resulting from theultimate division of the oocyst in the mos-quito.
Develops from the fertilized gamete betweenthe lining cells of the mosquito's stomach.
The pigment found in all but the earliest formsof the parasite; it may also be called hema-zoin.
The red staining nuclear material of theparasite.
The bluish staining protoplasm of the parasite.
116

117
DEFINITIONS (cont.)
Pre-patent The time which elapses between the infectiveperiod mosquito bite and the appearance of detec-
table parasites in the thick blood film.
Incubation The time which elapses between the infectiveperiod mosquito bite and the appearance of symp-
toms. It includes the duration of the pre-erythrocytic stage plus the number of daysrequired for the parasites to cause symp-toms.
Paroxysm The bodily manifestations which follow theschizogony of a sufficient number of para-sites of any species. The commonest ofthese are chills, fever, and sweating. Aparoxysm may last from 1/2 hour to 18hours.
Attack Can include one or several paroxysms andcan terminate spontaneously or after theadministration of medicine; it may last fromone to many days.
Anemia The loss of red blood cells from any cause.In malaria, it results from the rupture ofmature schizonts at the time of each schiz-ogony. An increase in the number of bluishstaining erythrocytic elements in the thickblood film was first noted by Barber as anindication of anemia.
![S]l1~I~cek: - IRIS PAHO Home](https://static.fdokumen.com/doc/165x107/631510f36ebca169bd0b0b21/sl1icek-iris-paho-home.jpg)