ADM ADM --025 025 ADMINISTRAÇÃO DE ADMINISTRAÇÃO DE CUSTOS CUSTOS --I I
Upload
khangminh22Category
view
0download
0
Software Version: 2022-2022 R1
LoadRunner Professional
Installation Guide
Go to HELP CENTER ONLINEhttp://admhelp.microfocus.com/lr/
Document Release Date: June 28, 2022 | Software Release Date: June 2022

Legal Notices
DisclaimerCertain versions of software and/or documents (“Material”) accessible here may contain branding from Hewlett-Packard Company (now
HP Inc.) and Hewlett Packard Enterprise Company. As of September 1, 2017, the Material is now offered by Micro Focus, a separately
owned and operated company. Any reference to the HP and Hewlett Packard Enterprise/HPE marks is historical in nature, and the HP
and Hewlett Packard Enterprise/HPE marks are the property of their respective owners.
WarrantyThe only warranties for products and services of Micro Focus and its affiliates and licensors (“Micro Focus”) are set forth in the express
warranty statements accompanying such products and services. Nothing herein should be construed as constituting an additional
warranty. Micro Focus shall not be liable for technical or editorial errors or omissions contained herein. The information contained herein
is subject to change without notice.
Restricted Rights LegendContains Confidential Information. Except as specifically indicated otherwise, a valid license is required for possession, use or copying.
Consistent with FAR 12.211 and 12.212, Commercial Computer Software, Computer Software Documentation, and Technical Data for
Commercial Items are licensed to the U.S. Government under vendor's standard commercial license.
Copyright Notice© Copyright 1994-2022 Micro Focus or one of its affiliates.
Installation Guide
LoadRunner Professional (2022-2022 R1) Page 2 of 63

Contents
LoadRunner Professional 1
Welcome to LoadRunner Professional 5LoadRunner Help Center 5
Useful links 5
LoadRunner Professional components 6
System requirements and prerequisites 8System requirements 8
Prerequisite software for installation on Windows 8
Automatically detected and installed by the installer 8
Manual installation for Windows updates 9
Installation notes and limitations 9
Installing LoadRunner Professional on Windows 12Installation workflow 12
Upgrade LoadRunner Professional 14
Install LoadRunner Professional on Windows 14
Setup wizard information 15
Running the installation 16
Install LoadRunner Professional silently 19
Installation command line options 21
Installing the full LoadRunner Professional package from the wrapper file 21
Installing a standalone application or an additional component from a PFTW file 23
Deploy Dockerized load generators on Windows 25
Prerequisites 25
Run a Dockerized load generator using the predefined image 25
Run a Dockerized load generator using a custom image 26
Examples of customized content for Dockerfiles 27
After running the load generator containers 28
Tips and guidelines 28
Configure user login settings 29
Install a LoadRunner language pack 29
Installing the load generator on Linux 31Installation workflow 31
Install a load generator on Linux with the Setup wizard 33
Before you start 33
Run the Setup wizard 34
LoadRunner Professional (2022-2022 R1) Page 3 of 63

Silent load generator installation on Linux 35
Deploy Dockerized load generators on Linux 36
Prerequisites 36
Run a Dockerized load generator using the predefined image 36
Run a Dockerized load generator using a custom image 38
After running the load generator containers 39
Tips and guidelines 39
Configure the Linux environment 40
Set the environment variables 40
Verify the Linux installation 41
Run verify_generator 42
Check Controller connection 43
Improve load generator performance 44
Increase file descriptors 44
Increase process entries 45
Increase swap space 46
Uninstall the load generator from a Linux machine 46
Uninstall load generator 12.55 or earlier 46
Uninstall load generator 12.56 or later 47
Troubleshoot the load generator Linux installation 47
Installing the LoadRunner Data Hub 53Installation workflow 53
Install the Data Hub with the Setup wizard 53
Before you start 54
Run the Setup wizard 54
Silent Data Hub installation 54
Run a silent installation 55
Silent installation options 56
Verify the Data Hub installation 57
Installing the Data Hub Web Connector 58Installation workflow 58
Install the Web Connector with the Setup wizard 58
Before you start 59
Run the Setup wizard 59
Silent Web Connector installation 59
Run a silent installation 60
Silent installation options 61
Verify the Web Connector installation 62
Send Us Feedback 63
Installation Guide
LoadRunner Professional (2022-2022 R1) Page 4 of 63
Welcome to LoadRunner ProfessionalWelcome to the LoadRunner Professional Installation Guide.
LoadRunner Professional, a tool for performance testing, stresses your application to isolate andidentify potential client, network, and server bottlenecks.
This guide describes how to install and set up LoadRunner Professional.
LoadRunner Help CenterFor context sensitive help within the LoadRunner Professional products, press F1 within a dialog boxor use the Help menu.
You can access the LoadRunner Professional Help Center on the web(https://admhelp.microfocus.com/lr/), or download and install a local version. To switch betweenonline and local modes, select Help > Help Center Options > Open Online or Open Locally.
Note:
l To view the Help Center in Internet Explorer or within VuGen, you need to enableJavaScript (Active scripting) in your browser settings (Tools > Options > Security > Internet> Custom Level).
l If the online Help Center is unavailable at the start of a LoadRunner application session, theOpen Online option may be disabled during the whole session with that application.
Useful linksThe following online resources provide more information for LoadRunner users:
Resource URL
Help Center LoadRunner Professional Help Center (select the relevant version)
Business Support https://www.microfocus.com/en-us/services/maintenance-and-support-plans
Knowledge Base andManuals Library
https://softwaresupport.softwaregrp.com/group/softwaresupport/
Community & blogs https://community.microfocus.com/adtd/loadrunner/
AppDeliveryMarketplace
https://marketplace.microfocus.com/appdelivery
LoadRunner Professional (2022-2022 R1) Page 5 of 63

Resource URL
Resources https://www.microfocus.com/resources/
Twitter https://twitter.com/hashtag/Loadrunner
LinkedIn https://www.linkedin.com/groups/1879289
Facebook https://www.facebook.com/groups/MFLoadRunner/
LoadRunner Professional componentsLoadRunner Professional installation includes the following components:
l Virtual User Generator (VuGen). Micro Focus's tool for creating virtual user (Vuser) scripts,primarily through recording. Vuser scripts emulate users without a graphical user interface byusing direct function calls.
l Controller. Controls the execution of scenarios and Vusers. Includes the online monitors whichmonitor and display information about the test execution. Controller must be installed on thecomputer used to control the Vusers.
l Analysis. Graphs and reports for analyzing the load test.
l Load Generator. Component for running Vusers (including Windows-based GUI Vusers) to generateload. The load generator can be installed on Windows or Linux platforms, using the installer or viaDocker.
l Data Hub. Communication channel that supports more robust communication betweenLoadRunner components. For more information, see the Data Hub and Web Connector setup sectionin the LoadRunner Professional Help Center.
l Data Hub Web Connector. Enables the Data Hub to communicate via the web and over firewalls. Formore information, see the Data Hub and Web Connector setup section in the LoadRunnerProfessional Help Center.
l MI Listener Component. Component for the MI Listener machine used in running Vusers andmonitoring over the firewall. For more information, refer to the Working with Firewalls section inthe LoadRunner Professional Help Center (select the relevant version).
l Monitors over Firewall. Component on the agent machine for monitoring over the firewall. For moreinformation, refer to the Working with Firewalls section in the LoadRunner ProfessionalHelp Center (select the relevant version).
l TruClient. Component for recording and developing test scripts for web-based applications. Formore information, see the TruClient Help Center (select the relevant version).
The LoadRunner Professional Full Setup installation package includes most of the above components.All of the standalone installations (for example, for VuGen or the load generator) can be found in theinstallation package's Standalone Applications folder.
Installation GuideWelcome to LoadRunner Professional
LoadRunner Professional (2022-2022 R1) Page 6 of 63

Other components (such as the Citrix Agent and so on) can be found in the installation package'sAdditional Components folder.
You can also download VuGen, TruClient, DevWeb, VTS, Data Hub, and more, for free fromAppDelivery Marketplace.
Installation GuideWelcome to LoadRunner Professional
LoadRunner Professional (2022-2022 R1) Page 7 of 63

System requirements and prerequisitesThis chapter includes:
• System requirements 8• Prerequisite software for installation on Windows 8• Installation notes and limitations 9
System requirementsThe system requirements necessary for running LoadRunner Professional on a Windows system, orfor running a load generator on a Windows or Linux system, are listed in the Support Matrix.
System requirements for other related components:
l Diagnostics: For system requirements, check the latest Diagnostics documentation in theKnowledge Base.
l Network Virtualization: For system requirements and installation instructions, see the NetworkVirtualization for LoadRunner Help (select the relevant version) . You can install NetworkVirtualization during the LoadRunner Professional installation, or at a later time.
Prerequisite software for installation on WindowsBefore installing LoadRunner Professional, make sure the prerequisite software is installed on theLoadRunner Professional machine. Some of the prerequisite software is automatically detected andinstalled by the installer; other prerequisite software must be installed manually.
l "Automatically detected and installed by the installer" below
l "Manual installation for Windows updates" on the next page
Automatically detected and installed by the installerWhen you run the installation wizard, the wizard detects which prerequisite software is alreadyinstalled on the machine and which software is missing. When you continue with the installation, allmissing prerequisite software is installed.
The following prerequisite software must be installed:
l .NET Framework 4.8
l Microsoft Visual C++ Redistributable for Visual Studio 2015-2019 (x86 and x64)
Note: Installation of .NET Framework 4.8 prompts an automatic restart. You then need to rerunthe LoadRunner Professional installation.
LoadRunner Professional (2022-2022 R1) Page 8 of 63

Manual installation for Windows updatesBefore installing any of the LoadRunner Professional components, make sure that the full set ofWindows updates has been installed. If this was not done automatically, you must install themmanually.
Note: Before installing any of the Windows updates, disable UAC (User Account Control) andrestart the computer. For details on how to disable UAC, see the Microsoft Windowsdocumentation.
You can find the list of Windows updates in the Support Matrix.
Installation notes and limitations
Note: See Known issues in the VuGen Help Center or LoadRunner Professional Help Center(select the relevant version) for additional notes and limitations.
Security review We strongly recommend that you install LoadRunner Professionalcomponents on dedicated machines that do not contain, or provide access to,sensitive information; and that you do a thorough security review of thenetwork topology and access levels in your testing environment.
Permissionrequirements
The installation process for all LoadRunner Professional components requiresa full administrator account (root account for Linux systems) for all operatingsystems.
After installation, all of the LoadRunner Professional applications andcomponents can run under a standard user account (an administratoraccount is not required), with UAC and DEP enabled.
Installation GuideSystem requirements and prerequisites
LoadRunner Professional (2022-2022 R1) Page 9 of 63

Running WebServices Vusers onWindows
The Axis toolkit and WSE are no longer automatically installed withLoadRunner Professional. When running Web Services Vusers on astandalone load generator, some legacy configurations may require activationof .NET 3.5 (see MSDN), the inclusion of the Axis java files, or an installationof WSE (2.0 SP3 and WSE 3.0).
To avoid using these components, recreate the scripts and import the WSDLusing the default WCF toolkit.
To use these components:
l For WSE, install the WSE components from the OneLG installationpackage's folders, DVD\lrunner\Common\wse20sp3 andDVD\lrunner\Common\wse30, or download them from the Internet:
WSE 2.0 SP3: https://www.microsoft.com/en-us/download/details.aspx?id=23689
WSE 3.0: https://www.microsoft.com/en-us/download/details.aspx?id=14089
l For Axis, copy the Axis java files to %LG_PATH%\bin\java\Axis. For OneLG,the files are located in the prerequisites\Axis subfolder of the extractedinstallation package, by default C:\Temp\Micro Focus LoadRunner OneLG<version>\prerequisites\Axis.This will allow you to run legacy scripts on anAxis toolkit.
For more details, see Troubleshooting and Limitations for Web Services.
Running JavaVusers onWindows
OpenJDK 32-bit is no longer automatically installed with LoadRunner. Towork with Java protocols, you need to manually install a supported version ofthe JDK. VuGen uses internal logic to automatically detect your JRE version.For details, see Set up the environment for Java protocols.
LoadRunnerProfessional andUFT coexistence
If you install LoadRunner Professional and UFT on the same machine, andthen uninstall one of them, the remaining software program may not functioncorrectly.
Resolution: Run a Repair of the software program you want to use on themachine.
License If upgrading from a version earlier than 2020, you need to replace yourcurrent license to work with the upgraded LoadRunner Professionalinstallation. If you are using the Community license, it is automaticallyreplaced during LoadRunner Professional installation. For any other license,contact licensing support to obtain a valid, compatible license.
For more information, see About LoadRunner Professional Licenses in theLoadRunner Professional Help Center.
Installation GuideSystem requirements and prerequisites
LoadRunner Professional (2022-2022 R1) Page 10 of 63

Customcertificates
When upgrading from version 12.55 or earlier, if you used custom certificatesin your previous installation of LoadRunner, install them again whenprompted for certificates during setup. Otherwise, the setup program willoverwrite them using the defaults.
NetworkVirtualization
If you choose to install NV automatically (as part of LoadRunner Professionalinstallation), you must disable Windows SmartScreen before proceeding withthe NV installation:
Open HKEY_LOCAL_MACHINE\SOFTWARE\Microsoft\Windows\CurrentVersion\Explorer in theRegistry Editor, and change the Value data for SmartScreenEnabled to Off.
Note: You do not need to disable SmartScreen when installing NV manually.
TruClient versionconflict
After upgrading your TruClient installation, if you encounter any versionconflict, check that the legacy TruClient registry key TcWebIELauncher.exe,has been removed.
l In the Registry Editor, open HKEY_LOCAL_MACHINE\SOFTWARE\Microsoft\InternetExplorer\MAIN\FeatureControl\FEATURE_BROWSER_EMULATION anddelete the key.
l Or, run the command:
"REG DELETE “HKEY_LOCAL_MACHINE\SOFTWARE\Microsoft\InternetExplorer\MAIN\FeatureControl\FEATURE_BROWSER_EMULATION”/v “TcWebIELauncher.exe” /f”
Virtualenvironments
The architectures provided by virtualization vendors are rapidly evolving.LoadRunner Professional is expected to function as designed in thesechanging environments, as long as the third-party vendor guarantees fullcompatibility of the virtualized environment with the LoadRunnerProfessional-approved hardware requirements. If you follow the systemrequirements and support matrix to create the virtual machine, LoadRunnerProfessional will work correctly.
Working on top of a virtual machine may require access to the virtualizationserver hardware/monitoring environment, to ensure the virtualization serveris not saturated; otherwise, this might obscure the virtual machine'smeasurements and lead to false results.
Installation GuideSystem requirements and prerequisites
LoadRunner Professional (2022-2022 R1) Page 11 of 63

Installing LoadRunner Professional onWindowsThis chapter describes how to install either the full version of LoadRunner Professional or aLoadRunner Professional component on a Windows platform.
This chapter includes:
• Installation workflow 12• Upgrade LoadRunner Professional 14• Install LoadRunner Professional on Windows 14• Install LoadRunner Professional silently 19• Installation command line options 21• Deploy Dockerized load generators on Windows 25• Configure user login settings 29• Install a LoadRunner language pack 29
Installation workflowYour LoadRunner Professional installation package includes the Setup wizard that guides youthrough the process of installing the LoadRunner Professional components.
The installation components includes OneLG, which is a combined load generator installer for allLoadRunner family products. You can install the load generator using the installer (UI based or silent),or through a Docker container. For more information, see "Deploy Dockerized load generators onWindows" on page 25.
Note: You can also provision a load generator in a cloud account. For details, see Loadgenerators on the cloud.
The final stage of the installation includes the optional installation of Network Virtualization. InstallingNetwork Virtualization enables you to generate the NV Insights report (replaces the NV Analyticsreport) from LoadRunner Professional. The NV Insights report provides an in-depth analysis of howyour application performs with different loads over various types of networks (virtual locations) andincludes suggestions for optimizing your application's performance.
LoadRunner Professional (2022-2022 R1) Page 12 of 63
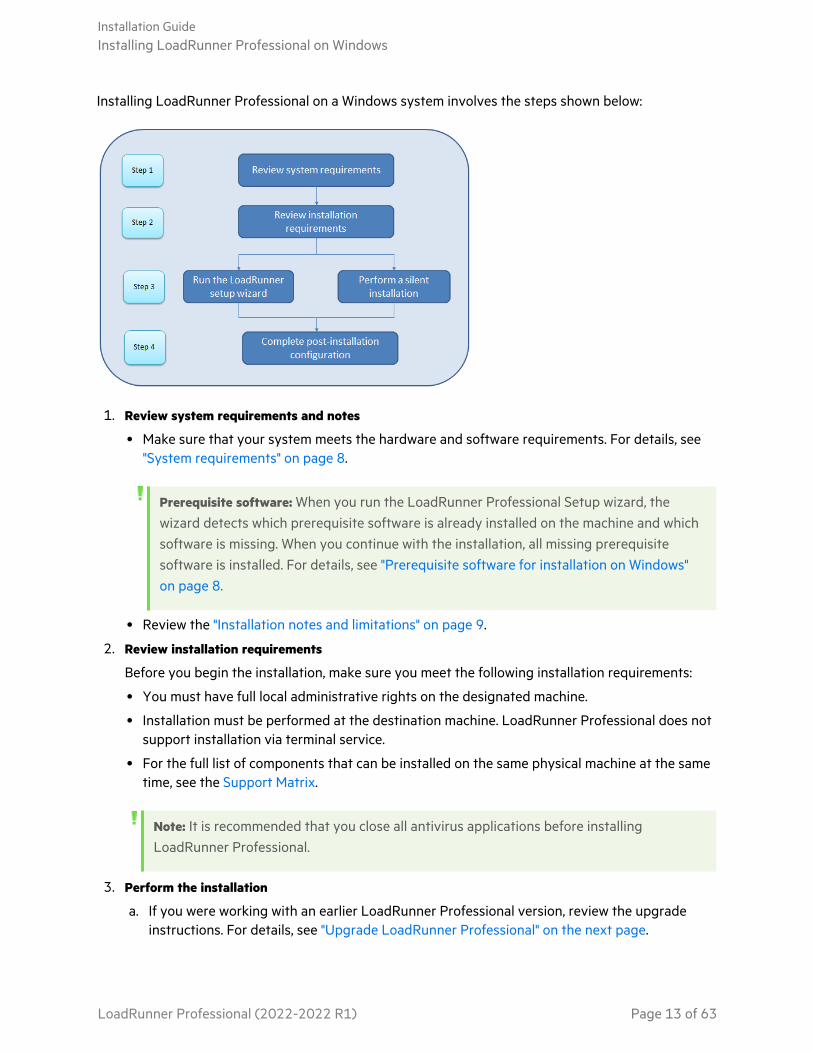
Installing LoadRunner Professional on a Windows system involves the steps shown below:
1. Review system requirements and notes
l Make sure that your system meets the hardware and software requirements. For details, see"System requirements" on page 8.
Prerequisite software: When you run the LoadRunner Professional Setup wizard, thewizard detects which prerequisite software is already installed on the machine and whichsoftware is missing. When you continue with the installation, all missing prerequisitesoftware is installed. For details, see "Prerequisite software for installation on Windows"on page 8.
l Review the "Installation notes and limitations" on page 9.
2. Review installation requirements
Before you begin the installation, make sure you meet the following installation requirements:
l You must have full local administrative rights on the designated machine.
l Installation must be performed at the destination machine. LoadRunner Professional does notsupport installation via terminal service.
l For the full list of components that can be installed on the same physical machine at the sametime, see the Support Matrix.
Note: It is recommended that you close all antivirus applications before installingLoadRunner Professional.
3. Perform the installation
a. If you were working with an earlier LoadRunner Professional version, review the upgradeinstructions. For details, see "Upgrade LoadRunner Professional" on the next page.
Installation GuideInstalling LoadRunner Professional on Windows
LoadRunner Professional (2022-2022 R1) Page 13 of 63

b. Run the Setup wizard to install the full version of LoadRunner Professional, LoadRunnerProfessional standalone components, or additional components on a Windows system. Fordetails, see "Install LoadRunner Professional on Windows" below.
Then run any patch installations if necessary.
c. After you complete the LoadRunner Professional installation, you can install a localizedversion to view the LoadRunner Professional, VuGen Standalone, and Analysis Standaloneuser interface in your local language. For details, see "Install a LoadRunner language pack" onpage 29.
Note:
l To perform a silent installation, see "Install LoadRunner Professional silently" onpage 19.
l VuGen and load generator installation on Windows includes OpenJDK 11, 32-bit.
4. Complete post-installation configuration
l Configure LoadRunner Professional to run Vusers on a load generator machine without theneed to log on manually. For details, see "Configure user login settings" on page 29.
l To run Vusers with Controller there must be a valid license installed on the Controllermachine. LoadRunner Professional automatically installs the Community license bundle (freeof charge) during LoadRunner Professional setup, providing 50 Vusers.
For details on managing LoadRunner Professional licenses and extending your Vuser capacity,see LoadRunner Professional licensing.
Upgrade LoadRunner ProfessionalLoadRunner Professional versions 2022 and 2022 R1 are full installations that can be installed overany LoadRunner or LoadRunner Professional installation (version 12.5x and later).
To upgrade all components in your Windows installation, follow the installation process as describedin "Install LoadRunner Professional on Windows" below. The installation process detects the olderversion, and gives you the option to upgrade.
Note: For silent upgrade, see "Install LoadRunner Professional silently" on page 19.
Install LoadRunner Professional on WindowsThis section describes how to install LoadRunner Professional on Windows using the Setup wizard.
For details on how to perform a silent installation, see "Install LoadRunner Professional silently" onpage 19.
Installation GuideInstalling LoadRunner Professional on Windows
LoadRunner Professional (2022-2022 R1) Page 14 of 63

Setup wizard informationReview the following information to help you successfully install your LoadRunner Professionalcomponent using the Setup wizard.
LoadRunner Agent Select the Start LoadRunner Agent after installationoption to start the LoadRunner Agent on a loadgenerator immediately after installation.
The agent enables communication between theload generator and Controller.
For moreinformation, seeLoadRunner Agentoverview
Agent mode During the installation of the OneLG load generator,MI Listener, or Monitors over Firewall components,you are prompted to select the mode for theinstalled LoadRunner Agent:
l LoadRunner Professional mode. The agent runsas a regular process, requiring log in before theprocess can start.
Note: Select this mode if you are installing a loadgenerator for use with Business ProcessMonitoring (BPM).
l LoadRunner Enterprise mode. The agent runsas a service, and is launched automatically whenthe operating system starts.
l LoadRunner Cloud mode. This is relevant forOneLG installation only. Select if you want to usethe load generator with LoadRunner Cloud.
Note: Agent configuration can be changed afterinstallation, if required.
For moreinformation, seeLoad generators
Silk Performer Agent Select the Install Silk Performer Agent afterinstallation option to install the Silk PerformerAgent on a load generator that will be used to runSilk Performer scripts.
Note: Silk Performer scripts are not currentlysupported for LoadRunner Professional.
For moreinformation, seeSilk Performerscripts
Installation GuideInstalling LoadRunner Professional on Windows
LoadRunner Professional (2022-2022 R1) Page 15 of 63

Certificates During installation of LoadRunner Professional FullSetup, OneLG, Monitor over Firewall, andMI Listener, you have the option to install CA andTLS (SSL) certificates by selecting the Specify acertificate that will be used by the LoadRunnerAgent option.
These certificates are used for authentication andsecure communication. Both certificates must be in*.cer (X.509) format.
l CA certificate: Enter the path to an existingcertificate, or leave it blank to skip the step. TheCA certificate should be generated in advance.
l TLS certificate: Select from an existing certificatefile. Alternatively, the certificate can begenerated automatically if you provide the CAcertificate containing the private key.
For moreinformation, seeSecurecommunication
Running the installationThe following procedure guides you through the Windows installation process.
To install LoadRunner Professional or an additional component:
1. Before installing:
l Review the pre-installation information, including the system requirements and prerequisitesoftware, described in "System requirements and prerequisites" on page 8.
l If you plan to install Network Virtualization, make sure that your system meets therequirements, as described in the Network Virtualization for LoadRunner Help (select therelevant version). (You can install Network Virtualization during LoadRunner Professionalinstallation, or at a later time.)
Note: If you install Network Virtualization as part of LoadRunner Professionalinstallation, you may need to restart the machine after setup.
l Make sure you have full, local administrative rights on the designated machine.
l Make sure the Windows Update process is not running.
2. Disable UAC (User Account Control) on the installation machine. For details, refer to yourMicrosoft Windows documentation.
Then reboot the machine. (Installation may fail if this is not done.)
3. To prevent DEP (Data Execution Prevention) from interfering with the installation, enable it foressential Windows programs and services only.
For details on how to change DEP settings, refer to your Microsoft Windows documentation.
Installation GuideInstalling LoadRunner Professional on Windows
LoadRunner Professional (2022-2022 R1) Page 16 of 63

4. Run the setup.exe file in the root folder of the installation package.
The LoadRunner Professional installation program begins and displays the installation options.
5. Select the required installation option.
From the installation menu page, select one of the following installation options:
l LoadRunner Professional Full Setup. Installs the main LoadRunner Professional components,including Controller, Virtual User Generator (VuGen), Analysis, OneLG Load Generator, andTruClient. Use this option for the machine that runs the load testing scenarios.
Note: The LoadRunner Professional Setup wizard can install either LoadRunnerProfessional or LoadRunner Enterprise. Make sure to select LoadRunner Professional.
For details on the components that are included in the full installation, see"LoadRunnerProfessional components" on page 6.
l VuGen. Installs a standalone version of VuGen (includes TruClient).
l Analysis. Installs a standalone version of LoadRunner Analysis.
l OneLG. Installs the standalone load generator component, needed for running Vusers togenerate load. Use this option for machines that are used to generate load only, and not tocontrol Vusers.
l Monitors Over Firewall. Installs the components on the agent machine for monitoring over thefirewall. For more information, refer to the Working with Firewalls section in the LoadRunnerProfessional Help Center.
l MI Listener. Installs the components needed on the MI Listener machine used in running Vusersover a firewall and monitoring over a firewall. For more information, refer to the Working withFirewalls section in the LoadRunner Professional Help Center.
l TruClient. Installs the standalone TruClient application for recording and developing testscripts for web-based applications.
Note: If you install the TruClient standalone on a machine, you cannot install any of theother LoadRunner Professional components, except for the standalone Analysis.
To use TruClient on a LoadRunner Professional machine, install the LoadRunnerProfessional full setup, which includes the TruClient component.
l Language Packs. This option is available only when installing on native non-English operatingsystems. Enables you to install a patch for localized LoadRunner Professional user interface, ontop of the English version. For details, see "Install a LoadRunner language pack" on page 29.
l Additional Components. Opens the Additional Components folder located in the root folder ofthe installation package. For details of the additional components that you can install, see theAdvanced > Additional Components section in the LoadRunner Professional Help Center .
Installation GuideInstalling LoadRunner Professional on Windows
LoadRunner Professional (2022-2022 R1) Page 17 of 63

6. Specific software, for example, Microsoft Visual C++, needs to be installed before you can installLoadRunner Professional (see "Prerequisite software for installation on Windows" on page 8). Ifthe prerequisite software is not already installed on your computer, a dialog box opens displayingthe list of prerequisite programs that are required.
Click OK to install the listed software before continuing with the LoadRunner Professionalinstallation. If you click Cancel, the LoadRunner Professional Setup wizard exits becauseLoadRunner Professional cannot be installed without the prerequisite software.
Note: After installing prerequisite software, LoadRunner Professional may restart themachine. If that occurs, rerun setup.exe.
7. Perform the installation.
The Setup wizard opens, displaying the Welcome page.
Follow the instructions in the wizard to complete the installation. Refer to the information in"Setup wizard information" on page 15 to ensure a successful installation.
Note:
l The installation path for LoadRunner Professional or LoadRunner Professionalcomponents cannot contain non-English characters.
l The default installation path is: C:\Program Files (x86)\Micro Focus\LoadRunner
8. After the installation is complete, you can choose to install Network Virtualization (NV).
In the Setup wizard, select:
l Typical mode for an automatic installation.
l Custom mode to change the installation folder, data folder, and the port.
For more details, see the installation section of the Network Virtualization for LoadRunner Help(select the relevant version).
9. If there is a patch available for the installed version:
a. Run the patch installation file provided with the installation package.
b. Follow the onscreen installation and deployment instructions.
Note:
l To repair the installation, run the setup.exe file located in the root directory of theLoadRunner Professional installation package, select LoadRunner Professional Full Setup,and then select the Repair option in the Setup wizard.
l You can configure LoadRunner Professional to run Vusers on a load generator machinewithout the need for the user to manually log in to the machine. For more information, see"Configure user login settings" on page 29.
Installation GuideInstalling LoadRunner Professional on Windows
LoadRunner Professional (2022-2022 R1) Page 18 of 63

l For a list of the components that were registered during setup, such as DLL and OCX files,see the RegisteredComponents_Micro Focus LoadRunner.txt file in the build_info folder ofthe installation.
Install LoadRunner Professional silentlyA silent installation is an installation that is performed without the need for user interaction. You usethe command line to run the setup files. For details, see "Installation command line options" onpage 21.
Note:
l Before you install LoadRunner Professional, review the pre-installation information,including the system requirements and prerequisite software, described in "Systemrequirements and prerequisites" on page 8.
l All machines on which you install LoadRunner Professional require administrator privileges.
l Use standard MSI command line options to define installation properties. For example, useINSTALLDIR to specify an alternate installation folder.
l To prevent the LoadRunner Agent on the load generator from starting immediately after
installation, add the following to the command line command: START_LGA=0. The agentenables communication between the load generator and Controller. For more details on theLoadRunner Agent, see the LoadRunner Professional Help Center (select the relevantversion).
To perform a silent installation of LoadRunner Professional
1. Run one of the following commands from the command line:
l To install all of the LoadRunner Professional components including the prerequisite softwarein a single command:
<Installation_package>\lrunner\<your_language_folder>\setup.exe /s
l To first install all of the prerequisites, and then LoadRunner Professional, run the followingcommands:
<Installation_package>\lrunner\<language_folder>\setup.exe/InstallOnlyPrerequisite /s
Installation GuideInstalling LoadRunner Professional on Windows
LoadRunner Professional (2022-2022 R1) Page 19 of 63

msiexec.exe /qn /i "<Installation_package>\lrunner\MSI\LoadRunner_x64.msi"
l By default, Network Virtualization is installed during the LoadRunner Professional installation.To facilitate this installation, add the following to the installation command:
REBOOT_IF_NEED=1
l To prevent the installation program from installing Network Virtualization, add the followingto the installation command:
NVINSTALL=N
l To secure your environment with TLS certificates and/or two-way TLS for LoadRunnerproducts, OneLG, MiListener, or MoFW, add the following to the installation command:
CACERT = <path to the root certificate in *.cer format>
CERT = <path to the server certificate in *.cer format>
TWO_WAY_SSL = High | Medium
The following command performs a silent installation of MI Listener.
Example: SetupMIListener.exe /s /a /s INSTALLDIR="C:\Program Files (x86)\MicroFocus\MI Listener" IS_RUNAS_SERVICE=0 START_LGA=1 NVINSTALL=NCACERT=c:\temp\root.cer CERT=server.cer TWO_WAY_SSL=Medium
For details, see Secure communication with TLS (SSL) in the LoadRunner Professional HelpCenter.
l To install a LoadRunner Professional standalone application (not VuGen or OneLG):
<Installation_package>\StandaloneApplications\Setup<component_name>.exe /s /a /s
l To install VuGen:
<Installation_package>\Standalone Applications\SetupVuGen.exe-s -sp"/s"
l To install additional components:
Installation GuideInstalling LoadRunner Professional on Windows
LoadRunner Professional (2022-2022 R1) Page 20 of 63

<Installation_package>\Additional Components\<setup_file_path>/s /a /s
Tip: See additional examples here: "Examples " on page 24
2. If you are installing an upgrade, run the following command:
msiexec.exe /update <full path to msp file> [/qn] [/l*vx <full path to log file>]
The msp files are located in the installation package.
Installation command line optionsYou can use the Windows command line to install the full LoadRunner Professional package,standalone applications, and additional components. The CLI uses Wrapper file (setup.exe) orPackage for the web files (<PFTW>.exe).
l The full LoadRunner Professional installation can be launched using the setup.exe file. For details,see "Installing the full LoadRunner Professional package from the wrapper file" below.
l The installations of standalone applications and additional components can be launched via PFTWfiles. For details, see "Installing a standalone application or an additional component from a PFTWfile" on page 23.
Installing the full LoadRunner Professional package fromthe wrapper fileYou can install full LoadRunner Professional from the installation wrapper file, setup.exe, located in\lrunner\<your_language> folder of your LoadRunner Professional installation package. The followingcommand line options are available:
Option Description
/s Runs the installation in the background (silently), with no userinteraction.
/qb Runs the installation in unattended mode, with limited user interaction.
/InstallOnlyPrerequisite Installs only the prerequisites – does not install any LoadRunnerProfessional components.
By default, the setup program checks that your machine has therequired prerequisites, and installs them if necessary, before installingthe LoadRunner Professional components.
You can set public properties for the command line installation, using the following syntax:
Installation GuideInstalling LoadRunner Professional on Windows
LoadRunner Professional (2022-2022 R1) Page 21 of 63
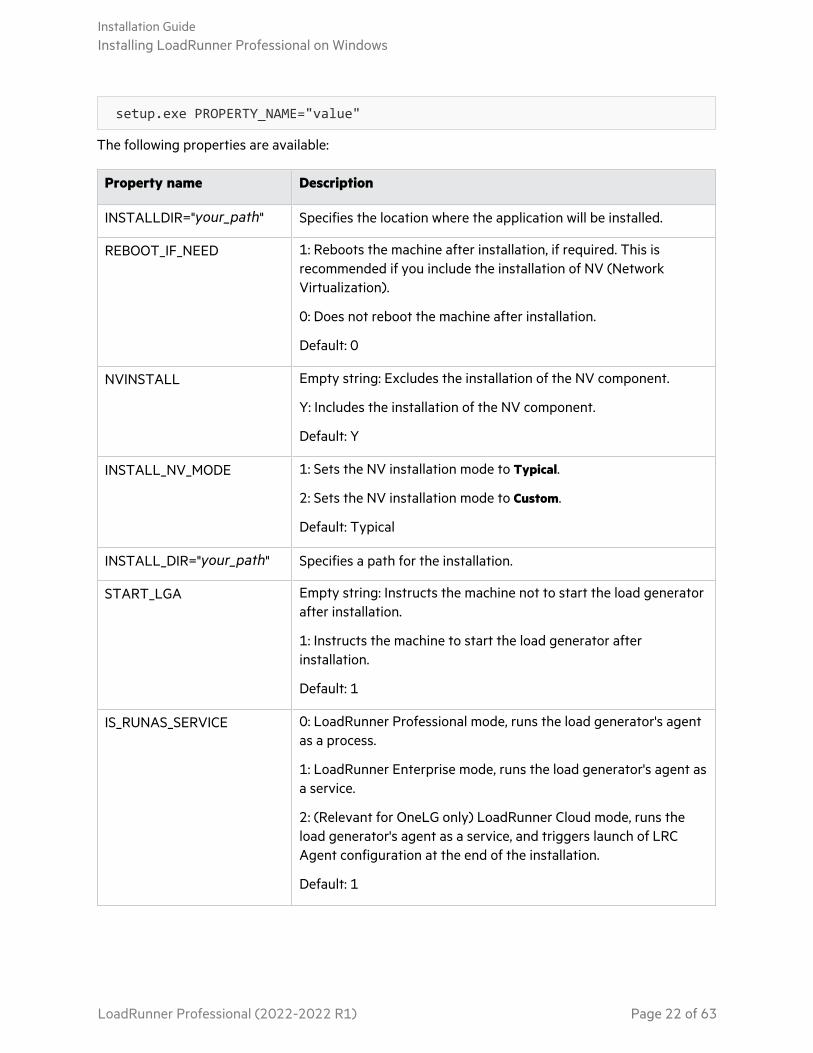
setup.exe PROPERTY_NAME="value"
The following properties are available:
Property name Description
INSTALLDIR="your_path" Specifies the location where the application will be installed.
REBOOT_IF_NEED 1: Reboots the machine after installation, if required. This isrecommended if you include the installation of NV (NetworkVirtualization).
0: Does not reboot the machine after installation.
Default: 0
NVINSTALL Empty string: Excludes the installation of the NV component.
Y: Includes the installation of the NV component.
Default: Y
INSTALL_NV_MODE 1: Sets the NV installation mode to Typical.
2: Sets the NV installation mode to Custom.
Default: Typical
INSTALL_DIR="your_path" Specifies a path for the installation.
START_LGA Empty string: Instructs the machine not to start the load generatorafter installation.
1: Instructs the machine to start the load generator afterinstallation.
Default: 1
IS_RUNAS_SERVICE 0: LoadRunner Professional mode, runs the load generator's agentas a process.
1: LoadRunner Enterprise mode, runs the load generator's agent asa service.
2: (Relevant for OneLG only) LoadRunner Cloud mode, runs theload generator's agent as a service, and triggers launch of LRCAgent configuration at the end of the installation.
Default: 1
Installation GuideInstalling LoadRunner Professional on Windows
LoadRunner Professional (2022-2022 R1) Page 22 of 63

Property name Description
INSTALL_SILK_PERFORMER_AGENT
1: Installs the Silk Performer Agent on load generators (used to runSilk Performer scripts).
SKIP_CHECK_PRIVILEGE 0: The installation process checks the install path for accessprivileges.
1: The installation process skips the access check for the installpath.
Default: 0
IMPROVEMENTPROGRAM 0: Disables the LoadRunner Improvement Program.
1: Enables the LoadRunner Improvement Program.
Default: 1
Example:
The following command performs the installation silently and then reboots the machine if necessary:
DVD\lrunner\en\setup.exe /s REBOOT_IF_NEED="1"
Installing a standalone application or an additionalcomponent from a PFTW fileYou can install a LoadRunner Professional standalone application or one of the additionalcomponents via the Package for the web (PFTW) files that are included with the LoadRunnerProfessional installation media. The installation files are located under the Standalone Applications orAdditional Components folders on the installation media.
Double-click on the packaged file, or run it from the command line using the following options:
Option Description
/s Runs the installation in the background (silently), with no user interaction.
/e Only extracts the installation files; does not run them.
/f Specifies the path of a temporary folder for file extraction.
For example: /f "c:\my_temp_folder"If you leave out this option, the default temporary folder is used.
Installation GuideInstalling LoadRunner Professional on Windows
LoadRunner Professional (2022-2022 R1) Page 23 of 63

Option Description
/a Allows you to pass parameters or properties to the autorun file, such as setup.exe.
Use the properties defined above (in the wrapper file section) for the setup.exe file.
Note: Silent installation for VuGen and OneLG:
l SetupVuGen.exe and SetupOneLG.exe uses different install commands (see the examplesbelow).
l If you need to insert a quotation mark character into the command line parameter, use twoconsecutive quotation marks.
Examples
The following commands silently run setup, and install the application in the specified folder. Whererelevant, they also start the agent after installation:
l Examples for SetupVuGen.exe and SetupOneLG.exe:
SetupOneLG.exe -s -sp"/s INSTALLDIR=""C:\Program Files (x86)\MicroFocus\LoadRunner OneLG"" IS_RUNAS_SERVICE=0 START_LGA=1 NVINSTALL=N"
SetupVuGen.exe -s -sp"/s INSTALLDIR=C:\VuGen"
l Examples for other standalone applications:
SetupAnalysis.exe /s /a /s INSTALLDIR="C:\Analysis"
SetupMIListener.exe /s /a /s INSTALLDIR="C:\MiListener"
SetupMoFW.exe /s /a /s INSTALLDIR="C:\MoFW"
SetupTruClient.exe /s /a /s INSTALLDIR="C:\TCSA"
Installation GuideInstalling LoadRunner Professional on Windows
LoadRunner Professional (2022-2022 R1) Page 24 of 63

Deploy Dockerized load generators on WindowsThis section describes how to run a Dockerized load generator on a Windows platform.
Docker is a platform that allows you to develop, ship, and run applications via a container. For detailsregarding Docker, see https://docs.docker.com.
Note:
l For supported protocols on Dockerized load generators, see the Supported Protocols guide.
l FTP is not fully supported with load generator for Docker on Windows. Passive mode FTP issupported, but Active mode FTP is not.
Prerequisites
Note: The Docker image for the OneLG load generator replaces the previous Windowsstandalone load generator docker image.
l Install Docker on the target machine, along with its dependencies, and set up the target machineenvironment as required. Currently, only the 64-bit version is supported. For installation details,see https://docs.docker.com/install/.
l Pull the Windows load generator Docker image from the from the relevant page, accessible fromthe performance testing page (https://hub.docker.com/u/performancetesting) in the Docker hub.Use the following command and appropriate <tag version number>, for example, 20.03:
docker pull performancetesting/microfocus_onelg_windows:<tag versionnumber>
Run a Dockerized load generator using the predefinedimageUse the ready-to-use image to run a load generator (OneLG) on Docker for Windows.
Note: If you need customization for your container, for example, for Java or to run under aspecific user, see "Run a Dockerized load generator using a custom image" on the next page.
To run a Dockerized load generator:
Run the load generator container using the following command:
Installation GuideInstalling LoadRunner Professional on Windows
LoadRunner Professional (2022-2022 R1) Page 25 of 63

docker run -id -p <host_port>:54345 performancetesting/microfocus_onelg_windows:<tag version number>
Note: Check that the <host_port> on the machine is available and allows incoming requests.You will specify this port on the Controller side when connecting to this load generator.
Run a Dockerized load generator using a custom imageIf your environment requires customized settings for running the container, you can create aDockerfile to build a custom image for Docker on Windows.
Examples for custom images:
l To use a specific user account for the processes under which the Vusers are running, to providesupport for accessing network resources like script parameter files. After running, the containershould be able to verify the user.
l To run Java protocols on Windows load generator containers.
l To define environment variables for proxy server host and port.
To run a custom Dockerized load generator:
1. Create a new folder, and within it create a file named dockerfile. Paste the following FROM lineinto the file, using the appropriate LoadRunner Professional version for the <tag versionnumber>, and add the relevant customization lines:
FROM performancetesting/microfocus_onelg_windows:<tag version number><Customization lines>
For customization examples, see "Examples of customized content for Dockerfiles" on the nextpage
Tip: For information on commands that can be used in Docker files, seehttps://docs.docker.com/engine/reference/builder/.
2. Save the Dockerfile.
3. Open a command line at the dockerfile folder path and run the following command, using thename you want for your custom image:
docker build -t <custom image name> .
4. Create a container for each load generator you want to use, by running the following command(or use any Docker orchestrator tool for running containers):
Installation GuideInstalling LoadRunner Professional on Windows
LoadRunner Professional (2022-2022 R1) Page 26 of 63

docker run -id -p <host_port>:54345 <custom image name>
If the custom image in step 3 was built with a tag then include it in the command:
docker run -id -p <host_port>:54345 <custom image name>:<tag versionnumber>
Note: Check that the <host_port> on the machine is available and allows incomingrequests. You will specify this port on the Controller side when connecting to this loadgenerator.
Examples of customized content for Dockerfiles
Example for Vusers under a specified user account
The following gives an example of dockerfile content for running the Vusers under a specified useraccount with network access to shared locations. Replace the values between <> with credentials for avalid user account in your environment, with network access to the shared resources.
Example:
#escape=`FROM performancetesting/microfocus_onelg_windows:<tag versionnumber>RUN c:\LG\launch_service\bin\magentservice.exe -removeRUN c:\LG\launch_service\bin\magentservice -install<domain>\<user name> <password>
Example for running Java/JMeter/Gatling protocols
The following gives an example of dockerfile content to run Java, JMeter, or Gatling protocols:
Example:
#escape=`FROM performancetesting/microfocus_onelg_windows:<tag versionnumber>COPY .\<folder contains JDK> <target path in the container>
l The path to the target JDK directory defined in the COPY line for the <target path in the container>must also be added to the Java VM runtime settings page:
Installation GuideInstalling LoadRunner Professional on Windows
LoadRunner Professional (2022-2022 R1) Page 27 of 63

l For Java 64-bit protocol testing, include the following command line in the dockerfile, in order toadd the path to the JDK 64-bit bin folder to the machine PATH environment variable:
RUN powershell [Environment]::SetEnvironmentVariable(\"Path\", $env:Path+ \";<target JDK path in the container>\bin\",[EnvironmentVariableTarget]::Machine)
l For JMeter/Gatling protocol testing, include the following command line in the dockerfile, in orderto add the path for the JDK/JRE to the machine JAVA_HOME environment variable:
RUN powershell [Environment]::SetEnvironmentVariable(\"JAVA_HOME\",\"<target JDK/JRE path in the container>\",[EnvironmentVariableTarget]::Machine)
After running the load generator containersAdd the load generators containers to scenarios. For details, see Configure Dockerized LoadGenerators in the LoadRunner Professional Help Center.
Tips and guidelinesl Dockerized load generators, run from the predefined image, are not supported when running over
a firewall.
l Use docker ps to list the containers that are running.l To stop the load generator service:
Installation GuideInstalling LoadRunner Professional on Windows
LoadRunner Professional (2022-2022 R1) Page 28 of 63
l Use docker stop <load generator container name or ID> if you want to reusethe same load generator.
l Use docker rm -f <load generator container name or ID> in order to removethe load generator container.
l To access the host network directly, use --net=host in place of -p <host_port>:54345. Werecommend you use this flag if the AUT generates a lot of network activity.
Configure user login settingsBy default, you need to manually log on to a computer before LoadRunner Professional can runVusers on that computer. However, you can configure LoadRunner Professional to run Vusers on aload generator machine, without the need to manually log on to the machine.
To configure user login settings:
1. Do one of the following:
l Select Windows Start menu > Micro Focus > LoadRunner Agent Runtime Settings Configuration.
l In icon-based desktops such as Windows 8, search for LoadRunner Agent and select theLoadRunner Agent Runtime Settings Configuration item.
The LoadRunner Agent Runtime Settings dialog box opens.
2. Select one of the following options:
l Allow virtual users to run on this machine without user login. LoadRunner Professionalautomatically logs on to the network from the load generator machine, so the Vusers can runwithout any manual intervention. Enter the network domain where the user machine resides, auser name, and password.
Note: When created, the LoadRunner Agent service starts with the LocalSystem account(not as a specified user). The specified credentials are used by the agent service to startthe mdrv.exe process when you run the script.
l Manual log in to this machine. The user must manually log on to the network from the loadgenerator machine for each session of running Vusers.
3. Click OK.
Note: You must reboot and log on to the system at least once after the LoadRunnerProfessional installation before the automatic login can work.
Install a LoadRunner language packThe language packs enable you to view the LoadRunner Professional user interface in your locallanguage. You install the language pack for the relevant LoadRunner Professional component:
Installation GuideInstalling LoadRunner Professional on Windows
LoadRunner Professional (2022-2022 R1) Page 29 of 63

LoadRunner Professional full, VuGen standalone, or Analysis standalone from the LoadRunnerProfessional installation package.
For a list of supported languages, see the Support Matrix.
The language packs are supported for native non-English operating systems only.
Important: The native language of the operating system must be the same as the languagepack you are installing. For example, the Spanish language pack must be installed on amachine with a native Spanish operating system.
To install a language pack:
1. Make sure that LoadRunner Professional in English is already installed.
2. In the root folder of the LoadRunner Professional installation package, run setup.exe. TheLoadRunner Professional installation program begins and displays the installation options.
3. Click Language Packs. The Language Packs folder in the installation package opens.
4. Navigate to the folder for the language and component you want to install and run theinstallation file. For example, to install the French language pack on a VuGen standalone machine,the path is ..\Language Packs\French\VugenSA\Vugen_FRA.msp.Follow the online instructions.
Installation GuideInstalling LoadRunner Professional on Windows
LoadRunner Professional (2022-2022 R1) Page 30 of 63

Installing the load generator on LinuxLoadRunner Professional uses load generators to run Vusers. There are two versions of theLoadRunner Professional load generator. One version runs Vusers on Windows platforms, and theother version runs Vusers on Linux platforms. You use Windows-based LoadRunner Controller tocontrol both the Windows-based and the Linux-based Vusers.
This chapter describes how to install the load generator on a Linux platform. For details on how toinstall the load generator on a Windows platform, see "Installing LoadRunner Professional onWindows" on page 12.
Note:
l You can install the Linux load generator using the installer (UI based or silent), as describedin this section, or through a Docker container—for more information, see "DeployDockerized load generators on Linux" on page 36.
l For troubleshooting information, see "Troubleshoot the load generator Linux installation" onpage 47.
This chapter includes:
• Installation workflow 31• Install a load generator on Linux with the Setup wizard 33• Silent load generator installation on Linux 35• Deploy Dockerized load generators on Linux 36• Configure the Linux environment 40• Improve load generator performance 44• Uninstall the load generator from a Linux machine 46• Troubleshoot the load generator Linux installation 47
Installation workflowYou can install the load generator component on a Linux platform to run Vusers. Linux-based Vusersinteract with LoadRunner Controller, installed on a Windows platform.
The load generator can be installed on a local Linux machine, or provisioned in a cloud account. SeeLoad generators on the cloud in the LoadRunner Professional Help Center for information onmanaging load generators on the cloud.
The following diagram shows the primary steps in installing the load generator on a Linux platformusing the standard installation program:
LoadRunner Professional (2022-2022 R1) Page 31 of 63

1. Review the system requirements
l Before you install the load generator on a Linux platform, make sure that your system meetsthe requirements, as described in "System requirements and prerequisites" on page 8.
l If you plan to install Network Virtualization: Make sure that your system meets therequirements, as described in the Network Virtualization for LoadRunner Help (select therelevant version).
l If you are using a RHEL 8 operating system: By default, libnsl.so.1 is not installed with RHEL8.0, so you need to manually install it before installing the load generator, or installation will
fail. Install using the package manager: yum install libnsl.i686l If you plan to replay ODBC Protocol scripts on the Linux machines: Install unixODBC v.2.3.1 or
higher.
2. Run the setup
Note:
l The load generator for this version can be installed over any load generatorinstallation from version 12.56 and later.
Installation GuideInstalling the load generator on Linux
LoadRunner Professional (2022-2022 R1) Page 32 of 63

l If load generator version 12.55 or earlier is installed, you must first uninstall it. Fordetails, see "Uninstall load generator 12.55 or earlier" on page 46.
l It is recommended that you close all antivirus applications before installingLoadRunner Professional.
l Wizard installation: Start the setup using the Load Generator Setup wizard. For moreinformation, see "Install a load generator on Linux with the Setup wizard" below.
l Silent installation: To perform a silent installation, see "Silent load generator installation onLinux" on page 35.
Note: The load generator installation on Linux includes OpenJDK 8, 32-bit .
3. Configure your environment
After the installation, before you can begin working with the load generator you need toconfigure your environment. This involves setting the appropriate environment variables,checking access to the load generator, and verifying the installation. See "Configure the Linuxenvironment" on page 40.
Install a load generator on Linux with the SetupwizardThis section describes how to install the load generator on a Linux platform using the Setup wizard.
Note: To perform the installation through a Docker container, see "Deploy Dockerized loadgenerators on Linux" on page 36.
To perform a silent installation, see "Silent load generator installation on Linux" on page 35.
This section includes:
l "Before you start" below
l "Run the Setup wizard" on the next page
Before you startDuring installation, you can optionally install CA and SSL certificates for the load generator. Thesecertificates are used for authentication and secure communication respectively. Both certificatesshould be in *.cer (X.509) format.
l For a CA certificate: You can enter the path to an existing certificate, or leave the path blank to skipthe step. If you want to install the CA certificate, it should be generated in advance.
Installation GuideInstalling the load generator on Linux
LoadRunner Professional (2022-2022 R1) Page 33 of 63

l For an SSL certificate: You can select it from an existing certificate file. Alternatively, it can begenerated automatically if you provide the CA certificate containing the private key.
For details on generating a CA certificate, see the section about creating and installing digitalcertificates in the LoadRunner Professional Help Center (select the relevant version).
For more information on working with certificates in LoadRunner Professional, see the section aboutconfiguring client-server authentication in the LoadRunner Professional Help Center.
Run the Setup wizardTo install the load generator:
1. Switch to super user.
2. If Load Generator version 12.55 or earlier is installed on the machine, you must uninstall itmanually. For details, see "Uninstall load generator 12.55 or earlier" on page 46.
If you do not uninstall the load generator, you will get an error during the installation.
Tip: If Load Generator 12.56 or later is installed, the Setup wizard uninstalls it during theinstallation process, then reinstalls it.
3. Unpack the load generator installation package and open the location of the .bin file.
4. Launch the Setup wizard:
For: Type:
[sh and bash shells] source./installer.sh
[csh and tcsh shells] source./installer.csh
If the source command is not supported by the current shell, usethe "dot" command.
For example:. ./installer.csh
Note: It is recommended that you use the source command to run the Setup wizard, asshown above. If you run the Setup wizard without using this command, you mustmanually set the environment variables for the current shell session. For details, see "Setthe environment variables" on page 40.
The Load Generator Setup wizard checks that the required prerequisite software is installed onthe computer. If any prerequisite software is missing, a message is displayed, and the Setupwizard aborts. Install the required package. Then rerun the Setup wizard.
Installation GuideInstalling the load generator on Linux
LoadRunner Professional (2022-2022 R1) Page 34 of 63

5. Follow the online instructions to install the load generator. For more help during installation, see"Troubleshoot the load generator Linux installation" on page 47.
Note: The default installation path is: /opt/MF/MF_LoadGenerator/_MF_LoadGenerator_Installation
6. Exit super user or switch to another user.
7. Configure your environment as described in "Configure the Linux environment" on page 40.
Silent load generator installation on LinuxThis section describes how to perform a silent installation of the load generator on a Linux machine.
Note: You must have super user privileges.
To perform a silent installation of the load generator:
1. If a load generator is installed on the machine, you must first uninstall it—otherwise the silentinstallation will fail. To uninstall the load generator, see "Uninstall the load generator from a Linuxmachine" on page 46.
2. Change directory to /<path_to_installer_dvd>/load_generator_linux_x64/.3. Run the following command to silently install the load generator:
source ./installer.sh -i silent
Note: It is recommended that you use a source command to perform a silent installation,as shown above. If you perform the installation without using the source command, youwill need to set up the environmental variables after installing the load generator. Fordetails, see "Set the environment variables" on page 40.
If the source command is not supported by the current shell, use the "dot" command. For
example, . ./installer.sh - i silent.
If you encounter an error during the installation, see "Troubleshoot the load generatorLinux installation" on page 47.
By default, the load generator will be launched at the end of the installation. If you do not want toautomatically launch the load generator, add the following command-line option:
source ./installer.sh -i silent –DSTART_PRODUCT_AFTER_INSTALL=No
Installation GuideInstalling the load generator on Linux
LoadRunner Professional (2022-2022 R1) Page 35 of 63
Deploy Dockerized load generators on LinuxThis section describes how to run a Dockerized load generator on a Linux distribution.
Docker is a platform that allows you to develop, ship, and run applications via a container. For detailsregarding Docker, see https://docs.docker.com.
Note: For supported protocols on Dockerized load generators, see the Supported Protocolsguide.
Prerequisites
Note: The Ubuntu image for the OneLG load generator replaces the previous Ubuntu loadgenerator docker image.
For information on OneLG, see Load generators in the LoadRunner Professional Help Center(select the relevant version).
l Install Docker on the target machine, along with its dependencies, and set up the target machineenvironment as required. Currently, only the 64-bit version is supported. For installation details,see https://docs.docker.com/install/.
Obtain the predefined load generator Docker image. Two images are available, for Linux-Ubuntu andRHEL.
Pull the image from the from the relevant page, accessible from the performance testing page(https://hub.docker.com/u/performancetesting) in the Docker hub.
Using one of the following commands and appropriate <tag version number>, for example, 20.03:
For Linux-Ubuntu:
docker pull performancetesting/microfocus_onelg_linux_ubuntu:<tag versionnumber>
For RHEL:
podman pull performancetesting/load_generator_redhat:<tag version number>
Run a Dockerized load generator using the predefinedimageUse the ready-to-use image to run a load generator on Docker for Linux.
Installation GuideInstalling the load generator on Linux
LoadRunner Professional (2022-2022 R1) Page 36 of 63

Note:
l To run the Linux-Ubuntu OneLG image for LoadRunner Professional, the appropriateenvironment variable must be included in the run command: ONELG_FLAVOR=1
l If you need customization for your container, for example, for proxy servers, see "Run aDockerized load generator using a custom image" on the next page.
To run a Dockerized load generator:
Run the load generator container using the appropriate command.
Linux-Ubuntu:
docker run -id -p <host_port>:54345 -e "ONELG_FLAVOR=1" --net=hostperformancetesting/microfocus_onelg_linux_ubuntu:<tag version number>
RHEL:
podman run -id -p <host_port>:54345 performancetesting/load_generator_redhat:<tag version number>
Note: Check that the <host_port> on the Linux machine is available and allows incomingrequests. You will specify this port on the Controller side when connecting to this loadgenerator.
Example using SSH
The following gives a simple C# code example for running multiple load generator containers usingSSH. There are container orchestrator tools which do the same, for example, Kubernetes, OpenShift,Docker Swarm, and more.
using (var client = new SshClient(dockerHost, dockerHostUserName,dockerHostPasswd)){client.Connect();for (int i =0; i > numOfContainers; i++){
string command = "docker run -id -p " + lgInitialPort + i) +":54345 -e "ONELG_FLAVOR=1" --net=hostperformancetesting/microfocus_onelg_linux_ubuntu:<tag versionnumber>";
Installation GuideInstalling the load generator on Linux
LoadRunner Professional (2022-2022 R1) Page 37 of 63

var terminal = client.RunCommand(command);if (terminal.ExistStatus != 0){throw new Exception("Failed to create new Docker container");}Console.WriteLine("Docker LG with external port" + lgInitialPort +
i + "created.");}client.Disconnect();
}
Run a Dockerized load generator using a custom imageIf your environment requires customized settings for running the container, for example for proxyservers, you can create a Dockerfile to build a custom image.
Note: Another alternative for customized settings: Start the container; once it is running, setup the load generator environment variables, then start the load generator manually inside thecontainer.
To run a custom Dockerized load generator:
1. Create a new folder, and within it create a file named dockerfile. Paste the FROM line, plus therequired customization lines, into the file, using the appropriate LoadRunner Professional versionfor the <tag version number>.
For example, for Linux-Ubuntu:
FROM performancetesting/microfocus_onelg_linux_ubuntu:<tag versionnumber>ENV http_proxy http://my_proxy_name:port
Note: The above customization example is for a proxy. It defines an environment variablefor the proxy server host and port in the target image.
2. Save dockerfile.
3. Open a command line at the dockerfile folder path and run the following command, using thename you want for your custom image:
Linux-Ubuntu:
Installation GuideInstalling the load generator on Linux
LoadRunner Professional (2022-2022 R1) Page 38 of 63

docker build -t <custom image name> .
RHEL:
podman build -t <custom image name> .
4. Create a container for each load generator you want to use, by running the following command:
Linux-Ubuntu:
docker run -id -p <host_port>:54345 -e "ONELG_FLAVOR=1" --net=host<custom image name>
RHEL:
podman run -id -p <host_port>:54345 <custom image name>
If the custom image in step 3 was built with a tag then include it in the command, for example:
docker run -id -p <host_port>:54345 -e "ONELG_FLAVOR=1" --net=host<custom image name>:<tag version number>
Note: Check that the <host_port> on the Linux machine is available and allows incomingrequests. You will specify this port on the Controller side when connecting to this loadgenerator.
After running the load generator containersAdd the load generators containers to scenarios. For details, see Configure Dockerized LoadGenerators in theLoadRunner Professional Help Center.
Tips and guidelinesl Dockerized load generators that are run from the predefined image are not supported when
running over a firewall. (Workaround for advanced users: You can develop your own Docker imagewith MI Listener support.)
l Use docker ps to list the containers that are running.l To stop the load generator service:
l Use docker stop <load generator container name or ID> if you want to reusethe same load generator.
l Use docker rm -f <load generator container name or ID> in order to removethe load generator container.
Installation GuideInstalling the load generator on Linux
LoadRunner Professional (2022-2022 R1) Page 39 of 63

l The Dockerfile container has an ENTRYPOINT section. The container first runs the commands inENTRYPOINT. It sets up the environment and then starts the load generator. The command uses aWhile loop to wait for input, in order to keep the container from exiting. This behavior prevents youfrom accessing the container while it is running. Make sure to add -i while starting the container;otherwise the While loop will consume an excessive amount of CPU.
l If you need entry into the container, add an argument such as --entrypoint=/bin/bashwhen starting the container. After entering the container, set the load generator environments andstart the load generator . You can then switch to the host using CTRL+p and CTRL+q while
keeping the container running in the background. To access the container again, use the dockerattach container_id command.
l To access the host network directly, use --net=host in place of -p <host_port>:54345. Werecommend you use this flag if the AUT generates a lot of network activity.
Configure the Linux environmentThis section describes the configuration steps you need to complete after installing the loadgenerator, before you can begin working with the load generator.
To complete the setup process after installing the load generator:
1. Set the appropriate environment variables.
See "Set the environment variables" below.
Note: If you used a source command to install the load generator, the Setup wizardautomatically sets the appropriate environment variables, and there is no need to performthis step.
2. Verify the load generator installation.
See "Verify the Linux installation" on the next page.
3. Start the load generator.
.cd /opt/MF/MF_LoadGenerator/;source env.csh;cd bin;./m_daemon_setup -install
4. Check that Controller is able to access the load generator.
For details, see "Check Controller connection" on page 43.
Set the environment variables
Note: This topic is applicable only if you ran the Load Generator Setup wizard without using asource (or "dot") command. If you used these commands, there is no need to perform any ofthe procedures described below.
Installation GuideInstalling the load generator on Linux
LoadRunner Professional (2022-2022 R1) Page 40 of 63

To enable the load generator to run, the following environment variables must be defined:
l M_LROOT. The location of the Linux load generator root folder.
l PATH. The location of the Linux load generator bin directory.
l PRODUCT_DIR. The location of the Linux load generator root folder.
The Load Generator Setup wizard performs the following tasks relating to the environment variables:
l Adds the environment variable definitions to the system-wide startup scripts.
If the variable definitions were not correctly set during the setup, see "Troubleshoot the loadgenerator Linux installation" on page 47 for possible solutions.
l Sets environment variables for the current shell session if the source command was used to run theSetup wizard.
This topic describes how to set the environment variables for the current shell session if a sourcecommand was not used to run the Setup wizard.
To determine if environment variables are set, run verify_generator (see "Run verify_generator" on thenext page) or use the following command:
echo $M_LROOT
If the name of the load generator root folder is returned, then the environment variables are correctlyset for current shell. If the name of the load generator root folder is not returned, then manually setthe variables as described below.
To manually set the environment variables for the current shell session (if the source command wasnot used to run the Setup wizard), execute one of the following commands:
l Bash users:
source <Load Generator root>/env.sh
l C Shell users:
source <Load Generator root>/env.csh
Verify the Linux installationThe load generator installation includes a setup verification utility, verify_generator, that checks theload generator setup on your Linux machine. The verification utility checks environment variables andyour startup scripts (/etc/csh.cshrc, ${HOME}/.cshrc or /etc/profile, ${HOME}/.profile) to verify thatthey are set up correctly.
Installation GuideInstalling the load generator on Linux
LoadRunner Professional (2022-2022 R1) Page 41 of 63

It is strongly recommended that you run verify_generator after installing the load generator, beforeattempting to invoke the load generator. For details on how to run the verify_generator utility, see"Run verify_generator" below.
The verify_generator utility checks the following:
l All the prerequisite software is installed. (This check is performed for 64-bit installations only.)
l There are at least 128 file descriptors
l The .rhosts permissions have been defined properly: -rw-r--r--l The host can be contacted by using rsh to the host. If not, it checks for the host name in .rhosts
l M_LROOT is defined
l .cshrc or .profile defines the correct M_LROOT
l /etc/csh.cshrc, ${HOME}/.cshrc or /etc/profile, ${HOME}/.profile defines thecorrect M_LROOT
l .cshrc or .profile exists in the home directory
l The current user is the owner of the .cshrc or .profile
l A Linux load generator installation exists in $M_LROOT
l The executables have executable permissions
l PATH contains $M_LROOT/bin and /usr/bin
Run verify_generator
It is recommended that you run the verify_generator utility after installing the load generator, beforeattempting to invoke the load generator. For details on what is checked by the verify_generator utility,see "Verify the Linux installation" on the previous page.
Note:
l To run this command, you must be a "normal" user and not root user.
l Before you run the verify_generator utility, make sure that you have set the DISPLAYenvironment variable on your machine.
To run verify_generator:
1. From the <Load Generator root>/bin folder, run the following command:
./verify_generator
For example:
/opt/MF/MF_LoadGenerator/bin/verify_generator
Installation GuideInstalling the load generator on Linux
LoadRunner Professional (2022-2022 R1) Page 42 of 63

If you want to receive detailed information about the checks, you can use the -v option, asfollows:
./verify_generator -v
2. View the results.
l If the settings are correct, verify_generator returns OK.
l If any of the settings are incorrect, verify_generator returns Failed, and suggestions on how tocorrect the setup.
Check Controller connectionIf Controller will connect remotely to the load generator using rsh (remote shell), you need to makesure that the load generator can be remotely accessed by Controller.
1. On the load generator machine, locate the .rhosts file which is located in the user home directory.
2. In the .rhosts file, verify that Controller is included in the list of machines. If it is not listed, add itto the list.
If Controller still cannot connect to the load generator, contact your system administrator.
Connecting to a Linux load generator without using rsh
You can configure Controller to connect to the load generator without using rsh. In this case, you needto activate the agent daemon on the load generator, as described below.
This section describes how to connect to a Linux load generator without using rsh.
1. On the Linux load generator, run the agent daemon by entering the following command from<Load Generator root>/bin:
./m_daemon_setup -install
This runs a daemon called m_agent_daemon, and if successful, you receive a message: m_agent_daemon <process ID>.
The agent now keeps running, even if the user is logged off. You can stop the agent by using thecommand explained in step 9 below, or by rebooting the machine.
Note: If you look at the m_agent_daemon[xxx].log log file in the temp directory, you maysee communication errors, even if the installation succeeded.
2. In Controller, select Scenario > Load Generators. The Load Generators dialog box opens.
3. Click Add. The Add New Load Generator dialog box opens.
4. In the Name box, enter the name of the computer on which the load generator is running.
5. From the Platform list, select Linux.
Installation GuideInstalling the load generator on Linux
LoadRunner Professional (2022-2022 R1) Page 43 of 63

6. Click More.
7. Click the Linux Environment tab, and make sure that the Don’t use RSH check box is selected.
8. Connect as usual.
9. To stop the agent daemon, run the following command from the <LoadRunner Professionalroot>/bin directory:
./m_daemon_setup -remove
This stops the m_agent_daemon daemon, and if successful, you receive the message: m_agent_daemon is down.
Improve load generator performanceThis section includes recommendations for improving load generator performance. You can increasethe number of file descriptors, process entries, and amount of swap space by configuring the kernel.
Note: Most operating systems using the Linux load generator have sufficient default filedescriptors, process entries, and swap space, and rarely require reconfiguration.
This section includes:
• Increase file descriptors 44• Increase process entries 45• Increase swap space 46
Increase file descriptorsA load generator uses the following file descriptor resources:
l 14 file descriptors for the launch service
l 20 file descriptors for the agent
l 30 file descriptors for each Vuser driver. By default, there is a driver for every 50 Vusers.
l File descriptors for the running Vusers. Each Vuser requires two descriptors.
For example, to compute the number of file descriptors used in running 100 threaded Vusers, theload generator requires:
Descriptors Purpose of the descriptors
14 For the launcher
20 For the agent
60 For 2 drivers (30 x 2, each one drives 50 Vusers)
Installation GuideInstalling the load generator on Linux
LoadRunner Professional (2022-2022 R1) Page 44 of 63

200 For 100 Vusers (each Vuser requires 2)
Total: 294 file descriptors
If Vusers are run as processes instead of threads, one driver is run per Vuser. Therefore, each Vuserrequires 30 file descriptors.
The procedure to increase the number of file descriptors differs between shells.
In the examples below, the number of descriptors is increased to the maximum of 1024.
l For sh and ksh users, type:
ulimit -n 1024
l For csh users, type:
limit descriptors 1024
Below is an alternate procedure to increase file descriptors. In this example, the number of descriptorsis increased to the maximum of 8192.
1. Add the following line to the /etc/security/limits.conf file:
hard nfile 8192
2. Add the following line to the /etc/sysctl.conf file:
fs.file-max = 8192
3. Reboot the machine.
Increase process entriesEach Vuser requires several free process entries. To increase the number of process entries on yoursystem, you must reconfigure the kernel.
This section describes how to reconfigure the kernel for Linux platforms.
1. Locate the /etc/security/limits.conf file.
2. Set the maximum number of processes in the limits file. Type:
hard nproc 8192
3. Reboot the machine.
Installation GuideInstalling the load generator on Linux
LoadRunner Professional (2022-2022 R1) Page 45 of 63

Increase swap spaceEach Vuser requires swap space ranging in size from 200 KB to 4 MB. Before adding space to yoursystem configuration, you should determine your paging requirements. For environments runningprograms with very large memory requirements, it is recommended to have paging space of fourtimes the physical memory. If you do not have enough paging space, certain processes may be killed,and others will be unable to start.
Uninstall the load generator from a Linux machineThis section describes how to uninstall the load generator from a Linux machine.
This section includes:
l "Uninstall load generator 12.55 or earlier" below
l "Uninstall load generator 12.56 or later" on the next page
Uninstall load generator 12.55 or earlierYou can uninstall load generator 12.55 or earlier versions using a manual command or silently.
To uninstall load generator version 12.55 or earlier:
1. Make sure that you are logged in as the same user who installed the load generator.
2. Make sure that the m_agent_daemon process is not running on the machine. If it is running, kill itsprocess:
cd /opt/HP/HP_LoadGenerator/bin;./m_daemon_setup -kill;su -;
3. Change the current directory to the installation directory:
cd <path_to_installation_folder>/_HP_LoadGenerator_Installation
4. Switch to super user.
5. Uninstall the load generator:
l Manual uninstall: run the following command:
sh ./Change_HP_LoadGenerator_Installation
l Silent uninstall: Run the following command:
sh ./Change_HP_LoadGenerator_Installation -i silent
Installation GuideInstalling the load generator on Linux
LoadRunner Professional (2022-2022 R1) Page 46 of 63

Uninstall load generator 12.56 or laterYou can uninstall load generator 12.56 or later using the Setup wizard or a manual command, orsilently.
To uninstall load generator version 12.56 or later:
1. Make sure that you are logged in as the same user who installed the load generator.
2. Make sure that the m_agent_daemon process is not running on the machine. If it is running, kill itsprocess:
cd /opt/MF/MF_LoadGenerator/bin;./m_daemon_setup -kill;su -;
3. Change the current directory to the installation directory:
cd <path_to_installation_folder>/_MF_LoadGenerator_Installation
4. Switch to super user.
5. Uninstall the load generator:
l Manual uninstall: Run the following command:
sh ./Change_MF_LoadGenerator_Installation
l Silent uninstall: Run the following command:
sh ./Change_MF_LoadGenerator_Installation -i silent
Troubleshoot the load generator Linux installationThis section describes troubleshooting tasks relating to the setup of the Linux load generator.
This section includes:
l "Environment variables were not set correctly in the system-wide startup scripts" on the next page
l "Error when installing the load generator on a Linux platform" on page 51
l "Error when running load generator on RedHat Enterprise Linux 5.x with SELinux enabled" onpage 51
l "Environment variables are not unset after uninstalling the load generator" on page 52
l "Unable to run Vusers on the load generator" on page 52
Installation GuideInstalling the load generator on Linux
LoadRunner Professional (2022-2022 R1) Page 47 of 63

Environment variables were not set correctly in thesystem-wide startup scriptsTo enable the load generator to run, the system-wide startup scripts must be modified to set specificenvironment variables. The required modifications to the startup scripts are made by the LoadGenerator Setup wizard. If the startup scripts were not correctly modified during the setup of the loadgenerator, you can manually make the required changes to the startup scripts as described below.The required changes differ slightly between C shell users, and Bourne and Korn shell users.
l Manually modifying the startup scripts for C shell users
During the load generator installation process, the wizard creates the env.csh script. This scriptincludes the commands to set the required environment variables for C shell users. A sampleenv.csh script is shown below.
setenv PRODUCT_DIR <Load Generator installation directory>
setenv M_LROOT ${PRODUCT_DIR}
if ( ! $?PATH ) then
setenv PATH ""
endif
setenv PATH ${M_LROOT}/bin:${PATH}"
Add the following line to the /etc/csh.cshrc or ~/.cshrc startup script to execute the env.csh scriptduring the shell startup:
source <Load Generator installation directory>/env.csh
For example:
source /opt/MF/MF_LoadGenerator/env.csh
The effect of making the above modification to the startup script is similar to the modifications thatare made by the Setup wizard. A sample of the modifications that the Setup wizard makes to the/etc/csh.cshrc startup script is shown below:
# New environment setting added by MF_LoadGenerator on Wed Jan 3016:20:10 IST 2020 2.
# The unmodified version of this file is saved in/etc/.login1557000131.
# Do NOT modify these lines; they are used to uninstall.
Installation GuideInstalling the load generator on Linux
LoadRunner Professional (2022-2022 R1) Page 48 of 63

setenv PRODUCT_DIR "/opt/MF/MF_LoadGenerator"
# End comments by InstallAnywhere on Wed Jan 30 16:20:10 IST 20202.
# New environment setting added by MF_LoadGenerator on Wed Jan 3016:20:10 IST 2020 5.
# The unmodified version of this file is saved in/etc/.login1557000131.
# Do NOT modify these lines; they are used to uninstall.
setenv M_LROOT "/opt/MF/MF_LoadGenerator"
# End comments by InstallAnywhere on Wed Jan 30 16:20:10 IST 20205.
# New environment setting added by MF_LoadGenerator on Wed Jan 3016:20:10 IST 2020 8.
# The unmodified version of this file is saved in/etc/.login1557000131.
# Do NOT modify these lines; they are used to uninstall.
if ( ! $?PATH ) then
setenv PATH ""
endif
setenv PATH "/opt/MF/MF_LoadGenerator/bin:${PATH}"
# End comments by InstallAnywhere on Wed Jan 30 16:20:10 IST 20208.
l Manually modifying the startup scripts for Bourne and Korn shell users
During the load generator installation, the Setup wizard creates the env.sh script. This scriptincludes commands to set the required environment variables for Bourne shell and Korn shell users.
Add the following line to the /etc/profile or ~/.profile startup script to execute the env.sh scriptduring the shell startup:
source <Load Generator installation directory>/env.sh
For example:
Installation GuideInstalling the load generator on Linux
LoadRunner Professional (2022-2022 R1) Page 49 of 63

source /opt/MF/MF_LoadGenerator/env.sh
The effect of making the above modification to the startup script is similar to the modifications thatare made by the Setup wizard. A sample of the modifications that the Setup wizard makes to the/etc/profile startup script is shown below:
# New environment setting added by MF_LoadGenerator on Fri Jan 1611:14:24 IST 2020 1.
# The unmodified version of this file is saved in/etc/profile1806316421.
# Do NOT modify these lines; they are used to uninstall.
PRODUCT_DIR=/opt/MF/MF_LoadGenerator
export PRODUCT_DIR
# End comments by InstallAnywhere on Fri Jan 16 11:14:24 IST 20201.
# New environment setting added by MF_LoadGenerator on Fri Jan 1611:14:24 IST 2020 4.
# The unmodified version of this file is saved in/etc/profile1806316421.
# Do NOT modify these lines; they are used to uninstall.
M_LROOT=/opt/MF/MF_LoadGenerator
export M_LROOT
# End comments by InstallAnywhere on Fri Jan 16 11:14:24 IST 20204.
# New environment setting added by MF_LoadGenerator on Fri Jan 1611:14:24 IST 2020 7.
# The unmodified version of this file is saved in/etc/profile1806316421.
# Do NOT modify these lines; they are used to uninstall.
PATH="/opt/MF/MF_LoadGenerator/bin:${PATH}"
export PATH
Installation GuideInstalling the load generator on Linux
LoadRunner Professional (2022-2022 R1) Page 50 of 63

# End comments by InstallAnywhere on Fri Jan 16 11:14:24 IST 20207. LoadRunner settings #PATH=${M_LROOT}/bin:$PATH; export PATH
Error when installing the load generator on a LinuxplatformWhen you use the source installer.sh command to install the latest load generator version on a Linuxmachine on which a load generator was previously installed, you may receive the following errormessage:
"An error occurred while trying to manage the selected instance."
Solution:
1. Open the registry file /var/.com.zerog.registry.xml and locate the element "product" with attribute"name"="MF_LoadGenerator".
For example:
<product name="MF_LoadGenerator" id="77f695c1-1f0c-11b2-883d-c486a85f6555"version="20.00.0.0" copyright="2019" info_url="http://www.microfocus.com" support_url="http://www.microfocus.com" location="/opt/MF/MF_LoadGenerator" last_modified="2019-11-21 13:12:14">
2. Record the value of the "location" attribute.
3. Remove the entire directory that is referred to by the "location" attribute.
4. Delete the registry file /var/.com.zerog.registry.xml.
5. Rerun the source installer.sh command.
Error when running load generator on RedHat EnterpriseLinux 5.x with SELinux enabledDuring use of the load generator on RHEL 5.x, you might receive the following error:
"m_agent_daemon: error while loading shared libraries: /opt/MF/MF_LoadGenerator/bin/liblwc_cryptolib.so: cannot restore segment prot afterreloc: Permission denied."
This problem occurs because SELinux is installed and enabled on the machine. SELinux is preventingthe specified shared library from loading.
Solution:
There are two possible workarounds:
Installation GuideInstalling the load generator on Linux
LoadRunner Professional (2022-2022 R1) Page 51 of 63
1. Before using the load generator, disable SELinux using the command "setenforce 0".
2. If you want to keep SELinux enabled, you can change the security context of all problematiclibraries (for example, <Path_to_LoadGenerator>/bin/*.so" to "textrel_shlib_t").To do this, execute the command: "chcon -t textrel_shlib_t <Path_to_LoadGenerator>/bin/*.so"
Environment variables are not unset after uninstalling theload generatorWhen you uninstalled the Linux load generator, the Setup wizard might not have unset the loadgenerator environment variables (M_LROOT, PRODUCT_DIR, and PATH) for the current shell. Tounset the environment variables, close the current shell session and invoke a new one, or manuallyunset the variables as described below:
l To unset the M_LROOT and PRODUCT_DIR variables:
l [bash shells] Use the unset command.
l [csh shells] Use the unsetenv command.
l To update the PATH variable to exclude the load generator binary directory, type:
l [bash shells] PATH=<required list of paths>; export PATHl [csh shells] setenv PATH <required list of paths>
Unable to run Vusers on the load generatorIf you are unable to run Vusers on the load generator, no specific error is reported, and the Vuserprotocol requires a third-party application or client to be present on load generator side, check thedynamic libraries used by the application. This will enable you to establish if any shared objectscannot be found. A shared object that cannot be found may indicate either a missing prerequisitepackage or an environment variable issue.
To check the dynamic libraries used by an application, type:
ldd application_name
For example, type ldd mdrv to determine if all the dependencies of the mdrv executable can befound. If any dependencies are not found, run verify_generator as described in "Run verify_generator"on page 42.
Note: If you are running Vusers for a protocol that requires a client installation (for example,Oracle), make sure that the path for the client libraries is included in the dynamic library pathenvironment variable (LD_LIBRARY_PATH or SHLIB_PATH).
Installation GuideInstalling the load generator on Linux
LoadRunner Professional (2022-2022 R1) Page 52 of 63

Installing the LoadRunner Data HubThe LoadRunner Data Hub is a communication channel based on Kafka technology that enables morerobust communication between LoadRunner components. To use this channel, install the Data Hub. Inaddition, if your LoadRunner components communicate via the web, you need to install the Data HubWeb Connector. For details, see "Installing the Data Hub Web Connector" on page 58.
The Data Hub must be installed on Linux. It can communicate with LoadRunner components runningon Linux and Windows machines.
After you install the Data Hub, you need to configure the LoadRunner components to use it. Fordetails, see Data Hub and Web Connector setup in the LoadRunner Professional Help Center.
This chapter includes:
• Installation workflow 53• Install the Data Hub with the Setup wizard 53• Silent Data Hub installation 54• Verify the Data Hub installation 57
Installation workflowFollow these primary steps to install the Data Hub using the standard installation program:
1. Review the system requirements
l Before you install the Data Hub, make sure that your system meets the requirements, asdetailed in the Support Matrix.
l The Data Hub requires the latest version of Java JRE to be installed as a prerequisite.
l It is recommended that you close all antivirus applications before running the installation.
2. Download the Data Hub installation package from AppDelivery Marketplace.
3. Run the setup
l Wizard installation: Start the setup using the Data Hub Setup wizard. For more information,see "Install the Data Hub with the Setup wizard" below.
l Silent installation: To perform a silent installation, see "Silent Data Hub installation" on thenext page.
4. Verify the installation
See "Verify the Data Hub installation" on page 57.
Install the Data Hub with the Setup wizardThis section describes how to install the LoadRunner Data Hub using the Setup wizard.
This section includes:
l "Before you start" on the next page
l "Run the Setup wizard" on the next page
Installation GuideInstalling the LoadRunner Data Hub
LoadRunner Professional (2022-2022 R1) Page 53 of 63

Before you startDuring installation, you can optionally install CA and SSL certificates. These certificates are used forauthentication and secure communication respectively. Both certificates should be in *.cer (X.509)format.
l For a CA certificate: You can enter the path to an existing certificate, or leave the path blank to skipthe step. If you want to install the CA certificate, it should be generated in advance.
l For an SSL certificate: You can select it from an existing certificate file. Alternatively, it can begenerated automatically if you provide the CA certificate containing the private key.
For details on generating a CA certificate, see the section about creating and installing digitalcertificates in the LoadRunner Professional Help Center (select the relevant version).
For more information on working with certificates in LoadRunner Professional, see the section aboutconfiguring client-server authentication in the LoadRunner Professional Help Center.
Run the Setup wizardTo install the Data Hub:
1. Switch to super user.
2. Unpack the Data Hub installation package and open the location of the .bin file.
3. Launch the Setup wizard:
For: Type:
[sh and bash shells] ./inst64.bin
4. Follow the online instructions to install the Data Hub.
Note: The default installation path is: /opt/MF/MF_LoadRunner_Data_Hub/_MF_LoadRunner_Data_Hub_Installation
5. Exit super user or switch to another user.
Silent Data Hub installationThis section describes how to perform a silent installation of the Data Hub.
This section includes:
Installation GuideInstalling the LoadRunner Data Hub
LoadRunner Professional (2022-2022 R1) Page 54 of 63

l "Run a silent installation" below
l "Silent installation options" on the next page
Note: You must have super user privileges.
Run a silent installationYou can install the Data Hub silently by following the steps below.
To perform a silent installation of the Data Hub:
1. Unpack the Data Hub installation package.
2. Create a file named installer.properties using the following template, changing the parameters asneeded.
Tip: An installer.properties file is generated when you run the Setup wizard, and can beused again for later silent installations.
#Choose Install Folder
#---------------------
USER_INSTALL_DIR=/opt/MF/MF_LoadRunner_Data_Hub
#Choose Link Location
#--------------------
USER_SHORTCUTS=/usr/local/bin/MF/MF_LoadRunner_Data_Hub
#Install
#-------
-fileOverwrite_/opt/MF/MF_LoadRunner_Data_Hub/_MF_LoadRunner_Data_Hub_Installation/Change_MF_LoadRunner_Data_Hub_Installation.lax=Yes
-fileOverwrite_/opt/MF/MF_LoadRunner_Data_Hub/zookeeper.service=Yes
-fileOverwrite_/opt/MF/MF_LoadRunner_Data_Hub/kafka.service=Yes
-fileOverwrite_/opt/MF/MF_LoadRunner_Data_Hub/run_after_install.sh=Yes
#Install certificate
#-------------------
Installation GuideInstalling the LoadRunner Data Hub
LoadRunner Professional (2022-2022 R1) Page 55 of 63

INSTALL_CERTIFICATE=\"\",\"No\"
3. Save the installer.properties file in the same location as the installer file.
4. Run the installation command using the following syntax:
./inst64.bin [-f<path to installer properties file> | -options]
You can modify the installation by adding options to this command. For details, see "Silentinstallation options" below.
Note:l When the installer.properties file is saved in the same directory as the installer, it overrides
all other command line options unless the -f option is used to specify another validproperties file.
l The path to the installer properties file may be either absolute, or relative to the directory inwhich the installer resides.
For example, the following command installs the Data Hub silently using an installer.properties filethat is saved in the same location as the installer:
Example: ./inst64.bin -i silent
Silent installation optionsYou can add the following options to the silent installation command:
Option Description
-i [swing | console | silent] Specifies the user interface mode for the installer.
-D<name>=<value> Specifies the installer properties.
-r <path to generate response file> Generates a response file.
Repair and uninstall options
The following options can be used to repair or uninstall the Data Hub:
Option Description
-repair Repairs the installation.
-uninstall Uninstalls the Data Hub.
Installation GuideInstalling the LoadRunner Data Hub
LoadRunner Professional (2022-2022 R1) Page 56 of 63

Verify the Data Hub installationTo verify that the Data Hub was installed successfully, run the following commands to check the
status of zookeeper and kafka services. If these services are running, the installation wassuccessful.
service zookeeper status
service kafka status
Installation GuideInstalling the LoadRunner Data Hub
LoadRunner Professional (2022-2022 R1) Page 57 of 63

Installing the Data Hub Web ConnectorThe Data Hub Web Connector enables the LoadRunner Data Hub to communicate via the web andover firewalls. For example, if a load generator is behind a firewall and communicates via a proxy, theWeb Connector enables the Data Hub to connect to the proxy and communicate with the loadgenerator.
The Web Connector must be installed on Linux.
After you install the Web Connector, you need to configure the LoadRunner components to use it. Fordetails, see Data Hub and Web Connector setup in the LoadRunner Professional Help Center.
This chapter includes:
• Installation workflow 58• Install the Web Connector with the Setup wizard 58• Silent Web Connector installation 59• Verify the Web Connector installation 62
Installation workflowFollow these primary steps to install the Web Connector using the standard installation program:
1. Review the system requirements
l Before you install the Web Connector, make sure that your system meets the requirements, asdetailed in the Support Matrix.
l It is recommended that you close all antivirus applications before running the installation.
2. The Web Connector installation package is included in the Data Hub installation package. If youhave not already downloaded the Data Hub installation package, download it from AppDeliveryMarketplace.
3. Run the setup
l Wizard installation: Start the setup using the Web Connector Setup wizard. For moreinformation, see "Install the Web Connector with the Setup wizard" below.
l Silent installation: To perform a silent installation, see "Silent Web Connector installation" onthe next page.
4. Verify the installation
See "Verify the Web Connector installation" on page 62.
Install the Web Connector with the Setup wizardThis section describes how to install the Web Connector using the Setup wizard.
This section includes:
l "Before you start" on the next page
l "Run the Setup wizard" on the next page
Installation GuideInstalling the Data Hub Web Connector
LoadRunner Professional (2022-2022 R1) Page 58 of 63

Before you startDuring installation, you can optionally install CA and SSL certificates. These certificates are used forauthentication and secure communication respectively. Both certificates should be in *.cer (X.509)format.
l For a CA certificate: You can enter the path to an existing certificate, or leave the path blank to skipthe step. If you want to install the CA certificate, it should be generated in advance.
l For an SSL certificate: You can select it from an existing certificate file. Alternatively, it can begenerated automatically if you provide the CA certificate containing the private key.
For details on generating a CA certificate, see the section about creating and installing digitalcertificates in the LoadRunner Professional Help Center (select the relevant version).
For more information on working with certificates in LoadRunner Professional, see the section aboutconfiguring client-server authentication in the LoadRunner Professional Help Center.
Run the Setup wizardTo install the Web Connector:
1. Switch to super user.
2. Unpack the Web Connector installation package and open the location of the .bin file.
3. Launch the Setup wizard:
For: Type:
[sh and bash shells] ./inst64.bin
4. Follow the online instructions to install the Web Connector.
Note: The default installation path is: /opt/MF/MF_LoadRunner_Data_Hub_Web_Connector/_MF_LoadRunner_Data_Hub_Web_Connector_Installation
5. Exit super user or switch to another user.
Silent Web Connector installationThis section describes how to perform a silent installation of the Web Connector.
This section includes:
Installation GuideInstalling the Data Hub Web Connector
LoadRunner Professional (2022-2022 R1) Page 59 of 63
l "Run a silent installation" below
l "Silent installation options" on the next page
Note: You must have super user privileges.
Run a silent installationYou can install the Web Connector silently by following the steps below.
To perform a silent installation of the Web Connector:
1. Unpack the Web Connector installation package.
2. Create a file named installer.properties using the following template, changing the parameters asneeded. The template here installs the Web Connector with the default LoadRunner certificates.
Tip: An installer.properties file is generated when you run the Setup wizard, and can beused again for later silent installations.
#Choose Install Folder
#---------------------
USER_INSTALL_DIR=/opt/MF/MF_LoadRunner_Data_Hub_Web_Connector
#Choose Link Location
#--------------------
USER_SHORTCUTS=/usr/local/bin/MF/MF_LoadRunner_Data_Hub_Web_Connector
#Install
#-------
-fileOverwrite_/opt/MF/MF_LoadRunner_Data_Hub_Web_Connector/_MF_LoadRunner_Data_Hub_Web_Connector_Installation/Change_MF_LoadRunner_Data_Hub_Web_Connector_Installation.lax=Yes
-fileOverwrite_/opt/MF/MF_LoadRunner_Data_Hub_Web_Connector/webconnector.service=Yes
-fileOverwrite_/opt/MF/MF_LoadRunner_Data_Hub_Web_Connector/run_after_install.sh=Yes
-fileOverwrite_/opt/MF/MF_LoadRunner_Data_Hub_Web_Connector/webconnector.sh=Yes
#Install certificate
#-------------------
Installation GuideInstalling the Data Hub Web Connector
LoadRunner Professional (2022-2022 R1) Page 60 of 63

INSTALL_CERTIFICATE=\"\",\"No\"
3. Save the installer.properties file in the same location as the installer file.
4. Run the installation command using the following syntax:
./inst64.bin [-f<path to installer properties file> | -options]
You can modify the installation by adding options to this command. For details, see "Silentinstallation options" below.
Note:l When the installer.properties file is saved in the same directory as the installer, it overrides
all other command line options unless the -f option is used to specify another validproperties file.
l The path to the installer properties file may be either absolute, or relative to the directory inwhich the installer resides.
For example, the following command installs the Web Connector silently using an installer.propertiesfile that is saved in the same location as the installer:
Example: ./inst64.bin -i silent
Silent installation optionsYou can add the following options to the silent installation command:
Option Description
-i [swing | console | silent] Specifies the user interface mode for the installer.
-D<name>=<value> Specifies the installer properties.
-r <path to generate response file> Generates a response file.
The following options can be used to repair or uninstall the Web Connector:
Option Description
-repair Repairs the installation.
-uninstall Uninstalls the Web Connector.
Installation GuideInstalling the Data Hub Web Connector
LoadRunner Professional (2022-2022 R1) Page 61 of 63

Verify the Web Connector installationTo verify that the Web Connector was installed successfully, run the following command to check the
status of the webconnector service. If this service is running, the installation was successful.
service webconnector status
Installation GuideInstalling the Data Hub Web Connector
LoadRunner Professional (2022-2022 R1) Page 62 of 63

Send Us FeedbackLet us know how we can improve your experience with the Installation Guide.Send your email to: [email protected]
Installation GuideSend Us Feedback
LoadRunner Professional (2022-2022 R1) Page 63 of 63
Copyright © 2022 FDOKUMEN