L5160/L5130 - CIP Training
44
6 Solutions CIP Training L5160/L5130 Roll media NG Good Roll media may deform Roll media Stand Keep on the floor Media Feed Direction Media Feeding Roller Roll Media Mechanism of media eccentric Swing Tension Loosen Tense Up Loosen
-
Upload
khangminh22 -
Category
Documents
-
view
6 -
download
0
Transcript of L5160/L5130 - CIP Training

6 Solutions
CIP TrainingL5160/L5130
Roll media
NG
Good
Roll mediamay deform
Roll media Stand
Keep onthe floor
Media Feed Direction
Media Feeding Roller
Roll Media
Mechanism of media eccentricSwing
Tension
Loosen Tense Up Loosen

CIP Training L5160/L5130 S
Solutions
Before You Start
How to Read the Manual
This document is a troubleshooting manual to handle abnormal images that may appear in some
situations.
In addition, it explains how to identify problem factors and technical mechanisms.
When Print Quality Is Not Satisfactory
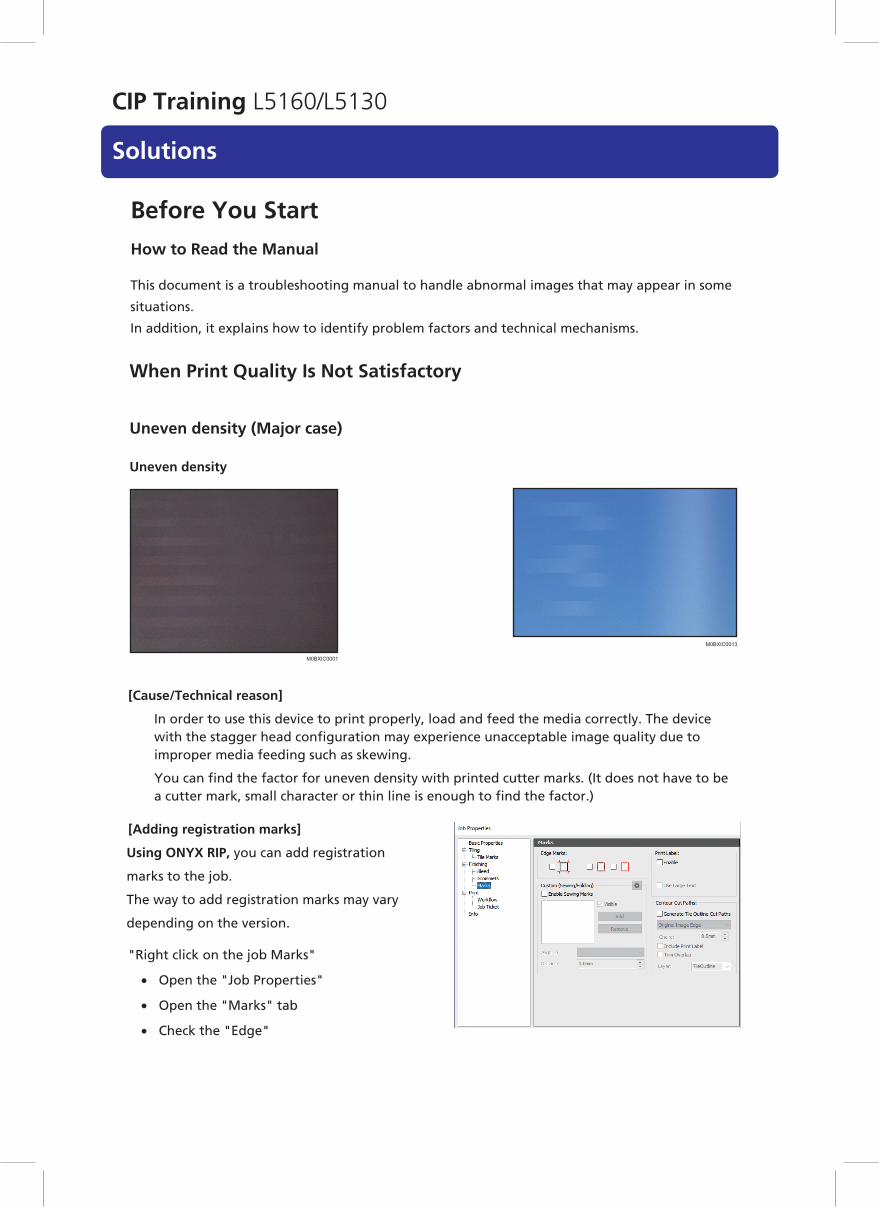
Uneven density (Major case)
Uneven density
M0BXIC0001
M0BXIC0013
[Cause/Technical reason]
In order to use this device to print properly, load and feed the media correctly. The device with the stagger head configuration may experience unacceptable image quality due to improper media feeding such as skewing.
You can find the factor for uneven density with printed cutter marks. (It does not have to be a cutter mark, small character or thin line is enough to find the factor.)
[Adding registration marks]
Using ONYX RIP, you can add registration
marks to the job.
The way to add registration marks may vary
depending on the version.
• Open the "Job Properties"
• Open the "Marks" tab
• Check the "Edge"
"Right click on the job Marks"

CIP Training L5160/L5130 S
Solutions
Using the ColorGATE RIP, you can add registration marks to the job. The way to add registration
marks may vary depending on the version.
Right click on the job
• Open the "Settings" window
• Open the "Job" tab
• Click on the cut marks icon
• Select "Cut Marks".
[Details / Solution]
The solution varies depending on the problem. See the corresponding item.
• a≠b
If the registration marks are not on the same level on the right and left positions, the media
is skewed. "STEP1-1 If there is skewing"
• a ≈ b≠0
If the registration marks are misaligned in a media feed direction, the media feed quantityis not correct. "STEP1-2 If the media feed quantity is not correct"
• a ≈ b ≈ 0
It is necessary to further adjust the media feed quantity.
"STEP2 Adjust the actual image by Media Feed Adjustment (Micro Setting)"

CIP Training L5160/L5130 S
Solutions
aa b b
a b
M0BXIC0004
Cutter mark
Media feeddirection
a = b:Media is skewing a b 0: Media feed quantity is not correct
Media feeddirection
Cutter mark
Media feeddirection
a b 0: Media feed quantity is correct
Cutter mark
STEP1-1 If there is skewing
1. The media has not been loaded correctly.
Load the media correctly. See the video, which describes how to load the media, or see the
section "Setting Media" in the manual "Operating Instructions".
How to load the media:
https://www.youtube.com/watch?v=aRqvMQCfMTg&feature=youtu.be
M0BXIC0017
https://2280171.mediaspace.kaltura.com/media/How+to+set+media+on+the+Pro+L5130+series+of+wide+format+devices/1_mlm093yt
2. The media may be being printed in a rewound state.
If you print on the media rewound area, the machine cannot feed the media correctly. Use
only one way.
3. The media edge may have touched the floor.
If the media edge comes into contact with the floor and the media is pulled to one side, a
media skew occurs. Use the roll-up unit to prevent the media edge from touching the floor.

CIP Training L5160/L5130 S
Solutions
STEP1-2 If the media feed quantity is not correct
1. You have not adjusted feed quantity and drop position.
Perform the feed quantity adjustment when change the media, because optimal feed quantity
differs for each media.
See the section "Adjusting the Media Feed Quantity" in the manual "Operating Instructions".
2. The media feed was adjusted in the part where the media has been fed and moved back or the
media is deformed due to heating.
Parts of media moved back at once has damage due to the heater temperatures and registration
roller.
If you adjust the media feed quantity in the damaged part, a problem such as uneven density,
white lines, or black lines may occur on the media that is undamaged because the optimal feed
quantity may differ between the damaged and undamaged parts.
If this happens, adjust the media feed quantity in the unrewound part.
STEP2 Adjust the actual image by Media Feed Adjustment (Micro Setting)
If STEP 1 does not solve the uneven density, try the STEP2 solutions. STEP2 has two options.
1. Adjust the image by Media Feed Adjustment (Micro Setting) and Media Feed Correction.
2. Print by upper print mode.(for example 16 pass is upper print mode of 12 pass.)
Adjusting the image takes time and consumes the media.
Total print time by upper print mode is less than in case of adjusting the actual image by Media feed adjustment (micro setting) and the media feed correction.
[Image Adjustment by Micro-Setting]
When changing "Micro Setting" to a negative value, the media feed quantity will become shorter.(Media feed quantity is the green line on the following figure.)
As a result, the uneven density is decreased, but black lines could appear when feed quantity is shorter than image length when printing each pass. (Image length is the gray line on the following figure.)
Micro Setting positive value
M0BXIC0018
Much LessUneven density
Micro Setting negative valueZero
White line Black line

CIP Training L5160/L5130 S
Solutions
Refer to "Troubleshooting" in the manual "Operating Instructions" for instructions on how to adjust the media feed.
• Media Feed Correction
You can remove black lines using "Media Feed Correction".
M0BXIC0019
Media Feed Correction = OFF Media Feed Correction = ON
You can select the level of media feed correction from level 0 to level 3. Typically, it should be
set to level 0.
If you can see any black lines, change the setting to level 1.
If this does not solve the problem, change the setting to a higher level.
• If media feed correction is too strong, white bands may occur. Setting level 0 or level 1 is recommended.
Setting Meaning
Off Media Feed Correction is turned off in all print modes
Level 0 Media Feed Correction is turned off in the corresponding print mode.
Level 1 Media Feed Correction is on.
Level 2 Stronger than level 1
Level 3 Stronger than level 1 and level 2
Refer to "Troubleshooting" in the manual "Operating Instructions" for instructions on how to adjust the media feed correction.

CIP Training L5160/L5130 S
Solutions
Uneven density at the media edge (Not in the centre)
[Problem]
Uneven density occurs at the edge of media.
M0BXIC0020
[Cause/Technical reason]
When you use eccentric media, uneven density occurs because media feed quantity is not even at the center or edge of the media.
In many cases, since the tension at the media edge becomes loose, the feed amount is not stable and uneven density occurs.
M0BXIC0021
Media Feed Direction
Media Feeding Roller
Roll Media
Mechanism of media eccentricSwing
Tension
Loosen Tense Up Loosen
[Solution]
If the roll media is being stored in an unsuitable way, it may become deformed. Support the roll core so that the media does not touch the floor.
M0BXIC0022
Roll media
NG
Good
Roll mediamay deform
Roll media Stand
Keep onthe floor

CIP Training L5160/L5130 S
Solutions
Uneven density (Media is stuck on the platen)
[Problem]
M0BXIC0001
[Cause/Technical reason]
The media may be stuck to the platen. If media that is sticky on the back is being used, the media may stick to the platen or roll media, resulting in a paper feed error. Also, the platen may be stained, resulting in paper feed error.
[Solution]
• Because of the heater temperature, the media may become stickier. Reduce the heater
temperature.
If ink is adhesive on the platen, clean it with a paper towel soaked in alcohol such as
Solmix.(Refer to the section "Cleaning the platen" in the manual "Requests for Daily Care
and Maintenance".)
• If the media sticks on the roll media:
Please pull out the media once and wind it around the roll core again. The media stickiness
will become weaker.
M0BXIC0023
Good
M0BXIC0024
1. Bad - Sticking on the roll media
M0BXIC0025
1. Pull out
2. Wind again

CIP Training L5160/L5130 S
Solutions
Black Lines (Major case)
M0BXIC0002 M0BXIC0026
1. Media feeding pitch
[Cause/Technical reason]
1. The media feed quantity is not correct.
The feed quantity is not adjusted properly or Media Feed Adjustment (Micro Setting) is
too short.
2. The heater temperature is not high enough to dry the dropped ink.
In the case of using high speed mode (6pass or 8pass), black lines occur at only dark
image position due to too much ink.
[Solution]
1. Adjust the feed quantity correctly, because optimal feed quantity differs for each media.
See the section "Adjusting the Media Feed Quantity" in the manual "Operating
Instructions". In the case of adjusting the media feed quantity with the part where the
media has been fed and moved back or the deformed due to heating, adjusted value
may be incorrect.
The rewound media and heated media are damaged by the registration roller and heater
temperature. If you adjust feed quantity in the damaged part, black lines may occur on
undamaged parts, because the optimal feed quantity may differ between damaged parts
and undamaged parts.
2. Change the heater temperature settings to higher or increase the drying time.
Change the pre and print heater settings to about 10 °C higher.
Use UNI direction to increase the drying time. It can be select on RIP software.
When using ONYX RIP, open print setting:
• select Unidirectional on printing direction.
When using ColorGATE RIP, right click on the job:
• select "Settings"
• select "Advanced"
• under the "Color" tab "Bidirectional"
• select "Settings"
• select the "Print Mode" tab and untick

CIP Training L5160/L5130 S
Solutions
Black Lines (Vacuum level is not Correct)1. The media setting is not correct.
• Black lines occur.
M0BXIC0002
[Cause/Technical reason]
A black line may occur if you raise the vacuum level after adjusting the media feed quantity.
This is because the media feed quantity differs as the load of the media increases.
The following images describe the trend of the vacuum level and black lines.
As the vacuum level get stronger, black lines become noticeable.
blacblack lineblack linek lineblacblack lineblack linek line
9821No black line
M0BXIC0028
* +9 is the strongest setting
* Feed adjustment is performed at vacuum setting +2
[Solution]
Basically, default setting is the best to get the high quality image.
If the media jams or floats, raise the vacuum level and perform feed adjustment after changing the vacuum level setting.

CIP Training L5160/L5130 S
Solutions
Black Lines (level changes as the job progresses.)Black lines occur, and the level changes as the job progresses.
M0BXIC0029
Media feed quantity of each pass
1st job
No blaNo black lineNo black lineck line BlacBlack lineBlack linek line
Media feed quantity of each pass
20th job
[Cause/Technical reason]
Media thickness is not correct.
Feed quantity is corrected according to the media thickness setting while printing. If this
setting is not correct, the correction function does not work.
[Solution]
Please set the media settings correctly referring to the section "Setting Media" in the manual "Operating Instructions".
White Lines
White lines occur.
M0BXIC0030
White line occurs
at media feeding pitch not media feeding pitch
[Cause/Technical reason]
There are two reasons for the white lines.
1. Media feed quantity is not correct.
2. Nozzle is clogged, or nozzle face is dirty

CIP Training L5160/L5130 S
Solutions
You can recognize the reason for the white lines by analyzing the actual image in progress. See
the following figure.
If the white lines occur on each media feed position, media feed quantity is not properly
adjusted. If the white lines occur at another position or the white line pitch is not the same as the
media feed pitch, the print heads have a problem.
White line are on each media feed position
M0BXIC0031
1pass
2pass
3pass
4pass
In p
rogr
ess
imag
eC
ompl
eted
imag
e
Media feed quantity of each pass
whitewhite linewhite line line
White line are inside each media feed position
M0BXIC0032
whitewhite linewhite line line1pass
2pass
3pass
4pass
In p
rogr
ess
imag
eC
ompl
eted
imag
e
Media feed quantity of each pass

CIP Training L5160/L5130 S
Solutions
[Solution]
1. Adjust the media feed quantity.
Adjust the feed quantity correctly, because optimal feed quantity differs for each media.
See the section "Adjusting the Media Feed Quantity" in the manual "Operating
Instructions".
The rewound media and heated media are damaged by the registration roller and heater
temperature. If you adjust feed quantity in the damaged part, black lines may occur on
undamaged parts, because the optimal feed quantity may differ between damaged parts
and undamaged parts.
See the section "Uneven density or black streaks occur on the printed image" in the
manual "Operating Instructions".
2. Clean print heads.
See the section "Cleaning Print Head Nozzles" in the manual "Operating Instructions".
When ink is deposited on the media guides or cap, the print heads will become dirty quickly even if the print heads are cleaned.
Also, see the relevant section in "Requests for Daily Care and Maintenance".
Characters Are Unclear/Faint/Blurred (Case 1)
The printed image is faint in the horizontal direction.
[Cause/Technical reason]
Drop position adjustment has not been performed.
[Solution]
Carry out drop position adjustment.
For details about adjustment, see section "Adjusting the Drop Position" in the manual "Operating Instructions".
Characters Are Unclear/Faint/Blurred (Case 2)
The printed image is faint in the vertical direction.
[Cause/Technical reason]
Media feed quantity adjustment has not been performed.
[Solution]
Adjust media feed quantity.
For details about adjustment, see the section "Adjusting the Media Feed Quantity" in the manual "Operating Instructions".
In the case of adjusting the media feed quantity with the part where the media has been fed and moved back or the deformed due to heating, adjusted value may be incorrect.
The rewound media and heated media are damaged by the registration roller and heater temperature. If you adjust feed quantity in the damaged part, black lines may occur on undamaged parts, because the optimal feed quantity may differ between damaged parts and undamaged parts.
CIP Training L5160/L5130 S
Solutions
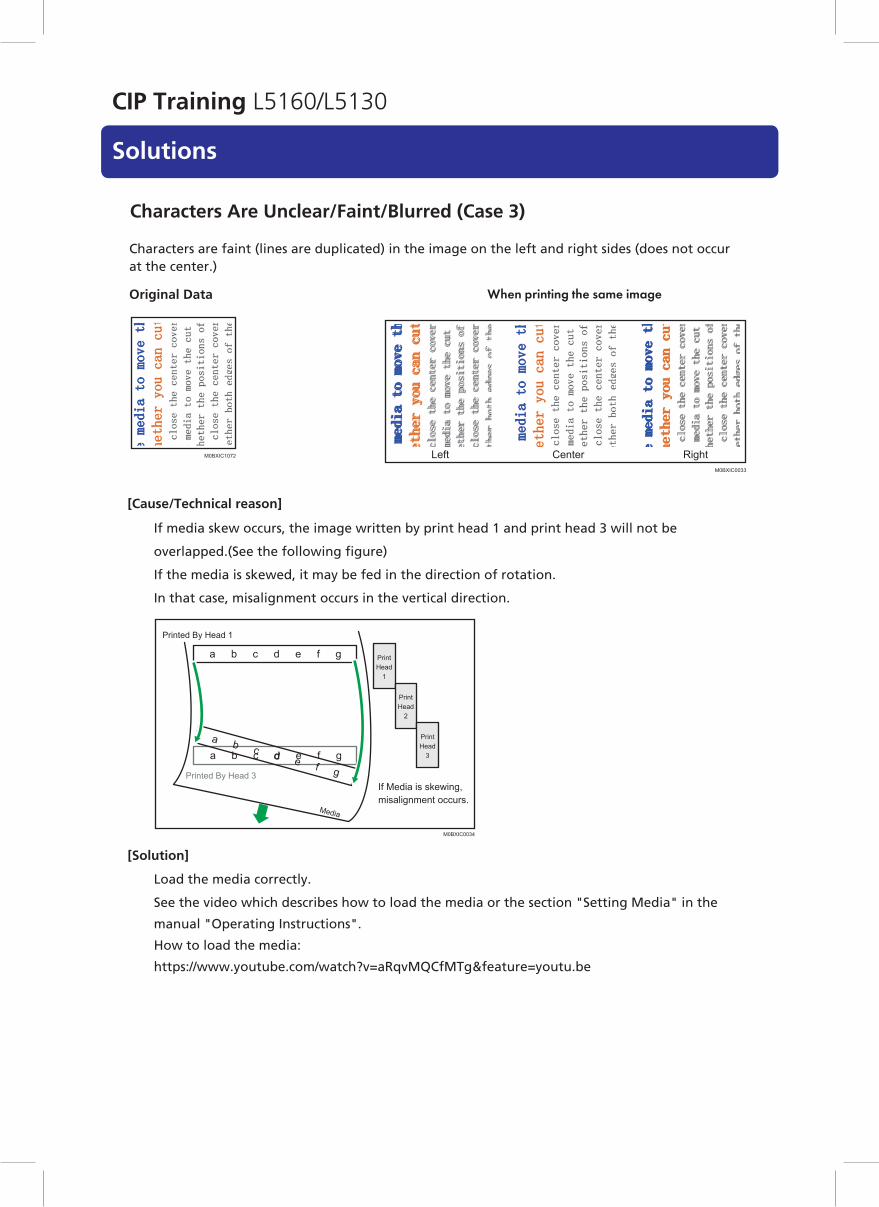
Characters Are Unclear/Faint/Blurred (Case 3)
Characters are faint (lines are duplicated) in the image on the left and right sides (does not occur at the center.)
Original Data
M0BXIC1072
When printing the same image
M0BXIC0033
Left Center Right
[Cause/Technical reason]
If media skew occurs, the image written by print head 1 and print head 3 will not be
overlapped.(See the following figure)
If the media is skewed, it may be fed in the direction of rotation.
In that case, misalignment occurs in the vertical direction.
a b c d e f g
c d ea b c d e f ga b
f g
M0BXIC0034
Printed By Head 1
PrintHead
1
PrintHead
2
PrintHead
3
Media
Printed By Head 3If Media is skewing,misalignment occurs.
[Solution]
Load the media correctly.
See the video which describes how to load the media or the section "Setting Media" in the
manual "Operating Instructions".
How to load the media:
https://www.youtube.com/watch?v=aRqvMQCfMTg&feature=youtu.be

CIP Training L5160/L5130 S
Solutions
M0BXIC0017
https://2280171.mediaspace.kaltura.com/media/How+to+set+media+on+the+Pro+L5130+series+of+wide+format+devices/1_mlm093yt
Characters Are Unclear/Faint/Blurred (Case 4)
[Problem]
Image misalignment occurs even if drop position adjustment and feed quantity adjustment are successful.
[Cause/Technical reason]
There are two reasons that may cause this problem.
1. The temperature used for the pre-heater or print heater is high enough to deform the media, making it wavy or curled.
2. Using uneven media such as those with nubby texture, holes, and patterns.
If you perform auto drop position adjustment in a deformed part or on uneven media, this function does not work properly. Image misalignment occurs due to incorrect adjustment values.
[Solution]
Please adjust the drop position in an un-deformed part of the media. There are two solutions
for preventing deformation of the media.
1. Changing the pre-heater and print heater to a lower setting.
When it is too low, bleeding may appear. Therefore, you should change the setting little
by little and see how the media behaves at each temperature.
See page 30 "Heater temperature & ink limit".
2. Changing vacuum level to a stronger setting.
Please adjust the feed quantity after changing the vacuum level.
When the vacuum level is too strong, black lines may appear.
If you use the uneven media, perform the manual drop position adjustment.
See the section "Adjusting the Media Feed Quantity" in Operating Instructions.
We recommend using adjustment value register and retrieve function.
It is possible to omit the adjustment of media feed quantity when using the same media again.

CIP Training L5160/L5130 S
Solutions
The colors are different from the original image in the gradation part.
The gradation is unsmooth, or the color is different.
Original image
M0BXIC0035
Abnormal image
M0BXIC0036
[Cause/Technical reason]
If you are not using a profile specific to the media, the ICC profile does not match, and gradation is not produced correctly.
[Solution]
Select the proper media profile matched with the media.
If you do not have the dedicated media profile, look for the media profile in Profile library or make a media profile.
[Profile library]
(mainly Europe and Asia)
ColorBase - https://ricoh.color-base.com/
(mainly North America)
Business Booster - https://ricohbusinessbooster.com/production-portfolio/color-profile//
CIP Training L5160/L5130 S
Solutions
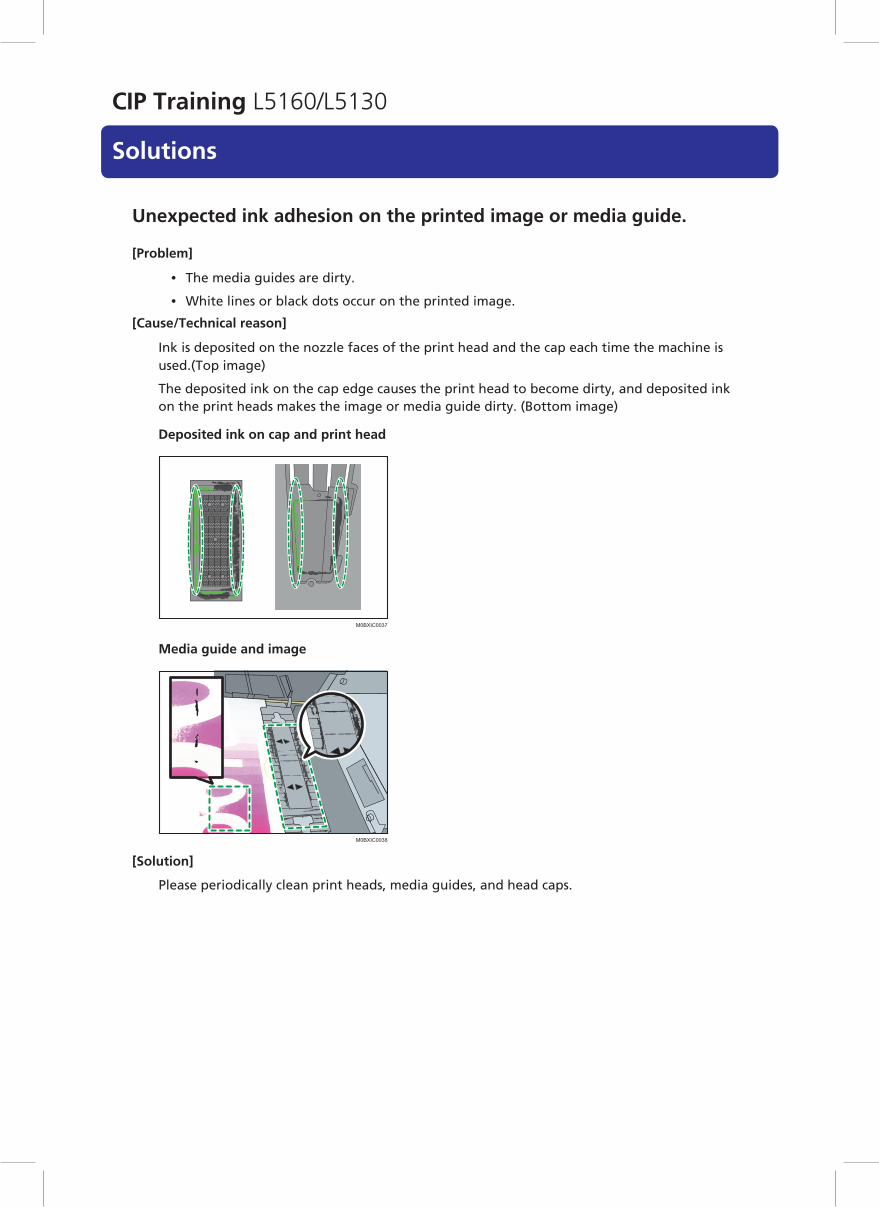
Unexpected ink adhesion on the printed image or media guide.
[Problem]
• The media guides are dirty.
• White lines or black dots occur on the printed image.
[Cause/Technical reason]
Ink is deposited on the nozzle faces of the print head and the cap each time the machine is used.(Top image)
The deposited ink on the cap edge causes the print head to become dirty, and deposited ink on the print heads makes the image or media guide dirty. (Bottom image)
Deposited ink on cap and print head
M0BXIC0037
Media guide and image
M0BXIC0038
[Solution]
Please periodically clean print heads, media guides, and head caps.

CIP Training L5160/L5130 S
Solutions
If you do not know how to specify the print settings
Head height
We recommend the default settings for the best image quality.
Increase the setting only if a media jam occurs or the print head rubs the media.
Adjust the drop position again after changing the setting to prevent the abnormal image.
Setting Head Height (mm) Head Height (inches)
default 1.8±0.2mm 0.07 inches
+1 2.3±0.2mm 0.09 inches
+2 2.8±0.2mm 0.11 inches
+3 3.8±0.2mm 0.15 inches
Media thickness
Check the media thickness information on the media data sheet or website, and set the appropriate setting values in the table below.
Setting Media thickness (mm) Media Thickness (inches)
-2 0.05 - 0.1 mm 0.002-0.004 inches
-1 0.1 - 15 mm 0.004-0.006 inches
0 0.15 - 0.2 mm 0.006-0.008 inches
+1 0.2 - 0.3 mm 0.008-0.012 inches
+2 0.3 - 0.5 mm 0.012 - 0.02 inches
If you do not know the media thickness information, try using the following reference settings.
CIP Training L5160/L5130 S
Solutions
[Reference settings]
Media Type Media ThicknessWidth
(mm)
Thickness
(mm)Setting
PVC LINTEC GIY-11Z5 1370 0.286 +1
Avery Dennison EU MPI
3000 Gloss
1370 0.23 +1
PET Kimoto TP-188 1600/1300 0.189 0
Soft signage SEIREN SS8000 1370/914/610
0.19 0
Synthetic paper Yupo VJFP120 1270 0.11 -1
Coated paper Sihl 3257 1524/1370 0.192 0
Paper NAKAGAWA MFG.
CO IJ plain paper
841/594 0.098 -2
Wallpaper LINTEC PROW-AP400F 930 0.249 +1
Canvas Sihl 3609 1370 0.421 +2
Tarpaulin Ultraflex 13oz jetflex Gloss 1370 0.352 +2
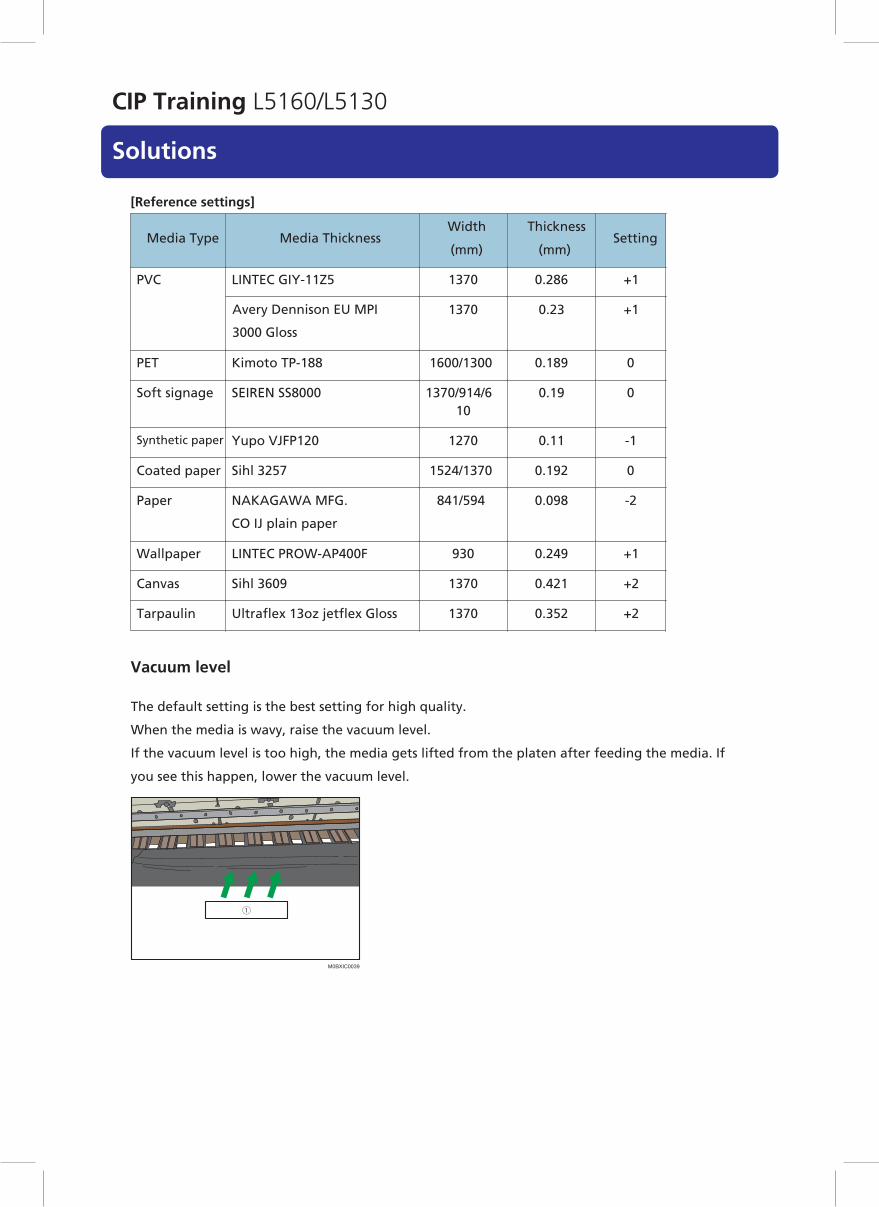
Vacuum level
The default setting is the best setting for high quality.
When the media is wavy, raise the vacuum level.
If the vacuum level is too high, the media gets lifted from the platen after feeding the media. If
you see this happen, lower the vacuum level.
①
M0BXIC0039

CIP Training L5160/L5130 S
Solutions
1. media lifted from the platen
Adjust the media feed quantity again after changing the vacuum level to prevent the black lines.
The following images describe the trend of the vacuum level and black lines.
As the vacuum level get stronger, black lines become noticeable.
• The following images describe the trend of the vacuum level and black lines.
• As the vacuum level gets stronger, black lines become noticeable. (Feed adjustment isperformed at vacuum setting +2.)
black lineblack lineblack lineblack lineblack lineblack line
8 921No black line
M0BXIC0028
Heater temperature & ink limit
If you do not have a media profile, adjust the heater temperature and ink limit by the following procedure.
1. Tentatively set the heater temperature to the highest value.
2. Pre and Print heater temperature settings
For details see "Heater Setting".
If the media is wavy, lower the pre and print heater temperature at intervals of 5 °C until
waviness stops occurring.
3. If beading or bleeding occur on the printed image, lower the ink limit setting on RIP
software. For details see "[Adjusting ink limit]".
Wavy media
If heater temp.is too high cockling may occur.
• Media cockling
M0BXIC0040
Beading
M0BXIC0041
Bleeding
M0BXIC0042

CIP Training L5160/L5130 S
Solutions
1. Post and Cure heater temperature setting
If the printed media becomes deformed, lower the post heater temperature at intervals of 5 °C and the cure heater at intervals of 10 °C until the media deformation stops occurring.
If blocking occurs on printed images, change the ink limit setting on RIP software.
[Adjusting ink limit]
Using ONYX RIP, Right click on the job
• Open the "Job in Job Editor"
• select the "Color Correction"tab
• select the "Primary Color Curves"
• select the "Line" on the "Edit Type" tab
• check the CMYK
• on the "Edit Channels"
• drag the graph down to the required level.
Using ColorGATE RIP, right click on the job
• select "Settings"
• select "Advanced" under the "Color" tab
• Select "Settings"
• select the "Color Correction" tab
• drag the graph down to the required level

CIP Training L5160/L5130 S
Solutions
Heater Setting
MediaType
Pass ModeTarget Heater Setting (°C)
RemarkPRE PRINT POST CURE
PVC 6pass 50-60 50-60 65 or 90 85 or 90
8pass 45-55 45-55 65 or 90 85 or 90
12pass 45-55 45-55 65 or 90 85 or 90
16pass 45-55 45-55 65 or 90 65 or 70
32pass 40-50 40-50 65 or 90 65 or 70
12 Pass (W) - - - - Not recommended
PET 6pass - - - - Not recommended
8pass - - - - Not recommended
12pass 55-65 55-65 65 or 90 65 or 70 -
16pass 55-65 55-65 65 or 90 65 or 70 -
32pass 55-65 55-65 65 or 90 65 or 70 -
12 Pass (W) 55-65 55-65 65 or 90 65 or 70 -
CoatedPaper
6pass 30-40 30-40 30-35 OFF Cure heater offrecommended
8pass 30-40 30-40 30-35 OFF
12pass 30-40 30-40 30-35 OFF
16pass 30-40 30-40 30-35 OFF
32pass 30-40 30-40 30-35 OFF
12 Pass (W) - - - - Not recommended

CIP Training L5160/L5130 S
Solutions
MediaType
Pass ModeTarget Heater Setting (°C)
RemarkPRE PRINT POST CURE
PP 6pass 40-50 40-50 50-55 50-55
8pass 40-50 40-50 50-55 50-55
12pass 40-50 40-50 50-55 50-55
16pass 40-50 40-50 50-55 50-55
32pass 35-45 35-45 50-55 50-55
12 Pass (W) - - - - Not recommended
Banner 6pass 45-55 45-55 65 or 90 65 or 70
8pass 45-55 45-55 65 or 90 65 or 70
12pass 45-55 45-55 65 or 90 65 or 70
16pass 45-55 45-55 65 or 90 65 or 70
32pass 45-55 45-55 65 or 90 65 or 70
12 Pass (W) - - - - Not recommended
Textile/Fabric
6pass 35-45 35-45 50-55 50-55
8pass 35-45 35-45 50-55 50-55
12pass 35-45 35-45 50-55 50-55
16pass 35-45 35-45 50-55 50-55
32pass 35-45 35-45 50-55 50-55
12 Pass (W) - - - - Not recommended
PlainPaper
6pass OFF OFF OFF OFF All heaters offrecommended
8pass OFF OFF OFF OFF
12pass OFF OFF OFF OFF
16pass OFF OFF OFF OFF
32pass OFF OFF OFF OFF
12 Pass (W) - - - - Not recommended

CIP Training L5160/L5130 S
Solutions
MediaType
Pass ModeTarget Heater Setting (°C)
RemarkPRE PRINT POST CURE
Wallpaper
6pass 30 30 20 40
8pass 30 30 20 40
12pass 30 30 20 40
16pass 30 30 20 40
32pass 30 30 20 40
12 Pass (W) - - - - Not recommended
Canvas 6pass 40-50 40-50 50-55 50-55
8pass 40-50 40-50 50-55 50-55
12pass 40-50 40-50 50-55 50-55
16pass 40-50 40-50 50-55 50-55
32pass 40-50 40-50 50-55 50-55
12 Pass (W) - - - - Not recommended

CIP Training L5160/L5130 S
Solutions
Unexpected Behavior
Auto drop position/Auto media feed quantity adjustment failed
[Problem]
Auto drop position or media feed quantity adjustment failed.
[Cause/Technical reason]
There are three possible reasons:
1. The machine could not print the adjustment pattern properly due to nozzlesclogging.
2. Using unsupported media.
3. Adjustment patterns are out of sensing area because misalignment is too big.
[Solution]
1. If the pattern is not clear, execute the nozzle cleaning.
See the section "Cleaning Print Head Nozzles" in the manual "Operating Instructions".
M0BXIC0046
2. If you are using the following media, adjust the drop position and media feedquantity manually.
• Transparent media.
• Colored media.
• Texture or fabric media
• Holed media.
• Patterned media.
• High reflective media
• Uneven Media
3. Adjust the drop position and media feed quantity manually.
See the sections "Adjusting the Drop Position" and "Adjusting the Media FeedQuantity" in "Operation instructions".

CIP Training L5160/L5130 S
Solutions
Nozzle clogging
[Problem]
There are many nozzles clogged after leaving the machine idle. (Nozzle clogging for more than 10ch has occurred.)
DVB195
[Cause/Technical reason]
If the humidity in the location of the machine is under 40%, the frequency of nozzles clogging may increase.
(For details about the operating environments, see "Getting Started" in the Operating Instructions.)
[Solution]Please change the auto maintenance setting if using the machine under recommended humidity
levels.
We recommend increasing auto maintenance frequency little by little while watching.
Ink consumption will increase when the maintenance frequency is increased.
(Refer to the section "Using the Auto Maintenance Function" in the manual "Operating
Instructions".)
First, change the "Flushing Interval" setting to Level 2 or Level 3. (Default is Level 1)
The frequency for discharging ink that accumulates in the print heads increases.
If it is not enough, change the "Cleaning Interval" setting to Level 2 or Level 3. (Default is Level 1)
The frequency for cleaning print head nozzles increases.
When using a 4CW machine, you can set cleaning intervals for white heads independently.

CIP Training L5160/L5130 S
Solutions
Set the frequency for discharging ink that accumulates in the print heads.
• Level 1 (Lo): every 30 minutes
• Level 2: every 20 minutes
• Level 3 (Hi): every 10 minutes
Default: [Level 1 (Lo)] Cleaning Interval
Set the frequency for cleaning print head nozzles.
• Level 1 (Lo): every 12 hours
• Level 2: every 6 hours
• Level 3 (Hi): every 3 hours
Default: [Level 1 (Lo)] Cleaning (White) Interval
Set the cleaning frequency to prevent white ink from clogging.
• Level 1 (Lo): every 4 hours
• Level 2: every 2 hours
• Level 3 (Hi): every hours
Default: [Level 1 (Lo)] Ink Circulation Interval
Set the circulation frequency to avoid white ink from settling in the ink supply route.
• Level 1 (Lo): every 3 hours
• Level 2: every 2 hours
• Level 3 (Hi): every hours
Default: [Level 3 (Hi)]
Flushing Interval

CIP Training L5160/L5130 S
Solutions
Width detection fails
[Problem]
Width detection fails.
[Cause/Technical reason]
Media width is detected by a photo reflective sensor at above the black line.
If you use a media that does not reflect the light, the media width may not be detected.
0
M0BXIC0048
[Solution]
Stick tape on the black line so that the machine can detect the media edge.
0
M0BXIC0049
• If the image size is bigger than the media width that is detected, the machine may print on media guides or platen. Print with large enough margins.
1. Media
1. Media width
2. Tape
3. Media

CIP Training L5160/L5130 S
Solutions
Media end is detected incorrectly (case 1)
[Problem]
"Media end" is detected even though media is still on the roll.
[Cause/Technical reason]
The roll holder is idling because the roll core size does not fit correctly.
Media remaining quantity is estimated from the rotation amount of roll media. If the flange is idling, the rotation amount is not measured correctly, and the remaining quantity is detected as smaller.
[Solution]
• Please set the roll core to the roll holder securely.
DWT126
DWT128
• If roll core size is too large, put the tape on the inside of the roll core, like the following figure.
Roll Core
M0BXIC0052
Roll Core with Tape
M0BXIC0053
1. Stick the tape on the inside of roll core

CIP Training L5160/L5130 S
Solutions
Media end is detected incorrectly (case 2)
[Problem]
"Media end" is detected even though there is remaining media.
[Cause/Technical reason]
Media is stuck on the platen.
Reasons why the media is stuck on the platen:
1. Media is sticky, and stickiness is increased by heater temperature.
2. Static electricity is high because the humidity of the operating location is too low.
3. Friction is raising because platen is dirty.
[Solution]
1. Lower the heater temperature.
When it is too low, bleeding and blocking may appear. Therefore, you should change
setting little by little while watching.
2. If the humidity in the location of the machine is under 40%, please adjust the humidity with a humidifier.(Operating environments are described in the section "Getting Started" the manual"Operating Instructions".)
3. If ink is sticking on the platen, clean it with a paper towel soaked in alcohol such as
Solmix.(Refer to the section "Cleaning the platen" in "Requests for Daily Care and
Maintenance".)

CIP Training L5160/L5130 S
Solutions
Convenient Usage
Reducing Print Preparation Time and Media Consumption
Print settings Registration/Retrieval function overview
Using print settings Retrieval / Retrieved function, it is possible to shorten the adjustment time
because the drop position and feed quantity adjustment can be omitted when you use the same
media again In this function, print settings can be registered / retrieved as one parameter set.
Print settings are indicated below:
• Media settings: media type, head height, media thickness, vacuum level, leaf or roll
• Adjustment values: drop position adjustment value and feed quantity adjustment value.
M0BXIC0054
Permanent memory area
Printing
No.1
No.2
No.30
Media settings
Media settings
Media settings
Adjusting values
Adjusting values
Adjusting values
Temporary memoryControl panel
AdjustmentWhen perform the feed or dropposition adjustment, adjustmentvalues are saved on thetemporary memory.
Input the Media settings bythe control panel each timeschanging media
Media settings Parameter setMedia type
Media thicknessVaccum levelHead hight
Adjusting valuesDrop position
(6pass)
Drop position(32pass)
Feed quantity(6pass)
Feed quantity(32pass)
RetrRetrieveRetrieveieve
RegRegisterRegisterister
SaSavingvSavinging val values valuesuesaareraree useused toused tod to
prinprinting.printing.ting.
Registering/retrieving print settings
This section describes how to register and retrieve print settings.
You can achieve a stable print quality by registering/retrieving print settings for each product
number of the media you are using.
By doing this, you can skip drop position and feed quantity adjustment, shortening the
adjustment time and reducing waste media, when you use the same media again.
• Abnormal images may occur depending on the production lots of the media and theenvironment.
• If it occurs, perform the feed quantity adjustment and drop position adjustment again.

CIP Training L5160/L5130 S
Solutions
• When retrieving print settings, you cannot check the registered settings. Note the registeredsettings on the print setting storage sheet. For details see "Print settings registered sheet".
M0BXIC0055
Print settings registered sheet
Record print Record print settings hereRecord print settings heresettings here
No.
(Ex)
1
2
3
4
5
DD/MM/YYYY HH:MM PVC AAA XXX-YYZZ Roll Ouder DefaultUse 1 2 1300mm
Registration dateMedia information
Media type ManufacturerModel number
Roll Outer/Roll Inner/Leaf
Take-up reelUse/Not use
Mediathickness
Headheight
Mediawidth 6pass 8pass 12pass 16pass 32pass 12pass
(W)Vacuum
level
Media and machine settings Adjusted print modeRemarks
Attention:Strongly recommend adjusting the Media Feed Quantity”” by each job or roll.
Registration
1. Fill in the registration time, media type, model number, roll/leaf, outer/inner
winding, head height, vacuum level, media width, and media thickness on the printsetting storage sheet.
The confirmation method is indicating below.
setting How to check
Media type
Product number
Check the website of the media vendor or the mediapackage.
Roll/leaf setting (Fill in the setting selected at media set.)
Outer/Inner winding of printside
(Fill in the setting selected at media set.)
Head height Press [Standard Procedure] key on the home screen Head height
Vacuum level Press [Standard Procedure] key on the home screen Press [Media Settings] Vacuum Level
Media width
Media thickness
MediaPress [Check Status] key on the home screen tab
2. Perform the media feed quantity and drop position adjustment.
Select the adjustment mode from [6 Pass], [8 Pass], [12 Pass], [16 Pass], and [32 Pass].
in the case of 4CW machines, select from [6 Pass], [8 Pass], [12 Pass], [16 Pass], [32 Pass],and [12 Pass (W)].

CIP Training L5160/L5130 S
Solutions
3. Press the [Standard procedure] key.
DWU103
4. Press [ ].
5. Press [Media Records Register / Retrieve].
6. Press [Media Records Register].
7. Press [ ]or [ ] to select the number you want to register.
• Selectable numbers are from 01 to 30.
8. Press Enter.
9. Fill in the registered number on the print setting storage sheet.
10. Select the mode you adjusted in advance to register from [6 Pass], [8 Pass], [12 Pass],[16 Pass], and [32 Pass].
in the case of 4CW machines, select from [6 Pass], [8 Pass], [12 Pass], [16 Pass], [32 Pass],and [12 Pass (W)].
• It is possible to select Multiple print modes.
• When registering all adjustment values, press [Register All Modes].

CIP Training L5160/L5130 S
Solutions
11. Press [Register].
This step is omitted when [Register All Modes] is selected.
12. Press [Execute].
• Adjustment values of selected mode are registered.
• Date and time are displayed in the order of day/month/year time: minute: second.
• The registration date and time are updated when registered values are overwrittenor another adjustment value is added.
13. Fill in the mode that you registered on the print setting storage sheet.
14. Press [Confirm].
15. Press [End].
Retrieving registered settings
This section describes how to retrieve the registered Print settings when changing or reloading the media.
1. Set the media.
2. Lower the media lock lever.
DWT137
3. Press [Yes].
4. Press [Yes].

CIP Training L5160/L5130 S
Solutions
5. Check the print setting storage sheet for the numbers where the printsettings used for printing are stored.
6. Press [ ]or [ ] to select the number for which the adjustment value to berecalled is registered.
• The number displayed as [Unregistered] can not be selected.
7. Press [Execute].
The print settings registered in advance is retrieved.
8. Press [Confirm].
• If there is no registered print setting, step 4 and later will not be displayed.
• When adding or overwriting the adjustment value, call up the print setting and perform thefeed adjustment or drop position adjustment. When registering, select only the mode adjustedin advance.
• If "Cannot detect the media." is displayed, registration and retrieving cannot be performed.Load the media before performing this procedure.
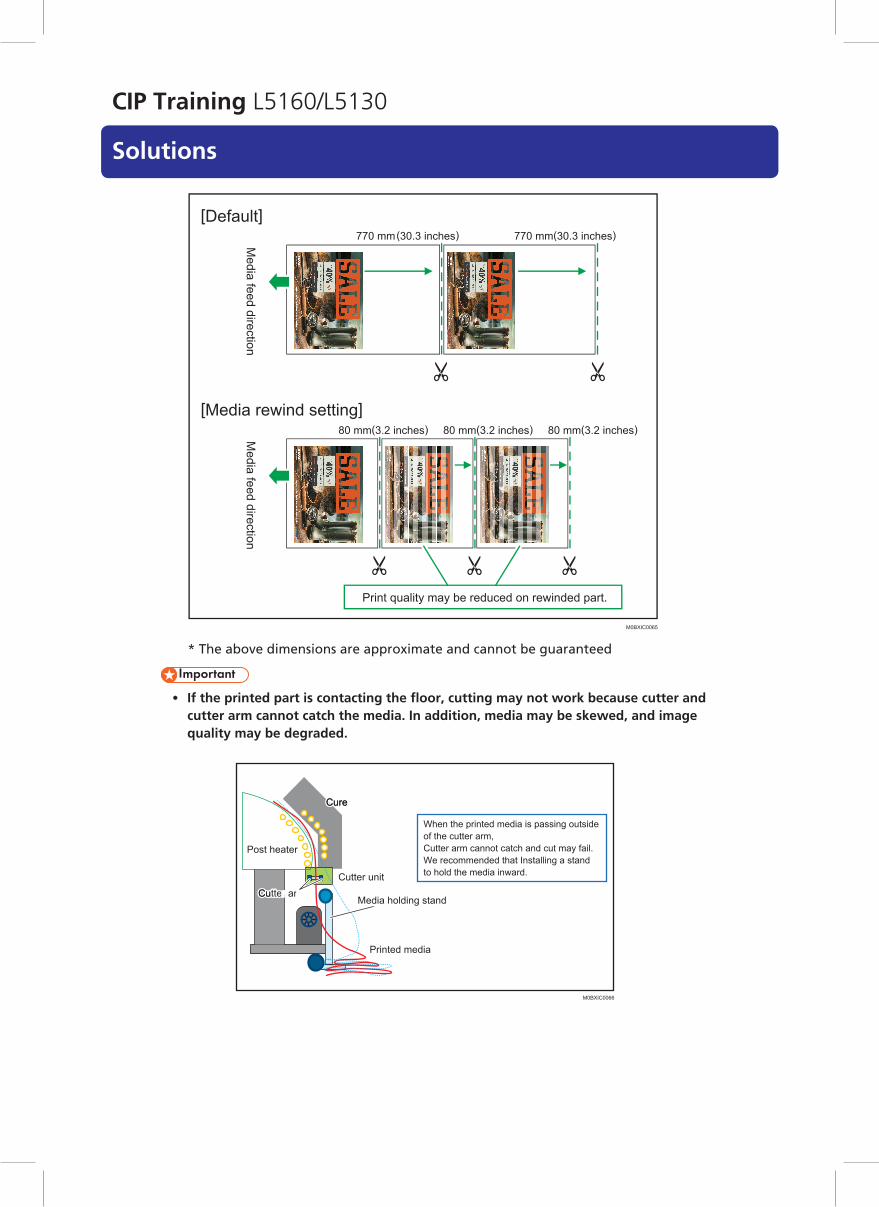
Roll to Cut function
It can be used as Roll to Cut mode by changing the RIP settings.
Media is wasted at each cut approximately 770 mm (30.3 inches), when default setting.
In order to prevent the abnormal image by the media deformation, the default setting is not to
rewind the media.
However, if you want to reduce the lost media, turn on the "Auto Rewind after Auto Cut". It can reduce up to 600 mm (23.6 inches) of waste media for each cut.
* Available with FW V1.07 or higher. If you cannot find this function, please contact your servicerepresentative.
Caution
Depending on the media, the image quality may be significantly degraded due to the deformation of the media due to heat, so please test with the media in advance.
CIP Training L5160/L5130 S
Solutions
M0BXIC0065
[Default]
[Media rewind setting]
Print quality may be reduced on rewinded part.
80 mm(3.2 inches) 80 mm(3.2 inches) 80 mm(3.2 inches)Media feed direction
770 mm (30.3 inches) 770 mm(30.3 inches)
Media feed direction
* The above dimensions are approximate and cannot be guaranteed
• If the printed part is contacting the floor, cutting may not work because cutter andcutter arm cannot catch the media. In addition, media may be skewed, and imagequality may be degraded.
M0BXIC0066
Post heater
Cure Cure heaterCure heaterheater
Media holding stand
Printed media
When the printed media is passing outsideof the cutter arm,Cutter arm cannot catch and cut may fail.We recommended that Installing a standto hold the media inward.
CuCuttertteCutter armr ararmmCutter unit
CIP Training L5160/L5130 S
Solutions
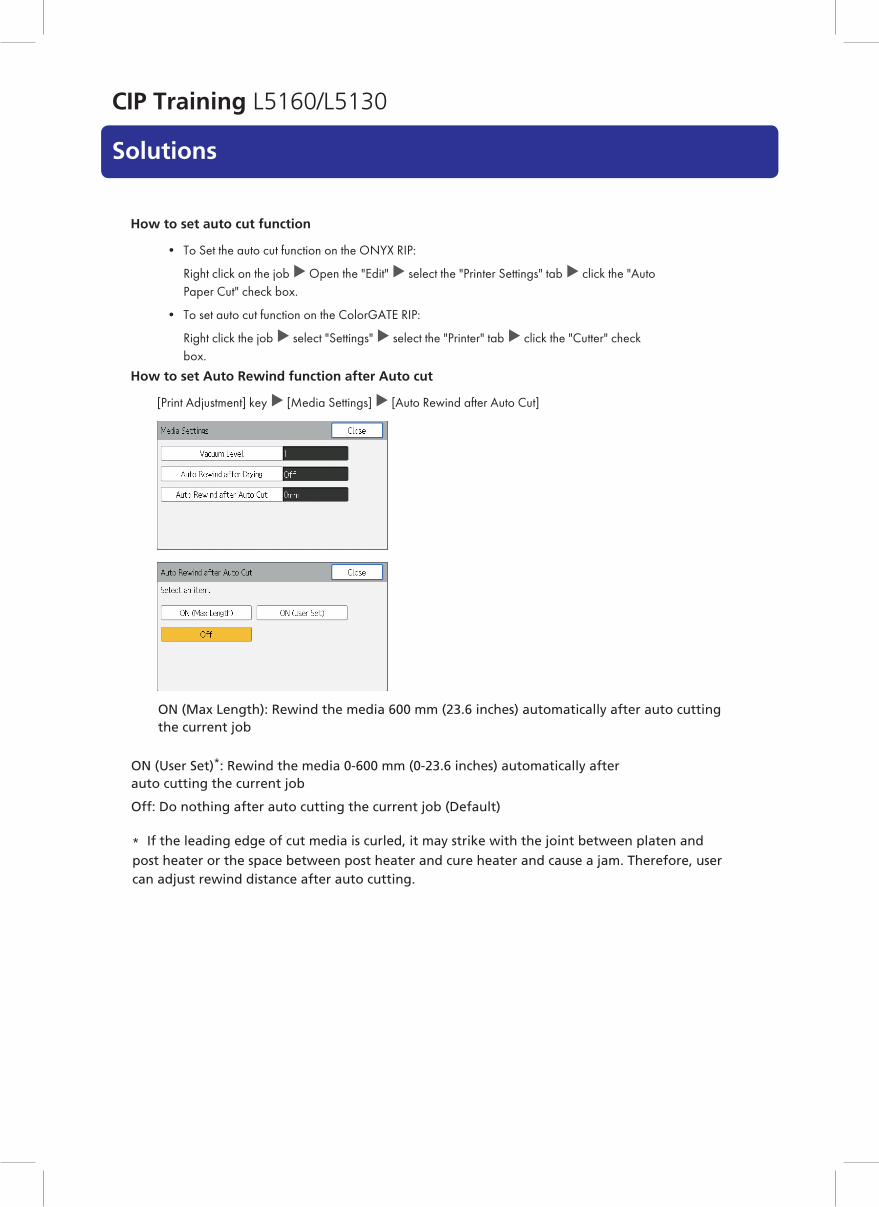
How to set auto cut function
select the "Printer Settings" tab click the "Auto
• To Set the auto cut function on the ONYX RIP:
Right click on the job Open the "Edit"Paper Cut" check box.
• To set auto cut function on the ColorGATE RIP:
select the "Printer" tab click the "Cutter" checkRight click the job select "Settings" box.
How to set Auto Rewind function after Auto cut
[Print Adjustment] key [Media Settings] [Auto Rewind after Auto Cut]
ON (Max Length): Rewind the media 600 mm (23.6 inches) automatically after auto cutting the current job
ON (User Set)*: Rewind the media 0-600 mm (0-23.6 inches) automatically after auto cutting the current job
Off: Do nothing after auto cutting the current job (Default)
* If the leading edge of cut media is curled, it may strike with the joint between platen and
post heater or the space between post heater and cure heater and cause a jam. Therefore, usercan adjust rewind distance after auto cutting.

CIP Training L5160/L5130 S
Solutions
Reducing media consumption that occurs when loading the media.
You can reduce the waste media occurring the media set by expanding the media edge to roll core with the tape.
The procedure for reducing waste media is introduced below.
• For this procedure, you need to set the media more accurately than the procedure describedin the operating instructions. If the media is skewed, the print image quality significantlyreduces.
Procedure
See the operating instructions, carry out the procedure until the media tip come out the cure heater and roll core is set on the roll-up unit.
Cut a strip about 1,000 mm (40 inches) long from the PVC media and attach one end to the center of the media using adhesive tape.
* You can also use commercially available tape
Peel off the bPeel off the bese materialPeel off the base materialese material
Cut PVC mCut PVC media thinlyCut PVC media thinlyedia thinly
Attach one endAttach one end to the center ofAttach one end to the center of to the center ofthe media usingthe media using adhesive tape.the media using adhesive tape. adhesive tape.
M0BXIC0069
Rewind the media so that media tip place on the platen edge by rotating the roll holder on the back. At that moment, you must close the center cover and raise the media hold lever.
Pull the other end of the tape straight down and attach it to the roll core using adhesive tape as shown.
M0BXIC0070

CIP Training L5160/L5130 S
Solutions
Carry out the latter procedure, seeing the operating instructions.
Begin inputting the media setting with the control panel.
Make sure the media is taut; otherwise, it may not be taken up correctly.
Referring to the section "Setting Media" in the manual "Operating
Instructions" or the following video.
How to load the media:
https://www.youtube.com/watch?v=aRqvMQCfMTg&feature=youtu.be
M0BXIC0017
https://2280171.mediaspace.kaltura.com/media/How+to+set+media+on+the+Pro+L5130+series+of+wide+format+devices/1_mlm093yt
Reducing media consumption occurring Job to Job
If you want to reduce the waste media, change the setting for the "Auto Rewind after Drying". If you turn on this function, the machine automatically rewinds the media after drying to reduce the waste media between one job and next job (maximum 690 mm (27.2 inches)).
* Available with FW V1.07 or higher. If you cannot find this function, please contact your servicerepresentative.
• Depending on the media, the image quality may be considerably degraded, so please testwith the media in advance.

CIP Training L5160/L5130 S
Solutions
[Default]
[Automatic rewind function]
You can reduce the waste media occurring job to job.But Print quality may be reduced on rewinded part.
1st Job
705 mm (27.8 inches)
15 mm (0.6 inches) 15 mm (0.6 inches)
705 mm (27.8 inches)
2nd Job
1st Job 2nd JobM
edia feed directionM
edia feed direction
M0BXIC0071
* The above dimensions are approximate and cannot be guaranteed
How to change setting
[Print Adjustment] key [Media Settings] [Auto Rewind after Drying]
If it is On, rewind the media 690 mm (27.2 inches) automatically after drying.

__________________________________________________________________________________ __________________________________________________________________________________ __________________________________________________________________________________ __________________________________________________________________________________ __________________________________________________________________________________ __________________________________________________________________________________ __________________________________________________________________________________ __________________________________________________________________________________ __________________________________________________________________________________ __________________________________________________________________________________ __________________________________________________________________________________ __________________________________________________________________________________ __________________________________________________________________________________ __________________________________________________________________________________ __________________________________________________________________________________ __________________________________________________________________________________ __________________________________________________________________________________ __________________________________________________________________________________ __________________________________________________________________________________ __________________________________________________________________________________ __________________________________________________________________________________ __________________________________________________________________________________ __________________________________________________________________________________ __________________________________________________________________________________ __________________________________________________________________________________ __________________________________________________________________________________ __________________________________________________________________________________ __________________________________________________________________________________ __________________________________________________________________________________ __________________________________________________________________________________ __________________________________________________________________________________ __________________________________________________________________________________ __________________________________________________________________________________ __________________________________________________________________________________ __________________________________________________________________________________ __________________________________________________________________________________ __________________________________________________________________________________ __________________________________________________________________________________ __________________________________________________________________________________ __________________________________________________________________________________ __________________________________________________________________________________ __________________________________________________________________________________ __________________________________________________________________________________ __________________________________________________________________________________ __________________________________________________________________________________

__________________________________________________________________________________ __________________________________________________________________________________ __________________________________________________________________________________ __________________________________________________________________________________ __________________________________________________________________________________ __________________________________________________________________________________ __________________________________________________________________________________ __________________________________________________________________________________ __________________________________________________________________________________ __________________________________________________________________________________ __________________________________________________________________________________ __________________________________________________________________________________ __________________________________________________________________________________ __________________________________________________________________________________ __________________________________________________________________________________ __________________________________________________________________________________ __________________________________________________________________________________ __________________________________________________________________________________ __________________________________________________________________________________ __________________________________________________________________________________ __________________________________________________________________________________ __________________________________________________________________________________ __________________________________________________________________________________ __________________________________________________________________________________ __________________________________________________________________________________ __________________________________________________________________________________ __________________________________________________________________________________ __________________________________________________________________________________ __________________________________________________________________________________ __________________________________________________________________________________ __________________________________________________________________________________ __________________________________________________________________________________ __________________________________________________________________________________ __________________________________________________________________________________ __________________________________________________________________________________ __________________________________________________________________________________ __________________________________________________________________________________ __________________________________________________________________________________ __________________________________________________________________________________ __________________________________________________________________________________ __________________________________________________________________________________ __________________________________________________________________________________ __________________________________________________________________________________ __________________________________________________________________________________ __________________________________________________________________________________