KD-ADV38/KD-AVX33 - JVC USA
382
ENGLISH FRANÇAIS ESPAÑOL KD-ADV38/KD-AVX33 For installation and connections, refer to the separate manual. Para la instalación y las conexiones, refiérase al manual separado. Pour l’installation et les raccordements, se référer au manuel séparé. INSTRUCTIONS MANUAL DE INSTRUCCIONES MANUEL D’INSTRUCTIONS LVT1658-001A [J] For canceling the display demonstration, see page 5. Para cancelar la demonstración en pantalla, consulte la página 5. Pour annuler la démonstration des affichages, référez-vous à la page 5. DVD/CD RECEIVER RECEPTOR CON DVD/CD RÉCEPTEUR DVD/CD KD-AVX33 KD-ADV38 For customer Use: Enter below the Model No. and Serial No. which are located on the top or bottom of the cabinet. Retain this information for future reference. Model No. Serial No.
-
Upload
khangminh22 -
Category
Documents
-
view
3 -
download
0
Transcript of KD-ADV38/KD-AVX33 - JVC USA

ENGLISH
FRANÇAIS
ESPA
ÑOL
KD-ADV38/KD-AVX33
For installation and connections, refer to the separate manual.Para la instalación y las conexiones, refiérase al manual separado.Pour l’installation et les raccordements, se référer au manuel séparé.
INSTRUCTIONSMANUAL DE INSTRUCCIONES
MANUEL D’INSTRUCTIONS
LVT1658-001A[J]
For canceling the display demonstration, see page 5. Para cancelar la demonstración en pantalla, consulte la página 5. Pour annuler la démonstration des affichages, référez-vous à la page 5.
DVD/CD RECEIVERRECEPTOR CON DVD/CDRÉCEPTEUR DVD/CD
KD-AVX33
KD-ADV38
For customer Use:Enter below the Model No. and Serial No. which are located on the top or bottom of the cabinet. Retain this information for future reference.
Model No.Serial No.
Cover_KD-AVX33J.indd 2Cover_KD-AVX33J.indd 2 07.2.6 1:06:19 PM07.2.6 1:06:19 PM

ENG
LISH
2
WARNINGS:To prevent accidents and damage
• DO NOT install any unit and wire any cable in locations where;– it may obstruct the steering wheel and
gearshift lever operations.– it may obstruct the operation of safety devices
such as air bags.– it may obstruct visibility.
• DO NOT operate the unit while driving. If you need to operate the unit while driving, be
sure to look around carefully.• The driver must not watch the monitor while
driving.• The driver must not put on the headphones while
driving.
Cautions on the monitor:
• The monitor built in this unit has been produced with high precision, but it may have some ineffective dots. This is inevitable and is not malfunction.
• Do not expose the monitor to direct sunlight.• When the temperature is very cold or very hot.– Chemical changes occur inside, causing
malfunction.– Pictures may not appear clearly or may move
slowly. Pictures may not be synchronized with the sound or picture quality may decline in such environments.
Thank you for purchasing a JVC product.Please read all instructions carefully before operation, to ensure your complete understanding and to obtain the best
possible performance from the unit.IMPORTANT FOR LASER PRODUCTS1. CLASS 1 LASER PRODUCT2. CAUTION: Do not open the top cover. There are no user serviceable parts inside the unit; leave all servicing to
qualified service personnel.3. CAUTION: (For U.S.A.) Visible and/or invisible class II laser radiation when open. Do not stare into beam.
(For Canada) Visible and/or invisible class 1M laser radiation when open. Do not view directly with optical instruments.
4. REPRODUCTION OF LABEL: CAUTION LABEL, PLACED OUTSIDE THE UNIT.
[European Union only]
INFORMATION (For U.S.A.)This equipment has been tested and found to comply with the limits for a Class B digital device, pursuant to Part 15 of the FCC Rules. These limits are designed to provide reasonable protection against harmful interference in a residential installation. This equipment generates, uses, and can radiate radio frequency energy and, if not installed and used in accordance with the instructions, may cause harmful interference to radio communications. However, there is no guarantee that interference will not occur in a particular installation. If this equipment does cause harmful interference to radio or television reception, which can be determined by turning the equipment off and on, the user is encouraged to try to correct the interference by one or more of the following measures:– Reorient or relocate the receiving antenna.– Increase the separation between the equipment
and receiver.– Connect the equipment into an outlet on a
circuit different from that to which the receiver is connected.
– Consult the dealer or an experienced radio/TV technician for help.
CautionChanges or modifications not approved by JVC could void the user’s authority to operate the equipment.
AVX33_J 2AVX33_J 2 07.2.1 2:48:14 PM07.2.1 2:48:14 PM

3
ENG
LISH
How to reset your unit
• Your preset adjustments (except for the registered Bluetooth devices) will also be erased.
How to forcibly eject a disc
• If this does not work, reset the unit.
For safety...• Do not raise the volume level too much, as this will
block outside sounds, making driving dangerous.• Stop the car before performing any complicated
operations.
Temperature inside the car...If you have parked the car for a long time in hot or cold weather, wait until the temperature in the car becomes normal before operating the unit.
This product incorporates copyright protection technology that is protected by U.S. patents and other intellectual property rights. Use of this copyright protection technology must be authorized by Macrovision, and is intended for home and other limited viewing uses only unless otherwise authorized by Macrovision. Reverse engineering or disassembly is prohibited.
Contents
INTRODUCTIONPlayable disc type ............................ 4Before operating the unit ................ 5
OPERATIONSBasic operations—Control panel ...... 7Basic operations—
Remote controller (RM-RK251) ...... 8Listening to the radio ...................... 10Disc operations ................................ 13Dual Zone operations ....................... 26USB operations ................................ 29Bluetooth® operations—
Cellular phone/audio player .......... 31
EXTERNAL DEVICESListening to the CD changer .............. 38Listening to the satellite radio ......... 40Listening to the iPod/D. player ......... 43Listening to other external
components ................................. 44
SETTINGSSound equalization .......................... 46Assigning titles to the sources .......... 47Menu operations ............................. 48
REFERENCESMaintenance ................................... 58More about this unit ........................ 59Troubleshooting .............................. 65Specifications .................................. 70
NO EJECT?EMERGENCY EJECT?
NO EJECT?EMERGENCY EJECT?
AVX33_J 3AVX33_J 3 07.2.1 2:48:20 PM07.2.1 2:48:20 PM

ENG
LISH
4
Playable disc type
Disc type Recording format, file type, etc. Playable
DVD DVD Video (Region Code: 1)*1
DVD Audio
DVD-ROM
DVD Recordable/Rewritable(DVD-R*2/-RW, +R/+RW*3)• DVD Video: UDF bridge• DVD-VR• DivX/MPEG1/MPEG2/JPEG/MP3/
WMA/WAV/AAC: Compliant to ISO 9660 level 1, level 2, Romeo, Joliet
• DVD-RAM cannot be played.
DVD Video
DVD-VR (non-CPRM only)
DivX/MPEG1/MPEG2
JPEG
MP3/WMA/WAV/AAC*4
MPEG4
DVD+VR
Dual Disc DVD side
Non-DVD side
CD/VCD Audio CD/CD Text (CD-DA)/DTS-CD
VCD (Video CD)
CD-ROM
CD-I (CD-I Ready)
CD Recordable/Rewritable(CD-R/-RW)• Compliant to ISO 9660 level 1,
level 2, Romeo, Joliet
CD-DA
MP3/WMA/WAV/AAC*4
JPEG
DivX/MPEG1/MPEG2
MPEG4
*1 If you insert a DVD Video disc of an incorrect Region Code, “Region code error” appears on the monitor.*2 DVD-R recorded in multi-border format is also playable (except for dual layer discs).*3 It is possible to play back finalized +R/+RW (Video format only) discs. However, the use of +R double layer disc is not recommended.*4 This unit can play back AAC files encoded using iTunes.
Caution for DualDisc playbackThe Non-DVD side of a “DualDisc” does not comply with the “Compact Disc Digital Audio” standard. Therefore, the use of Non-DVD side of a DualDisc on this product may not be recommended.
AVX33_J 4AVX33_J 4 07.2.1 2:48:20 PM07.2.1 2:48:20 PM

INTRODUCTION5
ENG
LISH
Before operating the unitCancel the display demonstration and set the clock. ( also pages 49 and 50)• Operations are explained mainly using the buttons on the unit; however, the buttons on the remote controller can
work in the same way if they have the same names or marks.
~ Turn on the power.
Ÿ Display <AV Menu>.
! Enter the <Setup> menu.
⁄ Select <Display> ] <Demonstration>, then activate the <Demonstration> screen.
@ Cancel the display demonstrations.Select <Off>.
Continued on the next page
AV Menu
Setup EnterENT
Setup menu icon
Currently selected menu
Demonstration
DisplayClockDisc Setup 1Disc Setup 2Tuner
On
DemonstrationWall PaperScrollTag DisplayDimmer
OffOn
ExitENT
Setup Display Demonstration
Currently selected submenu Current setting
OffOn
ExitENT
Demonstration
Indication language:In this manual, English indications are used for purpose of explanation. You can select the indication language on the monitor. ( page 50)
AVX33_J 5AVX33_J 5 07.2.1 2:48:21 PM07.2.1 2:48:21 PM

ENG
LISH
6
fi Select either the 12-hour or 24-hour system.
^ Return to the <Clock> menu.
fl Select <OSD Clock>.
& Activate the <OSD Clock> screen.
‡ Select the <OSD Clock> setting.• Off: The clock time is not displayed while
playing back a video source.• On: The clock time is displayed while playing
back a video source.
* Finish the procedure.
¤ Return to the <Setup> menu.
# Select <Clock> ]<Time Set>, then activate the <Time Set> screen.
‹ Set the clock time.
$ Return to the <Clock> menu.
› Select <12Hours/24Hours>.
% Activate the <12Hours/24Hours> screen.
Clock
1:00AM
Time Set12Hours/24HoursOSD Clock
Time SetHours
1 : 00AM
ExitENT
Time SetMinutes
3 : 45PM
ExitENT
12Hours/24Hours12 Hours24 Hours
ExitENT
(twice)
AVX33_J 6AVX33_J 6 07.2.1 2:48:22 PM07.2.1 2:48:22 PM

OPERATIONS7
ENG
LISH
Basic operations — Control panel
• TUNER/SAT: Select the bands.• DISC/USB: Stop playback.• On menus: Back.
Select the source.TUNER = SAT (SIRIUS/XM) = DISC (DVD/VCD/CD) = USB =CD-CH, iPod, D.PLAYER, or EXT-IN =Bluetooth Phone =Bluetooth Audio = AV-IN =(back to the beginning)• You cannot select these sources if they are not ready.
Eject the disc.
*1 <AV Menu> screensYou can use the menus to set up various settings.The <AV Menu> screen consists of the following sub-menus—Setup/Equalizer/Sound/Disc Surround/Mode/List/Bluetooth/Dual Zone.• For details, see pages 48 to 57.
*3 By holding 5 / ∞, you can display the list accessible for the selected source.
• Turn on the power.• Turn off the power
[Hold].• Attenuate the sound (if
the power is on). Change the display information.
4 / ¢• TUNER: Search for stations.• SAT: Select channels.• DISC/USB: Select chapters/tracks.• On menus: Go to previous/next step.• iPod/D.PLAYER: Select tracks.• Bluetooth Audio: Reverse skip/forward skip.5 / ∞*3
• TUNER: Select preset stations.• SAT: Select categories.• DISC/USB: Select titles/folders.• On menus: Select items.• iPod/D.PLAYER: Enter player’s menu/pause
or stop playback.• Bluetooth: Select a device.
Change the control panel tilt (Tilt1 – Tilt4).
Remote sensor
Adjust the volume.
Reset the unit.• Use only when the
internal system malfunctions.
• DISC/USB: Start playback.• On menus: Enter ( ENT :[Press]/
ENT :[Hold]).
Detach the control panel*2.
Display window
• Display <Dial Menu>.• Display <Redial> list [Hold].
• Display or erase <AV Menu>*1.• Activate Voice Dialing [Hold].
*2 To attach the control panel
AVX33_J 7AVX33_J 7 07.2.1 2:48:22 PM07.2.1 2:48:22 PM

8
ENG
LISH
Basic operations — Remote controller (RM-RK251)
Installing the battery
If the range or effectiveness of the remote controller decreases, replace both batteries.
Before using the remote controller:• Aim the remote controller directly at the remote
sensor on the unit.• DO NOT expose the remote sensor to bright light
(direct sunlight or artificial lighting).
The unit is equipped with the steering wheel remote control function.• See the Installation/Connection Manual (separate
volume) for connection.
Caution:
• Do not expose batteries to heat or flame.
IMPORTANT:If Dual Zone is activated ( page 26), the remote controller functions only for operating the DVD/CD player.
Main elements and features
1*1 • Turns on the power.• Attenuates the sound if the power is on.• Turns off the power if pressed and held (while
the power is on).2*1 Selects the source.3*1 • Displays <Dial Menu>.
• Displays <Redial> list if pressed and held.• Answers incoming calls.
4*1*2 Adjusts the volume level.5*1*2 Selects surround mode.
R03/LR03/AAA
i
o
;
as
AVX33_J Sec1:8AVX33_J Sec1:8 07.2.1 2:48:23 PM07.2.1 2:48:23 PM

OPERATIONS9
ENG
LISH
On menus:• 5 / ∞: Select items.• 4 / ¢: Goes to previous/next step.
w TUNER/SAT: Selects the bands. DISC/USB: Stop playback. Bluetooth Phone: Ends the call. Bluetooth Audio: Plays/pauses. On menus: Back.e*2 Adjusts the volume level through the 2nd AUDIO
OUT plug. ( page 26)r*2 Activates or deactivates Dual Zone.t*1*2 Selects the sound mode.y • DVD Video/DivX 6: Shows the disc menu.
• VCD: Resumes PBC playback. ( page 21)• DVD-VR: Shows the Play List screen.
u RETURN button• For VCD: Returns to the PBC menu.
i DISC/USB: Switches number entry mode.• Also functions as CLEAR button to erase the
misentry after entering the wrong number.o Enter numbers. ( pages 12, 19 to 21, 36 and
42)• CD changer: Selects the disc directly.• Tuner: Selects the preset stations.
;*1 Changes the aspect ratio of the playback pictures.a Reverse search/forward search for disc/USB
operationss • DVD Video: Selects audio language ( ),
subtitles ( ), angle ( ).• DVD Audio: Selects audio stream ( ).• DVD-VR: Turn on/off subtitles ( ) and
selects audio channel( ).• DivX: Selects audio language ( ),
subtitles ( ).• VCD: Selects audio channel ( ).
*1 If Dual Zone is activated, these buttons cannot be used.
*2 These buttons can be used only when the slide cover is closed.
*3 5 : Returns to the previous menu. ∞ : Confirms the selection.
6 • DVD/DivX 6: Shows the disc menu.• VCD: Resumes PBC playback ( page 21).• DVD-VR: Shows the Original Program screen.
7 • Makes selection/settings.• ~: Skips back or forward by 5 minutes for
DivX/MPEG1/MPEG2.• DISC +/– buttons: Changes discs for “CD-CH.”
8 Shows the on-screen bar.9*1 Changes the display information.p Display or erase <AV Menu>.q For disc/USB operations:
• 6: Plays/pauses.• 5 / ∞ DVD: Selects the title/group. DVD-VR: Selects the program/play list. USB/other discs (except VCD/CD): Selects the
folders.• 4 / ¢:– Press briefly: reverse skip/forward skip– Press and hold: reverse search/forward search
For FM/AM operations:• 5 / ∞: Selects the preset stations.• 4 / ¢: Functions to search for stations.– Press briefly: Auto Search– Press and hold: Manual Search
For satellite radio operations:• 5 / ∞: Selects a category.• 4 / ¢:– Selects a channel rapidly if pressed and held.– Selects a channel if pressed.
For Apple iPod/JVC D. player operations:• ∞: Pauses/stops or resumes playback.• 5: Enters the main menu (then 5 / ∞ /
4 / ¢ work as the menu selecting buttons).*3
• 4 / ¢ (in menu selecting mode)– Selects an item if pressed briefly. (Then, press
∞ to confirm the selection.)– Skips 10 items at a time if pressed and held.
For Bluetooth operations:• 5 / ∞: Selects a registered device.
• 4 / ¢: reverse skip/forward skip (for audio operation) • 6: Answers incoming calls (for “Bluetooth Phone”). Plays/Pauses (for “Bluetooth Audio”).
AVX33_J Sec1:9AVX33_J Sec1:9 07.2.1 2:48:23 PM07.2.1 2:48:23 PM

10
ENG
LISH
3: 45PM
FLAT
DXMO
TUNER
FM1 Preset1 ABC Radio 87.5 MHz
POWER]ON
When an FM stereo broadcast is hard to receive 1
2
Mode menu icon
3
Listening to the radio
~ Select “TUNER.”
Ÿ Select the bands.
! Search for a station—Auto Search.• Manual Search: Hold either 4 or ¢ until “Manual Search” appears on the display, then press it
repeatedly.• The ST indicator lights up when receiving an FM stereo broadcast with sufficient signal strength.
4
Reception improves, but stereo effect will be lost.• The MO indicator lights up.
To restore stereo effect, select <Off > in step 4.
Preset No.Band
page 46
Tuner indicators
AV Menu
Mode EnterENT
AV Menu
Setup EnterENT
Mode
Off
MonoDX/LocalSSMTitle Entry
MonoOffOn
ExitENT
Assigned station name ( page 47). If no name is assigned, “No Name” appears.
AVX33_J 10AVX33_J 10 07.2.1 2:48:24 PM07.2.1 2:48:24 PM

OPERATIONS11
ENG
LISH
FM station automatic presetting —SSM (Strong-station Sequential Memory) This function works only for FM bands.You can preset six stations for each band.
1
2
3
Local FM stations with the strongest signals are searched and stored automatically in the FM band.
Tuning in to stations with sufficient signal strength This function works only for FM bands.Once you have activated this function (selected <Local>), it always works when searching for FM stations.
1
2
Mode menu icon
3
4
Only stations with sufficient signal strength will be detected.• The DX indicator goes off, then the LO indicator
lights up.
Mode
DX
MonoDX/LocalSSMTitle Entry
DX/LocalDXLocal
ExitENT
ModeMonoDX/LocalSSMTitle Entry
StartENT
AV Menu
Mode EnterENT
AV Menu
Setup EnterENT
AV Menu
Setup EnterENT
AV Menu
Mode EnterENT
Mode menu icon
AVX33_J 11AVX33_J 11 07.2.1 2:48:25 PM07.2.1 2:48:25 PM
12
ENG
LISH
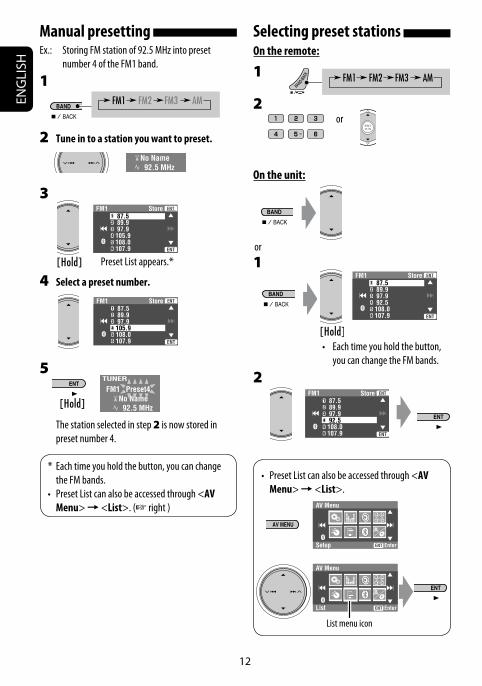
Selecting preset stations On the remote:
1
2 or
On the unit:
1
• Each time you hold the button, you can change the FM bands.
2
• Preset List can also be accessed through <AV Menu> = <List>.
List menu icon
FM1 Store 87.5 89.9 97.9 92.5108.0107.9 ENT
1
2
3
4
56
ENT
AV Menu
Setup EnterENT
AV Menu
List EnterENT
FM1 Store 87.5 89.9 97.9 92.5108.0107.9 ENT
1
2
3
4
56
ENT
or
Manual presetting Ex.: Storing FM station of 92.5 MHz into preset
number 4 of the FM1 band.
1
2 Tune in to a station you want to preset.
3
4 Select a preset number.
5
The station selected in step 2 is now stored in preset number 4.
* Each time you hold the button, you can change the FM bands.
• Preset List can also be accessed through <AV Menu> = <List>. ( right )
FM1 Store 87.5 89.9 97.9105.9108.0107.9 ENT
1
2
3
4
56
ENT
FM1 Store 87.5 89.9 97.9105.9108.0107.9 ENT
1
2
3
4
56
ENT
No Name 92.5 MHz
TUNER
FM1 Preset4 No Name 92.5 MHz
Preset List appears.*
AVX33_J 12AVX33_J 12 07.2.1 2:48:26 PM07.2.1 2:48:26 PM

OPERATIONS13
ENG
LISH
3: 45PM
DISCNow Reading ...
Disc operationsThe disc type is automatically detected, and playback starts automatically (for some discs: automatic start depends on its internal program).
If a disc does not have any disc menu, all tracks in it will be played repeatedly until you change the source or eject the disc.
If “ ” appears on the monitor, the unit cannot accept the operation you have tried to do.• In some cases, without showing “ ,” operations will not be accepted.
Label side
0: Eject the disc.
3: Start playback if necessary.
DISP: Press if no playback picture appears, but disc information screen ( pages 14 to 16) is displayed.
Insert the disc.Playback starts automatically.
7: Stop playback.
Caution:
Do not place your finger behind the control panel.
Caution on volume setting:
Discs and connected USB devices produce very little noise compared with other sources. Lower the volume before playing a disc to avoid damaging the speakers by the sudden increase of the output level.
AVX33_J 13AVX33_J 13 07.2.1 2:48:27 PM07.2.1 2:48:27 PM

14
ENG
LISH
While playing the following discs, press .• Each time you press the button, playback picture and disc information screens appear alternately.
Audio format
Title no./Chapter no./Playing timePlayback mode
Disc type
4 ¢ Press: Select chapter Hold: Reverse/forward search*1
5 ∞ Select title
3: 45PM
MULTIMLP
B.S.P
AUDIODVD
G 01 02 0:45:38
RPT
BONUS
Surround mode
4 ¢ Press: Select track Hold: Reverse/forward search*1
5 ∞ Select group
Group no./Track no./Playing time
BONUS indicator ( page 22)
B.S.P indicator ( page 22)
4 ¢ Press: Select chapter Hold: Reverse/forward search*1
5 ∞ Select program no./Play List no.
Program no.(or Play List no.)/Chapter no./Playing time
VR-PR: Original programVR-PL: Play List
3: 45PM
MULTI
CHAP. RPT
DIGITALVIDEODVD
T 01 C 02 0:45:38
3: 45PM
FLATDIGITALVR-PRDVD
P 01 C 02 0:45:38
AVX33_J 14AVX33_J 14 07.2.1 2:48:28 PM07.2.1 2:48:28 PM

OPERATIONS15
ENG
LISH
3: 45PM
FLATPBCVCD
02 0:45:38
Track no./Playing time
*1 Search speed: x2 ] x10.*2 Search speed: ¡1 ] ¡2.
PBC indicatorlights up when PBC is in use.
4 ¢ Press: Select track Hold: Reverse/forward search*1
page 46
3: 45PM
FRONT 2CH
RPT
DivXDVD
T 01 C 02 0:45:38Current Folder NameCurrent File Name.avi
For DivX/MPEG: Folder no./Track no./Playing timeFor JPEG: Folder no./File no.
4 ¢ Press: Select track Hold: Reverse/forward search for DivX/MPEG *2
5 ∞ Press: Select folder Hold: Display Folder List
AVX33_J 15AVX33_J 15 07.2.1 2:48:28 PM07.2.1 2:48:28 PM

16
ENG
LISH
3: 45PM
FLAT
RPT
MP3CD
T 01 02 0:45:38Current Folder NameCurrent File Name.mp3
Track no./Playing timeDisc title/Artist Name/Track title (only for CD Text)*3
Folder no./Track no./Playing time4 ¢ Press: Select track Hold: Reverse/forward search*1
5 ∞ Press: Select folder Hold: Display Folder List
Audio format(MP3/WMA/WAV/AAC)
4 ¢ Press: Select track Hold: Reverse/forward search*1
page 46
page 46
*1 Search speed: x2 ] x10.*3 “No Name” appears for conventional CDs.
Tag data will be shown instead of folder/file names when they are recorded and <Tag Display> is set to <On>. ( page 49)
3: 45PM
FLATCD
02 0:45:38 Disc Title Artist Name Current Track Title
RPT
AVX33_J 16AVX33_J 16 07.2.1 2:48:29 PM07.2.1 2:48:29 PM

OPERATIONS17
ENG
LISH
You can use only one of the following playback modes—Intro/Repeat/Random.Ex. To select Track Repeat
1
2
Mode menu icon
3
4
When one of the playback modes is selected, the corresponding indicator lights up on the disc information screen.
To cancel, select <All Off> in step 3 or <Off> in step 4.
Selecting playback modes
Disc type Intro Repeat Random
—Chapter: Repeats current
chapterTitle: Repeats current title
—
— Track: Repeats current track —
—
Chapter: Repeats current chapter
Program: Repeats current program (not available for Playlist playback)
—
Track: Plays the first 15 seconds of each track (for VCD: PBC not in use)
Track: Repeats current track (for VCD: PBC not in use)
Disc (All): Randomly plays all tracks (for VCD: PBC not in use)
Track: Plays the first 15 seconds of each track
Folder: Plays the first 15 seconds of the first track of each folder
Track: Repeats current trackFolder: Repeats all tracks of
the current folder
Folder: Randomly plays all tracks of current folder, then tracks of next folders
Disc (All): Randomly plays all tracks
—
Track: Repeats current trackFolder: Repeats current folder
—
—Folder: Repeats current folder
—
Mode
Off
All OffIntroRepeatRandom
RepeatOffTrackFolder
SetENTAV Menu
Mode EnterENT
AV Menu
Setup EnterENT
AVX33_J 17AVX33_J 17 07.2.1 2:48:29 PM07.2.1 2:48:29 PM

18
ENG
LISH
Selecting tracks on the list If a disc includes folders, you can display the Folder/Track (File) Lists, then start playback.
1
Folder List appears.• Hold the button to see the next/previous folders.
2 Select a folder, then activate the Track List.
Track List of the selected folder appears.
3 Select a track, and start playing.
• Folder List can also be accessed through <AV Menu> = <List>.
Prohibiting disc ejection You can lock a disc in the loading slot.
“No Eject” appears.
To cancel the prohibition, repeat the same procedure to select “EJECT OK?”.
Folder List
Off
My BestCinemaPopsMy Best2Favorite SongCinema2 ENT
Folder List
Off
My BestCinemaPopsMy Best2Favorite SongCinema2 ENT
File List
Off
Song011.mp3Song012.mp3Song013.mp3Song014.mp3Song015.mp3Song016.mp3 ENT
List menu icon
AV Menu
Setup EnterENT
AV Menu
List EnterENT
NO EJECT?EMERGENCY EJECT?
AVX33_J 18AVX33_J 18 07.2.1 2:48:30 PM07.2.1 2:48:30 PM

OPERATIONS19
ENG
LISH
: Stop playback.
: Start playback/Pause (if pressed during playback).
: Reverse/forward search.*2
: Press: Select track. Hold: Reverse/forward search.*4
: Select group.
Operations using the remote controller—RM-RK251
*1 Erases the misentry of the number.
*2 Search speed: x2 ] x5 ] x10 ] x20 ] x60
*3 Slow motion speed: 1/32 ] 1/16 ] 1/8 ] 1/4 ] 1/2
*4 Search speed: x2 ] x10
: Stop playback.
: Start playback/Pause (if pressed during playback).
: Reverse/forward search.*2 (No sound can be heard.) (Slow motion*3 during pause. No sound can be heard.)
: Press: Select chapter (during playback or pause). Hold: Reverse/forward search.*4
: Select title (during playback or pause).
Using menu driven features
1 2 Select an item you want
to start playback.
3
= = : Select chapter. Select title (when not playing).
(twice) = = :
Select title (during playback or pause).
: Select aspect ratio.
: Select audio language.
: Select subtitle language.
: Select view angle.
= = : Select track.
(twice) = = : Select group.
: Select aspect ratio.
: Select audio stream.
Using menu driven features
1 2 Select an item you want
to start playback.
3
*1
AVX33_J 19AVX33_J 19 07.2.1 2:48:31 PM07.2.1 2:48:31 PM

20
ENG
LISH
: Stop playback.
: Start playback/Pause (if pressed during playback).
: Reverse/forward search.*2 (No sound can be heard.)
: Press: Select track. Hold: Reverse/forward search.*3 (No sound can be heard.)
: Select folder.
= = : Select track (within the same folder).
(twice) = = : Select folder.
: Select aspect ratio.
: Select audio language. (DivX only) : Select subtitle language. (DivX only)
*1
1st press1st press 2nd press
3rd press2nd press
Current playback positionWhile playing...Back/advance the scenes by 5 minutes.
For DivX6: Using menu driven features
1 2 Select an item you want to
start playback.
3
: Stop playback.
: Start playback/Pause (if pressed during playback).
: Reverse/forward search.*4 (No sound can be heard.)
(Slow motion*5 during pause. No sound can be heard.)
Reverse slow motion does not work.
: Press: Select chapter (during playback or pause).
Hold: Reverse/forward search.*6
Select program. : Select play list (during playback or
pause). : Select aspect ratio.
: Select audio channel (ST: stereo, L: left, R: Right).
: Turn on/off subtitle.
= = : Select chapter. Select program (when not playing).
(twice) = = : Select program/play list (during playback or
pause).
Using Original Program/Play List screens( page 28)1 For Original Programs: For Play List: 2 Select an item you want to start playback.
3 (Hide screen)
AVX33_J 20AVX33_J 20 07.2.1 2:48:32 PM07.2.1 2:48:32 PM

OPERATIONS21
ENG
LISH
= = : Select track.
During PBC playback...
= = :
Select an item on the menu. To return to the previous menu, press .
To cancel PBC playback
1
2 Start the desired track. = =
• To resume PBC, press / .
: Stop playback.
: Start playback/Pause (if pressed during playback).
: Reverse/forward search.*4
(Forward slow motion*5 during pause. No sound can be heard.)
Reverse slow motion does not work.
: Press: Select track. Hold: Reverse/forward search.*6 (No
sound can be heard.) : Select aspect ratio.
: Select audio channel (ST: stereo, L: left, R: Right).
: Stop playback.
: Start playback/Pause (if pressed during playback).
: Reverse/forward search.*4
: Press: Select track. Hold: Reverse/forward search.*6
: Select folder.
= = :
Select track (within the same folder).
(twice) = = :
Select folder.
*1 Erases the misentry of the number.*2 Search speed: ¡1 ] ¡2 ] ¡3*3 Search speed: ¡1 ] ¡2 *4 Search speed: x2 ] x5 ] x10 ] x20 ] x60*5 Slow motion speed: 1/32 ] 1/16 ] 1/8 ]
1/4 ] 1/2*6 Search speed: x2 ] x10
: Stop playback.
: Start playback. (Slide show: each file is shown for a few seconds.)
Shows the current file until you change it if pressed during Slide show.
: Select track.
: Select folder.
: Select aspect ratio.
= = : Select track (within the same folder).
(twice) = = : Select folder.
: Stop playback.
: Start playback/Pause (if pressed during playback).
: Reverse/forward search.*4
: Press: Select track. Hold: Reverse/forward search.*6
= = : Select track.
AVX33_J 21AVX33_J 21 07.2.1 2:48:34 PM07.2.1 2:48:34 PM

22
ENG
LISH
Playing back a bonus groupIf a DVD Audio including a “bonus group” is detected, the BONUS indicator lights up on the disc information screen.
To play a bonus group...
1 Select the bonus group.• The bonus group is usually recorded as the last
group.
2 Enter the key number.
: Move the entry position
: Select a number
• “key number” (a kind of password) for the bonus group is not open to public. The way of getting the key number depends on the disc.
3 Follow the interactive instructions shown on the monitor.
Selecting browsable still pictureWhen a disc including browsable still pictures is detected, the B.S.P indicator lights up on the disc information screen.
When disc shows the BSP selecting icons such as @ or # on the screen...
1 Select an item you want to display.
2
Enjoying surround sounds You can enjoy multi-channel surround playback through the front, center, surround speakers.• After connecting the center speaker, make
sure to activate the center speaker; otherwise, no sound comes out of the center speaker ( page 52).
• All surround mode can also be used for “USB.”
MULTI: For multi-channel encoded sources such as Dolby Digital*1, DTS*2, and DVD Audio. (When activated, “MULTI” is shown on the source information screen.)
Dolby Pro Logic II (Movie/Music): For 2 channel sources except for DivX/MPEG 1/MPEG2 discs.
To turn on the surround
1
2
3
• Surround Off: Deactivates surround.• Surround On: Activates surround = go to the
following steps.
AV Menu
Setup EnterENT
AV Menu
Disc Surround EnterENT
Disc Surround menu icon
Disc Surround
Auto
Surround OffSurround On
AVX33_J 22AVX33_J 22 07.2.1 2:48:36 PM07.2.1 2:48:36 PM

OPERATIONS23
ENG
LISH
4
• Auto: When multi-channel digital signals come in, “MULTI” surround is activated.
When 2-channel or 2.1-channel signals come in, “4CH STEREO” is activated.
• Through: All incoming channel signals are sent to the corresponding speakers.
• Dolby PLII Movie: Activates Dolby Pro Logic II Movie.
• Dolby PLII Music: Activates Dolby Pro Logic II Music. You can adjust <Panorama> and <Center Width> settings. ( below)
To change the <Dolby PLII Music> settingin step 4 above...
1
2
• Panorama: Select <On> to add wraparound sound effect.
• Center Width: Adjust the center image so it may be heard only from the center speaker, only form the left/right front speaker as a “phantom” center image, or various combination of these speakers. As the number increases, the “phantom” effect becomes stronger (normally select <4>).
3
On the remote controller:
• You cannot change the <Dolby PLII Music> settings using the remote controller.
Surround OnAutoThroughDolby PLII MovieDolby PLII Music
SetENT
Dolby PLII Music
On
PanoramaCenterWidth
Surround On
Panorama
AutoThroughDolby PLII MovieDolby PLII Music
*1 Manufactured under license from Dolby Laboratories. Dolby, Pro Logic, and the double-D symbol are trademarks of Dolby Laboratories.
*2 “DTS” and “DTS Digital Surround” are registered trademarks of DTS, Inc.
AVX33_J 23AVX33_J 23 07.2.1 2:48:37 PM07.2.1 2:48:37 PM

24
ENG
LISH
1 Display the on-screen bar. ( page 25)
2 Select an item.
3 Make a selection.If a pop-up menu appears...
• For entering time/numbers...
: Move the entry position
To remove the on-screen bar
Operations using the on-screen bar (DVD/VCD/DivX/MPEG1/MPEG2/JPEG) These operations are possible on the monitor using the remote controller.
: Select a number
AVX33_J 24AVX33_J 24 07.2.1 2:48:38 PM07.2.1 2:48:38 PM

OPERATIONS25
ENG
LISH
Information
Operation
On-screen bar
1 Disc type2 • DVD: Audio signal format
• VCD: PBC3 Playback mode*1
DVD Video: T. RPT: Title repeat C. RPT: Chapter repeat DVD Audio: T. RPT: Track repeat DVD-VR: C. RPT: Chapter repeat PG. RPT: Program repeat DivX/MPEG: T. RPT: Track repeat F. RPT: Folder repeat JPEG: F. RPT: Folder repeat VCD: T. INT: Track intro T. RPT: Track repeat A. RND: All random4 Playback information T02-C03 Current title/chapter G02-T03 Current group/track
PG-001
C-002 Current program/chapter
PL-003
C-004 Current playlist/chapter TRACK 01 Current track F001-T001 Current folder/track F002-F002 Current folder/file (JPEG)
5 Time indicationTOTAL Elapsed playing time of the discT. REM Remaining title time (for DVD)
Remaining disc time (for others)TIME Elapsed playing time of the current
chapter/track*2
REM Remaining time of the current chapter/track*2
6 Playback status Play
Reverse/forward search Reverse/forward slow-motion
Pause Stop
7 Operation iconsTIME Change time indication (see 5)
Time Search (Specify a certain scene by entering time.)
TITLE Title Search (by its number)CHAP Chapter Search (by its number)GROUP Group Search (by its number)TRACK Track Search (by its number)RPT Repeat play*1
INT Intro play*1
RND Random play*1
Change the audio language, audio channel or audio stream
Change the subtitle language Change the view angle
PAGE Change the browsable still pictures (pages)
*1 page 17*2 Not applicable for DVD-VR.
Above example is of DVD Video. Items shown on the bar vary due to the disc type.
DVD -V T02-C03 TOTAL 1:25:58
TIME TITLE CHAP RPT
C. RPT
AVX33_J 25AVX33_J 25 07.2.1 2:48:38 PM07.2.1 2:48:38 PM

26
ENG
LISH
Folder : 2 / 3
TIME 00:00:14T. RPT
Track : 6 / 14 (Total 41)
Track Information
Cloudy.mp3Fair.mp3Fog.mp3Hail.wmaIndian summer.mp3Rain.mp3Shower.mp3Snow.mp3Thunder.wmaTyphoon.mp3Wind.mp3Winter sky.mp3
AlbumWeatherArtistRobert M. SmithTitleRain
01 Music02 Music03 Music
Dual Zone operationsYou can enjoy a disc playback on the external monitor connected to the VIDEO OUT and 2nd AUDIO OUT plugs, while listening to any other source than “USB” through the speakers.• When Dual Zone is in use, you can only operate the
DVD/CD player using the remote controller.
1
2
3
• Off: Deactivates Dual Zone.• On (DUAL): Activates Dual Zone without
applying Headphone Surround*1.• On/Surround On (DUAL-S): Activates Dual
Zone and applies Headphone Surround.
When Dual Zone is activated, the main source is changed to “DISC.”
Ex. When “On/Surround On” is selected.
To select a different source (main source) to listen through the speakers:Press SRC (source) on the control panel.• By using the buttons on the control panel, you
can operate the newly selected main source without affecting Dual Zone (DISC) operations.
• You cannot select “USB” for the main source.
On the remote controller:
1
2 Adjust the volume through the 2nd AUDIO OUT plug.
3 Operate the DVD/CD player.
*1 JVC original headphone virtual surround system. This surround will also work for the main source “DISC” if “On/Surround On” is selected as the sub-source. This surround does not work for DivX/MPEG1/MPEG2 discs.
*2 Displayed being shaded if Headphone Surround is not applied.
Operations using the control screen For discs except DVD and VCD:While Dual Zone is on, these operations are possible on the external monitor using the remote controller.The control screen automatically appears when you insert a disc. (For DivX/MPEG1/MPEG2/JPEG; while not playing.)
Ex.: MP3/WMA
AV Menu
Setup EnterENT
AV Menu
Dual Zone EnterENT
Dual Zone menu icon
Dual ZoneOffOnOn/Surround On
SetENT
FLATDIGITALVIDEODVD
T 01 C 02 0:45:38DUAL-S *2
AVX33_J 26AVX33_J 26 07.2.1 2:48:40 PM07.2.1 2:48:40 PM

OPERATIONS27
ENG
LISH
1 Current folder (highlighted bar)2 Current folder number/total folder number3 Folder list* If tag data includes “Jacket Picture” (baseline JPEG), it
will be displayed. If you press OSD, the playback mode selection window appears. ( below)
4 Selected playback mode ( below)5 Elapsed playing time of the current track (not
displayed for JPEG)6 Operation status7 Current track number/total number of tracks in the
current folder (total number of tracks on the disc)8 Track information (only for MP3/WMA/WAV/AAC)9 Track listp Current track (highlighted)
To select a folder or track
1 Select “Folder” column or “Track” column on the control screen.
2 Select a folder or track.• If necessary, press ENT to start playback.
1 Playback mode selection window: appears when OSD is pressed ( below).
2 Selected playback mode ( below)3 Elapsed playing time of the current track4 Operation status5 Current track number/total number of tracks on the
disc6 Track information7 Track list8 Current track (highlighted bar)
To select a track• If necessary, press ENT to start playback.
Ex.: CD Text
MODE
REPEATTRACK
TIME 00:14
Track : 6 / 14
Track Information
CloudyFairFogHailIndian summerRainShowerSnowThunderTyphoonWindWinter sky
AlbumFour seasonsArtistRobert M. SmithTitleRain
T. RPT
Selecting playback modesYou can also change the playback modes using the playback mode selection window.• For CD/MP3/WMA/WAV/AAC: Intro/Repeat/
Random• For DivX/MPEG1/MPEG2/JPEG: Repeat
12 Only for CD/MP3/WMA/WAV/AAC: Select a
playback mode.
3 Select your desired option.
4
Selected playback modeDivX/MPEG1/MPEG2/JPEG: page 25MP3/WMA/WAV/AAC: T. INT: Track intro F. INT: Folder intro T. RPT: Track repeat F. RPT: Folder repeat F. RND: Folder random A. RND: All randomCD: T. INT: Track intro T. RPT: Track repeat A. RND: All random
AVX33_J 27AVX33_J 27 07.2.1 2:48:41 PM07.2.1 2:48:41 PM

28
ENG
LISH
Operations using the list screen For discs except DVD, VCD, and CDWhile Dual Zone is on, these operations are possible on the external monitor using the remote controller.
While not playing...
1 Display the list screen.
2 Select a folder on the list.
3 Select a track on the list.
• To go back to the folder list, press .
1 Current folder number/total folder number 2 Current track number/total number of tracks in the
current folder3 Current page/total number of the pages included
in the list4 Current folder/track (highlighted bar)
List screen for DVD-VRYou can use Original Program and Play List screen anytime while playing DVD-VR with its data recorded.
1 Display the Original Program/Play List screen.
2 Select an item you want.
1 Program/Play list number2 Recording date 3 Recording source (TV station, the input terminal
of the recording equipment, etc.)4 Start time of recording5 Title of the program/play list*6 Highlighted bar (current selection)7 Creating date of play lists8 Total number of chapters9 Playback time* The title of the original program or play list may
not be displayed depending on the recording equipment.
Folder : 144/240 Track 144/198 Page : 4/7fol120fol121fol122fol123fol124fol125fol126fol127fol128fol129
fol150fol151fol152fol153fol154fol155fol156fol157fol158fol159
fol140fol141fol142fol143fol144fol145fol146fol147fol148fol149
fol130fol131fol132fol133fol134fol135fol136fol137fol138fol139
file0141.wmafile0142.mp3file0143.wmafile0144.mp3file0145.mp3file0146.mp3file0147.mp3file0148.wmafile0149.wmafile0150.wma
file0151.wmafile0152.mp3file0153.wmafile0154.mp3file0155.wmafile0156.wmafile0157.wmafile0158.wmafile0159.mp3file0160.wma
Folder : 144/240 Track 144/198 Page : 4/5file0121.mp3file0122.mp3file0123.wmafile0124.mp3file0125.mp3file0126.wmafile0127.wmafile0128.mp3file0129.mp3file0130.wma
file0131.mp3file0132.mp3file0133.mp3file0134.mp3file0135.wmafile0136.mp3file0137.wmafile0138.mp3file0139.wmafile0140.wma
ORIGINAL PROGRAM
No Date Ch ime itle1 07/04/25 4ch 19:00 JVC DVD World 20042 07/05/25 8ch 10:303 07/05/22 8ch 17:00 Music Festival4 07/05/26 L-1 13:19 children 0015 07/06/20 4ch 22:006 07/06/25 L-1 8:23 children 002
T T
PLAY LIST
No Date Chap Length Title1 07/05/25 001 1:03:16 My JVC World2 07/06/17 005 1:35:253 07/06/20 003 0:10:23 Favorite music4 07/06/25 001 0:07:19 children001-002
or
AVX33_J 28AVX33_J 28 07.2.1 2:48:41 PM07.2.1 2:48:41 PM

OPERATIONS29
ENG
LISH
USB operationsYou can connect a USB mass storage class device such as a USB memory, Digital Audio player*1, portable HDD, etc. to the unit.
~ Connect a USB device.
Ÿ Select “USB”.
USB cable from the rear of the unit.
3: 45PM
USBNow Reading ...
7: Stop playback
This unit can play DivX/JPEG/MPEG1/MPEG2*2/MP3/WMA/WAV/AAC*3 files stored in a USB mass storage class device.• You can operate the USB device in the same way you
operate the files on discs. ( page 17 to 25)• You cannot select “USB”when Dual Zone is in use.• All tracks in the USB device will be played repeatedly
until you change the source.
*1 Except for JVC D. Player XA-HD500.*2 Except for MPEG2 files recorded by JVC Everio
camcorder (extension code <.mod>).
3: Start playback if necessary.
DISP: Press if no playback picture appears , but disc information screen ( pages 14 to 16) is displayed.
4 ¢ Press: Select track Hold: Reverse/forward search5 ∞ Press: Select folder Hold: Display Folder List
• You cannot connect a computer to the USB ( ) terminal of the unit.
*3 This unit can play back AAC files encoded using iTunes. This unit cannot play back AAC files purchased from the iTunes Store.
AVX33_J 29AVX33_J 29 07.2.1 2:48:42 PM07.2.1 2:48:42 PM

30
ENG
LISH
You can use only one of the following playback modes—Intro/Repeat/Random.Ex. To select Track Repeat
1
2
3
4
When one of the playback modes is selected, the corresponding indicator lights up on the information screen.
To cancel, select <All Off> in step 3 or <Off> in step 4.
Selecting playback modes
File type Intro Repeat Random
Track: Plays the first 15 seconds of each track
Folder: Plays the first 15 seconds of the first track of each folder
Track: Repeats current trackFolder: Repeats all tracks of
the current folder
Folder: Randomly plays all tracks of current folder, then tracks of next folders
USB (All): Randomly plays all tracks
—
Track: Repeats current trackFolder: Repeats current folder —
— Folder: Repeats current folder —
Mode
Off
All OffIntroRepeatRandom
RepeatOffTrackFolder
SetENT
AV Menu
Mode EnterENT
AV Menu
Setup EnterENT
Mode menu icon
Caution:
• Avoid using the USB device if it might hinder your safety driving.• Do not pull out and attach the USB device repeatedly while “Now Reading...” is flashing on the monitor.• Do not start the car engine if a USB device is connected.• Stop playback before disconnecting a USB device.• Make sure all important data has been backed up to avoid losing the data.• Do not leave a USB device in the car, expose to direct sunlight, or high temperature to avoid deformation or
cause damages to the device.
AVX33_J 30AVX33_J 30 07.2.1 2:48:43 PM07.2.1 2:48:43 PM

OPERATIONS31
ENG
LISHConnecting a Bluetooth device
for the first time Pairing and PIN CodeWhen you connect a Bluetooth device to the unit for the first time, make pairing between the unit and the device. Pairing allows Bluetooth devices to communicate each other.To make pairing, you may need to enter the PIN (Personal Identification Number) code of your Bluetooth device you want to connect.
• Once the connection is established, it is registered in the unit even if you reset the unit. Up to five devices can be registered in total.
• Only one device can be connected at a time for each source (“Bluetooth Phone” and “Bluetooth Audio”).
• To use the Bluetooth function, you need to turn on Bluetooth function of the device.
Preparation: Operate the device to turn on itsBluetooth function.
Registration (Pairing) methodsUse either of the following items in the <Bluetooth> menu to register and establish the connection with a device.• Select “Bluetooth Phone” or “Bluetooth Audio” as the
source to operate the <Bluetooth> menu.
<Open> Make the unit ready to establish a new Bluetooth connection. Connection is established by operating the Bluetooth device.
<Search> Make the unit ready to establish a new Bluetooth connection. Connection is established by operating the unit.
Bluetooth® operations — Cellular phone/audio player
Bluetooth is a short-range wireless radio communication technology for the mobile device such as mobile phones, portable PCs, and other devices. The bluetooth devices can be connected without cables and communicate each other. • The serial number is printed on the label placed on
the bottom of the unit.• Refer to the list (included in the box) to see the
countries where you may use the Bluetooth® function.
Bluetooth profileThis unit supports the following Bluetooth profiles; HSP (Headset Profile) HFP (Hands-Free Profile) A2DP (Advanced Audio Distribution Profile) AVRCP (Audio/Video Remote Control Profile) SPP (Serial Port Profile) OPP (Object Push Profile)
FeaturesYou can operate Bluetooth devices through the unit as follows:• Receiving a call• Making a call—from phone book, from call history
(Redial/Missed Call/Received Call), by dialing number, by preset numbers, by voice command
• Receiving the Text Message• Play back a Bluetooth audio player
Refer also to the instructions supplied with the Bluetooth device.
Continued on the next page
• The Bluetooth word mark and logos are owned by the Bluetooth SIG, Inc. and any use of such marks by Victor Company of Japan, Limited (JVC) is under license. Other trademarks and trade names are those of their respective owners.
AVX33_J 31AVX33_J 31 07.2.1 2:48:44 PM07.2.1 2:48:44 PM

32
ENG
LISH
7 Operate the target Bluetooth device. (While “Open...” is flashing on the screen.)Enter the same PIN code (as entered in the above step) on the device to be connected.
Now connection is established and you can use the device through the unit.
The device remains registered even after you disconnect the device. Use <Connect> (or activate <Auto Connect>) to connect the same device from next time. ( pages 56 and 57)
Searching for available devicesPerform steps 1 to 3 on the left, then...
1
The unit searches for available devices and displays the list of them. (If no available device is detected, “Device Unfound” appears.)
2 Select a device you want to connect.
3 Enter the specific PIN code of the device to the unit.• Refer to the instructions supplied with the device
to check the PIN code.
4 Use the Bluetooth device to connect.
Now connection is established and you can use the device through the unit.
AV Menu
Bluetooth EnterENT
AV Menu
Setup EnterENT
Registering using <Open>
1 Select “Bluetooth Phone” or “Bluetooth Audio.”
2
3
Bluetooth menu icon
4
5 Enter a PIN (Personal Identification Number)* code to the unit.• You can enter any number you like (1-digit to
16-digit number).* Some devices have their own PIN code. Enter the
specified PIN code to the unit.
• To delete an unwanted digit, select blank space.
6
NEW DEVICEDial MenuMessageOpenSearchSpecial Device
NEW DEVICEDial MenuMessageOpenSearchSpecial Device
PIN Code
1234
EnterENT
3: 45PM
FLAT
NEW DEVICE
Bluetooth Phone
Select “NEW DEVICE” by pressing 5 / ∞.
AVX33_J 32AVX33_J 32 07.2.1 2:48:44 PM07.2.1 2:48:44 PM

OPERATIONS33
ENG
LISH
NEW DEVICEDial MenuMessageOpenSearchSpecial Device
Connecting a special devicePerform steps 1 to 3 of “Registering using <Open>” on page 32, then...
1
2 Select a device you want to connect.
3 Use <Open> (or <Search>) to connect.
Connecting/disconnecting a registered device
1 Select “Bluetooth Phone” or “Bluetooth Audio,” then select a registered device you want to connect/disconnect.
2 Perform steps 2 and 3 of “Registering using <Open>” on page 32, then...• Select <Connect> to connect the selected
device.• Select <Disconnect> to disconnect the selected
device.
You can set the unit to connect a Bluetooth device automatically when the unit is turned on. ( page 57)
Deleting a registered device
1 Select “Bluetooth Phone” or “Bluetooth Audio,” then select a registered device you want to delete.
2 Perform steps 2 and 3 of “Registering using <Open>” on page 32, then...• Select <Delete Pair>, then <Yes>.
The unit displays the list of the preset devices.
AVX33_J 33AVX33_J 33 07.2.1 2:48:45 PM07.2.1 2:48:45 PM

34
ENG
LISH
3: 45PM
FLAT
Connected Device Name
Bluetooth Phone
POWER]ON
~ Select “Bluetooth Phone.”
Ÿ Enter the <Bluetooth> menu.
! Establish the connection with a device, then make a call (or settings using the <Bluetooth> menu). pages 32, 48, 56, and 57
When the sound is stopped or interrupted during the use of a Bluetooth device, try the following remedies.• Turn off, then turn on the unit.• (When the sound is not yet restored,) connect the
device again. ( “Connecting/disconnecting a registered device” on page 33)
Using the Bluetooth cellular phone
*1 You can adjust the volume level for “Bluetooth Phone” without affecting the volume level for other sources.
*2 Appears only when the information comes from the device.
*3 Each time you press 5 ∞, the registered device name (and “NEW DEVICE” when a new device can be registered) appear in turn.
*4 When a cellular phone with audio function is connected, appears.
You can adjust the microphone volume level. ( page 57)
Status of the device*2
Signal strength/Battery remainder
Adjust the volume*1
When a call comes in...
The source is automatically changed to “Bluetooth Phone”.When <Auto Answer> is activated...The unit answers the incoming calls automatically. ( page 57)• When <Auto Answer> is deactivated, press any
button (except ATT or +/–) to answer the incoming call.
page 46
Press: Display <Dial Menu> Answer incoming callHold: Display <Redial> list
To end the call or reject an incoming callHold any button (except ATT or +/–).
Answering a waiting callIf your cellular phone is equipped with the call waiting function, you can put the current call on hold and answer the waiting call.Press any button (except ATT and +/–).• To restore the on-hold call, press any button (except
ATT and +/–) again.• When you end one call, you can connect to the
other.
Connected device name *3
Name and phone number (if acquired)
Turns Blue when the Bluetooth device is connected.
*4
AVX33_J 34AVX33_J 34 07.2.1 2:48:46 PM07.2.1 2:48:46 PM

OPERATIONS35
ENG
LISH
Making a call 1 Display the <Dial Menu>.
2 Select the method to make a call.
• Redial* : Shows the list of the phone numbers you have dialed = go to the following step.
• Received Calls* : Shows the list of the received calls = go to the following step.
• Phonebook* : Shows the phone book of the connected cellular phone = go to the following step.
• Missed Calls* : Shows the list of the missed calls.= go to the following step.
• Phone Number : Shows the phone number entry screen = “How to enter phone number” ( page 36).
• Voice Dialing (Only when the connected cellular phone has the voice recognition system): Speak the name you want to call.
* Displays only when your cellular phone is equipped with these functions.– If not displayed, please try to transfer the
phone book memory of the cellular phone to this unit. (Refer to the instruction manual supplied with your cellular phone.)
– With some cellular phones, the phone book memory is transferred automatically.
3 Select the name/phone number you want to call.
When a Text message comes in...If the cellular phone is compatible with Text message and <Message Info> is set to <Auto> ( page 57), the unit rings and “Receiving Message” appears on the monitor to inform you of the arrival of the message.• You cannot edit or send a message through the
unit.
When <Message Info> is set to <Auto>...To read the messageWhile “Receiving Message” is displayed...
• The source is changed to “Bluetooth Phone.”
To read the message later
• The message is stored into <Message> = <Unread>. ( page 56)
When <Message Info> is set to <Manual>Access the message list to read a message.( page 56)
P902i
Annie
RedialReceived CallsPhonebookMissed CallsPhone number
P902i
Annie
RedialReceived CallsPhonebookMissed CallsPhone number
or
AVX33_J 35AVX33_J 35 07.2.1 2:48:47 PM07.2.1 2:48:47 PM

36
ENG
LISH
How to enter phone numberOn the remote:
On the unit:
1
• To delete an unwanted digit, select blank space.
2
<Dial Menu> can be also accessed through <AV Menu> = <Bluetooth> = <Dial Menu>.
Direct operations to redial / Voice DialingYou can use the following functions regardless of the current source.To redial
To activate Voice DialingYou can make a call by your voice.
Presetting the phone numbers You can preset up to six phone numbers.
1 Display the phone number you want to preset by using one of <Dial Menu> items.
Ex.: “Jack” is selected from the phone book
Preset Memory list appears.
2 Select a preset number.
The phone number selected in step 1 is now stored in preset number 4.
To call a preset number On the remote:
On the unit:
1
2
111222233332223333666644455556666098456712349998888777755566668888
1
2
3
4
5
6 ENT
Preset List
111222233332223333666644455556666098456712349998888777755566668888
1
2
3
4
5
6 ENT
Preset List
111222233332223333666644455556666111333344449998888777755566668888
1
2
3
4
5
6 ENT
Preset Memory
Jack123123412340989876543209845671234
Dial
StoreENT
ENT
111222233332223333666644455556666111333344449998888777755566668888
1
2
3
4
5
6 ENT
Preset Memory
Speak the name you want to call.
AV Menu
Bluetooth EnterENT
AV Menu
Setup EnterENT
Dialling ...Jack09845671234
Select a number. Move the entry position.
or
Bluetooth menu icon
or
AVX33_J 36AVX33_J 36 07.2.1 2:48:48 PM07.2.1 2:48:48 PM

OPERATIONS37
ENG
LISH
Using the Bluetooth audio player
*1 Each time you press 5 ∞, the registered device names (and “NEW DEVICE” when a new device can be registered) appear in turn. You cannot select “New Device” when a Bluetooth audio player is connected.
*2 Appears only when the information comes from the device.
*3 Indicates the button pressed. It may be different from the operation status.
*4 When a cellular phone with audio function is connected, appears.
You can use the following buttons on the remote controller for the Bluetooth audio operations. For details, pages 8 and 9.
3: 45PM
FLAT
Connected device name
Bluetooth Audio
POWER]ON
Pause
Reverse/forward skip
*1
Status of the device*2
Signal strength/Battery remainder
page 46
List menu icon
AV Menu
Setup EnterENT
AV Menu
List EnterENT
*3
~ Select “Bluetooth Audio.”
Ÿ Start playback.• See pages 31 to 33 for connecting a new device.• See page 33 for connecting/disconnecting a
registered device.• See page 33 for deleting a registered device.When the sound is stopped or interrupted during the use of a Bluetooth device, try the following remedies.• Turn off, then turn on the unit.• (When the sound is not yet restored,) connect the
device again. ( “Connecting/disconnecting a registered device” on page 33)
• Preset List can also be accessed through <AV Menu> = <List>.
You can use the following buttons on the remote controller for the Bluetooth phone operations. For details, pages 8 and 9.
Turns Blue when the Bluetooth device is connected.
*4
Bluetooth Information:If you wish to receive more information about Bluetooth, visit our JVC web site.
AVX33_J 37AVX33_J 37 07.2.1 2:48:49 PM07.2.1 2:48:49 PM

38
ENG
LISH
3: 45PM
FLATCD-CH
01 01 0:02:38Disc TitleArtist NameCurrent Track Title
POWER]ON
Listening to the CD changer
It is recommended to use a JVC MP3-compatible CD changer with your unit.• You can play only CDs (CD-DA) and MP3 discs.
Preparation:Make sure <Changer> is selected for the external input setting. ( page 53)
~ Select “CD-CH.”
Ÿ Display the Disc List.
• Each time you hold the button, you can display the other list of the remaining discs.
! Select a disc to start playing.
“No Name” appears for conventional CDs
Disc no./Track no./Playing time
• While playing an MP3 disc, you can select and start playing a track in the disc using the Lists: Disc List (select the current disc) = Folder List = File List, then start playing a track you want.
4 ¢ Press: Select track Hold: Reverse/forward search5 ∞ Press: Select folder (MP3 only) Hold: Display Disc List
Disc List
Off
MP3 DISCDISC 02DISC 03DISC 04DISC 05DISC 06 ENT
Disc List
Off
MP3 DISCDISC 02DISC 03DISC 04DISC 05DISC 06 ENT
Folder List
Off
My BestCinemaPopsMy Best2Favorite SongCinema2 ENT
File List
Off
Song011.mp3Song012.mp3Song013.mp3Song014.mp3Song015.mp3Song016.mp3 ENT
Disc List
Off
MP3 DISCDISC 02DISC 03DISC 04DISC 05DISC 06 ENT
AVX33_J 38AVX33_J 38 07.2.1 2:48:50 PM07.2.1 2:48:50 PM

39 EXTERNAL DEVICES
ENG
LISH
You can use only one of the following playback modes—Intro/Repeat/Random.Ex. To select Track Repeat
1
2
Mode menu icon
3
4
When one of the playback modes is selected, the corresponding indicator lights up on the monitor.
To cancel, select <All Off> in step 3 or <Off> in step 4.
Selecting playback modes
Disc type Intro Repeat Random
Track: Plays the first 15 seconds of each track
Disc: Plays the first 15 seconds of the first track of all loaded discs
Track: Repeats current trackDisc: Repeats all tracks of the
current disc
Disc: Randomly plays all tracks of the current disc
All: Randomly plays all tracks of all loaded discs
Track: Plays the first 15 seconds of each track
Folder: Plays the first 15 seconds of the first track of each folder
Disc: Plays the first 15 seconds of the first track of all loaded discs
Track: Repeats current trackFolder: Repeats all tracks of
the current folderDisc: Repeats all tracks of the
current disc
Folder: Randomly plays all tracks of current folder, then tracks of next folders
Disc: Randomly plays all tracks of the current disc
All: Randomly plays all tracks of all loaded discs
You can use the following buttons on the remote controller to operate the CD changer.
or : Select disc
Press: Select folder (MP3 only)
Press: Select track Hold: Reverse/forward search
To use <Mode> menu above.
To use <List> menu page 38.Disc List = Folder List = File List
Mode
Off
All OffIntroRepeatRandom
RepeatOffTrackDisc
SetENT
AV Menu
Mode EnterENT
AV Menu
Setup EnterENT
AVX33_J 39AVX33_J 39 07.2.1 2:48:51 PM07.2.1 2:48:51 PM

40
ENG
LISH
Listening to the satellite radioBefore operating, connect either one of the following (separately purchased) to the CD changer jack on the rear of this unit.• JVC SIRIUS radio DLP—Down Link Processor, for listening to the SIRIUS Satellite radio.• XMDirectTM Universal Tuner Box—With a JVC Smart Digital Adapter (XMDJVC100: not supplied), for listening
to the XM Satellite radio.
For SIRIUS RadioActivate your subscription after connection:1 Turn on the power.
2 Select “SAT” for the source.
JVC DLP starts updating all the SIRIUS channels. ( “GCI update” column below.)• Once completed, JVC DLP tunes in to the preset
channel, CH184.
3 Check your SIRIUS ID, see page 53.
4 Contact SIRIUS on the internet at <http://activate.siriusradio.com/> to activate your subscription, or you can call SIRIUS toll-free at 1-888-539-SIRIUS (7474).“Subscription Updated Press Any Key to Continue” appears on the monitor once subscription has been completed.
For XM RadioActivate your subscription after connection:1 Turn on the power.
2 Select “SAT” for the source.
XMDirectTM Universal Tuner Box starts updating all the XM channels. “Channel 1” is tuned in automatically. ( “GCI update” column below.)
3 Check your XM Satellite radio ID labelled on the casing of the XMDirectTM Universal Tuner Box, or tune in to “Channel 0” (see page 41).
4 Contact XM Satellite radio on the internet at <http://xmradio.com/activation/> to activate your subscription, or you can call 1-800-XM-RADIO (1-800-967-2346).Once completed, the unit tunes in to one of the available channels (Channel 4 or higher).
GCI (Global Control Information) update:• If channels are updated after subscription, updating starts automatically, and no sound can be heard. For SIRIUS: “Channel is Updating XX% completed” appears. For XM: “UPDATING” appears.• Update takes a few minutes to complete.• Do not press any button or perform any operation until updating is completed.
AVX33_J 40AVX33_J 40 07.2.1 2:48:52 PM07.2.1 2:48:52 PM

41 EXTERNAL DEVICES
ENG
LISH
DISP: Switches the display to program information—artist name/song name (/composer name: only for SIRIUS Satellite radio).
SIRIUS/XM Band
Category name
Channel no. page 46Preset no.
Channel name
For SIRIUS Radio
~ Select “SAT.”
Ÿ Select the bands.
! Select a category.• To select a channel from all categories, select
“All.”
⁄ Make a channel to listen.• Holding either 4 or ¢ changes the
channels rapidly.• While searching, invalid and unsubscribed
channels are skipped.
• “SIRIUS” and the SIRIUS dog logo are registered trademarks of SIRIUS Satellite Radio Inc.
• XM and its corresponding logos are registered trademarks of XM Satellite Radio Inc.
• “SAT Radio”, the SAT Radio logo and all related marks are trademarks of SIRIUS Satellite Radio Inc., and XM Satellite Radio, Inc.
For XM Radio
~ Select “SAT.”
Ÿ Select the bands.
! Select a category.• To select a channel from all categories
(including non-categorised channels), skip this step.
• If you do not select a channel within 15 seconds, the category selected is canceled. You can select a channel from all categories now.
⁄ Select a channel to listen.• Holding either 4 or ¢ changes the
channels rapidly.• While searching, invalid and unsubscribed
channels are skipped.
Checking the XM Satellite radio IDSelect Channel “0.”The 8-digit (alphanumeric) ID number is displayed on the monitor.To cancel the ID number display, select any channel other than channel “0.”
Signal strength
POWER]ON
3: 45PM
FLATSAT
XM1 Preset1 01ch Category Name Channel Name
AVX33_J 41AVX33_J 41 07.2.1 2:48:52 PM07.2.1 2:48:52 PM

42
ENG
LISH
Storing channels in memory You can preset six channels for each band.Ex.: Storing a channel into preset number 5
1 Tune in to a channel you want.
2 Display the Preset List.
3 Select a preset number.
4
Selecting preset channels On the remote only:
1
2
3: 45PM
FLATSAT
XM1 3Bch Rock XM Music Club
XM1 StoreChannel NameThe City40 at 40Hank’s PlaceAudio VisionsPreview ENT
1
2
3
4
56
ENT
XM1 StoreChannel NameThe City40 at 40Hank’s PlaceAudio VisionsPreview ENT
1
2
3
4
56
ENT
3: 45PM
FLATSAT
XM1 Preset4 3Bch Rock XM Music Club
Selecting on the lists You can select a channel using one of the following lists—Preset list/Category list/Channel list.
1
2
List menu icon
3 Select a desired list.
• Preset List: Displays your preset channels.• Category List: Displays the categories.• Channel List: Displays all channels within the
selected category.
4 Select a desired channel.• When selecting <Category List> in step 3,
select a category, then a channel within the selected category.
• Category List can also be accessed by...
• Preset List can also be accessed by...
The BeachThe Heart20 on 20MIXX XMSpecial X40 to 40 ENT
Category List
ListPreset ListCategory ListChannel List
AV Menu
Setup EnterENT
AV Menu
List EnterENT
AVX33_J 42AVX33_J 42 07.2.1 2:48:53 PM07.2.1 2:48:53 PM

43 EXTERNAL DEVICES
ENG
LISH
3: 45PM
FLATD.PLAYER
01 0:45:38Album NameArtist NameTrack Title
POWER]ON
Listening to the iPod/D. player
It is required to connect the interface adapter (KS-PD100 for Apple iPod or KS-PD500 for JVC D. player) to the CD changer jack on the rear.Preparation:Make sure <iPod> or <D. Player> is selected for the external input setting. ( page 53)
~ Select “iPod” or “D. PLAYER.”Playback starts automatically.
Ÿ Select a track.
Selecting a track from the player’s menu 1 Enter the player’s menu.
• This mode will be canceled if no operations are done for about 5 seconds.
2 Select the desired item.Press: Select an itemHold: Skip 10 items at a time
For iPod:Playlists Ô Artists Ô Albums Ô Songs Ô Genres Ô Composers Ô (back to the beginning)For D. player:Playlist Ô Artist Ô Album Ô Genre Ô Track Ô (back to the beginning)
3 Confirm the selection.
4 Repeat steps 2 and 3 to select a track.• When a track is selected finally, playback starts.• To return to the previous menu...
Selecting playback modes 1 Display <AV Menu>, then select <Mode>
menu icon.
2 Enter <Mode>, then select <Repeat> or <Random>.
3 Select an appropriate option.
Repeat One: Functions the same as “Repeat One” or “Repeat Mode = One.”All: Functions the same as “Repeat All” or “Repeat Mode = All.”
Random Album: Functions the same as “Shuffle Albums” of the iPod.Song/On: Functions the same as “Shuffle Songs” or “Random Play = On.”
• When the playback modes are selected, the corresponding indicators light up on the monitor.
To cancel, select <All Off> in step 2 or <Off> in step 3.
4 ¢:Press: Select trackHold: Reverse/forward search
5 ∞5 : Enter player’s menu∞ : Pause/stop playback
• To resume, press again.
Track no./Playing time page 46
• iPod is a trademark of Apple Inc., registered in the U.S. and other countries.
AVX33_J 43AVX33_J 43 07.2.1 2:48:54 PM07.2.1 2:48:54 PM

44
ENG
LISH
Listening to other external components
AV-INPUT You can connect an external component to the LINE IN/VIDEO IN plugs.• You can also connect a Navigation System to the VIDEO IN plug so that you can watch the navigation screen (Make sure <Navigation> is selected for <AV Input>). ( page 53)
~ Select “AV-IN.”
Ÿ Turn on the connected component and start playing the source.
• If you select <Camera Mirror> or <Navigation> for <AV Input> ( page 53), some status messages such as volume level change will not appear on the monitor while viewing the picture.
When <Navigation> is selected for <AV Input>...• You can use the source “AV-IN” for listening to an audio source connected to the LINE IN plugs.• While selecting other source, you can watch the navigation screen without changing the source. To watch the
navigation screen, press DISP repeatedly.
3: 45PM
FLATAV-IN
AV-INPUT
POWER]ON
Press if no playback picture appears, but source information (this) screen is displayed.
Assigned title ( page 47) page 46
AVX33_J 44AVX33_J 44 07.2.1 2:48:55 PM07.2.1 2:48:55 PM

45 EXTERNAL DEVICES
ENG
LISH
EXT-INPUT You can connect an external component to the CD changer jack on the rear using the Line Input Adapter—KS-U57 (not supplied) or AUX Input Adapter—KS-U58 (not supplied).
Preparation:Make sure <External Input> is selected for the external input setting. ( page 53)
~ Select “EXT-IN.”
Ÿ Turn on the connected component and start playing the source.
3: 45PM
FLATEXT-IN
EXT-INPUT
POWER]ON Assigned title ( page 47) page 46
AVX33_J 45AVX33_J 45 07.2.1 2:48:55 PM07.2.1 2:48:55 PM

46
ENG
LISH
Selecting sound mode
~
Ÿ
! Select a sound mode.
• For preset equalizing values of each sound mode, page 63.
• For multi-channel source, the sound mode is temporarily canceled.
Storing your own adjustmentYou can store your adjustment into User1, User2, and User3.
1 Repeat steps ~ and Ÿ, then in step !...
2 Adjust.
3 Store.
Sound equalization
Edit
60.0 Hz ENT
+03
Store
User StoreUser1User2User3
ENT Store
AV Menu
Setup EnterENT
AV Menu
Equalizer EnterENT
FlatHard RockR&BPopJazz
ExitENT
Equalizer
Equalizer menu icon
FlatHard RockR&BPopJazz
ExitENT
Equalizer
Edit
60.0 Hz ENT
+03
Store
POWER]ON
AVX33_J 46AVX33_J 46 07.2.1 2:48:55 PM07.2.1 2:48:55 PM

SETTINGS47
ENG
LISH
You can assign titles as follows.
FM/AM stations Up to 16 characters—up to 30 stations
AV-INEXT-IN
Up to 16 characters
• If you try to assign a title to a 31st station, “Name Full” flashes on the monitor. Delete unwanted titles before assignment.
~ Select the source.• For FM/AM stations: Select the band, then
tune into a station.• For “AV-IN”/“EXT-IN”: Select the source.
Ÿ Display the title entry screen.1
2
Mode menu icon
3
Ex. When you select FM as the source
! Assign a title.1 Select a character, then move the entering
position.
• To change the character set, press DISP. (For available characters, page 64.)
2 Repeat step 1 until you finish entering the title.
⁄ Finish the procedure.
Assigning titles to the sourcesPress: Change character setHold: Erase title
AV Menu
Setup EnterENT
AV Menu
Mode EnterENT
Station Name
ABC Radio
DISP StoreENTA a 0 Á á
Title Entry
POWER]ON
ModeMonoDX/LocalSSMTitle Entry
Station Name
ABC
StoreENT
Title Entry
DISP A a 0 Á á
AVX33_J 47AVX33_J 47 07.2.1 2:48:56 PM07.2.1 2:48:56 PM

48
ENG
LISH
AV Menu
Setup EnterENT
POWER]ON
!
• For some items, repeat this steps to set the sub-items.
⁄
Menu items
Menu operations
Ex. Changing the <High Pass Filter> setting
~
Non-available items will be displayed being shaded.
Ÿ
Setup Equalizer Sound
Mode List Bluetooth
Sound menu icon
Sound
Through
Fader/BalanceVolume AdjustSubwooferHigh Pass FilterCrossover
ThroughOn
ExitENT
High Pass Filter
AV Menu
Setup EnterENT
AV Menu
Sound EnterENT
Disc Surround
Dual Zone
AV Menu
Setup EnterENTInput
Display
Clock
Disc Setup 1
Disc Setup 2
Tuner
Others
Setup
Equalizer
Sound
Disc Surround
Mode
Bluetooth
List
Dual Zone
• The display indications may change according to change of the specifications.
AVX33_J 48AVX33_J 48 07.2.1 2:48:57 PM07.2.1 2:48:57 PM

SETTINGS49
ENG
LISH
Initial: UnderlinedSetup
Menu items Selectable settings, [reference page]
Disp
lay
Demonstration Off : Cancels.On : Activates the demonstration on the monitor.
Wall Paper You can select the background picture of the monitor.Future-Blue, Future-Green, Wave-Blue, Wave-Green, Wave-Pink, Metal-A, Metal-B, Ball-A, Ball-B, Ball-C, Dolphin, Simple-Red, Simple-Purple, Simple-Blue, Simple-Gray
Scroll Off : Cancels.Once : Scrolls the disc information once.Auto : Repeats scrolling (5-second intervals).• Holding DISP (on the unit) scrolls the information regardless of this
setting.
Tag Display Off : Cancels.On : Shows the Tag data while playing MP3/WMA/WAV/AAC tracks.
Dimmer Off : Cancels.On : Activates dimmer.Auto : Dims the monitor when you turn on the headlights.*1
Time Set : Press ENT (or ¢) to display the time setting screen, then set the Dimmer On/Off times.
Bright You can adjust brightness of the monitor.–15 (darkest) to +15 (brightest); Initial 00
Picture Adjust*2 You can adjust the following to make the monitor clear and legible for watching the playback picture. The setting will be stored for“DISC/USB,” and “AV-IN.”–15 to +15; Initial 0Bright : Adjust if the picture is too bright or too dark.Contrast : Adjust the contrast.Color : Adjust the color of the picture—lighter or darker.Tint : Adjust the tint if the human skin color is unnatural.
*1 The ILLUMINATION CONTROL lead connection is required. ( Installation/Connection Manual)*2 Adjustable only when the source is a disc or USB containing pictures or movies, or “AV-IN.”
Continued on the next page
AVX33_J 49AVX33_J 49 07.2.1 2:48:58 PM07.2.1 2:48:58 PM

50
ENG
LISH
Menu items Selectable settings, [reference page]Di
spla
yAspect*3 You can change the aspect ratio of the picture.
Aspect ratio of incoming signal
4:3 16:9
Full :For 16:9 original pictures
Auto : • For “DISC”: Aspect ratio is automatically selected to match to the incoming signals.
• For the other video sources: Aspect ratio is fixed to <Regular>.
Regular :For 4:3 original pictures
Language*4 Select the indication language shown on the monitor.English, Spanish, French, German, Italian, Dutch, Swedish, Danish, Russian
Cloc
k
Time Set Initial 1:00AM [6]
12Hours/24Hours 12 Hours, 24 Hours [6]
OSD Clock Off, On, [6]
Clock Adjust*5 Off : Cancels. Auto : The built-in clock is automatically adjusted using the clock time
data provided via the satellite radio channel.
Time Zone*5 *6 Select your residential area from one of the following time zones for clock adjustment.Alaska, Pacific, Mountain, Central, Eastern, Atlantic, Newfoundland
DST*5 *6 (Daylight Saving Time)
Activates this if your residential area is subject to DST.Off : Cancels. On : Activates daylight saving time.
*3 Not adjustable for audio sources.*4 After you change the indication language setting, turn off then on the power so that your setting takes effect.*5 Appears only when SIRIUS Satellite Radio or XM Satellite Radio is connected.*6 Set <Clock Adjust> to <Auto>, then press ENT (or ¢) to display these setting items.
AVX33_J 50AVX33_J 50 07.2.1 2:48:58 PM07.2.1 2:48:58 PM

SETTINGS51
ENG
LISH
Menu items Selectable settings, [reference page]Di
sc Se
tup
1*7
Menu Language Select the initial disc menu language; Initial English ( also page 64).
Audio Language Select the initial audio language; Initial English ( also page 64).
Subtitle Select the initial subtitle language or erase the subtitle (<Off>); Initial Off ( also page 64).
OSD Language Select the on-screen language used for the external monitor connected to the VIDEO OUT plug; Initial English.
Monitor Type Select the monitor type to watch a wide screen picture on the external monitor.16:9 : Select when the aspect ratio of the external monitor is 16:9.4:3 Letterbox/4:3 Pan Scan : Select when the aspect ratio of the
external monitor is 4:3. Refer to the illustrations on the left to see how the pictures are shown on the monitor.
OSD Position Select the position of the on-screen bar, [25].1 : Higher position2 : Lower position
File Type Select playback file type when a disc/USB contains different types of files. You can store this setting separately for each source —“DISC/USB.”Audio : Plays back audio files.Still Picture : Plays back JPEG files.Video : Plays back DivX/MPEG1/MPEG2 files.
DivX Regist. (Registration) This unit has its own Registration Code. Once you have played back a file with which the Registration Code recorded, this unit’s Registration Code is overwritten for copyright protection.
*7 Selectable only for “DISC” and “USB.” (Playback stops when you select one of the items.)
Position 1 Position 2
16:9 4:3 Letterbox
4:3 Pan Scan
Continued on the next page
AVX33_J 51AVX33_J 51 07.2.1 2:48:59 PM07.2.1 2:48:59 PM

52
ENG
LISH
Menu items Selectable settings, [reference page]Di
sc Se
tup
2D. (Dynamic) Range Compres. (Compression)*7
You can enjoy a powerful sound at a low volume level while playing Dolby Digital software.Auto : Select to apply the effect to multi-channel encoded software.On : Select to always use this function.
Speaker Size*7 You can adjust the speaker size setting.• Front SPK : Small, Large• Center SPK : None, Small, Large• Rear SPK : None, Small, Large• Subwoofer : On, Off• Speaker size : <Large> for 13 cm (5-1/4 inch) diameter or more;
<Small> for 13 cm (5-1/4 inch) or less.• Front speakers and rear speakers cannot be adjusted separately the
left and right.Regardless of the setting above...• No sound comes out of the subwoofer while playing Dolby Pro Logic
II Movie or Music if the front speaker is set to <Large>.• No sound comes out of the center speaker when surround is
deactivated.
Speaker Level You can adjust the output level of the activated speakers ( <Speaker Size> above), monitoring the test tone.Front Lch/Center Ch/Front Rch/Rear Rch/Subwoofer*8/Rear Lch
: adjust the output level of each speaker in the range of –10dB to +10dB; Initial 0dB.
• Press and hold ENT to turn on and off the test tone.
Speaker Distance*9 You can adjust the speaker output timing.Front Lch/Center Ch/Front Rch/Rear Rch/Rear Lch : adjust the
speaker distance from the listening position in the range of 15cm/6 inches to 600 cm/240 inches in 15 cm/6 inch step; Initial 120 cm/48 inch (for center speaker), 150 cm/60 inch (for other speakers).
• Press and hold DISP to change the measuring unit—cm and inch.
*7 Selectable only for “DISC” and “USB.” (Playback stops when you select one of the items.)*8 This subwoofer level setting takes effect only when surround is activated. ( also page 22, 23)*9 This setting does not take effect for MPEG1/MPEG2 and DivX with MP3 audio track.
Select the speaker
Adjust the speaker level
Select the speaker
Adjust the speaker distance
Select the speaker
Adjust the speaker size
AVX33_J 52AVX33_J 52 07.2.1 2:49:00 PM07.2.1 2:49:00 PM

SETTINGS53
ENG
LISH
Menu items Selectable settings, [reference page]Tu
ner
IF Band Width Auto : Increases the tuner selectivity to reduce interference noises between adjacent stations. (Stereo effect may be lost.)
Wide : Subject to the interference from adjacent stations, but sound quality will not be degraded and the stereo effect will remain.
Area Setting US : When using in North/Central/South America. FM/AM intervals are set to 200 kHz/10 kHz.
Europe : When using in any other areas. FM/AM intervals are set to 50 kHz (100 kHz during auto search)/9 kHz.
South America : When using in South American countries where FM interval is 100 kHz. AM interval is set to 10 kHz.
SIRIUS ID*10 Your SIRIUS identification number appears on the monitor.
Inpu
t
AV Input You can determine the use of LINE IN and VIDEO IN plugs.Off : Select when no component is connected (“AV-IN” is skipped while
selecting the source).Audio&Video : Select when connecting an AV component such as a
VCR.Audio : Select when connecting an audio component such as a digital
audio player.Camera*11: Select when connecting the rear view camera. Camera Mirror*11: The mirror image of the rear view is displayed on
the monitor. (The monitor on the unit only; the normal rear view appears on the external monitor.)
Navigation : Select when connecting a Navigation System. [44]
External Input*12 For connecting an external component to the CD changer jack on the rear.Changer/iPod/D. Player*13: CD changer, iPod, or D. player
[38, 43]External Input : Any other than the above. [45]• For connecting JVC DLP/XMDJVC100, this setting is not required. It is
automatically detected.
*10 Appears only when SIRIUS Satellite Radio is connected.*11 Reverse lamp lead connection is required. See Installation/Connection Manual (separate volume). The rear view
through the camera appears on the monitor in “Full” aspect ratio (regardless of the aspect ratio setting) when you shift the gear to the reverse (R) position.
*12 Not selectable when the component connected to the CD changer jack is selected as the source.*13 The name of the component detected through the CD changer jack is shown.
AVX33_J 53AVX33_J 53 07.2.1 2:49:00 PM07.2.1 2:49:00 PM

54
ENG
LISH
Othe
rsBeep Off : Cancels.
On : Activates the key-touch tone.
Telephone Muting*14 Off : Cancels.Muting1, Muting2 : Select either one which mutes the sounds while
using the cellular phone.
Initialize Initialize all settings you have made in <AV Menu>. Press ENT, then reset the unit. ( page 3)
*14 The TEL MUTING lead connection is required. See Installation/Connection Manual (separate volume).
EqualizerFlat/Hard Rock/R&B/Pop/Jazz/Dance/Country/Reggae/Classic/User1/User2/User3, [46]
Sound
Menu items Selectable settings, [reference page]
Fader/Balance Adjust fader—speaker output balance between the front and rear speakers.• Upmost—front only• Downmost—rear onlyWhen using a two-speaker system, set the fader to the center (00).Adjust balance—speaker output balance between the left and right speakers.• Leftmost—left only• Rightmost—right only
Volume Adjust Adjust and store auto-adjustment volume level for each source, comparing to the FM volume level. The volume level will automatically increase or decrease when you change the source.–12 to +12; Initial 00
Subwoofer*15 Adjust the settings below in the submenu:Phase : Subwoofer phase. Select either <Normal> or <Reverse>, which
reproduces a better sound.Level : Subwoofer output level. Level: –06 to +08; Initial 00
High Pass Filter Through : Select when the subwoofer is not connected.On : Select when the subwoofer is connected.
*15 This subwoofer level setting takes effect only when surround is deactivated. ( also page 22, 23)
Adjusts fader
Adjust balance
AVX33_J 54AVX33_J 54 07.2.1 2:49:01 PM07.2.1 2:49:01 PM

SETTINGS55
ENG
LISH
Menu items Selectable settings, [reference page]
Crossover Adjust the crossover frequency between the front/rear speakers and the subwoofer.80Hz, 120Hz, 150Hz
Amplifier Gain You can change the maximum volume level of this unit.Off : Deactivates the built-in amplifier.Low Power : VOL 00 to 30 (Select this if the maximum power of the speakers
is less than 50 W.)High Power : VOL 00 to 50
Rear Speaker*16 You can activate/deactivate the rear speakers.Off, On
*16 This setting takes effect only when Dual Zone is activated. ( also page 26)
Disc Surround*17
Menu items Selectable settings, [reference page]
Surround Off Select to deactivate the surround function.
Surround On Select to activate the surround function. [22, 23]Auto, Through, Dolby PLII Movie, Dolby PLII Music• When you select Dolby PLII Music, you can adjust <Panorama> and
<Center Width>.*18
*17 Selectable only for “DISC” and “USB.”*18 This setting takes effect only when the center speaker is activated.
Mode*19
Menu items Selectable settings, [reference page]
Mono Only for FM. (Off, On), [10]
DX/Local Only for FM. (DX, Local), [11]
SSM Only for FM. [11]
Title Entry Only for FM/AM stations, AV-IN and EXT-IN. [47]
All Off/Intro/Repeat/Random Only for disc/USB playback and iPod/D. player. [17, 30, 39, 43]
*19 Items listed under <Mode> vary among the playback sources.
AVX33_J 55AVX33_J 55 07.2.1 2:49:02 PM07.2.1 2:49:02 PM

56
ENG
LISH
ListThe accessible lists differ depending on the sources. [12, 18, 37, 39]
Bluetooth*20
Menu items Selectable settings, [reference page]
Dial Menu Only for the device connected for “Bluetooth Phone.”Select the method to make a call. [35]
Message Only for the device connected for “Bluetooth Phone.”*21
You can read a message from the following message histories.Unread : Messages you have not read.Read : Messages you have read.Unsent : Messages you have not sent.Sent : Messages you have sent.• The number of messages in each history is also shown on the monitor.
Open [32]
Search [32]
Special Device Only for “NEW DEVICE.”Shows the list of Bluetooth devices which require some special procedure to establish Bluetooth connection. Select a device you want to connect.• After selecting the device, use <Open> or <Search> ( page 32) for
connection.• Once the connection is established, it is registered in the unit. You can
connect the unit and the device by using <Connect> (below) from the next time.
Connect Only for the registered devices.After selecting a device from among the registered devices ( page 33, 37), establish the connection with it.
Disconnect Only for the device being connected.Disconnect the current device before connecting another device.
Delete Pair Only for the registered devices.Delete the registered devices.
*20 Selectable only for “Bluetooth Phone” or “Bluetooth Audio.” Select a device (or “NEW DEVICE”) before operating the menu.
*21 Selectable only when the device is compatible with Text Message.
When operating the Bluetooth device, refer also to the instructions supplied with the device.
AVX33_J 56AVX33_J 56 07.2.1 2:49:02 PM07.2.1 2:49:02 PM

SETTINGS57
ENG
LISH
Menu items Selectable settings, [reference page]Se
ttin
gsAuto Connect*22 When the unit is turned on, the connection is established automatically
with...Off : No Bluetooth device.Last : The last connected Bluetooth device.Order : The available registered Bluetooth device found at first.
Auto Answer*23 Off : The unit does not answer the calls automatically. Answer the calls manually.
On : The unit answers the incoming calls automatically.Reject : The unit rejects all incoming calls.
Message Info*23 Auto : The unit informs you of the arrival of a message by ringing and displaying “Receiving Message.” To read the message, press ENT ( page 35).
Manual : The unit does not inform you the arrival of a message.
MIC Setting*23 Adjust microphone volume connected to the unit.01, 02, 03
Version*24 The Bluetooth software and hardware versions are shown.
*22 Selectable only for “Bluetooth Phone.”*23 Only for the device being connected for “Bluetooth Phone.” Not selectable for “NEW DEVICE”.*24 If you wish to receive more information about Bluetooth, visit our JVC web site.
Dual ZoneOff, On, On/Surround On, [26]
AVX33_J 57AVX33_J 57 07.2.1 2:49:03 PM07.2.1 2:49:03 PM

ENG
LISH
58
Maintenance How to clean the connector
Frequent detachment will deteriorate the connectors.To minimize this possibility, periodically wipe the connectors with a cotton swab or cloth moistened with alcohol, being careful not to damage the connectors.
Connector
Moisture condensationMoisture may condense on the lens inside the unit in the following cases:• After starting the heater in the car.• If it becomes very humid inside the car.Should this occur, the unit may malfunction. In this case, eject the disc and leave the unit turned on for a few hours until the moisture evaporates.
How to handle discsWhen removing a disc from its case, press down the center holder of the case and lift the disc out, holding it by the edges.• Always hold the disc by the edges.
Do not touch its recording surface.When storing a disc into its case, gently insert the disc around the center holder (with the printed surface facing up).• Make sure to store discs into the cases after use.
To keep discs cleanA dirty disc may not play correctly. If a disc does become dirty, wipe it with a soft cloth in a straight line from center to edge.• Do not use any solvent (for example, conventional
record cleaner, spray, thinner, benzine, etc.) to clean discs.
To play new discsNew discs may have some rough spots around the inner and outer edges. If such a disc is used, this unit may reject the disc.To remove these rough spots, rub the edges with a pencil or ball-point pen, etc.
Stick-on label
Sticker Sticker residue
Warped disc
Do not use the following discs:
Center holder
AVX33_J 58AVX33_J 58 07.2.1 2:49:03 PM07.2.1 2:49:03 PM

59 REFERENCES
ENG
LISH
More about this unit General
Turning on the power• By pressing SRC (source) on the unit, you can also
turn on the power. If the source is ready, playback starts.
FM/AMStoring stations in memory• When SSM is over, received stations are preset in
No.1 (lowest frequency) to No. 6 (highest frequency).
DiscGeneral• In this manual, words “track” and “file” are
interchangeably used.• This unit can also play back 8 cm (3-3/16”) discs.• This unit can only play back audio CD (CD-DA) files if
different type of audio files (MP3/WMA/WAV/AAC) are recorded in the same disc.
• This unit can display only one-byte characters. No other characters can be correctly displayed.
Inserting a disc• When a disc is inserted upside down or has no
playable files, “Cannot play this disc Check the disc” appears on the monitor. Eject the disc.
Ejecting a disc• If the ejected disc is not removed within 15 seconds,
the disc is automatically inserted again into the loading slot to protect it from dust. (Disc playback starts.)
Changing the source• If you change the source, playback also stops without
ejecting the disc. Next time you select “DISC” for the playback source,
disc play starts from where it stopped previously.
Playing Recordable/Rewritable discs• This unit can recognize a total of 5 000 files and 250
folders (a maximum of 999 files per folder).• Use only “finalized” discs.• This unit can play back multi-session discs; however,
unclosed sessions will be skipped while playing.• This unit can recognize a total 25 characters for file/
folder names.• Some discs or files may not be played back due to
their characteristics or recording conditions.
Playing DVD Audio• Some DVD Audios prohibit downmix. When you play
back such a disc, “LR ONLY” appears on the display and the unit plays back the left front and right front signals.
• “MULTI CH” appears on the monitor after a beep when you try to play a multi-channel disc with Surround turned <Off>.
Playing DVD-VR• This unit cannot play back CPRM (Content Protection
for Recordable Media) protected files.• For details about DVD-VR format and play list, refer
to the instructions supplied with the recording equipment.
File playbackPlaying DivX files• This unit can play back DivX files with the extension
code <.divx>, <.div>, <.avi> (regardless of the letter case—upper/lower).
• This unit supports the DivX files whose resolution is 720 x 576 pixels or less.
• This unit supports DivX 6.x, 5.x, 4.x, and 3.11.• Audio stream should conform to MP3 or Dolby Digital.• The file encoded in the interlaced scanning mode
may not be played back correctly.• The maximum bit rate for video signals (average) is
as follows:– DVD: 4 Mbps– USB: 2 Mbps
AVX33_J 59AVX33_J 59 07.2.1 2:49:04 PM07.2.1 2:49:04 PM

ENG
LISH
60
Playing MPEG1/MPEG2 files• This unit can play back MPEG1/MPEG2 files with the
extension code <.mpg>, <.mpeg>, or <.mod>*.* <.mod> is an extension code used for the
MPEG2 files recorded by JVC Everio camcorders.• The stream format should conform to MPEG system/
program stream.• The file format should be MP@ML (Main Profile at
Main Level)/SP@ML (Simple Profile at Main Level)/MP@LL (Main Profile at Low Level).
• Audio streams should conform to MPEG1 Audio Layer-2 or Dolby Digital.
• The maximum bit rate for video signals (average) is as follows:– DVD: 4 Mbps– USB: 2 Mbps
Playing JPEG files• This unit can play back JPEG files with the extension
code <.jpg>, or <.jpeg>.• It is recommended that you record a file at 640 x 480
resolution.• This unit can play back baseline JPEG files.
Progressive JPEG files or lossless JPEG files cannot be played.
Playing MP3/WMA/WAV/AAC files• This unit can play back files with the extension
code <.mp3>, <.wma>, <.wav>, or <.m4a> (regardless of the letter case—upper/lower).
• This unit can play back the files meeting the conditions below:– Bit rate: MP3/WMA: 32 kbps — 320 kbps AAC: 16 kbps — 320 kbps– Sampling frequency: 48 kHz, 44.1 kHz, 32 kHz (for MPEG1) 24 kHz, 22.05 kHz, 16 kHz (for MPEG2) 48 kHz, 44.1 kHz, 32 kHz, 22.05 kHz (for WMA) 44.1 kHz (for WAV) 48 kHz, 44.1 kHz (for AAC)
• This unit can show ID3 Tag Version 1.0/1.1/2.2/2.3/2.4 (for MP3). This unit can also show WAV/WMA/AAC Tag.
• This unit can play back files recorded in VBR (variable bit rate).
Files recorded in VBR have a discrepancy in elapsed time indication.
• This unit cannot play back the following files:– MP3 files encoded with MP3i and MP3 PRO
format.– MP3 files encoded with Layer 1/2.– WMA files encoded with lossless, professional,
and voice format.– WMA files which are not based upon Windows
Media® Audio.– WMA/AAC files copy-protected with DRM.– AAC files purchased from the iTunes store.– Files which have the data such as AIFF, ATRAC3,
etc.
Enjoying surround sounds• If <Surround On> is selected, “MULTI” surround
playback automatically starts for multi-channel encoded discs regardless of the <Surround On> setting.
• You cannot activate surround for MPEG multi-channel DVD Video, DivX 2-channel and MPEG 2-channel sources. If <Surround On> is selected, stereo sounds are emitted only through the front speakers. “FRONT 2CH” appears on the source information screen.
• When “FIX” appears on the source information screen, no sound comes out of the subwoofer.
• When <AUTO> is selected, downsampling is performed for DVD Video (LPCM only), DVD-VR (LPCM only), and DVD Audio with fs=88.2 kHz/96 kHz and higher.
AVX33_J 60AVX33_J 60 07.2.1 2:49:04 PM07.2.1 2:49:04 PM

61 REFERENCES
ENG
LISH
USB• If “No USB Device“ appears after removing a device,
reattach a device or select another playback source.• When the USB device has no playable files, or has not
been formatted correctly, “Cannot play this device Check the device” appears on the monitor.
• The unit cannot recognize a USB device whose rating is other than 5 V and does not exceed 500 mA.
• While playing from a USB device, the playback order may differ from other players.
• This unit may be unable to play back some USB devices or some files due to their characteristics or recording conditions.
• Depending on the shape of the USB devices and connection ports, some USB devices may not be attached properly or the connection might be loose.
• When connecting a USB device, refer also to its instructions.
• Connect only one USB device to the unit at a time. Do not use a USB hub.
• This unit may not recognize a USB device connected through a USB card reader.
• This unit may not play back files in a USB device properly when using a USB extension cord.
• This unit cannot assure proper functions or supply power to all types of the devices.
• This unit can recognize a total of 5 000 files and 250 folders (a maximum of 999 files per folder).
• This unit can recognize a total 25 characters for file/folder names.
Bluetooth operations General• While driving, do not perform complicated operation
such as dialling the numbers, using phone book, etc. When you perform these operations, stop your car in a safe place.
• Some Bluetooth devices may not be connected to this unit depending on the Bluetooth version of the device.
• This unit may not work for some Bluetooth devices.• Connecting condition may vary depending on
circumstances around you.• When the unit is turned off, the device is
disconnected.
Warning messages for Bluetooth operations• Connection Error : The device is registered but the
connection has failed. Use <Connect> to connect the device again. ( page 33)
• Error : Try the operation again. If “Error” appears again, check if the device supports the function you have tried.
• Device Unfound : No available Bluetooth device is detected by <Search>.
• Loading : The unit is updating the phone book and/or Text Message.
• Please Wait... : The unit is preparing to use the Bluetooth function. If the message does not disappear, turn off and turn on the unit, then connect the device again (or reset the unit).
Icons for phone types• These icons indicate the phone type set on the device.
: Cellular phone
: Household phone
: Office
: General
: Other than above
AVX33_J 61AVX33_J 61 07.2.1 2:49:05 PM07.2.1 2:49:05 PM

ENG
LISH
62
Satellite radio operations• You can also connect the JVC SIRIUS radio PnP (Plug
and Play), using the JVC SIRIUS radio adapter, KS-U100K (not supplied) to the CD changer jack on the rear. (Select “EXT-IN” as the source.)
By turning on/off the power of the unit, you can turn on/off the JVC PnP. However, you cannot control it from this unit.
• To know more about SIRIUS Satellite radio or to sign up, visit <http://www.sirius.com>.
• For the latest channel listings and programming information, or to sign up for XM Satellite radio, visit <http://www.xmradio.com>.
iPod/D. player operations • When you turn on this unit, the iPod or D. player is
charged through the adapter connected to this unit.• The text information may not be displayed correctly.
This unit can display up to 40 characters.
Notice:When operating an iPod or a D. player, some operations may not be performed correctly or as intended. In this case, visit the following JVC web site:For iPod users: <http://www.jvc.co.jp/english/car/support/ks-pd100/index.html>For D. player users: <http://www.jvc.co.jp/english/car/support/ks-pd500/index.html>
Menu settings• If you change the <Amplifier Gain> setting
from <High Power> to <Low Power> while the volume level is set higher than “30,” the unit automatically changes the volume level to “VOL 30.”
• After you change any of <Menu Language/Audio Language/Subtitle> settings, turn off then on the power, and re-insert the disc (or insert another disc) so that your setting takes effect.
• When you select <16:9> for a picture whose aspect ratio is 4:3, the picture slightly changes due to the process for converting the picture width.
• Even if <4:3 Pan Scan> is selected, the screen size may become <4:3 Letterbox> for some discs.
AVX33_J 62AVX33_J 62 07.2.1 2:49:05 PM07.2.1 2:49:05 PM

63 REFERENCES
ENG
LISH
Sound mode
Preset equalizing values
60 H
z
150 H
z
400 H
z
1 kHz
2.5 k
Hz
6.3 k
Hz
15 kH
z
Flat 00 00 00 00 00 00 00
Hard Rock +03 +03 +01 00 00 +02 +01
R&B +03 +02 +02 00 +01 +01 +03
Pop 00 +02 00 00 +01 +01 +02
Jazz +03 +02 +01 +01 +01 +03 +02
Dance +04 +02 00 –02 –01 +01 +01
Country +02 +01 00 00 00 +01 +02
Reggae +03 00 00 +01 +02 +02 +03
Classic +02 +03 +01 00 00 +02 00
User 1/2/3 00 00 00 00 00 00 00
About sounds reproduced through the rear terminals• Speaker out/analog discrete output—LINE OUT
(FRONT/REAR)/CENTER OUT/SUBWOOFER:Multi-channel signals are emitted for a multi-channel encoded software. (When Dual Zone is activated, the same signal emitted through 2nd AUDIO OUT plugs are emitted for the main source “DISC.”)
• 2nd AUDIO OUT: 2-channel signal is emitted when Dual Zone is activated. When playing a multi-channel encoded disc, multi-channel signals are downmixed (except for some DVD Audio).
• “DVD Logo” is a trademark of DVD Format/Logo Licensing Corporation registered in the US, Japan and other countries.
• DivX, DivX Ultra Certified, and associated logos are trademarks of DivX, inc. and are used under license.
• Official DivX® Ultra Certified product• Plays all versions of DivX® video (including DivX® 6)
with enhanced playback of DivX® media files and the DivX® Media Format
• Microsoft and Windows Media are either registered trademarks or trademarks of Microsoft Corporation in the United States and/or other countries.
• iPod and iTunes are trademarks of Apple Inc., registered in the U.S. and other countries.
AVX33_J 63AVX33_J 63 07.2.1 2:49:06 PM07.2.1 2:49:06 PM

ENG
LISH
64
In addition to the roman alphabet (A – Z, a – z), the following characters will be used to show the various information on the monitor.• You can also use the following
characters to assign titles ( page 47)
Upper and lower cases
Numbers and symbols
Characters shown on the monitor
Language codes (for DVD/DivX language selection)
Code Language Code Language Code Language Code Language Code LanguageAA Afar FA Persian KL Greenlandic OC Occitan ST SesothoAB Abkhazian FI Finnish KM Cambodian OM (Afan) Oromo SU SundaneseAF Afrikaans FJ Fiji KN Kannada OR Oriya SW SwahiliAM Ameharic FO Faroese KO Korean (KOR) PA Panjabi TA TamilAR Arabic FY Frisian KS Kashmiri PL Polish TE TeluguAS Assamese GA Irish KU Kurdish PS Pashto, Pushto TG TajikAY Aymara GD Scots Gaelic KY Kirghiz PT Portuguese TH ThaiAZ Azerbaijani GL Galician LA Latin QU Quechua TI TigrinyaBA Bashkir GN Guarani LN Lingala RM Rhaeto-Romance TK TurkmenBE Byelorussian GU Gujarati LO Laothian RN Kirundi TL TagalogBG Bulgarian HA Hausa LT Lithuanian RO Rumanian TN SetswanaBH Bihari HI Hindi LV Latvian, Lettish RW Kinyarwanda TO TongaBI Bislama HR Croatian MG Malagasy SA Sanskrit TR TurkishBN Bengali, Bangla HU Hungarian MI Maori SD Sindhi TS TsongaBO Tibetan HY Armenian MK Macedonian SG Sangho TT TatarBR Breton IA Interlingua ML Malayalam SH Serbo-Croatian TW TwiCA Catalan IE Interlingue MN Mongolian SI Singhalese UK UkrainianCO Corsican IK Inupiak MO Moldavian SK Slovak UR UrduCS Czech IN Indonesian MR Marathi SL Slovenian UZ UzbekCY Welsh IS Icelandic MS Malay (MAY) SM Samoan VI VietnameseDZ Bhutani IW Hebrew MT Maltese SN Shona VO VolapukEL Greek JI Yiddish MY Burmese SO Somali WO WolofEO Esperanto JW Javanese NA Nauru SQ Albanian XH XhosaET Estonian KA Georgian NE Nepali SR Serbian YO YorubaEU Basque KK Kazakh NO Norwegian SS Siswati ZU Zulu
AVX33_J 64AVX33_J 64 07.2.1 2:49:06 PM07.2.1 2:49:06 PM

65 REFERENCES
ENG
LISH
TroubleshootingWhat appears to be trouble is not always serious. Check the following points before calling a service center.
Symptoms Remedies/Causes
Gene
ral
• No sound comes out of the center speaker. • Center speaker is not activated. ( page 52) Once you have reset the unit, make sure to activate the
speaker again.• Center speaker is used only for surround playback. No
sound comes out for stereo playback.
• The monitor is not clear and legible. Sunshine from the windshield may cause this symptom.Adjust <Bright>. ( page 49)
• The unit does not work at all. Reset the unit. ( page 3)
• The remote controller does not work. Deactivate Dual Zone. ( page 26)(While Dual Zone is activated, the remote controller only functions for operating the DVD/CD player.)
• “No Signal” appears. • Change the source.• Start the playback on the external component connected
to VIDEO IN plug.• Check the cords and connections.• Signal input is too weak.
• “Mecha Error Push Reset” appears on the monitor, and the panel does not move.
Reset the unit. ( page 3)
FM/A
M • SSM automatic presetting does not work. Store stations manually. ( page 12)
• Static noise while listening to the radio. Connect the antenna firmly.
Disc
pla
ybac
k
• Disc can be neither recognized nor played . Eject the disc forcibly. ( page 3)
• Disc cannot be ejected. Unlock the disc. ( page 18)
• Recordable/Rewritable discs cannot be played back.
• Tracks on the Recordable/Rewritable discs cannot be skipped.
• Insert a finalized disc.• Finalize the discs with the component which you used
for recording.
• Playback does not start. • Insert the disc correctly again.• Region code of the DVD is not correct. ( page 4)• The format of files is not supported by the unit.
• The playback picture is not clear and legible. Adjust items in <Picture Adjust>. ( page 49)
• Sound and pictures are sometimes interrupted or distorted.
• Stop playback while driving on rough roads.• Change the disc.
AVX33_J 65AVX33_J 65 07.2.1 2:49:07 PM07.2.1 2:49:07 PM

ENG
LISH
66
Symptoms Remedies/CausesDi
sc p
layb
ack
• No playback picture appears on the monitor. Parking brake lead is not connected properly. ( Installation/Connection Manual)
• No picture appears on the external monitor. • Connect the video cord correctly.• Select the correct input on the external monitor.
• “Eject Error” or “Loading Error” appears on the monitor.
Changing the source by pressing SOURCE will solve this error.
File
pla
ybac
k
• Disc cannot be played back. • Change the disc.• Record the tracks using a compliant application in the
appropriate discs. ( page 4)• Add appropriate extension codes to the file names.
• Noise is generated. The track played back is not a playable file format. Skip to another file.
• Tracks are not played back as you have intended them to play.
Playback order may differs from the one played back using other players.
• Elapsed playing time is not correct. This sometimes occurs during playback. This is caused by how the tracks are recorded.
• “Not Support” appears on the monitor and track is skipped.
Track is unplayable.
USB
play
back
• Noise is generated. • The track played back is not a playable file format (MP3/WMA/WAV/AAC). Skip to another file.
• Do not add the extension code <.mp3>, <.wma>, <.wav>or <.m4a> to non-MP3/WMA/WAV/AAC tracks.
• Tracks cannot play back as you have intended them to play.
Playback order may differs from the one played back using other players.
• “Now Reading” keeps flashing on the monitor.
• Readout time varies depending on the USB device.• Do not use too many hierarchy, folders and empty
folders.** Folder that is physically empty or folder that contains
data but does not contain valid MP3/WMA/WAV/AAC track.
• Turn off the power then on again.• Do not pull out or connect the USB device repeatedly
while “Now Reading” is displayed on the monitor.
• Correct characters are not displayed (e.g. album name).
For available characters, page 64.
• While playing a track, sound is sometimes interrupted.
The tracks have not been properly copied into the USB device. Copy tracks again into the USB device, and try again.
AVX33_J 66AVX33_J 66 07.2.1 2:49:08 PM07.2.1 2:49:08 PM

67 REFERENCES
ENG
LISH
Symptoms Remedies/CausesBl
ueto
oth
• Bluetooth device does not detect the unit. This unit can be connected with one Bluetooth cellular phone and one Bluetooth audio device at a time.While connecting a device, this unit cannot be detected from another device. Disconnect currently connected device and search again.
• The unit does not detect the Bluetooth device.
• Check the Bluetooth setting of the device.• Search from the Bluetooth device. After the device
detects the unit, select <Open> on the unit to connect the device. ( page 32)
• The unit does not make pairing with the Bluetooth device.
• Enter the same PIN code for both the unit and target device. If the PIN code of the device is not indicated on its instructions, try “0000” or “1234.”
• Select the device name from <Special Device>, then try to connect again. ( page 33)
• Echo or noise occurs. Adjust the microphone unit position.
• Phone sound quality is poor. • Reduce the distance between the unit and the Bluetooth audio device.
• Move the car to place where you can get a better signal reception.
• The sound is interrupted or skipped during playback of a Bluetooth audio device.
• Reduce the distance between the unit and the Bluetooth audio device.
• Disconnect the device connected for “Bluetooth Phone.”• Turn off, then turn on the unit.• (When the sound is not yet restored,) connect the device
again.
• “New Device” cannot be selected for “Bluetooth Audio.”
Bluetooth audio device is being connected. To select “New Device,” disconnect it. ( page 33)
• The connected audio device cannot be controlled.
Check whether the connected audio device supports AVRCP (Audio Video Remote Control Profile).
CD ch
ange
r
• “No Disc” appears on the monitor. Insert a disc into the magazine.
• “No Magazine” appears on the monitor. Insert the magazine.
• “Cannot play this disc Check the disc” appears on the monitor.
Disc does not include playable files. Replace the disc with playable files.
• “Reset 08” appears on the monitor. Connect this unit and the CD changer correctly and press the reset button of the CD changer.
• “Reset 01” – “Reset 07” appears on the monitor.
Press the reset button of the CD changer.
• The CD changer does not work at all. Reset the unit. ( page 3)
AVX33_J 67AVX33_J 67 07.2.1 2:49:08 PM07.2.1 2:49:08 PM

ENG
LISH
68
Symptoms Remedies/CausesSa
telli
te ra
dio
• “CALL 1-888-539-SIRIUS TO SUBSCRIBE” appears on the monitor.
Starts subscribing SIRIUS Satellite radio. ( page 40)
• “No Signal” or “NO SIGNAL” appears on the monitor.
Move to an area with stronger signals.
• “No Antenna” or “CHECK ANTENNA” appears on the monitor.
Connect the antenna firmly.
• “Invalid Channel” appears on the monitor for about 5 seconds, then returns to the previous display when listening to the SIRIUS Satellite radio.
No broadcast on the selected channel.Select another channel or continue listening to the previous channel.
• “CHANNEL–––” appears on the display for about 2 seconds, then returns to the previous channel while listening to the XM Satellite radio.
Selected channel is no longer available or is unauthorized. Select another channel or continue listening to the previous channel.
• “No Name” or “–––” appears on the monitor.
No text information for the selected channel.
• “Channel is Updating XX% completed” or “UPDATING” appears on the monitor and no sound can be heard.
The receiver is updating the channel information and it takes a few minutes to complete.
• “OFF AIR” appears on the monitor while listening to the XM Satellite radio.
Selected channel is not broadcasting at this time. Select another channel or continue listening to the previous channel.
• “LOADING” appears on the monitor while listening to the XM Satellite radio.
The unit is loading the channel information and audio. Text information is temporarily unavailable.
• “Reset08” flashes on the monitor. Reconnect this unit and the Satellite radio correctly and reset the unit.
• Satellite radio does not work at all. Reconnect the Satellite radio after a few seconds.
AVX33_J 68AVX33_J 68 07.2.1 2:49:09 PM07.2.1 2:49:09 PM

69 REFERENCES
ENG
LISH
Symptoms Remedies/CausesiP
od/D
. pla
yer p
layb
ack
• The iPod/D. player does not turn on or does not work.
• Check the connecting cable and its connection.• Charge the battery.• For D. player: Update the firmware version.
• The sound is distorted. Deactivate the equalizer either on this unit or the iPod/D. player.
• “Disconnect” appears on the monitor. Check the connecting cable and its connection.
• For iPod: Playback stops. The headphones are disconnected during playback. Restart playback.
• No sound can be heard.• “Error 01” appears on the monitor when
connecting a D. player.
Disconnect the D. player from the adapter. Then, connect them again.
• “No Files” or “No Track” appears on the monitor.
No tracks are stored. Import tracks to the iPod or D. player.
• “Reset 01” – “Reset 07” appears on the monitor.
Disconnect the adapter from both this unit and iPod/D. player. Then, connect them again.
• “Reset 08” appears on the monitor. Check the connection between the adapter and this unit.
• The iPod’s or D. player’s controls do not work after disconnecting from this unit.
Reset the iPod or D. player.
AV-IN
• No picture appears on the monitor. • Turn on the video component if it is not on.• This unit is not connected to the video component
correctly. Connect it correctly.
• The playback picture is not clear and legible. Adjust items in <Picture Adjust>. ( page 49)
AVX33_J 69AVX33_J 69 07.2.1 2:49:09 PM07.2.1 2:49:09 PM

ENG
LISH
70
SpecificationsAM
PLIF
IER
Power Output: 20 W RMS × 4 Channels at 4 Ω and ≤ 1% THD+N
Signal-to-Noise Ratio: 80 dBA (reference: 1 W into 4 Ω)
Load Impedance: 4 Ω (4 Ω to 8 Ω allowance)Equalizer Control Range: Frequencies: 60 Hz, 150 Hz, 400 Hz, 1 kHz, 2.5 kHz,
6.3 kHz, 15 kHzLevel: ±10 dB
Audio Output LevelLINE OUT (FRONT/REAR)/CENTER OUT/ SUBWOOFER:
Line-Out Level/Impedance: 5.0 V/20 kΩ load (full scale)Output Impedance: 1 kΩ
Color System: NTSCVideo Output (composite): 1 Vp-p/75 ΩOther Terminals: Input: LINE IN, VIDEO IN, MIC IN, USB input
terminal, Antenna inputOutput: 2nd AUDIO OUT, VIDEO OUTOthers: CD changer, OE REMOTE
FM/A
M TU
NER
Frequency Range: FM (with channel interval set to 100 kHz or 200 kHz):
87.5 MHz to 107.9 MHz
FM (with channel interval set to 50 kHz):
87.5 MHz to 108.0 MHz
AM (with channel interval set to 10 kHz):
530 kHz to 1 710 kHz
AM (with channel interval set to 9 kHz): 531 kHz to 1 602 kHzFM Tuner: Usable Sensitivity: 11.3 dBf (1.0 μV/75 Ω)
50 dB Quieting Sensitivity: 16.3 dBf (1.8 μV/75 Ω)Alternate Channel Selectivity (400 kHz): 65 dBFrequency Response: 40 Hz to 15 000 HzStereo Separation: 35 dB
AM Tuner: Sensitivity/Selectivity: 20 μV/35 dB
DVD/
CD
Signal Detection System: Non-contact optical pickup (semiconductor laser)Frequency Response: DVD, fs=48 kHz: 16 Hz to 22 000 Hz
DVD, fs=192 kHz: 16 Hz to 88 000 HzVCD/CD: 16 Hz to 20 000 Hz
Dynamic Range: 93 dBSignal-to-Noise Ratio: 95 dBWow and Flutter: Less than measurable limit
AVX33_J 70AVX33_J 70 07.2.1 2:49:09 PM07.2.1 2:49:09 PM

71 REFERENCES
ENG
LISH
MON
ITOR
Screen Size: 3.5 inch wide liquid crystal display
Number of Pixel: 211 200 pixels: 960 (horizontal) × 220 (vertical)
Drive Method: TFT (Thin Film Transistor) active matrix format
Color System: PAL/NTSC
Aspect Ratio: 16:9 (wide)
Allowable Storage Temperature: –10°C to +60°C (14°F to 140°F)
Allowable Operating Temperature: 0°C to +40°C (32°F to 104°F)
USB
USB Standards: USB 1.1
Data Transfer Rate: Full Speed: Maximum 12 MbytesLow Speed: Maximum 1.5 Mbytes
Compatible Device: Mass storage class
Compatible File System: FAT 32/16/12
Max. Current: Less than 500 mA/5 V
BLUE
TOOT
H
Version: Bluetooth 1.2 certified
Output Power: +4 dBm Max. (Power class 2)
Service Area: Within 10 m (10.9 yd)
Profile: HSP (Headset Profile)HFP (Hands-Free Profile)A2DP (Advanced Audio Distribution Profile)AVRCP (Audio/Video Remote Control Profile)SPP (Serial Port Profile)OPP (Object Push Profile)
GENE
RAL
Power Requirement: Operating Voltage: DC 14.4 V (11 V to 16 V allowance)
Grounding System: Negative ground
Allowable Operating Temperature: 0°C to +40°C (32°F to 104°F)
Dimensions (W × H × D): Installation Size (approx.): 182 mm × 52 mm × 160 mm(7-3/16” × 2-1/16” × 6-5/16”)
Panel Size (approx.): 188 mm × 58 mm × 12 mm (7-7/16” × 2-5/16” × 1/2”)
Mass (approx.): 2.1 kg (4.7 lbs) (excluding accessories)
Design and specifications are subject to change without notice.
If a kit is necessary for your car, consult your telephone directory for the nearest car audio speciality shop.
AVX33_J 71AVX33_J 71 07.2.1 2:49:10 PM07.2.1 2:49:10 PM

EN, SP, FR0207MNMMDWJEIN© 2007 Victor Company of Japan, Limited
Having TROUBLE with operation?Please reset your unit
Refer to page of How to reset your unit
Still having trouble??USA ONLY
Call 1-800-252-5722http://www.jvc.com
We can help you!
Rear_KD-AVX33J.indd 2Rear_KD-AVX33J.indd 2 07.2.6 10:51:46 AM07.2.6 10:51:46 AM

1
KD-ADV38KD-AVX33Installation/Connection ManualManual de instalación/conexiónManuel d’installation/raccordement
ENGLISH
This unit is designed to operate on 12 V DC, NEGATIVE ground electrical systems. If your vehicle does not have this system, a voltage inverter is required, which can be purchased at JVC car audio dealers.
WARNINGS• DO NOT install any unit and wire any cable in locations where;
– it may obstruct the steering wheel and gearshift lever operations, as this may result in a traffic accident.
– it may obstruct the operation of safety devices such as air bags, as this may result in a fatal accident.
– it may obstruct visibility.• DO NOT operate any unit while manipulating the steering wheel, as
this may result in a traffic accident.• The driver must not watch the monitor while driving. If the driver
watches the monitor while driving, it may lead to carelessness and cause an accident.
• The driver must not put on the headphones while driving. It is dangerous to shut off the outside sounds while driving.
• If you need to operate the unit while driving, be sure to look around carefully.
• If the parking brake is not engaged, “Parking Brake” appears on the monitor, and no playback picture will be shown.– This warning appears only when the parking brake lead is
connected to the parking brake system built in the car.Notes on electrical connections:• Replace the fuse with one of the specified rating. If the fuse blows
frequently, consult your JVC car audio dealer.• It is recommended to connect to the speakers with maximum
power of more than 50 W (both at the rear and at the front, with an impedance of 4 Ω to 8 Ω).
If the maximum power is less than 50 W, change “Amplifier Gain” setting to prevent the speakers from being damaged (see page 55 of the INSTRUCTIONS).
• To prevent short-circuit, cover the terminals of the UNUSED leads with insulating tape.
• The heat sink becomes very hot after use. Be careful not to touch it when removing this unit.
QRubber cushionCojín de gomaAmortisseur en caoutchouc
GCrimp connectorsConectores de sujeciónRaccord à sertir
NWasher (ø5)Arandela (ø5)Rondelle (ø5)
oLock nut (M5)Tuerca de seguridad (M5)Ecrou d’arrêt (M5)
RMounting bolt—M5 x 20 mm (M5 x 13/16")Perno de montaje—M5 x 20 mm (M5 x 13/16 pulgada)Boulon de montage—M5 x 20 mm(M5 x 13/16 pouces)
PHandlesManijasPoignées
IBatteriesPliasPiles
FRANÇAIS
Cet appareil est conçu pour fonctionner sur des sources de courant continu de 12 V à masse NEGATIVE. Si votre véhicule n’offre pas ce type d’alimentation, il vous faut un convertisseur de tension, que vous pouvez acheter chez un revendeur d’autoradios JVC.
AVERTISSEMENTS• N’INSTALLEZ aucun appareil ni aucun câble dans un endroit où:
– où il peut gêner l’accès au volant ou au levier de vitesse car cela peut entraîner un accident de la circulation.
– où il peut gêner la manipulation de dispositifs de sécurité tels que les airbags car cela peut entraîner un accident fatal.
– où il peut gêner la visibilité.• NE COMMANDEZ pas l’appareil lors de la manipulation du volant
car cela peut entraîner un accident de la circulation.• Le conducteur ne doit pas regarder le moniteur lorsqu’il conduit.
Regarder le moniteur lorsqu’on est au volant réduit considérablement la vigilance du conducteur et multiplie les risques d’accident.
• Le conducteur ne doit pas utiliser un casque d’écoute quand il est au volant. Il est en effet dangereux de bloquer les sons de la circulation routière pendant la conduite d’un véhicule.
• Si vous devez commander l’appareil pendant que vous conduisez, assurez-vous de bien regarder autour de vous.
• Si le frein à main n’est pas engagé, “Parking Brake (Frein à Main)” s’affiche sur le moniteur et aucune image de lecture n’apparaît.
– Cet avertissement apparaît uniquement quand le fil du frein de stationnement est connecté au système de frein de stationnement intégré à la voiture.
Remarques sur les connexions électriques:• Remplacer le fusible par un de la valeur précisée. Si le fusible saute
souvent, consulter votre revendeur d’autoradios JVC.• Il est recommandé de connecter des enceintes avec une puissance de
plus de 50 W (les enceintes arrière et les enceintes avant, avec une impédance comprise entre 4 Ω et 8 Ω).
Si la puissance maximum est inférieure à 50 W, changez “Amplifier Gain” pour éviter d’endommager vos enceintes (voir page 55 du MANUEL D’INSTRUCTIONS).
• Pour éviter les court-circuits, couvrir les bornes des fils qui ne sont PAS UTILISÉS avec de la bande isolante.
• Le dissipateur de chaleur devient très chaud après usage. Faire attention de ne pas le toucher en retirant cet appareil.
Heat sinkSumidero térmico
Dissipateur de chaleur
MReverse gear signal extension cordCable prolongador para la señal del engranaje de marcha atrásCordon prolongateur pour le signal de marche arrière
Required space for installation / Espacio requerido para la instalación / Espace nécessaire pour l’installation
Control panelPanel de control
Panneau de commande
5 mm (1/4")
5 mm (1/4")
KMicrophoneMicrófonoMicrophone
LMicrophone clip Presilla para micrófonoAttache de microphone
Installing the remote controller / Instalación del control remoto / Installation de la télécommande
HRemote controller / HolderControl remoto / SoporteTélécommande / Support
Trim plate is detached on this illustration for explanation.Para fines explicativos, se ha retirado la placa de guarnición en esta ilustración.La plaque de garniture est montrée détachée sur cette illustration pour les besoins de l’explication.
LVT1658-002A[J] 0207MNMMDWJEIN
EN, SP, FR©2007 Victor Company of Japan, Limited
FAudio/video cordCable de audio/vídeoCordon audio/vidéo
Parts list for installation and connection / Lista de piezas para instalación y conexión / Liste des pièces pour l’installation et raccordementThe following parts are provided for this unit. After checking them, please set them correctly.Con esta unidad se suministran las siguientes piezas. Después de inspeccionarlas, colóquelas correctamente.Les pièces suivantes sont fournies avec cet appareil. Après vérification, veuillez les placer correctement.
DashboardTablero de instrumentosTableau de bord
ESPAÑOL
Esta unidad está diseñada para funcionar con 12 V de CC, con sistemas eléctricos de masa NEGATIVA. Si su vehículo no posee este sistema, será necesario un inversor de tensión, que puede ser adquirido en los concesionarios de JVC de equipos de audio para automóviles.
ADVERTENCIAS• NO instale ninguna unidad ni tienda cables en los lugares donde;
– Donde pueda obstruir la maniobra del volante de dirección y del cambio de engranajes, con el consiguiente riesgo de accidentes de tráfico.
– Donde pueda obstruir el funcionamiento de dispositivos de seguridad tales como bolsas de aire, pues podría resultar en un accidente fatal.
– Donde pueda obstruir la visibilidad.• NO OPERE la unidad mientras está maniobrando el volante de
dirección, pues podría producirse un accidente de tráfico.• El conductor no debe mirar el monitor mientras conduce. Si el
conductor mira el monitor mientras conduce puede descuidarse y causar un accidente.
• El conductor no deberá ponerse los auriculares mientras conduce. Es muy peligroso no escuchar los ruidos exteriores durante la conducción.
• Si es necesario operar la unidad mientras maneja, asegúrese de mirar atentamente en todas las direcciones.
• Si el freno de mano no está en uso, aparecerá “Parking Brake (Freno de Mano)” en la pantalla y no se mostrará ninguna secuencia de imagen.– Esta advertencia aparece únicamente cuando el cable del freno de
estacionamiento se encuentra conectado al sistema del freno de estacionamiento incorporado al automóvil.
Notas sobre las conexiones eléctricas:• Reemplace el fusible por uno con la corriente especificada. Si el
fusible se quemase frecuentemente consulte con su concesionario de JVC de equipos de audio para automóviles.
• Se recomienda conectar los altavoces con una potencia máxima de más de 50 W (tanto atrás como adelante, con una impedancia de 4 Ω a 8 Ω). Si la potencia máxima es de menos de 50 W, cambie “Amplifier Gain” para evitar daños en los altavoces (consulte la página 55 del MANUAL DE INSTRUCCIONES).
• Para evitar cortocircuitos, cubra los cables NO UTILIZADOS con cinta aislante.
• El sumidero térmico estará muy caliente después del uso. Asegúrese de no tocarlo al desmontar esta unidad.
CSleeveCubiertaManchon
EPower cordCordón de alimentaciónCordon d’alimentation
A / BHard case/Control panelEstuche duro/Panel de controlEtui de transport/Panneau de commande
DTrim platePlaca de guarniciónPlaque d’assemblage
J Double-sided adhesive tapeCinta adhesiva de doble caraBande adhésive à double face
Double-sided adhesive tapeCinta adhesiva de doble caraBande adhésive à double face
Holder / Soporte / Support
Remote controllerControl remotoTélécommande
Instal1-3_KD-AVX33[J].indd 1Instal1-3_KD-AVX33[J].indd 1 2007.2.2 9:35:58 AM2007.2.2 9:35:58 AM

2
When using the optional stay / Cuando emplea un soporte opcional / Lors de l’utilisation du hauban en option
When installing the unit without using the sleeve / Instalación de la unidad sin utilizar la cubierta / Lors de l’installation de l’appareil scans utiliser de manchonIn a car having the “Required space for installation” (see page 1), first remove the car radio and install the unit in its place.En un automóvil que disponga del “Espacio requerido para la instalación” (véase la página 1), primero desmonte la autorradio, e instale el receptor en su lugar.Dans une voiture avec l’“Espace nécessaire pour l’installation” (voir page 1), retirez d’abord l’ancien autoradio et installez cet autoradio à sa place.
Screw (option)Tornillo (opción)Vis (en option)
Stay (option)Soporte (opción)Hauban (en option)
Fire wallTabique a prueba de incendiosCloison
DashboardTablero de instrumentosTableau de bord
Bracket *2
Ménsula *2
Support *2
*2 Not included for this unit.*2 No suministrado con esta unidad.*2 Non fourni avec cet appareil.
Flat type screws—M5 x 8 mm (M5 x 3/8") *2
Tornillos tipo plano—M5 x 8 mm (M5 x 3/8 pulgada) *2
Vis à tête plate—M5 x 8 mm (M5 x 3/8 pouces) *2
Bracket *2
Ménsula *2
Support *2
Install the unit at an angle of less than 30˚.Instale la unidad a un ángulo de menos de 30˚.Installez l’appareil avec un angle de moins de 30˚.
Note: When installing the unit on the mounting bracket, make sure to use the 8 mm (3/8") -long screws. If longer screws are used, they could damage the unit.
Nota: Cuando instala la unidad en la ménsula de montaje, asegúrese de utilizar los tornillos de 8 mm (3/8 pulgada) de longitud. Si se utilizan tornillos más largos, éstos pueden dañar la unidad.
Remarque: Lors de l’installation de l’appareil sur le support de montage, s’assurer d’utiliser des vis d’une longueur de 8 mm (3/8 pouces). Si des vis plus longues sont utilisées, elles peuvent endommager l’appareil.
Removing the unitBefore removing the unit, release the rear section.
Extracción de la unidadAntes de extraer la unidad, libere la sección trasera.
Insert the two handles, then pull them as illustrated so that the unit can be removed.Inserte las dos manijas y, a continuación, extráigalas de la manera indicada en la ilustración para poder desmontar la unidad.Insérez les deux poignées, puis tirez de la façon illustrée de façon à retirer l’appareil.
Retrait de l’appareilAvant de retirer l’appareil, libérer la section arrière.
INSTALLATION (IN-DASH MOUNTING)The following illustration shows a typical installation. If you have any questions or require information regarding installation kits, consult your JVC car audio dealer or a company supplying kits.• If you are not sure how to install this unit correctly, have it installed
by a qualified technician.• Make sure not to block the fan on the rear panel to maintain proper
ventilation when installed.• You cannot install the unit on the car which has any obstacles in the
space shown in “Required space for installation” on page 1.
Caution when installingFit the unit into the mounting sleeve by using four corners of the trim plate.• DO NOT press the panel (shaded in the
illustration).
INSTALLATION (MONTAGE DANS LE TABLEAU DE BORD)L’illustration suivante est un exemple d’installation typique. Si vous avez des questions ou avez besoin d’information sur des kits d’installation, consulter votre revendeur d’autoradios JVC ou une compagnie d’approvisionnement.• Si l’on n’est pas sûr de pouvoir installer correctement cet appareil, le
faire installer par un technicien qualifié.• Lors de l’installation assurez-vous de ne pas bloquer le ventilateur à
l’arrière afin de permettre une ventilation correcte.• Vous ne pouvez pas installer l’appareil sur une voiture qui a
certains obstacles dans l’espace montré dans “Espace nécessaire pour l’installation” à la page 1.
Précautions lors de l’installationFixez l’autoradio sur le manchon de montage en utilisant les quatre coins de la plaque de garniture.• NE POUSSEZ PAS sur le panneau (en gris sur l’illustration).
30˚
INSTALACIÓN (MONTAJE EN EL TABLERO DE INSTRUMENTOS)La siguiente ilustración muestra una instalación típica. Si tiene alguna pregunta o necesita información acerca de las herramientas para instalación, consulte con su concesionario de JVC de equipos de audio para automóviles o a una compañía que suministra tales herramientas.• Si usted no está seguro de cómo instalar correctamente la unidad,
hágala instalar por un técnico cualificado.• Asegúrese de no bloquear las rendijas de ventilación del panel trasero,
para poder mantener una buena ventilación una vez instalado.• No podrá instalar la unidad en un coche en que haya algún
obstáculo en el espacio indicado en “Espacio requerido para la instalación” en la página 1.
Precaución en la instalaciónIntroduzca el receptor en la manga de montaje utilizando las cuatro esquinas de la placa decorativa.• NO presione el panel (sombreado en la ilustración).
Flat type screws—M5 x 8 mm (M5 x 3/8") *2
Tornillos tipo plano—M5 x 8 mm (M5 x 3/8 pulgada) *2
Vis à tête plate—M5 x 8 mm (M5 x 3/8 pouces) *2
*1 When you stand the unit, be careful not to damage the fuse on the rear.
*1 Al poner la unidad vertical, tenga cuidado de no dañar el fusible provisto en la parte posterior.
*1 Lorsque vous mettez l’appareil à la verticale, faire attention de ne pas endommager le fusible situé sur l’arrière.
Do the required electrical connections.Realice las conexiones eléctricas requeridas.Réalisez les connexions électriques.
Do not block the fan.No tape las rendijas de ventilación.Ne bloquez pas le ventilateur.
Bend the appropriate tabs to hold the sleeve firmly in place.Doble las lengüetas apropiadas para retener firmemente la manga en su lugar.Tordez les languettes appropriées pour maintenir le manchon en place.
Instal1-3_KD-AVX33[J].indd 2Instal1-3_KD-AVX33[J].indd 2 2007.2.7 10:39:56 AM2007.2.7 10:39:56 AM

3
PRECAUTIONS on power supply and speaker connections:• DO NOT connect the speaker leads of the power cord to the
car battery; otherwise, the unit will be seriously damaged.• BEFORE connecting the speaker leads of the power cord to the
speakers, check the speaker wiring in your car.
PRÉCAUTIONS sur l’alimentation et la connexion des enceintes:• NE CONNECTEZ PAS les fils d’enceintes du cordon
d’alimentation à la batterie; sinon, l’appareil serait sérieusement endommagé.
• AVANT de connecter les fils d’enceintes du cordon d’alimentation aux enceintes, vérifiez le câblage des enceintes de votre voiture.
ELECTRICAL CONNECTIONSTo prevent short circuits, we recommend that you disconnect the battery’s negative terminal and make all electrical connections before installing the unit.• Be sure to ground this unit to the car’s chassis again after
installation.
CONEXIONES ELECTRICASPara evitar cortocircuitos, recomendamos que desconecte el terminal negativo de la batería y que efectúe todas las conexiones eléctricas antes de instalar la unidad.• Asegúrese de volver a conectar a masa esta unidad al chasis del
automóvil después de la instalación.
RACCORDEMENTS ELECTRIQUESPour éviter tout court-circuit, nous vous recommandons de débrancher la borne négative de la batterie et d’effectuer tous les raccordements électriques avant d’installer l’appareil.• Assurez-vous de raccorder de nouveau la mise à la masse de
cet appareil au châssis de la voiture après l’installation.
PRECAUCIONES sobre las conexiones de la fuente de alimentación y de los altavoces:• NO conecte los conductores de altavoz del cable de
alimentación a la batería de automóvil, pues podrían producirse graves daños en la unidad.
• ANTES de conectar a los altavoces los conductores de altavoz del cable de alimentación, verifique el conexionado de altavoz de su automóvil.
Typical connectionsBefore connecting: Check the wiring in the vehicle carefully. Incorrect connection may cause serious damage to this unit.The leads of the power cord and those of the connector from the car body may be different in color.1 Connect the colored leads of the power cord in the order specified
in the illustration below.2 Connect the antenna cord.3 Finally connect the wiring harness to the unit.
Raccordements typiquesAvant de commencer la connexion: Vérifiez attentivement le câblage du véhicule. Une connexion incorrecte peut endommager sérieusement l’appareil.Le fil du cordon d’alimentation et ceux des connecteurs du châssis de la voiture peuvent être différents en couleur.1 Connectez les fils colorés du cordon d’alimentation dans l’ordre
spécifié sur l’illustration ci-dessous.2 Connectez le cordon d’antenne.3 Finalement, connectez le faisceau de fils à l’appareil.
15 A fuseFusible de 15 AFusible 15 A
Rear ground terminalTerminal de tierra posteriorBorne arrière de masse
To an external component (see diagram )A un componente externo (véase diagrama )Pour connecter un appareil extérieur (voir le diagramme )
To parking brake (see diagram ) Al freno de estacionamiento (véase diagrama )Au frein de stationnement (voir le diagramme )
Yellow *4
Amarillo *4
Jaune *4
USB cable / Cable USB / Câble USB(see diagram / véase diagrama /voir le diagramme )
*3 Not included for this unit*3 No suministrado con esta unidad*3 Non fourni avec cet appareil
*4 Before checking the operation of this unit prior to installation, this lead must be connected, otherwise power cannot be turned on.
*4 Antes de comprobar el funcionamiento de esta unidad previa a de la instalación, es necesario conectar este cable, de lo contrario no se podrá conectar la alimentación.
*4 Pour vérifier le fonctionnement de cet appareil avant installation, ce fil doit être raccordé, sinon l’appareil ne peut pas être mis sous tension.
Conexiones tipicasAntes de la conexión: Verifique atentamente el conexionado del vehículo. Una conexión incorrecta podría producir daños graves en la unidad. Los cordones del cable de alimentación y los del conector procedentes de la carrocería del automóvil podrían ser de diferentes en color.
1 Conecte los conductores de color del cable de alimentación en el orden especificado en la ilustración de abajo.
2 Conecte el cable de antena.
3 Por último, conecte el cable de alimentación a la unidad.
To metallic body or chassis of the carA un cuerpo metálico o chasis del automóvilVers corps métallique ou châssis de la voiture
To a live terminal in the fuse block connecting to the car battery (bypassing the ignition switch) (constant 12 V)A un terminal activo del bloque de fusibles conectado a la batería del automóvil (desviando el interruptor de encendido) (12 V constantes)A une borne sous tension du porte-fusible connectée à la batterie de la voiture (en dérivant l’interrupteur d’allumage) (12 V constant)
To an accessory terminal in the fuse blockA un terminal accesorio del bloque de fusiblesVers borne accessoire du porte-fusible
To automatic antenna if any (250 mA max.)A la antena automática, si hubiere (250 mA máx.)À l’antenne automatique s’il y en a une (250 mA max.)
Fuse blockBloque de fusiblesPorte-fusible
BlackNegroNoir
RedRojoRouge
BlueAzulBleu
Blue with white stripeAzul con rayas blancasBleu avec bande blanche
Orange with white stripeNaranja con rayas blancasOrange avec bande blanche
BrownMarrónMarron
Light greenVerde claroVert clair
To car light control switchAl interruptor de control de las luces del automóvilÀ l’interrupteur d’éclairage de la voiture
To cellular phone systemAl sistema de teléfono celularAl cellulare
To the remote lead of other equipment (200 mA max.)Al conductor remoto del otro equipo (200 mA máx.)Au fil de télécommande d’un autre appareil (200 mA max.)
Ignition switchInterruptor de encendidoInterrupteur d’allumage
White with black stripeBlanco con rayas negras
Blanc avec bande noire
WhiteBlancoBlanc
Gray with black stripeGris con rayas negrasGris avec bande noire
GrayGrisGris
Green with black stripeVerde con rayas negras
Vert avec bande noire
GreenVerdeVert
Purple with black stripePúrpura con rayas negras
Violet avec bande noire
PurplePúrpuraViolet
Left speaker (front)Altavoz izquierdo (frontal)Enceinte gauche (avant)
Right speaker (front)Altavoz derecho (frontal)Enceinte droit (avant)
Left speaker (rear)Altavoz izquierdo (trasero)Enceinte gauche (arrière)
Right speaker (rear)Altavoz derecho (trasero)Enceinte droit (arrière)
Instal1-3_KD-AVX33[J].indd 3Instal1-3_KD-AVX33[J].indd 3 2007.2.1 10:03:55 AM2007.2.1 10:03:55 AM

ENGLISH FRANÇAIS
4
Connecting the Mic unit / Conexión de la unidad de micrófono / Connexion du microphone
oroou Adjust the microphone angle
Ajuste el ángulo del micrófonoAjustez l’angle du microphone
MicrophoneMicrófonoMicrophone
Microphone clipPresilla para micrófonoAttache de microphone
JDouble-sided adhesive tapeCinta adhesiva de doble caraBande adhésive à double face
C
Secure the microphone cord using cord cramps (not supplied) if necessary.Si es necesario, asegure el cable del micrófono por medio de abrazaderas (no suministradas).Fixez si nécessaire le cordon du microphone en utilisant des serre-fils (non fournis).
1 2
ESPAÑOL
Connect the parking brake lead to the parking brake system built in the car.
Conecte el cable del freno de estacionamiento al sistema de freno de estacionamiento del automóvil.
Connectez le fil de frein de stationnement au système de frein de stationnement.
Parking brake lead (light green)Cable del freno de estacionamiento (verde claro)Fil du frein de stationnement (vert clair)
To metallic body or chassis of the carA un cuerpo metálico o chasis del automóvilVers corps métallique ou châssis de la voitureParking brake switch (inside the car)
Interruptor del freno de estacionamiento (dentro del automóvil)Commutateur de frein de stationnement (intérieur de la voiture)
Parking brakeFreno de estacionamientoFrein de stationnement
Connecting the parking brake lead / Conexión del cable del freno de estacionamiento / Connexion du cordon de frein de stationnementA
Connecting the reverse gear signal lead (for rear view camera) / Conexión del cable de señal del engranaje de marcha atrás (para la cámara trasera) / Connexion du fil de signal de marche arrière (pour la caméra du rétroviseur) (REVERSE GEAR SIGNAL)
Locate the reverse lamp lead in the trunk.Localice el conductor de la luz trasera en el compartimiento de equipajes.Localisez le fil des feux de recul dans le coffre.
To reverse lampA la luz trasera
Aux feux de recul
Reverse lamp leadConductor de la luz traseraFil des feux de recul
Reverse lamp leadConductor de la luz traseraFil des feux de recul
To car batteryA la batería del automóvilÀ la batterie de la voiture
Purple with white stripePúrpura con rayas blancasViolet avec bande blanche
Reverse lampsLuces traserasFeux de recul
B
TROUBLESHOOTING• The fuse blows.* Are the red and black leads connected correctly?• Power cannot be turned on.* Is the yellow lead connected?• No sound from the speakers.* Is the speaker output lead short-circuited?• Sound is distorted.* Is the speaker output lead grounded?* Are the “–” terminals of L and R speakers grounded in common?• Noise interfere with sounds.* Is the rear ground terminal connected to the car’s chassis using
shorter and thicker cords?• Unit becomes hot.* Is the speaker output lead grounded?* Are the “–” terminals of L and R speakers grounded in common?• This unit does not work at all.* Have you reset your unit?
EN CAS DE DIFFICULTES• Le fusible saute.* Les fils rouge et noir sont-ils racordés correctement?• L’appareil ne peut pas être mise sous tension.* Le fil jaune est-elle raccordée?• Pas de son des enceintes. * Le fil de sortie d’enceinte est-il court-circuité?• Le son est déformé.* Le fil de sortie d’enceinte est-il à la masse?* Les bornes “–” des enceintes gauche et droit sont-elles mises ensemble
à la masse?• Interférence avec les sons.* La prise arrière de mise à la terre est-elle connectée au châssis de la
voiture avec un cordon court et épais?• L’appareil devient chaud.* Le fil de sortie d’enceinte est-il à la masse?* Les bornes “–” des enceintes gauche et droit sont-elles mises ensemble
à la masse?• Cet appareil ne fonctionne pas du tout.* Avez-vous réinitialisé votre appareil?
LOCALIZACION DE AVERIAS• El fusible se quema.* ¿Están los conductores rojo y negro correctamente conectados?
• No es posible conectar la alimentación.* ¿Está el cable amarillo conectado?
• No sale sonido de los altavoces.* ¿Está el cable de salida del altavoz cortocircuitado?
• El sonido presenta distorsión.* ¿Está el cable de salida del altavoz conectado a masa?* ¿Están los terminales “–” de los altavoces L y R conectados a una
masa común?• Perturbación de ruido.* ¿El terminal de tierra trasero está conectado al chasis del automóvil
utilizando los cordones más corto y más grueso?• La unidad se calienta.* ¿Está el cable de salida del altavoz conectado a masa?* ¿Están los terminales “–” de los altavoces L y R conectados a una
masa común?
• Esta unidad no funciona en absoluto.* ¿Ha reinicializado su unidad?
Instal4-6_KD-AVX33[J].indd 4Instal4-6_KD-AVX33[J].indd 4 2007.1.31 2:56:03 PM2007.1.31 2:56:03 PM

Connecting the external amplifiers / Conexión a los ampli6 cadores externos / Connexion d’ampli6 cateurs extérieurs
You can connect amplifiers to upgrade your car stereo system.• Connect the remote lead (blue with white stripe) to the remote
lead of the other equipment so that it can be controlled through this unit.
• For amplifier only:– After you have connected the center speaker, make sure
to activate the center speaker; otherwise, no sound comes out of the connected center speaker, see page 52 of the INSTRUCTIONS.
– Disconnect the speakers from this unit, connect them to the amplifier. Leave the speaker leads of this unit unused.
– You can switch off the built-in amplifier and send the audio signals only to the external amplifier(s) to get clear sounds and to prevent internal heat buildup. See page 55 of the INSTRUCTIONS (separate volume).
*6 Firmly attach the ground wire to the metallic body or to the chassis of the car—to the place uncoated with paint (if coated with paint, remove the paint before attaching the wire). Failure to do so may cause damage to the unit.
*6 Fije firmemente el cable de tierra a la carrocería metálica o al chasis—a un lugar no cubierto con pintura (si está cubierto con pintura, quítela antes de fijar el cable). De lo contrario, se podrían producir daños en la unidad.
*6 Attachez solidement le fil de mise à la masse au châssis métallique de la voiture—à un endroit qui n’est pas recouvert de peinture (s’il est recouvert de peinture, enlevez d’abord la peinture avant d’attacher le fil). L’appareil peut être endommagé si cela n’est pas fait correctement.
Vous pouvez connecter des amplificateurs pour améliorer votre système autoradio.• Connectez le fil de commande à distance (bleu avec bande blanche)
au fil de commande à distance de l’autre appareil de façon qu’il puisse être commandé via cet appareil.
• Pour l’amplificateur seulement:– Après avoir connecté l’enceinte centrale, assurez-vous de
mettre en service l’enceinte centrale; sinon, aucun son ne sort de l’enceinte centrale connectée, référez-vous à la page 52 du MANUEL D’INSTRUCTIONS.
– Déconnectez les enceintes de cet appareil et connectez-les à l’amplificateur. Laissez les fils d’enceintes de cet appareil inutilisés.
– Vous pouvez désactiver l’amplificateur intégré et envoyer les signaux audio uniquement à un ou plusieurs amplificateurs extérieurs afin d’obtenir un son clair et pour éviter un échauffement interne de l’appareil. Référez-vous à la page 55 du MANUEL D’INSTRUCTIONS (volume séparé).
C
Connecting to the steering wheel remote controller / Conexión al control remoto del volante de dirección / Connexion de la télécommande de volant
If your car is equipped with the steering wheel remote controller, you can operate this unit using the controller. For connection, an exclusive remote adapter (not supplied) which matches your car is required. For details, consult the same car audio dealer as where the unit is purchased.Si su vehículo está equipado con control remoto en el volante de dirección, podrá hacer funcionar este receptor utilizando dicho control. Para la conexión, se requiere un adaptador remoto exclusivo (no suministrado) que sea adecuado para su automóvil. Para los detalles, consulte con el concesionario car audio donde compró el receptor.Si votre voiture est munie d’une télécommande de volant, vous pouvez commander cet autoradio en utilisant la télécommande. Pour la connexion, un adaptateur de télécommande exclusif (non fourni) correspondant à votre voiture est requis. Pour en savoir plus, consultez le revendeur autoradio auprès duquel vous avez acheté cet autoradio.
OE remote adapter (not supplied)Adaptador para control remoto OE (no suministrado)Adaptateur pour télécommande au volant (non fourni)
Steering wheel remote controller (equipped in the car)Control remoto del volante de dirección (equipado en el vehículo)Télécommande de volant (installée dans la voiture)
OE REMOTESteering wheel remote input
Entrada del control remoto del volante de dirección
Entrée de la télécommande de volant
5
Center speakerAltavoz centralEnceinte centrale
Connections for external component playback /Conexiones para la reproducción del componente externo / Connexions pour un appareil de lecture extérieur
KS-HP2Cordless headphones (not supplied) *7
Auriculares inalámbricos (no suministrado) *7
Casque d’écoute sans ? l (non fourni) *7
KV-MR90109-INCH WIDESCREEN MONITOR (not supplied)MONITOR DE PANTALLA ANCHA DE 9 PULGADAS (no suministrado)MONITEUR COULEUR À ÉCRAN LARGE DE 9 POUCES (non fourni)
Video cord (not supplied)Cordón de video (no suministrado)Cordon vidéo (non fourni)
*7 To listen to disc playback sound while in Dual Zone operations (see page 26 of INSTRUCTIONS).
*7 Para escuchar el sonido de reproducción de disco mientras se está en operaciones Dual Zone (consulte la página 26 del MANUAL DE INSTRUCCIONES).
*7 Pour écouter le son de lecture des disque lors de l’utilisation du mode Dual Zone (voir page 26 du MANUEL D’INSTRUCTIONS).
Camcorder, rear view camera, etc.Videocámera, cámera de retrovisión, etc.Caméscope, caméra de recul, etc.
A
B
*5 Audio cord (not supplied)*5 Cable de audio (no suministrado)*5 Cordon audio (non fourni)
Navigation SystemSistema de navegaciónSystème de navigation
Remote leadCable remoto
Fil d’alimentation à distance
Remote lead (Blue with white stripe)Cable remoto (Azul con rayas blancas)Fil d’alimentation à distance (Bleu avec bande blanche)
To the remote lead of other equipmentAl conductor remoto de otro equipoAu fil de télécommande de l’autre appareil
Y-connector (not supplied for this unit)Conector en Y (no suministrado con esta unidad)Connecteur Y (non fourni avec cet appareil)
JVC AmplifierAmplificador de JVC
JVC Amplificateur
JVC AmplifierAmplificador de JVC
JVC Amplificateur
JVC AmplifierAmplificador de JVC
JVC Amplificateur
JVC AmplifierAmplificador de JVC
JVC Amplificateur
Rear speakersAltavoces posteriores
Enceintes arrière
Front speakersAltavoces
delanterosEnceintes avant
SubwooferSubwooferCaisson de grave
Usted podrá conectar amplificadores para mejorar el sistema estéreo de su automóvil.• Conecte el conductor remoto (azul con rayas blancas) al conductor
remoto del otro equipo para poderlo controlar a través de esta unidad.
• Sólo para el amplificador:– Asegúrese de activar el altavoz central después de
conectarlo; de lo contrario, no saldrá sonido a través del mismo, consulte la página 52 del MANUAL DE INSTRUCCIONES.
– Desconecte los altavoces de esta unidad y conéctelos al amplificador. Los cables de los altavoces de esta unidad quedan sin usar.
– Podrá desconectar el amplificador incorporado y enviar las señales de audio solamente al(los) amplificador(es) externo(s) para obtener sonidos nítidos y evitar que se caliente el interior de la unidad. Véase la página 55 de las MANUAL DE INSTRUCCIONES (volumen separado).
Front speakersAltavoces delanteros
Enceintes avant
Instal4-6_KD-AVX33[J].indd 5Instal4-6_KD-AVX33[J].indd 5 2007.1.31 2:56:22 PM2007.1.31 2:56:22 PM

6
Connecting external components / Conexión de otros componentes externos / Connexion des appareils extérieurs
• iPod is a trademark of Apple Inc., registered in the U.S. and other countries.
• iPod es una marca comercial de Apple Inc., registrada en los EE. UU. y otros países.
• iPod est une marque de commerce d’Apple Inc., enregistrée aux États-Unis et dans les autres pays.
D
USB cable—approx.1.2 m (3.9 feet)Cable USB—aprox.1,2 m (3,9 pies)Câble USB—environ 1,2 m (3,9 pieds)
USB deviceDispositivo USBPériphérique USB
Audio cord (not supplied)Cable de audio (no suministrado)Codon audio (non fourni)
External componentComponente exteriorAppareil extérieur
or / o / ou
3.5 mm stereo mini plugMiniclavija estéreo de 3,5 mmMini fiche stéréo de 3,5 mm
External component / Componente exterior / Appareil extérieur
External componentComponente exteriorAppareil extérieur
USB devices / Dispositivos USB / Périphériques USB
You can connect external components in series as shown in the diagram below.• All the components, adapters or signal cords need to be
purchased separately.
CAUTION:Before connecting the external components, make sure that the unit is turned off.
• To use JVC CD changer, Apple iPod or JVC D. player, set “External Input” to “Changer/iPod/D. Player” (see page 53 of the INSTRUCTIONS).
• To use other external components via KS-U57, KS-U58, or KS-U100K, set “External Input” to “External Input” (see page 53 of the INSTRUCTIONS)
Los componentes externos se pueden conectar en serie, tal como se muestra en el diagrama siguiente.• Todos los componentes, adaptadores o cables de señal se deben
comprar separadamente.
PRECAUCION:Antes de conectar el cambiador dee componentes externos, asegúrese de que el receptor esté apagado.
• Para utilizar un cambiador de CD JVC, Apple iPod o reproductor D. de JVC, ajuste “External Input” a “Changer/iPod/D. Player” (véase la página 53 del MANUAL DE INSTRUCCIONES).
• Para utilizar otros componentes externos a través de KS-U57, KS-U58 o KS-U100K, ajuste “External Input” a “External Input” (véase la página 53 del MANUAL DE INSTRUCCIONES).
Vous pouvez connecter des appareils extérieurs en série comme montré sur l’illustration ci-dessous.• Tous les composants, adaptateurs ou cordons de signal doivent être
achetés séparément.
PRECAUTION:Avant de connecter votre appareil extérieur, assurez-vous que l’autoradio est hors tension.
• Pour utiliser un changeur de CD JVC, un iPod Apple ou le lecteur D. de JVC, réglez “External Input” sur “Changer/iPod/D. Player ” (voir page 53 du MANUEL D’INSTRUCTION).
• Pour utiliser d’autres appareils extérieurs via le KS-U57, KS-U58 ou KS-U100K, réglez “External Input” sur “External Input” (voir page 53 du MANUEL D’INSTRUCTION).
External componentComponente exterior
Appareil extérieur
JVC DLPDLP JVC
Processeur DLP JVC
External componentComponente exterior
Appareil extérieur
KS-U57*10
KS-U58*11
KS-PD100
KS-PD500
XMDJVC100
SIRIUS®
JVC PnP
or / o / ou
or / o / ou
or / o / ou
or / o / ou
or / o / ou
Apple iPodApple iPodiPod Apple
JVC D. playerReproductor D. JVCLecteur D. JVC
KS-U100K
XM Satellite radio / radio satelital XM / radio satellite XM
Antenna (supplied with XMDirectTM Universal Tuner Box)Antena (suministrada con el Sintonizador universal XMDirect™)Antenne (fournie avec le tuner universel XMDirectTM)
XMDirectTM Universal Tuner BoxSintonizador universal XMDirect™
Tuner universel XMDirectTM
JVC PnP (Plug and Play) / PnP (“Plug and Play”) JVC / PnP (“Plug and Play”) JVC
You can connect JVC PnP through this unit using JVC SIRIUS radio adapter, KS-U100K (not supplied).• Turning on/off the unit can also turns on/off the JVC PnP.También podrá conectar la PnP JVC a través de este receptor utilizando el adaptador para radio SIRIUS JVC, KS-U100K (no suministrado).• Al encender/apagar el receptor también se enciende/apaga la PnP JVC.Vous pouvez aussi connecter le PnP JVC à cet autoradio en utilisant l’adaptateur de radio SIRIUS JVC KS-U100K (non fourni).• Mettre sous/hors tension l’autoradio peut aussi mettre sous/hors tension le PnP JVC.
• For listening to the XM Satellite radio, you can connect XMDirectTM Universal Tuner Box (separately purchased) through this unit using JVC Smart Digital Adapter—XMDJVC100 (not supplied).
• Para escuchar la radio satelital XM, también puede conectar el Sintonizador universal XMDirectTM (adquirido por separado) al receptor mediante un adaptador Smart Digital XMDJVC100 de JVC (no suministrado).
• Pour écouter la radio satellite XM, vous pouvez aussi connecter le tuner universel XMDirectTM (vendu séparément) à cet appareil en utilisant l’adaptateur numérique intelligent JVC—XMDJVC100 (non fourni).
Stereo mini plugMiniclavija estéreoFiche stéré mini
DC power plugClavija de alimentación de CCFiche d’alimentation CC
To DC IN jackAl jack DC INÀ la prise DC IN
To headphones jackAl jack para auricularesÀ la prise du casque d’écoute
*8 Audio cord supplied with your Smart Digital Adapter*8 Cable de audio suministrado con el adaptador Smart Digital*8 Cordon audio fourni avec votre adaptateur numérique
intelligent*9 Signal cord supplied with your Smart Digital Adapter*9 Cable de señal suministrado con el adaptador Smart Digital*9 Cordon de signal fourni avec votre adaptateur numérique
intelligent
KS-U100K
To JVC DLP, XMDJVC100, KD-ADV38 or KD-AVX33A JVC DLP, XMDJVC100, KD-ADV38 o KD-AVX33Au JVC DLP, XMDJVC100, KD-ADV38 ou KD-AVX33
JVC CD changerCambiador de CD de JVC
Changeur de CD JVC
or / o / ou
CD changer jackJack para el cambiador de CDPrise du changeur de CD
To disconnect the connector / Para desconectar el cable / Pour déconnecter le connecteur
Hold the connector top tightly (1), then pull it out (2).Sujete firmemente la parte superior del conector (1) y seguidamente, extráigalo (2).Tenez fermement le connecteur par-dessus (1) et tirez vers l’extérieur (2).
*10 Line Input Adapter KS-U57 (separately purchased)*10 Adaptador de entrada de línea KS-U57 (adquirido separadamente)*10 Adaptateur d’entrée de ligne KS-U57 (vendu séparément)*11 Aux Input Adapter KS-U58 (separately purchased)*11 Adaptador de entrada auxiliar KS-U58 (adquirido separadamente)*11 Adaptateur d’entrée auxiliaire KS-U58 (vendu séparément)
You cannot connect a computer to the USB ( ) terminal of the unit.No se puede conectar un ordenador al terminal ( ) USB de la unidad.Vous ne pouvez pas connecter un ordinateur à la prise USB ( ) de l’appareil.
Instal4-6_KD-AVX33[J].indd 6Instal4-6_KD-AVX33[J].indd 6 2007.2.1 2:17:40 PM2007.2.1 2:17:40 PM

ENGLISH
DEU
TSCH
FRANÇAIS
NEDE
RLAN
DS
KD-AVX33
For installation and connections, refer to the separate manual.Für den Einbau und die Anschlüsse siehe das eigenständige Handbuch.Pour l’installation et les raccordements, se référer au manuel séparé.Bijzonderheden over de installatie en aansluiting van het apparaat vindt u in de desbetreffende handleiding.
INSTRUCTIONSBEDIENUNGSANLEITUNG
MANUEL D’INSTRUCTIONSGEBRUIKSAANWIJZING
LVT1659-001A[E]
For canceling the display demonstration, see page 5. Zum Abbrechen der Displaydemonstration siehe Seite 5. Pour annuler la démonstration des affichages, référez-vous à la page 5. Zie bladzijde 5 voor het annuleren van de displaydemonstratie.
DVD/CD RECEIVERDVD-/CD-RECEIVERRÉCEPTEUR DVD/CDDVD/CD-RECEIVER
Cover_KD-AVX33E_1.indd 2Cover_KD-AVX33E_1.indd 2 07.2.2 5:13:16 PM07.2.2 5:13:16 PM

G1
Declaration of Conformity with regard to the R&TTE Directive 1999/5/EC
0536English: Español:
Hereby, JVC, declares that this KD-AVX33 is in compliance with the essential requirements and other relevant provisions of Directive 1999/5/EC.
Por medio de la presente JVC declara que el KD-AVX33 cumple con los requisitos esenciales y cualesquiera otras disposiciones aplicables o exigibles de la Directiva 1999/5/CE.
Deutsch: Ελληνική:Hiermit erklärt JVC, dass sich das Gerät KD-AVX33 in Übereinstimmung mit den grundlegenden Anforderungen und den übrigen einschlägigen Bestimmungen der Richtlinie 1999/5/EG befindet. (BMWi)
ΜΕ ΤΗΝ ΠΑΡΟΥΣΑ JVC ∆ΗΛΩΝΕΙ ΟΤΙ KD-AVX33 ΣΥΜΜΟΡΦΩΝΕΤΑΙ ΠΡΟΣ ΤΙΣ ΟΥΣΙΩ∆ΕΙΣ ΑΠΑΙΤΗΣΕΙΣ ΚΑΙ ΤΙΣ ΛΟΙΠΕΣ ΣΧΕΤΙΚΕΣ ∆ΙΑΤΑΞΕΙΣ ΤΗΣ Ο∆ΗΓΙΑΣ 1999/5/ΕΚ.
Hiermit erklärt JVC die Italiano:Übereinstimmung des GerätesKD-AVX33 mit den grundlegendenAnforderungen und den anderenrelevanten Festlegungen der Richtlinie1999/5/EG befindet. (Wien)
Con la presente JVC dichiara che questo KD-AVX33 è conforme ai requisiti essenziali ed alle altre disposizioni pertinenti stabilite dalla direttiva 1999/5/CE.
Français: Malti:Par la présente JVC déclare que l’appareil KD-AVX33 est conforme aux exigences essentielles et aux autres dispositions pertinentes de la directive 1999/5/CE.
Hawnhekk, JVC, jiddikjara li dan KD-AVX33 jikkonforma mal-ħtiġijiet essenzjali u ma provvedimenti oħrajn relevanti li hemm fid-Dirrettiva 1999/5/EC.
Nederlands: Português:Hierbij verklaart JVC dat het toestel KD-AVX33 in overeenstemming is met de essentiële eisen en de andere relevante bepalingen van richtlijn 1999/5/EG.
JVC declara que este KD-AVX33 está conforme com os requisitos essenciais e outras disposições da Directiva 1999/5/CE.
Dansk: Suomi:Undertegnede JVC erklærer herved, at følgende udstyr KD-AVX33 overholder de væsentlige krav og øvrige relevante krav i direktiv 1999/5/EF.
JVC vakuuttaa täten että KD-AVX33 tyyppinen laite on direktiivin 1999/5/EY oleellisten vaatimusten ja sitä koskevien direktiivin muiden ehtojen mukainen.
CEcaution_KD-AVX33E_1.indd 2CEcaution_KD-AVX33E_1.indd 2 07.2.2 1:52:37 PM07.2.2 1:52:37 PM

G2
Svenska: Lietuviu:Härmed intygar JVC att denna KD-AVX33 står I överensstämmelse med de väsentliga egenskapskrav och övriga relevanta bestämmelser som framgår av direktiv 1999/5/EG.
Šiuo JVC deklaruoja, kad šis KD-AVX33 atitinka esminius reikalavimus ir kitas 1999/5/EB Direktyvos nuostatas.
Íslenska: Magyar:Hér með lýsir JVC yfir því að KD-AVX33 er í samræmi við grunnkröfur og aðrar kröfur, sem gerðar eru í tilskipun 1999/5/EC.
Alulírott, JVC nyilatkozom, hogy a KD-AVX33 megfelel a vonatkozó alapvetõ követelményeknek és az 1999/5/EC irányelv egyéb elõírásainak.
Norsk: Polski:JVC erklærer herved at utstyret KD-AVX33 er i samsvar med de grunnleggende krav og øvrige relevante krav i direktiv 1999/5/EF.
Niniejszym JVC oświadcza, że KD-AVX33 jest zgodny z zasadniczymi wymogami oraz pozostałymi stosownymi postanowieniami Dyrektywy 1999/5/EC.
Cesky: Slovensko:JVC tímto prohlašuje, že tento KD-AVX33 je ve shodě se základními požadavky a dalšími príslušnými ustanoveními směrnice 1999/5/ES.
JVC izjavlja, da je ta KD-AVX33 v skladu z bistvenimi zahtevami in ostalimi relevantnimi določili direktive 1999/5/ES.
Eesti: Slovensky:Käesolevaga kinnitab JVC seadme KD-AVX33 vastavust direktiivi 1999/5/EÜ põhinõuetele ja nimetatud direktiivist tulenevatele teistele asjakohastele sätetele.
JVC týmto vyhlasuje, že KD-AVX33 spĺňa základné požiadavky a všetky príslušné ustanovenia Smernice 1999/5/ES.
Latviski:Ar šo JVC deklarē, ka KD-AVX33 atbilst Direktīvas 1999/5/EK būtiskājam prasībām un citiem ar to saistītajiem noteikumiem.
CEcaution_KD-AVX33E_1.indd 3CEcaution_KD-AVX33E_1.indd 3 07.2.2 1:52:39 PM07.2.2 1:52:39 PM

ENG
LISH
2
WARNINGS:To prevent accidents and damage
• DO NOT install any unit and wire any cable in locations where;– it may obstruct the steering wheel and
gearshift lever operations.– it may obstruct the operation of safety devices
such as air bags.– it may obstruct visibility.
• DO NOT operate the unit while driving. If you need to operate the unit while driving, be
sure to look around carefully.• The driver must not watch the monitor while
driving.• The driver must not put on the headphones while
driving.
Cautions on the monitor:
• The monitor built in this unit has been produced with high precision, but it may have some ineffective dots. This is inevitable and is not malfunction.
• Do not expose the monitor to direct sunlight.
• When the temperature is very cold or very hot.– Chemical changes occur inside, causing
malfunction.– Pictures may not appear clearly or may move
slowly. Pictures may not be synchronized with the sound or picture quality may decline in such environments.
Thank you for purchasing a JVC product.Please read all instructions carefully before operation, to ensure your complete understanding and to obtain the best
possible performance from the unit.
IMPORTANT FOR LASER PRODUCTS1. CLASS 1 LASER PRODUCT2. CAUTION: Do not open the top cover. There are no user serviceable parts inside the unit; leave all servicing to
qualified service personnel.3. CAUTION: Visible and/or invisible class 1M laser radiation when open. Do not view directly with optical
instruments.4. REPRODUCTION OF LABEL: CAUTION LABEL, PLACED OUTSIDE THE UNIT.
Information for Users on Disposal of Old EquipmentThis symbol indicates that the product with this symbol should not be disposed as general household waste at its end-of-life. If you wish to dispose of this product, please do so in accordance with applicable national legislation or other rules in your country and municipality. By disposing of this product correctly, you will help to conserve natural resources and will help prevent potential negative effects on the environment and human health.
This symbol is only valid in the European Union.
For security reasons, a numbered ID card is provided with this unit, and the same ID number is imprinted on the unit’s chassis. Keep the card in a safe place, as it will help the authorities to identify your unit if stolen.
KD-AVX33[E]_0130.indb 2KD-AVX33[E]_0130.indb 2 07.2.1 4:43:49 PM07.2.1 4:43:49 PM

3
ENG
LISH
How to reset your unit
• Your preset adjustments (except for the registered Bluetooth devices) will also be erased.
How to forcibly eject a disc
• If this does not work, reset the unit.
For safety...• Do not raise the volume level too much, as this will
block outside sounds, making driving dangerous.• Stop the car before performing any complicated
operations.
Temperature inside the car...If you have parked the car for a long time in hot or cold weather, wait until the temperature in the car becomes normal before operating the unit.
This product incorporates copyright protection technology that is protected by U.S. patents and other intellectual property rights. Use of this copyright protection technology must be authorized by Macrovision, and is intended for home and other limited viewing uses only unless otherwise authorized by Macrovision. Reverse engineering or disassembly is prohibited.
Contents
INTRODUCTIONPlayable disc type ............................ 4Before operating the unit ................ 5
OPERATIONSBasic operations—Control panel ...... 7Basic operations—
Remote controller (RM-RK251) ...... 8Listening to the radio ...................... 10Disc operations ................................ 15Dual Zone operations ....................... 28USB operations ................................ 31Bluetooth® operations—
Cellular phone/audio player .......... 33
EXTERNAL DEVICESListening to the CD changer .............. 40Listening to the DAB tuner ............... 42Listening to the iPod/D.player .......... 45Listening to other external
components ................................. 46
SETTINGSSound equalization .......................... 48Assigning titles to the sources .......... 49Menu operations ............................. 50
REFERENCESMaintenance ................................... 60More about this unit ........................ 61Troubleshooting .............................. 66Specifications .................................. 70
NO EJECT?EMERGENCY EJECT?
NO EJECT?EMERGENCY EJECT?
KD-AVX33[E]_0130.indb 3KD-AVX33[E]_0130.indb 3 07.2.1 4:43:55 PM07.2.1 4:43:55 PM

ENG
LISH
4
Playable disc type
Disc type Recording format, file type, etc. Playable
DVD DVD Video (Region Code: 2)*1
DVD Audio
DVD-ROM
DVD Recordable/Rewritable(DVD-R*2/-RW, +R/+RW*3)• DVD Video: UDF bridge• DVD-VR• DivX/MPEG1/MPEG2/JPEG/MP3/
WMA/WAV/AAC: Compliant to ISO 9660 level 1, level 2, Romeo, Joliet
• DVD-RAM cannot be played.
DVD Video
DVD-VR (non-CPRM only)
DivX/MPEG1/MPEG2
JPEG
MP3/WMA/WAV/AAC*4
MPEG4
DVD+VR
Dual Disc DVD side
Non-DVD side
CD/VCD Audio CD/CD Text (CD-DA)/DTS-CD
VCD (Video CD)
CD-ROM
CD-I (CD-I Ready)
CD Recordable/Rewritable(CD-R/-RW)• Compliant to ISO 9660 level 1,
level 2, Romeo, Joliet
CD-DA
MP3/WMA/WAV/AAC*4
JPEG
DivX/MPEG1/MPEG2
MPEG4
*1 If you insert a DVD Video disc of an incorrect Region Code, “Region code error” appears on the monitor.*2 DVD-R recorded in multi-border format is also playable (except for dual layer discs).*3 It is possible to play back finalized +R/+RW (Video format only) discs. However, the use of +R double layer disc is not recommended.*4 This unit can play back AAC files encoded using iTunes.
Caution for DualDisc playbackThe Non-DVD side of a “DualDisc” does not comply with the “Compact Disc Digital Audio” standard. Therefore, the use of Non-DVD side of a DualDisc on this product may not be recommended.
KD-AVX33[E]_0130.indb 4KD-AVX33[E]_0130.indb 4 07.2.1 4:43:56 PM07.2.1 4:43:56 PM

INTRODUCTION
In this manual, English indications are used for purpose of explanation. You can select the indication language on the monitor. ( page 52)
5
ENG
LISH
Before operating the unitCancel the display demonstration and set the clock. ( also pages 51 and 52)• Operations are explained mainly using the buttons on the unit; however, the buttons on the remote controller can
work in the same way if they have the same names or marks.
~ Turn on the power.
Ÿ Display <AV Menu>.
! Enter the <Setup> menu.
⁄ Select <Display> ] <Demonstration>, then activate the <Demonstration> screen.
@ Cancel the display demonstrations.Select <Off>.
Continued on the next page
AV Menu
Setup EnterENT
Setup menu icon
Currently selected menu
Demonstration
DisplayClockDisc Setup 1Disc Setup 2Tuner
On
DemonstrationWall PaperScrollTag DisplayDimmer
OffOn
ExitENT
Setup Display Demonstration
Currently selected submenu Current setting
OffOn
ExitENT
Demonstration
Indication language:
KD-AVX33[E]_0130.indb 5KD-AVX33[E]_0130.indb 5 07.2.1 4:43:57 PM07.2.1 4:43:57 PM

ENG
LISH
6
fi Select either the 12-hour or 24-hour system.
^ Return to the <Clock> menu.
fl Select <Clock Adjust>.
& Activate the <Clock Adjust> screen.
‡ Select the <Clock Adjust> setting.• Off: Cancels.• Auto: Activate auto clock adjustment using
the clock time (CT) data from an FM RDS station.
* Finish the procedure.
To display the clock time while playing back a video source, select <Clock> = <OSD Clock> = <On>.
¤ Return to the <Setup> menu.
# Select <Clock> ]<Time Set>, then activate the <Time Set> screen.
‹ Set the clock time.
$ Return to the <Clock> menu.
› Select <12Hours/24Hours>.
% Activate the <12Hours/24Hours> screen.
Clock
0:00
Time Set12Hours/24HoursOSD ClockClock Adjust
Time SetHours
18 : 00
ExitENT
Time SetMinutes
18 : 35
ExitENT
12Hours/24Hours12 Hours24 Hours
ExitENT
(twice)
KD-AVX33[E]_0130.indb 6KD-AVX33[E]_0130.indb 6 07.2.1 4:43:57 PM07.2.1 4:43:57 PM

OPERATIONS7
ENG
LISH
Basic operations — Control panel
• TUNER/DAB: Select the bands.• DISC/USB: Stop playback.• On menus: Back.
Select the source.TUNER = DAB = DISC (DVD/VCD/CD) = USB =CD-CH, iPod, D.PLAYER, or EXT-IN =Bluetooth Phone =Bluetooth Audio = AV-IN =(back to the beginning)• You cannot select these sources if they are not ready.
• Eject the disc.• Change the
control panel tilt (Tilt1 – Tilt4) [Hold, then press].
*1 <AV Menu> screensYou can use the menus to set up various settings.The <AV Menu> screen consists of the following sub-menus—Setup/Equalizer/Sound/Disc Surround/Mode/List/Bluetooth/Dual Zone.• For details, see pages 50 to 59.
*2 To attach the control panel
*3 By holding 5 / ∞, you can display the list accessible for the selected source.
• Turn on the power.• Turn off the power
[Hold].• Attenuate the sound (if
the power is on). Change the display information.
4 / ¢• TUNER/DAB: Search for stations/ensembles.• DISC/USB: Select chapters/tracks.• On menus: Go to previous/next step.• iPod/D.PLAYER: Select tracks.• Bluetooth Audio: Reverse skip/forward skip.5 / ∞*3
• TUNER: Select preset stations.• DAB: Select services.• DISC/USB: Select titles/folders.• On menus: Select items.• iPod/D.PLAYER: Enter player’s menu/pause
or stop playback.• Bluetooth: Select a device.
Activate TA Standby Reception.Show PTY preset list [Hold].
Remote sensor
Adjust the volume.
Reset the unit.• Use only when the
internal system malfunctions.
• DISC/USB: Start playback.• On menus: Enter. ( ENT :[Press]/ ENT :[Hold])
Detach the control panel*2.
Display window
• Display <Dial Menu>.• Display <Redial> list [Hold].
• Display or erase <AV Menu>*1.• Activate Voice Dialing [Hold].
KD-AVX33[E]_0130.indb 7KD-AVX33[E]_0130.indb 7 07.2.1 4:43:57 PM07.2.1 4:43:57 PM

8
ENG
LISH
Basic operations — Remote controller (RM-RK251)
Installing the battery
If the range or effectiveness of the remote controller decreases, replace both batteries.
Before using the remote controller:• Aim the remote controller directly at the remote
sensor on the unit.• DO NOT expose the remote sensor to bright light
(direct sunlight or artificial lighting).
The unit is equipped with the steering wheel remote control function.• See the Installation/Connection Manual (separate
volume) for connection.
Caution:
• Do not expose batteries to heat or flame.
IMPORTANT:If Dual Zone is activated ( page 28), the remote controller functions only for operating the DVD/CD player.
Main elements and features
i
o
;
as
1*1 • Turns on the power.• Attenuates the sound if the power is on.• Turns off the power if pressed and held (while
the power is on).2*1 Selects the source.3*1 • Displays <Dial Menu>.
• Displays <Redial> list if pressed and held.• Answers incoming calls.
4*1*2 Adjusts the volume level.5*1*2 Selects surround mode.6 • DVD/DivX 6: Shows the disc menu.
• VCD: Resumes PBC playback ( page 23).• DVD-VR: Shows the Original Program screen.
R03/LR03/AAA
KD-AVX33[E]_0130.indb 8KD-AVX33[E]_0130.indb 8 07.2.1 4:43:58 PM07.2.1 4:43:58 PM

OPERATIONS9
ENG
LISH
On menus:• 5 / ∞: Select items.• 4 / ¢: Goes to previous/next step.
w TUNER/DAB: Selects the bands. DISC/USB: Stop playback. Bluetooth Phone: Ends the call. Bluetooth Audio: Plays/pauses. On menus: Back.e*2 Adjusts the volume level through the 2nd AUDIO
OUT plug. ( page 28)r*2 Activates or deactivates Dual Zone.t*1*2 Selects the sound mode.y • DVD Video/DivX 6: Shows the disc menu.
• VCD: Resumes PBC playback. ( page 23)• DVD-VR: Shows the Play List screen.
u RETURN button• For VCD: Returns to the PBC menu.
i DISC/USB: Switches number entry mode.• Also functions as CLEAR button to erase the
misentry after entering the wrong number.o Enter numbers. ( pages 12, 21 to 23, 38, and
43)• CD changer: Selects the disc directly.• Tuner: Selects the preset stations.
;*1 Changes the aspect ratio of the playback pictures.a Reverse search/forward search for disc/USB
operationss • DVD Video: Selects audio language ( ),
subtitles ( ), angle ( ).• DVD Audio: Selects audio stream ( ).• DVD-VR: Turn on/off subtitles ( ) and
selects audio channel( ).• DivX: Selects audio language ( ),
subtitles ( ).• VCD: Selects audio channel ( ).
*1 If Dual Zone is activated, these buttons cannot be used.
*2 These buttons can be used only when the slide cover is closed.
*3 5 : Returns to the previous menu. ∞ : Confirms the selection.
7 • Makes selection/settings.• ~: Skips back or forward by 5 minutes for
DivX/MPEG1/MPEG2.• DISC +/– buttons: Changes discs for “CD-CH.”
8 Shows the on-screen bar.9*1 Changes the display information.p Display or erase <AV Menu>.q For disc/USB operations:
• 6: Plays/pauses.• 5 / ∞ DVD: Selects the title/group. DVD-VR: Selects the program/play list. USB/other discs (except VCD/CD): Selects the
folders.• 4 / ¢:– Press briefly: reverse skip/forward skip– Press and hold: reverse search/forward search
For FM/AM operations:• 5 / ∞: Selects the preset stations.• 4 / ¢: Functions to search for stations.– Press briefly: Auto Search– Press and hold: Manual Search
For DAB tuner operations:• 5 / ∞: Selects a service.• 4 / ¢: Functions to search for
ensembles.– Press briefly: Auto Search– Press and hold: Manual Search
For Apple iPod/JVC D. player operations:• ∞: Pauses/stops or resumes playback.• 5: Enters the main menu (then 5 / ∞ /
4 / ¢ work as the menu selecting buttons).*3
• 4 / ¢ (in menu selecting mode)– Selects an item if pressed briefly. (Then, press
∞ to confirm the selection.)– Skips 10 items at a time if pressed and held.
For Bluetooth operations:• 5 / ∞: Selects a registered device.
• 4 / ¢: reverse skip/forward skip (for audio operation). • 6: Answers incoming calls (for “Bluetooth Phone”). Plays/Pauses (for “Bluetooth Audio”).
KD-AVX33[E]_0130.indb 9KD-AVX33[E]_0130.indb 9 07.2.1 4:43:59 PM07.2.1 4:43:59 PM

10
ENG
LISH
15: 45
FLAT
DXMOAFTP
TUNER
FM1 Preset1 Bayern Radio 87.5 MHz
Pop M
POWER]ON
When an FM stereo broadcast is hard to receive 1
2
Mode menu icon
3
Listening to the radio
~ Select “TUNER.”
Ÿ Select the bands.
! Search for a station—Auto Search.• Manual Search: Hold either 4 or ¢ until “Manual Search” appears on the display, then press it
repeatedly.• The ST indicator lights up when receiving an FM stereo broadcast with sufficient signal strength.
4
Reception improves, but stereo effect will be lost.• The MO indicator lights up.
To restore stereo effect, select <Off > in step 4.
PS (station name) for FM RDS. If no signal is coming in, “No Name” appears.
Preset No.Band
page 48
Tuner/Standby Reception indicators
PTY code for FM RDS
AV Menu
Mode EnterENT
AV Menu
Setup EnterENT
Mode
Off
MonoDX/LocalSSMPTy Standby
MonoOffOn
ExitENT
KD-AVX33[E]_0130.indb 10KD-AVX33[E]_0130.indb 10 07.2.1 4:44:00 PM07.2.1 4:44:00 PM

OPERATIONS11
ENG
LISH
2
3
Local FM stations with the strongest signals are searched and stored automatically in the FM band.
Manual presetting Ex.: Storing FM station of 92.5 MHz into preset
number 4 of the FM1 band.
1
2 Tune in to a station you want to preset.
3
4 Select a preset number.
5
The station selected in step 2 is now stored in preset number 4.
Tuning in to stations with sufficient signal strength This function works only for FM bands.Once you have activated this function (selected <Local>), it always works when searching for FM stations.
1
2
Mode menu icon
3
4
Only stations with sufficient signal strength will be detected.• The DX indicator goes off, then the LO indicator
lights up.
FM station automatic presetting —SSM (Strong-station Sequential Memory) This function works only for FM bands.You can preset six stations for each band.
1
Mode
DX
MonoDX/LocalSSMPTy Standby
DX/LocalDXLocal
ExitENT
ModeMonoDX/LocalSSMPTy Standby
StartENT
FM1 Store 87.5 89.9 97.9105.9108.0107.9 ENT
1
2
3
4
56
ENT
FM1 Store 87.5 89.9 97.9105.9108.0107.9 ENT
1
2
3
4
56
ENT
AV Menu
Mode EnterENT
AV Menu
Setup EnterENT
AV Menu
Setup EnterENT
AV Menu
Mode EnterENT
* Each time you hold the button, you can change the FM bands.
• Preset List can also be accessed through <AV Menu> = <List>. ( page 12)
No Name 92.5 MHz
TUNER
FM1 Preset4 No Name 92.5 MHz
Mode menu icon
Preset List appears.*
KD-AVX33[E]_0130.indb 11KD-AVX33[E]_0130.indb 11 07.2.1 4:44:01 PM07.2.1 4:44:01 PM

12
ENG
LISH
The following features are available only for FM RDS stations.
Searching for FM RDS programme—PTY Search You can search for your favorite programmes being broadcast by selecting the PTY code for your favorite programmes.
1
Available PTY codes appear (including six preset PTY codes).
2 Select a PTY code.
3
If there is a station broadcasting a programme of the same PTY code as you have selected, that station is tuned in.
Available PTY codes:News, Current Affairs, Information, Sport, Education, Drama, Cultures, Science, Varied Speech, Pop Music, Rock Music, Easy Listening, Light Classics M, Serious Classics, Other Music, Weather & Metr, Finance, Children’s Progs, Social Affairs, Religion, Phone In, Travel & Touring, Leisure & Hobby, Jazz Music, Country Music, National Music, Oldies Music, Folk Music, Documentary
Selecting preset stations On the remote:
1
2 or
On the unit:
or
1
• Each time you hold the button, you can change the FM bands.
2
• Preset List can also be accessed through <AV Menu> = <List>.
15: 45
FLAT
DXAF
TUNER
FM1 PTy Search XX.X MHz
Science
List menu icon
Pop MusicRock MusicEasy ListeningSerious ClassicsCurrent AffairsVaried Speech ENT
1
2
3
4
56
PTy Search
CulturesScienceVaried SpeechPop MusicRock MusicEasy Listening ENT
PTy Search
FM1 Store 87.5 89.9 97.9 92.5108.0107.9 ENT
1
2
3
4
56
ENT
Frequency changes as search goes on.
AV Menu
Setup EnterENT
AV Menu
List EnterENT
FM1 Store 87.5 89.9 97.9 92.5108.0107.9 ENT
1
2
3
4
56
ENT
KD-AVX33[E]_0130.indb 12KD-AVX33[E]_0130.indb 12 07.2.1 4:44:02 PM07.2.1 4:44:02 PM

OPERATIONS13
ENG
LISH
Storing your favorite programme types You can store your favorite PTY codes into the PTY Preset List.
1
Available PTY codes appear (including six preset PTY codes).
2 Select a PTY code to store into the List.
Current PTY Preset List is shown on the display.
3 Select a listed code to be replaced with the one newly selected.
Now <Current Affairs> is replaced with <Science>.
Activating/deactivating TA/PTY Standby Reception TA Standby Reception Indicator
Press to activate. TP
The unit will temporarily switch to Traffic Announcement (TA), if available, from any source other than AM.The volume changes to the preset TA volume level if the current level is lower than the preset level ( page 54).
Lights up
Not yet activated. Tune in to another station providing the RDS signals.
Flashes
Press to deactivate. Goes off
PTY Standby Reception Indicator
Activate <AV Menu>, then select <Mode>, <PTy Standby> ( pages 14, 57).
PTY
The unit will temporarily switch to your favorite PTY programme from any source other than AM.
Lights up
Not yet activated. Tune in to another station providing the RDS signals.
Flashes
To deactivate, select <Off> in step 4, then press ENT once ( page 14).
Goes off
• When a DAB tuner is connected, TA Standby/PTY Standby Reception also works for the DAB tuner.
Pop MusicRock MusicEasy ListeningSerious ClassicsCurrent AffairsVaried Speech ENT
1
2
3
4
56
PTy Memory
Pop MusicRock MusicEasy ListeningSerious ClassicsCurrent AffairsVaried Speech ENT
1
2
3
4
56
PTy Memory
Pop MusicRock MusicEasy ListeningSerious ClassicsCurrent AffairsVaried Speech ENT
1
2
3
4
56
PTy Search
CulturesScienceVaried SpeechPop MusicRock MusicEasy Listening ENT
PTy Search
KD-AVX33[E]_0130.indb 13KD-AVX33[E]_0130.indb 13 07.2.1 4:44:03 PM07.2.1 4:44:03 PM

14
ENG
LISH
Tracing the same programme—Network-Tracking Reception When driving in an area where FM reception is not sufficient enough, this unit automatically tunes in to another FM RDS station of the same network, possibly broadcasting the same programme with stronger signals.
Programme A broadcasting on different frequency areas (01 – 05)
When shipped from the factory, Network-Tracking Reception is activated.To change the Network-Tracking Reception setting, see <AF Regional> on page 54.• When the DAB tuner is connected, refer also to
“Tracing the same programme—Alternative Frequency Reception (DAB AF).” ( page 44)
Automatic station selection—Programme Search Usually when you select preset stations, the preset station is tuned in.If the signals from the FM RDS preset station are not sufficient for good reception, this unit, using the AF data, tunes in to another frequency broadcasting the same programme as the original preset station is broadcasting. ( page 54)• The unit takes some time to tune in to another
station using programme search.
Activating PTY Standby Reception
1
2
Mode menu icon
3
4
5 Select a PTY code for PTY Standby Reception.
OffNews
PTy Standby
Mode
Off
MonoDX/LocalSSMPTy Standby
DramaCulturesScienceVaried SpeechPop Music
PTy Standby
ExitENT
AV Menu
Mode EnterENT
AV Menu
Setup EnterENT
A
KD-AVX33[E]_0130.indb 14KD-AVX33[E]_0130.indb 14 07.2.1 4:44:04 PM07.2.1 4:44:04 PM

OPERATIONS15
ENG
LISH
15: 45
DISC
Now Reading ...
Disc operationsThe disc type is automatically detected, and playback starts automatically (for some discs: automatic start depends on its internal program).
If a disc does not have any disc menu, all tracks in it will be played repeatedly until you change the source or eject the disc.
If “ ” appears on the monitor, the unit cannot accept the operation you have tried to do.• In some cases, without showing “ ,” operations will not be accepted.
Label side
0: Eject the disc.
3: Start playback if necessary.
DISP: Press if no playback picture appears, but disc information screen ( pages 16 to 18) is displayed.
Insert the disc.Playback starts automatically.
7: Stop playback.
Caution:
Do not place your finger behind the control panel.
Caution on volume setting:
Discs and connected USB devices produce very little noise compared with other sources. Lower the volume before playing a disc to avoid damaging the speakers by the sudden increase of the output level.
KD-AVX33[E]_0130.indb 15KD-AVX33[E]_0130.indb 15 07.2.1 4:44:05 PM07.2.1 4:44:05 PM

15: 45
MULTI
CHAP. RPT
DIGITALVIDEODVD
T 01 C 02 0:45:38
15: 45
FLATDIGITALVR-PRDVD
P 01 C 02 0:45:38
16
ENG
LISH
While playing the following discs, press .• Each time you press the button, playback picture and disc information screens appear alternately.
Audio format
Title no./Chapter no./Playing time
Playback mode
Disc type
4 ¢ Press: Select chapter Hold: Reverse/forward search*1
5 ∞ Select title
15: 45
MULTIMLP
B.S.PBONUS
AUDIODVD
G 01 02 0:45:38
RPT
Surround mode
4 ¢ Press: Select track Hold: Reverse/forward search*1
5 ∞ Select group
Group no./Track no./Playing time
BONUS indicator ( page 24)
B.S.P indicator ( page 24)
4 ¢ Press: Select chapter Hold: Reverse/forward search*1
5 ∞ Select program no./Play List no.
Program no. (or Play List no.)/Chapter no./Playing time
VR-PR: Original programVR-PL: Play List
KD-AVX33[E]_0130.indb 16KD-AVX33[E]_0130.indb 16 07.2.1 4:44:05 PM07.2.1 4:44:05 PM

OPERATIONS17
ENG
LISH
15: 45
FLATPBCVCD
02 0:45:38
Track no./Playing time
*1 Search speed: x2 ] x10.*2 Search speed: ¡1 ] ¡2.
PBC indicatorlights up when PBC is in use.
4 ¢ Press: Select track Hold: Reverse/forward search*1
page 48
15: 45
FRONT 2CH
RPT
DivXDVD
T 01 C 02 0:45:38Current Folder NameCurrent File Name.avi
For DivX/MPEG: Folder no./Track no./Playing timeFor JPEG: Folder no./File no.
4 ¢ Press: Select track Hold: Reverse/forward search for DivX/MPEG *2
5 ∞ Press: Select folder Hold: Display Folder List
KD-AVX33[E]_0130.indb 17KD-AVX33[E]_0130.indb 17 07.2.1 4:44:06 PM07.2.1 4:44:06 PM

15: 45
FLATCD
02 0:45:38 Disc Title Artist Name Current Track Title
RPT
18
ENG
LISH
15: 45
FLAT
RPT
MP3CD
T 01 02 0:45:38Current Folder NameCurrent File Name.mp3
Track no./Playing timeDisc title/Artist Name/Track title (only for CD Text)*3
Folder no./Track no./Playing time4 ¢ Press: Select track Hold: Reverse/forward search*1
5 ∞ Press: Select folder Hold: Display Folder List
Audio format(MP3/WMA/WAV/AAC)
4 ¢ Press: Select track Hold: Reverse/forward search*1
page 48
page 48
*1 Search speed: x2 ] x10.*3 “No Name” appears for conventional CDs.
Tag data will be shown instead of folder/file names when they are recorded and <Tag Display> is set to <On>. ( page 51)
KD-AVX33[E]_0130.indb 18KD-AVX33[E]_0130.indb 18 07.2.1 4:44:06 PM07.2.1 4:44:06 PM

OPERATIONS19
ENG
LISH
You can use only one of the following playback modes—Intro/Repeat/Random.Ex. To select Track Repeat
1
2
Mode menu icon
3
4
When one of the playback modes is selected, the corresponding indicator lights up on the disc information screen.
To cancel, select <All Off> in step 3 or <Off> in step 4.
Selecting playback modes
Disc type Intro Repeat Random
—Chapter: Repeats current
chapterTitle: Repeats current title
—
— Track: Repeats current track —
—
Chapter: Repeats current chapter
Program: Repeats current program (not available for Playlist playback)
—
Track: Plays the first 15 seconds of each track (for VCD: PBC not in use)
Track: Repeats current track (for VCD: PBC not in use)
Disc (All): Randomly plays all tracks (for VCD: PBC not in use)
Track: Plays the first 15 seconds of each track
Folder: Plays the first 15 seconds of the first track of each folder
Track: Repeats current trackFolder: Repeats all tracks of
the current folder
Folder: Randomly plays all tracks of current folder, then tracks of next folders
Disc (All): Randomly plays all tracks
—
Track: Repeats current trackFolder: Repeats current folder
—
—Folder: Repeats current folder
—
Mode
Off
All OffIntroRepeatRandom
RepeatOffTrackFolder
SetENTAV Menu
Mode EnterENT
AV Menu
Setup EnterENT
KD-AVX33[E]_0130.indb 19KD-AVX33[E]_0130.indb 19 07.2.1 4:44:07 PM07.2.1 4:44:07 PM

20
ENG
LISH
Selecting tracks on the list If a disc includes folders, you can display the Folder/Track (File) Lists, then start playback.
1
Folder List appears.• Hold the button to see the next/previous folders.
2 Select a folder, then activate the Track List.
Track List of the selected folder appears.
3 Select a track, and start playing.
• Folder List can also be accessed through <AV Menu> = <List>.
Prohibiting disc ejection You can lock a disc in the loading slot.
“No Eject” appears.
To cancel the prohibition, repeat the same procedure to select “EJECT OK?”.
Folder List
Off
My BestCinemaPopsMy Best2Favorite SongCinema2 ENT
Folder List
Off
My BestCinemaPopsMy Best2Favorite SongCinema2 ENT
File List
Off
Song011.mp3Song012.mp3Song013.mp3Song014.mp3Song015.mp3Song016.mp3 ENT
List menu icon
AV Menu
Setup EnterENT
AV Menu
List EnterENT
NO EJECT?EMERGENCY EJECT?
KD-AVX33[E]_0130.indb 20KD-AVX33[E]_0130.indb 20 07.2.1 4:44:08 PM07.2.1 4:44:08 PM

OPERATIONS21
ENG
LISH
: Stop playback.
: Start playback/Pause (if pressed during playback).
: Reverse/forward search.*2
: Press: Select track. Hold: Reverse/forward search.*4
: Select group.
Operations using the remote controller—RM-RK251
*1 Erases the misentry of the number.
*2 Search speed: x2 ] x5 ] x10 ] x20 ] x60
*3 Slow motion speed: 1/32 ] 1/16 ] 1/8 ] 1/4 ] 1/2
*4 Search speed: x2 ] x10
: Stop playback.
: Start playback/Pause (if pressed during playback).
: Reverse/forward search.*2 (No sound can be heard.) (Slow motion*3 during pause. No sound can be heard.)
: Press: Select chapter (during playback or pause). Hold: Reverse/forward search.*4
: Select title (during playback or pause).
Using menu driven features
1 2 Select an item you want
to start playback.
3
= = : Select chapter. Select title (when not playing).
(twice) = = :
Select title (during playback or pause).
: Select aspect ratio.
: Select audio language.
: Select subtitle language.
: Select view angle.
= = : Select track.
(twice) = = : Select group.
: Select aspect ratio.
: Select audio stream.
Using menu driven features
1 2 Select an item you want
to start playback.
3
*1
KD-AVX33[E]_0130.indb 21KD-AVX33[E]_0130.indb 21 07.2.1 4:44:08 PM07.2.1 4:44:08 PM

22
ENG
LISH
: Stop playback.
: Start playback/Pause (if pressed during playback).
: Reverse/forward search*2. (No sound can be heard.)
: Press: Select track. Hold: Reverse/forward search*3. (No sound can be heard.)
: Select folder.
= = : Select track (within the same folder).
(twice) = = : Select folder.
: Select aspect ratio.
: Select audio language. (DivX only)
: Select subtitle language. (DivX only)
: Stop playback.
: Start playback/Pause (if pressed during playback).
: Reverse/forward search*4. (No sound can be heard.)
(Slow motion*5 during pause. No sound can be heard.)
Reverse slow motion does not work.
: Press: Select chapter (during playback or pause).
Hold: Reverse/forward search*6
: Select program. Select play list (during playback or pause).
: Select aspect ratio.
: Select audio channel (ST: stereo, L: left, R: Right).
: Turn on/off subtitle.
= = : Select chapter. Select program (when not playing).
(twice) = = : Select program/play list (during playback or
pause).
Using Original Program/Play List screens( page 30)1 For Original Programs: For Play List: 2 Select an item you want to start playback.3 (Hide screen)
*1
1st press1st press 2nd press
3rd press2nd press
Current playback position
While playing...Back/advance the scenes by 5 minutes.
For DivX6: Using menu driven features
1
2 Select an item you want to start playback.
3
KD-AVX33[E]_0130.indb 22KD-AVX33[E]_0130.indb 22 07.2.1 4:44:10 PM07.2.1 4:44:10 PM

OPERATIONS23
ENG
LISH
= = : Select track.
During PBC playback...
= = :
Select an item on the menu. To return to the previous menu, press .
To cancel PBC playback
1
2 Start the desired track. = =
• To resume PBC, press / .
: Stop playback.
: Start playback/Pause (if pressed during playback).
: Reverse/forward search*4. (Forward slow motion*5 during pause. No
sound can be heard.) Reverse slow motion does not work.
: Press: Select track. Hold: Reverse/forward search*6 (No sound
can be heard.) : Select aspect ratio. : Select audio channel (ST: stereo, L: left, R:
Right).
: Stop playback.
: Start playback/Pause (if pressed during playback).
: Reverse/forward search*4.
: Press: Select track. Hold: Reverse/forward search*6.
: Select folder.
= = : Select track (within the same folder).
(twice) = = :
Select folder.
*1 Erases the misentry of the number.*2 Search speed: ¡1 ] ¡2 ] ¡3*3 Search speed: ¡1 ] ¡2 *4 Search speed: x2 ] x5 ] x10 ] x20 ] x60*5 Slow motion speed: 1/32 ] 1/16 ] 1/8 ]
1/4 ] 1/2*6 Search speed: x2 ] x10
: Stop playback.
: Start playback. (Slide show: each file is shown for a few seconds.)
Shows the current file until you change it if pressed during Slide show.
: Select track.
: Select folder.
: Select aspect ratio.
= = : Select track (within the same folder).
(twice) = = : Select folder.
: Stop playback.
: Start playback/Pause (if pressed during playback).
: Reverse/forward search*4.
: Press: Select track. Hold: Reverse/forward search*6.
= = : Select track.
KD-AVX33[E]_0130.indb 23KD-AVX33[E]_0130.indb 23 07.2.1 4:44:12 PM07.2.1 4:44:12 PM

24
ENG
LISH
Playing back a bonus groupIf a DVD Audio including a “bonus group” is detected, the BONUS indicator lights up on the disc information screen.
To play a bonus group...
1 Select the bonus group.• The bonus group is usually recorded as the last
group.
2 Enter the key number.
: Move the entry position
: Select a number
• “key number” (a kind of password) for the bonus group is not open to public. The way of getting the key number depends on the disc.
3 Follow the interactive instructions shown on the monitor.
Selecting browsable still pictureWhen a disc including browsable still pictures is detected, the B.S.P indicator lights up on the disc information screen.
When disc shows the BSP selecting icons such as @ or # on the screen...
1 Select an item you want to display.
2
Enjoying surround sounds You can enjoy multi-channel surround playback through the front, center, surround speakers.• After connecting the center speaker, make
sure to activate the center speaker; otherwise, no sound comes out of the center speaker ( page 53).
• All surround mode can also be used for “USB.”
MULTI: For multi-channel encoded sources such as Dolby Digital*1, DTS*2, and DVD Audio. (When activated, “MULTI” is shown on the disc information screen.)
Dolby Pro Logic II (Movie/Music): For 2 channel sources except for DivX/MPEG 1/MPEG2 discs.
To turn on the surround
1
2
3
• Surround Off: Deactivates surround.• Surround On: Activates surround = go to the
following steps.
AV Menu
Setup EnterENT
AV Menu
Disc Surround EnterENT
Disc Surround menu icon
Disc Surround
Auto
Surround OffSurround On
KD-AVX33[E]_0130.indb 24KD-AVX33[E]_0130.indb 24 07.2.1 4:44:13 PM07.2.1 4:44:13 PM

OPERATIONS25
ENG
LISH
4
• Auto: When multi-channel digital signals come in, “MULTI” surround is activated.
When 2-channel or 2.1-channel signals come in, “4CH STEREO” is activated.
• Through: All incoming channel signals are sent to the corresponding speakers.
• Dolby PLII Movie: Activates Dolby Pro Logic II Movie.
• Dolby PLII Music: Activates Dolby Pro Logic II Music. You can adjust <Panorama> and <Center Width> settings. ( below)
To change the <Dolby PLII Music> settingin step 4 above...
1
2
• Panorama: Select <On> to add wraparound sound effect.
• Center Width: Adjust the center image so it may be heard only from the center speaker, only form the left/right front speaker as a “phantom” center image, or various combination of these speakers. As the number increases, the “phantom” effect becomes stronger (normally select <4>).
3
On the remote controller:
• You cannot change the <Dolby PL II Music> settings using the remote controller.
Surround OnAutoThroughDolby PLII MovieDolby PLII Music
SetENT
Surround On
Panorama
AutoThroughDolby PLII MovieDolby PLII Music
Dolby PLII Music
On
PanoramaCenterWidth
*1 Manufactured under license from Dolby Laboratories. Dolby, Pro Logic, and the double-D symbol are trademarks of Dolby Laboratories.
*2 “DTS” and “DTS Digital Surround” are registered trademarks of DTS, Inc.
KD-AVX33[E]_0130.indb 25KD-AVX33[E]_0130.indb 25 07.2.1 4:44:14 PM07.2.1 4:44:14 PM

26
ENG
LISH
1 Display the on-screen bar. ( page 27)
2 Select an item.
3 Make a selection.If a pop-up menu appears...
• For entering time/numbers...
: Move the entry position
: Select a number
To remove the on-screen bar
Operations using the on-screen bar (DVD/VCD/DivX/MPEG1/MPEG2/JPEG) These operations are possible on the monitor using the remote controller.
KD-AVX33[E]_0130.indb 26KD-AVX33[E]_0130.indb 26 07.2.1 4:44:15 PM07.2.1 4:44:15 PM

OPERATIONS27
ENG
LISH
Information
Operation
On-screen bar
1 Disc type2 • DVD: Audio signal format
• VCD: PBC3 Playback mode*1
DVD Video: T. RPT: Title repeat C. RPT: Chapter repeat DVD Audio: T. RPT: Track repeat DVD-VR: C. RPT: Chapter repeat PG. RPT: Program repeat DivX/MPEG: T. RPT: Track repeat F. RPT: Folder repeat JPEG: F. RPT: Folder repeat VCD: T. INT: Track intro T. RPT: Track repeat A. RND: All random4 Playback information T02-C03 Current title/chapter G02-T03 Current group/track
PG-001
C-002 Current program/chapter
PL-003
C-004 Current playlist/chapter TRACK 01 Current track F001-T001 Current folder/track F002-F002 Current folder/file (JPEG)
5 Time indicationTOTAL Elapsed playing time of the discT. REM Remaining title time (for DVD)
Remaining disc time (for others)TIME Elapsed playing time of the current
chapter/track*2
REM Remaining time of the current chapter/track*2
6 Playback status Play
Reverse/forward search Reverse/forward slow-motion
Pause Stop
7 Operation iconsTIME Change time indication (see 5)
Time Search (Specify a certain scene by entering time.)
TITLE Title Search (by its number)CHAP Chapter Search (by its number)GROUP Group Search (by its number)TRACK Track Search (by its number)RPT Repeat play*1
INT Intro play*1
RND Random play*1
Change the audio language, audio channel or audio stream
Change the subtitle language Change the view angle
PAGE Change the browsable still pictures (pages)
*1 page 19*2 Not applicable for DVD-VR.
Above example is of DVD Video. Items shown on the bar vary due to the disc type.
DVD -V T02-C03 TOTAL 1:25:58
TIME TITLE CHAP RPT
C. RPT
KD-AVX33[E]_0130.indb 27KD-AVX33[E]_0130.indb 27 07.2.1 4:44:16 PM07.2.1 4:44:16 PM

28
ENG
LISH
Dual Zone operationsYou can enjoy a disc playback on the external monitor connected to the VIDEO OUT and 2nd AUDIO OUT plugs, while listening to any other source than “USB” through the speakers.• When Dual Zone is in use, you can only operate the
DVD/CD player using the remote controller.
1
2
3
• Off: Deactivates Dual Zone.• On (DUAL): Activates Dual Zone without
applying Headphone Surround*1.• On/Surround On (DUAL-S): Activates Dual
Zone and applies Headphone Surround.
When Dual Zone is activated, the main source is changed to “DISC.”
Ex. When “On/Surround On” is selected.
To select a different source (main source) to listen through the speakers:Press SRC (source) on the control panel.• By using the buttons on the control panel,
you can operate the newly selected source without affecting Dual Zone (DISC) operations.
• You cannot select “USB” for the main source.
On the remote controller:
1
2 Adjust the volume through the 2nd AUDIO OUT plug.
3 Operate the DVD/CD player.
*1 JVC original headphone virtual surround system. This surround will also work for the main source “DISC” if “On/Surround On” is selected as the sub-source. This surround does not work for DivX/MPEG1/MPEG2 discs.
*2 Displayed being shaded if Headphone Surround is not applied.
Operations using the control screen For discs except DVD and VCD:While Dual Zone is on, these operations are possible on the external monitor using the remote controller.The control screen automatically appears when you insert a disc. (For DivX/MPEG1/MPEG2/JPEG; while not playing.)
Ex.: MP3/WMA
Folder : 2 / 3
TIME 00:00:14T. RPT
Track : 6 / 14 (Total 41)
Track Information
Cloudy.mp3Fair.mp3Fog.mp3Hail.wmaIndian summer.mp3Rain.mp3Shower.mp3Snow.mp3Thunder.wmaTyphoon.mp3Wind.mp3Winter sky.mp3
AlbumWeatherArtistRobert M. SmithTitleRain
01 Music02 Music03 Music
AV Menu
Setup EnterENT
AV Menu
Dual Zone EnterENT
Dual Zone menu icon
Dual ZoneOffOnOn/Surround On
SetENT
FLATDIGITALVIDEODVD
T 01 C 02 0:45:38DUAL-S *2
KD-AVX33[E]_0130.indb 28KD-AVX33[E]_0130.indb 28 07.2.1 4:44:17 PM07.2.1 4:44:17 PM

OPERATIONS29
ENG
LISH
Selecting playback modesYou can also change the playback modes using the playback mode selection window.• For CD/MP3/WMA/WAV/AAC: Intro/Repeat/
Random• For DivX/MPEG1/MPEG2/JPEG: Repeat
1
2 Only for CD/MP3/WMA/WAV: Select a playback mode.
3 Select your desired option.
4
1 Current folder (highlighted bar)2 Current folder number/total folder number3 Folder list* If tag data includes “Jacket Picture” (baseline JPEG), it
will be displayed. If you press OSD, the playback mode selection window appears. ( below)
4 Selected playback mode ( below)5 Elapsed playing time of the current track (not
displayed for JPEG)6 Operation status7 Current track number/total number of tracks in the
current folder (total number of tracks on the disc)8 Track information (only for MP3/WMA/WAV/AAC)9 Track listp Current track (highlighted)
To select a folder or track
1 Select “Folder” column or “Track” column on the control screen.
2 Select a folder or track.• If necessary, press ENT to start playback.
1 Playback mode selection window: appears when OSD is pressed ( below).
2 Selected playback mode ( below)3 Elapsed playing time of the current track4 Operation status5 Current track number/total number of tracks on the
disc6 Track information7 Track list8 Current track (highlighted bar)
To select a track• If necessary, press ENT to start playback.
Ex.: CD Text
MODE
REPEATTRACK
TIME 00:14
Track : 6 / 14
Track Information
CloudyFairFogHailIndian summerRainShowerSnowThunderTyphoonWindWinter sky
AlbumFour seasonsArtistRobert M. SmithTitleRain
T. RPT
Selected playback modeDivX/MPEG1/MPEG2/JPEG: page 27MP3/WMA/WAV/AAC: T. INT: Track intro F. INT: Folder intro T. RPT: Track repeat F. RPT: Folder repeat F. RND: Folder random A. RND: All randomCD: T. INT: Track intro T. RPT: Track repeat A. RND: All random
KD-AVX33[E]_0130.indb 29KD-AVX33[E]_0130.indb 29 07.2.1 4:44:18 PM07.2.1 4:44:18 PM

30
ENG
LISH
Operations using the list screen For discs except DVD, VCD, and CDWhile Dual Zone is on, these operations are possible on the external monitor using the remote controller.
While not playing...
1 Display the list screen.
2 Select a folder on the list.
3 Select a track on the list.
• To go back to the folder list, press .
1 Current folder number/total folder number 2 Current track number/total number of tracks in the
current folder3 Current page/total number of the pages included
in the list4 Current folder/track (highlighted bar)
List screen for DVD-VRYou can use Original Program and Play List screen anytime while playing DVD-VR with its data recorded.• These screens can be displayed on the built-in
monitor and the external monitor.
1 Display the Original Program/Play List screen.
2 Select an item you want.
1 Program/Play list number2 Recording date 3 Recording source (TV station, the input terminal
of the recording equipment, etc.)4 Start time of recording5 Title of the program/play list*6 Highlighted bar (current selection)7 Creating date of play lists8 Total number of chapters9 Playback time* The title of the original program or play list may
not be displayed depending on the recording equipment.
Folder : 144/240 Track 144/198 Page : 4/7fol120fol121fol122fol123fol124fol125fol126fol127fol128fol129
fol150fol151fol152fol153fol154fol155fol156fol157fol158fol159
fol140fol141fol142fol143fol144fol145fol146fol147fol148fol149
fol130fol131fol132fol133fol134fol135fol136fol137fol138fol139
file0141.wmafile0142.mp3file0143.wmafile0144.mp3file0145.mp3file0146.mp3file0147.mp3file0148.wmafile0149.wmafile0150.wma
file0151.wmafile0152.mp3file0153.wmafile0154.mp3file0155.wmafile0156.wmafile0157.wmafile0158.wmafile0159.mp3file0160.wma
Folder : 144/240 Track 144/198 Page : 4/5file0121.mp3file0122.mp3file0123.wmafile0124.mp3file0125.mp3file0126.wmafile0127.wmafile0128.mp3file0129.mp3file0130.wma
file0131.mp3file0132.mp3file0133.mp3file0134.mp3file0135.wmafile0136.mp3file0137.wmafile0138.mp3file0139.wmafile0140.wma
ORIGINAL PROGRAM
No Date Ch ime itle1 25/04/07 4ch 19:00 JVC DVD World 20042 17/05/07 8ch 10:303 22/05/07 8ch 17:00 Music Festival4 26/05/07 L-1 13:19 children 0015 20/06/07 4ch 22:006 25/06/07 L-1 8:23 children 002
T T
PLAY LIST
No Date Chap Length Title1 25/05/07 001 1:03:16 My JVC World2 17/06/07 005 1:35:253 20/06/07 003 0:10:23 Favorite music4 25/06/07 001 0:07:19 children001-002
or
KD-AVX33[E]_0130.indb 30KD-AVX33[E]_0130.indb 30 07.2.1 4:44:19 PM07.2.1 4:44:19 PM

OPERATIONS31
ENG
LISH
USB operationsYou can connect a USB mass storage class device such as a USB memory, Digital Audio player*1, portable HDD, etc. to the unit.
~ Connect a USB device.
Ÿ Select “USB”.
15: 45
USBNow Reading ...
7: Stop playback
This unit can play DivX/JPEG/MPEG1/MPEG2*2/MP3/WMA/WAV/AAC*3 files stored in a USB mass storage class device.• You can operate the USB device in the same way you
operate the files on discs. ( page 19 to 27)• You cannot select “USB”when Dual Zone is in use.• All tracks in the USB device will be played repeatedly
until you change the source.
*1 Except for JVC D. Player XA-HD500.*2 Except for MPEG2 files recorded by JVC Everio
camcorder (extension code <.mod>).
3: Start playback if necessary.
DISP: Press if no playback picture appears , but disc information screen ( pages 16 to 18) is displayed.
4 ¢ Press: Select track Hold: Reverse/forward search5 ∞ Press: Select folder Hold: Display Folder List
USB cable from the rear of the unit.• You cannot connect a computer to the
USB ( ) terminal of the unit.
*3 This unit can play back AAC files encoded using iTunes. This unit cannot play back AAC files purchased from the iTunes Store.
KD-AVX33[E]_0130.indb 31KD-AVX33[E]_0130.indb 31 07.2.1 4:44:20 PM07.2.1 4:44:20 PM

Caution:
• Avoid using the USB device if it might hinder your safety driving.• Do not pull out and attach the USB device repeatedly while “Now Reading...” is flashing on the monitor.• Do not start the car engine if a USB device is connected.• Stop play back before disconnecting a USB device.• Make sure all important data has been backed up to avoid losing the data.• Do not leave a USB device in the car, expose to direct sunlight, or high temperature to avoid deformation or
cause damages to the device.
32
ENG
LISH
You can use only one of the following playback modes—Intro/Repeat/Random.Ex. To select Track Repeat
1
2
3
4
When one of the playback modes is selected, the corresponding indicator lights up on the information screen.
To cancel, select <All Off> in step 3 or <Off> in step 4.
Selecting playback modes
File type Intro Repeat Random
Track: Plays the first 15 seconds of each track
Folder: Plays the first 15 seconds of the first track of each folder
Track: Repeats current trackFolder: Repeats all tracks of
the current folder
Folder: Randomly plays all tracks of current folder, then tracks of next folders
USB (All): Randomly plays all tracks
—
Track: Repeats current trackFolder: Repeats current folder —
— Folder: Repeats current folder —
Mode
Off
All OffIntroRepeatRandom
RepeatOffTrackFolder
SetENT
AV Menu
Mode EnterENT
AV Menu
Setup EnterENT
Mode menu icon
KD-AVX33[E]_0130.indb 32KD-AVX33[E]_0130.indb 32 07.2.1 4:44:20 PM07.2.1 4:44:20 PM

OPERATIONS33
ENG
LISH
Bluetooth® operations — Cellular phone/audio player
Bluetooth is a short-range wireless radio communication technology for the mobile device such as mobile phones, portable PCs, and other devices. The bluetooth devices can be connected without cables and communicate each other. • The serial number is printed on the label placed on
the bottom of the unit.• Refer to the list (included in the box) to see the
countries where you may use the Bluetooth® function.
Bluetooth profileThis unit supports the following Bluetooth profiles; HSP (Headset Profile) HFP (Hands-Free Profile) A2DP (Advanced Audio Distribution Profile) AVRCP (Audio/Video Remote Control Profile) SPP (Serial Port Profile) OPP (Object Push Profile)
FeaturesYou can operate Bluetooth devices through the unit as follows:• Receiving a call• Making a call—from phone book, from call history
(Redial/Missed Call/Received Call), by dialing number, by preset numbers, by voice command
• Receiving the SMS (Short Message Service)• Play back a Bluetooth audio player
Refer also to the instructions supplied with the Bluetooth device.
Continued on the next page
Connecting a Bluetooth device for the first time Pairing and PIN CodeWhen you connect a Bluetooth device to the unit for the first time, make pairing between the unit and the device. Pairing allows Bluetooth devices to communicate each other.To make pairing, you may need to enter the PIN (Personal Identification Number) code of your Bluetooth device you want to connect.
• Once the connection is established, it is registered in the unit even if you reset the unit. Up to five devices can be registered in total.
• Only one device can be connected at a time for each source (“Bluetooth Phone” and “Bluetooth Audio”).
• To use the Bluetooth function, you need to turn on Bluetooth function of the device.
Preparation: Operate the device to turn on itsBluetooth function.
Registration (Pairing) methodsUse either of the following items in the <Bluetooth> menu to register and establish the connection with a device.• Select “Bluetooth Phone” or “Bluetooth Audio” as the
source to operate the <Bluetooth> menu.
<Open> Make the unit ready to establish a new Bluetooth connection. Connection is established by operating the Bluetooth device.
<Search> Make the unit ready to establish a new Bluetooth connection. Connection is established by operating the unit.
• The Bluetooth word mark and logos are owned by the Bluetooth SIG, Inc. and any use of such marks by Victor Company of Japan, Limited (JVC) is under license. Other trademarks and trade names are those of their respective owners.
KD-AVX33[E]_0130.indb 33KD-AVX33[E]_0130.indb 33 07.2.1 4:44:21 PM07.2.1 4:44:21 PM

34
ENG
LISH
7 Operate the target Bluetooth device. (While “Open...” is flashing on the screen.)Enter the same PIN code (as entered in the above step) on the device to be connected.
Now connection is established and you can use the device through the unit.
The device remains registered even after you disconnect the device. Use <Connect> (or activate <Auto Connect>) to connect the same device from next time. ( pages 58 and 59)
Searching for available devicesPerform steps 1 to 3 on the left, then...
1
The unit searches for available devices and displays the list of them. (If no available device is detected, “Device Unfound” appears.)
2 Select a device you want to connect.
3 Enter the specific PIN code of the device to the unit.• Refer to the instructions supplied with the device
to check the PIN code.
4 Use the Bluetooth device to connect.
Now connection is established and you can use the device through the unit.
AV Menu
Bluetooth EnterENT
AV Menu
Setup EnterENT
Registering using <Open>
1 Select “Bluetooth Phone” or “Bluetooth Audio.”
2
3
Bluetooth menu icon
4
5 Enter a PIN (Personal Identification Number)* code to the unit.• You can enter any number you like (1-digit to
16-digit number).* Some devices have their own PIN code. Enter the
specified PIN code to the unit.
• To delete an unwanted digit, select blank space.
6
NEW DEVICEDial MenuMessageOpenSearchSpecial Device
NEW DEVICEDial MenuMessageOpenSearchSpecial Device
PIN Code
1234
EnterENT
15: 45
FLAT
NEW DEVICE
Bluetooth Phone
Select “NEW DEVICE” by pressing 5 / ∞.
KD-AVX33[E]_0130.indb 34KD-AVX33[E]_0130.indb 34 07.2.1 4:44:22 PM07.2.1 4:44:22 PM

OPERATIONS35
ENG
LISH
Connecting a special devicePerform steps 1 to 3 of “Registering using <Open>” on page 34, then...
1
The unit displays the list of the preset devices.
2 Select a device you want to connect.
3 Use <Open> (or <Search>) to connect.
Connecting/disconnecting a registered device
1 Select “Bluetooth Phone” or “Bluetooth Audio,” then select a registered device you want to connect/disconnect.
2 Perform steps 2 and 3 of “Registering using <Open>” on page 34, then...• Select <Connect> to connect the selected
device.• Select <Disconnect> to disconnect the selected
device.
You can set the unit to connect a Bluetooth device automatically when the unit is turned on. ( page 59)
NEW DEVICEDial MenuMessageOpenSearchSpecial Device
Deleting a registered device
1 Select “Bluetooth Phone” or “Bluetooth Audio,” then select a registered device you want to delete.
2 Perform steps 2 and 3 of “Registering using <Open>” on page 34, then...• Select <Delete Pair>, then <Yes>.
KD-AVX33[E]_0130.indb 35KD-AVX33[E]_0130.indb 35 07.2.1 4:44:23 PM07.2.1 4:44:23 PM

36
ENG
LISH
15: 45
FLAT
Connected Device Name
Bluetooth Phone
POWER]ON
~ Select “Bluetooth Phone.”
Ÿ Enter the <Bluetooth> menu.
! Establish the connection with a device, then make a call (or settings using the <Bluetooth> menu). pages 34, 50, 58, and 59
When the sound is stopped or interrupted during the use of a Bluetooth device, try the following remedies.• Turn off, then turn on the unit.• (When the sound is not yet restored,) connect the
device again. ( “Connecting/disconnecting a registered device” on page 35)
Using the Bluetooth cellular phone
Status of the device*2
Signal strength/Battery remainder
Adjust the volume*1
When a call comes in...
The source is automatically changed to “Bluetooth Phone.”When <Auto Answer> is activated...The unit answers the incoming calls automatically. ( page 59)• When <Auto Answer> is deactivated, press any
button (except ATT or +/–) to answer the incoming call.
page 48
Connected device name*3
Name and phone number (if acquired)
To end the call or reject an incoming callHold any button (except ATT or +/–).
Answering a waiting callIf your cellular phone is equipped with the call waiting function, you can put the current call on hold and answer the waiting call.Press any button (except ATT and +/–).• To restore the on-hold call, press any button
(except ATT and +/–) again.• When you end one call, you can connect to the
other.
Press: Display <Dial Menu> Answers incoming callHold: Display <Redial> list
Turns Blue when the Bluetooth device is connected.
*4
*1 You can adjust the volume level for “Bluetooth Phone” without affecting the volume level for other sources.
*2 Appears only when the information comes from the device.
*3 Each time you press 5 ∞, the registered device name (and “NEW DEVICE” when a new device can be registered) appear in turn.
*4 When a cellular phone with audio function is connected, appears.
You can adjust the microphone volume level. ( page 59)
KD-AVX33[E]_0130.indb 36KD-AVX33[E]_0130.indb 36 07.2.1 4:44:24 PM07.2.1 4:44:24 PM

OPERATIONS37
ENG
LISH
Making a call 1 Display the <Dial Menu>.
2 Select the method to make a call.
• Redial* : Shows the list of the phone numbers you have dialed = go to the following step.
• Received Calls* : Shows the list of the received calls = go to the following step.
• Phonebook* : Shows the phone book of the connected cellular phone = go to the following step.
• Missed Calls* : Shows the list of the missed calls = go to the following step.
• Phone Number : Shows the phone number entry screen = “How to enter phone number” on the next page.
• Voice Dialing (Only when the connected cellular phone has the voice recognition system): Speak the name you want to call.
* Displays only when your cellular phone is equipped with these functions.– If not displayed, please try to transfer the
phone book memory of the cellular phone to this unit. (Refer to the instruction manual supplied with your cellular phone.)
– With some cellular phones, the phone book memory is transferred automatically.
3 Select the name/phone number you want to call.
P902i
Annie
RedialReceived CallsPhonebookMissed CallsPhone number
P902i
Annie
RedialReceived CallsPhonebookMissed CallsPhone number
When an SMS comes in...If the cellular phone is compatible with SMS (Short Message Service) and <Message Info> is set to <Auto> ( page 59), the unit rings and “Receiving Message” appears on the monitor to inform you of the arrival of the message.• You cannot edit or send a message through the
unit.
When <Message Info> is set to <Auto>...To read the messageWhile “Receiving Message” is displayed...
• The source is changed to “Bluetooth Phone.” To read the message later
• The message is stored into <Message> = <Unread>. ( page 58)
When <Message Info> is set to <Manual>Access the message list to read a message.( page 58)
or
KD-AVX33[E]_0130.indb 37KD-AVX33[E]_0130.indb 37 07.2.1 4:44:25 PM07.2.1 4:44:25 PM

38
ENG
LISH
Presetting the phone numbers You can preset up to six phone numbers.
1 Display the phone number you want to preset by using one of <Dial Menu> items.
Ex.: “Jack” is selected from the phone book
Preset Memory list appears.
2 Select a preset number.
The phone number selected in step 1 is now stored in preset number 4.
To call a preset number On the remote:
On the unit:
1
2
111222233332223333666644455556666098456712349998888777755566668888
1
2
3
4
5
6 ENT
Preset List
111222233332223333666644455556666098456712349998888777755566668888
1
2
3
4
5
6 ENT
Preset List
111222233332223333666644455556666111333344449998888777755566668888
1
2
3
4
5
6 ENT
Preset Memory
Jack123123412340989876543209845671234
Dial
StoreENT
ENT
111222233332223333666644455556666111333344449998888777755566668888
1
2
3
4
5
6 ENT
Preset Memory
Speak the name you want to call.
How to enter phone numberOn the remote:
On the unit:
1
• To delete an unwanted digit, select blank space.
2
<Dial Menu> can be also accessed through <AV Menu> = <Bluetooth> = <Dial Menu>.
Direct operations to redial / Voice DialingYou can use the following functions regardless of the current source.To redial
To activate Voice DialingYou can make a call by your voice.
AV Menu
Bluetooth EnterENT
AV Menu
Setup EnterENT
Bluetooth menu icon
Dialling ...Jack09845671234
Select a number. Move the entry position.
or
or
KD-AVX33[E]_0130.indb 38KD-AVX33[E]_0130.indb 38 07.2.1 4:44:25 PM07.2.1 4:44:25 PM

OPERATIONS39
ENG
LISH
Using the Bluetooth audio player
*1 Each time you press 5 ∞, the registered device names (and “NEW DEVICE” when a new device can be registered) appear in turn. You cannot select “New Device” when a Bluetooth audio player is connected.
*2 Appears only when the information comes from the device.
*3 Indicates the button pressed. It may be different from the operation status.
*4 When a cellular phone with audio function is connected, appears.
You can use the following buttons on the remote controller for the Bluetooth audio operations. For details, pages 8 and 9
15: 45
FLAT
Connected Device Name
Bluetooth Audio
POWER]ON
Pause
Reverse/forward skip
*1
Status of the device*2
Signal strength/Battery remainder
page 48
List menu icon
AV Menu
Setup EnterENT
AV Menu
List EnterENT
~ Select “Bluetooth Audio.”
Ÿ Start playback.• See pages 33 to 35 for connecting a new device.• See page 35 for connecting/disconnecting a
registered device.• See page 35 for deleting a registered device.
When the sound is stopped or interrupted during the use of a Bluetooth device, try the following remedies.• Turn off, then turn on the unit.• (When the sound is not yet restored,) connect the
device again. ( “Connecting/disconnecting a registered device” on page 35)
You can use the following buttons on the remote controller for the Bluetooth phone operations. For details, pages 8 and 9.
• Preset List can also be accessed through <AV Menu> = <List>.
*3
Turns Blue when the Bluetooth device is connected.
*4
Bluetooth Information:If you wish to receive more information about Bluetooth, visit our JVC web site.
KD-AVX33[E]_0130.indb 39KD-AVX33[E]_0130.indb 39 07.2.1 4:44:27 PM07.2.1 4:44:27 PM

40
ENG
LISH
15: 45
FLATCD-CH
01 01 0:02:38Disc TitleArtist NameCurrent Track Title
POWER]ON
Listening to the CD changer
It is recommended to use a JVC MP3-compatible CD changer with your unit.• You can play only CDs (CD-DA) and MP3 discs.
Preparation:Make sure <Changer> is selected for the external input setting. ( page 55)
~ Select “CD-CH.”
Ÿ Display the Disc List.
• Each time you hold the button, you can display the other list of the remaining discs.
! Select a disc to start playing.
“No Name” appears for conventional CDs
Disc no./Track no./Playing time
• While playing an MP3 disc, you can select and start playing a track in the disc using the Lists: Disc List (select the current disc) = Folder List = File List, then start playing a track you want.
4 ¢ Press: Select track Hold: Reverse/forward search5 ∞ Press: Select folder (MP3 only) Hold: Display Disc List
Disc List
Off
MP3 DISCDISC 02DISC 03DISC 04DISC 05DISC 06 ENT
Disc List
Off
MP3 DISCDISC 02DISC 03DISC 04DISC 05DISC 06 ENT
Folder List
Off
My BestCinemaPopsMy Best2Favorite SongCinema2 ENT
File List
Off
Song011.mp3Song012.mp3Song013.mp3Song014.mp3Song015.mp3Song016.mp3 ENT
Disc List
Off
MP3 DISCDISC 02DISC 03DISC 04DISC 05DISC 06 ENT
KD-AVX33[E]_0130.indb 40KD-AVX33[E]_0130.indb 40 07.2.1 4:44:28 PM07.2.1 4:44:28 PM

41 EXTERNAL DEVICES
ENG
LISH
You can use only one of the following playback modes—Intro/Repeat/Random.Ex. To select Track Repeat
1
2
Mode menu icon
3
4
When one of the playback modes is selected, the corresponding indicator lights up on the monitor.
To cancel, select <All Off> in step 3 or <Off> in step 4.
Selecting playback modes
Disc type Intro Repeat Random
Track: Plays the first 15 seconds of each track
Disc: Plays the first 15 seconds of the first track of all loaded discs
Track: Repeats current trackDisc: Repeats all tracks of the
current disc
Disc: Randomly plays all tracks of the current disc
All: Randomly plays all tracks of all loaded discs
Track: Plays the first 15 seconds of each track
Folder: Plays the first 15 seconds of the first track of each folder
Disc: Plays the first 15 seconds of the first track of all loaded discs
Track: Repeats current trackFolder: Repeats all tracks of
the current folderDisc: Repeats all tracks of the
current disc
Folder: Randomly plays all tracks of current folder, then tracks of next folders
Disc: Randomly plays all tracks of the current disc
All: Randomly plays all tracks of all loaded discs
You can use the following buttons on the remote controller to operate the CD changer.
or : Select disc.
To use <Mode> menu above.
To use <List> menu page 40.Disc List = Folder List = File List
Mode
Off
All OffIntroRepeatRandom
RepeatOffTrackDisc
SetENT
AV Menu
Mode EnterENT
AV Menu
Setup EnterENT
Press: Select folder (MP3 only).
Press: Select trackHold: Reverse/forward search
KD-AVX33[E]_0130.indb 41KD-AVX33[E]_0130.indb 41 07.2.1 4:44:28 PM07.2.1 4:44:28 PM

42
ENG
LISH
15: 45
FLATTEXT
AFDRC ANN
DAB
DAB1 Preset1 Bayern Bayern2
News
POWER]ON
Listening to the DAB tuner
~ Select “DAB.”
Ÿ Select the bands.
! Searching for an ensemble.• Manual Search: Hold either 4 or ¢ until “Manual Search” appears on the display, then press it
repeatedly.
⁄ Select a service (either primary or secondary) to listen to.
Service label /Frequency, channel
Preset No.Band
page 48
DAB indicators/Standby Reception indicators
PTY code
Ensemble label*
* Information changes when you press DISP. While tuning in a service with DLS (Dynamic Label Segment), the TEXT indicator lights up.
When surrounding sounds are noisy Some services provide Dynamic Range Control (DRC) signals together with their regular programme signals. DRC will reinforce the low level sounds to improve your listening.• The DRC indicator will light up while tuning in a
service with the DRC signals.
1
2
3
4
• As the number increases, the effect becomes stronger.
4 ¢
5 ∞
TEXT indicator
Mode
Off
D. Range ControlAnnounce StandbyPty Standby
OffDRC1DRC2DRC3
ExitENT
D. Range Control
AV Menu
Mode EnterENT
AV Menu
Setup EnterENT
Mode menu icon
KD-AVX33[E]_0130.indb 42KD-AVX33[E]_0130.indb 42 07.2.1 4:44:29 PM07.2.1 4:44:29 PM

43 EXTERNAL DEVICES
ENG
LISH
Manual presetting You can preset six DAB services (primary) for each band.
1
2 Search for a service you want to preset.
3
• Preset List can also be accessed through <AV Menu> = <List> ( right).
4 Select a preset number.
5
Selecting preset stations On the remote:
1
2
On the unit:
1
2
3 Select a preset service.
• Preset List can also be accessed through <AV Menu> = <List>.
Activating/deactivating TA/PTY Standby Reception • Operations are exactly the same as explained on page
13 for FM RDS stations.• You cannot store PTY codes separately for the DAB
tuner and for the FM tuner.
DAB1Service LabelNo Serv.FFHNo Serv.HRSHRH ENT
1
2
3
4
56
Store ENT
Service LabelNo Serv.FFHNo Serv.HRSHRH ENT
1
2
3
4
56
DAB1 Store ENT
15: 45
FLAT
AF ANNDRC
DAB
DAB1 Preset4 Bayern Bayern2
DAB1 Store ENT
Service LabelNo Serv.FFHBayern2HRSHRH ENT
1
2
3
4
56
DAB1 Store ENT
Service LabelNo Serv.FFHBayern2HRSHRH ENT
1
2
3
4
56
List menu icon
AV Menu
Setup EnterENT
AV Menu
List EnterENT
KD-AVX33[E]_0130.indb 43KD-AVX33[E]_0130.indb 43 07.2.1 4:44:30 PM07.2.1 4:44:30 PM

44
ENG
LISH
Activating/deactivating Announcement Standby Reception Announcement Standby Reception allows the unit to switch temporarily to your favorite service (announcement type).
Announcement Standby Reception Indicator
Activate <AV Menu>, then select <Mode>, <Announce Standby> ( below).
ANN
The unit will temporarily switch to your favorite service from any source other than FM/AM.
Lights up
Not yet activated. Tune in to another service providing the related signals.
Flashes
To deactivate, select <Off> in step 4, then press ENT once ( right).
Goes off
Activating Announcement Standby Reception
1
2
Mode menu icon
3
Available announcement types:Transport News, Warning, News, Weather, Event, Special Event, Radio Info, Sports News, Financial News.
4
5
6 Select an announcement type for Announcement Standby Reception.
Tracing the same programme—Alternative Frequency Reception (DAB AF) • While receiving a DAB service: When driving in an area where a service cannot be
received, this unit automatically tunes in to another ensemble or FM RDS station, broadcasting the same programme.
• While receiving an FM RDS station: When driving in an area where a DAB service is
broadcasting the same programme as the FM RDS station, this unit automatically tunes in to the DAB service.
When shipped from the factory, Alternative Frequency Reception is activated.To deactivate the Alternative Frequency Reception, pages 50 and 54.
Mode
Off
D. Range ControlAnnounce StandbyPty Standby
OffTransport News
Announce Standby
Transport NewsWarningNewsWeatherEvent
ExitENT
Announce Standby
Transport NewsWarningNewsWeatherEvent
ExitENT
Announce Standby
AV Menu
Mode EnterENT
AV Menu
Setup EnterENT
KD-AVX33[E]_0130.indb 44KD-AVX33[E]_0130.indb 44 07.2.1 4:44:31 PM07.2.1 4:44:31 PM

45 EXTERNAL DEVICES
ENG
LISH
15: 45
FLATD.PLAYER
01 0:45:38Album NameArtist NameTrack Title
POWER]ON
Listening to the iPod/D. player
It is required to connect the interface adapter (KS-PD100 for Apple iPod or KS-PD500 for JVC D. player) to the CD changer jack on the rear.Preparation:Make sure <iPod> or <D. Player> is selected for the external input setting. ( page 55)
~ Select “iPod” or “D. PLAYER.”Playback starts automatically.
Ÿ Select a track.
Selecting a track from the player’s menu 1 Enter the player’s menu.
• This mode will be canceled if no operations are done for about 5 seconds.
2 Select the desired item.Press: Select an itemHold: Skip 10 items at a time
For iPod:Playlists Ô Artists Ô Albums Ô Songs Ô Genres Ô Composers Ô (back to the beginning)For D. player:Playlist Ô Artist Ô Album Ô Genre Ô Track Ô (back to the beginning)
3 Confirm the selection.
4 Repeat steps 2 and 3 to select a track.• When a track is selected finally, playback starts.• To return to the previous menu...
Selecting playback modes 1 Display <AV Menu>, then select <Mode>
menu icon.
2 Enter <Mode>, then select <Repeat> or <Random>.
3 Select an appropriate option.
Repeat One: Functions the same as “Repeat One” or “Repeat Mode = One.”All: Functions the same as “Repeat All” or “Repeat Mode = All.”
Random Album: Functions the same as “Shuffle Albums” of the iPod.Song/On: Functions the same as “Shuffle Songs” or “Random Play = On.”
• When one of the playback modes is selected, the corresponding indicators light up on the monitor.
To cancel, select <All Off> in step 2 or <Off> in step 3.
4 ¢ :Press: Select trackHold: Reverse/forward search
5 ∞5 : Enter player’s menu∞ : Pause/stop playback
• To resume, press again.
Track no./Playing time page 48
• iPod is a trademark of Apple Inc., registered in the U.S. and other countries.
KD-AVX33[E]_0130.indb 45KD-AVX33[E]_0130.indb 45 07.2.1 4:44:32 PM07.2.1 4:44:32 PM

46
ENG
LISH
Listening to other external components
AV-INPUT You can connect an external component to the LINE IN/VIDEO IN plugs.• You can also connect a Navigation System to the VIDEO IN plug so that you can watch the navigation screen (Make sure <Navigation> is selected for <AV Input>). ( page 55)
~ Select “AV-IN.”
Ÿ Turn on the connected component and start playing the source.
• If you select <Camera Mirror> or <Navigation> for <AV Input> ( page 55), some status messages such as volume level change will not appear on the monitor while viewing the picture.
When <Navigation> is selected for <AV Input>...• You can use the source “AV-IN” for listening to an audio source connected to the LINE IN plugs.• While selecting other source, you can watch the navigation screen without changing the source. To watch the
navigation screen, press DISP repeatedly.
15: 45
FLATAV-IN
AV-INPUT
POWER]ON
Press if no playback picture appears, but source information (this) screen is displayed.
Assigned title ( page 49) page 48
KD-AVX33[E]_0130.indb 46KD-AVX33[E]_0130.indb 46 07.2.1 4:44:33 PM07.2.1 4:44:33 PM

47 EXTERNAL DEVICES
ENG
LISH
EXT-INPUT You can connect an external component to the CD changer jack on the rear using the Line Input Adapter—KS-U57 (not supplied) or AUX Input Adapter—KS-U58 (not supplied).
Preparation:Make sure <External Input> is selected for the external input setting. ( page 55)
~ Select “EXT-IN.”
Ÿ Turn on the connected component and start playing the source.
15: 45
FLATEXT-IN
EXT-INPUT
POWER]ON Assigned title ( page 49) page 48
KD-AVX33[E]_0130.indb 47KD-AVX33[E]_0130.indb 47 07.2.1 4:44:33 PM07.2.1 4:44:33 PM

48
ENG
LISH
Selecting sound mode
~
Ÿ
! Select a sound mode.
• For preset equalizing values of each sound mode, page 64.
• For multi-channel source, the sound mode is temporarily canceled.
Storing your own adjustmentYou can store your adjustment into User1, User2, and User3.
1 Repeat steps ~ and Ÿ, then in step !...
2 Adjust.
3 Store.
Sound equalization
Edit
60.0 Hz ENT
+03
Store
User StoreUser1User2User3
ENT Store
AV Menu
Setup EnterENT
AV Menu
Equalizer EnterENT
FlatHard RockR&BPopJazz
ExitENT
Equalizer
Equalizer menu icon
FlatHard RockR&BPopJazz
ExitENT
Equalizer
Edit
60.0 Hz ENT
+03
Store
POWER]ON
KD-AVX33[E]_0130.indb 48KD-AVX33[E]_0130.indb 48 07.2.1 4:44:33 PM07.2.1 4:44:33 PM

SETTINGS49
ENG
LISH
You can assign titles to “AV-IN” and “EXT-IN.”Ex.: Assigning title to “AV-IN”
~ Select “AV-IN.”
Ÿ Display the title entry screen.1
2
Mode menu icon
! Assign a title.1 Select a character, then move the entering
position.
• To change the character set, press DISP. (For available characters, page 65.)
2 Repeat step 1 until you finish entering the title.• The maximum number of characters is 16.
⁄ Finish the procedure.
Assigning titles to the sourcesPress: Change character setHold: Erase title
AV Menu
Setup EnterENT
AV Menu
Mode EnterENT
ModeTitle Entry
AV-In Name
MY BEST
DISP StoreENTA a 0 Á á
Title Entry
POWER]ON
AV-In Name
AV-INPUT
DISP StoreENT
Title Entry
A a 0 Á á
KD-AVX33[E]_0130.indb 49KD-AVX33[E]_0130.indb 49 07.2.1 4:44:34 PM07.2.1 4:44:34 PM

50
ENG
LISH
AV Menu
Setup EnterENT
POWER]ON
!
• For some items, repeat this steps to set the sub-items.
⁄
Menu items
Menu operations
Ex. Changing the <High Pass Filter> setting
~
Non-available items will be displayed being shaded.
Ÿ
Setup Equalizer Sound
Mode List Bluetooth
Sound menu icon
Sound
Through
Fader/BalanceVolume AdjustSubwooferHigh Pass FilterCrossover
ThroughOn
ExitENT
High Pass Filter
AV Menu
Setup EnterENT
AV Menu
Sound EnterENT
Disc Surround
Dual Zone
AV Menu
Setup EnterENTInput
Display
Clock
Disc Setup 1
Disc Setup 2
Tuner
Others
Setup
Equalizer
Sound
Disc Surround
Mode
Bluetooth
List
Dual Zone
• The display indications may change according to change of the specifications.
KD-AVX33[E]_0130.indb 50KD-AVX33[E]_0130.indb 50 07.2.1 4:44:35 PM07.2.1 4:44:35 PM

SETTINGS51
ENG
LISH
Initial: UnderlinedSetup
Menu items Selectable settings, [reference page]
Disp
lay
Demonstration Off : Cancels.On : Activates the demonstration on the monitor.
Wall Paper You can select the background picture of the monitor.Future-Blue, Future-Green, Wave-Blue, Wave-Green, Wave-Pink, Metal-A, Metal-B, Ball-A, Ball-B, Ball-C, Dolphin, Simple-Red, Simple-Purple, Simple-Blue, Simple-Gray
Scroll Off : Cancels.Once : Scrolls the disc information once.Auto : Repeats scrolling (5-second intervals).• Holding DISP (on the unit) scrolls the information regardless of this
setting.
Tag Display Off : Cancels.On : Shows the Tag data while playing MP3/WMA/WAV/AAC tracks.
Dimmer Off : Cancels.On : Activates dimmer.Auto : Dims the monitor when you turn on the headlights.*1
Time Set : Press ENT (or ¢) to display the time setting screen, then set the Dimmer On/Off times.
Bright You can adjust brightness of the monitor.–15 (darkest) to +15 (brightest); Initial 00
Picture Adjust*2 You can adjust the following to make the monitor clear and legible for watching the playback picture. The setting will be stored for “DISC/USB,” and “AV-IN.”–15 to +15; Initial 0Bright : Adjust if the picture is too bright or too dark.Contrast : Adjust the contrast.Color : Adjust the color of the picture—lighter or darker.Tint : Adjust the tint if the human skin color is unnatural.
*1 The ILLUMINATION CONTROL lead connection is required. ( Installation/Connection Manual)*2 Adjustable only when the source is a disc or USB containing pictures or movies, or “AV-IN.”
Continued on the next page
KD-AVX33[E]_0130.indb 51KD-AVX33[E]_0130.indb 51 07.2.1 4:44:36 PM07.2.1 4:44:36 PM

52
ENG
LISH
Menu items Selectable settings, [reference page]Di
spla
yAspect*3 You can change the aspect ratio of the picture.
Aspect ratio of incoming signal
4:3 16:9
Full :For 16:9 original pictures
Auto : • For “DISC”: Aspect ratio is automatically selected to match to the incoming signals.
• For the other video sources: Aspect ratio is fixed to <Regular>.
Regular :For 4:3 original pictures
Language*4 Select the indication language shown on the monitor.English, Spanish, French, German, Italian, Dutch, Swedish, Danish, Russian
Cloc
k
Time Set Initial 0:00, [6]
12Hours/24Hours 12 Hours, 24 Hours, [6]
OSD Clock Off, On, [6]
Clock Adjust Off, Auto, [6]
Disc
Setu
p 1*
5
Menu Language Select the initial disc menu language; Initial English ( also page 65).
Audio Language Select the initial audio language; Initial English ( also page 65).
Subtitle Select the initial subtitle language or erase the subtitle (<Off>);Initial English ( also page 65).
OSD Language Select the on-screen language used for the external monitor connected to the VIDEO OUT plug; Initial English.
*3 Not adjustable for audio sources.*4 After you change the indication language setting, turn off then on the power so that your setting takes effect.*5 Selectable only for “DISC” and “USB.” (Playback stops when you select one of the items.)
KD-AVX33[E]_0130.indb 52KD-AVX33[E]_0130.indb 52 07.2.1 4:44:36 PM07.2.1 4:44:36 PM

SETTINGS53
ENG
LISH
Menu items Selectable settings, [reference page]Di
sc Se
tup
1*5
Monitor Type Select the monitor type to watch a wide screen picture on the external monitor.16:9 : Select when the aspect ratio of the external monitor is 16:9.4:3 Letterbox/4:3 Pan Scan : Select when the aspect ratio of the
external monitor is 4:3. Refer to the illustrations on the left to see how the pictures are shown on the monitor.
OSD Position Select the position of the on-screen bar, [27].1 : Higher position2 : Lower position
File Type Select playback file type when a disc/USB contains different types of files. You can store this setting separately for each source —“DISC/USB.”Audio : Plays back audio files.Still Picture : Plays back JPEG files.Video : Plays back DivX/MPEG1/MPEG2 files.
DivX Regist. (Registration) This unit has its own Registration Code. Once you have played back a file with which the Registration Code recorded, this unit’s Registration Code is overwritten for copyright protection.
Disc
Setu
p 2
D. (Dynamic) Range Compres. (Compression)*5
You can enjoy a powerful sound at a low volume level while playing Dolby Digital software.Auto : Select to apply the effect to multi-channel encoded software.On : Select to always use this function.
Speaker Size*5 You can adjust the speaker size setting.• Front SPK : Small, Large• Center SPK : None, Small, Large• Rear SPK : None, Small, Large• Subwoofer : On, Off• Speaker size : <Large> for 13 cm diameter or more; <Small> for
13 cm or less.• Front speakers and rear speakers cannot be adjusted separately the
left and right.Regardless of the setting above...• No sound comes out of the subwoofer while playing Dolby Pro Logic II Movie or Music if the front speaker is set to <Large>.
• No sound comes out of the center speaker when surround is deactivated.
*5 Selectable only for “DISC” and “USB.” (Playback stops when you select one of the items.)
Position 1 Position 2
16:9 4:3 Letterbox
4:3 Pan Scan
Select the speaker
Adjust the speaker size
Continued on the next page
KD-AVX33[E]_0130.indb 53KD-AVX33[E]_0130.indb 53 07.2.1 4:44:37 PM07.2.1 4:44:37 PM

54
ENG
LISH
Menu items Selectable settings, [reference page]Di
sc Se
tup
2Speaker Level You can adjust the output level of the activated speakers
( <Speaker Size> on page 53), monitoring the test tone.Front Lch/Center Ch/Front Rch/Rear Rch/Subwoofer*6/Rear Lch
: adjust the output level of each speaker in the range of –10dB to +10dB; Initial 0dB.
• Press and hold ENT to turn on and off the test tone.
Speaker Distance*7 You can adjust the speaker output timing.Front Lch/Center Ch/Front Rch/Rear Rch/Rear Lch : adjust the
speaker distance from the listening position in the range of 15cm/6 inches to 600 cm/240 inches in 15 cm/6 inch step; Initial 120 cm/48 inch (for center speaker), 150 cm/60 inch (for other speakers).
• Press and hold DISP to change the measuring unit—cm and inch.
Tune
r
AF Regional When the received signals from the current station become weak...Off : Cancels—not selectable when <DAB AF> is set to <On>.AF Regional : Switches to another station broadcasting the same
programme. The REG indicator lights up.AF : Switches to another station. The programme may differ from the
one currently received (AF indicator lights up), [14].
TA Volume 00 to 30 or 50*8, Initial 15, [13].
Program Search Off, On, [14]
IF Band Width Auto : Increases the tuner selectivity to reduce interference noises between adjacent stations. (Stereo effect may be lost.)
Wide : Subject to the interference from adjacent stations, but sound quality will not be degraded and the stereo effect will remain.
DAB AF*9 Off, On, [44]
*6 This subwoofer level setting takes effect only when surround is activated. ( also page 24, 25)*7 This setting does not take effect for MPEG1/MPEG2 and DivX with MP3 audio track.*8 Depends on the amplifier gain control. ( page 56)*9 Appears only when DAB tuner is connected.
Select the speaker
Adjust the speaker level
Select the speaker
Adjust the speaker distance
KD-AVX33[E]_0130.indb 54KD-AVX33[E]_0130.indb 54 07.2.1 4:44:38 PM07.2.1 4:44:38 PM

SETTINGS55
ENG
LISH
Menu items Selectable settings, [reference page]In
put
AV Input You can determine the use of LINE IN and VIDEO IN plugs.Off : Select when no component is connected (“AV-IN” is skipped while
selecting the source).Audio&Video : Select when connecting an AV component such as a
VCR.Audio : Select when connecting an audio component such as a digital
audio player.Camera*10: Select when connecting the rear view camera. Camera Mirror*10: The mirror image of the rear view is displayed on
the monitor. (The monitor on the unit only; the normal rear view appears on the external monitor.)
Navigation : Select when connecting a Navigation System. [46]
External Input*11 For connecting an external component to the CD changer jack on the rear.Changer/iPod/D. Player*12: CD changer, iPod, or D. player
[40, 45]External Input : Any other than the above. [47]• For connecting the DAB tuner, this setting is not required. It is
automatically detected.
Othe
rs
Beep Off : Cancels.On : Activates the key-touch tone.
Telephone Muting*13 Off : Cancels.Muting1, Muting2 : Select either one which mutes the sounds while
using the cellular phone.
Initialize Initialize all settings you have made in <AV Menu>. Press ENT, then reset the unit. ( page 3)
*10 Reverse lamp lead connection is required. See Installation/Connection Manual (separate volume). The rear view through the camera appears on the monitor in “Full” aspect ratio (regardless of the aspect ratio setting) when you shift the gear to the reverse (R) position.
*11 Not selectable when the component connected to the CD changer jack is selected as the source.*12 The name of the component detected through the CD changer jack is shown.*13 The TEL MUTING lead connection is required. See Installation/Connection Manual (separate volume).
KD-AVX33[E]_0130.indb 55KD-AVX33[E]_0130.indb 55 07.2.1 4:44:38 PM07.2.1 4:44:38 PM

56
ENG
LISH
EqualizerFlat/Hard Rock/R&B/Pop/Jazz/Dance/Country/Reggae/Classic/User1/User2/User3, [48]
Sound
Menu items Selectable settings, [reference page]
Fader/Balance Adjust fader—speaker output balance between the front and rear speakers.• Upmost—front only• Downmost—rear onlyWhen using a two-speaker system, set the fader to the center (00).Adjust balance—speaker output balance between the left and right speakers.• Leftmost—left only• Rightmost—right only
Volume Adjust Adjust and store auto-adjustment volume level for each source, comparing to the FM volume level. The volume level will automatically increase or decrease when you change the source.–12 to +12; Initial 00
Subwoofer*14 Adjust the settings below in the submenu:Phase : Subwoofer phase. Select either <Normal> or <Reverse>, which
reproduces a better sound.Level : Subwoofer output level. Level: –06 to +08; Initial 00
High Pass Filter Through : Select when the subwoofer is not connected.On : Select when the subwoofer is connected.
Crossover Adjust the crossover frequency between the front/rear speakers and the subwoofer.80Hz, 120Hz, 150Hz
Amplifier Gain You can change the maximum volume level of this unit.Off : Deactivates the built-in amplifier.Low Power : VOL 00 to 30 (Select this if the maximum power of the speakers
is less than 50 W.)High Power : VOL 00 to 50
Rear Speaker*15 You can activate/deactivate the rear speakers.Off, On
*14 This subwoofer level setting takes effect only when surround is deactivated. ( also page 24, 25)*15 This setting takes effect only when Dual Zone is activated. ( also page 28)
Adjusts fader
Adjust balance
KD-AVX33[E]_0130.indb 56KD-AVX33[E]_0130.indb 56 07.2.1 4:44:39 PM07.2.1 4:44:39 PM

SETTINGS57
ENG
LISH
Disc Surround*16
Menu items Selectable settings, [reference page]
Surround Off Select to deactivate the surround function.
Surround On Select to activate the surround function. [24]Auto, Through, Dolby PLII Movie, Dolby PLII Music• When you select Dolby PLII Music, you can adjust <Panorama> and
<Center Width>.*17
*16 Selectable only for “DISC” and “USB.”*17 This setting takes effect only when the center speaker is activated.
Mode*18
Menu items Selectable settings, [reference page]
Mono Only for FM. (Off, On), [10]
DX/Local Only for FM. (DX, Local), [11]
SSM Only for FM. [11]
PTy Standby Only for FM/DAB. (Off, News), [13, 43] • When you activate PTY Standby Reception, you can change the PTY code for
PTY Standby Reception.
Title Entry Only for AV-IN and EXT-IN. [49]
All Off/Intro/Repeat/Random Only for disc/USB playback and iPod/D. player. [19, 32, 41, 45]
D.(Dynamic) Range Control Only for DAB. (Off, DRC1, DRC2, DRC3), [42]
Announce Standby Only for DAB. (Off, Transport News), [44]
*18 Items listed under <Mode> vary among the playback sources.
ListThe accessible lists differ depending on the sources. [12, 20, 39, 41]
KD-AVX33[E]_0130.indb 57KD-AVX33[E]_0130.indb 57 07.2.1 4:44:40 PM07.2.1 4:44:40 PM

58
ENG
LISH
Bluetooth*19
Menu items Selectable settings, [reference page]
Dial Menu Only for the device connected for “Bluetooth Phone.”Select the method to make a call. [37]
Message Only for the device connected for “Bluetooth Phone.”*20
You can read a message from the following message histories.Unread : Messages you have not read.Read : Messages you have read.Unsent : Messages you have not sent.Sent : Messages you have sent.• The number of messages in each history is also shown on the monitor.
Open [34]
Search [34]
Special Device Only for “NEW DEVICE.”Shows the list of Bluetooth devices which require some special procedure to establish Bluetooth connection. Select a device you want to connect.• After selecting the device, use <Open> or <Search> ( page 34) for
connection.• Once the connection is established, it is registered in the unit. You can
connect the unit and the device by using <Connect> (below) from the next time.
Connect Only for the registered devices.After selecting a device from among the registered devices ( page 35, 39), establish the connection with it.
Disconnect Only for the device being connected.Disconnect the current device before connecting another device.
Delete Pair Only for the registered devices.Delete the registered devices.
*19 Selectable only for “ Bluetooth Phone” or “Bluetooth Audio. ” Select a device (or “NEW DEVICE”) before operating the menu.
*20 Selectable only when the device is compatible with SMS.
When operating the Bluetooth device, refer also to the instructions supplied with the device.
KD-AVX33[E]_0130.indb 58KD-AVX33[E]_0130.indb 58 07.2.1 4:44:40 PM07.2.1 4:44:40 PM

SETTINGS59
ENG
LISH
Menu items Selectable settings, [reference page]Se
ttin
gsAuto Connect*21 When the unit is turned on, the connection is established automatically
with...Off : No Bluetoothdevice.Last : The last connected Bluetooth device.Order : The available registered Bluetooth device found at first.
Auto Answer*22 Off : The unit does not answer the calls automatically. Answer the calls manually.
On : The unit answers the incoming calls automatically.Reject : The unit rejects all incoming calls.
Message Info*22 Auto : The unit informs you of the arrival of a message by ringing and displaying “Receiving Message.” To read the message, press ENT ( page 37).
Manual : The unit does not inform you the arrival of a message.
MIC Setting*22 Adjust microphone volume connected to the unit.01, 02, 03
Version*23 The Bluetooth software and hardware versions are shown.
*21 Selectable only for “Bluetooth Phone.”*22 Only for the device connected for “Bluetooth Phone.” Not selectable for “NEW DEVICE”.*23 If you wish to receive more information about Bluetooth, visit our JVC web site.
Dual ZoneOff, On, On/Surround On, [28]
KD-AVX33[E]_0130.indb 59KD-AVX33[E]_0130.indb 59 07.2.1 4:44:41 PM07.2.1 4:44:41 PM

ENG
LISH
60
Maintenance How to clean the connector
Frequent detachment will deteriorate the connectors.To minimize this possibility, periodically wipe the connectors with a cotton swab or cloth moistened with alcohol, being careful not to damage the connectors.
Connector
Moisture condensationMoisture may condense on the lens inside the unit in the following cases:• After starting the heater in the car.• If it becomes very humid inside the car.Should this occur, the unit may malfunction. In this case, eject the disc and leave the unit turned on for a few hours until the moisture evaporates.
How to handle discsWhen removing a disc from its case, press down the center holder of the case and lift the disc out, holding it by the edges.• Always hold the disc by the edges.
Do not touch its recording surface.When storing a disc into its case, gently insert the disc around the center holder (with the printed surface facing up).• Make sure to store discs into the cases after use.
To keep discs cleanA dirty disc may not play correctly. If a disc does become dirty, wipe it with a soft cloth in a straight line from center to edge.• Do not use any solvent (for example, conventional
record cleaner, spray, thinner, benzine, etc.) to clean discs.
To play new discsNew discs may have some rough spots around the inner and outer edges. If such a disc is used, this unit may reject the disc.To remove these rough spots, rub the edges with a pencil or ball-point pen, etc.
Stick-on label
Sticker Sticker residue
Warped disc
Do not use the following discs:
Center holder
KD-AVX33[E]_0130.indb 60KD-AVX33[E]_0130.indb 60 07.2.1 4:44:41 PM07.2.1 4:44:41 PM

61 REFERENCES
ENG
LISH
More about this unit General
Turning on the power• By pressing SRC (source) on the unit, you can also
turn on the power. If the source is ready, playback starts.
FM/AMStoring stations in memory• When SSM is over, received stations are preset in No. 1 (lowest frequency) to No. 6 (highest frequency).
DiscGeneral• In this manual, words “track” and “file” are
interchangeably used.• This unit can also play back 8 cm discs.• This unit can only play back audio CD (CD-DA) files if
different type of audio files (MP3/WMA/WAV/AAC) are recorded in the same disc.
• This unit can display only one-byte characters. No other characters can be correctly displayed.
Inserting a disc• When a disc is inserted upside down or has no
playable files, “Cannot play this disc Check the disc” appears on the monitor. Eject the disc.
Ejecting a disc• If the ejected disc is not removed within 15 seconds,
the disc is automatically inserted again into the loading slot to protect it from dust. (Disc playback starts.)
Changing the source• If you change the source, playback also stops without
ejecting the disc. Next time you select “DISC” for the playback source,
disc play starts from where it stopped previously.
Playing Recordable/Rewritable discs• This unit can recognize a total of 5 000 files and 250
folders (a maximum of 999 files per folder).• Use only “finalized” discs.• This unit can play back multi-session discs; however,
unclosed sessions will be skipped while playing.• This unit can recognize a total 25 characters for file/
folder names.• Some discs or files may not be played back due to
their characteristics or recording conditions.
Playing DVD Audio• Some DVD Audios prohibit downmix. When you play
back such a disc, “LR ONLY” appears on the display and the unit plays back the left front and right front signals.
• “MULTI CH” appears on the monitor after a beep when you try to play a multi-channel disc with Surround turned <Off>.
Playing DVD-VR• This unit cannot play back CPRM (Content Protection
for Recordable Media) protected files.• For details about DVD-VR format and play list, refer
to the instructions supplied with the recording equipment.
File playbackPlaying DivX files• This unit can play back DivX files with the extension
code <.divx>, <.div>, <.avi> (regardless of the letter case—upper/lower).
• This unit supports the DivX files whose resolution is 720 x 576 pixels or less.
• This unit supports DivX 6.x, 5.x, 4.x, and 3.11.• Audio stream should conform to MP3 or Dolby Digital.• The file encoded in the interlaced scanning mode
may not be played back correctly.• The maximum bit rate for video signals (average) is
as follows:– DVD: 4 Mbps– USB: 2 Mbps
KD-AVX33[E]_0130.indb 61KD-AVX33[E]_0130.indb 61 07.2.1 4:44:42 PM07.2.1 4:44:42 PM

ENG
LISH
62
Playing MPEG1/MPEG2 files• This unit can play back MPEG1/MPEG2 files with the
extension code <.mpg>, <.mpeg>, or <.mod>*.* <.mod> is an extension code used for the
MPEG2 files recorded by JVC Everio camcorders.• The stream format should conform to MPEG system/
program stream.• The file format should be MP@ML (Main Profile at
Main Level)/SP@ML (Simple Profile at Main Level)/MP@LL (Main Profile at Low Level).
• Audio streams should conform to MPEG1 Audio Layer-2 or Dolby Digital.
• The maximum bit rate for video signals (average) is as follows:– DVD: 4 Mbps– USB: 2 Mbps
Playing JPEG files• This unit can play back JPEG files with the extension
code <.jpg>, or <.jpeg>.• It is recommended that you record a file at 640 x 480
resolution.• This unit can play back baseline JPEG files.
Progressive JPEG files or lossless JPEG files cannot be played.
Playing MP3/WMA/WAV/AAC files• This unit can play back files with the extension
code <.mp3>, <.wma>, <.wav>, or <.m4a> (regardless of the letter case—upper/lower).
• This unit can play back the files meeting the conditions below:– Bit rate: MP3/WMA: 32 kbps — 320 kbps AAC: 16 kbps — 320 kbps– Sampling frequency: 48 kHz, 44.1 kHz, 32 kHz (for MPEG1) 24 kHz, 22.05 kHz, 16 kHz (for MPEG2) 48 kHz, 44.1 kHz, 32 kHz, 22.05 kHz (for WMA) 44.1 kHz (for WAV) 48 kHz, 44.1 kHz (for AAC)
• This unit can show ID3 Tag Version 1.0/1.1/2.2/2.3/2.4 (for MP3). This unit can also show WAV/WMA/AAC Tag.
• This unit can play back files recorded in VBR (variable bit rate).
Files recorded in VBR have a discrepancy in elapsed time indication.
• This unit cannot play back the following files:– MP3 files encoded with MP3i and MP3 PRO
format.– MP3 files encoded with Layer 1/2.– WMA files encoded with lossless, professional,
and voice format.– WMA files which are not based upon Windows
Media® Audio.– WMA/AAC files copy-protected with DRM.– AAC files purchased from the iTunes store.– Files which have the data such as AIFF, ATRAC3,
etc.
Enjoying surround sounds• If <Surround On> is selected, “MULTI” surround
playback automatically starts for multi-channel encoded discs regardless of the <Surround On> setting.
• You cannot activate surround for MPEG multi-channel DVD Video, DivX 2-channel and MPEG 2-channel sources. If <Surround On> is selected, stereo sounds are emitted only through the front speakers. “FRONT 2CH” appears on the source information screen.
• When “FIX” appears on the source information screen, no sound comes out of the subwoofer.
• When <AUTO> is selected, downsampling is performed for DVD Video (LPCM only), DVD-VR (LPCM only), and DVD Audio with fs=88.2 kHz/96 kHz and higher.
KD-AVX33[E]_0130.indb 62KD-AVX33[E]_0130.indb 62 07.2.1 4:44:42 PM07.2.1 4:44:42 PM

63 REFERENCES
ENG
LISH
Warning messages for Bluetooth operations• Connection Error : The device is registered but the
connection has failed. Use <Connect> to connect the device again. ( page 35)
• Error : Try the operation again. If “Error” appears again, check if the device supports the function you have tried.
• Device Unfound : No available Bluetooth device is detected by <Search>.
• Loading : The unit is updating the phone book and/or SMS.
• Please Wait... : The unit is preparing to use the Bluetooth function. If the message does not disappear, turn off and turn on the unit, then connect the device again (or reset the unit).
Icons for phone types• These icons indicate the phone type set on the device.
: Cellular phone
: Household phone
: Office
: General
: Other than above
DAB tuner• Only the primary DAB service can be preset even
when you store a secondary service.
iPod/D. player operations • When you turn on this unit, the iPod or D. player is
charged through the adapter connected to this unit.• The text information may not be displayed correctly.
This unit can display up to 40 characters.
USB• If “No USB device“ appears after removing a device,
Reattach a device or select another playback source.• When the USB device has no playable files, or has not
been formatted correctly, “Cannot play this device Check the device” appears on the monitor.
• The unit cannot recognize a USB device whose rating is other than 5 V and does not exceed 500 mA.
• While playing from a USB device, the playback order may differ from other players.
• This unit may be unable to play back some USB devices or some files due to their characteristics or recording conditions.
• Depending on the shape of the USB devices and connection ports, some USB devices may not be attached properly or the connection might be loose.
• When connecting a USB device, refer also to its instructions.
• Connect only one USB device to the unit at a time. Do not use a USB hub.
• This unit may not recognize a USB device connected through a USB card reader.
• This unit may not play back files in a USB device properly when using a USB extension cord.
• This unit cannot assure proper functions or supply power to all types of the devices.
• This unit can recognize a total of 5 000 files and 250 folders (a maximum of 999 files per folder).
• This unit can recognize a total 25 characters for file/folder names.
Bluetooth operationsGeneral• While driving, do not perform complicated operation
such as dialling the numbers, using phone book, etc. When you perform these operations, stop your car in a safe place.
• Some Bluetooth devices may not be connected to this unit depending on the Bluetooth version of the device.
• This unit may not work for some Bluetooth devices.• Connecting condition may vary depending on
circumstances around you.• When the unit is turned off, the device is disconnected.
Continued on the next page
KD-AVX33[E]_0130.indb 63KD-AVX33[E]_0130.indb 63 07.2.1 4:44:43 PM07.2.1 4:44:43 PM
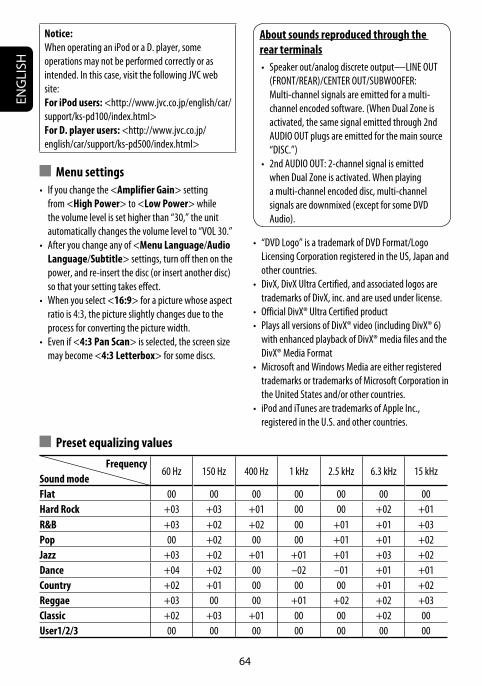
ENG
LISH
64
Preset equalizing values
Frequency60 Hz 150 Hz 400 Hz 1 kHz 2.5 kHz 6.3 kHz 15 kHz
Sound modeFlat 00 00 00 00 00 00 00Hard Rock +03 +03 +01 00 00 +02 +01R&B +03 +02 +02 00 +01 +01 +03Pop 00 +02 00 00 +01 +01 +02Jazz +03 +02 +01 +01 +01 +03 +02Dance +04 +02 00 –02 –01 +01 +01Country +02 +01 00 00 00 +01 +02Reggae +03 00 00 +01 +02 +02 +03Classic +02 +03 +01 00 00 +02 00User1/2/3 00 00 00 00 00 00 00
Menu settings• If you change the <Amplifier Gain> setting
from <High Power> to <Low Power> while the volume level is set higher than “30,” the unit automatically changes the volume level to “VOL 30.”
• After you change any of <Menu Language/Audio Language/Subtitle> settings, turn off then on the power, and re-insert the disc (or insert another disc) so that your setting takes effect.
• When you select <16:9> for a picture whose aspect ratio is 4:3, the picture slightly changes due to the process for converting the picture width.
• Even if <4:3 Pan Scan> is selected, the screen size may become <4:3 Letterbox> for some discs.
Notice:When operating an iPod or a D. player, some operations may not be performed correctly or as intended. In this case, visit the following JVC web site:For iPod users: <http://www.jvc.co.jp/english/car/support/ks-pd100/index.html>For D. player users: <http://www.jvc.co.jp/english/car/support/ks-pd500/index.html>
About sounds reproduced through the rear terminals• Speaker out/analog discrete output—LINE OUT
(FRONT/REAR)/CENTER OUT/SUBWOOFER:Multi-channel signals are emitted for a multi-channel encoded software. (When Dual Zone is activated, the same signal emitted through 2nd AUDIO OUT plugs are emitted for the main source “DISC.”)
• 2nd AUDIO OUT: 2-channel signal is emitted when Dual Zone is activated. When playing a multi-channel encoded disc, multi-channel signals are downmixed (except for some DVD Audio).
• “DVD Logo” is a trademark of DVD Format/Logo Licensing Corporation registered in the US, Japan and other countries.
• DivX, DivX Ultra Certified, and associated logos are trademarks of DivX, inc. and are used under license.
• Official DivX® Ultra Certified product• Plays all versions of DivX® video (including DivX® 6)
with enhanced playback of DivX® media files and the DivX® Media Format
• Microsoft and Windows Media are either registered trademarks or trademarks of Microsoft Corporation in the United States and/or other countries.
• iPod and iTunes are trademarks of Apple Inc., registered in the U.S. and other countries.
KD-AVX33[E]_0130.indb 64KD-AVX33[E]_0130.indb 64 07.2.1 4:44:43 PM07.2.1 4:44:43 PM

65 REFERENCES
ENG
LISH
In addition to the roman alphabet (A – Z, a – z), the following characters will be used to show the various information on the monitor.• You can also use the following
characters to assign titles. ( page 49)
Characters shown on the monitor
Language codes (for DVD/DivX language selection)
Code Language Code Language Code Language Code Language Code LanguageAA Afar FA Persian KL Greenlandic OC Occitan ST SesothoAB Abkhazian FI Finnish KM Cambodian OM (Afan) Oromo SU SundaneseAF Afrikaans FJ Fiji KN Kannada OR Oriya SW SwahiliAM Ameharic FO Faroese KO Korean (KOR) PA Panjabi TA TamilAR Arabic FY Frisian KS Kashmiri PL Polish TE TeluguAS Assamese GA Irish KU Kurdish PS Pashto, Pushto TG TajikAY Aymara GD Scots Gaelic KY Kirghiz PT Portuguese TH ThaiAZ Azerbaijani GL Galician LA Latin QU Quechua TI TigrinyaBA Bashkir GN Guarani LN Lingala RM Rhaeto-Romance TK TurkmenBE Byelorussian GU Gujarati LO Laothian RN Kirundi TL TagalogBG Bulgarian HA Hausa LT Lithuanian RO Rumanian TN SetswanaBH Bihari HI Hindi LV Latvian, Lettish RW Kinyarwanda TO TongaBI Bislama HR Croatian MG Malagasy SA Sanskrit TR TurkishBN Bengali, Bangla HU Hungarian MI Maori SD Sindhi TS TsongaBO Tibetan HY Armenian MK Macedonian SG Sangho TT TatarBR Breton IA Interlingua ML Malayalam SH Serbo-Croatian TW TwiCA Catalan IE Interlingue MN Mongolian SI Singhalese UK UkrainianCO Corsican IK Inupiak MO Moldavian SK Slovak UR UrduCS Czech IN Indonesian MR Marathi SL Slovenian UZ UzbekCY Welsh IS Icelandic MS Malay (MAY) SM Samoan VI VietnameseDZ Bhutani IW Hebrew MT Maltese SN Shona VO VolapukEL Greek JI Yiddish MY Burmese SO Somali WO WolofEO Esperanto JW Javanese NA Nauru SQ Albanian XH XhosaET Estonian KA Georgian NE Nepali SR Serbian YO YorubaEU Basque KK Kazakh NO Norwegian SS Siswati ZU Zulu
Upper and lower cases
Numbers and symbols
KD-AVX33[E]_0130.indb 65KD-AVX33[E]_0130.indb 65 07.2.1 4:44:44 PM07.2.1 4:44:44 PM

ENG
LISH
66
TroubleshootingWhat appears to be trouble is not always serious. Check the following points before calling a service center.
Symptoms Remedies/Causes
Gene
ral
• No sound comes out of the center speaker. • Center speaker is not activated. ( page 53) Once you have reset the unit, make sure to activate the
speaker again.• Center speaker is used only for surround playback. No
sound comes out for stereo playback.
• The monitor is not clear and legible. Sunshine from the windscreen may cause this symptom.Adjust <Bright>. ( page 51)
• The unit does not work at all. Reset the unit. ( page 3)
• The remote controller does not work. Deactivate Dual Zone. ( page 28)(While Dual Zone is activated, the remote controller only functions for operating the DVD/CD player.)
• “No Signal” appears. • Change the source.• Start the playback on the external component connected
to VIDEO IN plug.• Check the cords and connections.• Signal input is too weak.
• “Mecha Error Push Reset” appears on the monitor, and the panel does not move.
Reset the unit. ( page 3)
FM/A
M • SSM automatic presetting does not work. Store stations manually. ( page 11)
• Static noise while listening to the radio. Connect the aerial firmly.
Disc
pla
ybac
k
• Disc can be neither recognized nor played . Eject the disc forcibly. ( page 3)
• Disc cannot be ejected. Unlock the disc. ( page 20)
• Recordable/Rewritable discs cannot be played back.
• Tracks on the Recordable/Rewritable discs cannot be skipped.
• Insert a finalized disc.• Finalize the discs with the component which you used
for recording.
• Playback does not start. • Insert the disc correctly again.• Region code of the DVD is not correct. ( page 4)• The format of files is not supported by the unit.
• The playback picture is not clear and legible. Adjust items in <Picture Adjust>. ( page 51)
• Sound and pictures are sometimes interrupted or distorted.
• Stop playback while driving on rough roads.• Change the disc.
KD-AVX33[E]_0130.indb 66KD-AVX33[E]_0130.indb 66 07.2.1 4:44:45 PM07.2.1 4:44:45 PM

67 REFERENCES
ENG
LISH
Symptoms Remedies/CausesDi
sc p
layb
ack
• No playback picture appears on the monitor. Parking brake lead is not connected properly. ( Installation/Connection Manual)
• No picture appears on the external monitor. • Connect the video cord correctly.• Select the correct input on the external monitor.
• “Eject Error” or “Loading Error” appears on the monitor.
Changing the source by pressing SOURCE will solve this error.
File
pla
ybac
k
• Disc cannot be played back. • Change the disc.• Record the tracks using a compliant application in the
appropriate discs. ( page 4)• Add appropriate extension codes to the file names.
• Noise is generated. The track played back is not a playable file format. Skip to another file.
• Tracks are not played back as you have intended them to play.
Playback order may differs from the one played back using other players.
• Elapsed playing time is not correct. This sometimes occurs during playback. This is caused by how the tracks are recorded.
• “Not Support” appears on the monitor and track skips.
The track is unplayable.
USB
play
back
• Noise is generated. • The track played back is not a playable file format (MP3/WMA/WAV/AAC). Skip to another file.
• Do not add the extension code <.mp3>, <.wma>, <.wav>or <.m4a> to non-MP3/WMA/WAV/AAC tracks.
• Tracks cannot play back as you have intended them to play.
Playback order may differs from the one played back using other players.
• “Now Reading” keeps flashing on the monitor.
• Readout time varies depending on the USB device.• Do not use too many hierarchy, folders and empty
folders.** Folder that is physically empty or folder that contains
data but does not contain valid MP3/WMA/WAV/AAC track.
• Turn off the power then on again.• Do not pull out or connect the USB device repeatedly
while “Now Reading” is displayed on the monitor.
• Correct characters are not displayed (e.g. album name).
For available characters, page 65.
• While playing a track, sound is sometimes interrupted.
The tracks have not been properly copied into the USB device. Copy tracks again into the USB device, and try again.
KD-AVX33[E]_0130.indb 67KD-AVX33[E]_0130.indb 67 07.2.1 4:44:46 PM07.2.1 4:44:46 PM

ENG
LISH
68
Symptoms Remedies/CausesBl
ueto
oth
• Bluetooth device does not detect the unit. This unit can be connected with one Bluetooth cellular phone and one Bluetooth audio device at a time.While connecting a device, this unit cannot be detected from another device. Disconnect currently connected device and search again.
• The unit does not detect the Bluetooth device.
• Check the Bluetooth setting of the device.• Search from the Bluetooth device. After the device
detects the unit, select <Open> on the unit to connect the device. ( page 34)
• The unit does not make pairing with the Bluetooth device.
• Enter the same PIN code for both the unit and target device. If the PIN code of the device is not indicated on its instructions, try “0000” or “1234.”
• Select the device name from <Special Device>, then try to connect again. ( page 35)
• Echo or noise occurs. Adjust the microphone unit position.
• Phone sound quality is poor. • Reduce the distance between the unit and the Bluetooth audio device.
• Move the car to place where you can get a better signal reception.
• The sound is interrupted or skipped during playback of a Bluetooth audio device.
• Reduce the distance between the unit and the Bluetooth audio device.
• Disconnect the device connected for “Bluetooth phone.”• Turn off, then turn on the unit.• (When the sound is not yet restored,) connect the device
again.
• “New Device” cannot be selected for “Bluetooth Audio.”
Bluetooth audio device is being connected. To select “New Device,” disconnect it. ( page 35)
• The connected audio device cannot be controlled.
Check whether the connected audio device supports AVRCP (Audio Video Remote Control Profile).
CD ch
ange
r
• “No Disc” appears on the monitor. Insert a disc into the magazine.
• “No Magazine” appears on the monitor. Insert the magazine.
• “Cannot play this disc Check the disc” appears on the monitor.
Disc does not include playable files. Replace the disc with playable files.
• “Reset 08” appears on the monitor. Connect this unit and the CD changer correctly and press the reset button of the CD changer.
• “Reset 01” – “Reset 07” appears on the monitor.
Press the reset button of the CD changer.
• The CD changer does not work at all. Reset the unit. ( page 3)
KD-AVX33[E]_0130.indb 68KD-AVX33[E]_0130.indb 68 07.2.1 4:44:46 PM07.2.1 4:44:46 PM

69 REFERENCES
ENG
LISH
Symptoms Remedies/CausesDA
B tu
ner
• “No DAB Signal” appears on the monitor. Move to an area with stronger signals.
• “Reset 08” appears on the monitor. Connect this unit and the DAB tuner correctly, then reset the unit. ( page 3)
• The DAB tuner does not work at all. Connect this unit and the DAB tuner correctly, then reset the unit. ( page 3)
• “Antenna Power NG” appears on the monitor. Check the cords and connections.
iPod
/D. p
laye
r pla
ybac
k
• The iPod/D. player does not turn on or does not work.
• Check the connecting cable and its connection.• Charge the battery.• For D. player: Update the firmware version.
• The sound is distorted. Deactivate the equalizer either on this unit or the iPod/D. player.
• “Disconnect” appears on the monitor. Check the connecting cable and its connection.
• For iPod: Playback stops. The headphones are disconnected during playback. Restart playback.
• No sound can be heard.• “Error 01” appears on the monitor when
connecting a D. player.
Disconnect the D. player from the adapter. Then, connect them again.
• “No Files” or “No Track” appears on the monitor.
No tracks are stored. Import tracks to the iPod or D. player.
• “Reset 01” – “Reset 07” appears on the monitor.
Disconnect the adapter from both this unit and iPod/D. player. Then, connect them again.
• “Reset 08” appears on the monitor. Check the connection between the adapter and this unit.
• The iPod’s or D. player’s controls do not work after disconnecting from this unit.
Reset the iPod or D. player.
AV-IN
• No picture appears on the monitor. • Turn on the video component if it is not on.• This unit is not connected to the video component
correctly. Connect it correctly.
• The playback picture is not clear and legible. Adjust items in <Picture Adjust>. ( page 51)
KD-AVX33[E]_0130.indb 69KD-AVX33[E]_0130.indb 69 07.2.1 4:44:46 PM07.2.1 4:44:46 PM

ENG
LISH
70
SpecificationsAM
PLIF
IER
Maximum Power Output: Front/Rear: 50 W per channelContinuous Power Output (RMS):
Front/Rear: 20 W per channel into 4 Ω, 40 Hz to 20 000 Hz at no more than 0.8% total harmonic distortion
Load Impedance: 4 Ω (4 Ω to 8 Ω allowance)Equalizer Control Range: Frequencies: 60 Hz, 150 Hz, 400 Hz, 1 kHz, 2.5 kHz,
6.3 kHz, 15 kHzLevel: ±10 dB
Signal-to-Noise Ratio: 70 dBAudio Output Level
LINE OUT (FRONT/REAR)/CENTER OUT/ SUBWOOFER:
Line-Out Level/Impedance: 5.0 V/20 kΩ load (full scale)Output Impedance: 1 kΩ
Color System: PALVideo Output (composite): 1 Vp-p/75 ΩOther Terminals: Input: LINE IN, VIDEO IN, MIC IN, USB input
terminal, Aerial inputOutput: 2nd AUDIO OUT, VIDEO OUTOthers: CD changer, OE REMOTE
FM/A
M TU
NER
Frequency Range: FM: 87.5 MHz to 108.0 MHzAM: (MW) 522 kHz to 1 620 kHz
(LW) 144 kHz to 279 kHzFM Tuner: Usable Sensitivity: 11.3 dBf (1.0 μV/75 Ω)
50 dB Quieting Sensitivity: 16.3 dBf (1.8 μV/75 Ω)Alternate Channel Selectivity (400 kHz): 65 dBFrequency Response: 40 Hz to 15 000 HzStereo Separation: 35 dB
MW Tuner: Sensitivity/Selectivity: 20 μV/35 dBLW Tuner: Sensitivity: 50 μV
DVD/
CD
Signal Detection System: Non-contact optical pickup (semiconductor laser)
Frequency Response: DVD, fs=48 kHz: 16 Hz to 22 000 Hz
DVD, fs=192 kHz: 16 Hz to 88 000 Hz
VCD/CD: 16 Hz to 20 000 Hz
Dynamic Range: 93 dB
Signal-to-Noise Ratio: 95 dB
Wow and Flutter: Less than measurable limit
KD-AVX33[E]_0130.indb 70KD-AVX33[E]_0130.indb 70 07.2.1 4:44:47 PM07.2.1 4:44:47 PM
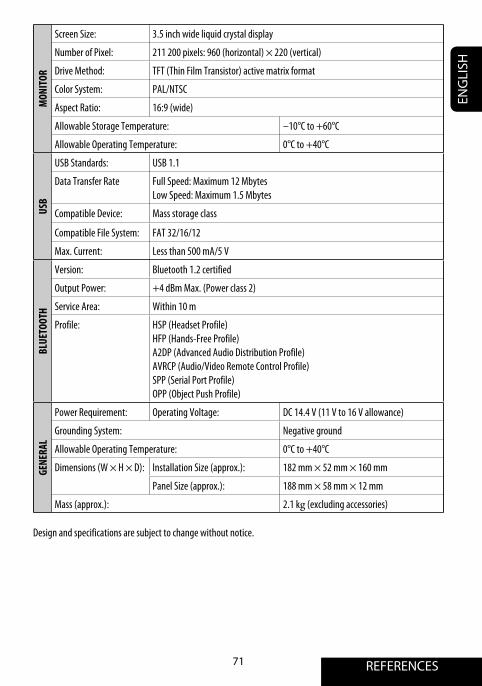
71 REFERENCES
ENG
LISH
MON
ITOR
Screen Size: 3.5 inch wide liquid crystal display
Number of Pixel: 211 200 pixels: 960 (horizontal) × 220 (vertical)
Drive Method: TFT (Thin Film Transistor) active matrix format
Color System: PAL/NTSC
Aspect Ratio: 16:9 (wide)
Allowable Storage Temperature: –10°C to +60°C
Allowable Operating Temperature: 0°C to +40°C
USB
USB Standards: USB 1.1
Data Transfer Rate Full Speed: Maximum 12 MbytesLow Speed: Maximum 1.5 Mbytes
Compatible Device: Mass storage class
Compatible File System: FAT 32/16/12
Max. Current: Less than 500 mA/5 V
BLUE
TOOT
H
Version: Bluetooth 1.2 certified
Output Power: +4 dBm Max. (Power class 2)
Service Area: Within 10 m
Profile: HSP (Headset Profile)HFP (Hands-Free Profile)A2DP (Advanced Audio Distribution Profile)AVRCP (Audio/Video Remote Control Profile)SPP (Serial Port Profile)OPP (Object Push Profile)
GENE
RAL
Power Requirement: Operating Voltage: DC 14.4 V (11 V to 16 V allowance)
Grounding System: Negative ground
Allowable Operating Temperature: 0°C to +40°C
Dimensions (W × H × D): Installation Size (approx.): 182 mm × 52 mm × 160 mm
Panel Size (approx.): 188 mm × 58 mm × 12 mm
Mass (approx.): 2.1 kg (excluding accessories)
Design and specifications are subject to change without notice.
KD-AVX33[E]_0130.indb 71KD-AVX33[E]_0130.indb 71 07.2.1 4:44:47 PM07.2.1 4:44:47 PM

EN, GE, FR, NL0207MNMMDWJEIN
Having TROUBLE with operation?Please reset your unit
Refer to page of How to reset your unit
Haben Sie PROBLEME mit dem Betrieb?Bitte setzen Sie Ihr Gerät zurück
Siehe Seite Zurücksetzen des Geräts
Vous avez des PROBLÈMES de fonctionnement?Réinitialisez votre appareil
Référez-vous à la page intitulée Comment réinitialiser votre appareil
Hebt u PROBLEMEN met de bediening?Stel het apparaat terug
Zie de pagina met de paragraaf Het apparaat terugstellen
© 2007 Victor Company of Japan, Limited
Dear Customer, This apparatus is in conformance with the valid European directives and standards regarding electromagnetic compatibility and electrical safety. European representative of Victor Company of Japan, Limited is: JVC Technology Centre Europe GmbHPostfach 10 05 5261145 FriedbergGermany
Sehr geehrter Kunde, sehr geehrte Kundin,dieses Gerät stimmt mit den gültigen europäischen Richtlinien und Normen bezüglich elektromagnetischer Verträglichkeit und elektrischer Sicherheit überein. Die europäische Vertretung für die Victor Company of Japan, Limited ist: JVC Technology Centre Europe GmbHPostfach 10 05 5261145 FriedbergDeutschland
Cher(e) client(e),Cet appareil est conforme aux directives et normes européennes en vigueur concernant la compatibilité électromagnétique et à la sécurité électrique.Représentant européen de la société Victor Company of Japan, Limited:JVC Technology Centre Europe GmbHPostfach 10 05 5261145 FriedbergAllemagne
Geachte klant,Dit apparaat voldoet aan de geldende Europese normen en richtlijnen inzake elektromagnetische compatibiliteit en elektrische veiligheid.De Europese vertegenwoordiger van Victor Company of Japan, Limited is:JVC Technology Centre Europe GmbHPostfach 10 05 5261145 FriedbergDuitsland
Rear_KD-AVX33E_1.indd 2Rear_KD-AVX33E_1.indd 2 07.1.28 1:52:02 PM07.1.28 1:52:02 PM

1
KD-AVX33Installation/Connection ManualEinbau/AnschlußanleitungManuel d’installation/raccordementHandleiding voor installatie/aansluiting
ENGLISH
This unit is designed to operate on 12 V DC, NEGATIVE ground electrical systems. If your vehicle does not have this system, a voltage inverter is required, which can be purchased at JVC IN-CAR ENTERTAINMENT dealers.
WARNINGS• DO NOT install any unit and wire any cable in
locations where;– it may obstruct the steering wheel and gearshift
lever operations, as this may result in a traffic accident.
– it may obstruct the operation of safety devices such as air bags, as this may result in a fatal accident.
– it may obstruct visibility.• DO NOT operate any unit while manipulating
the steering wheel, as this may result in a traffic accident.
• The driver must not watch the monitor while driving. If the driver watches the monitor while driving, it may lead to carelessness and cause an accident.
• The driver must not put on the headphones while driving. It is dangerous to shut off the outside sounds while driving.
• If you need to operate the unit while driving, be sure to look around carefully.
• If the parking brake is not engaged, “Parking Brake” appears on the monitor, and no playback picture will be shown.– This warning appears only when the parking
brake lead is connected to the parking brake system built in the car.
Notes on electrical connections:• Replace the fuse with one of the specified rating.
If the fuse blows frequently, consult your JVC IN-CAR ENTERTAINMENT dealer.
• It is recommended to connect to the speakers with maximum power of more than 50 W (both at the rear and at the front, with an impedance of 4 Ω to 8 Ω).
If the maximum power is less than 50 W, change “Amplifier Gain” setting to prevent the speakers from being damaged (see page 56 of the INSTRUCTIONS).
• To prevent short-circuit, cover the terminals of the UNUSED leads with insulating tape.
• The heat sink becomes very hot after use. Be careful not to touch it when removing this unit.
QRubber cushionGummipufferAmortisseur en caoutchoucRubberdop
GCrimp connectorsCrimpanschlüsseRaccord à sertirKrimpaansluitingen
NWasher (ø5)Unterlegscheibe (ø5)Rondelle (ø5)Sluitring (ø5)
OLock nut (M5)Sicherungsmutter (M5)Ecrou d’arrêt (M5)Contra- moer (M5)
RMounting bolt—M5 x 20 mm Befestigungsschraube—M5 x 20 mm Boulon de montage—M5 x 20 mmBevestigingsbout—M5 x 20 mm
CSleeveHalterung ManchonHuls
EPower cordStromkableCordon d’alimentationStroomkabel
PHandlesGriffePoignéesHendels
A / BHard case/Control panelEtui/SchalttafelEtui de transport/Panneau de commandeBehuizing/Bedieningspaneel
IBatteriesBatterienPilesBatterijen
DEUTSCH
Dieses Gerät ist für einen Betrieb in elektrischen Anlagen mit 12 V Gleichstrom und (–) Erdung ausgelegt. Verfügt Ihr Fahrzeug nicht über diese Anlage, ist ein Spannungsinverter erforderlich, der bei JVC Autoradiohändler erworben werden kann.
FRANÇAIS
Cet appareil est conçu pour fonctionner sur des sources de courant continu de 12 V à masse NEGATIVE. Si votre véhicule n’offre pas ce type d’alimentation, il vous faut un convertisseur de tension, que vous pouvez acheter chez un revendeur d’autoradios JVC.
AVERTISSEMENTS• N’INSTALLEZ aucun appareil ni aucun câble
dans un endroit où:– où il peut gêner l’accès au volant ou au levier
de vitesse car cela peut entraîner un accident de la circulation.
– où il peut gêner la manipulation de dispositifs de sécurité tels que les airbags car cela peut entraîner un accident fatal.
– où il peut gêner la visibilité.• NE COMMANDEZ pas l’appareil lors de la
manipulation du volant car cela peut entraîner un accident de la circulation.
• Le conducteur ne doit pas regarder le moniteur lorsqu’il conduit. Regarder le moniteur lorsqu’on est au volant réduit considérablement la vigilance du conducteur et multiplie les risques d’accident.
• Le conducteur ne doit pas utiliser un casque d’écoute quand il est au volant. Il est en effet dangereux de bloquer les sons de la circulation routière pendant la conduite d’un véhicule.
• Si vous devez commander l’appareil pendant que vous conduisez, assurez-vous de bien regarder autour de vous.
• Si le frein à main n’est pas engagé, “Parking Brake (Frein à Main)” s’affiche sur le moniteur et aucune image de lecture n’apparaît.– Cet avertissement apparaît uniquement
quand le fil du frein de stationnement est connecté au système de frein de stationnement intégré à la voiture.
Remarques sur les connexions électriques:• Remplacer le fusible par un de la valeur
précisée. Si le fusible saute souvent, consulter votre revendeur d’autoradios JVC.
• Il est recommandé de connecter des enceintes avec une puissance de plus de 50 W (les enceintes arrière et les enceintes avant, avec une impédance comprise entre 4 Ω et 8 Ω).
Si la puissance maximum est inférieure à 50 W, changez “Amplifier Gain” pour éviter d’endommager vos enceintes (voir page 56 du MANUEL D’INSTRUCTIONS).
• Pour éviter les court-circuits, couvrir les bornes des fils qui ne sont PAS UTILISÉS avec de la bande isolante.
• Le dissipateur de chaleur devient très chaud après usage. Faire attention de ne pas le toucher en retirant cet appareil.
DTrim plateFrontrahmenPlaque d’assemblageSierplaat
Heat sinkAbstrahlblech
Dissipateur de chaleurWarmte-opnemer
MReverse gear signal extension cordRückwärtsgangsignal-VerlängerungskabelCordon prolongateur pour le signal de marche arrièreVerlengsnoer achteruitrijsignaal
Required space for installation / Erforderlicher Platz für Einbau / Espace nécessaire pour l’installation / Voor de installatie vereiste ruimte
Control panelSchalttafel
Panneau de commande
Bedieningspaneel
WAARSCHUWING• Installeer toestellen en aansluitkabels NIET op
plaatsen waar;– dit een gevaar vormt voor het bedienen van
het stuur of de versnelling, aangezien elke belemmering van de juiste werking van het stuur en de versnelling tot een ongeluk kan lijden.
– dit een gevaar vormt voor de airbag, aangezien elke belemmering van de werking van de airbag tot een dodelijk ongeluk kan lijden.
– dit het uitzicht belemmert.• Bedien GEEN enkele eenheid terwijl u uw handen
aan het stuur nodig hebt, aangezien dit anders tot een ongeluk kan lijden.
• De bestuurder moet tijdens het autorijden niet naar het beeldscherm kijken. Als de bestuurder tijdens het rijden toch naar het beeldscherm kijkt, kan dit tot onverantwoord rijgedrag leiden en ernstige verkeersongelukken veroorzaken.
• De bestuurder mag geen hoofdtelefoon tijdens het autorijden opzetten. Autorijden is uitermate gevaarlijk indien u geluiden van buitenaf niet kunt hoort.
• Indien u het toestel tijdens het rijden moet bedienen, moet u uitermate voorzichtig zijn.
• Als de handrem niet is aangehaald, verschijnt “Parking Brake (Handrem)” op de monitor en is afspelen onmogelijk.– Deze waarschuwing verschijnt uitsluitend
indien het handremdraad met het in de auto ingebouwde handremsysteem is verbonden.
Opmerkingen voor de elektrische verbindinge:• Vervang de zekering door een exemplaar met
het aangegeven vermogen. Als de zekering vaak doorslaat, moet u uw JVC car audio dealer raadplegen.
• Sluit bij voorkeur luidsprekers met een hoger maximaal vermogen dan 50 W (zowel achter als voor, met een impedantie van 4 Ω t/m 8 Ω) aan.Indien het maximale vermogen lager dan 50 W is, moet u “Amplifier Gain” in de andere stand stellen zodat de luidsprekers niet kunnen worden beschadigd (zie bladzijde 56 van de GEBRUIKSAANWIJZING).
• Om kortsluiting te voorkomen, moet u de aansluitklemmen van ONGEBRUIKTE gekleurde draden met isolatieband bedekken.
• De warmte-opnemer kan na gebruik erg heet worden. Raak de warmte-opnemer niet aan wanneer u dit apparaat van zijn plaats haalt.
NEDERLANDS
Dit apparaat mag worden gebruikt bij elektrischesystemen die werken op 12 V gelijkstroom met NEGATIEVE aarding. Als uw auto niet is uitgerust met een dergelijk systeem, is een spanningsomzetter vereist. Dit instrument kan worden aangeschaft bij JVC car audio dealers.
KMicrophoneMicrofonMicrophoneMicrofoon
LMicrophone clip MikrofonclipAttache de microphoneMicrofoon-clip
JDouble-sided adhesive tapeDoppelseitiges KlebebandBande adhésive à double faceDubbelzijdig plakband
Installing the remote controller / Installation der Fernbedienung /Installation de la télécommande /Installeren van de afstandsbediening
HRemote controller / HolderFernbedienung / HalterTélécommande / SupportAfstandsbedienuing / Houder
Holder / Halter / Support / Houder
Remote controllerFernbedienungTélécommandeAfstandsbedienuing
Trim plate is detached on this illustration for explanation.Die Deckplatte ist in dieser Zeichnung zur Erklärung angebracht.La plaque de garniture est montrée détachée sur cette illustration pour les besoins de l’explication.Op deze afbeelding is de bekleding verwijdert ter verduidelijking.
LVT1659-004A[E] 0207MNMMDWJEIN
EN, GE, FR, NL©2007 Victor Company of Japan, Limited
FAudio/video cordAudio/Video-KabelCordon audio/vidéoAudio-/videosnoer
Parts list for installation and connection / Teileliste für den Einbau und Anschluß / Liste des pièces pour l’installation et raccordement / Lijst van onderdelen die u bij installatie en aansluiting nodig hebtThe following parts are provided for this unit. After checking them, please set them correctly.Die folgenden Teile werden zusammen mit diesem Gerät geliefert. Nach ihrer Überprüfung, die Teile richtig einsetzen.Les pièces suivantes sont fournies avec cet appareil. Après vérification, veuillez les placer correctement.De volgende onderdelen worden bij het apparaat geleverd. Installeer ze op de juiste wijze, nadat u ze hebt gecontroleerd.
DashboardArmaturenbrettTableau de bordDashboard
WARNHINWEISE• Installieren Sie Geräte over verdrahten Sie Kabel
NICHT an Orten; – an denen sie die Bewegungen des Lenkrads und
des Ganghebels behindern könnten. Anderenfalls führt diese Behinderung möglicherweise zu ernsten Verkehrsunfällen.
– an denen sie den Betrieb von Sicherheit seinrichtungen, z.B. Airbags, behindern könnten. Anderenfalls führt diese Behinderung möglicherweise zu ernsten Verkehrsunfällen.
– an denen sie die Sicht behindern.• Betätigen Sie beim Fahren KEINE Geräte.
Anderenfalls führt dies möglicherweise zu einem ernsten Verkehrsunfall.
• Der Fahrer darf während der Fahrt auf keinen Fall auf den Monitor sehen. Anderenfalls könnte der Fahrer abgelenkt werden und einen Unfall verursachen.
• Der Fahrer darf während der Fahrt keine Kopfhörer tragen. Es ist gefährlich, die Außengeräusche während der Fahrt zu blockieren.
• Wenn Sie das Gerät beim Fahren bedienen müssen, dürfen Sie nicht den Blick von der Straße nehmen.
• Wenn die Feststellbremse nicht verriegelt ist, erscheint „Parking Brake (Feststellbremse)“ auf dem Monitor und es wird kein Wiedergabebild angezeigt.– Diese Warnung wird nur angezeigt, wenn das
Feststellbremskabel an das in das Fahrzeug eingebaute Feststellbremssystem angeschlossen ist.
Hinweise zu elektrischen Anschlüssen:• Die Sicherung mit einer der entsprechenden
Nennleistung ersetzen. Brennt die Sicherung häufig durch, wenden Sie sich an ihren JVC Autoradiohändler.
• Es wird empfohlen, Lautsprecher mit einer Maximalleistung von mehr als 50 W anzuschließen (sowohl hinten als auch vorne, mit einer Impedanz von 4 Ω bis 8 Ω).Wenn die Maximalleistung weniger als 50 W beträgt, stellen Sie „Amplifier Gain“ anders ein, um Schäden an den Lautsprechern zu vermeiden (siehe Seite 56 der BEDIENUNGSANLEITUNG).
• Zur Vermeidung eines Kurzschlusses die Anschlußklemmen der NICHT VERWENDETEN Leitungen mit Isolierklebeband umwickeln.
• Das Abstrahlblech wird nach dem Gebrauch sehr heiß. Beim Ausbau des Geräts darauf achten, das Abstrahlblech nicht zu berühren.
Double-sided adhesive tapeDoppelseitiges KlebebandBande adhésive à double faceDubbelzijdig plakband
Instal1-3_KD-AVX33[E].indd 1Instal1-3_KD-AVX33[E].indd 1 2/2/07 1:51:04 pm2/2/07 1:51:04 pm

2
*1 When you stand the unit, be careful not to damage the fuse on the rear.*1 Beim Aufstellen des Geräts darauf achten, daß die Sicherung auf der Rückseite nicht beschädigt wird.*1 Lorsque vous mettez l’appareil à la verticale, faire attention de ne pas endommager le fusible situé
sur l’arrière.*1 Wanneer u het apparaat rechtop zet, moet u erop letten dat u de zekering aan de achterkant niet beschadigt.
Do the required electrical connections.Nehmen Sie die erforderlichen elektrischen Anschlüsse vor.Réalisez les connexions électriques.Breng de vereiste elektrische verbindingen tot stand.
Bend the appropriate tabs to hold the sleeve firmly in place.Die geeigneten Zapfen biegen, um die Manschette sicher festzuhalten.Tordez les languettes appropriées pour maintenir le manchon en place.Buig de vereiste lipjes zodat de huls goed op zijn plaats wordt gehouden.
When using the optional stay / Beim Verwenden der Anker-Option / Lors de l’utilisation du hauban en option / Wanneer u de steun gebruikt (facultatief)
When installing the unit without using the sleeve / Beim Einbau des Geräts ohne Halterung / Lors de l’installation de l’appareil scans utiliser de manchon / Wanneer u het apparaat zonder huls installeertIn a car having the “Required space for installation” (see page 1), first remove the car radio and install the unit in its place.In einem Fahrzeug wo der „Erforderlicher Platz für Einbau“ (siehe Seite 1), bauen Sie zunächst das Autoradio aus und bauen an seiner Stelle den Receiver ein.Dans une voiture avec l’“Espace nécessaire pour l’installation” (voir page 1), retirez d’abord l’ancien autoradio et installez cet autoradio à sa place.In een auto met de “Voor de installatie vereiste ruimte” (zie bladzijde 1) moet u eerst de autoradio verwijderen en dan de receiver op zijn plaats installeren.
Bracket *2
Konsole *2
Support *2
Console *2
*2 Not included for this unit.*2 Für diesen Receiver nicht
mitgeliefert.*2 Non fourni avec cet appareil.*2 Niet bij deze receiver bijgeleverd.
Flat type screws—M5 x 8 mm *2
Senkkopfschrauben—M5 x 8 mm *2
Vis à tête plate—M5 x 8 mm *2
Platkopschroeven—M5 x 8 mm*2
Bracket *2
Konsole *2
Support *2
Console *2
Install the unit at an angle of less than 30˚.Stellen Sie das Gerät mit einem Winkel von weniger als 30° auf.Installez l’appareil avec un angle de moins de 30˚.Installeer het toestel met een hoek kleiner dan 30°.
Note: When installing the unit on the mounting bracket, make sure to use the 8 mm-long screws. If longer screws are used, they could damage the unit.
Hinweise: Beim Anbringen des Gerät an der Konsole sicherstellen, daß 8 mm lange Schrauben verwendet werden. Werden längere Schrauben verwendet, können sie das Gerät beschädigen.
Remarque: Lors de l’installation de l’appareil sur le support de montage, s’assurer d’utiliser des vis d’une longueur de 8 mm. Si des vis plus longues sont utilisées, elles peuvent endommager l’appareil.
Opmerking: Wanneer u het apparaat aan de bevestigingsklem vastmaakt, moet u de 8 mm lange schroeven gebruiken. Als u langere schroeven gebruikt, kan het apparaat worden beschadigd.
Removing the unitBefore removing the unit, release the rear section.
Ausbau des GerätsVor dem Ausbau des Geräts den hinteren Teil freigeben.
Insert the two handles, then pull them as illustrated so that the unit can be removed.Die beiden Handgriffe einsetzen und dann ziehen wie in der Abbildung gezeigt, so daß das Gerät entfernt werden kann.Insérez les deux poignées, puis tirez de la façon illustrée de façon à retirer l’appareil.Plaats de twee hendels en trek ze vervolgens zoals afgebeeld naar voren zodat het toestel kan worden verwijderd.
Retrait de l’appareilAvant de retirer l’appareil, libérer la section arrière.
Do not block the fan.Nicht das Gebläse blockieren.Ne bloquez pas le ventilateur.Blokkeer de ventilatie niet.
INSTALLATION (IN-DASH MOUNTING)The following illustration shows a typical installation. If you have any questions or require information regarding installation kits, consult your JVC IN-CAR ENTERTAINMENT dealer or a company supplying kits.• If you are not sure how to install this unit
correctly, have it installed by a qualified technician.
• Make sure not to block the fan on the rear panel to maintain proper ventilation when installed.
• You cannot install the unit on the car which has any obstacles in the space shown in “Required space for installation” on page 1.
Caution when installingFit the unit into the mounting sleeve by using four corners of the trim plate.• DO NOT press the
panel (shaded in the illustration).
EINBAU (IM ARMATURENBRETT)Die folgende Abbildung zeigt einen typischen Einbau. Bei irgendwelchen Fragen oder wenn Sie Informationen hinsichtlich des Einbausatzes brauchen, wenden Sie sich an ihren JVC Autoradiohändler oder ein Unternehmen das diese Einbausätze vertreibt.• Sind Sie sich über den richtigen Einbau des Geräts
nicht sicher, lassen Sie es von einem qualifizierten Techniker einbauen.
• Sicherstellen, dass nicht das Gebläse an der Rückseite verdeckt wird, um richtige Ventilation beim Einbau zu gewährleisten.
• Sie können die Einheit nicht in einem Fahrzeug einbauen, wo sich Hindernisse im „Erforderlicher Platz für Einbau“ wie auf Seite 1 beschrieben befinden.
Vorsicht bei der InstallationSetzen Sie den Receiver in die Montagemanschette, indem Sie die vier Ecken der Deckplatte verwenden.• Drücken Sie NICHT auf die Platte selber (in der
Abbildung schraffiert).
INSTALLATION (MONTAGE DANS LE TABLEAU DE BORD)L’illustration suivante est un exemple d’installation typique. Si vous avez des questions ou avez besoin d’information sur des kits d’installation, consulter votre revendeur d’autoradios JVC ou une compagnie d’approvisionnement.• Si l’on n’est pas sûr de pouvoir installer
correctement cet appareil, le faire installer par un technicien qualifié.
• Lors de l’installation assurez-vous de ne pas bloquer le ventilateur à l’arrière afin de permettre une ventilation correcte.
• Vous ne pouvez pas installer l’appareil sur une voiture qui a certains obstacles dans l’espace montré dans “Espace nécessaire pour l’installation” à la page 1.
Précautions lors de l’installationFixez l’autoradio sur le manchon de montage en utilisant les quatre coins de la plaque de garniture.• NE POUSSEZ PAS sur le panneau (en gris sur
l’illustration).
INSTALLATIE (INBOUW IN HET DASHBOARD)Op de volgende afbeelding kunt u zien hoe de installatie, normaal gesproken, in zijn werk gaat. Neem bij vragen of voor meer bijzonderheden over inbouwpakketten contact op met uw JVC car audio dealer of een dealer of een bedrijf dat inbouwpakketten levert.• Als u niet zeker weet hoe u dit apparaat moet
installeren, kunt u dit beter door een daartoe gekwalificeerde technicus laten doen.
• Zorg dat u de ventilator op het achterpaneel niet blokkeert en zo de werking verhindert.
• U kunt het toestel niet installeren in een auto waar onderdelen of voorwerpen zijn bevestigd in de bij “Voor de installatie vereiste ruimte” op bladzijde 1.
Voorzorgen voor het installerenGebruik de vier hoeken van de afwerkplaat om de receiver in de bevestigingshuls te plaatsen.• Druk NIET op het paneel zelf (het grijze gedeelte in
de afbeelding).
Verwijderen van het apparaatVoordat u het apparaat verwijdert, moet u het achtergedeelte losmaken.
30˚
Flat type screws—M5 x 8 mm *2
Senkkopfschrauben—M5 x 8 mm *2
Vis à tête plate—M5 x 8 mm *2
Platkopschroeven—M5 x 8 mm*2
Screw (option)Schraube (Option)Vis (en option)Schroef (facultatief)
Stay (option)Anker (Option)Hauban (en option)Steun (facultatief)
Fire wallFeuerwandCloisonBrandscherm
DashboardArmaturenbrettTableau de bordDashboard
Instal1-3_KD-AVX33[E].indd 2Instal1-3_KD-AVX33[E].indd 2 7/2/07 10:04:36 am7/2/07 10:04:36 am

3
PRECAUTIONS on power supply and speaker connections:• DO NOT connect the speaker leads of the
power cord to the car battery; otherwise, the unit will be seriously damaged.
• BEFORE connecting the speaker leads of the power cord to the speakers, check the speaker wiring in your car.
VORSICHTSMASSREGELN beim Anschließen der Stromversorgung und Lautsprecher:• Die Lautsprecherleitungen des Netzkabels
NICHT an der Autobatterie anschließen, da sonst das Gerät schwer beschädigt wird.
• VOR dem Anschließen der Lautsprecherleitungen des Spannunsgversorgungskabels an die Lautsprecher, die Lautsprecherverdrahtung in Ihrem Auto überprüfen.
PRÉCAUTIONS sur l’alimentation et la connexion des enceintes:• NE CONNECTEZ PAS les fils d’enceintes du
cordon d’alimentation à la batterie; sinon, l’appareil serait sérieusement endommagé.
• AVANT de connecter les fils d’enceintes du cordon d’alimentation aux enceintes, vérifiez le câblage des enceintes de votre voiture.
VOORZORGSMAATREGELEN bij hetverbinden van de stroomkabeldraad met de speakers:• Verbind de speakerdraden van de
stroomkabel NIET met de accu van de auto; als u dit wel doet, zal het apparaat ernstige schade oplopen.
• VOORDAT u de speakerdraden van de stroomkabel met de speakers verbindt, moet u de bedrading van de speakers in uw auto controleren.
Y : Yellow Gelb Jaune Geel
R : Red Rot Rouge Rood
If your car is equipped with the ISO connector / Wenn Ihr Fahrzeug mit dem ISO-Steckverbinder ausgestattet ist / Si votre voiture est équippée d’un connecteur ISO / Indien uw auto een ISO-aansluiting heeft
• Connect the ISO connectors as illustrated.• Schließen Sie die ISO-Steckverbinder an, wie in der Abbildung gezeigt.• Connectez les connecteurs ISO comme montré sur l’illustration.• Verbind de ISO-stekkers zoals afgebeeld.
From the car bodyVon der FahrzeugkarosserieDe la carrosserie de la voitureVan het chassis van de auto
ISO connector of the supplied power cordISO-Stecker des mitgelieferten StromkabelsConnecteur ISO pour le cordon d’alimentation fourniISO-stekker van het bijgeleverde spanningssnoer
View from the lead sideVon der Kabelseite aus gesehenVue à partir du côté des filsGezien vanaf de spanningstoevoerkant
For some VW/Audi or Opel (Vauxhall) automobile / Bei bestimmten VW-/Audi- order Opel- (Vauxhall-) Fahrzeugen /Pour certaine voiture VW/Audi ou Opel (Vauxhall) / Voor bepaalde VW/Audi en Opel (Vauxhall) auto’s
Original wiring / Originalverdrahtung / Câblage original / Oorspronkelijke bedrading
Modified wiring 1 / Modifizierte Verdrahtung 1 / Câblage modifié 1 / Veranderde bedrading 1
Use modified wiring 2 if the unit does not turn on.Verwenden Sie die modifizierte Verdrahtung 2 wenn der Receiver nicht einschaltet.Utilisez le câblage modifié 2 si l’appareil ne se met pas sous tension.Gebruik methode 2 voor het veranderen van de bedrading indien de receiver niet wordt ingeschakeld.
Modified wiring 2 / Modifizierte Verdrahtung 2 / Câblage modifi é 2 / Veranderde bedrading 2
ISO connectorISO-SteckverbinderConnecteur ISOISO-aansluiting
* Choking coil Drosselspule Bobine d’arrêt Onderbrekingsspoel
You may need to modify the wiring of the supplied power cord as illustrated.• Contact your authorized car
dealer before installing this unit.
Es kann erforderlich sein, die Verdrahtung des mitgelieferten Stromkabels zu modifizieren, wie in der Abbildung gezeigt.• Wenden Sie sich vor dem
Einbau dieses Receivers an Ihre Auto-Fachwerkstatt.
Vous aurrez peut-être besoin de modifier le câblage du cordon d’alimentation fourni comme montré sur l’illustration.• Contactez votre revendeur
automobile autorisé avant d’installer l’appareil.
U moet mogelijk de bedrading van het bijgeleverde spanningssnoer als afgebeeld veranderen.• Raadpleeg een erkend
autogarage alvorens deze receiver te installeren.
ELECTRICAL CONNECTIONSTo prevent short circuits, we recommend that you disconnect the battery’s negative terminal and make all electrical connections before installing the unit.• Be sure to ground this unit to the car’s
chassis again after installation.
ELEKTRISCHE ANSCHLÜSSEZur Vermeidung von Kurzschlüssen empfehlen wir, daß Sie den negativen Batterieanschluß abtrennen und alle elektrischen Anschlüsse herstellen, bevor das Gerät eingebaut wird.• Sicherstellen, daß das Gerät nach dem
Einbau a Chassis des Fahrzeugs geerdet wird.
RACCORDEMENTS ELECTRIQUESPour éviter tout court-circuit, nous vous recommandons de débrancher la borne négative de la batterie et d’effectuer tous les raccordements électriques avant d’installer l’appareil.• Assurez-vous de raccorder de nouveau la
mise à la masse de cet appareil au châssis de la voiture après l’installation.
ELEKTRISCHE VERBINDINGENOm kortsluiting te voorkomen adviseren wij u om de minpool van de accu los te maken en alle elektrische verbindingen tot stand te brengen voordat u het apparaat in de auto installeert.• Aard dit toestel beslist weer op het chassis
van de auto na het installeren.
Connect the parking brake lead to the parking brake system built in the car.
Anschluss des Handbremsenkabels an das imFahrzeug eingebaute Handbremsensystem.
Connectez le fil de frein de stationnement au système de frein de stationnement.
Parking brake lead (light green)Handbremsenkabel (hellgrün)Fil du frein de stationnement (vert clair)Parkeerremdraad (lichtgroen)
To metallic body or chassis of the carZur metallenen Karosserie oder zum Fahrwerk des AutosVers corps métallique ou châssis de la voitureNaar metalen ondergrond of chassis van de autoParking brake switch (inside the car)
Handbremsenschalter (Fahrzeuginneres)Commutateur de frein de stationnement (intérieur de la voiture)Parkeerremschakelaar (in de auto)
Parking brakeHandbremseFrein de stationnementParkeerrem
Sluit de parkeerremdraad op het parkeerremsysteem van de auto aan.
Connecting the parking brake lead / Anschluss des Handbremsenkabels / Connexion du cordon de frein de stationnement / De parkeerremdraad aansluitenA
Connecting the reverse gear signal lead (for rear view camera) / Anschließen der Rückwärtsgangsignalleitung (für die Rückfahrkamera) / Connexion du fil de signal de marche arrière (pour la caméra du rétroviseur) / Aansluiten van het achteruitrij-signaaldraad (voor achteruitkijkcamera) (REVERSE GEAR SIGNAL)
Locate the reverse lamp lead in the trunk.Suchen Sie die Rückfahrleuchtenleitung im Kofferraum.Localisez le fil des feux de recul dans le coffre.Zoek het draad van het achterlicht in de kofferbak.
To reverse lampAn Rückfahrleuchte
Aux feux de reculNaar achterlicht
Reverse lamp leadRückfahrleuchtenleitungFil des feux de reculAchterlichtdraad
Reverse lamp leadRückfahrleuchtenleitungFil des feux de reculAchterlichtdraad
To car batteryAn AutobatterieÀ la batterie de la voitureNaar auto-accu
Purple with white stripeLila mit weißem StreifenViolet avec bande blanchePaars met witte strepen
Reverse lampsRückfahrleuchteFeux de reculAchterlichten
B
Instal1-3_KD-AVX33[E].indd 3Instal1-3_KD-AVX33[E].indd 3 1/2/07 6:49:34 pm1/2/07 6:49:34 pm

ENGLISH FRANÇAIS DEUTSCH NEDERLANDS
Connections without using the ISO connectors / Anschlüsse ohne Verwendung der ISO-Steckverbinder / Connexions sans l’utilisation des connecteurs ISO / Verbinden zonder gebruik van ISO-stekkers
Before connecting: Check the wiring in the vehicle carefully. Incorrect connection may cause serious damage to this unit.The leads of the power cord and those of the connector from the car body may be different in color.1 Cut the ISO connector.2 Connect the colored leads of the power cord in
the order specified in the illustration below.3 Connect the aerial cord.4 Finally connect the wiring harness to the unit.
Vor dem Anschließen: Die Verdrahtung im Fahrzeug sorgfältig überprüfen. Falsche Anschlüsse können ernsthafte Schäden am Gerät hervorrufen.Die Leiter des Stromkabels und die Leiter des Anschlusses im Fahrzeug können sich farblich unterscheiden.1 Schneiden Sie den ISO-Steckverbinder auf.2 Die farbigen Adern des Stromkabels in der
Reihenfolge anschließen, wie in der Abbildung unten gezeigt.
3 Das Antennenkabel anschließen.4 Die Kabelbäume am Gerät anschließen.
Avant de commencer la connexion: Vérifiez attentivement le câblage du véhicule. Une connexion incorrecte peut endommager sérieusement l’appareil.Le fil du cordon d’alimentation et ceux des connecteurs du châssis de la voiture peuvent être différents en couleur.1 Coupez le connecteur ISO.2 Connectez les fils colorés du cordon
d’alimentation dans l’ordre spécifié sur l’illustration ci-dessous.
3 Connectez le cordon d’antenne.4 Finalement, connectez le faisceau de fils à
l’appareil.
15 A fuse15 A SicherungFusible 15 AZekering 15 A
Rear ground terminalHintere Erdungscan-schlußklemmeBorne arrière de masseMassaklem aan de achterkant
To an external component (see diagram )Zu einer externen Komponente (siehe Diagramm)Pour connecter un appareil extérieur (voir le diagramme )Naar een extern component (zie afbeelding )
*3 Not included for this unit*3 Für diesen Receiver nicht mitgeliefert*3 Non fourni avec cet appareil*3 Niet bij deze receiver bijgeleverd
Ignition switchZündschalterInterrupteur d’allumageOntstekingsschakelaar
Fuse blockSicherungsblockPorte-fusibleZekeringblok
White with black stripeWeiß mit schwarzem
StreifenBlanc avec bande noire
Wit met zwarte streep
WhiteWeißBlancWit
Gray with black stripeGrau mit schwarzem
StreifenGris avec bande noireGrijs met zwarte streep
GrayGrauGrisGrijs
Green with black stripeGrün mit schwarzem
StreifenVert avec bande noire
Groen met zwarte streep
GreenGrünVertGroen
Purple with black stripeLila mit schwarzem
StreifenViolet avec bande noirePaars met zwarte streep
PurpleLilaVioletPaars
Left speaker (front)Linker Lautsprecher (vorne)Enceinte gauche (avant)Linkerspeaker (voorin)
Right speaker (front)Rechter Lautsprecher (vorne)Enceinte droit (avant)Rechterspeaker (voorin)
Left speaker (rear)Linker Lautsprecher (hinten)Enceinte gauche (arrière)Linkerspeaker (achterin)
Right speaker (rear)Rechter Lautsprecher (hinten)Enceinte droit (arrière)Rechterspeaker (achterin)
To metallic body or chassis of the carZur metallenen Karosserie oder zum Fahrwerk des AutosVers corps métallique ou châssis de la voitureNaar metalen ondergrond of chassis van de auto
To a live terminal in the fuse block connecting to the car battery (bypassing the ignition switch) (constant 12 V)Zur einer stromführenden Anschlußklemme im Sicherungsblock zum Anschließen an die Autobatterie (Umgehen des Zündschalters) (konstant 12 V)A une borne sous tension du porte-fusible connectée à la batterie de la voiture (en dérivant l’interrupteur d’allumage) (12 V constant)Naar een onder spanning staande aansluitklem in het zekeringblok die is aangesloten op de accu van de auto (u passeert de ontstekingsschakelaar) (constant 12 V)
To an accessory terminal in the fuse blockZur einer Zubehöranschlußklemme im SicherungsblockVers borne accessoire du porte-fusibleNaar een aansluitklem in het zekeringblok
To car light control switch / Zum Autobeleuchtungssteuerung-Schalter /À l’interrupteur d’éclairage de la voiture / Naar schakelaar van autoverlichting
To cellular phone system / Zur Mobiltelefon / À un système de téléphone cellulaire / Naar het mobiele-telefoonsysteem
To parking brake (see diagram ) / An Feststellbremse (siehe Schaltplan ) / Au frein de stationnement (voir le diagramme ) / Naar handrem ( zie schema )
BlackSchwarzNoirZwart
Yellow *4
Gelb *4
Jaune *4
Geel *4
RedRotRougeRood
Blue with white stripeBlau mit weißem StreifenBleu avec bande blancheBlauw met witte streep
Orange with white stripeOrange mit weißem StreifenOrange avec bande blancheOranje met witte streep
Brown / Braun / Marron / Bruin
Light green / HellgrünVert clair / Lichtgroen
To the remote lead of other equipment or power aerial if any (200 mA max.)Zum Zusatzkabel des anderen Geräts oder der Motorantenne, sofern vorhanden (max. 200 mA)Au fil de télécommande de l’autre appareil ou à l’antenne automatique s’il y en a une (200 mA max.)Naar afstandsdraad van andere apparatuur of antenne met circuit indien aanwezig (200 mA max.)
Alvorens de verbindingen tot stand te brengen: Moet u de bedrading in de auto zorgvuldig. Het apparaat kan door verkeerde verbindingen ernstige schade oplopen.De draden van het stroomsnoer verschillen mogelijk van kleur metde aansluitingen op het chassis van de auto.1 Knip de ISO-stekker af.2 Verbind de gekleurde draden van het
stroomsnoer in de afbeelding hieronder aangegeven volgorde.
3 Sluit de antenne aan.4 Verbind de draadbundel daarna met het
apparaat.
USB cable / USB-Kabel / Câble USB / USB-kabel(see diagram / siehe Schaltplan /voir le diagramme / zie schema )
*4 Before checking the operation of this unit prior to installation, this lead must be connected, otherwise power cannot be turned on.
*4 Vor der Überprüfung der Funktionsfähigkeit des Geräts vor dem Einbau, muß diese Leitung angeschlossen werden, da sonst die Stromversorgung nicht eingeschaltet werden kann.
*4 Pour vérifier le fonctionnement de cet appareil avant installation, ce fil doit être raccordé, sinon l’appareil ne peut pas être mis sous tension.
*4 Voordat u controleert of het apparaat werkt (alvorens het te installeren), moet deze draad aangesloten zijn. Als dit niet het geval is, kan de stroom niet worden ingeschakeld.
4
Connecting the Mic unit / Anschließen der Mikrofoneinheit / Connexion du microphone / Verbinden van de microfoon
oroderouof
Adjust the microphone angleStellen Sie den Mikrofonwinkel einAjustez l’angle du microphoneStel de hoek van de microfoon in
MicrophoneMicrofonMicrophoneMicrofoon
Microphone clipMikrofonclipAttache de microphoneMicrofoon-clip
JDouble-sided adhesive tapeDoppelseitiges KlebebandBande adhésive à double faceDubbelzijdig plakband
C
Secure the microphone cord using cord cramps (not supplied) if necessary.Sichern Sie das Mikrofonkabel mit Kabelklemmen (nicht mitgeliefert), wenn erforderlich.Fixez si nécessaire le cordon du microphone en utilisant des serre-fils (non fournis).Zet het microfoonsnoer indien nodig met snoerklemmen (niet bijgeleverd) vast.
1 2
Instal4-6_KD-AVX33[E].indd 4Instal4-6_KD-AVX33[E].indd 4 5/2/07 1:58:34 pm5/2/07 1:58:34 pm

Connecting the external amplifiers / Anschließen der externen Verstärker / Connexion d’amplifi cateurs extérieurs / Verbinden van externe versterkersYou can connect amplifiers to upgrade your car stereo system.• Connect the remote lead (blue with white stripe)
to the remote lead of the other equipment so that it can be controlled through this unit.
• For amplifier only:– After you have connected the center speaker,
make sure to activate the center speaker; otherwise, no sound comes out of the connected center speaker, see page 53 of the INSTRUCTIONS.
– Disconnect the speakers from this unit, connect them to the amplifier. Leave the speaker leads of this unit unused.
– You can switch off the built-in amplifier and send the audio signals only to the external amplifier(s) to get clear sounds and to prevent internal heat buildup. See page 56 of the INSTRUCTIONS (separate volume).
*6 Firmly attach the ground wire to the metallic body or to the chassis of the car—to the place uncoated with paint (if coated with paint, remove the paint before attaching the wire). Failure to do so may cause damage to the unit.
*6 Verbinden Sie den Erdungsleiter mit der Karosserie oder dem Rahmen des Fahrzeugs. Die Kontaktstelle darf nicht lackiert sein (sollte die Kontaktstelle lackiert sein, entfernen Sie den Lack der Kontaktstelle, bevor Sie den Leiter befestigen). Wenn der Erdungsleiter nicht ordnungsgemäß angeschlossen wird, kann dieses Gerät beschädigt werden.
*6 Attachez solidement le fil de mise à la masse au châssis métallique de la voiture—à un endroit qui n’est pas recouvert de peinture (s’il est recouvert de peinture, enlevez d’abord la peinture avant d’attacher le fil). L’appareil peut être endommagé si cela n’est pas fait correctement.
*6 Bevestig de aardedraad goed met een metalen onderdeel of het chassis van de auto—bevestig op een niet-gelakt gedeelte (indien gelakt, schuur dan af alvorens de draad te bevestigen). Het toestel kan worden beschadigd indien de aardedraad niet goed is aangesloten.
Sie können einen Verstärker anschließen, um Ihre Autostereoanlage zu erweitern.• Schließen Sie das Fernbedienungskabel (blau mit
weißem Streifen) an das Fernbedienungskabel des anderen Geräts an, so daß es über dieses Gerät gesteuert werden kann.
• Nur für den Verstärker:– Nachdem Sie den Center-Lautsprecher
angeschlossen haben, vergewissern Sie sich, dass dieser aktiviert ist; andernfalls kommt kein Ton vom angeschlossenen Center-Lautsprecher, siehe Seite 53 der BEDIENUNGSANLEITUNG.
– Die Lautsprecher von diesem Gerät abtrennen und am Verstärker anschließen. Die Lautsprecherleitungen dieses Geräts unbenutzt lassen.
– Sie können den eingebauten Verstärker abschalten und die Audiosignale nur zu dem(n) externen Verstärker(n) ausgeben, um scharfen Ton zu erhalten und Hitzestau im Receiver zu vermeiden. Siehe Seite 56 der BEDIENUNGSANLEITUNG (separate Druckschrift).
Vous pouvez connecter des amplificateurs pour améliorer votre système autoradio.• Connectez le fil de commande à distance (bleu avec
bande blanche) au fil de commande à distance de l’autre appareil de façon qu’il puisse être commandé via cet appareil.
• Pour l’amplificateur seulement:– Après avoir connecté l’enceinte centrale,
assurez-vous de mettre en service l’enceinte centrale; sinon, aucun son ne sort de l’enceinte centrale connectée, référez-vous à la page 53 du MANUEL D’INSTRUCTIONS.
– Déconnectez les enceintes de cet appareil et connectez-les à l’amplificateur. Laissez les fils d’enceintes de cet appareil inutilisés.
– Vous pouvez désactiver l’amplificateur intégré et envoyer les signaux audio uniquement à un ou plusieurs amplificateurs extérieurs afin d’obtenir un son clair et pour éviter un échauffement interne de l’appareil. Référez-vous à la page 56 du MANUEL D’INSTRUCTIONS (volume séparé).
Remote leadFernbedienungsleitungFil d’alimentation à distanceAfstandbedieningsdraad
JVC AmplifierJVC Verstärker
JVC AmplificateurJVC Versterker
Remote lead (Blue with white stripe)Fernbedienungsleitung (Blau mit weißem Streifen)Fil d’alimentation à distance (Bleu avec bande blanche)Afstandbedieningsdraad (Blauw met witte streep)
To the remote lead of other equipment or power aerial if anyZum Zusatzkabel des anderen Geräts oder der Motorantenne, sofern vorhandenAu fil de télécommande de l’autre appareil ou à l’antenne automatique s’il y en a uneNaar afstandsdraad van andere apparatuur of antenne met circuit indien aanwezig
Y-connector (not supplied for this unit) / Y-Anschluß (für diesen Receiver nicht mitgeliefert) / Connecteur Y (non fourni avec cet appareil) / Y-connector (niet bij deze receiver bijgeleverd)
SubwooferSubwoofer
Caisson de graveSubwoofer
Rear speakersHintere
LautsprecherEnceintes arrière
Achterspeakers
Front speakersVordere
LautsprecherEnceintes avant
Voorspeakers
C
Connecting to the steering wheel remote controller / Anschluß an die Lenkradfernbedienung / Connexion de la télécommande de volant /Verbinden met de stuurwiel-afstandsbediening
If your car is equipped with the steering wheel remote controller, you can operate this unit using the controller. To do it, a JVC’s OE remote adapter (not supplied) which matches with your car is required. Consult your JVC IN-CAR ENTERTAINMENT dealer for details.Wenn Ihr Fahrzeug mit einer Lenkradferndienung ausgestattet ist, können Sie damit diesen Receiver steuern. Hierfür ist ein für Ihr Fahrzeug passender Radio-Lenkrad-Fernbedienungsadaption von JVC (nicht im Lieferumfang enthalten) erforderlich. Für weitere Einzelheiten wenden Sie sich an Ihren JVC Autoradiohändler.Si votre voiture est munie d’une télécommande de volant, vous pouvez commander cet autoradio en utilisant la télécommande. Pour la connexion, un adaptateur de télécommande exclusif (non fourni) correspondant à votre voiture est requis. Pour en savoir plus, consultez le revendeur autoradio auprès duquel vous avez acheté cet autoradio.Indien uw auto een stuurwiel-afstandsbediening heeft, kunt u deze receiver met die afstandsbediening bedienen. Hiervoor heeft u echter een JVC adapter (niet bijgeleverd) nodig die geschikt is voor de stuurwiel-afstandsbediening van uw auto. Raadpleeg uw JVC car audio dealer voor details.
OE remote adapter (not supplied)Radio-Lenkrad-Fernbedienungsadaption (nicht im Lieferumfang enthalten)Adaptateur pour télécommande au volant (non fourni)Adapter voor stuurwiel-afstandsbediening(niet bijgeleverd)
Steering wheel remote controller (equipped in the car)Lenkradfernbedienung (im Fahrzeug installiert)Télécommande de volant (installée dans la voiture)Stuurwiel-afstandsbediening (in de auto)
OE REMOTESteering wheel remote input /
Lenkrad-Fernbedienungseingang / Entrée de la télécommande
de volant / Invoer afstandsbediening-met-
stuurwieltje
5
Center speakerCenterlautsprecherEnceinte centraleMiddenluidspreker
Het is mogelijk om uw autostereosysteem uit te breiden door een versterker aan te sluiten.• Verbind de externe kabel (blauw met witte
streep) met de externe kabel van het andere apparatuur zodat deze op afstand vanaf deze apparaat kan worden bediend.
• Alleen voor een versterker:– Nadat u de middenluidspreker heeft
aangesloten, moet u de middenluidspreker activeren; u hoort anders geen geluid via de middenluidspreker, zie bladzijde 53 van de GEBRUIKSAANWIJZING.
– Koppel de speakers van dit apparaat los en verbind ze aan de versterker. Gebruik de speakerdraden van dit apparaat niet.
– U kunt de ingebouwde versterker uitschakelen en de audiosignalen uitsluitend direct naar een externe versterker(s) sturen voor een helder geluid en om te voorkomen dat er te veel warmte in de receiver wordt opgehoopt. Zie bladzijde 56 van de GEBRUIKSAANWIJZING (afzonderlijk boekje).
JVC AmplifierJVC Verstärker
JVC AmplificateurJVC Versterker
JVC AmplifierJVC Verstärker
JVC AmplificateurJVC Versterker
JVC AmplifierJVC Verstärker
JVC AmplificateurJVC Versterker
Rear speakersHintere LautsprecherEnceintes arrièreAchterspeakers
Front speakersVordere LautsprecherEnceintes avantVoorspeakers
*7 Cut the rear speaker leads of the car’s ISO connector and connect them to the amplifier.
*7 Schneiden Sie die hinteren Lautsprecherkabel des ISO-Steckverbinders des Fahrzeugs ab, und schließen diese an den Verstärker an.
*7 Coupez les fils des enceintes arrière du connecteur ISO de la voiture et connectez-les à l’amplificateur.
*7 Knip de achterluidsprekerdraden van de ISO-stekker van de auto en verbind de draden met de versterker.
Connections for external component playback / Anschlüsse für externe Komponente / Connexions pour un appareil de lecture extérieur / Verbinden voor weergave van een extern component
KS-HP2Cordless headphones (not supplied) *8
Drahtlose Kopfhörer (nicht mitgeliefert) *8
Casque d’écoute sans fi l (non fourni) *8
Snoerloze koptelefoon (niet meegeleverd) *8
KV-MR90109-INCH WIDESCREEN MONITOR (not supplied)9-ZOLL-BREITBILDMONITOR (nicht mitgeliefert)MONITEUR COULEUR À ÉCRAN LARGE DE 9 POUCES (non fourni)9-INCH BREEDBEELD-MONITOR (niet bijgeleverd)
Video cord (not supplied)Videokabel (nicht mitgeliefert)Cordon vidéo (non fourni)Videosnoer (niet meegeleverd)
*8 To listen to disc playback sound while in Dual Zone operations (see page 28 of INSTRUCTIONS).
*8 Zum Abhören von Disc-Audio im Dual Zone-Betrieb (siehe Seite 28 der BEDIENUNGSANLEITUNG).
*8 Pour écouter le son de lecture des disque lors de l’utilisation du mode Dual Zone (voir page 28 du MANUEL D’INSTRUCTIONS).
*8 Om in Dual Zone naar een disk te luisteren (zie bladzijde 28 van de GEBRUIKSAANWIJZING).
Camcorder, rear view camera, etc.Camcorder, Rückfahrkamera, usw.Caméscope, caméra de recul, etc.Camcorder, achteruitkijkcamera, etc.
A
B
*5 Audio cord (not supplied)*5 Audiokabel (nicht mitgeliefert)*5 Codon audio (non fourni)*5 Audiosnoer (niet bijgeleverd)
Navigation SystemNavigationssystem
Système de navigationNavigatiesysteem
Instal4-6_KD-AVX33[E].indd 5Instal4-6_KD-AVX33[E].indd 5 5/2/07 1:58:40 pm5/2/07 1:58:40 pm

6
Connecting external components / Anschließen der externen Komponenten / Connexion des appareils extérieurs / Verbinden van externe componenten
• iPod is a trademark of Apple Inc., registered in the U.S. and other countries.
• iPod ist ein Warenzeichen von Apple Inc., eingetragen in den USA und anderen Ländern.
• iPod est une marque de commerce d’Apple Inc., enregistrée aux États-Unis et dans les autres pays.
• iPod is een handelsmerk van Apple Inc., geregistreerd in de V.S. en andere landen.
D
USB cable (approx.1.2 m)USB-Kabel (ca. 1,2 m)Câble USB (environ 1,2 m)USB-kabel (ongeveer 1,2 meter)
TROUBLESHOOTING• The fuse blows.* Are the red and black leads connected correctly?• Power cannot be turned on.* Is the yellow lead connected?• No sound from the speakers.* Is the speaker output lead short-circuited?• Sound is distorted.* Is the speaker output lead grounded?* Are the “–” terminals of L and R speakers
grounded in common?• Noise interfere with sounds.* Is the rear ground terminal connected to the car’s
chassis using shorter and thicker cords?• Unit becomes hot.* Is the speaker output lead grounded?* Are the “–” terminals of L and R speakers
grounded in common?• This unit does not work at all.* Have you reset your unit?
FEHLERSUCHE• Die Sicherung brennt durch.* Sind die roten und schwarzen Leitungen richtig
angeschlossen?• Stromversorgung kann nicht eingeschaltet
werden.* Ist die gelbe Leitung angeschlossen?• Kein Ton aus den Lautsprechern.* Ist die Lautsprecherausgangsleitung
kurzgeschlossen?• Ton verzerrt.* Ist die Lautsprecherausgangsleitung geerdet?* Sind die (–) Anschlußklemmen der linken und
rechten Lautsprecher zusammen geerdet?• Störgeräusche im Klang.* Ist die hintere Erdungsklemme mit kürzeren
und dickeren Kabeln an das Fahrzeugchassis angeschlossen?
• Gerät wird heiß.* Ist die Lautsprecherausgangsleitung geerdet?* Sind die (–) Anschlußklemmen der linken und
rechten Lautsprecher zusammen geerdet?• Diese Einheit funktioniert überhaupt nicht.* Haben Sie Ihre Einheit zurückgesetzt?
EN CAS DE DIFFICULTES• Le fusible saute.* Les fils rouge et noir sont-ils racordés
correctement?• L’appareil ne peut pas être mise sous tension.* Le fil jaune est-elle raccordée?
• Pas de son des enceintes. * Le fil de sortie d’enceinte est-il court-circuité?• Le son est déformé.* Le fil de sortie d’enceinte est-il à la masse?* Les bornes “–” des enceintes gauche et droit
sont-elles mises ensemble à la masse?• Interférence avec les sons.* La prise arrière de mise à la terre est-elle
connectée au châssis de la voiture avec un cordon court et épais?
• L’appareil devient chaud.* Le fil de sortie d’enceinte est-il à la masse?* Les bornes “–” des enceintes gauche et droit
sont-elles mises ensemble à la masse?• Cet appareil ne fonctionne pas du tout.* Avez-vous réinitialisé votre appareil?
PROBLEMEN OPLOSSEN• De zekering slaat door.* Zijn de rode en de zwarte draden op de juiste manier aangesloten?• De stroom kan niet worden ingeschakeld.* Is de gele draad aangesloten?• Er komt geen geluid uit de speakers.* Is de uitgaande speakerdraad kortgesloten?• Het geluid wordt vervormd.* Is de uitgaande speakerdraad geaard?* Zijn de “–” polen van de linker- en de
rechterspeakers gemeenschappelijk geaard?• Geluid wordt door ruis gestoord.* Is de aarde-aansluiting achter met gebruik van
kortere en dikkere snoeren met het chassis van de auto verbonden?
• Het apparaat raakt verhit.* Is de uitgaande speakerdraad geaard?* Zijn de “–” polen van de linker- en de
rechterspeakers gemeenschappelijk geaard?• Receiver werkt helemaal niet.* Heeft u de receiver teruggesteld?
You can connect external components in series as shown in the diagram below.• All the components, adapters or signal cords
need to be purchased separately.
CAUTION:Before connecting the external components, make sure that the unit is turned off.
• To use JVC CD changer, Apple iPod or JVC D. player, set “External Input” to “Changer/iPod/D. Player” (see page 55 of the INSTRUCTIONS).
• To use other external components via KS-U57 or KS-U58, set “External Input” to “External Input” (see page 55 of the INSTRUCTIONS).
CD changer jackCD-Wechsler-BuchsePrise du changeur de CDAansluiting voor CD-wisselaar
JVC DAB tunerDAB-Tuner von JVC
Tuner DAB JVCJVC DAB-tuner
JVC CD changerCD-Wechsler von JVCChangeur de CD JVC
JVC CD-wisselaar
or / oder / ou / of
or / oder / ou / of
or / oder / ou / of
or / oder / ou / of
USB deviceUSB-Gerät
Périphérique USBUSB-apparatuur
Audio cord (not supplied)Audiokabel (nicht mitgeliefert)Codon audio (non fourni)Audiosnoer (niet bijgeleverd)
or / oder / ou / ofor / oder / ou / of
3.5 mm stereo mini plug3,5-mm-Stereo-MinisteckerMini fiche stéréo de 3,5 mm3,5 mm stereo-ministekker
JVC DAB tunerDAB-Tuner von JVC
Tuner DAB JVCJVC DAB-tuner
External component / Externe Komponente / Appareil extérieur / Extern component
Sie können beide externe Komponenten in Reihe anschließen, wie in der Zeichnung unten gezeigt.• Alle Komponenten, Adapter oder Signalkabel
müssen getrennt gekauft werden.
ACHTUNG:Vor dem Anschließen der externen Komponenten sicherstellen, dass das Gerät ausgeschaltet ist.
• Zur Verwendung eines JVC CD-Wechsler, Apple iPod oder JVC D. player stellen Sie „External Input“ auf „Changer/iPod/D. Player“ (siehe Seite 55 der BEDIENUNGSANLEITUNG).
• Zur Verwendung anderer externer Komponenten über KS-U57 oder KS-U58 stellen Sie „External Input“ auf „External Input“ (siehe Seite 55 der BEDIENUNGSANLEITUNG).
Vous pouvez connecter des appareils extérieurs en série comme montré sur l’illustration ci-dessous.• Tous les composants, adaptateurs ou cordons
de signal doivent être achetés séparément.
PRÉCAUTION:Avant de connecter les appareils extérieurs, assurez-vous que l’appareil est hors tension.
• Pour utiliser un changeur de CD JVC, un iPod Apple ou le lecteur D. de JVC, réglez “External Input” sur “Changer /iPod/D. Player ” (voir page 55 du MANUEL D’INSTRUCTION).
• Pour utiliser d’autres appareils extérieurs via le KS-U57 ou KS-U58, réglez “External Input” sur “External Input” (voir page 55 du MANUEL D’INSTRUCTION).
U kunt externe componenten in serie, als hieronder aangegeven, verbinden.• Alle componenten, adapters en of signaalsnoeren
moeten afzonderlijk worden aangeschaft.
WAARSCHUWING:Controleer alvorens de externe componenten aan te sluiten dat dit toestel beslist is uitgeschakeld.
• Voor het gebruik van een JVC CD-wisselaar, Apple iPod of JVC D.speler, moet u “External Input” op “Changer/iPod/D. Player” stellen (zie bladzijde 55 van de GEBRUIKSAANWIJZING).
• Voor het gebruik van andere externe componenten via de KS-U57 of KS-U58, moet u “External Input” op “External Input” stellen (zie bladzijde 55 van de GEBRUIKSAANWIJZING).
USB devices / USB-Geräte / Périphériques USB / USB-apparatuur
To disconnect the connector / Zum Abtrennen des Steckverbinder / Pour déconnecter le connecteur / Ontkoppelen van de stekker
Hold the connector top tightly (1), then pull it out (2). Halten Sie die Steckverbinder-Oberseite fest (1) und ziehen Sie ihn heraus (2).Tenez fermement le connecteur par-dessus (1) et tirez vers l’extérieur (2).Druk stevig op de bovenkant van de stekker (1) en trek tegelijkertijd de stekker (2) naar u toe.
External componentExterne KomponenteAppareil extérieurExtern component
External componentExterne KomponenteAppareil extérieurExtern component
External componentExterne KomponenteAppareil extérieurExtern component
External componentExterne KomponenteAppareil extérieurExtern component
Apple iPodApple iPodiPod AppleApple iPod
JVC D. playerJVC D. PlayerLecteur D. JVCJVC D.speler
*9 Line Input Adapter KS-U57 (separately purchased)
*9 Line-Eingangsadapter KS-U57 (getrennt gekauft)*9 Adaptateur d’entrée de ligne KS-U57 (vendu
séparément)*9 Lijningangsadapter KS-U57 (los verkrijgbaar)
*10 Aux Input Adapter KS-U58 (separately purchased)
*10 Aux-Eingangsadapter KS-U58 (getrennt gekauft)*10 Adaptateur d’entrée auxiliaire KS-U58 (vendu
séparément)*10 Aux-ingangsadapter KS-U58 (los verkrijgbaar)
You cannot connect a computer to the USB ( ) terminal of the unit.Sie können keinen Computer an den USB ( )-Anschluss des Geräts anschließen.Vous ne pouvez pas connecter un ordinateur à la prise USB ( ) de l’appareil.U kunt geen computer aansluiten op de USB ( )-aansluiting van het apparaat.
Instal4-6_KD-AVX33[E].indd 6Instal4-6_KD-AVX33[E].indd 6 5/2/07 1:58:45 pm5/2/07 1:58:45 pm

ENGLISH
РУCCKИ
ЙУК
РАЇНА
For installation and connections, refer to the separate manual.Указания по установке и выполнению соединений приводятся в отдельной инструкции.Вказівки по встановленню та виконанню підключень наведені у окремій інструкції.
INSTRUCTIONSИНСТРУКЦИИ ПО ЭКСПЛУАТАЦИИ
ІНСТРУКЦІЇ
LVT1659-003A[EE]
For canceling the display demonstration, see page 5.Информацию об отмене демонстрации функций дисплея см. на стр. 5.Інформацію щодо відміни демонстрації функцій дисплею див. на стор. 5.
DVD/CD RECEIVERПРИЕМНИК ДЛЯ ВОСПРОИЗВЕДЕНИЯ ДИСКОВ DVD И КОМПАКТ-ДИСКОВПРИЙМАЧ З ПРОГРАВАЧЕМ DVD/CD-ДИСКІВ
KD-AVX33
Cover_KD-AVX33_EE.indd 2Cover_KD-AVX33_EE.indd 2 07.2.2 5:18:52 PM07.2.2 5:18:52 PM

ENGLISH
2
WARNINGS:To prevent accidents and damage
• DO NOT install any unit and wire any cable in locations where;– it may obstruct the steering wheel and
gearshift lever operations.– it may obstruct the operation of safety devices
such as air bags.– it may obstruct visibility.
• DO NOT operate the unit while driving. If you need to operate the unit while driving, be
sure to look around carefully.• The driver must not watch the monitor while
driving.• The driver must not put on the headphones while
driving.
Cautions on the monitor:
• The monitor built in this unit has been produced with high precision, but it may have some ineffective dots. This is inevitable and is not malfunction.
• Do not expose the monitor to direct sunlight.• When the temperature is very cold or very hot.
– Chemical changes occur inside, causing malfunction.
– Pictures may not appear clearly or may move slowly. Pictures may not be synchronized with the sound or picture quality may decline in such environments.
Thank you for purchasing a JVC product.Please read all instructions carefully before operation, to ensure your complete understanding and to obtain the best
possible performance from the unit.
IMPORTANT FOR LASER PRODUCTS1. CLASS 1 LASER PRODUCT2. CAUTION: Do not open the top cover. There are no user serviceable parts inside the unit; leave all servicing to
qualified service personnel.3. CAUTION: Visible and/or invisible class 1M laser radiation when open. Do not view directly with optical
instruments.4. REPRODUCTION OF LABEL: CAUTION LABEL, PLACED OUTSIDE THE UNIT.
[European Union only]
EN02-06_KD-AVX33EE2.indd 2EN02-06_KD-AVX33EE2.indd 2 07.2.1 8:52:44 PM07.2.1 8:52:44 PM

3
ENG
LISH
How to reset your unit
• Your preset adjustments (except for the registered Bluetooth devices) will also be erased.
How to forcibly eject a disc
• If this does not work, reset the unit.
For safety...• Do not raise the volume level too much, as this will
block outside sounds, making driving dangerous.• Stop the car before performing any complicated
operations.
Temperature inside the car...If you have parked the car for a long time in hot or cold weather, wait until the temperature in the car becomes normal before operating the unit.
This product incorporates copyright protection technology that is protected by U.S. patents and other intellectual property rights. Use of this copyright protection technology must be authorized by Macrovision, and is intended for home and other limited viewing uses only unless otherwise authorized by Macrovision. Reverse engineering or disassembly is prohibited.
Contents
INTRODUCTIONPlayable disc type ............................ 4Before operating the unit ................ 5
OPERATIONSBasic operations—Control panel ...... 7Basic operations—
Remote controller (RM-RK251) ...... 8Listening to the radio ...................... 10Disc operations ................................ 15Dual Zone operations ....................... 28USB operations ................................ 31Bluetooth® operations—
Cellular phone/audio player .......... 33
EXTERNAL DEVICESListening to the CD changer .............. 40Listening to the DAB tuner ............... 42Listening to the iPod/D.player .......... 45Listening to other external
components ................................. 46
SETTINGSSound equalization .......................... 48Assigning titles to the sources .......... 49Menu operations ............................. 50
REFERENCESMaintenance ................................... 60More about this unit ........................ 61Troubleshooting .............................. 66Specifications .................................. 70
NO EJECT?EMERGENCY EJECT?
NO EJECT?EMERGENCY EJECT?
Book 1.indb 3Book 1.indb 3 07.2.1 8:22:24 PM07.2.1 8:22:24 PM

ENG
LISH
4
Playable disc type
Disc type Recording format, file type, etc. Playable
DVD DVD Video (Region Code: 5)*1
DVD Audio
DVD-ROM
DVD Recordable/Rewritable(DVD-R*2/-RW, +R/+RW*3)• DVD Video: UDF bridge• DVD-VR• DivX/MPEG1/MPEG2/JPEG/MP3/
WMA/WAV/AAC: Compliant to ISO 9660 level 1, level 2, Romeo, Joliet
• DVD-RAM cannot be played.
DVD Video
DVD-VR (non-CPRM only)
DivX/MPEG1/MPEG2
JPEG
MP3/WMA/WAV/AAC*4
MPEG4
DVD+VR
Dual Disc DVD side
Non-DVD side
CD/VCD Audio CD/CD Text (CD-DA)/DTS-CD
VCD (Video CD)
CD-ROM
CD-I (CD-I Ready)
CD Recordable/Rewritable(CD-R/-RW)• Compliant to ISO 9660 level 1,
level 2, Romeo, Joliet
CD-DA
MP3/WMA/WAV/AAC*4
JPEG
DivX/MPEG1/MPEG2
MPEG4
*1 If you insert a DVD Video disc of an incorrect Region Code, “Region code error” appears on the monitor.*2 DVD-R recorded in multi-border format is also playable (except for dual layer discs).*3 It is possible to play back finalized +R/+RW (Video format only) discs. However, the use of +R double layer disc is not recommended.*4 This unit can play back AAC files encoded using iTunes.
Caution for DualDisc playbackThe Non-DVD side of a “DualDisc” does not comply with the “Compact Disc Digital Audio” standard. Therefore, the use of Non-DVD side of a DualDisc on this product may not be recommended.
Book 1.indb 4Book 1.indb 4 07.2.1 8:22:24 PM07.2.1 8:22:24 PM

INTRODUCTION
In this manual, English indications are used for purpose of explanation. You can select the indication language on the monitor. ( page 52)
5
ENG
LISH
Before operating the unitCancel the display demonstration and set the clock. ( also pages 51 and 52)• Operations are explained mainly using the buttons on the unit; however, the buttons on the remote controller can
work in the same way if they have the same names or marks.
~ Turn on the power.
Ÿ Display <AV Menu>.
! Enter the <Setup> menu.
⁄ Select <Display> ] <Demonstration>, then activate the <Demonstration> screen.
@ Cancel the display demonstrations.Select <Off>.
Continued on the next page
AV Menu
Setup EnterENT
Setup menu icon
Currently selected menu
Demonstration
DisplayClockDisc Setup 1Disc Setup 2Tuner
On
DemonstrationWall PaperScrollTag DisplayDimmer
OffOn
ExitENT
Setup Display Demonstration
Currently selected submenu Current setting
OffOn
ExitENT
Demonstration
Indication language:
Book 1.indb 5Book 1.indb 5 07.2.1 8:22:25 PM07.2.1 8:22:25 PM

ENG
LISH
6
fi Select either the 12-hour or 24-hour system.
^ Return to the <Clock> menu.
fl Select <Clock Adjust>.
& Activate the <Clock Adjust> screen.
‡ Select the <Clock Adjust> setting.• Off: Cancels.• Auto: Activate auto clock adjustment using
the clock time (CT) data from an FM RDS station.
* Finish the procedure.
To display the clock time while playing back a video source, select <Clock> = <OSD Clock> = <On>.
¤ Return to the <Setup> menu.
# Select <Clock> ]<Time Set>, then activate the <Time Set> screen.
‹ Set the clock time.
$ Return to the <Clock> menu.
› Select <12Hours/24Hours>.
% Activate the <12Hours/24Hours> screen.
Clock
0:00
Time Set12Hours/24HoursOSD ClockClock Adjust
Time SetHours
18 : 00
ExitENT
Time SetMinutes
18 : 35
ExitENT
12Hours/24Hours12 Hours24 Hours
ExitENT
(twice)
Book 1.indb 6Book 1.indb 6 07.2.1 8:22:25 PM07.2.1 8:22:25 PM

OPERATIONS7
ENG
LISH
Basic operations — Control panel
• TUNER/DAB: Select the bands.• DISC/USB: Stop playback.• On menus: Back.
Select the source.TUNER = DAB = DISC (DVD/VCD/CD) = USB =CD-CH, iPod, D.PLAYER, or EXT-IN =Bluetooth Phone =Bluetooth Audio = AV-IN =(back to the beginning)• You cannot select these sources if they are not ready.
• Eject the disc.• Change the
control panel tilt (Tilt1 – Tilt4) [Hold, then press].
*1 <AV Menu> screensYou can use the menus to set up various settings.The <AV Menu> screen consists of the following sub-menus—Setup/Equalizer/Sound/Disc Surround/Mode/List/Bluetooth/Dual Zone.• For details, see pages 50 to 59.
*2 To attach the control panel
*3 By holding 5 / ∞, you can display the list accessible for the selected source.
• Turn on the power.• Turn off the power
[Hold].• Attenuate the sound (if
the power is on). Change the display information.
4 / ¢• TUNER/DAB: Search for stations/ensembles.• DISC/USB: Select chapters/tracks.• On menus: Go to previous/next step.• iPod/D.PLAYER: Select tracks.• Bluetooth Audio: Reverse skip/forward skip.5 / ∞*3
• TUNER: Select preset stations.• DAB: Select services.• DISC/USB: Select titles/folders.• On menus: Select items.• iPod/D.PLAYER: Enter player’s menu/pause
or stop playback.• Bluetooth: Select a device.
Activate TA Standby Reception.Show PTY preset list [Hold].
Remote sensor
Adjust the volume.
Reset the unit.• Use only when the
internal system malfunctions.
• DISC/USB: Start playback.• On menus: Enter. ( ENT :[Press]/ ENT :[Hold])
Detach the control panel*2.
Display window
• Display <Dial Menu>.• Display <Redial> list [Hold].
• Display or erase <AV Menu>*1.• Activate Voice Dialing [Hold].
Book 1.indb 7Book 1.indb 7 07.2.1 8:22:26 PM07.2.1 8:22:26 PM
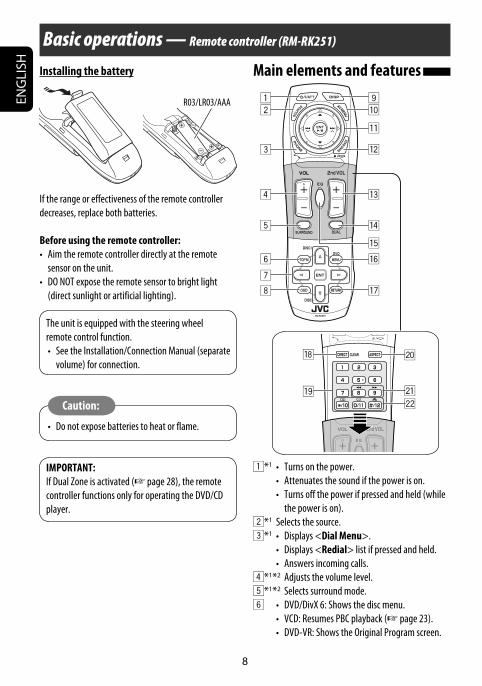
8
ENG
LISH
Basic operations — Remote controller (RM-RK251)
Installing the battery
If the range or effectiveness of the remote controller decreases, replace both batteries.
Before using the remote controller:• Aim the remote controller directly at the remote
sensor on the unit.• DO NOT expose the remote sensor to bright light
(direct sunlight or artificial lighting).
The unit is equipped with the steering wheel remote control function.• See the Installation/Connection Manual (separate
volume) for connection.
Caution:
• Do not expose batteries to heat or flame.
IMPORTANT:If Dual Zone is activated ( page 28), the remote controller functions only for operating the DVD/CD player.
Main elements and features
i
o
;
as
1*1 • Turns on the power.• Attenuates the sound if the power is on.• Turns off the power if pressed and held (while
the power is on).2*1 Selects the source.3*1 • Displays <Dial Menu>.
• Displays <Redial> list if pressed and held.• Answers incoming calls.
4*1*2 Adjusts the volume level.5*1*2 Selects surround mode.6 • DVD/DivX 6: Shows the disc menu.
• VCD: Resumes PBC playback ( page 23).• DVD-VR: Shows the Original Program screen.
R03/LR03/AAA
Book 1.indb 8Book 1.indb 8 07.2.1 8:22:27 PM07.2.1 8:22:27 PM

OPERATIONS9
ENG
LISH
On menus:• 5 / ∞: Select items.• 4 / ¢: Goes to previous/next step.
w TUNER/DAB: Selects the bands. DISC/USB: Stop playback. Bluetooth Phone: Ends the call. Bluetooth Audio: Plays/pauses. On menus: Back.e*2 Adjusts the volume level through the 2nd AUDIO
OUT plug. ( page 28)r*2 Activates or deactivates Dual Zone.t*1*2 Selects the sound mode.y • DVD Video/DivX 6: Shows the disc menu.
• VCD: Resumes PBC playback. ( page 23)• DVD-VR: Shows the Play List screen.
u RETURN button• For VCD: Returns to the PBC menu.
i DISC/USB: Switches number entry mode.• Also functions as CLEAR button to erase the
misentry after entering the wrong number.o Enter numbers. ( pages 12, 21 to 23, 38, and
43)• CD changer: Selects the disc directly.• Tuner: Selects the preset stations.
;*1 Changes the aspect ratio of the playback pictures.a Reverse search/forward search for disc/USB
operationss • DVD Video: Selects audio language ( ),
subtitles ( ), angle ( ).• DVD Audio: Selects audio stream ( ).• DVD-VR: Turn on/off subtitles ( ) and
selects audio channel( ).• DivX: Selects audio language ( ),
subtitles ( ).• VCD: Selects audio channel ( ).
*1 If Dual Zone is activated, these buttons cannot be used.
*2 These buttons can be used only when the slide cover is closed.
*3 5 : Returns to the previous menu. ∞ : Confirms the selection.
7 • Makes selection/settings.• ~: Skips back or forward by 5 minutes for
DivX/MPEG1/MPEG2.• DISC +/– buttons: Changes discs for “CD-CH.”
8 Shows the on-screen bar.9*1 Changes the display information.p Display or erase <AV Menu>.q For disc/USB operations:
• 6: Plays/pauses.• 5 / ∞ DVD: Selects the title/group. DVD-VR: Selects the program/play list. USB/other discs (except VCD/CD): Selects the
folders.• 4 / ¢:– Press briefly: reverse skip/forward skip– Press and hold: reverse search/forward search
For FM/AM operations:• 5 / ∞: Selects the preset stations.• 4 / ¢: Functions to search for stations.– Press briefly: Auto Search– Press and hold: Manual Search
For DAB tuner operations:• 5 / ∞: Selects a service.• 4 / ¢: Functions to search for
ensembles.– Press briefly: Auto Search– Press and hold: Manual Search
For Apple iPod/JVC D. player operations:• ∞: Pauses/stops or resumes playback.• 5: Enters the main menu (then 5 / ∞ /
4 / ¢ work as the menu selecting buttons).*3
• 4 / ¢ (in menu selecting mode)– Selects an item if pressed briefly. (Then, press
∞ to confirm the selection.)– Skips 10 items at a time if pressed and held.
For Bluetooth operations:• 5 / ∞: Selects a registered device.
• 4 / ¢: reverse skip/forward skip (for audio operation). • 6: Answers incoming calls (for “Bluetooth Phone”). Plays/Pauses (for “Bluetooth Audio”).
Book 1.indb 9Book 1.indb 9 07.2.1 8:22:27 PM07.2.1 8:22:27 PM

10
ENG
LISH
15: 45
FLAT
DXMOAFTP
TUNER
FM1 Preset1 Bayern Radio 87.5 MHz
Pop M
POWER]ON
When an FM stereo broadcast is hard to receive 1
2
Mode menu icon
3
Listening to the radio
~ Select “TUNER.”
Ÿ Select the bands.
! Search for a station—Auto Search.• Manual Search: Hold either 4 or ¢ until “Manual Search” appears on the display, then press it
repeatedly.• The ST indicator lights up when receiving an FM stereo broadcast with sufficient signal strength.
4
Reception improves, but stereo effect will be lost.• The MO indicator lights up.
To restore stereo effect, select <Off > in step 4.
PS (station name) for FM RDS. If no signal is coming in, “No Name” appears.
Preset No.Band
page 48
Tuner/Standby Reception indicators
PTY code for FM RDS
AV Menu
Mode EnterENT
AV Menu
Setup EnterENT
Mode
Off
MonoDX/LocalSSMPTy Standby
MonoOffOn
ExitENT
Book 1.indb 10Book 1.indb 10 07.2.1 8:22:28 PM07.2.1 8:22:28 PM

OPERATIONS11
ENG
LISH
2
3
Local FM stations with the strongest signals are searched and stored automatically in the FM band.
Manual presetting Ex.: Storing FM station of 92.5 MHz into preset
number 4 of the FM1 band.
1
2 Tune in to a station you want to preset.
3
4 Select a preset number.
5
The station selected in step 2 is now stored in preset number 4.
Tuning in to stations with sufficient signal strength This function works only for FM bands.Once you have activated this function (selected <Local>), it always works when searching for FM stations.
1
2
Mode menu icon
3
4
Only stations with sufficient signal strength will be detected.• The DX indicator goes off, then the LO indicator
lights up.
FM station automatic presetting —SSM (Strong-station Sequential Memory) This function works only for FM bands.You can preset six stations for each band.
1
Mode
DX
MonoDX/LocalSSMPTy Standby
DX/LocalDXLocal
ExitENT
ModeMonoDX/LocalSSMPTy Standby
StartENT
FM1 Store 87.5 89.9 97.9105.9108.0107.9 ENT
1
2
3
4
56
ENT
FM1 Store 87.5 89.9 97.9105.9108.0107.9 ENT
1
2
3
4
56
ENT
AV Menu
Mode EnterENT
AV Menu
Setup EnterENT
AV Menu
Setup EnterENT
AV Menu
Mode EnterENT
* Each time you hold the button, you can change the FM bands.
• Preset List can also be accessed through <AV Menu> = <List>. ( page 12)
No Name 92.5 MHz
TUNER
FM1 Preset4 No Name 92.5 MHz
Mode menu icon
Preset List appears.*
Book 1.indb 11Book 1.indb 11 07.2.1 8:22:29 PM07.2.1 8:22:29 PM

12
ENG
LISH
The following features are available only for FM RDS stations.
Searching for FM RDS programme—PTY Search You can search for your favorite programmes being broadcast by selecting the PTY code for your favorite programmes.
1
Available PTY codes appear (including six preset PTY codes).
2 Select a PTY code.
3
If there is a station broadcasting a programme of the same PTY code as you have selected, that station is tuned in.
Available PTY codes:News, Current Affairs, Information, Sport, Education, Drama, Cultures, Science, Varied Speech, Pop Music, Rock Music, Easy Listening, Light Classics M, Serious Classics, Other Music, Weather & Metr, Finance, Children’s Progs, Social Affairs, Religion, Phone In, Travel & Touring, Leisure & Hobby, Jazz Music, Country Music, National Music, Oldies Music, Folk Music, Documentary
Selecting preset stations On the remote:
1
2 or
On the unit:
or
1
• Each time you hold the button, you can change the FM bands.
2
• Preset List can also be accessed through <AV Menu> = <List>.
15: 45
FLAT
DXAF
TUNER
FM1 PTy Search XX.X MHz
Science
List menu icon
Pop MusicRock MusicEasy ListeningSerious ClassicsCurrent AffairsVaried Speech ENT
1
2
3
4
56
PTy Search
CulturesScienceVaried SpeechPop MusicRock MusicEasy Listening ENT
PTy Search
FM1 Store 87.5 89.9 97.9 92.5108.0107.9 ENT
1
2
3
4
56
ENT
Frequency changes as search goes on.
AV Menu
Setup EnterENT
AV Menu
List EnterENT
FM1 Store 87.5 89.9 97.9 92.5108.0107.9 ENT
1
2
3
4
56
ENT
Book 1.indb 12Book 1.indb 12 07.2.1 8:22:30 PM07.2.1 8:22:30 PM

OPERATIONS13
ENG
LISH
Storing your favorite programme types You can store your favorite PTY codes into the PTY Preset List.
1
Available PTY codes appear (including six preset PTY codes).
2 Select a PTY code to store into the List.
Current PTY Preset List is shown on the display.
3 Select a listed code to be replaced with the one newly selected.
Now <Current Affairs> is replaced with <Science>.
Activating/deactivating TA/PTY Standby Reception TA Standby Reception Indicator
Press to activate. TP
The unit will temporarily switch to Traffic Announcement (TA), if available, from any source other than AM.The volume changes to the preset TA volume level if the current level is lower than the preset level ( page 54).
Lights up
Not yet activated. Tune in to another station providing the RDS signals.
Flashes
Press to deactivate. Goes off
PTY Standby Reception Indicator
Activate <AV Menu>, then select <Mode>, <PTy Standby> ( pages 14, 57).
PTY
The unit will temporarily switch to your favorite PTY programme from any source other than AM.
Lights up
Not yet activated. Tune in to another station providing the RDS signals.
Flashes
To deactivate, select <Off> in step 4, then press ENT once ( page 14).
Goes off
• When a DAB tuner is connected, TA Standby/PTY Standby Reception also works for the DAB tuner.
Pop MusicRock MusicEasy ListeningSerious ClassicsCurrent AffairsVaried Speech ENT
1
2
3
4
56
PTy Memory
Pop MusicRock MusicEasy ListeningSerious ClassicsCurrent AffairsVaried Speech ENT
1
2
3
4
56
PTy Memory
Pop MusicRock MusicEasy ListeningSerious ClassicsCurrent AffairsVaried Speech ENT
1
2
3
4
56
PTy Search
CulturesScienceVaried SpeechPop MusicRock MusicEasy Listening ENT
PTy Search
Book 1.indb 13Book 1.indb 13 07.2.1 8:22:31 PM07.2.1 8:22:31 PM

14
ENG
LISH
Tracing the same programme—Network-Tracking Reception When driving in an area where FM reception is not sufficient enough, this unit automatically tunes in to another FM RDS station of the same network, possibly broadcasting the same programme with stronger signals.
Programme A broadcasting on different frequency areas (01 – 05)
When shipped from the factory, Network-Tracking Reception is activated.To change the Network-Tracking Reception setting, see <AF Regional> on page 54.• When the DAB tuner is connected, refer also to
“Tracing the same programme—Alternative Frequency Reception (DAB AF).” ( page 44)
Automatic station selection—Programme Search Usually when you select preset stations, the preset station is tuned in.If the signals from the FM RDS preset station are not sufficient for good reception, this unit, using the AF data, tunes in to another frequency broadcasting the same programme as the original preset station is broadcasting. ( page 54)• The unit takes some time to tune in to another
station using programme search.
Activating PTY Standby Reception
1
2
Mode menu icon
3
4
5 Select a PTY code for PTY Standby Reception.
OffNews
PTy Standby
Mode
Off
MonoDX/LocalSSMPTy Standby
DramaCulturesScienceVaried SpeechPop Music
PTy Standby
ExitENT
AV Menu
Mode EnterENT
AV Menu
Setup EnterENT
A
Book 1.indb 14Book 1.indb 14 07.2.1 8:22:32 PM07.2.1 8:22:32 PM

OPERATIONS15
ENG
LISH
15: 45
DISC
Now Reading ...
Disc operationsThe disc type is automatically detected, and playback starts automatically (for some discs: automatic start depends on its internal program).
If a disc does not have any disc menu, all tracks in it will be played repeatedly until you change the source or eject the disc.
If “ ” appears on the monitor, the unit cannot accept the operation you have tried to do.• In some cases, without showing “ ,” operations will not be accepted.
Label side
0: Eject the disc.
3: Start playback if necessary.
DISP: Press if no playback picture appears, but disc information screen ( pages 16 to 18) is displayed.
Insert the disc.Playback starts automatically.
7: Stop playback.
Caution:
Do not place your finger behind the control panel.
Caution on volume setting:
Discs and connected USB devices produce very little noise compared with other sources. Lower the volume before playing a disc to avoid damaging the speakers by the sudden increase of the output level.
Book 1.indb 15Book 1.indb 15 07.2.1 8:22:33 PM07.2.1 8:22:33 PM

15: 45
MULTI
CHAP. RPT
DIGITALVIDEODVD
T 01 C 02 0:45:38
15: 45
FLATDIGITALVR-PRDVD
P 01 C 02 0:45:38
16
ENG
LISH
While playing the following discs, press .• Each time you press the button, playback picture and disc information screens appear alternately.
Audio format
Title no./Chapter no./Playing time
Playback mode
Disc type
4 ¢ Press: Select chapter Hold: Reverse/forward search*1
5 ∞ Select title
15: 45
MULTIMLP
B.S.PBONUS
AUDIODVD
G 01 02 0:45:38
RPT
Surround mode
4 ¢ Press: Select track Hold: Reverse/forward search*1
5 ∞ Select group
Group no./Track no./Playing time
BONUS indicator ( page 24)
B.S.P indicator ( page 24)
4 ¢ Press: Select chapter Hold: Reverse/forward search*1
5 ∞ Select program no./Play List no.
Program no. (or Play List no.)/Chapter no./Playing time
VR-PR: Original programVR-PL: Play List
Book 1.indb 16Book 1.indb 16 07.2.1 8:22:33 PM07.2.1 8:22:33 PM

OPERATIONS17
ENG
LISH
15: 45
FLATPBCVCD
02 0:45:38
Track no./Playing time
*1 Search speed: x2 ] x10.*2 Search speed: ¡1 ] ¡2.
PBC indicatorlights up when PBC is in use.
4 ¢ Press: Select track Hold: Reverse/forward search*1
page 48
15: 45
FRONT 2CH
RPT
DivXDVD
T 01 C 02 0:45:38Current Folder NameCurrent File Name.avi
For DivX/MPEG: Folder no./Track no./Playing timeFor JPEG: Folder no./File no.
4 ¢ Press: Select track Hold: Reverse/forward search for DivX/MPEG *2
5 ∞ Press: Select folder Hold: Display Folder List
Book 1.indb 17Book 1.indb 17 07.2.1 8:22:34 PM07.2.1 8:22:34 PM

15: 45
FLATCD
02 0:45:38 Disc Title Artist Name Current Track Title
RPT
18
ENG
LISH
15: 45
FLAT
RPT
MP3CD
T 01 02 0:45:38Current Folder NameCurrent File Name.mp3
Track no./Playing timeDisc title/Artist Name/Track title (only for CD Text)*3
Folder no./Track no./Playing time4 ¢ Press: Select track Hold: Reverse/forward search*1
5 ∞ Press: Select folder Hold: Display Folder List
Audio format(MP3/WMA/WAV/AAC)
4 ¢ Press: Select track Hold: Reverse/forward search*1
page 48
page 48
*1 Search speed: x2 ] x10.*3 “No Name” appears for conventional CDs.
Tag data will be shown instead of folder/file names when they are recorded and <Tag Display> is set to <On>. ( page 51)
Book 1.indb 18Book 1.indb 18 07.2.1 8:22:34 PM07.2.1 8:22:34 PM

OPERATIONS19
ENG
LISH
You can use only one of the following playback modes—Intro/Repeat/Random.Ex. To select Track Repeat
1
2
Mode menu icon
3
4
When one of the playback modes is selected, the corresponding indicator lights up on the disc information screen.
To cancel, select <All Off> in step 3 or <Off> in step 4.
Selecting playback modes
Disc type Intro Repeat Random
—Chapter: Repeats current
chapterTitle: Repeats current title
—
— Track: Repeats current track —
—
Chapter: Repeats current chapter
Program: Repeats current program (not available for Playlist playback)
—
Track: Plays the first 15 seconds of each track (for VCD: PBC not in use)
Track: Repeats current track (for VCD: PBC not in use)
Disc (All): Randomly plays all tracks (for VCD: PBC not in use)
Track: Plays the first 15 seconds of each track
Folder: Plays the first 15 seconds of the first track of each folder
Track: Repeats current trackFolder: Repeats all tracks of
the current folder
Folder: Randomly plays all tracks of current folder, then tracks of next folders
Disc (All): Randomly plays all tracks
—
Track: Repeats current trackFolder: Repeats current folder
—
—Folder: Repeats current folder
—
Mode
Off
All OffIntroRepeatRandom
RepeatOffTrackFolder
SetENTAV Menu
Mode EnterENT
AV Menu
Setup EnterENT
Book 1.indb 19Book 1.indb 19 07.2.1 8:22:35 PM07.2.1 8:22:35 PM

20
ENG
LISH
Selecting tracks on the list If a disc includes folders, you can display the Folder/Track (File) Lists, then start playback.
1
Folder List appears.• Hold the button to see the next/previous folders.
2 Select a folder, then activate the Track List.
Track List of the selected folder appears.
3 Select a track, and start playing.
• Folder List can also be accessed through <AV Menu> = <List>.
Prohibiting disc ejection You can lock a disc in the loading slot.
“No Eject” appears.
To cancel the prohibition, repeat the same procedure to select “EJECT OK?”.
Folder List
Off
My BestCinemaPopsMy Best2Favorite SongCinema2 ENT
Folder List
Off
My BestCinemaPopsMy Best2Favorite SongCinema2 ENT
File List
Off
Song011.mp3Song012.mp3Song013.mp3Song014.mp3Song015.mp3Song016.mp3 ENT
List menu icon
AV Menu
Setup EnterENT
AV Menu
List EnterENT
NO EJECT?EMERGENCY EJECT?
Book 1.indb 20Book 1.indb 20 07.2.1 8:22:36 PM07.2.1 8:22:36 PM

OPERATIONS21
ENG
LISH
: Stop playback.
: Start playback/Pause (if pressed during playback).
: Reverse/forward search.*2
: Press: Select track. Hold: Reverse/forward search.*4
: Select group.
Operations using the remote controller—RM-RK251
*1 Erases the misentry of the number.
*2 Search speed: x2 ] x5 ] x10 ] x20 ] x60
*3 Slow motion speed: 1/32 ] 1/16 ] 1/8 ] 1/4 ] 1/2
*4 Search speed: x2 ] x10
: Stop playback.
: Start playback/Pause (if pressed during playback).
: Reverse/forward search.*2 (No sound can be heard.) (Slow motion*3 during pause. No sound can be heard.)
: Press: Select chapter (during playback or pause). Hold: Reverse/forward search.*4
: Select title (during playback or pause).
Using menu driven features
1 2 Select an item you want
to start playback.
3
= = : Select chapter. Select title (when not playing).
(twice) = = :
Select title (during playback or pause).
: Select aspect ratio.
: Select audio language.
: Select subtitle language.
: Select view angle.
= = : Select track.
(twice) = = : Select group.
: Select aspect ratio.
: Select audio stream.
Using menu driven features
1 2 Select an item you want
to start playback.
3
*1
Book 1.indb 21Book 1.indb 21 07.2.1 8:22:37 PM07.2.1 8:22:37 PM

22
ENG
LISH
: Stop playback.
: Start playback/Pause (if pressed during playback).
: Reverse/forward search*2. (No sound can be heard.)
: Press: Select track. Hold: Reverse/forward search*3. (No sound can be heard.)
: Select folder.
= = : Select track (within the same folder).
(twice) = = : Select folder.
: Select aspect ratio.
: Select audio language. (DivX only)
: Select subtitle language. (DivX only)
: Stop playback.
: Start playback/Pause (if pressed during playback).
: Reverse/forward search*4. (No sound can be heard.)
(Slow motion*5 during pause. No sound can be heard.)
Reverse slow motion does not work.
: Press: Select chapter (during playback or pause).
Hold: Reverse/forward search*6
: Select program. Select play list (during playback or pause).
: Select aspect ratio.
: Select audio channel (ST: stereo, L: left, R: Right).
: Turn on/off subtitle.
= = : Select chapter. Select program (when not playing).
(twice) = = : Select program/play list (during playback or
pause).
Using Original Program/Play List screens( page 30)1 For Original Programs: For Play List: 2 Select an item you want to start playback.3 (Hide screen)
*1
1st press1st press 2nd press
3rd press2nd press
Current playback position
While playing...Back/advance the scenes by 5 minutes.
For DivX6: Using menu driven features
1
2 Select an item you want to start playback.
3
Book 1.indb 22Book 1.indb 22 07.2.1 8:22:38 PM07.2.1 8:22:38 PM
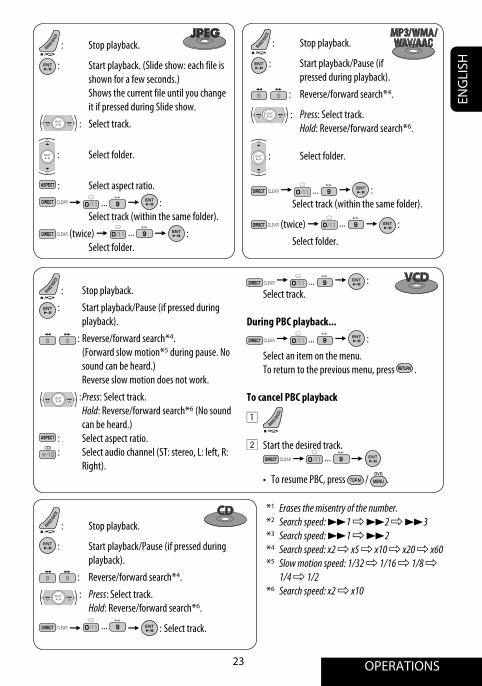
OPERATIONS23
ENG
LISH
= = : Select track.
During PBC playback...
= = :
Select an item on the menu. To return to the previous menu, press .
To cancel PBC playback
1
2 Start the desired track. = =
• To resume PBC, press / .
: Stop playback.
: Start playback/Pause (if pressed during playback).
: Reverse/forward search*4. (Forward slow motion*5 during pause. No
sound can be heard.) Reverse slow motion does not work.
: Press: Select track. Hold: Reverse/forward search*6 (No sound
can be heard.) : Select aspect ratio. : Select audio channel (ST: stereo, L: left, R:
Right).
: Stop playback.
: Start playback/Pause (if pressed during playback).
: Reverse/forward search*4.
: Press: Select track. Hold: Reverse/forward search*6.
: Select folder.
= = : Select track (within the same folder).
(twice) = = :
Select folder.
*1 Erases the misentry of the number.*2 Search speed: ¡1 ] ¡2 ] ¡3*3 Search speed: ¡1 ] ¡2 *4 Search speed: x2 ] x5 ] x10 ] x20 ] x60*5 Slow motion speed: 1/32 ] 1/16 ] 1/8 ]
1/4 ] 1/2*6 Search speed: x2 ] x10
: Stop playback.
: Start playback. (Slide show: each file is shown for a few seconds.)
Shows the current file until you change it if pressed during Slide show.
: Select track.
: Select folder.
: Select aspect ratio.
= = : Select track (within the same folder).
(twice) = = : Select folder.
: Stop playback.
: Start playback/Pause (if pressed during playback).
: Reverse/forward search*4.
: Press: Select track. Hold: Reverse/forward search*6.
= = : Select track.
Book 1.indb 23Book 1.indb 23 07.2.1 8:22:40 PM07.2.1 8:22:40 PM

24
ENG
LISH
Playing back a bonus groupIf a DVD Audio including a “bonus group” is detected, the BONUS indicator lights up on the disc information screen.
To play a bonus group...
1 Select the bonus group.• The bonus group is usually recorded as the last
group.
2 Enter the key number.
: Move the entry position
: Select a number
• “key number” (a kind of password) for the bonus group is not open to public. The way of getting the key number depends on the disc.
3 Follow the interactive instructions shown on the monitor.
Selecting browsable still pictureWhen a disc including browsable still pictures is detected, the B.S.P indicator lights up on the disc information screen.
When disc shows the BSP selecting icons such as @ or # on the screen...
1 Select an item you want to display.
2
Enjoying surround sounds You can enjoy multi-channel surround playback through the front, center, surround speakers.• After connecting the center speaker, make
sure to activate the center speaker; otherwise, no sound comes out of the center speaker ( page 53).
• All surround mode can also be used for “USB.”
MULTI: For multi-channel encoded sources such as Dolby Digital*1, DTS*2, and DVD Audio. (When activated, “MULTI” is shown on the disc information screen.)
Dolby Pro Logic II (Movie/Music): For 2 channel sources except for DivX/MPEG 1/MPEG2 discs.
To turn on the surround
1
2
3
• Surround Off: Deactivates surround.• Surround On: Activates surround = go to the
following steps.
AV Menu
Setup EnterENT
AV Menu
Disc Surround EnterENT
Disc Surround menu icon
Disc Surround
Auto
Surround OffSurround On
Book 1.indb 24Book 1.indb 24 07.2.1 8:22:42 PM07.2.1 8:22:42 PM

OPERATIONS25
ENG
LISH
4
• Auto: When multi-channel digital signals come in, “MULTI” surround is activated.
When 2-channel or 2.1-channel signals come in, “4CH STEREO” is activated.
• Through: All incoming channel signals are sent to the corresponding speakers.
• Dolby PLII Movie: Activates Dolby Pro Logic II Movie.
• Dolby PLII Music: Activates Dolby Pro Logic II Music. You can adjust <Panorama> and <Center Width> settings. ( below)
To change the <Dolby PLII Music> settingin step 4 above...
1
2
• Panorama: Select <On> to add wraparound sound effect.
• Center Width: Adjust the center image so it may be heard only from the center speaker, only form the left/right front speaker as a “phantom” center image, or various combination of these speakers. As the number increases, the “phantom” effect becomes stronger (normally select <4>).
3
On the remote controller:
• You cannot change the <Dolby PL II Music> settings using the remote controller.
Surround OnAutoThroughDolby PLII MovieDolby PLII Music
SetENT
Surround On
Panorama
AutoThroughDolby PLII MovieDolby PLII Music
Dolby PLII Music
On
PanoramaCenterWidth
*1 Manufactured under license from Dolby Laboratories. Dolby, Pro Logic, and the double-D symbol are trademarks of Dolby Laboratories.
*2 “DTS” and “DTS Digital Surround” are registered trademarks of DTS, Inc.
Book 1.indb 25Book 1.indb 25 07.2.1 8:22:43 PM07.2.1 8:22:43 PM

26
ENG
LISH
1 Display the on-screen bar. ( page 27)
2 Select an item.
3 Make a selection.If a pop-up menu appears...
• For entering time/numbers...
: Move the entry position
: Select a number
To remove the on-screen bar
Operations using the on-screen bar (DVD/VCD/DivX/MPEG1/MPEG2/JPEG) These operations are possible on the monitor using the remote controller.
Book 1.indb 26Book 1.indb 26 07.2.1 8:22:44 PM07.2.1 8:22:44 PM

OPERATIONS27
ENG
LISH
Information
Operation
On-screen bar
1 Disc type2 • DVD: Audio signal format
• VCD: PBC3 Playback mode*1
DVD Video: T. RPT: Title repeat C. RPT: Chapter repeat DVD Audio: T. RPT: Track repeat DVD-VR: C. RPT: Chapter repeat PG. RPT: Program repeat DivX/MPEG: T. RPT: Track repeat F. RPT: Folder repeat JPEG: F. RPT: Folder repeat VCD: T. INT: Track intro T. RPT: Track repeat A. RND: All random4 Playback information T02-C03 Current title/chapter G02-T03 Current group/track
PG-001
C-002 Current program/chapter
PL-003
C-004 Current playlist/chapter TRACK 01 Current track F001-T001 Current folder/track F002-F002 Current folder/file (JPEG)
5 Time indicationTOTAL Elapsed playing time of the discT. REM Remaining title time (for DVD)
Remaining disc time (for others)TIME Elapsed playing time of the current
chapter/track*2
REM Remaining time of the current chapter/track*2
6 Playback status Play
Reverse/forward search Reverse/forward slow-motion
Pause Stop
7 Operation iconsTIME Change time indication (see 5)
Time Search (Specify a certain scene by entering time.)
TITLE Title Search (by its number)CHAP Chapter Search (by its number)GROUP Group Search (by its number)TRACK Track Search (by its number)RPT Repeat play*1
INT Intro play*1
RND Random play*1
Change the audio language, audio channel or audio stream
Change the subtitle language Change the view angle
PAGE Change the browsable still pictures (pages)
*1 page 19*2 Not applicable for DVD-VR.
Above example is of DVD Video. Items shown on the bar vary due to the disc type.
DVD -V T02-C03 TOTAL 1:25:58
TIME TITLE CHAP RPT
C. RPT
Book 1.indb 27Book 1.indb 27 07.2.1 8:22:45 PM07.2.1 8:22:45 PM

28
ENG
LISH
Dual Zone operationsYou can enjoy a disc playback on the external monitor connected to the VIDEO OUT and 2nd AUDIO OUT plugs, while listening to any other source than “USB” through the speakers.• When Dual Zone is in use, you can only operate the
DVD/CD player using the remote controller.
1
2
3
• Off: Deactivates Dual Zone.• On (DUAL): Activates Dual Zone without
applying Headphone Surround*1.• On/Surround On (DUAL-S): Activates Dual
Zone and applies Headphone Surround.
When Dual Zone is activated, the main source is changed to “DISC.”
Ex. When “On/Surround On” is selected.
To select a different source (main source) to listen through the speakers:Press SRC (source) on the control panel.• By using the buttons on the control panel,
you can operate the newly selected source without affecting Dual Zone (DISC) operations.
• You cannot select “USB” for the main source.
On the remote controller:
1
2 Adjust the volume through the 2nd AUDIO OUT plug.
3 Operate the DVD/CD player.
*1 JVC original headphone virtual surround system. This surround will also work for the main source “DISC” if “On/Surround On” is selected as the sub-source. This surround does not work for DivX/MPEG1/MPEG2 discs.
*2 Displayed being shaded if Headphone Surround is not applied.
Operations using the control screen For discs except DVD and VCD:While Dual Zone is on, these operations are possible on the external monitor using the remote controller.The control screen automatically appears when you insert a disc. (For DivX/MPEG1/MPEG2/JPEG; while not playing.)
Ex.: MP3/WMA
Folder : 2 / 3
TIME 00:00:14T. RPT
Track : 6 / 14 (Total 41)
Track Information
Cloudy.mp3Fair.mp3Fog.mp3Hail.wmaIndian summer.mp3Rain.mp3Shower.mp3Snow.mp3Thunder.wmaTyphoon.mp3Wind.mp3Winter sky.mp3
AlbumWeatherArtistRobert M. SmithTitleRain
01 Music02 Music03 Music
AV Menu
Setup EnterENT
AV Menu
Dual Zone EnterENT
Dual Zone menu icon
Dual ZoneOffOnOn/Surround On
SetENT
FLATDIGITALVIDEODVD
T 01 C 02 0:45:38DUAL-S *2
Book 1.indb 28Book 1.indb 28 07.2.1 8:22:46 PM07.2.1 8:22:46 PM

OPERATIONS29
ENG
LISH
Selecting playback modesYou can also change the playback modes using the playback mode selection window.• For CD/MP3/WMA/WAV/AAC: Intro/Repeat/
Random• For DivX/MPEG1/MPEG2/JPEG: Repeat
1
2 Only for CD/MP3/WMA/WAV: Select a playback mode.
3 Select your desired option.
4
1 Current folder (highlighted bar)2 Current folder number/total folder number3 Folder list* If tag data includes “Jacket Picture” (baseline JPEG), it
will be displayed. If you press OSD, the playback mode selection window appears. ( below)
4 Selected playback mode ( below)5 Elapsed playing time of the current track (not
displayed for JPEG)6 Operation status7 Current track number/total number of tracks in the
current folder (total number of tracks on the disc)8 Track information (only for MP3/WMA/WAV/AAC)9 Track listp Current track (highlighted)
To select a folder or track
1 Select “Folder” column or “Track” column on the control screen.
2 Select a folder or track.• If necessary, press ENT to start playback.
1 Playback mode selection window: appears when OSD is pressed ( below).
2 Selected playback mode ( below)3 Elapsed playing time of the current track4 Operation status5 Current track number/total number of tracks on the
disc6 Track information7 Track list8 Current track (highlighted bar)
To select a track• If necessary, press ENT to start playback.
Ex.: CD Text
MODE
REPEATTRACK
TIME 00:14
Track : 6 / 14
Track Information
CloudyFairFogHailIndian summerRainShowerSnowThunderTyphoonWindWinter sky
AlbumFour seasonsArtistRobert M. SmithTitleRain
T. RPT
Selected playback modeDivX/MPEG1/MPEG2/JPEG: page 27MP3/WMA/WAV/AAC: T. INT: Track intro F. INT: Folder intro T. RPT: Track repeat F. RPT: Folder repeat F. RND: Folder random A. RND: All randomCD: T. INT: Track intro T. RPT: Track repeat A. RND: All random
Book 1.indb 29Book 1.indb 29 07.2.1 8:22:47 PM07.2.1 8:22:47 PM

30
ENG
LISH
Operations using the list screen For discs except DVD, VCD, and CDWhile Dual Zone is on, these operations are possible on the external monitor using the remote controller.
While not playing...
1 Display the list screen.
2 Select a folder on the list.
3 Select a track on the list.
• To go back to the folder list, press .
1 Current folder number/total folder number 2 Current track number/total number of tracks in the
current folder3 Current page/total number of the pages included
in the list4 Current folder/track (highlighted bar)
List screen for DVD-VRYou can use Original Program and Play List screen anytime while playing DVD-VR with its data recorded.• These screens can be displayed on the built-in
monitor and the external monitor.
1 Display the Original Program/Play List screen.
2 Select an item you want.
1 Program/Play list number2 Recording date 3 Recording source (TV station, the input terminal
of the recording equipment, etc.)4 Start time of recording5 Title of the program/play list*6 Highlighted bar (current selection)7 Creating date of play lists8 Total number of chapters9 Playback time* The title of the original program or play list may
not be displayed depending on the recording equipment.
Folder : 144/240 Track 144/198 Page : 4/7fol120fol121fol122fol123fol124fol125fol126fol127fol128fol129
fol150fol151fol152fol153fol154fol155fol156fol157fol158fol159
fol140fol141fol142fol143fol144fol145fol146fol147fol148fol149
fol130fol131fol132fol133fol134fol135fol136fol137fol138fol139
file0141.wmafile0142.mp3file0143.wmafile0144.mp3file0145.mp3file0146.mp3file0147.mp3file0148.wmafile0149.wmafile0150.wma
file0151.wmafile0152.mp3file0153.wmafile0154.mp3file0155.wmafile0156.wmafile0157.wmafile0158.wmafile0159.mp3file0160.wma
Folder : 144/240 Track 144/198 Page : 4/5file0121.mp3file0122.mp3file0123.wmafile0124.mp3file0125.mp3file0126.wmafile0127.wmafile0128.mp3file0129.mp3file0130.wma
file0131.mp3file0132.mp3file0133.mp3file0134.mp3file0135.wmafile0136.mp3file0137.wmafile0138.mp3file0139.wmafile0140.wma
ORIGINAL PROGRAM
No Date Ch ime itle1 25/04/07 4ch 19:00 JVC DVD World 20042 17/05/07 8ch 10:303 22/05/07 8ch 17:00 Music Festival4 26/05/07 L-1 13:19 children 0015 20/06/07 4ch 22:006 25/06/07 L-1 8:23 children 002
T T
PLAY LIST
No Date Chap Length Title1 25/05/07 001 1:03:16 My JVC World2 17/06/07 005 1:35:253 20/06/07 003 0:10:23 Favorite music4 25/06/07 001 0:07:19 children001-002
or
Book 1.indb 30Book 1.indb 30 07.2.1 8:22:48 PM07.2.1 8:22:48 PM

OPERATIONS31
ENG
LISH
USB operationsYou can connect a USB mass storage class device such as a USB memory, Digital Audio player*1, portable HDD, etc. to the unit.
~ Connect a USB device.
Ÿ Select “USB”.
15: 45
USBNow Reading ...
7: Stop playback
This unit can play DivX/JPEG/MPEG1/MPEG2*2/MP3/WMA/WAV/AAC*3 files stored in a USB mass storage class device.• You can operate the USB device in the same way you
operate the files on discs. ( page 19 to 27)• You cannot select “USB”when Dual Zone is in use.• All tracks in the USB device will be played repeatedly
until you change the source.
*1 Except for JVC D. Player XA-HD500.*2 Except for MPEG2 files recorded by JVC Everio
camcorder (extension code <.mod>).
3: Start playback if necessary.
DISP: Press if no playback picture appears , but disc information screen ( pages 16 to 18) is displayed.
4 ¢ Press: Select track Hold: Reverse/forward search5 ∞ Press: Select folder Hold: Display Folder List
USB cable from the rear of the unit.• You cannot connect a computer to the
USB ( ) terminal of the unit.
*3 This unit can play back AAC files encoded using iTunes. This unit cannot play back AAC files purchased from the iTunes Store.
Book 1.indb 31Book 1.indb 31 07.2.1 8:22:49 PM07.2.1 8:22:49 PM

Caution:
• Avoid using the USB device if it might hinder your safety driving.• Do not pull out and attach the USB device repeatedly while “Now Reading...” is flashing on the monitor.• Do not start the car engine if a USB device is connected.• Stop play back before disconnecting a USB device.• Make sure all important data has been backed up to avoid losing the data.• Do not leave a USB device in the car, expose to direct sunlight, or high temperature to avoid deformation or
cause damages to the device.
32
ENG
LISH
You can use only one of the following playback modes—Intro/Repeat/Random.Ex. To select Track Repeat
1
2
3
4
When one of the playback modes is selected, the corresponding indicator lights up on the information screen.
To cancel, select <All Off> in step 3 or <Off> in step 4.
Selecting playback modes
File type Intro Repeat Random
Track: Plays the first 15 seconds of each track
Folder: Plays the first 15 seconds of the first track of each folder
Track: Repeats current trackFolder: Repeats all tracks of
the current folder
Folder: Randomly plays all tracks of current folder, then tracks of next folders
USB (All): Randomly plays all tracks
—
Track: Repeats current trackFolder: Repeats current folder —
— Folder: Repeats current folder —
Mode
Off
All OffIntroRepeatRandom
RepeatOffTrackFolder
SetENT
AV Menu
Mode EnterENT
AV Menu
Setup EnterENT
Mode menu icon
Book 1.indb 32Book 1.indb 32 07.2.1 8:22:49 PM07.2.1 8:22:49 PM

OPERATIONS33
ENG
LISH
Bluetooth® operations — Cellular phone/audio player
Bluetooth is a short-range wireless radio communication technology for the mobile device such as mobile phones, portable PCs, and other devices. The bluetooth devices can be connected without cables and communicate each other. • The serial number is printed on the label placed on
the bottom of the unit.• Refer to the list (included in the box) to see the
countries where you may use the Bluetooth® function.
Bluetooth profileThis unit supports the following Bluetooth profiles; HSP (Headset Profile) HFP (Hands-Free Profile) A2DP (Advanced Audio Distribution Profile) AVRCP (Audio/Video Remote Control Profile) SPP (Serial Port Profile) OPP (Object Push Profile)
FeaturesYou can operate Bluetooth devices through the unit as follows:• Receiving a call• Making a call—from phone book, from call history
(Redial/Missed Call/Received Call), by dialing number, by preset numbers, by voice command
• Receiving the SMS (Short Message Service)• Play back a Bluetooth audio player
Refer also to the instructions supplied with the Bluetooth device.
Continued on the next page
Connecting a Bluetooth device for the first time Pairing and PIN CodeWhen you connect a Bluetooth device to the unit for the first time, make pairing between the unit and the device. Pairing allows Bluetooth devices to communicate each other.To make pairing, you may need to enter the PIN (Personal Identification Number) code of your Bluetooth device you want to connect.
• Once the connection is established, it is registered in the unit even if you reset the unit. Up to five devices can be registered in total.
• Only one device can be connected at a time for each source (“Bluetooth Phone” and “Bluetooth Audio”).
• To use the Bluetooth function, you need to turn on Bluetooth function of the device.
Preparation: Operate the device to turn on itsBluetooth function.
Registration (Pairing) methodsUse either of the following items in the <Bluetooth> menu to register and establish the connection with a device.• Select “Bluetooth Phone” or “Bluetooth Audio” as the
source to operate the <Bluetooth> menu.
<Open> Make the unit ready to establish a new Bluetooth connection. Connection is established by operating the Bluetooth device.
<Search> Make the unit ready to establish a new Bluetooth connection. Connection is established by operating the unit.
• The Bluetooth word mark and logos are owned by the Bluetooth SIG, Inc. and any use of such marks by Victor Company of Japan, Limited (JVC) is under license. Other trademarks and trade names are those of their respective owners.
Book 1.indb 33Book 1.indb 33 07.2.1 8:22:50 PM07.2.1 8:22:50 PM

34
ENG
LISH
7 Operate the target Bluetooth device. (While “Open...” is flashing on the screen.)Enter the same PIN code (as entered in the above step) on the device to be connected.
Now connection is established and you can use the device through the unit.
The device remains registered even after you disconnect the device. Use <Connect> (or activate <Auto Connect>) to connect the same device from next time. ( pages 58 and 59)
Searching for available devicesPerform steps 1 to 3 on the left, then...
1
The unit searches for available devices and displays the list of them. (If no available device is detected, “Device Unfound” appears.)
2 Select a device you want to connect.
3 Enter the specific PIN code of the device to the unit.• Refer to the instructions supplied with the device
to check the PIN code.
4 Use the Bluetooth device to connect.
Now connection is established and you can use the device through the unit.
AV Menu
Bluetooth EnterENT
AV Menu
Setup EnterENT
Registering using <Open>
1 Select “Bluetooth Phone” or “Bluetooth Audio.”
2
3
Bluetooth menu icon
4
5 Enter a PIN (Personal Identification Number)* code to the unit.• You can enter any number you like (1-digit to
16-digit number).* Some devices have their own PIN code. Enter the
specified PIN code to the unit.
• To delete an unwanted digit, select blank space.
6
NEW DEVICEDial MenuMessageOpenSearchSpecial Device
NEW DEVICEDial MenuMessageOpenSearchSpecial Device
PIN Code
1234
EnterENT
15: 45
FLAT
NEW DEVICE
Bluetooth Phone
Select “NEW DEVICE” by pressing 5 / ∞.
Book 1.indb 34Book 1.indb 34 07.2.1 8:22:51 PM07.2.1 8:22:51 PM

OPERATIONS35
ENG
LISH
Connecting a special devicePerform steps 1 to 3 of “Registering using <Open>” on page 34, then...
1
The unit displays the list of the preset devices.
2 Select a device you want to connect.
3 Use <Open> (or <Search>) to connect.
Connecting/disconnecting a registered device
1 Select “Bluetooth Phone” or “Bluetooth Audio,” then select a registered device you want to connect/disconnect.
2 Perform steps 2 and 3 of “Registering using <Open>” on page 34, then...• Select <Connect> to connect the selected
device.• Select <Disconnect> to disconnect the selected
device.
You can set the unit to connect a Bluetooth device automatically when the unit is turned on. ( page 59)
NEW DEVICEDial MenuMessageOpenSearchSpecial Device
Deleting a registered device
1 Select “Bluetooth Phone” or “Bluetooth Audio,” then select a registered device you want to delete.
2 Perform steps 2 and 3 of “Registering using <Open>” on page 34, then...• Select <Delete Pair>, then <Yes>.
Book 1.indb 35Book 1.indb 35 07.2.1 8:22:52 PM07.2.1 8:22:52 PM

36
ENG
LISH
15: 45
FLAT
Connected Device Name
Bluetooth Phone
POWER]ON
~ Select “Bluetooth Phone.”
Ÿ Enter the <Bluetooth> menu.
! Establish the connection with a device, then make a call (or settings using the <Bluetooth> menu). pages 34, 50, 58, and 59
When the sound is stopped or interrupted during the use of a Bluetooth device, try the following remedies.• Turn off, then turn on the unit.• (When the sound is not yet restored,) connect the
device again. ( “Connecting/disconnecting a registered device” on page 35)
Using the Bluetooth cellular phone
Status of the device*2
Signal strength/Battery remainder
Adjust the volume*1
When a call comes in...
The source is automatically changed to “Bluetooth Phone.”When <Auto Answer> is activated...The unit answers the incoming calls automatically. ( page 59)• When <Auto Answer> is deactivated, press any
button (except ATT or +/–) to answer the incoming call.
page 48
Connected device name*3
Name and phone number (if acquired)
To end the call or reject an incoming callHold any button (except ATT or +/–).
Answering a waiting callIf your cellular phone is equipped with the call waiting function, you can put the current call on hold and answer the waiting call.Press any button (except ATT and +/–).• To restore the on-hold call, press any button
(except ATT and +/–) again.• When you end one call, you can connect to the
other.
Press: Display <Dial Menu> Answers incoming callHold: Display <Redial> list
Turns Blue when the Bluetooth device is connected.
*4
*1 You can adjust the volume level for “Bluetooth Phone” without affecting the volume level for other sources.
*2 Appears only when the information comes from the device.
*3 Each time you press 5 ∞, the registered device name (and “NEW DEVICE” when a new device can be registered) appear in turn.
*4 When a cellular phone with audio function is connected, appears.
You can adjust the microphone volume level. ( page 59)
Book 1.indb 36Book 1.indb 36 07.2.1 8:22:53 PM07.2.1 8:22:53 PM

OPERATIONS37
ENG
LISH
Making a call 1 Display the <Dial Menu>.
2 Select the method to make a call.
• Redial* : Shows the list of the phone numbers you have dialed = go to the following step.
• Received Calls* : Shows the list of the received calls = go to the following step.
• Phonebook* : Shows the phone book of the connected cellular phone = go to the following step.
• Missed Calls* : Shows the list of the missed calls = go to the following step.
• Phone Number : Shows the phone number entry screen = “How to enter phone number” on the next page.
• Voice Dialing (Only when the connected cellular phone has the voice recognition system): Speak the name you want to call.
* Displays only when your cellular phone is equipped with these functions.– If not displayed, please try to transfer the
phone book memory of the cellular phone to this unit. (Refer to the instruction manual supplied with your cellular phone.)
– With some cellular phones, the phone book memory is transferred automatically.
3 Select the name/phone number you want to call.
P902i
Annie
RedialReceived CallsPhonebookMissed CallsPhone number
P902i
Annie
RedialReceived CallsPhonebookMissed CallsPhone number
When an SMS comes in...If the cellular phone is compatible with SMS (Short Message Service) and <Message Info> is set to <Auto> ( page 59), the unit rings and “Receiving Message” appears on the monitor to inform you of the arrival of the message.• You cannot edit or send a message through the
unit.
When <Message Info> is set to <Auto>...To read the messageWhile “Receiving Message” is displayed...
• The source is changed to “Bluetooth Phone.” To read the message later
• The message is stored into <Message> = <Unread>. ( page 58)
When <Message Info> is set to <Manual>Access the message list to read a message.( page 58)
or
Book 1.indb 37Book 1.indb 37 07.2.1 8:22:54 PM07.2.1 8:22:54 PM

38
ENG
LISH
Presetting the phone numbers You can preset up to six phone numbers.
1 Display the phone number you want to preset by using one of <Dial Menu> items.
Ex.: “Jack” is selected from the phone book
Preset Memory list appears.
2 Select a preset number.
The phone number selected in step 1 is now stored in preset number 4.
To call a preset number On the remote:
On the unit:
1
2
111222233332223333666644455556666098456712349998888777755566668888
1
2
3
4
5
6 ENT
Preset List
111222233332223333666644455556666098456712349998888777755566668888
1
2
3
4
5
6 ENT
Preset List
111222233332223333666644455556666111333344449998888777755566668888
1
2
3
4
5
6 ENT
Preset Memory
Jack123123412340989876543209845671234
Dial
StoreENT
ENT
111222233332223333666644455556666111333344449998888777755566668888
1
2
3
4
5
6 ENT
Preset Memory
Speak the name you want to call.
How to enter phone numberOn the remote:
On the unit:
1
• To delete an unwanted digit, select blank space.
2
<Dial Menu> can be also accessed through <AV Menu> = <Bluetooth> = <Dial Menu>.
Direct operations to redial / Voice DialingYou can use the following functions regardless of the current source.To redial
To activate Voice DialingYou can make a call by your voice.
AV Menu
Bluetooth EnterENT
AV Menu
Setup EnterENT
Bluetooth menu icon
Dialling ...Jack09845671234
Select a number. Move the entry position.
or
or
Book 1.indb 38Book 1.indb 38 07.2.1 8:22:54 PM07.2.1 8:22:54 PM

OPERATIONS39
ENG
LISH
Using the Bluetooth audio player
*1 Each time you press 5 ∞, the registered device names (and “NEW DEVICE” when a new device can be registered) appear in turn. You cannot select “New Device” when a Bluetooth audio player is connected.
*2 Appears only when the information comes from the device.
*3 Indicates the button pressed. It may be different from the operation status.
*4 When a cellular phone with audio function is connected, appears.
You can use the following buttons on the remote controller for the Bluetooth audio operations. For details, pages 8 and 9
15: 45
FLAT
Connected Device Name
Bluetooth Audio
POWER]ON
Pause
Reverse/forward skip
*1
Status of the device*2
Signal strength/Battery remainder
page 48
List menu icon
AV Menu
Setup EnterENT
AV Menu
List EnterENT
~ Select “Bluetooth Audio.”
Ÿ Start playback.• See pages 33 to 35 for connecting a new device.• See page 35 for connecting/disconnecting a
registered device.• See page 35 for deleting a registered device.
When the sound is stopped or interrupted during the use of a Bluetooth device, try the following remedies.• Turn off, then turn on the unit.• (When the sound is not yet restored,) connect the
device again. ( “Connecting/disconnecting a registered device” on page 35)
You can use the following buttons on the remote controller for the Bluetooth phone operations. For details, pages 8 and 9.
• Preset List can also be accessed through <AV Menu> = <List>.
*3
Turns Blue when the Bluetooth device is connected.
*4
Bluetooth Information:If you wish to receive more information about Bluetooth, visit our JVC web site.
Book 1.indb 39Book 1.indb 39 07.2.1 8:22:56 PM07.2.1 8:22:56 PM

40
ENG
LISH
15: 45
FLATCD-CH
01 01 0:02:38Disc TitleArtist NameCurrent Track Title
POWER]ON
Listening to the CD changer
It is recommended to use a JVC MP3-compatible CD changer with your unit.• You can play only CDs (CD-DA) and MP3 discs.
Preparation:Make sure <Changer> is selected for the external input setting. ( page 55)
~ Select “CD-CH.”
Ÿ Display the Disc List.
• Each time you hold the button, you can display the other list of the remaining discs.
! Select a disc to start playing.
“No Name” appears for conventional CDs
Disc no./Track no./Playing time
• While playing an MP3 disc, you can select and start playing a track in the disc using the Lists: Disc List (select the current disc) = Folder List = File List, then start playing a track you want.
4 ¢ Press: Select track Hold: Reverse/forward search5 ∞ Press: Select folder (MP3 only) Hold: Display Disc List
Disc List
Off
MP3 DISCDISC 02DISC 03DISC 04DISC 05DISC 06 ENT
Disc List
Off
MP3 DISCDISC 02DISC 03DISC 04DISC 05DISC 06 ENT
Folder List
Off
My BestCinemaPopsMy Best2Favorite SongCinema2 ENT
File List
Off
Song011.mp3Song012.mp3Song013.mp3Song014.mp3Song015.mp3Song016.mp3 ENT
Disc List
Off
MP3 DISCDISC 02DISC 03DISC 04DISC 05DISC 06 ENT
Book 1.indb 40Book 1.indb 40 07.2.1 8:22:57 PM07.2.1 8:22:57 PM

41 EXTERNAL DEVICES
ENG
LISH
You can use only one of the following playback modes—Intro/Repeat/Random.Ex. To select Track Repeat
1
2
Mode menu icon
3
4
When one of the playback modes is selected, the corresponding indicator lights up on the monitor.
To cancel, select <All Off> in step 3 or <Off> in step 4.
Selecting playback modes
Disc type Intro Repeat Random
Track: Plays the first 15 seconds of each track
Disc: Plays the first 15 seconds of the first track of all loaded discs
Track: Repeats current trackDisc: Repeats all tracks of the
current disc
Disc: Randomly plays all tracks of the current disc
All: Randomly plays all tracks of all loaded discs
Track: Plays the first 15 seconds of each track
Folder: Plays the first 15 seconds of the first track of each folder
Disc: Plays the first 15 seconds of the first track of all loaded discs
Track: Repeats current trackFolder: Repeats all tracks of
the current folderDisc: Repeats all tracks of the
current disc
Folder: Randomly plays all tracks of current folder, then tracks of next folders
Disc: Randomly plays all tracks of the current disc
All: Randomly plays all tracks of all loaded discs
You can use the following buttons on the remote controller to operate the CD changer.
or : Select disc.
To use <Mode> menu above.
To use <List> menu page 40.Disc List = Folder List = File List
Mode
Off
All OffIntroRepeatRandom
RepeatOffTrackDisc
SetENT
AV Menu
Mode EnterENT
AV Menu
Setup EnterENT
Press: Select folder (MP3 only).
Press: Select trackHold: Reverse/forward search
Book 1.indb 41Book 1.indb 41 07.2.1 8:22:58 PM07.2.1 8:22:58 PM
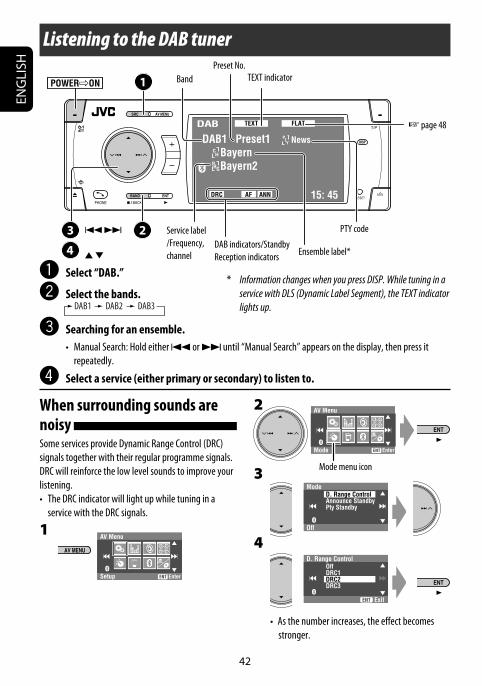
42
ENG
LISH
15: 45
FLATTEXT
AFDRC ANN
DAB
DAB1 Preset1 Bayern Bayern2
News
POWER]ON
Listening to the DAB tuner
~ Select “DAB.”
Ÿ Select the bands.
! Searching for an ensemble.• Manual Search: Hold either 4 or ¢ until “Manual Search” appears on the display, then press it
repeatedly.
⁄ Select a service (either primary or secondary) to listen to.
Service label /Frequency, channel
Preset No.Band
page 48
DAB indicators/Standby Reception indicators
PTY code
Ensemble label*
* Information changes when you press DISP. While tuning in a service with DLS (Dynamic Label Segment), the TEXT indicator lights up.
When surrounding sounds are noisy Some services provide Dynamic Range Control (DRC) signals together with their regular programme signals. DRC will reinforce the low level sounds to improve your listening.• The DRC indicator will light up while tuning in a
service with the DRC signals.
1
2
3
4
• As the number increases, the effect becomes stronger.
4 ¢
5 ∞
TEXT indicator
Mode
Off
D. Range ControlAnnounce StandbyPty Standby
OffDRC1DRC2DRC3
ExitENT
D. Range Control
AV Menu
Mode EnterENT
AV Menu
Setup EnterENT
Mode menu icon
Book 1.indb 42Book 1.indb 42 07.2.1 8:22:59 PM07.2.1 8:22:59 PM

43 EXTERNAL DEVICES
ENG
LISH
Manual presetting You can preset six DAB services (primary) for each band.
1
2 Search for a service you want to preset.
3
• Preset List can also be accessed through <AV Menu> = <List> ( right).
4 Select a preset number.
5
Selecting preset stations On the remote:
1
2
On the unit:
1
2
3 Select a preset service.
• Preset List can also be accessed through <AV Menu> = <List>.
Activating/deactivating TA/PTY Standby Reception • Operations are exactly the same as explained on page
13 for FM RDS stations.• You cannot store PTY codes separately for the DAB
tuner and for the FM tuner.
DAB1Service LabelNo Serv.FFHNo Serv.HRSHRH ENT
1
2
3
4
56
Store ENT
Service LabelNo Serv.FFHNo Serv.HRSHRH ENT
1
2
3
4
56
DAB1 Store ENT
15: 45
FLAT
AF ANNDRC
DAB
DAB1 Preset4 Bayern Bayern2
DAB1 Store ENT
Service LabelNo Serv.FFHBayern2HRSHRH ENT
1
2
3
4
56
DAB1 Store ENT
Service LabelNo Serv.FFHBayern2HRSHRH ENT
1
2
3
4
56
List menu icon
AV Menu
Setup EnterENT
AV Menu
List EnterENT
Book 1.indb 43Book 1.indb 43 07.2.1 8:23:00 PM07.2.1 8:23:00 PM

44
ENG
LISH
Activating/deactivating Announcement Standby Reception Announcement Standby Reception allows the unit to switch temporarily to your favorite service (announcement type).
Announcement Standby Reception Indicator
Activate <AV Menu>, then select <Mode>, <Announce Standby> ( below).
ANN
The unit will temporarily switch to your favorite service from any source other than FM/AM.
Lights up
Not yet activated. Tune in to another service providing the related signals.
Flashes
To deactivate, select <Off> in step 4, then press ENT once ( right).
Goes off
Activating Announcement Standby Reception
1
2
Mode menu icon
3
Available announcement types:Transport News, Warning, News, Weather, Event, Special Event, Radio Info, Sports News, Financial News.
4
5
6 Select an announcement type for Announcement Standby Reception.
Tracing the same programme—Alternative Frequency Reception (DAB AF) • While receiving a DAB service: When driving in an area where a service cannot be
received, this unit automatically tunes in to another ensemble or FM RDS station, broadcasting the same programme.
• While receiving an FM RDS station: When driving in an area where a DAB service is
broadcasting the same programme as the FM RDS station, this unit automatically tunes in to the DAB service.
When shipped from the factory, Alternative Frequency Reception is activated.To deactivate the Alternative Frequency Reception, pages 50 and 54.
Mode
Off
D. Range ControlAnnounce StandbyPty Standby
OffTransport News
Announce Standby
Transport NewsWarningNewsWeatherEvent
ExitENT
Announce Standby
Transport NewsWarningNewsWeatherEvent
ExitENT
Announce Standby
AV Menu
Mode EnterENT
AV Menu
Setup EnterENT
Book 1.indb 44Book 1.indb 44 07.2.1 8:23:01 PM07.2.1 8:23:01 PM

45 EXTERNAL DEVICES
ENG
LISH
15: 45
FLATD.PLAYER
01 0:45:38Album NameArtist NameTrack Title
POWER]ON
Listening to the iPod/D. player
It is required to connect the interface adapter (KS-PD100 for Apple iPod or KS-PD500 for JVC D. player) to the CD changer jack on the rear.Preparation:Make sure <iPod> or <D. Player> is selected for the external input setting. ( page 55)
~ Select “iPod” or “D. PLAYER.”Playback starts automatically.
Ÿ Select a track.
Selecting a track from the player’s menu 1 Enter the player’s menu.
• This mode will be canceled if no operations are done for about 5 seconds.
2 Select the desired item.Press: Select an itemHold: Skip 10 items at a time
For iPod:Playlists Ô Artists Ô Albums Ô Songs Ô Genres Ô Composers Ô (back to the beginning)For D. player:Playlist Ô Artist Ô Album Ô Genre Ô Track Ô (back to the beginning)
3 Confirm the selection.
4 Repeat steps 2 and 3 to select a track.• When a track is selected finally, playback starts.• To return to the previous menu...
Selecting playback modes 1 Display <AV Menu>, then select <Mode>
menu icon.
2 Enter <Mode>, then select <Repeat> or <Random>.
3 Select an appropriate option.
Repeat One: Functions the same as “Repeat One” or “Repeat Mode = One.”All: Functions the same as “Repeat All” or “Repeat Mode = All.”
Random Album: Functions the same as “Shuffle Albums” of the iPod.Song/On: Functions the same as “Shuffle Songs” or “Random Play = On.”
• When one of the playback modes is selected, the corresponding indicators light up on the monitor.
To cancel, select <All Off> in step 2 or <Off> in step 3.
4 ¢ :Press: Select trackHold: Reverse/forward search
5 ∞5 : Enter player’s menu∞ : Pause/stop playback
• To resume, press again.
Track no./Playing time page 48
• iPod is a trademark of Apple Inc., registered in the U.S. and other countries.
Book 1.indb 45Book 1.indb 45 07.2.1 8:23:02 PM07.2.1 8:23:02 PM

46
ENG
LISH
Listening to other external components
AV-INPUT You can connect an external component to the LINE IN/VIDEO IN plugs.• You can also connect a Navigation System to the VIDEO IN plug so that you can watch the navigation screen (Make sure <Navigation> is selected for <AV Input>). ( page 55)
~ Select “AV-IN.”
Ÿ Turn on the connected component and start playing the source.
• If you select <Camera Mirror> or <Navigation> for <AV Input> ( page 55), some status messages such as volume level change will not appear on the monitor while viewing the picture.
When <Navigation> is selected for <AV Input>...• You can use the source “AV-IN” for listening to an audio source connected to the LINE IN plugs.• While selecting other source, you can watch the navigation screen without changing the source. To watch the
navigation screen, press DISP repeatedly.
15: 45
FLATAV-IN
AV-INPUT
POWER]ON
Press if no playback picture appears, but source information (this) screen is displayed.
Assigned title ( page 49) page 48
Book 1.indb 46Book 1.indb 46 07.2.1 8:23:03 PM07.2.1 8:23:03 PM

47 EXTERNAL DEVICES
ENG
LISH
EXT-INPUT You can connect an external component to the CD changer jack on the rear using the Line Input Adapter—KS-U57 (not supplied) or AUX Input Adapter—KS-U58 (not supplied).
Preparation:Make sure <External Input> is selected for the external input setting. ( page 55)
~ Select “EXT-IN.”
Ÿ Turn on the connected component and start playing the source.
15: 45
FLATEXT-IN
EXT-INPUT
POWER]ON Assigned title ( page 49) page 48
Book 1.indb 47Book 1.indb 47 07.2.1 8:23:03 PM07.2.1 8:23:03 PM

48
ENG
LISH
Selecting sound mode
~
Ÿ
! Select a sound mode.
• For preset equalizing values of each sound mode, page 64.
• For multi-channel source, the sound mode is temporarily canceled.
Storing your own adjustmentYou can store your adjustment into User1, User2, and User3.
1 Repeat steps ~ and Ÿ, then in step !...
2 Adjust.
3 Store.
Sound equalization
Edit
60.0 Hz ENT
+03
Store
User StoreUser1User2User3
ENT Store
AV Menu
Setup EnterENT
AV Menu
Equalizer EnterENT
FlatHard RockR&BPopJazz
ExitENT
Equalizer
Equalizer menu icon
FlatHard RockR&BPopJazz
ExitENT
Equalizer
Edit
60.0 Hz ENT
+03
Store
POWER]ON
Book 1.indb 48Book 1.indb 48 07.2.1 8:23:03 PM07.2.1 8:23:03 PM

SETTINGS49
ENG
LISH
You can assign titles to “AV-IN” and “EXT-IN.”Ex.: Assigning title to “AV-IN”
~ Select “AV-IN.”
Ÿ Display the title entry screen.1
2
Mode menu icon
! Assign a title.1 Select a character, then move the entering
position.
• To change the character set, press DISP. (For available characters, page 65.)
2 Repeat step 1 until you finish entering the title.• The maximum number of characters is 16.
⁄ Finish the procedure.
Assigning titles to the sourcesPress: Change character setHold: Erase title
AV Menu
Setup EnterENT
AV Menu
Mode EnterENT
ModeTitle Entry
AV-In Name
MY BEST
DISP StoreENTA a 0
Title Entry
POWER]ON
AV-In Name
AV-INPUT
DISP StoreENT
Title Entry
Book 1.indb 49Book 1.indb 49 07.2.1 8:23:04 PM07.2.1 8:23:04 PM

50
ENG
LISH
AV Menu
Setup EnterENT
POWER]ON
!
• For some items, repeat this steps to set the sub-items.
⁄
Menu items
Menu operations
Ex. Changing the <High Pass Filter> setting
~
Non-available items will be displayed being shaded.
Ÿ
Setup Equalizer Sound
Mode List Bluetooth
Sound menu icon
Sound
Through
Fader/BalanceVolume AdjustSubwooferHigh Pass FilterCrossover
ThroughOn
ExitENT
High Pass Filter
AV Menu
Setup EnterENT
AV Menu
Sound EnterENT
Disc Surround
Dual Zone
AV Menu
Setup EnterENTInput
Display
Clock
Disc Setup 1
Disc Setup 2
Tuner
Others
Setup
Equalizer
Sound
Disc Surround
Mode
Bluetooth
List
Dual Zone
• The display indications may change according to change of the specifications.
Book 1.indb 50Book 1.indb 50 07.2.1 8:23:05 PM07.2.1 8:23:05 PM

SETTINGS51
ENG
LISH
Initial: UnderlinedSetup
Menu items Selectable settings, [reference page]
Disp
lay
Demonstration Off : Cancels.On : Activates the demonstration on the monitor.
Wall Paper You can select the background picture of the monitor.Future-Blue, Future-Green, Wave-Blue, Wave-Green, Wave-Pink, Metal-A, Metal-B, Ball-A, Ball-B, Ball-C, Dolphin, Simple-Red, Simple-Purple, Simple-Blue, Simple-Gray
Scroll Off : Cancels.Once : Scrolls the disc information once.Auto : Repeats scrolling (5-second intervals).• Holding DISP (on the unit) scrolls the information regardless of this
setting.
Tag Display Off : Cancels.On : Shows the Tag data while playing MP3/WMA/WAV/AAC tracks.
Dimmer Off : Cancels.On : Activates dimmer.Auto : Dims the monitor when you turn on the headlights.*1
Time Set : Press ENT (or ¢) to display the time setting screen, then set the Dimmer On/Off times.
Bright You can adjust brightness of the monitor.–15 (darkest) to +15 (brightest); Initial 00
Picture Adjust*2 You can adjust the following to make the monitor clear and legible for watching the playback picture. The setting will be stored for “DISC/USB,” and “AV-IN.”–15 to +15; Initial 0Bright : Adjust if the picture is too bright or too dark.Contrast : Adjust the contrast.Color : Adjust the color of the picture—lighter or darker.Tint : Adjust the tint if the human skin color is unnatural.
*1 The ILLUMINATION CONTROL lead connection is required. ( Installation/Connection Manual)*2 Adjustable only when the source is a disc or USB containing pictures or movies, or “AV-IN.”
Continued on the next page
Book 1.indb 51Book 1.indb 51 07.2.1 8:23:06 PM07.2.1 8:23:06 PM

52
ENG
LISH
Menu items Selectable settings, [reference page]Di
spla
yAspect*3 You can change the aspect ratio of the picture.
Aspect ratio of incoming signal
4:3 16:9
Full :For 16:9 original pictures
Auto : • For “DISC”: Aspect ratio is automatically selected to match to the incoming signals.
• For the other video sources: Aspect ratio is fixed to <Regular>.
Regular :For 4:3 original pictures
Language*4 Select the indication language shown on the monitor.English, Spanish, French, German, Italian, Dutch, Swedish, Danish, Russian
Cloc
k
Time Set Initial 0:00, [6]
12Hours/24Hours 12 Hours, 24 Hours, [6]
OSD Clock Off, On, [6]
Clock Adjust Off, Auto, [6]
Disc
Setu
p 1*
5
Menu Language Select the initial disc menu language; Initial Russian ( also page 65).
Audio Language Select the initial audio language; Initial Russian ( also page 65).
Subtitle Select the initial subtitle language or erase the subtitle (<Off>);Initial Russian ( also page 65).
OSD Language Select the on-screen language used for the external monitor connected to the VIDEO OUT plug; Initial Russian.
*3 Not adjustable for audio sources.*4 After you change the indication language setting, turn off then on the power so that your setting takes effect.*5 Selectable only for “DISC” and “USB.” (Playback stops when you select one of the items.)
Book 1.indb 52Book 1.indb 52 07.2.1 8:23:06 PM07.2.1 8:23:06 PM

SETTINGS53
ENG
LISH
Menu items Selectable settings, [reference page]Di
sc Se
tup
1*5
Monitor Type Select the monitor type to watch a wide screen picture on the external monitor.16:9 : Select when the aspect ratio of the external monitor is 16:9.4:3 Letterbox/4:3 Pan Scan : Select when the aspect ratio of the
external monitor is 4:3. Refer to the illustrations on the left to see how the pictures are shown on the monitor.
OSD Position Select the position of the on-screen bar, [27].1 : Higher position2 : Lower position
File Type Select playback file type when a disc/USB contains different types of files. You can store this setting separately for each source —“DISC/USB.”Audio : Plays back audio files.Still Picture : Plays back JPEG files.Video : Plays back DivX/MPEG1/MPEG2 files.
DivX Regist. (Registration) This unit has its own Registration Code. Once you have played back a file with which the Registration Code recorded, this unit’s Registration Code is overwritten for copyright protection.
Disc
Setu
p 2
D. (Dynamic) Range Compres. (Compression)*5
You can enjoy a powerful sound at a low volume level while playing Dolby Digital software.Auto : Select to apply the effect to multi-channel encoded software.On : Select to always use this function.
Speaker Size*5 You can adjust the speaker size setting.• Front SPK : Small, Large• Center SPK : None, Small, Large• Rear SPK : None, Small, Large• Subwoofer : On, Off• Speaker size : <Large> for 13 cm diameter or more; <Small> for
13 cm or less.• Front speakers and rear speakers cannot be adjusted separately the
left and right.Regardless of the setting above...• No sound comes out of the subwoofer while playing Dolby Pro Logic II Movie or Music if the front speaker is set to <Large>.
• No sound comes out of the center speaker when surround is deactivated.
*5 Selectable only for “DISC” and “USB.” (Playback stops when you select one of the items.)
Position 1 Position 2
16:9 4:3 Letterbox
4:3 Pan Scan
Select the speaker
Adjust the speaker size
Continued on the next page
Book 1.indb 53Book 1.indb 53 07.2.1 8:23:07 PM07.2.1 8:23:07 PM

54
ENG
LISH
Menu items Selectable settings, [reference page]Di
sc Se
tup
2Speaker Level You can adjust the output level of the activated speakers
( <Speaker Size> on page 53), monitoring the test tone.Front Lch/Center Ch/Front Rch/Rear Rch/Subwoofer*6/Rear Lch
: adjust the output level of each speaker in the range of –10dB to +10dB; Initial 0dB.
• Press and hold ENT to turn on and off the test tone.
Speaker Distance*7 You can adjust the speaker output timing.Front Lch/Center Ch/Front Rch/Rear Rch/Rear Lch : adjust the
speaker distance from the listening position in the range of 15cm/6 inches to 600 cm/240 inches in 15 cm/6 inch step; Initial 120 cm/48 inch (for center speaker), 150 cm/60 inch (for other speakers).
• Press and hold DISP to change the measuring unit—cm and inch.
Tune
r
AF Regional When the received signals from the current station become weak...Off : Cancels—not selectable when <DAB AF> is set to <On>.AF Regional : Switches to another station broadcasting the same
programme. The REG indicator lights up.AF : Switches to another station. The programme may differ from the
one currently received (AF indicator lights up), [14].
TA Volume 00 to 30 or 50*8, Initial 15, [13].
Program Search Off, On, [14]
IF Band Width Auto : Increases the tuner selectivity to reduce interference noises between adjacent stations. (Stereo effect may be lost.)
Wide : Subject to the interference from adjacent stations, but sound quality will not be degraded and the stereo effect will remain.
DAB AF*9 Off, On, [44]
*6 This subwoofer level setting takes effect only when surround is activated. ( also page 24, 25)*7 This setting does not take effect for MPEG1/MPEG2 and DivX with MP3 audio track.*8 Depends on the amplifier gain control. ( page 56)*9 Appears only when DAB tuner is connected.
Select the speaker
Adjust the speaker level
Select the speaker
Adjust the speaker distance
Book 1.indb 54Book 1.indb 54 07.2.1 8:23:08 PM07.2.1 8:23:08 PM

SETTINGS55
ENG
LISH
Menu items Selectable settings, [reference page]In
put
AV Input You can determine the use of LINE IN and VIDEO IN plugs.Off : Select when no component is connected (“AV-IN” is skipped while
selecting the source).Audio&Video : Select when connecting an AV component such as a
VCR.Audio : Select when connecting an audio component such as a digital
audio player.Camera*10: Select when connecting the rear view camera. Camera Mirror*10: The mirror image of the rear view is displayed on
the monitor. (The monitor on the unit only; the normal rear view appears on the external monitor.)
Navigation : Select when connecting a Navigation System. [46]
External Input*11 For connecting an external component to the CD changer jack on the rear.Changer/iPod/D. Player*12: CD changer, iPod, or D. player
[40, 45]External Input : Any other than the above. [47]• For connecting the DAB tuner, this setting is not required. It is
automatically detected.
Othe
rs
Beep Off : Cancels.On : Activates the key-touch tone.
Telephone Muting*13 Off : Cancels.Muting1, Muting2 : Select either one which mutes the sounds while
using the cellular phone.
Initialize Initialize all settings you have made in <AV Menu>. Press ENT, then reset the unit. ( page 3)
*10 Reverse lamp lead connection is required. See Installation/Connection Manual (separate volume). The rear view through the camera appears on the monitor in “Full” aspect ratio (regardless of the aspect ratio setting) when you shift the gear to the reverse (R) position.
*11 Not selectable when the component connected to the CD changer jack is selected as the source.*12 The name of the component detected through the CD changer jack is shown.*13 The TEL MUTING lead connection is required. See Installation/Connection Manual (separate volume).
Book 1.indb 55Book 1.indb 55 07.2.1 8:23:08 PM07.2.1 8:23:08 PM

56
ENG
LISH
EqualizerFlat/Hard Rock/R&B/Pop/Jazz/Dance/Country/Reggae/Classic/User1/User2/User3, [48]
Sound
Menu items Selectable settings, [reference page]
Fader/Balance Adjust fader—speaker output balance between the front and rear speakers.• Upmost—front only• Downmost—rear onlyWhen using a two-speaker system, set the fader to the center (00).Adjust balance—speaker output balance between the left and right speakers.• Leftmost—left only• Rightmost—right only
Volume Adjust Adjust and store auto-adjustment volume level for each source, comparing to the FM volume level. The volume level will automatically increase or decrease when you change the source.–12 to +12; Initial 00
Subwoofer*14 Adjust the settings below in the submenu:Phase : Subwoofer phase. Select either <Normal> or <Reverse>, which
reproduces a better sound.Level : Subwoofer output level. Level: –06 to +08; Initial 00
High Pass Filter Through : Select when the subwoofer is not connected.On : Select when the subwoofer is connected.
Crossover Adjust the crossover frequency between the front/rear speakers and the subwoofer.80Hz, 120Hz, 150Hz
Amplifier Gain You can change the maximum volume level of this unit.Off : Deactivates the built-in amplifier.Low Power : VOL 00 to 30 (Select this if the maximum power of the speakers
is less than 50 W.)High Power : VOL 00 to 50
Rear Speaker*15 You can activate/deactivate the rear speakers.Off, On
*14 This subwoofer level setting takes effect only when surround is deactivated. ( also page 24, 25)*15 This setting takes effect only when Dual Zone is activated. ( also page 28)
Adjusts fader
Adjust balance
Book 1.indb 56Book 1.indb 56 07.2.1 8:23:09 PM07.2.1 8:23:09 PM

SETTINGS57
ENG
LISH
Disc Surround*16
Menu items Selectable settings, [reference page]
Surround Off Select to deactivate the surround function.
Surround On Select to activate the surround function. [24]Auto, Through, Dolby PLII Movie, Dolby PLII Music• When you select Dolby PLII Music, you can adjust <Panorama> and
<Center Width>.*17
*16 Selectable only for “DISC” and “USB.”*17 This setting takes effect only when the center speaker is activated.
Mode*18
Menu items Selectable settings, [reference page]
Mono Only for FM. (Off, On), [10]
DX/Local Only for FM. (DX, Local), [11]
SSM Only for FM. [11]
PTy Standby Only for FM/DAB. (Off, News), [13, 43] • When you activate PTY Standby Reception, you can change the PTY code for
PTY Standby Reception.
Title Entry Only for AV-IN and EXT-IN. [49]
All Off/Intro/Repeat/Random Only for disc/USB playback and iPod/D. player. [19, 32, 41, 45]
D.(Dynamic) Range Control Only for DAB. (Off, DRC1, DRC2, DRC3), [42]
Announce Standby Only for DAB. (Off, Transport News), [44]
*18 Items listed under <Mode> vary among the playback sources.
ListThe accessible lists differ depending on the sources. [12, 20, 39, 41]
Book 1.indb 57Book 1.indb 57 07.2.1 8:23:10 PM07.2.1 8:23:10 PM

58
ENG
LISH
Bluetooth*19
Menu items Selectable settings, [reference page]
Dial Menu Only for the device connected for “Bluetooth Phone.”Select the method to make a call. [37]
Message Only for the device connected for “Bluetooth Phone.”*20
You can read a message from the following message histories.Unread : Messages you have not read.Read : Messages you have read.Unsent : Messages you have not sent.Sent : Messages you have sent.• The number of messages in each history is also shown on the monitor.
Open [34]
Search [34]
Special Device Only for “NEW DEVICE.”Shows the list of Bluetooth devices which require some special procedure to establish Bluetooth connection. Select a device you want to connect.• After selecting the device, use <Open> or <Search> ( page 34) for
connection.• Once the connection is established, it is registered in the unit. You can
connect the unit and the device by using <Connect> (below) from the next time.
Connect Only for the registered devices.After selecting a device from among the registered devices ( page 35, 39), establish the connection with it.
Disconnect Only for the device being connected.Disconnect the current device before connecting another device.
Delete Pair Only for the registered devices.Delete the registered devices.
*19 Selectable only for “ Bluetooth Phone” or “Bluetooth Audio. ” Select a device (or “NEW DEVICE”) before operating the menu.
*20 Selectable only when the device is compatible with SMS.
When operating the Bluetooth device, refer also to the instructions supplied with the device.
Book 1.indb 58Book 1.indb 58 07.2.1 8:23:10 PM07.2.1 8:23:10 PM

SETTINGS59
ENG
LISH
Menu items Selectable settings, [reference page]Se
ttin
gsAuto Connect*21 When the unit is turned on, the connection is established automatically
with...Off : No Bluetoothdevice.Last : The last connected Bluetooth device.Order : The available registered Bluetooth device found at first.
Auto Answer*22 Off : The unit does not answer the calls automatically. Answer the calls manually.
On : The unit answers the incoming calls automatically.Reject : The unit rejects all incoming calls.
Message Info*22 Auto : The unit informs you of the arrival of a message by ringing and displaying “Receiving Message.” To read the message, press ENT ( page 37).
Manual : The unit does not inform you the arrival of a message.
MIC Setting*22 Adjust microphone volume connected to the unit.01, 02, 03
Version*23 The Bluetooth software and hardware versions are shown.
*21 Selectable only for “Bluetooth Phone.”*22 Only for the device connected for “Bluetooth Phone.” Not selectable for “NEW DEVICE”.*23 If you wish to receive more information about Bluetooth, visit our JVC web site.
Dual ZoneOff, On, On/Surround On, [28]
Book 1.indb 59Book 1.indb 59 07.2.1 8:23:11 PM07.2.1 8:23:11 PM

ENG
LISH
60
Maintenance How to clean the connector
Frequent detachment will deteriorate the connectors.To minimize this possibility, periodically wipe the connectors with a cotton swab or cloth moistened with alcohol, being careful not to damage the connectors.
Connector
Moisture condensationMoisture may condense on the lens inside the unit in the following cases:• After starting the heater in the car.• If it becomes very humid inside the car.Should this occur, the unit may malfunction. In this case, eject the disc and leave the unit turned on for a few hours until the moisture evaporates.
How to handle discsWhen removing a disc from its case, press down the center holder of the case and lift the disc out, holding it by the edges.• Always hold the disc by the edges.
Do not touch its recording surface.When storing a disc into its case, gently insert the disc around the center holder (with the printed surface facing up).• Make sure to store discs into the cases after use.
To keep discs cleanA dirty disc may not play correctly. If a disc does become dirty, wipe it with a soft cloth in a straight line from center to edge.• Do not use any solvent (for example, conventional
record cleaner, spray, thinner, benzine, etc.) to clean discs.
To play new discsNew discs may have some rough spots around the inner and outer edges. If such a disc is used, this unit may reject the disc.To remove these rough spots, rub the edges with a pencil or ball-point pen, etc.
Stick-on label
Sticker Sticker residue
Warped disc
Do not use the following discs:
Center holder
Book 1.indb 60Book 1.indb 60 07.2.1 8:23:11 PM07.2.1 8:23:11 PM

61 REFERENCES
ENG
LISH
More about this unit General
Turning on the power• By pressing SRC (source) on the unit, you can also
turn on the power. If the source is ready, playback starts.
FM/AMStoring stations in memory• When SSM is over, received stations are preset in No. 1 (lowest frequency) to No. 6 (highest frequency).
DiscGeneral• In this manual, words “track” and “file” are
interchangeably used.• This unit can also play back 8 cm discs.• This unit can only play back audio CD (CD-DA) files if
different type of audio files (MP3/WMA/WAV/AAC) are recorded in the same disc.
• This unit can display only one-byte characters. No other characters can be correctly displayed.
Inserting a disc• When a disc is inserted upside down or has no
playable files, “Cannot play this disc Check the disc” appears on the monitor. Eject the disc.
Ejecting a disc• If the ejected disc is not removed within 15 seconds,
the disc is automatically inserted again into the loading slot to protect it from dust. (Disc playback starts.)
Changing the source• If you change the source, playback also stops without
ejecting the disc. Next time you select “DISC” for the playback source,
disc play starts from where it stopped previously.
Playing Recordable/Rewritable discs• This unit can recognize a total of 5 000 files and 250
folders (a maximum of 999 files per folder).• Use only “finalized” discs.• This unit can play back multi-session discs; however,
unclosed sessions will be skipped while playing.• This unit can recognize a total 25 characters for file/
folder names.• Some discs or files may not be played back due to
their characteristics or recording conditions.
Playing DVD Audio• Some DVD Audios prohibit downmix. When you play
back such a disc, “LR ONLY” appears on the display and the unit plays back the left front and right front signals.
• “MULTI CH” appears on the monitor after a beep when you try to play a multi-channel disc with Surround turned <Off>.
Playing DVD-VR• This unit cannot play back CPRM (Content Protection
for Recordable Media) protected files.• For details about DVD-VR format and play list, refer
to the instructions supplied with the recording equipment.
File playbackPlaying DivX files• This unit can play back DivX files with the extension
code <.divx>, <.div>, <.avi> (regardless of the letter case—upper/lower).
• This unit supports the DivX files whose resolution is 720 x 576 pixels or less.
• This unit supports DivX 6.x, 5.x, 4.x, and 3.11.• Audio stream should conform to MP3 or Dolby Digital.• The file encoded in the interlaced scanning mode
may not be played back correctly.• The maximum bit rate for video signals (average) is
as follows:– DVD: 4 Mbps– USB: 2 Mbps
Book 1.indb 61Book 1.indb 61 07.2.1 8:23:12 PM07.2.1 8:23:12 PM

ENG
LISH
62
Playing MPEG1/MPEG2 files• This unit can play back MPEG1/MPEG2 files with the
extension code <.mpg>, <.mpeg>, or <.mod>*.* <.mod> is an extension code used for the
MPEG2 files recorded by JVC Everio camcorders.• The stream format should conform to MPEG system/
program stream.• The file format should be MP@ML (Main Profile at
Main Level)/SP@ML (Simple Profile at Main Level)/MP@LL (Main Profile at Low Level).
• Audio streams should conform to MPEG1 Audio Layer-2 or Dolby Digital.
• The maximum bit rate for video signals (average) is as follows:– DVD: 4 Mbps– USB: 2 Mbps
Playing JPEG files• This unit can play back JPEG files with the extension
code <.jpg>, or <.jpeg>.• It is recommended that you record a file at 640 x 480
resolution.• This unit can play back baseline JPEG files.
Progressive JPEG files or lossless JPEG files cannot be played.
Playing MP3/WMA/WAV/AAC files• This unit can play back files with the extension
code <.mp3>, <.wma>, <.wav>, or <.m4a> (regardless of the letter case—upper/lower).
• This unit can play back the files meeting the conditions below:– Bit rate: MP3/WMA: 32 kbps — 320 kbps AAC: 16 kbps — 320 kbps– Sampling frequency: 48 kHz, 44.1 kHz, 32 kHz (for MPEG1) 24 kHz, 22.05 kHz, 16 kHz (for MPEG2) 48 kHz, 44.1 kHz, 32 kHz, 22.05 kHz (for WMA) 44.1 kHz (for WAV) 48 kHz, 44.1 kHz (for AAC)
• This unit can show ID3 Tag Version 1.0/1.1/2.2/2.3/2.4 (for MP3). This unit can also show WAV/WMA/AAC Tag.
• This unit can play back files recorded in VBR (variable bit rate).
Files recorded in VBR have a discrepancy in elapsed time indication.
• This unit cannot play back the following files:– MP3 files encoded with MP3i and MP3 PRO
format.– MP3 files encoded with Layer 1/2.– WMA files encoded with lossless, professional,
and voice format.– WMA files which are not based upon Windows
Media® Audio.– WMA/AAC files copy-protected with DRM.– AAC files purchased from the iTunes store.– Files which have the data such as AIFF, ATRAC3,
etc.
Enjoying surround sounds• If <Surround On> is selected, “MULTI” surround
playback automatically starts for multi-channel encoded discs regardless of the <Surround On> setting.
• You cannot activate surround for MPEG multi-channel DVD Video, DivX 2-channel and MPEG 2-channel sources. If <Surround On> is selected, stereo sounds are emitted only through the front speakers. “FRONT 2CH” appears on the source information screen.
• When “FIX” appears on the source information screen, no sound comes out of the subwoofer.
• When <AUTO> is selected, downsampling is performed for DVD Video (LPCM only), DVD-VR (LPCM only), and DVD Audio with fs=88.2 kHz/96 kHz and higher.
Book 1.indb 62Book 1.indb 62 07.2.1 8:23:12 PM07.2.1 8:23:12 PM

63 REFERENCES
ENG
LISH
Warning messages for Bluetooth operations• Connection Error : The device is registered but the
connection has failed. Use <Connect> to connect the device again. ( page 35)
• Error : Try the operation again. If “Error” appears again, check if the device supports the function you have tried.
• Device Unfound : No available Bluetooth device is detected by <Search>.
• Loading : The unit is updating the phone book and/or SMS.
• Please Wait... : The unit is preparing to use the Bluetooth function. If the message does not disappear, turn off and turn on the unit, then connect the device again (or reset the unit).
Icons for phone types• These icons indicate the phone type set on the device.
: Cellular phone
: Household phone
: Office
: General
: Other than above
DAB tuner• Only the primary DAB service can be preset even
when you store a secondary service.
iPod/D. player operations • When you turn on this unit, the iPod or D. player is
charged through the adapter connected to this unit.• The text information may not be displayed correctly.
This unit can display up to 40 characters.
USB• If “No USB device“ appears after removing a device,
Reattach a device or select another playback source.• When the USB device has no playable files, or has not
been formatted correctly, “Cannot play this device Check the device” appears on the monitor.
• The unit cannot recognize a USB device whose rating is other than 5 V and does not exceed 500 mA.
• While playing from a USB device, the playback order may differ from other players.
• This unit may be unable to play back some USB devices or some files due to their characteristics or recording conditions.
• Depending on the shape of the USB devices and connection ports, some USB devices may not be attached properly or the connection might be loose.
• When connecting a USB device, refer also to its instructions.
• Connect only one USB device to the unit at a time. Do not use a USB hub.
• This unit may not recognize a USB device connected through a USB card reader.
• This unit may not play back files in a USB device properly when using a USB extension cord.
• This unit cannot assure proper functions or supply power to all types of the devices.
• This unit can recognize a total of 5 000 files and 250 folders (a maximum of 999 files per folder).
• This unit can recognize a total 25 characters for file/folder names.
Bluetooth operationsGeneral• While driving, do not perform complicated operation
such as dialling the numbers, using phone book, etc. When you perform these operations, stop your car in a safe place.
• Some Bluetooth devices may not be connected to this unit depending on the Bluetooth version of the device.
• This unit may not work for some Bluetooth devices.• Connecting condition may vary depending on
circumstances around you.• When the unit is turned off, the device is disconnected.
Continued on the next page
Book 1.indb 63Book 1.indb 63 07.2.1 8:23:13 PM07.2.1 8:23:13 PM

ENG
LISH
64
Preset equalizing values
Frequency60 Hz 150 Hz 400 Hz 1 kHz 2.5 kHz 6.3 kHz 15 kHz
Sound modeFlat 00 00 00 00 00 00 00Hard Rock +03 +03 +01 00 00 +02 +01R&B +03 +02 +02 00 +01 +01 +03Pop 00 +02 00 00 +01 +01 +02Jazz +03 +02 +01 +01 +01 +03 +02Dance +04 +02 00 –02 –01 +01 +01Country +02 +01 00 00 00 +01 +02Reggae +03 00 00 +01 +02 +02 +03Classic +02 +03 +01 00 00 +02 00User1/2/3 00 00 00 00 00 00 00
Menu settings• If you change the <Amplifier Gain> setting
from <High Power> to <Low Power> while the volume level is set higher than “30,” the unit automatically changes the volume level to “VOL 30.”
• After you change any of <Menu Language/Audio Language/Subtitle> settings, turn off then on the power, and re-insert the disc (or insert another disc) so that your setting takes effect.
• When you select <16:9> for a picture whose aspect ratio is 4:3, the picture slightly changes due to the process for converting the picture width.
• Even if <4:3 Pan Scan> is selected, the screen size may become <4:3 Letterbox> for some discs.
Notice:When operating an iPod or a D. player, some operations may not be performed correctly or as intended. In this case, visit the following JVC web site:For iPod users: <http://www.jvc.co.jp/english/car/support/ks-pd100/index.html>For D. player users: <http://www.jvc.co.jp/english/car/support/ks-pd500/index.html>
About sounds reproduced through the rear terminals• Speaker out/analog discrete output—LINE OUT
(FRONT/REAR)/CENTER OUT/SUBWOOFER:Multi-channel signals are emitted for a multi-channel encoded software. (When Dual Zone is activated, the same signal emitted through 2nd AUDIO OUT plugs are emitted for the main source “DISC.”)
• 2nd AUDIO OUT: 2-channel signal is emitted when Dual Zone is activated. When playing a multi-channel encoded disc, multi-channel signals are downmixed (except for some DVD Audio).
• “DVD Logo” is a trademark of DVD Format/Logo Licensing Corporation registered in the US, Japan and other countries.
• DivX, DivX Ultra Certified, and associated logos are trademarks of DivX, inc. and are used under license.
• Official DivX® Ultra Certified product• Plays all versions of DivX® video (including DivX® 6)
with enhanced playback of DivX® media files and the DivX® Media Format
• Microsoft and Windows Media are either registered trademarks or trademarks of Microsoft Corporation in the United States and/or other countries.
• iPod and iTunes are trademarks of Apple Inc., registered in the U.S. and other countries.
Book 1.indb 64Book 1.indb 64 07.2.1 8:23:13 PM07.2.1 8:23:13 PM

65 REFERENCES
ENG
LISH
Characters shown on the monitorIn addition to the roman alphabet (A – Z, a – z), the following characters will be used to show the various information on the monitor.• You can also use the following characters to assign titles. ( page 49)
Language codes (for DVD/DivX language selection)
Code Language Code Language Code Language Code Language Code LanguageAA Afar FA Persian KL Greenlandic OC Occitan ST SesothoAB Abkhazian FI Finnish KM Cambodian OM (Afan) Oromo SU SundaneseAF Afrikaans FJ Fiji KN Kannada OR Oriya SW SwahiliAM Ameharic FO Faroese KO Korean (KOR) PA Panjabi TA TamilAR Arabic FY Frisian KS Kashmiri PL Polish TE TeluguAS Assamese GA Irish KU Kurdish PS Pashto, Pushto TG TajikAY Aymara GD Scots Gaelic KY Kirghiz PT Portuguese TH ThaiAZ Azerbaijani GL Galician LA Latin QU Quechua TI TigrinyaBA Bashkir GN Guarani LN Lingala RM Rhaeto-Romance TK TurkmenBE Byelorussian GU Gujarati LO Laothian RN Kirundi TL TagalogBG Bulgarian HA Hausa LT Lithuanian RO Rumanian TN SetswanaBH Bihari HI Hindi LV Latvian, Lettish RW Kinyarwanda TO TongaBI Bislama HR Croatian MG Malagasy SA Sanskrit TR TurkishBN Bengali, Bangla HU Hungarian MI Maori SD Sindhi TS TsongaBO Tibetan HY Armenian MK Macedonian SG Sangho TT TatarBR Breton IA Interlingua ML Malayalam SH Serbo-Croatian TW TwiCA Catalan IE Interlingue MN Mongolian SI Singhalese UK UkrainianCO Corsican IK Inupiak MO Moldavian SK Slovak UR UrduCS Czech IN Indonesian MR Marathi SL Slovenian UZ UzbekCY Welsh IS Icelandic MS Malay (MAY) SM Samoan VI VietnameseDZ Bhutani IW Hebrew MT Maltese SN Shona VO VolapukEL Greek JI Yiddish MY Burmese SO Somali WO WolofEO Esperanto JW Javanese NA Nauru SQ Albanian XH XhosaET Estonian KA Georgian NE Nepali SR Serbian YO YorubaEU Basque KK Kazakh NO Norwegian SS Siswati ZU Zulu
Upper and lower cases
Numbers and symbols
Book 1.indb 65Book 1.indb 65 07.2.1 8:23:14 PM07.2.1 8:23:14 PM

ENG
LISH
66
TroubleshootingWhat appears to be trouble is not always serious. Check the following points before calling a service center.
Symptoms Remedies/Causes
Gene
ral
• No sound comes out of the center speaker. • Center speaker is not activated. ( page 53) Once you have reset the unit, make sure to activate the
speaker again.• Center speaker is used only for surround playback. No
sound comes out for stereo playback.
• The monitor is not clear and legible. Sunshine from the windscreen may cause this symptom.Adjust <Bright>. ( page 51)
• The unit does not work at all. Reset the unit. ( page 3)
• The remote controller does not work. Deactivate Dual Zone. ( page 28)(While Dual Zone is activated, the remote controller only functions for operating the DVD/CD player.)
• “No Signal” appears. • Change the source.• Start the playback on the external component connected
to VIDEO IN plug.• Check the cords and connections.• Signal input is too weak.
• “Mecha Error Push Reset” appears on the monitor, and the panel does not move.
Reset the unit. ( page 3)
FM/A
M • SSM automatic presetting does not work. Store stations manually. ( page 11)
• Static noise while listening to the radio. Connect the aerial firmly.
Disc
pla
ybac
k
• Disc can be neither recognized nor played . Eject the disc forcibly. ( page 3)
• Disc cannot be ejected. Unlock the disc. ( page 20)
• Recordable/Rewritable discs cannot be played back.
• Tracks on the Recordable/Rewritable discs cannot be skipped.
• Insert a finalized disc.• Finalize the discs with the component which you used
for recording.
• Playback does not start. • Insert the disc correctly again.• Region code of the DVD is not correct. ( page 4)• The format of files is not supported by the unit.
• The playback picture is not clear and legible. Adjust items in <Picture Adjust>. ( page 51)
• Sound and pictures are sometimes interrupted or distorted.
• Stop playback while driving on rough roads.• Change the disc.
Book 1.indb 66Book 1.indb 66 07.2.1 8:23:15 PM07.2.1 8:23:15 PM

67 REFERENCES
ENG
LISH
Symptoms Remedies/CausesDi
sc p
layb
ack
• No playback picture appears on the monitor. Parking brake lead is not connected properly. ( Installation/Connection Manual)
• No picture appears on the external monitor. • Connect the video cord correctly.• Select the correct input on the external monitor.
• “Eject Error” or “Loading Error” appears on the monitor.
Changing the source by pressing SOURCE will solve this error.
File
pla
ybac
k
• Disc cannot be played back. • Change the disc.• Record the tracks using a compliant application in the
appropriate discs. ( page 4)• Add appropriate extension codes to the file names.
• Noise is generated. The track played back is not a playable file format. Skip to another file.
• Tracks are not played back as you have intended them to play.
Playback order may differs from the one played back using other players.
• Elapsed playing time is not correct. This sometimes occurs during playback. This is caused by how the tracks are recorded.
• “Not Support” appears on the monitor and track skips.
The track is unplayable.
USB
play
back
• Noise is generated. • The track played back is not a playable file format (MP3/WMA/WAV/AAC). Skip to another file.
• Do not add the extension code <.mp3>, <.wma>, <.wav>or <.m4a> to non-MP3/WMA/WAV/AAC tracks.
• Tracks cannot play back as you have intended them to play.
Playback order may differs from the one played back using other players.
• “Now Reading” keeps flashing on the monitor.
• Readout time varies depending on the USB device.• Do not use too many hierarchy, folders and empty
folders.** Folder that is physically empty or folder that contains
data but does not contain valid MP3/WMA/WAV/AAC track.
• Turn off the power then on again.• Do not pull out or connect the USB device repeatedly
while “Now Reading” is displayed on the monitor.
• Correct characters are not displayed (e.g. album name).
For available characters, page 65.
• While playing a track, sound is sometimes interrupted.
The tracks have not been properly copied into the USB device. Copy tracks again into the USB device, and try again.
Book 1.indb 67Book 1.indb 67 07.2.1 8:23:15 PM07.2.1 8:23:15 PM

ENG
LISH
68
Symptoms Remedies/CausesBl
ueto
oth
• Bluetooth device does not detect the unit. This unit can be connected with one Bluetooth cellular phone and one Bluetooth audio device at a time.While connecting a device, this unit cannot be detected from another device. Disconnect currently connected device and search again.
• The unit does not detect the Bluetooth device.
• Check the Bluetooth setting of the device.• Search from the Bluetooth device. After the device
detects the unit, select <Open> on the unit to connect the device. ( page 34)
• The unit does not make pairing with the Bluetooth device.
• Enter the same PIN code for both the unit and target device. If the PIN code of the device is not indicated on its instructions, try “0000” or “1234.”
• Select the device name from <Special Device>, then try to connect again. ( page 35)
• Echo or noise occurs. Adjust the microphone unit position.
• Phone sound quality is poor. • Reduce the distance between the unit and the Bluetooth audio device.
• Move the car to place where you can get a better signal reception.
• The sound is interrupted or skipped during playback of a Bluetooth audio device.
• Reduce the distance between the unit and the Bluetooth audio device.
• Disconnect the device connected for “Bluetooth phone.”• Turn off, then turn on the unit.• (When the sound is not yet restored,) connect the device
again.
• “New Device” cannot be selected for “Bluetooth Audio.”
Bluetooth audio device is being connected. To select “New Device,” disconnect it. ( page 35)
• The connected audio device cannot be controlled.
Check whether the connected audio device supports AVRCP (Audio Video Remote Control Profile).
CD ch
ange
r
• “No Disc” appears on the monitor. Insert a disc into the magazine.
• “No Magazine” appears on the monitor. Insert the magazine.
• “Cannot play this disc Check the disc” appears on the monitor.
Disc does not include playable files. Replace the disc with playable files.
• “Reset 08” appears on the monitor. Connect this unit and the CD changer correctly and press the reset button of the CD changer.
• “Reset 01” – “Reset 07” appears on the monitor.
Press the reset button of the CD changer.
• The CD changer does not work at all. Reset the unit. ( page 3)
Book 1.indb 68Book 1.indb 68 07.2.1 8:23:16 PM07.2.1 8:23:16 PM

69 REFERENCES
ENG
LISH
Symptoms Remedies/CausesDA
B tu
ner
• “No DAB Signal” appears on the monitor. Move to an area with stronger signals.
• “Reset 08” appears on the monitor. Connect this unit and the DAB tuner correctly, then reset the unit. ( page 3)
• The DAB tuner does not work at all. Connect this unit and the DAB tuner correctly, then reset the unit. ( page 3)
• “Antenna Power NG” appears on the monitor. Check the cords and connections.
iPod
/D. p
laye
r pla
ybac
k
• The iPod/D. player does not turn on or does not work.
• Check the connecting cable and its connection.• Charge the battery.• For D. player: Update the firmware version.
• The sound is distorted. Deactivate the equalizer either on this unit or the iPod/D. player.
• “Disconnect” appears on the monitor. Check the connecting cable and its connection.
• For iPod: Playback stops. The headphones are disconnected during playback. Restart playback.
• No sound can be heard.• “Error 01” appears on the monitor when
connecting a D. player.
Disconnect the D. player from the adapter. Then, connect them again.
• “No Files” or “No Track” appears on the monitor.
No tracks are stored. Import tracks to the iPod or D. player.
• “Reset 01” – “Reset 07” appears on the monitor.
Disconnect the adapter from both this unit and iPod/D. player. Then, connect them again.
• “Reset 08” appears on the monitor. Check the connection between the adapter and this unit.
• The iPod’s or D. player’s controls do not work after disconnecting from this unit.
Reset the iPod or D. player.
AV-IN
• No picture appears on the monitor. • Turn on the video component if it is not on.• This unit is not connected to the video component
correctly. Connect it correctly.
• The playback picture is not clear and legible. Adjust items in <Picture Adjust>. ( page 51)
Book 1.indb 69Book 1.indb 69 07.2.1 8:23:16 PM07.2.1 8:23:16 PM

ENG
LISH
70
SpecificationsAM
PLIF
IER
Maximum Power Output: Front/Rear: 50 W per channelContinuous Power Output (RMS):
Front/Rear: 20 W per channel into 4 Ω, 40 Hz to 20 000 Hz at no more than 0.8% total harmonic distortion
Load Impedance: 4 Ω (4 Ω to 8 Ω allowance)Equalizer Control Range: Frequencies: 60 Hz, 150 Hz, 400 Hz, 1 kHz, 2.5 kHz,
6.3 kHz, 15 kHzLevel: ±10 dB
Signal-to-Noise Ratio: 70 dBAudio Output Level
LINE OUT (FRONT/REAR)/CENTER OUT/ SUBWOOFER:
Line-Out Level/Impedance: 5.0 V/20 kΩ load (full scale)Output Impedance: 1 kΩ
Color System: PALVideo Output (composite): 1 Vp-p/75 ΩOther Terminals: Input: LINE IN, VIDEO IN, MIC IN, USB input
terminal, Aerial inputOutput: 2nd AUDIO OUT, VIDEO OUTOthers: CD changer, OE REMOTE
FM/A
M TU
NER
Frequency Range: FM: 87.5 MHz to 108.0 MHzAM: (MW) 522 kHz to 1 620 kHz
(LW) 144 kHz to 279 kHzFM Tuner: Usable Sensitivity: 11.3 dBf (1.0 μV/75 Ω)
50 dB Quieting Sensitivity: 16.3 dBf (1.8 μV/75 Ω)Alternate Channel Selectivity (400 kHz): 65 dBFrequency Response: 40 Hz to 15 000 HzStereo Separation: 35 dB
MW Tuner: Sensitivity/Selectivity: 20 μV/35 dBLW Tuner: Sensitivity: 50 μV
DVD/
CD
Signal Detection System: Non-contact optical pickup (semiconductor laser)
Frequency Response: DVD, fs=48 kHz: 16 Hz to 22 000 Hz
DVD, fs=192 kHz: 16 Hz to 88 000 Hz
VCD/CD: 16 Hz to 20 000 Hz
Dynamic Range: 93 dB
Signal-to-Noise Ratio: 95 dB
Wow and Flutter: Less than measurable limit
Book 1.indb 70Book 1.indb 70 07.2.1 8:23:16 PM07.2.1 8:23:16 PM

71 REFERENCES
ENG
LISH
MON
ITOR
Screen Size: 3.5 inch wide liquid crystal display
Number of Pixel: 211 200 pixels: 960 (horizontal) × 220 (vertical)
Drive Method: TFT (Thin Film Transistor) active matrix format
Color System: PAL/NTSC
Aspect Ratio: 16:9 (wide)
Allowable Storage Temperature: –10°C to +60°C
Allowable Operating Temperature: 0°C to +40°C
USB
USB Standards: USB 1.1
Data Transfer Rate Full Speed: Maximum 12 MbytesLow Speed: Maximum 1.5 Mbytes
Compatible Device: Mass storage class
Compatible File System: FAT 32/16/12
Max. Current: Less than 500 mA/5 V
BLUE
TOOT
H
Version: Bluetooth 1.2 certified
Output Power: +4 dBm Max. (Power class 2)
Service Area: Within 10 m
Profile: HSP (Headset Profile)HFP (Hands-Free Profile)A2DP (Advanced Audio Distribution Profile)AVRCP (Audio/Video Remote Control Profile)SPP (Serial Port Profile)OPP (Object Push Profile)
GENE
RAL
Power Requirement: Operating Voltage: DC 14.4 V (11 V to 16 V allowance)
Grounding System: Negative ground
Allowable Operating Temperature: 0°C to +40°C
Dimensions (W × H × D): Installation Size (approx.): 182 mm × 52 mm × 160 mm
Panel Size (approx.): 188 mm × 58 mm × 12 mm
Mass (approx.): 2.1 kg (excluding accessories)
Design and specifications are subject to change without notice.
Book 1.indb 71Book 1.indb 71 07.2.1 8:23:17 PM07.2.1 8:23:17 PM

EN, RU, UK0207MNMMDWJEIN
Having TROUBLE with operation?Please reset your unit
Refer to page of How to reset your unit
Затруднения при эксплуатации?Пожалуйста, перезагрузите Ваше
устройствоДля получения информации о перезагрузке Вашего
устройства обратитесь на соответствующую страницу
Маєте ПРОБЛЕМУ з функціонуванням?
Повторно налаштуйте системуДив. сторінку “Як повторно налаштувати пристрій”
© 2007 Victor Company of Japan, Limited
Bіктор Компані оф Джепен Лімітед12, 3-чоме, Морійя-чо, Канагава-ку, Йокогама, Канагава 221-8520, Японія
Rear_KD-AVX33EE.indd 2Rear_KD-AVX33EE.indd 2 07.1.28 2:05:34 PM07.1.28 2:05:34 PM

1
KD-AVX33Installation/Connection ManualРуководство по установке/подключениюКерівництво зі встановлення та з’єднання
LVT1659-006A[EE] 0207MNMMDWJEIN
EN, RU, UK©2007 Victor Company of Japan, Limited
ENGLISH
This unit is designed to operate on 12 V DC, NEGATIVE ground electrical systems. If your vehicle does not have this system, a voltage inverter is required, which can be purchased at JVC IN-CAR ENTERTAINMENT dealers.
WARNINGS• DO NOT install any unit and wire any cable in locations where;
– it may obstruct the steering wheel and gearshift lever operations, as this may result in a traffic accident.
– it may obstruct the operation of safety devices such as air bags, as this may result in a fatal accident.
– it may obstruct visibility.• DO NOT operate any unit while manipulating the steering wheel, as
this may result in a traffic accident.• The driver must not watch the monitor while driving. If the driver
watches the monitor while driving, it may lead to carelessness and cause an accident.
• The driver must not put on the headphones while driving. It is dangerous to shut off the outside sounds while driving.
• If you need to operate the unit while driving, be sure to look around carefully.
• If the parking brake is not engaged, “Parking Brake” appears on the monitor, and no playback picture will be shown.– This warning appears only when the parking brake lead is
connected to the parking brake system built in the car.Notes on electrical connections:• Replace the fuse with one of the specified rating. If the fuse blows
frequently, consult your JVC IN-CAR ENTERTAINMENT dealers.• It is recommended to connect to the speakers with maximum
power of more than 50 W (both at the rear and at the front, with an impedance of 4 Ω to 8 Ω).
If the maximum power is less than 50 W, change “Amplifier Gain” setting to prevent the speakers from being damaged (see page 56 of the INSTRUCTIONS).
• To prevent short-circuit, cover the terminals of the UNUSED leads with insulating tape.
• The heat sink becomes very hot after use. Be careful not to touch it when removing this unit.
РУCCKИЙ
Это устройство разработано для эксплуатации на 12 В постоянного напряжения с минусом на массе. Если Ваш автомобиль не имеет этой системы, требуется инвертор напряжения, который может быть приобретен у дилера автомобилнего специалиста JVC.
УКРАЇНА
Цей пристрій призначений для роботи під напругою 12 В постійного струму; з електричними системами, що мають заземлення ВІД’ЄМНОГО полюсу. Якщо ваше авто не оснащене такою системою, потрібно використовувати інвертор напруги, який можна придбати у дилерів устаткування JVC для автомобілів.
ПРЕДУПРЕЖДЕНИЯ• НЕ устанавливайте устройства и не прокладывайте провода в
местах, где:– возникает препятствие для функционирования руля
и рычага переключения скоростей, так как это может привести к аварии;
– возникает препятствие срабатыванию устройств безопасности, например, пневмоподушки, что может привести к несчастному случаю со смертельным исходом;
– может ухудшиться обзор.• НЕ используйте устройство, когда управляете рулем; это
может привести к аварии.• Водителю не следует смотреть на монитор во время
вождения. Это может отвлечь и привести к аварии. Если вощитель смотрит на монитор во время вождения, это может привести к потере внимания и стать причиной аварии.
• Водителю не следует надевать наушники во время вождения. Во время вождения опасно изолироваться от внешних шумов.
• При необходимости управления устройством во время вождения автомобиля внимательно следите за дорогой.
• Если стояночный тормоз не включен, на мониторе появляется сообщение “Parking Brake” и изображение воспроизведения отображаться не будет.– Это предупреждение появляется только в том случае, если
провод стояночного тормоза подключен к стояночной тормозной системе автомобиля.
Примечания по электрическим подключениям:• Заменяйте предохранитель другим предохранителем
указанного класса. Если предохранитель сгорает слишком часто, обратитесь к дилеру автомобилнего специалиста JVC.
• Рекомендуется подключать динамики с максимальной мощностью более 50 Вт (к задней и передней панели устройства, с полным сопротивлением от 4 Ω до 8 Ω).
Если максимальная мощность динамиков менее 50 Вт, перейдите в режим “Amplifier Gain”, чтобы предотвратить их повреждение (cм. ИНСТРУКЦИИ ПО ЭКСПЛУАТАЦИИ на стр. 56).
• Для предотвращения ороткого замыкания заклейте НЕИСПОЛЬЗУЕМЫЕ концы изолирующей лентой.
• Радиатор во время использования сильно нагревается. Старайтесь его не трогать во время удаления устройства.
ПОПЕРЕДЖЕННЯ• НЕ встановлюйте даний пристрій і не приєднуйте жодних
проводів у місцях, де:– вони можуть перешкоджати вправлятися з кермом і важелем
перемикання передач, тому що це може призвести до аварії на дорозі;
– вони можуть перешкоджати роботі таких пристроїв безпеки, як подушки безпеки, тому що це може призвести до смертельного випадку.
– затуляти огляд.• НЕ виконуйте ніяких операцій з пристроєм під час керування,
тому що це може призвести до аварії на дорозі.• Під час руху водій не повинен відволікатися і дивитись на
монітор. Якщо водій під час руху дивиться на монітор, його необачність може призвести до аварії.
• Підчас руху забороняється надягати навушники. Ізолювання від зовнішніх звуків підчас руху є небезпечним.
• Якщо ж це необхідно зробити, уважно стежте за рухом.• Якщо автомобіль не на ручному гальмі, на екрані монітора
з’являється напис “Parking Brake”, і зображення не буде виводитися.– Це попередження з’являється тільки тоді, коли провід
ручного гальма з’єднаний з ручним гальмом автомобіля.Зауваження щодо електричних з’єднань:• Заміняти запобіжник можна тільки запобіжником із вказаними
у специфікації номінальними характеристиками. Якщо запобіжники часто виходять з ладу, проконсультуйтеся з дилером устаткування JVC для автомобілів.
• Рекомендується підключати гучномовці з максимальною потужністю, що перевищує 50 Вт (як для розташованих спереду, так і для тих, що розміщуються позаду. Рекомендований діапазон опору: від 4 до 8 Ом).
У разі, якщо потужність є меншою чим 50 Вт, змініть налаштування “Amplifier Gain” (коефіцієнт підсилення) задля запобігання пошкодженню гучномовців (див. стор. 56 ІНСТРУКЦІЇ).
• Для запобігання короткому замиканню, заізолюйте клеми провідника, ЩО НЕ ВИКОРИСТОВУЄТЬСЯ, ізоляційною стрічкою.
• По закінчені роботи радіатор стає надто гарячим. Будьте обережні, не торкайтесь його при видалені цього пристрою.
GCrimp connectorsОбжимные разъемыОбтиснене рознімання
CSleeveМуфтаЕкран
EPower cordКабель питанияШнур живлення
A / BHard case/Control panelЖесткий футляр/Панель управленияЖорсткий футляр/Панель управління
DTrim plateДекоративную панельЗнімна пластина
Required space for installation / Пространство, необходимое для установки / Потрібне місце для встановлення
Trim plate is detached on this illustration for explanation.Для наглядности декоративная пластина показана снятой.Для роз’яснення, на малюнку знімну пластину зображено відокремленою.
Installing the remote controller / Установка пульта дистанционного управления / Встановлення пульту дистанційного керування
Holder / Держатель / Утримувач
Remote controllerДиcтaнциoннoго yпpaвлeнияПульт дистанційного керування
Heat sinkРадиаторРадіатор
Parts list for installation and connection / Список деталей для установки и подключения / Перелік деталей для встановлення та з’єднанняThe following parts are provided for this unit. After checking them, please set them correctly.Следующие детали поставлены в комплекте с устройством. После проверки комплектации, пожалуйста, установите их правильно.У комплекті з цим пристроєм надаються такі деталі. Після завершення перевірки, встановіть їх належним чином.
FAudio/video cordАудио/видеошнурАудіо/відео шнур
IBatteriesБатареиБатареї
JDouble-sided adhesive tapeДвусторонняя клейкая лентаДвостороння липка стрічка
LMicrophone clip Фиксатор микрофонаПрищіпка мікрофону
NWasher (ø5)Шайба (њ5)Шайба (ø5)
OLock nut (M5)Фиксирующая гайка (M5)Стопорна гайка (М5)
PHandlesРычагиРучки
QRubber cushionРезиновый чехолГумова прокладка
RMounting bolt—M5 × 20 mm Крепежный болт—M5 × 20 ммМонтажний болт—M5 × 20 мм
HRemote controller / HolderДиcтaнциoннoго yпpaвлeния / ДержательПульт дистанційного керування / Утримувач
MReverse gear signal extension cordУдлинительный кабель сигнала заднего ходаДодатковий провід для сигналу заднього ходу
KMicrophoneМикрофонМікрофон
Control panelПанель управленияПанель управління
DashboardПриборная панельПриладова панель
Double-sided adhesive tapeДвусторонняя клейкая лентаДвостороння липка стрічка
Instal1-3_AVX33_006A[EE]1.indd 1Instal1-3_AVX33_006A[EE]1.indd 1 2/2/07 3:53:50 pm2/2/07 3:53:50 pm

2
*1 When you stand the unit, be careful not to damage the fuse on the rear.*1 Устанавливайте устройство таким образом, чтобы не повредить предохранитель,
расположенный сзади.*1 При встановленні пристрою, будьте обережні, не пошкодьте запобіжник, розташований у
тильній частині.
Do the required electrical connections.Выполните необходимые подключения контактов, как показано на оборотной стороне этой инструкции.Виконайте потрібні електричні з’єднання.
Bend the appropriate tabs to hold the sleeve firmly in place.Отогните соответствующие фиксаторы, предназначенные для прочной установки корпуса.Зігніть відповідні фіксатори для надійного встановлення екрану на його місці.
When using the optional stay / При использовании дополнительной стойки / Використання додаткової стійки (постачається за окремим замовленням)
When installing the unit without using the sleeve / При установке устройства без использования муфты / Встановлення пристрою без екрануIn a car having the “Required space for installation” (see page 1), first remove the car radio and install the unit in its place.Нельзя установить устройство в автомобиле, в котором есть какие-либо препятствия в пределах расстояния, указанного на рисунке “Пространство, необходимое для установки” на стр. 1.Забороняється встановлювати пристрій у машину, якщо він буде створювати перешкоди у місцях, зазначених у розділі “Потрібне місце для встановлення” на стор. 1.
Screw (option)Винт (дополнительно)Гвинт (на замовлення)
Stay (option)Стойка (дополнительно)Стійка (на замовлення)
Fire wallСтенаВогнестійка стінка
DashboardПриборная панельПриладова панель Bracket *2
Кронштейн *2
Кронштейн *2
*2 Not included for this unit.*2 Не входят в комплект.*2 Не входить до комплекту постачання
цього пристрою.Flat type screws—M5 × 8 mm *2
Крепежные винты—M5 × 8 мм *2
Гвинти з пласкими голівками—M5 × 8 мм *2
Install the unit at an angle of less than 30˚.Установите устройство под углом менее 30°.Встановіть пристрій під кутом меншим, ніж 30˚.
Note: When installing the unit on the mounting bracket, make sure to use the 8 mm-long screws. If longer screws are used, they could damage the unit.
Примечание: При установке устройства на крепежный кронштейн, используйте только винты длиной 8 мм. При использовании более длинных винтов можно повредить устройство.
Примітка: Встановлюючи пристрій на монтажні кронштейни, переконайтеся, що застосовуються гвинти довжиною 8 мм. Якщо гвинти довші, вони можуть пошкодити пристрій.
Removing the unitBefore removing the unit, release the rear section.
Удаление устройстваПеред удалением устройства освободите заднюю часть.
Insert the two handles, then pull them as illustrated so that the unit can be removed.Вставьте два рычажка, затем потяните их, как показано на рисунке, чтобы вынуть устройство.Вставте дві ручки, а потім потягніть їх на себе згідно з ілюстрацією, щоби витягти пристрій.
Видалення пристроюПеред видаленням пристрою, ослабте кріплення тильної частини.
Do not block the fan.Не закрывайте вентилятор.Не блокуйте вентилятор.
INSTALLATION (IN-DASH MOUNTING)The following illustration shows a typical installation. If you have any questions or require information regarding installation kits, consult your JVC IN-CAR ENTERTAINMENT dealer or a company supplying kits.• If you are not sure how to install this unit correctly, have it installed
by a qualified technician.• Make sure not to block the fan on the rear panel to maintain proper
ventilation when installed.• You cannot install the unit on the car which has any obstacles in the
space shown in “Required space for installation” on page 1.
Caution when installingFit the unit into the mounting sleeve by using four corners of the trim plate.• DO NOT press the panel (shaded in the
illustration).
УСТАНОВКА (УСТАНОВКА В ПРИБОРНУЮ ПАНЕЛЬ)На следующих иллюстрациях показана типовая установка. Если у Вас есть какие-либо вопросы, касающиеся установки, обратитесь к Вашему дилеру автомобилнего специалиста JVC или в компанию, поставляющую соответству ющие принадлежности.• Если Вы не знаете точно, как следует устанавливать это
устройство, обратитесь к квалифицированному специалисту.• При установке для обеспечения правильной вентиляции не
закрывайте вентилятор на задней панели.• Нельзя установить устройство в автомобиле, в котором есть
какие-либо препятствия в пределах расстояния, указанного на рисунке “Пространство, необходимое для установки” на стр. 1.
Предостережение во время установкиПоместите приемник в монтажную панель, используя четыре угла лицевой панели.• НЕ нажимайте на панель (затемнена на рисунке).
ВСТАНОВЛЕННЯ (МОНТАЖ НА ПРИЛАДОВУ ПАНЕЛЬ)Наведена нижче ілюстрація демонструє типовий процес встановлення. У разі будь яких запитань або потреби у інформації щодо набору інструментів та спорядження, проконсультуйтеся з дилером устаткування JVC для автомобілів або з компанією, що постачає набір інструментів та спорядження.• Якщо ви не впевнені щодо правильності встановлення цього
пристрою, залучіть до його встановлення кваліфікованого спеціаліста.
• При встановленні переконайтеся, що вентилятор задньої панелі не заблокований для забезпечення належної вентиляції.
• Забороняється встановлювати пристрій у машину, якщо він буде створювати перешкоди у місцях, зазначених у розділі “Потрібне місце для встановлення” на стор. 1.
Застереження при встановленніВстановіть пристрій усередину монтажного коробу, використавши чотири кути знімної пластини.• НЕ тисніть на панель (на малюнку затінена).
Bracket *2
Кронштейн *2
Кронштейн *2
30˚
Flat type screws—M5 × 8 mm *2
Крепежные винты—M5 × 8 мм *2
Гвинти з пласкими голівками—M5 × 8 мм *2
Instal1-3_AVX33_006A[EE]1.indd 2Instal1-3_AVX33_006A[EE]1.indd 2 7/2/07 10:18:26 am7/2/07 10:18:26 am
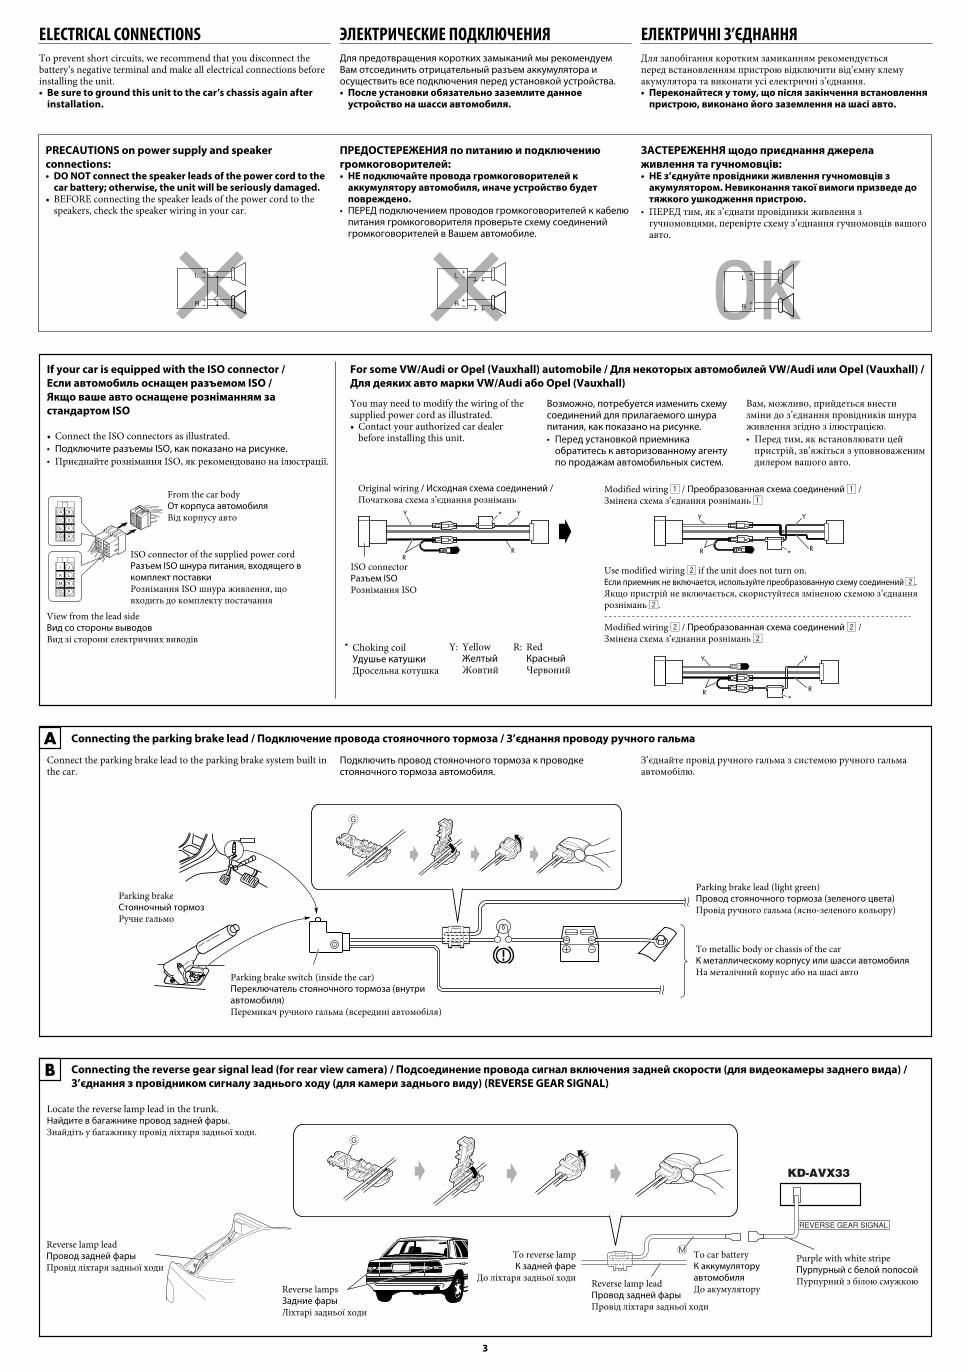
3
ELECTRICAL CONNECTIONSTo prevent short circuits, we recommend that you disconnect the battery’s negative terminal and make all electrical connections before installing the unit.• Be sure to ground this unit to the car’s chassis again after
installation.
ЭЛЕКТРИЧЕСКИЕ ПОДКЛЮЧЕНИЯДля предотвращения коротких замыканий мы рекомендуем Вам отсоединить отрицательный разъем аккумулятора и осуществить все подключения перед установкой устройства.• После установки обязательно заземлите данное
устройство на шасси автомобиля.
ЕЛЕКТРИЧНІ З’ЄДНАННЯДля запобігання коротким замиканням рекомендується перед встановленням пристрою відключити від’ємну клему акумулятора та виконати усі електричні з’єднання.• Переконайтеся у тому, що після закінчення встановлення
пристрою, виконано його заземлення на шасі авто.
PRECAUTIONS on power supply and speaker connections:• DO NOT connect the speaker leads of the power cord to the
car battery; otherwise, the unit will be seriously damaged.• BEFORE connecting the speaker leads of the power cord to the
speakers, check the speaker wiring in your car.
ПРЕДОСТЕРЕЖЕНИЯ по питанию и подключению громкоговорителей:• НЕ подключайте провода громкоговорителей к
аккумулятору автомобиля, иначе устройство будет повреждено.
• ПЕРЕД подключением проводов громкоговорителей к кабелю питания громкоговорителя проверьте схему соединений громкоговорителей в Вашем автомобиле.
ЗАСТЕРЕЖЕННЯ щодо приєднання джерела живлення та гучномовців:• НЕ з’єднуйте провідники живлення гучномовців з
акумулятором. Невиконання такої вимоги призведе до тяжкого ушкодження пристрою.
• ПЕРЕД тим, як з’єднати провідники живлення з гучномовцями, перевірте схему з’єднання гучномовців вашого авто.
If your car is equipped with the ISO connector / Если автомобиль оснащен разъемом ISO / Якщо ваше авто оснащене розніманням за стандартом ISO
• Connect the ISO connectors as illustrated.• Подключите разъемы ISO, как показано на рисунке.• Приєднайте рознімання ISO, як рекомендовано на ілюстрації.
From the car bodyОт корпуса автомобиляВід корпусу авто
ISO connector of the supplied power cordРазъем ISO шнура питания, входящего в комплект поставкиРознімання ISO шнура живлення, що входить до комплекту постачання
View from the lead sideВид со стороны выводовВид зі сторони електричних виводів
For some VW/Audi or Opel (Vauxhall) automobile / Для некоторых автомобилей VW/Audi или Opel (Vauxhall) / Для деяких авто марки VW/Audi або Opel (Vauxhall)
* Choking coil Удушье катушки Дросельна котушка
You may need to modify the wiring of the supplied power cord as illustrated.• Contact your authorized car dealer
before installing this unit.
Возможно, потребуется изменить схему соединений для прилагаемого шнура питания, как показано на рисунке.• Перед установкой приемника
обратитесь к авторизованному агенту по продажам автомобильных систем.
Вам, можливо, прийдеться внести зміни до з’єднання провідників шнура живлення згідно з ілюстрацією.• Перед тим, як встановлювати цей
пристрій, зв’яжіться з уповноваженим дилером вашого авто.
Connect the parking brake lead to the parking brake system built in the car.
Parking brake lead (light green)Провод стояночного тормоза (зеленого цвета)Провід ручного гальма (ясно-зеленого кольору)
To metallic body or chassis of the carК металлическому корпусу или шасси автомобиляНа металічний корпус або на шасі автоParking brake switch (inside the car)
Переключатель стояночного тормоза (внутри автомобиля)Перемикач ручного гальма (всередині автомобіля)
Parking brakeСтояночный тормозРучне гальмо
A Connecting the parking brake lead / Подключение провода стояночного тормоза / З’єднання проводу ручного гальма
Original wiring / Исходная схема соединений /Початкова схема з’єднання рознімань
ISO connectorРазъем ISOРознімання ISO
Y: Yellow Желтый Жовтий
R: Red Красный Червоний
Use modified wiring 2 if the unit does not turn on.Если приемник не включается, используйте преобразованную схему соединений 2.Якщо пристрій не включається, скористуйтеся зміненою схемою з’єднання рознімань 2.
Modified wiring 1 / Преобразованная схема соединений 1 / Змінена схема з’єднання рознімань 1
Modified wiring 2 / Преобразованная схема соединений 2 / Змінена схема з’єднання рознімань 2
Connecting the reverse gear signal lead (for rear view camera) / Подсоединение провода сигнал включения задней скорости (для видеокамеры заднего вида) / З’єднання з провідником сигналу заднього ходу (для камери заднього виду) (REVERSE GEAR SIGNAL)
B
Locate the reverse lamp lead in the trunk.Найдите в багажнике провод задней фары.Знайдіть у багажнику провід ліхтаря задньої ходи.
Reverse lamp leadПровод задней фарыПровід ліхтаря задньої ходи
Reverse lampsЗадние фарыЛіхтарі задньої ходи
To reverse lampК задней фаре
До ліхтаря задньої ходи Reverse lamp leadПровод задней фарыПровід ліхтаря задньої ходи
To car batteryК аккумулятору автомобиляДо акумулятору
Purple with white stripeПурпурный с белой полосойПурпурний з білою смужкою
Подключить провод стояночного тормоза к проводке стояночного тормоза автомобиля.
З’єднайте провід ручного гальма з системою ручного гальма автомобілю.
Instal1-3_AVX33_006A[EE]1.indd 3Instal1-3_AVX33_006A[EE]1.indd 3 5/2/07 4:55:22 pm5/2/07 4:55:22 pm

4
15 A fuseПредохранитель 15 AЗапобіжник 15 А
Rear ground terminalЗадний разъем заземленияТильна клема заземлення
To an external component (see diagram )К внешнему устройству (см. схему )До зовнішнього компоненту (див. схему )
*3 Not included for this unit*3 Не входит в комплект*3 Не входить до комплекту постачання
цього пристрою
To car light control switchК контрольному переключателю освещения автомобиляДо реле управління освітленням автомобіля
To parking brake (see diagram )К стояночному тормозу (см. схему )До ручного гальма (див. схему )
Yellow *4
Желтый *4
Жовтий *4
RedКрасныйЧервоний
Blue with white stripeСиний с белой полосойСиній з білою смужкою
BrownКоричневыйКоричневий
Light greenЗеленого цветаЯсно-зелений
USB cable / Кабель USB / Кабель USB(see diagram / см. схему / див. схему )
*4 Before checking the operation of this unit prior to installation, this lead must be connected, otherwise power cannot be turned on.
*4 Перед проверкой работы устройства подключите этот провод, иначе питание не включится.
*4 Перед тим, як перевірити працездатність цього виробу до його встановлення, цей контакт необхідно приєднати, інакше живлення на прилад подаватися не буде.
ENGLISH РУCCKИЙ УКРАЇНА
BlackЧерныйЧорний To metallic body or chassis of the car
К металлическому корпусу или шасси автомобиляНа металічний корпус або на шасі авто
To a live terminal in the fuse block connecting to the car battery (bypassing the ignition switch) (constant 12 V)К разъему фазы в блоке предохранителя (минуя блок зажигания) (постоянный 12 В)На клему фази у блоці запобіжників для з’єднання з акумулятором авто (обминаючи перемикач запалення)—постійний струм 12 В
To an accessory terminal in the fuse blockК вспомогательному разъему в блоке предохранителяНа допоміжну клему у блоці запобіжників
Ignition switchПереключатель зажиганияПеремикач запалювання
Fuse blockБлок предохранителяБлок запобіжників
To the remote lead of other equipment or power aerial if any (200 mA max.)К удаленному проводу другого оборудования или антенны (макс. 200 мА)На провідник зовнішнього пристрою іншого обладнання або на антену (якщо встановлена) (максимальний струм 200 мА)
To cellular phone systemК системе сотового телефонаНа систему стільникового телефону
Left speaker (front)Левый громкоговоритель (передний)Лівий гучномовець (передній)
Right speaker (front)Правый громкоговоритель (передний)Правий гучномовець (передній)
Left speaker (rear)Левый громкоговоритель (задний)Лівий гучномовець (задній)
Right speaker (rear)Правый громкоговоритель (задний)Правий гучномовець (задній)
PurpleПурпурныйПурпурний
Purple with black stripeПурпурный с черной полосой
Пурпурний з чорною смужкою
GreenЗеленыйЗелений
Green with black stripeЗеленый с черной полосойЗелений з чорною смужкою
GrayСерыйСірий
Gray with black stripeСерый с черной полосойСірий з чорною смужкою
WhiteБелыйБілий
White with black stripeБелый с черной полосойБілий з чорною смужкою
Orange with white stripeОранжевый с белой полосойПомаранчевий із білою смужкою
Connecting the Mic unit / Подключение микрофона / Підключення блоку мікрофона
Adjust the microphone angleРегулирование угла наклона микрофонаРегулювання кута нахилу мікрофона
MicrophoneМикрофонМікрофон
Microphone clipФиксатор микрофонаПрищіпка мікрофону
C
Secure the microphone cord using cord cramps (not supplied) if necessary.При необходимости закрепите кабель микрофона с помощью зажимов для кабеля (не поставляются).У разі необхідності зафіксуйте шнур мікрофону за допомогою скоб (не входять до комплекту).
1 2
orилиабо
JDouble-sided adhesive tapeДвусторонняя клейкая лентаДвостороння липка стрічка
Connections without using the ISO connectors / Подключение без использования разъемов ISO / З’єднання без допомоги рознімань ISO
Before connecting: Check the wiring in the vehicle carefully. Incorrect connection may cause serious damage to this unit.The leads of the power cord and those of the connector from the car body may be different in color.1 Cut the ISO connector.2 Connect the colored leads of the power cord in the order specified
in the illustration below.3 Connect the aerial cord.4 Finally connect the wiring harness to the unit.
Перед началом подключений: Тщательно проверьте проводку в автомобиле. Неправильное подключение может привести к серьезному повреждению устройства.Жилы силового кабеля и жилы соединителя от кузова автомобиля могут быть разного цвета.1 Обрежьте разъем ISO.2 Подсоедините цветные провода шнура питания в указанном
ниже порядке.3 Подключите кабель антенны.4 В последнюю очередь подключите электропроводку к
устройству.
Перед тим, як з’єднати: Уважно перевірте електричну схему з’єднання вашого авто. Неправильне з’єднання може спричинити тяжке пошкодження вашого пристрою.Контакти шнура живлення та рознімання, яке йде від корпуса авто можуть мати різні кольори.1 Від’єднайте рознімання ISO.2 З’єднайте кольорові провідники шнура живлення у порядку,
що наведений нижче на ілюстрації.3 Приєднайте провід антени.4 Виконайте кінцеве приєднання джгута провідників до
пристрою.
Instal4-6_AVX33_006A[EE]1.indd 4Instal4-6_AVX33_006A[EE]1.indd 4 5/2/07 6:58:18 pm5/2/07 6:58:18 pm

5
Connections for external compornent playback / Подключения для воспроизведения с внешнего устройства / З’єднання для зовнішніх пристроїв відтворенняC
Video cord (not supplied)Видеошнур (не поставляется)Відеошнур (не входить до комплекту)
Camcorder, rear view camera, etc.Видеокамера, камера заднего вида и т.д.Відеокамера з пристроєм відтворення, камера заднього виду, та ін.
*8 To listen to disc playback sound while in Dual Zone operations (see page 28 of INSTRUCTIONS).*8 Для прослушивания компакт-диска при работе в Двустороннем режиме (cм. ИНСТРУКЦИИ
ПО ЭКСПЛУАТАЦИИ на стр. 28).*8 Для прослуховування звуку під час програвання диску у режимі Dual Zone (див. стор. 28
ІНСТРУКЦІЇ).
KS-HP2Cordless headphones (not supplied) *8
Беспроводные наушники (не поставляется) *8
Бездротові навушники (не входить до комплекту) *8
KV-MR90109-INCH WIDESCREEN MONITOR (not supplied)9-ДЮЙМОВЫЙ ШИРОКОЭКРАННЫЙ МОНИТОР (не поставляется)9-ДЮЙМОВИЙ МОНІТОР З ШИРОКИМ ЄКРАНОМ (не входить до комплекту)
Navigation SystemСистема навигации
Система навігації
B Connecting the external amplifiers / Подключение внешних усилителей / З’єднання із зовнішніми підсилювачами
You can connect amplifiers to upgrade your car stereo system.• Connect the remote lead (blue with white stripe) to the remote
lead of the other equipment so that it can be controlled through this unit.
• For amplifier only:– After you have connected the center speaker, make sure
to activate the center speaker; otherwise, no sound comes out of the connected center speaker, see page 53 of the INSTRUCTIONS.
– Disconnect the speakers from this unit, connect them to the amplifier. Leave the speaker leads of this unit unused.
– You can switch off the built-in amplifier and send the audio signals only to the external amplifier(s) to get clear sounds and to prevent internal heat built-up inside the unit. See page 56 of the INSTRUCTIONS (separate volume).
*5 Audio cord (not supplied)*5 Аудиошнур (не поставляется)*5 Аудіошнур (не входить до комплекту)
*6 Firmly attach the ground wire to the metallic body or to the chassis of the car—to the place not coated with paint (if coated with paint, remove the paint before attaching the lead). Failure to do so may cause damage to the unit.
*6 Плотно прикрепите заземляющий провод к металлическому кузову или шасси автомобиля—в месте, не покрытом краской (если оно покрыто краской, удалите краску перед тем, как прикреплять провод). Невыполнение этого требования может привести к повреждению данного устройства.
*6 Надійно прикрутіть провідник заземлення до металічного корпусу або до шасі авто у місці, яке не має фарбового покриття (якщо воно є, видаліть фарбу до підключення провідника). Невиконання цієї вимоги може призвести до пошкодження пристрою.
Можно подключить усилители для обновления автомобильной стереосистемы.• Подсоедините провод внешнего устройства (синий с
белой полосой) к проводу внешнего устройства другого оборудования так, чтобы им можно было управлять с этого устройства.
• Только для усилителя:– После подключения центральното динамика не
забудьте его включить, иначе звук от центрального динамика будет отсутствовать, cм. стр. 53 ИНСТРУКЦИИ ПО ЗУСПЛУАТАЦИИ.
– Отсоедините громкоговорители от данного устройства, подключите их к усилителю. Оставьте провода громкоговорителей данного устройства неиспользованными.
– Для получения более чистого звука и предотвращения внутреннего перегрева приемника можно отключить встроенный усилитель и использовать для усиления аудиосигнала только внешние усилители. Cм. стр. 56 ИНСТРУКЦИИ ПО ЗУСПЛУАТАЦИИ (в отдельном издании).
Для покращення характеристик стереосистеми, до неї можна підключити підсилювачі.• Підключіть провідник зовнішнього пристрою (синій з білою
смужкою) до провідника зовнішнього пристрою іншого обладнання. Таким чином, ним можна буде керувати з цього пристрою.
• Тільки для підсилювача:– Після підключення центрального гучномовця,
переконайтеся, що він активований, інакше звук з цього гучномовця буде відсутній, див. стор. 53 ІНСТРУКЦІЇ
– Відключіть гучномовці від цього пристрою, приєднайте їх до підсилювача. Залиште провідники гучномовців такими, що не використовуються.
– Можна відключити вбудований підсилювач і спрямувати звуковий сигнал тільки до зовнішнього підсилювача, щоб одержати якісний звук і запобігти збільшенню температури в середині пристрою. Див. стор. 56 ІНСТРУКЦІЇ (окрема книга).
A Connecting to the steering wheel remote controller / Подключение к рулевому пульту дистанционного управления / З’єднання з блоком дистанційного керування, що встановлений на кермі
If your car is equipped with the steering wheel remote controller, you can operate this unit using the controller. To do it, a JVC’s OE remote adapter (not supplied) which matches with your car is required. Consult your JVC IN-CAR ENTERTAINMENT dealer for details.Если автомобиль оборудован рулевым пультом дистанционного управления, его можно использовать для управления данным устройством. Для этого необходим адаптер рулевого пульта дистанционного управления JVC OE (не поставляется), подходящий для Вашего автомобиля. За более подробной информацией обратитесь к поставщику автомобильных аудиосистем компании JVC.Якщо авто оснащене блоком дистанційного керування, який встановлюється на кермі, можна керувати пристроєм за його допомогою. Щоб зробити це, потрібен адаптер OE блоку дистанційного керування компанії JVC (не входить до комплекту), що підходить до даного типу авто. За додатковою інформацією зверніться до свого регіонального дилера JVC.
OE remote adapter (not supplied)Aдаптер рулевого пульта дистанционного управления OE (не поставляется)Адаптер OE блоку дистанційного керування OE (не входить до комплекту)
Steering wheel remote controller (equipped in the car)Рулевой пульт дистанционного управления (устанавливаемый в автомобиле)Блок дистанційного керування, встановлений на кермі (оснащення у авто)
OE REMOTESteering wheel remote input
Вход рулевого пульта дистанционного управленияДо зовнішнього компоненту
Remote leadПровод внешнего устройстваПровідник зовнішнього пристрою
JVC AmplifierJVC-усилитель
Підсилювач JVC
Remote lead (Blue with white stripe)Провод внешнего устройства (Синий с белой полосой)Провідник зовнішнього пристрою (Синій з білою смужкою)
To the remote lead of other equipment or power aerial if anyК удаленному проводу другого оборудования или антенныНа провідник зовнішнього пристрою іншого обладнання або на антену (якщо встановлена)
Y-connector (not supplied for this unit)Разъем Y (не входит в комплект)Y-рознімання (двійник) (не входить до комплекту постачання цього пристрою)
SubwooferНизкочастотный динамикНизькочастотний динамік
Rear speakersЗадние
громкоговорителиЗадні гучномовці
Rear speakersЗадние громкоговорителиЗадні гучномовці
Front speakersПередние громкоговорителиПередні гучномовці
*7 Cut the rear speaker leads of the car’s ISO connector and connect them to the amplifier.
*7 Обрежьте выводы задних динамиков для разъема ISO автомобиля и подсоедините их к усилителю.
*7 Відключіть провідники задніх гучномовців від рознімання ISO, що належить до авто, та з’єднайте їх із підсилювачем.
JVC AmplifierJVC-усилитель
Підсилювач JVC
Front speakersПередние
громкоговорителиПередні гучномовці
JVC AmplifierJVC-усилитель
Підсилювач JVC
JVC AmplifierJVC-усилитель
Підсилювач JVC
Center speakerЦентральный динамикЦентральний динамік
Instal4-6_AVX33_006A[EE]1.indd 5Instal4-6_AVX33_006A[EE]1.indd 5 5/2/07 5:09:08 pm5/2/07 5:09:08 pm

6
D
External component / Внешнее устройство / Зовнішній компонент
Connecting external components / Подключение внешних устройств / З’єднує зовнішні компоненти
To disconnect the connector / Отключение от разъема / Відключення з’єднувача
Hold the connector top tightly (1), then pull it out (2). Крепко возьмитесь за верхнюю часть разъема (1), затем выдерните его (2). Візьміться за верхню частину (1) з’єднувача, потім витягніть його (2).
TROUBLESHOOTING• The fuse blows.* Are the red and black leads connected correctly?• Power cannot be turned on.* Is the yellow lead connected?• No sound from the speakers.* Is the speaker output lead short-circuited?• Sound is distorted.* Is the speaker output lead grounded?* Are the “–” terminals of L and R speakers grounded in common?• Noise interfere with sounds.* Is the rear ground terminal connected to the car’s chassis using
shorter and thicker cords?• Unit becomes hot.* Is the speaker output lead grounded?* Are the “–” terminals of L and R speakers grounded in common?• This unit does not work at all.* Have you reset your unit?
You can connect external components in series as shown in the diagram below.• All the components, adapters or signal cords need to be purchased
separately.
CAUTION:Before connecting the external components, make sure that the unit is turned off.
• To use JVC CD changer, Apple iPod or JVC D. player, set “External Input” to “Changer/iPod/D. Player” (see page 55 of the INSTRUCTIONS).
• To use other external components via KS-U57 or KS-U58, set “External Input” to “External Input” (see page 55 of the INSTRUCTIONS)
Можно подключить внешние устройства последовательно, как показано на схеме ниже.• Все устройства, адаптеры или сигнальные провода
необходимо приобрести отдельно.
ПРЕДОСТЕРЕЖЕНИЕ:Перед подключением внешних компонентов убедитесь в том, что устройство выключено.
• Для использования устройства автоматической смены компакт-дисков JVC, проигрывателя Apple iPod или JVC D. установите значение “Enternal Input” для настройки “Changer/iPod/D. Player” (cм. ИНСТРУКЦИИ ПО ЭКСПЛУАТАЦИИ на стр. 55).
• Для использования внешних устройств через KS-U57 или KS-U58 установите значение “External Input” для настройки “External Input” (cм. ИНСТРУКЦИИ ПО ЭКСПЛУАТАЦИИ на стр. 55).
Можна з’єднувати зовнішні компоненти послідовно, як показано на схемі нижче.• Всі компоненти, адаптери або сигнальні шнури необхідно
придбати окремо.
ЗАСТЕРЕЖЕННЯ!:Перед тим як приєднати зовнішній компонент, переконайтеся утому, що ваш пристрій вимкнений.
• Для використання пристрою зміни CD-дисків від JVC, Apple iPod, або JVC D. player, встановіть у параметрі “External Input ” значення “Changer/iPod/D. Player” (див. стор. 55 ІНСТРУКЦІЇ).
• Для використання інших зовнішніх компонентів через KS-U57 або KS-U58, встановіть у параметрі “External Input” значення “External Input” (див. стор. 55 ІНСТРУКЦІЇ).
CD changer jackРазъем устройства автоматической смены компакт-дисковГніздо пристрою зміни CD-дисків
*9 Line Input Adapter KS-U57 (separately purchased)
*9 Адаптер для подключения радиотрансляционной линии KS-U57 (продается отдельно)
*9 Адаптер лінійного вводу KS-U57 (придбаний окремо)
*10 Aux Input Adapter KS-U58 (separately purchased)
*10 Адаптер для подключения внешних устройств (AUX) KS-U58 (продается отдельно)
*10 Адаптер AUX лінійного вводу зовнішнього пристрою KS-U58 (придбаний окремо)
Apple iPodApple iPodПрогравач Apple iPod
JVC D. playerПроигрыватель JVC D.JVC D. програвач
JVC DAB tunerТюнер DAB JVC
Тюнер цифрового радіомовлення JVC
or / или / або
or / или / або
or / или / абоExternal component
Внешнее устройствоЗовнішній компонент
3.5 mm stereo mini plugМини-разъем стерео-3,5 мм
Мініатюрний стереофонічний штекер 3,5 мм
• iPod is a trademark of Apple Inc., registered in the U.S. and other countries.
• iPod является торговой маркой Apple Inc., зарегистрированной в США и других странах.
• iPod є торговою маркою Apple Inc., зареєстрованою у Сполучених Штатах та інших країнах.
BЫЯВЛЕНИЕ НЕИСПРАВНОСТЕЙ• Сработал предохранитель.* Правильно ли подключены черный и красный провода?
• Питание не включается.* Подключен ли желтый провод?
• Звук не выводится через громкоговорители.* Нет ли короткого замыкания на кабеле выхода
громкоговорителей?
• Звук искажен.* Заземлен ли провод выхода громкоговорителей?* Заземлены ли разъемы “–” правого (R) и левого (L)
громкоговорителей?
• Шум мешает звучанию.* Соединен ли находящийся сзади зажим заземления с шасси
автомобиля с помощью более короткого и тонкого шнуров?
• Устройство нагревается.* Заземлен ли провод выхода громкоговорителей?* Заземлены ли разъемы “–” правого (R) и левого (L)
громкоговорителей?
• Приемник не работает.* Выполнена ли перенастройка приемника?
НЕСПРАВНОСТІ• Вийшов з ладу запобіжник.* Чи правильно приєднані червоний та чорний провідники?• Не можна включити живлення.* Чи приєднаний жовтий провідник?• Звук з гучномовців відсутній.* Чи не замкнуто “на коротко” вихідні провідники гучномовця?• Звук спотворений.* Чи не заземлені вихідні провідники гучномовця?* Чи заземлені разом провідники “–” лівого та правого
гучномовця?• Звук чути з перешкодами.* Чи приєднано тильну клему заземлення до шасі авто за
допомогою коротших та товстіших шнурів?• Пристрій нагрівається.* Чи не заземлені вихідні провідники гучномовця?* Чи заземлені разом провідники “–” лівого та правого
гучномовця?• Цей пристрій не працює взагалі.* Чи ви переналаштовували пристрій?
External componentВнешнее устройство
Зовнішній компонент
External componentВнешнее устройство
Зовнішній компонент
JVC CD changerПроигрыватель нескольких
компакт-дисков JVCПристрій зміни CD-дисків
JVC
or / или / або
USB cable (approx.1.2 m)Кабель USB (прибл. 1,2 м)Кабель USB (приблизно 1,2 м)
USB deviceУстройство USB
USB-пристрій
USB devices / Устройства USB / USB-пристрої
You cannot connect a computer to the USB ( ) terminal of the unit.Вы не можете подключить компьютер к терминалу USB ( ) устройства.Підключити комп’ютер до входу пристрою ( ), який використовується для підключення USB-пристроїв, неможливо.
Audio cord (not supplied)Аудиошнур (не поставляется)Аудіошнур (не входить до комплекту)
External componentВнешнее устройство
Зовнішній компонент
or / или / або
JVC DAB tunerТюнер DAB JVC
Тюнер цифрового радіомовлення JVC
Instal4-6_AVX33_006A[EE]1.indd 6Instal4-6_AVX33_006A[EE]1.indd 6 5/2/07 5:09:11 pm5/2/07 5:09:11 pm

ENGLISH
For installation and connections, refer to the separate manual.
INSTRUCTIONS
LVT1708-002A[U]
For canceling the display demonstration, see page 5.
DVD/CD RECEIVER
KD-AVX33
Cover_KD-AVX33U.indd 2Cover_KD-AVX33U.indd 2 07.2.26 1:11:00 PM07.2.26 1:11:00 PM

ENG
LISH
2
WARNINGS:To prevent accidents and damage
• DO NOT install any unit and wire any cable in locations where;– it may obstruct the steering wheel and
gearshift lever operations.– it may obstruct the operation of safety devices
such as air bags.– it may obstruct visibility.
• DO NOT operate the unit while driving. If you need to operate the unit while driving, be
sure to look around carefully.• The driver must not watch the monitor while
driving.• The driver must not put on the headphones while
driving.
Cautions on the monitor:
• The monitor built in this unit has been produced with high precision, but it may have some ineffective dots. This is inevitable and is not malfunction.
• Do not expose the monitor to direct sunlight.• When the temperature is very cold or very hot...– Chemical changes occur inside, causing
malfunction.– Pictures may not appear clearly or may move
slowly. Pictures may not be synchronized with the sound or picture quality may decline in such environments.
For safety...• Do not raise the volume level too much, as this will
block outside sounds, making driving dangerous.• Stop the car before performing any complicated
operations.
Temperature inside the car...If you have parked the car for a long time in hot or cold weather, wait until the temperature in the car becomes normal before operating the unit.
Thank you for purchasing a JVC product.Please read all instructions carefully before operation, to ensure your complete understanding and to obtain the best
possible performance from the unit.IMPORTANT FOR LASER PRODUCTS1. CLASS 1 LASER PRODUCT2. CAUTION: Do not open the top cover. There are no user serviceable parts inside the unit; leave all servicing to
qualified service personnel.3. CAUTION: Visible and/or invisible class 1M laser radiation when open. Do not view directly with optical
instruments.4. REPRODUCTION OF LABEL: CAUTION LABEL, PLACED OUTSIDE THE UNIT.
[European Union only]
KD-AVX33U.indb 2KD-AVX33U.indb 2 07.2.21 9:15:42 AM07.2.21 9:15:42 AM

3
ENG
LISH
How to reset your unit
• Your preset adjustments (except for the registered Bluetooth devices) will also be erased.
How to forcibly eject a disc
• If this does not work, reset the unit.
This product incorporates copyright protection technology that is protected by U.S. patents and other intellectual property rights. Use of this copyright protection technology must be authorized by Macrovision, and is intended for home and other limited viewing uses only unless otherwise authorized by Macrovision. Reverse engineering or disassembly is prohibited.
Contents
INTRODUCTIONPlayable disc type ............................ 4Before operating the unit ................ 5
OPERATIONSBasic operations—Control panel ...... 7Basic operations—
Remote controller (RM-RK251) ...... 8Listening to the radio ...................... 10Disc operations ................................ 13Dual Zone operations ....................... 26USB operations ................................ 29Bluetooth® operations—
Cellular phone/audio player .......... 31
EXTERNAL DEVICESListening to the CD changer .............. 38Listening to the iPod/D. player ......... 40Listening to other external
components ................................. 41
SETTINGSSound equalization .......................... 43Assigning titles to the sources .......... 44Menu operations ............................. 45
REFERENCESMaintenance ................................... 55More about this unit ........................ 56Troubleshooting .............................. 62Specifications .................................. 66
NO EJECT?EMERGENCY EJECT?
NO EJECT?EMERGENCY EJECT?
KD-AVX33U.indb 3KD-AVX33U.indb 3 07.2.21 9:15:49 AM07.2.21 9:15:49 AM

ENG
LISH
4
Playable disc type
Disc type Recording format, file type, etc. Playable
DVD DVD Video (Region Code: 3)*1
DVD Audio
DVD-ROM
DVD Recordable/Rewritable(DVD-R*2/-RW, +R/+RW*3)• DVD Video: UDF bridge• DVD-VR• DivX/MPEG1/MPEG2/JPEG/MP3/
WMA/WAV/AAC: Compliant to ISO 9660 level 1, level 2, Romeo, Joliet
• DVD-RAM cannot be played.
DVD Video
DVD-VR (non-CPRM only)
DivX/MPEG1/MPEG2
JPEG
MP3/WMA/WAV/AAC*4
MPEG4
DVD+VR
Dual Disc DVD side
Non-DVD side
CD/VCD Audio CD/CD Text (CD-DA)/DTS-CD
VCD (Video CD)
CD-ROM
CD-I (CD-I Ready)
CD Recordable/Rewritable(CD-R/-RW)• Compliant to ISO 9660 level 1,
level 2, Romeo, Joliet
CD-DA
MP3/WMA/WAV/AAC*4
JPEG
DivX/MPEG1/MPEG2
MPEG4
*1 If you insert a DVD Video disc of an incorrect Region Code, “Region code error” appears on the monitor.*2 DVD-R recorded in multi-border format is also playable (except for dual layer discs).*3 It is possible to play back finalized +R/+RW (Video format only) discs. However, the use of +R double layer disc is not recommended.*4 This unit can play back AAC files encoded using iTunes.
Caution for DualDisc playbackThe Non-DVD side of a “DualDisc” does not comply with the “Compact Disc Digital Audio” standard. Therefore, the use of Non-DVD side of a DualDisc on this product may not be recommended.
KD-AVX33U.indb 4KD-AVX33U.indb 4 07.2.21 9:15:49 AM07.2.21 9:15:49 AM

INTRODUCTION5
ENG
LISH
Before operating the unitCancel the display demonstration and set the clock. ( also pages 46 and 47)• Operations are explained mainly using the buttons on the unit; however, the buttons on the remote controller can
work in the same way if they have the same names or marks.
~ Turn on the power.
Ÿ Display <AV Menu>.
! Enter the <Setup> menu.
⁄ Select <Display> ] <Demonstration>, then activate the <Demonstration> screen.
@ Cancel the display demonstrations.Select <Off>.
Continued on the next page
AV Menu
Setup EnterENT
Setup menu icon
Currently selected menu
Demonstration
DisplayClockDisc Setup 1Disc Setup 2Tuner
On
DemonstrationWall PaperScrollTag DisplayDimmer
OffOn
ExitENT
Setup Display Demonstration
Currently selected submenu Current setting
OffOn
ExitENT
Demonstration
Indication language:In this manual, English indications are used for purpose of explanation. You can select the indication language on the monitor. ( page 47)
KD-AVX33U.indb 5KD-AVX33U.indb 5 07.2.21 9:15:50 AM07.2.21 9:15:50 AM

ENG
LISH
6
fi Select either the 12-hour or 24-hour system.
^ Return to the <Clock> menu.
fl Select <OSD Clock>.
& Activate the <OSD Clock> screen.
‡ Select the <OSD Clock> setting.• Off: The clock time is not displayed while
playing back a video source.• On: The clock time is displayed while playing
back a video source.
* Finish the procedure.
¤ Return to the <Setup> menu.
# Select <Clock> ]<Time Set>, then activate the <Time Set> screen.
‹ Set the clock time.
$ Return to the <Clock> menu.
› Select <12Hours/24Hours>.
% Activate the <12Hours/24Hours> screen.
Clock
1:00AM
Time Set12Hours/24HoursOSD Clock
Time SetHours
1 : 00AM
ExitENT
Time SetMinutes
3 : 45PM
ExitENT
12Hours/24Hours12 Hours24 Hours
ExitENT
(twice)
KD-AVX33U.indb 6KD-AVX33U.indb 6 07.2.21 9:15:51 AM07.2.21 9:15:51 AM

OPERATIONS7
ENG
LISH
Basic operations — Control panel
• TUNER: Select the bands.• DISC/USB: Stop playback.• On menus: Back.
Select the source.TUNER = DISC (DVD/VCD/CD) = USB =CD-CH, iPod, D.PLAYER, or EXT-IN =Bluetooth Phone =Bluetooth Audio = AV-IN =(back to the beginning)• You cannot select these sources if they are not ready.
Eject the disc.
*1 <AV Menu> screensYou can use the menus to set up various settings.The <AV Menu> screen consists of the following sub-menus—Setup/Equalizer/Sound/Disc Surround/Mode/List/Bluetooth/Dual Zone.• For details, see pages 45 to 54.
*3 By holding 5 / ∞, you can display the list accessible for the selected source.
• Turn on the power.• Turn off the power
[Hold].• Attenuate the sound (if
the power is on). Change the display information.
4 / ¢• TUNER: Search for stations.• DISC/USB: Select chapters/tracks.• On menus: Go to previous/next step.• iPod/D.PLAYER: Select tracks.• Bluetooth Audio: Reverse skip/forward skip.5 / ∞*3
• TUNER: Select preset stations.• DISC/USB: Select titles/folders.• On menus: Select items.• iPod/D.PLAYER: Enter player’s menu/pause
or stop playback.• Bluetooth: Select a device.
Change the control panel tilt (Tilt1 – Tilt4).
Remote sensor
Adjust the volume.
Reset the unit.• Use only when the
internal system malfunctions.
• DISC/USB: Start playback.• On menus: Enter ( ENT :[Press]/ ENT :[Hold]).
Detach the control panel*2.
Display window
• Display <Dial Menu>.• Display <Redial> list [Hold].
• Display or erase <AV Menu>*1.• Activate Voice Dialing [Hold].
*2 To attach the control panel
KD-AVX33U.indb 7KD-AVX33U.indb 7 07.2.21 9:15:51 AM07.2.21 9:15:51 AM

8
ENG
LISH
Basic operations — Remote controller (RM-RK251)
Installing the battery
If the range or effectiveness of the remote controller decreases, replace both batteries.
Before using the remote controller:• Aim the remote controller directly at the remote
sensor on the unit.• DO NOT expose the remote sensor to bright light
(direct sunlight or artificial lighting).
Caution:
• Do not expose batteries to heat or flame.
IMPORTANT:If Dual Zone is activated ( page 26), the remote controller functions only for operating the DVD/CD player.
Main elements and features
1*1 • Turns on the power.• Attenuates the sound if the power is on.• Turns off the power if pressed and held (while
the power is on).2*1 Selects the source.3*1 • Displays <Dial Menu>.
• Displays <Redial> list if pressed and held.• Answers incoming calls.
4*1*2 Adjusts the volume level.5*1*2 Selects surround mode.
R03/LR03/AAA
i
o
;
as
KD-AVX33U.indb Sec1:8KD-AVX33U.indb Sec1:8 07.2.21 9:15:52 AM07.2.21 9:15:52 AM
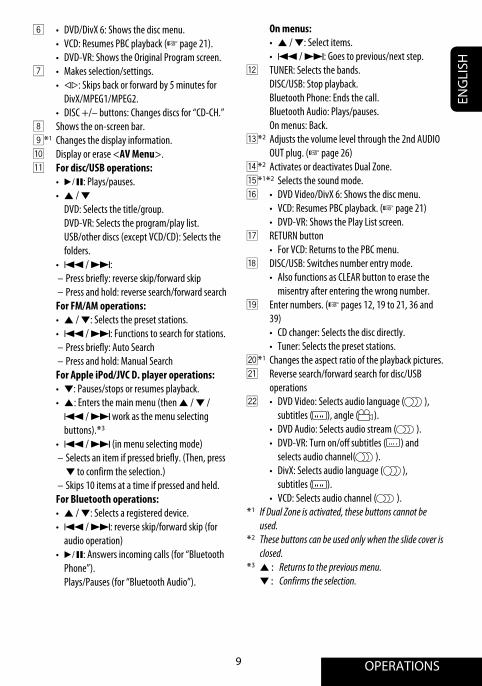
OPERATIONS9
ENG
LISH
On menus:• 5 / ∞: Select items.• 4 / ¢: Goes to previous/next step.
w TUNER: Selects the bands. DISC/USB: Stop playback. Bluetooth Phone: Ends the call. Bluetooth Audio: Plays/pauses. On menus: Back.e*2 Adjusts the volume level through the 2nd AUDIO
OUT plug. ( page 26)r*2 Activates or deactivates Dual Zone.t*1*2 Selects the sound mode.y • DVD Video/DivX 6: Shows the disc menu.
• VCD: Resumes PBC playback. ( page 21)• DVD-VR: Shows the Play List screen.
u RETURN button• For VCD: Returns to the PBC menu.
i DISC/USB: Switches number entry mode.• Also functions as CLEAR button to erase the
misentry after entering the wrong number.o Enter numbers. ( pages 12, 19 to 21, 36 and
39)• CD changer: Selects the disc directly.• Tuner: Selects the preset stations.
;*1 Changes the aspect ratio of the playback pictures.a Reverse search/forward search for disc/USB
operationss • DVD Video: Selects audio language ( ),
subtitles ( ), angle ( ).• DVD Audio: Selects audio stream ( ).• DVD-VR: Turn on/off subtitles ( ) and
selects audio channel( ).• DivX: Selects audio language ( ),
subtitles ( ).• VCD: Selects audio channel ( ).
*1 If Dual Zone is activated, these buttons cannot be used.
*2 These buttons can be used only when the slide cover is closed.
*3 5 : Returns to the previous menu. ∞ : Confirms the selection.
6 • DVD/DivX 6: Shows the disc menu.• VCD: Resumes PBC playback ( page 21).• DVD-VR: Shows the Original Program screen.
7 • Makes selection/settings.• ~: Skips back or forward by 5 minutes for
DivX/MPEG1/MPEG2.• DISC +/– buttons: Changes discs for “CD-CH.”
8 Shows the on-screen bar.9*1 Changes the display information.p Display or erase <AV Menu>.q For disc/USB operations:
• 6: Plays/pauses.• 5 / ∞ DVD: Selects the title/group. DVD-VR: Selects the program/play list. USB/other discs (except VCD/CD): Selects the
folders.• 4 / ¢:– Press briefly: reverse skip/forward skip– Press and hold: reverse search/forward search
For FM/AM operations:• 5 / ∞: Selects the preset stations.• 4 / ¢: Functions to search for stations.– Press briefly: Auto Search– Press and hold: Manual Search
For Apple iPod/JVC D. player operations:• ∞: Pauses/stops or resumes playback.• 5: Enters the main menu (then 5 / ∞ /
4 / ¢ work as the menu selecting buttons).*3
• 4 / ¢ (in menu selecting mode)– Selects an item if pressed briefly. (Then, press
∞ to confirm the selection.)– Skips 10 items at a time if pressed and held.
For Bluetooth operations:• 5 / ∞: Selects a registered device.
• 4 / ¢: reverse skip/forward skip (for audio operation) • 6: Answers incoming calls (for “Bluetooth Phone”). Plays/Pauses (for “Bluetooth Audio”).
KD-AVX33U.indb Sec1:9KD-AVX33U.indb Sec1:9 07.2.21 9:15:53 AM07.2.21 9:15:53 AM

10
ENG
LISH
3: 45PM
FLAT
DXMO
TUNER
FM1 Preset1 ABC Radio 87.5 MHz
POWER]ON
When an FM stereo broadcast is hard to receive 1
2
Mode menu icon
3
Listening to the radio
~ Select “TUNER.”
Ÿ Select the bands.
! Search for a station—Auto Search.• Manual Search: Hold either 4 or ¢ until “Manual Search” appears on the display, then press it
repeatedly.• The ST indicator lights up when receiving an FM stereo broadcast with sufficient signal strength.
4
Reception improves, but stereo effect will be lost.• The MO indicator lights up.
To restore stereo effect, select <Off > in step 4.
Preset No.Band
page 43
Tuner indicators
AV Menu
Mode EnterENT
AV Menu
Setup EnterENT
Mode
Off
MonoDX/LocalSSMTitle Entry
MonoOffOn
ExitENT
Assigned station name ( page 44). If no name is assigned, “No Name” appears.
KD-AVX33U.indb 10KD-AVX33U.indb 10 07.2.21 9:15:54 AM07.2.21 9:15:54 AM

OPERATIONS11
ENG
LISH
FM station automatic presetting —SSM (Strong-station Sequential Memory) This function works only for FM bands.You can preset six stations for each band.
1
2
3
Local FM stations with the strongest signals are searched and stored automatically in the FM band.
Tuning in to stations with sufficient signal strength This function works only for FM bands.Once you have activated this function (selected <Local>), it always works when searching for FM stations.
1
2
Mode menu icon
3
4
Only stations with sufficient signal strength will be detected.• The DX indicator goes off, then the LO indicator
lights up.
Mode
DX
MonoDX/LocalSSMTitle Entry
DX/LocalDXLocal
ExitENT
ModeMonoDX/LocalSSMTitle Entry
StartENT
AV Menu
Mode EnterENT
AV Menu
Setup EnterENT
AV Menu
Setup EnterENT
AV Menu
Mode EnterENT
Mode menu icon
KD-AVX33U.indb 11KD-AVX33U.indb 11 07.2.21 9:15:54 AM07.2.21 9:15:54 AM

12
ENG
LISH
Selecting preset stations On the remote:
1
2 or
On the unit:
1
• Each time you hold the button, you can change the FM bands.
2
• Preset List can also be accessed through <AV Menu> = <List>.
List menu icon
FM1 Store 87.5 89.9 97.9 92.5108.0107.9 ENT
1
2
3
4
56
ENT
AV Menu
Setup EnterENT
AV Menu
List EnterENT
FM1 Store 87.5 89.9 97.9 92.5108.0107.9 ENT
1
2
3
4
56
ENT
or
Manual presetting Ex.: Storing FM station of 92.5 MHz into preset
number 4 of the FM1 band
1
2 Tune in to a station you want to preset.
3
4 Select a preset number.
5
The station selected in step 2 is now stored in preset number 4.
* Each time you hold the button, you can change the FM bands.
• Preset List can also be accessed through <AV Menu> = <List>. ( right )
FM1 Store 87.5 89.9 97.9105.9108.0107.9 ENT
1
2
3
4
56
ENT
FM1 Store 87.5 89.9 97.9105.9108.0107.9 ENT
1
2
3
4
56
ENT
No Name 92.5 MHz
TUNER
FM1 Preset4 No Name 92.5 MHz
Preset List appears.*
KD-AVX33U.indb 12KD-AVX33U.indb 12 07.2.21 9:15:55 AM07.2.21 9:15:55 AM

OPERATIONS13
ENG
LISH
3: 45PM
DISCNow Reading ...
Disc operationsThe disc type is automatically detected, and playback starts automatically (for some discs: automatic start depends on its internal program).
If a disc does not have any disc menu, all tracks in it will be played repeatedly until you change the source or eject the disc.
If “ ” appears on the monitor, the unit cannot accept the operation you have tried to do.• In some cases, without showing “ ,” operations will not be accepted.
Label side
0: Eject the disc.
3: Start playback if necessary.
DISP: Press if no playback picture appears, but disc information screen ( pages 14 to 16) is displayed.
Insert the disc.Playback starts automatically.
7: Stop playback.
Caution:
Do not place your finger behind the control panel.
Caution on volume setting:
Discs produce very little noise compared with other sources. Lower the volume before playing a disc to avoid damaging the speakers by the sudden increase of the output level.
KD-AVX33U.indb 13KD-AVX33U.indb 13 07.2.21 9:15:56 AM07.2.21 9:15:56 AM

14
ENG
LISH
While playing the following discs, press .• Each time you press the button, playback picture and disc information screens appear alternately.
Audio format
Title no./Chapter no./Playing timePlayback mode
Disc type
4 ¢ Press: Select chapter Hold: Reverse/forward search*1
5 ∞ Select title
3: 45PM
MULTIMLP
B.S.P
AUDIODVD
G 01 02 0:45:38
RPT
BONUS
Surround mode
4 ¢ Press: Select track Hold: Reverse/forward search*1
5 ∞ Select group
Group no./Track no./Playing time
BONUS indicator ( page 22)
B.S.P indicator ( page 22)
4 ¢ Press: Select chapter Hold: Reverse/forward search*1
5 ∞ Select program no./Play List no.
Program no.(or Play List no.)/Chapter no./Playing time
VR-PR: Original programVR-PL: Play List
3: 45PM
MULTI
CHAP. RPT
DIGITALVIDEODVD
T 01 C 02 0:45:38
3: 45PM
FLATDIGITALVR-PRDVD
P 01 C 02 0:45:38
KD-AVX33U.indb 14KD-AVX33U.indb 14 07.2.21 9:15:57 AM07.2.21 9:15:57 AM

OPERATIONS15
ENG
LISH
3: 45PM
FLATPBCVCD
02 0:45:38
Track no./Playing time
*1 Search speed: x2 ] x10.*2 Search speed: ¡1 ] ¡2.
PBC indicatorlights up when PBC is in use.
4 ¢ Press: Select track Hold: Reverse/forward search*1
page 43
3: 45PM
FRONT 2CH
RPT
DivXDVD
T 01 C 02 0:45:38Current Folder NameCurrent File Name.avi
For DivX/MPEG: Folder no./Track no./Playing timeFor JPEG: Folder no./File no.
4 ¢ Press: Select track Hold: Reverse/forward search for DivX/MPEG *2
5 ∞ Press: Select folder Hold: Display Folder List
KD-AVX33U.indb 15KD-AVX33U.indb 15 07.2.21 9:15:57 AM07.2.21 9:15:57 AM

16
ENG
LISH
3: 45PM
FLAT
RPT
MP3CD
T 01 02 0:45:38Current Folder NameCurrent File Name.mp3
Track no./Playing timeDisc title/Artist Name/Track title (only for CD Text)*3
Folder no./Track no./Playing time4 ¢ Press: Select track Hold: Reverse/forward search*1
5 ∞ Press: Select folder Hold: Display Folder List
Audio format(MP3/WMA/WAV/AAC)
4 ¢ Press: Select track Hold: Reverse/forward search*1
page 43
page 43
*1 Search speed: x2 ] x10.*3 “No Name” appears for conventional CDs.
Tag data will be shown instead of folder/file names when they are recorded and <Tag Display> is set to <On>. ( page 46)
3: 45PM
FLATCD
02 0:45:38 Disc Title Artist Name Current Track Title
RPT
KD-AVX33U.indb 16KD-AVX33U.indb 16 07.2.21 9:15:58 AM07.2.21 9:15:58 AM
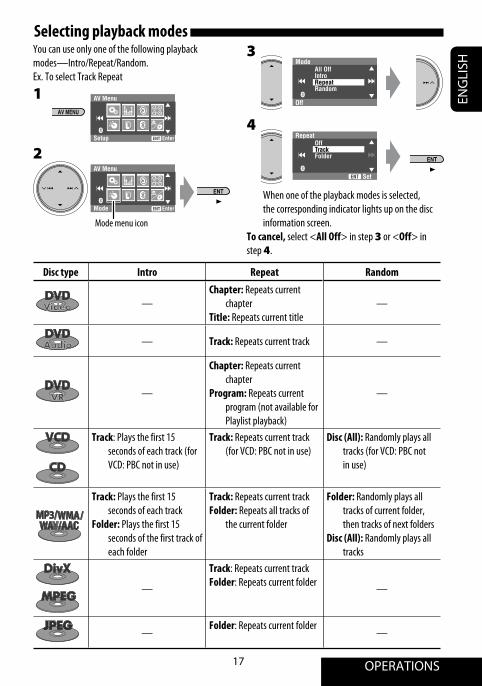
OPERATIONS17
ENG
LISH
You can use only one of the following playback modes—Intro/Repeat/Random.Ex. To select Track Repeat
1
2
Mode menu icon
3
4
When one of the playback modes is selected, the corresponding indicator lights up on the disc information screen.
To cancel, select <All Off> in step 3 or <Off> in step 4.
Selecting playback modes
Disc type Intro Repeat Random
—Chapter: Repeats current
chapterTitle: Repeats current title
—
— Track: Repeats current track —
—
Chapter: Repeats current chapter
Program: Repeats current program (not available for Playlist playback)
—
Track: Plays the first 15 seconds of each track (for VCD: PBC not in use)
Track: Repeats current track (for VCD: PBC not in use)
Disc (All): Randomly plays all tracks (for VCD: PBC not in use)
Track: Plays the first 15 seconds of each track
Folder: Plays the first 15 seconds of the first track of each folder
Track: Repeats current trackFolder: Repeats all tracks of
the current folder
Folder: Randomly plays all tracks of current folder, then tracks of next folders
Disc (All): Randomly plays all tracks
—
Track: Repeats current trackFolder: Repeats current folder
—
—Folder: Repeats current folder
—
Mode
Off
All OffIntroRepeatRandom
RepeatOffTrackFolder
SetENTAV Menu
Mode EnterENT
AV Menu
Setup EnterENT
KD-AVX33U.indb 17KD-AVX33U.indb 17 07.2.21 9:15:58 AM07.2.21 9:15:58 AM

18
ENG
LISH
Selecting tracks on the list If a disc includes folders, you can display the Folder/Track (File) Lists, then start playback.
1
Folder List appears.• Hold the button to see the next/previous folders.
2 Select a folder, then activate the Track List.
Track List of the selected folder appears.
3 Select a track, and start playing.
• Folder List can also be accessed through <AV Menu> = <List>.
Prohibiting disc ejection You can lock a disc in the loading slot.
“No Eject” appears.
To cancel the prohibition, repeat the same procedure to select “EJECT OK?”.
Folder List
Off
My BestCinemaPopsMy Best2Favorite SongCinema2 ENT
Folder List
Off
My BestCinemaPopsMy Best2Favorite SongCinema2 ENT
File List
Off
Song011.mp3Song012.mp3Song013.mp3Song014.mp3Song015.mp3Song016.mp3 ENT
List menu icon
AV Menu
Setup EnterENT
AV Menu
List EnterENT
NO EJECT?EMERGENCY EJECT?
KD-AVX33U.indb 18KD-AVX33U.indb 18 07.2.21 9:15:59 AM07.2.21 9:15:59 AM

OPERATIONS19
ENG
LISH
: Stop playback.
: Start playback/Pause (if pressed during playback).
: Reverse/forward search.*2
: Press: Select track. Hold: Reverse/forward search.*4
: Select group.
Operations using the remote controller—RM-RK251
*1 Erases the misentry of the number.
*2 Search speed: x2 ] x5 ] x10 ] x20 ] x60
*3 Slow motion speed: 1/32 ] 1/16 ] 1/8 ] 1/4 ] 1/2
*4 Search speed: x2 ] x10
: Stop playback.
: Start playback/Pause (if pressed during playback).
: Reverse/forward search.*2 (No sound can be heard.) (Slow motion*3 during pause. No sound can be heard.)
: Press: Select chapter (during playback or pause). Hold: Reverse/forward search.*4
: Select title (during playback or pause).
Using menu driven features
1 2 Select an item you want
to start playback.
3
= = : Select chapter. Select title (when not playing).
(twice) = = :
Select title (during playback or pause).
: Select aspect ratio.
: Select audio language.
: Select subtitle language.
: Select view angle.
= = : Select track.
(twice) = = : Select group.
: Select aspect ratio.
: Select audio stream.
Using menu driven features
1 2 Select an item you want
to start playback.
3
*1
KD-AVX33U.indb 19KD-AVX33U.indb 19 07.2.21 9:16:00 AM07.2.21 9:16:00 AM

20
ENG
LISH
: Stop playback.
: Start playback/Pause (if pressed during playback).
: Reverse/forward search.*2 (No sound can be heard.)
: Press: Select track. Hold: Reverse/forward search.*3 (No sound can be heard.)
: Select folder.
= = : Select track (within the same folder).
(twice) = = : Select folder.
: Select aspect ratio.
: Select audio language. (DivX only)
: Select subtitle language. (DivX only)*1
1st press1st press 2nd press
3rd press2nd press
Current playback positionWhile playing...Back/advance the scenes by 5 minutes.
For DivX6: Using menu driven features
1 2 Select an item you want to
start playback.
3
: Stop playback.
: Start playback/Pause (if pressed during playback).
: Reverse/forward search.*4 (No sound can be heard.)
(Slow motion*5 during pause. No sound can be heard.)
Reverse slow motion does not work.
: Press: Select chapter (during playback or pause).
Hold: Reverse/forward search.*6
Select program. : Select play list (during playback or
pause). : Select aspect ratio.
: Select audio channel (ST: stereo, L: left, R: Right).
: Turn on/off subtitle.
= = : Select chapter. Select program (when not playing).
(twice) = = :
Select program/play list (during playback or pause).
Using Original Program/Play List screens( page 28)1 For Original Programs: For Play List: 2 Select an item you want to start playback.
3 (Hide screen)
KD-AVX33U.indb 20KD-AVX33U.indb 20 07.2.21 9:16:02 AM07.2.21 9:16:02 AM

OPERATIONS21
ENG
LISH
= = : Select track.
During PBC playback...
= = :
Select an item on the menu. To return to the previous menu, press .
To cancel PBC playback
1
2 Start the desired track. = =
• To resume PBC, press / .
: Stop playback.
: Start playback/Pause (if pressed during playback).
: Reverse/forward search.*4
(Forward slow motion*5 during pause. No sound can be heard.)
Reverse slow motion does not work.
: Press: Select track. Hold: Reverse/forward search.*6 (No
sound can be heard.) : Select aspect ratio.
: Select audio channel (ST: stereo, L: left, R: Right).
: Stop playback.
: Start playback/Pause (if pressed during playback).
: Reverse/forward search.*4
: Press: Select track. Hold: Reverse/forward search.*6
: Select folder.
= = :
Select track (within the same folder).
(twice) = = :
Select folder.
*1 Erases the misentry of the number.*2 Search speed: ¡1 ] ¡2 ] ¡3*3 Search speed: ¡1 ] ¡2 *4 Search speed: x2 ] x5 ] x10 ] x20 ] x60*5 Slow motion speed: 1/32 ] 1/16 ] 1/8 ]
1/4 ] 1/2*6 Search speed: x2 ] x10
: Stop playback.
: Start playback. (Slide show: each file is shown for a few seconds.)
Shows the current file until you change it if pressed during Slide show.
: Select track.
: Select folder.
: Select aspect ratio.
= = : Select track (within the same folder).
(twice) = = : Select folder.
: Stop playback.
: Start playback/Pause (if pressed during playback).
: Reverse/forward search.*4
: Press: Select track. Hold: Reverse/forward search.*6
= = : Select track.
KD-AVX33U.indb 21KD-AVX33U.indb 21 07.2.21 9:16:03 AM07.2.21 9:16:03 AM

22
ENG
LISH
Playing back a bonus groupIf a DVD Audio including a “bonus group” is detected, the BONUS indicator lights up on the disc information screen.
To play a bonus group...
1 Select the bonus group.• The bonus group is usually recorded as the last
group.
2 Enter the key number.
: Move the entry position
: Select a number
• “key number” (a kind of password) for the bonus group is not open to public. The way of getting the key number depends on the disc.
3 Follow the interactive instructions shown on the monitor.
Selecting browsable still pictureWhen a disc including browsable still pictures is detected, the B.S.P indicator lights up on the disc information screen.
When disc shows the BSP selecting icons such as @ or # on the screen...
1 Select an item you want to display.
2
Enjoying surround sounds You can enjoy multi-channel surround playback through the front, center, surround speakers.• After connecting the center speaker, make
sure to activate the center speaker; otherwise, no sound comes out of the center speaker ( page 49).
• All surround mode can also be used for “USB.”
MULTI: For multi-channel encoded sources such as Dolby Digital*1, DTS*2, and DVD Audio. (When activated, “MULTI” is shown on the source information screen.)
Dolby Pro Logic II (Movie/Music): For 2 channel sources except for DivX/MPEG 1/MPEG2 discs.
To turn on the surround
1
2
3
• Surround Off: Deactivates surround.• Surround On: Activates surround = go to the
following steps.
AV Menu
Setup EnterENT
AV Menu
Disc Surround EnterENT
Disc Surround menu icon
Disc Surround
Auto
Surround OffSurround On
KD-AVX33U.indb 22KD-AVX33U.indb 22 07.2.21 9:16:05 AM07.2.21 9:16:05 AM

OPERATIONS23
ENG
LISH
4
• Auto: When multi-channel digital signals come in, “MULTI” surround is activated.
When 2-channel or 2.1-channel signals come in, “4CH STEREO” is activated.
• Through: All incoming channel signals are sent to the corresponding speakers.
• Dolby PLII Movie: Activates Dolby Pro Logic II Movie.
• Dolby PLII Music: Activates Dolby Pro Logic II Music. You can adjust <Panorama> and <Center Width> settings. ( below)
To change the <Dolby PLII Music> settingin step 4 above...
1
2
• Panorama: Select <On> to add wraparound sound effect.
• Center Width: Adjust the center image so it may be heard only from the center speaker, only form the left/right front speaker as a “phantom” center image, or various combination of these speakers. As the number increases, the “phantom” effect becomes stronger (normally select <4>).
3
On the remote controller:
• You cannot change the <Dolby PLII Music> settings using the remote controller.
Surround OnAutoThroughDolby PLII MovieDolby PLII Music
SetENT
Dolby PLII Music
On
PanoramaCenterWidth
Surround On
Panorama
AutoThroughDolby PLII MovieDolby PLII Music
*1 Manufactured under license from Dolby Laboratories. Dolby, Pro Logic, and the double-D symbol are trademarks of Dolby Laboratories.
*2 “DTS” and “DTS Digital Surround” are registered trademarks of DTS, Inc.
KD-AVX33U.indb 23KD-AVX33U.indb 23 07.2.21 9:16:06 AM07.2.21 9:16:06 AM

24
ENG
LISH
1 Display the on-screen bar. ( page 25)
2 Select an item.
3 Make a selection.If a pop-up menu appears...
• For entering time/numbers...
: Move the entry position
To remove the on-screen bar
Operations using the on-screen bar (DVD/VCD/DivX/MPEG1/MPEG2/JPEG) These operations are possible on the monitor using the remote controller.
: Select a number
KD-AVX33U.indb 24KD-AVX33U.indb 24 07.2.21 9:16:07 AM07.2.21 9:16:07 AM

OPERATIONS25
ENG
LISH
Information
Operation
On-screen bar
1 Disc type2 • DVD: Audio signal format
• VCD: PBC3 Playback mode*1
DVD Video: T. RPT: Title repeat C. RPT: Chapter repeat DVD Audio: T. RPT: Track repeat DVD-VR: C. RPT: Chapter repeat PG. RPT: Program repeat DivX/MPEG: T. RPT: Track repeat F. RPT: Folder repeat JPEG: F. RPT: Folder repeat VCD: T. INT: Track intro T. RPT: Track repeat A. RND: All random4 Playback information T02-C03 Current title/chapter G02-T03 Current group/track
PG-001
C-002 Current program/chapter
PL-003
C-004 Current playlist/chapter TRACK 01 Current track F001-T001 Current folder/track F002-F002 Current folder/file (JPEG)
5 Time indicationTOTAL Elapsed playing time of the discT. REM Remaining title time (for DVD)
Remaining disc time (for others)TIME Elapsed playing time of the current
chapter/track*2
REM Remaining time of the current chapter/track*2
6 Playback status Play
Reverse/forward search Reverse/forward slow-motion
Pause Stop
7 Operation iconsTIME Change time indication (see 5)
Time Search (Specify a certain scene by entering time.)
TITLE Title Search (by its number)CHAP Chapter Search (by its number)GROUP Group Search (by its number)TRACK Track Search (by its number)RPT Repeat play*1
INT Intro play*1
RND Random play*1
Change the audio language, audio channel or audio stream
Change the subtitle language Change the view angle
PAGE Change the browsable still pictures (pages)
*1 page 17*2 Not applicable for DVD-VR.
Above example is of DVD Video. Items shown on the bar vary due to the disc type.
DVD -V T02-C03 TOTAL 1:25:58
TIME TITLE CHAP RPT
C. RPT
KD-AVX33U.indb 25KD-AVX33U.indb 25 07.2.21 9:16:08 AM07.2.21 9:16:08 AM

26
ENG
LISH
Folder : 2 / 3
TIME 00:00:14T. RPT
Track : 6 / 14 (Total 41)
Track Information
Cloudy.mp3Fair.mp3Fog.mp3Hail.wmaIndian summer.mp3Rain.mp3Shower.mp3Snow.mp3Thunder.wmaTyphoon.mp3Wind.mp3Winter sky.mp3
AlbumWeatherArtistRobert M. SmithTitleRain
01 Music02 Music03 Music
Dual Zone operationsYou can enjoy a disc playback on the external monitor connected to the VIDEO OUT and 2nd AUDIO OUT plugs, while listening to any other source than “USB” through the speakers.• When Dual Zone is in use, you can only operate the
DVD/CD player using the remote controller.
1
2
3
• Off: Deactivates Dual Zone.• On (DUAL): Activates Dual Zone without
applying Headphone Surround*1.• On/Surround On (DUAL-S): Activates Dual
Zone and applies Headphone Surround.
When Dual Zone is activated, the main source is changed to “DISC.”
Ex. When “On/Surround On” is selected.
To select a different source (main source) to listen through the speakers:Press SRC (source) on the control panel.• By using the buttons on the control panel, you
can operate the newly selected main source without affecting Dual Zone (DISC) operations.
• You cannot select “USB” for the main source.
On the remote controller:
1
2 Adjust the volume through the 2nd AUDIO OUT plug.
3 Operate the DVD/CD player.
*1 JVC original headphone virtual surround system. This surround will also work for the main source “DISC” if “On/Surround On” is selected as the sub-source. This surround does not work for DivX/MPEG1/MPEG2 discs.
*2 Displayed being shaded if Headphone Surround is not applied.
Operations using the control screen For discs except DVD and VCD:While Dual Zone is on, these operations are possible on the external monitor using the remote controller.The control screen automatically appears when you insert a disc. (For DivX/MPEG1/MPEG2/JPEG; while not playing.)
Ex.: MP3/WMA
AV Menu
Setup EnterENT
AV Menu
Dual Zone EnterENT
Dual Zone menu icon
Dual ZoneOffOnOn/Surround On
SetENT
FLATDIGITALVIDEODVD
T 01 C 02 0:45:38DUAL-S *2
KD-AVX33U.indb 26KD-AVX33U.indb 26 07.2.21 9:16:09 AM07.2.21 9:16:09 AM

OPERATIONS27
ENG
LISH
1 Current folder (highlighted bar)2 Current folder number/total folder number3 Folder list* If tag data includes “Jacket Picture” (baseline JPEG), it
will be displayed. If you press OSD, the playback mode selection window appears. ( below)
4 Selected playback mode ( below)5 Elapsed playing time of the current track (not
displayed for JPEG)6 Operation status7 Current track number/total number of tracks in the
current folder (total number of tracks on the disc)8 Track information (only for MP3/WMA/WAV/AAC)9 Track listp Current track (highlighted)
To select a folder or track
1 Select “Folder” column or “Track” column on the control screen.
2 Select a folder or track.• If necessary, press ENT to start playback.
1 Playback mode selection window: appears when OSD is pressed ( below).
2 Selected playback mode ( below)3 Elapsed playing time of the current track4 Operation status5 Current track number/total number of tracks on the
disc6 Track information7 Track list8 Current track (highlighted bar)
To select a track• If necessary, press ENT to start playback.
Ex.: CD Text
MODE
REPEATTRACK
TIME 00:14
Track : 6 / 14
Track Information
CloudyFairFogHailIndian summerRainShowerSnowThunderTyphoonWindWinter sky
AlbumFour seasonsArtistRobert M. SmithTitleRain
T. RPT
Selecting playback modesYou can also change the playback modes using the playback mode selection window.• For CD/MP3/WMA/WAV/AAC: Intro/Repeat/
Random• For DivX/MPEG1/MPEG2/JPEG: Repeat
12 Only for CD/MP3/WMA/WAV/AAC: Select a
playback mode.
3 Select your desired option.
4
Selected playback modeDivX/MPEG1/MPEG2/JPEG: page 25MP3/WMA/WAV/AAC: T. INT: Track intro F. INT: Folder intro T. RPT: Track repeat F. RPT: Folder repeat F. RND: Folder random A. RND: All randomCD: T. INT: Track intro T. RPT: Track repeat A. RND: All random
KD-AVX33U.indb 27KD-AVX33U.indb 27 07.2.21 9:16:10 AM07.2.21 9:16:10 AM

28
ENG
LISH
Operations using the list screen For discs except DVD, VCD, and CDWhile Dual Zone is on, these operations are possible on the external monitor using the remote controller.
While not playing...
1 Display the list screen.
2 Select a folder on the list.
3 Select a track on the list.
• To go back to the folder list, press .
1 Current folder number/total folder number 2 Current track number/total number of tracks in the
current folder3 Current page/total number of the pages included
in the list4 Current folder/track (highlighted bar)
List screen for DVD-VRYou can use Original Program and Play List screen anytime while playing DVD-VR with its data recorded.
1 Display the Original Program/Play List screen.
2 Select an item you want.
1 Program/Play list number2 Recording date 3 Recording source (TV station, the input terminal
of the recording equipment, etc.)4 Start time of recording5 Title of the program/play list*6 Highlighted bar (current selection)7 Creating date of play lists8 Total number of chapters9 Playback time* The title of the original program or play list may
not be displayed depending on the recording equipment.
Folder : 144/240 Track 144/198 Page : 4/7fol120fol121fol122fol123fol124fol125fol126fol127fol128fol129
fol150fol151fol152fol153fol154fol155fol156fol157fol158fol159
fol140fol141fol142fol143fol144fol145fol146fol147fol148fol149
fol130fol131fol132fol133fol134fol135fol136fol137fol138fol139
file0141.wmafile0142.mp3file0143.wmafile0144.mp3file0145.mp3file0146.mp3file0147.mp3file0148.wmafile0149.wmafile0150.wma
file0151.wmafile0152.mp3file0153.wmafile0154.mp3file0155.wmafile0156.wmafile0157.wmafile0158.wmafile0159.mp3file0160.wma
Folder : 144/240 Track 144/198 Page : 4/5file0121.mp3file0122.mp3file0123.wmafile0124.mp3file0125.mp3file0126.wmafile0127.wmafile0128.mp3file0129.mp3file0130.wma
file0131.mp3file0132.mp3file0133.mp3file0134.mp3file0135.wmafile0136.mp3file0137.wmafile0138.mp3file0139.wmafile0140.wma
ORIGINAL PROGRAM
No Date Ch ime itle1 07/04/25 4ch 19:00 JVC DVD World 20042 07/05/25 8ch 10:303 07/05/22 8ch 17:00 Music Festival4 07/05/26 L-1 13:19 children 0015 07/06/20 4ch 22:006 07/06/25 L-1 8:23 children 002
T T
PLAY LIST
No Date Chap Length Title1 07/05/25 001 1:03:16 My JVC World2 07/06/17 005 1:35:253 07/06/20 003 0:10:23 Favorite music4 07/06/25 001 0:07:19 children001-002
or
KD-AVX33U.indb 28KD-AVX33U.indb 28 07.2.21 9:16:11 AM07.2.21 9:16:11 AM

OPERATIONS29
ENG
LISH
USB operationsYou can connect a USB mass storage class device such as a USB memory, Digital Audio player*1, portable HDD, etc. to the unit.
~ Connect a USB device.
Ÿ Select “USB”.
USB cable from the rear of the unit.
3: 45PM
USBNow Reading ...
7: Stop playback
This unit can play DivX/JPEG/MPEG1/MPEG2*2/MP3/WMA/WAV/AAC*3 files stored in a USB mass storage class device.• You can operate the USB device in the same way you
operate the files on discs. ( page 17 to 25)• You cannot select “USB”when Dual Zone is in use.• All tracks in the USB device will be played repeatedly
until you change the source.
*1 Except for JVC D. Player XA-HD500.*2 Except for MPEG2 files recorded by JVC Everio
camcorder (extension code <.mod>).
3: Start playback if necessary.
DISP: Press if no playback picture appears , but disc information screen ( pages 14 to 16) is displayed.
4 ¢ Press: Select track Hold: Reverse/forward search5 ∞ Press: Select folder Hold: Display Folder List
• You cannot connect a computer to the USB ( ) terminal of the unit.
*3 This unit can play back AAC files encoded using iTunes. This unit cannot play back AAC files purchased from the iTunes Store.
KD-AVX33U.indb 29KD-AVX33U.indb 29 07.2.21 9:16:12 AM07.2.21 9:16:12 AM

30
ENG
LISH
You can use only one of the following playback modes—Intro/Repeat/Random.Ex. To select Track Repeat
1
2
3
4
When one of the playback modes is selected, the corresponding indicator lights up on the information screen.
To cancel, select <All Off> in step 3 or <Off> in step 4.
Selecting playback modes
File type Intro Repeat Random
Track: Plays the first 15 seconds of each track
Folder: Plays the first 15 seconds of the first track of each folder
Track: Repeats current trackFolder: Repeats all tracks of
the current folder
Folder: Randomly plays all tracks of current folder, then tracks of next folders
USB (All): Randomly plays all tracks
—
Track: Repeats current trackFolder: Repeats current folder —
— Folder: Repeats current folder —
Mode
Off
All OffIntroRepeatRandom
RepeatOffTrackFolder
SetENT
AV Menu
Mode EnterENT
AV Menu
Setup EnterENT
Mode menu icon
Caution:
• Avoid using the USB device if it might hinder your safety driving.• Do not pull out and attach the USB device repeatedly while “Now Reading...” is flashing on the monitor.• Do not start the car engine if a USB device is connected.• Stop playback before disconnecting a USB device.• Make sure all important data has been backed up to avoid losing the data.• Do not leave a USB device in the car, expose to direct sunlight, or high temperature to avoid deformation or
cause damages to the device.
KD-AVX33U.indb 30KD-AVX33U.indb 30 07.2.21 9:16:12 AM07.2.21 9:16:12 AM

OPERATIONS31
ENG
LISHConnecting a Bluetooth device
for the first time Pairing and PIN CodeWhen you connect a Bluetooth device to the unit for the first time, make pairing between the unit and the device. Pairing allows Bluetooth devices to communicate each other.To make pairing, you may need to enter the PIN (Personal Identification Number) code of your Bluetooth device you want to connect.
• Once the connection is established, it is registered in the unit even if you reset the unit. Up to five devices can be registered in total.
• Only one device can be connected at a time for each source (“Bluetooth Phone” and “Bluetooth Audio”).
• To use the Bluetooth function, you need to turn on Bluetooth function of the device.
Preparation: Operate the device to turn on itsBluetooth function.
Registration (Pairing) methodsUse either of the following items in the <Bluetooth> menu to register and establish the connection with a device.• Select “Bluetooth Phone” or “Bluetooth Audio” as the
source to operate the <Bluetooth> menu.
<Open> Make the unit ready to establish a new Bluetooth connection. Connection is established by operating the Bluetooth device.
<Search> Make the unit ready to establish a new Bluetooth connection. Connection is established by operating the unit.
Bluetooth® operations — Cellular phone/audio player
Bluetooth is a short-range wireless radio communication technology for the mobile device such as mobile phones, portable PCs, and other devices. The bluetooth devices can be connected without cables and communicate each other. • The serial number is printed on the label placed on
the bottom of the unit.• Refer to the list (included in the box) to see the
countries where you may use the Bluetooth® function.
Bluetooth profileThis unit supports the following Bluetooth profiles; HSP (Headset Profile) HFP (Hands-Free Profile) A2DP (Advanced Audio Distribution Profile) AVRCP (Audio/Video Remote Control Profile) SPP (Serial Port Profile) OPP (Object Push Profile)
FeaturesYou can operate Bluetooth devices through the unit as follows:• Receiving a call• Making a call—from phone book, from call history
(Redial/Missed Call/Received Call), by dialing number, by preset numbers, by voice command
• Receiving the SMS• Play back a Bluetooth audio player
Refer also to the instructions supplied with the Bluetooth device.
Continued on the next page
• The Bluetooth word mark and logos are owned by the Bluetooth SIG, Inc. and any use of such marks by Victor Company of Japan, Limited (JVC) is under license. Other trademarks and trade names are those of their respective owners.
KD-AVX33U.indb 31KD-AVX33U.indb 31 07.2.21 9:16:13 AM07.2.21 9:16:13 AM

32
ENG
LISH
7 Operate the target Bluetooth device. (While “Open...” is flashing on the screen.)Enter the same PIN code (as entered in the above step) on the device to be connected.
Now connection is established and you can use the device through the unit.
The device remains registered even after you disconnect the device. Use <Connect> (or activate <Auto Connect>) to connect the same device from next time. ( pages 53 and 54)
Searching for available devicesPerform steps 1 to 3 on the left, then...
1
The unit searches for available devices and displays the list of them. (If no available device is detected, “Device Unfound” appears.)
2 Select a device you want to connect.
3 Enter the specific PIN code of the device to the unit.• Refer to the instructions supplied with the device
to check the PIN code.
4 Use the Bluetooth device to connect.
Now connection is established and you can use the device through the unit.
AV Menu
Bluetooth EnterENT
AV Menu
Setup EnterENT
Registering using <Open>
1 Select “Bluetooth Phone” or “Bluetooth Audio.”
2
3
Bluetooth menu icon
4
5 Enter a PIN (Personal Identification Number)* code to the unit.• You can enter any number you like (1-digit to
16-digit number).* Some devices have their own PIN code. Enter the
specified PIN code to the unit.
• To delete an unwanted digit, select blank space.
6
NEW DEVICEDial MenuMessageOpenSearchSpecial Device
NEW DEVICEDial MenuMessageOpenSearchSpecial Device
PIN Code
1234
EnterENT
3: 45PM
FLAT
NEW DEVICE
Bluetooth Phone
Select “NEW DEVICE” by pressing 5 / ∞.
KD-AVX33U.indb 32KD-AVX33U.indb 32 07.2.21 9:16:13 AM07.2.21 9:16:13 AM

OPERATIONS33
ENG
LISH
NEW DEVICEDial MenuMessageOpenSearchSpecial Device
Connecting a special devicePerform steps 1 to 3 of “Registering using <Open>” on page 32, then...
1
2 Select a device you want to connect.
3 Use <Open> (or <Search>) to connect.
Connecting/disconnecting a registered device
1 Select “Bluetooth Phone” or “Bluetooth Audio,” then select a registered device you want to connect/disconnect.
2 Perform steps 2 and 3 of “Registering using <Open>” on page 32, then...• Select <Connect> to connect the selected
device.• Select <Disconnect> to disconnect the selected
device.
You can set the unit to connect a Bluetooth device automatically when the unit is turned on. ( page 54)
Deleting a registered device
1 Select “Bluetooth Phone” or “Bluetooth Audio,” then select a registered device you want to delete.
2 Perform steps 2 and 3 of “Registering using <Open>” on page 32, then...• Select <Delete Pair>, then <Yes>.
The unit displays the list of the preset devices.
KD-AVX33U.indb 33KD-AVX33U.indb 33 07.2.21 9:16:14 AM07.2.21 9:16:14 AM

34
ENG
LISH
3: 45PM
FLAT
Connected Device Name
Bluetooth Phone
POWER]ON
~ Select “Bluetooth Phone.”
Ÿ Enter the <Bluetooth> menu.
! Establish the connection with a device, then make a call (or settings using the <Bluetooth> menu). pages 32, 45, 53, and 54
When the sound is stopped or interrupted during the use of a Bluetooth device, try the following remedies.• Turn off, then turn on the unit.• (When the sound is not yet restored,) connect the
device again. ( “Connecting/disconnecting a registered device” on page 33)
Using the Bluetooth cellular phone
*1 You can adjust the volume level for “Bluetooth Phone” without affecting the volume level for other sources.
*2 Appears only when the information comes from the device.
*3 Each time you press 5 ∞, the registered device name (and “NEW DEVICE” when a new device can be registered) appear in turn.
*4 When a cellular phone with audio function is connected, appears.
You can adjust the microphone volume level. ( page 54)
Status of the device*2
Signal strength/Battery remainder
Adjust the volume*1
When a call comes in...
The source is automatically changed to “Bluetooth Phone”.When <Auto Answer> is activated...The unit answers the incoming calls automatically. ( page 54)• When <Auto Answer> is deactivated, press any
button (except ATT or +/–) to answer the incoming call.
page 43
Press: Display <Dial Menu> Answer incoming callHold: Display <Redial> list
To end the call or reject an incoming callHold any button (except ATT or +/–).
Answering a waiting callIf your cellular phone is equipped with the call waiting function, you can put the current call on hold and answer the waiting call.Press any button (except ATT and +/–).• To restore the on-hold call, press any button (except
ATT and +/–) again.• When you end one call, you can connect to the
other.
Connected device name *3
Name and phone number (if acquired)
Turns Blue when the Bluetooth device is connected.
*4
KD-AVX33U.indb 34KD-AVX33U.indb 34 07.2.21 9:16:15 AM07.2.21 9:16:15 AM

OPERATIONS35
ENG
LISH
Making a call 1 Display the <Dial Menu>.
2 Select the method to make a call.
• Redial* : Shows the list of the phone numbers you have dialed = go to the following step.
• Received Calls* : Shows the list of the received calls = go to the following step.
• Phonebook* : Shows the phone book of the connected cellular phone = go to the following step.
• Missed Calls* : Shows the list of the missed calls.= go to the following step.
• Phone Number : Shows the phone number entry screen = “How to enter phone number” ( page 36).
• Voice Dialing (Only when the connected cellular phone has the voice recognition system): Speak the name you want to call.
* Displays only when your cellular phone is equipped with these functions.– If not displayed, please try to transfer the
phone book memory of the cellular phone to this unit. (Refer to the instruction manual supplied with your cellular phone.)
– With some cellular phones, the phone book memory is transferred automatically.
3 Select the name/phone number you want to call.
When an SMS comes in...If the cellular phone is compatible with SMS (Short Message Service) and <Message Info> is set to <Auto> ( page 54), the unit rings and “Receiving Message” appears on the monitor to inform you of the arrival of the message.• You cannot edit or send a message through the
unit.
When <Message Info> is set to <Auto>...To read the messageWhile “Receiving Message” is displayed...
• The source is changed to “Bluetooth Phone.”
To read the message later
• The message is stored into <Message> = <Unread>. ( page 53)
When <Message Info> is set to <Manual>Access the message list to read a message.( page 53)
P902i
Annie
RedialReceived CallsPhonebookMissed CallsPhone number
P902i
Annie
RedialReceived CallsPhonebookMissed CallsPhone number
or
KD-AVX33U.indb 35KD-AVX33U.indb 35 07.2.21 9:16:15 AM07.2.21 9:16:15 AM

36
ENG
LISH
How to enter phone numberOn the remote:
On the unit:
1
• To delete an unwanted digit, select blank space.
2
<Dial Menu> can be also accessed through <AV Menu> = <Bluetooth> = <Dial Menu>.
Direct operations to redial / Voice DialingYou can use the following functions regardless of the current source.To redial
To activate Voice DialingYou can make a call by your voice.
Presetting the phone numbers You can preset up to six phone numbers.
1 Display the phone number you want to preset by using one of <Dial Menu> items.
Ex.: “Jack” is selected from the phone book
Preset Memory list appears.
2 Select a preset number.
The phone number selected in step 1 is now stored in preset number 4.
To call a preset number On the remote:
On the unit:
1
2
111222233332223333666644455556666098456712349998888777755566668888
1
2
3
4
5
6 ENT
Preset List
111222233332223333666644455556666098456712349998888777755566668888
1
2
3
4
5
6 ENT
Preset List
111222233332223333666644455556666111333344449998888777755566668888
1
2
3
4
5
6 ENT
Preset Memory
Jack123123412340989876543209845671234
Dial
StoreENT
ENT
111222233332223333666644455556666111333344449998888777755566668888
1
2
3
4
5
6 ENT
Preset Memory
Speak the name you want to call.
AV Menu
Bluetooth EnterENT
AV Menu
Setup EnterENT
Dialling ...Jack09845671234
Select a number. Move the entry position.
or
Bluetooth menu icon
or
KD-AVX33U.indb 36KD-AVX33U.indb 36 07.2.21 9:16:16 AM07.2.21 9:16:16 AM

OPERATIONS37
ENG
LISH
Using the Bluetooth audio player
*1 Each time you press 5 ∞, the registered device names (and “NEW DEVICE” when a new device can be registered) appear in turn. You cannot select “New Device” when a Bluetooth audio player is connected.
*2 Appears only when the information comes from the device.
*3 Indicates the button pressed. It may be different from the operation status.
*4 When a cellular phone with audio function is connected, appears.
You can use the following buttons on the remote controller for the Bluetooth audio operations. For details, pages 8 and 9.
3: 45PM
FLAT
Connected device name
Bluetooth Audio
POWER]ON
Pause
Reverse/forward skip
*1
Status of the device*2
Signal strength/Battery remainder
page 43
List menu icon
AV Menu
Setup EnterENT
AV Menu
List EnterENT
*3
~ Select “Bluetooth Audio.”
Ÿ Start playback.• See pages 31 to 33 for connecting a new device.• See page 33 for connecting/disconnecting a
registered device.• See page 33 for deleting a registered device.When the sound is stopped or interrupted during the use of a Bluetooth device, try the following remedies.• Turn off, then turn on the unit.• (When the sound is not yet restored,) connect the
device again. ( “Connecting/disconnecting a registered device” on page 33)
• Preset List can also be accessed through <AV Menu> = <List>.
You can use the following buttons on the remote controller for the Bluetooth phone operations. For details, pages 8 and 9.
Turns Blue when the Bluetooth device is connected.
*4
Bluetooth Information:If you wish to receive more information about Bluetooth, visit our JVC web site.
KD-AVX33U.indb 37KD-AVX33U.indb 37 07.2.21 9:16:17 AM07.2.21 9:16:17 AM

38
ENG
LISH
3: 45PM
FLATCD-CH
01 01 0:02:38Disc TitleArtist NameCurrent Track Title
POWER]ON
Listening to the CD changer
It is recommended to use a JVC MP3-compatible CD changer with your unit.• You can play only CDs (CD-DA) and MP3 discs.
Preparation:Make sure <Changer> is selected for the external input setting. ( page 50)
~ Select “CD-CH.”
Ÿ Display the Disc List.
• Each time you hold the button, you can display the other list of the remaining discs.
! Select a disc to start playing.
“No Name” appears for conventional CDs
Disc no./Track no./Playing time
• While playing an MP3 disc, you can select and start playing a track in the disc using the Lists: Disc List (select the current disc) = Folder List = File List, then start playing a track you want.
4 ¢ Press: Select track Hold: Reverse/forward search5 ∞ Press: Select folder (MP3 only) Hold: Display Disc List
Disc List
Off
MP3 DISCDISC 02DISC 03DISC 04DISC 05DISC 06 ENT
Disc List
Off
MP3 DISCDISC 02DISC 03DISC 04DISC 05DISC 06 ENT
Folder List
Off
My BestCinemaPopsMy Best2Favorite SongCinema2 ENT
File List
Off
Song011.mp3Song012.mp3Song013.mp3Song014.mp3Song015.mp3Song016.mp3 ENT
Disc List
Off
MP3 DISCDISC 02DISC 03DISC 04DISC 05DISC 06 ENT
KD-AVX33U.indb 38KD-AVX33U.indb 38 07.2.21 9:16:18 AM07.2.21 9:16:18 AM

39 EXTERNAL DEVICES
ENG
LISH
You can use only one of the following playback modes—Intro/Repeat/Random.Ex. To select Track Repeat
1
2
Mode menu icon
3
4
When one of the playback modes is selected, the corresponding indicator lights up on the monitor.
To cancel, select <All Off> in step 3 or <Off> in step 4.
Selecting playback modes
Disc type Intro Repeat Random
Track: Plays the first 15 seconds of each track
Disc: Plays the first 15 seconds of the first track of all loaded discs
Track: Repeats current trackDisc: Repeats all tracks of the
current disc
Disc: Randomly plays all tracks of the current disc
All: Randomly plays all tracks of all loaded discs
Track: Plays the first 15 seconds of each track
Folder: Plays the first 15 seconds of the first track of each folder
Disc: Plays the first 15 seconds of the first track of all loaded discs
Track: Repeats current trackFolder: Repeats all tracks of
the current folderDisc: Repeats all tracks of the
current disc
Folder: Randomly plays all tracks of current folder, then tracks of next folders
Disc: Randomly plays all tracks of the current disc
All: Randomly plays all tracks of all loaded discs
You can use the following buttons on the remote controller to operate the CD changer.
or : Select disc
Press: Select folder (MP3 only)
Press: Select track Hold: Reverse/forward search
To use <Mode> menu above.
To use <List> menu page 38.Disc List = Folder List = File List
Mode
Off
All OffIntroRepeatRandom
RepeatOffTrackDisc
SetENT
AV Menu
Mode EnterENT
AV Menu
Setup EnterENT
KD-AVX33U.indb 39KD-AVX33U.indb 39 07.2.21 9:16:19 AM07.2.21 9:16:19 AM

40
ENG
LISH
3: 45PM
FLATD.PLAYER
01 0:45:38Album NameArtist NameTrack Title
POWER]ON
Listening to the iPod/D. player
It is required to connect the interface adapter (KS-PD100 for Apple iPod or KS-PD500 for JVC D. player) to the CD changer jack on the rear.Preparation:Make sure <iPod> or <D. Player> is selected for the external input setting. ( page 50)
~ Select “iPod” or “D. PLAYER.”Playback starts automatically.
Ÿ Select a track.
Selecting a track from the player’s menu 1 Enter the player’s menu.
• This mode will be canceled if no operations are done for about 5 seconds.
2 Select the desired item.Press: Select an itemHold: Skip 10 items at a time
For iPod:Playlists Ô Artists Ô Albums Ô Songs Ô Genres Ô Composers Ô (back to the beginning)For D. player:Playlist Ô Artist Ô Album Ô Genre Ô Track Ô (back to the beginning)
3 Confirm the selection.
4 Repeat steps 2 and 3 to select a track.• When a track is selected finally, playback starts.• To return to the previous menu...
Selecting playback modes 1 Display <AV Menu>, then select <Mode>
menu icon.
2 Enter <Mode>, then select <Repeat> or <Random>.
3 Select an appropriate option.
Repeat One: Functions the same as “Repeat One” or “Repeat Mode = One.”All: Functions the same as “Repeat All” or “Repeat Mode = All.”
Random Album: Functions the same as “Shuffle Albums” of the iPod.Song/On: Functions the same as “Shuffle Songs” or “Random Play = On.”
• When the playback modes are selected, the corresponding indicators light up on the monitor.
To cancel, select <All Off> in step 2 or <Off> in step 3.
4 ¢:Press: Select trackHold: Reverse/forward search
5 ∞5 : Enter player’s menu∞ : Pause/stop playback
• To resume, press again.
Track no./Playing time page 43
• iPod is a trademark of Apple Inc., registered in the U.S. and other countries.
KD-AVX33U.indb 40KD-AVX33U.indb 40 07.2.21 9:16:19 AM07.2.21 9:16:19 AM

41 EXTERNAL DEVICES
ENG
LISH
Listening to other external components
AV-INPUT You can connect an external component to the LINE IN/VIDEO IN plugs.• You can also connect a Navigation System to the VIDEO IN plug so that you can watch the navigation screen (Make sure <Navigation> is selected for <AV Input>). ( page 50)
~ Select “AV-IN.”
Ÿ Turn on the connected component and start playing the source.
• If you select <Camera Mirror> or <Navigation> for <AV Input> ( page 50), some status messages such as volume level change will not appear on the monitor while viewing the picture.
When <Navigation> is selected for <AV Input>...• You can use the source “AV-IN” for listening to an audio source connected to the LINE IN plugs.• While selecting other source, you can watch the navigation screen without changing the source. To watch the
navigation screen, press DISP repeatedly.
3: 45PM
FLATAV-IN
AV-INPUT
POWER]ON
Press if no playback picture appears, but source information (this) screen is displayed.
Assigned title ( page 44) page 43
KD-AVX33U.indb 41KD-AVX33U.indb 41 07.2.21 9:16:20 AM07.2.21 9:16:20 AM

42
ENG
LISH
EXT-INPUT You can connect an external component to the CD changer jack on the rear using the Line Input Adapter—KS-U57 (not supplied) or AUX Input Adapter—KS-U58 (not supplied).
Preparation:Make sure <External Input> is selected for the external input setting. ( page 50)
~ Select “EXT-IN.”
Ÿ Turn on the connected component and start playing the source.
3: 45PM
FLATEXT-IN
EXT-INPUT
POWER]ON Assigned title ( page 44) page 43
KD-AVX33U.indb 42KD-AVX33U.indb 42 07.2.21 9:16:20 AM07.2.21 9:16:20 AM

SETTINGS43
ENG
LISH
Selecting sound mode
~
Ÿ
! Select a sound mode.
• For preset equalizing values of each sound mode, page 60.
• For multi-channel source, the sound mode is temporarily canceled.
Storing your own adjustmentYou can store your adjustment into User1, User2, and User3.
1 Repeat steps ~ and Ÿ, then in step !...
2 Adjust.
3 Store.
Sound equalization
Edit
60.0 Hz ENT
+03
Store
User StoreUser1User2User3
ENT Store
AV Menu
Setup EnterENT
AV Menu
Equalizer EnterENT
FlatHard RockR&BPopJazz
ExitENT
Equalizer
Equalizer menu icon
FlatHard RockR&BPopJazz
ExitENT
Equalizer
Edit
60.0 Hz ENT
+03
Store
POWER]ON
KD-AVX33U.indb 43KD-AVX33U.indb 43 07.2.21 9:16:21 AM07.2.21 9:16:21 AM

44
ENG
LISH
You can assign titles as follows.
FM/AM stations Up to 16 characters—up to 30 stations
AV-INEXT-IN
Up to 16 characters
• If you try to assign a title to a 31st station, “Name Full” flashes on the monitor. Delete unwanted titles before assignment.
~ Select the source.• For FM/AM stations: Select the band, then
tune into a station.• For “AV-IN”/“EXT-IN”: Select the source.
Ÿ Display the title entry screen.1
2
Mode menu icon
3
Ex. When you select FM as the source
! Assign a title.1 Select a character, then move the entering
position.
• To change the character set, press DISP. (For available characters, page 61.)
2 Repeat step 1 until you finish entering the title.
⁄ Finish the procedure.
Assigning titles to the sourcesPress: Change character setHold: Erase title
AV Menu
Setup EnterENT
AV Menu
Mode EnterENT
Station Name
ABC Radio
DISP StoreENTA a 0 Á á
Title Entry
POWER]ON
ModeMonoDX/LocalSSMTitle Entry
Station Name
ABC
StoreENT
Title Entry
DISP A a 0 Á á
KD-AVX33U.indb 44KD-AVX33U.indb 44 07.2.21 9:16:21 AM07.2.21 9:16:21 AM

SETTINGS45
ENG
LISH
AV Menu
Setup EnterENT
POWER]ON
!
• For some items, repeat this steps to set the sub-items.
⁄
Menu items
Menu operations
Ex. Changing the <High Pass Filter> setting
~
Non-available items will be displayed being shaded.
Ÿ
Setup Equalizer Sound
Mode List Bluetooth
Sound menu icon
Sound
Through
Fader/BalanceVolume AdjustSubwooferHigh Pass FilterCrossover
ThroughOn
ExitENT
High Pass Filter
AV Menu
Setup EnterENT
AV Menu
Sound EnterENT
Disc Surround
Dual Zone
AV Menu
Setup EnterENTInput
Display
Clock
Disc Setup 1
Disc Setup 2
Tuner
Others
Setup
Equalizer
Sound
Disc Surround
Mode
Bluetooth
List
Dual Zone
• The display indications may change according to change of the specifications.
KD-AVX33U.indb 45KD-AVX33U.indb 45 07.2.21 9:16:22 AM07.2.21 9:16:22 AM

46
ENG
LISH
Initial: UnderlinedSetup
Menu items Selectable settings, [reference page]
Disp
lay
Demonstration Off : Cancels.On : Activates the demonstration on the monitor.
Wall Paper You can select the background picture of the monitor.Future-Blue, Future-Green, Wave-Blue, Wave-Green, Wave-Pink, Metal-A, Metal-B, Ball-A, Ball-B, Ball-C, Dolphin, Simple-Red, Simple-Purple, Simple-Blue, Simple-Gray
Scroll Off : Cancels.Once : Scrolls the disc information once.Auto : Repeats scrolling (5-second intervals).• Holding DISP (on the unit) scrolls the information regardless of this
setting.
Tag Display Off : Cancels.On : Shows the Tag data while playing MP3/WMA/WAV/AAC tracks.
Dimmer Off : Cancels.On : Activates dimmer.Auto : Dims the monitor when you turn on the headlights.*1
Time Set : Press ENT (or ¢) to display the time setting screen, then set the Dimmer On/Off times.
Bright You can adjust brightness of the monitor.–15 (darkest) to +15 (brightest); Initial 00
Picture Adjust*2 You can adjust the following to make the monitor clear and legible for watching the playback picture. The setting will be stored for“DISC/USB,” and “AV-IN.”–15 to +15; Initial 0Bright : Adjust if the picture is too bright or too dark.Contrast : Adjust the contrast.Color : Adjust the color of the picture—lighter or darker.Tint : Adjust the tint if the human skin color is unnatural.
*1 The ILLUMINATION CONTROL lead connection is required. ( Installation/Connection Manual)*2 Adjustable only when the source is a disc or USB containing pictures or movies, or “AV-IN.”
KD-AVX33U.indb 46KD-AVX33U.indb 46 07.2.21 9:16:23 AM07.2.21 9:16:23 AM

SETTINGS47
ENG
LISH
Menu items Selectable settings, [reference page]Di
spla
y
Aspect*3 You can change the aspect ratio of the picture.
Aspect ratio of incoming signal
4:3 16:9
Full :For 16:9 original pictures
Auto : • For “DISC”: Aspect ratio is automatically selected to match to the incoming signals.
• For the other video sources: Aspect ratio is fixed to <Regular>.
Regular :For 4:3 original pictures
NTSC/PAL This setting is valid only to the external monitor connected.Select the color system of the external monitor—NTSC, PAL.• Turn off the power and turn it on again to make the new setting
effective.
Language*4 Select the indication language shown on the monitor.English, Spanish, French, German, Italian, Dutch, Swedish, Danish, Russian
Cloc
k
Time Set Initial 1:00AM [6]
12Hours/24Hours 12 Hours, 24 Hours [6]
OSD Clock Off, On, [6]
*3 Not adjustable for audio sources.*4 After you change the indication language setting, turn off then on the power so that your setting takes effect.
KD-AVX33U.indb 47KD-AVX33U.indb 47 07.2.21 9:16:23 AM07.2.21 9:16:23 AM

48
ENG
LISH
Menu items Selectable settings, [reference page]Di
sc Se
tup
1*5
Menu Language Select the initial disc menu language; Initial English ( also page 61).
Audio Language Select the initial audio language; Initial English ( also page 61).
Subtitle Select the initial subtitle language or erase the subtitle (<Off>); Initial English ( also page 61).
OSD Language Select the on-screen language used for the external monitor connected to the VIDEO OUT plug; Initial English.
Monitor Type Select the monitor type to watch a wide screen picture on the external monitor.16:9 : Select when the aspect ratio of the external monitor is 16:9.4:3 Letterbox/4:3 Pan Scan : Select when the aspect ratio of the
external monitor is 4:3. Refer to the illustrations on the left to see how the pictures are shown on the monitor.
OSD Position Select the position of the on-screen bar, [25].1 : Higher position2 : Lower position
File Type Select playback file type when a disc/USB contains different types of files. You can store this setting separately for each source —“DISC/USB.”Audio : Plays back audio files.Still Picture : Plays back JPEG files.Video : Plays back DivX/MPEG1/MPEG2 files.
DivX Regist. (Registration) This unit has its own Registration Code. Once you have played back a file with which the Registration Code recorded, this unit’s Registration Code is overwritten for copyright protection.
*5 Selectable only for “DISC” and “USB.” (Playback stops when you select one of the items.)
Position 1 Position 2
16:9 4:3 Letterbox
4:3 Pan Scan
KD-AVX33U.indb 48KD-AVX33U.indb 48 07.2.21 9:16:24 AM07.2.21 9:16:24 AM

SETTINGS49
ENG
LISH
Menu items Selectable settings, [reference page]Di
sc Se
tup
2D. (Dynamic) Range Compres. (Compression)*5
You can enjoy a powerful sound at a low volume level while playing Dolby Digital software.Auto : Select to apply the effect to multi-channel encoded software.On : Select to always use this function.
Speaker Size*5 You can adjust the speaker size setting.• Front SPK : Small, Large• Center SPK : None, Small, Large• Rear SPK : None, Small, Large• Subwoofer : On, Off• Speaker size : <Large> for 13 cm diameter or more; <Small> for
13 cm or less.• Front speakers and rear speakers cannot be adjusted separately the
left and right.Regardless of the setting above...• No sound comes out of the subwoofer while playing Dolby Pro Logic
II Movie or Music if the front speaker is set to <Large>.• No sound comes out of the center speaker when surround is
deactivated.
Speaker Level You can adjust the output level of the activated speakers ( <Speaker Size> above), monitoring the test tone.Front Lch/Center Ch/Front Rch/Rear Rch/Subwoofer*6/Rear Lch
: adjust the output level of each speaker in the range of –10dB to +10dB; Initial 0dB.
• Press and hold ENT to turn on and off the test tone.
Speaker Distance*7 You can adjust the speaker output timing.Front Lch/Center Ch/Front Rch/Rear Rch/Rear Lch : adjust the
speaker distance from the listening position in the range of 15cm/6 inches to 600 cm/240 inches in 15 cm/6 inch step; Initial 120 cm/48 inch (for center speaker), 150 cm/60 inch (for other speakers).
• Press and hold DISP to change the measuring unit—cm and inch.
*5 Selectable only for “DISC” and “USB.” (Playback stops when you select one of the items.)*6 This subwoofer level setting takes effect only when surround is activated. ( also page 22, 23)*7 This setting does not take effect for MPEG1/MPEG2 and DivX with MP3 audio track.
Select the speaker
Adjust the speaker level
Select the speaker
Adjust the speaker distance
Select the speaker
Adjust the speaker size
KD-AVX33U.indb 49KD-AVX33U.indb 49 07.2.21 9:16:25 AM07.2.21 9:16:25 AM

50
ENG
LISH
Menu items Selectable settings, [reference page]Tu
ner IF Band Width Auto : Increases the tuner selectivity to reduce interference noises
between adjacent stations. (Stereo effect may be lost.)Wide : Subject to the interference from adjacent stations, but sound
quality will not be degraded and the stereo effect will remain.
Inpu
t
AV Input You can determine the use of LINE IN and VIDEO IN plugs.Off : Select when no component is connected (“AV-IN” is skipped while
selecting the source).Audio&Video : Select when connecting an AV component such as a
VCR.Audio : Select when connecting an audio component such as a digital
audio player.Camera*8: Select when connecting the rear view camera. Camera Mirror*8: The mirror image of the rear view is displayed on
the monitor. (The monitor on the unit only; the normal rear view appears on the external monitor.)
Navigation : Select when connecting a Navigation System. [41]
External Input*9 For connecting an external component to the CD changer jack on the rear.Changer/iPod/D. Player*10: CD changer, iPod, or D. player
[38, 40]External Input : Any other than the above. [42]
Othe
rs
Beep Off : Cancels.On : Activates the key-touch tone.
Telephone Muting*11 Off : Cancels.Muting1, Muting2 : Select either one which mutes the sounds while
using the cellular phone.
Initialize Initialize all settings you have made in <AV Menu>. Press ENT, then reset the unit. ( page 3)
*8 Reverse lamp lead connection is required. See Installation/Connection Manual (separate volume). The rear view through the camera appears on the monitor in “Full” aspect ratio (regardless of the aspect ratio setting) when you shift the gear to the reverse (R) position.
*9 Not selectable when the component connected to the CD changer jack is selected as the source.*10 The name of the component detected through the CD changer jack is shown.*11 The TEL MUTING lead connection is required. See Installation/Connection Manual (separate volume).
KD-AVX33U.indb 50KD-AVX33U.indb 50 07.2.21 9:16:25 AM07.2.21 9:16:25 AM

SETTINGS51
ENG
LISH
EqualizerFlat/Hard Rock/R&B/Pop/Jazz/Dance/Country/Reggae/Classic/User1/User2/User3, [43]
Sound
Menu items Selectable settings, [reference page]
Fader/Balance Adjust fader—speaker output balance between the front and rear speakers.• Upmost—front only• Downmost—rear onlyWhen using a two-speaker system, set the fader to the center (00).Adjust balance—speaker output balance between the left and right speakers.• Leftmost—left only• Rightmost—right only
Volume Adjust Adjust and store auto-adjustment volume level for each source, comparing to the FM volume level. The volume level will automatically increase or decrease when you change the source.–12 to +12; Initial 00
Subwoofer*12 Adjust the settings below in the submenu:Phase : Subwoofer phase. Select either <Normal> or <Reverse>, which
reproduces a better sound.Level : Subwoofer output level. Level: –06 to +08; Initial 00
High Pass Filter Through : Select when the subwoofer is not connected.On : Select when the subwoofer is connected.
Crossover Adjust the crossover frequency between the front/rear speakers and the subwoofer.80Hz, 120Hz, 150Hz
Amplifier Gain You can change the maximum volume level of this unit.Off : Deactivates the built-in amplifier.Low Power : VOL 00 to 30 (Select this if the maximum power of the speakers
is less than 50 W.)High Power : VOL 00 to 50
Rear Speaker*13 You can activate/deactivate the rear speakers.Off, On
*12 This subwoofer level setting takes effect only when surround is deactivated. ( also page 22, 23)*13 This setting takes effect only when Dual Zone is activated. ( also page 26)
Adjusts fader
Adjust balance
KD-AVX33U.indb 51KD-AVX33U.indb 51 07.2.21 9:16:26 AM07.2.21 9:16:26 AM

52
ENG
LISH
Disc Surround*14
Menu items Selectable settings, [reference page]
Surround Off Select to deactivate the surround function.
Surround On Select to activate the surround function. [22, 23]Auto, Through, Dolby PLII Movie, Dolby PLII Music• When you select Dolby PLII Music, you can adjust <Panorama> and
<Center Width>.*15
*14 Selectable only for “DISC” and “USB.”*15 This setting takes effect only when the center speaker is activated.
Mode*16
Menu items Selectable settings, [reference page]
Mono Only for FM. (Off, On), [10]
DX/Local Only for FM. (DX, Local), [11]
SSM Only for FM. [11]
Title Entry Only for FM/AM stations, AV-IN and EXT-IN. [44]
All Off/Intro/Repeat/Random Only for disc/USB playback and iPod/D. player. [17, 30, 39, 40]
*16 Items listed under <Mode> vary among the playback sources.
ListThe accessible lists differ depending on the sources. [12, 18, 37, 39]
KD-AVX33U.indb 52KD-AVX33U.indb 52 07.2.21 9:16:27 AM07.2.21 9:16:27 AM

SETTINGS53
ENG
LISH
Bluetooth*17
Menu items Selectable settings, [reference page]
Dial Menu Only for the device connected for “Bluetooth Phone.”Select the method to make a call. [35]
Message Only for the device connected for “Bluetooth Phone.”*18
You can read a message from the following message histories.Unread : Messages you have not read.Read : Messages you have read.Unsent : Messages you have not sent.Sent : Messages you have sent.• The number of messages in each history is also shown on the monitor.
Open [32]
Search [32]
Special Device Only for “NEW DEVICE.”Shows the list of Bluetooth devices which require some special procedure to establish Bluetooth connection. Select a device you want to connect.• After selecting the device, use <Open> or <Search> ( page 32) for
connection.• Once the connection is established, it is registered in the unit. You can
connect the unit and the device by using <Connect> (below) from the next time.
Connect Only for the registered devices.After selecting a device from among the registered devices ( page 33, 37), establish the connection with it.
Disconnect Only for the device being connected.Disconnect the current device before connecting another device.
Delete Pair Only for the registered devices.Delete the registered devices.
*17 Selectable only for “Bluetooth Phone” or “Bluetooth Audio.” Select a device (or “NEW DEVICE”) before operating the menu.
*18 Selectable only when the device is compatible with SMS.
When operating the Bluetooth device, refer also to the instructions supplied with the device.
Continued on the next page
KD-AVX33U.indb 53KD-AVX33U.indb 53 07.2.21 9:16:27 AM07.2.21 9:16:27 AM

54
ENG
LISH
Menu items Selectable settings, [reference page]Se
ttin
gsAuto Connect*19 When the unit is turned on, the connection is established automatically
with...Off : No Bluetooth device.Last : The last connected Bluetooth device.Order : The available registered Bluetooth device found at first.
Auto Answer*20 Off : The unit does not answer the calls automatically. Answer the calls manually.
On : The unit answers the incoming calls automatically.Reject : The unit rejects all incoming calls.
Message Info*20 Auto : The unit informs you of the arrival of a message by ringing and displaying “Receiving Message.” To read the message, press ENT ( page 35).
Manual : The unit does not inform you the arrival of a message.
MIC Setting*20 Adjust microphone volume connected to the unit.01, 02, 03
Version*21 The Bluetooth software and hardware versions are shown.
*19 Selectable only for “Bluetooth Phone.”*20 Only for the device being connected for “Bluetooth Phone.” Not selectable for “NEW DEVICE”.*21 If you wish to receive more information about Bluetooth, visit our JVC web site.
Dual ZoneOff, On, On/Surround On, [26]
KD-AVX33U.indb 54KD-AVX33U.indb 54 07.2.21 9:16:28 AM07.2.21 9:16:28 AM

55 REFERENCES
ENG
LISH
Maintenance How to clean the connector
Frequent detachment will deteriorate the connectors.To minimize this possibility, periodically wipe the connectors with a cotton swab or cloth moistened with alcohol, being careful not to damage the connectors.
Connector
Moisture condensationMoisture may condense on the lens inside the unit in the following cases:• After starting the heater in the car.• If it becomes very humid inside the car.Should this occur, the unit may malfunction. In this case, eject the disc and leave the unit turned on for a few hours until the moisture evaporates.
How to handle discsWhen removing a disc from its case, press down the center holder of the case and lift the disc out, holding it by the edges.• Always hold the disc by the edges.
Do not touch its recording surface.When storing a disc into its case, gently insert the disc around the center holder (with the printed surface facing up).• Make sure to store discs into the cases after use.
To keep discs cleanA dirty disc may not play correctly. If a disc does become dirty, wipe it with a soft cloth in a straight line from center to edge.• Do not use any solvent (for example, conventional
record cleaner, spray, thinner, benzine, etc.) to clean discs.
To play new discsNew discs may have some rough spots around the inner and outer edges. If such a disc is used, this unit may reject the disc.To remove these rough spots, rub the edges with a pencil or ball-point pen, etc.
Stick-on label
Sticker Sticker residue
Warped disc
Do not use the following discs:
Center holder
KD-AVX33U.indb 55KD-AVX33U.indb 55 07.2.21 9:16:28 AM07.2.21 9:16:28 AM

ENG
LISH
56
More about this unit General
Turning on the power• By pressing SRC (source) on the unit, you can also
turn on the power. If the source is ready, playback starts.
FM/AMStoring stations in memory• When SSM is over, received stations are preset in
No.1 (lowest frequency) to No. 6 (highest frequency).
DiscGeneral• In this manual, words “track” and “file” are
interchangeably used.• This unit can also play back 8 cm discs.• This unit can only play back audio CD (CD-DA) files if
different type of audio files (MP3/WMA/WAV/AAC) are recorded in the same disc.
• This unit can display only one-byte characters. No other characters can be correctly displayed.
Inserting a disc• When a disc is inserted upside down or has no
playable files, “Cannot play this disc Check the disc” appears on the monitor. Eject the disc.
Ejecting a disc• If the ejected disc is not removed within 15 seconds,
the disc is automatically inserted again into the loading slot to protect it from dust. (Disc playback starts.)
Changing the source• If you change the source, playback also stops without
ejecting the disc. Next time you select “DISC” for the playback source,
disc play starts from where it stopped previously.
Playing Recordable/Rewritable discs• This unit can recognize a total of 5 000 files and 250
folders (a maximum of 999 files per folder).• Use only “finalized” discs.• This unit can play back multi-session discs; however,
unclosed sessions will be skipped while playing.• This unit can recognize a total 25 characters for file/
folder names.• Some discs or files may not be played back due to
their characteristics or recording conditions.
Playing DVD Audio• Some DVD Audios prohibit downmix. When you play
back such a disc, “LR ONLY” appears on the display and the unit plays back the left front and right front signals.
• “MULTI CH” appears on the monitor after a beep when you try to play a multi-channel disc with Surround turned <Off>.
Playing DVD-VR• This unit cannot play back CPRM (Content Protection
for Recordable Media) protected files.• For details about DVD-VR format and play list, refer
to the instructions supplied with the recording equipment.
KD-AVX33U.indb 56KD-AVX33U.indb 56 07.2.21 9:16:29 AM07.2.21 9:16:29 AM

57 REFERENCES
ENG
LISH
Playing MP3/WMA/WAV/AAC files• This unit can play back files with the extension
code <.mp3>, <.wma>, <.wav>, or <.m4a> (regardless of the letter case—upper/lower).
• This unit can play back the files meeting the conditions below:– Bit rate: MP3/WMA: 32 kbps — 320 kbps AAC: 16 kbps — 320 kbps– Sampling frequency: 48 kHz, 44.1 kHz, 32 kHz (for MPEG1) 24 kHz, 22.05 kHz, 16 kHz (for MPEG2) 48 kHz, 44.1 kHz, 32 kHz, 22.05 kHz (for WMA) 44.1 kHz (for WAV) 48 kHz, 44.1 kHz (for AAC)
• This unit can show ID3 Tag Version 1.0/1.1/2.2/2.3/2.4 (for MP3). This unit can also show WAV/WMA/AAC Tag.
• This unit can play back files recorded in VBR (variable bit rate).
Files recorded in VBR have a discrepancy in elapsed time indication.
• This unit cannot play back the following files:– MP3 files encoded with MP3i and MP3 PRO
format.– MP3 files encoded with Layer 1/2.– WMA files encoded with lossless, professional,
and voice format.– WMA files which are not based upon Windows
Media® Audio.– WMA/AAC files copy-protected with DRM.– AAC files purchased from the iTunes store.– Files which have the data such as AIFF, ATRAC3,
etc.
File playbackPlaying DivX files• This unit can play back DivX files with the extension
code <.divx>, <.div>, <.avi> (regardless of the letter case—upper/lower).
• This unit supports the DivX files whose resolution is 720 x 576 pixels or less.
• This unit supports DivX 6.x, 5.x, 4.x, and 3.11.• Audio stream should conform to MP3 or Dolby Digital.• The file encoded in the interlaced scanning mode
may not be played back correctly.• The maximum bit rate for video signals (average) is
as follows:– DVD: 4 Mbps– USB: 2 Mbps
Playing MPEG1/MPEG2 files• This unit can play back MPEG1/MPEG2 files with the
extension code <.mpg>, <.mpeg>, or <.mod>*.* <.mod> is an extension code used for the
MPEG2 files recorded by JVC Everio camcorders.• The stream format should conform to MPEG system/
program stream.• The file format should be MP@ML (Main Profile at
Main Level)/SP@ML (Simple Profile at Main Level)/MP@LL (Main Profile at Low Level).
• Audio streams should conform to MPEG1 Audio Layer-2 or Dolby Digital.
• The maximum bit rate for video signals (average) is as follows:– DVD: 4 Mbps– USB: 2 Mbps
Playing JPEG files• This unit can play back JPEG files with the extension
code <.jpg>, or <.jpeg>.• It is recommended that you record a file at 640 x 480
resolution.• This unit can play back baseline JPEG files.
Progressive JPEG files or lossless JPEG files cannot be played.
KD-AVX33U.indb 57KD-AVX33U.indb 57 07.2.21 9:16:29 AM07.2.21 9:16:29 AM

ENG
LISH
58
Enjoying surround sounds• If <Surround On> is selected, “MULTI” surround
playback automatically starts for multi-channel encoded discs regardless of the <Surround On> setting.
• You cannot activate surround for MPEG multi-channel DVD Video, DivX 2-channel and MPEG 2-channel sources. If <Surround On> is selected, stereo sounds are emitted only through the front speakers. “FRONT 2CH” appears on the source information screen.
• When “FIX” appears on the source information screen, no sound comes out of the subwoofer.
• When <AUTO> is selected, downsampling is performed for DVD Video (LPCM only), DVD-VR (LPCM only), and DVD Audio with fs=88.2 kHz/96 kHz and higher.
USB• If “No USB Device“ appears after removing a device,
reattach a device or select another playback source.• When the USB device has no playable files, or has not
been formatted correctly, “Cannot play this device Check the device” appears on the monitor.
• The unit cannot recognize a USB device whose rating is other than 5 V and does not exceed 500 mA.
• While playing from a USB device, the playback order may differ from other players.
• This unit may be unable to play back some USB devices or some files due to their characteristics or recording conditions.
• Depending on the shape of the USB devices and connection ports, some USB devices may not be attached properly or the connection might be loose.
• When connecting a USB device, refer also to its instructions.
• Connect only one USB device to the unit at a time. Do not use a USB hub.
• This unit may not recognize a USB device connected through a USB card reader.
• This unit may not play back files in a USB device properly when using a USB extension cord.
• This unit cannot assure proper functions or supply power to all types of the devices.
• This unit can recognize a total of 5 000 files and 250 folders (a maximum of 999 files per folder).
• This unit can recognize a total 25 characters for file/folder names.
KD-AVX33U.indb 58KD-AVX33U.indb 58 07.2.21 9:16:30 AM07.2.21 9:16:30 AM

59 REFERENCES
ENG
LISH
iPod/D. player operations • When you turn on this unit, the iPod or D. player is
charged through the adapter connected to this unit.• The text information may not be displayed correctly.
This unit can display up to 40 characters.
Notice:When operating an iPod or a D. player, some operations may not be performed correctly or as intended. In this case, visit the following JVC web site:For iPod users: <http://www.jvc.co.jp/english/car/support/ks-pd100/index.html>For D. player users: <http://www.jvc.co.jp/english/car/support/ks-pd500/index.html>
Menu settings• If you change the <Amplifier Gain> setting
from <High Power> to <Low Power> while the volume level is set higher than “30,” the unit automatically changes the volume level to “VOL 30.”
• After you change any of <Menu Language/Audio Language/Subtitle> settings, turn off then on the power, and re-insert the disc (or insert another disc) so that your setting takes effect.
• When you select <16:9> for a picture whose aspect ratio is 4:3, the picture slightly changes due to the process for converting the picture width.
• Even if <4:3 Pan Scan> is selected, the screen size may become <4:3 Letterbox> for some discs.
Bluetooth operations General• While driving, do not perform complicated operation
such as dialling the numbers, using phone book, etc. When you perform these operations, stop your car in a safe place.
• Some Bluetooth devices may not be connected to this unit depending on the Bluetooth version of the device.
• This unit may not work for some Bluetooth devices.• Connecting condition may vary depending on
circumstances around you.• When the unit is turned off, the device is
disconnected.
Warning messages for Bluetooth operations• Connection Error : The device is registered but the
connection has failed. Use <Connect> to connect the device again. ( page 33)
• Error : Try the operation again. If “Error” appears again, check if the device supports the function you have tried.
• Device Unfound : No available Bluetooth device is detected by <Search>.
• Loading : The unit is updating the phone book and/or SMS.
• Please Wait... : The unit is preparing to use the Bluetooth function. If the message does not disappear, turn off and turn on the unit, then connect the device again (or reset the unit).
Icons for phone types• These icons indicate the phone type set on the device.
: Cellular phone
: Household phone
: Office
: General
: Other than above
KD-AVX33U.indb 59KD-AVX33U.indb 59 07.2.21 9:16:30 AM07.2.21 9:16:30 AM

ENG
LISH
60
Sound mode
Preset equalizing values
60 H
z
150 H
z
400 H
z
1 kHz
2.5 k
Hz
6.3 k
Hz
15 kH
z
Flat 00 00 00 00 00 00 00
Hard Rock +03 +03 +01 00 00 +02 +01
R&B +03 +02 +02 00 +01 +01 +03
Pop 00 +02 00 00 +01 +01 +02
Jazz +03 +02 +01 +01 +01 +03 +02
Dance +04 +02 00 –02 –01 +01 +01
Country +02 +01 00 00 00 +01 +02
Reggae +03 00 00 +01 +02 +02 +03
Classic +02 +03 +01 00 00 +02 00
User 1/2/3 00 00 00 00 00 00 00
About sounds reproduced through the rear terminals• Speaker out/analog discrete output—LINE OUT
(FRONT/REAR)/CENTER OUT/SUBWOOFER:Multi-channel signals are emitted for a multi-channel encoded software. (When Dual Zone is activated, the same signal emitted through 2nd AUDIO OUT plugs are emitted for the main source “DISC.”)
• 2nd AUDIO OUT: 2-channel signal is emitted when Dual Zone is activated. When playing a multi-channel encoded disc, multi-channel signals are downmixed (except for some DVD Audio).
• “DVD Logo” is a trademark of DVD Format/Logo Licensing Corporation registered in the US, Japan and other countries.
• DivX, DivX Ultra Certified, and associated logos are trademarks of DivX, inc. and are used under license.
• Official DivX® Ultra Certified product• Plays all versions of DivX® video (including DivX® 6)
with enhanced playback of DivX® media files and the DivX® Media Format
• Microsoft and Windows Media are either registered trademarks or trademarks of Microsoft Corporation in the United States and/or other countries.
• iPod and iTunes are trademarks of Apple Inc., registered in the U.S. and other countries.
KD-AVX33U.indb 60KD-AVX33U.indb 60 07.2.21 9:16:31 AM07.2.21 9:16:31 AM

61 REFERENCES
ENG
LISH
In addition to the roman alphabet (A – Z, a – z), the following characters will be used to show the various information on the monitor.• You can also use the following
characters to assign titles ( page 44)
Upper and lower cases
Numbers and symbols
Characters shown on the monitor
Language codes (for DVD/DivX language selection)
Code Language Code Language Code Language Code Language Code LanguageAA Afar FA Persian KL Greenlandic OC Occitan ST SesothoAB Abkhazian FI Finnish KM Cambodian OM (Afan) Oromo SU SundaneseAF Afrikaans FJ Fiji KN Kannada OR Oriya SW SwahiliAM Ameharic FO Faroese KO Korean (KOR) PA Panjabi TA TamilAR Arabic FY Frisian KS Kashmiri PL Polish TE TeluguAS Assamese GA Irish KU Kurdish PS Pashto, Pushto TG TajikAY Aymara GD Scots Gaelic KY Kirghiz PT Portuguese TH ThaiAZ Azerbaijani GL Galician LA Latin QU Quechua TI TigrinyaBA Bashkir GN Guarani LN Lingala RM Rhaeto-Romance TK TurkmenBE Byelorussian GU Gujarati LO Laothian RN Kirundi TL TagalogBG Bulgarian HA Hausa LT Lithuanian RO Rumanian TN SetswanaBH Bihari HI Hindi LV Latvian, Lettish RW Kinyarwanda TO TongaBI Bislama HR Croatian MG Malagasy SA Sanskrit TR TurkishBN Bengali, Bangla HU Hungarian MI Maori SD Sindhi TS TsongaBO Tibetan HY Armenian MK Macedonian SG Sangho TT TatarBR Breton IA Interlingua ML Malayalam SH Serbo-Croatian TW TwiCA Catalan IE Interlingue MN Mongolian SI Singhalese UK UkrainianCO Corsican IK Inupiak MO Moldavian SK Slovak UR UrduCS Czech IN Indonesian MR Marathi SL Slovenian UZ UzbekCY Welsh IS Icelandic MS Malay (MAY) SM Samoan VI VietnameseDZ Bhutani IW Hebrew MT Maltese SN Shona VO VolapukEL Greek JI Yiddish MY Burmese SO Somali WO WolofEO Esperanto JW Javanese NA Nauru SQ Albanian XH XhosaET Estonian KA Georgian NE Nepali SR Serbian YO YorubaEU Basque KK Kazakh NO Norwegian SS Siswati ZU Zulu
KD-AVX33U.indb 61KD-AVX33U.indb 61 07.2.21 9:16:31 AM07.2.21 9:16:31 AM

ENG
LISH
62
TroubleshootingWhat appears to be trouble is not always serious. Check the following points before calling a service center.
Symptoms Remedies/Causes
Gene
ral
• No sound comes out of the center speaker. • Center speaker is not activated. ( page 49) Once you have reset the unit, make sure to activate the
speaker again.• Center speaker is used only for surround playback. No
sound comes out for stereo playback.
• The monitor is not clear and legible. Sunshine from the windshield may cause this symptom.Adjust <Bright>. ( page 46)
• The unit does not work at all. Reset the unit. ( page 3)
• The remote controller does not work. Deactivate Dual Zone. ( page 26)(While Dual Zone is activated, the remote controller only functions for operating the DVD/CD player.)
• “No Signal” appears. • Change the source.• Start the playback on the external component connected
to VIDEO IN plug.• Check the cords and connections.• Signal input is too weak.
• “Mecha Error Push Reset” appears on the monitor, and the panel does not move.
Reset the unit. ( page 3)
FM/A
M • SSM automatic presetting does not work. Store stations manually. ( page 12)
• Static noise while listening to the radio. Connect the antenna firmly.
Disc
pla
ybac
k
• Disc can be neither recognized nor played . Eject the disc forcibly. ( page 3)
• Disc cannot be ejected. Unlock the disc. ( page 18)
• Recordable/Rewritable discs cannot be played back.
• Tracks on the Recordable/Rewritable discs cannot be skipped.
• Insert a finalized disc.• Finalize the discs with the component which you used
for recording.
• Playback does not start. • Insert the disc correctly again.• Region code of the DVD is not correct. ( page 4)• The format of files is not supported by the unit.
• The playback picture is not clear and legible. Adjust items in <Picture Adjust>. ( page 46)
• Sound and pictures are sometimes interrupted or distorted.
• Stop playback while driving on rough roads.• Change the disc.
KD-AVX33U.indb 62KD-AVX33U.indb 62 07.2.21 9:16:32 AM07.2.21 9:16:32 AM

63 REFERENCES
ENG
LISH
Symptoms Remedies/CausesDi
sc p
layb
ack
• No playback picture appears on the monitor. Parking brake lead is not connected properly. ( Installation/Connection Manual)
• No picture appears on the external monitor. • Connect the video cord correctly.• Select the correct input on the external monitor.
• “Eject Error” or “Loading Error” appears on the monitor.
Changing the source by pressing SRC will solve this error.
File
pla
ybac
k
• Disc cannot be played back. • Change the disc.• Record the tracks using a compliant application in the
appropriate discs. ( page 4)• Add appropriate extension codes to the file names.
• Noise is generated. The track played back is not a playable file format. Skip to another file.
• Tracks are not played back as you have intended them to play.
Playback order may differs from the one played back using other players.
• Elapsed playing time is not correct. This sometimes occurs during playback. This is caused by how the tracks are recorded.
• “Not Support” appears on the monitor and track is skipped.
Track is unplayable.
USB
play
back
• Noise is generated. • The track played back is not a playable file format (MP3/WMA/WAV/AAC). Skip to another file.
• Do not add the extension code <.mp3>, <.wma>, <.wav>or <.m4a> to non-MP3/WMA/WAV/AAC tracks.
• Tracks cannot play back as you have intended them to play.
Playback order may differs from the one played back using other players.
• “Now Reading” keeps flashing on the monitor.
• Readout time varies depending on the USB device.• Do not use too many hierarchy, folders and empty
folders.** Folder that is physically empty or folder that contains
data but does not contain valid MP3/WMA/WAV/AAC track.
• Turn off the power then on again.• Do not pull out or connect the USB device repeatedly
while “Now Reading” is displayed on the monitor.
• Correct characters are not displayed (e.g. album name).
For available characters, page 61.
• While playing a track, sound is sometimes interrupted.
The tracks have not been properly copied into the USB device. Copy tracks again into the USB device, and try again.
KD-AVX33U.indb 63KD-AVX33U.indb 63 07.2.21 9:16:33 AM07.2.21 9:16:33 AM

ENG
LISH
64
Symptoms Remedies/CausesBl
ueto
oth
• Bluetooth device does not detect the unit. This unit can be connected with one Bluetooth cellular phone and one Bluetooth audio device at a time.While connecting a device, this unit cannot be detected from another device. Disconnect currently connected device and search again.
• The unit does not detect the Bluetooth device.
• Check the Bluetooth setting of the device.• Search from the Bluetooth device. After the device
detects the unit, select <Open> on the unit to connect the device. ( page 32)
• The unit does not make pairing with the Bluetooth device.
• Enter the same PIN code for both the unit and target device. If the PIN code of the device is not indicated on its instructions, try “0000” or “1234.”
• Select the device name from <Special Device>, then try to connect again. ( page 33)
• Echo or noise occurs. Adjust the microphone unit position.
• Phone sound quality is poor. • Reduce the distance between the unit and the Bluetooth audio device.
• Move the car to place where you can get a better signal reception.
• The sound is interrupted or skipped during playback of a Bluetooth audio device.
• Reduce the distance between the unit and the Bluetooth audio device.
• Disconnect the device connected for “Bluetooth Phone.”• Turn off, then turn on the unit.• (When the sound is not yet restored,) connect the device
again.
• “New Device” cannot be selected for “Bluetooth Audio.”
Bluetooth audio device is being connected. To select “New Device,” disconnect it. ( page 33)
• The connected audio device cannot be controlled.
Check whether the connected audio device supports AVRCP (Audio Video Remote Control Profile).
CD ch
ange
r
• “No Disc” appears on the monitor. Insert a disc into the magazine.
• “No Magazine” appears on the monitor. Insert the magazine.
• “Cannot play this disc Check the disc” appears on the monitor.
Disc does not include playable files. Replace the disc with playable files.
• “Reset 08” appears on the monitor. Connect this unit and the CD changer correctly and press the reset button of the CD changer.
• “Reset 01” – “Reset 07” appears on the monitor.
Press the reset button of the CD changer.
• The CD changer does not work at all. Reset the unit. ( page 3)
KD-AVX33U.indb 64KD-AVX33U.indb 64 07.2.21 9:16:33 AM07.2.21 9:16:33 AM

65 REFERENCES
ENG
LISH
Symptoms Remedies/CausesiP
od/D
. pla
yer p
layb
ack
• The iPod/D. player does not turn on or does not work.
• Check the connecting cable and its connection.• Charge the battery.• For D. player: Update the firmware version.
• The sound is distorted. Deactivate the equalizer either on this unit or the iPod/D. player.
• “Disconnect” appears on the monitor. Check the connecting cable and its connection.
• For iPod: Playback stops. The headphones are disconnected during playback. Restart playback.
• No sound can be heard.• “Error 01” appears on the monitor when
connecting a D. player.
Disconnect the D. player from the adapter. Then, connect them again.
• “No Files” or “No Track” appears on the monitor.
No tracks are stored. Import tracks to the iPod or D. player.
• “Reset 01” – “Reset 07” appears on the monitor.
Disconnect the adapter from both this unit and iPod/D. player. Then, connect them again.
• “Reset 08” appears on the monitor. Check the connection between the adapter and this unit.
• The iPod’s or D. player’s controls do not work after disconnecting from this unit.
Reset the iPod or D. player.
AV-IN
• No picture appears on the monitor. • Turn on the video component if it is not on.• This unit is not connected to the video component
correctly. Connect it correctly.
• The playback picture is not clear and legible. Adjust items in <Picture Adjust>. ( page 46)
KD-AVX33U.indb 65KD-AVX33U.indb 65 07.2.21 9:16:33 AM07.2.21 9:16:33 AM

ENG
LISH
66
SpecificationsAM
PLIF
IER
Maximum Power Output: Front/Rear: 50 W per channelContinuous Power Output (RMS):
Front/Rear: 20 W per channel into 4 Ω, 40 Hz to 20 000 Hz at no more than 0.8% total harmonic distortion.
Signal-to-Noise Ratio: 70 dBLoad Impedance: 4 Ω (4 Ω to 8 Ω allowance)Equalizer Control Range: Frequencies: 60 Hz, 150 Hz, 400 Hz, 1 kHz, 2.5 kHz,
6.3 kHz, 15 kHzLevel: ±10 dB
Audio Output LevelLINE OUT (FRONT/REAR)/CENTER OUT/ SUBWOOFER:
Line-Out Level/Impedance: 5.0 V/20 kΩ load (full scale)Output Impedance: 1 kΩ
Color System: NTSC/PALVideo Output (composite): 1 Vp-p/75 ΩOther Terminals: Input: LINE IN, VIDEO IN, MIC IN, USB input
terminal, Antenna inputOutput: 2nd AUDIO OUT, VIDEO OUTOthers: CD changer
FM/A
M TU
NER
Frequency Range: FM: 87.5 MHz to 108.0 MHzAM: 531 kHz to 1 602 kHz
FM Tuner: Usable Sensitivity: 11.3 dBf (1.0 μV/75 Ω)50 dB Quieting Sensitivity: 16.3 dBf (1.8 μV/75 Ω)Alternate Channel Selectivity (400 kHz): 65 dBFrequency Response: 40 Hz to 15 000 HzStereo Separation: 35 dB
AM Tuner: Sensitivity/Selectivity: 20 μV/35 dB
DVD/
CD
Signal Detection System: Non-contact optical pickup (semiconductor laser)Frequency Response: DVD, fs=48 kHz: 16 Hz to 22 000 Hz
DVD, fs=192 kHz: 16 Hz to 88 000 HzVCD/CD: 16 Hz to 20 000 Hz
Dynamic Range: 93 dBSignal-to-Noise Ratio: 95 dBWow and Flutter: Less than measurable limit
KD-AVX33U.indb 66KD-AVX33U.indb 66 07.2.21 9:16:34 AM07.2.21 9:16:34 AM

67 REFERENCES
ENG
LISH
MON
ITOR
Screen Size: 3.5 inch wide liquid crystal display
Number of Pixel: 211 200 pixels: 960 (horizontal) × 220 (vertical)
Drive Method: TFT (Thin Film Transistor) active matrix format
Color System: NTSC/PAL
Aspect Ratio: 16:9 (wide)
Allowable Storage Temperature: –10°C to +60°C
Allowable Operating Temperature: 0°C to +40°C
USB
USB Standards: USB 1.1
Data Transfer Rate: Full Speed: Maximum 12 MbytesLow Speed: Maximum 1.5 Mbytes
Compatible Device: Mass storage class
Compatible File System: FAT 32/16/12
Max. Current: Less than 500 mA/5 V
BLUE
TOOT
H
Version: Bluetooth 1.2 certified
Output Power: +4 dBm Max. (Power class 2)
Service Area: Within 10 m
Profile: HSP (Headset Profile)HFP (Hands-Free Profile)A2DP (Advanced Audio Distribution Profile)AVRCP (Audio/Video Remote Control Profile)SPP (Serial Port Profile)OPP (Object Push Profile)
GENE
RAL
Power Requirement: Operating Voltage: DC 14.4 V (11 V to 16 V allowance)
Grounding System: Negative ground
Allowable Operating Temperature: 0°C to +40°C
Dimensions (W × H × D): Installation Size (approx.): 182 mm × 52 mm × 160 mm
Panel Size (approx.): 188 mm × 58 mm × 12 mm
Mass (approx.): 2.1 kg (excluding accessories)
Design and specifications are subject to change without notice.
KD-AVX33U.indb 67KD-AVX33U.indb 67 07.2.21 9:16:34 AM07.2.21 9:16:34 AM

EN, CT, TH0207MNMMDWJEIN© 2007 Victor Company of Japan, Limited
Having TROUBLE with operation?Please reset your unit
Refer to page of How to reset your unit
Rear_KD-AVX33U.indd 2Rear_KD-AVX33U.indd 2 07.2.26 11:48:38 AM07.2.26 11:48:38 AM

1
KD-AVX33Installation/Connection Manual
°“√µ‘¥µ—Èß/§ŸË¡◊Õ°“√µ‘¥µ—Èß
ENGLISH
This unit is designed to operate on 12 V DC, NEGATIVE ground electrical systems. If your vehicle does not have this system, a voltage inverter is required, which can be purchased at JVC car audio dealers.
WARNINGS• DO NOT install any unit and wire any cable in locations where;
– it may obstruct the steering wheel and gearshift lever operations, as this may result in a traffic accident.
– it may obstruct the operation of safety devices such as air bags, as this may result in a fatal accident.
– it may obstruct visibility.• DO NOT operate any unit while manipulating the steering wheel, as
this may result in a traffic accident.• The driver must not watch the monitor while driving. If the driver
watches the monitor while driving, it may lead to carelessness and cause an accident.
• The driver must not put on the headphones while driving. It is dangerous to shut off the outside sounds while driving.
• If you need to operate the unit while driving, be sure to look around carefully.
• If the parking brake is not engaged, “Parking Brake” appears on the monitor, and no playback picture will be shown.– This warning appears only when the parking brake lead is
connected to the parking brake system built in the car.Notes on electrical connections:• Replace the fuse with one of the specified rating. If the fuse blows
frequently, consult your JVC car audio dealer.• It is recommended to connect to the speakers with maximum
power of more than 50 W (both at the rear and at the front, with an impedance of 4 Ω to 8 Ω).
If the maximum power is less than 50 W, change “Amplifier Gain” setting to prevent the speakers from being damaged (see page 51 of the INSTRUCTIONS).
• To prevent short-circuit, cover the terminals of the UNUSED leads with insulating tape.
• The heat sink becomes very hot after use. Be careful not to touch it when removing this unit.
QRubber cushion
¬“ß°—π°√–·∑°
GCrimp connectors
¢—È«µËÕ ”À√—∫Àπ’∫
NWasher (ø5)
(ø5)ª√–‡°Áπ«ß·À«π (ø5)
oLock nut (M5)
(M5)πÕµ≈ÁÕ§ (M5)
RMounting bolt—M5 x 20 mm
—M5 × 20 mm ≈—°µ‘¥——M5 × 20 ¡¡.
PHandles
§—π∫—ߧ—∫
IBatteries
·∫µ‡µÕ√’Ë
‰∑¬
™ÿ¥ª√–°Õ∫π’ȉ¥È√—∫°“√ÕÕ°·∫∫¡“‡æ◊ËÕ„™Èß“π°—∫√–∫∫ °√–· ‰øøÈ“ “¬¥‘π¢—È«≈∫°√– · µ√ß 12 ‚«≈∑Ï À“°√∂¬πµÏ¢Õߧÿ≥‰¡Ë‰¥È„™È√–∫∫π’È µÈÕß„™È‡§√◊ËÕß·ª≈ß°√– · ‰ø™Ë«¬ ´÷Ëß “¡“√∂À“ ◊ÈÕ‰¥È®“°√È“π¢“¬‡§√◊ËÕ߇ ’¬ß√∂¬πµÏ JVC
Heat sink
·ºËπ√–∫“¬§«“¡√ÈÕπ
MReverse gear signal extension cord
“¬µËÕ —≠≠“≥‡°’¬√Ï∂Õ¬À≈—ß
Required space for installation / /æ◊Èπ∑’Ë«Ë“ß∑’˵ÈÕß„´È„π°“√µ‘¥µ—Èß
Control panel
ÀπÈ“ªí¥
5 mm
5 mm
KMicrophone
‰¡‚§√‚øπ
LMicrophone clip
§≈‘ª‰¡‚§√‚øπ
Installing the remote controller / /
°“√µ‘¥µ—Èß√ï‚¡µ§Õπ‚∑√≈
HRemote controller/Holder
/√’‚¡µ§Õπ‚∑√≈/∑’ˬ÷¥
Trim plate is detached on this illustration for explanation.
„π√Ÿªπ’ȇªÁπ°“√∂Õ¥·ºËπ‚≈À–¢Õ∫·µËßÕÕ° ‡æ◊ËÕ„™È„π°“√Õ∏‘∫“¬
LVT1708-005A[U] 0207MNMMDWJEIN
EN, CT, TH©2007 Victor Company of Japan, Limited
FAudio/video cord
/ “¬ÕÕ¥‘‚Õ/ «‘¥’‚Õ
Parts list for installation and connection / / √“¬°“√Ë«πª√–°Õ∫”À√—∫µ‘¥µ—Èß·≈–‡™◊ËÕ¡µËÕ°—πThe following parts are provided for this unit. After checking them, please set them correctly.
«πª√–°Õ∫µËÕ‰ªπ’È„ÀÈ¡“°—∫™ÿ¥ª√–°Õ∫π’È À≈—ß®“°µ√«® Õ∫·≈È« ª√—∫µ—È߇§√◊ËÕß„ÀÈ∂Ÿ°µÈÕß
Dashboard
·ºßÀπÈ“ªí∑¡á
12 V JVC
CSleeve
ª≈Õ°ÀÿÈ¡
EPower cord
“¬‡§‡∫‘≈°”≈—ß
A / BHard case/Control panel
/≈—ß∫√√®ÿ/ÀπÈ“ªí¥
DTrim plate
·ºËπ‚≈À–¢Õ∫·µËß
J Double-sided adhesive tape
‡∑ª°“« ÕßÀπÈ“
Double-sided adhesive tape
‡∑ª°“« ÕßÀπÈ“
Holder / / ∑’ˬ÷¥
Remote controller
√’‚¡µ§Õπ‚∑√≈
• ;–
–
– • •
•
• • “Parking Brake”
–
:•
JVC • 50 W
4 Ω 8 Ω 50 W “Amplifier Gain”( 51 )
• •
§”‡µ◊Õπ• ÀÈ“¡µ‘¥µ—ÈßÕÿª°√≥ÏÀ√◊Õ “¬‡§‡∫‘≈„¥Ê„π∫√‘‡«≥π’È;
– Õ“®°’¥¢«“ß°“√∑”ß“π¢Õßæ«ß¡“≈—¬·≈–§—π‡°’¬√Ï ‡æ√“–Õ“®°ËÕ„Àȇ°‘¥Õÿ∫—µ‡Àµÿ¢÷È
– Õ“®°’¥¢«“ß°“√∑”ß“π¢ÕßÕÿª°√≥ϪÈÕß°—𧫓ª≈Õ¥¿—¬ ‡™Ëπ ·Õ√Ï·∫§ ‡æ√“–
Õ“®°ËÕ„Àȇ°‘¥Õ—πµ√“¬√È“¬·√ß∂÷ß™’«‘µ¢÷Èπ‰¥È
– Õ“®°’¥¢«“ß “¬µ“• լ˓„™Èß“π¢≥–¢—∫¢’Ë ‡æ√“–Õ“®°ËÕ„Àȇ°‘¥Õÿ∫—µ‘‡Àµÿ¢÷Èπ‰¥È
• ºŸÈ¢—∫µÈÕ߉¡Ë¡Õß∑’ˮաÕ𑇵Õ√Ï¢≥–¢—∫¢’Ë ∂È“ºŸÈ¢—∫¡Õß∑’ˮաÕ𑇵Õ√Ï¢≥–¢—∫¢’Ë
Õ“®π”‰ª ŸË§«“¡ª√–¡“∑ ·≈–‡ªÁ𠓇Àµÿ„Àȇ°‘¥Õÿ∫—µ‘‡Àµÿ¢÷Èπ‰¥
• ºŸÈ¢—∫¢’˵ÈÕ߉¡Ë «¡ÀŸøíߢ≥–¢—∫¢’Ë ‡π◊ËÕß®“°®–‡ªÁπÕ—πµ√“¬Õ¬Ë“߬‘ËßÀ“°∑Ë“π‰¡Ë‰¥È¬‘π‡
’¬ß®“°¿“¬πÕ°¢≥–¢—∫¢’Ë
• ¿ô“®”‡ªìπµÈÕß„™È‡§√◊ËÕߢ≥–¢—∫¢’Ë ¢˝Õ„™È§Ÿ∑“ߢô“ßÀπÈ“„ÀÈ¥’
• À“°‰¡Ë‰¥È∑”°“√‡¢È“‡°’¬√Ϯե√∂À√◊Õ‡°’¬√Ïæ’‰«È §”«Ë“ “Parking Brake” ®–ª√“°Ø¢÷Èπ∑’ËÀπÈ“®Õ ·≈–√Ÿª°“√‰¡Ë‡≈Ëπ®–· ¥ß¢÷Èπ¡“
– §”‡µ◊Õππ’È®–ª√“°Ø¢÷Èπ‡©æ“–‡¡◊ËÕµËÕ “¬‡∫√°°—∫√–
∫∫‡∫√°„π√∂¬πµÏ‰«È‡∑Ë“π—Èπ
¡ÈÕπŸ≈„π°“√•ËÕ√–∫∫‰ø:
• „™Èæ‘°—¥®”‡æ“–·∑πøî« À“°øî«Ï¢“¥∫ËÕ¬ „ÀȪ√÷°…“√È“ π¢“¬‡§√◊ËÕ߇’¬ß√∂¬πµÏ JVC • ¢Õ·π–π”„ÀȵËÕ≈”‚æß ∑’Ë¡’°”≈—ߢ—∫ß ÿ¥‡°‘π°«Ë“ 50 W (∑—ÈߥȓπÀπÈ“·≈–¥È“πÀ≈—ß
¡’§Ë“§«“¡µÈ“π∑“π 4 Ω ∂÷ß 8 Ω) ∂È“°”≈—ߢ—∫µË”°«Ë“ 50 W „Àȇª≈’ˬπ§Ë“ “Amplifier Gain”
‡æ◊ËÕªÈÕß°—π‰¡Ë„ÀÈ≈”‚æß™”√ÿ¥ (¥ŸÀπÈ“ 51 §”·π–π”)• °“√ªÈÕß°—π°“√≈—¥«ß®√ ®–µÈÕßæ—π¢—È« “¬µ–°—Ë« ∑’ˉ¡Ë„™È·≈È«¥È«¬‡∑ ªæ—𠓬‰ø• ·ºËπ√–∫“¬§«“¡√ÈÕπ®–√ÈÕπ¡“°À≈—ß®“°„™È √–¡—¥√–«—ßլ˓‰ª
—¡º— ‡¡◊ËÕ∂Õ¥™ÿ¥ª√–°Õ∫π’È
Instal1-3_KD-AVX33[U].indd 1Instal1-3_KD-AVX33[U].indd 1 2/27/07 4:45:11 PM2/27/07 4:45:11 PM

2
*1 When you stand the unit, be careful not to damage the fuse on the rear.
*1
*1 ‡¡◊ËÕ§ÿ≥µ—Èß™ÿ¥ª√–°Õ∫¢÷Èπ
√–«—ßլ˓∑”„ÀÈø‘« Ï∫√‘‡«≥
Ë«π∑È“¬‡ ’¬À“¬
Do the required electrical connections.
µËÕ“¬‰øµ“¡∑’Ë°”À𥉫È∑—ÈßÀ¡¥
Bend the appropriate tabs to hold the sleeve firmly in place.
ßÕ·ºËπ‡æ◊ËÕ¬÷¥ª≈Õ°„ÀȵËÕ°—π‡¢È“∑’Ë
When using the optional stay / /‡¡◊ËÕ„™Èµ—«¬÷¥·∫∫‡≈◊Õ°‰¥
When installing the unit without using the sleeve / /
‡¡◊ËÕµ‘¥µ—Èß™ÿ¥ª√–°Õ∫‚¥¬‰¡Ë„™Èª≈Õ°ÀÿÈ¡In a car having the “Required space for installation” (see page 1), first remove the car radio and install the unit in its place.
“ ” ( 1 )„π√∂¬πµÏ∑’Ë¡’ “æ◊Èπ∑’Ë«Ë“ß∑’˵ÈÕß„ È„π°“√µ‘¥µ—Èß” (¥ŸÀπÈ“ 1) °ËÕπÕ◊Ëπ„ÀÈ∂Õ¥«‘∑¬ÿ√∂¬πµÏÕÕ°·≈È«µ‘¥µ—È߇§√◊ËÕ߇¢È“‰ª·∑π
Screw (option)( )
°√Ÿ (‡≈◊Õ°‰¥È)
Stay (option)( )
µ—«¬÷¥ (‡≈◊Õ°‰¥È)Fire wall
ºπ—ß°—π‰ø
Dashboard
·ºßÀπÈ“ª— ∑¡á
Bracket *2
*2
·∑Ëπ√Õß√—∫*2
*2 Not included for this unit.*2 *2 ‰¡Ë‰¥È„ÀÈ¡“°—∫™ÿ¥ª√–°Õ∫π’È
Flat type screws—M5 x 8 mm*2
—M5 x 8 mm*2
°√ŸÀ—«‡√’¬∫—M5 x 8 ¡¡.*2
Bracket *2
*2
·∑Ëπ√Õß√—∫*2
Install the unit at an angle of less than 30˚.30˚
µ‘¥µ—Èß™ÿ¥ª√–°Õ∫∑’Ë¡ÿ¡µË”°«Ë“ 30˚ Õß»“
Note: When installing the unit on the mounting bracket, make sure to use the 8 mm-long screws. If longer screws are used, they could damage the unit.
: 8 mmÀ¡“¬‡Àµ: ‡¡◊ËÕµ‘¥µ—Èß™ÿ¥ª√–°Õ∫≈ß„π·∑Ëπ√Õß√—∫‰«È „ÀÈ„™È °√Ÿ¬“«¢π“¥ 8 ¡¡. ∂È“„™È °√Ÿ¬“«°«Ë“π’ÈÕ“®∑”„ÀÈ™ÿ¥ª√–°Õ∫‡ ’¬À“¬‰¥ô
Removing the unitBefore removing the unit, release the rear section.
Insert the two handles, then pull them as illustrated so that the unit can be removed.
„ ˧—π∫—ߧ—∫ 2 Õ—π≈ß„π√ËÕß ”À√—∫„™Èæ—π≈«¥ ¥—ß¿“æ ®“°π—Èπ „Àȇ≈◊ËÕπ™ÿ¥ª√–°Õ∫ÕÕ° „π¢≥–∑’˧ËÕ¬ Ê ¥÷ߧ—π∫—ߧ—∫∑—Èß Õß Õ—πÕÕ°®“°°—π
Do not block the fan.
լ˓°’¥¢«“ß∑“ß√–∫“¬Õ“°“»¢Õßæ—¥≈¡
INSTALLATION (IN-DASH MOUNTING)The following illustration shows a typical installation. If you have any questions or require information regarding installation kits, consult your JVC car audio dealer or a company supplying kits.• If you are not sure how to install this unit correctly, have it installed
by a qualified technician.• Make sure not to block the fan on the rear panel to maintain proper
ventilation when installed.• You cannot install the unit on the car which has any obstacles in the
space shown in “Required space for installation” on page 1.
Caution when installingFit the unit into the mounting sleeve by using four corners of the trim plate.• DO NOT press the panel (shaded in the
illustration).
30˚
Flat type screws—M5 x 8 mm*2
—M5 x 8 mm*2
°√ŸÀ—«‡√’¬∫—M5 x 8 ¡¡.*2
( )
JVC
•
• • 1
“ ”
• ( )
°“√µ‘¥µ—Èß (°“√ª√–°Õ∫·ºßÀπÈ“ª— ∑¡Ï‡¢È“)¿“æµ—«Õ¬Ë“ßµËÕ‰ªπ’È·¥ß∂÷ß°“√µ‘¥µ—Èß·∫∫∑—Ë«‰ª À“°§ÿ≥¡’ª—≠À“À√◊ÕµÈÕß°“√¢ÈÕ¡Ÿ≈‡°’ˬ«°—∫™ÿ¥µ‘¥µ—Èß °√ÿ≥“ª√÷°…“° ∫ºŸÈ¢“¬‡§√◊ËÕ߇’¬ß√∂¬πµÏ JVC ¢Õß∑Ë“πÀ√◊Õ∫√‘…—• ™ÿ¥ª√–°Õ∫ ∂È“§ÿ≥‰¡Ë·πË„®«Ë“µ‘¥µ—Èß™ÿ¥ª√–°Õ∫π’È∂Ÿ°µÈÕßÀ√◊Õ‰¡Ë „ÀÈÀ“™Ë“ߺŸÈ‡™’ˬ«™“≠‡ªÁπºŸÈµ‘¥µ—Èß• ¥Ÿ„ÀÈ¥’«Ë“‰¡Ë¢«“ß∑“ßæ—¥≈¡∑’Ë·ºß¥È“πÀ≈—ß ‡æ◊ËÕ„Àȇ§√◊ËÕß “¡“√∂√
∫“¬§«“¡√ÈÕπ‰¥Èլ˓߇À¡“– ¡ ‡¡◊ËÕµ‘¥µ—È߇ √Á®·≈È«• ∑Ë“π‰¡Ë “¡“√∂µ‘¥µ—È߇§√◊ËÕß°—∫√∂¬πµÏ∑’Ë¡’ ‘Ëß°’¥¢«“ßµ√ßæ◊Èπ∑’Ë∑’Ë· ¥ß„π
“æ◊Èπ∑’Ë«Ë“ß∑’˵ÈÕß„ È„π°“√µ‘¥µ—Èß” „πÀπÈ“ 1
¢ÈÕ§«√√–«—߇¡◊ËÕ∑”°“√µ‘¥µ—Èßµ‘¥µ—È߇§√◊ËÕ߇¢È“„πª≈Õ°ÀÿÈ¡ „Àȵ√ß°—∫¢Õ∫¢Õß·ºËπ∑’˵—¥·µËß∑—Èß ’Ë• ÀÈ“¡¥—π∑’Ë·ºß§«∫§ÿ¡ ( Ë«π∑’Ë√–∫“¬ ’„π√Ÿª)
Fit the protrusions outside the unit.
µ‘¥ Ë«π∑’ˬ◊ËπÕÕ°¡“¥È“ππÕ°‡§√◊ËÕß
°“√∂Õ¥™ÿ¥ª√–°Õ∫°ËÕπ®–∂Õ¥™ÿ¥ª√–°Õ∫ „ÀȪ≈¥ÀπÈ“µ—¥ Ë«π∑È“¬°ËÕπ
Instal1-3_KD-AVX33[U].indd 2Instal1-3_KD-AVX33[U].indd 2 2/27/07 4:46:13 PM2/27/07 4:46:13 PM

3
PRECAUTIONS on power supply and speaker connections:• DO NOT connect the speaker leads of the power cord to the
car battery; otherwise, the unit will be seriously damaged.• BEFORE connecting the speaker leads of the power cord to the
speakers, check the speaker wiring in your car.
ELECTRICAL CONNECTIONSTo prevent short circuits, we recommend that you disconnect the battery’s negative terminal and make all electrical connections before installing the unit.• Be sure to ground this unit to the car’s chassis again after
installation.
Typical connectionsBefore connecting: Check the wiring in the vehicle carefully. Incorrect connection may cause serious damage to this unit.The leads of the power cord and those of the connector from the car body may be different in color.1 Connect the colored leads of the power cord in the order specified
in the illustration below.2 Connect the antenna cord.3 Finally connect the wiring harness to the unit.
15 A fuse15 A ø‘« Ï¢π“¥ 15 A
Rear ground terminal
®ÿ¥‡™◊ËÕ¡µËÕ “¬¥‘π¥È“πÀ≈—ß
To an external component (see diagram )
( )µËÕ‰ª¬—ßÕÿª°√≥Ï¿“¬πÕ° (¥Ÿ·ºπ¿Ÿ¡‘ )
To parking brake (see diagram )( )
µËÕ°—∫‡∫√°¡◊Õ (¥Ÿ·ºπ¿Ÿ¡‘ )
Yellow *4
*4
’‡À≈◊Õß *4
USB cable / USB / “¬ USB(see diagram / / ¥Ÿ·ºπ¿Ÿ¡‘ )
To metallic body or chassis of the car
µËÕ°—∫‚§√ß‚≈À–À√◊Õ‡™´ ‘¢Õß√∂¬πµú
To a live terminal in the fuse block connecting to the car battery (bypassing the ignition switch) (constant 12 V)
( ) ( 12 V)µµËÕ°—∫¢—È«∑’Ë¡’°√–·‰øøÈ“„π·ºßø‘«Ï ´÷ËßµËÕ°—∫·∫µ‡µÕ√’Ë√∂¬πµ (‚¥¬‰¡ËµÈÕß„™È« ‘∑™Ï®ÿ¥√–‡∫‘¥) (12 ‚«≈∑ϧß∑’Ë)
To an accessory terminal in the fuse block
µËÕ°—∫¢—È« Ë«πª√–°Õ∫„π·ºßø‘«
To automatic antenna if any (250 mA max.)( ) ( 250 mA)
‡ “Õ“°“»‰øøÈ“Õ—µ‚π¡—µ‘ À“°¡’ (¢π“¥ Ÿß ¸¥ 250 mA)
Fuse block
·ºßøî«
Black
’¥”
Red
’·¥ß
Blue
’πÈ”‡ß‘π
Blue with white stripe
’πÈ”‡ß‘π≈“¬¢“«
Orange with white stripe
’ È¡·∂∫¢“«
Brown
’πÈ”µ“≈
Light green
’‡¢’¬«ÕËÕπ
To car light control switch
«‘µ ϧ«∫§ÿ¡‰ø¢Õß√∂¬πµ√Ï
To cellular phone system
µËÕ°—∫‚∑√»—æ∑χ§≈◊ËÕπ∑
To the remote lead of other equipment (200 mA max.)( 200 mA)
µËÕ‡¢È“°—∫Õª°√≥ÏÕË◊π (¢π“¥ Ÿß ¸¥ 200 mA)
Ignition switch
«‘∑™Ï®ÿ¥√–‡∫‘¥
White with black stripe
’¢“«·∂∫¥”
White
’¢“«
Gray with black stripe
’‡∑“·∂∫¥”
Gray
’‡∑“
Green with black stripe
’‡¢’¬«·∂∫¥”
Green
’‡¢’¬«
Purple with black stripe
’¡Ë«ß·∂∫¥”
Purple
’¡Ë«ß
Left speaker (front)( )
≈”‚æß´È“¬ (ÀπÈ“)
Right speaker (front)( )
≈”‚æߢ«“ (ÀπÈ“)
Left speaker (rear)( )
≈”‚æß´È“¬ (À≈—ß)
Right speaker (rear)( )
≈”‚æߢ«“ (À≈—ß)
:• •
•
1 2 3
¢ÈÕ§«√√–«—ß”À√—∫°“√µËÕ·À≈Ë߮˓¬°”≈—ß·≈–≈”‚æß:• լ˓µËÕ “¬µ–°—Ë«‡§‡∫‘≈°”≈—ߢÕß≈”‚æ߇¢È“°—∫·∫µ‡µÕ√’Ë√∂¬πµÏ ¡‘©–π—Èπ ™ÿ¥ª√–°Õ∫®–‰¥È√—∫§«“¡‡ ’¬À“¬¡“°• °ËÕπ∑’Ë®–µËÕ“¬µ–°—Ë«‡§‡∫‘≈°”≈—ߢÕß≈”‚æ߇¢È“°—∫≈”‚æß
„Àȵ√«®Õ∫°“√‡¥‘𓬉ø≈”‚æß„π√∂¢Õߧÿ≥„Àȇ√’¬∫√ÈÕ¬‡’¬°ËÕπ
°“√‡™◊ËÕ¡‚¥¬„™È‰øøÈ“‡æ◊ËÕªÈÕß°—π°“√‡°‘¥‰øøÈ“≈—¥«ß®√ ¢Õ·π–π”„ÀȪ≈¥¢—È«·∫µ‡µÕ√’Ë≈∫ÕÕ° ·≈È«®÷ßµËÕ “¬‰ø°ËÕ𵑥µ—È߇§√◊ËÕß• µ√«® Õ∫„ÀÈ·πË„®«Ë“‰¥È‡¥‘𠓬¥‘πµËÕ√–À«Ë“߇§√◊ËÕß°—∫µ—«∂—ß √∂¬πµÏ„À¡Ë·≈È«À≈—ß®“°µ‘¥µ—Èß
°“√‡™◊ËÕ¡µËÕ·∫∫ª°µ°ËÕ•∑”°“•‡™•ËÕ¡µËÕ: µ•«®†Õ•°“•‡¥‘•†“¬‰ø„•••¬•µÏլ˓ߕ–¡—¥•–«—լ˓„ÀȺ‘¥æ•“¥„•°“•‡™•ËÕ¡µËÕ™ÿ¥ª•–°Õ•™ÿ¥•’ °“•‡™•ËÕ¡µËÕº‘¥æ•“¥Õ“®∑”„Àȇ°‘¥§«“¡‡ ’¬À“¬•È“¬·•ß°—•™ÿ¥ª•–°Õ••’ȉ¥È“•µ–°—Ë«¢Õ߆“¬‰ø ·•–¢ÕßÕÿª°••ÏµËÕ‡™•ËÕ¡®“°µ—«• ß••Õ“®¡’ ∑’ˉ¡Ë‡À¡•Õ•°—•
1 µËÕ “¬‰ø’µ“¡≈”¥—∫∑’Ë√–∫ÿ„π√Ÿª¥È“π≈Ë“ß
2 ‡™◊ËÕ¡µËÕ°—∫“¬Õ“°“»
3 ÿ¥∑È“¬ µËÕ Ë«π§«∫§ÿ¡°“√‡¥‘𠓬‰ø‡¢È“°—∫™ÿ¥ª√–°Õ∫™ÿ¥π’È
*3 Not included for this unit*3
*3 ‰¡Ë‰¥È„ÀÈ¡“°—∫™ÿ¥ª√–°Õ∫π’È
*4 Before checking the operation of this unit prior to installation, this lead must be connected, otherwise power cannot be turned on.
*4
*4 °ËÕπ°“√µ√«® Õ∫°“√∑”ß“π¢Õß™ÿ¥ª√–°Õ∫π’È°ËÕπ∑’Ë®–µ‘¥µ—Èß µÈÕßµËÕ “¬µ–°—Ë«π’È°ËÕπ ¡‘©–π—Èπ®–‰¡ “¡“√∂‡ª‘¥‡§√◊ËÕ߉¥
Instal1-3_KD-AVX33[U].indd 3Instal1-3_KD-AVX33[U].indd 3 2/27/07 4:46:27 PM2/27/07 4:46:27 PM

ENGLISH ‰∑¬
4
Connecting the Mic unit / / °“√µËÕ™ÿ¥‰¡‚§√‚øπ
or
À√◊Õ Adjust the microphone angle
ª√—∫¡ÿ¡‰¡‚§√‚øπ
Microphone
‰¡‚§√‚øπ
Microphone clip
§≈‘ª‰¡‚§√‚øπ
JDouble-sided adhesive tape
‡∑ª°“« ÕßÀπÈ“
C
Secure the microphone cord using cord cramps (not supplied) if necessary.( )
À“°®”‡ªÁπ „ÀȬ÷¥ “¬‰¡‚§√‚øπ¥È«¬·§≈¡ªÏ¬÷¥ ( ‰¡Ë‰¥È¡’¡“„ÀÈ)
1 2
Connect the parking brake lead to the parking brake system built in the car.
Parking brake lead (light green)( )
«‘µ™Ï‡∫√°¡◊Õ ( ’‡¢’¬«ÕËÕπ)
To metallic body or chassis of the car
µËÕ°—∫‚§√ß‚≈À–À√◊Õ‡™´ ‘¢Õß√∂¬πµúParking brake switch (inside the car)( )
«‘µ™Ï‡∫√°¡◊Õ (¿“¬„π√∂)
Parking brake
‡∫√°¡◊Õ
Connecting the parking brake lead / / µËÕ “¬‡∫√°¡◊ÕA
Connecting the reverse gear signal lead (for rear view camera) / ( ) / °“√‡™◊ËÕ¡µËÕ “¬‡°’¬√Ï∂Õ¬À≈—ß ( ”À√—∫°≈ÈÕß¡ÕßÀ≈—ß) (REVERSE GEAR SIGNAL
Locate the reverse lamp lead in the trunk.
®—∫„ÀÈ “¬‰ø∂Õ¬Õ¬ŸË„π√“ß
To reverse lamp
‰ª¬—߉ø∂Õ¬
Reverse lamp lead
“¬‰ø∂Õ¬Reverse lamp lead
“¬‰ø∂Õ¬
To car battery
µËÕ°—∫·∫µ‡µÕ√’Ë√∂¬πµÏ
Purple with white stripe
’¡Ë«ß·∂∫¢“«Reverse lamps
‰ø∂Õ¬
B
TROUBLESHOOTING• The fuse blows.* Are the red and black leads connected correctly?• Power cannot be turned on.* Is the yellow lead connected?• No sound from the speakers.* Is the speaker output lead short-circuited?• Sound is distorted.* Is the speaker output lead grounded?* Are the “–” terminals of L and R speakers grounded in common?• Noise interfere with sounds.* Is the rear ground terminal connected to the car’s chassis using
shorter and thicker cords?• Unit becomes hot.* Is the speaker output lead grounded?* Are the “–” terminals of L and R speakers grounded in common?• This unit does not work at all.* Have you reset your unit?
µËÕ “¬‡∫√°¡◊Õ°—∫√–∫∫‡∫√°¡◊Õ¢Õß√∂¬πµ
• *
• *
• *
• * * L R “–”
• *
• * * L R “–” • *
°“√µ√«®Õ∫ª— ≠À“¢—¥¢ÈÕß• ø‘« ú¢“¥* ¡’°“√‡™◊ËÕ¡ “¬µ–°—Ë« ’¥”·≈– ’·¥ßլ˓ß∂Ÿ°µÈÕßÀ√◊Õ‰¡ò• ‰¡Ë “¡“√∂‡ª‘¥‡§√◊ËÕ߉¥È* ¡’°“√‡™◊ËÕ¡ “¬µ–°—Ë« ’‡À≈◊ÕßÀ√◊Õ‰¡ò• ‰¡Ë¡’‡ ’¬ßÕÕ°®“°≈”‚æß* “¬µ–°—Ë« Ë«π∑’ËÕÕ°∑“ß≈”‚æ߇°‘¥‰øøÈ“≈—¥«ß®√À√◊Õ‰¡Ë
• ‡ ’¬ß‡æ’Ȭπ* “¬µ–°—Ë« Ë«π∑’ËÕÕ°∑“ß≈”‚æßµËÕ≈ߥ‘πÀ√◊Õ‰¡Ë* “¬¢—È«≈∫¢Õß≈”‚æߥȓπ´È“¬ (L) ·≈–¢«“ (R) µËÕ≈ߥ‘πµ“¡ª°µ‘À√◊Õ‰¡Ë
• ‡ ’¬ß√∫°«π* ¡’°“√„™ È“¬ —ÈπÊ À√◊ÕÀπ“Ê µËÕ®“°‡§√◊ËÕß ò«π∑’˵‘¥µ—Èß ‰«È∫πæ◊Èπ¥È“πÀ≈—ß °—∫µ—«∂—ß√∂¬πµÏÀ√◊Õ‰¡Ë
• ™ÿ¥ª√–°Õ∫√ÈÕπ¢÷Èπ* “¬µ–°—Ë« Ë«π∑’ËÕÕ°∑“ß≈”‚æßµËÕ≈ߥ‘πÀ√◊Õ‰¡Ë* “¬¢—È«≈∫¢Õß≈”‚æߥȓπ´È“¬ (L) ·≈–¢«“ (R) µËÕ≈ߥ‘πµ“¡ª°µ‘À√◊Õ‰¡Ë
• ‡§√◊ËÕ߉¡Ë∑”ß“π‡≈¬* ‰¥È∑”°“√√’‡´Áµ‡§√◊ËÕßÀ√◊Õ¬—ß
Instal4-6_KD-AVX33[U].indd 4Instal4-6_KD-AVX33[U].indd 4 2/27/07 2:32:09 PM2/27/07 2:32:09 PM

Connecting the external amplifiers / / °“√µËÕ‡æ‘Ë¡‡µ‘¡‡¢È“°—∫Õÿª°√≥ÏÕ◊ËπYou can connect amplifiers to upgrade your car stereo system.• Connect the remote lead (blue with white stripe) to the remote
lead of the other equipment so that it can be controlled through this unit.
• For amplifier only:– After you have connected the center speaker, make sure
to activate the center speaker; otherwise, no sound comes out of the connected center speaker, see page 49 of the INSTRUCTIONS.
– Disconnect the speakers from this unit, connect them to the amplifier. Leave the speaker leads of this unit unused.
– You can switch off the built-in amplifier and send the audio signals only to the external amplifier(s) to get clear sounds and to prevent internal heat buildup. See page 51 of the INSTRUCTIONS (separate volume).
*6 Firmly attach the ground wire to the metallic body or to the chassis of the car—to the place uncoated with paint (if coated with
paint, remove the paint before attaching the wire). Failure to do so may cause damage to the unit.
*6 (
)*6 µËÕ≈«¥ “¬¥‘π„ÀÈ·πËπ‡¢“°—∫µ—«∂—߇À≈Á° À√◊Õµ—«∂—ß√∂˙µ√ß Ë«π ∑’ˉ¡Ë¡’’ ’‡§≈◊Õ∫
(À“°¡’ ’‡§≈◊Õ∫Õ¬ŸË „ÀÈ¢Ÿ§¥’ÕÕ°°ËÕπ °ËÕπµËÕ≈«¥ “¬¥‘π)À“°‰¡ËªØ‘∫—µ‘µ“¡§”·π–π”π’È ‡§√◊ËÕßÕ“®™”√ÿ¥À√◊Õ‡ ’¬À“¬‰¥
5
Center speaker
”‚æß°≈“ß
Connections for external component playback / / °“√µËÕ‡æ◊ËÕ‡≈ËπÕÿª°√≥Ï¿“¬πÕ°
KS-HP2Cordless headphones (not supplied) *7
( ) *7
∑Ÿøíß·∫∫‰√È “¬ ( ‰¡Ë‰¥È„ÀÈ¡“æ√ÈÕ¡‡§√◊ËÕß) *7
KV-MR90109-INCH WIDESCREEN MONITOR (not supplied)9- ( )®Õ°«È“ß 9 π‘È« ( ‰¡Ë‰¥È„ÀÈ¡“æ√ÈÕ¡‡§√◊ËÕß)
Video cord (not supplied)( )
“¬«‘¥’‚Õ ( ‰¡Ë‰¥È„ÀÈ¡“æ√ÈÕ¡‡§√◊ËÕß)
*7 To listen to disc playback sound while in Dual Zone operations (see page 26 of INSTRUCTIONS).
*7 ( 26 )*7 ‡¡◊ËÕµÈÕß°“√ø—ß·ºË𥑠°Ï¢≥–Õ¬ŸË„π‚À¡¥°“√∑”ß“π·∫∫ Dual Zone (¥ÿÀπÈ“ 26 ¢ÕߧŸË¡◊Õ°“√„™Èß“π)
Camcorder, rear view camera, etc.
°≈ÈÕß«‘¥’‚Õ °≈ÈÕß¡ÕßÀ≈—ß œ≈œ
A
B
*5 Audio cord (not supplied)
*5 ( )*5 “¬ÕÕ¥‘‚Õ ( ‰¡Ë‰¥È„ÀÈ¡“æ√ÈÕ¡‡§√◊ËÕß)
Navigation System
√–∫∫π”∑“ß
Remote lead
“¬µ–°—Ë«•–¬–‰°•
Remote lead (Blue with white stripe)( )
“¬µ–°—Ë«•–¬–‰°• ( ’πÈ”‡ß‘π≈“¬¢“«)
To the remote lead of other equipment
µËÕ‡¢È“°—∫Õª°√≥ÏÕË◊π
Y-connector (not supplied for this unit)Y- ( )
¢ÈÕµËÕ√Ÿªµ—« Y ( ‰¡Ë‰¥È„ÀÈ¡“°—∫™ÿ¥ª√–°Õ∫π’È)
JVC AmplifierJVC ‡§√◊ËÕߢ¬“¬‡’¬ß JVC
JVC AmplifierJVC ‡§√◊ËÕߢ¬“¬‡’¬ß JVC
JVC AmplifierJVC ‡§√◊ËÕߢ¬“¬‡’¬ß JVC
JVC AmplifierJVC ‡§√◊ËÕߢ¬“¬‡’¬ß JVC
Rear speakers
≈”‚æßÀ≈—ß
Front speakers
≈”‚æßÀπÈ“
Subwoofer
´—∫«Ÿ‡øÕ√
Front speakers
≈”‚æßÀπÈ“
• ( )
• :–
49 –
–
51 ( )
§ÿ≥“¡“√∂µËÕ°—∫·Õ¡æ≈‘ø“¬‡ÕÕ√Ï · –Õÿª°√≥ÏÕ◊òπʉ¥ô ‡æ◊ËÕ‡æ‘Ë¡§ÿ≥¿“æ‡ ’¬ß„ÀÈ°—∫√–∫∫ ‡µÕ√‘‚Õ¢Õß√∂¬πµÏ• µËÕ “¬µ–°—Ë«√–¬–‰°≈ ( ’πÈ”‡ß‘π≈“¬¢“«) ‡¢È“°—∫ “¬µ–°—Ë«√–¬–‰°≈¢ÕßÕÿª°√≥ÏÕ◊Ëπ
Ê ‡æ◊ËÕ®– “¡“√∂§«∫§ÿ¡‚¥¬™ÿ¥ª√–°Õ∫π’ȉ¥È• ≈”À√—∫·Õ¡æ≈‘ø“¬‡ÕÕ√χ∑Ë“π—Èπ:
– À≈—ß®“°∑’˵ËÕ≈”‚æß°≈“ß·≈È« µÈÕß·πË „®«Ë“‰¥È‡ª‘¥„™Èß“π≈”‚æß ¡‘‡™Ëππ—Èπ ®–‰¡Ë¡’‡ ’¬ßÕÕ°¡“®“°≈”‚æß ¥ŸÀπÈ“ 49 §”·π–π”
– ∂Õ¥≈”‚æßÕÕ°®“°™ÿ¥ª√–°Õ∫π’È ·≈È«µËÕ‡¢È“°—∫‡§√◊ËÕߢ¬“¬ ∑‘Èß “¬µ–°—Ë«≈”‚æߢÕß™ÿ¥ª√–°Õ∫π’ȉ«È– “¡“√∂ª‘¥·Õ¡ª≈‘ø“¬‡ÕÕ√ϵ—«∫‘«∑ÏÕ‘π‰¥È ·≈È« Ë߇©æ“– —≠≠“≥‡ ’¬ß‰ª¬—
ß·Õ¡ªÏµ—«πÕ°‡æ◊ËÕ„Àȉ¥È‡ ’¬ß∑’˧¡™—¥¬‘Ëߢ÷Èπ ·≈–‡æ◊ËÕ‡ªÁπ°“√ªÈÕß°—π°“√‡°‘¥§«“¡ √ÈÕπ¿“¬„π‡§√◊ËÕߥȫ¬ ¥ŸÀπÈ“ 51 §”·π–π” (§ŸË¡◊ÕÕ’°‡≈Ë¡Àπ÷ËßÈ)
Instal4-6_KD-AVX33[U].indd 5Instal4-6_KD-AVX33[U].indd 5 2/27/07 2:32:48 PM2/27/07 2:32:48 PM

6
Connecting external components / / °“√‡™◊ËÕ¡µËÕ Ë«πª√–°Õ∫¿“¬πÕ°C
• iPod is a trademark of Apple Inc., registered in the U.S. and other countries.
• iPod Apple Inc. ( )
• iPod ‡ªÁπ‡§√◊ËÕßÀ¡“¬°“√§È“¢Õß Apple Inc. ÷Ëß®¥∑–‡∫’¬π°“√§È“„πª√–‡∑» À√—∞Õ‡¡√‘°“·≈–ª√–‡∑»Õ◊ËπÊ
USB cable—approx.1.2 mUSB — .1.2 m “¬ USB —ª√–¡“≥ 1.2 ‡¡µ√
USB deviceUSB Õÿª°√≥Ï USB
Audio cord (not supplied)( )
“¬ÕÕ¥‘‚Õ ( ‰¡Ë‰¥È„ÀÈ¡“æ√ÈÕ¡‡§√◊ËÕß)
3.5 mm stereo mini plug3.5 mm ª≈—Í°µËÕ —≠≠“≥ ‡µÕ√‘‚Õ¢π“¥‡≈Á° 3.5 ¡¡.
External component / / Õÿª°√≥Ï¿“¬πÕ°
USB devices / USB / Õÿª°√≥Ï USB
You can connect external components in series as shown in the diagram below.• All the components, adapters or signal cords need to be
purchased separately.
CAUTION:Before connecting the external components, make sure that the unit is turned off.
• To use JVC CD changer, Apple iPod or JVC D. player, set “External Input” to “Changer/iPod/D. Player” (see page 50 of the INSTRUCTIONS).
• To use other external components via KS-U57 or KS-U58, set “External Input” to “External Input” (see page 50 of the INSTRUCTIONS).
External component
Õÿª°√≥Ï¿“¬πÕ°KS-U57*8
KS-U58*9
KS-PD100
KS-PD500
Apple iPodApple iPodApple iPod
JVC D. playerJVC D. player‡§√◊ËÕ߇≈Ëπ JVC D.
JVC CD changerJVC CD
‡§√◊ËÕ߇≈Ëπ ’¥’ JVC CD
or / / À√◊Õ
CD changer jackCD ™ËÕ߇ ’¬∫µËÕ¢Õ߇§√◊ËÕ߇≈Ëπ´’¥’ CD
*8 Line Input Adapter KS-U57 (separately purchased)*8 KS-U57 ( )*8 Õ·¥ª‡µÕ√Ï “¬ —≠≠“≥‡¢È“ KS-U57 (·¬°Õ”ÀπË“¬)*9 Aux Input Adapter KS-U58 (separately purchased)*9 Aux KS-U58 ( )
*9 Õ–·¥a‡µÕ√Ï·a≈ß —≠≠“≥‡¢È“®“°Õÿa°√≥Ï¿“¬πÕ° KS-U58 (·¬°Õ”ÀπË“¬)
Hold the connector top tightly (1), then pull it out (2).
(1)(2)
®—∫¥È“π∫π¢Õߢ—È«µËÕ„ÀÈ·πËπ (1) ®“°π—Èπ®÷ߥ—ßÕÕ° (2)
To disconnect the connector / / ª≈¥¢—È«µËÕ
•
:
• JVC CD Apple iPod JVC D.“External Input” “Changer/iPod/D. Player”
( 50 )• KS-U57 KS-U58 “External
Input” “External Input” ( 50 )
“¡“√∂‡™◊ËÕ¡µËÕÕÿª°√≥Ï¿“¬πÕ°µ“¡Õπÿ°√¡∑’Ë· ¥ß „π·ºπº—ߥȓπ≈Ë“ß• Õÿª°√≥Ï∑ÿ°µ—«√«¡∂÷ßÕ·¥ª‡µÕ√ÏÀ√◊Õ “¬ —≠≠“≥µË“ßÊ ®–µÈÕß´◊ÈÕ·¬°µË“ßÀ“°
¢ÈÕ§«√√–«—ß:°ËÕπµËÕÕÿª°√≥Ï¿“¬πÕ° °“µ√«® Õ∫„ÀÈ·πË „®«Ë“‰¥Èªî¥‡§√◊ËÕß·≈ô«
• À“°µÈÕß°“√„™È´’¥’‡™π‡®Õ√Ï¢Õß JVC, Apple iPod À√◊Õ‡§√◊ËÕ߇≈Ëπ JVC D. „Àȵ—Èߧ˓ “External Input” ‰ª∑’Ë “Changer/iPod/D. Player” (¥ŸÀπÈ“ 50 §”·π–π”)
• À“°µÈÕß°“√µËÕÕÿª°√≥Ï¿“¬πÕ°ºË“π∑“ßÕ·¥ª‡µÕ√Ï KS-U57 À√◊Õ KS-U58 „Àȵ—Èߧ˓ “External Input” ‰ª∑’Ë “External Input” (¥ŸÀπÈ“ 50 §”·π–π”)
or / / À√◊Õ
or / / À√◊Õ
or / / À√◊Õ
or / / À√◊Õ
CD changer jackCD ™ËÕ߇ ’¬∫µËÕ¢Õ߇§√◊ËÕ߇≈Ëπ´’¥’ CD
External component
Õÿª°√≥Ï¿“¬πÕ°
External component
Õÿª°√≥Ï¿“¬πÕ°
External component
Õÿª°√≥Ï¿“¬πÕ°
You cannot connect a computer to the USB ( ) terminal of the unit. USB ( )
∑Ë“π‰¡Ë “¡“√∂µËÕ‡§√◊ËÕߧա摫‡µÕ√Ï°—∫™ËÕßµËÕ USB ( ) ¢Õ߇§√◊ËÕ߉¥ô
Instal4-6_KD-AVX33[U].indd 6Instal4-6_KD-AVX33[U].indd 6 2/27/07 2:33:03 PM2/27/07 2:33:03 PM

For installation and connections, refer to the separate manual.
INSTRUCTIONS
LVT1708-001A[A]
For canceling the display demonstration, see page 5.
DVD/CD RECEIVER
KD-AVX33
Cover_KD-AVX33A.indd 2Cover_KD-AVX33A.indd 2 07.2.13 9:37:02 AM07.2.13 9:37:02 AM

2
WARNINGS:To prevent accidents and damage
• DO NOT install any unit and wire any cable in locations where;– it may obstruct the steering wheel and
gearshift lever operations.– it may obstruct the operation of safety devices
such as air bags.– it may obstruct visibility.
• DO NOT operate the unit while driving. If you need to operate the unit while driving, be
sure to look around carefully.• The driver must not watch the monitor while
driving.• The driver must not put on the headphones while
driving.
Cautions on the monitor:
• The monitor built in this unit has been produced with high precision, but it may have some ineffective dots. This is inevitable and is not malfunction.
• Do not expose the monitor to direct sunlight.• When the temperature is very cold or very hot...– Chemical changes occur inside, causing
malfunction.– Pictures may not appear clearly or may move
slowly. Pictures may not be synchronized with the sound or picture quality may decline in such environments.
For safety...• Do not raise the volume level too much, as this will
block outside sounds, making driving dangerous.• Stop the car before performing any complicated
operations.
Temperature inside the car...If you have parked the car for a long time in hot or cold weather, wait until the temperature in the car becomes normal before operating the unit.
Thank you for purchasing a JVC product.Please read all instructions carefully before operation, to ensure your complete understanding and to obtain the best
possible performance from the unit.IMPORTANT FOR LASER PRODUCTS1. CLASS 1 LASER PRODUCT2. CAUTION: Do not open the top cover. There are no user serviceable parts inside the unit; leave all servicing to
qualified service personnel.3. CAUTION: Visible and/or invisible class 1M laser radiation when open. Do not view directly with optical
instruments.4. REPRODUCTION OF LABEL: CAUTION LABEL, PLACED OUTSIDE THE UNIT.
[European Union only]
KD-AVX33A.indb 2KD-AVX33A.indb 2 07.2.21 9:32:15 AM07.2.21 9:32:15 AM

3
How to reset your unit
• Your preset adjustments (except for the registered Bluetooth devices) will also be erased.
How to forcibly eject a disc
• If this does not work, reset the unit.
This product incorporates copyright protection technology that is protected by U.S. patents and other intellectual property rights. Use of this copyright protection technology must be authorized by Macrovision, and is intended for home and other limited viewing uses only unless otherwise authorized by Macrovision. Reverse engineering or disassembly is prohibited.
Contents
INTRODUCTIONPlayable disc type ............................ 4Before operating the unit ................ 5
OPERATIONSBasic operations—Control panel ...... 7Basic operations—
Remote controller (RM-RK251) ...... 8Listening to the radio ...................... 10Disc operations ................................ 13Dual Zone operations ....................... 26USB operations ................................ 29Bluetooth® operations—
Cellular phone/audio player .......... 31
EXTERNAL DEVICESListening to the CD changer .............. 38Listening to the iPod/D. player ......... 40Listening to other external
components ................................. 41
SETTINGSSound equalization .......................... 43Assigning titles to the sources .......... 44Menu operations ............................. 45
REFERENCESMaintenance ................................... 55More about this unit ........................ 56Troubleshooting .............................. 62Specifications .................................. 66
NO EJECT?EMERGENCY EJECT?
NO EJECT?EMERGENCY EJECT?
KD-AVX33A.indb 3KD-AVX33A.indb 3 07.2.21 9:32:21 AM07.2.21 9:32:21 AM

4
Playable disc type
Disc type Recording format, file type, etc. Playable
DVD DVD Video (Region Code: 4)*1
DVD Audio
DVD-ROM
DVD Recordable/Rewritable(DVD-R*2/-RW, +R/+RW*3)• DVD Video: UDF bridge• DVD-VR• DivX/MPEG1/MPEG2/JPEG/MP3/
WMA/WAV/AAC: Compliant to ISO 9660 level 1, level 2, Romeo, Joliet
• DVD-RAM cannot be played.
DVD Video
DVD-VR (non-CPRM only)
DivX/MPEG1/MPEG2
JPEG
MP3/WMA/WAV/AAC*4
MPEG4
DVD+VR
Dual Disc DVD side
Non-DVD side
CD/VCD Audio CD/CD Text (CD-DA)/DTS-CD
VCD (Video CD)
CD-ROM
CD-I (CD-I Ready)
CD Recordable/Rewritable(CD-R/-RW)• Compliant to ISO 9660 level 1,
level 2, Romeo, Joliet
CD-DA
MP3/WMA/WAV/AAC*4
JPEG
DivX/MPEG1/MPEG2
MPEG4
*1 If you insert a DVD Video disc of an incorrect Region Code, “Region code error” appears on the monitor.*2 DVD-R recorded in multi-border format is also playable (except for dual layer discs).*3 It is possible to play back finalized +R/+RW (Video format only) discs. However, the use of +R double layer disc is not recommended.*4 This unit can play back AAC files encoded using iTunes.
Caution for DualDisc playbackThe Non-DVD side of a “DualDisc” does not comply with the “Compact Disc Digital Audio” standard. Therefore, the use of Non-DVD side of a DualDisc on this product may not be recommended.
KD-AVX33A.indb 4KD-AVX33A.indb 4 07.2.21 9:32:21 AM07.2.21 9:32:21 AM

INTRODUCTION5
Before operating the unitCancel the display demonstration and set the clock. ( also pages 46 and 47)• Operations are explained mainly using the buttons on the unit; however, the buttons on the remote controller can
work in the same way if they have the same names or marks.
~ Turn on the power.
Ÿ Display <AV Menu>.
! Enter the <Setup> menu.
⁄ Select <Display> ] <Demonstration>, then activate the <Demonstration> screen.
@ Cancel the display demonstrations.Select <Off>.
Continued on the next page
AV Menu
Setup EnterENT
Setup menu icon
Currently selected menu
Demonstration
DisplayClockDisc Setup 1Disc Setup 2Tuner
On
DemonstrationWall PaperScrollTag DisplayDimmer
OffOn
ExitENT
Setup Display Demonstration
Currently selected submenu Current setting
OffOn
ExitENT
Demonstration
Indication language:In this manual, English indications are used for purpose of explanation. You can select the indication language on the monitor. ( page 47)
KD-AVX33A.indb 5KD-AVX33A.indb 5 07.2.21 9:32:22 AM07.2.21 9:32:22 AM

6
fi Select either the 12-hour or 24-hour system.
^ Return to the <Clock> menu.
fl Select <OSD Clock>.
& Activate the <OSD Clock> screen.
‡ Select the <OSD Clock> setting.• Off: The clock time is not displayed while
playing back a video source.• On: The clock time is displayed while playing
back a video source.
* Finish the procedure.
¤ Return to the <Setup> menu.
# Select <Clock> ]<Time Set>, then activate the <Time Set> screen.
‹ Set the clock time.
$ Return to the <Clock> menu.
› Select <12Hours/24Hours>.
% Activate the <12Hours/24Hours> screen.
Clock
1:00AM
Time Set12Hours/24HoursOSD Clock
Time SetHours
1 : 00AM
ExitENT
Time SetMinutes
3 : 45PM
ExitENT
12Hours/24Hours12 Hours24 Hours
ExitENT
(twice)
KD-AVX33A.indb 6KD-AVX33A.indb 6 07.2.21 9:32:23 AM07.2.21 9:32:23 AM

OPERATIONS7
Basic operations — Control panel
• TUNER: Select the bands.• DISC/USB: Stop playback.• On menus: Back.
Select the source.TUNER = DISC (DVD/VCD/CD) = USB =CD-CH, iPod, D.PLAYER, or EXT-IN =Bluetooth Phone =Bluetooth Audio = AV-IN =(back to the beginning)• You cannot select these sources if they are not ready.
Eject the disc.
*1 <AV Menu> screensYou can use the menus to set up various settings.The <AV Menu> screen consists of the following sub-menus—Setup/Equalizer/Sound/Disc Surround/Mode/List/Bluetooth/Dual Zone.• For details, see pages 45 to 54.
*3 By holding 5 / ∞, you can display the list accessible for the selected source.
• Turn on the power.• Turn off the power
[Hold].• Attenuate the sound (if
the power is on). Change the display information.
4 / ¢• TUNER: Search for stations.• DISC/USB: Select chapters/tracks.• On menus: Go to previous/next step.• iPod/D.PLAYER: Select tracks.• Bluetooth Audio: Reverse skip/forward skip.5 / ∞*3
• TUNER: Select preset stations.• DISC/USB: Select titles/folders.• On menus: Select items.• iPod/D.PLAYER: Enter player’s menu/pause
or stop playback.• Bluetooth: Select a device.
Change the control panel tilt (Tilt1 – Tilt4).
Remote sensor
Adjust the volume.
Reset the unit.• Use only when the
internal system malfunctions.
• DISC/USB: Start playback.• On menus: Enter ( ENT :[Press]/ ENT :[Hold]).
Detach the control panel*2.
Display window
• Display <Dial Menu>.• Display <Redial> list [Hold].
• Display or erase <AV Menu>*1.• Activate Voice Dialing [Hold].
*2 To attach the control panel
KD-AVX33A.indb 7KD-AVX33A.indb 7 07.2.21 9:32:23 AM07.2.21 9:32:23 AM

8
Basic operations — Remote controller (RM-RK251)
Installing the battery
If the range or effectiveness of the remote controller decreases, replace both batteries.
Before using the remote controller:• Aim the remote controller directly at the remote
sensor on the unit.• DO NOT expose the remote sensor to bright light
(direct sunlight or artificial lighting).
Caution:
• Do not expose batteries to heat or flame.
IMPORTANT:If Dual Zone is activated ( page 26), the remote controller functions only for operating the DVD/CD player.
Main elements and features
1*1 • Turns on the power.• Attenuates the sound if the power is on.• Turns off the power if pressed and held (while
the power is on).2*1 Selects the source.3*1 • Displays <Dial Menu>.
• Displays <Redial> list if pressed and held.• Answers incoming calls.
4*1*2 Adjusts the volume level.5*1*2 Selects surround mode.
R03/LR03/AAA
i
o
;
as
KD-AVX33A.indb Sec1:8KD-AVX33A.indb Sec1:8 07.2.21 9:32:24 AM07.2.21 9:32:24 AM

OPERATIONS9
On menus:• 5 / ∞: Select items.• 4 / ¢: Goes to previous/next step.
w TUNER: Selects the bands. DISC/USB: Stop playback. Bluetooth Phone: Ends the call. Bluetooth Audio: Plays/pauses. On menus: Back.e*2 Adjusts the volume level through the 2nd AUDIO
OUT plug. ( page 26)r*2 Activates or deactivates Dual Zone.t*1*2 Selects the sound mode.y • DVD Video/DivX 6: Shows the disc menu.
• VCD: Resumes PBC playback. ( page 21)• DVD-VR: Shows the Play List screen.
u RETURN button• For VCD: Returns to the PBC menu.
i DISC/USB: Switches number entry mode.• Also functions as CLEAR button to erase the
misentry after entering the wrong number.o Enter numbers. ( pages 12, 19 to 21, 36 and
39)• CD changer: Selects the disc directly.• Tuner: Selects the preset stations.
;*1 Changes the aspect ratio of the playback pictures.a Reverse search/forward search for disc/USB
operationss • DVD Video: Selects audio language ( ),
subtitles ( ), angle ( ).• DVD Audio: Selects audio stream ( ).• DVD-VR: Turn on/off subtitles ( ) and
selects audio channel( ).• DivX: Selects audio language ( ),
subtitles ( ).• VCD: Selects audio channel ( ).
*1 If Dual Zone is activated, these buttons cannot be used.
*2 These buttons can be used only when the slide cover is closed.
*3 5 : Returns to the previous menu. ∞ : Confirms the selection.
6 • DVD/DivX 6: Shows the disc menu.• VCD: Resumes PBC playback ( page 21).• DVD-VR: Shows the Original Program screen.
7 • Makes selection/settings.• ~: Skips back or forward by 5 minutes for
DivX/MPEG1/MPEG2.• DISC +/– buttons: Changes discs for “CD-CH.”
8 Shows the on-screen bar.9*1 Changes the display information.p Display or erase <AV Menu>.q For disc/USB operations:
• 6: Plays/pauses.• 5 / ∞ DVD: Selects the title/group. DVD-VR: Selects the program/play list. USB/other discs (except VCD/CD): Selects the
folders.• 4 / ¢:– Press briefly: reverse skip/forward skip– Press and hold: reverse search/forward search
For FM/AM operations:• 5 / ∞: Selects the preset stations.• 4 / ¢: Functions to search for stations.– Press briefly: Auto Search– Press and hold: Manual Search
For Apple iPod/JVC D. player operations:• ∞: Pauses/stops or resumes playback.• 5: Enters the main menu (then 5 / ∞ /
4 / ¢ work as the menu selecting buttons).*3
• 4 / ¢ (in menu selecting mode)– Selects an item if pressed briefly. (Then, press
∞ to confirm the selection.)– Skips 10 items at a time if pressed and held.
For Bluetooth operations:• 5 / ∞: Selects a registered device.
• 4 / ¢: reverse skip/forward skip (for audio operation) • 6: Answers incoming calls (for “Bluetooth Phone”). Plays/Pauses (for “Bluetooth Audio”).
KD-AVX33A.indb Sec1:9KD-AVX33A.indb Sec1:9 07.2.21 9:32:24 AM07.2.21 9:32:24 AM

10
3: 45PM
FLAT
DXMO
TUNER
FM1 Preset1 ABC Radio 87.5 MHz
POWER]ON
When an FM stereo broadcast is hard to receive 1
2
Mode menu icon
3
Listening to the radio
~ Select “TUNER.”
Ÿ Select the bands.
! Search for a station—Auto Search.• Manual Search: Hold either 4 or ¢ until “Manual Search” appears on the display, then press it
repeatedly.• The ST indicator lights up when receiving an FM stereo broadcast with sufficient signal strength.
4
Reception improves, but stereo effect will be lost.• The MO indicator lights up.
To restore stereo effect, select <Off > in step 4.
Preset No.Band
page 43
Tuner indicators
AV Menu
Mode EnterENT
AV Menu
Setup EnterENT
Mode
Off
MonoDX/LocalSSMTitle Entry
MonoOffOn
ExitENT
Assigned station name ( page 44). If no name is assigned, “No Name” appears.
KD-AVX33A.indb 10KD-AVX33A.indb 10 07.2.21 9:32:25 AM07.2.21 9:32:25 AM

OPERATIONS11
FM station automatic presetting —SSM (Strong-station Sequential Memory) This function works only for FM bands.You can preset six stations for each band.
1
2
3
Local FM stations with the strongest signals are searched and stored automatically in the FM band.
Tuning in to stations with sufficient signal strength This function works only for FM bands.Once you have activated this function (selected <Local>), it always works when searching for FM stations.
1
2
Mode menu icon
3
4
Only stations with sufficient signal strength will be detected.• The DX indicator goes off, then the LO indicator
lights up.
Mode
DX
MonoDX/LocalSSMTitle Entry
DX/LocalDXLocal
ExitENT
ModeMonoDX/LocalSSMTitle Entry
StartENT
AV Menu
Mode EnterENT
AV Menu
Setup EnterENT
AV Menu
Setup EnterENT
AV Menu
Mode EnterENT
Mode menu icon
KD-AVX33A.indb 11KD-AVX33A.indb 11 07.2.21 9:32:26 AM07.2.21 9:32:26 AM

12
Selecting preset stations On the remote:
1
2 or
On the unit:
1
• Each time you hold the button, you can change the FM bands.
2
• Preset List can also be accessed through <AV Menu> = <List>.
List menu icon
FM1 Store 87.5 89.9 97.9 92.5108.0107.9 ENT
1
2
3
4
56
ENT
AV Menu
Setup EnterENT
AV Menu
List EnterENT
FM1 Store 87.5 89.9 97.9 92.5108.0107.9 ENT
1
2
3
4
56
ENT
or
Manual presetting Ex.: Storing FM station of 92.5 MHz into preset
number 4 of the FM1 band
1
2 Tune in to a station you want to preset.
3
4 Select a preset number.
5
The station selected in step 2 is now stored in preset number 4.
* Each time you hold the button, you can change the FM bands.
• Preset List can also be accessed through <AV Menu> = <List>. ( right )
FM1 Store 87.5 89.9 97.9105.9108.0107.9 ENT
1
2
3
4
56
ENT
FM1 Store 87.5 89.9 97.9105.9108.0107.9 ENT
1
2
3
4
56
ENT
No Name 92.5 MHz
TUNER
FM1 Preset4 No Name 92.5 MHz
Preset List appears.*
KD-AVX33A.indb 12KD-AVX33A.indb 12 07.2.21 9:32:27 AM07.2.21 9:32:27 AM

OPERATIONS13
3: 45PM
DISCNow Reading ...
Disc operationsThe disc type is automatically detected, and playback starts automatically (for some discs: automatic start depends on its internal program).
If a disc does not have any disc menu, all tracks in it will be played repeatedly until you change the source or eject the disc.
If “ ” appears on the monitor, the unit cannot accept the operation you have tried to do.• In some cases, without showing “ ,” operations will not be accepted.
Label side
0: Eject the disc.
3: Start playback if necessary.
DISP: Press if no playback picture appears, but disc information screen ( pages 14 to 16) is displayed.
Insert the disc.Playback starts automatically.
7: Stop playback.
Caution:
Do not place your finger behind the control panel.
Caution on volume setting:
Discs produce very little noise compared with other sources. Lower the volume before playing a disc to avoid damaging the speakers by the sudden increase of the output level.
KD-AVX33A.indb 13KD-AVX33A.indb 13 07.2.21 9:32:28 AM07.2.21 9:32:28 AM

14
While playing the following discs, press .• Each time you press the button, playback picture and disc information screens appear alternately.
Audio format
Title no./Chapter no./Playing timePlayback mode
Disc type
4 ¢ Press: Select chapter Hold: Reverse/forward search*1
5 ∞ Select title
3: 45PM
MULTIMLP
B.S.P
AUDIODVD
G 01 02 0:45:38
RPT
BONUS
Surround mode
4 ¢ Press: Select track Hold: Reverse/forward search*1
5 ∞ Select group
Group no./Track no./Playing time
BONUS indicator ( page 22)
B.S.P indicator ( page 22)
4 ¢ Press: Select chapter Hold: Reverse/forward search*1
5 ∞ Select program no./Play List no.
Program no.(or Play List no.)/Chapter no./Playing time
VR-PR: Original programVR-PL: Play List
3: 45PM
MULTI
CHAP. RPT
DIGITALVIDEODVD
T 01 C 02 0:45:38
3: 45PM
FLATDIGITALVR-PRDVD
P 01 C 02 0:45:38
KD-AVX33A.indb 14KD-AVX33A.indb 14 07.2.21 9:32:28 AM07.2.21 9:32:28 AM

OPERATIONS15
3: 45PM
FLATPBCVCD
02 0:45:38
Track no./Playing time
*1 Search speed: x2 ] x10.*2 Search speed: ¡1 ] ¡2.
PBC indicatorlights up when PBC is in use.
4 ¢ Press: Select track Hold: Reverse/forward search*1
page 43
3: 45PM
FRONT 2CH
RPT
DivXDVD
T 01 C 02 0:45:38Current Folder NameCurrent File Name.avi
For DivX/MPEG: Folder no./Track no./Playing timeFor JPEG: Folder no./File no.
4 ¢ Press: Select track Hold: Reverse/forward search for DivX/MPEG *2
5 ∞ Press: Select folder Hold: Display Folder List
KD-AVX33A.indb 15KD-AVX33A.indb 15 07.2.21 9:32:29 AM07.2.21 9:32:29 AM

16
3: 45PM
FLAT
RPT
MP3CD
T 01 02 0:45:38Current Folder NameCurrent File Name.mp3
Track no./Playing timeDisc title/Artist Name/Track title (only for CD Text)*3
Folder no./Track no./Playing time4 ¢ Press: Select track Hold: Reverse/forward search*1
5 ∞ Press: Select folder Hold: Display Folder List
Audio format(MP3/WMA/WAV/AAC)
4 ¢ Press: Select track Hold: Reverse/forward search*1
page 43
page 43
*1 Search speed: x2 ] x10.*3 “No Name” appears for conventional CDs.
Tag data will be shown instead of folder/file names when they are recorded and <Tag Display> is set to <On>. ( page 46)
3: 45PM
FLATCD
02 0:45:38 Disc Title Artist Name Current Track Title
RPT
KD-AVX33A.indb 16KD-AVX33A.indb 16 07.2.21 9:32:29 AM07.2.21 9:32:29 AM

OPERATIONS17
You can use only one of the following playback modes—Intro/Repeat/Random.Ex. To select Track Repeat
1
2
Mode menu icon
3
4
When one of the playback modes is selected, the corresponding indicator lights up on the disc information screen.
To cancel, select <All Off> in step 3 or <Off> in step 4.
Selecting playback modes
Disc type Intro Repeat Random
—Chapter: Repeats current
chapterTitle: Repeats current title
—
— Track: Repeats current track —
—
Chapter: Repeats current chapter
Program: Repeats current program (not available for Playlist playback)
—
Track: Plays the first 15 seconds of each track (for VCD: PBC not in use)
Track: Repeats current track (for VCD: PBC not in use)
Disc (All): Randomly plays all tracks (for VCD: PBC not in use)
Track: Plays the first 15 seconds of each track
Folder: Plays the first 15 seconds of the first track of each folder
Track: Repeats current trackFolder: Repeats all tracks of
the current folder
Folder: Randomly plays all tracks of current folder, then tracks of next folders
Disc (All): Randomly plays all tracks
—
Track: Repeats current trackFolder: Repeats current folder
—
—Folder: Repeats current folder
—
Mode
Off
All OffIntroRepeatRandom
RepeatOffTrackFolder
SetENTAV Menu
Mode EnterENT
AV Menu
Setup EnterENT
KD-AVX33A.indb 17KD-AVX33A.indb 17 07.2.21 9:32:30 AM07.2.21 9:32:30 AM

18
Selecting tracks on the list If a disc includes folders, you can display the Folder/Track (File) Lists, then start playback.
1
Folder List appears.• Hold the button to see the next/previous folders.
2 Select a folder, then activate the Track List.
Track List of the selected folder appears.
3 Select a track, and start playing.
• Folder List can also be accessed through <AV Menu> = <List>.
Prohibiting disc ejection You can lock a disc in the loading slot.
“No Eject” appears.
To cancel the prohibition, repeat the same procedure to select “EJECT OK?”.
Folder List
Off
My BestCinemaPopsMy Best2Favorite SongCinema2 ENT
Folder List
Off
My BestCinemaPopsMy Best2Favorite SongCinema2 ENT
File List
Off
Song011.mp3Song012.mp3Song013.mp3Song014.mp3Song015.mp3Song016.mp3 ENT
List menu icon
AV Menu
Setup EnterENT
AV Menu
List EnterENT
NO EJECT?EMERGENCY EJECT?
KD-AVX33A.indb 18KD-AVX33A.indb 18 07.2.21 9:32:31 AM07.2.21 9:32:31 AM

OPERATIONS19
: Stop playback.
: Start playback/Pause (if pressed during playback).
: Reverse/forward search.*2
: Press: Select track. Hold: Reverse/forward search.*4
: Select group.
Operations using the remote controller—RM-RK251
*1 Erases the misentry of the number.
*2 Search speed: x2 ] x5 ] x10 ] x20 ] x60
*3 Slow motion speed: 1/32 ] 1/16 ] 1/8 ] 1/4 ] 1/2
*4 Search speed: x2 ] x10
: Stop playback.
: Start playback/Pause (if pressed during playback).
: Reverse/forward search.*2 (No sound can be heard.) (Slow motion*3 during pause. No sound can be heard.)
: Press: Select chapter (during playback or pause). Hold: Reverse/forward search.*4
: Select title (during playback or pause).
Using menu driven features
1 2 Select an item you want
to start playback.
3
= = : Select chapter. Select title (when not playing).
(twice) = = :
Select title (during playback or pause).
: Select aspect ratio.
: Select audio language.
: Select subtitle language.
: Select view angle.
= = : Select track.
(twice) = = : Select group.
: Select aspect ratio.
: Select audio stream.
Using menu driven features
1 2 Select an item you want
to start playback.
3
*1
KD-AVX33A.indb 19KD-AVX33A.indb 19 07.2.21 9:32:31 AM07.2.21 9:32:31 AM

20
: Stop playback.
: Start playback/Pause (if pressed during playback).
: Reverse/forward search.*2 (No sound can be heard.)
: Press: Select track. Hold: Reverse/forward search.*3 (No sound can be heard.)
: Select folder.
= = : Select track (within the same folder).
(twice) = = : Select folder.
: Select aspect ratio.
: Select audio language. (DivX only)
: Select subtitle language. (DivX only)
*1
1st press1st press 2nd press
3rd press2nd press
Current playback positionWhile playing...Back/advance the scenes by 5 minutes.
For DivX6: Using menu driven features
1 2 Select an item you want to
start playback.
3
: Stop playback.
: Start playback/Pause (if pressed during playback).
: Reverse/forward search.*4 (No sound can be heard.)
(Slow motion*5 during pause. No sound can be heard.)
Reverse slow motion does not work.
: Press: Select chapter (during playback or pause).
Hold: Reverse/forward search.*6
Select program. : Select play list (during playback or
pause). : Select aspect ratio.
: Select audio channel (ST: stereo, L: left, R: Right).
: Turn on/off subtitle.
= = : Select chapter. Select program (when not playing).
(twice) = = : Select program/play list (during playback or
pause).
Using Original Program/Play List screens( page 28)1 For Original Programs: For Play List: 2 Select an item you want to start playback.
3 (Hide screen)
KD-AVX33A.indb 20KD-AVX33A.indb 20 07.2.21 9:32:33 AM07.2.21 9:32:33 AM

OPERATIONS21
= = : Select track.
During PBC playback...
= = : Select an item on the menu. To return to the previous menu, press .
To cancel PBC playback
1
2 Start the desired track. = =
• To resume PBC, press / .
: Stop playback.
: Start playback/Pause (if pressed during playback).
: Reverse/forward search.*4
(Forward slow motion*5 during pause. No sound can be heard.)
Reverse slow motion does not work.
: Press: Select track. Hold: Reverse/forward search.*6 (No
sound can be heard.) : Select aspect ratio.
: Select audio channel (ST: stereo, L: left, R: Right).
: Stop playback.
: Start playback/Pause (if pressed during playback).
: Reverse/forward search.*4
: Press: Select track. Hold: Reverse/forward search.*6
: Select folder.
= = :
Select track (within the same folder).
(twice) = = :
Select folder.
*1 Erases the misentry of the number.*2 Search speed: ¡1 ] ¡2 ] ¡3*3 Search speed: ¡1 ] ¡2 *4 Search speed: x2 ] x5 ] x10 ] x20 ] x60*5 Slow motion speed: 1/32 ] 1/16 ] 1/8 ]
1/4 ] 1/2*6 Search speed: x2 ] x10
: Stop playback.
: Start playback. (Slide show: each file is shown for a few seconds.)
Shows the current file until you change it if pressed during Slide show.
: Select track.
: Select folder.
: Select aspect ratio.
= = : Select track (within the same folder).
(twice) = = : Select folder.
: Stop playback.
: Start playback/Pause (if pressed during playback).
: Reverse/forward search.*4
: Press: Select track. Hold: Reverse/forward search.*6
= = : Select track.
KD-AVX33A.indb 21KD-AVX33A.indb 21 07.2.21 9:32:35 AM07.2.21 9:32:35 AM

22
Playing back a bonus groupIf a DVD Audio including a “bonus group” is detected, the BONUS indicator lights up on the disc information screen.
To play a bonus group...
1 Select the bonus group.• The bonus group is usually recorded as the last
group.
2 Enter the key number.
: Move the entry position
: Select a number
• “key number” (a kind of password) for the bonus group is not open to public. The way of getting the key number depends on the disc.
3 Follow the interactive instructions shown on the monitor.
Selecting browsable still pictureWhen a disc including browsable still pictures is detected, the B.S.P indicator lights up on the disc information screen.
When disc shows the BSP selecting icons such as @ or # on the screen...
1 Select an item you want to display.
2
Enjoying surround sounds You can enjoy multi-channel surround playback through the front, center, surround speakers.• After connecting the center speaker, make
sure to activate the center speaker; otherwise, no sound comes out of the center speaker ( page 49).
• All surround mode can also be used for “USB.”
MULTI: For multi-channel encoded sources such as Dolby Digital*1, DTS*2, and DVD Audio. (When activated, “MULTI” is shown on the source information screen.)
Dolby Pro Logic II (Movie/Music): For 2 channel sources except for DivX/MPEG 1/MPEG2 discs.
To turn on the surround
1
2
3
• Surround Off: Deactivates surround.• Surround On: Activates surround = go to the
following steps.
AV Menu
Setup EnterENT
AV Menu
Disc Surround EnterENT
Disc Surround menu icon
Disc Surround
Auto
Surround OffSurround On
KD-AVX33A.indb 22KD-AVX33A.indb 22 07.2.21 9:32:37 AM07.2.21 9:32:37 AM
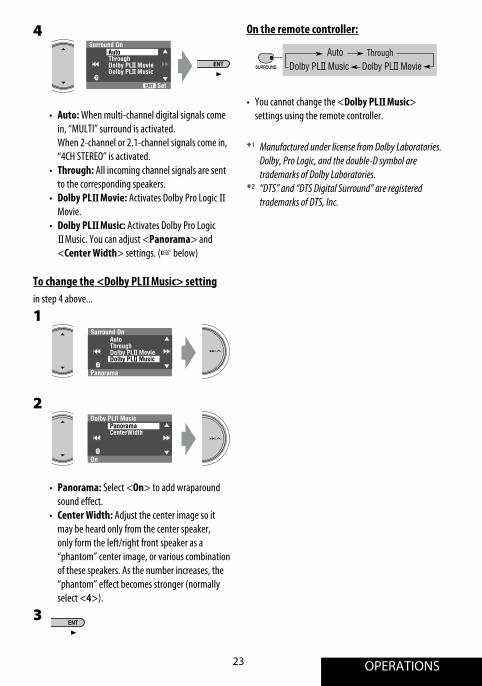
OPERATIONS23
4
• Auto: When multi-channel digital signals come in, “MULTI” surround is activated.
When 2-channel or 2.1-channel signals come in, “4CH STEREO” is activated.
• Through: All incoming channel signals are sent to the corresponding speakers.
• Dolby PLII Movie: Activates Dolby Pro Logic II Movie.
• Dolby PLII Music: Activates Dolby Pro Logic II Music. You can adjust <Panorama> and <Center Width> settings. ( below)
To change the <Dolby PLII Music> settingin step 4 above...
1
2
• Panorama: Select <On> to add wraparound sound effect.
• Center Width: Adjust the center image so it may be heard only from the center speaker, only form the left/right front speaker as a “phantom” center image, or various combination of these speakers. As the number increases, the “phantom” effect becomes stronger (normally select <4>).
3
On the remote controller:
• You cannot change the <Dolby PLII Music> settings using the remote controller.
Surround OnAutoThroughDolby PLII MovieDolby PLII Music
SetENT
Dolby PLII Music
On
PanoramaCenterWidth
Surround On
Panorama
AutoThroughDolby PLII MovieDolby PLII Music
*1 Manufactured under license from Dolby Laboratories. Dolby, Pro Logic, and the double-D symbol are trademarks of Dolby Laboratories.
*2 “DTS” and “DTS Digital Surround” are registered trademarks of DTS, Inc.
KD-AVX33A.indb 23KD-AVX33A.indb 23 07.2.21 9:32:37 AM07.2.21 9:32:37 AM

24
1 Display the on-screen bar. ( page 25)
2 Select an item.
3 Make a selection.If a pop-up menu appears...
• For entering time/numbers...
: Move the entry position
To remove the on-screen bar
Operations using the on-screen bar (DVD/VCD/DivX/MPEG1/MPEG2/JPEG) These operations are possible on the monitor using the remote controller.
: Select a number
KD-AVX33A.indb 24KD-AVX33A.indb 24 07.2.21 9:32:38 AM07.2.21 9:32:38 AM

OPERATIONS25
Information
Operation
On-screen bar
1 Disc type2 • DVD: Audio signal format
• VCD: PBC3 Playback mode*1
DVD Video: T. RPT: Title repeat C. RPT: Chapter repeat DVD Audio: T. RPT: Track repeat DVD-VR: C. RPT: Chapter repeat PG. RPT: Program repeat DivX/MPEG: T. RPT: Track repeat F. RPT: Folder repeat JPEG: F. RPT: Folder repeat VCD: T. INT: Track intro T. RPT: Track repeat A. RND: All random4 Playback information T02-C03 Current title/chapter G02-T03 Current group/track
PG-001
C-002 Current program/chapter
PL-003
C-004 Current playlist/chapter TRACK 01 Current track F001-T001 Current folder/track F002-F002 Current folder/file (JPEG)
5 Time indicationTOTAL Elapsed playing time of the discT. REM Remaining title time (for DVD)
Remaining disc time (for others)TIME Elapsed playing time of the current
chapter/track*2
REM Remaining time of the current chapter/track*2
6 Playback status Play
Reverse/forward search Reverse/forward slow-motion
Pause Stop
7 Operation iconsTIME Change time indication (see 5)
Time Search (Specify a certain scene by entering time.)
TITLE Title Search (by its number)CHAP Chapter Search (by its number)GROUP Group Search (by its number)TRACK Track Search (by its number)RPT Repeat play*1
INT Intro play*1
RND Random play*1
Change the audio language, audio channel or audio stream
Change the subtitle language Change the view angle
PAGE Change the browsable still pictures (pages)
*1 page 17*2 Not applicable for DVD-VR.
Above example is of DVD Video. Items shown on the bar vary due to the disc type.
DVD -V T02-C03 TOTAL 1:25:58
TIME TITLE CHAP RPT
C. RPT
KD-AVX33A.indb 25KD-AVX33A.indb 25 07.2.21 9:32:39 AM07.2.21 9:32:39 AM

26
Folder : 2 / 3
TIME 00:00:14T. RPT
Track : 6 / 14 (Total 41)
Track Information
Cloudy.mp3Fair.mp3Fog.mp3Hail.wmaIndian summer.mp3Rain.mp3Shower.mp3Snow.mp3Thunder.wmaTyphoon.mp3Wind.mp3Winter sky.mp3
AlbumWeatherArtistRobert M. SmithTitleRain
01 Music02 Music03 Music
Dual Zone operationsYou can enjoy a disc playback on the external monitor connected to the VIDEO OUT and 2nd AUDIO OUT plugs, while listening to any other source than “USB” through the speakers.• When Dual Zone is in use, you can only operate the
DVD/CD player using the remote controller.
1
2
3
• Off: Deactivates Dual Zone.• On (DUAL): Activates Dual Zone without
applying Headphone Surround*1.• On/Surround On (DUAL-S): Activates Dual
Zone and applies Headphone Surround.
When Dual Zone is activated, the main source is changed to “DISC.”
Ex. When “On/Surround On” is selected.
To select a different source (main source) to listen through the speakers:Press SRC (source) on the control panel.• By using the buttons on the control panel, you
can operate the newly selected main source without affecting Dual Zone (DISC) operations.
• You cannot select “USB” for the main source.
On the remote controller:
1
2 Adjust the volume through the 2nd AUDIO OUT plug.
3 Operate the DVD/CD player.
*1 JVC original headphone virtual surround system. This surround will also work for the main source “DISC” if “On/Surround On” is selected as the sub-source. This surround does not work for DivX/MPEG1/MPEG2 discs.
*2 Displayed being shaded if Headphone Surround is not applied.
Operations using the control screen For discs except DVD and VCD:While Dual Zone is on, these operations are possible on the external monitor using the remote controller.The control screen automatically appears when you insert a disc. (For DivX/MPEG1/MPEG2/JPEG; while not playing.)
Ex.: MP3/WMA
AV Menu
Setup EnterENT
AV Menu
Dual Zone EnterENT
Dual Zone menu icon
Dual ZoneOffOnOn/Surround On
SetENT
FLATDIGITALVIDEODVD
T 01 C 02 0:45:38DUAL-S *2
KD-AVX33A.indb 26KD-AVX33A.indb 26 07.2.21 9:32:40 AM07.2.21 9:32:40 AM

OPERATIONS27
1 Current folder (highlighted bar)2 Current folder number/total folder number3 Folder list* If tag data includes “Jacket Picture” (baseline JPEG), it
will be displayed. If you press OSD, the playback mode selection window appears. ( below)
4 Selected playback mode ( below)5 Elapsed playing time of the current track (not
displayed for JPEG)6 Operation status7 Current track number/total number of tracks in the
current folder (total number of tracks on the disc)8 Track information (only for MP3/WMA/WAV/AAC)9 Track listp Current track (highlighted)
To select a folder or track
1 Select “Folder” column or “Track” column on the control screen.
2 Select a folder or track.• If necessary, press ENT to start playback.
1 Playback mode selection window: appears when OSD is pressed ( below).
2 Selected playback mode ( below)3 Elapsed playing time of the current track4 Operation status5 Current track number/total number of tracks on the
disc6 Track information7 Track list8 Current track (highlighted bar)
To select a track• If necessary, press ENT to start playback.
Ex.: CD Text
MODE
REPEATTRACK
TIME 00:14
Track : 6 / 14
Track Information
CloudyFairFogHailIndian summerRainShowerSnowThunderTyphoonWindWinter sky
AlbumFour seasonsArtistRobert M. SmithTitleRain
T. RPT
Selecting playback modesYou can also change the playback modes using the playback mode selection window.• For CD/MP3/WMA/WAV/AAC: Intro/Repeat/
Random• For DivX/MPEG1/MPEG2/JPEG: Repeat
12 Only for CD/MP3/WMA/WAV/AAC: Select a
playback mode.
3 Select your desired option.
4
Selected playback modeDivX/MPEG1/MPEG2/JPEG: page 25MP3/WMA/WAV/AAC: T. INT: Track intro F. INT: Folder intro T. RPT: Track repeat F. RPT: Folder repeat F. RND: Folder random A. RND: All randomCD: T. INT: Track intro T. RPT: Track repeat A. RND: All random
KD-AVX33A.indb 27KD-AVX33A.indb 27 07.2.21 9:32:41 AM07.2.21 9:32:41 AM

28
Operations using the list screen For discs except DVD, VCD, and CDWhile Dual Zone is on, these operations are possible on the external monitor using the remote controller.
While not playing...
1 Display the list screen.
2 Select a folder on the list.
3 Select a track on the list.
• To go back to the folder list, press .
1 Current folder number/total folder number 2 Current track number/total number of tracks in the
current folder3 Current page/total number of the pages included
in the list4 Current folder/track (highlighted bar)
List screen for DVD-VRYou can use Original Program and Play List screen anytime while playing DVD-VR with its data recorded.
1 Display the Original Program/Play List screen.
2 Select an item you want.
1 Program/Play list number2 Recording date 3 Recording source (TV station, the input terminal
of the recording equipment, etc.)4 Start time of recording5 Title of the program/play list*6 Highlighted bar (current selection)7 Creating date of play lists8 Total number of chapters9 Playback time* The title of the original program or play list may
not be displayed depending on the recording equipment.
Folder : 144/240 Track 144/198 Page : 4/7fol120fol121fol122fol123fol124fol125fol126fol127fol128fol129
fol150fol151fol152fol153fol154fol155fol156fol157fol158fol159
fol140fol141fol142fol143fol144fol145fol146fol147fol148fol149
fol130fol131fol132fol133fol134fol135fol136fol137fol138fol139
file0141.wmafile0142.mp3file0143.wmafile0144.mp3file0145.mp3file0146.mp3file0147.mp3file0148.wmafile0149.wmafile0150.wma
file0151.wmafile0152.mp3file0153.wmafile0154.mp3file0155.wmafile0156.wmafile0157.wmafile0158.wmafile0159.mp3file0160.wma
Folder : 144/240 Track 144/198 Page : 4/5file0121.mp3file0122.mp3file0123.wmafile0124.mp3file0125.mp3file0126.wmafile0127.wmafile0128.mp3file0129.mp3file0130.wma
file0131.mp3file0132.mp3file0133.mp3file0134.mp3file0135.wmafile0136.mp3file0137.wmafile0138.mp3file0139.wmafile0140.wma
ORIGINAL PROGRAM
No Date Ch ime itle1 07/04/25 4ch 19:00 JVC DVD World 20042 07/05/25 8ch 10:303 07/05/22 8ch 17:00 Music Festival4 07/05/26 L-1 13:19 children 0015 07/06/20 4ch 22:006 07/06/25 L-1 8:23 children 002
T T
PLAY LIST
No Date Chap Length Title1 07/05/25 001 1:03:16 My JVC World2 07/06/17 005 1:35:253 07/06/20 003 0:10:23 Favorite music4 07/06/25 001 0:07:19 children001-002
or
KD-AVX33A.indb 28KD-AVX33A.indb 28 07.2.21 9:32:42 AM07.2.21 9:32:42 AM

OPERATIONS29
USB operationsYou can connect a USB mass storage class device such as a USB memory, Digital Audio player*1, portable HDD, etc. to the unit.
~ Connect a USB device.
Ÿ Select “USB”.
USB cable from the rear of the unit.
3: 45PM
USBNow Reading ...
7: Stop playback
This unit can play DivX/JPEG/MPEG1/MPEG2*2/MP3/WMA/WAV/AAC*3 files stored in a USB mass storage class device.• You can operate the USB device in the same way you
operate the files on discs. ( page 17 to 25)• You cannot select “USB”when Dual Zone is in use.• All tracks in the USB device will be played repeatedly
until you change the source.
*1 Except for JVC D. Player XA-HD500.*2 Except for MPEG2 files recorded by JVC Everio
camcorder (extension code <.mod>).
3: Start playback if necessary.
DISP: Press if no playback picture appears , but disc information screen ( pages 14 to 16) is displayed.
4 ¢ Press: Select track Hold: Reverse/forward search5 ∞ Press: Select folder Hold: Display Folder List
• You cannot connect a computer to the USB ( ) terminal of the unit.
*3 This unit can play back AAC files encoded using iTunes. This unit cannot play back AAC files purchased from the iTunes Store.
KD-AVX33A.indb 29KD-AVX33A.indb 29 07.2.21 9:32:43 AM07.2.21 9:32:43 AM

30
You can use only one of the following playback modes—Intro/Repeat/Random.Ex. To select Track Repeat
1
2
3
4
When one of the playback modes is selected, the corresponding indicator lights up on the information screen.
To cancel, select <All Off> in step 3 or <Off> in step 4.
Selecting playback modes
File type Intro Repeat Random
Track: Plays the first 15 seconds of each track
Folder: Plays the first 15 seconds of the first track of each folder
Track: Repeats current trackFolder: Repeats all tracks of
the current folder
Folder: Randomly plays all tracks of current folder, then tracks of next folders
USB (All): Randomly plays all tracks
—
Track: Repeats current trackFolder: Repeats current folder —
— Folder: Repeats current folder —
Mode
Off
All OffIntroRepeatRandom
RepeatOffTrackFolder
SetENT
AV Menu
Mode EnterENT
AV Menu
Setup EnterENT
Mode menu icon
Caution:
• Avoid using the USB device if it might hinder your safety driving.• Do not pull out and attach the USB device repeatedly while “Now Reading...” is flashing on the monitor.• Do not start the car engine if a USB device is connected.• Stop playback before disconnecting a USB device.• Make sure all important data has been backed up to avoid losing the data.• Do not leave a USB device in the car, expose to direct sunlight, or high temperature to avoid deformation or
cause damages to the device.
KD-AVX33A.indb 30KD-AVX33A.indb 30 07.2.21 9:32:43 AM07.2.21 9:32:43 AM

OPERATIONS31
Connecting a Bluetooth device for the first time Pairing and PIN CodeWhen you connect a Bluetooth device to the unit for the first time, make pairing between the unit and the device. Pairing allows Bluetooth devices to communicate each other.To make pairing, you may need to enter the PIN (Personal Identification Number) code of your Bluetooth device you want to connect.
• Once the connection is established, it is registered in the unit even if you reset the unit. Up to five devices can be registered in total.
• Only one device can be connected at a time for each source (“Bluetooth Phone” and “Bluetooth Audio”).
• To use the Bluetooth function, you need to turn on Bluetooth function of the device.
Preparation: Operate the device to turn on itsBluetooth function.
Registration (Pairing) methodsUse either of the following items in the <Bluetooth> menu to register and establish the connection with a device.• Select “Bluetooth Phone” or “Bluetooth Audio” as the
source to operate the <Bluetooth> menu.
<Open> Make the unit ready to establish a new Bluetooth connection. Connection is established by operating the Bluetooth device.
<Search> Make the unit ready to establish a new Bluetooth connection. Connection is established by operating the unit.
Bluetooth® operations — Cellular phone/audio player
Bluetooth is a short-range wireless radio communication technology for the mobile device such as mobile phones, portable PCs, and other devices. The bluetooth devices can be connected without cables and communicate each other. • The serial number is printed on the label placed on
the bottom of the unit.• Refer to the list (included in the box) to see the
countries where you may use the Bluetooth® function.
Bluetooth profileThis unit supports the following Bluetooth profiles; HSP (Headset Profile) HFP (Hands-Free Profile) A2DP (Advanced Audio Distribution Profile) AVRCP (Audio/Video Remote Control Profile) SPP (Serial Port Profile) OPP (Object Push Profile)
FeaturesYou can operate Bluetooth devices through the unit as follows:• Receiving a call• Making a call—from phone book, from call history
(Redial/Missed Call/Received Call), by dialing number, by preset numbers, by voice command
• Receiving the SMS• Play back a Bluetooth audio player
Refer also to the instructions supplied with the Bluetooth device.
Continued on the next page
• The Bluetooth word mark and logos are owned by the Bluetooth SIG, Inc. and any use of such marks by Victor Company of Japan, Limited (JVC) is under license. Other trademarks and trade names are those of their respective owners.
KD-AVX33A.indb 31KD-AVX33A.indb 31 07.2.21 9:32:44 AM07.2.21 9:32:44 AM

32
7 Operate the target Bluetooth device. (While “Open...” is flashing on the screen.)Enter the same PIN code (as entered in the above step) on the device to be connected.
Now connection is established and you can use the device through the unit.
The device remains registered even after you disconnect the device. Use <Connect> (or activate <Auto Connect>) to connect the same device from next time. ( pages 53 and 54)
Searching for available devicesPerform steps 1 to 3 on the left, then...
1
The unit searches for available devices and displays the list of them. (If no available device is detected, “Device Unfound” appears.)
2 Select a device you want to connect.
3 Enter the specific PIN code of the device to the unit.• Refer to the instructions supplied with the device
to check the PIN code.
4 Use the Bluetooth device to connect.
Now connection is established and you can use the device through the unit.
AV Menu
Bluetooth EnterENT
AV Menu
Setup EnterENT
Registering using <Open>
1 Select “Bluetooth Phone” or “Bluetooth Audio.”
2
3
Bluetooth menu icon
4
5 Enter a PIN (Personal Identification Number)* code to the unit.• You can enter any number you like (1-digit to
16-digit number).* Some devices have their own PIN code. Enter the
specified PIN code to the unit.
• To delete an unwanted digit, select blank space.
6
NEW DEVICEDial MenuMessageOpenSearchSpecial Device
NEW DEVICEDial MenuMessageOpenSearchSpecial Device
PIN Code
1234
EnterENT
3: 45PM
FLAT
NEW DEVICE
Bluetooth Phone
Select “NEW DEVICE” by pressing 5 / ∞.
KD-AVX33A.indb 32KD-AVX33A.indb 32 07.2.21 9:32:45 AM07.2.21 9:32:45 AM

OPERATIONS33
NEW DEVICEDial MenuMessageOpenSearchSpecial Device
Connecting a special devicePerform steps 1 to 3 of “Registering using <Open>” on page 32, then...
1
2 Select a device you want to connect.
3 Use <Open> (or <Search>) to connect.
Connecting/disconnecting a registered device
1 Select “Bluetooth Phone” or “Bluetooth Audio,” then select a registered device you want to connect/disconnect.
2 Perform steps 2 and 3 of “Registering using <Open>” on page 32, then...• Select <Connect> to connect the selected
device.• Select <Disconnect> to disconnect the selected
device.
You can set the unit to connect a Bluetooth device automatically when the unit is turned on. ( page 54)
Deleting a registered device
1 Select “Bluetooth Phone” or “Bluetooth Audio,” then select a registered device you want to delete.
2 Perform steps 2 and 3 of “Registering using <Open>” on page 32, then...• Select <Delete Pair>, then <Yes>.
The unit displays the list of the preset devices.
KD-AVX33A.indb 33KD-AVX33A.indb 33 07.2.21 9:32:46 AM07.2.21 9:32:46 AM

34
3: 45PM
FLAT
Connected Device Name
Bluetooth Phone
POWER]ON
~ Select “Bluetooth Phone.”
Ÿ Enter the <Bluetooth> menu.
! Establish the connection with a device, then make a call (or settings using the <Bluetooth> menu). pages 32, 45, 53, and 54
When the sound is stopped or interrupted during the use of a Bluetooth device, try the following remedies.• Turn off, then turn on the unit.• (When the sound is not yet restored,) connect the
device again. ( “Connecting/disconnecting a registered device” on page 33)
Using the Bluetooth cellular phone
*1 You can adjust the volume level for “Bluetooth Phone” without affecting the volume level for other sources.
*2 Appears only when the information comes from the device.
*3 Each time you press 5 ∞, the registered device name (and “NEW DEVICE” when a new device can be registered) appear in turn.
*4 When a cellular phone with audio function is connected, appears.
You can adjust the microphone volume level. ( page 54)
Status of the device*2
Signal strength/Battery remainder
Adjust the volume*1
When a call comes in...
The source is automatically changed to “Bluetooth Phone”.When <Auto Answer> is activated...The unit answers the incoming calls automatically. ( page 54)• When <Auto Answer> is deactivated, press any
button (except ATT or +/–) to answer the incoming call.
page 43
Press: Display <Dial Menu> Answer incoming callHold: Display <Redial> list
To end the call or reject an incoming callHold any button (except ATT or +/–).
Answering a waiting callIf your cellular phone is equipped with the call waiting function, you can put the current call on hold and answer the waiting call.Press any button (except ATT and +/–).• To restore the on-hold call, press any button (except
ATT and +/–) again.• When you end one call, you can connect to the
other.
Connected device name *3
Name and phone number (if acquired)
Turns Blue when the Bluetooth device is connected.
*4
KD-AVX33A.indb 34KD-AVX33A.indb 34 07.2.21 9:32:46 AM07.2.21 9:32:46 AM

OPERATIONS35
Making a call 1 Display the <Dial Menu>.
2 Select the method to make a call.
• Redial* : Shows the list of the phone numbers you have dialed = go to the following step.
• Received Calls* : Shows the list of the received calls = go to the following step.
• Phonebook* : Shows the phone book of the connected cellular phone = go to the following step.
• Missed Calls* : Shows the list of the missed calls.= go to the following step.
• Phone Number : Shows the phone number entry screen = “How to enter phone number” ( page 36).
• Voice Dialing (Only when the connected cellular phone has the voice recognition system): Speak the name you want to call.
* Displays only when your cellular phone is equipped with these functions.– If not displayed, please try to transfer the
phone book memory of the cellular phone to this unit. (Refer to the instruction manual supplied with your cellular phone.)
– With some cellular phones, the phone book memory is transferred automatically.
3 Select the name/phone number you want to call.
When an SMS comes in...If the cellular phone is compatible with SMS (Short Message Service) and <Message Info> is set to <Auto> ( page 54), the unit rings and “Receiving Message” appears on the monitor to inform you of the arrival of the message.• You cannot edit or send a message through the
unit.
When <Message Info> is set to <Auto>...To read the messageWhile “Receiving Message” is displayed...
• The source is changed to “Bluetooth Phone.”
To read the message later
• The message is stored into <Message> = <Unread>. ( page 53)
When <Message Info> is set to <Manual>Access the message list to read a message.( page 53)
P902i
Annie
RedialReceived CallsPhonebookMissed CallsPhone number
P902i
Annie
RedialReceived CallsPhonebookMissed CallsPhone number
or
KD-AVX33A.indb 35KD-AVX33A.indb 35 07.2.21 9:32:47 AM07.2.21 9:32:47 AM

36
How to enter phone numberOn the remote:
On the unit:
1
• To delete an unwanted digit, select blank space.
2
<Dial Menu> can be also accessed through <AV Menu> = <Bluetooth> = <Dial Menu>.
Direct operations to redial / Voice DialingYou can use the following functions regardless of the current source.To redial
To activate Voice DialingYou can make a call by your voice.
Presetting the phone numbers You can preset up to six phone numbers.
1 Display the phone number you want to preset by using one of <Dial Menu> items.
Ex.: “Jack” is selected from the phone book
Preset Memory list appears.
2 Select a preset number.
The phone number selected in step 1 is now stored in preset number 4.
To call a preset number On the remote:
On the unit:
1
2
111222233332223333666644455556666098456712349998888777755566668888
1
2
3
4
5
6 ENT
Preset List
111222233332223333666644455556666098456712349998888777755566668888
1
2
3
4
5
6 ENT
Preset List
111222233332223333666644455556666111333344449998888777755566668888
1
2
3
4
5
6 ENT
Preset Memory
Jack123123412340989876543209845671234
Dial
StoreENT
ENT
111222233332223333666644455556666111333344449998888777755566668888
1
2
3
4
5
6 ENT
Preset Memory
Speak the name you want to call.
AV Menu
Bluetooth EnterENT
AV Menu
Setup EnterENT
Dialling ...Jack09845671234
Select a number. Move the entry position.
or
Bluetooth menu icon
or
KD-AVX33A.indb 36KD-AVX33A.indb 36 07.2.21 9:32:48 AM07.2.21 9:32:48 AM

OPERATIONS37
Using the Bluetooth audio player
*1 Each time you press 5 ∞, the registered device names (and “NEW DEVICE” when a new device can be registered) appear in turn. You cannot select “New Device” when a Bluetooth audio player is connected.
*2 Appears only when the information comes from the device.
*3 Indicates the button pressed. It may be different from the operation status.
*4 When a cellular phone with audio function is connected, appears.
You can use the following buttons on the remote controller for the Bluetooth audio operations. For details, pages 8 and 9.
3: 45PM
FLAT
Connected device name
Bluetooth Audio
POWER]ON
Pause
Reverse/forward skip
*1
Status of the device*2
Signal strength/Battery remainder
page 43
List menu icon
AV Menu
Setup EnterENT
AV Menu
List EnterENT
*3
~ Select “Bluetooth Audio.”
Ÿ Start playback.• See pages 31 to 33 for connecting a new device.• See page 33 for connecting/disconnecting a
registered device.• See page 33 for deleting a registered device.When the sound is stopped or interrupted during the use of a Bluetooth device, try the following remedies.• Turn off, then turn on the unit.• (When the sound is not yet restored,) connect the
device again. ( “Connecting/disconnecting a registered device” on page 33)
• Preset List can also be accessed through <AV Menu> = <List>.
You can use the following buttons on the remote controller for the Bluetooth phone operations. For details, pages 8 and 9.
Turns Blue when the Bluetooth device is connected.
*4
Bluetooth Information:If you wish to receive more information about Bluetooth, visit our JVC web site.
KD-AVX33A.indb 37KD-AVX33A.indb 37 07.2.21 9:32:49 AM07.2.21 9:32:49 AM
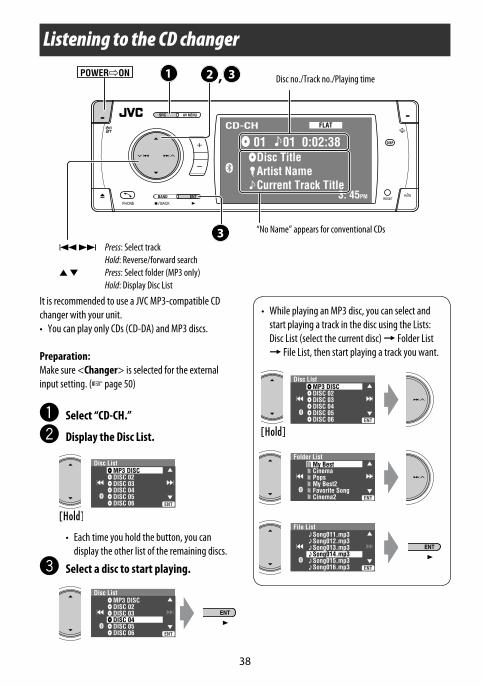
38
3: 45PM
FLATCD-CH
01 01 0:02:38Disc TitleArtist NameCurrent Track Title
POWER]ON
Listening to the CD changer
It is recommended to use a JVC MP3-compatible CD changer with your unit.• You can play only CDs (CD-DA) and MP3 discs.
Preparation:Make sure <Changer> is selected for the external input setting. ( page 50)
~ Select “CD-CH.”
Ÿ Display the Disc List.
• Each time you hold the button, you can display the other list of the remaining discs.
! Select a disc to start playing.
“No Name” appears for conventional CDs
Disc no./Track no./Playing time
• While playing an MP3 disc, you can select and start playing a track in the disc using the Lists: Disc List (select the current disc) = Folder List = File List, then start playing a track you want.
4 ¢ Press: Select track Hold: Reverse/forward search5 ∞ Press: Select folder (MP3 only) Hold: Display Disc List
Disc List
Off
MP3 DISCDISC 02DISC 03DISC 04DISC 05DISC 06 ENT
Disc List
Off
MP3 DISCDISC 02DISC 03DISC 04DISC 05DISC 06 ENT
Folder List
Off
My BestCinemaPopsMy Best2Favorite SongCinema2 ENT
File List
Off
Song011.mp3Song012.mp3Song013.mp3Song014.mp3Song015.mp3Song016.mp3 ENT
Disc List
Off
MP3 DISCDISC 02DISC 03DISC 04DISC 05DISC 06 ENT
KD-AVX33A.indb 38KD-AVX33A.indb 38 07.2.21 9:32:50 AM07.2.21 9:32:50 AM

39 EXTERNAL DEVICES
You can use only one of the following playback modes—Intro/Repeat/Random.Ex. To select Track Repeat
1
2
Mode menu icon
3
4
When one of the playback modes is selected, the corresponding indicator lights up on the monitor.
To cancel, select <All Off> in step 3 or <Off> in step 4.
Selecting playback modes
Disc type Intro Repeat Random
Track: Plays the first 15 seconds of each track
Disc: Plays the first 15 seconds of the first track of all loaded discs
Track: Repeats current trackDisc: Repeats all tracks of the
current disc
Disc: Randomly plays all tracks of the current disc
All: Randomly plays all tracks of all loaded discs
Track: Plays the first 15 seconds of each track
Folder: Plays the first 15 seconds of the first track of each folder
Disc: Plays the first 15 seconds of the first track of all loaded discs
Track: Repeats current trackFolder: Repeats all tracks of
the current folderDisc: Repeats all tracks of the
current disc
Folder: Randomly plays all tracks of current folder, then tracks of next folders
Disc: Randomly plays all tracks of the current disc
All: Randomly plays all tracks of all loaded discs
You can use the following buttons on the remote controller to operate the CD changer.
or : Select disc
Press: Select folder (MP3 only)
Press: Select track Hold: Reverse/forward search
To use <Mode> menu above.
To use <List> menu page 38.Disc List = Folder List = File List
Mode
Off
All OffIntroRepeatRandom
RepeatOffTrackDisc
SetENT
AV Menu
Mode EnterENT
AV Menu
Setup EnterENT
KD-AVX33A.indb 39KD-AVX33A.indb 39 07.2.21 9:32:51 AM07.2.21 9:32:51 AM

40
3: 45PM
FLATD.PLAYER
01 0:45:38Album NameArtist NameTrack Title
POWER]ON
Listening to the iPod/D. player
It is required to connect the interface adapter (KS-PD100 for Apple iPod or KS-PD500 for JVC D. player) to the CD changer jack on the rear.Preparation:Make sure <iPod> or <D. Player> is selected for the external input setting. ( page 50)
~ Select “iPod” or “D. PLAYER.”Playback starts automatically.
Ÿ Select a track.
Selecting a track from the player’s menu 1 Enter the player’s menu.
• This mode will be canceled if no operations are done for about 5 seconds.
2 Select the desired item.Press: Select an itemHold: Skip 10 items at a time
For iPod:Playlists Ô Artists Ô Albums Ô Songs Ô Genres Ô Composers Ô (back to the beginning)For D. player:Playlist Ô Artist Ô Album Ô Genre Ô Track Ô (back to the beginning)
3 Confirm the selection.
4 Repeat steps 2 and 3 to select a track.• When a track is selected finally, playback starts.• To return to the previous menu...
Selecting playback modes 1 Display <AV Menu>, then select <Mode>
menu icon.
2 Enter <Mode>, then select <Repeat> or <Random>.
3 Select an appropriate option.
Repeat One: Functions the same as “Repeat One” or “Repeat Mode = One.”All: Functions the same as “Repeat All” or “Repeat Mode = All.”
Random Album: Functions the same as “Shuffle Albums” of the iPod.Song/On: Functions the same as “Shuffle Songs” or “Random Play = On.”
• When the playback modes are selected, the corresponding indicators light up on the monitor.
To cancel, select <All Off> in step 2 or <Off> in step 3.
4 ¢:Press: Select trackHold: Reverse/forward search
5 ∞5 : Enter player’s menu∞ : Pause/stop playback
• To resume, press again.
Track no./Playing time page 43
• iPod is a trademark of Apple Inc., registered in the U.S. and other countries.
KD-AVX33A.indb 40KD-AVX33A.indb 40 07.2.21 9:32:52 AM07.2.21 9:32:52 AM

41 EXTERNAL DEVICES
Listening to other external components
AV-INPUT You can connect an external component to the LINE IN/VIDEO IN plugs.• You can also connect a Navigation System to the VIDEO IN plug so that you can watch the navigation screen (Make sure <Navigation> is selected for <AV Input>). ( page 50)
~ Select “AV-IN.”
Ÿ Turn on the connected component and start playing the source.
• If you select <Camera Mirror> or <Navigation> for <AV Input> ( page 50), some status messages such as volume level change will not appear on the monitor while viewing the picture.
When <Navigation> is selected for <AV Input>...• You can use the source “AV-IN” for listening to an audio source connected to the LINE IN plugs.• While selecting other source, you can watch the navigation screen without changing the source. To watch the
navigation screen, press DISP repeatedly.
3: 45PM
FLATAV-IN
AV-INPUT
POWER]ON
Press if no playback picture appears, but source information (this) screen is displayed.
Assigned title ( page 44) page 43
KD-AVX33A.indb 41KD-AVX33A.indb 41 07.2.21 9:32:52 AM07.2.21 9:32:52 AM

42
EXT-INPUT You can connect an external component to the CD changer jack on the rear using the Line Input Adapter—KS-U57 (not supplied) or AUX Input Adapter—KS-U58 (not supplied).
Preparation:Make sure <External Input> is selected for the external input setting. ( page 50)
~ Select “EXT-IN.”
Ÿ Turn on the connected component and start playing the source.
3: 45PM
FLATEXT-IN
EXT-INPUT
POWER]ON Assigned title ( page 44) page 43
KD-AVX33A.indb 42KD-AVX33A.indb 42 07.2.21 9:32:53 AM07.2.21 9:32:53 AM

SETTINGS43
Selecting sound mode
~
Ÿ
! Select a sound mode.
• For preset equalizing values of each sound mode, page 60.
• For multi-channel source, the sound mode is temporarily canceled.
Storing your own adjustmentYou can store your adjustment into User1, User2, and User3.
1 Repeat steps ~ and Ÿ, then in step !...
2 Adjust.
3 Store.
Sound equalization
Edit
60.0 Hz ENT
+03
Store
User StoreUser1User2User3
ENT Store
AV Menu
Setup EnterENT
AV Menu
Equalizer EnterENT
FlatHard RockR&BPopJazz
ExitENT
Equalizer
Equalizer menu icon
FlatHard RockR&BPopJazz
ExitENT
Equalizer
Edit
60.0 Hz ENT
+03
Store
POWER]ON
KD-AVX33A.indb 43KD-AVX33A.indb 43 07.2.21 9:32:53 AM07.2.21 9:32:53 AM

44
You can assign titles as follows.
FM/AM stations Up to 16 characters—up to 30 stations
AV-INEXT-IN
Up to 16 characters
• If you try to assign a title to a 31st station, “Name Full” flashes on the monitor. Delete unwanted titles before assignment.
~ Select the source.• For FM/AM stations: Select the band, then
tune into a station.• For “AV-IN”/“EXT-IN”: Select the source.
Ÿ Display the title entry screen.1
2
Mode menu icon
3
Ex. When you select FM as the source
! Assign a title.1 Select a character, then move the entering
position.
• To change the character set, press DISP. (For available characters, page 61.)
2 Repeat step 1 until you finish entering the title.
⁄ Finish the procedure.
Assigning titles to the sourcesPress: Change character setHold: Erase title
AV Menu
Setup EnterENT
AV Menu
Mode EnterENT
Station Name
ABC Radio
DISP StoreENTA a 0 Á á
Title Entry
POWER]ON
ModeMonoDX/LocalSSMTitle Entry
Station Name
ABC
StoreENT
Title Entry
DISP A a 0 Á á
KD-AVX33A.indb 44KD-AVX33A.indb 44 07.2.21 9:32:54 AM07.2.21 9:32:54 AM

SETTINGS45
AV Menu
Setup EnterENT
POWER]ON
!
• For some items, repeat this steps to set the sub-items.
⁄
Menu items
Menu operations
Ex. Changing the <High Pass Filter> setting
~
Non-available items will be displayed being shaded.
Ÿ
Setup Equalizer Sound
Mode List Bluetooth
Sound menu icon
Sound
Through
Fader/BalanceVolume AdjustSubwooferHigh Pass FilterCrossover
ThroughOn
ExitENT
High Pass Filter
AV Menu
Setup EnterENT
AV Menu
Sound EnterENT
Disc Surround
Dual Zone
AV Menu
Setup EnterENTInput
Display
Clock
Disc Setup 1
Disc Setup 2
Tuner
Others
Setup
Equalizer
Sound
Disc Surround
Mode
Bluetooth
List
Dual Zone
• The display indications may change according to change of the specifications.
KD-AVX33A.indb 45KD-AVX33A.indb 45 07.2.21 9:32:55 AM07.2.21 9:32:55 AM

46
Initial: UnderlinedSetup
Menu items Selectable settings, [reference page]
Disp
lay
Demonstration Off : Cancels.On : Activates the demonstration on the monitor.
Wall Paper You can select the background picture of the monitor.Future-Blue, Future-Green, Wave-Blue, Wave-Green, Wave-Pink, Metal-A, Metal-B, Ball-A, Ball-B, Ball-C, Dolphin, Simple-Red, Simple-Purple, Simple-Blue, Simple-Gray
Scroll Off : Cancels.Once : Scrolls the disc information once.Auto : Repeats scrolling (5-second intervals).• Holding DISP (on the unit) scrolls the information regardless of this
setting.
Tag Display Off : Cancels.On : Shows the Tag data while playing MP3/WMA/WAV/AAC tracks.
Dimmer Off : Cancels.On : Activates dimmer.Auto : Dims the monitor when you turn on the headlights.*1
Time Set : Press ENT (or ¢) to display the time setting screen, then set the Dimmer On/Off times.
Bright You can adjust brightness of the monitor.–15 (darkest) to +15 (brightest); Initial 00
Picture Adjust*2 You can adjust the following to make the monitor clear and legible for watching the playback picture. The setting will be stored for“DISC/USB,” and “AV-IN.”–15 to +15; Initial 0Bright : Adjust if the picture is too bright or too dark.Contrast : Adjust the contrast.Color : Adjust the color of the picture—lighter or darker.Tint : Adjust the tint if the human skin color is unnatural.
*1 The ILLUMINATION CONTROL lead connection is required. ( Installation/Connection Manual)*2 Adjustable only when the source is a disc or USB containing pictures or movies, or “AV-IN.”
KD-AVX33A.indb 46KD-AVX33A.indb 46 07.2.21 9:32:55 AM07.2.21 9:32:55 AM

SETTINGS47
Menu items Selectable settings, [reference page]Di
spla
y
Aspect*3 You can change the aspect ratio of the picture.
Aspect ratio of incoming signal
4:3 16:9
Full :For 16:9 original pictures
Auto : • For “DISC”: Aspect ratio is automatically selected to match to the incoming signals.
• For the other video sources: Aspect ratio is fixed to <Regular>.
Regular :For 4:3 original pictures
NTSC/PAL This setting is valid only to the external monitor connected.Select the color system of the external monitor—NTSC, PAL.• Turn off the power and turn it on again to make the new setting
effective.
Language*4 Select the indication language shown on the monitor.English, Spanish, French, German, Italian, Dutch, Swedish, Danish, Russian
Cloc
k
Time Set Initial 1:00AM [6]
12Hours/24Hours 12 Hours, 24 Hours [6]
OSD Clock Off, On, [6]
*3 Not adjustable for audio sources.*4 After you change the indication language setting, turn off then on the power so that your setting takes effect.
KD-AVX33A.indb 47KD-AVX33A.indb 47 07.2.21 9:32:56 AM07.2.21 9:32:56 AM

48
Menu items Selectable settings, [reference page]Di
sc Se
tup
1*5
Menu Language Select the initial disc menu language; Initial English ( also page 61).
Audio Language Select the initial audio language; Initial English ( also page 61).
Subtitle Select the initial subtitle language or erase the subtitle (<Off>); Initial English ( also page 61).
OSD Language Select the on-screen language used for the external monitor connected to the VIDEO OUT plug; Initial English.
Monitor Type Select the monitor type to watch a wide screen picture on the external monitor.16:9 : Select when the aspect ratio of the external monitor is 16:9.4:3 Letterbox/4:3 Pan Scan : Select when the aspect ratio of the
external monitor is 4:3. Refer to the illustrations on the left to see how the pictures are shown on the monitor.
OSD Position Select the position of the on-screen bar, [25].1 : Higher position2 : Lower position
File Type Select playback file type when a disc/USB contains different types of files. You can store this setting separately for each source —“DISC/USB.”Audio : Plays back audio files.Still Picture : Plays back JPEG files.Video : Plays back DivX/MPEG1/MPEG2 files.
DivX Regist. (Registration) This unit has its own Registration Code. Once you have played back a file with which the Registration Code recorded, this unit’s Registration Code is overwritten for copyright protection.
*5 Selectable only for “DISC” and “USB.” (Playback stops when you select one of the items.)
Position 1 Position 2
16:9 4:3 Letterbox
4:3 Pan Scan
KD-AVX33A.indb 48KD-AVX33A.indb 48 07.2.21 9:32:57 AM07.2.21 9:32:57 AM

SETTINGS49
Menu items Selectable settings, [reference page]Di
sc Se
tup
2D. (Dynamic) Range Compres. (Compression)*5
You can enjoy a powerful sound at a low volume level while playing Dolby Digital software.Auto : Select to apply the effect to multi-channel encoded software.On : Select to always use this function.
Speaker Size*5 You can adjust the speaker size setting.• Front SPK : Small, Large• Center SPK : None, Small, Large• Rear SPK : None, Small, Large• Subwoofer : On, Off• Speaker size : <Large> for 13 cm diameter or more; <Small> for
13 cm or less.• Front speakers and rear speakers cannot be adjusted separately the
left and right.Regardless of the setting above...• No sound comes out of the subwoofer while playing Dolby Pro Logic
II Movie or Music if the front speaker is set to <Large>.• No sound comes out of the center speaker when surround is
deactivated.
Speaker Level You can adjust the output level of the activated speakers ( <Speaker Size> above), monitoring the test tone.Front Lch/Center Ch/Front Rch/Rear Rch/Subwoofer*6/Rear Lch
: adjust the output level of each speaker in the range of –10dB to +10dB; Initial 0dB.
• Press and hold ENT to turn on and off the test tone.
Speaker Distance*7 You can adjust the speaker output timing.Front Lch/Center Ch/Front Rch/Rear Rch/Rear Lch : adjust the
speaker distance from the listening position in the range of 15cm/6 inches to 600 cm/240 inches in 15 cm/6 inch step; Initial 120 cm/48 inch (for center speaker), 150 cm/60 inch (for other speakers).
• Press and hold DISP to change the measuring unit—cm and inch.
*5 Selectable only for “DISC” and “USB.” (Playback stops when you select one of the items.)*6 This subwoofer level setting takes effect only when surround is activated. ( also page 22, 23)*7 This setting does not take effect for MPEG1/MPEG2 and DivX with MP3 audio track.
Select the speaker
Adjust the speaker level
Select the speaker
Adjust the speaker distance
Select the speaker
Adjust the speaker size
KD-AVX33A.indb 49KD-AVX33A.indb 49 07.2.21 9:32:57 AM07.2.21 9:32:57 AM

50
Menu items Selectable settings, [reference page]Tu
ner IF Band Width Auto : Increases the tuner selectivity to reduce interference noises
between adjacent stations. (Stereo effect may be lost.)Wide : Subject to the interference from adjacent stations, but sound
quality will not be degraded and the stereo effect will remain.
Inpu
t
AV Input You can determine the use of LINE IN and VIDEO IN plugs.Off : Select when no component is connected (“AV-IN” is skipped while
selecting the source).Audio&Video : Select when connecting an AV component such as a
VCR.Audio : Select when connecting an audio component such as a digital
audio player.Camera*8: Select when connecting the rear view camera. Camera Mirror*8: The mirror image of the rear view is displayed on
the monitor. (The monitor on the unit only; the normal rear view appears on the external monitor.)
Navigation : Select when connecting a Navigation System. [41]
External Input*9 For connecting an external component to the CD changer jack on the rear.Changer/iPod/D. Player*10: CD changer, iPod, or D. player
[38, 40]External Input : Any other than the above. [42]
Othe
rs
Beep Off : Cancels.On : Activates the key-touch tone.
Telephone Muting*11 Off : Cancels.Muting1, Muting2 : Select either one which mutes the sounds while
using the cellular phone.
Initialize Initialize all settings you have made in <AV Menu>. Press ENT, then reset the unit. ( page 3)
*8 Reverse lamp lead connection is required. See Installation/Connection Manual (separate volume). The rear view through the camera appears on the monitor in “Full” aspect ratio (regardless of the aspect ratio setting) when you shift the gear to the reverse (R) position.
*9 Not selectable when the component connected to the CD changer jack is selected as the source.*10 The name of the component detected through the CD changer jack is shown.*11 The TEL MUTING lead connection is required. See Installation/Connection Manual (separate volume).
KD-AVX33A.indb 50KD-AVX33A.indb 50 07.2.21 9:32:58 AM07.2.21 9:32:58 AM

SETTINGS51
EqualizerFlat/Hard Rock/R&B/Pop/Jazz/Dance/Country/Reggae/Classic/User1/User2/User3, [43]
Sound
Menu items Selectable settings, [reference page]
Fader/Balance Adjust fader—speaker output balance between the front and rear speakers.• Upmost—front only• Downmost—rear onlyWhen using a two-speaker system, set the fader to the center (00).Adjust balance—speaker output balance between the left and right speakers.• Leftmost—left only• Rightmost—right only
Volume Adjust Adjust and store auto-adjustment volume level for each source, comparing to the FM volume level. The volume level will automatically increase or decrease when you change the source.–12 to +12; Initial 00
Subwoofer*12 Adjust the settings below in the submenu:Phase : Subwoofer phase. Select either <Normal> or <Reverse>, which
reproduces a better sound.Level : Subwoofer output level. Level: –06 to +08; Initial 00
High Pass Filter Through : Select when the subwoofer is not connected.On : Select when the subwoofer is connected.
Crossover Adjust the crossover frequency between the front/rear speakers and the subwoofer.80Hz, 120Hz, 150Hz
Amplifier Gain You can change the maximum volume level of this unit.Off : Deactivates the built-in amplifier.Low Power : VOL 00 to 30 (Select this if the maximum power of the speakers
is less than 50 W.)High Power : VOL 00 to 50
Rear Speaker*13 You can activate/deactivate the rear speakers.Off, On
*12 This subwoofer level setting takes effect only when surround is deactivated. ( also page 22, 23)*13 This setting takes effect only when Dual Zone is activated. ( also page 26)
Adjusts fader
Adjust balance
KD-AVX33A.indb 51KD-AVX33A.indb 51 07.2.21 9:32:58 AM07.2.21 9:32:58 AM

52
Disc Surround*14
Menu items Selectable settings, [reference page]
Surround Off Select to deactivate the surround function.
Surround On Select to activate the surround function. [22, 23]Auto, Through, Dolby PLII Movie, Dolby PLII Music• When you select Dolby PLII Music, you can adjust <Panorama> and
<Center Width>.*15
*14 Selectable only for “DISC” and “USB.”*15 This setting takes effect only when the center speaker is activated.
Mode*16
Menu items Selectable settings, [reference page]
Mono Only for FM. (Off, On), [10]
DX/Local Only for FM. (DX, Local), [11]
SSM Only for FM. [11]
Title Entry Only for FM/AM stations, AV-IN and EXT-IN. [44]
All Off/Intro/Repeat/Random Only for disc/USB playback and iPod/D. player. [17, 30, 39, 40]
*16 Items listed under <Mode> vary among the playback sources.
ListThe accessible lists differ depending on the sources. [12, 18, 37, 39]
KD-AVX33A.indb 52KD-AVX33A.indb 52 07.2.21 9:32:59 AM07.2.21 9:32:59 AM

SETTINGS53
Bluetooth*17
Menu items Selectable settings, [reference page]
Dial Menu Only for the device connected for “Bluetooth Phone.”Select the method to make a call. [35]
Message Only for the device connected for “Bluetooth Phone.”*18
You can read a message from the following message histories.Unread : Messages you have not read.Read : Messages you have read.Unsent : Messages you have not sent.Sent : Messages you have sent.• The number of messages in each history is also shown on the monitor.
Open [32]
Search [32]
Special Device Only for “NEW DEVICE.”Shows the list of Bluetooth devices which require some special procedure to establish Bluetooth connection. Select a device you want to connect.• After selecting the device, use <Open> or <Search> ( page 32) for
connection.• Once the connection is established, it is registered in the unit. You can
connect the unit and the device by using <Connect> (below) from the next time.
Connect Only for the registered devices.After selecting a device from among the registered devices ( page 33, 37), establish the connection with it.
Disconnect Only for the device being connected.Disconnect the current device before connecting another device.
Delete Pair Only for the registered devices.Delete the registered devices.
*17 Selectable only for “Bluetooth Phone” or “Bluetooth Audio.” Select a device (or “NEW DEVICE”) before operating the menu.
*18 Selectable only when the device is compatible with SMS.
When operating the Bluetooth device, refer also to the instructions supplied with the device.
Continued on the next page
KD-AVX33A.indb 53KD-AVX33A.indb 53 07.2.21 9:33:00 AM07.2.21 9:33:00 AM

54
Menu items Selectable settings, [reference page]Se
ttin
gsAuto Connect*19 When the unit is turned on, the connection is established automatically
with...Off : No Bluetooth device.Last : The last connected Bluetooth device.Order : The available registered Bluetooth device found at first.
Auto Answer*20 Off : The unit does not answer the calls automatically. Answer the calls manually.
On : The unit answers the incoming calls automatically.Reject : The unit rejects all incoming calls.
Message Info*20 Auto : The unit informs you of the arrival of a message by ringing and displaying “Receiving Message.” To read the message, press ENT ( page 35).
Manual : The unit does not inform you the arrival of a message.
MIC Setting*20 Adjust microphone volume connected to the unit.01, 02, 03
Version*21 The Bluetooth software and hardware versions are shown.
*19 Selectable only for “Bluetooth Phone.”*20 Only for the device being connected for “Bluetooth Phone.” Not selectable for “NEW DEVICE”.*21 If you wish to receive more information about Bluetooth, visit our JVC web site.
Dual ZoneOff, On, On/Surround On, [26]
KD-AVX33A.indb 54KD-AVX33A.indb 54 07.2.21 9:33:00 AM07.2.21 9:33:00 AM

55 REFERENCES
Maintenance How to clean the connector
Frequent detachment will deteriorate the connectors.To minimize this possibility, periodically wipe the connectors with a cotton swab or cloth moistened with alcohol, being careful not to damage the connectors.
Connector
Moisture condensationMoisture may condense on the lens inside the unit in the following cases:• After starting the heater in the car.• If it becomes very humid inside the car.Should this occur, the unit may malfunction. In this case, eject the disc and leave the unit turned on for a few hours until the moisture evaporates.
How to handle discsWhen removing a disc from its case, press down the center holder of the case and lift the disc out, holding it by the edges.• Always hold the disc by the edges.
Do not touch its recording surface.When storing a disc into its case, gently insert the disc around the center holder (with the printed surface facing up).• Make sure to store discs into the cases after use.
To keep discs cleanA dirty disc may not play correctly. If a disc does become dirty, wipe it with a soft cloth in a straight line from center to edge.• Do not use any solvent (for example, conventional
record cleaner, spray, thinner, benzine, etc.) to clean discs.
To play new discsNew discs may have some rough spots around the inner and outer edges. If such a disc is used, this unit may reject the disc.To remove these rough spots, rub the edges with a pencil or ball-point pen, etc.
Stick-on label
Sticker Sticker residue
Warped disc
Do not use the following discs:
Center holder
KD-AVX33A.indb 55KD-AVX33A.indb 55 07.2.21 9:33:01 AM07.2.21 9:33:01 AM

56
More about this unit General
Turning on the power• By pressing SRC (source) on the unit, you can also
turn on the power. If the source is ready, playback starts.
FM/AMStoring stations in memory• When SSM is over, received stations are preset in
No.1 (lowest frequency) to No. 6 (highest frequency).
DiscGeneral• In this manual, words “track” and “file” are
interchangeably used.• This unit can also play back 8 cm discs.• This unit can only play back audio CD (CD-DA) files if
different type of audio files (MP3/WMA/WAV/AAC) are recorded in the same disc.
• This unit can display only one-byte characters. No other characters can be correctly displayed.
Inserting a disc• When a disc is inserted upside down or has no
playable files, “Cannot play this disc Check the disc” appears on the monitor. Eject the disc.
Ejecting a disc• If the ejected disc is not removed within 15 seconds,
the disc is automatically inserted again into the loading slot to protect it from dust. (Disc playback starts.)
Changing the source• If you change the source, playback also stops without
ejecting the disc. Next time you select “DISC” for the playback source,
disc play starts from where it stopped previously.
Playing Recordable/Rewritable discs• This unit can recognize a total of 5 000 files and 250
folders (a maximum of 999 files per folder).• Use only “finalized” discs.• This unit can play back multi-session discs; however,
unclosed sessions will be skipped while playing.• This unit can recognize a total 25 characters for file/
folder names.• Some discs or files may not be played back due to
their characteristics or recording conditions.
Playing DVD Audio• Some DVD Audios prohibit downmix. When you play
back such a disc, “LR ONLY” appears on the display and the unit plays back the left front and right front signals.
• “MULTI CH” appears on the monitor after a beep when you try to play a multi-channel disc with Surround turned <Off>.
Playing DVD-VR• This unit cannot play back CPRM (Content Protection
for Recordable Media) protected files.• For details about DVD-VR format and play list, refer
to the instructions supplied with the recording equipment.
KD-AVX33A.indb 56KD-AVX33A.indb 56 07.2.21 9:33:01 AM07.2.21 9:33:01 AM

57 REFERENCES
Playing MP3/WMA/WAV/AAC files• This unit can play back files with the extension
code <.mp3>, <.wma>, <.wav>, or <.m4a> (regardless of the letter case—upper/lower).
• This unit can play back the files meeting the conditions below:– Bit rate: MP3/WMA: 32 kbps — 320 kbps AAC: 16 kbps — 320 kbps– Sampling frequency: 48 kHz, 44.1 kHz, 32 kHz (for MPEG1) 24 kHz, 22.05 kHz, 16 kHz (for MPEG2) 48 kHz, 44.1 kHz, 32 kHz, 22.05 kHz (for WMA) 44.1 kHz (for WAV) 48 kHz, 44.1 kHz (for AAC)
• This unit can show ID3 Tag Version 1.0/1.1/2.2/2.3/2.4 (for MP3). This unit can also show WAV/WMA/AAC Tag.
• This unit can play back files recorded in VBR (variable bit rate).
Files recorded in VBR have a discrepancy in elapsed time indication.
• This unit cannot play back the following files:– MP3 files encoded with MP3i and MP3 PRO
format.– MP3 files encoded with Layer 1/2.– WMA files encoded with lossless, professional,
and voice format.– WMA files which are not based upon Windows
Media® Audio.– WMA/AAC files copy-protected with DRM.– AAC files purchased from the iTunes store.– Files which have the data such as AIFF, ATRAC3,
etc.
File playbackPlaying DivX files• This unit can play back DivX files with the extension
code <.divx>, <.div>, <.avi> (regardless of the letter case—upper/lower).
• This unit supports the DivX files whose resolution is 720 x 576 pixels or less.
• This unit supports DivX 6.x, 5.x, 4.x, and 3.11.• Audio stream should conform to MP3 or Dolby Digital.• The file encoded in the interlaced scanning mode
may not be played back correctly.• The maximum bit rate for video signals (average) is
as follows:– DVD: 4 Mbps– USB: 2 Mbps
Playing MPEG1/MPEG2 files• This unit can play back MPEG1/MPEG2 files with the
extension code <.mpg>, <.mpeg>, or <.mod>*.* <.mod> is an extension code used for the
MPEG2 files recorded by JVC Everio camcorders.• The stream format should conform to MPEG system/
program stream.• The file format should be MP@ML (Main Profile at
Main Level)/SP@ML (Simple Profile at Main Level)/MP@LL (Main Profile at Low Level).
• Audio streams should conform to MPEG1 Audio Layer-2 or Dolby Digital.
• The maximum bit rate for video signals (average) is as follows:– DVD: 4 Mbps– USB: 2 Mbps
Playing JPEG files• This unit can play back JPEG files with the extension
code <.jpg>, or <.jpeg>.• It is recommended that you record a file at 640 x 480
resolution.• This unit can play back baseline JPEG files.
Progressive JPEG files or lossless JPEG files cannot be played.
KD-AVX33A.indb 57KD-AVX33A.indb 57 07.2.21 9:33:01 AM07.2.21 9:33:01 AM

58
Enjoying surround sounds• If <Surround On> is selected, “MULTI” surround
playback automatically starts for multi-channel encoded discs regardless of the <Surround On> setting.
• You cannot activate surround for MPEG multi-channel DVD Video, DivX 2-channel and MPEG 2-channel sources. If <Surround On> is selected, stereo sounds are emitted only through the front speakers. “FRONT 2CH” appears on the source information screen.
• When “FIX” appears on the source information screen, no sound comes out of the subwoofer.
• When <AUTO> is selected, downsampling is performed for DVD Video (LPCM only), DVD-VR (LPCM only), and DVD Audio with fs=88.2 kHz/96 kHz and higher.
USB• If “No USB Device“ appears after removing a device,
reattach a device or select another playback source.• When the USB device has no playable files, or has not
been formatted correctly, “Cannot play this device Check the device” appears on the monitor.
• The unit cannot recognize a USB device whose rating is other than 5 V and does not exceed 500 mA.
• While playing from a USB device, the playback order may differ from other players.
• This unit may be unable to play back some USB devices or some files due to their characteristics or recording conditions.
• Depending on the shape of the USB devices and connection ports, some USB devices may not be attached properly or the connection might be loose.
• When connecting a USB device, refer also to its instructions.
• Connect only one USB device to the unit at a time. Do not use a USB hub.
• This unit may not recognize a USB device connected through a USB card reader.
• This unit may not play back files in a USB device properly when using a USB extension cord.
• This unit cannot assure proper functions or supply power to all types of the devices.
• This unit can recognize a total of 5 000 files and 250 folders (a maximum of 999 files per folder).
• This unit can recognize a total 25 characters for file/folder names.
KD-AVX33A.indb 58KD-AVX33A.indb 58 07.2.21 9:33:02 AM07.2.21 9:33:02 AM

59 REFERENCES
iPod/D. player operations • When you turn on this unit, the iPod or D. player is
charged through the adapter connected to this unit.• The text information may not be displayed correctly.
This unit can display up to 40 characters.
Notice:When operating an iPod or a D. player, some operations may not be performed correctly or as intended. In this case, visit the following JVC web site:For iPod users: <http://www.jvc.co.jp/english/car/support/ks-pd100/index.html>For D. player users: <http://www.jvc.co.jp/english/car/support/ks-pd500/index.html>
Menu settings• If you change the <Amplifier Gain> setting
from <High Power> to <Low Power> while the volume level is set higher than “30,” the unit automatically changes the volume level to “VOL 30.”
• After you change any of <Menu Language/Audio Language/Subtitle> settings, turn off then on the power, and re-insert the disc (or insert another disc) so that your setting takes effect.
• When you select <16:9> for a picture whose aspect ratio is 4:3, the picture slightly changes due to the process for converting the picture width.
• Even if <4:3 Pan Scan> is selected, the screen size may become <4:3 Letterbox> for some discs.
Bluetooth operations General• While driving, do not perform complicated operation
such as dialling the numbers, using phone book, etc. When you perform these operations, stop your car in a safe place.
• Some Bluetooth devices may not be connected to this unit depending on the Bluetooth version of the device.
• This unit may not work for some Bluetooth devices.• Connecting condition may vary depending on
circumstances around you.• When the unit is turned off, the device is
disconnected.
Warning messages for Bluetooth operations• Connection Error : The device is registered but the
connection has failed. Use <Connect> to connect the device again. ( page 33)
• Error : Try the operation again. If “Error” appears again, check if the device supports the function you have tried.
• Device Unfound : No available Bluetooth device is detected by <Search>.
• Loading : The unit is updating the phone book and/or SMS.
• Please Wait... : The unit is preparing to use the Bluetooth function. If the message does not disappear, turn off and turn on the unit, then connect the device again (or reset the unit).
Icons for phone types• These icons indicate the phone type set on the device.
: Cellular phone
: Household phone
: Office
: General
: Other than above
KD-AVX33A.indb 59KD-AVX33A.indb 59 07.2.21 9:33:02 AM07.2.21 9:33:02 AM

60
Sound mode
Preset equalizing values
60 H
z
150 H
z
400 H
z
1 kHz
2.5 k
Hz
6.3 k
Hz
15 kH
z
Flat 00 00 00 00 00 00 00
Hard Rock +03 +03 +01 00 00 +02 +01
R&B +03 +02 +02 00 +01 +01 +03
Pop 00 +02 00 00 +01 +01 +02
Jazz +03 +02 +01 +01 +01 +03 +02
Dance +04 +02 00 –02 –01 +01 +01
Country +02 +01 00 00 00 +01 +02
Reggae +03 00 00 +01 +02 +02 +03
Classic +02 +03 +01 00 00 +02 00
User 1/2/3 00 00 00 00 00 00 00
About sounds reproduced through the rear terminals• Speaker out/analog discrete output—LINE OUT
(FRONT/REAR)/CENTER OUT/SUBWOOFER:Multi-channel signals are emitted for a multi-channel encoded software. (When Dual Zone is activated, the same signal emitted through 2nd AUDIO OUT plugs are emitted for the main source “DISC.”)
• 2nd AUDIO OUT: 2-channel signal is emitted when Dual Zone is activated. When playing a multi-channel encoded disc, multi-channel signals are downmixed (except for some DVD Audio).
• “DVD Logo” is a trademark of DVD Format/Logo Licensing Corporation registered in the US, Japan and other countries.
• DivX, DivX Ultra Certified, and associated logos are trademarks of DivX, inc. and are used under license.
• Official DivX® Ultra Certified product• Plays all versions of DivX® video (including DivX® 6)
with enhanced playback of DivX® media files and the DivX® Media Format
• Microsoft and Windows Media are either registered trademarks or trademarks of Microsoft Corporation in the United States and/or other countries.
• iPod and iTunes are trademarks of Apple Inc., registered in the U.S. and other countries.
KD-AVX33A.indb 60KD-AVX33A.indb 60 07.2.21 9:33:03 AM07.2.21 9:33:03 AM

61 REFERENCES
In addition to the roman alphabet (A – Z, a – z), the following characters will be used to show the various information on the monitor.• You can also use the following
characters to assign titles ( page 44)
Upper and lower cases
Numbers and symbols
Characters shown on the monitor
Language codes (for DVD/DivX language selection)
Code Language Code Language Code Language Code Language Code LanguageAA Afar FA Persian KL Greenlandic OC Occitan ST SesothoAB Abkhazian FI Finnish KM Cambodian OM (Afan) Oromo SU SundaneseAF Afrikaans FJ Fiji KN Kannada OR Oriya SW SwahiliAM Ameharic FO Faroese KO Korean (KOR) PA Panjabi TA TamilAR Arabic FY Frisian KS Kashmiri PL Polish TE TeluguAS Assamese GA Irish KU Kurdish PS Pashto, Pushto TG TajikAY Aymara GD Scots Gaelic KY Kirghiz PT Portuguese TH ThaiAZ Azerbaijani GL Galician LA Latin QU Quechua TI TigrinyaBA Bashkir GN Guarani LN Lingala RM Rhaeto-Romance TK TurkmenBE Byelorussian GU Gujarati LO Laothian RN Kirundi TL TagalogBG Bulgarian HA Hausa LT Lithuanian RO Rumanian TN SetswanaBH Bihari HI Hindi LV Latvian, Lettish RW Kinyarwanda TO TongaBI Bislama HR Croatian MG Malagasy SA Sanskrit TR TurkishBN Bengali, Bangla HU Hungarian MI Maori SD Sindhi TS TsongaBO Tibetan HY Armenian MK Macedonian SG Sangho TT TatarBR Breton IA Interlingua ML Malayalam SH Serbo-Croatian TW TwiCA Catalan IE Interlingue MN Mongolian SI Singhalese UK UkrainianCO Corsican IK Inupiak MO Moldavian SK Slovak UR UrduCS Czech IN Indonesian MR Marathi SL Slovenian UZ UzbekCY Welsh IS Icelandic MS Malay (MAY) SM Samoan VI VietnameseDZ Bhutani IW Hebrew MT Maltese SN Shona VO VolapukEL Greek JI Yiddish MY Burmese SO Somali WO WolofEO Esperanto JW Javanese NA Nauru SQ Albanian XH XhosaET Estonian KA Georgian NE Nepali SR Serbian YO YorubaEU Basque KK Kazakh NO Norwegian SS Siswati ZU Zulu
KD-AVX33A.indb 61KD-AVX33A.indb 61 07.2.21 9:33:03 AM07.2.21 9:33:03 AM

62
TroubleshootingWhat appears to be trouble is not always serious. Check the following points before calling a service center.
Symptoms Remedies/Causes
Gene
ral
• No sound comes out of the center speaker. • Center speaker is not activated. ( page 49) Once you have reset the unit, make sure to activate the
speaker again.• Center speaker is used only for surround playback. No
sound comes out for stereo playback.
• The monitor is not clear and legible. Sunshine from the windshield may cause this symptom.Adjust <Bright>. ( page 46)
• The unit does not work at all. Reset the unit. ( page 3)
• The remote controller does not work. Deactivate Dual Zone. ( page 26)(While Dual Zone is activated, the remote controller only functions for operating the DVD/CD player.)
• “No Signal” appears. • Change the source.• Start the playback on the external component connected
to VIDEO IN plug.• Check the cords and connections.• Signal input is too weak.
• “Mecha Error Push Reset” appears on the monitor, and the panel does not move.
Reset the unit. ( page 3)
FM/A
M • SSM automatic presetting does not work. Store stations manually. ( page 12)
• Static noise while listening to the radio. Connect the antenna firmly.
Disc
pla
ybac
k
• Disc can be neither recognized nor played . Eject the disc forcibly. ( page 3)
• Disc cannot be ejected. Unlock the disc. ( page 18)
• Recordable/Rewritable discs cannot be played back.
• Tracks on the Recordable/Rewritable discs cannot be skipped.
• Insert a finalized disc.• Finalize the discs with the component which you used
for recording.
• Playback does not start. • Insert the disc correctly again.• Region code of the DVD is not correct. ( page 4)• The format of files is not supported by the unit.
• The playback picture is not clear and legible. Adjust items in <Picture Adjust>. ( page 46)
• Sound and pictures are sometimes interrupted or distorted.
• Stop playback while driving on rough roads.• Change the disc.
KD-AVX33A.indb 62KD-AVX33A.indb 62 07.2.21 9:33:04 AM07.2.21 9:33:04 AM

63 REFERENCES
Symptoms Remedies/CausesDi
sc p
layb
ack
• No playback picture appears on the monitor. Parking brake lead is not connected properly. ( Installation/Connection Manual)
• No picture appears on the external monitor. • Connect the video cord correctly.• Select the correct input on the external monitor.
• “Eject Error” or “Loading Error” appears on the monitor.
Changing the source by pressing SRC will solve this error.
File
pla
ybac
k
• Disc cannot be played back. • Change the disc.• Record the tracks using a compliant application in the
appropriate discs. ( page 4)• Add appropriate extension codes to the file names.
• Noise is generated. The track played back is not a playable file format. Skip to another file.
• Tracks are not played back as you have intended them to play.
Playback order may differs from the one played back using other players.
• Elapsed playing time is not correct. This sometimes occurs during playback. This is caused by how the tracks are recorded.
• “Not Support” appears on the monitor and track is skipped.
Track is unplayable.
USB
play
back
• Noise is generated. • The track played back is not a playable file format (MP3/WMA/WAV/AAC). Skip to another file.
• Do not add the extension code <.mp3>, <.wma>, <.wav>or <.m4a> to non-MP3/WMA/WAV/AAC tracks.
• Tracks cannot play back as you have intended them to play.
Playback order may differs from the one played back using other players.
• “Now Reading” keeps flashing on the monitor.
• Readout time varies depending on the USB device.• Do not use too many hierarchy, folders and empty
folders.** Folder that is physically empty or folder that contains
data but does not contain valid MP3/WMA/WAV/AAC track.
• Turn off the power then on again.• Do not pull out or connect the USB device repeatedly
while “Now Reading” is displayed on the monitor.
• Correct characters are not displayed (e.g. album name).
For available characters, page 61.
• While playing a track, sound is sometimes interrupted.
The tracks have not been properly copied into the USB device. Copy tracks again into the USB device, and try again.
KD-AVX33A.indb 63KD-AVX33A.indb 63 07.2.21 9:33:05 AM07.2.21 9:33:05 AM

64
Symptoms Remedies/CausesBl
ueto
oth
• Bluetooth device does not detect the unit. This unit can be connected with one Bluetooth cellular phone and one Bluetooth audio device at a time.While connecting a device, this unit cannot be detected from another device. Disconnect currently connected device and search again.
• The unit does not detect the Bluetooth device.
• Check the Bluetooth setting of the device.• Search from the Bluetooth device. After the device
detects the unit, select <Open> on the unit to connect the device. ( page 32)
• The unit does not make pairing with the Bluetooth device.
• Enter the same PIN code for both the unit and target device. If the PIN code of the device is not indicated on its instructions, try “0000” or “1234.”
• Select the device name from <Special Device>, then try to connect again. ( page 33)
• Echo or noise occurs. Adjust the microphone unit position.
• Phone sound quality is poor. • Reduce the distance between the unit and the Bluetooth audio device.
• Move the car to place where you can get a better signal reception.
• The sound is interrupted or skipped during playback of a Bluetooth audio device.
• Reduce the distance between the unit and the Bluetooth audio device.
• Disconnect the device connected for “Bluetooth Phone.”• Turn off, then turn on the unit.• (When the sound is not yet restored,) connect the device
again.
• “New Device” cannot be selected for “Bluetooth Audio.”
Bluetooth audio device is being connected. To select “New Device,” disconnect it. ( page 33)
• The connected audio device cannot be controlled.
Check whether the connected audio device supports AVRCP (Audio Video Remote Control Profile).
CD ch
ange
r
• “No Disc” appears on the monitor. Insert a disc into the magazine.
• “No Magazine” appears on the monitor. Insert the magazine.
• “Cannot play this disc Check the disc” appears on the monitor.
Disc does not include playable files. Replace the disc with playable files.
• “Reset 08” appears on the monitor. Connect this unit and the CD changer correctly and press the reset button of the CD changer.
• “Reset 01” – “Reset 07” appears on the monitor.
Press the reset button of the CD changer.
• The CD changer does not work at all. Reset the unit. ( page 3)
KD-AVX33A.indb 64KD-AVX33A.indb 64 07.2.21 9:33:05 AM07.2.21 9:33:05 AM

65 REFERENCES
Symptoms Remedies/CausesiP
od/D
. pla
yer p
layb
ack
• The iPod/D. player does not turn on or does not work.
• Check the connecting cable and its connection.• Charge the battery.• For D. player: Update the firmware version.
• The sound is distorted. Deactivate the equalizer either on this unit or the iPod/D. player.
• “Disconnect” appears on the monitor. Check the connecting cable and its connection.
• For iPod: Playback stops. The headphones are disconnected during playback. Restart playback.
• No sound can be heard.• “Error 01” appears on the monitor when
connecting a D. player.
Disconnect the D. player from the adapter. Then, connect them again.
• “No Files” or “No Track” appears on the monitor.
No tracks are stored. Import tracks to the iPod or D. player.
• “Reset 01” – “Reset 07” appears on the monitor.
Disconnect the adapter from both this unit and iPod/D. player. Then, connect them again.
• “Reset 08” appears on the monitor. Check the connection between the adapter and this unit.
• The iPod’s or D. player’s controls do not work after disconnecting from this unit.
Reset the iPod or D. player.
AV-IN
• No picture appears on the monitor. • Turn on the video component if it is not on.• This unit is not connected to the video component
correctly. Connect it correctly.
• The playback picture is not clear and legible. Adjust items in <Picture Adjust>. ( page 46)
KD-AVX33A.indb 65KD-AVX33A.indb 65 07.2.21 9:33:05 AM07.2.21 9:33:05 AM

66
SpecificationsAM
PLIF
IER
Maximum Power Output: Front/Rear: 50 W per channelContinuous Power Output (RMS):
Front/Rear: 20 W per channel into 4 Ω, 40 Hz to 20 000 Hz at no more than 0.8% total harmonic distortion.
Signal-to-Noise Ratio: 70 dBLoad Impedance: 4 Ω (4 Ω to 8 Ω allowance)Equalizer Control Range: Frequencies: 60 Hz, 150 Hz, 400 Hz, 1 kHz, 2.5 kHz,
6.3 kHz, 15 kHzLevel: ±10 dB
Audio Output LevelLINE OUT (FRONT/REAR)/CENTER OUT/ SUBWOOFER:
Line-Out Level/Impedance: 5.0 V/20 kΩ load (full scale)Output Impedance: 1 kΩ
Color System: NTSC/PALVideo Output (composite): 1 Vp-p/75 ΩOther Terminals: Input: LINE IN, VIDEO IN, MIC IN, USB input
terminal, Antenna inputOutput: 2nd AUDIO OUT, VIDEO OUTOthers: CD changer
FM/A
M TU
NER
Frequency Range: FM: 87.5 MHz to 108.0 MHzAM: 531 kHz to 1 602 kHz
FM Tuner: Usable Sensitivity: 11.3 dBf (1.0 μV/75 Ω)50 dB Quieting Sensitivity: 16.3 dBf (1.8 μV/75 Ω)Alternate Channel Selectivity (400 kHz): 65 dBFrequency Response: 40 Hz to 15 000 HzStereo Separation: 35 dB
AM Tuner: Sensitivity/Selectivity: 20 μV/35 dB
DVD/
CD
Signal Detection System: Non-contact optical pickup (semiconductor laser)Frequency Response: DVD, fs=48 kHz: 16 Hz to 22 000 Hz
DVD, fs=192 kHz: 16 Hz to 88 000 HzVCD/CD: 16 Hz to 20 000 Hz
Dynamic Range: 93 dBSignal-to-Noise Ratio: 95 dBWow and Flutter: Less than measurable limit
KD-AVX33A.indb 66KD-AVX33A.indb 66 07.2.21 9:33:06 AM07.2.21 9:33:06 AM

67 REFERENCES
MON
ITOR
Screen Size: 3.5 inch wide liquid crystal display
Number of Pixel: 211 200 pixels: 960 (horizontal) × 220 (vertical)
Drive Method: TFT (Thin Film Transistor) active matrix format
Color System: NTSC/PAL
Aspect Ratio: 16:9 (wide)
Allowable Storage Temperature: –10°C to +60°C
Allowable Operating Temperature: 0°C to +40°C
USB
USB Standards: USB 1.1
Data Transfer Rate: Full Speed: Maximum 12 MbytesLow Speed: Maximum 1.5 Mbytes
Compatible Device: Mass storage class
Compatible File System: FAT 32/16/12
Max. Current: Less than 500 mA/5 V
BLUE
TOOT
H
Version: Bluetooth 1.2 certified
Output Power: +4 dBm Max. (Power class 2)
Service Area: Within 10 m
Profile: HSP (Headset Profile)HFP (Hands-Free Profile)A2DP (Advanced Audio Distribution Profile)AVRCP (Audio/Video Remote Control Profile)SPP (Serial Port Profile)OPP (Object Push Profile)
GENE
RAL
Power Requirement: Operating Voltage: DC 14.4 V (11 V to 16 V allowance)
Grounding System: Negative ground
Allowable Operating Temperature: 0°C to +40°C
Dimensions (W × H × D): Installation Size (approx.): 182 mm × 52 mm × 160 mm
Panel Size (approx.): 188 mm × 58 mm × 12 mm
Mass (approx.): 2.1 kg (excluding accessories)
Design and specifications are subject to change without notice.
KD-AVX33A.indb 67KD-AVX33A.indb 67 07.2.21 9:33:06 AM07.2.21 9:33:06 AM

EN0207MNMMDWJEIN© 2007 Victor Company of Japan, Limited
Having TROUBLE with operation?Please reset your unit
Refer to page of How to reset your unit
Rear_KD-AVX33A.indd 2Rear_KD-AVX33A.indd 2 07.2.13 9:38:01 AM07.2.13 9:38:01 AM

1
KD-AVX33Installation/Connection Manual
This unit is designed to operate on 12 V DC, NEGATIVE ground electrical systems. If your vehicle does not have this system, a voltage inverter is required, which can be purchased at JVC car audio dealers.
WARNINGS• DO NOT install any unit and wire any cable in locations where;
– it may obstruct the steering wheel and gearshift lever operations, as this may result in a traffic accident.– it may obstruct the operation of safety devices such as air bags, as this may result in a fatal accident.– it may obstruct visibility.
• DO NOT operate any unit while manipulating the steering wheel, as this may result in a traffic accident.• The driver must not watch the monitor while driving. If the driver watches the monitor while driving, it
may lead to carelessness and cause an accident.• The driver must not put on the headphones while driving. It is dangerous to shut off the outside sounds
while driving.• If you need to operate the unit while driving, be sure to look around carefully.• If the parking brake is not engaged, “Parking Brake” appears on the monitor, and no playback picture
will be shown.– This warning appears only when the parking brake lead is connected to the parking brake system built
in the car.Notes on electrical connections:• Replace the fuse with one of the specified rating. If the fuse blows frequently, consult your JVC car audio
dealer.• It is recommended to connect to the speakers with maximum power of more than 50 W (both at the rear
and at the front, with an impedance of 4 Ω to 8 Ω). If the maximum power is less than 50 W, change “Amplifier Gain” setting to prevent the speakers from
being damaged (see page 51 of the INSTRUCTIONS).• To prevent short-circuit, cover the terminals of the UNUSED leads with insulating tape.• The heat sink becomes very hot after use. Be careful not to touch it when removing this unit.
QRubber cushion
GCrimp connectors
NWasher (ø5)
oLock nut (M5)
RMounting bolt—M5 x 20 mm
PHandles
IBatteries
*1 When you stand the unit, be careful not to damage the fuse on the rear.
Do the required electrical connections.
Bend the appropriate tabs to hold the sleeve firmly in place.
Heat sink
MReverse gear signal extension cord
Do not block the fan.
INSTALLATION (IN-DASH MOUNTING)The following illustration shows a typical installation. If you have any questions or require information regarding installation kits, consult your JVC car audio dealer or a company supplying kits.• If you are not sure how to install this unit correctly, have it installed by a qualified technician.• Make sure not to block the fan on the rear panel to maintain proper ventilation when installed.• You cannot install the unit on the car which has any obstacles in the space shown in “Required space for installation” above.
Required space for installation
Control panel
5 mm
5 mm
KMicrophone
LMicrophone clip
Installing the remote controller
HRemote controller / Holder
Trim plate is detached on this illustration for explanation.
LVT1708-004A[A] 0207MNMMDWJEIN
EN©2007 Victor Company of Japan, Limited
FAudio/video cord
Parts list for installation and connectionThe following parts are provided for this unit. After checking them, please set them correctly.
Dashboard
CSleeve
EPower cord
A / BHard case/Control panel
DTrim plate
J Double-sided adhesive tape
Double-sided adhesive tape
Holder
Remote controller
Fit the protrusions outside the unit.
Caution when installingFit the unit into the mounting sleeve by using four corners of the trim plate.• DO NOT press the panel (shaded in the illustration).
Instal1-2_KD-AVX33[A].indd 1Instal1-2_KD-AVX33[A].indd 1 07.2.21 11:04:43 AM07.2.21 11:04:43 AM

2
When using the optional stay When installing the unit without using the sleeveIn a car having the “Required space for installation” (see page 1), first remove the car radio and install the unit in its place.
Screw (option)
Stay (option)
Fire wall
DashboardBracket *2
*2 Not included for this unit.Flat type screws—M5 x 8 mm*2
Bracket *2
Install the unit at an angle of less than 30˚.
Note: When installing the unit on the mounting bracket, make sure to use the 8 mm-long screws. If longer screws are used, they could damage the unit.
Removing the unitBefore removing the unit, release the rear section.
Insert the two handles, then pull them as illustrated so that the unit can be removed.
30˚
Flat type screws—M5 x 8 mm*2
Connecting the Mic unit
or Adjust the microphone angle
Microphone
Microphone clip
JDouble-sided adhesive tape
C
Secure the microphone cord using cord cramps (not supplied) if necessary.
1 2
Connect the parking brake lead to the parking brake system built in the car.
Parking brake lead (light green)
To metallic body or chassis of the carParking brake switch (inside the car)
Parking brake
Connecting the parking brake leadA
Connecting the reverse gear signal lead (for rear view camera) (REVERSE GEAR SIGNAL)
Locate the reverse lamp lead in the trunk.
To reverse lampReverse lamp lead
Reverse lamp lead
To car battery Purple with white stripe
Reverse lamps
B
Instal1-2_KD-AVX33[A].indd 2Instal1-2_KD-AVX33[A].indd 2 07.2.21 11:04:50 AM07.2.21 11:04:50 AM

3
To prevent short circuits, we recommend that you disconnect the battery’s negative terminal and make all electrical connections before installing the unit.• Be sure to ground this unit to the car’s chassis again after installation.
Typical connectionsBefore connecting: Check the wiring in the vehicle carefully. Incorrect connection may cause serious damage to this unit.The leads of the power cord and those of the connector from the car body may be different in color.1 Connect the colored leads of the power cord in the order specified in the illustration below.2 Connect the antenna cord.3 Finally connect the wiring harness to the unit.
15 A fuse
Rear ground terminal
To an external component (see diagram )
To parking brake (see diagram )
Yellow *4
USB cable (see diagram )
*3 Not included for this unit*4 Before checking the operation of this unit prior
to installation, this lead must be connected, otherwise power cannot be turned on.
To metallic body or chassis of the car
To a live terminal in the fuse block connecting to the car battery (bypassing the ignition switch) (constant 12 V)
To an accessory terminal in the fuse block
To automatic antenna if any (250 mA max.)
Fuse block
Black
Red
Blue
Blue with white stripe
Orange with white stripe
Brown
Light green
To car light control switch
To cellular phone system
To the remote lead of other equipment (200 mA max.)
Ignition switch
White with black stripe White Gray with
black stripe Gray Green with black stripe Green Purple with
black stripe Purple
Left speaker (front) Right speaker (front) Left speaker (rear) Right speaker (rear)
PRECAUTIONS on power supply and speaker connections:• DO NOT connect the speaker leads of the power cord to the car battery; otherwise, the
unit will be seriously damaged.• BEFORE connecting the speaker leads of the power cord to the speakers, check the speaker wiring in
your car.
ELECTRICAL CONNECTIONS
Connections for external component playback
KS-HP2Cordless headphones (not supplied) *5
KV-MR90109-INCH WIDESCREEN MONITOR (not supplied)
Video cord (not supplied)
*5 To listen to disc playback sound while in Dual Zone operations (see page 26 of INSTRUCTIONS).
*6 Audio cord (not supplied)
Camcorder, rear view camera, etc.
A
Navigation System
Instal3-4_KD-AVX33[A].indd 4Instal3-4_KD-AVX33[A].indd 4 07.2.21 11:06:02 AM07.2.21 11:06:02 AM

Connecting the external amplifiersYou can connect amplifiers to upgrade your car stereo system.• Connect the remote lead (blue with white stripe) to the remote lead of the other equipment so that it can be controlled through this unit.• For amplifier only:
– After you have connected the center speaker, make sure to activate the center speaker; otherwise, no sound comes out of the connected center speaker, see page 49 of the INSTRUCTIONS.– Disconnect the speakers from this unit, connect them to the amplifier. Leave the speaker leads of this unit unused.– You can switch off the built-in amplifier and send the audio signals only to the external amplifier(s) to get clear sounds and to prevent internal heat buildup. See page 51 of the INSTRUCTIONS (separate
volume).
*6 Audio cord (not supplied)*7 Firmly attach the ground wire to the metallic
body or to the chassis of the car—to the place uncoated with paint (if coated with paint, remove the paint before attaching the wire). Failure to do so may cause damage to the unit.
Connecting external components C
4
Center speaker
• iPod is a trademark of Apple Inc., registered in the U.S. and other countries.
USB cable—approx.1.2 m
B
USB device
Audio cord (not supplied)
3.5 mm stereo mini plug
External component
Remote leadRemote lead (Blue with white stripe)
To the remote lead of other equipment
Y-connector (not supplied for this unit)
JVC Amplifier
JVC Amplifier
JVC AmplifierJVC Amplifier
Rear speakers
Front speakers
Subwoofer
You can connect external components in series as shown in the diagram below.• All the components, adapters or signal cords need to be purchased separately.
CAUTION:Before connecting the external components, make sure that the unit is turned off.
• To use JVC CD changer, Apple iPod or JVC D. player, set “External Input” to “Changer/iPod/D. Player” (see page 50 of the INSTRUCTIONS).
• To use other external components via KS-U57 or KS-U58, set “External Input” to “External Input” (see page 50 of the INSTRUCTIONS)
External componentKS-U57*8
KS-U58*9
KS-PD100
KS-PD500
Apple iPod
JVC D. player
Front speakers
JVC CD changer
orCD changer jack
Hold the connector top tightly (1), then pull it out (2).
To disconnect the connector
or
or
or
External component
External component
External component
orCD changer jack
USB devices
*8 Line Input Adapter KS-U57 (separately purchased)*9 Aux Input Adapter KS-U58 (separately purchased)
You cannot connect a computer to the USB ( ) terminal of the unit.
• The fuse blows.* Are the red and black leads connected correctly?• Power cannot be turned on.* Is the yellow lead connected?• No sound from the speakers.* Is the speaker output lead short-circuited?• Sound is distorted.* Is the speaker output lead grounded?* Are the “–” terminals of L and R speakers grounded in common?
TROUBLESHOOTING• Noise interfere with sounds.* Is the rear ground terminal connected to the car’s chassis using shorter and thicker cords?• Unit becomes hot.* Is the speaker output lead grounded?* Are the “–” terminals of L and R speakers grounded in common?• This unit does not work at all.* Have you reset your unit?
Instal3-4_KD-AVX33[A].indd 5Instal3-4_KD-AVX33[A].indd 5 07.2.21 11:06:08 AM07.2.21 11:06:08 AM