instructions manual planetary mixer - Skymsen
8
INSTRUCTIONS MANUAL PLANETARY MIXER Model BPS-05 ® - ALÉM DESTAS MÁQUINAS, FABRICAMOS UMA LINHA COMPLETA DE EQUIPAMENTOS. CONSULTE SEU REVENDEDOR. - ESTE PRODUTO CONTA COM ASSISTÊNCIA TÉCNICA, REPRESENTANTES E REVENDEDORES EM TODO TERRITÓRIO NACIONAL. DEVIDO À CONSTANTE EVOLUÇÃO DOS NOSSOS PRODUTOS, AS INFORMAÇÕES AQUI CONTIDAS PODEM SER MODIFICADAS SEM AVISO PRÉVIO. LINHA DIRETA SKYMSEN Ramais 2011 2012 2013 E-mail: [email protected] METAL RGICA SIEMSEN LTDA. Rua Anita Garibaldi, nº 262 – Bairro: Sn o Luiz – CEP: 88351-410 Brusque – Santa Catarina – Brasil Fone: +55 47 3255 2000 – Fax: +55 47 3255 2020 www.siemsen.com.br - [email protected] METALÚRGICA SIEMSEN LTDA. METALÚRGICA SIEMSEN LTDA. 32513.9 - Janeiro / 2014
-
Upload
khangminh22 -
Category
Documents
-
view
3 -
download
0
Transcript of instructions manual planetary mixer - Skymsen

INSTRUCTIONS MANUALPLANETARY MIXER
Model
BPS-05
®
- ALÉM DESTAS MÁQUINAS, FABRICAMOS UMA LINHA COMPLETA DE EQUIPAMENTOS. CONSULTE SEU REVENDEDOR.- ESTE PRODUTO CONTA COM ASSISTÊNCIA TÉCNICA, REPRESENTANTES E REVENDEDORES EM TODO TERRITÓRIO NACIONAL.
DEVIDO À CONSTANTE EVOLUÇÃO DOS NOSSOS PRODUTOS, AS INFORMAÇÕES AQUI CONTIDAS PODEM SER MODIFICADAS SEM AVISO PRÉVIO.
LINHA DIRETA
SKYMSENRamais 2011
2012 2013
E-mail: [email protected]
METALÚRGICA SIEMSEN LTDA.Rua Anita Garibaldi, nº 262 – Bairro: Sno Luiz – CEP: 88351-410
Brusque – Santa Catarina – BrasilFone: +55 47 3255 2000 – Fax: +55 47 3255 2020
www.siemsen.com.br - [email protected]
METALÚRGICA SIEMSEN LTDA.
METALÚRGICA SIEMSEN LTDA.
32513.9 - Janeiro / 2014

11
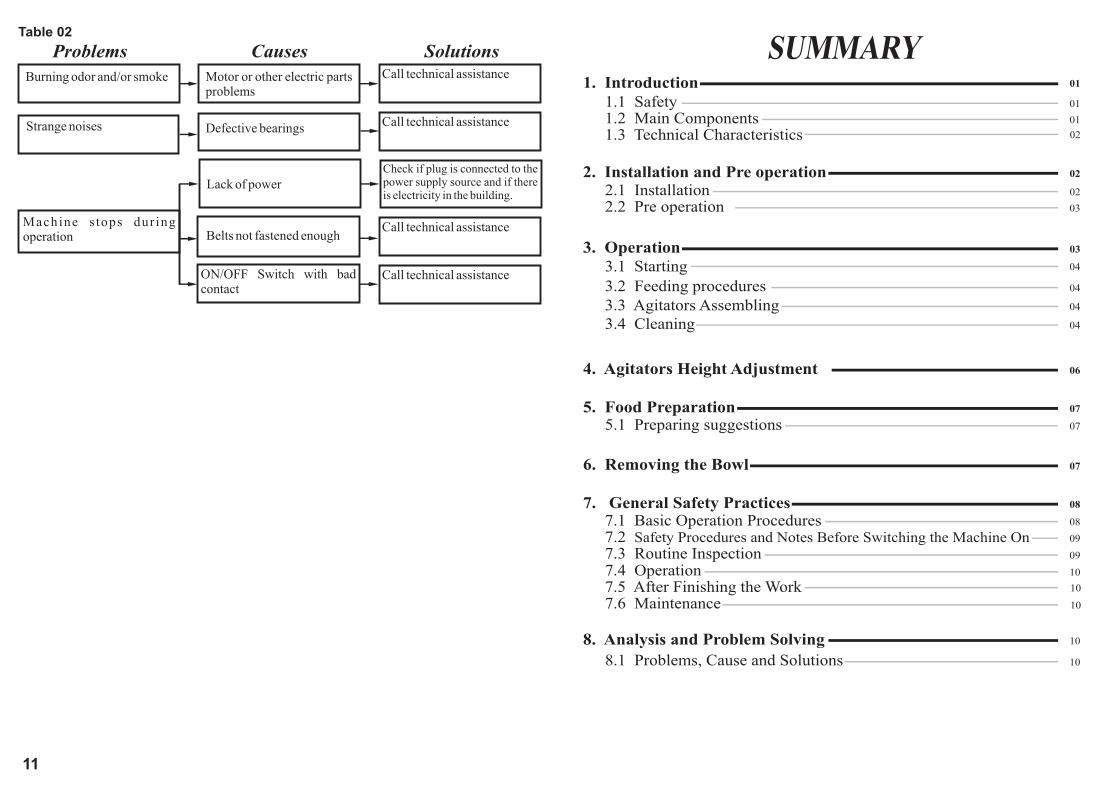
SUMMARY
1.2 Main Components1.3 Technical Characteristics
1. Introduction 01
1.1 Safety 01
01
02
2. Installation and Pre operation2.1 Installation2.2 Pre operation
02
02
03
7. General Safety Practices7.1 Basic Operation Procedures
7.4 Operation
7.2 Safety Procedures and Notes Before Switching the Machine On
7.5 After Finishing the Work
7.3 Routine Inspection
7.6 Maintenance
08
08
09
09
10
10
10
8. Analysis and Problem Solving
8.1 Problems, Cause and Solutions 10
10
3. Operation3.1 Starting
3.4 Cleaning
3.2 Feeding procedures
03
04
04
04
3.3 Agitators Assembling 04
4. Agitators Height Adjustment 06
5. Food Preparation5.1 Preparing suggestions
07
07
6. Removing the Bowl 07
Table 02
Problems Causes Solutions
Burning odor and/or smoke
Strange noises
Motor or other electric parts problems
Defective bearings
Call technical assistance
Call technical assistance
Machine s tops dur ing operation
Lack of power
Belts not fastened enough
ON/OFF Switch with bad contact
Check if plug is connected to the power supply source and if there is electricity in the building.
Call technical assistance
Call technical assistance

1001
1. Introduction
1.1 Safety
When not properly used the Planetary Mixer is a potentially dangerous machine. Servicing, cleaning or any other operation shall be made by trained people. Plug has to be off outlet during any of these operations.
* Unplug the machine when you need to remove any removable part during cleaning, servicing or any other operation.
* Never make use of any tool or instrument that is not originally part of the machine during any operation. Be sure that removable parts are properly installed in its correct position.
* Before switching the machine on check if all removable parts are properly fitted in their right positions.
* Never throw water directly to the machine.* Never use inappropriate clothes mainly long sleeves during operation.* Keep hands off turning parts.* Do not operate the machine wearing wet clothes or wet shoes.* Before operating the machine be sure it is grounded properly.* Operators have to tie his/her hair up before starting operation.* Take good care of this manual and have it handy for use at any time.* The Planetary Mixer must not be operated by children or by people incapable of
operating it correctly in order to avoid accidents.* Keep children away from the Planetary Mixer, its parts and accessories in order to avoid
accidents.* For your safety, the temperature of the processed products shall not exceed 40 °C.
1.2 Main Components
All components of this machine were designed and made to its proper function according to pattern tests and experience of Siemsen.
7.4 Operation
7.4.1 Advice
Be sure your hair is not loose in order to avoid getting caught by turning parts which could lead to a serious accident. Tie your hair up well and/or cover your head with a scarf.The operation performed by not trained or skilled personnel shall be forbidden.Never touch turning parts with your hands or in any other way.NEVER operate machine without all original safety devices under perfect conditions.
7.5 After Finishing The Work
7.5.1 Precautions
Always TURN THE MACHINE OFF by removing the plug from the socket before cleaning the machine. Never clean the machine unless it has come to a complete stop. Put all components back to their functional positions before turning it ON again. Check level of oil. DO NOT place your fingers in between belts and pulleys nor chains and gears.
7.6 Maintenance
7.6.1 Danger
Any maintenance with the machine in working situation is dangerous. TURN IT OFF BY PULLING THE PLUG OFF THE SOCKET DURING MAINTENANCE.
7.6.2 Advice
Electrical or mechanical maintenance has to be undertaken by qualified personal. Person in charge has to be sure that the machine is under TOTAL SAFETY conditions when working.
8.1 Problem, causes and solutions
The Planetary Mixer is designed to operate with the need of minimum maintenance but the natural wearing caused by longer use of the equipment may occasionally cause some malfunctions.
If such problem occurs with your mixer refer to Table 02 in which the most common situations are listed with recommended solutions.
8. Analysis and Problems Solving
09 02
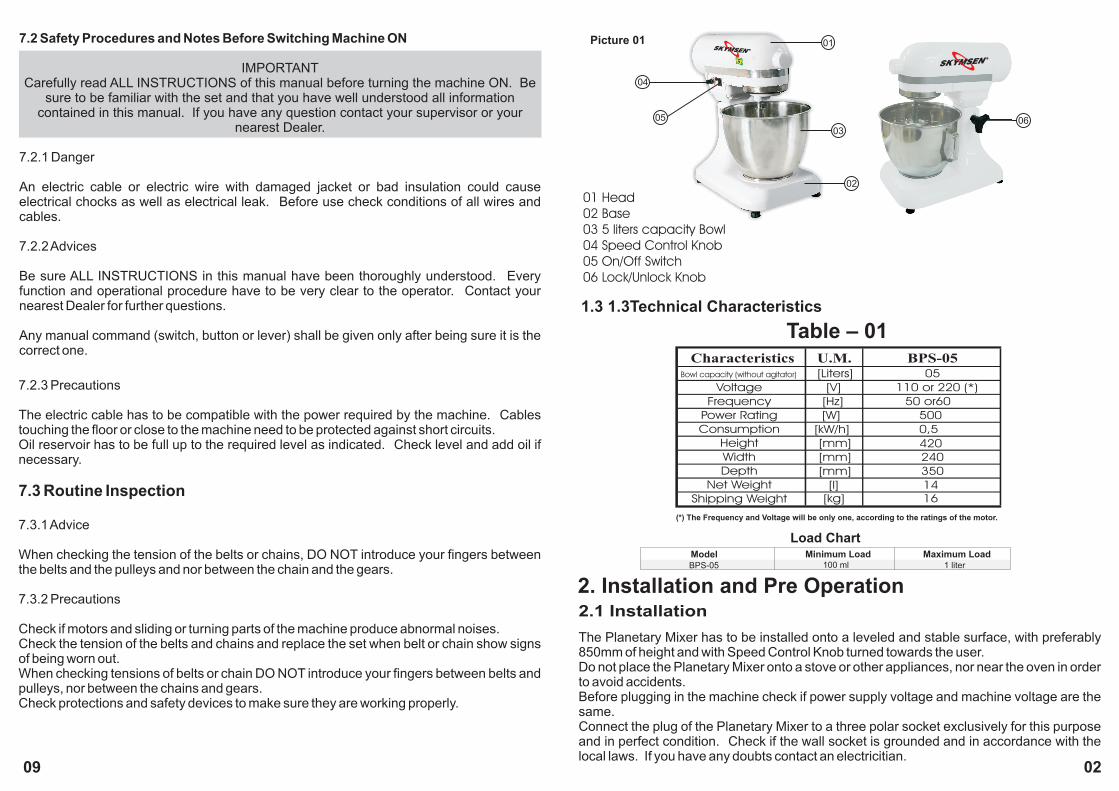
1.3 1.3Technical Characteristics
2.1 Installation
The Planetary Mixer has to be installed onto a leveled and stable surface, with preferably 850mm of height and with Speed Control Knob turned towards the user.Do not place the Planetary Mixer onto a stove or other appliances, nor near the oven in order to avoid accidents.Before plugging in the machine check if power supply voltage and machine voltage are the same. Connect the plug of the Planetary Mixer to a three polar socket exclusively for this purpose and in perfect condition. Check if the wall socket is grounded and in accordance with the local laws. If you have any doubts contact an electricitian.
2. Installation and Pre Operation
Table – 01Characteristics U.M. BPS-05
Bowl capacity (without agitator) [Liters] 05Voltage
Frequency Power Rating Consumption
HeightWidthDepth
Net Weight Shipping Weight
[V] 110 or 220 (*) [Hz] 50 or60 [W] 500
[kW/h] 0,5[mm] 420[mm] 240[mm] 350
[l] 14[kg] 16
Picture 01
01 Head02 Base03 5 liters capacity Bowl04 Speed Control Knob05 On/Off Switch06 Lock/Unlock Knob
05
04
01
0306
02
(*) The Frequency and Voltage will be only one, according to the ratings of the motor.
Model Maximum LoadMinimum LoadBPS-05 1 liter100 ml
Load Chart
®
®
7.2 Safety Procedures and Notes Before Switching Machine ON
IMPORTANTCarefully read ALL INSTRUCTIONS of this manual before turning the machine ON. Be
sure to be familiar with the set and that you have well understood all information contained in this manual. If you have any question contact your supervisor or your
nearest Dealer.
7.2.1 Danger
An electric cable or electric wire with damaged jacket or bad insulation could cause electrical chocks as well as electrical leak. Before use check conditions of all wires and cables.
7.2.2 Advices
Be sure ALL INSTRUCTIONS in this manual have been thoroughly understood. Every function and operational procedure have to be very clear to the operator. Contact your nearest Dealer for further questions.
Any manual command (switch, button or lever) shall be given only after being sure it is the correct one.
7.2.3 Precautions
The electric cable has to be compatible with the power required by the machine. Cables touching the floor or close to the machine need to be protected against short circuits.Oil reservoir has to be full up to the required level as indicated. Check level and add oil if necessary.
7.3 Routine Inspection
7.3.1 Advice
When checking the tension of the belts or chains, DO NOT introduce your fingers between the belts and the pulleys and nor between the chain and the gears.
7.3.2 Precautions
Check if motors and sliding or turning parts of the machine produce abnormal noises. Check the tension of the belts and chains and replace the set when belt or chain show signs of being worn out.When checking tensions of belts or chain DO NOT introduce your fingers between belts and pulleys, nor between the chains and gears.Check protections and safety devices to make sure they are working properly.

0803
2.2 Pre Operation
Check if the Planetary Mixer is firm in its position. Remove and wash all removable parts. For your safety read item “3.4 Cleaning” on this Manual.
3 Operation
- Check if Speed Control Knob is positioned at 0 position and if plug is disconnected from wall socket.
- Loosen the Lock/Unlock Knob (Pic.01 Nº06).- Incline the Head of the Mixer rearwards (Pic.02).
- Load the Bowl with ingredients then fast it to the support base turning it clockwise until it is blocked (Pic.03).
- Select the desired agitator and connect it to the agitator shaft matching the shaft pin with agitator groove. It is necessary to push and turn the agitator counter clockwise in order to lock it (Pic.04).
Pic.02
Pic.03
Pic.04
7. General Safety Practices
The following safety instructions are addressed to both the operator of the machine as well as the person in charge of maintenance. The machine has to be delivered only in perfect conditions of use by the Distributor to the user. The user shall operate the machine only after being well acquainted with the safety procedures described in the present manual. READ THIS MANUAL WITH ATTENTION.
7.1 Basic Operation Practices
7.1.1 Dangerous parts
Some areas of the electric device have parts that are connected or have parts connected to high voltage. These parts when touched may cause severe electrical chocks or even be fatal.Never touch switches such as buttons, turning keys and knobs with your hands wearing wet clothes and/or wet shoes. By not following these instructions operator could be exposed to severe electrical shocks or even to a fatal situation.
7.1.2 Warnings
The operator has to be well familiar with the position of ON/OFF Switch to make sure the Switch is easy to be reached when necessary. Before any kind of maintenance, physically remove plug from the socket.Provide space for a comfortable operation thus avoiding accidents.Water or oil spilled on the floor will turn it slippery and dangerous. Make sure the floor is clean and dry.Before giving any manual command (switch, buttons, turn keys or lever) be sure the command is the correct one. Check this manual for further details if necessary.Never use a manual command (switch, buttons, lever) unadvisedly.If any work is to be made by two or more persons, coordination signs will have to be given for each operation step. Every step of the operation shall be taken only if a sign has been made and responded.
7.1.3 Advices
In case of power shortage, immediately turn the machine OFF.Use recommended or equivalent lubricants, oils or greases.Avoid mechanical chocks as they may cause failures or malfunction.Avoid penetration of water, dirt or dust into mechanical or electrical components of the machine.DO NOT modify original characteristics of the machine.DO NOT remove, tear off or maculate any labels sticked on the machine. If any labels has been removed or is no longer legible contact your nearest dealer for replacement.READ CAREFULLY AND WITH ATTENTION THE SAFETY OR OPERATION INSTRUCTIONS LABELS DISPLAYED ON THE MACHINE, AS WELL AS THE INSTRUCTION MANUAL AND THE TECHNICAL CHARACTERISTICS WRITTEN INSIDE.
IMPORTANT
If any item from the GENERAL SAFETY NOTIONS section is not applicable to your product, please disregard it.

07 04
3.2 Feeding Procedure
Mount the selected agitator: Globe (Pic.07), Beater (Pic.08) or Hook (Pic.09); put ingredients into the Bowl (Pic.01 Nº03); switch the machine ON and then select desired speed using the Speed Control Konb.
IMPORTANTOnly alter speed with machine turned ON.
3.3 Agitators Assembling- Check if Speed Control Knob is at 0 position and if plug of the machine is disconnected from wall socket.
- Unlock knob that is located on machine’s base side.
- Incline Head of the machine backwards.
- Load Bowl with ingredients then fast it to the support base turning it clockwise until it is locked.
- Select desired agitator and slip it to the agitator shaft matching the shaft pin with agitator groove. It is necessary to push and turn the agitator counter clockwise in order to lock it to the shaft pin.
- Place Head back to its original position and lock it using the Lock/Unlock Knob that is located on machine’s base side. Before starting the operation check if Head is really locked trying to raise it.
- Connect plug to a wall socket with same voltage as the machine.
- Switch the machine ON using the ON/OFF Switch and then select the desired speed until operation is finished.
3.1 Starting
To switch ON the machine push ON/OFF Switch (Pic.01 Nº05) located on the head of the machine.
- Place the head back to its original position and fasten Lock/Unlock Knob (Pic.01 Nº06).
All removable parts must be removed and washed. Wash them with running water and neutral soap.
3.4 Cleaning
IMPORTANTNever do cleaning with machine plugged in, always unplug machine before
cleaning.
5. Food Preparation
Your Planetary Mixer mixes products in a more homogeneous way and faster than any other electric mixer. Therefore, the mixing time for most of the recipes must be adjusted in order to avoid product being over mixed. For making cakes, for example, mixing time may be different than the one indicated by other mixers.Three models of agitator accompany your machine. Each of them is used for a specific operation.
1. Agitator for light dough: The flat beater for light dough as shown on Picture 08 is ideal for beating light dough such as: cakes, pies, cookies, biscuits, quick breads, mashed potato, sweet balls, meat balls, and similar.
2. Agitator for heavy dough: The hook for heavy dough as shown on Picture 09 is ideal for beating heavy dough with yeast such as: bread, pizza, pasta and similar. Observation: when working with the hook for heavy dough use only speed 1 to avoid damage to the Mixer.
3. Agitator globe: The globe as shown on Picture 07 is ideal for mixtures that need air incorporated such as: egg whites, whipped cream, mayonnaise, sponge cakes, candies and similar.
Observation: Liquid Mixtures. Mixtures containing large quantity of liquid ingredients must be mixed at lower speed to avoid splashing.
5.1 Preparing suggestions
Speed 1: For agitating and mixing ingredients slowly. Start every type of mixture with speed 1. Use to add flour and other dry ingredients to the dough or liquid to dry ingredients or mixing heavy dough.
Speed 2: For mixing in a faster speed. Use to mix heavy dough, for example: to start mixing mashed potato or other vegetables, mixing butter or grease to flour or mixing thin light dough, mixing dough balls, breads and cookies dough.
Speed 3: For beating in medium and high speeds. Use to finish cakes and biscuits and similar dough.
Speed 4: For whipping small amounts of cream or egg whites. Also use to beat chantilly, whipped cream and glace.
6. Removing the Bowl- Place Speed Control Knob at 0 position and disconnect plug from the wall socket.- Unlock Lock/Unlock Knob (Pic.01 Nº06).- Incline Head of the machine backwards and lock Lock/Unlock Knob (Pic.01 Nº06).- Remove agitator holding it by its shaft, push it upward and turn clockwise at the same time. Then pull it down. - Remove bowl turning it counterclockwise.

05
IMPORTANTNever use water jets directly to the machine.
4. Agitator Height Adjustment
IMPORTANTMixer BPS-05 comes adjusted from factory. However, in case agitator is touching
the bottom of the bowl you can adjust it, as explained below.
- Check if Speed Control Knob is at 0 position and if plug is disconnected from wall socket.
- Unlock the Lock/Unlock Knob (Pic.01 Nº06).
- Incline Head of the machine backwards.
- Using a wrench key turn the screw located on superior portion of the support counterclockwise slowly in order to raise agitator, or clockwise to lower it and then regulate the screw until the ideal point is found, which is when agitator is almost touching the bottom of the bowl.
Pic.06Pic.05
06
Pic.07 Pic.08 Pic.09
3.4.1 Cautions with Stainless Steel:
The Stainless Steel may present rust signs, which ARE ALWAYS CAUSED BY EXTERNAL AGENTS, especially when the cleaning or sanitization is not constant and appropriate.
The Stainless Steel resistance towards corrosion is mainly due to the presence of chrome, which in contact with oxygen allows the formation of a very thin protective coat. This protective coat is formed through the whole surface of the steel, blocking the action of external corrosive agents.
When the protective coat is broken, the corrosion process begins, being possible to avoid it by means of constant and adequate cleaning.
Cleaning must always be done immediately after using the equipment. For such end, use water, neutral soap or detergent, and clean the equipment with a soft cloth or a nylon sponge. Then rinse it with plain running water, and dry immediately with a soft cloth, this way avoiding humidity on surfaces and especially on gaps.
The rinsing and drying processes are extremely important to prevent stains and corrosion from arising.
IMPORTANTAcid solutions, salty solutions, disinfectants and some sterilizing solutions (hypochlorites, tetravalent ammonia salts, iodine compounds, nitric acid and others), must be AVOIDED, once it cannot remain for long in contact with the stainless steel:
These substances attack the stainless steel due to the CHLORINE on its composition, causing corrosion spots (pitting).
Even detergents used in domestic cleaning must not remain in contact with the stainless steel longer than the necessary, being mandatory to remove it with plain water and then dry the surface completely.
Use of abrasives:Sponges or steel wool and carbon steel brushes, besides scratching the
surface and compromising the stainless steel protection, leave particles that rust and react contaminating the stainless steel. That is why such products must not be used for cleaning and sanitization. Scrapings made with sharp instruments or similar must also be avoided.
Main substances that cause stainless steel corrosion:Dust, grease, acid solutions such as vinegar, fruit juices, etc., saltern
solutions (brine), blood, detergents (except for the neutral ones), common steel particles, residue of sponges or common steel wool, and also other abrasives.