
iMod User's Manual ENG - a2s.pl
100
© 2012 TechBase S.A. Technical contact - support.techbase.eu 1/100 iMod User's Manual
-
Upload
khangminh22 -
Category
Documents
-
view
4 -
download
0
Transcript of iMod User's Manual ENG - a2s.pl

© 2012 TechBase S.A. Technical contact - support.techbase.eu 1/100
iMod User's Manual

TECHBASE (C) iMod User's Manual ENG 2/100
© 2012 TechBase S.A. Technical contact - support.techbase.eu 2/100
iMod User's Manual
VersionDocument version Creation Date Changes
2.1.0 21.08.2012 Extended base version (XML Tree - Possible Configuration Elements, F.A.Q. chaptersupplemented)
1.0.0 21.04.2010 Base version
1.1.0 01.06.2011 Extended base version (1wire, Mbus, WWW chapter, Basic commands, XML Tutorial,Added chapter 8., Appendix A, Appendix B, Appendix C)
2.0.0 01.05.2012 Second version
For further information on work with the device, consult the following documents:
NPE instructions1.NxDynamics instructions2.
For further information or in case of finding any innacuracy, please use the technical supprt portal TechBase Support in orderto submit an application.
This version of the document is a pre-release version, made public due to manyrequests from our customers. The folliwing content is not official technicaldocumentation and may be used only as auxiliary information. TechBase SA reservesthe right to change the contents of the document without notice.

TECHBASE (C) iMod User's Manual ENG 3/100
© 2012 TechBase S.A. Technical contact - support.techbase.eu 3/100
Table of ContentsTable of contents1.Preparation for the first start-up2.Introduction3.Description of the Connectors4.Configuration of the Device (NPE)5.iMod Platform Quickstart6.Configuration File Structure7.Modbus Gateway/Router/Proxy8.Integration of 1-Wire Bus with iMod Platform9.Mbus Protocol10.Scripts as Data Source11.Event Communication12.Web Visualization13.Data Registering14.SNMP15.iMod SDK16.iMod PLC17.F.A.Q.18.
Appendices
iMod Configuration Tutorials●
Example XML Configurations●
XML Tree - Possible Configuration Elements●
Useful Tools and Commands●
Accessories●
TRM Manual●

TECHBASE (C) iMod User's Manual ENG 4/100
© 2012 TechBase S.A. Technical contact - support.techbase.eu 4/100

TECHBASE (C) iMod User's Manual ENG 5/100
© 2012 TechBase S.A. Technical contact - support.techbase.eu 5/100
Spis treściPreparation for the first start-up ..................................................................................................................................... 7Connecting the device ........................................................................................................................................................ 8
Connecting the device ...................................................................................................................................................... 8Method 2. LAN connection .............................................................................................................................................. 10Telenet connection .......................................................................................................................................................... 12
Checking Firmware Version ............................................................................................................................................ 13Packages Update with NxDynamics ................................................................................................................................ 13
Introduction ....................................................................................................................................................................... 15About Document ............................................................................................................................................................. 15About the device ............................................................................................................................................................. 15About the NPE system ..................................................................................................................................................... 16
Preparation for the first start-up ................................................................................................................................... 17Preparation for the first start-up ..................................................................................................................................... 171 Screw Connection Description. (C1) ............................................................................................................................. 182 Screw Connection Description. (C2) ............................................................................................................................. 19
Configuration of the Device (NPE) ................................................................................................................................. 20Base Configuration (syscfg) ............................................................................................................................................ 20Startup Services Configuration (initsrv) .......................................................................................................................... 22GPRS Connection Configuration ...................................................................................................................................... 23DynDNS Configuration .................................................................................................................................................... 24
iMod Platform Quickstart ................................................................................................................................................ 25Initial Information ............................................................................................................................................................ 25Example Configuration of Receiving Access to Hardware Resources .............................................................................. 25
Configuration File Structure ........................................................................................................................................... 30Loading a Configuration .................................................................................................................................................. 30Configuration Verification ................................................................................................................................................ 30Rules of Construction ...................................................................................................................................................... 30
Modbus Gateway/Router/Proxy ...................................................................................................................................... 34Modbus Gateway ............................................................................................................................................................. 34Modbus Router ................................................................................................................................................................ 34Modbus Proxy .................................................................................................................................................................. 35Point-to-Point Connection ................................................................................................................................................ 36Point-to-Multipoint Connection ........................................................................................................................................ 38TCP/RTU/ASCII Connection .............................................................................................................................................. 40How to Adjust Configuration to the Poll? ......................................................................................................................... 4032-bit Parameters ........................................................................................................................................................... 42Gap / Cycle / Delay / Read Timeout ................................................................................................................................. 43Forcing Each Write - Property Force ................................................................................................................................ 45
Integration of 1-Wire Bus with iMod Platform ............................................................................................................. 46Sensor Detection ............................................................................................................................................................. 46Integration of the Configuration ...................................................................................................................................... 47
Mbus protocol .................................................................................................................................................................... 50Connecting Mbus meters ................................................................................................................................................ 50Making Your own MBus Configuration ............................................................................................................................. 52
Scripts as Data Source ..................................................................................................................................................... 56Example - User_LED readout ........................................................................................................................................... 56
Event Communication ...................................................................................................................................................... 59Triggering Conditions ...................................................................................................................................................... 59Action Types .................................................................................................................................................................... 67
Messages Definition ......................................................................................................................................................... 78Dynamic content definition ............................................................................................................................................. 78
Web Visualization ............................................................................................................................................................. 79NXDynamics .................................................................................................................................................................... 79TRM Template ................................................................................................................................................................. 79Own Website ................................................................................................................................................................... 79

TECHBASE (C) iMod User's Manual ENG 4/100
© 2012 TechBase S.A. Technical contact - support.techbase.eu 4/100
Apache Server Configuration .......................................................................................................................................... 82Data Registering ............................................................................................................................................................... 83
Into CSV Files .................................................................................................................................................................. 83SNMP ................................................................................................................................................................................... 87Example configuraion - Modbus to SNMP ..................................................................................................................... 87iMod SDK ............................................................................................................................................................................ 90iMod PLC ............................................................................................................................................................................. 91XML Tree - Possible Configuration Elements ............................................................................................................... 92F.A.Q. .................................................................................................................................................................................. 98

TECHBASE (C) iMod User's Manual ENG 5/100
© 2012 TechBase S.A. Technical contact - support.techbase.eu 5/100

TECHBASE (C) iMod User's Manual ENG 6/100
© 2012 TechBase S.A. Technical contact - support.techbase.eu 6/100
QuickStart

TECHBASE (C) iMod User's Manual ENG 7/100
© 2012 TechBase S.A. Technical contact - support.techbase.eu 7/100
Preparation for the first start-up
Power adapter1.In order to connect the device you need to prepare a power adapter according to the specification, with the minimumparameters of: 12VDC 1000 mA. You can use the DN-20-24 power adapter.Network cable with RJ45 connector2.Network cable will be used to connect the device to a local area network (LAN) with access to the Internet, or for a directcomputer connection.SearchNPE Application3.The SearchNPE application enables detection of iMOD/NPE devices in the network. You should install this application onthe computer.

TECHBASE (C) iMod User's Manual ENG 8/100
© 2012 TechBase S.A. Technical contact - support.techbase.eu 8/100
Connecting the device The first step is to connect the power supply.
Next, connect the device to a computer or LAN with a network cable.
Method 1. Direct connection
Direct connection between a computer and the device requires additional network interface configuration. The device shouldbe connected directly to a computer with an Ethernet network cable.
The device automatically detects the connection cable type, so that you can use bothcrossover and standard cables.

TECHBASE (C) iMod User's Manual ENG 9/100
© 2012 TechBase S.A. Technical contact - support.techbase.eu 9/100
IP configuration
In order to establish a connection you need to configure the IP properly. The IP address should be on the same subnet as thedevice. The subnet of the computer (and the device) is defined by two parameters:
IP address●
Subnet mask●
Ethernet interface of the device has the following default configuration:
IP address: 192.168.0.101●
Subnet mask: 255.255.255.0●
This information will be used in the next step.
Above there are the device default parameters, assuming they have not been changed. The computer must have thefollowing IP configuration:
IP address: 192.168.0.105●
Subnet mask: 255.255.255.0●
After the above mentioned network settings configuration you will be able to establish a connection with the iMod/NPEdevice.

TECHBASE (C) iMod User's Manual ENG 10/100
© 2012 TechBase S.A. Technical contact - support.techbase.eu 10/100
Method 2. LAN connection
Another method is connecting the device to a local area network (LAN). If a router in the network has the DHCP (DynamicHost Configuration Protocol) service active, the device IP address will be randomly assigned after start. In order to improvesearching for the addresses assigned to devices in the local area network the SearchNPE application has been created.
After launching the installed application a search window will appear:

TECHBASE (C) iMod User's Manual ENG 11/100
© 2012 TechBase S.A. Technical contact - support.techbase.eu 11/100
Next, you need to set the scope of the addresses you search as default for the LAN. For example, for 192.168.5.x networkaddresses type in '192.168.5.*'
Click on the Search button in order to search the network.

TECHBASE (C) iMod User's Manual ENG 12/100
© 2012 TechBase S.A. Technical contact - support.techbase.eu 12/100
Telnet connection When you already know the IP address of a device, you can make a telnet connection in order to begin the device startupand configuration.
In Windows 7 you need to install the service manually.
type in telnet IP address in the command-line interface●
The following window appears●
You need to enter a login and a password in order to log in. The default values are:
Login: user●
Password: user●
The entered password is not visible on the screen.
In order to get Administrator privileges, you need to use the su command●
Default password: techbase

TECHBASE (C) iMod User's Manual ENG 13/100
© 2012 TechBase S.A. Technical contact - support.techbase.eu 13/100
Checking Firmware Version Technical support covers only the latest versions of software. After the first startup, please check if the current firmwareversion and the latest packages are installed.
In order to do that, you need to execute the softmgr update firmware command●
This command checks if a more recent version of firmware is available and it updates the firmware together with the basicpackages.
After firmware update a reboot of the device with the reboot command is required.
Packages Update with NxDynamics
In order to check if there are any active software packages for the device, you need to log in the NXDynamics interface●
(pre-installed 30 days trial version) typing the deviceIP/nx into the browser URL address:

TECHBASE (C) iMod User's Manual ENG 14/100
© 2012 TechBase S.A. Technical contact - support.techbase.eu 14/100
After logging in, you need to open the Services tab and check if there are any available updates with the Check Updates●
button
If there are any updates for the packages, you need to use the update option●

TECHBASE (C) iMod User's Manual ENG 15/100
© 2012 TechBase S.A. Technical contact - support.techbase.eu 15/100
Introduction
About Document This documentation describes configuration of the iMod device.
Device Version
Functionality of an iMod depends on the configuration of the device.
In the following part of this document, the term device is used to describe a device based on the iMod platform. Certainhardware resources of a device like e.g., a built-in GSM/GPRS modem are only in selected versions of the device – this is thereason why the '*' is used. The '*' means that the described functionality is applicable only to some versions of the device.
Latest Version of Documentation
iMod is a dynamically developed product. This way you can receive new functionalities of the device by updating thesoftware. A new version of documentation is released with each software update.
The newest version of the documentation can be found at www.a2s.pl or the ftp server:
Host: ftp.a2s.plLogin: [email protected]: npe_1m0d
About the Device
iMod is a telemetry module with an innovative solution based on the concept of three channels:
source-channel●
access-channel●
message-channel●
The whole operation logic of the device is described in one descriptive file – MainConfig.xml
The following scheme illustrates the system structure of the device:

TECHBASE (C) iMod User's Manual ENG 16/100
© 2012 TechBase S.A. Technical contact - support.techbase.eu 16/100
About the NPE system As mentioned before, the platform operates on a NPE device. This means that it is possible to administer the device in amanner consistent with other devices or computers based on the Linux system using a terminal. You can access thehardware resources directly from the NPE system.
A detailed description of the NPE and Linux systems is beyond the scope of thisdocument. Further information:- NPE – User's Manual- NxDynamics Manual

TECHBASE (C) iMod User's Manual ENG 17/100
© 2012 TechBase S.A. Technical contact - support.techbase.eu 17/100
Description of the Connectors The iMod platform was developed based on the NPE device.
NPE has two screw connections (C1, C2) and a front panel. On the front panel there are two monostable buttons and LEDsindicating operation of the device. There is also a number of interfaces available, which are illustrated in the followingscheme.
Pin Description
Element name DescriptionConnector 1 Connector no. 1 (14 pins)Connector 2 Connector no. 2 (16 pins)Sim card slot Sim card slotSD Card Slot SD/MMC Card SlotEthernet port RJ45 socketAntenna GSM/GPRS antenna inputPower LED (PWR) LED power indicatorUser LED (USR) LED available to the UserStatus LED (RDY) LED for the device operation statusGPRS LED GPRS connection status LEDModem LED (GSM) LED for modem communication status

TECHBASE (C) iMod User's Manual ENG 18/100
© 2012 TechBase S.A. Technical contact - support.techbase.eu 18/100
1 Screw Connection Description. (C1)
Pin number Label Description1 VCC (+) Plus [12-30VDC, min. 1000mA]2 GND (-) Minus3 CWD Clamps for LEDs protecting the transistor outputs4 PO4 Open Collector digital output (This is Relay in the 'R' series models)5 PO3 Open Collector digital output (This is Relay in the 'R' series models)6 PO2 Open Collector digital output (This is Relay in the 'R' series models)7 PO1 Open Collector digital output (This is Relay in the 'R' series models)8 DO2 Open Collector digital output9 DO1 Open Collector digital output10 TX1 1. RS-232 Serial port - Transmit data (com0)11 RX1 1. RS-232 Serial port - Receive data (com0)12 GND Serial port common ground13 TX3 3. RS-232 Serial port - Transmit data (com2)14 RX3 3. RS-232 Serial port - Receive data (com2)
The serial ports in the iMod configuration are defined 'com0'(RX1/TX1) and'com2’(RX3/TX3), respectively.

TECHBASE (C) iMod User's Manual ENG 19/100
© 2012 TechBase S.A. Technical contact - support.techbase.eu 19/100
2 Screw Connection Description. (C2)
Pin number Label Description1 B (+) RS-485 Series port (com3)2 A (-) RS-485 Series port (com3)3 GND Ground4 DI1 Digital input5 DI2 Digital input6 DI3 Digital input7 DI4 Digital input8 DI5 Digital interrupt input9 DI6 Digital interrupt input10 DI7 Digital interrupt output11 DI5 Digital interrupt output or a 1Wire interface12 GND Ground13 AI1 0-10VDC analog input14 AI2 0-10VDC analog input15 AI3 0-10VDC analog input16 AIV 0-10VDC analog input
See the F.A.Q. chapter if you want to find out more about connection to hardwareresources.

TECHBASE (C) iMod User's Manual ENG 20/100
© 2012 TechBase S.A. Technical contact - support.techbase.eu 20/100
Configuration of the Device (NPE) The device based on the iMod platform is configured by two configuration files.
The (/mnt/mtd) Syscfg file s responsible for the startup options of the NPE system device. This configuration is called the1.Startup Configuration.The (/mnt/mtd/iMod/config) MainConfig.xml file s responsible for the iMod application configuration. This is called the2.Application Configuration
In order to upload a configuration, you need to restart the iMod platform. You can dothat by executing the imod start command from the console or the interfaceNxDynamics.
Base Configuration (syscfg) The startup configuration file is a text file with the following format: Parameter=Value
Do not put a space between the '=' sign and the text. Do NOT use quotation marks aswell - “Value”.

TECHBASE (C) iMod User's Manual ENG 21/100
© 2012 TechBase S.A. Technical contact - support.techbase.eu 21/100
Parameter Name Description Default Value
HOST_NAME Parameter which also describes a prompt on login screen. Whitespaces are notaccepted techbase
HOST_IP IP of a device if it doesn’t receive an address from the DHCP service 192.168.0.101GW_IP Gateway of the device 192.168.0.1NET_MASK Subnet mask 255.255.255.0HOST_MAC Mac address of the device 18:83:C4:04:XX:XXETH_DNS_1 DNS address if the device doesn’t receive one from the router 8.8.8.8ETH_DNS_2 Second DNS address if the device doesn’t receive one from the router
RTC_RESTORE Variable defining if the time should be synchronized with the RTC after thestartup Y
OUT_RESTORE Variable defining if the state of digital inputs/outputs should be restored YDEFAULT_ROUTE Variable defining a default routing ETHSTART_CONSOLE Startup of the system console on the COM0 serial port(/dev/ttyS0) NSTART_BLINK NPE system operation indicator on the RDY diode NSTART_DHCP IP lease from a router YSTART_FTP Variable defining if the FTP server starts at the device startup YSTART_TELNET Variable defining the telnet server startup YSTART_SNMP Variable defining if the SNMP server starts at the device startup NSTART_SMS Variable defining if the SMS server starts at the device startup Y
START_NPESRV Service that helps to find the device in the network with the SearchNPEapplication Y
START_INITSRV Variable defining loading of the start scripts from the /mnt/mtd/init.srv directory YSTART_APACHE Variable defining the automatic startup of the apache server YSTART_POSTGRESQL Variable defining the automatic startup of the PSQL server YSTART_SSH Variable defining the automatic startup of the SSH server YVPN_SERVER Variable defining the address of the VPN server 10.8.0.1
The PostgreSQL support and some components like e.g., VPN or SSH are not installedon the device. These packages require further installation with the packages manager (softmgr).

TECHBASE (C) iMod User's Manual ENG 22/100
© 2012 TechBase S.A. Technical contact - support.techbase.eu 22/100
Startup Services Configuration (initsrv) Activation of the packages dedicated to the NPE system uses the initsrv mechanism, which enables packages activation in aproper order.
Startup Management of Packages
During the system startup all scripts from the /mnt/mtd/initsrv directory with names in accordance with the convention areexecuted. If you want to exclude some of the scripts from the autostart, you only need to change their name - the best wayis to add a prefix '_'.
For example, you can use the mv command
mv S600apache.sh _S600apache.sh
After executing this command and rebooting the device the Apache package will not be activated.
Launching Order
During the installation of particular applications, scripts with a precise name, which are used during the device startup arecreated in the /mnt/mtd/initsrv directory. The script name is created in the S[1-9999] package convention, where thenumber 1-9999 indicates the order of launching the scripts.
It is recommended not to modify the order assigned to the packages by default.
How to Add Own Application to the Autostart
Adding own applications, which are run at the system startup is based on creating scripts in the /mnt/mtd/initsrv/ directorywith a specified name (in accordance with the order of activation). Next, you need to give the rights to run (with the chmod+x command).
Following reboot of the device, the script will be activated after scripts with smaller indexes and before scripts with biggerindexes.
Do not double the SXX indexes in the script names. If there are two scripts withidentical numbers - they will be activated in the alphabetical order.

TECHBASE (C) iMod User's Manual ENG 23/100
© 2012 TechBase S.A. Technical contact - support.techbase.eu 23/100
GPRS Connection Configuration Configuration of basic GPRS connection parameters can be done from the web interface of the device - NxDynamics. Inorder to get the full access to all the options, you need to modify the section of GPRS connection in the Syscfg directory.
Parameter Name Description Format Default Value
GSM_BAUD
Communication speed with the GSM modem. Forthe EDGE modems it is the value of 230400 andfor the GPRS modems it is the value of 115200.You can check the modem type with the modeminfo
Y/NAutocompletedepending on themodel
GPRS_AUTOSTARTVariable defining if the GPRS connection isautomatic after the device startup(Y) or it is notautomatically activated.
Y/N/B N
GPRS_APN_NAME The APN name for the GPRS connection. String empty
GPRS_RECONNECT
Activation of the GPRS reconnection processafter disconnection. In case of setting theDEAFAULT ROUTE to B, In case of using a number,it is the indication (in seconds) of the speed ofpinging the GPRS_PING addresses in order toverify if there is an active connection.
Y/integer N
GPRS_PING_IP_1 IP of the server for checking the GPRS connectionrelated to GPRS_RECONNECT. 1-255.1-255.1-255.1-255 208.67.222.222
GPRS_PING_IP_2 IP of the server for checking the GPRS connectionrelated to GPRS_RECONNECT. 1-255.1-255.1-255.1-255 208.67.220.220
GPRS_AUTO_DNS Definition of the Usepeerdns use while aconnection attempt.
AUTO /1-255.1-255.1-255.1-255 Y
GRPS_DNS_1In case when the GPRS_AUTO_DNS option is setto N, the written DNS records are set for the GSMnetwork.
1-255.1-255.1-255.1-255 211.138.151.161
GRPS_DNS_2In case when the GPRS_AUTO_DNS option is setto N, the written DNS records are set for the GSMnetwork.
1-255.1-255.1-255.1-255 202.101.103.55
GRPS_DNS_3In case when the GPRS_AUTO_DNS option is setto N, the written DNS records are set for the GSMnetwork.
1-255.1-255.1-255.1-255 8.8.8.8
GPRS_LOGIN Login for the APN of the GPRS connection String emptyGPRS_PASSWORD Password for the APN of the GPRS connection String empty
GPRS_PIN SIM card PIN. In case of no PIN on a card thissetting will be ignored. Number empty
GPRS_DYNDNSActivation of the DynDNS service at every GPRSconnection with options in the /etc/inadyn.conffile
Y/N N
GPRS_MUXGSM modem multiplex mode. Enables using theGPRS session (/dev/ttyS5) and SMS sending(/dev/ttyS6), leaving one channel for any usage(/dev/ttyS7).
Y/N Y

TECHBASE (C) iMod User's Manual ENG 24/100
© 2012 TechBase S.A. Technical contact - support.techbase.eu 24/100
DynDNS Configuration iMod has a mechanism for using the DynDNS service for the PPP protocol (GPRS connections). This script uses theInaDynConf library.
Further information on this package can be found at: http://www.inatech.eu/inadyn/
The DynDNS service configuration is limited to creating a personal account in the www.dyndns.com service and editing the /mnt/mtd/iMod/config/inadyn.conf file.
This is an example configuration:
# DynDNS configuration --username test--password test alias test.homeip.net iterations 1

TECHBASE (C) iMod User's Manual ENG 25/100
© 2012 TechBase S.A. Technical contact - support.techbase.eu 25/100
iMod Platform Quickstart
Initial Information In order to start with the iMod platform, you need to prepare the following software improving building of the configurationand verification of the iMod engine operation. This is the list of the necessary software:
FTP client (e.g., FreeCommander)●
XML files editor (e.g., Notepad++)●
iMod configuration parser (available here for download)●
Internet browser (not earlier than: IE9, FF6, Opera 10, Chrome 8)●
Modbus master type software (e.g., modbus poll)●
Modbus slave type software (e.g., Modbus simulator)●
Telnet client (e.g., Putty)●
SearchNPE●
The following examples illustrate an optimal configuration of the work environment with the iMod platform. All of theexamples below and video tutorials showing the usage are available on the FTP server.
Host: ftp.a2s.plLogin: [email protected]: npe_1m0d
Example Configuration of Receiving Access to Hardware Resources The iMod platform enables multiple access both to the internal hardware resources and the external parameters. In case ofbuilding a proper configuration the data is stored in a database, available via a web template, Modbus protocol and SNMP.
A few ways of gaining access to hardware resources are presented as an introductory example, this will be useful in furtherlearning about the iMod platform operation.

TECHBASE (C) iMod User's Manual ENG 26/100
© 2012 TechBase S.A. Technical contact - support.techbase.eu 26/100
I/O access from NxDynamics
Each iMod device is delivered with a pre-installed trial version of the NXDynamics interface (The possibility of a free interfaceupdate ends after 30 days). It enables an easy preview of hardware resources and control of digital outputs via the webinterface.
Type: <IP of the device>/nx into the browser URL address bar●
Log into the website and click on the I/O tab●
On the screen you will see a hardware resources chart, which you can control with your mouse.●
The NxDynamics interface uses a dedicated message channel with an application forinterrupt support of hardware resources. It provides almost instant refresh of theparameters on the web without burdening bandwidth.
Available hardware resources and the precise look of the chart may differ dependingon the version and model of the device.
Videotutorial: www.youtube.com/watch?v=psAXI8W3nTw

TECHBASE (C) iMod User's Manual ENG 27/100
© 2012 TechBase S.A. Technical contact - support.techbase.eu 27/100
I/O Access Via Modbus TCP Protocol
After uploading an appropriate configuration you can gain access to all the input/output resources that the platform isequipped with, using the Modbus protocol.
In order to gain access to the resources you need to upload the MainConfig.xml directory containing definitions of all thehardware resources for location of the /mnt/mtd/iMod/config configuration and reboot the iMod.
A complete example configuration can be found on the FTP server.
Configuration File Structure
The iMod configuration is saved in the MainConfig.xml file located in the /mnt/mtd/iMod/config/ directory on the device.
Upload the configuration which enables access to the hardware resources using the Modbus TCP protocol.
Run Notepad++1.Enable the NPP FTP plugin2.Configure the FTP connection with the device3.Download current configuration of the device /mnt/mtd/iMod/config/MainConfig.xml4.Download current configuration from the /mnt/mtd/iMod/config/example1-hardware_access.xml device5.Copy the content of the example1-hardware_access.xml file into the MainConfig.xml file.6.Save the configuration on the device (It is recommended to copy the previously uploaded configuration into the7.configuration parser in order to check if the configuration is correct. (This time you don’t have to do that, because youhave a guarantee that the prepared example files are correct)Log into the device with a console or the NxDynamics interface8.reboot the iMod with the imod start command9.
Video tutorial - points 1. - 7.: www.youtube.com/watch?v=1ouYOkJQvBU?medium

TECHBASE (C) iMod User's Manual ENG 28/100
© 2012 TechBase S.A. Technical contact - support.techbase.eu 28/100
Startup of the Platform
The iMod platform runs automatically after activation of the NPE firmware. If you modify the configuration, you need toreboot the iMod. You can do that by writing the imod start command from the command line.
There are different iMod startup modes - debug and trace which are useful in case ofdeveloping own configurations.
The iMod platform operation can be previewed in real time through so called live-logs. In order to preview with a live-log,execute the following commmand: tail -f /mnt/data/logs/iMod.log In case of a startup of the platform in the trace mode, youwill see each parameter change and each supported question together with the sent answer.
Operation Verification
Verify if you can connect to the device with the modbus protocol.
Run a modbus master type appllication (np. modbus poll)1.Configure polling (2. parameters from the address 100)2.Configure the connection setting with the device (Device id:1, Default IP: 192.168.0.101, default TCP port: 502)3.Start polling4.Check if the hardware resources on the NxDynamics chart change in accordance with the changes made by the actions5.performed via the TCP modbus protocol
Video tutorial illustrating points 1-5www.youtube.com/watch?v=6tKCJUZSQMo
Extensive Hardware Resources File
Depending on the version of the device, you can extend the example configuration with additional parameters. On the FTPserver you can find the example1-hardware_access-extended_version.xml configuration for the NPE 9000 series.

TECHBASE (C) iMod User's Manual ENG 29/100
© 2012 TechBase S.A. Technical contact - support.techbase.eu 29/100
I/O Access with Telnet Console
The NPE platform provides two access levels to hardware resources - with the uploaded into firmware of the device 'npe'application, which uses hardware resources library of the NPE device - via the npe-service application, which providespermanent readout of hardware resources.
Readout with 'npe' Application
In order to use the built in 'npe' application, you need to log into the device as a super-user (root). The npe command isvisible from any place on the device.
Readout is done by assigning one of the inputs/outputs to the variable '?' and calling the variable with the echo $? command.
npe ?DO1; echo $?;
More examples of the NPE application use can be found in the application manual onthe device. Just type the following command: npe [ Aplikaja npe - manual ]
Readout with npe_service
The NPE platform has a built in application for the event support of hardware resources. In order to preview or control the I/Oin NPE you need to refer to the npe-srv-client application.
Example readout of a digital output:[root@techbase /]# npe_srv_client -i DO1
Example writing of a digital output:[root@techbase /]# npe_srv_client -i DO1,”0”
Video tutorial illustrating access to hardware resources from a console:www.youtube.com/watch?v=OyLaq0gEHGk

TECHBASE (C) iMod User's Manual ENG 30/100
© 2012 TechBase S.A. Technical contact - support.techbase.eu 30/100
Configuration File Structure Configuration file is written in the XML format. The iMod engine reads a configuration from the MainConfig.xml file in/mnt/mtd/iMod/config/ directory.
Loading a Configuration Configuration is loaded via the FTP protocol into /mnt/mtd/iMod/config directory.
While using other programs, remember to copy onto NPE platform in binary mode.
Configuration Verification Each configuration and implemented changes should be verified in 3 stages.
User PC verification with configuration parser.1.NPE platform verification with iMod built-in parser - it is done automatically after executing the imod start command.2.Validation of configuration operation (to check if the implemented changes comply with your needs) with dedicated use3.cases.
It is crucial that the configuration is correct and optimal. Only then will iMod make fulluse of the NPE platform hardware resources. In order to check if it operates properly,see if there is no WARN and ERROR type information in the iMod.log file in normalmode.
Rules of Construction
General Rules
Configuration consists of elements. Each element must be closed. Closing the elements may be done in two ways. e.g.,
1. Opening and closing an element in one line:<element /> 2. Opening and closing an element in two lines:<element>...</element>
An element may have a property. Possible values of a property strongly depend on an element they are in. The use ofproperties is precisely written out in chapters describing specific functionalities e.g.,
<property name="device-id" value="3" />
Other elements may be nested in an element. e.g.,
<element> <element1 /></element>

TECHBASE (C) iMod User's Manual ENG 31/100
© 2012 TechBase S.A. Technical contact - support.techbase.eu 31/100
All the elements must be inside the imod element e.g.,
<imod version="1.0.0" >...</imod>
Elements may be grouped by closing them in a group element with a name e.g.,
<group name="Channel definitions"> ... </group>
Configuration is not case sensitive.
Channel Definition
iMod logic is based on a three channels principle:
Source-channel - data source channel●
Access-channel - data access channel●
Message-channel - event-triggered communication●
Name
Each channel must hold a separate name, which will be used in channel identification parameters. e.g.,
<access-channel name="Modbus_S1">
Protocol
Each channel must contain a protocol element which defines the protocol. e.g.,
<protocol name="MODBUS"/>
Other Elements
Definition of other elements depends on a channel type and a protocol. e.g.,
<access-channel name="Modbus_Master"> <protocol name="MODBUS"/> <port>"ET-502-TCP"</port>

TECHBASE (C) iMod User's Manual ENG 32/100
© 2012 TechBase S.A. Technical contact - support.techbase.eu 32/100
</access-channel> <source-channel name="Modbus_Slave"> <protocol name="Modbus"/> <port>"com3-1200-8N1"</port> <gap>0</gap> <cycle>5s</cycle> </source-channel> <message-channel name="DiffrenceCounter"> <protocol name="SCRIPT"/> <port>"/mnt/mtd/iMod/config/"</port> <recipient>"difference"</recipient> </message-channel>
Parameters Definition
Parameter Element
Each parameter contains a series of elements, defining where data is taken from and a method of data access.
It is possible to define a parameter which is not related to the Source-channel. Such aparameter is called dummy. It enables to create empty registers on the platform forany use.
In the parameter definition of an element you can declare its type as well.
There are the following types of parameters:
int16 - Integer. A whole number from −32 768 to +32 767●
int32 - Double Integer. A whole number from −2 147 483 648 to +2 147 483 647●
word16 - A whole number from 0 to 65 535●
word32 - A whole number from 0 to +4 294 967 295●
real32 - A floating-point number from 3.4e-038 to 3.4e+03●
An example parameter type definition:
<parameter type="real32" >
ID Element
The value of the ID element must be unique in the entire configuration. It is alphanumeric data type. e.g.,
<id>"ExampleID1"</id>
Source-channel Element
Data source assigned to a channel parameter. The assigned channel is identified by providing its name. You should providethe parameter-id properties along with the name. The parameter-id format strictly depends on a communication protocolassigned in the channel definition. Only 1 source-channel element may be assigned to each parameter. It is an optionalelement, so you may also omit its definition.
e.g., Data source as an analogue input I
<source-channel channel-name="NPE_io" parameter-id="AI1" />
Data source from an external modbus device from a 101 register:

TECHBASE (C) iMod User's Manual ENG 33/100
© 2012 TechBase S.A. Technical contact - support.techbase.eu 33/100
<source-channel channel-name="ModbusSlave" parameter-id="101" />
Data source from a 1-wire sensor:
<source-channel channel-name="OneWire" parameter-id="28E616CA020000:temperature9"/>
Access-channel Element
Assigning a parameter to the access-channel. An assigned channel is identified by providing its name. Many elements maybe assigned to one access-channel parameter. You should provide the parameter-id properties along with the name. Theparameter-id format strictly depends on a communication protocol assigned in the channel definition e.g., for a modbusparameter the parameter-id is the starting address of the parameter.
<access-channel channel-name="ModbusSlave" parameter-id="101" />
Event Element
Each parameter may include the event element. Further information on this element may be found in the eventcommunication chapter. This element is responsible for additional actions during values read-out.
Optional Elements
A number of elements improving clarity of the configuration may be assigned to each parameter. Additionally, content of theelements will be saved together with the parameter value in the SQLite3 default database - modbus.db.
It enables further download of the values and presenting them on the website in aneasy way
Offset - displacement●
Scale - scale●
Description - an element enabling adding a parameter description●
Label - an element enabling labeling a parameter●
minVal - an element defining a minimum allowed parameter●
maxVal - an element defining a maximum allowed parameter●
Definition of Message Content
Further information on communication and message content is in the Event-triggered definition chapter (messagesdefinition).
Configuration Validation
Before loading a configuration to a device you may validate the configuration on your computer. In order to do that, youneed to download a parser from an FTP server for iMod clients or iMod product from the following website www.a2s.pl.
iMod configuration parser

TECHBASE (C) iMod User's Manual ENG 34/100
© 2012 TechBase S.A. Technical contact - support.techbase.eu 34/100
Modbus Gateway/Router/Proxy The iMod can perform functions of a modbus gateway, router or a proxy device at the same time. In the following chapteryou will find a definition of the mentioned functionalities with configuration examples.
Modbus Gateway
Information from Modbus slave (Modbus RTU, Modbus ASCII) devices received through a serial port is transmitted to theEthernet network (Modbus TCP).
Modbus Router
Modbus slave devices can work in the Ethernet network.●
Modbus master device can communicate via serial port.●

TECHBASE (C) iMod User's Manual ENG 35/100
© 2012 TechBase S.A. Technical contact - support.techbase.eu 35/100
Modbus Proxy
Readout from slave type devices.●
Write in the buffer.●
Transmitting data to modbus masters.●

TECHBASE (C) iMod User's Manual ENG 36/100
© 2012 TechBase S.A. Technical contact - support.techbase.eu 36/100
Point-to-Point Connection
Example Configuration Structure
This example demonstrates a method of communication of the iMod device with another device supporting the Modbus RTUprotocol. An example configuration example2-modbus_proxy.xml can be found in the device directory:/mnt/mtd/iMod/config/examples/
Add Source-channel
First, you need to define a serial port for the readout. This is a structure of the configuration of a channel supporting theModbus RTU protocol on the COM3 port:
<source-channel name="Modbus_M1"> <protocol name="MODBUS"/> <port>"com3-19200-8E1"</port> <gap>0</gap> <cycle>6</cycle> </source-channel>
The parameters of the serial port are as follows:
COM port: 3 RS-485●
baudrate: 19200 baud/s●
datatbits: 8●
datatbits: Even●
stop bits: 1●
protocol type (default): Modbus RTU●
The above configuration contains only required elements. Remaining elements such asmodbus ID of the device or response to a request time are default. Further informationon the possible elements in defining the Modbus type source-channel can be found inthe XML chapter.

TECHBASE (C) iMod User's Manual ENG 37/100
© 2012 TechBase S.A. Technical contact - support.techbase.eu 37/100
Add Access-channel
After defining the data source, add the definition of access to the data. In this example it is the access via the Modbus TCPprotocol.
<access-channel name="Modbus_S1"> <protocol name="MODBUS" /> <port>"ET-502-TCP"</port> </access-channel>
Add Parameter (modbus registers)
Define the readout from selected modbus addresses and assign them to modbus addresses in the iMod.
In order to do that, you need to include a reference to access and source-channel in the <parameter> structure:
<parameter> <id>1</id> <source-channel channel-name="Modbus_M1" parameter-id="1"/> <access-channel channel-name="Modbus_S1" parameter-id="1"/> </parameter>
The Modbus RTU register with the address of the 1 device connected to the COM3 port is converted to the TCP Modbusregister with the same address. The following example enables users to buffer values and control a parameter in theexternal device supporting the modbus protocol.
The above configurations also contains only required elements. In iMod you can easilychoose a function code that will be used for polling an external device, set a byte orderreverse in the 32-bit parameters, force write of every same value, etc. Furtherinformation can be found in the XML chapter.
Configuration Verification
Connect iMod with a computer with the RS-485 serial port (e.g., with a converter ATC-820)1.Download modbus slave application (e.g., mod_RSsim_eth)2.Run modbus master software (e.g., modbus poll)3.Run modbus slave output with register 1 simulation (0x03 function code)4.Read and write values several times5.
Video tutorial illustrating points 4-5: www.youtube.com/watch?v=YsHrvpR_RS8

TECHBASE (C) iMod User's Manual ENG 38/100
© 2012 TechBase S.A. Technical contact - support.techbase.eu 38/100
Point-to-Multipoint Connection In the distributed networks there are often many slaves. This chapter shows how to build a configuration for apoint-to-multipoint network.
Modbus TCP - Many Slave Type Devices
In the previous configuration there was an example of how to read parameter values from the Modbus Slave devices. Theconfiguration contains a minimum configuration, which is required. Part of the not configured settings took default values.These included e.g., the device-id element.
How To Change iMod Modbus ID
The device ID enables its identification among other devices. iMod has a default ID = 1. You can change that by adding aproperty to the access-channel.
Example iMod ID change to ID = 2.
<access-channel name="Modbus_S1"> <protocol name="MODBUS" /> <port>"ET-502-TCP"</port> <property name="device-id" value="2" /> </access-channel>

TECHBASE (C) iMod User's Manual ENG 39/100
© 2012 TechBase S.A. Technical contact - support.techbase.eu 39/100
How to Set ID for Modbus Slave Device (modbus address)
There are two ways of an ID change for a modbus slave.
Deafult ID change for a Modbus Slave
Default modbus address for a source-channel (slave type devices) is 1. However, you can change the default setting bywriting an ID in the source-channel definition:
<property name="device-id" value="NEW_ID"/>
Example source-channel with a changed default modbus address to address = 2:
<source-channel name="Modbus_M1"> <protocol name="MODBUS"/> <port>"com0-19200-8E1"</port> <property name="device-id" value="2"/> <gap>0</gap> <cycle>1</cycle> <delay>100ms</delay> </source-channel>
Device ID Change in Parameter
If you have several devices, you need to enter the ID which the parameter refers to, for parameters with a modbus addressother than default (modbus register). The definition of a modbus address needs to be included in the <source-channel>element. Below there is an example parameter definition from a modbus device with the address 2 and register 3:
<parameter> <id>"2-3"</id> <source-channel channel-name="Modbus_M1" parameter-id="3" > <property name="device-id" value="2"/> </source-channel></parameter>

TECHBASE (C) iMod User's Manual ENG 40/100
© 2012 TechBase S.A. Technical contact - support.techbase.eu 40/100
TCP/RTU/ASCII Connection
iMod supports the modbus protocol in its three varations ASCII, TCP and RTU.
In order to define a modbus type protocol, you need to include the property type <protocol> in the element.
<protocol name="MODBUS"> <property name="type" value="RTU" /> </protocol>
Example Modbus ASCII protocol declaration:
<source-channel name="Modbus_M1"> <protocol name="MODBUS"> <property name="type" value="ASCII" /> </protocol> <port>"com0-19200-8E1"</port> <gap>0</gap> <cycle>1</cycle> <delay>100ms</delay> </source-channel>
A change in the protocol type is made in an identical way both for the data source-channel and data access-channel.
How to Adjust Configuration to the Poll?
Modbus RTU / Modbus ASCII
For Modbus RTU the frame is built of the following fields:
1st byte 2nd byte 3rd-4th byte 5th-6th byte 7th-8th byteDevice-id (modbus address) Function code Initial register Number of registers for readout Checksum
Example frame:
0A 03 00 00 00 0A B6Device-id=10 Function code= 0x03 Initial register=0 10 registers Checksum
Adjusting 1st Byte
The modbus address is set by adding the following element: <property name=„device-id” value=„XX” />
Further information can be found in the Point-to-multipoint connection section.

TECHBASE (C) iMod User's Manual ENG 41/100
© 2012 TechBase S.A. Technical contact - support.techbase.eu 41/100
Adjusting 2nd Byte - Functions Codes
There are four readout function codes in modbus:
Function code Name Function description0x01 Coil Modbus register for reading and writing binary parameters (0/1)0x02 Discrete Modbus register for read only binary parameters (0/1)0x03 Output Modbus register for reading and writing0x04 Input Modbus register for read only.
In iMod you change the sent function code in the poll, by adding a property element named „varspace” e.g.,
<property name="varspace" value="coil" />
The name 'varspace' is used, because in older devices function code also meantmemory area from which a parameter was taken.
Example definition of a coil type modbus register.
<parameter> <id>"1"</id> <source-channel channel-name="Modbus_M1" parameter-id="1"> <property name="varspace" value="coil" /> </source-channel></parameter>
Adjusting the 3rd and 4th byte - Initial Register
A shift of registers may occur in the modbus devices. If (in the modbus slave device documentation) there is a descriptionthat a parameter X is in the register at the N number, it may mean that it should be defined as N+1, N-1 or simply N in theiMod.
The initial value is taken from the parameter and its 'parameter-id’ element defined in the source-channel. i.e.,:
<parameter> <id>"1"</id> <source-channel channel-name="Modbus_M1" parameter-id="100"/></parameter>
means sending a poll with the initial address:
00 64
Adjusting the 5th and 6th byte - Number of Registers for Polling
iMod internally groups the read parameters. It finds the initial address and adjusts polls together with the number ofregisters to read, in such a way to gather as much data in the smallest number of polls.
Adjusting Checksum
iMod automatically calculates the correct checksum for each poll.

TECHBASE (C) iMod User's Manual ENG 42/100
© 2012 TechBase S.A. Technical contact - support.techbase.eu 42/100
32-bit Parameters Part of the modbus devices has 32-bit parameters in the registers table. iMod enables definition of such registers bychanging a parameter.
<parameter type="real32">...
When defining a 32-byte parameter, you need to remember to increment the followingaccess-channel parameter ID by two.
There are five types of parameters in iMod:
Parameter type Descriptionint16 16-bit Parameterint32 32-bit Parameterword16 16-bit Parameter with no sign (unsign integer)word32 32-bit Parameter with no sign (unsign integer)real32 32-bit Parameter with a floating point value
Example parameter definition:
<parameter type="int16"> <id>"1"</id> <source-channel channel-name="Modbus_M1" parameter-id="1" /> <access-channel channel-name="Modbus_S1" parameter-id="1" /></parameter> <parameter type="int32"> <id>"2"</id> <source-channel channel-name="Modbus_M1" parameter-id="2" /> <access-channel channel-name="Modbus_S1" parameter-id="2" /></parameter> <parameter type="word16"> <id>"3"</id> <source-channel channel-name="Modbus_M1" parameter-id="4" /> <access-channel channel-name="Modbus_S1" parameter-id="4" /></parameter> <parameter type="word32"> <id>"4"</id> <source-channel channel-name="Modbus_M1" parameter-id="5" /> <access-channel channel-name="Modbus_S1" parameter-id="5" /></parameter> <parameter type="real32"> <id>"5"</id> <source-channel channel-name="Modbus_M1" parameter-id="7" /> <access-channel channel-name="Modbus_S1" parameter-id="7" /></parameter>

TECHBASE (C) iMod User's Manual ENG 43/100
© 2012 TechBase S.A. Technical contact - support.techbase.eu 43/100
Property 'inverse'
Very often, there is an issue with value interpretation of the 32-bit parameters. If the 32-bit parameters have incorrect value,try to add bit inversion before calculating the value in such a way that the other 16 bits are at the front.
You can do that with the <property> element called inverse.
<property name="inverse" value="true" />
The information on inversion of parameters, can be both in the source-channel and access-channel element. Exampledefinition:
<parameter type="real32"> <id>"5"</id> <source-channel channel-name="Modbus_M1" parameter-id="7"> <property name="inverse" value="true" /> </source-channel> <access-channel channel-name="Modbus_S1" parameter-id="7" /> </parameter>
Gap / Cycle / Delay / Read Timeout Polling frequency parameters are linked with the modbus protocol. The section below in short describes polling parametersavailable for modification. Example source-channel containing definitions of all elements related to polling on the channel.
<source-channel name="Modbus_M1"> <protocol name="MODBUS"/> <port>"com3-19200-8E1"</port> <gap>0</gap> <cycle>1</cycle> <delay>100ms</delay> <read-timeout>100ms</read-timeout> </source-channel>
Cycle
The <cycle> parameter defines the frequency of the modbus addresses series update. This is a required element. Thedefault value unit is a second.
Gap

TECHBASE (C) iMod User's Manual ENG 44/100
© 2012 TechBase S.A. Technical contact - support.techbase.eu 44/100
The <gap> parameter defines the min. require silent at the end of a cycle. This is a required element. The default value unitis a second.
Delay
The <delay> parameter defines an interval between the modbus polls. Declared total values are seconds. The delayparameter is optional, lack of the parameter results in assigning a default value of 0ms
Read-timeout
The <read-timeout> element defines time the iMod platform waits for a response from a device. This is an optional element.The default value is 1000ms.

TECHBASE (C) iMod User's Manual ENG 45/100
© 2012 TechBase S.A. Technical contact - support.techbase.eu 45/100
Forcing Each Write - Property Force There are modbus elements which perform actions after update parameter value. iMod has an internal logic that does notforward the write command if the parameter value does not change. However, you can force such a transmission by addinga 'property’ element.
<property name="force" value="true" />
Example definition with a 'force’ property implementation:
<parameter type="int32"> <id>"1"</id> <source-channel channel-name="Modbus_M1" parameter-id="1" /> <access-channel channel-name="Modbus_S1" parameter-id="1" > <property name="force" value="true" /> </access-channel></parameter>

TECHBASE (C) iMod User's Manual ENG 46/100
© 2012 TechBase S.A. Technical contact - support.techbase.eu 46/100
Integration of 1-Wire Bus with iMod Platform
The following chapter describes the way of using the iMod system for collecting information from a distributed system ofsensors, transmitters, reed switches, etc. connected to the 1-Wire bus.
Sensor Detection
First check if the sensors were detected by the one-wire server with the following command:
[root@techbase /]# owlist infoid: 28E616CA020000 chip: DS18B20 desc: THERMOMETER value: 24.125
If the sensor has been detected, scan the one-wire bus with the imod scan onewire command.
This command results in generating a configuration containing parameters together with a readout from sensors and sharingthe results via the modbus protocol in the ONEWIREScan.xml directory.
[root@techbase /]# imod scan onewireiMod Tiger Engine [Version 1202171418]Stopping iMod daemon. Please wait...Killing iMod daemon: Succeeded12:01:17,963 [main] INFO - Starting iMod Tiger Engine Version 1203271136, Xml Config Version1.1.5312:01:18,511 [main] INFO - Parsing the file: /mnt/mtd/iMod/config/MainConfig.xml12:01:20,295 [main] INFO - Parsed the configuration file in: 1766 ms12:01:21,155 [main] INFO - Interpretation took: 849ms12:01:29,679 [main] INFO - Running Scanner...12:01:29,750 [main] INFO - OneWire scanner initialization...12:01:30,252 [main] INFO - Running owserver client thread on ip: 0.0.0.0 port: 430412:01:30,260 [main] INFO - Waiting for bus reset...12:01:30,280 [main] INFO - Trying to run OneWire scanner...12:01:30,392 [main] INFO - Scanning in progress. Please wait...12:01:30,401 [ONEWIRE(4304)] INFO - Starting the scan on port: 4304 ip: 0.0.0.012:01:32,820 [ONEWIRE(4304)] INFO - Found 1-Wire slave: (id: 28E616CA020000 type:THERMOMETER_DS18B20)12:01:32,861 [ONEWIRE(4304)] INFO - Add OneWire parameter 28E616CA020000:temperaturedefinition.12:01:32,875 [ONEWIRE(4304)] INFO - Add OneWire parameter 28E616CA020000:temperature9definition.12:01:32,889 [ONEWIRE(4304)] INFO - Add OneWire parameter 28E616CA020000:temperature10definition.

TECHBASE (C) iMod User's Manual ENG 47/100
© 2012 TechBase S.A. Technical contact - support.techbase.eu 47/100
12:01:32,903 [ONEWIRE(4304)] INFO - Add OneWire parameter 28E616CA020000:temperature11definition.12:01:32,917 [ONEWIRE(4304)] INFO - Add OneWire parameter 28E616CA020000:temperature12definition.12:01:32,928 [ONEWIRE(4304)] INFO - Close sensor detecting.12:01:32,947 [main] INFO - Trying to write to XML file...12:01:33,881 [main] INFO - XML file:/mnt/mtd/iMod/config/ONEWIREScan.xml successfullygenerated12:01:33,890 [main] INFO - Exit scanner...12:01:33,929 [main] INFO - Exiting12:01:34,262 [ShutdownHook] INFO - Shutdown complete
A way of connecting the sensors:
Integration of the Configuration
After scanning the one-wire bus you need to copy part of the configuration into the main configuration - the MainConfig.xmlfile from the /mnt/mtd/iMod/config directory.
When you join the configurations, you need to reboot the iMod platform with the imod start command.
Transferring Source-channel
The source-channel element can be completely transferred into the main configuration.
<source-channel name="OneWire"> <protocol name="ONEWIRE"/>

TECHBASE (C) iMod User's Manual ENG 48/100
© 2012 TechBase S.A. Technical contact - support.techbase.eu 48/100
<port>"ET-0.0.0.0"</port> <gap>0</gap> <cycle>10</cycle> </source-channel>
Channel Name
<source-channel name="OneWire">
You can freely modify the channel name. However, you need to remember that there are also references to the channelname in the parameters, where you need to change the name.
Port
<port>"ET-0.0.0.0"</port>
iMod can read the values of the one-wire sensors from another device. The default setting of the port is the device which theiMod is started from, you can just change the IP in order to receive values from another device.
Gap & Cycle
<gap>0</gap> <cycle>10</cycle>
The time intended for refreshing parameters, expressed in seconds.
Gap - time free from readout●
Cycle - the amount of time intended for refreshing all the values of the channel●
Transferring Access-channel
<access-channel name="Modbus"> <protocol name="MODBUS"/> <port>"ET-1502-TCP"</port> </access-channel>
You can transfer the access-channel completely into the main configuration. The default data access is configured on the1502 port. If you already have data access via Modbus TCP on the 502 port in the main configuration, you don’t have totransfer the access-channel element. You just need to change the name of the access channel in the parameters.
Transferring Parameters
TECHBASE (C) iMod User's Manual ENG 49/100
© 2012 TechBase S.A. Technical contact - support.techbase.eu 49/100
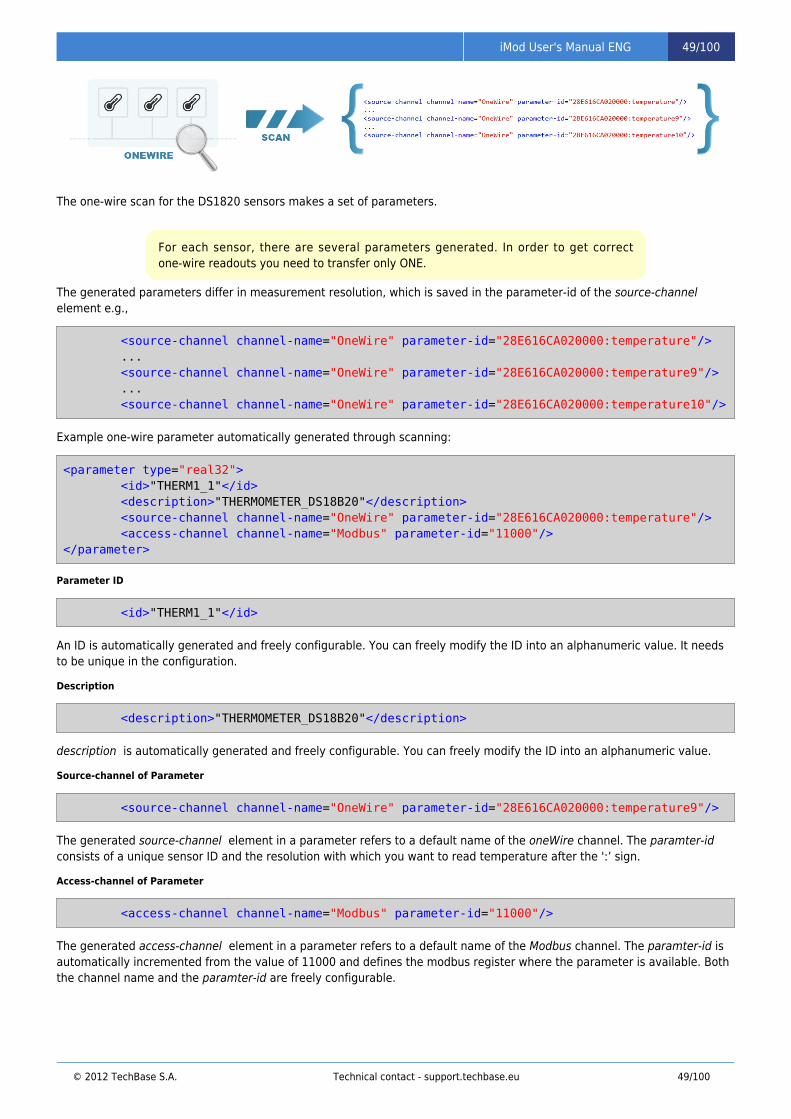
The one-wire scan for the DS1820 sensors makes a set of parameters.
For each sensor, there are several parameters generated. In order to get correctone-wire readouts you need to transfer only ONE.
The generated parameters differ in measurement resolution, which is saved in the parameter-id of the source-channelelement e.g.,
<source-channel channel-name="OneWire" parameter-id="28E616CA020000:temperature"/> ... <source-channel channel-name="OneWire" parameter-id="28E616CA020000:temperature9"/> ... <source-channel channel-name="OneWire" parameter-id="28E616CA020000:temperature10"/>
Example one-wire parameter automatically generated through scanning:
<parameter type="real32"> <id>"THERM1_1"</id> <description>"THERMOMETER_DS18B20"</description> <source-channel channel-name="OneWire" parameter-id="28E616CA020000:temperature"/> <access-channel channel-name="Modbus" parameter-id="11000"/></parameter>
Parameter ID
<id>"THERM1_1"</id>
An ID is automatically generated and freely configurable. You can freely modify the ID into an alphanumeric value. It needsto be unique in the configuration.
Description
<description>"THERMOMETER_DS18B20"</description>
description is automatically generated and freely configurable. You can freely modify the ID into an alphanumeric value.
Source-channel of Parameter
<source-channel channel-name="OneWire" parameter-id="28E616CA020000:temperature9"/>
The generated source-channel element in a parameter refers to a default name of the oneWire channel. The paramter-idconsists of a unique sensor ID and the resolution with which you want to read temperature after the ':’ sign.
Access-channel of Parameter
<access-channel channel-name="Modbus" parameter-id="11000"/>
The generated access-channel element in a parameter refers to a default name of the Modbus channel. The paramter-id isautomatically incremented from the value of 11000 and defines the modbus register where the parameter is available. Boththe channel name and the paramter-id are freely configurable.

TECHBASE (C) iMod User's Manual ENG 50/100
© 2012 TechBase S.A. Technical contact - support.techbase.eu 50/100
Mbus Protocol
Connecting Mbus meters
The meters, which communicate via Mbus protocol are connected with the Mbus10 device. A method of connecting metersto the Mbus converter depends on the kind of a meter. Please read the meter documentation in order to connect the Mbusinterface with an external device in a correct way.
The Mbus10 converter has the RS-232 interface on the other side. Below there is an example scheme of connecting theconverter to the iMod with a serial port.
Preparing Working Environment
A working iMod using serial ports in configuration, blocks the readout via external applications. This is why you need toswitch off the iMod application before polling the meters.
A set of commands turning off the platform:
[root@techbase /]# imod stop
After turning off the platform, you should download heatmet, which enables polling meters via console.
You can download the heatmet application from the ftp server dedicated for iMod uers.Ask for a password through the technical support portal: http://suppport.techbase.eu
Checking Connection and Response time of a Meter (heatmet)
After connecting the Mbus meter to the iMod device, you need to check if the connection is correct. You can do that with thefollowing application: heatmet. You need to copy the application onto the device and execute the following commands:
$ chmod 754 heatmet$ ./heatmet 1,2400,2400,<METER_ID>
Heatmet <com_number>,<check_baudrate>,<set_baudrate>,<scan mode/ID>Specify the COM port where the meter is plugged in as the first parameter. The second value is a baud rate where the metercurrently works. The third value is the communication speed set in the metre. The fourth parameter can take a value from:-1 do 255.-1 means scanning all the addresses in search for the meter. Instead of the -1 value it is better to enter the ID of a pluggedmeter.
In case of no response after sending a readout command, observe the Mbus10converter. If you see that the green RX LED signals feedback data, it means that the

TECHBASE (C) iMod User's Manual ENG 51/100
© 2012 TechBase S.A. Technical contact - support.techbase.eu 51/100
meter replies slower than 1000ms. In this case use heatmet command with the '-tXXXX' parameter where XXXX is the response time in ms.
If you receive the CHECK sum (OK) message in response:
It means that you can proceed to the next step.
Checking the Meter Support via Library (Mubs.jar)
The next step is to check if the mbus library detects the meter. Example query:
$ java -jar /mnt/mtd/iMod/jar/protocols/mbus.jar com0 2400-8E1 p94
Query structure: java -jar <path to the iMod installation directory>/jar/protocols/mbus.jar <serial-port> <communicationparameters> <meter id>
<path to the iMod installation directory> - you can check it with the command:
getenv | grep IMOD
Available ports:
com0 (RS-232 #1)●
com1 (RS-232 #2)●
com3 (RS-485)●
Available message parameters:
2400 – connection baud rate.●
8E1 – connection properties●
Meter ID:
p – address type (primery – p / secondary – s)●
ID – an integer from 0 to 255●
When you detect Mbus registers in the meter, you need to go to the scanning stage with the iMod engine.

TECHBASE (C) iMod User's Manual ENG 52/100
© 2012 TechBase S.A. Technical contact - support.techbase.eu 52/100
Making Your own MBus Configuration
Generating Configuration - iMod scan Mbus
iMod supports the process of scanning on the Mbus protocol on all the serial ports at the same time. In order to run amechanism, execute this command:
$ imod scan mbus
In this moment the device will start the scanning with a default response time-out for meters. 2000ms. After finishingscanning, the MBusScan.xml resulting file is created. In this file there is a configuration containing all the availableparameters detected during scanning.
If the meter is detected during scanning, you will be informed about it with a proper write. e.g.,
12:05:25,223 [/dev/ttyS0(com0)] INFO - Found MBUS slave: com0-2400-8E1:p2 (id: 09847273 type:CF55)
Consolidation of Configuration with Main File
After scanning the Mbus you need to copy part of the configuration into the main configuration - the MainConfig.xml file fromthe /mnt/mtd/iMod/config directory.
When you join the configurations, you need to reboot the iMod platform with the imod start command.
Source-channel
The source-channel element can be completely transferred into the main configuration. Do not make any changes in thiselement.
<source-channel name="MBUS_com0"> <protocol name="MBUS"/> <port>"com0-2400-8E1"</port> <property name="device-id" value="2-MODEL_CF55"/> <gap>"0"</gap> <cycle>"60"</cycle> </source-channel>
Name Element
<protocol name="MBUS"/>
You can freely modify the channel name. However, you need to remember that there are also references to the channelname in the parameters, where you need to change the name.
Port Element
<port>"com0-2400-8E1"</port>
The port element consists of the serial port definition where the readout is performed and connection parameters.
Property "device-id" Elements
<property name="device-id" value="2-MODEL_CF55"/>
There will be a number of property elements created, depending on the amount of detected meters. The value of thiselement is built in the following way: <meter id>-MODEL_<meter_name>

TECHBASE (C) iMod User's Manual ENG 53/100
© 2012 TechBase S.A. Technical contact - support.techbase.eu 53/100
If the meter is seen as Unknown it means that during the configuration generation default parameters were used (cycle,read-timeout, etc.)
GAP, CYCLE, DELAY and READ-TIMEOUT Elements
At the end you need to define the frequency response parameters. In case of slower meters you should also add the optionalread-timeout element.
Example of a complex channel definition:
<source-channel name="MBUS_com0"> <protocol name="MBUS"/> <port>"com0-2400-8E1"</port> <property name="device-id" value="2-MODEL_UNKNOWN"/> <gap>"0"</gap> <cycle>"60"</cycle> <delay>"1000ms"</delay> <read-timeout>"5000ms"</read-timeout></source-channel>
Access-channel
You can transfer the access-channel completely into the main configuration. The default data access is configured on the1502 port. If you already have data access via Modbus TCP on the 502 port in the main configuration, you don’t have totransfer the access-channel element. You just need to change the name of the access channel in the Mbus parameters.
Double definition of access-channel on the same TCP port results in malfunction of theplatform.
Parameters
Mbus scanning creates a set of parameters read from a meter. Transfer only the parameters necessary for the projectimplementation to the main configuration. Example parameter:
<parameter type="int32"> <id>MBUS_09847273_2:2_4</id><!--Actual value: 0 (Integer)--> <scale>10e3</scale> <unit>"W"</unit> <description>"POWER"</description> <comment>"MAX_VAL"</comment> <source-channel channel-name="MBUS_com0" parameter-id="2:2-4"/> <access-channel channel-name="Modbus_SMBUS" parameter-id="157"/></parameter>
Parameter Element
The 'parameter’ element has
<parameter type="int32">
In case there is no 'type' in the paramter element, a default value of int16 is taken.

TECHBASE (C) iMod User's Manual ENG 54/100
© 2012 TechBase S.A. Technical contact - support.techbase.eu 54/100
ID
ID is automatically generated and freely configurable. It consists of:
CHANNEL-NAMES_METER-SERIAL-NUMBER_METER-ID_FRAME-NUMBER
Example parameter ID:
<id>MBUS_09847273_2_10</id>
Scale (multiplier)
Scale is automatically generated and freely configurable.
<scale>10e7</scale>
The scale parameter is downloaded from the device by default and saved for ([J][W] [m^3], etc.).
Scaling of the values takes place in the following way:
<scale>10e7</scale>
it means: VALUE * 1*10^7 However, you can rescale the result by changing the parameter:
<scale>10e-2</scale>
Than if the previous value was in [J], after rescaling it will be presented in [GJ]. By changing a multiplier, you shouldremember to change also the Unit element after.
Unit
Unit is automatically generated and freely configurable. An element specifying the unit of read values.
<unit>"m^3"</unit>
Description
The description field is automatically generated and freely configurable. This is a short description of a Mbus field. Itdescribes the value read from a meter.
<description>"POWER"</description>
It is possible that the meter has several parameters with the same description. Than,you need to compare the read values during scanning. Compare them with the valueson the meter display. In this way you will be able to type which value is the desiredvalue.
Comment
The comment field is automatically generated and freely configurable. It often describes an additional information enablingproperty description of a read value.
<comment>"MAX_VAL"</comment>
Parameter Source-channel
Example source-channel:
<source-channel channel-name="MBUS_com0" parameter-id="2:2-10"/>
The source-channel element refers to the meter ID, frame in the meter and field in the frame. Syntax: <meterid>:<frame-number>-<field in the frame>

TECHBASE (C) iMod User's Manual ENG 55/100
© 2012 TechBase S.A. Technical contact - support.techbase.eu 55/100
Access-channel of Parameter
Example access-channel
<access-channel channel-name="Modbus_SMBUS" parameter-id="100"/>
The generated access-channel element in the parameter refers to a default channel name - Modbus. The id-parameter isautomatically incremented from the value of 100 and describes a modbus register where the parameter is available. Boththe channel name and the paramter-id are freely configurable.
Double definition of the same modbus register will result in a malfunction of the iModplatform. Make sure that after joining the Mbus configuration into the mainconfiguration, all the access-channel - parameter-id elements are unique.

TECHBASE (C) iMod User's Manual ENG 56/100
© 2012 TechBase S.A. Technical contact - support.techbase.eu 56/100
Scripts as Data Source
iMod can define the bash script as a data source. The value that the script sends back becomes a parameter value.
Example - User_LED readout
The configuration structure that contains source-channel as data source will be presented through reading the USER_LED.
Script will be run cyclically every 2 seconds●
Parameter value will equal the value send back by the script with the expression●
return $USER_LED_VALUE
Source-channel Definition
<source-channel name="SCRIPT_CHANNEL"><protocol name="SCRIPT"/><port>"/mnt/nand-user"</port><cycle>2</cycle></source-channel>
Script channel definition consists of the following:
Channel name - You can freely modify the channel name. However, you need to remember that there are also references●
to the channel name in the parameters.Port - the port element contains the path to directory with a script(s).●
Cycle - script execution frequency.●

TECHBASE (C) iMod User's Manual ENG 57/100
© 2012 TechBase S.A. Technical contact - support.techbase.eu 57/100
Parameter Definition
<parameter><id>"100"</id><source-channel channel-name="SCRIPT_CHANNEL" parameter-id="UserLed.sh"/><access-channel channel-name="Modbus_S1" parameter-id="100"/></parameter>
By assigning a script name to the parameter-id property in the source-channel element, you define the script file name. Thescript will be run cyclically in accordance with the value at the channel definition. The run script is with the read argument.Each read cycle executes a script with the read argument.
In the example above, the execution will be equal to running the script with the following command:
/mnt/nand-user/UserLed.sh read
The definition above enables a change of a parameter via modbus protocol. Than, the script is run with the write <writtenvalue> arguments:
/mnt/nand-user/UserLed.sh write <value>
Script Structure
The bash script is a text file beginning with the following line:
#!/bin/sh
In order to get familiar with the script structure create a file with the name - userLed.sh.
Arguments of Running a Script
Running the script with a parameter, makes it available as variables in the script. e.g.,
./UserLed.sh read
It makes that behind the $1 variable there is a sign of the read value.
Checking the First Argument - Read or Write
At the beginning, you should detect the value of the first parameter - should the parameter execute the (read) or (write)action.
if [ " class="code bash"" == "read" ]; then...elif [ " class="code bash"" == "write" ]; then...fi
Action for Read Argument
Next, enter proper actions for proper conditions. For the 'read’ action return the USER_LED state with the echo state function.
npe ?USER_LED;echo $?;

TECHBASE (C) iMod User's Manual ENG 58/100
© 2012 TechBase S.A. Technical contact - support.techbase.eu 58/100
Action for Write Argument
For the (write) action, check the value of the second argument. If it equals 0, set the USER_LED to 0 (turn off the user LED) Ifthe value of the second argument is a nonzero value, set it to high status. At the end, look at the current value of theUSER_LED.
if [ if [ $2 -eq 0 ]; then npe -USER_LED; npe ?USER_LED; echo $?; else npe +USER_LED; npe?USER_LED; echo $?; fi -eq 0 ]; thennpe -USER_LED;npe ?USER_LED;echo $?;elsenpe +USER_LED;npe ?USER_LED;echo $?;fi
Further information on bash scripts can be found in the documents fully available onthe Internet.
After copying the script file into the NPE device, you need to execute the followingcommands- dos2unix <file name> [corrects the line breakes]- chmod 754 <file name> [gives properly previlages to run a file]. Otherwise, the iModplatform will not have the permission to execute the script.
Verification of Actions
read the 100 parameter via the modbus protocol and verify if it matches the USER_LED status.1.Save the 100 parameter value and check if the the value changes according to the conditions written in the script2.Change 'USER_LED' into 'DO1' in the script3.Check if the DO1 parameter changes instead of the USER_LED4.
V i d e o t u t o r i a l p r e s e n t i n g p o i n t s f r o m 1 t o 3www.youtube.com/watch?v=W6wBm_GtWX8

TECHBASE (C) iMod User's Manual ENG 59/100
© 2012 TechBase S.A. Technical contact - support.techbase.eu 59/100
Event Communication
The iMod platform has a built-in event-triggered action performance mechanism. There are a few types of action e.g., e-mailsending, bash scripting. There are also a few conditions of triggering an event e.g., after crossing the value with a setthreshold. In addition, it has force read and force write mechanisms.
The following chapter describes the event configuration method.
Each event must be within the parameter element and must contain message-channel (action type) elements.
Triggering Conditions Together with the <event> element definition, a triggering condition is defined. An example event:
<event type="OnChange"> <message-channel channel-name="Email_sender"/> <message-id>"Mess_1"</message-id></event>

TECHBASE (C) iMod User's Manual ENG 60/100
© 2012 TechBase S.A. Technical contact - support.techbase.eu 60/100
OnUpdate
The first triggering type is the event type, which takes place at each parameter readout. The event will be triggeredregardless of the value.
It is useful in typical event-triggered communication like e.g., RFID reader support. Thesame user may enter or quit. Then the card ID doesn't change, however, the eventsends a value with the event time to a database.
Example definition:
<event type="OnUpdate"> <message-channel channel-name="BashScript"/></event>
OnChange
OnChange is a type of event which is triggered each time a parameter changes its value.

TECHBASE (C) iMod User's Manual ENG 61/100
© 2012 TechBase S.A. Technical contact - support.techbase.eu 61/100
<event type="OnChange"> <message-channel channel-name="BashScript"/></event>

TECHBASE (C) iMod User's Manual ENG 62/100
© 2012 TechBase S.A. Technical contact - support.techbase.eu 62/100
NoChange
NoChange is a type of event which is triggered each time a parameter doesn't change its value.
<event type="NoChange"> <message-channel channel-name="BashScript"/></event>
OnChangeStatus
OnChangeStatus is a type of event which is triggered each time it is impossible to read a parameter or when it is possibleagain, after a communication breakdown.

TECHBASE (C) iMod User's Manual ENG 63/100
© 2012 TechBase S.A. Technical contact - support.techbase.eu 63/100
<event type="OnChangeStatus"> <message-channel channel-name="BashScript"/> <property name="trigger" value="1"/></event>
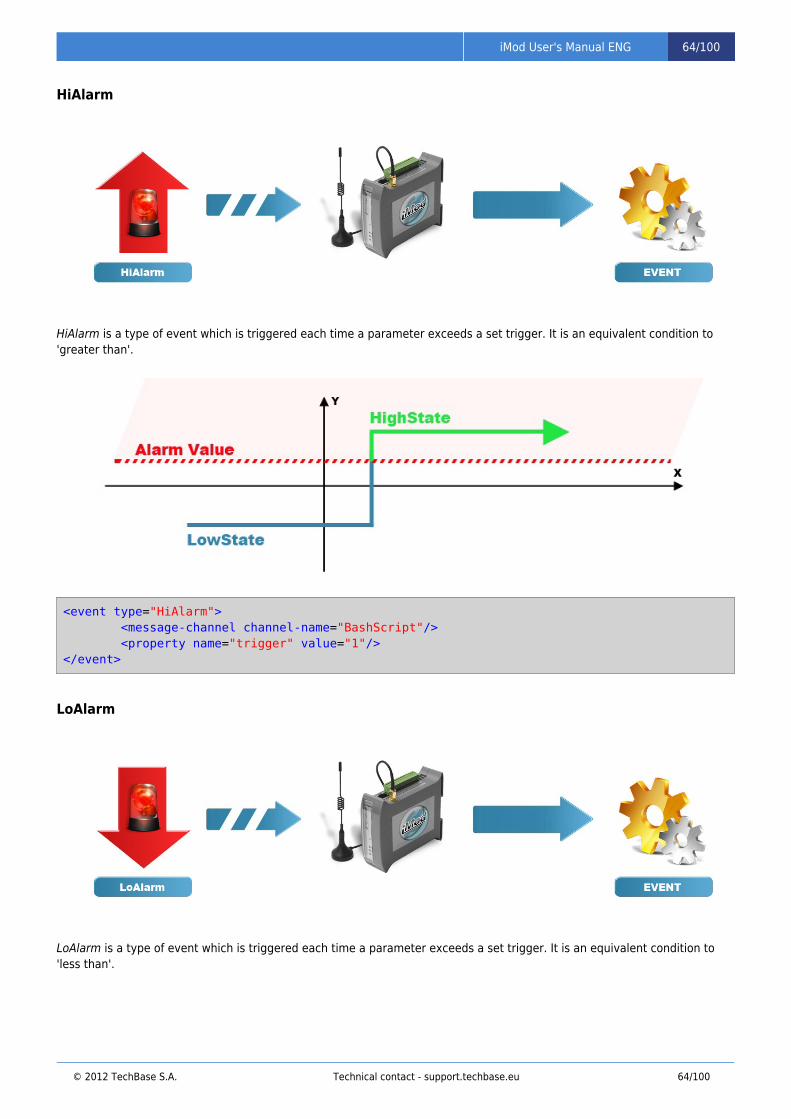
TECHBASE (C) iMod User's Manual ENG 64/100
© 2012 TechBase S.A. Technical contact - support.techbase.eu 64/100
HiAlarm
HiAlarm is a type of event which is triggered each time a parameter exceeds a set trigger. It is an equivalent condition to'greater than'.
<event type="HiAlarm"> <message-channel channel-name="BashScript"/> <property name="trigger" value="1"/></event>
LoAlarm
LoAlarm is a type of event which is triggered each time a parameter exceeds a set trigger. It is an equivalent condition to'less than'.

TECHBASE (C) iMod User's Manual ENG 65/100
© 2012 TechBase S.A. Technical contact - support.techbase.eu 65/100
<event type="LoAlarm"> <message-channel channel-name="BashScript"/> <property name="trigger" value="1"/></event>

TECHBASE (C) iMod User's Manual ENG 66/100
© 2012 TechBase S.A. Technical contact - support.techbase.eu 66/100
Hysteresis
HiAlarm/LoAlarm type events may contain a hysteresis element. When a parameter value exceeds/drops below the 'trigger'value – an event is triggered. An event is not triggered until it exceeds/drops below the hysteresis value.
For example, an event is triggered if a parameter exceeds the (HiAlarm) trigger value=27. If hysteresis is '2', it means thatthe value must drop below 25 in order to trigger the event again.
If an event is defined to be triggered at a decrease (LoAlarm) of the trigger value=27 and hysteresis is set to '2', it meansthat the value must increase to 29 in order to trigger the event again after the decrease below 27.
In case of events definition without hysteresis, it has its default value of 0.
<parameter> <id>"110"</id> <access-channel channel-name="Modbus_S1" parameter-id="110"/> <event type="LoAlarm"> <message-channel channel-name="Script"/> <property name="trigger" value="27"/> <histeresis>2</histeresis> </event> </parameter>

TECHBASE (C) iMod User's Manual ENG 67/100
© 2012 TechBase S.A. Technical contact - support.techbase.eu 67/100
Action Types An action may be assigned to each event. Very often a message is related to an action. Actions are defined by (message-channel) and contents are defined by declared messages (message).
Script
The simplest type of action is an execution of a script. If an event occurs, a bash script is run.
Message-channel Definition
If you want to assign a script to an event, you need to define a message channel first.
Example definition:
<message-channel name="ScriptChangeLED"> <protocol name="script" /> <port>"/mnt/mtd/iMod/config/examples"</port> <recipient>"changeLED"</recipient> </message-channel>
Provide the path to the (port element) file and the (recipient element) file in the (message-channel) definition.
The script files should be given permissions by the chmod 754 <file name> command.
It is important that the script file has correct run time permissions. Otherwise the scriptwill not be executed.
Assigning Script to an Event
If you add a line in the event element, you assign a script execution to an event:
<message-channel channel-name="Script"/>
An example parameter with executing a script:
<parameter> <id>"110"</id> <access-channel channel-name="Modbus_S1" parameter-id="110"/> <event type="OnChange"> <message-channel channel-name="ScriptChangeLED"/> </event></parameter>
Verifying Script Running
You can check script running in the iMod logs. In order to do this execute the following command: tail -f/mnt/data/logs/iMod.log | grep <channel name> . An example entry from an execution of the 'Script’ channel:
13:24:29,589 | INFO | pool-1-thread-9 | Added to Script's queue event [eid: ff36-a633](pos:3/200) parameter id: 110 [mid:110->did:none]13:24:29,783 | INFO | Script | The channel Script received the event [eid: ff36-a633](pos:3/200) parameter id: none message: 23

TECHBASE (C) iMod User's Manual ENG 68/100
© 2012 TechBase S.A. Technical contact - support.techbase.eu 68/100
iMod can send e-mail messages via a given e-mail account. It has no limitations on the amount of receivers, groups ofreceivers or the message content structure.
The Current iMod version does not support e-mail accounts requiring TLS encryption.
Channel Definition
Example channel definition:
<message-channel name="Email_sender"> <protocol name="EMAIL"> <property name="user" value="testnpe"/> <property name="password" value="123npe"/> </protocol> <port>"mail.a2s.pl"</port> <recipient>"[email protected]"</recipient></message-channel>
In order to define a message sending channel, you need to provide:
freely configurable channel-name element●
protocol element (it must equal EMAIL)●
the protocol element must contain the definition of user’s account (user and password to log into the server)●
port element defining the (SMTP) e-mail server●
list of recipients (each recipient must be located between a recipient element).●
There are no limitations on the number of recipients.
Message Definition
A message must be defined in accordance with the format presented in the Messages Definition chapter.
Assigning e-mail to an event
In the <event> element you need to provide a reference to an e-mail channel and an ID of a message to be sent. Exampledefinition:
<event type="LoAlarm"> <message-channel channel-name="Email_sender"/> <message-id>"EmailMessage1"</message-id> <property name="trigger" value="1"/> </event>

TECHBASE (C) iMod User's Manual ENG 69/100
© 2012 TechBase S.A. Technical contact - support.techbase.eu 69/100
SMS
iMod has the function to send an SMS with a dynamically generated content.
Example of a configuration sending messages to 48123456789 when the 102 parameter value changes:
<message-channel name="SMS_sender"> <protocol name="SMS"/> <recipient>"48123456789"</recipient> </message-channel> <message id="SMSMessage1"> <![CDATA[ "REG_NAME[THIS] changed to Value: REG_VALUE[THIS] REG_UNIT[THIS]" ]]> </message> <parameter> <id>102</id> <access-channel channel-name="Modbus_S1" parameter-id="102" /> <event type="OnChange"> <message-channel channel-name="SMS_sender"/> <message-id>"SMSMessage1"</message-id> <property name="trigger" value="1"/> </event></parameter>
Channel Definition
The channel definition consists of:
freely configurable channel-name element●
protocol element (must equal SMS)●
list of recipients (each recipient must be located between recipient element). There are no limitations on the number of●
recipients.
<message-channel channel-name="SMS_sender"> <protocol name="SMS"/> <recipient>"48123456789"</recipient> </message-channel>

TECHBASE (C) iMod User's Manual ENG 70/100
© 2012 TechBase S.A. Technical contact - support.techbase.eu 70/100
The recipient’s number must contain a dialing code of a country.
In order to define several recipient groups you can define several SMS channels.
Message Definition
A message must be defined in accordance with the format presented in the Messages Definition chapter.
Assigning SMS to an Event
In the <event> element you need to provide a reference to an SMS channel and an ID of a message to be sent. Exampledefinition:
<event type="LoAlarm"> <message-channel channel-name="SMS_sender"/> <message-id>"SMSMessage1"</message-id> <property name="trigger" value="1"/> </event>
You can also define a recipient in the event. In order to do that, you need to add themessage-channe l channe l -name=„SMS_sender” e lement to theparameter- id=„phone-number” e lement.
Definition of a recipient in a channel reference:
<message-channel channel-name="SMS_sender" parameter-id="48987654321"/>
Example of assigning SMS sending to an event with a recipient definition:
<event type="LoAlarm"> <message-channel channel-name="SMS_sender" parameter-id="48987654321"/> <message-id>"SMSMessage1"</message-id> <property name="trigger" value="1"/> </event>
Action Verification
In order to verify the operation of SMS sending, you can define a simple configuration which sends a message at aparameter change. You will see the following entry in the iMod.log file:
11:15:05,502 | INFO | SMS_CHANNE_NAME | The channel SMS_CHANNE_NAME received the event [eid:73f9-d98a] (pos:1/200) parameter id: none message: YOUR_MESSAGE_CONTENT

TECHBASE (C) iMod User's Manual ENG 71/100
© 2012 TechBase S.A. Technical contact - support.techbase.eu 71/100
Database Entry
iMod has a built-in mechanism for writing to a database. It cooperates by default with the SQLite3 database, however thereis another way to define the communication with the PostgreSQL database in iMod. Moreover, there is a possibility to addanother plugin to connect with the custom database.
Default SQLite Database Entry
iMod holds a current value of parameters in the DANE table in the modbus.db database. The modbus.db file is in the /mnt/ramdisk directory. You can preview the database with any database software e.g., SQLite2009Pro.
A default database contains columns corresponding with the elements that a user is able to define in the iMod configuration:
Configuration element name SQLite database element nameID TIGER_IDDescription NameOffset OffsetScale ScaleComment CommentUnit Unitminval minvalmaxval maxvaldata-logging data-logging
If you do not use the database, you can disable creating it by adding theparameter_db=false properties to the imod element to improve performence.
<imod version="1.0.25" paramter_db="false">

TECHBASE (C) iMod User's Manual ENG 72/100
© 2012 TechBase S.A. Technical contact - support.techbase.eu 72/100
If you assign value 1 in the SQLiteFlag column, the iMod engine will try to enter thevalue from the VALUE column and to change the flag with value 0 automatically.
Message-channel Definition
Example channel definition:
<message-channel name="PSQL_Alarms"> <protocol name="SQL"/> <port>"0.0.0.0:5432/databaseName"</port> <property name="mode" value="direct"/> <property name="driver" value="POSTGRESQL"/> <property name="user" value="postgres"/> <property name="password" value=""/> </message-channel>
PSQL type message-channel element contains the following elements:
protocol - protocol definition. Must equal SQL●
port - IP definition where the PSQL server is located.●
The /0.0.0.0/ value indicates an iMod device where it is started. After entering the IP you need to type in the TCP PORT wherethe database listening has been launched. The Default value is 5432. The last value in the port field is the name of thedatabase you want to connect to.
mode - database connection mode. Must equal 'direct'●
driver - database driver. Must equal POSTGRESQL●
user - database user’s login●
password - database password●
If you do not enter the direct operation mode iMod will create its own ALARM tablewhere it will insert entries in case of an event.

TECHBASE (C) iMod User's Manual ENG 73/100
© 2012 TechBase S.A. Technical contact - support.techbase.eu 73/100
SQL Expression Definition
The SQL expression which is to be executed must be entered in the messages element content. It can contain any SQLquestion and in place of parameters content it can use MACROS. Further information on communications structure can befound in the event communication section.
Example expression recorded in a message content:
<message id="Alarm1"> <![CDATA[ INSERT INTO TABLE (value, name, description, Date) VALUES ('REG_VALUE[100]','REG_NAME[100]', 'Some text message', 'NOW()') ]]></message>
Modbus
The iMod engine is supported by a unique modbus event-triggered messages mechanism. It enables minimization of thetransmission between two iMod devices. There is also an option of a force write or read of selected parameters on the basisof:
exceeding a set value1.dropping below a set value2.parameter value change by the set hysteresis3.
There is also an option of sending a read value or saving it on another modbus device. e.g.,
An example below helps to illustrate a channel operation based on the 'onChange’ event and a configuration where only onedevice is enough. A change on the PO1 digital output results in a change in the USER_LED as well.
Declaration of the event-triggered modbus channel:
<message-channel name="ModbusEvent"> <protocol name="modbus"/> <port>"ET-localhost-502-TCP"</port></message-channel>
After a change of the value in the 104 parameter, the parameter value is propagated to the 105 address, which is indicatedby the USER_LED.

TECHBASE (C) iMod User's Manual ENG 74/100
© 2012 TechBase S.A. Technical contact - support.techbase.eu 74/100
<parameter> <id>"104"</id> <description>"PO1"</description> <source-channel channel-name="NPE_io" parameter-id="PO1"/> <access-channel channel-name="Modbus_S1" parameter-id="104"/> <event type="OnChange"> <message-channel cannel-name="ModbusEvent" parameter-id="105"/> </event></parameter>

TECHBASE (C) iMod User's Manual ENG 75/100
© 2012 TechBase S.A. Technical contact - support.techbase.eu 75/100
These are the three stages:
PO1 input and USER LED have low status.
PO1 has been changed. PO1 value has been sent to modbus 105 address of the 502 port of a device with the following IP:Localhost.
iMod has read the writing report in the 105 modbus address (USER_LED) and changes the parameter.

TECHBASE (C) iMod User's Manual ENG 76/100
© 2012 TechBase S.A. Technical contact - support.techbase.eu 76/100
Force Read
Modbus message for reading values is the least frequently used type, but for some solutions it is irreplaceable. This type ofmessage enables a refresh (read) at an event of other parameters defined on the iMod platform.
Channel declaration is carried out similarly to other messages. There is a possibility of defining the receiver both whendefining the channel and during an event execution in the parameter. In this case the declaration takes place at theparameter, this is why a channel definition takes only three lines:
<message-channel name="ForceRead"> <protocol name="forceread"/></message-channel>
Setting a 'noChange' type event forces a refresh of the 102 parameter in the iMod internal parameter array, each time theUSER_LED doesn’t change its value at the read:
<parameter> <id>"105"</id> <comment>"USR LED"</comment> <description>"USR LED"</description> <source-channel channel-name="NPE_io" parameter-id="USER_LED"/> <access-channel channel-name="Modbus_S1" parameter-id="105"/> <event type="NoChange"> <message-channel channel-name="ForceRead" parameter-id="102"/> </event></parameter>

TECHBASE (C) iMod User's Manual ENG 77/100
© 2012 TechBase S.A. Technical contact - support.techbase.eu 77/100
Force Write
Force write type message is a modbus message which enables to write a value of another parameter at an event. In thefollowing example a method in which the DO1 value change results in the DO2 change.
Declaration of the channel is made by giving the channel a unique name. Enter 'forcewrite’ as the protocol.●
There is a possibility of defining several receivers. Enter a parameter ID where the parameter value is written as a receiver.●
A parameter value where the event 'comes out' is sent by default.●
There is a possibility of overwriting that by entering the value to be written in the message declaration, however, such acase is not presented in the examples:
<message-channel name="ForceWrite"> <protocol name="forcewrite"/> <recipient>"103"</recipient> </message-channel>
Each time a parameter value changes, it will be rewritten to the 103 parameter:
<parameter> <id>"102"</id> <comment>"DO1"</comment> <init-value>"0"</init-value> <description>"DO1"</description> <source-channel channel-name="NPE_io" parameter-id="DO1"/> <access-channel channel-name="Modbus_S1" parameter-id="102"/> <event type="OnChange"> <message-channel channel-name="ForceWrite"/> </event></parameter>

TECHBASE (C) iMod User's Manual ENG 78/100
© 2012 TechBase S.A. Technical contact - support.techbase.eu 78/100
Messages Definition An event can send a message with a static or a dynamically completed content.
Static Content Definition
<message id="Mess_1"> <![CDATA[ "Connected to ground" ]]></message>
Each communication definition must contain a unique ID, which will be assigned to an event.
The content of a message is written between the elements:
<![CDATA[ ]]>
For the force-write type events it is recommended to enter the numerical value bywhich we want to update a selected parameter.
The SMS messages do not support national characters like e.g., ą, ć.
Dynamic content definition In message contents, you can use MACROS. Those macros, will be replaced dynamicaly by temporary value.
Below is presented list of available macros:
REG_NAME[id] – ID content of parameter with ID = id●
REG_VALUE[id] – current value parameter with ID = id●
REG_UNIT[id] – value from UNIT element defined in parameter with ID = id●
REG_LABEL[id] – value from Label element defined in parameter with ID = id●
In macros, instead of specify ID, you could use word THIS. It means that value writtenin this macro, will be taken from parameter value which trigger parent event. Suchmechanism enable better performance, and more transparency configuration. Forexample: REG_VALUE[THIS].

TECHBASE (C) iMod User's Manual ENG 79/100
© 2012 TechBase S.A. Technical contact - support.techbase.eu 79/100
Web Visualization The iMod platform has a bult-in Apache2 web server. Two kinds of web interfaces were created on the basis of this server. Asystem integrator can use them for building the visualization.
NXDynamics
NXDynamics is a modern web visualization platform (web SCADA) dedicated to cooperation with the NPE/iMod devices viaweb browser.
The main advantages are:
quick refresh of parameters●
efficient data transfer (without overloading bandwidth)●
Further information on the NXDynamics interface and examples of its use can be found in the NXDynamics product card.
TRM Template There is a default TRM interface template uploaded to the device. Source files are in the /mnt/nand-user/htdocs_srcdirectory. At the startup, they are copied into the /mnt/ramdisk/htdocs ramdisk.
The template contains an example PHP code, which enables downloading data from database and its presentation.
A detailed description of the used functions can be found in the synoptyka.php file.
Own Website
The iMod telemetry module uses a built-in Apache2 web server with PHP and database (SQLite and PSQL) support for sharingdata. In order to build a simple web interface you just need to know basics of HTML, PHP and be familiar with databasesupport.

TECHBASE (C) iMod User's Manual ENG 80/100
© 2012 TechBase S.A. Technical contact - support.techbase.eu 80/100
iMod Device Configuration
In order to read the data with a web browser, you need to configure the iMod device in a proper way first. Use theexample1-hardware_access.xml file in the /mnt/mtd/iMod/config/examples directory. This configuration is a defaultconfiguration on the iMod device and it enables access to the hardware resources of the device.
User LED●
DI1 digital input●
Registering data in the database of the iMod device is assigned by default to the SQLite database. However, there is anoption of sending the value directly from the iMod engine to a local or external postgreSQL database.
Database
The second step is creating an example php file, which will read the previously declared parameters and control them. Allthe parameters defined in the configuration file are registered in the SQLite database, which is in the following directory:/mnt/ramdisk/modbus.db
In order to read the value of a selected parameter, you need to refer to the variable value in the VALUE column.

TECHBASE (C) iMod User's Manual ENG 81/100
© 2012 TechBase S.A. Technical contact - support.techbase.eu 81/100
PHP Configuration
Defining Database
First, define the access path to the database, by specifying its location. The SQLite database on the iMod device uses anuniversal interface for connection with the PDO database, this is why there is a reference to this interface in the databasedefinition. The $db variable is assigned to the modbus.db database:
define(‘DB_SQLLITE’,‘/mnt/ramdisk/modbus.db’);$db = new PDO(‘sqlite:’.DB_SQLLITE);
Readout of Values from Database
The next step is referring to the database and reading proper values for selected parameters - in this situation theparameters for which the Description in the MainConfig.xml file was defined as USER_LED and DI1:
$sqlite = „SELECT TIGER_ID, Name, Value, SQLiteFlag FROM dane WHERE name=’USR_LED’ or name=’DI1′”;
The SQLiteFlag variable enables writing selected values directly in the NPE/iMod device. Next, you need to view theparameters, which are interesting for a user.
You need to create a table with a template fragment, where a user can change the value of a selected parameter. As anexample, a 4×3 table will be created:
echo „<table>”;echo „<tr><td><b>ID</b></td><td><b>Name</b></td><td><b>Value</b></td></tr>”;foreach($dbh->query($sqlite) as $row){ print „<tr><td>”.$row['TIGER_ID'].„</td>”; print „<td>”.$row['Name'].„</td>”; print ‘<td><form action=”test.php?a=update” method=”post”> <input type=”hidden” name=”id” value=”‘.$row['TIGER_ID'].‘”/> <input type=”text” name=”value_new” value=”‘.$row['Value'].‘”/></td>’; print ‘<td><input type=”submit” value=”upgrade”/> </form></td></tr>’;}echo „</table>”;
Writing Value into Database
The action attribute value from the form is defined as the test.php?a=update address. The $a variable is introduced. Whenyou press the upgrade button next to a selected parameter, the $a variable takes the update value. Writing the parametervalue takes place by means of using a logical function - at the moment when the $a variable takes update value.

TECHBASE (C) iMod User's Manual ENG 82/100
© 2012 TechBase S.A. Technical contact - support.techbase.eu 82/100
In this case the ID and the value of a selected parameter is read from the form and saved in the database.
It is important to assign the ‘1′ value to the SQLite variable. Setting the SQLiteFlag to ‘1′ makes the iMod download a valuefrom the table and write it into a parameter. Next, it resets the change flag. Such a solution improves the efficiency ofmonitoring the changes made via the Web. At the end, the website is refreshed in order to load the current values from thedatabase.
if($_GET['a']==„update”){ $id2=$_POST['id']; $value2=$_POST['value_new']; $sth = $dbh->exec(„UPDATE dane SET SQLiteFlag = 1, Value = ‘$value2‘ WHERE TIGER_ID = ‘$id2‘”); header(„location: „ . $_SERVER['REQUEST_URI']);}
Finishing Work with Database
Disconnecting with a database is an important element. In order to do that you can use the following function:
$dbh = null;
At the end, there is a function that views error messages. During a correct operation of the device, the function is nottriggered:
catch (PDOException $e){ print „Error!: „ . $e->getMessage() . „<br/>”; die();}
For testing purposes, there is an option of uploading PHP f i les to themnt/ramdisk/htdocs directory. However, it is a part of volatile memory, which meansthat after a reboot of the iMod platform all the saved files will disappear. This is why itis advised to put all the tested files in the /mnt/nand-user/htdocs_src directory. Thisprocedure saves all the files permanently and they will be visible after a reboot of thedevice.
Apache Server Configuration You can configure the Apache through configuration of the httpd.conf file in the /<home_apache_directory>/conf .
In order to change setting of the Apache server you need to reboot it.

TECHBASE (C) iMod User's Manual ENG 83/100
© 2012 TechBase S.A. Technical contact - support.techbase.eu 83/100
Data Registering
The iMod engine enables saving buffered values into a file or a database.
Into CSV Files
iMod enables two ways of registering data.
The first way - Simple registration enables to register selected parameters in one file, with selected frequency since the●
moment of start of the iMod engine.The second way - Registration with Message-channel enables to register selected parameters into selected files with●
frequency that doesn’t depend on the start of the iMod engine.

TECHBASE (C) iMod User's Manual ENG 84/100
© 2012 TechBase S.A. Technical contact - support.techbase.eu 84/100
Simple Registration
In order to begin registration of parameters into one file you need to do two things:
Add the acuqisition_period property into the imod element, by entering the value in seconds you define how often you●
want to register selected parameters.
<imod version="1.0.0" acquisition_period="10">
Add the data-logging element into a selected parameter.●
<data-logging>ture</data-logging>
The parameters will be registered in the data.csv file in the /mnt/data/SQL directory.
The values saved into a csv file are previously counted by the scale and offsetelements.
Example configuration registering the value of the USER_LED every ten seconds:
<?xml version="1.0" encoding="UTF-8"?><imod version="1.0.0" acquisition_period="10"> <group name="Definicje kanalow"> <access-channel name="Modbus_S1"> <protocol name="MODBUS" /> <port>"ET-502-TCP"</port> </access-channel> <source-channel name="NPE_io"> <protocol name="HARDWARE"/> <gap>0</gap> <cycle>5</cycle> </source-channel> <parameter> <id>100</id> <data-logging>true</data-logging> <description>"USR_LED"</description> <source-channel channel-name="NPE_io" parameter-id="USER_LED"/> <access-channel channel-name="Modbus_S1" parameter-id="100"/> </parameter> </group></imod>
The data.csv files are rotated each time after start of the iMod or after reaching a configured file size. The amount and thefiles and the size after they are rotated is configured in the log4j.xml file in the /mnt/mtd/iMod/config/log4j.xml directory.

TECHBASE (C) iMod User's Manual ENG 85/100
© 2012 TechBase S.A. Technical contact - support.techbase.eu 85/100
Registration with Message-channel
iMod can write values of selected parameters into CSV files or databases (SQLite or PSQL) at certain minutes, hours, days,weeks or even years.
The schedule of the tasks implemented in the iMod device can be used in a variety of ways e.g., to write selectedparameters into CSV files.
Cron Format
The schedule of tasks functionality is performed with message-channel connected to the CRON functionality - a Linuxprogram enabling periodic launching of programs and events. It enables to define time and date with accuracy of 1 minute.Time and date is defined by using separate combinations of signs, where each one is responsible for another variable.
Apart from the values presented above, there is a possibility of using the * sign, which describes execution of a command foreach available time interval value. As an example the ” * * * * * ” write means execution of a command every minute.
You can put the properly configured time and date in the cycle type element in the iMod configuration file.

TECHBASE (C) iMod User's Manual ENG 86/100
© 2012 TechBase S.A. Technical contact - support.techbase.eu 86/100
Example CSV message-channel
An example of use of the event schedule is presented below.In this example, a write into the data1.csv będzie file will be executed at 16:15 everyday:
<message-channel name="RegisterAt1615"> <protocol name="CSV"/> <port>"/mnt/nand-user/exampleCSV.csv"</port> <cycle>"15 16 * * *"</cycle> <property name="separator" value=";"/></message-channel>
Location and Name of Registered File
Enter the path and file name where you want to register data into the port element:
<port>"/mnt/nand-user/exampleCSV.csv"</port>
Separator
In the channel definition you can enter a whitespace between columns:
<property name="separator" value=";"/>
Assigning Message-channel in Parameter
Enter a reference to the message-channel element in the parameter element. Example definition:
<parameter> <id>"100"</id> <access-channel channel-name="Modbus_S1" parameter-id="100"/> <message-channel channel-name="CSV"/></parameter>

TECHBASE (C) iMod User's Manual ENG 87/100
© 2012 TechBase S.A. Technical contact - support.techbase.eu 87/100
SNMP
The iMod engine contains a plugin to convert its parameters into SNMP values. A MIB file is ganerated automatically andenables easy conversion of the NPE hardware resources or modbus parameters to SNMP protocol. Moreover, the plugincontains an event mechanism called a TRAP in SNMP.
Example configuraion - Modbus to SNMP The configuration below presents how to declare a place for creating SNMP files and roots of parameters (access-channeldefinition).
Access-channelIn access-channel, you must define a place for generating MIB files (configuration), and roots of parameters in an OID tree.
<access-channel name="SNMP_Slave_1"> <protocol name="SNMP" /> <port>"ET-161-UDP"</port> <property name="device-id" value="1" /> <property name="mib-file" value="/etc/snmp/NPE2-MIB.txt" /> <property name="ip-address" value="0.0.0.0" /> <property name="parametersRootName" value="techbaseObjects" /> <property name="groupRootName" value="techbaseGroups" /> </access-channel>
TrapsiMod enables to sent SNMP traps, when event conditions become true.
Firstly you need to declare a message-channel, then include reference to that channel in the _event_ element.
Example SNMP type message-channel:
<message-channel name="SNMP_Msg_1"> <protocol name="SNMP" /> <port>"ET-162-UDP"</port> <property name="device-id" value="1" /> <property name="mib-file" value="/etc/snmp/NPE2-MIB2.txt" /> <property name="ip-address" value="0.0.0.0" /> <property name="parametersRootName" value="techbaseObjects" /> <property name="groupRootName" value="techbaseGroups" /> <recipient>"192.168.1.11/162"</recipient> </message-channel>
Example of setting reference to access-channel:
<parameter type="int32"> <id>"1120"</id> <description>"ParamInt2"</description> <access-channel channel-name="SNMP_Slave_1" parameter-id="1120" /> <event type="HiAlarm"> <message-channel channel-name="SNMP_Msg_1" /> <message-id>"trap_1"</message-id> <property name="SnmpDescr" value="Trap description" /> <property name="SnmpTrapType" value="inform" /> <property name="trigger" value="12"/>

TECHBASE (C) iMod User's Manual ENG 88/100
© 2012 TechBase S.A. Technical contact - support.techbase.eu 88/100
</event> </parameter>
Parameters / OIDsThe last thing you need to do in order to build the SNMP configuration of the iMod device is to add parameters.
This is the whole example configuration:
<?xml version="1.0" encoding="UTF-8"?><imod version="1.0.25"> <group name="Channels definition"> <access-channel name="SNMP_Slave_1"> <protocol name="SNMP" /> <port>"ET-161-UDP"</port> <property name="device-id" value="1" /> <property name="mib-file" value="/etc/snmp/NPE2-MIB.txt" /> <property name="ip-address" value="0.0.0.0" /> <property name="parametersRootName" value="techbaseObjects" /> <property name="groupRootName" value="techbaseGroups" /> </access-channel> <message-channel name="SNMP_Msg_1"> <protocol name="SNMP" /> <port>"ET-162-UDP"</port> <property name="device-id" value="1" /> <property name="mib-file" value="/etc/snmp/NPE2-MIB2.txt" /> <property name="ip-address" value="0.0.0.0" /> <property name="parametersRootName" value="techbaseObjects" /> <property name="groupRootName" value="techbaseGroups" /> <recipient>"192.168.1.11/162"</recipient> </message-channel> <source-channel name="Modbus_M1"> <protocol name="MODBUS"/> <port>"com3-19200-8E1"</port> <gap>0</gap> <cycle>60</cycle> <delay>1000ms</delay> <read-timeout>250ms</read-timeout> </source-channel> <message id="trap_1"> <![CDATA[ "Exceed edge value" ]]> </message> </group> <group name="Parameters"> <parameter type="int32"> <id>"1100"</id> <description>"ParamInt1"</description> <access-channel channel-name="SNMP_Slave_1" parameter-id="1100"/>

TECHBASE (C) iMod User's Manual ENG 89/100
© 2012 TechBase S.A. Technical contact - support.techbase.eu 89/100
</parameter> <parameter> <id>"1102"</id> <description>"ParamInt1"</description> <source-channel channel-name="Modbus_M1" parameter-id="1102" /> <access-channel channel-name="SNMP_Slave_1" parameter-id="1102"/> </parameter> <parameter type="int32"> <id>"1120"</id> <description>"ParamInt2"</description> <access-channel channel-name="SNMP_Slave_1" parameter-id="1120" /> <event type="HiAlarm"> <message-channel channel-name="SNMP_Msg_1" /> <message-id>"trap_1"</message-id> <property name="SnmpDescr" value="Trap description" /> <property name="SnmpTrapType" value="inform" /> <property name="trigger" value="12"/> </event> </parameter> </group> </imod>

TECHBASE (C) iMod User's Manual ENG 90/100
© 2012 TechBase S.A. Technical contact - support.techbase.eu 90/100
iMod SDK
The iMod engine enables adding user protocols with a simple API in JAVA.
A precise API description can be found in a separate document describing an example addition of a plugin to the iMod engine.
Use this link to download the document: http://www.a2s.pl/products/imod/SDK-iMod-Manual-PLv3.pdf

TECHBASE (C) iMod User's Manual ENG 91/100
© 2012 TechBase S.A. Technical contact - support.techbase.eu 91/100
iMod PLC
You can use the iMod platform as a PLC. You can program its functionalities in Ladder Logic.
A precise description of use of the iMod platform as a PLC can be found in the following document:http://www.a2s.pl/products/imod/iMod_PLC_PL.pdf
In order to use the iMod PLC engine, you need to prepare the iMod configuration, whichenables using the iMod parameters with the Ladder Logic (LAD), in an XML file.

TECHBASE (C) iMod User's Manual ENG 92/100
© 2012 TechBase S.A. Technical contact - support.techbase.eu 92/100
XML Tree - Possible Configuration Elements
imod-element:
group-element:
channel-element:

TECHBASE (C) iMod User's Manual ENG 93/100
© 2012 TechBase S.A. Technical contact - support.techbase.eu 93/100
source-channel-element:
protocol-element:
port-element:
property-element:
device-id-element:
gap-element:
cycle-element:

TECHBASE (C) iMod User's Manual ENG 94/100
© 2012 TechBase S.A. Technical contact - support.techbase.eu 94/100
delay-element:
write-delay-element:
read-timeout-element:
access-channel-element:
message-channel-element:
persistent-element:
recipient-element:

TECHBASE (C) iMod User's Manual ENG 95/100
© 2012 TechBase S.A. Technical contact - support.techbase.eu 95/100
command-channel-element:
message-element:
parameter-element:
init-value-element:
data-logging-element:
description-element:
label-element:
comment-element:
unit-element:

TECHBASE (C) iMod User's Manual ENG 96/100
© 2012 TechBase S.A. Technical contact - support.techbase.eu 96/100
scale-element:
offset-element:
min-val-element:
max-val-element:
source-channel-ref-element:
access-channel-ref-element:
message-channel-ref-element:

TECHBASE (C) iMod User's Manual ENG 97/100
© 2012 TechBase S.A. Technical contact - support.techbase.eu 97/100
event-element:

TECHBASE (C) iMod User's Manual ENG 98/100
© 2012 TechBase S.A. Technical contact - support.techbase.eu 98/100
F.A.Q.
Q. How to connect a relay to a digital output?A. A scheme illustrating the connection of relays is in the NPE manual.
Q. What are the parameters of the digital output?A. If a digital output is set to low state (‘0’), than after using a pull-up resistor externally, you can get maximum 24VDC.Digital output load is 500 mA.
Q. What are the parameters of the relay output?A. 230VAC, 1000mA.
Q. How can I easily check if my digital output is working?A. You just need to connect a digital output with a digital input.
Q. How can I check the output with the software?A. You can check the digital output with the NxDynamics Web interface or a console with the following command: # npe?DO1; echo $?;
Q. What is the voltage range in the analog input?A. For the 9×00 version it is 4x 0-10VDC. For the 9×01 version it is 3x 0-10VDC and 1x 0-70VAC.
Q. How do I connect voltage to the analog input?A. Connect Plus(+) to AI input and minus(-) to GND input.
Q. Do analog inputs in the NPE 9000 have galvanic separation?A. No, they don’t.
Q. How do I read voltage?A.
With the iMod configuration HardwareResources.xml●
Through telnet console with the command: # npe ?AIU1; echo $?;●
With the NXDynamics interface and the I/O tab.●
Q. Does the RS-485 port have polarizing resistors?A. Biasing polarizing resistors are built-in all the NPE devices produced since 01.02.2012.
Q. What is the analog and digital input resolution in the 9000 series?A. Analog inputs: 12 bit, digital inputs: 45Hz
Q. Does iMod operate in continuous mode as a TCP master and a TCP slave, or do I need to reconfigure?A. iMod operates as a router. It can be both a master and a slave.
Q. Can I reset the digital input counter with the Modbus TCP?A. Yes, you can.