VIPG3 manual eng - AUDIONET
164
audionet VIP G3 Versatile Integrated Player User's Manual
-
Upload
khangminh22 -
Category
Documents
-
view
1 -
download
0
Transcript of VIPG3 manual eng - AUDIONET

audionet
VIP G3
Versatile Integrated Player
User's Manual


3
Contents
1 Preface ............................................................................. 9
2 Overview of control elements ...................................... 11
2.1 Front panel ................................................................................ 11
3 Overview of connections .............................................. 12
3.1 Back panel ................................................................................. 12
4 Overview of display elements ...................................... 13
4.1 Display window ......................................................................... 13
4.2 About progressive scan video .................................................. 15
5 Installation and power supply ...................................... 16
5.1 Placement .................................................................................. 16
5.2 Mains connection ...................................................................... 16
5.3 Orientation of mains plug ........................................................ 16
6 Audionet System Remote Control ................................ 17
6.1 Key assignments VIP G3 ......................................................... 18
6.2 Using the touch screen ............................................................. 19
6.3 Using the numeric key pad ...................................................... 21
6.3.1 Selecting track / title / group number ......................................... 21 6.3.2 Selecting a time or chapter number ............................................ 21
7 Operational principles .................................................. 22
7.1 How to use on-screen displays ................................................. 22
8 About discs .................................................................... 23
8.1 Playable disc types .................................................................... 23
8.1.1 Non-playable disc types ............................................................. 23 8.1.2 Disc structures ............................................................................ 24
4
8.1.3 MP3 discs ................................................................................... 24 8.1.4 General disc compatibility ......................................................... 25
9 Getting started .............................................................. 27
9.1 Setting the TV system .............................................................. 27
9.1.1 Watching NTSC on a PAL TV .................................................. 28
9.2 Switching on/off ........................................................................ 28
9.2.1 Audionet Link............................................................................. 28
9.3 Inserting and removing discs .................................................. 29
9.4 Setting up with the Setup Navigator ....................................... 30
9.5 Using the on-screen displays.................................................... 30
9.6 Using the Setup Navigator ....................................................... 32
9.7 Playing discs .............................................................................. 38
9.7.1 Basic playback controls .............................................................. 39 9.7.2 Front panel controls .................................................................... 39 9.7.3 DVD disc menus ........................................................................ 40 9.7.4 Video CD/Super VCD PBC menus ............................................ 40
10 Playing discs ................................................................. 44
10.1 Introduction .............................................................................. 44
10.2 Using the Disc Navigator to browse the contents of a disc ... 44
10.2.1 Scanning discs ............................................................................ 47
10.3 Playing in slow motion ............................................................. 47
10.4 Frame advance/frame reverse ................................................. 48
10.5 Looping a section of a disc ....................................................... 49
10.6 Using Repeat Play ..................................................................... 50
10.7 Using Random Play .................................................................. 52
10.8 Creating a program list............................................................ 54
10.8.1 Editing a program list ................................................................. 58 10.8.2 Other functions available from the Program menu .......................... 59
10.9 Using the comfort keys ............................................................. 60
10.9.1 Track Repeat .............................................................................. 60 10.9.2 Disc repeat .................................................................................. 61 10.9.3 Looping a section ....................................................................... 62 10.9.4 Random play ............................................................................... 63 10.9.5 The program function ................................................................. 64
10.10 Searching a disc ........................................................................ 65

5
10.11 Switching subtitles .................................................................... 66
10.12 Switching the DVD Audio language ....................................... 67
10.13 Switching the DVD-RW audio channels ................................ 68
10.14 Switching the DVD Audio channels ........................................ 68
10.15 Switching the CD/MP3/Video CD/Super VCD audio channels ..... 69
10.16 Switching camera angles .......................................................... 69
10.17 Displaying disc information .................................................... 69
11 Audio Settings menu ..................................................... 72
11.1 Audio DRC ................................................................................ 72
11.2 Virtual Surround ...................................................................... 73
11.3 Channel Level ........................................................................... 74
11.4 Speaker Distance ...................................................................... 76
12 Video Settings menu ..................................................... 77
12.1 Video Adjust ............................................................................. 77
12.2 Creating your own presets ....................................................... 78
13 Initial Settings menu ..................................................... 81
13.1 Digital Audio Out settings ....................................................... 81
13.1.1 Dolby Digital Out ....................................................................... 82 13.1.2 DTS Out ..................................................................................... 82 13.1.3 Linear PCM Out ......................................................................... 83 13.1.4 MPEG Out .................................................................................. 84
13.2 Video Output settings ............................................................... 84
13.2.1 TV Screen ................................................................................... 84 13.2.2 Component Out .......................................................................... 85 13.2.3 AV Connector Out...................................................................... 86 13.2.4 S-Video Out ................................................................................ 87 13.2.5 Still Picture ................................................................................. 87
13.3 Language settings ..................................................................... 88
13.3.1 Audio Language ......................................................................... 88 13.3.2 Subtitle Language ....................................................................... 89 13.3.3 Auto Language ........................................................................... 90 13.3.4 DVD Menu Language ................................................................ 90 13.3.5 Subtitle Display .......................................................................... 91

6
13.4 Display settings ......................................................................... 92
13.4.1 OSD Language ........................................................................... 92 13.4.2 On Screen Display ...................................................................... 92 13.4.3 Angle Indicator ........................................................................... 93
13.5 Background ............................................................................... 93
13.5.1 Screen Saver ............................................................................... 94
13.6 Options ...................................................................................... 94
13.6.1 Parental Lock .............................................................................. 94 13.6.2 Registering a new password ....................................................... 95 13.6.3 Changing your password ............................................................ 96 13.6.4 Setting/changing the Parental Lock level ................................... 97 13.6.5 Setting/changing the Country Code ........................................... 98 13.6.6 Bonus Group............................................................................... 99 13.6.7 Auto Disc Menu ....................................................................... 100 13.6.8 Group Playback ........................................................................ 101 13.6.9 DVD Playback Mode ............................................................... 101 13.6.10 SACD Playback ........................................................................ 102 13.6.11 HDMI Settings ......................................................................... 103 13.6.12 CD Playback ............................................................................. 107 13.6.13 DTS Downmix ......................................................................... 107
13.7 Speakers .................................................................................. 108
13.7.1 Audio Output Mode ................................................................. 108 13.7.2 Speaker Installation .................................................................. 109 13.7.3 Speaker Distance ...................................................................... 110 13.7.4 Channel Level........................................................................... 111
13.8 i.LINK Setup ........................................................................... 114
13.8.1 Audio Out ................................................................................. 114 13.8.2 Connections Setup .................................................................... 114 13.8.3 Auto Select Play ....................................................................... 115 13.8.4 DVD Audio Out ....................................................................... 116
14 Additional information .................................................118
14.1 Taking care of your player and discs ................................... 118
14.1.1 Handling discs .......................................................................... 118 14.1.2 Storing discs ............................................................................. 118 14.1.3 Discs to avoid ........................................................................... 119 14.1.4 Cleaning the pickup lens .......................................................... 119 14.1.5 Problems with condensation ..................................................... 119 14.1.6 Hints on installation ................................................................. 120 14.1.7 Moving the player .................................................................... 120 14.1.8 Power cable caution ................................................................. 121
14.2 Screen sizes and disc formats ................................................ 121
14.2.1 Widescreen TV users ............................................................... 121 14.2.2 Standard TV users .................................................................... 121
14.3 Resetting the player ................................................................ 122

7
14.4 About the audio output settings ............................................ 123
14.5 About the HDMI output settings .......................................... 124
14.6 HDMI output with DVD Audio sources ............................... 125
14.7 About the i.LINK output settings ......................................... 126
14.8 Country Code list.................................................................... 127
14.9 Language Code list ................................................................. 127
14.10 Selecting languages using the Language Code list .............. 128
14.11 Glossary ................................................................................... 128
14.12 Troubleshooting ...................................................................... 133
14.12.1 General ..................................................................................... 133 14.12.2 DVD/CD/Video CD/Super VCD playback .............................. 134 14.12.3 HDMI troubleshooting ............................................................. 137 14.12.4 i.LINK troubleshooting ............................................................ 138 14.12.5 i.LINK-related messages .......................................................... 139
15 Connections and options on the back panel............. 140
15.1 Video outputs .......................................................................... 140
15.2 Analog audio outputs ............................................................. 142
15.3 Digital audio outputs .............................................................. 143
15.4 Digital output formats ............................................................ 145
15.4.1 LowBit mode ............................................................................ 145 15.4.2 HighBit mode ........................................................................... 147
15.5 About HDMI ........................................................................... 149
15.5.1 Connecting using HDMI .......................................................... 149
15.6 About i.LINK .......................................................................... 151
15.6.1 Connecting using i.LINK ......................................................... 151 15.6.2 Creating an i.LINK network ..................................................... 152
15.7 USB/SPDIF digital audio input ............................................. 154
15.7.1 Connecting the computer the USB-Audio input ...................... 154 15.7.2 Example overview Device Manager ........................................ 156 15.7.3 Using the SPDIF input.............................................................. 157
15.8 Connecting the external power supply EPS ......................... 158
16 Factory default settings VIP G3.................................. 159
17 Recommended setup for 2-channel analog usage ... 160

8
18 Security advice .............................................................162
19 Technical data ..............................................................163

9
1 Preface
The Audionet Team congratulates you on your purchase of this unit. But before you start listening to your new Audionet VIP G3, please read this manual care-fully so you are able to use and enjoy all functions of this unit without draw-back on music or picture quality.
Audionet VIP G3: A Sensual Statement
Already his predecessor was considered to be the reference player for the en-joyment of music and film. Now, the third generation takes the stage: the VIP G3 (Generation 3) is nothing less than Audionets final statement for the classic audio and film media.
The VIP G3 is the outstanding specialist for the established and well proven CD, DVD-Video and DVD-Audio as well as SACD formats. Media – that are technically absolutely mature, easily available and, due to their uncountable variety, define home entertainment. More than that, the VIP G3 receives and decodes music even from servers or personal computers through its USB Audio interface.
With a performance that sets standards in most aspects even compared to new high resolution media, the VIP G3 exceeds the expectation from expert con-noisseurs of high-quality music and video reproduction.
The VIP G3 fathoms the unimagined potential of established media. Therefore the VIP G3 plays your familiar records in a way that touches each of your senses.

10
Included
Included you will find the following items:
• the universal CD, SACD and DVD transport system VIP G3
• one low resonance stabilizer ('Puck') made of POM (black)
• the user's manual (that you are currently reading)
• one standard mains chord
• one DVD Audio disc 'Hamamura Quintett - Retold'
• Audionet System Remote Control Logitech Harmony Ultimate One (in separate package)
Transportation
Important
• Please transport the VIP G3 only inside the included package.
• Use the provided bag to prevent scratches on the housing.
• Never leave a CD/DVD/SACD disc or the stabilizer inside the VIP G3 during transport. The sensitive mechanics could suffer damage.
11
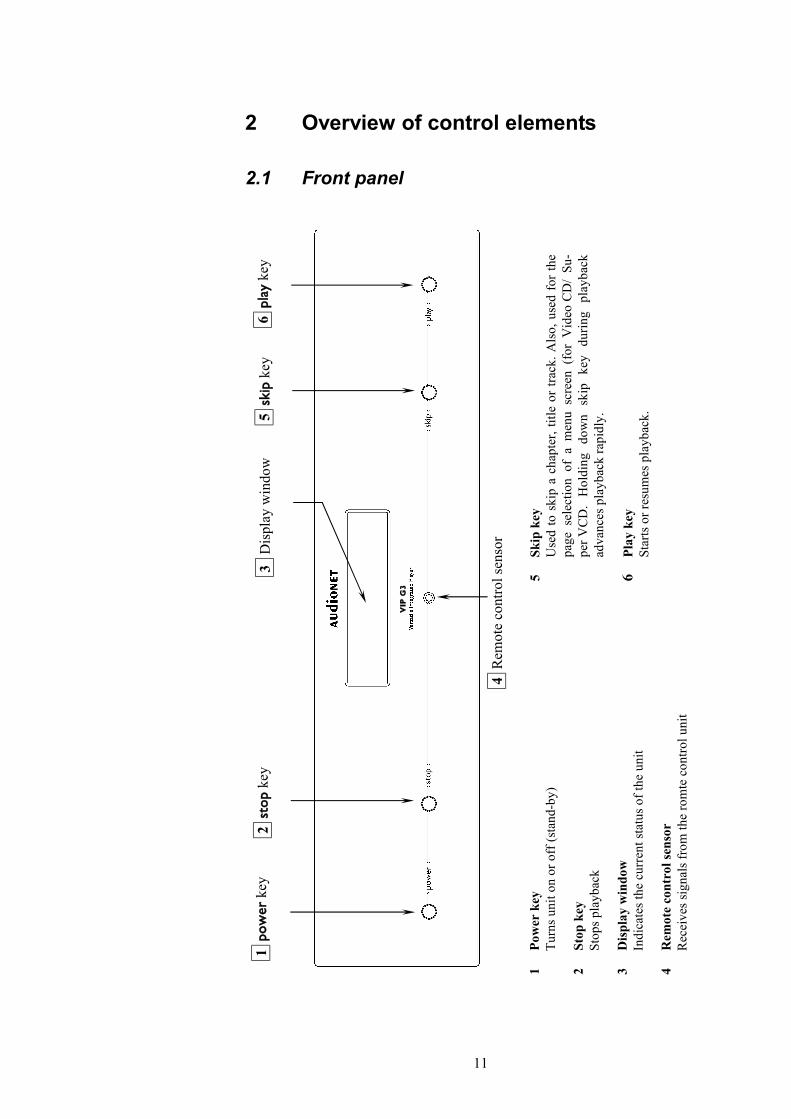
2 Overview of control elements
2.1 Front panel
1 p
ow
er k
ey
2 s
top
key
3
Dis
play
win
dow
4 R
emot
e co
ntro
l sen
sor
5 s
kip
key
6 p
lay
key
1 Po
wer
key
Turn
s uni
t on
or o
ff (s
tand
-by)
2 St
op k
ey
St
ops p
layb
ack
3 D
ispla
y w
indo
w
Indi
cate
s the
cur
rent
stat
us o
f the
uni
t
4 R
emot
e co
ntro
l sen
sor
R
ecei
ves s
igna
ls fr
om th
e ro
mte
con
trol u
nit
5 Sk
ip k
ey
U
sed
to s
kip
a ch
apte
r, tit
le o
r tra
ck. A
lso,
use
d fo
r th
e pa
ge s
elec
tion
of a
men
u sc
reen
(fo
r V
ideo
CD
/ Su
-pe
r VC
D.
Hol
ding
do
wn
skip
ke
y du
ring
play
back
ad
vanc
es p
layb
ack
rapi
dly.
6 Pl
ay k
ey
St
arts
or r
esum
es p
layb
ack.
VIP
G3

12
3 Overview of connections
3.1 Back panel
For further information about connections and hardware settings please refer to section 'Connections and options on the back panel' on page 140.
1 V
ideo
out
put R
/CR
2 V
ideo
out
put G
/Y
3 V
ideo
out
put B
/CB
4 Se
lect
or v
ideo
on/
off
5 V
ideo
out
put C
ompo
site
(CV
BS)
6
Vid
eo o
utpu
t S-V
ideo
(Y/C
) 7
Ana
log
outp
ut S
ubw
oofe
r 8
Ana
log
outp
ut R
ight
Sur
roun
d 9
Ana
log
outp
ut L
eft S
urro
und
10
Ana
log
outp
ut C
ente
r 11
Se
lect
or o
utpu
t for
mat
for d
igita
l ou
tput
s and
dig
ital o
uput
s on/
off
12
USB
-Aud
io in
put (
SPD
IF)
13
Dig
ital o
utpu
t 4 (S
PDIF
-TO
S-Li
nk)
14
Mai
ns in
put
15
Mar
king
mai
ns p
hase
16
D
igita
l out
put 3
(AES
/EB
U)
17
Dig
ital o
utpu
t 2 (S
PDIF
) 18
D
igita
l out
put 1
(SPD
IF)
19
Dig
ital o
utpu
t 'D
ataL
ink'
20
In
put E
PS (E
nhan
ced
Pow
er S
uppl
y)
21
Ana
log
outp
ut M
ain
Left
(Cin
ch)
22
Ana
log
outp
ut M
ain
Left
(bal
ance
d)
23
Ana
log
outp
ut M
ain
Rig
ht (b
alan
ced)
24
A
nalo
g ou
tput
Mai
n R
ight
(Cin
ch)
25
Inpu
t Aud
ione
t Lin
k 26
H
DM
I out
put
27
i.Lin
k ou
tput
(2 u
nits
) 28
SD
I vid
eo o
utpu
t (op
tiona
l)
1
2
3
4
5
6
7
8
9
10
1
1 1
2
13
1
4
27
2
8
26
2
5
24
2
3
22
2
1
20
1
9
18
1
7
16
1
5
13
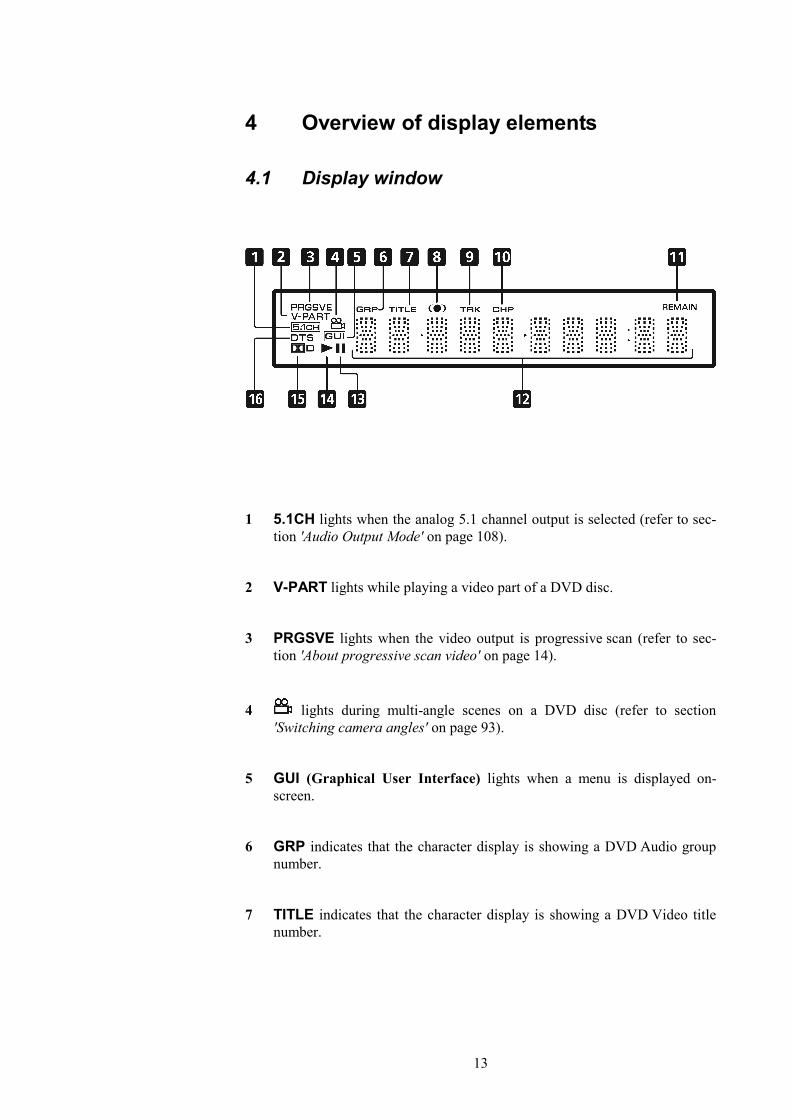
4 Overview of display elements
4.1 Display window
1 5.1CH lights when the analog 5.1 channel output is selected (refer to sec-tion 'Audio Output Mode' on page 108).
2 V-PART lights while playing a video part of a DVD disc.
3 PRGSVE lights when the video output is progressive scan (refer to sec-tion 'About progressive scan video' on page 14).
4 lights during multi-angle scenes on a DVD disc (refer to section 'Switching camera angles' on page 93).
5 GUI (Graphical User Interface) lights when a menu is displayed on-screen.
6 GRP indicates that the character display is showing a DVD Audio group number.
7 TITLE indicates that the character display is showing a DVD Video title number.

14
8 *1 lights when V / TruSurround is active (refer to section 'Virtual Surround' on page 73).
9 TRK indicates that the character display is showing a track number.
10 CHP indicates that the character display is showing a DVD chapter num-ber.
11 REMAIN lights when the character display is showing the time or number of tracks/titles/chapters remaining.
12 Character display
13 ▐▐ lights when a disc is paused.
14 ► lights when a disc is playing.
15 *2 lights when a Dolby Digital soundtrack is playing.
16 DTS *3 lights when a DTS soundtrack is playing.
*1 TruSurround and the symbol are registered trademarks of SRS Labs, Inc. *2 'Dolby' and the double-D symbol are registered tademarks of Dolby Laboratories. *3 'DTS' and 'DTS Digital Surround' are registered trademarks of Digital Theater Systems, Inc.

15
4.2 About progressive scan video Compared to interlace video *1, progressive scan video*2 effectively doubles the scanning rate of the picture, resulting in a very stable, flicker-free image. Pro-gressive scan video is available only from the component video output. Use the [Progressive] function in the [Video Output] menu to switch the compo-nent video output between interlace and progressive (refer to section 'Component Out' on page 85). With a DVD Video disc you can do this during playback, or when the disc stopped. For other types of discs, the VIP G3 must be stopped.
Important
• If you connect a TV that is not compatible with a NTSC or PAL progres-sive scan signal and switch the VIP G3 to progressive, you will not be able to see any picture at all. In this case, please deactivate the [Progressive] function to switch back to interlace.
Note
• You can’t switch video output when an OSD is on-screen.
• The picture on some TVs may momentarily break up when you switch the video output of the VIP G3.
*1 refer to glossar 'Interlaced Video' on page 134. *2 refer to glossar 'Progressive scan video' on page 135.

16
5 Installation and power supply
5.1 Placement Please choose a level and dry place. It is recommended to place the VIP G3 into a high quality rack or onto a stable table. Do not expose the unit to vibrations and direct sunlight. Do not place the unit in close range to heat sources like radiators.
5.2 Mains connection The mains input 14 is on the back panel of the VIP G3. To connect the unit to mains use the included mains cord. If you want to use a different power cord make sure that it meets the specifications for your home country.
Important
• The electrical specifications at the back must meet the specifications of your home country.
• The VIP G3 is a Class I unit and must be earthed. Please ensure a stable earth connection. 'Phase' ('hot pin') is marked at the back panel (PHASE) 15 .
• Only in case of extended absence (like vacations) or if massive trouble on mains power is to be expected you should disconnect the unit from mains. To disconnect the unit from mains pull the mains plug.
5.3 Orientation of mains plug The correct polarization of mains is important for reasons of audio clarity and stability. Please connect the mains cord that the hot pin of the wall outlet is connected to the pin of mains input 14 marked PHASE 15 on the back panel of the unit.

17
6 Audionet System Remote Control All functions of the VIP G3 can be controlled using the Audionet System Re-mote Control Logitech Harmony Ultimate One. Furthermore it is possible to control up to 14 additional devices with the Harmony Ultimate One.
18
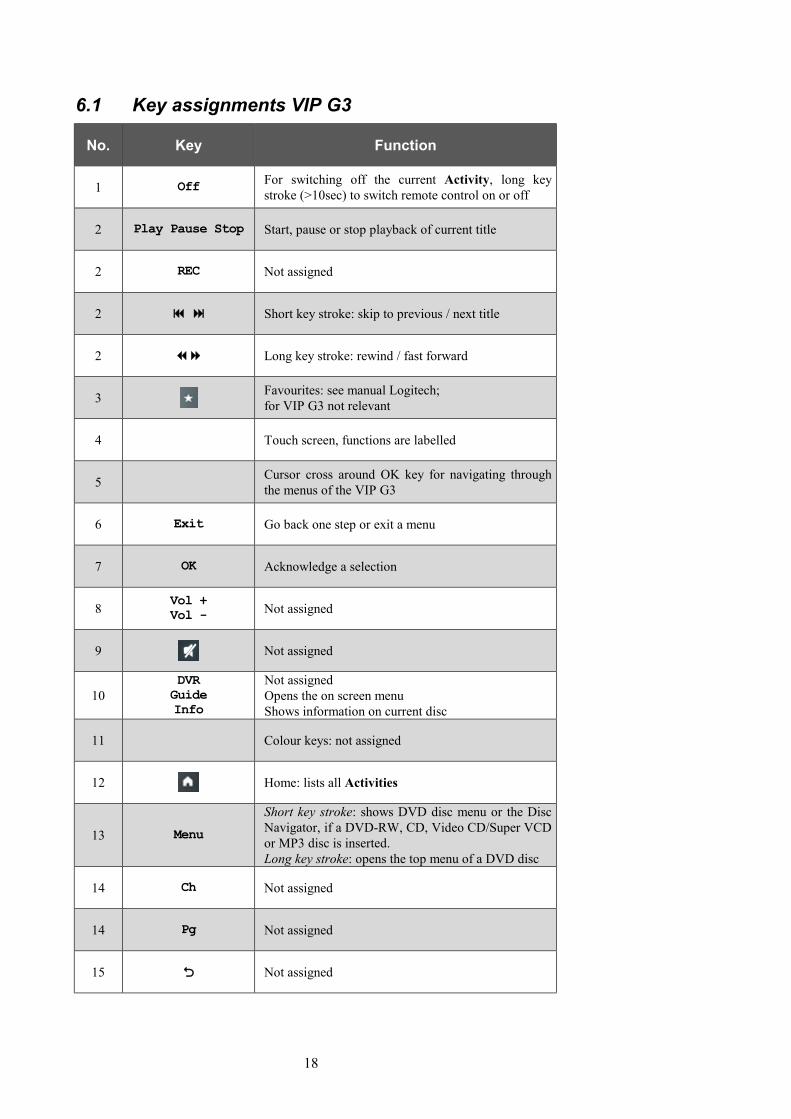
6.1 Key assignments VIP G3
No. Key Function
1 Off For switching off the current Activity, long key stroke (>10sec) to switch remote control on or off
2 Play Pause Stop Start, pause or stop playback of current title
2 REC Not assigned
2 9 : Short key stroke: skip to previous / next title
2 78 Long key stroke: rewind / fast forward
3 Favourites: see manual Logitech; for VIP G3 not relevant
4 Touch screen, functions are labelled
5 Cursor cross around OK key for navigating through the menus of the VIP G3
6 Exit Go back one step or exit a menu
7 OK Acknowledge a selection
8 Vol + Vol - Not assigned
9 Not assigned
10 DVR Guide Info
Not assigned Opens the on screen menu Shows information on current disc
11 Colour keys: not assigned
12 Home: lists all Activities
13 Menu Short key stroke: shows DVD disc menu or the Disc Navigator, if a DVD-RW, CD, Video CD/Super VCD or MP3 disc is inserted. Long key stroke: opens the top menu of a DVD disc
14 Ch Not assigned
14 Pg Not assigned
15 O Not assigned

19
You will find help for setting up your Logitech Harmony Ultimate One on the internet on Logitech's webpage: https://support.myharmony.com/de-de/harmony-ultimate-one-user-manual
6.2 Using the touch screen
Tap on the Symbol above the touch screen of your Harmony Ultimate One to get a list of all your Activities. Tap now on the symbol on the lower right and then on the key Devices . The screen will give you a list of all pro-grammed devices to be controlled by your Harmony Ultimate One. Scroll through the list with an up or down wipe and press then the key VIP G3 in order to control your VIP G3 with the Harmony Ultimate One. The Device mode gives you access to all remote control commands your VIP G3 under-stands. The following will discuss these commands in detail.
Important
• During everyday use, you should never need to use the Device Mode of your Harmony Ultimate One, but control the VIP G3 (and other devices of your audio setup) by customizing your Activities. For detailed information on how to customize and use Activities on your Harmony Ultimate One please consult the separate user manual for Harmony Ultimate One.
Key Function
123 Opens the numeric key pad
Power Toggle Switches the VIP G3 on / off (toggle)
Power On Switches the VIP G3 on
Power Off Switches the VIP G3 off
Menu Opens the DVD disc menu or the Disc Navigator, if a DVD-RW, CD, Video CD/Super VCD or MP3 disc is inserted
Top Menu Opens the top menu of a DVD disc
Home Menu Opens / closes the on-screen menu of the VIP G3 (same function a s key Guide )
Audio Select the audio channel or language

20
Subtitle Select subtitles (see section "Switching subtitles" on page 66)
Angle Switch camera angles during multi angle playback of a DVD (see section "Switching camera angles" on page 69)
SACD Mode Select which area of a SACD you would like to playback (see section "SACD Playback" on page 102).
Surround Switch on/off V/ TruSurround (see section "Virtual Sur-round" on page 73)
Dim Display Change display brightness
Video Adjust Display the Video Adjust menu (see section "Video Adjust" on page 77)
OSD on/off Display information about the disc playing (see section "Displaying disc information" on page 69
Random Play tracks or chapters (DVD Video), groups or tracks (DVD Audio) or tracks (CD, Video CD / Super VCD and MP3 discs) in random order (see section "Random play" on page 63).
Repeat Provides several repeat modes for DVD, CD, SACD, MP3, VCD or SACD discs, e.g. track or disc repeat (see section "Track Repeat" on page 60 and section "Disc repeat" on page 61)
Repeat A-B Loop a section of a DVD, CD or SACD (see section "Looping a section" on page 62)
Play Mode Display the Play Mode menu (see pages 49 to 60 and 65). You can also get to the Play Mode menu by pressing Home Menu or Guide and then selecting [Play Mode]
Program Program titles, chapters, folders, or tracks to playback in a de-sired order (see section "The program function" on page 64)
Important
• The Power key Off is only available for Activities. In Device Mode the Power key has no function.
• Even without using an Activity, the user is able to control all functions of the VIP G3 using the Harmony Ultimate One in Device Mode.
• The keys described below to control the VIP G3 refer to the factory default programming of the Audionet System Remote Control Har-mony Ultimate One. Understandably, any changes done to this setup by the user cannot be discussed here.
Tip
• In order to switch the VIP G3 on/off, without using an Activity, please use the keys Power On , Power Off or Power Toggle on the touch screen. Of course, it is possible to control the VIP G3 without any Activ-

21
ity, but to tap the full potential of the Harmony Ultimate One you need to configure Activities customized to your needs (please refer to separate manual of the remote control Harmony Ultimate One).
Note
• Please read the separate user manual to your Audionet System Remote Control Harmony Ultimate One. Activities, Devices and Device Mode as well as customizing the remote control are discussed there. The user man-ual to the Audionet system remote control Harmony Ultimate One is avail-able for download here: http://cdn-www.myharmony.com/files/harmonyultimateone-usermanual-en.pdf
6.3 Using the numeric key pad Use the digit keys of the numeric key pad to select a track, title or group di-rectly. Additionally, you can use them to enter a time for the Time Search function or a chapter for the Chaper Search function.
6.3.1 Selecting track / title / group number To select a number between 1 and 9 please press the corresponding digit key and confirm the selection with OK or enter .
To enter a two digit number please press the key for the first digit. After select-ing the left digit press the key for the second (right) digit and confirm with OK or enter . If you need to correct your last entry press clear to erase the entry and start over.
Example: To enter number
- 5 press 5 à OK or enter
- 10 press 1 à 0 à OK or enter
- 24 press 2 à 4 à OK or enter
6.3.2 Selecting a time or chapter number The method for entering a time for Time Search or a chapter number for Chapter Search is different from above. Please refer to section "Searching a disc" on page 65 for details.
Note
• There is a different method for selecting a track or folder of a MP3 disc. For further information see section "Searching a disc" on page 65.
22
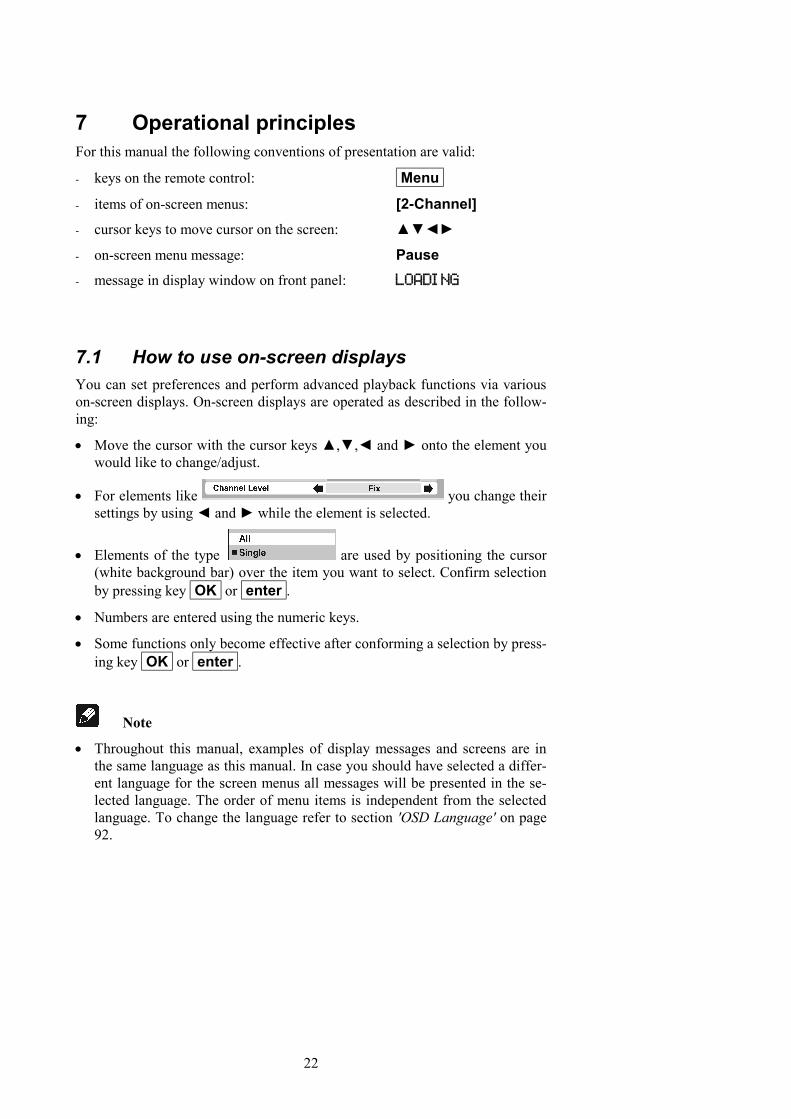
7 Operational principles For this manual the following conventions of presentation are valid:
- keys on the remote control: Menu
- items of on-screen menus: [2-Channel] - cursor keys to move cursor on the screen: ▲▼◄►
- on-screen menu message: Pause
- message in display window on front panel: LOADING
7.1 How to use on-screen displays You can set preferences and perform advanced playback functions via various on-screen displays. On-screen displays are operated as described in the follow-ing:
• Move the cursor with the cursor keys ▲,▼,◄ and ► onto the element you would like to change/adjust.
• For elements like you change their settings by using ◄ and ► while the element is selected.
• Elements of the type are used by positioning the cursor (white background bar) over the item you want to select. Confirm selection by pressing key OK or enter .
• Numbers are entered using the numeric keys.
• Some functions only become effective after conforming a selection by press-ing key OK or enter .
Note
• Throughout this manual, examples of display messages and screens are in the same language as this manual. In case you should have selected a differ-ent language for the screen menus all messages will be presented in the se-lected language. The order of menu items is independent from the selected language. To change the language refer to section 'OSD Language' on page 92.

23
8 About discs
8.1 Playable disc types
The VIP G3 is engineered to play back the following types of discs:
DVD Audio
DVD Video
DVD R
DVD RW
Audio CD
Video CD
CD-R
CD-RW
Super VCD
Super Audio CD
CD-R and CD-RW discs recorded in the Audio CD or MP3 format can be played back, though some of them may not be played back because of the disc characteristics or recording conditions.
DVD Video discs have one or more Region Code numbers, which are indicated on the cover. This unit can playback DVD Video discs whose Region Code numbers include the unit's Region Code.
Example of playable DVD discs when the unit's Region Code is 2:
The VIP G3 can playback a disc recorded with either the NTSC or PAL format.
8.1.1 Non-playable disc types The following disc types are non-playable by the VIP G3:
DVD-ROM, DVD-RAM, CD-ROM, PHOTO CD, CD-EXTRA, CD-G, CD-TEXT
Playing back discs listed above as 'non-playable discs' may generate noise and could cause damage to your speakers
The VIP G3 can playback audio recorded on CD-G, CD-EXTRA and CD-TEXT discs.

24
8.1.2 Disc structures DVD Video discs are generally divided into one or more 'titles'. Titles maybe further divided into 'chapters'. For example, if a DVD Video disc contains some movies, each movie may have its own title number, and each movie may be divided into some chapters. On a DVD Video Karaoke disc, each song usually has its own title number and does not have chapters. DVD Audio discs are di-vided into one or more 'groups', and each group can contain a number of 'tracks'. Some DVD Audio discs also contain a 'bonus group' that will only play after entering the 'key number' (a kind of password). Usually the contents of a 'bonus group' are not open to the public. Note that most DVD Audio discs in-clude other information in addition to audio, such as still pictures, movies and text. Audio CD, Video CD or Super VCD discs are divided into 'tracks'. CD-ROMs containing MP3 files are divided into 'folders'. Folders may also contain subfolders.
Example: DVD Video disc
Example: DVD Audio disc
Example: Audio CD/Video CD
SACD
8.1.3 MP3 discs The VIP G3 will playback CD-R/CD-RW discs recorded in the MP3 format (those discs are referred to as MP3 discs in this manual). Though available functions with MP3 discs are limited, operations for the available functions are similar to those with Audio CD discs.
MP3 is the abbreviation of 'MPEG1 Audio Layer 3'. MPEG Audio is a com-pression specification that compresses the audio portion only. The audio data has been compressed into about 1/10. A similar compression method is also used on images on DVD Video, Video CD and Super VCD discs.
On a MP3 disc, each material (song) is recorded in a file. Files are usually grouped into folders, often sorted by category, by artist etc. In addition, folders can also be subdivided into subfolders, creating hierarchical folder layers. If you are familiar with personal computers, you may easily understand the hier-
Title 1
Chapter 2 Chapter 3
Title 2
Chapter 1 Chapter 1 Chapter 2
Track 3 Track 2 Track 1
Group 1 Group 2
Track 1 Track 3 Track 2 Track 1 Track 2

25
archical folder layer construction of MP3 discs because it is similar to the folder layer construction of computers.
Note
• The VIP G3 can recognize a combined total of up to 250 files and folders. If a disc containing over 250 files/folders is loaded, only the first 250 files/folders recorded on the disc will be playable.
• The VIP G3 will play CD-ROM discs containing files saved in the MPEG-1 Audio Layer 3 format (MP3) with a sampling rate of 44.1 or 48 kHz. Incompatible files will not play, and UNPLAYABLE will be dis-played.
• Fixed bit-rate files are recommended. Variable bit-rate (VBR) files are playable, but playing time may not be shown correctly.
• The CD-ROM used to compile your MP3 files must be ISO 9660 Level 2 compliant.
• CD physical format: Mode 1, Mode 2 XA Form 1.
• The VIP G3 only plays tracks that are named *.MP3 or *.mp3.
• The VIP G3 is compatible with multisession discs, but only plays sessions that are closed.
• Use CD-R or CD-RW media for recording your MP3 files.
• Folder and track names (excluding the extension '.mp3') are displayed.
• There are many different recording bit-rates available to encode MP3 files. The VIP G3 was designed to be compatible with all of them. Audio should be encoded at least at 256 kbps for a reasonably decent sound quality. The VIP G3 will playback MP3 files with lower bit-rates, but please note that sound quality becomes noticeably worse at lower bit-rates.
8.1.4 General disc compatibility DVD-R/RW and CD-R/RW discs recorded using DVD-/CD-Recorders or PCs my not be playable on this unit. This may be caused by a number of possibili-ties, including but not limited to:
• the type of disc used,
• the type of recording,
• damage, dirt or condensation on either the disc or the VIP G3's pickup lens.

26
CD-R/RW compatibility
• The VIP G3 will play CD-R and CD-RW discs recorded in CD Audio or Video CD/Super VCD format, or as CD-ROM containing MP3 audio files. However, any other content may cause the disc not to play, or create noise/distortion in the output.
• This unit cannot record CD-R or CD-RW discs.
• Unfinalized CD-R/RW discs recorded as CD Audio can be played, but the full Table of Contents (playing time, etc.) will not be displayed.
DVD-R/RW compatibility
• The VIP G3 will play DVD-R/RW discs that were recorded using the DVD Video format or Video Recording format.
• This unit cannot record DVD-R/RW discs.
• Unfinalized DVD-R/RW discs cannot be played in the VIP G3.
PC created disc compatibility
• If you record a disc using a personal computer (PC), even if it is recorded in a 'compatible format' as listed above, there will be cases in which the disc may not be playable in this machine due to the setting of the applica-tion software used to create the disc. In these particular instances, check with the user's manual the software you are using.
• Check the DVD-R/RW or CD-R/RW discs boxes for additional compatibil-ity information.
About DualDisc playback
• A DualDisc is a new two-sided disc, one side of which contains DVD con-tent video, audio etc. while the other side contains non-DVD content such as digital audio material
• The non-DVD audio side of the disc is not compliant with the CD Audio specification and therefore my not play.
• The DVD side of a DualDisc plays in the VIP G3.
• For more detailed information on the DualDisc specification, please refer to the disc manufacturer or disc retailer.

27
9 Getting started
9.1 Setting the TV system The default setting of the VIP G3 is AUTO, and unless you notice that the pic-ture is distorted when playing some discs, you should leave it set to AUTO. If you experience picture distortion with some discs, set the TV system to match your country or region's system. Doing this, however, may restrict the kinds of disc you can watch. The table below shows what kinds of disc are compatible with each setting (AUTO, PAL and NTSC).
1. If the VIP G3 is not plugged in yet, plug it in now, but leave it in stand-by.
2. Using the front panel controls, hold the skip key down then press the power key on the front panel to change the setting of the TV system. The setting changes as follows:
AUTO à NTSC
NTSC à PAL
PAL à AUTO
The display of the VIP G3 indicates the new setting.
Note
• You have to switch the VIP G3 into stand-by (press power key on front panel) before each change.
• If you are watching an NTSC disc on a PAL TV, you will only be able to see interlace video. Progressive scan video is not compatible with the MOD.PAL setting.
Disc Player setting
Type Format NTSC PAL AUTO
DVD NTSC NTSC MOD.PAL NTSC
PAL PAL PAL PAL
Video CD NTSC NTSC MOD.PAL NTSC
PAL NTSC PAL PAL
CD / No disc - NTSC PAL NTSC or PAL

28
9.1.1 Watching NTSC on a PAL TV Most models of the newly developed countdown PAL TV system detect 50 Hz (PAL) / 60 Hz (NTSC) and automatically switch vertical amplitude, resulting in a display without vertical shrinkage.
If your PAL TV does not have a V-Hold control, you may not be able to watch NTSC discs because of picture roll. If the TV has a V-Hold control, adjust it until the picture stops rolling.
On some TVs, the picture may shrink vertically, leaving black bands at the top and bottom of the screen. This is not a malfunction; it is caused by the NTSC to PAL conversion.
9.2 Switching on/off After making sure that everything is connected properly and that the VIP G3 is plugged in, press the power key on the front panel or the key Power On or Power Toggle of the remote control Harmony Ultimate One in Device Mode for the VIP G3 to switch on the unit. The display on the front panel shows LOADING for a short time.
If the disc drawer is open the display shows OPEN.
If you switch on the unit while the disc drawer is closed and no disc inserted, a short time after switching on the display will read 0 for group / title / track / chapter / time.
Switch off the unit by pressing the power key on the front panel or the key Power Off or Power Toggle of the remote control Harmony Ultimate One in Device Mode for the VIP G3. The display will first show -OFF- and then go dark after a short time. Now the unit is in stand-by mode.
Tip
• Of course, it is much more comfortable to switch on/off the VIP G3 using the Activity feature of the Audionet System Remote Control Harmony Ul-timate One. For more information on Activities please read the user's man-ual of the Harmony Ultimate One.
9.2.1 Audionet Link For your convenience, the VIP G3 can be controlled remotely by one of Audio-net's multi-channel pre amplifiers MAP or MAP 1, as well as one of Audionet's stereo pre amplifiers series PRE or PRE 1 using the "Audionet Link" interface.
You only need a simple optical "Toslink" cable to connect the "Audionet Link" output of your Audionet pre amplifier to the "Audionet Link" input 25 of the VIP G3. Now, the VIP G3 and all other units connected via "Audionet Link"
29
will be switched on/off automatically, when you switch on/off your pre ampli-fier at the front panel or by remote control.
Note
• Independently from the "Audionet Link" interface, you can switch on/off manually your VIP G3 at any time by using the power key on the front panel or the remote control.
9.3 Inserting and removing discs Open the disc drawer on top of the unit by pushing it to the back using the han-dle. Put a disc onto the spindle with its printed side facing up. Fix disc with included stabilizer ('Puck'). Please make sure that the stabilizer gives the disc a centred and level position.
Close the drawer now. The display shows LOADING. After a short moment the disc type is indicated (refer to section 'About discs' on page 23). For further information about playback of discs please refer to section 'Playing discs' on page 38.
Stop playback by using button stop at front panel or ■ on the remote control before you open the drawer. Please wait until the disc stopped turning com-pletely before lifting off the stabilizer ('Puck') to remove the disc.
Important
• If you open the disc drawer during playback the VIP G3 takes a short mo-ment to stop the disc. Please wait until the disc stopped spinning com-pletely before you remove it.
• The drawer always has to be closed completely in order to playback a disc.
• Please always use the provided stabilizer for fixing the disc during play-back. Otherwise the disc and the player may suffer damage.
• Never use any additional disc stabilizers!
• Do not use any non-standard shaped discs available on the market because it may damage the unit.
• Please check the copyright laws in your country before recording from DVD Audio, DVD Video, Audio CD, SACD, Video CD, Super VCD or MP3 discs. Recording of copyrighted material may infringe copyright laws.
• DVD Video discs are protected by the copyguard system. When you con-nect the unit to your VCR directly, the copyguard system is activated, and the picture may not be played back correctly.

30
• If you insert a DVD Video disc that has a Region Code incompatible to the Region Code of the VIP G3, this unit will refuse to play the disc.
• With some DVD Video discs, the unit starts playback automatically after inserting the disc and closing the drawer.
9.4 Setting up with the Setup Navigator When you switch on the VIP G3 for the first time, you will see the audionet logo on the TV screen. From here you can let the VIP G3 know what kind of TV you have, then either use the Setup Navigator to make more settings, or jump right in and start playing some discs.
Note
• If you have connected an HDMI compatible device to the VIP G3, the HDMI settings screen will appear instead of the setup screens below. Refer to section 'HDMI Settings' on page 103 for further information.
9.5 Using the on-screen displays For ease of use, the VIP G3 makes extensive use of graphical on-screen dis-plays (OSDs). You should get used to the way these work as you will need to use them when setting up the VIP G3, using some of the playback features, such as program play, and when making more advanced settings for audio and video.
All the screens are navigated in basically the same way, using the cursor keys ▲,▼,◄ and ► to change the highlighted item and to select it by pressing OK or enter .
Important
• Throughout this manual, 'select' means to use the cursor keys ▲,▼,◄ and ► to highlight a menu item, and then press OK or enter to confirm.

31
Key Function
Home Menu or
Guide Display/exit the on-screen display
▲ ▼ ◄ ► Changes the highlighted menu item
OK or
enter. Selects the highlighted menu item
Return od
Exit Returns to the previous menu without saving changes
Tip
• Information at the bottom of every OSD screen explains the currently se-lected menu item and shows which keys can be used for that screen.

32
9.6 Using the Setup Navigator Using the Setup Navigator you can make a number of other initial settings for the VIP G3. We recommend using the Setup Navigator, especially if you con-nected the VIP G3 to an AV receiver for playing surround sound. To answer some of the questions about digital audio formats you may need to look at the instructions that came with your AV receiver.
1. If a disc is playing, press ■ (stop).
Also turn on your TV and make sure that it is set to the correct video input.
2. Please press the key Home Menu or Guide .
The on-screen display (OSD) appears.
3. Select [Setup Navigator].

33
4. Select a DVD language.
Some DVD discs feature on-screen menus, soundtracks and subtitles in several languages. Set your preferred language here.
• Note that the language you choose here may not be available on all discs.
• If you want to select a language other than those listed, select [Other Language]. For further information refer to section 'Selecting languages using the Language Code list' on page 128.
5. Is your TV/monitor compatible with progressive scan video?
Select [Compatible], [Not Compatible] or [Don’t Know].
• This setting is only applicable if you used the component video outputs to connect up your TV/monitor.

34
6. Did you connect this player to an AV-Receiver?
If you selected [Not Connected] here, that completes the setup. Press OK or enter to leave Setup Navigator.
7. Did you connect the 5.1 channel analog audio outputs to your AV re-ceiver?
Select [Connected] or [Not Connected].
8. Did you connect the VIP G3 to your AV receiver using the digital au-dio output?
Select [Connected] or [Not Connected].
• If you selected [Not Connected] in both steps 7 and 8, that completes the setup. Press OK or enter to the Setup Navigator.

35
• If you selected [Connected] in step 7, then answer the following ques-tions about the speakers in your system, otherwise jump to step 12.
9. Do you have a center speaker connected to your AV receiver?
Select [Connected] or [Not Connected].
10. Do you have surround speakers connected to your AV receiver?
Select [Connected] or [Not Connected].
11. Do you have a subwoofer connected to your AV receiver?
Select [Connected] or [Not Connected].
• If you selected [Not Connected] in step 8, that completes the setup. Press OK or enter to leave the Setup Navigator.

36
Questions 12 through 15 are concerned with the digital decoding capabilities of your AV receiver.
12. Is your AV receiver Dolby Digital compatible?
Select [Compatible], [Not Compatible] or [Don’t Know].
13. Is your AV receiver DTS compatible?
Select [Compatible], [Not Compatible] or [Don’t Know].
14. Is your AV receiver compatible with 96 kHz Linear PCM audio?
Select [Compatible] in any case. See section 'Linear PCM Out' on page 83 for details.

37
15. Is your AV receiver MPEG compatible?
Select [Compatible], [Not Compatible] or [Don’t Know].
16. Press OK or enter to complete the setup, or press Home Menu or Guide to quit the Setup Navigator without making any changes.
Congratulations, setup is complete!

38
9.7 Playing discs The basic playback controls for playing DVD, CD, SACD, Video CD / Su-per VCD and MP3 discs are covered here. Further functions are detailed in the next chapter.
Important
• Throughout this manual, the term 'DVD' means DVD Video, DVD Audio and DVD-R/RW. If a function is specific to a particular kind of DVD disc, it is specified.
1. If the VIP G3 isn’t already on, press key power on the front panel or the key Power On or Power Toggle of the remote control Har-mony Ultimate One in Device Mode for the VIP G3 to switch it on.
If you are playing a DVD or Video CD/Super VCD, also turn on your TV and make sure that it is set to the correct video input.
2. Please open the drawer on the top.
Open the disc drawer on top of the unit by pushing it to the back using the han-dle.
3. Insert a disc.
Put a disc onto the spindle with its printed side facing up. Fix disc with in-cluded stabilizer ('Puck'). Please make sure that the stabilizer gives the disc a centred and level position. Close the disc drawer now.
Never load more than one disc at a time, and never use any additional stabiliz-ers!
4. Press the play key (►) to start playback. If you are playing a DVD or a Video CD/Super VCD, a menu may appear. Re-fer to sections 'DVD disc menus' on page 40 and 'Video CD/Super VCD PBC menus' on page 40 for details on navigating through menus. If you’re playing an MP3 disc, it may take a few seconds before playback starts, depending on the complexity of the file structure on the disc.

39
9.7.1 Basic playback controls The table below shows the basic controls on the remote for playing discs. The following chapter covers more playback features in more detail.
Key Function
► Starts playback.
DVD and Video CD/Super VCD: If the display shows RESUME, playback starts from the resume point.
▌▌ Pauses a disc that is playing, or restarts a paused disc.
■ Stops playback. DVD Video and DVD-RW and Video CD: Press ■ (Stop) again to cancel the resume function.
The resume function is also cancelled when you open the drawer.
◄◄ Press to start fast reverse scanning. Press ► (play) to resume nor-mal playback.
►► Press to start fast forward scanning. Press ► (play) to resume normal playback.
▐◄◄ Skips to the start of the current track or chapter. Press again to skip to previous tracks/chapters.
►►▌ Skips to the next track or chapter.
Numbers
Use to enter a title/group/track number. Press enter to select (or wait a few seconds):
If the disc is stopped, playback starts from the selected title / group (for DVD) or track number (for CD / SACD / Video CD / Su-per VCD / MP3).
If the disc is playing, playback jumps to the start of the selected chapter or track (within the current group for DVD Audio).
9.7.2 Front panel controls The play and stop keys on the front panel of the VIP G3 work in exactly the same way as their remote control equivalents. The skip key on the front panel works slightly differently from the remote keys. For forward scanning mode hold the key pressed. For skipping to the next track or chapter press the skip key only for a short time.
Important
• You may find with some DVD discs that some playback controls don’t work in certain parts of the disc. This is not a malfunction.

40
9.7.3 DVD disc menus Many DVD Video and DVD Audio discs contain menus from which you can select what you want to watch or listen to. They may give access to additional features, such as subtitle and audio language selection, or special features such as slideshows. See the disc packaging for details. Sometimes menus are dis-played automatically when you start playback; others only appear when you press Menu or Top Menu .
Important
• Some DVD Audio discs feature a 'bonus group'. To access this group you have to input a password, which you can find on the disc's packaging. Refer to section 'Bonus Group' on page 99 for further information.
Key Function
Top Menu Displays the top menu of a DVD disc – this varies with the disc.
Menu Displays a DVD disc menu – this varies with the disc and may be the same as the top menu.
▲ ▼ ◄ ► Moves the cursor around the screen.
OK or enter Selects the current menu option.
Exit or Return Returns to the previously displayed menu screen. On some DVD Audio discs featuring browsable pictures, press to display the browser screen.
Numbers Highlights a numbered menu option (some discs only). Press enter to select (or wait a few seconds).
9.7.4 Video CD/Super VCD PBC menus Some Video CD/Super VCDs have menus from which you can choose what you want to watch. These are called PBC (Playback control) menus. You can play a PBC Video CD/Super VCD without having to navigate the PBC menu by starting playback using a number key or the skip key ►►▌ to select a track, rather than the ► (play) key.

41
Key Function
Exit or Return Displays the PBC menu.
Numbers Use to enter a numbered menu option. Press enter to se-lect (or wait a few seconds).
Cursor key ◄ Displays the previous menu page (if there is one).
Cursor key ► Displays the next menu page (if there is one).
FAQ (frequently asked questions)
• After I inserted a DVD disc, it is not played back!
Most likely, the disc is the wrong region for your player. The region number should be printed on the disc; check it against the region number of the VIP G3. Refer to section 'About discs' on page 23. If the region number is OK, it may be that the disc is damaged or dirty. Clean the disc and look for signs of damage. Refer to section 'Taking care of your player and discs' on page 118. Check also that the disc is aligned properly in the disc drawer and that it is loaded label side up.
• Why won't the disc I loaded play?
First check that you loaded the disc the right way up (label side up), and that it is clean and not damaged. See 'Taking care of your player and discs' on page 118 for information on cleaning discs. If a disc loaded correctly won't play, it's probably an incompatible format or disc type, such as DVD-ROM. See section 'About discs' on page 23 for more information on disc compatibility.
• There's no picture!
Check the back panel and make sure that the video outputs are active. If they are not, activate them using switch 4 on the back panel. Refer to section 'Video outputs' on page 140. Also make sure that if your TV is not compatible with progressive scan video, that the PRGRSVE indicator is not lit. If the indi-cator is lit, open the HOMEMENU and set the [Video Output] format to interlace.

42
• I have a wide screen TV so why are there black bars at the top and bottom of the screen when I play some discs?
Some movie formats are produced in a way that even when played on a wide-screen TV, black bars are necessary at the top and bottom of the screen to rep-resent the correct aspect ratio. This is not a malfunction.
• I have a standard (4:3) TV and set the VIP G3 to show widescreen DVDs in Pan & Scan format, so why do I still get black bars at the top and bot-tom of the screen with some discs?
Some discs override the display preferences of the VIP G3, so even if you have [4:3 (Pan & Scan)] selected, those discs will still be shown in letterbox for-mat. This it not a malfunction.
• My DVD Audio disc starts playing, but then suddenly stops!
The disc my have been illegally copied.
• My CD with MP3 tracks won't play!
Make sure that the tracks are encoded in MPEG1 audio layer 3 format. See also section 'MP3 discs' on page 24.
• Some MP3 tracks don't show up. Where are they?
Filenames that don't end with the extension '.mp3' won't be recognized by the VIP G3. Also, if there are more than 250 folders or tracks on the disc, only the first 250 are recognized. See also section 'MP3 discs' on page 24.
• There's no sound from the optical/coaxial outputs or the HDMI interface!
Check on the back panel, if the digital outputs are active. If not, then use switch 11 to activate (position L bit or H bit) the digital outputs (digital audio only).
You won't hear any sound from the HDMI output if the source component is only DVI/HDCP-compatible.
If the i.LINK interface is active, all other audio outputs are switched off. Refer to section 'Audio Out' on page 114 for how to switch it off.
• My AV receiver is definitely compatible with 96/88.2 kHz Linear PCM audio, but it doesn’t seem to work with this player. What’s wrong?
Make sure that you have activated the digital outputs. If not, turn the digital outputs on into LowBit Mode by setting switch 11 into position L bit (Low-Bit Mode). The HighBit Mode is only compatible with Audionet pre amplifiers like MAP V2.0 or MAP1. Refer to section 'Digital audio outputs' on page 143.

43
• I've connected the VIP G3 to a HDMI/DVI compatible component, but I can't get any sound!
Make sure that you have selected the VIP G3 as the HDMI input in the settings for the component you are using. You may need to refer to the instruction man-ual of the component to do this. An HDMI connection can only be made with components compatible with both DVI and High Bandwidth Digital Content Protection (HDCP). Refer to section 'Connecting using HDMI' on page 149 for more on HDMI compatibility.
• There's no picture from the HDMI output!
Depending on the source material, you may not be able to get a picture from DVI-compatible sources. DVI sources must also be encoded using High Band-width Digital Content Protection (HDCP) for you to see a picture using the VIP G3. Refer to section 'Connecting using HDMI' on page 149 for more on HDMI compatibility. Make sure the resolution on the VIP G3 matches that of the component you have connected using HDMI. Refer to section 'HDMI Set-tings' on page 103 to change the HDMI resolution.

44
10 Playing discs
10.1 Introduction Most of the features described in this section make use of on-screen displays. For an explanation of how to navigate these, refer to section 'Using the on-screen displays' on page 30. Many of the functions covered in this section ap-ply to DVDs, SACDs, Video CDs/Super VCDs, CDs and MP3 discs, although the exact operation of some varies slightly with the kind of disc loaded.
Some DVD discs restrict the use of some functions (random or repeat, for ex-ample). This is not a malfunction.
When playing Video CD/Super VCD discs, some of the functions are not avail-able during PBC playback. If you want to use them, start playback using a number button to select a track.
10.2 Using the Disc Navigator to browse the con-tents of a disc
Use the Disc Navigator to browse through the contents of a disc to find the part you want to play. You can use the Disc Navigator when a disc is playing or stopped.
Important
• It’s not possible to use the Disc Navigator when playing a Video CD / Su-per VCD in PBC mode, or when a DVD disc menu is displayed.
1. Press Home Menu or Guide and select [Disc Navigator] from the on-screen display.
Alternatively, if a DVD-RW, CD, Video CD/Super VCD or MP3 disc is loaded, you can press Menu , which takes you straight to the Disc Navigator screen.

45
2. Select what you want to play.
Depending on the type of disc you have loaded, the Disc Navigator looks slightly different.
For DVD Video discs select a title, or a chapter within a title.
For DVD Audio discs select a group, or a track within a group.
For SACD discs select a track within the current playback area.

46
For a VR mode DVD-RW disc select between the Playlist and Original areas of the disc, or a title. Use cursor key ► to preview the title.
Important
• It’s not possible to switch between Original and Playlist during playback.
• Not all DVD-RW discs have a Playlist.
For CDs and Video CD/Super VCDs select a track. The screen below shows a CD loaded.
For MP3 discs select a folder, or a track within a folder. Note that if a folder or track name contains accented or non-roman characters, they may show up with generic names like F_033, T_035, etc.

47
Playback starts after you press OK or enter .
Tip
• The Disc Navigator is not available unless there is a disc loaded.
• Another way to find a particular place on a disc is to use one of the search modes. Refer to section 'Searching a disc' on page 65.
10.2.1 Scanning discs You can fast-scan discs forward or backward at various speeds.
1. You can fast-scan discs forward or backward at various speeds using ◄◄ or ►► to start scanning.
2. Press repeatedly to increase the scanning speed.
• MP3s can only be scanned at one speed.
• The scanning speed is shown on-screen.
3. To resume normal playback, press ► (play).
• Sound can be heard while scanning SACDs, Audio CDs, and MP3 discs.
• There is no sound while scanning DVDs and Video CD/Super VCDs, and no subtitles while scanning DVD Video.
• Depending on the disc, normal playback may automatically resume when a new chapter is reached on a DVD Video disc.
10.3 Playing in slow motion You can play DVD Videos, DVD-R/RW and Video CD/Super VCDs at four different forward slow motion speeds, and DVD Videos, DVD-R/RW also at two reverse speeds.
1. During playback, press ▌▌ (pause).

48
2. Press and hold ◄◄ or ►►, until slow motion playback starts.
• The slow motion speed is shown on-screen.
• There is no sound during slow motion playback.
3. Press repeatedly to change the slow motion speed.
• The slow motion speed is displayed on-screen.
4. To resume normal playback, press ► (play).
Note
• You can't use slow motion playback with some titles on some DVDs.
• Video CD/Super VCD only supports forward slow motion playback.
• The picture quality during slow motion playback is not as good as during normal playback.
• Depending on the disc, normal playback may automatically resume when a new chapter is reached.
• For DVD Audio discs featuring browsable pictures (refer to glossary 'Browsable pictures (DVD Audio only)' on page 128), press ◄◄ or ►► to view the previous/next picture.
10.4 Frame advance/frame reverse You can advance or back up DVD Video or DVD-RW discs frame-by-frame. With Video CD/Super VCDs, you can only use frame advance.
1. During playback, press ▌▌(pause).
2. Press ◄◄ or ►► to reverse or advance a frame at a time.
3. To resume normal playback, press ► (play).

49
Note
• The picture quality when using frame reverse is not as good as frame ad-vance.
• Depending on the disc, normal playback may automatically resume when a new chapter is reached.
• When changing direction of a DVD Video disc, the picture may 'move' in an unexpected way. This is not a malfunction.
• For DVD Audio discs featuring browsable pictures (refer to glossary 'Browsable pictures (DVD Audio only)' on page 128), press ◄◄ or ►► to view the previous/next picture.
10.5 Looping a section of a disc The A-B Repeat function allows you to specify two points (A and B) within a track (DVD Audio, CD and Video CD) or title (DVD Video and DVD-RW) that form a loop which is played over and over.
Important
• A-B Repeat is not available with SACDs, MP3s, Super VCDs or Video CDs in PBC mode, or while a DVD disc menu is being displayed.
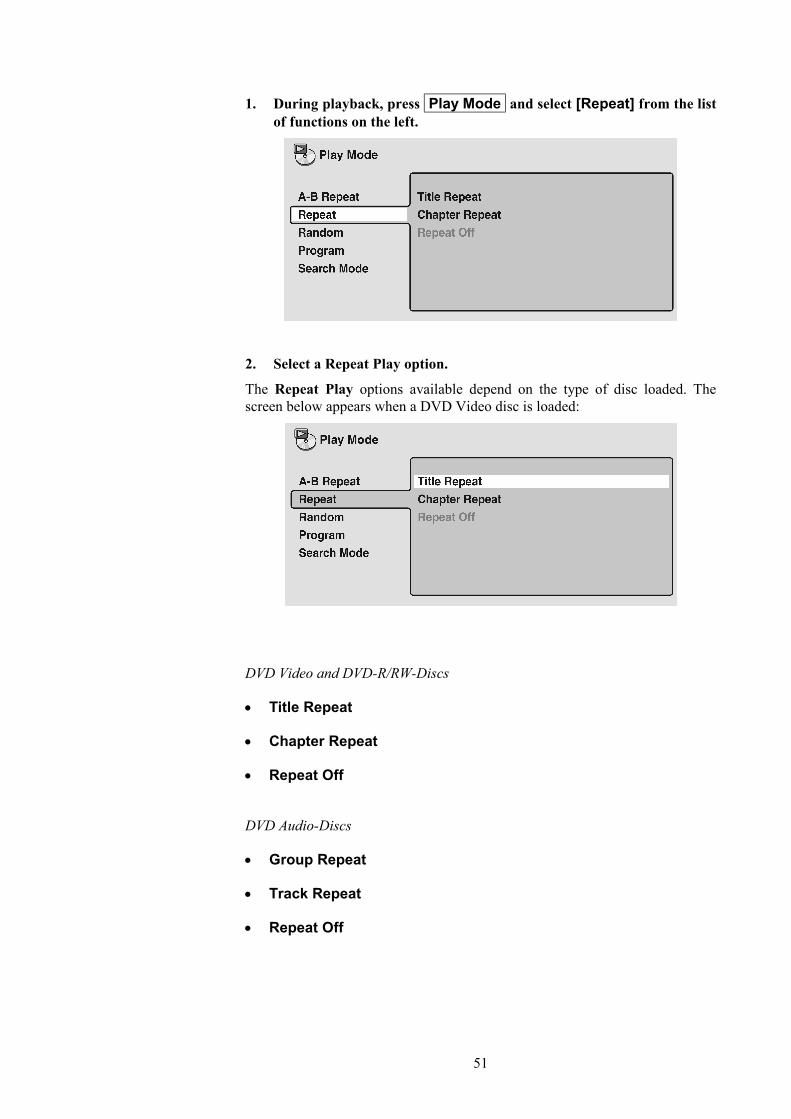
1. During playback, press Play Mode and select [A-B Repeat] from the list of functions on the left.

50
2. Press OK or enter on [A (Start Point)] to set the loop start point.
3. Press OK or enter on [B (End Point)] to set the loop start point.
After pressing OK or enter playback jumps back to the start point and plays the loop.
4. To resume normal playback, press clear or select [Off] from the menu.
10.6 Using Repeat Play There are various Repeat Play options, depending on the kind of disc loaded. It's also possible to use Repeat Play together with program play to repeat the tracks / chapters in the program list (refer to 'Creating a program list' on page 54).
Important
• Repeat play is not available with Video CD/Super VCDs in PBC mode, or while a DVD disc menu is being displayed.
51
1. During playback, press Play Mode and select [Repeat] from the list of functions on the left.
2. Select a Repeat Play option.
The Repeat Play options available depend on the type of disc loaded. The screen below appears when a DVD Video disc is loaded:
DVD Video and DVD-R/RW-Discs
• Title Repeat
• Chapter Repeat
• Repeat Off
DVD Audio-Discs
• Group Repeat
• Track Repeat
• Repeat Off

52
SACD, CD and Video CD/Super VCD-Discs
• Disc Repeat
• Track Repeat
• Repeat Off
MP3-Discs
• Disc Repeat
• Folder Repeat
• Track Repeat
• Repeat Off
Tip
• If you've made a program list, the [Program Repeat] option also appears as a repeat option.
• To stop the disc and cancel Repeat Play, press ■ (stop).
• You can also cancel Repeat Play without stopping playback by pressing clear . The disc will play to the end, then stop.
Note
• You can’t use Repeat and Random Play at the same time.
• If you switch camera angle during Repeat Play, Repeat Play is cancelled.
10.7 Using Random Play Use the Random Play function to play titles or chapters (DVD Video), groups or tracks (DVD Audio), or tracks (CD, Video CD/Super VCD and MP3 discs) in a random order. You can set the Random Play option when a disc is playing or stopped.

53
Important
• You can't use Random Play with SACDs, DVD-RWs, Video CD / Su-per VCDs playing in PBC mode, or while a DVD disc menu is being dis-played.
1. Press Play Mode and select [Random] from the list of functions on the left.
2. Select a random play option.
The Random Play options available depend on the type of disc loaded. The screen below appears when a DVD Video disc is loaded.
DVD Video-Discs
• Random Title
• Random Chapter
• Random Off

54
DVD Audio-Discs
• Random Group
• Random Track
• Random Off
MP3, CD und Video CD/Super VCD-Discs
• On
• Off
Tip
• To stop the disc and cancel Random Play, press ■ (stop).
• You can also cancel Random Play without stopping the disc by pressing clear . The disc will play to the end, then stop.
• During Random Play, the ▐◄◄ and ►►▌ keys function a little differently to normal: ▐◄◄ returns to the beginning of the current track/chapter. You can't go back further than this. ►►▌ selects another track/chapter at random from those remaining.
• You can't use Random Play together with Program or Repeat Play.
10.8 Creating a program list This feature lets you program the play order of titles / groups / chapters / fold-ers / tracks on a disc.
Important
• Program play is not available with DVD-RWs, Video CD/Super VCDs playing in PBC mode, or while a DVD disc menu is being displayed.

55
1. Press Play Mode and select [Program] from the list of functions on the left.
2. Select [Create/Edit] from the list of program options.
Which kind of program edit screen appears, depends on the kind of disc loaded. On the left side is the program list, then to the right is a list of titles (if a DVD Video disc is loaded), groups (for DVD Audio), tracks (for SACDs, CDs and Video CD/Super VCDs), or folders (for MP3 discs). On the far right is a list of chapters (for DVD Video) or tracks (for DVD Audio and MP3).
3. Select a title, chapter, group, folder or track for the current step in the program list.
For a DVD disc, you can add a whole title, or a chapter within a title to the program list.
56
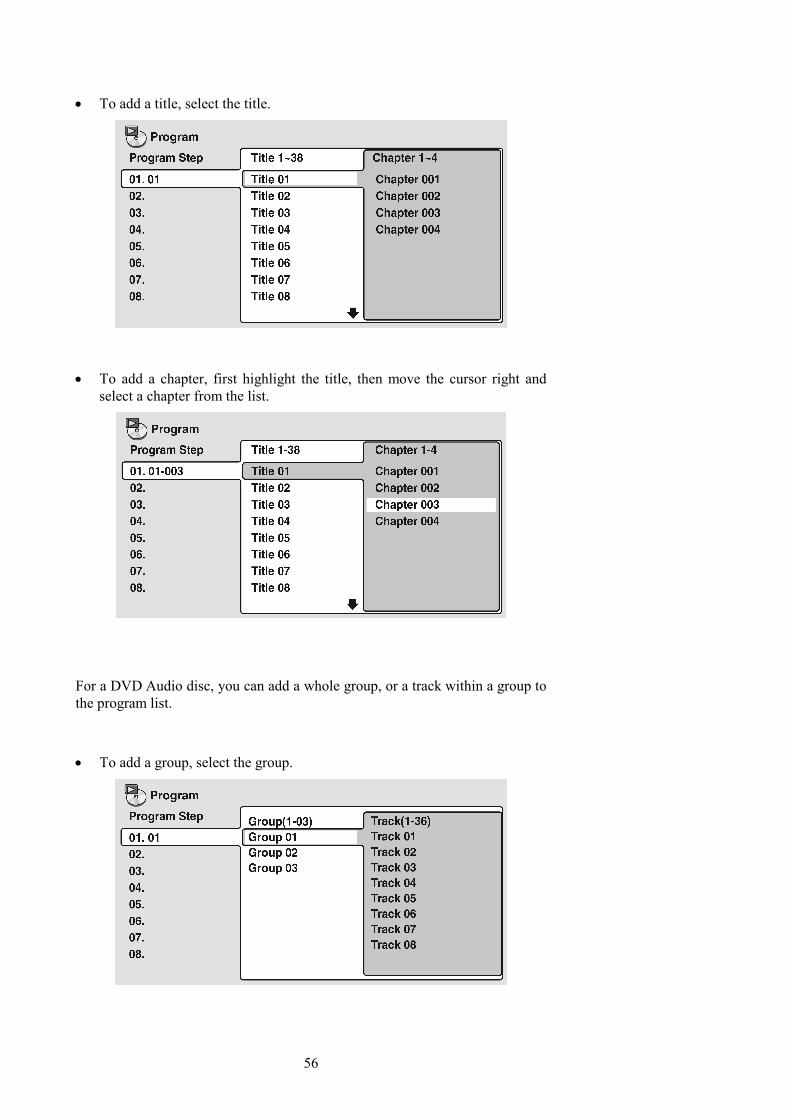
• To add a title, select the title.
• To add a chapter, first highlight the title, then move the cursor right and select a chapter from the list.
For a DVD Audio disc, you can add a whole group, or a track within a group to the program list.
• To add a group, select the group.

57
• To add a track, first highlight the group, then move the cursor right and select a track from the list.
For SACD, CD or Video CD/Super VCD, select a track to add to the program list. The screen below shows a CD loaded:
For an MP3 disc, you can add a whole folder, or a track within a folder to the program list.
• To add a folder, select the folder.

58
• To add a track, first find the folder, then move the cursor right and select a track name from the list.
After pressing OK or enter to select the title/group/chapter/folder/track, the step number automatically moves down one.
4. Repeat step 3 to build up a program list.
A program list can contain up to 24 titles/chapters/groups/folders/tracks.
5. Please press ► (play) to playback the program list.
Program Play remains active until you turn off Program Play (see below), erase the program list (see below), open the disc drawer or switch off the VIP G3.
Tip
• To exit the program edit screen without starting playback, press Play Mode or Home Menu or Guide . Don't press Return or Exit . Your program list would be lost.
• During Program Play, press ►►▌ to skip to the next program step.
• Press clear during playback (though not if the program list OSD is dis-played) to switch off program play. Press clear while stopped to erase the program list.
10.8.1 Editing a program list After creating a program list, you can add, delete and change steps.
1. Press Play Mode and select [Program] from the list of functions on the left.

59
2. Select [Create/Edit] from the list of program options.
3. To clear a step, highlight the step number and press clear .
4. To insert a step in the middle of the program list, highlight the step where you want the new step to appear, then select a title/group/chap-ter/folder/track to add.
After pressing OK or enter , the new step is inserted into the list.
5. To add a step to the end of the program list, highlight the next free step then select a title/group/chapter/folder/track to add.
Tip
• To exit the program edit screen without starting playback, press Play Mode or Home Menu .
• If you want to exit the program edit screen without saving the changes you made, press Return or Exit .
10.8.2 Other functions available from the Program menu As well as creating and editing a program list, you can start and stop Program Play, erase the program list, and memorize a DVD program list from the Pro-gram menu.
1. Press Play Mode and select [Program] from the list of functions on the left.
2. Select a program play function.
[Create/Edit] – Refer to 'Creating a program list' on page 54.

60
[Playback Start] – Starts playback of a saved program list.
[Playback Stop] – Turns off program play, but does not erase the program list.
[Program Delete] – Erases the program list and turns off Program Play.
[Program Memory] (DVD Video only) – Select [On] to save the program list for the disc loaded. Select [Off] to cancel the program memory for the disc loaded.
Tip
• After saving a program list using the [Program Memory] feature, when-ever you load that disc, the program list is automatically recalled and Pro-gram Play switched on.
• You can save program lists for up to 24 discs. After that, the oldest one is replaced with the new one saved.
10.9 Using the comfort keys The comfort keys are developed for pure audio operations without any use of on-screen menus. Therefore, you can use these function with your TV set switched off. Primarily designed for CD usage, the comfort keys work with other disc types, too, but maybe limited or not at all (it will be explained in the following sections). In this case, use the identical functions from the on-screen menu (refer to section 'Looping a section of a disc' on page 49 and following).
10.9.1 Track Repeat With the Repeat function you can repeat a track of the disc or the complete disc in a loop.
1. Press Repeat on the remote control once to activate the Repeat Track function.
Initially the display reads:
One moment later the display changes to:

61
CD identifies the loaded disc type, 1 is the number of the track to be repeated, and R_TRK indicates that the Repeat Track function is active.
2. To end the repeat function, press key clear once or the key Repeat twice (with an MP3 disc running three times).
10.9.2 Disc repeat 1. Press key Repeat on the remote control twice to activate the Disc
Repeat function.
Initially the display reads:
One moment later the display changes to:
CD identifies the loaded disc type, 1 is the number of the track to be repeated, and R_DSC indicates that the Repeat Disc function is active.
2. To end the repeat function, press key clear or the key Repeat (with an MP3 disc running press key twice).
Important
• If you playback a SACD, you can repeat a track as well as the complete selected area. Press key Repeat repeatedly to switch through the differ-ent repeat modes in the following order:
REPEAT TRK (repeat track) â
REPEAT ALL (repeat area).
• If you playback a DVD Audio, you can repeat a track as well as the se-lected group. Press key Repeat repeatedly to switch through the different repeat modes in the following order:
REPEAT TRK (repeat a track) â
REPEAT GRP (repeat a group).

62
• If you playback a MP3 disc, you can repeat a track, the selected folder or the complete disc. Press key Repeat repeatedly to switch through the dif-ferent repeat modes in the following order:
REPEAT TRK (repeat track) â
REPEAT FLD (repeat folder) â
REPEAT DSC (repeat disc).
10.9.3 Looping a section The A-B Repeat function allows you to specify two points (A and B) within a track (DVD Audio, CD and Video CD) or title (DVD Video and DVD-RW) that form a loop which is played over and over.
1. Press key Repeat A-B on the remote control to activate the function A-B repeat.
Initially the display reads:
One moment later the display changes to:
CD identifies the loaded disc type, 1 is the number of the track to be repeated, and R_A indicates that point A is now set for the function A-B Repeat.
2. Press key Repeat A-B to select the end point of the loop (point B).
Initially the display reads:
One moment later the display changes to:
After you selected end point B the loop starts playing at start point A and will be played back until point B in an endless loop.

63
3. To quit the Repeat function press key clear .
Important
• A-B Repeat is not available with SACDs, MP3s, Super VCDs or Video CDs in PBC mode, or while a DVD disc menu is being displayed.
• If you playback a DVD Audio, the A-B Repeat functions works like de-scribed above.
10.9.4 Random play 1. Press key Random on the remote control to activate the Random
Play function.
The display indicates that the Random Play function is active.
CD identifies the loaded disc type, 3 is the number of the track currently played back and RDM indicates that the Random Play function is now active. During Random Play, the ▐◄◄ and ►►▌ keys function a little differently to normal: ▐◄◄ returns to the beginning of the current track/chapter. You can't go back further than this. ►►▌ selects another track/chapter at random from those re-maining.
2. To quit Random Play, press key clear .
Important
• You can't use Random Play with SACDs, DVD-RWs, Video CD / Su-per VCDs playing in PBC mode, or while a DVD disc menu is being dis-played.
• If you playback a DVD Audio, press key Random once and Ent. or to activate the Random Track function. Press key Random once and Ent. or to activate the Random Group function. If you have your TV set active, you will get support from the on-screen dis-play showing a flashing Random Track or Random Group before you select the corresponding function by pressing Ent. or .
• The Random Play function works with MP3 discs in the same way as it does with Audio CDs. All tracks, not matter in which folders they are lo-cated, are played back randomly.

64
10.9.5 The program function Use this function to program a play list of titles/groups/chapters/folders/tracks of your preferred order.
1. Press key Program on the remote control once to enter the program mode.
CD identifies the loaded disc type, the flashing 4 is the number of the title you currently selected, and P-02 tells you the current number of already pro-grammed titles.
2. Use keys to select the title you would like to add to your pro-gram list, and confirm your selection by pressing OK or enter .
Repeat step 2 until your play list is complete. If you want to leave the program mode without saving the compiled play list, press Program or Return or Exit .
3. Press ► (play) to end the program mode, save your compiled play list and start playback.
Use key clear to leave your play list during playback and resume directly normal playback mode. Press ■ (stop) to end playback. But the program list will remain in the memory of the VIP G3. To start playback the saved play list again, press key Program and then ►(play).
4. To delete a title from the play list press key Program , then cursor key ◄. Use cursor keys ▲ and ▼ to select the title you would like to delete and confirm with key clear .
Erase the complete play list by deleting every title in the list. Of course, you can also use the methode described in section "Other functions available from the Program menu" on page 59 to delete the play list.
Note
• If you have compiled a play list (program), you can select the repeat mode option Program Repeat when you use the key Repeat or the on-screen display to enter repeat mode.
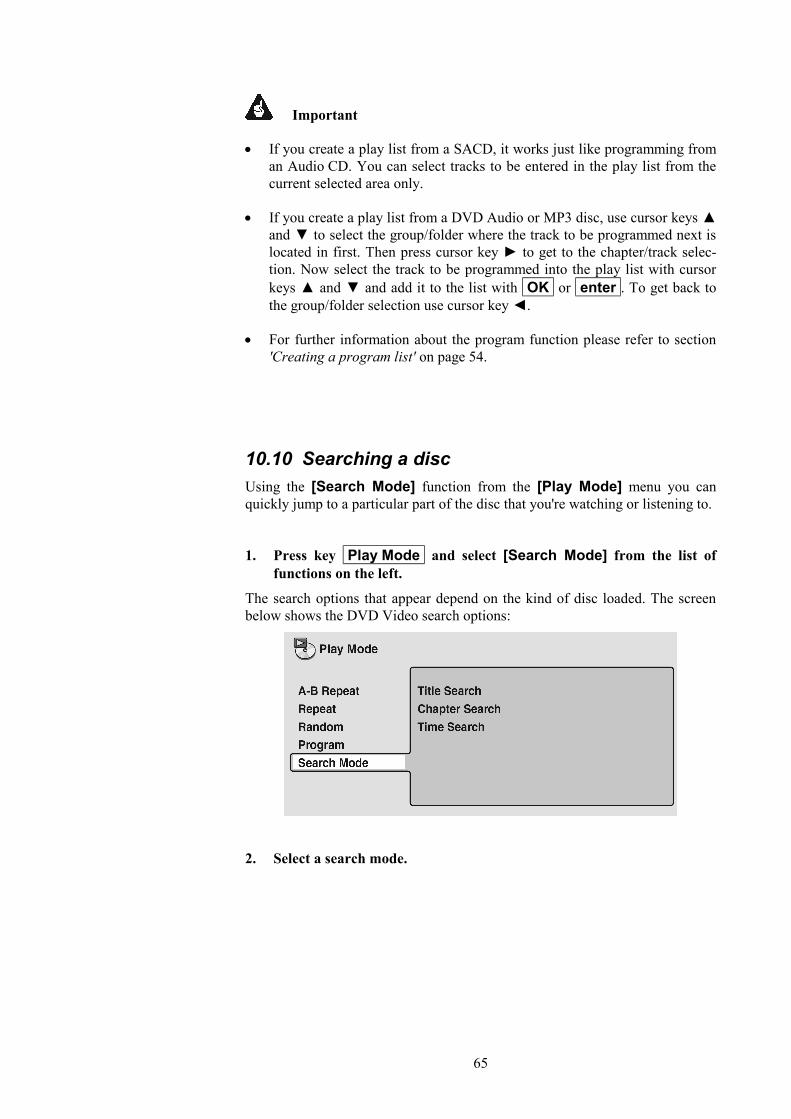
65
Important
• If you create a play list from a SACD, it works just like programming from an Audio CD. You can select tracks to be entered in the play list from the current selected area only.
• If you create a play list from a DVD Audio or MP3 disc, use cursor keys ▲ and ▼ to select the group/folder where the track to be programmed next is located in first. Then press cursor key ► to get to the chapter/track selec-tion. Now select the track to be programmed into the play list with cursor keys ▲ and ▼ and add it to the list with OK or enter . To get back to the group/folder selection use cursor key ◄.
• For further information about the program function please refer to section 'Creating a program list' on page 54.
10.10 Searching a disc Using the [Search Mode] function from the [Play Mode] menu you can quickly jump to a particular part of the disc that you're watching or listening to.
1. Press key Play Mode and select [Search Mode] from the list of functions on the left.
The search options that appear depend on the kind of disc loaded. The screen below shows the DVD Video search options:
2. Select a search mode.

66
3. Use the number keys to enter a title, group, chapter, folder or track number, or a time.
• For a Time Search, enter the number of minutes and seconds into the cur-rently playing title (DVD Video/DVD-RW) you want playback to resume from. For example, press 4 , 5 , 0 and 0 , to have playback start from 45 minutes into the disc. For 1 hour, 20 minutes and 30 seconds, press 8 , 0 , 3 and 0 .
• Some DVD Audio discs feature pages of browsable pictures. Enter the number of the page you would like to go to.
4. Press OK or enter to start playback.
Note
• You can only use Time Search with Video CDs und DVD Video discs.
• The disc must be playing in order to use Time Search (except Video CD).
• Search functions are not available with Video CD in PBC mode. Start non-PBC playback by stopping playback, then pressing ►►▌, then ► (play).
• You can often select what you want to watch from a DVD disc menu. Refer also to section 'DVD disc menus' on page 40.
10.11 Switching subtitles Some DVD discs have subtitles in one or more languages; the disc box will usually tell you which subtitle languages are available. You can switch subtitle language during playback.

67
1. Press Subtitle repeatedly to select subtitle option.
While the above display is showing, you can also use the cursor keys ▲ and ▼ and OK or enter to select a subtitle language from a drop-down menu.
Note
• Some discs only allow you to change subtitle language from the disc menu. Press Top Menu to access.
• To set the subtitle preferences, see section 'Subtitle Language' on page 89.
10.12 Switching the DVD Audio language When playing a DVD disc recorded with dialog in two or more languages, you can switch audio language during playback.
1. Press Audio repeatedly to select an audio language option.

68
With some discs, while the above display is showing, you can also use the cur-sor keys ▲ and ▼ and OK or enter to select an audio language from a drop-down menu.
Note
• Some discs only allow you to change audio language from the disc menu. Press Top Menu to access.
• To set audio language preferences, see section 'Audio Language' on page 88.
10.13 Switching the DVD-RW audio channels When playing a DVD-RW disc recorded with dual-mono audio, you can switch between the main, sub, and mixed channels during playback.
1. Press Audio repeatedly to select an audio channel option.
10.14 Switching the DVD Audio channels Depending on the disc, you may be able to switch channels when playing DVD Audio discs – see the disc box for details.
1. Press Audio repeatedly to select an audio channel option.

69
10.15 Switching the CD/MP3/Video CD/Super VCD audio channels
You can switch between stereo, just left channel or just right channel of a CD / MP3 / Video CD / Super VCD. To change the audio channel of a CD it must be playing.
1. Press Audio repeatedly to select an audio channel.
10.16 Switching camera angles Some DVD discs feature scenes shot from two or more angles – check disc box for details. When a multi-angle scene is playing, a camera icon appears on the screen to let you know that other angles are available. This feature can be switched off if you prefer – refer to section 'Angle Indicator' on page 93.
1. During playback (or when paused) press Angle to switch angle.
10.17 Displaying disc information Various track, chapter and title information, as well as the video transmission rate for DVD discs, can be displayed on-screen.
1. During playback, press OSD or Info to show/switch the informa-tion displayed.
Keep pressing OSD or Info to change the displayed information.
• DVD Video displays
The # mark displayed with some DVD Video discs means that the video is playing at 24 frames/second, progressive. This is the original cinema frame rate.

70
When the disc is paused, the display also shows the frame number:
• DVD Audio displays
• DVD-RW displays
• SACD displays
During multi-channel playback only:

71
• CD and Video CD displays
During PBC playback only:
With Super VCDs, only the elapsed time is displayed.
• MP3 disc displays
Tip
• You can see disc information (number of titles/chapters, groups tracks, folders and so on) from the Disc Navigator screen. Refer to section 'Using the Disc Navigator to browse the contents of a disc' on page 44.

72
11 Audio Settings menu
11.1 Audio DRC
• Default setting: [Off] When watching Dolby Digital DVDs at low volumes, it's easy to lose the qui-eter sounds completely – including some of the dialog. Switching [Audio DRC] (Dynamic Range Control) to [On] can help by bringing up the quieter sounds, while controlling loud peaks.
How much of a difference you hear depends on the material you're listening to. If the material doesn't have wide variations in volume, you may not notice much change.
1. Press Home Menu or Guide and select [Audio Settings] from the on-screen display.
2. Highlight [Audio DRC] and use cursor keys ◄ and ► to change to [On] or [Off] as required.
3. Press OK or enter to make the setting and exit the [Audio Set-tings] screen.
Note
• Audio DRC is only effective with Dolby Digital audio sources.
• Audio DRC is only effective through the digital output when [Dolby Digital Out] is set to [Dolby Digital > PCM] (refer to page 82). Please

73
make sure that the digital outputs of the VIP G3 are active. Switch 11 on the back panel has to be in either position H bit or L bit (refer to section 'Digital audio outputs' on page 143).
• The effect of Audio DRC depends on your speakers and AV receiver set-tings.
11.2 Virtual Surround
• Default setting: [Off] Switch on Virtual Surround to enjoy surround sound effects from just two speakers. When you play a Dolby Digital or Pro Logic encoded source, TruSur-round technology from SRS produces a deep, realistic 3D soundscape from a pair of stereo speakers. SRS TruSurround is a process certified by Dolby Labo-ratories for Virtual Dolby Digital sound.
1. Press Home Menu or Guide and select [Audio Settings] from the on-screen display.
2. Highlight [Virtual Surround], then use cursor keys ◄ and ► to change to [ V/ SRS TruSurround] or [Off], as required.
3. Press OK or enter to make the setting and exit the [Au-dio Settings] screen.

74
Tip
• You can also use the key Surround on the remote control to switch Vir-tual Surround on ( V / SRS TruSurround / Off).
Note
• Virtual Surround does not work with CD, MP3, DVD Audio or SACD discs, or 96 kHz Linear PCM soundtracks.
• Make sure that [Audio Output Mode] is set to [2 Channel] (refer to section 'Audio Output Mode' on page 108).
• How good the surround effect is varies with the disc.
11.3 Channel Level
• Default setting: [Fix] The setting allows you to set the level of each channel sent to the 5.1 channel analog outputs.
1. Press Home Menu or Guide and select [Audio Settings] from the on-screen display.
2. Highlight [Channel Level], then use the cursor keys ◄ and ► to change to [Fix] or [Variable], as required.
• Fix – Channel levels are fixed, but you can set the speaker distances.
• Variable – You can specify variable channel levels as well as speaker dis-tances.

75
3. If you chose [Variable], use the cursor key ▼ to proceed to the next screen.
4. [Variable] setting only: Set the channel levels for each speaker.
• Use the cursor keys ▲ and ▼ to select a speaker.
• Use cursor keys ◄ and ► to adjust the channel level for that speaker.
• Channel levels can be set from [–6 dB] to [+6 dB] in 0.5 dB increments.
5. Press OK or enter to make the settings and exit the [Audio Set-tings] screen.
Note
• You can't adjust the channel level for any speakers that are set to [Off] on the screen [Speaker Installation] (refer to section 'Speaker Installation' on page 109).
• The [Fix] setting is equivalent to setting all the channel levels to [+6 dB]. Therefore, the [Variable] setting will usually sound quieter than the [Fix] setting.

76
11.4 Speaker Distance
• Default setting: all speakers [3 m] To get the best surround sound from your system, you should set up the speaker distances from your listening position.
1. Press Home Menu or Guide and select [Audio Settings] from the on-screen display.
2. Move the cursor down using cursor key ▼ until you reach the Speaker Distance setting screen.
• Use cursor keys ▲ and ▼ to select a speaker.
• Use cursor keys ◄ and ► to adjust the distance from your listening posi-tion to your speaker.
Front left/right (L/R) speaker distances can be set from [30 cm] to [9 m] in 10 cm increments.
The center speaker (C) and the subwoofer (SW) can be set from [–2 m] to [+2 m] relative to the front left/right speakers.
Surround left/right (LS/RS) speakers can be set from [–6 m] to [+2 m] rela-tive to the front left/right speakers.
When you adjust the front left (L) or front right (R) speaker, all the other speaker distances are adjusted relative to that speaker.
3. Press OK or enter to make the settings and exit the [Audio Set-tings] screen.
Note
• The speaker distance settings have no effect on SACD playback. The chan-nel level settings, however, do apply.

77
12 Video Settings menu
12.1 Video Adjust
• Default setting: [Professional] or (when connected using HDMI) [Direct].
From the [Video Adjust] screen you can select the standard video presenta-tion or define presets of your own.
1. Press Home Menu or Guide and select [Video Adjust] from the on-screen display.
You can also access these settings by pressing Video Adjust .
2. Use the cursor keys ◄ and ► to select a preset:
• TV (CRT) – Optimized for a regular CRT TV.
• PDP – Optimized display for a plasma display screen.
• Professional – Optimized for a professional video monitor.
• Memory 1-3 – Use for saving your own presets (see below).
When the HDMI output is connected, the following options appear instead:
• Direct – The picture appears simply according to how the source was encoded.
• Natural – Edges are softer making this setting good for movies.

78
• Enhanced – Edges are sharper making this setting ideal for animation and material with computer generated effects.
• Memory 1–3 – Use for saving your own presets (see below).
3. Press OK or enter to make the setting and exit the [Video Adjust] screen.
Note
• Depending on the disc and the TV/monitor, you may not see the effect clearly.
12.2 Creating your own presets You can create up to three presets of your own.
1. Select one of the Memory presets (see above).
2. Use cursor key ▼ to select [Detailed Settings], then press OK or enter .
3. Adjust the picture quality settings.
• Use cursor keys ▲ and ▼ to select a setting.
• Use cursor keys ◄ and ► to adjust the current setting.
• Press OSD or Info to switch between full and single view.

79
• You can recall the preset number from the [Recall Settings] menu item.
You can adjust any or all of the following picture quality settings:
• Prog. Motion – Adjusts the motion and still picture quality when the VIP G3 is set to progressive video output. This has no effect when the bar is in the middle position.
• PureCinema – When watching DVD movies, PureCinema optimizes the picture quality. The default setting is [Auto1], but if the picture appears unnatural, then set to [Auto2], [On] or [Off], as appropriate.
• YNR – Adjusts the amount of noise reduction in the Y (brightness) part of the video signal.
• CNR – Adjusts the amount of noise reduction in the C (colour) part of the video signal.
• Sharpness High – Adjusts the sharpness of the high-frequency (detailed) elements in the picture.
• Sharpness Mid – Adjusts the sharpness of the mid-frequency (less de-tailed) elements of the picture.
• Detail – Adjusts the sharpness of edges in the picture.
• White Level – Adjusts the intensity of white.
• Black Level – Adjusts the intensity of black.
• Black Setup – Setup to correct the floating black colour for better 3-dimensional realism.
• Gamma – Adjusts the brightness of darker images.
• Hue – Adjusts the overall colour balance between red and green.
• Chroma Level – Adjusts how saturated colours appear.
• Chroma Delay – Adjust to correct the gap between the Y and C compo-nents in the video signal.
When the HDMI output is connected, the following options also appear:
• HDMI Detail – Adjusts the sharpness of edges in the HDMI video signal.
4. Press OK or enter to save the preset and exit the [Video Adjust] screen.

80
Note
• Video on DVD discs may be either video material (originally shot on video) or film material (originally shot on film). Video material has a frame rate of 30 frames/sec (NTSC) or 25 frames/sec (PAL), compared with 24 frames/sec for film. This player converts film material to 60 frames/sec (in progressive scan mode). [PureCinema] adjusts the picture so that it matches more closely the picture quality of a cinema screen. You can see whether video on a DVD disc is film or video material by displaying the video transmission rate (see 'Displaying disc information' on page 69). If a hash mark (#) appears next to the transmission rate display, it is film mate-rial.

81
13 Initial Settings menu The [Initial Settings] menu gives you complete control in setting up your VIP G3, including audio, and video output settings, audience limitation set-tings, among others. If an option is greyed out it means that it cannot be changed at the current time. This is usually because a disc is playing. Stop the disc, then change the setting.
1. Press Home Menu or Guide and select [Initial Settings] from the on-screen display.
2. Select the setup category from the list on the left, then select an item from the menu list to the right.
3. Make the setting you want.
Note
• The language options shown in the on-screen display illustrations on the following pages may not correspond to those available in your country or region.
13.1 Digital Audio Out settings
• None of the [Digital Audio Out] settings affect the audio output from the i.LINK interface. For i.LINK settings, please refer to section 'i.LINK Setup' on page 114.

82
13.1.1 Dolby Digital Out
• Default setting: [Dolby Digital] You only need to make this setting if you connected the VIP G3 to an AV re-ceiver (or other component) using one of the digital outputs 13 or 16 to 19 .
If your AV receiver (or other connected component) is Dolby Digital compati-ble, set to [Dolby Digital], otherwise set to [Dolby Digital > PCM].
Note
• If you have a component connected that is not Dolby Digital compatible and the option [Dolby Digital Out] is set to [Dolby Digital], you might hear heavy noise from the speakers, if you playback a Dolby Digital sound-track.
13.1.2 DTS Out
• Default setting: [DTS] You only need to make this setting if you connected the VIP G3 to an AV re-ceiver (or other component) using one of the digital outputs 13 or 16 to 19 .

83
If your AV receiver (or other connected component) has a build-in DTS de-coder, set this to [DTS], otherwise set to [DTS > PCM]. DTS audio is con-verted to more compatible PCM audio). Check the manual that came with the other component if you're unsure whether it is DTS-compatible.
Note
• If you set [DTS Out] to [DTS] with a non-DTS compatible amplifier, noise will be output when you play a DTS disc.
• This setting applies only to DTS audio on DVDs. DTS-CDs always output DTS digital audio as-is, regardless of this setting.
13.1.3 Linear PCM Out
• Default setting: [Down Sample Off]
Make sure this is always set to [Down Sample Off]. Setting to [Down Sample On] has no function. Please refer to section 'Digital output formats' on page 145 to determine which sample rate is available at which digital output depending on the disc format and output mode please refer to section 'Digital output formats' on page 145.

84
13.1.4 MPEG Out
• Default setting: [MPEG > PCM] You only need to make this setting if you connected the VIP G3 to an AV re-ceiver (or other component) using one of the digital outputs 13 or 16 to 19 .
If your AV receiver (or other connected component) is compatible with MPEG audio, set this to [MPEG], otherwise set it to [MPEG > PCM]. MPEG audio is then converted to more compatible PCM audio. Check the manual that came with the other component if you're unsure whether it is MPEG audio compati-ble.
13.2 Video Output settings
13.2.1 TV Screen
• Default setting: [16:9 (Wide)]
If you have a widescreen TV, select the [16:9 (Wide)] setting – widescreen DVD software is then shown using the full screen area. When playing software in conventional 4:3 format, the setting on your TV will determine how the ma-terial is presented – see the manual that came with your TV for details on what options are available.

85
When set to [16:9 (Compressed)], progressive scan 4:3 material is shown with black bars on either side of the screen.
If you have a conventional TV, select either [4:3 (Letter Box)] or [4:3 (Pan&Scan)]. In Letterbox mode, widescreen software is shown with black bars at the top and bottom of the screen. Pan & Scan chops the sides off wide-screen material to make it fit the 4:3 screen. So even though the image looks larger on the screen, you're actually seeing less of the picture. See also section 'Screen sizes and disc formats' on page 121.
Note
• You can't change the video output setting when an HDMI component is connected.
13.2.2 Component Out
• Default setting: [Interlace] You only need to make this setting if you connected the VIP G3 to your TV us-ing the component video outputs 1 to 3 .
If you have a progressive-scan compatible TV, set this to [Progressive] for flicker-free video output. If your TV is not compatible with progressive-scan video, set to [Interlace]. Check the operating instructions that came with your TV if you're unsure about its compatibility.
Note
• The VIP G3 is compatible with both PAL and NTSC progressive scan for-mats. However, your TV must also be progressive scan compatible to take advantage of this feature.
• The [RGB] setting of [AV Connector Out] (refer to section 'AV Connec-tor Out' on page 86) will automatically be switched off when the compo-nent video outputs are set to output progressive-scan video.

86
13.2.3 AV Connector Out
• Default setting: [Video] à YUV Out
You only need to make this setting if you connected the VIP G3 to your TV us-ing the YUV/RGB outputs 1 to 3 .
Important
• If you make a setting here that is incompatible with your TV, the TV may not display any picture at all. If this happens switch everything off and re-connect to the TV using either a video cable or S-Video cable (refer to sec-tion 'Connections and options on the back panel' on page 140) and make the appropriate setting.
• Video – With this setting the YUV signal is available at the YUV/RGB output.
• S-Video – With this setting the YUV signal is available at the YUV/RGB output.
• RGB – With this setting the RGB signal is available at the YUV/RGB out-put.
Important
• If [Component Out] is set to [Progressive], you can't change option [AV Connector Out]. In this case the YUV signals are always output at the YUV/RGB connectors 1 to 3 . In order to select [RGB] mode again, you first have to set option [Component Out] to [Interlace].
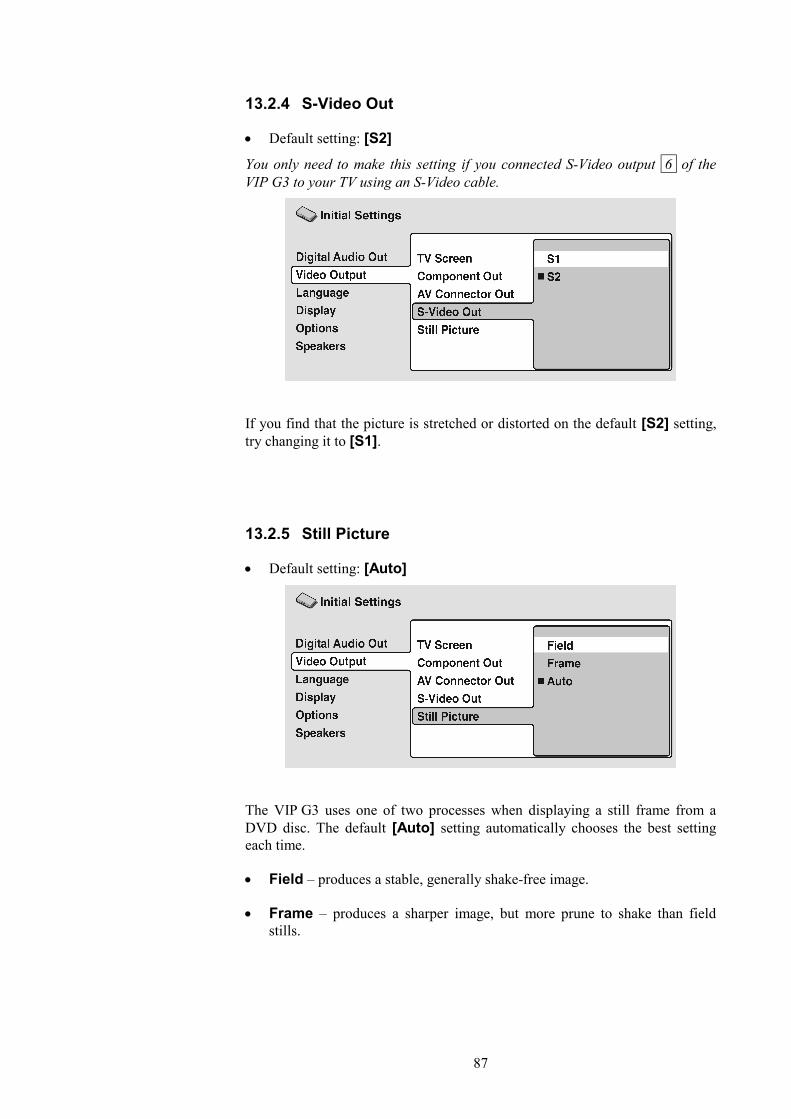
87
13.2.4 S-Video Out
• Default setting: [S2]
You only need to make this setting if you connected S-Video output 6 of the VIP G3 to your TV using an S-Video cable.
If you find that the picture is stretched or distorted on the default [S2] setting, try changing it to [S1].
13.2.5 Still Picture
• Default setting: [Auto]
The VIP G3 uses one of two processes when displaying a still frame from a DVD disc. The default [Auto] setting automatically chooses the best setting each time.
• Field – produces a stable, generally shake-free image.
• Frame – produces a sharper image, but more prune to shake than field stills.

88
13.3 Language settings
Note
• The language options shown in the on-screen illustrations on the following pages may not correspond to those available in your country or region.
13.3.1 Audio Language
• Default setting: [English]
This setting is your preferred audio language for DVD discs. If the language you specify here is recorded on a disc, the VIP G3 automatically plays the disc in that language.
The DVD format recognizes 136 different languages. Select [Other Lan-guage], if you want to specify a language other than those listed. Refer also to section 'Selecting languages using the Language Code list' on page 128.
Tip
• You can switch between the languages recorded on a DVD disc during playback using the key Audio . This does not affect this setting (refer to section 'Switching the DVD Audio language' on page 67).
• Some DVD discs set the audio language automatically when loaded, over-riding the audio language you set in the Initial Settings menu.
• Discs with two or more audio languages usually allow you to select the audio language from the disc menu. Press Top Menu to access the disc menu.

89
13.3.2 Subtitle Language
• Default setting: [English]
This setting is your preferred subtitle language for DVD discs. If the language you specify here is recorded on a disc, the VIP G3 automatically plays the disc with those subtitles. The DVD format recognizes 136 different languages. Se-lect [Other Language], if you want to specify a language other than those listed. Refer also to section 'Selecting languages using the Language Code list' on page 128.
Tip
• You can change or switch off the subtitles on a DVD disc during playback using the key Subtitle . This does not affect this setting. Refer to section 'Switching subtitles' on page 66.
• Some DVD discs set the subtitle language automatically when loaded, overriding the subtitle language you set in the Initial Settings.
• Discs with two or more subtitle languages usually allow you to select the subtitle language from the disc menu. Press Top Menu to access the disc menu.

90
13.3.3 Auto Language
• Default setting: [Off]
When set to [On], the player always selects the default audio language on a DVD Video disc (French dialog for a French movie, for example), and displays subtitles in your preferred language only if that is set to something different. In other words, movies in your native language won't have any subtitles, while foreign language movies will be shown with subtitles.
Set to [Off] to have the VIP G3 play discs strictly according to you're [Audio Language] and [Subtitle Language] settings.
For [Auto Language] to work, the [Audio Language] and [Subtitle Lan-guage] settings must be the same (refer to section 'Audio Language' on page 88 und 'Subtitle Language' on page 89).
Tip
• You can still switch audio and subtitle language on playback using the Audio and Subtitle keys.
13.3.4 DVD Menu Language
• Default setting: [w/Subtitle Lang]

91
Some multilingual discs have menus in several languages. This setting specifies in which language the disc menus should appear. Leave on the default setting for menus to appear in the same language as your Subtitle Language – see above.
The DVD format recognizes 136 different languages. Select [Other Lan-guage], if you want to specify a language other than those listed. Refer also to section 'Selecting languages using the Language Code list' on page 128.
13.3.5 Subtitle Display
• Default setting: [Off]
When set to [On], the VIP G3 displays subtitles according to the [Subtitle Language] and [Auto Language] settings.
Set to [Assist Subtitle] to have the VIP G3 display the extra assistive subti-tles recorded onto some DVD discs.
Set to [Off] to switch subtitles off altogether.

92
13.4 Display settings
13.4.1 OSD Language
• Default setting: [English]
This sets the language of the VIP G3's on-screen displays.
13.4.2 On Screen Display
• Default setting: [On]
This sets whether operation displays are shown on-screen (Play, Stop, Search, Scan etc).

93
13.4.3 Angle Indicator
• Default setting: [On]
If you prefer not to see the camera icon on-screen during multi-angle scenes on DVD discs, change this setting to [Off].
13.5 Background
• Default setting: [Logo]
This specifies what is displayed on-screen when the VIP G3 is stopped.
• Logo – displays the audionet logo in grey on a black background.
• Black – displays a black blank screen.
Logo

94
13.5.1 Screen Saver
• Default setting: [Off]
If a constant image is displayed on a conventional CRT-type TV or projectors using LCDs, it can 'burn in' leaving a ghost image on the screen.
Switch to [On] to make sure that a constant image is not displayed for a dan-gerously long time.
13.6 Options
13.6.1 Parental Lock
• Default setting: [Off]
• Default password: [none]
• Default Country Code: [us] (2119)
Some DVD Video discs feature a Parental Lock level. If your VIP G3 is set to a lower level than the disc, the disc won't play. This gives you some control about what your children watch on your VIP G3.
Some discs also support the Country Code feature. The VIP G3 does not play certain scenes on these discs, depending on the Country Code you set.
Before you can set the Parental Lock level or the Country Code you must regis-ter a password. As the password owner, you can change Parental Lock level or Country Code whenever you like. You can also change the password.
Note
• Not all discs that you may consider inappropriate for your children use the Parental Lock feature. These discs will always play without requiring the password first.

95
• If you forgot your password, you'll need to reset the VIP G3 to its factory settings (refer to section 'Resetting the player' on page 122), then register a new password.
13.6.2 Registering a new password You must register a password before you can change the Parental Lock level or enter a Country Code.
1. Select [Password].
2. Use the number keys to enter a 4-digit password.
3. Press OK or enter to register the password and return to the [Options] menu screen.
If you forget you’re your password, you can reset the VIP G3 then register a new one. Refer to section 'Resetting the player' on page 122 for how to reset the VIP G3.
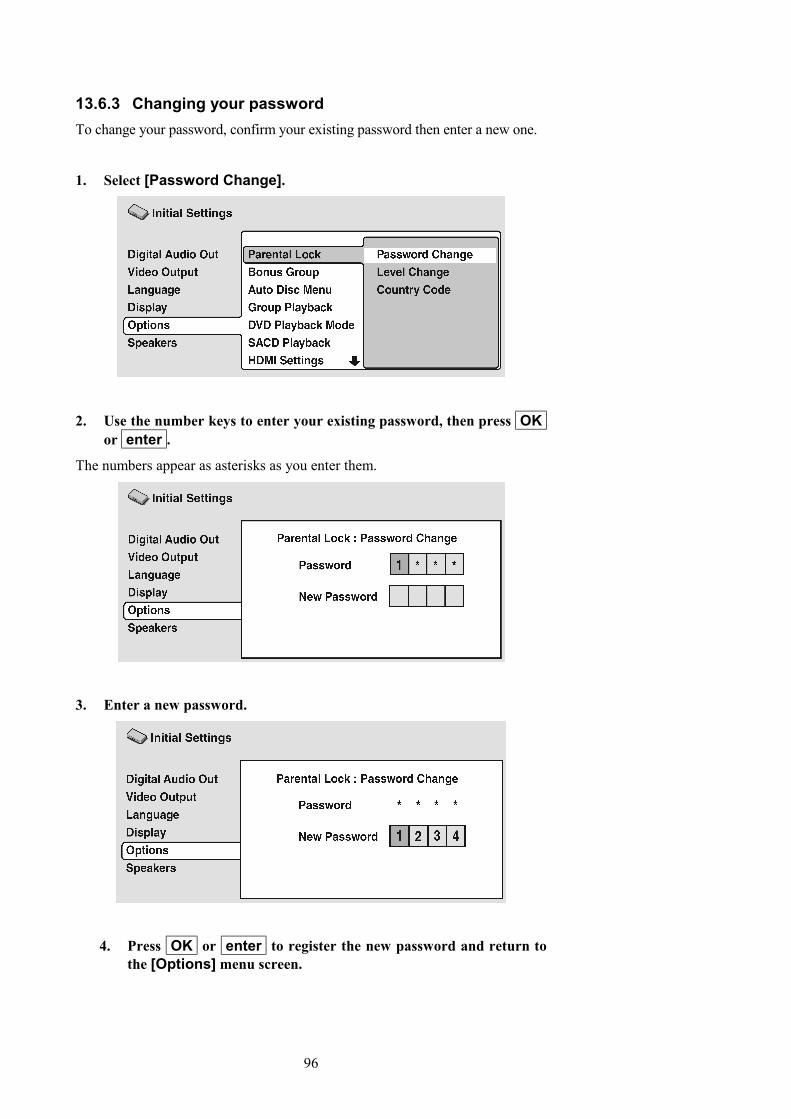
96
13.6.3 Changing your password To change your password, confirm your existing password then enter a new one.
1. Select [Password Change].
2. Use the number keys to enter your existing password, then press OK or enter .
The numbers appear as asterisks as you enter them.
3. Enter a new password.
4. Press OK or enter to register the new password and return to the [Options] menu screen.

97
13.6.4 Setting/changing the Parental Lock level 1. Select [Level Change].
2. Use number keys to enter your password, then press enter or OK
3. Select a new level.
Use the cursor key ◄ to move the cursor left to lock more levels. Use cursor key ► to move cursor right to unlock levels. You can't lock level 1.
4. Press OK or enter to set the new level and return to the [Options] menu screen.

98
13.6.5 Setting/changing the Country Code You may also want to refer to the 'Country Code list' on page 127.
1. Select [Country Code].
2. Use number keys to enter your password, then press OK or enter
3. Select a Country Code.
There are two ways you can do this:
• Select by code letter: Use the cursor keys ▲ and ▼ to change the Country Code.

99
• Select by code number: Use the cursor key ► to move the cursor right then use the number keys to enter 4-digit country code (you can find the 'Country Code list' on page 127).
4. Press OK or enter to set the new Country Code and return to the [Options] menu screen.
Note
• Changing the Country Code does not take effect until the next disc is loaded (or the current disc is reloaded).
13.6.6 Bonus Group Some DVD Audio discs have an extra 'bonus' group that requires a 4-digit key number to access. See the disc packaging for details and the key number.

100
When you play a DVD Audio disc that has a bonus group, the key number input screen appears automatically. You can also access the same screen here.
Note
• If you open the disc drawer, switch the power off, or unplug the VIP G3, you will need to re-enter the key number.
13.6.7 Auto Disc Menu
• Default setting: [On]
This specifies whether the menu (Top Menu) is automatically displayed after loading a disc. Set to [On] if you want the menu displayed automatically, or [Off] if you don't want it displayed.
Note
• Some DVD discs display a menu automatically regardless of this setting. If you press ► (play) while a disc is loading, this setting is ignored.
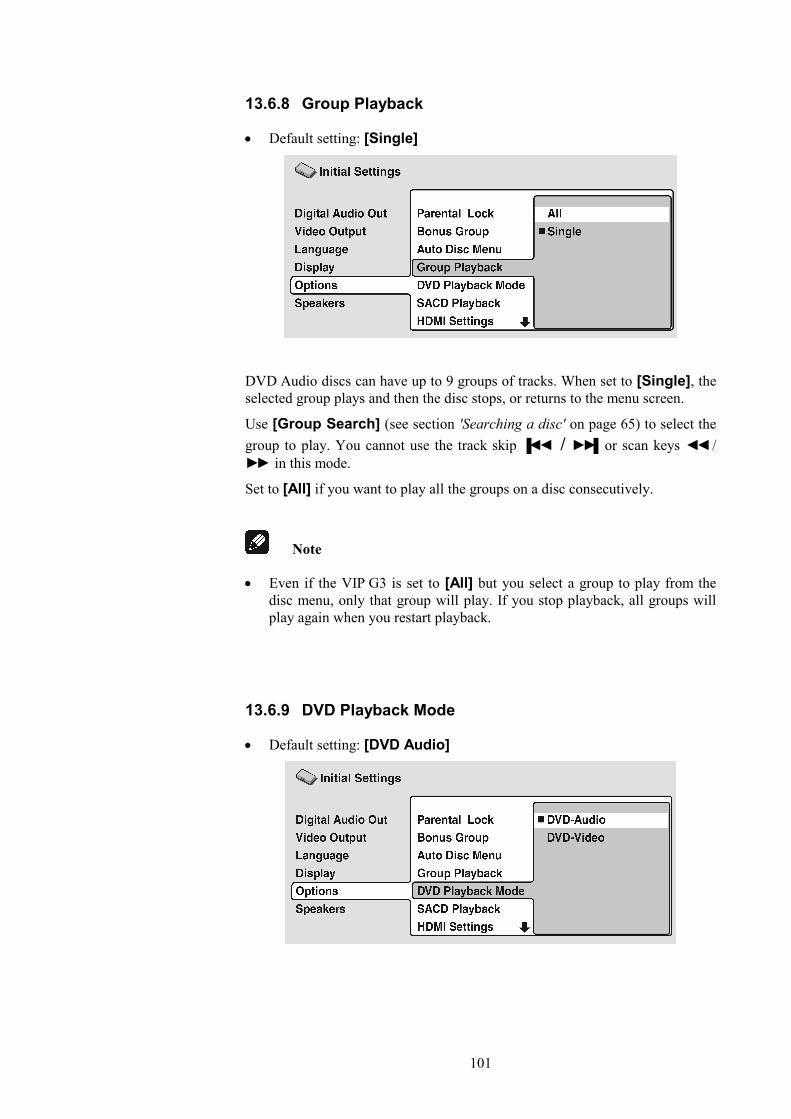
101
13.6.8 Group Playback
• Default setting: [Single]
DVD Audio discs can have up to 9 groups of tracks. When set to [Single], the selected group plays and then the disc stops, or returns to the menu screen.
Use [Group Search] (see section 'Searching a disc' on page 65) to select the group to play. You cannot use the track skip ▐◄◄ / ►►▌ or scan keys ◄◄ / ►► in this mode.
Set to [All] if you want to play all the groups on a disc consecutively.
Note
• Even if the VIP G3 is set to [All] but you select a group to play from the disc menu, only that group will play. If you stop playback, all groups will play again when you restart playback.
13.6.9 DVD Playback Mode
• Default setting: [DVD Audio]

102
Some DVD Audio discs contain DVD Video content in addition to the DVD Audio content. Set to [DVD Video] to play a DVD Audio disc as if it were a DVD Video disc. Note that in this case only the DVD Video part of the disc will play.
Note
• This setting reverts to [DVD Audio] (default) when the disc drawer is opened, or the VIP G3 is switched into stand-by.
13.6.10 SACD Playback
• Default setting: [2ch Area]
SACD discs can be divided up into several different areas – stereo audio [2ch Area], multi-channel audio [Multi-ch Area] and, for hybrid SACDs, standard CD audio [CD Area]. Select which you want to listen to.
Note
• For multi-channel audio from the i.LINK and 5.1 channel analog outputs, [SACD Playback] must be set to [Multi-ch Area].
• If you select an area that isn't on the disc loaded, a different area of the disc will play. For example, if you choose standard CD audio but the disc loaded is not a hybrid SACD, the stereo SACD audio will play.
• If a SACD is currently loaded, The VIP G3 re-loads the disc again, if you change the playback area from or to the CD area. The display informs the user with SACD -> CD or SACD <- CD.

103
Tip
• Use the key SACD Mode on screen 2 of the remote control Harmony Ultimate One in Device Mode for VIP G3 to comfortably select the SACD playback area.First stop any playing disc. Thren press key SACD Mode to show the current setting in the display on the fornt panel of the VIP G3. While this information is still in the display, press key SACD Mode again to select the next playback area. Repeat pressing SACD Mode un-til the desired playback area for SACD is selected.
13.6.11 HDMI Settings You only need to make this setting if you connected the VIP G3 to an HDMI-compatible component using the HDMI connector 26 .
After selecting [HDMI] from the Initial Settings menu, the HDMI settings menu appears.
With DVI/HDMI-compatible devices (with HDCP), the same screen is shown, but with the audio setting greyed-out (there is no audio with DVI).

104
• Use the cursor keys ▲ and ▼ to select a setting.
• Use cursor keys ◄ and ► to adjust the current setting.
• After you've finished, press OK or enter to confirm any settings you've made and return to the Initial Settings menu.
You can adjust the following HDMI settings (the same options are available for DVI/HDCP-compatible devices):
Resolution
Since HDMI has the capacity to support many different high-definition video formats, you may want to change the resolution depending on the monitor you're using. The options that appear will depend on the video format of the current disc (NTSC or PAL).
• VGA – 640 x 480 pixel progressive-scan video (NTSC only)
• 720 x 480 P (NTSC) / 720 x 576 P (PAL) – 720 x 480/576 pixel pro-gressive-scan video.
• 720 x 480 I (NTSC) / 720 x 576 I (PAL) – 720 x 480/576 pixel interlace video
• 1280 x 720 P – 1280 x 720 pixel progressive-scan video
• 1920 x 1080 I – 1920 x 1080 pixel interlace video
Note
• When the resolution is changed, a confirmation message appears on the screen. Press OK or enter to confirm. Note that this may take some time.
• If the screen goes blank after changing the resolution, it means that you selected a resolution incompatible with your monitor. Press and hold the (number) 0 key for 5 seconds to return to the auto resolution setting.
Aspect Ratio
Select an aspect ratio according to the kind of display you have, and how you want to see the image on-screen. Refer to the table below to match the HDMI resolution you chose in [Resolution] above to the disc type you're using and the setting on your monitor. See also section 'Screen sizes and disc formats' on page 121.

105
• 4:3 (Letter Box) – Widescreen discs are shown with black bars top and bottom.
• 4:3 (Pan&Scan) – Widescreen discs are shown with left and right sides cropped.
• 16:9 (Wide) – Use this setting if you have a widescreen monitor.
• 16:9 (Compressed) – Progressive-scan 4:3 material is shown with black bars on either side of the screen.
Disc type
HDMI resolution
setting
16 : 9 4 : 3
Aspect (HDMI) Monitor setting Aspect (HDMI) Monitor
setting
720 x 576 P/I
720 x 480 P/I 16 : 9 (Wide) or
16 : 9 (Compressed)
Full / Squeeze
4 : 3 / 16 : 9 (Wide) Normal /
Pass Thru / Dot by Dot /
4 : 3 1280 x 720 P Normal /
Pass Thru / Dot by Dot /
4 : 3
16 : 9 (Compressed) 1920 x 1080 I
Note
• The monitor settings listed in the table may be different from your moni-tor's settings.
Colour
This setting determines the video output colour format. Depending on the con-nected equipment, some HDMI Colour settings may cause the picture to be displayed incorrectly. In this case, use the TV's own video input settings to select RGB, if possible. Alternatively, revert to the previous HDMI Colour setting.
• Full Range RGB – Gives brighter colours and deeper black. Use if col-ours are weak. This is the standard setting for HDMI-compatible DVI de-vices, but it is also effective with HDMI devices.
• RGB – Use this setting if colours appear overly rich on the [Full Range RGB] setting.
• Component (12-bit) – Outputs 12-bit component video format. If your connected device is compatible with this setting, 12-bit output provides

106
very fine gradations of colour. If the connected device is not compatible with this setting, the VIP G3 automatically reverts to setting [Compo-nent].
• Component – Outputs 8-bit component video format. This is the standard setting for HDMI-compatible devices.
Video Memory
These settings allow you to change the appearance of the HDMI video presen-tation. You can also access these options from the [Video Adjust] menu (refer to section 'Video Adjust' on page 77 for more on this).
• Direct – The picture appears simply according to how the source was en-coded.
• Natural – Edges are softer making this setting good for movies.
• Enhanced – Edges are sharper making this setting ideal for animation and material with computer generated effects.
• Memory 1–3 – Use for saving your own presets (see 'Creating your own presets' on page 78 for more on this).
Audio
If the monitor or device you have connected using HDMI is not compatible with compressed multi-channel formats, you should set this to [Linear PCM], otherwise set to [Auto].
• Linear PCM – All audio signals are output as linear PCM.
• Auto – Dolby Digital, DTS and MPEG sources are processed according to how they were encoded, and linear PCM sources are output with no proc-essing.
Note
• Even with [Auto] selected, if the monitor or device you have connected using HDMI is not compatible with multi-channel formats, the audio signal will be output as linear PCM.
• It is not possible to output SACD sources from the HDMI connection. If the connected component is not compatible to DVD Audio with CPPM, it is not possible to output CPPM copy-controlled DVD Audio sources from the HDMI connection (see section 'HDMI output with DVD Audio sources' on page 125).

107
• If necessary, sources with high sample rates (such as DVD Audio 88.2 / 96 / 176.4 / 192 kHz sources) will be downsampled to match the sampling rate of your connected HDMI component.
13.6.12 CD Playback
• Default setting: [PCM Playback]
When set to [PCM Playback], playback is optimized for standard audio CDs. You can also play DTS CDs, however you may notice some noise when a DTS CD starts playing. This is no malfunction.
When set to [DTS CD Playback], playback is optimized for DTS CDs. In this mode you cannot play standard audio CDs through the analog outputs.
Change the setting back to [PCM Playback] to play standard CDs.
The i.LINK output is not affected by this setting.
13.6.13 DTS Downmix
• Default setting: [Stereo]

108
If you've selected [DTS > PCM] in menu item [DTS Out] (see section 'DTS Out' on page 82), or [2 Channel] in menu item [Audio Output Mode] (see section 'Audio Output Mode' on page 108), you can choose the way the DTS signal is downmixed to PCM audio. [Stereo] downmixes the signal to 2-channel stereo, whereas [Lt/Rt] downmixes to a 2-channel signal compatible with Dolby surround matrix decoders. This allows you to hear surround sound if your AV receiver or amplifier has Dolby Pro Logic capability.
Note
• If you've selected [DTS > PCM] in menu item [DTS Out] (see section 'DTS Out' on page 82) and [5.1 Channel] in menu item [Audio Output Mode] (see section 'Audio Output Mode' on page 108), the [DTS Down-mix] setting will automatically be set to [Stereo].
13.7 Speakers
13.7.1 Audio Output Mode
• Set in Setup Navigator Default setting: [2 Channel])
If you connected the VIP G3 to an AV receiver using the 5.1 channel analog outputs 7 to 10 as well as 21 and 24 or 22 and 23 , set this to [5.1 Channel]. This will enable you to enjoy multi-channel sound.
If you connected only the stereo analog outputs 21 and 24 or 22 and 23 , select option [2 Channel]. On this setting multi-channel audio is downmixed to 2 channels for stereo analog output.
Note
• When set to [5.1 Channel], you'll only get sound from all speakers when playing multi-channel discs.

109
• Refer to section 'Digital output formats' on page 145 for audio format available at the digital outputs.
• Some DVD Audio discs don't allow downmixing of audio. These discs always output multi-channel audio regardless of the setting made here.
13.7.2 Speaker Installation
• Set in Setup Navigator Default setting: [L/R: Large], [C: Large], [LS/RS: Large], [SW: On]
You only need to make this setting if you connected the VIP G3 to your ampli-fier using the 5.1 channel analog outputs 7 to 10 as well as 21 and 24 or 22 and 23 . Otherwise this setting affects the data on the digital outputs 13 and 16 to 19 .
Use the [Speaker Installation] screen to tell the VIP G3 what kind of speak-ers you have connected.
1. Use the keys ▲ and ▼ to move the cursor up/down to select a speaker.
• The L and R, and RS and LS speakers are paired; you can't set them differ-ently.
2. Move the cursor right to modify the selected speaker.

110
3. Use cursor keys ▲ and ▼ to change the current setting.
• You can see the effect of your changes in the room graphic on the right of the screen.
• Except for the subwoofer, you can set speaker size to [Large] or [Small]. If the main speaker cone in the speaker is 12 cm or more, set to [Large], otherwise set to [Small] (or [Off] if you don't have that speaker).
• If you set the front L and R speakers to [Small], the center and surround speakers are automatically set to [Small] and the subwoofer to [On].
• The subwoofer can only be set to [On] or [Off].
4. Move the cursor left to go back to the speaker list if you want to mod-ify another speaker, or press OK or enter to exit the [Speaker In-stallation] screen.
13.7.3 Speaker Distance
• Default setting: all speakers [3 m] You only need to make this setting if you connected the VIP G3 to your ampli-fier using the 5.1 channel analog outputs 7 to 10 as well as 21 and 24 or 22 and 23 . Otherwise this setting affects the data on the digital outputs 13 and 16 to 19 .
To get the best surround sound from your system, you should set up the speaker distances from your listening position.

111
1. Use the keys ▲ and ▼ to move the cursor up/down to select a speaker.
The L and R speakers are paired; you can't set them differently.
2. Move the cursor right to change the speaker distance for the high-lighted speaker.
3. Use the cursor keys ▲ and ▼ to change the distance.
• When you change the distance settings of the front left (L) and front right (R) speakers, all other speaker distances change relative to it.
• Front left/right (L/R) speaker distances can be set from [30 cm] to [9 m] in 10 cm increments.
• The center speaker (C) and subwoofer (SW) can be set from [-2 m] to [+2 m] relative to the front left/right speakers L / R.
• Surround left/right (LS/RS) speakers can be set from [-6 m] to [+2 m] relative to the front left/right speakers L / R.
4. Move the cursor left to go back to the speaker list if you want to mod-ify another speaker, or press OK or enter to exit the [Speaker distance] screen.
Note
• Speaker distance settings do not affect SACD playback.
13.7.4 Channel Level
• Default setting: [Fix] You only need to make this setting if you connected the VIP G3 to your ampli-fier using the 5.1 channel analog outputs 7 to 10 as well as 21 and 24 or

112
22 and 23 . Otherwise this setting affects the data on the digital outputs 13 and 16 to 19 .
When set to [Fix], the level of each of the 5.1 channel analog outputs is fixed.
Choose [Variable] if you want to adjust the relative levels to balance the sur-round sound better for your listening room.
You can set the individual channel levels between [-6 dB] and [+6 dB] on 0.5 dB increments using the test tone output as a guide to set the correct levels. Adjust the levels until the output level from all channels sounds the same you’re your usual listening position.
Note that [Audio Output Mode] (refer to page 108) must be set to [5.1 Channel] in order to use the test tone.
Automatic: Select [Auto] to start the test tone output. No sound will be heard from the subwoofer.
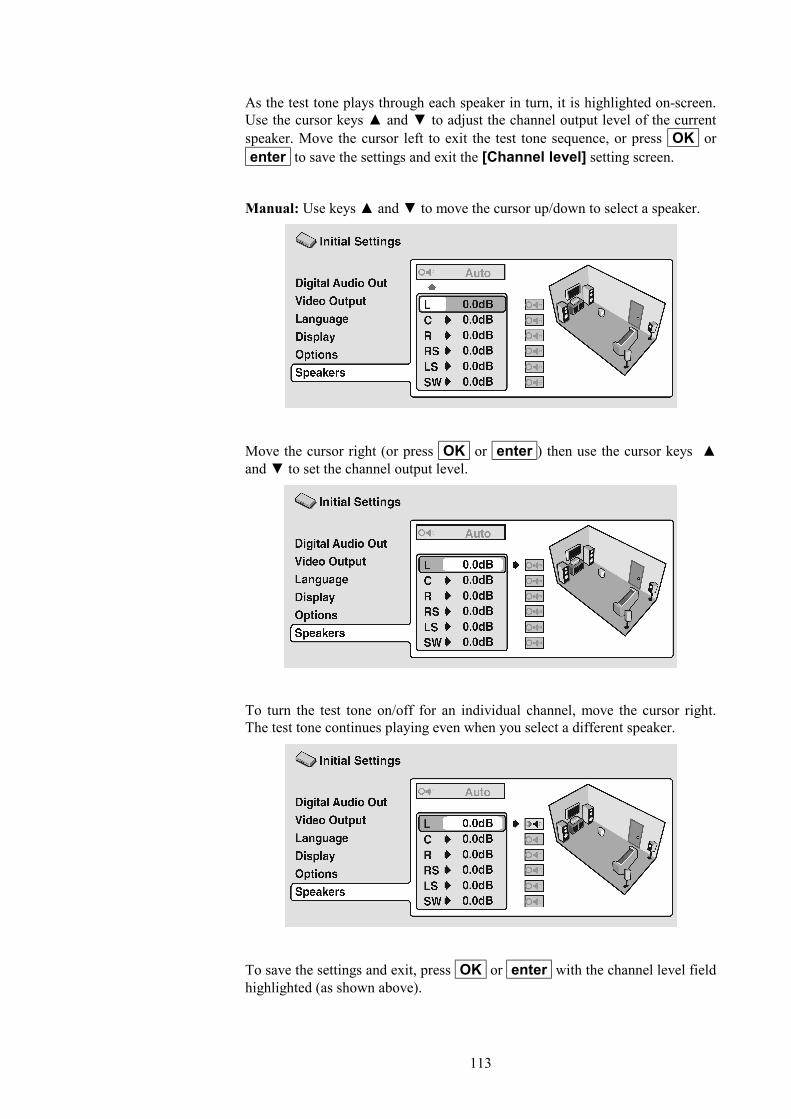
113
As the test tone plays through each speaker in turn, it is highlighted on-screen. Use the cursor keys ▲ and ▼ to adjust the channel output level of the current speaker. Move the cursor left to exit the test tone sequence, or press OK or enter to save the settings and exit the [Channel level] setting screen.
Manual: Use keys ▲ and ▼ to move the cursor up/down to select a speaker.
Move the cursor right (or press OK or enter ) then use the cursor keys ▲ and ▼ to set the channel output level.
To turn the test tone on/off for an individual channel, move the cursor right. The test tone continues playing even when you select a different speaker.
To save the settings and exit, press OK or enter with the channel level field highlighted (as shown above).

114
Note
• The subwoofer output will sound quite low compared to the other speakers.
13.8 i.LINK Setup
13.8.1 Audio Out
• Default setting: [On] You only need to make this setting if you connected the VIP G3 to other equip-ment using the i.LINK interface 27 .
Change setting to [Off] if the i.LINK interface is still connected but you need to use one of the other outputs. Selecting [Off] does not affect i.LINK thru data (i.e., if the VIP G3 is between two i.LINK components, it will still pass data between them).
Set back to [On] (i.LINK ready) to be able to use the i.LINK interface.
13.8.2 Connections Setup You only need to make this setting if you connected the VIP G3 to other equip-ment using the i.LINK interface 27 .

115
This screen shows the equipment connected using the i.LINK interface.
Components which are able to receive i.LINK Audio are shown in black (an i.LINK receiver, for example); those which can't (a DV camcorder, for exam-ple) are shown in grey. If the VIP G3 can't display the name of a component, [****] is shown. If the name can't be determined, [Unknown] is displayed.
Select the component that you want to set up the audio output formats for.
This screen shows the output settings for Dolby Digital, DTS and MPEG audio. Depending on the other component, these may be configured automatically. If the VIP G3 can't determine the appropriate settings, the defaults are [Dolby Digital], [DTS] and [PCM]. If you need to change the settings, move the cur-sor right and make the new setting.
13.8.3 Auto Select Play
• Default setting: [Off] You only need to make this setting if you connected the VIP G3 to other equip-ment using the i.LINK interface 27 .
Using this setting you can specify up to five receivers to automatically switch input function to the VIP G3 when you start playback of a disc. Highlight a receiver from the list and press OK or enter .

116
The most recently selected component is marked with an orange box (■). The i.LINK output when playing Dolby Digital, DTS or MPEG discs will be as set for this component (see section 'Connections Setup' on page 114).
Select [Off] to reset all settings.
When the i.LINK connections are changed, the following screen appears.
Press OK or enter to return to the menu screen.
Note
• Whether a receiver from the list has been selected or not, the VIP G3 will start playback when you change the input function of the receiver to the VIP G3.
• Note that some AV receivers may not be compatible with this feature.
13.8.4 DVD Audio Out
• Default setting: [5.1 Channel] You only need to make this setting if you connected the VIP G3 to other equip-ment using the i.LINK interface 27 .
117
Set this to [5.1 Channel] to enjoy surround sound when playing multi-channel discs.
To downmix a multi-channel source when using the i.LINK connection, set to [2 Channel] for stereo output.
Note
• When set to [5.1 Channel], you'll only get sound from all speakers when playing multi-channel discs.
• Some DVD Audio discs don't allow downmixing of audio. These discs always output multi-channel audio regardless of the setting made here.

118
14 Additional information
14.1 Taking care of your player and discs
14.1.1 Handling discs When holding discs of any type, take care not to leave fingerprints, dirt or scratches on the disc's surface. Hold the disc by its edge or by the center hole and edge. Damaged or dirty discs can affect playback performance. Take care also not to scratch the label side of the disc. Although not as fragile as the re-corded side, scratches can still result in a disc becoming unusable.
Should a disc become marked with fingerprints, dust, etc., clean it using a soft, dry cloth, wiping the disc lightly from the center to the outside edge as shown in the diagram below.
Wipe lightly from the center of the disc using straight strokes.
Don’t wipe the disc surface using circular strokes.
If necessary, use a cloth soaked in alcohol, or a commercially available CD/DVD cleaning kit to clean a disc more thoroughly. Never use benzine, thinner or other cleaning agents, including products designed for cleaning vinyl records.
14.1.2 Storing discs Although CDs and DVD discs are more durable than vinyl records, you should still take care to handle and store discs correctly. When you're not using a disc, return it to its case and store it upright. Avoid leaving discs in excessively cold, humid, or hot environments (including under direct sunlight).
Don't glue paper or put stickers onto the disc, or use a pencil, ball-point pen or other sharp tipped writing instrument. These could all damage the disc.

119
For more detailed care information see the instructions that come with discs. Do not load more than one disc into the player at a time.
14.1.3 Discs to avoid Discs spin at high speed inside the player. If you can see that a disc is cracked, chipped, warped, or otherwise damaged, don't risk using it in your VIP G3 - you could end up damaging it.
The VIP G3 is designed for use with conventional, fully circular discs only. Use of shaped discs is not recommended for this product. Audionet disclaims all liability arising in connection with the use of shaped discs.
14.1.4 Cleaning the pickup lens The DVD player's lens should not become dirty in normal use, but if for some reason it should malfunction due to dust or dirt, consult your nearest Audionet authorized service center. Although lens cleaners for CD players are commer-cially available, we do not recommend using them since some may damage the lens.
14.1.5 Problems with condensation Condensation may form inside the player if it is brought into a warm room from outside, or if the temperature of the room rises quickly. Although the condensa-tion won't damage the player, it may temporarily impair its performance. For this reason you should leave it to adjust to the warmer temperature for about an hour before switching on and using.

120
14.1.6 Hints on installation We want you to enjoy using this product for years to come, so please bear in mind the following points when choosing a suitable location for it:
Do...
• Use in a well-ventilated room.
• Place on a solid, flat, level surface, such as a table, shelf or stereo rack.
• Connect the unit to other components in stand-by mode only!
Don't...
• Use in a place exposed to high temperatures or humidity, including near radiators and other heat-generating appliances.
• Place on a window sill or other place where the VIP G3 will be exposed to direct sunlight.
• Use in an excessively dusty or damp environment.
• Place directly on top of an amplifier, or other component in your au-dio/video system that becomes hot in use.
• Use near a television or monitor as you may experience interference— especially if the television uses an indoor antenna.
• Use in a kitchen or other room where the player may be exposed to smoke or steam.
• Use on a thick rug or carpet, or cover with cloth—this may prevent proper cooling of the unit.
• Place on an unstable surface, or one that is not large enough to support all four of the unit's feet.
14.1.7 Moving the player If you need to move the VIP G3, first press the power key on the front panel or key Power Off or Power Toggle of the remote control Harmony Ulti-mate One in Device Mode for the VIP G3 to turn off the VIP G3. Wait for --OFF-- to disappear from the display, then unplug the power cable. Never lift or move the unit during playback – discs rotate at a high speed and may be damaged.

121
14.1.8 Power cable caution Handle the power cable by the plug part. Do not pull out the plug by tugging the cable, and never touch the power cable when your hands are wet, as this could cause a short circuit or electric shock. Do not place the unit, a piece of furniture, or other object on the power cable or pinch the cable in any other way. Never make a knot in the cable or tie it with other cables. The power ca-bles should be routed so that they are not likely to be stepped on. A damaged power cable can cause a fire or give you an electric shock. Check the power cable once in a while. If you find it damaged, ask your nearest Audionet author-ized dealer for a replacement.
14.2 Screen sizes and disc formats DVD Video discs come in several different screen aspect ratios, ranging from TV programs, which are generally 4:3, to CinemaScope widescreen movies, with an aspect ratio of up to about 7:3.
Televisions, too, come in different aspect ratios; standard 4:3 and widescreen 16:9.
14.2.1 Widescreen TV users If you have a widescreen TV, the [TV Screen] setting (see section 'TV Screen' on page 84) of the VIP G3 should be set to [16:9 (Wide)]. When you watch discs recorded in 4:3 format, you can use the TV controls to select how the picture is presented. Your TV may offer various zoom and stretch options. See the instructions that came with your TV for details.
Please note that some movie aspect ratios are wider than 16:9, so even though you have a widescreen TV, these discs will still play in a 'letter box' style with black bars at the top and bottom of the screen. This is no malfunction.
14.2.2 Standard TV users If you have a standard TV, the [TV Screen] setting (see section 'TV Screen' on page 84) of the VIP G3 should be set to [4:3 (Letter Box)] or [4:3 (Pan&Scan)], depending on which you prefer.
Set to [4:3 (Letter Box)], widescreen discs are shown with lack bars top and bottom. Set to [4:3 (Pan&Scan)], widescreen discs are shown with left and right sides cropped. Although the picture looks larger, you don't actually see the whole picture. Please note that many widescreen discs override the settings of the VIP G3 so that the disc is shown in letter box format regardless of the set-ting.

122
Note
• Using the [16:9 (Wide)] setting with a standard 4:3 TV, or either of the [4:3] settings with a widescreen TV, will result in a distorted picture.
14.3 Resetting the player Use this procedure to reset all the settings of your VIP G3 to the factory de-faults:
1. Switch the VIP G3 into stand-by and close cover.
2. Press and hold down front panel key stop and press power to switch the VIP G3 back on.
All the settings of the VIP G3 are now reset and you should see the 'Let’s Get Started' screen.
Important
• If you have a HDMI video connection you will see the HDMI setup menu.
• Please note the recommended settings in sections 'Factory default settings VIP G3' on page 159 and 'Recommended setup for 2-channel analog usage' on page 160. Restore the settings listed in these sections manually de-pending on your application.

123
14.4 About the audio output settings The table below shows how the audio settings you make in the [Digital Audio Out] and [Audio Output Mode] screens (refer to section 'Digital Audio Out settings' on page 81 and section 'Audio Output Mode' on page 108) affect the output from the 2 channel and the 5.1 channel analog outputs, and from the optical and electrical digital outputs with various types of disc.
Disc audio format Player setting
Front L/R analog outputs*1
Surround L/R, Center, LFE,
analog outputs*1
Digital outputs
PCM converted*2 Bitstream*3 DV
D
Dolby Digital 2 Ch 2 channel downmix –
2 channel downmix Dolby Digital
5.1 Ch Front L / R Surround L/R, Center, LFE
Dolby Digital Karaoke 2 Ch/5.1 Ch Left / Right – Left / Right Dolby Digital
Linear-PCM 2 Ch/5.1 Ch Left / Right – Left / Right Left / Right
DTS 2 Ch 2 channel downmix –
2 channel downmix DTS 5.1 Ch Front L / R Surround L/R,
Center, LFE
MPEG 2 Ch/5.1 Ch Left / Right – Left / Right MPEG
DVD Audio 2 Ch 2 channel downmix *4 –
2 channel downmix 2 channel downmix
5.1 Ch Front L / R Surround L/R, Center, LFE –
DVD-RW 2 Ch/5.1 Ch Left / Right *5 – Left / Right Dolby Digital MPEG or PCM
Super Audio CD 2 Ch 2 channel downmix –
2 channel downmix –
5.1 Ch Front L / R Surround L/R, Center, LFE
CD 2 Ch/5.1 Ch Left / Right – Left / Right Left / Right
DTS CD 2 Ch 2 channel downmix –
DTS DTS
5.1 Ch Front L / R Surround L/R, Center, LFE
Video CD 2 Ch/5.1 Ch Left / Right – Left / Right Left / Right
*1 When [Audio Output Mode] is set to [2 Channel], the MAIN LEFT 21 or 22 and MAIN RIGHT 24 or 23 jacks act as stereo audio outputs (refer to 'Back panel' on page 12).
*2 [Dolby Digital > PCM], [DTS > PCM] or [MPEG > PCM] setting (refer to 'Digital Audio Out settings' on page 81).
*3 [Dolby Digital], [DTS] or [MPEG] setting (refer to 'Digital Audio Out settings' on page 81).
*4 Discs that prohibit downmixing will be output as 5.1 channel even if [2 Channel] is se-lected for the [Audio Output Mode] setting (refer to 'Audio Output Mode' on page 108).
*5 If the sound is mono, the Left and Right channels will be the same.

124
14.5 About the HDMI output settings The table below shows how the audio settings you make in the [HDMI] and [Audio Output Mode] screens (refer to sections 'HDMI Settings' on page 103 and 'Audio Output Mode' on page 108) affect the HDMI output with various types of disc.
Audio format HDMI audio setting
Linear PCM Auto
DVD
Dolby Digital*1 2 channel downmix Dolby Digital*2
Dolby Digital (Karaoke) Left / Right Dolby Digital*2
Linear-PCM*1 Left / Right Left / Right
DTS 2 channel downmix DTS*2
MPEG*1 Left / Right MPEG*2
DVD Audio (with CPPM) 5.1 channels*3
DVD Audio (w/out CPPM) 5.1 channels
CD / MP3 Left / Right
DTS-CD DTS
Video CD Left / Right
SACD Playback
2 ch Area Multi-ch Area CD Area
Super Audio-CD –– *4 –– *4 Left / Right *5
*1 These formats include DVD-RW discs.
*2 If the HDMI device you are using is not compatible with these compressed formats, the signal is output as Linear PCM.
*3 If the connected component is not compatible to DVD Audio with CPPM, it is not possible to output CPPM copy-controlled DVD Audio sources from the HDMI connection (see sec-tion 'HDMI output with DVD Audio sources' on page 125).
*4 It is not possible to listen to SACDs using the HDMI connection.
*5 Only applicable to discs that have a CD area.

125
14.6 HDMI output with DVD Audio sources DVD Audio sources often have high sample rates (such as 192 kHz / 24 Bit / 2-ch or 96 kHz / 24 Bit / 6-ch), and the way they are output from the HDMI connector 26 will depend on the specification of the connected component.
Component specification Format Speakers
Audio Output Mode (see page 108) 2 channel 5.1 channel
HDMI Ver. 1.1 (DVD Audio and
5.1 channel compatible) 2 channel 5.1 channel *2*3 set to [5.1 Channel]
HMDI Ver. 1.1 (DVD Audio and
2 channel compatible) *1 2 channel
Left / Right or 2 channel downmix *4
set to [2 Channel]
HDMI Ver. 1.1 (incompatible with DVD Audio)
or only HDMI Ver. 1.0 *1
no sound *4 no sound *5
*1 The VIP G3 checks the specifications of the connected component (such as sample rate,
multi-channel limitations and CPPM compatibility) and outputs the signal accordingly. Note that 'DVD Audio compatible' indicates compatibility with CPPM (Content Protection for Pre-recorded Media).
*2 If the speakers audio output mode (see section 'Audio Output Mode' on page 108) is set to [2-Channel], multi-channel sources will be downmixed to stereo. In cases where the source is downmix-prohibited, the output is 5.1 channel audio.
*3 If the video output resolution is [VGA], [720x480/576p] or [720x480/576i], audio out-put may be limited to 2 channel, depending on the connected component.
*4 If the speakers audio output mode (see section 'Audio Output Mode' on page 108) is set to [2-Channel], multi-channel sources will be downmixed to stereo. In cases where the source is downmix-prohibited, only the front left/right channels are output.
*5 If the display in the front panel shows CPPM, it means it is not possible to output CPPM copy-controlled DVD Audio sources from the HDMI 26 connection. Discs with no CPPM protection are limited to 2 channel output.

126
14.7 About the i.LINK output settings The table below shows how the audio settings you make in the [SACD Play-back], [DVD Audio Out] and [Connection Setup] screens (see section 'SACD Playback' on page 102, section 'DVD Audio Out' on page 116 and sec-tion 'Connections Setup' on page 114) affect the i.LINK audio output with vari-ous types of disc.
Audio format Connections setup
Bitstream*1 Bitstream > PCM*2
DVD
Dolby Digital Dolby Digital 2 channel downmix
Dolby Digital (Karaoke) Dolby Digital Left / Right
Linear-PCM Left / Right Left / Right
DTS DTS 2 channel downmix
MPEG*1 MPEG Left / Right
DVD-RW (Mono, Dual-Mono, 2 ch.) Left / Right Left / Right
DVD-RW (3 ch. or more) Dolby Digital / MPEG Left / Right
DVD Audio Out
2 Channel 5.1 Channel
DVD Audio 2 channel downmix multi-channel
CD / MP3 Left / Right
DTS-CD DTS
Video CD Left / Right
SACD Playback
2 ch Area Multi-ch Area CD Area
Super Audio-CD Left / Right multi-channel *3 Left / Right *4
*1 [Dolby Digital], [DTS] or [MPEG] setting (see section 'Connections Setup' on page 114).
*2 [PCM] setting (see section 'Connections Setup' on page 114).
*3 Only applicable to discs that have a multi-channel area.
*4 Only applicable to discs that have a CD area.

127
14.8 Country Code list Country, Country Code, Country Code letter
Argentina 0118 ar Australia 0121 au Austria 0120 at Belgium 0205 be Brazil 0218 br Canada 0301 ca Chile 0312 cl China 0314 cn Denmark 0411 dk Finland 0609 fi France 0618 fr Germany 0405 de
Hong Kong 0811 hk India 0914 in Indonesia 0904 id Italy 0920 it Japan 1016 jp Korea, Republic of 1118 kr Malaysia 1325 my Mexico 1324 mx Netherlands 1412 nl New Zealand 1426 nz Norway 1415 no Pakistan 1611 pk
Philippines 1608 ph Portugal 1620 pt Russian Federation 1821 ru Singapore 1907 sg Spain 0519 es Switzerland 0308 ch Sweden 1905 se Taiwan 2023 tw Thailand 2008 th United Kingdom 0702 gb USA 2119 us
14.9 Language Code list Language (Language Code letter), Language Code
Japanese (ja) 1001 English (en) 0514 French (fr) 0618 German (de) 0405 Italian (it) 0920 Spanish (es) 0519 Dutch (nl) 1412 Russian (ru) 1821 Chinese (zh) 2608 Korean (ko) 1115 Greek (el) 0512 Afar (aa) 0101 Abkhazian (ab) 0102 Afrikaans (af) 0106 Amharic (am) 0113 Arabic (ar) 0118 Assamese (as) 0119 Aymara (ay) 0125 Azerbaijani (az) 0126 Bashkir (ba) 0201 Byelorussian (be) 0205 Bulgarian (bg) 0207 Bihari (bh) 0208 Bislama (bi) 0209 Bengali (bn) 0214 Tibetan (bo) 0215 Breton (br) 0218 Catalan (ca) 0301 Corsican (co) 0315 Czech (cs) 0319 Welsh (cy) 0325 Danish (da) 0401 Bhutani (dz) 0426 Esperanto (eo) 0515
Estonian (et) 0520 Basque (eu) 0521 Persian (fa) 0601 Finnish (fi) 0609 Fiji (fj) 0610 Faroese (fo) 0615 Frisian (fy) 0625 Irish (ga) 0701 Scots-Gaelic (gd) 0704 Galician (gl) 0712 Guarani (gn) 0714 Gujarati (gu) 0721 Hausa (ha) 0801 Hindi (hi) 0809 Croatian (hr) 0818 Hungarian (hu) 0821 Armenian (hy) 0825 Interlingua (ia) 0901 Interlingue (ie) 0905 Inupiak (ik) 0911 Indonesian (in) 0914 Icelandic (is) 0919 Hebrew (iw) 0923 Yiddish (ji) 1009 Javanese (jw) 1023 Georgian (ka) 1101 Kazakh (kk) 1111 Greenlandic (kl) 1112 Cambodian (km) 1113 Kannada (kn) 1114 Kashmiri (ks) 1119 Kurdish (ku) 1121 Kirghiz (ky) 1125 Latin (la) 1201
Lingala (ln) 1214 Laothian (lo) 1215 Lithuanian (lt) 1220 Latvian (lv) 1222 Malagasy (mg) 1307 Maori (mi) 1309 Macedonian (mk) 1311 Malayalam (ml) 1312 Mongolian (mn) 1314 Moldavian (mo) 1315 Marathi (mr) 1318 Malay (ms) 1319 Maltese (mt) 1320 Burmese (my) 1325 Nauru (na) 1401 Nepali (ne) 1405 Norwegian (no) 1415 Occitan (oc) 1503 Oromo (om) 1513 Oriya (or) 1518 Panjabi (pa) 1601 Polish (pl) 1612 Pashto, Pushto (ps) 1619 Portuguese (pt) 1620 Quechua (qu) 1721 Rhaeto-Romance (rm) 1813 Kirundi (rn) 1814 Romanian (ro) 1815 Kinyarwanda (rw) 1823 Sanskrit (sa) 1901 Sindhi (sd) 1904 Sangho (sg) 1907 Serbo-Croatian (sh) 1908 Sinhalese (si) 1909
Slovak (sk) 1911 Slovenian (sl) 1912 Samoan (sm) 1913 Shona (sn) 1914 Somali (so) 1915 Albanian (sq) 1917 Serbian (sr) 1918 Siswati (ss) 1919 Sesotho (st) 1920 Sundanese (su) 1921 Swedish (sv) 1922 Swahili (sw) 1923 Tamil (ta) 2001 Telugu (te) 2005 Tajik (tg) 2007 Thai (th) 2008 Tigrinya (ti) 2009 Turkmen (tk) 2011 Tagalog (tl) 2012 Setswana (tn) 2014 Tonga (to) 2015 Turkish (tr) 2018 Tsonga (ts) 2019 Tatar (tt) 2020 Twi (tw) 2023 Ukrainian (uk) 2111 Urdu (ur) 2118 Uzbek (uz) 2126 Vietnamese (vi) 2209 Volapük (vo) 2215 Wolof (wo) 2315 Xhosa (xh) 2408 Yoruba (yo) 2515 Zulu (zu) 2621
128
14.10 Selecting languages using the Language Code list
Some of the language options (such as [DVD Language] in the Setup Naviga-tor) allow you to set your preferred language from any of the 136 languages listed in the Language Code list on page 127.
1. Select [Other Language].
2. Use cursor keys ◄ and ► to select either a code letter or a code number.
3. Use cursor keys ▲ and ▼ to select a code letter or a code number.
You can also use the number keys if you're entering a Language Code. Refer to 'Language Code list' on page 127 for a complete list of languages and codes.
14.11 Glossary
Analog audio
An electrical signal that directly represents sound. Compare this to digital audio which can be an electrical signal, but is an indirect representation of sound. See also Digital audio.
Aspect ratio
The width of a TV screen relative to its height. Conventional TVs are 4:3 (in other words, the screen is almost square); widescreen models are 16:9 (the screen is almost twice as wide as it is high).
Bonus group (DVD Audio only)
An 'extra' group on some DVD Audio discs that requires a key number to ac-cess.
Browsable pictures (DVD Audio only)
A feature of some DVD Audio discs in which the user can browse still pictures recorded on the disc as the audio is played. See also Slideshow (DVD, Video CD).

129
Digital audio
An indirect representation of sound by numbers. During recording, the sound is measured at discrete intervals (44,100 times a second for CD audio) by an ana-log-to-digital converter, generating a stream of numbers. On playback, a digital-to-analog converter generates an analog signal based on these numbers. See also Sampling frequency and Analog audio.
Dolby Digital
Using a maximum of 5.1 channels of audio, this high quality surround system is used in many of the finer movie theaters around the world. The on-screen dis-play shows which channels are active, for example showing 3/2.1. The 3 being the two front channels and the center channel; the 2 being the surround chan-nels, and the .1 being the LFE channel.
'Dolby' and the double-D symbol are trademarks of Dolby Laboratories.
DTS
DTS stands for Digital Theater Systems. DTS is a surround system different from Dolby Digital that has become a popular surround sound format for movies.
'DTS' and 'DTS Digital Surround' are registered trademarks of Digital Theater Systems, Inc.
Dynamic range
The difference between the quietest and loudest sounds possible in an audio signal (without distorting or getting lost in noise). Dolby Digital and DTS soundtracks are capable of a very wide dynamic range, delivering dramatic cinema-like effects.
File extension
A tag added to the end of a filename to indicate the type of file. For example, '.mp3' indicates an MP3 file.
i.LINK
i.LINK is a trademark name of IEEE 1394, a high-speed digital interface capa-ble of carrying audio, video and other types of data. The VIP G3 outputs only audio data using the i.LINK interface.
i.LINK and the i.LINK logo are trademarks of Sony Corporation.
130
HDMI
HDMI (High-Definition Multimedia Interface) is a high-speed digital interface which has the capability to support standard, enhanced, or high-definition video plus standard to multi-channel surround-sound audio on a single digital connec-tion. HDMI features include uncompressed digital video, a bandwidth of up to 5 gigabytes per second and communication between the AV source and AV devices such as DTVs
HDMI, the HDMI logo and High-Definition Multimedia Interface are trade-marks or registered trademarks of HDMI licensing LLC.
Interlaced Video
A method of displaying a picture in which odd-numbered lines are updated in one pass, then even-numbered lines updated in the next. See also Progressive scan video.
ISO 9660 format
International standard for the volume and file structure of CD-ROM discs.
MP3
MP3 (MPEG1 audio layer 3) is a compressed audio file format. Files are recog-nized by their file extension '.mp3' or '.MP3'.
MPEG audio
An audio format used on Video CD/Super VCDs and some DVD discs. The VIP G3 can convert MPEG audio to PCM format for wider compatibility with digital recorders and AV amplifiers. See also PCM (Pulse Code Modulation).
MPEG video
The video format used for Video CD / Super VCDs and DVDs. Video CD / Super VCD uses the older MPEG-1 standard, while DVD uses the newer and much better quality MPEG-2 standard.
Packed PCM (DVD Audio only)
A lossless compression system that enables more PCM audio to be stored on a DVD Audio disc than would otherwise be possible.

131
PBC (PlayBack) (Video CD/Super VCD only)
A system of navigating a Video CD/Super VCD through on-screen menus re-corded onto the disc. Especially good for discs that you would normally not watch from beginning to end all at once - karaoke discs, for example.
PCM (Pulse Code Modulation)
The most common system of encoding digital audio, found on CDs and DAT. Excellent quality, but requires a lot of data compared to formats such as Dolby Digital and MPEG audio. For compatibility with digital audio recorders (CD, MD and DAT) and AV amplifiers with digital inputs, this unit can convert Dolby Digital, DTS and MPEG audio to PCM. See also Digital audio.
Progressive scan video
Also called non-interlaced video, this method of displaying a picture updates all the lines in one pass, resulting in a more stable, flicker free image than inter-laced video (for a given scanning rate). See also Interlaced Video and 'About progressive scan video' on page 15.
Regions (DVD Video only)
These associate discs and players with particular areas of the world. This unit will only play discs that have compatible region codes. Some discs are com-patible with more than one region (or all regions).
S1 S-Video output
This S-Video signal format includes aspect ratio information (4:3 or 16:9) within the video signal. TVs which are compatible with S1 S-Video automati-cally switch aspect ratio according to the signal.
S2 S-Video output
S2 is an enhanced version of S-Video which, in addition to aspect ratio infor-mation, contains letterbox / pan & scan information. Widescreen TVs which are compatible with S2 S-Video automatically switch aspect ratio according to the signal.
Sampling frequency
The rate at which sound is measured to be turned into digital audio data. The higher the rate, the better the sound quality, but the more digital information is generated. Standard CD audio has a sampling frequency of 44.1kHz, which means 44,100 samples (measurements) per second. See also Digital audio.

132
Slideshow (DVD, Video CD)
A feature of some DVD discs in which still pictures recorded on the disc cycle automatically as the audio is played. See also Browsable pictures (DVD Audio only).
Super Audio CD (SACD)
Super Audio CD is a high quality audio disc format that can accommodate high sampling rate stereo and multi-channel audio, as well as conventional CD audio all on the same disc.

133
14.12 Troubleshooting Incorrect operation and operator errors are often mistaken for trouble or mal-function. If you think that there is something wrong with this component, check the points below. Sometimes the trouble may lie in another component. Inspect the other components and electrical appliances being used. If the trouble cannot be rectified after checking the items below, contact your Audionet authorized dealer.
14.12.1 General
Problem Remedy
The disc won't play after read-ing.
• Make sure the disc is free from dirt and dust and is not damaged (refer to 'Taking care of your player and discs' on page 118).
• Make sure the disc is loaded with the label side face-up and that the stabilizer gives the disc a centred and level position.
• Incompatible region number: If the region number on a DVD Video disc does not match the number on the player, the disc cannot be used (refer to 'Playable disc types' on page 23).
• Condensation inside the VIP G3: Allow time for conden-sation to evaporate. Avoid using the player near an air-conditioning unit.
DVD Audio playback stops. • The disc may have been illegally copied.
Picture playback stops and the operation keys cannot be used.
• Press ■, then start playback again (►).
• Switch the power off once, unplug the wall socket, then plug back in and switch on again by pressing power on the front plate.
New settings made in the Setup screen menus while a disc is playing are ineffective.
• Some settings can be changed while a disc is playing, but are not effective until the disc is stopped then restarted: Press ■, then start playback again (►).
Settings are cancelled.
• When the power is cut due to power failure or by un-plugging the power cord during operation, settings will be cancelled. Refer to 'Moving the player' on page 120 for proper shutdown instructions.

134
14.12.2 DVD/CD/Video CD/Super VCD playback
Problem Remedy
The remote control doesn't seem to work.
• The remote control is too far from the VIP G3, or the angle with the remote sensor is too wide: Use the remote within its operating range.
• The batteries are exhausted: Put in new ones (refer to the user's manual of the remote control SRC).
No picture / no colour. • Check if the switch Video 4 at the back panel is in position off. If so, activate the video outputs by flipping switch 4 into position on (refer to section 'Back panel' on page 12 und 'Video outputs' on page 140).
• Incorrect video connections: Check that connections are correct and that plugs are inserted fully. Also check the video cable for damage.
• TV/monitor or AV amplifier settings are incorrect: Check the instruction manual of the connected equipment.
• The video output is set to progressive but your TV/monitor is not compatible with progressive scan: En-ter [Setup Navigator] and switch off the [Progres-sive] function to switch video output to interlaced video (refer to 'About progressive scan video' on page 15).
Screen is stretched or aspect does not change.
• The [TV Screen] settings in the [Initial Settings] menu is incorrect. Refer to section 'TV Screen' on page 84 for how to set it correctly for your TV/monitor.
• If your TV/monitor is connected using S-Video cable, try changing the [S-Video Out] setting (refer to 'S-Video Out' on page 87).
Picture disturbance during playback or dark.
• The VIP G3 is compatible with Macro-Vision System copy guard. Some discs include a copy prevention signal, and when this type of disc is played back, stripes etc. may appear on some sections of the picture depending on the TV. This is not a malfunction.
• Due to the copy protection circuits of the VIP G3, connection of this device through a VCR or an AV selector may prevent recording or cause picture problems. This is not a malfunc-tion.
• The TV system may be set inappropriately. Refer to 'Setting the TV system' on page 27.
No audio, or audio is distorted.
• No audio is output during slow motion playback or when scanning discs other than audio CDs.
• Check that the disc is free from dust and dirt, and that it is not damaged (refer to section 'Taking care of your player and discs' on page 118).
• Check that all interconnections are firmly inserted.

135
• Check that the plugs and terminals are free of dirt, oxide, etc. and clean if necessary. Also check the cable for dam-age.
• Make sure the VIP G3 is not connected to the amplifier's phono (turntable) inputs.
• Check your amplifier/receiver's settings (volume, input function, speaker settings, etc.).
• If the i.LINK interface is active, all other audio outputs are switched off. See section 'Audio Out' on page 114 for how to switch it off.
Analog audio is OK, but there appears to be no optical / coaxial digital audio signal.
• Make sure that the switch 11 on the back panel is in position H bit or L bit (refer to 'Digital audio outputs' on page 143).
• Check if the HighBit/LowBit settings are correct de-pending on the device your VIP G3 is connected to.
• Check that the [Dolby Digital Out], [DTS Out] and [MPEG Out] settings (refer to 'Digital Audio Out set-tings' on page 81) are suitable for your amplifier/receiver – check the user's manual that came with your ampli-fier/receiver.
Noticeable difference in DVD, SACD and CD volume.
• This is due to differences in the audio format and is not a malfunction.
Cannot play multi-channel audio.
• Make sure that [Audio Output Mode] is set to [5.1 Channel] (refer to 'Audio Output Mode' on page 108).
• Check that the [Dolby Digital Out], [DTS Out] and [MPEG Out] settings (refer to 'Digital Audio Out set-tings' on page 81) are suitable for your amplifier/receiver – check the user's manual that came with your ampli-fier/receiver.
• Check that the settings in the [Speaker Installation] menu (see section 'Speaker Installation' on page 109) are correct.
• Check the audio options available from the disc menu.
Cannot output 192 kHz or 176.4 kHz digital audio from optical/coaxial outputs.
• The VIP G3 outputs digital audio at high sampling rates in HighBit mode only (compatible to Audionet MAP V2.0 and MAP 1 only!).
• In LowBit mode the digital audio signal is downsampled to 96/88.2 kHz automatically.
No output of 96 kHz or 88.2 kHz digital audio from the optical/coaxial outputs.
• Check if the digital outputs are deactivated. Activate them if necessary (refer to section 'Digital audio outputs' on page 143).
• Make sure the component the VIP G3 is connected to is compatible to 88.2 kHz and 96 kHz.
No DTS audio output from optical/coaxial output.
• If the VIP G3 is connected to a non-DTS compatible amplifier or decoder using a digital audio cable, set [DTS Out] to [DTS > PCM]. If you do not do this,

136
noise will be output when you play a DTS disc.
• If the VIP G3 is connected to a DTS compatible amplifier or decoder using a digital audio cable, check the ampli-fier settings, and that the cable is properly connected.
Audio mix does not sound right or sounds incomplete (for example, inaudible dialog).
• Make sure that [Audio Output Mode] is set to [2 Channel] if you've connected to the stereo inputs on your amplifier or TV (refer to 'Audio Output Mode' on page 108).
Disc containing MP3 tracks won't play.
• The VIP G3 is compatible with multisession discs, but only plays sessions that are closed.
• If the message UNPLAYABLE is displayed when you try to play a disc/track, check the audio file formats (refer to 'MP3 discs' on page 24).
Can't hear effect of TruSur-round.
• TruSurround does not work with CD, MP3, DVD Audio, SACD or 96 kHz linear PCM DVD.
• The TruSurround effect is only output through the MAIN LEFT 21 or 22 and MAIN RIGHT 24 or 23 audio outputs (refer to 'Back panel' on page 12).
• Make sure that [Audio Output Mode] is set to [2 Channel] (refer to 'Audio Output Mode' on page 108).
• The effectiveness of TruSurround varies with the disc.
The audio on a Super VCD disc is not output correctly.
• If the audio is switched to [2] when playing a Super VCD that contains only one stereo soundtrack, there may be no sound at all. Press Audio to change the soundtrack.

137
14.12.3 HDMI troubleshooting
Problem Remedy
No HDMI audio output. • The VIP G3 has been designed to be compliant with HDMI (High Definition Multimedia Interface) Version 1.1. Depending on the component you have connected, unreliable signal transfers may re-sult.
• You won't hear any sound from the HDMI output 26 if the source component is only DVI/HDCP-compatible.
• It is not possible to output SACDs from the HDMI connection 26 .
• Make sure that you've selected the VIP G3 as the HDMI input in the settings for the component you're using. You may need to refer to the user's manual of the component.
• Check that the HDMI cable is connected properly and that the cable isn't damaged.
• Check that components connected using the HDMI interface are switched on and HDMI compatible. An HDMI connection can only be made with components compatible with both DVI and High Bandwidth Digital Content Protection (HDCP).
No HDMI video output • Make sure that you've selected the VIP G3 as the HDMI input in the settings for the component you're using. You may need to refer to the user's manual of the component.
• It is not possible to output SACD sources from the HDMI connec-tion.
• Check that the HDMI cable is connected properly and that the cable isn't damaged.
• Check that components connected using the HDMI interface are switched on and HDMI compatible. An HDMI connection can only be made with components compatible with both DVI and High Bandwidth Digital Content Protection (HDCP).
• The VIP G3 has been designed to be compliant with HDMI (High Definition Multimedia Interface) Version 1.1. Depending on the component you have connected, unreliable signal transfers may re-sult.
• Use high-quality HDMI cables no longer than 7 m (max.).
• Make sure that the resolution on the VIP G3 matches that of the component you have connected using HDMI (refer to 'HDMI Set-tings' on page 103 to change the HDMI resolution).
No multi-channel HDMI audio.
• Make sure the [Audio] setting in the HDMI menu is set to [Auto] (refer to 'HDMI Settings' on page 103 to change the audio setting).
A connected DVI com-ponent (with HDCP) doesn't work with the VIP G3.
• The VIP G3 has been designed to be compliant with HDMI (High Definition Multimedia Interface) Version 1.1. Depending on the component you have connected, using a DVI connection may result in unreliable signal transfers.
Colour problems occur with your monitor after changing [Video Ad-just] (page 77) or [Video Memory] (page 78)
• You can correct this by choosing an input setting on your monitor according to the settings you've selected in the setup menus of the VIP G3.

138
14.12.4 i.LINK troubleshooting
Problem Remedy
No i.LINK audio output • Check that your AV receiver is DTCP (Digital Transmission Copy Protection) compatible.
• Check that you AV receiver is compatible with the type of disc that you're trying to play (for example, SACD).
• Check that your AV receiver is set to the correct input.
• Check that the i.LINK cable is connected properly and that the cable isn't damaged. Use an i.LINK cable no longer than 3.5 m.
• Check that components connected using the i.LINK interface are switched on and i.LINK Audio compatible. Do not connect DV format players/recorders or personal computers.
• Check that the i.LINK setting [Audio Out] is set to [On] (see section 'Audio Out' on page 114).
Auto Select Play doesn't work.
• Make sure that the receiver has been selected in the [Auto Select Play] menu (see section 'Auto Select Play' on page 115).
• Make sure that i.LINK menu item [Audio Out] is set to [On] (see section 'Audio Out' on page 114).
• Auto Select Play doesn't work while the display at the front panel shows LINE CHECK (see section 'i.LINK-related messages' on page 139).
i.LINK audio is tempo-rarily interrupted.
• Consult list of messages in section 'i.LINK-related messages' on page 139 for possible causes.
No multi-channel i.LINK audio.
• For multi-channel SACD playback, make sure that [SACD Play-back] is set to [Multi-ch Area] (see section 'SACD Playback' on page 102).
• For multi-channel DVD Audio playback, make sure that [Audio Output Mode] is set to [5.1 Channel] (see section 'Audio Out-put Mode' on page 108).
Playback starts automati-cally when the input function of AV receiver is changed to this player.
• This is an i.LINK feature and not a malfunction.
A connected i.LINK component doesn't work with this player.
• Depending on the connected component, the VIP G3 may not work properly with it. See also the operating instructions that came with the other component.

139
14.12.5 i.LINK-related messages You may see the following messages in the display of the front panel when using the i.LINK interface.
LINK CHECK
The VIP G3 is checking the i.LINK network. It does this, for example, when components are added or removed from the network. The sound may be inter-rupted if this happens during playback.
PQLS ON
Displayed when the VIP G3 receives a rate control request from the receiver during playback. The sound may be interrupted momentarily when this hap-pens. Note that PQLS feature works only when the VIP G3 is connected to a single receiver.
PQLS OFF
Displayed when the VIP G3 receives a rate control off request from the receiver during playback. The sound may be interrupted momentarily when this hap-pens.
LOOP CONNECT
The i.LINK network cannot function because it is connected in a loop (see sec-tion 'Creating an i.LINK network' on page 152).
BUS FULL
The i.LINK bus has reached its capacity and cannot transmit any more data.

140
15 Connections and options on the back panel
15.1 Video outputs
1 Video output R/CR
Use this video output (in conjunction with outputs 2 and 3 ), if you con-nect the VIP G3 to a display device (TV, monitor, projector etc.) compati-ble to component video (interlaced or progressive). The signal available at this video output depends on your setting of the on-screen menu [AV Connector Out]: Select [RGB] for Red (R) signal output (interlaced only). Select [YUV] for U (CR) signal output (interlaced or progressive).
2 Video output G/Y Use this video output (in conjunction with outputs 1 and 3 ), if you con-nect the VIP G3 to a display device (TV, monitor, projector etc.) compati-ble to component video (interlaced or progressive). The signal available at this video output depends on your setting of the on-screen menu [AV Connector Out]: Select [RGB] for Green (G) signal output (interlaced only). Select [YUV] for Y signal output (interlaced or progressive).
3 Video output B/CB Use this video output (in conjunction with outputs 1 and 2 ), if you con-nect the VIP G3 to a display device (TV, monitor, projector etc.) compati-ble to component video (interlaced or progressive). The signal available at this video output depends on your setting of the on-screen menu [AV Connector Out]: Select [RGB] for Blue (R) signal output (interlaced only). Select [YUV] for V (CB) signal output (interlaced or progressive).
Note
Consult sections 'Component Out' and 'AV Connector Out' on page 85 for more information how to setup the video output formats correctly.

141
4 Selector video on/off Use this switch to turn video outputs on or off. The switch works only on the analog video outputs.
5 Video output Composite (CVBS) This video output provides the video signal in composite (CVBS) format. Connect a TV or monitor compatible to the composite (CVBS) video for-mat here.
6 Video output S-Video (Y/C) Video output 6 provides the video signal in S-Video (Y/C) format. Be-fore you connect a display device (like TV, monitor, projector, VCR etc.) to this output, make sure the device is compatible to the S-Video (Y/C) format.
26 Digital video output (HDMI) Connect a display device (TV, monitor, projector etc.) to this video output that is compatible to the HDMI interface. For more information regarding HDMI please refer to sections 'About HDMI' on page 149 and 'HDMI Set-tings' on page 103.
28 SDI video output Connect a display device (TV, monitor, projector etc.) to this video output that is compatible to SDI video. The SDI output of the VIP G3 is optional.

142
15.2 Analog audio outputs
7 Analog output Subwoofer Output of analog Subwoofer channel (during multi-channel playback).
8 Analog output Right Surround Output of analog Right Surround channel (during multi-channel playback).
9 Analog output Left Surround Output of analog Right Surround channel (during multi-channel playback).
10 Analog output Center Output of analog Center channel (during multi-channel playback).
21 Analog output Main Left (Cinch) Analog audio output Front/Main Left, Cinch.
22 Analog output Main Left (balanced) Analog audio output Front/Main Left, XLR/balanced.
23 Analog output Main Right (balanced) Analog audio output Front/Main Right, XLR/balanced.
24 Analog output Main Right (Cinch) Analog audio output Front/Main Right, Cinch.
Note The availability of signals depends on settings preferences (refer to section 'Speakers' on page 108) and the multi-channel audio format on the disc playing.

143
15.3 Digital audio outputs
11 Selector for digital audio output format To switch off all digital outputs bring switch 11 in position off. If you need one or more digital audio outputs put switch 11 in position H bit or L bit according to the desired digital audio output format (refer to section 'Digital output formats' on page 145 for detailed information on digital au-dio output formats).
Important
• In case you don't need any of the digital audio outputs, do not use shorting plugs for termination of the digital audio outputs. Put switch 11 in posi-tion off instead to switch off all digital audio outputs.
12 USB/SPDIF digital audio input Digital audio input to connect a personal computer to the VIP G3 for play-back of music and sound files using the sophisticated D/A-converters of the front channels. The VIP G3 is recognized as 'USB Audio Device' by the operating system of your computer (for example, Windows XP*1). Use a standard audio player (for example, Windows Media Player*1) to play-back your music over the VIP G3. Via an optional adapter cable the USB input can be used as SPDIF input for connecting CD players, DAT recorders etc. (refer to section 'USB/SPDIF digital audio input' on page 154).
*1 'Microsoft Windows' and 'Windows Media Player' are registered trademarks of Microsoft Corporation
and were only used for information purposes.

144
13 Digital output OUT 4 (optical/TOSLink) Connecter a PCM-, Dolby Digital-, DTS- and/or MPEG- compatible AV receiver to the optical digital output OUT 4 using an optical (TOSLink) cable).
16 Digital output OUT 3 (AES/EBU) The digital audio signal is available at output OUT 3 in the AES/EBU format depending on the position of switch 11 .
17 Digital output OUT 2 (SPDIF) The digital audio signal is available at output OUT 2 in the SPDIF format depending on the position of switch 11 .
18 Digital output OUT 1 (SPDIF) The digital audio signal is available at output OUT 1 in the SPDIF format depending on the position of switch 11 .
19 Digital output DATA LINK The digital audio output DATA LINK is only for connecting the VIP G3 to an Audionet pre amplifier with a DATA LINK input (for example, Audio-net MAP 1). The digital output signal depends on the position of switch 11 .
Important
• Switch 11 has to be either in position H bit or L bit to have a signal on the digital audio outputs. In position off, all digital audio outputs are switched off.
• For detailed information on output format of the digital audio outputs OUT 1 to 4 and DATA LINK please refer to section 'Digital output for-mats' on page 145.

145
15.4 Digital output formats
In order to use digital audio outputs OUT 1 to 4 and DATA LINK of your VIP G3, switch 11 on the back panel has to be either in position H bit or L bit. In position L bit the VIP G3 sends out the digital audio data in the LowBit mode, in position H bit correspondingly in the HighBit mode. In position off all digital audio outputs of the VIP G3 are switched off.
Please refer to the following tables to determine which digital output format at which sample rate and resolution is available at the digital audio outputs. The decision whether to use the HighBit or the LowBit mode depends on the kind of digital receiver unit your VIP G3 is connected to.
15.4.1 LowBit mode Use the LowBit mode to connect your VIP G3 with a component (digital re-ceiver) that has no Audionet HighBit-Interface. Referring to the following ta-ble, digital audio outputs OUT 1 17 to OUT 4 13 transmits a stereo PCM signal up to max. 96 kHz for all programs except bitstreams.

146
Program
DATA LINK 19 Digital Out 2
SPDIF 15
Digital Out 3
AES/EBU 16
Digital Out 4
SPDIF 13 Digital Out 1
SPDIF 17
Bitstream
(Dolby Digital, DTS, MPEG)
Bitstream
(Dolby Digital, DTS, MPEG)
Bitstream
(Dolby Digital, DTS, MPEG)
Bitstream
(Dolby Digital, DTS, MPEG)
Bitstream
(Dolby Digital, DTS, MPEG)
44.1kHz / 16bit Stereo
PCM
44.1kHz / 16bit Stereo
PCM
44.1kHz / 16bit Stereo
PCM
44.1kHz / 16bit Stereo
PCM
44.1kHz / 16bit Stereo
PCM
48kHz / 24bit Stereo
PCM / DVD-A
48kHz / 24bit Stereo
PCM
48kHz / 24bit Stereo
PCM
48kHz / 24bit Stereo
PCM
48kHz / 24bit Stereo
PCM
48kHz / 24bit Multi-channel
DVD-A
48kHz / 24bit Stereo (Downmix)*
PCM
48kHz / 24bit Stereo (Downmix)*
PCM
48kHz / 24bit Stereo (Downmix)*
PCM
48kHz / 24bit Stereo (Downmix)*
PCM
88.2/96kHz / 24bit Stereo
PCM / DVD-A
88.2/96kHz / 24bit Stereo
PCM
88.2/96kHz / 24bit Stereo
PCM
88.2/96kHz / 24bit Stereo
PCM
88.2/96kHz / 24bit Stereo
PCM
88.2/96kHz / 24bit Multi-channel
DVD-A
88.2/96kHz / 24bit Stereo (Downmix)*
PCM
88.2/96kHz / 24bit Stereo (Downmix)*
PCM
88.2/96kHz / 24bit Stereo (Downmix)*
PCM
88.2/96kHz / 24bit Stereo (Downmix)*
PCM
176.4/192kHz / 24bit Stereo
DVD-A
88.2/96kHz / 24bit Stereo Downsampling
PCM
88.2/96kHz / 24bit Stereo Downsampling
PCM
88.2/96kHz / 24bit Stereo Downsampling
PCM
88.2/96kHz / 24bit Stereo Downsampling
PCM
SACD
Stereo
88.2kHz / 24bit Stereo
PCM
88.2kHz / 24bit Stereo
PCM
88.2kHz / 24bit Stereo
PCM
88.2kHz / 24bit Stereo
PCM
SACD
Multi-channel
88.2kHz / 24bit Stereo (Downmix)*
PCM
88.2kHz / 24bit Stereo (Downmix)*
PCM
88.2kHz / 24bit Stereo (Downmix)*
PCM
88.2kHz / 24bit Stereo (Downmix)*
PCM
*) depending on settings and selected audio track

147
15.4.2 HighBit mode Use the HighBit mode if you want to transmit digital audio data from the VIP G3 to an Audionet pre amplifier compatible with the Audionet HighBit-Interface, for example the Audionet MAP V2.0 or Audionet MAP 1.
Important
• With other devices but HighBit-compatible Audionet pre amplifiers a cor-rect decoding of digital audio data is not possible and can lead to high level noise from the speakers, which might damage your ear and/or equipment.
In order to transmit digital audio data from your VIP G3 to an Audionet pre amplifier, you have to connect digital audio output OUT 1 17 of the VIP G3 to the digital audio input 'Digital In 2' of the MAP V2.0 or 'Digital Audio IN 1' of the MAP 1.
Additionally, connect digital audio output OUT 2 18 of the VIP G3 to the digital audio input 'Digital In 3' of the MAP V2.0 or 'Digital Audio IN 2' of the MAP 1.
Important
• Only if both connections are in place and switch 11 on the back panel of the VIP G3 is in position H bit, you can transmit and receive digital audio data for all sample rates and resolutions!
Tip
• If you are the user of an Audionet MAP 1, you can use the digital audio output DATA LINK of the VIP G3 to connect to the digital audio input DATA LINK of the MAP 1. The connection using the Audionet DATA LINK interface supports both LowBit and HighBit mode. Select the digital output format for the DATA LINK interface with switch 11 on the back panel of the VIP G3. Only if switch 11 is in position H bit, a trans-mission of all digital audio data for all sample rates and resolutions is pos-sible!
• Improve sound quality: In case you are using only the 2-channel analog outputs of the VIP G3, activate the HighBit mode. If you listen to music only, put switch 4 on the back panel to position off to shut down the video section. The sound of the 2-channel analog outputs be at its best.

148
Program
DATA LINK 19
Digital Out 3
AES/EBU 16
Digital Out 4
SPDIF 13 Digital Out 1
SPDIF 17
Digital Out 2
SPDIF 15
Bitstream
(Dolby Digital, DTS, MPEG)
Bitstream
(Dolby Digital, DTS, MPEG)
Bitstream
(Dolby Digital, DTS, MPEG)
Bitstream
(Dolby Digital, DTS, MPEG)
Bitstream
(Dolby Digital, DTS, MPEG)
44.1kHz / 16bit Stereo
PCM
192kHz / 24bit Stereo Upsampling
Audionet High Bit Mode
44.1kHz / 16bit Stereo
PCM
44.1kHz / 16bit Stereo
PCM
48kHz / 24bit Stereo
PCM / DVD-A
48kHz / 24bit Stereo
Audionet High Bit Mode
48kHz / 24bit Stereo
Audionet High Bit Mode NO OUTPUT NO OUTPUT
48kHz / 24bit Multi-channel
DVD-A
48kHz / 24bit Multi-channel
Audionet High Bit Mode NO OUTPUT NO OUTPUT
88.2 / 96kHz / 24bit Stereo
PCM / DVD-A
88.2 / 96kHz / 24bit Stereo
PCM
88.2 / 96kHz / 24bit Stereo
PCM NO OUTPUT NO OUTPUT
88.2 / 96kHz / 24bit Multi-channel
DVD-A
88.2 / 96kHz / 24bit Multi-channel
Audionet High Bit Mode NO OUTPUT NO OUTPUT
176.4 / 192kHz / 24bit Stereo
DVD-A
176.4 / 192kHz / 24bit Stereo
Audionet High Bit Mode NO OUTPUT NO OUTPUT
SACD
Stereo
88.2kHz / 24bit Stereo
Audionet High Bit Mode NO OUTPUT NO OUTPUT
SACD
Multi-channel
88.2kHz / 24bit Multi-channel (Downmix)*
Audionet High Bit Mode NO OUTPUT NO OUTPUT
*) depending on settings and selected audio track
Note
• The MAP V2.0 and MAP 1 will automatically recognize the Audionet HighBit mode if connected correctly. If the second connection is missing the MAP will issue the error message: HighBit Cable 2 Out of lock. In this case, please check if the cabling from the VIP G3 to the MAP is correct.
• In HighBit mode, digital audio outputs OUT 3 16 and OUT 4 13 can be used to transmit bitstreams (Dolby Digital, DTS, MPEG).

149
15.5 About HDMI HDMI*1 (High Definition Multimedia Interface) supports both video and audio on a single digital connection for use with DVD players, DTV, set-top boxes, and other AV devices. HDMI was developed to provide the technologies of High Bandwidth Digital Content Protection (HDCP) as well as Digital Visual Interface (DVI) in one specification. HDCP is used to protect digital content transmitted and received by DVI-compliant displays.
HDMI has the capability to support standard, enhanced, or high-definition video plus standard to multi-channel surround-sound audio. HDMI features include uncompressed digital video, a bandwidth of up to 5 gigabytes per sec-ond, one connector (instead of several cables and connectors), and communica-tion between the AV source and AV devices such as DTVs.
15.5.1 Connecting using HDMI If you have a HDMI or DVI-equipped monitor or display, you can connect it to the VIP G3 using a commercially available HDMI cable. The HDMI connector outputs uncompressed digital video, as well as almost every kind of digital au-dio that the player is compatible with, including DVD Video, DVD Audio (see below for limitations), Video CD/Super VCD, CD and MP3.
1 Use a HDMI cable to connect the HDMI OUT 26 interconnect on the VIP G3 to a HDMI interconnect on a HDMI-compatible monitor.
• The arrow on the cable connector body should be face up for correct align-ment with connector HDMI OUT 26 on the VIP G3.
When you first switch on the VIP G3, you will see the HDMI settings menu appear on your monitor or display. From here you can select the resolution, aspect ratio and audio settings, as well as adjust the video presentation to your liking. For more on these settings see 'HDMI Settings' on page 103. HDMI or DVI appears in the display of the front panel according to the compatibility of the component connected.
*1 HDMI, the HDMI-Logo and High Definition Multimedia Interface are trademarks or registered trade-
marks of HDMI licensing LLC.

150
Note
• An HDMI connection can only be made with DVI-equipped components compatible with both DVI and High Bandwidth Digital Content Protection (HDCP). If you choose to connect to a DVI connector, you will need a separate adaptor (DVI à HDMI) to do so. A DVI/HDCP connection, how-ever, does not support audio signals. Consult your local audio dealer for more information.
• The VIP G3 has been designed to be compliant with HDMI (High Defini-tion Multimedia Interface) Version 1.1. Depending on the component you have connected, using a DVI connection may result in unreliable signal transfers.
• When you change the component connected to the HDMI output, you will also need to change the HDMI settings to match the new component (see 'HDMI Settings' on page 103to do this). However, the settings for each component are then stored in memory (for up to 5 components).
• The HDMI connection is compatible with 2 channel linear PCM signals (44.1 to 192 kHz, 16/20/24 Bit), as well as Dolby Digital, DTS and MPEG audio bitstreams (5.1 channel signals up to 96 kHz, 16/20/24 Bit).
• It is not possible to output SACD sources from the HDMI connection.
• The length of HDMI cables should not exceed 7 m. The maximum capable length depends on screen resolution and cable quality. In case of display er-rors, use a shorter HDMI cable or use a HDMI repeater available from your local dealer.
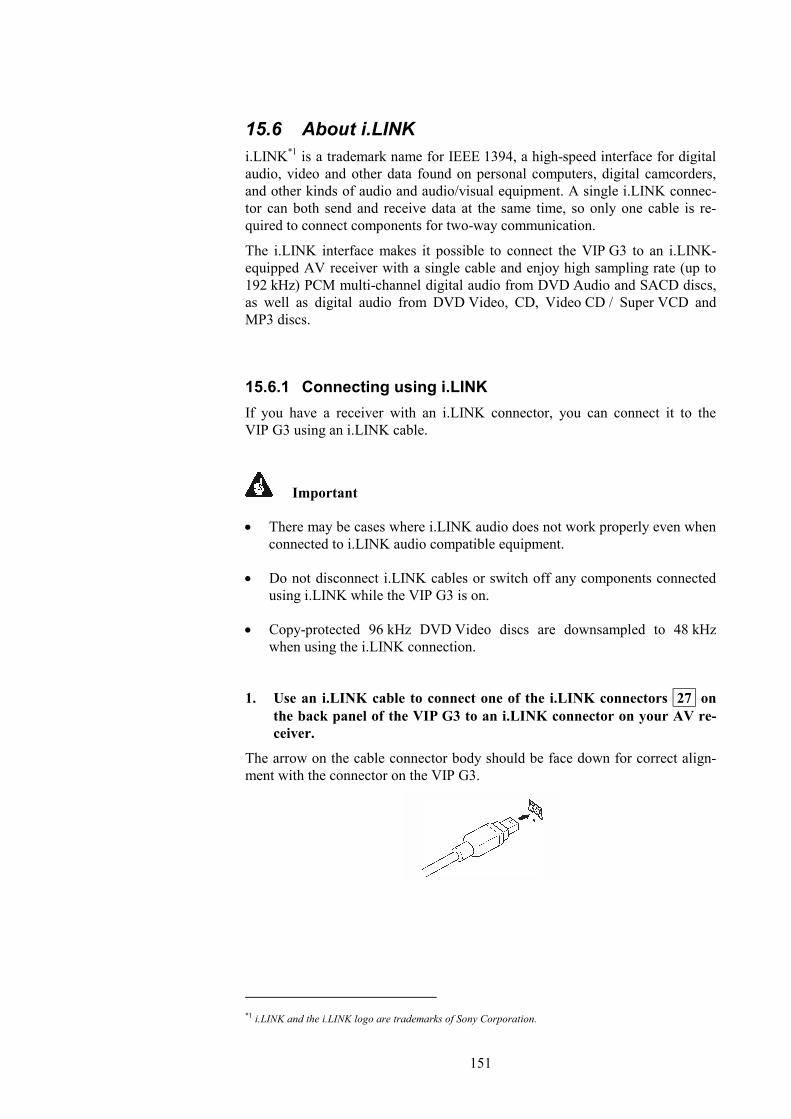
151
15.6 About i.LINK i.LINK*1 is a trademark name for IEEE 1394, a high-speed interface for digital audio, video and other data found on personal computers, digital camcorders, and other kinds of audio and audio/visual equipment. A single i.LINK connec-tor can both send and receive data at the same time, so only one cable is re-quired to connect components for two-way communication.
The i.LINK interface makes it possible to connect the VIP G3 to an i.LINK-equipped AV receiver with a single cable and enjoy high sampling rate (up to 192 kHz) PCM multi-channel digital audio from DVD Audio and SACD discs, as well as digital audio from DVD Video, CD, Video CD / Super VCD and MP3 discs.
15.6.1 Connecting using i.LINK If you have a receiver with an i.LINK connector, you can connect it to the VIP G3 using an i.LINK cable.
Important
• There may be cases where i.LINK audio does not work properly even when connected to i.LINK audio compatible equipment.
• Do not disconnect i.LINK cables or switch off any components connected using i.LINK while the VIP G3 is on.
• Copy-protected 96 kHz DVD Video discs are downsampled to 48 kHz when using the i.LINK connection.
1. Use an i.LINK cable to connect one of the i.LINK connectors 27 on the back panel of the VIP G3 to an i.LINK connector on your AV re-ceiver.
The arrow on the cable connector body should be face down for correct align-ment with the connector on the VIP G3.
*1 i.LINK and the i.LINK logo are trademarks of Sony Corporation.
152
Important
• The i.LINK interface of the VIP G3 does not support video output. There-fore, connect one of the video outputs of the VIP G3 to the corresponding video input of your AV receiver, TV, projector etc.
• In order to be able to hear multi-channel sound from SACDs, you need to set [SACD Playback] to [Multi-ch Area] (see section 'SACD Playback' on page 102).
• In order to hear multi-channel sound from DVD Audio discs, make sure that [DVD Audio Out] is set to [5.1 Channel] (see section 'DVD Audio Out' on page 116).
• To be able to use the Auto Select Play feature, you must first set it up us-ing the [Auto Select Play] menu screen (see section 'Auto Select Play' on page 115).
• During playback using the i.LINK interface, no audio is output from the other digital or analog audio jacks. You can switch off i.LINK output using the [Audio Out] menu (see section 'Audio Out' on page 114) if you need to use the analog and or digital outputs.
Note
• You can connect several components together using i.LINK (see section 'Creating an i.LINK network' on page 152).
• If you need to use the i.LINK interface of the VIP G3, please use 4-pin, S400 i-LINK cables less than 3.5 m in length. Although longer ones are available, they may not work reliably.
15.6.2 Creating an i.LINK network Using i.LINK it is possible to chain up to 17 components together so that the digital audio and control signals from each component is available to other components in the network. With the addition of an i.LINK repeater, it is pos-sible to connect up to 63 components.
i.LINK connectors come in 4-pin and 6-pin configurations. The VIP G3 uses the 4-pin connection, but the two types can be mixed on a network.
The VIP G3 is compatible with i.LINK audio components, such as AV receiv-ers. It may not work properly if connected to i.LINK MPEG-II TS equipment (such as a DVD recorder or DV camcorder), or an i.LINK-equipped personal computer. Check the operating instructions supplied with your other i.LINK components for compatibility information.
Connected components should be DTCP (Digital Transmission Content Protec-tion) compliant to be able to play DVD Video, DVD Audio and SACD discs

153
using i.LINK audio. If a connected component is not DTCP compliant, only CD, MP3, VCD audio will be output.
When setting up an i.LINK network, it is important that the components form an open ended chain (fig. 1), or a tree (fig. 2).
The system will not work if the connected components form a loop. If a loop is detected, the message LOOP CONNECT shows up in the display. Figs. 3 and 4 show connections that form a loop.
Another consideration when connecting i.LINK devices is the speed of the in-terface. At present there are three speeds: S100 (slowest), S200 and S400 (fast-est). Although you can use components with different speeds together, we rec-ommend connecting slower speed components at the edge of the network if possible (represented by the shaded boxes in figs. 1 and 2). This will keep the network free of bottlenecks.
When used within an i.LINK network, the VIP G3 must be on for the i.LINK connection to be maintained. Other components in the network may or may not maintain the connection in stand-by (none will when the power is completely off) – check the operating instructions supplied with individual components. Note that the audio may be momentarily interrupted if a component in the i.LINK network is switched on/off, or its i.LINK connection is switched on/off.

154
15.7 USB/SPDIF digital audio input
15.7.1 Connecting the computer the USB-Audio input With the USB Audio interface you can playback music and sound files from your personal computer (PC) using the sophisticated digital-to-analog convert-ers of the VIP G3 instead of the soundcard of the PC. The VIP G3 is integrated into your computer system as USB Audio device. The installation is done (mostly) automatically via Plug'n'Play, provided a correctly installed operating system.
Note
• To use the USB Audio functions of the VIP G3, your computer requires to have Microsoft™ Windows™ 98SE, Windows ME™, Windows 2000 Pro-fessional or Windows XP™ Home/Professional with the latest USB Audio drivers installed. For further information about the minimum system re-quirements please refer to the documentation of your Microsoft Windows version in use.
1. Connect digital input USB/SPDIF-Audio 12 with a suitable USB ca-ble (plug type A to plug type B) to a free USB port at your computer that is compatible with USB 1.1 or above and supports the Full Speed USB protocol.
2. Start your computer, then switch on the VIP G3.
The VIP G3 is recognized as newly added hardware by your computer. Depend-ing on the Microsoft Windows version installed on your system, it might occur that at the first connection of the VIP G3 the operating system prompts you to install a driver for the new hardware. In this case let Windows choose the cor-rect driver automatically and follow the installation dialog until it is finished.
• If necessary, Windows may prompt you to insert its installation CD/DVD. Pease have the disc ready.
• For further information about automatic hardware recognition, searching for and installing hardware drivers, please refer to the documentation of your operating system.
• USB Audio is an integral part of Microsoft Windows, so no further soft-ware installation is necessary. After installing the necessary hardware driv-ers the VIP G3 will be automatically integrated into your computer system from now on and is ready to use after plugging in the USB cable.
Microsoft Windows will setup the VIP G3 automatically as standard device for sound playback. In case this is not done automatically due to your current sys-tem configuration, please set the corresponding option manually:

155
3. Open up the 'Sounds and Audio Devices' dialog of your Windows Set-tings menu. Click on the tag 'Audio' and select 'Audionet VIP G3' from the list of standard devices (see the following example):
Now all music and sound files, that Microsoft Windows or your sound applica-tion is capable of processing, are played back with your VIP G3.
Note
• Microsoft Windows converts every input format automatically into a stereo PCM signal with 44.1 or 48 kHz sampling frequency and 16 bits resolution. Which audio formats are played back depends on the capabilities of your Microsoft Windows system and/or your sound application only!
• All volume and balance settings of Microsoft Windows or your sound ap-plication will be still active. In case you hear no sound at all or the sound has low volume while playing back sound and music files with your VIP G3, please make sure that your volume settings of your Windows sys-tem are not muted or set to a low level.
In case you like to check, if Microsoft Windows recognized your VIP G3 cor-rectly, please open up the Device Manager of your Windows system. You will find the VIP G3 in the following 3 places in the list of devices:
Sound, video and game controller → USB Audio Device Human Interface Devices → USB Human Interface Device Universal Serial Bus controllers → USB Composite Device
The diagram on the following page gives an overview of an example list of entries in the Device Manager:
Audionet VIP G3
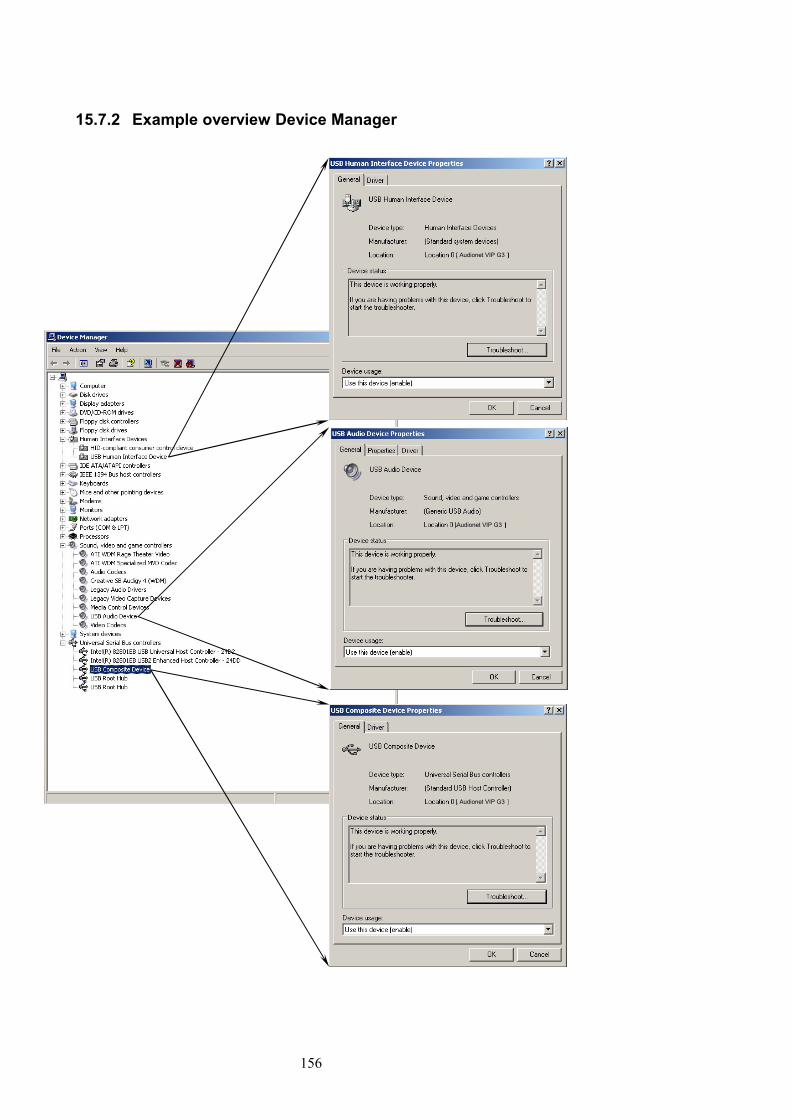
156
15.7.2 Example overview Device Manager
Audionet VIP G3
Audionet VIP G3
Audionet VIP G3

157
Important
• The USB Audio function of the VIP G3 can only be used if the loaded disc is stopped, or no disc is loaded at all.
• During playback of any disc with the VIP G3 you will hear only the audio from the disc. There will be no signal from the USB Audio interface.
15.7.3 Using the SPDIF input Alternatively, you can use the USB/SPDIF Digital audio input 12 as SPDIF digital audio input using a special adaptor cable available from Audionet. Therefore, you can use the sophisticated digital-to-analog converter of the VIP G3 for other digital sources like CD transports, DAT recorder, too.
1. Connect the USB/SPDIF Audio input 12 to the SPDIF output of the source device using an adaptor cable.
2. Switch on the VIP G3, then switch on the source device, and start playback on the source device. The music of the source device is now played back using the sophisticated digital-to-analog converters of the VIP G3.
Note
• The VIP G3 supports the formats: PCM Stereo, sample rate 32 kHz up to 96 kHz, 16 and 24 Bits resolution.
Important
• In order to listen to music using the SPDIF digital audio input playback of any loaded disc in the VIP G3 must be stopped, or not disc at all must be loaded.
• During playback discs VIP G3 you can listen to their audio signal only. There will be no signal form the SPDIF input.
Note
Pin layout of SPDIF input
1 = not connected 2 = not connected 3 = SPDIF 4 = Ground
158
15.8 Connecting the external power supply EPS To use the optional external power supply EPS (External Power Supply) with your VIP G3 follow these steps:
1. Make sure both VIP G3 and EPS are switched off and disconnected from the mains.
2. Connect the EPS with the included cable to input jack 20 on the back panel of the VIP G3. The shape of the plug prevents any wrong polar-ity. The small 'nose' inside the plug has to face upwards. Now screw the ring of the plug onto the input jack 20 .
3. Connect both (!!) units VIP G3 and EPS to mains.
4. Switch on the EPS at the back panel first.
5. Use key power at the front plate or key Power On or Power Toggle of the remote control Harmony Ultimate One in De-vice Mode for the VIP G3 to switch on the unit. The VIP G3 is now ready to use and gets its power from the external power supply.
6. To switch off the VIP G3 into stand-by, use key power on the front panel or key Power Off or Power Toggle of the remote control Harmony Ultimate One in Device Mode for the VIP G3.
Important
• Never switch on or off the EPS on its back panel while the VIP G3 is switched on or during playback.
• For further information referring to the external power supply EPS please consult its user's manual.
Tip
• Use a high quality mains cable (for example the Audionet power cable P10) to connect the EPS to mains. The sound will improve.

159
16 Factory default settings VIP G3
for multi-channel use
Digital Audio Out → Dolby Digital Out → Dolby Digital → DTS Out → DTS → Linear PCM Out → Down Sample Off → MPEG Out → MPEG > PCM Video Output → TV Screen → 16:9 (Wide) → Component Out → Progressive → AV Connector → RGB → S-Video Out → S2 → Still Picture → Auto Language → Audio Language → English → Subtitle Language → English → Auto Language → Off → DVD Menu Lang. → w/ Subt. Lang. → Subtitle Display → Off Display → OSD Language → English → On Screen Display → On → Angle Indicator → On → Background → Logo → Screen Saver → Off Options → Parental Lock → Off → Bonus Group → … → Auto Disc Menu → On → Group Playback → Single → DVD Playback Mode → DVD Audio → SACD Playback → Multi-ch Area → HDMI Settings → ... → CD Playback → PCM Playback → DTS Downmix → Stereo Speakers → Audio Out → 5.1 Channel → Speaker Installation → all set to 'LARGE / On' → Speaker Distances → 3.0 m for all speakers → Channel Level → Fix
i.LINK Setup → Audio Out → Off → Connections Setup → … → Auto Select Play → Off → DVD Audio Output → 5.1 Channel

160
17 Recommended setup for 2-channel ana-log usage
Digital Audio Out → Dolby Digital Out → Dolby Digital → DTS Out → DTS Out → Linear PCM Out → Down Sample Off → MPEG Out → MPEG > PCM Video Output → TV Screen → 16:9 (Wide) → Component Out → Progressive → AV Connector → RGB → S-Video Out → S2 → Still Picture → Auto Language → Audio Language → English → Subtitle Language → English → Auto Language → On → DVD Menu Lang. → w/ Subt. Lang. → Subtitle Display → Off Display → OSD Language → English → On Screen Display → On → Angle Indicator → On → Background → Logo → Screen Saver → Off Options → Parental Lock → Off → Bonus Group → → Auto Disc Menu → On → Group Playback → Single → DVD Playback Mode → DVD Audio → SACD Playback → 2-ch Area → HDMI Settings → ... → CD Playback → PCM Playback → DTS Downmix → Stereo Speakers → Audio Out → 2-ch → Speaker Installation → ... → Speaker Distances → ... → Channel Level → Fix i.LINK Setup → Audio Out → Off → Connections Setup → … → Auto Select Play → Off → DVD Audio Output → 5.1 Channel

161
Note
Additional settings for best sound quality of 2-channel analog usage:
• If available, select 2-channel audio track on DVD Video or DVD Audio disks.
• In case you listen to music only, use switch 4 on the back panel of the VIP G3 to shut down the video section (switch position off).
• Put switch 11 in position H bit to activate the HighBit Mode (even if you are using the analog outputs only!).
162
18 Security advice
§ Avoid packaging material, especially plastic bags, to come into children’s hands.
§ Store and operate the unit in a dry room at a rea-
sonable room temperature. § Avoid moisture or any liquid to get into the unit. § Set up the unit in a sufficiently ventilated place. § Do not cover, e.g. with a blanket. § Do not open the case. Unauthorised opening will
cause loss of guarantee. § Use a dry cloth for cleaning. We would like to wish you many exciting listening ex-periences with your new Audionet product! If you still have any questions, don't hesitate to ask your competent Audionet dealer.

163
19 Technical data Function Universal playback system for CD, DVD and SACD
Laser system Semiconductor laser, 650nm and 780nm wave length
Standards CD, CD-R, CD-RW
DVD-R, DVD+R, DVD-RW, DVD+RW
Video CD, Super VCD
DVD Audio, DVD Video
SACD stereo and multi-channel
Dolby Digital, DTS, DTS CD, MP3
PAL/NTSC progressive, PAL/NTSC interlaced
Converters Main channels: 192 kHz/24 bit, multibit delta-sigma
Effect channels: 96 kHz/24 bit, multibit delta-sigma
Sampling rates 32 kHz, 44.1 kHz, 48 kHz, 88.2 kHz, 96 kHz, 176.4 kHz, 192 kHz
Video six 14 bit video DACs, 8x oversampling, 108 MHz
Audio bandwidth max. 0 - 90,000 Hz (-3 dB)
THD+N Main channels: typ. 115 dB @ -60 dBFS (A-weighted)
typ. 104 dB @ 0 dBFS
Effect channels: typ. 110 dB @ -60 dBFS (A-weighted)
SNR 111 dB
Channel separation >130 dB @ 10 kHz
Audio outputs, analog 6 Cinch line, gold plated 2 XLR symmetrical, gold plated
Audio outputs, digital 2 Cinch, 75 Ω, gold plated 1 AES/EBU, 110 Ω, gold plated 1 Audionet HighBit-DataLink 1 Optical (TOS Link)
Audio input, digital 1 USB, connected for USB-Audio and SPDIF
Video outputs, analog 1 YUV progressive & interlaced / RGB interlaced 1 S-Video 1 Composite-Video (CVBS/Sync)
Video outputs, digital 1 HDMI 1.1 (DVI with HDCP compatible)
External power supply 5 pin precision connector
Output impedance 33 Ω real
Output voltage, analog 3.5 VRMS
Power consumption < 1 W stand-by, max. 50 W

164
Dimensions Width 430 mm, Height 110 mm, Depth 360 mm
Weight 18 kg
Top cover / body MDF, Nextel coated / granite, steel, black coating
Features - D/A converter with USB/SPDIF digital input
- DSD to PCM converter
- Top loader, absorbing MDF, aluminium and granite casing
- massive disc drawer cover made of 10 mm aluminium, Teflon-bedded
- decoupling of the transport unit by Audionet Aligned Resonance technology
- special stabilizer made of POM
- separate power supplies for digital and analog sections
- Audionet Intelligent Sampling technology
- discrete, extremely fast and stable filter and output stages
- fully DC coupled, no capacitors in the signal path
- Audionet HighBit interface for all audio data including DVD-A and SACD
- disengageable digital outputs
- progressive scan
- HDMI output
- disengageable video processing
- switch on/off remotely via 'Audionet Link' (optical)
- adaptive Audionet System Remote Control Harmony Ultimate One, replaces up to 15 remote controls
- optional external power supply Audionet EPS / EPS G2 for the analog section
Errors and omissions excepted. Specifications and design are subject to changes without prior notice.
audionet is a trademark of Idektron GmbH & Co KG
Engineered and produced by: Idektron GmbH & Co. KG, Alboinstraße 36 - 42, 12103 Berlin, Germany
www.audionet.de [email protected]