IBM Transportation Management System (TMS) Exercises
9
Page 1 IBM Transportation Management System (TMS) Exercises SCM 476, Spring 2014 IBM TMS is a Software as a Service (SaaS) transportation management solution. Originating as the Nistevo TMS, the product was purchased by Sterling Commerce, who were acquired by IBM in 2010. Today, we’ll do some basic exercises in the TMS. You’re then free to explore and play around. We’re in a sandbox environment, and you should only be able to see your own data. Your role is that of a dispatcher/router/load planner. Each of you has responsibility for planning & routing loads for a specific U.S. state. Important Note: If you do not see any of the buttons mentioned below, you may need to use CTRL + or – to play with the screen size. 1. Consult the separate sheet for your user ID. It will be in the format of “msuuserx” where x is some number between 2 and 150. 2. Your password will be the inverse of your user ID. For example, if you user ID is “msuuser99” 3. To access the IBM TMS sandbox instance, surf to https://cte.sterlingtms.net/tms/servlet/Login 4. 5. Enter your login information. Our account number, if you need to enter it is “MSU13”. MSU13 msuuserx
-
Upload
independent -
Category
Documents
-
view
0 -
download
0
Transcript of IBM Transportation Management System (TMS) Exercises
Page 1
IBM Transportation Management System (TMS) Exercises
SCM 476, Spring 2014
IBM TMS is a Software as a Service (SaaS) transportation management solution. Originating as the
Nistevo TMS, the product was purchased by Sterling Commerce, who were acquired by IBM in 2010.
Today, we’ll do some basic exercises in the TMS. You’re then free to explore and play around. We’re in
a sandbox environment, and you should only be able to see your own data.
Your role is that of a dispatcher/router/load planner. Each of you has responsibility for planning &
routing loads for a specific U.S. state.
Important Note: If you do not see any of the buttons mentioned below, you may need to use CTRL + or –
to play with the screen size.
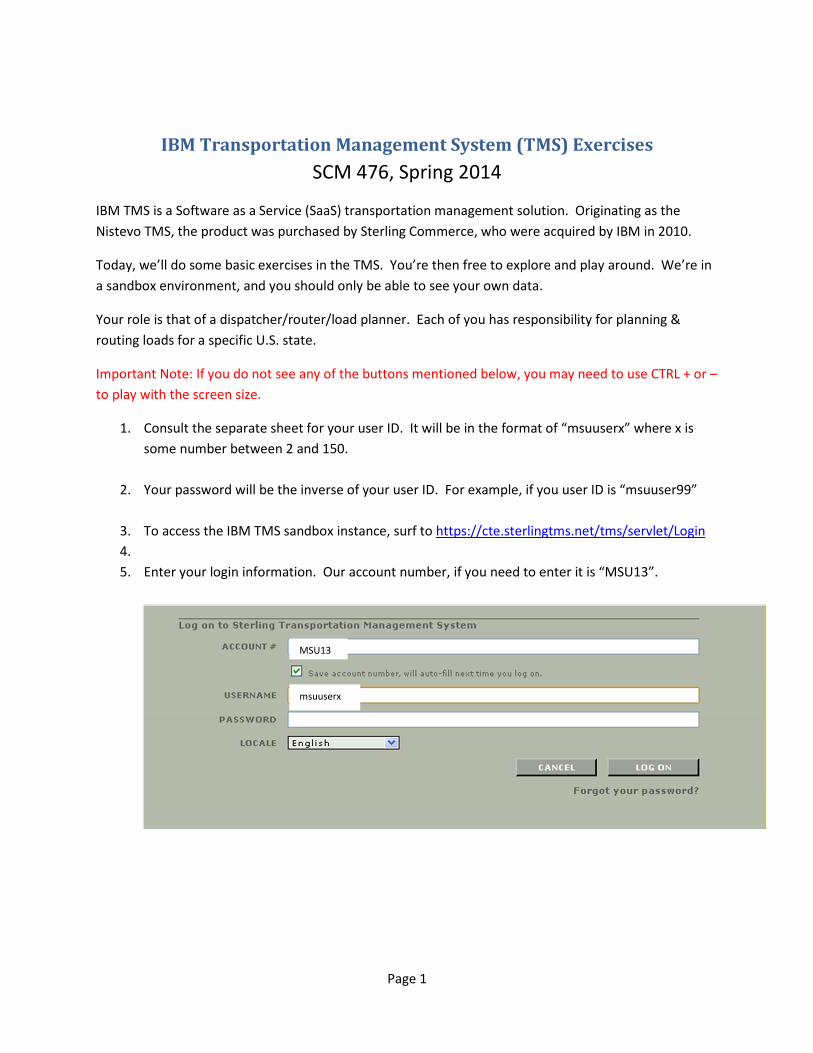
1. Consult the separate sheet for your user ID. It will be in the format of “msuuserx” where x is
some number between 2 and 150.
2. Your password will be the inverse of your user ID. For example, if you user ID is “msuuser99”
3. To access the IBM TMS sandbox instance, surf to https://cte.sterlingtms.net/tms/servlet/Login
4.
5. Enter your login information. Our account number, if you need to enter it is “MSU13”.
MSU13
msuuserx

Page 2
6. Upon logging in you’ll see the TMS welcome screen. Here, an administrator could share
information about the deployment or other important news.
7. You should have only one functionality option, “Execution”. It can be seen in the upper right-
hand corner of your screen. Click on it.
8. By default, the system will start you on the “Shipments” tab. If we had any shipments already
planned, they’d appear here. We do not, so click on “Orders”.
9. The system has been preconfigured to retrieve your orders. Later, if you want to play with the
order parameters, feel free to do so. For now, click on the “Go” button:
The date to enter: 24-March-2014
Page 3
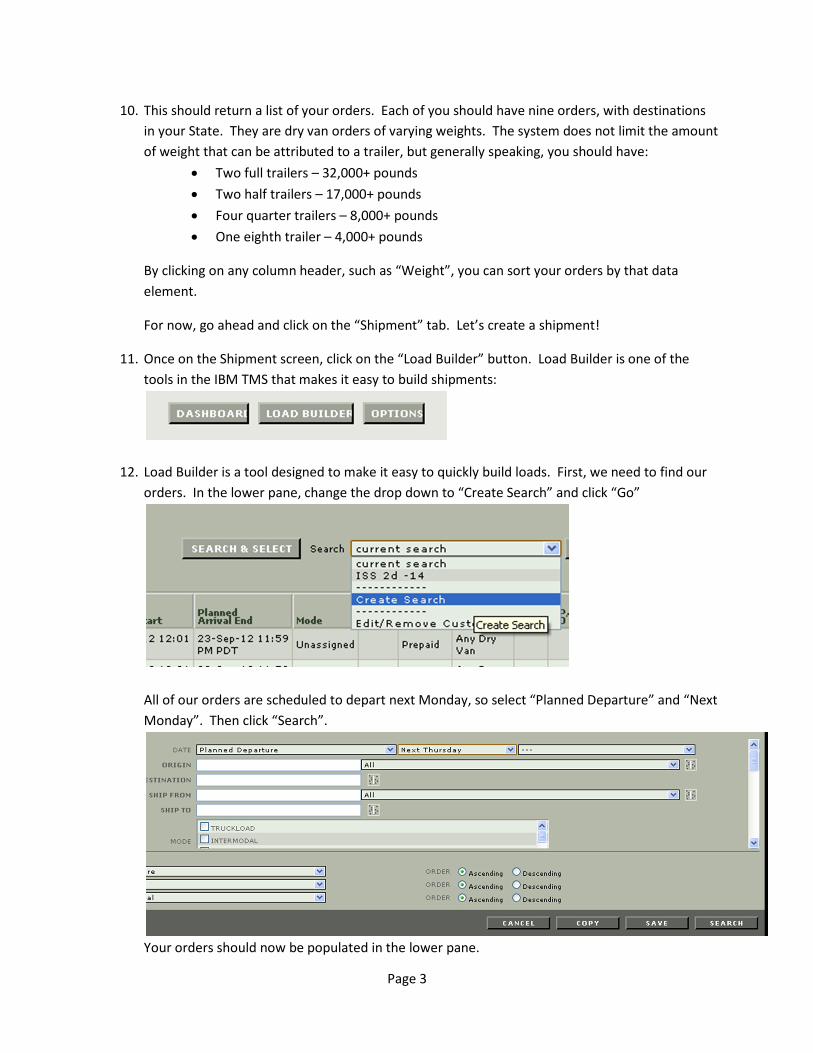
10. This should return a list of your orders. Each of you should have nine orders, with destinations
in your State. They are dry van orders of varying weights. The system does not limit the amount
of weight that can be attributed to a trailer, but generally speaking, you should have:
• Two full trailers – 32,000+ pounds
• Two half trailers – 17,000+ pounds
• Four quarter trailers – 8,000+ pounds
• One eighth trailer – 4,000+ pounds
By clicking on any column header, such as “Weight”, you can sort your orders by that data
element.
For now, go ahead and click on the “Shipment” tab. Let’s create a shipment!
11. Once on the Shipment screen, click on the “Load Builder” button. Load Builder is one of the
tools in the IBM TMS that makes it easy to build shipments:
12. Load Builder is a tool designed to make it easy to quickly build loads. First, we need to find our
orders. In the lower pane, change the drop down to “Create Search” and click “Go”
All of our orders are scheduled to depart next Monday, so select “Planned Departure” and “Next
Monday”. Then click “Search”.
Your orders should now be populated in the lower pane.
Page 4
13. To indicate that you wish to add orders to a shipment, just click on them to highlight them.
Alternately, you can hold down the CTRL key and click to select multiple orders. For now,
highlight one of your “full truckload” (32,000 LB+) orders.
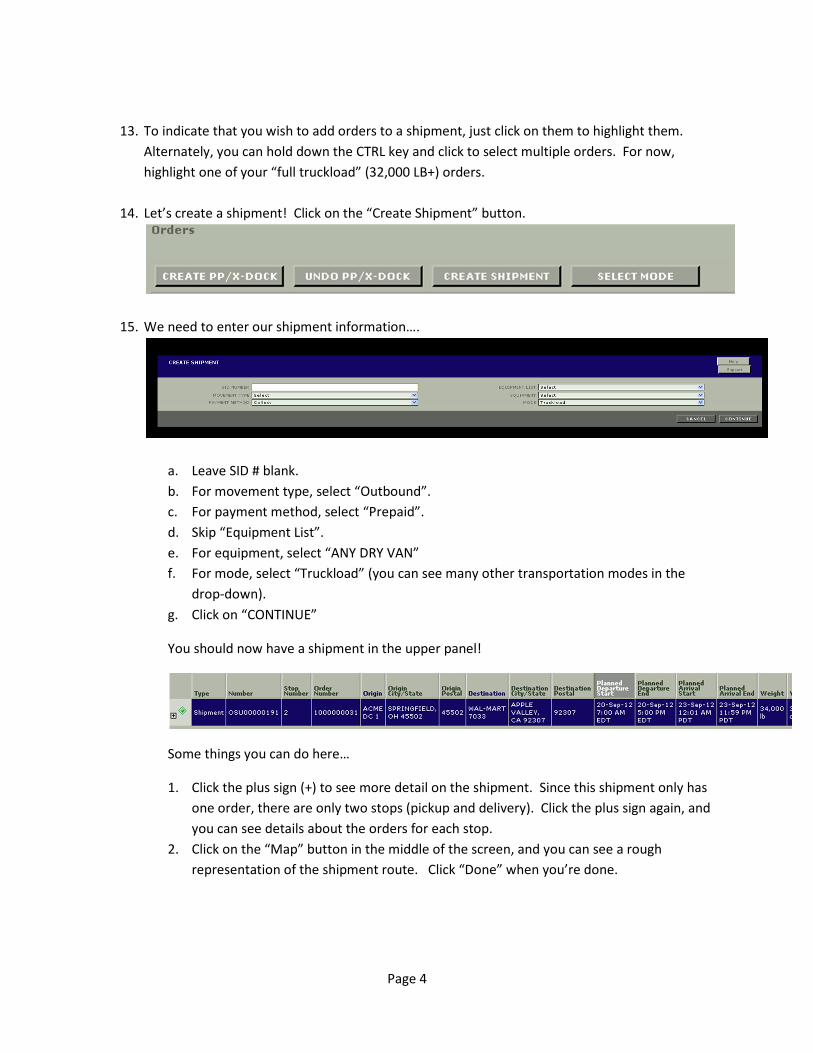
14. Let’s create a shipment! Click on the “Create Shipment” button.
15. We need to enter our shipment information….
a. Leave SID # blank.
b. For movement type, select “Outbound”.
c. For payment method, select “Prepaid”.
d. Skip “Equipment List”.
e. For equipment, select “ANY DRY VAN”
f. For mode, select “Truckload” (you can see many other transportation modes in the
drop-down).
g. Click on “CONTINUE”
You should now have a shipment in the upper panel!
Some things you can do here…
1. Click the plus sign (+) to see more detail on the shipment. Since this shipment only has
one order, there are only two stops (pickup and delivery). Click the plus sign again, and
you can see details about the orders for each stop.
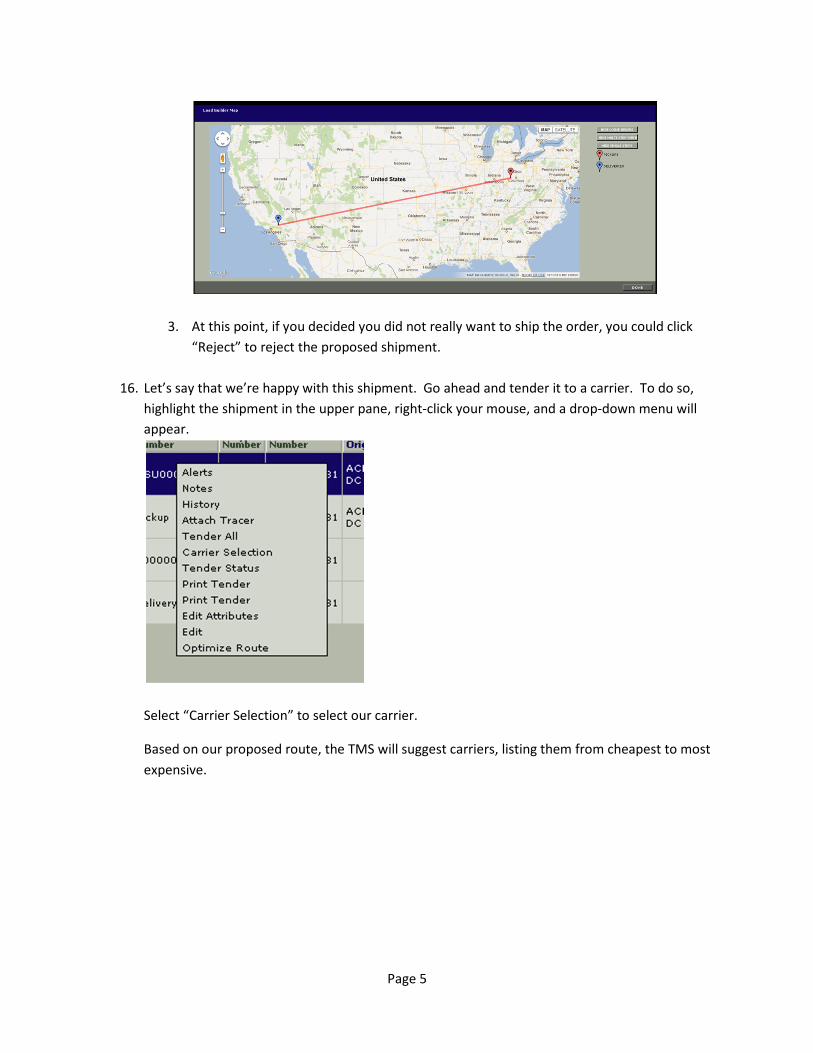
2. Click on the “Map” button in the middle of the screen, and you can see a rough
representation of the shipment route. Click “Done” when you’re done.
Page 5
3. At this point, if you decided you did not really want to ship the order, you could click
“Reject” to reject the proposed shipment.
16. Let’s say that we’re happy with this shipment. Go ahead and tender it to a carrier. To do so,
highlight the shipment in the upper pane, right-click your mouse, and a drop-down menu will
appear.
Select “Carrier Selection” to select our carrier.
Based on our proposed route, the TMS will suggest carriers, listing them from cheapest to most
expensive.
Page 6
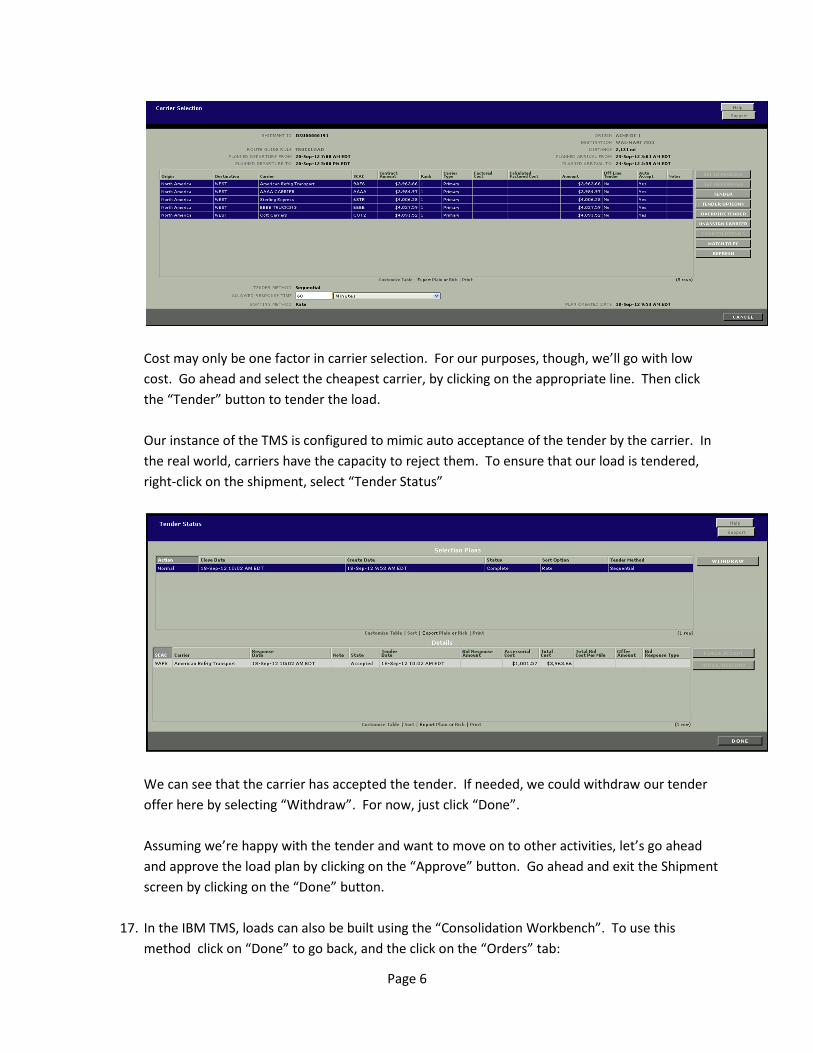
Cost may only be one factor in carrier selection. For our purposes, though, we’ll go with low
cost. Go ahead and select the cheapest carrier, by clicking on the appropriate line. Then click
the “Tender” button to tender the load.
Our instance of the TMS is configured to mimic auto acceptance of the tender by the carrier. In
the real world, carriers have the capacity to reject them. To ensure that our load is tendered,
right-click on the shipment, select “Tender Status”
We can see that the carrier has accepted the tender. If needed, we could withdraw our tender
offer here by selecting “Withdraw”. For now, just click “Done”.
Assuming we’re happy with the tender and want to move on to other activities, let’s go ahead
and approve the load plan by clicking on the “Approve” button. Go ahead and exit the Shipment
screen by clicking on the “Done” button.
17. In the IBM TMS, loads can also be built using the “Consolidation Workbench”. To use this
method click on “Done” to go back, and the click on the “Orders” tab:

Page 7
18. If your orders are not visible, query for them and retrieve them (Planned Departure, Fixed, 24,
March, 2014). Pick two orders by highlighting them holding “Ctrl” key.
19. On the right-hand side of the screen, click “Consolidation”:
20. The orders you selected should be the only ones listed. Highlight them again, and then click the
“Consolidate” button.
21. The system will display your proposed load:

Page 8
a. You can click on “Optimize Route” to make sure the total distance is minimized. (You
can see the difference between the shipment costs with and without optimizing the
route by trying both ways)
b. In the shipment pane, Leave SID # blank.
c. For movement type, select “Outbound”.
d. For payment method, select “Prepaid”.
e. Skip “Equipment List”.
f. For equipment, select “DRY VAN”
g. For mode, select “Truckload” (you can see many other transportation modes in the
drop-down).
h. Click on “CREATE SHIPMENT”
i. Click on “CANCEL” to back out of the screen
22. A new shipment will have been created. Click on the “Shipment” tab:
23. If no shipments appear, run your query (Planned Departure Date, Fixed, 24, March, 2014 ).
Your new shipment should appear. It will have no status or carrier. To view details, highlight
the shipment, and click the “Itinerary” button. Click “Done” when you’re done reviewing the
shipment.
24. To tender the shipment to a carrier, click the “Carrier Selection” button on the right-hand side:
25. Follow the same process you did using the “Load Builder” tool. Highlight a carrier, and click the
“Tender” button.
You have many additional orders for which you’re responsible. Go ahead and explore the system
and tools. Attempt to build additional loads, tender them, cancel them, and so forth.

Page 9
Report:
Once all your orders are tendered,
1- While you are on Shipment Tab, highlight each shipment one by one and click “Print Detail” and
save it (using Print Screen) in a word file.
2- Select all of your shipments and click on “Map” and using Print Screen save it in the same word
document.
3- Upload your report to the dropbox on Angel, with your name and PID.