HP LaserJet 4000 and 4050 Series Printers Service Manual
394
HP LaserJet 4000 and 4050 Series Printers Service Manual
-
Upload
khangminh22 -
Category
Documents
-
view
3 -
download
0
Transcript of HP LaserJet 4000 and 4050 Series Printers Service Manual

HP
LaserJet 4000 and 4050 Series P
rinters Service M
anualHP LaserJet 4000 and4050 Series PrintersService Manual
Printed on at least50% Total Recycled Fiber withat least 10% Post-Consumer Paper
Copyright© 1999Hewlett-Packard Co.Printed in USA
Manual Part No.C4251-91003
*C4251-91003**C4251-91003*
C4251-91003


HP LaserJet 4000 and 4050 Series Printers
Service Manual _____________

© Copyright Hewlett -Packard Company 1999
All Rights Reserved. Reproduction, adaptation, or translation without prior written permission is prohibited, except as allowed under the copyright laws.
Publication numberC4251-91003
First edition, April 1999
Warranty
The information contained in this document is subject to change without notice.
Hewlett-Packard makes no warranty of any kind with respect to this information. HEWLETT-PACKARD SPECIFICALLY DISCLAIMS THE IMPLIED WARRANTY OF MERCHANTABILITY AND FITNESS FOR A PARTICULAR PURPOSE.
Hewlett-Packard shall not be liable for any direct, indirect, incidental, consequential, or other damage alleged in connection with the furnishing or use of this information.
Trademark Credits
PostScript™ is a trademark of Adobe Systems Incorporated which may be registered in certain jurisdictions.
CompuServe™ is a U.S. trademark of CompuServe, Inc.
Windows® is a U.S. registered trademarks of Microsoft Corporation.
TrueType™ is a U.S. trademark of Apple Computer, Inc.
ENERGY STAR® is a U.S. registered service mark of the U.S. EPA.
Hewlett-Packard Company11311 Chinden BoulevardBoise, Idaho 83714 USA

Contents
1 Printer Description
Overview . . . . . . . . . . . . . . . . . . . . . . . . . . . . . . . . . . . . . . . . . . . . 1-1Printer Features . . . . . . . . . . . . . . . . . . . . . . . . . . . . . . . . . . . . . . . 1-2Identification . . . . . . . . . . . . . . . . . . . . . . . . . . . . . . . . . . . . . . . . . . 1-8
Model and Serial Numbers . . . . . . . . . . . . . . . . . . . . . . . . . . . 1-8Site Requirements . . . . . . . . . . . . . . . . . . . . . . . . . . . . . . . . . . . . . 1-9
Space Requirements . . . . . . . . . . . . . . . . . . . . . . . . . . . . . . . 1-10Environmental Requirements . . . . . . . . . . . . . . . . . . . . . . . . 1-11
Paper Specifications. . . . . . . . . . . . . . . . . . . . . . . . . . . . . . . . . . . 1-12Supported Types of Paper. . . . . . . . . . . . . . . . . . . . . . . . . . . 1-15Guidelines for Using Paper . . . . . . . . . . . . . . . . . . . . . . . . . . 1-16Labels . . . . . . . . . . . . . . . . . . . . . . . . . . . . . . . . . . . . . . . . . . 1-19Transparencies . . . . . . . . . . . . . . . . . . . . . . . . . . . . . . . . . . . 1-19Envelopes . . . . . . . . . . . . . . . . . . . . . . . . . . . . . . . . . . . . . . . 1-20Card Stock and Heavy Paper . . . . . . . . . . . . . . . . . . . . . . . . 1-23
Safety Information . . . . . . . . . . . . . . . . . . . . . . . . . . . . . . . . . . . . 1-24Laser Safety Statement . . . . . . . . . . . . . . . . . . . . . . . . . . . . . 1-24Canadian DOC Regulations . . . . . . . . . . . . . . . . . . . . . . . . . 1-24FCC Regulations . . . . . . . . . . . . . . . . . . . . . . . . . . . . . . . . . . 1-25Laser Statement for Finland . . . . . . . . . . . . . . . . . . . . . . . . . 1-26Toner Safety . . . . . . . . . . . . . . . . . . . . . . . . . . . . . . . . . . . . . 1-27Environmental Product Stewardship . . . . . . . . . . . . . . . . . . . 1-28
2 Service Approach
Overview . . . . . . . . . . . . . . . . . . . . . . . . . . . . . . . . . . . . . . . . . . . . 2-1Service Approach. . . . . . . . . . . . . . . . . . . . . . . . . . . . . . . . . . . . . . 2-2Parts and Supplies . . . . . . . . . . . . . . . . . . . . . . . . . . . . . . . . . . . . . 2-3
Ordering Information . . . . . . . . . . . . . . . . . . . . . . . . . . . . . . . . 2-3Helpful Documentation . . . . . . . . . . . . . . . . . . . . . . . . . . . . . . 2-4Phone Numbers for Ordering. . . . . . . . . . . . . . . . . . . . . . . . . . 2-6Exchange Program . . . . . . . . . . . . . . . . . . . . . . . . . . . . . . . . . 2-6Consumables. . . . . . . . . . . . . . . . . . . . . . . . . . . . . . . . . . . . . . 2-6World Wide Web . . . . . . . . . . . . . . . . . . . . . . . . . . . . . . . . . . . 2-6HP Service Parts Information Compact Disc . . . . . . . . . . . . . . 2-6HP Support Assistant Compact Disc . . . . . . . . . . . . . . . . . . . . 2-7HP FIRST . . . . . . . . . . . . . . . . . . . . . . . . . . . . . . . . . . . . . . . . 2-7Toner Cartridge Information. . . . . . . . . . . . . . . . . . . . . . . . . . . 2-9
Warranty Statement . . . . . . . . . . . . . . . . . . . . . . . . . . . . . . . . . . . 2-10
Contents -1

3 Printer Operation
Overview . . . . . . . . . . . . . . . . . . . . . . . . . . . . . . . . . . . . . . . . . . . . 3-1Using the Control Panel . . . . . . . . . . . . . . . . . . . . . . . . . . . . . . . . . 3-2
Control Panel Layout . . . . . . . . . . . . . . . . . . . . . . . . . . . . . . . . 3-2Control Panel Lights. . . . . . . . . . . . . . . . . . . . . . . . . . . . . . . . . 3-2Control Panel Keys . . . . . . . . . . . . . . . . . . . . . . . . . . . . . . . . . 3-3Settings and Defaults. . . . . . . . . . . . . . . . . . . . . . . . . . . . . . . . 3-4
Control Panel Menus . . . . . . . . . . . . . . . . . . . . . . . . . . . . . . . . . . . 3-5Quick Copy Jobs Menu . . . . . . . . . . . . . . . . . . . . . . . . . . . . . . 3-6Private/Stored Jobs Menu . . . . . . . . . . . . . . . . . . . . . . . . . . . . 3-7Information Menu . . . . . . . . . . . . . . . . . . . . . . . . . . . . . . . . . . . 3-8Paper Handling Menu . . . . . . . . . . . . . . . . . . . . . . . . . . . . . . . 3-9Print Quality Menu . . . . . . . . . . . . . . . . . . . . . . . . . . . . . . . . . 3-12Printing Menu. . . . . . . . . . . . . . . . . . . . . . . . . . . . . . . . . . . . . 3-15Configuration Menu . . . . . . . . . . . . . . . . . . . . . . . . . . . . . . . . 3-20I/O Menu . . . . . . . . . . . . . . . . . . . . . . . . . . . . . . . . . . . . . . . . 3-26EIO Menu (Networked Printers). . . . . . . . . . . . . . . . . . . . . . . 3-29Resets Menu . . . . . . . . . . . . . . . . . . . . . . . . . . . . . . . . . . . . . 3-31
Service Mode . . . . . . . . . . . . . . . . . . . . . . . . . . . . . . . . . . . . . . . . 3-32Service Menu . . . . . . . . . . . . . . . . . . . . . . . . . . . . . . . . . . . . . 3-33Setting the Page Count, Maintenance Count, and
Serial Number. . . . . . . . . . . . . . . . . . . . . . . . . . . . . . . . . . . 3-33Cold Reset Paper. . . . . . . . . . . . . . . . . . . . . . . . . . . . . . . . . . 3-36Diagnostics . . . . . . . . . . . . . . . . . . . . . . . . . . . . . . . . . . . . . . 3-36Clear Event Log . . . . . . . . . . . . . . . . . . . . . . . . . . . . . . . . . . . 3-36
Testing the Printer . . . . . . . . . . . . . . . . . . . . . . . . . . . . . . . . . . . . 3-37Resetting the Printer. . . . . . . . . . . . . . . . . . . . . . . . . . . . . . . . . . . 3-38System Configuration . . . . . . . . . . . . . . . . . . . . . . . . . . . . . . . . . . 3-39
MS-DOS System Configuration . . . . . . . . . . . . . . . . . . . . . . . 3-39Parallel DOS Commands. . . . . . . . . . . . . . . . . . . . . . . . . . . . 3-39Serial MS-DOS Commands . . . . . . . . . . . . . . . . . . . . . . . . . . 3-40
Printer I/O Configuration. . . . . . . . . . . . . . . . . . . . . . . . . . . . . . . . 3-41Parallel Menu . . . . . . . . . . . . . . . . . . . . . . . . . . . . . . . . . . . . . 3-41Serial Configuration . . . . . . . . . . . . . . . . . . . . . . . . . . . . . . . . 3-41
4 Printer Maintenance
Overview . . . . . . . . . . . . . . . . . . . . . . . . . . . . . . . . . . . . . . . . . . . . 4-1Cleaning the Printer and Accessories . . . . . . . . . . . . . . . . . . . . . . 4-2
Cleaning Spilled Toner. . . . . . . . . . . . . . . . . . . . . . . . . . . . . . . 4-4Preventative Maintenance . . . . . . . . . . . . . . . . . . . . . . . . . . . . . . . 4-5
Reset Maintenance Count . . . . . . . . . . . . . . . . . . . . . . . . . . . . 4-5Expected Life of Components . . . . . . . . . . . . . . . . . . . . . . . . . 4-6
Contents-2

5 Functional Information
Overview . . . . . . . . . . . . . . . . . . . . . . . . . . . . . . . . . . . . . . . . . . . . 5-1Power Supply System . . . . . . . . . . . . . . . . . . . . . . . . . . . . . . . . . . 5-2
AC/DC Power Distribution . . . . . . . . . . . . . . . . . . . . . . . . . . . . 5-2Overcurrent Overvoltage Protection . . . . . . . . . . . . . . . . . . . . 5-3High-voltage Power Distribution . . . . . . . . . . . . . . . . . . . . . . . 5-4Toner Cartridge Detection . . . . . . . . . . . . . . . . . . . . . . . . . . . . 5-5
Engine Controller System. . . . . . . . . . . . . . . . . . . . . . . . . . . . . . . . 5-6Engine Controller Board Inputs and Outputs . . . . . . . . . . . . . . 5-8Laser and Scanner Drive . . . . . . . . . . . . . . . . . . . . . . . . . . . . 5-12Paper Motion Monitoring and Control . . . . . . . . . . . . . . . . . . 5-12Solenoids, Sensors, Clutches, and Switches . . . . . . . . . . . . 5-12Engine Test Print . . . . . . . . . . . . . . . . . . . . . . . . . . . . . . . . . . 5-12Motors . . . . . . . . . . . . . . . . . . . . . . . . . . . . . . . . . . . . . . . . . . 5-13
Formatter System . . . . . . . . . . . . . . . . . . . . . . . . . . . . . . . . . . . . 5-15PowerSave . . . . . . . . . . . . . . . . . . . . . . . . . . . . . . . . . . . . . . 5-15Resolution Enhancement technology (REt). . . . . . . . . . . . . . 5-16EconoMode . . . . . . . . . . . . . . . . . . . . . . . . . . . . . . . . . . . . . . 5-16Input/Output . . . . . . . . . . . . . . . . . . . . . . . . . . . . . . . . . . . . . . 5-17CPU . . . . . . . . . . . . . . . . . . . . . . . . . . . . . . . . . . . . . . . . . . . . 5-18Printer Memory . . . . . . . . . . . . . . . . . . . . . . . . . . . . . . . . . . . 5-18Random Access Memory (RAM) . . . . . . . . . . . . . . . . . . . . . . 5-19DIMM Slots . . . . . . . . . . . . . . . . . . . . . . . . . . . . . . . . . . . . . . 5-19Page Protect . . . . . . . . . . . . . . . . . . . . . . . . . . . . . . . . . . . . . 5-20PJL Overview. . . . . . . . . . . . . . . . . . . . . . . . . . . . . . . . . . . . . 5-20PML . . . . . . . . . . . . . . . . . . . . . . . . . . . . . . . . . . . . . . . . . . . . 5-21Control Panel . . . . . . . . . . . . . . . . . . . . . . . . . . . . . . . . . . . . . 5-21
Image Formation System . . . . . . . . . . . . . . . . . . . . . . . . . . . . . . . 5-22Toner Cartridge . . . . . . . . . . . . . . . . . . . . . . . . . . . . . . . . . . . 5-24Photosensitive Drum . . . . . . . . . . . . . . . . . . . . . . . . . . . . . . . 5-25Writing the Image. . . . . . . . . . . . . . . . . . . . . . . . . . . . . . . . . . 5-28Developing the Image . . . . . . . . . . . . . . . . . . . . . . . . . . . . . . 5-29Transferring the Image . . . . . . . . . . . . . . . . . . . . . . . . . . . . . 5-30Image Fusing/Variable Fusing Temperature . . . . . . . . . . . . . 5-31
Paper Feed System . . . . . . . . . . . . . . . . . . . . . . . . . . . . . . . . . . . 5-33Clutches and Sensors . . . . . . . . . . . . . . . . . . . . . . . . . . . . . . 5-35Printing from Tray 1 . . . . . . . . . . . . . . . . . . . . . . . . . . . . . . . . 5-36Printing from Tray 2 . . . . . . . . . . . . . . . . . . . . . . . . . . . . . . . . 5-38Printing from the Optional 500-sheet
Universal Tray . . . . . . . . . . . . . . . . . . . . . . . . . . . . . . . . . . 5-41Envelope Feeder . . . . . . . . . . . . . . . . . . . . . . . . . . . . . . . . . . 5-44Duplexer . . . . . . . . . . . . . . . . . . . . . . . . . . . . . . . . . . . . . . . . 5-46Paper Jam . . . . . . . . . . . . . . . . . . . . . . . . . . . . . . . . . . . . . . . 5-48
Basic Sequence of Operation. . . . . . . . . . . . . . . . . . . . . . . . . . . . 5-49
Contents-3

6 Removing and Replacing Parts
Overview . . . . . . . . . . . . . . . . . . . . . . . . . . . . . . . . . . . . . . . . . . . . 6-1Removal and Replacement Strategy . . . . . . . . . . . . . . . . . . . . . . . 6-2
Tools . . . . . . . . . . . . . . . . . . . . . . . . . . . . . . . . . . . . . . . . . . . . 6-3Removing Covers. . . . . . . . . . . . . . . . . . . . . . . . . . . . . . . . . . . . . . 6-6
Rear Right Side Cover . . . . . . . . . . . . . . . . . . . . . . . . . . . . . . . 6-6Top Cover . . . . . . . . . . . . . . . . . . . . . . . . . . . . . . . . . . . . . . . . 6-7Left Side Cover . . . . . . . . . . . . . . . . . . . . . . . . . . . . . . . . . . . 6-12Front Right Side Cover . . . . . . . . . . . . . . . . . . . . . . . . . . . . . 6-13Rear Cover/Rear Output Bin . . . . . . . . . . . . . . . . . . . . . . . . . 6-14Tray 1. . . . . . . . . . . . . . . . . . . . . . . . . . . . . . . . . . . . . . . . . . . 6-15
Removing Assemblies . . . . . . . . . . . . . . . . . . . . . . . . . . . . . . . . . 6-18Fuser . . . . . . . . . . . . . . . . . . . . . . . . . . . . . . . . . . . . . . . . . . . 6-18Formatter Cage Assembly . . . . . . . . . . . . . . . . . . . . . . . . . . . 6-20Output Assembly . . . . . . . . . . . . . . . . . . . . . . . . . . . . . . . . . . 6-21Laser Scanner . . . . . . . . . . . . . . . . . . . . . . . . . . . . . . . . . . . . 6-23Fan. . . . . . . . . . . . . . . . . . . . . . . . . . . . . . . . . . . . . . . . . . . . . 6-24Main Motor . . . . . . . . . . . . . . . . . . . . . . . . . . . . . . . . . . . . . . . 6-25Transfer Roller . . . . . . . . . . . . . . . . . . . . . . . . . . . . . . . . . . . . 6-26Tray 1 Pickup Roller. . . . . . . . . . . . . . . . . . . . . . . . . . . . . . . . 6-27Tray 1 Pickup Assembly . . . . . . . . . . . . . . . . . . . . . . . . . . . . 6-29Right Side Toner Cartridge Guide . . . . . . . . . . . . . . . . . . . . . 6-33Registration Assembly . . . . . . . . . . . . . . . . . . . . . . . . . . . . . . 6-34Paper Feed Assembly . . . . . . . . . . . . . . . . . . . . . . . . . . . . . . 6-36Formatter Pan . . . . . . . . . . . . . . . . . . . . . . . . . . . . . . . . . . . . 6-39Gear Train . . . . . . . . . . . . . . . . . . . . . . . . . . . . . . . . . . . . . . . 6-40Delivery Drive Assembly . . . . . . . . . . . . . . . . . . . . . . . . . . . . 6-41
Separating the Engine Module from the Paper Feed Module . . . 6-42Engine Controller Board. . . . . . . . . . . . . . . . . . . . . . . . . . . . . 6-44Paper Feed Rollers . . . . . . . . . . . . . . . . . . . . . . . . . . . . . . . . 6-48Separation Rollers . . . . . . . . . . . . . . . . . . . . . . . . . . . . . . . . . 6-49Paper Feed Module Plate . . . . . . . . . . . . . . . . . . . . . . . . . . . 6-50Paper Feed Module Gear Train Assembly. . . . . . . . . . . . . . . 6-51Paper Feed Module Side Rails . . . . . . . . . . . . . . . . . . . . . . . 6-52Lower Paper Feed Module Plate (HP LaserJet 4000 T/4000 TN
and 4050 T/4050 TN) . . . . . . . . . . . . . . . . . . . . . . . . . . . . . 6-53PCA Cover (HP LaserJet 4000 T/4000 TN and
4050 T/4050 TN). . . . . . . . . . . . . . . . . . . . . . . . . . . . . . . . . 6-54PCA Cover (HP LaserJet 4000/4000 N and 4050/4050 N) . . 6-55PCA Controller . . . . . . . . . . . . . . . . . . . . . . . . . . . . . . . . . . . . 6-56
Contents-4

7 Troubleshooting
Overview . . . . . . . . . . . . . . . . . . . . . . . . . . . . . . . . . . . . . . . . . . . . 7-1Troubleshooting Process . . . . . . . . . . . . . . . . . . . . . . . . . . . . . . . . 7-2
Troubleshooting Flowchart . . . . . . . . . . . . . . . . . . . . . . . . . . . 7-4Troubleshooting Flowchart (Continued). . . . . . . . . . . . . . . . . . 7-5
Troubleshooting the Printing System . . . . . . . . . . . . . . . . . . . . . . . 7-6Preliminary Operating Checks . . . . . . . . . . . . . . . . . . . . . . . . . 7-6Power On. . . . . . . . . . . . . . . . . . . . . . . . . . . . . . . . . . . . . . . . . 7-7Engine Test . . . . . . . . . . . . . . . . . . . . . . . . . . . . . . . . . . . . . . 7-11Display . . . . . . . . . . . . . . . . . . . . . . . . . . . . . . . . . . . . . . . . . . 7-12Event Log. . . . . . . . . . . . . . . . . . . . . . . . . . . . . . . . . . . . . . . . 7-13Printer Messages. . . . . . . . . . . . . . . . . . . . . . . . . . . . . . . . . . 7-17General Paper Path Troubleshooting . . . . . . . . . . . . . . . . . . 7-45Information Pages . . . . . . . . . . . . . . . . . . . . . . . . . . . . . . . . . 7-48Image Quality. . . . . . . . . . . . . . . . . . . . . . . . . . . . . . . . . . . . . 7-54Image System Troubleshooting . . . . . . . . . . . . . . . . . . . . . . . 7-74Interface Troubleshooting . . . . . . . . . . . . . . . . . . . . . . . . . . . 7-77AUTOEXEC.BAT Standard Configurations . . . . . . . . . . . . . . 7-81
Reference Diagrams . . . . . . . . . . . . . . . . . . . . . . . . . . . . . . . . . . 7-84Locations of Components . . . . . . . . . . . . . . . . . . . . . . . . . . . 7-84Paper Path. . . . . . . . . . . . . . . . . . . . . . . . . . . . . . . . . . . . . . . 7-90Engine Controller Board . . . . . . . . . . . . . . . . . . . . . . . . . . . . 7-93Paper Size Detection Switches . . . . . . . . . . . . . . . . . . . . . . . 7-94Motors . . . . . . . . . . . . . . . . . . . . . . . . . . . . . . . . . . . . . . . . . . 7-96Connectors . . . . . . . . . . . . . . . . . . . . . . . . . . . . . . . . . . . . . . 7-97PCAs . . . . . . . . . . . . . . . . . . . . . . . . . . . . . . . . . . . . . . . . . . 7-100Sensors and Thermistor . . . . . . . . . . . . . . . . . . . . . . . . . . . 7-102Solenoids and Clutch. . . . . . . . . . . . . . . . . . . . . . . . . . . . . . 7-105Switches . . . . . . . . . . . . . . . . . . . . . . . . . . . . . . . . . . . . . . . 7-108Timing . . . . . . . . . . . . . . . . . . . . . . . . . . . . . . . . . . . . . . . . . 7-110
8 Parts and Diagrams
Overview . . . . . . . . . . . . . . . . . . . . . . . . . . . . . . . . . . . . . . . . . . . . 8-1How To Use the Parts Lists and Diagrams . . . . . . . . . . . . . . . . . . 8-2Accessories and Supplies . . . . . . . . . . . . . . . . . . . . . . . . . . . . . . . 8-4
Common Screws and Replacement Cables . . . . . . . . . . . . . . 8-6Illustrations and Parts Lists . . . . . . . . . . . . . . . . . . . . . . . . . . . . . . 8-8
Alphabetical Parts List . . . . . . . . . . . . . . . . . . . . . . . . . . . . . . 8-58Numerical Parts List. . . . . . . . . . . . . . . . . . . . . . . . . . . . . . . . 8-67
Contents-5

Contents-6

1 Printer Description
Overview
This chapter discusses the following:
Printer Features
Identification
Site Requirements
Paper Specifications
Safety Information
Overview 1-1

Printer Features
Table 1-1. Printer Features for the HP LaserJet 4000 Series Printer
Speed 17 pages per minute (ppm)100 MHz RISC microprocessorFirst page out = 15 sec.
Resolution 300 dpi with PCL5e/HP’s PostScriptTM Level 2 emulation (PS)600 dpi with PCL5e/PSHP FastRes 1200 (PCL6 only)HP ProRes 1200 at half engine speed (PCL6, PS)
Typefaces 110 Scalable TrueTypeTM (80 built-in, 30 via HP FontSmart, all PS and PCL accessible)
Memory Options HP LaserJet 4000/4000 T: 4 MB RAM standardHP LaserJet 4000 N/4000 TN: 8 MB RAM standard
Optional Memory:4, 8, 16, and 32 MB EDO DIMMs4, 8, 16, 32, and 64 MB SDRAM DIMM
Mass Storage Options 2 and 4 MB Flash DIMMsGreater than 1 GB hard disk
Interface Bidirectional IEEE 1284 compliant parallel interfaceRS-232 9-pin serialPaper Handling Connector (PHC)10Base-T and 10Base-2 (HP LaserJet 4000 N/4000 TN)LocalTalk
Optional Networking 10Base-T and 10Base-210/100Base-TXToken RingLocalTalk
Expansion Slots 3 100-pin DIMM slots2 Enhanced I/O (EIO) slots
1-2 Printer Description

Paper Trays 100-sheet Tray 1 Size: 3 by 5 in to legal (76 by 127 mm to 216 by 356 mm)
500-sheet Tray 2 (HP LaserJet 4000/ 4000 N) Size: letter, legal, A4
250-sheet Trays 2 and 3 (HP LaserJet 4000 T/ 4000 TN) Size: letter, A4, executive, legal, B5 (ISO), B5 (JIS), A5
Optional Universal 500-sheet Tray Supports standard and custom sizes from 5.8 by 8.2 in (149
by 210 mm) to 8.5 by 14 in (216 by 356 mm).
Paper Path Straight through from Tray 1 to Rear Output Binor to Top Output Bin
Output Capacity 250-sheet Top Output Bin50-sheet Rear Output Bin
Paper Handling Options Duplexer, Envelope Feeder, Optional 500-sheet Universal Tray Assembly
Table 1-1. Printer Features for the HP LaserJet 4000 Series Printer (continued)
Printer Features 1-3

Table 1-2. Printer Features for the HP LaserJet 4050 Series Printer
Speed 17 pages per minute (ppm)133 MHz RISC microprocessorFirst page out = 15 sec.“RIP ONCE” capability with 16 MB or hard disk option
Resolution 300 dpi with PCL5e/HP’s PostScriptTM Level 2 emulation (PS)600 dpi with PCL5e/PSHP FastRes 1200 (PCL6, PS)HP ProRes 1200 at engine speed (17 ppm) (PCL6, PS)
Typefaces 110 Scalable TrueTypeTM (80 built-in, 30 via HP FontSmart, all PS and PCL accessible)Euro symbol
Memory Options HP LaserJet 4050/4050 T: 8 MB RAM standardHP LaserJet 4050 N/4050 TN: 16MB RAM standard
Optional Memory:4, 8, 16, MB EDO DIMMs4, 8, 16, 32, 64 MB SDRAM DIMM
Mass Storage Options 2 and 4 MB Flash DIMMsGreater than 1 GB hard disk
Expansion Slots 3 100-pin DIMM slots2 enhanced I/O (EIO) slots
Interface Bidirectional IEEE 1284-compliant parallel10/100Base-TX (HP LaserJet 4050 N/4050 TN)HP Fast InfraRed Receiver (FIR)RS232 9-pin serialPaper Handling Connector (PHC)
Optional Networking 10Base-T and 10Base-210/100Base-TXToken RingLocalTalk
1-4 Printer Description

Paper Trays 100-sheet Tray 1 Size: 3 by 5 to legal (76 by 127 mm to 216 by 356 mm)
500-sheet Tray 2 (HP LaserJet 4050/ 4050 N) Size: letter, legal, A4
250-sheet Trays 2 and 3 (HP LaserJet 4050 T/ 4050 TN) Size: letter, A4, executive, legal, B5 (ISO), B5 (JIS), A5
Optional 500-sheet Universal Tray Supports standard and custom sizes from 5.8 by 8.2 in (149
by 210 mm) to 8.5 by 14 in (216 by 356 mm).
Paper Path Straight through from Tray 1 to Rear Output Binor to Top Output Bin
Output Capacity 250-sheet Top Output Bin50-sheet Rear Output Bin
Paper Handling Options Duplexer, Envelope Feeder, Optional 500-sheet Universal Tray Assembly
Table 1-2. Printer Features for the HP LaserJet 4050 Series Printer (continued)
Printer Features 1-5

Table 1-3. Comparison of HP LaserJet 4000 Series Printers
HP LaserJet 4000
HP LaserJet 4000 T
HP LaserJet 4000 N
HP LaserJet 4000 TN
Ethernet 10-T/ 10-2 LocalTalk
optional optional standard standard
Max. # Input Bins 3 4 3 4
Standard RAM 4 MB internal 4 MB internal 8 MB internal 8 MB internal
250-Sheet Tray not available 2 standard not available 2 standard
500-Sheet Tray standard not available standard not available
500-Sheet Universal Tray
optional optional optional optional
> 1 GB EIO Drive optional optional optional optional
Envelope Feeder optional optional optional optional
Duplexer optional optional optional optional
1-6 Printer Description

Table 1-4. Comparison of HP LaserJet 4050 Series Printers
HP LaserJet 4050
HP LaserJet 4050 T
HP LaserJet 4050 N
HP LaserJet 4050 TN
Ethernet 10-T/ 10-2 LocalTalk
optional optional optional optional
10/100 Base TX optional optional standard standard
Max. # Input Bins 3 4 3 4
Standard RAM 8 MB internal 8 MB internal 16 MB internal 16 MB internal
250-Sheet Tray not available 2 standard not available 2 standard
500-Sheet Tray standard not available standard not available
500-Sheet Universal Tray
optional optional optional optional
> 1 GB EIO Drive optional optional optional optional
Envelope Feeder optional optional optional optional
Duplexer optional optional optional optional
HP Fast InfraRed Receiver (FIR)
optional optional standard standard
Printer Features 1-7

Identification
Model and Serial NumbersThe model number and printer serial number are listed on an identification label located under the top cover on the right side of the printer.
The model number is alphanumeric, such as C4253A for the HP LaserJet 4050 N printer.
The serial number contains information about the Country of Origin, the Revision Level, the Production Code, and Production Number of the printer. An example of a serial number is USBB123456.
The top label also contains power rating and regulatory information as shown in Figure 1-1.
Figure 1-1 Sample Label
1-8 Printer Description

Site Requirements
The following environmental specifications must be maintained to ensure the proper operation of the printer. Consider the following points before installing the printer:
Install in a well-ventilated, dust-free area.
Install on a hard, flat and continuous surface, with all four printer feet level. Do not install on carpet or other soft surfaces.
Ensure adequate power is supplied. Printer power requirements are listed in Table 1-5. (Uninterruptable power supplies (UPSs) are not recommended.)
Install where temperature and humidity is stable, away from water sources, humidifiers, air conditioners, refrigerators, or other major appliances.
Install away from direct sunlight, open flames, or ammonia fumes. If the printer is placed near a window, make sure the window has a curtain or blind to block any direct sunlight.
Install with enough space around the printer for proper access and ventilation.
Install away from the direct flow of exhaust from air ventilation systems.
Table 1-5. Electrical Specifications for the HP LaserJet 4000 and 4050 Series Printers
Volts Frequency Amperes Watts (typical)
100-127 VAC±10% 50/60 Hz ± 3 Hz 8 A printing = 330 Wstandby = 22 WPowerSave On = 20 W (EPA ENERGY STAR®)
220-240 VAC±10% 50/60 Hz ± 3 Hz 4 A printing = 330 Wstandby = 22 WPowerSave On = 20 W (EPA ENERGY STAR®)
Site Requirements 1-9

Space Requirements
Figure 1-2 Printer Dimensions
Printer Weight (without Toner Cartridge) HP LaserJet 4000/4000 N and 4050/4050 N printers:
39.27 lb (17.85 kg)
HP LaserJet 4000 T/4000 TN and 4050 T/4050 TN printers: 45.66 lb (20.71 kg)
15.4 in(39.0 cm)
16.77 in (42.6 cm) printer only, Rear Output Bin closed
HP LaserJet 4000/4000 N and
4050/4050 N18.5 in
(46.99 cm)with cover open
13.3 in(34.3 cm)
with cover closed
HP LaserJet 4000 T/4000 TN and
4050 T/4050 TN20.1 in
(51.19 cm)with cover open
15.5 in(38.5 cm)
with cover closed
39.67 in (100.76 cm) full length, trays and Rear Output Bin open
1-10 Printer Description

Environmental Requirements
Table 1-6. Printer and Toner Cartridge Environmental Conditions
Item Operating Storage
Temperature 50-91° F (10-32° C) 32 to 95° F (0 to 35°C)
Relative Humidity 20-80% RH (with no condensation)
10% to 95% RH
Table 1-7. Acoustic Emissions (Per ISO 9296)
Printer State Sound Power
Printing, 17 pages per minute (ppm)
Lwad= 6.6 bels (A)
Printing, 8 ppm Lwad= 6.2 bels (A)
PowerSave Lwad= 0 bels (A)
Site Requirements 1-11

Paper Specifications
The following tables show paper specifications for the HP LaserJet 4000 and 4050 series printer.
* The printer supports a wide range of paper sizes. Check the printer software for supported sizes.To print custom-size paper see the user’s guide.
** Capacity may vary depending on paper weight and thickness, and environmental conditions.*** Custom media must be fed short edge first (portrait).
* The printer supports a wide range of paper sizes. Check the printer software for supported sizes. ** Capacity may vary depending on paper weight and thickness, and environmental conditions.
Table 1-8. Paper Specifications, Tray 1
Supported Paper
Dimensions* Weight Capacity**
Minimum Size (custom)
3 by 5 in***(76 by 127 mm) 16 to 53 lb
(60 to 199 g/m2)100 sheets of 20 lb
(75 g/m2) paperMaximum Size 8.5 by 14 in(216 by 356 mm)
Transparencies
Same as minimum and maximum paper sizes listed above.
Thickness:0.0039 in to 0.0045 in (0.099 to 0.114 mm)
75 transparencies
Labels Thickness:0.005 in to 0.007 in
(0.127 mm to 0.178 mm)
50 labels
Envelopes 20 to 28 lb (75 to 105 g/m2)
10 envelopes
Table 1-9. Paper Specifications, Tray 2 (HP LaserJet 4000/4000 N and 4050/4050 N)
Supported Paper
Dimensions* Weight Capacity**
Letter 8.5 by 11 in(216 by 279 mm)
16 to 28 lb(60 to 105 g/m2)
500 sheets of 20 lb (75 g/m2) paper
50-100 transparencies
A4 8.3 by 11.7 in(210 by 297 mm)
Legal 8.5 by 14 in(216 by 356 mm)
1-12 Printer Description

* The printer supports a wide range of paper sizes. Check the printer software for supported sizes. ** Capacity may vary depending on paper weight and thickness, and environmental conditions.*** To print custom-size paper see the user’s guide.
Table 1-10. Paper Specifications, Trays 2 and 3 (HP LaserJet 4000 T/4000 TN and 4050 T/4050 TN)
Supported Paper
Dimensions* Weight Capacity**
Letter 8.5 by 11 in(216 by 279 mm)
16 to 28 lb(60 to 105 g/m2)
250 sheets of 20 lb(75 g/m2) paper
50-100 transparencies
A4 8.3 by 11.7 in(210 by 297 mm)
Executive 7.3 by 10.5 in(191 by 267 mm)
Legal 8.5 by 14 in(216 by 356 mm)
B5 (ISO) (custom***)
6.9 by 9.9 in(176 by 250 mm)
B5 (JIS)7.2 by 10 in(182 by 257 mm)
A5 (custom***)5.8 by 8.2 in(148 by 210 mm)
Paper Specifications 1-13

* The printer supports a wide range of paper sizes. Check the printer software for supported sizes.** Capacity may vary depending on paper weight and thickness, and environmental conditions.*** To print custom-size paper see the user’s guide.
Table 1-11. Paper Specifications, Optional 500-Sheet Universal Tray
Supported Paper
Dimensions* Weight Capacity**
Letter 8.5 by 11 in(216 by 279 mm)
16 to 28 lb(60 to 105 g/m2)
500 sheets of 20 lb (75 g/m2) paper
50-100 transparencies
A4 8.3 by 11.7 in(210 by 297 mm)
Executive 7.3 by 10.5 in(191 by 267 mm)
Executive JIS (custom ***)
8.5 by 13 in(216 by 330 mm)
16K (custom ***) 7.75 by 10.75 in(197 by 273 mm)
Legal 8.5 by 14 in(216 by 356 mm)
B5 (ISO) (custom***)
6.9 by 9.9 in(176 by 250 mm)
B5 (JIS) 7.2 by 10 in(182 by 257 mm)
A5 (custom***) 5.8 by 8.2 in(148 by 210 mm)
Custom*** 5.8 by 8.2 in to 8.5 by 14 in(149 by 210 mm to 216 by 356 mm)
1-14 Printer Description

* The printer supports a wide range of paper sizes. Check the printer software for supported sizes.** Capacity may vary depending on paper weight and thickness, and environmental conditions.
Supported Types of PaperThe printer supports the following types of paper:
Table 1-12. Paper Specifications, Optional Envelope Feeder
Supported Paper
Dimensions* Weight Capacity**
Minimum Size 3.5 by 6.3 in(90 by 160 mm) 20 to 28 lb
(75 to 105 g/m2)75 envelopes
Maximum Size 7 by 10 in(178 by 254 mm)
Table 1-13. Paper Specifications, Optional Duplex Printing Accessory (Duplexer)
Dimensions Weight Capacity
Letter 8.5 by 11 in(216 by 279 mm)
16 to 28 lb (60 to 105 g/m2)
not applicable
A4 8.3 by 11.7 in(210 by 297 mm)
Executive 7.3 by 10.5 in(191 by 267 mm)
Legal 8.5 by 14 in(216 by 356 mm)
B5 (JIS) 7.2 by 10 in(182 by 257 mm)
plain preprinted
letterhead transparency
prepunched labels
bond recycled
color card stock
rough user-defined (5 types)
Paper Specifications 1-15

Guidelines for Using PaperFor best results, use conventional 20 lb (75 g/m2) paper. Make sure the paper is of good quality and free of cuts, nicks, tears, spots, loose particles, dust, wrinkles, voids, and curled or bent edges.
If you are unsure what type of paper you are loading (such as bond or recycled), check the label on the package of paper.
Some paper causes print quality problems, jamming, or damage to the printer.
Table 1-14. Guidelines for Using Paper
Symptom Problem with Paper Solution
Poor print quality or Toner adhesion.Problems with feeding.
Too moist, too rough, too smooth, or embossed; faulty paper lot.
Try another kind of paper, between 100-250 Sheffield, 4-6% moisture content.
Dropouts, jamming, curl. Stored improperly. Store paper flat in its moisture-proof wrapping.
Increased gray background shading.
Too heavy. Use lighter paper.Open the Rear Output Bin.
Excessive curl.Problems with feeding.
Too moist, wrong grain direction or short-grain construction.
Open the Rear Output Bin.Use long-grain paper.
Jamming, damage to printer. Cutouts or perforations. Do not use paper with cutouts or perforations.
Problems with feeding. Ragged edges. Use quality paper.
1-16 Printer Description

Note Do not use letterhead paper that is printed with low-temperature inks, such as those used in some types of thermography.
Do not use raised letterhead.
The printer uses heat and pressure to fuse Toner to the paper. Make sure that any colored paper or preprinted forms use inks that are compatible with the printer’s temperature (400° F or 205° C).
Avoid using paper that has already been used in a printer or copier. Do not print on both sides of envelopes, transparencies, or labels.
Paper Specifications 1-17

Paper Weight Equivalence Table
Use this table to determine approximate equivalent points in weight specifications other than U.S. bond weight. For example, to determine the equivalent of 20 lb U.S. bond weight paper in U.S. cover weight, locate the bond weight (in the third row, first column) and scan across the row to the cover weight (in the third column). The equivalent is 28 lb.
Shaded areas indicate a standard weight for that grade.
* U.S. postcard measurements are approximate. Use for reference only.
Table 1-15. Paper Weight Equivalence
Bond wt.(17x22)
Text/book wt.
(25x38)
Cover wt.(20x26)
Bristol wt.(22.5x28.5)
Index wt.(25.5x30.5)
Tag wt.(24x36)
Metric wt. Bond wt.(17x22)
Text/book wt.
(25x38)
Cover wt.(20x26)
16# 41# 22# 27# 33# 37# 60 g/m2 16# 41# 22#
17# 43# 24# 29# 35# 39# 64 g/m2 17# 43# 24#
20# 50# * 28# 34# 42# 46# 75 g/m2 20# 50# * 28#
21# 54# 30# 36# 44# 49# 80 g/m2 21# 54# 30#
24# 60# * 33# 41# 50# 55# 90 g/m2 24# 60# * 33#
27# 68# 37# 45# 55# 61# 100 g/m2 27# 68# 37#
28# 70# * 39# 49# 58# 65# 105 g/m2 28# 70# * 39#
29# 74# 41# 50# 61# 68# 110 g/m2 29# 74# 41#
32# 80#* 44# 55# 67# 74# 120 g/m2 32# 80# * 44#
36# 90# 50# 62# 75# 83# 135 g/m2 36# 90# 50#
39# 100# 55# 67# 82# 91# 148 g/m2 39# 100# 55#
40# 101# 55# 68# 83# 92# 150 g/m2 40# 101# 55#
43# 110# 60# 74# 90# 100# 163 g/m2 43# 110# 60#
45# 115# 63# 77# 94# 104# 170 g/m2 45# 115# 63#
47# 119# 65# 80# 97# 108# 176 g/m2 47# 119# 65#
51# 128# 70# 86# 105# 117# 190 g/m2 51# 128# 70#
1-18 Printer Description

Labels
CAUTION To avoid damaging the printer, use only labels recommended for use in laser printers.
If you have problems printing labels, use Tray 1 and open the Rear Output Bin.
Never print on the same sheet of labels more than once.
Label Construction
When selecting labels, consider the quality of each component:
Adhesives: The adhesive material should be stable at 400° F (205° C), the printer’s maximum temperature.
Arrangement: Only use labels with no exposed backing between them. Labels can peel off of sheets that have spaces between the labels, causing serious jams.
Curl: Prior to printing, labels must lie flat with no more than 0.5 in (13 mm) of curl in any direction.
Condition: Do not use labels with wrinkles, bubbles, or other indications of separation.
TransparenciesTransparencies used in the printer must be able to withstand 400° F (205° C), the printer’s maximum temperature. For best results, close the Rear Output Bin to print transparencies to the Top Output Bin.
CAUTION To avoid damaging the printer, use only transparencies recommended for use in laser printers.
If you have problems printing transparencies, use Tray 1.
Paper Specifications 1-19

Envelopes
Envelope Construction
Envelope construction is critical. Envelope fold lines can vary considerably, not only between manufacturers, but also within a box from the same manufacturer. Successful printing on envelopes depends upon the quality of the envelopes. When selecting envelopes, consider the following components:
Weight: The weight of the envelope paper should not exceed 28 lb (105 g/m2), or jamming may result.
Construction: Prior to printing, envelopes should lie flat with less than 0.25 in (6 mm) curl, and should not contain air. (Envelopes that trap air may cause problems.)
Condition: Make sure envelopes are not wrinkled, nicked, or otherwise damaged.
Sizes in Tray 1: From 3 by 5 in (76 by 127 mm) to 8.5 by 14 in (216 by 356 mm).
Sizes in the optional envelope feeder: From 3.5 by 6.3 in(90 by 160 mm) to 7 by 10 in (178 by 254 mm).
If you do not have an optional envelope feeder, always print envelopes from Tray 1. If envelopes wrinkle, try opening the Rear Output Bin.
1-20 Printer Description

Envelopes with Double Side Seams
Some envelopes have vertical seams at both ends of the envelope, rather than diagonal seams. This style of envelope may be more likely to wrinkle. When using envelopes with double side seams, be sure the seam extends all the way to the corner of the envelope as illustrated below.
Figure 1-3 Envelopes with Double-Side-Seams
Envelopes with Adhesive Strips or Flaps
Envelopes with a peel-off adhesive strip or with more than one flap that folds over to seal must use adhesives compatible with the heat (400° F (205° C)) and pressure in the printer. The extra flaps and strips might cause wrinkling, creasing, or jams.
Acceptable
Unacceptable
Paper Specifications 1-21

Envelope Margins
The following table gives typical address margins for a Commercial #10 or DL envelope.
Note For the best print quality, position margins no closer than 0.6 in (15 mm) from the edges of the envelope.
Envelope Storage
Proper storage of envelopes helps contribute to good print quality. Envelopes should be stored flat. If air is trapped in an envelope, creating an air bubble, then the envelope may wrinkle during printing.
Table 1-16. Envelope Margins
Type of Address Top Margin Left Margin
Return Address 0.6 in (15 mm) 0.6 in (15 mm)
Delivery Address 2 in (51 mm) 3.5 in (89 mm)
1-22 Printer Description

Card Stock and Heavy PaperMany types of card stock can be printed from Tray 1, including index cards and postcards. Some types of card stock perform better than others because the construction is better suited for feeding through a laser printer.
For optimum printer performance, do not use paper heavier than 53 lb (199 g/m2) in Tray 1 or 28 lb (105 g/m2) in other trays. Paper that is too heavy might cause misfeeds, stacking problems, paper jams, poor Toner fusing, poor print quality, or excessive mechanical wear.
Note Printing on paper heavier than 53 lb may be possible if the tray is not filled to capacity, and paper with a smoothness rating of 100-180 Sheffield is used.
Card Stock Construction Smoothness: 36-53 lb (135-199 g/m2) card stock should have a
smoothness rating of 100-180 Sheffield. 16-36 lb (60-135 g/m2) card stock should have a smoothness rating of 100-250 Sheffield.
Construction: Card stock should lie flat with less than 0.2 in (5 mm) of curl.
Condition: Make sure card stock is not wrinkled, nicked, or otherwise damaged.
Sizes: Use only card stock within the following size ranges:
• minimum: 3 by 5 in (76 by 127 mm)
• maximum: 8.5 by 14 in (216 by 356 cm)
Note Before loading card stock in Tray 1, make sure it is regular in shape and not damaged. Also, make sure the cards are not stuck together.
Card Stock Guidelines If cards curl or jam, try printing from Tray 1 and opening the Rear
Output Bin.
Set margins at least 0.08 in (2 mm) away from the edges of the paper.
Paper Specifications 1-23

Safety Information
Laser Safety StatementThe Center for Devices and Radiological Health (CDRH) of the U.S. Food and Drug Administration has implemented regulations for laser products manufactured since August 1, 1976. Compliance is mandatory for products marketed in the United States. The printer is certified as a “Class 1” laser product under the U.S. Department of Health and Human Services (DHHS) Radiation Performance Standard according to the Radiation Control for Health and Safety Act of 1968. Since radiation emitted inside the printer is completely confined within protective housings and external covers, the laser beam cannot escape during any phase of normal user operation.
WARNING! Using controls, making adjustments, or performing procedures other than those specified in this service manual may result in exposure to hazardous radiation.
Canadian DOC RegulationsComplies with Canadian EMC Class B requirements.
«Conforme á la classe B des normes canadiennes de compatibilité électromagnétiques. «CEM».»
1-24 Printer Description

FCC RegulationsThis equipment has been tested and found to comply with the limits for a Class B digital device, pursuant to Part 15 of the FCC rules. These limits are designed to provide reasonable protection against harmful interference in a residential installation. This equipment generates, uses, and can radiate radio frequency energy. If this equipment is not installed and used in accordance with the instructions, it may cause harmful interference to radio communications. However, there is no guarantee that interference will not occur in a particular installation. If this equipment does cause harmful interference to radio or television reception, which can be determined by turning the equipment off and on, the user is encouraged to try to correct the interference by one or more of the following measures:
Reorient or relocate the receiving antenna.
Increase separation between equipment and receiver.
Connect equipment to an outlet on a circuit different from that to which the receiver is located.
Consult your dealer or an experienced radio/TV technician.
Note Any changes or modifications to the printer that are not expressly approved by HP could void the user’s authority to operate this equipment.
Use of a shielded interface cable is required to comply with the Class B limits of Part 15 of FCC rules.
Safety Information 1-25

Laser Statement for FinlandLASERTURVALLISUUS
LUOKAN 1 LASERLAITE
KLASS 1 LASER APPARAT
HP LaserJet 4000/4000 T/4000 N/4000 TN and 4050/4050 T/4050 N/4050 TN -laserkirjoitin on käyttäjän kannalta turvallinen luokan 1 laserlaite. Normaalissa käytössä kirjoittimen suojakotelointi estää lasersäteen pääsyn laitteen ulkopuolelle.
Laitteen turvallisuusluokka on määritetty standardin EN 60825-1 (1993) mukaisesti.
VAROITUS !
Laitteen käyttäminen muulla kuin käyttöohjeessa mainitulla tavalla saattaa altistaa käyttäjän turvallisuusluokan 1 ylittävälle näkymättömälle lasersäteilylle.
VARNING !
Om apparaten används på annat sätt än i bruksanvisning specificerats, kan användaren utsättas för osynlig laserstrålning, som överskrider gränsen för laserklass 1.
HUOLTO
HP LaserJet 4000/4000 T/4000 N/4000 TN and 4050/4050 T/4050 N/4050 TN -kirjoittimen sisällä ei ole käyttäjän huollettavissa olevia kohteita. Laitteen saa avata ja huoltaa ainoastaan sen huoltamiseen koulutettu henkilö. Tällaiseksi huoltotoimenpiteeksi ei katsota väriainekasetin vaihtamista, paperiradan puhdistusta tai muita käyttäjän käsikirjassa lueteltuja, käyttäjän tehtäväksi tarkoitettuja ylläpitotoimia, jotka voidaan suorittaa ilman erikoistyökaluja.
VARO !
Mikäli kirjoittimen suojakotelo avataan, olet alttiina näkymättömälle lasersäteilylle laitteen ollessa toiminnassa. Älä katso säteeseen.
VARNING !
Om laserprinterns skyddshölje öppnas då apparaten är i funktion, utsättas användaren för osynlig laserstrålning. Betrakta ej strålen.
Tiedot laitteessa käytettävän laserdiodin säteilyominaisuuksista:
Aallonpituus 770-795 nm
Teho 5 mW
Luokan 3B laser
1-26 Printer Description

Toner Safety
Note Toner may stain clothing. Skin and clothing are best cleaned by removing as much Toner as possible with a dry tissue, then washing with cold water. Hot water causes Toner to melt and permanently fuse into clothing.
The Toner Cartridge/Drum Material Safety Data Sheet (MSDS) can be obtained by contacting the HP LaserJet website at: http://www.ljsupplies.com/planetpartners/datasheets.html.
If you do not have access to the Internet, call the U.S. HP FIRST fax-on-demand service at (800) 231-9300. Use index number 7 for a listing of the Toner Cartridge/Drum Material/Chemical Safety Data Sheets.
Note To get documents from HP FIRST by fax, you must use a Group 3 fax machine.
Safety Information 1-27

Environmental Product Stewardship
Protecting the Environment
Hewlett-Packard Company is committed to providing quality products in an environmentally-sound manner. The printer has been designed to minimize impacts on the environment.
The printer design eliminates:
Ozone Production
The printer uses charging rollers in the electrophotographic process and therefore generates no appreciable ozone gas (03).
CFC Usage Class I U.S. Clean Air Act stratospheric ozone-depleting chemicals (chlorofluorocarbons [CFCs], for example) have been eliminated from the manufacturing of the printer and packaging.
The printer design reduces:
Energy Consumption
Energy usage drops from 330 watts (W) during printing to as little as 20W while in low-power (PowerSave) mode. This saves energy without affecting the high performance of the printer. This product qualifies for the ENERGY STAR® Program (U.S. and Japan). ENERGY STAR is a voluntary program established to encourage the development of energy-efficient office products. The ENERGY STAR name is a registered service mark of the U.S. Environmental Protection Agency.
As an ENERGY STAR partner, Hewlett-Packard Company has determined that this product meets ENERGY STAR Guidelines for energy efficiency.
1-28 Printer Description

2 Service Approach
Overview
This chapter discusses the following:
Service Approach
Parts and Supplies
Warranty Statement
Overview 2-1

Service Approach
Repair of the printer normally begins with use of the printer’s internal diagnostics in conjunction with the troubleshooting procedures in Chapter 7. Once a faulty part is located, repair is generally accomplished by assembly level replacement of Field Replaceable Units (FRUs). Some mechanical assemblies may be repaired at the subassembly level. PCA component replacement is not supported by Hewlett-Packard.
2-2 Service Approach

Parts and Supplies
Ordering InformationField replaceable and accessory part numbers are found in Chapter 8 of this manual. Replacement parts may be ordered from HP’s Service Materials Organization (SMO) or Support Materials Europe (SME), divisions of Product Support Division (PSD).
Use only accessories specifically designed for this printer. Accessories can be ordered from an authorized service or support provider. See page 2-6 and page 8-4 for ordering information.
Parts and Supplies 2-3
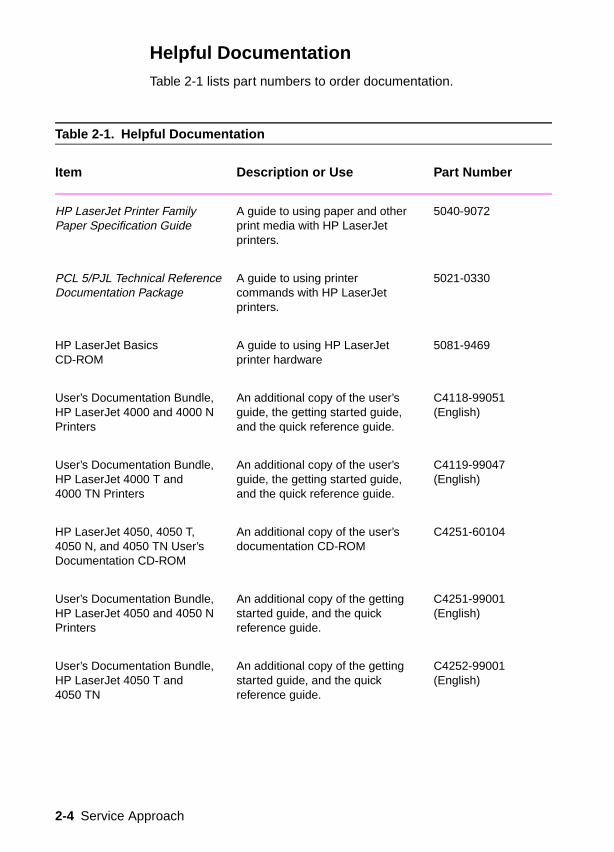
Helpful Documentation Table 2-1 lists part numbers to order documentation.
Table 2-1. Helpful Documentation
Item Description or Use Part Number
HP LaserJet Printer Family Paper Specification Guide
A guide to using paper and other print media with HP LaserJet printers.
5040-9072
PCL 5/PJL Technical Reference Documentation Package
A guide to using printer commands with HP LaserJet printers.
5021-0330
HP LaserJet Basics CD-ROM
A guide to using HP LaserJet printer hardware
5081-9469
User’s Documentation Bundle, HP LaserJet 4000 and 4000 N Printers
An additional copy of the user’s guide, the getting started guide, and the quick reference guide.
C4118-99051 (English)
User’s Documentation Bundle, HP LaserJet 4000 T and 4000 TN Printers
An additional copy of the user’s guide, the getting started guide, and the quick reference guide.
C4119-99047(English)
HP LaserJet 4050, 4050 T, 4050 N, and 4050 TN User’s Documentation CD-ROM
An additional copy of the user’s documentation CD-ROM
C4251-60104
User’s Documentation Bundle, HP LaserJet 4050 and 4050 N Printers
An additional copy of the getting started guide, and the quick reference guide.
C4251-99001 (English)
User’s Documentation Bundle, HP LaserJet 4050 T and 4050 TN
An additional copy of the getting started guide, and the quick reference guide.
C4252-99001 (English)
2-4 Service Approach

Service and Support CD-ROM for the HP LaserJet 4050 Printers
An interactive training CD-ROM for printer service representatives and customer care specialists.
C4251-91011
HP LaserJet 4000 and 4050 Series Printers Service Manual
A combined service manual for both series of printers.
C4251-91003
Table 2-1. Helpful Documentation (continued)
Item Description or Use Part Number
Parts and Supplies 2-5

Phone Numbers for Ordering SMO (Service Materials Organization)
1-800-227-8164 (U.S. only)
SME (Support Materials Europe)(49 7031) 142253
Exchange ProgramHP offers remanufactured assemblies for some parts. These are identified in Chapter 8 and can be ordered through Service Materials Organization (SMO) or Support Materials Europe (SME), divisions of Product Support Division (PSD).
ConsumablesPaper and Toner Cartridges can be ordered directly from Hewlett-Packard. See Chapter 8 for ordering information.
World Wide WebPrinter drivers, updated HP printer software, and product and support information may be obtained from the following URL:in the U.S.http://www.hp.com/go/support
Printer drivers may be obtained from the following sites:
in China ftp://www.hp.com.cn/go/supportin Japan ftp://www.jpn.hp.com/go/supportin Korea http://www.hp.co.kr/go/supportin Taiwan http://www.hp.com.tw/go/support
or the local driver website http://www.dds.com.tw
HP Service Parts Information Compact DiscThis powerful, CD-ROM-based parts information tool is designed to give users fast, easy access to parts information such as pricing and recommended stocking lists for a wide range of HP products. To subscribe to this quarterly service in the U.S. or Canada, call (800) 336-5987. In Asia Pacific, call (65) 740-4484. Parts identification and pricing information can also be accessed via the World Wide Web at http://www.hp.com/go/partsinfo.
2-6 Service Approach

HP Support Assistant Compact DiscThis support tool offers a comprehensive online information system designed to provide technical and product information on HP products. To subscribe to the quarterly service in the U.S. or Canada, call (800) 457-1762. In Hong Kong, Indonesia, Malaysia, or Singapore, call Mentor Media at (65) 740-4477.
HP FIRSTHP FIRST fax-on-demand service will deliver detailed troubleshooting information on common software and troubleshooting tips for your HP product. Call from any touch tone phone and request up to three documents per call. These documents will be sent to the fax of your choice. Many of these numbers are local numbers and will not work internationally.
North and Latin America
Outside the U.S. and Canada: (404) 329-2009In the U.S and Canada: (800) 333-1917
Asia/Pacific
Australia (03) 9272 2627China (10) 6505 5280Hong Kong 2506 2422India (11) 682 6031Indonesia (21) 352 2044Japan (03) 3335 8622Korea (02) 769 0543Malaysia (03) 298 2478New Zealand (09) 356 6648Philippines (02) 848 9880Singapore 275 7251Thailand (02) 661 3511Vietnam (08) 823 4161
Parts and Supplies 2-7

Europe, Middle East, and Africa
Austria 0660-8218Belgium
Dutch 0800 1 1906French 0800 1 7043
Denmark 800-10453European International +31 20 681 5792Finland 9800-13134France 0800-9050900Germany 0130-810061Hungary 36 1 461-8222Italy 1678-59020Netherlands 0800-0222420Norway 800-11319Portugal 05 05 313342Spain 900-993123Sweden 020-795743Switzerland
French 0800-551526German 0800-551527
United Kingdom 0800-960271
Customer Care Reseller Sales and Service Support Center
The Customer Care Reseller Sales and Service Support Center is available to assist resellers and service technicians. You can reach this support center at 1-800-544-9976.
Other Areas
Outside of North America and Europe, contact your local HP sales office for assistance in obtaining technical support for resellers and service technicians.
2-8 Service Approach

Toner Cartridge InformationThe Toner Cartridge is designed to simplify replacement of the major “consumable” parts. The Toner Cartridge contains the printing mechanism and a supply of Toner.
At 5% page coverage, a Toner Cartridge will print approximately 6,000 or 10,000 pages (depending on the model installed). However, a Toner Cartridge should print more pages if regularly printing pages with less coverage, such as short memos. If EconoMode is used full-time, it is possible that the Toner supply will outlast the mechanical parts in the Toner Cartridge. The cartridge may print fewer pages if routinely printing dense print.
Note For best results, always use a Toner Cartridge before the expiration date stamped on the Toner Cartridge’s box.
Refilled Toner Cartridges
While Hewlett-Packard does not prohibit the use of refilled Toner Cartridges during the warranty period or while the printer is under a maintenance contract, it is not recommended for the following reasons:
Repairs resulting from the use of refilled Toner Cartridges are not covered under Hewlett-Packard warranty or maintenance contracts.
Hewlett-Packard has no control or process to ensure that a refilled Toner Cartridge functions at the high level of reliability of a new HP LaserJet Toner cartridge. Hewlett-Packard also cannot predict what the long term reliability effect on the printer is from using different Toner formulations found in refilled cartridges.
The print quality of HP LaserJet Toner Cartridges influences the customer’s perception of the printer. Hewlett-Packard has no control over the actual print quality of a refilled Toner Cartridge.
Recycling Toner Cartridges
In order to reduce waste, Hewlett-Packard offers a recycling program for used Toner Cartridges. Cartridge components that do not wear out are recycled. Plastics and other materials are recycled. HP pays the shipping costs from the user to the recycling plant. For each cartridge returned, HP donates one U.S. dollar to be shared by the Nature Conservancy and the National Wildlife Federation. To join this recycling effort, follow the instructions inside the Toner Cartridge’s box.
Parts and Supplies 2-9

Warranty Statement
The warranty for this product gives you specific legal rights. There may also be other rights that vary from area to area. Refer to the user’s documentation for the full warranty and supporting warranty information.
2-10 Service Approach

3 Printer Operation
Overview
This chapter discusses the following:
Using the Control Panel
Control Panel Menus
Service Mode
Testing the Printer
Resetting the Printer
System Configuration
Printer I/O Configuration
Overview 3-1

Using the Control Panel
Control Panel LayoutThe printer’s Control Panel consists of the following:
Figure 3-1 Control Panel Layout
Control Panel Lights
Ready
Data
Attention
Menu
Item
– Value +
Select
Go
CancelJob
2-line display
READY
4050 only
Table 3-1. Control Panel Lights
Light Indication
Ready The printer is ready to print.
Data The printer is processing information.
Attention Action is required. See the Control Panel display.
3-2 Printer Operation

Control Panel Keys
Table 3-2. Control Panel Keys
Key Function
[Go] Places the printer either online or offline.
Prints any data residing in the printer’s buffer.
Allows the printer to resume printing after being offline. Clears most printer messages and places the printer online.
Allows the printer to continue printing with an error message such as TRAY X LOAD [TYPE] [SIZE] or UNEXPECTED PAPER SIZE.
Confirms a manual feed request if Tray 1 is loaded and TRAY 1 MODE=CASSETTE has been set from the Paper Handling Menu in the printer’s Control Panel.
Overrides a manual feed request from Tray 1 by selecting paper from the next available tray.
Exits the Control Panel menus. (To save a selected Control Panel setting, first press [Select] .)
[Cancel Job] Cancels the print job that the printer is processing. The time it takes to cancel depends on the size of the print job. (Press it only once.)
[Menu] Cycles through the Control Panel menus. Press the right end of the button to move forward or the left end of the button to move backward.
[Item] Cycles through the selected menu’s items. Press the right end of the button to move forward or the left end of the button to move backward.
[– Value +] Cycles through the selected menu item’s values. Press [+] to move forward or [–] to move backward.
[Select] Saves the selected value for that item. An asterisk (*) appears next to the selection, indicating that it is the new default. Default settings remain when the printer is switched off or reset (unless you reset all factory defaults from the Resets Menu).
Prints one of the printer information pages from the Control Panel.
[?] Provides instructions for resolving most printer errors. Certain Control Panel error messages alternate with instructions on accessing the online help system. This on-board help system is a feature of the 4050 series printer only.
Using the Control Panel 3-3

Settings and DefaultsThe printer makes most printing decisions based on either temporary settings or permanent defaults.
Note Settings sent from software applications override printer defaults.
Setting the display language
1 Press and hold [Select] while turning on the printer. Hold [Select] until SELECT LANGUAGE appears.
2 Release [Select] . INITIALIZING appears briefly. Wait for LANGUAGE=ENGLISH to appear.
3 Press [– Value +] repeatedly until the desired language appears.
4 Press [Select] to save your choice. An asterisk (*) will appear beside the selected language.
5 Press [Go] to exit the menu.
Table 3-3. Settings and Defaults
Setting or Default Explanation
Temporary Setting A value set for the current print job by the software application. For example, a request from the software to print three copies instead of the Control Panel default value of one copy is a temporary setting. The printer continues to use the temporary setting until it receives another software request or until it is reset.
Control Panel Default A value set at the Control Panel when you select a menu item. An asterisk appears, indicating the default setting. The printer retains this default when it is turned off.
Factory Default The value set for each menu item at the factory. Factory defaults are listed in the item column in the menu tables starting on page 3-8.
3-4 Printer Operation

Control Panel Menus
Press [Menu] for access to all Control Panel menus. When additional trays or other accessories are installed in the printer, new menu items automatically appear.
To change a Control Panel setting:
1 Press [Menu] until the desired menu appears.
2 Press [Item] until the desired item appears.
3 Press [– Value +] until the desired setting appears.
4 Press [Select] to save the selection. An asterisk (*) appears next to the selection in the display, indicating that it is now the default.
5 Press [Go] to exit the menu.
Note Settings in the printer driver and software application override Control Panel settings. (Software application settings override printer driver settings.)
If you cannot access a menu or item, it is either not an option for the printer, or the customer’s network administrator has locked the function. (The Control Panel reads ACCESS DENIED MENUS LOCKED.) See the customer’s network administrator.
To print a Control Panel menu map:
To see the current settings for all of the menus and menu items available on the Control Panel, print a Control Panel menu map.
1 Press [Menu] until INFORMATION MENU appears.
2 Press [Item] until PRINT MENU MAP appears.
3 Press [Select] to print the menu map.
Control Panel Menus 3-5

Quick Copy Jobs MenuThis menu provides a list of the quick copy jobs stored on the printer’s hard disk. The user can print or delete these jobs from the Control Panel.
Note If there are no quick copy jobs stored on the printer’s hard disk, this menu is not displayed on the Control Panel.
Table 3-4. Quick Copy Jobs Menu
Item Value Explanation
[JOBNAME] The name of the person who owns the quick copy job.
COPIES=1 1 to 999DELETE
The number of additional copies the user wants to print.
1-999: Prints the requested number of copies of the job.
DELETE: Deletes the job from the printer’s hard disk.
3-6 Printer Operation

Private/Stored Jobs MenuThis menu provides a list of the private and stored jobs on the printer’s hard disk. The user can print or delete these jobs from the Control Panel.
Note If there are no private or stored jobs on the printer’s hard disk, this menu is not displayed on the Control Panel.
Table 3-5. Private/Stored Jobs Menu
Item Value Explanation
[JOBNAME] The name of the job stored on the printer’s hard disk.
PIN:0000 To print the job, the user must enter the Personal Identification Number (PIN) assigned to the job in the driver.
COPIES=1 1 to 999DELETE
The number of copies the user wants to print.
1-999: Prints the requested number of copies of the job.
DELETE: Deletes the job from the printer’s hard disk.
Control Panel Menus 3-7

Information MenuThis menu contains printer information pages that give details about the printer and its configuration. To print an information page, scroll to the desired page and press [Select] .
Table 3-6. Information Menu
Item Explanation
MENU MAP
The menu map shows the layout and current settings of the Control Panel menu items.
CONFIGURATION
The Configuration Page shows the printer’s current configuration. If an HP JetDirect print server card is installed (HP LaserJet 4000 N/4000 TN and 4050 N/4050 TN printers), a JetDirect Configuration Page will print out as well.
PCL FONT LIST
The PCL font list shows all the PCL fonts currently available to the printer.
PS FONT LIST
The PS font list shows all the PS fonts currently available to the printer.
FILE DIRECTORY
This item appears only when a mass storage device (such as an optional flash DIMM or hard disk) containing a recognized file system is installed in the printer. The file directory shows information for all installed mass storage devices.
EVENT LOG
The event log lists printer events or errors.
SHOW
EVENT LOG
This item allows you to view the most recent printer events on the Control Panel display. Press [– Value +] to scroll through the event log entries.
PAPER PATH TEST
The paper path test can be used to verify that the paper path is working properly, or to troubleshoot problems with a type of paper.Choose the input tray, output bin, duplexer (if available), and number of copies.
USAGE PAGE
The usage page shows the quantity of pages printed, as well as the paper size used. It also reflects the number of one-sided versus two-sided pages (HP LaserJet 4050 only, with hard disk installed).
3-8 Printer Operation

Paper Handling MenuWhen paper handling settings are correctly configured through the Control Panel, you can print by choosing the type and size of paper from the printer driver or software application.
Some items in this menu (such as duplex and manual feed) can be accessed from a software application, or from the printer driver (if the appropriate driver is installed). Printer driver and software application settings override Control Panel settings.
Table 3-7. Paper Handling Menu
Item Values Explanation
ENVELOPE FEEDER
SIZE=COM10
For supported paper sizes see page 1-12.
This item appears only when the optional envelope feeder is installed. Set the value to correspond with the envelope size currently loaded in the envelope feeder.
ENVELOPE FEEDER
TYPE=PLAIN
For supported paper types see page 1-12.
This item appears only when the optional envelope feeder is installed. Set the value to correspond with the envelope type currently loaded in the envelope feeder.
TRAY 1 MODE=
FIRST
FIRST
CASSETTE
Determine how the printer will use Tray 1.FIRST: If paper is loaded in Tray 1, the printer will pull paper from that tray first. CASSETTE: A paper size must be assigned to Tray 1 using the TRAY 1 SIZE option (the next item in this menu when TRAY 1
MODE=CASSETTE). This allows Tray 1 to be used as a reserved tray.
TRAY 1 SIZE=
LETTER
For supported paper sizes see page 1-12.
This item appears only when TRAY 1
MODE= CASSETTE. Set the value to correspond with the paper size currently loaded in Tray 1.
Control Panel Menus 3-9

TRAY 1 TYPE=
PLAIN
For supported paper types see page 1-12.
This item appears only when TRAY 1
MODE= CASSETTE. Set the value to correspond with the paper type currently loaded in Tray 1.
TRAY 2 TYPE=
PLAIN
For supported paper types see page 1-12.
Set the value to correspond with the paper type currently loaded in Tray 2.
TRAY 3 TYPE=
PLAIN
For supported paper types see page 1-12.
This item appears only when a third paper tray is installed. Set the value to correspond with the paper type currently loaded in Tray 3.
TRAY 4 TYPE=
PLAIN
For supported paper types see page 1-12.
This item appears only when a fourth paper tray is installed (available only on the HP LaserJet 4000 T/4000 TN and 4050 T/4050 TN printers). Set the value to correspond with the paper type currently loaded in Tray 4.
MANUAL FEED=OFF OFF
ON
Feed the paper manually from Tray 1, rather than automatically from a tray. When MANUAL FEED=ON and Tray 1 is empty, the printer goes offline when it receives a print job and displays MANUALLY FEED [PAPER SIZE].
DUPLEX=OFF OFF
ON
This item appears only when an optional duplexer is installed. Set the value to ON to print on both sides (duplex) or OFF to print on one side (simplex) of a sheet of paper.
BINDING=
LONG EDGE
LONG EDGE
SHORT EDGE
This item appears only when an optional duplexer is installed and the duplex option is on. Choose the binding edge when duplexing (printing on both sides of paper).
Table 3-7. Paper Handling Menu (continued)
Item Values Explanation
3-10 Printer Operation

OVERRIDE A4/
LETTER=NO
NO
YES
Choose YES to print on letter size paper when an A4 job is sent, but no A4 size paper is loaded in the printer (or to print on A4 size paper when a letter job is sent, but no letter paper is loaded in the printer).
CONFIGURE FUSER
MODE MENU=NO
NO
YES
Configure the Fuser mode associated with each paper type. (This is only necessary if you are experiencing problems printing on certain paper types.)NO: The Fuser mode menu items are not accessible.YES: Additional items appear (see below).
NoteTo see the default Fuser mode for each paper type, select YES, scroll back to the Information Menu, and print a menu map (page 3-8).
[TYPE]=
NORMAL
NORMAL
LOW
HIGH
This item appears only when CONFIGURE FUSER MODE
MENU=YES. Most paper types are set to NORMAL by default.
The exception is as follows:
ROUGH=HIGH
(The ROUGH=HIGH setting is only available with A4, letter, and legal sizes.)
For a complete list of supported paper types, see page 1-12.
Table 3-7. Paper Handling Menu (continued)
Item Values Explanation
Control Panel Menus 3-11

Print Quality MenuSome items in this menu can be accessed from a software application, or from the printer driver (if the appropriate driver is installed). Printer driver and software application settings override Control Panel settings.
Table 3-8. Print Quality Menu
Item Values Explanation
RESOLUTION=
FASTRES 1200
300
600
FASTRES 1200
PRORES 1200
Select the resolution from the following values:300: Produces draft print quality at the printer’s maximum speed (17 ppm). 300 dpi (dots per inch) is recommended for some bitmapped fonts and graphics, and for compatibility with the HP LaserJet III family of printers.600: Produces high print quality at the printer’s maximum speed (17 ppm).FASTRES 1200: Produces optimum print quality (comparable to 1200 dpi) at the printer’s maximum speed (17 ppm).PRORES 1200: Produces optimum print quality (true 1200 dpi) at half the printer’s maximum speed (8 ppm for the HP LaserJet 4000 printer, or at highest print quality at engine speed for the HP LaserJet 4050 printer).When the resolution is changed, any downloaded resources (such as fonts or macros) will need to be downloaded again, unless they are stored on an optional hard disk or flash DIMM.
NoteIt is best to change the resolution from the printer driver or software application. (Driver and software settings override Control Panel settings.)
3-12 Printer Operation

RET=MEDIUM OFF
LIGHT
MEDIUM
DARK
Use the printer’s Resolution Enhancement technology (REt) setting to produce print with smooth angles, curves, and edges.REt does not affect print quality when the print resolution is set to ProRes 1200. All other print resolutions, including FastRes 1200, benefit from REt.
NoteIt is best to change the REt setting from the printer driver or software application. (Driver and software settings override Control Panel settings.)
ECONOMODE=OFF OFF
ON
Turn EconoMode on (to save Toner) or off (for high quality).EconoMode creates draft-quality printing by reducing the amount of Toner on the printed page by up to 50%.
CautionHP does not recommend full-time use of EconoMode. (If EconoMode is used full-time, it is possible that the Toner supply will outlast the mechanical parts in the Toner cartridge.)
NoteIt is best to turn EconoMode on or off from the printer driver or software application. (Driver and software settings override Control Panel settings.)
Table 3-8. Print Quality Menu (continued)
Item Values Explanation
Control Panel Menus 3-13

TONER DENSITY=3 1
2
3
4
5
Lighten or darken the print on the page by changing the Toner density setting. The settings range from 1 (light) to 5 (dark), but the default setting of 3 usually produces the best results.Use a lower Toner density setting to save Toner.
NoteIt is best to change the Toner density from the printer driver or software application. (Driver and software settings override Control Panel settings.)
CREATE
CLEANING PAGE
No value to select. Press [Select] to print a cleaning page (for cleaning excess Toner from the Fuser assembly). In order for the cleaning page to work properly, print the page on copier grade paper (not bond or rough paper). Follow the instructions on the cleaning page.
PROCESS
CLEANING PAGE
No value to select. This item appears only after a cleaning page has been generated (as described above).Press [Select] to process the cleaning page.
Table 3-8. Print Quality Menu (continued)
Item Values Explanation
3-14 Printer Operation

Printing MenuSome items in this menu can be accessed from a software application, or from the printer driver (if the appropriate driver is installed). Printer driver and software application settings override Control Panel settings.
Table 3-9. Printing Menu
Item Values Explanation
COPIES=1 1 TO 999 Set the default number of copies by selecting any number from 1 to 999. Press [– Value +] once to change the setting by increments of 1, or hold down [– Value +] to scroll by increments of 10.
NoteIt is best to set the number of copies from the printer driver or software application. (Driver and software settings override Control Panel settings.)
PAPER=
LETTER
(110V printers)orPAPER=
A4
(220V printers)and ENVELOPE=
COM10
(110V printers)orENVELOPE=
DL
(220V printers)
For supported paper sizes see page 1-12.
Set the default image size for paper and envelopes. (The item name will change from paper to envelope as you scroll through the available sizes.)
CONFIGURE CUSTOM
PAPER=NO
NO
YES
NO: The custom paper menu items are not accessible.YES: The custom paper menu items appear (see the next item).
Control Panel Menus 3-15

UNIT OF MEASURE=
INCHES
(110V printers)orMILLIMETERS
(220V printers)
INCHES
MILLIMETERS
This item appears only when CONFIGURE CUSTOM
PAPER=YES. Select the unit of measurement for the custom paper size.
X DIMENSION=
8.5 INCHES
(110V printers)or216 MILLIMETERS
(220V printers)
3.00 TO 8.5 INCHES
(110V printers)or76 to 216 MILLIMETERS(220V printers)
This item appears only when CONFIGURE CUSTOM
PAPER=YES. Select the dimension to be fed into the printer (short edge).
Y DIMENSION=
14.0 INCHES
(110V printers)or356 MILLIMETERS
(220V printers)
5.00 TO 14.0 INCHES
(110V printers)or127 to 356 MILLIMETERS(220V printers)
This item appears only when CONFIGURE CUSTOM
PAPER=YES. Select the other dimension (long edge).
FORM=
60 LINES
(110V printers)or64 LINES
(220V printers)
5 to 128 Sets vertical spacing from 5 to 128 lines for default paper size. Press [– Value +] once to change the setting by increments of 1, or hold down [– Value +] to scroll by increments of 10.
ORIENTATION=
PORTRAIT
PORTRAIT
LANDSCAPE
Determine the default orientation of print on the page.
NoteIt is best to set the page orientation from the printer driver or software application. (Driver and software settings override Control Panel settings.)
Table 3-9. Printing Menu (continued)
Item Values Explanation
3-16 Printer Operation

PCL FONT
SOURCE=INTERNAL
INTERNAL
SOFT
SLOT 1, 2, OR 3
INTERNAL: Internal fonts.SOFT: Permanent soft fonts.
SLOT 1, 2, or 3: Fonts stored in one of the three DIMM slots.
NoteIt is best to set the font source from the printer driver or software application. (Driver and software settings override Control Panel settings.)
PCL FONT
NUMBER=0
0 TO 999 The printer assigns a number to each font and lists them on the PCL Font List. The font number appears in the Font # column of the printout.
NoteIt is best to set the font number from the printer driver or software application. (Driver and software settings override Control Panel settings.)
PCL FONT
PITCH= 12.00
0.44 TO 99.99 This item might not appear, depending on the font selected. Press [– Value +] once to change setting by increments of.01 for pitch, or hold down [– Value +] to scroll by increments of 1.
NoteIt is best to set the font pitch from the printer driver or software application. (Driver and software settings override Control Panel settings.)
Table 3-9. Printing Menu (continued)
Item Values Explanation
Control Panel Menus 3-17

PCL SYMBOL
SET=PC-8
PC-8
many othersSelect any one of several available symbol sets from the printer’s Control Panel. A symbol set is a unique grouping of all the characters in a font. PC-8 or PC-850 is recommended for line draw characters.
NoteIt is best to set the symbol set from the printer driver or software application. (Driver and software settings override Control Panel settings.)
COURIER=REGULAR REGULAR
DARK
Select the version of Courier font to use:REGULAR: The internal Courier font available on the HP LaserJet 4 series printers.DARK: The internal Courier font available on the HP LaserJet III series printers.Both fonts are not available at the same time.
WIDE A4=NO NO
YES
The Wide A4 setting changes the number of characters that can be printed on a single line of A4 paper. NO: Up to 78 10-pitch characters can be printed on one line. YES: Up to 80 10-pitch characters can be printed on one line.
Table 3-9. Printing Menu (continued)
Item Values Explanation
3-18 Printer Operation
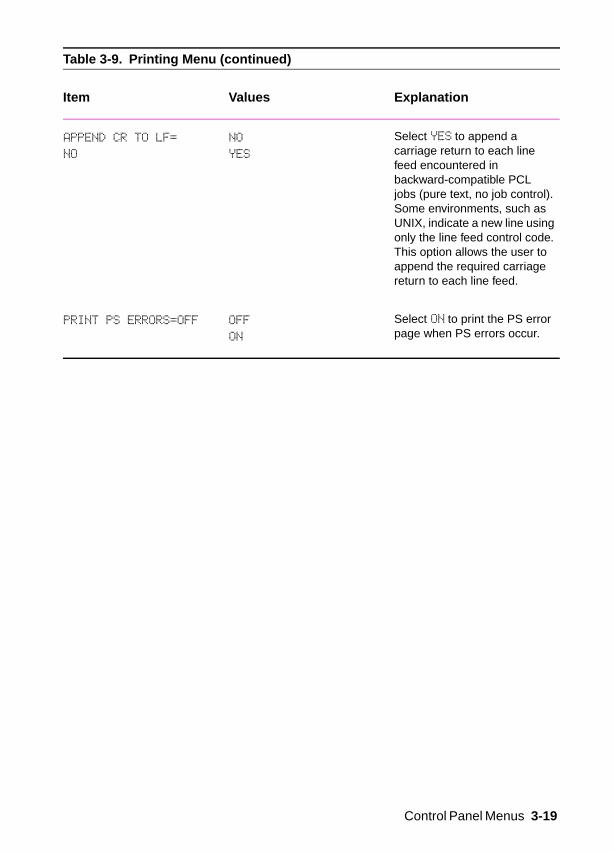
APPEND CR TO LF=
NO
NO
YES
Select YES to append a carriage return to each line feed encountered in backward-compatible PCL jobs (pure text, no job control). Some environments, such as UNIX, indicate a new line using only the line feed control code. This option allows the user to append the required carriage return to each line feed.
PRINT PS ERRORS=OFF OFF
ON
Select ON to print the PS error page when PS errors occur.
Table 3-9. Printing Menu (continued)
Item Values Explanation
Control Panel Menus 3-19

Configuration MenuItems in this menu affect the printer’s behavior. Configure the printer according to your printing needs.
Table 3-10. Configuration Menu
Item Values Explanation
POWERSAVE=
30 MINUTES
OFF
15 MINUTES
30 MINUTES
1 HOUR
2 HOURS
3 HOURS
Set the printer to enter PowerSave after it has been idle for a specified amount of time. Turning PowerSave off is not recommended. The PowerSave feature does the following:1. Minimizes the amount of power consumed by the printer when it is idle. 2. Reduces wear on the printer’s electronic components. (Turns off the display’s backlight.)When you send a print job, press a Control Panel key, open a paper tray, or open the top cover, the printer automatically comes out of PowerSave mode.
NotePowerSave turns off the backlight on the display, but the display is still readable.
PERSONALITY=
AUTO
AUTO
PCL
PS
Select the default printer language (personality). Possible values are determined by which valid languages are installed in the printer.Normally you should not change the printer language (the default is AUTO). If you change it to a specific printer language, the printer will not automatically switch from one language to another unless specific software commands are sent to the printer.
3-20 Printer Operation
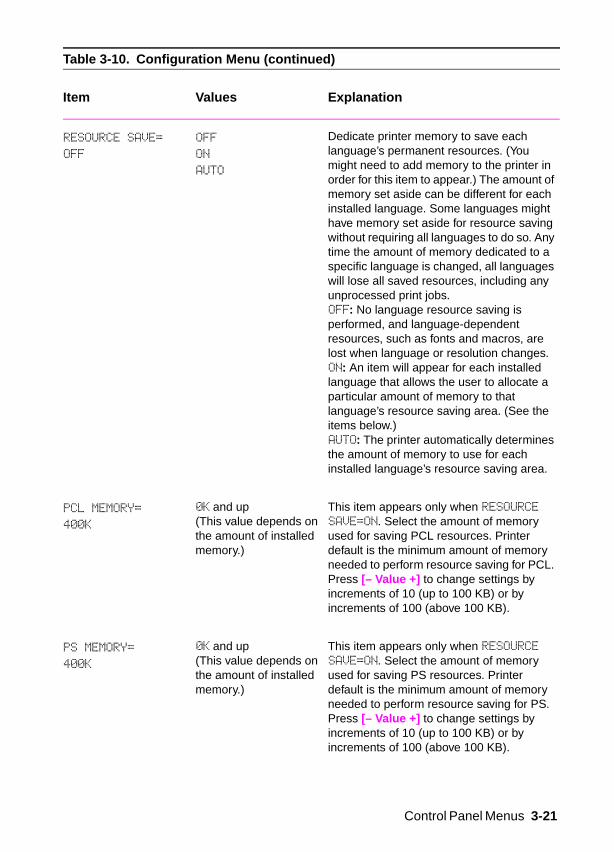
RESOURCE SAVE=
OFF
OFF
ON
AUTO
Dedicate printer memory to save each language’s permanent resources. (You might need to add memory to the printer in order for this item to appear.) The amount of memory set aside can be different for each installed language. Some languages might have memory set aside for resource saving without requiring all languages to do so. Any time the amount of memory dedicated to a specific language is changed, all languages will lose all saved resources, including any unprocessed print jobs.OFF: No language resource saving is performed, and language-dependent resources, such as fonts and macros, are lost when language or resolution changes.ON: An item will appear for each installed language that allows the user to allocate a particular amount of memory to that language’s resource saving area. (See the items below.)AUTO: The printer automatically determines the amount of memory to use for each installed language’s resource saving area.
PCL MEMORY=
400K
0K and up(This value depends on the amount of installed memory.)
This item appears only when RESOURCE SAVE=ON. Select the amount of memory used for saving PCL resources. Printer default is the minimum amount of memory needed to perform resource saving for PCL. Press [– Value +] to change settings by increments of 10 (up to 100 KB) or by increments of 100 (above 100 KB).
PS MEMORY=
400K
0K and up(This value depends on the amount of installed memory.)
This item appears only when RESOURCE SAVE=ON. Select the amount of memory used for saving PS resources. Printer default is the minimum amount of memory needed to perform resource saving for PS. Press [– Value +] to change settings by increments of 10 (up to 100 KB) or by increments of 100 (above 100 KB).
Table 3-10. Configuration Menu (continued)
Item Values Explanation
Control Panel Menus 3-21

PAGE PROTECT=
AUTO
AUTO
ON
This item appears only after a 21 PAGE TOO COMPLEX, PRESS GO TO
CONTINUE message displays. Memory Enhancement technology (MEt) attempts to guarantee that all pages will print. If the page does not print, turn PAGE PROTECT to ON. This might increase chances of a 20 INSUFFICIENT MEMORY, PRESS GO TO CONTINUE message. If this occurs, simplify the print job or install additional memory.
CLEARABLE
WARNINGS=JOB
JOB
ON
Set the amount of time that a clearable warning is displayed on the printer’s Control Panel.JOB: Warning messages display on the Control Panel until the end of the job from which they were generated.ON: Warning messages display on the Control Panel until [Go] is pressed.
AUTO CONTINUE=
ON
ON
OFF
Determine how the printer reacts to errors.ON: If an error occurs that prevents printing, the message will display, and the printer will go offline for 10 seconds before returning online. OFF: If an error occurs that prevents printing, the message will remain on the display and the printer will remain offline until [Go] is pressed. If the printer is on a network, you will probably want to turn AUTO CONTINUE to ON.
Table 3-10. Configuration Menu (continued)
Item Values Explanation
3-22 Printer Operation

TONER
LOW=CONTINUE
CONTINUE
STOP
Determine how the printer behaves when Toner is low. The TONER LOW message will first appear when the Toner Cartridge is almost out of Toner. (About 100 to 300 sheets can still be printed.)CONTINUE: The printer will continue to print while the TONER LOW message is displayed. STOP: The printer will go offline and wait for further action.
RAM DISK=OFF OFF
ON
AUTO
Determine how the RAM disk is configured. This item appears only if there is no optional hard disk installed and the printer has at least 8 MB of memory.OFF: The RAM disk is disabled.ON: The RAM disk is enabled. Configure the amount of memory to be used through the following item: RAM DISK SIZE.
NoteIf the setting is changed from OFF to ON or from OFF to AUTO, the printer will automatically reinitialize when it becomes idle.
RAM DISK
SIZE=XXXK
0K and up(This value depends on the amount of installed memory.)
Determine the size of the RAM disk. This item appears if RAM DISK=ON or AUTO.Press [– Value +] to change settings by increments of 100.
NoteThis setting cannot be changed if RAM DISK=AUTO. Changing this value will cause the printer to reinitialize when it becomes idle.
Table 3-10. Configuration Menu (continued)
Item Values Explanation
Control Panel Menus 3-23

JAM RECOVERY=
AUTO
AUTO
ON
OFF
Determine how the printer behaves when a paper jam occurs.AUTO: The printer automatically selects the best mode for printer jam recovery (usually AUTO). This is the default setting.ON: The printer automatically reprints pages after a paper jam is cleared.OFF: The printer does not reprint pages following a paper jam. Printing performance might be increased with this setting.
MAINTENANCE
MESSAGE=OFF
OFF This item appears only after the PERFORM PRINTER MAINTENANCE message displays.OFF: The PERFORM PRINTER MAINTENANCE message will be cleared and will not be displayed again until the next maintenance is due.The message should not be turned off unless the printer maintenance has been performed. If the required maintenance is not performed, the printer’s performance will degrade.
SMALL PAPER
SPEED=NORMAL
NORMAL
SLOW
Select SLOW when alternately printing envelopes or small paper and standard paper sizes.Be sure to return the speed to NORMAL when finished.
TONER LOW=CONTINUE CONTINUE
STOP
Determine how the printer behaves when Toner is low. The TONER LOW message will first appear when the Toner Cartridge is almost out of Toner. (About 100 to 300 sheets can still be printed)CONTINUE: The printer will continue to print while the TONER LOW message is displayed.STOP: The printer will go offline and wait for further action.
Table 3-10. Configuration Menu (continued)
Item Values Explanation
3-24 Printer Operation

QUICK COPY
JOBS = 32
(HP LaserJet 4050 series printer with hard disk installed only)
1 to 50 Specifies the number of quick copy jobs that can be stored on the printer’s hard disk.
HELD JOB
TIMEOUT = OFF
(HP LaserJet 4050 series printer with hard disk installed only)
1 HOUR
4 HOURS
1 DAY
1 WEEK
This setting allows the user to set the timeout value for how long a job will be stored before it is automatically deleted from the held job queue.
CONFIGURE
PRORES 1200=NO*
(HP LaserJet 4050 series printer only)
YES
NO
This item allows the user to tell the printer whether or not to use ProRes, which provides 1200 dpi. If YES is selected, another menu entry appears giving the user the option of NORMAL or HALF speed.
Table 3-10. Configuration Menu (continued)
Item Values Explanation
Control Panel Menus 3-25

I/O MenuItems in the I/O (input/output) Menu affect the communication between the printer and the computer.
Table 3-11. I/O Menu
Item Values Explanation
I/O TIMEOUT=15 5 to 300 Select the I/O timeout period in seconds. (I/O timeout refers to the time, measured in seconds, that the printer waits before ending a print job.)This setting allows you to adjust timeout for best performance. If data from other ports appear in the middle of your print job, increase the timeout value.Press [– Value +] once to change settings by increments of 1, or hold down [– Value +] to scroll by increments of 10.
I/O BUFFER=AUTO AUTO
ON
OFF
Allocate memory for I/O buffering.AUTO: The printer automatically reserves memory for I/O buffering. Additional configurations are not required and the I/O BUFFER SIZE menu item does not appear.ON: The I/O BUFFER SIZE item appears (see below). Specify the amount of memory to be used for I/O buffering.OFF: I/O buffering is not performed and the I/O BUFFER SIZE item does not appear.When the I/O buffer setting is changed, any downloaded resources (such as fonts or macros) will need to be downloaded again, unless they are stored on an optional hard disk or flash DIMM.
I/O BUFFER SIZE=
100K
10K and up This item appears only when I/O BUFFER=ON. Specify the amount of memory for I/O buffering. The maximum amount of memory available for I/O buffering is determined by the amount of memory installed in the printer, the languages installed in the printer, and by other memory allocations that must be made.Press [–Value +] to change settings by increments of 10 (up to 100 KB) or by increments of 100 (above 100 KB).
3-26 Printer Operation

PARALLEL HIGH
SPEED=YES
YES
NO
Select the speed at which data is transmitted to the printer.YES: The printer accepts faster parallel communications used for connections with newer computers.NO: The printer accepts slower parallel communications used for connections with older computers.
PARALLEL ADV
FUNCTIONS=ON
ON
OFF
Turn the bidirectional parallel communication on or off. The default is set for a bidirectional parallel port (IEEE-1284).This setting allows the printer to send status readback messages to the computer. (Turning on the parallel advanced functions might slow language switching.)
SERIAL
PACING=DTR/DSR
DTR/DSR
XON/XOFF
Select the type of pacing used. Pacing, or “handshaking” allows the printer to tell the computer when to send information. The printer uses XON/XOFF and DTR/DSR signal protocols rather than ETX/ACK protocol. DTR/DSR: Select this value if your computer requires hardware flow control (most personal computers do). XON/XOFF: Select this value if your computer requires software flow control (a UNIX workstation, for example). The SERIAL ROBUST XON item appears (see below).
Table 3-11. I/O Menu (continued)
Item Values Explanation
Control Panel Menus 3-27

SERIAL ROBUST
XON=ON
ON
OFF
This item appears only when SERIAL PACING=XON/XOFF. Select the method for generating XONs.ON: The printer sends an XON when the printer is online and when sufficient buffer space is available. If the host does not receive data within approximately one second, the printer will transmit additional XONs at one second intervals until the host receives data.OFF: The printer sends one XON when it can accept more data or when it is online. The printer does not send XONs every second while the printer is online and ready for more data.
SERIAL BAUD
RATE=9600
300
600
1200
2400
4800
9600
19200
38400
57600
115200
Select the printer’s baud rate (speed at which information is transferred) for communicating from the computer to the printer.
SERIAL DTR
POLARITY=HIGH
HIGH
LOW
Determine whether pin #8 is high or low when the printer is ready.HIGH: Pin number 8 is held high when the printer is ready.LOW: Pin number 8 is held low when the printer is ready.
Table 3-11. I/O Menu (continued)
Item Values Explanation
3-28 Printer Operation

EIO Menu (Networked Printers)EIO (enhanced input/output) Menus depend on the particular accessory product installed in an EIO slot of the printer. If the printer contains an HP JetDirect print server EIO card, you can configure basic networking parameters using the EIO Menu. These and other parameters can also be configured through HP JetAdmin.
Table 3-12. EIO Menu
Item Values Explanation
CFG NETWORK=NO NO
YES
NO: The JetDirect Menu is not accessible.YES: The JetDirect Menu appears.
NOVELL=ON ON
OFF
Select whether the IPX/SPX protocol stack (in Novell NetWare networks, for example) is enabled (on) or disabled (off).
DLC/LLC=ON ON
OFF
Select whether the DLC/LLC protocol stack is enabled (on) or disabled (off).
TCP/IP=ON ON
OFF
Select whether the TCP/IP protocol stack is enabled (on) or disabled (off).
ETALK=ON ON
OFF
Select whether the Apple EtherTalk protocol stack is enabled (on) or disabled (off).
CFG NOVELL=NO NO
YES
NO: The IPX/SPX Menu is not accessible.YES: The IPX/SPX Menu appears. In the IPX/SPX Menu, you can specify the frame type parameter used on your network. The default is AUTO, to automatically set and limit the frame type to the one detected.For Ethernet cards, frame type selections include EN_8023, EN_II, EN_8022, EN_SNAP.For Token Ring cards, frame type selections include TR_8022, TR_SNAP. In the IPX/SPX Menu for Token Ring cards, you can also specify NetWare Source Routing parameters, which include SRC RT=AUTO (default), OFF, SINGLE R, or ALL RT.
Control Panel Menus 3-29

CFG TCP/IP=NO NO
YES
NO: The TCP/IP Menu is not accessible.YES: The TCP/IP Menu appears. In the TCP/IP Menu, you can specify BOOTP=YES for TCP/IP parameters to be automatically loaded from a bootp or DHCP server when the printer is turned on. If you specify BOOTP=NO, you can manually set selected TCP/IP parameters from the Control Panel. You can manually set each byte of the IP address (IP), Subnet Mask (SM), Syslog Server (LG), and Default Gateway (GW). Also, you can manually set the Timeout time period.
NoteIf no IP address is assigned within the first 5 minutes, the HP JetDirect print server card will assume a default IP address of 192.0.0.192.
CFG ETALK=NO NO
YES
NO: The EtherTalk Menu is not accessible.YES: The EtherTalk Menu appears. In the EtherTalk Menu you can set the AppleTalk phase parameter (ETALK PHASE=1 OR 2) for your network.
Table 3-12. EIO Menu (continued)
Item Values Explanation
3-30 Printer Operation

Resets MenuUse this menu with caution. You can lose buffered page data or printer configuration settings when you select these items. Only reset the printer under the following circumstances:
You want to restore the printer’s default settings.
Communication between the printer and computer has been interrupted.
You are using both the serial and parallel I/O ports, and one of the ports is having problems.
The items in the Resets Menu will clear all memory in the printer, while [Cancel Job] clears only the current job.
Note Job retention features will be deleted if you do not have the hard disk accessory. (HP LaserJet 4050 series printer only.)
Table 3-13. Resets Menu
Item Explanation
RESET MEMORY This item clears the printer buffer and the active I/O input buffer, and makes the Control Panel defaults current.Resetting memory during a print job can result in data loss.
RESTORE FACTORY SETTINGS This item performs a simple reset and restores most of the factory (default) settings. This item also clears the input buffer for the active I/O.
RESET ACTIVE I/O CHANNEL This item performs a simple reset and clears the input and output buffers (for the active I/Os only).
RESET ALL I/O CHANNELS This item performs a simple reset and clears the input and output buffers for all I/Os.
Control Panel Menus 3-31
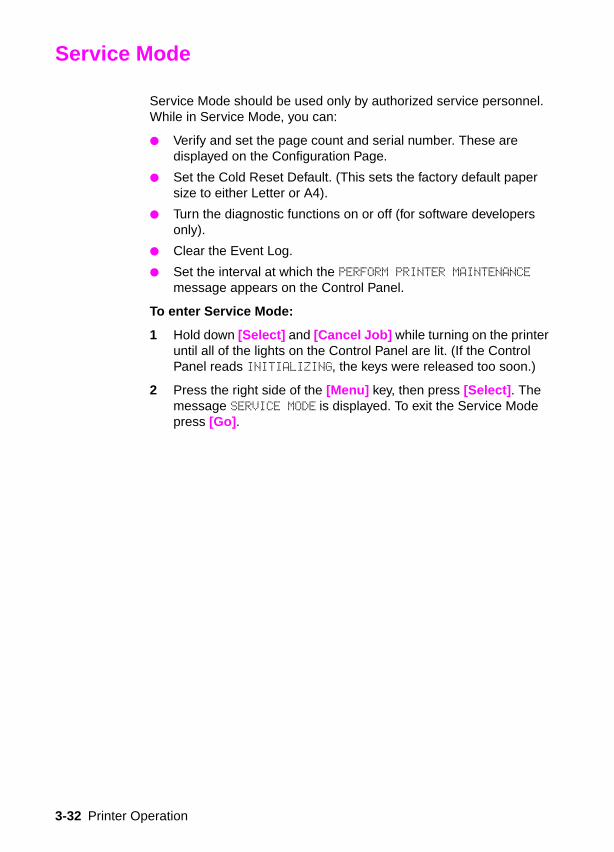
Service Mode
Service Mode should be used only by authorized service personnel. While in Service Mode, you can:
Verify and set the page count and serial number. These are displayed on the Configuration Page.
Set the Cold Reset Default. (This sets the factory default paper size to either Letter or A4).
Turn the diagnostic functions on or off (for software developers only).
Clear the Event Log.
Set the interval at which the PERFORM PRINTER MAINTENANCE message appears on the Control Panel.
To enter Service Mode:
1 Hold down [Select] and [Cancel Job] while turning on the printer until all of the lights on the Control Panel are lit. (If the Control Panel reads INITIALIZING, the keys were released too soon.)
2 Press the right side of the [Menu] key, then press [Select] . The message SERVICE MODE is displayed. To exit the Service Mode press [Go] .
3-32 Printer Operation

Service Menu
Figure 3-2 Service Menu
Setting the Page Count, Maintenance Count, and Serial NumberThe page count and printer serial number are stored in non-volatile memory. If it is necessary to replace the Formatter PCA, the page count should be set to the current value to reflect the age of the Print Engine. The procedure for setting the serial number is similar to setting the page count.
Note Before replacing the Formatter PCA, print a Configuration Page to verify the current page count and serial number of the printer, if possible. Use the information on the Configuration Page to reset the page count and printer serial number for the new Formatter PCA.
Service Mode 3-33

Page Count
The page count stored in NVRAM and displayed on the Configuration Page printout represents the number of pages which the printer has printed (excluding engine test prints). If it becomes necessary to repair a printer by installing a new Formatter, the page count must be reset so that it represents the age of the printer’s engine rather than the age of the Formatter.
The page count value is changed using a different method than is used for other Control Panel values. Instead of increasing the entire value by increments, each digit can be selected and modified individually. The following Control Panel keys are used to modify the page count value:
Table 3-14 shows the sequence of keystrokes used to change the page count from a value of 000000 to a value of 0010480.
[Select] Enters any changes to the current digit and advances the cursor one digit to the right. If the last digit is currently selected, pressing the [Select] key wraps the cursor around to the first digit.
[Value +] Increases the value of the currently selected digit by one. Pressing [Value +] when 9 is the value of the currently selected digit will change the value of the digit to 0.
[– Value] Decreases the value of the currently selected digit by one. Pressing [– Value] when 0 is the value of the currently selected digit will change the value of the digit to 9.
Table 3-14. Changing the Page Count
Key Press Display Description
SERVICE MODE
[Menu+] SERVICE MENU Enter the SERVICE MENU.
[Item+] PAGES=0000000 * Advance to the first item in the SERVICE MENU.
[Select] PAGES=0000000 * Advance the cursor one digit to the right.
3-34 Printer Operation

Maintenance Page Count
The maintenance page count should be reset only after a maintenance kit has been installed.
This will reset the maintenance counter so that the message PERFORM PRINTER MAINTENANCE will display another 200,000 pages later (default).
Hold down the [– Item] and [– Value] keys.
Turn the printer on.
Wait for RESET MAINTENANCE COUNT to be displayed and then release both keys.
[Select] PAGES=0000000 * Advance the cursor one digit to the right.
[Value +] PAGES=0010000 * Increase the value of the third digit by one.
[Select] PAGES=0010000 * Enter the change to the third digit and advance the cursor one digit to the right.
[Select] PAGES=0010000 * Advance the cursor one digit to the right.
[Value +](4 presses)
PAGES=0010400 * Increase the value of the fifth digit by four.
[Select] PAGES=0010400 * Enter the change to the fifth digit and advance the cursor one digit to the right.
[– Value](2 presses)
PAGES=0010480 * Decrease the value of the sixth digit by two.
[Select](2 presses)
PAGES=0010480 * Enter the change to the sixth digit and advance the cursor one digit to the right causing the cursor to wrap around to the first digit.
[Go] To exit.
Table 3-14. Changing the Page Count (continued)
Key Press Display Description
Service Mode 3-35

MAINTENANCE COUNT in the Service Mode Menu sets the page count interval at which the next service is due for the printer. This is set initially at the factory to 200,000 pages. (For example, the message displays at 200,000 pages. If the Printer Maintenance Kit is installed at 200,114 pages, the message displays 200,000 pages later, at 400,114 pages.) Editing this number is similar to editing the PAGES item above.
Serial Number
If a Formatter is replaced, then the printer serial number must be reentered. Editing this number is similar to editing the PAGES item above.
Cold Reset PaperThe default paper size is stored in NVRAM and when the printer is cold reset, the default paper size is set to the factory setting. Possible values are COLD RESET PAPER=LETTER and COLD RESET PAPER=A4. When replacing the Formatter in countries that use A4 rather than letter size paper, set the cold reset paper size to A4.
DiagnosticsThis menu item enables or disables the use of the firmware diagnostic features. Possible values are DIAGNOSTICS=OFF* and DIAGNOSTICS=ON. When enabled, the diagnostic features are accessible when the printer is in the online READY state by pressing the [Select] key.
Note This feature is for developers only.
Clear Event LogThis item allows the internal Event Log to be cleared.
3-36 Printer Operation

Testing the Printer
When you print a Configuration Page, the printer checks its internal controller and I/O interface, and then prints a test page. You can review the Configuration Page printout to verify proper installation of such options as paper trays or printer languages. For more information, see page 7-52.
Engine Test
The engine test print can be used to verify that the Print Engine is functioning correctly. For more information, see page 7-11.
Testing the Printer 3-37

Resetting the Printer
Cold Reset
Cold reset clears all data from the printer memory and sets all the defaults back to the factory settings.
CAUTION Performing a Cold Reset resets the HP JetDirect configuration. To avoid making changes to your configuration, remove the HP JetDirect card before performing a cold reset.
If possible, print a Configuration Page prior to performing a Cold Reset. This will document current settings for later reference.
To perform a Cold Reset:
1 Turn off the printer.
2 While pressing [Go] , turn the printer on. COLD RESET appears briefly on the display, then INITIALIZING appears. After a few seconds, RESTORING FACTORY SETTINGS appears on the display, followed by OFFLINE. The cold reset is complete.
3 Press [Go] to return the printer online. READY appears on the display.
Clearing NVRAM
This procedure will clean up the NVRAM by removing old areas that are not being used.
1 Turn off the printer.
2 While pressing [Cancel Job] turn the printer on. CLEANUP NVRAM appears briefly on the display, followed by INITIALIZING. After a few seconds READY appears.
3-38 Printer Operation

System Configuration
MS-DOS System ConfigurationTo communicate properly with the printer, the MS-DOS environment requires the addition or modification of MODE commands in the AUTOEXEC.BAT file. Add or modify the MODE command(s), depending on the interface configuration, as follows:
Parallel DOS CommandsMost IBM and AT compatible computers default to a parallel printer port. To ensure that information is sent to your parallel printer port, type the following MS-DOS command at your MS-DOS prompt or include it in your AUTOEXEC.BAT file:
MODE LPT1: , , P
For MS-DOS version 4.0 and above, enter:
MODE LPT1: , , B
Note This example assumes that you are using parallel printer port LPT1. If you are using LPT2 or LPT3, replace LPT1 in the example with the printer port that you are using.
Since the MODE command is an external MS-DOS command (a program named MODE.COM is run when the MODE command is invoked), the program file must be contained in the root directory, or in a directory specified in a preceding PATH command in the AUTOEXEC.BAT file.
After changing the AUTOEXEC.BAT file, reboot the computer to initiate the changes.
System Configuration 3-39

Serial MS-DOS CommandsMost IBM compatible computers default to a parallel printer port. To ensure that information is sent to the serial printer port, type the following MS-DOS commands at the MS-DOS prompt, or include them in the AUTOEXEC.BAT file.
MODE COM1: 9600, N, 8, 1, P
MODE LPT1: =COM1
For MS-DOS version 4.0 or above, enter:
MODE COM1: 9600, N, 8, 1, B
MODE LPT1: =COM1
Note These examples assume that you are using serial printer port COM1. If you are using COM2 or COM3, replace COM1 with the printer port that you are using.
Since the MODE command is an external MS-DOS command (a program named MODE.COM is run when the MODE command is invoked), the program file must be contained either in the root directory or in a directory specified in a preceding PATH command in the AUTOEXEC.BAT file.
After changing the AUTOEXEC.BAT file, reboot the computer to initiate the changes.
3-40 Printer Operation

Printer I/O Configuration
Parallel MenuThe default setting for the HIGH SPEED PARALLEL I/O is YES. If it is set to NO, the interface runs at a slower speed that is compatible with older computers. When the default is set to YES, the parallel interface runs at a higher rate supported by newer computers.
Advanced Functions
The ADVANCED FUNCTIONS feature of the printer enables bidirectional communications between the printer and the host. The default setting is ON. This default setting (ON) must be active in order to use HP LaserJet Explorer, the Windows® Printing System, and other software applications and drivers.
Serial ConfigurationUse RS-232C serial configuration when the printer is located 11 to 50 feet (3.35 to 15.24 meters) from the computer. If you need to locate the printer between 51 and 2000 feet (15.54 and 610 meters) from the computer, use an RS-422A serial configuration.
Serial I/O settings must be configured correctly for proper serial communication.
Serial Protocol
When printing with a serial configuration, the same protocol must be set on both the printer and the computer. Protocol on the printer is set by changing the Control Panel settings. Protocol on the computer is set by using DOS commands. The default protocol settings are described below.
BAUD Rate
The BAUD RATE setting tells the printer how fast information is transferred to and from the computer. The default setting is BAUD RATE=9600*.
Printer I/O Configuration 3-41

Pacing (Handshaking)
Pacing (or “handshaking”) is a type of communication between the printer and the computer. This is an important setting in the printer because it allows the printer to tell the computer when to send information. If the printer is unable to receive information, for example, when the print buffer is full or when the printer is out of paper, a signal is sent to the computer to stop sending information. When the printer is able to resume receiving information, it sends another signal to the computer to send more data.
Pacing is set through the Control Panel’s I/O Menu. Two types of handshaking are supported by the printer:
Select DTR/DSR through the I/O Menu’s PACING item if the computer requires hardware flow control (most personal computers do). Through the I/O Menu’s DTR POLARITY item, the DTR polarity can be set to High or Low. The default is DTR POLARITY=HI.
Select XON/XOFF through the I/O Menu’s PACING item if the computer requires software flow control (for example, if you are using a UNIX workstation). Note that status readback messages are not paced when XON/XOFF is selected. Through the I/O Menu’s ROBUST XON item, Robust Xon can be set to ON (the default) or OFF. Note that the ROBUST XON item only appears under the I/O Menu if XON/XOFF is selected.
3-42 Printer Operation

4 Printer Maintenance
Overview
This chapter discusses the following:
Cleaning the Printer and Accessories
Preventative Maintenance
Overview 4-1

Cleaning the Printer and Accessories
To maintain high print quality and performance, thoroughly clean the printer and the paper handling accessories:
Every time you change the Toner Cartridge (run a cleaning page).
After printing approximately 10,000 pages.
Whenever print quality problems occur.
Clean the outside surfaces with a lightly water-dampened cloth. Clean the inside parts as indicated in Table 4-1. Observe the warning and caution below.
WARNING! Before you begin these steps, turn the printer off and unplug all power cords to avoid shock hazard.
Be careful when cleaning around the Fusing Assembly area. It may be hot.
CAUTION To avoid permanent damage to the Toner Cartridge, do not use ammonia-based cleaners on or around the printer.
Do not touch the Transfer Roller. Skin oils on the roller can reduce print quality. If Toner gets on your clothes, wipe it off with a dry cloth and wash your clothes in cold water. Hot water sets Toner into fabric.
Figure 4-1 Location of the Transfer Roller – Do Not Touch!
4-2 Printer Maintenance

Table 4-1. Cleaning the Printer
Component Cleaning Method / Notes
Outside Covers Use a water-dampened cloth. Do not use solvents or ammonia-based cleaners.
Inside General With a dry lint-free cloth, wipe any dust, spilled Toner, and paper particles from the paper path area, the Registration Roller, and the Toner Cartridge cavity.
Paper Pickup, Feed, and Separation Rollers
Use a water-dampened, lint-free cloth.
Separation Pad Use a dry, lint-free cloth.
Registration Roller Use a dry, lint-free cloth.
Transfer Roller Use a dry, lint-free cloth. DO NOT TOUCH with your fingers.
Fuser Use a water-dampened, lint-free cloth.
Cleaning the Printer and Accessories 4-3

Using the Printer Cleaning Page
If Toner specks appear on the front or back side of your print jobs, follow the procedure below.
From the printer’s Control Panel, do the following:
1 Press [Menu] until PRINT QUALITY MENU appears.
2 Press [Item] until CREATE CLEANING PAGE appears.
3 Press [Select] to create the cleaning page.
4 Follow the instructions on the cleaning page to complete the cleaning process.
Note In order for the cleaning page to work properly, print the page on copier grade paper (not bond or rough paper).
You might need to create a cleaning page more than once. When Toner has been cleaned from the Fuser Assembly, shiny black spots will appear on the page’s black strip.
To ensure good print quality with certain types of paper, use the cleaning page every time the Toner Cartridge is replaced. If the cleaning page is frequently needed, try a different type of paper.
Cleaning Spilled TonerDefective Toner Cartridges can develop leaks. Also, after a paper jam has occurred, there may be some Toner remaining on the rollers and guides inside the printer. The pages that print immediately after the jam may pick up this Toner.
Clean spilled Toner with a cloth dampened with cold water. Do not touch the Transfer Roller with the damp cloth or with your fingers. Do not use a vacuum cleaner unless it is equipped with a micro-fine particle filter.
4-4 Printer Maintenance

Preventative Maintenance
The preventative maintenance cycle for this printer is every 200,000 pages. To order the maintenance kit see page 8-2. The kit contains the following replacement parts:
One Fuser
One Transfer Roller
One Tray 1 Roller
Three Feed Rollers
Three Separation Rollers
Refer to the instructions included in the kit for detailed replacement procedures.
Reset Maintenance CountAfter the PM kit has been installed, reset the maintenance count.
1 Turn the printer off.
2 While pressing [– Item] and [– Value] turn the printer on.
RESET MAINTENANCE COUNT appears, followed by INITIALIZING. After a few seconds READY appears.
Preventative Maintenance 4-5

Expected Life of ComponentsThe following table shows the expected life of certain components in the printer. To order parts, see Chapter 8.
Table 4-2. Life of Components for the HP LaserJet 4000 and 4050 Series Printer
No. Part name Part No. Quantity Expected Life
1 Tray 1 Pickup Roller RG5-3718-000CN 1 100,000 pages
2 Tray Feed Roller RF5-2490-000CN 1 200,000 pages
3 Tray Separation Roller RF5-2490-000CN 1 200,000 pages
4 Tray 1 Separation Pad RG5-2655-000CN(Tray 1 Pickup Assembly)
1 200,000 pages
5 Tray 1 Pickup Solenoid RH7-5172-000CN 1 200,000 pages
6 Fuser 100-127V220-240V
C4118-69003C4118-69004
11
200,000 pages200,000 pages
7 Transfer Charging Roller RG5-4283-000CN 1 200,000 pages
8 Cooling Fan RH7-1335-000CN 1 25,000 hours
9 Duplexer Exhaust Fan RH7-1361-000CN 1 25,000 hours
4-6 Printer Maintenance

5 Functional Information
Overview
This chapter presents a generalized functional overview of the printer and the printing processes. This chapter discusses the following printer systems:
Power Supply System
Engine Controller System
Formatter System
Image Formation System
Paper Feed System
Basic Sequence of Operation
Overview 5-1

Power Supply System
AC/DC Power DistributionAC power is supplied to the low-voltage power supply circuit in the Engine Controller Board when the power switch (SW1) is turned on. The low-voltage power supply circuit supplies +24 VDC and +3.3 VDC required for the printer.
+24 VDC is supplied to drive the main motor, scanner motor and fan, and to the high-voltage power supply. +3.3 VDC is used for sensors and ICs on the engine controller board. +24 VDC is divided into +24 VA which is normally supplied from the low-voltage power circuit, and +24VB which is interrupted when the door switch (SW101) turns off by opening the upper cover.
Figure 5-1 Low-voltage Power Supply Circuit
If a short-circuit or other problems on the load side cause an excessive current flow from the +24VDC, or +3.3 VDC power supplies or generate abnormal voltage, the excess-current protection system and excess-voltage protection system automatically shut off the output voltage to protect the power supplies.
If the protection systems are activated and the power supply circuit does not output DC voltage, it is necessary to turn the printer off, correct the problem in the faulty load, then turn the printer on again.
The circuit has two fuses which break the circuit and cut off the output voltage if excess current flows through the AC line.
5-2 Functional Information

Overcurrent Overvoltage ProtectionThe Fusing Heater Safety Circuit is located on the Engine Controller Board, and constantly monitors the fusing temperature.
In case of abnormality, the output from this circuit turns off the relay (RL101) and interrupts the power to the fusing heater.
If an increase in the temperature of the Fusing Heater causes the Thermistor Output voltage to exceed about 1.2V (240° C), the output of pin #13 of the comparator (IC301) becomes “L”.
When the output of pin #14 becomes “L” and Q302 is turned off, the relay (RL101) is turned off.
To protect the Fuser from excessive voltages, the printer has the following three protective functions:
The CPU monitors the voltage of TH901. If it is abnormal, the CPU assesses fusing heater failure and turns off the relay (RL101). At the same time, it reports the fusing heater failure to the Formatter.
If the temperature of the fusing heater rises abnormally and the voltage of TH901 falls below about 1.2V (240° C), the fusing heater’s safety circuit interrupts the power to the fusing heater, regardless of CPU outputs.
If the temperature of the fusing heater rises abnormally and the temperature of the Thermal Fuse exceeds about 230° C, the temperature fuse melts, which interrupts the power to the fusing heater.
Power Supply System 5-3
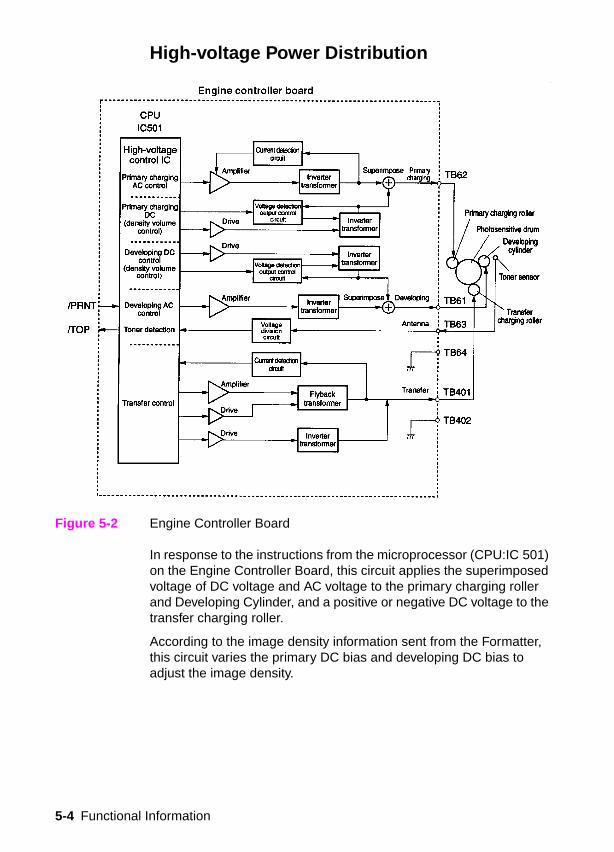
High-voltage Power Distribution
Figure 5-2 Engine Controller Board
In response to the instructions from the microprocessor (CPU:IC 501) on the Engine Controller Board, this circuit applies the superimposed voltage of DC voltage and AC voltage to the primary charging roller and Developing Cylinder, and a positive or negative DC voltage to the transfer charging roller.
According to the image density information sent from the Formatter, this circuit varies the primary DC bias and developing DC bias to adjust the image density.
5-4 Functional Information

Toner Cartridge DetectionThe Toner Cartridge has a Toner sensor. The circuit compares the output value of the developing AC bias and the output value from the antenna inside the Cartridge, and outputs the Toner detection signal.
The CPU detects the remaining Toner level and the presence of the Cartridge when the developing bias is applied to the Developing Cylinder. The remaining Toner level is always detected when the developing bias is applied. The presence of the Cartridge is detected only when the developing bias is applied during the initial rotation.
Power Supply System 5-5

Engine Controller System
The following systems and functions are controlled by the engine controller board:
DC power distribution (+3.3V DC, +5V DC, +24VA)
Laser and scanner drive
Paper motion monitoring and control (photosensors and flags)
Clutches (tray pickup and Tray 1 feed)
Engine Test
Motors (main drive, scanner, and fans)
The operation sequences of this printer are controlled by the CPU of this circuit. When the power switch of the printer is turned on and the printer enters the standby mode, the CPU outputs the signals to drive the loads such as Laser Diode, motors, and solenoids, based on the print commands and the image data input from the external device.
5-6 Functional Information

Figure 5-3 Engine Controller Board
Engine Controller System 5-7

Engine Controller Board Inputs and Outputs
Figure 5-4 Engine Controller Board I/O (1 of 4)
5-8 Functional Information

Figure 5-5 Engine Controller Board I/O (2 of 4)
Engine Controller System 5-9

Figure 5-6 Engine Controller Board I/O (3 of 4)
5-10 Functional Information
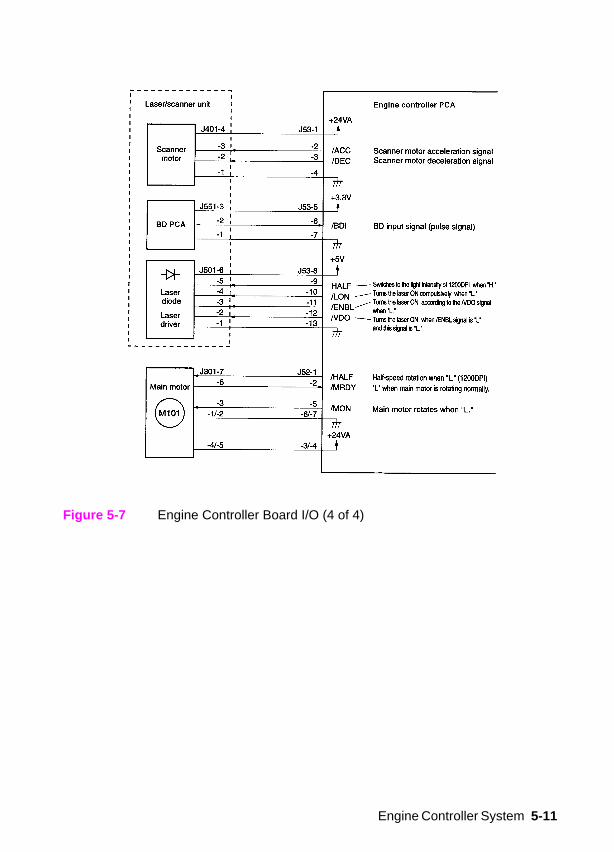
Figure 5-7 Engine Controller Board I/O (4 of 4)
Engine Controller System 5-11

Laser and Scanner DriveBased on information received from the Formatter, the Engine Controller Board sends signals to the Laser Scanner Assembly to modulate the Laser Diode on and off and to drive the Laser Scanner motor. See “Image Formation System” on page 5-22 for more information.
Paper Motion Monitoring and ControlThe Engine Controller Board controls paper motion by continuously monitoring the various Paper Sensors and coordinating paper movement with the other print processes. For more information, see “Paper Feed System” on page 5-33.
Solenoids, Sensors, Clutches, and SwitchesSee “Engine Controller Board Inputs and Outputs” on page 5-8.
Engine Test PrintSee “Engine Test” on page 7-11.
5-12 Functional Information

MotorsSee “Timing Diagram” on page 5-50 for specific timing details for the printer motors.
The Main Motor, MT1, is controlled by the Engine Controller Board. The Main Motor drives the Main Gear Assembly and rotates during the initial rotation period (following power-on), the print period, the last rotation period, or whenever the printer’s Top Cover is opened and closed.
Figure 5-8 Main Motor Control
The Main Motor is a DC brushless motor and is unified with the motor drive circuit.
The CPU (IC501) sets the Main Motor Drive signal (/MON) to “L” and rotates the Main Motor. When the HP LaserJet 4000 series printer is printing at 1200 dpi, the CPU sets the main motor rotation switching signal (/HALF) to “L” and decreases the rotation speed of the Main Motor to half. The HP LaserJet 4050 prints 1200 dpi at engine speed.
Engine Controller System 5-13

The Scanner Motor is controlled and monitored by the Engine Controller Board. It rotates the Scanner Mirror during the initial rotation period and the print period.
The Fan Motor is controlled and monitored by the Engine Controller Board. The fan operates at full speed during the printing modes. The Fan turns off in PowerSave mode after the Fuser cools down.
5-14 Functional Information

Formatter System
The Formatter PCA is responsible for the following:
Controlling the PowerSave mode
Receiving and processing print data from the various printer interfaces
Monitoring Control Panel inputs and relaying printer status information (through the Control Panel and the bidirectional I/O)
Developing and coordinating data placement and timing with the print engine
Storing font information
Communicating with the host computer through the Bidirectional Interface
The Formatter PCA receives a print job from the Bidirectional Interface and separates it into image information and instructions which control the printing process. The Engine Controller Board synchronizes the Image Formation System with the Paper Input and Output systems, and then signals the Formatter to send the print image data.
The Formatter PCA also provides the electrical interface and mounting locations for two EIO cards, additional memory DIMMs, and the Hard Disk accessory, and the HP Fast InfraRed Receiver (HP LaserJet 4050 series printer only).
PowerSaveThis feature (accessed from the Configuration Menu) conserves power by shutting down the Fuser and Exhaust Fans after the printer has been idle for an adjustable period of time. The printer retains all printer settings, downloaded fonts, and macros while in PowerSave mode. The default setting is POWERSAVE ON, with a 30 minute idle time. (PowerSave can also be turned OFF from the Control Panel.)
The printer exits PowerSave mode and enters the warm-up cycle when any of the following occurs:
A print job, valid data, or a PML or PJL command is received at the parallel port, serial port, FIR port, and EIO card
A Control Panel key is pressed
The Top Cover is opened and then closed
A paper tray is opened and then closed
The Engine Test button is pressed
Formatter System 5-15

Note Printer error messages override the PowerSave message. The printer will enter PowerSave mode at the appropriate time, but the error message will continue to be displayed.
Resolution Enhancement technology (REt)The Formatter PCA contains circuitry for Resolution Enhancement technology (REt), which modifies the standard video dot data on its way to the Engine Controller Board to produce “smoothed” black-to-white boundaries. REt can be turned on or off from the Control Panel, or from some software applications. The default setting is medium.
Note REt settings sent from software applications or printer drivers override the Control Panel settings.
EconoModeThe EconoMode setting uses up to 50% less Toner than standard mode printing by reducing the dot density. However, EconoMode does not extend Toner Cartridge component life. EconoMode, which can be thought of as “draft mode” can be selected from the Control Panel (Print Quality Menu) and through some software applications and printer drivers. The default setting is off.
Note EconoMode does not affect print speed, memory usage, nor extend the Toner Cartridge’s life.
5-16 Functional Information

Input/Output
Parallel Interface
The Formatter PCA receives incoming data through its Bidirectional Interface (IEEE 1284). The I/O provides high speed and two way communication between the printer and the host, allowing the user to change printer settings and monitor printer status from the host computer. The user may configure the HIGH SPEED item in the Control Panel Menu. The default setting, YES, allows the I/O to run at the higher speeds supported by most newer computers. When set to NO, the parallel interface runs at the slower mode that is compatible for older computers. The user may also configure the ADVANCED FUNCTIONS item. The default setting, ON, allows for two way parallel communications. The OFF mode disables the advanced functionality. The I/O is compatible with the Bidirectional Parallel Interface standard.
Expanded I/O
The optional Expanded I/O card can be installed in the slots provided on the Formatter PCA. It provides automatic I/O switching between multiple computers or networks connected to the printer. The network versions for the HP LaserJet 4000 series printers include LocalTalk and the HP JetDirect Multi-protocol Network Card with Ethernet/10Base-T and 10Base-2. The network versions for the HP LaserJet 4050 series printers include the HP JetDirect Print Server with 10/100 Base TX.
HP Fast InfraRed Receiver
The HP Fast InfraRed Receiver enables wireless printing from any iRDA-compliant portable device (such as a laptop computer) to the HP LaserJet 4050, 4050 N, 4050 T, or 4050 TN printer.
The printing connection is maintained by positioning the sending infrared port within operating range. Note that the connection can be blocked by objects such as a hand, paper, direct sunlight, or any bright light shining into either infrared port.
Flash
Flash is provided in optional 2 MB and 4 MB flash memory DIMMs for storing forms, fonts, and signatures.
Formatter System 5-17

Disk
The disk accessory is mounted on the rear of the Formatter PCA. The optional greater than 1 GB EIO-based hard drive is used for creating multiple original prints (mopies) and storing forms, fonts, and signatures.
Local Talk I/O
The printer implements AppleTalk networking protocol through LocalTalk hardware. The LocalTalk network cable (HP P/N 92215N) is connected through the EIO card. The LocalTalk hardware is an optional feature for the HP LaserJet 4000, 4000 T, and 4050 series printers. The LocalTalk hardware is bundled with the HP LaserJet 4000 N/TN printers.
CPUThe HP LaserJet 4000 series printer’s Formatter PCA incorporates a 100MHz RISC processor. The HP LaserJet 4050 series printer’s Formatter PCA incorporates a 133MHz RISC processor.
Printer Memory
Note If the printer encounters difficulty managing available memory, a clearable warning message will be displayed on the Control Panel.
Some printer messages are affected by the Auto Continue and Clearable Warning settings from the Configuration Menu in the printer’s Control Panel. If CLEARABLE WARNING=JOB is set on the Control Panel, warning messages display on the Control Panel until the end of the job from which they were generated. If CLEARABLE WARNING=ON is set, warning messages display on the Control Panel until [Go] is pressed. If an error occurs that prevents printing and AUTO CONTINUE=ON is set, the printer goes offline for 10 seconds before it returns online. If AUTO CONTINUE=OFF is set, the message displays until [Go] is pressed.
Read Only Memory (ROM)
Besides storing microprocessor control programs, the ROM stores dot patterns of internal character sets (fonts).
5-18 Functional Information

Random Access Memory (RAM)The RAM contains the page and I/O buffers and the font storage area. It stores printing and font information received from the host system, and can also serve to temporarily store a full page of print image data before the data is sent to the print engine (see “Page Protect” below). RAM memory capacities for each printer are shown in “Printer Features” on page 1-2. Memory capacity can be increased by adding DIMMs to the Formatter PCA. Note that adding memory (DIMMs) may also increase the print speed of complex graphics.
DIMM Slots The DIMM slots may be used to add memory, fonts, or firmware upgrades. Note that DIMMs and SIMMS are not compatible.
Non-Volatile Memory (NVRAM)
The printer uses NVRAM to store I/O and information on the print environment’s configuration. The contents of NVRAM are retained when the printer is turned off or disconnected.
Memory Enhancement technology (MEt)
The Hewlett-Packard Memory Enhancement technology (MEt) effectively doubles the standard memory through a variety of font and data compression methods.
Note MEt is only available in PCL mode; it is not functional when printing in PS mode.
Formatter System 5-19

Page ProtectPage complexity (rules, complex graphics, or dense text) may exceed the printer’s ability to create the page image fast enough to keep pace with the image formation process. If Page Protect is disabled, and a page is too complex, it may print in parts (for example, the top half on one page and the bottom half on the next page). Some print data loss is likely in these instances, and the printer will display the 21 PAGE TOO COMPLEX error message, alternating with PRESS GO TO CONTINUE.
Page Protect allows the Formatter to create the entire page image in page buffer memory before physically moving the paper through the printer. This process ensures that the entire page will be printed. Page Protect applies only to PCL printing. The default setting is Auto.
PJL OverviewPrinter Job Language (PJL) is an integral part of configuration, in addition to the standard Printer Command Language (PCL). With standard cabling, PJL allows the printer to perform functions such as:
Two-way communication with the host computer through a Bidirectional Parallel Connection. The printer can tell the host such things as the Control Panel settings, and it allows the Control Panel settings to be changed from the host.
Dynamic I/O switching allows the printer to be configured with a host on each I/O. The printer can receive data from more than one I/O simultaneously, until the I/O buffer is full. This can occur even when the printer is offline.
Context-sensitive switching allows the printer to automatically recognize the personalities (PS or PCL) of each job and configure itself to serve that personality.
Isolation of print environment settings from one print job to the next. For example, if a print job is sent to the printer in landscape mode, the subsequent print jobs print in landscape only if they are formatted for landscape printing.
5-20 Functional Information

PMLPML is a Printer Management Language that allows remote configuration and status readback through the I/O ports.
Control PanelThe Formatter PCA sends and receives printer status and command data via a Control Panel PCA. See “Using the Control Panel” on page 3-2, and “Printer Messages” on page 7-17 for more information.
Formatter System 5-21

Image Formation System
The image formation system is the main system in the printer. It consists of six stages:
When the Formatter Board sends the print signal to the Engine Controller Board, it drives the Main Motor to rotate the Photosensitive Drum, the Developing Cylinder, the Primary Charging Roller, and the Transfer Charging Roller.
The Primary Charging Roller places a uniform negative charge on the surface of the Photosensitive Drum. The laser beam modulated by the video signal is illuminated on the Photosensitive Drum surface to form the latent image on the Drum with the Laser Diode.
The latent image formed on the Photosensitive Drum is changed to a visual image by the Toner on the Developing Cylinder, then transferred to the paper by the Transfer Charging Roller. The residual Toner on the Photosensitive Drum surface is scraped down with the cleaning blade. The potential on the Drum is uniformed by the Primary Charging Roller to prepare for a new latent image.
The Cartridge has a Toner sensor that detects the remaining Toner level and the presence of the Cartridge.
If the Toner in the Cartridge becomes lower than the specified level or if there is no Cartridge in the printer, it is reported to the Formatter.
1. Cleaning 4. Developing
2. Conditioning 5. Transferring
3. Writing 6. Fusing
5-22 Functional Information

Figure 5-9 Image Formation System
After the image has been transferred to the paper, it is then fused onto the paper by heat and pressure at the Fuser.
Image Formation System 5-23

Toner Cartridge
Figure 5-10 Toner Cartridge
A major portion of the Image Formation System is contained in the Cartridge as shown in the figure above.
The Toner Cartridge is the “heart” of the Image Formation System. It houses the cleaning, conditioning, and developing steps of the process. The Toner Cartridge contains the photosensitive Drum, primary charging roller, developing station, Toner cavity, and cleaning station. Including these components that wear, degrade, or are consumed in the replaceable Toner Cartridge eliminates the need for a service call when replacement is required.
The printer also has a new Cartridge drive system that minimizes banding, with more constant paper speed.
5-24 Functional Information

Photosensitive DrumThe special properties of the Photosensitive Drum allow an image to be formed on the Drum surface and then transferred to paper. The Drum is an aluminum cylinder. The outside of the cylinder is coated with a layer of organic-photoconductive material (OPC) which is non-toxic. The OPC material has properties similar to a photo-resistor. It becomes electrically conductive when exposed to light. (The negative charges deposited on the Drum are conducted to the ground potential of the Drum base.) Areas not exposed to light remain non-conductive and maintain their negative charge. The aluminum base of the photosensitive Drum is electrically connected to ground potential.
Figure 5-11 Photosensitive Drum
Image Formation System 5-25
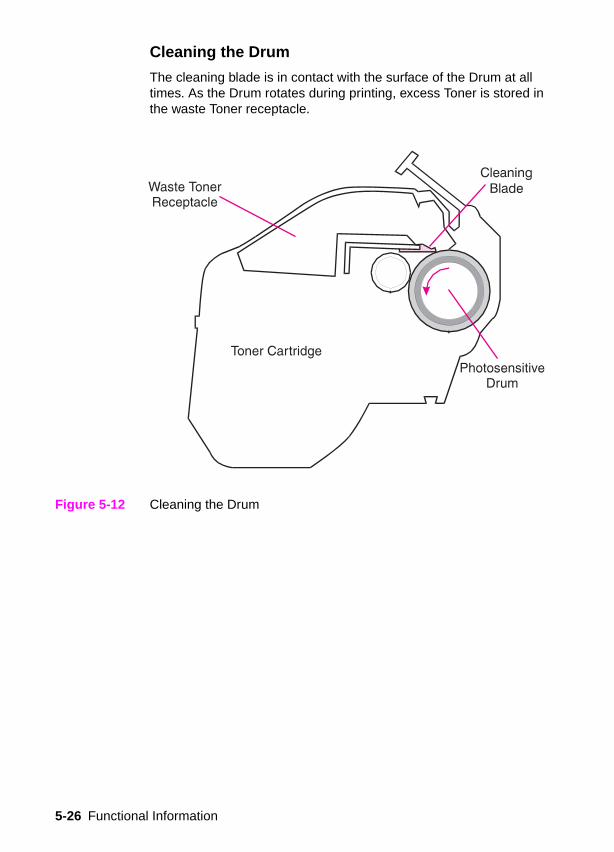
Cleaning the Drum
The cleaning blade is in contact with the surface of the Drum at all times. As the Drum rotates during printing, excess Toner is stored in the waste Toner receptacle.
Figure 5-12 Cleaning the Drum
5-26 Functional Information

Conditioning the Drum
After the Drum is cleaned, it must be conditioned. This process consists of applying a uniform negative charge on the surface of the Drum with the Primary Charging Roller. The Primary Charging Roller is coated with conductive rubber with an AC bias applied to erase any residual charges and maintain a constant Drum surface to create a uniform negative potential on the Drum surface. The amount of DC voltage is modified by the print density setting.
Figure 5-13 Primary Charging Roller
Image Formation System 5-27

Writing the ImageDuring the writing process, a modulated Laser Diode projects the beam onto the rotating six-sided Scanning Mirror. As the mirror rotates, the beam reflects off the mirror, through a set of focusing lenses, through a slot in the rear of the Toner Cartridge, and onto the Photosensitive Drum. The beam sweeps the Drum from left to right, discharging the negative potential wherever the beam strikes the surface. This creates a latent electrostatic image, which later is developed into a visible image.
Figure 5-14 Writing the Image
Because the beam is sweeping the entire length of the Drum and the Drum is rotating, the entire surface area of the Drum can be covered. The speed of the Scanner Motor (which turns the Scanning Mirror) and the speed of the Main Motor (which turns the Drum) are synchronized, and each successive sweep of the beam is offset by 1/1200th of an inch. The beam can be turned on and off to place a dot of light every 1/1200th of an inch. This is how the printer achieves its 1200x1200 dpi resolution. After the writing process, the Drum surface has an invisible (latent) electrostatic image.
At the end of each sweep, the beam strikes the Beam Detect Lens, generating the Beam Detect Signal (BD). The BD signal is sent to the Engine Controller Board, where it is converted to an electrical signal used to synchronize the output of data (/VDO) for one sweep (scan line) and to diagnose problems with the Laser Diode or Scanner Motor.
5-28 Functional Information

Developing the ImageThe developing process develops the latent electrostatic image into a visible image on the Drum. The Developing Unit consists of a metallic cylinder that rotates around a fixed magnetic core inside the Toner cavity. Toner is a powdery substance made of black plastic resin bound to iron particles, which is uniformly attracted to the magnetic core of the cylinder.
The Toner particles obtain a negative surface charge by rubbing against the Developing Cylinder which is connected to a negative DC supply. The negatively charged Toner is attached to the discharged (exposed, grounded) areas. An AC potential is applied to the Developing Cylinder to decrease the attraction between the Toner and the magnetic core of the cylinder, and to increase the repelling action of the Toner against the areas of the Drum not exposed to laser light. This AC potential improves density and contrast.
Figure 5-15 Developing the Image
The Print Density Control in the Control Panel Menu adjusts the DC bias of the Developing Cylinder by changing the force of attraction between the Toner and Drum. A change in the DC bias causes either more or less Toner to be attracted to the Drum, which in turn either increases or decreases the print density. Both the primary and Developer DC bias voltages are changed in response to the density setting.
Image Formation System 5-29

Transferring the ImageDuring the transferring process the Toner image on the Drum surface is transferred to the paper. A positive charge applied to the back of the paper by the transfer roller causes the negatively charged Toner on the Drum surface to be attracted to the page.
The small diameter of the Drum, combined with the stiffness of the paper, causes the paper to peel away from the Drum. The static eliminator teeth also help separate the paper from the Drum. The static eliminator teeth weaken the attractive forces between the negatively charged Drum surface. After separation, the Drum is cleaned and conditioned for the next image.
Figure 5-16 Transferring the Image
5-30 Functional Information

Image Fusing/Variable Fusing TemperatureDuring the fusing process, the Toner is fused into the paper by heat and pressure to produce a permanent image. The paper passes between a heated Fusing Roller and a soft Pressure Roller. This melts the Toner and presses it into the paper.
The Fusing Roller contains a ceramic heating element that provides heat for the fusing process. Fusing temperature is monitored by the Engine Controller Board, via the Thermistor TH901. The Engine Controller Board maintains a temperature of about 383° F (195° C) during print mode. If the Fusing System overheats (about 428° F/220° C), a relay opens, interrupting power to the Fusing Heater, causing a Fuser error message (50.X FUSER ERROR). If the Fusing System exceeds 464° F (240° C), the thermal fuse will open, cutting off power to the Fuser.
Figure 5-17 Image Fusing
Image Formation System 5-31

Variable Fusing Temperature
Figure 5-18 Fusing Temperature Control
Variable fusing temperature is a feature that gives the user or service technician the ability to adjust the fusing temperature based on the media being used in the printer. The default mode is normal and should be optimal for most users. There is an optional low and high Fuser mode selection. If very heavy or rough media is being used, then high Fuser mode is beneficial. If transparencies or light media are being used, then low Fuser mode might be appropriate. CONFIGURE FUSER MODE is in the Paper Handling Menu and when set to the default of NO, paper types are not displayed in the menu. When CONFIGURE FUSER MODE is set to YES, the different paper types are then displayed in the menu.
Note Fusing modes only operate for A4-, letter-, and legal-sized paper.
5-32 Functional Information

Paper Feed System
Figure 5-19 Paper Feed Subsystem
Paper Feed System 5-33

Figure 5-20 Paper Path
The presence of paper in Tray 1 is detected by the Tray 1 Paper Sensor (PS105). Presence of paper in Tray 2 is detected by the Tray 2 Paper Sensor (PS101) for the HP LaserJet 4000, 4000 N, 4050 and 4050 N; and by the Upper Tray Paper Sensor (PS101) or the Lower Tray Paper Sensor (PS102) for the HP LaserJet 4000 T, 4000 TN, 4050 T, and 4050 TN.
Both the size of the paper in the tray and the presence of a tray are detected by the three switches (SW600, 601, 602) on the Paper Size Detection PCA for the HP LaserJet 4000, 4000 N, 4050, and 4050 N,
5-34 Functional Information

and by the six switches (SW600, 601, 602, 603, 604, 605) on the Paper Size Detection PCA for the HP LaserJet 4000 T, 4000 TN, 4050 T, and 4050 TN.
While the Main Motor rotates, the Tray 1 Pickup Solenoid (SL102) is turned on, the Tray 1 Pickup Roller rotates, and a sheet of paper is fed into the printer.
The paper passes the pre-feed roller, which compensates for the skew of the paper.
After the top of page sensor (PS103) detects the leading edge of the paper, the horizontal synchronization signal (/TOP) is sent from the Engine Controller Board to the Formatter.
After the Formatter receives the /TOP signal, the /VDO signal is sent; this synchronizes the leading edge of the image on the Drum with the leading edge of the paper. The paper goes through transfer, separation, and fusing stages, passes through the delivery unit, and is delivered to the Top Output Bin or Rear Output Bin.
There are four photo-interrupters (PS102, PS103, PS106, PS501) in the paper path that detect the presence of paper. If the paper does not reach or pass these sensors within a prescribed time interval, the microprocessor on the Engine Controller Board notifies the Formatter of a paper jam.
Clutches and SensorsSee “Reference Diagrams” starting on page 7-84 for locations of switches, sensors, and clutches.
Paper Feed System 5-35

Printing from Tray 1The presence of paper in Tray 1 is detected by the Tray 1 Paper Sensor (PS105).
When the Engine Controller Board receives the /PRNT signal from the Formatter, the printer starts the initial rotation phase. (This consists of Main Motor warm-up, Scanner Motor warm-up, high-voltage control sequence and Fuser warm-up.) When the initial rotation phase ends, the Tray 1 Pickup Solenoid (SL102) is turned on.
The cam rotates, the paper tray lifter rises, and the paper comes in contact with the Tray 1 Pickup Roller. At the same time, the Tray 1 Pickup Roller rotates once and a sheet of paper in Tray 1 is picked up. The Separation Pad removes the unnecessary sheets, and the paper is at the Top-of-Page Sensor (PS103) when SL102 is turned back on again.
The paper then reaches the Registration Arm, where its skew is corrected. Then it goes through transfer, separation, and fusing stages, passes through the delivery unit, and is delivered to the tray.
Figure 5-21 Tray 1 Pickup Timing
5-36 Functional Information
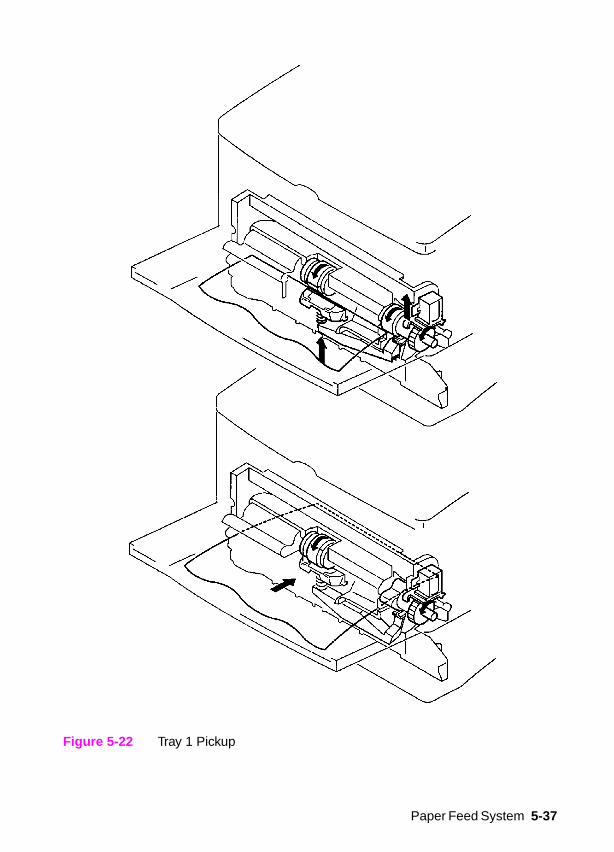
Figure 5-22 Tray 1 Pickup
Paper Feed System 5-37

Printing from Tray 2When the Formatter inputs the /PRNT signal to the printer, the Main Motor (M1) starts rotation. When the Main Motor reaches its prescribed speed, the Feed Roller Clutch (CL101) and Tray 2 Pickup Solenoid (SL 101 or SL 103) are turned on. (The Tray 2 Pickup Roller, Tray 2 Feed Roller, Separation Roller, and Feed Rollers are driven by the Main Motor rotation.)
The Tray 2 Pickup Roller, driven by the Pickup Solenoid, rotates once and picks up the paper in the tray. The unnecessary sheets are removed by the Separation Roller and the paper is fed to the pre-feed sensor (PS102).
The CPU monitors the condition of the PS102 for a prescribed period of time. If PS102 does not detect paper within that time, the CPU resumes feeding the paper, maintaining the appropriate between-page distance for continuous printing.
The paper then reaches the Registration Arm, where its skew is corrected. Then it goes through transfer, separation, and fusing stages, passes through the delivery unit, and is delivered to the tray.
Figure 5-23 Tray 2 Pickup Timing
5-38 Functional Information

Figure 5-24 Tray 2 Pickup
Paper Feed System 5-39

Multi-Feed Prevention Mechanism
When feeding paper from Tray 2, the printer uses the Separation Roller to prevent multi-feeding. Normally, the Separation Roller is imparted with a rotational force in the same direction as the Feed Roller. However, since the Separation Roller is equipped with a Torque Limiter, it rotates with Feed Roller 1 by transmission of its rotational force via the transported paper. On the other hand, if multiple sheets of paper are picked up, the low friction force between the sheets of paper results in a weak rotational force being transmitted to the Separation Roller from Feed Roller 1. Consequently, the Separation Roller’s own rotational force separates the extra sheet.
Figure 5-25 Multi-Feed Prevention Mechanism
5-40 Functional Information

Printing from the Optional 500-sheet Universal TrayThe operation sequences of the Paper Feeder are controlled by the Paper Feeder Driver. A 4-bit microprocessor is used in the Paper Feeder Driver, which controls the sequences of the Paper Feeder and the serial communication with the Engine Controller Board.
The Engine Controller Board outputs the pickup command to the Paper Feeder Driver with the necessary timing.
The Paper Feeder Driver drives the solenoid in response to the pickup command. The Paper Feeder Driver also returns the status of the Paper Feeder to the Engine Controller Board.
+24VDC is supplied to the Paper Feeder from the printer, and +3.3V for the integrated circuits is generated from +24VDC inside the Paper Feeder Driver.
Figure 5-26 Paper Feeder Driver I/O
Paper Feed System 5-41

Pickup and Feeding
The Paper Feeder picks up the paper from the installed trays and feeds the paper to the printer. The flow of the paper is shown below.
Figure 5-27 Paper Feed from Trays
The paper size and the presence of the 500-sheet Tray are detected by three switches (SW801, 802, 803) on the Paper Feeder Driver PCA. The relationship between the switch combinations and the paper sizes is the same as for the printer.
The Paper Feeder is driven by the Main Motor (M101) of the printer.
When the /PRNT signal is sent to the Paper Feeder from the Formatter, the Main Motor (M101) of the printer starts rotation. When the Main Motor reaches its prescribed speed, the Paper Feeder Driver PCA receives the pickup command from the Engine Controller Board, and the Paper Feeder Pickup Solenoid (SL801) is turned on. (The Pickup Roller, Feed Roller, and Separation Roller are driven by the Main Motor’s rotation.)
The Pickup Roller, driven by the Solenoid, rotates once, picking up the paper inside the 500-sheet tray. Any unnecessary sheets are removed by the Separation Roller and the paper is fed to the pre-feed sensor (PS102) of the printer.
5-42 Functional Information

The CPU on the Engine Controller Board monitors the conditions of the PS102 for a prescribed period of time after the pickup starts. If the PS102 does not detect paper within that time interval, the CPU turns off the Feed Roller clutch (CL101) to stop the paper after the top of page sensor (PS103) detects the presence of the preceding page.
The paper then reaches the Registration Arm, where its skew is corrected. Then it goes through transfer, separation, and fusing stages, passes through the delivery unit, and is delivered to the output bin.
Figure 5-28 Paper Feed Pickup
Paper Feed System 5-43

Envelope FeederThe operation sequences of the Envelope Feeder are controlled by the Envelope Feeder Driver. A 4-bit microprocessor is used in the Envelope Feeder Driver, which controls the sequences of the Envelope Feeder and the serial communication with the Engine Controller Board of the printer.
The Engine Controller Board outputs the pickup command to the Paper Feeder Driver with the necessary timing.
The Envelope Feeder Driver drives the solenoid in response to the command. The Envelope Feeder Driver also returns the Envelope Feeder status to the Engine Controller Board.
+24VDC is supplied to the Envelope Feeder from the printer, and +3.3V for the ICs is generated from the +24VDC inside the Paper Feeder Driver.
Pickup and Feeding
The Envelope Feeder picks up the envelope from the Envelope Feeder and feeds it to the printer. The envelope path is shown below.
Figure 5-29 Envelope Feed
The Envelope Feeder is driven by the Main Motor (M101) of the printer.
When the /PRNT signal is sent to the printer from the Formatter, the printer starts the initial rotation phase. (This phase consists of Main Motor start-up, Scanner Motor start-up, High-voltage Control Sequence, and Fusing unit start-up.) When the initial rotation phase
5-44 Functional Information

is completed, the Envelope Feeder Driver PCA receives the pickup command from the Engine Controller Board and turns on the envelope pickup solenoid (SL901).
The Pickup Roller, Feed Roller and Separation Roller are rotated sequentially by the Main Motor rotation, and an envelope is picked up. Then, any unnecessary envelopes are removed by the Separation Roller, and the envelope is fed to the printer.
Figure 5-30 Envelope Feed Pickup
Paper Feed System 5-45

DuplexerThe operation sequences of the Duplexer are controlled by the Duplexer Driver. A 4-bit microprocessor is used in the Duplexer Driver, which controls the sequences of the Duplexer and the serial communication with the Engine Controller Board.
The Duplexer Driver drives the Solenoid, Motors, and Fan according to commands sent from the Engine Controller Board to the Duplexer and Duplex Pickup command via serial communication. The Duplexer also returns its status to the Engine Controller Board.
+24VDC is supplied to the Duplexer from the printer, and +5V for the ICs is generated from the +24VDC inside the Duplexer Driver.
Reversing and Duplexer Pickup
The paper is fed to the Duplexer by the Top Output Bin Deflector. This Top Output Bin Deflector moves in conjunction with the Top Output Bin. However, the Top Output Bin Deflector is controlled by the Duplexer Solenoid (SL701) when the Top Output Bin is closed.
The feed direction of the paper in the Duplexer is controlled by the Reversing Roller. The paper is then transported by the Oblique Roller and Feed Roller so that its edge contacts with the left panel to correct its skew.
The Duplexer has two stepping motors, the Reversing Motor (M701) and the Duplex Feed Motor (M702). Normal and reverse rotations are controlled by the Duplexer Driver.
5-46 Functional Information

Figure 5-31 Paper Path for the Duplexer
Paper Feed System 5-47

Figure 5-32 Paper Feed for the Duplexer
Paper JamThere are four photointerrupters (PS102, PS103, PS106, PS501) in the paper path for detecting the presence of the paper.
If the paper does not reach or pass three sensors within the prescribed time, the microprocessor in the Engine Controller Board notifies the Formatter of a paper jam.
5-48 Functional Information

Basic Sequence of Operation
The Formatter PCA and the Engine Controller Board share information during printer operation. The Interface PCA forms a link which operates as a serial data bus. This allows printer status, command, and dot-image data to be passed between the two PCAs. Table 5-1 shows the general timing of the printer events. The following events take place during normal printer operation:
Table 5-1. Printer Timing
Period Timing Purpose
WAIT From power on to the end of Main Motor initial rotation.
Clears the Drum surface potential and cleans the Transfer Roller.
STBY (standby) From the end of the WAIT or the LSTR period until the input of the PRNT signal from the Formatter. Or from the end of the LSTR period until power off.
Maintains the printer in ready state.
INTR (initial rotation) From the input of the PRNT signal from the Formatter until the Engine Controller outputs the TOP signal.
Stabilizes the photosensitive Drum sensitivity in preparation for printing. Also cleans the Transfer Roller.
PRNT After the end of initial rotation until the top of the page sensor detects the trailing edge of the paper.
Forms images on the photosensitive Drum based on the /VDO signal from the Formatter and transfers the image to paper.
LSTR (last rotation) From the primary voltage (DC) off until the main motor stops.
If another PRNT signal is sent from the Formatter, the printer returns to the INTR period. If not, it returns to the STBY period.
Delivers the last sheet of paper and cleans the Transfer Roller.
Basic Sequence of Operation 5-49

Figure 5-33 Timing Diagram
5-50 Functional Information

6 Removing and Replacing Parts
Overview
This chapter discusses the following:
Removal and Replacement Strategy
Removing Covers
Removing Assemblies
Separating the Engine Module from the Paper Feed Module
Overview 6-1

Removal and Replacement Strategy
This chapter describes the complete disassembly of the printer. In every instance, tasks that must be performed before beginning the procedure are listed first. Remove the assemblies in the order listed to prevent damage during re-assembly.
To ensure optimum print quality, the printer will prompt to have routine maintenance performed every 200,000 pages. When the message PERFORM PRINTER MAINTENANCE appears on the Control Panel, the Printer Maintenance Kit must be installed. See page 4-5.
Servicing the printer involves replacing printed circuit and electro-mechanical assemblies. Do not repair component failures within these assemblies. In all instances, replace the failed assembly.
The replacement procedure is the reverse of the removal procedure, except where specific instructions are provided.
WARNING! Some sheet metal edges, particularly around the formatter cage, are sharp. Be careful when working in these areas to avoid cutting yourself.
CAUTION The printer contains parts that are sensitive to Electrostatic-Static Discharge (ESD). Always observe proper ESD procedures when servicing the printer. The ESD symbol appears in this chapter when the parts being serviced are especially susceptible to ESD damage.
It is usually best to remove and replace the covers in the order shown. Turn the printer off and unplug the power cord and any cables.
6-2 Removing and Replacing Parts

Tools Phillips #2 magnetized screwdriver with 6-inch shaft
Flat-blade screwdriver with 6-inch shaft
Needle-nose pliers
Penlight
Screws Used in the Printer
All screws used in the printer are Phillips head, which require a Phillips screwdriver. The following figure shows the difference between a Phillips and a Posidriv screwdriver. Note that the Phillips tip has more beveled surfaces.
CAUTION Using a Posidriv screwdriver will damage the screw heads. Use Phillips only.
Figure 6-1 Comparing Phillips and Posidriv Screwdrivers
Table 6-1 on page 6-4 describes the screws used in the printer and provides guidelines to help determine where each type of screw is used. The screws can vary in length depending on the thickness of the material being fastened.
Always note where each type of screw is located and replace each one into its original location.
Phillips Posidriv
Removal and Replacement Strategy 6-3

Table 6-1. Screws Used in the Printer
Drawing and Description Purpose
Threaded Phillips with captive star washer
Used to fasten metal to metal when good electrical contact is needed.
Silver Self-tapping Phillips screw
Used to fasten metal or plastic to plastic mainframes.
Black Self-tapping Phillips screw
Used to fasten metal or plastic to plastic mainframes.
Threaded Phillips screw with lock and flat washer
Used to fasten metal or plastic to threaded plastic or metal.
6-4 Removing and Replacing Parts

Hint To insert self-tapping screws, turn the screw to the left (counter-clockwise) until it clicks, then turn it to the right (clockwise) until it is seated. If a self-tapping screw-hole strips, you must repair the screw-hole or replace the affected assembly.
Long screw (4.8 in/116 mm)
Used to anchor Tray 1 Pickup Assembly
Table 6-1. Screws Used in the Printer (continued)
Drawing and Description Purpose
Removal and Replacement Strategy 6-5

Removing Covers
It is usually best to remove and replace the covers in the order shown. Turn the printer off and unplug the power cord and any cables.
Hint Left and right are indicated as you face the front of the printer unless otherwise noted.
Rear Right Side Cover
Figure 6-2 Removing the Rear Right Side Cover
The Formatter and Dual In-line Memory Modules (DIMMs) are located underneath the Right Side Cover.
1 Grasp the cover by its rear lip and pull it firmly toward the rear of the printer until it stops.
2 Remove the cover from the printer.
6-6 Removing and Replacing Parts

Top CoverOpen the Top Cover and remove the Toner Cartridge.
CAUTION To prevent damage to the Toner Cartridge, do not expose it to light for more than a few minutes.
To remove the Top Cover, you must remove the Rear Right Side Cover (page 6-6), the Toner Cartridge Drive Arm (page 6-9), the Control Panel Overlay (below) and the Control Panel (page 6-8).
Control Panel Overlay
Figure 6-3 Removing the Control Panel Overlay
1 Using a flat-blade screwdriver, gently pry upward on the right side of the Control Panel Overlay to loosen it.
2 Remove the Control Panel Overlay from the tabs on the left and lift it upward, off of the printer.
Removing Covers 6-7

Control Panel
Figure 6-4 Removing the Control Panel
1 Using a flat-blade screwdriver, pry each side of the Control Panel upward.
2 Remove the top of the Control Panel from the tab.
3 Disconnect the ribbon cable from the Control Panel.
Tab
6-8 Removing and Replacing Parts

Toner Cartridge Drive Arm
Figure 6-5 Removing the Toner Cartridge Drive Arm
1 Remove the Toner Cartridge Drive Arm by using needle-nose pliers to pinch the pin from its hinge on the Top Cover.
Note Be sure to reconnect the Toner Cartridge Drive Arm when you replace the Top Cover, or the Toner Cartridge will not seat properly.
Removing Covers 6-9

Figure 6-6 Removing the Top Cover
2 Remove the four screws holding the Top Cover (two are behind the Rear Output Bin, near the top, and two are on top of the printer under the Top Cover).
Top screwsRear screws
Toner cartridge drive arm
6-10 Removing and Replacing Parts

Figure 6-7 Releasing tabs to lift the Top Cover
3 Squeeze the right front side of the Top Cover to remove it. It may be necessary to use a small flat-blade screwdriver to release the tab inside the small hole.
4 Holding the output assembly in place (located toward the rear of the printer), remove the Top Cover.
Release tab if necessary
Removing Covers 6-11

Left Side Cover
Figure 6-8 Removing the Left Side Cover
1 Open Tray 1.
2 Release the latch on the left side cover from the inside of the printer. Release the catches on the front side of the cover.
3 Lift the cover upward to release the front top side of the cover, then pull the cover away from the printer.
Latch (inside) Catches
6-12 Removing and Replacing Parts

Front Right Side Cover
Figure 6-9 Removing the Front Right Side Cover
1 Release the latch at the top center of the cover.
2 Lift the cover straight up until it is free of the tabs at the bottom and the power switch rod, then pull it away from the printer.
Hint When you reinstall the Front Right Side Cover, be sure to reconnect the power switch rod.
Latch
Removing Covers 6-13

Rear Cover/Rear Output Bin
Figure 6-10 Removing the Rear Cover/Rear Output Bin
1 Facing the rear of the printer, pinch the right side of the Rear Output Bin and release the hinge from the slot.
2 Rotate the bin upward and slide it to the right to release the left hinge.
Step 1
Step 2
6-14 Removing and Replacing Parts

Tray 1
Figure 6-11 Removing Tray 1 from the Front Cover
1 Open Tray 1.
2 Push outward on the two slot hinges to release the pins on Tray 1.
3 Slide the Front Cover to the right and remove it from the three hinges on the bottom.
Removing Covers 6-15

Figure 6-12 Removing the Tray 1 Sensor Arm Cover
4 Firmly pull both sides of the Tray 1 Sensor Arm Cover toward you until it releases from the shaft. See Figure 6-13, “Detail of the Tray 1 Sensor Arm Cover,” on page 6-17.
5 Rotate Tray 1 downward and remove it from the two hinges.
6-16 Removing and Replacing Parts

Figure 6-13 Detail of the Tray 1 Sensor Arm Cover
Hint When you reinstall the Tray 1 Sensor Arm Cover be sure the Sensor Arms move freely.
Removing Covers 6-17

Removing Assemblies
The order in which you replace the following assemblies depends on the part needing to be replaced. It is not necessary to remove every assembly.
Fuser
WARNING! Let the Fuser Assembly cool before disassembly.
1 Remove the Rear Cover/Rear Output Bin (page 6-14).
Figure 6-14 Removing the Left and Right Duplex Connector Covers
2 If a Duplexer is installed, remove it. If a Duplexer is not installed, remove the Left and Right Duplex Access Covers from the rear of the printer by pulling each from the bottom.
6-18 Removing and Replacing Parts

Figure 6-15 Loosening the captive screws in the Fuser Assembly
3 Loosen the two captive screws on the Fuser Assembly.
4 Pull the Fuser Assembly straight out of the printer.
Removing Assemblies 6-19

Formatter Cage Assembly
Figure 6-16 Removing the Formatter Cage Assembly
1 Print a Configuration Page. The information is necessary to reconfigure the printer after you replace the Formatter.
2 Remove the rear right side cover (page 6-6). The Formatter Cage Assembly is directly underneath.
3 Remove the captive screw and open the DIMM access door to see if any DIMMs are installed. Remove and transfer any DIMMs or EIO accessories if you replace the Formatter.
4 Remove the 5 screws around the Formatter cage.
5 Slide the Formatter toward the rear of the printer and remove it.
Note Using the Configuration Page you printed in step 1 above, reconfigure the printer after replacing the Formatter. Be sure to reset the printer’s page count (page 3-33).
For accessing DIMMs
EIOaccessory
6-20 Removing and Replacing Parts

Output Assembly
Figure 6-17 Removing the Output Assembly
1 Remove the Top Cover (page 6-7). The Output Assembly is on the top, rear of the printer.
Brass armWhite tab
Removing Assemblies 6-21

2 Facing the rear of the printer, release the 2 latches as follows:
Figure 6-18 Left end of Output Assembly (brass arm)
a On the left end of the assembly, rotate the brass arm up 90°.
Figure 6-19 Right end of Output Assembly (white tab)
b On the right end of the assembly, release the white tab.
3 Lift the assembly up and out of the printer.
CAUTION Lift the assembly carefully to avoid damaging the Top Output Bin full sensor flag. When the assembly is replaced, the flag must be able to rotate freely.
6-22 Removing and Replacing Parts

Laser Scanner
Figure 6-20 Removing the Laser Scanner
1 Remove the Top Cover (page 6-7). The Laser Scanner is on the top of the printer, tilted toward the rear, and has a yellow label on it.
2 Unplug the 3 connectors as shown.
3 Remove the 4 black screws around the edges of the Laser Scanner. Do not remove the two screws on the cover of the Laser Scanner.
4 Lift the Laser Scanner straight up.
Hint When you replace the Laser Scanner be sure the black shutter interlock is resting on top of the silver shutter plate.
Shutter interlock and plate
Removing Assemblies 6-23

Fan
Figure 6-21 Removing the Fan
1 Remove the Top Cover (page 6-7) and the Left Side Cover (page 6-12). The Fan is on the left side of the printer.
2 Unplug the Fan’s connector to the Engine Controller Board.
3 Squeeze the latches on the left and right sides of the Fan cover.
4 Pull the Fan straight out.
Hint The cover attaches to the Fan at the top right and bottom left corners. Retain the cover; it is separate from the Replacement Fan.
6-24 Removing and Replacing Parts

Main Motor
Figure 6-22 Removing the Main Motor
1 Remove the Top Cover (page 6-7) and the Front Right Side Cover (page 6-13). The Main Motor is on the right front side of the printer.
2 Unplug the connector.
3 Remove the 4 silver screws around the corners of the metal plate.
4 Remove the Main Motor from the printer.
Removing Assemblies 6-25

Transfer Roller
Figure 6-23 Removing the Transfer Roller
1 Open the Top Cover and remove the Toner Cartridge. The Transfer Roller is underneath the Toner Cartridge.
CAUTION Do not touch the black rubber part of the roller. Skin oils on the roller can cause problems with print quality.
2 Using a flat-blade screwdriver, pry the right end of the metal shaft out of place, then the left end.
Hint When you replace the Transfer Roller, make sure the black collar is oriented properly, with the open end down.
DO NOT TOUCH!
(See Hint)
6-26 Removing and Replacing Parts

Tray 1 Pickup Roller
Figure 6-24 Removing the Pickup Roller (shown with Envelope Entrance Cover removed)
1 Open Tray 1. The Tray 1 Pickup Roller is in the center of the Tray 1 Pickup Assembly.
2 Grasp the Envelope Entrance Cover and pull it straight away from the printer.
3 Pry open the blue latch on the roller.
4 Lift the roller out.
Hint To replace the roller, make sure the pin in the roller lines up with the hole in the shaft.
Removing Assemblies 6-27

Figure 6-25 Detail of the Tray 1 Pickup Roller
6-28 Removing and Replacing Parts

Tray 1 Pickup Assembly1 Remove the covers (starting on page 6-6): Top Cover, Left Side
Cover, Front Right Side Cover, and Tray 1. The Tray 1 Pickup Assembly is on the front of the printer.
Figure 6-26 Removing the Envelope Feeder Gear Cover
2 Flip down or remove the Envelope Feeder Connector Cover.
3 Remove the Envelope Entrance Cover.
4 Remove the Envelope Feeder Gear Cover as follows:
a Remove the black self-tapping screw at the bottom of the Envelope Feeder Gear Cover.
b Remove the long screw (4.8 in/116 mm) on the right side of the Tray 1 Pickup Assembly.
Envelope feeder connector coverStep 4a
Step 4b
Envelope feeder gear cover
Removing Assemblies 6-29

Figure 6-27 Removing the Tray 1 Pickup Assembly – Right Side
5 Disconnect the solenoid cable on the right side of the Tray 1 Pickup Assembly. (Note the way the cables are routed for replacement.)
6-30 Removing and Replacing Parts

Figure 6-28 Removing the Tray 1 Pickup Assembly – Left Side
6 Unplug the connector to the Engine Controller Board on the left side of the Tray 1 Pickup Assembly.
7 Remove the long screw (4.8 in/116 mm) from the left side of the assembly.
8 Remove the self-tapping screw shown.
Step 6
Step 7
Step 8
Removing Assemblies 6-31

Figure 6-29 Removing the Tray 1 Pickup Assembly – Front Side
9 Remove the 3 screws shown.
10 Lift the black Toner Cartridge Guide on the right side of the assembly and pull the assembly straight out of the printer. See page 6-33 for the procedure.
Toner cartridge guide
6-32 Removing and Replacing Parts

Right Side Toner Cartridge GuideYou can lift aside the Right Side Toner Cartridge Guide (instead of removing it) to access the Registration Assembly. It is not necessary to unplug the connectors.
Remove the Right Side Toner Cartridge Guide to access the Gear Train. Follow the steps below:
1 Remove the Top Cover (page 6-7), Front Right Side Cover (page 6-13), and Tray 1 (page 6-15). The Right Side Toner Cartridge Guide is on the right front side of the printer.
Figure 6-30 Removing the Right Side Toner Cartridge Guide
2 Remove the black self-tapping screw.
3 Unplug the 3 connectors if necessary.
4 Remove the small silver screw to disconnect the ground wire.
5 Lift the Right Side Toner Cartridge Guide off the printer.
Step 2
Step 3
Step 4
Removing Assemblies 6-33

Registration Assembly
Figure 6-31 Removing the Registration Assembly
1 Remove the following covers (starting on page 6-6): Top Cover, Left Side Cover, Front Right Side Cover, and Tray 1. Remove the Tray 1 pickup assembly (page 6-29). The Right Side Toner Cartridge Guide can be lifted without removal (page 6-33). The Registration Assembly is under the Toner Cartridge.
2 Remove the 3 black self-tapping screws shown. (Lift the green handle on the right end of the Registration Assembly to access the black screw on the left rear side.)
6-34 Removing and Replacing Parts

Figure 6-32 Detail of screws for the Registration Assembly
CAUTION Do not remove the silver screw closest to the Registration Assembly! It holds the spring in place. Take out the silver screw farther from the registration assembly, the one that is under the green handle.
3 Lift the green handle. Remove the 2 black self-tapping screws and the rearmost silver screw shown. See the caution above.
Hint If the Anti-static Bar becomes displaced, reinstall it with the left end in the slot, or paper may jam in this area.
DO NOT REMOVE!
Removing Assemblies 6-35

Paper Feed Assembly1 Remove the following covers (starting on page 6-6): Top Cover,
Left Side Cover, Front Right Side Cover, and Tray 1. Remove the Tray 1 Pickup Assembly (page 6-29). The Paper Feed Assembly is on the front of the printer.
Figure 6-33 Unplugging the connector to the Paper Feed Assembly
2 Unplug and unroute the 2-pin connector from the right side.
CAUTION For replacement of the Paper Feed Assembly, note the way the wires are routed to the connector. If a wire is routed improperly, it can be damaged.
Noterouting
6-36 Removing and Replacing Parts

Figure 6-34 Removing the upper screws from the Paper Feed Assembly
3 Remove the 2 black upper screws.
Hint After replacing the Paper Feed Assembly, make sure to insert the 2 upper screws only. The 2 lower screws are for holding the Tray 1 Pickup Assembly in place.
Removing Assemblies 6-37

Hint For replacement of the Paper Feed Assembly, orient the clutch properly by inserting it into the slot, as shown.
Figure 6-35 Detail of the Paper Feed Clutch
6-38 Removing and Replacing Parts

Formatter Pan
Figure 6-36 Removing the Formatter Pan
1 Remove the Top Cover (page 6-7) and the Front Right Side Cover (page 6-13). Remove the Formatter Cage Assembly (page 6-20). The Formatter Pan is on the right rear side. Remove the Formatter Pan in order to split the engine from the tray assembly or to access the Gear Train.
2 Remove the 4 black self-tapping screws.
3 Remove the 3 silver M-3 screws.
4 Pull the Formatter Pan straight out, away from the printer.
Removing Assemblies 6-39

Gear Train
Figure 6-37 Removing the Gear Train
1 Remove the following covers (starting on page 6-6): Top Cover, Front Right Side Cover, Rear Cover/Rear Output Bin, and Tray 1. Remove the Right Side Toner Cartridge Guide (page 6-33), the Registration Assembly (page 6-34), the Formatter Cage Assembly (page 6-20), and the Formatter Pan (page 6-39). The Gear Train is on the right side of the printer.
2 If the Registration Assembly has not already been removed, take out the rearmost silver screw under the green handle (page 6-35).
3 Remove the 8 black self-tapping screws.
4 Pull the Ribbon Cable Assembly outward (off the pin), then down, out of the way.
5 Remove any remaining wires from the white plastic guide.
6 Slide out the Gear Train.
Note When you reinstall the Gear Train, slide the top in first and then push the bottom in.
Step 4
Toner Cartridge Drive Arm
6-40 Removing and Replacing Parts

Delivery Drive Assembly
Figure 6-38 Removing the Delivery Drive Assembly
1 Remove the covers (starting on page 6-6): Top Cover, Left Side Cover, Front Right Side Cover, Rear Cover/Rear Output Bin, and Tray 1. Remove the Output Assembly (page 6-21), Formatter Cage Assembly (page 6-20), Formatter Pan (page 6-39), and Fuser Assembly (page 6-18). The Delivery Drive Assembly is on the right rear side of the printer.
2 Remove the single screw.
3 Unplug the 3-pin connector shown.
4 Lift the Delivery Drive assembly upward, away from the printer.
Removing Assemblies 6-41

Separating the Engine Module from the Paper Feed Module
This procedure is the same for printers with a single 500-sheet Tray or two 250-sheet Trays.
1 Remove the Rear Right Side cover (page 6-6). Remove the Formatter Cage Assembly (page 6-20), Formatter Pan (page 6-39), and 2 long screws from the Tray 1 Pickup Assembly (See Figure 6-26 on page 6-29 and Figure 6-28 on page 6-31).
Figure 6-39 Unplugging the connector to the Paper Feed Module
2 Unplug the connector to the Paper Feed Module on the right rear side of the printer (under the formatter pan). Remove the cable from its bracket.
6-42 Removing and Replacing Parts

Figure 6-40 Separating the Engine from the Paper Feed Module
3 Remove the single black, self-tapping screw from the left side of the printer, below the Fan.
CAUTION Lift the Engine carefully, being sure that all cables are disconnected.
4 Lift the Engine away from the Paper Feed Module.
Separating the Engine Module from the Paper Feed Module 6-43

Engine Controller Board
Note After you replace the Engine Controller Board, do not forget to readjust the top margin as described on page 6-46.
1 Separate the Engine from the Paper Feed Module (page 6-42). The Engine Controller Board is on the underside of the Engine and contains the following:
• DC controller
• High-voltage power supply
• AC power supply
• DC power supply
• Timing controls
Figure 6-41 Removing the Engine Controller Board
2 Remove the Fuser Assembly (page 6-18).
Spring
Power switch rod
(In the back, not on the board)
6-44 Removing and Replacing Parts

Facing the front of the Engine Module:
3 Remove 7 screws (shown in Figure 6-41 on page 6-44):
• 4 black, self-tapping M4 screws (3 in front and 1 in the right rear)
• From the left rear, 3 M3 screws (1 recessed)
4 Disconnect the spring on the right side from the notch.
5 Disconnect the Power Switch Rod.
Figure 6-42 Removing the Engine Controller Board
6 Lifting from the printer’s left side (the side the Fan is on), tip the board up, then unplug all connectors.
Hint The black cable router in the middle of the Engine Controller Board can be folded aside with the cables intact. When you replace the board, reconnect and route all cables before reconnecting the power switch rod.
Be sure to reconnect the spring on the right side to the Ground Plate.
Separating the Engine Module from the Paper Feed Module 6-45
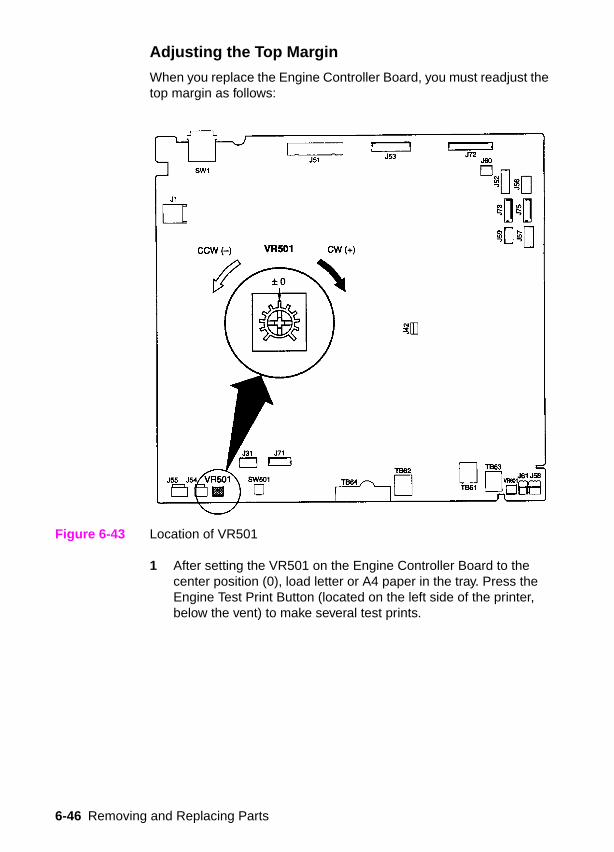
Adjusting the Top Margin
When you replace the Engine Controller Board, you must readjust the top margin as follows:
Figure 6-43 Location of VR501
1 After setting the VR501 on the Engine Controller Board to the center position (0), load letter or A4 paper in the tray. Press the Engine Test Print Button (located on the left side of the printer, below the vent) to make several test prints.
6-46 Removing and Replacing Parts

Figure 6-44 Adjusting the top margin
2 Measure the distance between the edge of the paper and the print pattern. Measure all the test prints and calculate the average.
3 Adjust VR501 so that the margin becomes .08 in (2 mm). Turn VR501 clockwise to decrease the margin or counter-clockwise to increase the margin.
4 Make several test prints again and perform step 2 above. If the top margin is still incorrect, repeat the procedure.
Measure this distance
Separating the Engine Module from the Paper Feed Module 6-47
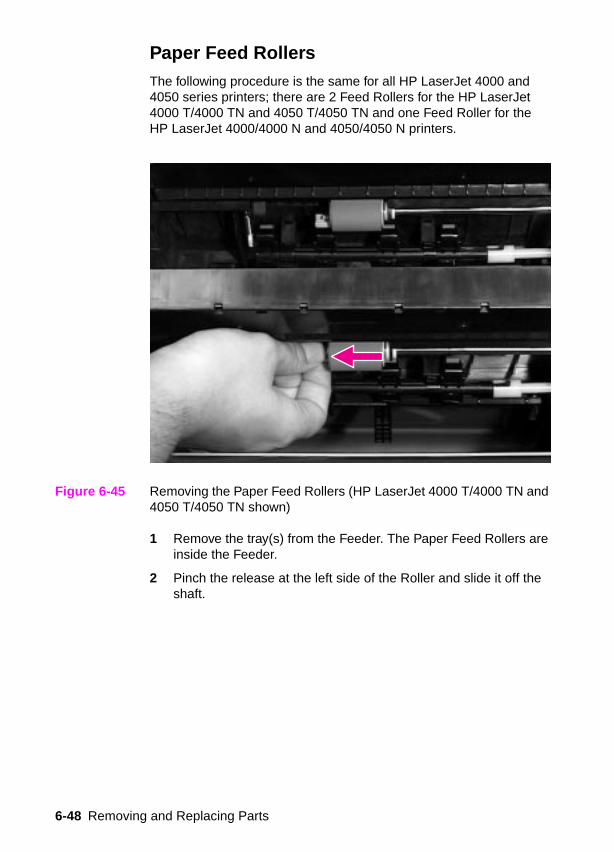
Paper Feed RollersThe following procedure is the same for all HP LaserJet 4000 and 4050 series printers; there are 2 Feed Rollers for the HP LaserJet 4000 T/4000 TN and 4050 T/4050 TN and one Feed Roller for the HP LaserJet 4000/4000 N and 4050/4050 N printers.
Figure 6-45 Removing the Paper Feed Rollers (HP LaserJet 4000 T/4000 TN and 4050 T/4050 TN shown)
1 Remove the tray(s) from the Feeder. The Paper Feed Rollers are inside the Feeder.
2 Pinch the release at the left side of the Roller and slide it off the shaft.
6-48 Removing and Replacing Parts

Separation Rollers
Figure 6-46 Removing the Separation Rollers
The Separation Rollers are inside the paper trays.
1 Release the latch and lift the cover inside the tray.
2 Pinch the release at the left side of the Roller and slide it off the shaft.
Separating the Engine Module from the Paper Feed Module 6-49

Paper Feed Module PlateRemove the Paper Feed Module Plate to access the Controller PCA. This procedure is the same for one 500-sheet Tray or two 250-sheet Trays.
Figure 6-47 Removing the Paper Feed Module Plate
1 Remove the 7 black self-tapping screws (one of them is recessed in front).
2 Remove 2 small metal-to-metal screws.
3 Lift up the Paper Feed Module Plate to remove it.
(Small)
6-50 Removing and Replacing Parts

Paper Feed Module Gear Train AssemblyThis procedure is the same for one 500-sheet Tray or two 250-sheet Trays.
Figure 6-48 Removing the Gear Train
1 Remove the long recessed screw shown.
2 Unplug the connector (note routing).
3 Lift the gear train upward, away from the Paper Feed Module.
Unplug connector
Separating the Engine Module from the Paper Feed Module 6-51

Paper Feed Module Side RailsRemove the Paper Feed Module side rails to access the PCA Controller. This procedure is the same for one 500-sheet Tray or two 250-sheet Trays.
Figure 6-49 Removing the Paper Feed Module side rails (HP LaserJet 4000 T/4000 TN and 4050 T/4050 TN shown)
1 To remove the side rails, remove the 4 recessed screws (1 is long).
2 Unplug the connector.
3 Lift the side rails off of the Paper Feed Module.
Unplug connector(Long
screw)
6-52 Removing and Replacing Parts
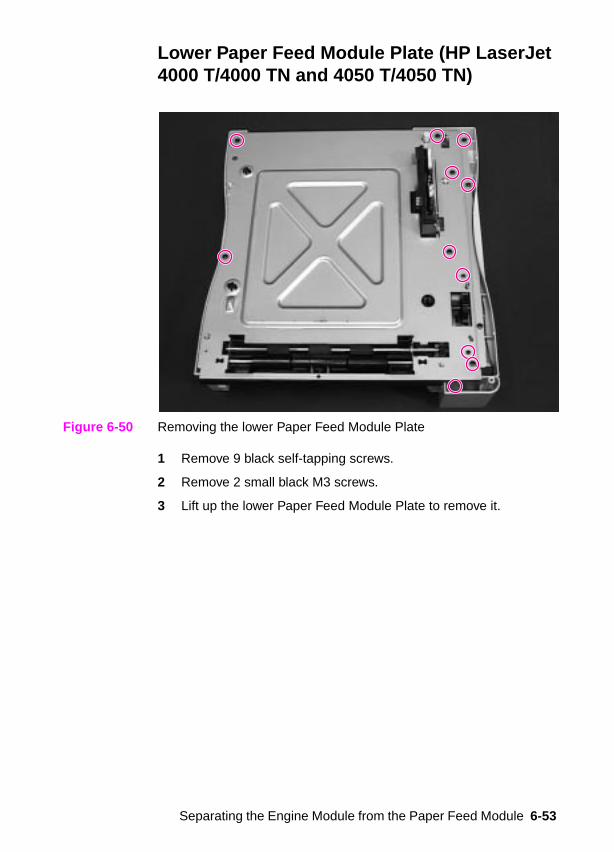
Lower Paper Feed Module Plate (HP LaserJet 4000 T/4000 TN and 4050 T/4050 TN)
Figure 6-50 Removing the lower Paper Feed Module Plate
1 Remove 9 black self-tapping screws.
2 Remove 2 small black M3 screws.
3 Lift up the lower Paper Feed Module Plate to remove it.
Separating the Engine Module from the Paper Feed Module 6-53

PCA Cover (HP LaserJet 4000 T/4000 TN and 4050 T/4050 TN)
Figure 6-51 Removing the PCA Cover (HP LaserJet 4000 T/4000 TN and 4050 T/4050 TN)
1 Pinch the left and right sides of the PCA Cover to release it from the side latches.
2 Rotate the PCA Cover downward and toward you to remove it.
6-54 Removing and Replacing Parts

PCA Cover (HP LaserJet 4000/4000 N and 4050/4050 N)
Figure 6-52 Removing the PCA Cover (HP LaserJet 4000/4000 N and 4050/4050 N)
1 Release the latches shown.
2 Remove the PCA Cover.
Separating the Engine Module from the Paper Feed Module 6-55

PCA ControllerThis procedure is the same for one 500-sheet Tray or two 250-sheet Trays.
Figure 6-53 Removing the PCA Controller
1 Unplug 3 connectors to the PCA Controller.
2 Unclip the left side of the PCA Controller and remove it.
6-56 Removing and Replacing Parts

7 Troubleshooting
Overview
This chapter discusses the following:
Troubleshooting Process
Troubleshooting the Printing System
Reference Diagrams
Overview 7-1
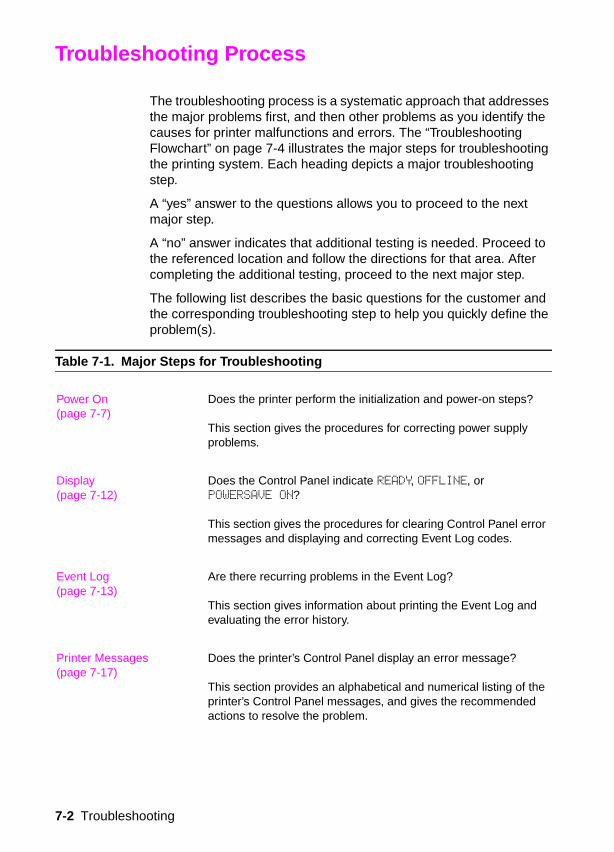
Troubleshooting Process
The troubleshooting process is a systematic approach that addresses the major problems first, and then other problems as you identify the causes for printer malfunctions and errors. The “Troubleshooting Flowchart” on page 7-4 illustrates the major steps for troubleshooting the printing system. Each heading depicts a major troubleshooting step.
A “yes” answer to the questions allows you to proceed to the next major step.
A “no” answer indicates that additional testing is needed. Proceed to the referenced location and follow the directions for that area. After completing the additional testing, proceed to the next major step.
The following list describes the basic questions for the customer and the corresponding troubleshooting step to help you quickly define the problem(s).
Table 7-1. Major Steps for Troubleshooting
Power On(page 7-7)
Does the printer perform the initialization and power-on steps?
This section gives the procedures for correcting power supply problems.
Display(page 7-12)
Does the Control Panel indicate READY, OFFLINE, or POWERSAVE ON?
This section gives the procedures for clearing Control Panel error messages and displaying and correcting Event Log codes.
Event Log(page 7-13)
Are there recurring problems in the Event Log?
This section gives information about printing the Event Log and evaluating the error history.
Printer Messages(page 7-17)
Does the printer’s Control Panel display an error message?
This section provides an alphabetical and numerical listing of the printer’s Control Panel messages, and gives the recommended actions to resolve the problem.
7-2 Troubleshooting

General Paper Path Troubleshooting(page 7-45)
Is there a paper jam in the printer?
This section gives information about solving problems in the paper path.
Information Pages(page 7-48)
Will the printer print information pages successfully?
This section gives the procedures for printing the information pages and evaluating and correcting the printer’s configuration.
Image Quality(page 7-54)
Does the print quality meet the customer’s expectations?
This section gives Toner Cartridge checks, information on EconoMode, image defect examples, and the Repetitive Defect Ruler.
Interface Troubleshooting(page 7-77)
Can the customer print from the host system successfully?
This section describes how to determine if the printer is communicating properly with the host system.
Table 7-1. Major Steps for Troubleshooting (continued)
Troubleshooting Process 7-3

Troubleshooting Flowchart
Figure 7-1 Troubleshooting Flowchart (1 of 2)
7-4 Troubleshooting

Troubleshooting Flowchart (Continued)
Troubleshooting Flowchart, continued
Troubleshooting Process 7-5

Troubleshooting the Printing System
Preliminary Operating ChecksPrior to troubleshooting a specific printer problem, you should ensure that:
The printer is being maintained on a regular basis as described in Chapter 4.
The customer is using acceptable paper as specified in the HP Printer Family Paper Specification Guide.
The printer is positioned on a solid, level surface.
The line voltage does not vary more than 10% from the nominal rated value as specified on the Power Rating Label.
The operating environment for the printer and paper is within the temperature and humidity specifications listed in Chapter 1 of this manual.
The printer is never exposed to ammonia fumes such as those produced by diazo copiers or office cleaning materials.
The printer is not exposed to direct sunlight.
Non-HP components (such as refilled Toner Cartridges, font cartridges, and memory boards) are removed from the printer.
Note When moving the printer into a warm room from a cold location such as a warehouse, various problems can occur due to condensation in the printer. For example, if the Photosensitive Drum is cold, the resistance of the photoconductive layer will be high. This will lead to incorrect contrast. Leave the printer running for 10 to 20 minutes.
7-6 Troubleshooting

Power On
Note It is important to have the printer’s Control Panel functional as soon as possible in the troubleshooting process so that the printer’s diagnostics can assist in locating printing errors.
Table 7-2. Power On Defect or Blank Display
Problem Action
Is the power cord plugged into the wall and the printer? Is AC and DC power available?
Verify. See Table 7-3, “No AC Power,” on page 7-9 and Table 7-4, “No DC Power,” on page 7-10.
Is the power switch set to on?
Set the switch to the on position. You should hear the switch toggle. If the Front Right Side Cover has been removed recently, be sure that the rod leading to the power supply moves as the rocker switch is toggled.
Troubleshooting the Printing System 7-7

Note The Fan only operates during initial power on and while printing, unless the temperature inside the printer is too high. If the temperature is too high, the Fan turns on to cool the inside of the printer.
Does the Fan turn on for about 4 seconds when you first turn the printer on?
Note: Fan operation is significant since the Fan is controlled by the printer’s Engine Controller Board. An operational Fan indicates the following:1. AC power is present in the printer. 2. DC power supply is functional (both 24VDC and 3.5VDC are being generated).3. The Engine Controller Board’s micro-processor is functional.
If the Fan is not working:1. Turn the printer off and remove the printer’s Formatter PCA. Disconnect all the printer’s Paper Handling Options. 2. Turn the printer on and check the Fan again.
If the Fan is still not working, perform the following steps:1. Verify that the fan is connected to the Engine Controller Board.2. Replace the Fan.3. Replace the Engine Controller Board.
If the Fan is working but the printer’s Control Panel is blank:1. Print an Engine Test. See “Engine Test” on page 7-11.If the Engine Test is successful, perform the following steps:
a. Reseat the Control Panel and Formatter Connector.b. Replace the Control Panel Assembly.c. Replace the Formatter.d. Replace the cable from the Control Panel.
2. If the Engine Test is not successful, replace the Engine Controller Board.
Table 7-2. Power On Defect or Blank Display (continued)
Problem Action
7-8 Troubleshooting

Table 7-3. No AC Power
Cause Action
No correct voltage present at the outlet. Plug the power cord into another AC circuit outlet.Inform the customer that the correct line voltage is not available at the outlet.
The power cord is not firmly plugged into the printer and the outlet.
Insert the power plug firmly.
Blown fuse. 1. Check the fuses (FU1 and FU2) on the Engine Controller Board.2. Replace the fuses if necessary.
Defective power switch. Remove the Engine Controller Board. Measure the resistance between the two terminals of the power switch (SW1) by applying the tester probes to the terminals. The resistance must be low (under 1KΩ) when the power is turned ON, and high (over 6MΩ) when the Switch is turned OFF. Otherwise, replace the Engine Controller Board.
Defective AC receptacle or AC power line. Check the printer’s AC receptacle and wiring for the AC power line. If no problem is found, replace the Engine Controller Board.
Troubleshooting the Printing System 7-9

Table 7-4. No DC Power
Cause Action
No AC power is supplied. Check the AC power supply. See Table 7-3, “No AC Power,” on page 7-9
The overcurrent/overvoltage detection circuit activated.
If the problem is not rectified after the power switch is turned off and on again, find the cause of activation of the overcurrent/overvoltage detection circuit in the power supply. Wait for more than two minutes before turning the printer back on.
Blown fuse. 1. Check the fuses (FU1 and FU2) on the Engine Controller Board.2. Replace the fuses if necessary.
7-10 Troubleshooting

Engine TestThe printer has one test pattern (vertical lines). When an image defect appears, a test print can be made to identify the problem. The test print can be made by pressing the test print switch located on the left side of the printer (see Figure 7-2 on page 7-12). A test pattern can be printed by pressing the test print switch once after the Photosensitive Drum has stopped and the printer has entered the standby mode. If the switch is held down, the test pattern is printed continuously. The switch can be used when paper is loaded in any tray other than Tray 1.
The Engine Test does the following:
Verifies that the Print Engine is functioning correctly (the Formatter PCA is completely bypassed during an Engine Test)
Is used for isolating printer problems
Is used for checking and adjusting registration
Prints from Tray 2, 3, or 4 only, not from Tray 1
Can be activated with the Formatter PCA removed
Note For the printer to perform an Engine Test, Tray 2, 3, or 4 must be installed and loaded with paper, and the Toner Cartridge must be installed in the printer.
Location of Engine Test Button
The Engine Test button is located on the left side of the printer, below the Fan vent, as shown in Figure 7-2 on page 7-12.
Troubleshooting the Printing System 7-11

Figure 7-2 Location of the Engine Test Button
Printing an Engine Test
To print an engine test, use a non-metallic object (such as a pencil) to press the engine test button. A single test page with vertical lines prints. To print multiple test pages, hold down the engine test button.
DisplayThe Control Panel should display READY, OFFLINE, or POWERSAVE ON. For information about errors displayed, access the Event Log (see page 7-13). If the display is blank, see page 7-7.
7-12 Troubleshooting

Event LogUse the Event Log to diagnose and troubleshoot printer errors and intermittent failures. You can either display or print the Event Log.
Access the Event Log from the Control Panel’s Information Menu. (Select PRINT EVENT LOG or SHOW EVENT LOG.) The Event Log retains the printer’s last 30 error messages.
See the tables starting on page 7-18 for more information about correcting Event Log messages in the printer.
Note LJ4000 Only: The Event Log codes and the error on the Control Panel do not always correspond exactly. The numbers in the Control Panel message may not be the same in the Event Log; the decimal numbers may be shifted by one digit. For example, 13.1 on the Control Panel reads 13.01 in the Event Log. Refer to the correct number in the tables starting on page 7-18.
Troubleshooting the Printing System 7-13

Figure 7-3 Sample Event Log
Most recent error (up to 30)
7-14 Troubleshooting

Display the Event Log
If the printer cannot print or move any paper, follow these steps to display the Event Log. Otherwise, print the event log.
1 Press [Menu] until INFORMATION MENU appears.
2 Press [Item] until SHOW EVENT LOG appears.
3 Press [Select] to show the Event Log.
4 Press [+] to scroll through the Event Log.
5 Write down the error messages.
6 Check the Event Log for specific error trends in the last 10,000 printed pages.
7 Ask the customer for any observed error trends. (For example, do paper jams tend to occur in a specific area of the printer?)
8 Record any specific error trends.
9 See Table 7-5, “Alphabetical Printer Messages,” on page 7-18 or Table 7-6, “Numerical Printer Messages,” on page 7-29 and follow the recommended action.
10 If the Control Panel displays READY, OFFLINE, or POWERSAVE ON, go to the next section. If it displays any other message, repeat this procedure starting from step 1.
Print the Event Log
The printer’s internal Event Log stores the last 30 errors and can be printed at any time. To print the Event Log:
1 Press [Menu] until INFORMATION MENU appears.
2 Press [Item] until PRINT EVENT LOG appears.
3 Press [Select] to print the Event Log.
Troubleshooting the Printing System 7-15

Interpret the Event Log
The Event Log is the key tool in troubleshooting printer problems. Figure 7-3 shows a typical Event Log. The Event Log shows the current page count at the top left of the page with the printer’s serial number directly to the right of the page count. The left column is the error sequence number, with the error listed at the top (the highest sequence number is the most recent error logged). The next column is the page count at the time of the error, and the last column is the Personality (PCL or PostScript) column or the cause of the jam at the time of the error.
The event log for early versions of the HP LaserJet 4000 series printer may record errors in a different format than the Control Panel display. For example, if 13.20 PAPER JAM is displayed on the Control Panel, the Event Log records error number 13.32.48 or 13.20.48.
Hint Whenever a 13.XX appears on the Control Panel, a good practice is to clear the jammed paper from the printer and print the Event Log. If you cannot print the Event Log, you can still display it on the Control Panel. Write the error next to the last error logged. The last error is the error at the top of the Event Log printout with the highest number in the left-most column.
To interpret the Event Log:
Each individual entry in the log is called an “error,” while all errors occurring at the same page count are called an “event.” Read the Recommended Action for each error comprising an event to gain a clear picture of what took place during that event. Events usually conclude with a time-out, or no response from device (error 66.XX in the Event Log) which requires a power cycle of the print engine.
Use the Event Log table in this section to associate errors in the Event Log with the Control Panel error message. Follow the recommended action listed in the table for each error or event.
7-16 Troubleshooting

Printer MessagesThe following tables explain messages that might display on the printer’s Control Panel. Alphabetical printer messages and their meanings are listed in Table 7-5, and numerical printer messages are listed in Table 7-6.
Hint If a message persists requesting that you load a tray, or if a message indicates that a previous print job is still in the printer’s memory, press [Go] to print or press [Cancel Job] to clear the job from the printer’s memory.
Note Not all messages are described (many are self-explanatory).
Some printer messages are affected by the Auto Continue and Clearable Warning settings from the Configuration Menu in the printer’s Control Panel. If CLEARABLE WARNING=JOB is set on the Control Panel, warning messages display on the Control Panel until the end of the job from which they were generated. If CLEARABLE WARNING=ON is set, warning messages display on the Control Panel until [Go] is pressed. If an error occurs that prevents printing and AUTO CONTINUE=ON is set, the printer goes offline for 10 seconds before it returns online. If AUTO CONTINUE=OFF is set, the message displays until [Go] is pressed.
Troubleshooting the Printing System 7-17

Table 7-5. Alphabetical Printer Messages
Control Panel Message
Event Log Message
Explanation Recommended Action
ACCESS DENIED
MENUS LOCKED
The Control Panel function you are trying to access has been locked by the network administrator to prevent unauthorized access.
Ask the network administrator to unlock the function.
BAD DUPLEXER
CONNECTION
The Duplexer is not connected properly.
1. Re-install the Duplexer.2. If the message persists make sure the Duplexer is connected and the connector is not damaged.3. Replace the Duplexer.
BAD OPT TRAY
CONNECTION
The optional tray is not connected properly.
1. Re-install the optional tray.2. Make sure the optional tray is connected and the connector is not damaged.3. Replace the optional tray.
CANNOT DUPLEX
REAR BIN OPEN
The printer cannot duplex because the Rear Output Bin is open.
Close the Rear Output Bin.
CHECK INPUT DEVICE
alternates withPAPER PATH OPEN
PLEASE CLOSE IT
The optional input tray cannot feed paper to the printer because a door or tray is open.
1. Check the doors and trays.2. If doors and trays are closed, check tabs and sensor levers in the tray for proper operation. Replace any defective tabs or sensors.3. Replace the PCA Controller in the feeder.
7-18 Troubleshooting

CHOSEN LANGUAGE
NOT AVAILABLE
A print job requested a printer language that does not exist in the printer. The job will not print and will be cleared from memory.
1. Print the job using a driver for a different printer language, or add the requested language to the printer (if available).2. Press [Go] to continue.
CLOSE TOP COVER This message may persist when the Top Cover is closed because of a damaged or improperly connected switch.
1. Check SW101 (Figure 7-33 on page 7-108) for proper operation. Make sure wires are connected.2. Replace SW101.3. If the new switch does not solve the error, the wiring or the Engine Controller Board may be defective.
DISK DEVICE
FAILURE
The EIO disk had a critical failure and can no longer be used.
Reseat the EIO disk or replace it with a new one.
DISK FILE
OPERATION FAILED
The requested operation could not be performed. You might have attempted an illegal operation, such as trying to download a file to a non-existent directory.
1. Check the file name and directory name.2. Reattempt the operation.
DISK FILE
SYSTEM IS FULL
The disk is full. 1. Delete files from the EIO disk and then try again, or add a flash DIMM. 2. Download or delete files from HP JetAdmin, and download or delete fonts from HP FontSmart. (See the software help for more information.)
Table 7-5. Alphabetical Printer Messages (continued)
Control Panel Message
Event Log Message
Explanation Recommended Action
Troubleshooting the Printing System 7-19

DISK IS
WRITE PROTECTED
The EIO disk is protected, and no new files can be written to it.
Disable the write protection through HP JetAdmin.
EIO n DISK
INITIALIZING
The disk accessory card takes a long time to initialize. The first parameter is the accessory slot number for this disk accessory card.
EIO n DISK
NOT FUNCTIONAL
The EIO disk is not working correctly.
Remove the EIO disk from the slot indicated.
Replace it with a new EIO disk.
EIO n
INITIALIZING
alternates with
DO NOT POWER OFF
Wait for the message to disappear (approximately 5 minutes). If the printer EIO card is operating correctly and communicating with the network, this message disappears after approximately one minute and no action is required.
If the EIO card is unable to communicate with the network, this message remains for five minutes and then disappears. In this case the printer is not communicating with the network (even though the message is no longer present). The problem may be a bad EIO card, a bad cable or connection on the network, or a network problem. Contact your network administrator.
EIO n DISK
SPINNING UP
The disk accessory is initializing. The first parameter is the accessory slot number for this accessory card.
Table 7-5. Alphabetical Printer Messages (continued)
Control Panel Message
Event Log Message
Explanation Recommended Action
7-20 Troubleshooting

ENV FEEDER LOAD
[TYPE] [SIZE]
There is no envelope in the feeder, the wrong size is loaded in the feeder, or the type and size is set incorrectly in the Control Panel.
1. Load the requested envelope type and size into the Envelope Feeder.2. Make sure the envelope size and type are set correctly from the Paper Handling Menu in the printer’s Control Panel.3. Press [Go] if the desired envelope is already loaded in the feeder.4. Press [-Value+] to scroll through the available types and sizes. 5. Press [Select] to accept the alternate type or size.
FLASH DEVICE
FAILURE
The flash DIMM had a critical failure and no longer can be used.
Remove the flash DIMM and replace it with a new one.
FLASH FILE
OPERATION FAILED
The requested operation could not be performed. You might have attempted an illegal operation, such as trying to download a file to a non-existent directory.
1. Check the file name and directory name.2. Reattempt the operation.
FLASH FILE
SYSTEM IS FULL
The flash DIMM is full. 1. Delete files from the flash DIMM or add another DIMM. 2. Download or delete files from HP JetAdmin, and download or delete fonts from HP FontSmart. (See the software help for more information.)
Table 7-5. Alphabetical Printer Messages (continued)
Control Panel Message
Event Log Message
Explanation Recommended Action
Troubleshooting the Printing System 7-21
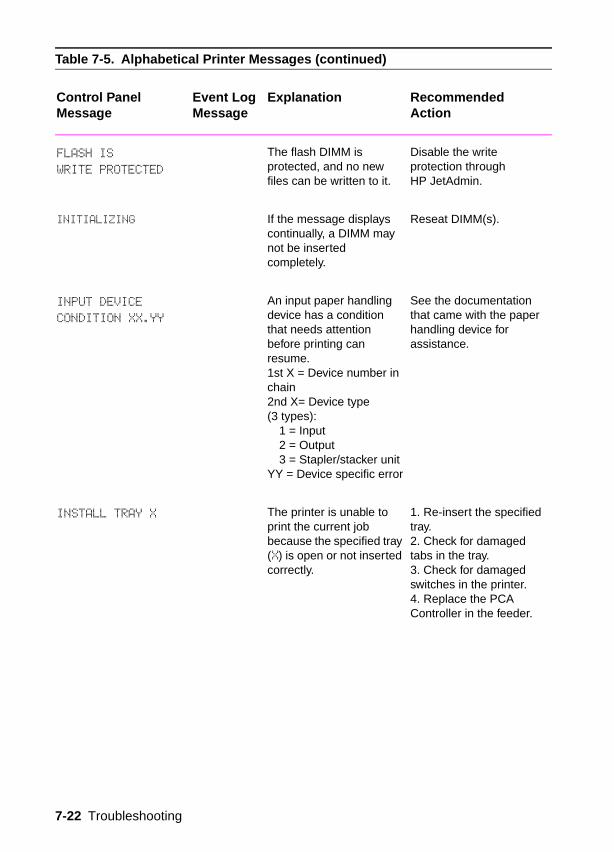
FLASH IS
WRITE PROTECTED
The flash DIMM is protected, and no new files can be written to it.
Disable the write protection through HP JetAdmin.
INITIALIZING If the message displays continually, a DIMM may not be inserted completely.
Reseat DIMM(s).
INPUT DEVICE
CONDITION XX.YY
An input paper handling device has a condition that needs attention before printing can resume.1st X = Device number in chain2nd X= Device type (3 types):
1 = Input2 = Output3 = Stapler/stacker unit
YY = Device specific error
See the documentation that came with the paper handling device for assistance.
INSTALL TRAY X The printer is unable to print the current job because the specified tray (X) is open or not inserted correctly.
1. Re-insert the specified tray.2. Check for damaged tabs in the tray.3. Check for damaged switches in the printer.4. Replace the PCA Controller in the feeder.
Table 7-5. Alphabetical Printer Messages (continued)
Control Panel Message
Event Log Message
Explanation Recommended Action
7-22 Troubleshooting

LOADING
PROGRAM <NUMBER>
alternates withDO NOT POWER OFF
Programs and fonts can be stored on the printer’s file system. At bootup time these entities are loaded into RAM. (These entities can take a long time to load into RAM depending on the size and number of entities being loaded.) The <NUMBER> specifies a sequence number indicating the current program being loaded.
Wait for the program to load.
MANUALLY FEED
[TYPE] [SIZE]
One of the following occurred:A manual feed was requested.There is no paper in Tray 1.The wrong size of paper is loaded.The Control Panel is not set for the kind of paper loaded.
1. Load the requested paper into Tray 1. 2. Press [Go] if the desired paper is already loaded in Tray 1.3. Press [-Value+] to scroll through the available types and sizes. 4. Press [Select] to accept the alternate type or size.
MEMORY FULL
STORED DATA LOST
There is no available memory in the printer. The current job might not print correctly and some resources (such as downloaded fonts or macros) might have been deleted.
The customer might want to add more memory to the printer or simplify the print job.
Table 7-5. Alphabetical Printer Messages (continued)
Control Panel Message
Event Log Message
Explanation Recommended Action
Troubleshooting the Printing System 7-23

MEMORY SETTINGS
CHANGED
The printer changed its memory settings because it did not have enough memory to use the previous settings for I/O Buffering and Resource Saving. This usually occurs after removing memory from the printer, adding a Duplexer, or adding a printer language.
You might want to change memory settings for I/O Buffering and Resource Saving (although default settings are usually best) or add more memory to the printer.
MEMORY SHORTAGE
JOB CLEARED
The printer did not have enough free memory to print the entire job. The remainder of the job will not print and will be cleared from memory.
1. Press [Go] to continue.2. Change the Resource Saving setting from the printer’s Control Panel or add more memory to the printer.
MEMORY SHORTAGE
PAGE SIMPLIFIED
The printer had to compress the job in order to fit it in available memory. Some data loss might have occurred.
Press [Go] to continue.The customer might want to add more memory to the printer.
OFFLINE The printer is offline. Press [Go] to place the printer online.
PERFORM PRINTER
MAINTENANCE
To ensure optimum print quality, the printer prompts the customer to have routine maintenance performed every 200,000 pages.
Install the Printer Maintenance Kit. You must reset the maintenance page count after performing maintenance by pressing [Item-] and [Value-] while turning the printer on.
Table 7-5. Alphabetical Printer Messages (continued)
Control Panel Message
Event Log Message
Explanation Recommended Action
7-24 Troubleshooting

RAM DISK DEVICE
FAILURE
The RAM disk had a critical failure and can no longer be used.
1. Turn the printer off, and then turn the printer on to clear the message.2. If the message persists, install a new RAM disk.
RAM DISK FILE
OPERATION FAILED
The requested operation could not be performed. You might have attempted an illegal operation, such as trying to download a file to a non-existent directory.
1. Check the file name and directory name.2. Reattempt the operation.
RAM DISK FILE
SYSTEM IS FULL
The RAM disk is full. 1. Delete files and then try again, or turn the printer off, and then turn the printer on to delete all files on the device. (Delete files using HP JetAdmin, HP FontSmart, or another software utility. See the software help for more information.)2. If the message persists, increase the size of the RAM disk. Change the RAM disk size from the Configuration Menu in the printer’s Control Panel.
RAM DISK IS
WRITE PROTECTED
The RAM disk is protected, and no new files can be written to it.
Disable the write protection through HP JetAdmin.
Table 7-5. Alphabetical Printer Messages (continued)
Control Panel Message
Event Log Message
Explanation Recommended Action
Troubleshooting the Printing System 7-25

TRAY X EMPTY The specified tray is empty, but the current job does not need this tray in order to print correctly.If this message appears and the tray contains paper, a sensor could be damaged.PS101 detects paper in Tray 2.PS105 detects paper in Tray 1.PS107 detects paper in Tray 3 (HP LaserJet 4050 T/4050 TN).PS801 detects paper in the optional 500-sheet feeder.PS901 detects envelopes in the Envelope Feeder.See Figure 7-29 on page 7-102 for sensor locations.
1. Load the empty tray (x) to clear the message. If you do not load the specified tray, the printer will continue printing from the next available tray, and the message will continue to display.2. Inspect the tray for damaged tabs.3. Check Sensor Arm Flags for damage and be sure they move freely.4. Replace any defective sensors.
Table 7-5. Alphabetical Printer Messages (continued)
Control Panel Message
Event Log Message
Explanation Recommended Action
7-26 Troubleshooting

TRAY X LOAD
[TYPE] [SIZE]
One of the following occurred:There is no paper loaded in the specified tray, or the paper is not the size requested, or the Control Panel is not set for the size of paper loaded.The tray is not properly adjusted for size.The default paper size is set incorrectly.If this message appears and the tray contains the correct size of paper, a sensor could be damaged or a paper sensor lever could be stuck.
1. Load the requested paper into the specified tray (X). Ensure that the trays are correctly adjusted for size. The tray type settings (and size for Tray 1) must be set from the printer’s Control Panel.If you are trying to print from the optional Universal 500-sheet Tray, be sure to set the paper size dial.If you are trying to print A4 or letter size paper, and this message appears, make sure the default paper size is set correctly from the Printing Menu in the printer’s Control Panel.2. Press [Go] to print from the next available tray.3. Press [-Value+] to scroll through the available types and sizes. 4. Press [Select] to accept the alternate type or size. 5. Inspect the switches in the tray. 6. Turn the printer on with the tray removed and push the switches by hand to see if they register.See “Paper Size Detection Switches” on page 7-94.
Table 7-5. Alphabetical Printer Messages (continued)
Control Panel Message
Event Log Message
Explanation Recommended Action
Troubleshooting the Printing System 7-27

UNABLE TO
MOPY JOB
Memory or file system failures would not allow a mopy job to occur. Only one copy will be produced.
UNSUPPORTED SIZE
IN TRAY [YY]
An external paper handling device detected an unsupported paper size. The printer will go offline until the condition is corrected.
Load a supported paper size in the tray.
USE [TYPE]
[SIZE] INSTEAD?
If the requested paper size or type is not loaded, the printer asks if it should use another paper size or type instead.
1. Press [-Value+] to scroll through the available types and sizes.2. Press [Select] to accept the alternate type or size.
WAIT FOR PRINTER
TO REINITIALIZE
The RAM disk setting has been changed from the printer’s Control Panel. This change will not take effect until the printer reinitializes.
Wait for the printer to reinitialize.
WRONG ENVELOPE
FEEDER INSTALLED
The Envelope Feeder you are trying to install will not work for this printer.
Install the correct Envelope Feeder instead.
Table 7-5. Alphabetical Printer Messages (continued)
Control Panel Message
Event Log Message
Explanation Recommended Action
7-28 Troubleshooting

Table 7-6. Numerical Printer Messages
Control Panel Message
Event Log Message
Explanation Recommended Action
13.XX PAPER JAM
[LOCATION]
Paper is jammed at the specified location (and possibly at other locations).If the message persists after all jams have been cleared, a sensor or sensor lever might be stuck or broken.See page 7-45.
For all paper jam messages, do the following:1. Remove jammed paper from the specified location. Check the entire paper path for other pieces of paper in the path.2. Open and close the Top Cover to clear the message.3. If the jam reoccurs see “General Paper Path Troubleshooting” on page 7-45.4. Check sensors and flags in the paper path for proper operation. For the locations of the sensors, see page 7-92.
13.1 PAPER JAM 13.1 Paper delay jam at paper feed area.
For 13.1 and 13.2:1. Ensure that paper trays are loaded properly so paper can feed from the tray.2. Check the input area for obstructions such as paper in the path. Also check to see if the Registration Assembly is damaged or if the Transfer Roller is out of place.3. Check PS102 and PS103 for proper operation. Replace any defective sensors or flags. For locations of sensors, see page 7-92.
13.2 PAPER JAM 13.2 Paper stopped jam at paper feed area.
Troubleshooting the Printing System 7-29

13.5 PAPER JAM 13.5 Paper delay jam at Fuser. For 13.5 and 13.6:1. Check the Transfer Roller and Small Media Belt to ensure they are operating and can feed paper.2. Check the paper path for obstructions at the Transfer Roller, Toner Cartridge, Paper Feed Guide, and Fuser.3. Check PS501 and PS106 for proper operation. Replace any defective sensors or flags. For locations of sensors, see page 7-92.
13.6 PAPER JAM 13.6 Paper stopped jam at Fuser.
13.10 PAPER JAM 13.10 or 13.22(LJ 4000 printer only)
Paper delay jam at paper reversing areaPaper jam at Duplexer.
1. Check the Duplexer and the rear area of the printer for obstructions or damage.2. Check PS701 and PS703 in the Duplexer for proper operation. Replace the Duplexer if a sensor is defective.
13.20 PAPER JAM 13.20 or 13.32 (LJ 4000 printer only)
Paper stopped jam in the paper path.
For 13.20 and 13.21:1. Check the entire paper path for obstructions such as paper in the path, Registration Area, Transfer Area, Paper Feed, and Fuser.2. Check that all assemblies are seated and doors are closed.3. Check all sensors and flags in the paper path (see page 7-92).
13.21 PAPER JAM 13.21 or 13.33(LJ 4000 printer only)
Top open jam.
Table 7-6. Numerical Printer Messages (continued)
Control Panel Message
Event Log Message
Explanation Recommended Action
7-30 Troubleshooting

20 INSUFFICIENT
MEMORY
alternates withPRESS GO TO
CONTINUE
The printer received more data than can fit in its available memory. You might have tried to transfer too many macros, soft fonts, or complex graphics.
Press [Go] to print the transferred data (some data might be lost), then simplify the print job or install additional memory.
21 PAGE TOO
COMPLEX
alternates withPRESS GO TO
CONTINUE
The data (dense text, rules, raster or vector graphics) sent to the printer was too complex.
Press [Go] to print the transferred data. (Some data might be lost.)To print the job without losing data, from the Configuration Menu in the printer’s Control Panel, set PAGE PROTECT=ON, print the job, and then return PAGE PROTECT=AUTO. Do not leave PAGE PROTECT=ON; it might degrade performance.If this message appears often, simplify the print job.
22 EIO X
BUFFER OVERFLOW
alternates withPRESS GO TO
CONTINUE
Too much data was sent to the EIO card in the specified slot (X).
Press [Go] to clear the message. (Data will be lost.)
Table 7-6. Numerical Printer Messages (continued)
Control Panel Message
Event Log Message
Explanation Recommended Action
Troubleshooting the Printing System 7-31

22 PARALLEL I/O
BUFFER OVERFLOW
alternates withPRESS GO TO
CONTINUE
Too much data was sent to the parallel port.This error can occur if the driver you are using is not IEEE-1284 compliant. For best results, use an HP driver that came with the printer.
Check for a loose cable connection and be sure to use a high-quality cable. (Some non-HP parallel cables might be missing pin connections, or might otherwise not conform to the IEEE-1284 specification.)Press [Go] to clear the error message. (Data will be lost.)
22 SERIAL I/O
BUFFER OVERFLOW
alternates withPRESS GO TO
CONTINUE
Too much data was sent to the serial port.
1. Make sure the correct serial pacing option is selected from the I/O Menu in the printer’s Control Panel. 2. Print a Menu Map and verify that the serial pacing item (from the I/O Menu in the printer’s Control Panel) matches the setting on the computer. 3. Press [Go] to clear the error message. (Data will be lost.)
Table 7-6. Numerical Printer Messages (continued)
Control Panel Message
Event Log Message
Explanation Recommended Action
7-32 Troubleshooting

40 BAD SERIAL
TRANSMISSION
alternates withPRESS GO TO
CONTINUE
The printer encountered an error while transferring data from the computer. The error might have occurred for several reasons: The computer was turned on or off while the printer was online.The printer’s serial configuration was not the same as the computer’s.
1. Verify cable connections. Make sure the printer’s serial configuration is set the same as the computer from the I/O Menu in the printer’s Control Panel. 2. The serial baud rate setting can be accessed from the I/O Menu in the printer’s Control Panel.3. Press [Go] to clear the error message and continue printing.4. Turn the printer off.5. Reseat the EIO card and turn the printer on.
40 EIO X BAD
TRANSMISSION
alternates withPRESS GO TO
CONTINUE
The connection has been broken between the printer and the EIO card in the specified slot.X Description:1 = EIO Slot 12 = EIO Slot 2
1. Turn the printer off and reseat the card.2. Press [Go] to clear the error message and continue printing.
Table 7-6. Numerical Printer Messages (continued)
Control Panel Message
Event Log Message
Explanation Recommended Action
Troubleshooting the Printing System 7-33

41.3 UNEXPECTED
PAPER SIZE
The paper size you are trying to print is not the same as the settings for the tray.
1. Make sure that all trays are correctly adjusted for size. (The printer will continue trying to print the job until size settings are correct.)If you are trying to print from Tray 1, make sure the printer’s Control Panel setting for paper size is correctly configured.If you are trying to print from the optional Universal 500-sheet Tray, be sure to set the paper size dial to match the paper size loaded in the tray. 2. After performing the actions above, press [Go] . The page containing the error will automatically be reprinted. (Or, you might want to press [Cancel Job] to clear the job from the printer’s memory.)
41.X
PRINTER ERROR
alternates withPRESS GO TO
CONTINUE
A temporary printing error occurred.X Description:1 = Unknown misprint error2 = Beam detect misprint error3 = See error 41.3 above4 = No VSYNC error5 = Media feed error9 = Noise VSREQ error
Press [Go] . The page containing the error will automatically be reprinted.If the error persists:1. Reseat the connections to the Laser Scanner and the Engine Controller Board.2. Replace the Laser Scanner.3. Replace the Engine Controller Board.
Table 7-6. Numerical Printer Messages (continued)
Control Panel Message
Event Log Message
Explanation Recommended Action
7-34 Troubleshooting

50.X FUSER ERROR A Fuser error has occurred.X Description:1 = Low Fuser temperature2 = Fuser warm up service3 = High Fuser temperature4 = Low/Bad line voltage. (Printer hooked up to UPS uninterruptible power supply)5 = Inconsistent Fuser
Turn the printer off, wait 20 minutes, and then turn the printer on.If the message persists, reseat the Fuser. If that does not work, replace the Fuser.To check the Fuser, turn the printer off and remove the Fuser. Measure the resistance between the Fuser connectors J132-1 and J132-2. See Figure 7-4. If it is not within the range of 200kΩ to 500kΩ, replace the Fuser.If there is no continuity between the Fuser connectors J143F (neutral) and J142F (hot) with the Fuser removed, replace the Fuser.If the problem is not related to the Fuser, replace the Engine Controller Board.
Figure 7-4 Fuser connectors
Table 7-6. Numerical Printer Messages (continued)
Control Panel Message
Event Log Message
Explanation Recommended Action
J132-4
J141FJ142F J143F
J132-3 J132-2 J132-1
J132-5
Troubleshooting the Printing System 7-35
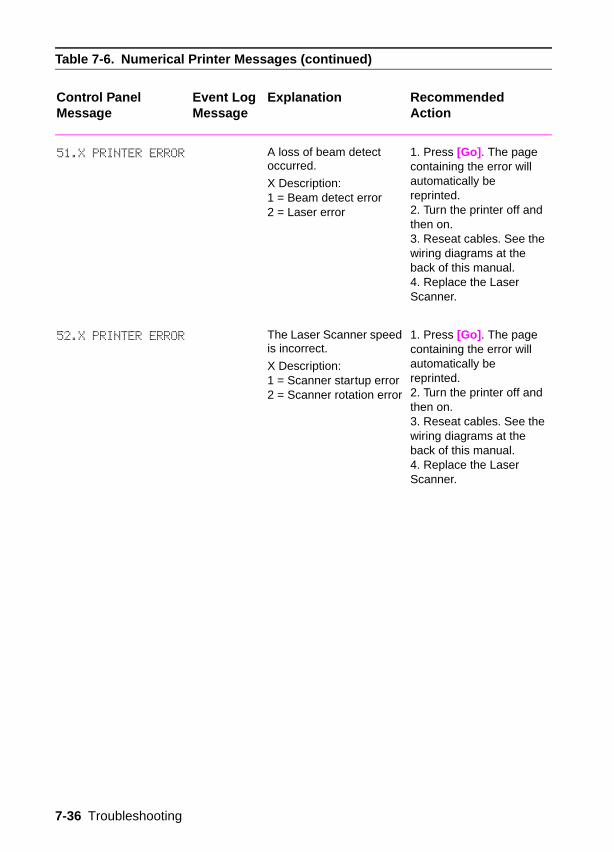
51.X PRINTER ERROR A loss of beam detect occurred.
X Description:1 = Beam detect error2 = Laser error
1. Press [Go] . The page containing the error will automatically be reprinted.2. Turn the printer off and then on.3. Reseat cables. See the wiring diagrams at the back of this manual.4. Replace the Laser Scanner.
52.X PRINTER ERROR The Laser Scanner speed is incorrect.
X Description:1 = Scanner startup error2 = Scanner rotation error
1. Press [Go] . The page containing the error will automatically be reprinted.2. Turn the printer off and then on.3. Reseat cables. See the wiring diagrams at the back of this manual.4. Replace the Laser Scanner.
Table 7-6. Numerical Printer Messages (continued)
Control Panel Message
Event Log Message
Explanation Recommended Action
7-36 Troubleshooting

53.XY.ZZ
PRINTER ERROR
There is a memory error with an accessory. The DIMM that caused the error will not be used. Values of X, Y, and ZZ are as follows:X = DIMM type0 = ROM1 = RAM
Y = Device location0 = internal memory(ROM or RAM)1 to 4 = DIMM slots1, 2, 3, or 4
ZZ= Error number0 = Unsupported memory1 = Unrecognized memory2 = Unsupported memory size3 = Failed RAM test4 = Exceeded maximum RAM size5 = Exceeded maximum ROM size6 = Invalid DIMM speed7 = DIMM reporting information incorrectly8 = DIMM RAM parity error9 = ROM needs to be mapped to an unsupported address10 = DIMM address conflict11 = PDC XROM out of bounds12 = Unable to make a temporary mapping
1. Turn the printer off, and reseat or replace the specified DIMM.2. Try the DIMM in another slot.3. Replace the DIMM that caused the error.
Table 7-6. Numerical Printer Messages (continued)
Control Panel Message
Event Log Message
Explanation Recommended Action
Troubleshooting the Printing System 7-37

55 PRINTER ERROR
alternates withPRESS GO TO
CONTINUE
An internal communications error occurred.
1. Press [Go] . The page containing the error will automatically be reprinted.2. Check the power at the customer’s location.3. Replace the Formatter PCA.4. Replace the Engine Controller Board.
56.X PRINTER ERROR A temporary printing error occurred.X Description:1 = Illegal input or bad accessory connector2 = Illegal output
1. Press [Go] . The page containing the error will automatically be reprinted.2. Turn the printer off, and then turn the printer on.3. Check the printer’s configuration.4. Verify accessory connection.
57.X PRINTER ERROR An error occurred with the Fan’s motor.X Description:4 = Printer fan7 = Duplex fan8 = Thermistor
1. Check the Fan’s connector and make sure the Fan is not blocked.2. Replace the Fan.3. Replace the Engine Controller Board (for 57.8 error message only).
Table 7-6. Numerical Printer Messages (continued)
Control Panel Message
Event Log Message
Explanation Recommended Action
7-38 Troubleshooting

59.X PRINTER ERROR A printing error occurred.X Description:0 = Motor error1 = Motor startup error2 = Motor rotation error
1. Turn the printer off, and then turn the printer on.2. Check and reseat the Fuser and Toner Cartridge to make sure they are not hindering gear movement in the drive train.3. Check the Main Motor’s cable to ensure that it is seated properly.4. If the error persists, replace the Motor.
62.X
PRINTER ERROR
There is a problem with the printer’s memory. The X value refers to the location of the problem:0 = Internal memory1 to 4= DIMM slots 1, 2, 3, or 4
Reseat or replace the specified DIMM.
64.X
PRINTER ERROR
A scan buffer error occurred.
1. Turn the printer off, and then turn the printer on.2.Cold reset.3. If the message persists, replace the Formatter.
66.XX.YY
FINISHER/STAPLER
STACKER FAILURE
or 66.XX.YY INPUT DEVICE FAILURE
or 66.XX.YY OUTPUT DEVICE FAILUREalternates withCHECK CABLES
AND CYCLE POWER
An error occurred in an external paper handling device.1st X = Device number in chain2nd X = Device type (3 types):
1 Input2 Output3 Stapler/stacker unit
YY= Device specific error
1. Press [Go] to clear the message. If the message will not clear:2. Turn the printer off, and then turn the printer on.3. Check all cables.4. Reseat the external paper handling device.
Table 7-6. Numerical Printer Messages (continued)
Control Panel Message
Event Log Message
Explanation Recommended Action
Troubleshooting the Printing System 7-39

68 NVRAM ERROR
CHECK SETTINGS
An error occurred in the printer’s nonvolatile memory (NVRAM) and one or more printer settings has been reset to its factory default.
1. Print a Configuration Page and check the printer settings to determine which values have changed.2. Hold down [Cancel Job] while turning the printer on. This will clean up the NVRAM by removing old areas that are not being used.
68 NVRAM FULL
CHECK SETTINGS
An error occurred in the printer’s nonvolatile memory (NVRAM) and one or more printer settings has been reset to its factory default.
1. Print a Configuration Page and check the printer settings to determine which values have changed.2. Hold down [Cancel Job] while turning the printer on. This will clean up the NVRAM by removing old areas that are not being used.
69.X
PRINTER ERROR
A temporary printing error occurred. X Description:0 = The Duplex mechanism has failed
1. Turn the printer off, and then turn the printer on.2. Reseat the Duplexer.
Table 7-6. Numerical Printer Messages (continued)
Control Panel Message
Event Log Message
Explanation Recommended Action
7-40 Troubleshooting

79.XXXX
PRINTER ERROR
The printer detected an error. The numbers (XXXX) indicate the specific type of error.
1. Turn the printer off, and then turn the printer on.2. Try printing a job from a different software application. If the job prints, go back to the first application and try printing a different file. (If the message only appears with a certain software application or print job, have the customer contact the software vendor for assistance.)
If the message persists, try the following:1. Cycle power.2. Reseat or replace the interface cable and cycle power.3. Remove the DIMMs one at a time and cycle power.4. Try using the parallel interface, if possible.5. With the EIO cards removed from the printer, perform a cold reset.6. If the error persists, replace the Formatter.
Table 7-6. Numerical Printer Messages (continued)
Control Panel Message
Event Log Message
Explanation Recommended Action
Troubleshooting the Printing System 7-41

8X.YYYY The EIO accessory in slot X has encountered a critical error as specified by YYYY.X Description:1 = EIO slot 1 – The printer detected an error with the EIO card.2 = EIO slot 2 – The printer detected an error with the EIO card.6 = EIO slot 1 – The EIO card detected an error. The EIO card may be defective.7 = EIO slot 2 – The EIO card detected an error. The EIO card may be defective.
1. Turn the printer off, and then turn the printer on.2. Reseat or replace the EIO board.
Table 7-6. Numerical Printer Messages (continued)
Control Panel Message
Event Log Message
Explanation Recommended Action
7-42 Troubleshooting

The following table lists the disk error numbers reported on either the Printer Collation or Job Storage Disk Error page, which is printed when an error exists.
Table 7-7. Mopy Disk Error Messages
Disk Error Number
Error Description Solution
1 Disk volume not present – it may be uninitialized.
• Hard disk: Initialize the hard disk. If the problem persists, replace the hard drive.
• RAM disk: Power cycle the printer.
3 A file or directory asked for could not be found.
• Possible data corruption, delete the job the error occurred with.
5 Invalid # of bytes given in a read/write request.
• Possible data corruption, delete the job the error occurred with.
6 Attempt to create a file or directory that already exists.
• The user has sent a username that is the same as an existing directory. Change the username in the driver and resend the job.
15 Bad Disk • Hard disk: Initialize the hard disk. If the problem persists, replace the hard drive.
16 No volume label • Hard disk: Initialize the hard disk. If the problem persists, replace the hard drive.
23 Bad seek request – the resulting offset would be negative.
• Possible data corruption, delete the job the error occurred with.
24 Unexpected internal error • Possible data corruption, delete the job the error occurred with.
• Disk media problem – initialize the hard disk or reboot to reinitialize the RAM disk.
• If the problem persists on a hard drive, replace the hard drive.
55 Bad file system • Possible data corruption, delete the job the error occurred with.
• Disk media problem – initialize the hard disk or reboot to reinitialize the RAM disk.
• If the problem persists on a hard drive, replace the hard drive.
56 Hardware failure • Replace the hard drive.
Troubleshooting the Printing System 7-43

59 The maximum number of directories has been reached
There is a maximum number of directories that can be put on a disk. Stored jobs are stored in directories created for each user. To solve this problem:
• Delete all jobs stored for a user. The firmware will automatically delete the directory for a user with no stored jobs.
• Delete other directories on the disk.
70 Disk Error • Contact your HP Service and Support Representative.
Disk Error Number
Error Description Solution
7-44 Troubleshooting

General Paper Path TroubleshootingPaper jams occur in the printer when paper does not either reach or clear a photosensor along the printer’s paper path in a specific amount of time. If a paper jam occurs, a 13.XX PAPER JAM message is displayed on the printer’s Control Panel. The following table contains general questions you might ask and topics to explore prior to troubleshooting. See the 13.xx section in the Event Log for specific error codes.
Table 7-8. General Paper Path Troubleshooting Questions
Troubleshooting Check Action
What is the frequency of the paper jams (for example: continuous, one jam per 100 pages, one jam per 1000 pages)?
Verify with the customer. Print the Event Log to determine the paper jam history. See “Display” (page 7-12) and the “Sample Event Log”(page 7-13) and evaluate the Event Log.
Do paper jams only occur when the paper is fed from a particular paper input source (such as Tray 1 or Tray 2)?
Use the Paper Path Test to isolate the problem (page 7-47).
Do jams only occur when paper is output to a specific output bin (either the Top Output Bin or Rear Output Bin)?
Use the Paper Path Test to isolate the problem (page 7-47).
Do paper jams occur with a specific type of paper?
Try different media. See the HP LaserJet Printer Family Paper Specification Guide. The guide is bundled with this service manual.
Where does the leading edge of the first sheet of paper in the printer’s paper path stop when a jam occurs? Are any sheets of paper damaged or torn?
Attempt to duplicate. Use the Paper Path Test to isolate the problem. Inspect the paper path and all paper path mechanical assemblies up to the location where the paper jams.
Is the customer loading the paper trays correctly?
Observe the customer loading paper. Do not fan paper. See proper paper handling procedures in the HP LaserJet Printer Family Paper Specification Guide.
Is the customer overfilling the paper trays? Ensure that paper is NOT over the maximum fill marks in the paper trays. Observe the customer loading paper in the trays.
Troubleshooting the Printing System 7-45

There are four photosensors (PS102, PS103, PS106, PS501) in the paper path for detecting arrival or passing of the paper.
If the paper does not reach or pass these sensors within the prescribed time, the microprocessor on the Engine Controller Board assesses a paper jam and notifies the Formatter of the jam. See page 7-92 for the location and function of sensors.
Are the paper tray guides set correctly? Ensure that the left-side paper guides for Trays 2 and 3 are set correctly at both the front and rear of the trays, and that the front guide is locked into the correct position. For Tray 4 ensure that all adjustments are set correctly: front, back, and side, at the top and bottom of the tray.
Does the printer need to be cleaned? Inspect the paper path and paper path rollers. See the cleaning procedures in Chapter 4.
When was maintenance last performed on the printer?
Determine from the Configuration Page the number of pages since the last maintenance (see Figure 7-7 on page 7-52). The Printer Maintenance Kit should be installed every 200,000 images.
Table 7-8. General Paper Path Troubleshooting Questions (continued)
Troubleshooting Check Action
7-46 Troubleshooting

Paper Path Test
To perform a Paper Path Test:
1 Press [Menu] until INFORMATION MENU appears.
2 Press [Item] until PRINT PAPER PATH TEST appears.
3 Press [Select].
4 Press [+] to cycle selections until the desired paper tray appears.
5 Press [Select].
6 Press [+] until the desired output bin appears (open the Rear Output Bin to print to it).
7 Press [Select] .
8 Press [+] until the desired duplex mode (on or off) appears.
9 Press [Select] .
10 Press [+] to cycle selections until the desired number of copies appears. Choose 1, 10, 50, 100, or 500 copies.
11 Press [Select] to perform the Paper Path Test.
Troubleshooting the Printing System 7-47

Information PagesFrom the printer’s Control Panel you can print pages that give details about the printer and its current configuration. The following information pages are described here:
Menu Map
Configuration Page
PCL or PS font list
For a complete list of the printer’s information pages, print a Menu Map and see the Information Menu.
Menu Map
To see the current settings for the menus and items available in the Control Panel, print a Control Panel Menu Map:
1 Press [Menu] until INFORMATION MENU appears.
2 Press [Item] until PRINT MENU MAP appears.
3 Press [Select] to print the Menu Map.
The content of the Menu Map varies, depending on the options currently installed in the printer. The printer driver or software application can override many of these values.
7-48 Troubleshooting

Figure 7-5 Sample Menu Map (4000 series printer)
Troubleshooting the Printing System 7-49

Figure 7-6 Sample Menu Map (4050 series printer)
7-50 Troubleshooting

Configuration Page
Use the Configuration Page to view current printer settings, to help troubleshoot printer problems, or to verify installation of optional accessories, such as memory (DIMMs), paper trays, and printer languages.
Note If an HP JetDirect print server EIO card is installed, a JetDirect Configuration Page will print out as well.
To print a Configuration Page:
1 Press [Menu] until INFORMATION MENU appears.
2 Press [Item] until PRINT CONFIGURATION appears.
3 Press [Select] to print the Configuration Page.
Figure 7-7 on page 7-52 is a sample Configuration Page. The content of the Configuration Page varies, depending on the options currently installed in the printer.
Troubleshooting the Printing System 7-51

Figure 7-7 Sample Configuration Page (4000 series printer)
Printer InformationLists the serial number, HP JetSend IP addresses, page counts, and other information for the printer.
MemoryLists printer memory, PCL Driver work space (DWS), and I/O buffering and resource saving information.
Installed Personalities and OptionsLists all printer languages that are installed (such as PCL and PS) and lists options that are installed in each DIMM slot and EIO slot.
SecurityLists the status of the printer’s Control Panel Lock, Control Panel Password, and disk drive.
Event LogLists the number of entries in the log, the maximum number of entries viewable, and the last three entries.
Paper Trays and OptionsLists the size settings for all trays and lists optional paper handling accessoriesthat are installed.
7-52 Troubleshooting

Figure 7-8 Sample Configuration Page (4050 series printer)
Printer InformationLists the serial number, HP JetSend IP addresses, page counts, and other information for the printer.addresses, page counts, and other information for the printer.
MemoryLists printer memory, PCL Driver work space (DWS), and I/O buffering and resource saving information.
Event LogLists the number of entries in the log, the maximum number of entries viewable, and the last three entries.
SecurityLists the status of the printer’s Control Panel Lock, Control Panel Password, and disk drive.
Installed Personalitiesand OptionsLists all printer languages that are installed (such as PCL and PS) and lists options that are installed in each DIMM slot and EIO slot.
Paper Trays and OptionsLists the size settings for all trays and lists optional paper handling accessories that are installed.
Toner GaugeA graphic representation of amount of Toner remaining in the Toner Cartridge.
Troubleshooting the Printing System 7-53

Verify Installed Options
Under “Installed Personality” on the Configuration Page, look for options such as hard disk or DIMM types and sizes.
Verify that the options which are installed in the printer are reflected on the Configuration Page. If an installed device is not shown, reseat the device and print a new Configuration Page.
Image QualityWhen you are working with customers, obtain a print sample before you begin troubleshooting the printer. Ask the customer to explain the quality they expect from the printer. The print sample will also help clarify the customer’s explanation.
Table 7-9. Image Quality Checks
Image Quality Checks Action
Does the problem repeat on the page?
Use the Repetitive Defect Ruler on page 7-73.
Is the Toner Cartridge full and is it manufactured by HP?
Check the Toner Cartridge using the checklist on page 7-55.
Is the customer using print media that meets all HP paper specification standards?
For more information about HP’s paper specification standards, see Chapter 1 of this manual and the HP LaserJet Family Paper Specification Guide.
Is the print sample similar to those in the Print Quality Tables on page 7-58?
Compare and perform the actions recommended in the Print Quality Tables.
Is the problem on the Toner Cartridge Drum or the Transfer Roller?
Perform the Half Self Test Functional Check (page 7-74) to determine where the defect is.If a dark and distinct Toner image is preset on the Drum’s surface, assume that the first four functions of the electrophotographic process are functioning (cleaning, conditioning, writing, and developing – see Chapter 5), and troubleshoot the failure as a Transfer or Fusing problem.
7-54 Troubleshooting

Check the Toner Cartridge
Image formation defects are often the result of problems with the Toner Cartridge. If there is any doubt, always replace the Toner Cartridge before troubleshooting image defects.
Use the following checklist to ensure that the Toner Cartridge is still operable.
Ensure that the Toner Cartridge has Toner.
Check the expiration date of the Toner Cartridge (stamped on the box).
Check the Toner Cartridge to see if it has been disassembled or refilled.
Ensure that the Toner Cartridge is seated properly in the printer.
Inspect the cartridge for leaking Toner through worn seals. (If the Drum has been manually rotated, it may have caused internal damage and Toner may spill.)
Table 7-10. Weights of Toner Cartridges
Toner Cartridge Capacity
Full Weight Empty Weight
6,000 pages 45.7 ounces1295 grams
36 ounces1020 grams
10,000 pages 51 ounces1445 grams
35.3 ounces1000 grams
Troubleshooting the Printing System 7-55

Note Toner Cartridges are rated for 6,000 or 10,000 images at 5% coverage (depending on the model). It is possible to wear out the gears and the cartridge seals before TONER LOW is displayed if the number of images exceeds 6,000 or 10,000 (depending on the model). See “EconoMode” below.
Check the surface of the Photosensitive Drum in the cartridge to see if it has been damaged or scratched. Touching the Drum will contaminate the photosensitive surface and may cause spotting and defects during printing.
White areas on the page may indicate that the Drum has been exposed to light for too long. If white areas appear, stop the printer and wait a few minutes This should eliminate most defective images. If not, place the Toner Cartridge in a dark environment for several days. This can restore some life to the Drum.
EconoMode
EconoMode creates draft-quality printing by reducing the amount of Toner on the printed page by up to 50%. Advise the customer to turn EconoMode on or off from the printer driver or software application, since those settings override the Control Panel settings. EconoMode settings can also be accessed from the Print Quality Menu.
CAUTION HP does not recommend full-time use of EconoMode. If EconoMode is used full-time, it is possible that the Toner supply will outlast the mechanical parts in the Toner Cartridge.
7-56 Troubleshooting

Image Defects
The quality of the printer’s output is subject to the judgment of the user. This section of the manual helps you define print quality defects and understand what factors affect print quality.
The print samples shown in the following tables illustrate some print quality defects. Keep copies of print quality defects encountered in the field with an explanation of their causes for future reference.
The image defects listed below are covered in the following tables.
Black Page (page 7-58)
Blank Page (page 7-59)
Blank Spots (page 7-60)
Creases (page 7-61)
Curl (page 7-62)
Contamination on Back (page 7-63)
Distorted Image (page 7-64)
Dropouts (page 7-65)
Faded Print/Bubbles (page 7-65)
Gray Background (page 7-66)
Horizontal Black Lines (page 7-67)
Horizontal Smudges (page 7-67)
Horizontal White Lines (page 7-67)
Light Print, Dark Print, or Fade (page 7-68)
Loose Toner (page 7-69)
Repetitive Defects (page 7-69)
Skew (page 7-70)
Toner Smear (page 7-70)
Toner Specks (page 7-71)
Vertical Black Lines (page 7-71)
Vertical Dots (page 7-72)
Vertical White Lines (page 7-72)
Troubleshooting the Printing System 7-57

Hint If you find a defect that is not depicted, record the probable cause along with the conditions in the printing environment and save a copy of the defect for future reference.
Table 7-11. Black Page
Possible Cause Action
The high-voltage power supply connections are contaminated.
Clean the high-voltage power supply terminals. See Figure 7-20, “Engine Controller Board Layout,” on page 7-93. Also clean the high-voltage springs where they contact the Toner Cartridge.
The high-voltage power supply is installed improperly.If the high voltage power supply has been removed and replaced, it may not be seated properly.
Remove the Engine Controller Board and check the connectors for damage. Reseat the Engine Controller Board, being certain to fully seat the connectors.
Defective Primary Charging Roller.
Replace the Toner Cartridge.
The Laser Drive circuitry is damaged on the Engine Controller Board so that the laser is always on.
Replace the Engine Controller Board, followed by the Formatter PCA if necessary.
7-58 Troubleshooting

Table 7-12. Blank Page
Possible Cause Action
No Toner is available for print.
Remove sealing tape or replace the Toner Cartridge.
Defective laser shutter.
Check the laser shutter for free operation when inserting the Toner Cartridge.
Toner Cartridge Guide damaged, improperly positioned, or missing.
Make sure the guide is installed properly above the Toner Cartridge.
No Transfer Roller voltage.
Without Transfer Roller voltage, Toner cannot be attracted from the surface of the Drum to the paper. Perform the Half Self Test Functional Check (page 7-74) to check all other electrophotographic processes. Replace the Transfer Roller if necessary.
No developing bias. 1. Clean the High-voltage Power Supply Contacts. With no developing bias charge, Toner is not attracted to the Drum.2. Replace the Engine Controller Board.
No Drum Ground Path.
With no ground path the Drum cannot discharge. The negative charge on the Drum repels Toner, and leaves a white page with bubble print. 1. Check the Drum Ground Spring and connect it as shown on page 6-44.2. Replace the Engine Controller Board.
Defective laser Scanner Cable Assembly.
Low-level signals exchanged between the Laser Scanner Assembly and the Engine Controller Board may be affecting laser output. Replace the Laser Scanner Cable Assembly.
Troubleshooting the Printing System 7-59

Table 7-13. Blank Spots
Possible Cause Action
Paper does not meet printer specifications or is stored improperly.
1. Print a few more pages to see if the problem corrects itself.2. Turn over the stack of paper in the tray. Also try rotating the paper 180°.3. Check the paper (or other print media) type and quality. Replace the paper, and advise the customer to use the recommended paper and store it properly.
Contaminated or deformed Transfer Roller.
Replace the Transfer Roller.
Defective Toner Cartridge.
Replace the Toner Cartridge.
See also “Dropouts” on page 7-65.
7-60 Troubleshooting

Table 7-14. Creases
Possible Cause Action
Paper does not meet printer specifications or is stored improperly.
1. Print a few more pages to see if the problem corrects itself.2. Turn over the stack of paper in the tray. Also try rotating the paper 180°.3. Check the paper (or other print media) type and quality. Replace the paper, and advise the customer to use the recommended paper and store it properly.
Printer’s operating environment does not meet specifications.
Make sure the printer’s operating environment meets specifications.
Paper is loaded incorrectly.
Make sure paper is loaded correctly and that the guides fit properly against the paper stack.
Wrong tray. Print from a different tray (such as Tray 1).
Wrong output bin for paper type.
Print to a different output bin (top or Rear Output Bin).
Obstruction in paper path.
1. Check the paper path for paper or label debris.2. Check for damaged components that could be creasing the paper.
Troubleshooting the Printing System 7-61

Table 7-15. Curl
Possible Cause Action
Paper does not meet printer specifications or is stored improperly.
1. Print a few more pages to see if the problem corrects itself.2. Turn over the stack of paper in the tray. Also try rotating the paper 180°.3. Check the paper (or other print media) type and quality. Replace the paper, and advise the customer to use the recommended paper and store it properly.
Printer’s operating environment does not meet specifications.
Make sure the printer’s operating environment meets specifications.
Wrong output bin. Print to a different output bin (top or Rear Output Bin).
Wrong Fuser setting for paper type.
From the Paper Handling Menu on the Control Panel, change the Fuser mode setting or choose another paper type from the printer driver.
See also “Dropouts” on page 7-65.
7-62 Troubleshooting

Table 7-16. Contamination on Back
Possible Cause Action
Contamination inside printer (Tray Separation Roller, Feed Roller, Transfer Roller, Fuser, Toner Cartridge).
1. Print at least 10 pages to see if the problem goes away.2. Print a cleaning page (page 4-4).Identify and clean the contaminated part according to the “Repetitive Defect Ruler” on page 7-73. If contamination cannot be removed, replace the contaminated part.3. Check for Toner leaks.
Paper does not meet printer specifications or is stored improperly.
1. Print a few more pages to see if the problem corrects itself.2. Turn over the stack of paper in the tray. Also try rotating the paper 180°.3. Check the paper (or other print media) type and quality. Replace the paper, and advise the customer to use the recommended paper and store it properly.
Troubleshooting the Printing System 7-63

Table 7-17. Distorted Image
Possible Cause Action
Paper does not meet printer specifications or is stored improperly.
1. Print a few more pages to see if the problem corrects itself.2. Turn over the stack of paper in the tray. Also try rotating the paper 180°.3. Check the paper (or other print media) type and quality. Replace the paper, and advise the customer to use the recommended paper and store it properly.
Printer’s operating environment does not meet specifications.
Make sure the printer’s operating environment meets specifications.
Wrong output bin for paper type.
Print to a different output bin.
Poor connection of cables to the Laser Scanner.
Reseat the cables connected to the Laser Scanner.
Poor connection of cables to the Engine Controller Board.
Reseat the cables connected to the Engine Controller Board.
Defective Laser Scanner.
Replace the Laser Scanner.
Defective Engine Controller Board.
Replace the Engine Controller Board.
7-64 Troubleshooting

Table 7-18. Dropouts
Possible Cause Action
Paper might be too smooth.
Check the paper (or other print media) type and quality.
Printer’s operating environment does not meet specifications.
Make sure the printer’s operating environment meets specifications.
Wrong Toner density setting.
From the print quality menu on the Control Panel, adjust the Toner density setting. Make sure EconoMode is off.
Wrong Fuser setting for paper type.
From the Paper Handling Menu on the Control Panel, change the Fuser Mode setting or choose another paper type from the printer driver.
See also “Blank Spots” on page 7-60.
Table 7-19. Faded Print/Bubbles
Possible Cause Action
No Drum ground path. With no ground path the Drum cannot discharge. The negative charge on the Drum repels Toner, and leaves a white page with bubble print. 1. Check the Drum ground spring and connect it as shown on page 6-44.2. Replace the Engine Controller Board.
Engine Controller Board.
Replace the Engine Controller Board.
Troubleshooting the Printing System 7-65
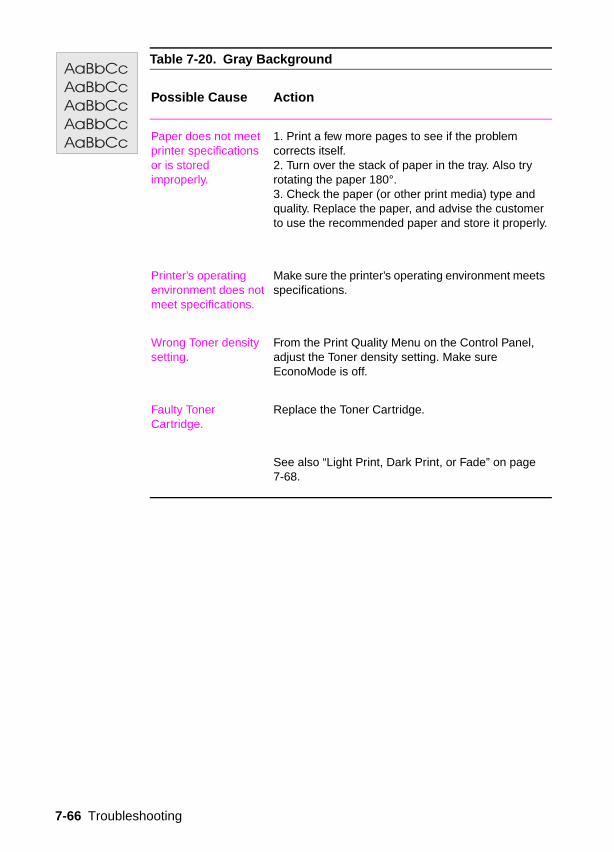
Table 7-20. Gray Background
Possible Cause Action
Paper does not meet printer specifications or is stored improperly.
1. Print a few more pages to see if the problem corrects itself.2. Turn over the stack of paper in the tray. Also try rotating the paper 180°.3. Check the paper (or other print media) type and quality. Replace the paper, and advise the customer to use the recommended paper and store it properly.
Printer’s operating environment does not meet specifications.
Make sure the printer’s operating environment meets specifications.
Wrong Toner density setting.
From the Print Quality Menu on the Control Panel, adjust the Toner density setting. Make sure EconoMode is off.
Faulty Toner Cartridge.
Replace the Toner Cartridge.
See also “Light Print, Dark Print, or Fade” on page 7-68.
7-66 Troubleshooting

Table 7-21. Horizontal Black Lines
Possible Cause Action
Defective Laser Scanner Assembly or Engine Controller Board.
1. See the “Repetitive Defect Ruler” on page 7-73.2. Reseat connectors on the Laser Scanner and Engine Controller Board.3. Replace the Laser Scanner Assembly followed by the Engine Controller Board, if necessary.
Table 7-22. Horizontal Smudges
Possible Cause Action
Paper path contamination or damage.
1. See the “Repetitive Defect Ruler” on page 7-73.2. Check the Toner Cartridge and replace it if necessary.3. Check the Fuser and replace it if necessary.
Table 7-23. Horizontal White Lines
Possible Cause Action
1. Check the Toner Cartridge and replace it if necessary.2. Check the Fuser and replace it if necessary.3. Replace the Laser Scanner Assembly, followed by the Engine Controller Board, if necessary.
Troubleshooting the Printing System 7-67

Table 7-24. Light Print, Dark Print, or Fade
Possible Cause Action
Wrong Toner density setting.
From the print quality menu on the Control Panel, adjust the Toner density setting. Make sure EconoMode is off.
Toner Cartridge is low. Replace the Toner Cartridge.
Transfer Roller is defective.
Replace the Transfer Roller.
Paper does not meet printer specifications or is stored improperly.
1. Print a few more pages to see if the problem corrects itself.2. Turn over the stack of paper in the tray. Also try rotating the paper 180°.3. Check the paper (or other print media) type and quality. Replace the paper, and advise the customer to use the recommended paper and store it properly.
Poor contact to the Engine Controller Board.
1. Ensure that the Drum Ground Spring is connected to the Engine Controller Board correctly.2. Clean the contacts if they are contaminated. If the problem remains after cleaning, or parts are damaged or deformed, replace them. 3. Replace the Engine Controller Board if necessary.
Defective Laser Scanner.
Replace the Laser Scanner.
Defective Engine Controller Board.
Replace the Engine Controller Board.
See also “Faded Print/Bubbles” on page 7-65.
7-68 Troubleshooting

Table 7-25. Loose Toner
Possible Cause Action
Contamination in the printer.
1. Print a few more pages to see if the problem corrects itself.2. Clean the inside of the printer (page 4-2) or use the printer’s cleaning page (page 4-4).
Toner Cartridge is defective.
Replace the Toner Cartridge.
Paper might be too smooth.
Check the paper (or other print media) type and quality.
Wrong Fuser setting for paper type.
From the Paper Handling Menu on the Control Panel, change the Fuser Mode setting or choose another paper type from the printer driver.
Defective Fuser. Replace the Fuser.
Table 7-26. Repetitive Defects
Possible Cause Action
Contamination or defect on a roller.
See “Repetitive Defect Ruler” on page 7-73.
Troubleshooting the Printing System 7-69

Table 7-27. Skew
Possible Cause Action
Paper does not meet printer specifications or is stored improperly.
1. Print a few more pages to see if the problem corrects itself.2. Turn over the stack of paper in the tray. Also try rotating the paper 180°.3. Check the paper (or other print media) type and quality. Replace the paper, and advise the customer to use the recommended paper and store it properly.
Paper is not loaded correctly or trays are not adjusted properly.
Make sure paper is loaded correctly and that the guides fit properly against the paper stack.
Registration Assembly is improperly installed.
Be sure that the Registration Assembly is installed correctly.
Table 7-28. Toner Smear
Possible Cause Action
Contamination in the printer.
1. Print a few more pages to see if the problem corrects itself.2. Clean the inside of the printer (page 4-2) or use the printer’s cleaning page (page 4-4).
Paper might be too smooth.
Check the paper (or other print media) type and quality.
Defective Toner Cartridge.
Replace the Toner Cartridge. (See instructions with the Toner Cartridge.)
Wrong Fuser setting for paper type.
From the Paper Handling Menu on the Control Panel, change the Fuser Mode setting or choose another paper type from the printer driver.
7-70 Troubleshooting

Table 7-29. Toner Specks
Possible Cause Action
Contamination in printer.
1. Print a few more pages to see if the problem corrects itself.2. Clean the inside of the printer (page 4-2) or use the printer’s cleaning page (page 4-4).
Paper does not meet printer specifications or is stored improperly.
1. Print a few more pages to see if the problem corrects itself.2. Turn over the stack of paper in the tray. Also try rotating the paper 180°.3. Check the paper (or other print media) type and quality. Replace the paper, and advise the customer to use the recommended paper and store it properly.
Alternating small and standard paper (such as envelopes and letterhead).
To alternate small and standard paper, from the Configuration Menu on the Control Panel, set SMALL PAPER SPEED=SLOW.
Table 7-30. Vertical Black Lines
Possible Cause Action
Defective Toner Cartridge.
Replace the Toner Cartridge.
Contaminated Fuser Entrance Guide.
Clean the Guide.
Scratches on the Fuser.
Replace the Fuser.
Troubleshooting the Printing System 7-71

Table 7-31. Vertical Dots
Possible Cause Action
Contaminated Static Eliminator teeth.
Clean the Static Eliminator.
Poor contact between the Static Eliminator and the Engine Controller Board.
Clean the contacts, if contaminated. If the problem remains after cleaning, or parts are damaged or deformed, replace them.
Deformed or deteriorated Transfer Roller.
Replace the Transfer Roller.
Defective Engine Controller Board.
Replace the Engine Controller Board.
Table 7-32. Vertical White Lines
Possible Cause Action
Lack of Toner or faulty Toner Cartridge.
Redistribute the Toner in the Toner Cartridge. If the problem continues, replace the Toner Cartridge.
Contamination in the Laser Path.
Clean the Laser Path. (Remove the Laser Scanner Assembly and clean the lens.)
Defective Fuser. Replace the Fuser Assembly.
Dirty mirror in the Laser Scanner.
Replace the Laser Scanner.
7-72 Troubleshooting

Repetitive Defect Ruler
Repetitive print defects are usually associated with a specific roller within the printer or the Toner Cartridge. Use Figure 7-9 to isolate the cause of repetitive print defects. Align the first occurrence of the defect with the top of the “ruler” and measure to the next occurrence of the defect to determine the roller in question. When you are certain that your defect pattern matches the pattern of the ruler, replace the indicated roller.
Figure 7-9 Repetitive Defect Ruler
Troubleshooting the Printing System 7-73

Image System Troubleshooting
Half Self Test Functional Check
The electrophotographic process can be subdivided into the following stages:
Cleaning (removes excess Toner from Drum surface)
Conditioning (places a uniform electrical charge on Drum)
Writing (laser strikes surface of Drum and creates latent image)
Developing (forms the Toner image on Drum)
Transferring (charge transfers the image to paper)
Fusing (heat and pressure produces a permanent image)
The purpose of the Half Self Test Check is to determine which stage is malfunctioning. Perform the test as follows:
1 Print a Configuration Page from the Control Panel Information Menu.
2 Open the Top Cover after the paper advances half-way through the printer (about five seconds after the main motor begins rotation). The leading edge of the paper should have advanced past the Toner Cartridge.
3 Remove the Toner Cartridge.
4 Open the Toner Cartridge’s Drum shield to view the Drum’s surface.
If a dark and distinct Toner image is present on the Drum’s surface, assume that the first four functions of the electrophotographic process are functioning (cleaning, conditioning, writing, and developing – see Chapter 5), and troubleshoot the failure as a transfer or fusing problem.
If no image is present on the Photosensitive Drum, perform all the following functional checks.
7-74 Troubleshooting

Drum Rotation Functional Check
The Photosensitive Drum, located in the Toner Cartridge, must rotate for the print process to work. The Photosensitive Drum receives its drive from the Main Drive Assembly. To verify whether the Drum is rotating:
1 Open the Top Cover.
2 Remove the Toner Cartridge.
3 Mark the cartridge’s drive gear with a felt-tipped marker. Note the position of the mark.
4 Install the Toner Cartridge and close the Top Cover. The start-up sequence should rotate the Drum enough to move the marked gear.
5 Open the printer and inspect the marked gear. Verify that the mark moved. If the gear did not move, inspect the main drive assembly to ensure that it is meshing with the Toner Cartridge gears. If the Drive Gears function and the Drum does not move, replace the Toner Cartridge.
Note This test is especially important if refilled Toner Cartridges are in use.
Troubleshooting the Printing System 7-75

High-voltage Power Supply Functional Check
The High-voltage Power Supply Assembly provides the necessary voltages for the printer’s electrophotographic processes. The +24B VDC supply is used to power the High-voltage Power Supply Assembly. A summary of the major components of the High-voltage System is given in Table 7-33.
Table 7-33. High Voltage System Checks
Checks Action
Are the connectors for the Primary Charge Roller, Drum Ground, Developing Bias, and Toner Level Sensor damaged, corroded, contaminated, or missing?
1. Inspect and correct each item.2. Check the Toner Cartridge.3. Check all wire connections.4. Replace the Engine Controller Board if the connection cannot be repaired.
Are the High-voltage Power Supply connections contaminated, bent, or broken?
1. Clean the terminals with alcohol only.2. Check all wire connections.3. Replace the Engine Controller Board if the connection cannot be repaired.
7-76 Troubleshooting

Interface TroubleshootingThis section provides an overview of the printer’s interface requirements.
Communications Check
Note Communication problems are normally the customer’s responsibility. Time spent attempting to resolve these problems may not be covered by the product’s Hewlett-Packard warranty.
Refer the customer to the network administrator for assistance in troubleshooting network problems.
If the printer is not connected to an MS-DOS-based host, proceed to Table 7-34, “Communications Checks,” on page 7-82.
Test Message
After the printer is installed, verify communications between the printer and the IBM-compatible computer. Enter the following at the DOS prompt:
C: \ DIR > LPT1 Enter (for printing to the parallel port)
The printer should print a directory listing of the C: \ directory.
EIO Troubleshooting
The JetDirect Configuration Page shown in Figure 7-10 contains valuable information regarding the current status of the EIO accessories. Before attempting to troubleshoot a network problem or notifying your network consultant of a problem, always print a Configuration Page.
See the HP JetDirect Network Interface Configuration Guide for detailed explanations of network issues.
Troubleshooting the Printing System 7-77

Figure 7-10 Sample JetDirect Configuration Page (4000 series printer)
Network statistics
I/O card status
IP address
Node name
Novell status
7-78 Troubleshooting

Sample JetDirect Configuration Page (4050 series printer)
Troubleshooting the Printing System 7-79

HP JetDirect Configuration
If the HP EIO JetDirect Card has successfully powered up and completed its internal diagnostics, the I/O CARD READY message appears. If communication is lost, an I/O NOT READY message appears followed by a two-digit error code. See the HP JetDirect Network Interface Configuration Guide for further details and recommended action.
The “Network Statistics” column indicates that network activity has been occurring. Bad packets, framing errors, un-sendable packets and collisions should be minimal. If a high percentage (greater than one percent) of these occur, contact the network administrator. All of the statistics are set to zero when the printer is powered-off.
The “Novell Status” block should state the Novell printer server name to which the printer is connected. If the node name reads “NPIxxxxxx” (xxxxxx=last six digits of the EIO’s LAN address), the EIO card has not been configured for a Novell server. This could indicate that the card is operating under an IPX protocol other than Novell. Consult with the network administrator if the Node Name is not present.
In the TCP/IP protocol block, the default IP address is “192.0.0.192.” It is acceptable to operate the printer with this default address. The error message ARP DUPLICATE ADDRESS may appear in this block. This is also an acceptable error code if the TCP/IP protocol is not being used. Check with the network administrator to determine the correct IP Address for the printer.
7-80 Troubleshooting

AUTOEXEC.BAT Standard Configurations
Parallel DOS Commands
If the previous check did not produce the desired result, ensure that the AUTOEXEC.BAT file contains the following statements for parallel interface communications:
MODE LPT1: , , P
For MS-DOS version 4.0 and above:
MODE LPT1: , , B
Note This example assumes that you are using parallel printer port LPT1. If you are using LPT2 or LPT3, replace LPT1 in the example with the appropriate printer port.
If the problem persists, see Table 7-34, “Communications Checks,” on page 7-82.
Serial DOS Commands
Most IBM-compatible computers default to a parallel printer port. To ensure that information is sent to the serial printer port, type the following MS-DOS commands at the MS-DOS prompt, or include them in the AUTOEXEC.BAT file.
MODE COM1: 9600, N, 8, 1, P
MODE LPT1: =COM1
For MS-DOS version 4.0, or above, enter:
MODE COM1: 9600, N, 8, 1, B
MODE LPT1: =COM1
Note These examples assume that you are using serial printer port COM1. If you are using COM2 or COM3, replace COM1 with the appropriate printer port.
If the problem persists, see Table 7-34, “Communications Checks,” on page 7-82.
Troubleshooting the Printing System 7-81

Communications Checks
Table 7-34. Communications Checks
Checks Action
Is your computer configured to the parameters described in the configuration instructions?
These parameters are required to communicate with the printer. Verify that the configuration of the computer's communications port matches these parameters.
Note: If these parameters are not set properly, an error may display on the Control Panel.
For Serial Communications Only
Does the printer's baud rate match that of the computer's communications port?
Print a Configuration Page to verify the baud rate setting. At the computer, verify that the baud rate is set correctly in any configuration files.
Note: A baud rate problem may cause an error.
Are you using the correct cable for communications between the computer and the printer?
Hint: On an RS-232 cable, pins 2 and 3 may need to be reversed at the printer-end of the cable.
Are you using the correct RS-232-C protocol?
During the communications “handshake,” the printer transmits both the XON/XOFF signal and the Data Terminal Ready (DTR) signal. The DTR signal may be either negative going, or positive going.
DTR polarity is set at the printer's Control Panel. The XON may be set to normal (only transmitted when data is needed), or Robust XON (transmitted every second). This feature is configurable from the Control Panel. DTR is available at pin 20, and XOFF is transmitted from pin 2 of the printer.
If using a serial interface, is the cable longer than 50 feet (15 meters)?
The maximum recommended cable length for RS-232 serial communications is 50 feet (15 meters). Use the correct cable or move the printer closer to the host.
7-82 Troubleshooting

If the host system and printer still are not communicating and you have addressed the issues in Table 7-34, replace the Formatter PCA and the EIO card and reconfigure the printer. If the problem persists, a protocol analyzer may be needed to find the source of the problem.
CAUTION HP LaserJet printers are not designed to work with mechanical switch-box products without proper surge protection. These devices generate high transient voltages that cause permanent damage to the Formatter PCA. This circumstance is not covered by the Hewlett-Packard warranty.
If using a bidirectional parallel cable, is it longer than 10 feet (3 meters) long?
The maximum recommended cable length for the printer is 10 feet (3 meters). Use a serial interface connection or move the printer closer to the host.
Do all the current Control Panel Configuration Menu items match the host system's parameters?
Make appropriate changes. If host system changes are made, be sure to reboot the system, or otherwise ensure the changes are in effect.
Does the printer have a bad interface port?
If possible, try a different printer interface than the one with the problem. Reconfigure the printer and host appropriately.
Does the host have a bad interface port?
If possible, try a different host system port. Reconfigure both the host and printer appropriately.
Table 7-34. Communications Checks (continued)
Checks Action
Troubleshooting the Printing System 7-83

Reference Diagrams
Locations of Components
Figure 7-11 Components of the Paper Pickup and Feed System (HP LaserJet 4000/4000 N and 4050/4050 N)
7-84 Troubleshooting

Table 7-35. Components in Figure 7-11
PS101 Tray 2 Paper Out Sensor
PS102 Pre-Feed Sensor
PS103 Top of Page Sensor
PS104 Top Output Bin Full Sensor
PS105 Tray 1 Paper Out Sensor
PS106 Fuser Delivery Sensor 2
PS501 Fuser Delivery Sensor 1
SL101 Tray Pickup Solenoid
SL102 Tray 1 Pickup Solenoid
CL101 Feed Roller Clutch
Reference Diagrams 7-85

Figure 7-12 Components of the Paper Feed System (HP LaserJet 4000/4000 N and 4050/4050 N with Optional 500-sheet Universal Tray Assembly)
7-86 Troubleshooting

Figure 7-13 Components of the Duplexer
Reference Diagrams 7-87

Figure 7-14 Components of the Fusing and Delivery Unit
7-88 Troubleshooting

Figure 7-15 Components of the Envelope Feeder
Reference Diagrams 7-89

Paper Path
Figure 7-16 Paper Path (HP LaserJet 4000 T/4000 TN and 4050 T/4050 TN Shown)
Figure 7-17 Paper Path with the Duplexer
7-90 Troubleshooting

Figure 7-18 Paper Path with the Envelope Feeder
Reference Diagrams 7-91

Figure 7-19 Paper Sensors and the Paper Path
Table 7-36. Paper Sensors in Figure 7-19
PS102 Pre-Feed Sensor Sensor and flag located on Registration/Feed Sensor Assembly.
PS103 Top of Page Sensor Sensor and flag located on Registration/Feed Sensor Assembly.
PS106 Fuser Paper Delivery Sensor 2 Sensor and flag located on Fuser Assembly.
PS501 Fuser Paper Delivery Sensor 1 Sensor located on Engine Controller flags on Engine Controller Board and Fusing Assembly.
PS701 Duplex Pickup Paper Sensor (Duplexer)
Sensor and flag located in Duplexer.
PS703 Reversed Paper Sensor (Duplexer) Sensor and flag located in Duplexer.
PS902 Envelope Multiple Feed Sensor (Envelope Feeder)
Sensor and flag located in Envelope Feeder.
7-92 Troubleshooting

Engine Controller Board
Figure 7-20 Engine Controller Board Layout
Table 7-37. Engine Controller Board Layout
SW1 Power switch
SW501 Test print switch
VR201 Adjusted at factory
VR501 Top of page adjustment
VR601 Adjusted at factory
Reference Diagrams 7-93

Paper Size Detection Switches
Figure 7-21 Paper Size Detection Switches (1 of 3), Tray 2 (HP LaserJet 4000/4000 N and 4050/4050 N)
Figure 7-22 Paper Size Detection Switches (2 of 3), Trays 2 and 3 (HP LaserJet 4000 T/4000 TN and 4050 T/4050 TN)
Top
Tray 3 Switches
Tray 2 Switches
7-94 Troubleshooting

Figure 7-23 Paper Size Detection Switches (3 of 3), Optional 500-sheet Universal Tray Assembly
Table 7-38. Paper Size Detection Switches in Figure 7-21 to Figure 7-23
Paper Size Paper Size Detection Switch
SW600/603/801 SW601/604/802 SW602/605/803
No tray OFF OFF OFF
Legal OFF OFF ON
Executive OFF ON OFF
Letter OFF ON ON
Other ON OFF OFF
Other ON OFF ON
B5 ON ON OFF
A4 ON ON ON
Reference Diagrams 7-95

Motors
Figure 7-24 Location of Motors
Table 7-39. Motors in Figure 7-24
M101 Main Motor
M701 Reversing Motor (Duplexer)
M702 Duplex Feed Motor (Duplexer)
FM101 Cooling Fan
FM701 Duplexer Exhaust Fan (Duplexer)
H901 Fusing Heater
7-96 Troubleshooting

Connectors
Figure 7-25 Connectors (1 of 3)
Reference Diagrams 7-97

Figure 7-26 Connectors (2 of 3)
7-98 Troubleshooting

Figure 7-27 Connectors (3 of 3)
For locations of connectors see the wiring diagrams at the back of this manual.
Reference Diagrams 7-99

PCAs
Figure 7-28 Location of PCAs
7-100 Troubleshooting

Table 7-40. Location of PCAs
1 Engine Controller Board Sequence control, High-voltage output, DC output, and Heater Drive.
2 Paper Size Detection PCA
Relay between Sensors/Solenoids and Engine Controller Board, and Paper Size Detection.
3 Paper Feeder Driver PCA Control and detection of solenoids in the Paper Feeder.
4 Envelope Feeder Driver PCA
Control and detection of solenoids in the Envelope Feeder.
5 Duplexer Driver PCA Controls paper in the Duplexer.
Reference Diagrams 7-101

Sensors and Thermistor
Figure 7-29 Location of Sensors and Thermistor (1 of 2)
7-102 Troubleshooting
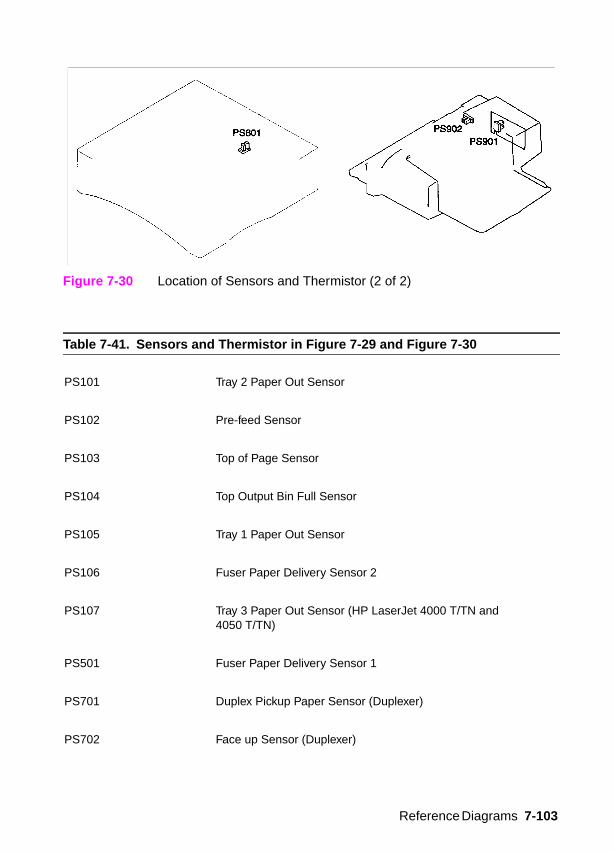
Figure 7-30 Location of Sensors and Thermistor (2 of 2)
Table 7-41. Sensors and Thermistor in Figure 7-29 and Figure 7-30
PS101 Tray 2 Paper Out Sensor
PS102 Pre-feed Sensor
PS103 Top of Page Sensor
PS104 Top Output Bin Full Sensor
PS105 Tray 1 Paper Out Sensor
PS106 Fuser Paper Delivery Sensor 2
PS107 Tray 3 Paper Out Sensor (HP LaserJet 4000 T/TN and 4050 T/TN)
PS501 Fuser Paper Delivery Sensor 1
PS701 Duplex Pickup Paper Sensor (Duplexer)
PS702 Face up Sensor (Duplexer)
Reference Diagrams 7-103

PS703 Reversed Paper Sensor (Duplexer)
PS801 Paper Feeder Paper Sensor (Paper Feeder)
PS901 Envelope Sensor (Envelope Feeder)
PS902 Envelope Multiple Feed Sensor (Envelope Feeder)
TH901 Fusing Surface Temperature Sensor
Table 7-41. Sensors and Thermistor in Figure 7-29 and Figure 7-30 (continued)
7-104 Troubleshooting

Solenoids and Clutch
Figure 7-31 Location of Solenoids and Clutch (1 of 2)
Reference Diagrams 7-105

Figure 7-32 Location of Solenoids and Clutch (2 of 2)
7-106 Troubleshooting

Table 7-42. Solenoids and Clutch in Figure 7-31 and Figure 7-32
CL102 Feed Roller Clutch
SL101 Tray 2 Pickup Solenoid
SL102 Tray 1 Pickup Solenoid
SL103 Tray 3 Pickup Solenoid (HP LaserJet 4000 T/TN and 4050 T/TN)
SL701 Duplexer Solenoid (Duplexer)
SL801 Paper Feeder Pickup Solenoid (Paper Feeder)
SL901 Envelope Pickup Solenoid (Envelope Feeder)
Reference Diagrams 7-107

Switches
Figure 7-33 Location of Switches
7-108 Troubleshooting

Table 7-43. Switches in Figure 7-33
SW101 Door open detection switch
SW600 Tray 2 Paper size switch
SW601 Tray 2 Paper size switch
SW602 Tray 2 Paper size switch
SW603 Tray 3 paper size switch (HP LaserJet 4000 T/TN and 4050 T/TN)
SW604 Tray 3 paper size switch (HP LaserJet 4000 T/TN and 4050 T/TN)
SW605 Tray 3 paper size switch (HP LaserJet 4000 T/TN and 4050 T/TN)
SW801 Paper Feeder paper size switch
SW802 Paper Feeder paper size switch
SW803 Paper Feeder paper size switch
Reference Diagrams 7-109

Timing
Figure 7-34 Pickup Timing for Tray 2 (and lower trays)
Figure 7-35 Pickup Timing for Tray 1
7-110 Troubleshooting

8 Parts and Diagrams
Overview
This chapter discusses the following:
How To Use the Parts Lists and Diagrams
Accessories and Supplies
Illustrations and Parts Lists
Overview 8-1

How To Use the Parts Lists and Diagrams
The figures in this chapter illustrate the major subassemblies in the printer and their component parts. A table accompanies each exploded view diagram. Each table lists the item number for the replaceable part, the associated part number for the item, the quantity, and a description of the part.
CAUTION While looking for an electrical part number, pay careful attention to the voltage listed in the description column to ensure that the part number selected is for the correct model of the printer.
Ordering Parts
All standard part numbers listed are stocked and may be ordered from HP’s Support Materials Organization (SMO), or Support Materials Europe (SME).
Hewlett-Packard Co.Support Materials Organization8050 Foothills Blvd.Roseville, CA 95678Parts Direct Ordering: (800) 227-8164 (U.S. Only)
Hewlett-Packard Co.Support Materials, EuropeWolf-Hirth Strasse 33D-7030Boblingen, Germany(49 7031) 14-2253
Ordering Consumables
Consumables and accessories such as those listed in Table 8-1 can be ordered from Hewlett-Packard.
The phone numbers are:
U.S.: (800) 538-8787Canada: 1-800-387-3154(Toronto) 516-671-8383United Kingdom: 0734-441212Germany: 0130-3322
Contact your local HP Parts Coordinator for other phone numbers.
8-2 Parts and Diagrams

Note Parts that have no item number or part number listed are not field replacement parts and cannot be ordered.
How To Use the Parts Lists and Diagrams 8-3

Accessories and Supplies
The following items are available through your local authorized HP dealer. To find a dealer near you, call the HP Customer Information Center (800) 752-0900.
Note See page 2-4 for documentation product numbers.
Table 8-1. Accessories and Supplies
Description Part No. Exchange No. Product No.
500-Sheet Paper Feeder and Tray C4124A
Envelope Feeder C4122-69001 C4122A
Duplexer C4123-69001 C4123A
Standard 500-Sheet Tray C3122A
250-sheet Universal Replacement Tray
C4126-67901 C4126A
500-sheet Universal Replacement Tray
C4125-67901 C4125A
HP Multi-Purpose Paper HPM1120
HP LaserJet Paper HPJ1124
Toner Cartridge (6,000 pages) C4127A
Toner Cartridge (10,000 pages) C4127X
EDO DIMM4 MB8 MB16 MB
C4135-67901C4136-67901C4137-67901
C4135AC4136AC4137A
SDRAM DIMM4 MB8 MB16 MB32 MB
64 MB
C4140-67901C4141-67901C4142-67901C4143-67901
C4140AC4141AC4142AC4143AC3913A
Flash DIMM2 MB4 MB
C4286AC4287A
8-4 Parts and Diagrams

* The maintenance kits can be ordered from Support Materials Organization(U.S.) or Support Materials Europe. See page 8-2 for ordering information.
Font DIMM (8 MB Asian MROM)Traditional ChineseSimplified ChineseEuro
C4292AC4293A
FIR Receiver (4050 only) C4103A
Hard Disk C2985A
Parallel Cables2 Meter IEEE-1284 cable3 Meter IEEE-1284 cable
C2950AC2951A
Serial Cables9-9 pin serial cable (male/female)9-25 pin serial cable (male/female)
C2932AC2933A
Serial Adapter25-9 pin adapter (male/female) C2809A
Macintosh Computer Serial Cable 92215S
Macintosh Network Cable Kit 92215N
Enhanced I/O CardsEthernet RJ-45 onlyEthernet RJ-45 and BNC, Local TalkToken Ring RJ-45 and DB-910/100Base-TX networks
J3111-61003J3110AJ3111AJ3112AJ3113A
Maintenance Kit*110V220V
C4118-67902C4118-67903
C4118-69001C4118-69002
Assy: Dust Cover, 1 x 500Assy: Dust Cover, 2 x 250Assy: Dust Cover, opt 500
C4232-60101C4233-60101C4234-60101
C4232AC4233AC4234A
Table 8-1. Accessories and Supplies (continued)
Description Part No. Exchange No. Product No.
Accessories and Supplies 8-5

Common Screws and Replacement Cables
Table 8-2. Screws Used in the Printer
Description Part No.
Screw, M4x10, self-tapping (black) XA9-0870-000CN
Screw, M3x4, washer head XA9-0434-000CN
Screw, M3x6, with star washer FA9-1449-000CN
Screw, M3x6, washer head XA9-0267-000CN
Screw, M4x12, self-tapping XA9-0773-000CN
Screw, M4x116, long, module RB1-8703-000CN
Screw, M4x10, self-tapping (silver) XA9-0606-000CN
Screw, M4, captive, Fuser RB1-8819-000CN
Screw, M3x16, Feed Modules XA9-0917-000CN
8-6 Parts and Diagrams

Table 8-3. Replaceable Cables
Description Part No. Table No. Item No.
Cable and Power Receptacle RG5-3696-000CN Table 8-7 on page 8-15
15
Cable, Tray 1 Sensor RG5-3700-000CN Table 8-7 on page 8-15
14
Cable, Laser Scanner, and Output Bin Sensor
RG5-3876-000CN Table 8-8 on page 8-17
20
Cable, Paper Feed/Tray 1 Pickup Solenoid
RG5-3703-000CN Table 8-7 on page 8-15
8
Cable, Envelope Feeder Connect RG5-3704-000CN Table 8-7 on page 8-15
11
Cable, Top Cover Switch RG5-3705-000CN Table 8-7 on page 8-15
10
Cable, Feed/Registration Sensors RG5-3706-000CN Table 8-8 on page 8-17
7
Cable, Formatter/Control Panel RG5-3708-000CN Table 8-7 on page 8-15
2
Cable, Main Motor RG5-3709-000CN Table 8-7 on page 8-15
5
Cable, Feeder Module RG5-3710-000CN Table 8-8 on page 8-17
8
Accessories and Supplies 8-7

Illustrations and Parts Lists
Figure 8-1 Assembly Location Diagram
Engine Controller Board Assembly
Tray 1 Pickup Assembly
Top Cover Assembly
Paper Delivery Assembly
Fusing Assembly
Tray 1 Assembly
Paper Feed Assembly
Registration Assembly
Paper Feed Guide Assembly
Printer Drive Assembly
Delivery Drive Assembly
Laser Scanner Assembly
Formatter Assembly
8-8 Parts and Diagrams
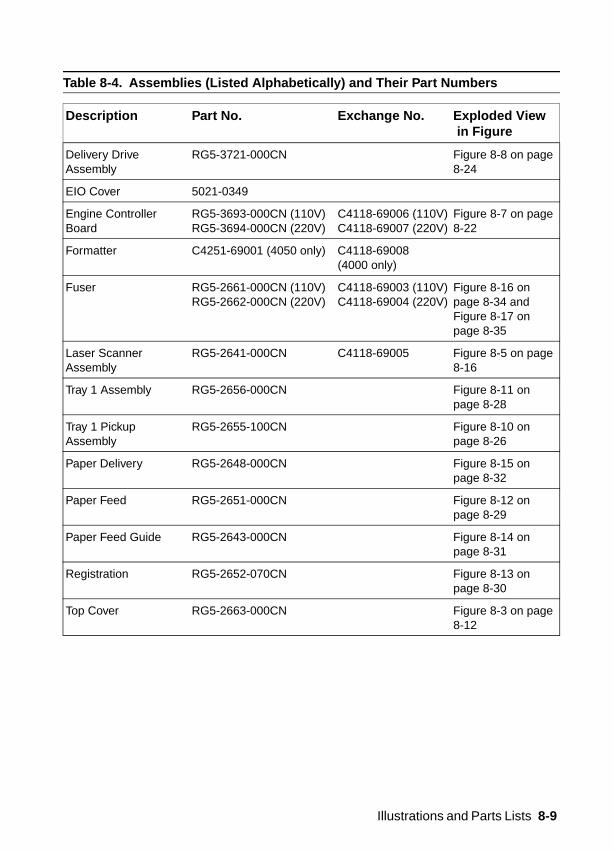
Table 8-4. Assemblies (Listed Alphabetically) and Their Part Numbers
Description Part No. Exchange No. Exploded View in Figure
Delivery Drive Assembly
RG5-3721-000CN Figure 8-8 on page 8-24
EIO Cover 5021-0349
Engine Controller Board
RG5-3693-000CN (110V)RG5-3694-000CN (220V)
C4118-69006 (110V)C4118-69007 (220V)
Figure 8-7 on page 8-22
Formatter C4251-69001 (4050 only) C4118-69008 (4000 only)
Fuser RG5-2661-000CN (110V)RG5-2662-000CN (220V)
C4118-69003 (110V)C4118-69004 (220V)
Figure 8-16 on page 8-34 and Figure 8-17 on page 8-35
Laser Scanner Assembly
RG5-2641-000CN C4118-69005 Figure 8-5 on page 8-16
Tray 1 Assembly RG5-2656-000CN Figure 8-11 on page 8-28
Tray 1 Pickup Assembly
RG5-2655-100CN Figure 8-10 on page 8-26
Paper Delivery RG5-2648-000CN Figure 8-15 on page 8-32
Paper Feed RG5-2651-000CN Figure 8-12 on page 8-29
Paper Feed Guide RG5-2643-000CN Figure 8-14 on page 8-31
Registration RG5-2652-070CN Figure 8-13 on page 8-30
Top Cover RG5-2663-000CN Figure 8-3 on page 8-12
Illustrations and Parts Lists 8-9

Figure 8-2 External Covers and Panels
9
8
1
3
4
6
2
5
7
8-10 Parts and Diagrams

Table 8-5. External Covers and Panels
Item No. Part No. Quantity Description
1 RB1-8858-000CN 1 Panel, Formatter Cover
2 RG5-2664-000CN 1 Cover Assembly, Right Front
3 RB1-8860-000CN 1 Clip, Right Side Panel
4 RB1-8849-000CN 1 Power Switch Button
5 RG5-2667-000CN 1 Tray 1 Door Assembly
6 RB1-8848-000CN 1 Clip, Left Side Panel
7 RG5-2665-000CN 1 Cover Assembly, Left
8 RB1-8843-000CN 1 Tray, Rear
9 RB1-8844-000CN 1 Tray, Rear Extension
Illustrations and Parts Lists 8-11

Figure 8-3 Top Cover Assembly
2
3
41
5
8-12 Parts and Diagrams

Table 8-6. Top Cover Assembly
Item No. Part No. Quantity Description
1 RG5-2663-000CN 1 Top Cover Assembly
2 RB1-8841-000CN 1 Panel, Toner Cartridge access
3 RB1-8846-000CN 1 Latch, Rear Tray
4 RB1-8847-000CN 1 Spring, Rear Tray Latch
5 RB1-8710-000CN Plate Cover
Illustrations and Parts Lists 8-13

Figure 8-4 Internal Components (1 of 3)
13
12
7
3
1
2 4
5
6
9
10
1114
15
8
1618
20 21
22
17
19
8-14 Parts and Diagrams

Table 8-7. Internal Components (1 of 3)
Item No. Part No. Quantity Description
1 RB1-8862-000CN 1 Guide, Formatter/CP Cable
2 RG5-3708-000CN 1 Cable Formatter/Control Panel
3 RB1-8703-000CN 2 Screw, Module Attachment
4 RH7-1331-000CN 1 Main Motor Assembly
5 RG5-3709-000CN 1 Cable, Main Motor
6 RG5-2645-000CN 1 Support, Top Cover, Right
7 RB1-8694-000CN 1 Strap, Interlock Support Ground
8 RG5-3703-000CN 1 Cable, Paper Feed/Tray 1 Pickup Solenoid
9 WC4-5139-000CN 1 Switch, Top Cover Interlock access
10 RG5-3705-000CN 1 Cable, Top Cover Switch
11 RG5-3704-000CN 1 Cable, Envelope Feeder Connect
12 RB1-8704-000CN 1 Guide, Bottom Cable
13 RB1-8851-000CN 1 Power Switch Activator
14 RG5-3700-000CN 1 Cable, Tray 1 Sensor
15 RG5-3696-000CN 1 AC, Power Receptacle
16 C4118-69003C4118-69004
1 Fusing Assembly (110V)Fusing Assembly (220V)
17 C4118-69006C4118-69007
1 Engine Controller Board (110V)Engine Controller Board (220V)
18 RG5-2648-000CN 1 Delivery Assembly
19 RG5-2653-000CN 1 Printer Drive Assembly
20 RG5-2643-000CN 1 Paper Feed Guide Assembly
21 RG5-2655-100CN 1 Tray 1 Pickup Assembly
22 RG5-2656-000CN 1 Tray 1 Assembly
Illustrations and Parts Lists 8-15

Figure 8-5 Internal Components (2 of 3)
1
2
3
4
5
6
9
101112
14
1516
18
19
17
7
13
20
8
21
22
23
8-16 Parts and Diagrams

Table 8-8. Internal Components (2 of 3)
Item No. Part No. Quantity Description
1 RB2-2405-000CN 1 Plate, Control Panel Ground
2 RB1-8671-000CN 1 Support, Top Cover, Left
3 RB1-8827-000CN 1 Leaf Spring
4 RB1-8689-000CN 1 Cable Holder
5 RB1-8708-000CN 1 Plate, Gear Plate Ground
6 RG5-2642-000CN 1 Registration/Feed Sensor Assembly
7 RG5-3706-000CN 1 Cable, Feed/Registration Sensors
8 RG5-3710-000CN 1 Cable, Feeder Module
9 RB1-8690-000CN 1 Retainer, Toner Sensing Spring
10 RB1-8695-000CN 1 Spring, Toner Sensing
11 RB1-8693-000CN 1 Spring, Toner Cartridge Drum Ground
12 RB1-8688-000CN 1 Button, Engine Test
13 RH7-1335-000CN 1 Fan, Main Cooling
14 RB1-8706-000CN 1 Fan Cover
15 RB2-2400-000CN 1 Panel, Left Duplex access
16 RB2-2401-000CN 1 Panel, Right Duplex access
17 RB1-8700-000CN 1 Laser Shutter Arm
18 RB1-8702-000CN 1 Spring, Shutter
19 RG5-2641-000CN/C4118-69005
1 Laser Scanner Assembly
20 RG5-3876-000CN 1 Cable, Laser Scanner and Output Bin Sensor
21 RG5-2666-000CN 1 Control Panel
22 C4118-69006C4118-69007
11
Engine Controller Board (110V)Engine Controller Board (220V)
Illustrations and Parts Lists 8-17

23 C4118-40002C4118-40007C4118-40020C4118-40008C4118-40009C4118-40010C4118-40011C4118-40012C4118-40013C4118-40015C4118-40017C4118-40018C4118-40019C4118-40021C4118-40022C4118-40023C4118-40025C4118-40026C4118-40029C4118-40014C4118-40024C4118-40027C4118-40028C4118-40030C4251-40001C4251-40002C4251-40014C4251-40003C4251-40004C4251-40005C4251-40006C4251-40007C4251-40008C4251-40010C4251-40011C4251-40012C4251-40013C4251-40015C4251-40016C4251-40017C4251-40019C4251-40020C4251-40023C4251-40009C4251-40018C4251-40021C4251-40022
11111111111111111111111111111111111111111111111
LJ4000 Overlay (English)LJ4000 Overlay (French)LJ4000 Overlay (German)LJ4000 Overlay (Italian)LJ4000 Overlay (Portugal)LJ4000 Overlay (Norway)LJ4000 Overlay (Hungarian)LJ4000 Overlay (Swedish)LJ4000 Overlay (Polish)LJ4000 Overlay (Czech)LJ4000 Overlay (Korean)LJ4000 Overlay (Chinese, Simplified)LJ4000 Overlay (Chinese, Traditional)LJ4000 Overlay (Spanish)LJ4000 Overlay (Danish)LJ4000 Overlay (Dutch)LJ4000 Overlay (Finland)LJ4000 Overlay (Turkish)LJ4000 Overlay (Japanese)LJ4000 Overlay (Russian)LJ4000 Overlay (Greek)LJ4000 Overlay (Hebrew)LJ4000 Overlay (Arabic)LJ4000 Overlay (Thai)LJ4050 Overlay (English)LJ4050 Overlay (French)LJ4050 Overlay (German)LJ4050 Overlay (Italian)LJ4050 Overlay (Portugal)LJ4050 Overlay (Norway)LJ4050 Overlay (Hungarian)LJ4050 Overlay (Swedish)LJ4050 Overlay (Polish)LJ4050 Overlay (Czech)LJ4050 Overlay (Korean)LJ4050 Overlay (Chinese, Simplified)LJ4050 Overlay (Chinese, Traditional)LJ4050 Overlay (Spanish)LJ4050 Overlay (Danish)LJ4050 Overlay (Dutch)LJ4050 Overlay (Finland)LJ4050 Overlay (Turkish)LJ4050 Overlay (Japanese)LJ4050 Overlay (Russian)LJ4050 Overlay (Greek)LJ4050 Overlay (Hebrew)LJ4050 Overlay (Arabic)
Table 8-8. Internal Components (2 of 3) (continued)
Item No. Part No. Quantity Description
8-18 Parts and Diagrams
C4251-40024 1 LJ4050 Overlay (Thai)

Notes:
Illustrations and Parts Lists 8-19

Figure 8-6 Internal Components (3 of 3)
5
1
2
3
4
8-20 Parts and Diagrams

Table 8-9. Internal Components (3 of 3)
Item No. Part No. Quantity Description
1 RF5-1867-000CN 1 Pre-Transfer Ground Plate Assembly
2 RG5-4283-000CN 1 Transfer Roller Assembly
3 RS5-0911-000CN 1 Gear, Coupler
4 RF5-2496-000CN 1 Plate, Gear
5 RB1-8747-000CN 1 Plate, Registration Ground
Illustrations and Parts Lists 8-21

Figure 8-7 Engine Controller Board Assembly
1
8-22 Parts and Diagrams

Table 8-10. Engine Controller Board Assembly
Item No. Part No. Exchange No. Quantity Description
1 RG5-3693-000CN C4118-69006 1 Engine Controller Board (110V)
1 RG5-3694-000CN C4118-69007 1 Engine Controller Board (220V)
Illustrations and Parts Lists 8-23

Figure 8-8 Delivery Drive Assembly
12
Table 8-11. Delivery Drive Assembly
Item No. Part No. Quantity Description
1 RG5-3721-000CN 1 Delivery Drive Assembly
2 WG8-5362-000CN 1 Sensor, Optical
8-24 Parts and Diagrams

Figure 8-9 Printer Drive Assembly
2
1
3
Table 8-12. Printer Drive Assembly
Item No. Part No. Quantity Description
1 RG5-2653-000CN 1 Printer Drive Assembly
2 RB1-8757-000CN 1 Guide, Cable, Gear Assembly Plate
3 RB1-8756-000CN 1 Rod, Toner Drive
Illustrations and Parts Lists 8-25

Figure 8-10 Tray 1 Pickup Assembly
1
45
6
2
3
7
8-26 Parts and Diagrams

Table 8-13. Tray 1 Pickup Assembly
Item No. Part No. Quantity Description
1 RG5-2655-100CN 1 Tray 1 Pickup Assembly
2 RB2-2386-000CN 1 Cover Envelope Feeder Drive
3 RG5-3718-000CN 1 Tray 1 Pickup Roller Assembly
4 RB1-8787-000CN 1 Arm, Tray 1 Paper Sensing
5 RB2-2387-000CN 1 Arm, Tray 1 Retaining
6 RB1-8788-000CN 1 Cover, Tray 1 Sensor Arm
7 RH7-5172-000CN 1 Solenoid, Tray 1 Drive
Illustrations and Parts Lists 8-27

Figure 8-11 Tray 1 Assembly
1
Table 8-14. Tray 1 Assembly
Item No. Part No. Quantity Description
1 RG5-2656-000CN 1 Tray 1 Assembly
8-28 Parts and Diagrams

Figure 8-12 Paper Feed Assembly
1
Table 8-15. Paper Feed Assembly
Item No. Part No. Quantity Description
1 RG5-2651-000CN 1 Paper Feed Assembly
Illustrations and Parts Lists 8-29

Figure 8-13 Registration Assembly
1
Table 8-16. Registration Assembly
Item No. Part No. Quantity Description
1 RG5-2652-070CN 1 Registration Assembly
8-30 Parts and Diagrams

Figure 8-14 Paper Feed Guide Assembly
Table 8-17. Paper Feed Guide Assembly
Item No. Part No. Quantity Description
1 RG5-2643-000CN 1 Paper Feed Guide Assembly
2 RF5-2495-000CN 1 Shaft, Belt Idler Assembly
3 RB1-8668-000CN 1 Belt, Feed Guide
4 RB1-8674-000CN 1 Shaft, Belt Drive
2
3
4
1
Illustrations and Parts Lists 8-31
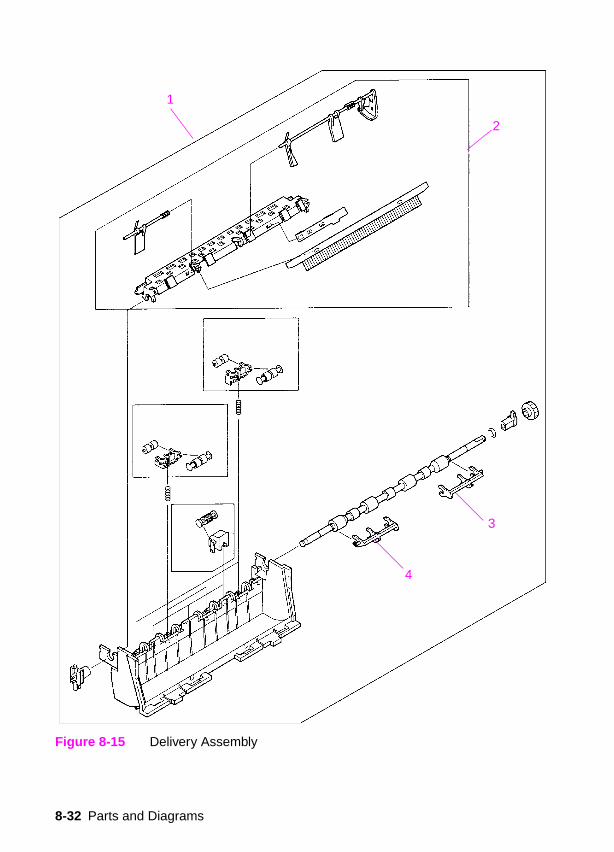
Figure 8-15 Delivery Assembly
3
4
1
2
8-32 Parts and Diagrams

Table 8-18. Delivery Assembly
Item No. Part No. Quantity Description
1 RG5-2648-000CN 1 Delivery Assembly
2 RG5-2650-000CN 1 Delivery Sensor Arm Assembly
3 RB2-2408-000CN 1 Arm, Output Kicker, Right
4 RB2-2409-000CN 1 Arm, Output Kicker, Left
Illustrations and Parts Lists 8-33

Figure 8-16 Fuser Assembly (1 of 2)
1
2
Table 8-19. Fuser Assembly (1 of 2)
Item No. Part No. Exchange No. Quantity Description
1 RG5-2661-000CNRG5-2662-000CN
C4118-69003C4118-69004
11
Fuser (110 V)Fuser (220 V)
2 RB1-8805-000CN 1 Panel, Fuser Cover
8-34 Parts and Diagrams

Figure 8-17 Fuser Assembly (2 of 2)
1
2
3
Table 8-20. Fuser Assembly (2 of 2)
Item No. Part No. Exchange No. Quantity Description
1 RG5-2661-000CNRG5-2662-000CN
C4118-60003C4118-60004
11
Fuser (110V)Fuser (220V)
2 RG5-4269-000CNRG5-4291-000CN
1 Fuser Film Assembly (110V)Fuser Film Assembly (220V)
3 RB1-8794-000CN 1 Roller, Fuser Pressure
Illustrations and Parts Lists 8-35

Figure 8-18 Internal Components of 500-Sheet Feeder
1
2
34
5
6
7
8
1110
9
12
13
14
8-36 Parts and Diagrams

Table 8-21. Internal Components of 500-sheet Feeder
Item No. Part No. Quantity Description
1 RB1-8890-000CN 1 Guide, Paper
2 RB1-8873-000CN 1 Support, Paper Guide
3 RG5-2668-000CN 1 Cover Feeder Right Assembly
4 RG5-3711-000CN 1 Cable, Sensor
5 RG5-2673-000CN 1 Feeder Controller PCA
6 RB1-8887-000CN 1 Levers, Tray Sensing
7 RB1-8886-000CN 1 Cover, Feeder PCA
8 RG5-3712-000CN 1 Connector, Lower Tray (with cable)
9 RB1-8107-000CN 4 Foot
10 RG5-2669-000CN 1 Cover, Feeder, Left
11 RS5-2652-000CN 1 Spring, Tray Lock
12 RG5-2672-000CN 1 Paper Pickup Drive Assembly (500-sheet)
13 XA9-0917-000CN 1 Screw, M3x16, Feed Modules
14 VS1-6176-000CN 1 Connector (250- and 500-sheet Feeder)
Illustrations and Parts Lists 8-37

Figure 8-19 Paper Pickup Drive Assembly
1
2
3
45
6
7
8
8-38 Parts and Diagrams

Table 8-22. Paper Pickup Drive Assembly
Item No. Part No. Quantity Description
1 RG5-2672-000CN 1 Paper Pickup Drive Assembly(500-sheet)
2 RS5-2632-000CN 1 Spring, Pickup
3 RB1-8877-000CN 1 Coupler, Pickup
4 RF5-2484-000CN 1 Pickup Roller Assembly
5 RB1-2190-000CN 1 Clip, Pickup Spring
6 RB1-8865-000CN 4 Roller, Pickup
7 RF5-2490-000CN 1 Feed, Roller
8 RB1-8879-000CN 1 Arm, Tray Sensing
Illustrations and Parts Lists 8-39

Figure 8-20 500-sheet Tray
1
2
6
3
45
7
8
9
11
12
10
8-40 Parts and Diagrams

Table 8-23. 500-sheet Tray
Item No. Part No. Quantity Description
1 RB1-8947-000CN 1 Panel, Roller Access
2 RF5-2489-000CN 1 Mounting Assembly Separation Roller
3 RB1-8948-000CN 1 Gear, Separation Roller Drive
4 RB1-8946-000CN 1 Bushing, Separation Roller
5 RB1-8945-000CN 1 Coupler, Separation Roller
6 RS5-2622-000CN 1 Spring, Separation Roller Tension
7 RF5-2670-000CN 1 Paper Stop, 500-sheet Tray
8 RF5-2490-000CN 1 Roller
9 RB1-8974-000CN 1 Clutch, Separation Roller
10 RB1-9009-000CN 1 Paper Level Indicator
11 RB1-8961-000CN 1 Left Arm Lifter
12 RB1-8962-000CN 1 Right Arm Lifter
Illustrations and Parts Lists 8-41

Figure 8-21 Internal Components of 250-sheet Module (1 of 2)
1
23
4
5
6
78
9
10
11
6
12
13
3
8-42 Parts and Diagrams

Table 8-24. Internal Components of 250-sheet Module (1 of 2)
Item No. Part No. Quantity Description
1 XA9-0870-000CN 1 Screw, M4x10, Feed Modules
2 RG5-2677-000CN 1 Cover Assembly, Feeder, Upper Right
3 RS5-1309-000CN 2 Bearing, Transport Roller
4 XD9-0135-000CN 1 E-Clip
5 RB1-8923-000CN 1 Roller, Transport
6 RB1-8922-000CN 2 Roller, Transport Pressure
7 RS5-2653-000CN 1 Spring, Transport Roller
8 RB1-8926-000CN 1 Mount, Transport Pressure
9 RB1-8913-000CN 1 Support, Paper Guide Lower
10 RB1-8914-000CN 1 Guide, Paper, Lower
11 RG5-2678-000CN 1 Cover Assembly, Feeder, Left Upper
12 RG5-2683-000CN 1 Paper Pickup Drive Assembly, Upper (250-sheet)
13 RS5-0946-000CN 1 Gear, Transport Roller
Illustrations and Parts Lists 8-43

Figure 8-22 Internal Components of 250-sheet Feeder (2 of 2)
1
2
3
45A
6
7
5B
8
8-44 Parts and Diagrams

Table 8-25. Internal Components of 250-sheet Feeder (2 of 2)
Item No. Part No. Quantity Description
1 RG5-2679-000CN 1 Cover Assembly, Feeder, Right Lower
2 RG5-2680-000CN 1 Cover Assembly, Feeder, Left Lower
3 RB1-8907-000CN 1 Cover, Feeder PCA
4 RG5-2685-000CN 1 Feeder, Control PCA
5A RB1-9033-000CN 1 Levers, Tray Sensing Upper
5B RB1-9034-000CN 1 Levers, Tray Sensing Lower
6 XA9-0917-000CN 1 Screw, M3x16, Feed Modules
7 RG5-2684-000CN 1 Paper Pickup Drive Assembly, Lower (250-sheet)
8 VS1-6176-000CN 1 Connector (250- and 500-sheet Feeder)
Illustrations and Parts Lists 8-45

Figure 8-23 Upper Paper Pickup Drive Assembly
1
2
Table 8-26. Upper Paper Pickup Drive Assembly
Item No. Part No. Quantity Description
1 RG5-2683-000CN 1 Upper Paper Pickup Drive Assembly (250-sheet)
2 RB1-8910-000CN 1 Arm, Tray Sensing
8-46 Parts and Diagrams

Figure 8-24 Lower Paper Pickup Drive Assembly
1
2
Table 8-27. Lower Paper Pickup Drive Assembly
Item No. Part No. Quantity Description
1 RG5-2684-000CN 1 Lower Paper Pickup Drive Assembly (250-sheet)
2 RB1-8910-000CN 1 Arm, Tray Sensing
Illustrations and Parts Lists 8-47

Figure 8-25 250-sheet Tray
1
2
3 4
5
6
8-48 Parts and Diagrams

Table 8-28. 250-sheet Tray
Item No. Part No. Quantity Description
1 RF5-2505-000CN 1 each Mounting Assembly Separation Roller
2 RB1-9001-000CN 1 each Panel Roller Access
3 RF5-2490-000CN 1 each Roller
4 RB1-9009-000CN 1 each Paper Level Indicator
5 RB1-9012-010CN 1 each Left Arm Lifter
6 RB1-9013-010CN 1 each Right Arm Lifter
Illustrations and Parts Lists 8-49

Figure 8-26 Internal Components of Optional 500-sheet Universal Tray Assembly
1
2
3
4
5
6
78
9
10
11
11
12
13
13
8-50 Parts and Diagrams

Table 8-29. Internal Components of Optional 500-sheet Universal Tray Assembly
Item No. Part No. Quantity Description
1 XD2-1100-502CN 1 Ring, E
2 RG5-2690-000CN 1 Paper Pickup Drive Assembly, Optional (500-sheet)
3 RB1-8865-000CN 4 Roller
4 VS1-6174-000CN 1 Connector
5 RB1-8928-000CN 1 Tray Identifier Plunger
6 RS5-2967-000CN 1 Spring, Compression
7 RB1-8915-000CN 1 Frame, Right
8 RG5-2688-000CN 1 Left Frame Assembly
9 RB1-8927-000CN 1 Spring, Leaf
10 RG5-3822-000CN 1 Paper Feeder Cable
11 RB1-8924-000CN 2 Guide, Lower Tray
12 RG5-3821-000CN 1 Lower Tray Logic PCA
13 RS5-1179-000CN 2 Bearing, Transport Roller
Illustrations and Parts Lists 8-51

Figure 8-27 Optional 500-sheet Universal Tray Assembly
4
1
2 3
5 6
87
8-52 Parts and Diagrams

Table 8-30. Optional 500-sheet Universal Tray Assembly
Item No. Part No. Quantity Description
1 RF5-2489-000CN 1 Separation Roller Mounting Assembly
2 RB1-9374-000CN 1 Stopper
3 RS5-2981-000CN 1 Spring
4 RB1-9371-000CN 1 Plate
5 RF5-2490-000CN 1 Feed Roller
6 RB1-9009-000CN 1 Paper Level Indicator
7 RB1-8961-000CN 1 Left Arm Lifter
8 RB1-8962-000CN 1 Right Arm Lifter
Illustrations and Parts Lists 8-53

Figure 8-28 Envelope Feeder
1
2
4
3
8-54 Parts and Diagrams

Table 8-31. Envelope Feeder
Item No. Part No. Exchange No. Quantity Description
1 C4122A C4122-69001 1 Envelope Feeder
2 RB1-9088-000CN 1 Tray, Envelope Feeder
3 RF5-2511-000CN 1 Weight, Envelope
4 RB1-9095-000N 1 Mount, Envelope Weight
Illustrations and Parts Lists 8-55

Figure 8-29 Internal Components of Duplexer
2
3
4
5
6
1
8-56 Parts and Diagrams

Table 8-32. Internal Components of Duplexer
Item No. Part No. Exchange No. Quantity Description
1 C4123A C4123-69001 1 Duplexer
2 RB1-9044-000CN 1 Cover, Top
3 RB1-9047-000CN 1 Cover, Right Duplexer
4 RF5-1876-000CN 1 Cover, Left with Connector
5 RB1-9045-000CN 1 Panel, Rear
6 RH7-1361-000CN 1 Fan
Illustrations and Parts Lists 8-57

Alphabetical Parts List
Table 8-33. Alphabetical Parts List
Description Part Number Table Number and Page
250-sheet Universal Replacement Tray
C4126A Table 8-1 on page 8-4
500-sheet Paper Feeder and Tray
C4124A Table 8-1 on page 8-4
500-sheet Universal Replacement Tray
C4125A Table 8-1 on page 8-4
AC, Power Receptacle RG5-3696-000CN Table 8-7 on page 8-15
Arm, Output Kicker, Left RB2-2409-000CN Table 8-18 on page 8-33
Arm, Output Kicker, Right RB2-2408-000CN Table 8-18 on page 8-33
Arm, Tray 1 Paper Sensing RB1-8787-000CN Table 8-13 on page 8-27
Arm, Tray 1 Tray Retaining RB2-2387-000CN Table 8-13 on page 8-27
Arm, Tray Sensing RB1-8910-000CN Table 8-26 on page 8-46
Arm, Tray Sensing RB1-8879-000CN Table 8-22 on page 8-39
Bearing, Transport Roller RS5-1179-000CN Table 8-29 on page 8-51
Bearing, Transport Roller RS5-1309-000CN Table 8-24 on page 8-43
Belt, Feed Guide RB1-8668-000CN Table 8-17 on page 8-31
Bushing, Separation Roller RB1-8946-000CN Table 8-23 on page 8-41
Button, Engine Test RB1-8688-000CN Table 8-8 on page 8-17
Cable Formatter/Control Panel RG5-3708-000CN Table 8-7 on page 8-15
Cable Holder RB1-8689-000CN Table 8-8 on page 8-17
Cable, Envelope Feeder Connect
RG5-3704-000CN Table 8-7 on page 8-15
Cable, Feed/Registration Sensors
RG5-3706-000CN Table 8-8 on page 8-17
Cable, Feeder Module RG5-3710-000CN Table 8-8 on page 8-17
Cable Formatter Control Panel RG5-3708-000CN Table 8-7 on page 8-15
Cable, Laser Scanner and Output Bin Sensor
RG5-3876-000CN Table 8-8 on page 8-17
Cable, Main Motor RG5-3709-000CN Table 8-7 on page 8-15
8-58 Parts and Diagrams

Cable, Paper Feed/Tray 1 Pickup Solenoid
RG5-3703-000CN Table 8-7 on page 8-15
Cable, Sensor RG5-3711-000CN Table 8-21 on page 8-37
Cable, Top Cover Switch RG5-3705-000CN Table 8-7 on page 8-15
Cable, Tray 1 Sensor RG5-3700-000CN Table 8-7 on page 8-15
Clip, Left Side Panel RB1-8848-000CN Table 8-5 on page 8-11
Clip, Pickup Spring RB1-2190-000CN Table 8-22 on page 8-39
Clip, Right Side Panel RB1-8860-000CN Table 8-5 on page 8-11
Clutch, Separation Roller RB1-8974-000CN Table 8-23 on page 8-41
Connector VS1-6174-000CN Table 8-29 on page 8-51
Connector (250- and 500-sheet Feeder)
VS1-6176-000CN Table 8-21 on page 8-37 and Table 8-25 on page 8-45
Connector, Lower Tray (with Cable)
RG5-3712-000CN Table 8-21 on page 8-37
Control Panel RG5-2666-000CN Table 8-8 on page 8-17
Coupler, Pickup RB1-8877-000CN Table 8-22 on page 8-39
Coupler, Separation Roller RB1-8945-000CN Table 8-23 on page 8-41
Cover Assembly, Feeder, Left Lower
RG5-2680-000CN Table 8-25 on page 8-45
Cover Assembly, Feeder, Left Upper
RG5-2678-000CN Table 8-24 on page 8-43
Cover Assembly, Feeder, Right Lower
RG5-2679-000CN Table 8-25 on page 8-45
Cover Assembly, Feeder, Upper Right
RG5-2677-000CN Table 8-24 on page 8-43
Cover Assembly, Left RG5-2665-000CN Table 8-5 on page 8-11
Cover Assembly, Right Front RG5-2664-000CN Table 8-5 on page 8-11
Cover Envelope Feeder Drive RB2-2386-000CN Table 8-13 on page 8-27
Cover, Feeder PCA, 250-sheet Tray
RB1-8907-000CN Table 8-25 on page 8-45
Cover, Feeder PCA, 500-sheet Tray
RB1-8886-000CN Table 8-21 on page 8-37
Cover, Feeder, Left RG5-2669-000CN Table 8-21 on page 8-37
Table 8-33. Alphabetical Parts List (continued)
Description Part Number Table Number and Page
Illustrations and Parts Lists 8-59

Cover Feeder Right Assembly RG5-2668-000CN Table 8-21 on page 8-37
Cover, Left with Connector RF5-1876-000CN Table 8-32 on page 8-57
Cover, Right Duplexer RB1-9047-000CN Table 8-32 on page 8-57
Cover, Top RB1-9044-000CN Table 8-32 on page 8-57
Cover, Tray 1 Sensor Arm RB1-8788-000CN Table 8-13 on page 8-27
Delivery Assembly RG5-2648-000CN Table 8-7 on page 8-15 and Table 8-18 on page 8-33
Delivery Drive Assembly RG5-3721-000CN Table 8-11 on page 8-24
Delivery Sensor Arm Assembly
RG5-2650-000CN Table 8-18 on page 8-33
Duplex Printing Accessory (Duplexer)
C4123A Table 8-32 on page 8-57
E-Clip XD9-0135-000CN Table 8-24 on page 8-43
EDO DIMM4 MB8 MB16 MB
C4135-67901C4136-67901C4137-67901
Table 8-1 on page 8-4
Engine Controller Board RG5-3693-000CN (110V)RG5-3694-000CN (220V)
Table 8-10 on page 8-23
Enhanced I/O CardsEthernet RJ-45 onlyEthernet RJ-45 and BNC,
Local TalkToken Ring RJ-45 and DB-910/100Base-TX networks
J3111-61003
Table 8-1 on page 8-4
Envelope Feeder C4122A Table 8-31 on page 8-55
Fan, Duplexer RH7-1361-000CN Table 8-32 on page 8-57
Fan Cover RB1-8706-000CN Table 8-8 on page 8-17
Fan, Main Cooling RH7-1335-000CN Table 8-8 on page 8-17
Feed Roller RF5-2490-000CN Table 8-30 on page 8-53
Feeder Controller PCA RG5-2673-000CN Table 8-21 on page 8-37
Feeder, Control PCA RG5-2685-000CN Table 8-25 on page 8-45
Flash DIMM2 MB4 MB
C4286AC4287A
Table 8-1 on page 8-4
Table 8-33. Alphabetical Parts List (continued)
Description Part Number Table Number and Page
8-60 Parts and Diagrams

Font DIMM (8 MB Asian MROM)Traditional ChineseSimplified ChineseEuro
C4292AC4293AC4210A
Table 8-1 on page 8-4
Foot RB1-8107-000CN Table 8-21 on page 8-37
Formatter C4118-69008 (LJ 4000)C4251-69001 (LJ 4050)
Table 8-4 on page 8-9
Frame, Right RB1-8915-000CN Table 8-29 on page 8-51
Fuser C4118-69003 (110V)C4118-69004 (220V)
Table 8-19 on page 8-34 and Table 8-20 on page 8-35
Fuser Film Assembly (110V)Fuser Film Assembly (220V)
RG5-4269-000CN (110V)RG5-4291-000CN (220V)
Table 8-20 on page 8-35
Gear, Coupler RS5-0911-000CN Table 8-9 on page 8-21
Gear, Separation Roller Drive RB1-8948-000CN Table 8-23 on page 8-41
Gear, Transport Roller RS5-0946-000CN Table 8-24 on page 8-43
Guide, Bottom Cable RB1-8704-000CN Table 8-7 on page 8-15
Guide, Cable, Gear Assembly Plate
RB1-8757-000CN Table 8-12 on page 8-25
Guide, Formatter/CP Cable RB1-8862-000CN Table 8-7 on page 8-15
Guide, Lower Tray RB1-8924-000CN Table 8-29 on page 8-51
Guide, Paper RB1-8890-000CN Table 8-21 on page 8-37
Guide, Paper, Lower RB1-8914-000CN Table 8-24 on page 8-43
Hard Disk C2985A Table 8-1 on page 8-4
HP LaserJet Paper HPJ1124 Table 8-1 on page 8-4
HP Multi-purpose Paper HPM1120 Table 8-1 on page 8-4
Laser Shutter Arm RB1-8700-000CN Table 8-8 on page 8-17
Laser Scanner Assembly RG5-2641-000CN/C4118-69005
Table 8-4 on page 8-9
Latch, Rear Tray RB1-8846-000CN Table 8-6 on page 8-13
Left Frame Assembly RG5-2688-000CN Table 8-29 on page 8-51
Leaf Spring RB1-8827-000CN Table 8-8 on page 8-17
Levers, Tray Sensing RB1-8887-000CN Table 8-21 on page 8-37
Table 8-33. Alphabetical Parts List (continued)
Description Part Number Table Number and Page
Illustrations and Parts Lists 8-61

Levers, Tray Sensing Lower RB1-9034-000CN Table 8-25 on page 8-45
Levers, Tray Sensing Upper RB1-9033-000CN Table 8-25 on page 8-45
Lower Paper Pickup Drive Assembly (250-sheet)
RG5-2684-000CN Table 8-27 on page 8-47
Lower Tray Logic PCA RG5-3821-000CN Table 8-29 on page 8-51
Macintosh Computer Serial Cable
92215S Table 8-1 on page 8-4
Macintosh Network Cable Kit 92215N Table 8-1 on page 8-4
Main Motor Assembly RH7-1331-000CN Table 8-7 on page 8-15
Maintenance Kit110V220V
C4118-67902C4118-67903
Table 8-1 on page 8-4
Mount, Envelope Weight RB1-9095-000CN Table 8-31 on page 8-55
Mount, Transport Pressure RB1-8926-000CN Table 8-24 on page 8-43
Mounting Assembly Separation Roller, 250-sheet Tray
RF5-2505-000CN Table 8-28 on page 8-49
Mounting Assembly Separation Roller, 500-sheet Tray
RF5-2489-000CN Table 8-23 on page 8-41
Overlay (English) C4118-40002 (LJ 4000)RBI-8861-000CN (LJ 4000)C4251-40001 (LJ 4050)
Table 8-8 on page 8-17
Panel Roller Access RB1-9001-000CN Table 8-28 on page 8-49
Panel, Formatter Cover RB1-8858-000CN Table 8-5 on page 8-11
Panel, Fuser Cover RB1-8805-000CN Table 8-19 on page 8-34
Panel, Left Duplex Access RB2-2400-000CN Table 8-8 on page 8-17
Panel, Rear RB1-9045-000CN Table 8-32 on page 8-57
Panel, Right Duplex Access RB2-2401-000CN Table 8-8 on page 8-17
Panel, Roller Access RB1-8947-000CN Table 8-23 on page 8-41
Panel, Toner Cartridge Access RB1-8841-000CN Table 8-6 on page 8-13
Paper Delivery RG5-2648-000CN Table 8-18 on page 8-33
Paper Feed Assembly RG5-2651-000CN Table 8-15 on page 8-29
Paper Feed Guide Assembly RG5-2643-000CN Table 8-17 on page 8-31
Table 8-33. Alphabetical Parts List (continued)
Description Part Number Table Number and Page
8-62 Parts and Diagrams

Paper Feeder Cable RG5-3822-000CN Table 8-29 on page 8-51
Paper Pickup Drive Assembly, Optional 500-sheet Tray
RG5-2690-000CN Table 8-29 on page 8-51
Paper Pickup Drive Assembly (500-sheet)
RG5-2672-000CN Table 8-22 on page 8-39
Paper Stop, 500-sheet Tray RF5-2670-000CN Table 8-23 on page 8-41
Parallel Cables2 Meter IEEE-1284 cable3 Meter IEEE-1284 cable
C2950AC2951A
Table 8-1 on page 8-4
Pickup Roller Assembly RF5-2484-000CN Table 8-22 on page 8-39
Plate RB1-9371-000CN Table 8-30 on page 8-53
Plate Cover RB1-8710-000CN Table 8-6 on page 8-13
Plate, Control Panel Ground RB2-2405-000CN Table 8-8 on page 8-17
Plate, Gear RF5-2496-000CN Table 8-9 on page 8-21
Plate, Gear Plate Ground RB1-8708-000CN Table 8-8 on page 8-17
Plate, Registration Ground RB1-8747-000CN Table 8-9 on page 8-21
Power Receptacle RG5-3696-000CN Table 8-7 on page 8-15
Power Switch Activator RB1-8851-000CN Table 8-7 on page 8-15
Power Switch Button RB1-8849-000CN Table 8-5 on page 8-11
Pre-transfer Ground Plate Assembly
RF5-1867-000CN Table 8-9 on page 8-21
Printer Drive Assembly RG5-2653-000CN Table 8-12 on page 8-25
Registration Assembly RG5-2652-070CN Table 8-16 on page 8-30
Registration/Feed Sensor Assembly
RG5-2642-000CN Table 8-8 on page 8-17
Retainer, Toner Sensing Spring
RB1-8690-000CN Table 8-8 on page 8-17
Ring, E XD2-1100-502CN Table 8-29 on page 8-51
Rod, Toner Drive RB1-8756-000CN Table 8-12 on page 8-25
Roller, 250-sheet Tray RF5-2490-000CN Table 8-28 on page 8-49
Roller, Fuser Pressure RB1-8794-000CN Table 8-20 on page 8-35
Roller, Pickup, 500-sheet Tray RB1-8865-000CN Table 8-22 on page 8-39
Roller, Transport RB1-8923-000CN Table 8-24 on page 8-43
Table 8-33. Alphabetical Parts List (continued)
Description Part Number Table Number and Page
Illustrations and Parts Lists 8-63

Roller, Transport Pressure RB1-8922-000CN Table 8-24 on page 8-43
Screw, M3x16, Feed Modules XA9-0917-000CN Table 8-21 on page 8-37, Table 8-24 on page 8-43, and Table 8-25 on page 8-45
Screw, M3x4, washer head XA9-0434-000CN Table 8-2 on page 8-6
Screw, M3x6, washer head XA9-0267-000CN Table 8-2 on page 8-6
Screw, M3x6, with star washer FA9-1449-000CN Table 8-2 on page 8-6
Screw, M4, Captive, Fuser RB1-8819-000CN Table 8-2 on page 8-6
Screw, M4x10, self-tapping (black)
XA9-0870-000CN Table 8-2 on page 8-6
Screw, M4x10, self-tapping (silver)
XA9-0606-000CN Table 8-2 on page 8-6
Screw, M4x116, long, module RB1-8703-000CN Table 8-2 on page 8-6
Screw, M4x12, self-tapping XA9-0773-000CN Table 8-2 on page 8-6
Screw, Module Attachment RB1-8703-000CN Table 8-7 on page 8-15
SDRAM DIMM4 MB8 MB16 MB32 MB
C4140-67901C4141-67901C4142-67901C4143-67901
Table 8-1 on page 8-4
Sensor, Optical WG8-5362-000CN Table 8-11 on page 8-24
Separation Roller Mounting Assembly
RF5-2489-000CN Table 8-30 on page 8-53
Serial Adapter25-9 Pin Adapter (male/female)
C2809A Table 8-1 on page 8-4
Serial cables9-9 pin serial cable
(male/female)9-25 pin serial cable
(male/female)
C2932AC2933A
Table 8-1 on page 8-4
Shaft, Belt Drive RB1-8674-000CN Table 8-17 on page 8-31
Shaft, Belt Idler Assembly RF5-2495-000CN Table 8-17 on page 8-31
Solenoid, Tray 1 Drive RH7-5172-000CN Table 8-13 on page 8-27
Spring RS5-2981-000CN Table 8-30 on page 8-53
Spring, Compression RS5-2967-000CN Table 8-29 on page 8-51
Table 8-33. Alphabetical Parts List (continued)
Description Part Number Table Number and Page
8-64 Parts and Diagrams

Spring, Leaf RB1-8927-000CN Table 8-29 on page 8-51
Spring, Pickup RS5-2632-000CN Table 8-22 on page 8-39
Spring, Rear Tray Latch RB1-8847-000CN Table 8-6 on page 8-13
Spring, Separation Roller Tension
RS5-2622-000CN Table 8-23 on page 8-41
Spring, Shutter RB1-8702-000CN Table 8-8 on page 8-17
Spring, Toner Cartridge Drum Ground
RB1-8693-000CN Table 8-8 on page 8-17
Spring, Toner Sensing RB1-8695-000CN Table 8-8 on page 8-17
Spring, Transport Roller RS5-2653-000CN Table 8-24 on page 8-43
Spring, Tray Lock RS5-2652-000CN Table 8-21 on page 8-37
Standard 500-sheet Tray C3122A Table 8-1 on page 8-4
Stopper RB1-9374-000CN Table 8-30 on page 8-53
Strap, Interlock Support Ground
RB1-8694-000CN Table 8-7 on page 8-15
Support, Paper Guide RB1-8873-000CN Table 8-21 on page 8-37
Support, Paper Guide Lower RB1-8913-000CN Table 8-24 on page 8-43
Support, Top Cover, Left RB1-8671-000CN Table 8-8 on page 8-17
Support, Top Cover, Right RG5-2645-000CN Table 8-7 on page 8-15
Switch, Top Cover Access WC4-5139-000CN Table 8-7 on page 8-15
Toner Cartridge (10,000 Pages)
C4127X Table 8-1 on page 8-4
Toner Cartridge (6,000 Pages) C4127A Table 8-1 on page 8-4
Top Cover Assembly RG5-2663-000CN Figure 8-3 on page 8-12
Transfer Roller Assembly RG5-4283-000CN Table 8-9 on page 8-21
Tray 1 Assembly RG5-2656-100CN Table 8-14 on page 8-28
Tray 1 Door Assembly RG5-2667-000CN Table 8-5 on page 8-11
Tray 1 Pickup Assembly RG5-2655-100CN Table 8-13 on page 8-27
Tray 1 Pickup Roller Assembly RG5-3718-000CN Table 8-13 on page 8-27
Tray Identifier Plunger RB1-8928-000CN Table 8-29 on page 8-51
Tray, Envelope Feeder RB1-9088-000CN Table 8-31 on page 8-55
Tray, Rear RB1-8843-000CN Table 8-5 on page 8-11
Table 8-33. Alphabetical Parts List (continued)
Description Part Number Table Number and Page
Illustrations and Parts Lists 8-65

Tray, Rear Extension RB1-8844-000CN Table 8-5 on page 8-11
Upper Paper Pickup Drive Assembly (250-sheet)
RG5-2683-000CN Table 8-26 on page 8-46
Weight, Envelope RF5-2511-000CN Table 8-31 on page 8-55
Table 8-33. Alphabetical Parts List (continued)
Description Part Number Table Number and Page
8-66 Parts and Diagrams

Numerical Parts List
Table 8-34. Numerical Parts List
Part Number Description Table Number and Page
92215N Macintosh Network Cable Kit Table 8-1 on page 8-4
92215S Macintosh Computer Serial Cable
Table 8-1 on page 8-4
C2809A Serial adapter25-9 Pin Adapter (male/female)
Table 8-1 on page 8-4
C2932A
C2933A
Serial cables9-9 pin serial cable (male/female)
9-25 pin serial cable (male/female)
Table 8-1 on page 8-4
C2950AC2951A
Parallel cables2 Meter IEEE-1284 cable3 Meter IEEE-1284 cable
Table 8-1 on page 8-4
C2985A Hard Disk Table 8-1 on page 8-4
C3122A Standard 500-sheet Tray Table 8-1 on page 8-4
C4103A HP Fast InfraRed Receiver(LJ 4050 only)
C4118-40002RBI-8861-000CN
Overlay (English) Table 8-8 on page 8-17
C4118-67902C4118-67903
Maintenance Kit110V220V
Table 8-1 on page 8-4
C4118-69003 (110V)C4118-69004 (220V)
Fuser Table 8-19 on page 8-34 and Table 8-20 on page 8-35
C4118-69008 Formatter (LJ 4000 only) Table 8-4 on page 8-9
C4122A Envelope Feeder
C4123A Duplexer Table 8-32 on page 8-57
C4124A 500-sheet Paper Feeder and Tray
Table 8-1 on page 8-4
C4125A 500-sheet Universal Replacement Tray
Table 8-1 on page 8-4
C4126A 250-sheet Universal Replacement Tray
Table 8-1 on page 8-4
Illustrations and Parts Lists 8-67

C4127A Toner Cartridge (6,000 Pages) Table 8-1 on page 8-4
C4127X Toner Cartridge (10,000 pages)
Table 8-1 on page 8-4
C4135-67901C4136-67901C4137-67901
EDO DIMM4 MB8 MB16 MB
Table 8-1 on page 8-4
C4140-67901C4141-67901C4142-67901C4143-67901
SDRAM DIMM4 MB8 MB16 MB32 MB
Table 8-1 on page 8-4
C4251-69001 Formatter (LJ 4050 only) Table 8-4 on page 8-9
C4286AC4287A
Flash DIMM2 MB4 MB
Table 8-1 on page 8-4
C4292AC4293A
Font DIMM (8 MB Asian MROM)Traditional ChineseSimplified Chinese
Table 8-1 on page 8-4
FA9-1449-000CN Screw, M3x6, with star washer Table 8-2 on page 8-6
HPJ1124 HP LaserJet Paper Table 8-1 on page 8-4
HPM1120 HP Multi-Purpose Paper Table 8-1 on page 8-4
J3111-61003
Enhanced I/O CardsEthernet RJ-45 onlyEthernet RJ-45 and BNC, Local TalkToken Ring RJ-45 and DB-910/100Base-TX networks
Table 8-1 on page 8-4
RB1-2190-000CN Clip, Pickup Spring Table 8-22 on page 8-39
RB1-8107-000CN Foot Table 8-21 on page 8-37
RB1-8668-000CN Belt, Feed Guide Table 8-17 on page 8-31
RB1-8671-000CN Support, Top Cover, Left Table 8-8 on page 8-17
RB1-8674-000CN Shaft, Belt Drive Table 8-17 on page 8-31
RB1-8688-000CN Button, Engine Test Table 8-8 on page 8-17
RB1-8689-000CN Cable Holder Table 8-8 on page 8-17
Table 8-34. Numerical Parts List (continued)
Part Number Description Table Number and Page
8-68 Parts and Diagrams

RB1-8690-000CN Retainer, Toner Sensing Spring
Table 8-8 on page 8-17
RB1-8693-000CN Spring, Toner Cartridge Drum Ground
Table 8-8 on page 8-17
RB1-8694-000CN Strap, Interlock Support Ground
Table 8-7 on page 8-15
RB1-8695-000CN Spring, Toner Sensing Table 8-8 on page 8-17
RB1-8700-000CN Laser Shutter Arm Table 8-8 on page 8-17
RB1-8702-000CN Spring, Shutter Table 8-8 on page 8-17
RB1-8703-000CN Screw, M4x116, Long, Module Table 8-2 on page 8-6
RB1-8704-000CN Guide, Bottom Cable Table 8-7 on page 8-15
RB1-8706-000CN Fan Cover Table 8-8 on page 8-17
RB1-8708-000CN Plate, Gear Plate Ground Table 8-8 on page 8-17
RB1-8710-000CN Plate Cover Table 8-6 on page 8-13
RB1-8747-000CN Plate, Registration Ground Table 8-9 on page 8-21
RB1-8756-000CN Rod, Toner Drive Table 8-12 on page 8-25
RB1-8757-000CN Guide, Cable, Gear Assembly Plate
Table 8-12 on page 8-25
RB1-8787-000CN Arm, Tray 1 Paper Sensing Table 8-13 on page 8-27
RB1-8788-000CN Cover, Tray 1 Sensor Arm Table 8-13 on page 8-27
RB1-8794-000CN Roller, Fuser Pressure Table 8-20 on page 8-35
RB1-8805-000CN Panel, Fuser Cover Table 8-19 on page 8-34
RB1-8819-000CN Screw, M4, Captive, Fuser Table 8-2 on page 8-6
RB1-8827-000CN Leaf Spring
RB1-8841-000CN Panel, Toner Cartridge Access Table 8-6 on page 8-13
RB1-8843-000CN Tray, Rear Table 8-5 on page 8-11
RB1-8844-000CN Tray, Rear Extension Table 8-5 on page 8-11
RB1-8846-000CN Latch, Rear Tray Table 8-6 on page 8-13
RB1-8847-000CN Spring, Rear Tray Latch Table 8-6 on page 8-13
RB1-8848-000CN Clip, Left Side Panel Table 8-5 on page 8-11
RB1-8849-000CN Power Switch Button Table 8-5 on page 8-11
RB1-8851-000CN Power Switch Activator Table 8-7 on page 8-15
Table 8-34. Numerical Parts List (continued)
Part Number Description Table Number and Page
Illustrations and Parts Lists 8-69

RB1-8858-000CN Panel, Formatter Cover Table 8-5 on page 8-11
RB1-8860-000CN Clip, Right Side Panel Table 8-5 on page 8-11
RB1-8862-000CN Guide, Formatter/cp Cable Table 8-7 on page 8-15
RB1-8865-000CN Roller, Pickup Table 8-22 on page 8-39
RB1-8873-000CN Support, Paper Guide Table 8-21 on page 8-37
RB1-8877-000CN Coupler, Pickup Table 8-22 on page 8-39
RB1-8879-000CN Arm, Tray Sensing Table 8-22 on page 8-39
RB1-8886-000CN Cover, Feeder PCA, 500-sheet Tray
Table 8-21 on page 8-37
RB1-8887-000CN Levers, Tray Sensing Table 8-21 on page 8-37
RB1-8890-000CN Guide, Paper Table 8-21 on page 8-37
RB1-8907-000CN Cover, Feeder PCA, 250-sheet Tray
Table 8-25 on page 8-45
RB1-8910-000CN Arm, Tray Sensing Table 8-26 on page 8-46
RB1-8913-000CN Support, Paper Guide Lower Table 8-24 on page 8-43
RB1-8914-000CN Guide, Paper, Lower Table 8-24 on page 8-43
RB1-8915-000CN Frame, Right Table 8-29 on page 8-51
RB1-8922-000CN Roller, Transport Pressure Table 8-24 on page 8-43
RB1-8923-000CN Roller, Transport Table 8-24 on page 8-43
RB1-8924-000CN Guide, Lower Tray Table 8-29 on page 8-51
RB1-8926-000CN Mount, Transport Pressure Table 8-24 on page 8-43
RB1-8927-000CN Spring, Leaf Table 8-29 on page 8-51
RB1-8928-000CN Tray Identifier Plunger Table 8-29 on page 8-51
RB1-8945-000CN Coupler, Separation Roller Table 8-23 on page 8-41
RB1-8946-000CN Bushing, Separation Roller Table 8-23 on page 8-41
RB1-8947-000CN Panel, Roller Access Table 8-23 on page 8-41
RB1-8948-000CN Gear, Separation Roller Drive Table 8-23 on page 8-41
RB1-8974-000CN Clutch, Separation Roller Table 8-23 on page 8-41
RB1-9001-000CN Panel Roller Access Table 8-28 on page 8-49
RB1-9033-000CN Levers, Tray Sensing Upper Table 8-25 on page 8-45
RB1-9034-000CN Levers, Tray Sensing Lower Table 8-25 on page 8-45
Table 8-34. Numerical Parts List (continued)
Part Number Description Table Number and Page
8-70 Parts and Diagrams

RB1-9044-000CN Cover, Top Table 8-32 on page 8-57
RB1-9045-000CN Panel, Rear Table 8-32 on page 8-57
RB1-9047-000CN Cover, Right Duplexer Table 8-32 on page 8-57
RB1-9088-000CN Tray, Envelope Feeder Table 8-31 on page 8-55
RB1-9095-000CN Mount, Envelope Weight Table 8-31 on page 8-55
RB1-9371-000CN Plate Table 8-30 on page 8-53
RB1-9374-000CN Stopper Table 8-30 on page 8-53
RB2-2386-000CN Cover Envelope Feeder Drive Table 8-13 on page 8-27
RB2-2387-000CN Arm, Tray 1 Tray Retaining Table 8-13 on page 8-27
RB2-2400-000CN Panel, Left Duplex Access Table 8-8 on page 8-17
RB2-2401-000CN Panel, Right Duplex Access Table 8-8 on page 8-17
RB2-2405-000CN Plate, Control Panel Ground Table 8-8 on page 8-17
RB2-2408-000CN Arm, Output Kicker, Right Table 8-18 on page 8-33
RB2-2409-000CN Arm, Output Kicker, Left Table 8-18 on page 8-33
RF5-1867-000CN Pre-transfer Ground Plate Assembly
Table 8-9 on page 8-21
RF5-1876-000CN Cover, Left With Connector Table 8-32 on page 8-57
RF5-2484-000CN Pickup Roller Assembly Table 8-22 on page 8-39
RF5-2489-000CN Separation Roller Mounting Assembly
Table 8-30 on page 8-53
RF5-2490-000CN Feed Roller Table 8-30 on page 8-53
RF5-2495-000CN Shaft, Belt Idler Assembly Table 8-17 on page 8-31
RF5-2496-000CN Plate, Gear Table 8-9 on page 8-21
RF5-2505-000CN Mounting Assembly Separation Roller, 250-sheet Tray
Table 8-28 on page 8-49
RF5-2511-000CN Weight, Envelope Table 8-31 on page 8-55
RF5-2670-000CN Paper Stop, 500-sheet Tray Table 8-23 on page 8-41
RG5-2641-000CN/C4118-69005
Laser Scanner Assembly Table 8-4 on page 8-9
RG5-2642-000CN Registration/Feed Sensor Assembly
Table 8-8 on page 8-17
RG5-2643-000CN Paper Feed Guide Assembly Figure 8-14 on page 8-31
Table 8-34. Numerical Parts List (continued)
Part Number Description Table Number and Page
Illustrations and Parts Lists 8-71

RG5-2645-000CN Support, Top Cover, Right Table 8-7 on page 8-15
RG5-2648-000CN Delivery Assembly Table 8-7 on page 8-15 and Table 8-18 on page 8-33
RG5-2650-000CN Delivery Sensor Arm Assembly
Table 8-18 on page 8-33
RG5-2651-000CN Paper Feed Assembly Table 8-12 on page 8-25
RG5-2652-070CN Registration Assembly Table 8-16 on page 8-30
RG5-2653-000CN Printer Drive Assembly Table 8-12 on page 8-25
RG5-2655-000CN Tray 1 Pickup Assembly Figure 8-10 on page 8-26
RG5-2656-100CN Tray 1 Assembly Table 8-14 on page 8-28
RG5-2661-000CNRG5-2662-000CN
Fuser (110V)Fuser (220V)
Table 8-19 on page 8-34
RG5-2663-000CN Top Cover Assembly Table 8-6 on page 8-13
RG5-2664-000CN Cover Assembly, Right Front Table 8-5 on page 8-11
RG5-2665-000CN Cover Assembly, Left Table 8-5 on page 8-11
RG5-2666-000CN Control Panel Table 8-8 on page 8-17
RG5-2667-000CN Tray 1 Door Assembly Table 8-5 on page 8-11
RG5-2668-000CN Cover Feeder Right Assembly Table 8-21 on page 8-37
RG5-2669-000CN Cover, Feeder, Left Table 8-21 on page 8-37
RG5-2672-000CN Paper Pickup Drive Assembly (500-sheet)
Table 8-22 on page 8-39
RG5-2673-000CN Feeder Controller PCA Table 8-21 on page 8-37
RG5-2677-000CN Cover Assembly, Feeder, Upper Right
Table 8-24 on page 8-43
RG5-2678-000CN Cover Assembly, Feeder, Left Upper
Table 8-24 on page 8-43
RG5-2679-000CN Cover Assembly, Feeder, Right Lower
Table 8-25 on page 8-45
RG5-2680-000CN Cover Assembly, Feeder, Left Lower
Table 8-25 on page 8-45
RG5-2683-000CN Upper Paper Pickup Drive Assembly (250-sheet)
Table 8-26 on page 8-46
RG5-2684-000CN Lower Paper Pickup Drive Assembly (250-sheet)
Table 8-27 on page 8-47
Table 8-34. Numerical Parts List (continued)
Part Number Description Table Number and Page
8-72 Parts and Diagrams

RG5-2685-000CN Feeder, Control PCA Table 8-25 on page 8-45
RG5-2688-000CN Left Frame Assembly Table 8-29 on page 8-51
RG5-2690-000CN Paper Pickup Drive Assembly, Optional 500-sheet Tray
Table 8-29 on page 8-51
RG5-3693-000CN (110V)RG5-3694-000CN (220V)
Engine Controller Board Table 8-10 on page 8-23
RG5-3696-000CN AC, Power Receptacle Table 8-7 on page 8-15
RG5-3700-000CN Cable, Tray 1 Sensor Table 8-7 on page 8-15
RG5-3703-000CN Cable, Paper Feed Tray 1 Pickup Solenoid
Table 8-7 on page 8-15
RG5-3704-000CN Cable, Envelope Feeder Connect
Table 8-7 on page 8-15
RG5-3705-000CN Cable, Top Cover Switch Table 8-7 on page 8-15
RG5-3706-000CN Cable, Feed/Registration Sensors
Table 8-8 on page 8-17
RG5-3708-000CN Cable, Formatter/Control Panel
Table 8-7 on page 8-15
RG5-3709-000CN Cable, Main Motor Table 8-7 on page 8-15
RG5-3710-000CN Cable, Feeder Module Table 8-8 on page 8-17
RG5-3711-000CN Cable, Sensor Table 8-21 on page 8-37
RG5-3712-000CN Connector, Lower Tray (With Cable)
Table 8-21 on page 8-37
RG5-3718-000CN Tray 1 Pickup Roller Assembly Table 8-13 on page 8-27
RG5-3721-000CN Delivery Drive Assembly Table 8-11 on page 8-24
RG5-3821-000CN Lower Tray Logic PCA Table 8-29 on page 8-51
RG5-3822-000CN Paper Feeder Cable Table 8-29 on page 8-51
RG5-3876-000CN Cable, Laser Scanner & Output Bin Sensor
Table 8-8 on page 8-17
RG5-4269-000CN Fuser Film Assembly (110V) Table 8-20 on page 8-35
RG5-4283-000CN Transfer Roller Assembly Table 8-9 on page 8-21
RG5-4291-000CN Fuser Film Assembly (220V) Table 8-20 on page 8-35
RH7-1331-000CN Main Motor Assembly Table 8-7 on page 8-15
RH7-1335-000CN Fan, Main Cooling Table 8-8 on page 8-17
Table 8-34. Numerical Parts List (continued)
Part Number Description Table Number and Page
Illustrations and Parts Lists 8-73

RH7-5172-000CN Solenoid, Tray 1 Drive Table 8-13 on page 8-27
RS5-0911-000CN Gear, Coupler Table 8-9 on page 8-21
RS5-0946-000CN Gear, Transport Roller Table 8-24 on page 8-43
RS5-1179-000CN Bearing, Transport Roller Table 8-29 on page 8-51
RS5-1309-000CN Bearing, Transport Roller Table 8-24 on page 8-43
RS5-2622-000CN Spring, Separation Roller Tension
Table 8-23 on page 8-41
RS5-2632-000CN Spring, Pickup Table 8-22 on page 8-39
RS5-2652-000CN Spring, Tray Lock Table 8-21 on page 8-37
RS5-2653-000CN Spring, Transport Roller Table 8-24 on page 8-43
RS5-2967-000CN Spring, Compression Table 8-29 on page 8-51
RS5-2981-000CN Spring Table 8-30 on page 8-53
VS1-6174-000CN Connector Table 8-29 on page 8-51
VS1-6176-000CN Connector (250- and 500-sheet Feeder)
Table 8-21 on page 8-37 and Table 8-25 on page 8-45
WC4-5139-000CN Switch, Top Cover Access Table 8-7 on page 8-15
WG8-5362-000CN Sensor, Optical Table 8-11 on page 8-24
XA9-0267-000CN Screw, M3x6, washer head Table 8-2 on page 8-6
XA9-0434-000CN Screw, M3x4, washer head Table 8-2 on page 8-6
XA9-0606-000CN Screw, M4x10, self-tapping (silver)
Table 8-2 on page 8-6
XA9-0773-000CN Screw, M4x12, self-tapping Table 8-2 on page 8-6
XA9-0870-000CN Screw, M4x10, self-tapping (black)
Table 8-2 on page 8-6
XA9-0917-000CN Screw, M3x16, Feed Modules Table 8-21 on page 8-37, Table 8-24 on page 8-43, and Table 8-25 on page 8-45
XD2-1100-502CN Ring, E Table 8-29 on page 8-51
XD9-0135-000CN E-Clip Table 8-24 on page 8-43
Table 8-34. Numerical Parts List (continued)
Part Number Description Table Number and Page
8-74 Parts and Diagrams
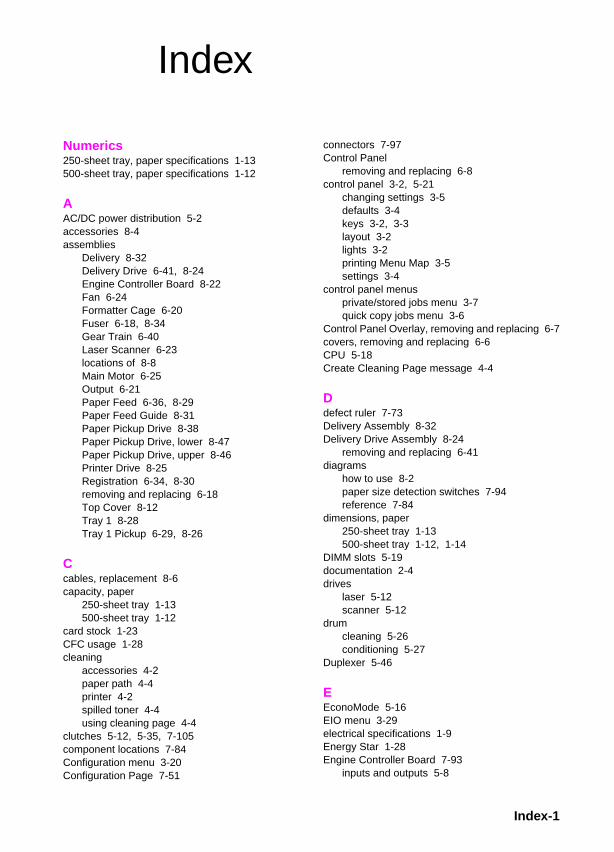
Index
Numerics250-sheet tray, paper specifications 1-13500-sheet tray, paper specifications 1-12
AAC/DC power distribution 5-2accessories 8-4assemblies
Delivery 8-32Delivery Drive 6-41, 8-24Engine Controller Board 8-22Fan 6-24Formatter Cage 6-20Fuser 6-18, 8-34Gear Train 6-40Laser Scanner 6-23locations of 8-8Main Motor 6-25Output 6-21Paper Feed 6-36, 8-29Paper Feed Guide 8-31Paper Pickup Drive 8-38Paper Pickup Drive, lower 8-47Paper Pickup Drive, upper 8-46Printer Drive 8-25Registration 6-34, 8-30removing and replacing 6-18Top Cover 8-12Tray 1 8-28Tray 1 Pickup 6-29, 8-26
Ccables, replacement 8-6capacity, paper
250-sheet tray 1-13500-sheet tray 1-12
card stock 1-23CFC usage 1-28cleaning
accessories 4-2paper path 4-4printer 4-2spilled toner 4-4using cleaning page 4-4
clutches 5-12, 5-35, 7-105component locations 7-84Configuration menu 3-20Configuration Page 7-51
connectors 7-97Control Panel
removing and replacing 6-8control panel 3-2, 5-21
changing settings 3-5defaults 3-4keys 3-2, 3-3layout 3-2lights 3-2printing Menu Map 3-5settings 3-4
control panel menusprivate/stored jobs menu 3-7quick copy jobs menu 3-6
Control Panel Overlay, removing and replacing 6-7covers, removing and replacing 6-6CPU 5-18Create Cleaning Page message 4-4
Ddefect ruler 7-73Delivery Assembly 8-32Delivery Drive Assembly 8-24
removing and replacing 6-41diagrams
how to use 8-2paper size detection switches 7-94reference 7-84
dimensions, paper250-sheet tray 1-13500-sheet tray 1-12, 1-14
DIMM slots 5-19documentation 2-4drives
laser 5-12scanner 5-12
drumcleaning 5-26conditioning 5-27
Duplexer 5-46
EEconoMode 5-16EIO menu 3-29electrical specifications 1-9Energy Star 1-28Engine Controller Board 7-93
inputs and outputs 5-8
Index-1

Engine Controller Board Assembly 8-22removing and replacing 6-44
engine controller subsystem 5-6Engine Module 6-42engine test 7-11Envelope Feeder 5-44envelopes 1-20environmental product stewardship 1-28error messages 7-17Event Log 7-13
FFan, removing and replacing 6-24500-sheet tray, paper specifications 1-12Formatter Cage Assembly, removing and replacing
6-20Formatter Pan, removing and replacing 6-39Formatter system 5-15Front Right Side Cover, removing and replacing
6-13Fuser Assembly 8-34Fuser Mode setting 5-32Fuser, removing and replacing 6-18fusing temperature, variable 5-32
GGear Train, removing and replacing 6-40
Hheavy paper 1-23
II/O menu 3-26image
developing 5-29transferring 5-30writing 5-28
Image Formation System 5-22photosensitive drum 5-25
Information menu 3-8input/output 5-17
Llabels 1-19laser drive 5-12Laser Scanner, removing and replacing 6-23Left Side Cover, removing and replacing 6-12Lower Paper Feed Module Plate (HP LaserJet 4000
T/4000 TN), removing and replacing 6-53
Mmedia specifications
See paper specificationsMain Motor
locating 7-96removing and replacing 6-25
maintenance 4-1maintenance count 3-33memory
printer 5-18Random Access Memory (RAM) 5-19
Memory Enhancement technology (MEt) 5-19model numbers 1-8motors 5-13, 7-96
NNVRAM, clearing 3-38
OOptional 500-sheet Tray 5-41ordering information 2-3
phone numbers 2-6Output Assembly, removing and replacing 6-21overcurrent overvoltage protection 5-3ozone production 1-28
Ppage count 3-33page protect 5-20paper
heavy 1-23motion control 5-12size detection switches 7-94specifications 1-12
Paper Feed Assembly 8-29removing and replacing 6-36
Paper Feed Guide Assembly 8-31Paper Feed Module 6-42Paper Feed Module Gear Train Assembly,
removing and replacing 6-51Paper Feed Module Plate, removing and replacing
6-50Paper Feed Module Side Rails, removing and
replacing 6-52Paper Feed Rollers, removing and replacing 6-48Paper Feed System 5-33Paper Handling menu 3-9paper jam 5-48paper path 7-90
cleaning 4-4troubleshooting 7-45
Index-2

Paper Pickup Drive Assembly 8-38Paper Pickup Drive assembly
lower 8-47upper 8-46
paper specificationscard stock 1-23envelopes 1-20guidelines for using paper 1-16heavy paper 1-23labels 1-19supported types 1-15transparencies 1-19weight equivalence 1-18
parts 2-3parts lists
alphabetical 8-58how to use 8-2numerical 8-67
PCA Controller, removing and replacing 6-56PCA Cover, removing and replacing
HP LaserJet 4000 T/4000 TN 6-54HP LaserJet 4000/4000 N 6-55
PCAs 7-100Phillips screwdriver 6-3photosensitive drum 5-24Posidrive screwdriver 6-3power distribution, high voltage 5-4power on troubleshooting 7-7power supply system
AC/DC distribution 5-2PowerSave mode 1-28preventative maintenance 4-5Print Quality menu 3-12printer
display 7-12features 1-2messages 7-17model numbers 1-8serial numbers 1-8testing 3-37weight 1-10
Printer Drive Assembly 8-25printing
Configuration Page 7-51engine test 3-37, 7-11Event Log 7-13images 7-74interface 7-77operating checks 7-6Optional 500-sheet Tray 5-41Tray 1 5-36Tray 2 5-38troubleshooting 7-6
Printing menu 3-15private/stored jobs menu 3-7Product Stewardship, power consumption 1-28
Qquick copy jobs menu 3-6
RRandom Access Memory (RAM) 5-19Rear Cover/Rear Output Bin, removing and
replacing 6-14Rear Right Side Cover, removing and replacing 6-6recycling toner cartridges 2-9Registration Assembly 8-30
removing and replacing 6-34regulatory information 1-24– 1-26removal/replacement strategy 6-2repetitive defect ruler 7-73reset
maintenance count 3-33page count 3-33serial number 3-33
Resets menu 3-31resetting printer 3-38
clearing NVRAM 3-38cold reset 3-38
Right Side Toner Cartridge Guide, removing and replacing 6-33
Ssafety statements 1-24– 1-26scanner drive 5-12screwdrivers 6-3screws 6-3, 8-6sensors 5-12, 5-35, 7-102Separation Rollers, removing and replacing 6-49sequence of operation 5-49serial number 3-33
locating 1-8service mode 3-32
maintenance count 3-33page count 3-33serial number 3-33
site requirements 1-9electrical specifications 1-9printer weight 1-10space requirements 1-10
solenoids 5-12, 7-105space requirements 1-10specifications
electrical 1-9paper 1-12
supplies 2-3, 8-4cables, replacement 8-6screws 8-6
switches 5-12, 7-108
Index-3

Ttesting, engine 7-11thermistor 7-102timing diagrams 7-110toner
cleaning spilled 4-4consumption 1-28
toner cartridge 2-9, 5-22, 5-24detection 5-5recycling 2-9refilled 2-9
Toner Cartridge Drive Arm, removing and replacing 6-9
tools 6-3Top Cover
Assembly 8-12removing and replacing 6-7
top margin adjustment 6-46training media 2-4Transfer Roller, removing and replacing 6-26transparencies 1-19Tray 1
Assembly 8-28paper sensor 5-36Pickup Assembly 8-26printing from 5-36removing and replacing 6-15
Tray 1 Pickup Assembly, removing and replacing 6-29
Tray 1 Pickup Roller, removing and replacing 6-27Tray 2 5-38troubleshooting
Configuration Page 7-51display 7-12engine test 7-11Event Log 7-13flowchart 7-4image system 7-74information pages 7-48interface 7-77paper path troubleshooting 7-45power on 7-7preliminary operating checks 7-6printer messages 7-17printing system 7-6
troubleshooting process 7-2250-sheet tray, paper specifications 1-13
Vvariable fusing temperature 5-32
Wwarranty statement 2-10weight, paper
250-sheet tray 1-13500-sheet tray 1-12, 1-14
Index-4

Wiring Diagram (HP LaserJet 4000/4000N)
Printer controller PCA
Fuser paper delivery sensor 1Control Panel
Duplexing unit driver PCA
Duplexing unit
PS 106Fuser
paper deliverysensor 2
Fuser
Toner cartridge Laser/scanner unit
Scanningmotor
BD PCA Laser driver
Envelope feeder
Envelope feederdriver PCAVideo controller
Paper feeder driver PCAPaper size detection PCA
M101Main motor
Paper feeder
Paper feederpaper sizeswitches
Envelope sensor
SL 901Envelope
pickup solenoid
A
B
C
123456
D
Duplex feed motorM702
Reversing motorM701
Duplex pickuppaper sensor
PS701
Duplexing unitsolenoid
SL701
J702 J701 J706 J703 J705
FM701 J719 J718 J707
J704
J714
J715 J716J717
J713
PS703
PS702
Reversed papersensor
Rear Output Binsensor J137
J133TH901
J134
FU901
FGTB13 J135
J132 J401 J551 J501
J53J55F
J61MTB63TB62TB61TB64TR
J131
NEUTRALHOTFG
TB10TB11TB12
Test print switchSW501
J712
J103
J711
J102
J71 J31
PS501
Duplexing unitexhaust fan
Tray 1paper sensor
PS105Cooling fan
FM101
J114
J154 J58
LINEINPUT
FG
J101 J1
NEUTRALHOT
J72 J52 J50 J51
J301
J75 J60
J56
J113
J125 J126
PS104
SL102
CL101J127 J128
Top Output Bin paper full sensor
Tray 1pickup solenoid
Feed roller clutch
J106
J107
J911
J912
J901PS901
J301 J200 J201
J603
J601J104 J811
J801
SW600SW601SW602
paper size switches
J602 J604 J105 J812J803 J802
SW801SW802SW803
J202J57 J57
J111 J112
PS102 PS103
J129F
SW101
J73
Pre-feedsensor
Top ofpage
sensor
Dooropen
detectionswitch
J813
TB101
TB102 TB902
TB901
J902
PS801 SL801Paper feederpaper sensor
Paper feederpickup solenoid
J110
PS101 SL101Tray papersensor
Tray pickupsolenoid
J903
J913
PS902Envelope mulitple feed sensor

Wiring Diagram (HP LaserJet 4000 T/4000TN)
Printer controller PCA
Fuser paper delivery sensor 1Control Panel
Duplexing unit driver PCA
Duplexing unit
PS 106Fuser
paper deliverysensor 2
Fuser
Toner cartridge Laser/scanner unit
Scanningmotor
BD PCA Laser driver
Envelope feeder
Envelope feederdriver PCAVideo controller
Paper feeder driver PCAPaper size detection PCA
M101Main motor
Paper feeder
Paper feederpaper sizeswitches
Envelope sensor
SL 901Envelope
pickup solenoid
A
B
C
123456
D
Duplex feed motorM702
Reversing motorM701
Duplex pickuppaper sensor
PS701
Duplexing unitsolenoid
SL701
J702 J701 J706 J703 J705
FM701 J719 J718 J707
J704
J714
J715 J716J717
J713
PS703
PS702
Reversed papersensor
Rear Output Binsensor J137
J133TH901
J134
FU901
FGTB13 J135
J132 J401 J551 J501
J53J55F
J61MTB63TB62TB61TB64TR
J131
NEUTRALHOTFG
TB10TB11TB12
Test print switchSW501
J712
J103
J711
J102
J71 J31
PS501
Duplexing unitexhaust fan
Tray 1paper sensor
PS105Cooling fan
FM101
J114
J154 J58
LINEINPUT
FG
J101 J1
NEUTRALHOT
J72 J52 J50 J51
J301
J75 J60
J56
J113
J125 J126
PS104
SL102
CL101J127 J128
Top Output Bin paper full sensor
Tray 1pickup solenoid
Feed roller clutch
J106
J107
J911
J912
J901PS901
J301 J200 J201
J603
J601J104 J811
J801
SW600SW601SW602
SW603SW604SW605
Upper traypaper sizeswitches
Lower traypaper sizeswitches J602 J604 J606 J605 J105 J812
J803 J802
SW801SW802SW803
J202J57 J57
J111 J112
PS102 PS103
J129F
SW101
J73
Pre-feedsensor
Top ofpage
sensor
Dooropen
detectionswitch
J813
TB101
TB102 TB902
TB901
J902
PS801 SL801Paper feederpaper sensor
Paper feederpickup solenoid
J110 J115
PS101 SL103 SL101 PS107Upper tray
paper sensorLower tray
pickup solenoidLower tray
paper sensorUpper tray
pickup solenoid
J903
J913
PS902Envelope mulitple feed sensor


HP
LaserJet 4000 and 4050 Series P
rinters Service M
anual
HP LaserJet 4000 and4050 Series PrintersService Manual
Printed on at least50% Total Recycled Fiber withat least 10% Post-Consumer Paper
Copyright© 1999Hewlett-Packard Co.Printed in USA
Manual Part No.C4251-91003
*C4251-91003**C4251-91003*
C4251-91003